Owner's Manual - Home & Hearth
7
www.heatilator.com WARNING If the information in these instruc- tions is not followed exactly, a fire may result causing property damage, personal injury, or death. • Do not store or use gasoline or other flam- mable vapors and liquids in the vicinity of this or any other appliance. • Do not overfire - If heater or chimney con- nector glows, you are overfiring. Overfiring will void your warranty. • Comply with all minimum clearances to combustibles as specified. Failure to comply may cause house fire. Fire Risk. WARNING Tested and approved for wood pellets. Burning of any other type of fuel will void your warranty. WARNING Hot glass will cause burns. • Do not touch glass until it is cooled • NEVER allow children to touch glass • Keep children away • CAREFULLY SUPERVISE children in same room as fireplace. • Alert children and adults to hazards of high temperatures. High temperatures may ignite clothing or other flammable materials. • Keep clothing, furniture, draperies and other flammable materials away. HOT SURFACES! Glass and other surfaces are hot during operation AND cool down. Owner’s Manual Installation and Operation Models: ECO-ADV-PS35 ECO-ADV-PS50 Pellet Burning Stove Heatilator • ECO-ADV-PS35/50 • 7058-142D • July 21, 2010 1 Check building codes prior to installation. • Installation MUST comply with local, regional, state and national codes and regulations. • Consult local building, fire officials or authorities having jurisdic- tion about restrictions, installation inspection, and permits. CAUTION DO NOT DISCARD THIS MANUAL CAUTION • Important operating and maintenance instruc- tions included. • Leave this manual with party responsible for use and operation. • Read, understand and follow these instruc- tions for safe installa- tion and operation. DO NOT DISCARD ECO-ADV-PS35 ECO-ADV-PS50
-
Upload
khangminh22 -
Category
Documents
-
view
0 -
download
0
Transcript of Owner's Manual - Home & Hearth

www.heatilator.com
WARNING
If the information in these instruc-tions is not followed exactly, a fire may result causing property damage, personal injury, or death.
• Do not store or use gasoline or other flam-mable vapors and liquids in the vicinity of this or any other appliance.
• Do not overfire - If heater or chimney con-nector glows, you are overfiring. Overfiring will void your warranty.
• Comply with all minimum clearances to combustibles as specified. Failure to comply may cause house fire.
Fire Risk.
WARNING
Tested and approved for wood pellets. Burning of any other type of fuel will void your warranty.
WARNING
Hot glass will cause burns.• Do not touch glass until it is cooled• NEVER allow children to touch glass• Keep children away• CAREFULLY SUPERVISE children in same room as
fireplace.• Alert children and adults to hazards of high
temperatures.High temperatures may ignite clothing or other flammable materials.• Keep clothing, furniture, draperies and other flammable
materials away.
HOT SURFACES!
Glass and other surfaces are hot during operation AND cool down.
Owner’s ManualInstallation and Operation
Models:ECO-ADV-PS35ECO-ADV-PS50
Pellet Burning Stove
Heatilator • ECO-ADV-PS35/50 • 7058-142D • July 21, 2010 1
Check building codes prior to installation.• Installation MUST comply with local, regional, state and national
codes and regulations.• Consult local building, fire officials or authorities having jurisdic-
tion about restrictions, installation inspection, and permits.
CAUTION
DO NOT DISCARD THIS MANUALCAUTION
• Important operating and maintenance instruc-tions included.
• Leave this manual with party responsible for use and operation.
• Read, understand and follow these instruc-tions for safe installa-tion and operation.
DO NOTDISCARD
ECO-ADV-PS35 ECO-ADV-PS50

12
R
Heatilator • ECO-ADV-PS35/50 • 7058-142D • July 21, 2010
R
C. General Maintenance1. Types of Fuel
Depending on the type of fuel you are burning will dictate how often you have to clean your firepot. If the fuel you are burning has a high dirt or ash content, it may be necessary to clean the firepot more than once a day. Dirty fuel will cause clinkers to form in the firepot. A clinker is formed when dirt, ash or a non-burnable substance is heated to 2000°F (1093°C) and becomes glass-like. See “D” page 16 in this section for more details on fuels with high ash content.
Clinker
Figure 12.1 - Clinker
Shock and Smoke Hazard• Turn down thermostat, let appliance completely
cool and exhaust blower must be off. Now you can unplug appliance before servicing.
• Smoke spillage into room can occur if appliance is not cool before unplugging.
• Risk of shock if appliance not unplugged before servicing appliance.
CAUTION
A. Proper Shutdown Procedure
Cleaning or Inspection Frequency Daily Weekly Monthly YearlyAsh Drawer Every 5 bags of fuel OR XAsh Removal from Firebox Every 5 bags of fuel or more
frequently depending on ash build-up
ORX
Blower, Exhaust More frequently depending on the fuel type
OR X
Blower, Convection Every 25 bags or more fre-quently depending on operat-ing environment.
ORX
Door Handle & Gasket Inspection Prior to heating season OR XExhaust Path, Drop Tube and Behind Baffles
Every 25 bags or more fre-quently depending on ash build-up
ORX
Firepot Cleaning Rod Every 1 bag of fuel OR XFirepot with Clean-out Tool Every 5 bags of fuel OR XFirebox - Prepare for Non-Burn Season At end of heating season OR XGlass When clear view of firepot
becomes obscureOR X
Hopper Every 50 bags of fuel OR XTop Vent Adapter More frequently depending on
ash build-upOR X
Venting System Every 3 tons or more fre-quently depending on the fuel type
ORX
B. Quick Reference Maintenance Chart
Follow the detailed instructions found in this section for each step listed as referenced in the chart below.
NOTICE: These are recommendations. Clean more frequently if you encounter heavy build-up of ash at the recommended interval or you see soot coming from the vent. Not properly cleaning your appliance on a regular basis will void your warranty.
3 Maintaining & Servicing Your Appliance

R R
13Heatilator • ECO-ADV-PS35/50 • 7058-142D • July 21, 2010
2. Cleaning Firepot with Cleaning Rod & Firepot Clean-Out Tool;
• Frequency: Daily or more often as needed• By: Homeowner
WARNING
• NEVER pull firepot cleaning rod out when appliance is operating.
• Cleaning Rod MUST be complelety pushed in before operating appliance.
•. Hot pellets may fall into ashpan and start a fire or mis-starts due to lack of vacuum.
Fire Risk
4. Cleaning Ash Drawer• Frequency: Weekly or every 5 bags of fuel• By: Homeowner
3. Ash Removal from Firebox• Frequency: Weekly or more frequently depending on
ash build-up.• By: Homeowner
Pull out Ash Drawer & Dispose of Ashes in Non-Combustible Container
Ash Drawer
Figure 13.3
Firepot Cleaning Rod
Figure 13.1
Figure 13.2
OPEN Position. Light color painted area visible
CLOSED PositionNo light color paint is visible
WARNING
• NEVER remove ash drawer while appliance is operating.
Burn Risk
a. The appliance must be in complete shutdown and cool and the exhaust blower off. If you are just cleaning the firepot, there is no need to unplug the appliance.
b. Locate the firepot cleaning rod on the right side of the appliance. Figure 13.1. When you pull the cleaning rod straight out it will slide open the firepot floor to allow the ashes to be deposited in the ash drawer. You will see the light color painted area on the cleaning rod to let you know the rod is in OPEN position. Figure 13.2.
c. Pull the firepot cleaning rod OUT and IN a couple of times to help shake debris loose. If the rod is hard to pull, it may be necessary to use your firepot clean-out tool to chip away material that has built up on the bottom plate of the firepot and to push out any clinkers. while in the open position. Larger clinkers may have to be removed from the top of the firepot.
d. To close the firepot floor slightly raise the cleaning rod and then push it back into place. If you have closed the cleaning rod properly (pushed all the way in) you will not see any of the light color painted area. Figure 13.2.
e. Always have the ash drawer in place before pulling the firepot cleaning rod, otherwise the ashes will fall down and fill the outside air opening and the appliance will produce soot out of the exhaust and will affect efficiency.
a. There must not be any hot ashes in the firebox during cleaning so allow the appliance to completely cool. The firebox ash should be removed every time the exhaust path is cleaned. Frequent cleaning of the ash in the firebox will help slow down the build-up of ash in the exhaust blower and vent system.
b. Vacuum out the firebox thoroughly on both sides of the firebox and the floor and ceiling. The ash drawer should be emptied every time you clean the firebox. Remember to place the ash and debris into a metal or non-combustible container.See Disposal of Ashes.
c. Always have the ash drawer in place before pulling the firepot cleaning rod, otherwise the ashes will fall down and fill the outside air opening and the appliance will produce soot out of the exhaust and will affect efficiency.
a. There must not be any hot ashes in the ash drawer when you empty it, so allow the appliance to completely cool.
b. Locate the ash drawer underneath the firepot. Slide the ash drawer straight out. Empty into a non-combustible container and re-install the ash drawer. See Disposal of Ashes.
b. Always have the ash drawer in place before pulling the firepot cleaning rod, otherwise the ashes will fall down and fill the outside air opening and the appliance will produce soot out of the exhaust and will affect efficiency.

14
R
Heatilator • ECO-ADV-PS35/50 • 7058-142D • July 21, 2010
R
Figure 14.1
NOTE: Hearth & Home Technologies recommends to use a heavy duty vacuum cleaners specifically designed for solid fuel appliance cleaning.
6. Cleaning the Exhaust Path, Baffles & Drop Tube• Frequency: Monthly or every 25 bags or more fre-
quently depending on ash build-up.• By: Homeowner a. Appliance must be completely cool. b. Open the door and remove the center baffle first and
then the right and left baffles. See Baffle Removal Instructions on page 21. Thoroughly vacuum the exhaust path and drop tube and continue throughout the rest of the firebox. Also vacuum the front and back of the baffles.
c. Also vacuum the convection blower impellers or use a soft brush to remove any ash build-up.
c. Replace the right and left baffles and then the center baffle and close and latch the door.
7. Cleaning the Hopper• Frequency: Monthly or after burning 50 bags of fuel• By: Homeowner
After burning approximately 50 bags of fuel you will need to clean the hopper to prevent sawdust build-up. A combination of sawdust and pellets on the bottom end of the auger reduces the amount of fuel supply to the firepot. This can result in nuisance shutdowns and mis-starts.
a. The appliance must be in complete shutdown. Allow the appliance to completely run out of pellets and cool down.
b. Empty the hopper of any remaining pellets. c. Vacuum the hopper and feed tube.
8. Soot and Fly Ash: Formation & Need for Removal in Exhaust Venting System.
• Frequency: Yearly or more frequently depending on ash build-up.
• By: Qualified Service Technician/Homeowner
Be sure the appliance is allowed to cool, has been unplugged and the exhaust blower is off.The products of combustion will contain small particles of fly ash. The fly ash will collect in the exhaust venting system and restrict the flow of the flue gases. At start-up if there is incomplete combustion, or if there is a shutdown or incorrect operation of the appliance it will lead to some soot formation. This will collect in the exhaust vent-ing system. The venting (chimney) system may need to be cleaned at least once a year or more often depending upon the qual-ity of your fuel or if there are any horizontal pipe sections. Ash will build up more quickly in the horizontal sections and elbows.
Baffles Removed
Exhaust Path and Blower Impellers
Drop Tube
Disposal of Ashes
WARNING
• Ashes should be placed in metal container with tight fitting lid.
• Ashes should be retained in closed container until all cinders have thoroughly cooled.
5. Disposal of Ashes• Frequency: As needed• By: Homeowner
Ashes should be placed in a metal container with a tight-fitting lid. The closed container of ashes should be placed on a non-combustible floor or on the ground, well away from all combustible materials, pending final disposal. If the ashes are disposed of by burial in soil or otherwise locally dispersed, they should be retained in the closed container until all cinders have been thoroughly cooled.
9. Door Handle Inspection• Frequency: Monthly or prior to heating season• By: HomeownerThe gasketing between the glass and firebox should be inspected periodically to make sure there is a good seal. Check door handle for smooth cam operation.
Locknut
Door Cross Section (example) Latch Cam
Spacing Washers
Square Key
Door Handle
Spring Handle
Figure 14.2

R R
15Heatilator • ECO-ADV-PS35/50 • 7058-142D • July 21, 2010
10. Cleaning the Glass
• Frequency: When clear view of the firepot becomes obscure
• By: Homeowner a. Appliance must be completely cool before cleaning
glass. b. Vacuum fly ash from glass and door rope. c. Use a damp paper towel or any non-abrasive glass
cleaner. Wipe off with dry towel.
Handle glass assembly with care.
When cleaning glass:• Avoid striking, scratching or
slamming glass.• Do NOT clean glass when hot.
CAUTION
• Do NOT use abrasive cleaners.• Refer to maintenance instructions.
11. Cleaning Exhaust Blower - Requires No Lubrication
• Frequency: Yearly or more frequently depending on ash build-up
• By: Homeowner or Qualified Service Technician
12. Cleaning Convection Blower - Requires No Lubrication
• Frequency: Yearly or more frequently depending on ash build-up
• By: Homeowner or Qualified Service Technician
Figure 15.1
a. The appliance must be in complete shutdown and the exhaust blower should be off. Allow the appli-ance to completely cool down.
b. Open the clean-out cover. Figure 15.1.c. Sweep out any ash build-up.
14. Preparing Firebox for Non-Burn Season• Frequency: Yearly• By: Homeowner
a. Be sure the appliance is allowed to cool, has been unplugged and the exhaust blower is off.
b. Remove all ash from the firebox and vacuum thorough-ly.
c. Paint all exposed steel, including cast-iron. • Purchase paint from your local dealer. • Must use a high-temperature paint made specifi-
cially for heating appliances.
Clean-Out Cover
13. Cleaning the Top Vent Adapter• Frequency: Yearly or more frequently depending on
ash build-up• By: Homeowner
Handle glass with care.• Inspect the gasket to ensure it is
undamaged.• Do NOT strike, slam or scratch glass.• Do NOT operate appliance with glass
assembly removed.
WARNING
• Do NOT operate with glass cracked, broken or scratched.
a. Be sure the appliance is allowed to cool, has been unplugged and the exhaust blower is off.
b. Follow the directions for cleaning the exhaust path found on page 14.
c. If unable to thoroughly clean the blower through this access, then follow the directions on page 19 for direct access to the exhaust blower.
d. Vacuum the blower’s impellers. Use care not to bend or damage the blower fins.
a. Be sure the appliance is allowed to cool, has been unplugged and the exhaust blower is off.
b. Follow the directions on page 19 for direct access to the convection blower.
d. Vacuum the blower’s impellers.
NOTE: Hearth & Home Technologies recommends to use a heavy duty vacuum cleaners specifically designed for solid fuel appliance cleaning.

16
R
Heatilator • ECO-ADV-PS35/50 • 7058-142D • July 21, 2010
R
D. High Ash Fuel Content Maintenance
• Frequency: As needed• By: Homeowner
Figure 16.3
Figure 16.1
Figure 16.2
Fire Risk.
WARNING
• High ash fuels, or lack of maintenance, can cause the firepot to overfill. Follow proper shutdown procedure if ash buildup exceeds half way point in firepot.
• Failure to do so could result in smoking, sooting and possible hopper fires.
Poor quality pellet fuel, or lack of maintenance, can create conditions that make the firepot fill quickly with ashes and clinkers. This condition makes the appliance susceptible to overfilling the firepot with pellets which may result in smoking, sooting and possible hopper fires. Figure 16.1 shows an example where the firepot overfills, pellets back up into the feed tube and ash has accumulated in the firebox. An inefficient and non-economical method of burning of fuel caused by poor quality pellet fuel is shown in Figure 16.2. The correct flame size when good quality, premium pellet fuel is burned is shown in Figure 16.3.If the ash buildup exceeds the half way point in the firepot IMMEDIATE ATTENTION AND CLEANING IS REQUIRED.
Correct Flame HeightYellow/White in Color
Incorrect Flame HeightTall, Lazy Flame Orange in Color
Pellets Back-up in Feed Tube
Ash build-up in Firebox
Firepot Overfills
R R
17Heatilator • ECO-ADV-PS35/50 • 7058-142D • July 21, 2010
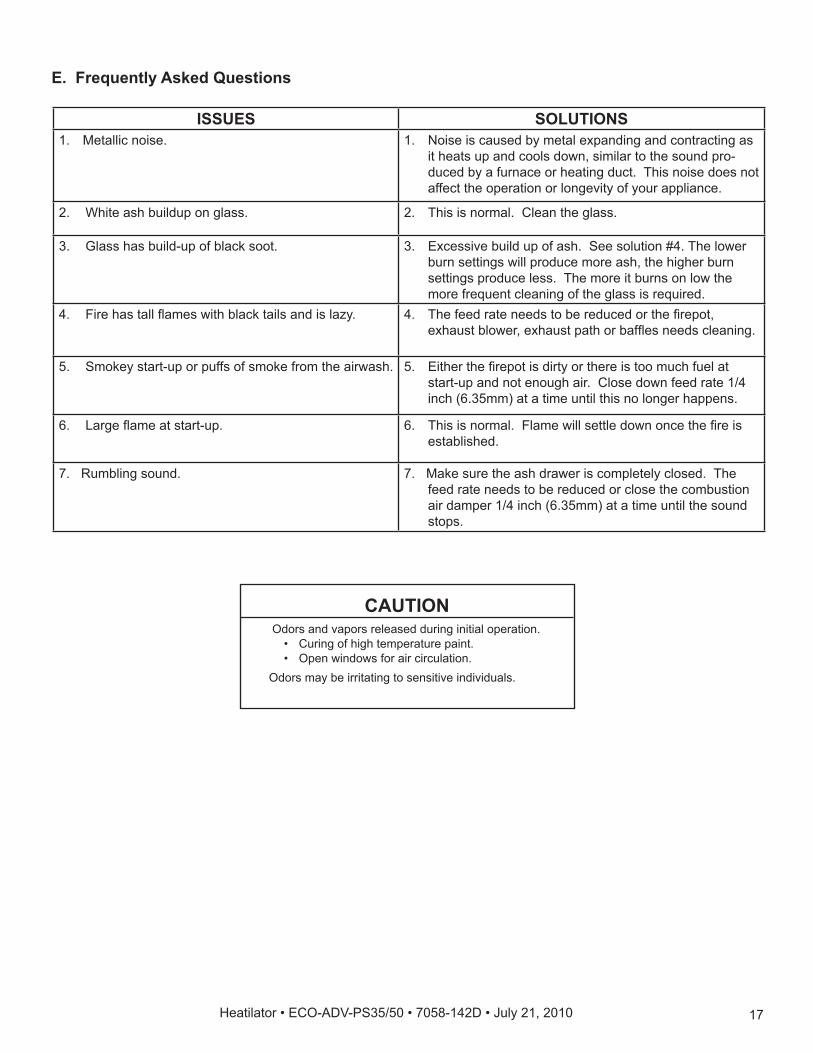
E. Frequently Asked Questions
Odors and vapors released during initial operation.• Curing of high temperature paint.• Open windows for air circulation.
Odors may be irritating to sensitive individuals.
CAUTION
ISSUES SOLUTIONS1. Metallic noise. 1. Noise is caused by metal expanding and contracting as
it heats up and cools down, similar to the sound pro-duced by a furnace or heating duct. This noise does not affect the operation or longevity of your appliance.
2. White ash buildup on glass. 2. This is normal. Clean the glass.
3. Glass has build-up of black soot. 3. Excessive build up of ash. See solution #4. The lower burn settings will produce more ash, the higher burn settings produce less. The more it burns on low the more frequent cleaning of the glass is required.
4. Fire has tall flames with black tails and is lazy. 4. The feed rate needs to be reduced or the firepot, exhaust blower, exhaust path or baffles needs cleaning.
5. Smokey start-up or puffs of smoke from the airwash. 5. Either the firepot is dirty or there is too much fuel at start-up and not enough air. Close down feed rate 1/4 inch (6.35mm) at a time until this no longer happens.
6. Large flame at start-up. 6. This is normal. Flame will settle down once the fire is established.
7. Rumbling sound. 7. Make sure the ash drawer is completely closed. The feed rate needs to be reduced or close the combustion air damper 1/4 inch (6.35mm) at a time until the sound stops.