OWNER'S MANUAL - Boote Polch
133
OWNER’S MANUAL MODEL YEAR 2021 AXOPAR 28 T-TOP
-
Upload
khangminh22 -
Category
Documents
-
view
5 -
download
0
Transcript of OWNER'S MANUAL - Boote Polch
OWNER’SMANUALMODEL YEAR 2021AXOPAR 28 T-TOP
Table of Contents
Table of Contents1. Introduction............................................................................................................... 41.1. Purpose of this manual.................................................................................................................... 41.2. Safety symbols................................................................................................................................. 41.3. Document conventions..................................................................................................................... 51.4. Copyright...........................................................................................................................................51.5. Disclaimer ........................................................................................................................................ 51.6. Warranty............................................................................................................................................5
2. Safety........................................................................................................................62.1. Safety diagram..................................................................................................................................62.2. Fire protection and control............................................................................................................... 7
2.2.1. Fire control equipment........................................................................................................... 72.2.2. Boat owners' and users' responsibilities................................................................................ 72.2.3. Checklist: Fire in the engine.................................................................................................. 82.2.4. Checklist: After fire................................................................................................................. 8
2.3. Carbon monoxide............................................................................................................................. 82.4. Life raft..............................................................................................................................................9
3. Product overview....................................................................................................113.1. Purpose of use............................................................................................................................... 113.2. Identification.................................................................................................................................... 113.3. Builder's plate................................................................................................................................. 113.4. CE certification................................................................................................................................123.5. Conformity.......................................................................................................................................123.6. Dimensions and weight.................................................................................................................. 143.7. Boat layout......................................................................................................................................16
4. Product description.................................................................................................174.1. Stability and buoyancy................................................................................................................... 17
4.1.1. Self-draining systems........................................................................................................... 174.1.2. Openings in the hull and deck............................................................................................. 184.1.3. Bilge system ........................................................................................................................20
4.2. Technical systems...........................................................................................................................244.2.1. Electrical system...................................................................................................................244.2.2. 12 V system......................................................................................................................... 244.2.3. Main switches....................................................................................................................... 254.2.4. Direct supply switches..........................................................................................................264.2.5. Fuses.................................................................................................................................... 264.2.6. Heavy duty fuses..................................................................................................................27
Axopar 28 T-Top MY2021 Document ID: 28TMY21202012ENOwner's Manual© 2020 Axopar Boats Page 1
-
-
Table of Contents
4.2.7. Batteries................................................................................................................................284.2.7.1. Charging the batteries............................................................................................ 284.2.7.2. Winter storage ....................................................................................................... 284.2.7.3. Cleaning the batteries ............................................................................................29
4.2.8. 110/230 V system.................................................................................................................294.2.9. Fuel system.......................................................................................................................... 30
4.2.9.1. Refueling the boat...................................................................................................314.3. Optional equipment.........................................................................................................................32
4.3.1. Fresh water system..............................................................................................................324.3.2. Septic system....................................................................................................................... 33
4.3.2.1. Toilet seat................................................................................................................344.3.2.2. Septic tank.............................................................................................................. 35
4.3.3. Heating system.....................................................................................................................354.3.4. Bow thruster......................................................................................................................... 364.3.5. Anchor windlass................................................................................................................... 36
5. Transportation.........................................................................................................385.1. Lifting the boat................................................................................................................................385.2. Transporting the boat..................................................................................................................... 39
6. Operation................................................................................................................ 416.1. Handling devices............................................................................................................................ 41
6.1.1. Steering console...................................................................................................................416.1.2. Windscreen wipers ..............................................................................................................426.1.3. Steering system....................................................................................................................42
6.1.3.1. Checking and topping up oil ................................................................................ 426.1.3.2. Steering maintenance ...........................................................................................436.1.3.3. Steering console switch panel................................................................................ 43
6.1.4. Starting the engine............................................................................................................... 436.2. Swivel seat - Driver and passenger seats..................................................................................... 446.3. Inspecting the boat......................................................................................................................... 45
6.3.1. Checklist: Regular inspection before leaving harbor............................................................456.3.2. Checklist: After using the boat............................................................................................. 45
6.4. Handling the boat........................................................................................................................... 466.4.1. Checklist: Boat handling before leaving harbor .................................................................. 466.4.2. Leaving the jetty ..................................................................................................................466.4.3. Driving the boat.................................................................................................................... 47
6.4.3.1. Dead man's switch ................................................................................................ 476.4.3.2. Driving at high speed..............................................................................................476.4.3.3. Driving in rough seas..............................................................................................486.4.3.4. Maneuvering in narrow channels............................................................................49
6.4.4. Visibility from helming position.............................................................................................496.4.5. Using the trim tabs...............................................................................................................49
Axopar 28 T-Top MY2021 Document ID: 28TMY21202012ENOwner's Manual© 2020 Axopar Boats Page 2
-
-
Table of Contents
6.5. Preventing falling overboard...........................................................................................................506.6. Anchoring, docking and mooring....................................................................................................51
6.6.1. Fastening points................................................................................................................... 516.6.2. Docking................................................................................................................................. 516.6.3. Checklist: Before anchoring ................................................................................................ 526.6.4. Towing and mooring............................................................................................................. 52
7. Maintenance........................................................................................................... 537.1. Maintaining the gelcoat surface..................................................................................................... 537.2. Maintaining the interiors................................................................................................................. 53
7.2.1. Wooden interiors.................................................................................................................. 537.2.2. Plastic and painted surfaces................................................................................................ 537.2.3. Fabrics.................................................................................................................................. 547.2.4. Doors and hatches............................................................................................................... 54
7.3. Maintaining the cover..................................................................................................................... 547.3.1. Cleaning the cover............................................................................................................... 54
7.4. Preventing frost damage................................................................................................................ 557.5. Checklist: Before winter lay-up.......................................................................................................557.6. Checklist: Before launching............................................................................................................557.7. Corrective maintenance..................................................................................................................56
7.7.1. Chalking................................................................................................................................ 567.7.2. Scratches and nicks............................................................................................................. 567.7.3. Stains.................................................................................................................................... 567.7.4. Deep marks, gouges and holes........................................................................................... 56
8. Environment............................................................................................................578.1. Requirements for North America....................................................................................................57
9. Appendix I: Checklists............................................................................................589.1. Checklist: Fire in the engine.......................................................................................................... 589.2. Checklist: After fire......................................................................................................................... 589.3. Checklist: Regular inspection before leaving harbor......................................................................589.4. Checklist: After using the boat....................................................................................................... 599.5. Checklist: Boat handling before leaving harbor ............................................................................ 599.6. Checklist: Before anchoring .......................................................................................................... 609.7. Checklist: Before winter lay-up.......................................................................................................609.8. Checklist: Before launching............................................................................................................61
10. Appendix II: Fuel system..................................................................................... 62
11. Appendix III: Electrical diagrams..........................................................................63
12. Appendix IV: Warning label placement................................................................ 64
Axopar 28 T-Top MY2021 Document ID: 28TMY21202012ENOwner's Manual© 2020 Axopar Boats Page 3
-
-
1. Introduction
1. Introduction1.1. Purpose of this manual
This instruction manual contains important information and instructions for properly using your boat.
In this owner's manual you will find important information that will help you handle and maintain your boatin a safe and easy manner. Furthermore, the manual contains detailed information about the boat andthe systems installed, and general information about handling and taking care of the boat.
We advise you to read the manual carefully and familiarize yourself with your boat before you start touse it. This owner's manual is not a substitute for boating safety skills or good seamanship. If this is yourfirst boat or if this boat type is new to you, we ask for your own comfort and safety that you ensure youcan handle the boat before you set out for the first time. Your boat dealer, local boat clubs and nationalmotorboat or yacht federations will gladly inform you about local sea schools or recommend approvedinstructors.
You should ensure that the anticipated wind and wave conditions correspond to the design category ofyour boat, and that you and your crew are able to handle the boat in these conditions.
This owner’s manual is not a detailed maintenance or troubleshooting guide. If problems occur, youshould contact the boat manufacturer or their representative. When you are in need of maintenance orrepair and alteration work, you should always turn to competent and trained workshops. Changes thatcan affect the boat’s security features must be assessed, carried out and documented by competentprofessionals. The boat manufacturer cannot be held responsible for unauthorized modifications. Everychange to the boat’s center of gravity (from highly mounted heavy equipment or a new engine type etc.)will significantly affect the stability, trim and performance of the boat.
Keep this manual in a safe place and pass it on to the new owner if you sell your boat. If the manual ismislaid or destroyed, a copy can be ordered from your dealer.
See the purchase agreement or order for the scope of your purchase. In case something does not worksatisfactorily with your boat or its equipment, you can check the service documents for possible serviceand repair measures. In the event of uncertainty, you should always contact your dealer.
1.2. Safety symbols
This instruction manual contains danger, warning, caution and notice statements informing the user orauthorized service representatives of any potential harm to the product or person.
Hazard is defined as a source of potential injury to a person.
All abnormal use is forbidden, including disregarding information on safety.
DANGER Danger indicates an imminently hazardous situation which, if not avoided, willresult in death or serious injury.
WARNING Warning indicates a potentially hazardous situation which, if not avoided, couldresult in death or serious injury.
CAUTION Caution indicates a potentially hazardous situation which, if not avoided, mightresult in minor or moderate injury.
Axopar 28 T-Top MY2021 Document ID: 28TMY21202012ENOwner's Manual© 2020 Axopar Boats Page 4
-
-
1. Introduction
NOTICE Notice indicates a potential situation which, if not avoided, might result inproperty damage or in an undesirable result or state.
Note calls attention to information that clarifies or simplifies a procedure.
1.3. Document conventions
Units
This manual uses SI units in accordance with ISO 1000. In some cases, other units may have been usedalongside.An exception is the wind velocity, which in the Recreational Boat Directive is given in the Beaufort Scale.
Terminology
In this manual, the right side of the hull is referred to as starboard (STB) and the left side as port.
1.4. Copyright
Copyright ©2020 Axopar Boats. All rights reserved.
This Owner's Manual is protected by copyright controlled by Axopar Boats. This manual cannot be whollyor partly reproduced without prior written authorization by Axopar Boats. This material also containsconfidential information, which may not be disclosed to others without the prior written consent of AxoparBoats.
1.5. Disclaimer
• The material in this manual is for information purposes only.
• Axopar Boats reserves the right to change the products without prior notice to improve reliability,function, design or other characteristics of the products. Axopar Boats assumes no liability forany damages, losses, costs or expenses arising out of or relating to the use of this manual or theproducts described herein.
• Axopar Boats makes no representations and warranties with respect to this manual, eitherexpress or implied, including, but not limited to, the implied warranties of merchantability andfitness for a particular purpose.
1.6. Warranty
The Limited Warranty for the boat and the relevant contact information are enclosed as a separatedocument.
For any warranty claims, please contact your Axopar dealer mentioned on the cover page.
Axopar 28 T-Top MY2021 Document ID: 28TMY21202012ENOwner's Manual© 2020 Axopar Boats Page 5
-
-
2. Safety
2. Safety
WARNING Necessary safety equipment is required on the boat at all times.
The boat owner is responsible for making sure that all safety equipment, forexample the fire extinguishers, meet the rules and regulations of the localauthorities.
WARNING Overloading the boat can damage the engine, even when shut off.
When loading the boat, never exceed the maximum recommended load of theboat. Always load the boat carefully and distribute loads appropriately to maintaindesign trim. Avoid placing heavy equipment or material high up in the boat.
The liquids in the built-in tanks are not included in the maximum load shown onthe builder's plate.
WARNING Do not exceed the maximum number of persons allowed in the boat. The totalweight of the persons on board and their personal luggage must never exceed themaximum load of the boat.
When out on the water, always use the seats intended for passengers.
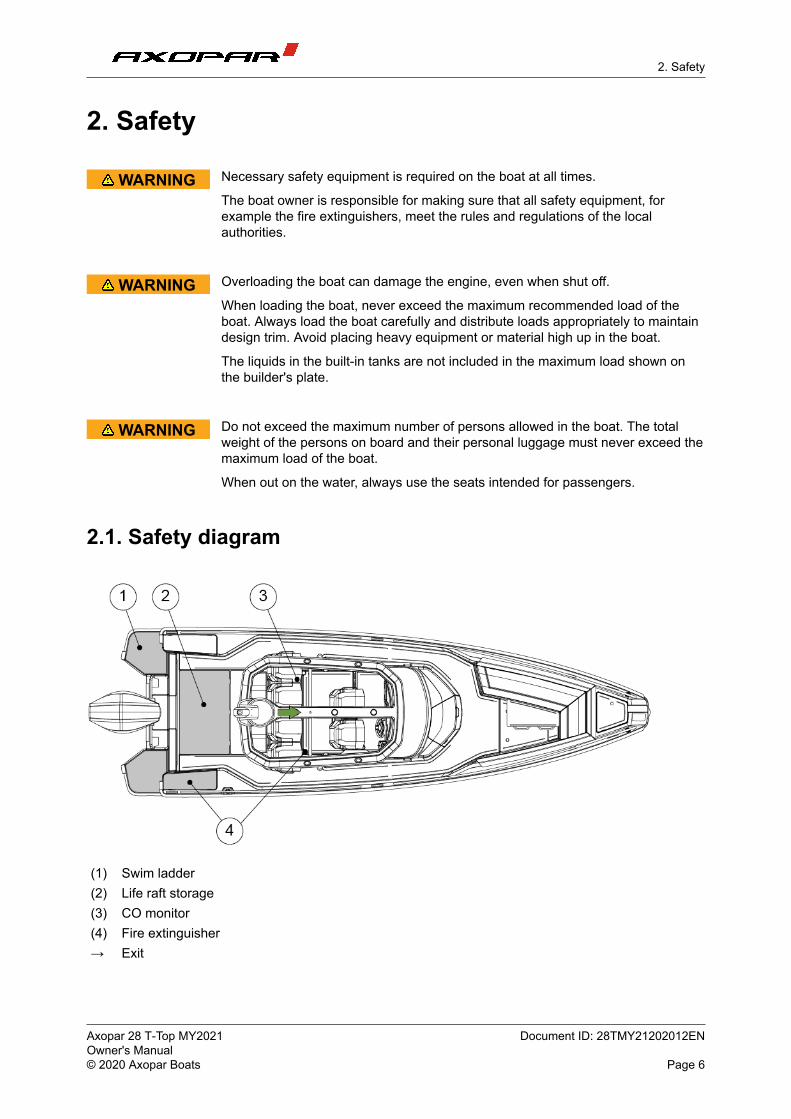
2.1. Safety diagram
(1) Swim ladder(2) Life raft storage(3) CO monitor(4) Fire extinguisher→ Exit
Axopar 28 T-Top MY2021 Document ID: 28TMY21202012ENOwner's Manual© 2020 Axopar Boats Page 6
-
-
2. Safety
2.2. Fire protection and control
The most common fire sources are the engine and the stove. If there is a fire in the boat, it may result inan explosion.
Fire usually spreads very fast — be quick to extinguish the fire.
Fire should be put down by extinguishing, that is, depriving the fire of oxygen. Using water in firesinvolving flammable liquids does not help, but can spread the flammable liquid and make the fire worse.
WARNING If the fire reaches the fuel containers, an explosion may occur and cause a largearea around the boat to burn.
• Keep the bilge clean and check it regularly for fuel and gas fumes or fueland oil leaks.
• Do not hang curtains or other flammable material near or above anyequipment with naked flames.
• Never leave the boat unattended when the heater is switched on.
• Never refuel or replace gas containers when the engines are running.
• Never smoke when handling fuel or gas.
• Never block evacuation routes or emergency exits.
• Never block access to safety equipment such as fuel valves or mainpower switches.
• Never block access to fire extinguishers, visible or concealed.
• Never modify the boat’s systems (especially electrical, fuel or gassystems).
In case of fire, use the fire extinguisher on the boat. See the section Safetydiagram for the exact location of the fire extinguisher.
If the fire starts to get out of control, leave the burning boat to save lives.
2.2.1. Fire control equipment
This boat must be fitted with hand-held fire extinguishers with the following output and locations:
• The fire extinguisher must have a fire rating of at least 13A/89B (2 kg).
• Check the exact locations of the fire control equipment in the section Safety diagram.
The fire extinguishers are not included in the manufacturer's delivery.
2.2.2. Boat owners' and users' responsibilities
It is the boat owner’s and users' responsibility to ensure that:
• The fire control equipment is accessible at all times.
• The fire extinguishing equipment is checked regularly at the intervals specified for theequipment.
Axopar 28 T-Top MY2021 Document ID: 28TMY21202012ENOwner's Manual© 2020 Axopar Boats Page 7
-
-
2. Safety
• Equipment with expired date is replaced immediately with equivalent or better equipment.
• The crew and guests are advised of the location of and instructions for use of fire controlequipment, and the location of evacuation routes and emergency exits.
2.2.3. Checklist: Fire in the engine
• Stop the engine.
• Steer the boat up against the wind, if possible.
• Make sure all passengers have life jackets.
• If necessary:
◦ Evacuate the passengers.
◦ Call for sea rescue.
• Shut off fuel and main power switches.
• Extinguish the fire.
• Wait until fully certain that the fire has been extinguished before opening the engine cover.
Carefully open the engine cover and be prepared to use the handheld fire extinguisher ifnecessary for post-fire extinguishing.
• Put out possible smoldering fires with water.
2.2.4. Checklist: After fire
• Open doors and windows for better ventilation.
• Inspect the boat and its equipment, and repair eventual damages.
• Contact local authorities, if needed.
• Make sure that the fire extinguishing equipment is refilled or replaced after use.
2.3. Carbon monoxide
There is a carbon monoxide monitor system in the boat. The system alarm is located in the main switchpanel.
For the exact location of the CO monitor, see the section Safety diagram.
• With regular intervals, check that the monitor system is functioning. For instructions, seethe equipment manufacturer's manual.
• When the boat is in use, do not turn the system switch off.
Axopar 28 T-Top MY2021 Document ID: 28TMY21202012ENOwner's Manual© 2020 Axopar Boats Page 8
-
-
2. Safety
WARNING Carbon monoxide (CO) is colorless, odorless, tasteless, and extremely dangerousgas.
All engines, generators, and fuel burning appliances produce CO as exhaust.
Prolonged exposure to low concentrations or very quick exposure to highconcentrations may cause brain damage or death.
Open all doors, curtains, windows, and hatches to let fresh air circulate whenrunning the engine or generator or burning any fuel while the boat is anchored,moored or docked.
Symptoms of carbon monoxide poisoning are dizziness, ears ringing, headache, nausea andunconsciousness. A poisoning victim’s skin often turns cherry red.Because carbon monoxide gas (CO) is odorless, colorless and tasteless, it is unlikely to be noticed untila person is affected.
• If CO poisoning is suspected, have the victim breath fresh air deeply.• If breathing stops, resuscitate.• A victim often revives, but then relapses because organs are damaged by the lack of oxygen.
Seek immediate medical attention.
Dangerous concentrations of carbon monoxide are present if:• the engine or generator exhaust systems leak• insufficient fresh air is circulating where people are present• fumes move from the rear of the boat into the cockpit and cabin area.
To minimize the danger of CO accumulation when the engine and generator are running or when usingburning fuel applications:
• Be sure to have sufficient ventilation when using canvas or window-type side curtains whenunderway, anchored, moored or docked.
• Operate all burning fuel appliances, such as charcoal, propane, LPG, CNG or alcohol cookingdevices, in areas where fresh air can circulate.Do not use such devices where there is no noticeable air movement, especially in the cabin,when anchored, moored or docked.
• Do not idle the engine without moving the boat for more than 15 minutes at a time.• Inspect the exhaust system regularly. See the manufacturer's manual for instructions.
High levels of carbon monoxide may accumulate in the following ways:• Blocking hull exhausts while operating at slow speed or if exhausts are submerged. • Using canvas curtains.• Winds blowing exhaust toward boat occupants.• Operating engine or generator in a confined space.• Operating with the bow high.
2.4. Life raft
The boat is not equipped with a life raft by the manufacturer.
Axopar 28 T-Top MY2021 Document ID: 28TMY21202012ENOwner's Manual© 2020 Axopar Boats Page 9
-
-
2. Safety
Storing a life raft
If you decide to acquire a life raft for your boat, we recommend that you stow it to the aft of the boat, sothat it is easily accessible in case of emergency.
Using the life raft
The life raft shall be tied to the stern of the boat and prepared for use.In an emergency, the life raft is easiest and safest to board from the swimming deck. Switch off theengine before using the life raft.Follow the life raft manufacturer’s instructions.
Axopar 28 T-Top MY2021 Document ID: 28TMY21202012ENOwner's Manual© 2020 Axopar Boats Page 10
-
-
3. Product overview
3. Product overview3.1. Purpose of use
The boat is a recreational boat, thus not suitable for professional use.
3.2. Identification
Each boat is supplied with a unique identification code, containing 14 characters and a hyphen.
The height of the code text is 6 mm and it is applied to the starboard side of the stern.
Example: FI – AXO7A001F920 Data
FI Country of manufacturer: Finland
- Hyphen
AXO Manufacturer: Axopar
7A Boat model
• A = Open
• B = T-Top
• C = Cabin
001 Boat number
F Manufacturing month
• A = January
• B = February
• C = March
• etc.
9 Last digit of the manufacturing year
20 Model year
3.3. Builder's plate
The builder’s plate is always fitted close to the steering position in the boat.
Eurofins Expert Services Oy has inspected that the boat fulfils the Recreational Boat Directive andrelated standards' requirements.
Axopar 28 T-Top MY2021 Document ID: 28TMY21202012ENOwner's Manual© 2020 Axopar Boats Page 11
-
-
3. Product overview
Boat type Boat model
Design category CE classification
Max. load Buoyancy
Total weight of persons including personal luggage(excluding tank contents)
Max. no Maximum number of persons on board
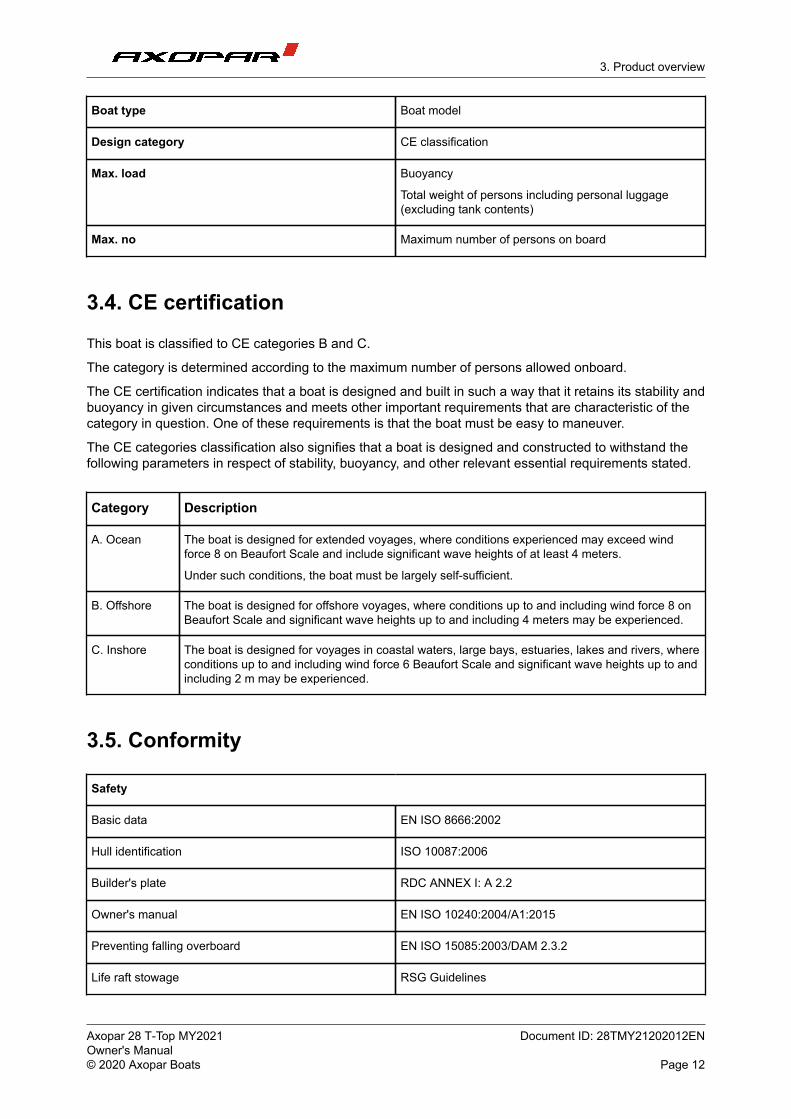
3.4. CE certification
This boat is classified to CE categories B and C.
The category is determined according to the maximum number of persons allowed onboard.
The CE certification indicates that a boat is designed and built in such a way that it retains its stability andbuoyancy in given circumstances and meets other important requirements that are characteristic of thecategory in question. One of these requirements is that the boat must be easy to maneuver.
The CE categories classification also signifies that a boat is designed and constructed to withstand thefollowing parameters in respect of stability, buoyancy, and other relevant essential requirements stated.
Category Description
A. Ocean The boat is designed for extended voyages, where conditions experienced may exceed windforce 8 on Beaufort Scale and include significant wave heights of at least 4 meters.
Under such conditions, the boat must be largely self-sufficient.
B. Offshore The boat is designed for offshore voyages, where conditions up to and including wind force 8 onBeaufort Scale and significant wave heights up to and including 4 meters may be experienced.
C. Inshore The boat is designed for voyages in coastal waters, large bays, estuaries, lakes and rivers, whereconditions up to and including wind force 6 Beaufort Scale and significant wave heights up to andincluding 2 m may be experienced.
3.5. Conformity
Safety
Basic data EN ISO 8666:2002
Hull identification ISO 10087:2006
Builder's plate RDC ANNEX I: A 2.2
Owner's manual EN ISO 10240:2004/A1:2015
Preventing falling overboard EN ISO 15085:2003/DAM 2.3.2
Life raft stowage RSG Guidelines
Axopar 28 T-Top MY2021 Document ID: 28TMY21202012ENOwner's Manual© 2020 Axopar Boats Page 12
-
-
3. Product overview
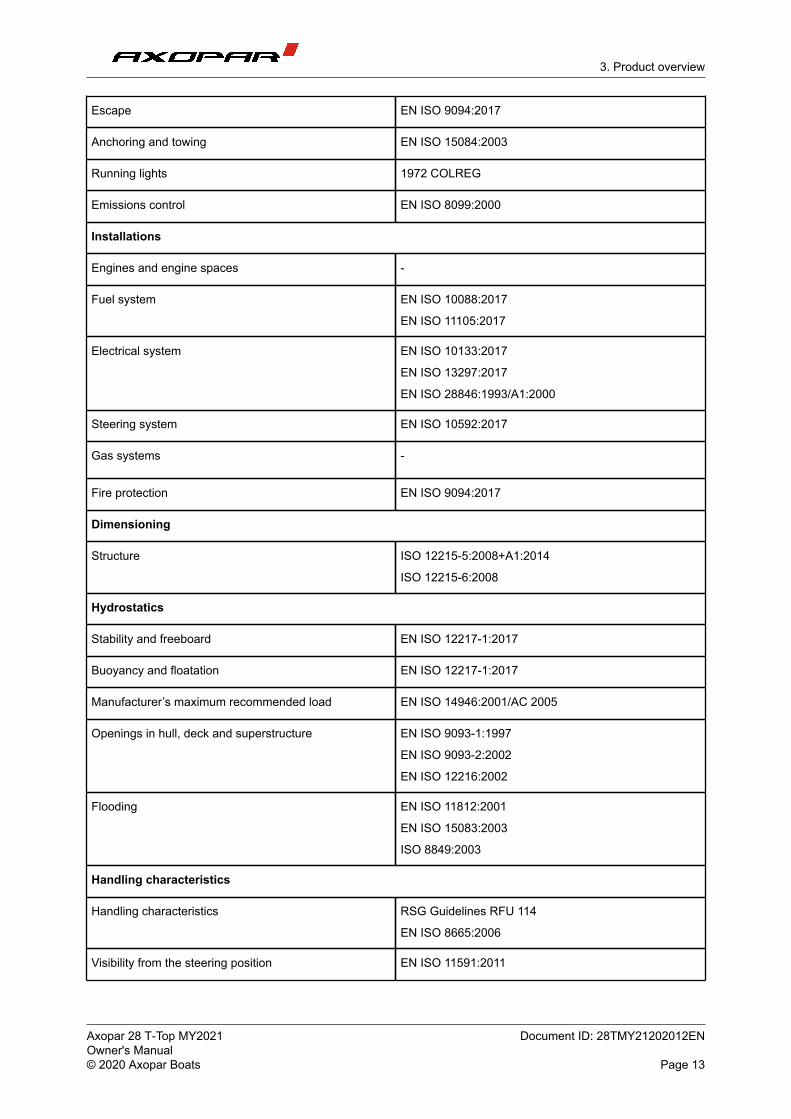
Escape EN ISO 9094:2017
Anchoring and towing EN ISO 15084:2003
Running lights 1972 COLREG
Emissions control EN ISO 8099:2000
Installations
Engines and engine spaces -
Fuel system EN ISO 10088:2017
EN ISO 11105:2017
Electrical system EN ISO 10133:2017
EN ISO 13297:2017
EN ISO 28846:1993/A1:2000
Steering system EN ISO 10592:2017
Gas systems -
Fire protection EN ISO 9094:2017
Dimensioning
Structure ISO 12215-5:2008+A1:2014
ISO 12215-6:2008
Hydrostatics
Stability and freeboard EN ISO 12217-1:2017
Buoyancy and floatation EN ISO 12217-1:2017
Manufacturer’s maximum recommended load EN ISO 14946:2001/AC 2005
Openings in hull, deck and superstructure EN ISO 9093-1:1997
EN ISO 9093-2:2002
EN ISO 12216:2002
Flooding EN ISO 11812:2001
EN ISO 15083:2003
ISO 8849:2003
Handling characteristics
Handling characteristics RSG Guidelines RFU 114
EN ISO 8665:2006
Visibility from the steering position EN ISO 11591:2011
Axopar 28 T-Top MY2021 Document ID: 28TMY21202012ENOwner's Manual© 2020 Axopar Boats Page 13
-
-
3. Product overview
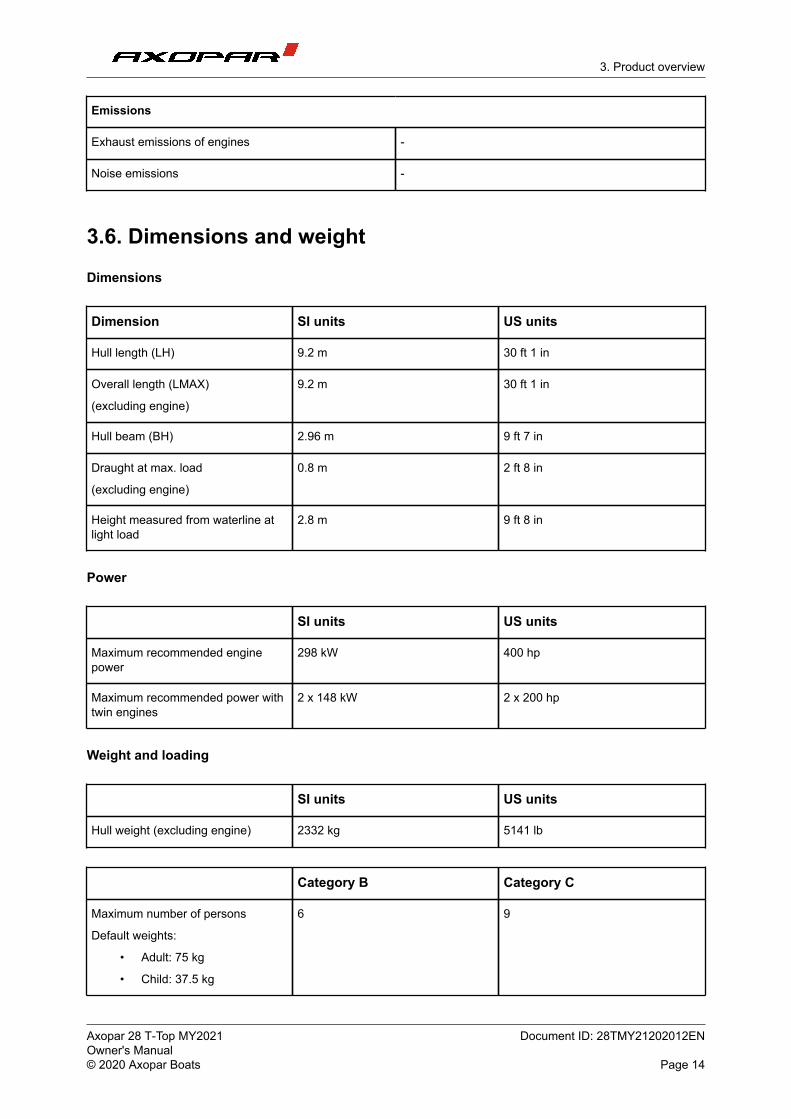
Emissions
Exhaust emissions of engines -
Noise emissions -
3.6. Dimensions and weight
Dimensions
Dimension SI units US units
Hull length (LH) 9.2 m 30 ft 1 in
Overall length (LMAX)
(excluding engine)
9.2 m 30 ft 1 in
Hull beam (BH) 2.96 m 9 ft 7 in
Draught at max. load
(excluding engine)
0.8 m 2 ft 8 in
Height measured from waterline atlight load
2.8 m 9 ft 8 in
Power
SI units US units
Maximum recommended enginepower
298 kW 400 hp
Maximum recommended power withtwin engines
2 x 148 kW 2 x 200 hp
Weight and loading
SI units US units
Hull weight (excluding engine) 2332 kg 5141 lb
Category B Category C
Maximum number of persons
Default weights:
• Adult: 75 kg
• Child: 37.5 kg
6 9
Axopar 28 T-Top MY2021 Document ID: 28TMY21202012ENOwner's Manual© 2020 Axopar Boats Page 14
-
-
3. Product overview
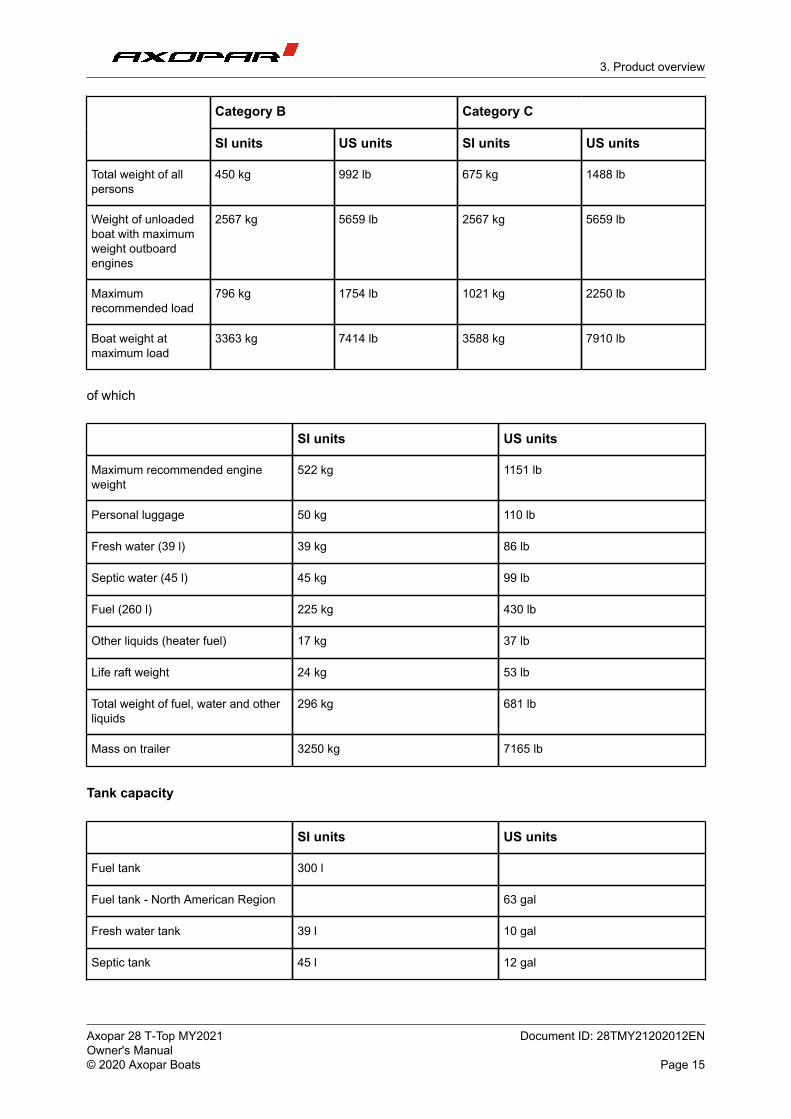
Category B Category C
SI units US units SI units US units
Total weight of allpersons
450 kg 992 lb 675 kg 1488 lb
Weight of unloadedboat with maximumweight outboardengines
2567 kg 5659 lb 2567 kg 5659 lb
Maximumrecommended load
796 kg 1754 lb 1021 kg 2250 lb
Boat weight atmaximum load
3363 kg 7414 lb 3588 kg 7910 lb
of which
SI units US units
Maximum recommended engineweight
522 kg 1151 lb
Personal luggage 50 kg 110 lb
Fresh water (39 l) 39 kg 86 lb
Septic water (45 l) 45 kg 99 lb
Fuel (260 l) 225 kg 430 lb
Other liquids (heater fuel) 17 kg 37 lb
Life raft weight 24 kg 53 lb
Total weight of fuel, water and otherliquids
296 kg 681 lb
Mass on trailer 3250 kg 7165 lb
Tank capacity
SI units US units
Fuel tank 300 l
Fuel tank - North American Region 63 gal
Fresh water tank 39 l 10 gal
Septic tank 45 l 12 gal
Axopar 28 T-Top MY2021 Document ID: 28TMY21202012ENOwner's Manual© 2020 Axopar Boats Page 15
-
-
3. Product overview
The boat's stability assessment is based on maximum load conditions. The maximum recommended load only contains the weight components mentioned above.
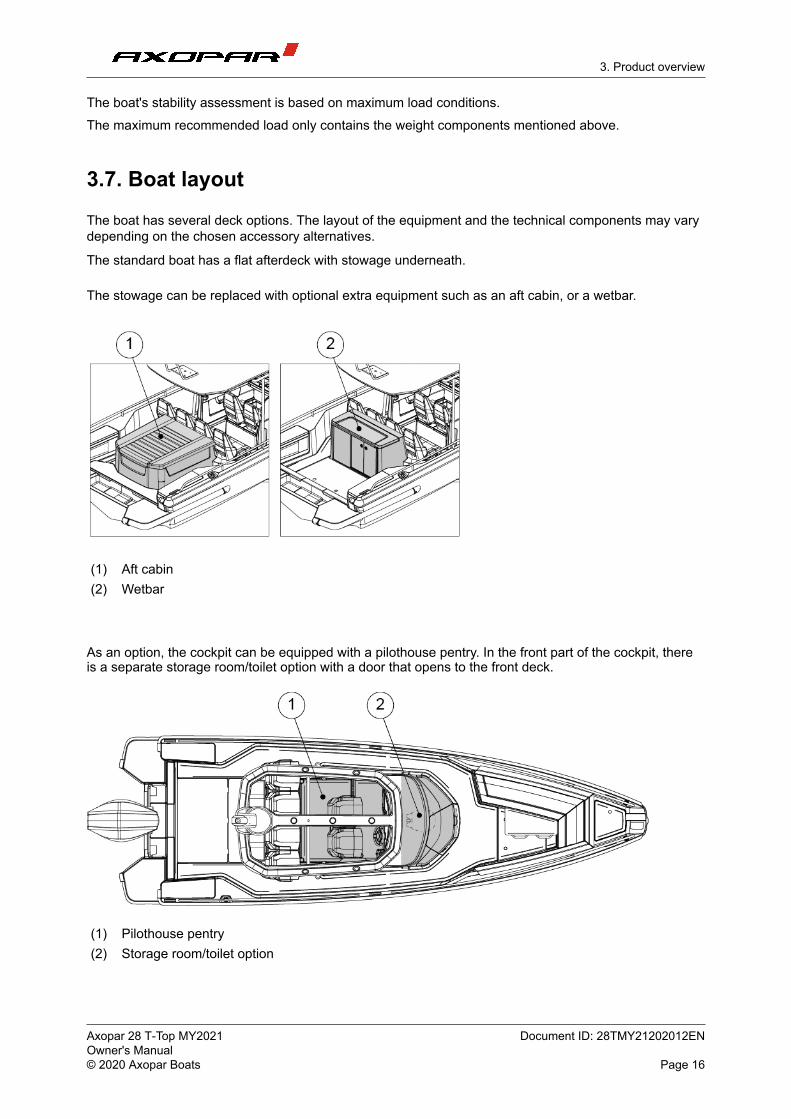
3.7. Boat layout
The boat has several deck options. The layout of the equipment and the technical components may varydepending on the chosen accessory alternatives.
The standard boat has a flat afterdeck with stowage underneath.
The stowage can be replaced with optional extra equipment such as an aft cabin, or a wetbar.
(1) Aft cabin (2) Wetbar
As an option, the cockpit can be equipped with a pilothouse pentry. In the front part of the cockpit, thereis a separate storage room/toilet option with a door that opens to the front deck.
(1) Pilothouse pentry(2) Storage room/toilet option
Axopar 28 T-Top MY2021 Document ID: 28TMY21202012ENOwner's Manual© 2020 Axopar Boats Page 16
-
-

4. Product description
4. Product description4.1. Stability and buoyancy
Pay attention to the stability and buoyancy of the boat.
All weight dispositions (for example installing a fishing tower, radar or furling mast, and enginereplacement) can have a significant impact on the stability, trim, and performance of the boat.
• The bilge water level should be kept at a minimum.
• The stability of the boat is compromised if any weight is placed in a high position.
In stormy weather, all hatches, compartments and doors should be kept closed to minimize the risk offlooding.
Breaking waves represent a significant danger to stability.
WARNING To avoid the risk of flooding, always keep the seacocks closed when not in use(for example, the seacock for the toilet’s flushing water).
4.1.1. Self-draining systems
The boat is equipped with self-draining systems for the whole deck area. The system is drained throughdrain holes in the aft of the boat.
There are drain holes for water in both aft corners of the deck. The openings are directly connected tothe sea. The deck of the boat has been designed to allow the water to drain straight into the sea via thewater gullies.
In addition to rainwater, the drain holes are intended to drain water ending up on the deck throughsplashing or from breaking waves.
The drain holes must be open at all times and the holes regularly cleaned by removing any accumulateddebris to prevent clogging.
The system is built so as to drain the water from the deck in normal use. Do not close the taps whenusing the boat or when the boat is attached to the dock.
Axopar 28 T-Top MY2021 Document ID: 28TMY21202012ENOwner's Manual© 2020 Axopar Boats Page 17
-
-

4. Product description
In the cockpit and driver's floor there are draining holes on both sides of the floor. Cockpit draining holesare equipped with seacocks located on transom. Driver's floor drains to a container located in front of thetoilet. There is a water pump that pumps water out from the container.
CAUTION The self-emptying open space is meant for the removal of such water that endsup on the deck through rain, splashing or from breaking waves. A part of the rainwater as well as water condensation in the bilge may end up in the bilge.
Do not leave the boat unattended in the water for a long time. Observe thefloating position of the boat and empty the bilge when necessary. Leaving the boatunattended in the water for a long time may cause damage.
WARNING Do not close the drain holes when using the boat.
4.1.2. Openings in the hull and deck
There are several inlets through the boat that include valves for opening and closing such inlets. It isrecommended to keep these inlets closed if the boat is out of use for a long time, and to open them againwhen the boat is used again. If the boat is lifted out from water or in rainy conditions, inlets should bekept open.
Always check that all hatches are securely closed before and after using the boat.
We recommend that you keep the windows, doors, deck hatches, roof hatches, vents and interior doorsclosed while driving. In stormy weather, always keep them securely closed to minimize the risk of watergetting into the boat and to avoid any personal injuries.
In certain conditions and speeds, it is possible that water is sprayed inside through canopies, hatches orother openings, due to negative pressure or other effects. Risk for this can be minimized by closing thecanopies, hatches or other openings.
WARNING All doors and hatches must be kept shut when under way.
Axopar 28 T-Top MY2021 Document ID: 28TMY21202012ENOwner's Manual© 2020 Axopar Boats Page 18
-
-
4. Product description
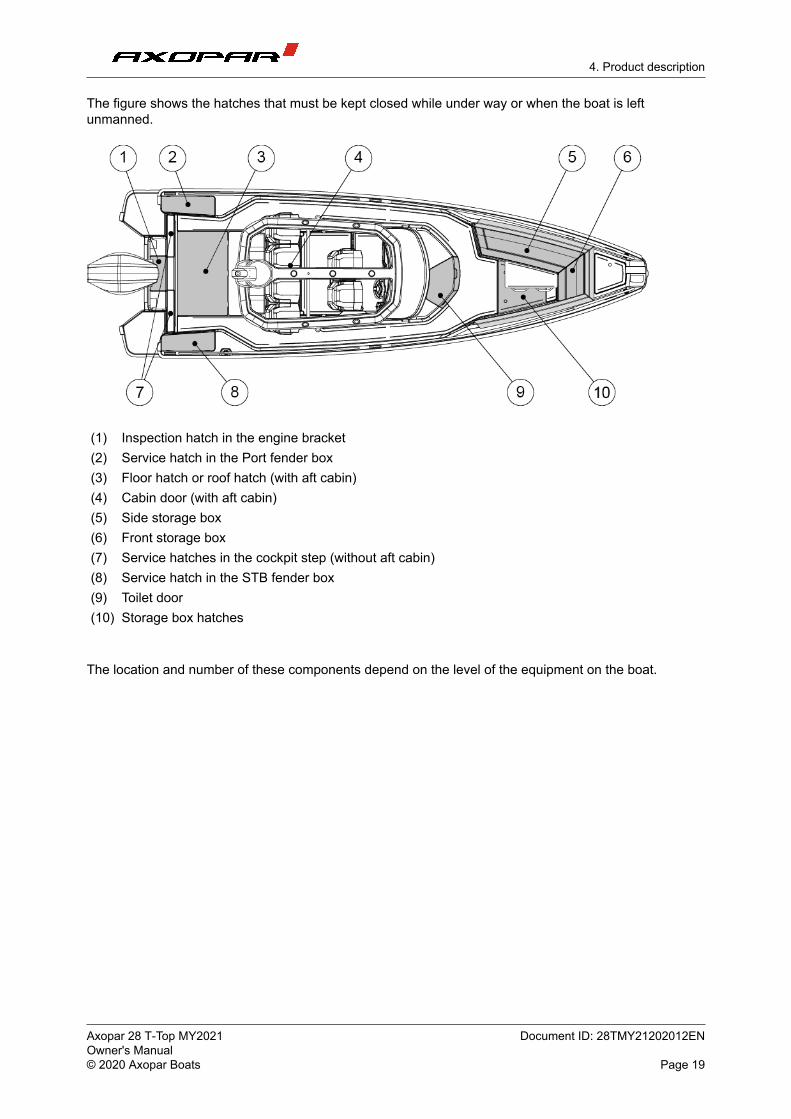
The figure shows the hatches that must be kept closed while under way or when the boat is leftunmanned.
(1) Inspection hatch in the engine bracket (2) Service hatch in the Port fender box (3) Floor hatch or roof hatch (with aft cabin) (4) Cabin door (with aft cabin)(5) Side storage box (6) Front storage box (7) Service hatches in the cockpit step (without aft cabin) (8) Service hatch in the STB fender box (9) Toilet door (10) Storage box hatches
The location and number of these components depend on the level of the equipment on the boat.
Axopar 28 T-Top MY2021 Document ID: 28TMY21202012ENOwner's Manual© 2020 Axopar Boats Page 19
-
-
4. Product description
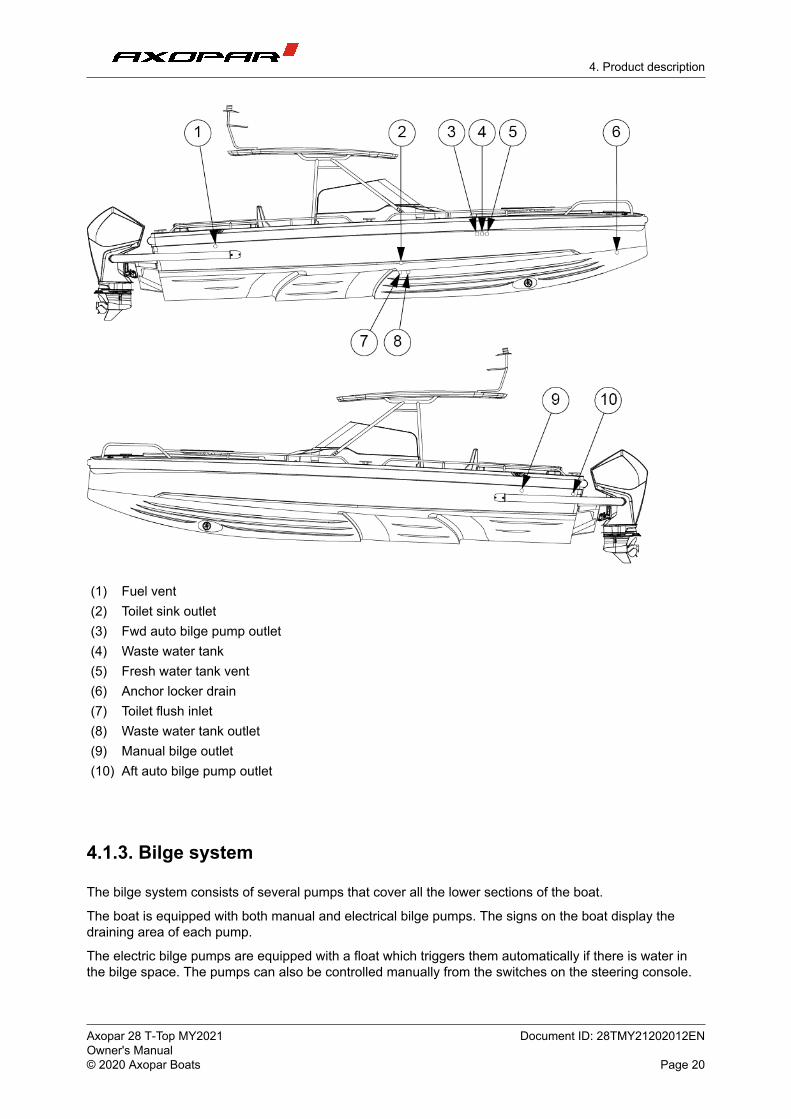
(1) Fuel vent(2) Toilet sink outlet(3) Fwd auto bilge pump outlet(4) Waste water tank(5) Fresh water tank vent(6) Anchor locker drain(7) Toilet flush inlet(8) Waste water tank outlet(9) Manual bilge outlet(10) Aft auto bilge pump outlet
4.1.3. Bilge system
The bilge system consists of several pumps that cover all the lower sections of the boat.
The boat is equipped with both manual and electrical bilge pumps. The signs on the boat display thedraining area of each pump.
The electric bilge pumps are equipped with a float which triggers them automatically if there is water inthe bilge space. The pumps can also be controlled manually from the switches on the steering console.
Axopar 28 T-Top MY2021 Document ID: 28TMY21202012ENOwner's Manual© 2020 Axopar Boats Page 20
-
-
4. Product description
The manual bilge pump is controlled with its handle, which is located in the port side fender storage inthe afterdeck.The purpose of the manual bilge pump is to drain the aft bilge room.
The electric pumps are submersible. One of them is located under the berth of the aft cabin and accessto pump can be get by opening floor hatch. Another bilge pumps is located front of toilet and access topump can be get by opening toilet front wall. The bilge water level should remain at a minimum.
The output of each automatic bilge pump is 41 liters (11 gallons) per minute. The manual bilge pump’soutput is 33 liters (9 gallons) per minute.
CAUTION Avoid pollution!
Since the bilge system comprises of several automatic and manual pumps thatcover all areas of the boat, the risk of accidental discharge of contaminated waterby automatic pumps should be minimized. The boat owner and user shall mitigatethe risk by checking the bilge water regularly for contaminants such as oil, diesel,and glycol. There is a sign in the boat indicating the draining area of each pumprespectively.
CAUTION Do not run dry for long time. The pump will be damaged.
WARNING • Check the functionality of the bilge pumps regularly by manuallyactivating them.
• Remove any waste from the intakes.
The combined capacity of the bilge system is not designed to pump out the boatin the event of hull damage.
The pumps are by default in the automatic mode and pump out the bilge once thefloat-switch is triggered. The pumps can also be started manually from the boat’smain control panel.
CAUTION The bilge system is not designed for damage control.
WARNING Check the function of all bilge pumps at regular intervals. Clear pump outlets fromdebris.
If seacocks are fitted in the fore and aft peak bulkheads, they shall be kept closedand shall only be opened to let water drain into the main bilges.
Axopar 28 T-Top MY2021 Document ID: 28TMY21202012ENOwner's Manual© 2020 Axopar Boats Page 21
-
-
4. Product description
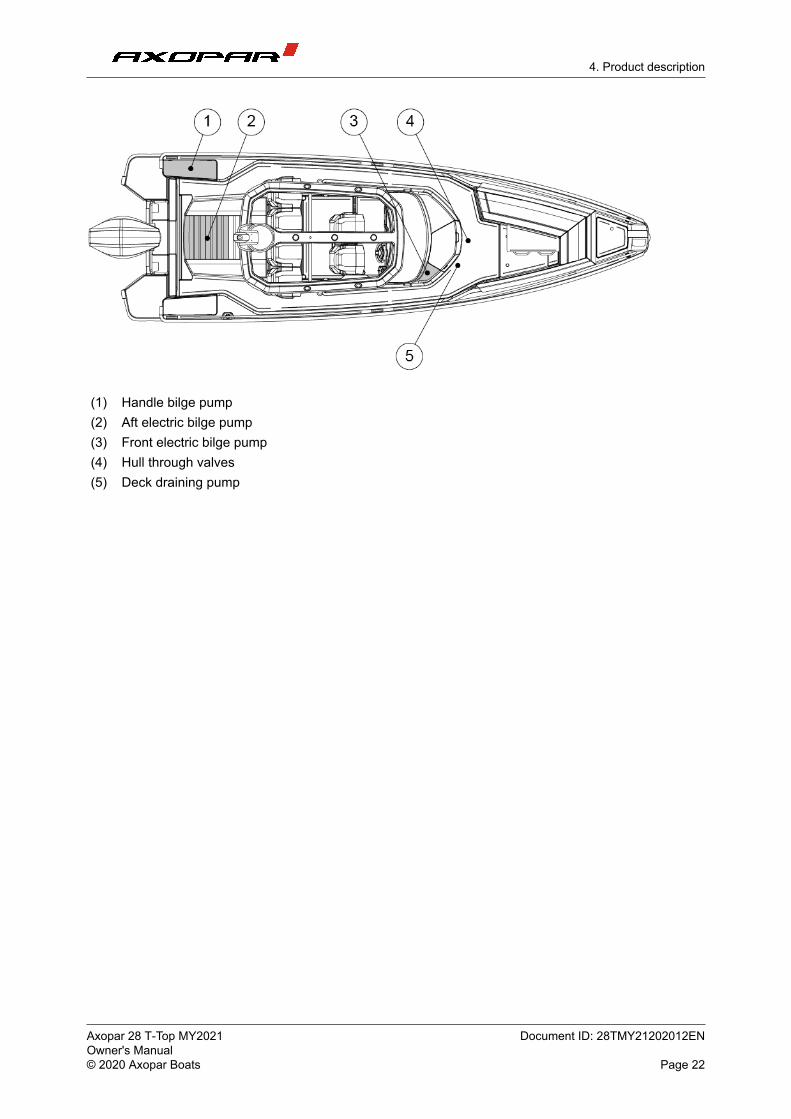
(1) Handle bilge pump(2) Aft electric bilge pump(3) Front electric bilge pump(4) Hull through valves(5) Deck draining pump
Axopar 28 T-Top MY2021 Document ID: 28TMY21202012ENOwner's Manual© 2020 Axopar Boats Page 22
-
-

4. Product description
The figure shows the seacocks and inlets through the side. Always check in the spring when launchingthat the inlets through the side and bottom are tightly closed.
(1) Deck draining holes and valves(2) Deck draining pump outlet (3) Shower pump outlet (4) Front bilge pump outlet (5) Septic tank ventilation(6) Fresh water tank ventilation(7) Diesel tank ventilation(8) Septic tank draining seacock(9) Sinks draining seacock(10) Toilet seat inlet seacock(11) Heater exhaust(12) Manual bilge pump outlet(13) Aft bilge pump outlet
Axopar 28 T-Top MY2021 Document ID: 28TMY21202012ENOwner's Manual© 2020 Axopar Boats Page 23
-
-
4. Product description
4.2. Technical systems
4.2.1. Electrical system
WARNING Risks of fire, explosion and electric shock!
Improper use of electric DC and AC systems may result in fire, explosion orelectric shock.
Follow the instructions carefully.
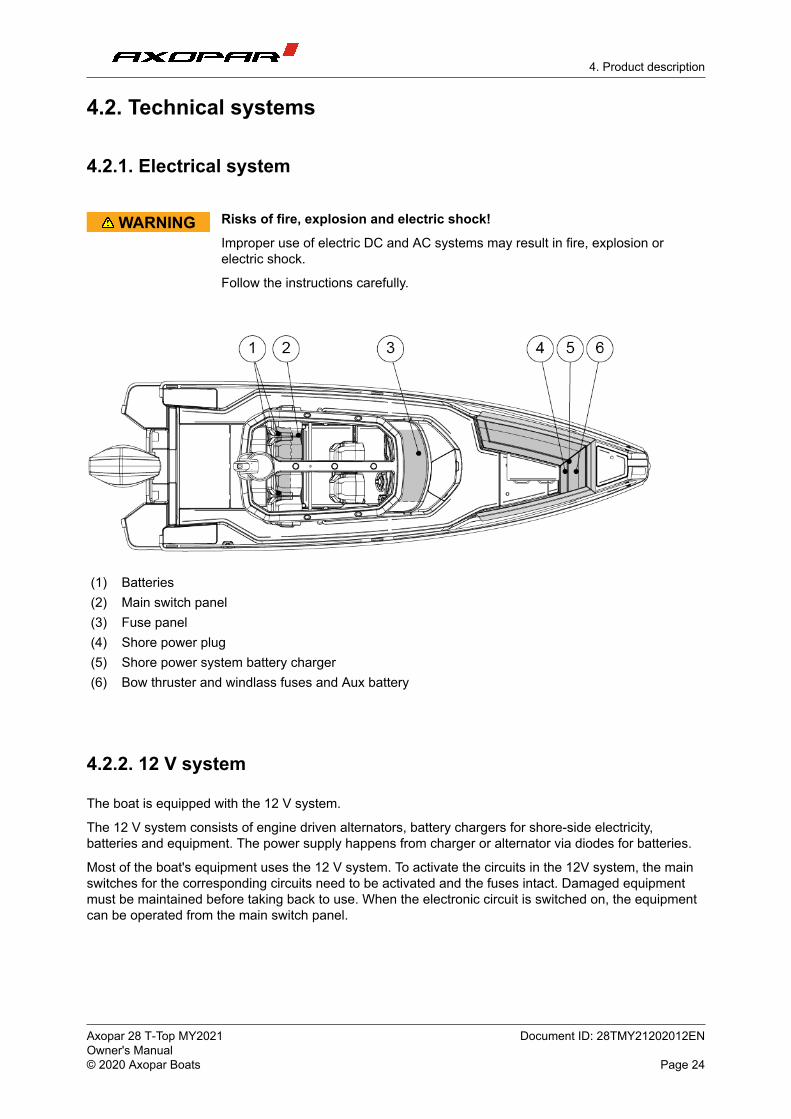
(1) Batteries(2) Main switch panel(3) Fuse panel(4) Shore power plug(5) Shore power system battery charger(6) Bow thruster and windlass fuses and Aux battery
4.2.2. 12 V system
The boat is equipped with the 12 V system.
The 12 V system consists of engine driven alternators, battery chargers for shore-side electricity,batteries and equipment. The power supply happens from charger or alternator via diodes for batteries.
Most of the boat's equipment uses the 12 V system. To activate the circuits in the 12V system, the mainswitches for the corresponding circuits need to be activated and the fuses intact. Damaged equipmentmust be maintained before taking back to use. When the electronic circuit is switched on, the equipmentcan be operated from the main switch panel.
Axopar 28 T-Top MY2021 Document ID: 28TMY21202012ENOwner's Manual© 2020 Axopar Boats Page 24
-
-
4. Product description
WARNING • Never switch off the main switch when the engine is running, becausethis may cause damage to the alternator.
• Never carry out electrical installations when the power is switched on.
• Never modify the boat’s electrical system or diagrams; service andmaintenance must be carried out by a qualified electrician.
• Never modify the nominal rated amperage of the overvoltage protector.
• Never install or replace electrical equipment with components that causethe circuit’s nominal rated amperage to be exceeded.
• Never leave the boat unattended with the electrical system energized,except automatic bilge pump, fire protection, and alarm circuits.
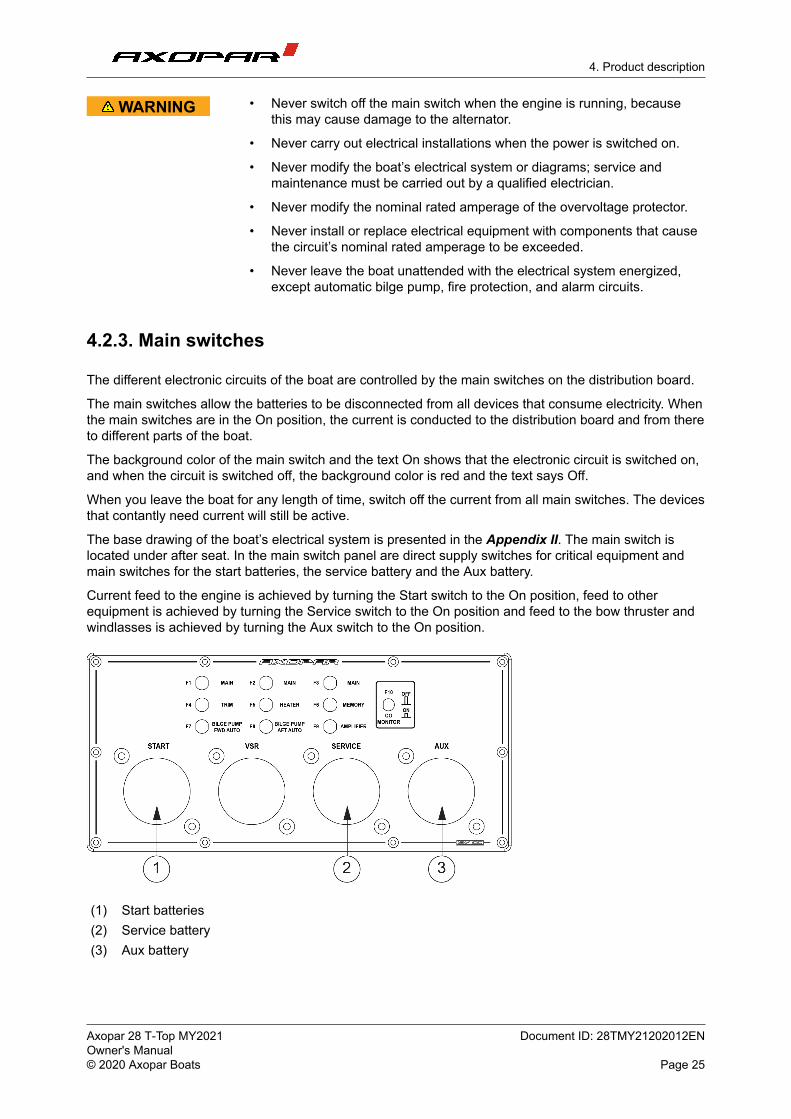
4.2.3. Main switches
The different electronic circuits of the boat are controlled by the main switches on the distribution board.
The main switches allow the batteries to be disconnected from all devices that consume electricity. Whenthe main switches are in the On position, the current is conducted to the distribution board and from thereto different parts of the boat.
The background color of the main switch and the text On shows that the electronic circuit is switched on,and when the circuit is switched off, the background color is red and the text says Off.
When you leave the boat for any length of time, switch off the current from all main switches. The devicesthat contantly need current will still be active.
The base drawing of the boat’s electrical system is presented in the Appendix II. The main switch islocated under after seat. In the main switch panel are direct supply switches for critical equipment andmain switches for the start batteries, the service battery and the Aux battery.
Current feed to the engine is achieved by turning the Start switch to the On position, feed to otherequipment is achieved by turning the Service switch to the On position and feed to the bow thruster andwindlasses is achieved by turning the Aux switch to the On position.
(1) Start batteries(2) Service battery(3) Aux battery
Axopar 28 T-Top MY2021 Document ID: 28TMY21202012ENOwner's Manual© 2020 Axopar Boats Page 25
-
-

4. Product description
4.2.4. Direct supply switches
Some of the devices in the boat are supplied by direct supply switches. Direct supply switches areintended for such equipment that need current when main switches are turned off.
When pushed down, the switch is on and when pushed up it is off. The switch indicates a short circuit orinterference in the electronic circuit by springing up to the “off” position. The switch can be reconnectedby pushing it back down to the “on” position. Do not reconnect the switch before you have found out thereason for the interference.
The direct supply switches must be left on even if the current from other circuits is switched off. Anappliance that is switched off too early may cause the appliance to overheat and become damaged.
The switches are located in the main switch panel.
WARNING Turning the direct supply switch off too early may cause the device (for example,the heater) to break or catch fire, because the devices have a ventilation featurethat works even if the device is otherwise switched off.
• Make sure the device is cooled down before turning it off completely. Formore information, see the manual of the device in question.
4.2.5. Fuses
The fuse panel includes fuses for the boat’s equipment. The fuse panel is located in the toilet room.
The fuses are in the form of trip switches that break the circuit and spring up when tripped. Do not resetthe switch before you have found out the reason for the breaker tripping. After that press the switch backdown.
The panel has a combined switch and fuse for the macerator and fresh water pump. The fuse panel alsohas a 12 V output.
WARNING Before connecting an electric circuit, make sure that the circuit is not damagedand that there will be no short circuit or a fire caused by possible damages in theelectric circuit. Any damaged equipment must be maintained or changed beforethey are again taken into use.
Axopar 28 T-Top MY2021 Document ID: 28TMY21202012ENOwner's Manual© 2020 Axopar Boats Page 26
-
-
4. Product description
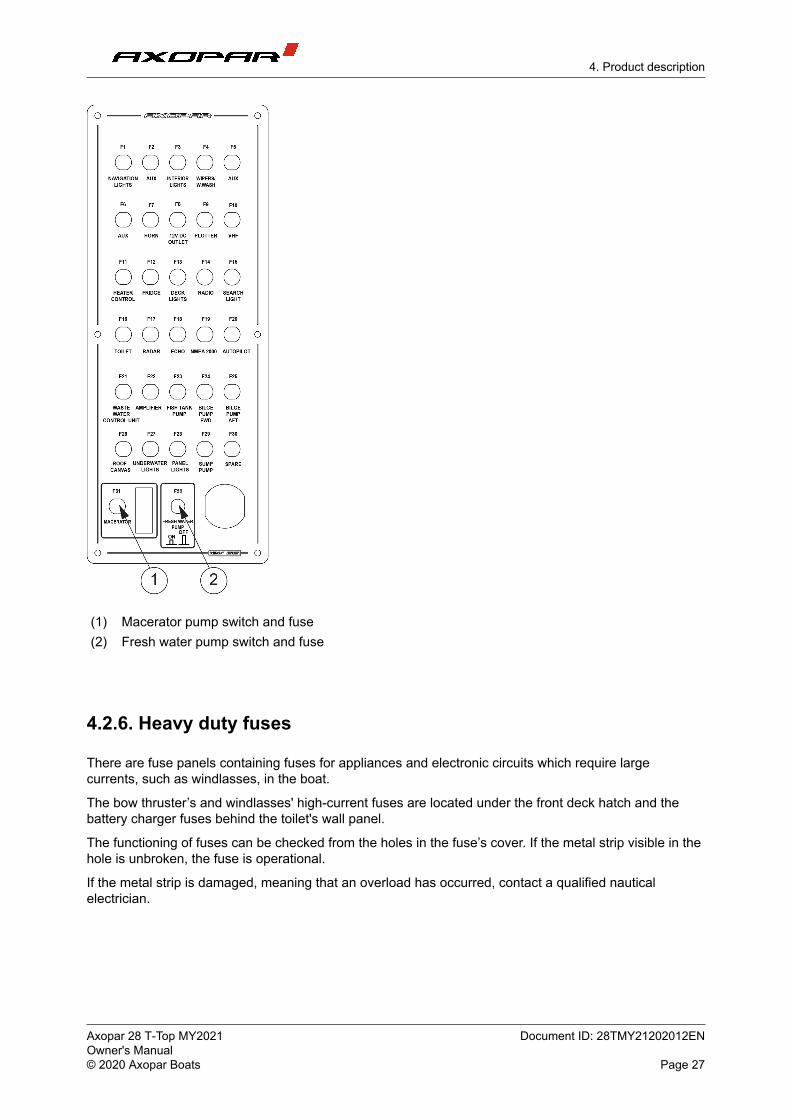
(1) Macerator pump switch and fuse(2) Fresh water pump switch and fuse
4.2.6. Heavy duty fuses
There are fuse panels containing fuses for appliances and electronic circuits which require largecurrents, such as windlasses, in the boat.
The bow thruster’s and windlasses' high-current fuses are located under the front deck hatch and thebattery charger fuses behind the toilet's wall panel.
The functioning of fuses can be checked from the holes in the fuse’s cover. If the metal strip visible in thehole is unbroken, the fuse is operational.
If the metal strip is damaged, meaning that an overload has occurred, contact a qualified nauticalelectrician.
Axopar 28 T-Top MY2021 Document ID: 28TMY21202012ENOwner's Manual© 2020 Axopar Boats Page 27
-
-
4. Product description
WARNING Opening the cover is not recommended, as there is a danger of electric shock andserious injury.
If the metal strip is damaged, contact a qualified nautical electrician. If it isnecessary to open the cover, make sure that all the current cables from thebatteries are disconnected.
4.2.7. Batteries
The battery system has been designed and built so that the boat’s engine starts even if its start batteriesare dead, because then the service battery supplies the current. However, this function does not work theother way around.
The batteries are located under the aft cabin’s berth. The location of the batteries is presented in thesection Electrical System. When you leave the boat, switch off the current from the main switch.
Remove the battery from the boat for winter storage. When removing the battery, detach the negativepole first. Use only maintenance-free absorbent glass mat (AGM) batteries in the boat. Whendisconnecting batteries, be careful not to touch both poles at the same time with a metal tool.
The boat is equipped with three batteries, of which the start battery supplies current to the engine andpower steering, and service battery for other appliances and equipment on the boat.
There is also one battery for the bow thruster.
CAUTION Use only maintenance-free AGM batteries in the boat.
4.2.7.1. Charging the batteries
• Make sure that the battery compartment is always well ventilated whencharging batteries.
Only charge batteries in the boat with the boat's own chargers. In other cases,remove batteries from the boat.
Remember that the batteries discharge an explosive oxy-hydrogen gas at a voltage of 14.4 volts. Thevoltage of a normal battery in unloaded status is 12.3-12.7 V. During charging, the voltage increasesand the charging regulator stops the charging process automatically at a preset level. The voltagemeasurement should be taken at the battery terminals, not the alternator, to achieve the correct result.
4.2.7.2. Winter storage
For winter storage, the batteries can be left on board only if they are fully charged.
A partially discharged battery can freeze and crack. Always disconnect the cable terminals from thebattery to avoid oxidation. When removing batteries, disconnect the negative pole first and make surethat there are no flammable or explosive materials or liquids nearby. When putting the batteries back inplace, connect them in reverse order (positive pole first).
Axopar 28 T-Top MY2021 Document ID: 28TMY21202012ENOwner's Manual© 2020 Axopar Boats Page 28
-
-
4. Product description
4.2.7.3. Cleaning the batteries
The top of the batteries should be cleaned regularly to avoid current leakage between the cells.
If the battery is located in a separate area, it is normally sufficient to clean it in the spring and autumn.
Make sure that the air holes in the cell plugs are open so that gas can be vented.
The terminals and cable terminals must be lubricated to prevent deposits and corrosion.
4.2.8. 110/230 V system
You can choose to equip your boat with the optional 110/230 V AC system with a shore powerconnection, which will allow you to use devices that run on the standard mains current.
The system obtains its power from an external supply on shore or from the jetty (shore power). In theEuropean market the system used is 230 V and in the American market 110 V.
The system functions when a shore power cable has been connected to the shore power socketconnection.
1. Turn off the shore power switch before connecting or disconnecting the cable.
2. Connect the shore power cable to the boat before connecting it to the shore power.
3. Disconnect the shore power cable from the shore power before disconnecting from the boat.
4. Close the hatch of the boat’s shore power connection.
The system’s main fuse is located in a separate control panel. The system includes a battery charger,which starts charging batteries automatically when the boat has been connected to shore power. Thelocation of the components is presented in the section Electrical System.
The shore power system should be checked at least biannually. Always disconnect the shore powercable when the system is not in use. Metal casings of installed electrical equipment must always beconnected to earth in the boat electrical system. Use electrical equipment equipped with earth protectiononly.
WARNING • Do not touch an energized high voltage system.
• Do not change the plug of the shore power cable. Use compatibleconnectors only.
• Try to minimize the risk of electric shock, short circuit and fire.
• Do not allow the shore power cable to hang in the water. If it does, ahazardous electric field could be created in the water.
• Never modify the connections on the shore power cable. Use compatibleconnectors only.
• If the earth fault breaker is tripped, disconnect the shore power cableimmediately. In such a case contact a qualified electrician for repairsbefore the system is used again.
Axopar 28 T-Top MY2021 Document ID: 28TMY21202012ENOwner's Manual© 2020 Axopar Boats Page 29
-
-

4. Product description
WARNING To avoid an electric shock and risk of fire:
• Switch off the shore power switch before connecting and disconnectingthe cable.
• Connect the shore power cable to the boat before connecting it ashore.
• Disconnect the shore power cable ashore before disconnecting it from theboat.
• Close the hatch to the shore power socket on the boat carefully, avoidinggetting it wet.
4.2.9. Fuel system
The boat is fitted with a separate fixed fuel system and extra water-separating fuel filter on the suctionline.
Instead of the fuel system used in the European region, the boats produced for the American region usethe EPA (United States Environmental Protection Agency) fuel system regarding NMMA (National MarineManufacturers Association) certification rules.
See the fuel system drawing in the Appendix II. For care and maintenance of the fuel system, see theinstructions in the engine manual.
WARNING Do not smoke or handle open flames when refueling.
Remember that it is not allowed to store fuel in spaces not specifically designedfor it. Since there is no ventilated storage space on this boat, possible spare fuelcans must be stored on deck.
The fuel filter (if available) is located under the helmsman' seat.
The fuel tank is located midpart of the keel. Try to prevent damage to the fuel lines.
The fuel tank valves are located under the helmsman's seat. The EPA fuel system is equipped with anautomatic fuel valve. The components of the tank are under the helmsman´s seat.
The inlet pipe for fuel is located in the starboard side of the deck.
If the boat has been equipped with an extra diesel tank, the inlet pipe and tank are located forward.
Axopar 28 T-Top MY2021 Document ID: 28TMY21202012ENOwner's Manual© 2020 Axopar Boats Page 30
-
-
4. Product description
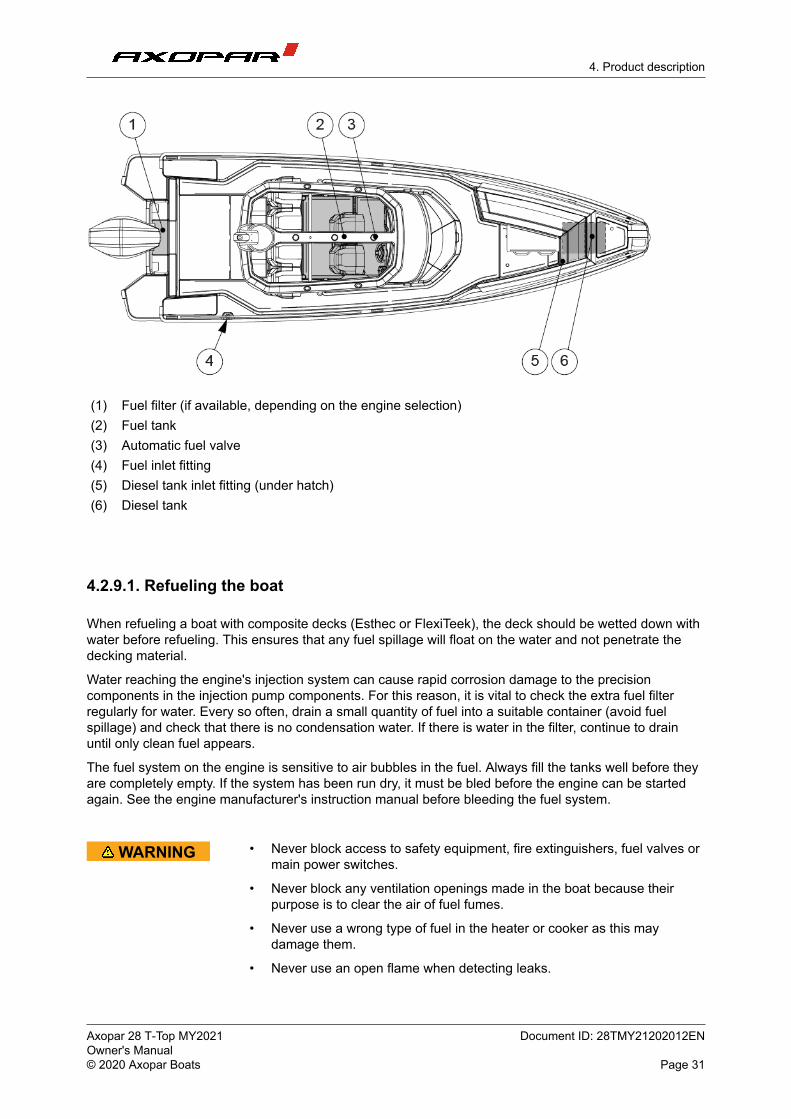
(1) Fuel filter (if available, depending on the engine selection)(2) Fuel tank (3) Automatic fuel valve(4) Fuel inlet fitting (5) Diesel tank inlet fitting (under hatch) (6) Diesel tank
4.2.9.1. Refueling the boat
When refueling a boat with composite decks (Esthec or FlexiTeek), the deck should be wetted down withwater before refueling. This ensures that any fuel spillage will float on the water and not penetrate thedecking material.
Water reaching the engine's injection system can cause rapid corrosion damage to the precisioncomponents in the injection pump components. For this reason, it is vital to check the extra fuel filterregularly for water. Every so often, drain a small quantity of fuel into a suitable container (avoid fuelspillage) and check that there is no condensation water. If there is water in the filter, continue to drainuntil only clean fuel appears.
The fuel system on the engine is sensitive to air bubbles in the fuel. Always fill the tanks well before theyare completely empty. If the system has been run dry, it must be bled before the engine can be startedagain. See the engine manufacturer's instruction manual before bleeding the fuel system.
WARNING • Never block access to safety equipment, fire extinguishers, fuel valves ormain power switches.
• Never block any ventilation openings made in the boat because theirpurpose is to clear the air of fuel fumes.
• Never use a wrong type of fuel in the heater or cooker as this maydamage them.
• Never use an open flame when detecting leaks.
Axopar 28 T-Top MY2021 Document ID: 28TMY21202012ENOwner's Manual© 2020 Axopar Boats Page 31
-
-
4. Product description
4.3. Optional equipment
This section presents the optional equipment and systems available for the boat.
4.3.1. Fresh water system
You can choose to equip your boat with a fresh water system as an optional extra.
The fresh water system consists of a fresh water tank, pump and accumulator. The boat may also beequipped with a water supply point in the galley and a deck shower and a water supply point for the wetbar.
The tank is located under front deck. The pump and hydraulic accumulator are next to the tank. Thefresh water tank is filled via the inlet pipe on the foredeck.
The fresh water system is turned on by switching on the fresh water pump. The pump switch is locatedon the fuse panel.
The system maintains a working pressure automatically with the assistance of a hydraulic accumulator,which is why the pump does not need to be shut after use.
Switch the system off when leaving the boat. Do not forget to check filter in the pump regularly.
The dealer is responsible for disinfecting the fresh water tank before sale.
NOTICE The fresh water system must be thoroughly emptied for winter storage. It is notrecommended to use any anti-freeze products in the fresh water system.
Axopar 28 T-Top MY2021 Document ID: 28TMY21202012ENOwner's Manual© 2020 Axopar Boats Page 32
-
-
4. Product description
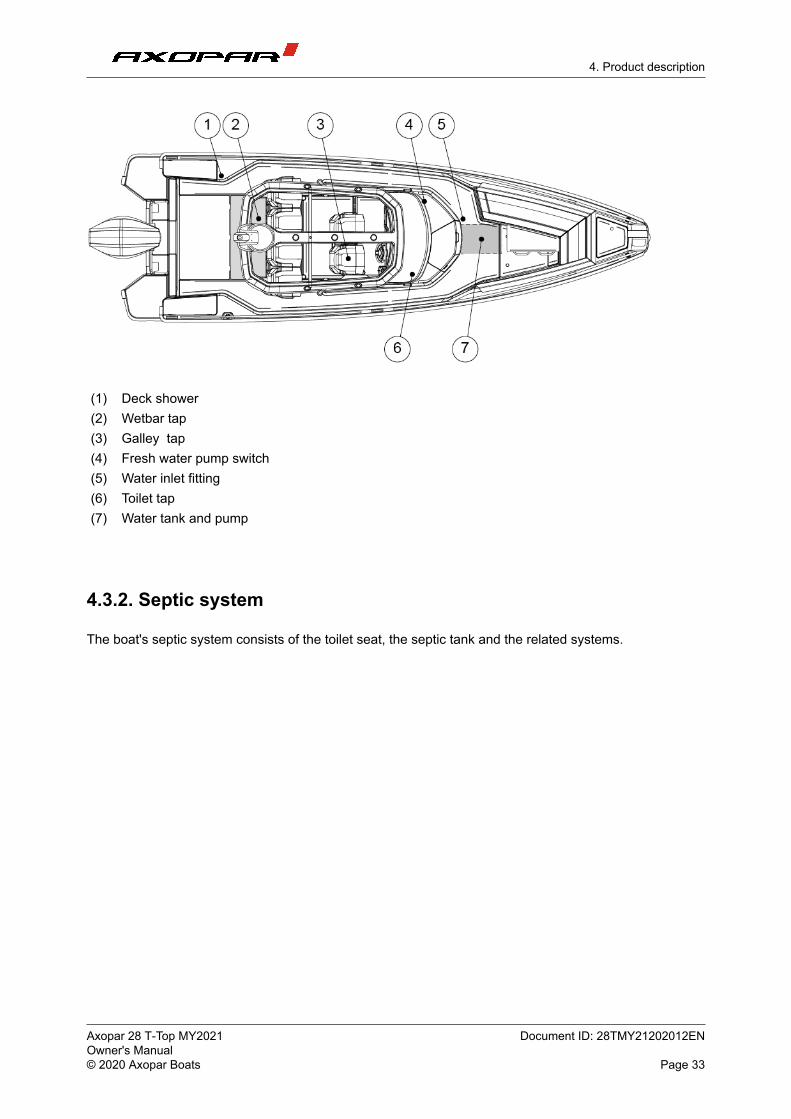
(1) Deck shower(2) Wetbar tap(3) Galley tap(4) Fresh water pump switch(5) Water inlet fitting (6) Toilet tap (7) Water tank and pump
4.3.2. Septic system
The boat's septic system consists of the toilet seat, the septic tank and the related systems.
Axopar 28 T-Top MY2021 Document ID: 28TMY21202012ENOwner's Manual© 2020 Axopar Boats Page 33
-
-
4. Product description
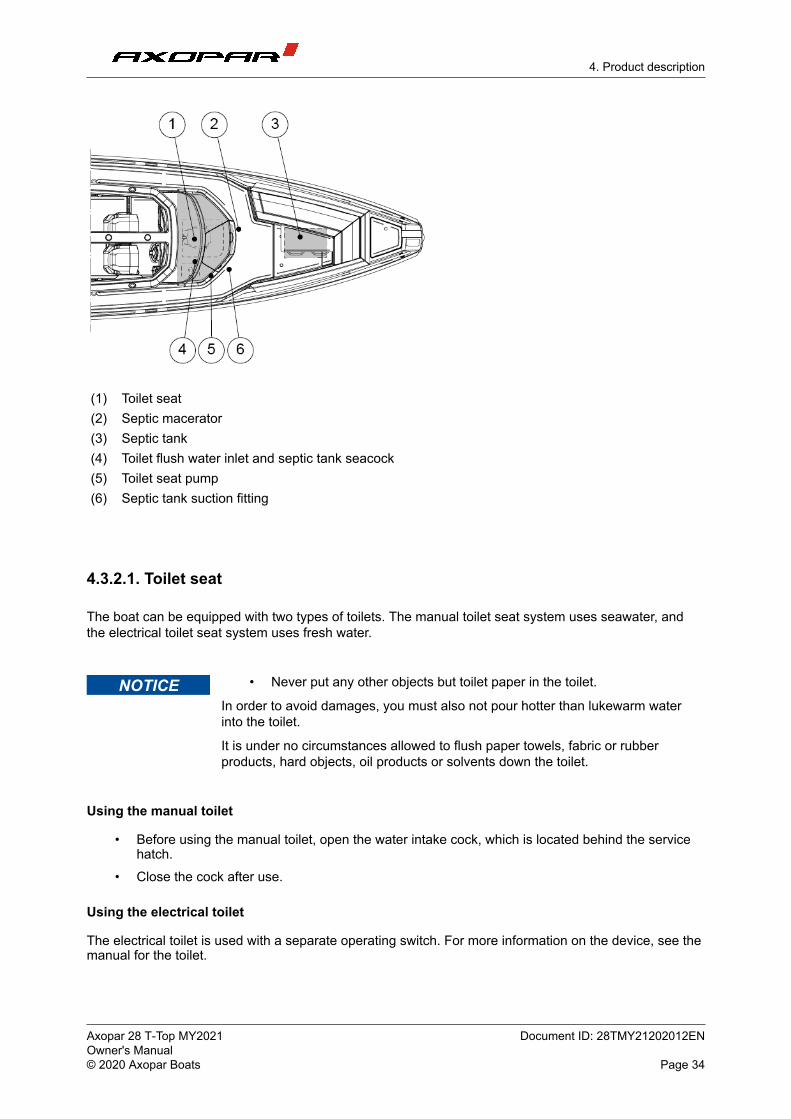
(1) Toilet seat(2) Septic macerator (3) Septic tank (4) Toilet flush water inlet and septic tank seacock (5) Toilet seat pump(6) Septic tank suction fitting
4.3.2.1. Toilet seat
The boat can be equipped with two types of toilets. The manual toilet seat system uses seawater, andthe electrical toilet seat system uses fresh water.
NOTICE • Never put any other objects but toilet paper in the toilet.
In order to avoid damages, you must also not pour hotter than lukewarm waterinto the toilet.
It is under no circumstances allowed to flush paper towels, fabric or rubberproducts, hard objects, oil products or solvents down the toilet.
Using the manual toilet
• Before using the manual toilet, open the water intake cock, which is located behind the servicehatch.
• Close the cock after use.
Using the electrical toilet
The electrical toilet is used with a separate operating switch. For more information on the device, see themanual for the toilet.
Axopar 28 T-Top MY2021 Document ID: 28TMY21202012ENOwner's Manual© 2020 Axopar Boats Page 34
-
-
4. Product description
Maintaining the toilet
• Clean the toilet with a mild cleaner.• Never use cleaning agents or deodorants which contain pine oil, formaldehyde or chlorine, nor
corrosive or petroleum-based agents.These materials can damage the plastic and rubber parts in the toilet.
• Lubricate the pump shaft with Vaseline to increase the service life of the seal.• Flush the toilet system thoroughly with fresh water when the boat is not in use.
4.3.2.2. Septic tank
Avoid environmental pollution!
The black water tank is fitted with a deck outlet pump using an internationalstandard type connection. Using the pump, the black water can be emptied to apermanent septic tanks ashore. These facilities must always be used.
In areas where there are no permanent septic tanks, the macerator is used toevacuate the contents of the tank straight into the water as follows: Open thesealed seacock. If possible, empty the tank daily and always in deep waters farfrom the shore. For the location of the pump, see the section Septic system.
The shut-off valve must be closed after the evacuation.
Do not allow the tank to become full. It can lead to paper becoming compacted inthe bottom of the tank, making it more difficult to empty.
NOTICE Before the boat is laid-up for winter storage, the whole system must be cleanedand flushed through while the boat is still in the water. The whole system must bethoroughly drained of water when the boat is lifted out of the water. This measureprevents frost damage, bacteria growth and smells.
We do not recommend the use of antifreeze, since it is impossible to guaranteethat it reaches all parts of the system.
4.3.3. Heating system
The boat can be equipped with a heating system as an optional equipment.
The heater unit is located behind the toilet room wall. In addition, there are a different number of heatingvents available, depending on the boat's equipment.
The operation panel is located in the steering console.
The heater tank is located in the fore. The filling cap for the heater tank is in the bow of the boat.
Axopar 28 T-Top MY2021 Document ID: 28TMY21202012ENOwner's Manual© 2020 Axopar Boats Page 35
-
-
4. Product description
WARNING Appliances that burn fuel, consume oxygen and discharge toxic combustionproducts into the boat.
Good ventilation is essential when such an appliance is in use. Open ventilationholes and make sure that they are not blocked and that air flows freely throughthem.
• Never leave the boat unattended when the heater is in use.
NOTICE Heater components may break if the wrong kind of fuel is used. For moreinformation, see the manufacturer’s manual.
• Do not switch off the heater’s direct supply current before you have madesure that the appliance has cooled down.
4.3.4. Bow thruster
The bow thruster enhances the maneuverability of the bow when docking or performing other maneuversthat require increased operator control.
The bow thruster is located under the front deck and can be accessed by removing the bottom of thestorage box.
The bow thruster is powered by the Aux battery. The main switch is located in the bow area of the boat.
The control switch is located in the steering console.
The batteries must be disconnected from the electronic circuit before changing a fuse. For moreinformation, see the manufacturer’s manual.
WARNING Incorrect use may cause overheating and short circuiting, and pose a fire risk.
• Use the bow thruster for only short periods at a time.
• Do not exceed four duty cycles (max. 30 seconds long in 25 mins).
If overloading occurs, contact a qualified marine electrician.
WARNING • Do not touch the bow thruster or its fuse if the main switch Aux isswitched on.
4.3.5. Anchor windlass
The boat can be equipped with a fore anchor windlass as an optional extra.
The windlass switches are located in the bow of the boat, and a remote control for the windlass can befound on the steering console.
Axopar 28 T-Top MY2021 Document ID: 28TMY21202012ENOwner's Manual© 2020 Axopar Boats Page 36
-
-
4. Product description
The anchor windlasses are powered by the Aux battery. The battery and its fuse are located next to thewindlasses.
WARNING • Do not touch the anchor windlass or its fuse if the main switch Aux isswitched on.
Even if the current is switched off, we do not recommend changing the windlassfuse, because the high current may cause a fatal electric shock.
Before using an anchor windlass
Always check that:• The windlass is in working order.• The anchor chain can move freely.• The anchor and the chain cannot damage the boat when lowered.
For more information, see the manufacturer’s manual.
While under way
An anchor windlass must be fixed mechanically to prevent it from coming loose when the boat ismoving. For more information, see the manufacturer’s manual.
WARNING If the windlass loosens when the boat is moving at great speed, it may causegreat damage to the boat, its passengers and outsiders.
• Always fix the anchor windlass mechanically in place before getting underway.
Axopar 28 T-Top MY2021 Document ID: 28TMY21202012ENOwner's Manual© 2020 Axopar Boats Page 37
-
-
5. Transportation
5. Transportation5.1. Lifting the boat
Commission only a reputable lifting company or a boatyard with sufficient lifting capacity to lift the boat.Make sure the company has full insurance cover, in case of any damages.
In addition to the boat’s own weight, also take the equipment and other possible loads in the boat intoaccount.
DANGER Risk of serious injury or death by dropped load.
• Do not stay under the boat when it is hanging in the crane.
Lift slings may slip on the hull. When appropriate, tie the slings together beforelifting.
The position of the slings may need to be adjusted depending on how the boat isloaded.
CAUTION Note the location of the log transducer to avoid damaging it.
• Protect the hull sides well to avoid damages.
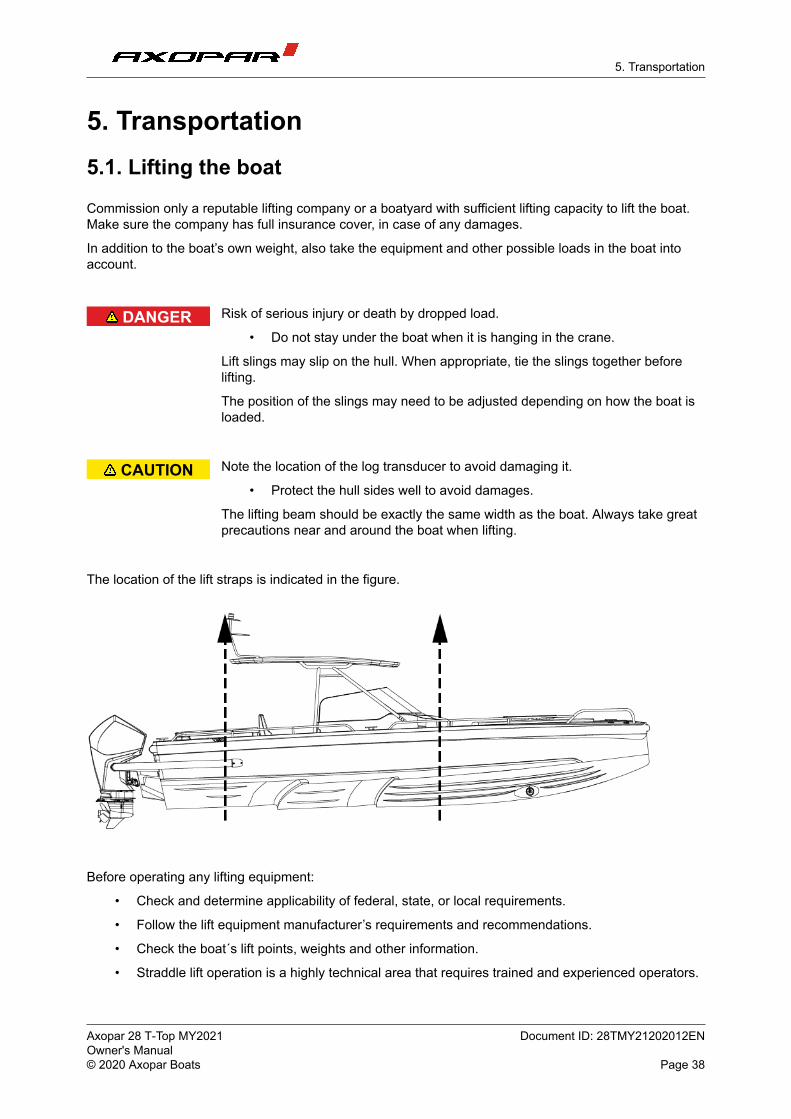
The lifting beam should be exactly the same width as the boat. Always take greatprecautions near and around the boat when lifting.
The location of the lift straps is indicated in the figure.
Before operating any lifting equipment:
• Check and determine applicability of federal, state, or local requirements.
• Follow the lift equipment manufacturer’s requirements and recommendations.
• Check the boat´s lift points, weights and other information.
• Straddle lift operation is a highly technical area that requires trained and experienced operators.
Axopar 28 T-Top MY2021 Document ID: 28TMY21202012ENOwner's Manual© 2020 Axopar Boats Page 38
-
-
5. Transportation
During lifting:
• Ensure that all hull penetrations are closed or secure.
• Check the boat for bilge water before lifting.
Excessive quantities of bilge water can shift, changing the balance of the load.
• Check for thru-hull appendages such as knot meters and stabilizers, rub, spray, and splash rails,so that they are not damaged by the lifting equipment.
• Check the hull structure to locate shafts, rudders, struts, and the forward and aft ends of anykeels.
• Check the hull’s structural configuration, including the location of bulkheads, stringers, engines,and tanks.
• Check bilges for water ingress following launch.
• Transport the boat as close to the ground as practicable.
5.2. Transporting the boat
Before lifting the boat onto the trailer, make sure that the trailer is suitable for the boat.
Make sure that there are a sufficient number of supports to distribute the weight properly withoutexcessive point loads, and the capacity and dimensions of the trailer are sufficient to carry the boat andits engine, equipment, battery, boating accessories and fuel on board.
WARNING A boat trailer that does not have sufficient capacity or that is poorly maintainedcan become damaged and cause a danger on the road.
• Make sure that the trailer capacity is sufficient to also carry the weight ofthe engine, fuel and equipment.
CAUTION The hull of the boat can be damaged if there is an insufficient amount of supportson the trailer.
The trailer must be a little nose heavy. Make sure that the boat is securelyfastened to the trailer, that it cannot move into any direction, and that the sidesupports provide an even support for the weight of the boat.
Before loading the boat on the trailer:
• Remove any unnecessary weight from the boat.
• Drain the bilge water.
• Adjust the side supports of the trailer so that the most weight rests on the keel supports, and theside supports only offer lateral support.
• Protect the boat by placing suitable padding between the tie down straps and the boat, ifnecessary.
• See the engine manual for any instructions on trailering.
Axopar 28 T-Top MY2021 Document ID: 28TMY21202012ENOwner's Manual© 2020 Axopar Boats Page 39
-
-
5. Transportation
• Make sure that the doors and hatches are properly closed.
• Pay attention to any equipment and accessories in the boat during trailering.
◦ Make sure you secure all loose items in the boat.
◦ Do not use a hood, canopy, tonneau cover or other similar top or cover on the boat duringtrailering.
These hoods and covers can become detached at high speeds and damage the boat andcause a danger to traffic.
A hood or other cover flapping in the wind during trailering can damage the boat surface.
◦ Keep the hood in its dedicated storage compartment during trailering, or remove the hoodcompletely, if necessary.
Axopar 28 T-Top MY2021 Document ID: 28TMY21202012ENOwner's Manual© 2020 Axopar Boats Page 40
-
-

6. Operation
6. OperationThe boat owner must take local and international regulations into consideration concerning theboat crew, equipment and handling of the boat. In some countries, a driving license or a separateauthorization is required for driving the boat. Special regulations may also apply.
Ensure that the anticipated wind and wave conditions do not exceed the design category of the boat, andthat the crew is able to handle the boat in these conditions. Even though the boat is designed for suchconditions, they can still very dangerous. Only a capable, fit and trained crew, using a well maintainedboat, can satisfactorily operate in such conditions.
If the boat is fitted with a life raft, carefully read its operation manual. Onboard, the boat shall have theappropriate safety equipment according to the boat type and weather conditions. This equipment iscompulsory in some countries. The crew shall be familiar with the use of all safety equipment and themost important actions in different emergency situations. Sailing schools and clubs regularly organizerescue drills.
The equipment in the boat may differ from the equipment used in the figures in this manual. Thismight be due to any optional equipment chosen or modifications made after producing this manual. Insuch cases, we recommend that you contact your local dealer for additional information regarding theoperation of the equipment in question.
Always maintain the boat properly and make allowance for the deterioration that will occur over timeand as a result of heavy use or misuse of the boat. Any boat, no matter how strong it may be, can beseverely damaged if not used properly. Inappropriate use of this boat not compatible with safe boatingis not allowed. It is always important to adjust the speed and direction of the boat to the sea conditionsand own boating experience. The gelcoat parts, especially the colored parts, should be polished andwaxed approximately every fourth months to prevent the parts from fading or getting other visual defects.
6.1. Handling devices
6.1.1. Steering console
The controllers are situated so that the driver can easily manage them from the steering console.
The location and quantity of the devices depend on what optional equipment and engine models havebeen chosen. See the device manuals for further information on the devices.
Axopar 28 T-Top MY2021 Document ID: 28TMY21202012ENOwner's Manual© 2020 Axopar Boats Page 41
-
-
6. Operation
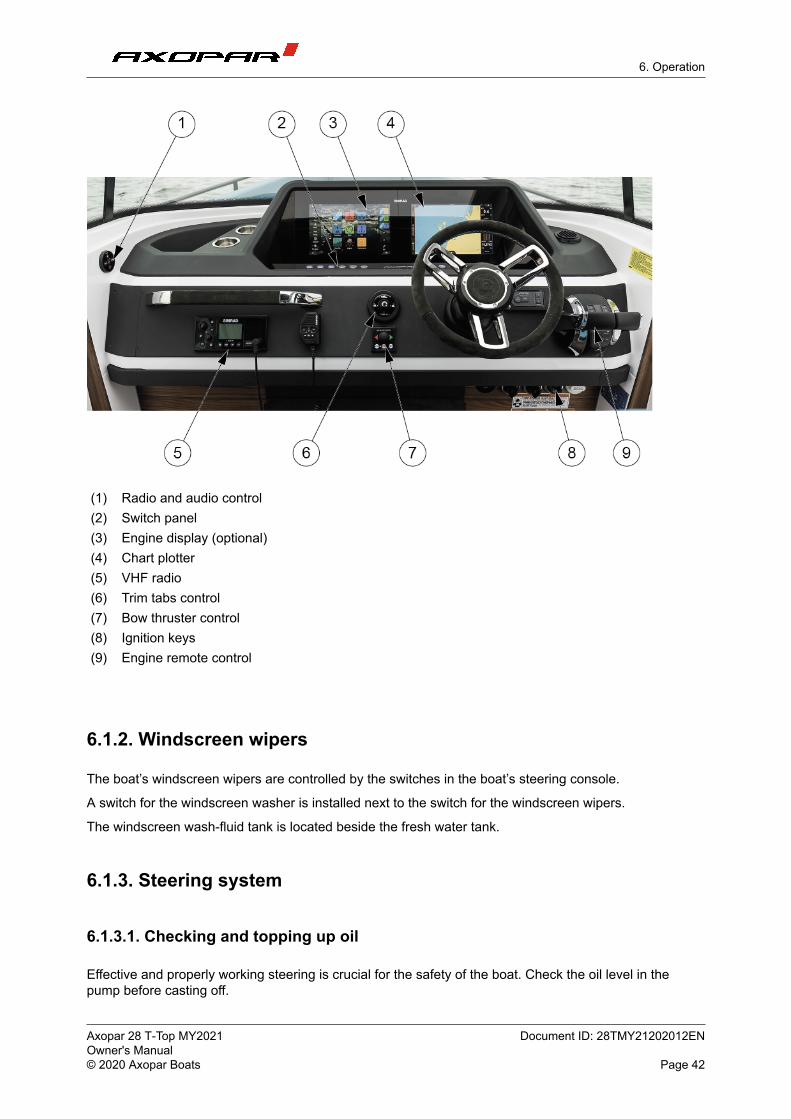
(1) Radio and audio control(2) Switch panel(3) Engine display (optional)(4) Chart plotter(5) VHF radio(6) Trim tabs control(7) Bow thruster control(8) Ignition keys(9) Engine remote control
6.1.2. Windscreen wipers
The boat’s windscreen wipers are controlled by the switches in the boat’s steering console.
A switch for the windscreen washer is installed next to the switch for the windscreen wipers.
The windscreen wash-fluid tank is located beside the fresh water tank.
6.1.3. Steering system
6.1.3.1. Checking and topping up oil
Effective and properly working steering is crucial for the safety of the boat. Check the oil level in thepump before casting off.
Axopar 28 T-Top MY2021 Document ID: 28TMY21202012ENOwner's Manual© 2020 Axopar Boats Page 42
-
-
6. Operation
Hydraulic oil is added to the steering system via the filling plug in the steering wheel pump. The oil levelmust be approximately 10 mm below the filler hole.
See the manufacturer's manual for the steering system oil recommendation. For steering systemsprovided by engine manufacturer, see the engine manufacturer's instructions.
6.1.3.2. Steering maintenance
Check couplings, mountings and bearings. For maintenance of the steering system, see themanufacturer’s instruction manual.
6.1.3.3. Steering console switch panel
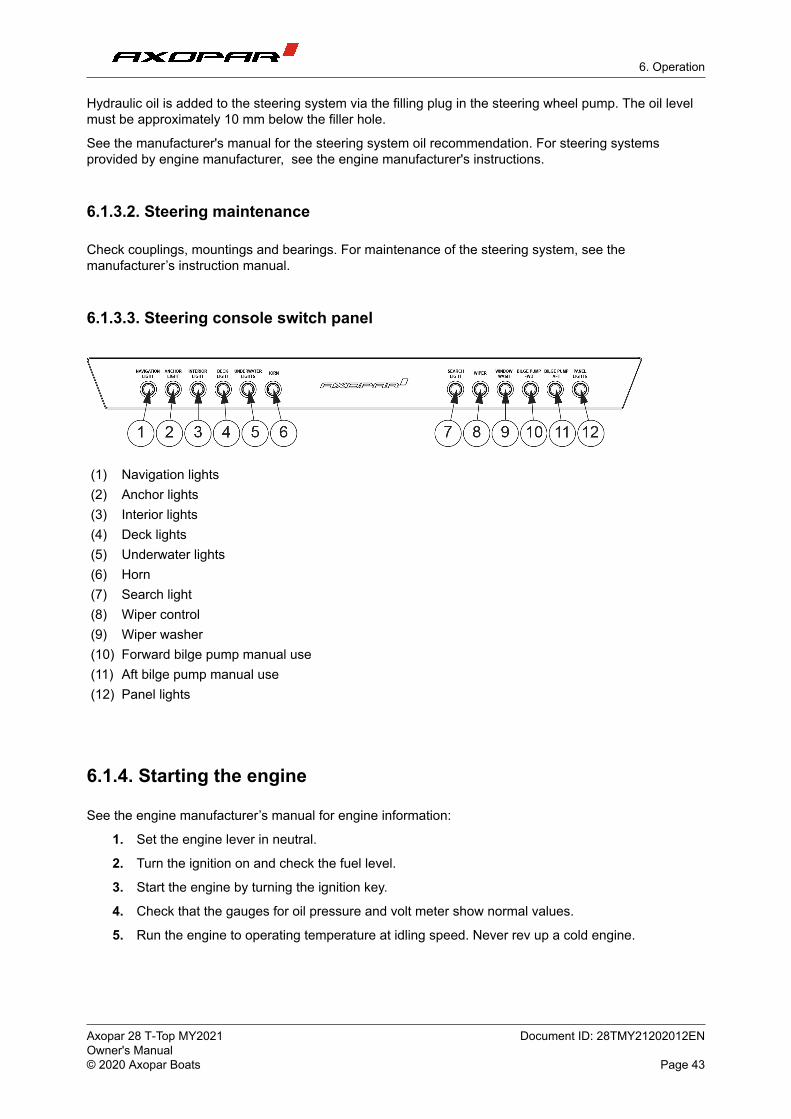
(1) Navigation lights(2) Anchor lights(3) Interior lights(4) Deck lights(5) Underwater lights(6) Horn(7) Search light(8) Wiper control(9) Wiper washer(10) Forward bilge pump manual use(11) Aft bilge pump manual use(12) Panel lights
6.1.4. Starting the engine
See the engine manufacturer’s manual for engine information:
1. Set the engine lever in neutral.
2. Turn the ignition on and check the fuel level.
3. Start the engine by turning the ignition key.
4. Check that the gauges for oil pressure and volt meter show normal values.
5. Run the engine to operating temperature at idling speed. Never rev up a cold engine.
Axopar 28 T-Top MY2021 Document ID: 28TMY21202012ENOwner's Manual© 2020 Axopar Boats Page 43
-
-
6. Operation
DANGER Risk of carbon monoxide poisoning.
Be aware of the risks with engine exhausts. For example, under turbulence ordisadvantageous wind conditions, exhaust can enter the boat. If this happens,avoid idling the engines. If these problems occur under way, do not open thehatches and ventilators, as it can worsen the problems. Instead, you may trysolving the problems by changing the boat’s speed or weight distribution.
WARNING Never step onto the swim ladder when the engine is running. Stop the enginewhile the steering and propeller are being inspected.
WARNING Do not operate this boat with an engine that exceeds the maximum engine powerrecommended by the manufacturer.
6.2. Swivel seat - Driver and passenger seats
The driver and passenger seats are operated with the locking handle.
The locking handle must be in the locked position when the boat speed exceeds 5 knots.
(1) Moving locking handle(2) Rotation locking handle
• In the moving function, lift the locking handle up to release the lock.
This allows you to move seat from back to front.
• In the rotating function, press the locking handle down to release the lock.
This allows you to rotate the seat on the post.
DANGER The locking handle must be in the locked position before boat speed exceed 5knots.
Axopar 28 T-Top MY2021 Document ID: 28TMY21202012ENOwner's Manual© 2020 Axopar Boats Page 44
-
-
6. Operation
6.3. Inspecting the boat
Due to safety reasons, the below listed inspections must be carried out before and after using the boat.
6.3.1. Checklist: Regular inspection before leaving harbor
Safety
Make sure that:• All the people onboard have life jackets.• The wind and wave conditions do not exceed the design category of the boat.• The dead man's switch is switched to driver. • There is fire extinguisher(s) onboard and their approval/inspection date has not expired.• The needed ropes and anchor are onboard.
Draining and tightness
Check that:• There is no water in the bilge.• All the bilge pumps are functional.• The bilge has no signs of fuel or oil leaks.• The deck drain system is clean and the valves are open.• All deck hatches are tightly closed.
Electrical and engine
Check that: • All the fuses are intact.• The main switches are switched on.• The batteries have enough power.• The engine works properly.• The engine cooling water flows as expected.• The fuel level is sufficient.
WARNING The specified tank capacity is not necessarily fully available, depending on thetrim and load on board. The tank should always be kept at least 20% full.
6.3.2. Checklist: After using the boat
Make sure that:
• The main switches are switched off.
• The septic tank discharge valve is closed.
• There is no water in the bilge.
Axopar 28 T-Top MY2021 Document ID: 28TMY21202012ENOwner's Manual© 2020 Axopar Boats Page 45
-
-
6. Operation
• The bilge pumps are functional.
• The deck draining works properly and all the draining valves are open.
• All deck hatches, roof canvas and doors are tightly closed.
6.4. Handling the boat
6.4.1. Checklist: Boat handling before leaving harbor
For safe navigation under all weather conditions, proper sound signaling equipment in compliance withregulations (COLREG, 1972) must be carried on board. Make sure that the sound signaling equipmenton the boat is compliant with these regulations.
CAUTION According to national regulations in some countries, it is a legal requirement towear a life vest at all times.
• Check that the boat and its equipment are in seaworthy condition.
• Always listen to long-term weather forecasts when planning longer trips.
• Always make sure there is enough fuel and freshwater in the tanks.
• Always keep the engine compartment closed when starting the engine.
• Check that all items on board are properly stowed and adequatelysecured to manage rough sea and wind conditions.
• Make sure that the swim ladder is raised out of the water before movingoff.
• Make sure that the steering is correctly positioned before starting.
• All persons on board should wear an appropriate life vest when on deck.
6.4.2. Leaving the jetty
Before casting off, consider how to best leave the jetty.
• Check what the wind direction is.
• Using a bow thruster, move the bow out and then engage the propeller.
• If the boat has two engines, move away from the jetty by engaging the engine nearer the jettyastern at idling speed and engaging the other engine ahead at idling speed on.
• The boat will swing out from the jetty astern. As the bow will move against the jetty, fend offproperly.
With only one engine this can be a little more challenging, especially if the wind is pressing the boatfirmly against the jetty, you have to use a spring to get the stern out.
• Firmly fend off the bow from the jetty.
• Take a line from the bow around a bollard or cleat, so that it can be easily let go.
Axopar 28 T-Top MY2021 Document ID: 28TMY21202012ENOwner's Manual© 2020 Axopar Boats Page 46
-
-
6. Operation
• Engage idling speed ahead and turn the rudder so that the stern glides out from the jetty.
• When the boat has reached a position, where it can safely be reversed, release and retrieve theline, quickly center the rudder and engage astern.
CAUTION Gather in all lines and fenders while you are still in sheltered water. A rope aroundthe propeller can disable a boat.
6.4.3. Driving the boat
Going out in a motor boat involves responsibility not just to those on board, but also to others we meet onthe water. Showing consideration for others makes boating comfortable. Everyone has the same right tobe at sea, whatever kind of boat they go afloat in.
The physical laws that apply to a boat are rather different from, for example, those affecting a car, as arethe possibilities of influencing its maneuverability.
You can influence a boat’s behavior and the level of comfort on board primarily by adapting the speed tothe prevailing sea conditions and by the intelligent use of the trim tabs. A planing boat rides almost levelin the water at maximum speed. As the speed of the boat is reduced the trim angle increases and thebow rises slightly. This is normal, and is a prerequisite for good performance.
6.4.3.1. Dead man's switch
If the boat is equipped with a dead man’s switch, attach its lanyard to yourself immediately afterdetaching the mooring lines. For more detailed instructions, see the engine manual.
It is very important that the boat stops if you for some reason fall overboard or stumble on board,particularly if you are alone. However, remember to detach the lanyard from your wrist before docking orbeaching operations to prevent the engine from stopping unintentionally.
6.4.3.2. Driving at high speed
Although the boats have passed the CE requirements for swerve tests at full speed, we do notrecommend making sharp turns at high speed. When exceeding a certain speed limit any hullconstruction might lose its grip. This might lead to passengers hurtling out of the boat, especially in asingle engine configuration.
• Do not use the boat if it has an engine with a higher power rating than indicated on the capacityplate.
• Do not drive the boat at high speed if the engine's rig angle is negative (bow down).
• Do not drive at full speed on congested waterways or if the visibility is limited because ofweather conditions or waves.
• Reduce your speed and wake as a matter of courtesy, and also for the safety of yourself andothers.
• Observe and obey speed limits and prohibitions associated with a swell.
• Follow the rules of navigation and the requirements of COLREG (Convention on theInternational Regulations for Preventing Collisions at Sea).
• Always make sure that you have the space needed for avoiding collisions and coming to a haltand for evasive maneuvers.
Axopar 28 T-Top MY2021 Document ID: 28TMY21202012ENOwner's Manual© 2020 Axopar Boats Page 47
-
-
6. Operation
• Always use a dead man's switch if available.
• Reduce speed in high seas for increased comfort and safety.
• Learn the boat's speed potential. Utilize this knowledge for economical and safe cruising.
• Avoid using high speed along with large rudder movements when going astern, because thatplaces great strain on the rudder and steering mechanism.
• Avoid sudden steering maneuvers at high speeds.
• Avoid staying in the bow area when driving at high speeds.
You should avoid sudden changes in direction of travel at high speed. Let the boat come to a stop, andthe engine rev down before shifting between forward and reverse. Otherwise excessive strain is put onthe engine, which could cause the engine to stop. In the worst case, sea water may enter the engine.
A right-handed propeller rotates clockwise and a left-handed propeller anti-clockwise, seen from thestern. The rotation of the propeller is critical for steering the boat. The right-handed propeller pushes thestern of the boat to starboard when the engine is engaged ahead and to port when it is going astern. Thedirection of rotation of the propeller has a major impact on the turning radius. A right-handed propellergives a smaller turning radius to port than to starboard. This is called the propeller's paddlewheel effect.
The boat's propellers have considerable propulsion power that provides powerful acceleration. Take thisinto consideration to avoid dangerous situations arising from this.
DANGER A revolving propeller is life-threatening to a swimmer or a person who has fallenoverboard. Use the dead man’s switch and turn off the engine when someone isclimbing on board.
6.4.3.3. Driving in rough seas
Never go out in rough seas, if you are uncertain whether the boat and those on board can cope. Followthese simple rules.
• Be well prepared.
• Remember to secure loose equipment.
• Always have a sea anchor and other emergency equipment easily accessible.
• Avoid breaking seas that can appear close to land and over shallows.
• If there are significant waves, always reduce speed to guarantee the safety of the persons onboard.
• Use the trim tab to trim the bow down to reduce hull slamming in a head sea.
In a head sea
• Adjust speed to suit the size of the waves.• Adjust the trim angle to the size of the waves. Avoid taking seas beam on.
In a following sea
Remember to keep the bow high in a following sea. Avoid crashing through waves, maintain low speed. Ifnecessary, deploy the sea anchor to reduce speed.Planing boats can be particularly exposed in rough following seas. The stern of the boat rises and therudder does not answer, so the boat broaches while the bow cuts down into the sea.
Axopar 28 T-Top MY2021 Document ID: 28TMY21202012ENOwner's Manual© 2020 Axopar Boats Page 48
-
-
6. Operation
6.4.3.4. Maneuvering in narrow channels
When maneuvering the boat in narrow channels the engine speed should be kept as low as possible sothat maneuvers are calm and steady.
In difficult wind and current conditions, more revs might be necessary to make full use of the power of theengine. In these conditions, it is important that maneuvers are made quickly and precisely to prevent theboat from drifting into trouble for example.
A good rule before starting a maneuver under difficult conditions, is to think through the differentsituations which could arise. Pay attention to the wind and current conditions and decide in advancewhich maneuver you will make. It is also important to brief crew members on what they should do indifferent situations.
Always keep in mind that the stability of the boat may be reduced when towing.
CAUTION Even a nonslip molding can be slippery to walk on when the deck is wet.
6.4.4. Visibility from helming position
Take the visibility from the helming position into consideration.
Among other things the following factors can considerably reduce visibility.
• Gear trim angle
• Trim tab angle
• Load and load positioning
• Speed
• Rapid acceleration
• Changeover from displacement speed to planning
• Sea conditions
• Rain and thunderstorms
• Darkness and fog
• Inner lighting when under way in the dark
• Position of curtains
• People and equipment that block the helmsman’s view.
The International Regulations for Preventing Collisions at Sea (COLREG) demand that a proper lookoutis kept at all times, and the “right of way" rule must be observed. It is essential that these rules arefollowed.
WARNING Make only small adjustments at a time. Holding down the button for the trim tabfor any length of time can result in partial loss of control of the boat.
6.4.5. Using the trim tabs
A boat does not need trim tabs to get up on the plane or to give good performance. However, trim tabsare a very useful aid when used correctly.
Axopar 28 T-Top MY2021 Document ID: 28TMY21202012ENOwner's Manual© 2020 Axopar Boats Page 49
-
-
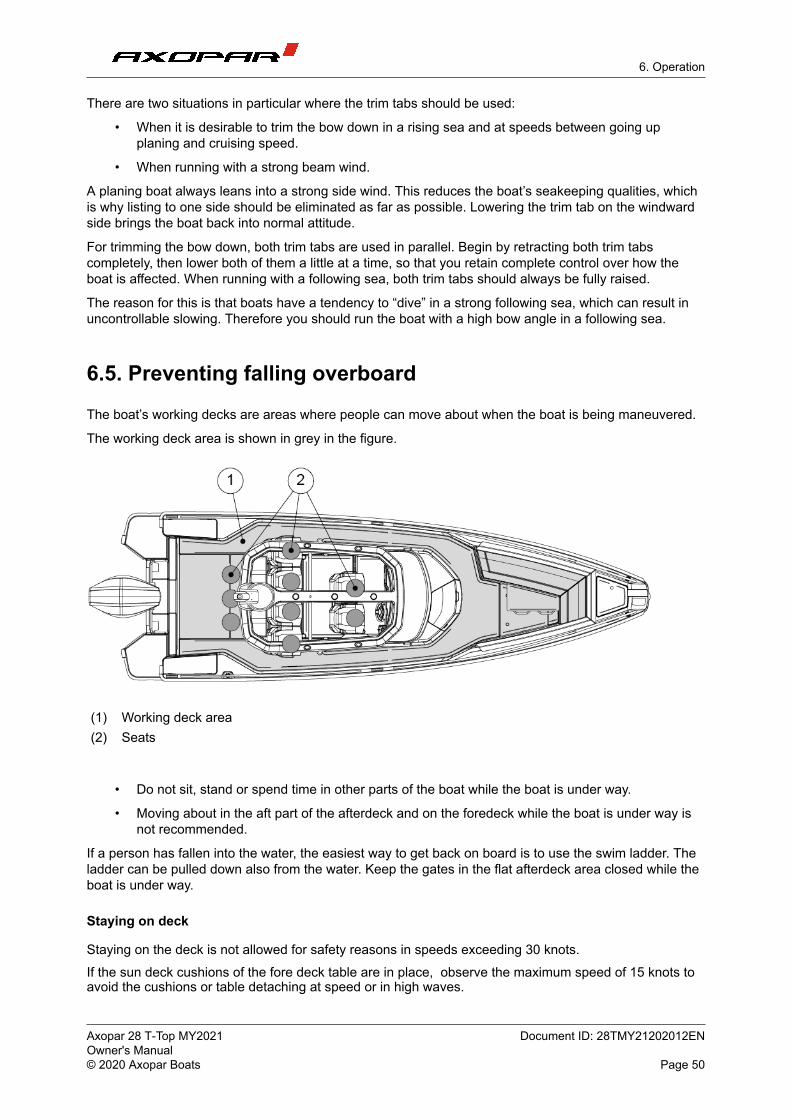
6. Operation
There are two situations in particular where the trim tabs should be used:
• When it is desirable to trim the bow down in a rising sea and at speeds between going upplaning and cruising speed.
• When running with a strong beam wind.
A planing boat always leans into a strong side wind. This reduces the boat’s seakeeping qualities, whichis why listing to one side should be eliminated as far as possible. Lowering the trim tab on the windwardside brings the boat back into normal attitude.
For trimming the bow down, both trim tabs are used in parallel. Begin by retracting both trim tabscompletely, then lower both of them a little at a time, so that you retain complete control over how theboat is affected. When running with a following sea, both trim tabs should always be fully raised.
The reason for this is that boats have a tendency to “dive” in a strong following sea, which can result inuncontrollable slowing. Therefore you should run the boat with a high bow angle in a following sea.
6.5. Preventing falling overboard
The boat’s working decks are areas where people can move about when the boat is being maneuvered.
The working deck area is shown in grey in the figure.
(1) Working deck area(2) Seats
• Do not sit, stand or spend time in other parts of the boat while the boat is under way.
• Moving about in the aft part of the afterdeck and on the foredeck while the boat is under way isnot recommended.
If a person has fallen into the water, the easiest way to get back on board is to use the swim ladder. Theladder can be pulled down also from the water. Keep the gates in the flat afterdeck area closed while theboat is under way.
Staying on deck
Staying on the deck is not allowed for safety reasons in speeds exceeding 30 knots.If the sun deck cushions of the fore deck table are in place, observe the maximum speed of 15 knots toavoid the cushions or table detaching at speed or in high waves.
Axopar 28 T-Top MY2021 Document ID: 28TMY21202012ENOwner's Manual© 2020 Axopar Boats Page 50
-
-
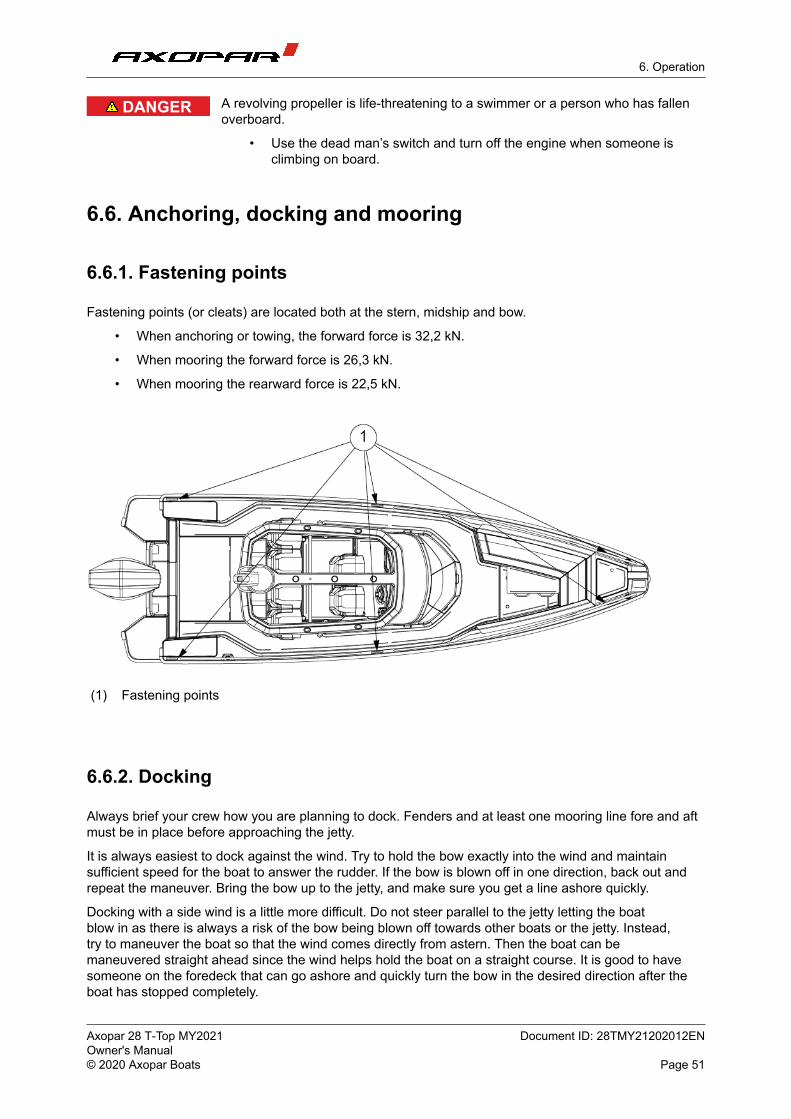
6. Operation
DANGER A revolving propeller is life-threatening to a swimmer or a person who has fallenoverboard.
• Use the dead man’s switch and turn off the engine when someone isclimbing on board.
6.6. Anchoring, docking and mooring
6.6.1. Fastening points
Fastening points (or cleats) are located both at the stern, midship and bow.
• When anchoring or towing, the forward force is 32,2 kN.
• When mooring the forward force is 26,3 kN.
• When mooring the rearward force is 22,5 kN.
(1) Fastening points
6.6.2. Docking
Always brief your crew how you are planning to dock. Fenders and at least one mooring line fore and aftmust be in place before approaching the jetty.
It is always easiest to dock against the wind. Try to hold the bow exactly into the wind and maintainsufficient speed for the boat to answer the rudder. If the bow is blown off in one direction, back out andrepeat the maneuver. Bring the bow up to the jetty, and make sure you get a line ashore quickly.
Docking with a side wind is a little more difficult. Do not steer parallel to the jetty letting the boatblow in as there is always a risk of the bow being blown off towards other boats or the jetty. Instead,try to maneuver the boat so that the wind comes directly from astern. Then the boat can bemaneuvered straight ahead since the wind helps hold the boat on a straight course. It is good to havesomeone on the foredeck that can go ashore and quickly turn the bow in the desired direction after theboat has stopped completely.
Axopar 28 T-Top MY2021 Document ID: 28TMY21202012ENOwner's Manual© 2020 Axopar Boats Page 51
-
-
6. Operation
Try to always avoid sharp movements of the throttle, since idling speed in ahead and astern is generallyadequate. Sharp movements of the throttle can lead to panic maneuvers.
CAUTION The tensile strength of the lines or chains should normally not exceed the strengthof the fastening point in question.
6.6.3. Checklist: Before anchoring
1. Check the chart to see if anchoring is permitted in the area.
2. Listen to the weather forecast for the area and take note of the expected wind conditions.
3. Switch on the echo sounder.
4. Study the seabed conditions and make sure that there is good holding ground.
5. Check that the safety chain has been released from the anchor.
6. Wait until you have reached the intended anchoring point before lowering the anchor.
7. Let out the anchor line equal to at least three times the depth of the water.
8. Put the engine in astern to check that the anchor has taken hold (only when bow anchoring).
9. Note your position on the GPS. Regularly check that the boat has not moved from its position.
10. Set the echo sounder to “Anchor Watch”.
WARNING Always fix the anchor in such a way that it is securely fastened onto theboat. An anchor that falls off when under way may cause serious damageto the boat and mortal danger to the crew.
6.6.4. Towing and mooring
CAUTION When towing another boat or being towed, always drive slowly. If the boat you aretowing is of the displacement hull type, never exceed its hull speed.
• Always attach the tow line so that it can be detached under load. It isthe owner’s and users' responsibility to ensure that the mooring lines,towing lines, anchor chains, anchor lines and anchors are adequate forthe vessel’s intended use.
• Always remember that the stability of the boat may decrease when beingtowed.
Axopar 28 T-Top MY2021 Document ID: 28TMY21202012ENOwner's Manual© 2020 Axopar Boats Page 52
-
-
7. Maintenance
7. Maintenance
7.1. Maintaining the gelcoat surface
When the boat is not in use, keep the gelcoat surface out of the sun or covered with a canvas tarpaulin.Do not use plastic or other non-porous materials, which can trap moisture between the cover and thesurface.
• Wash the surface with a mild detergent.
For best results, use a cleaner recommended for fiberglass and follow the instructions on thelabel of the product.
NOTICE Do not use automatic dishwasher detergent, abrasives, bleaches, andstrong chemicals with acids/bases or ammonia.
• Wax the surface at least twice yearly to restore gloss and protect the finish.
Only use wax recommended for fiberglass and follow the instructions carefully.
NOTICE Never wax a gelcoat surface in direct sunlight.
7.2. Maintaining the interiors
7.2.1. Wooden interiors
The interior details of the boat, such as the locker doors and drawer fronts and wooden strips, are madeof oiled wood.
• Clean the wooden interior details with a damp cloth and a small amount of soapy water.
• Treat the wooden surfaces again every year to protect the wood.
7.2.2. Plastic and painted surfaces
1. Wet the surface evenly with water before the actual cleaning.
2. Remove stains.
◦ Remove regular stains with a brush and a lightly diluted cleaner.
◦ Remove grease with a brush or a sponge and window cleaner.
3. Clean the surface afterwards with sponge and water.
4. Wipe dry with a piece of cloth.
Axopar 28 T-Top MY2021 Document ID: 28TMY21202012ENOwner's Manual© 2020 Axopar Boats Page 53
-
-
7. Maintenance
7.2.3. Fabrics
The interior fabrics are washed according to separate washing instructions (marking on the fabric).
In case the marking is not visible:
1. Wash in 40°C with a light spin cycle.
2. Hang to drip dry.
The material may slightly shrink. If you want to avoid shrinking, take the fabrics to a dry cleaner.
7.2.4. Doors and hatches
• Clean the tracks of sliding doors and hatches regularly and lubricate, if necessary.
• Lubricate handles and locks with regular lock lubricant.
7.3. Maintaining the cover
New covers may leak initially, since the seams need to swell.
To prevent quick deterioration of the cover, secure it tightly in a folded-up position to prevent flapping.
NOTICE • Hang to dry. Never use a drying cabinet or iron to speed up drying.
• Check that the cover is completely dry before stowing. Stowing a moistcover can cause mold damage.
• Store the cover in dry indoor conditions for the winter.
• The cover must not be stored in the boat.
7.3.1. Cleaning the cover
The cover should be thoroughly cleaned two or three times a year.
NOTICE Never use high pressure washers or chemical cleaning agents.
1. Let the fabric cover soak for at least 24 hours.
2. After soaking, wash the inside and outside of the cover with a sponge or a soft brush.
3. Use mild soapy water and plenty of water, max. 30°C.
4. Rinse thoroughly with freshwater.
We recommend mixing 12% vinegar in the final rinsing water to neutralize the soap residues.
5. Hang the cover to drip dry.
Axopar 28 T-Top MY2021 Document ID: 28TMY21202012ENOwner's Manual© 2020 Axopar Boats Page 54
-
-
7. Maintenance
7.4. Preventing frost damage
• The bilge pump system is fitted with a water lock on the hose.
◦ Detach the hose and fully drain the water from the water lock and run the pumps dry.Otherwise the pumps may freeze and break.
• Unscrew the frost plug on the underside of the shower fittings.
◦ If there is no frost plug, unscrew the shower hose.
• Drain the water tank and all other components containing water in order to avoid frost damage.
• Run the freshwater pump dry to drain out all the water.
• Make sure that no water remains in the boat under any circumstances. Leave the hatches in thecabin partially open.
7.5. Checklist: Before winter lay-up
1. Wash the hull and bottom immediately after lifting the vessel out of the water.
2. Wash all parts inside, also under the floorboards.
3. Leave all lockers, drawers, cabin and wardrobe doors open.
4. Remove the carpets.
◦ Store the carpets and cushions indoors in a dry place.
◦ If this is not possible, make sure that the cushions are dry and position them on their side.
5. Be very thorough about having good ventilation in the boat.
6. If the batteries are left aboard, make sure they are fully charged, otherwise the batteries canfreeze and crack.
7.6. Checklist: Before launching
1. Remove the tarpaulin in good time before launching.
2. Wash the hull with a regular shampoo and a soft brush.
3. Wax the hull, if necessary.
Use a standard boat wax.
4. If there are small scratches on the hull or if some of the surface gelcoat has lost its shine, use arubbing compound on these areas before polishing.
5. Paint the bottom with antifouling paint.
6. If the batteries have been removed, put them back and check the electrolyte level in the cells.
Check the condition of the batteries.
7. Check all cables, clamps, engine mountings and other fastenings.
8. Check the steering before launching.
9. Check the instrumentation.
10. Close all water drain plugs.
11. Check that the seacocks are tight and in order, check for any frost damage.
Axopar 28 T-Top MY2021 Document ID: 28TMY21202012ENOwner's Manual© 2020 Axopar Boats Page 55
-
-
7. Maintenance
12. Check all pipes, hoses and cocks.
13. Make a note of any frost damage.
7.7. Corrective maintenance
7.7.1. Chalking
A fine rubbing compound as well as a mild detergent reduce the weathering and chalking accumulatedon the surface.
NOTICE Do not apply rubbing compound in direct sunlight.
• Use only a fine grit compound and follow label directions carefully.
• For best result, wax after compounding.
7.7.2. Scratches and nicks
Most scratches and nicks can be removed by using a rubbing compound followed by waxing.
7.7.3. Stains
The most stains can be removed by washing with a mild detergent.
• For stubborn stains, use a tine abrasive household cleanser followed by waxing to restoreoriginal luster.
• For non-water-soluble stains, such as grease, oil, and rubber heel marks, use a solvent such asacetone, rubbing alcohol, toluene or xylene, followed by a mild detergent.
◦ If these solvents are not effective, try a rubbing compound or fine sanding followed bywaxing.
7.7.4. Deep marks, gouges and holes
Deep marks, gouges and holes should be repaired professionally.
Gelcoats can be well repaired by professionals, and in most cases the repair will be undetectable.
NOTICE In cases where the damage has pierced the gelcoat layer, further exposure towater or chemicals should be avoided.
Failure to observe this precaution may result in extensive and potentially costlydamage to the underlying laminate structure.
Axopar 28 T-Top MY2021 Document ID: 28TMY21202012ENOwner's Manual© 2020 Axopar Boats Page 56
-
-
8. Environment
8. EnvironmentWhen handling environmentally hazardous substances such as fuel, oils, solvents, grease, bottom coatsetc. you should consider the following matters:
• Always read the instructions for each product carefully and handle the product with care.
◦ Make sure that used packaging, cans and similar items are discarded in designatedcollection points.
◦ If you are in any doubt whether the product is hazardous or not, contact the supplier orvendor of the product.
• The backwash from boats wears down the shoreline and creates problems for other boats nearyou.
◦ Always adjust your speed to the situation and the surroundings to avoid unnecessarybackwash.
• Always drive the boat at the most economical engine revs possible, taking the prevailingconditions in account, to avoid unnecessary emissions and noise.
• Make sure that the engine is properly maintained at regular intervals so that noise and emissionlevels are minimized.
◦ Read the engine manufacturers manual carefully.
• As a boat owner you should be aware of local environmental laws, and respect codes of goodpractice.
◦ Never empty the septic tanks or black water tank into waters.
◦ Familiarize yourself with the international regulations on the prevention of marine pollution(MARPOL) and comply with these regulations as far as possible.
8.1. Requirements for North America
The EPA standards state that in freshwater lakes, freshwater reservoirs or other freshwaterimpoundments whose inlets or outlets are such as to prevent the ingress or egress by vessel trafficsubject to this regulation, or in rivers not capable of navigation by interstate vessel traffic subject to thisregulation, marine sanitation devices certified by the U.S. Coast Guard installed on all vessels shall bedesigned and operated to prevent the overboard discharge of sewage, treated or untreated, or of anywaste derived from sewage.
The EPA standards further state that this shall not be construed to prohibit the carriage of Coast Guard-certified flow-through treatment devices which have been secured so as to prevent such discharges.They also state that waters where a Coast Guard-certified marine sanitation device permitting dischargeis allowed include coastal waters and estuaries, the Great Lakes and interconnected waterways,freshwater lakes and impoundments accessible through locks, and other flowing waters that arenavigable interstate by vessels subject to this regulation (40 CFR 140.3).
Axopar 28 T-Top MY2021 Document ID: 28TMY21202012ENOwner's Manual© 2020 Axopar Boats Page 57
-
-
9. Appendix I: Checklists
9. Appendix I: Checklists9.1. Checklist: Fire in the engine
• Stop the engine.
• Steer the boat up against the wind, if possible.
• Make sure all passengers have life jackets.
• If necessary:
◦ Evacuate the passengers.
◦ Call for sea rescue.
• Shut off fuel and main power switches.
• Extinguish the fire.
• Wait until fully certain that the fire has been extinguished before opening the engine cover.
Carefully open the engine cover and be prepared to use the handheld fire extinguisher ifnecessary for post-fire extinguishing.
• Put out possible smoldering fires with water.
9.2. Checklist: After fire
• Open doors and windows for better ventilation.
• Inspect the boat and its equipment, and repair eventual damages.
• Contact local authorities, if needed.
• Make sure that the fire extinguishing equipment is refilled or replaced after use.
9.3. Checklist: Regular inspection before leaving harbor
Safety
Make sure that:• All the people onboard have life jackets.• The wind and wave conditions do not exceed the design category of the boat.• The dead man's switch is switched to driver. • There is fire extinguisher(s) onboard and their approval/inspection date has not expired.• The needed ropes and anchor are onboard.
Draining and tightness
Check that:• There is no water in the bilge.• All the bilge pumps are functional.• The bilge has no signs of fuel or oil leaks.
Axopar 28 T-Top MY2021 Document ID: 28TMY21202012ENOwner's Manual© 2020 Axopar Boats Page 58
-
-
9. Appendix I: Checklists
• The deck drain system is clean and the valves are open.• All deck hatches are tightly closed.
Electrical and engine
Check that: • All the fuses are intact.• The main switches are switched on.• The batteries have enough power.• The engine works properly.• The engine cooling water flows as expected.• The fuel level is sufficient.
WARNING The specified tank capacity is not necessarily fully available, depending on thetrim and load on board. The tank should always be kept at least 20% full.
9.4. Checklist: After using the boat
Make sure that:
• The main switches are switched off.
• The septic tank discharge valve is closed.
• There is no water in the bilge.
• The bilge pumps are functional.
• The deck draining works properly and all the draining valves are open.
• All deck hatches, roof canvas and doors are tightly closed.
9.5. Checklist: Boat handling before leaving harbor
For safe navigation under all weather conditions, proper sound signaling equipment in compliance withregulations (COLREG, 1972) must be carried on board. Make sure that the sound signaling equipmenton the boat is compliant with these regulations.
Axopar 28 T-Top MY2021 Document ID: 28TMY21202012ENOwner's Manual© 2020 Axopar Boats Page 59
-
-
9. Appendix I: Checklists
CAUTION According to national regulations in some countries, it is a legal requirement towear a life vest at all times.
• Check that the boat and its equipment are in seaworthy condition.
• Always listen to long-term weather forecasts when planning longer trips.
• Always make sure there is enough fuel and freshwater in the tanks.
• Always keep the engine compartment closed when starting the engine.
• Check that all items on board are properly stowed and adequatelysecured to manage rough sea and wind conditions.
• Make sure that the swim ladder is raised out of the water before movingoff.
• Make sure that the steering is correctly positioned before starting.
• All persons on board should wear an appropriate life vest when on deck.
9.6. Checklist: Before anchoring
1. Check the chart to see if anchoring is permitted in the area.
2. Listen to the weather forecast for the area and take note of the expected wind conditions.
3. Switch on the echo sounder.
4. Study the seabed conditions and make sure that there is good holding ground.
5. Check that the safety chain has been released from the anchor.
6. Wait until you have reached the intended anchoring point before lowering the anchor.
7. Let out the anchor line equal to at least three times the depth of the water.
8. Put the engine in astern to check that the anchor has taken hold (only when bow anchoring).
9. Note your position on the GPS. Regularly check that the boat has not moved from its position.
10. Set the echo sounder to “Anchor Watch”.
WARNING Always fix the anchor in such a way that it is securely fastened onto theboat. An anchor that falls off when under way may cause serious damageto the boat and mortal danger to the crew.
9.7. Checklist: Before winter lay-up
1. Wash the hull and bottom immediately after lifting the vessel out of the water.
2. Wash all parts inside, also under the floorboards.
3. Leave all lockers, drawers, cabin and wardrobe doors open.
4. Remove the carpets.
◦ Store the carpets and cushions indoors in a dry place.
◦ If this is not possible, make sure that the cushions are dry and position them on their side.
Axopar 28 T-Top MY2021 Document ID: 28TMY21202012ENOwner's Manual© 2020 Axopar Boats Page 60
-
-
9. Appendix I: Checklists
5. Be very thorough about having good ventilation in the boat.
6. If the batteries are left aboard, make sure they are fully charged, otherwise the batteries canfreeze and crack.
9.8. Checklist: Before launching
1. Remove the tarpaulin in good time before launching.
2. Wash the hull with a regular shampoo and a soft brush.
3. Wax the hull, if necessary.
Use a standard boat wax.
4. If there are small scratches on the hull or if some of the surface gelcoat has lost its shine, use arubbing compound on these areas before polishing.
5. Paint the bottom with antifouling paint.
6. If the batteries have been removed, put them back and check the electrolyte level in the cells.
Check the condition of the batteries.
7. Check all cables, clamps, engine mountings and other fastenings.
8. Check the steering before launching.
9. Check the instrumentation.
10. Close all water drain plugs.
11. Check that the seacocks are tight and in order, check for any frost damage.
12. Check all pipes, hoses and cocks.
13. Make a note of any frost damage.
Axopar 28 T-Top MY2021 Document ID: 28TMY21202012ENOwner's Manual© 2020 Axopar Boats Page 61
-
-

10. Appendix II: Fuel system
10. Appendix II: Fuel system
Axopar 28 T-Top MY2021 Document ID: 28TMY21202012ENOwner's Manual© 2020 Axopar Boats Page 62
-
-
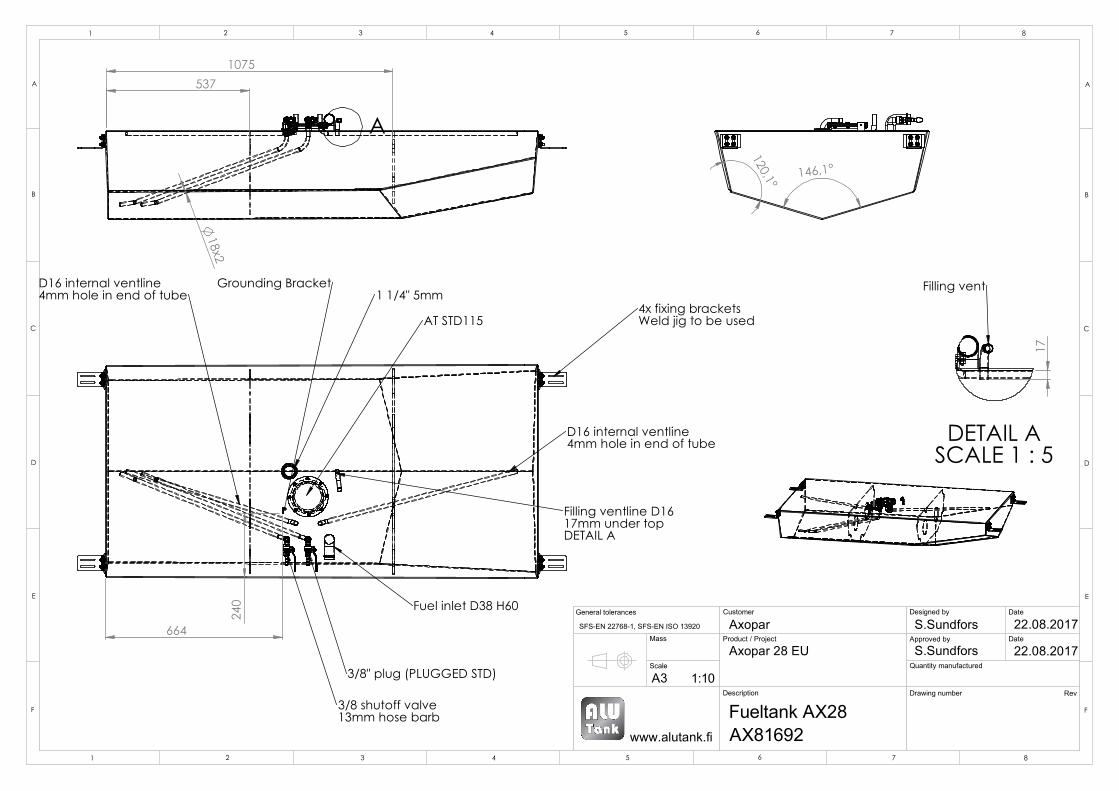
4mm hole in end of tube
DETAIL A
D16 internal ventline
D16 internal ventline
Grounding Bracket
3/8 shutoff valve
17mm under top
Fuel inlet D38 H60
AT STD115
3/8" plug (PLUGGED STD)
1 1/4" 5mm
13mm hose barb
4mm hole in end of tube
Filling ventline D16
4x fixing bracketsWeld jig to be used
240
664 S.Sundfors 22.08.2017
22.08.2017S.Sundfors
1 2 3 4 5 6 7 8
1 8765432
A
B
C
E
D
F F
E
D
C
B
A
Product / Project
AX81692
Axopar 28 EU
AxoparSFS-EN 22768-1, SFS-EN ISO 13920
A3
Designed by
Scale
General tolerances
Mass
Date
Drawing number
1:10
Approved by Date
Quantity manufactured
Customer
Fueltank AX28Description Rev
www.alutank.fi
A
537
18x2
1075
DETAIL ASCALE 1 : 5
Filling vent
17
146,1°
120,1°

11. Appendix III: Electrical diagrams
11. Appendix III: Electrical diagrams
Axopar 28 T-Top MY2021 Document ID: 28TMY21202012ENOwner's Manual© 2020 Axopar Boats Page 63
-
-
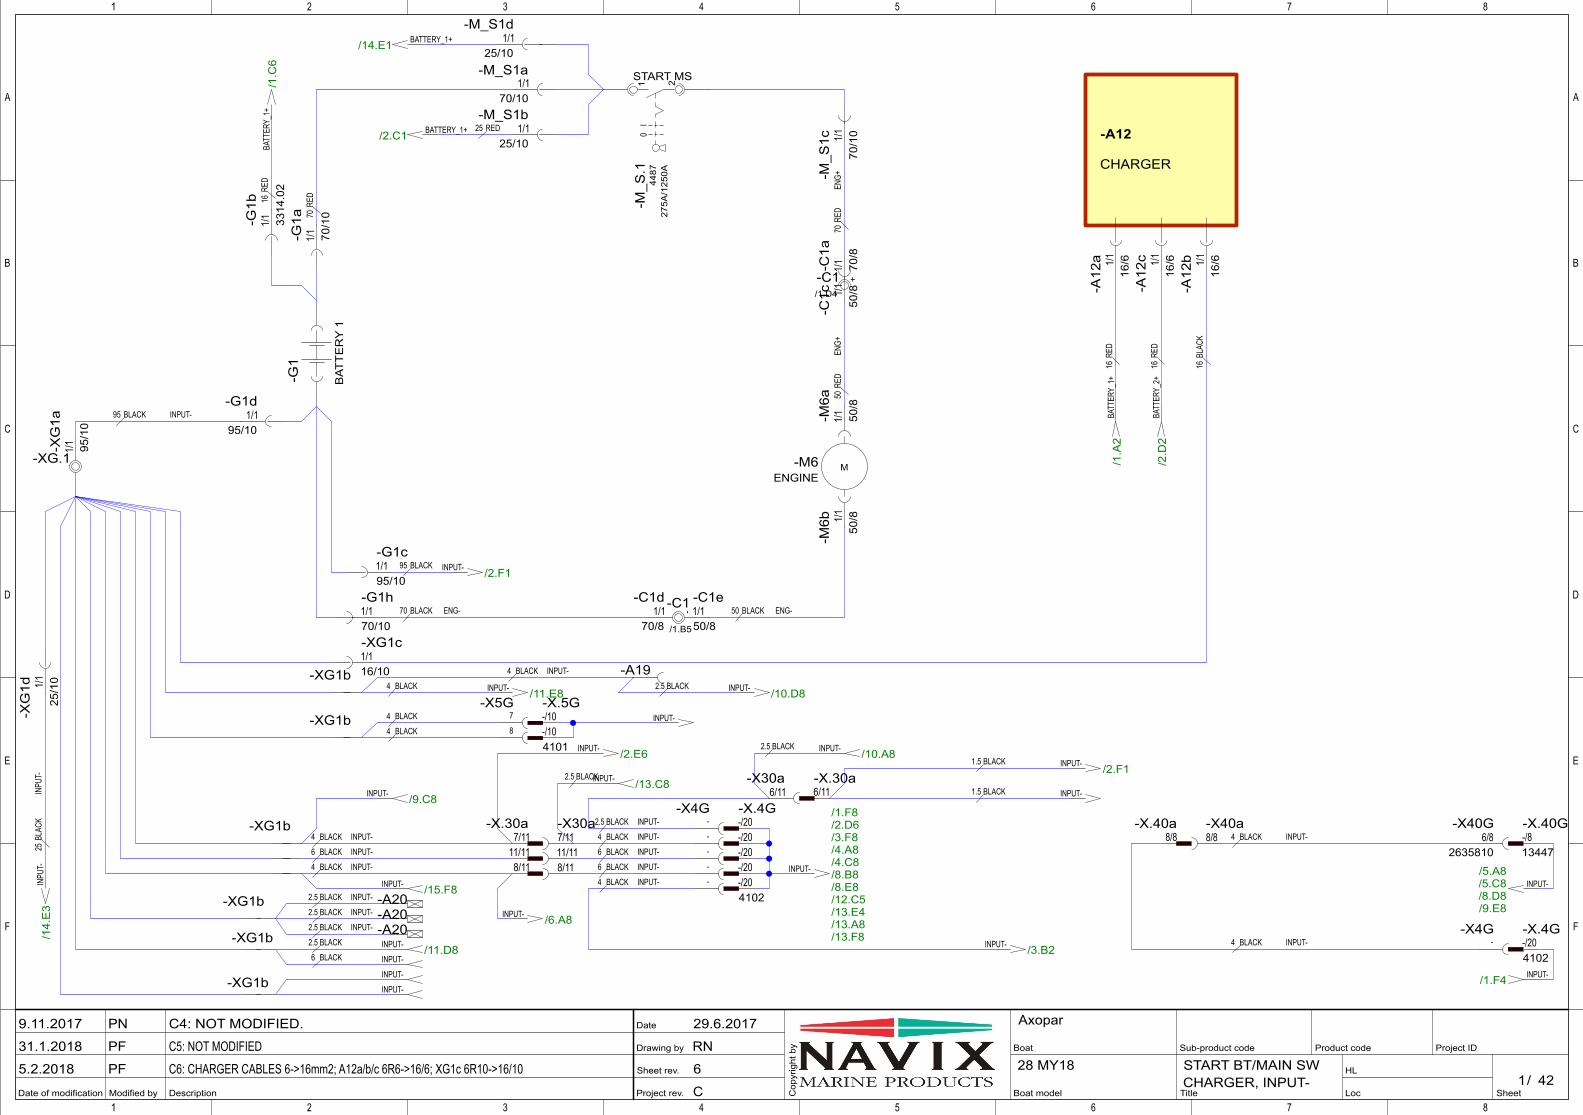
Project rev.
Sheet rev.
Drawing by
Date
Modified by Description
A
B
C
D
E
F
1 2 3 4 5 6 7 8
Date of modification SheetLoc
HL/
Project IDBoat
Boat model
Product code
Cop
yrig
ht b
y Sub-product code
Title
1 2 3 4 5 6 7 8
A
B
C
D
E
F
4228 MY18
AxoparC4: NOT MODIFIED.
C5: NOT MODIFIED
C6: CHARGER CABLES 6->16mm2; A12a/b/c 6R6->16/6; XG1c 6R10->16/10
PN
PF
PF
29.6.2017
RN
6
C
9.11.2017
31.1.2018
5.2.20181
START BT/MAIN SWCHARGER, INPUT-
/11.E8
/1.F8/2.D6/3.F8/4.A8/4.C8/8.B8/8.E8/12.C5/13.E4/13.A8/13.F8
/6.A8
M
/14.
E3
/1.C
6
/1.A
2
/2.D
2
/2.F1
/10.D8
/3.B2
/10.A8
I0/2.C1
/2.F1
/13.C8
/5.A8/5.C8/8.D8/9.E8
/1.F4
/2.E6
/11.D8
/9.C8
/15.F8
/14.E1
-XG1b
-XG1b
-XG1b
INPUT-
INPUT-
INPUT-
-G1
BAT
TER
Y 1
INPU
T-
-A12
CHARGER
BATT
ERY_
1+
BATT
ERY_
1+
BATT
ERY_
2+
INPUT-
INPUT-
-A19INPUT-
-A20-A20-A20
INPUT-
INPUT-
BATTERY_1+
INPUT-
-XG1b
-XG.1
INPUT-
INPUT-
INPUT-
INPUT-
-XG1b INPUT-
INPUT-
INPUT-
BATTERY_1+
INPUT-
-XG1bINPUT-
INPUT-
INPUT-
-/813447
-X.40G
7-X5G
8
1/125/10
-M_S1b
1/1
25/1
0
-XG
1d1/1
25/10
-M_S1d
8/8-X.40a
6/82635810
-X40G8/8-X40a
7/11-X30a
8/11
6/11-X30a
11/117/11
-X.30a
8/11
6/11-X.30a
11/11
1/116/10
-XG1c
1/1 3314
.02
-G1b
1/1
16/6
-A12
a 1/1
16/6
-A12
c 1/1
16/6
-A12
b
-/104101
-/10-X.5G
-/20
-/20
-/20-X.4G
-/204102
-X.4G
-/204102
-/201/
150
/8
-C1c
1/150/8
-C1e
1/1 50/8
-M6a
1/1
50/8
-M6b
1/170/10
-M_S1a
1/1 70/1
0
-G1a
1/170/10
-G1h
1/1
70/1
0
-M_S
1c1/
1 70/8
-C1a
1/170/8
-C1d
1/195/10
-G1c
1/1 95/1
0
-XG
1a 1/195/10
-G1d
1 2
4487
-M_S
.1
275A
/125
0A
START MS
ENGINE-M6
-
/1.B5
-C1
+
/1.D4
-C1
-
-
--X4G
--X4G
-
-INPUT-4 BLACK
4 BLACK
INPUT-
4 BLACK
4 BLACK
25BL
ACK
70RE
D
16RE
D
16RE
D
16BL
ACK
16RE
D
1.5 BLACK
1.5 BLACK
70RE
DEN
G+
4 BLACK
4 BLACK INPUT-
2.5 BLACK
70 BLACK ENG-
2.5 BLACK
25 RED
95 BLACK
INPUT-
4 BLACK
6 BLACK INPUT-
2.5 BLACK INPUT-
2.5 BLACK INPUT-
2.5 BLACK INPUT-
95 BLACK INPUT-
INPU
T-
INPUT-2.5 BLACK
INPUT-4 BLACK
INPUT-4 BLACK
4 BLACK INPUT-
INPUT-6 BLACKINPUT-6 BLACK
50RE
DEN
G+
50 BLACK ENG-
2.5 BLACK
2.5 BLACK
6 BLACK

Project rev.
Sheet rev.
Drawing by
Date
Modified by Description
A
B
C
D
E
F
1 2 3 4 5 6 7 8
Date of modification SheetLoc
HL/
Project IDBoat
Boat model
Product code
Cop
yrig
ht b
y Sub-product code
Title
1 2 3 4 5 6 7 8
A
B
C
D
E
F
4228 MY18
AxoparC4: HEATER MOVED, AFTER MAIN SWICTH TO DIRECT+.
C5: NOT MODIFIED
C6: NOT MODIFIED
PN
PF
PF
29.6.2017
RN
6
C
9.11.2017
31.1.2018
5.2.20182
SERV BT, MAIN SW,MAIN FUSES, VSR
/1.E
6
/1.C
6
I0
/1.A
3
/1.D3
/11.E1
/3.A1/3.B1/3.D1/6.A1/7.A1/12.B1/12.B1/12.D1/12.E1/14.E4
/3.E1/4.A1/5.D1/8.A1/8.B1/9.D1/13.F1/13.C1/13.D1/15.C1
/7.B1/7.E1/10.B1/10.E1/11.D1/13.A1/13.E1/15.B1/15.D1/15.F1
/12.F1
/10.D1
/10.A1
DIGITAL VOLTAGE SENSITIVE RELAY
/9.C1
/1.F4
/9.D8
/1.E3
/7.F5
/4.A4/4.C4/5.D4
/6.A3/7.C4/9.D4
/7.B3/8.C3/8.B3
/10.B3/10.E4/7.E4
/7.B5
/10.B5/10.E6
/6.A5
/3.C1
INPU
T-
-G2
BAT
TER
Y 2
BATT
ERY_
2+
BATT
ERY_
1+
INPUT-
MS+
INPUT+
INPUT+
INPUT+
-M_S3f
-M_S3f
-M_S3f
-M_S3f
DIRECT+
DIRECT+
DIRECT+-M_S3c
DIRECT+
INPUT-
INPUT-
INPUT-
INPUT-
-A55
-A56
-A57
-A58
-A59
INPUT-
INPUT-
INPUT-
INPUT-
INPUT-
INPUT-
INPUT-
INPUT-
INPUT-
INPUT-
INPUT-
INPUT-
INPUT-
INPUT-
INPUT-
INPUT-
1/110/10
-M_S3k1/1
10/5
-M_F9
1
-2
17019
-K.3
12/24V 140A
House battery positive+
Start BatteryPositive +
BatteryNegative
-A.55
-A.56
-A.57
-A.58
-A.59
1/125/10
-M_S3a4/8-X.4b
5/8
6/8
4/8-X4b
5/8
6/8
8/11
-X1a
1/11-X1a
2/11
3/11
3/11-X6b
1/11-X30a
2/11
3/11
2/11-X7c
3/11-X7c
1/11-X.1a
2/11
3/11
8/11-X.1
a
3/11-X.6b
1/11-X.30a
2/11
3/11
2/11-X.7c
3/11-X.7c
1/1 3314
.02
-G2c
-/204102
-X.4G
1/195/10
-M_S3b
1/1 95/1
0
-G2a
1/1
95/1
0
-G2b
1 2
98-2
5-A
1B13
-A00
-M_F
.1
25A
MAIN
1 2
98-2
5-A
1B13
-A00
-M_F
.2 25A
MAIN
1 2
98-2
5-A
1B13
-A00
-M_F
.3 25A
MAIN
1 2
98H
-50-
A1B
10-A
00S
B-M
_F.9 50
A
UPG. AMPLIFIER
1244
87-M
_S.3
275A
/125
0A
SERV MS 1-M_F1
2-M_F1
1-M_F2
2-M_F2
1-M_F3
2-M_F3
--X4G
1-K3
2-K
3
--K3
DIRECT+
1/13314.02
-M_S3d
SWITCH/ RELAY MINUS
BATT
ERY_
2+
1.5BL
ACK
1.5BL
ACK
25RE
D
25RE
DBA
TTER
Y_2+
95 BLACK
16RE
D
95RE
D
INPU
T-
6 RED
6 REDMS+6 RED
MS+6 RED
MS+6 RED
4 RED
INPUT+6 RED
INPUT+6 RED
INPUT+6 RED
6 RED
6 RED
6 RED
6 RED
6 RED
2.5 RED
INPUT+
INPUT+
INPUT+
INPUT+
INPUT+
2.5 RED
2.5 RED
2.5 RED
6 RED INPUT+
INPUT+
10 RED AMPL+
2.5 RED
1.5 BLACK
1 BLACK
1.5 BLACK
1.5 BLACK 1.5 BLACK
1 BLACK
1 BLACK
1 BLACK
1 BLACK
1 BLACK
1 BLACK
1 BLACK
1 BLACK
INPU
T-
1 BLACK
INPUT-
INPUT-
INPUT-
INPU
T-
1 BLACK
1 BLACK
1 BLACK
1 BLACK
1 BLACK
1 BLACK
1 BLACK
1 BLACK
1 BLACK
1 BLACK
1 BLACK
1 BLACK
6 RED
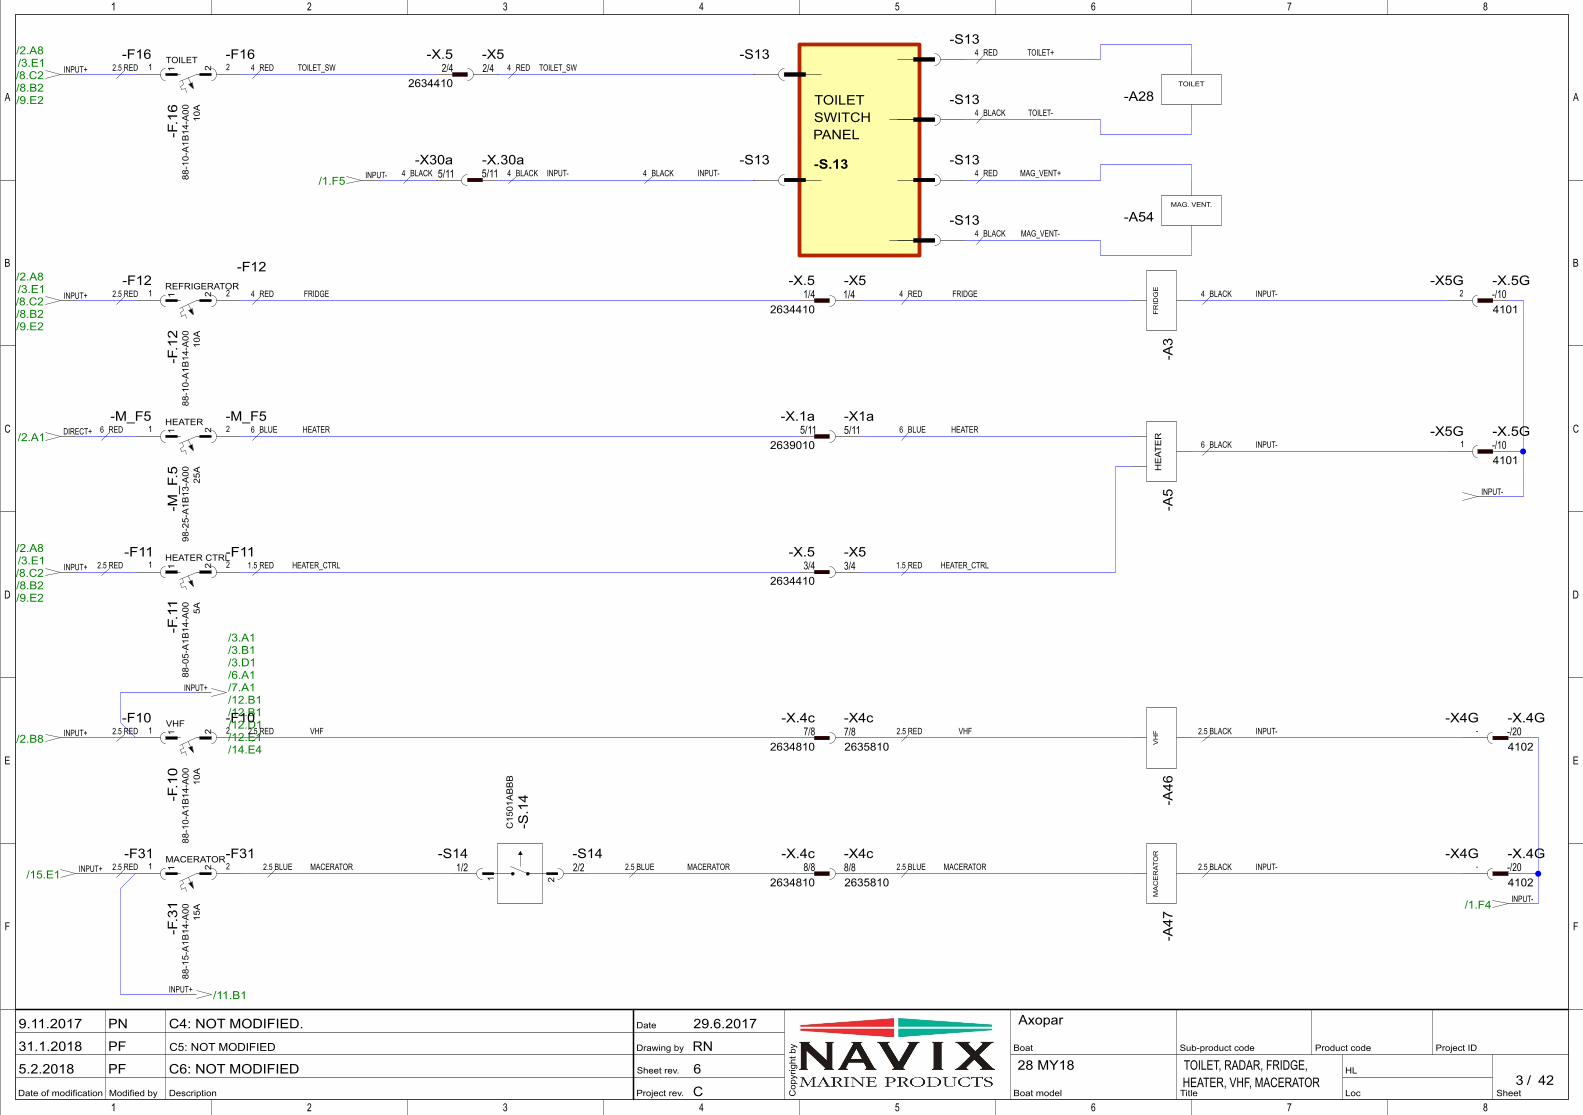
Project rev.
Sheet rev.
Drawing by
Date
Modified by Description
A
B
C
D
E
F
1 2 3 4 5 6 7 8
Date of modification SheetLoc
HL/
Project IDBoat
Boat model
Product code
Cop
yrig
ht b
y Sub-product code
Title
1 2 3 4 5 6 7 8
A
B
C
D
E
F
4228 MY18
AxoparC4: NOT MODIFIED.
C5: NOT MODIFIED
C6: NOT MODIFIED
PN
PF
PF
29.6.2017
RN
6
C
9.11.2017
31.1.2018
5.2.20183
TOILET, RADAR, FRIDGE,HEATER, VHF, MACERATOR
/2.A1
/1.F5
/15.E1
/1.F4
/2.B8
/2.A8/3.E1/8.C2/8.B2/9.E2
/2.A8/3.E1/8.C2/8.B2/9.E2
/11.B1
/2.A8/3.E1/8.C2/8.B2/9.E2
/3.A1/3.B1/3.D1/6.A1/7.A1/12.B1/12.B1/12.D1/12.E1/14.E4
DIRECT+
-S13-S13
INPUT-
INPUT+
INPUT-
INPUT+
-S.13
TOILETSWITCHPANEL
-S13
-S13
-S13
-S13
INPUT+
INPUT+
INPUT+
INPUT-
INPUT+
INPUT+
1-X5G
2-X5G
3/42634410
-X.5
1/42634410
-X.5
2/42634410
-X.5
7/82634810
-X.4c
8/82634810
-X.4c
1/4-X5
3/4-X5
2/4-X5
7/82635810
-X4c
8/82635810
-X4c
5/11-X1a
5/11-X30a
5/112639010
-X.1a
5/11-X.30a
-/104101
-X.5G
-/104101
-X.5G
-/204102
-X.4G
-/204102
-X.4G
1 2
88-0
5-A
1B14
-A00
-F.1
1 5A
HEATER CTRL
1 2
88-1
0-A
1B14
-A00
-F.1
2
10A
REFRIGERATOR
1 2
88-1
0-A
1B14
-A00
-F.1
6
10A
TOILET
1 2
88-1
0-A
1B14
-A00
-F.1
0
10A
VHF
1 2
88-1
5-A
1B14
-A00
-F.3
1
15A
MACERATOR
1 2
98-2
5-A
1B13
-A00
-M_F
.5 25A
HEATER
C15
01A
BB
B
-S.1
4
21
-A3
FR
IDG
E
-A28TOILET
-A46
VH
F
-A47
MA
CE
RAT
OR
-A54MAG. VENT.
-A5
HE
ATE
R
1-F11
2-F11
1-F12
2
-F12
1-F16
2-F16
1-M_F5
2-M_F5
1-F10
2-F10
1-F31
2-F31
2/2-S14
1/2-S14
--X4G
--X4G
INPUT-4 BLACK
1.5 RED
HEATER6 BLUE
HEATER_CTRL1.5 RED HEATER_CTRL
6 BLUE HEATER
4 RED FRIDGE FRIDGE4 RED
4 RED TOILET_SW TOILET_SW
2.5 RED
2.5 RED
2.5 RED
2.5 RED VHF
2.5 BLUE MACERATOR
2.5 RED VHF
2.5 BLUE MACERATOR
2.5 BLACK INPUT-
2.5 BLACK INPUT-
2.5 RED
2.5 RED
6 RED
2.5 BLUE MACERATOR
4 BLACK INPUT-
4 RED TOILET+
4 BLACK TOILET-
4 RED MAG_VENT+
4 BLACK MAG_VENT-
4 BLACK4 BLACK INPUT-
4 RED
INPUT-6 BLACK
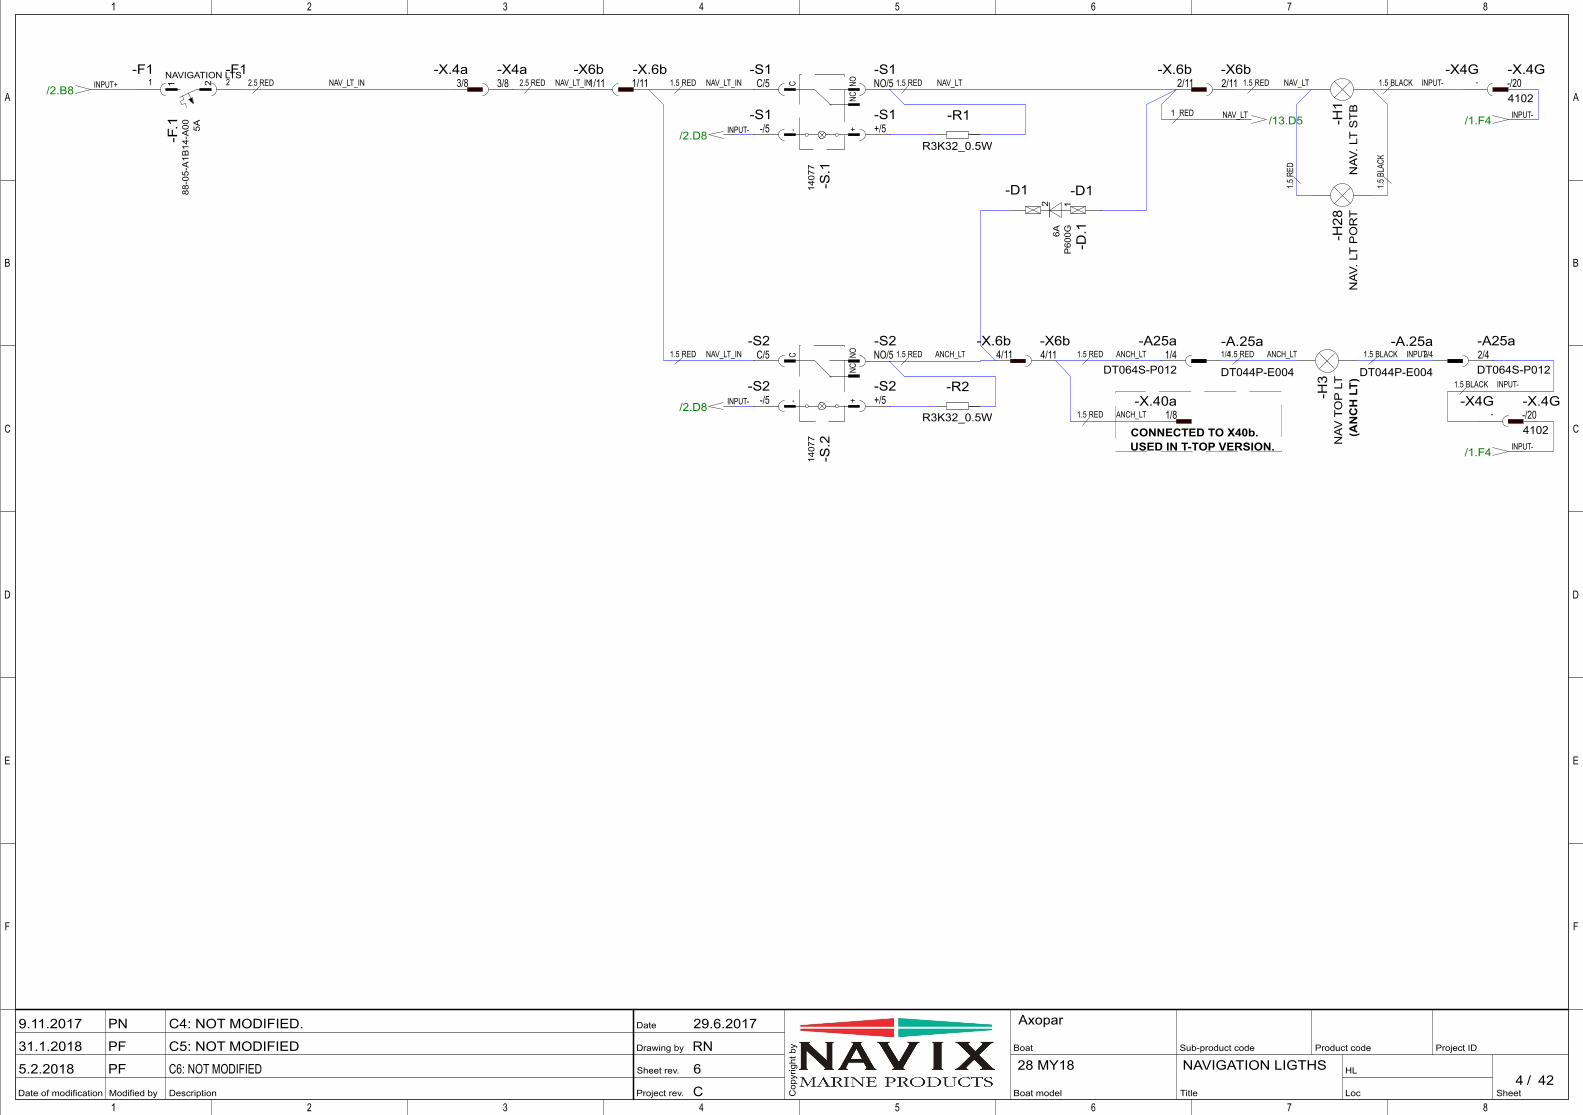
Project rev.
Sheet rev.
Drawing by
Date
Modified by Description
A
B
C
D
E
F
1 2 3 4 5 6 7 8
Date of modification SheetLoc
HL/
Project IDBoat
Boat model
Product code
Cop
yrig
ht b
y Sub-product code
Title
1 2 3 4 5 6 7 8
A
B
C
D
E
F
4228 MY18
AxoparC4: NOT MODIFIED.
C5: NOT MODIFIED
C6: NOT MODIFIED
PN
PF
PF
29.6.2017
RN
6
C
9.11.2017
31.1.2018
5.2.20184
NAVIGATION LIGTHS
/1.F4/13.D5
/1.F4
/2.B8
/2.D8
/2.D8
INPUT-
-D1-D1
NAV_LT
INPUT-
INPUT+
INPUT-
INPUT-1/8
-X.40a
3/8-X.4a
3/8-X4a
4/11-X6b
1/11-X6b
2/11-X6b
1/11-X.6b
4/11-X.6b
2/11-X.6b
-/204102
-X.4G
-/204102
-X.4G
C NONC
+-
1407
7
-S.1
C NONC
+-
1407
7
-S.2
1 2
88-0
5-A
1B14
-A00
-F.1 5A
NAVIGATION LTS
1/4
DT044P-E004
-A.25a2/4
DT044P-E004
-A.25a1/4
DT064S-P012
-A25a2/4DT064S-P012
-A25a
C/5-S1
NO/5-S1
+/5-S1
-/5-S1
C/5-S2
NO/5-S2
+/5-S2
-/5-S2
1-F1
2-F1
NAV
. LT
ST
B-H
1N
AV T
OP
LT
-H3
NAV
. LT
PO
RT
-H28
12
P60
0G
-D.16A
R3K32_0.5W
-R1
R3K32_0.5W
-R2
--X4G
--X4G
CONNECTED TO X40b.USED IN T-TOP VERSION.
(AN
CH
LT)
1.5 BLACK INPUT-2.5 RED2.5 RED
1.5 RED 1.5 RED 1.5 BLACK INPUT-ANCH_LT ANCH_LT
1.5 RED ANCH_LT
NAV_LT_IN NAV_LT_IN 1.5 RED NAV_LT_IN
1.5 RED NAV_LT_IN
1.5 RED NAV_LT 1.5 RED NAV_LT
1.5 RED ANCH_LT
1 RED
1.5 BLACK INPUT-
1.5RE
D
1.5BL
ACK

Project rev.
Sheet rev.
Drawing by
Date
Modified by Description
A
B
C
D
E
F
1 2 3 4 5 6 7 8
Date of modification SheetLoc
HL/
Project IDBoat
Boat model
Product code
Cop
yrig
ht b
y Sub-product code
Title
1 2 3 4 5 6 7 8
A
B
C
D
E
F
4228 MY18
AxoparC4: CIRCUIT CHANGES AND ADDED H44, H45, H46
C5: NOT MODIFIED
C6: H51 & H52 (TOILET DN LT) ADDED
PN
PF
PF
30.6.2017
TuM
6
C
9.11.2017
31.1.2018
5.2.20185
INTERIOR LTS
/8.E7
/1.F8
/1.F8
/2.B8
/2.D8
/13.D8
INPUT-
INPUT-
INPUT-
-A.26 -A.26-A26 -A26
-DS
.1
3/3-DS12/3-DS1
1/3-DS1
INPUT+
INPUT-
INPUT-
-/813447
-X.40G
-/813447
-X.40G
3/8-X.40a
4/8-X.40a
5/8-X.4a
2/8-X.4b
3/82635810
-X40G
5/82635810
-X40G
3/8-X40a
4/8-X40a
5/8-X4a
2/8-X4b
1/2-D_S.1
2/2-D_S.1
1/22637710
-X.102/2-X.10
1/2-D_S1
2/2-D_S1
1/22637810
-X102/2
-X10
5/11-X6b
6/11-X6b
5/11-X.6b
6/11-X.6b
C NONC
+-
1407
7
-S.3
1 2
88-1
0-A
1B14
-A00
-F.3 10
A
INTERIOR LTS
C/5-S3
NO/5-S3
+/5-S3
-/5-S3
1-F3
2-F3
DOWN LT LED STRIPE
-H7
INTERIOR LT
-H35
R3K32_0.5W
-R3
TOILET LT-H11
LED STRIPE ROOF LT FORE
-H44
LED STRIPE ROOF AFT
-H45
READING LT WITH USB-H12
READING LT WITH USB-H16
ROOF LT FORE-H13
ROOF LT FORE-H14
ROOF LT AFT-H4
ROOF LT AFT-H5
READING LT-H46
TOIL
ET
LT-H
17
TOILET DN LT-H51
TOILET DN LT-H52
2.5 YELLOW/BLACK2.5 YELLOW/BLACK
INTERIOR_LTS
1.5 YELLOW/BLACK
INPUT-INTERIOR_LTS1 RED
2.5 YELLOW/BLACK INTERIOR_LTS
1.5 BLACK
1 RED1.5 YELLOW/BLACK1.5 YELLOW/BLACK
1 RED INTERIOR_LTS INPUT-
1RE
D
1.5 BLACK
INTE
RIOR
_LTS
1.5 YELLOW/BLACK 1.5 BLACK
2.5 YELLOW/BLACK 1.5 YELLOW/BLACKINTERIOR_LTS DOWN_LT_OUT
1.5YE
LLOW
/BLA
CK
1.5BL
ACK
1.5 YELLOW/BLACK
1.5 YELLOW/BLACK
1 BLACK
1.5 YELLOW/BLACK INTERIOR_LTS
1 RED INTERIOR_LTS
1 RED1 RED ROOF_LT_OUT
1BL
ACK
1RE
D
ROOF_LT_OUT
ROOF_LT_OUT1 RED
1RE
D
1 BLACK
1BL
ACK
1BL
ACK
1 BLACK
1.5BL
ACK
1.5BL
ACK
1.5YE
LLOW
/BLA
CK
1.5BL
ACK
1.5 YELLOW/BLACK
1.5 BLACK
1.5 YELLOW/BLACK
1.5BL
ACK
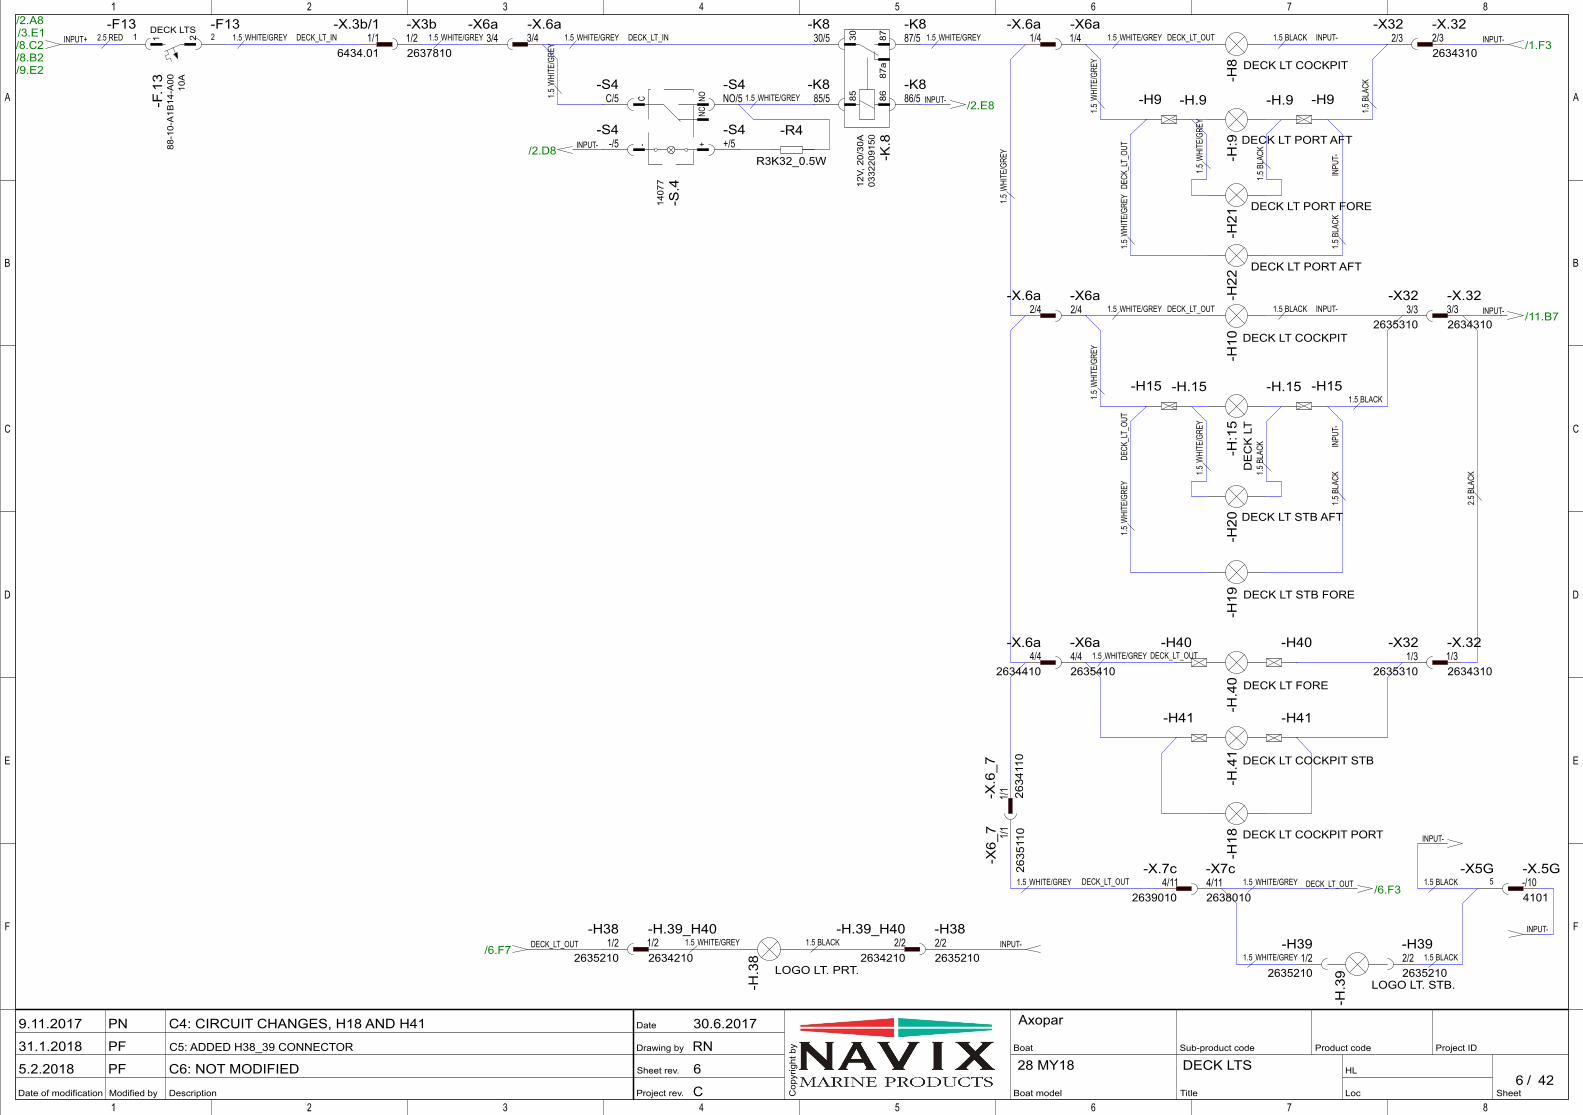
Project rev.
Sheet rev.
Drawing by
Date
Modified by Description
A
B
C
D
E
F
1 2 3 4 5 6 7 8
Date of modification SheetLoc
HL/
Project IDBoat
Boat model
Product code
Cop
yrig
ht b
y Sub-product code
Title
1 2 3 4 5 6 7 8
A
B
C
D
E
F
4228 MY18
AxoparC4: CIRCUIT CHANGES, H18 AND H41
C5: ADDED H38_39 CONNECTOR
C6: NOT MODIFIED
PN
PF
PF
30.6.2017
RN
6
C
9.11.2017
31.1.2018
5.2.20186
DECK LTS
/1.F3
/2.D8
/2.A8/3.E1/8.C2/8.B2/9.E2
/2.E8
/11.B7
/6.F3
/6.F7
INPUT-
-H15 -H15-H.15 -H.15
-H.9-H.9 -H9-H9
INPUT-
INPUT+
INPUT-
INPUT-
-H40
-H41-H41
-H40
INPUT-
8687
a8730
85
0332
2091
50
-K.8
12V,
20/
30A
5-X5G
1/1 26
3411
0
-X.6
_7
2/32634310
-X.32
3/32634310
-X.32
1/32634310
-X.32
1/4-X.6a
2/4-X.6a
3/4-X.6a
4/42634410
-X.6a
1/1
2635
110
-X6_
7
1/22635210
-H392/22635210
-H39
2/3-X32
3/32635310
-X32
1/32635310
-X32
1/4-X6a
2/4-X6a
3/4-X6a
4/42635410
-X6a
1/22637810
-X3b
4/112638010
-X7c4/11
2639010
-X.7c-/104101
-X.5G
1/16434.01
-X.3b/1
C NONC
+-
1407
7
-S.4
1 2
88-1
0-A
1B14
-A00
-F.1
3
10A
DECK LTS
C/5-S4
NO/5-S4
+/5-S4
-/5-S4
1-F13
2-F13
DECK LT COCKPIT
-H8
DECK LT PORT AFT
-H:9
DECK LT COCKPIT
-H10
DE
CK
LT
-H:1
5
DECK LT COCKPIT PORT
-H18
DECK LT STB FORE
-H19
DECK LT STB AFT
-H20
DECK LT PORT FORE
-H21
DECK LT PORT AFT
-H22
LOGO LT. STB.
-H.3
9
DECK LT FORE
-H.4
0
DECK LT COCKPIT STB
-H.4
1
R3K32_0.5W
-R4
86/5-K8
87/5-K8
30/5-K8
85/5-K8
LOGO LT. PRT.
-H.3
8
1/22635210
-H382/22635210
-H38INPUT-
INPUT-
DECK_LT_OUT
DECK_LT_OUT 1/22634210
-H.39_H402/2
2634210
-H.39_H40
1.5 WHITE/GREY DECK_LT_OUT1.5 WHITE/GREY
DECK_LT_OUT 1.5 BLACK INPUT-
INPUT-1.5 BLACK
1.5 WHITE/GREY
1.5 WHITE/GREY DECK_LT_IN
1.5W
HITE
/GRE
Y
1.5W
HITE
/GRE
Y
1.5W
HITE
/GRE
Y
1.5BL
ACK1.5
WHI
TE/G
REY
1.5BL
ACK
1.5 BLACK
1.5W
HITE
/GRE
Y
1.5W
HITE
/GRE
Y
1.5BL
ACK
1.5BL
ACK
1.5W
HITE
/GRE
Y
1.5BL
ACK
DECK
_LT_
OUT
INPU
T-
DECK
_LT_
OUT
INPU
T-
1.5 WHITE/GREY
2.5 RED 1.5 WHITE/GREY DECK_LT_IN
1.5W
HITE
/GRE
Y
1.5 WHITE/GREY
1.5 WHITE/GREY
1.5 WHITE/GREY 1.5 BLACK
1.5 BLACKDECK_LT_OUT1.5 WHITE/GREY
DECK_LT_OUT1.5 WHITE/GREY
2.5BL
ACK
1.5 WHITE/GREY 1.5 BLACK
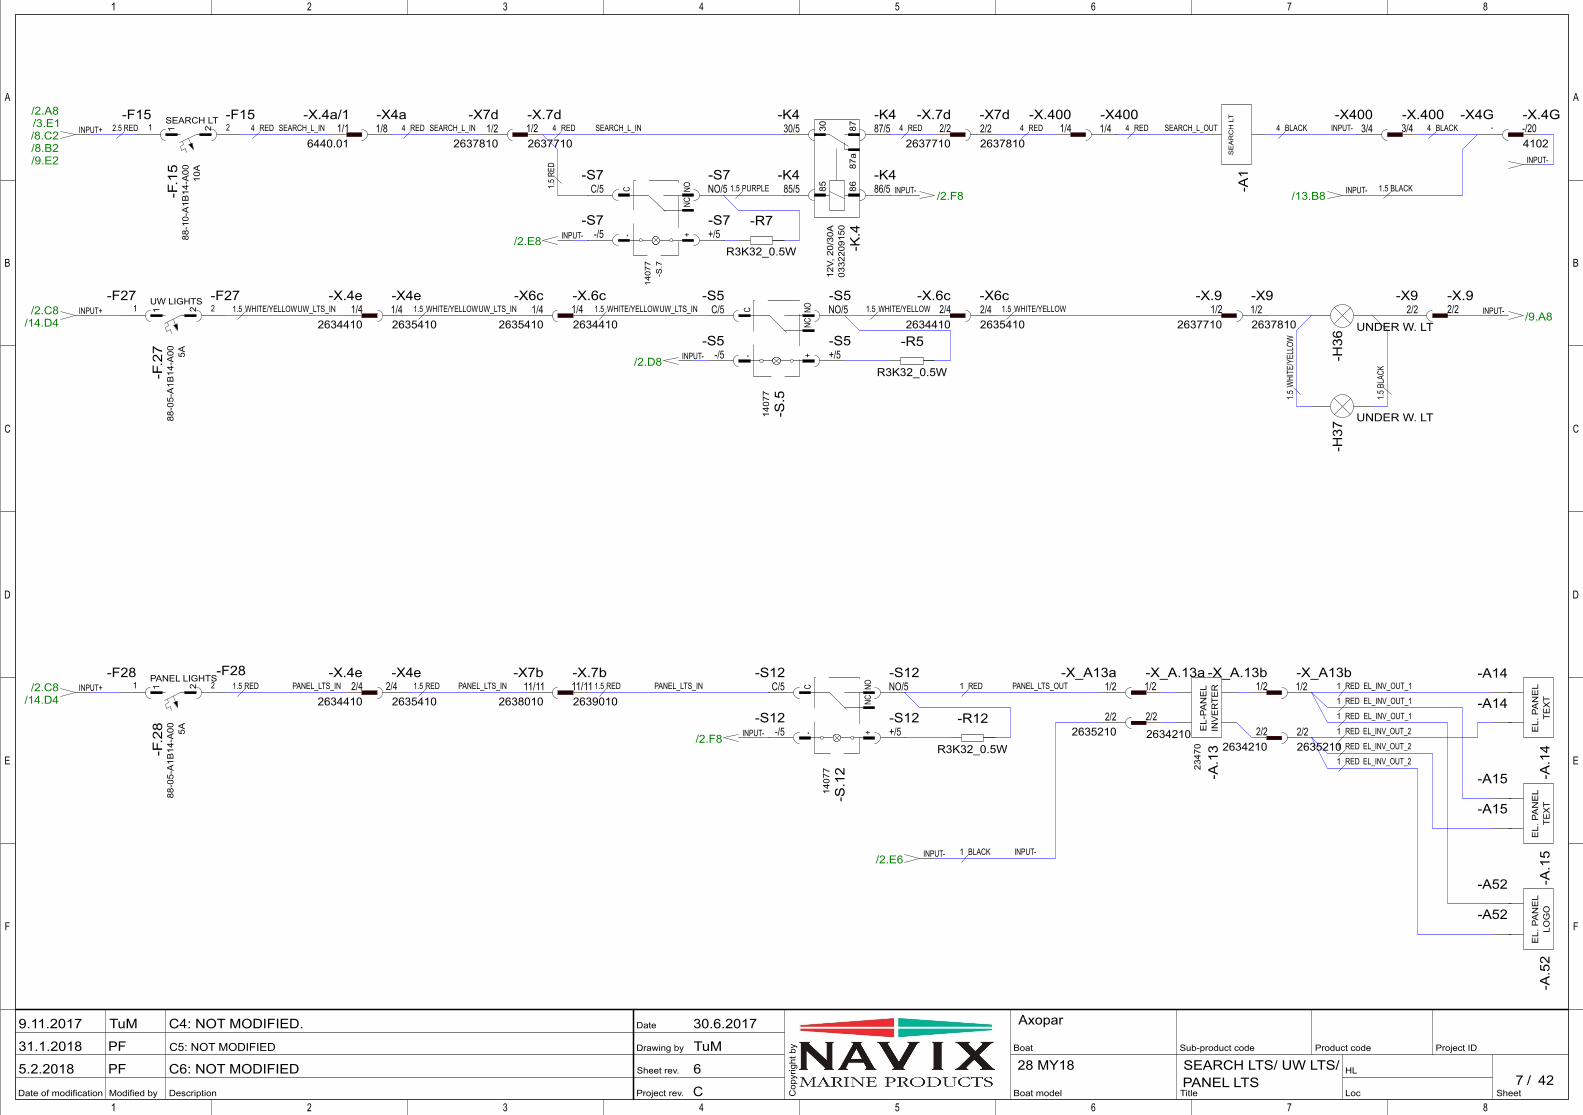
Project rev.
Sheet rev.
Drawing by
Date
Modified by Description
A
B
C
D
E
F
1 2 3 4 5 6 7 8
Date of modification SheetLoc
HL/
Project IDBoat
Boat model
Product code
Cop
yrig
ht b
y Sub-product code
Title
1 2 3 4 5 6 7 8
A
B
C
D
E
F
4228 MY18
AxoparC4: NOT MODIFIED.
C5: NOT MODIFIED
C6: NOT MODIFIED
TuM
PF
PF
30.6.2017
TuM
6
C
9.11.2017
31.1.2018
5.2.20187
SEARCH LTS/ UW LTS/PANEL LTS
/9.A8
/13.B8
/2.C8/14.D4
/2.E6
/2.C8/14.D4
/2.A8/3.E1/8.C2/8.B2/9.E2
/2.E8
/2.D8
/2.F8
/2.F8
INPUT-
INPUT-
INPUT+
INPUT-
INPUT+
INPUT-
INPUT+
INPUT-
INPUT-
INPUT-
INPUT-
2347
0
-A.1
3E
L-PA
NE
LIN
VE
RTE
R
-A.1
4E
L. P
AN
EL
TEX
T-A
.15
EL.
PA
NE
LTE
XT
-A.5
2E
L. P
AN
EL
LOG
O
-A14
-A14
-A15
-A15
-A52
-A52
8687
a8730
85
0332
2091
50
-K.4
12V,
20/
30A
1/2-X_A.13a
2/22634210
1/2-X_A.13b
2/22634210
1/4-X.400
3/4-X.400
1/42634410
-X.6c2/4
2634410
-X.6c1/4
2634410
-X.4e
2/42634410
-X.4e1/2
-X_A13a
2/22635210
1/2-X_A13b
2/22635210
1/4-X400
3/4-X400
1/42635410
-X6c2/42635410
-X6c1/42635410
-X4e
2/42635410
-X4e
1/8-X4a
1/22637710
-X.7d2/2
2637710
-X.7d
1/22637710
-X.92/2-X.9
1/22637810
-X7d2/22637810
-X7d
1/22637810
-X92/2
-X9
11/112638010
-X7b11/112639010
-X.7b
-/204102
-X.4G1/1
6440.01
-X.4a/1
C NONC
+-
1407
7-S
.7
C NONC
+-
1407
7
-S.5
C NONC
+-
1407
7
-S.1
2
1 2
88-0
5-A
1B14
-A00
-F.2
7 5A
UW LIGHTS
1 2
88-0
5-A
1B14
-A00
-F.2
8 5A
PANEL LIGHTS
1 2
88-1
0-A
1B14
-A00
-F.1
5
10A
SEARCH LT
-A1
SE
AR
CH
LT
C/5-S7
NO/5-S7
+/5-S7
-/5-S7
C/5-S5
NO/5-S5
+/5-S5
-/5-S5
C/5-S12
NO/5-S12
+/5-S12
-/5-S12
1-F15
2-F15
1-F27
2-F27
1-F28
2-F28
UNDER W. LT
-H37
UNDER W. LT
-H36
R3K32_0.5W
-R7
R3K32_0.5W
-R5
R3K32_0.5W
-R12
86/5-K4
87/5-K4
30/5-K4
85/5-K4
--X4G
1.5W
HITE
/YEL
LOW
1.5BL
ACK
4 BLACK INPUT-SEARCH_L_OUT 4 BLACK
1.5 BLACK
2.5 RED
1.5 PURPLE
1.5 WHITE/YELLOW1.5 WHITE/YELLOWUW_LTS_IN 1.5 WHITE/YELLOWUW_LTS_IN 1.5 WHITE/YELLOWUW_LTS_IN
1.5 RED PANEL_LTS_IN 1.5 RED PANEL_LTS_IN 1.5 RED PANEL_LTS_IN
4 RED4 RED 4 REDSEARCH_L_IN4 RED
1.5RE
D
4 RED4 RED SEARCH_L_INSEARCH_L_IN
1 RED PANEL_LTS_OUT
1 BLACK INPUT-
1 RED
1 RED
EL_INV_OUT_1
EL_INV_OUT_2
1.5 WHITE/YELLOW
1 RED EL_INV_OUT_1
1 RED EL_INV_OUT_1
1 RED EL_INV_OUT_2
1 RED EL_INV_OUT_2
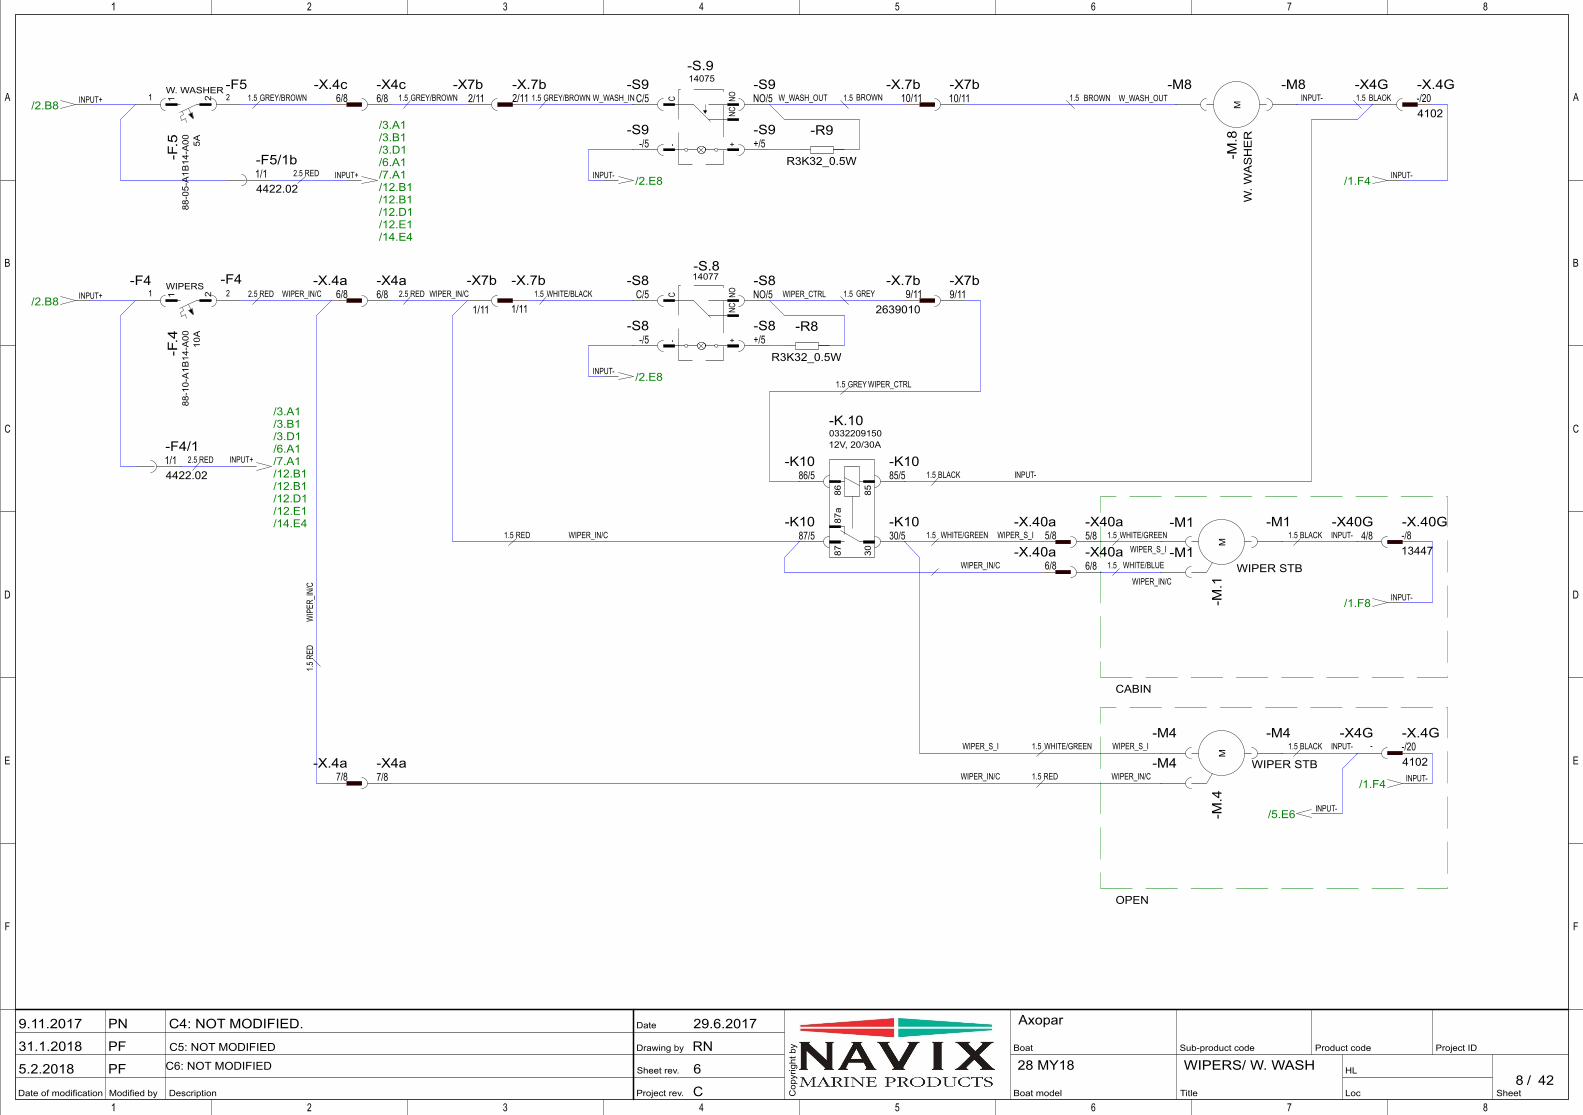
Project rev.
Sheet rev.
Drawing by
Date
Modified by Description
A
B
C
D
E
F
1 2 3 4 5 6 7 8
Date of modification SheetLoc
HL/
Project IDBoat
Boat model
Product code
Cop
yrig
ht b
y Sub-product code
Title
1 2 3 4 5 6 7 8
A
B
C
D
E
F
4228 MY18
AxoparC4: NOT MODIFIED.
C5: NOT MODIFIED
C6: NOT MODIFIED
PN
PF
PF
29.6.2017
RN
6
C
9.11.2017
31.1.2018
5.2.20188
WIPERS/ W. WASH
M
/1.F8
M
/1.F4
/5.E6
/2.B8
/3.A1/3.B1/3.D1/6.A1/7.A1/12.B1/12.B1/12.D1/12.E1/14.E4
/3.A1/3.B1/3.D1/6.A1/7.A1/12.B1/12.B1/12.D1/12.E1/14.E4
M
/1.F4
/2.B8
/2.E8
/2.E8
INPUT-
INPUT-
INPUT-
-M4-M4
-M4
-M1-M1
-M1
INPUT+
INPUT+
INPUT+ INPUT-
INPUT+
INPUT-
INPUT-
-M8 -M8
8687
a87 30
85
0332209150-K.10
12V, 20/30A
-/813447
-X.40G5/8
-X.40a
6/8-X.40a
6/8-X.4a
7/8-X.4a
6/8-X.4c
4/8-X40G
5/8-X40a
6/8-X40a
6/8-X4a
7/8-X4a
6/8-X4c
10/11-X7b
1/11
-X7b9/11-X7b
2/11-X7b
10/11-X.7b
1/11
-X.7b9/11
2639010
-X.7b
2/11-X.7b
-/204102
-X.4G
-/204102
-X.4G
1/14422.02
-F4/1
1/14422.02
-F5/1b
C NONC
+-
14075-S.9
C NONC
+-
14077-S.8
1 2
88-0
5-A
1B14
-A00
-F.5 5A
W. WASHER
1 2
88-1
0-A
1B14
-A00
-F.4 10
A
WIPERSC/5
-S8NO/5-S8
+/5-S8
-/5-S8
C/5-S9
NO/5-S9
+/5-S9
-/5-S9
1-F4
2-F4
1 2-F5
W. W
AS
HE
R-M
.8
WIPER STB
-M.1
WIPER STB
-M.4
R3K32_0.5W
-R8
R3K32_0.5W
-R9
87/5-K10
86/5-K10
30/5-K10
85/5-K10
--X4G
--X4G
CABIN
OPEN
INPUT-
WIPER_IN/C
WIPER_S_I
INPUT-
2.5 RED
2.5 RED
2.5 RED
1.5 BLACK
1.5 RED
1.5 BLACK
1.5 BLACK
1.5 GREY
1.5 BROWN
WIPER_IN/C
INPUT-
WIPER_IN/C
W_WASH_OUT
WIPER_CTRL2.5 RED WIPER_IN/C
1.5 BROWN W_WASH_OUT
WIPER_S_I1.5 WHITE/GREEN
1.5 WHITE/GREEN WIPER_S_I
1.5 GREY WIPER_CTRL
1.5 BLACK INPUT-
1.5 WHITE/GREEN
1.5 WHITE/BLUE
WIP
ER_IN
/C1.5
RED
1.5 RED WIPER_IN/C
1.5 WHITE/BLACK
1.5 GREY/BROWN 1.5 GREY/BROWN 1.5 GREY/BROWN W_WASH_IN
WIPER_IN/C
WIPER_S_I
WIPER_IN/C
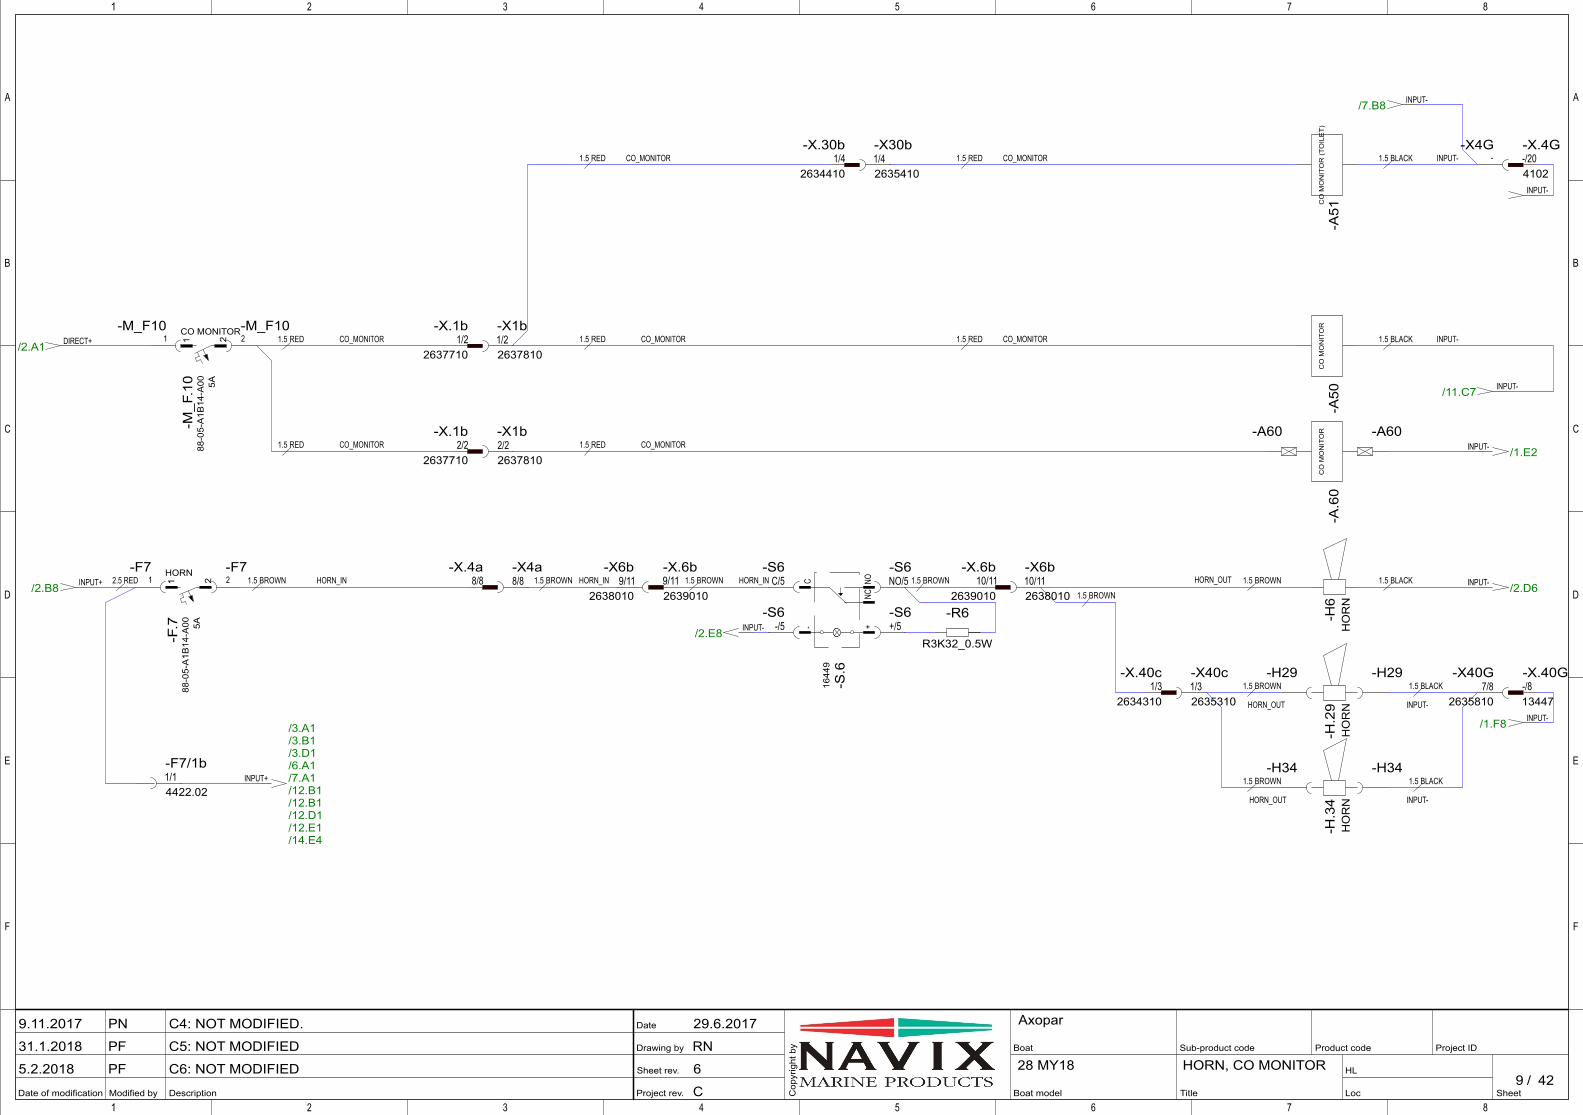
Project rev.
Sheet rev.
Drawing by
Date
Modified by Description
A
B
C
D
E
F
1 2 3 4 5 6 7 8
Date of modification SheetLoc
HL/
Project IDBoat
Boat model
Product code
Cop
yrig
ht b
y Sub-product code
Title
1 2 3 4 5 6 7 8
A
B
C
D
E
F
4228 MY18
AxoparC4: NOT MODIFIED.
C5: NOT MODIFIED
C6: NOT MODIFIED
PN
PF
PF
29.6.2017
RN
6
C
9.11.2017
31.1.2018
5.2.20189
HORN, CO MONITOR
/3.A1/3.B1/3.D1/6.A1/7.A1/12.B1/12.B1/12.D1/12.E1/14.E4
/2.D6
/1.F8
/11.C7
/2.A1
/2.B8
/2.E8
/1.E2
/7.B8
INPUT+
INPUT-
INPUT-
-H29-H29
-H34-H34
INPUT-
INPUT-
DIRECT+
INPUT+
INPUT-
-A60-A60INPUT-
INPUT-
-/813447
-X.40G1/3
2634310
-X.40c
1/42634410
-X.30b
8/8-X.4a
1/32635310
-X40c
1/42635410
-X30b
7/82635810
-X40G
8/8-X4a
1/22637710
-X.1b
2/22637710
-X.1b
1/22637810
-X1b
2/22637810
-X1b
9/112638010
-X6b10/112638010
-X6b9/112639010
-X.6b10/11
2639010
-X.6b
-/204102
-X.4G
1/14422.02
-F7/1b
C NONC
+-
1644
9
-S.6
1 2
88-0
5-A
1B14
-A00
-F.7 5A
HORN
1 2
88-0
5-A
1B14
-A00
-M_F
.10 5A
CO MONITOR
-A50
CO
MO
NIT
OR
-A51
CO
MO
NIT
OR
(TO
ILE
T)
-A.6
0C
O M
ON
ITO
R
C/5-S6
NO/5-S6
+/5-S6
-/5-S6
1-F7
2-F7
1-M_F10
2-M_F10
HO
RN
-H6
HO
RN
-H.2
9H
OR
N-H
.34
R3K32_0.5W
-R6
--X4G
HORN_IN1.5 BROWN 1.5 BROWN 1.5 BROWN 1.5 BROWN 1.5 BROWN 1.5 BLACK2.5 RED
1.5 BROWN
HORN_IN HORN_OUT
1.5 BLACK
INPUT-HORN_OUT
1.5 BROWN
HORN_OUT
1.5 BROWN
INPUT-
1.5 BLACK
1.5 BLACK1.5 RED CO_MONITOR INPUT-
HORN_IN
1.5 BLACK INPUT-1.5 RED CO_MONITOR1.5 RED CO_MONITOR
CO_MONITOR1.5 RED
CO_MONITOR1.5 RED CO_MONITOR1.5 RED
CO_MONITOR1.5 RED
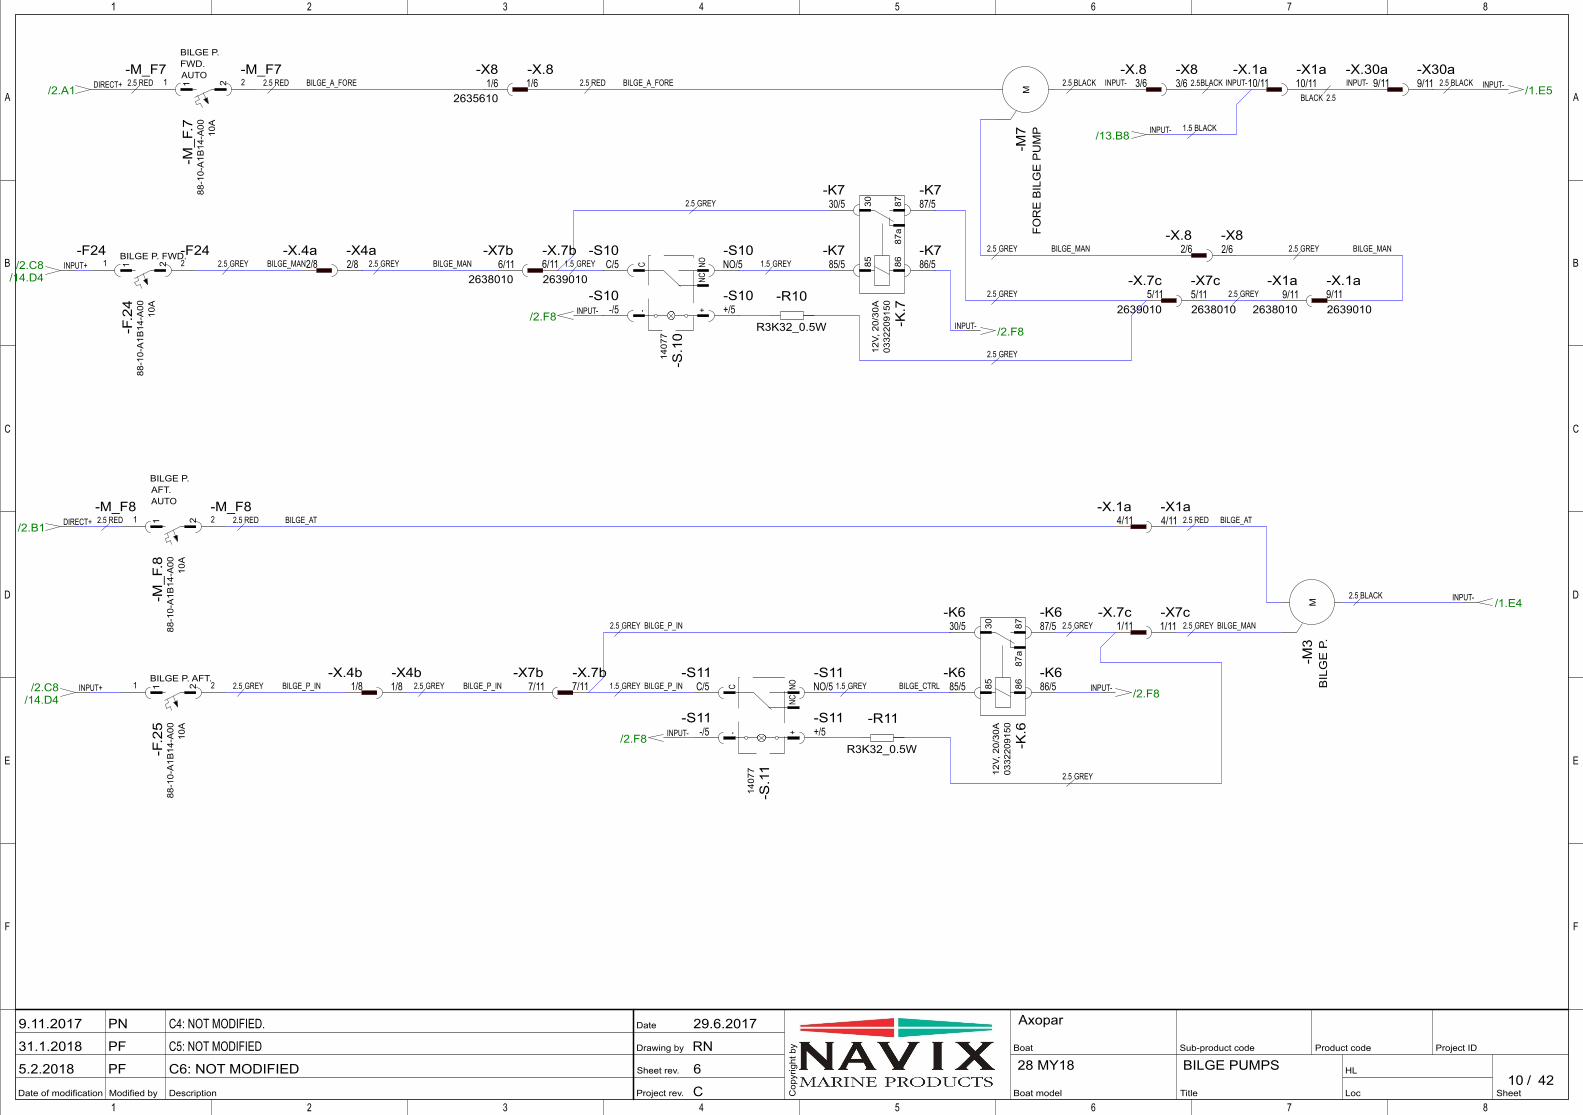
Project rev.
Sheet rev.
Drawing by
Date
Modified by Description
A
B
C
D
E
F
1 2 3 4 5 6 7 8
Date of modification SheetLoc
HL/
Project IDBoat
Boat model
Product code
Cop
yrig
ht b
y Sub-product code
Title
1 2 3 4 5 6 7 8
A
B
C
D
E
F
4228 MY18
AxoparC4: NOT MODIFIED.
C5: NOT MODIFIED
C6: NOT MODIFIED
PN
PF
PF
29.6.2017
RN
6
C
9.11.2017
31.1.2018
5.2.201810
BILGE PUMPS
M /1.E4
/2.B1
/2.A1 M /1.E5
/13.B8
/2.C8/14.D4
/2.F8
/2.F8
/2.F8
/2.F8/2.C8/14.D4
INPUT-
DIRECT+
DIRECT+ INPUT-
INPUT-
INPUT+
INPUT-
INPUT-
INPUT-
INPUT-INPUT+ 8687
a8730
85
0332
2091
50
-K.6
12V,
20/
30A
8687
a8730
85
0332
2091
50
-K.7
12V,
20/
30A
1/6-X.8
3/6-X.8
2/6-X.8
2/8-X.4a
1/8-X.4b
3/6-X8
2/6-X8
1/62635610
-X8
2/8-X4a
1/8-X4b
4/11-X1a
10/11-X1a
9/112638010
-X1a
7/11-X7b
6/112638010
-X7b
9/11-X30a
1/11-X7c
5/112638010
-X7c
4/11-X.1a
10/11-X.1a
9/112639010
-X.1a
7/11-X.7b
6/112639010
-X.7b
9/11-X.30a
1/11-X.7c
5/112639010
-X.7c
C NONC
+-
1407
7
-S.1
1
C NONC
+-
1407
7
-S.1
0
1 2
88-1
0-A
1B14
-A00
-F.2
5
10A
BILGE P. AFT.
1 2
88-1
0-A
1B14
-A00
-M_F
.8 10A
BILGE P.AFT.AUTO
1 2
88-1
0-A
1B14
-A00
-M_F
.7 10A
BILGE P.FWD.AUTO
1 2
88-1
0-A
1B14
-A00
-F.2
4
10A
BILGE P. FWD.
C/5-S11
NO/5-S11
+/5-S11
-/5-S11
C/5-S10
NO/5-S10
+/5-S10
-/5-S10
1 2
1-M_F8
2-M_F8
1-M_F7
2-M_F7
1-F24
2-F24
BIL
GE
P.
-M3
FOR
E B
ILG
E P
UM
P-M
7
R3K32_0.5W
-R10
R3K32_0.5W
-R11
85/5-K6
86/5-K6
87/5-K6
30/5-K6
30/5-K7
85/5-K7
87/5-K7
86/5-K7
2.5 BLACK
BILGE_MAN2.5 GREY
BILGE_AT2.5 RED
BILGE_P_IN2.5 GREY
BILGE_AT2.5 RED
2.5 GREY 1.5 GREY
2.5 RED BILGE_A_FORE2.5 RED BILGE_A_FORE2.5 RED
BILGE_MAN2.5 GREY
INPUT- INPUT-
2.5BLACK
INPUT- 2.5 BLACK
1.5 BLACK
BILGE_P_IN BILGE_P_IN
2.5 GREY BILGE_P_IN
1.5 GREY BILGE_CTRL
2.5 GREY
2.5 RED
2.5 GREY BILGE_MAN 2.5 GREY BILGE_MAN
2.5 GREY
2.5 GREY
1.5 GREY1.5 GREY
2.5 GREY
2.5 GREY
2.5 GREY
2.5 BLACK
BILGE_MAN2.5 GREY
2.5BLACK
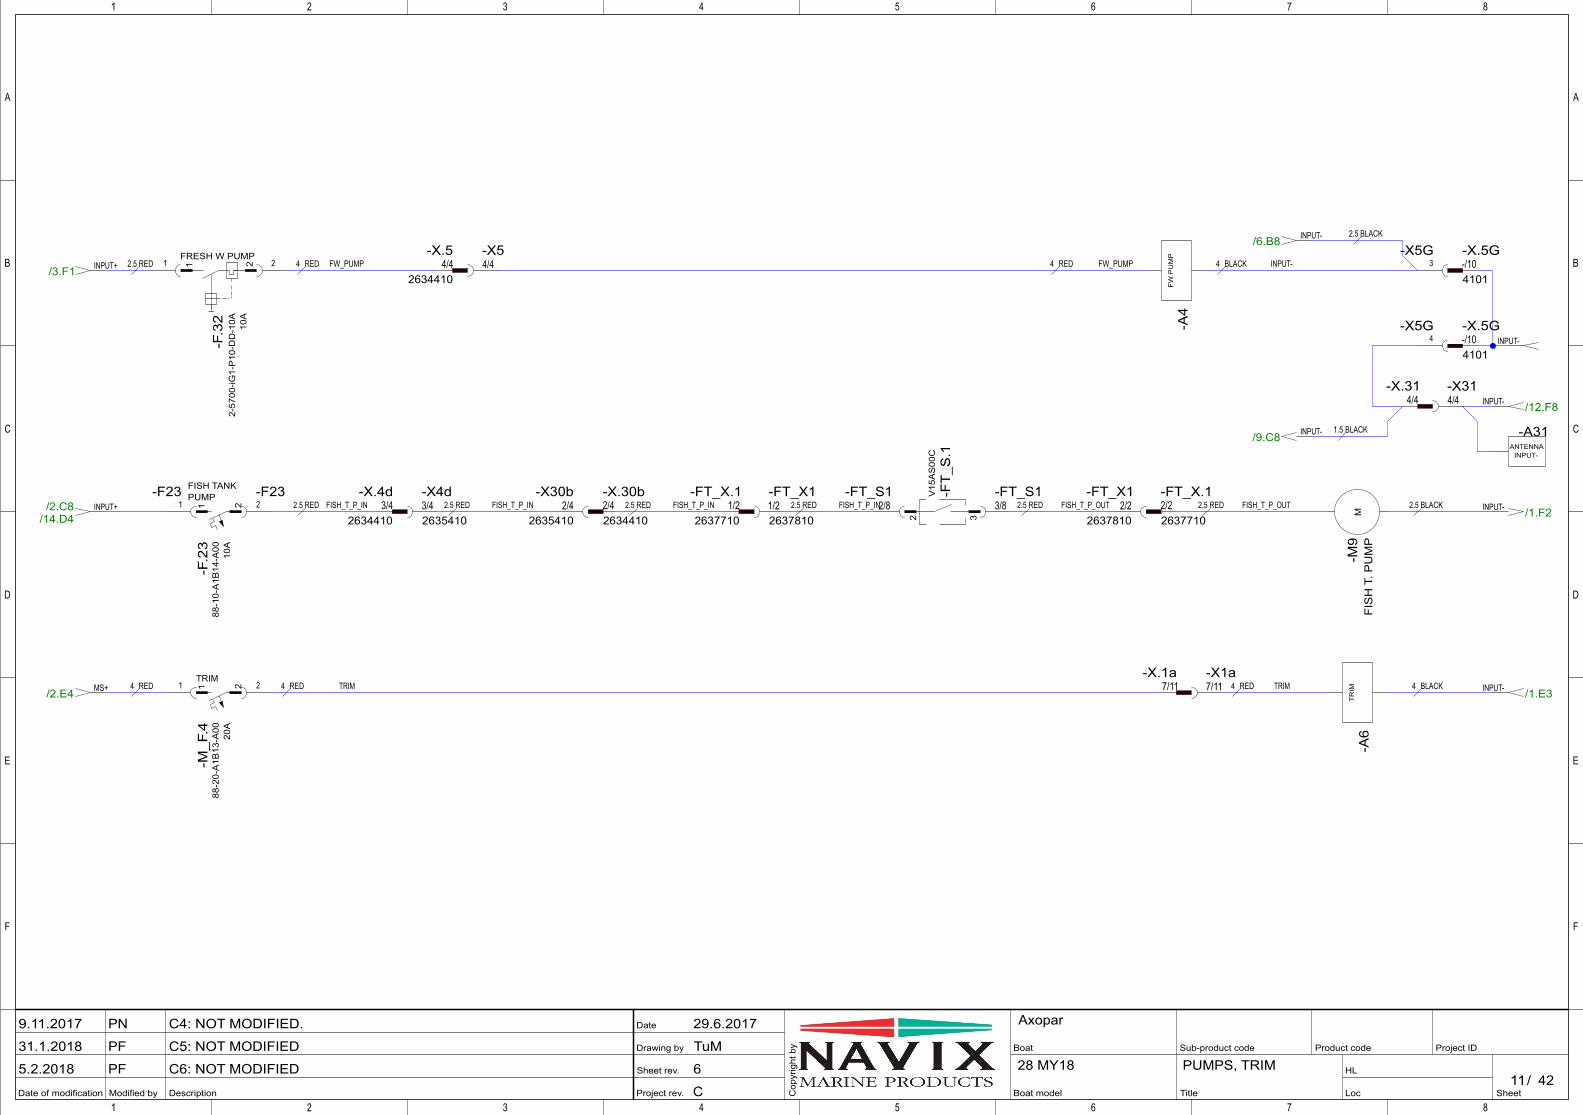
Project rev.
Sheet rev.
Drawing by
Date
Modified by Description
A
B
C
D
E
F
1 2 3 4 5 6 7 8
Date of modification SheetLoc
HL/
Project IDBoat
Boat model
Product code
Cop
yrig
ht b
y Sub-product code
Title
1 2 3 4 5 6 7 8
A
B
C
D
E
F
4228 MY18
AxoparC4: NOT MODIFIED.
C5: NOT MODIFIED
C6: NOT MODIFIED
PN
PF
PF
29.6.2017
TuM
6
C
9.11.2017
31.1.2018
5.2.201811
PUMPS, TRIM
/1.E3
/3.F1
/9.C8
M /1.F2/2.C8/14.D4
/2.E4
/12.F8
/6.B8
INPUT-
INPUT+
INPUT-
INPUT-INPUT+
MS+
INPUT-
INPUT-
-A31ANTENNA
INPUT-
INPUT-
3-X5G
4-X5G
1 2
2-57
00-iG
1-P
10-D
D-1
0A-F
.32
10A
FRESH W PUMP4/4
2634410
-X.5
4/4-X.31
3/42634410
-X.4d2/42634410
-X.30b
4/4-X5
4/4-X31
3/42635410
-X4d2/4
2635410
-X30b1/2
2637710
-FT_X.12/22637710
-FT_X.11/22637810
-FT_X12/2
2637810
-FT_X1
7/11-X1a
7/11-X.1a
-/104101
-X.5G
-/104101
-X.5G
1 2
88-1
0-A
1B14
-A00
-F.2
3
10A
FISH TANKPUMP
1 2
88-2
0-A
1B13
-A00
-M_F
.4 20A
TRIM
-A4
FW P
UM
P
-A6
TR
IM
1 2
1 2
1-F23
2-F23
FIS
H T
. PU
MP
-M9
2/8-FT_S1
3/8-FT_S1
32
V15
AS
00C
-FT_
S.1
4 BLACKTRIM4 RED
INPUT-4 BLACKFW_PUMP4 RED4 RED
TRIM4 RED
FW_PUMP
4 RED
2.5 RED
1.5 BLACK
2.5 RED FISH_T_P_IN FISH_T_P_IN2.5 RED 2.5 BLACKFISH_T_P_IN2.5 RED FISH_T_P_IN2.5 RED FISH_T_P_OUT2.5 RED FISH_T_P_OUT2.5 RED
2.5 BLACK
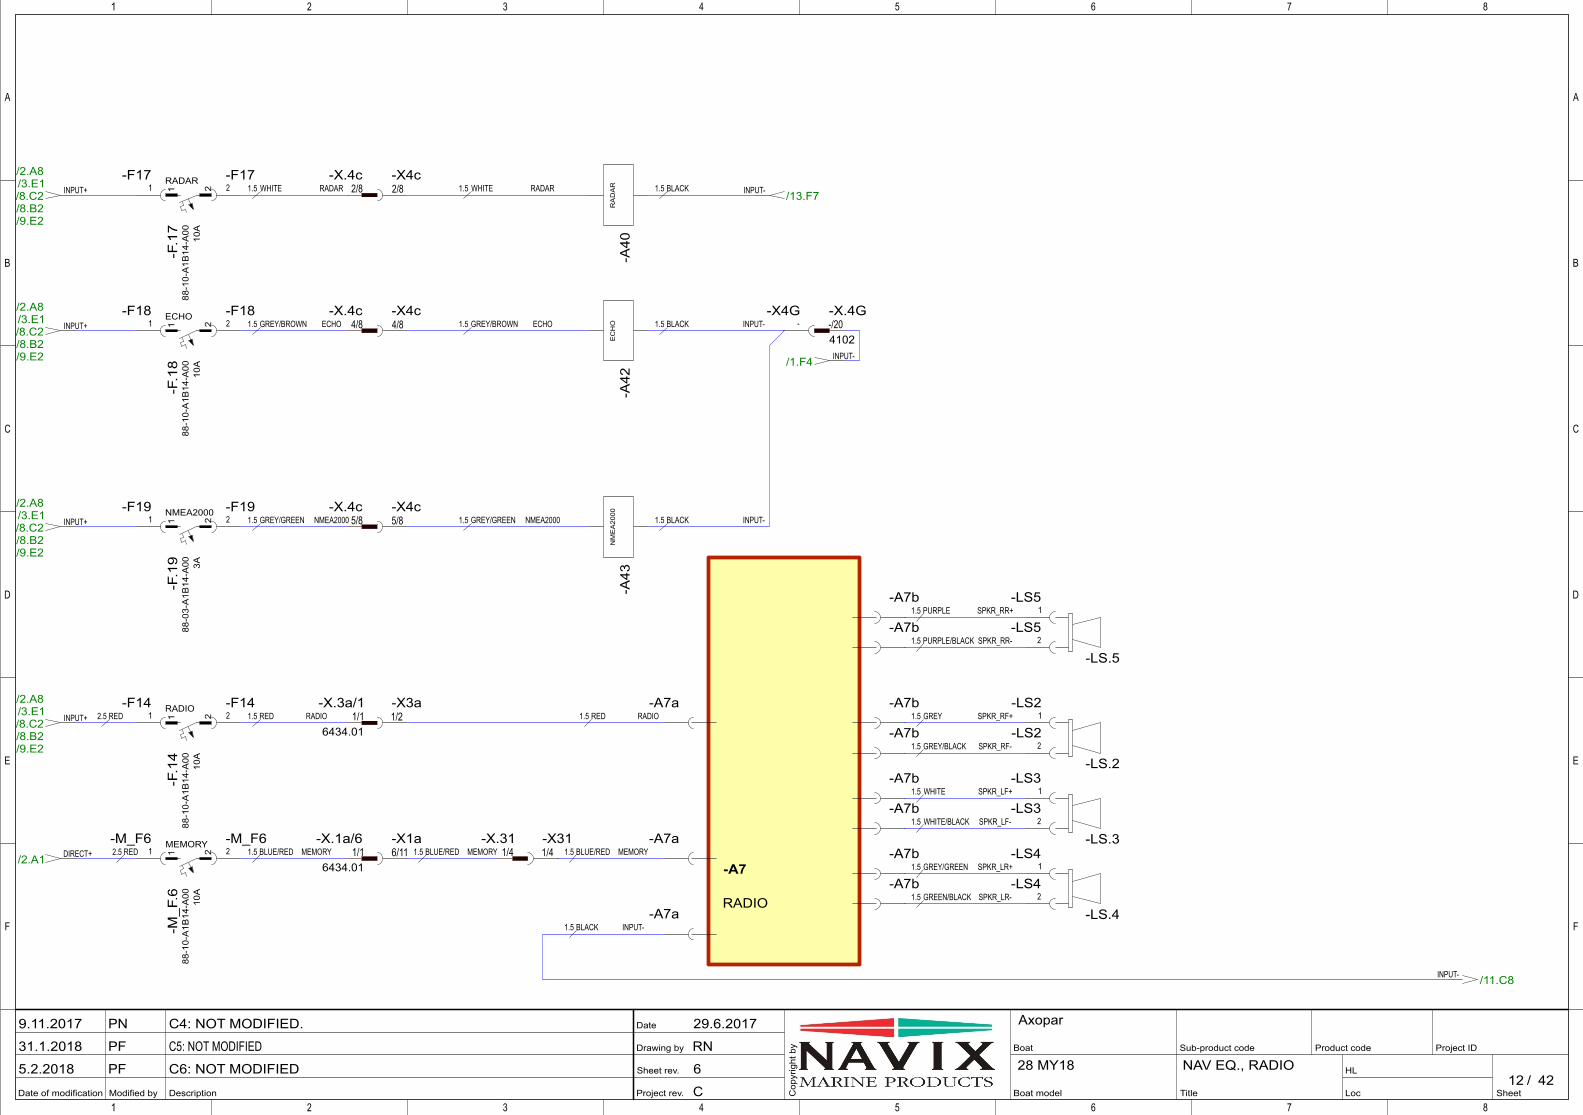
Project rev.
Sheet rev.
Drawing by
Date
Modified by Description
A
B
C
D
E
F
1 2 3 4 5 6 7 8
Date of modification SheetLoc
HL/
Project IDBoat
Boat model
Product code
Cop
yrig
ht b
y Sub-product code
Title
1 2 3 4 5 6 7 8
A
B
C
D
E
F
4228 MY18
AxoparC4: NOT MODIFIED.
C5: NOT MODIFIED
C6: NOT MODIFIED
PN
PF
PF
29.6.2017
RN
6
C
9.11.2017
31.1.2018
5.2.201812
NAV EQ., RADIO
/2.A1
/1.F4
/13.F7
/2.A8/3.E1/8.C2/8.B2/9.E2
/2.A8/3.E1/8.C2/8.B2/9.E2
/11.C8
/2.A8/3.E1/8.C2/8.B2/9.E2
/2.A8/3.E1/8.C2/8.B2/9.E2
-A7
RADIO
DIRECT+
-A7a
-A7a
-A7a
-A7b
-A7b
-A7b
-A7b
-A7b
-A7b
-A7b
-A7b
INPUT-
INPUT-INPUT+
INPUT+
INPUT-
INPUT+
INPUT+
1/4-X.31
2/8-X.4c
4/8-X.4c
5/8-X.4c
1/4-X31
2/8-X4c
4/8-X4c
5/8-X4c
1/2-X3a
6/11-X1a
-/204102
-X.4G
1/16434.01
-X.3a/1
1/16434.01
-X.1a/6
1 2
88-0
3-A
1B14
-A00
-F.1
9 3A
NMEA2000
1 2
88-1
0-A
1B14
-A00
-F.1
4
10A
RADIO
1 2
88-1
0-A
1B14
-A00
-M_F
.6 10A
MEMORY
1 2
88-1
0-A
1B14
-A00
-F.1
7
10A
RADAR1 2
88-1
0-A
1B14
-A00
-F.1
8
10A
ECHO
-A40
RA
DA
R
-A42
EC
HO
-A43
NM
EA
2000
1-F14
2-F14
1-M_F6
2-M_F6
2-F17
1-F17
2-F18
1-F18
2-F19
1-F19
-LS.2
-LS.3
-LS.4
-LS.5
1-LS2
2-LS2
1-LS3
2-LS3
1-LS4
2-LS4
1-LS5
2-LS5
--X4G
RADIO1.5 RED
MEMORY1.5 BLUE/RED
SPKR_RF+1.5 GREY
SPKR_RF-1.5 GREY/BLACK
SPKR_LF+1.5 WHITE
SPKR_LF-1.5 WHITE/BLACK
SPKR_LR+1.5 GREY/GREEN
SPKR_LR-1.5 GREEN/BLACK
MEMORY1.5 BLUE/RED
1.5 BLACK
MEMORY1.5 BLUE/RED
RADIO1.5 RED
1.5 WHITE RADAR
1.5 GREY/BROWN ECHO
1.5 GREY/GREEN NMEA2000
1.5 WHITE RADAR
1.5 GREY/BROWN ECHO
1.5 GREY/GREEN NMEA2000
1.5 BLACK
1.5 BLACK
1.5 BLACK
INPUT-
INPUT-
2.5 RED
2.5 RED
1.5 PURPLE
1.5 PURPLE/BLACK
INPUT-
SPKR_RR+
SPKR_RR-
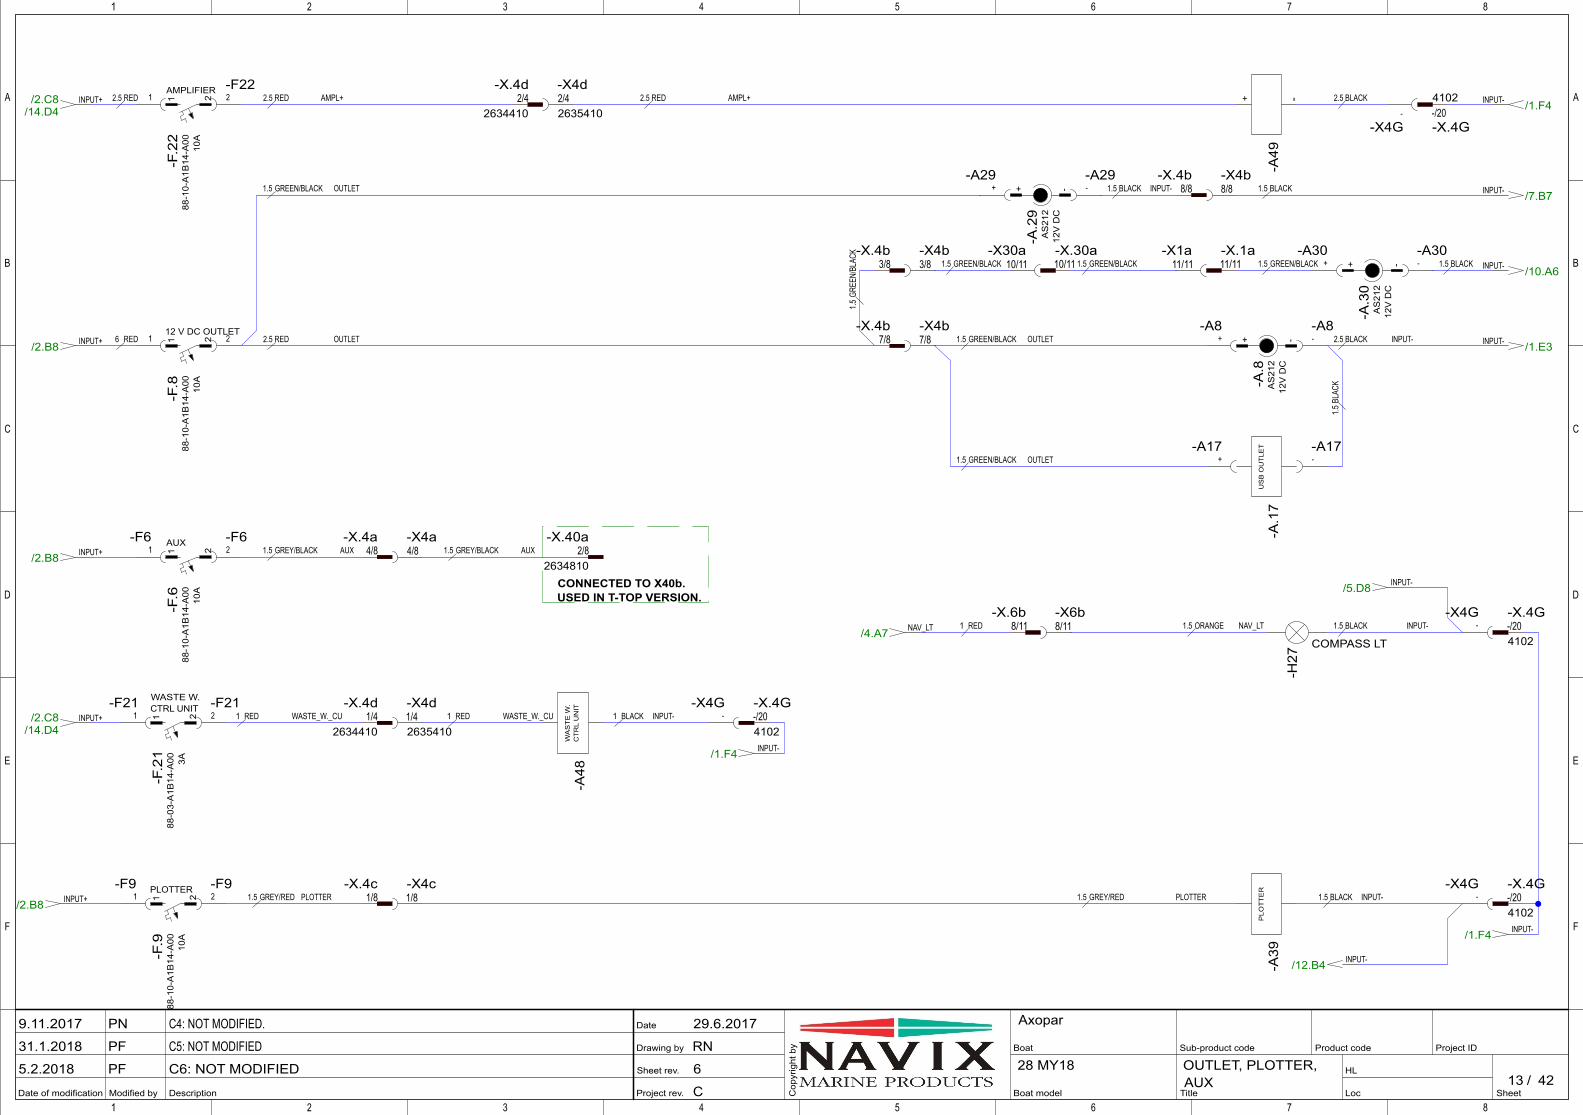
Project rev.
Sheet rev.
Drawing by
Date
Modified by Description
A
B
C
D
E
F
1 2 3 4 5 6 7 8
Date of modification SheetLoc
HL/
Project IDBoat
Boat model
Product code
Cop
yrig
ht b
y Sub-product code
Title
1 2 3 4 5 6 7 8
A
B
C
D
E
F
4228 MY18
AxoparC4: NOT MODIFIED.
C5: NOT MODIFIED
C6: NOT MODIFIED
PN
PF
PF
29.6.2017
RN
6
C
9.11.2017
31.1.2018
5.2.201813
OUTLET, PLOTTER,AUX
/2.B8
/10.A6
/7.B7
/1.F4
/12.B4
/4.A7
/1.F4
/1.F4
/2.C8/14.D4
/2.C8/14.D4
/2.B8
/2.B8
/1.E3
/5.D8
INPUT+
INPUT-
INPUT-
INPUT-
INPUT-
NAV_LT
INPUT-
INPUT-
INPUT+
INPUT+
INPUT+
INPUT+
INPUT-
INPUT-
1/42634410
-X.4d
2/42634410
-X.4d
2/82634810
-X.40a4/8
-X.4a
7/8-X.4b
8/8-X.4b
3/8-X.4b
1/8-X.4c
1/42635410
-X4d
2/42635410
-X4d
4/8-X4a
7/8-X4b
8/8-X4b
3/8-X4b
1/8-X4c
11/11-X1a
8/11-X6b
10/11-X30a
11/11-X.1a
8/11-X.6b
10/11-X.30a
-/204102
-X.4G
-/204102
-X.4G
-/204102
-X.4G
-/204102
-X.4G
1 2
88-0
3-A
1B14
-A00
-F.2
1
3A
WASTE W. CTRL UNIT
1 2
88-1
0-A
1B14
-A00
-F.6 10
A
AUX
1 2
88-1
0-A
1B14
-A00
-F.8 10
A
12 V DC OUTLET
1 2
88-1
0-A
1B14
-A00
-F.9 10
A
PLOTTER
1 2
88-1
0-A
1B14
-A00
-F.2
2
10A
AMPLIFIER
+ -
AS
212
-A.8
12V
DC
+ -
AS
212
-A.2
9
12V
DC
+ -
AS
212
-A.3
0
12V
DC
+
-A49
-
+-A17
--A17
-A.1
7U
SB
OU
TLE
T
-A39
PLO
TT
ER
-A48
WA
ST
E W
. C
TR
L U
NIT
1-F6
2-F6
1 2
1-F9
2-F9
1-F21
2-F21
1 2-F22
COMPASS LT
-H27
+-A8
--A8
+-A29
--A29
+-A30
--A30
--X4G
--X4G
--X4G
-
-X4G
CONNECTED TO X40b.USED IN T-TOP VERSION.
2.5 RED OUTLET 1.5 GREEN/BLACK OUTLET 2.5 BLACK
1.5 GREY/BLACK AUX
1.5 GREEN/BLACK OUTLET
1.5 ORANGE
1.5 GREEN/BLACK OUTLET
1.5 GREEN/BLACK 1.5 GREEN/BLACK 1.5 GREEN/BLACK 1.5 BLACK
1.5 BLACK INPUT- 1.5 BLACK
1.5 GREY/BLACK AUX
1.5 GREY/RED 1.5 GREY/RED PLOTTER
NAV_LT
1.5 BLACK INPUT-
1 RED 1.5 BLACK INPUT-
6 RED
1 RED1 RED INPUT-1 BLACKWASTE_W._CU
PLOTTER
WASTE_W._CU
2.5 RED2.5 RED AMPL+ AMPL+2.5 RED 2.5 BLACK
INPUT-
1.5GR
EEN/
BLAC
K
1.5BL
ACK
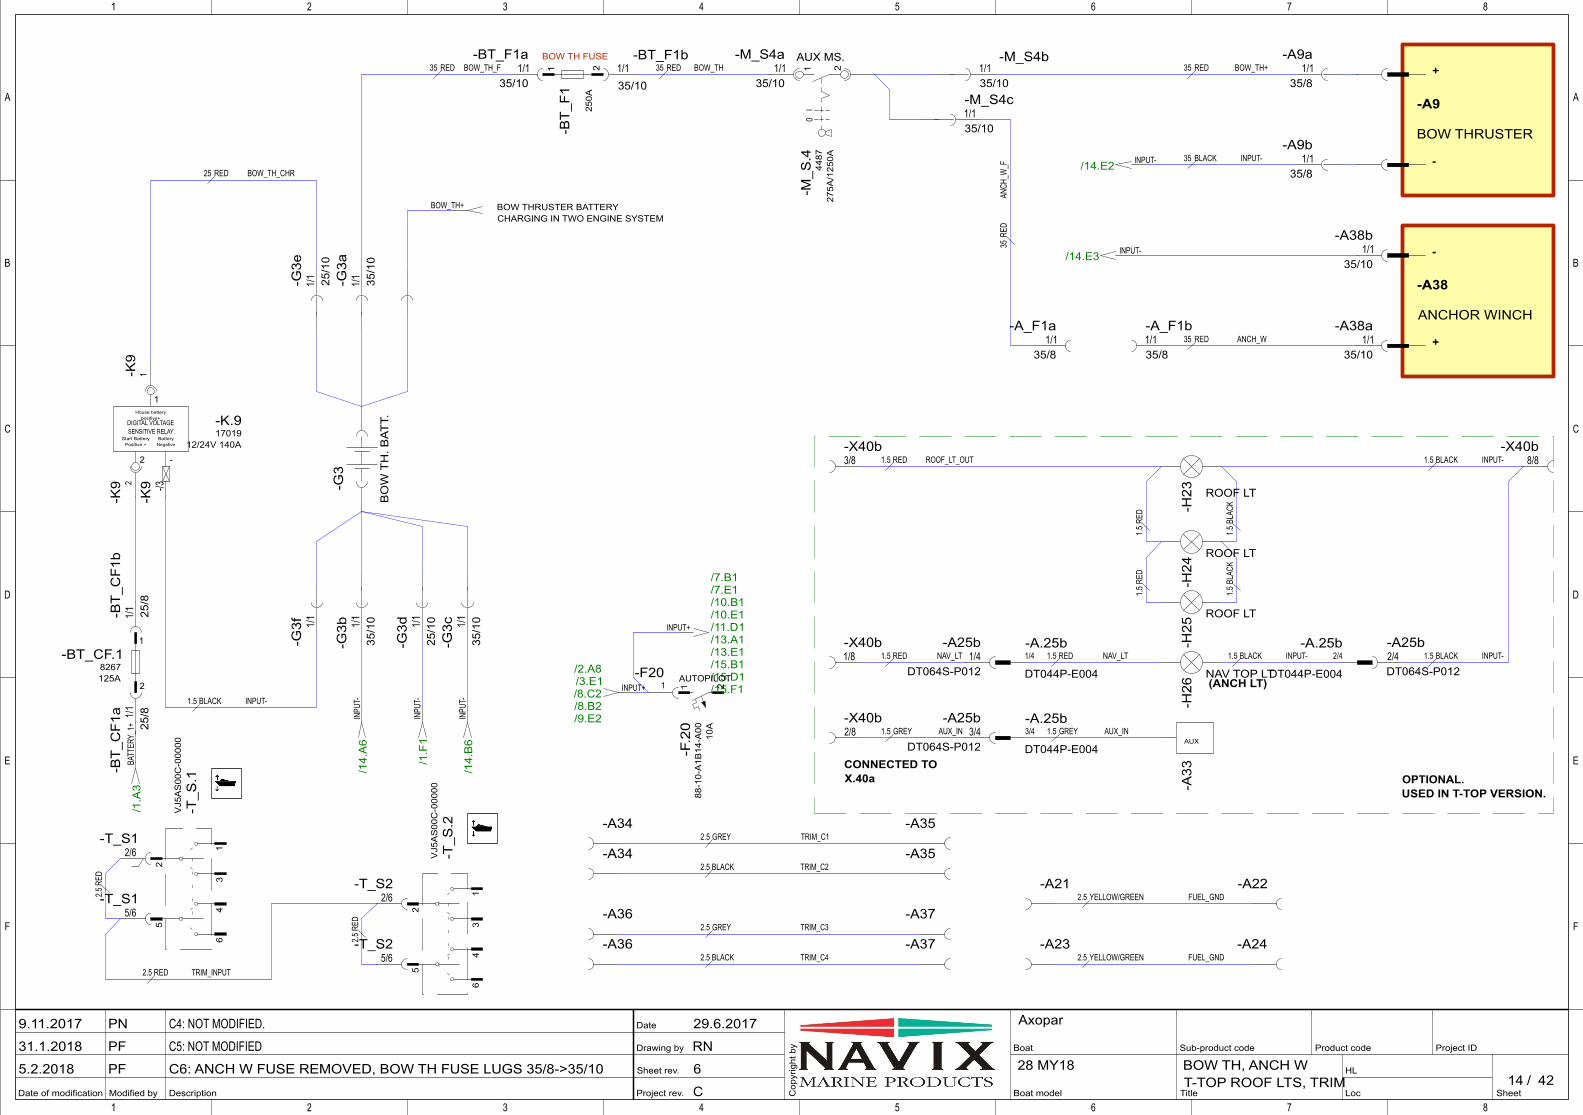
Project rev.
Sheet rev.
Drawing by
Date
Modified by Description
A
B
C
D
E
F
1 2 3 4 5 6 7 8
Date of modification SheetLoc
HL/
Project IDBoat
Boat model
Product code
Cop
yrig
ht b
y Sub-product code
Title
1 2 3 4 5 6 7 8
A
B
C
D
E
F
4228 MY18
AxoparC4: NOT MODIFIED.
C5: NOT MODIFIED
C6: ANCH W FUSE REMOVED, BOW TH FUSE LUGS 35/8->35/10
PN
PF
PF
29.6.2017
RN
6
C
9.11.2017
31.1.2018
5.2.201814
BOW TH, ANCH WT-TOP ROOF LTS, TRIM
/2.A8/3.E1/8.C2/8.B2/9.E2
I0
DIGITAL VOLTAGE SENSITIVE RELAY
/14.E2
/14.
A6
/1.F
1
/1.A
3
/7.B1/7.E1/10.B1/10.E1/11.D1/13.A1/13.E1/15.B1/15.D1/15.F1
/14.E3
/14.
B6
-A9
BOW THRUSTER
-A34
-A36
-A35
-A37
-A34 -A35
-A36 -A37
-A33
AUX
-A38
ANCHOR WINCH
-A21
-A23
-A22
-A24
INPUT+
-G3
BO
W T
H. B
ATT.
INPUT-
INPU
T-
INPU
T-
BATT
ERY_
1+
INPUT+
INPUT-
INPU
T-
1
-2
17019-K.9
12/24V 140A
House battery positive+
Start BatteryPositive +
BatteryNegative
1/1
25/1
0
-G3d
1/1 25
/10
-G3e
1/1 25
/8
-BT_
CF1
b1/
125
/8
-BT_
CF1
a
1/8-X40b
2/8-X40b
3/8-X40b
8/8-X40b
1/135/10
-A38a
1/135/10
-A38b
1/1
35/1
0
-G3b
1/1 35/1
0
-G3a
1/135/10
-M_S4b1/1
35/10
-M_S4a
1/1
35/1
0
-G3c
1/135/10
-M_S4c
1/135/8
-A9a
1/135/8
-A9b
1/135/10
-BT_F1a1/135/10
-BT_F1b
1/135/8
-A_F1a1/135/8
-A_F1b
1 2
88-1
0-A
1B14
-A00
-F.2
0
10A
AUTOPILOT
1 2
4487
-M_S
.4
275A
/125
0A
AUX MS.
1/4
DT044P-E004
-A.25b2/4
DT044P-E004
-A.25b
3/4
DT044P-E004
-A.25b
1/4DT064S-P012
-A25b2/4DT064S-P012
-A25b
3/4DT064S-P012
-A25b
1
2
8267-BT_CF.1
125A
1 2
-BT_
F1
250A
BOW TH FUSE
1-F20
ROOF LT
-H23
ROOF LT
-H24
ROOF LT
-H25
NAV TOP LT
-H26
2/6-T_S1
5/6-T_S1 2/6
-T_S2
5/6-T_S2
13
46
52
VJ5
AS
00C
-000
00
-T_S
.1
13
46
52
VJ5
AS
00C
-000
00
-T_S
.2
1-K9
-/3-K
92-K
9
BOW_TH+
1/1
-G3f
OPTIONAL.USED IN T-TOP VERSION.
CONNECTED TOX.40a
+
-
-
+
(ANCH LT)
10
BOW THRUSTER BATTERYCHARGING IN TWO ENGINE SYSTEM
35 BLACK INPUT-
2.5 RED
2.5RE
D
2.5RE
D
TRIM_INPUT
2.5 GREY TRIM_C1
2.5 GREY TRIM_C3
2.5 BLACK TRIM_C2
2.5 BLACK TRIM_C4
ROOF_LT_OUT1.5 RED
NAV_LT1.5 RED
AUX_IN1.5 GREY
NAV_LT1.5 RED
AUX_IN1.5 GREY
INPUT-1.5 BLACK INPUT-1.5 BLACK
INPUT-1.5 BLACK
1.5RE
D
1.5BL
ACK
1.5RE
D
1.5BL
ACK
35 RED ANCH_W
2.5 YELLOW/GREEN FUEL_GND
2.5 YELLOW/GREEN FUEL_GND
35 RED BOW_TH_F 35 RED BOW_TH+35 RED BOW_TH
25 RED BOW_TH_CHR
1.5 BLACK INPUT-
ANCH
_W_F
35RE
D
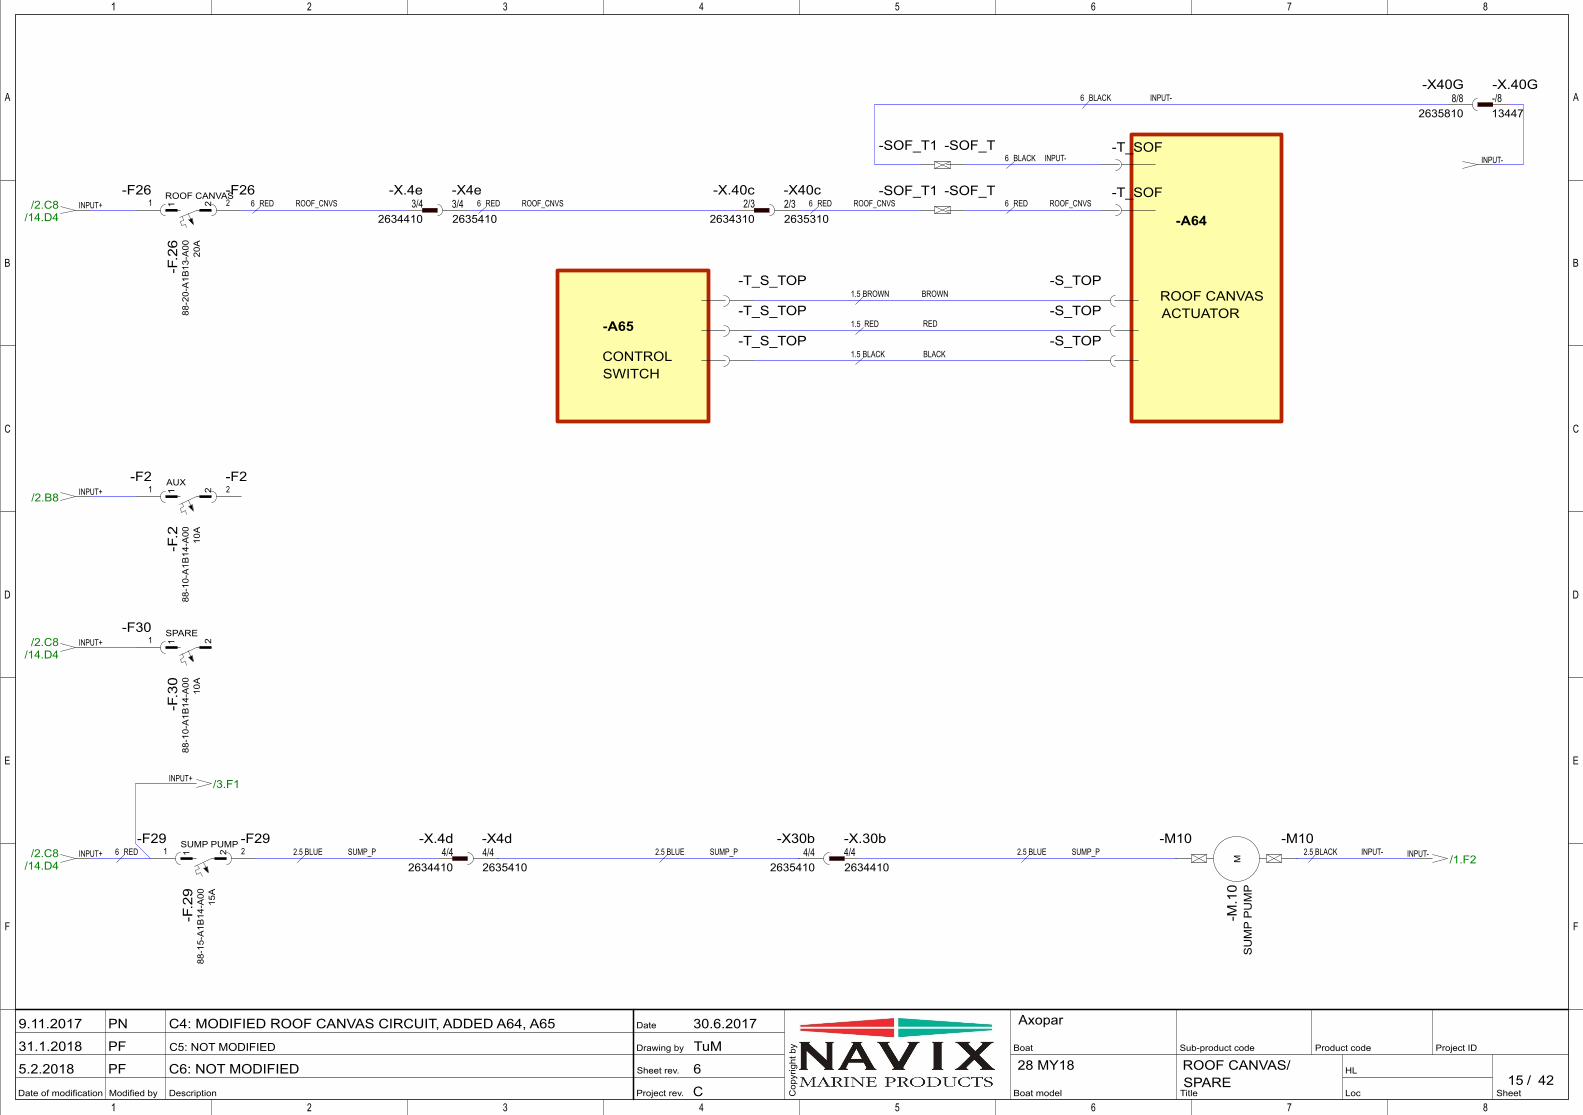
Project rev.
Sheet rev.
Drawing by
Date
Modified by Description
A
B
C
D
E
F
1 2 3 4 5 6 7 8
Date of modification SheetLoc
HL/
Project IDBoat
Boat model
Product code
Cop
yrig
ht b
y Sub-product code
Title
1 2 3 4 5 6 7 8
A
B
C
D
E
F
4228 MY18
AxoparC4: MODIFIED ROOF CANVAS CIRCUIT, ADDED A64, A65
C5: NOT MODIFIED
C6: NOT MODIFIED
PN
PF
PF
30.6.2017
TuM
6
C
9.11.2017
31.1.2018
5.2.201815
ROOF CANVAS/SPARE
/2.C8/14.D4
/2.B8
/2.C8/14.D4
/1.F2M/2.C8/14.D4
/3.F1
INPUT+
INPUT-
INPUT+
INPUT+
INPUT--M10-M10
INPUT+
INPUT+
-/813447
-X.40G
2/32634310
-X.40c
4/42634410
-X.4d4/42634410
-X.30b
3/42634410
-X.4e2/32635310
-X40c
4/42635410
-X4d4/4
2635410
-X30b
3/42635410
-X4e
8/82635810
-X40G
1 2
88-1
0-A
1B14
-A00
-F.3
0
10A
SPARE
1 2
88-1
0-A
1B14
-A00
-F.2 10
A
AUX
1 2
88-1
5-A
1B14
-A00
-F.2
9
15A
SUMP PUMP
1-F26
2-F26
1-F30
2-F29
1-F29
1-F2
2-F2
SU
MP
PU
MP
-M.1
0
1 2
88-2
0-A
1B13
-A00
-F.2
6
20A
ROOF CANVAS
-A64
ROOF CANVASACTUATOR
-A65
CONTROLSWITCH
-T_S_TOP
-T_S_TOP
-T_S_TOP
-S_TOP
-S_TOP
-S_TOP
-T_SOF
-T_SOF
-SOF_T1
-SOF_T1 -SOF_T
-SOF_T
ROOF_CNVS6 RED ROOF_CNVS6 RED
SUMP_P2.5 BLUE INPUT-2.5 BLACKSUMP_P2.5 BLUESUMP_P2.5 BLUE6 RED
BROWN1.5 BROWN
RED1.5 RED
BLACK1.5 BLACK
ROOF_CNVS6 RED 6 RED
INPUT-6 BLACK
6 BLACK
ROOF_CNVS
INPUT-
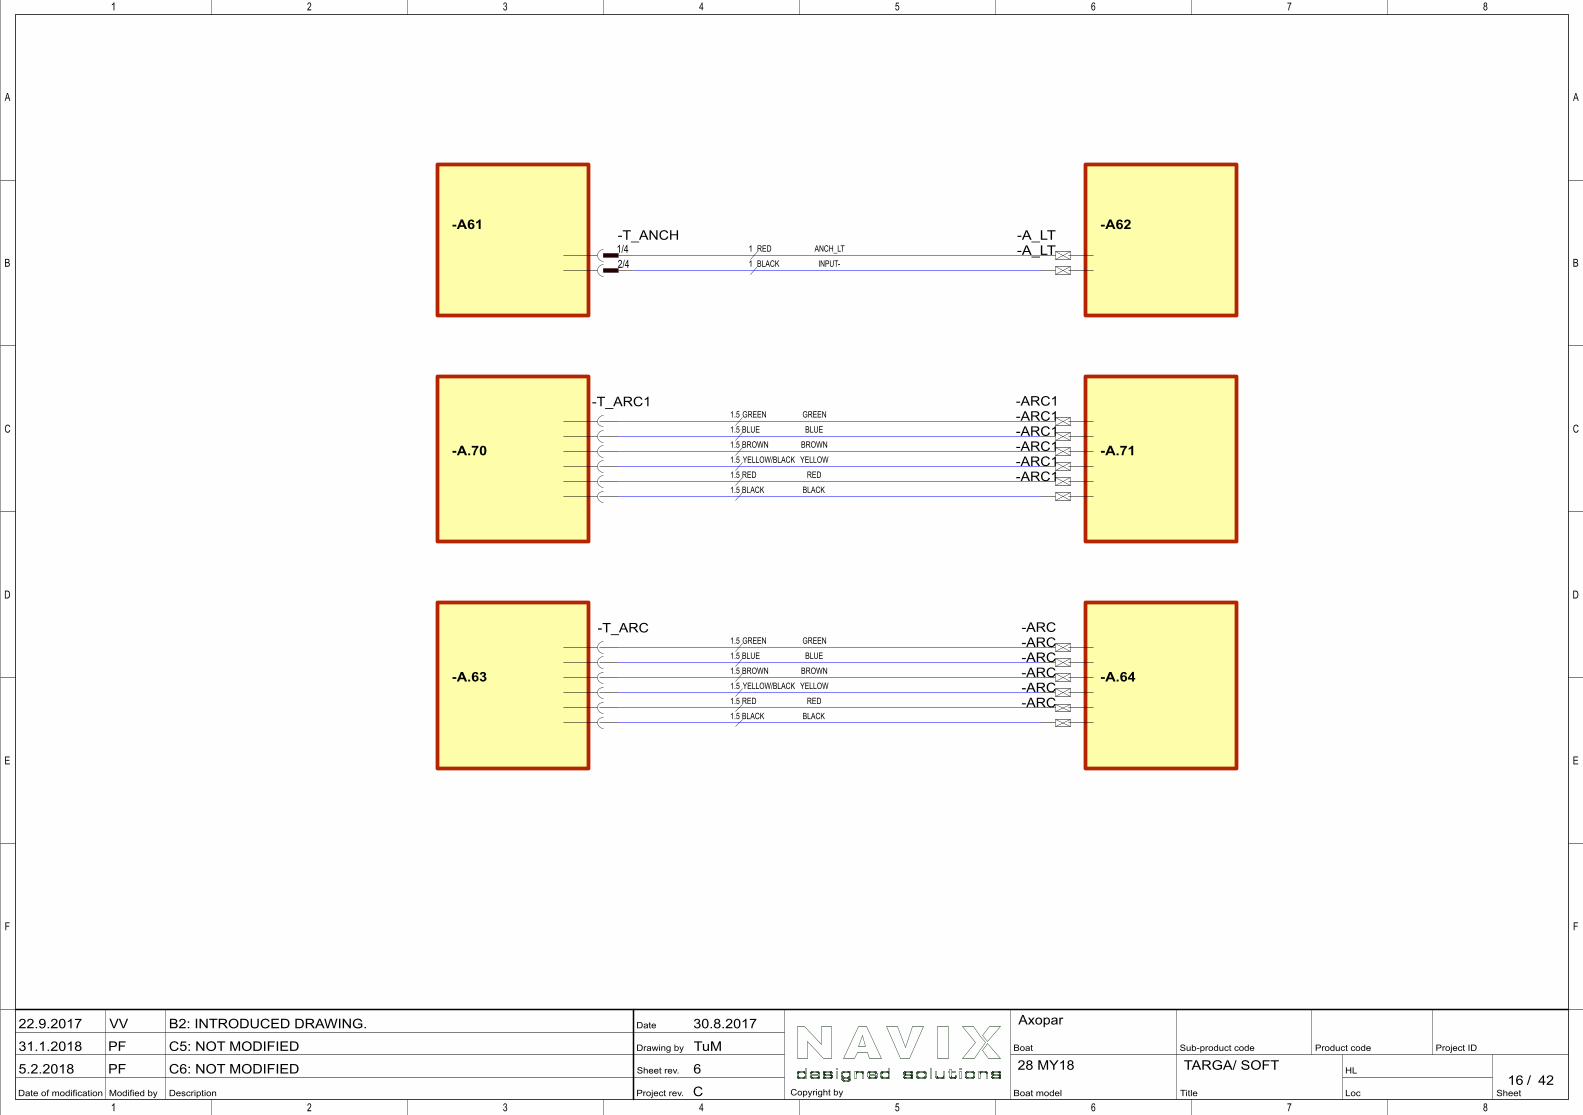
Project rev.
Sheet rev.
Drawing by
Date
Modified by Description
A
B
C
D
E
F
1 2 3 4 5 6 7 8
Date of modification SheetLoc
HL/
Project IDBoat
Boat model
Product code
Copyright by
Sub-product code
Title
1 2 3 4 5 6 7 8
A
B
C
D
E
F
4228 MY18
AxoparB2: INTRODUCED DRAWING.
C5: NOT MODIFIED
C6: NOT MODIFIED
VV
PF
PF
30.8.2017
TuM
6
C
22.9.2017
31.1.2018
5.2.201816
TARGA/ SOFT
-A61 -A62
-A.63 -A.64
-T_ARC -ARC-ARC-ARC-ARC-ARC-ARC
-A_LT-A_LT1/4
-T_ANCH
2/4
-A.70 -A.71
-T_ARC1 -ARC1-ARC1-ARC1-ARC1-ARC1-ARC1
BLACK1.5 BLACK
RED1.5 RED
YELLOW1.5 YELLOW/BLACK
BROWN1.5 BROWN
BLUE1.5 BLUE
GREEN1.5 GREEN
INPUT-1 BLACK
ANCH_LT1 RED
BLACK1.5 BLACK
RED1.5 RED
YELLOW1.5 YELLOW/BLACK
BROWN1.5 BROWN
BLUE1.5 BLUE
GREEN1.5 GREEN
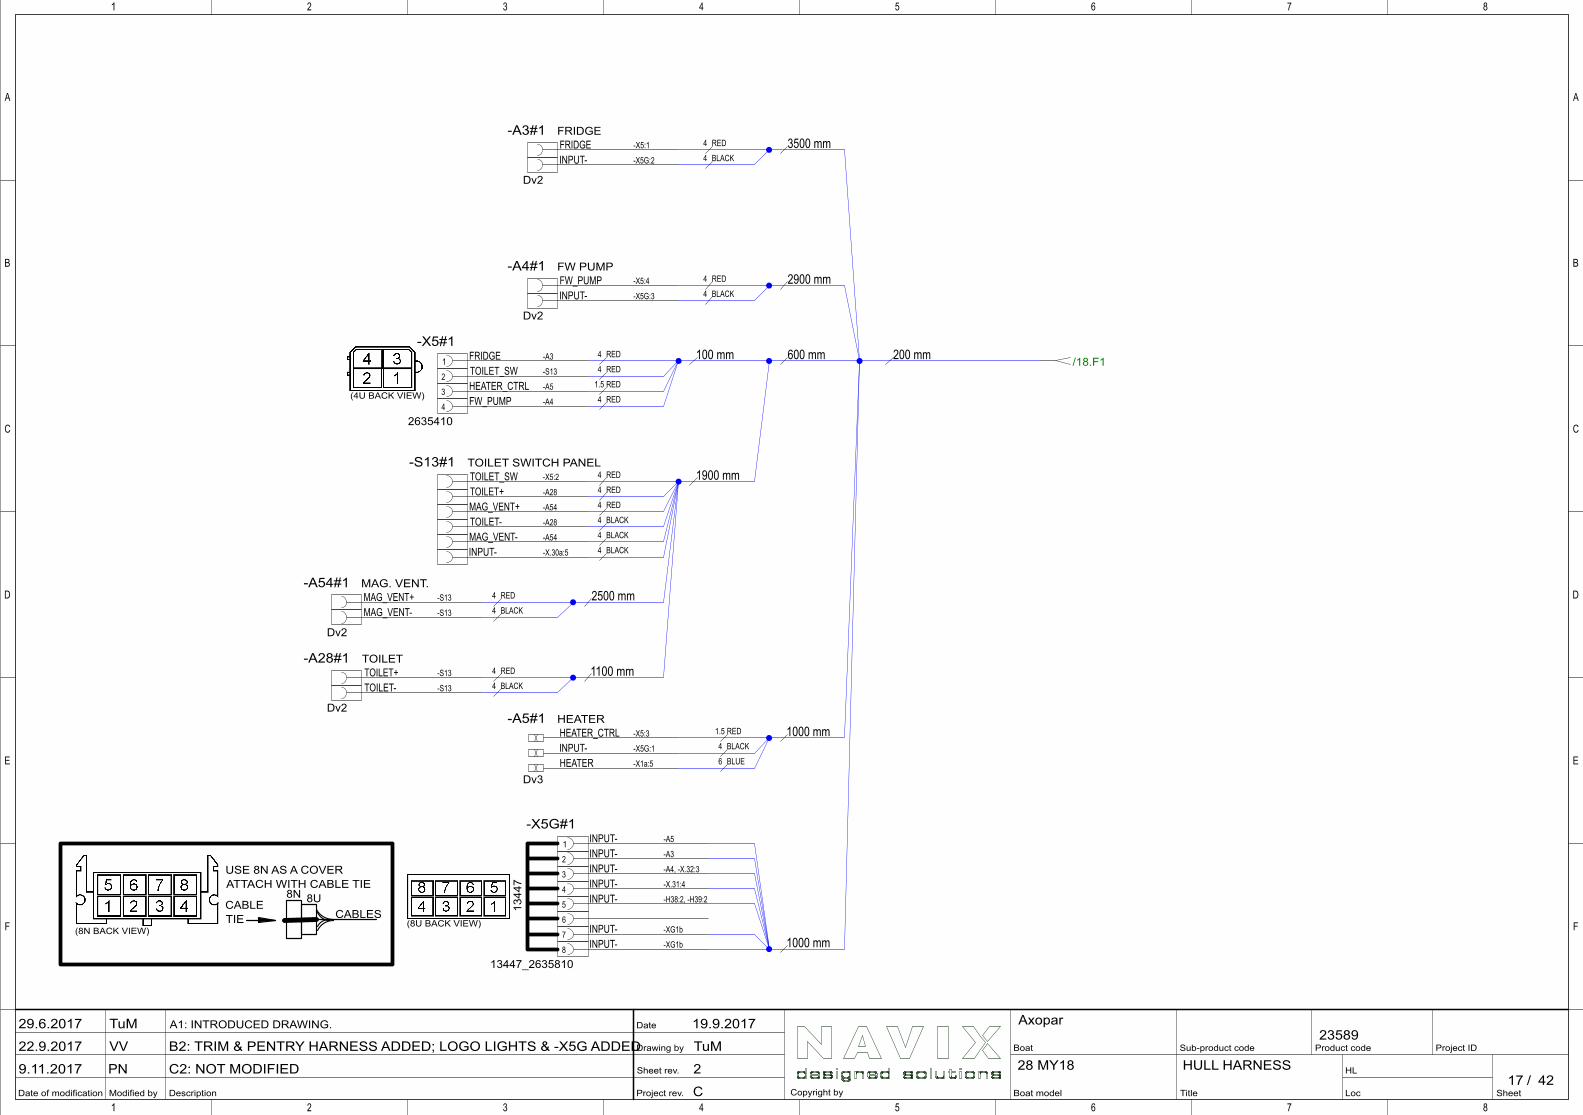
Project rev.
Sheet rev.
Drawing by
Date
Modified by Description
A
B
C
D
E
F
1 2 3 4 5 6 7 8
Date of modification SheetLoc
HL/
Project IDBoat
Boat model
Product code
Copyright by
Sub-product code
Title
1 2 3 4 5 6 7 8
A
B
C
D
E
F
4228 MY18
AxoparA1: INTRODUCED DRAWING.
B2: TRIM & PENTRY HARNESS ADDED; LOGO LIGHTS & -X5G ADDED
C2: NOT MODIFIED
TuM
VV
PN
19.9.2017
TuM
2
C
29.6.2017
22.9.2017
9.11.201717
23589
HULL HARNESS
/18.F1
(8N BACK VIEW)
FRIDGE -X5:1-A3#1 FRIDGE
INPUT- -X5G:2
Dv2
FW_PUMP -X5:4-A4#1 FW PUMP
INPUT- -X5G:3
Dv2
HEATER_CTRL -X5:3-A5#1 HEATER
INPUT- -X5G:1
HEATER -X1a:5
Dv3
TOILET+ -S13-A28#1 TOILET
TOILET- -S13
Dv2
MAG_VENT+ -S13-A54#1 MAG. VENT.
MAG_VENT- -S13
Dv2
TOILET_SW -X5:2-S13#1 TOILET SWITCH PANEL
TOILET+ -A28
MAG_VENT+ -A54
TOILET- -A28
MAG_VENT- -A54
INPUT- -X.30a:5
1 INPUT- -A5-X5G#1
2 INPUT- -A3
3 INPUT- -A4, -X.32:3
4 INPUT- -X.31:4
5 INPUT- -H38:2, -H39:2
6
7 INPUT- -XG1b
8 INPUT- -XG1b
13447_2635810
1 FRIDGE -A3-X5#1
2 TOILET_SW -S13
3 HEATER_CTRL -A5
4 FW_PUMP -A4
2635410
(4U BACK VIEW)
1344
7
USE 8N AS A COVERATTACH WITH CABLE TIE
CABLES8U8N
CABLETIE (8U BACK VIEW)
1.5 RED
4 BLACK
6 BLUE
4 BLACK
4 RED
4 BLACK
4 BLACK
4 RED
4 RED
4 RED
4 RED
4 RED
1.5 RED
4 RED
4 BLACK
4 RED
4 BLACK
4 RED
4 BLACK
4 RED
4 BLACK
1900 mm
100 mm
2900 mm
3500 mm
200 mm
1100 mm
2500 mm
1000 mm
600 mm
1000 mm
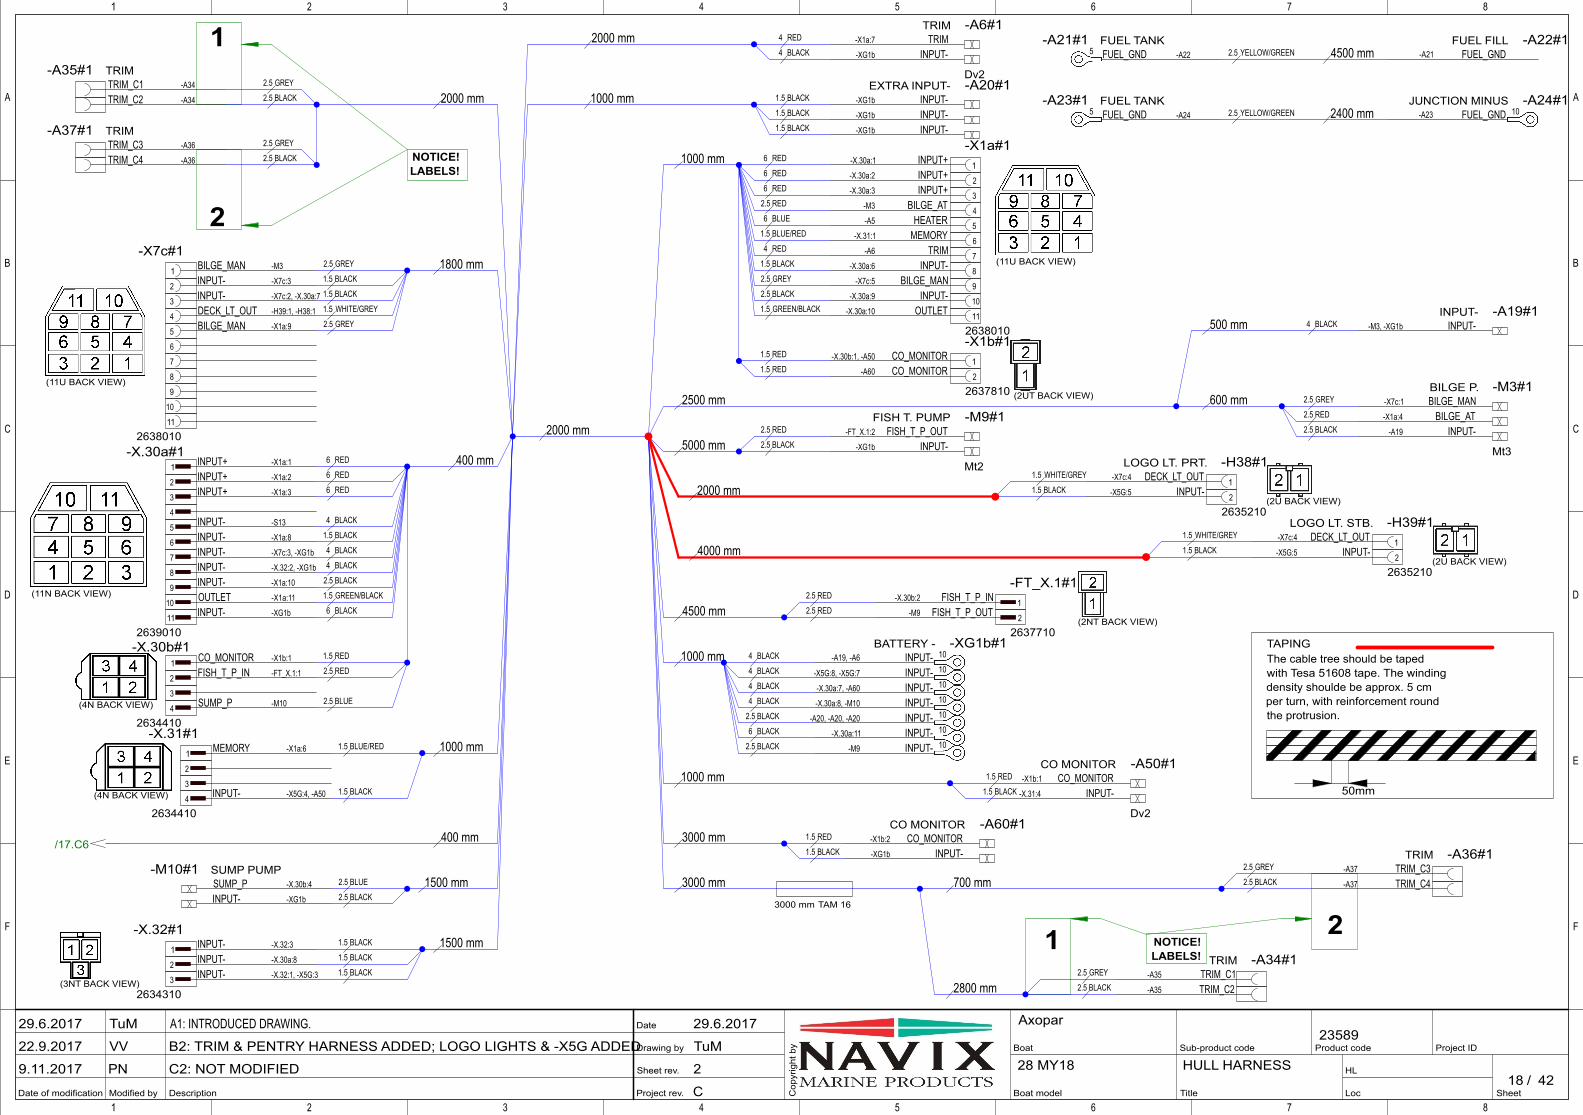
Project rev.
Sheet rev.
Drawing by
Date
Modified by Description
A
B
C
D
E
F
1 2 3 4 5 6 7 8
Date of modification SheetLoc
HL/
Project IDBoat
Boat model
Product code
Cop
yrig
ht b
y Sub-product code
Title
1 2 3 4 5 6 7 8
A
B
C
D
E
F
4228 MY18
AxoparA1: INTRODUCED DRAWING.
B2: TRIM & PENTRY HARNESS ADDED; LOGO LIGHTS & -X5G ADDED
C2: NOT MODIFIED
TuM
VV
PN
29.6.2017
TuM
2
C
29.6.2017
22.9.2017
9.11.201718
23589
HULL HARNESS
5
5 10
/17.C6
10
10
10
10
10
10
10
TRIM-X1a:7-A6#1TRIM
INPUT--XG1b
Dv2
BILGE_MAN-X7c:1-M3#1BILGE P.
BILGE_AT-X1a:4
INPUT--A19
Mt3
INPUT--XG1b-A20#1EXTRA INPUT-
INPUT--XG1b
INPUT--XG1b
INPUT--M3, -XG1b-A19#1INPUT-
FUEL_GND -A22-A21#1 FUEL TANK
FUEL_GND-A21-A22#1FUEL FILL
FUEL_GND -A24-A23#1 FUEL TANK
FUEL_GND-A23-A24#1JUNCTION MINUS
INPUT--X.31:4
Dv2
CO_MONITOR-X1b:1-A50#1CO MONITOR
INPUT--XG1b
Mt2
FISH_T_P_OUT-FT_X.1:2-M9#1FISH T. PUMP
INPUT--XG1b
CO_MONITOR-X1b:2-A60#1CO MONITOR
INPUT- -XG1b
SUMP_P -X.30b:4-M10#1 SUMP PUMP
INPUT--X5G:8, -X5G:7
INPUT--X.30a:7, -A60
INPUT--X.30a:8, -M10
INPUT--A20, -A20, -A20
INPUT--X.30a:11
INPUT--M9
TRIM_C1-A35-A34#1TRIM
TRIM_C2-A35
TRIM_C3-A37-A36#1TRIM
TRIM_C4-A37
TRIM_C1 -A34-A35#1 TRIM
TRIM_C2 -A34
TRIM_C3 -A36-A37#1 TRIM
TRIM_C4 -A36
1 INPUT- -X.32:3-X.32#1
2 INPUT- -X.30a:8
3 INPUT- -X.32:1, -X5G:3
2634310
1 MEMORY -X1a:6-X.31#1
(4N BACK VIEW)
2
3
4 INPUT- -X5G:4, -A50
2634410
1 CO_MONITOR -X1b:1-X.30b#1
2 FISH_T_P_IN -FT_X.1:1
3
4 SUMP_P -M10
2634410
1DECK_LT_OUT-X7c:4-H38#1LOGO LT. PRT.
2INPUT--X5G:5
2635210
1DECK_LT_OUT-X7c:4-H39#1LOGO LT. STB.
2INPUT--X5G:5
2635210
1FISH_T_P_IN-X.30b:2-FT_X.1#1
(2NT BACK VIEW)2FISH_T_P_OUT-M9
2637710
1CO_MONITOR-X.30b:1, -A50-X1b#1
(2UT BACK VIEW)
2CO_MONITOR-A60
2637810
1INPUT+-X.30a:1-X1a#1
2INPUT+-X.30a:2
3INPUT+-X.30a:3
(11U BACK VIEW)
4BILGE_AT-M3
5HEATER-A5
6MEMORY-X.31:1
7TRIM-A6
8INPUT--X.30a:6
9BILGE_MAN-X7c:5
10INPUT--X.30a:9
11OUTLET-X.30a:10
2638010
1 BILGE_MAN -M3-X7c#1
2 INPUT- -X7c:3
3 INPUT- -X7c:2, -X.30a:7
4 DECK_LT_OUT -H39:1, -H38:1
5 BILGE_MAN -X1a:9
6
7
8
9
10
11
2638010
1 INPUT+ -X1a:1-X.30a#1
2 INPUT+ -X1a:2
3 INPUT+ -X1a:3
4
5 INPUT- -S13
(11N BACK VIEW)
6 INPUT- -X1a:8
7 INPUT- -X7c:3, -XG1b
8 INPUT- -X.32:2, -XG1b
9 INPUT- -X1a:10
10 OUTLET -X1a:11
11 INPUT- -XG1b
2639010
INPUT--A19, -A6-XG1b#1BATTERY -
(11U BACK VIEW)
(3NT BACK VIEW)
(4N BACK VIEW)
1 2NOTICE!LABELS!
2
1
NOTICE!LABELS!
(2U BACK VIEW)
(2U BACK VIEW)
TAPINGThe cable tree should be taped with Tesa 51608 tape. The winding density shoulde be approx. 5 cm per turn, with reinforcement round the protrusion.
2000 mm
1000 mm
1000 mm
600 mm
400 mm
1000 mm
6 RED
6 RED
6 RED
1.5 BLUE/RED
1.5 BLACK
4 BLACK
4 BLACK
4 BLACK
4 BLACK
6 RED
6 RED
6 RED
2.5 RED
6 BLUE
1.5 BLUE/RED
4 RED
1.5 BLACK
4 BLACK
2.5 GREY
2.5 RED
2.5 BLACK
4 RED
1.5 BLACK
1.5 BLACK
1.5 BLACK
500 mm 4 BLACK
2.5 BLACK
2.5 YELLOW/GREEN
2.5 YELLOW/GREEN
4500 mm
2400 mm
2000 mm
1000 mm
4 BLACK
1.5 BLACK
4 BLACK
4 BLACK
2.5 GREY
2.5 BLACK
2.5 BLACK
1.5 GREEN/BLACK
1.5 GREEN/BLACK
6 BLACK
6 BLACK
1.5 RED
1.5 BLACK1000 mm
1800 mm2.5 GREY
1.5 BLACK
1.5 BLACK
2.5 GREY
1.5 RED
1.5 RED
2.5 BLACK
2500 mm
4500 mm
5000 mm
2.5 RED
2.5 RED
2.5 RED
2.5 BLACK
2.5 RED
3000 mm
1500 mm
1.5 RED
1.5 BLACK
1.5 BLACK
2.5 BLUE
2.5 BLACK
1.5 BLACK
1.5 RED
1.5 BLACK
1500 mm
2.5 GREY
2.5 BLACK
2.5 GREY
2.5 BLACK
3000 mm
2800 mm
700 mm
400 mm
2.5 GREY
2.5 BLACK
2.5 GREY
2.5 BLACK 2000 mm
TAM 163000 mm
1.5 WHITE/GREY
1.5 WHITE/GREY
1.5 BLACK
1.5 WHITE/GREY
1.5 BLACK2000 mm
4000 mm
2.5 BLUE
50mm
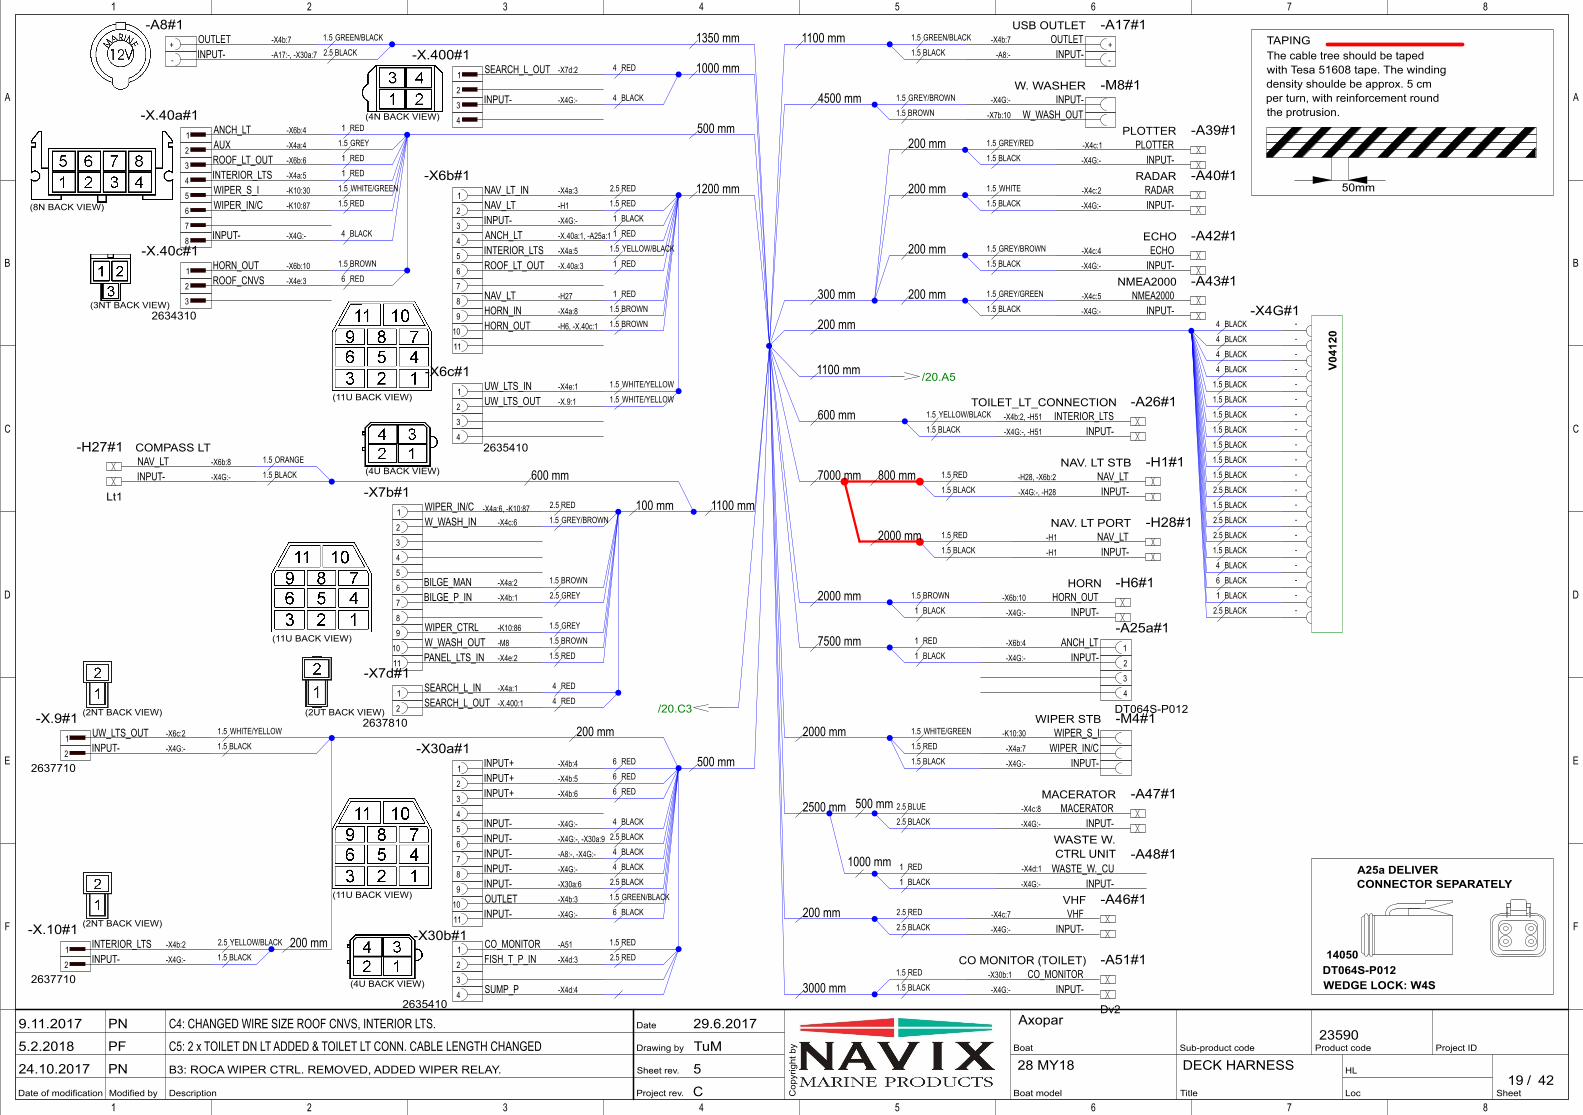
Project rev.
Sheet rev.
Drawing by
Date
Modified by Description
A
B
C
D
E
F
1 2 3 4 5 6 7 8
Date of modification SheetLoc
HL/
Project IDBoat
Boat model
Product code
Cop
yrig
ht b
y Sub-product code
Title
1 2 3 4 5 6 7 8
A
B
C
D
E
F
4228 MY18
AxoparC4: CHANGED WIRE SIZE ROOF CNVS, INTERIOR LTS.
C5: 2 x TOILET DN LT ADDED & TOILET LT CONN. CABLE LENGTH CHANGED
B3: ROCA WIPER CTRL. REMOVED, ADDED WIPER RELAY.
PN
PF
PN
29.6.2017
TuM
5
C
9.11.2017
5.2.2018
24.10.201719
23590
DECK HARNESS
/20.A5
/20.C3
NAV_LT-H28, -X6b:2-H1#1NAV. LT STB
INPUT--X4G:-, -H28
HORN_OUT-X6b:10-H6#1HORN
INPUT--X4G:-
INTERIOR_LTS-X4b:2, -H51-A26#1TOILET_LT_CONNECTION
INPUT--X4G:-, -H51
NAV_LT -X6b:8-H27#1 COMPASS LT
INPUT- -X4G:-
Lt1
PLOTTER-X4c:1-A39#1PLOTTER
INPUT--X4G:-
RADAR-X4c:2-A40#1RADAR
INPUT--X4G:-
ECHO-X4c:4-A42#1ECHO
INPUT--X4G:-
NMEA2000-X4c:5-A43#1NMEA2000
INPUT--X4G:-
INPUT--H1
NAV_LT-H1-H28#1NAV. LT PORT
INPUT--X4G:-
VHF-X4c:7-A46#1VHF
WIPER_IN/C-X4a:7
INPUT--X4G:-
WIPER_S_I-K10:30-M4#1WIPER STB
MACERATOR-X4c:8-A47#1MACERATOR
INPUT--X4G:-
INPUT--X4G:-
WASTE_W._CU-X4d:1-A48#1
WASTE W. CTRL UNIT
INPUT--X4G:-
Dv2
CO_MONITOR-X30b:1-A51#1CO MONITOR (TOILET)
W_WASH_OUT-X7b:10
INPUT--X4G:--M8#1W. WASHER
1 HORN_OUT -X6b:10-X.40c#1
2 ROOF_CNVS -X4e:3
(3NT BACK VIEW) 3
2634310
1 SEARCH_L_OUT -X7d:2-X.400#1
(4N BACK VIEW)
2
3 INPUT- -X4G:-
4
1 ANCH_LT -X6b:4-X.40a#1
(8N BACK VIEW)
2 AUX -X4a:4
3 ROOF_LT_OUT -X6b:6
4 INTERIOR_LTS -X4a:5
5 WIPER_S_I -K10:30
6 WIPER_IN/C -K10:87
7
8 INPUT- -X4G:-
1 CO_MONITOR -A51-X30b#1
2 FISH_T_P_IN -X4d:3
3
4 SUMP_P -X4d:4
2635410
1 UW_LTS_IN -X4e:1-X6c#1
2 UW_LTS_OUT -X.9:1
(4U BACK VIEW)
3
42635410
1 UW_LTS_OUT -X6c:2-X.9#1
2 INPUT- -X4G:-
2637710
1 INTERIOR_LTS -X4b:2-X.10#1
2 INPUT- -X4G:-
2637710
1 SEARCH_L_IN -X4a:1-X7d#1
(2UT BACK VIEW) 2 SEARCH_L_OUT -X.400:1
2637810
1 NAV_LT_IN -X4a:3-X6b#1
2 NAV_LT -H1
3 INPUT- -X4G:-
4 ANCH_LT -X.40a:1, -A25a:1
5 INTERIOR_LTS -X4a:5
6 ROOF_LT_OUT -X.40a:3
(11U BACK VIEW)
7
8 NAV_LT -H27
9 HORN_IN -X4a:8
10 HORN_OUT -H6, -X.40c:1
11
1 WIPER_IN/C -X4a:6, -K10:87
-X7b#1
2 W_WASH_IN -X4c:6
3
4
5
6 BILGE_MAN -X4a:2
(11U BACK VIEW)
7 BILGE_P_IN -X4b:1
8
9 WIPER_CTRL -K10:86
10 W_WASH_OUT -M8
11 PANEL_LTS_IN -X4e:2
1 INPUT+ -X4b:4-X30a#1
2 INPUT+ -X4b:5
3 INPUT+ -X4b:6
4
5 INPUT- -X4G:-
(11U BACK VIEW)
6 INPUT- -X4G:-, -X30a:9
7 INPUT- -A8:-, -X4G:-
8 INPUT- -X4G:-
9 INPUT- -X30a:6
10 OUTLET -X4b:3
11 INPUT- -X4G:-
1ANCH_LT-X6b:4-A25a#1
2INPUT--X4G:-
3
4
DT064S-P012
+OUTLET-X4b:7-A17#1USB OUTLET
-INPUT--A8:-+ OUTLET -X4b:7
-A8#1
- INPUT- -A17:-, -X30a:7
--X4G#1
-
-
-
-
-
-
-
-
-
-
-
-
-
-
-
-
-
-
-
A25a DELIVERCONNECTOR SEPARATELY
DT064S-P012
V04
120
WEDGE LOCK: W4S
TAPINGThe cable tree should be taped with Tesa 51608 tape. The winding density shoulde be approx. 5 cm per turn, with reinforcement round the protrusion.
14050
(2NT BACK VIEW)
(2NT BACK VIEW)
(4U BACK VIEW)
7500 mm
2000 mm
1.5 GREEN/BLACK
2.5 BLACK
1 RED
1 RED
4 BLACK
1.5 WHITE/GREEN
1.5 RED
4 BLACK
1.5 RED
1 BLACK
1 RED
1.5 YELLOW/BLACK
1 RED
1 RED
2.5 RED
1.5 BROWN
2.5 GREY
1.5 GREY
1 BLACK
1 BLACK
1.5 BLACK
1.5 RED
1.5 BLACK
1.5 YELLOW/BLACK
1.5 BLACK
1.5 RED
1.5 BROWN
1 RED
500 mm
1100 mm
1200 mm
4 RED
1.5 WHITE/GREEN
1000 mm
1350 mm
6 RED
6 RED
6 RED
4 BLACK
2.5 BLACK
4 BLACK
4 BLACK
2.5 BLACK
1.5 GREEN/BLACK
1.5 GREY
1 RED 500 mm
100 mm
600 mm1.5 ORANGE
1.5 BLACK
2.5 RED
300 mm
200 mm
200 mm
200 mm
200 mm
1.5 GREY/RED
1.5 BLACK
1.5 WHITE
1.5 BLACK
1.5 GREY/BROWN
1.5 BLACK
1.5 GREY/GREEN
1.5 BLACK
2000 mm
1.5 BROWN
1.5 BLACK
1.5 RED
200 mm
4500 mm 1.5 GREY/BROWN
1.5 BROWN
200 mm 2.5 RED
2.5 BLACK
4 BLACK
4 BLACK
4 BLACK
4 BLACK
1.5 BLACK
1.5 BLACK
1.5 BLACK
1.5 BLACK
1.5 BLACK
1.5 BLACK
1.5 BLACK
2.5 BLACK
1.5 BLACK
2.5 BLACK
2.5 BLACK
1.5 BLACK
4 BLACK
1.5 BROWN
6 BLACK
6 BLACK
7000 mm 800 mm
2000 mm
1 BLACK
1100 mm
2.5 BLUE
2.5 BLACK
1 RED
1 BLACK
1000 mm
500 mm2500 mm
2.5 BLACK
1.5 BROWN
1.5 BROWN
1.5 RED
1.5 BLACK3000 mm
600 mm
1100 mm 1.5 GREEN/BLACK
1.5 BLACK
1.5 RED
2.5 RED
1.5 WHITE/YELLOW
1.5 WHITE/YELLOW
6 RED
4 RED
4 RED
1.5 RED
200 mm1.5 WHITE/YELLOW
1.5 BLACK
200 mm2.5 YELLOW/BLACK
1.5 BLACK
1.5 GREY/BROWN
50mm
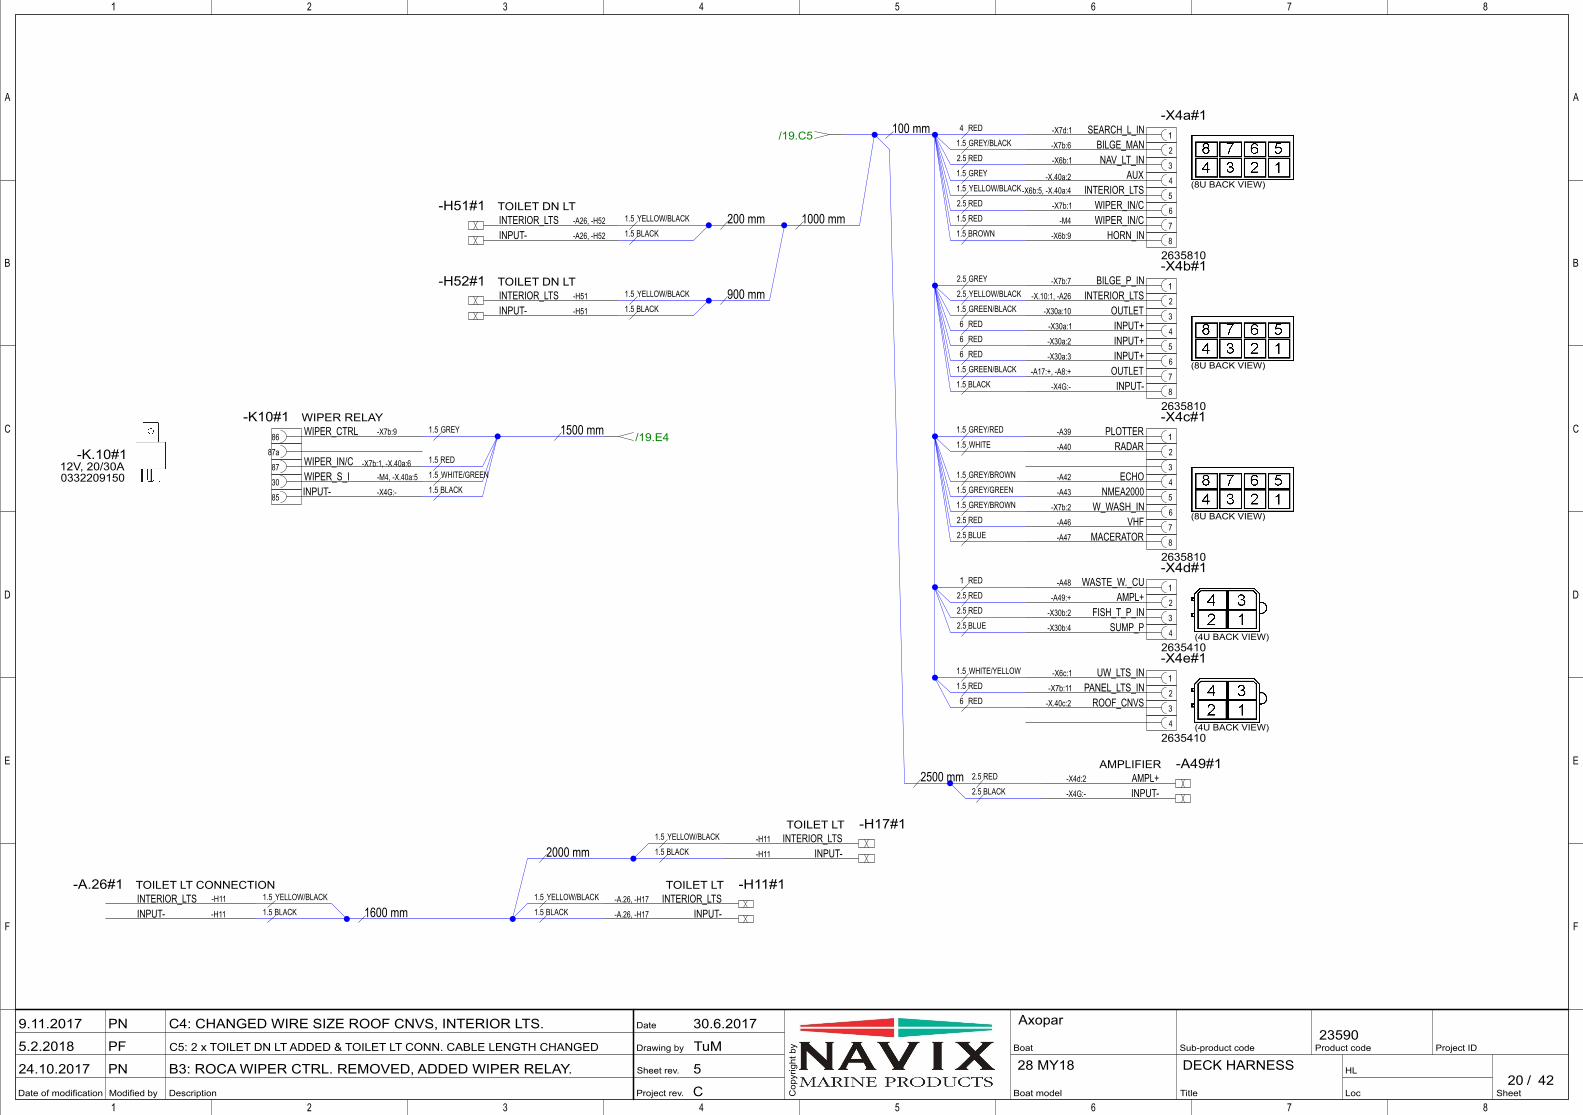
Project rev.
Sheet rev.
Drawing by
Date
Modified by Description
A
B
C
D
E
F
1 2 3 4 5 6 7 8
Date of modification SheetLoc
HL/
Project IDBoat
Boat model
Product code
Cop
yrig
ht b
y Sub-product code
Title
1 2 3 4 5 6 7 8
A
B
C
D
E
F
4228 MY18
AxoparC4: CHANGED WIRE SIZE ROOF CNVS, INTERIOR LTS.
C5: 2 x TOILET DN LT ADDED & TOILET LT CONN. CABLE LENGTH CHANGED
B3: ROCA WIPER CTRL. REMOVED, ADDED WIPER RELAY.
PN
PF
PN
30.6.2017
TuM
5
C
9.11.2017
5.2.2018
24.10.201720
23590
DECK HARNESS
(4U BACK VIEW)
/19.C5
/19.E4
AMPL+-X4d:2-A49#1AMPLIFIER
INPUT--X4G:-
INTERIOR_LTS-A.26, -H17-H11#1TOILET LT
INPUT--A.26, -H17
INTERIOR_LTS-H11-H17#1TOILET LT
INPUT--H11
INTERIOR_LTS -H11-A.26#1 TOILET LT CONNECTION
INPUT- -H11
0332209150
-K.10#112V, 20/30A
1WASTE_W._CU-A48-X4d#1
2AMPL+-A49:+
3FISH_T_P_IN-X30b:2
4SUMP_P-X30b:4
2635410
1UW_LTS_IN-X6c:1-X4e#1
2PANEL_LTS_IN-X7b:11
(4U BACK VIEW)
3ROOF_CNVS-X.40c:2
4
2635410
1SEARCH_L_IN-X7d:1-X4a#1
(8U BACK VIEW)
2BILGE_MAN-X7b:6
3NAV_LT_IN-X6b:1
4AUX-X.40a:2
5INTERIOR_LTS-X6b:5, -X.40a:4
6WIPER_IN/C-X7b:1
7WIPER_IN/C-M4
8HORN_IN-X6b:9
2635810
1BILGE_P_IN-X7b:7-X4b#1
2INTERIOR_LTS-X.10:1, -A26
3OUTLET-X30a:10
4INPUT+-X30a:1
(8U BACK VIEW)
5INPUT+-X30a:2
6INPUT+-X30a:3
7OUTLET-A17:+, -A8:+
8INPUT--X4G:-
2635810
1PLOTTER-A39-X4c#1
2RADAR-A40
3
4ECHO-A42
5NMEA2000-A43
(8U BACK VIEW)6W_WASH_IN-X7b:2
7VHF-A46
8MACERATOR-A47
2635810
87a
87 WIPER_IN/C -X7b:1, -X.40a:6
30 WIPER_S_I -M4, -X.40a:5
85 INPUT- -X4G:-
86 WIPER_CTRL -X7b:9-K10#1 WIPER RELAY
INTERIOR_LTS -A26, -H52-H51#1 TOILET DN LT
INPUT- -A26, -H52
INTERIOR_LTS -H51-H52#1 TOILET DN LT
INPUT- -H51
4 RED
2.5 RED
2.5 GREY
2.5 YELLOW/BLACK
6 RED
6 RED
6 RED
1.5 GREEN/BLACK
1.5 GREY
1.5 YELLOW/BLACK
2.5 RED
1.5 BLACK
1.5 GREEN/BLACK
1.5 GREY/RED
1.5 WHITE
1.5 GREY/BROWN
1.5 GREY/GREEN
1.5 GREY/BLACK
1.5 GREY/BROWN
2.5 RED
2.5 BLUE
100 mm
2.5 RED2500 mm2.5 BLACK
1.5 BLACK
1.5 YELLOW/BLACK
1.5 BLACK
1.5 YELLOW/BLACK
1.5 BLACK
1.5 YELLOW/BLACK
1600 mm
2000 mm
1 RED
2.5 RED
2.5 RED
1.5 WHITE/YELLOW
1.5 RED
6 RED
2.5 BLUE
1.5 RED
1.5 BROWN
1.5 RED
1.5 WHITE/GREEN
1.5 BLACK
1.5 GREY 1500 mm
900 mm
200 mm 1000 mm
1.5 YELLOW/BLACK
1.5 BLACK
1.5 YELLOW/BLACK
1.5 BLACK
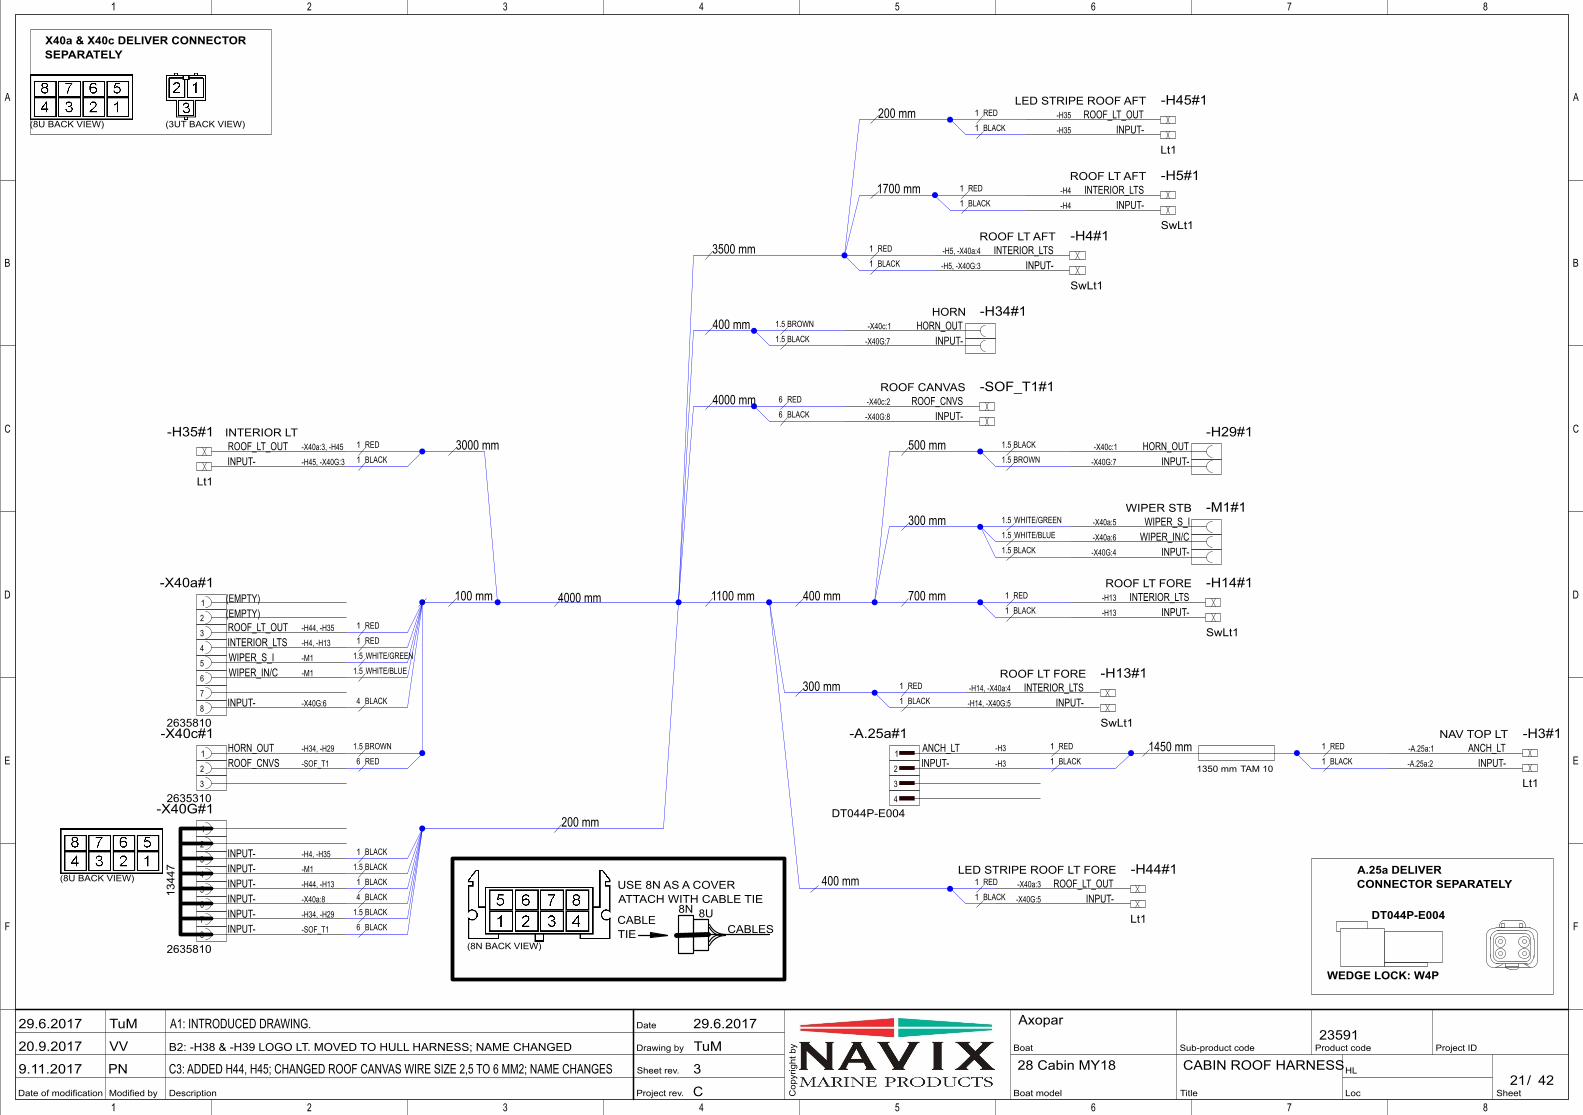
Project rev.
Sheet rev.
Drawing by
Date
Modified by Description
A
B
C
D
E
F
1 2 3 4 5 6 7 8
Date of modification SheetLoc
HL/
Project IDBoat
Boat model
Product code
Cop
yrig
ht b
y Sub-product code
Title
1 2 3 4 5 6 7 8
A
B
C
D
E
F
4228 Cabin MY18
AxoparA1: INTRODUCED DRAWING.
B2: -H38 & -H39 LOGO LT. MOVED TO HULL HARNESS; NAME CHANGED
C3: ADDED H44, H45; CHANGED ROOF CANVAS WIRE SIZE 2,5 TO 6 MM2; NAME CHANGES
TuM
VV
PN
29.6.2017
TuM
3
C
29.6.2017
20.9.2017
9.11.201721
23591
CABIN ROOF HARNESS
(8N BACK VIEW)
INTERIOR_LTS-H5, -X40a:4-H4#1ROOF LT AFT
INPUT--H5, -X40G:3
SwLt1
INTERIOR_LTS-H4-H5#1ROOF LT AFT
INPUT--H4
SwLt1
INTERIOR_LTS-H14, -X40a:4-H13#1ROOF LT FORE
INPUT--H14, -X40G:5
SwLt1
INTERIOR_LTS-H13-H14#1ROOF LT FORE
INPUT--H13
SwLt1
ANCH_LT-A.25a:1-H3#1NAV TOP LT
INPUT--A.25a:2
Lt1
WIPER_IN/C-X40a:6
INPUT--X40G:4
WIPER_S_I-X40a:5-M1#1WIPER STB
HORN_OUT-X40c:1-H34#1HORN
INPUT--X40G:7
ROOF_LT_OUT -X40a:3, -H45-H35#1 INTERIOR LT
INPUT- -H45, -X40G:3
Lt1
HORN_OUT-X40c:1-H29#1
INPUT--X40G:7
1 HORN_OUT -H34, -H29-X40c#1
(3UT BACK VIEW)
2 ROOF_CNVS -SOF_T1
3
2635310
1
-X40G#1
(8U BACK VIEW)
2
3 INPUT- -H4, -H35
4 INPUT- -M1
5 INPUT- -H44, -H13
6 INPUT- -X40a:8
7 INPUT- -H34, -H29
8 INPUT- -SOF_T1
2635810
1
-X40a#1
2
3 ROOF_LT_OUT -H44, -H35
(8U BACK VIEW)
4 INTERIOR_LTS -H4, -H13
5 WIPER_S_I -M1
6 WIPER_IN/C -M1
7
8 INPUT- -X40G:6
2635810
1 ANCH_LT -H3-A.25a#1
2 INPUT- -H3
3
4
DT044P-E004
INPUT--X40G:5
Lt1
ROOF_LT_OUT-X40a:3-H44#1LED STRIPE ROOF LT FORE
INPUT--H35
Lt1
ROOF_LT_OUT-H35-H45#1LED STRIPE ROOF AFT
INPUT--X40G:8
ROOF_CNVS-X40c:2-SOF_T1#1ROOF CANVAS
USE 8N AS A COVERATTACH WITH CABLE TIE
CABLES8U8N
CABLETIE
1344
7
X40a & X40c DELIVER CONNECTORSEPARATELY
DT044P-E004
A.25a DELIVERCONNECTOR SEPARATELY
(EMPTY)(EMPTY)
WEDGE LOCK: W4P
1100 mm
300 mm
400 mm 700 mm
300 mm
1 RED
1 RED
1.5 WHITE/GREEN
1.5 WHITE/BLUE
4 BLACK
1 BLACK
1.5 BLACK
1 BLACK
4 BLACK
1 RED
1 BLACK
1.5 WHITE/GREEN
1.5 WHITE/BLUE
1.5 BLACK
1 RED
1 BLACK
1 RED
1 BLACK
1 BLACK
1 RED1700 mm
1 RED 1450 mm1 BLACK
1 RED
1 BLACK
1.5 BLACK
1.5 BROWN
1.5 BLACK
1.5 BROWN
TAM 101350 mm
400 mm1.5 BLACK
1.5 BROWN
500 mm
4000 mm100 mm
3000 mm1 BLACK
1 RED
200 mm
6 RED
4000 mm6 BLACK
6 BLACK
3500 mm
1 RED
1 BLACK
1 RED
1 BLACK200 mm
400 mm
6 RED
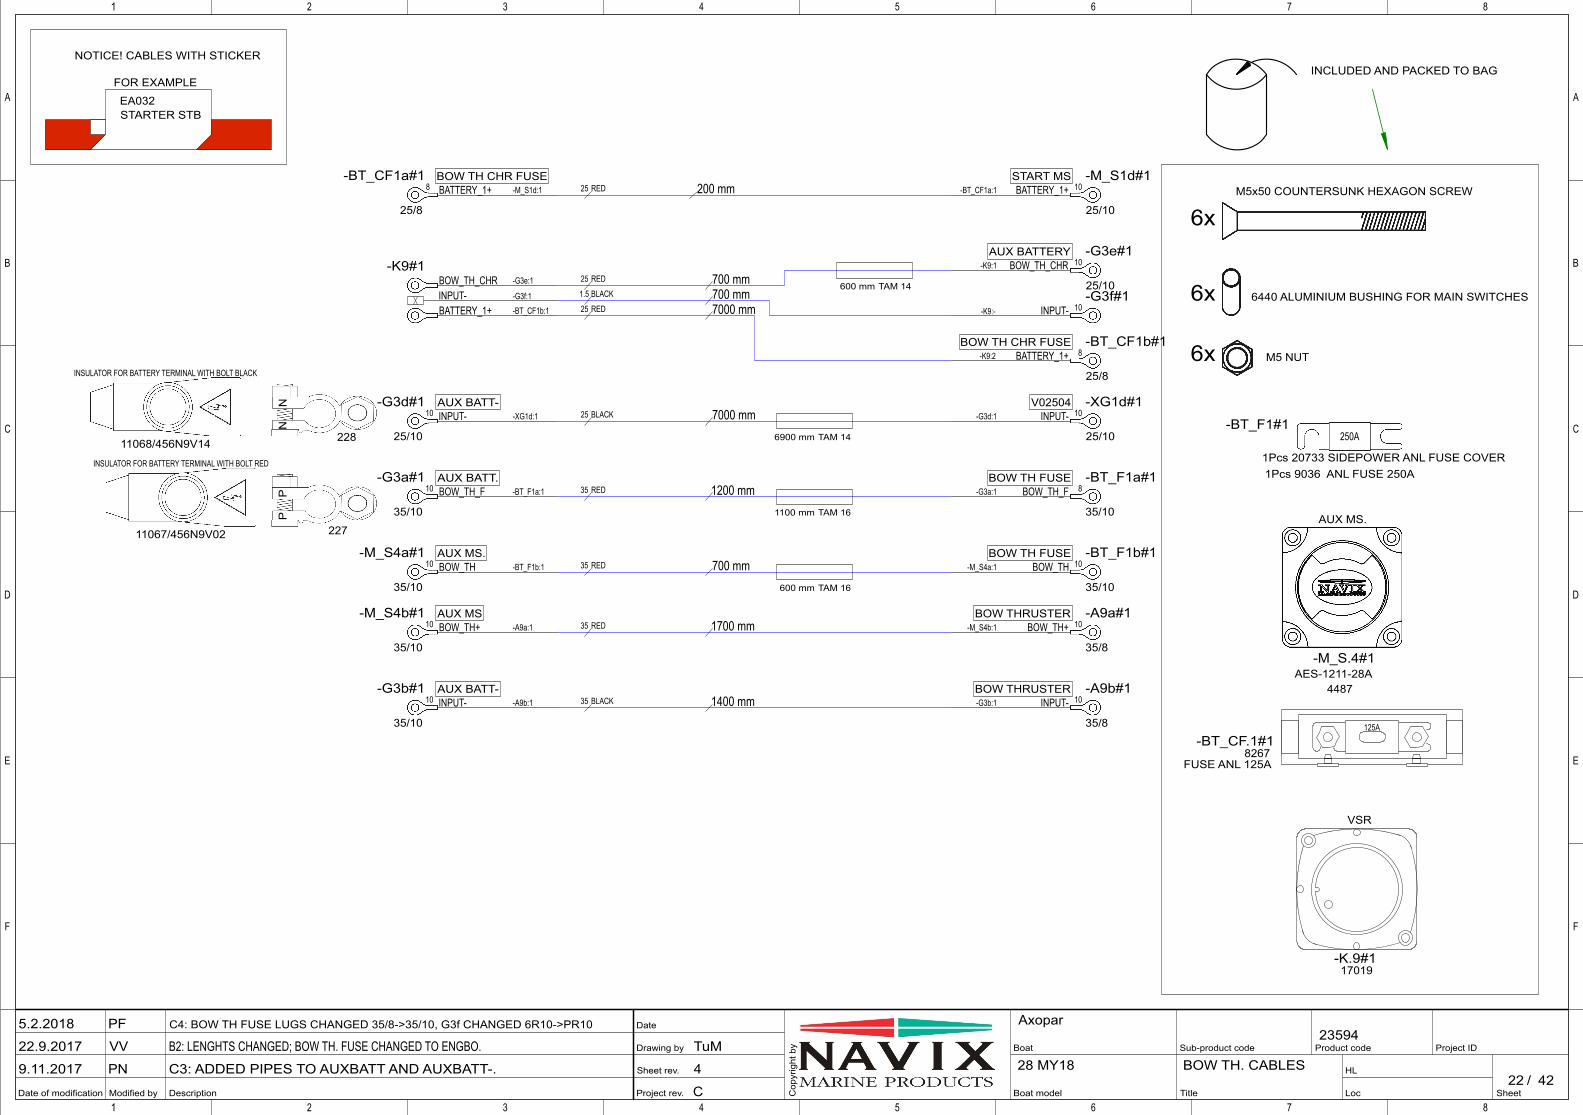
Project rev.
Sheet rev.
Drawing by
Date
Modified by Description
A
B
C
D
E
F
1 2 3 4 5 6 7 8
Date of modification SheetLoc
HL/
Project IDBoat
Boat model
Product code
Cop
yrig
ht b
y Sub-product code
Title
1 2 3 4 5 6 7 8
A
B
C
D
E
F
4228 MY18
AxoparC4: BOW TH FUSE LUGS CHANGED 35/8->35/10, G3f CHANGED 6R10->PR10
B2: LENGHTS CHANGED; BOW TH. FUSE CHANGED TO ENGBO.
C3: ADDED PIPES TO AUXBATT AND AUXBATT-.
PF
VV
PN
TuM
4
C
5.2.2018
22.9.2017
9.11.201722
23594
BOW TH. CABLES
10
10
10
10
8
8 10
810
10
10
10
10
10 10-BT_F1#1
250A
AES-1211-28A-M_S.4#1
AUX MS.
17019-K.9#1
INPUT--K9:--G3f#1
FUSE ANL 125A
-BT_CF.1#1125A
11067/456N9V02
INSULATOR FOR BATTERY TERMINAL WITH BOLT RED
11068/456N9V14
INSULATOR FOR BATTERY TERMINAL WITH BOLT BLACK
INPUT--G3d:1
25/10
-XG1d#1V02504INPUT- -XG1d:1
25/10
-G3d#1 AUX BATT-
BOW_TH_CHR-K9:1
25/10
-G3e#1AUX BATTERY
BATTERY_1+-BT_CF1a:1
25/10
-M_S1d#1START MS
BATTERY_1+-K9:2
25/8
-BT_CF1b#1BOW TH CHR FUSE
BATTERY_1+ -M_S1d:1
25/8
-BT_CF1a#1 BOW TH CHR FUSE
INPUT- -A9b:1
35/10
-G3b#1 AUX BATT-
BOW_TH_F -BT_F1a:1
35/10
-G3a#1 AUX BATT.
BOW_TH+ -A9a:1
35/10
-M_S4b#1 AUX MS
BOW_TH -BT_F1b:1
35/10
-M_S4a#1 AUX MS.
BOW_TH+-M_S4b:1
35/8
-A9a#1BOW THRUSTER
INPUT--G3b:1
35/8
-A9b#1BOW THRUSTER
BOW_TH_F-G3a:1
35/10
-BT_F1a#1BOW TH FUSE
BOW_TH-M_S4a:1
35/10
-BT_F1b#1BOW TH FUSE
BOW_TH_CHR -G3e:1-K9#1
INPUT- -G3f:1
BATTERY_1+ -BT_CF1b:1
NOTICE! CABLES WITH STICKER
EA032STARTER STB
FOR EXAMPLE
M5x50 COUNTERSUNK HEXAGON SCREW
6440 ALUMINIUM BUSHING FOR MAIN SWITCHES
M5 NUT
6x
6x
6x
INCLUDED AND PACKED TO BAG
4487
VSR
1Pcs 9036 ANL FUSE 250A1Pcs 20733 SIDEPOWER ANL FUSE COVER
8267
PP
227
NN
228
35 RED 1700 mm
35 BLACK 1400 mm
35 RED
35 RED 1200 mm
25 RED 200 mm
25 RED 7000 mm1.5 BLACK 700 mm25 RED 700 mm
25 BLACK 7000 mm
TAM 161100 mm
TAM 146900 mm
700 mmTAM 16600 mm
TAM 14600 mm
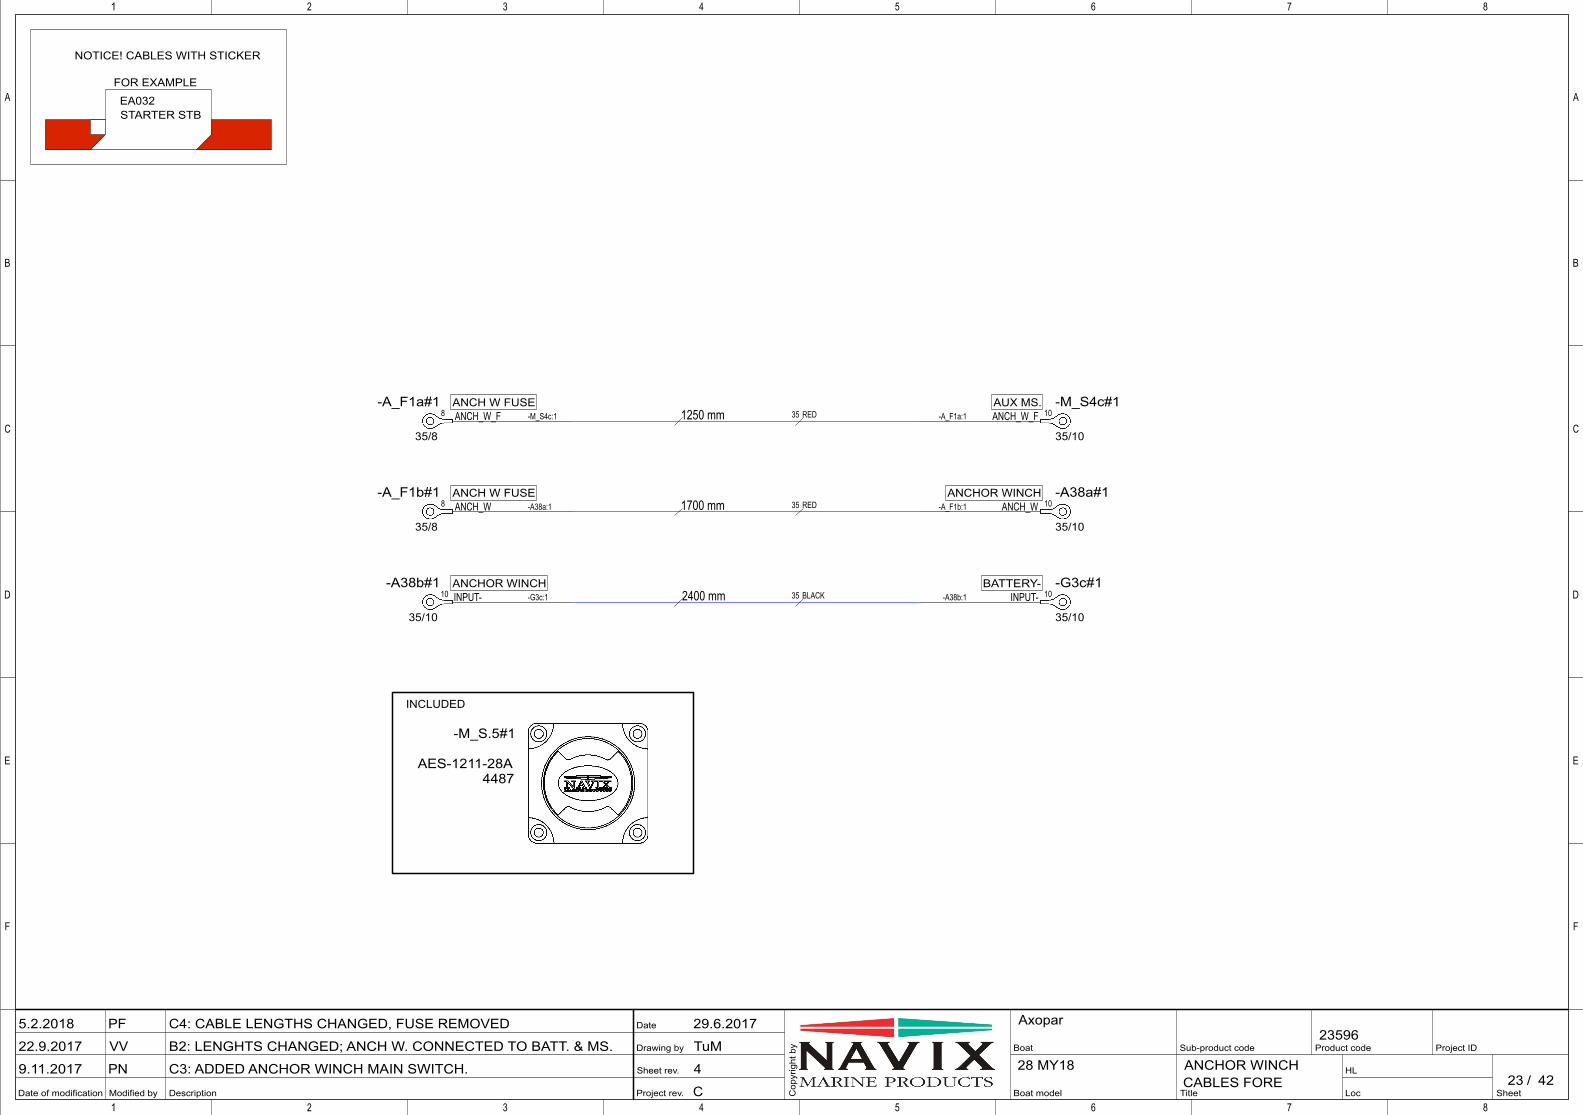
Project rev.
Sheet rev.
Drawing by
Date
Modified by Description
A
B
C
D
E
F
1 2 3 4 5 6 7 8
Date of modification SheetLoc
HL/
Project IDBoat
Boat model
Product code
Cop
yrig
ht b
y Sub-product code
Title
1 2 3 4 5 6 7 8
A
B
C
D
E
F
4228 MY18
AxoparC4: CABLE LENGTHS CHANGED, FUSE REMOVED
B2: LENGHTS CHANGED; ANCH W. CONNECTED TO BATT. & MS.
C3: ADDED ANCHOR WINCH MAIN SWITCH.
PF
VV
PN
29.6.2017
TuM
4
C
5.2.2018
22.9.2017
9.11.201723
23596
ANCHOR WINCHCABLES FORE
10
8
8 10
10
10
ANCH_W-A_F1b:1
35/10
-A38a#1ANCHOR WINCH
INPUT- -G3c:1
35/10
-A38b#1 ANCHOR WINCHINPUT--A38b:1
35/10
-G3c#1BATTERY-
ANCH_W_F-A_F1a:1
35/10
-M_S4c#1AUX MS.ANCH_W_F -M_S4c:1
35/8
-A_F1a#1 ANCH W FUSE
ANCH_W -A38a:1
35/8
-A_F1b#1 ANCH W FUSE
AES-1211-28A
-M_S.5#1
4487
NOTICE! CABLES WITH STICKER
EA032STARTER STB
FOR EXAMPLE
I0
INCLUDED
35 RED1250 mm
35 RED1700 mm
35 BLACK2400 mm
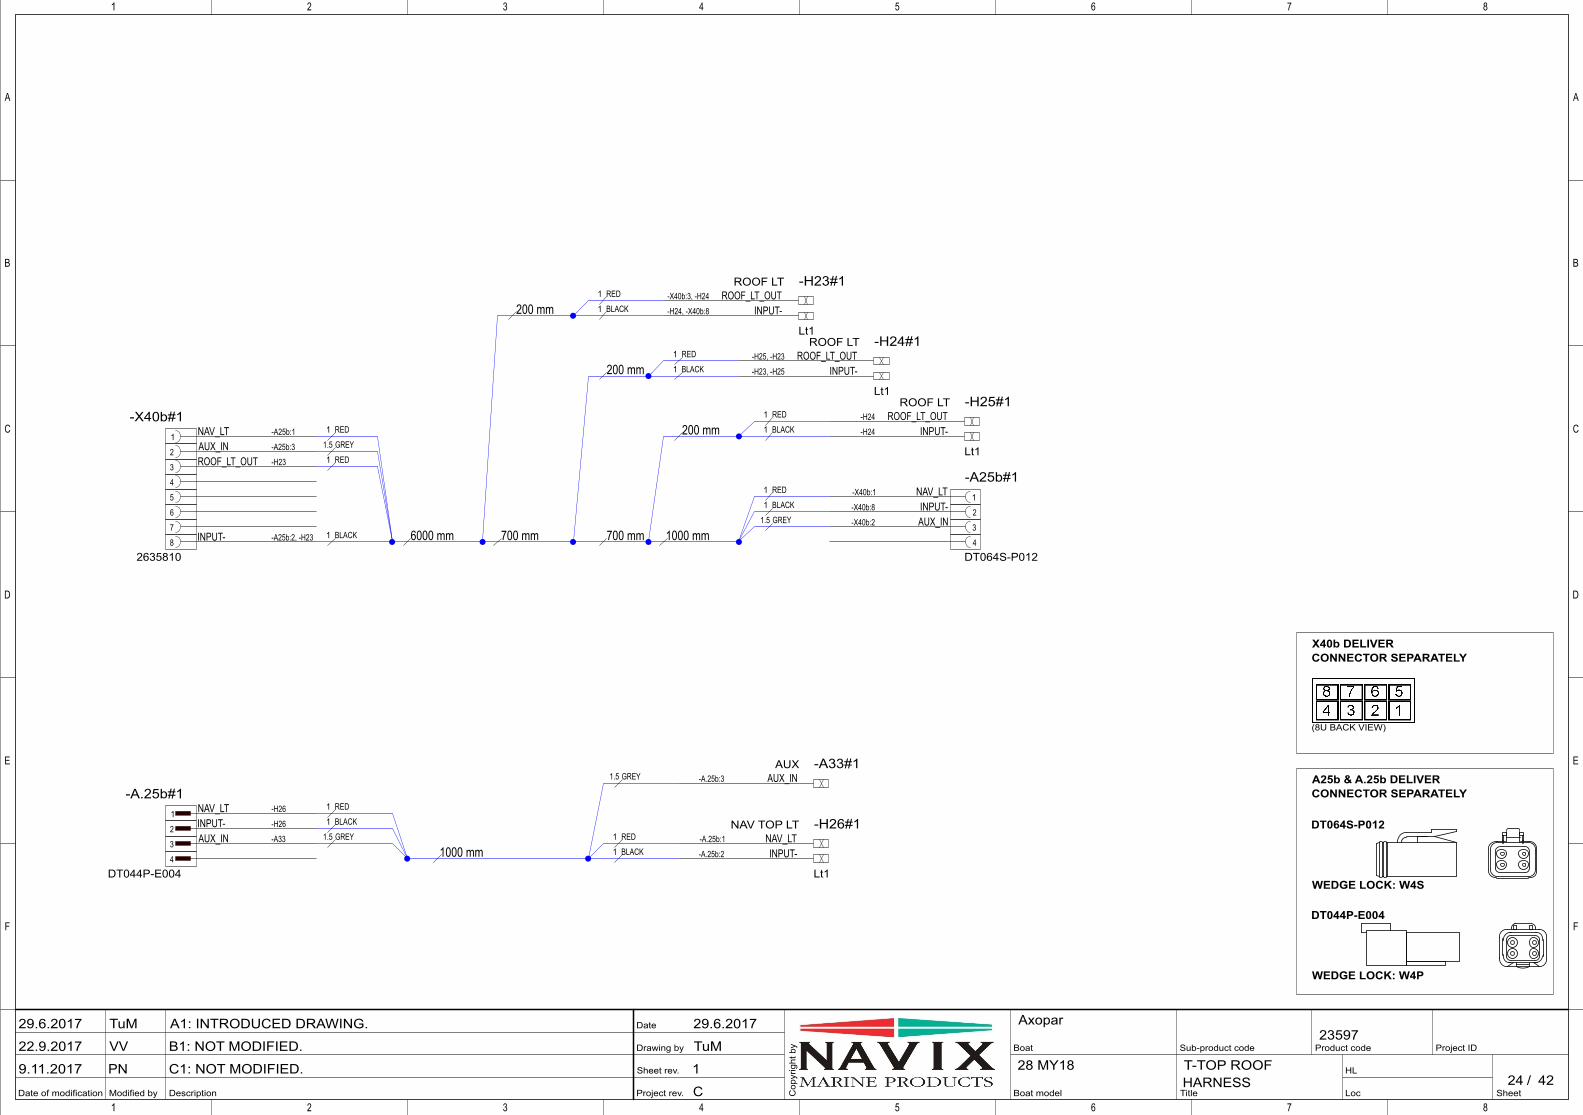
Project rev.
Sheet rev.
Drawing by
Date
Modified by Description
A
B
C
D
E
F
1 2 3 4 5 6 7 8
Date of modification SheetLoc
HL/
Project IDBoat
Boat model
Product code
Cop
yrig
ht b
y Sub-product code
Title
1 2 3 4 5 6 7 8
A
B
C
D
E
F
4228 MY18
AxoparA1: INTRODUCED DRAWING.
B1: NOT MODIFIED.
C1: NOT MODIFIED.
TuM
VV
PN
29.6.2017
TuM
1
C
29.6.2017
22.9.2017
9.11.201724
23597
T-TOP ROOFHARNESS
ROOF_LT_OUT-X40b:3, -H24-H23#1ROOF LT
INPUT--H24, -X40b:8
Lt1
ROOF_LT_OUT-H25, -H23-H24#1ROOF LT
INPUT--H23, -H25
Lt1
ROOF_LT_OUT-H24-H25#1ROOF LT
INPUT--H24
Lt1
NAV_LT-A.25b:1-H26#1NAV TOP LT
INPUT--A.25b:2
Lt1
AUX_IN-A.25b:3-A33#1AUX
1 NAV_LT -A25b:1-X40b#1
2 AUX_IN -A25b:3
3 ROOF_LT_OUT -H23
(8U BACK VIEW)
4
5
6
7
8 INPUT- -A25b:2, -H23
2635810
1 NAV_LT -H26-A.25b#1
2 INPUT- -H26
3 AUX_IN -A33
4
DT044P-E004
1NAV_LT-X40b:1-A25b#1
2INPUT--X40b:8
3AUX_IN-X40b:2
4
DT064S-P012
A25b & A.25b DELIVERCONNECTOR SEPARATELY
X40b DELIVERCONNECTOR SEPARATELY
DT044P-E004
DT064S-P012
WEDGE LOCK: W4S
WEDGE LOCK: W4P
6000 mm
1000 mm
200 mm
700 mm
200 mm
700 mm
200 mm
1000 mm
1 RED
1.5 GREY
1 RED
1 BLACK
1 RED
1 BLACK
1 RED
1 BLACK
1 RED
1 BLACK
1 RED
1 BLACK
1.5 GREY
1 RED
1 BLACK
1.5 GREY
1.5 GREY
1 RED
1 BLACK
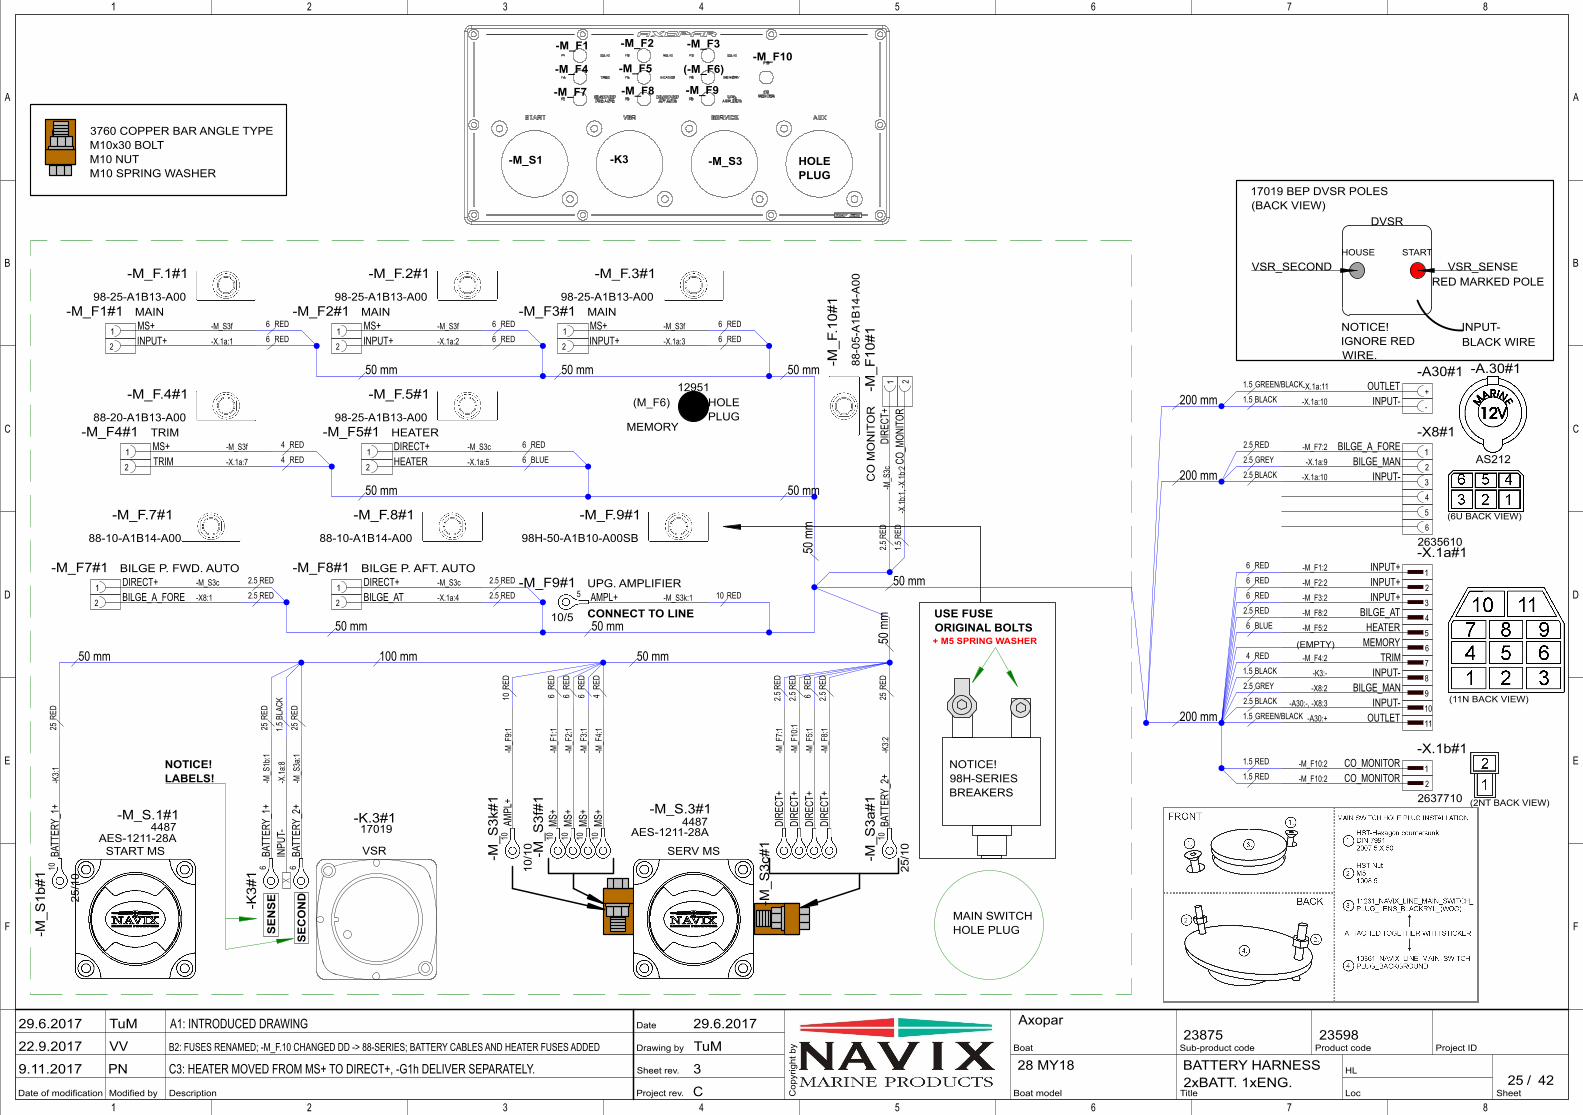
Project rev.
Sheet rev.
Drawing by
Date
Modified by Description
A
B
C
D
E
F
1 2 3 4 5 6 7 8
Date of modification SheetLoc
HL/
Project IDBoat
Boat model
Product code
Cop
yrig
ht b
y Sub-product code
Title
1 2 3 4 5 6 7 8
A
B
C
D
E
F
4228 MY18
AxoparA1: INTRODUCED DRAWING
B2: FUSES RENAMED; -M_F.10 CHANGED DD -> 88-SERIES; BATTERY CABLES AND HEATER FUSES ADDED
C3: HEATER MOVED FROM MS+ TO DIRECT+, -G1h DELIVER SEPARATELY.
TuM
VV
PN
29.6.2017
TuM
3
C
29.6.2017
22.9.2017
9.11.201725
2359823875
BATTERY HARNESS2xBATT. 1xENG.
6 610
5
10 10 10 1010 10AES-1211-28A
-M_S.1#1
START MS
AES-1211-28A
-M_S.3#1
SERV MS
98-25-A1B13-A00
-M_F.1#1
98-25-A1B13-A00
-M_F.2#1
98-25-A1B13-A00
-M_F.3#1
88-10-A1B14-A00
-M_F.8#1
88-20-A1B13-A00
-M_F.4#1
98H-50-A1B10-A00SB
-M_F.9#1
17019-K.3#1
AS212
-A.30#1
MS+
-M_F
1:1-M
_S3f
#1
MS+
-M_F
2:1
MS+
-M_F
3:1
MS+
-M_F
4:1
88-10-A1B14-A00
-M_F.7#1
88-0
5-A
1B14
-A00
-M_F
.10#
1
98-25-A1B13-A00
-M_F.5#1
AMPL
+-M
_F9:1
10/1
0
-M_S
3k#1
AMPL+ -M_S3k:1
10/5
-M_F9#1 UPG. AMPLIFIER
BATT
ERY_
1+-K
3:1
25/1
0
-M_S
1b#1
BATT
ERY_
2+-K
3:2
25/1
0
-M_S
3a#1
1BILGE_A_FORE-M_F7:2-X8#1
2BILGE_MAN-X.1a:9
3INPUT--X.1a:10
4
5
6
2635610
1CO_MONITOR-M_F10:2-X.1b#1
(2NT BACK VIEW)
2CO_MONITOR-M_F10:2
2637710
1INPUT+-M_F1:2-X.1a#1
2INPUT+-M_F2:2
3INPUT+-M_F3:2
4BILGE_AT-M_F8:2
5HEATER-M_F5:2
6MEMORY
(11N BACK VIEW)
7TRIM-M_F4:2
8INPUT--K3:-
9BILGE_MAN-X8:2
10INPUT--A30:-, -X8:3
11OUTLET-A30:+
1 MS+ -M_S3f-M_F1#1 MAIN
2 INPUT+ -X.1a:11 MS+ -M_S3f
-M_F2#1 MAIN
2 INPUT+ -X.1a:21 MS+ -M_S3f
-M_F3#1 MAIN
2 INPUT+ -X.1a:3
1 DIRECT+ -M_S3c-M_F8#1 BILGE P. AFT. AUTO
2 BILGE_AT -X.1a:4
1 DIRECT+ -M_S3c-M_F5#1 HEATER
2 HEATER -X.1a:51 MS+ -M_S3f
-M_F4#1 TRIM
2 TRIM -X.1a:7
1 DIRECT+ -M_S3c-M_F7#1 BILGE P. FWD. AUTO
2 BILGE_A_FORE -X8:1
1DI
RECT
+-M
_S3c
-M_F
10#1
CO
MO
NIT
OR
2CO
_MON
ITOR
-X.1b
:1, -X
.1b:2
+OUTLET-X.1a:11-A30#1
-INPUT--X.1a:10
BATT
ERY_
1+-M
_S1b
:1-K
3#1
INPU
T--X
.1a:8
BATT
ERY_
2+-M
_S3a
:1
DIRE
CT+
-M_F
7:1-M
_S3c
#1
DIRE
CT+
-M_F
10:1
DIRE
CT+
-M_F
5:1
DIRE
CT+
-M_F
8:1
(EMPTY)
MEMORY
(M_F6) HOLEPLUG
3760 COPPER BAR ANGLE TYPEM10x30 BOLTM10 NUTM10 SPRING WASHER
VSR
SE
NS
E
SE
CO
ND
NOTICE!LABELS!
CONNECT TO LINE
MAIN SWITCHHOLE PLUG
NOTICE!98H-SERIESBREAKERS
USE FUSEORIGINAL BOLTS
NOTICE!IGNORE REDWIRE.
INPUT-BLACK WIRE
VSR_SENSEVSR_SECOND
DVSR
17019 BEP DVSR POLES(BACK VIEW)
RED MARKED POLE
STARTHOUSE
-M_S1 -K3 -M_S3 HOLEPLUG
-M_F1
-M_F7
-M_F3
-M_F9
-M_F4 (-M_F6)
-M_F8
(6U BACK VIEW)
+ M5 SPRING WASHER
12951
-M_F10
4487 4487
-M_F2
-M_F5
2.5 GREY
2.5 BLACK
6 RED
6 RED
6 RED
2.5 RED
4 RED
1.5 BLACK
2.5 GREY
2.5 BLACK
1.5 GREEN/BLACK
25RE
D
25RE
D
1.5BL
ACK
25RE
D
50 mm 100 mm 50 mm
50 mm50 mm50 mm
200 mm
200 mm
200 mm
1.5 GREEN/BLACK
1.5 BLACK
50 m
m
50 m
m
6 RED
6 RED
2.5 RED
2.5 RED
4 RED
4 RED
6 RED
6 RED
6 RED
6 RED
50 mm
50 mm
6RE
D
6RE
D
6RE
D
10RE
D
4RE
D
25RE
D
2.5 RED
2.5 RED
2.5 RED
2.5RE
D
1.5 RED
2.5RE
D
2.5RE
D
1.5RE
D
1.5 RED
6 RED
6 BLUE
50 mm
50 mm 50 mm 6 BLUE
10 RED
6RE
D
2.5RE
D
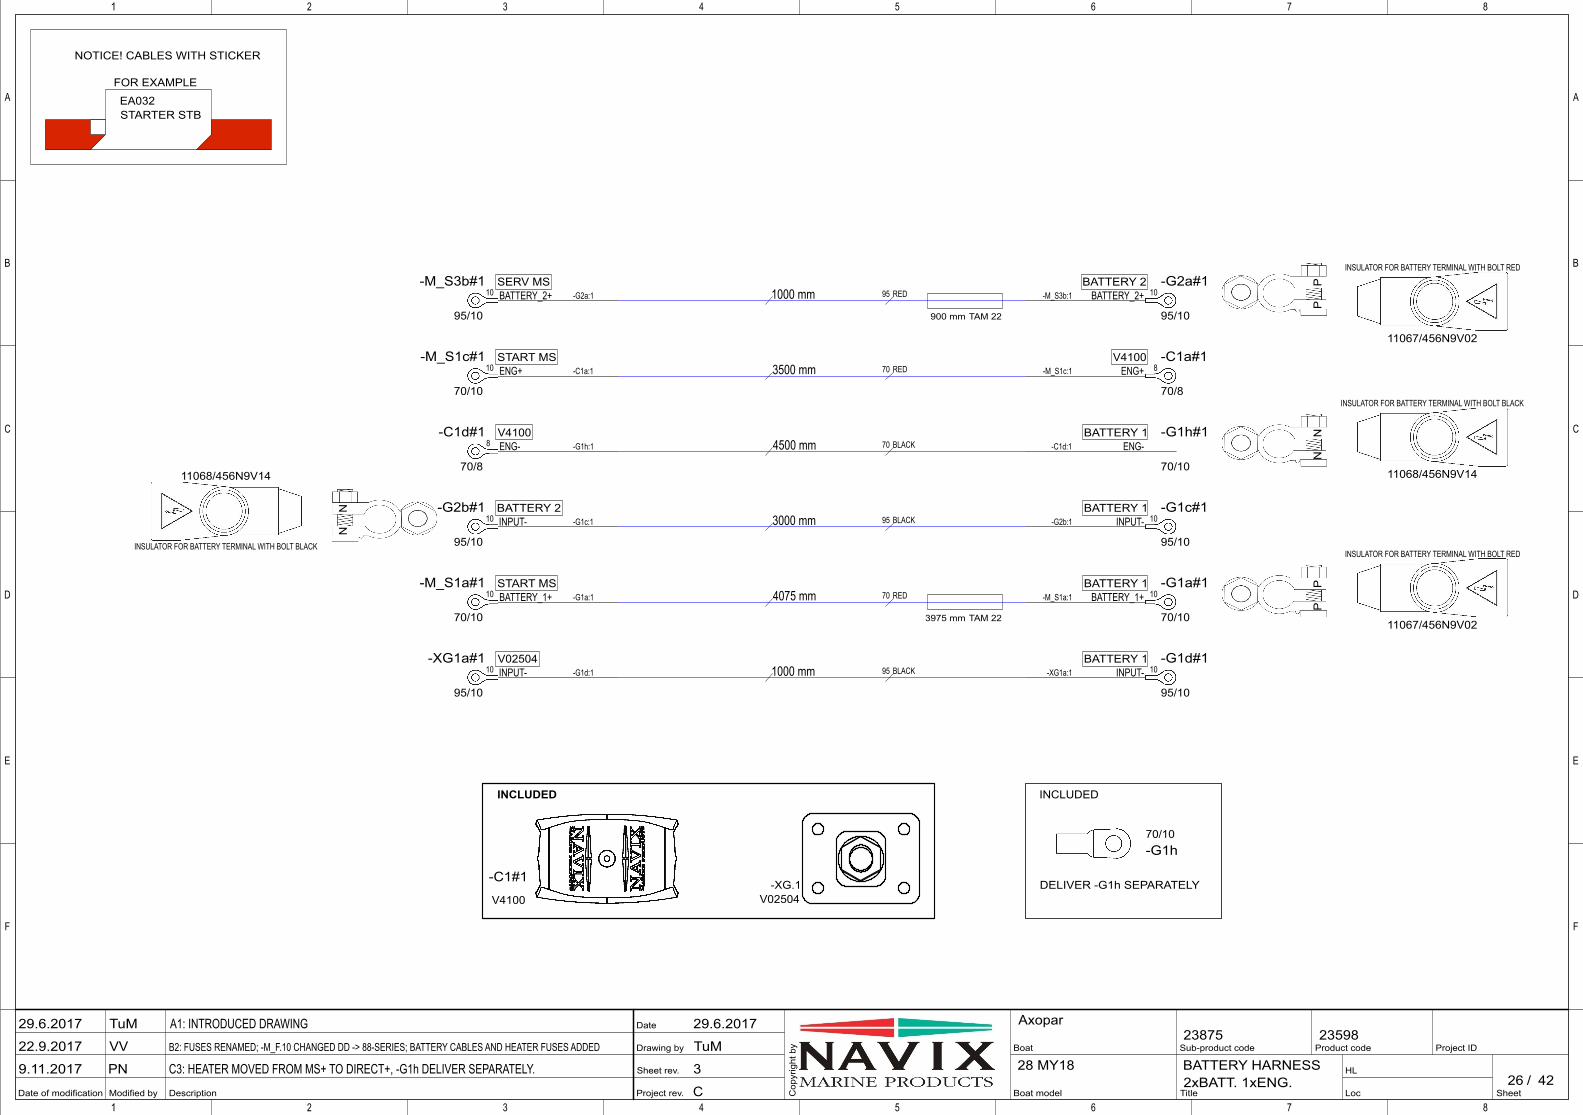
Project rev.
Sheet rev.
Drawing by
Date
Modified by Description
A
B
C
D
E
F
1 2 3 4 5 6 7 8
Date of modification SheetLoc
HL/
Project IDBoat
Boat model
Product code
Cop
yrig
ht b
y Sub-product code
Title
1 2 3 4 5 6 7 8
A
B
C
D
E
F
4228 MY18
AxoparA1: INTRODUCED DRAWING
B2: FUSES RENAMED; -M_F.10 CHANGED DD -> 88-SERIES; BATTERY CABLES AND HEATER FUSES ADDED
C3: HEATER MOVED FROM MS+ TO DIRECT+, -G1h DELIVER SEPARATELY.
TuM
VV
PN
29.6.2017
TuM
3
C
29.6.2017
22.9.2017
9.11.201726
2359823875
BATTERY HARNESS2xBATT. 1xENG.
10 10
10 8
8
10 10
10 10
10 10
V4100
-C1#1
11067/456N9V02
INSULATOR FOR BATTERY TERMINAL WITH BOLT RED
11067/456N9V02
INSULATOR FOR BATTERY TERMINAL WITH BOLT RED
11068/456N9V14
INSULATOR FOR BATTERY TERMINAL WITH BOLT BLACK
11068/456N9V14
INSULATOR FOR BATTERY TERMINAL WITH BOLT BLACK
BATTERY_1+ -G1a:1
70/10
-M_S1a#1 START MSBATTERY_1+-M_S1a:1
70/10
-G1a#1BATTERY 1
ENG+ -C1a:1
70/10
-M_S1c#1 START MSENG+-M_S1c:1
70/8
-C1a#1V4100
ENG- -G1h:1
70/8
-C1d#1 V4100
BATTERY_2+ -G2a:1
95/10
-M_S3b#1 SERV MSBATTERY_2+-M_S3b:1
95/10
-G2a#1BATTERY 2
INPUT- -G1c:1
95/10
-G2b#1 BATTERY 2INPUT--G2b:1
95/10
-G1c#1BATTERY 1
INPUT- -G1d:1
95/10
-XG1a#1 V02504INPUT--XG1a:1
95/10
-G1d#1BATTERY 1
ENG--C1d:1
70/10
-G1h#1BATTERY 1
70/10-G1h
NOTICE! CABLES WITH STICKER
EA032STARTER STB
FOR EXAMPLE
INCLUDED
PP
NN
NN
PP
-XG.1V02504
DELIVER -G1h SEPARATELY
INCLUDED
95 RED1000 mm
70 RED3500 mm
70 BLACK4500 mm
95 BLACK3000 mm
70 RED4075 mm
95 BLACK1000 mm
TAM 223975 mm
TAM 22900 mm
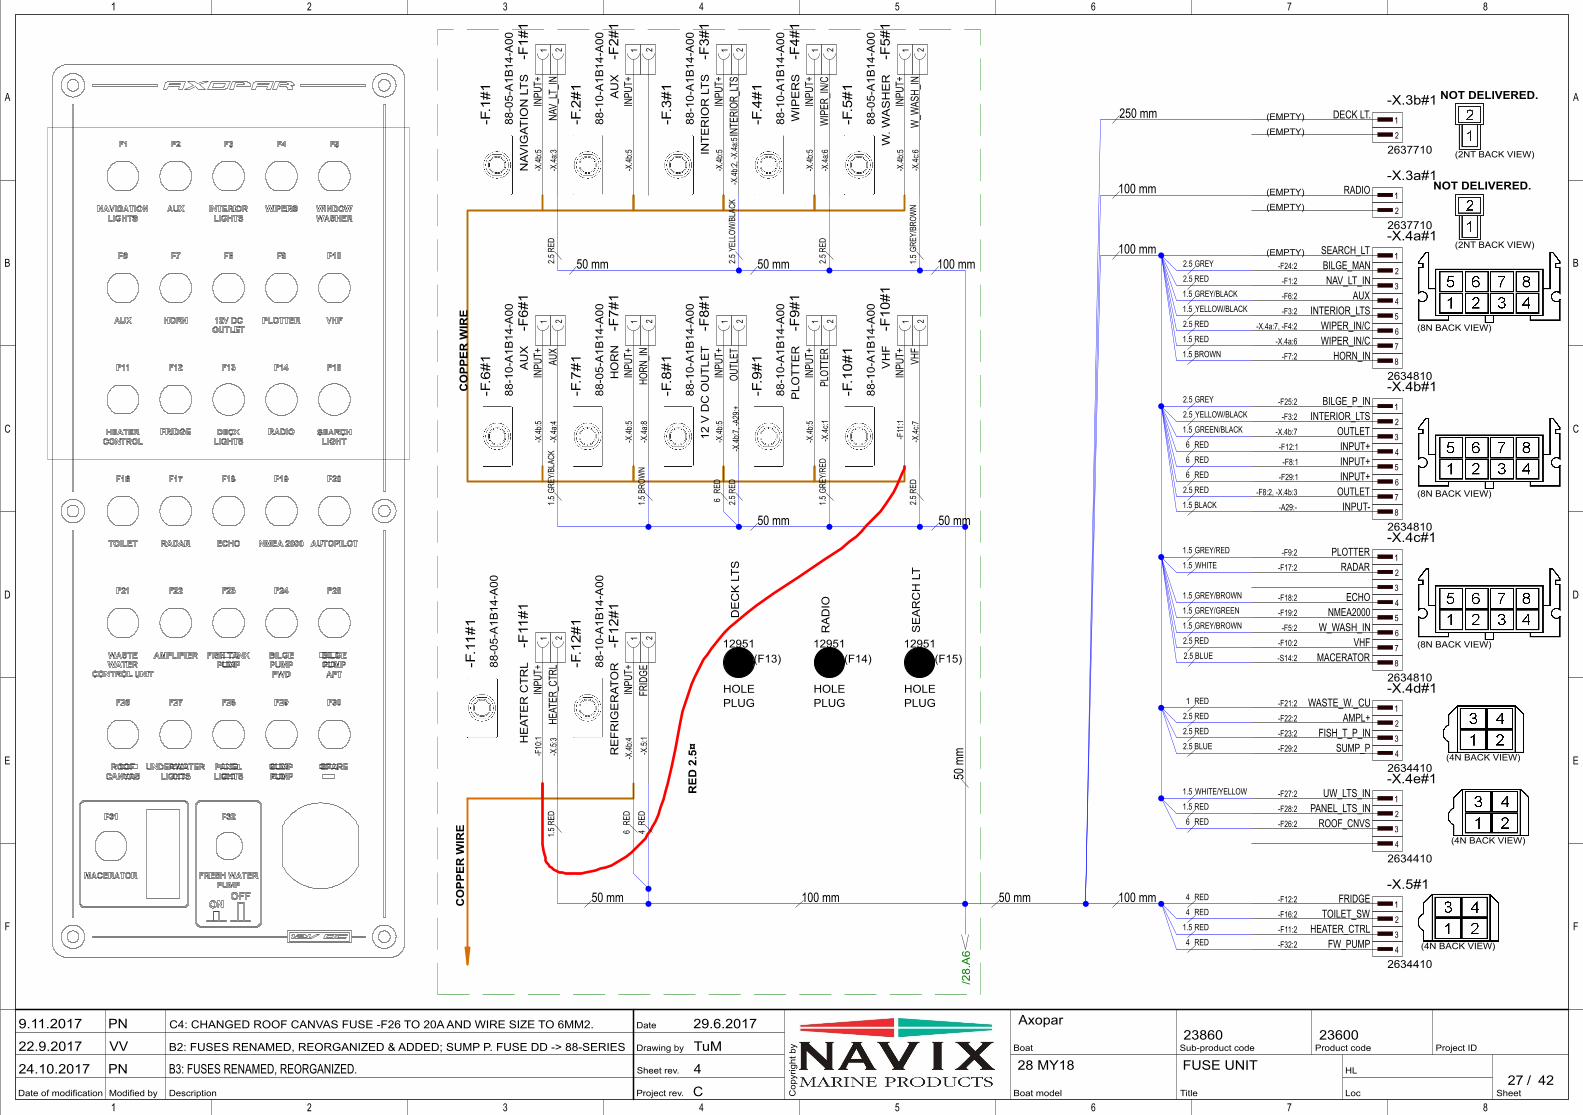
Project rev.
Sheet rev.
Drawing by
Date
Modified by Description
A
B
C
D
E
F
1 2 3 4 5 6 7 8
Date of modification SheetLoc
HL/
Project IDBoat
Boat model
Product code
Cop
yrig
ht b
y Sub-product code
Title
1 2 3 4 5 6 7 8
A
B
C
D
E
F
4228 MY18
AxoparC4: CHANGED ROOF CANVAS FUSE -F26 TO 20A AND WIRE SIZE TO 6MM2.
B2: FUSES RENAMED, REORGANIZED & ADDED; SUMP P. FUSE DD -> 88-SERIES
B3: FUSES RENAMED, REORGANIZED.
PN
VV
PN
29.6.2017
TuM
4
C
9.11.2017
22.9.2017
24.10.201727
2360023860
FUSE UNIT
/28.
A6
(4N BACK VIEW)
88-0
5-A
1B14
-A00
-F.1
#1
88-1
0-A
1B14
-A00
-F.3
#1
88-1
0-A
1B14
-A00
-F.4
#1
88-1
0-A
1B14
-A00
-F.6
#1
88-0
5-A
1B14
-A00
-F.5
#1
88-0
5-A
1B14
-A00
-F.7
#1
88-1
0-A
1B14
-A00
-F.8
#1
88-1
0-A
1B14
-A00
-F.9
#1
88-1
0-A
1B14
-A00
-F.1
0#1
88-0
5-A
1B14
-A00
-F.1
1#1
88-1
0-A
1B14
-A00
-F.1
2#1
88-1
0-A
1B14
-A00
-F.2
#1
1FRIDGE-F12:2-X.5#1
(4N BACK VIEW)
2TOILET_SW-F16:2
3HEATER_CTRL-F11:2
4FW_PUMP-F32:2
2634410
1WASTE_W._CU-F21:2-X.4d#1
2AMPL+-F22:2
3FISH_T_P_IN-F23:2
4SUMP_P-F29:2
2634410
1UW_LTS_IN-F27:2-X.4e#1
(4N BACK VIEW)
2PANEL_LTS_IN-F28:2
3ROOF_CNVS-F26:2
4
2634410
1SEARCH_LT-X.4a#1
(8N BACK VIEW)
2BILGE_MAN-F24:2
3NAV_LT_IN-F1:2
4AUX-F6:2
5INTERIOR_LTS-F3:2
6WIPER_IN/C-X.4a:7, -F4:2
7WIPER_IN/C-X.4a:6
8HORN_IN-F7:2
2634810
1BILGE_P_IN-F25:2-X.4b#1
2INTERIOR_LTS-F3:2
3OUTLET-X.4b:7
(8N BACK VIEW)
4INPUT+-F12:1
5INPUT+-F8:1
6INPUT+-F29:1
7OUTLET-F8:2, -X.4b:3
8INPUT--A29:-
2634810
1PLOTTER-F9:2-X.4c#1
2RADAR-F17:2
3
4ECHO-F18:2
(8N BACK VIEW)
5NMEA2000-F19:2
6W_WASH_IN-F5:2
7VHF-F10:2
8MACERATOR-S14:2
2634810
1RADIO-X.3a#1
2
2637710
1DECK LT.-X.3b#1
2
2637710
1IN
PUT+
-X.4b
:5-F
1#1
NAV
IGAT
ION
LT
S
2NA
V_LT
_IN-X
.4a:3
1IN
PUT+
-X.4b
:5-F
3#1
INTE
RIO
R L
TS
2IN
TERI
OR_L
TS-X
.4b:2,
-X.4a
:5
1IN
PUT+
-X.4b
:5-F
4#1
WIP
ER
S
2W
IPER
_IN/C
-X.4a
:6
1IN
PUT+
-X.4b
:5-F
6#1
AU
X
2AU
X-X
.4a:4
1IN
PUT+
-X.4b
:5-F
5#1
W. W
AS
HE
R
2W
_WAS
H_IN
-X.4c
:6
1IN
PUT+
-X.4b
:5-F
7#1
HO
RN
2HO
RN_IN
-X.4a
:8
1IN
PUT+
-X.4b
:5-F
8#1
12 V
DC
OU
TLE
T
2OU
TLET
-X.4b
:7, -A
29:+
1IN
PUT+
-X.4b
:5-F
9#1
PLO
TTE
R
2PL
OTTE
R-X
.4c:1
1IN
PUT+
-F10
:1-F
11#1
HE
ATE
R C
TRL
2HE
ATER
_CTR
L-X
.5:3
1IN
PUT+
-X.4b
:4-F
12#1
RE
FRIG
ER
ATO
R
2FR
IDGE
-X.5:
1
1IN
PUT+
-F11
:1-F
10#1
VH
F
2VH
F-X
.4c:7
1IN
PUT+
-X.4b
:5-F
2#1
AU
X
2
HOLEPLUG
HOLEPLUG
HOLEPLUG
(EMPTY)
DE
CK
LTS
RA
DIO
SE
AR
CH
LT
(F13) (F14) (F15)
CO
PPER
WIR
E
NOT DELIVERED.
12951 12951 12951
(2NT BACK VIEW)
(EMPTY)
(EMPTY)
(2NT BACK VIEW)
(2NT BACK VIEW)
NOT DELIVERED.
(EMPTY)
(EMPTY)
CO
PPER
WIR
E
RE
D 2
.5¤
50 mm 100 mm
100 mm
100 mm
2.5RE
D
1.5BR
OWN
2.5RE
D
2.5 RED
1.5 GREY/BLACK
1.5 YELLOW/BLACK
2.5 RED
2.5 GREY
2.5 YELLOW/BLACK
6 RED
6 RED
6 RED
2.5 RED
1.5 BLACK
1.5 GREEN/BLACK
1.5 GREY/RED
1.5 WHITE
1.5 GREY/BROWN
1.5 GREY/GREEN
1.5GR
EY/R
ED
2.5 GREY50 mm
50 mm
100 mm50 mm
50 mm
2.5 RED
2.5 BLUE
2.5RE
D
6RE
D
1 RED
2.5 RED
2.5 RED
1.5 WHITE/YELLOW
1.5 RED
6 RED
50 m
m
100 mm50 mm
250 mm
2.5YE
LLOW
/BLA
CK
2.5RE
D
4 RED
4 RED
1.5 RED
4 RED
4RE
D
6RE
D
1.5RE
D
2.5 BLUE
1.5 RED
1.5 BROWN
1.5GR
EY/B
LACK
1.5 GREY/BROWN
1.5GR
EY/B
ROW
N
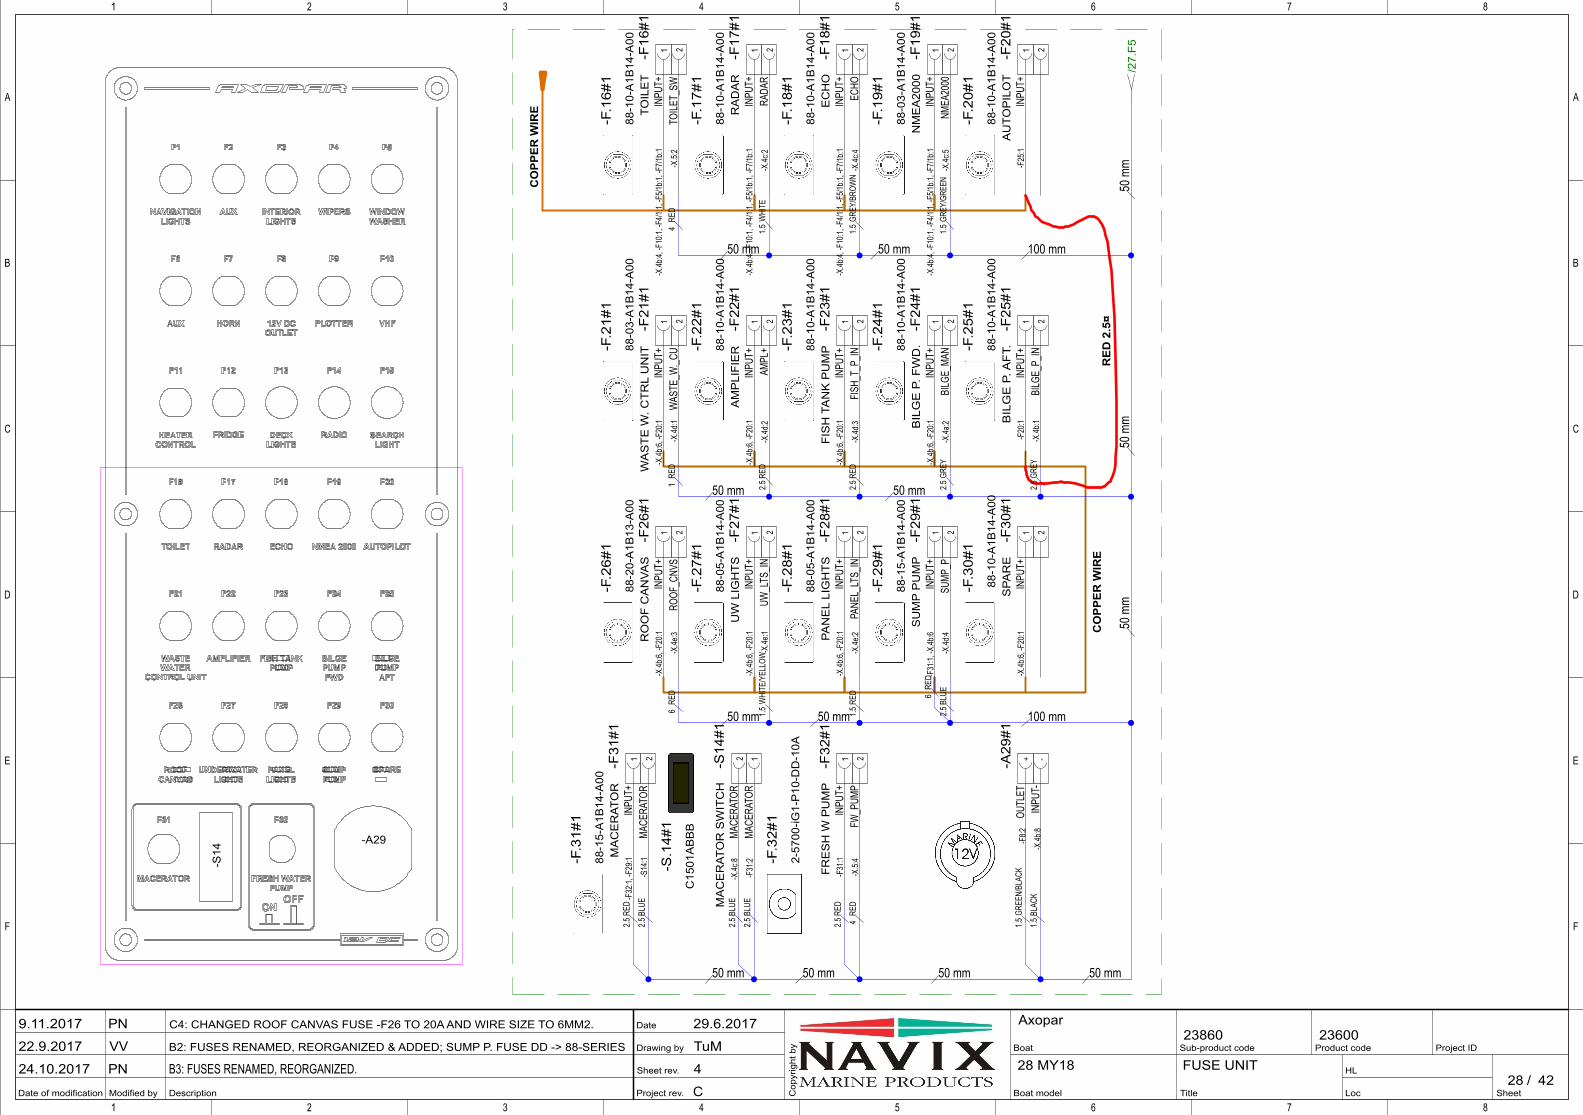
Project rev.
Sheet rev.
Drawing by
Date
Modified by Description
A
B
C
D
E
F
1 2 3 4 5 6 7 8
Date of modification SheetLoc
HL/
Project IDBoat
Boat model
Product code
Cop
yrig
ht b
y Sub-product code
Title
1 2 3 4 5 6 7 8
A
B
C
D
E
F
4228 MY18
AxoparC4: CHANGED ROOF CANVAS FUSE -F26 TO 20A AND WIRE SIZE TO 6MM2.
B2: FUSES RENAMED, REORGANIZED & ADDED; SUMP P. FUSE DD -> 88-SERIES
B3: FUSES RENAMED, REORGANIZED.
PN
VV
PN
29.6.2017
TuM
4
C
9.11.2017
22.9.2017
24.10.201728
2360023860
FUSE UNIT
/27.
F5
88-0
3-A
1B14
-A00
-F.2
1#1
88-1
5-A
1B14
-A00
-F.3
1#1
88-1
0-A
1B14
-A00
-F.2
3#1
88-1
0-A
1B14
-A00
-F.2
2#1
88-1
0-A
1B14
-A00
-F.2
4#1
C15
01A
BB
B
-S.1
4#1
88-2
0-A
1B13
-A00
-F.2
6#1
88-0
5-A
1B14
-A00
-F.2
7#1
88-0
5-A
1B14
-A00
-F.2
8#1
88-1
0-A
1B14
-A00
-F.3
0#1
88-1
0-A
1B14
-A00
-F.1
7#1
88-1
0-A
1B14
-A00
-F.1
8#1
88-0
3-A
1B14
-A00
-F.1
9#1
88-1
0-A
1B14
-A00
-F.2
0#1
88-1
0-A
1B14
-A00
-F.1
6#1
88-1
0-A
1B14
-A00
-F.2
5#1
88-1
5-A
1B14
-A00
-F.2
9#1
2-57
00-iG
1-P
10-D
D-1
0A
-F.3
2#1
1IN
PUT+
-F20
:1-F
25#1
BIL
GE
P. A
FT.
2BI
LGE_
P_IN
-X.4b
:1
1IN
PUT+
-F31
:1-F
32#1
FRE
SH
W P
UM
P
2FW
_PUM
P-X
.5:4
1IN
PUT+
-X.4b
:4, -F
10:1,
-F4/1
:1, -F
5/1b:1
, -F7
/1b:1
-F16
#1TO
ILE
T
2TO
ILET_
SW-X
.5:2
1IN
PUT+
-X.4b
:4, -F
10:1,
-F4/1
:1, -F
5/1b:1
, -F7
/1b:1
-F17
#1R
AD
AR
2RA
DAR
-X.4c
:2
1IN
PUT+
-X.4b
:4, -F
10:1,
-F4/1
:1, -F
5/1b:1
, -F7
/1b:1
-F18
#1E
CH
O
2EC
HO-X
.4c:4
1IN
PUT+
-X.4b
:4, -F
10:1,
-F4/1
:1, -F
5/1b:1
, -F7
/1b:1
-F19
#1N
ME
A20
00
2NM
EA20
00-X
.4c:5
1IN
PUT+
-F25
:1-F
20#1
AU
TOP
ILO
T
2
1IN
PUT+
-F32
:1, -F
29:1
-F31
#1M
AC
ER
ATO
R
2MA
CERA
TOR
-S14
:1
1IN
PUT+
-X.4b
:6, -F
20:1
-F21
#1W
AS
TE
W. C
TR
L U
NIT
2W
ASTE
_W._C
U-X
.4d:1
1IN
PUT+
-X.4b
:6, -F
20:1
-F22
#1A
MP
LIFI
ER
2AM
PL+
-X.4d
:2
1IN
PUT+
-X.4b
:6, -F
20:1
-F23
#1FI
SH
TA
NK
PU
MP
2FI
SH_T
_P_IN
-X.4d
:3
1IN
PUT+
-X.4b
:6, -F
20:1
-F24
#1B
ILG
E P
. FW
D.
2BI
LGE_
MAN
-X.4a
:2
1IN
PUT+
-X.4b
:6, -F
20:1
-F27
#1U
W L
IGH
TS
2UW
_LTS
_IN-X
.4e:1
1IN
PUT+
-X.4b
:6, -F
20:1
-F28
#1PA
NE
L LI
GH
TS
2PA
NEL_
LTS_
IN-X
.4e:2
1IN
PUT+
-X.4b
:6, -F
20:1
-F26
#1R
OO
F C
AN
VAS
2RO
OF_C
NVS
-X.4e
:3
1IN
PUT+
-X.4b
:6, -F
20:1
-F30
#1S
PAR
E
21IN
PUT+
-F31
:1, -X
.4b:6
-F29
#1S
UM
P P
UM
P
2SU
MP_P
-X.4d
:4
+OU
TLET
-F8:2
-A29
#1
-IN
PUT-
-X.4b
:8
2MA
CERA
TOR
-X.4c
:8-S
14#1
MA
CE
RAT
OR
SW
ITC
H
1MA
CERA
TOR
-F31
:2
RE
D 2
.5¤
CO
PPER
WIR
E
CO
PPER
WIR
E
-S14
-A29
50 mm
1.5BL
ACK
2.5RE
D
2.5BL
UE
1RE
D
2.5RE
D
2.5RE
D
2.5GR
EY
2.5BL
UE
50 mm
50 mm50 mm
1.5W
HITE
/YEL
LOW
1.5RE
D
50 mm
50 mm
1.5GR
EY/B
ROW
N
1.5GR
EY/G
REEN
1.5W
HITE
50 m
m50
mm
50 m
m
50 mm
50 mm 100 mm
50 mm 50 mm
100 mm
6RE
D
2.5BL
UE
1.5GR
EEN/
BLAC
K
4RE
D
2.5GR
EY
6RE
D
2.5BL
UE
4RE
D
2.5RE
D
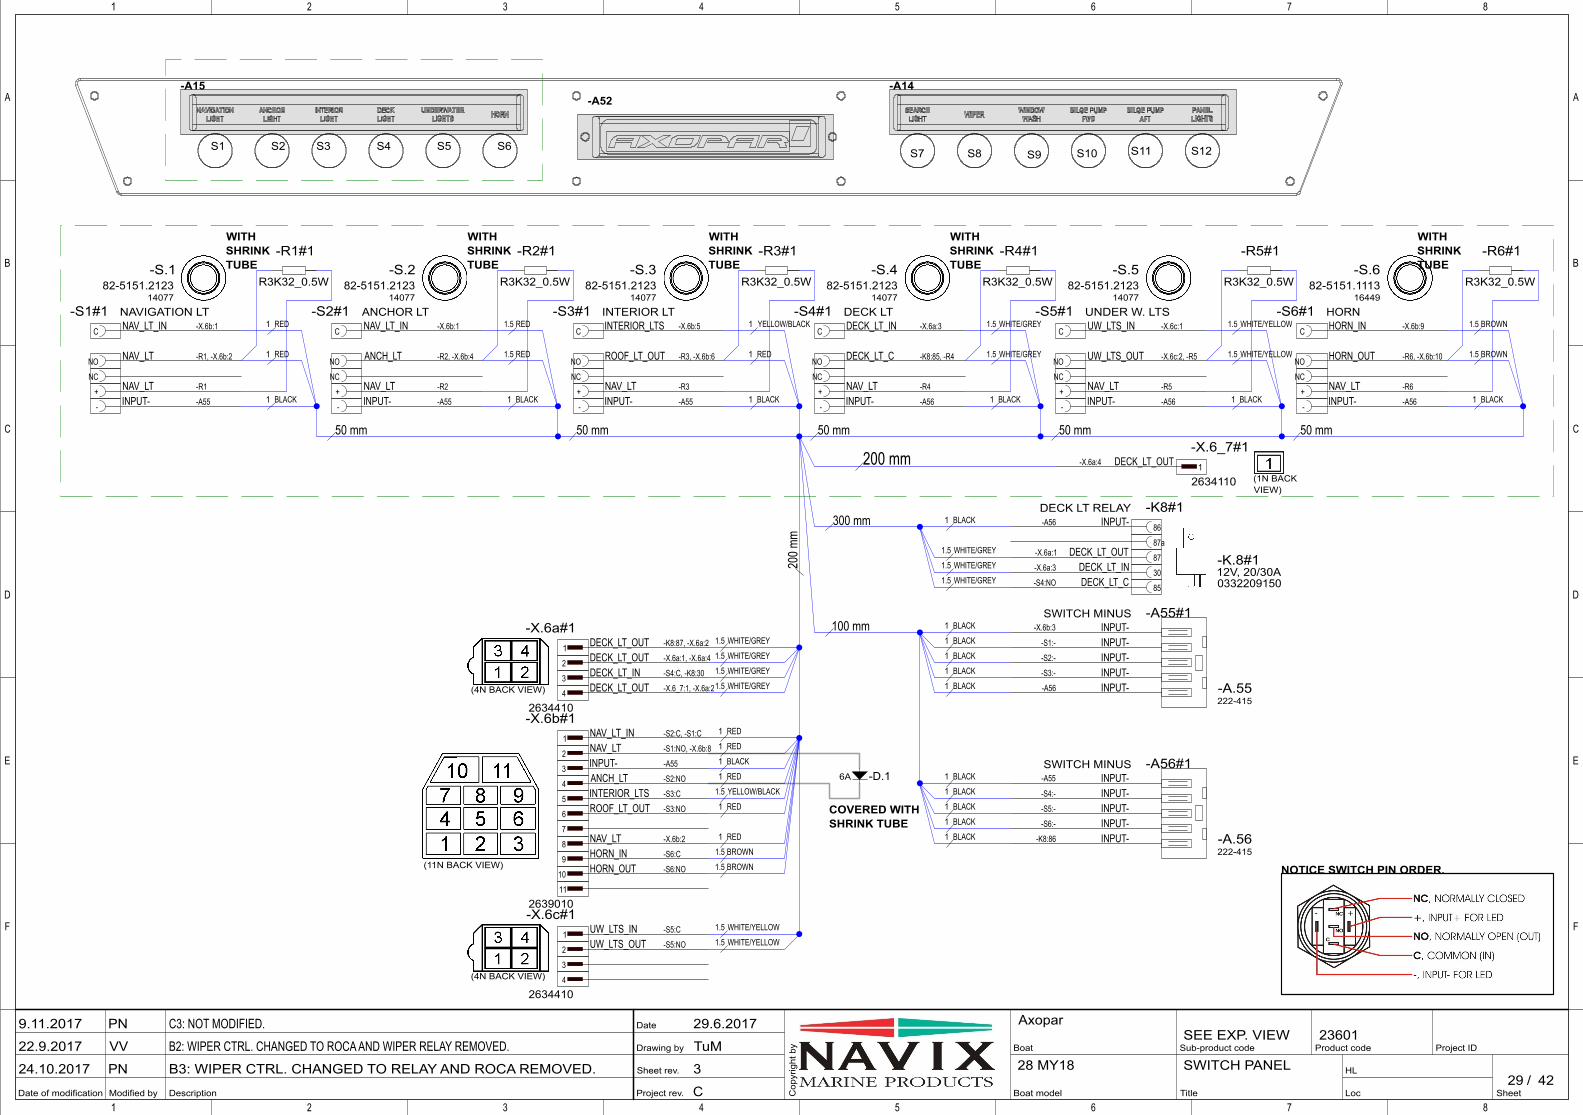
Project rev.
Sheet rev.
Drawing by
Date
Modified by Description
A
B
C
D
E
F
1 2 3 4 5 6 7 8
Date of modification SheetLoc
HL/
Project IDBoat
Boat model
Product code
Cop
yrig
ht b
y Sub-product code
Title
1 2 3 4 5 6 7 8
A
B
C
D
E
F
4228 MY18
AxoparC3: NOT MODIFIED.
B2: WIPER CTRL. CHANGED TO ROCA AND WIPER RELAY REMOVED.
B3: WIPER CTRL. CHANGED TO RELAY AND ROCA REMOVED.
PN
VV
PN
29.6.2017
TuM
3
C
9.11.2017
22.9.2017
24.10.201729
23601SEE EXP. VIEW
SWITCH PANEL
INPUT--S1:-
INPUT--S2:-
INPUT--S3:-
INPUT--A56
INPUT--S4:-
INPUT--S5:-
INPUT--S6:-
INPUT--K8:86
INPUT--X.6b:3-A55#1SWITCH MINUS
INPUT--A55-A56#1SWITCH MINUS
0332209150
-K.8#112V, 20/30A
222-415-A.55
222-415-A.56
1DECK_LT_OUT-X.6a:4
2634110
-X.6_7#1
1 DECK_LT_OUT -K8:87, -X.6a:2-X.6a#1
(4N BACK VIEW)
2 DECK_LT_OUT -X.6a:1, -X.6a:4
3 DECK_LT_IN -S4:C, -K8:30
4 DECK_LT_OUT -X.6_7:1, -X.6a:2
2634410
1 UW_LTS_IN -S5:C-X.6c#1
2 UW_LTS_OUT -S5:NO
(4N BACK VIEW)3
4
2634410
1 NAV_LT_IN -S2:C, -S1:C-X.6b#1
2 NAV_LT -S1:NO, -X.6b:8
3 INPUT- -A55
4 ANCH_LT -S2:NO
5 INTERIOR_LTS -S3:C
6 ROOF_LT_OUT -S3:NO
(11N BACK VIEW)
7
8 NAV_LT -X.6b:2
9 HORN_IN -S6:C
10 HORN_OUT -S6:NO
11
2639010
82-5151.1113-S.6
1644982-5151.2123
-S.1
1407782-5151.2123
-S.3
1407782-5151.2123
-S.2
1407782-5151.2123
-S.4
1407782-5151.2123
-S.5
14077
C NAV_LT_IN -X.6b:1-S1#1 NAVIGATION LT
NO NAV_LT -R1, -X.6b:2
NC
+ NAV_LT -R1
- INPUT- -A55
C INTERIOR_LTS -X.6b:5-S3#1 INTERIOR LT
NO ROOF_LT_OUT -R3, -X.6b:6
NC
+ NAV_LT -R3
- INPUT- -A55
C NAV_LT_IN -X.6b:1-S2#1 ANCHOR LT
NO ANCH_LT -R2, -X.6b:4
NC
+ NAV_LT -R2
- INPUT- -A55
C DECK_LT_IN -X.6a:3-S4#1 DECK LT
NO DECK_LT_C -K8:85, -R4
NC
+ NAV_LT -R4
- INPUT- -A56
C HORN_IN -X.6b:9-S6#1 HORN
NO HORN_OUT -R6, -X.6b:10
NC
+ NAV_LT -R6
- INPUT- -A56
C UW_LTS_IN -X.6c:1-S5#1 UNDER W. LTS
NO UW_LTS_OUT -X.6c:2, -R5
NC
+ NAV_LT -R5
- INPUT- -A56
-D.16A
R3K32_0.5W
-R1#1
R3K32_0.5W
-R2#1
R3K32_0.5W
-R3#1
R3K32_0.5W
-R4#1
R3K32_0.5W
-R6#1
R3K32_0.5W
-R5#1
86INPUT--A56-K8#1DECK LT RELAY
87a
87DECK_LT_OUT-X.6a:1
30DECK_LT_IN-X.6a:3
85DECK_LT_C-S4:NO
COVERED WITHSHRINK TUBE
NOTICE SWITCH PIN ORDER.
WITHSHRINKTUBE
WITHSHRINKTUBE
WITHSHRINKTUBE
WITHSHRINKTUBE
WITHSHRINKTUBE
S1 S2 S3 S4 S5 S6S7 S8 S9 S10 S11 S12
-A14-A15-A52
(1N BACK VIEW)
200 m
m
1 RED
1 BLACK
1.5 WHITE/GREY
1.5 WHITE/GREY
1 BLACK
1.5 RED
1.5 RED
1 BLACK 1 BLACK
1.5 WHITE/GREY
1.5 WHITE/GREY
1.5 WHITE/GREY
1 RED
1 RED
1 BLACK
1 RED
1.5 YELLOW/BLACK
1 RED
1 RED
1 YELLOW/BLACK
1 RED
1 BLACK
1.5 BROWN
50 mm 50 mm50 mm 50 mm
1.5 BROWN
1.5 BROWN
1.5 BROWN
50 mm
1.5 WHITE/YELLOW
1.5 WHITE/YELLOW
1.5 WHITE/YELLOW
1.5 WHITE/YELLOW
1 BLACK
100 mm 1 BLACK
1 BLACK
1 BLACK
1 BLACK
1 BLACK
1 BLACK
1 BLACK
1 BLACK
1 BLACK
1 BLACK
1.5 WHITE/GREY
1.5 WHITE/GREY
1.5 WHITE/GREY
300 mm
1 BLACK
1 RED
1.5 WHITE/GREY
200 mm
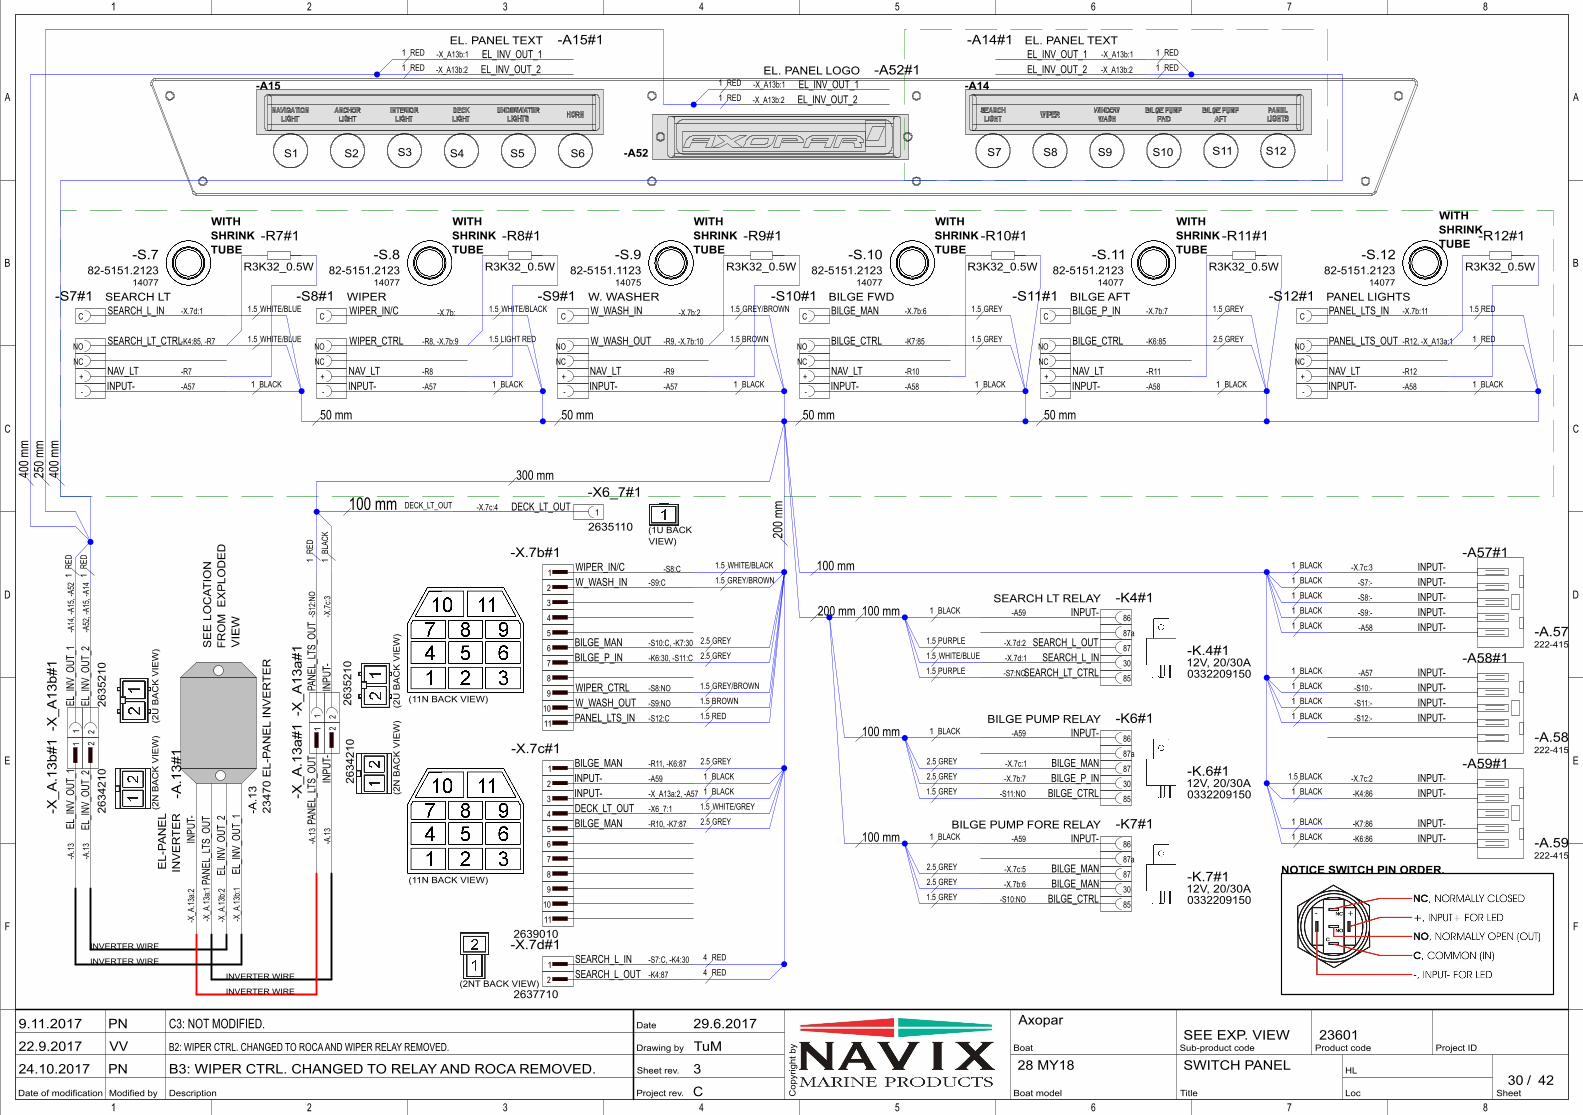
Project rev.
Sheet rev.
Drawing by
Date
Modified by Description
A
B
C
D
E
F
1 2 3 4 5 6 7 8
Date of modification SheetLoc
HL/
Project IDBoat
Boat model
Product code
Cop
yrig
ht b
y Sub-product code
Title
1 2 3 4 5 6 7 8
A
B
C
D
E
F
4228 MY18
AxoparC3: NOT MODIFIED.
B2: WIPER CTRL. CHANGED TO ROCA AND WIPER RELAY REMOVED.
B3: WIPER CTRL. CHANGED TO RELAY AND ROCA REMOVED.
PN
VV
PN
29.6.2017
TuM
3
C
9.11.2017
22.9.2017
24.10.201730
23601SEE EXP. VIEW
SWITCH PANEL
0332209150
-K.4#112V, 20/30A
0332209150
-K.6#112V, 20/30A
0332209150
-K.7#112V, 20/30A
INPUT--X.7c:3-A57#1
INPUT--S7:-
INPUT--S8:-
INPUT--S9:-
INPUT--A58
INPUT--A57-A58#1
INPUT--S10:-
INPUT--S11:-
INPUT--S12:-
INPUT--X.7c:2-A59#1
INPUT--K4:86
INPUT--K7:86
INPUT--K6:86INPU
T--X
_A.13
a:2-A
.13#
1E
L-PA
NE
LIN
VE
RTE
R
PANE
L_LT
S_OU
T-X
_A.13
a:1
EL_IN
V_OU
T_2
-X_A
.13b:2
EL_IN
V_OU
T_1
-X_A
.13b:1
EL_INV_OUT_2 -X_A13b:2EL_INV_OUT_2-X_A13b:2
EL_INV_OUT_1 -X_A13b:1-A14#1 EL. PANEL TEXT
EL_INV_OUT_1-X_A13b:1-A15#1EL. PANEL TEXT
EL_INV_OUT_2-X_A13b:2
EL_INV_OUT_1-X_A13b:1-A52#1EL. PANEL LOGO
222-415-A.57
222-415-A.58
222-415-A.59
1PA
NEL_
LTS_
OUT
-A.13
-X_A
.13a
#1 2IN
PUT-
-A.13
2634
210
(2N
BA
CK
VIE
W)
1EL
_INV_
OUT_
1-A
.13
-X_A
.13b
#1 2EL
_INV_
OUT_
2-A
.13
2634
210
(2N
BA
CK
VIE
W)
1DECK_LT_OUT-X.7c:4
2635110
-X6_7#1
1PA
NEL_
LTS_
OUT
-S12
:NO
-X_A
13a#
1
2IN
PUT-
-X.7c
:3
2635
210
(2U
BA
CK
VIE
W)
1EL
_INV_
OUT_
1-A
14, -
A15,
-A52
-X_A
13b#
1
2EL
_INV_
OUT_
2-A
52, -
A15,
-A14
2635
210
(2U
BA
CK
VIE
W)
1 SEARCH_L_IN -S7:C, -K4:30-X.7d#1
(2NT BACK VIEW) 2 SEARCH_L_OUT -K4:87
2637710
1 WIPER_IN/C -S8:C
-X.7b#1
2 W_WASH_IN -S9:C
3
4
5
(11N BACK VIEW)
6 BILGE_MAN -S10:C, -K7:30
7 BILGE_P_IN -K6:30, -S11:C
8
9 WIPER_CTRL -S8:NO
10 W_WASH_OUT -S9:NO
11 PANEL_LTS_IN -S12:C
1 BILGE_MAN -R11, -K6:87-X.7c#1
2 INPUT- -A59
3 INPUT- -X_A13a:2, -A57
4 DECK_LT_OUT -X6_7:1
5 BILGE_MAN -R10, -K7:87
6
7
8
9
10
11
2639010
82-5151.1123-S.9
1407582-5151.2123
-S.7
1407782-5151.2123
-S.8
1407782-5151.2123
-S.11
1407782-5151.2123
-S.10
1407782-5151.2123
-S.12
14077
C SEARCH_L_IN -X.7d:1-S7#1 SEARCH LT
NO SEARCH_LT_CTRL-K4:85, -R7
NC
+ NAV_LT -R7
- INPUT- -A57
C WIPER_IN/C -X.7b:
-S8#1 WIPER
NO WIPER_CTRL -R8, -X.7b:9
NC
+ NAV_LT -R8
- INPUT- -A57
C BILGE_P_IN -X.7b:7-S11#1 BILGE AFT
NO BILGE_CTRL -K6:85
NC
+ NAV_LT -R11
- INPUT- -A58
C W_WASH_IN -X.7b:2
-S9#1 W. WASHER
NO W_WASH_OUT -R9, -X.7b:10
NC
+ NAV_LT -R9
- INPUT- -A57
C BILGE_MAN -X.7b:6-S10#1 BILGE FWD
NO BILGE_CTRL -K7:85
NC
+ NAV_LT -R10
- INPUT- -A58
C PANEL_LTS_IN -X.7b:11-S12#1 PANEL LIGHTS
NO PANEL_LTS_OUT -R12, -X_A13a:1
NC
+ NAV_LT -R12
- INPUT- -A58
R3K32_0.5W
-R10#1
R3K32_0.5W
-R7#1
R3K32_0.5W
-R8#1
R3K32_0.5W
-R9#1
R3K32_0.5W
-R11#1
R3K32_0.5W
-R12#1
86INPUT--A59-K4#1SEARCH LT RELAY
87a
87SEARCH_L_OUT-X.7d:2
30SEARCH_L_IN-X.7d:1
85SEARCH_LT_CTRL-S7:NO
86INPUT--A59-K6#1BILGE PUMP RELAY
87a
87BILGE_MAN-X.7c:1
30BILGE_P_IN-X.7b:7
85BILGE_CTRL-S11:NO
86INPUT--A59-K7#1BILGE PUMP FORE RELAY
87a
87BILGE_MAN-X.7c:5
30BILGE_MAN-X.7b:6
85BILGE_CTRL-S10:NO
NOTICE SWITCH PIN ORDER.(11N BACK VIEW)
WITHSHRINKTUBE
WITHSHRINKTUBE
WITHSHRINKTUBE
WITHSHRINKTUBE
WITHSHRINKTUBE
S1 S2 S3 S4 S5 S6 S7 S8 S9 S10 S11 S12
-A.1
323
470
EL-
PAN
EL
INV
ER
TER
(2N BACK VIEW)
SE
E L
OC
ATIO
NFR
OM
EX
PLO
DE
DV
IEW
-A14-A15
-A52
INVERTER WIRE
INVERTER WIRE
INVERTER WIRE
INVERTER WIRE
WITHSHRINKTUBE
(1U BACK VIEW)
1.5 WHITE/BLUE
1.5 WHITE/BLUE
1 BLACK
1.5 WHITE/BLACK
1.5 LIGHT RED
1 BLACK
1.5 GREY/BROWN
1.5 BROWN
1 BLACK
1.5 WHITE/BLACK
2.5 GREY
1.5 GREY/BROWN
2.5 GREY
50 mm 50 mm 50 mm
1 BLACK
1 BLACK
1 BLACK
1 BLACK
1.5 PURPLE
1.5 WHITE/BLUE
1.5 PURPLE
1 BLACK
2.5 GREY
2.5 GREY
1.5 GREY
200 mm 100 mm
100 mm
1.5 BROWN
1.5 GREY
1.5 GREY
1.5 GREY
2.5 GREY
1 BLACK
50 mm
1.5 WHITE/GREY
100 mm 1 BLACK
2.5 GREY
2.5 GREY
1.5 GREY
2.5 GREY
2.5 GREY
4 RED
4 RED
1.5 RED
1 RED
1 BLACK
1 BLACK
1 BLACK
1 BLACK
1 BLACK
1 BLACK
1 BLACK
1 BLACK
1 BLACK
1 BLACK
1.5 BLACK
1 BLACK
1 BLACK
1 BLACK
100 mm
1.5 RED
200 m
m
1RE
D
1BL
ACK
1 RED
1 RED
1 RED
1 RED
1 RED
1 RED1
RED
1RE
D
400 m
m25
0 mm
400 m
m
300 mm
1.5 GREY/BROWN
DECK_LT_OUT100 mm
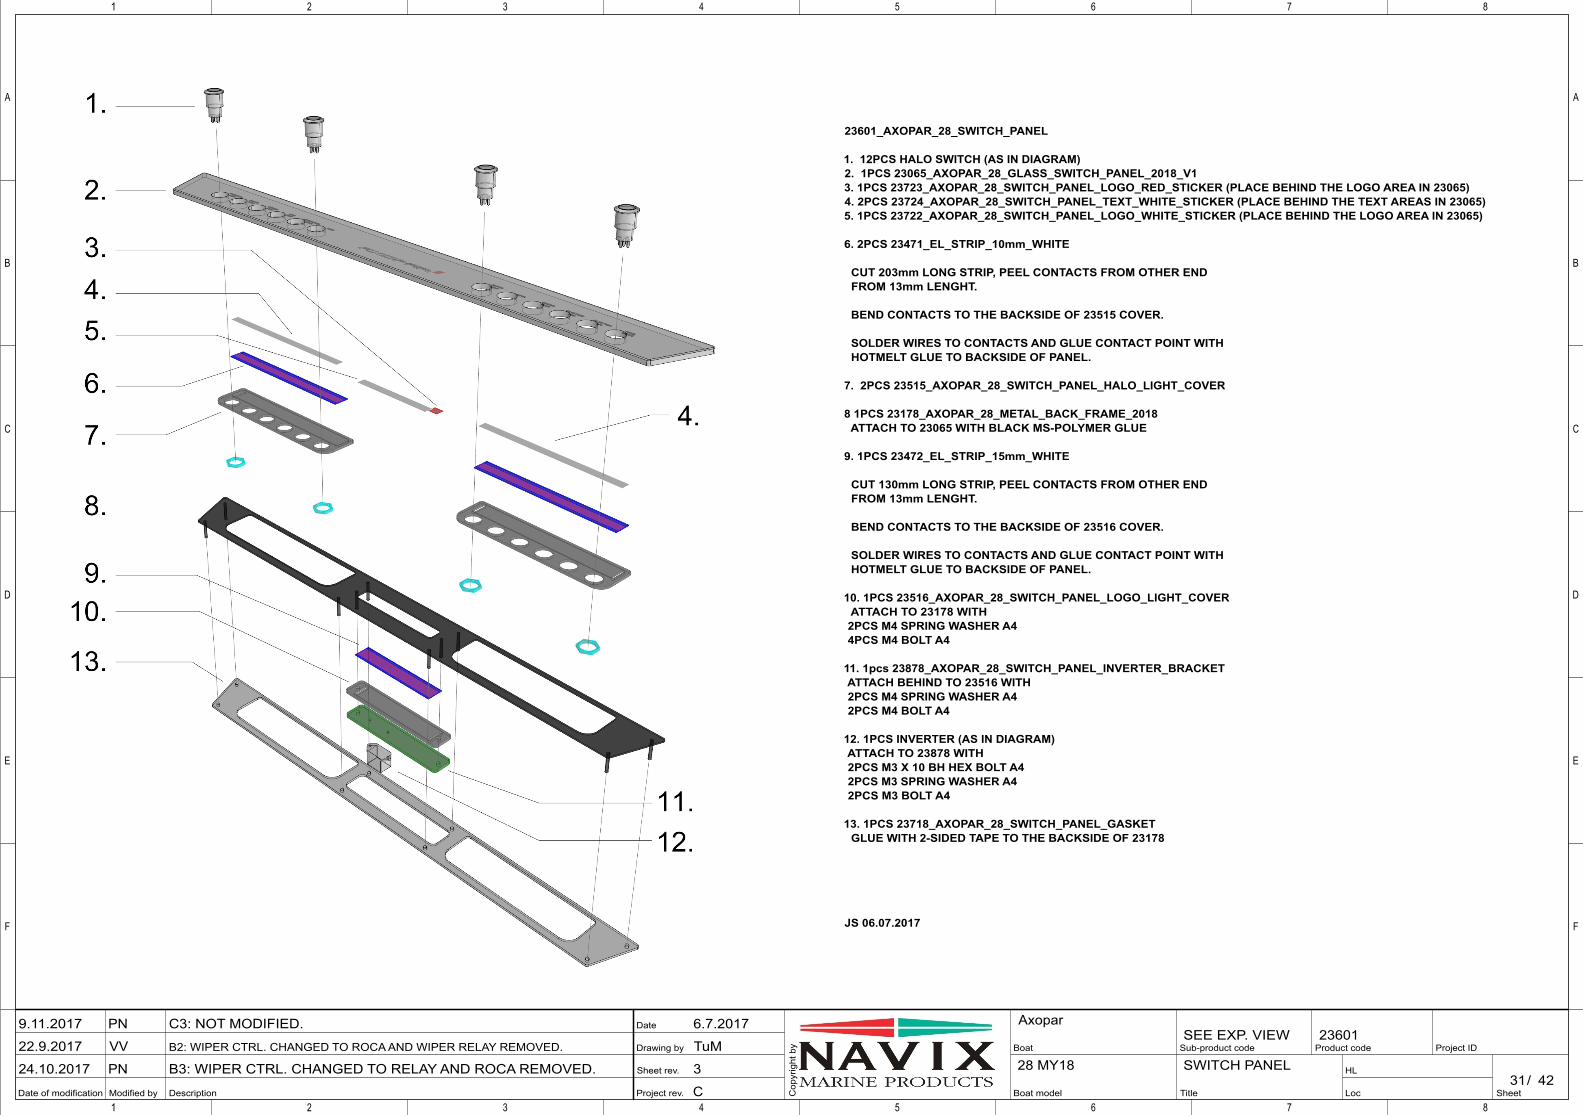
Project rev.
Sheet rev.
Drawing by
Date
Modified by Description
A
B
C
D
E
F
1 2 3 4 5 6 7 8
Date of modification SheetLoc
HL/
Project IDBoat
Boat model
Product code
Cop
yrig
ht b
y Sub-product code
Title
1 2 3 4 5 6 7 8
A
B
C
D
E
F
4228 MY18
AxoparC3: NOT MODIFIED.
B2: WIPER CTRL. CHANGED TO ROCA AND WIPER RELAY REMOVED.
B3: WIPER CTRL. CHANGED TO RELAY AND ROCA REMOVED.
PN
VV
PN
6.7.2017
TuM
3
C
9.11.2017
22.9.2017
24.10.201731
23601SEE EXP. VIEW
SWITCH PANEL
23601_AXOPAR_28_SWITCH_PANEL
1. 12PCS HALO SWITCH (AS IN DIAGRAM)2. 1PCS 23065_AXOPAR_28_GLASS_SWITCH_PANEL_2018_V13. 1PCS 23723_AXOPAR_28_SWITCH_PANEL_LOGO_RED_STICKER (PLACE BEHIND THE LOGO AREA IN 23065)4. 2PCS 23724_AXOPAR_28_SWITCH_PANEL_TEXT_WHITE_STICKER (PLACE BEHIND THE TEXT AREAS IN 23065)5. 1PCS 23722_AXOPAR_28_SWITCH_PANEL_LOGO_WHITE_STICKER (PLACE BEHIND THE LOGO AREA IN 23065)
6. 2PCS 23471_EL_STRIP_10mm_WHITE
CUT 203mm LONG STRIP, PEEL CONTACTS FROM OTHER END FROM 13mm LENGHT.
BEND CONTACTS TO THE BACKSIDE OF 23515 COVER. SOLDER WIRES TO CONTACTS AND GLUE CONTACT POINT WITH HOTMELT GLUE TO BACKSIDE OF PANEL.
7. 2PCS 23515_AXOPAR_28_SWITCH_PANEL_HALO_LIGHT_COVER
8 1PCS 23178_AXOPAR_28_METAL_BACK_FRAME_2018 ATTACH TO 23065 WITH BLACK MS-POLYMER GLUE
9. 1PCS 23472_EL_STRIP_15mm_WHITE
CUT 130mm LONG STRIP, PEEL CONTACTS FROM OTHER END FROM 13mm LENGHT.
BEND CONTACTS TO THE BACKSIDE OF 23516 COVER. SOLDER WIRES TO CONTACTS AND GLUE CONTACT POINT WITH HOTMELT GLUE TO BACKSIDE OF PANEL.
10. 1PCS 23516_AXOPAR_28_SWITCH_PANEL_LOGO_LIGHT_COVER ATTACH TO 23178 WITH 2PCS M4 SPRING WASHER A4 4PCS M4 BOLT A4
11. 1pcs 23878_AXOPAR_28_SWITCH_PANEL_INVERTER_BRACKET ATTACH BEHIND TO 23516 WITH 2PCS M4 SPRING WASHER A4 2PCS M4 BOLT A4
12. 1PCS INVERTER (AS IN DIAGRAM) ATTACH TO 23878 WITH 2PCS M3 X 10 BH HEX BOLT A4 2PCS M3 SPRING WASHER A4 2PCS M3 BOLT A4
13. 1PCS 23718_AXOPAR_28_SWITCH_PANEL_GASKET GLUE WITH 2-SIDED TAPE TO THE BACKSIDE OF 23178
JS 06.07.2017

Project rev.
Sheet rev.
Drawing by
Date
Modified by Description
A
B
C
D
E
F
1 2 3 4 5 6 7 8
Date of modification SheetLoc
HL/
Project IDBoat
Boat model
Product code
Cop
yrig
ht b
y Sub-product code
Title
1 2 3 4 5 6 7 8
A
B
C
D
E
F
4228 Cabin MY18
AxoparA1: INTRODUCED DRAWING.
B2: NAME CHANGED.
C3: ADDED -X405, -X406 AND SEARCH LT CONTROL WIRES.
TuM
VV
PN
29.6.2017
TuM
3
C
29.6.2017
22.9.2017
9.11.201732
23786
SEARCH LT/ROOF HARNESS
SEARCH_L_OUT-X400:1-A1#1SEARCH LT
INPUT--X400:3
Dv2
88-10-A1B14-A00
-F.15#1
1 SEARCH_L_OUT -A1-X400#1
(4U BACK VIEW)
2
3 INPUT- -A1
4
2635410
1INPUT+-F15:1
4422.02
-F5/1b#1
1SEARCH_L_IN-F15:2
6440.01
-X.4a/1#1
1 INPUT+ -F5/1b:1-F15#1 SEARCH LT
2 SEARCH_L_IN -X.4a/1:1
GREEN-T_ARC1-ARC1#2
BLUE-T_ARC1
BROWN-T_ARC1
YELLOW-T_ARC1
RED-T_ARC1
BLACK-T_ARC1
DT06-6S-P01214046
-X406DT04-6P-E004
14044
-X405
GREEN -ARC1-T_ARC1#1
BLUE -ARC1
BROWN -ARC1
YELLOW -ARC1
RED -ARC1
BLACK -ARC1
INCLUDEDDELIVER CONNECTORS SEPARATELY
W6P14045
W6S-P01214047
+ +
5000 mm
250 mm250 mm
4 RED
4 BLACK
2.5 RED
4 RED
2.5 RED
4 RED
4 RED
4 BLACK
6300 mm 1.5 GREEN/BLACK
1.5 BLUE
1.5 BROWN
1.5 YELLOW/BLACK
1.5 RED
1.5 BLACK
1.5 GREEN/BLACK
1.5 BLUE
1.5 BROWN
1.5 YELLOW/BLACK
1.5 RED
1.5 BLACK
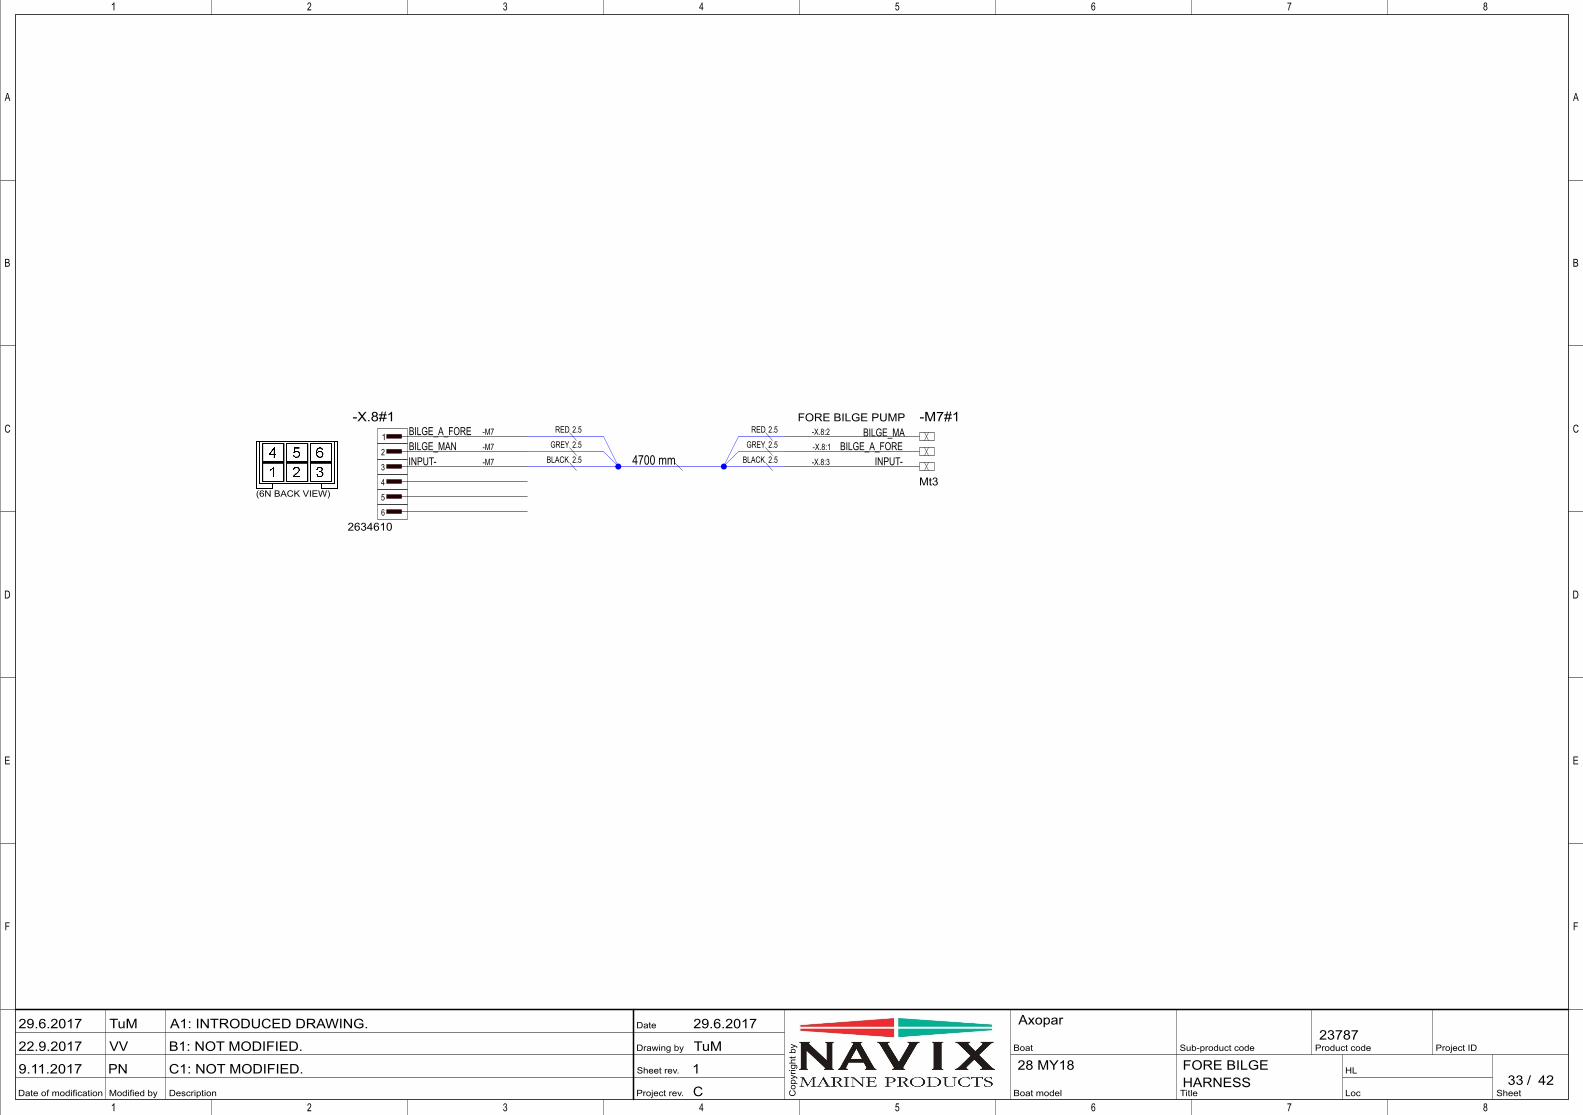
Project rev.
Sheet rev.
Drawing by
Date
Modified by Description
A
B
C
D
E
F
1 2 3 4 5 6 7 8
Date of modification SheetLoc
HL/
Project IDBoat
Boat model
Product code
Cop
yrig
ht b
y Sub-product code
Title
1 2 3 4 5 6 7 8
A
B
C
D
E
F
4228 MY18
AxoparA1: INTRODUCED DRAWING.
B1: NOT MODIFIED.
C1: NOT MODIFIED.
TuM
VV
PN
29.6.2017
TuM
1
C
29.6.2017
22.9.2017
9.11.201733
23787
FORE BILGEHARNESS
BILGE_MA-X.8:2-M7#1FORE BILGE PUMP
BILGE_A_FORE-X.8:1
INPUT--X.8:3
Mt3
1 BILGE_A_FORE -M7-X.8#1
2 BILGE_MAN -M7
3 INPUT- -M7
4
5
6
2634610
(6N BACK VIEW)
2.5RED
2.5GREY
4700 mm 2.5BLACK
2.5RED
2.5GREY
2.5BLACK

Project rev.
Sheet rev.
Drawing by
Date
Modified by Description
A
B
C
D
E
F
1 2 3 4 5 6 7 8
Date of modification SheetLoc
HL/
Project IDBoat
Boat model
Product code
Cop
yrig
ht b
y Sub-product code
Title
1 2 3 4 5 6 7 8
A
B
C
D
E
F
4228 MY18
AxoparA1: INTRODUCED DRAWING.
B1: NOT MODIFIED.
C1: NOT MODIFIED.
TuM
VV
PN
30.6.2017
TuM
1
C
30.6.2017
22.9.2017
9.11.201734
2380223863
FISH TANK PUMPSWITCH PANEL
V15AS00C
-FT_S.1#1
1 FISH_T_P_IN -FT_S1:2-FT_X1#1
(2UT BACK VIEW) 2 FISH_T_P_OUT -FT_S1:3
2637810
1
-FT_S1#1 FISHT TANK PUMP
2 FISH_T_P_IN -FT_X1:1
3 FISH_T_P_OUT -FT_X1:2
4
5
6
-7
+8
VVAZC00ACTUATOR BLANCO, CONTURA II
-FT_S1
2.5 RED
2.5 RED
2.5 RED
2.5 RED
250 mm
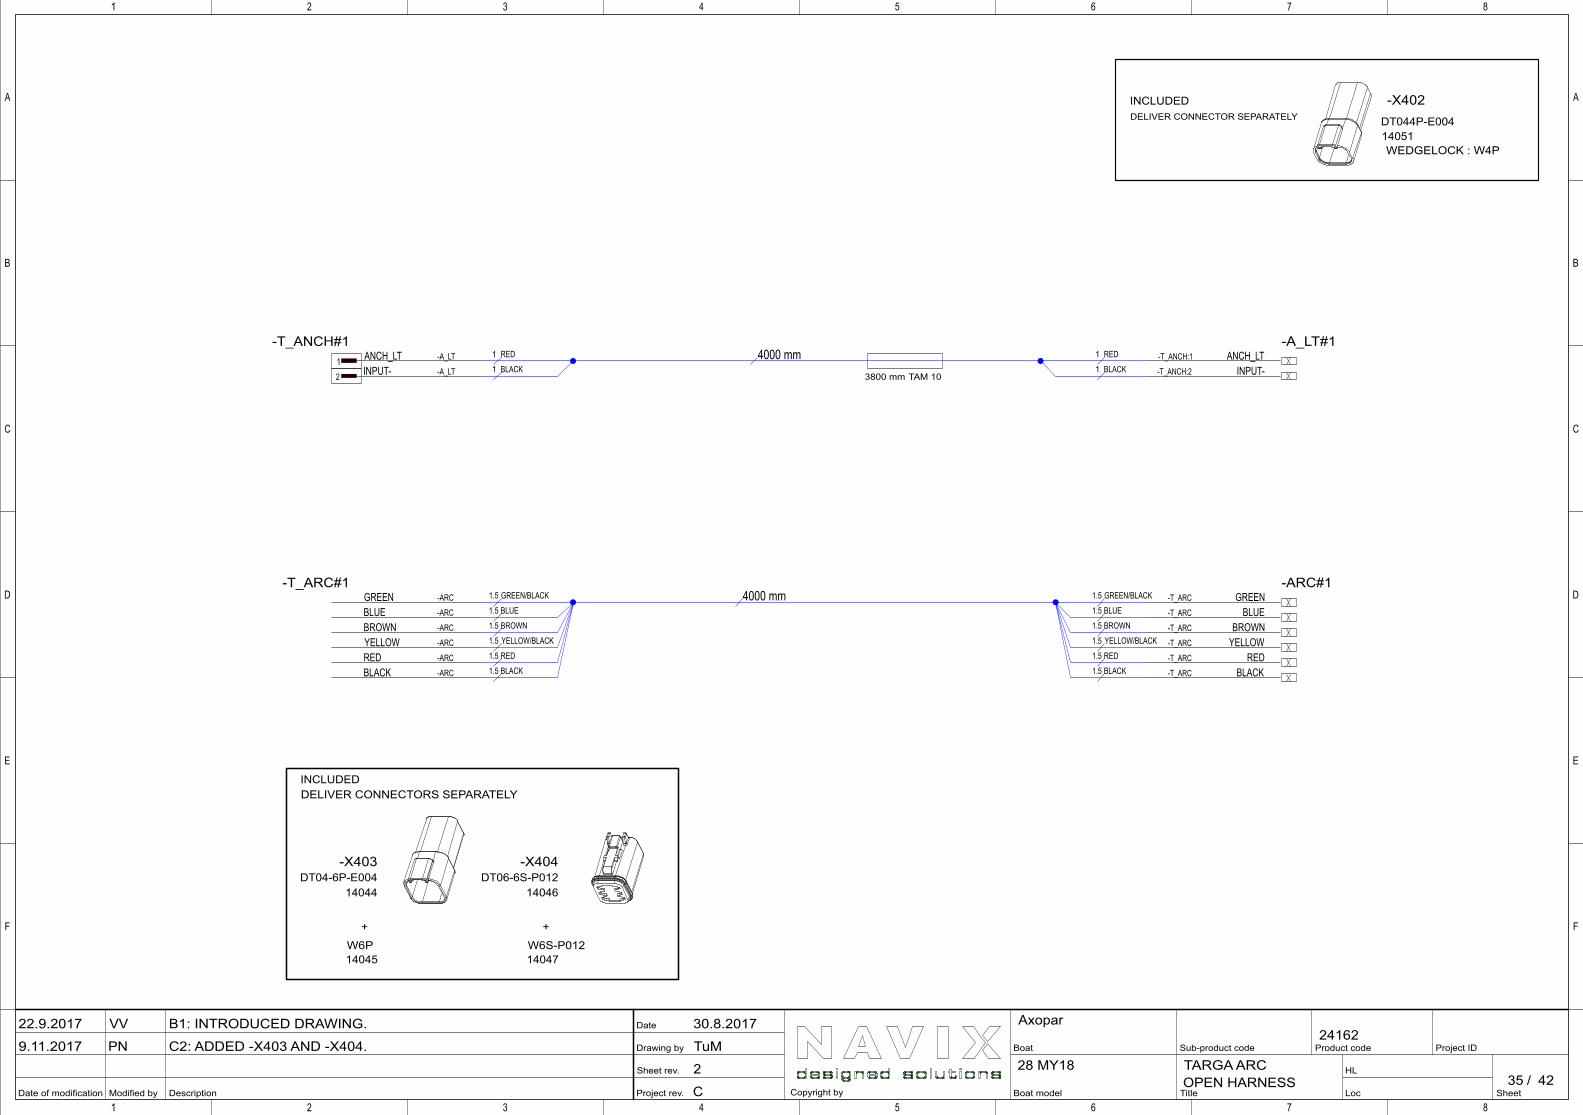
Project rev.
Sheet rev.
Drawing by
Date
Modified by Description
A
B
C
D
E
F
1 2 3 4 5 6 7 8
Date of modification SheetLoc
HL/
Project IDBoat
Boat model
Product code
Copyright by
Sub-product code
Title
1 2 3 4 5 6 7 8
A
B
C
D
E
F
4228 MY18
AxoparB1: INTRODUCED DRAWING.
C2: ADDED -X403 AND -X404.
VV
PN
30.8.2017
TuM
2
C
22.9.2017
9.11.2017
35
24162
TARGA ARCOPEN HARNESS
ANCH_LT-T_ANCH:1-A_LT#1
INPUT--T_ANCH:2
GREEN-T_ARC-ARC#1
BLUE-T_ARC
BROWN-T_ARC
YELLOW-T_ARC
RED-T_ARC
BLACK-T_ARC
GREEN -ARC-T_ARC#1
BLUE -ARC
BROWN -ARC
YELLOW -ARC
RED -ARC
BLACK -ARC
DT044P-E004
-X402
1 ANCH_LT -A_LT-T_ANCH#1
2 INPUT- -A_LT
DT06-6S-P01214046
-X404DT04-6P-E004
14044
-X403
14051 WEDGELOCK : W4P
INCLUDEDDELIVER CONNECTOR SEPARATELY
INCLUDEDDELIVER CONNECTORS SEPARATELY
W6P14045
W6S-P01214047
+ +
TAM 103800 mm
4000 mm
4000 mm
1 RED
1 BLACK
1.5 GREEN/BLACK
1.5 BLUE
1.5 BROWN
1.5 YELLOW/BLACK
1.5 RED
1.5 BLACK 1.5 BLACK
1.5 RED
1.5 YELLOW/BLACK
1.5 BROWN
1.5 BLUE
1.5 GREEN/BLACK
1 BLACK
1 RED
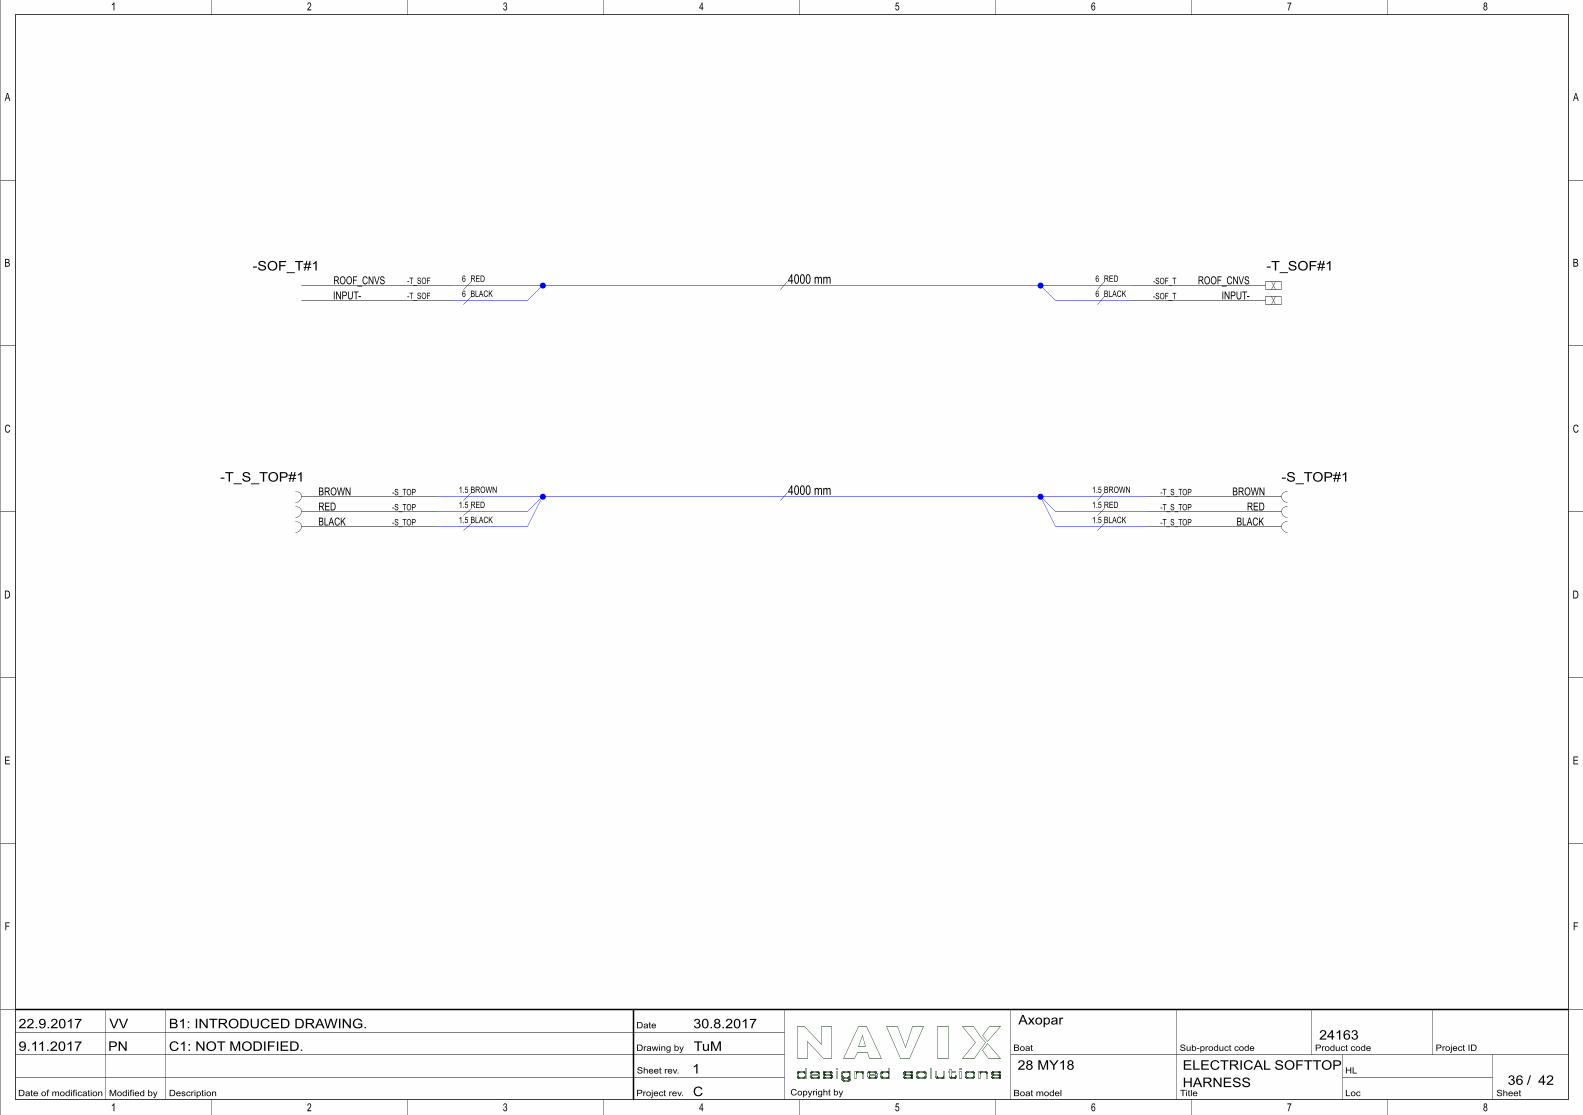
Project rev.
Sheet rev.
Drawing by
Date
Modified by Description
A
B
C
D
E
F
1 2 3 4 5 6 7 8
Date of modification SheetLoc
HL/
Project IDBoat
Boat model
Product code
Copyright by
Sub-product code
Title
1 2 3 4 5 6 7 8
A
B
C
D
E
F
4228 MY18
AxoparB1: INTRODUCED DRAWING.
C1: NOT MODIFIED.
VV
PN
30.8.2017
TuM
1
C
22.9.2017
9.11.2017
36
24163
ELECTRICAL SOFTTOPHARNESS
BROWN -S_TOP-T_S_TOP#1
RED -S_TOP
BLACK -S_TOP
BROWN-T_S_TOP-S_TOP#1
RED-T_S_TOP
BLACK-T_S_TOP
ROOF_CNVS -T_SOF-SOF_T#1
INPUT- -T_SOF INPUT--SOF_T
ROOF_CNVS-SOF_T-T_SOF#1
1.5 BROWN
1.5 RED
1.5 BLACK
1.5 BROWN
1.5 RED
1.5 BLACK
4000 mm
6 RED
6 BLACK
6 RED
6 BLACK4000 mm
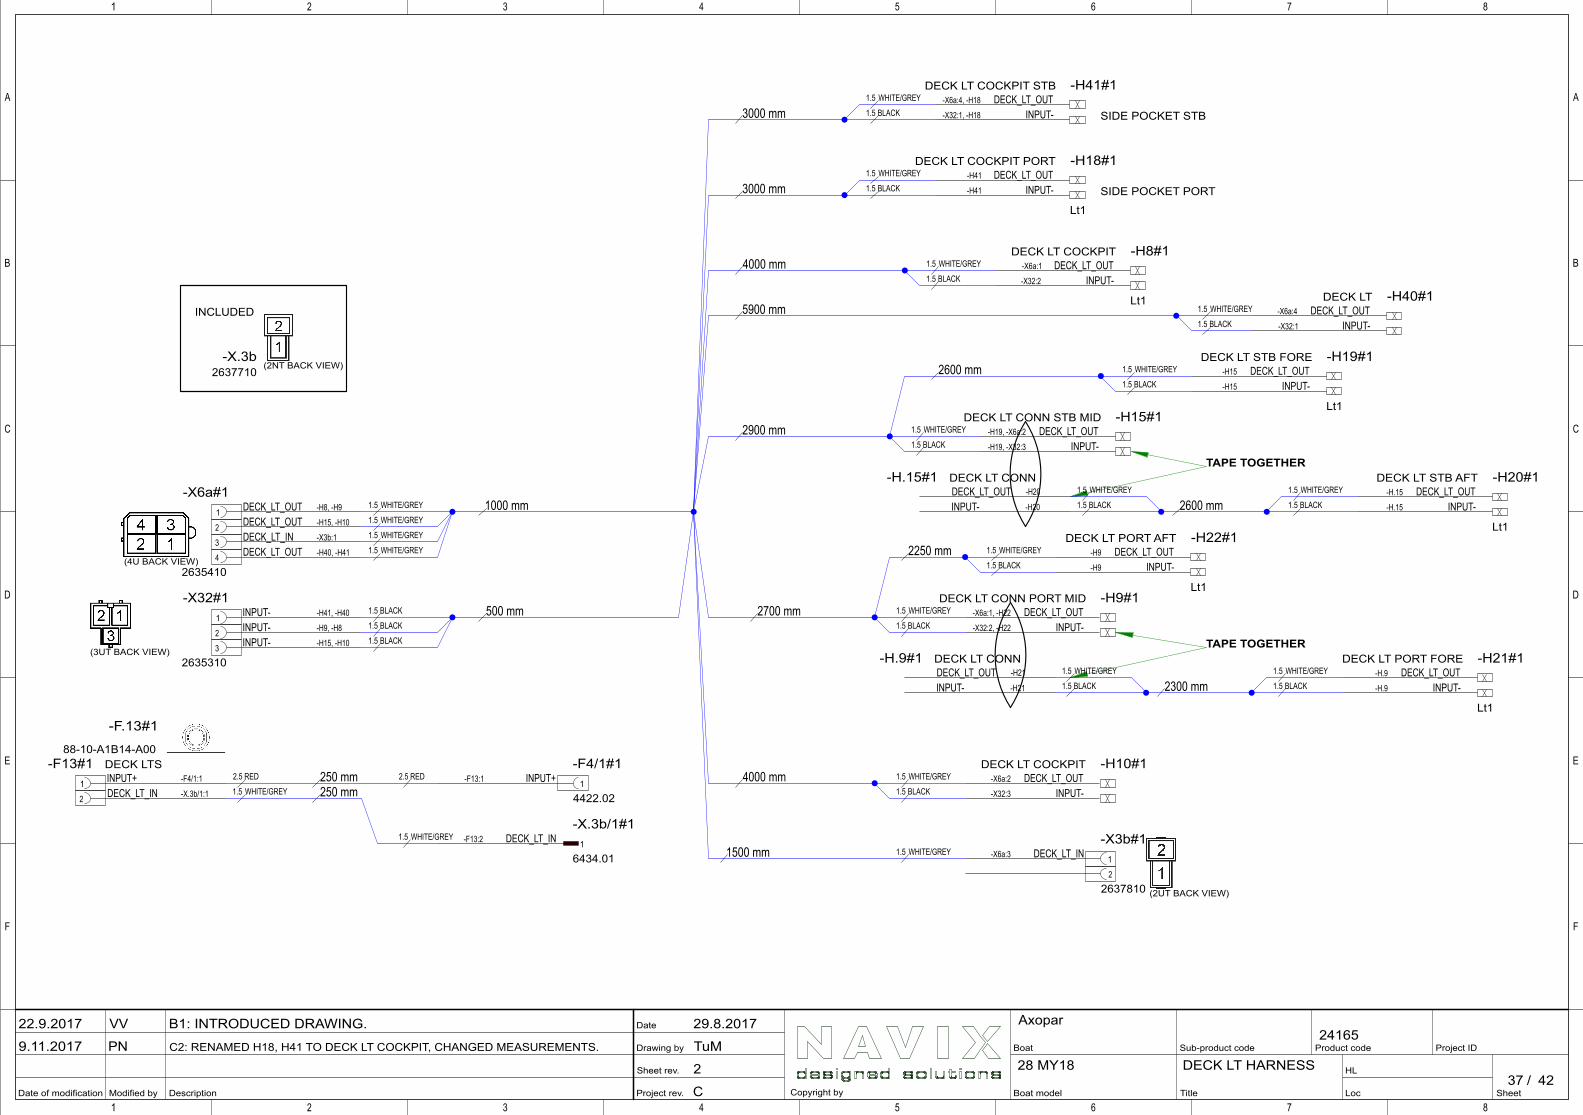
Project rev.
Sheet rev.
Drawing by
Date
Modified by Description
A
B
C
D
E
F
1 2 3 4 5 6 7 8
Date of modification SheetLoc
HL/
Project IDBoat
Boat model
Product code
Copyright by
Sub-product code
Title
1 2 3 4 5 6 7 8
A
B
C
D
E
F
4228 MY18
AxoparB1: INTRODUCED DRAWING.
C2: RENAMED H18, H41 TO DECK LT COCKPIT, CHANGED MEASUREMENTS.
VV
PN
29.8.2017
TuM
2
C
22.9.2017
9.11.2017
37
24165
DECK LT HARNESS
(2NT BACK VIEW)
DECK_LT_OUT-X6a:1-H8#1DECK LT COCKPIT
INPUT--X32:2
Lt1
DECK_LT_OUT-X6a:2-H10#1DECK LT COCKPIT
INPUT--X32:3
88-10-A1B14-A00
-F.13#1
DECK_LT_OUT-H19, -X6a:2-H15#1DECK LT CONN STB MID
INPUT--H19, -X32:3
DECK_LT_OUT-H41-H18#1DECK LT COCKPIT PORT
INPUT--H41
Lt1
INPUT--H15
Lt1
DECK_LT_OUT -H20-H.15#1 DECK LT CONN
INPUT- -H20
DECK_LT_OUT-H.15-H20#1DECK LT STB AFT
INPUT--H.15
Lt1
DECK_LT_OUT-X6a:1, -H22-H9#1DECK LT CONN PORT MID
INPUT--X32:2, -H22
DECK_LT_OUT-H9-H22#1DECK LT PORT AFT
INPUT--H9
Lt1
DECK_LT_OUT -H21-H.9#1 DECK LT CONN
INPUT- -H21
DECK_LT_OUT-H.9-H21#1DECK LT PORT FORE
INPUT--H.9
Lt1
2637710-X.3b
INPUT--X32:1
INPUT--X32:1, -H18
DECK_LT_OUT-X6a:4, -H18-H41#1DECK LT COCKPIT STB
DECK_LT_OUT-X6a:4-H40#1DECK LT
DECK_LT_OUT-H15-H19#1DECK LT STB FORE
1 INPUT- -H41, -H40-X32#1
2 INPUT- -H9, -H8
3 INPUT- -H15, -H10
2635310
1 DECK_LT_OUT -H8, -H9-X6a#1
(4U BACK VIEW)
2 DECK_LT_OUT -H15, -H10
3 DECK_LT_IN -X3b:1
4 DECK_LT_OUT -H40, -H41
2635410
1DECK_LT_IN-X6a:3-X3b#1
2
2637810
1INPUT+-F13:1
4422.02
-F4/1#1
1DECK_LT_IN-F13:2
6434.01
-X.3b/1#1
1 INPUT+ -F4/1:1-F13#1 DECK LTS
2 DECK_LT_IN -X.3b/1:1
TAPE TOGETHER
TAPE TOGETHER
INCLUDED
(2UT BACK VIEW)
(3UT BACK VIEW)
SIDE POCKET PORT
SIDE POCKET STB
4000 mm
4000 mm250 mm250 mm
2.5 RED
1.5 WHITE/GREY
2.5 RED
1.5 WHITE/GREY
1.5 WHITE/GREY
1.5 WHITE/GREY
1.5 BLACK
1.5 WHITE/GREY
1.5 BLACK
1.5 WHITE/GREY
1.5 BLACK
2600 mm1.5 WHITE/GREY
1.5 BLACK
1.5 WHITE/GREY
1.5 BLACK
2700 mm 1.5 WHITE/GREY
1.5 BLACK
2250 mm 1.5 WHITE/GREY
1.5 BLACK
2300 mm1.5 WHITE/GREY
1.5 BLACK
1.5 WHITE/GREY
1.5 BLACK
1000 mm1.5 WHITE/GREY
1.5 WHITE/GREY
1.5 WHITE/GREY
1500 mm 1.5 WHITE/GREY
1.5 WHITE/GREY
1.5 BLACK
1.5 WHITE/GREY
1.5 BLACK
1.5 BLACK
1.5 BLACK
500 mm
1.5 BLACK
5900 mm
2900 mm
2600 mm
3000 mm
3000 mm
1.5 BLACK
1.5 WHITE/GREY
1.5 BLACK
1.5 WHITE/GREY
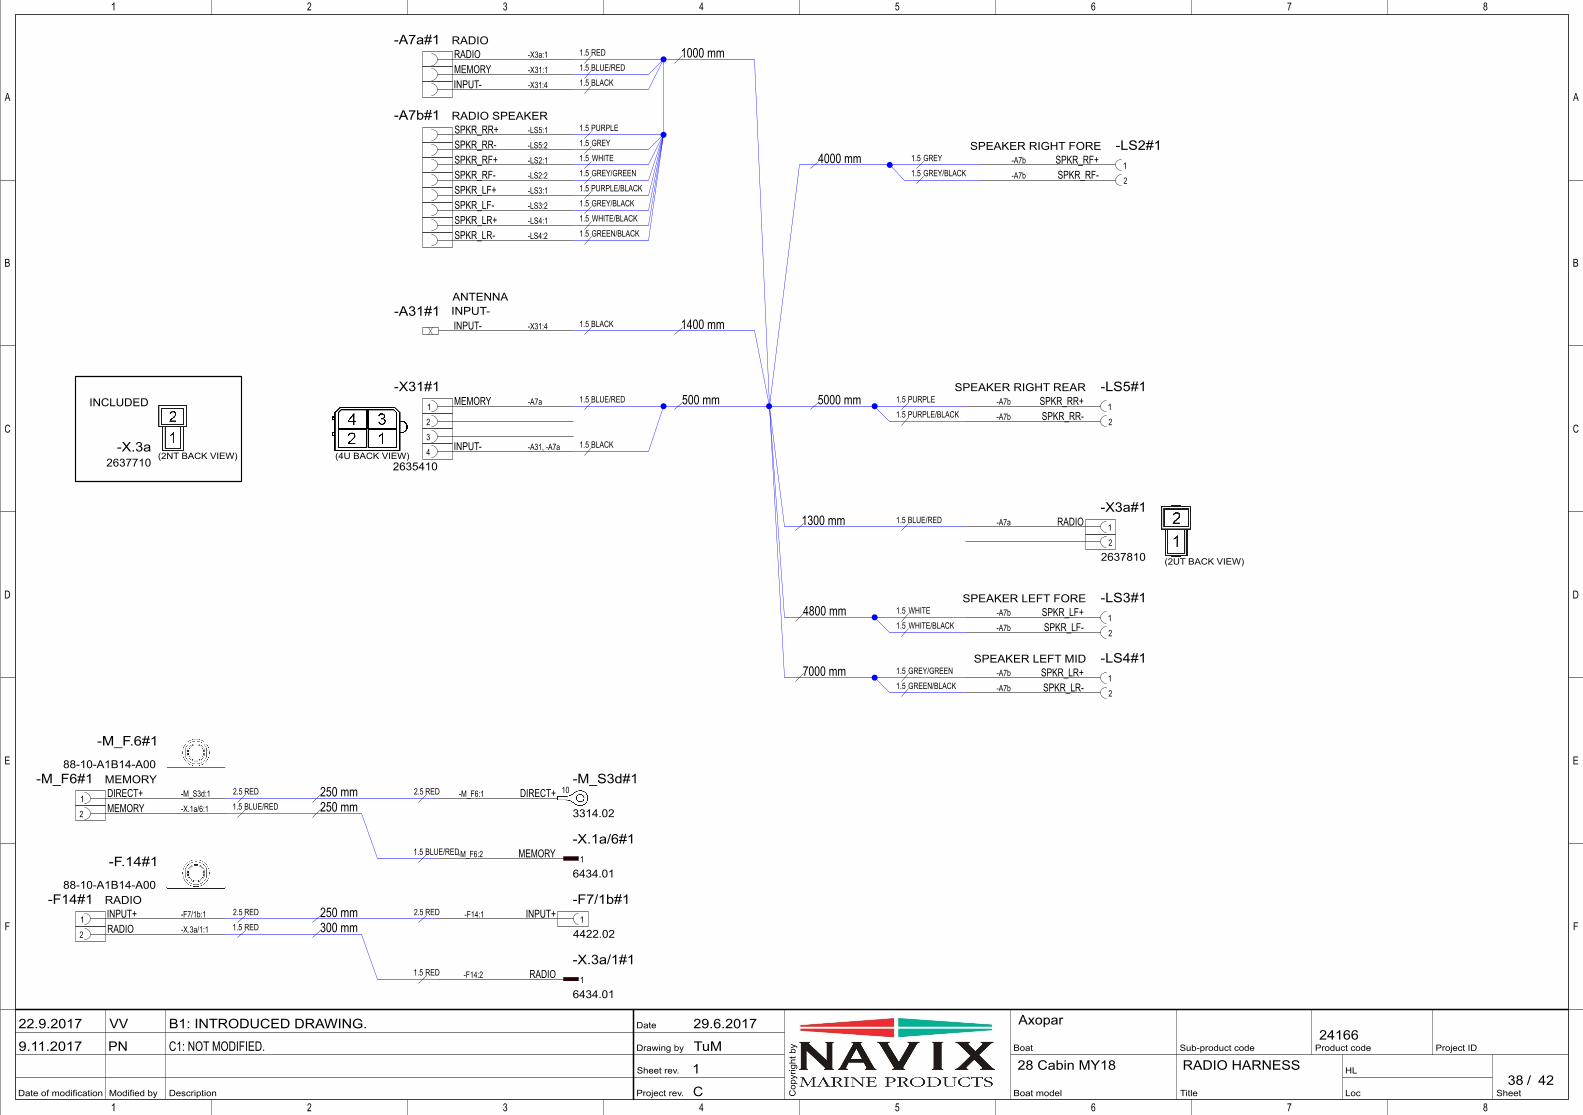
Project rev.
Sheet rev.
Drawing by
Date
Modified by Description
A
B
C
D
E
F
1 2 3 4 5 6 7 8
Date of modification SheetLoc
HL/
Project IDBoat
Boat model
Product code
Cop
yrig
ht b
y Sub-product code
Title
1 2 3 4 5 6 7 8
A
B
C
D
E
F
4228 Cabin MY18
AxoparB1: INTRODUCED DRAWING.
C1: NOT MODIFIED.
VV
PN
29.6.2017
TuM
1
C
22.9.2017
9.11.2017
38
24166
RADIO HARNESS
10
(2NT BACK VIEW)
88-10-A1B14-A00
-M_F.6#1
88-10-A1B14-A00
-F.14#1
SPKR_RR+ -LS5:1-A7b#1 RADIO SPEAKER
SPKR_RR- -LS5:2
SPKR_RF+ -LS2:1
SPKR_RF- -LS2:2
SPKR_LF+ -LS3:1
SPKR_LF- -LS3:2
SPKR_LR+ -LS4:1
SPKR_LR- -LS4:2
RADIO -X3a:1-A7a#1 RADIO
MEMORY -X31:1
INPUT- -X31:4
INPUT- -X31:4-A31#1
ANTENNAINPUT-
2637710-X.3a
1 MEMORY -A7a-X31#1
(4U BACK VIEW)
2
3
4 INPUT- -A31, -A7a
2635410
1RADIO-A7a-X3a#1
2
2637810
DIRECT+-M_F6:1
3314.02
-M_S3d#1
1INPUT+-F14:1
4422.02
-F7/1b#1
1RADIO-F14:2
6434.01
-X.3a/1#1
1MEMORY-M_F6:2
6434.01
-X.1a/6#1
1 INPUT+ -F7/1b:1-F14#1 RADIO
2 RADIO -X.3a/1:1
1 DIRECT+ -M_S3d:1-M_F6#1 MEMORY
2 MEMORY -X.1a/6:1
1SPKR_RF+-A7b-LS2#1SPEAKER RIGHT FORE
2SPKR_RF--A7b
1SPKR_LF+-A7b-LS3#1SPEAKER LEFT FORE
2SPKR_LF--A7b
1SPKR_LR+-A7b-LS4#1SPEAKER LEFT MID
2SPKR_LR--A7b
1SPKR_RR+-A7b-LS5#1SPEAKER RIGHT REAR
2SPKR_RR--A7bINCLUDED
(2UT BACK VIEW)
500 mm
1000 mm
1300 mm
250 mm250 mm
250 mm300 mm
2.5 RED
1.5 BLUE/RED
2.5 RED
1.5 RED
2.5 RED
1.5 BLUE/RED
2.5 RED
1.5 RED
1.5 PURPLE
1.5 GREY
1.5 WHITE
1.5 GREY/GREEN
1.5 PURPLE/BLACK
1.5 GREY/BLACK
1.5 WHITE/BLACK
1.5 GREEN/BLACK
1.5 BLUE/RED
1.5 BLACK
1.5 GREY
1.5 GREY/BLACK
1.5 BLUE/RED
1.5 WHITE
1.5 WHITE/BLACK
1.5 GREY/GREEN
1.5 GREEN/BLACK
4800 mm
7000 mm
4000 mm
1.5 RED
1.5 BLUE/RED
1.5 BLACK
1.5 BLACK 1400 mm
5000 mm 1.5 PURPLE
1.5 PURPLE/BLACK
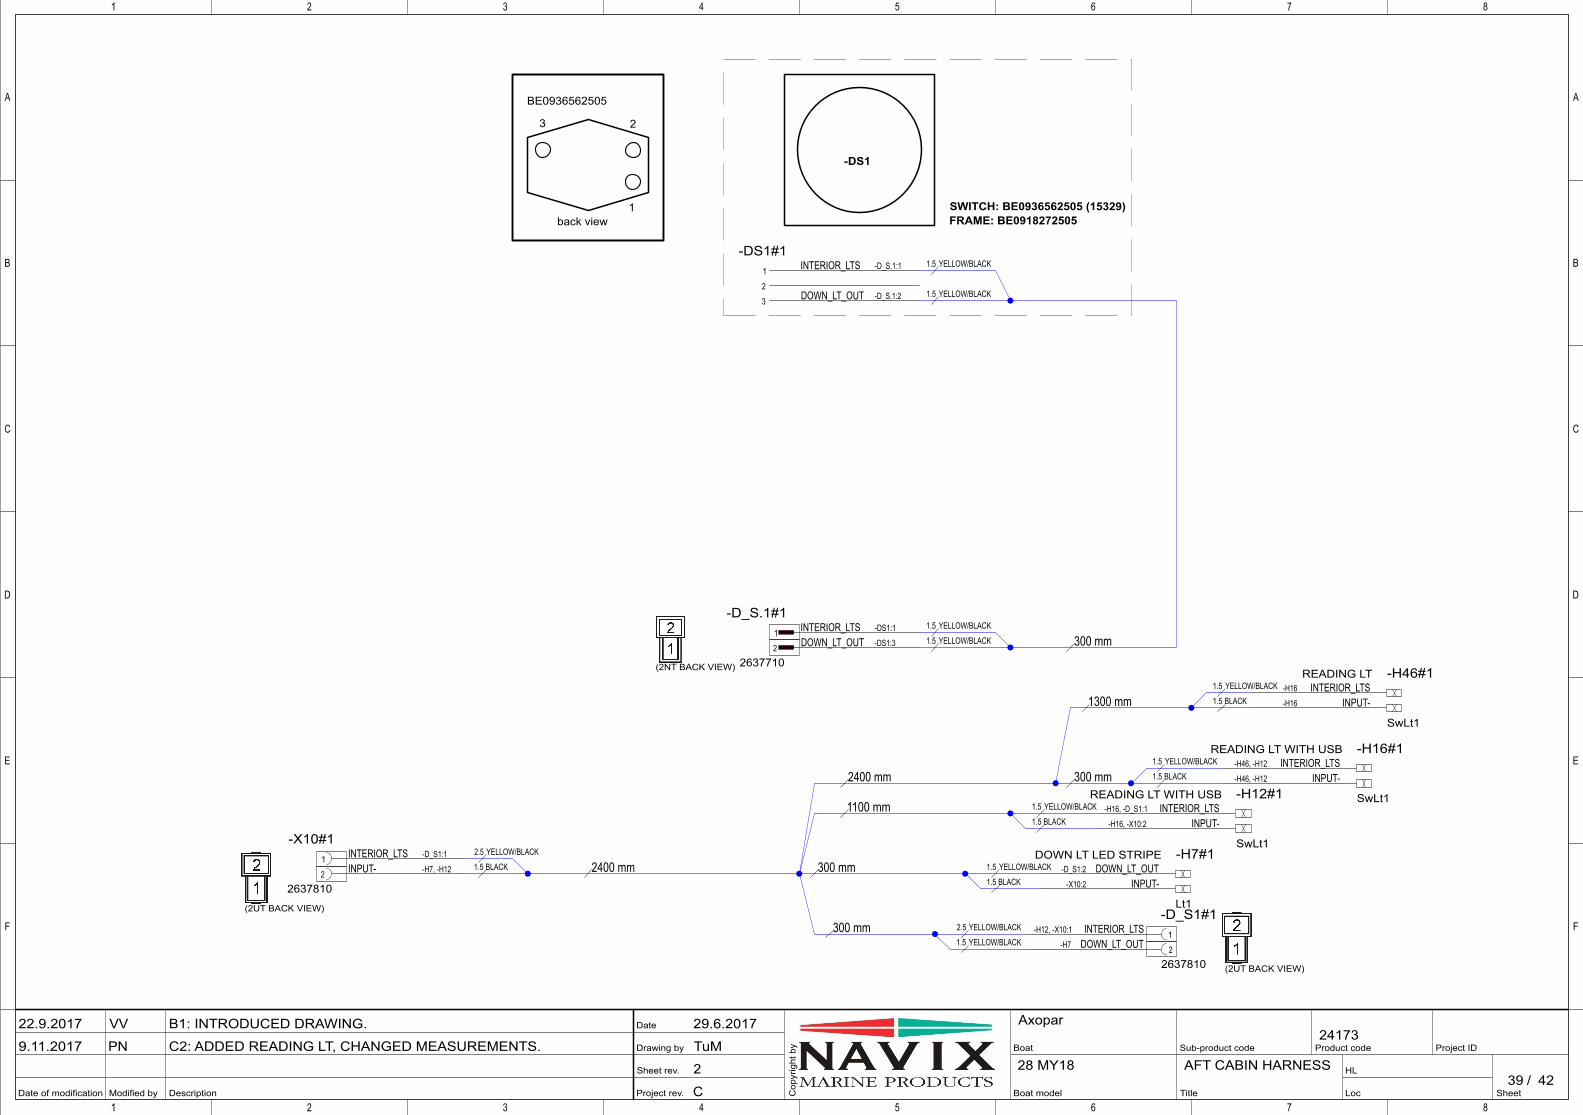
Project rev.
Sheet rev.
Drawing by
Date
Modified by Description
A
B
C
D
E
F
1 2 3 4 5 6 7 8
Date of modification SheetLoc
HL/
Project IDBoat
Boat model
Product code
Cop
yrig
ht b
y Sub-product code
Title
1 2 3 4 5 6 7 8
A
B
C
D
E
F
4228 MY18
AxoparB1: INTRODUCED DRAWING.
C2: ADDED READING LT, CHANGED MEASUREMENTS.
VV
PN
29.6.2017
TuM
2
C
22.9.2017
9.11.2017
39
24173
AFT CABIN HARNESS
INTERIOR_LTS -D_S.1:1-DS1#1
1
2DOWN_LT_OUT -D_S.1:23
DOWN_LT_OUT-D_S1:2-H7#1DOWN LT LED STRIPE
INPUT--X10:2
Lt1
INTERIOR_LTS-H16, -D_S1:1-H12#1READING LT WITH USB
INPUT--H16, -X10:2
SwLt1
INTERIOR_LTS-H46, -H12-H16#1READING LT WITH USB
INPUT--H46, -H12
SwLt1
1 INTERIOR_LTS -DS1:1-D_S.1#1
(2NT BACK VIEW)
2 DOWN_LT_OUT -DS1:3
2637710
1INTERIOR_LTS-H12, -X10:1-D_S1#1
(2UT BACK VIEW)
2DOWN_LT_OUT-H7
2637810
1 INTERIOR_LTS -D_S1:1-X10#1
2 INPUT- -H7, -H12
2637810
INPUT--H16
SwLt1
INTERIOR_LTS-H16-H46#1READING LT
SWITCH: BE0936562505 (15329)FRAME: BE0918272505
-DS1
1
23
BE0936562505
back view
(2UT BACK VIEW)
300 mm1.5 YELLOW/BLACK
1.5 YELLOW/BLACK
1.5 YELLOW/BLACK
1.5 YELLOW/BLACK
1100 mm
300 mm 1.5 YELLOW/BLACK
1.5 BLACK
1.5 YELLOW/BLACK
1.5 BLACK
1.5 YELLOW/BLACK
1.5 BLACK
300 mm 2.5 YELLOW/BLACK
1.5 YELLOW/BLACK
2400 mm2.5 YELLOW/BLACK
1.5 BLACK
2400 mm 300 mm
1300 mm1.5 YELLOW/BLACK
1.5 BLACK

Project rev.
Sheet rev.
Drawing by
Date
Modified by Description
A
B
C
D
E
F
1 2 3 4 5 6 7 8
Date of modification SheetLoc
HL/
Project IDBoat
Boat model
Product code
Copyright by
Sub-product code
Title
1 2 3 4 5 6 7 8
A
B
C
D
E
F
4228 MY18
AxoparB1: INTRODUCED DRAWING.
C2: CHANGED UNDER W.LT. WIRE MEASUREMENT.
VV
PN
29.8.2017
TuM
2
C
22.9.2017
9.11.2017
40
24174
UW. LT. HARNESS
UW_LTS_OUT-X9:1, -H37-H36#1UNDER W. LT
INPUT--X9:2, -H37
Lt1
UW_LTS_OUT-H36-H37#1UNDER W. LT
INPUT--H36
Lt1
1 UW_LTS_OUT -H36-X9#1
2 INPUT- -H36
2637810
(2UT BACK VIEW)
500 mm
3200 mm
1.5 WHITE/YELLOW
1.5 BLACK
1.5 WHITE/YELLOW
1.5 BLACK
5400 mm1.5 WHITE/YELLOW
1.5 BLACK
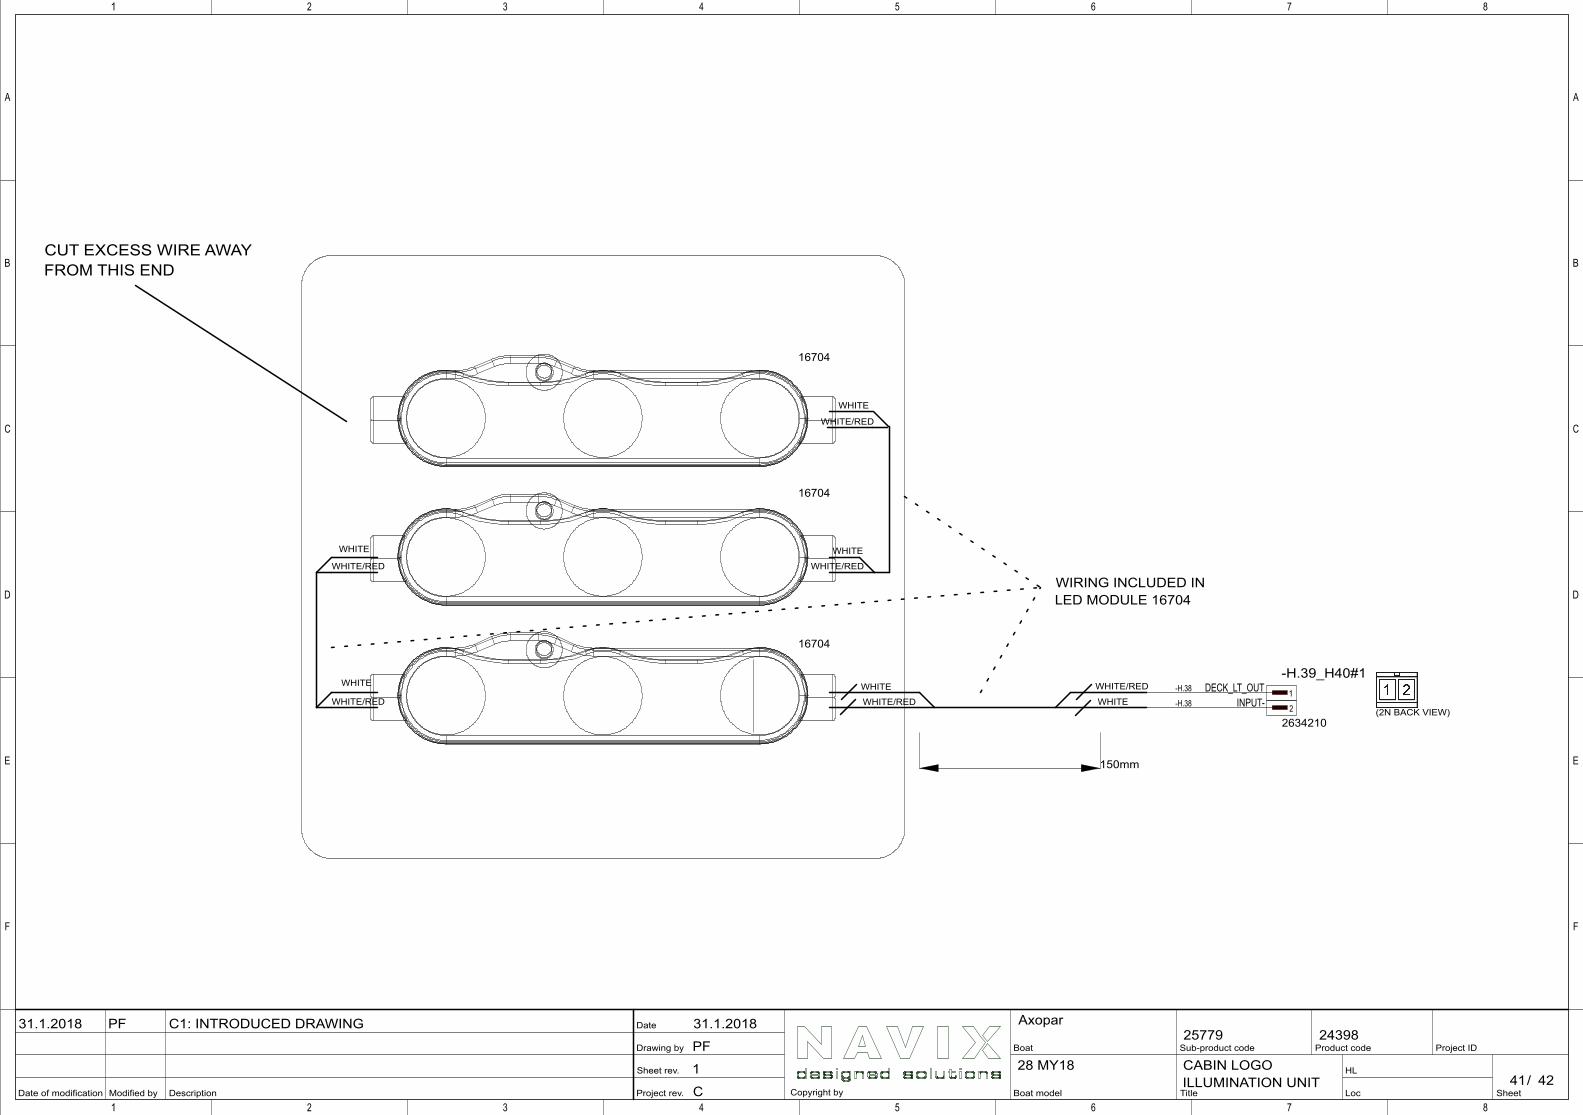
Project rev.
Sheet rev.
Drawing by
Date
Modified by Description
A
B
C
D
E
F
1 2 3 4 5 6 7 8
Date of modification SheetLoc
HL/
Project IDBoat
Boat model
Product code
Copyright by
Sub-product code
Title
1 2 3 4 5 6 7 8
A
B
C
D
E
F
4228 MY18
AxoparC1: INTRODUCED DRAWINGPF 31.1.2018
PF
1
C
31.1.2018
41
2439825779
CABIN LOGO ILLUMINATION UNIT
1DECK_LT_OUT-H.38-H.39_H40#1
2INPUT--H.38
2634210
16704
16704
16704
WIRING INCLUDED IN LED MODULE 16704
(2N BACK VIEW)WHITE/RED
WHITE/REDWHITE
WHITEWHITE/RED
WHITE/RED WHITE/RED
WHITE/RED
CUT EXCESS WIRE AWAY FROM THIS END
WHITE
WHITE WHITE
WHITE
150mm
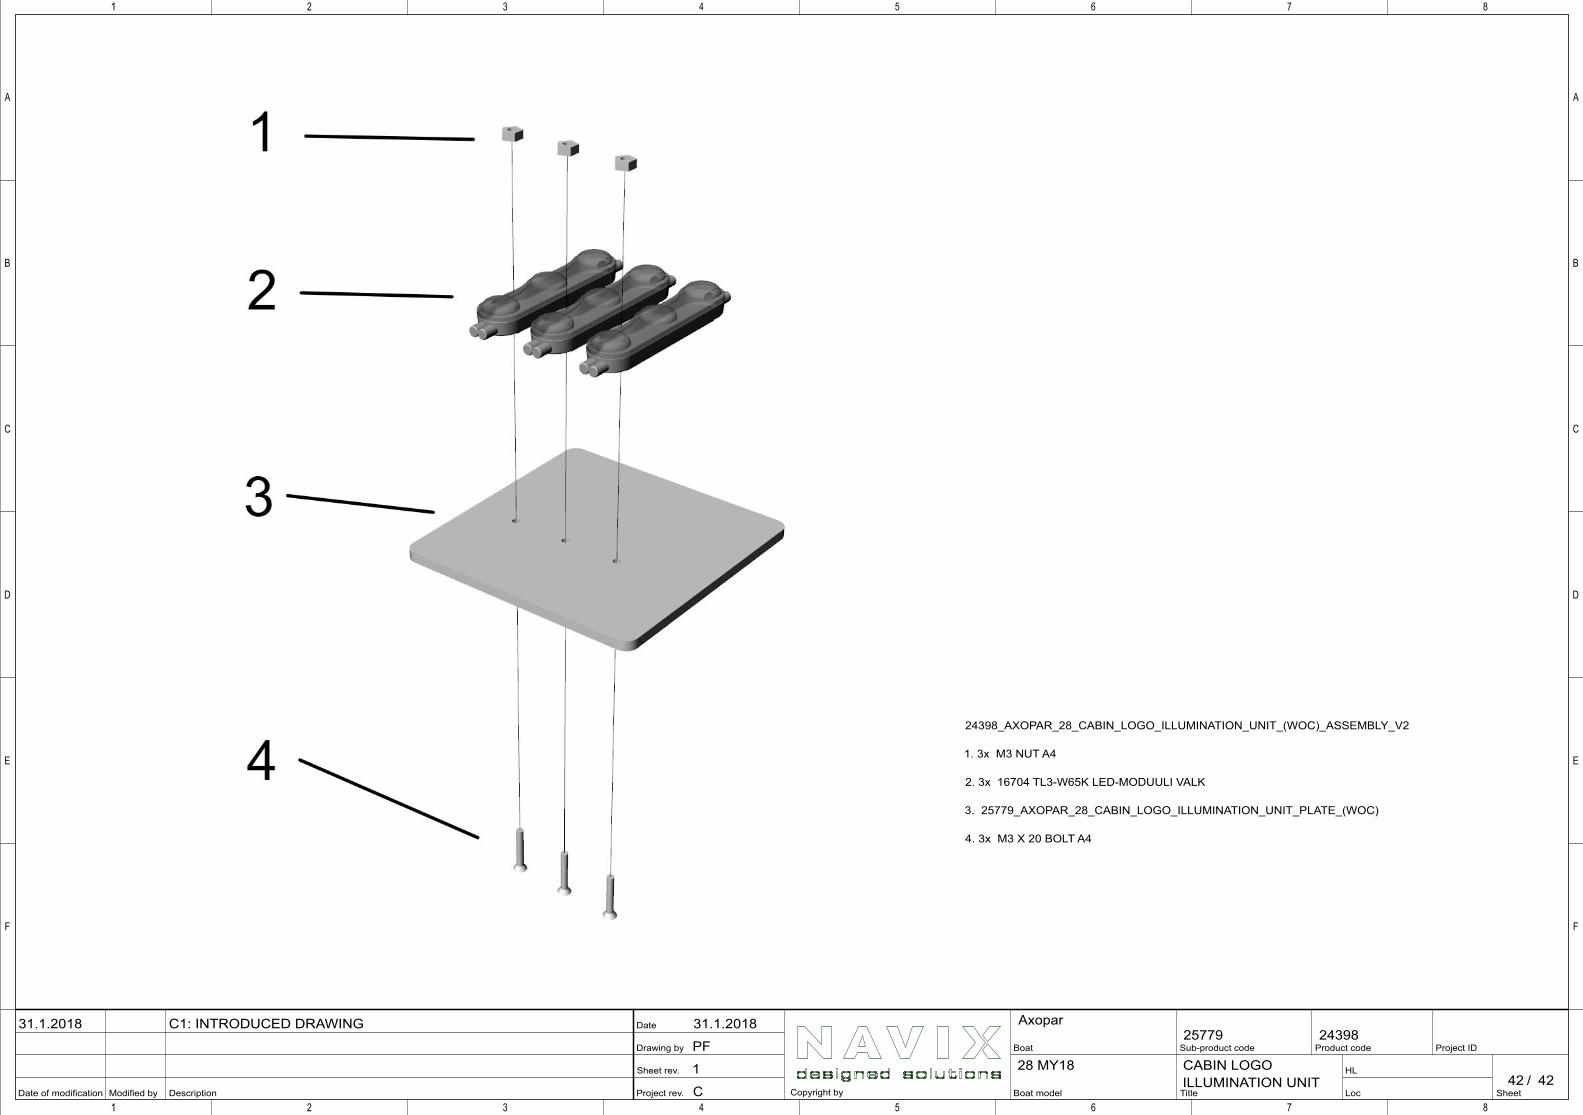
Project rev.
Sheet rev.
Drawing by
Date
Modified by Description
A
B
C
D
E
F
1 2 3 4 5 6 7 8
Date of modification SheetLoc
HL/
Project IDBoat
Boat model
Product code
Copyright by
Sub-product code
Title
1 2 3 4 5 6 7 8
A
B
C
D
E
F
4228 MY18
AxoparC1: INTRODUCED DRAWING 31.1.2018
PF
1
C
31.1.2018
42
2439825779
CABIN LOGOILLUMINATION UNIT
24398_AXOPAR_28_CABIN_LOGO_ILLUMINATION_UNIT_(WOC)_ASSEMBLY_V2
1. 3x M3 NUT A4
2. 3x 16704 TL3-W65K LED-MODUULI VALK
3. 25779_AXOPAR_28_CABIN_LOGO_ILLUMINATION_UNIT_PLATE_(WOC)
4. 3x M3 X 20 BOLT A4

12. Appendix IV: Warning label placement
12. Appendix IV: Warning label placement
Axopar 28 T-Top MY2021 Document ID: 28TMY21202012ENOwner's Manual© 2020 Axopar Boats Page 64
-
-
Table of Contents
Table of Contents
1. Port fwd storage.......................................................................................................4
2. Cabin roof inner....................................................................................................... 5
3. Main cabin port door................................................................................................6
4. Front seats............................................................................................................... 7
5. CO2 sensor - port - main cabin...............................................................................8
6. Aft cabin hatch and skylights................................................................................... 9
7. Switch panel in aft cabin........................................................................................10
8. Ski pole...................................................................................................................11
9. Aft deck folding seat.............................................................................................. 12
10. Bow thruster option.............................................................................................. 13
11. Shore power - fwd locker..................................................................................... 14
12. STB above speaker..............................................................................................15
13. Switch panel in toilet compartment...................................................................... 16
14. Panel in toilet compartment................................................................................. 17
15. Dashboard panel.................................................................................................. 18
16. Main cabin, STBD under cabin window...............................................................21
17. Fire extinguisher...................................................................................................22
18. Main cabin, PS - main switch.............................................................................. 23
19. Wetbar lid - grill option.........................................................................................25
20. Deck STBD, fuel inlet...........................................................................................26
© 2020 Axopar Boats Page 2-
-

28 Warning label positions
This document presents the positions and the pictures of the warning labels that are placed on the boat.The position numbers in the picture below correspond the numbering of the chapters to guide you infinding the correct warning label.
© 2020 Axopar Boats Page 3-
-
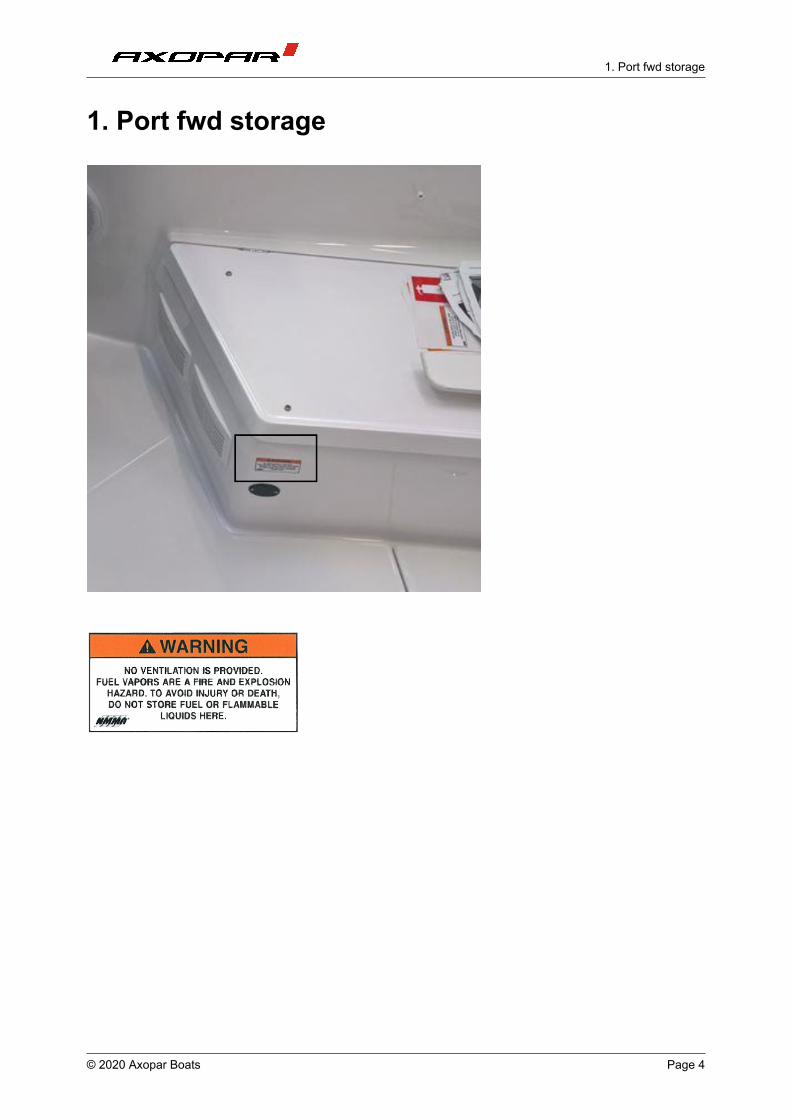
1. Port fwd storage
1. Port fwd storage
© 2020 Axopar Boats Page 4-
-
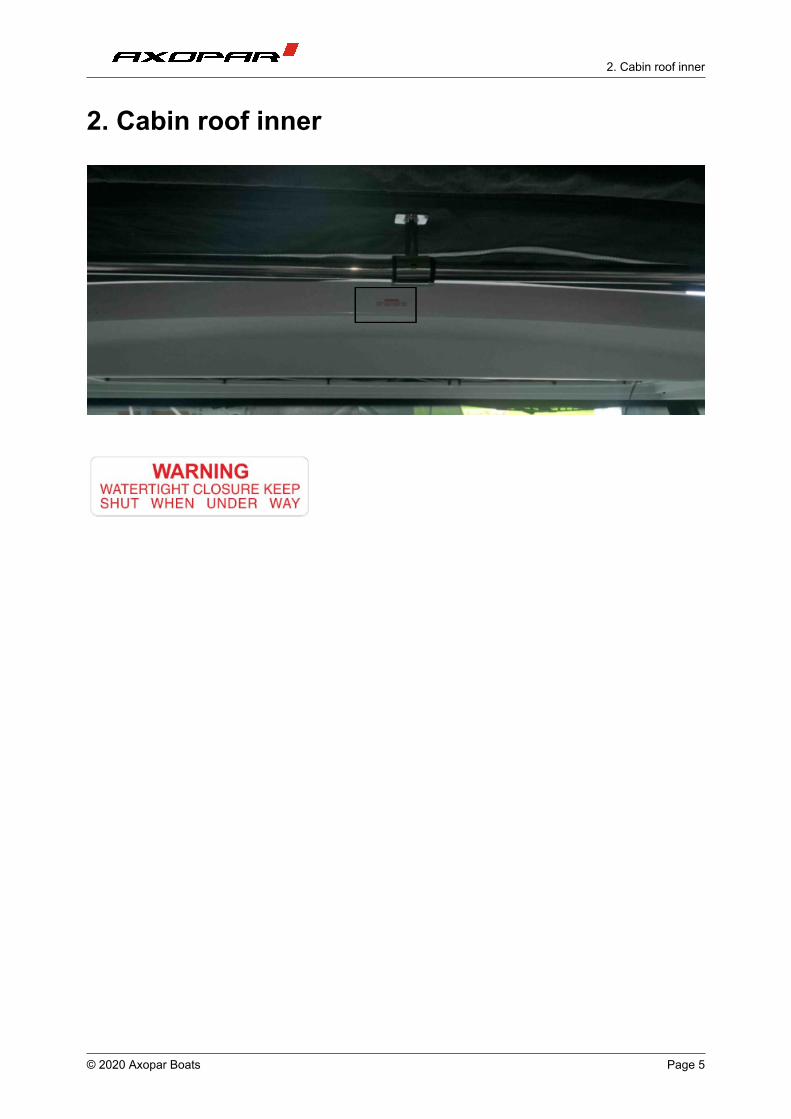
2. Cabin roof inner
2. Cabin roof inner
© 2020 Axopar Boats Page 5-
-
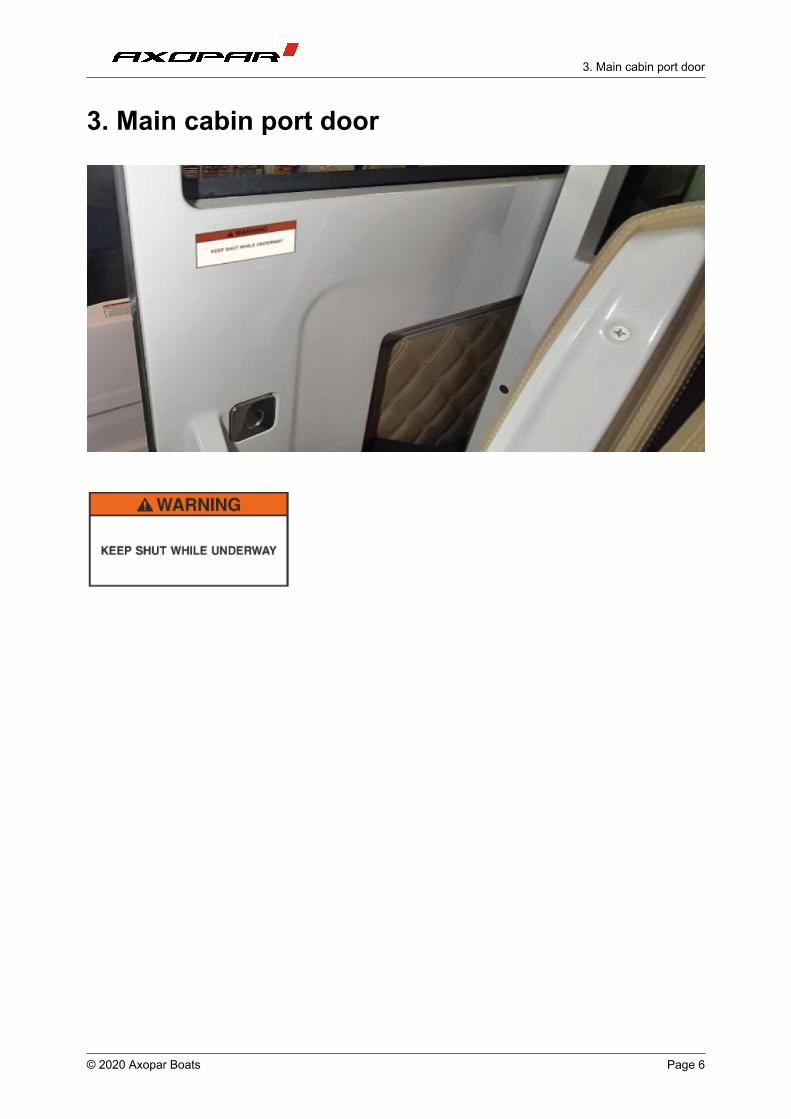
3. Main cabin port door
3. Main cabin port door
© 2020 Axopar Boats Page 6-
-
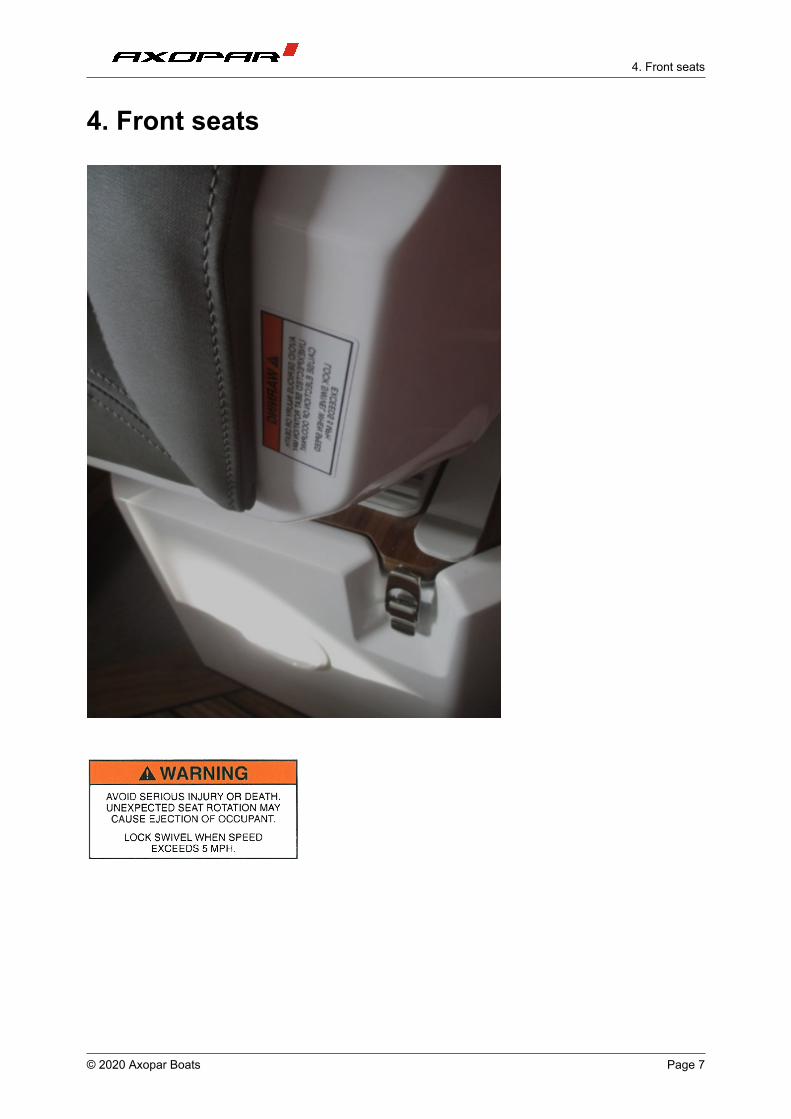
4. Front seats
4. Front seats
© 2020 Axopar Boats Page 7-
-
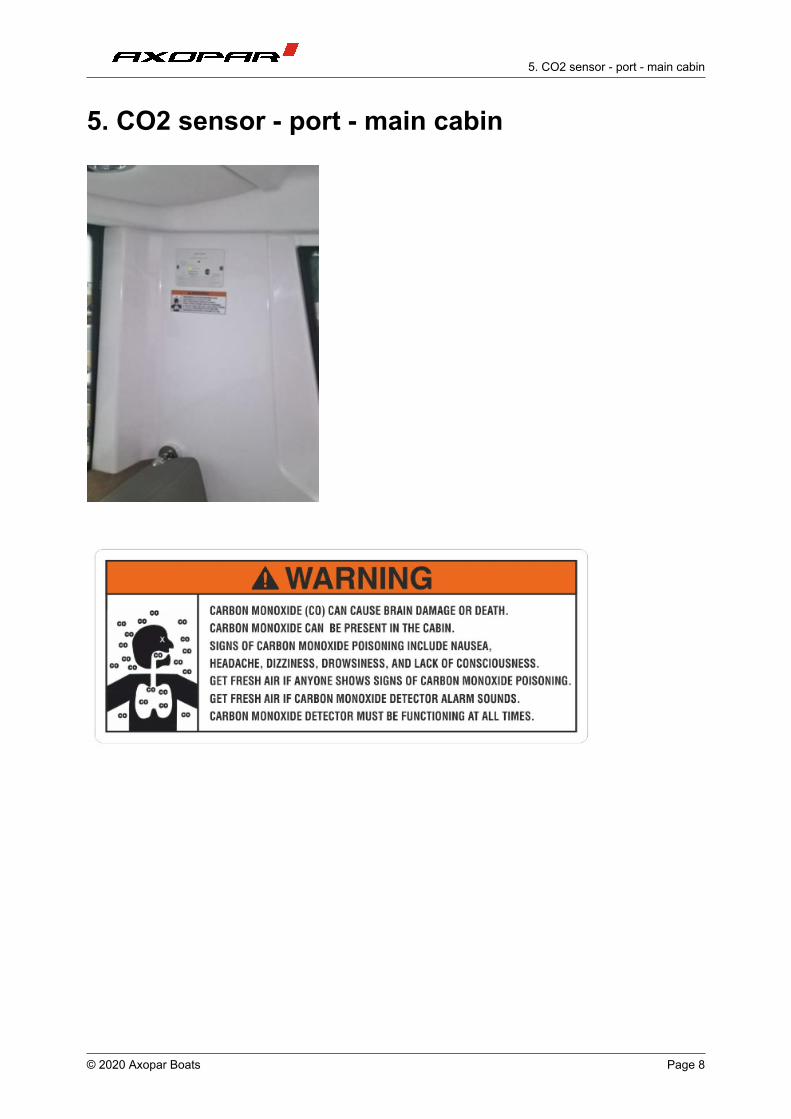
5. CO2 sensor - port - main cabin
5. CO2 sensor - port - main cabin
© 2020 Axopar Boats Page 8-
-
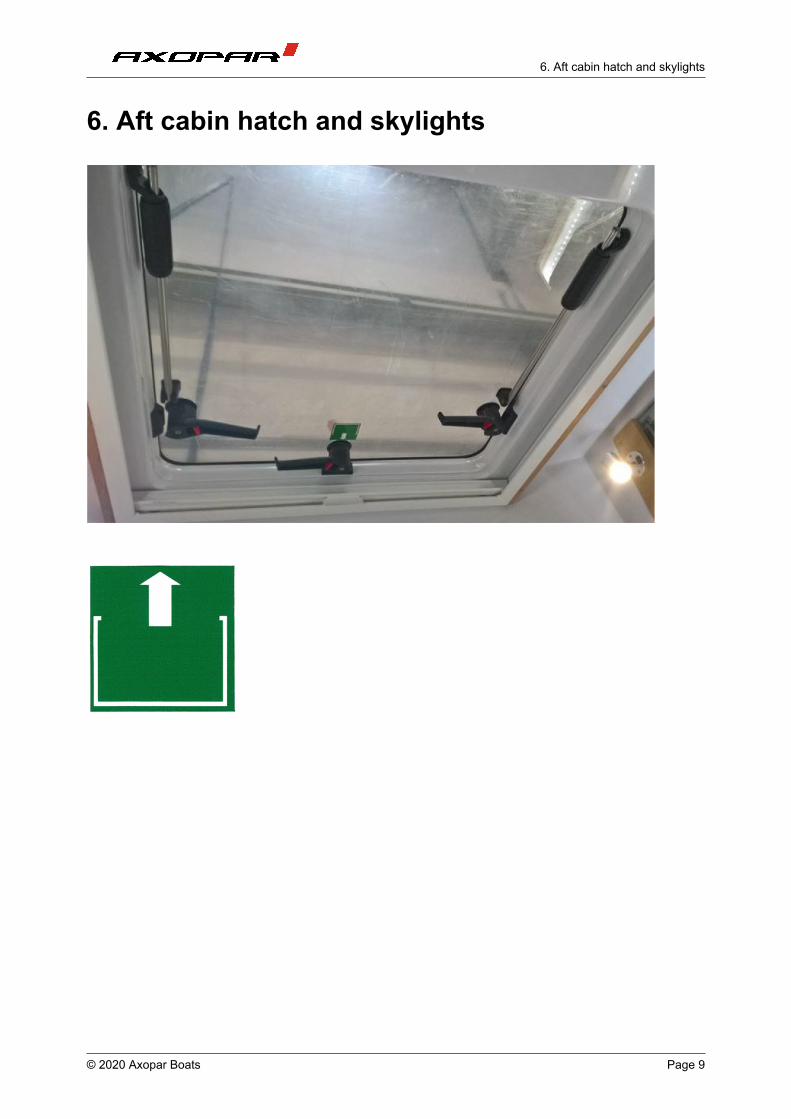
6. Aft cabin hatch and skylights
6. Aft cabin hatch and skylights
© 2020 Axopar Boats Page 9-
-
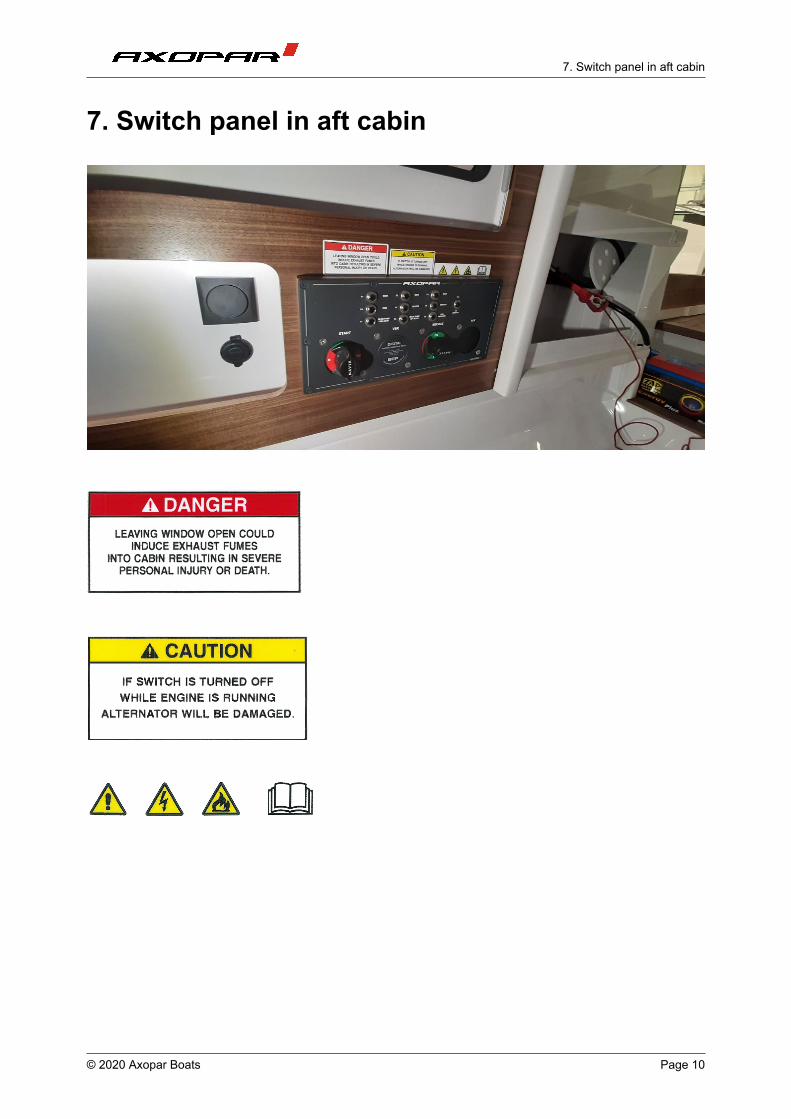
7. Switch panel in aft cabin
7. Switch panel in aft cabin
© 2020 Axopar Boats Page 10-
-
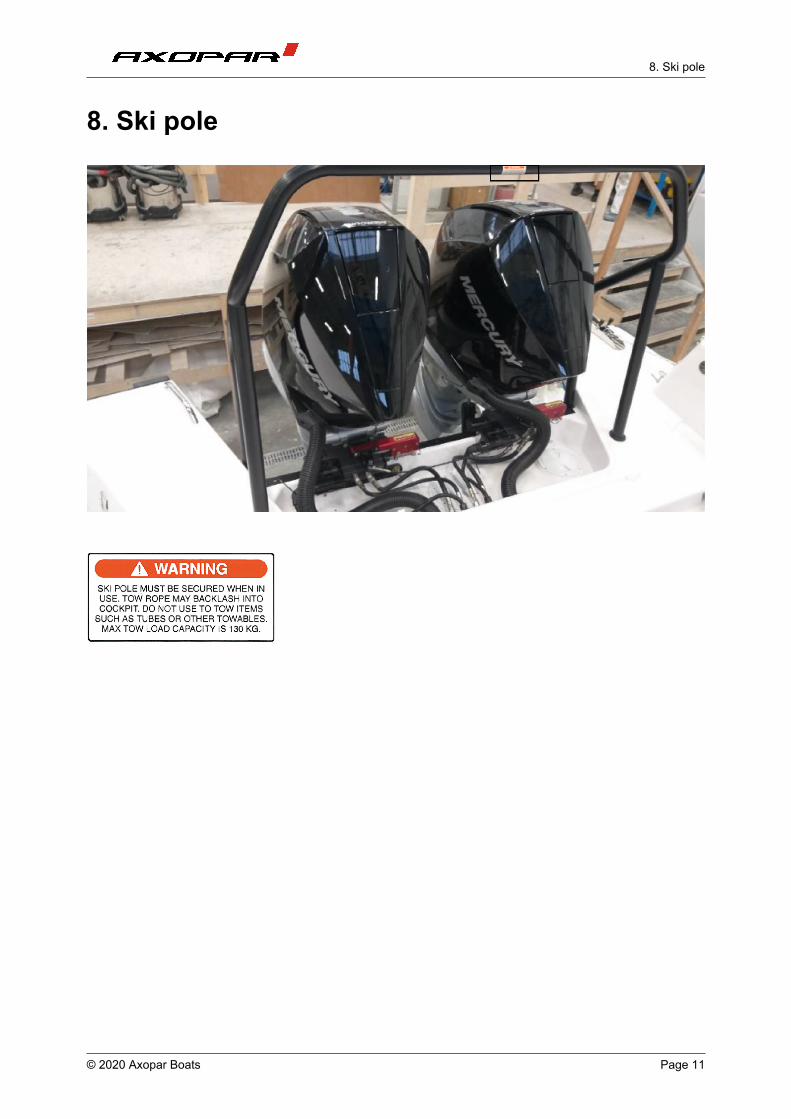
8. Ski pole
8. Ski pole
© 2020 Axopar Boats Page 11-
-
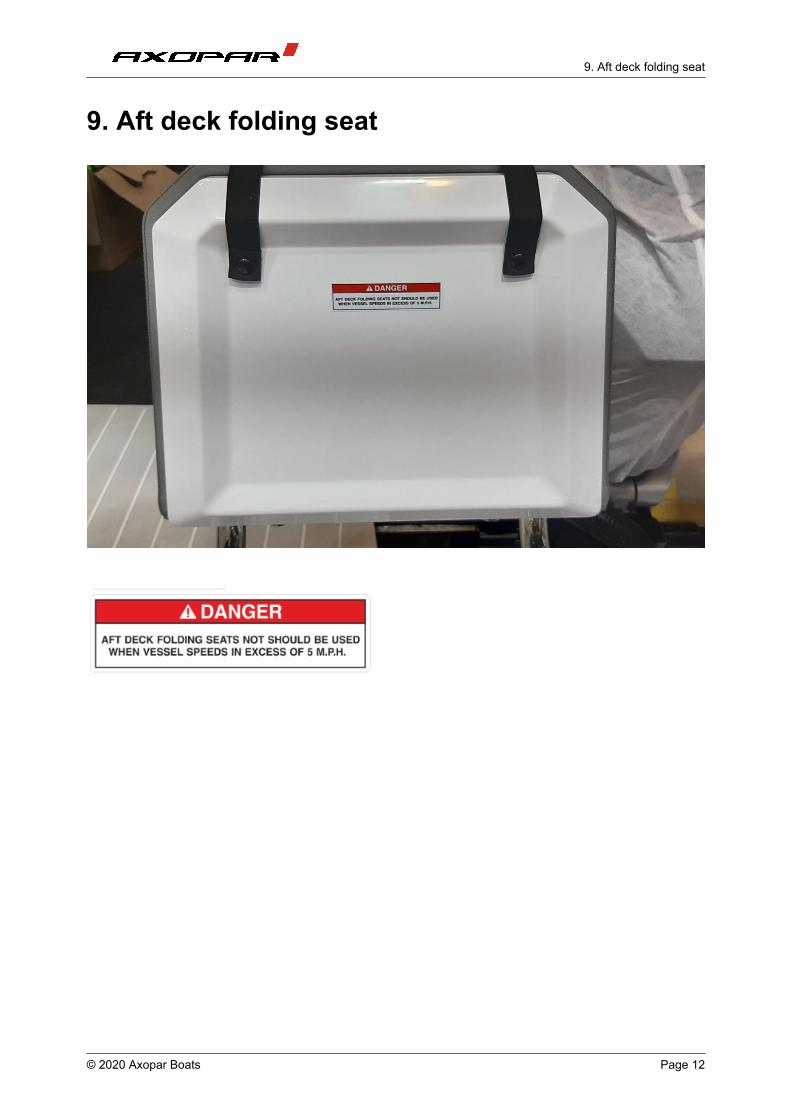
9. Aft deck folding seat
9. Aft deck folding seat
© 2020 Axopar Boats Page 12-
-
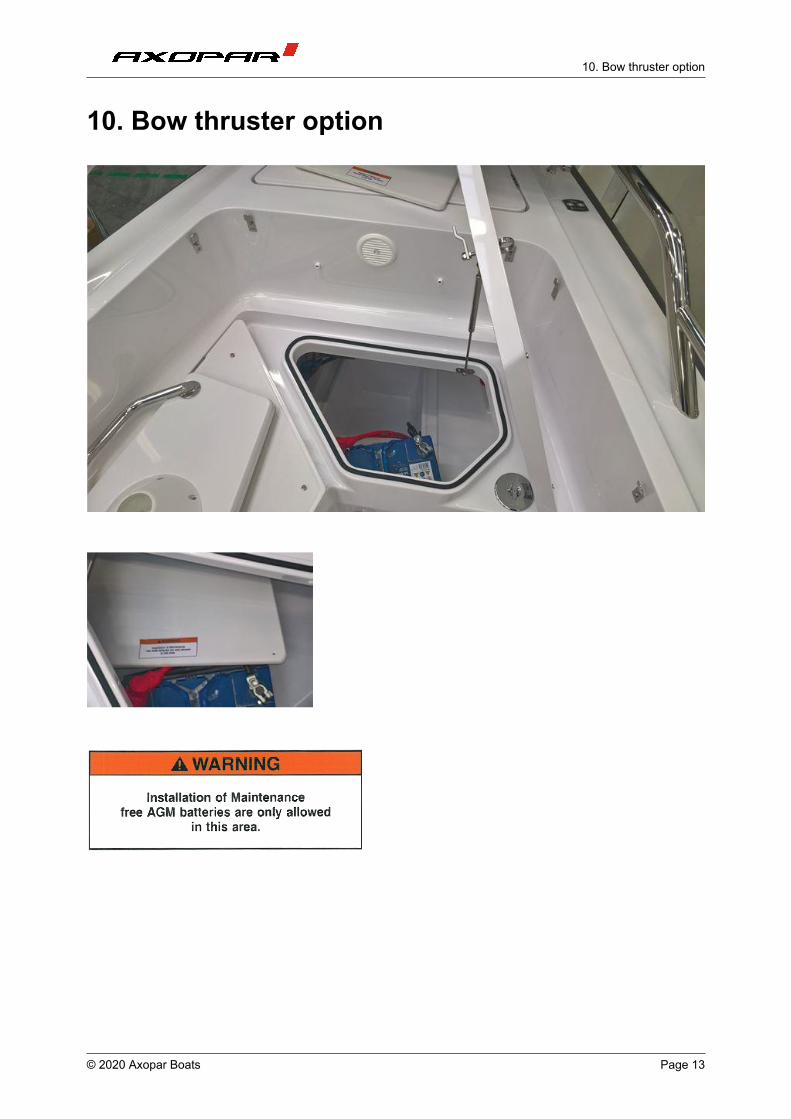
10. Bow thruster option
10. Bow thruster option
© 2020 Axopar Boats Page 13-
-

11. Shore power - fwd locker
11. Shore power - fwd locker
© 2020 Axopar Boats Page 14-
-
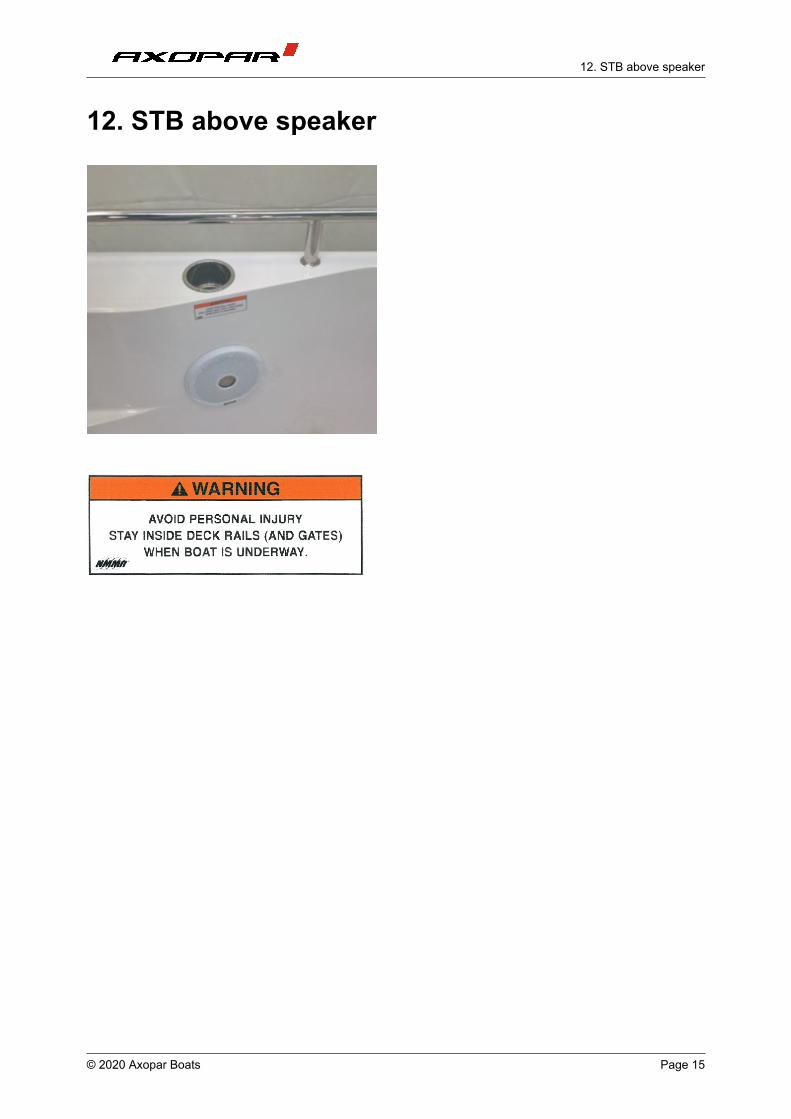
12. STB above speaker
12. STB above speaker
© 2020 Axopar Boats Page 15-
-
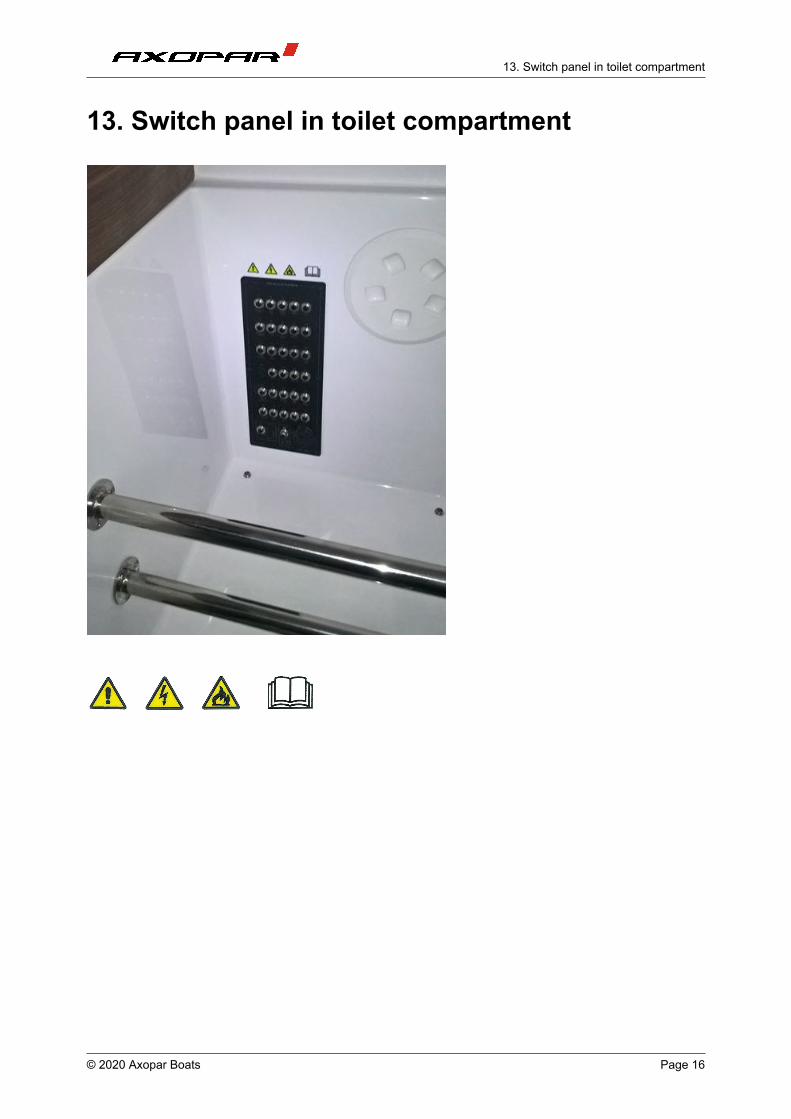
13. Switch panel in toilet compartment
13. Switch panel in toilet compartment
© 2020 Axopar Boats Page 16-
-
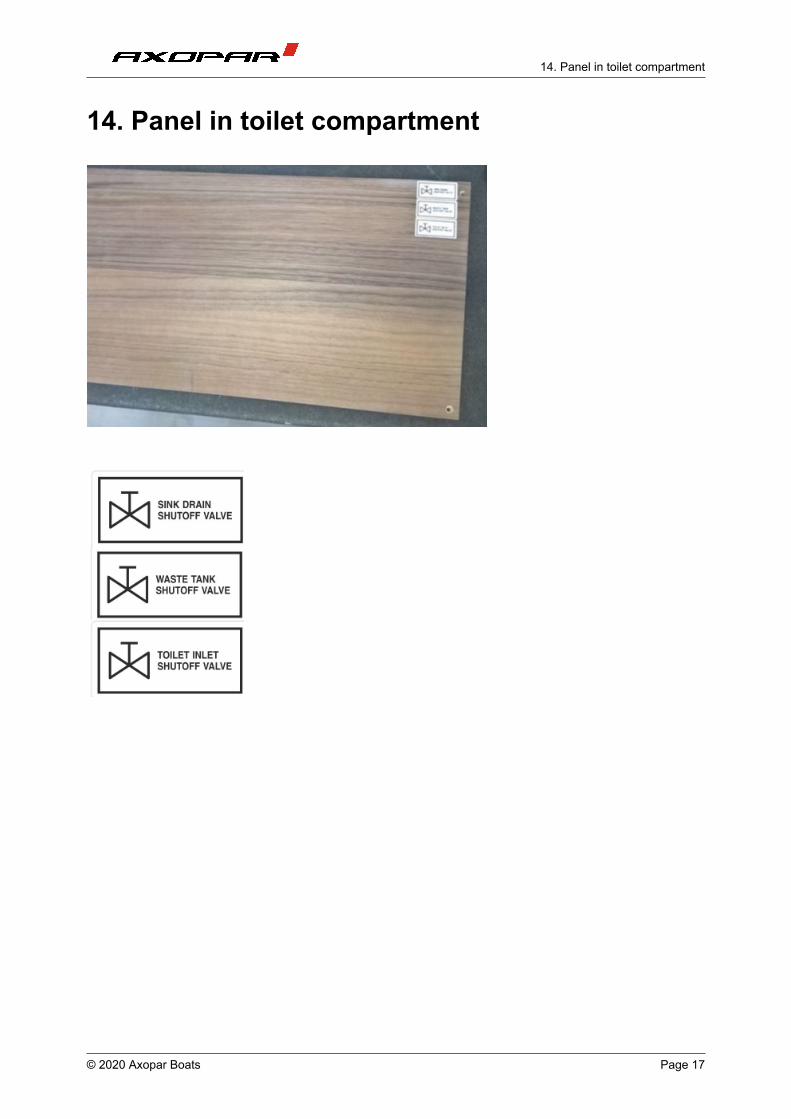
14. Panel in toilet compartment
14. Panel in toilet compartment
© 2020 Axopar Boats Page 17-
-
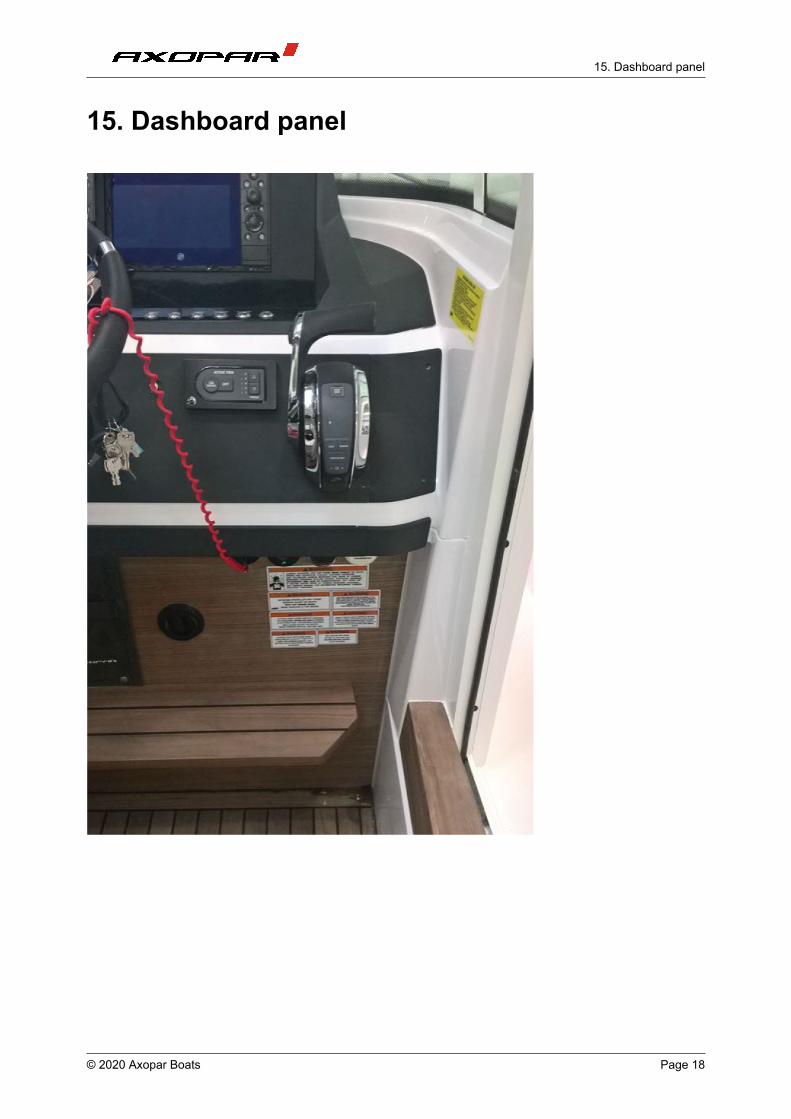
15. Dashboard panel
15. Dashboard panel
© 2020 Axopar Boats Page 18-
-
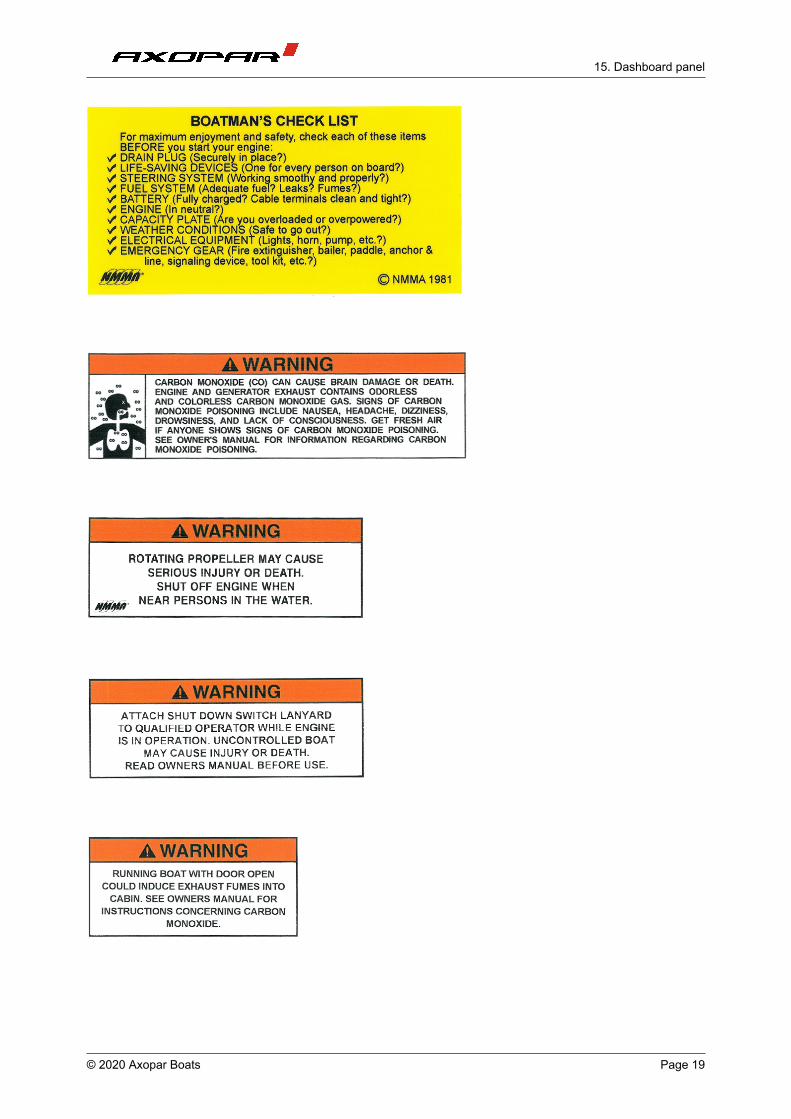
15. Dashboard panel
© 2020 Axopar Boats Page 19-
-

15. Dashboard panel
© 2020 Axopar Boats Page 20-
-
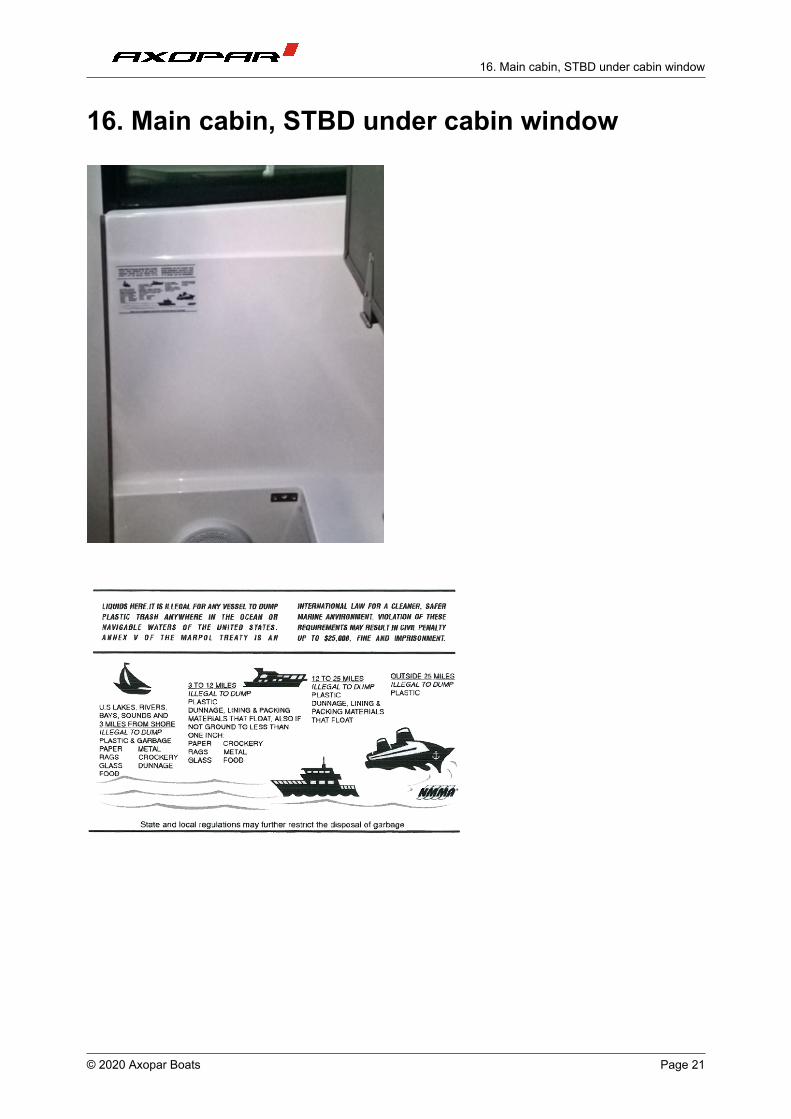
16. Main cabin, STBD under cabin window
16. Main cabin, STBD under cabin window
© 2020 Axopar Boats Page 21-
-

17. Fire extinguisher
17. Fire extinguisher
© 2020 Axopar Boats Page 22-
-
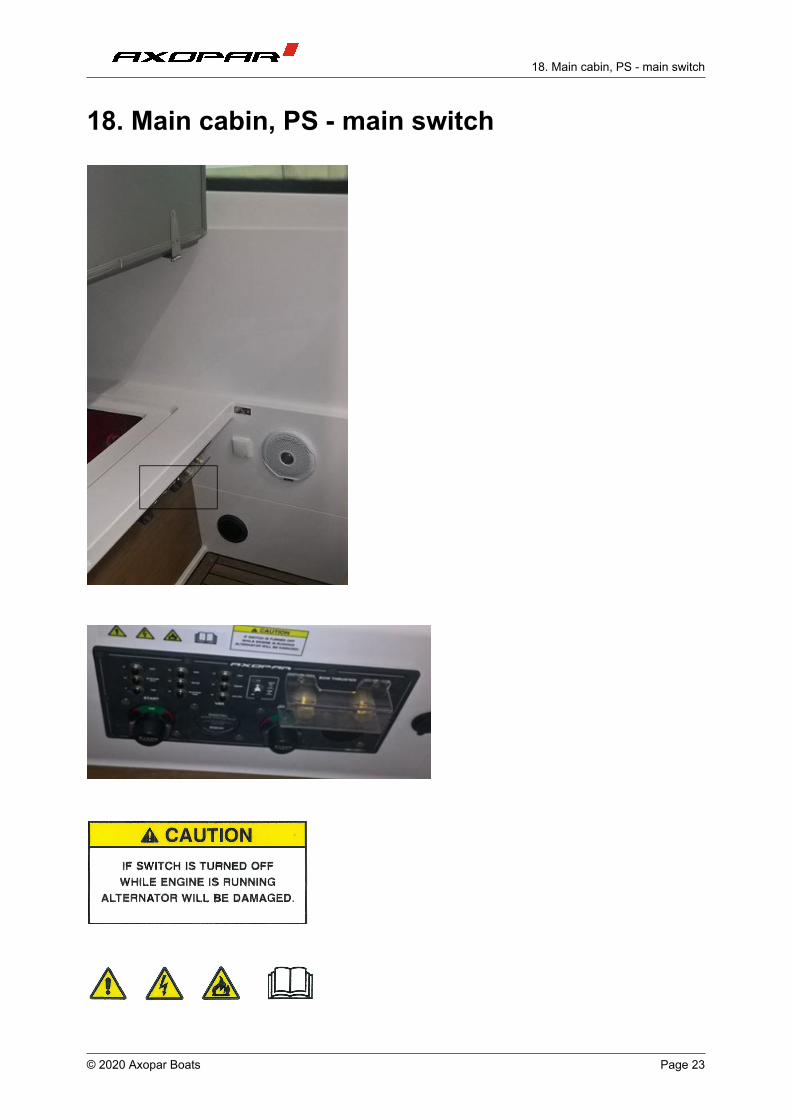
18. Main cabin, PS - main switch
18. Main cabin, PS - main switch
© 2020 Axopar Boats Page 23-
-
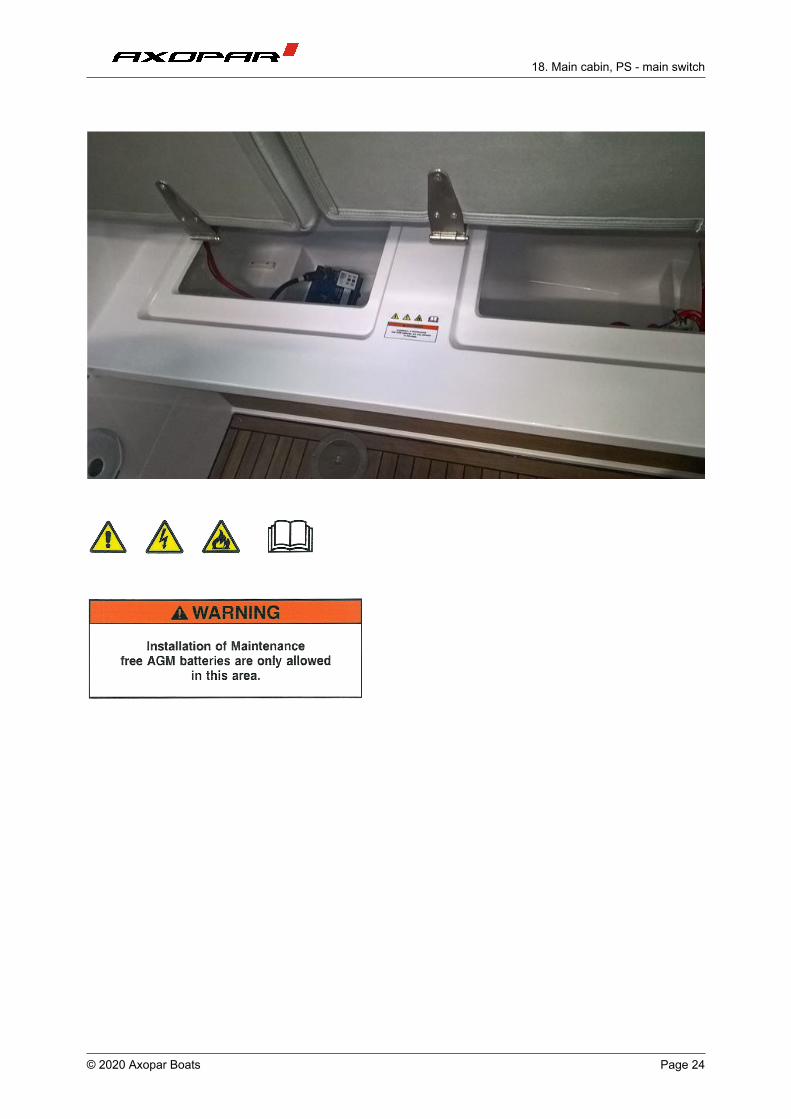
18. Main cabin, PS - main switch
© 2020 Axopar Boats Page 24-
-
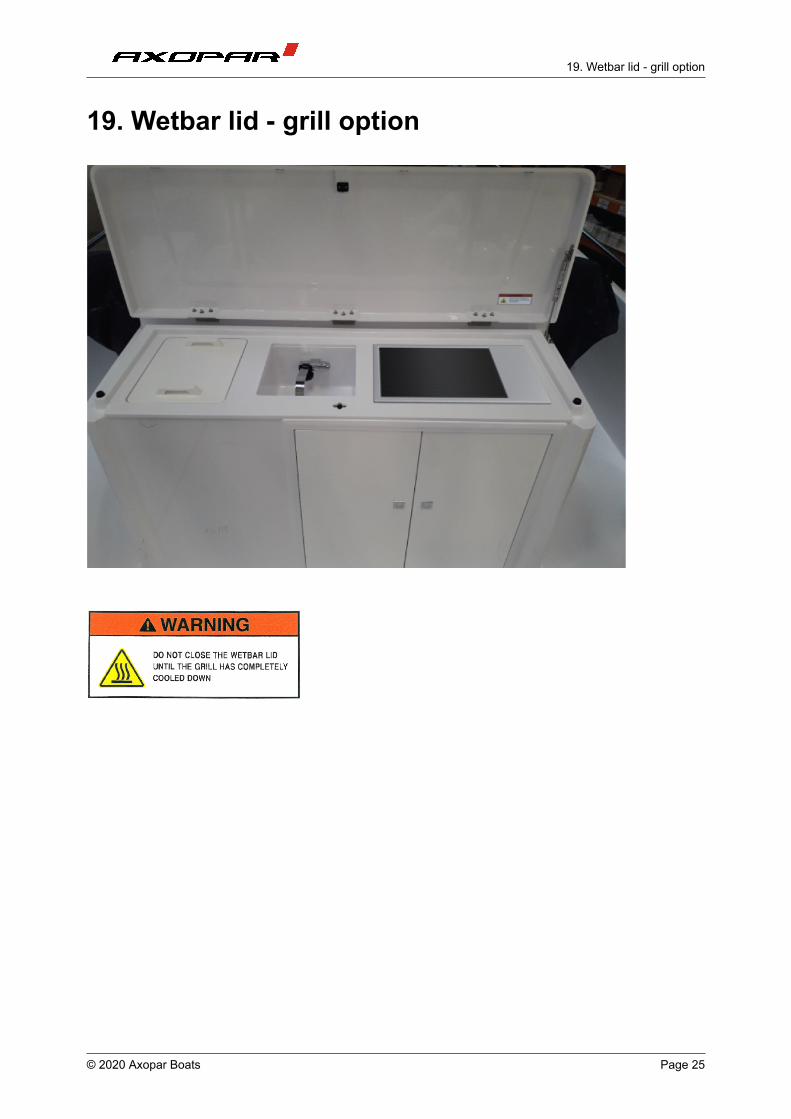
19. Wetbar lid - grill option
19. Wetbar lid - grill option
© 2020 Axopar Boats Page 25-
-

20. Deck STBD, fuel inlet
20. Deck STBD, fuel inlet
© 2020 Axopar Boats Page 26-
-