Owner's Manual - KAWAI
76
Owner’s Manual
-
Upload
khangminh22 -
Category
Documents
-
view
2 -
download
0
Transcript of Owner's Manual - KAWAI
Owner’s Manual

2
Important Safety Instructions
When connecting the AC power cordand other cords, take carenot to get them tangled.
Pulling the AC power cord itself may damage thecord, causing a fire, electric shock or short-circuit.
denotes that care should be taken.The example instructs the user to take care not to allow fingers to be trapped.
denotes a prohibited operation.The example instructs that disassembly of the product is prohibited
denotes an operation that should be carried out.The example instructs the user to remove the power cord plug from the AC outlet.
SAVE THESE INSTRUCTIONSINSTRUCTIONS PERTAINING TO A RISK OF FIRE, ELECTRIC SHOCK, OR INJURY TO PERSONS
RISK OF ELECTRIC SHOCKDO NOT OPEN
WARNINGTO REDUCE THE RISK OFFIRE OR ELECTRICSHOCK, DO NOT EXPOSETHIS PRODUCT TO RAINOR MOISTURE.
CAUTION
AVIS : RISQUE DE CHOC ELECTRIQUE - NE PAS OUVRIR.
TO REDUCE THE RISK OF ELECTRIC SHOCK, DO NOT REMOVE COVER (OR BACK).NO USER-SERVICEABLE PARTS INSIDE. REFER SERVICING TO QUALIFIED SERVICE PERSONNEL.
The lighting flash with arrowhead symbol, withinan equilateral triangle, is intended to alert the userto the presence of uninsulated "dangerous voltage"within the product's enclosure that may be ofsufficient magnitude to constitute a risk of electricshock to persons.
The exclamation point within an equilateral triangleis intended to alert the user to the presence ofimportant operating and maintenance (servicing)instructions in the leterature accompanying theproduct.
Examples of Picture Symbols
Read all the instructions before using the product.
WARNING - When using electric products, basic precautions should always be followed,including the following.
WARNING Indicates a potential hazard that could result in deathor serious injury if the product is handled incorrectly.
The product should be connected toan AC outlet of the specified voltage.
Do not disassemble, repair or modifythe product.
When using the headphones, do notlisten for long periods oftime at high volume levels.
Do not insert or disconnect the powercord plug with wet hands.
If you are going to use an AC power cord,make sure that its has the correct plug shapeand conforms to the specified power voltage. Failure to do so may result in fire.
Doing so may cause electric shock.
Doing so may result in hearing problems.
Doing so may result in product breakdown, electricshock or short-circuit.

3
Do not place the product near electricalappliances such as TVs andradios.
Take care not to allow any foreignmatter to enter the product.
Before connecting cords, make surethat the power to this productand other devices is turnedOFF.
Do not use the product in the following areas. Areas, such as those near windows, where the product isexposed to direct sunlight Extremely hot areas, such as near a heater Extremely cold areas, such as outside Extremely humid areas Areas where a large amount of sand or dust is present Areas where the product is exposed to excessive vibrations
The product is not completely disconnected from thepower supply even when the power switch is turnedoff. If the product will not be used for a long time,unplug the AC power cord from the AC outlet.
Do not drag the product on the floor.Take care not to drop the product.
Do not stand on the product or exertexcessive force.
CAUTION
Failure to do so may cause fire in case of lightning. Failure to do so may over-heat the product, resultingin fire.
Indicates a potential hazard that could result in injury ordamage to the product or other property if the productis handled incorrectly
Using the product in such areas may result in productbreakdown.Use the product only in moderate climates (not in tropicalclimates).
Failure to do so may cause breakdown of this productand other devices.
Doing so may cause the product to generate noise. If the product generates noise, move the productsufficiently away from the electrical appliance orconnect it to another AC outlet.
Entry of water, needles or hair pins may result inbreakdown or short-circuit.The product shall not be exposed to dripping or splashing.No objects filled with liquids, such as vases, shall beplaced on the product.
Please lift up the product when moving it. Please notethat the product is heavy and must be carried by morethan two persons.Dropping the product may result in breakdown.
Failure to do so may damage them, resulting in fire,electric shock or short-circuit.
When disconnecting the AC power cord’splug, always hold the plugand pull it to remove it.
Doing so may result in discoloration or deformation ofthe product. When cleaning the product, put a soft cloth inlukewarm water, squeeze it well, then wipe the product.
Doing so may cause the product to become deformed orfall over, resulting in breakdown or injury.
Do not wipe the product with benzeneor thinner.
The product should be located so that its location or position does not interfere with its proper ventilation.Ensure a minimum distance of 5cm around the product for sufficient ventilation.Ensure that the ventilation is not impeded by covering the ventilation openings with items,such as newspaper, table-cloths, curtains, etc.
This product may be equipped with a polarized line plug (one blade wider than theother). This is a safety feature.If you are unable to insert the plug into the outlet, contact an electrician to replaceyour obsolete outlet.Do not defeat the safety purpose of the plug.
It is a good practice to have the instrument near the AC outlet and the power cord plug in a positionso that it can readily be disconnected in an emergency because electricity is always chargingwhile the plug is in the AC outlet even in a power switch off condition.

4
The power supply cord or the plug has been damaged. Objects have fallen, or liquid has been spilled into the product. The product has been exposed to rain. The product does not appear to operate normally or exhibits a marked change inperformance. The product has been dropped, or the enclosure damaged.
Do not place open flame sources, such as lighted candles on the product.
The product should be serviced by qualified service personnel when:
GROUNDING INSTRUCTIONSThis product must be grounded. If it should malfunction or breakdown, grounding provides a path of least resistancefor electric current to reduce the risk of electric shock. This product is equipped with a cord having an equipment-grounding conductor and a grounding plug. The plug must be plugged into an appropriate outlet that is properlyinstalled and grounded in accordance with all local codes and ordinances.
DANGER - Improper connection of the equipment-grounding conductor can result in a risk of electric shock.Check with a qualified electrician or serviceman if you are in doubt as to whether the product is properly grounded.Do not modify the plug provided with the product - if it will not fit the outlet, have a proper outlet installed by aqualified electrician.
Notes on RepairShould an abnormality occur in the product, immediately turn the power OFF, disconnect the power cord plug, andthen contact the shop from which the product was purchased.
Canadian Radio Interference RegulationsThis instrument complies with the limits for a class B digital apparatus, pursuant to the Radio Interference Regulations,C.R.C., c. 1374.
Use the apparatus only in moderate climates (not in tropical climates)
The mains plug shall remain readily operable.
An information on Dispasal for usersIf your product is marked with this recycling symbol it means that, at the end of its life, you must disposeof it separately by taking it to an appropriate collection point.You should not mix it with general household waste. Disposing of this product correctly will pervent potentialnegative effects on the environment and human health which could otherwise arise due to inappropriatewaste handling. For further details, please contact your local authority.(European Union only)

5

6

7
WELCOME TO THE MP8IIThank you for purchasing the KAWAI MP8II. The MP8II Stage Piano features256 Internal Sounds of the highest quality. The MP8II can also be used as aMIDI master controller. On stage, at home, or in the studio, the MP8II hasbeen designed to offer quick and easy access to many sophisticated features.
BASIC FEATURES of the MP8II
4 ASSIGNABLE ZONESThe MP8II keyboard can be divided into 4 zones. Each zone can be set to INT,EXT or BOTH individually. INT (Internal) is to play any of the 256 internalsounds. EXT (External) is to play external MIDI devices. BOTH is to playinternal sounds and external MIDI devices at the same time. Each zone can beplayed individually, or multiple zones can be freely split, layered and velocityswitched to create stunning and personalized performances.
ACOUSTIC TOUCH KEYBOARDThe MP8II’s “AWA Grand Pro II” keyboard provides excellent feel and controllike that found in an acoustic piano.
256 INTERNAL SOUNDS, 256 SETUPSThe MP8II offers not only acoustic piano and electric piano sounds, but alsoother sounds such as organ, brass, pads and so on. All the settings of thesesounds, together with the settings to control the external devices, can be storedinto 256 setups.
REVERB AND EFFECTSThe MP8II offers 7 high quality REVERB types, and 22 different EFFECT typesto improve acoustical realism and enhance tonal quality.
CONTROL KNOBSThe MP8II has 4 multi-function CONTROL KNOBS, which offer real time controlof the EFFECTS, EQ, TONE MODIFY and MIDI-CONTROL CHANGE messages.

8
WELCOME TO THE MP8II.....7
1. NAMES AND FUNCTIONS.....101.1 FRONT PANEL.....101.2 HEADPHONE JACK.....121.3 REAR PANEL.....12
2. Basic Operations.....142.1 Getting Ready.....142.2 Selecting a Sound.....152.3 Layer.....172.4 Split.....172.5 Piano Only.....182.6 Metronome.....182.7 Transpose.....182.8 Using the MP8II as a MIDI controller.....192.9 Selecting a SETUP.....20
3. SW Button.....213.1 Panel Lock.....213.2 Touch Curve.....213.3 Rotary Slow/Fast.....213.4 EQ Bypass On/Off.....223.5 Wheel Lock.....223.6 Foot Switch Lock.....233.7 Expression Pedal Lock.....233.8 External Sequencer Start/Stop.....24
4. EFX/REVERB.....254.1 EFX.....254.2 REVERB.....26
5. Control Knobs.....275.1 EFFECT.....275.2 EQ (EQUALIZER).....295.3 TONE MODIFY.....295.4 MIDI CC# (Control Change).....30
6. MENU.....326.1 Editing Procedure and Parameters.....336.2 Edit Parameters.....336.2.1 Zone Mode.....336.2.2 Sound (Int only).....336.2.3 Damper Resonance (Int Piano only).....336.2.4 String resonance (Int Piano only).....346.2.5 Key-Off Effect (Int Piano only) .....346.2.6 Voicing (Int Piano only).....346.2.7 TX Ch (Ext only).....346.2.8 TX Prg # (Ext only).....35
TABLE OF CONTENTS
6.2.9 Prg # (Ext only).....356.2.10 TX Bank (Ext only).....356.2.11 Bank MSB/LSB (Ext only).....356.2.12 Keyboard On/Off (Ext only).....356.2.13 Key Range Hi/Lo .....366.2.14 Velocity Switch.....366.2.15 Velocity Switch Value.....366.2.16 Velocity Compression.....376.2.17 Velocity Offset.....376.2.18 Zone Transpose.....376.2.19 Transmitting Volume (Ext only).....386.2.20 Volume.....386.2.21 Transmitting Control Change.....386.2.22 Pan.....386.2.23 Fine Tune.....386.2.24 Damper.....386.2.25 Foot Switch.....396.2.26 Expression Pedal.....396.2.27 Modulation.....396.2.28 Bender.....396.2.29 Transmitting Bender Range (Ext only).....396.2.30 Bender Range.....396.2.31 Solo.....396.2.32 Solo Mode.....40
6.3 Common Parameters.....406.3.1 Stretch Tuning.....406.3.2 Temperament.....406.3.3 Key of Temperament.....416.3.4 Tuning C-B.....416.3.5 Foot SW Control Change Number.....416.3.6 EXP Control Change Number.....416.3.7 Modulation Wheel Control Change Number.....426.3.8 Left Pedal Mode.....426.3.9 Master Volume.....42
7. STORE.....437.1 Storing the settings as a SOUND.....437.2 Storing the COMMON settings.....447.3 Storing the settings as a SETUP.....44
8. SYSTEM.....458.1 System Menu.....458.2 System Parameters.....458.2.1 System Channel.....458.2.2 Touch .....468.2.3 System Tuning.....478.2.4 Volume Slider Action.....478.2.5 Reverb Offset.....478.2.6 EQ Offset On/Off.....478.2.7 EQ Offset.....478.2.8 Local Control.....478.2.9 Multi-Timbral Mode.....488.2.10 System Ch Mode.....48

9
8.2.11 Receive Channel.....498.2.12 LCD Contrast.....498.2.13 LED Brightness.....498.2.14 Out Mode.....498.2.15 Foot Switch Mode .....498.2.16 Wheel Mode .....508.2.17 Dump Mode .....50
8.3 System Dump.....508.3.1 Dump Current.....508.3.2 Dump All Sound.....518.3.3 Dump All Setup.....51
8.4 System Reset.....528.4.1 Reset One SOUND/SETUP.....528.4.2 Reset All.....52
9. OTHER.....53
9.1 MIDI IN.....539.2 SETUP Program Number Table.....539.3 SOUND Program Number List.....549.4 Notes about USB.....60Specifications.....61
MP8II MIDI Implementation.....621. Recognized Data.....631.1 Channel Voice Message.....631.2 Channel Mode Message.....651.3 System Realtime Message.....66
2. Transmitted Data.....662.1 Channel Voice Message.....662.2 Channel Mode Message.....682.3 System Realtime Message.....69
3. Exclusive Data.....693.1 Universal Realtime Exclusive Message.....693.2 Dump Message.....693.2.1 Normal Dump Message.....693.2.2 Divided Dump Message.....693.3 Sound Data Format.....703.4 Setup Data Format.....70
4. Control Change Number (CC#) Table.....72MIDI Implementation Chart.....73

10
1. NAMES AND FUNCTIONS1.1 FRONT PANEL
[FADER SECTION]1. VOLUME Fader
The VOLUME fader controls the master volume level of the MP8II.
2. ZONE SELECT buttonsThe ZONE SELECT buttons are used to select one of the four zones for editing. Only onezone can be selected at a time. The front panel setting represents the current zonestatus.
3. ON/OFF buttonsThe ON/OFF buttons are used to turn zones ON/OFF. When the button is lit, the zone isactive. Normally the button color is red, but when a zone is not using the full keyboardrange the color will be green to indicate it.
4. FADERS (zone volume level control)Each fader controls the volume level of a designated zone. When multiple zones areactive, these faders can be used as an audio mixer.
[CONTROL KNOBS SECTION]The four CONTROL KNOBS are multi-function real time controllers. The different functionscan be selected using the four buttons to the left side of the CONTROL KNOBS. When afunction is active, its button is lit. Touching any of these knobs will instantly change thedisplay to the current knob function and value.
5. EFFECT buttonWhen this button is lit, the CONTROL KNOBS will adjust the REVERB time, REVERBdepth, EFX rate and EFX depth.
6. EQ buttonWhen this button is lit, the CONTROL KNOBS will adjust the 4-band graphic equalizer.
7. TONE MODIFY buttonWhen this button is lit, the CONTROL KNOBS will adjust the CUTOFF, ATTACK, DECAYand RELEASE Levels for the selected zone.
8. MIDI CC# buttonWhen this button is lit, MIDI control changes are sent from the MP8II to the MIDI devicespecified by the selected zone. Some control changes can also be used with the internalsounds.
[WHEEL CONTROLLERS]9. PITCH BEND
This control wheel smoothly bends the pitch Up or Down from its current value.
10. MODULATIONThis control wheel controls the modulation (vibrato) depth. Moving the wheel forwardincreases the vibrato depth.

11
[EFFECT BUTTONS]11. SW button
This button turns the assigned function ON or OFF. Many different functions can beassigned to this switch for your convenience.When in edit mode, pressing the SW button will exit from edit mode.
12. EFX buttonThis button turns the EFX ON or OFF for the selected zone.
13. REVERB buttonThis button turns the REVERB ON or OFF for the selected zone.
To change the function or type assigned to the above buttons, press and hold the desiredbutton to display the currently selected function or type, then use the VALUE buttons tochange it.
[MENU BUTTONS]14. MENU buttons
The MENU buttons are used to enter the edit mode and scroll through all the variousparameters of the MP8II. To change a parameter value, use the VALUE buttons.
[DISPLAY]15. DISPLAY
[VALUE BUTTONS]16. VALUE buttons
The VALUE buttons are used to change the value of the current parameter as indicatedon the DISPLAY.
[SOUND SELECTION & SETUP SELECTION]17. SOUND button
The SOUND button switches the MP8II to the SOUND mode. The PATCH buttons willnow select any of the 256 internal sounds.
18. SETUP buttonThe SETUP button switches the MP8II to the SETUP mode. The PATCH buttons will nowselect any of the 256 SETUPs.
19. SOUND SELECT buttonsThe SOUND SELECT buttons are organized in two rows of eight buttons and one row offour ones. In SOUND mode the upper row of buttons is used to select a sound categoryand the second & third rows of buttons is used to select the different internal soundswithin each category. In SETUP mode the upper row of buttons is used to select a bankand the second & third rows of buttons is used to select the different SETUPs within eachbank.
[OTHERS]20. STORE button
The STORE button is used to store the settings of the MP8II.
21. SYSTEM buttonThe SYSTEM button is used to set the system parameters of the MP8II.
22. TRANSPOSE buttonThe TRANSPOSE button is used to turn the TRANSPOSE function ON/OFF.

12
1.2 HEADPHONE JACK
The headphone jack is located in front at the left end of the key slip. Use a headphonewith a standard stereo 1/4 inch phone jack.
1.3 REAR PANEL
1. OUTPUTS -FIXED-R, L OUTPUTSThe R, L outputs are used to connect the MP8II to a musical instrument amplifier usingXLR Terminals. The R, L outputs can also be used to connect the MP8II to a PA systemor recording console. The (Master) VOLUME fader DOES NOT affect these outputs.
GROUND LIFT SWWith this switch ON, a possible ground loop can be shut from an external machine whichis connected to your MP8II with XLR terminal. Usually, you may leave the switch to itsOFF position.
2. OUTPUTS -Normal-R, L/MONO OUTPUTSThe R, L/MONO outputs are used to connect the MP8II to a musical instrument amplifierusing standard 1/4 inch phone jacks. The R, L/MONO outputs can also be used toconnect the MP8II to a PA system or recording console.
3. FOOT CONTROLLERSEXP JACKAn expression pedal can be connected to this jack.The expression pedal can be assigned to different MIDI control numbers or functions inthe Menu.
FSW JACKA momentary footswitch can be connected to this jack (EX: KAWAI F-1). The FootSwitchcan be assigned to different MIDI control numbers or functions in the Menu.
4. DAMPER / SOFT JACKThis jack is used to connect the Foot Pedal included with the MP8II (KAWAI F-20). Theright pedal works as Damper pedal, and the left one works as Soft pedal. When theRotary EFX is in use, the Soft pedal changes function to a Fast/Slow Rotorswitch.
5. MIDI JACKSThese jacks are used to connect the MP8II with external MIDI devices such as a MIDIsound module or a MIDI sequencer.

13
6. USB JACKThis jack is used to connect the MP8II with a personal computer. See page60 for details.
7. POWER SWITCHTurns the MP8II ON or OFF.
8. POWER RECEPTACLEConnect the power cable, which is included in the MP8II package, to this receptacle.

14
2. Basic Operations2.1 Getting Ready
Since the MP8II has no built-in speakers, you will need to connect a mixer,keyboard amplifier or headphones in order to listen.
Turn the MP8II on, using the POWER SWITCH on the rear panel.It is recommended to turn the MP8II on before turning on any amplifiers inorder to avoid switching noise.
What you need to know before starting:
Please read this part for a better understanding of the MP8II structure.
The MP8II’s SOUND and SETUP modes are largely the same. The main differencebetween the two is that SETUP is used to recall stored SETUPs. Edits andchanges can be made freely in either mode, using the 4 faders, 4 knobs andMENU functions, however edits made in SOUND mode will be lost when thepower is turned OFF and must therefore be stored in SETUP mode.
In order to start from scratch, use the SOUND mode and press PIANO ONLYfirst.In order to modify a SETUP, select the desired SETUP, perform any edits, andstore the changes as a SETUP.
If selected sounds do not sound correct, it is possible that parameters (knobsetc.) were edited. To restore sounds to their default setting, use the PIANOONLY function, then re-select the desired sound.

15
2.2 Selecting a SoundThe MP8II always starts up in SOUND mode when the power is turned ON.The SOUND button will be lit to indicate SOUND mode is active.
Operation 1Select the sound category by pressing a sound select button in the top row.There are 3 rows of sound select buttons, the top row is for selecting a soundcategory and the second and third rows are for selecting a variation.For example, to select "60’s EP2", first press the E.PIANO in the top row andthe first sound in the E.PIANO category "Classic EP" is recalled. (If any othervariation was selected before, the last selected sound is recalled as long as thepower is on.)
Operation 2Select the first variation by pressing a sound select button in the second row.Press one of the 1-8 buttons in the second row. If you press 3, the variation 3"60’s EP" is recalled. (If any other variation was selected before, the last selectedsound is recalled as long as the power is on.)
Operation 3Select the second variation by pressing a sound select button in the third row.Press one of the A-D buttons in the second row. If you press B, a variationsound "60’s EP2" is recalled.
Select the variations with the sound select buttons in the second and thirdrows.
The display shows the currently selected sound name.
Note:Internal sounds or Setups can be also selected using the VALUE buttons.
You should also listen to the preprogrammed Setups.Setups are organized in 8 Banks with 32 Numbers each (total 256 Setups).Press the SETUP button to change to SETUP mode and select a Setup bypressing one of the Bank buttons in the upper row followed by a Numberbutton in the second and third row.The display shows the currently selected Setup name.

16
In Sound mode, the “1” in the display indicates that the zone 1 is currentlyselected.
When the multitimbre is off, the default settings of the zones are as follows.It is recomended for simple MIDI transmit/receive use on stage etc.The default TXchannel is System Ch (see page45).
Zone 1 Internal On (Plays internal sound) Zone 2 Internal Off (Muted) Zone 3 External On (Plays external device) Zone 4 External Off (Muted)
When the multitimbre is on, the default settings of the zones are as follows.It is recomended for recording/playback with PC or sequencer.The default TXchannel is System Ch (see page45).
The system channel mode is Panel: Zone 1 Both On (Plays internal sound & external device) Zone 2 int Off (Muted) Zone 3 int Off (Muted) Zone 4 int Off (Muted)
The system channel mode is Normal: Zone 1 Both On (Plays internal sound & external device) Zone 2 Both Off (Muted) Zone 3 Both Off (Muted) Zone 4 Both Off (Muted)
The zone mode for each zone is indicated by the INT/EXT LED beside thefaders. The zone status for each zone is indicated by the ZONE ON/OFFbuttons. If the ZONE buttons is red, this zone is assigned to the entirekeyrange of the MP8II. If the button is green, the key range for that zoneis less than the entire key range. You can check the key range setting byholding the SELECT button for the zone for 1 second.
17
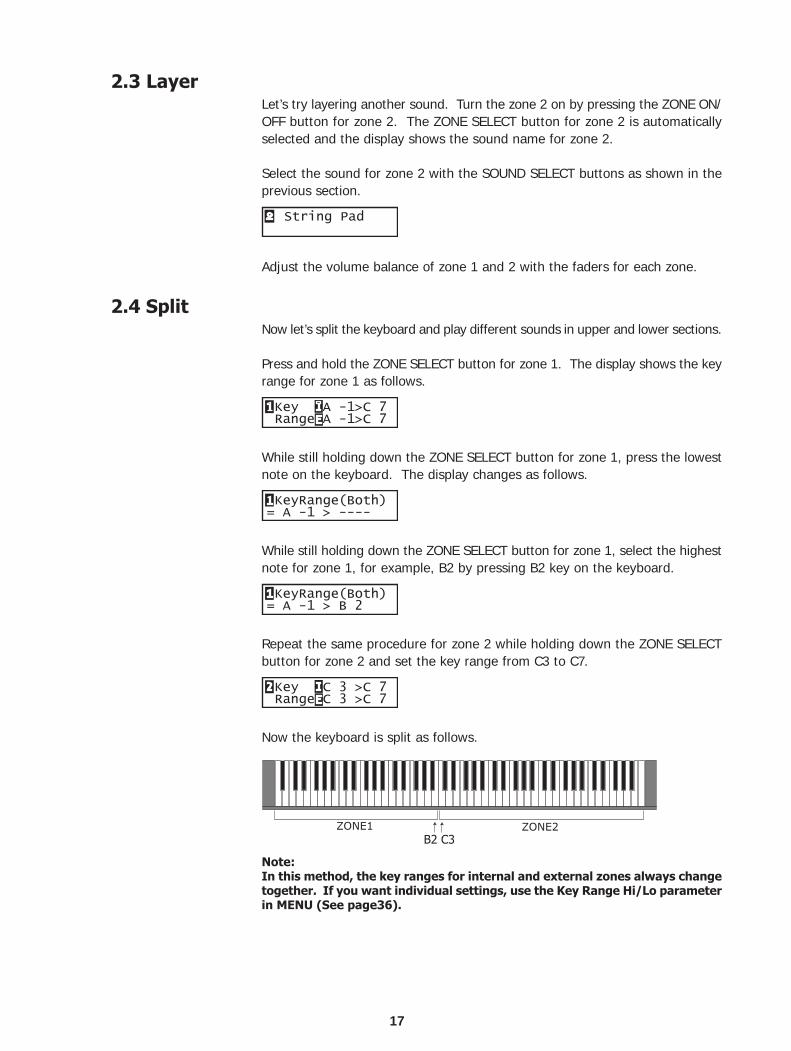
2.3 LayerLet’s try layering another sound. Turn the zone 2 on by pressing the ZONE ON/OFF button for zone 2. The ZONE SELECT button for zone 2 is automaticallyselected and the display shows the sound name for zone 2.
Select the sound for zone 2 with the SOUND SELECT buttons as shown in theprevious section.
Adjust the volume balance of zone 1 and 2 with the faders for each zone.
2.4 SplitNow let’s split the keyboard and play different sounds in upper and lower sections.
Press and hold the ZONE SELECT button for zone 1. The display shows the keyrange for zone 1 as follows.
While still holding down the ZONE SELECT button for zone 1, press the lowestnote on the keyboard. The display changes as follows.
While still holding down the ZONE SELECT button for zone 1, select the highestnote for zone 1, for example, B2 by pressing B2 key on the keyboard.
Repeat the same procedure for zone 2 while holding down the ZONE SELECTbutton for zone 2 and set the key range from C3 to C7.
Now the keyboard is split as follows.
Note:In this method, the key ranges for internal and external zones always changetogether. If you want individual settings, use the Key Range Hi/Lo parameterin MENU (See page36).
18
2.5 Piano OnlyThe Piano Only function lets you quickly return the MP8II sounds to the defaultsettings.
Press the PIANO button and the SOUND SELECT button 1 simultaneously. Allthe current settings (except for SYSTEM settings) will go back to original andonly Concert Grand sound can be played on the whole keyboard.
Note:You may use this function also as a kind of Panic or Reset button. Also it is agood starting point to create Setups from scratch.
2.6 MetronomeA metronome is available on the MP8II.
Press the STORE and SYSTEM buttons simultaneously to start the metronome.
Press the STORE or SYSTEM button to stop the metronome.
Changing the Tempo/Volume
The display will show as follows.
Use the VALUE buttons to change the tempo.
Use the MENU buttons to change the volume.
Note:The metronome tempo is also used as MIDI clock tempo to control an externalsequencer. See page24 for details.
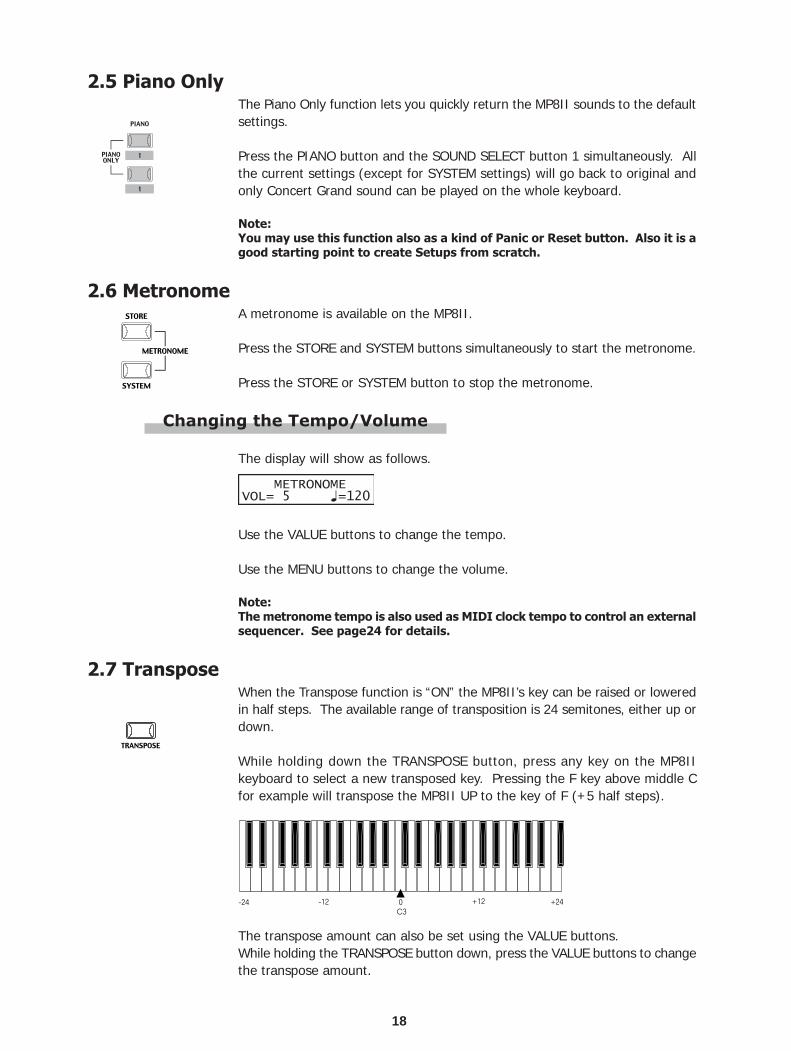
2.7 TransposeWhen the Transpose function is “ON” the MP8II’s key can be raised or loweredin half steps. The available range of transposition is 24 semitones, either up ordown.
While holding down the TRANSPOSE button, press any key on the MP8IIkeyboard to select a new transposed key. Pressing the F key above middle Cfor example will transpose the MP8II UP to the key of F (+5 half steps).
The transpose amount can also be set using the VALUE buttons.While holding the TRANSPOSE button down, press the VALUE buttons to changethe transpose amount.

19
2.8 Using the MP8II as a MIDI controllerThe MP8II can control external devices via MIDI.
MIDI Connection
Connect the MIDI OUT on the MP8II to the MIDI IN on an external MIDI devicewith a MIDI cable.
Selecting the MIDI Channel
The MIDI Transmit Channel of the MP8II must be matched with the ReceiveChannel of any MIDI devices connected to the MP8II.
Select zone 3 by pressing the ZONE SELECT button 3. (Zone 3 is set to externalas default setting.)
Press the MENU-UP button until “TX Channel” (Transmit Channel) appears onthe display.
Use the VALUE buttons to choose a MIDI Transmit Channel from 1 to 16.
To exit from MENU, press the EXIT(SW) button.
Any notes played on the keyboard or any movements of the Knobs, sliders, etc.will be transmitted to any external MIDI devices connected to the MIDI out ofthe MP8II on the selected MIDI channel.
Sending Program Change Number
The MP8II can send MIDI program change numbers from 1 to 256 and Banknumber LSB from 0 to 1 in SOUND mode. Simply press the SOUND SELECTbuttons and the corresponding program number will be transmitted. See theprogram number table below.
The display shows the current TRANSPOSE amount when the TRANSPOSEbutton is held down. A value of “0” indicates no transposition.

20
The transmitted program number is shown in the display.
You can also send program change numbers by using VALUE buttons.
Note:Full program change numbers including bank numbers can be transmitted bysetting them in MENU and saving it as a SETUP. See page35 for details.
2.9 Selecting a SETUPThe MP8II offers 256 preset combinations of the panel settings called SETUPs.To select a SETUP, press the SETUP button. Now the SOUND SELECT buttonsare used to select a SETUP. Use a combination of the numbers in the upper,second and third rows to select a desired SETUP. The display will show theselected SETUP name.
To check the sound (internal) or program number (external) assigned to eachzone, press the ZONE SELECT button. The display briefly shows the assignedsound name or program number, and then automatically returns to the SETUPname in a few seconds.If you hold a ZONE SELECT button for 2 seconds the display will show you thekey range information for that zone. You can also set the key range using thesame procedure that is used in Sound mode.
UPPER SECOND THIRD PROG#:MSB-LSB1 1 A 001:000-0001 1 B 002:000-0001 1 C 003:000-0001 1 D 004:000-0001 2 A~D 005:000-000 ~ 008:000-0001 3 A~D 009:000-000 ~ 012:000-0001 4 A~D 013:000-000 ~ 016:000-0001 5 A~D 017:000-000 ~ 020:000-0001 6 A~D 021:000-000 ~ 024:000-0001 7 A~D 025:000-000 ~ 028:000-0001 8 A~D 029:000-000 ~ 032:000-0002 1~8 A~D 033:000-000 ~ 064:000-0003 1~8 A~D 065:000-000 ~ 096:000-0004 1~8 A~D 097:000-000 ~ 128:000-0005 1~8 A~D 001:000-001 ~ 032:000-0016 1~8 A~D 033:000-001 ~ 064:000-0017 1~8 A~D 065:000-001 ~ 096:000-0018 1~8 A~D 097:000-001 ~ 128:000-001

21
3. SW ButtonThe SW button is a programmable realtime switch which can be assigned toone of 8 different functions.
Press and hold the SW button. The display shows the currently assigned function.Press the SW button again to exit without changing the function.
Use the VALUE buttons to change the function. The display will automaticallyreturn to SOUND or SETUP mode after you change the function.This function can be stored using the STORE button. (See page43)When the MENU function is displayed, the SW button works as an EXIT button.
3.1 Panel LockYou can lock the panel operation to avoid unnecessary changes to the settingsby accident.When the SW button is lit Panel Lock is ON.
Panel Lock On: All the operations except for keyboard, wheels, pedals and SWbutton are locked. The display shows as follows while the panel is locked.
Panel Lock Off: Panel Lock is canceled.
3.2 Touch CurveYou can temporary turn on/off the Touch Curve for example to play organsounds correctly.
Touch Curve On: The display briefly shows the selected Touch Curve in theSYSTEM and the Touch Curve becomes active. If the selected Touch Curve inthe SYSTEM is Off, the Normal Touch Curve becomes active.
Touch Curve Off: The display briefly shows as follows and the Touch Curvebecomes Off.
3.3 Rotary Slow/FastYou can switch the speed of roter between slow and fast when the Rotary effectis in use.When the SW button is lit: The display briefly shows as follows and the rotaryspeed changes to fast.

22
When the SW button is OFF: The display briefly shows as follows and therotary speed changes to slow.
Note:When the Rotary effect is not in use, the display briefly shows as follows.
3.4 EQ Bypass On/OffYou can temporarily bypass the EQ by turning the SW button on.When the SW button is lit the EQ Bypass is on.
EQ Bypass On: The display briefly shows as follows and the sound bypassesthe EQ.
EQ Bypass Off: The display briefly shows as follows and the EQ comes back toactive.
Note:When the EQ Bypass is turned on and the EQ control knobs are used, thedisplay briefly shows as follows.
3.5 Wheel LockYou can lock the bender wheel and modulation wheel to avoid unnecessarymovement by accident.When the SW button is lit the Wheel Lock is on.
Wheel Lock On: The display briefly shows as follows and the wheels are locked.
Wheel Lock Off: The display briefly shows as follows and the wheels are unlocked.
Note:When the Wheel Lock is turned on and the wheels are used, the display brieflyshows as follows.
23
3.6 Foot Switch LockYou can lock the assignable foot switch to avoid unnecessary movement byaccident.First, connect a foot switch to the FSW jack on the rear panel of the MP8II.When the SW button is lit the Foot Switch Lock is on.
Foot Switch Lock On: The display briefly shows as follows and the assignablefoot switch is locked.
Foot Switch Lock Off: The display briefly shows as follows and the assignablefoot switch is unlocked.
Note:When the FSW Lock is turned on and the foot switch is used, the displaybriefly shows as follows.
3.7 Expression Pedal LockYou can lock the expression pedal to avoid unnecessary movement by accident.First, connect an expression pedal to the EXP jack on the rear panel of theMP8II.When the SW button is lit the Expression Pedal Lock is on
Expression Pedal Lock On: The display briefly shows as follows and the expressionpedal is locked.
Expression Pedal Lock Off: The display briefly shows as follows and theexpression pedal is unlocked.
Note:When the EXP Lock is turned on and the expression pedal is used, the displaybriefly shows as follows.

24
3.8 External Sequencer Start/StopYou can start and stop the external sequencer connected to the MP8II with SWbutton.First, connect an external sequencer to the MIDI OUT jack on the rear panel ofthe MP8II. Make sure that the sequencer is capable to receiving external MIDIclock and commands. Check the MIDI implementation chart of the sequencerif the Recognized column of the System Real Time Clock & Commands is marked“O (yes)”. Consult the owner’s manual of the sequencer on how to set thesequencer to receive external MIDI clock and commands.When the SW button is lit the MIDI clock is transmitted
External Sequencer Start: Press the SW button to turn the light on. The displaybriefly shows as follows and the external sequencer starts.
External Sequencer Stop: Press the SW button to turn the light off. The displaybriefly shows as follows and the external sequencer stops.
Note:The tempo is controlled by the Metronome tempo of the MP8II. See page18for details.
25
4. EFX/REVERBThe internal sounds of the MP8II can be enhanced using the built in REVERBand EFX generators.
There are 7 REVERB types and 22 different EFX types to choose from. MP8IIcontains 4 variations of EFX type per INT section, and different EFX can beadded to the sound of each ZONE.
4.1 EFXThe MP8II contains 22 high quality EFX types, designed to complement theinternal sounds. Each internal sound has a preset effect assigned as the default.The EFX button turns the EFX generator ON or OFF for the selected sound.
To turn the EFX “ON” for the current sound, press the EFX button and thebutton will light up. EFX will be added to the current sound.
To turn the EFX “OFF” again, press the EFX button again (The light on thebutton will be turned OFF).
EFX type
Press and hold the EFX button for a few seconds. The display shows EFX typeadded to the current selected ZONE.
Use the VALUE buttons to change the effect type. Each EFX type has a defaultvalue for RATE and DEPTH, so when changing the EFX type, the values arechanged automatically. You can edit these values with the EFX RATE and EFXDEPTH knobs in the first row of the CONTROL KNOBS section on the panel. Tochoose another ZONE, press ZONE SELECT button of it.
Chorus: Chorus is a slight detuning of the sound, which adds depth andrichness to the sound.
Flanger: Flanger introduces a shifting comb-filter, which adds motion and a“hollow” tone to the sound.
Celeste: Celeste is a three phase chorus, with each of the three chorusunits at different phase.
Ensemble: Ensemble is a three phase chorus, with each of the three chorusunits at a different phase and frequency. This gives a slightlyricher sound than the Celeste effect, above.
Delay 1/2/3/4: Delay adds echoes to the sound.AutoPan 1/2/3: AutoPan alternates the sound left and right across the stereo field
at a variable rate. AutoPan 3 include an overdrive effect.Tremolo 1/2/3: Tremolo changes the volume of the sound, making it louder and
softer at a variable rate. Tremolo 3 include an overdrive effect.Phaser 1/2: Phaser creates a cyclic phase change, adding motion to the sound.Rotary 1/2: The Rotary effect simulates the sound of the rotary speaker cabinet
commonly used with electronic organs. Rotary 2 include anoverdrive effect.

26
Auto Wah: Auto Wah creates an automatic filter sweep at the attack of eachnote.
Pedal Wah: Pedal Wah creates a filter sweep with the expression pedalconnected to the MP8II.
Enhancer: Enhancer produces a crisper tone, so the sound is more easilydiscernible.
Overdrive: Overdrive effect adds tube-amp style distortion.
Note:You can select different types for each zone.
4.2 REVERBThe MP8II contains 7 high quality REVERB types, designed to complement theinternal sounds. Each internal sound has a preset REVERB type assigned as thedefault. The REVERB button turns the REVERB generator ON or OFF for theselected sound.
To turn the REVERB “ON” for the current sound, press the REVERB button andthe button will light up.REVERB will be added to the current sound.
To turn the REVERB “OFF” again, press the REVERB button again (The light onthe button will be turned OFF).
REVERB type
Press and hold the REVERB button until the display shows REVERB type.
Use the VALUE buttons to change the REVERB type. Each REVERB type has adefault value for TIME, so when changing the REVERB type, the value is changedautomatically.
Hall 1: Simulates the reverb in a standard hallHall 2: Simulates the reverb in a small hallStage 1: Simulates the reverb on a standard stageStage 2: Simulates the reverb on a small stageRoom 1: Simulates the reverb in a standard roomRoom 2: Simulates the reverb in a small roomPlate: Simulates the reverb of a metallic plate
Note:REVERB type is common to all internal zones. You cannot select a differenttype for each zone. But you can individually turn on/off or set different depthsfor each zone.

27
5. Control KnobsSelect the function with the buttons on the left and use the knobs to changethe values. You can also move the cursor with the MENU buttons and changethe value with the VALUE buttons while the display is showing Control Knobsfunction.
5.1 EFFECTMake sure that the EFFECT button in the CONTROL KNOBS section is lit. If theEFFECT button is turned off, press it to turn it ON.
The CONTROL KNOBS are now active and assigned to the EFX/REVERBparameters for the selected zone. Use the CONTROL KNOBS to change thecurrent settings.
EfR (EFX Rate) adjusts the value of the preset parameter for each EFX. (internalonly)EfD (EFX Depth) adjusts the depth of the EFX added to the sound.RvT (REVERB Time) adjusts the reverb time. (internal only)RvD (REVERB Depth) adjusts the depth of the reverb added to the sound.
EFX parameter list
EFX Rate EFX Depth1. CHORUS rate 0 -12.7Hz send level2. FLANGER rate 0 -12.7Hz send level3. CELESTE rate 0 -12.7Hz send level4. ENSEMBLE rate 0 -12.7Hz send level5. DELAY 1 delay time 0 -100 (%) send level6. DELAY 2 delay time 0 -100 (%) send level7. DELAY 3 delay time 0 -100 (%) send level8. DELAY 4 delay time 0 -100 (%) send level9. AUTO PAN 1 rate 0 -12.7Hz wet balance
10. AUTO PAN 2 rate 0 -12.7Hz wet balance11. AUTO PAN 3 rate 0 -12.7Hz wet balance12. TREMOLO 1 rate 0 -12.7Hz wet balance13. TREMOLO 2 rate 0 -12.7Hz wet balance14. TREMOLO 3 rate 0 -12.7Hz wet balance15. PHASER 1 rate 0 -12.7Hz wet balance16. PHASER 2 rate 0 -12.7Hz wet balance
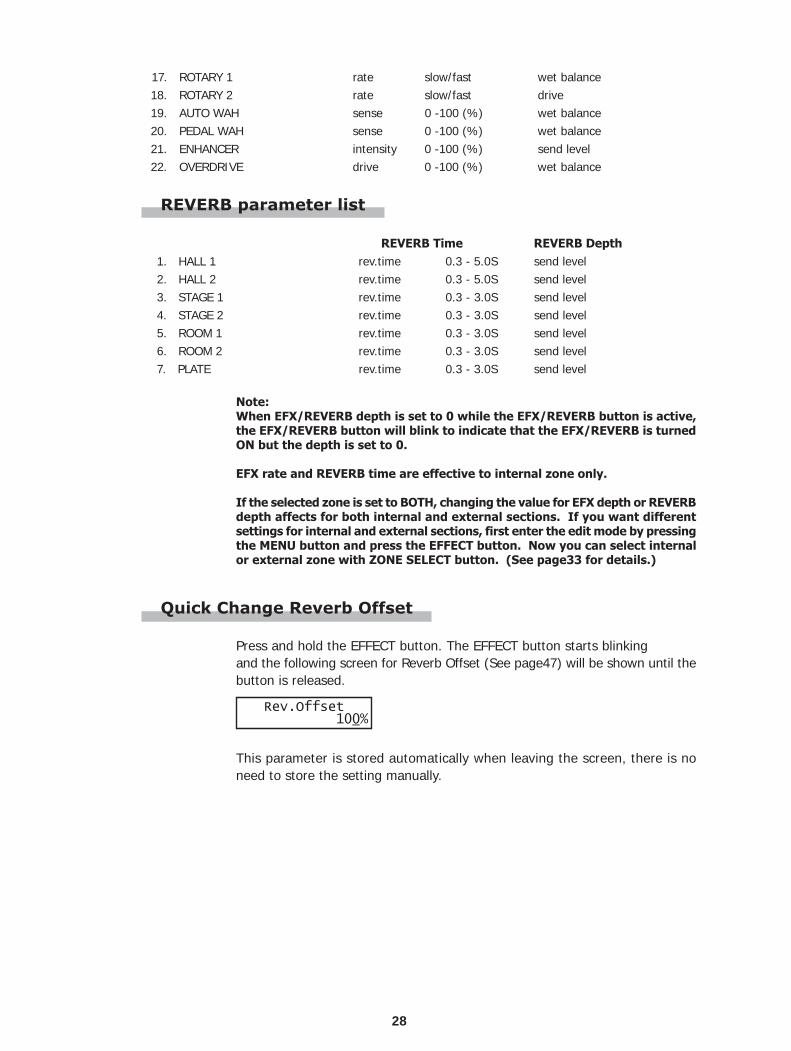
28
17. ROTARY 1 rate slow/fast wet balance18. ROTARY 2 rate slow/fast drive19. AUTO WAH sense 0 -100 (%) wet balance20. PEDAL WAH sense 0 -100 (%) wet balance21. ENHANCER intensity 0 -100 (%) send level22. OVERDRIVE drive 0 -100 (%) wet balance
REVERB parameter list
REVERB Time REVERB Depth1. HALL 1 rev.time 0.3 - 5.0S send level2. HALL 2 rev.time 0.3 - 5.0S send level3. STAGE 1 rev.time 0.3 - 3.0S send level4. STAGE 2 rev.time 0.3 - 3.0S send level5. ROOM 1 rev.time 0.3 - 3.0S send level6. ROOM 2 rev.time 0.3 - 3.0S send level7. PLATE rev.time 0.3 - 3.0S send level
Note:When EFX/REVERB depth is set to 0 while the EFX/REVERB button is active,the EFX/REVERB button will blink to indicate that the EFX/REVERB is turnedON but the depth is set to 0.
EFX rate and REVERB time are effective to internal zone only.
If the selected zone is set to BOTH, changing the value for EFX depth or REVERBdepth affects for both internal and external sections. If you want differentsettings for internal and external sections, first enter the edit mode by pressingthe MENU button and press the EFFECT button. Now you can select internalor external zone with ZONE SELECT button. (See page33 for details.)
Quick Change Reverb Offset
Press and hold the EFFECT button. The EFFECT button starts blinkingand the following screen for Reverb Offset (See page47) will be shown until thebutton is released.
This parameter is stored automatically when leaving the screen, there is noneed to store the setting manually.
29
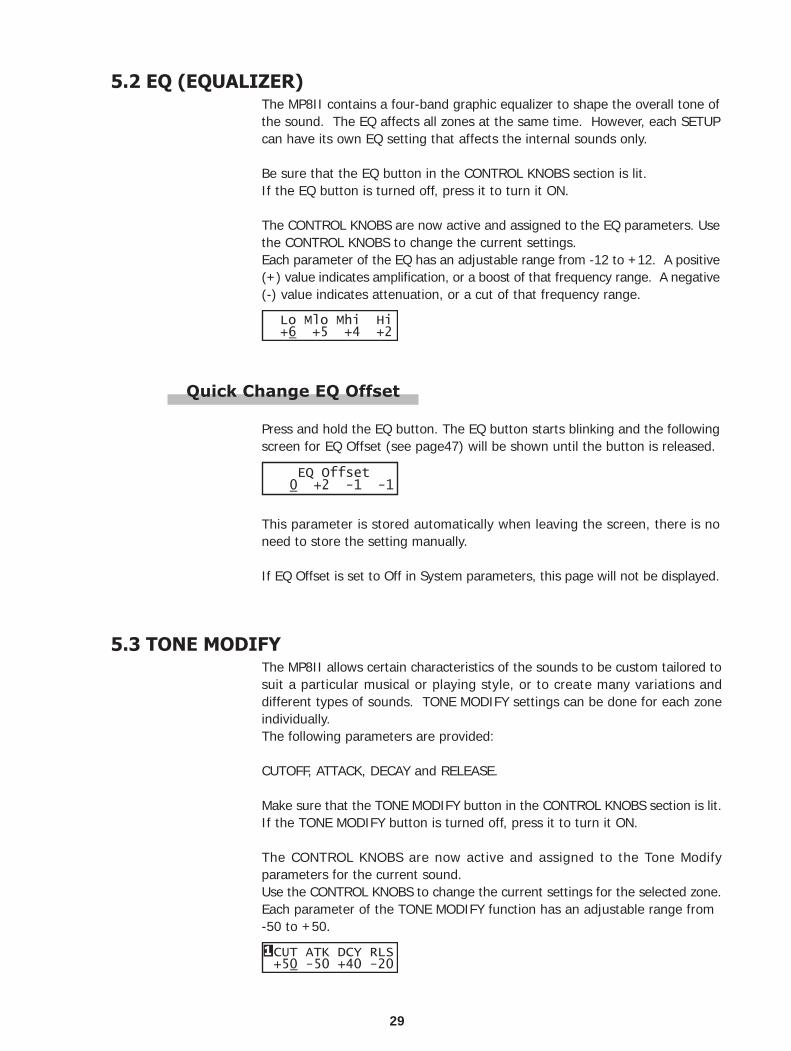
5.3 TONE MODIFYThe MP8II allows certain characteristics of the sounds to be custom tailored tosuit a particular musical or playing style, or to create many variations anddifferent types of sounds. TONE MODIFY settings can be done for each zoneindividually.The following parameters are provided:
CUTOFF, ATTACK, DECAY and RELEASE.
Make sure that the TONE MODIFY button in the CONTROL KNOBS section is lit.If the TONE MODIFY button is turned off, press it to turn it ON.
The CONTROL KNOBS are now active and assigned to the Tone Modifyparameters for the current sound.Use the CONTROL KNOBS to change the current settings for the selected zone.Each parameter of the TONE MODIFY function has an adjustable range from-50 to +50.
5.2 EQ (EQUALIZER)The MP8II contains a four-band graphic equalizer to shape the overall tone ofthe sound. The EQ affects all zones at the same time. However, each SETUPcan have its own EQ setting that affects the internal sounds only.
Be sure that the EQ button in the CONTROL KNOBS section is lit.If the EQ button is turned off, press it to turn it ON.
The CONTROL KNOBS are now active and assigned to the EQ parameters. Usethe CONTROL KNOBS to change the current settings.Each parameter of the EQ has an adjustable range from -12 to +12. A positive(+) value indicates amplification, or a boost of that frequency range. A negative(-) value indicates attenuation, or a cut of that frequency range.
Quick Change EQ Offset
Press and hold the EQ button. The EQ button starts blinking and the followingscreen for EQ Offset (see page47) will be shown until the button is released.
This parameter is stored automatically when leaving the screen, there is noneed to store the setting manually.
If EQ Offset is set to Off in System parameters, this page will not be displayed.

30
CUTOFF: Raising the CUTOFF level makes the sound brighter, lowering thelevel makes the sound duller.
ATTACK: As the value increases, the attack time becomes longer, whichmeans a slower attack is produced.
DECAY: This parameter controls the amount of time from the peak level tothe sustain level of the sound.
RELEASE: This parameter controls the amount of time needed for the soundto fade out after the key is released.
Note:If the selected zone is set to BOTH, changing the TONE MODIFY parametersaffects both internal and external sections. If you want different settings forinternal and external sections, enter the edit mode by pressing the MENUbutton and select internal or external section with the ZONE SELECT button.(See page33 for details.)
5.4 MIDI CC# (Control Change)The MP8II can send any MIDI Continuous Controller information to any MIDIInstrument or Device.This powerful feature allows for editing the sounds of an external sound modulein Real Time during performance, or for recording Real Time performance editsto a MIDI sequencer.Some control changes are also effective to internal sounds.
Make sure that the MIDI CC# button in the CONTROL KNOBS section is lit. Ifthe MIDI CC# button is turned off, press it to turn it ON.
The CONTROL KNOBS are now active and assigned to the MIDI CC parameters.Use the CONTROL KNOBS to change the MIDI continuous controller informationassigned to each knob as described below.Each parameter of the Control Change has an adjustable range from 0 to 127.
When the selected zone is set to INT or BOTH, the display shows the parameternames.

31
When the selected zone is set to EXT, the display shows the MIDI CC numbers.
The default parameters assigned for each knob are as follows.
A: #10 Panpot (PAN)B: #70 Sustain Level (STN)C: #76 Vibrato Rate (VbR)D: #77 Vibrato Depth (VbD)
Note:If the selected zone is set to BOTH, changing the MIDI CC# parameters affectsboth internal and external sections. If you want different settings for internaland external sections, enter the edit mode by pressing the MENU button andselect internal or external section with the ZONE SELECT button. (See page33for details.)
Changing MIDI CC parameter
Press and hold the MIDI CC# button. The MIDI CC# button starts blinking andthe cursor in the display moves up to the parameter name.
Use the CONTROL KNOBS to change the parameters.After changing the parameter, press the MIDI CC# button again. The MIDICC# button stops blinking and the cursor in the display moves down to thevalue.
Note:When the selected zone is set to INT, only the following parameters can beselected.
10 Panpot PAN70 Sustain Level STN71 Resonance RSN76 Vibrato Rate VbR77 Vibrato Depth VbD78 Vibrato Delay VbY93 Chorus Depth ChD
When the selected zone is set to BOTH and the internal section is selected inedit mode, the parameters not available for INT section show as “ XXX”.

32
6. MENUThe MENU buttons allow access to the edit parameters in the MP8II. Thiscollection of settings together with other editable parameters can be stored asa SETUP. The MP8II provides 256 SETUPs, and all are user programmable.
A SETUP consists of four zones. Each zone can be set as Internal, External orBoth individually. Inside each of the four zones, a multitude of features andeffects can be programmed and combined together into one exciting SETUP.A total of 256 SETUPs may be programmed in this way.
The menu consists of Internal parameters, External parameters and Commonparameters.Common parameter affect all zones. If a zone is set as Both, both the Internalparameters and External parameters are available for the zone.Use the MENU buttons to scroll through all the different parameters.
In SOUND mode, both the Int Zone parameters and the Common parameterswithout the inverse “S(Setup)” icon can be individually stored. (See page43)The Int Zone parameters can be stored as a SOUND of the MP8II’s 256 SOUNDs.The Common parameters can be stored as the initial settings in SOUND mode.
Zone parameters (Int)ModeSound SelectionDamper Reso. (Int Piano only)String Reso. (Int Piano only)KeyOff Effect (IntPiano only)Voicing (Int Piano only)Key Range Hi/LoVelocity Switch On/OffVelocity Switch ValueVelocity CompressionVelocity OffsetZone TransposeVolumePanFine TuneDamper Pedal On/Off/HoldFootswitch On/OffExpression Pedal On/OffModulation On/OffBender On/OffBender RangeSolo On/OffSolo Mode
Caution:The edited settings will be erased when the power is turned off, or othersound is recalled. To save these settings, use the STORE procedure to savethem as a SETUP. (See page43)
Zone parameters (Ext)ModeTX ChannelTX PRG # On/OffPRG #TX Bank On/OffBank Select MSB LSBKeyboard On/OffKey Range Hi/LoVelocity Switch On/OffVelocity Switch ValueVelocity CompressionVelocity OffsetZone TransposeTX Volume On/OffVolumeTX Controller On/OffPanFine TuneDamper Pedal On/OffFootswitch On/OffExpression Pedal On/OffModulation On/OffBender On/OffTX Bender Range On/OffBender RangeSolo On/OffSolo Mode
Common parametersMaster VolumeLeft Pedal ModeM.Wheel CC#Expression Pedal CC#Footswitch CC#TemperamentStretch Tuning

33
6.1 Editing Procedure and Parameters
First, press the ZONE SELECT button for the zone to be edited.Next, press the MENU buttons until the parameter you want to edit appears inthe DISPLAY. When a zone is set as Both, pressing the ZONE SELECT buttonagain will switch the menu list from Internal to External or vice versa.
Set the value of the parameter using the VALUE buttons.Since each parameter has a different value range, consult the following pagesfor the details. Repeat this procedure for any other parameters in any of thezones that need to be modified.
Save these settings using the STORE button.(See page43 for detail)
Note:Once you enter the edit mode from SETUP mode by pressing the MENU button,the mode automatically changes to SOUND mode and the SOUND SELECTbuttons are used to select sounds, not SETUPs.
You can exit the edit mode by pressing the EXIT(SW) button. Any edits youhave made so far will be retained to SOUND mode. If you exit the edit modeby pressing SOUND or SETUP buttons, your changes will be lost and thepreviously saved settings are recalled.
6.2 Edit Parameters
Zone parameters can be edited individually for each zone. There are twoparameter groups, Internal parameter group and External parameter group. Ifa zone is set to Int, only Internal parameters are available for editing. If a zoneis set to Ext, only External parameters are available for editing. If a zone is setto Both, both Internal and External parameters are available for editing.
6.2.1 Zone Mode
This parameter sets the Zone mode. The example shows that the Zone 1 is setto Both mode.
6.2.2 Sound (Int only)
This parameter determines which internal sound is assigned for the selectedzone.
6.2.3 Damper Resonance (Int Piano only)
When the sustain pedal is depressed, the volume of the whole resonance canbe changed to the level you prefer. The value changes from 0 (off) to 10.
* The display shows this parameter only when Piano sound is selected.

34
6.2.4 String Resonance (Int Piano only)
The volume of string resonance can be changed to the level you prefer. Thevalue changes from 0 (off) to 10.<String Resonance> In acoustic pianos, there are strings corresponding to each key. When a keyis pressed, strings of other keys in the related harmonic series to the noteplayed resonate. This effect is called "sound resonance", which makes thesound of an acoustic piano full and rich.
* The display shows this parameter only when Piano sound is selected.
6.2.5 Key-off Effect (Int Piano only)
Especially for low-pitched tones, when a key is played strongly and releasedquickly, there will be the sound of the damper touching the strings immediatelybefore the sound stops. The key-off effect simulates this phenomenon, andallows you to adjust the key-off volume to your taste. The value changes from0 (off) to 10.
* The display shows this parameter only when Piano sound is selected.
6.2.6 Voicing (Int Piano only)
This parameter re-creates electronically the voicing technique of adjusting theaction, hammers and strings on an acoustic piano to change the tone character.This function is a very powerful way to enhance and customize the pianoresponse for each player and each sound.The effect is only available for the internal piano sounds. Other sounds cannotuse this parameter.
Normal: Produces the normal tone of an acoustic piano throughout theentire dynamic range.
Mellow: Reproduces the effect of a softer hammer surface. It produces amellower tone throughout the entire dynamic range.
Dynamic: This setting is not possible with an acoustic piano. Softly playednotes will have the tone of a mellow voicing and notes playedharder will have the tone of a bright voicing. This setting producesa dramatic change from mellow to bright throughout the entiredynamic range.
Bright: Produces a brighter tone throughout the entire dynamic range.
* The display shows this parameter only when Piano sound is selected.
6.2.7 TX Ch (Ext only)
This parameter sets the MIDI transmit channel for the selected zone. All MIDIdata for the selected zone will be transmitted on this channel. Make sure thatthe receiving channel for any external MIDI devices to be controlled from thiszone is set to the same channel as the zone.

35
6.2.8 TX Prg # (Ext only)
This parameter determines if a Program Change Number will be transmitted(On) or not (Off) when a SETUP is recalled. If you want to switch sounds onexternal MIDI devices every time you call the Setup turn this parameter ON.
6.2.9 Prg # (Ext only)
This parameter determines which Program Change Number will be transmittedwhen a SETUP is recalled. When the TX Prg # is set to Off, this page won’t bedisplayed. Select the desired PRG number for the sound you want to select onthe external MIDI device.
6.2.10 TX Bank (Ext only)
This parameter determines if Program Bank Numbers (MSB, LSB) will betransmitted (On) or not (Off) when a SETUP is recalled. If your external MIDIdevice requires a Bank Select message, turn on this function.
6.2.11 Bank MSB/LSB (Ext only)
This parameter determines which MSB and LSBNumber will be transmitted when this SETUPis recalled. When the TX Bank is set to Off,this page won’t be displayed.In the MIDI standard, there are 128 storagespaces. The number of storage spaces canbe expanded using an MSB and an LSB.
This is a 3D image of the expanded program change system with the MSB andLSB. To use these efficiently and correctly, refer to the operation manual ofany external MIDI sound modules that are connected to the MP8II.
6.2.12 Keyborad On/Off (Ext only)
This parameter determines whether or not note data generated by playing thekeys on the MP8II will be transmitted to an external MIDI device. This parameteris useful when using 2 or more keyboards. When set to OFF the MP8II will notsend any note data to an external MIDI device but the MP8II can still be usedto adjust other connected keyboards or MIDI devices using the knobs, wheelsetc.

36
6.2.14 Velocity Switch
Velocity switching is an extremely useful and creative tool for customizing aperformance. Using Velocity Switching, it is possible to have either one soundswitch to another sound at a set velocity, or even for a second sound to beadded in once a certain velocity has been reached, or to have a sound drop outabove or below a set velocity level.This parameter sets the velocity switch type.
Off: No effect. The sound plays normally.Loud: The selected sound plays only when the key is struck harder than the Vel SW
Val. (See next parameter)Soft: The selected sound plays only when the key is struck softer than the Vel SW
Val. (See next parameter)
6.2.15 Velocity Switch Value
This parameter determines switching level of the key velocity.
For the Loud Vel SW :determines the lowest key velocity to sound.For the Soft Vel SW : determines the highest key velocity to sound.
When the Velosity Switch is set to Off, this page won’t be displayed.
6.2.13 Key Range Hi/Lo
These two parameters define the playable key range on the keyboard forthe selected zone. First, while K.Range Hi appears in the display, use theVALUE buttons to set the highest note that the selected zone can play.Next, while K.Range Lo appears in the display, use the VALUE buttons toset the lowest note that the selected zone can play.
Note:Another convenient way to input the key range is to hold the ZONE SELECTbutton of the desired zone for more than 1 second and input the K.RangeLo by pressing the lowest key followed by the key of the highest note,while still holding the ZONE SELECT button.

37
Note:Each zone can have a separate Velocity Switch Value. By setting the SoftZone Velocity Switch Value higher than that of the Loud Zone, a dynamicarea where both sounds play can be created. It is also possible to switchInternal Zones with External Zones for even more possibilities.
Note2:Velocity Switch = Loud /Velocity Switch Value = 1In this settings, it is possible to press a key very softly and hear no sound.This is just the same as an acoustic piano.
6.2.16 Velocity Compression
This parameter adjusts the keyboard response.When the value is 10 (default), the keyboard response is normal (same as thesetting in the SYSTEM).When the value comes closer to 0, the keyboard response becomes less dynamicand at 0, it becomes completely flat (no touch response).
6.2.17 Velocity Offset
This parameter sets the velocity value used when Velocity Compression is lowerthan 10.For example to get a “No-Velocity” Organ type of playing feeling, set VelocityCompression to 0 and adjust the velocity level with this parameter to 127 orany other wanted level of velocity.When the Velocity Compression is set to 10, this page won’t be displayed.
6.2.18 Zone Transpose
This parameter sets the amount of transposition for the selected zone. Theavailable range is three octaves up or down (+/-36 semitones).
Note:To set the master transpose, press the TRANSPOSE button and set thevalue. messages even if TX Volume is set to Off.

38
6.2.19 Transmitting Volume (Ext only)
This parameter determines if an initial MIDI Volume message will be transmitted(On) to an external MIDI device or not (Off) when a SETUP is recalled.
Note:In a zone set to External or Both, moving the faders will still transmit volumemessages even if TX Volume is set to Off.
6.2.20 Volume
This parameter sets the volume level for the selected zone. The value can bechanged by using the FADER or VALUE buttons.For External zones, when the TX Volume is “Off”, this page won’t be displayed.
6.2.21 Transmitting Control Change (Ext only)
This parameter determines if the Pan/Fine Tune/Control Knob settings will betransmitted (On) via MIDI or not (Off) when a SETUP is recalled.
Note:In a zone set to External or Both, moving the Control Knobs will still transmitthe values even if TX CC is set to Off.
6.2.22 Pan
Int: This sets the pan-pot (right and left balance).Ext: This sets the pan-pot value that will be transmitted to external sound modules.
If the TX CC is “On”, the value is transmitted when a SETUP is recalled. Whenthe TX CC is “Off”, this page won’t be displayed.
The value changes from L63 to R63.
6.2.23 Fine Tune
Int: This is a fine tuning function for values smaller than a semi-tone.Ext: This is used to transmit fine tuning settings to external sound modules. If the
TX CC is “On”, the value is transmitted when a SETUP is recalled. When theTX CC is “Off”, this page won’t be displayed.
The value changes from -63 to +63.
6.2.24 Damper
This parameter determines if the damper pedal is active (Norm [Int] / On [Ext],with natural decay), deactivated (Off) or set to HOLD (On, with steady sustainlevel) for the selected zone.Use the HOLD value, if you don’t want a sound to disappear. HOLD is onlyavailable for internal Sounds.

39
6.2.25 Foot Switch
This parameter determines if a Foot Switch connected to the FSW jack is active(On) or not (Off) for the selected zone. The type of controller assigned to thefootswitch is a common Setup parameter and is used for all zones of a Setup asa global parameter.
6.2.26 Expression Pedal
This parameter determines if an Expression Pedal connected to the EXP jack isactive (On) or not (Off) for the selected zone. The type of controller assignedto Expression pedal is a common Setup parameter and is used for all zones ofa Setup as a global parameter.
6.2.27 Modulation
This parameter determines if the Modulation Wheel is active (On) or not (Off)for the selected zone.
6.2.28 Bender
This parameter determines if the Bender Wheel is active (On) or not (Off) forthe selected zone.
6.2.29 Transmitting Bender Range (Ext only)
This parameter decides if a Bender Range should be transmitted (On) or not(Off) when a SETUP is recalled. When the Bender is “Off”, this page won’t bedisplayed.
6.2.30 Bender Range
Int: This sets the Bender Range in semitone steps. The value changes from 0 to7.
Ext: This is used to transmit Bender Range information to external sound modules.If the Tx Bender Range is “On”, the value is transmitted when a SETUP isrecalled. The value changes from 0 to 12.
When the Bender is “Off”, this page won’t be displayed.
6.2.31 Solo
This parameter turns the Solo Mode On/Off.When Solo is turned “On” only one note will be heard for the selected zoneeven if more than one note is being played simultaneously. This can be used toeffectively simulate the performance characteristics of a monophonic synthesizeror as a special performance tool for playing solo parts. Solo mode can also beused while playing a polyphonic part from another zone.

40
6.3 Common ParametersCommon parameters are affecting all zones.
6.3.1 Stretch Tuning
The hearing ability of a human is uneven and is not accurate with high frequencyand low frequency as it is with the middle range. The tuning of an acousticpiano is stretched to compensate for this so the sound will be heard naturallyto the ears.
Off: The tuning is flat without stretching.On: The tuning is always stretched.Piano: The tuning is stretched only when piano sounds are selected.On W: Same as “On” but the stretching is wider.Piano W: Same as “Piano” but the stretching is wider.
6.3.2 Temperament
This parameter sets the temperament of the MP8II.
Equal: This is the most popular tuning method that divides the scale intotwelve equal semitones. This produces the same chordal intervalsin all twelve keys, and has the advantage of limitless modulationof the key. However the tonality of each key becomes lesscharacteristic and no chord is in pure consonance.
Pure Maj/min: This temperament, which eliminates dissonances for thirds andfifths is still popular for choral music because of its perfect harmony.When playing in a major key select “Pure Maj” and when playingin a minor key select “Pure Min”.
Pythagor: This temperament, which uses mathematical ratios to eliminatedissonance for fifths, is very limited for use with chords, but itproduces very characteristic melodic lines.
Meantone: This temperament, which uses a mean between a major and minorwhole tone to eliminate dissonance for thirds, was devised toeliminate the lack of consonances experienced with certain fifths
6.2.32 Solo Mode
This parameter determines which note will be played when Solo is ON andmore than one note is being played simultaneously. There are three choicesfor Solo note priority.
Last: The most recently played note within a group of notes will be heard whenSolo is ON
Hi: The highest note played within a group of notes will be heard when Solo isON.
Low: The lowest note played within a group of notes will be heard when Solo is ON.
When the Solo is “Off”, this page won’t be displayed.

41
for the Mersenne pure temperament. It produces chords thatare more beautiful than those with the equal temperament.
Werkmeis/Kirnberg: These two temperaments are placed in between Meantone andPythagorean. For music with few accidentals, this temperamentproduces the beautiful chords of the mean tone, but asaccidentals increase, the temperament produces thecharacteristic melodies of the Pythagorean temperament. It isused primarily for classical music written in the Baroque era torevive the original characteristics.
User: You can make your own temperament by raising or lowering thepitch for each half tone.
6.3.3 Key of Temperament
Limitless modulation of the key became available only after the invention ofEqual temperament. When we use a temperament other than Equaltemperament, we must carefully choose the key signature to play in.For example, if the song you are going to play is written in D major, choose“D” as the temperament key.When Temperament is set to Equal, this page won’t be displayed.
6.3.4 Tuning C - B
When the temperament is set to “User”, adjust the pitch for each key andcreate your own temperament. The value changes from -50 to +50.These pages will only be displayed when the user temperament is selected.
Note:The value is shown in “cent”. Half tone equals to 100 cents.
6.3.5 Foot SW Control Change Number
This parameter assigns a Control Change Number to the Footswitch connectedto the FSW jack on the rear panel.See page72 for the list of Control Change numbers.If the “SW” is selected, the footswitch is used to turn on/off the SW button.When the System parameter FootSW is “Setup+” this page won’t be displayed.
6.3.6 EXP Control Change Number
This parameter assigns a Control Change Number to the Expression Pedalconnected to the EXP jack on the rear panel.See page72 for the list of Control Change numbers.If the “AFT” is selected, the expression pedal is used to send After Touchinformation.If the “RTR” is selected, the expression pedal is used to switch the speed ofroter between slow and fast when the Rotary effect is in use.If the “Pedal Wah” is selected in EFX, the pedal works as a Wah Pedal regardlessof the setting in this parameter.

42
6.3.7 Modulation Wheel Control Change Number
This parameter assigns a Control Change Number to the Modulation Wheel onthe right side of the front panel.See page72 for the list of Control Change numbers.
Note:When the following Numbers are selected for the FootSW,EXP or ModulationWheel Control Change Number, the functions affect the internal sounds, too.
1. Modulation Wheel (MOD) 7. Volume (VOL)10. Pan (PAN)11. Expression Controller (EXP)64. Damper Pedal (HLD)66. Sostenuto (SST)67. Soft Pedal (SFT)
6.3.8 Left Pedal Mode
This parameter determines whether the left pedal of the optional F-20 (twinpedal) accessory functions as Soft or Sost (Sostenuto).
Soft: The Left Pedal works as a Soft Pedal ( Default ).When the Rotary EFX is in use, the Soft Pedal changes function to a Fast/SlowRotor switch.
Sost: The Left Pedal works as a Sostenuto Pedal.When the Damper setting ( see page38 ) is Off or Norm, the sosotenuto pedalworks with natural decay. When the Damper setting is Hold, the sostenutopedal works with a steady susutain level.
6.3.9 Master Volume
Adjust the total volume of the SETUP.The value changes from 0 to 127.

43
7. STOREYou can save the changes of the settings made as either a SOUND or a SETUP.Up to 256 SOUNDs or 256 SETUPs can be stored.Moreover, the Common parameters can also be stored as the initial setting inSOUND mode.The following groups of parameters are stored.
[SOUND]Selected Zone’s One Sound settings: EFX/REVERB settings ( see page25 ) Control Knob settings -except for EQ ( see page27 ) Int Zone parameters in MENU settings ( see page32 ) -except for parameters with the inverse “S(Setup)” icon
[COMMON]Initial settings in SOUND mode: Function SW setting ( see page21 ) COMMON parameters in MENU settings ( see page32 ) -except for parameters with the inverse “S(Setup)” icon
[SETUP]MP8II’s whole settings of 4zones: Sound Selection, Zone On/Off Status ( see page15 ) EFX/REVERB settings ( see page25 ) Fader, Control Knob settings ( see page17, page27 ) Function SW setting ( see page21 ) All MENU settings ( see page32 )
7.1 Storing the settings as a SOUNDWhile in SOUND mode, press the STORE button. The display will show thefollowing screen:
Press the VALUE UP button, the display will show the following screen:
Press the VALUE UP button to confirm. The STORE procedure can be cancelledat any time by pressing any other button which is not used during the STOREprocedure.
Note:Storing will overwrite the selected SOUND.If the selected zone is external, the SOUND cannot be stored.

44
7.2 Storing the COMMON settingsWhile in SOUND mode, press the STORE button. The display will show thefollowing screen:
Press the VALUE DOWN button, the display will show the following screen:
Press the VALUE UP button to confirm. The STORE procedure can be cancelledat any time by pressing any other button which is not used during the STOREprocedure.
7.3 Storing the settings as a SETUPWhile in SOUND mode, press the STORE button. The display will show thefollowing screen:
Press the MENU UP button to select to store the settings as a SETUP.In SETUP mode, press the STORE button. The display will show the SETUPnumber to store.
Use the SOUND SELECT buttons to change the SETUP number in which thesettings will be stored. For example, to choose SETUP 2-3-B, press 2 in theupper row, press 3 in the second row, and press B in the third row. Then pressthe STORE button.
To set a name use the MENU buttons to move the cursor, use the VALUEbuttons to select the character. After you rename the SETUP, press the STOREbutton again.
Press the VALUE UP button to confirm. The STORE procedure can be cancelledat any time by pressing any other button which is not used during the STOREprocedure.
Note:Storing will overwrite the selected SETUP.

45
8. SYSTEMUse this mode to set the System parameters of MP8II.To enter the SYSTEM mode, press the SYSTEM button.
8.1 System MenuUse the MENU buttons to scroll through the System parameters.
[System Parameter] System Channel Touch System Tune Volume Slider Action Reverb Offset EQ Offset Local Control On/Off Multitimbre On/Off System Channel Mode Receive Channel On/Off LCD Contrast LED Brightness Out Mode Foot SW Wheel Mode Dump Mode
[System Dump] Dump Current Dump All Sound/Setup
[System Reset] Reset One Sound/Setup Reset All
Make sure the SYSTEM button is lit.Press the MENU buttons until the parameter you want to edit appears in thedisplay.
Set the value of the parameter by using the VALUE buttons.The value range differs depending on the parameter.
8.2 System ParametersThe System Menu parameters are global and always stored automatically whenleaving the SYSTEM mode, so there is no need to store them.
8.2.1 System Channel
This parameter sets the System MIDI channel on which System Exclusivemessages are transmitted/received.
46
8.2.2 Touch
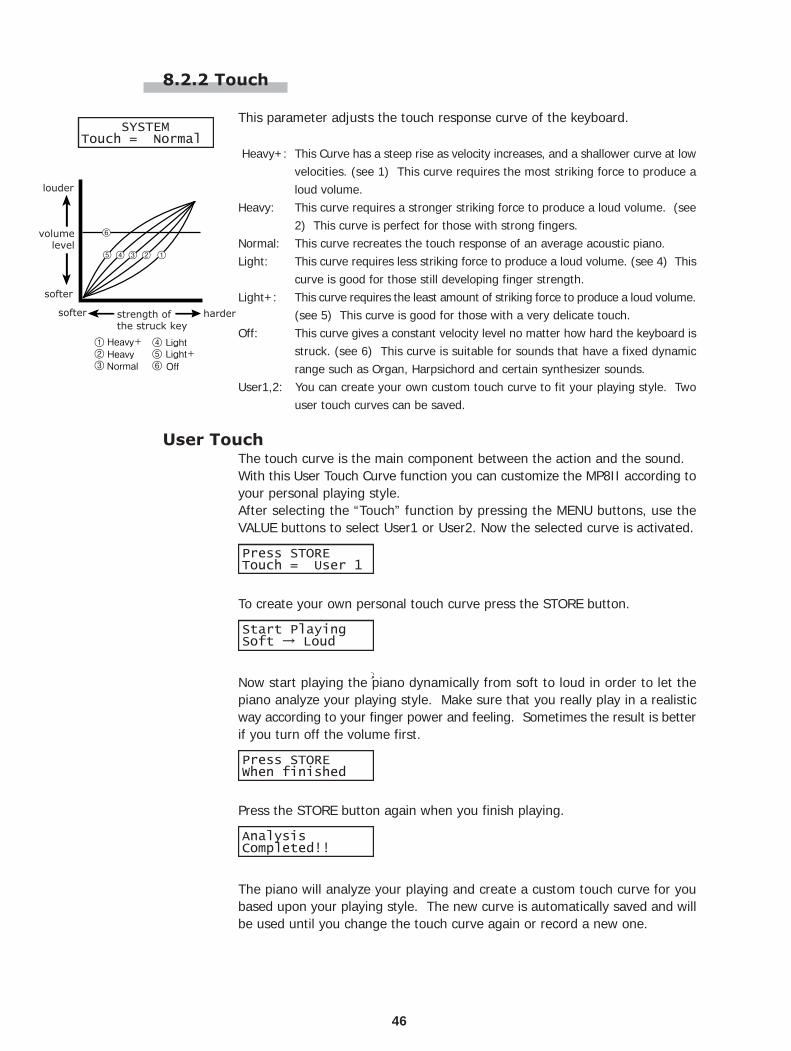
This parameter adjusts the touch response curve of the keyboard.
Heavy+: This Curve has a steep rise as velocity increases, and a shallower curve at lowvelocities. (see 1) This curve requires the most striking force to produce aloud volume.
Heavy: This curve requires a stronger striking force to produce a loud volume. (see2) This curve is perfect for those with strong fingers.
Normal: This curve recreates the touch response of an average acoustic piano.Light: This curve requires less striking force to produce a loud volume. (see 4) This
curve is good for those still developing finger strength.Light+: This curve requires the least amount of striking force to produce a loud volume.
(see 5) This curve is good for those with a very delicate touch.Off: This curve gives a constant velocity level no matter how hard the keyboard is
struck. (see 6) This curve is suitable for sounds that have a fixed dynamicrange such as Organ, Harpsichord and certain synthesizer sounds.
User1,2: You can create your own custom touch curve to fit your playing style. Twouser touch curves can be saved.
User TouchThe touch curve is the main component between the action and the sound.With this User Touch Curve function you can customize the MP8II according toyour personal playing style.After selecting the “Touch” function by pressing the MENU buttons, use theVALUE buttons to select User1 or User2. Now the selected curve is activated.
To create your own personal touch curve press the STORE button.
Now start playing the piano dynamically from soft to loud in order to let thepiano analyze your playing style. Make sure that you really play in a realisticway according to your finger power and feeling. Sometimes the result is betterif you turn off the volume first.
Press the STORE button again when you finish playing.
The piano will analyze your playing and create a custom touch curve for youbased upon your playing style. The new curve is automatically saved and willbe used until you change the touch curve again or record a new one.

47
8.2.3 System Tuning
This parameter sets the global master tuning of the MP8II. The value changesfrom 427.0 to 453.0 (Hz).
8.2.4 Volume Slider Action
This selects how the volume sliders react, when you change the volume.
Normal: The value changes immediately, when the volume slider is moved.Catch: The value won’t change until the volume slider catches the position of the
previously saved Volume value. This setting is designed for live editing toprevent you from unexpected volume jumps.
8.2.5 Reverb Offset
This parameter sets the global reverb depth offset. The value changes from 0to 100%. You can decrease the whole depth of the MP8II.
8.2.6 EQ Offset On/Off
This parameter sets the global EQ.
On: The global EQ settings are added to the EQ knob settings.Off: The global EQ is disabled.
8.2.7 EQ Offset
This parameter sets the global EQ offset value of the MP8II. The value changesfrom -12 to +12 (dB).These parameters - High, Mid High, Mid Low and Low - are each added to theEQ knob settings. In the case that the total value exceeds +-12dB, it is limitedto +-12dB.
When the EQ Offset On/Off is set to Off, this page won’t be displayed.
8.2.8 Local Control
On: The keyboard of the MP8II and the internal tone generators are connected.Set this parameter to “On” for normal use.
Off: The internal connection between the keyboard and the tone generatorsis switched off. This feature will avoid the “Doubled Sound” that results fromuse with an external sequencer equipped with Soft Thru or Echo Thru.

48
8.2.9 Multi-Timbral Mode
Multi-Timbral Mode allows the MP8II to receive data on more than one MIDIchannel simultaneously. In this mode, the MP8II can play different musicalparts with different sounds for each part.
On1/2: This is a flexible 16 part multi-timbral setup. (On 1 and On 2)MP8II’s normal program change numbers are assigned in On 1, and GeneralMIDI program change numbers are assingned in On 2.(please see page54 for SOUND Program Number List.)
Off: This turns off the multi-timbral capability. Only the system channel will beactive and only the preset sound currently selected will be heard when aMIDI signal is received.
8.2.10 System Ch Mode
This parameter determines whether or not MIDI data received on the systemchannel will be sent to panel section (4zone setup internal section) whenMultiTimbre is set to ON.
Panel: MIDIdata received on the SystemCh is sent to panel section (Default).Use this setting to play your sound and setup patches (including effect/reverbsettings) via MIDI on the system channel in Multi -Timbral mode.
Normal: The system channel receives MIDI data as part of a simple 16 part Multi-Timbral set up. When Normal is selected Sound and setup patch settings willnot be used via MIDI.
When the Multi-Timbral Mode is set to Off, this page won’t be displayed.
Note:When “Multi-Timbre=On” and “SysCh mode=Panel”, The Receive Channelparameter in the System menu will display an asterisk for the MIDI channelassigned to the System. The asterisk indicates that MIDI data receivedon this channel will be sent to the Panel section.

49
8.2.11 Receive Channel
This parameter determines whether or not a particular MIDI channel will receiveincoming MIDI data from an external source. This parameter can be used tofilter out data on specific MIDI channels that are not intended for the MP8II.
On: The MP8II responds to MIDI data received on this channel.Off: The MP8II ignores MIDI data received on this channel.
When the Multi-Timbral Mode is set to Off, this page won’t be displayed.
8.2.12 LCD Contrast
This parameter adjusts the contrast of the LCD display.As the value changes higher, the contrast gets sharper. The value changesfrom 1 to 10.
8.2.13 LED Brightness
This adjusts the brightness of the LEDs. You can choose from High or Low.The Low setting is designed for dark stages, while the High setting is good forbright ambience.
8.2.14 Out Mode
Sometimes it is convenient to have two mono outputs instead of a stereooutput.In this case one mono output can be used for your own monitor system andthe other goes to the mixing console.
Stereo: The signal on the Line-Outs is normal stereo.2xMono: The signal on the Line-Outs is mono on both jacks
Note:To avoid unexpected sound issues some stereo effects like AutoPan will beturned off when 2xMono is selected.
8.2.15 Foot Switch Mode
This parameter sets the mode of FootSW's function.
Normal: The type of controller assigned to the footswitch is a common Setup parameter"FootSW CC#". (see page41)
Setup+: The footswitch is pushed 1 time, and Setup number will be increased by 1.
Note:When the value is "Setup+", FootSW CC# page won't be displayed.

50
8.2.16 Wheel Mode
This parameter determines whether or not the modulation wheel can be usedto edit parameters like a value dial.
Normal: The wheel functions as a performance wheel and controls the CCcontroller that is assigned in the setup menu (Default).
Edit: The wheel is used to edit parameters. The value won’t change until the wheelreaches the position of the previously set the value. It can be used to edit thefollowing parameters:
*Setup parameters in the MENU except Zone mode and Sound*Setup name when stored*Function SW assign, EFX/REVERB type*Tempo of the metronome
Note:When the Wheel Mode is set to “Edit”, the normal function of the wheel isineffective,and the wheel parameters will show an asterisk.
8.2.17 Dump Mode
This parameter determines whether or not the dump data is divided into pluralPackets. When a Personal Computer is used for the Dump, if the performanceof the computer or sequencer is insufficient, the MP8II may not dump informationcorrectly. In such a case, please set the Dump mode to “Divide”.
Normal: Dump data is transmitted as one exclusive data.[default]Divide: Dump data is transmitted as plural Packets -each max 128bytes. The “Divide”
transmission requires more time than “Normal”.
8.3 System Dump8.3.1 Dump Current
This function transmits the current and active settings of the MP8II as a SystemExclusive Message via the MIDI OUT.
Press the SYSTEM button. Then press the MENU-DOWN button until “DumpCurrent” appears on the display.
Press the VALUE-UP button. The display will ask for confirmation.
To cancel Dump Current at this point, press the VALUE-DOWN button.Otherwise, press the VALUE-UP button again.
The display will change to read “Completed!!”. Dump Current is complete.

51
Note:Loading the data back to the MP8II will change the current settings. SETUPand SYSTEM data will not change. You can use this function to temporarilychange the setting from your sequencer. If you want to save the setting, youmust use the STORE procedure and save as Setup.
8.3.2 Dump All SOUND
This function transmits all the Sounds of the MP8II as System Exclusive Messagesvia the MIDI OUT. Use this function to backup your Setups on an externalMIDI sequencer.
Press the SYSTEM button. Then press the MENU-DOWN button until “DumpAll Sound” appears on the display.
Press the VALUE-UP button. The display will ask for confirmation.
To cancel Dump All Sound at this point, press the VALUE-DOWN button.Otherwise, press the VALUE-UP button again.
When the data is done transmitting, the display will change to read “Completed!!”.Dump All Sound is complete.
Note:Loading the data back to MP8II will overwrite all the sound data in thememory.
8.3.3 Dump All SETUP
This function transmits all the Setups of the MP8II as System Exclusive Messagesvia the MIDI OUT. Use this function to backup your Setups on an externalMIDI sequencer.
Press the SYSTEM button. Then press the MENU-DOWN button until “DumpAll” appears on the display.
Press the VALUE-UP button. The display will ask for confirmation.
To cancel Dump All Setup at this point, press the VALUE-DOWN button.Otherwise, press the VALUE-UP button again.
When the data is done transmitting, the display will change to read “Completed!!”.Dump All Setup is complete.
Note:Loading the data back to MP8II will overwrite all the setup data in the memory.

52
8.4 System Reset8.4.1 Reset One SOUND/SETUP
This function resets one SOUND or SETUP back to the original factory defaultsettings.
Press the SYSTEM button. Then press the MENU-DOWN button until “Reset X-X-X” (X-X-X stands for the setup number) appears on the display. Now use theSOUND SELECT buttons to select the sound or setup you want to reset.
Press the VALUE-UP button. The display will ask for confirmation.
To cancel the Reset procedure at this point, press the VALUE-DOWN button.Otherwise, press the VALUE-UP button again.
The display will show “Completed!!” after finishing.
Note:The selected SOUND/SETUP data will be overwritten by the factory settings.
8.4.2 Reset All
This function performs a global reset of all 256 SOUNDs, all 256 SETUPs andSYSTEM settings back to the original factory default settings.
Press the SYSTEM button. Then press the MENU-DOWN button until “Reset All”appears on the display.
Press the VALUE-UP button. The display will ask for confirmation.
To cancel Reset All at this point, press the VALUE-DOWN button.Otherwise, press the VALUE-UP button again.
The display will show “Completed!!” after finishing.
Note:All the data in the MP8II will be overwritten by the factory settings.

53
9. OTHER9.1 MIDI IN
When the Multi-Timbral Mode is Off, the MP8II receives the MIDI informationcoming in the System Channel only. (see page45)For changing the internal sounds via MIDI, refer to the SOUND Program NumberList on the next page.
Note:If the MP8II receives the Program Number from 1 to 128 and Bank numberLSB from 2 to 3 in the System Channel (see page45), the MP8II will switch toSETUP mode and the corresponding SETUP is recalled. (See the SETUP ProgramNumber Table below.) The recalled SETUP can be played only from thekeyboard of the MP8II.
When the Multi-Timbral Mode is On, the MP8II can be used as a multi-timbralsound module, playing up to 16 different sounds on 16 MIDI channels.
9.2 SETUP Program Number Table
UPPER SECOND THIRD PROG#:MSB-LSB1 1 A 001:000-0021 1 B 002:000-0021 1 C 003:000-0021 1 D 004:000-0021 2 A~D 005:000-002 ~ 008:000-0021 3 A~D 009:000-002 ~ 012:000-0021 4 A~D 013:000-002 ~ 016:000-0021 5 A~D 017:000-002 ~ 020:000-0021 6 A~D 021:000-002 ~ 024:000-0021 7 A~D 025:000-002 ~ 028:000-0021 8 A~D 029:000-002 ~ 032:000-0022 1~8 A~D 033:000-002 ~ 064:000-0023 1~8 A~D 065:000-002 ~ 096:000-0024 1~8 A~D 097:000-002 ~ 128:000-0025 1~8 A~D 001:000-003 ~ 032:000-0036 1~8 A~D 033:000-003 ~ 064:000-0037 1~8 A~D 065:000-003 ~ 096:000-0038 1~8 A~D 097:000-003 ~ 128:000-003

54
9.3 SOUND Program Number ListMulti Timbre ON1 Multi Timbre ON2
Bank Bank Bank BankProg# MSB LSB Prog# MSB LSB
Piano1 A Concert Grand 1 0 0 1 95 16
B Studio Grand 2 0 0 1 95 17C Mellow Grand 3 0 0 1 95 18D Jazz Grand 4 0 0 1 95 19
2 A Concert Grand2 5 0 0 1 121 0B Studio Grand 2 6 0 0 1 121 1C Mellow Grand 2 7 0 0 1 121 2D Jazz Grand 2 8 0 0 1 95 8
3 A Modern Piano 9 0 0 2 121 0B Rock Piano 10 0 0 2 121 1C Old Age Piano 11 0 0 2 95 5D Honky Tonk 12 0 0 4 121 0
4 A Mono Piano 13 0 0 1 95 20B Mono Piano 2 14 0 0 1 95 3C Mono Piano 3 15 0 0 1 95 21D Mono Piano 4 16 0 0 1 95 24
5 A Piano Vari. 17 0 0 1 95 22B Piano Vari. 2 18 0 0 1 95 23C Piano Vari. 3 19 0 0 2 95 6D Piano Vari. 4 20 0 0 2 95 7
6 A Piano Oct. 21 0 0 1 95 1B Piano Oct. 2 22 0 0 1 95 2C Piano & EP 23 0 0 2 95 1D Piano & EP 2 24 0 0 2 95 2
7 A New Age Piano 25 0 0 1 95 9B New Age Piano2 26 0 0 1 95 10C New Age Piano3 27 0 0 1 95 11D New Age Piano4 28 0 0 1 95 15
8 A Harpsichord 29 0 0 7 121 3B Harpsichord2 30 0 0 7 121 0C Harpsi. Octave 31 0 0 7 121 1D Harpsi & Clavi 32 0 0 7 95 5
E.Piano1 A Classic EP 33 0 0 5 121 0
B Classic EP 2 34 0 0 5 95 5C Classic EP 3 35 0 0 5 95 3D Classic EP 4 36 0 0 5 121 1
2 A Modern EP 37 0 0 6 121 0B Modern EP 2 39 0 0 6 121 1C Modern EP 3 40 0 0 6 121 2D Modern EP 4 38 0 0 6 95 5
3 A 60s EP 41 0 0 5 121 3B 60’s EP 2 42 0 0 5 95 4C Electric Grand 44 0 0 3 121 0D Electric GP 2 43 0 0 3 121 1
4 A Dolce EP 45 0 0 5 95 2B Legend EP 46 0 0 6 121 3C Phase EP 47 0 0 6 121 4D Classic EP 5 48 0 0 5 121 2

55
Multi Timbre ON1 Multi Timbre ON2Bank Bank Bank Bank
Prog# MSB LSB Prog# MSB LSB
5 A Crystal EP 49 0 0 6 95 1B New Age EP 50 0 0 6 95 2C New Age EP2 51 0 0 6 95 3D New Age EP3 52 0 0 6 95 4
6 A Clavinet 53 0 0 8 121 0B Synth Clavinet 54 0 0 8 121 1C Clavi & Marim 55 0 0 8 95 1D Clavi Phaser 56 0 0 8 95 2
7 A Vibraphone 57 0 0 12 121 0B Octave Vibes 58 0 0 12 95 2C Celesta 59 0 0 9 121 0D Bells 60 0 0 15 95 3
8 A Marimba 61 0 0 13 121 0B Hard Marimba 62 0 0 13 95 1C Xylophone 63 0 0 14 121 0D Steel Drums 64 0 0 115 121 0
Drawbar1 A Be More 65 0 0 17 95 2
B Jazzer 66 0 0 18 95 1C Be 3 67 0 0 17 95 1D Be Nice 68 0 0 17 95 7
2 A Mellow 69 0 0 17 95 5B Drawbar 2 70 0 0 17 121 3C Odd Man 71 0 0 17 95 6D Hi-Lo 72 0 0 17 95 3
3 A Soft Solo 73 0 0 17 95 8B Full Organ 74 0 0 18 95 4C Jazz Organ 2 75 0 0 18 95 12D Hollow 76 0 0 18 95 6
4 A Rock Organ 2 77 0 0 19 121 0B Drawbar 3 78 0 0 17 121 1C Screamin’ 79 0 0 17 95 4D Drawbar 80 0 0 17 121 0
5 A Jazz Organ 81 0 0 18 121 0B Rock Organ 82 0 0 18 95 13C Perc. Organ 2 83 0 0 18 12 11D Perc. Organ 84 0 0 18 95 15
6 A 16' Drawbar 85 0 0 19 95 1B 8' Drawbar 86 0 0 19 95 2C 5 1/3' Drawbar 87 0 0 19 95 3D 4' Drawbar 88 0 0 19 95 4
7 A 2 2/3' Drawbar 89 0 0 19 95 5B 2' Drawbar 90 0 0 19 95 6C 1 3/5' Drawbar 91 0 0 19 95 7D 1 1/3' Drawbar 92 0 0 19 95 8
8 A 1' Drawbar 93 0 0 19 95 9B 4' percussion 94 0 0 18 95 3C 2 2/3' perc. 95 0 0 18 95 2D Key Click 96 0 0 122 95 1

56
Multi Timbre ON1 Multi Timbre ON2Bank Bank Bank Bank
Prog# MSB LSB Prog# MSB LSB
Organ1 A Church Organ 97 0 0 20 121 0
B Full Pipes 98 0 0 20 95 9C Full Ensemble 99 0 0 21 95 10D Church Organ 2 100 0 0 20 121 1
2 A PrincipleChoir 101 0 0 20 95 23B Small Ensemble 102 0 0 20 95 8C Small Ens. 2 103 0 0 20 95 25D Baroque 104 0 0 20 95 19
3 A Chiffy Tibia 105 0 0 20 95 17B 8'&4’sPrinciple 106 0 0 20 95 24C Stopped Pipe 107 0 0 20 95 21D Principle Pipe 108 0 0 20 95 22
4 A 8' Celeste 109 0 0 20 95 5B Diapason 110 0 0 20 95 6C Voice Celeste 111 0 0 20 95 39D Baroque Mix 112 0 0 20 95 7
5 A Reeds 113 0 0 20 95 10B 8' Reed 114 0 0 21 95 1C Reed Pipes 115 0 0 20 95 26D Posaune 116 0 0 20 95 27
6 A Theater Organ 117 0 0 20 95 2B Theater Organ2 118 0 0 20 95 3C Theater Organ3 119 0 0 20 95 4D Theater Tibia 120 0 0 20 95 36
7 A Elec. Organ 121 0 0 17 95 9B Elec. Organ 2 122 0 0 17 95 10C 60’s Organ 123 0 0 17 121 2D Pump Organ 124 0 0 20 95 40
8 A Fr. Accordion 125 0 0 22 121 0B TangoAccordion 126 0 0 24 121 0C Harmonica 127 0 0 23 121 0D Kenban Harmo. 128 0 0 23 95 4
Strings/Vocal1 A String Pad 1 0 1 49 95 8
B Warm Strings 2 0 1 49 95 1C Warm Strings 2 3 0 1 51 121 0D Synth Strings 4 0 1 52 121 0
2 A Beautiful Str. 5 0 1 45 95 1B String Ens. 2 6 0 1 50 121 0C String Ens. 7 0 1 49 121 0D Full Orchestra 8 0 1 49 95 12
3 A Small Str. Ens 9 0 1 49 95 13B Quartet 10 0 1 49 95 11C Str. Bass Ens. 11 0 1 44 121 0D Str. Sustain 12 0 1 49 95 10
4 A Pizzicato 13 0 1 46 121 0B TremoloStrings 14 0 1 45 121 0C Str. Sforzando 15 0 1 49 95 9D Orchestra Hit 16 0 1 56 121 0

57
Multi Timbre ON1 Multi Timbre ON2Bank Bank Bank Bank
Prog# MSB LSB Prog# MSB LSB
5 A Passionate Vln 17 0 1 41 121 0B Classic Violin 18 0 1 41 95 3C Passionate Vc 19 0 1 43 121 0D Classic Cello 20 0 1 43 95 4
6 A Choir 21 0 1 53 121 0B Breathy Choir 22 0 1 53 95 1C Choir Aahs 23 0 1 53 95 3D Slow Choir 24 0 1 53 95 2
7 A Jazz Ensemble 25 0 1 54 95 2B Female Scat 26 0 1 54 95 22C Pop Ensemble 27 0 1 54 121 0D Contemp Ens. 28 0 1 54 95 10
8 A Itopia 29 0 1 92 121 0B Halo Pad 30 0 1 95 121 0C Halo Pad 2 31 0 1 95 95 1D Synth Vocals 32 0 1 55 121 0
Brass/Wind1 A Exp Brass 33 0 1 62 95 8
B Exp Saxes 34 0 1 66 95 11C Tp&Bone&Tenor 35 0 1 58 95 11D Flugel & Tenor 36 0 1 57 95 18
2 A Brass Section 37 0 1 62 121 0B Synth Brass 39 0 1 63 121 0C Synth Brass 2 40 0 1 64 121 0D Jump Brass 38 0 1 63 121 3
3 A Exp Trumpet 41 0 1 57 121 0B PlungerTrumpet 42 0 1 57 95 7C Trumpet Shake 44 0 1 57 95 6D Harmon Mute Tp 43 0 1 60 121 0
4 A Exp Trombone 45 0 1 58 121 0B Lead Trombone 46 0 1 58 95 2C PlungerTrombon 47 0 1 58 95 4D ClosedMuteBone 48 0 1 58 95 9
5 A Exp Alto 49 0 1 66 121 0B Lead Alto 50 0 1 66 95 2C Soft Alto 51 0 1 66 95 7D Lead Soprano 52 0 1 65 121 0
6 A Exp Tenor 53 0 1 67 121 0B Ballad Tenor 54 0 1 67 95 6C Growl Tenor 55 0 1 67 95 4D Baritone Sax 56 0 1 68 121 0
7 A Exp Flute 57 0 1 74 95 12B Ballad Flute 58 0 1 74 121 0C Flute Overblow 59 0 1 74 95 9D Flute Flutter 60 0 1 74 95 10
8 A Oboe 61 0 1 69 121 0B Bassoon 62 0 1 71 121 0C Jazz Clarinet 63 0 1 72 121 0D Pan Flute 64 0 1 76 121 0

58
Multi Timbre ON1 Multi Timbre ON2Bank Bank Bank Bank
Prog# MSB LSB Prog# MSB LSB
Pad & Synth1 A New Age Pad 65 0 1 89 121 0
B New Age Pad 2 66 0 1 89 95 1C New Age Pad 3 67 0 1 89 95 2D New Age Pad 4 68 0 1 89 95 3
2 A Atmosphere 69 0 1 100 121 0B Brightness 70 0 1 101 121 0C Brightness 2 71 0 1 101 95 1D Goblin 72 0 1 102 121 0
3 A Classic Synth 73 0 1 82 121 0B Classic Synth2 74 0 1 82 121 1C Big Saw 75 0 1 82 95 1D Saw Pad 76 0 1 82 95 3
4 A Pulse Lead 77 0 1 82 95 4B Pulse Lead 2 78 0 1 82 95 5C Square Lead 79 0 1 81 121 0D Lead 80 0 1 82 121 2
5 A Caliope 81 0 1 83 121 0B Chiff 82 0 1 84 121 0C Ensemble Lead 83 0 1 84 95 1D Blow lead 84 0 1 83 95 2
6 A Bright WarmPad 85 0 1 90 95 1B Warm Pad 86 0 1 90 121 0C Sine Pad 87 0 1 90 121 1D Bowed Pad 88 0 1 93 121 0
7 A Brass Pad 89 0 1 62 95 2B Metallic 90 0 1 94 121 0C Multi Sweep 91 0 1 96 121 0D Soundtrack 92 0 1 98 121 0
8 A Analog Brass 93 0 1 63 121 2B Analog Brass 2 94 0 1 64 121 2C Analog Brass 3 95 0 1 64 95 1D Analog Brass 4 96 0 1 64 95 2
Bass/Guitar1 A Acc. Bass 97 0 1 33 121 0
B Acc. Bass&Ride 98 0 1 33 95 1C Electric Bass 99 0 1 34 95 1D Electric Bass2 100 0 1 34 95 4
2 A Finger Bass 101 0 1 34 121 0B FingerSlapBass 102 0 1 34 121 1C Pick Bass 103 0 1 35 121 0D Fretless Bass 104 0 1 36 121 0
3 A Synth Bass 105 0 1 39 121 0B Synth Bass 2 106 0 1 40 121 0C Rubber Bass 107 0 1 40 121 2D Warm SynthBass 108 0 1 39 121 1
4 A Exp. Nylon Gtr 109 0 1 25 121 0B Pick Nylon Gtr 110 0 1 25 95 3C Exp Guitar 111 0 1 26 121 0D Exp Guitar 2 112 0 1 26 95 11

59
Multi Timbre ON1 Multi Timbre ON2Bank Bank Bank Bank
Prog# MSB LSB Prog# MSB LSB
5 A Rhythm Guitar 113 0 1 28 121 0B Overdrive 114 0 1 30 121 0C Distortion 115 0 1 31 121 0D Muted Electric 116 0 1 29 121 0
6 A Pedal Steel 117 0 1 27 121 1B HawaiianGuitar 118 0 1 27 95 1C Jazz Guitar 119 0 1 27 121 0D Jazz Guitar 2 120 0 1 27 95 2
7 A Banjo 121 0 1 106 121 0B Mandolin 122 0 1 26 121 2C Sitar 123 0 1 105 121 0D Harp 124 0 1 47 121 0
8 A Standard Set 125 0 1 1 120 0B Standard Set 2 126 0 1 33 120 0C Room Set 127 0 1 9 120 0D Analog Set 128 0 1 26 120 0

60
9.4 Notes about USB
The MP8II can be connected to a personal computer with a USB cable for exchanging MIDI data. You need aUSB driver installed in your computer.
[For Windows XP/Me users]A standard USB driver is already installed in your computer. You don’t need to install a new driver.
[For Windows 2000/98SE users]You need to install the designated driver in your computer. Visit the KAWAI web site athttp://www.kawai.co.jp/english/Download1.html and download the program.
[For Macintosh users]Macintosh OSX automatically recognizes our USB interface. No special driver is needed. Older Macintosh OSare not supported by us. If you have an older Macintosh OS, please use an appropriate MIDI interface and MIDIcables when connecting the MP8II to a Macintosh computer.
NOTE:When both MIDI jacks and USB jack are connected, USB has priority.When connecting USB cable to the MP8II, first connect the USB cable and then turn the power of the MP8II on.It may take some time to start communication when the MP8II is connected to the computer via USB.When USB communication is unstable with connection via hub, connect the USB cable directly to the USB portof the computer.Turning the power of MP8II on/off or disconnecting the USB cable while the following actions may causeunstable communication.
while installing USB driverwhile booting up the computerwhile MIDI application is workingwhile communicating with the computerwhile the computer is in energy saver mode
* If you have any problem with USB communication, consult the instruction manual of your computer and checkyour computer set up.
* The USB-MIDI conversion board TID10000934 used in the MP8II is approved to show the USB logo. TheUSB logo can be used only for the product which is approved by USB-IF (USB Implements Forum Inc.) test.
* Windows is registered trademark of Microsoft Corporation.
* Macintosh is registered trademark of Apple Computer, Inc.
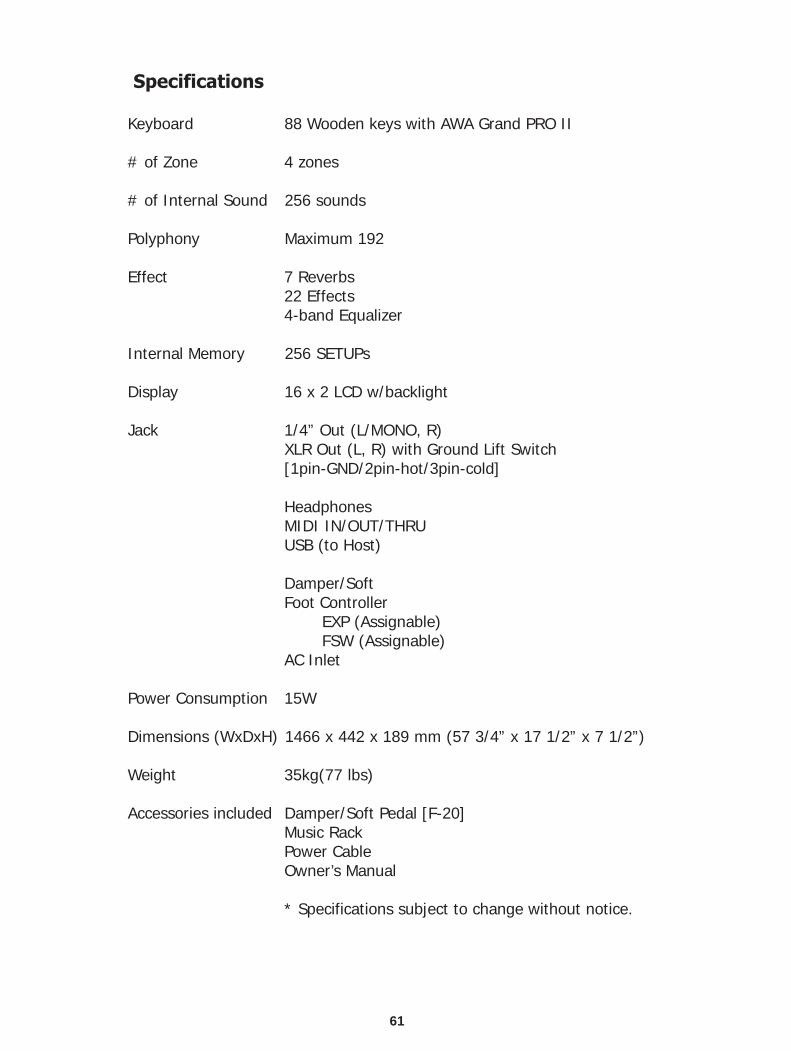
61
Specifications
Keyboard 88 Wooden keys with AWA Grand PRO II
# of Zone 4 zones
# of Internal Sound 256 sounds
Polyphony Maximum 192
Effect 7 Reverbs22 Effects4-band Equalizer
Internal Memory 256 SETUPs
Display 16 x 2 LCD w/backlight
Jack 1/4” Out (L/MONO, R)XLR Out (L, R) with Ground Lift Switch[1pin-GND/2pin-hot/3pin-cold]
HeadphonesMIDI IN/OUT/THRUUSB (to Host)
Damper/SoftFoot Controller
EXP (Assignable)FSW (Assignable)
AC Inlet
Power Consumption 15W
Dimensions (WxDxH) 1466 x 442 x 189 mm (57 3/4” x 17 1/2” x 7 1/2”)
Weight 35kg(77 lbs)
Accessories included Damper/Soft Pedal [F-20]Music RackPower CableOwner’s Manual
* Specifications subject to change without notice.

62
MP8II MIDI Implementation
Contents
1. Recognized data1.1 Channel Voice Message1.2 Channel Mode Message1.3 System Real time Message
2. Transmitted data2.1 Channel Voice Message2.2 Channel Mode Message2.3 System Real time Message
3. Exclusive data3.1 Universal Realtime Exclusive Message3.2 Dump Message3.3 Sound Data Format3.4 Setup Data Format
4. Table4.1 CC# table
MIDI Implementation Chart
Version 1.1 June 2007

63
1. Recognized Data 1.1 Channel Voice message
Note offStatus 2nd Byte 3rd Byte8nH kkH vvH9nH kkH 00H
n=MIDI channel number :0H-fH(ch.1 ~ ch.16)kk=Note Number :00H - 7fH(0 ~ 127)vv=Velocity :00H - 7fH(0 ~ 127)
Note onStatus 2nd Byte 3rd Byte9nH kkH vvH
n=MIDI channel number :0H-fH(ch.1 ~ ch.16)kk=Note Number :00H - 7fH(0 ~ 127)vv=Velocity :00H - 7fH(0 ~ 127)
Control Change
Bank Select (MSB)Status 2nd Byte 3rd ByteBnH 00H mmHBnH 20H llHn=MIDI channel number :0H-fH(ch.1 ~ ch.16)mm = Bank Number MSB :00H-7fH (0 ~ 127)ll = BankNumber LSB :00H-7fH (0 ~ 127)
ModulationStatus 2nd Byte 3rd ByteBnH 01H vvH
n=MIDI channel number :0H-fH(ch.1 ~ ch.16)vv = Modulation depth :00H - 7fH(0 ~ 127) Default = 00H
Data EntryStatus 2nd Byte 3rd ByteBnH 06H mmHBnH 26H llH
n=MIDI channel number :0H-fH(ch.1 ~ ch.16)mm,ll=Value indicated in RPN/NRPN:00H - 7fH(0 ~ 127) *see RPN/NRPN chapter
VolumeStatus 2nd Byte 3rd ByteBnH 07H vvH
n=MIDI channel number :0H-fH(ch.1 ~ ch.16)vv=Volume :00H - 7fH(0 ~ 127) Default = 7fH
PanpotStatus 2nd Byte 3rd ByteBnH 0aH vvH
n=MIDI channel number :0H-fH(ch.1 - ch.16)vv=Panpot :00H - 40H - 7fH(left ~center~right) Default = 40H(center)
ExpressionStatus 2nd Byte 3rd ByteBnH 0bH vvH
n=MIDI channel number :0H-fH(ch.1 - ch.16)vv=Expression :00H - 7fH(0 - 127) Default = 7fH
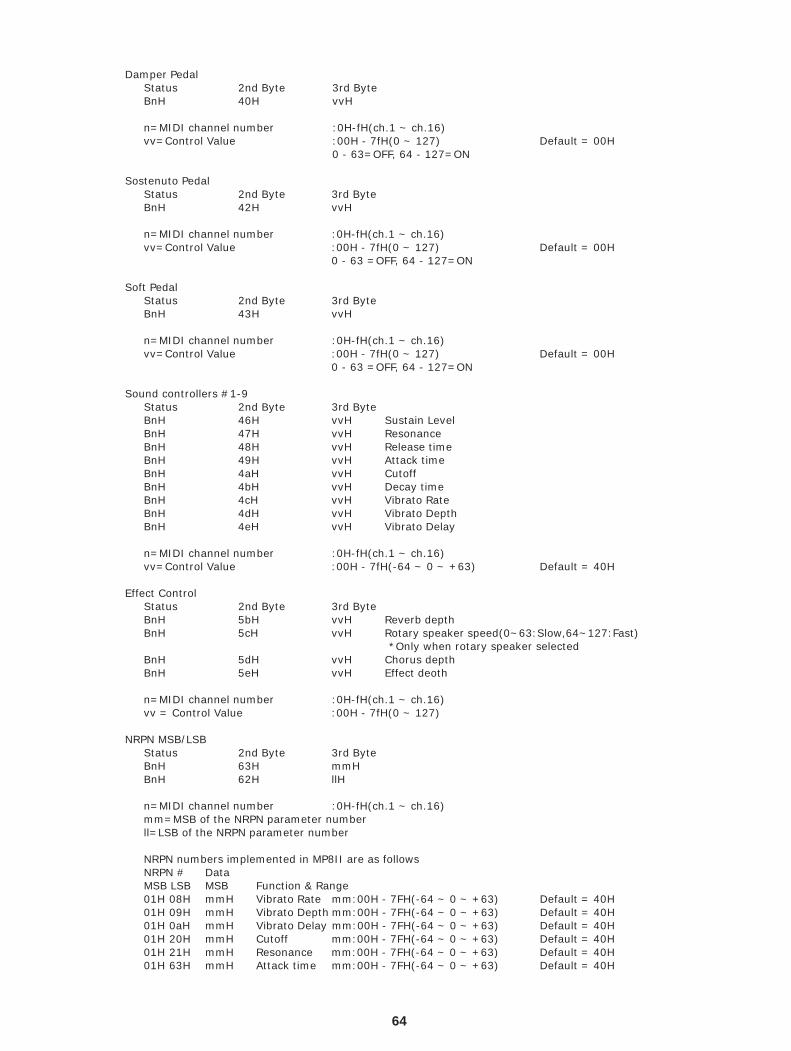
64
Damper PedalStatus 2nd Byte 3rd ByteBnH 40H vvH
n=MIDI channel number :0H-fH(ch.1 ~ ch.16)vv=Control Value :00H - 7fH(0 ~ 127) Default = 00H
0 - 63=OFF, 64 - 127=ON
Sostenuto PedalStatus 2nd Byte 3rd ByteBnH 42H vvH
n=MIDI channel number :0H-fH(ch.1 ~ ch.16)vv=Control Value :00H - 7fH(0 ~ 127) Default = 00H
0 - 63 =OFF, 64 - 127=ON
Soft PedalStatus 2nd Byte 3rd ByteBnH 43H vvH
n=MIDI channel number :0H-fH(ch.1 ~ ch.16)vv=Control Value :00H - 7fH(0 ~ 127) Default = 00H
0 - 63 =OFF, 64 - 127=ON
Sound controllers #1-9Status 2nd Byte 3rd ByteBnH 46H vvH Sustain LevelBnH 47H vvH ResonanceBnH 48H vvH Release timeBnH 49H vvH Attack timeBnH 4aH vvH CutoffBnH 4bH vvH Decay timeBnH 4cH vvH Vibrato RateBnH 4dH vvH Vibrato DepthBnH 4eH vvH Vibrato Delay
n=MIDI channel number :0H-fH(ch.1 ~ ch.16)vv=Control Value :00H - 7fH(-64 ~ 0 ~ +63) Default = 40H
Effect ControlStatus 2nd Byte 3rd ByteBnH 5bH vvH Reverb depthBnH 5cH vvH Rotary speaker speed(0~63:Slow,64~127:Fast)
*Only when rotary speaker selectedBnH 5dH vvH Chorus depthBnH 5eH vvH Effect deoth
n=MIDI channel number :0H-fH(ch.1 ~ ch.16)vv = Control Value :00H - 7fH(0 ~ 127)
NRPN MSB/LSBStatus 2nd Byte 3rd ByteBnH 63H mmHBnH 62H llH
n=MIDI channel number :0H-fH(ch.1 ~ ch.16)mm=MSB of the NRPN parameter numberll=LSB of the NRPN parameter number
NRPN numbers implemented in MP8II are as followsNRPN # DataMSB LSB MSB Function & Range01H 08H mmH Vibrato Rate mm:00H - 7FH(-64 ~ 0 ~ +63) Default = 40H01H 09H mmH Vibrato Depth mm:00H - 7FH(-64 ~ 0 ~ +63) Default = 40H01H 0aH mmH Vibrato Delay mm:00H - 7FH(-64 ~ 0 ~ +63) Default = 40H01H 20H mmH Cutoff mm:00H - 7FH(-64 ~ 0 ~ +63) Default = 40H01H 21H mmH Resonance mm:00H - 7FH(-64 ~ 0 ~ +63) Default = 40H01H 63H mmH Attack time mm:00H - 7FH(-64 ~ 0 ~ +63) Default = 40H

65
01H 64H mmH Decay time mm:00H - 7FH(-64 ~ 0 ~ +63) Default = 40H01H 66H mmH Release time mm:00H - 7FH(-64 ~ 0 ~ +63) Default = 40H
* Ignoring the LSB of data Entry* It is not affected in case of modifying cutoff if tone does not use the DCF.
RPN MSB/LSBStatus 2nd Byte 3rd ByteBnH 65H mmHBnH 64H llH
n=MIDI channel number :0H-fH(ch.1 ~ ch.16)mm=MSB of the RPN parameter numberll=LSB of the RPN parameter number
RPN number implemented in MP8II are the followingsRPN # DataMSB LSB MSB LSB Function & Range00H 00H mmH llH Pitch bend sensitivity
mm:00H-0cH (0~12 [half tone]),ll:00H Default=02H00H 01H mmH llH Master fine tuning
mm,ll :20 00H - 40 00H - 60 00H (-8192x50/8192 ~ 0 ~ +8192x50/8192 [cent])00H 02H mmH llH Master coarse tuning
mm:28H - 40H - 58H(-24 ~ 0 ~ +24 [half tone]), ll:Ignored(as 00H)7fH 7fH -- -- RPN NULL
Program ChangeStatus 2nd ByteCnH ppH
n=MIDI channel number :0H-fH(ch.1 ~ ch.16)pp=Program number :00H - 7fH(0 ~- 127) Default = 00H
Pitch Bend ChangeStatus 2nd Byte 3rd ByteEnH llH mmH
n=MIDI channel number :0H-fH(ch.1 ~ ch.16)mm,ll=Pitch bend value :00 00-7f 7fH(-8192~0~+8192) Default = 40 00H
1.2 Channel Mode MessageAll Sound OFF
Status 2nd Byte 3rd ByteBnH 78H 00H
n=MIDI channel number :0H-fH(ch.1 ~ ch.16)
Reset All ControllerStatus 2nd Byte 3rd ByteBnH 79H 00H
n=MIDI channel number :0H-fH(ch.1 ~ ch.16)
All Note OffStatus 2nd Byte 3rd ByteBnH 7bH 00H
n=MIDI channel number :0H-fH(ch.1 ~ ch.16)

66
MONOStatus 2nd Byte 3rd ByteBnH 7eH mmH
n=MIDI channel number :0H-fH(ch.1 ~ ch.16)mm=mono number :01H(M=1)
POLYStatus 2nd Byte 3rd ByteBnH 7fH 00Hn=MIDI channel number :0H-fH(ch.1 ~ ch.16)
1.3 System Realtime MessageStatusFEH Active sensing
2. Transmitted Data2.1 Channel Voice MessageNote off
Status 2nd Byte 3rd Byte9nH kkH 00H
n=MIDI channel number :0H-fH(ch.1 ~ ch.16)kk=Note Number :00H - 7fH(0 ~ 127)
Note onStatus 2nd Byte 3rd Byte9nH kkH vvH
n=MIDI channel number :0H-fH(ch.1 ~ ch.16)kk=Note Number :00H - 7fH(0 ~ 127)vv=Velocity :00H - 7fH(0 ~ 127)
Control Change
Bank SelectStatus 2nd Byte 3rd ByteBnH 00H mmHBnH 20H llH
n=MIDI channel number :0H-fH(ch.1 ~ ch.16)mm=Bank Number MSB :00H - 7fH(0 ~ 127)ll=Bank Number LSB :00H - 7fH(0 ~ 127)
ModulationStatus 2nd Byte 3rd ByteBnH 01H vvHn=MIDI channel number :0H-fH(ch.1 ~ ch.16)vv = Modulation depth :00H - 7fH(0 ~ 127)
Data EntryStatus 2nd Byte 3rd ByteBnH 06H mmHBnH 26H llH
n=MIDI channel number :0H-fH(ch.1 ~ ch.16)mm,ll=Value indicated in RPN/NRPN:00H - 7fH(0 ~ 127) *see RPN/NRPN chapter

67
VolumeStatus 2nd Byte 3rd ByteBnH 07H vvH
n=MIDI channel number :0H-fH(ch.1 ~ ch.16)v=Volume :00H - 7fH(0 ~ 127) Default = 64H
PanpotStatus 2nd Byte 3rd ByteBnH 0aH vvH
n=MIDI channel number :0H-fH(ch.1 ~ ch.16)vv=Panpot :00H - 7fH(0 ~ 127) Default = 40H(center)
ExpressionStatus 2nd Byte 3rd ByteBnH 0bH vvH
n=MIDI channel number :0H-fH(ch.1 ~ ch.16)vv=Expression :00H - 7fH(0 ~ 127) Default = 7fH
Damper PedalStatus 2nd Byte 3rd ByteBnH 40H vvH
n=MIDI channel number :0H-fH(ch.1 ~ ch.16)vv=Control Value :00H - 7fH(0 ~ 127) Default = 00H
0 - 63 =OFF, 64 - 127=ONSostenuto Pedal
Status 2nd Byte 3rd ByteBnH 42H vvH
n=MIDI channel number :0H-fH(ch.1 ~ ch.16)vv=Control Value :00H - 7fH(0 ~ 127) Default = 00H
Soft PedalStatus 2nd Byte 3rd ByteBnH 43H vvH
n=MIDI channel number :0H-fH(ch.1 ~ ch.16)vv=Control Value :00H - 7fH(0 ~ 127) Default = 00H
0 - 63 =OFF, 64 - 127=ON
Sound controllers #1-9Status 2nd Byte 3rd ByteBnH 46H vvH Sustain LevelBnH 47H vvH ResonanceBnH 48H vvH Release timeBnH 49H vvH Attack timeBnH 4aH vvH CutoffBnH 4bH vvH Decay timeBnH 4cH vvH Vibrato RateBnH 4dH vvH Vibrato DepthBnH 4eH vvH Vibrato Delay
n=MIDI channel number :0H-fH(ch.1 ~ ch.16)vv=Control Value :00H - 7fH(-64 ~ 0 ~ +63) Default = 40H
Effect ControlStatus 2nd Byte 3rd ByteBnH 5bH vvH Reverb depthBnH 5cH vvH Rotary speaker speed(0~63:Slow,64~127:Fast)
*Only when rotary speaker selectedBnH 5dH vvH Chorus depthBnH 5eH vvH Effect deoth
n=MIDI channel number :0H-fH(ch.1 ~ ch.16)vv=Control Value :00H - 7fH(0 ~ 127)

68
RPN MSB/LSBStatus 2nd Byte 3rd ByteBnH 65H mmHBnH 64H llH
n=MIDI channel number :0H-fH(ch.1~ch.16)mm=MSB of the RPN parameter numberll=LSB of the RPN parameter number
RPN number implemented in MP8II are the followings
RPN # DataMSB LSB MSB LSB Function & Range00H 00H mmH llH Pitch bend sensitivity Default=02H
mm:00H-0cH(0~12 [half tone]), ll:00H00H 01H mmH llH Master fine tuning
mm,ll:20 00H - 40 00H - 60 00 (-8192x50/8192 ~ 0 ~+8192x50/8192 [cent])7fH 7fH -- -- RPN NULL
Program ChangeStatus 2nd ByteCnH ppH
n=MIDI channel number :0H-fH(ch.1 ~ ch.16)pp=Program number :00H - 7fH Default = 00H
After TouchStatus 2nd ByteDnH ppH
n=MIDI channel number :0H-fH(ch.1 ~ ch.16)pp=Value :00H - 7fH Default = 00H*Sending only when EXP CC#=AFT
Pitch Bend ChangeStatus 2nd Byte 3rd ByteEnH llH mmH
n=MIDI channel number :0H-fH(ch.1 ~ ch.16)mm,ll=Pitch bend value :00 00 - 7f 7fH(-8192~0~+8192) Default = 40 00H(center)
2.2 Channel Mode MessageMONO
Status 2nd Byte 3rd ByteBnH 7eH mmH
n=MIDI channel number :0H-fH(ch.1 ~ ch.16)mm=mono number :01H(M=1)
POLYStatus 2nd Byte 3rd ByteBnH 7fH 00H
n=MIDI channel number :0H-fH(ch.1 ~ ch.16)
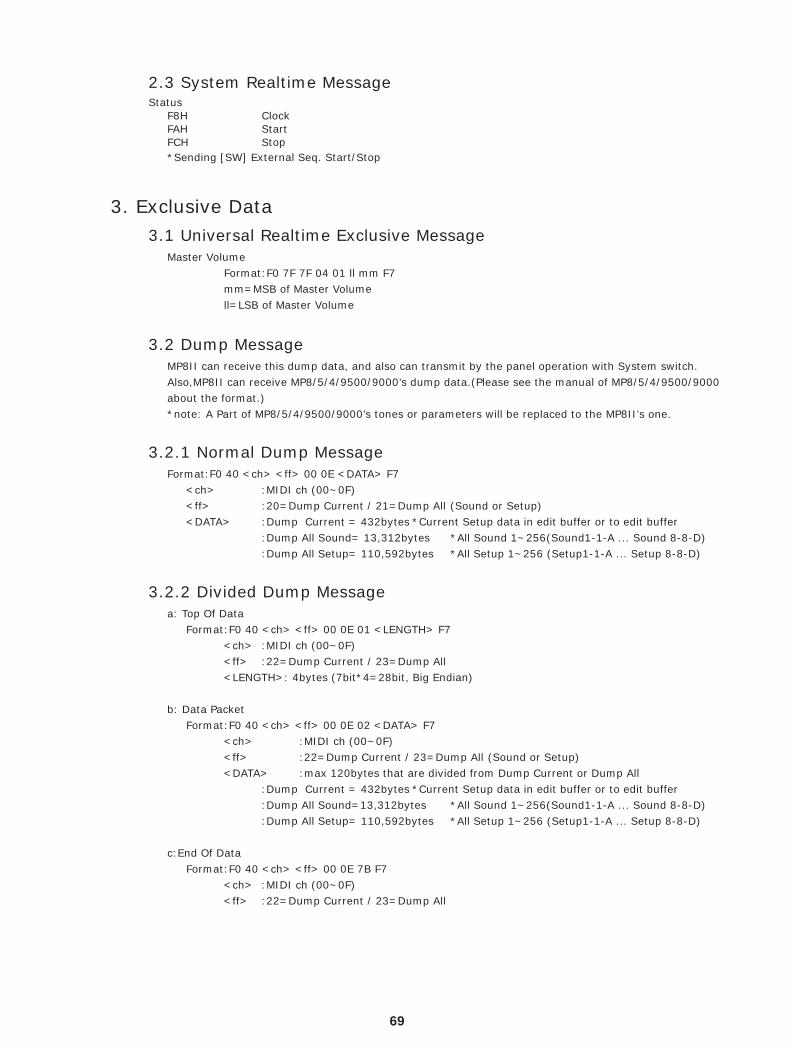
69
2.3 System Realtime MessageStatus
F8H ClockFAH StartFCH Stop*Sending [SW] External Seq. Start/Stop
3. Exclusive Data3.1 Universal Realtime Exclusive Message
Master VolumeFormat:F0 7F 7F 04 01 ll mm F7mm=MSB of Master Volumell=LSB of Master Volume
3.2 Dump MessageMP8II can receive this dump data, and also can transmit by the panel operation with System switch.Also,MP8II can receive MP8/5/4/9500/9000’s dump data.(Please see the manual of MP8/5/4/9500/9000about the format.)*note: A Part of MP8/5/4/9500/9000’s tones or parameters will be replaced to the MP8II’s one.
3.2.1 Normal Dump MessageFormat:F0 40 <ch> <ff> 00 0E <DATA> F7
<ch> :MIDI ch (00~0F)<ff> :20=Dump Current / 21=Dump All (Sound or Setup)<DATA> :Dump Current = 432bytes *Current Setup data in edit buffer or to edit buffer
:Dump All Sound= 13,312bytes *All Sound 1~256(Sound1-1-A ... Sound 8-8-D):Dump All Setup= 110,592bytes *All Setup 1~256 (Setup1-1-A ... Setup 8-8-D)
3.2.2 Divided Dump Messagea: Top Of Data
Format:F0 40 <ch> <ff> 00 0E 01 <LENGTH> F7<ch> :MIDI ch (00~0F)<ff> :22=Dump Current / 23=Dump All<LENGTH>: 4bytes (7bit*4=28bit, Big Endian)
b: Data PacketFormat:F0 40 <ch> <ff> 00 0E 02 <DATA> F7
<ch> :MIDI ch (00~0F)<ff> :22=Dump Current / 23=Dump All (Sound or Setup)<DATA> :max 120bytes that are divided from Dump Current or Dump All
:Dump Current = 432bytes *Current Setup data in edit buffer or to edit buffer:Dump All Sound=13,312bytes *All Sound 1~256(Sound1-1-A ... Sound 8-8-D):Dump All Setup= 110,592bytes *All Setup 1~256 (Setup1-1-A ... Setup 8-8-D)
c:End Of DataFormat:F0 40 <ch> <ff> 00 0E 7B F7
<ch> :MIDI ch (00~0F)<ff> :22=Dump Current / 23=Dump All

70
3.3 Sound Data FormatThe structure of the one Sound patch [52bytes]
No. PARAMETER VALUE1 Sound Data ID 22 Reverb Type 0~6 (see page26)3 Reverb Time 0-1274-7 MIDI CC# A-D 0-1198 -undifiend-9-51 <Int Parameters> *see table3.4.252 -undifined-
3.4 Setup Data FormatThe structure of the one Setup patch [432bytes](common DATA) + (Zone 1,2,3,4 Int DATA) + (Zone 1,2,3,4 Ext DATA)
3.4.1 Common DATANo. PARAMETER VALUE1 Setup Data ID 0 or 12 -reserved-3-16 Name 1st~14th ASCII17 Zone Select 0-3 (0-3:Zone1-4)18-21 Zone1-4 Edit Section 1,2 0(1:INT, 2:EXT)22-25 Zone1-4 Mode 0,1,2(0:BOTH, 1:INT, 2:EXT)26-29 Zone1-4 On/Off 0,1 (0:off, 1:on)30 Knob Mode 0-3 (0:Effect, 1:EQ, 2:tone, 3:CC#)31 EQ Lo 52~64~76 (-12~0~+12[dB])32 EQ Mid Lo 52~64~76 (-12~0~+12[dB])33 EQ Mid Hi 52~64~76 (-12~0~+12[dB])34 EQ Hi 52~64~76 (-12~0~+12[dB])35 -reserved-36 -reserved-37 Reverb Type 0~6 (see page26)38 Reverb Time 0-12739-42 Zone1 MIDICC# A-D 0-11943-46 Zone2 MIDI CC#A-D 0-11947-50 Zone3 MIDICC# A-D 0-11951-54 Zone4 MIDICC# A-D 0-11955 FootSW CC# 0-120 (120:Function SW)56 EXP CC# 0-121 (120:After Touch,121:Rotary Slow/Fast)57 -reserved-58 -reserved-59 Function SW Type 0-8 (see page21)60 Function SW 0,1 (0:off,1:on)61 Stretch Tuning 0-4 (0:Off,1:On,2:Piano,3:On Wide,4:Piano Wide)62 Temperament 0-7 (see page40)63 Key of Temperament 0-11(0:C,1:C# ~ 9:A,10:Bb,11:B)64-75 User C-B Tuning 14~64~114 (-50~0~+50[cent])76 Master Volume 0-12777 Left Pedal Mode 0,127(0:Sostenuto Pedal,127:Soft Pedal)78 Wheel CC# 0-11979-84 -undefined-

71
3.4.2 Zone 1-4 Internal DATANo. PARAMETER VALUE1 Tone Number MSB 0-22 Tone Number LSB 0-1273 Voicing 0-5 (0:Normal,1~2:Mellow1~2,3:Dynamic,4~5:Bright1~2)4 -reserved-5 Damper Resonance 0-10 (0:off, 1-10)6 String Resonance 0-10 (0:off, 1-10)7-40 <Both Parameters> *see table3.3.441 EFX Type 0-21 (see page25)42 EFX Rate 0-12743 Key-Off Effect 0-10 (0:off, 1-10)
3.4.3 Zone 1-4 External DATANo. PARAMETER VALUE1 tx_ch 0-15 (1~16ch)2 Program Number 0-127 (#001-#128)3 Bank Number LSB 0-1274 Bank NUmber MSB 0-1275 Prog# TX SW 0,1 (0:off,1:on)6 Bank# TX SW 0,1 (0:off,1:on)7 Volume TX SW 0,1 (0:off,1:on)8 MIDI CC# TX SW 0,1 (0:off,1:on)9 BendRange TX SW 0,1 (0:off,1:on)10-43 <Both Parameters> *see table3.3.444 Several SWs bit0:TX keyboard 0,1(0:off,1:on) bit1~6: undefined
3.4.4 Zone 1-4 Both ParametersNo. PARAMETER VALUE1 Section On/Off 0,1 (off,on)2-3 KeyRange Lo/Hi 0-127 (A0~C8)4 VeloSW Type 0~2(off,loud,soft)5 VeloSW Value 0~1276 Velo Comp 1~64~127 (-63~0~+63)7 Solo SW 0,1 (off,on)8 Solo Mosw 0,1,2 (Last,Hi,Lo)9 Zone Transpose 40~64~88 (-24~0~+24)10 Effect SW 0,1 (off,on)11 Reverb SW 0,1 (off,on)12 Damper SW 0,1 (off,on)13 FootSW SW 0,1 (off,on)14 EXP SW 0,1 (off,on)15 Modulation SW 0,1 (off,on)16 Bender SW 0,1 (off,on)17 Volume 0-12718 Panpot 1-64-127 (L63~0~R63)19 Reverb Depth 0-12720 Effect Depth 0-12721 Bend Range <INT>0-7 <EXT>0-1222 -reserverd-23 Fine Tune 1-64-127 (-50*63/63~0~+50*63/63[cent])24 Cutoff 14~64~114(-50~0~+50)25 Attack Time 14~64~114(-50~0~+50)26 Decay Time 14~64~114(-50~0~+50)27 Release Time 14~64~114(-50~0~+50)28 CC# A Value 0-12729 CC# B Value 0-12730 CC# C Value 0-12731 CC# D Value 0-12732 Velo Offset 0-12733-34 -undefined-

72
4. Control Change Number (CC#) TableControl Number Control Function
Decimal Hex0 0 Bank Select (MSB)1 1 Modulation Wheel or lever2 2 Breath Controller3 3 (undefined)4 4 Foot Controller5 5 Portament Time6 6 Data Entry (MSB)7 7 Channel Volume8 8 Balance9 9 (undefined)10 A Panpot11 B Expression Controller12 C Effect Controller113 D Effect Controller214 E (undefined)15 F (undefined)16-19 10-13 General Purpose Controller1~420-31 14-1F (undeifined)32 20 Bank Select (LSB)33-63 21-3F (LSB of Control Number 1-32)64 40 Hold1 (Damper Pedal or Sustain)65 41 Poratament On/Off66 42 Sostenuto67 43 Soft Pedal68 44 Legato Footswitch69 45 Hold2 (freez etc)70 46 Sound Controller1 (Sound Variation)71 47 Sound Controller2 (Filter Resonance/Harmonic Intensity)72 48 Sound Controller3 (Release Time)73 49 Sound Controller4 (Attack Time)74 4A Sound Controller5 (Brightness/Cutoff)75 4B Sound Controller6 (Decay TIme)76 4C Sound Controller7 (Vibrato Rate)77 4D Sound Controller8 (Vibrato Depth)78 4E Sound Controller9 (Vibrato Delay)79 4F Sound Controller1080-83 50-53 General Purpose Controller5~884 54 Portament Control85-90 55-5A (undefine)91 5B Effect1 Depth (Reverb Send Level)92 5C Effect2 Depth93 5D Effect3 Depth (Chorus Send Level)94 5E Effect4 Depth95 5F Effect5 Depth96 60 Data Increment97 61 Data Decrement98 62 Non Registered Parameter Number (LSB)99 63 Non Registered Parameter Number (MSB)100 64 Registered Parameter Number (LSB)101 65 Registered Parameter Number (MSB)102-119 66-77 (undefined/reserved)
120-127 78-7F Channel Mode Message

73
[STAGE PIANO] Date: April 2007Model: KAWAI MP8II Version: 1.0Function Transmit Receive Remarks
Multi Off(*5) Multi OnBasic Default 1-16 1-16 1-16Channel Changed 1-16 1-16 1-16
Default 3 3 3Mode Messages 3, 4 (M=1) X 3, 4 (M=1)
Altered *****Note 0-127 0-127 0-127Number: True Voice *****Velocity Note ON O 1-127 O 1-127 O 1-127
Note OFF X X XAfer Touch Key’s X X XTouch Ch’s O (*1) X XPitch Bend O O O
0, 32 O O O Bank Select1 O O (*2) O Modulation
6, 38 O O O Data Entry7 O O O Volume
10 O O O Panpot11 O O (*2, 3) O Expression (EXP)64 O O (*2) O Hold1 (Damper)
Control 66 O O (*2, 3) O Sostenuto (FootSW)Change 67 O O O Soft
70, 71 O O O Sustain, Resonance72, 73, 74, 75 O O O RLS, ATK, CTF, DCY
76, 77, 78 O O O Vibrato (Rate, Depth, Delay)91 O O O Reverb Depth92 O O (*4) X Rotary Speed93 O O O Chorus Depth94 O O X Effect Depth
98, 99 O O O NRPN LSB/MSB100, 101 O O O RPN LSB/MSB
0-119 O (*1) X XProg O O OChange: True # ***** 0-127 0-127System Exclusive O O O
: Song Position X X XCommon : Song Select X X X
: Tune X X XSystem : Clock O X XReal Time : Commands O X X
: All Sound Off X O O: Reset All Controller X O O
Aux : Local ON/OFFX X X XMessages : All Note OFF X O (123-127) O (123-127)
: Active Sense X O O: Reset X X X
Notes *1: assigned to Modulation Wheel, EXP, FootSW or Knob A-D *2: On/Off settings of each zones are set in Menu. *3: The effect is assigned to EXP/FootSW in Menu . (default effect is #11.Exp/#66.Soste) *4: Only when rotary effect is selected. *5: a. In the case of MultiOn and SysChMode=Panel, Able to receive on system channel b. Control changes work to a selected zone only. (except controllers of [*2]) c. Knob A-D parameters are received only when it is assigned to Knob.
“Mode1: OMNI ON, POLY” “Mode2: OMNI ON, MONO” O: Yes“Mode3: OMNI OFF, POLY” “Mode4: OMNI OFF, MONO” X: No
MIDI Implementation Chart

74

75

Copyright © 2007 KAWAI Musical Instruments Mfg. Co.,Ltd. All Rights Reserved.
MP8II Owner’s ManualOW1010E(R)-S0801 Version.3Printed in Japan
KMSZ-0023 816034