Owner's instructions - Sears Parts Direct
92
Owner's instructions Register your product at www.samsung.com/global/register Record your Model and Serial number here for future reference. • Model • Serial No.
-
Upload
khangminh22 -
Category
Documents
-
view
2 -
download
0
Transcript of Owner's instructions - Sears Parts Direct

Owner'sinstructions
Register your product at www.samsung.com/global/registerRecord your Model and Serial number here for future reference.
• Model • Serial No.

Important Warranty Regarding Viewinginformation Television Format
Wide screen forrnat LCD Displays (16:9, the aspect ratio of the screen width to height) are primarily designed to view wide screen format
full-motion video. The images displayed on them should primarily be in the wide screen 16:9 ratio format, or expanded to fill the screen
if your model offers this feature and the images are constantly moving. Displaying stationary graphics and images on screen, such asthe dark side-bars on nonexpanded standard format television video and programming, should be limited to no more than 5% of the total
television viewing per week.
Additionally, viewing other stationary images and text such as stock market reports, video game displays, station loges, web sites or
computer graphics and patterns, should be limited as described above for all televisions. Displaying stationary images that exceed theabove guidelines can cause uneven aging of LCD Displays that leave subtle, but permanent burned-in ghost images in the LCD picture. To
avoid this, vary the programming and images, and primarily display full screen moving images, not stationary patterns or dark bars.
On LCD models that offer picture sizing features, use these controls to view different formats as a full screen picture
Be careful in the selection and duration of television formats used for viewing. Uneven LCD aging as a result of format selection and use,as well as burned-in images, are not covered by your Samsung limited warranty.
U.S.A Only
The product unit accompanying this user manual is licensed under certain intellectual property rights of certain third parties. In particular,
this product is licensed under the following US patents: 5,991,715, 5,740,317, 4,972,484, 5,2t4,678, 5,323,396, 5,539,829, 5,606,618,
5,530,655, 5,777,992, 6,289,308, 5,610,985, 5,481,643, 5,544,247, 5,960,037, 6,023,490, 5,878,080, and under US Published Patent
Application No. 2001-44713-A1.
This license is limited to private non-commercial use by end-user consumers for licensed contents. No rights are granted for commercial
use. The license does not cover any product unit other than this product unit and the license does not extend to any unlicensed product
unit or process conforming to ISO/IEC 11172-3 or ISO/IEC 13818-3 used or sold in combination with this product unit. The license only
covers the use of this product unit to encode and/or decode audio files conforming to the ISO/{EC 11172-3 or ISO/IEC 13818-3. No rights
are granted under this license for product features or functions that do not conform to the ISO/{EC 11172-3 or ISO/IEC 13818-3.
Other countries
The product unit accompanying this user manual is licensed under certain intellectual property rights of certain third parties. This license is
limited to private non-commercial use by end-user consumers for licensed contents. No rights are granted for commercial use. The license
does not cover any product unit other than this product unit and the license does not extend to any unlicensed product unit or processconforming to ISO/IEC 1t172-3 or ISO/}EC 13818-3 used or sold in combination with this product unit. The license only covers the use of
this product unit to encode and/or decode audio files conforming to the ISO/IEC 11172-3 or ISO/IEC 13818-3. No rights are granted under
this license for product features or functions that do not conform to the ISO/IEC 11172-3 or ISO/tEC 13818-3.
8AMSUNG ELECTRONICS NORTH AMERICAN LIMITED WARRANTY STATEMENTSubject to the requirements, coeatnons, exclusions and limitations of tne onglnal Limited Warranty supplied with Samsung Electronics
SAMSUNG proaucts, ana me reaulremenrs, conai[ions, exclusions ana llmttauonscontamea nerem SAMSUNG will additionaIi_, Drovlae
Warramy Repair Service in tne united States on SAMSUNG proeucts purcnased in Canada ancn Canada on SAMSUNG proaucts Durcnasea
n rne United States for the warranty penoa originally specified and to the Original Purchaser onl_
The abe te aescnDea warranty repairs must be performed by a SAMSUNG Authorized Set ce Center. &.long with this Statement the Original
Dmited Warranty Statement and a dated Bill of Sale as Proof of Purchase must be presemea to the Service Center. Transportation to and from
tne Service Center is the reseonsibitity of the purchaser.
Conditions covered are iimltea or y to rnanufactunng defects in matenal or worKmansnlD, ana only those encounrerea m normal use )f the
Droauct.
Exc Jaea. but not limited to are any originally specified provisions for. in-home or on-site services, mlmmum or maximum reealr umes.
excnaeges or realacements, accessones, canoes upgraaes, or consumables.
For the location of a SAMSUNG Authorized Service Center, please call toll-free:
In the United States : 1-80O-SAMSUNG {1-800-726-7864} In Canada : 1-800-SAMSUNG
Precautions when Displaying a still tmageA still image may cause permanentdamage to the TV screen
* Do not display a stiIl imageon the LCD panel for more than 2 hoursas it can cause screen image retention.This image retention is alsoknownas "screen bum". Toavoid such imageretention, reduce the degree of brightnessand contrast of the screen when displaying a still
image,, Watching the LCD TV in 4:3 format for a Ibbg period of time may leave traces of borders displayed on the eft, right and
center of the Screencaused by the differenceof tighternission on the screen.Playing a DVD or a game consolemay cause a similar effect to the screen.
above effectare not ceyered bythe Warranty.. Displayingstill imagesfrom Video games and PCfor longerthan a certain period of time may produce partia!after-imagesl
Toprevent this effect, reduce the _brightness'and cont[ast' when displayingsti!l images.
© 2007 Samsung Electronics Co, Ltd. All rights reserved.

Contents
= Listof Features............................................................................2 u SelectingtheAntenna............. 38= Accessories..................................................................................2 [] ClearingScrambledChannels- DiglTa 38= wewlr j meControtPaneI...................... 3 = Addingand ErasingChannels................ 39m ViewingmeConnectionPanel ........................................... 4 = ToSet-UpYourFavoriteChannels.............................................40= RemoteControl............................................................................5 [] Using[ne ChannelLists..........................................................41= InstaitingBatteriesinthe RemoteControl....................................6 [] v(ewlngtheChanneILists ...................................................
[] Labeiir ] Charmed......................................................................42
. . " .. . .........................................................: ................................................4423= ConnectingCableTV ........... - [] Checkingthe DigitaI-Sjnal Strength..........................................43
= Connectinga DVD Playeror CableBox/SatellitereceiverSet-TopBox)via HDM ............................................................8
= Connectinga DVD Playeror CableBox/Satellitereceiver [] using YourTV asa Computer(PC) Display..............................44Set-TopBox]via DVI.......................................................... 8 = Disp)a_Modes ......................................................................44
= Connecunga DVD Playeror CableBox/Satelliterecel _r [] Settingup theTV witt ,our PC...............................................45Set-TopBox)via Componentcables..........................................9 = Settir_ the HomeTheaterPC ...................................................46
Connectincoa Camcoraer............................................................9= Connectinga VCR........................................... 10= Connectinga DigitalAudioSystem.........................................11 [] Settingthe C(ock........................................................................47= ConnecunganAmplifier/DVDHomeTheater...........................I1
= Connectinca PC.......................................................................11g en g g .......................................................
= TurningtheTV On and )ff .................................................. 12 [] Settingthe BlueScreenMode............................................... 51
= Plug& PlayFeature............. 12= ChangingChannels.............................. 13= Aajusungtnevolume........................................... 14= V(ewlngtheDisoiay... 14= viewingthe Menus......................................................... 15= Memorizingthe Channels........................................... 15
Sernnguu YourRemoteControt.. 17[] RemoteControlCodes........................................ 19[] ToSelecttheSource...............................................................22
= ToEditthe InputSourceName 22
= usingAutomaticPictureSettings............. 23= AajusungtheColorTone..................................... 24= Resernng[nePictureSettingsto the Factob Defaults...............24
Adjustingthe DetailedSettings.............. 25= Changingthe ScreenSize........ 28= Setting[heActiveColor........ 29= DNle(DigitalNaturalimageengine; ...........29m Setting[heAutoMotionPlus120hz.........................................29= Setting[heHDMIBlackLevel.............. 30= Setting[heFilmMode................................................................30= viewingPicture-in-Picwre........................................ 31= Freezir] the Picture..............................................................32
[] -",ustomizingthe Sound .................................................. 33u UsingAutomaticSoundSettings.................................... 33
[] using me GameMode........................................................ 5"= v(ewlngClosedCannons
On-ScreenTextMessages)-Analog............................... 52[] ViewingClosedCannons
On-ScreenTextMessages)- Digi[am.......................................53[] MenuTransparencyLeve ........................................................54[] Usingthe EnergySavingFeature..............................................54[] Settingthe FunctionHell_............ 55[] Digl[amNoiseReduction............................................................55[] using the V-ChiP................................................................. 56[] Settingthe LightEffect.............. 63= Upgradingthe Software..............................................................63
[] using the WISELINKFunction......... 64= using the WISELINKMenu......... 65[] Usingthe PHOTO(JPEG)List...................................... 66[] using the MP3List.......... 73= Usingthe SetupMenu................................................................75
[] WhatBAnynet_? _1-[] ConnectingAnynet Devices.............. 77
[] SettingUpAnynet_ .............................................................. 78[] ScanningandSwitchingbetweenAnynet1-Devices............... 78[] Recording...................................................................................79[] L(s[enlng[nrougha Receiver Home_nea[erl........................ 80[] TroubleshootingforAnyneff 80
= SettingtheTruSurroundXT.......................... 34= _,hoosng _ Mut-Channe Sound MTS track- Dg a ............34= Choosinga Multi-ChannelSound(MTS)track-Analog ......35 [] Troubleshooting......................... 81
AutomatlcVolumeControl...... 35 [] Instal ngtheStana. 83Selecting_neinternalMute...................... 36 [] Disconnectingthe Stand............................................................83AdjusungtheTV On/OffMelod_Sound ......................36 [] AutoWall-MountAdjustment(Soldseparately) 84Listeningto the Soundof the Sub PIP_Picture.........................37 [] #all MountKitSpecifications(VESA ........................................85ReseE(ngtheSoundSettingsto the FactoryDefaults............ 37 = UsingtheAnti-TheftKensingtonLock(dependingonthemodel)..86
= Connecnng_eaopnones................................ 37 = Specifications 87[] Dimensions..................... 88
Symbol Press Important Note One-TouchButton

General information
List of Features
. Adjustable picture settings that can be stored in the TV's memory.
. Automatic timer to turn the TV on and off.
A specia! sleep timer.Excellent Digital Interface & Networking :With a buitt-in HD digital tuner, non-subscription HD broadcasts can be viewed with no Cable Box/Satellite receiver(Set-Top Box) needed.
. HDMI/DVl connection of your PC to this TV.Remote ControlThe supplied remote can be used to operate the TV as welt as most DVD players, Cable Box/Satellite receiver(Set-Top Box) and VCRs.Excellent Picture Quality- DNle technology provides life-like clear images.SRS TruSurround XT
- SRS TruSurround XT provides a virtual Dolby surround system.
Accessories
Pleasemakesure the followingitemsare includedwith your LCDTV.If any itemsare missing,contact your dealer.
Remote Control & BatteriesPower Cord CleaningCloth FerriteCore
(AAAx 2)(BN59-00599A) (3903-000144) (BN63-01798A) LN-T4669F : 3301-001305
Cover-Bottom
LN-T4069F: BN63-03911A
LN-T4669F: BN63-03914A
Owner's InstructionsWarranty Card / RegistrationCard / Safety Guide Manual
(Not available in all locations)
>The items color and shape may vary depending on the model.
>_ Ferrite Core (Side Panel Jacks} .................................................
The ferrite cores are used to shield the cables from interference. [SidePanelJacks]When connecting a cable, open the ferrite core and clip it around the
cable near the plug.

Viewing the Control PanelButtons on the Lower-Riqhtht Part of the Panel
The buttons on the lower-right panel control your TV's basic features, including the on-screen menu.To use the more advanced features, you must use the remote control.
I "
Front Panel buttons
Touch the each button to operate.
::_ The product color and shape may vary depending on the model
O _ (POWER)Press to turn the TV on and off.
POWER INDICATOR 0Blinks and turns off when the power is on andlights up in stand-by mode.
_vCH^Press to change channels.In the on-screen menu, use the v CH ^ buttons asyou would use the • and A buttons on the remotecontrol.
O - VOL +Press to increase or decrease the volume.
In the on-screen menu, use the - VOL + buttons as youwould use the _ and i_ buttons on the remote control.
O
O
MENUPress to see an on-screen menu of your TV's features.
SOURCEToggles between all the available input sources(TV, AV1, AV2, S-Video1, S-Video2, Component1,Component2, PC, HDMI1, HDMt2, HDMI3).In the on-screen menu, use this button as you woulduse the ENTER button on the remote control.
SPEAKERS
REMOTE CONTROL SENSORAim the remote control towards this spot on the TV.

Viewing the Connection Panel
Rear Panel Jacks
Use the rear panel jacks to connect A/V components that will be connected continuously, such as VCR or DVD players.For more information on connecting equipment, see pages 6-11.
[Side Panel Jacks]
÷÷ of
O AUDIO OUT OConnects to the audio input jacks on your Amplifier/
Home theater. Q
O DIGITAL AUDIO OUT (OPTICAL)Connects to a Digital Audio component.
PC INConnects to the video and audio output jacks onyour PC. Q
0 HDMI IN 1,2,3 / DVI IN(HDMI1) (AUDIO R/L)Connects to the HDMI jack of a device with an HDMI output.Use the HDMt IN 1 jack for DVI connection to anexternal device.Use a DVl to HDMt cable or DVt-HDMt adapter(DVl to HDMt) for video connection and the DVl IN(HDMtl) 'R-AUDIO-L' jacks for audio.- No sound connection isneeded for an HDMt to HDMI
connection. @- When using an HDMI/DVI cable connection, you must use
the HDMt IN 1 jack.
O ANT 1 IN/ANT 2 IN _)Connects to an antenna or cable TV system.
EX-LINKConnect this to the jack on the optional wall mountbracket. This will allow you to adjust the TV viewingangle using your remote control.
COMPONENT IN 1,2Connects Component video/audio.
AVlN I/AVIN2
Video and audio inputs for external devices, such as acamcorder or VCR.S-VIDEO
Connects an S-Video signal from a camcorder or VCR.
POWER INPUTConnects the supplied power cord
KENSINGTON LOCK (depending on the model)The Kensington lock (optional) is a device used tophysically fix the system when used in a public place.If you want to use a locking device, contact the dealerwhere you purchased the TV.>_The location of the Kensington Lock may be different
depending on your TV.
_-) HEADPHONE
Connects a set of external headphones for privatelistening.
WISELINKConnect a USB mass storage device to view photo files(JPEG) and play audio files (MP3).

Remote Control
You can use the remote control up to a distance of about 23 feet from the TV. When using the remote, always point it directly at theTV. You can atso use your remote control to operate your VCR, Cable box, DVD player or Cable Box/Satellite receiver(Set-Top Box)
O POWER _) SOURCETurns the TV on and off. Press to display all of the available
video sources.NUMERIC BUTTONSPress to change the channel. _) PRB-CH
_ Tunes to the previous channel.
Pressto select additional channels(digital _ WtSELINK
and analog) being broadcast by the samestation. For example_ to select channel"54-3", press "54", then press "-'_and "3".
CH LIST
Used to display Channel Lists on thescreen.
I_ ANTENNAPress to select 'AIR" or 'CABLE".
VCR/BVD Functions- Rewind
- Stop- Play/Pause- Fast/Forward
VOLe)/VOL_Press to increase or decrease thevolume.
_(MUTE)Press to temporarily cut off the soLmd.
MENU
Displays the main on-screen menu.
S.MODBPress to select the sound mode.
RETURNReturns to the previous menu.
I_ P.MODE
Press to select the picture mode.
_) CAPTION
Controls the caption decoder.
This function enables you to view andplay photo (JPEG) and audio files(MP3) from an external device.(Refer to pages 66 (JPEG) and 73(MP3))
_) RECThis remote call be used to control
recording on Samsung DVD recorderswith the Anynet feature.(Refer to page 79)
CH® /CH®Press to change channels.
i_) EXITPress to exit the menu.
_) UPA ! DOWN_ ! LBFT_ /RIGHT_ t ENTER_Use to select on-screen menu items
and change menu values.
INFO
Press to display information on the TVscreen.
_) Anynet*Runs the Anynet +functions and setsup Anynet devices.
_) STILL
Press to stop the action during aparticular scene.Press again to resume normal video.
_) RSIZEPicture size selection.
_) FAV.C H
Press to switch to your favorite channels. _ PiPPicture-in Picture ON/OFR
SLEEP
Press to select a preset time intervalfor automatic Shut off.
SRSSelects SRS TruSurround XT mode.
_1 SETSets the remote to control yourTV, VCR, Cable, DVD or Set-Top Box
TV, BVD, STB, CABLE, VCR
Press to operate your TV,DVD, STB,CABLE (box) or VCR(See pages 17-21 )
_) When pressing this button, a number
of buttons on the remote control (e.g.TV, DVD, STB, CABLE, VCR,
VOL and CH buttons) light up for a fewseconds and then turn off to save
power. This function is convenient forusing the remote at night or when dark.
_)CH^/v
Displays the available channels insequence. (These buttons changechannels in the PIP window only.)
t_) MTSPress to choose stereo, mono orSeparate Audio Program
(SAP broadcast).
_} RESETWhen your remote does not work,change the batteries and press theRESET button for 2-3 seconds beforeuse.
>-This is a special remote control for the visually impaired and has Braillepoints on the POWER, CH, VOL, STOP and PLAY/PAUSE buttons.
>_The performance of the remote control may be affected by bright light.
q}®@®@@
....
nEW 8TOP PLAYIPAUSE FF
®®®®
MEnU _T
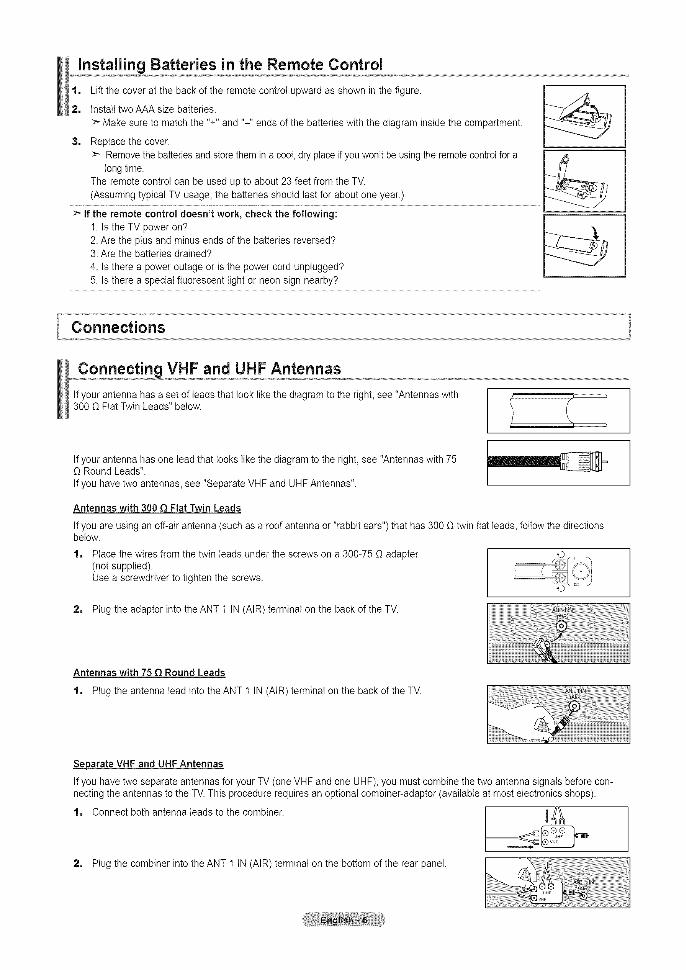
Installing Batteries in the Remote Control
1, Lift the cover at the back of the remote control upward as shown in the figure. ...4,2, install two AAA size batteries. "---7"/_=_
>-Make sure to match the %" and "-" ends of the batteries with the diagram inside the compartment,
3, Replacethe cover,
>_ Remove the batteries and store them in a coot,dry place if you won't be using the remote control for a /z_longtime.
The remote control can be used up to about 23 feet from the TV.
...............!Asst)mti_g !YP!ta! TV usage: !t?t ba!te_it! s_!d !a!!!€_r ab°u! yea!;! ......................................................................................................................
If the remote control doesn't work, check the following:1. Is the TV power on?2. Are the plus and minus ends of the batteries reversed?3. Are the batteries drained?
4. Is there a power outage or is the power cord unplugged?5. Is there a special fluorescent light or neon sign nearby?
Connections
Connecting VHF and UHF Antennas
If your antenna has a set of leads that look like the diagram to the righL see "Antennas with300 O Flat Twin Leads" below.
1
If your antenna has one lead that looks like the diagram to the right, see "Antennas with 75O Round Leads".If you have two antennas, see "Separate VHF and UHF Antennas".
Antennas with 300 O Fiat Twin Leads
If you are using an off-air antenna (such as a roof antenna or "rabbit ears") that has 300 O twin flat leads, follow the directionsbelow.
1, Place the wires from the twin leads under the screws on a 300-75 O adapter(not supplied).Use a screwdriver to tighten the screws.
2, Plug the adaptor into theANT 1 IN (AIR) terminal on the back of the TV.
Antennas with 75 O Round Leads
1, Plug the antenna lead into the ANT 1 IN (AtR) terminal on the back of the TV.
Separate VHF and UHF Antennas
If you have two separate antennas for your TV (one VHF and one UHF), you must combine the two antenna signals before con-necting the antennas to the TV. This procedure requires an optional combiner-adaptor (available at most electronics shops).
1, Connect both antenna leads to the combiner.
2. PiugthecombinerintotheANT11N(AIR)terminalonthebottomoftherearpanek

Connecting Cable TVTo connect to a cable TV system, follow the instructions below.
Cable without a Cable Box
t. Plug the incomingcable into the ANT 2 IN (CABLE) terminal on the back of the TV.BecausethisTV iscable-ready,youdonotneeda cableboxtoviewunscrambledcablechannels.
Connectinqto a Cable Box that Descrambles All Channels
t. Find the cable that is connected to the ANT OUT terminal on your cable box.
Thisterminalmightbe labeled"ANTOUT","VHFOUT"orsimply,"OUT".
2. Connect the other end of this cableto the ANT 2 IN (CABLE) terminal on the back of the TV.
Connectin_to a Cable Box that Descrambles Some Channels
If your cable box descrambles only some channels (such as premium channels), fotow the instructions below. You will need a two-way splitter, an RF (A/B) switch and four lengths of RF cable. (These items are available at most electronics stores.)
Find and disconnect the cable that is
connected to the ANT IN terminal on yourcable box.
This terminalmightbe labeled"ANTIN","VHFIN"or simply,"IN"
2, Connect this cable to a two-way splitter.
3=
4=
Connect an RF cable between the OUTPUTterminal on the splitter and the IN terminalon the cable box.
Connect an RF cable between theANT OUT terminal on the cable box andthe B-IN terminal on the RF(A/B) switch.
.............L.incoming
cableSplitter
Incomingcable
incoming
cable
RF (A/B)
Cable Box Switch
5= Connect another cable between the otherOUT terminal on the splitter and the A-INterminal on the RF (A/B) switch.
Sphttecable -_r h RF_/ )(A/B
Cable Box Switch
6= Connect the tast RF cable between the
OUT terminal on the RF (A/B) switch andthe ANT 2 IN (CABLE) terminal on the rearof the TV.
ANT 2 iN
cable . i
Sp,tte, L J RF(A_BICable Box Switch
After you have made this connection, set the A/B switch to the "A" position for normal viewing. Set the A/B switch to the "B" position toview scrambled channels. (When you set the A/B switchto "B", you will need to tune your TV to the cable box'soutput channel, which isusually channel 3 or 4.)

Connecting a DVD Player or Cable Bo×/Satellite receiver (Set-Top Box) via HDMI
(1,2 or 3) jack on theTV and the HDMI jackon the DVD Player orCable Box/Satellite receiver(Set-Top Box)
This connection can only be made if there is an HDMI Output connector on the external device.
t, Connect an HDMt Cablebetween the HDMI tN OVDPlayeror Cable Box/Satellite receiver
(Set-Top Box) Rear Panel TV Rear Panel
HDMI Cable (Not supplied)
Side Panel Jacks
i or--
>What is HDMI?
, HDMl(High-Definition Multimedia Interface), is an interface thatenables the transmission of digital audio and video signals using a single cable.
• The difference between HDMt and DVl is that the HDMt device is smaller in
size and has the HDCP (High Bandwidth Digital Copy Protection) coding featureinstalled
>Each DVD Player or Cable Box/Satellite receiver (Set-Top Box) has a different backpanel configuration.
>The TV may not output sound and pictures may be displayed with abnormal colorwhen DVD players/Cable Boxes/Satellite receivers supporting HDMt versions olderthan 1.3 are connected. When connecting an older HDMt cable and there is nosound, connect the HDMI cable to the HDMI IN 1 jack and the audio cables to theDVt IN (HDMI1) [R-AUDIO-L] jacks on the back of the TV. If this happens, contactthe company that provided the DVD player/Cable Box/Satellite receiver to confirm theHDMI version, then request an upgrade.
> HDMI cables that are not 1.3 may cause annoying flicker or no screen display.
Connecting a DVD Player or Cable Bo×/Satellite receiver (Set-Top Box) via DVl
This connection can only be made if there is a DVI Output connector on the externat device.
t, Connect a DVI to HDMICable or DVI-HDMI Adapterbetween the BDMI IN 1jack on the TV and the DVIjack on th DVD Player orCable Box/Satellite receiver(Set-Top Box)
2. Connect Audio Cables
between the DVI IN (HDMI 1)[R-AUDIO-L] jack on theTV and the DVD Player orCable Box/Satellite receiver
(Set-Top Box)
TV Rear Panel
> Each DVD Player or Cable Box/Satellite receiver (Set-Top Box) has a different backpanel configuration.
> When connecting a DVD Player or Cable Box/Satellite receiver (Set-Top Box), matchthe color of the connection terminal to the cable.
>When using an HDMI/DVl cable connection, you must use the HDMI IN1 jack.

Connectinga DVDPlayerorCableBox/Satellitereceiver(Set-TopBox)viaComponentcables
The rear panel jacks on your TV make it easy to connect a DVD Player or Cable Box/Satellite receiver (Set-Top Box) to your TV.
t, Connect a ComponentCable between theCOMPONENT IN (t or 2)[Y, PB,PR]jacks on the TVand the COMPONENT[Y, PB,PR] jacks on theDVD Player or Cable Box/Satellite receiver (Set-TopBox).
2, Connect Audio Cablesbetween the COMPONENTIN(1 or 2) [R-AUDIO-L]jacks on the TV and theAUDIO OUT jacks on theDVD Player or Cable Box/Satellite receiver (Set-TopBox).
TV Rear Panel
_--Component video separates the video into Y (Luminance (brightness), Pb (Blue) andPr (Red) for enhanced video quality.Be sure to match the component video and audio connections.For example, if connecting the video cable to COMPONENT IN, connect the audio cableto COMPONENT IN also.
> Each DVD Player or Cable Box/Satellite receiver (Set-Top Box) has a different back panelconfiguration.
> Whenconnecting a DVD Player or Cable Box/Satellitereceiver (Set-TopBox), match the colorof the connection terminal to the cable.
Connecting a Camcorder
The side panel jacks on your TV make it easy to connect a camcorder to your TV.They allow you to view the camcorder tapes without using a VCR
t, Connect a Video Cable(or S-Video Cable) betweenthe AV IN2 [VIDEO](or S-VIDEO)jack on theTV and the VIDEO OUTjack on the camcorder.
2, ConnectAudio Cablesbetween the AV IN2[R-AUDIO-L] jacks on theTV and the AUDIO OUTjacks on the camcorder.
eamoorder;1" S-Video Cable (Not supplied)
TV Side Panel
>--Each Camcorder has a different back panel configuration.:_ When connecting a Camcorder, match the color of the connection terminal to the cable.

Connecting a VCR
Video Connection
These instructions assume that you have already connected your TV to an antenna or a cable TV system (according to theinstructions on pages 6-7). Skip step 1 if you have not yet connected to an antenna or a cable system.
t, Unplug the cable or antennafrom the back of the TV.
2, Connect thecable or antennato theANT IN terminalon theback d the VCR
Connect an RF Cable betweenthe ANT OUT terminal on theVCR and the ANT 1 IN (AIR) orANT 2 IN (CABLE) terminal onthe TV.
Connect a Video Cable
between the VIDEO OUT jackon the VCR and the AV IN 1
(orAV IN 2) [VIDEO] jack onthe TV.
Connect Audio Cablesbetween the AUDIO OUTjacks on the VCR and theAVlN 1 (orAV IN 2)[R-AUDIO-L] jacks on the TV.
:_ If you have a "mend'(non-stereo) VCR, use aY-connector (not supplied)to hook up to the rightand left audio input jacksof the TV. If your VCRis stereo, you mustconnect two cables.
TV Rear Panel
VCR Rear Panel
%
Follow the instructions in "Viewing a VCR or Camcorder Tape" to view your VCR tape.>* Each VCR has a different back panel configuration.>-When connecting a VCR, match the color of the connection terminal to the cable.
S-Video Connection
Your Samsung TV can be connected to an S-Video jack of a VCR.(This connection delivers a better picture when compared to the regular Video connection above.)
t, To begin, follow steps 1-3in the previous section toconnect the antenna or
cable to your VCR andyour TV.
2, Connect an S-Video Cablebetween the S-VIDEO OUTjack on the VCR and theAV IN1 [S-VIDEO] jack onthe TV.
3, ConnectAudio Cablesbetween the AUDIO OUTjacks on the VCR and theAV IN1 [R-AUDIO-L] jackson the TV.
VCR Rear Panel
TV Rear Panel
An S-Video cable maybe includedwith a VCR. (If not, checkyour local electronicsstore.)
> Each VCR has a different back panel configuration.> When connecting a VCR, match the color of the connection terminal to the cable.
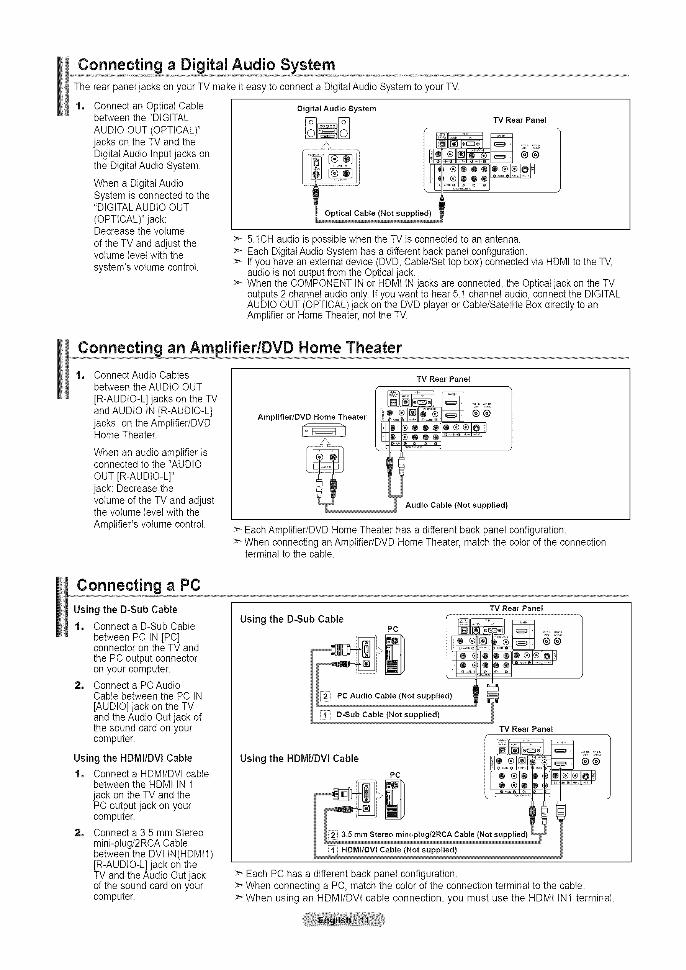
Connecting a Digital Audio SystemThe rear panel jacks on your TV make it easy to connect a Digital Audio System to your TV.
t, Connect an Optical Cablebetween the "DIGITAL
AUDIO OUT (OPTICAL)"jacks on the TV and theDigital Audio Input jacks onthe Digital Audio System.
When a Digital AudioSystem is connected to the"DIGITAL AUDIO OUT
(OPTICAL)' jack:Decrease the volume
of the TV and adjust thevolume levet with the
system's volume control.
Digital Audio System
r 1L Optical Cable (Not supplied)
> 5.1CH audio is possible when the TV is connected to an antenna.> Each Digital Audio System has a different back panel configuration.> If you have an external device (DVD, Cable/Set top box) connected via HDMI to the TV,
audio is not output from the Optical jack.> When the COMPONENT IN or HDM) IN jacks are connected, the Optical jack on the TV
outputs 2 channel audio only. If you want to hear 5.1 channel audio, connect the DIGITALAUDIO OUT (OPTICAL) jack on the DVD player or Cable/Satellite Box directly to anAmplifier or Home Theater, not the TM
Connecting an AmplifiedDVD Home Theater
t, Connect Audio Cablesbetween the AUDIO OUT
[R-AUDIO-L] jacks on the TVand AUDIO IN [R-AUDIO-L]jacks on the Amplifier/DVDHome Theater.
When an audio amplifier isconnected to the "AUDIO
OUT JR-AUDIO-L]"jack: Decrease thevolume of the TV and adjustthe volume level with the
Amplifier's volume control.
Amplifier/DVD Home Theater
TV Rear Panel
Audio Cable (Not supplied)
> Each Amplifier/DVD Home Theater has a different back panel configuration.:_ When connecting an Amplifier/DVD Home Theater, match the color of the connection
terminal to the cable.
Connecting a PC
Using the D-Sub Cable
1, Connect a D-Sub Cablebetween PC IN [PC]connector on the TV andthe PC output connectoron your computer.
2, Connect a PCAudioCable between the PC IN[AUDIO] jack on the TVand the Audio Out jack ofthe sound card on yourcomputer.
Using the HDMI/DVI Cable1, Connect a HDMI/DVI cable
between the HDMI IN 1jack on the TV and thePC output jack on yourcomputer.
2, Connect a 3.5 mm Stereomini-plug/2RCA Cablebetween the DVI IN(HDMI1)[R-AUDIO-L] jack on theTV and the Audio Out jackof the sound card on yourcomputer.
TV Rear Panel
Using the D-Sub Cable ..........................................................pc t [_]_ _ ,_,
Cable (Not supplied} _
i';l': D-Sub Sable {Not supplied) J
TV Rear Panel
Using the HDMI/DVl Cable
JwNIJ !
_able (Not supplied)
> Each PC has a different back panel configuration.> When connecting a PC, match the color of the connection terminal to the cable.>When using an HDMI/DVt cable connection, you must use the HDMI IN1 terminal.

Operation
Turning the TV On and Off
Press the POWER(b button on the remote control.
You can also use the POWERO button on the TV.I_1 POWER
SOURCE NPlug & Play Feature
When the TV is initially powered on, basic settings proceed automatically and subsequently:
Press the POWER button on the remote controI.The message "Menu language, Shop Mode, Channels and Time will be set." isdisplayed.
Press the ENTER button, then "Select the language of the OSD' menuis automatically displayed.
2, Press the A. or V button to select language, then press the ENTER button.The message "Select Home Mode when installing this TV at home." is displayed.
3, Press the _1or _ button to select "Shop" or "Home", thenpress the ENTER button.The message "Select the antennas to memorize.' is displayed.
:_ We recommend setting the TV to Home mode for the best picture in yourhome environment.Shop mode is only intended for use in retail environments.
>_ If the unit is accidentally set to Shop mode and you want to return to Dynamic(Home) mode, press any Volume button and then hold down the MENU buttonfor five seconds on the side panel of the TV.
4, Press the A or V' button to memorize the channels of the selected connection.Press the ENTER button to select "Start".
>_ If the antenna is connected to ANT 1(AIR), select 'Air" and if it is connected toANT 2 (CABLE), select "Cable'.
If both ANT 1 (AIR) and ANT 2 (CABLE) are connected_select the "Air + Cable".
In Cable mode, you can select the correct signal source among STD, HRC_and IRC by pressing the A or 'V button, then press the ENTER button.Contact your local cable company to identify the type of cable system thatexists in your particular area.
S, The TV wilt begin memorizing all of the available channels.After alt the available channels are stored, the Auto program menu reappears.Press the ENTER button when channel memorization is complete.The message "Select the clock mode." is displayed.
To stop the search before it has finished_ press the ENTER button with stopselected.
Press the ENTER button.Press the A. or 'V button to select "Auto", then Press the ENTER button.The message "Set to daylight savings time." is displayed.
If you select ' Manual"_"Set current date and time." is displayed. (See page 47)

7. PresstheA.or_'buttontoselect"On"or"Off",thenpresstheENTERbutton.Themessage"Selectthetimezoneinwhichyoulive."isdisplayed.
PresstheAorTbuttontohighlightthetimezoneforyourlocalareaPresstheENTERbutton.Ifyouhavereceivedadigitalsignal,thetimewillbesetautomatically.Ifnot,seepage48tosettheclock.
9. Themessage"Enjoyyourwatching."isdisplayed.Whenyouhavefinished_presstheENTERbutton.
ff you want to reset this feature...
1. Press the MENU button to display the menu.Press the A or _' button to select "Setup", then press the ENTER button.
2. Press the ENTER button again_to select "Plug & Play".
3. The message "Menu language, Shop Mode, Channels and Time wilt be set."is displayed.
Changing Channels
Usinqthe Channel Buttons
Press the CH@ or CH® button to change channels.
:_When you press the CH_ or CH® button, the TV changes channels insequence.You wilt see all the channels that the TV has memorized. (The TV must havememorized at least three channels). You will not see channels that were eithererased or not memorized. See page 16 to memorize channels.
Usinqthe Number Buttons
1. Press the number buttons to go directly to a channel. For example, to selectchannel 27, press 2, then 7. The TV will change channels when you press thesecond number.
Usinqthe "-" Button
The "-" button is used to select stations that broadcast a digital signal.
1. For example, for Channel 7-1, press 7, then -, then 1.
>_ HD indicates the TV is receiving a Digital High Definition signal. SD indicatesthe TV is receiving a Standard Definition signal.
:_ For quick channel change, press the number buttons, then press the ENTERbutton.
oo
I IIIII- IN
II®®® II
catlsT_lsEtI.K REC

UsinqthePRE-CHButton to select the Previous Channel
Press the PRE-CH button.The TV will switch to the last channel viewed.
>-To quickly switch between two channels that are far apart, tune to onechannel, then use the number button to select the second channel. Thenuse the PRE-CH button to quickly alternate between them.
Adjusting the VolumeUsinq the Volume Buttons
1. Press the VOL ® or VOL® button to decrease or increase the volume.
Usinq the MUTE button
At any time, you can cut off the sound using the MUTE button.
t, Press MUTE button and the sound cuts off.
The word "_" will appear in the lower-left corner of the screen.
2, To turn mute off, press the MUTE button again or simply press theVOL® orVOL® button.
Viewing the Display
The display identifiesthe current channel and the status of certain audio-video settings.
1. Press the INFO button on the remote control.
The TV will display the channel, the type of sound,and the status of certain picture and sound settings.
Press the iNFO button once more or wait approximately 10 seconds and thedisplay disappears automatically.
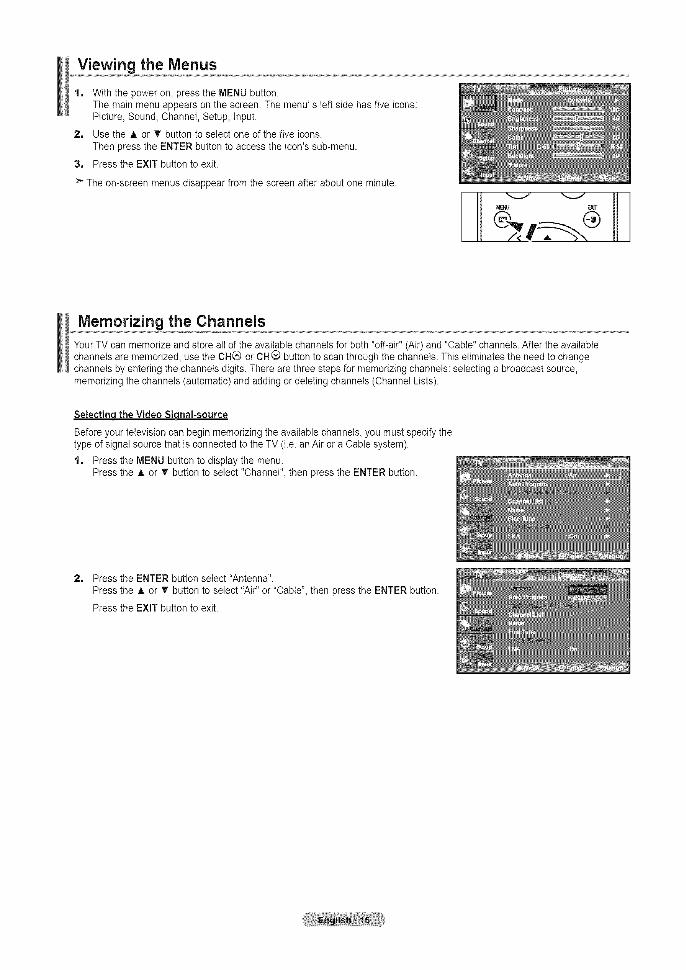
Viewing the Menus
t, With the power on, press the MENU button.The main menu appears on the screen. The menu' s left side has five icons:Picture, Sound, Channel, Setup, input.
2, Use the _t,or V' button to select one of the five icons.
Then press the ENTER button to access the icon's sub-menu.
3, Press the EXIT button to exit.
> The on-screen menus disappear from the screen after about one minute.
MENU E_3T
Memorizing the ChannelsYour TV can memorize and store all of the available channels for both "off-air" (Air) and "Cable" channels. After the availablechannels are memorized, use the CH(_ or CH_ button to scan through the channels. This eliminates the need to changechannels by entering the channels digits. There are three steps for memorizing channels: selecting a broadcast source,memorizing the channels (automatic) and adding or deleting channels (Channel Lists).
SetectincJ the Video Siqnal-source
Before your television can begin memorizing the available channels_ you must specify thetype of signal source that is connected to the TV (i.e. an Air or a Cable system).
t, Press the MENU button to display the menu.Press the A or T button to select "Channel"_ then press the ENTER button.
2, Press the ENTER button select "Antenna".
Press the A or T button to select "Air" or "Cabte"_then press the ENTER button.
Press the EXIT button to exit.

Storing Channels in Memor_L_Automatic MethodJ
1. Press the MENU button to display the menu.Press the A or • button to seJect"Channel', then press the ENTER button.
2. Press the A or T button to select "Auto Program", then press the ENTER button.
Press the A or T button to select the antenna connection, then press theENTER button.
>_Air: "Air" antenna signal.Cable: "Cable' antenna signal.Air+Cable: "Air" and "Cable" antenna signals.
4. When selecting the Cable TV system : Press the ENTER button to start the autoprogram. By default, the cable TV system is set to "STD'. if you want to selectanother type of cable system, press the _, or T button to select"STD', "HRC' or "IRC'.
>- STD, HRC and IRC identify various types of cable TV systems. Contact yourlocal cable company to identify the type of cable system that exists in yourparticular area. At this point the signal source has been selected.
Press the ENTER button to start the auto program.>'-To stop the search before it has finished, press the ENTER button with "Stop"
selected.
5. After all the available channels are stored, the "Auto Program" menu reappears.Press the EXIT button to exit.

Setting Up Your Remote Control
After the television has been set up properly, your remote control can operate in fivedifferent modes: TV, DVD, Cable, Set-Top Box, VCR. Pressing the correspondingbutton on the remote control allows you to switch between these modes and controlwhichever piece of equipment you choose.
The remote control might not be compatible with all DVD Players, VCRs, Cable boxesand Set-Top Boxes.
Setting Up the Remote to Operate Your VCR
1. Turn off your VCR.
2. Press the VCR button on your TV's remote control.
3. Press the SET button on your TV's remote control.
4. Using the number buttons on your remote control, enter three digits of the VCR codelisted on page 19 of this manual for your brand of VCR Make sure you enter threedigits of the code, even if the first digit is a "0".(If more than one code is listed, try the first one.)
5. Press the POWERo button on the remote control.Your VCR should turn on if your remote is set up correctly.
If your VCR does not turn on after set up, repeat steps 2, 3 and 4, but try one of theother codes listed for your brand of VCR.If no other codes are listed, try each VCR code, 000 through 080.
> Note on Using Remote Control Modes: VCRWhen your remote control is in "VCR" mode, the volume buttons still control yourTV's volume.
r- .....
©0
....
g O 5pMOUE SMO_
_] C_ION
s. is
p,
Setting Up the Remote to Operate Your Cable Box
1. Turn off your cable box.
2. Press the CABLE button on your TV's remote control.
3. Press the SET button on your TV's remote control.
4. Using the number buttons on your remote control, enter three digits of the cable boxcode listed on page 20 of this manual for your brand of cable box. Make sure you enterthree digits of the code, even if the first digit is a "0". (if there is more than one codelisted, try the first one.)
5. Press the POWERo button on the remote control.Your cable box should turn on if your remote is set up correctly.
If your cable box does not turn on after set up, repeat steps 2, 3 and 4, but try one ofthe other codes listed for your brand of cable box. if no other codes are listed, try eachcode, 000 through 046.
> Note on Using Remote Control Modes: Cable BoxWhen your remote control is in "CABLE" mode, the volume buttons still control yourTV's volume.
_ C_LI&TWlSEtlNK REC
.... ....
0 6pMous sMo_
rE_ C_TION
P

Setting Up the Remote to Operate Your DVD
1. Turn off your DVD
2. Press the DVD button on your TV's remote control.
3. Press the SET button on your TV's remote control.
4. Using the number buttons on your remote control, enter three digits of the DVD codelisted on page 20~21 of this manual for your brand of DVDMake sure you enter three digits of the code, even if the first digit is a "0".(if there is more than one code listed, try the first one.)
5. Press the POWER® button on the remote control.Your DVD should turn on if your remote is set up correctly.
if your DVD does not turn on after set up, repeat steps 2, 3 and 4, but try one of theother codes listed for your brand of DVD.if no other codes are listed, try each code, 000 through 141.
> Note on Using Remote Control Modes: DVDWhen your remote control is in "DVD" mode, the volume buttons still control yourTV's volume.
....
pMOtf sI*OlE
FAy,It _lONEII:_ EII:_ D E}I!D
p,
Setting Up the Remote to Operate Your STB
1. Turn off your STB.
2. Press the STB button on your TV's remote control.
3. Press the SET button on your TV's remote control.
4. Using the number buttons on your remote control, enter three digits of the STB codelisted on page 21 of this manual for your brand of STB.Make sure you enter three digits of the code, even if the first digit is a "0".(if there is more than one code listed, try the first one.)
5. Press the POWERo button on the remote controI.Your STB should turn on if your remote is set up correctly.
if your STB does not turn on after set-up, repeat steps 2, 3 and 4, but try one of theother codes listed for your brand of STB.(if no other codes are listed, try each code, 000 through 074.)
_- Note on Using Remote Control Modes: STBWhen your remote control is in "STB" mode, the volume buttons still control yourTV's volume.
pOWfR SCIII:t®o #
...........
............ ....
123_ d!5 _©sEt O_r
p,
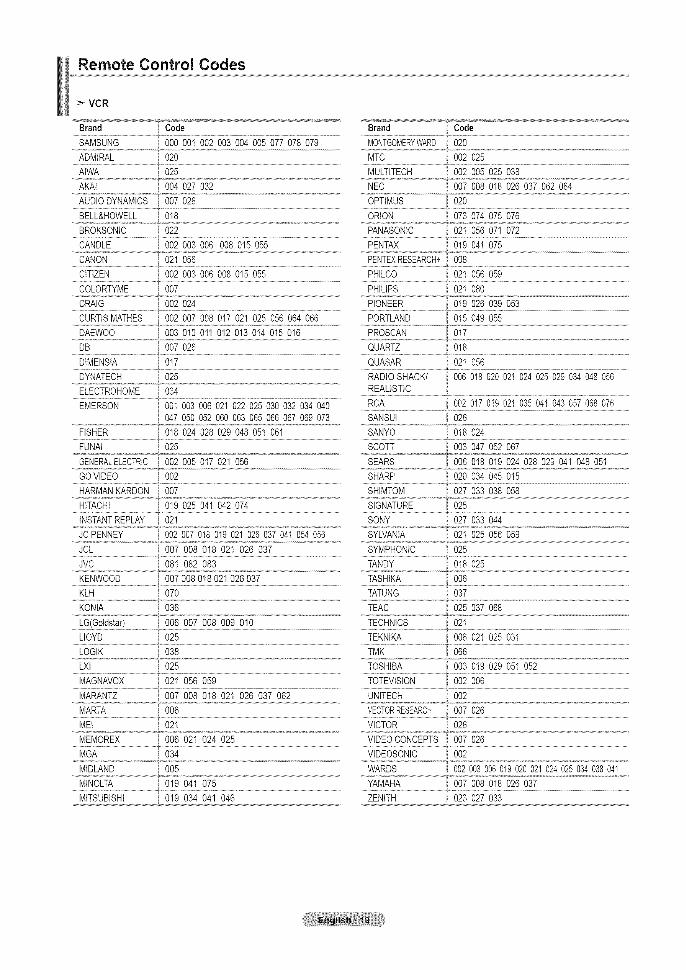
Remote Control Codes
VCR
Brand Code Brand Code
SAMSUNG 000 001 002 003 004 005 077 078 079 MBNTGOMERYWARD020
ADMIRAL 020 MTC 002 025
AIWA 025 MULTITECH 002 005 025 038
AKAI 004 027 032 NEC 007 0% 018 026 037 062 064
AUDIODYNAMICS 007 026 OPTIMUS 020
BELL&HOWELL 018 ORLON 073 074 075 076t
BROKSONIC 022 PANASONIC 021 056 071 072
CANDLE 002 003 006 008 015 055 PENTAX 019 041 075
CANON 021 056 PENTEXRESEARCH+008
CITIZEN 002 003 006 008 015 055 PHILCO 021 056 059
COLORTYME 007 PHILIPS 021 080
CRAIG 002 024 PIONEER 019 026 039 053
CURTISMATHES 002 007 008 017 021 025 056 064 066 PORTLAND 015 049 055
DAEWOO 003 010 011 012 013 014 015 016
DB 007 026
DIMENSIA 017
DYNATECH 025
ELECTROHOME 034
EMERSON 001 003006 021 022025 030 032034 040
PROSCAN 017
QUARTZ , 0,,!8QUASAR 021 056
RADIOSHACK/ 006018 020021024 025029034 048056REALISTIC
RCA 002017 019021035 041043057 068076
047 050052 060 063065 066 067069 073 SANSUI 026
FISHER 018 024 028 029 048 05t 061 SANYO 018 024
FUNAI 025
GENERALELEBTRIC002 005 017 021 056
GOVIDEO 002
HARMANKARDON 007
......H!T/_H[INSTANTREPLAY 021
SCOTT 003 047 052 067
SEARS 006 018 019 024 028 029 041 048 051
SHARP 020 034 045 015
SHIMTOM 027 033 038 058
SIGNATURE 025
SONY 027 033 044
JCPENNEY 002007 018019021 026037041 054056 SYLVANIA 021 025 056 059
JCL 007 008 018 021 026 037 SYMPHONIC 025
JVC 081 082 083 TANDY 018 025
KENWOOD 007008018 021026037 TASHIKA 006
KLH 070 TATUNG 037KONIA 036 TEAC 025 037 068
hO(eo/dstar).............................006 007 008 009 010 TECHNICS 021LLOYD 025 TEKNIKA 006 021 025 031
LOGIK 038 TMK 066
LXl 025 TOSHIBA 003 019 029 051 052..........................................................................................................................................................................................................................................................................................................¢..........................................................................................................................................................
M_,GNAVOX.............................021 056 059 TOTEVlSION 002 006MARANTZ 007 008 018 021 026 037 062 UNITECH 002MARTA 006 VECTORRESEARCH 007 026
MEI 021 VICTOR 026
MEMOREX 006 021 024 025 VIDEOCONCEPTS 007 026
MGA 034 VIDEOSONIC 002
MIDLAND 005 WARDS 002003006019020021024025034038041
MINOLTA 019 041 075 YAMAHA 007 008 018 026 037
MITSUBISHI 019 034 041 046 ...................................ZENITH , 023 027 03

:_ CABLE BOX
Brand Code Brand Code
SAMSUNG %0 001 002 003 004 005 006 007 REGENCY 015 023
GI 041 SA 042 043
HAMLIN 003 024 031 SQENTIFICATLAN 042 043
HITACHI 025 030 SPRUCER 022
JERROLD 038 039 STARGATE2000 036
MACOM 025 030 SYLVANIA 016
MAGNAVOX 019 023 028 TEXSCAN 016
OAK 026 TOCOM 032
PANASONIC 003 022 027 037 044......PHi[JPS............................................. VlEWSTAR 019 021 023 028
......p!ONEgR..........................................O047t_0_0744....................................................................................................................W_RNERAMEx.................040RCA 014 022 040 ZENITH 017 029 035 037 045
REGAL 003
SAMSUNG DVD
Product Code Product Code
DVD 000 001 002 HomeTheaterVCRCOMBO 014 015 016
DVDR 003 004 HDDRecorderCOMBO 017
BDRecord 005 006 TWINTRAYCOMBO 018VCRCOMBO 007 008 009 010 011 STBDVDCOMBO 019
VCRRecord 012 DVDReceiver 020
DHRCOMBO 013 AVReceiver 02_
_- DVD
Brand Code Brand Code
ANAM 030 INTEGRA 092
AUDIOVOX 075 JBL 091
AUDIOLOGIC 085 JVC 022 033 115 116
ANABA 072 JATON 073
APEXDIGITAL 070 071 074 086 083 084 088 111112 KENWOOD 051 108 109
AIWA 114 KISS 073
BROKSONIC 062 KONKA 059 100 106 107BLAUPUNKT 074 KLH 074 075
B&K 122 123 LG(Go]dstar) 025 031.......................................................................................................................................................................................................................................................................................t ........................................................................................................................................
CURTISMATHES 027 LOEWE 057
......C_BE_!OME...................Q7707L07_0_2.......................................................................................LASONIC '0_8CLARION 080 125 MOBILEAUTHORITY 054
CIRRUS 081 MEMOREX 055
CYBERHOME 065 MALATA 056QNEVISION 095 MAGNAVOX 076 093
DAEWOO 066 MINTEK 074 094DEMON 146 MONYKA 073
FARENHEIT 067 068 NORCENT 048 049 050
FISHER 090 NEXTBASE 052
GPX 060 NEC 053
GOVIDEO 061 089 133 135 NANTAUS 144
GE 069 074 MESA 074
GREENHILL 074 0PTOMEDIAELECTRONCS 105
HITACHI 064 113 OPTIVlEW 072HITEKER 071 ONKYO 076 092 119
HOYO 073 PHILCO 044 045
HARMAN/ KARDON 091 110 PRINCETON 046 047
IRT 089 PROSCAN 023

DVD
Brand 'i Code Brand Code
PANASONIC 024 034 124 134 136 137 138 THOMSON 145PHILIPS 036 076 TOSHIBA 028 062 076
ROTEL 117 118 TECHNICS 139
RIO 120RCA 023 035 074 075 131 132
RAITE 073
ROWA 038I
SAMPO 104
TVIEW 072
TOKAI 073
TEAC 096TECHWOOD 097
TREDEX 098 099 101
SONY 026 029 126 127 128 129 130 141 URBANCONCEPTS 076SHERWOOD 039 041 VENTURER 075
SVA 042 VOCOPRO 102
SYLVANIA 043 093 YAMAHA 032 063
SHARP 140 YAMAKAWA 040 073
SANSUI 062 XWAVE 103
.....SANYO........................................._,_ n_n', Y'!_ X_.........................................................................................................................................................ZENITH O7612
SHINSONIC 094
SAMSUNG SET-TOP BOX
Product Code
CABLESTB 000 004 008 013
SatelliteSTB 000 003 008 013
SET-TOP BOX
Brand Code Brand Code
ALPHASTAR 023 MAGNAVOX 016 021 036 038 039 040 041 042
ANAM 043 MEMOREX 016CHANNELMASTER 018 034 MOTOROLA 064
CROSSDIGITAL 019 MACOM 018
CHAPARRAL 035 MFSUBISHI 015t ..................................................................................................................................................
DIRECTTV 015 016 017 019 022 045 060 061 062 ......-----NEXTLEVEL..............................- --O47048064065 066 067 068 PHILIPS 015 016 017 021 033 036 038 039 040
DAEWOO 074
DiSNETWORKSYSTEM069 070
DISHPRO 069
DRAKE 018 024 032
ECHOSTAR 025 069 070 071
041 042 067
PRIMESTAR 046 049 050 063
PANASONIC 058 059 061 062
PAYSAT 016
065 066
RCA 051 052 053 065 066
EXPRESSVU i 069 RADIOSHACK i064
GOI ,i 069 REALISTIC i057GE 065 STARTRAK I 026
GENERALINSTRUMENT046 047 048 063 064 STS i 020 027
HTS 069 SKY I 031
HOMECABLE 056
......H!TACH#.................................o22......................................................................................................................................
IQ 020
IQPRISM 020JANEIL 059
JERROID 063
.....JVC......................................................oG9070LG(Goldstar) 044 073
SKYLIFE i 005 006 007SHACK i 064
SONY I 054 060TOSHIBA I 015 017 028 029 030 072
ULTIMATETV i 060 066
ZENITH i 024 031 06

To Select the Source
Use to select TV or other external input sources such as DVD players or Cable Box/Satellite receivers (Set-Top Box) connected to the TV. Use to select the input sourceof your choice.
% Press the MENU button to display the menu.Press theA or _' button to select "lnput"_then press the ENTER button.
2, Press the ENTER button to select "Source List".Press the A or T button to select signal source, then press the ENTER button.
> You can choose between the following sets of jacks: AV1, S-Videol,Component1, Component2, PC, HDMI1, or HDMI2 on the TV's rear panel andAV2, S-Video2, or HDMI3 on the TV's side panel.
> HDMI1, HDMI2, HDMt3 input can only be selected when the external device isturned on and connected via HDMI.
:_ You can choose only those external devices that are connected to the TV.
Press the SOURCE button on the remote control to view an external signal source. I Po_R source
To Edit the input Source Name
Name the device connected to the input jacks to make your input source selection easier.
t, Press the MENU button to display the menu.Press theA or T button to select "lnpur', then press the ENTER button.Press the A or _r button to select "Edit Name", then press the ENTER button.
2, Press the A or T button to select "AVI", "AV2"_"S-Videol"_ "S-Video2","Componentl"_ "Component2", "PC", "HDMII", "HDMI2", "HDMI3" input jack_thenpress the ENTER button.
3, Press the A or T button to select "VCR", "DVD", "D-VHS", "Cable STB"_"HD STB"_ "Satellite STB", "PVR STB", "AV Receiver"_ "DVD Receiver","Game"_ "Camcorder", "DVD Combo"_ "PC"_"VOD STB"_"TV" input source_thenpress the ENTER button.Press the EXIT button to exit.
>-When a PC with a resolution of 1920 x 1080@60Hz is connected to theHDMI IN 1 port_you should set the" HDMII" mode to "PC" in the "Edit Name" ofthe "Input" mode. If the "HDMII" mode is not PC_it works depending on the TVsetting.

Picture Control
Using Automatic Picture SettingsYour TV has Three automatic picture settings ("Dynamic", "Standard" and "Movie") that are preset at the factory.You can activate either Dynamic_Standard, Movie by making a selection from the menu.
t. Press the MENU button to display the menu.Press the ENTER button_to select "Picture".
Press the ENTER button to select "Mode".Press the A or V button to select the "Dynamic", "Standard", "Movie" picturesetting. Press the ENTER button.
, ChooseDynamicto increasetheclarityandsharpnessof thepicture._'ChooseStandardfor the standardfactorysettings.* ChooseMoviefora naturalimagewithoutpictureenhancements.
Press the A or 'V button to select "Contrast", "Brightness", "Sharpness","Color", "Tint(G/R)" or "Backlight", then press the ENTER button.
Press the 4 or =,-button to decrease or increase the value of a particular item.For example, if you select "Contrast", pressing the _,-button increases it.Press the ENTER button.
Press the EXIT button to exit.
When you make changes to "Contrast", "Brightness", "Sharpness","Color", "Tint(G/R)" or "Backlight", the OSD will be adjusted accordingly.
> When in PC mode, Tint, Sharpness and Color are not available.
> Each adjusted setting will be stored separately according to its input mode.
Press the P.MODE button on the remote control repeatedly to select the desiredpicture mode.
L.) L.)
_MODE S,MOOE _ _PSIZE

Adjusting the Color ToneYou can change the color of the entire screen according to your preference.
% Press the MENU button to display the menu.Press the ENTER button to select "Picture".
2, Press the A or T button to select "Color Tone"_then press the ENTER button.
3, Press the A or T button to select "Cool2", "Cooll"_ "Normal"_ "Warm1"or "Warm2".Press the ENTER button.
>-When the picture mode is set to "Dynamic" or "Standard", "Warm1" and"Warm2" cannot be selected. "Movie" mode is only available.
>- Each adjusted setting will be stored separately according to its input mode.
Resetting the Picture Settings to the Factory Defaultst, Press the MENU button to display the menu.
Press the ENTER button to select "Picture".
2, Press the A or 'V button to select "Reset", then press the ENTER button.Press the A or T button to select "Cancel' or "OK' then press the ENTER button.
Press the EXIT button to exit.
Each mode can be reset.
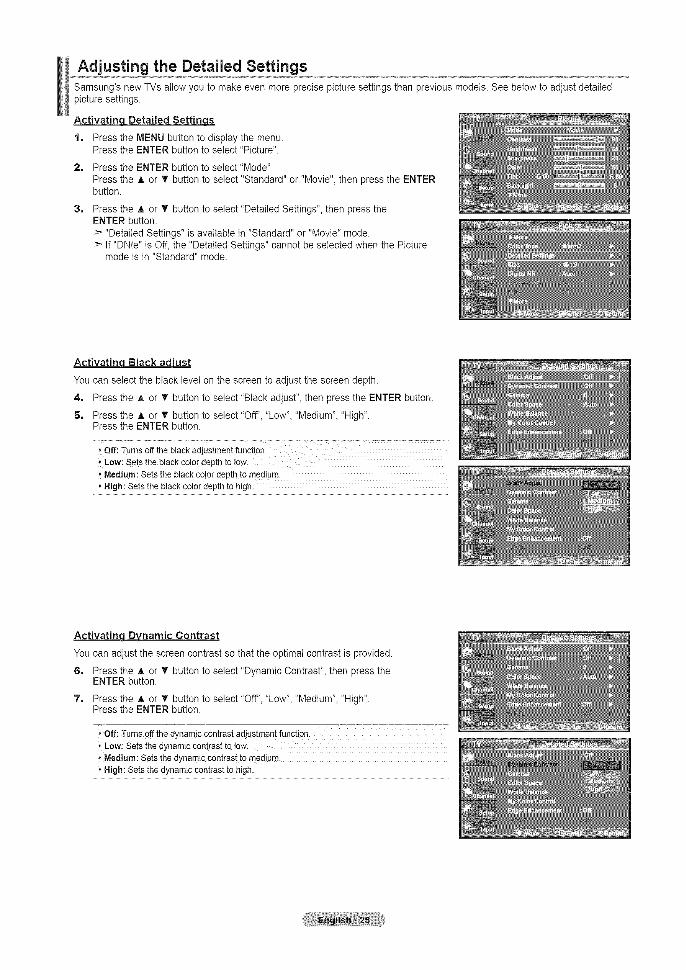
Adjusting the Detailed SettingsSamsung's new TVs allow you to make even more precise picture settings than previous models. See below to adjust detaitedpicture settings.
Activatinu Detailed Settings
t. Press the MENU button to display the menu.Press the ENTER button to select "Picture".
2. Press the ENTER button to select "Mode"
Press the A or T button to select "Standard" or "Movie", then press the ENTERbutton.
Press the A or T button to select "Detailed Settings", then press theENTER button.
>_"Detailed Settings" is available in "Standard" or "Movie" mode.>_If "DNle" is Off, the "Detailed Settings" cannot be selected when the Picture
mode is in "Standard" mode.
Activatin Black ad'ust
You can select the black level on the screen to adjust the screen depth.
4. Press the A or T button to select "Black adjust", then press the ENTER button.
5. Press the _, or T button to select "Off"_"Low'_ "Medium'_ "High".Press the ENTER button.
,,Low:Setstheblackcolordepthto tow.Medium: Setsthe blackcolordepthto medium.
, High: Setsthe blackcolordepthto high.
Activating Dynamic Contrast
You can adjust the screen contrast so that the optimal contrast is provided.
6. Press the A. or • button to select "Dynamic Contrast", then press theENTER button.
7. Press the _, or T button to select "Off", "Low', "Medium', "High".Press the ENTER button.
_,Off: Turnsoffthe dynamiccoatrastadjustmentfunction.÷Low: Setsthedynamiccontrastto iow.,'Medium: Setsthe dynamiccontrastto medium.* High: Setsthe dynamiccontrastto high.

Activating Gamma
You can adjust the Primary Color (Red, Green Blue) Intensity. (-3 ~ +3)
8. Press the A or _' button to select "Gamma", then press the ENTER button.
9. Press the 4 or _,-button to decrease or increase the value of a particular item.Press the ENTER button.
__ace
Cotor space is a cotor matrix composed of red, green and blue colors.Select your favorite color space to experience the most natural cotor.
tO. Press the A or T button to select "Color Space", then press the ENTER button.
t t. Press the _, or T button to select "Auto" or "Wide".Press the ENTER button.
<'AUto : AutoCo!0rSpaceautomaticallyadjuststo themostnaturalcolor tonebasedonprogramsources.
* Wide : WideColorSpaceoffersdeepand richcolor tone.
Activating White Balance
You can adjust the color temperature for more natural picture colors.
t2, Press the A or • button to select "White Balance", then press the ENTERbutton.
t3, Select the required option by pressing the _. or _' button, then press theENTER button.
t4, Press the 4 or _ button to decrease or increase the value of a particular item.Press the ENTER button.
* R-Offset:Adjuststheredco!ordarkness.* G-Offset:Adjuststhe greencotordarkness.* B-Offset: Adjuststhe b!ueColordarkness._R-Gain:Adjuststheled co!erbrightness., G-Gain:Adjuststhe greencolorbrightness.,'B-Gain:Adjuststhe bluecolorbrightness.* Reset:ThepreviouslyadjustedwhitebalancewilIbe resetto thefactorydefaults.
> Changing the adjustment value wilt refresh the adjusted screen.

Activating Mv Color Control
This setting can be adjusted to suit your personal preferences. When using the My ColorControl Feature, the current picture remains in movement.
t S. Press the ENTER button to select "My Color Control".
t 6. Press the A or T button to select "Pink", "Green", "Blue", "White" or "Reset".Press the ENTER button.
t7. Press the 4 or _ button to decrease or increase the value of a particular item.Press the ENTER button.
* Pink: DarkensOrlightensthe pinkcolor, Greeri:Darkensor lightensthe greencolor,'Blue: Darkensor lightensthe blue¢otor* White;Darkensor lightensthewhitecolor* Reset:Thepreviouslyadjustedcolorswillbe resetto thefactorydefaults.
> Changing the adjustment value wilt refresh the adjusted screen.
ActivatinLEdcze Enhancement
You can emphasize object boundaries in the picture.
t8. Press the A or • button to select "Edge Enhancement", then press theENTER button.
t9. Press the _. or T button to select "Off" or 'On".Press the ENTER button.
Activatinq xvYCC
Setting the xvYCC mode to On increases detail and color space when watching moviesfrom an external device (ie. DVD player) connected to the HDMI or Component INjacks. You must set the Picture Mode to Movie to enjoy this feature.
20. Press the ,_ or T button to select "xvYCC", then press the ENTER button.
2t. Press the A or T button to select "Off" or "On'.Press the ENTER button.
Press the EXIT button to exit.
>_ Only available in "HDMI" and "Component" on "Movie" option.
:_ If xvYCC function is active, PIP cannot be selected.

Changing the Screen Size
Occasionally,you maywant to changethe size of the imageon your screen. YourTV comes withsix screen size options,eachdesignedto work bestwith specifictypesof video input. Your cable boxor satellitereceiver mayhave its own set of screen sizes as welt.In general,though,you shouldview theTV in 16:9 modeas muchas possible.
t. Press the MENU button to display the menu.Press the ENTER button, to select "Picture".
2. Press the A or _' button to select "Size", then press the ENTER button.
3, Press the A or T button to select the screen format you want.Press the ENTER button.
Press the EXIT button to exit.
,16:9 : Sets the picture to 16;9 Wide m0del, Zoom1 : Magnifies the size of the picture on the Screen., Zoom2 :Magnifies the size of the picture more than 'Zoomt!L• Wide Fit : Enlarges the aspect ratio of the picture to fit the entire screen:,, 4:3 : Sets the picture to 4:3 normal mode., Just Scan : Use the function to see the full image without any cutoff when
HDMI (720p/1080i/1080p), Component (720pl!OSOi!108Qp) or
............................... ............................... u kj[_ Alternately, you can press the P.SlZE button on the remote control repeatedly to IIIw S._0DESTILL PISIZE
change the picture size. _ !.2_ _'_A"X-I>-Temporary image retention may occur when viewing a static image I !1on the set for more than two hours.
:_ HD (High Definition)16:9 - 1080i/t 080p (1920xl 080), 720p (1280x720)
16:9Setsthe pictureto 16:9widemoae.
r
Zoom1The screen size when Wide screen
ISver[tcatly enlargea.
Zoom2_The screen size when the Zoom1
screen is vert_calt_ enlarged
Wide Fit 4:,.1._3 Just ScanEnlarges me aspect ratio of the Sets the picture to 4:3 use me function to see me fulpicture to fit the entire screen, norma_ mode. "nagewanou[ an} cutoff when
HDM 720D11080i11080pComponent (720p11080i/1080D orDTV 1080i) signals are input.
> . In TV, VIDEO, S-VIDEO and all COMPONENT (48% 480p) modes, all screen modes can be selected.(16:9, Zoom1, Zoom2, 4:3).
. You can select only the 18:9, 4:3 and Wide Fit screen sizes in the DTV(1080i), Component (720p, 1080J, 1080p) orHDMI (720p, 1080i, 1088P) mode.
• In PC modes, only 16:9 & 4:3 modes can be selected.. You must select Zoom with P.StZE button on the remote if you want to move the Zoom 1 or 2 picture up or down.• When watching a DTV's HD signal, you can use Wide Fit. Horizontal zoom (Wide Fit) sets the optical picture format by
expanding it both horizontally and vertically. For example, you can reset the picture in 4:3 format to 16:9. Wide Fit does notsupport all external devices (DVD, VCR etc.).
• When Double ( [11, r=r"l ) mode has been set in PIP, the Picture Size cannot be set.

Setting the Active ColorIf you turn on this option, the blue and green colors witl be more vivid.
t. Press the MENU button to display the menu.Press the ENTER button, to select "Picture".
2. Press the h, or T button to select "Active Color", then press the ENTER button.
3. Press the A or T button to select "Off" or "On"Press the ENTER button.
Press the EXIT button to exit.
_'- "Active Color" is available only in "Dynamic" mode.This function doesn't work when the input Source is PC.
DNle (Digital Natural image engine)
This TV includes the DNle function to provide high visual quality. If you set DNle to on, you can view the screen with theDNte feature activated. Using this function, you can view the difference in the visual quality.
1. Press the MENU button to display the menu.Press the ENTER button, to select "Picture'.
2. Press the A or _' button to select "DNle", then press the ENTER button.
3. Press the A or T button to select "Off' or "On", then press the ENTER button.
' Off: Switches Offthe "DNIe" mode.On: Switches on the "DNle" mode.
Press the EXIT button to exit.
DNleTM (Digital Natural Image engine)This feature brings you a more detailed image with 3D noise reduction anddetailed, contrast and white enhancement.
:_ This function doesn't work when the Input Source is PC.>- The DNle function is not supported in the Movie mode.
Setting the Auto Motion Plus 120HzRemoves drag from fast scenes with a lot of movement to provide a clearer picture.
1. Press the MENU button to display the menu.Press the A or T button to select "Picture", then press the ENTER button.
2. Press the A or T button to select "Auto Motion Plus 120Nz"_then press the ENTERbutton.
3. Press the ,t, or T button to select "Off', "Low", "Medium"_"High" or "Demo"_thenpress the ENTER button.
• Off: Switches Auto Motion Ptus 120Hz 0ff.• Low: Sets Auto Motion Plus 120Hz to minimum., Medium: Sets Auto Motion Plus 120Hz to medium.,, High: Sets Auto Motion Plus 120Hz to maximum., Berne: Displays the difference between Auto Motion Plus 12gHz on and off
modes. The screen after applying !'Auto Motion Plus !20Hz '! appears on theleft screen.
Press the EXIT button to exit.
:_ If you enable "Auto Motion Plus 120 Hz", noise may appear on the screen.If this occurs_ set "Auto Motion Plus 120 Hz" to "Off".

Setting the HDMI Black Level
You can select the black level on the screen to adjust the screen depth.
1, Press the MENU button to display the menu.Press the h, or T button to select "Setup", then press the ENTER button.
2, Press the A or _' button to select "HDMI Black Level_ then
press the ENTER button.
3, Press the A or T button to select "Normal" or "Low", then pressthe ENTER button.
>- This function is active only when the external input connects to HDMI(RGB signals). "HDMI Black Level" function may not be compatible with orexternal devices.
Press the EXiT button to exit.
Setting the Film Mode
The TV can be set to automatically sense and process film signals from alt sources and adjust the picture for optimum quality.
1, Press the MENU button to display the menu.Press the A or T button to select "Setup", then press the ENTER button.
2, Press the A or T button to select "Film Mode"_then press the ENTER button.
3, Press the A or T button to select "On" or "Off', then press the ENTER button.
Press the EXIT button to exit.
>- "Film mode" is supported in TV_VIDEO_ S-VIDEO, COMPONENT(480i / 1080i)and HDMI(480i / 1080i).

Viewing Picture-in-Picture
This product has one built-in tuner, which does not allow PIPto function in the same mode. For example, you cannot watch one TVchannel in the main screen and a different one in the PIP screen, Please see 'PIP Settings' below for details. You can use the PIPfeature to simultaneously watch two video sources. (See page 37 to select the PIP picture sound,)
:_ While V-Chip (See page 56) is in operation, the PIP function cannot be used,While xvYCC (See page 27) is in operation, the PIP function cannot be used.
Activating[ Picture-in-Picture
t, Press the MENU button to display the menu.Press the A or V button to select "Setup", then press the ENTER button.Press the A or T button to select "PIP", then press the ENTER button.
Press the ENTER button again.Press the _. or T button to select "On", then press the ENTER button.
If you turn the TV off while watching in PIP mode and turn it on again, the PIPwindow will disappear.
:_ You can view Analog TV broadcasts on the PIP screen (sub-picture) when themain picture is from an external device connected to HDMI1, 2, 3,Component1, 2 or PC
Main picture Sub picture
Component 1, 2HDMI 1,2, 3 Analog TV broadcasts onlyPC
[_J Alternately, you can press the PIP button on the remote control repeatedly to activate ordeactivate the PIP.
Chanclinq the PIP Channel
3, Press the A or V button to select "Channel", then press the ENTER button.Press the A or T button to select the desired channel in the PIP window.
Press the ENTER buttons.
>- MAIN: PC / HDMI 1,2,3 / Component 1,2PIP: TV(Analog)
[_ Alternatly, you can press the PIP Channel buttons on the remote control.FAV_H CAPTION _¢_

Chanqinq the Position of the PIP Window
4. Press the A or T button to select "Position", then press the ENTER button.Press the A or • button to select the required option_then press the ENTERbutton.
In Double Window ( [11 ), and Double Wide ( r"T=l) modes_ "Position" cannot beselected.
Chanqinq the Size of the PIP Window
5. Press the A or _' button to select "Size", then press the ENTER button.Press the A or T button to select the required option_then press the ENTERbutton.
Press the EXIT button to exit.
>-If the main picture is in PC and HDMI 1 mode, "Size" is not available.>* You may notice that the picture in the PIP window becomes slightly unnatural
when you use the main screen to view a game or karaoke.>_You can adjust picture position only by using the C_ size menu.
Freezing the Picture
t. Press the STILL button to freeze a moving picture. (,_)
>- Normal sound witl still be heard. Press again to cancel. _M00E_ PS__ IIIs._o0E S'nLL PSlZE>- While "V-Chip" is in operation, the Still function cannot be used. (See page 56) m
Sound Control
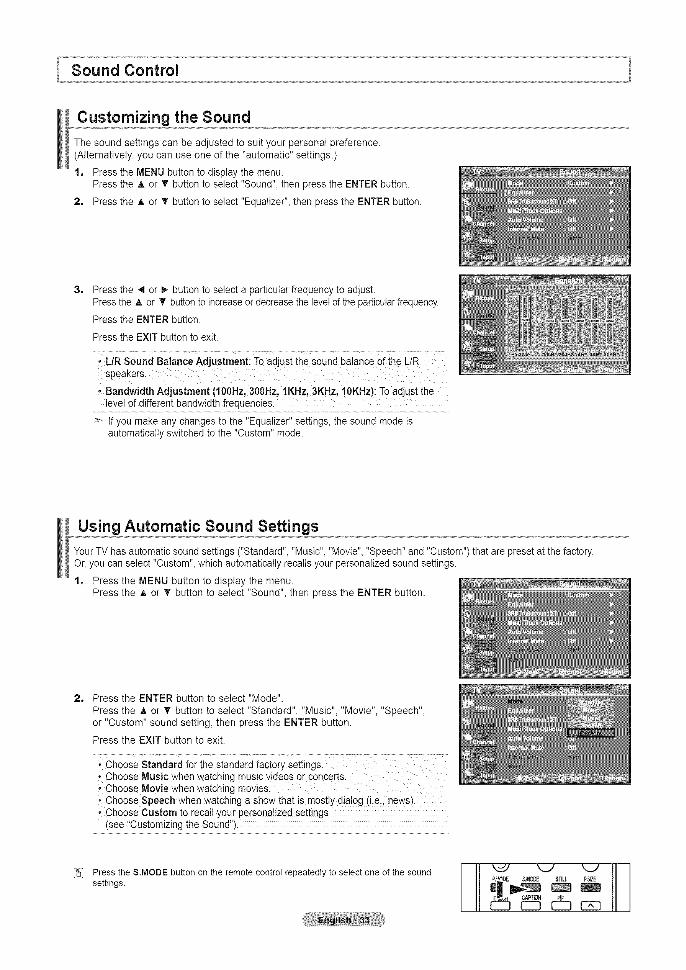
Customizing the Sound
The sound settings can be adjusted to suit your personal preference.(Alternatively, you can use one of the "automatic" settings.)
t. Press the MENU button to display the menu.Press the A or T button to select "Sound", then press the ENTER button.
2. Press the A or T button to select "Equalizer"_ then press the ENTER button.
Press the _ or _- button to select a particular frequency to adjust.Press the & or T buttonto increase or decrease the levelof the particularfrequency.
Press the ENTER button.
Press the EXIT button to exit.
• L/R Sound Balanc e Adjustment: To ad ust the saund balance of the L/Rspeakers.
• Bandwidth Adjustment (100Hz, 300Hz, 1KHz, 3KHz, ! 0KHz): To adjust thelevel of different bandwidth frequencies.
If you make any changes to the "Equalizer" settings, the sound mode isautomatically switched to the "Custom" mode.
Using Automatic Sound Settings
Your TV has automatic sound settings ("Standard"_ "Music"_"Movie"_"Speech" and "Custom") that are preset at the factory.Or, you can select "Custom", which automatically recalls your personalized sound settings.
t. Press the MENU button to display the menu.Press the A or T button to select "Sound"_ then press the ENTER button.
2. Press the ENTER button to select "Mode".
Press the A or 'V button to select "Standard", "Music", "Movie", "Speech",or "Custom" sound setting, then press the ENTER button.
Press the EXIT button to exit.
' Ch°ose Standard for the standard fact°ry settings• Choose Music when watching music videos or concerts.
Choose Movie when watching movies.• Choose Speech when watching a show that is mostly dial0g (i_e_ news):• Choose Custom to recall your personalized settings
(see !'Customizing the Sound'!).
Press the S.MODE button on the remote control repeatedly to select one of the soundsettings.

Setting the TruSurround XT
TruSurround XT is a patented SRS technology that solves the problem of playing 5.1 multichanne{ content over two speakers.TruSurround delivers a compelling, virtual surround sound experience through any two-speaker playback system_ including internaltelevision speakers. It is fully compatible with all multichannel formats.
t. Press the MENU button to display the menu.Press the A or T button to select "Sound", then press the ENTER button.
2. Press the A or _' button to select "SRS TruSurround XT", then press theENTER button.
3, Press the A or _' button to select "On" or "Off", then press the ENTER button.
Press the EXIT button to exit.
I_l Press the SRS button on the remote control to select "On" or "Off".
T[uSuri'ound XTI SRS and <.e) Symbol aretrademarks of SRS Labs, Inc.
TruSurround XT techn01qgy is incorporated
under license from SRS Labs, Inc.
Choosing a Multi-Channel Sound (IVlTS)track =Digital
The digitaI-TV transmission system is capable of simultaneous transmission of many audio tracks (for example_simultaneoustranslations of the program into foreign languages). The availability of these additional "multitracks" depends upon the program.
Preferred Lanauag_
t, Press the MENU button to display the menu.Press the A. or T button to select "Sound", then press the ENTER button.
:_ Quick way to access the MTS menu: Just press the "MTS" button on theremote control. You can listen in a language other than your chosen languageby pressing the MTS button.
2, Press the A or T button to select ""Multi-Track Options", then press the ENTERbutton.
3. Press the ENTER button to select 'Preferred Language".Press the _, or T button to choose the language (English,Spanish or French)youwant, then press the ENTER button.
Press the EXIT buttonto exit.
>- "Multi-TrackOptions" isavailable only in TV mode.
>- You can only select the language from among the actual languagesbeing broadcast.
[_ You can listen in a language other than the favorite language by pressingthe MTS button on the remote control.

Choosing a Multi-Channel Sound (IVlTS)track -Analog
Multi=Track Sound
1, Press the MENU button to display the menu.Press the ,_ or T button to select "Sound", then press the ENTER button.
2, Press the A or _' button to select "Multi-Track Options", then press theENTER button.
Press the A or 'V buttonto select "Multi-TrackSound", then press the ENTER button.Press the _t, or '_' button to select a settingyou want, then press the ENTER button.Press the EXIT buttonto exit.
, Choose Mono for channels that are broadcasting in mono or if you are havingdifficulty receiving a stereo signal.
,, Choose Stereo for channels '[hat are broadcasting in stereo.• Choose SAP to listen to the Separate Audio Program, which is usually a
foreign-Ianguage translation.
> "Multi-TrackOptions" is available only in TV mode.
[5} Press the MTS buttons on the remote control repeatedly to select "Mono","Stereo" or "SAP".
h_Fr
@7
E221I::_
¢b _F_FT
Automatic Volume Control
Reduces tile differences in volume level among broadcasters.
1, Press the MENU button to display the menu.Press the _, or T button to select "Sound", then press the ENTER button.
2, Press the A or T buttonto setect "Auto Volume", then press the ENTER button.
3, Press the A. or V button to set Auto Volume "On" or "Off' then press theENTER button.
Press the EXIT button to exit.

Selecting the Internal Mute
Sound output from tile TV speakers is muted.
1, Press the MENU button to display the menu.Press the A or T button to select "Sound", then press the ENTER button.
2, Press the A or _' buttonto select "Internal Mute"_then press the ENTER button.
3= Press the A or T button to select "on",then press the ENTER button.
Press the EXIT button to exit.
>-When "internal mute" is set to "On', Sound menus except 'Multi-Track Options'and "Sound Select" (in PiP mode) cannot be adjusted.
The VOL®_ VOL® and MUTE buttons do not operate when the "Internal Mute"is set to On.
......................................................... i..........................................................................................................................................................................................................................................InternaIMute Off Speaker Output Speaker Output _:Speaker Output Sound Output _: Sound Output :: Sound Output
internalMuteOn Mute
Adjusting the TV On/Off Melody Sound
A melody sound can be set to come on when the TV is powered On or Off.
1, Press the MENU button to display the menu.Press the _, or T button to setect "Setup", then press the ENTER button.
2, Press the A or T buttonto setect "Melody",then press the ENTER button.
3, Press the A or T button to select "Off', "Low", "Medium" or "High"_then pressthe ENTER button.
• Low : Sets the melody volume to Iow., Medium : Sets the melody votume to medium., High : Sets the melody voIume to high.
Press the EXIT button to exit.
OO I"_--'_ Manu[actured under license from Do!by Labo[at_rories.DIGITAL "Dolbyll and the doub!e:D symbol are trademarks o[ Do!by Laboratories.

Listening to the Sound of the Sub (PIP) Picture
When the PIPfeature is activated, you can listen to the sound of the sub (PIP) picture.
1, Press the MENU button to display the menu.Press the A or T button to select "Sound", then press the ENTER button.
2, Press the A or T buttonto select "Sound Setect'_then press the ENTER button.
3= Press the A or T button to select "Main" or "Sub"_then press the ENTER button.
Press the EXIT button to exit.
, Main: Used to listen to the sound of the main picture.* Sub: Used to listen to the sound of the sub picture.
>-You can select this option when "PIP" is set to "On'.
Resetting the Sound Settings to the Factory Defaults
If Game Mode is On, the Reset Sound function is activated(Refer to page 51). Selecting the Reset function resets the equalizersetting to the factory defaults.
1, Press the MENU button to display the menu.Press the A or T button to select "Sound", then press the ENTER button.
2, Press the A or T buttonto select "Reset', then press the ENTER button.
Press the EXIT buttonto exit.
Connecting HeadphonesYou can connect a set of headphones to your set if you wish to watch a TV program without disturbing the other people in theroom.
When you insert the head set jack into the corresponding port, you can operateonly "Multi-Track Option", "Auto Volume" and "Sound Select"(in PIP mode) in Soundmenu.
>- Prolonged use of headphones at a high volume may damage your hearing
_--You will not receive sound from the speakers when you connect headphonesto the system.
The headphone volume and TV volume are adjusted separately.
TV Side Panel

Channel Control
Selecting the Antenna
t, Press the MENU button to display the menu.Press the A or T button to select "Channel", then press the ENTER button.
Press the ENTER button to select "Antenna".Press the A or V' button to select "Air" or "Cable", then press theENTER button.
Press the EXIT button to exit.
:_ If the amenna is connected toANT 1 IN (AIR),select "Air" and if it is connected to ANT 2 IN(CABLE/ select "Cable".
> f both ANT 1 IN (AtR and ANT 2 IN CABLE)are connected select the antenna input you want.If the antenna npu_Is no_selected properly, noBemay appear on the screen.
.. V1Press the ANTENNA button on theremote control.
Clearing Scrambled Channels - Digital
The Clear Scrambled Channel function is used to filter out scrambled channels after Auto Program is completed.It removes the scrambled channels from the list by tuning the digital cable channels. This process may take up to 20~30 minutes.
t, Press the MENU button to display the menu.Press the A or T button to select "Channel", then press the ENTER button.
Press the A. or T button to select "Clear Scrambled Channel", then press theENTER button.It searches scrambled channels, which are to be removed from the list.
To stop searching scrambled channels;Press the ENTER button to select Stop.Press the 4 button to select "Yes", then press the ENTER button.
3, When the scrambled channel searching is completed, press the ENTER button.
Press the EXIT button to exit.
Only cable mode is available.

Adding and Erasing Channels
You can add or delete a channel to display the channels you want. To use the Channel List function, first run "Auto Program".
t. Press the MENU button to display the menu.Press the A or T button to select "Channel"_ then press the ENTER button.
2. Press the ,t. or T button to select "Channel List", then press theENTER button.
3. Press the ENTER button to setect "All".
Press the 4, _ A or T button to select a channel to delete, then press theENTER button.
Press the A or T button to select 'DeleW, then press the ENTER button todelete the channel.
The @ mark will disappear.
Press the _ t,,-_A or T button to select a channel to add, then press theENTER button.
Press the A or T button to select "Add", then press the ENTER button toadd the channel.
TheOmark will appear and the channel will be added.
Press the EXIT button to exit.
:_ All selected channels witl be shown on "Added" menu.
. P.MODE (Red) button: Press repeatedly to select I'AII:' 'Added'! or!'Favorite".
, S.MODE (Green} button: Press to add all channels deleted.. STILL (Yellow} button: Press to delete all channels memorized.

To Set-Up Your Favorite Channels
You can set channels you watch frequently as favorites.
t, Press the MENU button to display the menu.Press the A or _' button to select "Channel"_ then press the ENTER button.
2, Press the A or T button to select "Channel List", then press theENTER button
3, Press the A or T button to select "All" or "Added"_then press the ENTER button.
Press the 4_ _, A or 'V button to select your favorite channels to watchamong the labeled channels. Then press the ENTER button.
Press the A or _' button to select "Favorite'_then press the ENTER button.
The "_" symbol will be highlighted and the channel will be set as a Favorite.To cancel your Favorite channel selection, press the ENTER button until the"_" symbol is no longer highlighted.
Press the EXIT button to exit.
Only memorized channels can be set as favorite channels.> All favorite channels will be shown in the "Favorite" menu.
[_ To select the favorite channels you have set up, press the FAV.CH buttonon the remote control. -_ "d ,,_g
8,MODE STILL PSIZE
r--1 E3 G_D

Using the Channel Lists
Displays the channel list automatically when you press CH LIST button on the remote. (Choose AIL Added or Favorite)
t, Press the MENU button to display the menu.Press the A or _' button to select "Channel"_ then press the ENTER button.
2, Press the A or _' button to select "Channel List", then press theENTER button.
Press the A or V button to select "Default List Mode" (the channel list you want toappear when you press CH LIST), then press the ENTER button.Press the A or _' button to select "All', "Added" or "Favorite" then press theENTER button.
> The Channel list you have chosen will now be set.
Press the EXIT button to exit.
_NNA CHLIST WISELINK REC
[_/Alternately, press the CHLIST buttonon the remote controlto bring up the ChannelLists. C)
Viewing the Channel Lists
You can display a list of all channels, added channels or your favorite channels.
t, Press the MENU button to display the menu.Press the A or _' button to select "Channel"_ then press the ENTER button.
2, Press the _, or V button to select "Channel List", then press theENTER button.
3, Press the & or T button to select 'AtI', "Added' or "Favorite", then press theENTER button.
Press the A or T button to select "Channel", then press the ENTER button.To toggle between your all channels_add channels or favorite channels_use the RMODE (red) button on the remote control.
• P,MODE {Red) button: Press iepea!edtY to select 'All'!, f'Added'! or'Favorite'!
_MODE S,MODE S11LL _,SIZ_
NN _
FAV_H _, _

Labeling ChannelsChannels can be labeled so that their call letters appear whenever the channel is selected.
t, Press the MENU button to display the menu.Press the A or 'V button to select "Channel", then press the ENTER button.Press the A or T button to select "Name", then press the ENTER button,
Press the _, or _' button to select the channel to be assigned a new name_then press the ENTER button.Press the h, or '_' button to select a letter_a number or a blank (Results in thissequence: A...Z, 0...9, +, -, *,/, blank).Press the I_ button to switch to the next field, which wilt be selected.Select a second letter or digit by pressing the A or 'V button, as above.Repeat the process to select the last three digits. When you have finished_press the ENTER button to assign the new name.To erase the assigned new name, select "Clear" by pressing the 4 or _ button_then press the ENTER button.
Press the EXIT button to exit.
_" The names of digital broadcasting channels are automatically assigned andthus cannot be assigned by users.
LNA (Low Noise Amplifier)
If the TV is operating in a weak-signal area_ sometimes the LNA function can improve the reception (a low-noise preamplifierboosts the incoming signal).
t=
2,
3,
Press the MENU button to display the menu.Press the A or T button to select "Channet'_ then press the ENTER button.
Press the A or _' button to select "LNA", then press the ENTERbutton.
Press the A or T button to select "On"_then press the ENTER button.
Press the EXIT button to exit.
LNA functions only when antenna is set to Air or Cable.
> The LNA setting must be made separately for each channel.
> If the picture is noisy with the LNA set to "On"_select "Off".
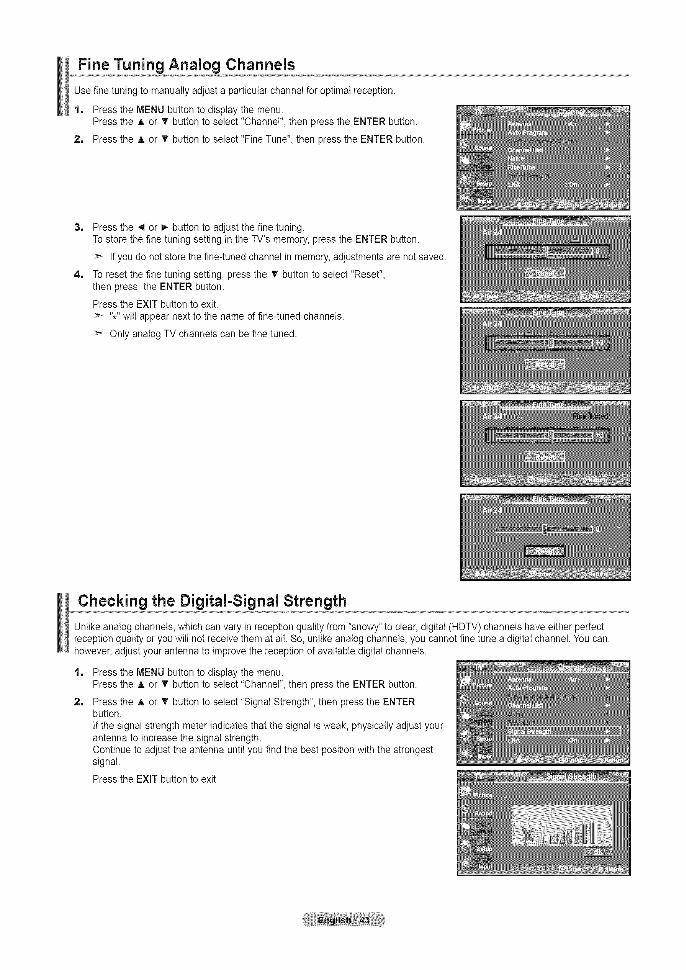
Fine Tuning Analog Channels
Use fine tuning to manually adjust a particular channel for optimal reception.
t. Press the MENU button to display the menu.Press the A or V button to select "Channel", then press the ENTER button.
2. Press the A or _' button to select "Fine Tune", then press the ENTER button.
Press the _ or _ button to adjust the fine tuning.To store the fine tuning setting in the TV's memory, press the ENTER button.
If you do not store the fine-tuned channel in memo% adjustments are not saved.
To reset the fine tuning setting, press the _' button to select "Reset",then press the ENTER button.
Press the EXIT button to exit."," will appear next to the name of fine-tuned channels.
Only analog TV channels can be fine tuned.
Checking the Digital-Signal Strength
Unlike analog channels, which can vary in reception quality from "snowy" to clear, digital (HDTV) channels have either perfectreception quality or you will not receive them at all. So, unlike analog channels, you cannot fine tune a digital channel. You can,however, adjust your antenna to improve the reception of available digital channels.
t=
2,
Press the MENU button to display the menu.Press the A or T button to select "Channel", then press the ENTER button.
Press the A or T button to select "Signal Strength", then press the ENTERbutton.If the signal strength meter indicates that the signal is weak, physically adjust yourantenna to increase the signal strength.Continue to adjust the antenna until you find the best position with the strongestsignal.
Press the EXIT button to exit

PC Display
Using Your TV as a Computer (PC) Display
SettincLULoUYour PC Software_Based on Windows
The Windows display-settings for a typical computer are shown below. The actual screens on your PC will probably be different,depending upon your particular version of Windows and your particular video card. However, even if your actual screens lookdifferent, the same basic set-up information wilt apply in almost all cases. (If not, contact your computer manufacturer or SamsungDealer.)
t. First, click on "Control Panel" on the Windows start menu.
2. When the control panel window appears, click on "Appearance and Themes" and adisplay dialog-box will appear.
3. When the control panel window appears, click on "Display" and a display dialog-boxwilt appear.
4. Navigate to the "Settings" tab on the display dialog-box.The correct size setting (resolution)
Optimum: 1920 X 1080 pixels
If a vertical-frequency option exists on your display settings dialog box,the correct value is "60" or "60 Hz". Otherwise, just click "OK" and exit the dialog box.
Display ModesIf the signal from the system equals the standard signal mode, the screen is adjusted automatically. If the signal from the systemdoesn't equal the standard signal mode, adjust the mode by referring to your videocard user guide; otherwise there may be novideo. For the display modes listed below, the screen image has been optimized during manufacturing.
D-Sub
-/+59.940 25.175 -/-
VESA
640x480640x480800 x 600800 x 600800 x 600800 x 600
1024 x 7681024 x 7681024 x 768
1280 x 10241920 x 1080
37.86137.50035.15637.87948.07746.87548.36356.47660.02379.97666.500
72.80975.00056.25060.31772.18875.00060.00470.06975.02975.02560.000
31.50031.50036.00040.00050.00049.50065.00075.00078.750
123.000138.500
-/--/-
+/++/++/++/+-/-
-/-
+/++/+-/+
HDMI/DVI
Mode ReSO!Uii0n Horizontal Vertical Pixel ClockFrequency (kHz) Frequency (Hz) Frequency (MHz) (HN )
640 x 350 31.469 70.086 25.175 i +/-IBM 720 X 400 31.469 70.087 28.322 i - / +
640 X 480 31.469 59.940 25.175 - / -
800 x 600 37.879 60.317 40.000 +/+1024 x 768 48.364 60.000 65.000 - / -VESA
1280 x 1024 63.981 60.020 108.000 +/+1920 x 1080 66.587 59.934 138.500 +/-

Setting up the TV with your PC
How to Auto Adjust
Use the Auto Adjust function to have the TV set automatically adjust the video signals it receives.The function also automatically fine-tunes the settings and adjusts the frequency values and positions.
>- This function does not work in DVI-Digitat mode.
Press the MENU button to display the menu.Press the A or T button to select "Setup", then press the ENTER button.Press the A or V button to select "PC", then press the ENTER button.
_Change to the PC mode first.
2. Press the A or V buttonto select "Auto Adjustment",then press the ENTER button.
Press the EXIT button to exit.
A diustina the Screen Quality
The purpose of the picture quality adjustment is to remove or reduce picture noise. If the noise is not removed by fine tuningalone, then make the vertical frequency adjustments on your PC and fine tune again. After the noise has been reduced,re-adjust the picture so that it is aligned on the center of the screen.
t. Press the MENU button to display the menu.Press the A or T button to select "Setup", then press the ENTER button.Press the _, or T button to select "PC", then press the ENTER button.
:_ Change to the PC mode first.
2. Press the ENTER button to select "image Lock".
Press the A or T buttonto select "Coarse" or "Fine", then press the ENTER button.Press the 4 or _- button to adjust the screen quality.
Vertical stripes may appear or the picture may be blurry.
Press the ENTER button.
Press the EXIT button to exit.

Chan_ Screen Position
t, Press the MENU button to display the menu.Press the A or V button to select "Setup", then press the ENTER button.Press the A or V button to select "PC", then press the ENTER button,
2.
3,
Changeto the PC modefirst.
Press the A or _' button to select "Position", then press the ENTER button.
Press the A or 'V button to adjust the V-Position.Press the 4 or 1_ button to adjust the H-Position.Press the ENTER button.
Press the EXIT button to exit.
Initializinci the Screen Position or Color SettingsYou can replace all image settings with the factory default values.
t. Press the MENU button to display the menu.Press the A or T button to select "Setup", then press the ENTER button.Press the _, or T button to select "PC", then press the ENTER button.
>_ Change to the PC mode first.
2. Press the A or T button to select "image Reset", then press the ENTER button.
Press the EXIT button to exit.
Setting the Home Theater PC
This function enables you to view higher quality pictures while in PC Mode.After setting the Home Theater PC function to On, you can go into the Detailed Settingsmenu and make adjustments without affecting settings in the regular TV mode.
t. Press the MENU button to display the menu.Press the A or _' button to select "Setup", then press the ENTER button.
2. Press the A or _' button to select "Home Theater PC", then press the ENTERbutton.
3, Press the _. or T button to select "On" or "Off", then press the ENTER button.
_'Off: Turns off the settings for screen:related functions in PC input mode.
÷On: Turns en the settings for screen-related functions ill PC inPUt mode to provide more
dynamic scenes.
Press the EXIT button to exit.
This function is available only in PC mode.

Time Setting
Setting the ClockSetting the clock is necessary in order to use the various timer features of the TV.Also, you can check the time while watching the TV. (Just press the INFO button.)
_Option 1: Setting the Clock Manually
t, Press the MENU button to display the menu.Press the A or 'V button to select "Setup", then press the ENTER button.Press the A or _' button to select "Time", then press the ENTER button.
2, Press the ENTER button to select "Clock".
3, Press the ENTER button to select "Clock Mode".Press the A or T button to select 'Manual"_ then press the ENTER button.
4, Press the A or _' button to select "Clock Set"_ then press the ENTER button.
5. Press the 4 or I_. button to move to "Month", "Day", "Year", "Hour", "Minute"_or "am/pro". Set the date and time you want by pressing the A or _r button,then press the ENTER button.
Press the EXIT button to exit.
:_ The current time will appear every time you press the INFO button.
:_ You can set the month, day, year_ hour and minute directly by pressing thenumber buttons on the remote control.

Option2: Settin_ the Clock Automatically
The Clock can be set automatically if you are receiving a digital signal.
t. Press the MENU button to display the menu.Press the A or _r button to select "Setup", then press the ENTER button.Press the A or T button to select "Time", then press the ENTER button.
2. Press the ENTER button to select "Clock".
3. Press the ENTER button to select "Clock Mode".Press the A or _r button to select "Auto", then press the ENTER button.
4. Press the A or T button to select "Time Zone", then press the ENTERbutton.
5. Press the A or T button to highlight the time zone for your local area,then press the ENTER button.
6. Press the A or _' button to select "DST" (Daylight Saving Time), then pressthe ENTER button.
Press the A or _' button to select "On" or 'Off', then press the ENTER button.
Press the EXIT button to exit.
> Depending on the broadcast station and signal, the auto time may not beset correctly. If this occurs, set the time manually.
:_ The Antenna or cable must be connected in order to set the time automatically.

Settin_ Timer
The sleep timer automatically shuts off the TV after a preset time (30, 60, 90, 120, I50 and 180 minutes).
t. Press the MENU button to display the menu.Press the A or V button to select "Setup", then press the ENTER button.Press the A or T button to select "Time", then press the ENTER button.
2. Press the A or V button to select "Sleep Timer", then press the ENTER button.
3. Press the A or V button to adjust "Minute".
4. Press the I_ button to select "Activation".Press the A or _' button to select "On", then press the ENTER button.
Press the EXiT button to exit.
,, I-I1 1Flsee truersett ,

Settincl the On/Off Timer
t. Press the MENU button to display the menu.Press the A. or _r button to select "Setup", then press the ENTER button.Press the A or _r button to select "Time", then press the ENTER button.
2. Press the A. or T button to select "Timer 1", "Timer 2" or "Timer 3", then press theENTER button.
3= Press the A or T button to adjust "Hour", then press the i_ button to move tothe next step.
Set other items using the same method as above.
Activate or inactivate Press the A or T button
Repeat Select Once, Everyday, Mon-Fri, Press the A or _' buttonMon-Sat, Sat-Sun Sets the desiredday(s) of the week you want the TV toturn on.
Volume Select the desired turn on volume Press the A or _' buttonlevel.
Contents When the On Timer is active, you can Press the A or T buttonturn on a specific channel or play backcontents such as photo or audio files.(Make sure that an USB device isconnected to your TV.)
:_ You can set the hour, minute and channel by pressing the number buttons onthe remote control.
> Auto Power OffWhen you set the timer On, the television wilt eventually turn off, if no controlsare operated for 3 hours after the TV was turned on by timer. This function isonly available in timer On mode and prevents overheating, which may occur if aTV is on for too long time.
Press the EXIT button to exit.
Function DescriptionL
Selecting a Menu Language
t. Press the MENU button to display the menu.Press the A or 'V button to select "Setup", then press the ENTER button.Press the A or T button to select "Language", then press the ENTER button.
2. Press the _, or T button to select "English', "EspaSol" or "Fran_ais".Press the ENTER button.
Press the EXIT button to exit.

Setting the Blue Screen Mode
If no signal is being received or the signal is very weak, a blue screen automatically replaces the noisy picture background.If you wish to continue viewing the poor picture, you must set the "Blue Screen" mode to "Off'
t. Press the MENU button to display the menu.Press the A or T button to select "Setup", then press the ENTER button.
2. Press the A or T button to select "Blue Screen"_ then press the ENTER button.
Press the A or T button to select "On" or "Off" then press the ENTER button.
Press the EXIT button to exit.
> Blue Screen is displayed when there is no signal from an external device,regardless of the "Blue Screen" setting.
Using the Game ModeWhen connecting to a game console such as PlayStationTM or XboxTM_yOUcan enjoy a more realistic gaming experience byselecting the game menu.
t. Press the MENU button to display the menu.Press the A or V button to select "Setup", then press the ENTER button.
2. Press the A or _' button to select "Game Mode"_then press the ENTER button.
3. Select "On"or "Off' bypressing the A or V button,then press the ENTER button.
4. Press the EXIT button to exit.
>- Restrictions on "Game mode" (Caution)* To disconnect the game console and connect another external device, set
"Game" to Off in the setup menu.* If you display the TV menu in "Game mode", the screen shakes slightly.* The mark (_) appears on the screen which means that "Game Mode" is on
with the selected source.If "Game Mode" is On* Picture Mode is automatically changed to "Standard" and users cannot
change the mode.
* Sound Mode is automatically changed to" Custom" and users cannot changethe mode. Adjust the sound using the equalizer.
* The "Reset" in the Sound menu is activated. "Reset" function initializes the"Equalizer" settings to the factory default setting.
:_ "Game Mode" is not available in regular TV/Antenna mode.
:_ If the picture is poor when external device is connected to TV, check if "GameMode" is "On". Set "Game Mode" to "Off" and connect external devices.
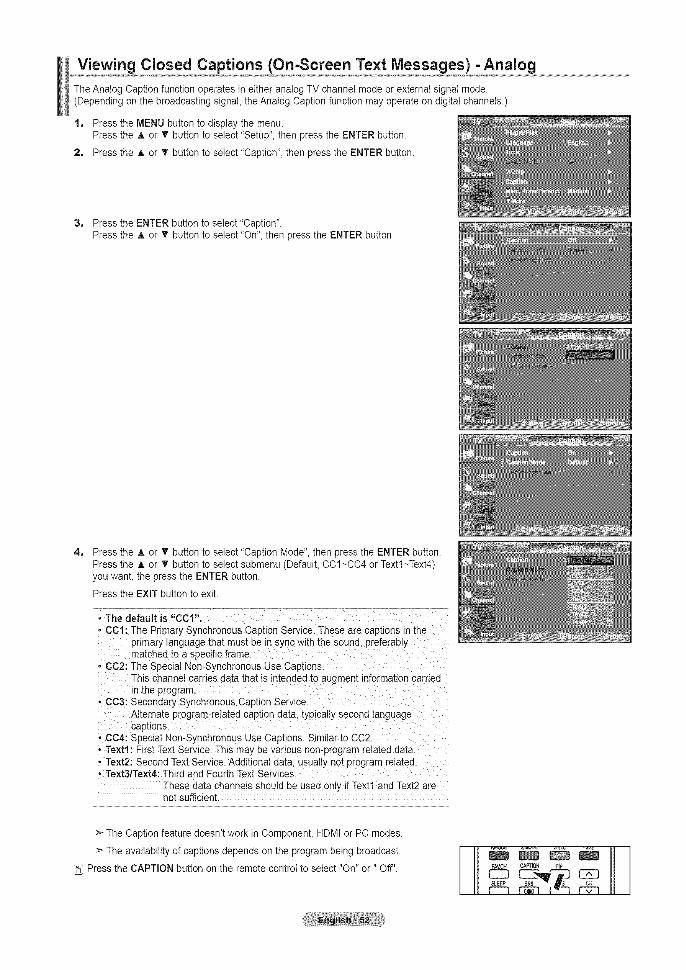
Viewing Closed Captions (On-Screen Text Messages) =Analog
The Analog Caption function operates in either analog TV channel mode or external signal mode.(Depending on the broadcasting signal, the Analog Caption function may operate on digital channels.)
t. Press the MENU button to display the menu.Press the A or T button to select "Setup", then press the ENTER button.
2. Press the A or T button to select "Caption'_ then press the ENTER button.
3. Press the ENTER button to select "Caption'.Press the A or V' button to select "On"_then press the ENTER button.
Press the A. or V button to select "Caption Mode", then press the ENTER button.Press the A or V' button to select submenu (Default_CC1~CC4 or Textl~Text4)you wahl the press the ENTER button.
Press the EXIT button to exit.
• The default is "CCl",
• CCl : The Primary Synchronous Caption Service. These are captions in theprimary language ma[ mus[ be in s/nc wltn the sound, preferablymatched to a specific frame.
• CC2: The Special Non-S) nchronous Use Capi onsThis channel carries data that is intended to augmem information carriea"_me program.
• CC3: Secondary Synchronous Caption Serv se.Alternate program-related caDuonaa[a, _ypical j second languagecap[lens.
• CC4: SDeclaI Non-Synchronous Use Captions. Similar to CC2.. Text1: First Text Service. This maj De various non-program related data.• Text2: Second Text Service. Additional data, usuaIly not program rela[ea.• Text3/Te×t4: Third and Fourth Text Services.
These aa[a channels should be used on • f Text1 and Text2 arenot sufficient.
>" The Caption feature doesn't work in Component, HDMI or PC modes.
>- The availability of captions depends on the program being broadcast.
Press the CAPTION button on the remote control to select "On" or" Off'.
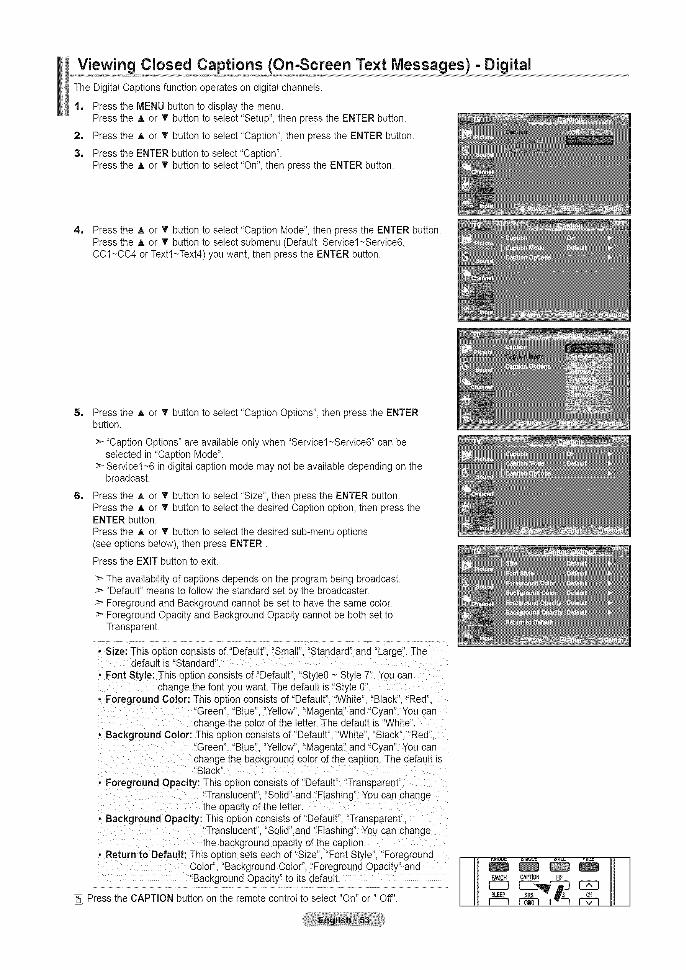
Viewing Closed Captions (On-Screen Text Messages) - DigitalThe Digital Captions function operates on digital channels.
t, Press the MENU button to display the menu.Press the A or T button to select "Setup", then press the ENTER button.
2, Press the A or T button to select "Caption'_ then press the ENTER button.
3, Press the ENTER button to select "Caption'.Press the A or _' button to select "On'_ then press the ENTER button.
4, Press the A. or 'V button to select "Caption Mode"_then press the ENTER button.Press the A or T button to select submenu (Default, Servicel~Service6_CC1~CC4 or Textl~Text4) you want, then press the ENTER button.
Press the A or _' button to select "Caption Options"_then press the ENTERbutton.
'Caption Options' are available only when "Servicel~Service6" can beselected in "Caption Mode'.
> Service1~6 in digital caption mode may not be available depending on thebroadcast.
Press the A. or 'V button to select "Size", then press the ENTER button.Press the A or _' button to select the desired Caption option_ then press theENTER button.
Press the A. or T button to select the desired sub-menu options(see options below), then press ENTER.
Press the EXIT button to exit.
_'- The availability of captions depends on the program being broadcast.> "Default" means to follow the standard set by the broadcaster.>- Foreground and Background cannot be set to have the same color.
Foreground Opacity and Background Opacity cannot be both set toTransparent.
• Size: This oo[ton consists of"Defaul_. 'Small". "Standard" and "Large". Thedefaui_ s "Standard".
- Font Style: This opuon consists of "Default" 'Style0 - Style 7". You canchange me font you want. The default is 'Style 0".
• Foreground Color: This ODIJonconsists of "Default". "White". "Black". "Red".Green. 'B Je'. "Yellow". 'Magenta" and "Cyan. You can
cnange me c_Jorof the letter. The default is "White,• Background Color: This option consists of "Default. "White". "Black". "Red".
"Green. 'Blue'. "Yellow, 'Magenta" and "Cyan. You canchange the :_cKgrouna color of the caution. The default is"Black".
• Foreground Opacity: This opuon consists of 'Default' Transparem"Translucent' 'Solid" and "Flashlnc '. You can changeme opacity,of the letter,
• Background Opacity: This option consists of "Default. 'TransDarem.Translucent' 'SoIid'.and "Flashing. YOUcan cnange
[ne background opacity of the caption• Return to Default: This c a_lonse_s eacn of "Size' "Font Style", "Foreground _ ..................
Color". "Background Color". "Foreground Opacity aria J J _ _
BacKground Opacity to its defaulL J J _ c_o, _,_,Press the CAPTION button on the remote control to select "On" or" Off'. _ _ I q_3®

Menu Transparency Level
Adjusts the transparency of the menu screen.
1, Press the MENU button to display the menu.Press the A or _r button to select "Setup"_ then press the ENTER button.
2, Press the A or _r button to select "Menu Transparency",then press the ENTERbutton.
3, Press the A or • button to select level_then press the ENTER button.Press the EXIT button to exit.
Using the Energy Saving FeatureThis feature adjusts the brightness of the TV inorder to reduce power consumption. When watching TV at nighL set the"Energy Saving " mode option to "High" to reduce eye fatigue as welt as power consumption.
1, Press the MENU button to display the menu.Press the & or _' button to select "Setup"_ then press the ENTER button.
2, Press the & or T button to select"Energy Saving"_then press the ENTER button.
Selectthe required option (Off, Low, Medium, High,Auto) by pressing the _. or T button.Press the ENTER button.
, Off: Turns off the energy saving function. ::................• Low: Sets the TV to tow energy saving mode., Medium: Sets the TV to medium eaergy saving mode.• High: Sets the TV to high energy saving mode.• Auto: Automatically adjusts the brightness of the TV screen in accordance
with the scenes.
Press the EXIT button to exit.

Setting the Function Help
Displays help on the menu functions.
1, Press the MENU button to display the menu.Press the A or T button to select "Setup", then press the ENTER button.
2, Press the A or _r button to select "Function Help", then press the ENTER button.
3, Press the A or T button to select "On'_ then press the ENTER button.
Press the EXIT button to exit.
>- The predetermined value of the "Function Help" is On.
Digital Noise ReductionIf the broadcast signal received by your TV is weak_you can activate the Digital Noise Reduction feature to help reduce any staticand ghosting that may appear on the screen.
t=
2,
3,
Press the MENU button to display the menu.Press the ENTER button to select "Picture".
Press the A or T button to select "Digital NR", then press the ENTER button.
Press the A or T button to select "Off"_"Low"_"Medium", "High"_"Auto".Press the ENTER button.
,,off: Turnsthescreen noise reductionfunctionoff.',Low: Reducesscreennoise at a tow tevel.* Medium:Reducesscreen noise at a mediumlevel',High; Reducesscreen noise at a high level',Auto: Automaticallyrecognizesand reducesscreen noise.
Press the EXIT button to exit.

Using the V-Chip
The V-Chip feature automatically locks out programs that are deemed inappropriate for children. The user must enter a PIN(personal ID number) before any of the V-Chip restrictions are set up or changed.
When the V-chip feature is activated, the PIP features do not function.
U.S.A Only ]This product is covered by the following U.S.patents :US4,930,158,US4,930,160
SettinqUpU Your Personal ID Number
1, Press the MENU button to display the menu.Press the _, or _' button to select "Setup", then press the ENTER button.
2, Press the A or _' button to select "V-Chip", then press the ENTER button.The message "Enter PtN" will appear. Enter your 4 digit PIN number.
:_ The default PIN number of a new TV set is '0-O-0-0".
3, The "V-Chip" screen will appear.Press the A or _" button to select "Change PIN", then press the ENTER button.The Change PIN screen wilt appear. Choose any 4 digits for your PIN and enterthem. As soon as the 4 digits are entered, the "Confirm new PIN_ screen appears.Re-enter the same 4 digits. When the Confirm screen disappears, your PIN hasbeen memorized.
Press the EXIT button to exit.
:_ If you forget the PIN, press the remote-control buttons in the followingsequence, which resets the pin to O-0-0-O: Power Off. Mute 8 24 Power On.

How to _:nable/Disable the V-Chip
1, Press the MENU button to display the menu.
Press the A or T button to select "Setup"_ then press the ENTER button.
2, Press the A or T button to select "V-Chip", then press the ENTER button.The message "Enter PIN" will appear. Enter your 4 digit PIN number.
3, The "V-Chip" screen will appear.To enable the V-Chip feature, press the ENTER button so that the "V-Chip Lock"field is 'OnL (Pressing the A or T button will alternate between "On" and "Off".)
Press the ENTER button.
Press the EXIT button to exit.
How to Set _ Restrictions Usinq the "TV Parental Guidelines"
First, set up a personal identification number (PIN) and enable the V-Chip. (See previous section.)Parental restrictions can be set up using either of two methods: The TV guidelines or the MPAA rating.
1, Press the MENU button to display the menu.Press the _kor T button to select "Setup", then press the ENTER button.
2, Press the A or T button to select "V-Chip", then press the ENTER button.The message "Enter PIN" will appear. Enter your 4 digit PIN numben

3, The"V-Chip"screenwillappear.PresstheAor_'buttontoselect"TVParentalGuidelines",thenpresstheENTERbutton.
4, The"TVParentalGuidelines"screenwillappear.PresstheAor'_'buttontoselectoneofthesixagedbasedcategories:
t TV-YT: Children 7 and over• TV-G: General audience
TV-PG: Parental guidance-TV-14: Viewers !4 and over• TV-MA: Mature audience
5, At this point, one of the TV-Ratings is selected.Press the ENTER button. Depending on your existing setup, the" _" symbol willbe selected. (Blank = Unblocked, _ = Blocked)While "_" is selected, press the ENTER button to block or unblock the category.
To select a different TV-Rating, press the A or T button and then repeat theprocess.
>Allow all: Press to unlock all TV ratings. / Block all: Press to lock all TV ratings.
> The TV-Y_TV-Y7, TV-G, TV-PG, TV-14 and TV-MA have additional options.See the next step to change any of the following sub-ratings:
FV: Fantasy violence / D: Sexually Suggestive Dialog / L: Adult Language /S: Sexual situation / V: Violence
> The V-Chip will automatically block certain categories that are "morerestrictive". For example, if you block "TV-Y" category, then TV-Y7 will automaticatly be blocked. Similarly, if you block the TV-G category, then all the categories in the "young adult" group wilt be blocked (TV-G, TV-PG, TV-14 andTV-MA). The sub-ratings (D, L S_V) work together similarly.(See next section.)
6, How to set the FV, D_L S and V sub-ratings.First, select one of these TV-Ratings: TV-Y, TV-Y7, TV-G, TV-PG, TV-14 or TV-MA(See Step 4) and press the 1_ button. The "_" symbol will be displayed for eachsub-rating.While "_" isselected, press the ENTER button to go to a sub rating.
Press ENTER to block the sub rating. Toselect a different TV-Rating, press theA or T button and then repeat the process.
> The V-chip will automatically block certain categories that are "More restrictive".For example_ if you block "L" sub-rating in TV-PG, then the "L" sub-ratings inTV-14 and TV-MA will automatically be blocked.
7, Press the EXIT button to clear all the screens. (Or proceed to the next section_
and set up additional restrictions based on the MPAA codes.)
> These categories consist of two separate groups: TV-Y and TV-Y7 (youngchildren through age 7) and TV-G through TV-MA (everybody else).The restrictions for these two groups work independently: If a householdincludes very young children as well as young adults, the TV guidelines mustbe set up separately for each age group. (See next step.)
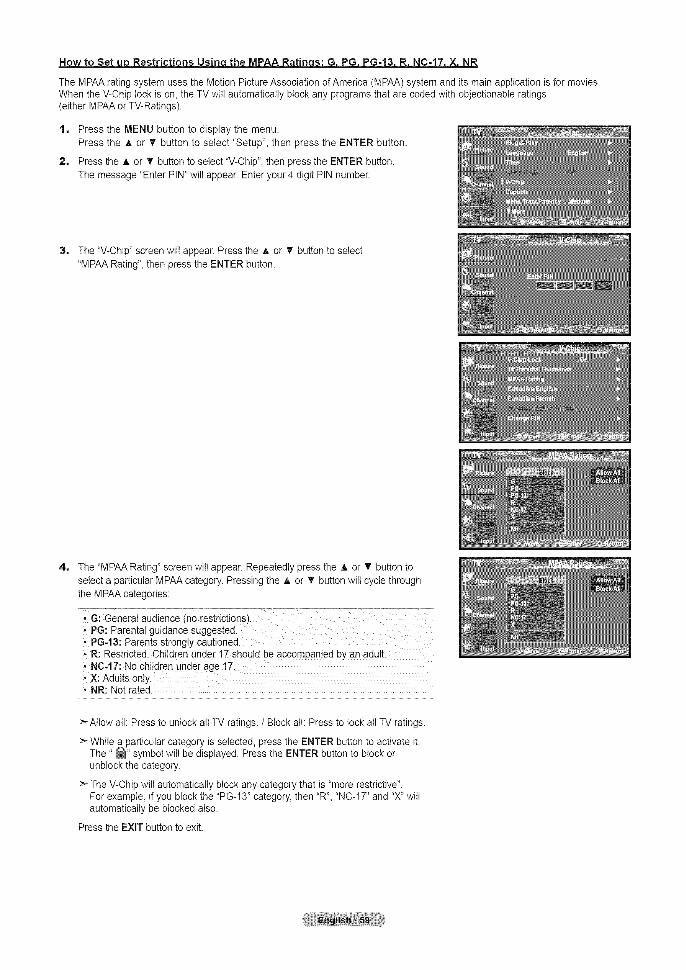
Howto Setu_o Restrictions Usinqthe MPAA Ratin s: G PG PG-13 R NC-17 X NR
The MPAA rating system uses the Motion Picture Association of America (MPAA) system and its main application is for movies.When the V-Chip lock is on, the TV will automatically block any programs that are coded with objectionable ratings(either MPAA or TV-Ratings).
1. Press the MENU button to display the menu.Press the A or T button to select "Setup", then press the ENTER button.
2. Press the A or _' button to select "V-Chip", then press the ENTER button.The message "Enter PIN" will appear. Enter your 4 digit PIN number.
3. The "V-Chip" screen will appear. Press the _t.or _' button to select"MPAA Rating", then press the ENTER button.
4. The "MPAA Rating" screen will appear. Repeatedly press the A or T button toselect a particular MPAA category. Pressing the A or T button will cycle throughthe MPAA categories:
,, G: General audience (- PG: Parentai guidance suggested.
PG-13: Parents strongly' cautioned.• R: Restricted. Children under 17 should be accompanied bY an adult:, NC-17'. No children under age 17.• X: Adults only., NR: Not rated.
:_-Atlow all: Press to unlock all TV ratings. / Block all: Press to lock all TV ratings.
>_While a particular category is selected, press the ENTER button to activate it.The" _' symbol will be displayed. Press the ENTER button to block orunblock the category.
The V-Chip will automatically block any category that is "more restrictive".For example, if you block the "PG-13' category, then "R", "NC-17" and "X" willautomatically be blocked also.
Press the EXIT button to exit.

How to Set ujo Restrictions Usin_ the 'Canadian Enqlish'
1, Press the MENU button to display the menu.Press the A or T button to select "Setup", then press the ENTER button.
2, Press the A or T button to select "V-Chip", then press the ENTER button.The message "Enter PIN" will appear. Enter your 4 digit PIN number.
3, The "V-Chip" screen wilt appear. Press the A. or T button to select"Canadian English", then press the ENTER button.
4, Press the A or _" button to select a appropriate restriction.Press the ENTER button to activate the restriction selected. The" _" symbol isindicated.
Press the EXIT button to exit.
> AItow all: Press to unlock all TV ratings. / Block all: Press to lock all TV ratings.
'C: Programming intended for children under age 8.• C8+: programming generally considered acceptable for children 8 years and
over to watch on their own.
, G: General programming, suitable for eli audiences.• PG: Parental Guidance.' 14+: programming contains themes or content which maY not be suitable for
viewers under the age of !4.• 18+: Adult programming.
>* The V-Chip will automatically block any category that is "more restrictive".For example, if you block G category_then PG_ 14+ and 18+ will automaticallybe blocked also.

How to Set ujo Restrictions Usinq the 'Canadian French'
1. Press the MENU button to display the menu.Press the A or T button to select "Setup", then press the ENTER button.
2. Press the A or T button to select "V-Chip", then press the ENTER button.The message "Enter PIN" will appear. Enter your 4 digit PIN number.
3. The "V-Chip" screen will appear. Press the A. or V' button to select"Canadian French"_ then press the ENTER button.
4. Press the A or _" button to select an appropriate restriction.Press the ENTER button to activate the restriction selected. The" _" symbol isindicated.
Press the EXIT button to exit.
>-Allow atl: Press to unlock all TV ratings. / Block all: Press to lock all TV ratings.
, G: Generat,8 arts+: Programming generally considered acceptable for #hildren 8 years
and over to watch on their own.13 ans÷: Programming may not be suitable for children under the age of !3.
* 16 arts÷: Programming is not suitable for children under the age of 16.,18 ans+: Programming restricted to adults.
>- The V-Chip will automatically block any category that is 'more restrictive".For example, if you block 8 ans+ category, then 13 ans+, 16 ans+ and 18 ans+will automatically be blocked also.
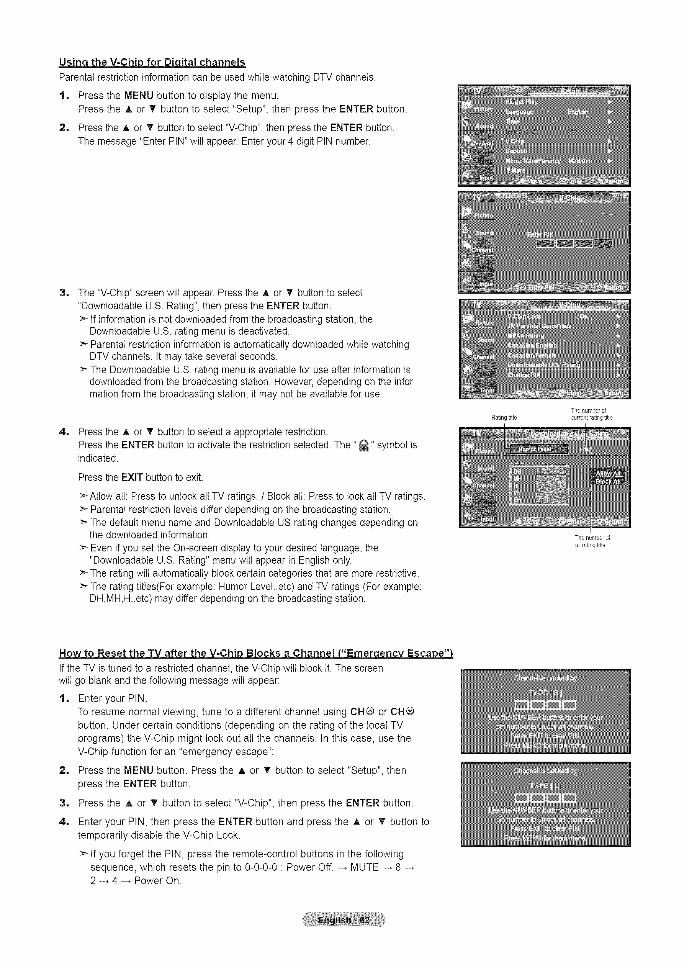
Usin the V-Chi for Di_ channels
Parental restriction information can be used while watching DTV channels.
1. Press the MENU button to display the menu.Press the & or T button to select "Setup"_ then press the ENTER button.
2. Press the A or _' button to select "V-Chip", then press the ENTER button.The message "Enter PIN" will appear. Enter your 4 digit PIN number.
3. The "V-Chip" screen will appear. Press the A or T button to select"Downloadable U.S. Rating", then press the ENTER button.>--If information is net downloaded from the broadcasting station, the
Downleadable U.B. rating menu is deactivated,>- Parental restriction information is automatically downloaded while watching
DTV channels. It may take several seconds.>--The Downleadable U.S. rating menu is available for use after information is
downloaded from the broadcasting station. However, depending on the infermation from the broadcasting station, it may net be available for use.
4. Press the A or _' button to select a appropriate restriction.
Press the ENTER button to activate the restriction selected. The ' _" symbol isindicated.
Press the EXIT button to exit.
:_Atlow all: Press to unlock all TV ratings. / Block all: Press to lock all TV ratings.> Parental restriction levels differ depending on the broadcasting station.> The default menu name and Downloadable US rating changes depending on
the downloaded information.
> Even if you set the On-screen display to your desired language, the"Downloadabte U.S. Rating" menu will appear in English only.
:_ The rating will automatically block certain categories that are more restrictive.>-The rating titles(For example: Humor Levet..etc) and TV ratings (For example:
DH,MH,H.etc) may differ depending on the broadcasting station.
Rating title
The number of
current r_iag tide
How to Reset the TV after the V-Chip Blocks a Channel _enc_
If the TV is tuned to a restricted channel, the V-Chip will block it. The screenwill go blank and the following message will appear:
1. Enter your PIN.To resume normal viewing_ tune to a different channel using CH@ or CH®button. Under certain conditions (depending on the rating of the local TVprograms) the V-Chip might lock out all the channels. In this case, use theV-Chip function for an "emergency escape":
2. Press the MENU button. Press the _, or 'I' button to select "Setup", thenpress the ENTER button.
3. Press the A or • button to select "V-Chip", then press the ENTER button.
4. Enter your PIN, then press the ENTER button and press the A or 'I' button totemporarily disable the V-Chip Lock.
> If you forget the PIN, press the remote-control buttons in the followingsequence, which resets the pin to O-O-O-O: Power Off. MUTE 8 ..........2 4 Power On.
The n_mber d
all ra[ingtitle

Setting the Light EffectYou can turn the LED on the front of TV on/off.
2.
3.
Press the MENU button to display the menu.Press the A or T button to select "Setup", then press the ENTER button.
Press the A or _' button to select "Light Effect"_then press the ENTERbutton.
Press the A or T button to select "Off', "In Standby"_ "In Watching TV" or "Always",then press the ENTER button.
' Off: LED will not come on.• In Standby: Turns the LED on in standby mode.,, tn Watching TV: Turns the LED on while watching TV.• Always: LED wilt come on after you turn the TV off.
Press the EXiT button to exit.
> Set the "Light Effect" to "Off" to reduce power consumption.
Upgrading the Software
Samsung may offer upgrades for TV's firmware in the future. Please contact the Samsung call center at 1-800-SAMSUNG(726-7864) to receive information about downloading upgrades and using a USB drive. Upgrades wilt be possible by connecting aUSB drive to the USB port located on located on the side of your TV.
t. Insert a USB drive containing the firmware upgrade into the WISELINK port onthe side of the TV.
2. Press the MENU button to display the menu.Press the A or _r button to select Setup, then press the ENTER button.
3, Press the A or T button to select Software upgrade, then press the ENTER button.
4. Press the ENTER button.
The message Scanning for USB... It may take up to 30 seconds, is displayed.Please be careful to not disconnect the power or remove the USB drive whileupgrades are being applied. The TV wilt turn off and turn on automatically aftercompleting the firmware upgrade. Please check the firmware version after theupgrades are complete.When software is upgraded, video and audio settings you have made will return totheir default (factory) settings. We recommend you write down your settings so thatyou can easily reset them after the upgrade.

WISELiNK
Using the WISELINK Function
This function enables you to view and listen to photo (JPEG) and audio files (MP3) saved on a USB Mass Storage Class(MBC) device.
Press the POWER button on the remote control or front panel.Connect a USB device containing JPEG and/or MP3 files to the WISELINK jack(UBB jack) on the side of the TV.
If you enter the WISELINK mode with no USB device connected the message "There is no device connected' witl appear.In this case_ insert the USB device_exit the screen by pressing the WISE LINK button on the remote control and enter theWISELINK screen again.
>- Photo and audio files must be named in English, French or Spanish. If not, the files can not be played. Change the filenames to English, French,or Spanish if necessary,
> The file system only supports FAT16/32 (The NTFB file system is not supported):_ Certain types of UBB devices may not be compatible with this TV.
Wiselink only supports the UBB Mass Storage Class device (MSC). MSC is a Mass Storage Class Bulk-Only Transportdevice. Examples of MSC are Thumb drives and Flash Card Readers (Both USB HDD and HUB are not supported,)
> Before connecting your device to the TV, please back up your files to prevent them from damage or loss of data,
SAMSUNG is not responsible for any data file damage or data loss.>" Recommended image resolution for Wisetink is 6 mega pixels.> Please connect directly to the USB port of your TV. If you are using a separate cable connection, there may be a USB
Compatibility problem.
Only MP3 and JPEG file formats are supported.We recommend the sequential jpeg format. Progressive jpeg uses a lot of memory and decoding may fail.
:_ Do not disconnect the USB device while it is "loading."
:_ Neither PTP (Picture Transfer Protocol) nor MTP (Media Transfer Pprotocol) is supported.The playing duration of an mp3 file may be displayed as '00:00:00' if its playing time information is not foundat the start of the file.
The higher the resolution of the image, the longer it takes to display on the screen.
>* If the horizontal resolution of an image is higher than 5000, it cannot be decoded.If the vertical resolution of an image is higher than 4000_ it cannot be decoded.
Using the Remote Control Button in WISELINK Menu
Button Operations
C<2_) Move the cursor and select an item
Setect the currently selected item.
P_Y]_AUSE
G Play or pause the Slide Show or MP3 file.
RETU_
Q Return to the previous menu
O Run various functions from the Photo and Music menus.
STOP
(_) Stop the current slide show or MP3 file.
(_) Page Up or Down (file list item)
B_r
Stop the current function and return to the previous high-level menu.

Using the WiSELiNK Menu
1, Press the MENU button. Press the A or 'I' button to select "input",then press the ENTER button.
2, Press the A or _r button to select "WISELtNK", then press the ENTER button.
3, Press the A or T button to select the corresponding USB Memory Device_thenpress the ENTER button.
>_The WtSELINK menu differs depending on the USB Memory Deviceconnected to TV.
4, Press the ,,q or I,_ button to move to an icon, then press the ENTER button.
>- To exit WISELINK mode, press the WISELINK button on the remote control.
[_1 Press the WISELINK button on the remote control to display a WISELINK menu. AN'_NNA CHLIST WISELINK REC

Using the PHOTO (JPEG) ListThis menu shows JPEG files and folders saved on an USB memory device.
1, Complete Steps 1 to 3 of "Using the WISELINK Menu". (Refer to page 65)
2, Press the 4 or _,-button to move to "Photo", then press the ENTER button.The saved file information is displayed as a folder or file.
3, Press the &, T_ 4 and _,-buttons to select a file_then press the ENTER button.
• Pressing the ENTER button over a photo icon shows the currently selected photoin full screen.
• Pressing the ENTER button over a folder icon shows the JPEG files included inthe folder.
To exit WISELINK mode_press the WISELINK button on the remote control.
Moving to a photo may take a few seconds to load the file.At this point, the icon witl appear at the top left of the screen.
This menu only shows files whose file extension is jpg. Files of other formatssuch as bmp or tiff will not be displayed.
The files are displayed on a page. 15 thumbnail photos are displayed perpage.
The thumbnails are numbered from left to right and from top to bottom_from 1to 15.
Certain types of USB Digital camera and audio devices may not be compatiblewith this TV.
Folders are displayed first and they are followed by all JPEG files in the currentfolder. The folders and JPEG files are sorted in alphabetical order.
If the photo is displayed in full screen_ you can zoom in and out or rotate thephoto on the screen.
It takes time to show JPEG files as Thumbnail images.
Photos without EXIF information may not be displayed as thumbnail images inthe PHOTO LIST depending on the picture quality and resolution.
" Folder icon
" Photo icon
" Move to the previous
folder stage icon
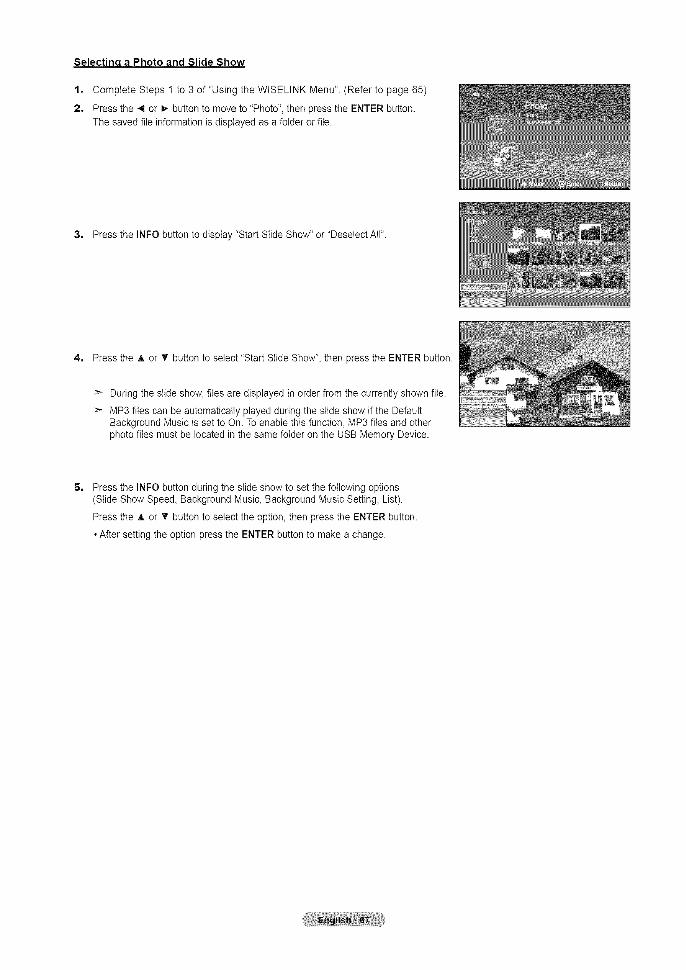
Selectino_a Photo and Slide Show
t, Complete Steps 1 to 3 of "Using the WISELINK Menu". (Refer to page 65)
2, Press the 4 or _,-button to move to "PhotC, then press the ENTER button.The saved file information is displayed as a folder or file.
3, Press the INFO button to display "Start Slide Show" or "Deselect All".
4, Press the A or V button to select "Start Slide Show"_then press the ENTER button.
> During the slide show, files are displayed in order from the currently shown file.
>- MP3 files can be automatically played during the slide show if the DefaultBackground Music is set to On. To enable this function, MP3 files and otherphoto files must be located in the same folder on the USB Memory Device.
Press the INFO button during the slide show to set the following options(Slide Show Speed_Background Music, Background Music Setting, List).
Press the A or V button to select the option, then press the ENTER button.
• After setting the option press the ENTER button to make a change.

_the Menu durinq a Slide Show
Slide Show Speed:
Select to control the slide show speed.
You can select "Stow", "Norm" or "Fast".
Background Music:
Setect to choose whether you want to play an MP3 file during a slide show.
You can select Music "ON" or "OFF".
Background Music Setting:
While the slide show is in progresa, MP3 files and folders under the same directoryare displayed.
Select a folder using the • or • button and press the ENTER button.The selected folder will be highlighted.Press the RETURN button again to return to the slide show screen.The selected background music is played.
>- if you turn Off the Background Music, even if the Background Music Settings havebeen set up, the background music will not be played.
List:
The file information is displayed as a folder or JPEG file.
To exit WISELINK mode, press the WISELINK button on the remote control.

Slideshow function information icon_ ed at the to left of the screen_,
Icon Current OSD Function
(Photo) SIideShow Photo SlideShow is in progress.
You are able to pause a SlideShow and Music bypressing the PLAY/PAUSE _ll button on the remotecontrol during a SlideShow.
Photo PauseTo resume the SlideShow, press the PLAY/PAUSE _*llbutton on the remote control again.
Pressing the (right) direction button on the remoteMove to Next Photo control allows you to move to the next photo.
Pressing the (left) direction button on the remoteMove to Previous Photo control allows you to move to the previous photo
:_ When selecting a photo file, the photo file information is displayed on the left side of the TV screen,such as the resolution, the date modified and the order of the file in the current directory (eg. 10th out of 15).
Such as the resolution
Date modified
current directory

Rotating.
t. Complete Steps 1 to 3 of "Using the WISELINK Menu". (Refer to page 65)
2. Press the 4 or _,-button to move to "Photo", then press the ENTER button.The saved file information is displayed as a folder or file.
3. Press the A, T, 4 and t,, buttons to select a file, then press the ENTER button.Pressing the button over a photo thumbnail displays the photo in full screen.
Press the INFO button to display the option (Start Slide Show, Rotate, Zoom, List).
Press the A or T button to select "Rotate", then press the ENTER button.
Press the A or _' button to select the required option (0°, 90°, 180°, 270°), thenpress the ENTER button.
To exit WISELINK mode, press the WISELINK button on the remote control.
>- The rotated file is not saved.
>- The Zoom/Slide Show option is disabled when the Rotate option is selected.
The Rotating function information icon (Displayed at the top left of the screen).
Icon Current OSD Function
Rotating (0°) This rotates a photo to its original position
Rotating (90°) This rotates a photo by 90 degrees
Rotating (!80 °) This rotates a photo by !80 degrees
Rotating (270 °) This rotates a photo by 270 degrees

Zoomina-in
t, Complete Steps 1 to 3 of "Using the WISELINK Menu". (Refer to page 65)
2, Press the 4 or I,_ button to move to "PhotC, then press the ENTER button.The saved file information is displayed as a folder or file.
3, Press the A, T 4 and _ buttons to select a file, then press the ENTER button.Pressing the button over a photo thumbnail displays the photo in full screen.
Press the INFO button to display the option (Start Slide Show, Rotate, Zoom, List).Press the A. or V button to select "Zoom', then press the ENTER button.Press the A or T button to select the required option (X1, X2_X4), then press theENTER button.
• Zoom(x 1): Restore the photo to its original size.• Zoom(x 2): Zoom-in to the photo x2.• Zoom(x 4): Zoom-in to the photo x4.
To pan up/down/left/right in the zoomed-in photo_ press the INFO button to exitoption menu_then press the A_ _', 4 and _ buttons.
Images with a resolution larger than 1280 X 720 are not supported.
The Rotate/Slide show option isdisabled when the Zoom option is selected.
To exit WISELINK mode_press the WISELINK button on the remote control.

Zoom function information icon _ ed at the to left of the screen}..
Icon Current OSD Function
Zoom (x 2) Zoom-in to a photo x2.
Zoom (x 4) Zoom-in to a photo x4.
Zoom (x 1) Restore a photo to its original size.
Pan Down Pan down to view the lower part of a zoomed-inphoto.
Pan Up Pan up to view the upper part of a zoomed-inphoto.
Pan Right Pan right to view the right side of a zoomed-inphoto.
Pan Left Pan left to view the left side of a zoomed-in photo.
_- The Rotate/Slide show option is disabled when the Zoom option is selected.

Using the IVlP3ListThis menu shows MP3 files from among the files saved on a USB memory device.
1, Complete Steps 1 to 3 of "Using the WISELINK Menu". (Refer to page 65)
2, Press the 4 or 1_ button to move to "Music", then press the ENTER button.The saved file information is displayed as a folder or file.
3, Press the & or _r button to select a file, then press the ENTER button.
To select all files or a file_ press the INFO button to display the Music menus.Press the ENTER button to setect "Play"_'Repeat Music' or "Deselect All".
• Pressing the ENTER button over a musical note icon immediately plays themusic file.
• Pressing the ENTER button over a folder icon shows the music files included inthe folder.
To select a fite on the next page, press the REW 4 4 or FF I,-)- button to moveto the next page.
4, Press the PLAY/PAUSE _111button while playing an MP3 file to pause the file.Press the STOP [] button to exit Play mode.
To exit WISELINK mode_press the WISELINK button on the remote control.
: Folder icon
: Music icon
This menu only shows flies with the MP3 file extension. Files with other fileextensions are not displaye&even if they are saved on the same USB device.
> The selected fite is displayed on the top with its playing time.
>- To adjust the music volume, press the VOL+ or VOL- button on the remotecontrol. To mute the sound, press the MUTE button on the remote control.
>_ FF _1,- or REW 44 button do not function during the play.
: Move to the previous
folder stage icon
Music function information icon (Displayed at the top left of the screen).
Icon Current OSD Function
(Music) All When all music files are being played.
(Music) One When a music file is being played.
(Music) Play/Pause When pressing the PLAY/PAUSE _,-IIbutton on theremote control while music is playing, The musicstops and the 'Play _text appears at the top of thescreen.
(Music) Stop When pressing the STOP [] button on the remotecontrol when music is stopped. The music resumesand the 'Stop _text appears at the top of the screen.
Music Repeat
t. Complete Steps 1 to 3 of "Using the WtSELINK Menu". (Refer to page 65)
2. Press the 4 or _,-button to move to "Music", then press the ENTER button.The saved file information is displayed as a folder or file.
3. Press the A or T button to select a file, then press the ENTER button.
To select all files or a flle_ press the INFO button to display the Music menus.Press the ENTER button to select "Play"_"Repeat Music' or ' Deselect All".
Press the ENTER button to select "Repeat Music".
>_ Select to repeatedly play MP3 files in the current folder.
You can select On or Off
• On: Plays back a music file or all music files repeatedly
• Off: Doesn't play back the music files repeatedly.
To exit WISELINK mode_press the WISELINK button on the remote control.

Using the Setup MenuSetup displays the user settings of the WISELINK menu.
1. Complete Steps 1 to 3 of "Using the WtSELINK Menu". (Refer to page 65)
2. Press the 4 or _,-button to move to "Setup"_then press the ENTER button.
3, Press the A or T button to select an item you wanL then press theENTER button.
4. Press the A or _' button to select the option, then press the ENTER button.
continued...

Slide Show Speed:
Select to control the slide show speed. You can select "Fast"_ "Normal" or "Stow".
Baekqround Music :
Select to determine whether to play an MP3 file during a slide show.
You can select Music "On" or Music "Off".
Baekqround Music Settinct:.
You can select the background music to play during a slide show. You can alsoselect the background music while a slide show is playing by pressing theINFO button and selecting the 'Background Music Setting" menu.
Repeat Music:
Select to repeatedly play MP3 files in the current folder.
You can select "On" or "Off".
* On: Plays back a music file or all music files repeatedly.* Off: Doesn't play back the music files repeatedly.
Screen Saver:
Select to set the waiting time before the screen saver appears.The screensaver will appear when no button is pressed for 1, 3 or 5 minutes.
To exit WISELINK mode, press the WISELINK button on the remote control.

What is Anynet+?
Anynet + is a function that enables you to control all connected Samsung devices that support Anynet+ with yourSamsung TV's remote.
Connecting Anynet + DevicesThe Anynet + system can be used only with Samsung devices that have the Anynet + feature. To be sure your Samsung devicehas this feature, check if there is an Anynet+ logo on it.
To connect to a TV
TV Anynet+ Device1 Anynet+Device2 Anynet+Device3
Connect the [HDMI 1],[HDMI 2] or [HDMI 3] jack onthe TV and the HDMI OUTjack of the correspondingAnynet + device using anHDMI cable.
To connect to Home Theater
TV
Optical Cable
Anynet+ Device1 Anynet+Device2
HDMI 1,3 Cable _-_
HomeTheater Anynet+Device3
HDMI1.3Cable _
1. Connect the [HDMI 1],[HDMI 2] or [HDMI 3]jack on the TV and theHDMI OUT jack of thecorresponding Anynet +device using an HDMtcable.
2. Connect the HDMI IN jackof the home theater andthe HDMI OUT jack of thecorresponding Anynet +device using an HDMIcabte.
> Connect the Optical cable between the Digital Audio Out (Optical) jack on your TV and the Digital Audio Input on the HomeTheater.
>_ Connect only one Home Theater.:_ When following the connection above, the Optical jack only outputs 2 channel audio. You wilt only hear sound from the Home
Theater's Front Left and Right speakers and the subwoofer. If you want to hear 5.1 channel audio, connect the DIGITALAUDIO OUT (OPTICAL) jack on the DVD player or Cable/Satellite Box (ie Anynet Device 1 or 2) directly to the Amplifier orHome Theater, not the TV.Please see the home theater's user manual for more information.
> Some HDMI cables may not supportAnynet + functions.Anynet + works when the AV device supporting Anynet+ is in the Standby or On status.Anynet + supports up to 12 AV devices in total. Note that you can connect up to 3 devices of the same type.

Setting Up Anynet +
The following settings help set the Anynet + functions.
To use theAn net + Function An net + HDMI-CEC} must be set to On
1. Press the Anynet + button.Press the A or _' button to select "Setup", then press the ENTER button.
2. Press the ENTER button to select "Anynet+ (HDMI-CEC)", then press the ENTERbutton.
3_ Press the A or T button to select "On", then press the ENTER button.
> The Anynet+ (HDMI-CEC) function is enabled.> If you select Off, Anynet + (HDMt-CEC) is disabled.> When the Anynet+ (HDMI-CEC) function is disabled, all the Anynet + related
operations are deactivated.
SettinancL_An net + Device to turn Off Automatically when the TV is Turned Off
2. Press the A or T button to select Auto Turn Off, then press the ENTER button.
3. Press the A or T button to select "On", then press the ENTER button.
> The "Auto Turn Off" function is enabled.
>- If you select "Off", the "Auto Turn Off" function is canceled.
Press the EXIT button to exit.
> The active source on the TV remote must be set to TV to use the Anynet + function.>- If you set Auto Turn Off to On, connected external devices are also turned off when the
TV is turned off. If an external device is still recording, it may or may not turn off.
Scanning and Switching between Anynet + Devices1. Press the Anynet + button.
:_ Anynet + devices connected to the TV are listed.
2,
3.
Press the _. or V button to select to a particular device and press the ENTER button.It is switched to the selected device.
If you cannot find a device you want, press the A or _' button to select "SearchingConnections", then press the ENTER button.
The rneassage "Configuring Anynet + connection..." is displayed.When searching devices completes, the connected devices are listed in the Anynet+menu.
Switching to the selected devices may take up to 2 minutes. You cannot cancel theoperation during the switching operation.The time required to scan for devices is determined by the number of connecteddevices.When the device scan is complete, the number of devices found are not displayed.Although the TV automatically scans devices when it is turned on using the POWERbutton, devices connected when the TV is already on are not displayed in the device list.In this case, select the Searching Connections menu to search devices.If you have selected external input mode by pressing the SOURCE button, you cannot +use the Anynet function. Make sure to
+ +switch to an Anynet device by using the Anynet button.

Anynet + Menu
The Anynet + menu changes depending on the type and status of the Anynet + devices connected to the TV.
Anynet + Menu Description
View TV Switches from Anynet + to TV broadcast mode.
Record Starts a recording. (This menu works only for a device supporting recording.)
(Device_Name) Menu Shows the menu of the connected device.Example: When a DVD Recorder is connected, the DVD Recorder's title menu appears.
(Device_Name) Operation Shows the play control menu of the connected device.Example: When a DVD Recorder is connected, the play control menu of the DVDRecorder appears.
Connect (Device_Name) Your TV connects to the corresponding device.
Receiver Sound is output through the receiver (home theater).
Setup You can set the Anynet+ (HDMI-CEC), auto turn off, and searching connections forusing Anynet +.
TV Remote Control Buttons Available in Anynet + Mode
Anynet + Device
Operating Status
After switching to the device, when the menu of thecorresponding device is displayed on the screen.
Numeric buttonsA/T/4/_-/ENTER buttonsColor buttonsEXIT button
4 4 (Backward search)!_ (Forward search)
[] (Stop)1_11(Play/Pause)
After switching to the device, while playing a file
After switching to the device, when you are watching a TVprogram
When Receiver is activated
Device with built-in Tuner CH A/T button
VOL +/- buttonAudio Device MUTE button
>_ The Anynet + function only works when the active source on the TV remote control is set to TV.>_ The REC button works only while in the recordable state.>_ You cannot control Anynet + devices using the buttons on the side of the TV. You can control Anynet + devices only using the
TV remote control.The TV remote control may not work under certain conditions, in this case, reselect the Anynet + device.
> The Anynet + functions do not operate with other manufacturers' products.>_ The ._ 4, 1__ operations may differ depending on the device.
Recording
You can make a recording of a TV program using a recorder.
Press the REC button.
Recording begins. (Only when the Anynet + enabled recording device connected.)
You can record the source streams by selecting "Record" after pressing the Anynet + button.>- Pressing the REC button wilt record whatever you are currently watching. If you are watching video from another device, the
video from the device is recorded.
Before recording, check whether the antenna jack is properly connected to the recording device. Toproperly connect anantenna to a recording device, refer to the recording devices users manual.

Listening through a Receiver (Home theater)You can listen to sound through a receiver instead of the TV speaker.
1. Press the Anynet + button.Press the A or T button to select "Receiver"_then press the ENTER button.
2. Press the ._1or 1_ button to select to "On", then press the ENTER button.Now you can listen to sound through the receiver.
3. Press the EXIT button to exit.
When the receiver (home theater) is set to On, you can hear sound output from the TV's Optical jack.When the TV is displaying a DTV(air) signal, the TV wilt send out 5.1 channel sound to the Hometheater receiver. When the source is a digital component such as a DVD and is connected to the TVvia HDMI, only 2 channeI sound witl be heard from the Home Theater receiver.If your receiver supports audio only, it may not appear in the device list.The receiver will work when you have properly connected the Optical IN jack of the receiver to the Optical Out jack of the TV.When using the WISELINK feature, sound may not output properly through the receiver.When listening through the receiver, there are restrictions for using the PIP and audio-related(MTS, Preferred language)menus.
Troubleshooting for Anynet +
Symptom Solution
Anynet + does not work. [] Check if the device isan Anynet + device. The Anynet + system supports Anynet +devices only.
[] Connect only one receiver (home theater).[] Check if the Anynet + device power cord is properly connected.[] Check the Anynet + device's Video/Audio/HDMI 1.3 cable connections.
+[] Check whether Anynet (HDMI-CEC) is set to On in the Anynet+ setup menu.[] Check whether the TV remote control is in TV mode.
[] Check whether it is Anynet + exclusive remote control.[] Anynet + doesn't work at a certain condition. (Searching channeis_ Operating
WlSELINK)[] When connecting or removing the HDMI 1.3 cable_please make sure to search
devices again or restart your TV.[] Check if the Anynet + Function of Anynet + device is set on.
I want to start Anynet +. [] Check if the Anynet + device is properly connected to the TV and check if the Anynet +(HDMI-CEC) is set to On in the Anynet + Setup menu.
[] Press the TV button on the TV remote control to switch to TV. Then press theAnynet + button to show the Anynet+ menu and select a menu you want.
I want to exit Anynet +. [] Select View TV in Anynet+ menu.[] Press the SOURCE button on the TV remote control and select a device other than
Anynet + devices.[] Press any of CH, CH LIST, PRE-CH, and FAV.CH to change the TV mode.
(Note that the channel button operates only when a tuner-embedded Anynet+ deviceis not connected.)
The message Connecting to [] You cannot use the remote control when you are configuring Anynet + or switching to aAnynet + device.., appears on the view mode.screen. [] Use the +remote control when the Anynet setting or switching to view mode is
complete.
The Anynet + device does not play. You cannot use the play function when Plug & Play is in progress.
The connected device is not [] Check whether or not the device supports Anynet + functions.displayed. [] Check whether or not the HDMI 1.3 cable is properly connected.
[] Check whether Anynet + (HDMI-CEC) is set to On in the Anynet+ setup menu.[] SearchAnynet + devices again.[] You +can connect an Anynet device using the HDMI 1.3 cable only. Some HDMt
cables may net support Anynet + functions.
The TV program cannot be Check whether the antenna jack on the recording device is properly connected.recorded.
The TV sound is not output Connect the optical cable between TV and the receiver.through the receiver.

Appendix
TroubleshootingIf the TV seems to have a problem, first try this list of possible problems and solutions.If none of these troubleshooting tips apply, call your nearest Samsung service center.
Problem Possible Solution
Poor aicture Try another channel.Adjust the antenna.Check alt wire connections
Poor souna udahty.
No p]c[ure or souna
Try another channel.Adjust the antenna.
Try another channel.Press the SOURCE button.Make sure the TV is plugged in.Check the antenna connections.
No sound or sound is too low a[ First check the volume of units connected to your TV (digital broadcasting receiver_DVD,maximum volume cable broadcasting receiver, VCR, etc.). Then, adjust the TV volume accordingly.
Picture rolls ver[ical y. Check alt wire connections
The TV oDerates erraticalI, unplug the TV for 30 seconds, then try operating it again.
The TV won't turn on.
Remote control malfunctions
"Check signai caDle message.
Make sure the walt outlet is working.
Reotace the remote control batteries.Clean the upper edge of the remote control (transmission window).Check the battery terminals,
Ensure that the signal cable is firmly connected to the PC source.
'Not Supported Mode" message. Check the maximum resolution and the frequency of the Video Adapter.Compare these values with the data in the Display Modes.
Digital broadcasting screenproblem.
Please check the digital signal strength and input antenna.
The image is too Hgntor too dark. Adjust the Brightness and Contrast.Adjust the Fine tuning.
Black bars on me screen.
Picture has a Red/Green orPink tint.
Closed Captioning qot worKing
Snowy picture
Make sure the broadcasl you're receiving is High Definition (HD).HD channels sometimes broadcast Standard Definition (SD) programming, which cancause black bars.Set your cable/satellite box to stretch or widescreen mode to eliminate the bars.
Make sure the Component cables are connected to the correct jacks.
If you are using a Cable/Satellite box, you must set Closed Captioning on the box,not your TV.
Your cable box may need a firmware upgrade. Please contact your Cable company.
Ghosting on Dic_ure This is sometimes caused by compatibility issues with your cable box.Try connecting Component cables instead.
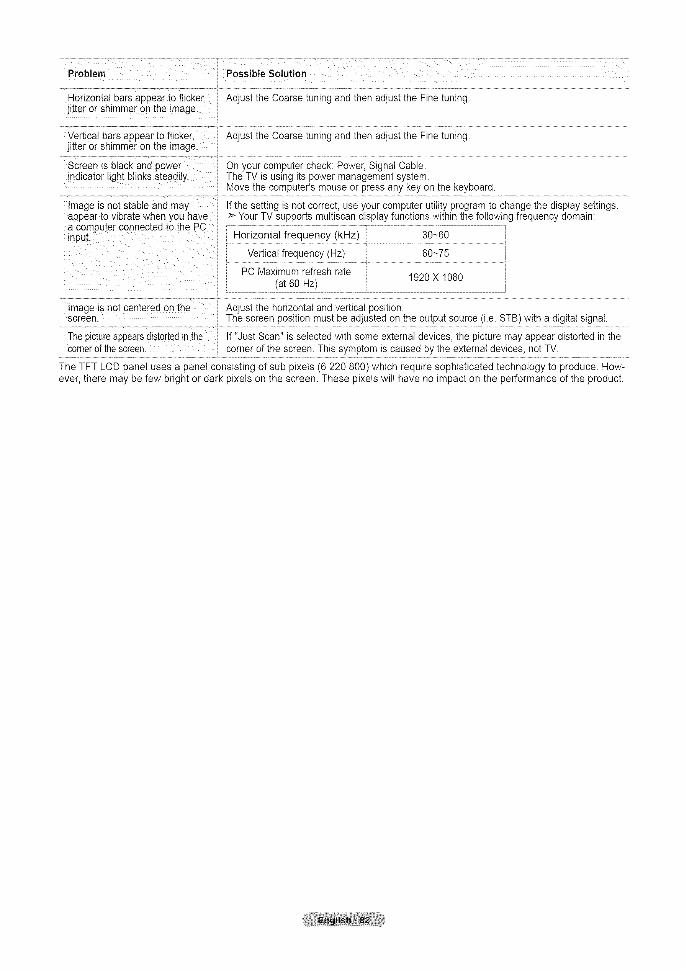
Problem PossibleSolution
Horizontalbarsappeartoflicker,AdjusttheCoarsetuningandthenadjusttheFinetuning.jitterorshimmerontheimage.
Verticalbarsappeartoflicker, AdjusttheCoarsetuningandthenadjusttheFinetuning.jitter or shimmer on the image.
Screen is black and power On your computer check: Power, Signal Cable.indicator light blinks steadily. The TV is using its power management system.
Move the computer's mouse or press any key on the keyboard.
Image is not stable and may If the setting is not correct, use your computer utility program to change the display settings.appear to vibrate when you nave >- Your TV supports multiscan display functions within the following frequency domain:
compu[er connec[ea to me PCtnDut. Horizontal frequency (kHz) 30~60
Vertical frequency (Hz) 60~75
PC Maximum refresh rate 1920 X 1080(at 60 Hz)
Ime je is nor cemerea on me Adjust the horizontal and vertical position.screen. The screen position must be adjusted on the output source (i.e. STB) with a digital signal.
The pictureappearsaistortedinthe If "Just Scan" is selected with some external devices, the picture may appear distorted in the
comer0f thescrten: .............. _°[ntr €'f!he screen: Th!s symp_:°m is caused bY !he ex!erna I de_/icts not TV- ...............
The TFT LCD panel uses a panel consisting of sub pixels (6 220 800) which require sophisticated technology to produce. How-ever, there may be few bright or dark pixets on the screen. These pixels will have no impact on the performance of the product.

Installing the Stand
<2> <3>
t, Place the TV face down on a soft cloth or cushion on a table.
2, Put the stand into the hole at the bottom of the TV.
3, Insert screw into the hole indicated and tighten.
Disconnecting the Stand
<2> <3> <4>
t, Place the TV face down on a soft cloth or cushion on a table.
2, Remove four screws from the back of the TV.
3, Separate the stand from the TV.
4, Cover the bottom hole with a cap.

Auto Wall-Mount Adjustment (Soldseparately)
Once the auto wall mount is installed, your TV's position can be easily adjusted.
TV Rear Panel Auto Wall-Mount
EX-UNK Cable (Not supplied)
Enterinq the menu
1. Press the A T, 4 or I_ button on your remote control.The Walt Mount Adjustment screen is displayed.
If the Wall Mount Adjustment screen is not displayed when clicking on a directionbutton while watching your TV, use the menu to display that screen.• Press the MENU butt on to display the menu. Press the A or T button to select
'Setup", then press the ENTER button.• Press the _, or T button to select 'Walt-Mount Adjustment", then press the
ENTER button.
Rememberin_l the Position
2. Adjust to the desired position using the A,'_,_,_ buttons.
>- If you press an arrow button when no OSD is displayed on the TV screen, theAdjustment screen appears.
Press the INFO button to reset. Press the ._ or _ button to select "Yes", thenpress the ENTER button.The position is initialized to the default setting.
3. Press the blue button.Press the A and _' buttons to select a save mode from either Position 1,Position 2 or Position 3 in order to save the current position.
:_ Tonot save the current position, press the RETURN button.
When selecting a save mode, you cannot use the Color buttons.
4. Press the ENTER button to save.
:_ When Position1 is selected, the message "Current position saved as Position1" isdisplayed.
5. Press the ENTER button.
>- The saved Position appears on the left side of the OSD.
Movin_l to the remembered #osition
1. Complete Step 1 of"Entering the menu".
2. Pressing a Color (Red, Green, Yellow) button moves the auto wall mount to thesaved position.
>- You can move the waft mount to one of the 3 pre-set positions by pressing theRed (Position 1), Green (Position 2) or Yellow (Position 3) buttons.
> If you adjust the positon after moving to a pre-set position, the position display wiltdisappear.
SLEEP SRS MTS _
>_ For installation, refer to the Installation Manual provided with the walt mount.
>_ For product installation and the installation and moving of the wall mount, make sure to consult a specialized installation company.
This installation manual is to be used when attaching the watl mount to a wall. When attaching to other building materials, pleasecontact your nearest dealer.
>- The auto walt mount will not work when Anynet + is operating.

Wall Mount Kit Specifications (VESA)Install your wall mount on a solid wall perpendicular to the floor.When attaching to other building materials, please contact your nearest dealer.If installed on a ceiling or slanted wail it may fall and result in severe personal injury.
........................................................................................46 _ 52 }............................................................................................600 * 400 i
LCD-TV .............................................................................................................700*400 .........................................457
(No VESA)M8
57 ~ 70 800 * 400
80 ~ 1400 * 800
42 ~ 50 600 * 400
55 ~ 70 800 *400PDP-TV ...................................................................................................................................................................................
63 No VESA
80 ~ 1400 * 800
M8
4
6
4
> Standard dimensions for walt mount kits are shown in the table above.
> When purchasing our wall mount kit, a detailed installation manual and atl parts necessary for assembly are provided.
>- Do not use screws longer than the standard dimension, as they may cause damage to the inside of the TV set.
> For walt mounts that do not comply with the VESA standard screw specifications, the length of the screws may differdepending on their specifications.
> Do not use screws that do not comply with the VESA standard screw specifications.Do not use fasten the screws too strongly, this may damage the product or cause the product to fall, leading to personal injury.Samsung is not liable for these kinds of accidents
> Samsung is not liable for product damage or personal injury when a non-VESA or non-specified walt mount is used or theconsumer fails to follow the product installation instructions.
> Our 57" and 63" models do not comply with VESA Specifications. Therefore, you should use our dedicated walt mount kitfor this model.
> Do not exceed 15 degrees tilt when mounting this TV.
///_ Do not install your Walt Mount Kit while your TV is turned on. |It may result in personal injury due to electric shock 1

Using the Anti-Theft Kensington Lock (depending on the model)The Kensington lock is a device used to physically fix the system when using it in a public place. The locking devicehas to be purchased separately. The appearance and locking method may differ from the illustration depending on themanufacturer. Please refer to the manual provided with the Kensington lock for proper use.
',"@@,t
<Optional>
>- The location of the Kensington Lock may be different depending on its model.
t, Insert the locking device into the Kensington slot on the LCD TV (Figure 1) and turn it in the locking direction (Figure 2).
2, Connect the Kensington lock cable.
3, Fix the Kensington lock to a desk or a heavy stationary object.

Specifications
Model Name
Screen Size {Diagonal)
PC Resolution
LN-T4069F i LN-T4669F
40 inches 46 inches
1920 x 1080 @ 60 HZ 1920 x 1080 @ 60 Hz
Sound
Outz Jt
DimenMon$ (WxOxH)
Body
With s[ane
WeightWith StandWithout stane
EnvironmentalConsiderations
Ooerating TemperatureOperating Humidity
10WX2
39,4 X 34 X 250 inches
(9998 x 87.0 x 634.3 ram)394 X 11.4 X 274 inches
(999.8 x 2899 x 5961 ram)
500 Ibs (22.7 kg)41 2 Ibs (18.7 kg)
50 °F to 104 °F (10 °C to 40 °C)10% to 80%, non-condensing
1OW X2
44.6 X 41 X 28.2 inches
(1133.8 x 104.0 x 715.2 mm)44.6 X 126 X 30.9 inches
Cl133.8 x 319.9 x 783.7 mm)
66.8 ibs (303 kg)
55.1 lbs (250 kg)
50 °F to 104 °F (10 °C to 40 °C)10% to 80%, non-condensing
Design and specifications are subject to change without prior notice.
>This device is a Class B digital apparatus.
> For the power supply and Power Consumption, refer to the label attached to the product.

Dimensions (LN=T4069F)
lL v j
TOP VIEW
JACK PANEL DETAIL 3.5"H X 9"W
30.4
•4 34.9 [1 b
19.7
% ,,
V-7i_ 22.8
FRONT VIEW I SIDE VIEW
3.4
\
7.9 (200 rnm)
7.9 (208 ram}
\ !
REAR VIEW
NOTE: All drawings are not necessarily to scale.Some dimensions are subject to change without prior noticeRefer to the dimensions prior to performing installation of your TV.Not responsible for typographical or printed errors.© 2007 Samsung Electronics America, Inc.

Dimensions (LN=T4669F)
L -- ,JTOP ViEW
JACK PANEL DETAIL 3.5"H X 9"W
44.6
Io
40.2 //
22.6
i_ 24.4
FRONT ViEW I SiDE ViEW
4.1
\
23.6 (600 mm)
15.7 (400 ram)
m
\ /
REAR ViEW
NOTE: All drawings are not necessarily to scale.Some dimensions are subject to change without prior noticeRefer to the dimensions prior to performing installation of your TV.Not responsible for typographical or printed errors.© 2007 Samsung Electronics America, Inc.

Contact SAMSUNG WORLDWIDE
If you have any questions or comments relating to Samsung products, ptease contact the SAIVISUNGcustomer care center.
Comment contacter Samsung dans le monde
Si vous avez des suggestions ou des questions concernant les produits Samsung, veuillez contacter le ServiceConsommateurs Samsung.
Contacte con SAMSUNG WORLDWIDE
Si tiene atguna pregunta o comentario referente a nuestros productos, por favor contacte con nuestro Servicio deAtenci6n at Cliente.
C°untrY i Cu;t0rnei Ca[e Ce nter_. Web Site Addr ess .................................. ....
Samsung Electronics Canada Inc., CustomerService 55 Standish Court Mississauga,Ontario L5R 4B2 Canada
CANADA 1-8O0-SAMSU NG(726-7864) www.samsung.com/caSamsung Electronique Canada Inc.,Service a la Clientele 55 Standish Court
Mississauga, Ontario L5R 4B2 Canada
Samsung Electronics America, Inc.U.S.A 1-800-SAMSUNG(726-7864) www.samsung.com/us I05 Challenger Road
i Ridgefield Park, NJ 07660-0511
BN68-01310B-00