UB'E EATURE" Panasonic" - Sears Parts Direct
64
UB'E EATURE" Panasonic" DVD/VCR DECK a..r.,,_n_ Operating Instructions Model No. PV-D4743/PV-D4743S I Connections and Initial Setup Procedures are on pages 12 to 17. Brlr_q DIGITAL mmliLaZmO MULTI FORMAT PLAYBACK *Ability to play back may depend on recording conditions. As an ENERGY STAR ® Partner, Matsushita Electric Corporation of America has determined that this product or product model meets the ENERGY STAR ® guidelines for energy efficiency, Please read these instructions carefully before attempting to connect, operate or adjust this product, Please save this manual. Spanish Quick Use Guide is included, (Guia para rApida consulta en espaSol estA incluida,) LSQT0674B
-
Upload
khangminh22 -
Category
Documents
-
view
2 -
download
0
Transcript of UB'E EATURE" Panasonic" - Sears Parts Direct

UB'E EATURE" Panasonic"DVD/VCR DECK
a..r.,,_n_ Operating InstructionsModel No. PV-D4743/PV-D4743S
I Connections and Initial Setup Procedures are on pages 12 to 17.
Brlr_qDIGITAL
mmliLaZmO
MULTI FORMAT PLAYBACK
*Ability to play back may depend on recording conditions.
As an ENERGY STAR ® Partner, Matsushita Electric Corporationof America has determined that this product or product modelmeets the ENERGY STAR ® guidelines for energy efficiency,
Please read these instructions carefully before attempting to connect, operate or adjust thisproduct, Please save this manual.Spanish Quick Use Guide is included,(Guia para rApida consulta en espaSol estA incluida,) LSQT0674B

Important Safeguards and PrecautionsFrFORYOURSAFETY'READANDRETAINALLSAFETY I OUTDOOR ANTENNA INSTALLATIONAND OPERATING INSTRUCTIONS. HEED ALL 1 SAFE ANTENNA AND CABLE CONNECTION
ARNINGS IN THE MANUAL AND ON THE UNIT ff an outside antenna or cable system is connected to the
I INSTALLATION I
1 POWER SOURCECAUTIONOperate only from a power source indicated on theunit or in this manual, ff necessary, have y,ourElectric Utility Service Company or Video ProductsDealer verity the power source in your home.
g POLARIZEDOR GROUNDING PLUGAs a safety feature, this product comes with eithera polarized power cord p_ug (one blade is widerthan the other), or a three-wire grounding type plug.
POLARIZED PLUG CAUTION:
This plug wil_only f_ into an outlet one way. it you cannotfully insert the plug, try reversing it. If it still will not fit,have a_ electrician instal_ the proper wal_ OLdJebDO notdefeat the safety feature by tampering with the p_ug.GROUNDING PLUG CAUTION:
This plug wil_ only fit into a three-hole groundingout_et. _Inecessary, have an electrician instal_ theproper outlet. DO not defeat the safety feature bytampering with the plug.
3 POWER CORDMake sure power cords are routed so that theyare not _ikely to have anything rest on them, rollover them, or be in the way of walking traftic.If an extension cord is used, make sure it alsohas either a polarized or grounded plug and thatthe cords can be securelvconnected.Frayed cords, damaged plugs, and damaged orcracked wire insulation are hazardous and shouldbe replaced by a qualified service technician.Overloaded outlets and extension cords are firehazards and should be avoided.
4 DO NOT BLOCK VENTILATION HOLESVentitation openings in the cabinet release heatgenerated during operation. _f they are blocked,heat build-up inside the unit can cause failures thatmay result in a fire hazard or heat damage tocasseftes or discs.For protection, foitow these ru_es:a. Never cover ventilation slots or the unit while in
use, or operate the unit when placed on a bed,sofa, rug, or other soft sudace.
b. Avoid built-in instaitation, such as a book caseor rack, unless proper ventilation is provided.
B PLACEMENT: AVOtD EXTREMELY HOT LOCATIONSOR SUDDEN TEMPERATURE CHANGESDo not place the unit over or near heater orradiator, in direct sunlight, inside cthsed vehicles,in high temperature [over t04°F (40°C)], or in over75% humidity. If the unit is suddenly moved froma cold place to a warm one, moisture maycondense in the unit and on the tape causingdamage. Never subject the unit to vibration,impact, or place it so that the sud_ce is titled asinternal parts may be seriously damaged.
6 TO AVOID PERSONAL INJURY• Do not place unsecured equipment on _ sloping
Surface.• DO not place this unit on _ny support that is not
firm, level, and adequately strong AThe unit could fal_ causing seriouinjury to a child or adult anddamage to the unit.
• An appliance and cartcombination should be movedwith care. Quick stops,excessive force, and uneven
sudaces may cause the appliance _nd cartcombination to overturn.
• Carefuity follow ait operating instructions anduse the manufacturer's recommendedaccessories when operating this unit orconnecting it to any other equipment.
2
equipment, be sure the antenna or cable system is groundedso as to provide some protection against built up staticcharges and voltage surges. _. _,_ -Section 810 of the National Electrical _,,_Code, ANSI/NFPA 70 (in Canada, ca
part I of the Canadian Electrical _ _._,.,_%_,Cede provides information _ /_f-_ ............with respect to proper grounding _ _-_.j_,'_=.'="of the mast and supporting .,=_ ......structure, grounding of the lead-in wire _#_to an _ntenna discharge unit, size of grounding conductors,location of antenna discharge unit, connection to groundingelectrodes and requirements for the grounding electrode.
2 KEEPANTENNACLEAROFHIGH VOLTAGEPOWERLINESOR CIRCUITSAn outside antenna system should be located welt away frompower lines, electric light or power circuits and where it will nevercome into contact with these power sources if it should happento fall. When installing an outside antenna, extreme care shouldbe taken to avoid touching power lines, circuits or other powersources as this could be fatal. Because of the hazards involved,antenna installation should be left to a professional.
I USING THE UNIT IIf the unit has been in storage or moved to a new location,refer first to the INSTALLATION section of these safeguards.t KEEP THE UNIT AWAY FROM WATER OR MOISTURE OF ANY KIND,
2 IF EQUIPMENT tS EXPOSED TO RAIN, MOISTURE, ORSTRONG IMPACT, unplug the unit and have it inspected by aqualified service technician before use.
3 DURING AN ELECTRICAL STORMDuring a lightning storm, whether indoors or outdoors, orbefore leaving the unit unused for extended periods of time,disconnect all equipment from the power source as well asthe antenna and cable system.
4 WHEN THE UNIT IS PLUGGED IN• Never expose the unit to r_in or water. DO NOT OPERATE
if liquid has been spiited into the unit. _mmediately unplugthe unit, and have it inspected by a service technician.Fire and shock hazards can result from electrical shortscaused by liquid contact inside.
• Never drop or push any object through openings in the unit.Some internal parts carry hazardous voltages and contactcan cause electric shock or fire hazard.DO not put any foreign object on the disc tray.
• Avoid placing the unit directly above or below your TV setas this may cause electrical interference. Keep _ll magnetsaway from electronic equipment.
5 USING ACCESSORIESUse only accessories recommended by the manufacturer toavoid risk of fire, shock, or other hazards.
6 CLEANING THE UNITUnplug the unit. Then, use a clean, dry, chemicaity untreatedcloth to gently remove dust or debris. DO NOT USE cleaningfluids, aerosols, or forced air that could over-spray, or seepinto the unit and cause electrical shock. Any substance suchas wax, adhesive t_pe, etc. may mar the cabinet surface.Exposure to greasy, humid, or dusty areas may adverselyaffect internal parts.
I SERVICE I1 DO NOT SERVICE THIS PRODUCT YOURSELF
If, after carefully following the detaited operatinginstructions, this product does not operate properly, do notattempt to open or remove covers, or make anyadjustments not described in the manual. Unplug the unitand contact a qualified service technician.
2 IF REPLACEMENT PARTS ARE REQUIREDMake sure the service technician uses only parts specifiedby the manufacturer, or those havthg the same safetycharacteristics as the edgina{ paris. The use of unauthorizedsubstitutes may result in fire, electric shock, or other hazards.
3 HAVE THE SERVICE TECHNICIAN PERFORM A SAFETY CHECKAfter any service or repairs to the unit, request the servicetechnician to conduct a thorough s_fety check asdescribed in the manufacturer's service literature to ensurethat the unit is in s_fe operating condition.

Safety Precautions/Mesures de sdcuritdWARNING: To prevent fire or shock hazard, do not expose this
equipment to rain or moisture.CAUTION: To prevent electric shock, match wide blade of plug to
wide slot, fully insert.Avertissement: Afin de pr_venir tout risque d'incendie ou de chocs
dlectriques, ne pas exposer cet appareil & la pluie ouune humiditd excessive.
Attention: Pour _viter les chocs _lectriques, introduire la lame laplus large de la fiche darts la borne correspondante de laprise et pousser jusqu'au fond.
CAUTION: TO HEDUCE THE HISK OFELECTRIC SHOC}
{3Q NOTR_OVE COVS£ (0£ BACK)
NO US_R-SERVLC£_LE PA£TS _NS_I)E
£EFER SERViCinG TO QUAklF_ED 9ERVrCE PERSONN_
This symbol warns the user that uninsulated voltagewithin the unit may have sufficient magnitude to causeelectric shock.Therefore, it is dangerous to make any kind of contactwith any inside part of this unit,
This symbol alerts the user that important literatureconcerning the operation and maintenance of this unithas been included. Therefore, it should be readcarefully in order to avoid any problems.
CAUTION:
UNIT IS A CLASS I LASER PRODUCT.HOWEVER THIS UNIT USES A VISIBLE LASER BEAM WHICH COULDCAUSE HAZARDOUS RADIATION EXPOSURE IF DIRECTED.BE SURE TO OPERATE THE UNIT CORRECTLY AS INSTRUCTED.
WHEN THIS UNIT IS PLUGGED TO THE WALL OUTLET, DO NOT PLACEYOUR EYES CLOSE TO THE OPENING OF THE DISC TRAY AND OTHEROPENINGS TO LOOK INTO THE INSIDE OF THIS UNIT.
USE OF CONTROLS OR ADJUSTMENTS OR PERFORMANCE OFPROCEDURES OTHER THAN THOSE SPECIFIED HEREIN MAY RESULT INHAZARDOUS RADIATION EXPOSURE.
DO NOT OPEN COVERS AND DO NOT ATTEMPT TO REPAIR YOURSELF.REFER SERVICING TO QUALIFIED PERSONNEL.
' CAUTION:
LASER RADIATIONWHEN OPEN DO NOT
STARE INTO BEAM.
ATTENTION:I RAYONNEMENT| LASER EN CAS| D'OUVERTURE.| NE PAS REGARDER
DANS LE FAISCEAU.
(Inside of product)
FCC NOTE:This equipment has been tested and found to comply with part 15 of the FCC Rules. These limits aredesigned to provide reasonable protection against harmful interference when operated in a residentialenvironment. If this equipment does cause interference to radio or television reception, which can bedetermined by turning the equipment off and on, use the equipment in another location and/or utilizean electrical outlet different from that used by the receiver.If necessary, consult the dealer or an experienced radio/TV technician for help. The user may find thebooklet, "Something About Interference" available from FCC local regional offices helpfuh
FCC Caution:To assure continued compliance, (example- use only shielded interface cables when connecting toother devices.) Any changes or modifications not expressly approved by the party responsible forcompliance could void the user's authority to operate this equipment.
FCOWaming: Any unauthorized changes or modifications to this equipment would void the user'sauthority to operate.
Region Management Information:This DECK is designed and manufactured to respond to theRegion Management Information that is recorded on a DVDdisc. If the Region number described on the DVD disc doesnot correspond to the Region number of this DECK, thisDECK cannot play this disc.OThe Region number for this DECK is "1".OThe Player will play DVD-Video marked with labels
containing "1" or "ALL".
I Example:
3

Congratulationson your purchase of one of the mostsophisticated and reliable products on themarket today. Used properly, it will bring youyears of enjoyment. Please fill in theinformation below. The serial number is on thetag located on the back of your DECK.• Date of Purchase• Dealer Purchased From• Dealer Address• Dealer Phone No.• Model No• Serial No.
[] Remote ControlLSSQ0374 (PV-D4743)LSSQ0375 (PV-D4743S)
'@
[] Batteries 2 "AA"
[] RF Coaxial CableLSJA0372
jJ
J
To order accessories, call toll freet-800-332-5368.
Disc formats supported by this DECKDECK can play back discs bearing any of the followingmarks: [Discs Played 8cm (3") or 12cm (5")]
Logo Disc type
DVD (DVD-Video)
DVD-R (DVD-Video formatted_. discs [finalized])
_]_ Video CO
CD (CD-DA)_]_'_ CD-R/CD-RW (CD-DA,Video CDMmtL_ formatted discs [finalizedj,
WMA_ MP3_ JPEGDiscs which cannot be played• DVD with Region No. other than "1" or "ALL'• DVD of PAL system, DVD-Audio, DVD-RAM, DVD-ROM,
DVD-RW, DVD+RW, CD-ROM, CDV, CD-G, CVD, SVCD,SAC[:), Divx Video Disc and Photo-CD
O• Do not use irregularly shaped discs (e.g. heart-
shaped), as these can damage the unit.• It may not be possible to play CD-R, CD-RW and
DVD-R in all cases due to the type of disc orcondition of the recording.
Handling precautions• Sticking a label on the disc may impair DVD-R
playback.• Do not attach sticker to discs. (Do not use discs
with exposed adhesive from tape or left overpeeled-off stickers.)
• Only hold disc by edges as shown below.Fingerprints, dirt and scratches can cause skippingand distortion.
• Do not write on label side of disc.• Never use record cleaning sprays, benzine, thinner,
static electricity prevention liquids, or any othersolvent.
_ j l)Opencover.
2) marked,insertbatteries as
3) Close cover.
[] Battery replacement caution• Do not mix old and new batteries.• Do not mix alkaline with manganese
batteries.
• Do not try to close disc tray when disc Vis not properly placed.
To clean disc surface OWith a soft, damp (water only) cloth,gently wipe from the center hole to the (" _ZZ)-*_outer edge as shown below. (Wiping in acircular pattern will scratch the surface.) X
If disc is brought from s cold to awarm environment, moisture mayform on the discWipe away moisture with a soft, dry. lint-free clothbefore using disc. (See above.)Improper disc storageDiscs could be damaged if stored or left in areas:• exposed to direct sunlight,• that are humid or dusty.• near heat (i.e. heater, radiator, etc.).
4

I]L,_J_wJ_w_ LwJJ _w_l ILILS_J
Important Safeguards and Precautions ............................ 2, 3
Before Using ............................................................................ 4DECK & Cassette Information ........................................... 6,7
Location of Controls ....................................................... 8 ~ 10
Displays (On Screen Displays and Multi Function Display) .................... 1 1Connections .................................................................. 12 ~ 15
Initial Setup for Basic Connections (Ready to Play) .......... 16, 17
Reset Language, Channels, Clock, VCR's Output Channel ... 18, 19Playback/Record on a Tape ........................................... 20, 21
Basic DVD Operation ...................................................... 22, 23
Timer Recording .............................................................. 24, 25MTS Broadcast/VHS Hi-Fi Stereo System .................... 26, 27Multi-Brand Control Feature ........................................... 28, 29Tape Operation (SearchSystem) ....................................... 30 ~ 32
Special VCR Features ..................................................... 33, 34Copying Your Tapes (Dubbing)......................................................... 35
Disc Operation ............................................................... 36 ~ 40DVD Operation using On-Screen Displays ................. 41 ~ 42MP3/WMA/JPEG Playback Operation .......................... 43 ~ 45DVD Lock Feature ................................................................. 46
Settings for DVD Operation .......................................... 47 ~ 49
Language Code List .............................................................. 50
Warning and Instruction Displays ........................................ 51Before Requesting Service ............................................. 52, 53Limited Warranty ............................................................. 54, 55Customer Services Directory ............................................... 55Spanish (EspaSol) Quick Use Guide ............................ 56 ~ 61Index ................................................................................. 62, 63

Playing older or damaged tapes may eventuallycause video heads to become clogged.
Video Head Clog SensorDuring playback, thisscreen appears ifclogging is detected.To remove screen,press PLAY on theremote or DECK.
• Use "dry" type head cleaning cassetteonly. (Part NO.NV_TCL30PTis recommended.)
• Follow cleaning tape instructions carefully.Excessive use of tape can shorten head life.
• If head clog symptoms persist, contact yournearest servicenter by visiting our Web Site(see p. 55).
Break off the tab toprevent recording.
Record Tab
Screw driver j
To record again
Cover the holewith cellophane tape.
Only use tapes with the _ mark in this DECK.
Tape Speed Type of Video CassetteSetting T6O T120 T160
SP 2 HoursStandard Play) t Hour 2 Hours 40 Minutes
LP 2 Hours 4 Hours 5 Hours(Long Play) 20 Minutes
SLP 3 Hours 6 Hours 8 Hours(Super Long Play}
Use a soft cloth or dusting attachment of a vacuum cleaner to remove dust from the ventilation holeson the back sides and bottom of the cabinet. Plastic surfaces are easily scratched and can bemarred by alcohol and various solvents. Avoid excessive use of oil-based furniture polishes sincethe materials used in the cabinet will accumulate more dust. We recommend using a non-abrasive,antistatic cleaner and polisher.
Digital Auto PictureAutomatically controls the video output signal for less noise depending on the tape condition.Digital Auto TrackingContinuously analyzes the signal and adjusts for optimum picture quality.
Manual Tracking Control(to reduce picture noise)Use during Playback and Slow Motion mode to reduce picture noise.Press CR (TRACKING) _ on the remote control or on DECK until the picture clears up.To return to Auto Tracking, press POWER off, then on again a few seconds later.
:b
V-Lock Control (to reduce picture iitter'_In Still mode, CH(TRACKIN(_) _ 6pera_[e as a V-Lock control.
6

Power Source:Power Consumption:Video Signal:Video Recording System:Audio Track:Tuner:Broadcast Channels:CABLE Channels:
Input/Output Terminal:input Terminal:Output Terminal:
Operating Temperature:_vPeerating Humidity:
ight:Dimensions:
Discs Played(t) DVD-Video Disc
(2) Compact Disc
120 V AC, 60 HzPower On: Approx. 32 watts, Power Off: Approx. 4 wattsEIA Standard NTSC color4 rotary heads helical scanning system1 track (Normal), 2 channel (Hi-Fi Audio Sound)
VHF 2 - 13, UHF 14 ~ 69Midband A through I (14 - 22), Superband J through W (23 - 36)Hyperband AA ~ EEE (37 ~ 64), Lowband A-3 ~ A-1 (95 - 99)Special CABLE channel 5A (01), Ultraband 65 - 94, 100 ~ 125
Audio/Video Line Input/Output, RF Input/OutputAudio/Video Line Input (Front)S-Video Output (DVD only), Component Video Output (DVD only)Audio Output 2 (L), (R)
5 °C - 40 °C (41 °F ~ 104 °F)10%-75%4.9 k._ (10.8 Ibs).430 (W) x 95.5 (H) x 344 (D) mm16-15/16" (W) x 3-12/16" (H) x 13-9/16" (D) inch
5"5"_12 cm) single-sided double-layer112 cm) single-sided single-layer5" (12 cm) double-sided double-layer (one layer per side)3" (8 cm) single-sided single-layer3" (8 cm) single-sidod double-layer3" (8 cm) double-sidod double-layer (one layer per side)5" (12 cm) disc
CD-DA, Video CD) 3" (8 cm) disc(CD-R/CD-RW, MP3, WMA, JPEG
Digital Audio Output: Digital Optical ConnectorPickup: Wavelength: 655 nm (DVD), 790 nm (Video CD/CD)
Laser power: CLASS IINote: • Designs and specifications are subject to change without notice.
Angle: Some DVD discs feature scenes simultaneously shot from different angles.The ANGLE button can be used to view the scene from different angles.(ANGLE indicator lights on DECK when a scene recorded at differentangles is detected.)
Chapter Number:Titles are subdivided into numbered sections. You can quickly search fora favorite scene using these numbers.
DVD: A high-density optical disc on which high-quality pictures and sound havebeen digitally recorded. DVD incorporates new video compressiontechnology (MPEG II) and high-density recording technology which allowentire movies to be recorded with incredible playback quality.
Playback Control:With Video CD (version 2.0), scenes or information may be selected forviewing or listening from an interactive menu that appears on the TV screen.
Subtitles: Written dialogue which appears at the bottom of the screen.Time Number: The elapsed play time from the start of a disc or title. Use to quickly find
scenes. (May net work with some discs.)Title Number: For DVD discs with two or more titles, the title is numbered as title 1, title 2, etc.Track Number: Numbers assigned to tracks on Video CDs and CDs to allow specific tracks
to be quickly located.Video CD: CD containing picture and sound with same quality level as video tape.
This DECK also supports Video CDs with playback control (version 2.0).
Apparstus Claims of U.S. Patent Nos. 4,631,603, 4,577,216, 4,819,098 and 4,907,093,licensed for limited viewing uses only_ ....
certain U.S. Patents and other intellectual property rights owned by Macrovision Corporation andThis product incorporates copyright protection technology that is protected by method claims of
I other rights owners. Use of this copyright protection technology must be authorized by MacrovisionCorporation, and is intended for home and other limited viewing uses only unless otherwiseauthorized by Macrovision Corporation. Reverse engineering or disassembly is prohibited. 7

[_ei_";J._ILeJl LeJl L_eJII3LeJIE:']
EJECT/OPEN / CLOSEpp. 20, 22
PC
NUMBER keys
AC_ONpp. 18, 47
SET
VCR modep. 28
STOPpp. 20, 22
FAST FORWARD /SEARCH/SLOW+pp. 20, 23REWIND / SEARCH/SLOW-
pp. 20, 23PAUSE / STILL Jpp. 20, 23COMMERCIAL SKIP /ZEROpp. 31, 32 /
i
ANGLEp. 37 ,_
AUDIO (SAP / Hi-Fi)pp. 27, 36
COUNTERp. 32
VCRiTVp. 21
RECORDp. 21
ENTER
PROS SPEED DISPLAY
Bold: VCR FunctionItalic: DVD FunctionBold Italic: VCR and DVD FunctionsNormal: Others
j INPUTjJ p. 35
TV modep, 28
CHANNEL& / •TRACKING/V-LOCK
pp. 6, 21
VOLUME +/-p, 28
ADD/DELETE / CLEAR
pp. 19, 39, 46MENU
p, 38SELECTAV<,
DVD modep. 28
PLA Ypp. 20, 22SKIPSKIP
p. 23TITLEp. 38
ZOOMp, 37
, / SUB TITLEp. 36
Virtual Surround Sound /ENTER
pp. 23, 28TAPE POSITION /VOLUME ADJUST
p. 34, 40
PROGRAM fp. 24
EJECT button: When this button is pressed in VCR mode, the tape is ejected.This button is inoperative if pressed during recording.If pressed in DVD mode, the disc tray opens or closes.
pp, 22, 30
DISPLAYp. 11, 41
SPEEDp. 21
8

Bold: VCR FunctionItalic: DVD FunctionBold Italic: VCR and DVD FunctionsNormal: Others
STOP/EJECTp. 20FAST FORWARD/SEARCHp. 20PLAYp. 20REWIND/SEARCHp. 20
POWER
Audio/Video_
Input Connector 2
TRACKING/V-LOCKpp. 6, 21
RECp. 21
CassetteCompartment
If the disc cannot be removed...First, unplug DECK. Then, prepare a rigidwire (e.g. an extended paper clip) and,applying moderate force, insert it straightinto the hole at the base of the tray.The tray will eject a little. Now, pull the trayall the way out and remove the disc.
Over 2 inchesio_,2_,_s
u_ OPEN/CLOSE
p. 22
,Jl
_ PROGRESSIVE
Multi FunctionDisplay
p. ll
RemoteSensor
p. 10PAUSE
p. 23SKIPSKIP
p. 23PLA Yp. 22
STOPp, 22
Use when moving DECK to new location, or if a mistake was made in the initialSetup section (return to Factory Setting).• Make sure a tape is not inserted in the DECK.
i11! !I r ==== 7 1
I "2
J
] Turn DECK Power on.
t) Press and hold both VCR PLAYand CHANNEL • on the DECK formore than 5 seconds.• The power shuts off.
Do "Doing Initial Setup (Ready toPlay)" on page 16.
9

Bold: VCR Function Italic: DVD FunctionBo/d ltalic: VCR and DVD Functions
='. " l • I I'][I
AC Power Plug• While plugged into an AC outlet,
this DECK consumes 4 W ofelectrical power in off mode.
Component Video OutputConnector (Y, P_, PR) (DVD Only)p. 13
VHF/UHF Antenna Output Terminalp.t2
VHF/UHFAntenna InputTerminalp. 12
VideoOutput VideolnputConnector Connectorp. 12 p. 35
Audio InputOptical Digital Audio S-Video Out Audio Output 2 Connec_or {UR)Output Connector Connector Connector (UR)
(DVD Only) (DVDfo,0nlY)f3 P" p. 35p. 15 PP. 13 Audio Output l
Connector (LIR)p. 12
The followin 9 table shows the status of the output jacks when in VCR or DVD mode.
_ _. Video Output Component 5-VIDEO OUTAudio Out t Video OutputAudio Out 2
VCR YES N/A N/A
DVD YES YES
i_l_l o PROG functions on the remote are not available when using Component Video Outputand S-VIDEO OUT. Please set TV to either RF INPUT or VIDEQ INPUT, and then pressPROG.
•To enjoy PROGRESSIVE SCAN video
(1).Conr_e_t Component Video Output to the component video input terminals of a television.(See p. 13.)
(2). When the PROGRESSIVE button is pressed, the ON lamp lights up (see p. 9) and thePROGRESSIVE SCAN signal is output from the Component Video Output Connector.
Note• The PROGRESSIVE button can be operated when the DECK is in DVD function mode.• The screen may shift oft-center when using progressive output. Please ad)ust the screen
position if this ocsiJrs. (Refer to your TV manuaL)• The DECK outputs video signals (not PROGRESSIVE SCAN) from the "VIDEO OUT' and "S-
VIDEO OUT" terminals when the ON lamp is tit,
10

Function & Channel Displays
CH08 When a function buttonis pressed, e.g. PLAY,or you changechannels, a 5-seconddisplay appears.
Blank Tape/No Video Signalindications
Whenever a blank section of a tapecomes up in Play mode, or when theselected channel has no broadcastsignal with Weak Signal DisplayFeature (p. 33) set to OFF, the TVscreen will turn solid blue.
VCR Status & Clock Displays Function StatusTO display or remove \\\\
overlay at right, Rec Time Remainir÷ press DISPLAY. (OTR mode only,
see p. 21.)
Current Time Channel/
/
12:00AM CliO2-0:12:34
i_$ApMONO
Broadcast AudioBeing Received(See p. 26.)
Tape Speed(See p. 6.)
VCR mode IndicatorLights up whenDECK is VCR mode.
Tape IndicatorLights up when a tape _._is inserted.
Hi-Fi Indicator
Lights up when Hi-Fi audiois monitored in Play mode.
ANGLE Indicator /
Lights up when a scenerecorded at differentangles is detected.See p. 37. (DVD only).
AM/PMIndicator
Clock/Status/Channel/Speed DisplayDisplays the current time. Briefly displays DECKstatus when a function button is pressed. Brieflydisplays the channel number, or "Lf" or "L2" whena channel or line input is selected. Briefly displaysthe recording speed when SPEED is pressed.
DVD mode IndicatorLights up whenDECK is DVD mode.
DISC Indicator/ Lights up when a disc
is inserted.
REC Indicator
Lights up duringrecording.
\\Timer Indicator
Lights up when DECK is setfor Timer Recording, or whenOne Touch Recording (OTR)is used. Flashes when TimerRecording is set, but a tapehas not been inserted intoDECK and when a powerinterruption occurs duringTimer Programming.
11

• If your"IV has AUDIO and VIDEO IN terminals, connect them to DECK for higherquality picture and sound.
• You can enjoy stereo sound even if your TV is not stereo by connecting a stereoamplifier to DECK.
• Connect DECK and TV with an RF Coaxial Cable _ (supplied) or an AV Cable @
(net supplied) as shown in the figure below.
II DSSReceiver_DECK_TV II DECK_TV III Cable Box d_DECK_I, TV
D 1/D/VCR DECK
Disconnect antenna or oab{e _'rom TVand connect to DECK.
2 Connect DECK to "PCwith P,F Coaxial Cable.
a_ RF COAXIAL CABLE
\\
\_l AV CABLE(notsuppLied)
WARNING jWhen using "Nut type" RF coaxial cables, tighten with ]
fingers only. Overtightening may damage terminals. J
Note to CABLE system installer , ]
This reminder is provided to call the CABLE system installer s attention to Article 820-40 of theNEC in USA (and to the Canadian Electrical Code in Canada) that provides guidelines for propergrounding and, in particular, specifies that the cable ground shall be connected to the grounding
system of the bai{ding, as c(oss to the point of cabte entry as practical

• With a Cable Box (DECK_Cable Box=I_TV) • viewany(including
D _D/_C_ DECK TV scrambled)channel
• Connect With Two Cable Boxes
D VD/VCR DECK_NT"I
I Cable Box
O O VIDEO
TV
• use RemoteControl to select
channels without
using Multi-brandcoDtFo] fe2,ture.
• record and view
both scrambledand unscrambledchannels if
additional
equipment isadded.This connection
requires: twoconverter boxes,
an A/B swffch,
and a 2-waysplitter.
record
scrambledchannels.
• view a channelother than the
one selected
for any type of
recording.
• do a Timer
recording of achannel unless
you select it onthe Cable Box.
_)Connect AUDIO OUT2 (L, R) to the AUDIO IN (L, R) of the TV. (audio input for COMPONENTor S-VIDEO mode).
@)If your TV has COMPONENT VIDEO INPUT, connect to COMPONENT VIDEO OUT.If your TV does not have COMPONENT VIDEO INPUT but has S-VIDEO INPUT, connect toS-VIDEO OUT.
_3_When in DVD mode, set your TV to either COMPONENT VIDEO IN or S-VIDEO IN.
_• You can watch DVDs through the S-VIDEO or COMPONENT VIDEO, VHF/UNF OUT TO TV,and VIDEO OUT connections to your TV. The VCR and TUNER pictures are available onlyfrom the VIDEO OUT and VRF/UNF OUT TO TV connections to your TV.
• PROG functions on the remote are not available when using S-VIDEO OUT and COMPONENTVideo Output. Please set TV to either RF INPUT or VIDEO INPUT, and then press PROG.
• TV must have capability to accept and display a progressive scan signal to usePROGRESSIVE mode. Consult your TV operating instructions.
DVD/VCR DECK From DECK'sIV A/V OUTPUT
13

I_ Ready Checklist[] Turn down the volume, then turn DECK, as well as other equipment to be connected,
off before proceeding with connection.[] Do not block ventilation holes of any of the equipment and arrange them so that air can
circulate freely.[] Read through the instructions before connecting other equipment.[] Ensure that you observe the color coding when connecting audio and video cables.
• Connecting Amplifier (2ch stereo system) [Analog connection]DVD/VCR DECK Speaker Amplifier Speaker
AUDIO tNR L
Enjoying digital audio output from the digital audio output connectorNotes onaudio output from the optical digital audio output connector
Disc Sound recording format Optical digital audio output from connector
DVD Dolby Digital Dolby Digital bitstream (1-5.1 ch)or PCM (48 kHz sampling/16 bit only) *_
Linear PCM Linear PCM (2ch)(48/96 kHz 16/20/24bit) (48 kHz sampling/16 bit only) .2
DTS Bitstream or PCM (48 kHz sampling/16 bit only)*
VideoCD MPEG 1 PCM (44.1 kHz sampling)CD Linear PCM Linear PCM (44.1 kHz sampling)
MP3 MP3 Linear PCM (It depends on the MP3 file)
WMA WMA Linear PCM (It depends on the WMA file)
"1 The type of audio output from the connector can be selected by the Settings for DVDOperation. (See p. 46.)
*2 Sound having 96 kHz sampling is converted into 48 kHz sampling when it is outputfrom the DECK's optical digital audio output connector.
For your reference:• Dolby Digital is a digital sound compression technique developed by the Dolby Laboratories
Licensing Corporation. Supporting 6.1-channel surround sound, as well as stereo (2-channel)sound, this technique enables a large quantity of sound data to be efficiently recorded on a disc.
• Linear PCM is a signal recording format used in CDs. While CDs are recorded in 44.1 kHz/16 bit,DVDs are recorded in 48 kHz/16 bit up to 96 kHz/24 bit.
• If you have a Dolby Pro Logic Surround decoder, you will obtain the full benefit of Pro Logic fromthe same DVD movies that provide full 5.1 channel Dolby Digital soundtracks, as well as fromtitles with the Dolby Surround mark. For information on Panasonic or Technics Dolby Pro LogicSurround Sound Decoders please contact your local dealer.
Manufactured under license from Digital Theater Systems, Inc. US Pat. No. 6,451,942, 5,956,674,5,974,380, 6,978,762 and other world-wide patents issued and pending. "DTS" is a registeredtrademark of Digital Theater Systems, Inc. Copyright 1996, 2000 Digital Theater Systems, Inc. Allrights reserved.
Manufactured under license from Dolby Laboratories."Dolby" and the double-D symbol are trademarks of Dolby Laboratories.
14

• Connecting Amplifier (5.1 ch Surround system) [Digital connection]DECK,I'Dolby Digital Decoder =l,Amplifier,bSpeaker
or
DECK,_ DTS (digital theater systems) Decoder =l,Amplifier =l,Speaker
When DVDs recorded in Dolby Digital or DTS are played, Dolby Digital bitstreamor DTS bitstream is output from the DECK OPTICAL digital audio output connector.When DECK is connected to a Dolby Digital decoder or DTS decoder, you canenjoy theater-quality audio in your home. [An optical digital audio cable (optional)is required when an optional Dolby Digital decoder or DTS decoder is used.]
Notes on connecting an optical
digital audio cable (optional)
• Firmly conrtect the cable to theConnector.
/ Surround Surround5_eaker 5_eaker
5.1ch Surround s
(Real')b¥ontSpeaker
Optical DigitalAudio Cable
(optional)
To OpticalDigital AudioInput Connector
Caution for optical digital audio output connector:• When connecting an amplifier (with an Optical Digital Input Connector) which does not
contain the Dolby Digital or DTS decoder, be sure to select "PCM" at "Dolby Digital"and "PCM" at "dts" of the Settings for DVD Operation "AUDIO OUTPUT" (see p. 48).Otherwise, any attempt to play DVDs may cause such a high level of noise that it maybe harmful to your ears and damage your speakers.
• When a Dolby Digital/DTS decoder is connected, please select "Bitstream" at "dts" or"Dolby Digital" of the Settings for DVD Operation "AUDIO OUTPUT".If "PCM" is selected, there will be stereo sound. (See p. 48).
• Video CDs and CDs can be played as usual.Note:• Some DTS decoders which do not support DVD-DTS interface may not work properly with
DECK.
15

3
Turn TV on.
See connections (_ RF Coaxial Cable Connection and @ AV Cable Connection on p. 12.<RF Coaxial Cable Connection>
Set TV to channel 3.
<AV Cable Connection>Set TV to VIDEO.
[DECK "_ TV]
• Go to "Doing Initial Setup (Ready to Play)." (See below.)
[Cable Box ÷ DECK ->-TV], [DSS ->-DECK ÷ TV]
• Turn on Cable Box and set it to your Public Broadcasting Station (PBS) channelin your time zone.
• If you use a DSS Receiver, it must be turned off.
Press VCR on remote for VCR mode.
Plug DECK Power Cord into AC wall outlet. DECK comes on and auto channeland clock set starts.
• If screen below does not appear, check DECK - TV connection and, if TV is tuned tochannel 3, try switching it to channel 4.
• To change VCR's output channel, please refer to "VCR's Output Channel" on p. 19.
Plugging the AC Power Plug intoan AC outlet
\ / Jj
CH AL_O SET PROCEEDING_j
CANCEL: STO_'
AL_O CLOCK SET
pROCEEDING
CANCEL:STOP
• Function buttons are inoperative during Initial Setup.• To remove a cassette during Auto Set, press EJECT on
the remote or STOP/EJECT twice on the DECK.In this case, settings must be made manually. (See p. 18.)
• Depending on conditions, Auto Clock Set may take longerthan 30 minutes. If so, press STOP to stop setup andperform settings manually. (See p. 18.)
Con tinued on next page...
16

EJECT@D(fO@O,4_.".
9_ ACTION
@_ SELECTAV,<,
(_._ -- SET
@(DO(D',
,_ -- VCR
Settings are made automatically.When setup is done, this screen appears.
6/8/2003SUN2:20PMDST :ON
SETTING : CH IO
A_O CLOCK SET
CO_.IPLETED
If "AUTO CLOCK SET IS INCOMPLETE"appears, manually set clock. See below.
AUTO CLOCK SET ISI NCOMPLETE
PLEASE SET CLOCK BY
PRESSING ACTION KEY
If Auto Clock Set was incomplete.
Press ACTION* on remote to displayCLOCK screen.
STOP
_,11 II r_
2 Press AV to select the month and SET toset. In the same manner, select and set thedate, year, time, and DST (Daylight SavingTime).
Press ACTION to start clock and exit.
17

1 MENU
SET CLOCK
SET UP CHANNELID_OMNLANGUE : ENGLESNVCR'S OUTPUT CH:3
_ELECT : • • SET:SETEXET : ACTEON
Press ACTION*
to display MENU.
• PROGRAM functions are net availablewhen using COMPONENT Video Outputand S-VIDEO OUT. Please set TV toeither RF INPUT or VIDEO INPUT, andthen press PROGRAM.
• Language1) Press AT to sele0t
language item.
MENUSET UP VORSET CLOCK
VCR_S OUTPUT CH_3
_ELECT_• • SET,SET_×_T _ACT_ON
2) Press SET repeatedly tochange language item asshown below.
MENU /
PI_EPARAR VCAFMAR RELOjFUAR CANAL
CANAL DE SALIDA : 3
ELEGIR : • • FIJAR : SET
For Spanish _.
M_NUREGLAGE MAGNETOSCOPE
REGLAGE NOF_LOGE
CA SORTIE : 3
SEL : • • REGLEI',:SET
For French _
MNN_
SET CLOCK
VCR,S OUTPUT CH:3
ELECT : • • _ET:SET
For English
3) Press ACTION to exit.
• Channels
1) Press AV to select"SET UP CHANNEL,"and press SET.
9ET UP VCRSET CLOGK
"rl_lEDIOM/JLANGUE : ENGLISH
VCR'S OUTPUT CH:3
SELECT : • • NET : S_T
_ EXiT : ACTION
2) Press AV to select"ANTENNA," thenpress SET to set yourantenna system("TV" or "CABLE.")
W_AK S_GN_L DISPLAY : OFF
S_LEC_ :• • SET : S_T_×IT :A_T_ON
3) Press &V to select"AUTO SET," thenpress SET.
• If you use a Cable Box,set it to the PBS channel)n your time zone.
• After Channel Auto Setis finished, Auto ClockSet will be performed.
• Clock
1) Press AV to select"SET CLOCK," endpress SET.
I M_NUSET _ VCR
l SE T U_ CHANNEL
_DIOMA/LANGUE : ENGLISHVCR'9 OUTPUT CH:3
S_LECT : • • SET : SETEXiT ; ACTION
2) Press AV to select"MANUAL," and press SET.(For Auto Clock Set, select"AUTO CLOCK SET.")
SET CLC_,K
("TIME ZONE ADJUST"appears only when autoclock is set.)
SELECT : • •SET : SET _ACK : •
3) Press AV and -_ toselect, then set the date,time, and DST (DaylightSaving Time),
4) Press ACTION to startClock and exit thismode.

*Important:ifaremotecontrolbuttondoesnetworkwhenpressed,press the VCR buttonon the remote and try the button again.
• TimeZoneAdjust • VCR's Output(on_y_ _o clot. _ssou Channel1) Press Ay to select
"SET CLOCK," andpress SET,
MENUS_1" Up VQR
_1 UP CP_ANI_L
IO_OM_LAt_GUE : _tGLf6_
EX_'; : ACTION
1) Press AV to select"VCR'S OUTPUT CH.,"and press SET,
MENU
SE_ t)_ 'VG__ET CLOCK_ET UP C}4ANNELIDIOMA/LAN GLJE : ENGLISH
l _ELECT:A V _ET: _ETEXET : _,CTEQN
-- POWER
--CH &Iv
NUMBERkeys
--ADD/DLT
--SELECT
SET
VCR
ACTION
2) Press _lkT to select"TIME ZONE ADJUSTs"
SET CLOQK
I _/AUTO CLOCK _T
S_LECT:& • SET:S_T
and press SET tosubtract or add houris)as necessary,
3) Press ACTION twice.
• "TIME ZONE ADJUST"returns to "0" if clock isset manually.
2) Press SET.
IF YOU p_;_%_ AOT I Ot_KEY, VCR S OUT_Yl _ G_SWtTCIffE,_ TO OH 4
3) Press ACTION.
P_ASE TUN_ YOUR TV TO
1 After 3 seconds
q
', To Make Corrections,repeat steps 1) _ 3).
To add channet:
Select ehannel with NUMRER keysand press ADD/OLT,
Ok/ANNUL 08 A_D_D
TO delete ohan_eh
Select channel with ON _ orNUMBER keys and press ADR/DLT
I C,_ANNEL 08 O_L_T_D
Ii]€tll IIIIIIIIIIIIIIIIIII__ i._. _11i[1 i _ i
DECK auto adjusts clock for DST.(p. 17.)
Spring (First Sunday in April)DST:ON -_ Setc clock ahead one hour,
Autumn {Last Sunday in OctoberDST:ON ,-_ Turns clock back one hou
Ityour area does not observeDaylight Saving Time, selectDST:OFF.
Keep these time changes in mindwhen programming DECK tartimer recordings.
IQ

I_ Ready Checklist[1 All connections are made (pp, 12 - 15).[_ TV and DECK are plugged in,[_ TV is on and tuned to OH 3, 4, or VIDEO.[1 Remote is in VCR mode. (Press VCR.)
1 Insert a tape.
• DECK power comes on. If Auto VCR/TV (seep.32) is set to "OFF," press VCR/TV on theremote to be VCR mode.
Press PLAY* to play a tape.If tape has no rec. tab (p, 6), auto play begins.
Special Features During Play
• Forward/Reverse Scene Search.._ Press FF/S LOW+ or RL=W/SLOW'..-_ Press PLAY to release.After search has begun, each additional press ofFF or REW changes speed as shown below.[SLP] : Approx. 2t X * *Approx. 9X[LP] :Approx. 9X _ *Approx. 7X[SP] : Approx. 7X'_ * Approx. 3XIf at 21X, gX, or 7X speed the pictureisinterrupted, change speed to 9X, 7X, or 3X.
• Picture interruption may occur with some ]'Vs.• FF and REW search speed may vary
depending on current tape peek.ion.
• Still (Freeze) Picture-_ Press PAUSE/STILL÷ Press PLAY to release.
• Frame by Frame PictuPe-_ Press PAUSE/STILL in Still mode.-_ Press PLAY to release.
• Slow Motion Picture"_ Press FF/SLOW+ (increase speed) or
REW/SLOW- (decrease speed) in Stillmode,
"_ Press PLAY to release.
Press STOP to stop a tape.
• Press REW/SLOW- or FF/SLOW+ in Stopmode to rewind or fast forward a tape.
• Press EJECT on remote, or STOP/EJECTon DECK to eject a tape.
EJECT_
VCR
STOP
REW/SLOW-
PAUSE/ jSTILL
VCR/TV
REC
lo
÷ ÷NNe.%
-- CH_
-- DVD-- PLA Y
FF/-- SLOW+
SPEED
• These features work best in SP or SLP mode.• The sound will be muted.• To reduce picture noise, see "Manua) Tracking
Control" on p. 6.• After DECK is in Still or Slow mode for 3 minutes,
it wi)l switch to Stop mode autoraatica_ly toprotect the tape and the video head.
Playback using DECK buttons
2 Press PLAY. 1 Insert a tape.
MuSti F!nction Display
• Press STOP/EJECT to stopand/or eject a tape.
20 '=...............ill'P .............. ..........."......... ..............

1 Insert a tape with a record tab (p. 6).
• DECK power comes on. If Auto VCPJTV (see p,32)is set to "OFF," press VCR/TV on the remote to beVCR mode.
Press OH Av, or NUMBER keysto select the channel.
• For "LINE" input, see p. 35.• If channel is over 100, press 100 key then press
the remaining 2 digits.O
Press SPEED
to select the record speed (p. 6).
SP = Standard Play LP = Long PlaySLP = Super Long Play
• Speed appears on-screen and on Multi Function Display.
Press RECto start recording.(The VCR REC indicator lights up on Multi FunctionDisplay),
• To edit out unwanted scenes, press PAUSE/STILLto pause, and again to resume recording.
• You cannot view another channel during recording.
Press STOPto stop recording.
This video recorder, equipped with HQ I(High Quality) system, is compatiblewith existing VHS equipment. Only use Itapes with the I_ mark. Only tapestested and inspected for use in 2, 4, 6,and 8 hour machines arerecommended.
Remove loose or peelinglabels from tapes to preventtape jam.
• OneTouch Recording (recording in progress),-_ Press REC repeatedly to set the recording length÷ (30 min. - 4 hours).
• DECK shuts off after the preset record length.
• Record one station, watch another,-_ press VCR/TV on the remote
(change to TV mode),-_ select channels at TV (recording continues).
• Select Channels at DECK (In STOP or
REC. PAUSE mode),-_ press MCR/TM on the remote
(change to TV mode),-_ select channels at DECK.
• Play a disc while recording s tape.÷ insert a disc during recording,-_ press DVD, and then press PLAY.
• It is not possible to record from DVD/VideoCD/CD to VHS tape usino DECK.
• Watching one channel and recording anotheris not possible when using Cable Box orDSS Receiver.
• After 5 minutes in Pause mode, DECK stops toprotect a tape and video heads.
Record using DECK buttons
Insert a tape. _4 Press REC
) Select I Multi Function Display
" Channe.
• Press STOP/EJECT to stop.
\ /
21

[_ Ready Checklist
[] All connections are made. (pp. 12 - 15)[] DECK is plugged in.[] If DECK is connected to an audio amplifier,
turn the stereo system's power on.
OPEN/
POWER _ _ n_ CLOSE
QQQ_o®o@i
,,D0 0 C_
2oo2
SELECTAV<•
SET
STOP
REW/SLOW-
FF//SLOW+
PAUSE/fSTILL
_10
NUMBERkeys
MENU
f DVD
j PLAYJ SKIPHI4
SKIPI=_ITITLE
VSS
RETURN
Operation using DECK buttons
3, 7 PressI Press OPEN/CLOSE
POWER A [R. Press PLAY.
3Insert a disc_ _ PLAY.
6 Press STOP.
*_ Interactive DVD...May include multiple camera angles,stories, etc.
,2 Video CD with playback control...Particular scenes or information can beinteractively selected from a menu thatappears on the screen.
22
Press POWER* on the remote or DECK.
Press DVD to select DVD mode.• If a disc is already inserted, go to step 4.(Depending on the disc, playback maystart automatically.)
Press OPEN/CLOSE,and then place a disc into the disc tray.
• Hold disc by its edgesonly (p. 4) with printedside up and use guides toplace into tray.UseO 3"(8 cm)
or O 5" (12 cm) disc.
Press PLAYto start playing.Disc tray closes automatically.
i [ • You may also close tray by
I pressing OPEN/CLOSE.CLOSE
I • Data reading time differs withREADING each disc.
<Example1>
If an interactive DVD *_ ora Video CD with playbackcontrol .2 is used and TITLEMENU appears, go to step 5.
TITLE M_]
ogs
of the wodd
<Example2>
Press kv<l • or
NUMBER keys (seebelow) to select title,and press SETorPLAYto start playing.• "Pressing SET or PLAY"
is not necessary whenusing NUMBER keys,
Using NUMBER keys starts playing automatically.The number of available titles varies with each disc.<Input 1 digit number 1 ••• 1
Example> 2 digit number 12 •••> 10 1 23 digit number 123 •••100 1 2 3
Press SKIPI=_'t or I_lql to go to next or previousmenu screen=• SKIP function not available with all discs.
Please refer to disc jacket for operation information.TO return to menu (play stops)Press TITLE, MENU, or RETURN. (DVD)Press RETURN. (Video CD)
Press STOPto stop playing.
PressOPEN/CLOSEtoejectthedisc.

• Forward/Reverse Scene SearchPress FF/SLOW+ or REW/SLOW.during play.Press PLAYto release.• Startingforward/reversesearch duringplay
startedfrom menuon VideoCDs mayrecallmenu.• Search speed, slow at first, increaseswith each
additional press of the button up to 5 levels.
• Forward/Reverse Chapter/Track SkipPress $KIPI_IN or I_NI SKIPduring play.Each press skips a chapter (DVD) ortrack (Video CD/CD).• Pressing 14141SKIP once midway through a
chapter/track returns to the start of thatchapter/track. Each additional press skipsback one chaptedtrack.
• Pressing SKIPI_I_I or I_l_ during play startedfrom menu on Video CDs may recall menu.
Current playback position
Reverse Skip -._-_.- Forward Skip
• Still Picture or PausePress PAUSE/STILL during play.Press PLAY to release.
• DVD/VIdeo CD : DECK w#l enter still picture mode.• CD : DECK will enter pause mode.
• Frame by Frame Picture(DVD/Video CD)Press PAUSE/STILL in still mode.
Press PLAY to release.
• Each press advances picture one frame.• Hold button down for consecutive frame advance.
.Whether pictures are advanced by "FRAME" or"FIELD" is selected automatically. (See p. 49)
• Slow Motion Picture (DVD/Video CD)Press FF/SLOW+ or REW/SLOW.in still mode.
Press PLA Y to release.• Slow motion speed, slow at first, is increased
with each additional press of the button up to5 levels.
Enjoy a surround-like effect if you areusing two front speakers only. The effectis broadened and sound seems to comefrom virtual speakers on either side if thedisc has surround signals recorded on it.Press VSS in DVD mode.• The Surround sound effects can be
changed by pressing VSS repeatedly asshown by the figure below.
VSS 3 _)
O• Surround sound effects is available in DVD
mode only.• Turn oft the surround effects on the other
equipment.• V.S.S. will not work, or will have less effect,
with some discs.• Turn V.S.S. off if it causes distortion.• Sound will only come from the two front
speakers if V.S.S. is on.
DECK memorizes the point where STOP ispressed (STOP • is displayed on screen).Press PLAYto resume piny from this point.Pressing STOP again or opening the traycancels RESUME, however, RESUME is notcanceled when power is turned off and on.• RESUME works only with discs for which
elapsed play time is displayed during play.
• Reverse slow motion is not ava#ab_e for Video CDs.
Power turns off after DECK has been inStop mode (DVD) for about 5 minutes.
1. Do steps 1-4 (previous page).When menu appears, press STOP.
2. Press NUMBER keys to select desiredtrack (play begins).• Check disc for track numbers.• Press "t" to start at beginning of disc.
TO Resume Menu use,Press STOPand press PLAY, then themenu will be displayed.Now, go to step 5 (previous page).
.When (_ appears on the screen while a buttonis being operated, it means that thecorresponding operation is prohibited by DECKor the disc.
• Please read the disc jacket for operationinformation,
• If a single sided disc is placed in upsidedown, "THIS TYPE OF DISC CANNOT BEPLAYED. PLEASE INSERT A DIFFERENTDISC" is displayed.
• Remove disc and press DECK POWER offwhen not in use,
• Disc continues to rotate with menu displayedeven after play is done.Press STOP to clear menu display whenfinished with menu.
/
23

[_ Ready Checklist
[] All connections are made (pp. 12 - 15).[] TV and DECK are plugged in.[] Clock set correctly. (p. 18)[] Tape has rec.tab. (p. 6)[] Remote is in VCR mode. (Press VCR.)[] Sufficient tape remaining for recording time.
Press PROG*to display Program.
ExampleToday
L r14... 31-1 ....12 DA_LY
1! sSeELE,C_or_Or,_er _E/_ ¥
L wdK,__EKLY .,... (MON){SAT)
1) To set record DATE,press Ai,v to select:1~31= one time, orDAILY= MON~ FRI, orWEEKLY= same timeeach week and
press SET.• See selection order left.
2) To set remaining items,press A.Vto select andpress SETto set START/STOP times,CH (channel) er LINEinput (p. 35), and tapespeed (SP, LP, SLP).
Press PROG
to end programming.
_EI®o®® i(]D0 (£, (£_i
2
POWER
-- ADD/DLT
SELECTAV<I I_
SETVCR
--PROG
To Enter More Programs,press AVto select and
press SETto set an unused programnumber, 8nd then repeatstep 2.
OrPress PROGto exit.
VCR REC Indicator
VCR mode Indicator
r_ MMultiFunction Display
I_ 311 _L
TIMER Indicator
• The "Timer" Indicator lights up on DECK.• You san do Timer Recording with the power on or off.
• "TIMER REC WILL START SOON" appears on-screen for 2 mir_utesbefore Timer Recording starts. If DECK is in DVD mode, no messageappears, but the VCR REC Indicator, the VCR mode indicator and"REC" will flash on Multi function Display.
24 ................,lfllH14.=,,,,..,...;,,,;,TiTl................,,.................,,.,,,,r............,,,........

I_ Ilil!llVlSllt iillliiil'ililll i_ _i'lii _a'l'_
Review, Replace or Clear Program Contents:(Recording is not in progress)
Press PROGto display ProgrammList.
_ Press ,i'll"
to select number andpress SETto display.
To Replace program...
To cancel a TimerRecording in progress...
Hold down STOP in VCR mode fora few seconds to cancel the TimerRecording.
(The "TIMER" Indicator goes outon Multi Function Display.)
• Any future daiJy or weekly recordingwill be performedas programmed.
/_START STOP 0}4
/ SELECT :Iv /SET :SET BACK:,£ND : pROG
or
To Clear program...
8 IO:OOP 12:00P 0'2 _p10 8:00P 9:00p 10 SP
SU 9:00p 10:002 L_ L P
CANCEL :ADD/DLTSELECT 1-8 :&VENTER : SETE×ET : PROG
Repeat Step 2 (p. 24)to set new programs.
Press ADD/DLT.
Press PROGto end the programming.
O• If you are using a Cable Box, the VCR'a channel for Timer Recording mast be set to
the Cable Box input channel and Cable Box must be manually set to the desiredchannel. Cable Box power must be left on.
• 2 minutes before Timer Recording is performed, "PLEASE PREPARE FOR TIMERREC" appears and Timer Indicator flashes.
Be sure a cassette with record tab is loaded and DECK is in Stop mode.
• If a power interruption occurs while programming the timer, the timer program(s) may becanceled. If "TIMER PROGRAMS WERE LOST DUE TO POWER INTERRUPTION"appears on-screen, please re-enter the timer programs.
• If the start time for Timer Recording comes up during recording and playing back,Timer Recording will not be performed.
Important notes when using DSS Receiver• When recording programs via DSS Receiver, DSS Receiver must be ]eft on,• When recording programs via an antenna or cable, DSS Receiver must be turned off.
25

ConnectionMake the Audio/Video Connection as shown on pp. f2 ~ 15.• You can use TV connected to a Stereo amplifier and speakers insteadof Stereo TV.
The following are possible audio broadcast types and on-screen displays.
The signal being received is indicated with an "(£' markwhile the selected audio mode is indicated with an arrow.
To display the broadcast signal being received,
÷ press DISPLAY*.
MTS Stereo and SAP broadcast
Multi-channel Television SoundStereo (main language) andSecondary Audio Program (sublanguage) broadcasts are beingreceived simultaneously.Select STEREO or SAP audio mode.
STOP 12:00AM CH_J
_STEREO • 0:00:
([_STEREO • 0:00:
STOP,2,OOAMO. ;j
STEREO • 0:00:
STOP 12:00AM CH 020:00:00
STEREO SPSAP_QNO •
MTS Stereo broadcast
Multi-channel Television SoundStereo broadcast. Select STEREOaudio mode.
• If stereo broadcast is weak anddisplay flickers, select MONO audiomode for possible better results.
(D (73 O0 (_
o@o
® ®
_DO00
AUDIO(SAP/Hi-Fi)
DISPLAY
SAP broadcast
Secondary Audio Program (sublanguage) broadcast. Select SAPaudio mode for the sub language.
MONO broadcast
Normal monaural sound broadcast.
Equipped with dbz_-TVNoise Reduction fortrue MTS reproduction.db_-TV NoiseReduction is requiredfor good stereoseparation and audiofidelity, d_ ®is aregistered trademark,and is licensed by db_Technology Licensing.
26

Press AUDIO (SAP/Hi-Fi)to display audio mode.
(Display disappears after 5 seconds.)
Press AUDIO (SAP/Hi-FI) repeatedlyto select desired mode.
• Refer to Recewable Broadcast Types on p. 26.• Arrow indicates selection.
Make a recording.See p. 21.
Start playback.See p. 20.
Press AUDIO (SAP/Hi-Fi)to display audio mode.
H_Ft:L/R •
HIF_:LHIF_:RNORMAL
Arrow indicatesselection.
Press AUDIO (SAP/Hi-FI) repeatedlyto select desired mode.
• Select "HIFI (L/R)" or "HIFI (L)" or "HIFI (R)" to listen to stereorecordings in stereo sound.Select "NORMAL" for monaural sound.
• Display disappears after 5 seconds.
O• Only tapes recorded in Hi-Fi stereo will playback with true stereo sound. Standard
stereo tapes will playback in monaural sound.
• To listen to Hi-Fi stereo playback, the DECK AUDIO (L/R) jacks must be connected toa stereo TV or an external stereo amplifier and speakers. (See pp. 12, 14.)
• If tracking is adjusted during playback, Hi-Fi audio may revert to normal audio.
• Hi-Fi and normal audio playback volume level may differ.
27

The Remote Control can be set to control some TV functions.
Find your TV Brand Code Number on thefollowing page.
2 Set up for TV control,-_ hold down TV button,-_ enter code with NUMBER keys.• If code number is 100 or greater,
-_- e.g., press 1 - 0 - 2 for 102.
Confirm code entry,-_ press POWER to turn selected unit on or oft.• See table below for controllable functions in each mode.
• Repeat setup after remote battery replacement.• Remote will not control every TV made by the
manufacturer listed. If you get no response, your particularunit cannot be controlled. There are NO additional codesfor the products listed. If your product is not listed, then theremote is not compatible with that product.
After remote is set up, you can select VCR, DVD, or TV for thedesired function.
Press VCR, DVD, orTV on the remote.Table below shows available remote buttons for each mode.)
DVD/VCR TV
DVD/VCR All
TV EJECT/OPEN/CLOSE*,DISPLAY, PLAY, STOP,
FF/SLOW+, REW/SLOW-,VCRFFV, PAUSE/STILL, SKIP,AUDIO, CM/ZERO,TAPE POSITION,COUNTER RESET, SPEED,REC
POWER
QQ®_:(_ (_) (_ _ NUMBER
0 (_O_T(_ keys
DVD=,_(_ (_._ VCR
_ ENTER
VOL 4--/--
POWER, iNPUT,NUMBER keys, ENTER,CH A!Y, VOL 4-/--
* Bold: VCR FunctionItafic: DVD Function
Bold Itafic: VCR and DVD FunctionsNormal: TV
O• Not all functions listed may be controllable.• In TV mode, it may be necessary to press ENTER after pressing NUMBER keys
for channel selection.
28

I iv| .1 r. i iilil_ [-.ill I ill i
Panasonic ....................... 01, 02
Quasar ............................ 01, 02
}:_CA ....................................... 63
GE ......................................... 03
Zenith .................................... 04
Magnavox .............................. 05
Sylvania ................................ 05
Sharp ............................... 06,07
Sony ...................................... 08
Toshiba ................................. 09
Sanyo .................................... 10
Fisher .................................... 10
JVC ........................................ 11
Hitachi ................................... 12
Mitsubishi ........................ 07, 13
Samsung ............................... 14
Gold Star ................... 15, 16, 17
• Some manufacturers use several codes for one brand, If the first cocle entered falls, try thenext one listed,
• Some TV brands require you to turn on the power manually.
29

Search SystemFor each recording, an invisible index mark is placed on the tape. A program index andinformation are also included for timer recordings. These marks are used to access orscan recordings.
i]1_e_[,.--t,jt_=]o
_NDE× £EARCH
ENTER _NDEX NUMS£R :1USENG I gKEYS
FORWARD SEARCH :FFR£VERSE S£AF=CH :REWNE×T :SE'_F=CH£X_T ;STOP
Press SEARCH*
to display SEARCHin Stop or Playmode, and thenpress NUMBERkeysto select recordingnumber.• To calculate
number, see below.Press FP/SLOW+or REW/SLOW- onthe remote to startsearch.
2 ENDEX SEARCH
FORWARD SEARCH : FFREVERSE S£ARCH : REW
Play begins atsearch end.To search forwardor back 1 index,press FP/SLOW+ orREW/SLOW- on theremote whilescreen left isdisplayed (10 sec.).
• TO cancel, pressPLAY or STOP.
• To Calculate Index Number
Example 1:To go to rec. 2 from rec. 4, enter3 and press REW.
Example 2:To go to rec. 6 from rec. 2, enter 4 and pressFF.
NOTE: _. indicates start points of each recording,
Locates end point of recording for continuity.
Press SEARCH twiceto display SEARCH in Stop or Playmode.
2/................SEARCH START : FF
EXIT :S£ARCH
Press FF/SLOW+on the remote tostart PROGRAMEND SEARCH.
• To cancel, pressPLAY or STOP.
Examples of Program End Search.
F_IL_ p,o_,om, Jill P_o0_m_o,_._IIthelcurront _pe po_it_on
_'_°_°" _°° / _ End Point• FF
HI _,o_,_m,lll_,_ I1_;1_[hel_r 8_ tape p_t4_ t.
P_s SEA_ _ut_
i fll, searchexseedslEnd Point _la few seconds in I
LBLANK area. J
Upon locating end point,÷ search continues 7 sec. past end point,÷ tape rewinds to 10 sec. before end point,÷ tape plays to end point and stops.
O• If Index Search is started very close to an
index mark, that index mark may not becounted in the search.
30
• If Program End Search is started very close toan index mark, that mark may be skipped over.

®®0®
®®®qi(E_(_ @l}(}£_d __ NUMBERG Q =%_1 keys
e®Q o@o/
-- REWiSLOW-
_ -- FFiSLOW+-- CM/ZERO
_ --SEARCH
• Auto Play
Insert a tape '_ Power comes on,•- Play starts if there is no record tab(see p. 6).
• Auto Rewind
PlayFast Forward,.J "_ Tape end ,_ Rewind
• Play Auto Eject(Repeat Play must be off)
Play -_ Tape end --_ Rewind÷ Tape ejects if set some programs.
VCR fast forwards (skips) over f-3 minutesof recorded tape,
Press CM/ZERO in _ mode.
• The skip time can be changed bypressing CM/ZERO repeatedly asshown by the figure below.
PLAY
1st Press--*1 min Skip
2rid Press--_-2 rain Skip
3rd Press---_3 minSkip
• No indication appears on-screen.
31

I_rIl,T_l_rJi_ • - . -. :
Set to playback a recording over and over.
Press ACTION*to display MENU.
r MENU 4SET UP CH*_Nr_ELED_OMNLAr_GuE _ENGLISHVCR'S OUTPUT CH_3
SELEC_ _• • _ET _SETE×iT _ACT_Ot_
Press AW!'to select "SET UP VCR," andpress SET.
F _ ._ _c. _ Press &V
_0_ _,_._._ o. / to select "REPEAT PLAY,"
_UTOVO_ O_ and press SETto set "ON" or "OFF."
_ELE_ :A • SET: SETEt_b ;ACT mr_
• Play repeats at tape end or if unrecorded portionover 30 sec. is detected.
Press ACTION twiceto return to normal screen.
• For repeat play in DVD mode, see page 42.
To quickly return to a specified tape location.
Press DISPLAY during playto display Counter.
Press COUNTER RESET
at desired position to resetto "0:00:00".
Continue to record, playback etc.
Press STOP.
The VCR/TV selection can be set toauto or manual.
Press ACTIONto display MENU.
r _E.O _ Press AV/ /o eect_O,_"_UE=E.GUS. "SET UPvcR$ OUTPUT CH:_
VCR," and_ELECT:& • SET:SET
E×,T :_c_o. press SET.
3 _ _TUPV_R 1_EPEAT play : OFF
_,O SHUT-OFF _ OFF
Er_D :_C'_ON
Press AVto select"AUTO VCR/TV," andpress SETto set "ON"or "OFF."
• OFF(Manual):You select "VCR" or"TV" mode using theVCR/TV button on theremote.
• ON(Auto): "VCR" mode isautomatically set whenVCR is turned on, or inPlay mode.
Press ACTIONto return to normal screen.
• For more an VCR/TV selection, see"Record one station, watch another"and "Select channels at DECK"sections (see p. 21).
5/ ........... °:_:_ 1 toPressCM/ZERO in StopmOdestartZero Search.
41-o:oo;oo
SP
• DECK will go into FF or REW mode and stopat the last point the Counter was set to 0:00:00.
32

®®o@
_P_-_ ACTION
_£ SELECTAV<b,
,_,(_ (_._ _ SET
STOP_)©00 CM/ZERO
_D_:_ COUNTER
',_ _'_ RESET
(_ _ =_ DISPLAY
When set to ON, all operationsexcept for timer record and tapeeject are prohibited, Useful forhouseholds with small children.
To turn on, hold down REC onDECK in Stop mode with notape inserted for 7 seconds.{Please igno[e "NO CASSETTE"warning.)
vc_ LOOK ACTiVATeD
To turn off, repeat above.
_VC_ LOCK OFF
• VCR Leek 6ancels in 24 hours ifclock is set,
_ 2"_T--'_REC
When "ON," picture is displayed regardless of signalstrength.
Press ACTIONto display MENU.
2[ .... 1 Press AVSET UP VGR
s_ c,o_, to select "SET UP
[ _o,o_,._u_=_Gus.j CHANNEL," and
VCR$ OUTPUT CH:3
s_o_., s_._ press SET.E×FT : ACTION
s_ ,,_o._,_L Press &V*"_"_ _"_ tO select "WEAK SIGNAL
t DISPLAY," ands_,_o_:,• s_:s_ press SETEXI_ AC_"O" to set "ON" or "OFF."
• ON: Picture is displayed regardless of signalcondition, and may not always be clearly visible.
OFF: Screen turns solid blue when signal is weak ornon-existent.
• Selecting ON has no effect on connected equipmentwith blue back feature.
Press ACTION twiceto return to normal screen.
The power shuts off at a preset time.
Press ACTIONto display MENU.
Press AVs_ _,,c,*,,_, tO select "SET UP VCR," and_0,O_,_U_=_L,S. press SET.vcR$ OUTPUT _:3
SELECT:J* V SET:SET
_EpEAT pLAY ; OFFaEMOTE WA_G ON
_UTO VCP,n V OF_
Press &Vto select "AUTO SHUT-OFF."Press SET repeatedly tochange shutoff time asshown below.
_2Hours _OFF 4Hours
_k_ 6Hours_. .)
Press ACTION twiceto return to normal screen.
• The shut-off countdown will not function during Play orRecord.
33

"- • - . _ • *Important: If a remote control button does not workwhen pressed, press the VCR button
If Multi-brand feature is used (p. 28), and this feature isset to on, a warning appears whenever an invalid keyis pressed in TV mode.
Press ACTION*to display MENU.
MEnU
_ET CLOC__ET UP CHA_NEL
J_O_LANGUE : E_U_H
VCR'_ OUTPUT CH:3
_ELECT;A • SET;SET
Press AVto select "SET UP VCR,"andpress SET.
Press ,&vto select"REMOTE WARNING," andpress SETto set "ON" or "OFF."
• If "OFF," remote warning will not appearwhen invalid key is pressed.
Press ACTION twiceto return to normal screen.
on the remote and try the button again.
,NPUT
ACTION
_ SELECTAV<I_
-- SET
_ _ STOP
"_®_ _ PAUSE/
_ STILL
O O _ Tape Position
REC
To find out the present tape position and amount of tape remaining.Tape position is displayed for VHS-C type Cassettes, tapesunder 30 minute long, and some other tapes, but theposition is not correct.
PressTAPE POS.to detect current tape position.
LDETEOTINGTAPEpOSITK}N_• "DETECTING TAPE POSITION" is displayedonly when a cassette is first inserted, and ittakes several seconds for correct tapeposition to appear.
• The present tape position indication andamount of tape remaining (according totape speed) is displayed.
• Tape remaining time display may not beprecise.
Press TAPE POS.to return to normal screen.
This function cannot display exact amount of tape remaining fortapes 30 minutes or less, or for tapes over 120 minutes in length.
34
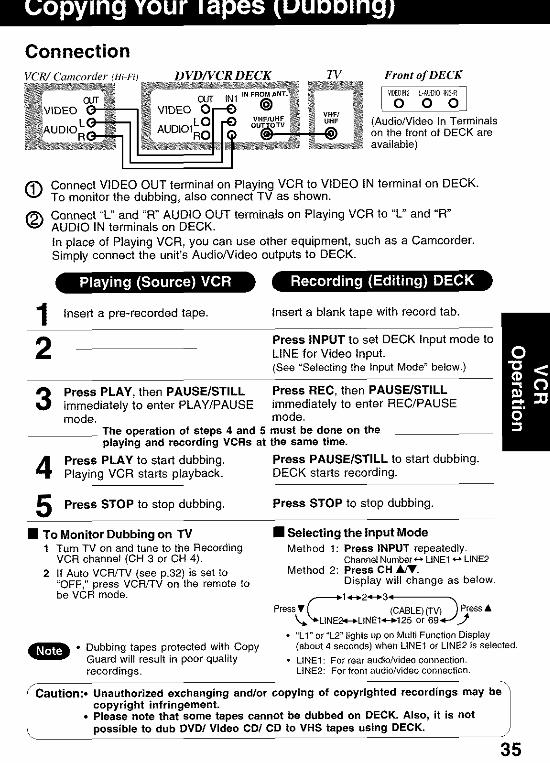
Connection
VCR/ Camcorder (Hi-Fi) D VD/VCR DECK TV Front of DECK
V_DE01N2L-AUD[0IN2-£ 7
o o o /(Audio/Video In Terminalson the front of DECK areavailable)
(_ Connect VIDEO OUT terminal on Playing VCR to VIDEO IN terminal on DECK.To monitor the dubbing, also connect TV as shown.
(_ Connect "L" and "R" AUDIO OUT terminals on Playing VCR to "L" and "R"AUDIO IN terminals on DECK.
In place of Playing VCR, you can use other equipment, such as a Camcorder.Simply connect the unit's Audio/Video outputs to DECK.
i lt4_lllll!ili[,ll ;_ii ilil!il II lot _1i1111111[t - !i ii
Insert a pro-recorded tape. Insert a blank tape with record tab.
Press INPUT to set DECK Input mode toLINE for Video Input.(See "Selecting the Input Mode" below.)
Press PLAY, then PAUSE/STILL Press REC, then PAUSE/STILLimmediately to enter PLAY/PAUSE immediately to enter REC/PAUSEmode. mode.
The operation of steps 4 and 5 must be done on theplaying and recording VCRs at the same time.
Press PLAY to start dubbing. Press PAUSE/STILL to start dubbing.Playing VCR starts playback. DECK starts recording.
Press STOP to stop dubbing. Press STOP to stop dubbing.
• To Monitor Dubbing on TV1 Turn TV on and tune to the Recording
VCR channel (CH 3 or CH 4),
2 If Auto VCR/TV (see p.32) is set to"OFF," press VCR/TV on the remote tobe VCR mode.
• Selecting the Input ModeMethod 1: Press II'IPUT repeatedly.
ChannelNumber+* LINEr_ LINE2Method 2: Press CH iJV.
Display will change as below.
Press_ L_IN E2_I2N Et'iI-_A2_LEo_ <6TgV)_ ess"
• <'L1" or "L2" Iighls up on Multi Function Oispla 7
i_l • Dubbing tapes protected with Copy (about 4 seconds) when LINEI or LINE2 is selected.Guard will result in poor quality ° LINEr: For rearaudio/videoconnection.recordings. LINE2: For front audio/video connection.
f
Caution:• Unauthorized exchanging and/or copying of copyrighted recordings may be /copyright infringement. J• Please note that some tapes cannot be dubbed on DECK. Also, it is notpossible to dub DVD/Video CD/CD to VHS tapes using DECK. /
35

i-JFl Lw4 It
You can select a different subtitle language (if offered) thanthe one set at the Settings for DVD Operation.(See p. 47.)
Press SUB TITLE*
in Play mode to displaythe subtitle selectionOn-screen.
• Display disappears after5 seconds.
• When no subtitles are offered,"-" will be displayed instead ofthe language number.
2 Press &Vto select a language.Press • •to select "ON" or "OFF."
Subtitle language being played back (see chart, right).
O• If after several presses of the button the language does not
change, language selection is not offered on the disc.
• When disc is removed, subtitles revert to initial settinglanguage. If the initial language is not recorded on the disc,the disc's priority language will appear.
_IP Ready Checklist
[] Please read "Basic DVD Operation"on p. 22.
[Subtitle language][Audio sound track language]
ENG English
FRA French
DEU German
ITA Italian
ESP Spanish
NLD Dutch
SVE Swedish
NOR Norwegian
DAN Danish
POR Portuguese
RUS Russian
JPN Japanese
CHI Chinese
KOR Korean
MAL Malay
VIE Vietnamese
THA Thai
Otherl_4rrr_ ir_J_-_o] i i i[i i l'iET_l:! !: i i[i iiP.__[i [:.! i IllfJ II]t_J'[I trl
You can change the audio soundtrack language, selectedat the Settings for DVD Operation, to a different languageif available. (See p. 47.)(This operation works only with discs on which multipleaudio soundtrack languages are recorded.)
• Change the No. by pressing IV,and press SE_
[Audio attribute 1 type, samplingfrequency, bit No. of the disc (see
r_oo=o,aEa Press AUDIO p. 48.)][3Ofby DI_ t_l 3/2 1oh • • ,t_hl #
\ in Play mode to display the 96 kHz lSblt_ ]r'_J \ audio selection on-screen. LPCM or 20bit_ _ • Display disappears after 48 kHz
_ _ 5 seconds. SolbyOlgita Ich-5.1Ch_cr_ J\Audio attribute 1 type, sampling DTS lch - 51ch
frequency, bit No. of the disc ornumber of speaker channel.
AUO'O °[bY Digital _/2 Ich Press &Y
2__ t0 select desired language.
Audio soundtrack language being played back (see chart,above right).
Linear PCM disc
Dolby Digital discDTS disc
• If, after several presses of theAUDIO button the language does notchange, language selection is notoffered on the disc.
• When disc is removed, languagereverts to initial setting. If thislanguage is not recorded on the disc,the language recorded will be heard.
36

When Q_ appears on the screen while • • J 4 - - o I II 0a button is being operated, it means
that the corresponding operation is DVDs may contain scenes shot from multiple cameraprohibited by DECK or the disc. angles altowing the same scene te be viewed at different
angles. You can view these angles, if available, using the
,,_ Press ANGLE
f in Play mode to display theangle selection on-screen.
ANGLE Indicator ° Display disappears after5 seconds.
° The ANGLE Indicator lights up onDECK when a scene recorded atdifferent angles is detected.
• The angle number can be setbeforehand so that the angle isswitched whenever the ANGLEindicator _ightsUp.
@®0®
®®®@
-- ZOOM-- SUB TITLE
• The subtitle cannot be enlarged norcan it's portion be ehanged.
• The picture zoom feature does notwork with a Video CD.
• During picture zoom, "ZOOM1" or"ZOOM2" appears on-screen for 5second.
• Zooming, on some discs, may resultin poor picture quality, or may notoperate at all.
Press AVte select the desired
angle.
Number of angle being played back.
Press AUDIO in Pray modeto display the audio screen.
Press •. (or _ I_)to select as shown below,andpress • (or V) to set.(DVD only)
•DV{]_r_ke g _) VOCAL ON--VOCAL OFF
• DVD Keraoke 12vocals) VOCAl. Vl _VOGAL V2_VOCAL Vl ÷V2_VOCAL OFF
• Video CD
You can enlarge specific portions of a picture andselect the zoom ratio using the ZOOM button duringDVD playback,
Press ZOOM repeatedly to change displayas follows.
• You can enlarge the center portion of the imageto one of 2 magnifications.
II Use the _, V, • and I_" buttons to move the positionup, down, }eft and right.
37

Some DVDs have more than one title, e.g. movies.If the disc offers a title menu, you can select the desiredtitle number. (Operation may vary according to the disc.)
1 Press TITLE*in Play modeto display the title screen.
2<Example>
TITLE MENU
Birdsof the world
Press AV<I • orNUMBER keysto select a title, andpress SET or PLA Yto start playing.
• "Pressing SETor PLAY" isnot necessary when usingNUMBER keys.
<Example>
DVDs may offer a special menu. This menu may includeguides to unique contents, audio/subtitle languages, etc.Although contents and operation may vary, the followingsteps show basic steps for using the menu.
1 Press MENUin Play mode to displayDVD MENU.
<Example>
DVD MENU Press AV41 • or
NUMBER keys• to select an item, and
press SET or PLA Y
[I 3 .ANGLE I1 to,perform.• Pressing SETor PLAY is
<Example> not necessary when usingNUMBER keys.
Repeat step 2 if there ismore than one menu•
38
®®@(_iNUMBERkeysCLEAR
--AC_ON
MENUSELECTAV<,
SETf PLAY
STOP
TITLE

==_II[°I'_I_]=JlI"]I_&r=['r_'iI']ITLI']I]FR'IL!'JIBB _ Ready Checklist
You can programspecifictracks and order of play. [] DECK is in DVD mode, press DVD.[] Video CD or CD is inserted.
Press ACTIONto display DVD MAIN MENU.
4
_VD MA_N MENU Press Ai,Vto select"PLAY MODE," andpress SETte d{sptay.
PLAY teOD_
_D ;ACTIO_ZSE,ECT ;• •
Press &Yto select"PROGRAM PLAY,"andpress SET to display.
,__.-_ _'_._ _ Press &Y'd •DiSC PROGF_AM
a 0, ,o _ ' to select a track
_o_._,__o,, _ _ number (Tracko_, _s_ numbers on disc areCLEAR ALL START
SE,ECT"• ' ' displayed.), andSET _
_"° _'°" press SET.• Repeat step 4 to select another track.• The selected track is added o_ the dgh'i side.
Do operation steps 1 through 5at lefl on this page.
Press DISPLAYto display Disc|oformation screen.(Disc information Screen)
34
Press A,V< I_to select "START," andpress SETto start playof programs in thesequence selected.
• To cancel, press ST"OPduring play, then pressCLEAR
6• Up to 15 tracks can be programmed.• "_" or "•" (depending on disc) indicates additional
PROGRAM PLAY screen.Press A.V4 • for next or previous screer_,
• To clear the last program one by onePress AV41 • to move to "CLEAR LAST" and
press SET. (Pressing CLEAR on remote controlalso clears last program.)
• To clear all programsPress _.V4 • to move to "CLEAR ALU' and pressSET, (Programs are also cleared when the poweris turned off or the disc is removed.)
Press DISPLAY to displayDECK Information screen.
Press SETto enter Select mode.Cursor move to "OFF."(DECK information Screen)
Press AV to select "DISC. °(DECK Information Screen)
/ROaRA_I_
Press SETto set mode.Cursor move to "REPEAT."To cancel, select "REPEAT :OFF" in step 5, then press SET.
39

Tracks are played in a random order.
Press ACTION*to display DVD MAIN MENU.
i ......... ._ Press AV
D_sc_,GUAGES to select "PLAY MODE,"A_D_O O_[PUTST_LL MODE AUTOTV MODE 43 LeIlerbox and_._A_ _oc_:_w_, .- press SET_E_EC_:.. to display.SET : S£TEND : ACT_Ot_
i PLAY MODESELE¢_ ;A •S£T ;SET
Press AVto select"RANDOM PLAY," andpress SETto begin random play.
• To cancel, press STOPduring play, then pressCLEAR,
Some DVD are recorded in lower average volume level.For these DVD, this DECK can be set so that theaverage volume is increased.
E_ Ready Checklist
[] DECK is in DVD mode, press DVD.
*Important:If a remote control button does notwork when pressed, press theDVD button on the remote and trythe button again.
@®® o.l®Q® i
® ® _ CLEAR_ ACTION
l SELECTSET
r_ _ _'_ STOP
VOLU E
Press VOL.ADJ repeatedly to change "ON" *_ "OFF."
• "ON" or "OFF" lights up on Multi Function Display (about 3 seconds) whenpress VOL.ADJ.
VOLUME ADJUST "OFF" VOLUME ADJUST "ON"Some DVD Volume level is increased
[Volume level is low] Volume is the original level, when played back.
• "ON" is set ..... When a DVD is played back, the average volume is increased.• "OFF" is set .... The volume level recorded on the disc is played back just as it is.
O• When audio equipment is connected, setting the Sound Output level to "OFF" is recommended.• If the sound becomes abnormal while playing a disc, set the Sound Output level to "OFF."
40

When DISPLAY is pressed, On-Screen Displays showdisc information (title/chapter/track number, elapsedplaying time) and DECK information (repeat play, playmode)
Press DISPLAY in Play or Stop modeto display "On-Screen Displays."
• Each press of DISPLAYchanges the on-screendisplay as follows. (Refer to p. 42)
Selected dis_information
Selected DE_K information
NormaliScreen
ODISPLAY button does not function while DVDTITLE MENU is displayed.
Press &V (or, I_)to select an item, andpress SET.
Press AV or NUMBER keysto select the setting, andpress SET.
<Example of DVD>
[_'_ I_ Dw/ •When numbers are00:12:34 displayed (e.g. title
._rE_.,_._ 00:l_r'v_ number), NUMBER keys.EX__ISP_¥ are also available.
• If the number entered iss_ not on the disc, the entry
will have no effect.SELEC_:A VSET :SET Re-enter the correct
number.
CD> " For more details, refer to<Example of Video the disc operation
[_ _2F VO__102:_[_] information,
_._c, : %0_:°_ To return to normal
_o =_1_ _×_:_ screen,
press CLEAR or
sL_sa_ :sa_ DISPLAY repeatedly.
I_ Ready Checklist
[] DECK is in DVD mode, press DVD.
26
NUMBERkeysCLEAR
SELECT
SET
DISPLAY
• When DISPLAY button ispressed during playback of aVideo CD with Playback control,NUMBER keys are not availableon the displayed screen. In thiscase, press DISPLAY again toremove the displayed screen.
• When (_ appears on the screenwhile a button is being operated,it means that the correspondingoperation is prohibited by DECKor the disc
41

• Disc information screen (for DVD)1. TITLE No.
• Select "TITLE", and press SET*.*Change the No. by pressing AV or NUMBER keys, and press SET
2. CHAPTER NO.
• Select "CHAPTER", and press SET*Change the No. by pressing 4,V or NUMBER keys, and press SET
3. Disc currently being played4. Elapsed playing time
The screen may be changed by selecting the elapsed time.• Select the elapsed playing time ("xx:xx:xx"), and press SET• Change the elapsed time by pressing NUMBER keys.
Hours -,- Minutes -,- Seconds are entered in order.If the time entered is not on the disc, the entry will have no effect.Re-enter the correct time.
e.g., press _1 - _3 - 4_5 for 01 : 23 : 45.Hour Minutes Seconds
• This function does not work with some discs.
SET ;SE;
Ef_TE_ ;0.9 _EXT:OISp_,¥
If SET is pressed whilemaking entries, unitreturns to the conditionbefore entries were made.
• Disc information screen (for Video CD/CD)A. TRACK No.
• Select "TRACK", and press SET.• Change the No. by pressing AV or NUMBER keys, and press SE'£
B. Playback control ON/OFF[Video CD with playback control only]
N I Video CD menu play is displayed. IFI Video CD menu play is not displayed. I
C. Disc currently being playedIVideo CDI CD I
D. Elapsed playing time
_, Track No. and the elapsed playing time are not displayed during play started from menu ofVideo CDs with playback control.
• When (_ appears on the screen while a button is being operated, it means that thecorresponding operation is prohibited by DECK or the disc.
• DECK information screen (for DECK)a. Repeat Play
• Select "REPEAT", and press SET• Change the desired mode during play by pressing AV, and press SET
DVD REPEAT CHAPTERII Video CD/CDII REPEAT TRACK REPEAT TITLE REPEAT OFFREPEAT D SC REPEAT OFF
b. Play mode [Video CD/CD only] (See p. 39 or 40.)
PROGRAM PLAY program playrandom playnorma pay
a _. ..........
p_',¥
b _[_
• CHAPTER/TITLE REPEAT PLAY (DVD) * TRACK/DISC REPEAT PLAY (Video CD/CD)CURRENT pLAyBACK pOS_ION C/3RRENT pLAyBACK p0_0N
I_LE _PEA'r DISC RE.AT
NOflMAL PLAY NORMAL PLAY
_* For repeat play in VCR mode, see p. 32.
42

This unff can play MP3/WMA/JPEG format CD-R orCD-RW recorded for personal use on a PC, etc.Some discs may not play due to the condition of therecording.
Press POWER on the remote or DECK.
Press OPEN/CLOSE,then place an MP3/WMA/JPEG disc intothe disc tray.Press OPEN/CLOSE to close.
• MP3/WMA!JPEG menu is displayed.• Playback starts automatically(except JPEG files).
• CD directory is displayed.<Example>
Function A¥ cooo CounterStatus _P_ oooooo_
ea _OOT _ ParentCYCA rFolder ar _c_No folde(Cu_Tentfo_der_ J'_ J_ _ File area
appears green.) _MAL !Selected file/[ ...... OE:.O_AL / folder is
I highlighted.PLAY •ODE Titles are
I,_J:MP3 file _:WMA file displayedupfo 11
C3:Folder r_n:Parent folder characters.)
__:JPEG file
<Example> (Diagram left shows CD directorystructure as displayed in exampleOSD above.)
LOVA
'_ Er_DWAL_
11 _J_r_'_}.... Only File (not Folder) area, ''rJ_°RN operation is possible.-[]T_ca.o . Files are displayed in the"GPoPs following order:
_GJAZZ (L..0,1 ....9,A,B-....Z).
. Select file (During STOP mode)1) Press &V to select an MP3/WMA file (_/_).,_ MP3/WMA Playback (see right)
2) Press A,V to select a JPEG file ((_).,,t JPEG Playback (see p.44)
3) Press SKIP I_1 (next) or 1'4<1SKIP(previous) to skip a file/folder page (Tfiles)in the Filearea.
• Select folder (During STOP mode)1 ) Press AV to select a folder (C3).2) Press SETto display files/folders contained
in the folder.
• Select parent folder (During STOP mode)1) Press AV to select a folder (_::]).2) Press SET to make changes to the previous
directory display.
Press ACTIONto return the DVD MAINMENU. (* Press ACTION again to returnthe MP3/WMA/jPEG MENU.)
Do steps 1-3 on left.
a Press A_' to select an MP3/WMA file (_/j_).(During STOP mode)
b Press SET or PLAY to start playback.
• Forward/Reverse SearchPress FF/SLOW+ or REW/SLOW- during play,Press PLAY to release,• Search speed, slow at first, increases with each
additional press of the button up to 5 levels.• Forward/Reverse Track Skip
Press SKIPIH_I or 1<1'41SKIPduring play.Each press skips a track.• If pressed within first 3 seconds of playback,
skips to the previous track. If over 3 seconds,returns to top of track. (1'4141SKIP only.)
• Put DECK in Stop mode before performingfolder/file selection (see step 4.)
• PausePress PAUSE during play,Press PLAY to _elease.
C Press STOPto stop play.
d Press OPEN/CLOSEto eject the disc.The MP3/WMA/JPEG MENU is closedautomatically.
i_I_i • Copyright protected files and filescontaining errors cannot be playedback. The DECK skips to the next file.
• Select PLAY MODE [MP3/WMA Playback](During STOP mode)1) Press • • to move cursor to
PLAY MODE.2) Press AY to select the desired pLAY
MODE (see below).PLAY MODE]
NORMAL: IAll MP3/WMA files are selected andplayed back one time only.
SINGLE REPEAT:The selected MP3/WMA file is playedback repeatedly.
FOLDER REPEAT:The MP3/WMA files contained in theselected folder are played backrepeatedly. However, folders below theselected folder are not played back.
DISC REPEAT:All MP3A,VMA files are played backrepeatedly.
*Important:if a remote control button does not workwhen pressed, press the DVD button onthe remote and try the button again. 43

You can play back JPEG images,
Displayable Image Size: 32x32-768Ox7680 pixels
_)o Some JPEG format may not be playedback,
Do steps 1-3 on page 43.
Press AWl' to select an JPEG file ([_).
Press SETor PLAY.Selected JPEG file is displayed.[JPEG Playback Screen]
<Example>• Returned on the MP3/WMA/JPEG MENU
,,_ Press STOP. (See p.43)• Next/Previous Search
,J Press SKIPIt, l_l or I_ SKIP.
• Start Slide-show ,,_ Press FF/SLOW+ orREW/SLOW-. (below)
• Enlarging an image = Press ZOOM. (P.45)• Rotating an image ,= Press ANGLE. (P.45)
Press STOPto return tile MP3/WMA/JPEG MENU.
B Select PLAY MODE [JPEG Slide-show](During STOP mode) (See p.43)1) Press • • to move cursor to
PLAY MODE.2) Press AV to select the desired PLAY
MODE (see below).
PLAY MODE]NORMAL:
All JPEG files are selected andplayed back one time only.
SINGLE REPEAT:The selected JPEG file is played backrepeatedly.
FOLDER REPEAT:The JPEG flies contained in theselected folder are played backrepeatedly. However, folders below theselected folder are not played back.
DISC REPEAT:All JPEG files are played backrepeatedly.
(During JPEG Playback.)JPEG files are displayed automatically(about every 3 seconds) as a slide-show.
Press FF/SLOW+ or REW/SLOW-.
<Example>
Image changes every 3 seconds.• Cancel slide show
,= Press STOPto return the MP3/WMA!JPEG MENU. (See p.43)
• Still picture,,_ Press STILL (only SLIDE).,= Press PLAYto release.
• Forward/Reverse File Skip,= Press SKIPII,._I or 141_SKIP.
Each press skips a file.
Press ACTIONto return the DVD MAINMENU.
<Example>
Operation can be done when files are inorder, such as in the diagram below.
EW:LOW-
: [_DDD, [_TT£ REW/SLOW-:_uuu' _VVV:_www' [_ZZZ FF/SLOW+
[1TECHNO
44

ACTION
STOP _.
REW/SLOW-
FF/SLOW+J
STILL _
®,lq
Q°® I®®®
mu Io
SELECTAV4P_
SETPLA YSKIPIHHSKIPI•4ZOOMANGLE
(During JPEG Playback.)You can enlarge specific portions of a JPEG pictureand select the zoom ratio using the ZOOM buttonon the remote during JPEG Playback screen.
Set Zoom size.Press ZOOM repeatedly to change display asfollows.
,_ Press STOPto return the MP3NVMA/JPEG MENU.• You can enlarge the center portion of the image to
one of 2 magnifications.• Operation can be done during Rotation (below).
X 1 0 (OREGINAL) X 15(ZOOM 1) X2 0(ZOOM 2)
_, 3rd press I
• Use the A, V, • and • buttons to move theposition up, down, left and right.(Position cannot be changed on X1.0ORIGINAL images.)
(During JPEG Playback.)You can rotate a JPEG picture using the ANGLEbutton on the remote during JPEG Playbackscreen. (The JPEG picture will be rotated 90 °clockwise.)
Set rotation.Press ANGLE repeatedly to change displayas below.
Press STOPto retum the MP3/WMA/JPEG MENU.
• Operation can be done during Zoom (above).• The vertical/horizontal ratio of rotated JPEG
images may vary when they are displayed.
1st press 2rid press 3rd press
4th press
MPEG Layer-3 audio decoding technology licensed from Fraunhofer IIS andThomson multimedia. NP_
Windows Media, and the Windows logo are trademarks, or registeredtrademarks of Microsoft Corporation in the United States and/or other countries.WMA is a compression format developed by Microsoft Corporation. It achievesthe same sound quality as MP3 with a file size that is smaller than that of MP3.
45

You can prevent playback of DVDs of a specificrating level which may be unsuitable for children.
• Some DVDs are encoded with a rating level. If the discrating is higher (stricter) than the one you preset,playback will be prohibited.
_' Ready Checklist
[] DECK is in DVD mode, press DVD.
0A 4-digit code must be entered to view a blockedprogram or change rating settings.
Press ACTION*to display DVD MAiN MENU.
DvD MA]_ _u
I_AuDl° O_IPUT
_LEOT • ,r
_T _SET
Press AI,Vto select "PARENTAL LOCK,"andpress SETto display.
ENTER 4-DIGIT OODE
_NTER :0-9
To Make Corrections
Press • repeatedly tomove the CUrSOr.
Press NUMBER keys tomake the correction.
1) Press NUMBER keysto enter your secret code.
2) Enter same secret codeagain for confirmation.
3) Press SETto display.
• Step 2) not necessary whenchanging rating or secretcode.
• Take care that you are notobserved entering thesecret code.
4LEV_. 5 LE_L1
L_I_L0
Press &T<I •
to select rating level, andpress SETto select "LOCKED" or"UNLOCKED. _
LEVEL 0 : LOCK ALL, Playback of all DVDs, CDs, VideoCDs, MP3, WMA and JPEG is t_ohib_ted.(Use to prohibit play of mature theme DVDs noten_:x_dedwith r,_ting _evaL)
LEVEL 1 : mature theme DVDsLEVEL 2 : DVDs expressly for children can be played back.LEVEL 3 to 7 : DVDs _or general aL_d_nces/children can be
played back. (DVDs with mature contentare prohibited.)
LEVEL 8 : NO LIMIT: (Factory preset)All DVDs can be played back.
Discs not encoded with ratinglevel will play even if the jacketstates it is for matureaudiences. For these discs, theDVD Lock Ratings will not work.
<When DVD Lock is activated>
After DVD Lock is set and ablocked DVD {s played, thismessage will appear.The message may differdepending on the disc.
To continue v{ewing e blockedprogram for now,Press AV to select "YES" andSET. Then, enter your 4 digitsecret code (see step 3 left).When "NO" is selected, blockedprograms cannot be viewed.
<When blocked programs>
_your secret code
You will need your current code,Do step 1 ~ 2 left.Enter current secret code.Press CLEAR to clear the cede.Do step 4 to enter new code.
• DO NOT forget your secret code.
46

Press ACTIONto display DVD MAIN MENU.
Press &Yto select an item, andpress SET.
Once initial settings are done, theyremain in memory (even after power off)until changed. This means DECK willoperate under the same conditions(especially DVDs) each time.
_IP Ready Checklist
[] DECK is in DVD mode, press DVD.
DISC LANGUAGES (See below)All languages offered on the disc can be set.If the language not offered is set, the original disclanguage will be selected.
AUDIO OUTPUT (See p. 48.)You can set the audio output that comes from thedigital audio output terminal.
STILL MODE (See p. 49.)To select "FIELD" (Field still) or "FRAME" (Framestill) to prevent jitter or make small text or finepatterns clearly visible in a still picture. When"AUTO" is set "FIELD" or "FRAME" is selectedautomatically.
TV MODE (See p. 49.)To select whether the video material for a wide-screen will be played back in the Pan & Scan style,Letterbox style or 16 : 9 style.
II . • .o- III =
To select and set the language of the audiosoundtrack, subtitles, or title/DVD menus for all discsto be played.
Press AVto select"DISC LANGUAGES,"andpress SETto display screen.
r_uH_Lt _ p,ur_
SELECT • •SET _ET
Press AVto select an item, andpress SET repeatedlyfor desired language.(Please refer right.)
Press ACTIONto redisplay DVD MAINMENU and go to step 2 to setup anotheritem.Or, press ACTION twice to exit.
®®o®G Q_ NUMBERkeysQ QQ_ CLEAR
AC_ON
AV_
® ® SET-,®®_
"AUDIO" selections(Factory preset: English)To select the audio soundtrack language.English/Spanish/French/JapaneseOriginal: Original disc languageOTHER t_: Other language selection *_
"SUBTITLE" selections(Factory preset: AUTO)To select the subtitle language.AUTO: Same language selected
for "AUDIO"• If language set for "AUDIO" is used in
playback, subtitles will not appear.• If another language is used during
playback, the subtitles will appearin the language selected at "AUDIO"setup.
English/Spanish/French/JapaneseOTHER _=k_: Other language selection*_
"MENUS" selections(factory preset: English)To select the language used in titlemenus or DVD menus.English/Spanish/French/JapaneseOTHER _=k=k: Other language selection *_
To enter OTHER =_=k=_=_codenumber,Press NUMBER keys (Please refer tolanguage codes on p. 50).To make corrections, press •repeatedly to delete language codenumber, and correct.*_ If the selected language is not offered,
the original disc language is selected.
47

_!_7J Ee]T_*_1
Select the digital output to be output from the opticaldigital audio output connector of DECK.
Press ACTION*to display DVD MAIN MENU.
2 Press A,Vto select"AUDIO OUTPUT,"and
press SETto display screen.
3 Press AVto select an item,and
press SETrepeatedly foroutput. (See below.)
• "LPCM (DVD)" selectionsOFF: Linear PCM of less than 48 kHz/16 bit is
output. When playing DVDs recorded in linearPCM of over 48 kHz/20 bit, no digital audio isoutput. (Factory preset)
PCM: When playing DVDs recorded in linear PCM of48 kHz/20 bit/24 bit or more, digital audioconverted to 44.1 kHz/16 bit or 48 kHz/16 bit isoutp_,(Digital output of PCM audio is restricted to48 kHz/16 bit or below for copyright protection.)
• "Dolby Digital" selectionsBitstream: Dolby Digital bitstmam (tch-5,tch) is
output. (Factory preset)PCM: When you have connected a amplifier that
doesn't have a built-in Dolby Digital decoder.
• "dts" selections
Bitstream: DTS bitetream is output, (Factoey preset)PCM: When you have connected a amplifier that
doesn't have a built-in DTS decoder,
• "DRC (Dynamic Range Compression)"selections
OFF: Normal audio range is selected, (Factory preset)ON: For dynamic sound even at low volume, this
is useful for late-night listening. [Dolby DigitalDVDs only],
I_ Ready Checklist
DECK is in DVD mode, press DVD.
Type of amplifierto be Connected
No amptifier is connected
AV amplifier (with digital
audio input connector) PCMwithout Dolby Digital/DT_decoder
AV amplifier including PCMDolby Digital decoder
AV amplifier inoludingDolby Digita_/DTSdecoder PCM
Recommended settin
LPCM Dolby DTS(DVD) Oigita_
PCM*+ PCM*l
Bitstrean PCM
• *23itstrean Bitstream
• Make settings according to amplifierconnected to optical audio output as shownin above table.
"1 When connecting an amplifier (with anoptical digital input connector) which doesnot contain the Dolby Digital or DTSdecoder, be sure to select "PCM".If "Bitstream" is selected, starting DVD playmay cause such a high level of noise as tobe harmful to your ears and damage thespeakers.
*2 When a DTS decoder is connected, pleaseselect "Bitstream" in "tits"+
Press ACTION to red]splay DVD MAINMENU and go to step 2 to setup anotheritem.
Or, press ACTlONtwice to exit.
48 • ................IITH1 .................................11 ......................

Set to reduce jitter in a displayed still picture or a motionpicture,
Press ACTIONto display DVD MAIN MENU.
Press &Yto select "STILL MODE,"andfpress SET repeated)yor mode. (See below.)
AUTO: "FIELD" (Field Still) or "FRAME" (Frame slit 0 isautomatically selected during the still mode.(Factory preset)
FIELb: "FIELD" (Field still) is a_ways selected,This setting will reduce j_tter when comparedwith "AUTO" on some discs.
FRAME: "FRAME" (Frame still) is always selected.Some texts and fine patterns will be seen clearlywhen compared with "AUTO" on some discs.
Press ACTION'_oexit this mode.
Set the screen display style for wide-screen videomaterial playback.
Press ACTIONto display DVD MAtN MENU.
I_ _w _,.._.. Press _kVo_ L*NGUAG_S to select "TV MODE,"A o_o 0 T_UT
_ _ :*_o and press SET
T:_.,_ _o_, _ __ repeatedly for mode._L_c..... (See below.)O : ACTION
4:3 Pan & Scan (Factory preset) :Wide-screen video data is played in Pan & Scanstyle (left and right of screen is trimmed,)• Video data not formatted in Pan & Scan will play
i_ letterbox style.4:3 Letterbex :
Wide-screen video data is played in Letterboxstyle (top and bottom of screen has btack margin),
16:9 :Set "16:9" when using Wide-screen TV_
Press ACTIONto exit this mode.
®dYO@®®®d®®®@®®®@
,_ -- ACTION
SELECT_,T<).
• Pan & Scan (Factory preset)
• Letterbox
4_

Enter the appropriate code number for the initial settings "AUDIO", "SUBTITLE" and/or"MENUS" (see p. 47).
ode. Language "
565, Afar
566 Abkhazian
570 ' Afrikaans
55 ;L:,?r'°583 ] Assamese
588 I Aymara
590 I Azerbaijani
665 JBashkir
669 I Byelerussian
671 I Bulgarian
672 I Bihari
678 I Bengali;Bangla
679 ITibetan
682 I Breton
766 I Catalan
779 ) Corsican
783 I Czech
789 I Welsh
865 ] Banish
869 I German
890 ( Bhutani
976 I Greek
976 ) English
979 I Esperanto
983 I Spanish
984 I Estonian
986 I Basque
066 ( Persian
073 I Finnish
074 ) Fiji •
Code Language
7079 Faroese
7082 French
7689 Ffisian
7165 _rish
7168 Scots Gaelic
7176 Galician
7178 Guarani
7185 GujaratJ
7265 Hausa
7273 Hindi
7282 Croatian
7285 Hungarian
7269 Armenian
7365 Interlingua
7378 tndonesian
7383 icelandic
7384 ha_ian
7387 Hebrew
7465 Japanese
7473 Yiddish
7487 Javanese
7565 Georgian
7575 Kazakh
7576 Greenlandic
7577 Cambodian
7578 Kannada
7679 Korean
7583 Kashmid
7585 Kurdish
7569 Kirgh,z
7665 Latin
3ode
7678
7679
7684
7686
7771
7773
7775
7776
7778
7779
7782
7783
7784
7789
7865
7869
7876
7879
7982
8065
8076
8083
8084
8185
8277
8279
8285
8365
8368
8372
8373
Language
Lingala
Laothian
Lithuanian
Latvian, Lettish
Malagasy
Maorl
Macedonian
Malayalam
Mongolian
Moldavian
Marathi
Ma/ay
Maltese
Burmese
Nauru
Nepali
Dutch
Norwegian
Odya
Panjabi
Polish
Pashto, Pushtc
Portuguese
Quechua
Rhaeto-Romance
Romanian
Russ Jan
Sanskrit
Sindhi
Berbo-Croatiar
Singhalese
"_ (Code Language
8375 Siovak
8376 Slovenian
18377 I Samoan
8378 Shona
p379 I Soma,,
8381 Albanian
8382 Serbian
[8385( Sundanese
_8386 I Swedish
p387 ) Swahili
p465 I Tamil
184691Ze'ugu(6471 I Zajik
p'721Thai_84731Tigrinya
p475 I Zurkmen
1,475 ) Tagalog
_8479 I Tonga
p462 [ Turkish
184841 Tatar
p487 )Tw,
p6751Ukrainianp6621Urdup590 I Uzbek
_86731 Vietnamese
p6791Volap0kp770I*olofp6721×hosap6791 orubapo,2[Ohinese
• e,O651z°'u ,

These displays will alert you to a missed operation or provide further instruction_'
PLEASE SET CLOCK BYPRESSING ACTION KEY
PLEASE PREPARE FOR TIMERREC
CHECK CASSETTERECORD TAB
NO CASSETTE
TO CANCEL TIMER RECHOLD DOWN STOP KEYFOR APPROX 3 SEC
VIDEO HEADS MAY NEEDCLEANING PLEASE INSERTHEAD CLEANING CASSETTEOR REFER TO MANUAL
END : PLAY
VCR LOCK ACTIVATED
If you attempt to set or review a TimerRecording and the Clock is not set..,
If DECK is not in Stop mode or a cassette withrecord tab is not inserted 2 minutes before aTimer Rece_ding is about te begin...
If you press REC or_ the remote control orDECK, and a cassette is inserted with no recordtab...
If you press PLAY, FF, REW, or REC on theremote control or DECK without a cassetteinsetted..
If you press STOP or POWERduring a Timer Recording...visible in VCR mode only)
If head cleaning becomes necessary whileplaying ba0k a tape...
If you press a functkm button other than STOP/EJECT or POWER while DECK isin VCR Lock mode...
REMOTE CONTROL IS SET )f you press an invalid key on the remote whileTO TV MODE in TV mode...USE VCR : VCR KEYUSE DVD : DVD KEY
PLEASE CHECK THE DISC, If you press PLAY, and DECK reads data from aAND FOR STAINS OR stained or scratched disc in DVD mode.SCRATCHES ON DISC
THIS DISC MAY NOT BE PLAYED Playback of a disc with different regk_a number wasIN YOUR REGION attempted. Only discs marked region "1", "ALL", or
those that include "1" are playable on this DECK.
THIS TYPE OF DISC CANNOT BE An unusable disc is inserted in the DECK.PLAYED. PLEASE INSERT ADIFFERENT DISC
This file format cannot be played.CANNOT PLAY THIS FILE (Appears during MP3/WMA/JPEG rite ptayback)
This file is copyright protected and cannot beTHIS FILE IS PROTECTED played back. (Playback is prohibited.)
IT IS PROHIBITED TO COPY If you prees REC in DVD mode...DVD/VIDEO CD/CD TO VHS
.Z24
2425
6
2O21
25
6
33
2B2934
4
3
4
43
43
21
51

;heck the following points if you are having trouble with your DECK.
No power...
Power turns itself off...
I:T_"_ _lf'_X,,_l,_l_"_ _ ITV program cannot be recorded...
Completely insert Power Plug into an AC outlet.Set POWER button to on.Make sure power source is active.
• Auto power-off (shutoff) occurs after about 5 rain.in DVD mode with no operation, or if there is nobroadcast signal in TV or Playback mode.Turn the power back on. (pp. 23, 33)
• Check connections between DECK, externalantenna, and TV.
• Check channel selections.• Make sure your antenna system (CABLE or TV) is
correctly set. (Channels [p. 18])• Make sure cassette record tab is intact. (p. 6)
Timer recording cannot be • Confirm that clock is set to current time and date.performed... • Make sure Cable/DSS box (if used) is left on and
tuned to channe] to be recorded.• Set recording start/stop times correctly. (p. 24)• Timer recording may not be performed or continued
if a power interruption occurs before or during aTimer Recording, even after power is restored.
There is no playback picture, or the • Select channel 3 or 4 on TV to match VCR outputplayback picture is noisy or contains channel (3 or 4) (p. 16) or select LINE.streaks... • Set VCR/TV selector to "VCR."
• Adjust TRACKING control in either direction. (p. 6)• Try Head Cleaning. (p. 6)
During special effects playback, • Set TV's Vertical Hold Control to MANUAL, thenpicture may contain some vertical adjust.jitter when using a TV with anAutomatic Vertical Hold Control...
DECK cannot be controlled... • Make sure DECK power is on.• Check Remote batteries.• Make sure VCR LOCK is set to off. (p. 33)• Make sure Remote is in proper mode. (p. 28)• Make sure Timer Recording is not in progress.
I_e,_l [o_
DECK cannot be remote controlled... • Make sure DECK power is on.• Make sure Remote is in VCR mode.
• Aim Remote Control direly at remote sensor on DECK. (p.9)• Avoid any object blocking signal path.• Check Remote batteries. (p. 4)• Exposing DECK remote sensor to direct fluorescent
or outdoor light may cause signal interference.
PROG buttons do not respond... • PROG functions are not available in COMPONENTVideo Output and S-VIDEO OUT. Set TV to either RFIN or VIDEO IN. (p. 10)
• Check Remote batteries. (p. 4)• Press VCR or DVD button for DVD/VCR mode. (p. 28)
52

;heck the following points if you are having trouble with your DECK.
Play falls to start even when PLAY is)ressed._
Play starts but then stops immediately...
Picture is distorted during rapidadvance or rapid reverse...
No Forward/Reverse Scene Search
play...
Play does not start even when title isselected...
Audio soundtrack and/or subtitle
language is not the one selected atthe initial settings...No subtitles...
Alternative audio soundtrack
(or subtitle) language cannot beselected...
Angle cannot be changed...
hlli l.."[it'..11 !';.I i [':Jill ! I.. Illll] i litit I [l|
Programs cannot be viewed on TV...
• This DECK cannot play discs other than DVDs,Video CDs and CDs.
• The disc may be dirty and require cleaning.
• Be sure disc is installed with label side up.
• The picture will be somewhat distorted at times:this is normal.
• Some discs may have sections which prohibitForward/Reverse Scene Search. (p. 23)
• Confirm the "DVD LOCK" setting. (p. 46)
• If the audio soundtrack and/or subtitle languageselected at DVD initial settings does not existon the disc, it will not be accessible.
• Subtitles appear only when available on disc.• "OFF" is selected at the changing subtitle
language. Select "ON" at the "Subtitle Languages"section (p. 36) to display the subtitles.
• Alternative language cannot be selected with discswhich do not contain more than one language.
• For some discs, alternative language cannot beselected with the AUDIO or SUB TITLE b_iton.
Try selecting it from the DVD MAIN MENU if available.
• This function is dependent on software availability.Even if disc has multiple angles, they may berecorded for specific scenes only (ANGLEindicator on DECK lights up). (p. 37)
• Make sure TV is set to output of DECK.• Check connections between DECK,
external antenna, and TV.• Set VCR/TV selector to "TV." (p. 21)• Make sure proper signal source is selected.
• Insert the cassette with window side up; recordtab facing you.
Video cassette cannot be inserted...
Video cassette ejects when • Make sure cassette record tab is intact. (p. 6)a recording is started or the power isturned off for timer recording...
In Stop mode, the motor (CYLINDER' • To enable Quick play mechanism, the cylinder will_ontinues to rotate.., rotate for about 3 minutes. This reduces response
time from Stop to Play mode.
The disc cannot be removed.. • First, unplug DECK. Then, prepare a rigid wire(e.g. an extended paper clip) and, applyingmoderate force, insert it straight into the hole at thebase of the tray. The tray will eject a little. Now, pullthe tray all the way out and remove the disc. (p. 9)
If you cannot resolve the problem, please call the Customer Call Center for productassistance at 1-800-211-PANA (7262).To locate an authorized servicenter, please call toll free 1-800-211-PANA (7262).or send e-mail to : [email protected] 53

PANASONIC CONSUMER ELECTRONICS COMPANy,DIVISION OF MATSUSHITA ELECTRICCORPORATION OF AMERICAOne Panasonic Way Secaucus, New Jersey 07094
PANASONIC SALES COMPANY, DIVISION OF MATSUSHITAELECTRIC OF PUERTO RICO, INC.,AVE. 65 de Infanterla, Km. 9.5 San Gabriel Industrial Park,Carolina, Puerto Rice 00985
Panasonic/Quasar Video ProductsLimited Warranty
Limited Warran W CoverageIf your product does not work properly because of a defect in materials or workmanship, PanasonicConsumer filectronics Company or Panasonic Sales Company (collectively referred to as "the warrantor")will, for the length of the period indicated on the chart below, which starts with the date ot original purchase("warranty period"), at its option either (a) repair your product with new or refurbished parts, or (b) replace itwith a new or a refurbished product. The decision to repair or replace will be made by the warrantor.
Product
Camcerder
DVD/VCR DeckAIM Mixer
TV/VCR, TV/DVDTV/DVD/VCRCombination
TV/HDRCombination
Rechafgeab_eBatteries(in exchange te_defective item)
Tape(in exchange fordetective item)
Memory Cards(in exchange fordefective item)
PartsOne i t) Year (except3CD Image Sensor)CCD Image Sensor - 6_Six) Months
One (1) Year
One (1) Year (except3RT)CRT - Two (g) Years
One (1) Year (except_R]3CRT - Two (2) Years
Ten (tO) Days
Five (5) Days
Ninety (90) Days
Labor
Ninety (90) Days
Ninety (90) Days
Ninety (90) Days
Ninety (90) Days
Ninety (90) Days
Ninety (90) Days
Ninety (90} Days
Not Appl_cabb
Not Applicable
Net AppLicable
Service
tarry-In or MaiFIn
garry-In or MaiFIn
garry-In: 21" CRT_nd Smallern-Horr_eor Ce._ry-ln:22" CRT and Larger
n-Home or Carry-in
3arry-ln or MaiHn
3arry-ln or MaiNe
3arty-In or Mail-In
Contact Number
I1-809-211 -PANA(7262)
I1-800-211 -PANA(7262)
1-800-211 -PANA(7262)
It -888-843-9788
It -800-211 ..PANA(7262)
It -800-2 f 1-PANA(7262)
1-80O-2f1-PANA(7262)
During the "Labo¢' warranty period there will be no charge for labor. During the "Parts" warranty period,there will be no charge for parts. You must carry-in or mail-in your product or arrange for in-home service,as applicable, during the warrsnty pedad.If nomrechargeable batteries are included, they are not warranted. This warranty only applies to productspurchased and serviced in the United States or Puerto Rico. This warranty is eXtended only to the originalpurchaser of a new product which was not sold "as is". A purchase receipt or other proof of the originalpurchase date is requi_ed for warranty service.Carry-In, MaiHn or In-Home ServiceFor Carry-in, Mail-In or In-Home Service (as applicable) in the United States call toll free contact numberlisted above or visit Panasonic Web Site: http://www.panasonic.aomFor assistance in Puerto Rico call Panasonic Sales Company (787)-750-4300 or fax (787)-768-2910.In-Home service, if applicable, requires clear, complete and easy access to the product by the authorizedservicer and does not include removal or re-installation of an installed product. It is possible that certainimhome repairs wiU not be completed in-home, but will require that the product, or parts of the product, beremoved for shop diagnosis and/or repair and then returned.
54

Limited Warranty Limits And ExclusionsThis warranty ONLY COVERS failures due to defects in materials or workmanship, and DOES NOTCOVER normal wear and tear or cosmetic damage, nor does it cover markings or retained images onthe picture tube resulting from viewing fixed images (including, among other things, letterbex pictureson standard 4:3 screen TV's, or non-expanded standard 4:3 pictures on wide screen TV's, orenscreen data in a stationary and fixed location). The warranty ALSO DOES NOT COVER damageswhich occurred in shipment, or failures which are caused by products net supplied by the warrantor,or failures which result from accidents, misuse, abuse, neglect, mishandling, misapplication,alteration, faulty installation, set-up adjustments, misadjustment of consumer controls, impropermaintenance, power line surge, lightning damage, modification, or commercial use (such as in a hotel,office, restaurant, or other business), rental use of the product, service by anyone other than aFactory Servicenter or other Authorized Servicer, or damage that is attributable to acts of God.THERE ARE NO EXPRESS WARRANTIES EXCEPT AS LISTED UNDER "LIMITED WARRANTYCOVERAGE". THE WARRANTOR IS NOT LIABLE FOR INCIDENTAL OR CONSEQUENTIALDAMAGES RESULTING FROM THE USE OF THIS PRODUCT_ OR ARISING OUT OF ANYBREACH OF THIS WARRANTY. (As examples, this excludes damages for lost time, cost of havingsomeone remove or re-install an installed unit if applicable, or travel to and from the servicer, loss ofmedia or images, data or other memory or recorded content. The items listed are not exclusive, butare for illustration only.)ALL EXPRESS AND IMPLIED WARRANTIES, INCLUDING THE WARRANTY OFMERCHANTABILITY_ ARE LIMITED TO THE PERIOD OF THE LIMITED WARRANTY.Some states do not allow the exclusion or limitation of incidental or consequential damages, orlimitations on how long an implied warranty lasts, so the exclusions may not apply to you.This warranty gives you specific legal rights and you may also have other rights which vary fromstate to state. If a problem with this product develops during or after the warranty period, you maycontact your dealer or Servicenter. If the problem is not handled to your satisfaction, then write to thewarrantor's Consumer Affairs Department at the addresses listed for the warrantor.PARTS AND SERVICE (INCLUDING COST OF AN IN-HOME SERVICE CALL, WHEREAPPLICABLE) WHICH ARE NOT COVERED BY THIS LIMITED WARRANTY ARE YOURRESPONSIBILITY.
1-800-332-5368 (Customer Orders Only)For hearing or speech impaired TTY users, TTY : 1-866-605-1277Panasonic Services Company 20421 84th Avenue South, Kent, WA 98032(6 am to 5 pm Monday - Friday; 6 am to 10:30 am Saturday; PST)(Visa, MasterCard, Discover Card, American Express, Check)
AS of August 2002
55

[lie] ! I :Iit [o] 11it.'ILilo] ! I l [ll I1 :l'-llt [o] 111 ! I [it I-'I I!111 :I'-1 ll'll (ol ".lI!'-I'I|
Realice la conexi6n de la anlena oTV por cable antes de enchufar el cable de CA,El DVDNCR inioiar_ autom_iioamente la fijaci6n de los oanales Y del relojal enohufar el cable de CA.
Para Ant/Cable ÷ DVD/VCR ÷ TV
(_ Conecte el cable de la antena al terminal INFROM ANT del DVD/VCR.
(_ Conecte el terminal OUT TO TV del DVDNCRa la entrada de la antena VHF/UHF del TV conel cable RF incluido.
Para Sistema Digital de Satelite (DSS)/Convertidor de cable ÷ DVD/VCR ÷ TV(_ Conecte la salida de convertidor de cable T_iRal
TcIty-or DVD VCR IN FROM AN" Est_he _r_idoral terminal IN FROM ANT. __ _o_,o,_,_o_,o_o(_ Conecte el terminal OUT TO TV del DVDNCR _,,__ _'T_ _
a la entrada de la antena VHF/UHF del TV con __Eo_,a_,_o_el cable RF incluido. °_<_
1 Encienda el TV y cambie al canal 3.
2 Enchufe el cable de CA.El DVD/VCR se encender_ e iniciard lasfijaciones de los canales y del reloj.• Si no aparece la pantalla de abajo, compruebe
la conexi6n del DVDNCR-TV y si el canal delTV est_ a 3, intennte cambiando al canal 4.
• Para cambiar el canal de salida del DVD/VCR,consulte las instrucciones de "Canal de salidadel VCR" (informaciones en ingles pAgina 19).
[ Enchufe el cable de CA. I
AI inicio, el idioma de lapantalla est_ fijado aingl#a.
_ Para cambiar el idioma,seleccione la pantallaMENU (informaciones eninglds p_gina 18).
Si est,. usanndo un convertidor de TV pot cable yen su area hay un canal de Public BroadcastStation (PBS), ajuste su convertidor el canal PBSde su area. Siesta usando un receptor DSS, estedebe estar apagado.
Las fijaciones se realizan aatom_ticamente.Cuando termina las fijaciones, aparecer_ lasigaiente pantalla.
_6/8/2003SUN2:20F_1
DSTONSE_ING Cl_ _0
_OTO CLOC_ S_T
CC_a_LET_D
Si aparece en la pantaUa "AUTO CLOCK SET ISINCOMPLETE (FIJACION AUTOMATICA DELRELOJ ES INCOMPLETO)', Ajuste el relojcomo se describe a continuaci_n.
_UTO C_OCK SET IS
PL_SESET CLOC_¥
Si la fijaci6n ha side incomp]eta.
1 Prosione la tecla ACTION en el control remotopara visualizar la pantalla del mend SETCLOCK.
• Los botches de funciones no funcionan durante 2 Presione • • para seleccionar el rues y SETpara ajastar. De la misma forma, seleccione yla configuraciCn inicial, ajuste la fecha, aSo, horay DST (hora de
• Para retirar un cassette durante el ajusteautorn_tico, presione EJECT en el control rernotoo STOP dos veces en el aparato. En este caso,los ajustes de los canales y la hora se debenhacer rnanualmente. Para los ajustes seleccionela pantalla MENU (informaciones en inglesp_gina 18).
• Dependiendo de las condiciones, el ajusteautom&tico puede durar mAs de 30 rninutos.En ese caso, presione STOP para detener elajuste autorn&tico y realice Ios ajustesrnanualmente en la pantaIla MENU.
verano). S£T CLOCK
OST:ON
3 Presione dos veces la tecla ACTION paraporter el RELOJ en marcha y salir.
- PRECAUCIONAI usar cables coaxiales RF del tipo '_uerca",aprietelos solamente con los dedos. Un aprieteexcesivo puede da_ar los terrninales.
;_,,llli, l,li[*t,;,itl,;.llil-.ll;,ll illllillllill'.l_'lillAlli_7.'l_ll_ll=lli, ll_ ".llitlll _.! _liil,.llllii+.tllllllllllr,,ikl,_llll;,lti¢l,.1lltl[ll_.i._lit56

1 Inserte un cassette,• La alimentaci6n del DECK se active.
En la Pantalla de Visualizeci6n MultiFunci6n se ilumina "VCR".
2 Presione PLAY pard reproducir el cassette.• Si el cassette no tiene le lengQeta de
prevenci6n de grabaci6n (pAgina 6), seinicia la reproducci6n eutom_ticamente.
I Detalles especiales durante la grabacidn 1
• Presione FF/SLOW+ e REW/SLOW- parab_squeda de escenas hacia delante/haciaatrAs. Preaione PLAY para liberar. Durante]a bOsqueda, cada vez qua presione FF/SLOW+ o REW/SLOW- se cambia lavelocidad como sigue:[SLP] aprox. 21X_--_ aprox. 9X[LP] aprox. 9X _ aprox. 7X[SP] aprox. 7X -_. aprox. 3XSi la imAgen se interrumpe con 18velocidad de21x, 9x e 7x, cambie la velocidad a 9x, 7x o 3x.
• Presione PAUSE/STILL para imagen Fija(Congelada).Presione PLAY para liberar.
• Presione PAUSE/STILL en el modc deimagen fija para im_genes cuadro a cuadro.Presione PLAY para liberar.
• Preaione FF/SLOW+ o REW/SLOW- en elmode de imagen fija para cambiar lavelocidad de Ins im_genes a c_mara lent&
3 Preaione STOP para detener el cassette.• Presione REW/SLOW- o FF/SLOW+ en el
mode de parada para rebobinado/avancer_pido del cassette.
• Preaione EJECT en el control remoto,o STOP/EJECT en el DECK para expulsarel cassette.
i_lJ * [ t.] t. [ It {I} I [ t,&.l t'_. _-.I [ I_. "_II I]';ll'; I I';. ill I';l* B [ It II111
1 Inaerte el cassette con leng_eta deproteccibn de grabaci6n (p_gina 6).
1 Presione PROGpara visualizar ]a pantalla de Programacion.
/HOY SLP
Orde_ pare eteqir
1) Para ajustar la FECHA degrabaci6n, presione AVpara seleccionar:1-31 = una vez, 0DIARIO = a 18 misma horade lunes a viemes, 0SEMANA = a la mismahorn cada semana ypresione SET para ajustar.
Ejemplo _,..8-9..-.--- sl -- 1-- 2-----6-_Fecha de hoy 7 A/_ Orden Para eleglr DIAR_O
LSE_"AL......SEMA"AL__SEMANAL.J{SAB) (LUN) {DOt_
2) Para ajustar los items que quedan,presione AV para seleccionar y presioneSET para ajustar los tiempos de INIClO/PARADA, CANAL, o entrada de LINEA (pag.35), y velocidad del cessette (SP, LP, SLP).Presione PROG para finalizar PROGRAM.
para seleccionar un nt_meroiiiiii iiii i ii que no estA usanda para
c_c_o_T ingresar mas programas y_,_ _ presione SET
para ajustar.Luego repita el peso 2.OPreaione nuevamentePROG para salir.
2 Presione CH A,/V, o las teclas de nt_merospara seleccionar el canal
Preaione SPEED para seleccionar [avelocidad de grabacion (p_gina 6)
• SP = Reproducci6n est&ndar,
: LP = Larga duraci6n,SLP Superlarga dureci6n.
4 Preaione REC para comenzar a grabar,• Pare eliminer escenas indeseadas, presione
PAUSE/STILL pare hacer una pausa, y elpresionar nuevamente continua la grebaci6n.
• No podra ver otto canal durente legrebeci6n.
5 Presione STOP para detener ]a grabaci6n.
• Grabaci6n de un toque
Presione REC repetidamente para ajustar lahera de grabaci6n (30 min - 4 horas),
• La videegrabadera termina la grebaci6na une hora programede,
cG r;asijci_i rmall"_°:3°00__T_D
57

• !" - •l- •o o olil]llllill]
Presione POWER en el control remoto o elaparato.
Presione DFD para seleccionar el modo DVD.
1 ) Preeione OPEN/CLOSE.2) Ponga un disco en la bandeja de disco.• Sujete el disco sin tocar ninguna de sus
superficies, p6ngalo con el Iado donde esteimpreso el tftulo hacia arriba, alineelo con lasgufas y p6ngalo en su posici6n apropiada.Disco de 3"(8 cm) / Disco de 5" (12 cm)
Presione PLAYpara iniciar la reproducci6n.La bandeja del disco se cierraautom&ticamente.• Siesta usando un DVD interactivo (Interactive
DVD) o un Video CD con contol dereproducci6n (playback control) y aparece unmen0 de tftulos (TITLE MENU) en la pantalla,siga al paso 5.
Presione AV<I • o las teclas num_ricas paraseleccionar el artfculo deseado.Presione SET o PLA Y para la reproducci6n.Si usa lae teclas num_ricae, lareproducci6n comienza autom_ticamente.
Presione STOP la reproducci6n.para parar
Presione OPEN/CLOSE expulsar el disco.para
IIPara buscar una escena particularBdsqueda hacia adelante
Presione FF/SLOW+ en el modo de reproducci6n,Bdsqueda hacia etrds
Presione REW/SLOW-en el modo de reproducci6n.(Para liberar, presione pLAY)
IIPara saltar un cepftulo o una pistaSalto hacia adelante
Presione SKIPb,'•I en el modo de reproducci6n.Un capitulo (DVD) o una pista (Video CD/CD)se salta cada ves que se opdme la tecla.
Salto hacia atr_sPr_sione I_<l SKIP en el modo de reproducci6n.
IIPare ver una imagen fijaPresione PAUSE/STILL durante la reproducci6n.(Para liberar, presione PLAY)
IIPara vet imzigenes cuadro a cuadro(DVD/Video CD)Presione PAUSE/STILL en el modo de imagen fija.
La imagen avanza un cuadro cada vez quepresiona la tecla. (Para volver a lareproducci6n normal, presione PLAY.)
IIPara ver en cdmara lenta (DVD/Vfdeo CD)Presione FF/SLOW+ o REW/SLOW- en el modode imagen fija.(Para liberar, presione PLAY)
POWER
SELECTiV<•
SET --
STOP
REW/SLOW-
FF/ /SLOW+
PAUSE//STILL
OPEN/
CLOSE
®CD®_I NUMBER
® (D Q_,_ keys
.ovo_ _ PLA Y
ISKIPI<<
SKIPI,'IH
£oo2
58

Cuando se presiona DISPLAY, la visualizaci6n enpantalla muestra la informaci6n del disco (tffulo / capffulo/ n_mero de lista, tiempo transcur_do de reproducci6n,audio / idioma del subtffulo, y _ngulo) e informaci6n(repetir la reproducci6n, modo reproducci6n, Karaokevocal encendido / apagado, etc.).
Presione DISPLAY en el modo reproducci6no parada para visualizar ]as visualizaciones en
pantalla.• Cada vez que se presione DISPLAY, la
visualizaci6n en pantalla cambia como semuestra a continuaci6n.
i Informacion seleccionada del disco
1Informaci6n seleccionada del DECK
1Pantalla normal
I
Presione At,V (o • I_) para seleccionar el itemdeseado,Presione SET para ajustar.
Presione AV para seleccionar el ajustedeseado.Presione SET para ajustar.Para volver a la pantalla normal,Presione repetidamente CLEAR o DISPLAY.
<Ejemplo (DVD)>
O®Q ='"
ADD/DL T
SELECTAV•,
SET
DISPLA Y
<Ejemplo (Video CD)>
ifsr_ Vf_EOCr_
59

Algunos discos con peliculas, v{enen con dos o mas Algunos discos DVD ofrecen un ment_ especial.titulos. Por ejemplo, si el disco tiene un men_ detitulos grabados, el bot6n TITLE podr& utilizarsepare seleccionar el titulo de la pelicula.
Presione TITLEdurantela reproducci6n.Ahora se visualize una lista de los tffulos deldisco.
Presione &V • • o lasteclas de nt_meros parase[eccionar el t(tu]odeseado.Presione SET para elegir.
Este menQ incluye gufas para contenidos Qnicos,audio, subtitulos, idiomas, etc. Aunque loscontenidos y las operaciones se cambian, lossiguientes son unos pesos b_sicos para el uso delmen6.
Presione MENU durante [a reproduccion.El ment_ de DVD introducido en el disco sevisualize ahora.
DVDMENU Presione Ay • • o lasteclas de ndmeros paraseleccionar el item deseado.Presione SET para elegir.
<ejemplo><ejemplo>
Durante la reproducci6n de un DVD, puede ampliar partes especfficas de una irnagen y seleccionar larelael6n de zoom usando el bot6n ZOOM. Xl.0(ORIGINAL) Xl.5(ZOOM1) X2.0(ZOOM2)Presione ZOOM repetidamente pare cambiar eltama_o de la imagen como se indica a continuaci6n:• Use los botones &, V, • y •para desplazar
la poelci6n hacia arriba, hacia abajo, hacia laizquierda o hacia la derecha. + 3dar_1nl
Puede utilizar esta unidad para reproducir audio de 4 • Ejecuci6n MP3/WMNJPEG (Durante el modo STOP)formato MP3/WMA/JPEG, grabado pare uso personal Presione AV para seleccionar un archivo MP3/WMAcon una computadora, etc., en un CD-ROM o CD-RW. (J]/_) o un erchivo JPEG ((_), y presione SETo
La ejecuci6n no podr_ reelizarse en elgunos casos,debido alas condiciones de la grabaci6n.
Presione POWER en el control remoto o DECK.
Presione OPEN/CLOSE y a continuacioncoloque un disco MP3/WMA/JPEG en la bandejade discos.Presione OPEN/CLOSE pare cerrarla.
Se visualizar& el MENU MP3/WMA/JPEG y laejecuci6n se iniciar_ autom_ticamente. (SevisualizarA el directorio del CD.)
<ejemplo>
Estadode la r_oD oo:oo: Contador(unci6n / ROOT _ Carpeta
t icc_(_CRNO DCUmC principal(3POPS N0_TURNE
Area de las j_zz _ Area decarpetas(La carpeta M_ _CCrON archtvosMODE_ REP_ODUCCION: El archivo/lavisuelizada l .C_M_ (actualmente se _carpeta se
visualiza convolverA verde) MODODE REPRODUCCIC)N un cursor.)
J_:Archivo MP3 j):Archivo WMA _:Archivo JPEG
:Carpeta _:Carpeta pr no pal 5
PLAY
• MP3/WMABttsqueda hacia adelante/hacla atrds_,Fmsi_e. FF/SLOW+o REW/SLOW- duran_ la ejecuciSn.Salto de plsta hacia adelante/hacia atrds•*Pmelone SKIP_•t o _ SKIPduranbe la ejecud6n.
• JPEGBdsqueda siguienteJanteriorwPresione SKIPIHI_I o 1•41 SKIP.
Intcie la muest ra-dlapositiva•*P_esione FF/SLOW+o REW/SLOW-.
Ampltar una imagen ,* P_eslone ZOOM.Girar una imagen w Presione ANGLE.
Presione STOPpara detener la operacion descrita ardba.• Seleccione MODO DE REPRODUCClON
(Durante el modo STOP)Pteelone • • pare mover el cursor a MODO DEREPRODUCCION, y Presigne _k._ pare seleccionar elMODO DE REPRODUCCION deseado.[MODO DE REPRODUCCI(_N]NORMAL:TOdos los archivos se reproducen s61o una vezREPETICION DE UNA MUSIC:El archivo seleccionado se reproduce repetidamente.
REPETICION DE UN ARCHIVO:LOSarchivos que se encuentran en la carpetaseleccionada se reproducen repetidamente.REPETIClON DEL DISCO:
Todos los archivos se reproducen repetidamente.
Presione ACTION pare regresar al DVD MENUPRINCIPAL.

Presione DVD para seleccionar el modo DVD.
Presione ACTION en el modo de parada paravisualizar MENU.
Presione AV para seleccionar el artfculo deseado.Presione SE'_IDIOMAS DEL DISCOTodos los idiomas ofrecidos en el disco pueden serajustados. Si el idioma ajustado no es ofrecido en eldisco, se seIeccionar_ el idioma original del disco.SALIDA DE AUDIOPuede usted ajustar la salida audio procedente deltermina( de sa(ida audio digffaLDETENER RASTREOPare seleccionar 'CAMPO" o "CUADRO fijo" pareprevenir inestabilidad opara permitir ver textospequeSos o patrones finos claramente en el modo deima en fia.
Pare seleccionar cuando e) material del video es parepantalla ancha y se qu_ere reproducir en el estilo Pan&Scan,en el estilo Letterbox o en el estilo 16 : 9 en la pantalla.
Presione •V pare seleccionar el artfculo deseado.Presione SE'_
Volver a visualizar el mend de DVD paracontinuar el ajuste.Presione ACTION y paseal paso 3 pare ajustar otroajuste o, para sa(ir, presione ACTION tres veces.
Seleccione "AUDIO"(Fijaci6n de f&brica : ingles)Ingles / Espa_ol / Frances / Japonesa :Original : Se se]eccionar& el idioma
original de cada disco.OTRO **,_ : Se puede seleccionar el otto
idioma.Seleccione"SUBTITULO"AUTO : Se seleccionar6 el mismo que fue
seleccionado en ]a preparaci6n de"AUDIO". (Fijaci6n de f_brica)
• Si el idioma seleccionado en la preparaci6nde "AUDIO" se utiliza durante lareproducci6n, los subt(tulos no aparecer_n.
• Si se L_iBzaotro idioma durante lareproducci6n, los subtftulos aparecer&n en elidioma seleccionado en la preparaci6n de"AUDIO"
Ingl_,s / Espahol / Franc_s / Japonesa :OTRO **,_ : Se puede seleccionar el otro
idiom&Seleccione "MENU"
(Fijaci6n de f&brica : ingles)Ingles / EspaSol / Frances / Japonesa :OTRO **_ : Se puede seleccionar el otto
idiom&
El idiomade los subtffulos seleccionado al hacer lasfijaciones iniciales se puede cambiar por otto idiomadiferente, si _ste se encuentra disponible.
_=,_= Presione SUBTITLE durante verse desde cada uno de estos Angulos diferentes
/(areproducci6n, utUizandoelbotSnANGLE.Cuando no haya subtffulos 1 [,_,,.o,oa ] Presione ANGLE durante ]agrabados, se visualizarA '-" en / _ reproduccion pare visualizer/
....... / 'u0erde,o0 oro4o,d,o a._' la selecci6n del _ngulo.
2 /PresioneAVpara/_ _ _ / seleccionar el idioma deseado./Presione • • pare 2 Presione •Y para
_L_ / mseleccionar "ACTIVO" o seleccionar el _ngulo;_'" ° J "INACTWO." deseado.
Aigunos discos DVD tienen escenas que ban sidofilmadas simult_neamente desde un n_mero de Angulosdiferentes. Con estos discos, la misma escena podrA
Presione AUDIO durante la reproducci6npare visualizar la pantalla AUDIO.
° DVD Karaoke (I vocal) VOCAL ON--VOCAL OFF• DVD Karaok_ (2vocals) VOCAL V1_VOCAL V2_VOCAL V1+V2_VOCAL OFF
+ I°V_o CD LR_L_R
El idioma de la pista de sonido seleccionado al hacerPresione Ay (o • •) las fijaciones iniciales se puede cambiar pot otropara seleccionar el ajuste idioma diferente, si 6ste se encuentradisponible.deseado. t Presione AUDIOPresione • (o V) para m " /durante la reproducci6najustar. (DVD solamente) '_ /paravisualizar
_ SONIDO en la pantalla,
Presione •V paraseleccionar idioma.
61

A ACTION button ................................. 8, 18Accessories ............................................ 4ADD/DELETE button
(Add or Delete a C_nel) .................. 8, 19Audio Broadcast types
(Stereo/SAP/Mono) ............................ 26Audio Mode (Playback, Recording).... 27Auto Operation Functions .................... 31Auto Shut-Off ........................................ 33
B Batteries ................................................. 4
C Channel ("SET UP CHANNEL") .......... 18Channel Up/Down,
Tracking/V-Lock Button ...................... 6, 8Clock ("SET CLOCK") .......................... 18Commercial Skip ................................. 31Connections ................................. 12 ~ 15Copy Your Tapes (Dubbing) ............... 35COUNTER RESET button ............... 8, 32Customer Services Directory ............... 55
D DISPLAY button ............................... 8, 11DST (Daylight Saving Time) ................ 19
E EJECT button ................................... 8, 20ENTER button
(For tuning TV Channel) ................ 8, 28
F FAST FORWARD/SEARCH button .. 8, 20
H Head Cleaning ...................................... 6
I Index Search ........................................ 30Indicator (Multi Function Display) ....... 11Initial Setup (Ready to Play) ......... 16, 17INPUT button ................................... 8, 35
L Limited Warranty ........................... 54, 55Location of Controls
(Remote, DECK) .......................... 8 ~ 10
M Multi-Brand Control ....................... 28, 29
OOn-Screen Displays (VCR) .................. 11One Touch Recording ......................... 21
P PAUSE/STILL button (Still Picture) .. 8, 20PLAY button (Playback a Tape) ...... 8, 20POWER button ....................................... 8
PROG button (PROGRAM) .............. 8, 24Program Clear, Review, Replace ....... 25Program End Search ........................... 30
O Quality Picture ........................................ 6
R REC button (Record on a Tape) ..... 8, 21Record Tab ............................................ 6Remote Sensor ...................................... 9
Remote Warning .................................. 34Repeat Play ......................................... 32Reset All Memory Functions ................. 9REWIND/SEARCH button ............... 8, 20
S SAP/Hi-Fi ............................................. 27SEARCH
(Index and Program End Search) ..... 30SLOW+/SLOW- button
(Slow Motion Picture) ........................ 8, 20Spanish Quick Use Guide ........... 56 ~ 61Specifications ......................................... 7SPEED button .................................. 8, 21Still (Freeze) Picture ............................ 20STOP button ..................................... 8, 20
T Tape Position, Tape Status ................. 34Timer Recording .................................. 24Trouble Shooting ........................... 52, 53TV mode button ................................ 8, 28
V VCR Lock ............................................. 33
VCR mode button ............................ 8, 28VCR!TV button ................................. 8, 21VCR/TV Selector Function .................. 32VOLUME +/- button (TV Volume) ... 8, 28
WWarning and Instruction Displays ....... 51Weak Signal Display ........................... 33
Z ZERO SEARCH button .................... 8, 32
62

A ACTION button ................................. 8, 47ANGLE button
(Multiple Angle Viewing) ......... 8, 37, 45AUDIO button
(Audio Soundtrack Language) ....... 8, 36Audio Output
(For Selecting Audio Output) ............. 48Auto Power Off Function ...................... 23
C CLEAR button ............................ 8, 39, 46Component Video Output .............. 10, 13
D Disc Languages ................................... 47DISPLAY button
("On-Screen Display") .................... 8, 41DTS ...................................................... 14DVD Menu ........................................... 38DVD mode button ............................ 8, 28DVD Lock Ratings ............................... 46
F Frame by Frame Picture ...................... 23Forwards/Reverse Chapter/Track ....... 23Forwards/Reverse Scene Search ....... 23
J JPEG ............................................ 43 ~ 45
K Karaoke(Vocal Selection for Karaoke Discs) .... 37
L Language Code List ............................ 50M MENU button
(To display DVD Menu) ................. 8, 38MP3 ...................................................... 43Multiple Angle Viewing ........................ 37
OOPEN/CLOSE button ....................... 8, 22Optical Digital Audio Output .......... 10, 15
P PLAY button (Play a Disc) ............... 8, 22Program Play (For Video CD/CD) ...... 39PROGRESSIVE button .......................... 9Progressive Scan ................................. 10
R Random Play (For Video CD/CD) ...... 40Repeat Play ......................................... 42Resume Function ................................. 23RETURN button ............................... 8, 22Rotation ................................................ 45
S SEARCH button(Forward!Reverse Scene Search) .. 8, 23
SKIP _ or NI_ button(Forward/Reverse Chapter/Track) .. 8, 23
Slide-show ........................................... 44SLOW+/SLOW- button
(Slow Motion Picture) ....................... 8, 23STILL button
(Still Picture or Pause) ................... 8, 23Still Mode
(For selecting "FIELD" or "FRAME") ...... 49STOP button ..................................... 8, 22SUB TITLE button
(For selecting Subtitle Language) .. 8, 36S-Video Out .................................... 10, 13
T TITLE button (Title Menu) ................ 8, 38TV Mode(For selecting the screen display style) ...... 49
V Video CD ............................................. 23VOLUME ADJUST ........................... 8, 40V.S.S. (Virtual Surround Sound) ..... 8, 23
WWMA ..................................................... 43
Z ZOOM button (Picture Zoom)..... 8, 37, 45
63

Panasonic Consumer Electronics Company,Division of Matsushita Electric Corporation of AmericaOne Panasonic Way Secaucus, New Jersey 07094Panasonic Sales Company ("PSC"),Division of Matsushita Electric of Puerto Rico, Inc.Ave, 65 de Infanteria. Km, 9.5 San Gabriel Industrial Park, Carolina,Puerto Rico 00985
PdntedinlndonesiaLSQT0674BS0103-1033