Owner's Instructions - HDTV Solutions
148
Owner’s Instructions Register your product at www.samsung.com/global/register Record your Model and Serial number here for future reference. · Model __________ · Serial No. ____________ LN-T2342H LN-T2642H LN-T3242H LN-T4042H LN-T4642H TFT-LCD TELEVISION Contact SAMSUNG WORLD-WIDE If you have any questions or comments relating to Samsung products, please contact the SAMSUNG customer care center. Contacte con SAMSUNG WORLD-WIDE Si tiene alguna pregunta o comentario referente a nuestros productos, por favor contacte con nuestro Servicio de Atención al Cliente. Country Customer Care Center Web Site Address CANADA 1-800-SAMSUNG (7267864) www.samsung.com/ca Samsung Electronics Canada Inc., Customer Service 55 Standish Court Mississauga, Ontario L5R 4B2 Canada Samsung Electronique Canada Inc., Service à la Clientèle 55 Standish Court Mississauga, Ontario L5R 4B2 Canada U.S.A 1-800-SAMSUNG (7267864) www.samsung.com Samsung Electronics America, Inc. 105 Challenger Road Ridgefield Park, NJ 07660-0511 BN68-01167A-00
-
Upload
khangminh22 -
Category
Documents
-
view
2 -
download
0
Transcript of Owner's Instructions - HDTV Solutions

Owner’s Instructions
Register your product at www.samsung.com/global/register Record your Model and Serial number here for future reference.
· Model __________ · Serial No. ____________
LN-T2342HLN-T2642HLN-T3242HLN-T4042H LN-T4642H
TFT-LCD TELEVISION
Contact SAMSUNG WORLD-WIDEIf you have any questions or comments relating to Samsung products, please contact the SAMSUNGcustomer care center.
Contacte con SAMSUNG WORLD-WIDESi tiene alguna pregunta o comentario referente a nuestros productos, por favor contacte con nuestro Servicio deAtención al Cliente.
Country Customer Care Center Web Site Address
CANADA 1-800-SAMSUNG (7267864) www.samsung.com/ca
Samsung Electronics Canada Inc., Customer Service 55 Standish Court Mississauga, Ontario L5R 4B2 Canada
Samsung Electronique Canada Inc., Service à la Clientèle 55 Standish Court Mississauga, Ontario L5R 4B2 Canada
U.S.A 1-800-SAMSUNG (7267864) www.samsung.comSamsung Electronics America, Inc. 105 Challenger Road Ridgefield Park, NJ 07660-0511
BN68-01167A-00
BN68-01167A-00-Cover.indd 1 2007-02-08 12:28:38
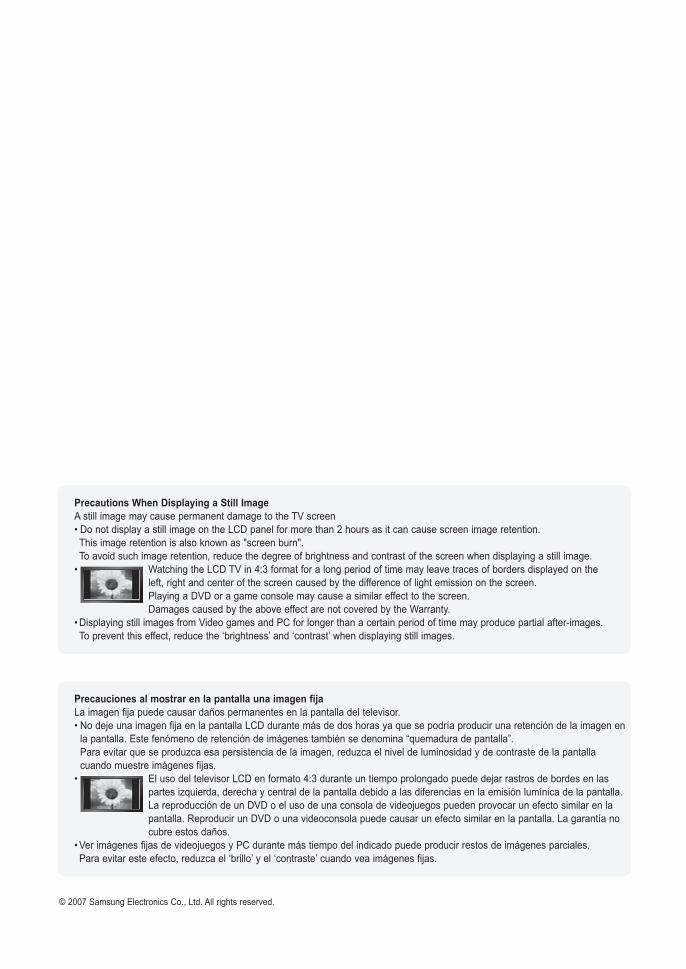
Precautions When Displaying a Still Image A still image may cause permanent damage to the TV screen • Do not display a still image on the LCD panel for more than 2 hours as it can cause screen image retention. This image retention is also known as "screen burn". To avoid such image retention, reduce the degree of brightness and contrast of the screen when displaying a still image. • Watching the LCD TV in 4:3 format for a long period of time may leave traces of borders displayed on the left, right and center of the screen caused by the difference of light emission on the screen. Playing a DVD or a game console may cause a similar effect to the screen. Damages caused by the above effect are not covered by the Warranty. • Displaying still images from Video games and PC for longer than a certain period of time may produce partial after-images. To prevent this effect, reduce the ‘brightness’ and ‘contrast’ when displaying still images.
© 2007 Samsung Electronics Co., Ltd. All rights reserved.
Precauciones al mostrar en la pantalla una imagen fija La imagen fija puede causar daños permanentes en la pantalla del televisor. • No deje una imagen fija en la pantalla LCD durante más de dos horas ya que se podría producir una retención de la imagen en
la pantalla. Este fenómeno de retención de imágenes también se denomina “quemadura de pantalla”. Para evitar que se produzca esa persistencia de la imagen, reduzca el nivel de luminosidad y de contraste de la pantalla cuando muestre imágenes fijas.
• El uso del televisor LCD en formato 4:3 durante un tiempo prolongado puede dejar rastros de bordes en las partes izquierda, derecha y central de la pantalla debido a las diferencias en la emisión lumínica de la pantalla. La reproducción de un DVD o el uso de una consola de videojuegos pueden provocar un efecto similar en la pantalla. Reproducir un DVD o una videoconsola puede causar un efecto similar en la pantalla. La garantía no cubre estos daños.
• Ver imágenes fijas de videojuegos y PC durante más tiempo del indicado puede producir restos de imágenes parciales. Para evitar este efecto, reduzca el ‘brillo’ y el ‘contraste’ cuando vea imágenes fijas.
Still.indd 1 2007-02-08 12:28:55
Contents
Symbol Press Important Note One-TouchButton
English
GEnEral InformatIon ListofFeatures.......................................................... 2 Accessories................................................................ 2 ViewingtheControlPanel...................................... 3 ViewingtheConnectionPanel................................... 4 RemoteControl.......................................................... 5 InstallingBatteriesintheRemoteControl................. 6
ConnECtIonS ConnectingVHFandUHFAntennas......................... 6 ConnectingCableTV................................................. 7 ConnectingaVCR..................................................... 8 ConnectingaCamcorder........................................... 9 ConnectingaDVDPlayer/Set-TopBox..................... 9 ConnectingaDVDPlayer/Set-TopBoxviaHDMI..... 10 ConnectingaDVDPlayer/Set-TopBoxviaDVI....... 10 ConnectingaDigitalAudioSystem............................ 11 ConnectinganAmplifier/DVDHomeTheater............ 11 ConnectingaPC........................................................ 11
opEratIon TurningtheTVOnandOff......................................... 12 Plug&PlayFeature................................................... 12 ChangingChannels................................................... 13 AdjustingtheVolume................................................. 14 ViewingtheDisplay.................................................... 14 ViewingtheMenus..................................................... 15 MemorizingtheChannels.......................................... 15 SettingUpYourRemoteControl................................ 17 RemoteControlCodes.............................................. 19 ToSelecttheSource(dependingonthemodel)....... 22 ToEdittheInputSourceName (dependingonthemodel).......................................... 22
pICturE Control UsingAutomaticPictureSettings...........................23 ActivatingBacklight................................................24 AdjustingtheColorTone........................................24 AdjustingtheDetailedSettings..............................25 ChangingtheScreenSize.....................................28 SettingtheActiveColor.........................................29 DNIe(DigitalNaturalImageengine)......................29 SettingtheFilmMode............................................29 FreezingthePicture...............................................30 SettingtheHDMIBlackLevele...................................30 ViewingPicture-in-Picture......................................30
Sound Control CustomizingtheSound..........................................32 UsingAutomaticSoundSettings............................32 SettingtheTruSurroundXT....................................33 ChoosingaMulti-ChannelSound(MTS) track-Digital..........................................................33 ChoosingaMulti-ChannelSound(MTS) track-Analog.........................................................34 AutomaticVolumeControl.....................................34 SelectingtheInternalMute.....................................35 SettingtheOn/OffMelody......................................35 ListeningtotheSoundoftheSub(PIP)Picture....36 ResettingtheSoundSettingstotheFactory Defaults..................................................................36 ConnectingHeadphones........................................36
ChannEl Control SelectingtheAntenna............................................37 ClearingScrambledChannels-Digital..................37 SettingtheChannelLists.......................................38 Toset-upYourFavoriteChannels..........................39 UsingtheChannelLists.........................................40 ViewingtheChannelLists......................................40 LabelingChannels..................................................41 LNA(LowNoiseAmplifier)......................................41 FineTuningAnalogChannels................................42 CheckingtheDigital-SignalStrength.....................42
pC dISplay UsingYourTVasaComputer(PC)Display..........43 DisplayModes........................................................43 SettinguptheTVwithyourPC..............................44 SettingtheHomeTheaterPC................................45
tImE SEttInG SettingtheClock....................................................46
funCtIon dESCrIptIon SelectingaMenuLanguage..................................49 SettingtheBlueScreenMode...............................49 UsingtheGameMode...........................................49 ViewingClosedCaptions(On-ScreenText Messages)-Analog................................................50 ViewingClosedCaptions(On-ScreenText Messages)-Digital.................................................51 MenuTransparencyLevel......................................52 UsingtheEnergySavingFeature..........................52 SettingtheFunctionHelp.......................................53 DigitalNoiseReduction..........................................53 UsingtheV-Chip....................................................54 UpgradingtheSoftware..........................................61
appEndIx Troubleshooting......................................................62 InstallingtheStand.................................................64 DisconnectingtheStand........................................64 Wall-MountAdjustment (LN-T4042H,LN-T4642H)......................................65 WallMountKitSpecifications(VESA)........................66 UsingtheAnti-TheftKensingtonLock....................67 Specifications.........................................................68
English -
BN68-01167A-Eng-00.indd 1 2007-02-09 9:20:56
English -
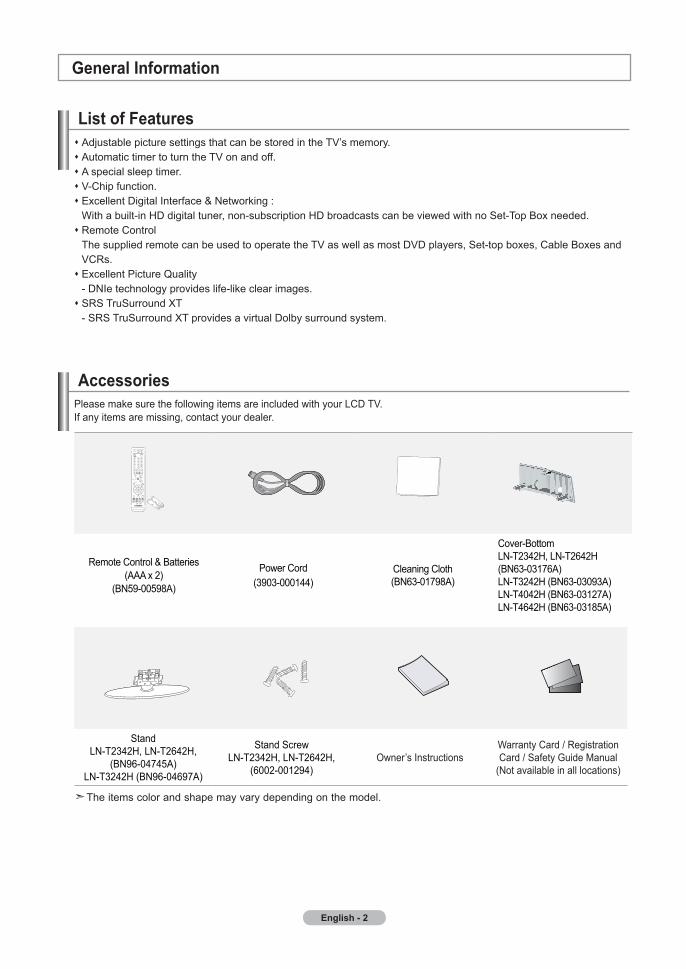
accessoriesPleasemakesurethefollowingitemsareincludedwithyourLCDTV.Ifanyitemsaremissing,contactyourdealer.
RemoteControl&Batteries(AAAx2)
(BN59-00598A)
PowerCord(3903-000144)
CleaningCloth(BN63-01798A)
Cover-BottomLN-T2342H,LN-T2642H(BN63-03176A)LN-T3242H(BN63-03093A)LN-T4042H(BN63-03127A)LN-T4642H(BN63-03185A)
StandLN-T2342H,LN-T2642H,
(BN96-04745A)LN-T3242H(BN96-04697A)
StandScrewLN-T2342H,LN-T2642H,
(6002-001294)Owner’sInstructions
WarrantyCard/RegistrationCard/SafetyGuideManual
(Notavailableinalllocations)
Theitemscolorandshapemayvarydependingonthemodel.
General Information
list of featuresAdjustablepicturesettingsthatcanbestoredintheTV’smemory.AutomatictimertoturntheTVonandoff.Aspecialsleeptimer.V-Chipfunction.ExcellentDigitalInterface&Networking: Withabuilt-inHDdigitaltuner,non-subscriptionHDbroadcastscanbeviewedwithnoSet-TopBoxneeded.RemoteControl ThesuppliedremotecanbeusedtooperatetheTVaswellasmostDVDplayers,Set-topboxes,CableBoxesand VCRs.ExcellentPictureQuality -DNIetechnologyprovideslife-likeclearimages.SRSTruSurroundXT -SRSTruSurroundXTprovidesavirtualDolbysurroundsystem.
BN68-01167A-Eng-00.indd 2 2007-02-09 9:20:59
English -
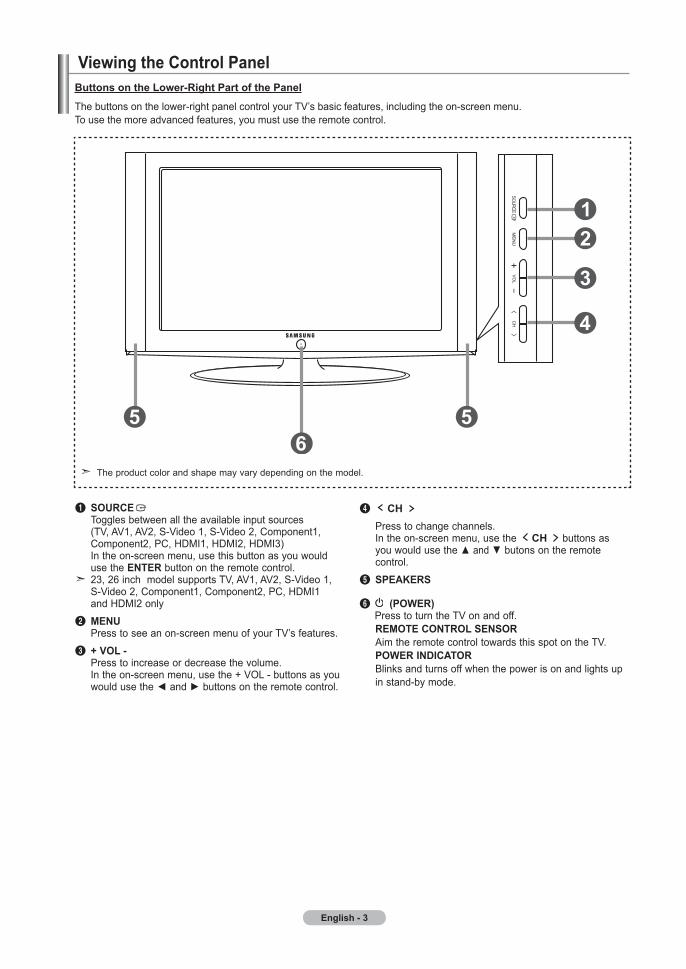
Viewing the Control panel
1SourCE Togglesbetweenalltheavailableinputsources (TV,AV1,AV2,S-Video1,S-Video2,Component1, Component2,PC,HDMI1,HDMI2,HDMI3) Intheon-screenmenu,usethisbuttonasyouwould usetheEntEr buttonontheremotecontrol.
23,26inchmodelsupportsTV,AV1,AV2,S-Video1, S-Video2,Component1,Component2,PC,HDMI1 andHDMI2only2mEnu Presstoseeanon-screenmenuofyourTV’sfeatures.3+ Vol - Presstoincreaseordecreasethevolume. Intheon-screenmenu,usethe+VOL-buttonsasyou wouldusetheandbuttonsontheremotecontrol.
4 Ch Presstochangechannels. Intheon-screenmenu,usethe Ch buttonsas youwouldusetheandbutonsontheremote control.5SpEaKErS
6 (powEr) PresstoturntheTVonandoff. rEmotE Control SEnSor AimtheremotecontroltowardsthisspotontheTV. powEr IndICator Blinksandturnsoffwhenthepowerisonandlightsup instand-bymode.
Buttons on the lower-right part of the panel
Thebuttonsonthelower-rightpanelcontrolyourTV’sbasicfeatures,includingtheon-screenmenu.Tousethemoreadvancedfeatures,youmustusetheremotecontrol.
Theproductcolorandshapemayvarydependingonthemodel.
BN68-01167A-Eng-00.indd 3 2007-02-09 9:21:01
English -
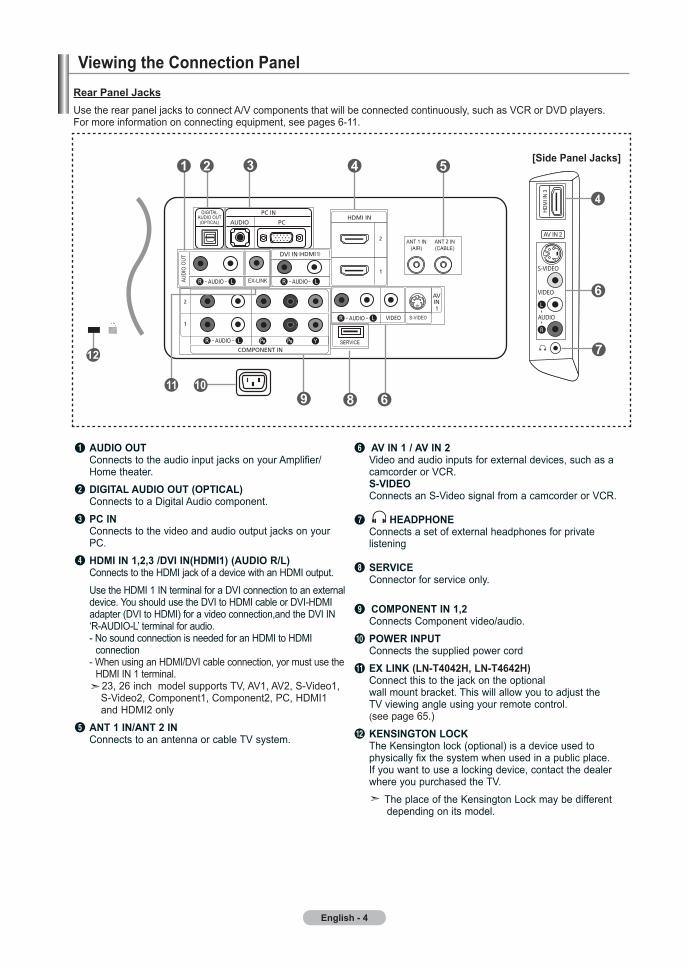
1audIo out ConnectstotheaudioinputjacksonyourAmplifier/ Hometheater.2dIGItal audIo out (optICal) ConnectstoaDigitalAudiocomponent.3pC In Connectstothevideoandaudiooutputjacksonyour PC.4hdmI In ,, /dVI In(hdmI) (audIo r/l) ConnectstotheHDMIjackofadevicewithanHDMIoutput. UsetheHDMI1INterminalforaDVIconnectiontoanexternal
device.YoushouldusetheDVItoHDMIcableorDVI-HDMIadapter(DVItoHDMI)foravideoconnection,andtheDVIIN‘R-AUDIO-L’terminalforaudio.-NosoundconnectionisneededforanHDMItoHDMI connection-WhenusinganHDMI/DVIcableconnection,yormustusethe HDMIIN1terminal.
23,26inchmodelsupportsTV,AV1,AV2,S-Video1, S-Video2,Component1,Component2,PC,HDMI1 andHDMI2only
5ant In/ant In ConnectstoanantennaorcableTVsystem.
6aV In / aV In Videoandaudioinputsforexternaldevices,suchasa camcorderorVCR. S-VIdEo ConnectsanS-VideosignalfromacamcorderorVCR.
7 hEadphonE Connectsasetofexternalheadphonesforprivate listening8 SErVICE Connectorforserviceonly.
9ComponEnt In , ConnectsComponentvideo/audio.0powEr Input Connectsthesuppliedpowercord!Ex lInK (ln-t0h, ln-t6h) Connectthistothejackontheoptional wallmountbracket.Thiswillallowyoutoadjustthe TVviewingangleusingyourremotecontrol. (seepage65.)@KEnSInGton loCK TheKensingtonlock(optional)isadeviceusedto physicallyfixthesystemwhenusedinapublicplace. Ifyouwanttousealockingdevice,contactthedealer whereyoupurchasedtheTV. TheplaceoftheKensingtonLockmaybedifferent dependingonitsmodel.
Viewing the Connection panel rear panel JacksUsetherearpaneljackstoconnectA/Vcomponentsthatwillbeconnectedcontinuously,suchasVCRorDVDplayers.Formoreinformationonconnectingequipment,seepages6-11.
[Side panel Jacks]
BN68-01167A-Eng-00.indd 4 2007-02-09 9:21:01

English -
remote ControlYoucanusetheremotecontroluptoadistanceofabout23feetfromtheTV.Whenusingtheremote,alwayspointitdirectlyattheTV.YoucanalsouseyourremotecontroltooperateyourVCR,Cablebox,DVDplayer,orSet-TopBox.
1powEr TurnstheTVonandoff.
2numErIC ButtonS Presstochangethechannel.
3– Presstoselectadditionalchannels(digital andanalog)beingbroadcastbythesame station.Forexample,toselectchannel “54-3”,press“54”,thenpress“–”and“3”.
4Ch lISt UsedtodisplayChannelListsonthe screen.
5antEnna Presstoselect“AIR”or“CABLE”.
6VCr/dVd functions -Rewind -Stop -Play/Pause -Fast/Forward
7Vol / Vol Presstoincreaseordecreasethe volume.
8 (mutE) Presstotemporarilycutoffthesound.
9mEnu Displaysthemainon-screenmenu.
0S.modE Presstoselectthesoundmode.
!rEturn Returnstothepreviousmenu.
@p.modE Presstoselectthepicturemode.
#SrS SelectsSRSTruSurroundXTmode.$mtS Presstochoosestereo,monoor SeparateAudioProgram (SAPbroadcast).%SlEEp Presstoselectapresettimeinterval forautomaticshutoff.
^auto proG. Presstoautomaticallystoreselected TV/Cablechannels.
&SEt Setstheremotetocontrolyour TV,VCR,Cable,DVD,orSet-TopBox
*tV, dVd, StB, CaBlE, VCr PresstooperateyourTV, DVD,STB,CABLE(box),orVCR (seepages17-21.)
(Whenpressingthisbutton,anumber ofbuttonsontheremotecontrol(e.g. TV,DVD,STB,CABLE,VCR, VOLandCHbuttons)lightupforafew secondsandthenturnofftosave power.Thisfunctionisconvenientfor usingtheremoteatnightorwhendark.
)SourCE Presstodisplayalloftheavailable videosources.
aprE-Ch Tunestothepreviouschannel.
bfaV.Ch Presstoswitchtoyourfavoritechannels.
c hdmI SelectstheHDMImodedirectly.
d Ch / Ch Presstochangechannels.
e ExIt Presstoexitthemenu.
f UP / DOWN / LEFT / RIGHT / EntEr Usetoselecton-screenmenuitems andchangemenuvalues.
g Info PresstodisplayinformationontheTV screen.
h CaptIon Controlsthecaptiondecoder.
i StIll Presstostoptheactionduringa particularscene. Pressagaintoresumenormalvideo.
j p.SIZE Picturesizeselection.
k pIp Picture-inPictureON/OFF.
l Ch / Displaystheavailablechannelsin sequence.(Thesebuttonschange channelsinthePIPwindowonly.)
m add/dEl Usetostoreanddeletechannels to/frommemory.
n rESEt Whenyourremotedoesnotwork, changethebatteriesandpressthe RESETbuttonfor2-3secondsbefore use.
Thisisaspecialremotecontrolforthevisuallyimpaired,andhasBraille pointsonthePower,Channel,STOP,PLAY/PAUSEandVolumebuttons.
Theperformanceoftheremotecontrolmaybeaffectedbybrightlight.
BN68-01167A-Eng-00.indd 5 2007-02-09 9:21:03
English - 6
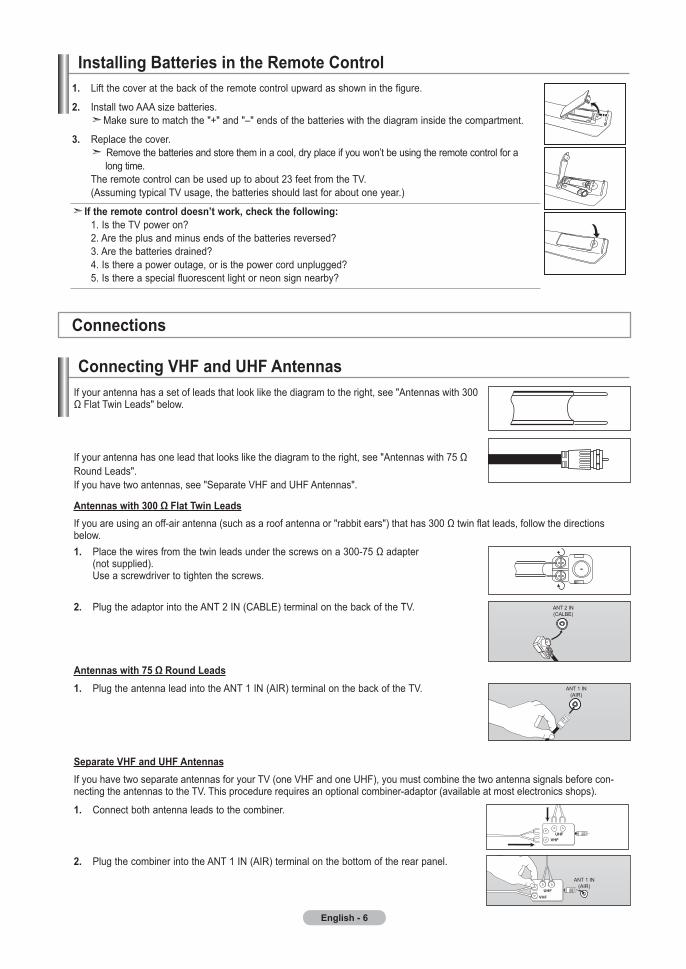
. Liftthecoveratthebackoftheremotecontrolupwardasshowninthefigure.
. InstalltwoAAAsizebatteries. Makesuretomatchthe"+"and"–"endsofthebatterieswiththediagraminsidethecompartment.
. Replacethecover. Removethebatteriesandstoretheminacool,dryplaceifyouwon’tbeusingtheremotecontrolfora longtime. Theremotecontrolcanbeuseduptoabout23feetfromtheTV. (AssumingtypicalTVusage,thebatteriesshouldlastforaboutoneyear.)
If the remote control doesn’t work, check the following: 1.IstheTVpoweron? 2.Aretheplusandminusendsofthebatteriesreversed? 3.Arethebatteriesdrained? 4.Isthereapoweroutage,oristhepowercordunplugged? 5.Isthereaspecialfluorescentlightorneonsignnearby?
Installing Batteries in the remote Control
Connecting Vhf and uhf antennasIfyourantennahasasetofleadsthatlooklikethediagramtotheright,see"Antennaswith300ΩFlatTwinLeads"below.
Ifyourantennahasoneleadthatlookslikethediagramtotheright,see"Antennaswith75ΩRoundLeads".Ifyouhavetwoantennas,see"SeparateVHFandUHFAntennas".
. Placethewiresfromthetwinleadsunderthescrewsona300-75Ωadapter (notsupplied). Useascrewdrivertotightenthescrews.
. PlugtheadaptorintotheANT2IN(CABLE)terminalonthebackoftheTV. ANT2IN(CALBE)
Antennas with 300 Ω Flat Twin LeadsIfyouareusinganoff-airantenna(suchasaroofantennaor"rabbitears")thathas300Ωtwinflatleads,followthedirectionsbelow.
. PlugtheantennaleadintotheANT1IN(AIR)terminalonthebackoftheTV.
Antennas with 75 Ω Round LeadsANT1IN
(AIR)
Separate Vhf and uhf antennasIfyouhavetwoseparateantennasforyourTV(oneVHFandoneUHF),youmustcombinethetwoantennasignalsbeforecon-nectingtheantennastotheTV.Thisprocedurerequiresanoptionalcombiner-adaptor(availableatmostelectronicsshops).
. Connectbothantennaleadstothecombiner.
. PlugthecombinerintotheANT1IN(AIR)terminalonthebottomoftherearpanel.
uhfVhf
ANT1IN(AIR)
uhfVhf
Connections
BN68-01167A-Eng-00.indd 6 2007-02-09 9:21:05
English -
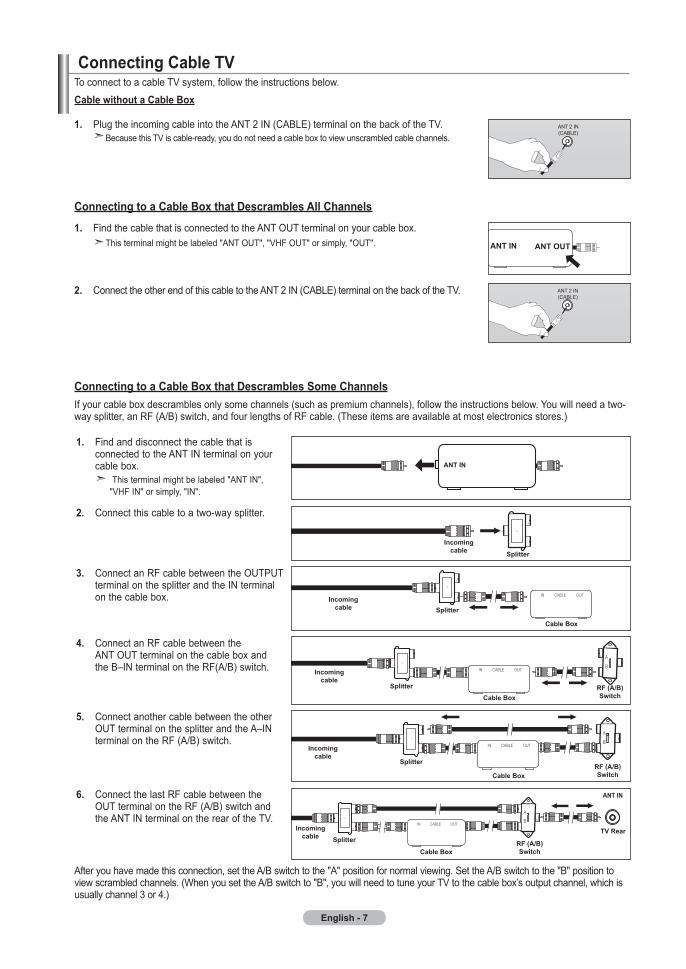
Afteryouhavemadethisconnection,settheA/Bswitchtothe"A"positionfornormalviewing.SettheA/Bswitchtothe"B"positiontoviewscrambledchannels.(WhenyousettheA/Bswitchto"B",youwillneedtotuneyourTVtothecablebox’soutputchannel,whichisusuallychannel3or4.)
Connecting to a Cable Box that descrambles Some ChannelsIfyourcableboxdescramblesonlysomechannels(suchaspremiumchannels),followtheinstructionsbelow.Youwillneedatwo-waysplitter,anRF(A/B)switch,andfourlengthsofRFcable.(Theseitemsareavailableatmostelectronicsstores.)
. Connectthiscabletoatwo-waysplitter.
. ConnectanRFcablebetweentheOUTPUT terminalonthesplitterandtheINterminal onthecablebox.
. ConnectanRFcablebetweenthe ANTOUTterminalonthecableboxand theB–INterminalontheRF(A/B)switch.
. Findanddisconnectthecablethatis connectedtotheANTINterminalonyour cablebox. Thisterminalmightbelabeled"ANTIN",
"VHFIN"orsimply,"IN".
. Connectanothercablebetweentheother OUTterminalonthesplitterandtheA–IN terminalontheRF(A/B)switch.
6. ConnectthelastRFcablebetweenthe OUTterminalontheRF(A/B)switchand theANTINterminalontherearoftheTV.
Splitter
Incomingcable
Splitter
Cable Box
Incomingcable
Splitter
Cable Boxrf (a/B)Switch
Incomingcable
ant In
Splitter
Cable Box
Incomingcable
rf (a/B)Switch
Splitter
Cable Box
Incomingcable
tV rear
rf (a/B)Switch
ant In
Connecting Cable tVToconnecttoacableTVsystem,followtheinstructionsbelow.Cable without a Cable Box
. PlugtheincomingcableintotheANT2IN(CABLE)terminalonthebackoftheTV. BecausethisTViscable-ready,youdonotneedacableboxtoviewunscrambledcablechannels.
Connecting to a Cable Box that descrambles all Channels
. FindthecablethatisconnectedtotheANTOUTterminalonyourcablebox. Thisterminalmightbelabeled"ANTOUT","VHFOUT"orsimply,"OUT".
. ConnecttheotherendofthiscabletotheANT2IN(CABLE)terminalonthebackoftheTV.
ant outant In
ANT2IN(CABLE)
ANT2IN(CABLE)
BN68-01167A-Eng-00.indd 7 2007-02-09 9:21:07

English -
Connecting a VCr
TheseinstructionsassumethatyouhavealreadyconnectedyourTVtoanantennaoracableTVsystem(accordingtotheinstructionsonpages6-7).Skipstep1ifyouhavenotyetconnectedtoanantennaoracablesystem.
. Unplugthecableorantenna fromthebackoftheTV.. Connectthecableorantenna totheANTINterminalonthe backoftheVCR.. ConnectanRFCablebetween theANTOUTterminalonthe VCRandtheANT1IN(AIR)or ANT2IN(CABLE)terminalon theTV.. ConnectaVideoCable betweentheVIDEOOUTjack ontheVCRandtheAVIN1(or AVIN2)[VIDEO]jackonthe TV.. ConnectAudioCables betweentheAUDIOOUT jacksontheVCRandthe AVIN1(orAVIN2) [R-AUDIO-L]jacksontheTV. Ifyouhavea“mono” (non-stereo)VCR,usea Y-connector(notsupplied) tohookuptotheright andleftaudioinputjacks oftheTV.IfyourVCR isstereo,youmust connecttwocables.
Followtheinstructionsin“ViewingaVCRorCamcorderTape”toviewyourVCRtape.EachVCRhasadifferentbackpanelconfiguration.WhenconnectingaVCR,matchthecoloroftheconnectionterminaltothecable.
tV rear panel
rf Cable (not supplied)
VCr rear panel
Video Cable (not supplied)
audio Cable (not supplied)
ant In (aIr)
YourSamsungTVcanbeconnectedtoanS-VideosignalfromaVCR.(ThisconnectiondeliversabetterpictureascomparedtoastandardVCR.)
. Tobegin,followsteps1–3 intheprevioussectionto connecttheantennaor cabletoyourVCRand yourTV.. ConnectanS-VideoCable betweentheS-VIDEOOUT jackontheVCRandthe AVIN1[S-VIDEO]jackon theTV.. ConnectAudioCables betweentheAUDIOOUT jacksontheVCRandthe AVIN1[R-AUDIO-L]jacks ontheTV.
AnS-VideocablemaybeincludedwithaVCR.(Ifnot,checkyourlocalelectronicsstore.)EachVCRhasadifferentbackpanelconfiguration.WhenconnectingaVCR,matchthecoloroftheconnectionterminaltothecable.
VCr rear panel
rf Cable (not supplied)
audio Cable (not supplied)
tV rear panel
S-Video Cable (not supplied)
S-Video Connection
Video Connection
ant In (CaBlE)
BN68-01167A-Eng-00.indd 8 2007-02-09 9:21:09
English -
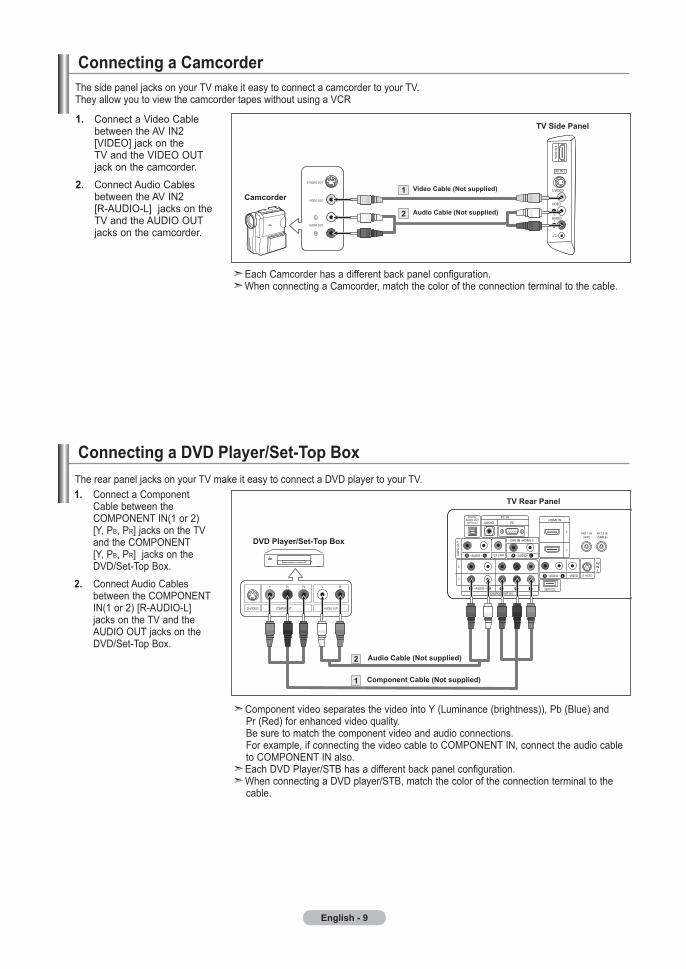
Connecting a dVd player/Set-top BoxTherearpaneljacksonyourTVmakeiteasytoconnectaDVDplayertoyourTV.. ConnectaComponent Cablebetweenthe COMPONENTIN(1or2) [Y,PB,PR]jacksontheTV andtheCOMPONENT [Y,PB,PR]jacksonthe DVD/Set-TopBox.. ConnectAudioCables betweentheCOMPONENT IN(1or2)[R-AUDIO-L] jacksontheTVandthe AUDIOOUTjacksonthe DVD/Set-TopBox.
ComponentvideoseparatesthevideointoY(Luminance(brightness)),Pb(Blue)and Pr(Red)forenhancedvideoquality. Besuretomatchthecomponentvideoandaudioconnections. Forexample,ifconnectingthevideocabletoCOMPONENTIN,connecttheaudiocable toCOMPONENTINalso.
EachDVDPlayer/STBhasadifferentbackpanelconfiguration.WhenconnectingaDVDplayer/STB,matchthecoloroftheconnectionterminaltothe
cable.
dVd player/Set-top Box
tV rear panel
Component Cable (not supplied)
audio Cable (not supplied)
Connecting a Camcorder ThesidepaneljacksonyourTVmakeiteasytoconnectacamcordertoyourTV.TheyallowyoutoviewthecamcordertapeswithoutusingaVCR
. ConnectaVideoCable betweentheAVIN2 [VIDEO]jackonthe TVandtheVIDEOOUT jackonthecamcorder.. ConnectAudioCables betweentheAVIN2 [R-AUDIO-L]jacksonthe TVandtheAUDIOOUT jacksonthecamcorder.
Camcorder
tV Side panel
Video Cable (not supplied)
audio Cable (not supplied)
EachCamcorderhasadifferentbackpanelconfiguration.WhenconnectingaCamcorder,matchthecoloroftheconnectionterminaltothecable.
BN68-01167A-Eng-00.indd 9 2007-02-09 9:21:10
English - 0
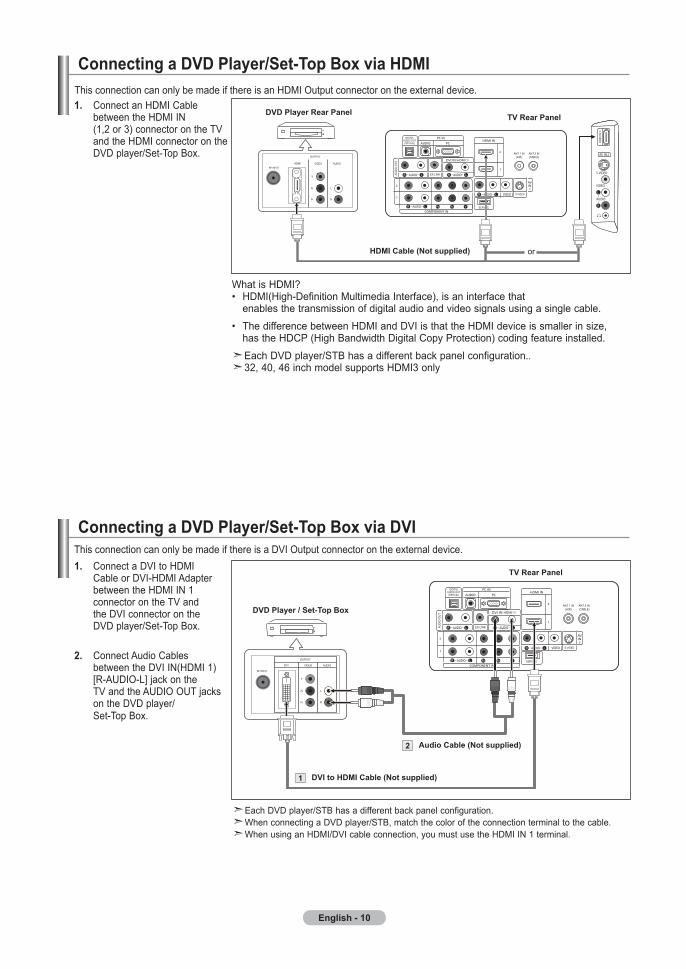
Connecting a dVd player/Set-top Box via hdmIThisconnectioncanonlybemadeifthereisanHDMIOutputconnectorontheexternaldevice.. ConnectanHDMICable betweentheHDMIIN (1,2or3)connectorontheTV andtheHDMIconnectoronthe DVDplayer/Set-TopBox.
dVd player rear panel tV rear panel
hdmI Cable (not supplied)
WhatisHDMI?• HDMI(High-DefinitionMultimediaInterface),isaninterfacethat enablesthetransmissionofdigitalaudioandvideosignalsusingasinglecable.• ThedifferencebetweenHDMIandDVIisthattheHDMIdeviceissmallerinsize, hastheHDCP(HighBandwidthDigitalCopyProtection)codingfeatureinstalled.
EachDVDplayer/STBhasadifferentbackpanelconfiguration.. 32,40,46inchmodelsupportsHDMI3only
Connecting a dVd player/Set-top Box via dVIThisconnectioncanonlybemadeifthereisaDVIOutputconnectorontheexternaldevice.. ConnectaDVItoHDMI CableorDVI-HDMIAdapter betweentheHDMIIN1 connectorontheTVand theDVIconnectoronthe DVDplayer/Set-TopBox.
. ConnectAudioCables betweentheDVIIN(HDMI1) [R-AUDIO-L]jackonthe TVandtheAUDIOOUTjacks ontheDVDplayer/ Set-TopBox.
EachDVDplayer/STBhasadifferentbackpanelconfiguration.WhenconnectingaDVDplayer/STB,matchthecoloroftheconnectionterminaltothecable.WhenusinganHDMI/DVIcableconnection,youmustusetheHDMIIN1terminal.
tV rear panel
dVd player / Set-top Box
audio Cable (not supplied)
dVI to hdmI Cable (not supplied)
WhenusinganHDMIcable connection,itisonly possiblefromtheHDMI2IN terminal.
BN68-01167A-Eng-00.indd 10 2007-02-09 9:21:12
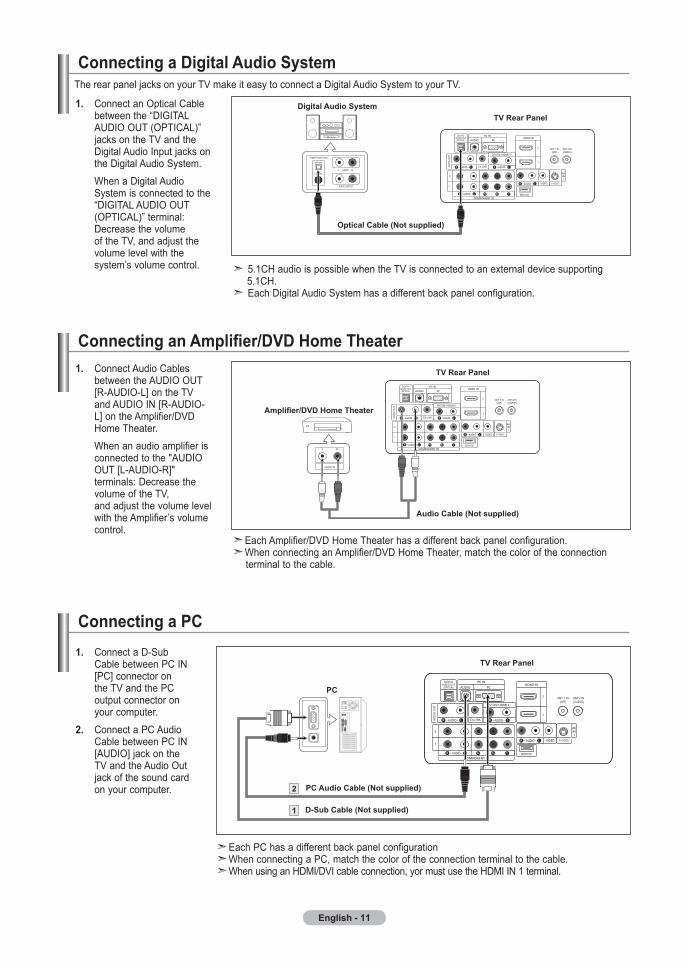
Connecting an Amplifier/DVD Home Theater. ConnectAudioCables betweentheAUDIOOUT [R-AUDIO-L]ontheTV andAUDIOIN[R-AUDIO- L]ontheAmplifier/DVD HomeTheater. Whenanaudioamplifieris connectedtothe"AUDIO OUT[L-AUDIO-R]" terminals:Decreasethe volumeoftheTV, andadjustthevolumelevel withtheAmplifier’svolume control.
Amplifier/DVD Home Theater
tV rear panel
audio Cable (not supplied)
EachAmplifier/DVDHomeTheaterhasadifferentbackpanelconfiguration.WhenconnectinganAmplifier/DVDHomeTheater,matchthecoloroftheconnection
terminaltothecable.
English -
Connecting a digital audio System
. ConnectanOpticalCable betweenthe“DIGITAL AUDIOOUT(OPTICAL)” jacksontheTVandthe DigitalAudioInputjackson theDigitalAudioSystem. WhenaDigitalAudio Systemisconnectedtothe “DIGITALAUDIOOUT (OPTICAL)”terminal: Decreasethevolume oftheTV,andadjustthe volumelevelwiththe system’svolumecontrol.
digital audio SystemtV rear panel
optical Cable (not supplied)
5.1CHaudioispossiblewhentheTVisconnectedtoanexternaldevicesupporting 5.1CH.
EachDigitalAudioSystemhasadifferentbackpanelconfiguration.
TherearpaneljacksonyourTVmakeiteasytoconnectaDigitalAudioSystemtoyourTV.
Connecting a pC. ConnectaD-Sub CablebetweenPCIN [PC]connectoron theTVandthePC outputconnectoron yourcomputer.. ConnectaPCAudio CablebetweenPCIN [AUDIO]jackonthe TVandtheAudioOut jackofthesoundcard onyourcomputer.
pC
tV rear panel
d-Sub Cable (not supplied)
pC audio Cable (not supplied)
EachPChasadifferentbackpanelconfigurationWhenconnectingaPC,matchthecoloroftheconnectionterminaltothecable.WhenusinganHDMI/DVIcableconnection,yormustusetheHDMIIN1terminal.
BN68-01167A-Eng-00.indd 11 2007-02-09 9:21:14
English -
plug & play featureWhentheTVisinitiallypoweredon,basicsettingsproceedautomaticallyandsubsequently:
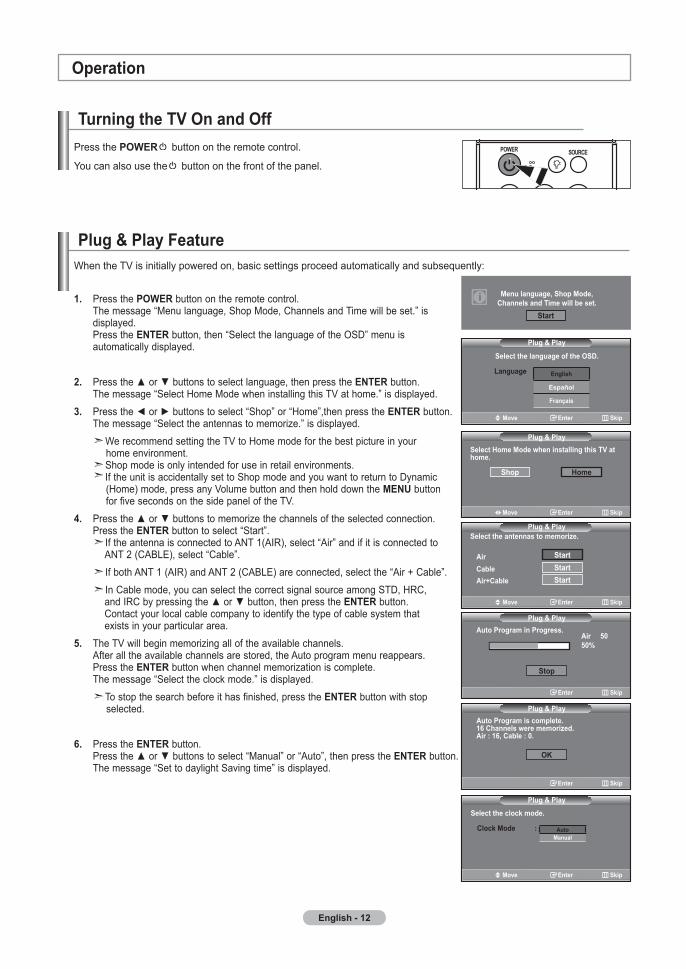
. PressthepowErbuttonontheremotecontrol. Themessage“Menulanguage,ShopMode,ChannelsandTimewillbeset.”is displayed. PresstheEntErbutton,then“SelectthelanguageoftheOSD”menuis automaticallydisplayed.
. Presstheorbuttonstoselectlanguage,thenpresstheEntErbutton. Themessage“SelectHomeModewheninstallingthisTVathome.”isdisplayed.. Presstheorbuttonstoselect“Shop”or“Home”,thenpresstheEntErbutton. Themessage“Selecttheantennastomemorize.”isdisplayed. WerecommendsettingtheTVtoHomemodeforthebestpictureinyour homeenvironment. Shopmodeisonlyintendedforuseinretailenvironments. IftheunitisaccidentallysettoShopmodeandyouwanttoreturntoDynamic (Home)mode,pressanyVolumebuttonandthenholddownthemEnubutton forfivesecondsonthesidepaneloftheTV.. Presstheorbuttonstomemorizethechannelsoftheselectedconnection. PresstheEntErbuttontoselect“Start”. IftheantennaisconnectedtoANT1(AIR),select“Air”andifitisconnectedto ANT2(CABLE),select“Cable”. IfbothANT1(AIR)andANT2(CABLE)areconnected,selectthe“Air+Cable”. InCablemode,youcanselectthecorrectsignalsourceamongSTD,HRC, andIRCbypressingtheorbutton,thenpresstheEntErbutton. Contactyourlocalcablecompanytoidentifythetypeofcablesystemthat existsinyourparticulararea.. TheTVwillbeginmemorizingalloftheavailablechannels. Afteralltheavailablechannelsarestored,theAutoprogrammenureappears. Pressthe EntErbuttonwhenchannelmemorizationiscomplete. Themessage“Selecttheclockmode.”isdisplayed. Tostopthesearchbeforeithasfinished,presstheEntErbuttonwithstop selected.
6. PresstheEntErbutton. Presstheorbuttonstoselect“Manual”or“Auto”,thenpresstheEntErbutton. Themessage“SettodaylightSavingtime”isdisplayed.
turning the tV on and offPressthepowEr buttonontheremotecontrol.
Youcanalsousethe buttononthefrontofthepanel.
operation
Select home mode when installing this tV at home.
plug & play
plug & play
air 00%
Clock Set
Shop
Stop
menu language, Shop mode, Channels and time will be set.
Start
language
plug & play
English
Español
français
move Enter Skip
Select the language of the oSd.
home
move Enter Skip
Select the antennas to memorize.
Startair
plug & play
Cableair+Cable
StartStart
move Enter Skip
Enter Skip
auto program in progress.
Clock mode :
move Enter Skip
Select the clock mode.plug & play
automanual
plug & playauto program is complete.6 Channels were memorized.air : 6, Cable : 0.
Enter Skip
oK
BN68-01167A-Eng-00.indd 12 2007-02-09 9:21:18

English -
. Presstheorbuttonstoselect“Off”or“On”,thentheEntErbutton. Themessage“Selectthetimezoneinwhichyoulive.”isdisplayed.
. Presstheorbuttonstohighlightthetimezoneforyourlocalarea. PresstheEntErbutton.Ifyouhavereceivedadigitalsignal,thetimewillbeset automatically. Ifnot,seepage47tosettheclock.
. Themessage“Enjoyyourwatching.”isdisplayed. Whenyouhavefinished,presstheEntErbutton.
Changing Channels
. PresstheCh or Ch buttontochangechannels. WhenyoupresstheCh or Ch button,theTVchangeschannelsin sequence. YouwillseeallthechannelsthattheTVhasmemorized.(TheTVmusthave memorizedatleastthreechannels).Youwillnotseechannelsthatwereeither erasedornotmemorized.Seepage16tomemorizechannels.
If you want to reset this feature.... PressthemEnubuttontodisplaythemenu. Presstheorbuttonstoselect"Setup",thenpresstheEntErbutton.. PresstheEntErbuttonagain,toselect"Plug&Play".. Themessage"Menulanguage,ShopMode,ChannelsandTimewillbeset."is displayed.
using the Channel Buttons
. PresstheprE-Chbutton. TheTVwillswitchtothelastchannelviewed. Toquicklyswitchbetweentwochannelsthatarefarapart,tunetoone channel,thenusethenumberbuttontoselectthesecondchannel.Then usetheprE-Chbuttontoquicklyalternatebetweenthem.
using the prE-Ch Button to select the previous Channel
dSt :
move Enter Skip
Set to daylight saving time.plug & play
offon
move Enter Skip
Selects a cable signal type for your location. plug & play
newfoundlandatlanticEasternCentral
mountainpacificalaskahawaii
Enjoy your watching.
oK
Setupplug & play language : English time Game mode : off V-Chip Caption menu transparency : medium more
tV
move Enter return
menu language, Shop mode, Channels and time will be set.
Start
BN68-01167A-Eng-00.indd 13 2007-02-09 9:21:20
English -
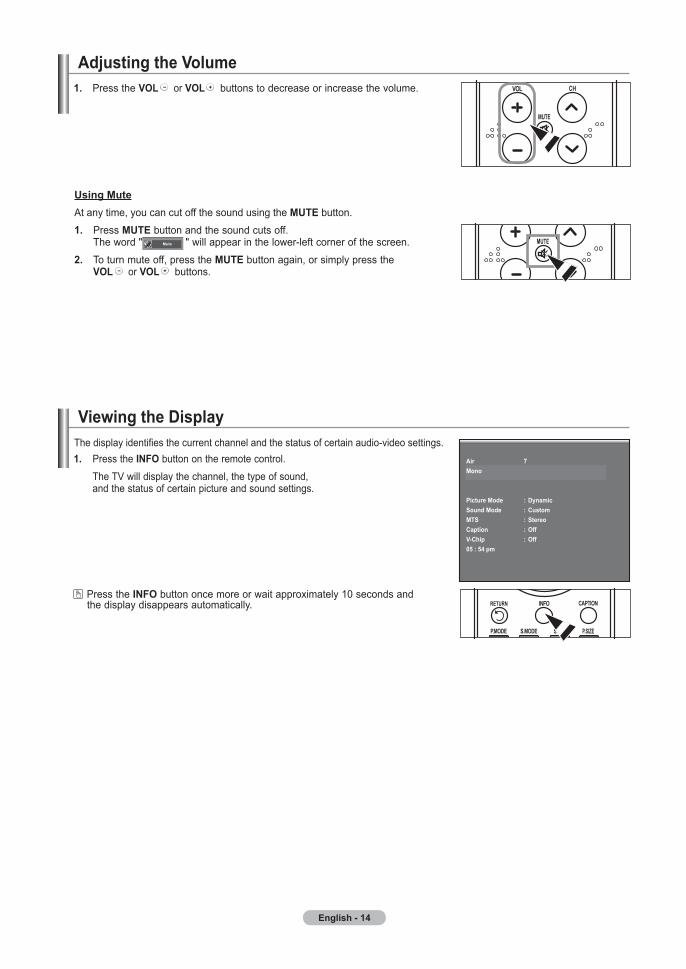
adjusting the Volume. PresstheVol orVol buttonstodecreaseorincreasethevolume.
using muteAtanytime,youcancutoffthesoundusingthemutEbutton.. PressmutE buttonandthesoundcutsoff. Theword""willappearinthelower-leftcornerofthescreen.. Toturnmuteoff,pressthemutE buttonagain,orsimplypressthe Vol orVol buttons.
Viewing the display
. PresstheInfo buttonontheremotecontrol. TheTVwilldisplaythechannel,thetypeofsound, andthestatusofcertainpictureandsoundsettings.
PresstheInfo buttononcemoreorwaitapproximately10secondsand thedisplaydisappearsautomatically.
Thedisplayidentifiesthecurrentchannelandthestatusofcertainaudio-videosettings.air mono
picture mode : dynamicSound mode : CustommtS : StereoCaption : offV-Chip : off0 : pm
BN68-01167A-Eng-00.indd 14 2007-02-09 9:21:21

English -
Viewing the menus. Withthepoweron,pressthemEnu button. Themainmenuappearsonthescreen.Themenu’sleftsidehasfiveicons: Picture,Sound,Channel,Setup,Input.. Usetheorbuttonstoselectoneofthefiveicons. ThenpresstheEntEr buttontoaccesstheicon’ssub-menu.. PresstheExIt buttontoexit.
Theon-screenmenusdisappearfromthescreenafteraboutoneminute.
InputSource list : tV Edit name
tV
move Enter Exit
memorizing the ChannelsYourTVcanmemorizeandstorealloftheavailablechannelsforboth"off-air"(Air)and"Cable"channels.Aftertheavailablechannelsarememorized,usetheCh or Ch buttonstoscanthroughthechannels.Thiseliminatestheneedtochangechannelsbyenteringthechannelsdigits.Therearethreestepsformemorizingchannels:selectingabroadcastsource,memorizingthechannels(automatic)andaddingordeletingchannels(ChannelList).
Selecting the Video Signal-sourceBeforeyourtelevisioncanbeginmemorizingtheavailablechannels,youmustspecifythetypeofsignalsourcethatisconnectedtotheTV(i.e.anAiroraCablesystem).. PressthemEnu buttontodisplaythemenu. Presstheorbuttonstoselect"Channel",thenpressthe EntEr button.
. PresstheEntErbuttonselect“Antenna”. Presstheorbuttonstoselect“Air”or“Cable”,thenpresstheEntErbutton. PresstheExItbuttontoexit.
antenna : air auto program Clear Scrambled Channel Channel list name fine tune Signal Strength lna : off
Channel
move Enter return
tV
Channel
move Enter return
tVantenna : air auto program Clear Scrambled ChannelChannel list name fine tune Signal Strength lna : off
airCable
BN68-01167A-Eng-00.indd 15 2007-02-09 9:21:23
English - 6
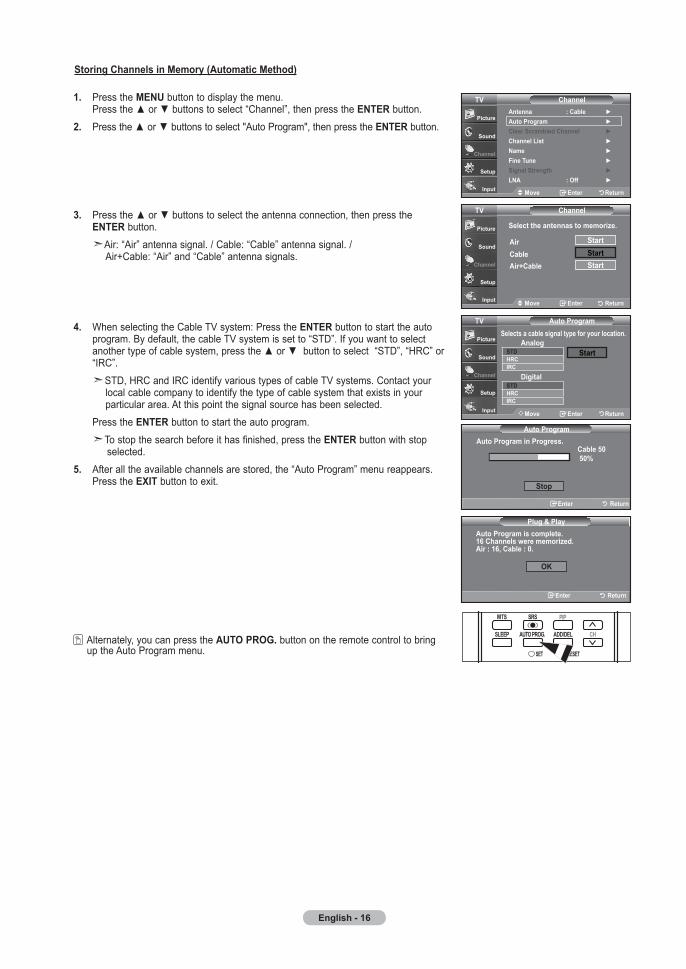
Storing Channels in memory (automatic method)
. PressthemEnubuttontodisplaythemenu. Presstheorbuttonstoselect“Channel”,thenpresstheEntErbutton.. Presstheorbuttonstoselect"AutoProgram",thenpresstheEntEr button.
. Presstheorbuttonstoselecttheantennaconnection,thenpressthe EntErbutton. Air:“Air”antennasignal./Cable:“Cable”antennasignal./ Air+Cable:“Air”and“Cable”antennasignals.
. WhenselectingtheCableTVsystem:PresstheEntErbuttontostarttheauto program.Bydefault,thecableTVsystemissetto“STD”.Ifyouwanttoselect anothertypeofcablesystem,presstheorbuttontoselect“STD”,“HRC”or “IRC”. STD,HRCandIRCidentifyvarioustypesofcableTVsystems.Contactyour localcablecompanytoidentifythetypeofcablesystemthatexistsinyour particulararea.Atthispointthesignalsourcehasbeenselected. PresstheEntErbuttontostarttheautoprogram. Tostopthesearchbeforeithasfinished,presstheEntErbuttonwithstop selected.. Afteralltheavailablechannelsarestored,the“AutoProgram”menureappears. PresstheExItbuttontoexit.
Alternately,youcanpresstheauto proG.buttonontheremotecontroltobring uptheAutoProgrammenu.
move Enter return
antenna : Cable auto program Clear Scrambled Channel Channel list name fine tune Signal Strength lna : off
Channel
move Enter return
tV
move Enter return
Select the antennas to memorize.
Channel
move Enter return
tV
StartairCableair+Cable
StartStart
plug & playauto program is complete.6 Channels were memorized.air : 6, Cable : 0.
auto program
Cable 0 0%
Stop
Enter return
auto program in progress.
move Enter return
Selects a cable signal type for your location.auto program
move Enter return
tV
analogStartStd
hrCIrC
digitalStdhrCIrC
oK
Enter return
BN68-01167A-Eng-00.indd 16 2007-02-09 9:21:26
English -
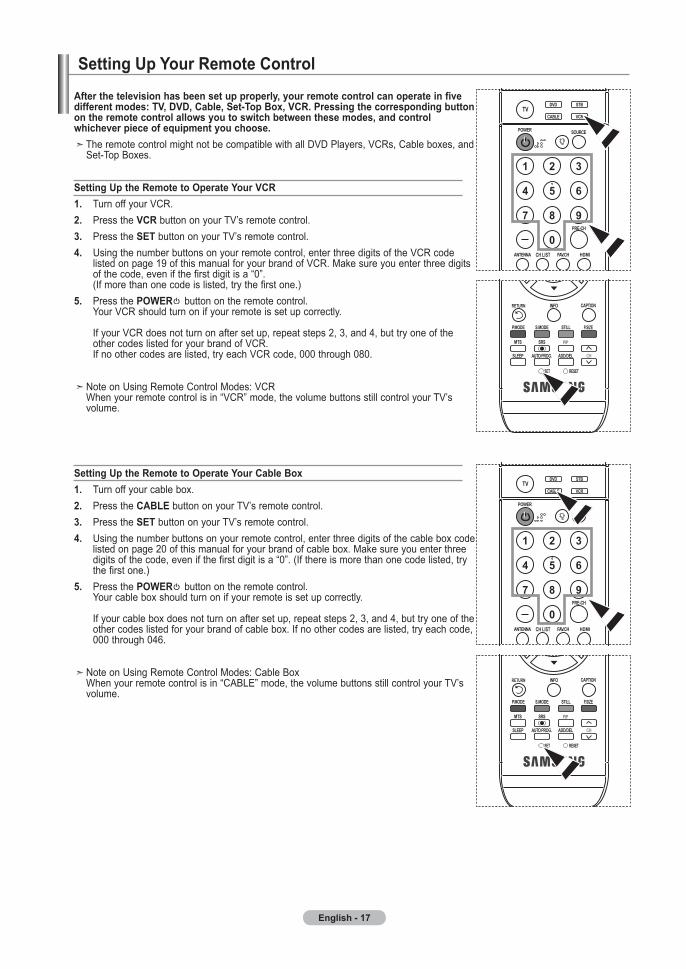
after the television has been set up properly, your remote control can operate in five different modes: tV, dVd, Cable, Set-top Box, VCr. pressing the corresponding button on the remote control allows you to switch between these modes, and control whichever piece of equipment you choose.
TheremotecontrolmightnotbecompatiblewithallDVDPlayers,VCRs,Cableboxes,andSet-TopBoxes.
Setting up the remote to operate your VCr. TurnoffyourVCR.. PresstheVCrbuttononyourTV’sremotecontrol.. PresstheSEtbuttononyourTV’sremotecontrol.. Usingthenumberbuttonsonyourremotecontrol,enterthreedigitsoftheVCRcode
listedonpage19ofthismanualforyourbrandofVCR.Makesureyouenterthreedigitsofthecode,evenifthefirstdigitisa“0”.(Ifmorethanonecodeislisted,trythefirstone.)
. PressthepowEr buttonontheremotecontrol.YourVCRshouldturnonifyourremoteissetupcorrectly.IfyourVCRdoesnotturnonaftersetup,repeatsteps2,3,and4,buttryoneoftheothercodeslistedforyourbrandofVCR.Ifnoothercodesarelisted,tryeachVCRcode,000through080.
NoteonUsingRemoteControlModes:VCRWhenyourremotecontrolisin“VCR”mode,thevolumebuttonsstillcontrolyourTV’svolume.
Setting up the remote to operate your Cable Box. Turnoffyourcablebox.. PresstheCaBlEbuttononyourTV’sremotecontrol.. PresstheSEtbuttononyourTV’sremotecontrol.. Usingthenumberbuttonsonyourremotecontrol,enterthreedigitsofthecableboxcode
listedonpage20ofthismanualforyourbrandofcablebox.Makesureyouenterthreedigitsofthecode,evenifthefirstdigitisa“0”.(Ifthereismorethanonecodelisted,trythefirstone.)
. PressthepowEr buttonontheremotecontrol.Yourcableboxshouldturnonifyourremoteissetupcorrectly.Ifyourcableboxdoesnotturnonaftersetup,repeatsteps2,3,and4,buttryoneoftheothercodeslistedforyourbrandofcablebox.Ifnoothercodesarelisted,tryeachcode,000through046.
NoteonUsingRemoteControlModes:CableBoxWhenyourremotecontrolisin“CABLE”mode,thevolumebuttonsstillcontrolyourTV’svolume.
Setting up your remote Control
BN68-01167A-Eng-00.indd 17 2007-02-09 9:21:27
English -
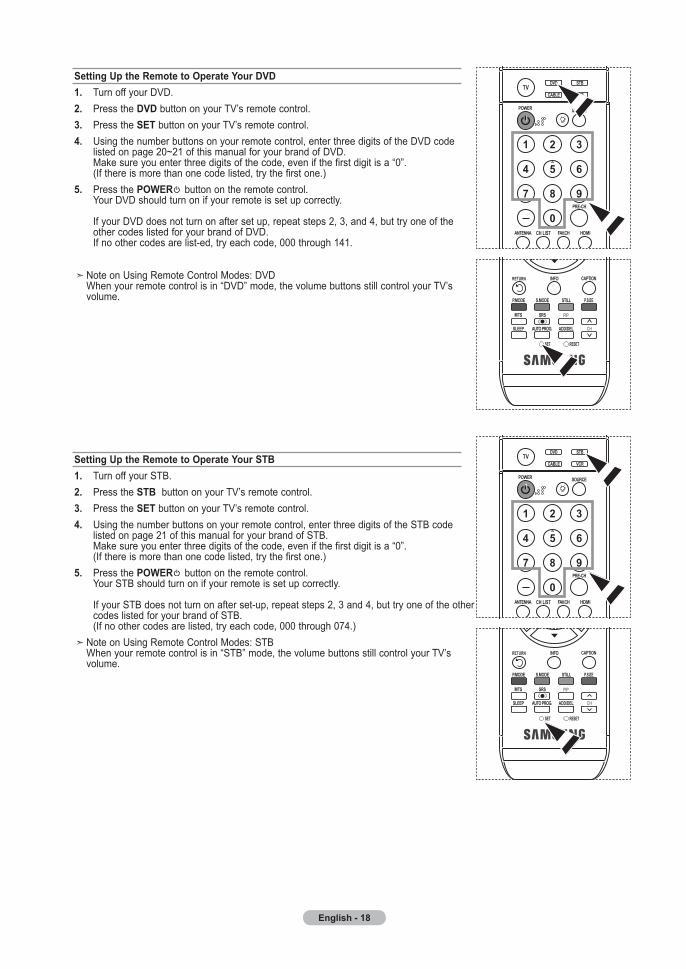
Setting up the remote to operate your dVd. TurnoffyourDVD.. PressthedVdbuttononyourTV’sremotecontrol.. PresstheSEtbuttononyourTV’sremotecontrol.. Usingthenumberbuttonsonyourremotecontrol,enterthreedigitsoftheDVDcode
listedonpage20~21ofthismanualforyourbrandofDVD.Makesureyouenterthreedigitsofthecode,evenifthefirstdigitisa“0”.(Ifthereismorethanonecodelisted,trythefirstone.)
. PressthepowEr buttonontheremotecontrol.YourDVDshouldturnonifyourremoteissetupcorrectly.IfyourDVDdoesnotturnonaftersetup,repeatsteps2,3,and4,buttryoneoftheothercodeslistedforyourbrandofDVD.Ifnoothercodesarelist-ed,tryeachcode,000through141.
NoteonUsingRemoteControlModes:DVDWhenyourremotecontrolisin“DVD”mode,thevolumebuttonsstillcontrolyourTV’svolume.
Setting up the remote to operate your StB. TurnoffyourSTB.. PresstheStBbuttononyourTV’sremotecontrol.. PresstheSEtbuttononyourTV’sremotecontrol.. Usingthenumberbuttonsonyourremotecontrol,enterthreedigitsoftheSTBcode
listedonpage21ofthismanualforyourbrandofSTB.Makesureyouenterthreedigitsofthecode,evenifthefirstdigitisa“0”.(Ifthereismorethanonecodelisted,trythefirstone.)
. PressthepowEr buttonontheremotecontrol.YourSTBshouldturnonifyourremoteissetupcorrectly.IfyourSTBdoesnotturnonafterset-up,repeatsteps2,3and4,buttryoneoftheothercodeslistedforyourbrandofSTB.(Ifnoothercodesarelisted,tryeachcode,000through074.)
NoteonUsingRemoteControlModes:STBWhenyourremotecontrolisin“STB”mode,thevolumebuttonsstillcontrolyourTV’svolume.
BN68-01167A-Eng-00.indd 18 2007-02-09 9:21:28

English -
VCr
Brand CodeSAMSUNG 000001002003004005077078079ADMIRAL 020AIWA 025AKAI 004027032AUDIODYNAMICS 007026BELL&HOWELL 018BROKSONIC 022CANDLE 002003006008015055CANON 021056CITIZEN 002003006008015055COLORTYME 007CRAIG 002024CURTISMATHES 002007008017021025056064066DAEWOO 003010011012013014015016DB 007026DIMENSIA 017DYNATECH 025ELECTROHOME 034EMERSON 001003006021022025030032034040
047050052060063065066067069073FISHER 018024028029048051061FUNAI 025GENERALELECTRIC 002005017021056GOVIDEO 002HARMANKARDON 007HITACHI 019025041042074INSTANTREPLAY 021JCPENNEY 002007018019021026037041054056JCL 007008018021026037JVC 081082083KENWOOD 007008018021026037KLH 070KONIA 036LG(Goldstar) 006007008009010LIOYD 025LOGIK 038LXI 025MAGNAVOX 021056059MARANTZ 007008018021026037062MARTA 006MEI 021MEMOREX 006021024025MGA 034MIDLAND 005MINOLTA 019041075MITSUBISHI 019034041046
Brand CodeMONTGOMERYWARD 020MTC 002025MULTITECH 002005025038NEC 007008018026037062064OPTIMUS 020ORION 073074075076PANASONIC 021056071072PENTAX 019041075PENTEXRESEARCH+ 008PHILCO 021056059PHILIPS 021080PIONEER 019026039053PORTLAND 015049055PROSCAN 017QUARTZ 018QUASAR 021056RADIOSHACK/REALISTIC
006018020021024025029034048056
RCA 002017019021035041043057068076SANSUI 026SANYO 018024SCOTT 003047052067SEARS 006018019024028029041048051SHARP 020034045015SHIMTOM 027033038058SIGNATURE 025SONY 027033044SYLVANIA 021025056059SYMPHONIC 025TANDY 018025TASHIKA 006TATUNG 037TEAC 025037068TECHNICS 021TEKNIKA 006021025031TMK 066TOSHIBA 003019029051052TOTEVISION 002006UNITECH 002VECTORRESEARCH 007026VICTOR 026VIDEOCONCEPTS 007026VIDEOSONIC 002WARDS 002003006019020021024025034038041YAMAHA 007008018026037ZENITH 023027033
remote Control Codes
BN68-01167A-Eng-00.indd 19 2007-02-09 9:21:28

English - 0
CaBlE BoxBrand CodeSAMSUNG 000001002003004005006007GI 041HAMLIN 003024031HITACHI 025030JERROLD 038039MACOM 025030MAGNAVOX 019023028OAK 026PANASONIC 003022027037044PHILIPS 019021023028PIONEER 004018020044RCA 014022040REGAL 003
Brand CodeREGENCY 015023SA 042043SCIENTIFICATLAN 042043SPRUCER 022STARGATE2000 036SYLVANIA 016TEXSCAN 016TOCOM 032UNIVERSAL 033034VIEWSTAR 019021023028WARNERAMEX 046ZENITH 017029035037045
SamSunG dVdproduct CodeDVD 000001002DVDR 003004BDRecord 005006VCRCOMBO 007008009010011VCRRecord 012DHRCOMBO 013
product CodeHomeTheaterVCRCOMBO 014015016HDDRecorderCOMBO 017TWINTRAYCOMBO 018STBDVDCOMBO 019DVDReceiver 020AVReceiver 021
dVdBrand CodeANAM 030AUDIOVOX 075AUDIOLOGIC 085ANABA 072APEXDIGITAL 070071074086083084088111112AIWA 114BROKSONIC 062BLAUPUNKT 074B&K 122123CURTISMATHES 027CYBERHOME 077078079082CLARION 080125CIRRUS 081CYBERHOME 065CINEVISION 095DAEWOO 066DENON 146FARENHEIT 067068FISHER 090GPX 060GOVIDEO 061089133135GE 069074GREENHILL 074HITACHI 064113HITEKER 071HOYO 073HARMAN/KARDON 091110IRT 089
Brand CodeINTEGRA 092JBL 091JVC 022033115116JATON 073KENWOOD 051108109KISS 073KONKA 059100106107KLH 074075LG(Goldstar) 025031LOEWE 057LASONIC 058MOBILEAUTHORITY 054MEMOREX 055MALATA 056MAGNAVOX 076093MINTEK 074094MONYKA 073NORCENT 048049050NEXTBASE 052NEC 053NANTAUS 144NESA 074OPTOMEDIAELECTRONICS 105OPTIVIEW 072ONKYO 076092119PHILCO 044045PRINCETON 046047PROSCAN 023
BN68-01167A-Eng-00.indd 20 2007-02-09 9:21:29

English -
dVdBrand CodePANASONIC 024034124134136137138PHILIPS 036076ROTEL 117118RIO 120RCA 023035074075131132RAITE 073ROWA 038SAMPO 104SONY 026029126127128129130141SHERWOOD 039041SVA 042SYLVANIA 043093SHARP 140SANSUI 062SANYO 062090SHINSONIC 094
Brand CodeTHOMSON 145TOSHIBA 028062076TECHNICS 139TVIEW 072TOKAI 073TEAC 096TECHWOOD 097TREDEX 098099101URBANCONCEPTS 076VENTURER 075VOCOPRO 102YAMAHA 032063YAMAKAWA 040073XWAVE 103ZENITH 076121
SamSunG SEt-top Boxproduct CodeSatelliteSTBHDDCOMBOPremium 010CABLESTBHDDCOMBOStandard 011CABLESTBHDDCOMBOPremium 012GroundwaveSTBHDDCOMBOStandard 013GroundwaveSTBHDDCOMBOPremium 014
product CodeGroundwaveSTB 001002SatelliteSTB 003CABLESTB 004STBDVDCOMBO 008SatelliteSTBHDDCOMBOStandard 009
SEt-top BoxBrand CodeALPHASTAR 023ANAM 043CHANNELMASTER 018034CROSSDIGITAL 019CHAPARRAL 035DIRECTTV 015016017019022045060061062
065066067068DAEWOO 074DISHNETWORKSYSTEM 069070DISHPRO 069DRAKE 018024032DXANTENNA 027ECHOSTAR 025069070071EXPRESSVU 069GOI 069GE 065GENERALINSTRUMENT 046047048063064HTS 069HOMECABLE 056HITACHI 022HUGHESNETWORK 015017IQ 020IQPRISM 020JANEIL 059JERROID 063JVC 069070LG(Goldstar) 044073
Brand CodeMAGNAVOX 016021036038039040041042MEMOREX 016MOTOROLA 064MACOM 018MITSUBISHI 015NEXTLEVEL 047048064PHILIPS 015016017021033036038039040
041042067PRIMESTAR 046049050063PANASONIC 058059061062PAYSAT 016PROSCAN 065066RCA 051052053065066RADIOSHACK 064REALISTIC 057STARTRAK 026STS 020027SKY 031SKYLIFE 005006007SHACK 064STARCHOICE 064SONY 054060TOSHIBA 015017028029030072ULTIMATETV 060066UNIDEN 016021037055056057ZENITH 024031068
BN68-01167A-Eng-00.indd 21 2007-02-09 9:21:29

English -
to Select the Source (depending on the model)UsetoselectTVorotherexternalinputsourcesconnectedtotheTV.Usetoselecttheinputsourceofyourchoice.
. PressthemEnu buttontodisplaythemenu. Press theorbuttonstoselect“Input”,thenpresstheEntErbutton.. PresstheEntEr buttontoselect"SourceList". Presstheorbuttonstoselectsignalsource,thenpresstheEntEr button. WhenyouconnectequipmenttotheLCD,youcanchoosebetweenthe followingsetsofjacks:TV,AV1,AV2,S-Video1,S-Video2,Component1, Component2,PC,HDMI1,HDMI2,HDMI3ontheTV’srearpanel. HDMI1,HDMI2,HDMI3inputcanonlybeselectedwhentheexternaldeviceis turnedonandconnectedviaHDMI. AV2/S-Video2/HDMI3isplacedonthesideoftheTV. 23,26inchmodelsupportsTV,AV1,AV2,S-Video1,S-Video2,Component1, Component2,PC,HDMI1andHDMI2only
YoucanchooseonlythoseexternaldevicesthatareconnectedtotheTV.
PresstheSourCE buttonontheremotecontroltoviewanexternalsignalsource.
to Edit the Input Source name (depending on the model)Namethedeviceconnectedtotheinputjackstomakeyourinputsourceselectioneasier.
. PressthemEnu buttontodisplaythemenu. Press theorbuttonstoselect“Input”,thenpresstheEntErbutton. Presstheorbuttonstoselect"EditName",thenpresstheEntEr button.
. Presstheorbuttonstoselect"AV1","AV2","S-Video1","S-Video2", "Component1","Component2","PC","HDMI1","HDMI2","HDMI3"inputjack,then presstheEntEr button. 23,26inchmodelsupportsTV,AV1,AV2,S-Video1,S-Video2,Component1, Component2,PC,HDMI1andHDMI2only
. Presstheorbuttonstoselect"VCR","DVD","D-VHS","CableSTB", "HDSTB","SatelliteSTB","PVRSTB","AVReceiver","DVDReceiver", "Game","Camcorder","DVDCombo","DVDHDDRecorder","PC", "InternetTVRecv.","InteractiveTVRecv.","VODSTB","TV"inputsource,then presstheEntEr button. PresstheExIt buttontoexit.
InputSource list : tV Edit name
tV
move Enter return
Source listtV
move Enter return
tVaV :----aV :----S-Video :----S-Video :----Component :----Component : ----more
InputSource list : tV Edit name
tV
move Enter return
Edit nametV
move Enter return
aV :----aV :----S-Video :----S-Video :----Component :----Component : ----pC : ----more
----VCrdVdd-VhSCable StBhd StBSatellite StB
Edit nametV
move Enter return
aV :----aV :----S-Video :----S-Video :----Component :----Component : ----pC : ----more
BN68-01167A-Eng-00.indd 22 2007-02-09 9:21:31
English -
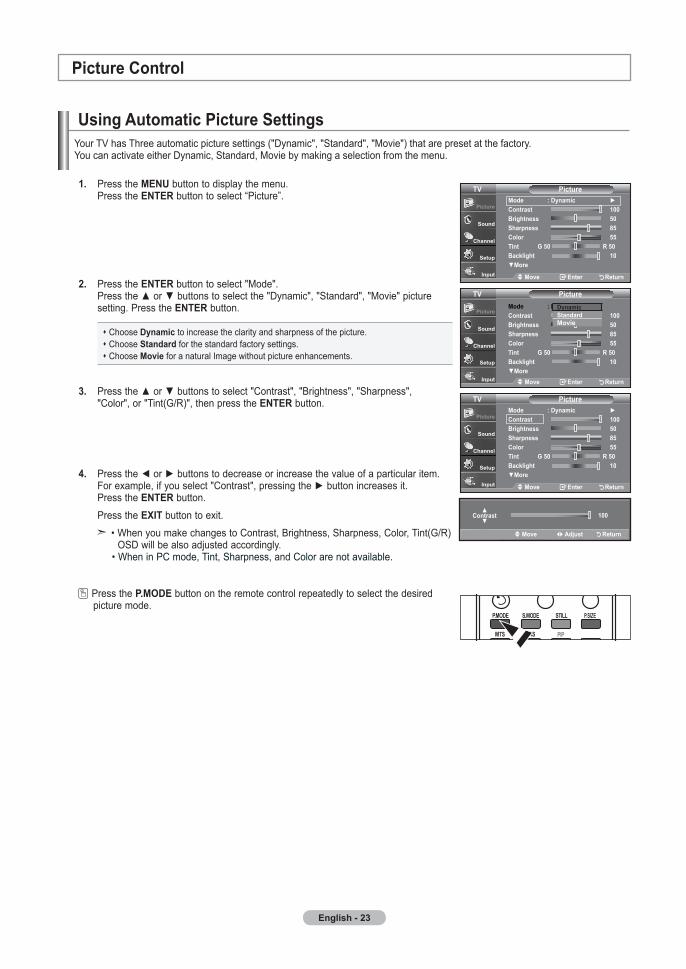
using automatic picture SettingsYourTVhasThreeautomaticpicturesettings("Dynamic","Standard","Movie")thatarepresetatthefactory. YoucanactivateeitherDynamic,Standard,Moviebymakingaselectionfromthemenu.
. PressthemEnu buttontodisplaythemenu. PresstheEntEr buttontoselect“Picture”.
. PresstheEntEr buttontoselect"Mode". Presstheorbuttonstoselectthe"Dynamic","Standard","Movie"picture setting.PresstheEntEr button.
Choosedynamic toincreasetheclarityandsharpnessofthepicture.ChooseStandard forthestandardfactorysettings.ChoosemovieforanaturalImagewithoutpictureenhancements.
. Presstheorbuttonstoselect"Contrast","Brightness","Sharpness", "Color",or"Tint(G/R)",thenpresstheEntEr button.
. Presstheorbuttonstodecreaseorincreasethevalueofaparticularitem. Forexample,ifyouselect"Contrast",pressingthebuttonincreasesit. PresstheEntEr button. PresstheExIt buttontoexit. •WhenyoumakechangestoContrast,Brightness,Sharpness,Color,Tint(G/R) OSDwillbealsoadjustedaccordingly. •WheninPCmode,Tint,Sharpness,andColorarenotavailable.
Pressthep.modEbuttonontheremotecontrolrepeatedlytoselectthedesired picturemode.
picture Control
move Enter return
picturetVmode : dynamicContrast 00Brightness 0Sharpness Color tint G 0 r 0 Backlight 0More
dynamicStandardmovie
move Enter return
mode : dynamic Contrast 00Brightness 0Sharpness Color tint G 0 r 0 Backlight 0More
picturetV
00
Contrast
move adjust return
move Enter return
mode : dynamic Contrast 00Brightness 0Sharpness Color tint G 0 r 0 Backlight 0More
picturetV
BN68-01167A-Eng-00.indd 23 2007-02-09 9:21:34
English -
adjusting the Color tone
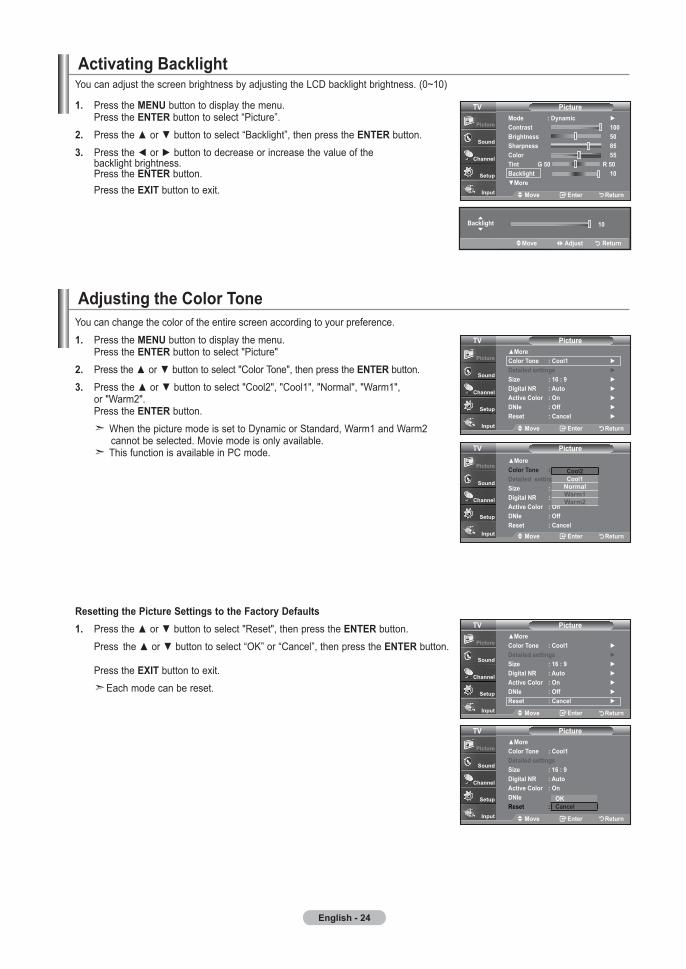
. PressthemEnu buttontodisplaythemenu. PresstheEntEr buttontoselect"Picture". Presstheorbuttontoselect"ColorTone",thenpresstheEntEr button.. Presstheorbuttontoselect"Cool2","Cool1","Normal","Warm1", or"Warm2". PresstheEntEr button. WhenthepicturemodeissettoDynamicorStandard,Warm1andWarm2 cannotbeselected.Moviemodeisonlyavailable. ThisfunctionisavailableinPCmode.
resetting the picture Settings to the factory defaults. Presstheorbuttontoselect"Reset",thenpresstheEntEr button. Press theorbuttontoselect“OK”or“Cancel”,thenpresstheEntErbutton. PresstheExIt buttontoexit. Eachmodecanbereset.
move Enter return
picturetVMoreColor tone : Cool detailed settingsSize : 6 : digital nr : autoactive Color : ondnIe : offreset : Cancel
CoolCool
normalwarmwarm
move Enter return
MoreColor tone : Cool detailed settings Size : 6 : digital nr : auto active Color : on dnIe : off reset : Cancel
picturetV
move Enter return
mode : dynamic Contrast 00Brightness 0Sharpness Color tint G 0 r 0 Backlight 0More
picturetV
activating Backlight
. PressthemEnu buttontodisplaythemenu. PresstheEntEr buttontoselect“Picture”.. Presstheorbuttontoselect“Backlight”,thenpresstheEntErbutton.. Presstheorbuttontodecreaseorincreasethevalueofthe backlightbrightness. PresstheEntErbutton. PresstheExItbuttontoexit.
YoucanadjustthescreenbrightnessbyadjustingtheLCDbacklightbrightness.(0~10)
05
Backlight 6
move adjust return
Youcanchangethecoloroftheentirescreenaccordingtoyourpreference.
move Enter return
MoreColor tone : Cool detailed settings Size : 6 : digital nr : auto active Color : on dnIe : off reset : Cancel
picturetV
move Enter return
MoreColor tone : Cool detailed settings Size : 6 : digital nr : auto active Color : on dnIe reset : Cancel
picturetV
oKCancel
BN68-01167A-Eng-00.indd 24 2007-02-09 9:21:36

English -
move Enter return
MoreColor tone : warm detailed settings Size : 6 : digital nr : auto active Color : on dnIe : off reset :Cancel
picturetV
move Enter return
Youcansetdetailpicturesettings.
activating detailed Settings. PressthemEnu buttontodisplaythemenu. PresstheEntErbuttontoselect“Picture”.. PresstheEntErbuttontoselect“Mode” Presstheorbuttonstoselect“Movie”,thenpresstheEntErbutton.. Presstheorbuttonstoselect“Detailedsettings”,thenpressthe EntErbutton. PictureModeisavailableinStandardorMoviemode. IfDNIeisOff,theDetailedSettingscannotbeselectedwhenthe PicturemodeisinStandardmode.
activating Black adjustYoucandirectlyselecttheblacklevelonthescreentoadjustthescreendepth.. Presstheorbuttontoselect“Blackadjust”,thenpresstheEntEr button.. Presstheorbuttontoselect“Off”,“Low”,“Medium”,“High”. PresstheEntErbutton.
off: Turnsofftheblackadjustmentfunction. low: Setstheblackcolordepthtolow.medium: Setstheblackcolordepthtomedium.high: Setstheblackcolordepthtohigh.
activating dynamic ContrastYoucanadjustthescreencontrastsothattheoptimalcontrastisprovided.6. Presstheorbuttontoselect“DynamicContrast”,thenpresstheEntEr button.. Presstheorbuttontoselect“Off”,“Low”,“Medium”,“High”. PresstheEntErbutton.
off: Turnsoffthedynamiccontrastadjustmentfunction.low: Setsthedynamiccontrasttolow.medium: Setsthedynamiccontrasttomedium.high: Setsthedynamiccontrasttohigh.
adjusting the detailed Settings
move Enter return
Black adjust : off dynamic Contrast : off Gamma 0Color Space : auto white Balance my Color Control Edge Enhancement : off
detailed SettingstV
move Enter return
Black adjust : offdynamic Contrast : offGamma Color Space : autowhite Balance my Color Control Edge Enhancement : off
detailed SettingstVofflowmediumhigh
move Enter return
Black adjust : off dynamic Contrast : off Gamma 0Color Space : auto white Balance my Color Control Edge Enhancement : off
detailed SettingstV
move Enter return
Black adjust : offdynamic Contrast : offGamma Color Space : autowhite Balance my Color Control Edge Enhancement : off
detailed SettingstV
offlowmediumhigh
move Enter return
mode : movie Contrast 00Brightness 0Sharpness Color tint G 0 r 0 Backlight : 10More
picturetV
BN68-01167A-Eng-00.indd 25 2007-02-09 9:21:39

English - 6
move Enter return
r offset G offset B offset r gain G gain B gain reset
white BalancetV
activating GammaYoucanadjustthemiddlebrightnessofpictures.(-3~3). Presstheorbuttontoselect“Gamma”,thenpresstheEntEr button.. Presstheorbuttontodecreaseorincreasethevalueofaparticularitem. PresstheEntErbutton.
Changing the Color SpaceColorspaceisacolormatrixcomposedofred,green,andbluecolors.Selectyourfavoritecolorspacetoexperiencethemostnaturalcolor.0. Presstheorbuttontoselect“ColorSpace”,thenpresstheEntErbutton.. Presstheorbuttontoselect“Wide”or“Auto”. PresstheEntErbutton.
wide :WideColorSpaceoffersdeepandrichcolortone.auto : AutoColorSpaceautomaticallyadjuststothemostnaturalcolortonebasedonprogramsources.
activating white BalanceYoucanadjustthecolortemperatureformorenaturalpicturecolors.. Presstheorbuttontoselect“WhiteBalance”,thenpresstheEntEr button.. Selecttherequiredoptionbypressingtheorbutton,thenpressthe EntErbutton.. Presstheorbuttontodecreaseorincreasethevalueofaparticularitem. PresstheEntErbutton.
r offset: Adjuststheredcolordarkness..G offset: Adjuststhegreencolordarkness.B offset: Adjuststhebluecolordarkness.r gain: Adjuststheredcolorbrightness.G gain: Adjuststhegreencolorbrightness.B gain: Adjuststhebluecolorbrightness.reset:Thepreviouslyadjustedwhitebalancewillberesettothefactorydefaults.
Changingtheadjustmentvaluewillrefreshtheadjustedscreen.
r offset
move adjust return
move Enter return
Black adjust : off dynamic Contrast : off Gamma 0Color Space : auto white Balance my Color Control Edge Enhancement : off
detailed SettingstV
0
Gamma
adjust return
move Enter return
Black adjust : off dynamic Contrast : off Gamma 0Color Space : auto white Balance my Color Control Edge Enhancement : off
detailed SettingstV
move Enter return
Black adjust : offdynamic Contrast : offGamma 0Color Space : autowhite Balance my Color Control Edge Enhancement : off
detailed SettingstV
autowide
move Enter return
Black adjust : off dynamic Contrast : off Gamma 0Color Space : auto white Balance my Color Control Edge Enhancement : off
detailed SettingstV
BN68-01167A-Eng-00.indd 26 2007-02-09 9:21:41

English -
activating my Color Control Thissettingcanbeadjustedtosuityourpersonalpreferences.WhenusingtheMyColorControlFeature,thecurrentpictureremainsinmovement.. PresstheEntErbuttontoselect“MyColorControl”.6. Presstheorbuttontoselect“Pink”,“Green”,“Blue”,“White”,“Reset”. PresstheEntErbutton.. Presstheorbuttontodecreaseorincreasethevalueofaparticularitem. PresstheEntErbutton.
pink: Darkensorlightensthepinkcolor. Green: Darkensorlightensthegreencolor. Blue: Darkensorlightensthebluecolor. white: Darkensorlightensthewhitecolor.reset: Thepreviouslyadjustedcolorswillberesettothefactorydefaults.
Changingtheadjustmentvaluewillrefreshtheadjustedscreen.
activating Edge Enhancement Youcanemphasizeobjectboundariesinthepicture.. Presstheorbuttontoselect“EdgeEnhancement”,thenpresstheEntEr button.. Presstheorbuttontoselect“Off”or“On”. PresstheEntErbutton. PresstheExItbuttontoexit.
move Enter return
Black adjust : off dynamic Contrast : off Gamma 0Color Space : auto white Balance my Color Control Edge Enhancement : off
detailed SettingstV
move Enter return
pink Green Blue white reset
my Color ControltV
pink
move adjust return
move Enter return
Black adjust : off dynamic Contrast : off Gamma 0Color Space : auto white Balance my Color Control Edge Enhancement : off
detailed SettingstV
move Enter return
Black adjust : offdynamic Contrast : offGamma 0 Color Space : autowhite Balance my Color Control Edge Enhancement : off
detailed SettingstV
onoff
BN68-01167A-Eng-00.indd 27 2007-02-09 9:21:43

English -
Screensizeselectiondependsonthetypeofvideoinput.
Changing the Screen Size
. PressthemEnu buttontodisplaythemenu. PresstheEntEr buttontoselect“Picture”.. Presstheorbuttonstoselect"Size",thenpresstheEntEr button.
. Presstheorbuttonstoselectthescreenformatyouwant. PresstheEntEr button. PresstheExIt buttontoexit.
•6::Setsthepictureto16:9widemode.•Zoom:Magnifiesthesizeofthepictureonthescreen.•Zoom:Magnifiesthesizeofthepicturemorethan“Zoom1”.•wide fit:Enlargestheaspectratioofthepicturetofittheentirescreen.•::Setsthepictureto4:3normalmode.•Just Scan:UsethefunctiontoseethefullimagewithoutanycutoffwhenHDMI720p/1080isignalsareinput.
Alternately,youcanpressthep.SIZE buttonontheremotecontrolrepeatedlyto changethepicturesize.
Ifyouwatchastillimageorthe4:3modeforalongtime(over2hours),an imagemaybeburnedontothescreen.ViewtheTVin16:9modeasmuchaspossible.
HD(HighDefinition) 16:9-1080i(1920x1080),720P(1280x720)
•InTV,VIDEO,S-VIDEO,andallCOMPONENT(480i,480p),DTV(480i,480p)modes,allscreenmodescanbeselected. (16:9•Zoom1•Zoom2•4:3). •Youcanselectonlythe16:9,4:3andWideFitscreensizesintheDTVComponent(720p,1080i)orHDMI(720p,1080i) mode. •InPCmodes,only16:9&4:3modescanbeselected. •YoumustselectZoomwithP.SizebuttonontheremoteifyouwanttomovetheZoom1or2pictureupordown. •WhenwatchingaDTV’sHDsignal,youcanuseWideFit.Horizontalzoom(WideFit)setstheopticalpictureformatby expandingitbothhorizontallyandvertically.Forexample,youcanresetthepicturein4:3formatto16:9.WideFitdoesnot supportallexternaldevices(DVD,VCRetc.).
move Enter return
6 : Zoom Zoom wide fit : Just Scan
SizetV
position reset
MoreColor tone : Cool detailed settings Size : 6 : digital nr : auto active Color : on dnIe : off reset : Cancel
picturetV
move Enter return
6:Setsthepictureto16:9widemode.
ZoomThescreensizewhenWidescreenisverticallyenlarged.
ZoomThescreensizewhentheZoom1screenisverticallyenlarged.
:Setsthepictureto4:3normalmode.
wide fitEnlargestheaspectratioofthepicturetofittheentirescreen..
Just Scan Usethefunctiontoseethefull imagewithoutanycutoffwhen HDMI720p/1080isignalsare input.
BN68-01167A-Eng-00.indd 28 2007-02-09 9:21:46
English -
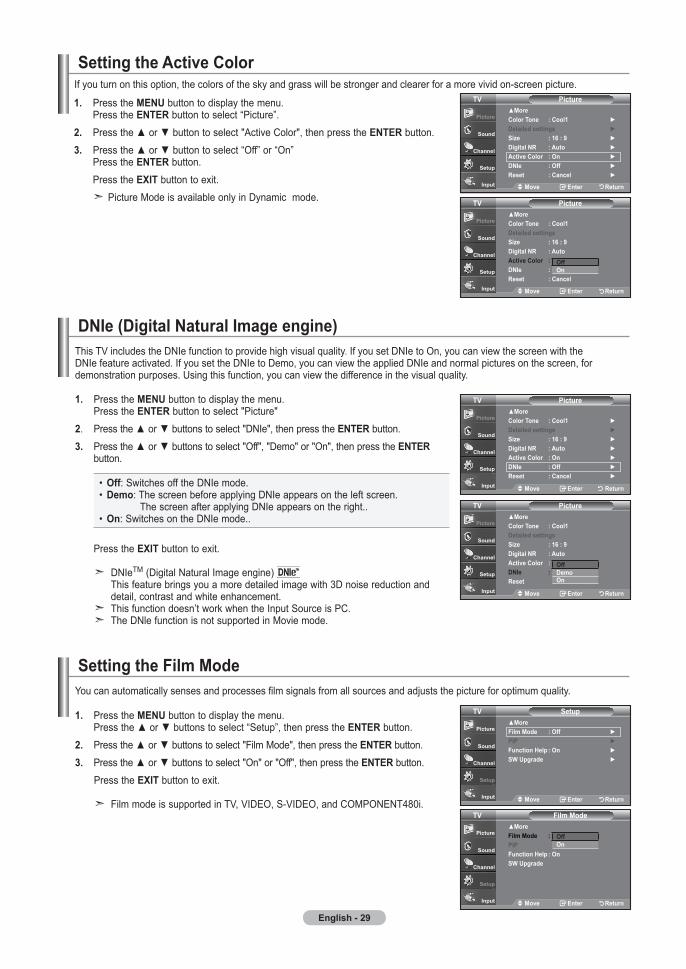
. PressthemEnubuttontodisplaythemenu. PresstheEntEr buttontoselect“Picture”.. Presstheorbuttontoselect"ActiveColor",thenpresstheEntErbutton.. Presstheorbuttontoselect“Off”or“On”
PresstheEntErbutton. PresstheExItbuttontoexit. PictureModeisavailableonlyinDynamicmode.
MoreColor tone : Cool detailed settings Size : 6 : digital nr : auto active Color : on dnIe : off reset : Cancel
picturetV
move Enter return
MoreColor tone : Cooldetailed settingsSize : 6 : digital nr : autoactive Color : ondnIe : offreset : Cancel
picturetV
offon
Setting the active Color
dnIe (digital natural Image engine)ThisTVincludestheDNIefunctiontoprovidehighvisualquality.IfyousetDNIetoOn,youcanviewthescreenwiththeDNIefeatureactivated.IfyousettheDNIetoDemo,youcanviewtheappliedDNIeandnormalpicturesonthescreen,fordemonstrationpurposes.Usingthisfunction,youcanviewthedifferenceinthevisualquality.
MoreColor tone : Cool detailed settings Size : 6 : digital nr : auto active Color : on dnIe : off reset : Cancel
picturetV
move Enter return
MoreColor tone : Cooldetailed settingsSize : 6 : digital nr : autoactive Color : ondnIe : offreset
picturetV
offdemoon
Ifyouturnonthisoption,thecolorsoftheskyandgrasswillbestrongerandclearerforamorevividon-screenpicture.
. PressthemEnu buttontodisplaythemenu. PresstheEntEr buttontoselect"Picture". Presstheorbuttonstoselect"DNIe",thenpresstheEntEr button.. Presstheorbuttonstoselect"Off","Demo"or"On",thenpresstheEntEr button.
• off:SwitchesofftheDNIemode.• demo:ThescreenbeforeapplyingDNIeappearsontheleftscreen.ThescreenafterapplyingDNIeappearsontheright..• on:SwitchesontheDNIemode..
PresstheExItbuttontoexit. DNIeTM(DigitalNaturalImageengine) Thisfeaturebringsyouamoredetailedimagewith3Dnoisereductionand detail,contrastandwhiteenhancement. Thisfunctiondoesn’tworkwhentheInputSourceisPC. TheDNlefunctionisnotsupportedinMoviemode.
move Enter return
move Enter return
Setting the film modeYoucanautomaticallysensesandprocessesfilmsignalsfromallsourcesandadjuststhepictureforoptimumquality.
. PressthemEnu buttontodisplaythemenu. Presstheorbuttonstoselect“Setup”,thenpresstheEntErbutton.. Presstheorbuttonstoselect"FilmMode",thenpresstheEntEr button.. Presstheorbuttonstoselect"On"or"Off",thenpresstheEntEr button.
PresstheExItbuttontoexit.
FilmmodeissupportedinTV,VIDEO,S-VIDEO,andCOMPONENT480i.
move Enter return
Morefilm mode : offpIpfunction help : on Sw upgrade
film modetV
offon
Morefilm mode : off PIP function help : on Sw upgrade
SetuptV
move Enter return
BN68-01167A-Eng-00.indd 29 2007-02-09 9:21:50
English - 0
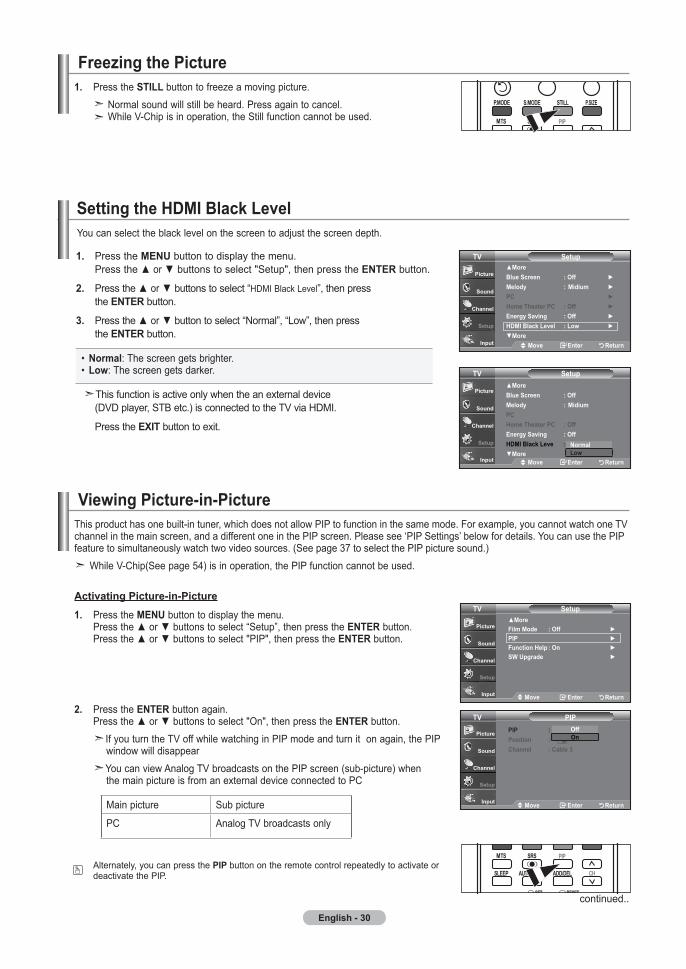
Viewing picture-in-pictureThisproducthasonebuilt-intuner,whichdoesnotallowPIPtofunctioninthesamemode.Forexample,youcannotwatchoneTVchannelinthemainscreen,andadifferentoneinthePIPscreen.Pleasesee‘PIPSettings’belowfordetails.YoucanusethePIPfeaturetosimultaneouslywatchtwovideosources.(Seepage37toselectthePIPpicturesound.)
WhileV-Chip(Seepage54)isinoperation,thePIPfunctioncannotbeused.
activating picture-in-picture
. PressthemEnu buttontodisplaythemenu. Presstheorbuttonstoselect“Setup”,thenpresstheEntErbutton. Presstheorbuttonstoselect"PIP",thenpresstheEntEr button.
. PresstheEntEr buttonagain. Presstheorbuttonstoselect"On",thenpresstheEntEr button. IfyouturntheTVoffwhilewatchinginPIPmodeandturnitonagain,thePIP windowwilldisappear YoucanviewAnalogTVbroadcastsonthePIPscreen(sub-picture)when themainpictureisfromanexternaldeviceconnectedtoPC
Mainpicture Subpicture
PC AnalogTVbroadcastsonly
Alternately,youcanpressthepIp buttonontheremotecontrolrepeatedlytoactivateor deactivatethePIP.
continued..
move Enter return
pIp : position :Channel : Cable
pIptVoffon
Morefilm mode : off pIp function help : on Sw upgrade
SetuptV
move Enter return
freezing the picture. PresstheStIll buttontofreezeamovingpicture. Normalsoundwillstillbeheard.Pressagaintocancel. WhileV-Chipisinoperation,theStillfunctioncannotbeused.
. PressthemEnu buttontodisplaythemenu. Presstheorbuttonstoselect"Setup",thenpresstheEntEr button.
. Presstheorbuttonstoselect“HDMIBlackLevel”,thenpress theEntErbutton.
. Presstheorbuttontoselect“Normal”,“Low”,thenpress theEntErbutton.
• normal:Thescreengetsbrighter.• low:Thescreengetsdarker.
Thisfunctionisactiveonlywhentheanexternaldevice (DVDplayer,STBetc.)isconnectedtotheTVviaHDMI.
PresstheExItbuttontoexit.
Setting the hdmI Black levelYoucanselecttheblacklevelonthescreentoadjustthescreendepth.
SetupmoreBlue Screen : off Melody : Midium pC home theater pC : off Energy Saving : off hdml Black level : low more
tV
move Enter return
SetupmoreBlue Screen : off melody : midium pC home theater pC : off Energy Saving : off hdml Black leve :more
tV
move Enter return
normallow
BN68-01167A-Eng-00.indd 30 2007-02-09 9:21:52

English -
Changing the pIp Channel
. Presstheorbuttonstoselect“Channel”,thenpresstheEntErbutton. PresstheorbuttonstoselectthedesiredchannelinthePIPwindow. PresstheEntErbuttons. • MAIN:PC,PIP:TV(Analog) • ThechannelcanbeactivewhenthesubpictureissettoTV.
PressthePIPChannelbuttonsontheremotecontrol.
pIp : on position : Channel : Cable
pIptV
pIptVpIp : on position : Channel : Cable
Cable
Changing the position of the pIp window
move Enter return
pIp : on position :Channel : Cable
pIptV
pIp : on position : Channel : Cable
pIptV. Presstheorbuttonstoselect“Position”,thenpresstheEntErbutton. PresstheEntErbuttons. PresstheExItbuttontoexit.
move Enter return
move Enter return
move Enter return
BN68-01167A-Eng-00.indd 31 2007-02-09 9:21:54

English -
Customizing the SoundThesoundsettingscanbeadjustedtosuityourpersonalpreference.(Alternatively,youcanuseoneofthe"automatic"settings.). PressthemEnu buttontodisplaythemenu. Presstheorbuttonstoselect"Sound",thenpresstheEntEr button.. Presstheorbuttonstoselect"Equalizer",thenpresstheEntEr button.
. Presstheorbuttonstoselectaparticularfrequencytoadjust. Presstheorbuttonstoincreaseordecreasetheleveloftheparticularfrequency. PresstheEntEr button. PresstheExIt buttontoexit. •l/r Sound Balance adjustment : ToadjustthesoundbalanceoftheL/Rspeakers. •Bandwidth adjustment (00hz, 00hz, Khz, Khz, 0Khz) : :Toadjustthelevelofdifferentbandwidthfrequencies.
using automatic Sound SettingsYourTVhasautomaticsoundsettings("Standard","Music","Movie","Speech",and"Custom")thatarepresetatthefactory.Or,youcanselect"Custom",whichautomaticallyrecallsyourpersonalizedsoundsettings.. PressthemEnu buttontodisplaythemenu. Presstheorbuttonstoselect"Sound",thenpresstheEntEr button.
. PresstheEntEr buttontoselect"Mode". Presstheorbuttonstoselect"Standard","Music","Movie","Speech", or"Custom"soundsetting,thenpresstheEntEr button. PresstheExIt buttontoexit.
• ChooseStandardforthestandardfactorysettings.• Choosemusicwhenwatchingmusicvideosorconcerts.• Choosemoviewhenwatchingmovies.• ChooseSpeechwhenwatchingashowthatismostlydialog(i.e.,news).• ChooseCustomtorecallyourpersonalizedsettings (see“CustomizingtheSound”).
PresstheS.modEbuttonontheremotecontrolrepeatedlytoselectoneofthesound settings.
Sound Control
move adjust return
EqualizertV
r
l
00hz
+
-
0
00hz Khz Khz 0KhzBalance
move Enter return
Mode : Custom Equalizer SrS truSurround xt : off Multi-Track Options auto Volume : off Internal mute : off Sound Select : Main reset
SoundtV
move Enter return
mode : Custom Equalizer SrS truSurround xt : off multi-track optionsauto Volume : offInternal mute : offSound Select : mainreset
SoundtVStandard
musicmovie
SpeechCustom
move Enter return
Mode : Custom Equalizer SrS truSurround xt : off Multi-Track Options auto Volume : off Internal mute : off Sound Select : Main reset
SoundtV
BN68-01167A-Eng-00.indd 32 2007-02-09 9:21:56

English -
Setting the truSurround xtTruSurroundXTisapatentedSRStechnologythatsolvestheproblemofplaying5.1multichannelcontentovertwospeakers.TruSurrounddeliversacompelling,virtualsurroundsoundexperiencethroughanytwo-speakerplaybacksystem,includinginternaltelevisionspeakers.Itisfullycompatiblewithallmultichannelformats.. PressthemEnu buttontodisplaythemenu. Presstheorbuttonstoselect"Sound",thenpresstheEntEr button.. Presstheorbuttonstoselect"SRSTruSurroundXT",thenpresstheEntEr button.
. Presstheorbuttonstoselect"On"or"Off",thenpresstheEntEr button. PresstheExIt buttontoexit.
. PressthemEnu buttontodisplaythemenu. Presstheorbuttonstoselect"Sound",thenpresstheEntEr button. QuickwaytoaccesstheMTSmenu:Justpressthe“MTS”buttononthe remotecontrol.Youcanlisteninalanguageotherthanyourchosenlanguage bypressingtheMTSbutton.. Presstheorbuttonstoselect"“Multi-TrackOptions",thenpresstheEntEr button.. PresstheEntErbuttontoselect“PreferredLanguage”. Presstheorbuttonstochoosethelanguage(English,SpanishorFrench)you want,thenpresstheEntErbutton. PresstheExItbuttontoexit.
Youcanlisteninalanguageotherthanthefavoritelanguage bypressingthemtS buttonontheremotecontrol.
preferred language
Choosing a multi-Channel Sound (mtS) track - digital Thedigital-TVtransmissionsystemiscapableofsimultaneoustransmissionofmanyaudiotracks(forexample,simultaneoustranslationsoftheprogramintoforeignlanguages).Theavailabilityoftheseadditional“multitracks”dependsupontheprogram.
move Enter return
Mode : Custom Equalizer SrS truSurround xt : off Multi-Track Options auto Volume : off Internal mute : off Sound Select : Main reset
SoundtV
move Enter return
mode : Custom Equalizer SrS truSurround xt : off multi-track optionsauto Volume : offInternal mute : offSound Select : mainreset
SoundtV
offon
move Enter return
Mode : Custom Equalizer SrS truSurround xt : off Multi-Track Options auto Volume : off Internal mute : off Sound Select : Main reset
SoundtV
tradEmarK & laBEl lICEnSE notICE
truSurround xt,SRSand SymbolaretrademarksofSRSLabs,Inc.truSurround xttechnologyisincorporatedunderlicensefromSRSLabs,Inc.
move Enter return
preferred language : English multi-track Sound : Stereo
multi-track optionstVEnglishSpanishfrench
Enter return
preferred language : English multi-track Sound : Stereo
multi-track optionstV
BN68-01167A-Eng-00.indd 33 2007-02-09 9:21:59
English -
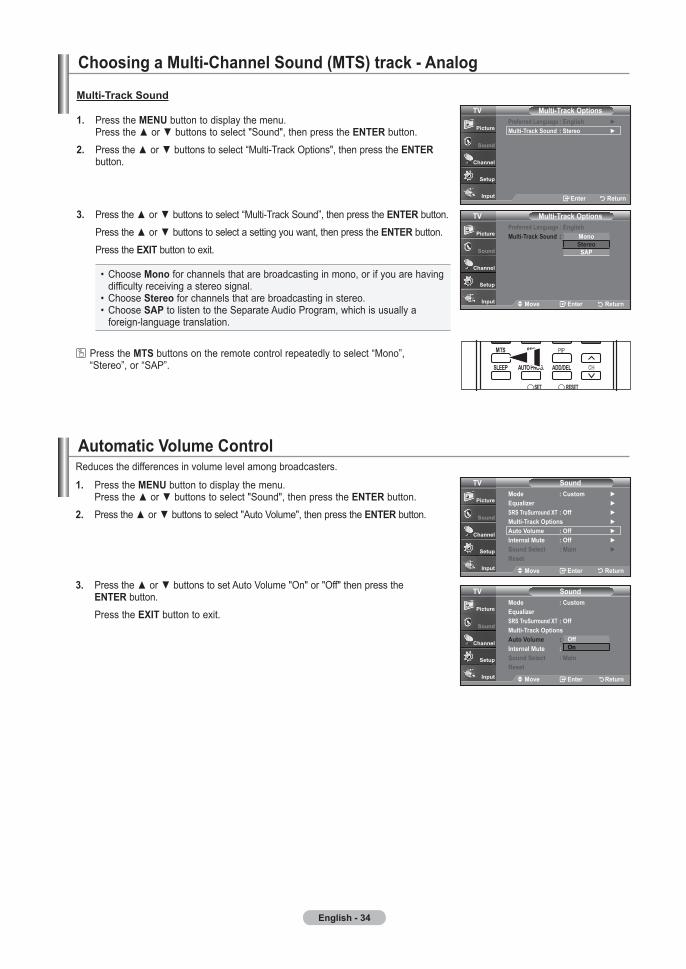
automatic Volume Control
. PressthemEnu buttontodisplaythemenu. Presstheorbuttonstoselect"Sound",thenpresstheEntEr button.. Presstheorbuttonstoselect"AutoVolume",thenpresstheEntEr button.
. PresstheorbuttonstosetAutoVolume"On"or"Off"thenpressthe EntEr button. PresstheExIt buttontoexit.
Reducesthedifferencesinvolumelevelamongbroadcasters.
. PressthemEnu buttontodisplaythemenu. Presstheorbuttonstoselect"Sound",thenpresstheEntEr button.. Presstheorbuttonstoselect“Multi-TrackOptions",thenpresstheEntEr button.
. Presstheorbuttonstoselect“Multi-TrackSound”,thenpressthe EntErbutton. Presstheorbuttonstoselectasettingyouwant,thenpresstheEntErbutton. PresstheExItbuttontoexit.
• Choosemonoforchannelsthatarebroadcastinginmono,orifyouarehaving difficultyreceivingastereosignal.• ChooseStereoforchannelsthatarebroadcastinginstereo.• ChooseSaptolistentotheSeparateAudioProgram,whichisusuallya foreign-languagetranslation.
PressthemtSbuttonsontheremotecontrolrepeatedlytoselect“Mono”,
“Stereo”,or“SAP”.
multi-track Sound
Choosing a multi-Channel Sound (mtS) track - analog
move Enter return
preferred language : English multi-track Sound : Stereo
multi-track optionstV
monoStereoSap
Enter return
preferred language : English multi-track Sound : Stereo
multi-track optionstV
move Enter return
Mode : Custom Equalizer SrS truSurround xt : off Multi-Track Options auto Volume : off Internal mute : off Sound Select : Main reset
SoundtV
move Enter return
mode : Custom Equalizer SrS truSurround xt : off multi-track optionsauto Volume : offInternal mute : offSound Select : mainreset
SoundtV
offon
BN68-01167A-Eng-00.indd 34 2007-02-09 9:22:01

English -
Selecting the Internal mute
. PressthemEnu buttontodisplaythemenu. Presstheorbuttonstoselect"Sound",thenpresstheEntEr button.. Presstheorbuttonstoselect"InternalMute",thenpresstheEntEr button.
. Presstheorbuttonstoselect“On”,thenpresstheEntErbutton. PresstheExItbuttontoexit. WhenInternalMuteissetto“On”,SoundmenusexceptMulti-trackOptions cannotbeadjusted. TheVOL ,VOL andMUTEbuttonsdonotoperatewhentheInternalMute issettoOn.
SoundoutputfromtheTVspeakersismuted.
move Enter return
Mode : Custom Equalizer SrS truSurround xt : Off Multi-Track Options Auto Volume : Off Internal mute : off Sound Select : Main reset
SoundtV
move Enter return
mode : Custom Equalizer SrS truSurround xt : off multi-track optionsauto Volume : offInternal mute : offSound Select : mainreset
SoundtV
offon
Setting the on/off melodyAmelodysoundcanbesettocomeonwhentheTVispoweredOnorOff.. PressthemEnu buttontodisplaythemenu. Presstheorbuttonstoselect"Setup",thenpresstheEntEr button.. Presstheorbuttonstoselect"Melody",thenpresstheEntEr button.
. Presstheorbuttonstoselect"Off","Low","Medium","High"thenpressthe EntEr button.
off: Turnsoffthemelodyfunction.low: Setsthemelodyvolumetolow.medium: Setsthemelodyvolumetomedium.high: Setsthemelodyvolumetohigh.
PresstheExIt buttontoexit.
SetupmoreBlue Screen : off melody : off pC home theater pC : off Energy Saving : off hdmI Black level : low more
tV
move Enter return
SetupmoreBlue Screen : off melody : pC home theater pC : off Energy Saving : off hdmI Black level : low more
tV
move Enter return
offlowmediumhigh
dolBy dIGItal
ManufacturedunderlicensefromDolbyLaboratories.“Dolby”andthedouble-DsymbolaretrademarksofDolbyLaboratories.
tV's Internal Speakers audio out (optical, l/r out) to Sound System
rf aV, S-Video Component, pC, hdmI rf aV, S-Video Component, pC, hdmI
Internal mute off SpeakerOutput SpeakerOutput SpeakerOutput SoundOutput SoundOutput SoundOutput
Internal mute on Mute Mute Mute SoundOutput SoundOutput SoundOutput
Video no Signal Mute Mute Mute Mute Mute Mute
When“Internalmute”issetto“On”,Soundmenusexcept“Multi-TrackOptions”cannotbeadjusted.
BN68-01167A-Eng-00.indd 35 2007-02-09 9:22:03

English - 6
resetting the Sound Settings to the factory defaults
. PressthemEnu buttontodisplaythemenu. Presstheorbuttonstoselect"Sound",thenpresstheEntEr button.. Presstheorbuttonstoselect"Reset”,thenpresstheEntEr button. PresstheExItbuttontoexit.
IfGameModeisOn,theResetSoundfunctionisactivated.SelectingtheResetfunctionresetstheequalizersettingtothefactorydefaults.
YoucanconnectasetofheadphonestoyoursetifyouwishtowatchaTVprogramwithoutdisturbingtheotherpeopleintheroom.
Connecting headphones
Whenyouinserttheheadsetjackintothecorrespondingport,youcanoperateonly "MultiTrackOption"and"AutoVolume"inSoundMenu.
Prolongeduseofheadphonesatahighvolumemaydamageyourhearing.Youwillnotreceivesoundfromthespeakerswhenyouconnectheadphones
tothesystem.TheheadphonevolumeandTVvolumeareadjusteddifferently.
0
Mode : Custom Equalizer SrS truSurround xt : off Multi-Track Options auto Volume : off Internal mute : off Sound Select : Main reset
SoundtV
move Enter return
listening to the Sound of the Sub (pIp) picture
. PressthemEnu buttontodisplaythemenu. Presstheorbuttonstoselect"Sound",thenpresstheEntEr button.. Presstheorbuttonstoselect"SoundSelect”,thenpresstheEntEr button.
. Presstheorbuttonstoselect“Main”or“Sub”,thenpresstheEntErbutton. PresstheExItbuttontoexit.
• main:Usedtolistentothesoundofthemainpicture..• Sub:Usedtolistentothesoundofthesubpicture.
Youcanselectthisoptionwhen“PIP”issetto“On”.
WhenthePIPfeatureisactivated,youcanlistentothesoundofthesub(PIP)picture.
Mode : Custom Equalizer SrS truSurround xt : off Multi-Track Options auto Volume : off Internal mute : off Sound Select : Main reset
SoundtV
move Enter return
mode : Custom Equalizer SrS truSurround xt : off multi-track optionsauto Volume : offInternal mute : offSound Select : mainreset
SoundtV
mainSub
move Enter return
PresstheVolbuttonontheremotecontrolrepeatedlytoselectoneofthesound settings.
BN68-01167A-Eng-00.indd 36 2007-02-09 9:22:05

English -
Channel Control
Selecting the antenna
. PressthemEnu buttontodisplaythemenu. Presstheorbuttonstoselect"Channel",thenpresstheEntEr button.
. PresstheEntErbuttontoselect“Antenna”. Presstheorbuttonstoselect“Air”or“Cable”,thenpresstheEntEr button. PresstheExItbuttontoexit.
IftheantennaisconnectedtoANT1IN(AIR), select“Air”andifitisconnectedtoANT2IN (CABLE),select“Cable”.
IfbothANT1IN(AIR)andANT2IN(CABLE) areconnected,selecttheantennainputyouwant. Iftheantennainputisnotselectedproperly,noise mayappearonthescreen.
antenna : air auto program Clear Scrambled Channel Channel list name fine tune Signal Strength lna : on
Channel
move Enter return
tV
antenna : air auto program Clear Scrambled ChannelChannel list name fine tune Signal Strength lna : on
Channel
move Enter return
tVairCable
Clearing Scrambled Channels - digital
. PressthemEnu buttontodisplaythemenu. Presstheorbuttonstoselect"Channel",thenpresstheEntEr button.
. Presstheorbuttontoselect"ClearScrambledChannel",thenpressthe EntErbutton.Itsearchesscrambledchannels,whicharetoberemovedfrom thelist. Tostopsearchingscrambledchannels. PresstheEntErbuttontoselectStop PresstheEntErbuttontoselectyes,thenpresstheEntErbutton.
. Whenthescrambledchannelsearchingiscompleted,presstheEntErbutton. PresstheExItbuttontoexit.
TheClearScrambledChannelfunctionisusedtofilteroutscrambledchannelsafterAutoProgramiscompleted.Itremovesthescrambledchannelsfromthelistbytuningthedigitalcablechannels.Thisprocessmaytakeupto20~30minutes.
antenna : Cable auto program Clear Scrambled Channel Channel list name fine tune Signal Strength lna : on
ChanneltV
move Enter return
Clear Scrambled Channel
Stop
removing scrambled channel.dtV Cable -
0%
Enter return
PresstheantEnnabuttononthe remotecontrol.
or
60%
dtV Cable -
Clear Scrambled Channel
Scrambled Channel Searching is completed.0 Channels are deleted.
oK
Enter return
BN68-01167A-Eng-00.indd 37 2007-02-09 9:22:08
English -
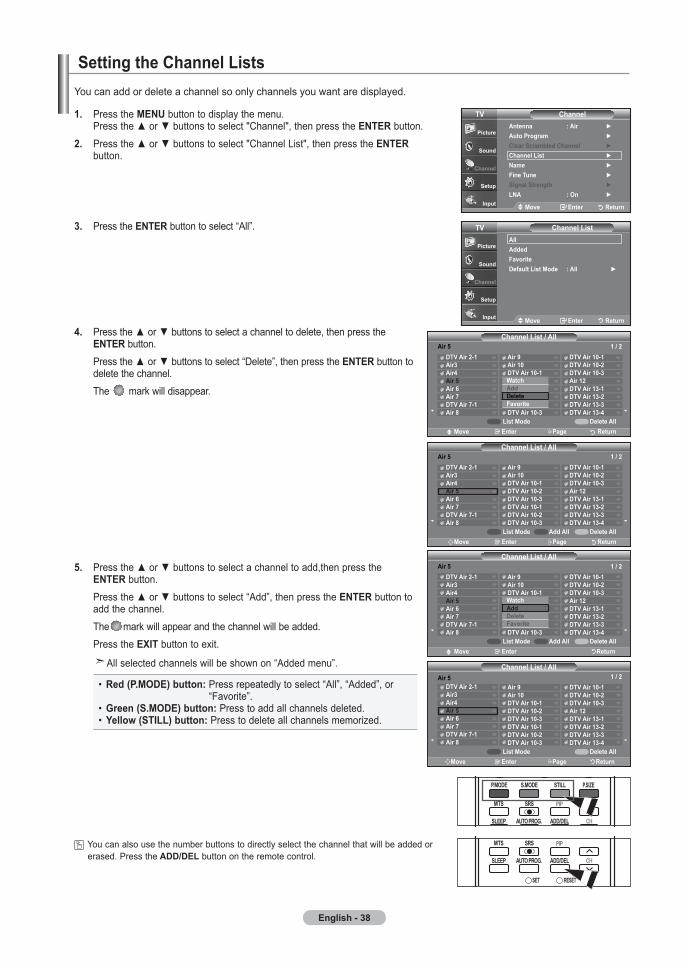
Setting the Channel listsYoucanaddordeleteachannelsoonlychannelsyouwantaredisplayed.
antenna : air auto program Clear Scrambled Channel Channel list name fine tune Signal Strength lna : on
Channel
move Enter return
tV
alladdedfavoritedefault list mode : all
Channel list
move Enter return
tV
CH
Channel list / all
move Enter page return
dtV air -airairair air 6air dtV air -air
air air 0dtV air 0-dtV air 0-dtV air 0-dtV air 0-dtV air 0-dtV air 0-
dtV air 0-dtV air 0-dtV air 0-air dtV air -dtV air -dtV air -dtV air -
list mode delete all
air /
add all
move Enter page return
dtV air -airairair air 6air dtV air -air
air
CH
Channel list / all
air air 0dtV air 0-dtV air 0-dtV air 0-dtV air 0-dtV air 0-dtV air 0-
dtV air 0-dtV air 0-dtV air 0-air dtV air -dtV air -dtV air -dtV air -
/
Channel list / all
move Enter return
dtV air -airairair air 6air dtV air -air
air air 0dtV air 0-dtV air 0-dtV air 0-dtV air 0-dtV air 0-dtV air 0-
dtV air 0-dtV air 0-dtV air 0-air dtV air -dtV air -dtV air -dtV air -
air /
watchadddeletefavorite
list mode delete alladd all
CH
Channel list / all
move Enter page return
dtV air -airairair air 6air dtV air -air
air air 0dtV air 0-dtV air 0-dtV air 0-dtV air 0-dtV air 0-dtV air 0-
dtV air 0-dtV air 0-dtV air 0-air dtV air -dtV air -dtV air -dtV air -
list mode delete all
air /
watchadddeletefavorite
. PressthemEnu buttontodisplaythemenu. Presstheorbuttonstoselect"Channel",thenpresstheEntEr button.. Presstheorbuttonstoselect"ChannelList",thenpresstheEntEr button.
. PresstheEntErbuttontoselect“All”.
. Presstheorbuttonstoselectachanneltodelete,thenpressthe EntErbutton. Presstheorbuttonstoselect“Delete”,thenpresstheEntErbuttonto deletethechannel. Themarkwilldisappear.
. Presstheorbuttonstoselectachanneltoadd,thenpressthe EntErbutton. Presstheorbuttonstoselect“Add”,thenpresstheEntErbuttonto addthechannel. Themarkwillappearandthechannelwillbeadded. PresstheExItbuttontoexit. Allselectedchannelswillbeshownon“Addedmenu”.
• red (p.modE) button:Pressrepeatedlytoselect“All”,“Added”,or “Favorite”. • Green (S.modE) button:Presstoaddallchannelsdeleted. • yellow (StIll) button:Presstodeleteallchannelsmemorized.
Youcanalsousethenumberbuttonstodirectlyselectthechannelthatwillbeaddedor erased.Pressthe add/dElbuttonontheremotecontrol.
dtV air -airairair air 6air dtV air -air
move Enter page return
air
list mode delete all
BN68-01167A-Eng-00.indd 38 2007-02-09 9:22:12

English -
to set-up your favorite Channels
. PressthemEnu buttontodisplaythemenu. Presstheorbuttonstoselect"Channel",thenpresstheEntEr button.. Presstheorbuttonstoselect"ChannelList",thenpresstheEntEr button
.. Presstheorbuttonstoselect“Added”,thenpresstheEntErbutton.
. Presstheorbuttonstoselectyourfavoritechannelstowatchamongthe labeledchannels.ThenpresstheEntEr button. Presstheorbuttonstoselect“Favorite”,thenpresstheEntErbutton. The""symbolwillbehighlightedandthechannelwillbesetasaFavorite. TocancelyourFavoritechannelselection,presstheEntErbuttonuntilthe ""symbolisnolongerhighlighted. PresstheExItbuttontoexit. Onlymemorizedchannelscanbesetasfavoritechannels. Allfavoritechannelswillbeshowninthe“Favorite”menu.
Toselectthefavoritechannelsyouhavesetup,pressthefaV.Chbuttonontheremote.
Youcansetchannelsyouwatchfrequentlyasfavorites.
antenna : air auto program Clear Scrambled Channel Channel list name fine tune Signal Strength lna : on
Channel
move Enter return
tV
alladdedfavoritedefault list mode : all
Channel list
move Enter return
tV
CH
Channel list / all
move Enter page return
dtV air -airairair air 6air dtV air -air
air air 0dtV air 0-dtV air 0-dtV air 0-dtV air 0-dtV air 0-dtV air 0-
dtV air 0-dtV air 0-dtV air 0-air dtV air -dtV air -dtV air -dtV air -
list mode delete all
air /
Channel list / added
move Enter return
dtV air -airairair air 6air dtV air -air
air air 0dtV air 0-dtV air 0-dtV air 0-dtV air 0-dtV air 0-dtV air 0-
dtV air 0-dtV air 0-dtV air 0-air dtV air -dtV air -dtV air -dtV air -
list mode delete all
air /
watchadddeletefavorite
BN68-01167A-Eng-00.indd 39 2007-02-09 9:22:14
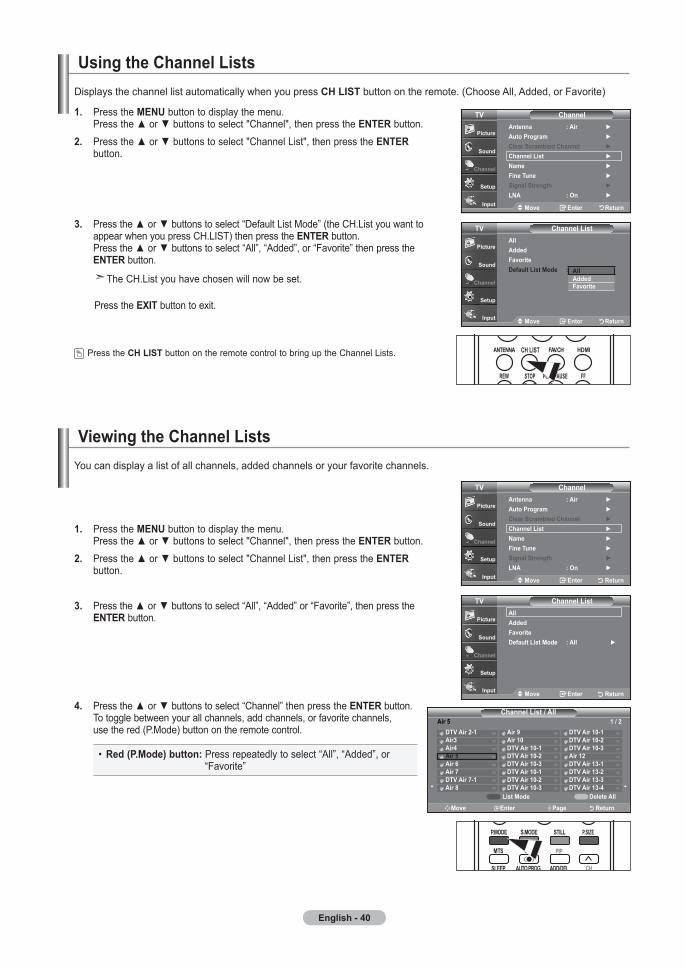
English - 0
using the Channel lists
. PressthemEnu buttontodisplaythemenu. Presstheorbuttonstoselect"Channel",thenpresstheEntEr button.. Presstheorbuttonstoselect"ChannelList",thenpresstheEntEr button.
. Presstheorbuttonstoselect“DefaultListMode”(theCH.Listyouwantto appearwhenyoupressCH.LIST)thenpresstheEntErbutton. Presstheorbuttonstoselect“All”,“Added”,or“Favorite”thenpressthe EntErbutton. TheCH.Listyouhavechosenwillnowbeset.
PresstheExItbuttontoexit.
PresstheCh lIStbuttonontheremotecontroltobringuptheChannelLists.
DisplaysthechannellistautomaticallywhenyoupressCh lIStbuttonontheremote.(ChooseAll,Added,orFavorite)
Viewing the Channel lists
. PressthemEnu buttontodisplaythemenu. Presstheorbuttonstoselect"Channel",thenpresstheEntEr button.. Presstheorbuttonstoselect"ChannelList",thenpresstheEntEr button.
. Presstheorbuttonstoselect“All”,“Added”or“Favorite”,thenpressthe EntErbutton.
. Presstheorbuttonstoselect“Channel”thenpresstheEntErbutton. Totogglebetweenyourallchannels,addchannels,orfavoritechannels, usethered(P.Mode)buttonontheremotecontrol.
• red (p.mode) button:Pressrepeatedlytoselect“All”,“Added”,or “Favorite”
Youcandisplayalistofallchannels,addedchannelsoryourfavoritechannels.
antenna : air auto program Clear Scrambled Channel Channel list name fine tune Signal Strength lna : on
Channel
move Enter return
tV
alladdedfavoritedefault list mode : all
Channel list
move Enter return
tV
alladdedfavorite
antenna : air auto program Clear Scrambled Channel Channel list name fine tune Signal Strength lna : on
Channel
move Enter return
tV
alladdedfavoritedefault list mode : all
Channel list
move Enter return
tV
CH
Channel list / all
move Enter page return
dtV air -airairair air 6air dtV air -air
air air 0dtV air 0-dtV air 0-dtV air 0-dtV air 0-dtV air 0-dtV air 0-
dtV air 0-dtV air 0-dtV air 0-air dtV air -dtV air -dtV air -dtV air -
list mode delete all
air /
BN68-01167A-Eng-00.indd 40 2007-02-09 9:22:17
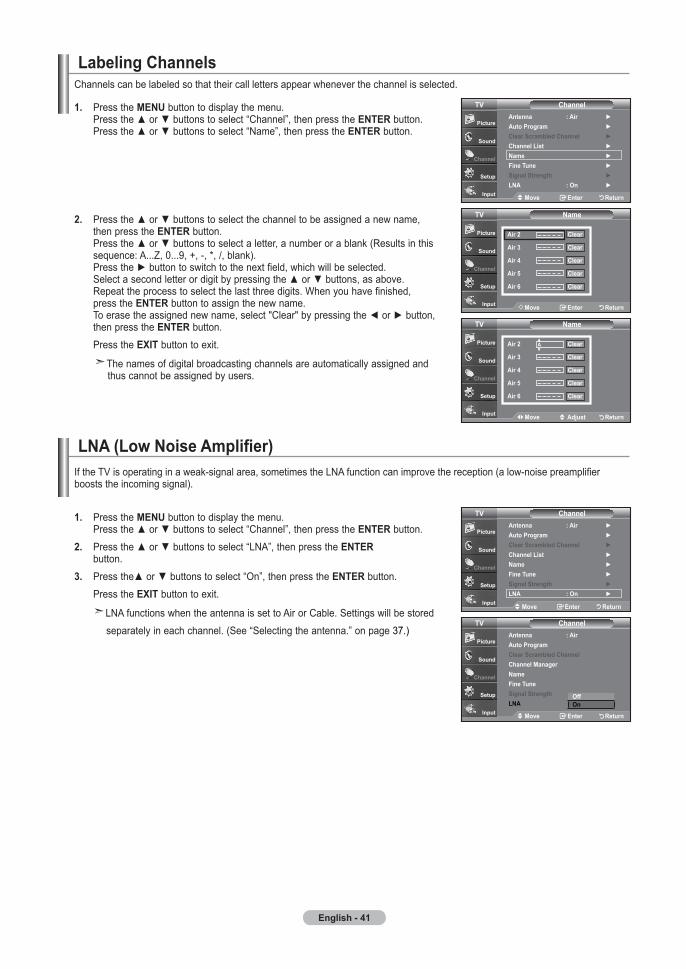
English -
labeling Channels
. PressthemEnubuttontodisplaythemenu. Presstheorbuttonstoselect“Channel”,thenpresstheEntErbutton. Presstheorbuttonstoselect“Name”,thenpresstheEntErbutton.
. Presstheorbuttonstoselectthechanneltobeassignedanewname, thenpresstheEntErbutton. Presstheorbuttonstoselectaletter,anumberorablank(Resultsinthis sequence:A...Z,0...9,+,-,*,/,blank). Pressthebuttontoswitchtothenextfield,whichwillbeselected. Selectasecondletterordigitbypressingtheorbuttons,asabove. Repeattheprocesstoselectthelastthreedigits.Whenyouhavefinished, presstheEntErbuttontoassignthenewname. Toerasetheassignednewname,select"Clear"bypressingtheorbutton, thenpresstheEntErbutton. PresstheExItbuttontoexit. Thenamesofdigitalbroadcastingchannelsareautomaticallyassignedand thuscannotbeassignedbyusers.
antenna : air auto program Clear Scrambled Channel Channel list name fine tune Signal Strength lna : on
Channel
move Enter return
tV
name
move Enter return
tV
air
air
air
air
air 6
Clear
Clear
Clear
Clear
Clear
name
move adjust return
tV
air
air
air
air
air 6
Clear
Clear
Clear
Clear
Clear
a
LNA (Low Noise Amplifier)
. PressthemEnubuttontodisplaythemenu. Presstheorbuttonstoselect“Channel”,thenpresstheEntErbutton.. Presstheorbuttonstoselect“LNA”,thenpresstheEntEr button.. Presstheorbuttonstoselect“On”,thenpresstheEntErbutton. PresstheExItbuttontoexit. LNAfunctionswhentheantennaissettoAirorCable.Settingswillbestored separatelyineachchannel.(See“Selectingtheantenna.”onpage37.)
IftheTVisoperatinginaweak-signalarea,sometimestheLNAfunctioncanimprovethereception(alow-noisepreamplifierbooststheincomingsignal).
antenna : air auto program Clear Scrambled Channel Channel list name fine tune Signal Strength lna : on
ChanneltV
move Enter return
antenna : air auto program Clear Scrambled ChannelChannel manager name fine tune Signal Strength lna
ChanneltV
offon
move Enter return
Channelscanbelabeledsothattheircalllettersappearwheneverthechannelisselected.
BN68-01167A-Eng-00.indd 41 2007-02-09 9:22:19
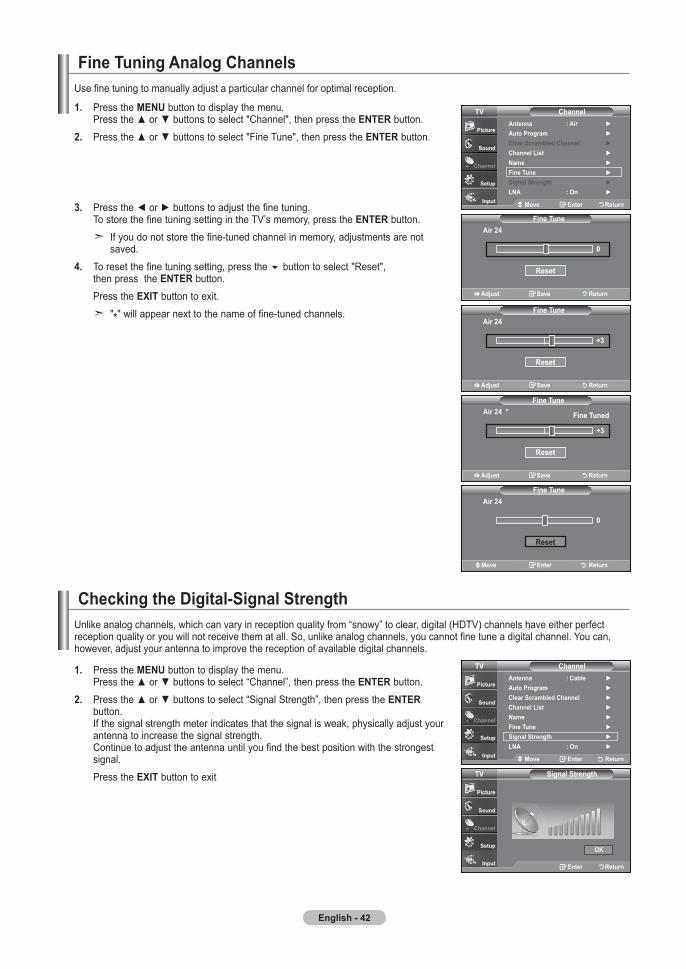
English -
fine tuning analog Channels
. PressthemEnu buttontodisplaythemenu. Presstheorbuttonstoselect"Channel",thenpresstheEntEr button.. Presstheorbuttonstoselect"FineTune",thenpresstheEntEr button.
. Presstheorbuttonstoadjustthefinetuning. TostorethefinetuningsettingintheTV’smemory,presstheEntEr button. Ifyoudonotstorethefine-tunedchannelinmemory,adjustmentsarenot saved.. Toresetthefinetuningsetting,pressthe6buttontoselect"Reset", thenpresstheEntEr button. PresstheExIt buttontoexit. "*"willappearnexttothenameoffine-tunedchannels.
Usefinetuningtomanuallyadjustaparticularchannelforoptimalreception.
Checking the digital-Signal Strength
. PressthemEnubuttontodisplaythemenu. Presstheorbuttonstoselect“Channel”,thenpresstheEntErbutton.. Presstheorbuttonstoselect“SignalStrength”,thenpresstheEntEr button. Ifthesignalstrengthmeterindicatesthatthesignalisweak,physicallyadjustyour antennatoincreasethesignalstrength. Continuetoadjusttheantennauntilyoufindthebestpositionwiththestrongest signal. PresstheExItbuttontoexit
Unlikeanalogchannels,whichcanvaryinreceptionqualityfrom“snowy”toclear,digital(HDTV)channelshaveeitherperfectreceptionqualityoryouwillnotreceivethematall.So,unlikeanalogchannels,youcannotfinetuneadigitalchannel.Youcan,however,adjustyourantennatoimprovethereceptionofavailabledigitalchannels.
antenna : air auto program Clear Scrambled Channel Channel list name fine tune Signal Strength lna : on
Channel
move Enter return
tV
fine tune
adjust Save return
air *
+
reset
antenna : Cable auto program Clear Scrambled Channel Channel list name fine tune Signal Strength lna : on
Channel
move Enter return
tV
Signal Strength
Enter return
tV
oK
adjust Save return
fine tuneair
0
reset
adjust Save return
fine tuneair
+
reset
move Enter return
fine tuneair
0
reset
fine tune
fine tuned
BN68-01167A-Eng-00.indd 42 2007-02-09 9:22:22

English -
using your tV as a Computer (pC) displaySetting up your pC Software (Based on windows xp)TheWindowsdisplay-settingsforatypicalcomputerareshownbelow.TheactualscreensonyourPCwillprobablybedifferent,dependinguponyourparticularversionofWindowsandyourparticularvideocard.However,evenifyouractualscreenslookdifferent,thesamebasicset-upinformationwillapplyinalmostallcases.(Ifnot,contactyourcomputermanufacturerorSamsungDealer.)
. First,clickon"Control panel"ontheWindowsstartmenu.. Whenthecontrolpanelwindowappears,clickon"appearance and themes"anda displaydialog-boxwillappear.. Whenthecontrolpanelwindowappears,clickon"display"andadisplaydialog-box willappear.. Navigatetothe"Settings"tabonthedisplaydialog-box. Thecorrectsizesetting(resolution) Optimum:1360x768pixels Ifavertical-frequencyoptionexistsonyourdisplaysettingsdialogbox, thecorrectvalueis"60"or"60Hz".Otherwise,justclick"OK"andexitthedialogbox.
display modes
mode resolution horizontal frequency (khz)
Vertical frequency (hz)
pixel Clock frequency (mhz)
Sync polarity (h/V)
IBm 720X400640X480
31.46931.469
70.08759.940
28.32225.175
-/+-/-
VESa
640x480640x480800x600800x600800x600
1024x7681024x7681024x7681360x768
37.86137.50037.87948.07746.87548.36356.47660.02347.712
72.80975.00060.31772.18875.00060.00470.06975.02960.015
31.50031.50040.00050.00049.50065.00075.00078.75085.800
-/--/-+/++/++/+-/--/-+/++/+
pC display
Ifthesignalfromthesystemequalsthestandardsignalmode,thescreenisadjustedautomatically.Ifthesignalfromthesystemdoesn’tequalthestandardsignalmode,adjustthemodebyreferringtoyourvideocarduserguide;otherwisetheremaybenovideo.Forthedisplaymodeslistedbelow,thescreenimagehasbeenoptimizedduringmanufacturing.
d-Sub Input
mode resolution horizontal frequency (khz)
Vertical frequency (hz)
pixel Clock frequency (mhz)
Sync polarity (h/V)
IBm 720X400640X480
31.46931.469
70.08759.940
28.32225.175
-/+-/-
VESa800x600
1024x7681360x768
37.87948.36347.712
60.31760.00460.015
40.00065.00085.800
+/+-/-+/+
hdmI/dVI Input
BN68-01167A-Eng-00.indd 43 2007-02-09 9:22:23
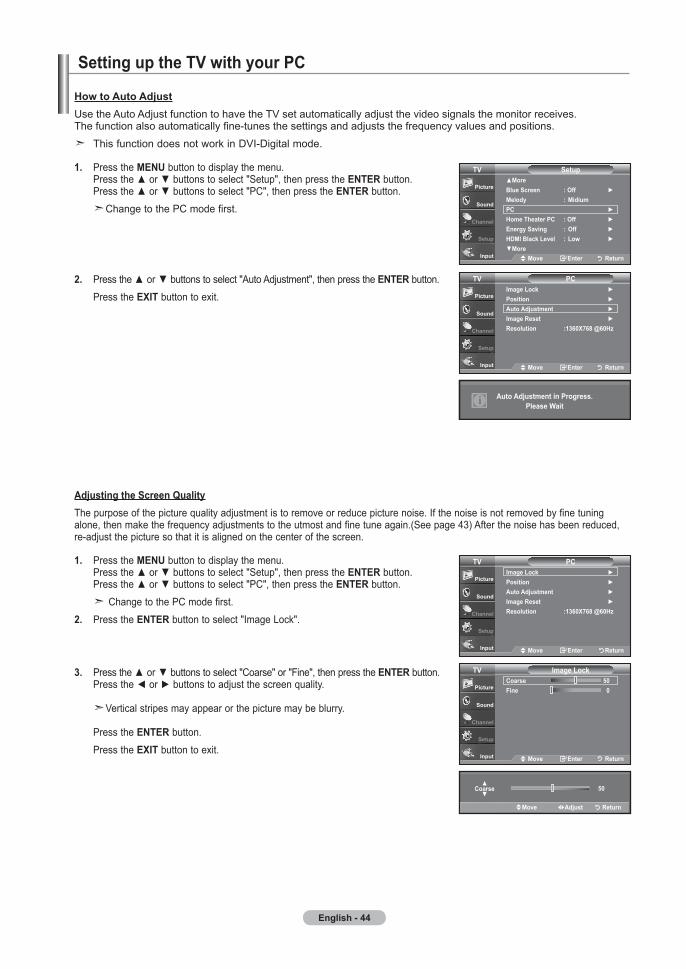
English -
. PressthemEnu buttontodisplaythemenu. Presstheorbuttonstoselect"Setup",thenpresstheEntEr button. Presstheorbuttonstoselect"PC",thenpresstheEntEr button. ChangetothePCmodefirst.
. Presstheorbuttonstoselect"AutoAdjustment",thenpresstheEntEr button. PresstheExIt buttontoexit.
how to auto adjustUsetheAutoAdjustfunctiontohavetheTVsetautomaticallyadjustthevideosignalsthemonitorreceives.Thefunctionalsoautomaticallyfine-tunesthesettingsandadjuststhefrequencyvaluesandpositions.
ThisfunctiondoesnotworkinDVI-Digitalmode.
Setting up the tV with your pC
. PressthemEnu buttontodisplaythemenu. Presstheorbuttonstoselect"Setup",thenpresstheEntEr button. Presstheorbuttonstoselect"PC",thenpresstheEntEr button. ChangetothePCmodefirst.. PresstheEntEr buttontoselect"ImageLock".
. Presstheorbuttonstoselect"Coarse"or"Fine",thenpresstheEntEr button. Presstheorbuttonstoadjustthescreenquality. Verticalstripesmayappearorthepicturemaybeblurry. PresstheEntEr button. PresstheExIt buttontoexit.
adjusting the Screen QualityThepurposeofthepicturequalityadjustmentistoremoveorreducepicturenoise.Ifthenoiseisnotremovedbyfinetuningalone,thenmakethefrequencyadjustmentstotheutmostandfinetuneagain.(Seepage43)Afterthenoisehasbeenreduced,re-adjustthepicturesothatitisalignedonthecenterofthescreen.
SetupmoreBlue Screen : off melody : midium pC home theater pC : off Energy Saving : off hdml Black level : low more
tV
move Enter return
pCImage lock position auto adjustment Image reset resolution :60x6 @60hz
tV
move Enter return
pCImage lock position auto adjustment Image reset resolution :60x6 @60hz
tV
move Enter return
Image lockCoarse 0fine 0
tV
move Enter return
auto adjustment in progress.please wait
0
Coarse
move adjust return
BN68-01167A-Eng-00.indd 44 2007-02-09 9:22:26
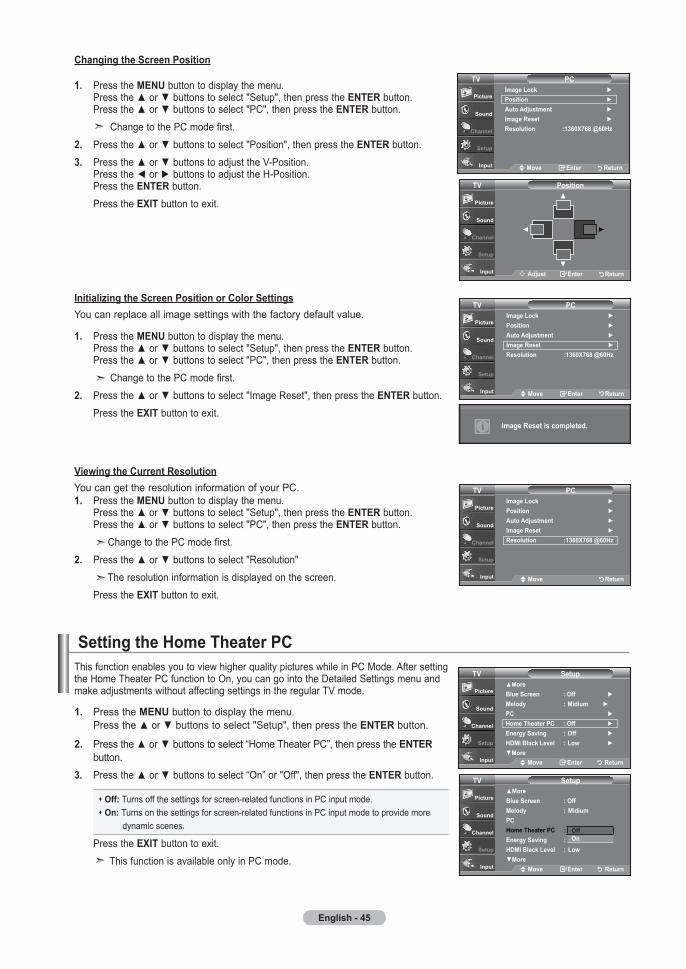
English -
Changing the Screen position
. PressthemEnu buttontodisplaythemenu. Presstheorbuttonstoselect"Setup",thenpresstheEntEr button. Presstheorbuttonstoselect"PC",thenpresstheEntEr button. ChangetothePCmodefirst.. Presstheorbuttonstoselect"Position",thenpresstheEntEr button.. PresstheorbuttonstoadjusttheV-Position. PresstheorbuttonstoadjusttheH-Position. PresstheEntEr button. PresstheExIt buttontoexit.
Initializing the Screen position or Color Settings
. PressthemEnu buttontodisplaythemenu. Presstheorbuttonstoselect"Setup",thenpresstheEntEr button. Presstheorbuttonstoselect"PC",thenpresstheEntEr button. ChangetothePCmodefirst.. Presstheorbuttonstoselect"ImageReset",thenpresstheEntEr button. PresstheExIt buttontoexit.
pCImage lock position auto adjustment Image reset resolution :60x6 @60hz
tV
move Enter return
tV
adjust Enter return
position
pCImage lock position auto adjustment Image reset resolution :60x6 @60hz
tV
move Enter return
Image reset is completed.
SetupmoreBlue Screen : off Melody : Midium pC home theater pC : off Energy Saving : off hdml Black level : low more
tV
move Enter return
SetupmoreBlue Screen : off melody : midium pC home theater pC : off Energy Saving : off hdml Black level : low more
tV
move Enter return
offon
. PressthemEnu buttontodisplaythemenu. Presstheorbuttonstoselect"Setup",thenpresstheEntEr button.
. Presstheorbuttonstoselect“HomeTheaterPC”,thenpresstheEntEr button.. Presstheorbuttonstoselect“On”or"Off",thenpresstheEntEr button.
off: Turnsoffthesettingsforscreen-relatedfunctionsinPCinputmode.on: Turnsonthesettingsforscreen-relatedfunctionsinPCinputmodetoprovidemore dynamicscenes.
PresstheExItbuttontoexit. ThisfunctionisavailableonlyinPCmode.
Setting the home theater pCThisfunctionenablesyoutoviewhigherqualitypictureswhileinPCMode.AftersettingtheHomeTheaterPCfunctiontoOn,youcangointotheDetailedSettingsmenuandmakeadjustmentswithoutaffectingsettingsintheregularTVmode.
Youcanreplaceallimagesettingswiththefactorydefaultvalue.
Viewing the Current resolution
YoucangettheresolutioninformationofyourPC.. PressthemEnu buttontodisplaythemenu. Presstheorbuttonstoselect"Setup",thenpresstheEntEr button. Presstheorbuttonstoselect"PC",thenpresstheEntEr button. ChangetothePCmodefirst.. Presstheorbuttonstoselect"Resolution" Theresolutioninformationisdisplayedonthescreen. PresstheExIt buttontoexit.
pCImage lock position auto adjustment Image reset resolution :60x6 @60hz
tV
move return
BN68-01167A-Eng-00.indd 45 2007-02-09 9:22:29

English - 6
Setting the ClockSettingtheclockisnecessaryinordertousethevarioustimerfeaturesoftheTV.Also,youcancheckthetimewhilewatchingtheTV.(JustpresstheINFObutton.)
option : Setting the Clock manually. PressthemEnu buttontodisplaythemenu. Presstheorbuttonstoselect"Setup",thenpresstheEntErbutton. Presstheorbuttonstoselect"Time",thenpresstheEntEr button.
. PresstheEntErbuttontoselect"Clock".
. PresstheEntErbuttontoselect“ClockMode”. Presstheorbuttonstoselect“Manual”,thenpresstheEntErbutton.
. Presstheorbuttonstoselect“ClockSet”,thenpresstheEntErbutton.
. Presstheorbuttonstomoveto“Month”,“Day”,“Year”,“Hour”,“Minute”, or“am/pm”.Setthedateandtimeyouwantbypressingtheorbuttons, thenpresstheEntErbutton. PresstheExItbuttontoexit. ThecurrenttimewillappeareverytimeyoupresstheInfobutton. Youcansetthemonth,day,year,hour,andminutedirectlybypressingthe numberbuttonsontheremotecontrol.
time Setting
Setupplug & play language : English time Game mode : off V-Chip Caption menu transparency : medium more
tV
move Enter return
time
Clock Sleep timer : off timer : Inactivated timer : Inactivated timer : Inactivated
tV
move Enter return
- - / - - / - - - - / - - : - - - -
ClockClock mode : manual Clock Set time Zone dSt
tV
move Enter return
Clock Set
Enter the current date and time.
tV
move adjust return
month
day year
hour minute am/pm
Clock Set
Enter the current date and time.
tV
month
day year
hour minute am/pm
00
00 am
move adjust return
BN68-01167A-Eng-00.indd 46 2007-02-09 9:22:31
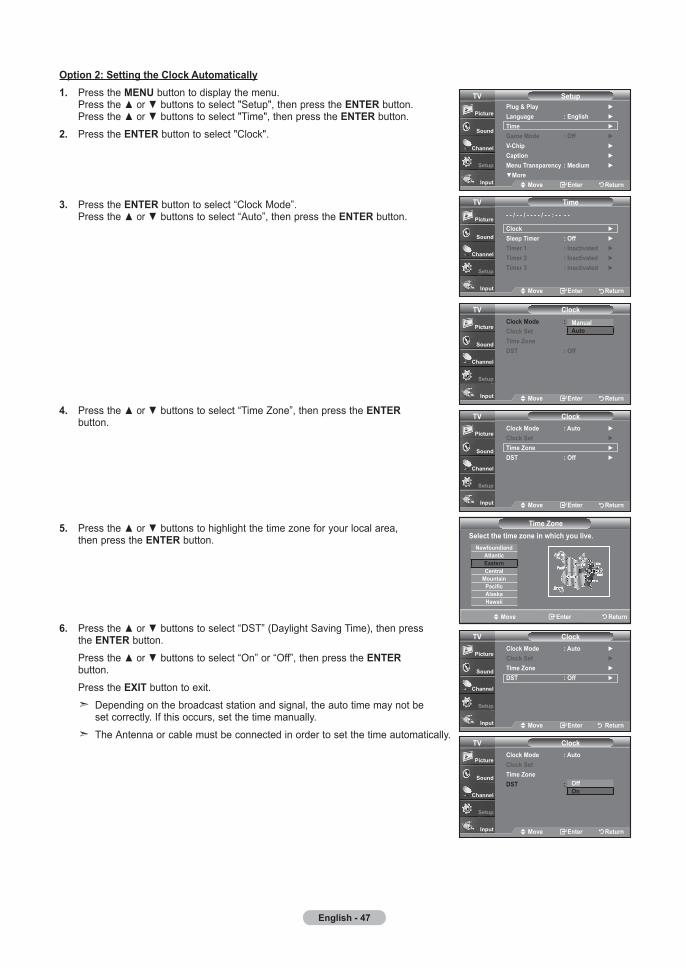
English -
option : Setting the Clock automatically. PressthemEnu buttontodisplaythemenu. Presstheorbuttonstoselect"Setup",thenpresstheEntErbutton. Presstheorbuttonstoselect"Time",thenpresstheEntEr button.. PresstheEntErbuttontoselect"Clock".
. PresstheEntErbuttontoselect“ClockMode”. Presstheorbuttonstoselect“Auto”,thenpresstheEntErbutton.
. Presstheorbuttonstoselect“TimeZone”,thenpresstheEntEr button.
. Presstheorbuttonstohighlightthetimezoneforyourlocalarea, thenpresstheEntErbutton.
6. Presstheorbuttonstoselect“DST”(DaylightSavingTime),thenpress theEntErbutton. Presstheorbuttonstoselect“On”or“Off”,thenpresstheEntEr button. PresstheExItbuttontoexit. Dependingonthebroadcaststationandsignal,theautotimemaynotbe setcorrectly.Ifthisoccurs,setthetimemanually. The Antennaorcablemustbeconnectedinordertosetthetimeautomatically.
Setupplug & play language : English time Game mode : off V-Chip Caption menu transparency : medium more
tV
move Enter return
time
Clock Sleep timer : off timer : Inactivated timer : Inactivated timer : Inactivated
tV
move Enter return
- - / - - / - - - - / - - : - - - -
ClockClock mode : manual Clock Set time Zone dSt : off
tV
move Enter return
manualauto
ClockClock mode : auto Clock Set time Zone dSt : off
tV
move Enter return
move Enter return
Select the time zone in which you live. time Zone
newfoundlandatlanticEasternCentral
mountainpacificalaskahawaii
ClockClock mode : auto Clock Set time Zone dSt : off
tV
move Enter return
ClockClock mode : auto Clock Set time Zone dSt : off
tV
move Enter return
offon
BN68-01167A-Eng-00.indd 47 2007-02-09 9:22:34
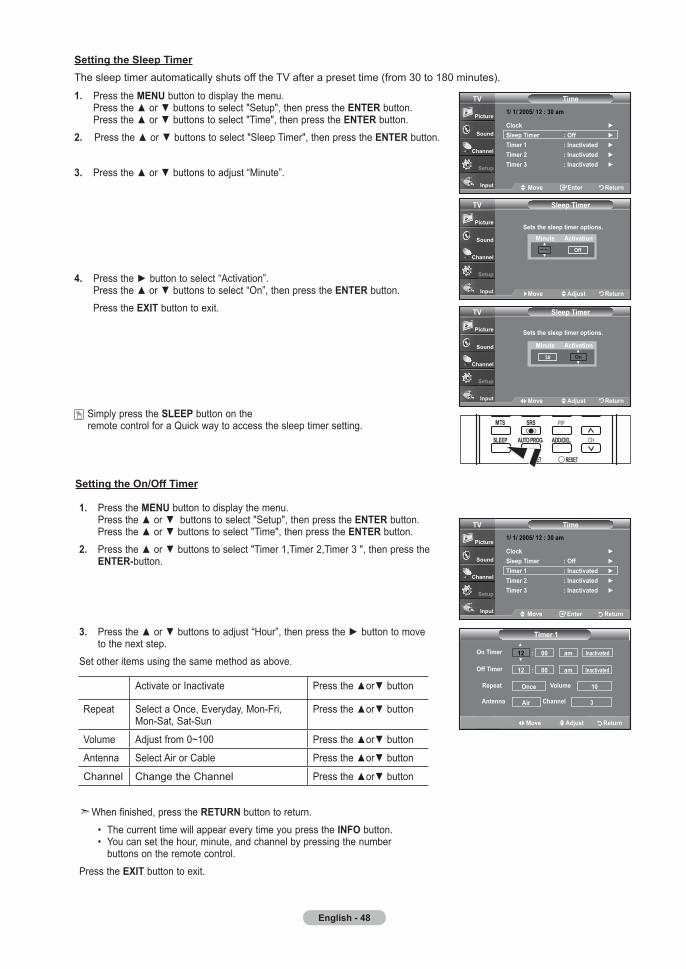
English -
Setting the Sleep timerThesleeptimerautomaticallyshutsofftheTVafterapresettime(from30to180minutes).
. PressthemEnu buttontodisplaythemenu. Presstheorbuttonstoselect"Setup",thenpresstheEntEr button. Presstheorbuttonstoselect"Time",thenpresstheEntEr button.. Presstheorbuttonstoselect"SleepTimer",thenpresstheEntErbutton.
. Presstheorbuttonstoadjust“Minute”.
. Pressthebuttontoselect“Activation”. Presstheorbuttonstoselect“On”,thenpresstheEntErbutton. PresstheExItbuttontoexit.
SimplypresstheSlEEpbuttononthe remotecontrolforaQuickwaytoaccessthesleeptimersetting.
time
Clock Sleep timer : off timer : Inactivated timer : Inactivated timer : Inactivated
tV
move Enter return
/ / 00/ : 0 am
. PressthemEnu buttontodisplaythemenu. Presstheor buttonstoselect"Setup",thenpresstheEntErbutton. Presstheorbuttonstoselect"Time",thenpresstheEntErbutton. . Presstheorbuttonstoselect"Timer1,Timer2,Timer3",thenpressthe EntEr-button.
. Presstheorbuttonstoadjust“Hour”,thenpressthebuttontomove tothenextstep. Setotheritemsusingthesamemethodasabove.
ActivateorInactivate Presstheorbutton
Repeat SelectaOnce,Everyday,Mon-Fri,Mon-Sat,Sat-Sun
Presstheorbutton
Volume Adjustfrom0~100 Presstheorbutton
Antenna SelectAirorCable Presstheorbutton
Channel ChangetheChannel Presstheorbutton
Whenfinished,presstherEturnbuttontoreturn. • ThecurrenttimewillappeareverytimeyoupresstheInfobutton. • Youcansetthehour,minute,andchannelbypressingthenumber buttonsontheremotecontrol. PresstheExItbuttontoexit.
Setting the on/off timer
time
Clock Sleep timer : off timer : Inactivated timer : Inactivated timer : Inactivated
tV/ / 00/ : 0 am
move Enter return
tV
move adjust return
timer
on timer
00 am Inactivated
off timer 00 am Inactivated
repeat once
antenna
Volume 0
air Channel
:
:
Sleep timertV
move adjust return
minute
activation
off
Sets the sleep timer options.
Sleep timer
Sets the sleep timer options.
tV
move adjust return
minute
activationon0
BN68-01167A-Eng-00.indd 48 2007-02-09 9:22:37

English -
Setting the Blue Screen modeIfnosignalisbeingreceivedorthesignalisveryweak,abluescreenautomaticallyreplacesthenoisypicturebackground.Ifyouwishtocontinueviewingthepoorpicture,youmustsetthe"BlueScreen"modeto"Off"
. PressthemEnu buttontodisplaythemenu. Presstheorbuttonstoselect"Setup",thenpresstheEntEr button.. Presstheorbuttonstoselect"BlueScreen",thenpresstheEntEr button.
. Presstheorbuttonstoselect"On"or"Off"thenpresstheEntEr button. PresstheExIt buttontoexit. Pressingtheorbuttonswillalternatebetween“On”or“Off”
Selecting a menu language. PressthemEnu buttontodisplaythemenu. Presstheorbuttonstoselect"Setup",thenpresstheEntEr button. Presstheorbuttonstoselect"Language",thenpresstheEntEr button.
. Presstheorbuttonstoselect"English","Español",or"Français". PresstheEntEr button. PresstheExIt buttontoexit.
function description
Setupplug & play language : English time Game mode : off V-Chip Caption menu transparency : medium more
tV
move Enter return
Setupplug & play language : English time Game mode : off V-Chip Caption menu transparency : medium more
tV
move Enter return
EnglishEspañolfrançais
SetupmoreBlue Screen : off Melody : Midium pC home theater pC : off Energy Saving : off hdml Black level : low more
tV
move Enter return
SetupmoreBlue Screen :off melody : off pC home theater pC : off Energy Saving : off hdml Black level : lowmore
tV
move Enter return
offon
using the Game modeWhenconnectingtoagameconsolesuchasPlayStationTMorXboxTM,youcanenjoyamorerealisticgamingexperiencebyselectingGamemode
. PressthemEnu buttontodisplaythemenu. Presstheorbuttonstoselect"Setup",thenpresstheEntEr button.. Presstheorbuttonstoselect"GameMode",thenpresstheEntEr button.
. Select"On"or"Off"bypressingtheorbuttons,thenpresstheEntEr button.. PresstheExIt buttontoexit. Todisconnectthegameconsoleandconnectanotherexternaldevice,cancelgamemode intheSetupmenu.
IfyoudisplaytheTVmenuinGamemode,thescreenshakesslightly.
GameModeisnotavailableinTVmode.
Setupplug & play language : English time Game mode : off V-Chip Caption menu transparency : medium more
tV
move Enter return
Setupplug & play language : English time Game mode : off V-Chip Caption menu transparency : medium more
tV
move Enter return
offon
BN68-01167A-Eng-00.indd 49 2007-02-09 9:22:39
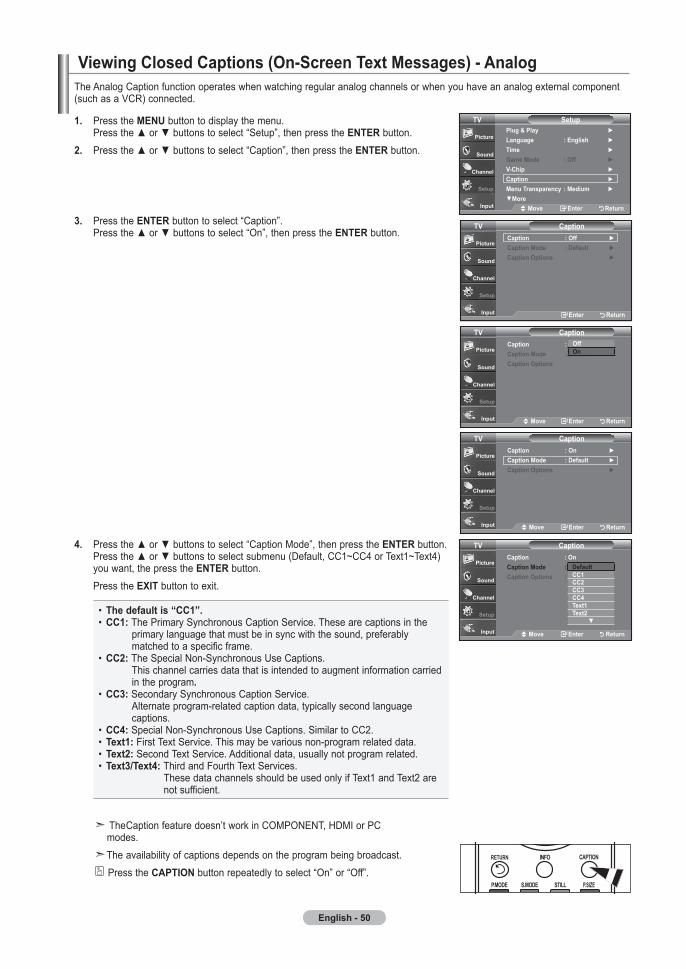
English - 0
TheAnalogCaptionfunctionoperateswhenwatchingregularanalogchannelsorwhenyouhaveananalogexternalcomponent(suchasaVCR)connected.
. PressthemEnubuttontodisplaythemenu. Presstheorbuttonstoselect“Setup”,thenpresstheEntErbutton.. Presstheorbuttonstoselect“Caption”,thenpresstheEntErbutton.
. PresstheEntErbuttontoselect“Caption”. Presstheorbuttonstoselect“On”,thenpresstheEntErbutton.
. Presstheorbuttonstoselect“CaptionMode”,thenpresstheEntErbutton. Presstheorbuttonstoselectsubmenu(Default,CC1~CC4orText1~Text4) youwant,thepresstheEntErbutton. PresstheExItbuttontoexit.
• the default is “CC”. • CC: ThePrimarySynchronousCaptionService.Thesearecaptionsinthe primarylanguagethatmustbeinsyncwiththesound,preferably matchedtoaspecificframe. • CC: TheSpecialNon-SynchronousUseCaptions. Thischannelcarriesdatathatisintendedtoaugmentinformationcarried intheprogram. • CC: SecondarySynchronousCaptionService. Alternateprogram-relatedcaptiondata,typicallysecondlanguage captions. • CC: SpecialNon-SynchronousUseCaptions.SimilartoCC2. • text: FirstTextService.Thismaybevariousnon-programrelateddata. • text: SecondTextService.Additionaldata,usuallynotprogramrelated. • text/text: ThirdandFourthTextServices. ThesedatachannelsshouldbeusedonlyifText1andText2are notsufficient.
TheCaptionfeaturedoesn’tworkinCOMPONENT,HDMIorPC modes.
Theavailabilityofcaptionsdependsontheprogrambeingbroadcast. PresstheCaptIonbuttonrepeatedlytoselect“On”or“Off”.
Viewing Closed Captions (on-Screen text messages) - analog
Setupplug & play language : English time Game mode : off V-Chip Caption menu transparency : medium more
tV
move Enter return
CaptionCaption : offCaption mode : default Caption options
tV
move Enter return
offon
CaptionCaption : off Caption mode : default Caption options
tV
Enter return
CaptionCaption : on Caption mode : default Caption options
tV
move Enter return
CaptionCaption : onCaption mode : default Caption options : off
tV
move Enter return
defaultCCCCCCCCtexttext
BN68-01167A-Eng-00.indd 50 2007-02-09 9:22:42
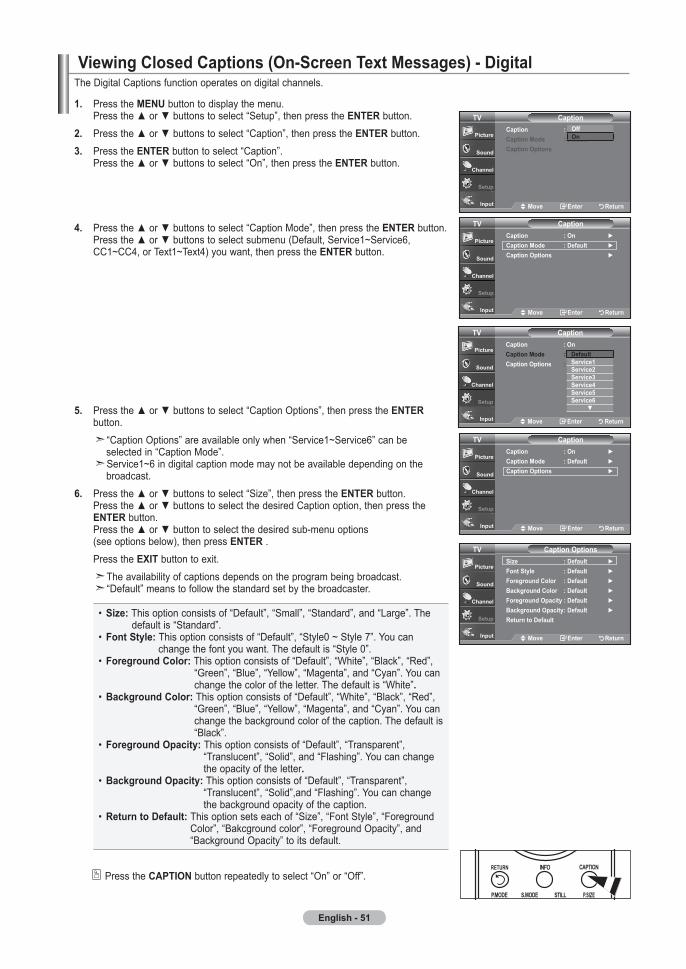
English -
TheDigitalCaptionsfunctionoperatesondigitalchannels.
. PressthemEnubuttontodisplaythemenu. Presstheorbuttonstoselect“Setup”,thenpresstheEntErbutton.. Presstheorbuttonstoselect“Caption”,thenpresstheEntErbutton.. PresstheEntErbuttontoselect“Caption”. Presstheorbuttonstoselect“On”,thenpresstheEntErbutton.
. Presstheorbuttonstoselect“CaptionMode”,thenpresstheEntErbutton. Presstheorbuttonstoselectsubmenu(Default,Service1~Service6, CC1~CC4,orText1~Text4)youwant,thenpresstheEntErbutton.
. Presstheorbuttonstoselect“CaptionOptions”,thenpresstheEntEr button. “CaptionOptions”areavailableonlywhen“Service1~Service6”canbe selectedin“CaptionMode”. Service1~6indigitalcaptionmodemaynotbeavailabledependingonthe broadcast.6. Presstheorbuttonstoselect“Size”,thenpresstheEntErbutton. PresstheorbuttonstoselectthedesiredCaptionoption,thenpressthe EntErbutton. Presstheorbuttontoselectthedesiredsub-menuoptions (seeoptionsbelow),thenpressEntEr. PresstheExItbuttontoexit. Theavailabilityofcaptionsdependsontheprogrambeingbroadcast. “Default”meanstofollowthestandardsetbythebroadcaster.
• Size: Thisoptionconsistsof“Default”,“Small”,“Standard”,and“Large”.The defaultis“Standard”. • font Style: Thisoptionconsistsof“Default”,“Style0~Style7”.Youcan changethefontyouwant.Thedefaultis“Style0”. • foreground Color: Thisoptionconsistsof“Default”,“White”,“Black”,“Red”, “Green”,“Blue”,“Yellow”,“Magenta”,and“Cyan”.Youcan changethecoloroftheletter.Thedefaultis“White”. • Background Color: Thisoptionconsistsof“Default”,“White”,“Black”,“Red”, “Green”,“Blue”,“Yellow”,“Magenta”,and“Cyan”.Youcan changethebackgroundcolorofthecaption.Thedefaultis “Black”. • foreground opacity: Thisoptionconsistsof“Default”,“Transparent”, “Translucent”,“Solid”,and“Flashing”.Youcanchange theopacityoftheletter. • Background opacity: Thisoptionconsistsof“Default”,“Transparent”, “Translucent”,“Solid”,and“Flashing”.Youcanchange thebackgroundopacityofthecaption. • return to default: Thisoptionsetseachof“Size”,“FontStyle”,“Foreground Color”,“Bakcgroundcolor”,“ForegroundOpacity”,and “BackgroundOpacity”toitsdefault.
PresstheCaptIonbuttonrepeatedlytoselect“On”or“Off”.
Viewing Closed Captions (on-Screen text messages) - digital
CaptionCaption : offCaption mode : default Caption options
tV
move Enter return
offon
CaptionCaption : on Caption mode : default Caption options
tV
move Enter return
CaptionCaption : onCaption mode : default Caption options : off
tV
move Enter return
defaultServiceServiceServiceServiceServiceService6
CaptionCaption : on Caption mode : default Caption Options
tV
move Enter return
Caption optionsSize : default font Style : default foreground Color : default Background Color : default foreground opacity : default Background opacity : default return to default
tV
move Enter return
BN68-01167A-Eng-00.indd 51 2007-02-09 9:22:44

English -
using the Energy Saving feature
menu transparency levelAdjuststhetransparencyofthemenuscreen.
. PressthemEnu buttontodisplaythemenu. Presstheorbuttonstoselect"Setup",thenpresstheEntEr button.. Presstheorbuttonstoselect“MenuTransparency”,thenpresstheEntEr button.
. Presstheorbuttonstoselectlevel,thenpresstheEntErbutton. PresstheExItbuttontoexit.
Setupplug & play language : English time Game mode : off V-Chip Caption menu transparency : medium more
tV
move Enter return
Setupplug & play language : English time Game mode : off V-Chip Caption menu transparency : medium more
tV
move Enter return
highmediumlowopaque
SetupmoreBlue Screen : off Melody : Midium pC home theater pC : off Energy Saving : off hdml Black level : low more
tV
move Enter return
SetupmoreBlue Screen : offmelody : medium pC home theater pC : off Energy Saving : off hdml Black level :more
tV
move Enter return
offlowmediumhighauto
ThisfeatureadjuststhebrightnessoftheTVinordertoreducepowerconsumption.WhenwatchingTVatnight,setthe"EnergySaving"modeoptionto"High"toreduceeyefatigueaswellaspowerconsumption.
. PressthemEnu buttontodisplaythemenu. Presstheorbuttonstoselect"Setup",thenpresstheEntEr button.. Presstheorbuttonstoselect"EnergySaving",thenpresstheEntEr button. Selecttherequiredoption(Off,Low,Medium,High,Auto)bypressingtheor button. PresstheEntEr button.
• off: Turnsofftheenergysavingfunction.• low: SetstheTVtolowenergysavingmode.• medium: SetstheTVtomediumenergysavingmode. • high: SetstheTVtohighenergysavingmode.• auto: AutomaticallyadjuststhebrightnessoftheTVscreeninaccordancewiththescenes.
PresstheExIt buttontoexit.
BN68-01167A-Eng-00.indd 52 2007-02-09 9:22:46

English -
. PressthemEnu buttontodisplaythemenu. Presstheorbuttonstoselect"Setup",thenpresstheEntEr button.
. Presstheorbuttonstoselect“FunctionHelp”,thenpresstheEntErbutton.. Presstheorbuttonstoselect“On”,thenpresstheEntEr button. PresstheExItbuttontoexit. ThepredeterminedvalueofthefunctionhelpisOn.
Setting the function helpDisplayshelponthemenufunctions.
IfthebroadcastsignalreceivedbyyourTVisweak,youcanactivatetheDigitalNoiseReductionfeaturetohelpreduceanystaticandghostingthatmayappearonthescreen.. PressthemEnubuttontodisplaythemenu. PresstheEntErbuttontoselect“Picture”. Pressthe5or6buttontoselect"DigitalNR",thenpresstheEntErbutton.. Pressthe5or6buttontoselect"Off","Low","Medium","High","Auto".
PresstheEntErbutton.
off: Turnsthescreennoisereductionfunctionoff.low: Reducesscreennoiseatalowlevel. medium: Reducesscreennoiseatamediumlevel. high: Reducesscreennoiseatahighlevel.auto: Automaticallyrecognizesandreducesscreennoise.
PresstheExItbuttontoexit.
digital noise reduction
move Enter return
MoreColor tone : Cooldetailed settingsSize : 6 : digital nr : lowactive Color : ondnIe : offreset
picturetV
offlowmediumhighauto
MoreColor tone : Cool detailed settings Size : 6 : digital nr : low active Color : on dnIe : off reset : Cancel
picturetV
move Enter return
move Enter return
Morefilm mode : offpIpfunction help : on Sw upgrade
film modetV
offon
Morefilm mode : off PIP function help : on Sw upgrade
SetuptV
BN68-01167A-Eng-00.indd 53 2007-02-09 9:22:48

English -
. PressthemEnu buttontodisplaythemenu. Presstheorbuttonstoselect"Setup",thenpresstheEntEr button.
. Presstheorbuttonstoselect“V-Chip”,thenpresstheEntErbutton. Themessage“EnterPIN”willappear.Enteryour4digitPINnumber.
ThedefaultPINnumberofanewTVsetis“0-0-0-0”.
. The“V-Chip”screenwillappear. Presstheorbuttonstoselect“ChangePIN”,thenpresstheEntErbutton. TheChangePINscreenwillappear.Chooseany4digitsforyourPINandenter them.Assoonasthe4digitsareentered,the“ConfirmnewPIN”screenappears. Re-enterthesame4digits.WhentheConfirmscreendisappears,yourPINhas beenmemorized. PresstheExItbuttontoexit. IfyouforgetthePIN,presstheremote-controlbuttonsinthefollowing sequence,whichresetsthepinto0-0-0-0:PowerOff.→Mute→8→2→ 4→PowerOn.
using the V-ChipTheV-Chipfeatureautomaticallylocksoutprogramsthataredeemedinappropriateforchildren.TheusermustenteraPIN(personalIDnumber)beforeanyoftheV-Chiprestrictionsaresetuporchanged.
WhentheV-chipfeatureisactivated,thePIPfeaturesdonotfunction.
Setting up your personal Id number (pIn)
u.S.a onlyThisproductiscoveredbythefollowingU.S.patents:US4,930,158,US4,930,160
Setupplug & play language : English time Game mode : off V-Chip Caption menu transparency : medium more
tV
move Enter return
move Enter return
V-Chip lock : off tV parental Guidelines mpaa rating Canadian English Canadian french downloadable u.S. rating Change pIn
V-ChiptV
V-Chip
Enter pIn
tV
* * * *
Enter pIn return
Enter new pIn
Confirm new pIn
Change pIntV
Enter pIn return
BN68-01167A-Eng-00.indd 54 2007-02-09 9:22:50
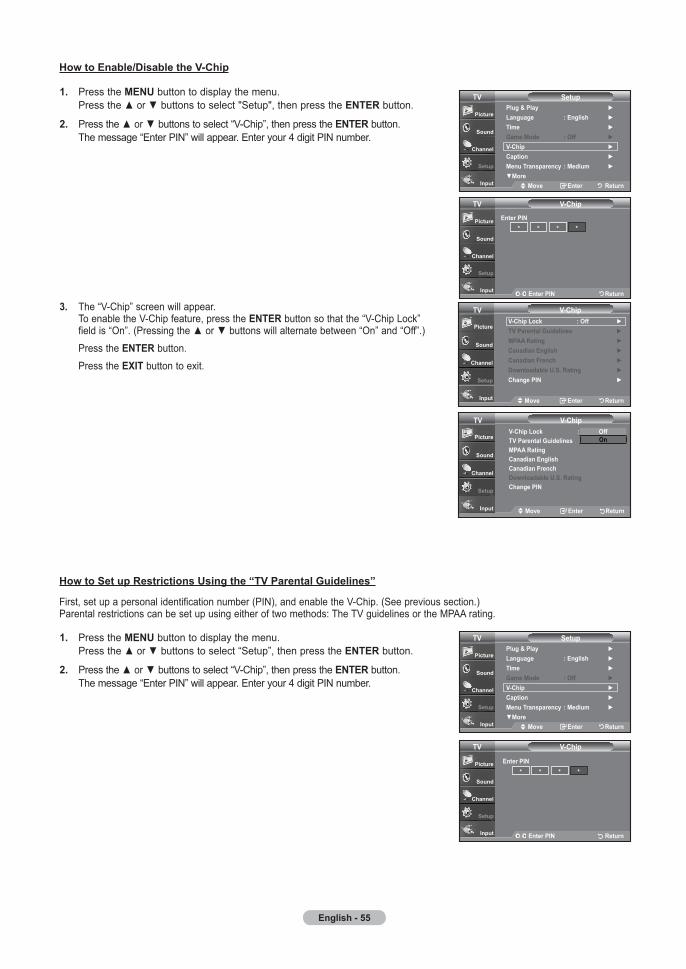
English -
. PressthemEnu buttontodisplaythemenu. Presstheorbuttonstoselect"Setup",thenpresstheEntEr button.
. Presstheorbuttonstoselect“V-Chip”,thenpresstheEntErbutton. Themessage“EnterPIN”willappear.Enteryour4digitPINnumber.
. The“V-Chip”screenwillappear. ToenabletheV-Chipfeature,presstheEntErbuttonsothatthe“V-ChipLock” fieldis“On”.(Pressingtheorbuttonswillalternatebetween“On”and“Off”.) PresstheEntErbutton. PresstheExItbuttontoexit.
how to Enable/disable the V-Chip
Setupplug & play language : English time Game mode : off V-Chip Caption menu transparency : medium more
tV
move Enter return
move Enter return
V-Chip lock : off tV parental Guidelines mpaa rating Canadian English Canadian french downloadable u.S. rating Change pIn
V-ChiptV
. PressthemEnubuttontodisplaythemenu. Presstheorbuttonstoselect“Setup”,thenpresstheEntErbutton.
. Presstheorbuttonstoselect“V-Chip”,thenpresstheEntErbutton. Themessage“EnterPIN”willappear.Enteryour4digitPINnumber.
how to Set up restrictions using the “tV parental Guidelines”
First,setupapersonalidentificationnumber(PIN),andenabletheV-Chip.(Seeprevioussection.)Parentalrestrictionscanbesetupusingeitheroftwomethods:TheTVguidelinesortheMPAArating.
Setupplug & play language : English time Game mode : off V-Chip Caption menu transparency : medium more
tV
move Enter return
V-Chip
Enter pIn
tV
* * * *
Enter pIn return
V-Chip
Enter pIn
tV
* * * *
Enter pIn return
move Enter return
V-Chip lock : offtV parental Guidelines mpaa rating Canadian English Canadian french downloadable u.S. ratingChange pIn
V-ChiptVoffon
BN68-01167A-Eng-00.indd 55 2007-02-09 9:22:52
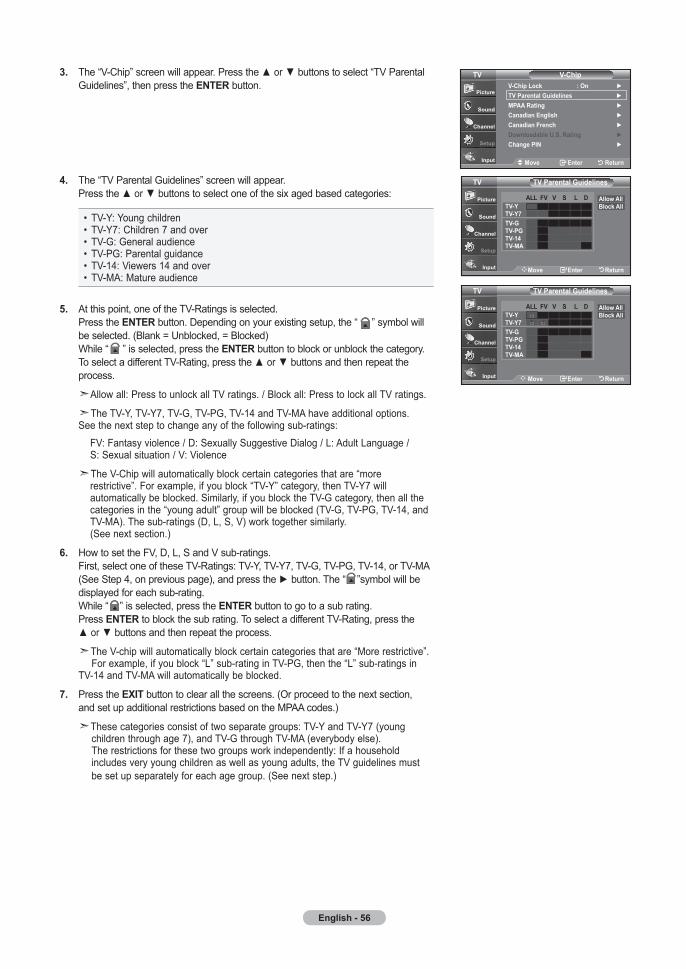
English - 6
. The“V-Chip”screenwillappear.Presstheorbuttonstoselect“TVParental Guidelines”,thenpresstheEntErbutton.
. The“TVParentalGuidelines”screenwillappear. Presstheorbuttonstoselectoneofthesixagedbasedcategories:
• TV-Y:Youngchildren• TV-Y7:Children7andover• TV-G:Generalaudience• TV-PG:Parentalguidance• TV-14:Viewers14andover• TV-MA:Matureaudience
. Atthispoint,oneoftheTV-Ratingsisselected. PresstheEntErbutton.Dependingonyourexistingsetup,the“”symbolwill beselected.(Blank=Unblocked,=Blocked) While“”isselected,presstheEntErbuttontoblockorunblockthecategory. ToselectadifferentTV-Rating,presstheorbuttonsandthenrepeatthe process.
Allowall:PresstounlockallTVratings./Blockall:PresstolockallTVratings.
TheTV-Y,TV-Y7,TV-G,TV-PG,TV-14andTV-MAhaveadditionaloptions. Seethenextsteptochangeanyofthefollowingsub-ratings: FV:Fantasyviolence/D:SexuallySuggestiveDialog/L:AdultLanguage/ S:Sexualsituation/V:Violence
TheV-Chipwillautomaticallyblockcertaincategoriesthatare“more restrictive”.Forexample,ifyoublock“TV-Y”category,thenTV-Y7will automaticallybeblocked.Similarly,ifyoublocktheTV-Gcategory,thenallthe categoriesinthe“youngadult”groupwillbeblocked(TV-G,TV-PG,TV-14,and TV-MA).Thesub-ratings(D,L,S,V)worktogethersimilarly. (Seenextsection.)
6. HowtosettheFV,D,L,SandVsub-ratings. First,selectoneoftheseTV-Ratings:TV-Y,TV-Y7,TV-G,TV-PG,TV-14,orTV-MA (SeeStep4,onpreviouspage),andpressthebutton.The“”symbolwillbe displayedforeachsub-rating. While“”isselected,presstheEntErbuttontogotoasubrating. PressEntEr toblockthesubrating.ToselectadifferentTV-Rating,pressthe orbuttonsandthenrepeattheprocess.
TheV-chipwillautomaticallyblockcertaincategoriesthatare“Morerestrictive”. Forexample,ifyoublock“L”sub-ratinginTV-PG,thenthe“L”sub-ratingsin TV-14andTV-MAwillautomaticallybeblocked.
. PresstheExItbuttontoclearallthescreens.(Orproceedtothenextsection, andsetupadditionalrestrictionsbasedontheMPAAcodes.)
Thesecategoriesconsistoftwoseparategroups:TV-YandTV-Y7(young childrenthroughage7),andTV-GthroughTV-MA(everybodyelse). Therestrictionsforthesetwogroupsworkindependently:Ifahousehold includesveryyoungchildrenaswellasyoungadults,theTVguidelinesmust besetupseparatelyforeachagegroup.(Seenextstep.)
move Enter return
V-Chip lock : on tV parental Guidelines mpaa rating Canadian English Canadian french downloadable u.S. rating Change pIn
V-ChiptV
move Enter return
tV-ytV-y
tV parental GuidelinestV
tV-GtV-pGtV-tV-ma
all fV V S l d allow allBlock all
move Enter return
tV-ytV-y
tV parental GuidelinestV
tV-GtV-pGtV-tV-ma
all fV V S l d allow allBlock all
BN68-01167A-Eng-00.indd 56 2007-02-09 9:22:54

English -
how to Set up restrictions using the mpaa ratings: G, pG, pG-, r, nC-, x, nr
TheMPAAratingsystemusestheMotionPictureAssociationofAmerica(MPAA)system,anditsmainapplicationisformovies.WhentheV-Chiplockison,theTVwillautomaticallyblockanyprogramsthatarecodedwithobjectionableratings(eitherMPAAorTV-Ratings).
. PressthemEnubuttontodisplaythemenu. Presstheorbuttonstoselect“Setup”,thenpresstheEntErbutton.
. Presstheorbuttonstoselect“V-Chip”,thenpresstheEntErbutton. Themessage“EnterPIN”willappear.Enteryour4digitPINnumber.
. The“V-Chip”screenwillappear.Presstheorbuttonstoselect“MPAARating”, thenpresstheEntErbutton.
. The“MPAARating”screenwillappear.Repeatedlypresstheorbuttonsto selectaparticularMPAAcategory.Pressingtheorbuttonswillcyclethrough theMPAAcategories:
• G:Generalaudience(norestrictions).• pG:Parentalguidancesuggested.• pG-:Parentsstronglycautioned.• r:Restricted.Childrenunder17shouldbeaccompaniedbyanadult.• nC-:Nochildrenunderage17.• x:Adultsonly.• nr: Notrated.
Allowall:PresstounlockallTVratings./Blockall:PresstolockallTVratings.
Whileaparticularcategoryisselected,presstheEntErbuttontoactivateit. The“”symbolwillbedisplayed.Pressthe EntErbuttontoblockor unblockthecategory.
TheV-Chipwillautomaticallyblockanycategorythatis“morerestrictive”. Forexample,ifyoublockthe“PG-13”category,then“R”,“NC-17”and“X”will automaticallybeblockedalso. PresstheExItbuttontoexit.
Setupplug & play language : English time Game mode : off V-Chip Caption menu transparency : medium more
tV
move Enter return
move Enter return
V-Chip lock : on tV parental Guidelines mpaa rating Canadian English Canadian french downloadable u.S. rating Change pIn
V-ChiptV
move Enter return
mpaa ratingtV
GpGpG-rnC-x
nr
Block allow allBlock all
move Enter return
mpaa ratingtV
GpGpG-rnC-x
nr
Block allow allBlock all
V-ChipEnter pIn
tV
* * * *
Enter pIn return
BN68-01167A-Eng-00.indd 57 2007-02-09 9:22:57
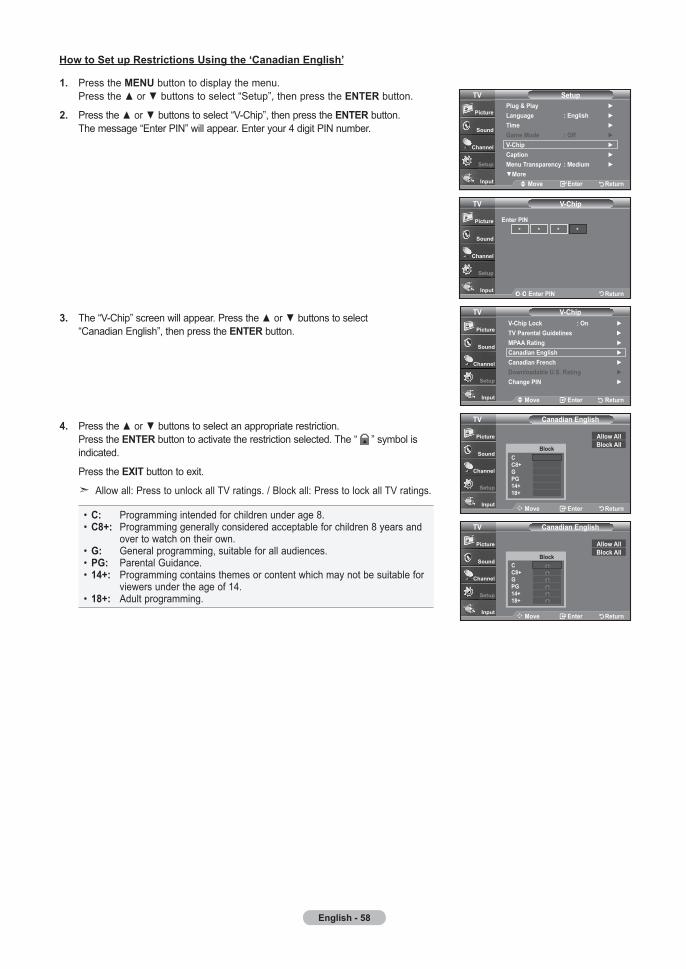
English -
how to Set up restrictions using the ‘Canadian English’
. PressthemEnubuttontodisplaythemenu. Presstheorbuttonstoselect“Setup”,thenpresstheEntErbutton.
. Presstheorbuttonstoselect“V-Chip”,thenpresstheEntErbutton. Themessage“EnterPIN”willappear.Enteryour4digitPINnumber.
. The“V-Chip”screenwillappear.Presstheorbuttonstoselect “CanadianEnglish”,thenpresstheEntErbutton.
. Presstheorbuttonstoselectanappropriaterestriction. PresstheEntErbuttontoactivatetherestrictionselected.The“”symbolis indicated.
PresstheExItbuttontoexit.
Allowall:PresstounlockallTVratings./Blockall:PresstolockallTVratings.
• C: Programmingintendedforchildrenunderage8.• C+: Programminggenerallyconsideredacceptableforchildren8yearsand overtowatchontheirown.• G: Generalprogramming,suitableforallaudiences.• pG: ParentalGuidance.• +: Programmingcontainsthemesorcontentwhichmaynotbesuitablefor viewersundertheageof14.• +: Adultprogramming.
Setupplug & play language : English time Game mode : off V-Chip Caption menu transparency : medium more
tV
move Enter return
move Enter return
V-Chip lock : on tV parental Guidelines mpaa rating Canadian English Canadian french downloadable u.S. rating Change pIn
V-ChiptV
move Enter return
Canadian EnglishtV
CC+GpG++
Block
allow allBlock all
move Enter return
Canadian EnglishtV
CC+GpG++
Block
allow allBlock all
V-Chip
Enter pIn
tV
* * * *
Enter pIn return
BN68-01167A-Eng-00.indd 58 2007-02-09 9:23:00
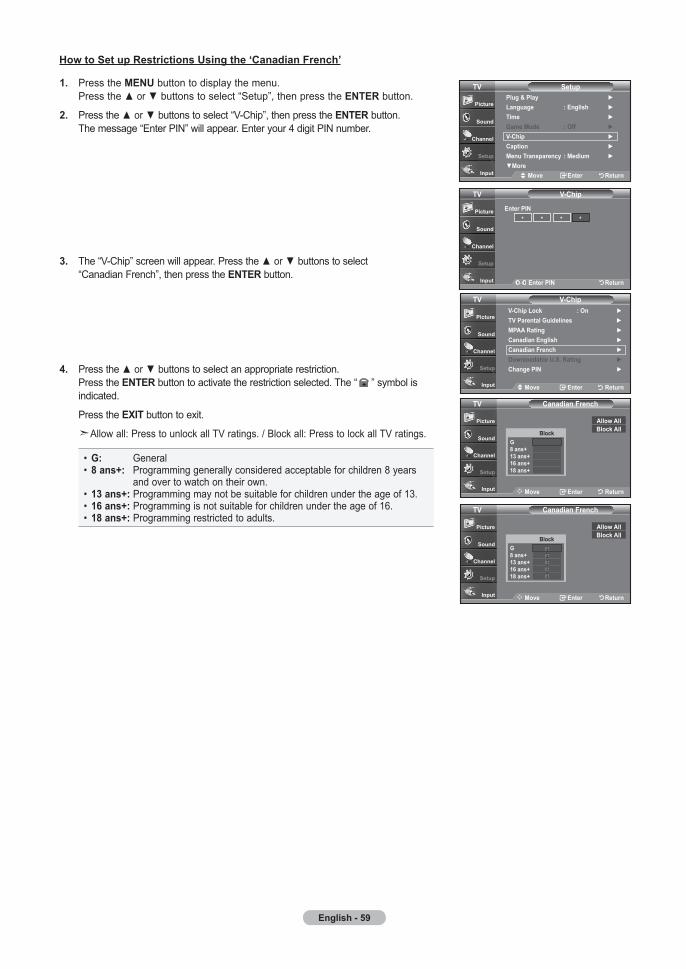
English -
how to Set up restrictions using the ‘Canadian french’
. PressthemEnubuttontodisplaythemenu. Presstheorbuttonstoselect“Setup”,thenpresstheEntErbutton.
. Presstheorbuttonstoselect“V-Chip”,thenpresstheEntErbutton. Themessage“EnterPIN”willappear.Enteryour4digitPINnumber.
. The“V-Chip”screenwillappear.Presstheorbuttonstoselect “CanadianFrench”,thenpresstheEntErbutton.
. Presstheorbuttonstoselectanappropriaterestriction. PresstheEntErbuttontoactivatetherestrictionselected.The“”symbolis indicated.
PresstheExItbuttontoexit.
Allowall:PresstounlockallTVratings./Blockall:PresstolockallTVratings.
• G: General• ans+: Programminggenerallyconsideredacceptableforchildren8years andovertowatchontheirown.• ans+: Programmingmaynotbesuitableforchildrenundertheageof13.• 6 ans+: Programmingisnotsuitableforchildrenundertheageof16.• ans+: Programmingrestrictedtoadults.
Setupplug & play language : English time Game mode : off V-Chip Caption menu transparency : medium more
tV
move Enter return
move Enter return
V-Chip lock : on tV parental Guidelines mpaa rating Canadian English Canadian french downloadable u.S. rating Change pIn
V-ChiptV
move Enter return
Canadian frenchtV
G ans+ ans+6 ans+ ans+
Block
allow allBlock all
move Enter return
Canadian frenchtV
G ans+ ans+6 ans+ ans+
Block
allow allBlock all
V-Chip
Enter pIn
tV
* * * *
Enter pIn return
BN68-01167A-Eng-00.indd 59 2007-02-09 9:23:04
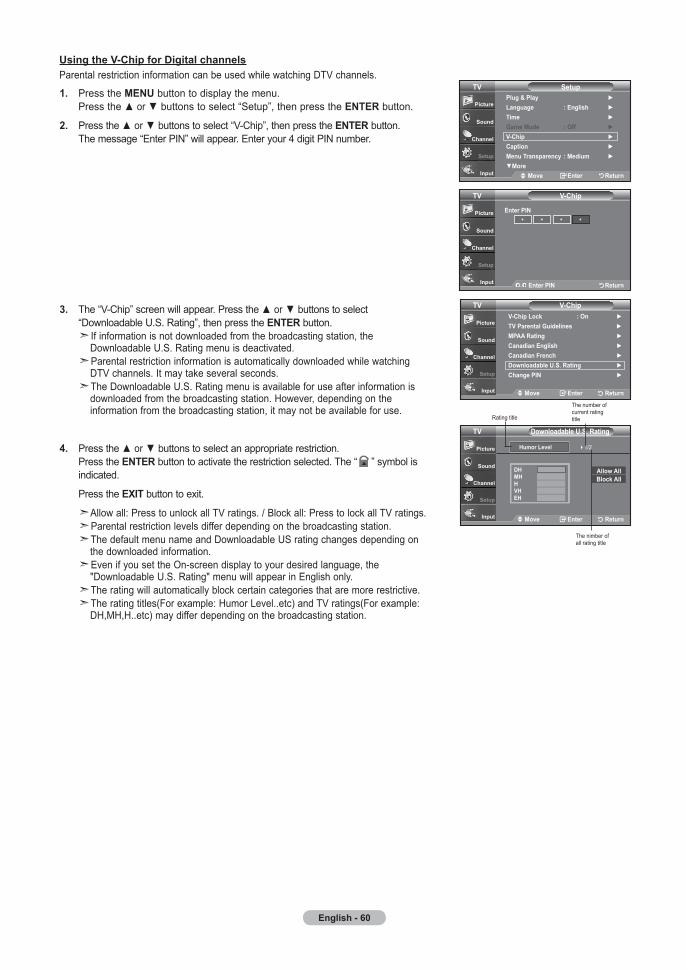
English - 60
. PressthemEnubuttontodisplaythemenu. Presstheorbuttonstoselect“Setup”,thenpresstheEntErbutton.
. Presstheorbuttonstoselect“V-Chip”,thenpresstheEntErbutton. Themessage“EnterPIN”willappear.Enteryour4digitPINnumber.
. The“V-Chip”screenwillappear.Presstheorbuttonstoselect “DownloadableU.S.Rating”,thenpresstheEntErbutton. Ifinformationisnotdownloadedfromthebroadcastingstation,the DownloadableU.S.Ratingmenuisdeactivated. Parentalrestrictioninformationisautomaticallydownloadedwhilewatching DTVchannels.Itmaytakeseveralseconds. TheDownloadableU.S.Ratingmenuisavailableforuseafterinformationis downloadedfromthebroadcastingstation.However,dependingonthe informationfromthebroadcastingstation,itmaynotbeavailableforuse.
. Presstheorbuttonstoselectanappropriaterestriction. PresstheEntErbuttontoactivatetherestrictionselected.The“”symbolis indicated.
PresstheExItbuttontoexit.
Allowall:PresstounlockallTVratings./Blockall:PresstolockallTVratings. Parentalrestrictionlevelsdifferdependingonthebroadcastingstation. ThedefaultmenunameandDownloadableUSratingchangesdependingon thedownloadedinformation. EvenifyousettheOn-screendisplaytoyourdesiredlanguage,the "DownloadableU.S.Rating"menuwillappearinEnglishonly. Theratingwillautomaticallyblockcertaincategoriesthataremorerestrictive. Theratingtitles(Forexample:HumorLevel..etc)andTVratings(Forexample: DH,MH,H..etc)maydifferdependingonthebroadcastingstation.
using the V-Chip for digital channelsParentalrestrictioninformationcanbeusedwhilewatchingDTVchannels.
Setupplug & play language : English time Game mode : off V-Chip Caption menu transparency : medium more
tV
move Enter return
move Enter return
V-Chip lock : on tV parental Guidelines mpaa rating Canadian English Canadian french Downloadable U.S. Rating Change pIn
V-ChiptV
move Enter return
downloadable u.S. ratingtV
dhmhhVhEh
humor level
allow allBlock all
41/2
Ratingtitle
Thenumberofcurrentratingtitle
Thenimberofallratingtitle
V-Chip
Enter pIn
tV
* * * *
Enter pIn return
BN68-01167A-Eng-00.indd 60 2007-02-09 9:23:06
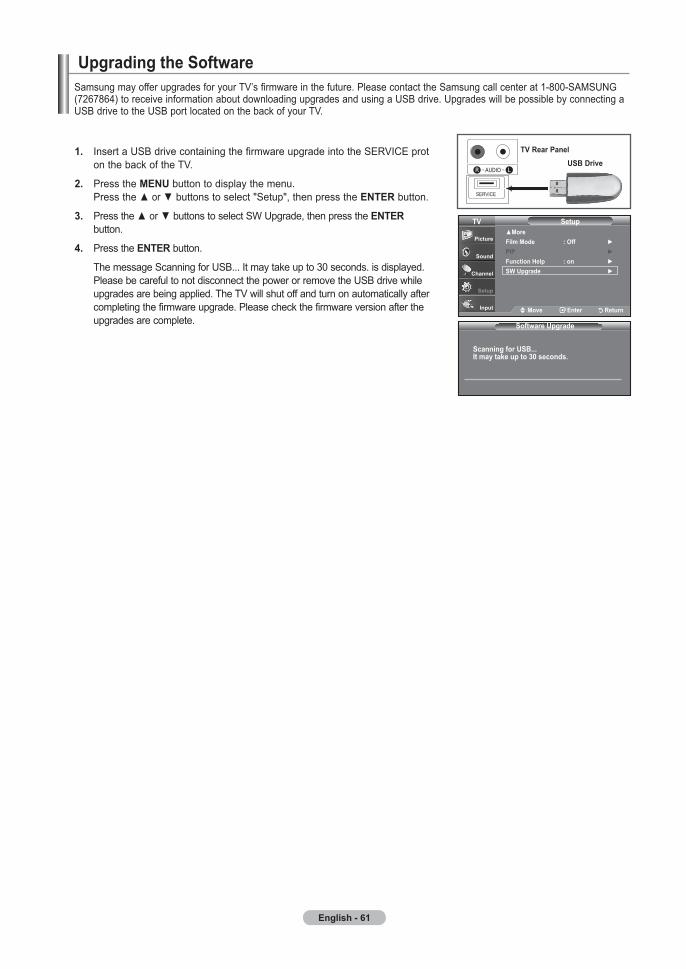
English - 6
. InsertaUSBdrivecontainingthefirmwareupgradeintotheSERVICEprot onthebackoftheTV.
. PressthemEnu buttontodisplaythemenu. Presstheorbuttonstoselect"Setup",thenpresstheEntEr button.
. PresstheorbuttonstoselectSWUpgrade,thenpresstheEntEr button.
. PresstheEntErbutton.
ThemessageScanningforUSB...Itmaytakeupto30seconds.isdisplayed. PleasebecarefultonotdisconnectthepowerorremovetheUSBdrivewhile upgradesarebeingapplied.TheTVwillshutoffandturnonautomaticallyafter completingthefirmwareupgrade.Pleasecheckthefirmwareversionafterthe upgradesarecomplete.
upgrading the SoftwareSamsungmayofferupgradesforyourTV’sfirmwareinthefuture.PleasecontacttheSamsungcallcenterat1-800-SAMSUNG(7267864)toreceiveinformationaboutdownloadingupgradesandusingaUSBdrive.UpgradeswillbepossiblebyconnectingaUSBdrivetotheUSBportlocatedonthebackofyourTV.
Software upgrade
Scanning for uSB...It may take up to 0 seconds.
Setupmorefilm mode : off pIp Function Help : on Sw upgrade
tV
move Enter return
tV rear panel uSB drive
BN68-01167A-Eng-00.indd 61 2007-02-09 9:23:07

English - 6
IftheTVseemstohaveaproblem,firsttrythislistofpossibleproblemsandsolutions.Ifnoneofthesetroubleshootingtipsapply,callyournearestSamsungservicecenter.
problem possible Solution
Poorpicture Tryanotherchannel.Adjusttheantenna.Checkallwireconnections.
Poorsoundquality. Tryanotherchannel.Adjusttheantenna.
Nopictureorsound. Tryanotherchannel.PresstheSOURCEbutton.MakesuretheTVispluggedin.Checktheantennaconnections.
Nosoundorsoundistoolowatmaximumvolume.
First,checkthevolumeofunitsconnectedtoyourTV(digitalbroadcastingreceiver,DVD,cablebroadcastingreceiver,VCR,etc.).Then,adjusttheTVvolumeaccordingly.
Picturerollsvertically. Checkallwireconnections.
TheTVoperateserratically. UnplugtheTVfor30seconds,thentryoperatingitagain.
TheTVwon’tturnon. Makesurethewalloutletisworking.
Remotecontrolmalfunctions Replacetheremotecontrolbatteries.Cleantheupperedgeoftheremotecontrol(transmissionwindow).Checkthebatteryterminals.
“Checksignalcable”message. EnsurethatthesignalcableisfirmlyconnectedtothePCsource.
“NotSupportedMode”message. CheckthemaximumresolutionandthefrequencyoftheVideoAdapter.ComparethesevalueswiththedataintheDisplayModes.
Digitalbroadcastingscreenproblem.
Pleasecheckthedigitalsignalstrengthandinputantenna.
Theimageistoolightortoodark. AdjusttheBrightnessandContrast.AdjusttheFinetuning.
Blackbarsonthescreen. Makesurethebroadcastyou’rereceivingisHighDefinition(HD).HDchannelssometimesbroadcastStandardDefinition(SD)programming,whichcancauseblackbars.Setyourcable/satelliteboxtostretchorwidescreenmodetoeliminatethebars.
PicturehasaRed/GreenorPinktint.
MakesuretheComponentcablesareconnectedtothecorrectjacks.
ClosedCaptioningnotworking. IfyouareusingaCable/Satellitebox,youmustsetClosedCaptioningonthebox,notyourTV.
Snowypicture Yourcableboxmayneedafirmwareupgrade.PleasecontactyourCablecompany.
Ghostingonpicture Thisissometimescausedbycompatibilityissueswithyourcablebox.TryconnectingComponentcablesinstead.
appendixtroubleshooting
BN68-01167A-Eng-00.indd 62 2007-02-09 9:23:07
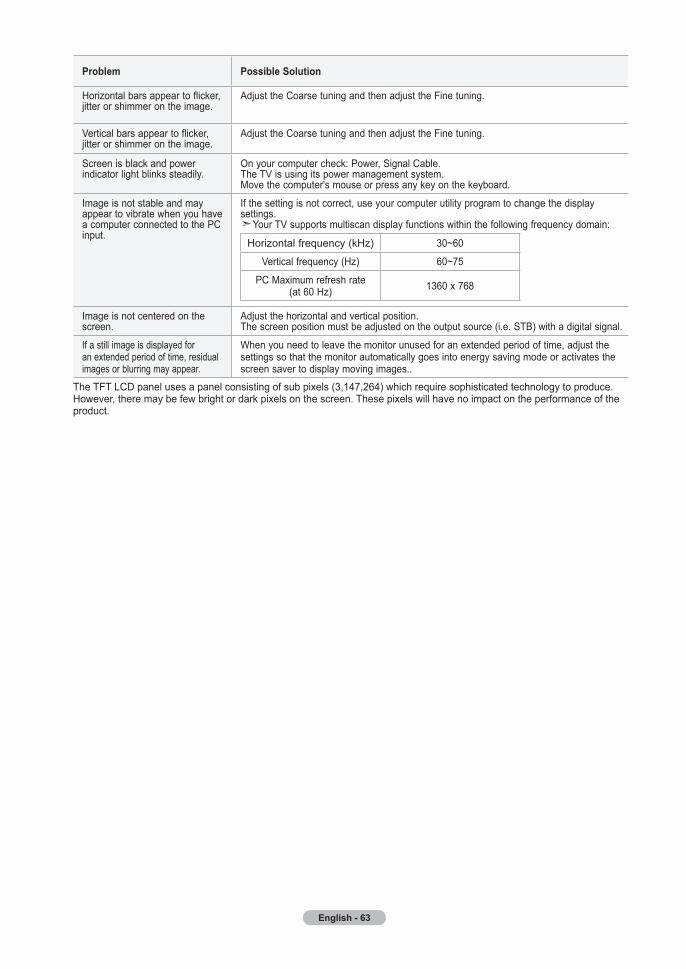
English - 6
problem possible Solution
Horizontalbarsappeartoflicker,jitterorshimmerontheimage.
AdjusttheCoarsetuningandthenadjusttheFinetuning.
Verticalbarsappeartoflicker,jitterorshimmerontheimage.
AdjusttheCoarsetuningandthenadjusttheFinetuning.
Screenisblackandpowerindicatorlightblinkssteadily.
Onyourcomputercheck:Power,SignalCable.TheTVisusingitspowermanagementsystem.Movethecomputer'smouseorpressanykeyonthekeyboard.
ImageisnotstableandmayappeartovibratewhenyouhaveacomputerconnectedtothePCinput.
Ifthesettingisnotcorrect,useyourcomputerutilityprogramtochangethedisplaysettings.
YourTVsupportsmultiscandisplayfunctionswithinthefollowingfrequencydomain:
Horizontalfrequency(kHz) 30~60
Verticalfrequency(Hz) 60~75
PCMaximumrefreshrate(at60Hz) 1360x768
Imageisnotcenteredonthescreen.
Adjustthehorizontalandverticalposition.Thescreenpositionmustbeadjustedontheoutputsource(i.e.STB)withadigitalsignal.
Ifastillimageisdisplayedforanextendedperiodoftime,residualimagesorblurringmayappear.
Whenyouneedtoleavethemonitorunusedforanextendedperiodoftime,adjustthesettingssothatthemonitorautomaticallygoesintoenergysavingmodeoractivatesthescreensavertodisplaymovingimages..
TheTFTLCDpanelusesapanelconsistingofsubpixels(3,147,264)whichrequiresophisticatedtechnologytoproduce.However,theremaybefewbrightordarkpixelsonthescreen.Thesepixelswillhavenoimpactontheperformanceoftheproduct.
BN68-01167A-Eng-00.indd 63 2007-02-09 9:23:08
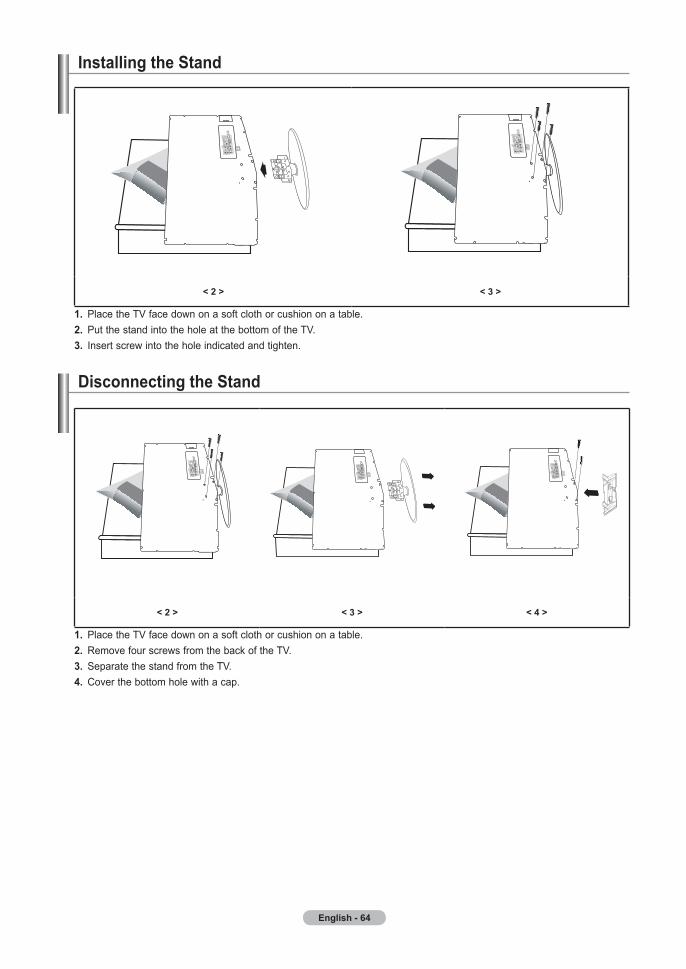
English - 6
Installing the Stand
< > < >
. PlacetheTVfacedownonasoftclothorcushiononatable.. PutthestandintotheholeatthebottomoftheTV.. Insertscrewintotheholeindicatedandtighten.
disconnecting the Stand
< > < > < >
. PlacetheTVfacedownonasoftclothorcushiononatable.. RemovefourscrewsfromthebackoftheTV.. SeparatethestandfromtheTV.. Coverthebottomholewithacap.
BN68-01167A-Eng-00.indd 64 2007-02-09 9:23:11
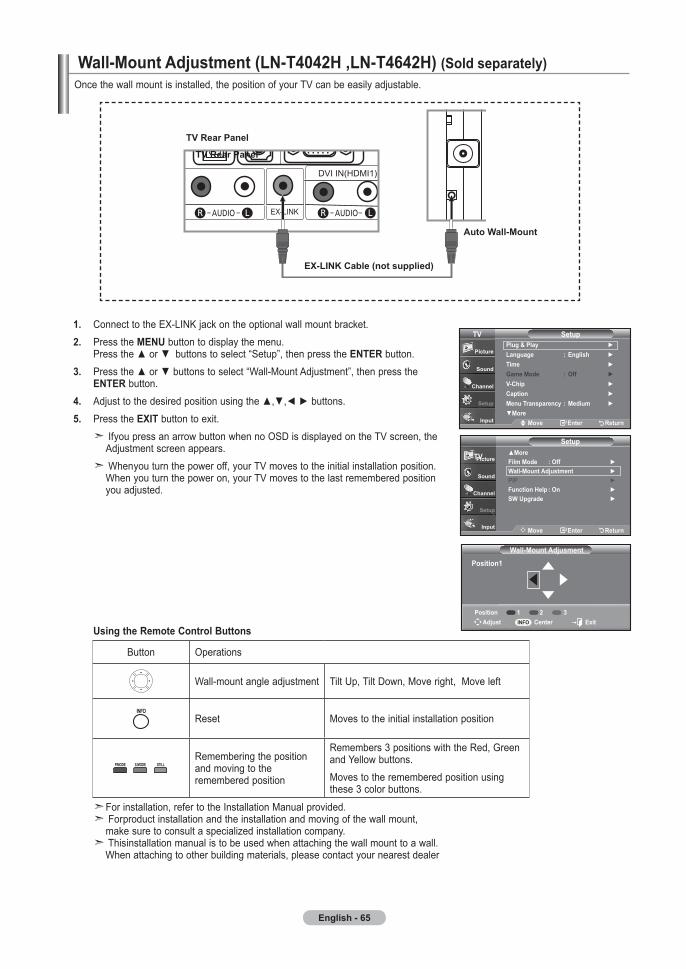
English - 6
wall-mount adjustment (ln-t0h ,ln-t6h) (Sold separately)
wall-mount adjusment
position
adjust Center ExitInfo
position
Morefilm mode : off wall-mount adjustment PIP function help : on Sw upgrade
Setup
tV
move Enter return
Setupplug & play language : English time Game mode : off V-Chip Caption menu transparency : medium more
tV
move Enter return
Oncethewallmountisinstalled,thepositionofyourTVcanbeeasilyadjustable.
tV rear panel
tV rear panel
auto wall-mount
Ex-lInK Cable (not supplied)
. ConnecttotheEX-LINKjackontheoptionalwallmountbracket.. PressthemEnu buttontodisplaythemenu. Presstheor buttonstoselect“Setup”,thenpresstheEntErbutton.. Presstheorbuttonstoselect“Wall-MountAdjustment”,thenpressthe EntEr button.. Adjusttothedesiredpositionusingthe,,buttons.. PresstheExItbuttontoexit. IfyoupressanarrowbuttonwhennoOSDisdisplayedontheTVscreen,the
Adjustmentscreenappears. Whenyouturnthepoweroff,yourTVmovestotheinitialinstallationposition.
Whenyouturnthepoweron,yourTVmovestothelastrememberedpositionyouadjusted.
using the remote Control Buttons
Button Operations
Wall-mountangleadjustment TiltUp,TiltDown,Moveright,Moveleft
Reset Movestotheinitialinstallationposition
Rememberingthepositionandmovingtotherememberedposition
Remembers3positionswiththeRed,GreenandYellowbuttons.Movestotherememberedpositionusingthese3colorbuttons.
Forinstallation,refertotheInstallationManualprovided. Forproductinstallationandtheinstallationandmovingofthewallmount,
makesuretoconsultaspecializedinstallationcompany. Thisinstallationmanualistobeusedwhenattachingthewallmounttoawall.
Whenattachingtootherbuildingmaterials,pleasecontactyournearestdealer
BN68-01167A-Eng-00.indd 65 2007-02-09 9:23:13

English - 66
wall mount Kit Specifications ( VESa )Whenattachingtootherbuildingmaterials,pleasecontactyournearestdealer.
product family inch VESa Spec. (a * B) Standard Screw (C * d) Quantity
lCd-tV
23~26 200*100 M4*L10 4
32~40 200*200 M6*L10 4
46~52 600*400
M8*L15 457 700*400
pdp-tV42~50 600*400
63 NoVESA M8 6
Weprovidedthestandarddimensionsforwallmountkitsasshowninthetableabove.Whenpurchasingourwallmountkit,adetailedinstallationmanualandallpartsnecessaryforassemblyareprvided.Donotusescrewslongerthanthestandarddimension,astheymaycausedamagetotheinsideoftheTVset.Our63”modeldoesnotcomplywithVESASpecifications.Therefore,youshoulduseourdedicatedwallmountkit
forthismodel.
BN68-01167A-Eng-00.indd 66 2007-02-09 9:23:14
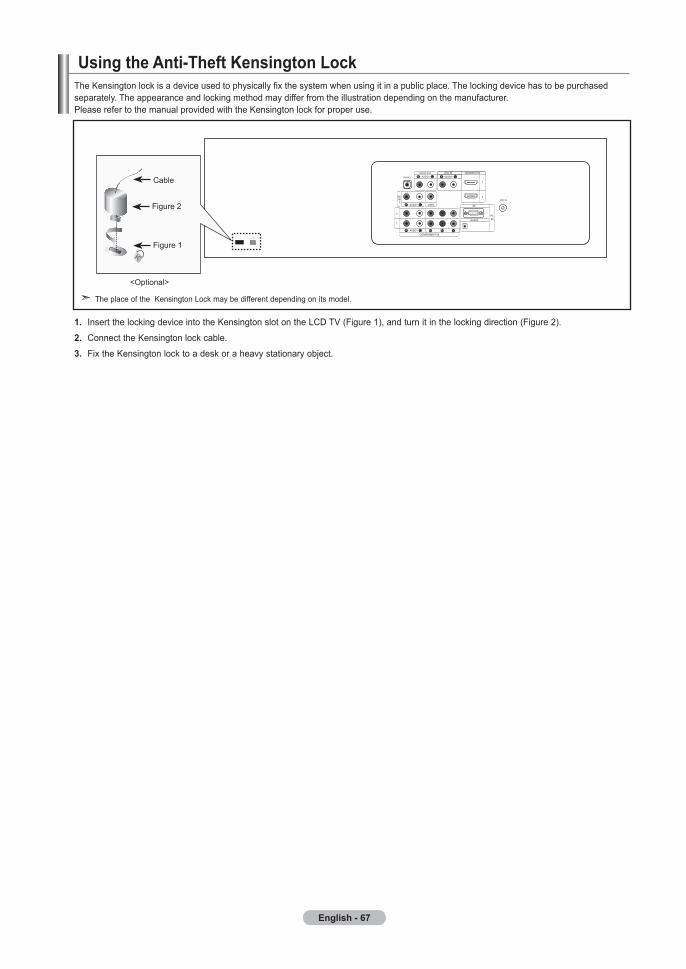
English - 6
. InsertthelockingdeviceintotheKensingtonslotontheLCDTV(Figure1),andturnitinthelockingdirection(Figure2).
. ConnecttheKensingtonlockcable.
. FixtheKensingtonlocktoadeskoraheavystationaryobject.
using the anti-theft Kensington lockTheKensingtonlockisadeviceusedtophysicallyfixthesystemwhenusingitinapublicplace.Thelockingdevicehastobepurchasedseparately.Theappearanceandlockingmethodmaydifferfromtheillustrationdependingonthemanufacturer.PleaserefertothemanualprovidedwiththeKensingtonlockforproperuse.
Figure2
Figure1
Cable
<Optional>
TheplaceoftheKensingtonLockmaybedifferentdependingonitsmodel.
BN68-01167A-Eng-00.indd 67 2007-02-09 9:23:14

English - 6
Specifications
model name ln-th ln-t6h ln-th
Screen Size (diagonal) 23inches 26inches 32inches
power Consumption 100W 130W 170W
pC resolution 1360x768@60Hz 1360x768@60Hz 1360x768@60Hz
SoundOutput
3WX2
5WX2
10WX2
dimensions (wxdxh)BodyWithstand
668X232X445mm
(26.2X9.1X17.5inches)668X80X403mm
(26.2X3.1X15.9inches)
744X232X507mm
(29.2X9.1X19.9inches)744X81X447mm
(29.2X3.1X17.5inches)
874X291X577mm
(34.4X11.4X22.7inches)874X81X531mm
(34.4X3.1X20.9inches)
weight WithStandWithoutstand
7.0kg(15.4lbs)
8.9kg(19.6lbs)
13kg(28.6lbs)
Environmental Considerations OperatingTemperatureOperatingHumidityStorageTemperatureStorageHumidity
50°Fto104°F(10°Cto40°C)10%to80%,non-condensing
-4°Fto113°F(-20°Cto45°C)5%to95%,non-condensing
50°Fto104°F(10°Cto40°C)10%to80%,non-condensing
-4°Fto113°F(-20°Cto45°C)5%to95%,non-condensing
50°Fto104°F(10°Cto40°C)10%to80%,non-condensing
-4°Fto113°F(-20°Cto45°C)5%to95%,non-condensing
model name ln-t0h ln-t6h
Screen Size (diagonal) 40inches 46inches
power Consumption 195W 255W
pC resolution 1360x768@60Hz 1360x768@60Hz
SoundOutput
10WX2
10WX2
dimensions (wxdxh)BodyWithstand
1084X300X690mm
(42.6X11.8X27.1inches)1084X95X639mm
(42.6X3.7X25.1inches)
1220X326X776mm
(48.0X12.8X30.5inches)1220X111X709mm
(48.0X4.3X27.9inches)
weight WithStandWithoutstand
18.2kg(40.1lbs)
(53.7lbs)24.4kg
Environmental Considerations OperatingTemperatureOperatingHumidityStorageTemperatureStorageHumidity
50°Fto104°F(10°Cto40°C)10%to80%,non-condensing
-4°Fto113°F(-20°Cto45°C)5%to95%,non-condensing
50°Fto104°F(10°Cto40°C)10%to80%,non-condensing
-4°Fto113°F(-20°Cto45°C)5%to95%,non-condensing
Stand Swivel (left / right) (ln-th, ln-t0h, ln-t6h)
-20˚~20˚Designandspecificationsaresubjecttochangewithoutpriornotice.ThisdeviceisaClassBdigitalapparatus.Forthepowersupply,refertothelabelattachedtotheproduct.
BN68-01167A-Eng-00.indd 68 2007-02-09 9:23:15

English - 6
Continued...
the Gnu General public license (Gpl) (ln-th, ln-th , ln-t6h)Version , June
Copyright(C)1989,1991FreeSoftwareFoundation,Inc.59TemplePlace,Suite330,Boston,MA02111-1307USA
Everyoneispermittedtocopyanddistributeverbatimcopiesofthislicensedocument,butchangingitisnotallowed.
preamble
Thelicensesformostsoftwarearedesignedtotakeawayyourfreedomtoshareandchangeit.Bycontrast,theGNUGeneralPublicLicenseisintendedtoguaranteeyourfreedomtoshareandchangefreesoftware--tomakesurethesoftwareisfreeforallitsusers.ThisGeneralPublicLicenseappliestomostoftheFreeSoftwareFoundation’ssoftwareandtoanyotherprogramwhoseauthorscommittousingit.(SomeotherFreeSoftwareFoundationsoftwareiscoveredbytheGNULibraryGeneralPublicLicenseinstead.)Youcanapplyittoyourprograms,too.
Whenwespeakoffreesoftware,wearereferringtofreedom,notprice.OurGeneralPublicLicensesaredesignedtomakesurethatyouhavethefreedomtodistributecopiesoffreesoftware(andchargeforthisserviceifyouwish),thatyoureceivesourcecodeorcangetitifyouwantit,thatyoucanchangethesoftwareorusepiecesofitinnewfreeprograms;andthatyouknowyoucandothesethings.
Toprotectyourrights,weneedtomakerestrictionsthatforbidanyonetodenyyoutheserightsortoaskyoutosurrendertherights.Theserestrictionstranslatetocertainresponsibilitiesforyouifyoudistributecopiesofthesoftware,orifyoumodifyit.
Forexample,ifyoudistributecopiesofsuchaprogram,whethergratisorforafee,youmustgivetherecipientsalltherightsthatyouhave.Youmustmakesurethatthey,too,receiveorcangetthesourcecode.Andyoumustshowthemthesetermssotheyknowtheirrights.
Weprotectyourrightswithtwosteps:(1)copyrightthesoftware,and(2)offeryouthislicensewhichgivesyoulegalpermissiontocopy,distributeand/ormodifythesoftware.
Also,foreachauthor’sprotectionandours,wewanttomakecertainthateveryoneunderstandsthatthereisnowarrantyforthisfreesoftware.Ifthesoftwareismodifiedbysomeoneelseandpassedon,wewantitsrecipientstoknowthatwhattheyhaveisnottheoriginal,sothatanyproblemsintroducedbyotherswillnotreflectontheoriginalauthors’reputations.
Finally,anyfreeprogramisthreatenedconstantlybysoftwarepatents.Wewishtoavoidthedangerthatredistributorsofafreeprogramwillindividuallyobtainpatentlicenses,ineffectmakingtheprogramproprietary.Topreventthis,wehavemadeitclearthatanypatentmustbelicensedforeveryone’sfreeuseornotlicensedatall.
Theprecisetermsandconditionsforcopying,distributionandmodificationfollow.
tErmS and CondItIonS for CopyInG, dIStrIButIon and modIfICatIon
0.ThisLicenseappliestoanyprogramorotherworkwhichcontainsanoticeplacedbythecopyrightholdersayingitmaybedistributedunderthetermsofthisGeneralPublicLicense.The“Program”,below,referstoanysuchprogramorwork,anda“workbasedontheProgram”meanseithertheProgramoranyderivativeworkundercopyrightlaw:thatistosay,aworkcontainingtheProgramoraportionofit,eitherverbatimorwithmodificationsand/ortranslatedintoanotherlanguage.(Hereinafter,translationisincludedwithoutlimitationintheterm“modification”.)Eachlicenseeisaddressedas“you”.
Activitiesotherthancopying,distributionandmodificationarenotcoveredbythisLicense;theyareoutsideitsscope.TheactofrunningtheProgramisnotrestricted,andtheoutputfromtheProgramiscoveredonlyifitscontentsconstituteaworkbasedontheProgram(independentofhavingbeenmadebyrunningtheProgram).WhetherthatistruedependsonwhattheProgramdoes.
.YoumaycopyanddistributeverbatimcopiesoftheProgram’ssourcecodeasyoureceiveit,inanymedium,providedthatyouconspicuouslyandappropriatelypublishoneachcopyanappropriatecopyrightnoticeanddisclaimerofwarranty;keepintactallthenoticesthatrefertothisLicenseandtotheabsenceofanywarranty;andgiveanyotherrecipientsoftheProgramacopyofthisLicensealongwiththeProgram.
Youmaychargeafeeforthephysicalactoftransferringacopy,andyoumayatyouroptionofferwarrantyprotectioninexchangeforafee.
.YoumaymodifyyourcopyorcopiesoftheProgramoranyportionofit,thusformingaworkbasedontheProgram,andcopyanddistributesuchmodificationsorworkunderthetermsofSection1above,providedthatyoualsomeetalloftheseconditions:
a)Youmustcausethemodifiedfilestocarryprominentnoticesstatingthatyouchangedthefilesandthedateofanychange.
b)Youmustcauseanyworkthatyoudistributeorpublish,thatinwholeorinpartcontainsorisderivedfromtheProgramoranypartthereof,tobelicensedasawholeatnochargetoallthirdpartiesunderthetermsofthisLicense.
c)Ifthemodifiedprogramnormallyreadscommandsinteractivelywhenrun,youmustcauseit,whenstartedrunningforsuchinteractiveuseinthemostordinaryway,toprintordisplayanannouncementincludinganappropriatecopyrightnoticeandanoticethatthereisnowarranty(orelse,sayingthatyouprovideawarranty)andthatusersmayredistributetheprogramundertheseconditions,andtellingtheuserhowtoviewacopyofthisLicense.(Exception:iftheProgramitselfisinteractivebutdoesnotnormallyprintsuchanannouncement,yourworkbasedontheProgramisnotrequiredtoprintanannouncement.)
ThisproductusespartsofthesoftwarefromtheIndependentJPEGGroup. ThisproductusespartsofthesoftwareownedbytheFreetypeProject(www.freetype.org).ThisproductusessomesoftwareprogramswhicharedistributedundertheGPL/LGPLlicense.Accordingly,thefollowingGPLand LGPLsoftwaresourcecodesthathavebeenusedinthisproductcanbeprovidedafteraskingtovdswmanager@samsung.com.
GPLsoftware:LinuxKernel,Busybox,BinutilsLGPLsoftware:Glibc
BN68-01167A-Eng-00.indd 69 2007-02-09 9:23:15

English - 0
Theserequirementsapplytothemodifiedworkasawhole.IfidentifiablesectionsofthatworkarenotderivedfromtheProgram,andcanbereasonablyconsideredindependentandseparateworksinthemselves,thenthisLicense,anditsterms,donotapplytothosesectionswhenyoudistributethemasseparateworks.ButwhenyoudistributethesamesectionsaspartofawholewhichisaworkbasedontheProgram,thedistributionofthewholemustbeonthetermsofthisLicense,whosepermissionsforotherlicenseesextendtotheentirewhole,andthustoeachandeverypartregardlessofwhowroteit.
Thus,itisnottheintentofthissectiontoclaimrightsorcontestyourrightstoworkwrittenentirelybyyou;rather,theintentistoexercisetherighttocontrolthedistributionofderivativeorcollectiveworksbasedontheProgram.
Inaddition,mereaggregationofanotherworknotbasedontheProgramwiththeProgram(orwithaworkbasedontheProgram)onavolumeofastorageordistributionmediumdoesnotbringtheotherworkunderthescopeofthisLicense.
.YoumaycopyanddistributetheProgram(oraworkbasedonit,underSection2)inobjectcodeorexecutableformunderthetermsofSections1and2aboveprovidedthatyoualsodooneofthefollowing:
a)Accompanyitwiththecompletecorrespondingmachine-readablesourcecode,whichmustbedistributedunderthetermsofSections1and2aboveonamediumcustomarilyusedforsoftwareinterchange;or,
b)Accompanyitwithawrittenoffer,validforatleastthreeyears,togiveanythirdparty,forachargenomorethanyourcostofphysicallyperformingsourcedistribution,acompletemachine-readablecopyofthecorrespondingsourcecode,tobedistributedunderthetermsofSections1and2aboveonamediumcustomarilyusedforsoftwareinterchange;or,
c)Accompanyitwiththeinformationyoureceivedastotheoffertodistributecorrespondingsourcecode.(Thisalternativeisallowedonlyfornoncommercialdistributionandonlyifyoureceivedtheprograminobjectcodeorexecutableformwithsuchanoffer,inaccordwithSubsectionbabove.)
Thesourcecodeforaworkmeansthepreferredformoftheworkformakingmodificationstoit.Foranexecutablework,completesourcecodemeansallthesourcecodeforallmodulesitcontains,plusanyassociatedinterfacedefinitionfiles,plusthescriptsusedtocontrolcompilationandinstallationoftheexecutable.However,asaspecialexception,thesourcecodedistributedneednotincludeanythingthatisnormallydistributed(ineithersourceorbinaryform)withthemajorcomponents(compiler,kernel,andsoon)oftheoperatingsystemonwhichtheexecutableruns,unlessthatcomponentitselfaccompaniestheexecutable.
Ifdistributionofexecutableorobjectcodeismadebyofferingaccesstocopyfromadesignatedplace,thenofferingequivalentaccesstocopythesourcecodefromthesameplacecountsasdistributionofthesourcecode,eventhoughthirdpartiesarenotcompelledtocopythesourcealongwiththeobjectcode.
.Youmaynotcopy,modify,sublicense,ordistributetheProgramexceptasexpresslyprovidedunderthisLicense.Anyattemptotherwisetocopy,modify,sublicenseordistributetheProgramisvoid,andwillautomaticallyterminateyourrightsunderthisLicense.However,partieswhohavereceivedcopies,orrights,fromyouunderthisLicensewillnothavetheirlicensesterminatedsolongassuchpartiesremaininfullcompliance.
.YouarenotrequiredtoacceptthisLicense,sinceyouhavenotsignedit.However,nothingelsegrantsyoupermissiontomodifyordistributetheProgramoritsderivativeworks.TheseactionsareprohibitedbylawifyoudonotacceptthisLicense.Therefore,bymodifyingordistributingtheProgram(oranyworkbasedontheProgram),youindicateyouracceptanceofthisLicensetodoso,andallitstermsandconditionsforcopying,distributingormodifyingtheProgramorworksbasedonit.
6.EachtimeyouredistributetheProgram(oranyworkbasedontheProgram),therecipientautomaticallyreceivesalicensefromtheoriginallicensortocopy,distributeormodifytheProgramsubjecttothesetermsandconditions.Youmaynotimposeanyfurtherrestrictionsontherecipients’exerciseoftherightsgrantedherein.YouarenotresponsibleforenforcingcompliancebythirdpartiestothisLicense.
.If,asaconsequenceofacourtjudgmentorallegationofpatentinfringementorforanyotherreason(notlimitedtopatentissues),conditionsareimposedonyou(whetherbycourtorder,agreementorotherwise)thatcontradicttheconditionsofthisLicense,theydonotexcuseyoufromtheconditionsofthisLicense.IfyoucannotdistributesoastosatisfysimultaneouslyyourobligationsunderthisLicenseandanyotherpertinentobligations,thenasaconsequenceyoumaynotdistributetheProgramatall.Forexample,ifapatentlicensewouldnotpermitroyalty-freeredistributionoftheProgrambyallthosewhoreceivecopiesdirectlyorindirectlythroughyou,thentheonlywayyoucouldsatisfybothitandthisLicensewouldbetorefrainentirelyfromdistributionoftheProgram.
Ifanyportionofthissectionisheldinvalidorunenforceableunderanyparticularcircumstance,thebalanceofthesectionisintendedtoapplyandthesectionasawholeisintendedtoapplyinothercircumstances.
Itisnotthepurposeofthissectiontoinduceyoutoinfringeanypatentsorotherpropertyrightclaimsortocontestvalidityofanysuchclaims;thissectionhasthesolepurposeofprotectingtheintegrityofthefreesoftwaredistributionsystem,whichisimplementedbypubliclicensepractices.Manypeoplehavemadegenerouscontributionstothewiderangeofsoftwaredistributedthroughthatsysteminrelianceonconsistentapplicationofthatsystem;itisuptotheauthor/donortodecideifheorsheiswillingtodistributesoftwarethroughanyothersystemandalicenseecannotimposethatchoice.
ThissectionisintendedtomakethoroughlyclearwhatisbelievedtobeaconsequenceoftherestofthisLicense.
.Ifthedistributionand/oruseoftheProgramisrestrictedincertaincountrieseitherbypatentsorbycopyrightedinterfaces,theoriginalcopyrightholderwhoplacestheProgramunderthisLicensemayaddanexplicitgeographicaldistributionlimitationexcludingthosecountries,sothatdistributionispermittedonlyinoramongcountriesnotthusexcluded.Insuchcase,thisLicenseincorporatesthelimitationasifwritteninthebodyofthisLicense.
.TheFreeSoftwareFoundationmaypublishrevisedand/ornewversionsoftheGeneralPublicLicensefromtimetotime.Suchnewversionswillbesimilarinspirittothepresentversion,butmaydifferindetailtoaddressnewproblemsorconcerns.
Eachversionisgivenadistinguishingversionnumber.IftheProgramspecifiesaversionnumberofthisLicensewhichappliestoitand“anylaterversion”,youhavetheoptionoffollowingthetermsandconditionseitherofthatversionorofanylaterversionpublishedbytheFreeSoftwareFoundation.IftheProgramdoesnotspecifyaversionnumberofthisLicense,youmaychooseanyversioneverpublishedbytheFreeSoftwareFoundation.
Continued...
BN68-01167A-Eng-00.indd 70 2007-02-09 9:23:15
English -
0.IfyouwishtoincorporatepartsoftheProgramintootherfreeprogramswhosedistributionconditionsaredifferent,writetotheauthortoaskforpermission.ForsoftwarewhichiscopyrightedbytheFreeSoftwareFoundation,writetotheFreeSoftwareFoundation;wesometimesmakeexceptionsforthis.Ourdecisionwillbeguidedbythetwogoalsofpreservingthefreestatusofallderivativesofourfreesoftwareandofpromotingthesharingandreuseofsoftwaregenerally.
no warranty
.BECAUSETHEPROGRAMISLICENSEDFREEOFCHARGE,THEREISNOWARRANTYFORTHEPROGRAM,TOTHEEXTENTPERMITTEDBYAPPLICABLELAW.EXCEPTWHENOTHERWISESTATEDINWRITINGTHECOPYRIGHTHOLDERSAND/OROTHERPARTIESPROVIDETHEPROGRAM“ASIS”WITHOUTWARRANTYOFANYKIND,EITHEREXPRESSEDORIMPLIED,INCLUDING,BUTNOTLIMITEDTO,THEIMPLIEDWARRANTIESOFMERCHANTABILITYANDFITNESSFORAPARTICULARPURPOSE.THEENTIRERISKASTOTHEQUALITYANDPERFORMANCEOFTHEPROGRAMISWITHYOU.SHOULDTHEPROGRAMPROVEDEFECTIVE,YOUASSUMETHECOSTOFALLNECESSARYSERVICING,REPAIRORCORRECTION.
.INNOEVENTUNLESSREQUIREDBYAPPLICABLELAWORAGREEDTOINWRITINGWILLANYCOPYRIGHTHOLDER,ORANYOTHERPARTYWHOMAYMODIFYAND/ORREDISTRIBUTETHEPROGRAMASPERMITTEDABOVE,BELIABLETOYOUFORDAMAGES,INCLUDINGANYGENERAL,SPECIAL,INCIDENTALORCONSEQUENTIALDAMAGESARISINGOUTOFTHEUSEORINABILITYTOUSETHEPROGRAM(INCLUDINGBUTNOTLIMITEDTOLOSSOFDATAORDATABEINGRENDEREDINACCURATEORLOSSESSUSTAINEDBYYOUORTHIRDPARTIESORAFAILUREOFTHEPROGRAMTOOPERATEWITHANYOTHERPROGRAMS),EVENIFSUCHHOLDEROROTHERPARTYHASBEENADVISEDOFTHEPOSSIBILITYOFSUCHDAMAGES.
ENDOFTERMSANDCONDITIONS
how to apply these terms to your new programs
Ifyoudevelopanewprogram,andyouwantittobeofthegreatestpossibleusetothepublic,thebestwaytoachievethisistomakeitfreesoftwarewhicheveryonecanredistributeandchangeundertheseterms.
Todoso,attachthefollowingnoticestotheprogram.Itissafesttoattachthemtothestartofeachsourcefiletomosteffectivelyconveytheexclusionofwarranty;andeachfileshouldhaveatleastthe“copyright”lineandapointertowherethefullnoticeisfound.
Onelinetogivetheprogram’snameandabriefideaofwhatitdoes.Copyright(C)<year><nameofauthor>
Thisprogramisfreesoftware;youcanredistributeitand/ormodifyitunderthetermsoftheGNUGeneralPublicLicenseaspublishedbytheFreeSoftwareFoundation;eitherversion2oftheLicense,or(atyouroption)anylaterversion.
Thisprogramisdistributedinthehopethatitwillbeuseful,butWITHOUTANYWARRANTY;withouteventheimpliedwarrantyofMERCHANTABILITYorFITNESSFORAPARTICULARPURPOSE.SeetheGNUGeneralPublicLicenseformoredetails.
YoushouldhavereceivedacopyoftheGNUGeneralPublicLicensealongwiththisprogram;ifnot,writetotheFreeSoftwareFoundation,Inc.,59TemplePlace,Suite330,Boston,MA02111-1307USA
Alsoaddinformationonhowtocontactyoubyelectronicandpapermail.
Iftheprogramisinteractive,makeitoutputashortnoticelikethiswhenitstartsinaninteractivemode:
Gnomovisionversion69,Copyright(C)yearnameofauthorGnomovisioncomeswithABSOLUTELYNOWARRANTY;fordetailstype`showw’.Thisisfreesoftware,andyouarewelcometoredistributeitundercertainconditions;type`showc’fordetails.
Thehypotheticalcommands`showw’and`showc’shouldshowtheappropriatepartsoftheGeneralPublicLicense.Ofcourse,thecommandsyouusemaybecalledsomethingotherthan`showw’and`showc’;theycouldevenbemouse-clicksormenuitems--whateversuitsyourprogram.
Youshouldalsogetyouremployer(ifyouworkasaprogrammer)oryourschool,ifany,tosigna“copyrightdisclaimer”fortheprogram,ifnecessary.Hereisasample;alterthenames:
Yoyodyne,Inc.,herebydisclaimsallcopyrightinterestintheprogram`Gnomovision’(whichmakespassesatcompilers)writtenbyJamesHacker.
signatureofTyCoon,1April1989TyCoon,PresidentofVice
ThisGeneralPublicLicensedoesnotpermitincorporatingyourprogramintoproprietaryprograms.Ifyourprogramisasubroutinelibrary,youmayconsideritmoreusefultopermitlinkingproprietaryapplicationswiththelibrary.Ifthisiswhatyouwanttodo,usetheGNULibraryGeneralPublicLicenseinsteadofthisLicense.
Continued...
BN68-01167A-Eng-00.indd 71 2007-02-09 9:23:16

English -
Gnu lesser General public license (lGpl)Version2.1,February1999
Copyright(C)1991,1999FreeSoftwareFoundation,Inc.59TemplePlace,Suite330,Boston,MA02111-1307USAEveryoneispermittedtocopyanddistributeverbatimcopiesofthislicensedocument,butchangingitisnotallowed.
[ThisisthefirstreleasedversionoftheLesserGPL.ItalsocountsasthesuccessoroftheGNULibraryPublicLicense,version2,hencetheversionnumber2.1.]
preamble
Thelicensesformostsoftwarearedesignedtotakeawayyourfreedomtoshareandchangeit.Bycontrast,theGNUGeneralPublicLicensesareintendedtoguaranteeyourfreedomtoshareandchangefreesoftware--tomakesurethesoftwareisfreeforallitsusers.
Thislicense,theLesserGeneralPublicLicense,appliestosomespeciallydesignatedsoftwarepackages--typicallylibraries--oftheFreeSoftwareFoundationandotherauthorswhodecidetouseit.Youcanuseittoo,butwesuggestyoufirstthinkcarefullyaboutwhetherthislicenseortheordinaryGeneralPublicLicenseisthebetterstrategytouseinanyparticularcase,basedontheexplanationsbelow.
Whenwespeakoffreesoftware,wearereferringtofreedomofuse,notprice.OurGeneralPublicLicensesaredesignedtomakesurethatyouhavethefreedomtodistributecopiesoffreesoftware(andchargeforthisserviceifyouwish);thatyoureceivesourcecodeorcangetitifyouwantit;thatyoucanchangethesoftwareandusepiecesofitinnewfreeprograms;andthatyouareinformedthatyoucandothesethings.
Toprotectyourrights,weneedtomakerestrictionsthatforbiddistributorstodenyyoutheserightsortoaskyoutosurrendertheserights.Theserestrictionstranslatetocertainresponsibilitiesforyouifyoudistributecopiesofthelibraryorifyoumodifyit.
Forexample,ifyoudistributecopiesofthelibrary,whethergratisorforafee,youmustgivetherecipientsalltherightsthatwegaveyou.Youmustmakesurethatthey,too,receiveorcangetthesourcecode.Ifyoulinkothercodewiththelibrary,youmustprovidecompleteobjectfilestotherecipients,sothattheycanrelinkthemwiththelibraryaftermakingchangestothelibraryandrecompilingit.Andyoumustshowthemthesetermssotheyknowtheirrights.
Weprotectyourrightswithatwo-stepmethod:(1)wecopyrightthelibrary,and(2)weofferyouthislicense,whichgivesyoulegalpermissiontocopy,distributeand/ormodifythelibrary.
Toprotecteachdistributor,wewanttomakeitveryclearthatthereisnowarrantyforthefreelibrary.Also,ifthelibraryismodifiedbysomeoneelseandpassedon,therecipientsshouldknowthatwhattheyhaveisnottheoriginalversion,sothattheoriginalauthor’sreputationwillnotbeaffectedbyproblemsthatmightbeintroducedbyothers.
Finally,softwarepatentsposeaconstantthreattotheexistenceofanyfreeprogram.Wewishtomakesurethatacompanycannoteffectivelyrestricttheusersofafreeprogrambyobtainingarestrictivelicensefromapatentholder.Therefore,weinsistthatanypatentlicenseobtainedforaversionofthelibrarymustbeconsistentwiththefullfreedomofusespecifiedinthislicense.
MostGNUsoftware,includingsomelibraries,iscoveredbytheordinaryGNUGeneralPublicLicense.Thislicense,theGNULesserGeneralPublicLicense,appliestocertaindesignatedlibraries,andisquitedifferentfromtheordinaryGeneralPublicLicense.Weusethislicenseforcertainlibrariesinordertopermitlinkingthoselibrariesintonon-freeprograms.
Whenaprogramislinkedwithalibrary,whetherstaticallyorusingasharedlibrary,thecombinationofthetwoislegallyspeakingacombinedwork,aderivativeoftheoriginallibrary.TheordinaryGeneralPublicLicensethereforepermitssuchlinkingonlyiftheentirecombinationfitsitscriteriaoffreedom.TheLesserGeneralPublicLicensepermitsmorelaxcriteriaforlinkingothercodewiththelibrary.
Wecallthislicensethe“Lesser”GeneralPublicLicensebecauseitdoesLesstoprotecttheuser’sfreedomthantheordinaryGeneralPublicLicense.ItalsoprovidesotherfreesoftwaredevelopersLessofanadvantageovercompetingnon-freeprograms.ThesedisadvantagesarethereasonweusetheordinaryGeneralPublicLicenseformanylibraries.However,theLesserlicenseprovidesadvantagesincertainspecialcircumstances.
Forexample,onrareoccasions,theremaybeaspecialneedtoencouragethewidestpossibleuseofacertainlibrary,sothatitbecomesade-factostandard.Toachievethis,non-freeprogramsmustbeallowedtousethelibrary.Amorefrequentcaseisthatafreelibrarydoesthesamejobaswidelyusednon-freelibraries.Inthiscase,thereislittletogainbylimitingthefreelibrarytofreesoftwareonly,soweusetheLesserGeneralPublicLicense.
Inothercases,permissiontouseaparticularlibraryinnon-freeprogramsenablesagreaternumberofpeopletousealargebodyoffreesoftware.Forexample,permissiontousetheGNUCLibraryinnon-freeprogramsenablesmanymorepeopletousethewholeGNUoperatingsystem,aswellasitsvariant,theGNU/Linuxoperatingsystem.
AlthoughtheLesserGeneralPublicLicenseisLessprotectiveoftheusers’freedom,itdoesensurethattheuserofaprogramthatislinkedwiththeLibraryhasthefreedomandthewherewithaltorunthatprogramusingamodifiedversionoftheLibrary.
Theprecisetermsandconditionsforcopying,distributionandmodificationfollow.Paycloseattentiontothedifferencebetweena“workbasedonthelibrary”anda“workthatusesthelibrary”.Theformercontainscodederivedfromthelibrary,whereasthelattermustbecombinedwiththelibraryinordertorun.
tErmS and CondItIonS for CopyInG, dIStrIButIon and modIfICatIon
0.ThisLicenseAgreementappliestoanysoftwarelibraryorotherprogramwhichcontainsanoticeplacedbythecopyrightholderorotherauthorizedpartysayingitmaybedistributedunderthetermsofthisLesserGeneralPublicLicense(alsocalled“thisLicense”).Eachlicenseeisaddressedas“you”.
A“library”meansacollectionofsoftwarefunctionsand/ordatapreparedsoastobeconvenientlylinkedwithapplicationprograms(whichusesomeofthosefunctionsanddata)toformexecutables.
The“Library”,below,referstoanysuchsoftwarelibraryorworkwhichhasbeendistributedundertheseterms.A“workbasedontheLibrary”meanseithertheLibraryoranyderivativeworkundercopyrightlaw:thatistosay,aworkcontainingtheLibraryoraportionofit,eitherverbatimorwithmodificationsand/ortranslatedstraightforwardlyintoanotherlanguage.(Hereinafter,translationisincludedwithoutlimitationintheterm“modification”.)
Continued...
BN68-01167A-Eng-00.indd 72 2007-02-09 9:23:16

English -
“Sourcecode”foraworkmeansthepreferredformoftheworkformakingmodificationstoit.Foralibrary,completesourcecodemeansallthesourcecodeforallmodulesitcontains,plusanyassociatedinterfacedefinitionfiles,plusthescriptsusedtocontrolcompilationandinstallationofthelibrary.
Activitiesotherthancopying,distributionandmodificationarenotcoveredbythisLicense;theyareoutsideitsscope.TheactofrunningaprogramusingtheLibraryisnotrestricted,andoutputfromsuchaprogramiscoveredonlyifitscontentsconstituteaworkbasedontheLibrary(independentoftheuseoftheLibraryinatoolforwritingit).WhetherthatistruedependsonwhattheLibrarydoesandwhattheprogramthatusestheLibrarydoes.
.YoumaycopyanddistributeverbatimcopiesoftheLibrary’scompletesourcecodeasyoureceiveit,inanymedium,providedthatyouconspicuouslyandappropriatelypublishoneachcopyanappropriatecopyrightnoticeanddisclaimerofwarranty;keepintactallthenoticesthatrefertothisLicenseandtotheabsenceofanywarranty;anddistributeacopyofthisLicensealongwiththeLibrary.
Youmaychargeafeeforthephysicalactoftransferringacopy,andyoumayatyouroptionofferwarrantyprotectioninexchangeforafee.
.YoumaymodifyyourcopyorcopiesoftheLibraryoranyportionofit,thusformingaworkbasedontheLibrary,andcopyanddistributesuchmodificationsorworkunderthetermsofSection1above,providedthatyoualsomeetalloftheseconditions:
a)Themodifiedworkmustitselfbeasoftwarelibrary.
b)Youmustcausethefilesmodifiedtocarryprominentnoticesstatingthatyouchangedthefilesandthedateofanychange.
c)YoumustcausethewholeoftheworktobelicensedatnochargetoallthirdpartiesunderthetermsofthisLicense.
d)IfafacilityinthemodifiedLibraryreferstoafunctionoratableofdatatobesuppliedbyanapplicationprogramthatusesthefacility,otherthanasanargumentpassedwhenthefacilityisinvoked,thenyoumustmakeagoodfaithefforttoensurethat,intheeventanapplicationdoesnotsupplysuchfunctionortable,thefacilitystilloperates,andperformswhateverpartofitspurposeremainsmeaningful.
(Forexample,afunctioninalibrarytocomputesquarerootshasapurposethatisentirelywell-definedindependentoftheapplication.Therefore,Subsection2drequiresthatanyapplication-suppliedfunctionortableusedbythisfunctionmustbeoptional:iftheapplicationdoesnotsupplyit,thesquarerootfunctionmuststillcomputesquareroots.)
Theserequirementsapplytothemodifiedworkasawhole.IfidentifiablesectionsofthatworkarenotderivedfromtheLibrary,andcanbereasonablyconsideredindependentandseparateworksinthemselves,thenthisLicense,anditsterms,donotapplytothosesectionswhenyoudistributethemasseparateworks.ButwhenyoudistributethesamesectionsaspartofawholewhichisaworkbasedontheLibrary,thedistributionofthewholemustbeonthetermsofthisLicense,whosepermissionsforotherlicenseesextendtotheentirewhole,andthustoeachandeverypartregardlessofwhowroteit.
Thus,itisnottheintentofthissectiontoclaimrightsorcontestyourrightstoworkwrittenentirelybyyou;rather,theintentistoexercisetherighttocontrolthedistributionofderivativeorcollectiveworksbasedontheLibrary.
Inaddition,mereaggregationofanotherworknotbasedontheLibrarywiththeLibrary(orwithaworkbasedontheLibrary)onavolumeofastorageordistributionmediumdoesnotbringtheotherworkunderthescopeofthisLicense.
.YoumayopttoapplythetermsoftheordinaryGNUGeneralPublicLicenseinsteadofthisLicensetoagivencopyoftheLibrary.Todothis,youmustalterallthenoticesthatrefertothisLicense,sothattheyrefertotheordinaryGNUGeneralPublicLicense,version2,insteadoftothisLicense.(Ifanewerversionthanversion2oftheordinaryGNUGeneralPublicLicensehasappeared,thenyoucanspecifythatversioninsteadifyouwish.)Donotmakeanyotherchangeinthesenotices.
Oncethischangeismadeinagivencopy,itisirreversibleforthatcopy,sotheordinaryGNUGeneralPublicLicenseappliestoallsubsequentcopiesandderivativeworksmadefromthatcopy.
ThisoptionisusefulwhenyouwishtocopypartofthecodeoftheLibraryintoaprogramthatisnotalibrary.
.YoumaycopyanddistributetheLibrary(oraportionorderivativeofit,underSection2)inobjectcodeorexecutableformunderthetermsofSections1and2aboveprovidedthatyouaccompanyitwiththecompletecorrespondingmachine-readablesourcecode,whichmustbedistributedunderthetermsofSections1and2aboveonamediumcustomarilyusedforsoftwareinterchange.
Ifdistributionofobjectcodeismadebyofferingaccesstocopyfromadesignatedplace,thenofferingequivalentaccesstocopythesourcecodefromthesameplacesatisfiestherequirementtodistributethesourcecode,eventhoughthirdpartiesarenotcompelledtocopythesourcealongwiththeobjectcode.
.AprogramthatcontainsnoderivativeofanyportionoftheLibrary,butisdesignedtoworkwiththeLibrarybybeingcompiledorlinkedwithit,iscalleda“workthatusestheLibrary”.Suchawork,inisolation,isnotaderivativeworkoftheLibrary,andthereforefallsoutsidethescopeofthisLicense.
However,linkinga“workthatusestheLibrary”withtheLibrarycreatesanexecutablethatisaderivativeoftheLibrary(becauseitcontainsportionsoftheLibrary),ratherthana“workthatusesthelibrary”.TheexecutableisthereforecoveredbythisLicense.Section6statestermsfordistributionofsuchexecutables.
Whena“workthatusestheLibrary”usesmaterialfromaheaderfilethatispartoftheLibrary,theobjectcodefortheworkmaybeaderivativeworkoftheLibraryeventhoughthesourcecodeisnot.WhetherthisistrueisespeciallysignificantiftheworkcanbelinkedwithouttheLibrary,oriftheworkisitselfalibrary.Thethresholdforthistobetrueisnotpreciselydefinedbylaw.
Ifsuchanobjectfileusesonlynumericalparameters,datastructurelayoutsandaccessors,andsmallmacrosandsmallinlinefunctions(tenlinesorlessinlength),thentheuseoftheobjectfileisunrestricted,regardlessofwhetheritislegallyaderivativework.(ExecutablescontainingthisobjectcodeplusportionsoftheLibrarywillstillfallunderSection6.)
Continued...
BN68-01167A-Eng-00.indd 73 2007-02-09 9:23:16
English -
Otherwise,iftheworkisaderivativeoftheLibrary,youmaydistributetheobjectcodefortheworkunderthetermsofSection6.AnyexecutablescontainingthatworkalsofallunderSection6,whetherornottheyarelinkeddirectlywiththeLibraryitself.
6.AsanexceptiontotheSectionsabove,youmayalsocombineorlinka“workthatusestheLibrary”withtheLibrarytoproduceaworkcontainingportionsoftheLibrary,anddistributethatworkundertermsofyourchoice,providedthatthetermspermitmodificationoftheworkforthecustomer’sownuseandreverseengineeringfordebuggingsuchmodifications.
YoumustgiveprominentnoticewitheachcopyoftheworkthattheLibraryisusedinitandthattheLibraryanditsusearecoveredbythisLicense.YoumustsupplyacopyofthisLicense.Iftheworkduringexecutiondisplayscopyrightnotices,youmustincludethecopyrightnoticefortheLibraryamongthem,aswellasareferencedirectingtheusertothecopyofthisLicense.Also,youmustdooneofthesethings:
a)Accompanytheworkwiththecompletecorrespondingmachine-readablesourcecodefortheLibraryincludingwhateverchangeswereusedinthework(whichmustbedistributedunderSections1and2above);and,iftheworkisanexecutablelinkedwiththeLibrary,withthecompletemachine-readable“workthatusestheLibrary”,asobjectcodeand/orsourcecode,sothattheusercanmodifytheLibraryandthenrelinktoproduceamodifiedexecutablecontainingthemodifiedLibrary.(ItisunderstoodthattheuserwhochangesthecontentsofdefinitionsfilesintheLibrarywillnotnecessarilybeabletorecompiletheapplicationtousethemodifieddefinitions.)
b)UseasuitablesharedlibrarymechanismforlinkingwiththeLibrary.Asuitablemechanismisonethat(1)usesatruntimeacopyofthelibraryalreadypresentontheuser’scomputersystem,ratherthancopyinglibraryfunctionsintotheexecutable,and(2)willoperateproperlywithamodifiedversionofthelibrary,iftheuserinstallsone,aslongasthemodifiedversionisinterface-compatiblewiththeversionthattheworkwasmadewith.
c)Accompanytheworkwithawrittenoffer,validforatleastthreeyears,togivethesameuserthematerialsspecifiedinSubsection6a,above,forachargenomorethanthecostofperformingthisdistribution.
d)Ifdistributionoftheworkismadebyofferingaccesstocopyfromadesignatedplace,offerequivalentaccesstocopytheabovespecifiedmaterialsfromthesameplace.
e)Verifythattheuserhasalreadyreceivedacopyofthesematerialsorthatyouhavealreadysentthisuseracopy.
Foranexecutable,therequiredformofthe“workthatusestheLibrary”mustincludeanydataandutilityprogramsneededforreproducingtheexecutablefromit.However,asaspecialexception,thematerialstobedistributedneednotincludeanythingthatisnormallydistributed(ineithersourceorbinaryform)withthemajorcomponents(compiler,kernel,andsoon)oftheoperatingsystemonwhichtheexecutableruns,unlessthatcomponentitselfaccompaniestheexecutable.
Itmayhappenthatthisrequirementcontradictsthelicenserestrictionsofotherproprietarylibrariesthatdonotnormallyaccompanytheoperatingsystem.SuchacontradictionmeansyoucannotuseboththemandtheLibrarytogetherinanexecutablethatyoudistribute.
.YoumayplacelibraryfacilitiesthatareaworkbasedontheLibraryside-by-sideinasinglelibrarytogetherwithotherlibraryfacilitiesnotcoveredbythisLicense,anddistributesuchacombinedlibrary,providedthattheseparatedistributionoftheworkbasedontheLibraryandoftheotherlibraryfacilitiesisotherwisepermitted,andprovidedthatyoudothesetwothings:
a)AccompanythecombinedlibrarywithacopyofthesameworkbasedontheLibrary,uncombinedwithanyotherlibraryfacilities.ThismustbedistributedunderthetermsoftheSectionsabove.
b)GiveprominentnoticewiththecombinedlibraryofthefactthatpartofitisaworkbasedontheLibrary,andexplainingwheretofindtheaccompanyinguncombinedformofthesamework.
.Youmaynotcopy,modify,sublicense,linkwith,ordistributetheLibraryexceptasexpresslyprovidedunderthisLicense.Anyattemptotherwisetocopy,modify,sublicense,linkwith,ordistributetheLibraryisvoid,andwillautomaticallyterminateyourrightsunderthisLicense.However,partieswhohavereceivedcopies,orrights,fromyouunderthisLicensewillnothavetheirlicensesterminatedsolongassuchpartiesremaininfullcompliance.
.YouarenotrequiredtoacceptthisLicense,sinceyouhavenotsignedit.However,nothingelsegrantsyoupermissiontomodifyordistributetheLibraryoritsderivativeworks.TheseactionsareprohibitedbylawifyoudonotacceptthisLicense.Therefore,bymodifyingordistributingtheLibrary(oranyworkbasedontheLibrary),youindicateyouracceptanceofthisLicensetodoso,andallitstermsandconditionsforcopying,distributingormodifyingtheLibraryorworksbasedonit.
0.EachtimeyouredistributetheLibrary(oranyworkbasedontheLibrary),therecipientautomaticallyreceivesalicensefromtheoriginallicensortocopy,distribute,linkwithormodifytheLibrarysubjecttothesetermsandconditions.Youmaynotimposeanyfurtherrestrictionsontherecipients’exerciseoftherightsgrantedherein.YouarenotresponsibleforenforcingcompliancebythirdpartieswiththisLicense.
.If,asaconsequenceofacourtjudgmentorallegationofpatentinfringementorforanyotherreason(notlimitedtopatentissues),conditionsareimposedonyou(whetherbycourtorder,agreementorotherwise)thatcontradicttheconditionsofthisLicense,theydonotexcuseyoufromtheconditionsofthisLicense.IfyoucannotdistributesoastosatisfysimultaneouslyyourobligationsunderthisLicenseandanyotherpertinentobligations,thenasaconsequenceyoumaynotdistributetheLibraryatall.Forexample,ifapatentlicensewouldnotpermitroyalty-freeredistributionoftheLibrarybyallthosewhoreceivecopiesdirectlyorindirectlythroughyou,thentheonlywayyoucouldsatisfybothitandthisLicensewouldbetorefrainentirelyfromdistributionoftheLibrary.
Ifanyportionofthissectionisheldinvalidorunenforceableunderanyparticularcircumstance,thebalanceofthesectionisintendedtoapply,andthesectionasawholeisintendedtoapplyinothercircumstances.
Itisnotthepurposeofthissectiontoinduceyoutoinfringeanypatentsorotherpropertyrightclaimsortocontestvalidityofanysuchclaims;thissectionhasthesolepurposeofprotectingtheintegrityofthefreesoftwaredistributionsystemwhichisimplementedbypubliclicensepractices.Manypeoplehavemadegenerouscontributionstothewiderangeofsoftwaredistributedthroughthatsysteminrelianceonconsistentapplicationofthatsystem;itisuptotheauthor/donortodecideifheorsheiswillingtodistributesoftwarethroughanyothersystemandalicenseecannotimposethatchoice.
Continued...
BN68-01167A-Eng-00.indd 74 2007-02-09 9:23:17

English -
ThissectionisintendedtomakethoroughlyclearwhatisbelievedtobeaconsequenceoftherestofthisLicense.
.Ifthedistributionand/oruseoftheLibraryisrestrictedincertaincountrieseitherbypatentsorbycopyrightedinterfaces,theoriginalcopyrightholderwhoplacestheLibraryunderthisLicensemayaddanexplicitgeographicaldistributionlimitationexcludingthosecountries,sothatdistributionispermittedonlyinoramongcountriesnotthusexcluded.Insuchcase,thisLicenseincorporatesthelimitationasifwritteninthebodyofthisLicense.
.TheFreeSoftwareFoundationmaypublishrevisedand/ornewversionsoftheLesserGeneralPublicLicensefromtimetotime.Suchnewversionswillbesimilarinspirittothepresentversion,butmaydifferindetailtoaddressnewproblemsorconcerns.
Eachversionisgivenadistinguishingversionnumber.IftheLibraryspecifiesaversionnumberofthisLicensewhichappliestoitand“anylaterversion”,youhavetheoptionoffollowingthetermsandconditionseitherofthatversionorofanylaterversionpublishedbytheFreeSoftwareFoundation.IftheLibrarydoesnotspecifyalicenseversionnumber,youmaychooseanyversioneverpublishedbytheFreeSoftwareFoundation.
.IfyouwishtoincorporatepartsoftheLibraryintootherfreeprogramswhosedistributionconditionsareincompatiblewiththese,writetotheauthortoaskforpermission.ForsoftwarewhichiscopyrightedbytheFreeSoftwareFoundation,writetotheFreeSoftwareFoundation;wesometimesmakeexceptionsforthis.Ourdecisionwillbeguidedbythetwogoalsofpreservingthefreestatusofallderivativesofourfreesoftwareandofpromotingthesharingandreuseofsoftwaregenerally.
NOWARRANTY
.BECAUSETHELIBRARYISLICENSEDFREEOFCHARGE,THEREISNOWARRANTYFORTHELIBRARY,TOTHEEXTENTPERMITTEDBYAPPLICABLELAW.EXCEPTWHENOTHERWISESTATEDINWRITINGTHECOPYRIGHTHOLDERSAND/OROTHERPARTIESPROVIDETHELIBRARY“ASIS”WITHOUTWARRANTYOFANYKIND,EITHEREXPRESSEDORIMPLIED,INCLUDING,BUTNOTLIMITEDTO,THEIMPLIEDWARRANTIESOFMERCHANTABILITYANDFITNESSFORAPARTICULARPURPOSE.THEENTIRERISKASTOTHEQUALITYANDPERFORMANCEOFTHELIBRARYISWITHYOU.SHOULDTHELIBRARYPROVEDEFECTIVE,YOUASSUMETHECOSTOFALLNECESSARYSERVICING,REPAIRORCORRECTION.
6.INNOEVENTUNLESSREQUIREDBYAPPLICABLELAWORAGREEDTOINWRITINGWILLANYCOPYRIGHTHOLDER,ORANYOTHERPARTYWHOMAYMODIFYAND/ORREDISTRIBUTETHELIBRARYASPERMITTEDABOVE,BELIABLETOYOUFORDAMAGES,INCLUDINGANYGENERAL,SPECIAL,INCIDENTALORCONSEQUENTIALDAMAGESARISINGOUTOFTHEUSEORINABILITYTOUSETHELIBRARY(INCLUDINGBUTNOTLIMITEDTOLOSSOFDATAORDATABEINGRENDEREDINACCURATEORLOSSESSUSTAINEDBYYOUORTHIRDPARTIESORAFAILUREOFTHELIBRARYTOOPERATEWITHANYOTHERSOFTWARE),EVENIFSUCHHOLDEROROTHERPARTYHASBEENADVISEDOFTHEPOSSIBILITYOFSUCHDAMAGES.
End of tErmS and CondItIonShow to apply these terms to your new librariesIfyoudevelopanewlibrary,andyouwantittobeofthegreatestpossibleusetothepublic,werecommendmakingitfreesoftwarethateveryonecanredistributeandchange.Youcandosobypermittingredistributionundertheseterms(or,alternatively,underthetermsoftheordinaryGeneralPublicLicense).
Toapplytheseterms,attachthefollowingnoticestothelibrary.Itissafesttoattachthemtothestartofeachsourcefiletomosteffectivelyconveytheexclusionofwarranty;andeachfileshouldhaveatleastthe“copyright”lineandapointertowherethefullnoticeisfound.
<onelinetogivethelibrary’snameandanideaofwhatitdoes.>Copyright(C)<year><nameofauthor>
Thislibraryisfreesoftware;youcanredistributeitand/ormodifyitunderthetermsoftheGNULesserGeneralPublicLicenseaspublishedbytheFreeSoftwareFoundation;eitherversion2.1oftheLicense,or(atyouroption)anylaterversion.
Thislibraryisdistributedinthehopethatitwillbeuseful,butWITHOUTANYWARRANTY;withouteventheimpliedwarrantyofMERCHANTABILITYorFITNESSFORAPARTICULARPURPOSE.SeetheGNULesserGeneralPublicLicenseformoredetails.
YoushouldhavereceivedacopyoftheGNULesserGeneralPublicLicensealongwiththislibrary;ifnot,writetotheFreeSoftwareFoundation,Inc.,59TemplePlace,Suite330,Boston,MA02111-1307USA
Alsoaddinformationonhowtocontactyoubyelectronicandpapermail.
Youshouldalsogetyouremployer(ifyouworkasaprogrammer)oryourschool,ifany,tosigna“copyrightdisclaimer”forthelibrary,ifnecessary.Hereisasample;alterthenames:
Yoyodyne,Inc.,herebydisclaimsallcopyrightinterestinthelibrary`Frob’(alibraryfortweakingknobs)writtenbyJamesRandomHacker.
signatureofTyCoon,1April1990TyCoon,PresidentofVice
That’sallthereistoit!
BN68-01167A-Eng-00.indd 75 2007-02-09 9:23:17

This page is intentionallyleft blank.
BN68-01167A-Eng-00.indd 76 2007-02-09 9:23:17
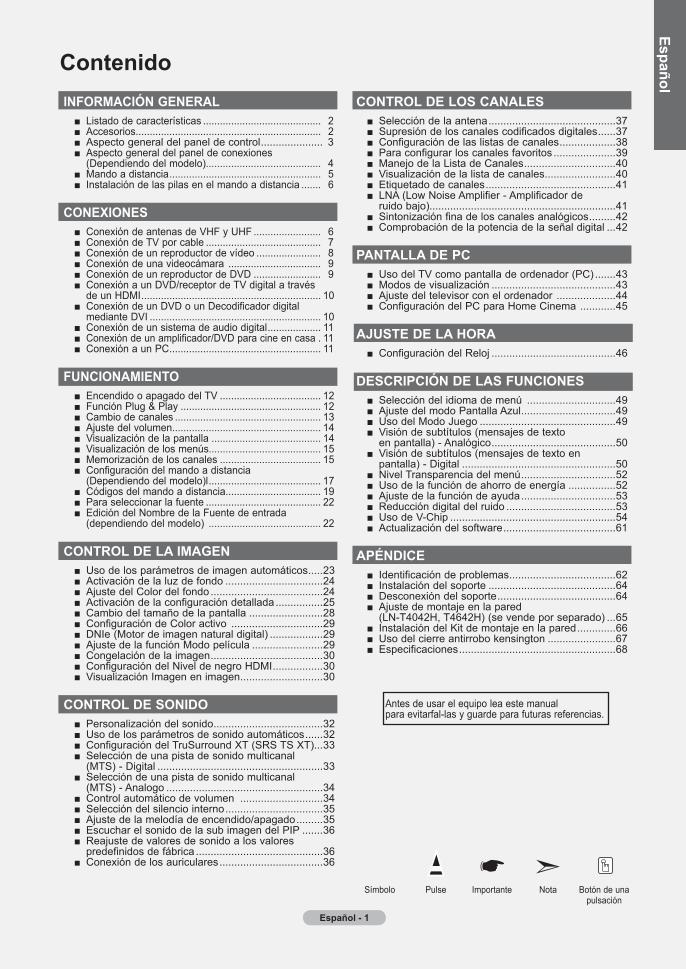
Contenido
Símbolo Pulse Importante Nota Botón de una pulsación
Español
InformaCIón GEnEral Listado de características .......................................... 2 Accesorios.................................................................. 2 Aspecto general del panel de control ..................... 3 Aspecto general del panel de conexiones (Dependiendo del modelo)......................................... 4 Mando a distancia ...................................................... 5 Instalación de las pilas en el mando a distancia ....... 6
ConExIonEs Conexión de antenas de VHF y UHF ........................ 6 Conexión de TV por cable ......................................... 7 Conexión de un reproductor de vídeo ....................... 8 Conexión de una videocámara ................................. 9 Conexión de un reproductor de DVD ........................ 9 Conexión a un DVD/receptor de TV digital a través de un HDMI ................................................................ 10 Conexión de un DVD o un Decodificador digital mediante DVI ............................................................. 10 Conexión de un sistema de audio digital ................... 11 Conexión de un amplificador/DVD para cine en casa . 11 Conexión a un PC ...................................................... 11
funCIonamIEnto Encendido o apagado del TV .................................... 12 Función Plug & Play .................................................. 12 Cambio de canales .................................................... 13 Ajuste del volumen..................................................... 14 Visualización de la pantalla ....................................... 14 Visualización de los menús........................................ 15 Memorización de los canales .................................... 15 Configuración del mando a distancia (Dependiendo del modelo)l ........................................ 17 Códigos del mando a distancia.................................. 19 Para seleccionar la fuente ......................................... 22 Edición del Nombre de la Fuente de entrada (dependiendo del modelo) ........................................ 22
Control dE la ImaGEn Uso de los parámetros de imagen automáticos ..... 23 Activación de la luz de fondo ................................. 24 Ajuste del Color del fondo ...................................... 24 Activación de la configuración detallada ................ 25 Cambio del tamaño de la pantalla ......................... 28 Configuración de Color activo ............................... 29 DNIe (Motor de imagen natural digital) .................. 29 Ajuste de la función Modo película ........................ 29 Congelación de la imagen ...................................... 30 Configuración del Nivel de negro HDMI ................. 30 Visualización Imagen en imagen ............................ 30
Control dE sonIdo Personalización del sonido ..................................... 32 Uso de los parámetros de sonido automáticos ...... 32 Configuración del TruSurround XT (SRS TS XT)... 33 Selección de una pista de sonido multicanal (MTS) - Digital ........................................................ 33 Selección de una pista de sonido multicanal (MTS) - Analogo ..................................................... 34 Control automático de volumen ............................ 34 Selección del silencio interno ................................. 35 Ajuste de la melodía de encendido/apagado ......... 35 Escuchar el sonido de la sub imagen del PIP ....... 36 Reajuste de valores de sonido a los valores predefinidos de fábrica ........................................... 36 Conexión de los auriculares ................................... 36
Control dE los CanalEs Selección de la antena ........................................... 37 Supresión de los canales codificados digitales ...... 37 Configuración de las listas de canales ................... 38 Para configurar los canales favoritos ..................... 39 Manejo de la Lista de Canales ............................... 40 Visualización de la lista de canales ........................ 40 Etiquetado de canales ............................................ 41 LNA (Low Noise Amplifier - Amplificador de ruido bajo)............................................................... 41 Sintonización fina de los canales analógicos ......... 42 Comprobación de la potencia de la señal digital ... 42
Pantalla dE PC Uso del TV como pantalla de ordenador (PC) ....... 43 Modos de visualización .......................................... 43 Ajuste del televisor con el ordenador .................... 44 Configuración del PC para Home Cinema ............ 45
ajustE dE la Hora Configuración del Reloj .......................................... 46
dEsCrIPCIón dE las funCIonEs Selección del idioma de menú .............................. 49 Ajuste del modo Pantalla Azul ................................ 49 Uso del Modo Juego .............................................. 49 Visión de subtítulos (mensajes de texto en pantalla) - Analógico .......................................... 50 Visión de subtítulos (mensajes de texto en pantalla) - Digital .................................................... 50 Nivel Transparencia del menú ................................ 52 Uso de la función de ahorro de energía ................ 52 Ajuste de la función de ayuda ................................ 53 Reducción digital del ruido ..................................... 53 Uso de V-Chip ........................................................ 54 Actualización del software ...................................... 61
aPéndICE Identificación de problemas .................................... 62 Instalación del soporte ........................................... 64 Desconexión del soporte ........................................ 64 Ajuste de montaje en la pared (LN-T4042H, T4642H) (se vende por separado) ... 65 Instalación del Kit de montaje en la pared ............. 66 Uso del cierre antirrobo kensington ....................... 67 Especificaciones ..................................................... 68
Antes de usar el equipo lea este manual para evitarfal-las y guarde para futuras referencias.
Español -
BN68-01167A-Spa-00.indd 1 2007-02-09 9:30:26
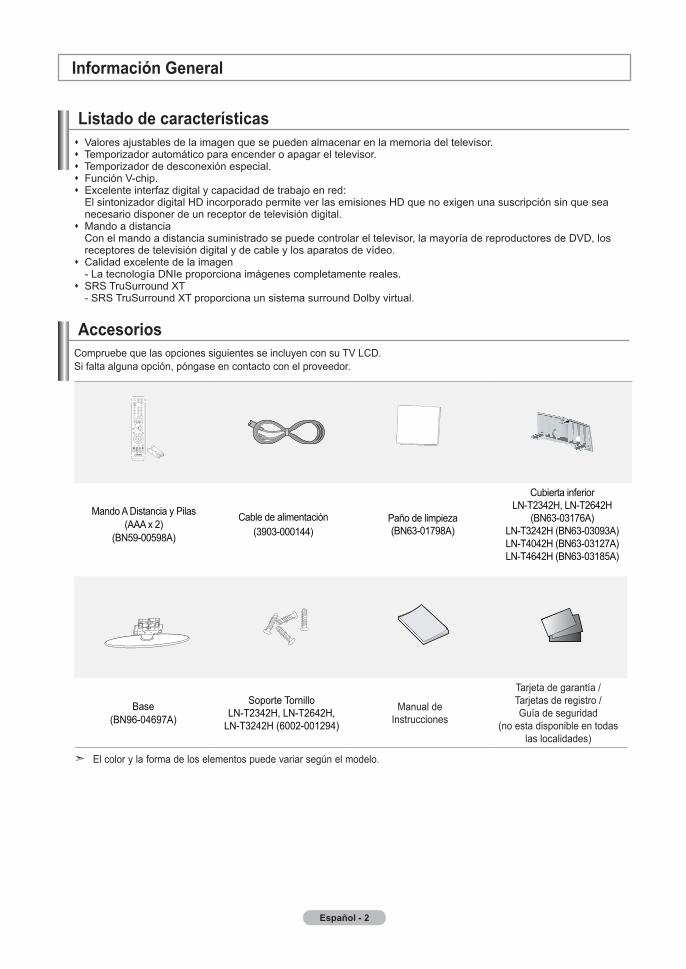
Español -
accesoriosCompruebe que las opciones siguientes se incluyen con su TV LCD. Si falta alguna opción, póngase en contacto con el proveedor.
Mando A Distancia y Pilas (AAA x 2)
(BN59-00598A)
Cable de alimentación(3903-000144)
Paño de limpieza(BN63-01798A)
Cubierta inferiorLN-T2342H, LN-T2642H
(BN63-03176A)LN-T3242H (BN63-03093A)LN-T4042H (BN63-03127A)LN-T4642H (BN63-03185A)
Base(BN96-04697A)
Soporte TornilloLN-T2342H, LN-T2642H,
LN-T3242H (6002-001294)
Manual deInstrucciones
Tarjeta de garantía /Tarjetas de registro /Guía de seguridad
(no esta disponible en todas las localidades)
El color y la forma de los elementos puede variar según el modelo.
Información General
listado de características Valores ajustables de la imagen que se pueden almacenar en la memoria del televisor. Temporizador automático para encender o apagar el televisor. Temporizador de desconexión especial. Función V-chip. Excelente interfaz digital y capacidad de trabajo en red:
El sintonizador digital HD incorporado permite ver las emisiones HD que no exigen una suscripción sin que sea necesario disponer de un receptor de televisión digital.
Mando a distancia Con el mando a distancia suministrado se puede controlar el televisor, la mayoría de reproductores de DVD, los receptores de televisión digital y de cable y los aparatos de vídeo.
Calidad excelente de la imagen - La tecnología DNIe proporciona imágenes completamente reales.
SRS TruSurround XT - SRS TruSurround XT proporciona un sistema surround Dolby virtual.
BN68-01167A-Spa-00.indd 2 2007-02-09 9:30:29
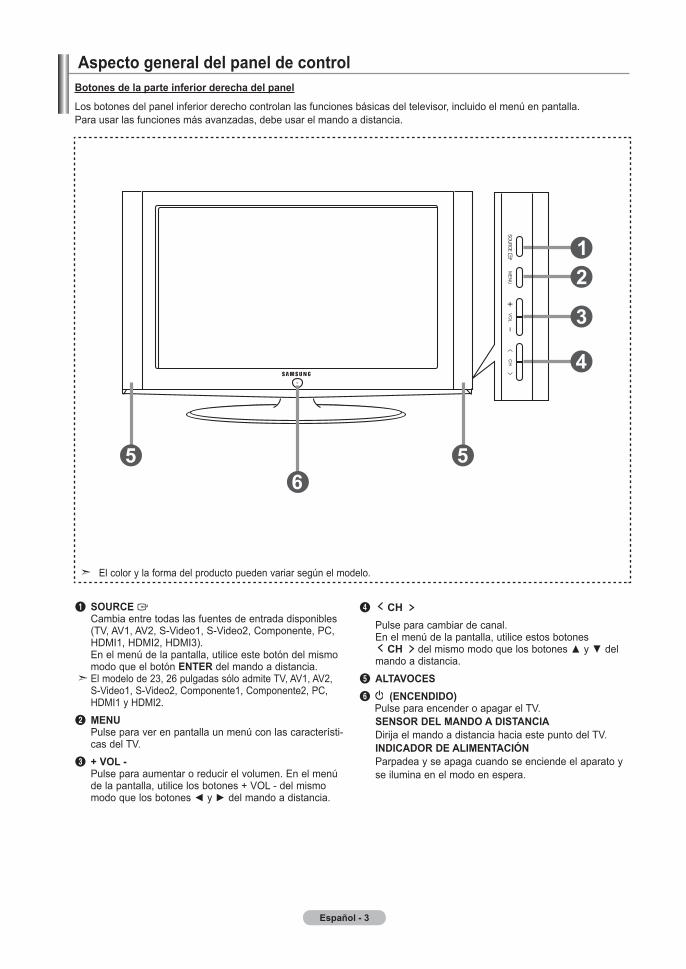
Español -
aspecto general del panel de control
1sourCE Cambia entre todas las fuentes de entrada disponibles
(TV, AV1, AV2, S-Video1, S-Video2, Componente, PC, HDMI1, HDMI2, HDMI3). En el menú de la pantalla, utilice este botón del mismo modo que el botón EntEr del mando a distancia. El modelo de 23, 26 pulgadas sólo admite TV, AV1, AV2, S-Video1, S-Video2, Componente1, Componente2, PC, HDMI1 y HDMI2.
2mEnu Pulse para ver en pantalla un menú con las característi-
cas del TV.3+ Vol - Pulse para aumentar o reducir el volumen. En el menú
de la pantalla, utilice los botones + VOL - del mismo modo que los botones y del mando a distancia.
4 CH Pulse para cambiar de canal. En el menú de la pantalla, utilice estos botones
CH del mismo modo que los botones y del mando a distancia.
5altaVoCEs6 (EnCEndIdo) Pulse para encender o apagar el TV. sEnsor dEl mando a dIstanCIa Dirija el mando a distancia hacia este punto del TV. IndICador dE alImEntaCIón Parpadea y se apaga cuando se enciende el aparato y
se ilumina en el modo en espera.
Botones de la parte inferior derecha del panel
Los botones del panel inferior derecho controlan las funciones básicas del televisor, incluido el menú en pantalla. Para usar las funciones más avanzadas, debe usar el mando a distancia.
El color y la forma del producto pueden variar según el modelo.
BN68-01167A-Spa-00.indd 3 2007-02-09 9:30:30
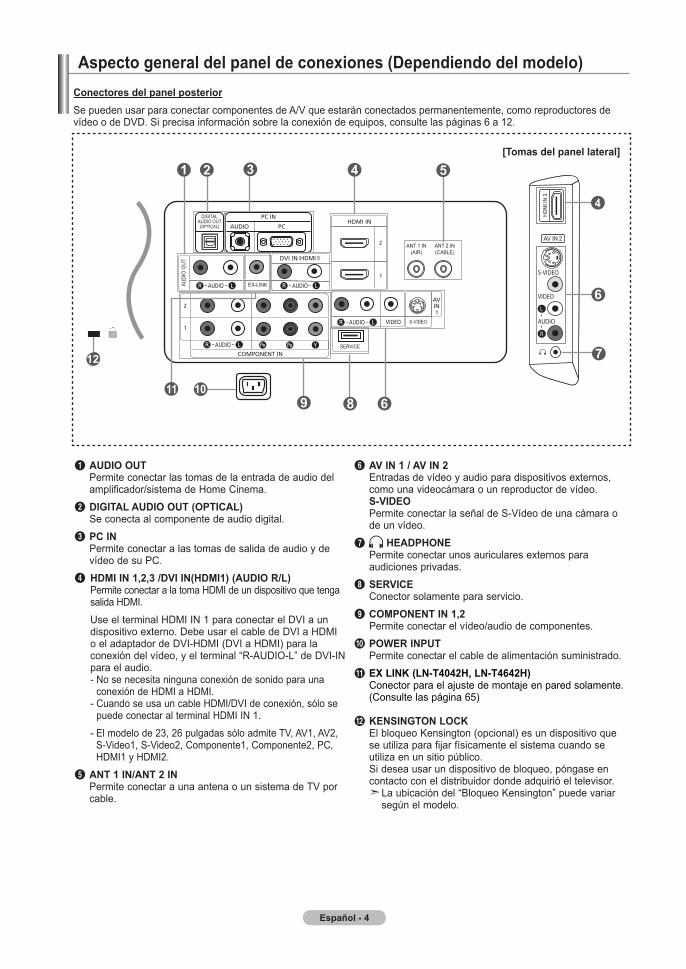
Español -
aspecto general del panel de conexiones (dependiendo del modelo)Conectores del panel posteriorSe pueden usar para conectar componentes de A/V que estarán conectados permanentemente, como reproductores de vídeo o de DVD. Si precisa información sobre la conexión de equipos, consulte las páginas 6 a 12.
1audIo out Permite conectar las tomas de la entrada de audio del
amplificador/sistema de Home Cinema.2 dIGItal audIo out (oPtICal) Se conecta al componente de audio digital.3 PC In Permite conectar a las tomas de salida de audio y de
vídeo de su PC.4 HdmI In ,, /dVI In(HdmI) (audIo r/l) Permite conectar a la toma HDMI de un dispositivo que tenga
salida HDMI. Use el terminal HDMI IN 1 para conectar el DVI a un
dispositivo externo. Debe usar el cable de DVI a HDMI o el adaptador de DVI-HDMI (DVI a HDMI) para la conexión del vídeo, y el terminal “R-AUDIO-L” de DVI-IN para el audio.
- No se necesita ninguna conexión de sonido para una conexión de HDMI a HDMI.
- Cuando se usa un cable HDMI/DVI de conexión, sólo se puede conectar al terminal HDMI IN 1.
- El modelo de 23, 26 pulgadas sólo admite TV, AV1, AV2, S-Video1, S-Video2, Componente1, Componente2, PC, HDMI1 y HDMI2.
5 ant In/ant In Permite conectar a una antena o un sistema de TV por
cable.
6aV In / aV In Entradas de vídeo y audio para dispositivos externos,
como una videocámara o un reproductor de vídeo. s-VIdEo Permite conectar la señal de S-Vídeo de una cámara o de un vídeo.
7 HEadPHonE Permite conectar unos auriculares externos para
audiciones privadas.8sErVICE Conector solamente para servicio.9 ComPonEnt In , Permite conectar el vídeo/audio de componentes.0PoWEr InPut Permite conectar el cable de alimentación suministrado.! Ex lInK (ln-t0H, ln-t6H) Conector para el ajuste de montaje en pared solamente. (Consulte las página 65)
@KEnsInGton loCK El bloqueo Kensington (opcional) es un dispositivo que
se utiliza para fijar físicamente el sistema cuando se utiliza en un sitio público. Si desea usar un dispositivo de bloqueo, póngase en contacto con el distribuidor donde adquirió el televisor.
La ubicación del “Bloqueo Kensington” puede variar según el modelo.
[tomas del panel lateral]
BN68-01167A-Spa-00.indd 4 2007-02-09 9:30:31
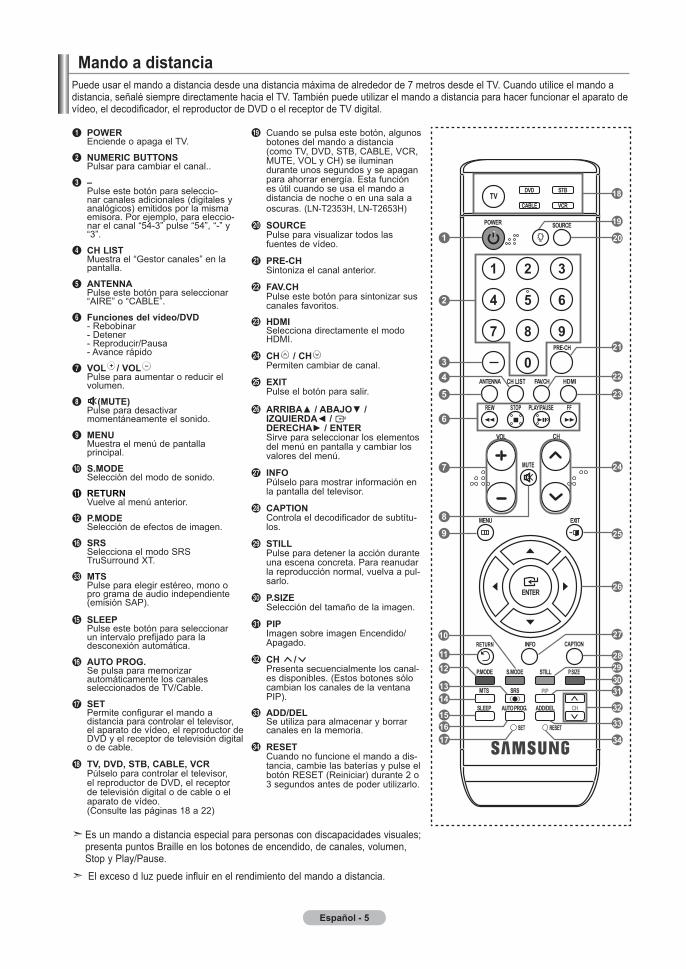
Español -
mando a distanciaPuede usar el mando a distancia desde una distancia máxima de alrededor de 7 metros desde el TV. Cuando utilice el mando a distancia, señalé siempre directamente hacia el TV. También puede utilizar el mando a distancia para hacer funcionar el aparato de vídeo, el decodificador, el reproductor de DVD o el receptor de TV digital.
Es un mando a distancia especial para personas con discapacidades visuales; presenta puntos Braille en los botones de encendido, de canales, volumen, Stop y Play/Pause. El exceso d luz puede influir en el rendimiento del mando a distancia.
1PoWEr Enciende o apaga el TV.
2numErIC Buttons Pulsar para cambiar el canal..
3– Pulse este botón para seleccio-
nar canales adicionales (digitales y analógicos) emitidos por la misma emisora. Por ejemplo, para eleccio-nar el canal “54-3” pulse “54”, “-” y “3”.
4CH lIst Muestra el “Gestor canales” en la
pantalla.
5antEnna Pulse este botón para seleccionar
“AIRE” o “CABLE”.
6funciones del vídeo/dVd - Rebobinar - Detener - Reproducir/Pausa - Avance rápido
7Vol / Vol Pulse para aumentar o reducir el
volumen.
8 (mutE) Pulse para desactivar
momentáneamente el sonido.
9mEnu Muestra el menú de pantalla
principal.
0s.modE Selección del modo de sonido.
!rEturn Vuelve al menú anterior.
@P.modE Selección de efectos de imagen.
^srs Selecciona el modo SRS
TruSurround XT.
m mts Pulse para elegir estéreo, mono o
pro grama de audio independiente (emisión SAP).
%slEEP Pulse este botón para seleccionar
un intervalo prefijado para la desconexión automática.
^auto ProG. Se pulsa para memorizar
automáticamente los canales seleccionados de TV/Cable.
&sEt Permite configurar el mando a
distancia para controlar el televisor, el aparato de vídeo, el reproductor de DVD y el receptor de televisión digital o de cable.
*tV, dVd, stB, CaBlE, VCr Púlselo para controlar el televisor,
el reproductor de DVD, el receptor de televisión digital o de cable o el aparato de vídeo. (Consulte las páginas 18 a 22)
(Cuando se pulsa este botón, algunos botones del mando a distancia (como TV, DVD, STB, CABLE, VCR, MUTE, VOL y CH) se iluminan durante unos segundos y se apagan para ahorrar energía. Esta función es útil cuando se usa el mando a distancia de noche o en una sala a oscuras. (LN-T2353H, LN-T2653H)
)sourCE Pulse para visualizar todos las
fuentes de vídeo.
aPrE-CH Sintoniza el canal anterior.
bfaV.CH Pulse este botón para sintonizar sus
canales favoritos.
c HdmI Selecciona directamente el modo HDMI.
d CH / CH Permiten cambiar de canal.
e ExIt Pulse el botón para salir.
f ARRIBA / ABAJO / IZQUIERDA / DERECHA / ENTER
Sirve para seleccionar los elementos del menú en pantalla y cambiar los valores del menú.
g Info Púlselo para mostrar información en
la pantalla del televisor.
h CaPtIon Controla el decodificador de subtítu-
los.
i stIll Pulse para detener la acción durante
una escena concreta. Para reanudar la reproducción normal, vuelva a pul-sarlo.
j P.sIZE Selección del tamaño de la imagen.
k PIP Imagen sobre imagen Encendido/
Apagado.
l CH / Presenta secuencialmente los canal-
es disponibles. (Estos botones sólo cambian los canales de la ventana PIP).
m add/dEl Se utiliza para almacenar y borrar
canales en la memoria.
n rEsEt Cuando no funcione el mando a dis-
tancia, cambie las baterías y pulse el botón RESET (Reiniciar) durante 2 o 3 segundos antes de poder utilizarlo.
BN68-01167A-Spa-00.indd 5 2007-02-09 9:30:32
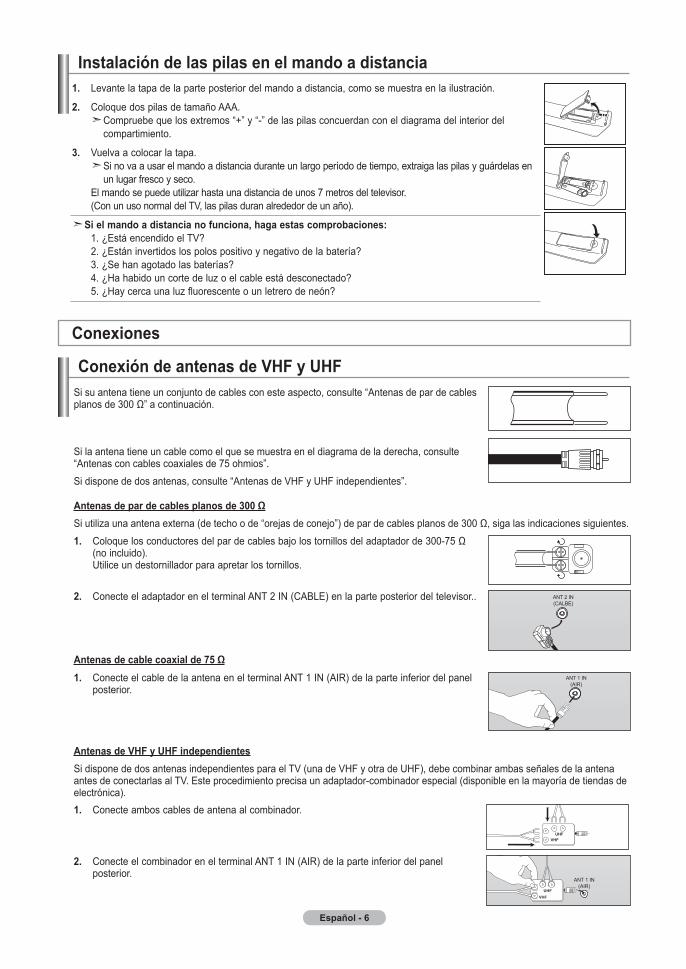
Español - 6
. Levante la tapa de la parte posterior del mando a distancia, como se muestra en la ilustración.
. Coloque dos pilas de tamaño AAA. Compruebe que los extremos “+” y “-” de las pilas concuerdan con el diagrama del interior del
compartimiento.
. Vuelva a colocar la tapa. Si no va a usar el mando a distancia durante un largo período de tiempo, extraiga las pilas y guárdelas en
un lugar fresco y seco. El mando se puede utilizar hasta una distancia de unos 7 metros del televisor.
(Con un uso normal del TV, las pilas duran alrededor de un año).
si el mando a distancia no funciona, haga estas comprobaciones: 1. ¿Está encendido el TV?
2. ¿Están invertidos los polos positivo y negativo de la batería? 3. ¿Se han agotado las baterías? 4. ¿Ha habido un corte de luz o el cable está desconectado? 5. ¿Hay cerca una luz fluorescente o un letrero de neón?
Instalación de las pilas en el mando a distancia
Conexión de antenas de VHf y uHfSi su antena tiene un conjunto de cables con este aspecto, consulte “Antenas de par de cables planos de 300 Ω” a continuación.
Si la antena tiene un cable como el que se muestra en el diagrama de la derecha, consulte “Antenas con cables coaxiales de 75 ohmios”.Si dispone de dos antenas, consulte “Antenas de VHF y UHF independientes”.
. Coloque los conductores del par de cables bajo los tornillos del adaptador de 300-75 Ω (no incluido). Utilice un destornillador para apretar los tornillos.
. Conecte el adaptador en el terminal ANT 2 IN (CABLE) en la parte posterior del televisor.. ANT 2 IN(CALBE)
Antenas de par de cables planos de 300 ΩSi utiliza una antena externa (de techo o de “orejas de conejo”) de par de cables planos de 300 Ω, siga las indicaciones siguientes.
. Conecte el cable de la antena en el terminal ANT 1 IN (AIR) de la parte inferior del panel posterior.
Antenas de cable coaxial de 75 ΩANT 1 IN
(AIR)
antenas de VHf y uHf independientesSi dispone de dos antenas independientes para el TV (una de VHF y otra de UHF), debe combinar ambas señales de la antena antes de conectarlas al TV. Este procedimiento precisa un adaptador-combinador especial (disponible en la mayoría de tiendas de electrónica).. Conecte ambos cables de antena al combinador.
. Conecte el combinador en el terminal ANT 1 IN (AIR) de la parte inferior del panel posterior.
uHfVHf
ANT 1 IN(AIR)
uHfVHf
Conexiones
BN68-01167A-Spa-00.indd 6 2007-02-09 9:30:34

Español -
Una vez hecha esta conexión, coloque el conmutador A/B en la posición “A” para la visualización normal. Coloque el conmutador A/B en la posición “B” para ver los canales codificados. (Cuando sitúe el conmutador A/B en “B”, deberá sintonizar el TV al canal de salida del decodificador, que normalmente es el canal 3 o 4).
Conexión a un decodificador que decodifica algunos canalesSi su decodificador sólo decodifica algunos canales (como los canales de pago), siga las instrucciones siguientes. Necesitará un divisor de dos vías, un conmutador de RF (A/B) y cuatro largos de cable RF. Estas opciones se encuentran en la mayoría de tiendas de electrónica).
. Conecte este cable al divisor de dos vías.
. Conecte el cable RF entre un terminal OUTPUT(salida) del divisor y el terminal IN (entrada) del decodificador.
. Conecte el cable RF entre el terminal ANT OUT del decodificador y el terminal B.IN del conmutador A/B.
. Busque y desconecte el cable que está conectado al terminal ANT IN (entrada de antena) del decodificador.
Este terminal puede estar indicado como “ANT IN”, “VHF IN” o “IN”.
. Conecte otro cable RF entre el otro terminal OUT del divisor y el terminal A.IN del conmutador de RF (A/B).
6. Conecte el último cable RF entre el terminal OUT del conmutador RF (A/B) y el terminal ANT IN en la parte posterior del televisor.
divisor
Cable entrante
divisor
servicio de Cable
Cable entrante
divisor
servicio de Cablerf (a/B)
Conmutador
Cable entrante
ant In
divisor
servicio de Cable
Cable entrante
rf (a/B) Conmutador
divisor
servicio de Cable
Cable entrante
antena del
televisorrf (a/B)Conmutador
ant In
Conexión de tV por cablePara conectar a un sistema de TV por cable, siga estas instrucciones.TV por cable sin decodificador
. Conecte el cable de entrada en el terminal de la antena ANT 2 IN (CABLE) de la parte posterior del TV.
Dado que el TV está preparado para la televisión por cable, no se necesita un decodificador para ver canales de cable no codificados.
Conexión al decodificador que decodifica todos los canales
. Busque el cable conectado al terminal ANT OUT del decodificador. Este terminal puede estar indicado como “ANT OUT”, “VHF OUT” o “OUT”.
. Conecte el otro extremo del cable en el terminal ANT 2 IN (CABLE) de la parte posterior del TV.
ant outant In
ANT 2 IN(CABLE)
ANT 2 IN(CABLE)
BN68-01167A-Spa-00.indd 7 2007-02-09 9:30:36

Español -
Conexión de un reproductor de vídeo
Estas instrucciones presuponen que ya ha conectado el TV a una antena o sistema de TV por cable (siguiendo las instrucciones de las páginas 6 a 7). Si aún no ha conectado el TV a una antena o un sistema de cable, sáltese el paso 1. . Desconecte el cable o la
antena de la parte posterior del TV.
. Conecte el cable o la antena en el terminal ANT IN de la parte posterior del reproductor de vídeo.
. Conecte el cable RF entre el terminal ANT OUT (salida de antena) del reproductor de vídeo y el terminal ANT 1 IN (AIR) o ANT 2 IN (CABLE) del televisor.
. Conecte un cable de vídeo entre la toma VIDEO OUT del reproductor de vídeo y la toma AV IN 1 (o AV IN 2) [VIDEO] del televisor.
. Conecte un juego de cables de audio entre los conectores AUDIO OUT del reproductor de VCR y los conectores AV IN 1 (o AV IN 2) [R-AUDIO-L] del TV.
Si tiene un reproductor de vídeo “mono” (sin estéreo), use el conector Y (no suministrado) para conectar los conectores de entrada de audio izquierdo o derecho del TV. Si el vídeo es estéreo, tendrá que conectar dos cables.
Siga las instrucciones de “Visualización de una cinta de vídeo o de cámara de vídeo” para ver sus cintas.
Cada reproductor de video tiene una configuración distinta en el panel posterior. Cuando conecte un reproductor de video, debe hacer coincidir los colores del terminal de conexión y del cable.
Panel posterior del tV
Cable rf (no incluido)
Panel posterior del VCr
Cable de vídeo (no incluido)
Cable de audio (no incluido)
ant In(aIr)
Este televisor Samsung se puede conectar a una señal S-Video procedente de un reproductor de VCR. (Esta conexión ofrece mejor calidad de imagen con relación a un reproductor de VCR normal).
. Para empezar, siga los pasos 1 a 3 del apartado anterior para conectar la antena o el sistema de cable al reproductor de VCR y al TV.
. Conecte un cable de S-Vídeo entre la toma de salida de S-Vídeo del reproductor y la toma de entrada de S-Vídeo del televisor.
. Conecte un juego de cables de audio entre los conectores AUDIO OUT del reproductor de VCR y los conectores AV IN [R-AUDIO-L] del TV.
Normalmente se incluye un cable S-Video con los reproductores de vídeo S-VHS. (En caso contrario, consulte en la tienda de electrónica).
Cada reproductor de video S-VHS tiene una configuración distinta en el panel posterior. Cuando conecte un reproductor de S-VHS, debe hacer coincidir los colores del terminal de conexión y del cable.
Panel posterior del VCr
Cable rf (no incluido)
Cable de audio(no incluido)
Panel posterior del tV
Cable de s-Video (no incluido)
ant In(CaBlE)
Conexión de s-Vídeo
Conexión de vídeo
BN68-01167A-Spa-00.indd 8 2007-02-09 9:30:38
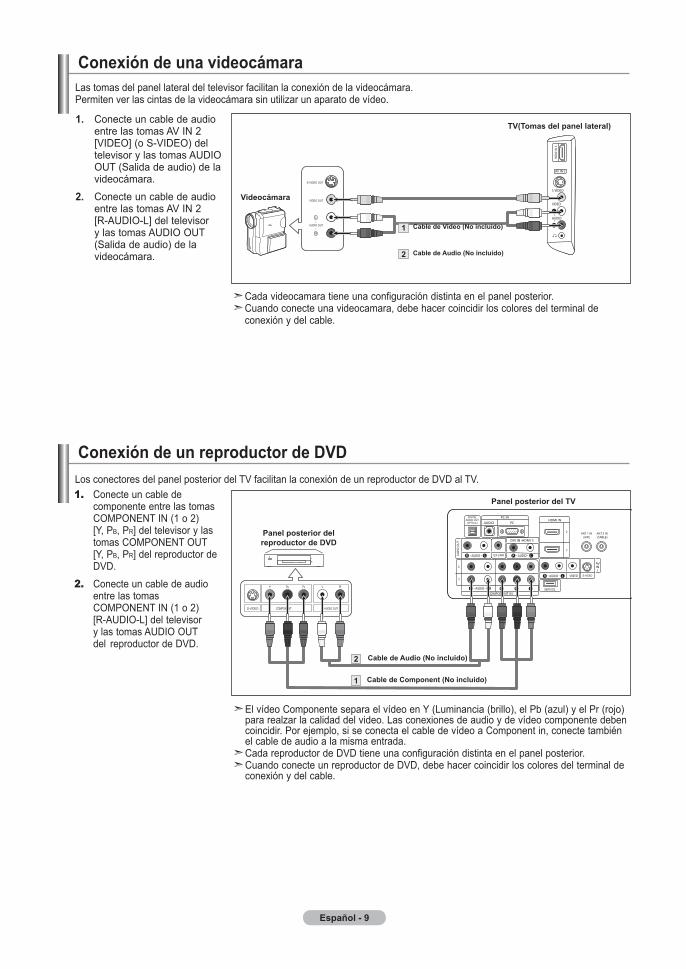
Español -
Conexión de un reproductor de dVdLos conectores del panel posterior del TV facilitan la conexión de un reproductor de DVD al TV.1. Conecte un cable de
componente entre las tomas COMPONENT IN (1 o 2) [Y, PB, PR] del televisor y las tomas COMPONENT OUT [Y, PB, PR] del reproductor de DVD.
2. Conecte un cable de audio entre las tomas COMPONENT IN (1 o 2) [R-AUDIO-L] del televisor y las tomas AUDIO OUT del reproductor de DVD.
El vídeo Componente separa el vídeo en Y (Luminancia (brillo), el Pb (azul) y el Pr (rojo) para realzar la calidad del video. Las conexiones de audio y de vídeo componente deben coincidir. Por ejemplo, si se conecta el cable de vídeo a Component in, conecte también el cable de audio a la misma entrada. Cada reproductor de DVD tiene una configuración distinta en el panel posterior. Cuando conecte un reproductor de DVD, debe hacer coincidir los colores del terminal de conexión y del cable.
Panel posterior delreproductor de dVd
Panel posterior del tV
Cable de Component (no incluido)
Cable de audio (no incluido)
Conexión de una videocámaraLas tomas del panel lateral del televisor facilitan la conexión de la videocámara. Permiten ver las cintas de la videocámara sin utilizar un aparato de vídeo.
. Conecte un cable de audio entre las tomas AV IN 2 [VIDEO] (o S-VIDEO) del televisor y las tomas AUDIO OUT (Salida de audio) de la videocámara.
. Conecte un cable de audio entre las tomas AV IN 2 [R-AUDIO-L] del televisor y las tomas AUDIO OUT (Salida de audio) de la videocámara.
Videocámara
tV(tomas del panel lateral)
Cable de Video (no incluido)
Cable de audio (no incluido)
Cada videocamara tiene una configuración distinta en el panel posterior. Cuando conecte una videocamara, debe hacer coincidir los colores del terminal de conexión y del cable.
BN68-01167A-Spa-00.indd 9 2007-02-09 9:30:39
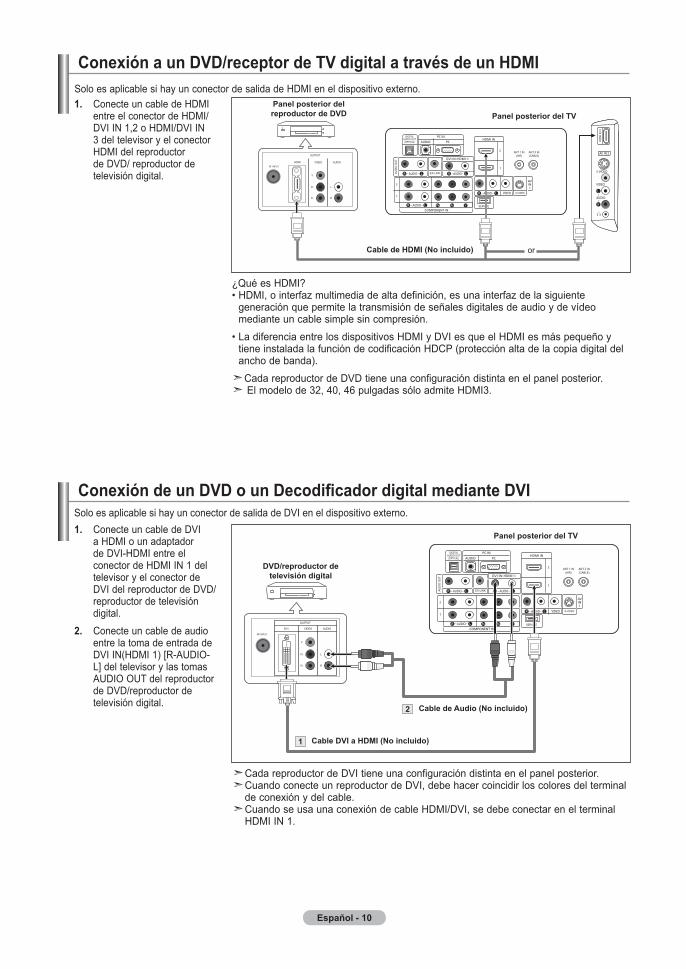
Español - 0
Conexión a un dVd/receptor de tV digital a través de un HdmISolo es aplicable si hay un conector de salida de HDMI en el dispositivo externo.. Conecte un cable de HDMI
entre el conector de HDMI/DVI IN 1,2 o HDMI/DVI IN 3 del televisor y el conector HDMI del reproductor de DVD/ reproductor de televisión digital.
Panel posterior delreproductor de dVd Panel posterior del tV
Cable de HdmI (no incluido)
¿Qué es HDMI? • HDMI, o interfaz multimedia de alta definición, es una interfaz de la siguiente
generación que permite la transmisión de señales digitales de audio y de vídeo mediante un cable simple sin compresión.
• La diferencia entre los dispositivos HDMI y DVI es que el HDMI es más pequeño y tiene instalada la función de codificación HDCP (protección alta de la copia digital del ancho de banda).
Cada reproductor de DVD tiene una configuración distinta en el panel posterior. El modelo de 32, 40, 46 pulgadas sólo admite HDMI3.
Conexión de un DVD o un Decodificador digital mediante DVISolo es aplicable si hay un conector de salida de DVI en el dispositivo externo.. Conecte un cable de DVI
a HDMI o un adaptador de DVI-HDMI entre el conector de HDMI IN 1 del televisor y el conector de DVI del reproductor de DVD/reproductor de televisión digital.
. Conecte un cable de audio entre la toma de entrada de DVI IN(HDMI 1) [R-AUDIO-L] del televisor y las tomas AUDIO OUT del reproductor de DVD/reproductor de televisión digital.
Cada reproductor de DVI tiene una configuración distinta en el panel posterior. Cuando conecte un reproductor de DVI, debe hacer coincidir los colores del terminal de conexión y del cable. Cuando se usa una conexión de cable HDMI/DVI, se debe conectar en el terminal HDMI IN 1.
Panel posterior del tV
dVd/reproductor detelevisión digital
Cable de audio (no incluido)
Cable dVI a HdmI (no incluido)
BN68-01167A-Spa-00.indd 10 2007-02-09 9:30:40
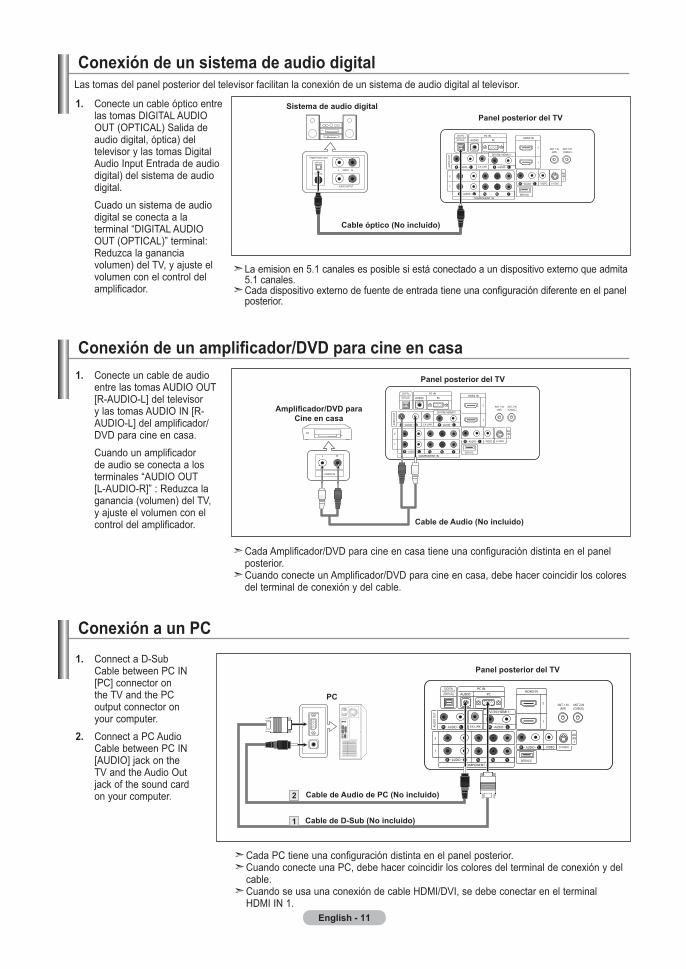
Conexión de un amplificador/DVD para cine en casa. Conecte un cable de audio
entre las tomas AUDIO OUT [R-AUDIO-L] del televisor y las tomas AUDIO IN [R-AUDIO-L] del amplificador/DVD para cine en casa.
Cuando un amplificador de audio se conecta a los terminales “AUDIO OUT [L-AUDIO-R]” : Reduzca la ganancia (volumen) del TV, y ajuste el volumen con el control del amplificador.
Amplificador/DVD paraCine en casa
Panel posterior del tV
Cable de audio (no incluido)
Cada Amplificador/DVD para cine en casa tiene una configuración distinta en el panel posterior. Cuando conecte un Amplificador/DVD para cine en casa, debe hacer coincidir los colores del terminal de conexión y del cable.
English -
Conexión de un sistema de audio digital
. Conecte un cable óptico entre las tomas DIGITAL AUDIO OUT (OPTICAL) Salida de audio digital, óptica) del televisor y las tomas Digital Audio Input Entrada de audio digital) del sistema de audio digital.
Cuado un sistema de audio digital se conecta a la terminal “DIGITAL AUDIO OUT (OPTICAL)” terminal: Reduzca la ganancia volumen) del TV, y ajuste el volumen con el control del amplificador.
sistema de audio digitalPanel posterior del tV
Cable óptico (no incluido)
La emision en 5.1 canales es posible si está conectado a un dispositivo externo que admita 5.1 canales. Cada dispositivo externo de fuente de entrada tiene una configuración diferente en el panel posterior.
Las tomas del panel posterior del televisor facilitan la conexión de un sistema de audio digital al televisor.
Conexión a un PC. Connect a D-Sub Cable between PC IN [PC] connector on the TV and the PC output connector on your computer. . Connect a PC Audio Cable between PC IN [AUDIO] jack on the TV and the Audio Out jack of the sound card on your computer.
Cada PC tiene una configuración distinta en el panel posterior. Cuando conecte una PC, debe hacer coincidir los colores del terminal de conexión y del cable. Cuando se usa una conexión de cable HDMI/DVI, se debe conectar en el terminal HDMI IN 1.
PC
Panel posterior del tV
Cable de d-sub (no incluido)
Cable de audio de PC (no incluido)
BN68-01167A-Spa-00.indd 11 2007-02-09 9:30:42
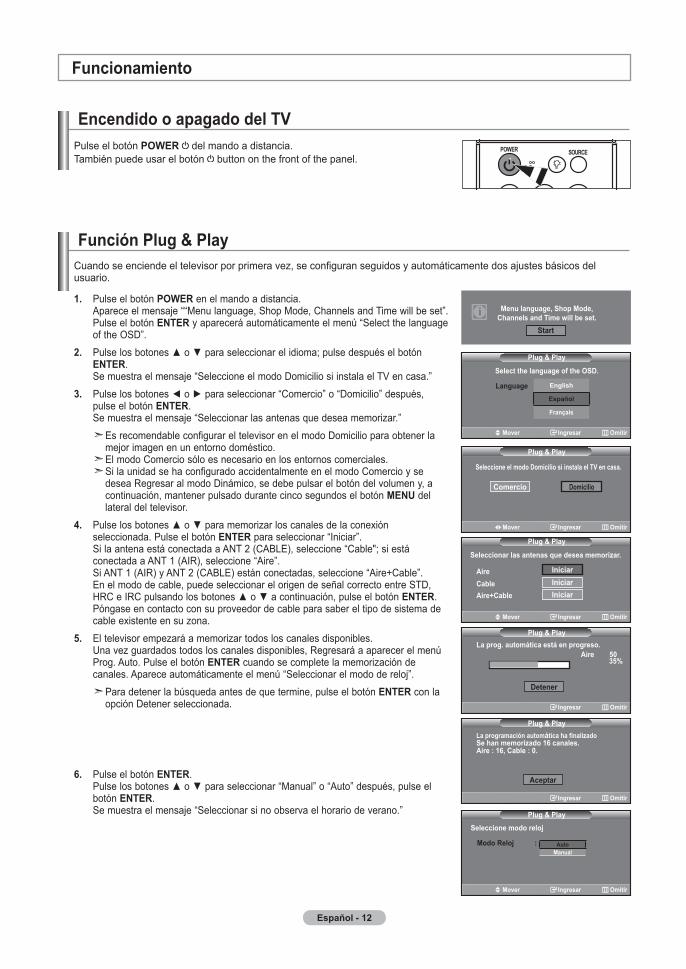
Español -
función Plug & PlayCuando se enciende el televisor por primera vez, se configuran seguidos y automáticamente dos ajustes básicos del usuario.
. Pulse el botón PoWEr en el mando a distancia. Aparece el mensaje ““Menu language, Shop Mode, Channels and Time will be set”. Pulse el botón EntEr y aparecerá automáticamente el menú “Select the language of the OSD”.
. Pulse los botones o para seleccionar el idioma; pulse después el botón EntEr. Se muestra el mensaje “Seleccione el modo Domicilio si instala el TV en casa.”. Pulse los botones o para seleccionar “Comercio” o “Domicilio” después,
pulse el botón EntEr. Se muestra el mensaje “Seleccionar las antenas que desea memorizar.”
Es recomendable configurar el televisor en el modo Domicilio para obtener la mejor imagen en un entorno doméstico.
El modo Comercio sólo es necesario en los entornos comerciales. Si la unidad se ha configurado accidentalmente en el modo Comercio y se
desea Regresar al modo Dinámico, se debe pulsar el botón del volumen y, a continuación, mantener pulsado durante cinco segundos el botón mEnu del lateral del televisor.
. Pulse los botones o para memorizar los canales de la conexión seleccionada. Pulse el botón EntEr para seleccionar “Iniciar”. Si la antena está conectada a ANT 2 (CABLE), seleccione “Cable"; si está conectada a ANT 1 (AIR), seleccione “Aire”. Si ANT 1 (AIR) y ANT 2 (CABLE) están conectadas, seleccione “Aire+Cable”. En el modo de cable, puede seleccionar el origen de señal correcto entre STD, HRC e IRC pulsando los botones o a continuación, pulse el botón EntEr. Póngase en contacto con su proveedor de cable para saber el tipo de sistema de cable existente en su zona.
. El televisor empezará a memorizar todos los canales disponibles. Una vez guardados todos los canales disponibles, Regresará a aparecer el menú Prog. Auto. Pulse el botón EntEr cuando se complete la memorización de canales. Aparece automáticamente el menú “Seleccionar el modo de reloj”.
Para detener la búsqueda antes de que termine, pulse el botón EntEr con la opción Detener seleccionada.
6. Pulse el botón EntEr. Pulse los botones o para seleccionar “Manual” o “Auto” después, pulse el botón EntEr. Se muestra el mensaje “Seleccionar si no observa el horario de verano.”
Encendido o apagado del tVPulse el botón PoWEr del mando a distancia. También puede usar el botón button on the front of the panel.
funcionamiento
language
Plug & Play
English
Español
français
mover Ingresar omitir
select the language of the osd.
seleccione el modo domicilio si instala el tV en casa.
Plug & Play
Comercio domicilio
mover Ingresar omitir
Seleccionar las antenas que desea memorizar.
Iniciaraire
Plug & Play
Cableaire+Cable
IniciarIniciar
mover Ingresar omitir
Plug & Playla programación automática ha finalizadoSe han memorizado 16 canales.aire : 6, Cable : 0.
modo reloj :
mover Ingresar omitir
seleccione modo relojPlug & Play
automanual
menu language, shop mode, Channels and time will be set.
start
Plug & Play
%
detener
Ingresar omitir
la prog. automática está en progreso.aire 0
aceptar
Ingresar omitir
BN68-01167A-Spa-00.indd 12 2007-02-09 9:30:46
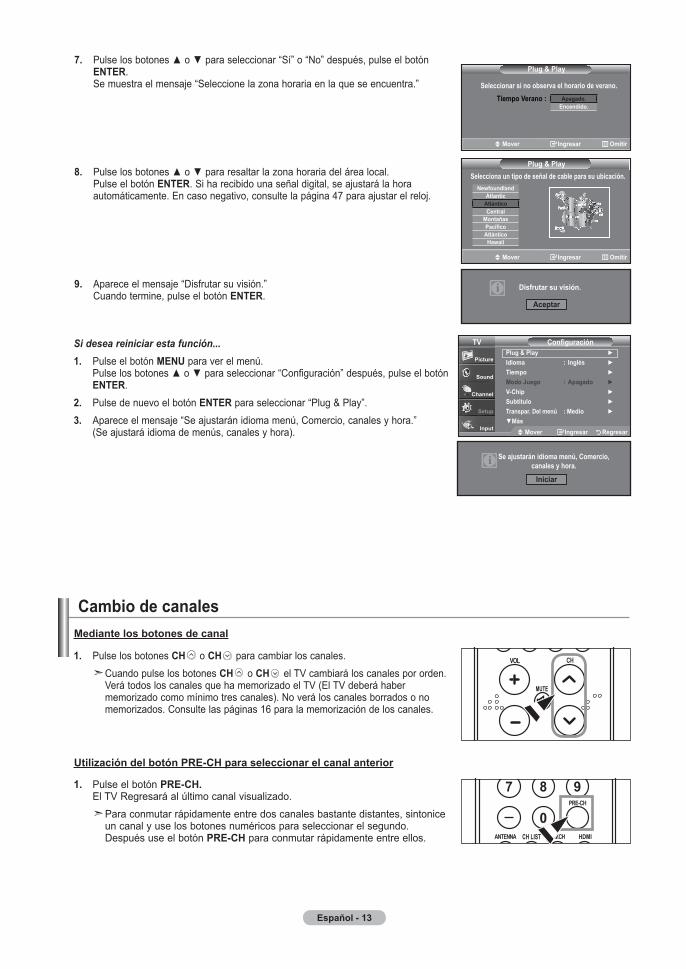
Español -
. Pulse los botones o para seleccionar “Sí” o “No” después, pulse el botón EntEr. Se muestra el mensaje “Seleccione la zona horaria en la que se encuentra.”
. Pulse los botones o para resaltar la zona horaria del área local. Pulse el botón EntEr. Si ha recibido una señal digital, se ajustará la hora automáticamente. En caso negativo, consulte la página 47 para ajustar el reloj.
. Aparece el mensaje “Disfrutar su visión.” Cuando termine, pulse el botón EntEr.
Cambio de canales
. Pulse los botones CH o CH para cambiar los canales. Cuando pulse los botones CH o CH el TV cambiará los canales por orden.
Verá todos los canales que ha memorizado el TV (El TV deberá haber memorizado como mínimo tres canales). No verá los canales borrados o no memorizados. Consulte las páginas 16 para la memorización de los canales.
Si desea reiniciar esta función.... Pulse el botón mEnu para ver el menú. Pulse los botones o para seleccionar “Configuración” después, pulse el botón
EntEr.. Pulse de nuevo el botón EntEr para seleccionar “Plug & Play”.. Aparece el mensaje “Se ajustarán idioma menú, Comercio, canales y hora.”
(Se ajustará idioma de menús, canales y hora).
mediante los botones de canal
. Pulse el botón PrE-CH. El TV Regresará al último canal visualizado. Para conmutar rápidamente entre dos canales bastante distantes, sintonice
un canal y use los botones numéricos para seleccionar el segundo. Después use el botón PrE-CH para conmutar rápidamente entre ellos.
Utilización del botón PRE-CH para seleccionar el canal anterior
tiempo Verano :
mover Ingresar omitir
seleccionar si no observa el horario de verano.
Plug & Play
apagado.Encendido.
mover Ingresar omitir
selecciona un tipo de señal de cable para su ubicación.Plug & Play
newfoundlandatlantic
atlánticoCentral
montañasPacíficoatlánticoHawaii
disfrutar su visión.
aceptar
ConfiguraciónPlug & Play Idioma : Inglés tiempo modo juego : apagado V-Chip subtítulo transpar. del menú : medio más
tV
mover Ingresar regresar
se ajustarán idioma menú, Comercio, canales y hora.
Iniciar
BN68-01167A-Spa-00.indd 13 2007-02-09 9:30:48
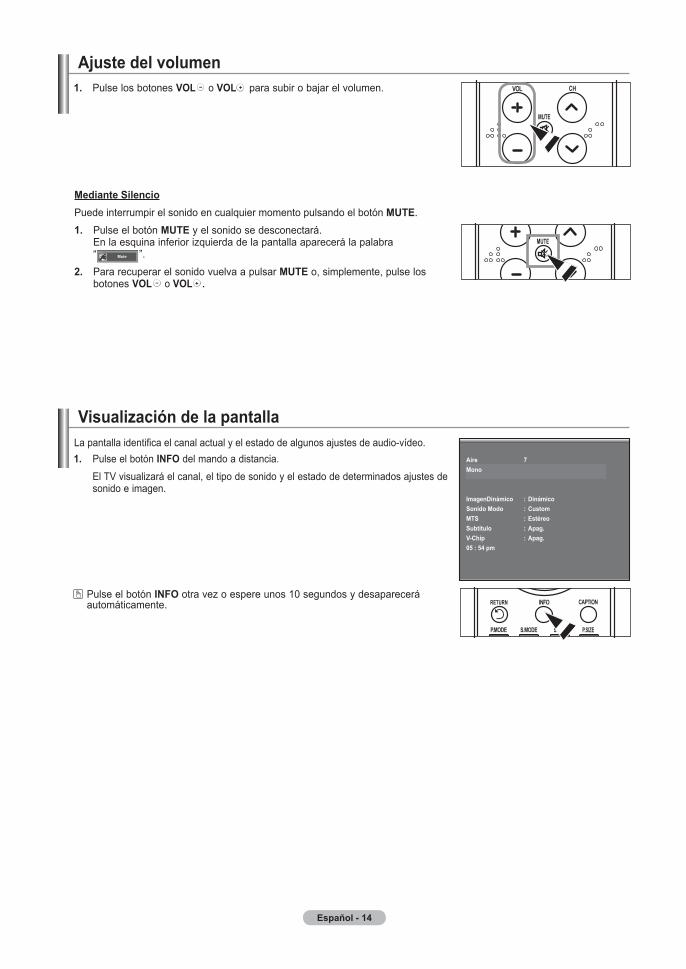
Español -
ajuste del volumen. Pulse los botones Vol o Vol para subir o bajar el volumen.
mediante silencioPuede interrumpir el sonido en cualquier momento pulsando el botón mutE.. Pulse el botón mutE y el sonido se desconectará.
En la esquina inferior izquierda de la pantalla aparecerá la palabra “ ”.
. Para recuperar el sonido vuelva a pulsar mutE o, simplemente, pulse los botones Vol o Vol .
Visualización de la pantalla
. Pulse el botón Info del mando a distancia. El TV visualizará el canal, el tipo de sonido y el estado de determinados ajustes de
sonido e imagen.
Pulse el botón Info otra vez o espere unos 10 segundos y desaparecerá automáticamente.
La pantalla identifica el canal actual y el estado de algunos ajustes de audio-vídeo.aire mono
Imagendinámico : dinámicosonido modo : Custommts : Estéreosubtítulo : apag.V-Chip : apag.0 : pm
BN68-01167A-Spa-00.indd 14 2007-02-09 9:30:49

Español -
Visualización de los menús. Con el aparato encendido, pulse el botón mEnu.
En la pantalla aparece el menú principal. En el lado izquierdo del menú hay cinco iconos:
. Pulse los botones o para seleccionar uno de los cinco iconos. A continuación, pulse EntEr para acceder al submenú del icono.
. Pulse el botón ExIt para salir.
Pasado aproximadamente un minuto, los menús de la pantalla desaparecen de ésta.
Memorización de los canalesEl TV puede memorizar y almacenar todos los canales disponibles, tanto de “antena” como de cable. Una vez memorizados los canales disponibles, use los botones CH y CH para explorarlos. De este modo no es necesario cambiar los canales introduciendo los dígitos. La memorización de canales tiene tres pasos: seleccionar una emisora de origen, memorizar los canales (automático) y agregar o borrar canales (manual).
selección del origen de la señal de vídeoAntes de empezar a memorizar los canales disponibles, debe indicar el tipo de origen de la señal conectada al TV (es decir, antena o sistema de cable).. Pulse el botón mEnu para visualizar el menú.
Pulse los botones o para seleccionar “Canal” y, después, pulse el botón EntEr.
. Pulse el botón EntEr para seleccionar “Antena”. Pulse los botones o para seleccionar “Aire” o “Cable” después, pulse el botón EntEr. Pulse el botón ExIt para salir.
Entradalista de origen : tV Editar nombre
tV
mover Ingresar salir
antena : aire Prog. auto Borrar canal encriptado lista de canales nombre sintonia fina Intensidad señal lna : apagado
Canal
mover Ingresar regresar
tV
Canal
mover Ingresar regresar
tVantena :aire Prog. auto Borrar canal encriptado lista de canales nombre sintonia fina Intensidad señal lna : apagado
aireCable
BN68-01167A-Spa-00.indd 15 2007-02-09 9:30:51

Español - 6
almacenamiento de los canales en la memoria (método automático)
. Pulse el botón mEnu para visualizar el menú. Pulse los botones o para seleccionar “Canal” y, después, pulse el botón EntEr.
. Pulse los botones o para seleccionar “Prog. Auto” y, después, pulse el botón EntEr.
. Pulse los botones o para seleccionar la conexión de la antena, después pulse EntEr.
Aire.: señal de antena “Aire.”. / Cable: señal de antena de “Cable”. / Aire + Cable: señales de antena “Aire.” y de “Cable”.
. Al seleccionar el sistema de TV de cable: Pulse el botón EntEr para iniciar el programa automático.De forma predeterminada, el sistema de televisión por cable está establecido en "STD". Si desea seleccionar otro tipo de sistema de cable, pulse los botones o para seleccionar las opciones “STD”, “HRC” o “IRC”.
STD, HRC e IRC identifican los distintos tipos de sistemas de TV por cable. Póngase en contacto con su proveedor de cable para averiguar el tipo de sistema de cable existente en su zona. En este momento ya se ha seleccionado el origen de la señal.
Pulse EntEr para iniciar el programa automático. Para detener la búsqueda antes de que termine, pulse el botón EntEr con la
opción Detener seleccionada. . Una vez memorizados todos los canales disponibles, el menú “Prog. Auto”,
Regresará a aparecer. Pulse el botón ExIt para salir.
mover Enter return
Seleccionar las antenas que desea memorizar.
Canal
mover Ingresar regresar
tV
IniciaraireCableaire+Cable
IniciarIniciar
move Enter return
selecciona un tipo de señal de cable para su ubicación.Prog. auto
mover Ingresar regresar
tV
analógicoIniciarstd
HrCIrC
digitalstdHrCIrC
moverrr Enter regresar
Canal
mover Ingresar regresar
tVantena : aire Prog. auto Borrar canal encriptado lista de canales nombre sintonia fina Intensidad señal lna : apagado
Plug & Play
%
detener
Ingresar omitir
la prog. automática está en progreso.aire Canal 0
Alternativo, Pulse el botón AUTO PROG. del mando a distancia para mostrar menú Prog. Auto.
Plug & Playla programación automática ha finalizadoSe han memorizado 16 canales.aire : 6, Cable : 0.
aceptar
Ingresar omitir
BN68-01167A-Spa-00.indd 16 2007-02-09 9:30:54

Español -
Una vez configurado correctamente, el mando a distancia puede funcionar en cinco modos diferentes: TV, DVD, Cable (Decodificador), Set- Top Box (receptor TV digital), o VCR (vídeo). Pulsando el botón correspondiente del mando a distancia podrá cambiar de un modo a otro y controlar cualquiera de estos equipos.
El mando a distancia quizá no sea compatible con todos los reproductores de DVD, vídeos, decodificadores y receptores de TV digital.
Configuración del mando a distancia para controlar el vídeo. Apague el vídeo.. Pulse el botón VCr del mando a distancia del televisor.. Pulse el botón sEt del mando a distancia del televisor.. Mediante los botones numericos del mando a distancia, introduzca los tres dígitos del
código del vídeo correspondientes a la marca de su vídeo, que aparece en la lista de la página 18 de este manual. Asegúrese de introducir los tres dígitos del código, incluso aunque el primero sea un “0”. (Si aparece más de un código, inténtelo con el primero.)
. Pulse el botón PoWEr del mando a distancia. El vídeo debería encenderse si el mando está correctamente configurado.
Si el vídeo no se enciende, repita los pasos 2, 3 y 4 pero pruebe con otro de loscódigos indicados para la marca de su vídeo. Si no aparece ningún otro código, pruebe con todos los códigos de vídeo, desde el 000 hasta el 080.
Nota sobre el uso de los modos del mando a distancia: vídeo Cuando el mando a distancia esté en el modo “VCR”, los botones de volumen seguirán controlando el volumen del televisor.
Configuración del mando a distancia para controlar el decodificador de cable. Apague el decodificador del cable.. Pulse el botón CaBlE del mando a distancia del televisor.3. Pulse el botón sEt del mando a distancia del televisor.4. Mediante los botones numericos del mando a distancia, introduzca los tres dígitos del
código de decodificador de cable correspondientes a la marca de su decodificador, que aparece en la lista de la página 19 de este manual. Asegúrese de introducir los tres dígitos del código, incluso aunque el primer dígito sea un “0”. (Si aparece más de un código, inténtelo con el primero.)
5. Pulse el botón PoWEr del mando a distancia. El decodificador de cable debería encenderse si el mando está correctamente configurado.
Si el decodificador no se enciende, repita los pasos 2, 3 y 4 pero pruebe con otro de los códigos indicados para la marca de su decodificador. Si no aparece ningún otro código, pruebe con todos los códigos, desde el 000 al 046.
Nota sobre el uso de los modos del mando a distancia: decodificador de cable Cuando el mando a distancia esté en el modo “CABLE”, los botones de volumen seguirán controlando el volumen del televisor.
Configuración del mando a distancia (Dependiendo del modelo)
BN68-01167A-Spa-00.indd 17 2007-02-09 9:30:54

Español -
Configuración del mando a distancia para controlar el dVd. Apague el DVD.. Pulse el botón dVd del mando a distancia del televisor.. Pulse el botón sEt del mando a distancia del televisor.. Mediante los botones numericos del mando a distancia, introduzca los tres dígitos del
código del DVD correspondientes a la marca de su DVD, que aparece en la lista de la página19~20 de este manual. Asegúrese de introducir los tres dígitos del código, incluso aunque el primer dígito sea un “0.” (Si aparece más de un código, inténtelo con el primero.)
. Pulse el botón PoWEr del mando a distancia. El DVD debería encenderse si el mando está correctamente configurado. Si el DVD no se enciende, repita los pasos 2, 3 y 4 pero pruebe con otro de los códigos indicados para la marca de su DVD. Si no aparece ningún otro código, inténtelo con cada uno de ellos, del 000 al 141.
Nota sobre el uso de los modos del mando a distancia: DVD Cuando el mando a distancia esté en el modo “DVD”, los botones de volumen seguirán controlando el volumen del televisor.
Configuración del mando a distancia para controlar el stB. Apague el STB.. Pulse el botón stB del mando a distancia del televisor.. Pulse el botón sEt del mando a distancia del televisor.. Mediante los botones numericos del mando a distancia, introduzca los tres dígitos del
código del STB correspondientes a la marca de su STB, que aparece en la lista de la página 21 de este manual. Asegúrese de introducir los tres dígitos del código, incluso aunque el primer dígito sea un “0.” (Si aparece más de un código, inténtelo con el primero.)
. Pulse el botón PoWEr del mando a distancia. El STB debería encenderse si el mando está correctamente configurado. Si el STB no se enciende, repita los pasos 2, 3 y 4 pero pruebe con otro de los códigos indicados para la marca de su STB. Si no aparece ningún otro código, inténtelo con cada uno de ellos, del 000 al 074.
Nota sobre el uso de los modos del mando a distancia: STB Cuando el mando a distancia esté en el modo “STB”, los botones de volumen seguirán controlando el volumen del televisor.
BN68-01167A-Spa-00.indd 18 2007-02-09 9:30:55

Español -
Códigos de vídeo
marca CodigoSAMSUNG 000 001 002 003 004 005 077 078 079ADMIRAL 020AIWA 025AKAI 004 027 032AUDIO DYNAMICS 007 026BELL&HOWELL 018BROKSONIC 022CANDLE 002 003 006 008 015 055CANON 021 056CITIZEN 002 003 006 008 015 055COLORTYME 007CRAIG 002 024CURTIS MATHES 002 007 008 017 021 025 056 064 066DAEWOO 003 010 011 012 013 014 015 016DB 007 026DIMENSIA 017DYNATECH 025ELECTROHOME 034EMERSON 001 003 006 021 022 025 030 032 034 040
047 050 052 060 063 065 066 067 069 073FISHER 018 024 028 029 048 051 061FUNAI 025GENERAL ELECTRIC 002 005 017 021 056GO VIDEO 002HARMAN KARDON 007HITACHI 019 025 041 042 074INSTANT REPLAY 021JC PENNEY 002 007 018 019 021 026 037 041 054 056JCL 007 008 018 021 026 037JVC 081 082 083KENWOOD 007 008 018 021 026 037KLH 070KONIA 036LG(Goldstar) 006 007 008 009 010LIOYD 025LOGIK 038LXI 025MAGNAVOX 021 056 059MARANTZ 007 008 018 021 026 037 062MARTA 006MEI 021MEMOREX 006 021 024 025MGA 034MIDLAND 005MINOLTA 019 041 075MITSUBISHI 019 034 041 046
marca CodigoMONTGOMERY WARD 020MTC 002 025MULTITECH 002 005 025 038NEC 007 008 018 026 037 062 064OPTIMUS 020ORION 073 074 075 076PANASONIC 021 056 071 072PENTAX 019 041 075PENTEX RESEARCH+ 008PHILCO 021 056 059PHILIPS 021 080PIONEER 019 026 039 053PORTLAND 015 049 055PROSCAN 017QUARTZ 018QUASAR 021 056RADIO SHACK/REALISTIC
006 018 020 021 024 025 029 034 048 056
RCA 002 017 019 021 035 041 043 057 068 076SANSUI 026SANYO 018 024SCOTT 003 047 052 067SEARS 006 018 019 024 028 029 041 048 051SHARP 020 034 045 015SHIMTOM 027 033 038 058SIGNATURE 025SONY 027 033 044SYLVANIA 021 025 056 059SYMPHONIC 025TANDY 018 025TASHIKA 006TATUNG 037TEAC 025 037 068TECHNICS 021TEKNIKA 006 021 025 031TMK 066TOSHIBA 003 019 029 051 052TOTEVISION 002 006UNITECH 002VECTOR RESEARCH 007 026VICTOR 026VIDEO CONCEPTS 007 026VIDEOSONIC 002WARDS 002 003 006 019 020 021 024 025 034 038 041YAMAHA 007 008 018 026 037ZENITH 023 027 033
Códigos del mando a distancia
BN68-01167A-Spa-00.indd 19 2007-02-09 9:30:56

Español - 0
Códigos de cablemarca CodigoSAMSUNG 000 001 002 003 004 005 006 007GI 041HAMLIN 003 024 031HITACHI 025 030JERROLD 038 039MACOM 025 030MAGNAVOX 019 023 028OAK 026PANASONIC 003 022 027 037 044PHILIPS 019 021 023 028PIONEER 004 018 020 044RCA 014 022 040REGAL 003
marca CodigoREGENCY 015 023SA 042 043SCIENTIFIC ATLAN 042 043SPRUCER 022STARGATE 2000 036SYLVANIA 016TEXSCAN 016TOCOM 032UNIVERSAL 033 034VIEWSTAR 019 021 023 028WARNER AMEX 046ZENITH 017 029 035 037 045
samsunG Códigos de dVdProducto CodigoDVD 000 001 002DVDR 003 004BD Record 005 006VCR COMBO 007 008 009 010 011VCR Record 012DHR COMBO 013
Producto CodigoHome Theater VCR COMBO 014 015 016HDD Recorder COMBO 017TWIN TRAY COMBO 018STB DVD COMBO 019DVD Receiver 020AV Receiver 021
Códigos de dVdmarca CodigoANAM 030AUDIOVOX 075AUDIOLOGIC 085ANABA 072APEX DIGITAL 070 071 074 086 083 084 088 111 112AIWA 114BROKSONIC 062BLAUPUNKT 074B&K 122 123CURTIS MATHES 027CYBER HOME 077 078 079 082CLARION 080 125CIRRUS 081CYBER HOME 065CINEVISION 095DAEWOO 066DENON 146FARENHEIT 067 068FISHER 090GPX 060GO VIDEO 061 089 133 135GE 069 074GREENHILL 074HITACHI 064 113HITEKER 071HOYO 073HARMAN / KARDON 091 110IRT 089
marca CodigoINTEGRA 092JBL 091JVC 022 033 115 116JATON 073KENWOOD 051 108 109KISS 073KONKA 059 100 106 107KLH 074 075LG(Goldstar) 025 031LOEWE 057LASONIC 058 MOBILE AUTHORITY 054MEMOREX 055MALATA 056MAGNAVOX 076 093MINTEK 074 094MONYKA 073NORCENT 048 049 050NEXT BASE 052NEC 053NANTAUS 144NESA 074OPTOMEDIA ELECTRONICS 105OPTIVIEW 072ONKYO 076 092 119PHILCO 044 045PRINCETON 046 047PROSCAN 023
BN68-01167A-Spa-00.indd 20 2007-02-09 9:30:56

Español -
Códigos de dVdmarca CodigoPANASONIC 024 034 124 134 136 137 138PHILIPS 036 076ROTEL 117 118RIO 120RCA 023 035 074 075 131 132RAITE 073ROWA 038SAMPO 104SONY 026 029 126 127 128 129 130 141SHERWOOD 039 041SVA 042SYLVANIA 043 093SHARP 140SANSUI 062SANYO 062 090SHINSONIC 094
marca CodigoTHOMSON 145TOSHIBA 028 062 076TECHNICS 139TVIEW 072TOKAI 073TEAC 096TECHWOOD 097TREDEX 098 099 101URBAN CONCEPTS 076VENTURER 075VOCOPRO 102YAMAHA 032 063YAMAKAWA 040 073XWAVE 103ZENITH 076 121
samsunG Códigos de stBProducto CodigoSatellite STB HDD COMBO Premium 010CABLE STB HDD COMBO Standard 011CABLE STB HDD COMBO Premium 012Ground wave STB HDD COMBO Standard 013Ground wave STB HDD COMBO Premium 014
Producto CodigoGround wave STB 001 002Satellite STB 003CABLE STB 004STB DVD COMBO 008Satellite STB HDD COMBO Standard 009
Códigos de stBmarca CodigoALPHASTAR 023ANAM 043CHANNEL MASTER 018 034CROSSDIGITAL 019CHAPARRAL 035DIRECT TV 015 016 017 019 022 045 060 061 062
065 066 067 068DAEWOO 074DISH NETWORK SYSTEM 069 070DISHPRO 069DRAKE 018 024 032DX ANTENNA 027ECHOSTAR 025 069 070 071EXPRESSVU 069GOI 069GE 065GENERAL INSTRUMENT 046 047 048 063 064HTS 069HOME CABLE 056HITACHI 022HUGHES NETWORK 015 017IQ 020IQ PRISM 020JANEIL 059JERROID 063JVC 069 070LG(Goldstar) 044 073
marca CodigoMAGNAVOX 016 021 036 038 039 040 041 042MEMOREX 016MOTOROLA 064MACOM 018MITSUBISHI 015NEXT LEVEL 047 048 064PHILIPS 015 016 017 021 033 036 038 039 040
041 042 067PRIMESTAR 046 049 050 063PANASONIC 058 059 061 062PAYSAT 016PROSCAN 065 066RCA 051 052 053 065 066RADIOSHACK 064REALISTIC 057STAR TRAK 026STS 020 027SKY 031SKY LIFE 005 006 007SHACK 064STAR CHOICE 064SONY 054 060TOSHIBA 015 017 028 029 030 072ULTIMATE TV 060 066UNIDEN 016 021 037 055 056 057ZENITH 024 031 068
BN68-01167A-Spa-00.indd 21 2007-02-09 9:30:56
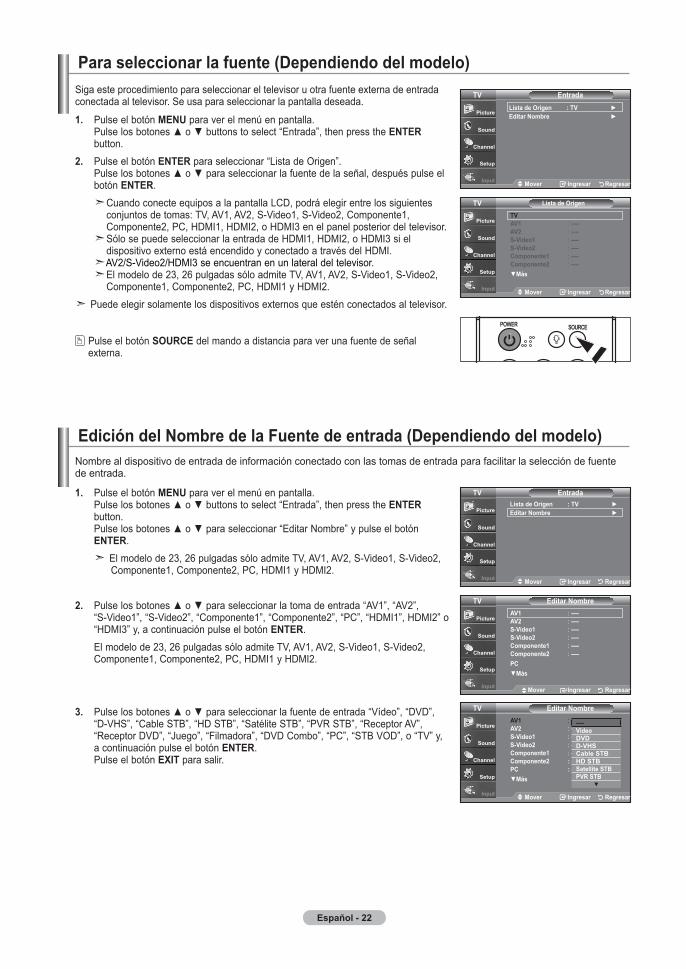
Español -
Para seleccionar la fuente (dependiendo del modelo)Siga este procedimiento para seleccionar el televisor u otra fuente externa de entrada conectada al televisor. Se usa para seleccionar la pantalla deseada.
. Pulse el botón mEnu para ver el menú en pantalla. Pulse los botones o buttons to select “Entrada”, then press the EntEr button.
. Pulse el botón EntEr para seleccionar “Lista de Origen”. Pulse los botones o para seleccionar la fuente de la señal, después pulse el botón EntEr.
Cuando conecte equipos a la pantalla LCD, podrá elegir entre los siguientes conjuntos de tomas: TV, AV1, AV2, S-Video1, S-Video2, Componente1, Componente2, PC, HDMI1, HDMI2, o HDMI3 en el panel posterior del televisor.
Sólo se puede seleccionar la entrada de HDMI1, HDMI2, o HDMI3 si el dispositivo externo está encendido y conectado a través del HDMI.
AV2/S-Video2/HDMI3 se encuentran en un lateral del televisor. El modelo de 23, 26 pulgadas sólo admite TV, AV1, AV2, S-Video1, S-Video2,
Componente1, Componente2, PC, HDMI1 y HDMI2. Puede elegir solamente los dispositivos externos que estén conectados al televisor.
Pulse el botón sourCE del mando a distancia para ver una fuente de señal externa.
Edición del nombre de la fuente de entrada (dependiendo del modelo)Nombre al dispositivo de entrada de información conectado con las tomas de entrada para facilitar la selección de fuente de entrada.
. Pulse el botón mEnu para ver el menú en pantalla. Pulse los botones o buttons to select “Entrada”, then press the EntEr button. Pulse los botones o para seleccionar “Editar Nombre” y pulse el botón EntEr.
El modelo de 23, 26 pulgadas sólo admite TV, AV1, AV2, S-Video1, S-Video2, Componente1, Componente2, PC, HDMI1 y HDMI2.
. Pulse los botones o para seleccionar la toma de entrada “AV1”, “AV2”, “S-Video1”, “S-Video2”, “Componente1”, “Componente2”, “PC”, “HDMI1”, HDMI2” o “HDMI3” y, a continuación pulse el botón EntEr.
El modelo de 23, 26 pulgadas sólo admite TV, AV1, AV2, S-Video1, S-Video2, Componente1, Componente2, PC, HDMI1 y HDMI2.
. Pulse los botones o para seleccionar la fuente de entrada “Vídeo”, “DVD”, “D-VHS”, “Cable STB”, “HD STB”, “Satélite STB”, “PVR STB”, “Receptor AV”, “Receptor DVD”, “Juego”, “Filmadora”, “DVD Combo”, “PC”, “STB VOD”, o “TV” y, a continuación pulse el botón EntEr. Pulse el botón ExIt para salir.
lista de origentV
mover Ingresar regresar
tVaV : ----aV : ----s-Video : ----s-Video : ----Componente : ----Componente : ----más
Editar nombretV
mover Ingresar regresar
aV : ----aV : ----s-Video : ----s-Video : ----Componente : ----Componente : ----PCmás
Editar nombretV
mover Ingresar regresar
aV : ----aV : ----s-Video : ----s-Video : ----Componente : ----Componente : ----PC : ----más
----VídeodVdd-VHsCable stBHd stBsatellite stBPVr stB
EntradatV
mover Ingresar regresar
lista de origen : tV Editar nombre
EntradatVlista de origen : tV Editar nombre
mover Ingresar regresar
BN68-01167A-Spa-00.indd 22 2007-02-09 9:30:59

Español -
uso de los parámetros de imagen automáticosEl TV tiene cuatro valores de imagen automáticos (“Dinámico”, “Normal”, “Cine”, y “Favorito”) predeterminados de fábrica. Puede activar el ajuste Dinámico, Normal o Película seleccionándolo en el menú.
. Pulse el botón mEnu para ver el menú en pantalla. Pulse el botón EntEr para seleccionar “Imagen”.
. Pulse el botón EntEr para seleccionar “Modo”. Pulse de nuevo el botón EntEr. Pulse los botones o para seleccionar el ajuste de imagen “Dinámico”, “Normal”, o “Cine”. Pulse el botón EntEr.
Elija dinámico para aumentar la claridad y la definición de la imagen.• Elija normal para Regresar a la configuración estándar de fábrica.• Elija Cine para obtener una imagen natural sin mejoras.
. Pulse los botones o para seleccionar “Contraste”, “Luminos.”, “Definición”, “Color”, y “Tinte” después, pulse el botón EntEr.
. Pulse los botones o para aumentar o reducir el valor de una opción concreta. Por ejemplo, si selecciona “Contraste”, pulse para incrementarlo.
Pulse el botón ExIt para salir. • Cuando haga cambios en “Contraste”, “Luminos.”, “Color”, o “Tinte”, el color
del OSD también se ajustará. • En el modo PC, las opciones Tinte, Definición y Color no están disponibles.
Pulse repetidamente el botón P.modE del mando adistancia para seleccionar un modo de imagen.
Control de la Imagen
00
Contraste
mover ajustar regresar
mover Ingresar regresar
modo : dinámico Contraste 00luminos 0definición Color tinte V 0 r 0Luz de fondo 10 Más
ImagentV
mover Ingresar regresar
ImagentVmodo : dinámico Contraste 00luminos 0definición Color tinte V 0 r 0Luz de fondo 10 Más
dinámiconormalCine
mover Ingresar regresar
ImagentVmodo : dinámico Contraste 00luminos 0definición Color tinte V 0 r 0Luz de fondo 10 Más
BN68-01167A-Spa-00.indd 23 2007-02-09 9:31:01
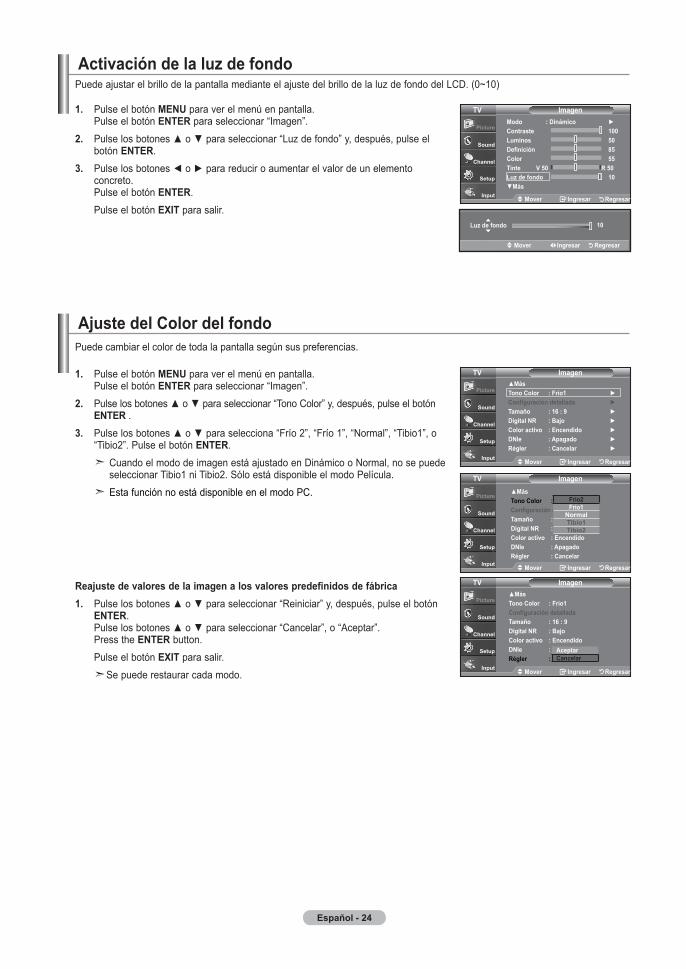
Español -
ajuste del Color del fondoPuede cambiar el color de toda la pantalla según sus preferencias.
. Pulse el botón mEnu para ver el menú en pantalla. Pulse el botón EntEr para seleccionar “Imagen”.. Pulse los botones o para seleccionar “Tono Color” y, después, pulse el botón
EntEr .. Pulse los botones o para selecciona “Frío 2”, “Frío 1”, “Normal”, “Tibio1”, o
“Tibio2”. Pulse el botón EntEr. Cuando el modo de imagen está ajustado en Dinámico o Normal, no se puede
seleccionar Tibio1 ni Tibio2. Sólo está disponible el modo Película. Esta función no está disponible en el modo PC.
reajuste de valores de la imagen a los valores predefinidos de fábrica. Pulse los botones o para seleccionar “Reiniciar” y, después, pulse el botón
EntEr. Pulse los botones o para seleccionar “Cancelar”, o “Aceptar”. Press the EntEr button.
Pulse el botón ExIt para salir. Se puede restaurar cada modo.
Activación de la luz de fondo
. Pulse el botón mEnu para ver el menú en pantalla. Pulse el botón EntEr para seleccionar “Imagen”.
. Pulse los botones o para seleccionar “Luz de fondo” y, después, pulse el botón EntEr.
. Pulse los botones o para reducir o aumentar el valor de un elemento concreto. Pulse el botón EntEr. Pulse el botón ExIt para salir.
Puede ajustar el brillo de la pantalla mediante el ajuste del brillo de la luz de fondo del LCD. (0~10)
mover Ingresar regresar
Mástono Color : frío Configuración detallada tamaño : 6 : digital nr : Bajo Color activo : Encendido dnle : apagado régler : Cancelar
ImagentV
05
Luz de fondo6
mover Ingresar regresar
ImagentVmodo : dinámico Contraste 00luminos 0definición Color tinte V 0 r 0Luz de fondo 10 Más
mover Ingresar regresar
ImagentVMástono Color : frío Configuración detallada tamaño : 6 : digital nr : Bajo Color activo : Encendido dnle : apagado régler : Cancelar
fríofrío
normaltibiotibio
mover Ingresar regresar
mover Ingresar regresar
ImagentVMástono Color : frío Configuración detallada tamaño : 6 : digital nr : Bajo Color activo : Encendido dnle : apag régler :
aceptarCancelar
BN68-01167A-Spa-00.indd 24 2007-02-09 9:31:03
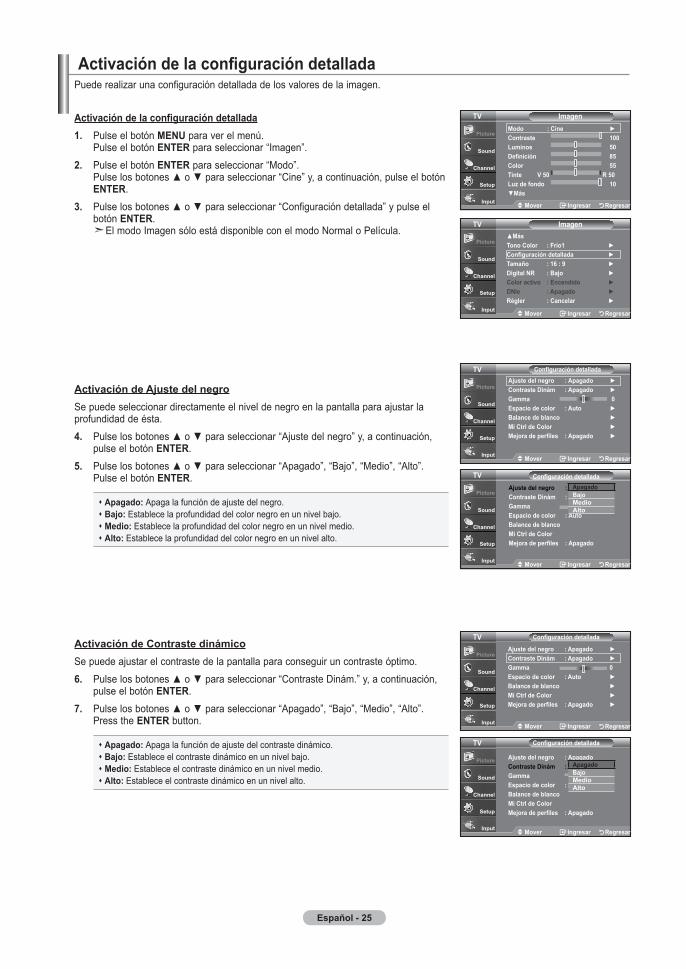
Español -
Puede realizar una configuración detallada de los valores de la imagen.
activación de la configuración detallada. Pulse el botón mEnu para ver el menú.
Pulse el botón EntEr para seleccionar “Imagen”.. Pulse el botón EntEr para seleccionar “Modo”.
Pulse los botones o para seleccionar “Cine” y, a continuación, pulse el botón EntEr.
. Pulse los botones o para seleccionar “Configuración detallada” y pulse el botón EntEr.
El modo Imagen sólo está disponible con el modo Normal o Película.
activación de ajuste del negroSe puede seleccionar directamente el nivel de negro en la pantalla para ajustar la profundidad de ésta.. Pulse los botones o para seleccionar “Ajuste del negro” y, a continuación,
pulse el botón EntEr.. Pulse los botones o para seleccionar “Apagado”, “Bajo”, “Medio”, “Alto”.
Pulse el botón EntEr.
apagado: Apaga la función de ajuste del negro. Bajo: Establece la profundidad del color negro en un nivel bajo. medio: Establece la profundidad del color negro en un nivel medio. alto: Establece la profundidad del color negro en un nivel alto.
activación de Contraste dinámicoSe puede ajustar el contraste de la pantalla para conseguir un contraste óptimo.6. Pulse los botones o para seleccionar “Contraste Dinám.” y, a continuación,
pulse el botón EntEr.. Pulse los botones o para seleccionar “Apagado”, “Bajo”, “Medio”, “Alto”.
Press the EntEr button.
apagado: Apaga la función de ajuste del contraste dinámico. Bajo: Establece el contraste dinámico en un nivel bajo. medio: Establece el contraste dinámico en un nivel medio. alto: Establece el contraste dinámico en un nivel alto.
Activación de la configuración detallada
mover Ingresar regresar
ajuste del negro : apagado Contraste dinám : apagado Gamma 0Espacio de color : auto Balance de blanco mi Ctrl de Color mejora de perfiles : apagado
Configuración detalladatV
mover Ingresar regresar
ImagentVmodo : Cine Contraste 00luminos 0definición Color tinte V 0 r 0Luz de fondo 10 Más
mover Ingresar regresar
ImagentVMástono Color : frío Configuración detallada tamaño : 6 : digital nr : Bajo Color activo : Encendido dnle : apagado régler : Cancelar
mover Ingresar regresar
Configuración detalladatVajuste del negro : apagado Contraste dinám : apagado Gamma 0Espacio de color : auto Balance de blanco mi Ctrl de Color mejora de perfiles : apagado
mover Ingresar regresar
Configuración detalladatV
ajuste del negro : apagado Contraste dinám : apagado Gamma 0Espacio de color : auto Balance de blanco mi Ctrl de Color mejora de perfiles : apagado
apagadoBajomedioalto
mover Ingresar regresar
Configuración detalladatVajuste del negro : apagado Contraste dinám : apag Gamma Espacio de color : auto Balance de blanco mi Ctrl de Color mejora de perfiles : apagado
apagadoBajomedioalto
BN68-01167A-Spa-00.indd 25 2007-02-09 9:31:05
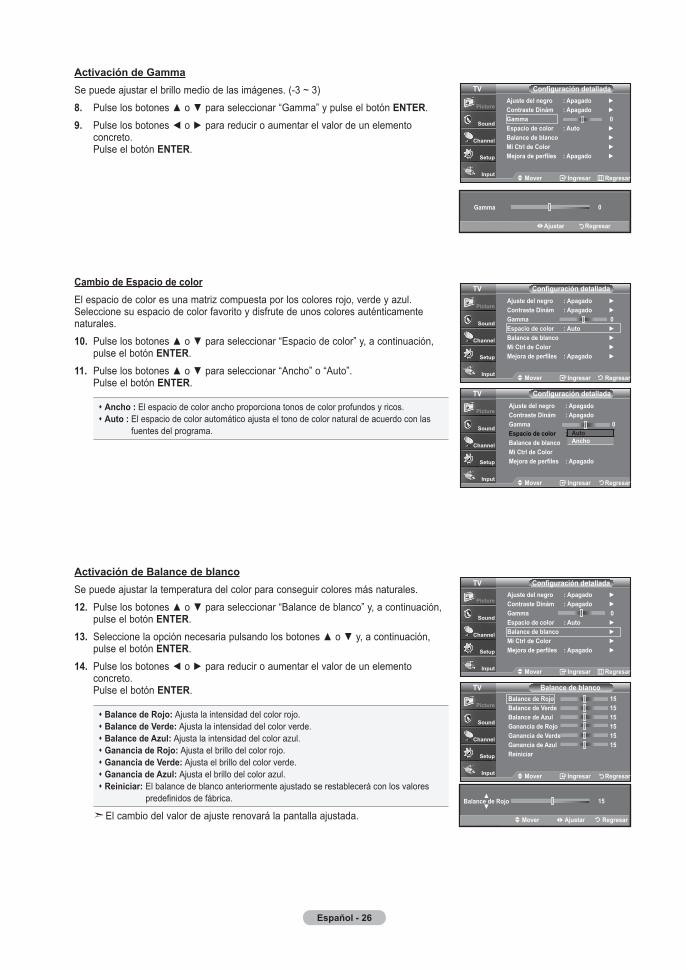
Español - 6
activación de GammaSe puede ajustar el brillo medio de las imágenes. (-3 ~ 3). Pulse los botones o para seleccionar “Gamma” y pulse el botón EntEr.. Pulse los botones o para reducir o aumentar el valor de un elemento
concreto. Pulse el botón EntEr.
Cambio de Espacio de colorEl espacio de color es una matriz compuesta por los colores rojo, verde y azul. Seleccione su espacio de color favorito y disfrute de unos colores auténticamente naturales. 0. Pulse los botones o para seleccionar “Espacio de color” y, a continuación,
pulse el botón EntEr.. Pulse los botones o para seleccionar “Ancho” o “Auto”.
Pulse el botón EntEr.
ancho : El espacio de color ancho proporciona tonos de color profundos y ricos. auto : El espacio de color automático ajusta el tono de color natural de acuerdo con las
fuentes del programa.
activación de Balance de blancoSe puede ajustar la temperatura del color para conseguir colores más naturales.. Pulse los botones o para seleccionar “Balance de blanco” y, a continuación,
pulse el botón EntEr.. Seleccione la opción necesaria pulsando los botones o y, a continuación,
pulse el botón EntEr.. Pulse los botones o para reducir o aumentar el valor de un elemento
concreto. Pulse el botón EntEr.
Balance de rojo: Ajusta la intensidad del color rojo. Balance de Verde: Ajusta la intensidad del color verde. Balance de Azul: Ajusta la intensidad del color azul. Ganancia de rojo: Ajusta el brillo del color rojo. Ganancia de Verde: Ajusta el brillo del color verde. Ganancia de Azul: Ajusta el brillo del color azul. reiniciar: El balance de blanco anteriormente ajustado se restablecerá con los valores
predefinidos de fábrica.
El cambio del valor de ajuste renovará la pantalla ajustada.
mover Ingresar regresar
Balance de rojo Balance de Verde Balance de Azul Ganancia de rojo Ganancia de Verde Ganancia de Azul reiniciar
Balance de blancotV
Balance de rojo
mover ajustar regresar
0
Gamma
ajustar regresar
mover Ingresar regresar
Configuración detalladatVajuste del negro : apagado Contraste dinám : apagado Gamma 0Espacio de color : auto Balance de blanco mi Ctrl de Color mejora de perfiles : apagado
mover Ingresar regresar
Configuración detalladatVajuste del negro : apagado Contraste dinám : apagado Gamma 0Espacio de color : auto Balance de blanco mi Ctrl de Color mejora de perfiles : apagado
mover Ingresar regresar
Configuración detalladatVajuste del negro : apagado Contraste dinám : apagado Gamma 0Espacio de color : auto Balance de blanco mi Ctrl de Color mejora de perfiles : apagado
autoancho
mover Ingresar regresar
Configuración detalladatVajuste del negro : apagado Contraste dinám : apagado Gamma 0Espacio de color : auto Balance de blanco mi Ctrl de Color mejora de perfiles : apagado
BN68-01167A-Spa-00.indd 26 2007-02-09 9:31:08

Español -
activación de mi Ctrl de ColorEste valor puede ajustarse para que se adapte a sus preferencias personales. Cuando se ejecuta la función Mi Ctrl de Color se captura la imagen actual como una imagen fija antes de mostrarla en la pantalla.. Pulse el botón EntEr para seleccionar “Mi Ctrl de Color”.6. Pulse los botones o para seleccionar “Rosa”, “Verde”, “Azul”,
“Blanco”,“Reiniciar”. Pulse el botón EntEr.
. Pulse los botones o para reducir o aumentar el valor de un elemento concreto. Pulse el botón EntEr.
rosa: Oscurece o aclara el color rosa. Verde: Oscurece o aclara el color verde. Azul: Oscurece o aclara el color azul. Blanco: Oscurece o aclara el color blanco. reiniciar: Los colores anteriormente ajustados se reiniciarán con los valores predefinidos
de fábrica.
El cambio del valor de ajuste renovará la pantalla ajustada.
Activación de Mejora de perfilesPermite acentuar los bordes de los objetos en las imágenes.. Pulse los botones o para seleccionar “Mejora de perfiles” y,
a continuación, pulse el botón EntEr.. Pulse los botones o para seleccionar “Apagado” o “Encendido”.
Pulse el botón EntEr. Pulse el botón ExIt para salir.
mover Ingresar regresar
rosa Verde Azul Blanco reiniciar
mi Ctrl de ColortV
mover ajustar regresar
rosa
mover Ingresar regresar
Configuración detalladatVajuste del negro : apagado Contraste dinám : apagado Gamma 0Espacio de color : auto Balance de blanco mi Ctrl de Color mejora de perfiles : apagado
mover Ingresar regresar
Configuración detalladatVajuste del negro : apagado Contraste dinám : apagado Gamma 0Espacio de color : auto Balance de blanco mi Ctrl de Color mejora de perfiles : apagado
mover Ingresar regresar
Configuración detalladatVajuste del negro : apagado Contraste dinám : apagado Gamma 0Espacio de color : auto Balance de blanco mi Ctrl de Color mejora de perfiles : apagado apagado
Encendido
BN68-01167A-Spa-00.indd 27 2007-02-09 9:31:10
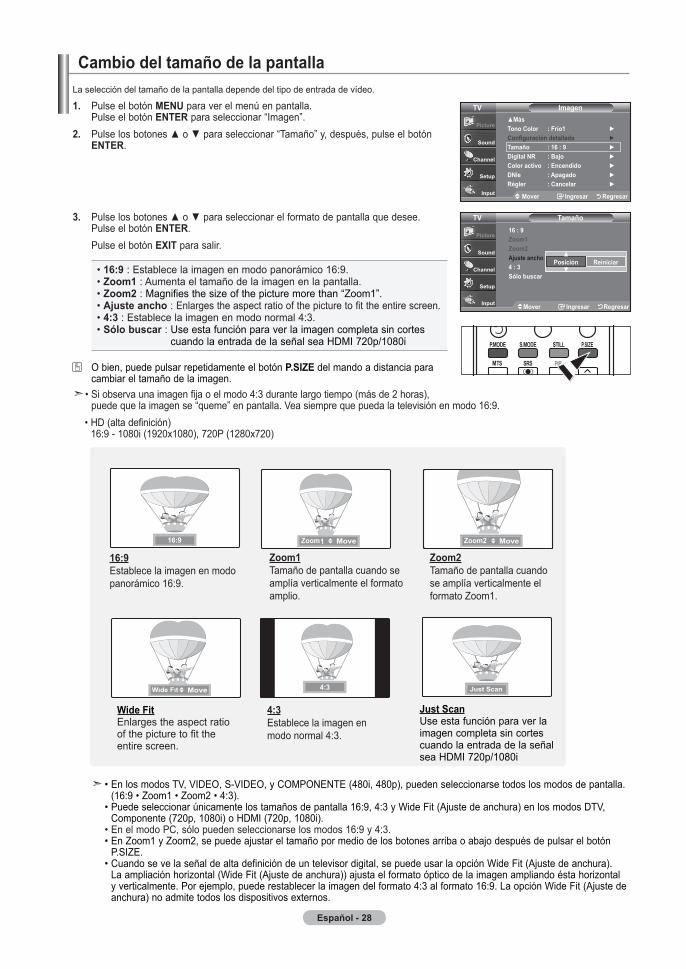
Español -
La selección del tamaño de la pantalla depende del tipo de entrada de vídeo.
Cambio del tamaño de la pantalla
. Pulse el botón mEnu para ver el menú en pantalla. Pulse el botón EntEr para seleccionar “Imagen”.. Pulse los botones o para seleccionar “Tamaño” y, después, pulse el botón
EntEr.
. Pulse los botones o para seleccionar el formato de pantalla que desee. Pulse el botón EntEr.
Pulse el botón ExIt para salir.
• 6: : Establece la imagen en modo panorámico 16:9. • Zoom : Aumenta el tamaño de la imagen en la pantalla. • Zoom : Magnifies the size of the picture more than “Zoom1”. • ajuste ancho : Enlarges the aspect ratio of the picture to fit the entire screen. • : : Establece la imagen en modo normal 4:3. • sólo buscar : Use esta función para ver la imagen completa sin cortes
cuando la entrada de la señal sea HDMI 720p/1080i
O bien, puede pulsar repetidamente el botón P.sIZE del mando a distancia para cambiar el tamaño de la imagen.
• Si observa una imagen fija o el modo 4:3 durante largo tiempo (más de 2 horas), puede que la imagen se “queme” en pantalla. Vea siempre que pueda la televisión en modo 16:9.
• HD (alta definición) 16:9 - 1080i (1920x1080), 720P (1280x720)
• En los modos TV, VIDEO, S-VIDEO, y COMPONENTE (480i, 480p), pueden seleccionarse todos los modos de pantalla. (16:9 • Zoom1 • Zoom2 • 4:3).
• Puede seleccionar únicamente los tamaños de pantalla 16:9, 4:3 y Wide Fit (Ajuste de anchura) en los modos DTV, Componente (720p, 1080i) o HDMI (720p, 1080i).
• En el modo PC, sólo pueden seleccionarse los modos 16:9 y 4:3. • En Zoom1 y Zoom2, se puede ajustar el tamaño por medio de los botones arriba o abajo después de pulsar el botón
P.SIZE. • Cuando se ve la señal de alta definición de un televisor digital, se puede usar la opción Wide Fit (Ajuste de anchura).
La ampliación horizontal (Wide Fit (Ajuste de anchura)) ajusta el formato óptico de la imagen ampliando ésta horizontal y verticalmente. Por ejemplo, puede restablecer la imagen del formato 4:3 al formato 16:9. La opción Wide Fit (Ajuste de anchura) no admite todos los dispositivos externos.
6:Establece la imagen en modo panorámico 16:9.
ZoomTamaño de pantalla cuando se amplía verticalmente el formato amplio.
ZoomTamaño de pantalla cuando se amplía verticalmente el formato Zoom1.
:Establece la imagen en modo normal 4:3.
Wide fit Enlarges the aspect ratio
of the picture to fit the entire screen.
just scan Use esta función para ver la imagen completa sin cortes cuando la entrada de la señal sea HDMI 720p/1080i
mover Ingresar regresar
6 : Zoom Zoom ajuste ancho : sólo buscar
tamañotV
Posición reiniciar
ImagentV
mover Ingresar regresar
Mástono Color : frío Configuración detallada tamaño : 6 : digital nr : Bajo Color activo : Encendido dnle : apagado régler : Cancelar
BN68-01167A-Spa-00.indd 28 2007-02-09 9:31:13

Español -
1. Pulse el botón mEnu para ver el menú. Pulse el botón EntEr para seleccionar “Imagen”.2. Pulse los botones o para seleccionar “Color activo” y, a continuación, pulse el
botón EntEr.3. Pulse los botones o para seleccionar “Apagado” o “Encendido”.
Pulse el botón EntEr. Pulse el botón ExIt para salir. El modo Imagen sólo está disponible en el modo Dinámico.
Configuración de Color activo
dnIe (motor de imagen natural digital) Este televisor incluye la función DNIe con el fin de conseguir una gran calidad visual. Si ajusta DNIe en On, se puede ver la pantalla con la función DNIe activada. Si ajusta DNIe en Demo, podrá ver en la pantalla una imagen normal y con el modo DNIe aplicado para realizar la demostración. Mediante esta función podrá ver la diferencia en la calidad visual.
Si activa esta opción, los colores del cielo y del césped se ven más sólidos y claros y la imagen de la pantalla aparece más vívida.
. Pulse el botón mEnu para ver el menú en pantalla. Pulse el botón EntEr para seleccionar “Imagen”.. Pulse los botones o para seleccionar “Imagen” y, después, pulse el botón
EntEr.. Pulse los botones o para seleccionar “Demo” y, después, pulse el botón
EntEr.
• apag.: Desactiva el modo DNIe.• demo: La pantalla aparece a la izquierda antes de aplicar DNIe y la de dere-
cha tras aplicar DNIe.• Enc.: Activa el modo DNIe.
Pulse el botón ExIt para salir. DNIeTM (Digital Natural Image engine, Motor de imagen digital natural)
Esta función proporciona una imagen más detallada con reducción de interferencias 3D, ampliación de los detalles, mejora del contraste y de los blancos.
Esta función no se activa si la fuente de entrada es un PC. La función DNle no se admite en el modo Movie (Cine).
ImagentV
mover Ingresar regresar
Mástono Color : frío Configuración detallada tamaño : 6 : digital nr : Bajo Color activo : Encendido dnle : apagado régler : Cancelar
mover Ingresar regresar
ImagentVMástono Color : frío Configuración detallada tamaño : 6 : digital nr : Bajo Color activo : Encendido dnle : apagado régler : Cancelar
apagadoEncendido
ImagentV
mover Ingresar regresar
Mástono Color : frío Configuración detallada tamaño : 6 : digital nr : Bajo Color activo : Encendido dnle : apagado régler : Cancelar
mover Ingresar regresar
ImagentVMástono Color : frío Configuración detallada tamaño : 6 : digital nr : Bajo Color activo : Encendido dnle : apag régler : aceptar
apagadodnIe demoEncendido
ajuste de la función modo películaPuede automáticamente detectar y procesar las señales de las películas procedentes de todas las fuentes y ajustar la imagen para conseguir una calidad óptima.
. Pulse el botón mEnu para ver el menú en pantalla. Pulse los botones o para seleccionar “Configuración” y, después, pulse el botón EntEr.
. Pulse los botones o para seleccionar “Modo película” y, después, pulse el botón EntEr.
. Pulse los botones o para seleccionar “Apagado” u “Encendido.” y, a continuación, pulse el botón EntEr.
Pulse el botón ExIt para salir.
El Modo película se admite en TV, VIDEO, S-VIDEO, y COMPONENTE 480i.
Configuraciónmoremodo película : apag PIP Función de Ayuda : Enc Actualiz.software
tV
mover Ingresar regresar
Configuraciónmoremodo película : apag PIP función de ayuda : Enc Actualiz.software
tV
mover Ingresar regresar
apagEnc.
BN68-01167A-Spa-00.indd 29 2007-02-09 9:31:16

Español - 0
Congelación de la imagen. Pulse el botón stIll para congelar una imagen en movimiento. El sonido normal se oirá todavía. Pulse de nuevo el botón para cancelar.
Configuración del Nivel de negro HDMI
. Pulse el botón mEnu para ver el menú en pantalla. Pulse los botones o para seleccionar “Configuración” y después pulse el
botón EntEr.. Pulse los botones o para seleccionar “n.neg HDMI” y, a continuación, pulse el
botón EntEr.. Pulse los botones o para seleccionar “Normal” o “ Bajo” y, a continuación, pulse
el botón EntEr.
• normal: La pantalla adquiere más brillo. • Bajo: La pantalla se oscurece.
Esta función sólo está operativa cuando se ha conectado un dispositivo externo (reproductor DVD, decodificador, etc.) al televisor a través de HDMI.
Pulse el botón ExIt para salir.
Se puede seleccionar el nivel de negro en la pantalla para ajustar la profundidad de ésta.
Visualización Imagen en imagenEste producto lleva un sintonizador incorporado. Por ejemplo, no es posible mirar un canal de televisión en la pantalla principal y otro en la pantalla PIP. Para mirar dos fuentes simultáneamente, puede utilizar la función PIP. (Vea la pagina 38 para seleccionar el sonido de la imagen PIP.)
Mientras la opción V-chip activada, la función de PIP no se puede usar.
activación de Imagen en imagen
. Pulse el botón mEnu para ver el menú en pantalla. Pulse los botones o para seleccionar “Configuración” y, después, pulse el botón EntEr. Pulse los botones o para seleccionar “PIP” y, después, pulse el botón EntEr.
. Pulse de nuevo el botón EntEr. Pulse los botones o para seleccionar “Encendido.” y, después, pulse el botón EntEr.
Si mientras mira la televisión en el modo PIP, apaga el televisor y vuelve a encenderlo, la ventana PIP desaparecerá.
La pantalla PIP puede configurarse como una imagen secundaria cuando la imagen principal está en modo PC, y sólo se ajusta en el modo TV.
Imagen principal Imagen secundaria
PC Analog TV broadcasts only
Alternativo, pulse el botón PIP del mando a distancia de forma repetida para activar o desactivar PIP.
mover Ingresar regresar
PIP : : Posición :Canal : Cable
PIPtVapag
Encendido
ConfiguraciónmásPantalla Azul : apag melodía : medio PC PC para Home Cinema: apag ahorro energía : apag n.neg HdmI :más
tV
normalBajo
ConfiguraciónmásPantalla Azul : apag melodía : medio PC PC para Home Cinema: apag ahorro energía : apag n.neg HdmI : Bajo más
tV
mover Ingresar regresar
mover Ingresar regresar
Configuraciónmoremodo película : apag PIP Función de Ayuda : Encendido Actualiz.software
tV
mover Ingresar regresar
BN68-01167A-Spa-00.indd 30 2007-02-09 9:31:18
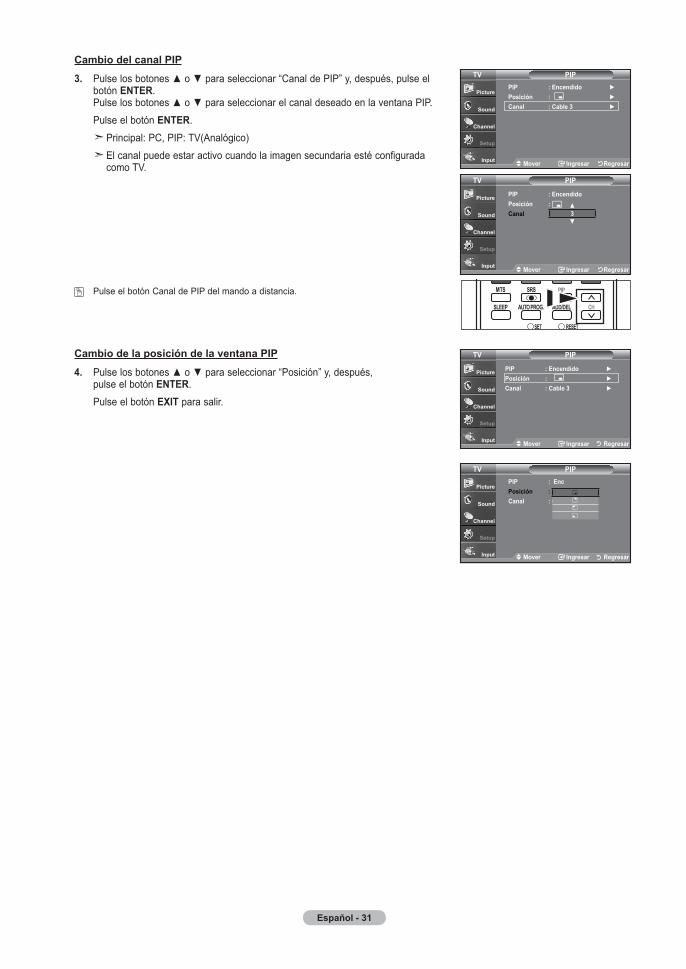
Español -
Cambio del canal PIP
. Pulse los botones o para seleccionar “Canal de PIP” y, después, pulse el botón EntEr. Pulse los botones o para seleccionar el canal deseado en la ventana PIP.
Pulse el botón EntEr. Principal: PC, PIP: TV(Analógico) El canal puede estar activo cuando la imagen secundaria esté configurada
como TV.
Pulse el botón Canal de PIP del mando a distancia.
PIP : Encendido Posición : Canal : Cable
PIPtV
Cambio de la posición de la ventana PIP
. Pulse los botones o para seleccionar “Posición” y, después, pulse el botón EntEr.
Pulse el botón ExIt para salir.
PIP : EncPosición :Canal : Cable
PIP
PIPtV
PIP : Encendido Posición : Canal : Cable
mover Ingresar regresar
PIP : Encendido Posición : Canal : Cable
PIP
mover Ingresar regresar
mover Ingresar regresar
mover Ingresar regresar
tV
tV
BN68-01167A-Spa-00.indd 31 2007-02-09 9:31:20
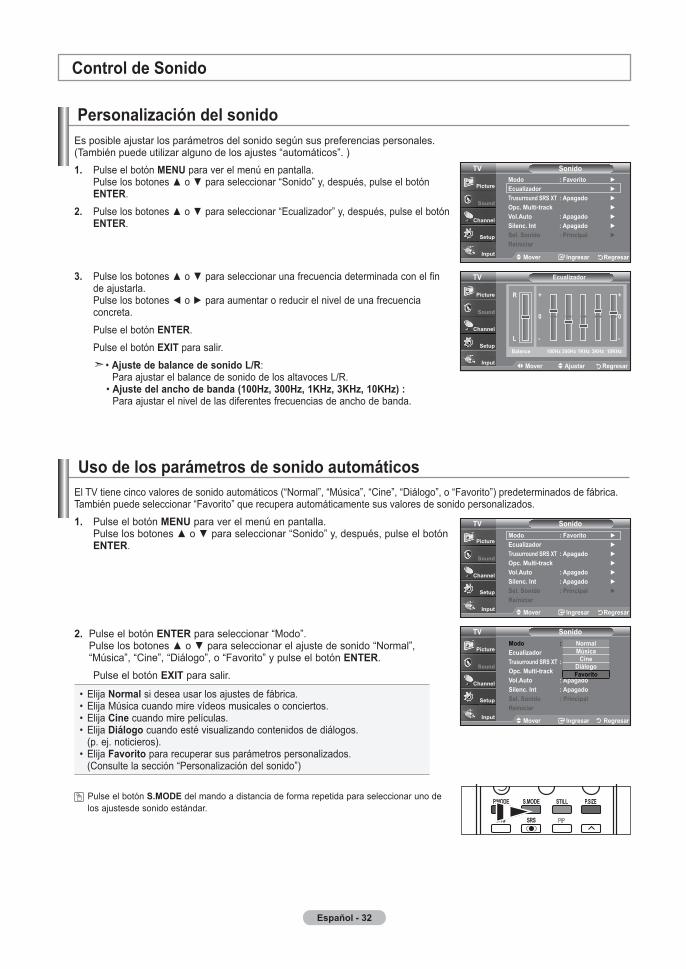
Español -
Personalización del sonidoEs posible ajustar los parámetros del sonido según sus preferencias personales. (También puede utilizar alguno de los ajustes “automáticos”. ). Pulse el botón mEnu para ver el menú en pantalla.
Pulse los botones o para seleccionar “Sonido” y, después, pulse el botón EntEr.
. Pulse los botones o para seleccionar “Ecualizador” y, después, pulse el botón EntEr.
. Pulse los botones o para seleccionar una frecuencia determinada con el fin de ajustarla. Pulse los botones o para aumentar o reducir el nivel de una frecuencia concreta.
Pulse el botón EntEr. Pulse el botón ExIt para salir. • ajuste de balance de sonido l/r:
Para ajustar el balance de sonido de los altavoces L/R. • Ajuste del ancho de banda (100Hz, 300Hz, 1KHz, 3KHz, 10KHz) :
Para ajustar el nivel de las diferentes frecuencias de ancho de banda.
uso de los parámetros de sonido automáticosEl TV tiene cinco valores de sonido automáticos (“Normal”, “Música”, “Cine”, “Diálogo”, o “Favorito”) predeterminados de fábrica. También puede seleccionar “Favorito” que recupera automáticamente sus valores de sonido personalizados.. Pulse el botón mEnu para ver el menú en pantalla.
Pulse los botones o para seleccionar “Sonido” y, después, pulse el botón EntEr.
. Pulse el botón EntEr para seleccionar “Modo”. Pulse los botones o para seleccionar el ajuste de sonido “Normal”, “Música”, “Cine”, “Diálogo”, o “Favorito” y pulse el botón EntEr.
Pulse el botón ExIt para salir.
• Elija normal si desea usar los ajustes de fábrica. • Elija Música cuando mire vídeos musicales o conciertos. • Elija Cine cuando mire películas. • Elija diálogo cuando esté visualizando contenidos de diálogos.
(p. ej. noticieros).• Elija favorito para recuperar sus parámetros personalizados.
(Consulte la sección “Personalización del sonido”)
Pulse el botón s.modE del mando a distancia de forma repetida para seleccionar uno de los ajustesde sonido estándar.
Control de sonido
mover Ingresar regresar
Modo : Favorito Ecualizador trusurround srs xt : apagado Opc. Multi-track Vol.auto : apagado silenc. Int : apagado Sel. Sonido : Principal reiniciar
sonidotV
mover ajustar regresar
EcualizadortV
r
l
100Hz
+
-
0
300Hz 1KHz 3KHz 10KHzBalance
+
-
0
mover Ingresar regresar
sonidotVModo : Favorito Ecualizador trusurround srs xt : apagado Opc. Multi-track Vol.auto : apagado silenc. Int : apagado Sel. Sonido : Principal reiniciar
mover Ingresar regresar
sonidotVmodo : favorito Ecualizador trusurround srs xt : apag opc. multi-track Vol.auto : apagado silenc. Int : apagado sel. sonido : Principal reiniciar
normalmúsica
Cinediálogofavorito
BN68-01167A-Spa-00.indd 32 2007-02-09 9:31:23

Español -
Configuración del TruSurround XT (SRS TS XT)TruSurround XT es una tecnología SRS patentada que solventa el problema de reproducir contenido multicanal 5.1 en dos altavo-ces. Trusurround proporciona una experiencia de sonido virtual convincente a través de cualquier sistema de reproducción con dos altavoces. Es totalmente compatible con todos los formatos multicanal.
. Pulse el botón mEnu para ver el menú en pantalla. Pulse los botones o para seleccionar “Sonido” y, después, pulse el botón EntEr.
. Pulse los botones o para seleccionar “Trusurround SRS XT” y, después, pulse el botón EntEr.
. Pulse los botones o para seleccionar “Enc.” o “Apag.” y, después, pulse el botón EntEr.
Pulse el botón ExIt para salir.
. Pulse el botón mEnu para ver el menú en pantalla. Pulse los botones o para seleccionar “Sonido” y, después, pulse el botón EntEr.
Forma rápida de acceder al menú MTS: Pulse el botón “MTS” del mando a distancia. Puede escuchar en un idioma distinto del elegido pulsando el botón MTS.
. Pulse los botones o para seleccionar “Opc. Multi-track” y, después, pulse el botón EntEr.
. Pulse los botones EntEr para seleccionar “Idioma preferido”. Pulse los botones o para elegir el idioma que desee (Inglés, Español, Francés) y pulse el botón EntEr.
Pulse el botón ExIt para salir.
Puede escuchar en un idioma distinto del favorito pulsando el botón mts del mando a distancia
Idioma preferido
selección de una pista de sonido multicanal (mts) - digitalEl sistema de transmisión de TV digital permite transmitir simultáneamente muchas pistas de audio (por ejemplo, traducciones simultáneas del programa en otros idiomas). La disponibilidad de estas “multipistas” adicionales depende del programa.
tradEmarK & laBEl lICEnsE notICE
trusurround xt, SRS y el símbolo son marcas comerciales de SRS Labs,Inc. La tecnología trusurround xt está incorporada bajo licencia de SRS Labs,Inc.
Ingresar regresar
opc. multi-track :Inglés sonido multi-track : Estéreo
opc. multi-tracktV
mover Ingresar regresar
sonidotVModo : Favorito Ecualizador trusurround srs xt : apagado Opc. Multi-track Vol.auto : apagado silenc. Int : apagado Sel. Sonido : Principal reiniciar
mover Ingresar regresar
sonidotVmodo : favorito Ecualizador trusurround srs xt : apagado opc. multi-track Vol.auto : apagado silenc. Int : apagado sel. sonido : Principal reiniciar
apagadoEncendido
mover Ingresar regresar
sonidotVModo : Favorito Ecualizador trusurround srs xt : apagado Opc. Multi-track Vol.auto : apagado silenc. Int : apagado Sel. Sonido : Principal reiniciar
mover Ingresar regresar
opc. multi-tracktVopc. multi-track :Inglés sonido multi-track : Estéreo
InglésEspañolfrançais
BN68-01167A-Spa-00.indd 33 2007-02-09 9:31:25
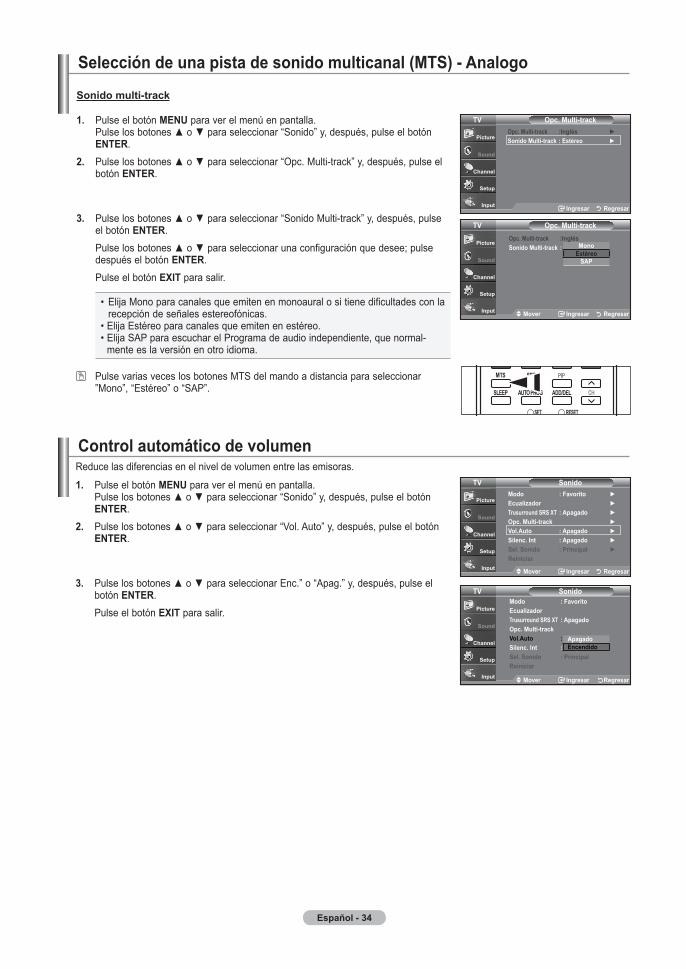
Español -
Control automático de volumen
. Pulse el botón mEnu para ver el menú en pantalla. Pulse los botones o para seleccionar “Sonido” y, después, pulse el botón EntEr.
. Pulse los botones o para seleccionar “Vol. Auto” y, después, pulse el botón EntEr.
. Pulse los botones o para seleccionar Enc.” o “Apag.” y, después, pulse el botón EntEr.
Pulse el botón ExIt para salir.
Reduce las diferencias en el nivel de volumen entre las emisoras.
. Pulse el botón mEnu para ver el menú en pantalla. Pulse los botones o para seleccionar “Sonido” y, después, pulse el botón EntEr.
. Pulse los botones o para seleccionar “Opc. Multi-track” y, después, pulse el botón EntEr.
. Pulse los botones o para seleccionar “Sonido Multi-track” y, después, pulse el botón EntEr.
Pulse los botones o para seleccionar una configuración que desee; pulse después el botón EntEr.
Pulse el botón ExIt para salir.
• Elija Mono para canales que emiten en monoaural o si tiene dificultades con la recepción de señales estereofónicas.
• Elija Estéreo para canales que emiten en estéreo.• Elija SAP para escuchar el Programa de audio independiente, que normal-
mente es la versión en otro idioma.
Pulse varias veces los botones MTS del mando a distancia para seleccionar ”Mono”, “Estéreo” o “SAP”.
sonido multi-track
selección de una pista de sonido multicanal (mts) - analogo
Ingresar regresar
opc. multi-tracktVopc. multi-track :Inglés sonido multi-track : Estéreo
mover Ingresar regresar
opc. multi-tracktVopc. multi-track :Inglés sonido multi-track : Estéreo mono
EstéreosaP
mover Ingresar regresar
sonidotVModo : Favorito Ecualizador trusurround srs xt : apagado Opc. Multi-track Vol.auto : apagado silenc. Int : apagado Sel. Sonido : Principal reiniciar
mover Ingresar regresar
sonidotVmodo : favorito Ecualizador trusurround srs xt : apagado opc. multi-track Vol.auto : apag silenc. Int : apag sel. sonido : Principal reiniciar
apagadoEncendido
BN68-01167A-Spa-00.indd 34 2007-02-09 9:31:27

Español -
selección del silencio interno
. Pulse el botón mEnu para ver el menú en pantalla. Pulse los botones o para seleccionar “Sonido” y, después, pulse el botón EntEr.
. Pulse los botones o para seleccionar “Silenc. Int” y, después, pulse el botón EntEr.
. Pulse los botones o para seleccionar “Enc.” y, después, pulse el botón EntEr.
Pulse el botón ExIt para salir. Cuando “Silenc. Int” se ajusta en “Enc.”, el único menú de sonido que se
puede ajustar es “Opc. Multi-track”. Los botones VOL +, VOL - y MUTE no funcionan si Silenc. Int está establecido
en Enc.
Se silencia la salida de sonido desde los altavoces del televisor.
ajuste de la melodía de encendido/apagadoPuede definirse un sonido de melodía para que suene cuando se encienda o se apague el TV.. Pulse el botón mEnu para ver el menú en pantalla.
Pulse los botones o para seleccionar “Configuración” y, después, pulse el botón EntEr.
. Pulse los botones o para seleccionar “Melodía” y, después, pulse el botón EntEr.
. Pulse los botones o para seleccionar “Enc.” o “Apag.” y, después, pulse el botón EntEr.
desactivado: Apaga la función de la melodía. Bajo: Establece el volumen de la melodía en un nivel bajo. medio: Establece el volumen de la melodía en un nivel medio. alto: Establece el volumen de la melodía en un nivel alto.
Pulse el botón ExIt para salir.
dolBY dIGItal
Fabricado bajo licencia de Dolby Laboratories. “Dolby” y el símbolo de la doble D son marcas registradas de Dolby Laboratories.
Altavoz interno salida de audio (optical, l/r out)
rf aV, s-Video Componente, PC y HdmI rf aV, s-Video Componente, PC y HdmI
silencio interno desactivado Speaker Output Speaker Output Speaker Output Sound Output Sound Output Sound Output
silencio interno activado Mute Mute Mute Sound Output Sound Output Sound Output
sin señal del vídeo Mute Mute Mute Mute Mute Mute
Cuando “Silenc. Int” se ajusta en “Enc.”, el único menú de sonido que se puede ajustar es “Opc. Multi-track”.
mover Ingresar regresar
sonidotVModo : Favorito Ecualizador trusurround srs xt : Apagado Opc. Multi-track Vol.Auto : Apagado silenc. Int : apagado Sel. Sonido : Principal reiniciar
mover Ingresar regresar
sonidotVmodo : favorito Ecualizador trusurround srs xt : apagado opc. multi-track Vol.auto : apagado silenc. Int : apag sel. sonido : Principal reiniciar
apagadoEncendido
ConfiguraciónmásPantalla Azul : apag melodía : medio PC PC para Home Cinema: apagado ahorro energía : apagado n.neg HdmI : Bajo más
tV
mover Ingresar regresar
ConfiguraciónmásPantalla Azul : apagado melodía : medio PC PC para Home Cinema: apag ahorro energía : apagado n.neg HdmI : Bajo más
tV
mover Ingresar regresar
apagadoBajomedioalto
BN68-01167A-Spa-00.indd 35 2007-02-09 9:31:29
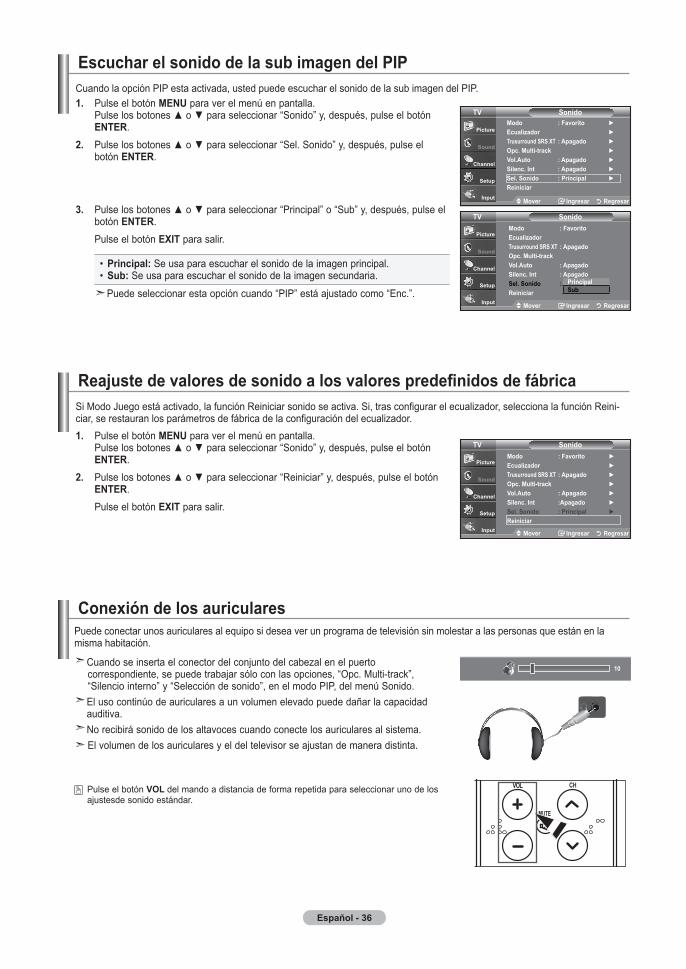
Español - 6
Reajuste de valores de sonido a los valores predefinidos de fábrica
. Pulse el botón mEnu para ver el menú en pantalla. Pulse los botones o para seleccionar “Sonido” y, después, pulse el botón EntEr.
. Pulse los botones o para seleccionar “Reiniciar” y, después, pulse el botón EntEr.
Pulse el botón ExIt para salir.
Si Modo Juego está activado, la función Reiniciar sonido se activa. Si, tras configurar el ecualizador, selecciona la función Reini-ciar, se restauran los parámetros de fábrica de la configuración del ecualizador.
Puede conectar unos auriculares al equipo si desea ver un programa de televisión sin molestar a las personas que están en la misma habitación.
Conexión de los auriculares
Cuando se inserta el conector del conjunto del cabezal en el puerto correspondiente, se puede trabajar sólo con las opciones, “Opc. Multi-track”, “Silencio interno” y “Selección de sonido”, en el modo PIP, del menú Sonido.
El uso continúo de auriculares a un volumen elevado puede dañar la capacidad auditiva.No recibirá sonido de los altavoces cuando conecte los auriculares al sistema. El volumen de los auriculares y el del televisor se ajustan de manera distinta.
0
Escuchar el sonido de la sub imagen del PIP
. Pulse el botón mEnu para ver el menú en pantalla. Pulse los botones o para seleccionar “Sonido” y, después, pulse el botón EntEr.
. Pulse los botones o para seleccionar “Sel. Sonido” y, después, pulse el botón EntEr.
. Pulse los botones o para seleccionar “Principal” o “Sub” y, después, pulse el botón EntEr.
Pulse el botón ExIt para salir.
• Principal: Se usa para escuchar el sonido de la imagen principal. • sub: Se usa para escuchar el sonido de la imagen secundaria.
Puede seleccionar esta opción cuando “PIP” está ajustado como “Enc.”.
Cuando la opción PIP esta activada, usted puede escuchar el sonido de la sub imagen del PIP.
sonidotV
mover Ingresar regresar
Modo : Favorito Ecualizador trusurround srs xt : apagado Opc. Multi-track Vol.auto : apagado silenc. Int : apagado Sel. Sonido : Principal reiniciar
sonidotV
mover Ingresar regresar
modo : favorito Ecualizador trusurround srs xt : apagado opc. multi-track Vol.auto : apagado silenc. Int : apagado sel. sonido : Principal reiniciar
Principalsub
sonidotV
mover Ingresar regresar
Modo : Favorito Ecualizador trusurround srs xt : apagado Opc. Multi-track Vol.auto : apagado silenc. Int :apagado Sel. Sonido : Principal reiniciar
Pulse el botón Vol del mando a distancia de forma repetida para seleccionar uno de los ajustesde sonido estándar.
BN68-01167A-Spa-00.indd 36 2007-02-09 9:31:31

Español -
Control de los Canalesselección de la antena
. Pulse el botón mEnu para ver el menú en pantalla. Pulse los botones o para seleccionar “Canal” y, después, pulse el botón EntEr.
. Pulse el botón EntEr para seleccionar “Antena”. Pulse los botones o para seleccionar “Aire” o “Cable” y, después, pulse el botón EntEr.
Pulse el botón ExIt para salir..
Pulse el botón antEnna del mando a distancia.
Si la antena está conectada a ANT 1 IN (AIR), seleccione “Aire"; si está conectada a ANT 2 IN(CABLE), seleccione “Cable”.
Si las dos tomas ANT 1 IN (AIR) y ANT 2 IN (CABLE) están conectadas, seleccione la entrada de antena que desee. Si no se selecciona la entrada de antena correctamente puede aparecer ruido en la pantalla.
o
Canal
mover Ingresar regresar
tVantena :aire Prog. auto Borrar canal encriptado lista de canales nombre sintonia fina Intensidad señal lna : apagado
Canal
mover Ingresar regresar
tVantena :aire Prog. auto Borrar canal encriptado lista de canales nombre sintonia fina Intensidad señal lna : apagado
aireCable
Supresión de los canales codificados digitales
. Pulse el botón mEnu para ver el menú. Pulse los botones o para seleccionar “Canal” y pulse el botón EntEr.
. Pulse los botones o para seleccionar “Clear Scrambled Channel” y pulse el botón EntEr. Busca los canales codificados para borrarlos de la lista.
Para detener la búsqueda de canales codificados. Pulse el botón para seleccionar detener. Pulse el botón para seleccionar sí y, a continuación, pulse el botón
EntEr.
. Una vez completada la búsqueda de los canales codificados, pulse el botón EntEr.
Pulse el botón ExIt para salir.
La función Borrar canales codificados se usa para filtrar los canales codificados después de realizar una búsqueda automática.Borra los canales codificados de la lista y sintoniza los canales digitales por cable. Puede tardar de 20 a 30 minutos.
Borrar canal encriptado
stop
removing scrambled channel.dtV Cable -
0%
Ingresar regresar
Borrar canal encriptado
scrambled Channel searching is completed.0 Channels are deleted.
regresar
CanaltV
mover Ingresar regresar
antena :aire Prog. auto Borrar canal encriptado lista de canales nombre sintonia fina Intensidad señal lna : apagado
Pulse el botón antEnna del mando a distancia.
aceptar
BN68-01167A-Spa-00.indd 37 2007-02-09 9:31:34
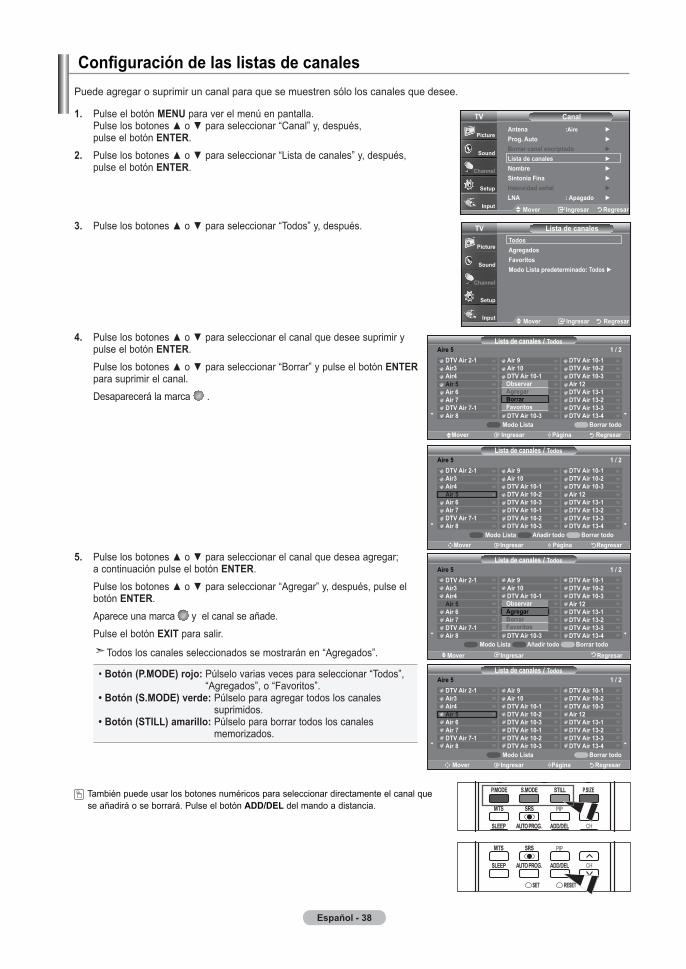
Español -
Configuración de las listas de canalesPuede agregar o suprimir un canal para que se muestren sólo los canales que desee.
. Pulse el botón mEnu para ver el menú en pantalla. Pulse los botones o para seleccionar “Canal” y, después, pulse el botón EntEr.
. Pulse los botones o para seleccionar “Lista de canales” y, después, pulse el botón EntEr.
. Pulse los botones o para seleccionar “Todos” y, después.
. Pulse los botones o para seleccionar el canal que desee suprimir y pulse el botón EntEr.
Pulse los botones o para seleccionar “Borrar” y pulse el botón EntEr para suprimir el canal.
Desaparecerá la marca .
. Pulse los botones o para seleccionar el canal que desea agregar; a continuación pulse el botón EntEr.
Pulse los botones o para seleccionar “Agregar” y, después, pulse el botón EntEr.
Aparece una marca y el canal se añade. Pulse el botón ExIt para salir. Todos los canales seleccionados se mostrarán en “Agregados”.
• Botón (P.modE) rojo: Púlselo varias veces para seleccionar “Todos”, “Agregados”, o “Favoritos”.
• Botón (s.modE) verde: Púlselo para agregar todos los canales suprimidos.
• Botón (stIll) amarillo: Púlselo para borrar todos los canales memorizados.
todosagregadosfavoritosmodo lista predeterminado: todos
lista de canales
mover Ingresar regresar
tV
CH
lista de canales / todos
mover Ingresar Página regresar
dtV air -airairair air 6air dtV air -air
air air 0dtV air 0-dtV air 0-dtV air 0-dtV air 0-dtV air 0-dtV air 0-
dtV air 0-dtV air 0-dtV air 0-air dtV air -dtV air -dtV air -dtV air -
aire /
modo lista Borrar todoañadir todo
CH
lista de canales / todos
mover Ingresar Página regresar
dtV air -airairair air 6air dtV air -air
air air 0dtV air 0-dtV air 0-dtV air 0-dtV air 0-dtV air 0-dtV air 0-
dtV air 0-dtV air 0-dtV air 0-air dtV air -dtV air -dtV air -dtV air -
modo lista Borrar todo
aire /
Canal
mover Ingresar regresar
tVantena :aire Prog. auto Borrar canal encriptado lista de canales nombre sintonia fina Intensidad señal lna : apagado
lista de canales / todos
mover Ingresar regresar
dtV air -airairair air 6air dtV air -air
air air 0dtV air 0-dtV air 0-dtV air 0-dtV air 0-dtV air 0-dtV air 0-
dtV air 0-dtV air 0-dtV air 0-air dtV air -dtV air -dtV air -dtV air -
aire /
observaragregarBorrarfavoritos
modo lista Borrar todoañadir todo
CH mover Ingresar Página regresar
dtV air -airairair air 6air dtV air -air
air air 0dtV air 0-dtV air 0-dtV air 0-dtV air 0-dtV air 0-dtV air 0-
dtV air 0-dtV air 0-dtV air 0-air dtV air -dtV air -dtV air -dtV air -
modo lista Borrar todo
aire /
observaragregarBorrarfavoritos
lista de canales / todos
También puede usar los botones numéricos para seleccionar directamente el canal que se añadirá o se borrará. Pulse el botón add/dEl del mando a distancia.
BN68-01167A-Spa-00.indd 38 2007-02-09 9:31:37
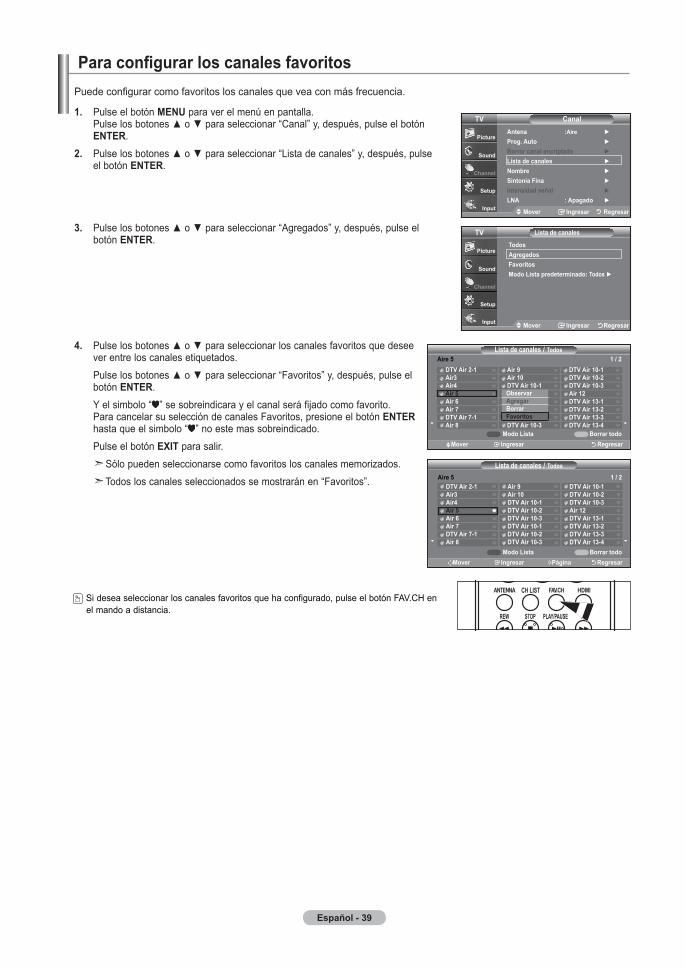
Español -
Para configurar los canales favoritos
. Pulse el botón mEnu para ver el menú en pantalla. Pulse los botones o para seleccionar “Canal” y, después, pulse el botón EntEr.
. Pulse los botones o para seleccionar “Lista de canales” y, después, pulse el botón EntEr.
. Pulse los botones o para seleccionar “Agregados” y, después, pulse el botón EntEr.
. Pulse los botones o para seleccionar los canales favoritos que desee ver entre los canales etiquetados.
Pulse los botones o para seleccionar “Favoritos” y, después, pulse el botón EntEr.
Y el simbolo “ ” se sobreindicara y el canal será fijado como favorito. Para cancelar su selección de canales Favoritos, presione el botón EntEr hasta que el simbolo “ ” no este mas sobreindicado.
Pulse el botón ExIt para salir. Sólo pueden seleccionarse como favoritos los canales memorizados. Todos los canales seleccionados se mostrarán en “Favoritos”.
Puede configurar como favoritos los canales que vea con más frecuencia.
Canal
mover Ingresar regresar
tVantena :aire Prog. auto Borrar canal encriptado lista de canales nombre sintonia fina Intensidad señal lna : apagado
lista de canales
mover Ingresar regresar
tVtodosagregadosfavoritosmodo lista predeterminado: todos
lista de canales / todos
mover Ingresar regresar
dtV air -airairair air 6air dtV air -air
air air 0dtV air 0-dtV air 0-dtV air 0-dtV air 0-dtV air 0-dtV air 0-
dtV air 0-dtV air 0-dtV air 0-air dtV air -dtV air -dtV air -dtV air -
aire /
observaragregarBorrarfavoritos
modo lista Borrar todo
CH
lista de canales / todos
mover Ingresar Página regresar
dtV air -airairair air 6air dtV air -air
air air 0dtV air 0-dtV air 0-dtV air 0-dtV air 0-dtV air 0-dtV air 0-
dtV air 0-dtV air 0-dtV air 0-air dtV air -dtV air -dtV air -dtV air -
aire /
modo lista Borrar todo
Si desea seleccionar los canales favoritos que ha configurado, pulse el botón FAV.CH en el mando a distancia.
BN68-01167A-Spa-00.indd 39 2007-02-09 9:31:39
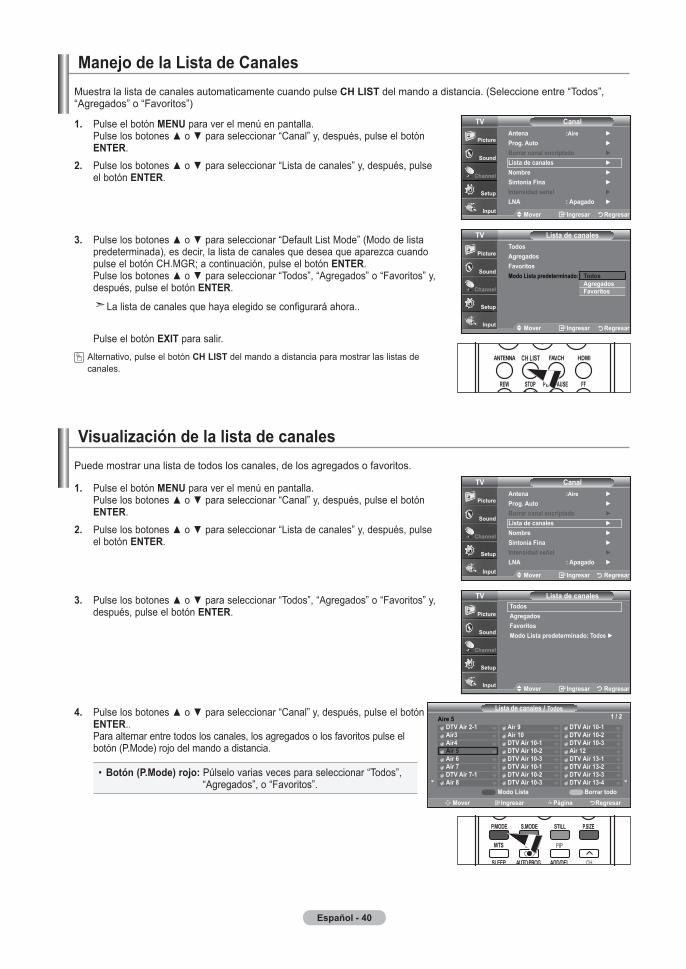
Español - 0
manejo de la lista de Canales
. Pulse el botón mEnu para ver el menú en pantalla. Pulse los botones o para seleccionar “Canal” y, después, pulse el botón EntEr.
. Pulse los botones o para seleccionar “Lista de canales” y, después, pulse el botón EntEr.
. Pulse los botones o para seleccionar “Default List Mode” (Modo de lista predeterminada), es decir, la lista de canales que desea que aparezca cuando pulse el botón CH.MGR; a continuación, pulse el botón EntEr. Pulse los botones o para seleccionar “Todos”, “Agregados” o “Favoritos” y, después, pulse el botón EntEr.
La lista de canales que haya elegido se configurará ahora..
Pulse el botón ExIt para salir. Alternativo, pulse el botón CH lIst del mando a distancia para mostrar las listas de canales.
Muestra la lista de canales automaticamente cuando pulse CH lIst del mando a distancia. (Seleccione entre “Todos”, “Agregados” o “Favoritos”)
Visualización de la lista de canales
. Pulse el botón mEnu para ver el menú en pantalla. Pulse los botones o para seleccionar “Canal” y, después, pulse el botón EntEr.
. Pulse los botones o para seleccionar “Lista de canales” y, después, pulse el botón EntEr.
. Pulse los botones o para seleccionar “Todos”, “Agregados” o “Favoritos” y, después, pulse el botón EntEr.
. Pulse los botones o para seleccionar “Canal” y, después, pulse el botón EntEr.. Para alternar entre todos los canales, los agregados o los favoritos pulse el botón (P.Mode) rojo del mando a distancia.
• Botón (P.mode) rojo: Púlselo varias veces para seleccionar “Todos”, “Agregados”, o “Favoritos”.
Puede mostrar una lista de todos los canales, de los agregados o favoritos.
Canal
mover Ingresar regresar
tVantena :aire Prog. auto Borrar canal encriptado lista de canales nombre sintonia fina Intensidad señal lna : apagado
lista de canales
mover Ingresar regresar
tVtodosagregadosfavoritosmodo lista predeterminado: todos
lista de canales
mover Ingresar regresar
tVtodosagregadosfavoritosmodo lista predeterminado: todos todos
agregadosfavoritos
Canal
mover Ingresar regresar
tVantena :aire Prog. auto Borrar canal encriptado lista de canales nombre sintonia fina Intensidad señal lna : apagado
CH
lista de canales / todos
mover Ingresar Página regresar
dtV air -airairair air 6air dtV air -air
air air 0dtV air 0-dtV air 0-dtV air 0-dtV air 0-dtV air 0-dtV air 0-
dtV air 0-dtV air 0-dtV air 0-air dtV air -dtV air -dtV air -dtV air -
aire /
modo lista Borrar todo
BN68-01167A-Spa-00.indd 40 2007-02-09 9:31:41

Español -
Etiquetado de canales
. Pulse el botón mEnu para ver el menú en pantalla. Pulse los botones o para seleccionar “Canal” y, después, pulse el botón EntEr. Pulse los botones o para seleccionar “Nombre” y, después, pulse el botón EntEr.
. Pulse los botones o para seleccionar el canal al que se va a asignar un nuevo nombre y pulse el botón EntEr. Pulse los botones o para seleccionar una letra, un número o un espacio. (Se produce esta secuencia: A...Z, 0...9, +, -, o, /, espacio). Pulse el botón para pasar al siguiente campo, que quedará seleccionado. Seleccione una segunda letra o dígito pulsando los botones o , como antes. Repita el proceso para seleccionar los tres últimos dígitos. Cuando haya terminado, pulse el botón EntEr para asignar el nombre nuevo. Para borrar el nuevo nombre asignado, seleccione “Supr.” pulsando los botones y pulse el botón EntEr.
Pulse el botón ExIt para salir. Los nombres de los canales emitidos digitalmente están asignados
automáticamente y no pueden asignarlos los usuarios.
LNA (Low Noise Amplifier - Amplificador de ruido bajo)
. Pulse el botón mEnu para ver el menú en pantalla. Pulse los botones o para seleccionar “Canal” y, después, pulse el botón EntEr.
. Pulse los botones o para seleccionar “LNA” y, después, pulse el botón EntEr.
. Pulse los botones o para seleccionar “Enc.” y, después, pulse el botón EntEr.
Pulse el botón ExIt para salir. LNA funciona cuando la antena seleccionada es Aire o Cable. Los ajustes se
almacenan de manera independiente para cada canal. (Consulte “Selección de la antena” en la página 37).
Si el televisor está funcionando en una zona con señal débil, la función LNA puede mejorar la recepción (un amplificador previo de bajo ruido refuerza la señal entrante).
Los canales se pueden etiquetar con el propósito de que cuando éstos se seleccionan se pueda ver su nombre.
nombre
mover Ingresar regresar
tV
air
air
air
air
air 6
supr
supr
Clear
supr
supr
nombre
mover ajustar regresar
tV
air
air
air
air
air 6
supr
supr
supr
supr
supr
a
Canal
mover Ingresar regresar
tVantena :aire Prog. auto Borrar canal encriptado lista de canales nombre sintonia fina Intensidad señal lna : apagado
CanaltV
mover Ingresar regresar
antena :aire Prog. auto Borrar canal encriptado lista de canales nombre sintonia fina Intensidad señal lna : apagado
CanaltV
mover Ingresar regresar
antena :aire Prog. auto Borrar canal encriptado lista de canales nombre sintonia fina Intensidad señal lna : apag
apagadoon
BN68-01167A-Spa-00.indd 41 2007-02-09 9:31:44

Español -
Sintonización fina de los canales analógicos
. Pulse el botón mEnu para ver el menú en pantalla. Pulse los botones o para seleccionar “Canal” y, después, pulse el botón EntEr.
. Pulse los botones o para seleccionar “Sintonia Fina” y, después, pulse el botón EntEr.
. Pulse los botones o para ajustar la sintonía con precisión. Para memorizar la sintonía fina en la memoria del televisor, pulse el botón EntEr.
Si no almacena en la memoria el canal que ha ajustado de manera precisa, los ajustes no se guardan.
. Para memorizar la sintonía fina en la memoria del televisor, pulse el botón EntEr. Para reiniciar la sintonización fina, pulse el botón para seleccionar “Reiniciar” y pulse el botón EntEr.
Pulse el botón ExIt para salir. El simbolo “ * “ aparecera junto al nombre de los canales cuya sintonizacion se
haya ajustado.
Utilice la sintonización fina para ajustar manualmente un determinado canal a fin de que la recepción sea óptima.
Comprobación de la potencia de la señal digital
. Pulse el botón mEnu para ver el menú en pantalla. Pulse los botones o para seleccionar “Canal” y, después, pulse el botón EntEr.
. Pulse los botones o para seleccionar “Intensidad señal” y, después, pulse el botón EntEr. Si el medidor de potencia de señal indica que la señal es débil, ajuste físicamente su antena para incrementar la potencia de la señal. Continúe ajustando la antena hasta que encuentre la mejor posición con la señal más potente.
Pulse el botón ExIt para salir.
A diferencia de los canales analógicos, cuya calidad de recepción puede variar desde “nebuloso” a claro, los canales digitales (HDTV) tienen una calidad de recepción perfecta o no se reciben en absoluto. Por tanto, a diferencia de los canales analógicos, no puede sintonizar ningún canal digital. Puede, no obstante, ajustar la antena para mejorar la recepción de los canales digitales disponibles.
ajustar Guardar regresar
sintonia fina
aire
0
reiniciar
ajustar Guardar regresar
sintonia fina
aire
+
reiniciar
mover Ingresar regresar
sintonia fina
aire
0
reiniciar
Canal
mover Ingresar regresar
tVantena : aire Prog. auto Borrar canal encriptado lista de canales nombre sintonia fina Intensidad señal lna : apagado
Canal
mover Ingresar regresar
tVantena : aire Prog. auto Borrar canal encriptado lista de canales nombre sintonia fina Intensidad señal lna : apagado
Intensidad señaltV
aceptar
Ingresar regresar
fine tune
ajustar Guardar regresar
aire *
+
reiniciar
sintonia fina
sintonía fina
BN68-01167A-Spa-00.indd 42 2007-02-09 9:31:47

Español -
uso del tV como pantalla de ordenador (PC)Instalación del software en el equipo (según Windows XP)A continuación se muestra una pantalla de configuración normal en un ordenador con Windows. No obstante, las pantallas reales en su PC probablemente serán diferentes, en función de su versión concreta de Windows y de su tarjeta de vídeo. Pero aunque las pantallas reales tengan un aspecto diferente, se aplicarán los mismos ajustes básicos e información en la mayoría de los casos. (Si no es así, póngase en contacto con el fabricante del ordenador o con un concesionario Samsung).
. Primero, haga clic en “Control Panel (Panel de control)” en el menú Inicio de Windows.. Cuando aparezca la pantalla del Panel de control, haga clic en “appearance and
themes (apariencia y temas)” y aparecerá un cuadro de diálogo.. Cuando aparezca la pantalla del Panel de control, haga clic en “display (Pantalla)” y
aparecerá un cuadro de diálogo.. Seleccione la ficha “settings (Configuración)” en el cuadro de diálogo.
La configuración de tamaño correcto (resolución) Modo óptimo: 1360 x 768 pixels
Si existe una opción de frecuencia vertical en el cuadro de diálogo de configuración de la pantalla, el valor correcto es “60” o “60 Hz”. Si no, haga clic en “Aceptar” y salga del cuadro de diálogo.
Pantalla de PC
Modos de visualizaciónIf the signal from the system equals the standard signal mode, the screen is adjusted automatically. If the signal from the system doesn’t equal the standard signal mode, adjust the mode by referring to your videocard user guide; otherwise there may be no video. For the display modes listed below, the screen image has been optimized during manufacturing.
mode resolución frecuencia horizontal (kHz)
frecuencia vertical (Hz)
frecuencia del reloj de píxeles
(MHz)
Polaridad de sincronización
(H/V)
IBm 720 X 400 640 X 480
31.469 31.469
70.087 59.940
28.322 25.175
- / + - / -
VEsa
640 x 480 640 x 480 800 x 600 800 x 600 800 x 600
1024 x 768 1024 x 768 1024 x 768 1360 x 768
37.861 37.500 37.879 48.077 46.875 48.363 56.476 60.023 47.712
72.809 75.000 60.317 72.188 75.000 60.004 70.069 75.029 60.015
31.500 31.500 40.000 50.000 49.500 65.000 75.000 78.750 85.800
- / - - / - + /+ + /+ + /+ - / - - / - + /+ + /+
d-sub Entrada
mode resolución frecuencia horizontal (kHz)
frecuencia vertical (Hz)
frecuencia del reloj de píxeles
(MHz)
Polaridad de sincronización
(H/V)
IBm 720 X 400 640 X 480
31.469 31.469
70.087 59.940
28.322 25.175
- / + - / -
VEsa800 x 600
1024 x 768 1360 x 768
37.879 48.363 47.712
60.317 60.004 60.015
40.000 65.000 85.800
+ /+ - / - + /+
HdmI/dVI Entrada
BN68-01167A-Spa-00.indd 43 2007-02-09 9:31:48

Español -
. Pulse el botón mEnu para ver el menú en pantalla. Pulse los botones o para seleccionar “Configuración” y, después, pulse el botón EntEr. Pulse los botones o para seleccionar “PC” y, después, pulse el botón EntEr.
En primer lugar, cambie al modo PC.
. Pulse los botones o para seleccionar “Ajuste Auto.” y, después, pulse el botón EntEr.
Pulse el botón ExIt para salir.
Cómo realizar el Ajuste automáticoUtilice la función de Ajuste automático para que el aparato de TV ajuste automáticamente las señales de vídeo que el monitor recibe. La función también ajusta automáticamente con más configuración y ajusta los valores y las posiciones de la frecuencia.
Esta función no está disponible en el modo DVI-Digital.
ajuste del televisor con el ordenador
. Pulse el botón mEnu para ver el menú en pantalla. Pulse los botones o para seleccionar “Configuración” y, después, pulse el botón EntEr. Pulse los botones o para seleccionar “PC” y, después, pulse el botón EntEr.
En primer lugar, cambie al modo PC.. Pulse los botones o para seleccionar “Fijar la Imagen” y, después, pulse el
botón EntEr.. Pulse los botones o para seleccionar “Grueso” o “Fino” y, después, pulse el
botón EntEr. Pulse los botones o para ajustar la calidad de la pantalla.
Pueden aparecer rayas verticales o la imagen tener poca definición.
Pulse el botón EntEr. Pulse el botón ExIt para salir.
ajuste de la calidad de la pantallaEl propósito del ajuste de la calidad de imagen es eliminar o reducir el ruido de la imagen. Si el ruido no desaparece sólo con la sintonización fina, realice los ajustes de frecuencia hasta el máximo y vuelva a realizar la sintonización fina. (consulte las páginas 43.) Después de reducir el ruido, vuelva a ajustar la imagen para que quede alineada en el centro de la pantalla.
PCfijar la Imagen Posición ajuste auto reiniciar Imagen resolución : 1360X768 @60Hz
tV
mover Ingresar regresar
fijar la ImagenGrueso 0fino 0
tV
mover Ingresar regresar
ajuste autom. en Progreso. Espere por favor.
ConfiguracióntV
mover Ingresar regresar
másPantalla Azul : on melodía : apagado PC PC para Home Cinema: apagado Efecto de luz : modo vis. act. ahorro energía : apagado Más
PCtV
mover Ingresar regresar
fijar la Imagen Posición ajuste auto reiniciar Imagen resolución : 1360X768 @60Hz
0
fijar la Imagen
mover ajustar regresar
Grueso
BN68-01167A-Spa-00.indd 44 2007-02-09 9:31:51
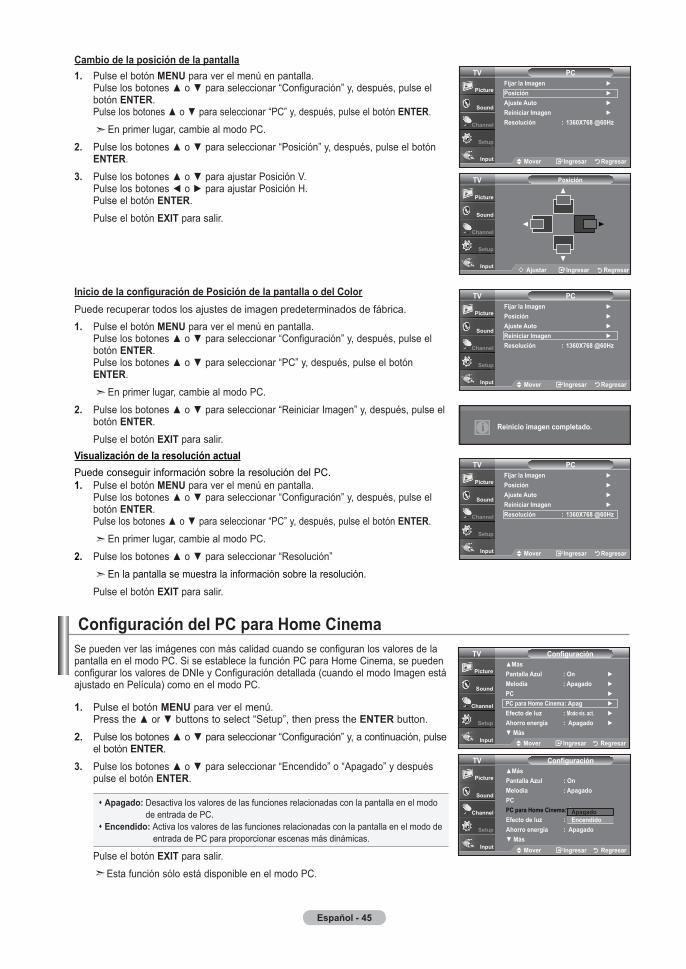
Español -
Cambio de la posición de la pantalla. Pulse el botón mEnu para ver el menú en pantalla.
Pulse los botones o para seleccionar “Configuración” y, después, pulse el botón EntEr. Pulse los botones o para seleccionar “PC” y, después, pulse el botón EntEr.
En primer lugar, cambie al modo PC.. Pulse los botones o para seleccionar “Posición” y, después, pulse el botón
EntEr.. Pulse los botones o para ajustar Posición V.
Pulse los botones o para ajustar Posición H. Pulse el botón EntEr.
Pulse el botón ExIt para salir.
Inicio de la configuración de Posición de la pantalla o del ColorPuede recuperar todos los ajustes de imagen predeterminados de fábrica.. Pulse el botón mEnu para ver el menú en pantalla.
Pulse los botones o para seleccionar “Configuración” y, después, pulse el botón EntEr. Pulse los botones o para seleccionar “PC” y, después, pulse el botón EntEr.
En primer lugar, cambie al modo PC.. Pulse los botones o para seleccionar “Reiniciar Imagen” y, después, pulse el
botón EntEr. Pulse el botón ExIt para salir.
. Pulse el botón mEnu para ver el menú. Press the or buttons to select “Setup”, then press the EntEr button.
. Pulse los botones o para seleccionar “Configuración” y, a continuación, pulse el botón EntEr.
. Pulse los botones o para seleccionar “Encendido” o “Apagado” y después pulse el botón EntEr.
apagado: Desactiva los valores de las funciones relacionadas con la pantalla en el modo de entrada de PC.
Encendido: Activa los valores de las funciones relacionadas con la pantalla en el modo de entrada de PC para proporcionar escenas más dinámicas.
Pulse el botón ExIt para salir. Esta función sólo está disponible en el modo PC.
Configuración del PC para Home CinemaSe pueden ver las imágenes con más calidad cuando se configuran los valores de la pantalla en el modo PC. Si se establece la función PC para Home Cinema, se pueden configurar los valores de DNIe y Configuración detallada (cuando el modo Imagen está ajustado en Película) como en el modo PC.
tV
ajustar Ingresar regresar
Posición
ConfiguracióntV
mover Ingresar regresar
másPantalla Azul : On melodía : apagado PC PC para Home Cinema: apag Efecto de luz : modo vis. act. ahorro energía : apagado Más
ConfiguracióntV
mover Ingresar regresar
másPantalla Azul : On melodía : apagado PC PC para Home Cinema: apag Efecto de luz : Watching mode on ahorro energía : apagado Más
apagadoEncendido
PCtV
mover Ingresar regresar
fijar la Imagen Posición ajuste auto reiniciar Imagen resolución : 1360X768 @60Hz
PCtV
mover Ingresar regresar
fijar la Imagen Posición ajuste auto reiniciar Imagen resolución : 1360X768 @60Hz
reinicio imagen completado.
Visualización de la resolución actualPuede conseguir información sobre la resolución del PC.. Pulse el botón mEnu para ver el menú en pantalla. Pulse los botones o para seleccionar “Configuración” y, después, pulse el botón EntEr. Pulse los botones o para seleccionar “PC” y, después, pulse el botón EntEr. En primer lugar, cambie al modo PC.. Pulse los botones o para seleccionar “Resolución” En la pantalla se muestra la información sobre la resolución. Pulse el botón ExIt para salir.
PCtV
mover Ingresar regresar
fijar la Imagen Posición ajuste auto reiniciar Imagen resolución : 1360X768 @60Hz
BN68-01167A-Spa-00.indd 45 2007-02-09 9:31:54

Español - 6
Configuración del RelojEstablecer el reloj es necesario para usar las distintas características de temporizador del TV. Además, puede comprobar la horamientras está viendo el TV. (Simplemente pulse Info).
opción : ajuste manual del reloj. Pulse el botón mEnu para ver el menú en pantalla.
Pulse los botones o para seleccionar “Configuración” y, después, pulse el botón EntEr. Pulse los botones o para seleccionar “Tiempo” y, después, pulse el botón EntEr.
. Pulse el botón EntEr para seleccionar “Reloj”
. Pulse el botón EntEr para seleccionar “Modo Reloj”. Pulse los botones o para seleccionar “Manual” y, después, pulse el botón EntEr.
. Pulse los botones o para seleccionar “Config. Reloj” y, después, pulse el botón EntEr.
. Pulse los botones o para desplazarse a “Mes”, “Día”, “Año”, “Hora”, “Minuto”, o “am/pm”. Seleccione la fecha y la hora que desee pulsando los botones o , pulse después el botón EntEr.
Pulse el botón ExIt para salir.. La hora actual aparecerá siempre que se pulse el botón Info. Puede ajustar el mes, el día, el año, la hora y el minuto directamente pul-
sando los botones numéricos del mando a distancia.
ajuste de la Hora
ConfiguraciónPlug & Play Idioma : Españo tiempo modo juego : apagado V-Chip subtítulo transpar. del menú : medio más
tV
mover Ingresar regresar
tiempo
reloj Temporizador : Apagado Temporizador 1 : inactivo Temporizador 2 : inactivo Temporizador 3 : inactivo
tV
mover Ingresar regresar
- - / - - / - - - - / - - : - - - -
relojmodo reloj : manual Config. reloj Zona tiempo tiempo Verano
tV
mover Ingresar regresar
Config. relojEscriba la fecha y la hora.
tV
mover ajustar regresar
mes
día año
Hora minuto am/pm
Config. relojEscriba la fecha y la hora.
tV
mes
día año
Hora minuto am/pm
00
00 am
mover ajustar regresar
BN68-01167A-Spa-00.indd 46 2007-02-09 9:31:56

Español -
opción : ajuste automático del reloj. Pulse el botón mEnu para ver el menú en pantalla.
Pulse los botones o para seleccionar “Configuración” y, después, pulse el botón EntEr. Pulse los botones o para seleccionar “Tiempo” y, después, pulse el botón EntEr.
. Pulse el botón EntEr para seleccionar “Reloj”.
. Pulse el botón EntEr para seleccionar “Modo Reloj”. Pulse los botones o para seleccionar “Auto” y, después, pulse el botón EntEr.
. Pulse los botones o para seleccionar “Zona Tiempo” y, después, pulse el botón EntEr.
. Pulse los botones o para resaltar la zona horaria del área local, después pulse el botón EntEr.
6. Pulse los botones o para seleccionar “Tiempo Verano"; después pulse el botón EntEr.
Pulse los botones o para seleccionar “Enc.” o “Apag.” y, después, pulse el botón EntEr.
Pulse el botón ExIt para salir. Según la estación emisora y la señal, puede que el ajuste automático
de la hora no se realice correctamente. En este caso, ajuste la hora manualmente.
La antena o el cable debe estar conectado para que se ajuste la hora automáticamente.
tiempo
reloj Temporizador : Apagado Temporizador 1 : inactivo Temporizador 2 : inactivo Temporizador 3 : inactivo
tV
mover Ingresar regresar
- - / - - / - - - - / - - : - - - -
relojmodo reloj : manual Config. reloj Zona tiempo tiempo Verano : apagado
tV
mover Ingresar regresar
manualauto
relojmodo reloj : auto Config. reloj Zona tiempo tiempo Verano : apagado
tV
mover Ingresar regresar
mover Ingresar regresar
Seleccione la zona horaria en la que se encuentra.Zona tiempo
newfoundlandatlántico
EsteCentral
montañasPacíficoalaskaHawaii
ConfiguracióntV
mover Ingresar regresar
Plug & Play Idioma : Españo tiempo modo juego : apagado V-Chip subtítulo transpar. del menú : medio más
relojtV
mover Ingresar regresar
modo reloj : auto Config. reloj Zona tiempo tiempo Verano : apagado
relojtV
mover Ingresar regresar
modo reloj : auto Config. reloj Zona tiempo tiempo Verano : apag Encendido
apagado
BN68-01167A-Spa-00.indd 47 2007-02-09 9:31:59
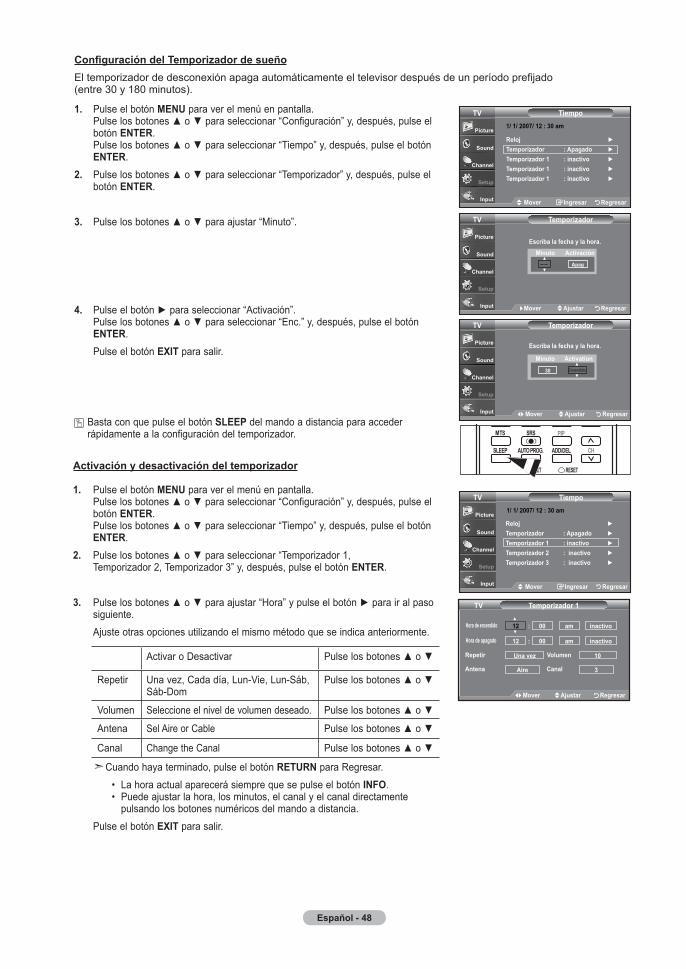
Español -
Configuración del Temporizador de sueñoEl temporizador de desconexión apaga automáticamente el televisor después de un período prefijado (entre 30 y 180 minutos).
. Pulse el botón mEnu para ver el menú en pantalla. Pulse los botones o para seleccionar “Configuración” y, después, pulse el botón EntEr. Pulse los botones o para seleccionar “Tiempo” y, después, pulse el botón EntEr.
. Pulse los botones o para seleccionar “Temporizador” y, después, pulse el botón EntEr.
. Pulse los botones o para ajustar “Minuto”.
. Pulse el botón para seleccionar “Activación”. Pulse los botones o para seleccionar “Enc.” y, después, pulse el botón EntEr.
Pulse el botón ExIt para salir.
Basta con que pulse el botón slEEP del mando a distancia para acceder rápidamente a la configuración del temporizador.
tiempo
reloj Temporizador : Apagado Temporizador 1 : inactivo Temporizador 1 : inactivo Temporizador 1 : inactivo
tV
mover Ingresar regresar
/ / 00/ : 0 am
. Pulse el botón mEnu para ver el menú en pantalla. Pulse los botones o para seleccionar “Configuración” y, después, pulse el botón EntEr. Pulse los botones o para seleccionar “Tiempo” y, después, pulse el botón EntEr.
. Pulse los botones o para seleccionar “Temporizador 1, Temporizador 2, Temporizador 3” y, después, pulse el botón EntEr.
. Pulse los botones o para ajustar “Hora” y pulse el botón para ir al paso siguiente.
Ajuste otras opciones utilizando el mismo método que se indica anteriormente.
Activar o Desactivar Pulse los botones o
Repetir Una vez, Cada día, Lun-Vie, Lun-Sáb, Sáb-Dom
Pulse los botones o
Volumen Seleccione el nivel de volumen deseado. Pulse los botones o
Antena Sel Aire or Cable Pulse los botones o
Canal Change the Canal Pulse los botones o
Cuando haya terminado, pulse el botón rEturn para Regresar. • La hora actual aparecerá siempre que se pulse el botón Info. • Puede ajustar la hora, los minutos, el canal y el canal directamente
pulsando los botones numéricos del mando a distancia. Pulse el botón ExIt para salir.
Activación y desactivación del temporizador
tiempotV/ / 00/ : 0 am
mover Ingresar regresar
reloj Temporizador : Apagado Temporizador 1 : inactivo Temporizador 2 : inactivo Temporizador 3 : inactivo
Temporizador 1tV
Hora de encendido
00 am inactivo
Hora de apagado 00 am inactivo
repetir Una vez
antena
Volumen 0
:
:
mover ajustar regresar
aire Canal
TemporizadortV
mover ajustar regresar
minuto
activación
apag
Escriba la fecha y la hora.
Temporizador
Escriba la fecha y la hora.
tV
mover ajustar regresar
minuto
activationEncendido0
BN68-01167A-Spa-00.indd 48 2007-02-09 9:32:02

Español -
Ajuste del modo Pantalla AzulSi no se recibe ninguna señal o ésta es muy débil, una pantalla azul sustituye de forma automática la imagen con interferencias.Si desea continuar viendo la imagen deficiente, debe definir el modo “Pantalla Azul” en “Apag.”.
. Pulse el botón mEnu para ver el menú en pantalla. Pulse los botones o para seleccionar “Configuración” y, después, pulse el botón EntEr.
. Pulse los botones o para seleccionar “Pantalla Azul” y, después, pulse el botón EntEr.
. Pulse los botones o para seleccionar “Enc.” o “Apag.” y, después, pulse el botón EntEr.
Pulse el botón ExIt para salir. Si se pulsan los botones o se alterna entre “Enc.” y “Apag”.
selección del idioma de menú. Pulse el botón mEnu para ver el menú en pantalla.
Pulse los botones o para seleccionar “Configuración” y, después, pulse el botón EntEr. Pulse los botones o para seleccionar “Idioma” y, después, pulse el botón EntEr.
. Pulse los botones o para seleccionar el idioma apropiado: "Inglés”, “Español” o “Francés”. Pulse el botón EntEr.
Pulse el botón ExIt para salir.
descripción de las funciones
ConfiguraciónPlug & Play Idioma : apagado tiempo modo juego : apagado V-Chip subtítulo transpar. del menú : medio más
tV
mover Ingresar regresar
ConfiguracióntV
mover Ingresar regresar
Plug & Play Idioma : apag tiempo modo juego : apag V-Chip subtítulo transpar. del menú : medio más
InglésEspañolfrançais
ConfiguraciónmásPantalla Azul : apagado melodía : medio PC PC para Home Cinema: apagado ahorro energía : apagado n.neg HdmI : Bajo más
tV
mover Ingresar regresar
ConfiguraciónmásPantalla Azul : apag melodía : medio PC PC para Home Cinema: apagado ahorro energía : apagado n.neg HdmI : Bajo más
tV
mover Ingresar regresar
apagadoEnc
uso del modo juegoSi se conecta a una consola de videojuegos como PlayStationTM o XboxTM, podrá obtener sensaciones más realistas, seleccionando Modo juego.
. Pulse el botón mEnu para ver el menú en pantalla. Pulse los botones o para seleccionar “Configuración” y, después, pulse el botón EntEr.
. Pulse los botones o para seleccionar “Modo Juego” y, después, pulse el botón EntEr.
. Pulse los botones o para seleccionar “Encendido.” o “Apagado” y, después, pulse el botón EntEr.
. Pulse el botón ExIt para salir. Si desea desconectarse de la consola de videojuegos y conectarse a otro dispositivo exter
no, ajuste la opción Modo del juego como Apagado en el menú de configuración. Si ve la televisión en Modo juego, la pantalla tiembla ligeramente. Modo juego no está disponible en el modo de TV.
ConfiguracióntV
mover Ingresar regresar
Plug & Play Idioma : apagado tiempo modo juego : apagado V-Chip subtítulo transpar. del menú : medio más
ConfiguracióntV
mover Ingresar regresar
Plug & Play Idioma : apagado tiempo modo juego : apag V-Chip subtítulo transpar. del menú : medio más
apagadoEncendido
BN68-01167A-Spa-00.indd 49 2007-02-09 9:32:05
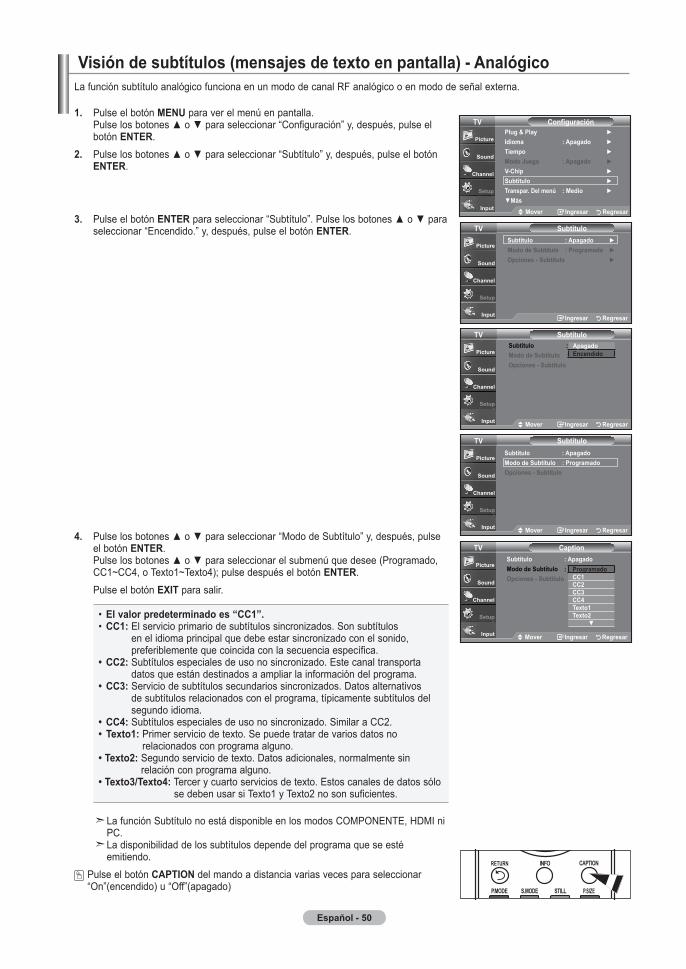
Español - 0
La función subtítulo analógico funciona en un modo de canal RF analógico o en modo de señal externa.
. Pulse el botón mEnu para ver el menú en pantalla. Pulse los botones o para seleccionar “Configuración” y, después, pulse el botón EntEr.
. Pulse los botones o para seleccionar “Subtítulo” y, después, pulse el botón EntEr.
. Pulse el botón EntEr para seleccionar “Subtítulo”. Pulse los botones o para seleccionar “Encendido.” y, después, pulse el botón EntEr.
. Pulse los botones o para seleccionar “Modo de Subtítulo” y, después, pulse el botón EntEr. Pulse los botones o para seleccionar el submenú que desee (Programado, CC1~CC4, o Texto1~Texto4); pulse después el botón EntEr.
Pulse el botón ExIt para salir.
• El valor predeterminado es “CC”. • CC: El servicio primario de subtítulos sincronizados. Son subtítulos
en el idioma principal que debe estar sincronizado con el sonido, preferiblemente que coincida con la secuencia específica.
• CC: Subtítulos especiales de uso no sincronizado. Este canal transporta datos que están destinados a ampliar la información del programa.
• CC: Servicio de subtítulos secundarios sincronizados. Datos alternativos de subtítulos relacionados con el programa, típicamente subtítulos del segundo idioma.
• CC: Subtítulos especiales de uso no sincronizado. Similar a CC2.• texto: Primer servicio de texto. Se puede tratar de varios datos no
relacionados con programa alguno.• texto: Segundo servicio de texto. Datos adicionales, normalmente sin
relación con programa alguno.• texto/texto: Tercer y cuarto servicios de texto. Estos canales de datos sólo
se deben usar si Texto1 y Texto2 no son suficientes.
La función Subtítulo no está disponible en los modos COMPONENTE, HDMI ni PC.
La disponibilidad de los subtítulos depende del programa que se esté emitiendo.
Pulse el botón CaPtIon del mando a distancia varias veces para seleccionar “On”(encendido) u “Off”(apagado)
Visión de subtítulos (mensajes de texto en pantalla) - analógico
subtítulosubtítulo : apagado modo de subtítulo : Programado opciones - subtítulo
tV
Ingresar regresar
ConfiguracióntV
mover Ingresar regresar
Plug & Play Idioma : apagado tiempo modo juego : apagado V-Chip subtítulo transpar. del menú : medio más
subtítulotV
mover Ingresar regresar
subtítulo : apag modo de subtítulo : Programado opciones - subtítulo
apagadoEncendido
subtítulotV
mover Ingresar regresar
subtítulo : apagado modo de subtítulo : Programado opciones - subtítulo
CaptiontV
mover Ingresar regresar
subtítulo : apagado modo de subtítulo : Programado opciones - subtítulo
ProgramadoCCCCCCCCtextotexto
BN68-01167A-Spa-00.indd 50 2007-02-09 9:32:07

Español -
La función Subtítulo digital funciona en canales digitales.
. Pulse el botón mEnu para ver el menú en pantalla. Pulse los botones o para seleccionar “Configuración” y, después, pulse el botón EntEr.
. Pulse los botones o para seleccionar “Subtítulo” y, después, pulse el botón EntEr.
. Pulse el botón EntEr para seleccionar “Subtítulo”. Pulse los botones o para seleccionar “Enc.” y, después, pulse el botón EntEr.
. Pulse los botones o para seleccionar “Modo de Subtítulo” y, después, pulse el botón EntEr. Pulse los botones o para seleccionar el submenú (Programado, Servicio1~Servicio6, CC1~CC4 o Texto1~Texto4) que desee; pulse después el botón EntEr.
. Pulse los botones o para seleccionar “Opciones - Subtítulos” y, después, pulse el botón EntEr.
La función “Opciones - Subtítulos” sólo está disponible cuando puede seleccionarse “Servicio1~Servicio6” en el modo “Modo de Subtítulo”.
Los modos de subtitulación Servicio 1-6 pueden no estar disponibles según el tipo de emisión.
6. Pulse los botones o para seleccionar “Tamaño” y, después, pulse el botón EntEr. Pulse los botones o para seleccionar la opción deseada para el Subtítulo; después pulse el botón EntEr. Pulse los botones o para seleccionar las opciones de submenú que desee (vea las opciones en la pagina siguiente) y pulse el botón EntEr.
Pulse el botón ExIt para salir. La disponibilidad de los subtítulos depende del programa que se esté emitiendo. La opción “Programado” significa que se sigue el estándar establecido por el
emisor.
• tamaño: Esta opción consta de “Programado”, “Pequeño”, “Normal” y “Grande”. El valor predeterminado es “Normal”.
• tipo de letra: Esta opción consta de “Programado”, “Estilo 0-Estilo 7”. Puede cambiar el tipo de letra que desee. El valor predeterminado es “Estilo 0”.
• Color primer plano: Esta opción consta de “Programado”, “Blanco”, “Negro”, “Rojo”, “Verde”, “Azul”, “Amarillo”, “Magenta”, y “Cián”. Puede cambiar el color del texto. El valor predeterminado es Blanco.
• Color de fondo: Esta opción consta de “Programado”, “Blanco”, “Negro”, “Rojo”, “Verde”, “Azul”, “Amarillo”, “Magenta”, y “Cián”. Puede cambiar el color del fondo de los subtítulos. El valor predeterminado es “Negro”.
• opacidad prim. plano: Esta opción consta de “Programado”, “Transparente”, “Traslúcido”, “Sólido” e “Intermitente”. Puede cambiar la opacidad de la letra.
• opacidad del fondo: Esta opción consta de “Programado”, “Transparente”, “Traslúcido”, “Sólido” e “Intermitente”. Puede cambiar la opacidad del fondo de los subtítulos.
• regresar al predeter.: Esta opción reajusta las opciones “Tamaño”, “Tipo de letra”, “Color primer plano”, “Color de fondo”, “Opacidad prim. plano” y “Opacidad del fondo” a sus valores predeterminados.
Pulse el botón CaPtIon del mando a distancia varias veces para seleccionar “On”(encendido) u “Off”(apagado)
Visión de subtítulos (mensajes de texto en pantalla) - digital
opciones - subtítulotamaño : Programado tipo de letra : Programado Color Primer Plano : Programado Color de fondo : Programado opac. Primer Plano : Programado opac. de fondo : Programado regresar al Predeter
tV
mover Ingresar regresar
subtítulotV
mover Ingresar regresar
subtítulo : apag modo de subtítulo : Programado opciones - subtítulo
apagadoEncendido
subtítulotV
mover Ingresar regresar
subtítulo : apagado modo de subtítulo : Programado opciones - subtítulo
subtítulotV
mover Ingresar regresar
subtítulo : apagado modo de subtítulo : Programado opciones - subtítulo
defaultservicioservicioservicioservicioservicioservicio6
subtítulotV
mover Ingresar regresar
subtítulo : apagado modo de subtítulo : Programado opciones - subtítulo
BN68-01167A-Spa-00.indd 51 2007-02-09 9:32:09
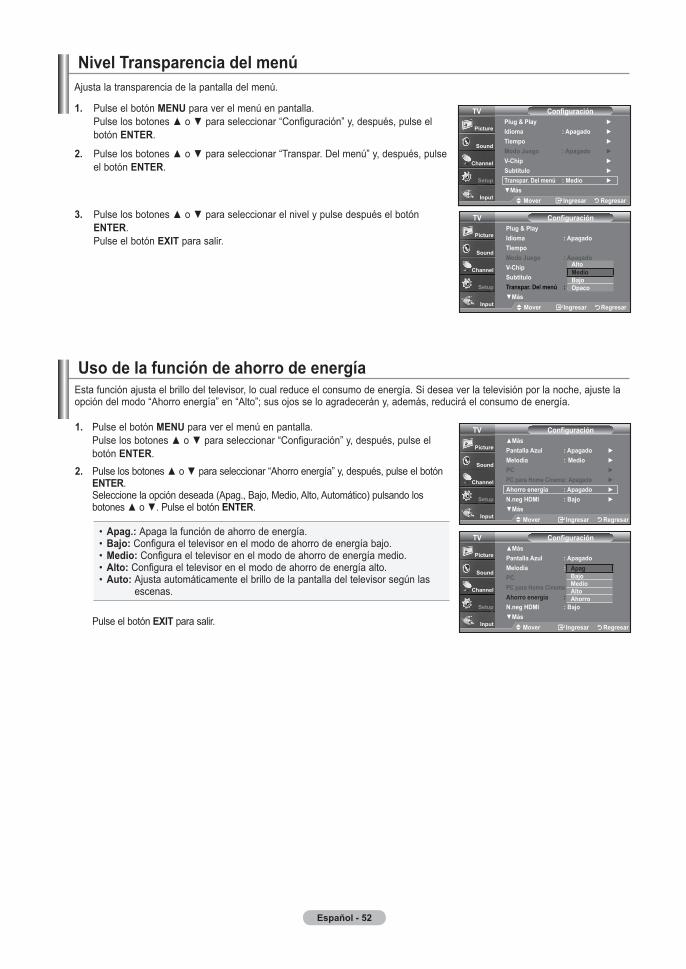
Español -
uso de la función de ahorro de energía
nivel transparencia del menúAjusta la transparencia de la pantalla del menú.
. Pulse el botón mEnu para ver el menú en pantalla. Pulse los botones o para seleccionar “Configuración” y, después, pulse el botón EntEr.
. Pulse los botones o para seleccionar “Transpar. Del menú” y, después, pulse el botón EntEr.
. Pulse los botones o para seleccionar el nivel y pulse después el botón EntEr. Pulse el botón ExIt para salir.
Esta función ajusta el brillo del televisor, lo cual reduce el consumo de energía. Si desea ver la televisión por la noche, ajuste la opción del modo “Ahorro energía” en “Alto”; sus ojos se lo agradecerán y, además, reducirá el consumo de energía.
. Pulse el botón mEnu para ver el menú en pantalla. Pulse los botones o para seleccionar “Configuración” y, después, pulse el botón EntEr.
. Pulse los botones o para seleccionar “Ahorro energía” y, después, pulse el botón EntEr. Seleccione la opción deseada (Apag., Bajo, Medio, Alto, Automático) pulsando los botones o . Pulse el botón EntEr.
• apag.: Apaga la función de ahorro de energía. • Bajo: Configura el televisor en el modo de ahorro de energía bajo. • medio: Configura el televisor en el modo de ahorro de energía medio. • alto: Configura el televisor en el modo de ahorro de energía alto. • auto: Ajusta automáticamente el brillo de la pantalla del televisor según las
escenas.
Pulse el botón ExIt para salir.
ConfiguracióntV
mover Ingresar regresar
Plug & Play Idioma : apagado tiempo modo juego : apagado V-Chip subtítulo transpar. del menú : medio más
ConfiguracióntV
mover Ingresar regresar
Plug & Play Idioma : apagado tiempo modo juego : apagado V-Chip subtítulo transpar. del menú : alto más
altomedioBajoopaco
ConfiguraciónmásPantalla Azul : apagado melodía : medio PC PC para Home Cinema: apagado ahorro energía : apagado n.neg HdmI : Bajo más
tV
mover Ingresar regresar
ConfiguraciónmásPantalla Azul : apagado melodía : apagado PC PC para Home Cinema: apag ahorro energía : apag n.neg HdmI : Bajo más
tV
mover Ingresar regresar
apagBajomedioaltoahorro
BN68-01167A-Spa-00.indd 52 2007-02-09 9:32:11
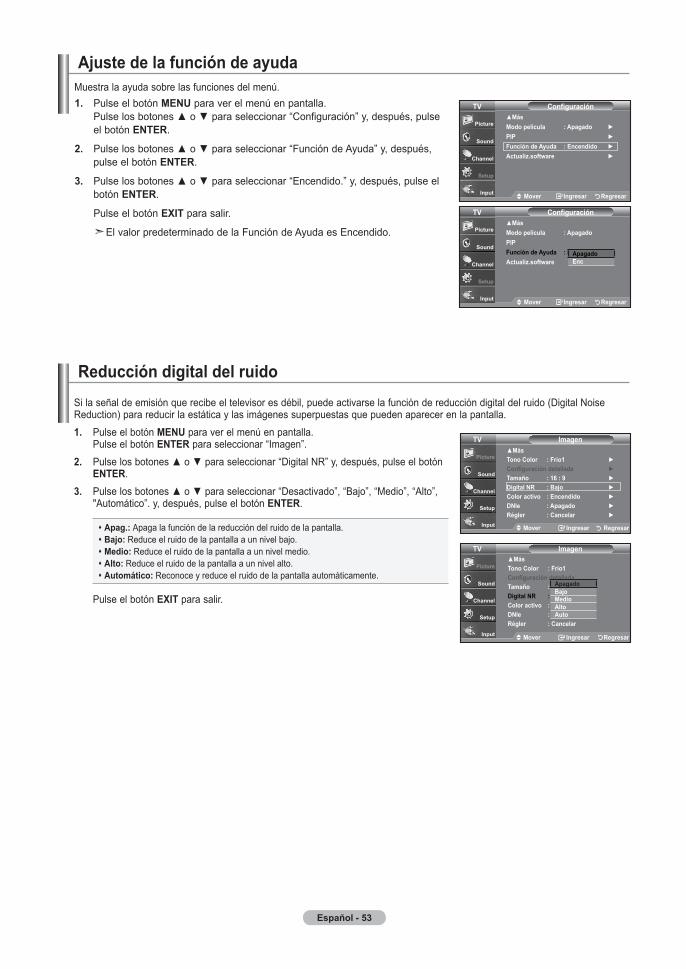
Español -
. Pulse el botón mEnu para ver el menú en pantalla. Pulse los botones o para seleccionar “Configuración” y, después, pulse el botón EntEr.
. Pulse los botones o para seleccionar “Función de Ayuda” y, después, pulse el botón EntEr.
. Pulse los botones o para seleccionar “Encendido.” y, después, pulse el botón EntEr.
Pulse el botón ExIt para salir.
El valor predeterminado de la Función de Ayuda es Encendido.
ajuste de la función de ayudaMuestra la ayuda sobre las funciones del menú.
Si la señal de emisión que recibe el televisor es débil, puede activarse la función de reducción digital del ruido (Digital Noise Reduction) para reducir la estática y las imágenes superpuestas que pueden aparecer en la pantalla.. Pulse el botón mEnu para ver el menú en pantalla.
Pulse el botón EntEr para seleccionar “Imagen”.. Pulse los botones o para seleccionar “Digital NR” y, después, pulse el botón
EntEr.. Pulse los botones o para seleccionar “Desactivado”, “Bajo”, “Medio”, “Alto”,
"Automático”. y, después, pulse el botón EntEr.
apag.: Apaga la función de la reducción del ruido de la pantalla. Bajo: Reduce el ruido de la pantalla a un nivel bajo. medio: Reduce el ruido de la pantalla a un nivel medio. alto: Reduce el ruido de la pantalla a un nivel alto. automático: Reconoce y reduce el ruido de la pantalla automáticamente.
Pulse el botón ExIt para salir.
reducción digital del ruido
ImagentV
mover Ingresar regresar
Mástono Color : frío Configuración detallada tamaño : 6 : digital nr : Bajo Color activo : Encendido dnle : apagado régler : Cancelar
mover Ingresar regresar
ImagentVMástono Color : frío Configuración detallada tamaño : 6 : digital nr : Bajo Color activo : Encendido dnle : apag régler : Cancelar
apagadoBajomedioaltoauto
Configuraciónmásmodo película : apagado PIP Función de Ayuda : Encendido Actualiz.software
tV
mover Ingresar regresar
Configuraciónmásmodo película : apagado PIP función de ayuda : Enc Actualiz.software
tV
mover Ingresar regresar
apagadoEnc
BN68-01167A-Spa-00.indd 53 2007-02-09 9:32:13

Español -
. Pulse el botón mEnu para ver el menú en pantalla. Pulse los botones o para seleccionar “Configuración” y, después, pulse el botón EntEr.
. Pulse los botones o para seleccionar “V-Chip” y, después, pulse el botón EntEr. Aparecerá el mensaje “Ingresar Código”. Escriba su código PIN de 4 dígitos.
El código PIN predeterminado para un televisor nuevo es “0-0-0-0”.
. Aparecerá la pantalla “V-Chip”. Pulse los botones o para seleccionar “Cambiar Código” y, después, pulse el botón EntEr. Aparecerá la pantalla Cambiar Código. Escriba un nuevo código PIN de 4 dígitos. En cuanto introduzca los 4 dígitos, aparece la pantalla “Confirmar Nuevo Código”. Vuelva a escribir los 4 dígitos. Cuando desaparezca la pantalla de confirma-ción, el código quedará memorizado.
Pulse el botón ExIt para salir. Si olvida su código, pulse los botones del mando a distancia siguiendo la
secuencia siguiente, que restablece el código a 0-0-0-0: Power Off → Mute → 8 → 2 → 4 → Power On.
uso de V-ChipLa función V-Chip bloquea automáticamente la programación que se considera inadecuada para los niños. El usuario debe introducir primero un código PIN (número de identificación personal) antes de establecer o cambiar las restricciones de V-Chip.
Si se ha activado la función V-chip, las opciones de PIP no funcionan.
Ajuste del número de identificación personal (código PIN)
mover Ingresar regresar
Bloqueo V-Chip : apagado Guías pater. tV Clas. mPaa Inglés Canadiense francés Canadiense Clasificación u.s. descargable Cambiar Código
V-ChiptV
V-Chip
Ingresar Código
tV
* * * *
Enter PIn regresar
Ingresar nuevo Código
Confirmar nuevo Código
Cambiar CódigotV
Enter PIn regresar
ConfiguracióntV
mover Ingresar regresar
Plug & Play Idioma : apagado tiempo modo juego : apagado V-Chip subtítulo transpar. del menú : medio más
BN68-01167A-Spa-00.indd 54 2007-02-09 9:32:15
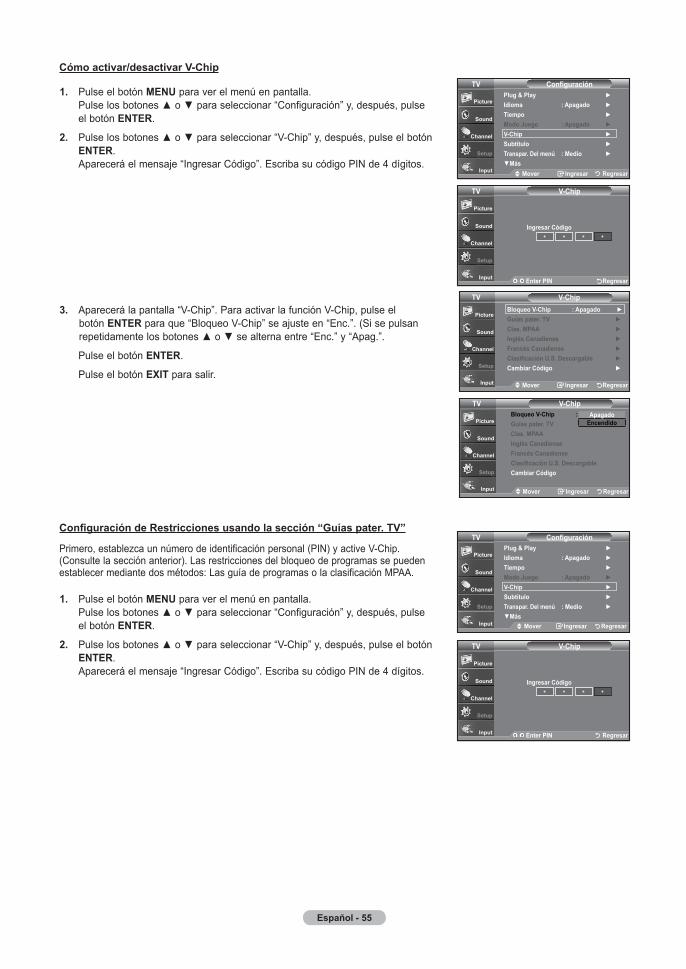
Español -
. Pulse el botón mEnu para ver el menú en pantalla. Pulse los botones o para seleccionar “Configuración” y, después, pulse el botón EntEr.
. Pulse los botones o para seleccionar “V-Chip” y, después, pulse el botón EntEr. Aparecerá el mensaje “Ingresar Código”. Escriba su código PIN de 4 dígitos.
. Aparecerá la pantalla “V-Chip”. Para activar la función V-Chip, pulse el botón EntEr para que “Bloqueo V-Chip” se ajuste en “Enc.”. (Si se pulsan repetidamente los botones o se alterna entre “Enc.” y “Apag.”.
Pulse el botón EntEr.
Pulse el botón ExIt para salir.
Cómo activar/desactivar V-Chip
. Pulse el botón mEnu para ver el menú en pantalla. Pulse los botones o para seleccionar “Configuración” y, después, pulse el botón EntEr.
. Pulse los botones o para seleccionar “V-Chip” y, después, pulse el botón EntEr. Aparecerá el mensaje “Ingresar Código”. Escriba su código PIN de 4 dígitos.
Configuración de Restricciones usando la sección “Guías pater. TV”
Primero, establezca un número de identificación personal (PIN) y active V-Chip. (Consulte la sección anterior). Las restricciones del bloqueo de programas se pueden establecer mediante dos métodos: Las guía de programas o la clasificación MPAA.
V-Chip
Ingresar Código
tV
* * * *
Enter PIn regresar
V-Chip
Ingresar Código
tV
* * * *
Enter PIn regresar
ConfiguracióntV
mover Ingresar regresar
Plug & Play Idioma : apagado tiempo modo juego : apagado V-Chip subtítulo transpar. del menú : medio más
mover Ingresar regresar
V-ChiptVBloqueo V-Chip : apagado Guías pater. tV Clas. mPaa Inglés Canadiense francés Canadiense Clasificación u.s. descargable Cambiar Código
mover Ingresar regresar
V-ChiptVBloqueo V-Chip : apag Guías pater. tV Clas. mPaa Inglés Canadiense francés Canadiense Clasificación u.s. descargable Cambiar Código
apagadoEncendido
ConfiguracióntV
mover Ingresar regresar
Plug & Play Idioma : apagado tiempo modo juego : apagado V-Chip subtítulo transpar. del menú : medio más
BN68-01167A-Spa-00.indd 55 2007-02-09 9:32:17

Español - 6
. Aparecerá la pantalla “V-Chip”. Pulse los botones o para seleccionar “Guías pater. TV” y, después, pulse el botón EntEr.
. Aparecerá la pantalla “Guías pater. TV”. Pulse los botones o para seleccionar una de las seis categorías basadas en la edad:
• TV-Y: Niños pequeños • TV-Y7: Niños de más de 7 años • TV-G: Todos los públicos • TV-PG: Acompañados de un adulto • TV-14: Mayores de 14 años • TV-MA: Para adultos
. En este punto, ya ha se seleccionado una de las clasificaciones. Pulse el botón EntEr. Según la configuración, se seleccionará un símbolo . (En blanco = Desbloqueada, = Bloqueada) Mientras se selecciona “ ”, pulse el botón EntEr para bloquear o desbloquear la categoría. Para seleccionar una clasificación de TV distinta, pulse los botones o y, después, repita el proceso.
Perm. todo: Se pulsa para desbloquear todos los programas de televisión. / Bloq. todo: Se pulsa para bloquear todos los programas de televisión.
TV-Y, TV-Y7, TV-G, TV-PG, TV-14 y TV-MA incluyen opciones adicionales. Consulte el paso siguiente para cambiar las subclasificaciones:
FV: Fantasía y violencia / D: Diálogos con alusiones sexuales / L: Lenguaje adulto / S: Situaciones sexuales / V: Violencia
La opción V-Chip bloqueará automáticamente ciertas categorías que son “más restrictivas”. Por ejemplo, si bloquea la categoría “TV-Y”, automáticamente se bloqueará TV-Y7. De manera similar, si bloquea la categoría TV-G, todas las categorías en el grupo “adolescente” quedarán bloqueadas (TV-G, TV-PG, TV-14, y TV-MA). Las subclasificaciones (D, L, S, V) funcionan de manera similar. (Consulte la sección siguiente).
6. Cómo establecer las subclasificaciones FV, D, L, S, y V. Primero, seleccione una de las clasificaciones de TV: TV-Y, TV-Y7 TV-G, TV-PG, TV-14, o TV-MA (consulte el paso 4, en la página anterior) y pulse el botón . Por cada subclasificación aparecerá un símbolo “ ”. Con el “ ” seleccionado, pulse el botón EntEr para ir a la subclasificación. Pulse EntEr para bloquear la subclasificación. Para seleccionar una clasificación de TV distinta, pulse los botones o , después, repita el proceso.
La opción V-chip bloqueará automáticamente ciertas categorías que son “más restrictivas”. Por ejemplo, si bloquea la subclasificación “L” en TV-PG, las subclasificaciones “L” en TV-14 y TV-MA se bloquearán automáticamente.
. Pulse el botón ExIt para borrar todas las pantallas. (O continúe en la sección siguiente y establezca restricciones adicionales según los códigos MPAA.)
Estas categorías se dividen en dos grupos: TV-Y y TV-Y7 (niños pequeños y niños a partir de 7 años), y TV-G a TV-MA (todos los demás). Las limitaciones para estos grupos funcionan de forma independiente. Si en la familia hay niños muy pequeños y adultos jóvenes, la opción Guía de programas debe configurarse por separado para grupo de edad. (Consulte el siguiente paso.)
mover Ingresar regresar
tV-YtV-Y
Guías pater. tVtV
tV-GtV-PGtV-tV-ma
all fV V s l d Perm. todoBloq. Todo
mover Ingresar regresar
tV-YtV-Y
Guías pater. tVtV
tV-GtV-PGtV-tV-ma
all fV V s l d Perm. todoBloq. Todo
mover Ingresar regresar
V-ChiptVBloqueo V-Chip : apagado Guías pater. tV Clas. mPaa Inglés Canadiense francés Canadiense Clasificación u.s. descargable Cambiar Código
BN68-01167A-Spa-00.indd 56 2007-02-09 9:32:19
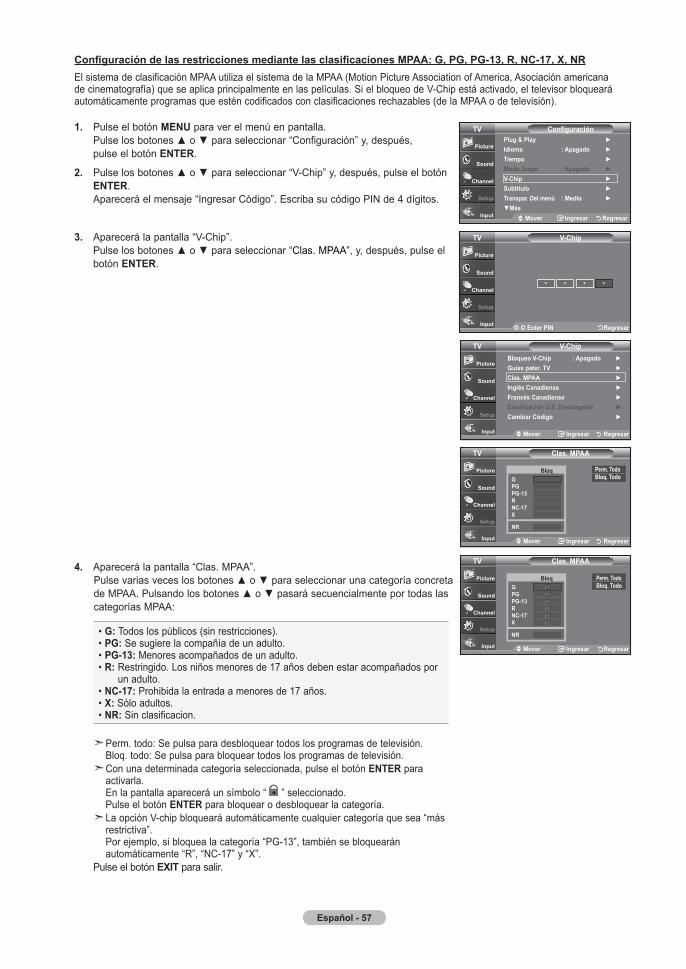
Español -
Configuración de las restricciones mediante las clasificaciones MPAA: G, PG, PG-13, R, NC-17, X, NREl sistema de clasificación MPAA utiliza el sistema de la MPAA (Motion Picture Association of America, Asociación americana de cinematografía) que se aplica principalmente en las películas. Si el bloqueo de V-Chip está activado, el televisor bloqueará automáticamente programas que estén codificados con clasificaciones rechazables (de la MPAA o de televisión).
. Pulse el botón mEnu para ver el menú en pantalla. Pulse los botones o para seleccionar “Configuración” y, después, pulse el botón EntEr.
. Pulse los botones o para seleccionar “V-Chip” y, después, pulse el botón EntEr. Aparecerá el mensaje “Ingresar Código”. Escriba su código PIN de 4 dígitos.
. Aparecerá la pantalla “V-Chip”. Pulse los botones o para seleccionar “Clas. MPAA”, y, después, pulse el botón EntEr.
. Aparecerá la pantalla “Clas. MPAA”. Pulse varias veces los botones o para seleccionar una categoría concreta de MPAA. Pulsando los botones o pasará secuencialmente por todas las categorías MPAA:
• G: Todos los públicos (sin restricciones).• PG: Se sugiere la compañía de un adulto.• PG-: Menores acompañados de un adulto.• r: Restringido. Los niños menores de 17 años deben estar acompañados por
un adulto.• nC-: Prohibida la entrada a menores de 17 años.• x: Sólo adultos.• nr: Sin clasificacion.
Perm. todo: Se pulsa para desbloquear todos los programas de televisión. Bloq. todo: Se pulsa para bloquear todos los programas de televisión.
Con una determinada categoría seleccionada, pulse el botón EntEr para activarla. En la pantalla aparecerá un símbolo “ ” seleccionado. Pulse el botón EntEr para bloquear o desbloquear la categoría.
La opción V-chip bloqueará automáticamente cualquier categoría que sea “más restrictiva”. Por ejemplo, si bloquea la categoría “PG-13”, también se bloquearán automáticamente “R”, “NC-17” y “X”.
Pulse el botón ExIt para salir.
V-Chip
tV
* * * *
Enter PIn regresar
ConfiguracióntV
mover Ingresar regresar
Plug & Play Idioma : apagado tiempo modo juego : apagado V-Chip subtítulo transpar. del menú : medio más
mover Ingresar regresar
V-ChiptVBloqueo V-Chip : apagado Guías pater. tV Clas. mPaa Inglés Canadiense francés Canadiense Clasificación u.s. descargable Cambiar Código
mover Ingresar regresar
Clas. mPaatV
GPGPG-rnC-x
nr
Bloq Perm. todoBloq. Todo
mover Ingresar regresar
Clas. mPaatV
GPGPG-rnC-x
nr
Bloq Perm. todoBloq. Todo
BN68-01167A-Spa-00.indd 57 2007-02-09 9:32:22
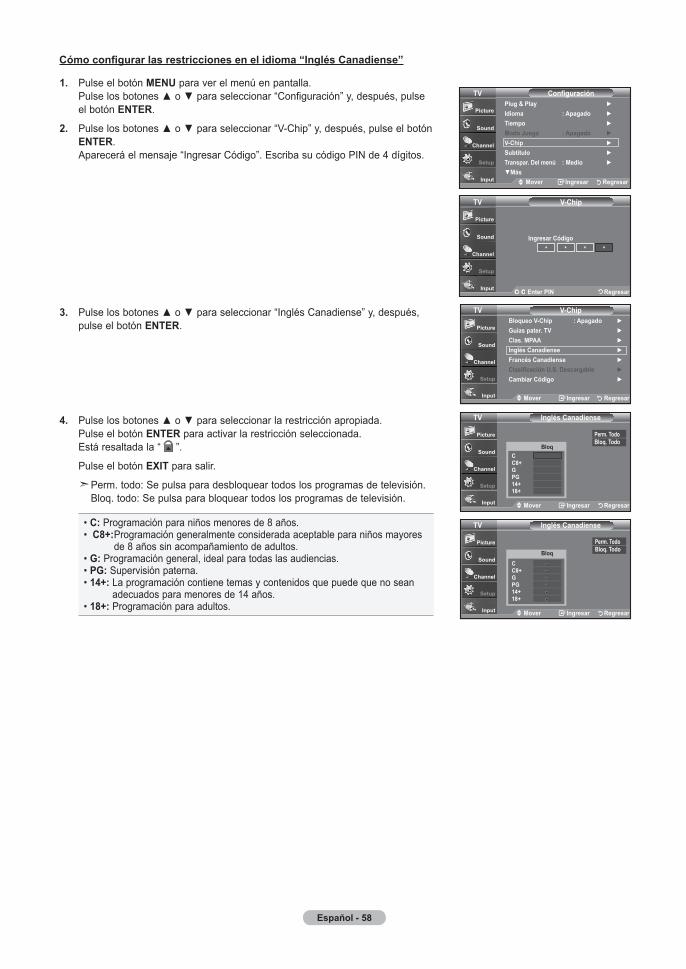
Español -
Cómo configurar las restricciones en el idioma “Inglés Canadiense”
. Pulse el botón mEnu para ver el menú en pantalla. Pulse los botones o para seleccionar “Configuración” y, después, pulse el botón EntEr.
. Pulse los botones o para seleccionar “V-Chip” y, después, pulse el botón EntEr. Aparecerá el mensaje “Ingresar Código”. Escriba su código PIN de 4 dígitos.
. Pulse los botones o para seleccionar “Inglés Canadiense” y, después, pulse el botón EntEr.
. Pulse los botones o para seleccionar la restricción apropiada. Pulse el botón EntEr para activar la restricción seleccionada. Está resaltada la “ ”.
Pulse el botón ExIt para salir.
Perm. todo: Se pulsa para desbloquear todos los programas de televisión. Bloq. todo: Se pulsa para bloquear todos los programas de televisión.
• C: Programación para niños menores de 8 años.• C+: Programación generalmente considerada aceptable para niños mayores
de 8 años sin acompañamiento de adultos.• G: Programación general, ideal para todas las audiencias.• PG: Supervisión paterna.• +: La programación contiene temas y contenidos que puede que no sean
adecuados para menores de 14 años.• +: Programación para adultos.
V-Chip
Ingresar Código
tV
* * * *
Enter PIn regresar
ConfiguracióntV
mover Ingresar regresar
Plug & Play Idioma : apagado tiempo modo juego : apagado V-Chip subtítulo transpar. del menú : medio más
mover Ingresar regresar
V-ChiptVBloqueo V-Chip : apagado Guías pater. tV Clas. mPaa Inglés Canadiense francés Canadiense Clasificación u.s. descargable Cambiar Código
mover Ingresar regresar
Inglés CanadiensetV
CC+GPG++
Bloq
Perm. todoBloq. Todo
mover Ingresar regresar
Inglés CanadiensetV
CC+GPG++
Bloq
Perm. todoBloq. Todo
BN68-01167A-Spa-00.indd 58 2007-02-09 9:32:24

Español -
Cómo configurar las restricciones en el idioma ‘Francés Canadiense’
. Pulse el botón mEnu para ver el menú en pantalla. Pulse los botones o para seleccionar “Configuración” y, después, pulse el botón EntEr.
. Pulse los botones o para seleccionar “V-Chip” y, después, pulse el botón EntEr. Aparecerá el mensaje “Ingresar Código”. Escriba su código PIN de 4 dígitos.
. Pulse los botones o para seleccionar “Francés Canadiense” y, después, pulse el botón EntEr.
. Pulse los botones o para seleccionar la restricción apropiada. Pulse el botón EntEr para activar la restricción seleccionada. Está resaltada la “ ”.
Pulse el botón ExIt para salir.
Perm. todo: Se pulsa para desbloquear todos los programas de televisión. Bloq. todo: Se pulsa para bloquear todos los programas de televisión.
• G: General.• ans+: No recomendada para niños pequeños.• ans+: Es posible que la programación no sea adecuada para niños meno-
res de 13 años.• 6 ans+: Es posible que la programación no sea adecuada para niños meno-
res de 16 años.• ans+: Programación restringida para adultos.
V-Chip
Ingresar Código
tV
* * * *
Enter PIn regresar
ConfiguracióntV
mover Ingresar regresar
Plug & Play Idioma : apagado tiempo modo juego : apagado V-Chip subtítulo transpar. del menú : medio más
mover Ingresar regresar
V-ChiptVBloqueo V-Chip : apagado Guías pater. tV Clas. mPaa Inglés Canadiense francés Canadiense Clasificación u.s. descargable Cambiar Código
mover Ingresar regresar
francés CanadiensetV
G ans+ ans+6 ans+ ans+
Bloq
Perm. todoBloq. Todo
mover Ingresar regresar
francés CanadiensetV
G ans+ ans+6 ans+ ans+
Bloq
Perm. todoBloq. Todo
BN68-01167A-Spa-00.indd 59 2007-02-09 9:32:27
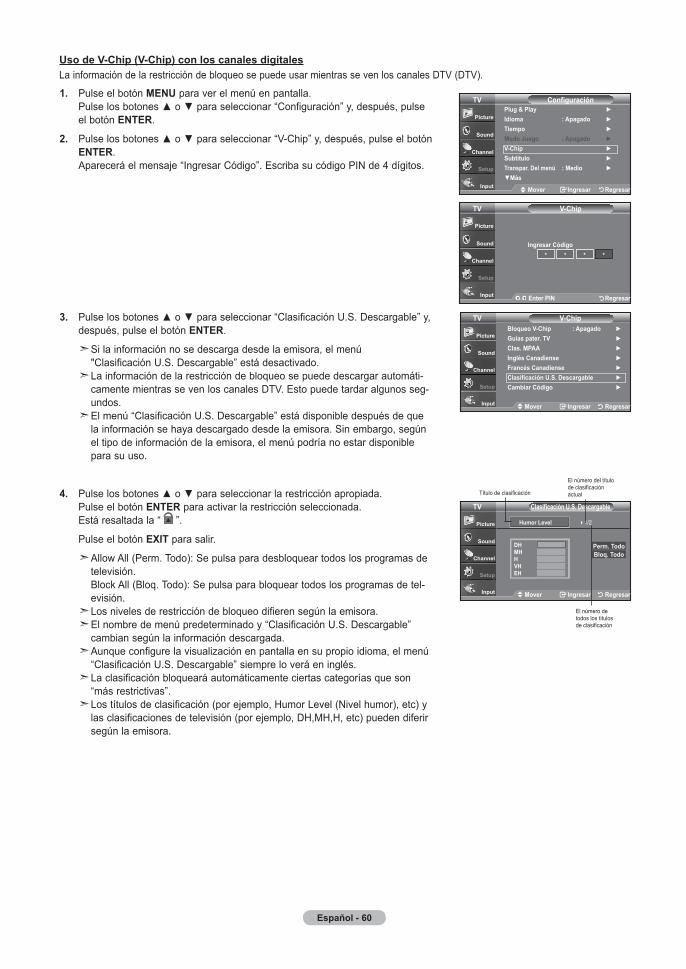
Español - 60
. Pulse el botón mEnu para ver el menú en pantalla. Pulse los botones o para seleccionar “Configuración” y, después, pulse el botón EntEr.
. Pulse los botones o para seleccionar “V-Chip” y, después, pulse el botón EntEr. Aparecerá el mensaje “Ingresar Código”. Escriba su código PIN de 4 dígitos.
. Pulse los botones o para seleccionar “Clasificación U.S. Descargable” y, después, pulse el botón EntEr.
Si la información no se descarga desde la emisora, el menú "Clasificación U.S. Descargable” está desactivado.
La información de la restricción de bloqueo se puede descargar automáti-camente mientras se ven los canales DTV. Esto puede tardar algunos seg-undos.
El menú “Clasificación U.S. Descargable” está disponible después de que la información se haya descargado desde la emisora. Sin embargo, según el tipo de información de la emisora, el menú podría no estar disponible para su uso.
. Pulse los botones o para seleccionar la restricción apropiada. Pulse el botón EntEr para activar la restricción seleccionada. Está resaltada la “ ”.
Pulse el botón ExIt para salir.
Allow All (Perm. Todo): Se pulsa para desbloquear todos los programas de televisión. Block All (Bloq. Todo): Se pulsa para bloquear todos los programas de tel-evisión.
Los niveles de restricción de bloqueo difieren según la emisora. El nombre de menú predeterminado y “Clasificación U.S. Descargable”
cambian según la información descargada. Aunque configure la visualización en pantalla en su propio idioma, el menú
“Clasificación U.S. Descargable” siempre lo verá en inglés. La clasificación bloqueará automáticamente ciertas categorías que son
“más restrictivas”. Los títulos de clasificación (por ejemplo, Humor Level (Nivel humor), etc) y
las clasificaciones de televisión (por ejemplo, DH,MH,H, etc) pueden diferir según la emisora.
uso de V-Chip (V-Chip) con los canales digitalesLa información de la restricción de bloqueo se puede usar mientras se ven los canales DTV (DTV).
mover Ingresar regresar
Clasificación u.s. descargabletV
dHmHHVHEH
Humor level
Perm. todoBloq. Todo
41/2
Título de clasificación
El número del título de clasificación actual
El número de todos los títulos de clasificación
V-Chip
Ingresar Código
tV
* * * *
Enter PIn regresar
ConfiguracióntV
mover Ingresar regresar
Plug & Play Idioma : apagado tiempo modo juego : apagado V-Chip subtítulo transpar. del menú : medio más
mover Ingresar regresar
V-ChiptVBloqueo V-Chip : apagado Guías pater. tV Clas. mPaa Inglés Canadiense francés Canadiense Clasificación u.s. descargable Cambiar Código
BN68-01167A-Spa-00.indd 60 2007-02-09 9:32:29

Español - 6
Actualización del software
Actualización software
Explorando usB... Puede tardar hasta 0 segundos.
. Inserte una unidad USB que contenga las actualizaciones de firmware en las conexiones servicio. de la parte posterior del televisor.
. Pulse el botón MENU para ver el menú. Pulse los botones o para seleccionar Configuración y después pulse el botón EntEr.
. Pulse los botones o para seleccionar Actualización software (Actual. software) y después pulse EntEr.
. Pulse los botones o para seleccionar la actualización por USB y después pulse EntEr. Aparece el mensaje Explorando USB... IPuede tardar hasta 30 segundos. No desconecte la alimentación ni retire la unidad USB mientras se aplican las actualizaciones. El televisor se apagará y se encenderá automáticamente después de completar la actualización de firmware. Después de realizar la actualización compruebe la versión del firmware.
El firmware y el proceso de actualización pueden ser diferentes en cada país o región.
Panel lateral del tV
unidad usB
Samsung puede ofrecer actualizaciones para el firmware del televisor en el futuro. Póngase en contacto con el centro de llama-das de Samsung en 1-800-SAMSUNG (7267864) para recibir información acerca de la descarga de las actualizaciones y del uso de un controlador USB. Las actualizaciones se pueden realizar conectando una unidad USB al puerto USB situado en la parte posterior del televisor.
Configuraciónmoremodo película : apagado PIP Función de Ayuda : Encendido Actualización softwar
tV
mover Ingresar regresar
BN68-01167A-Spa-00.indd 61 2007-02-09 9:32:30
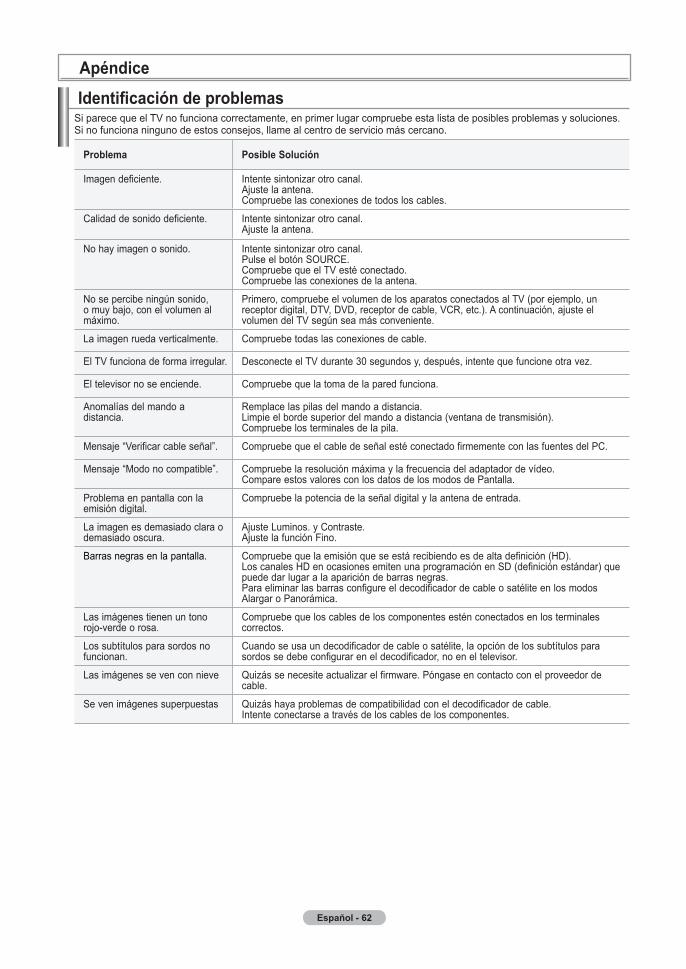
Español - 6
Identificación de problemasSi parece que el TV no funciona correctamente, en primer lugar compruebe esta lista de posibles problemas y soluciones. Si no funciona ninguno de estos consejos, llame al centro de servicio más cercano.
Problema Posible solución
Imagen deficiente. Intente sintonizar otro canal.Ajuste la antena.Compruebe las conexiones de todos los cables.
Calidad de sonido deficiente. Intente sintonizar otro canal.Ajuste la antena.
No hay imagen o sonido. Intente sintonizar otro canal.Pulse el botón SOURCE.Compruebe que el TV esté conectado.Compruebe las conexiones de la antena.
No se percibe ningún sonido, o muy bajo, con el volumen al máximo.
Primero, compruebe el volumen de los aparatos conectados al TV (por ejemplo, un receptor digital, DTV, DVD, receptor de cable, VCR, etc.). A continuación, ajuste el volumen del TV según sea más conveniente.
La imagen rueda verticalmente. Compruebe todas las conexiones de cable.
El TV funciona de forma irregular. Desconecte el TV durante 30 segundos y, después, intente que funcione otra vez.
El televisor no se enciende. Compruebe que la toma de la pared funciona.
Anomalías del mando a distancia.
Remplace las pilas del mando a distancia.Limpie el borde superior del mando a distancia (ventana de transmisión).Compruebe los terminales de la pila.
Mensaje “Verificar cable señal”. Compruebe que el cable de señal esté conectado firmemente con las fuentes del PC.
Mensaje “Modo no compatible”. Compruebe la resolución máxima y la frecuencia del adaptador de vídeo.Compare estos valores con los datos de los modos de Pantalla.
Problema en pantalla con laemisión digital.
Compruebe la potencia de la señal digital y la antena de entrada.
La imagen es demasiado clara odemasiado oscura.
Ajuste Luminos. y Contraste.Ajuste la función Fino.
Barras negras en la pantalla. Compruebe que la emisión que se está recibiendo es de alta definición (HD).Los canales HD en ocasiones emiten una programación en SD (definición estándar) que puede dar lugar a la aparición de barras negras.Para eliminar las barras configure el decodificador de cable o satélite en los modos Alargar o Panorámica.
Las imágenes tienen un tono rojo-verde o rosa.
Compruebe que los cables de los componentes estén conectados en los terminales correctos.
Los subtítulos para sordos no funcionan.
Cuando se usa un decodificador de cable o satélite, la opción de los subtítulos para sordos se debe configurar en el decodificador, no en el televisor.
Las imágenes se ven con nieve Quizás se necesite actualizar el firmware. Póngase en contacto con el proveedor de cable.
Se ven imágenes superpuestas Quizás haya problemas de compatibilidad con el decodificador de cable.Intente conectarse a través de los cables de los componentes.
apéndice
BN68-01167A-Spa-00.indd 62 2007-02-09 9:32:30

Español - 6
Problema Posible solución
Unas barras horizontales parpadean, tiemblan u oscilan en la imagen.
Ajuste la función Grueso y después ajuste la función Fino.
Unas barras verticales parpadean, tiemblan u oscilan en la imagen.
Ajuste la función Grueso y después ajuste la función Fino.
La pantalla está negra y el indicador luminoso de alimentación parpadea constantemente.
Compruebe lo siguiente en el equipo: Alimentación, Cable de señal.El TV utiliza su sistema de gestión de energía.Mueva el ratón del equipo o pulse una tecla del teclado.
La imagen no es estable y parece vibrar cuando se conecta el ordenador en la entrada de PC.
Si el ajuste no es correcto, use la utilidad del ordenador para cambiar los ajustes de pantalla.
El televisor admite funciones de visualización multiscan dentro del siguiente rango de frecuencias:
Frecuencia horizontal (kHz) 30~60
Frecuencia vertical (Hz) 60~75
Índice de barrido máximo (60 Hz) 1360 x 768
La imagen no está centrada en la pantalla.
Ajuste la posición horizontal y vertical.La posición de la pantalla se debe ajustar respecto a la fuente de salida (por ejemplo, STB)con una señal digital.
Si se muestra una imagen inmóvil durante un período de tiempo prolongado, pueden aparecer imágenes residuales o borrosas.
Cuando tenga que dejar el monitor sin utilizar por un período de tiempo prolongado, ajuste la configuración de modo que el monitor entre automáticamente en modo de ahorro de energía o active el protector de pantalla para visualizar imágenes móviles.
El panel LCD TFT utiliza un panel que consta de muchos píxeles de ínfimo tamaño (3,147,264) que requieren de una tec-nología altamente sofisticada para su fabricación. Sin embargo, pueden haber unos pocos píxeles poco iluminados u oscuros en pantalla. Estos píxeles no suponen una anomalia en el funcionamiento del producto.
BN68-01167A-Spa-00.indd 63 2007-02-09 9:32:31

Español - 6
Instalación del soporte
< > < >
. Coloque hacia abajo el TV sobre un paño suave o un almohadón sobre una mesa.. Coloque el soporte en el orificio de la parte inferior del televisor.. Inserte el tornillo en el orificio indicado y apriételo.
desconexión del soporte
< > < > < >
. Coloque hacia abajo el TV sobre un paño suave o un almohadón sobre una mesa.. Desmonte los 4 tornillos de la parte posterior del TV.. Separe el soporte del TV.. Cubra con una tapa el orificio inferior.
BN68-01167A-Spa-00.indd 64 2007-02-09 9:32:33
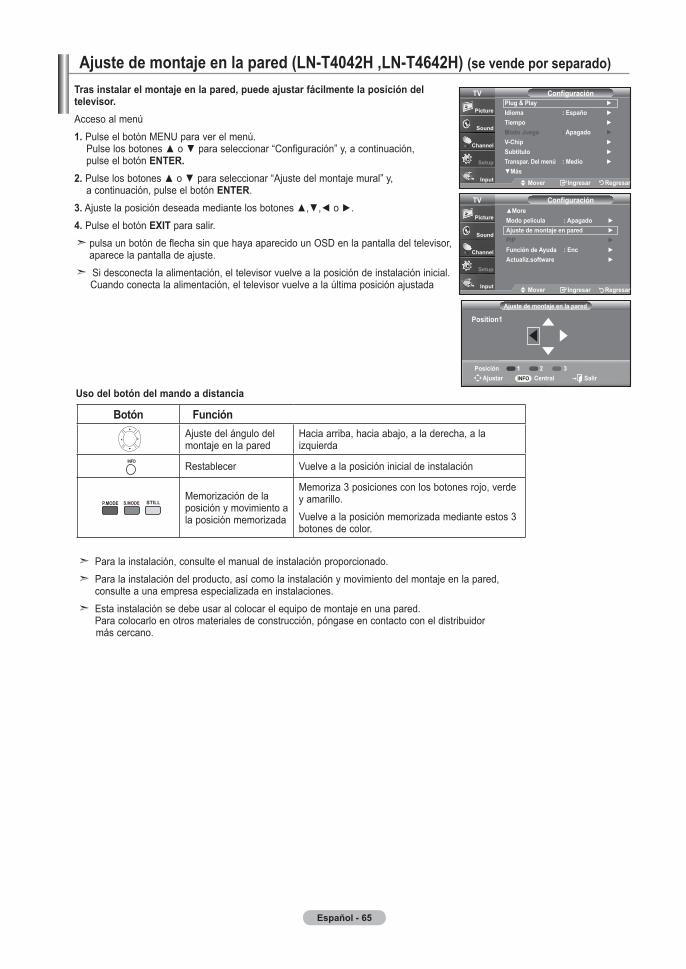
Español - 6
tras instalar el montaje en la pared, puede ajustar fácilmente la posición del televisor.Acceso al menú. Pulse el botón MENU para ver el menú. Pulse los botones o para seleccionar “Configuración” y, a continuación, pulse el botón EntEr.. Pulse los botones o para seleccionar “Ajuste del montaje mural” y, a continuación, pulse el botón EntEr. . Ajuste la posición deseada mediante los botones ,, o .. Pulse el botón ExIt para salir.
pulsa un botón de flecha sin que haya aparecido un OSD en la pantalla del televisor, aparece la pantalla de ajuste. Si desconecta la alimentación, el televisor vuelve a la posición de instalación inicial. Cuando conecta la alimentación, el televisor vuelve a la última posición ajustada
uso del botón del mando a distancia
Para la instalación, consulte el manual de instalación proporcionado. Para la instalación del producto, así como la instalación y movimiento del montaje en la pared, consulte a una empresa especializada en instalaciones. Esta instalación se debe usar al colocar el equipo de montaje en una pared. Para colocarlo en otros materiales de construcción, póngase en contacto con el distribuidor
más cercano.
Botón funciónAjuste del ángulo del montaje en la pared
Hacia arriba, hacia abajo, a la derecha, a la izquierda
Restablecer Vuelve a la posición inicial de instalación
Memorización de la posición y movimiento a la posición memorizada
Memoriza 3 posiciones con los botones rojo, verde y amarillo.Vuelve a la posición memorizada mediante estos 3 botones de color.
P.MODE S.MODE STILL
P.MODE S.MODE STILL
P.MODE S.MODE STILL
ajuste de montaje en la pared (ln-t0H ,ln-t6H) (se vende por separado)
ajuste de montaje en la pared
Position
ajustar Central salirInfo
Posición
Configuraciónmoremodo película : apagado ajuste de montaje en pared PIP Función de Ayuda : Enc Actualiz.software
tV
mover Ingresar regresar
ConfiguracióntV
mover Ingresar regresar
Plug & Play Idioma : Españo tiempo modo juego : apagado V-Chip subtítulo transpar. del menú : medio más
BN68-01167A-Spa-00.indd 65 2007-02-09 9:32:36

Español - 66
Especificaciones del equipo de montaje en la pared (VESA)Esta instalación se debe usar al colocar el equipo de montaje en una pared.Al colocarlo en otros materiales de construcción, póngase en contacto con el distribuidor más cercano.
familia de producto Pulgadas Especificaciones VEsa (a * B)
tornillo estándar (C * d) Cantidad
televisor lCd
23~26 200 * 100 M4 * L10 4
32 ~ 40 200 * 200 M6 * L10 4
46 ~ 52 600 * 400
M8 * L15 457 700 * 400
televisor PdP42 ~ 50 600 * 400
63 No VESA M8 6
Se ofrecen las dimensiones estándar para los equipos de montaje en la pared, como se muestra en la tabla anterior. Al adquirir el equipo de montaje en la pared, también se distribuye un manual de instalación detallado y todas las piezas necesarias para el montaje. No use tornillos con un tamaño superior al estándar, ya que pueden causar daños en el interior del televisor. El modelo de 63” no es compatible con las especificaciones VESA. Por ello, debe usar un equipo de montaje en la pared exclusivo para este modelo.
BN68-01167A-Spa-00.indd 66 2007-02-09 9:32:36

Español - 6
. Inserte el dispositivo de bloqueo en la ranura Kensington del TV LCD (Figura 1) y gírelo en el sentido del bloqueo (Figura 2).
. Conecte el cable del bloqueo Kensington.
. Fije el bloqueo Kensington a un mueble o a un objeto pesado que no se mueva.
uso del cierre antirrobo kensingtonEl bloqueo Kensington es un dispositivo que se usa para fijar físicamente el sistema cuando se usa en un lugar público. El dispositivo de bloqueo debe adquirirse por separado. La apariencia y el método de bloqueo pueden diferir de la ilustración según los fabricantes. Consulte el manual proporcionado con el bloqueo Kensington para usarlo correctamente.
Figura 2
Figura 1
Cable
<Opcional>
La ubicación del “Bloqueo Kensington” puede variar según el modelo.
BN68-01167A-Spa-00.indd 67 2007-02-09 9:32:37
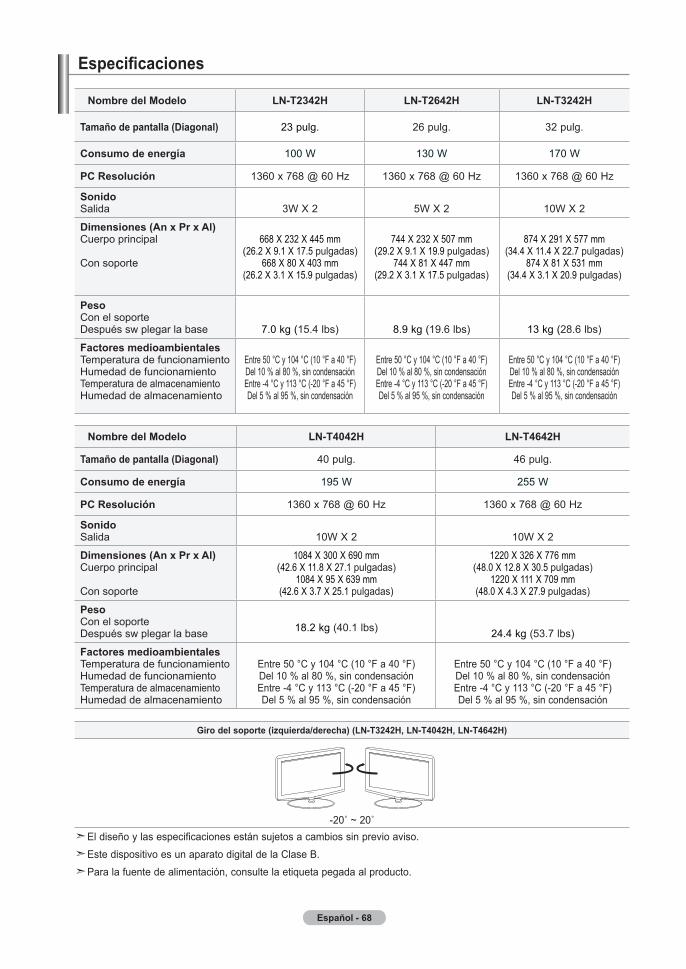
Español - 6
Especificaciones
nombre del modelo ln-tH ln-t6H ln-tH
tamaño de pantalla (diagonal) 23 pulg. 26 pulg. 32 pulg.
Consumo de energía 100 W 130 W 170 W
PC resolución 1360 x 768 @ 60 Hz 1360 x 768 @ 60 Hz 1360 x 768 @ 60 Hz
sonido Salida
3W X 2
5W X 2
10W X 2
dimensiones (an x Pr x al) Cuerpo principal Con soporte
668 X 232 X 445 mm (26.2 X 9.1 X 17.5 pulgadas)
668 X 80 X 403 mm(26.2 X 3.1 X 15.9 pulgadas)
744 X 232 X 507 mm (29.2 X 9.1 X 19.9 pulgadas)
744 X 81 X 447 mm(29.2 X 3.1 X 17.5 pulgadas)
874 X 291 X 577 mm (34.4 X 11.4 X 22.7 pulgadas)
874 X 81 X 531 mm(34.4 X 3.1 X 20.9 pulgadas)
Peso Con el soporte Después sw plegar la base 7.0 kg (15.4 lbs)
8.9 kg (19.6 lbs)
13 kg (28.6 lbs)
factores medioambientales Temperatura de funcionamiento Humedad de funcionamiento Temperatura de almacenamiento Humedad de almacenamiento
Entre 50 °C y 104 °C (10 °F a 40 °F) Del 10 % al 80 %, sin condensación Entre -4 °C y 113 °C (-20 °F a 45 °F) Del 5 % al 95 %, sin condensación
Entre 50 °C y 104 °C (10 °F a 40 °F) Del 10 % al 80 %, sin condensación Entre -4 °C y 113 °C (-20 °F a 45 °F) Del 5 % al 95 %, sin condensación
Entre 50 °C y 104 °C (10 °F a 40 °F) Del 10 % al 80 %, sin condensación Entre -4 °C y 113 °C (-20 °F a 45 °F) Del 5 % al 95 %, sin condensación
nombre del modelo ln-t0H ln-t6H
tamaño de pantalla (diagonal) 40 pulg. 46 pulg.
Consumo de energía 195 W 255 W
PC resolución 1360 x 768 @ 60 Hz 1360 x 768 @ 60 Hz
sonido Salida
10W X 2
10W X 2
dimensiones (an x Pr x al) Cuerpo principal Con soporte
1084 X 300 X 690 mm (42.6 X 11.8 X 27.1 pulgadas)
1084 X 95 X 639 mm(42.6 X 3.7 X 25.1 pulgadas)
1220 X 326 X 776 mm (48.0 X 12.8 X 30.5 pulgadas)
1220 X 111 X 709 mm (48.0 X 4.3 X 27.9 pulgadas)
Peso Con el soporte Después sw plegar la base
18.2 kg (40.1 lbs)
24.4 kg (53.7 lbs)
factores medioambientales Temperatura de funcionamiento Humedad de funcionamiento Temperatura de almacenamiento Humedad de almacenamiento
Entre 50 °C y 104 °C (10 °F a 40 °F) Del 10 % al 80 %, sin condensación Entre -4 °C y 113 °C (-20 °F a 45 °F) Del 5 % al 95 %, sin condensación
Entre 50 °C y 104 °C (10 °F a 40 °F) Del 10 % al 80 %, sin condensación Entre -4 °C y 113 °C (-20 °F a 45 °F) Del 5 % al 95 %, sin condensación
Giro del soporte (izquierda/derecha) (LN-T3242H, LN-T4042H, LN-T4642H)
-20˚ ~ 20˚El diseño y las especificaciones están sujetos a cambios sin previo aviso.Este dispositivo es un aparato digital de la Clase B.Para la fuente de alimentación, consulte la etiqueta pegada al producto.
BN68-01167A-Spa-00.indd 68 2007-02-09 9:32:37

Esta pagina se ha dejado enblanco expresamente.
BN68-01167A-Spa-00.indd 69 2007-02-09 9:32:38

Contact samsunG World-WIdEIf you have any questions o comments relating to Samsung products, please contact the SAMSUNGcustomer care center.
Contacte con samsunG World-WIdEsi tiene alguna pregunta o comentario referente a nuestros productos, por favor contacte con nuestro servicio deatención al Cliente.
Country Customer Care Center Web site address
CANADA 1-800-SAMSUNG (7267864) www.samsung.com/ca
Samsung Electronics Canada Inc., Customer Service 55 Standish Court Mississauga, Ontario L5R 4B2 Canada
Samsung Electronique Canada Inc., Service á la Clientéle 55 Standish Court Mississauga, Ontario L5R 4B2 Canada
U.S.A 1-800-SAMSUNG (7267864) www.samsung.comSamsung Electronics America, Inc. 105 Challenger Road Ridgefield Park, NJ 07660-0511
BN68-01167A-00
BN68-01167A-Spa-00.indd 70 2007-02-09 9:32:38