Oracle Retail Store Inventory Operations Cloud Services
363
[1]Oracle® Retail Store Operations Cloud Service User Guide Release 19.4 F51351-01 January 2022
-
Upload
khangminh22 -
Category
Documents
-
view
5 -
download
0
Transcript of Oracle Retail Store Inventory Operations Cloud Services

[1] Oracle® Retail Store Operations Cloud ServiceUser Guide
Release 19.4
F51351-01
January 2022

Oracle Retail Store Operations Cloud Service User Guide, Release 19.4
F51351-01
Copyright © 2022, Oracle and/or its affiliates. All rights reserved.
Primary Author: Tracy Gunston
Contributing Author: Becky Maifeld, Eswari Mani, Ragav Vasudevan, Steven Gooijer
This software and related documentation are provided under a license agreement containing restrictions on use and disclosure and are protected by intellectual property laws. Except as expressly permitted in your license agreement or allowed by law, you may not use, copy, reproduce, translate, broadcast, modify, license, transmit, distribute, exhibit, perform, publish, or display any part, in any form, or by any means. Reverse engineering, disassembly, or decompilation of this software, unless required by law for interoperability, is prohibited.
The information contained herein is subject to change without notice and is not warranted to be error-free. If you find any errors, please report them to us in writing.
If this is software or related documentation that is delivered to the U.S. Government or anyone licensing it on behalf of the U.S. Government, then the following notice is applicable:
U.S. GOVERNMENT END USERS: Oracle programs, including any operating system, integrated software, any programs installed on the hardware, and/or documentation, delivered to U.S. Government end users are "commercial computer software" pursuant to the applicable Federal Acquisition Regulation and agency-specific supplemental regulations. As such, use, duplication, disclosure, modification, and adaptation of the programs, including any operating system, integrated software, any programs installed on the hardware, and/or documentation, shall be subject to license terms and license restrictions applicable to the programs. No other rights are granted to the U.S. Government.
This software or hardware is developed for general use in a variety of information management applications. It is not developed or intended for use in any inherently dangerous applications, including applications that may create a risk of personal injury. If you use this software or hardware in dangerous applications, then you shall be responsible to take all appropriate fail-safe, backup, redundancy, and other measures to ensure its safe use. Oracle Corporation and its affiliates disclaim any liability for any damages caused by use of this software or hardware in dangerous applications.
Oracle and Java are registered trademarks of Oracle and/or its affiliates. Other names may be trademarks of their respective owners.
Intel and Intel Xeon are trademarks or registered trademarks of Intel Corporation. All SPARC trademarks are used under license and are trademarks or registered trademarks of SPARC International, Inc. AMD, Opteron, the AMD logo, and the AMD Opteron logo are trademarks or registered trademarks of Advanced Micro Devices. UNIX is a registered trademark of The Open Group.
This software or hardware and documentation may provide access to or information about content, products, and services from third parties. Oracle Corporation and its affiliates are not responsible for and expressly disclaim all warranties of any kind with respect to third-party content, products, and services unless otherwise set forth in an applicable agreement between you and Oracle. Oracle Corporation and its affiliates will not be responsible for any loss, costs, or damages incurred due to your access to or use of third-party content, products, or services, except as set forth in an applicable agreement between you and Oracle.
Value-Added Reseller (VAR) Language
Oracle Retail VAR Applications
The following restrictions and provisions only apply to the programs referred to in this section and licensed to you. You acknowledge that the programs may contain third-party software (VAR applications) licensed to Oracle. Depending upon your product and its version number, the VAR applications may include:
(i) the MicroStrategy Components developed and licensed by MicroStrategy Services Corporation (MicroStrategy) of McLean, Virginia to Oracle and imbedded in the MicroStrategy for Oracle Retail Data Warehouse and MicroStrategy for Oracle Retail Planning & Optimization applications.
(ii) the Wavelink component developed and licensed by Wavelink Corporation (Wavelink) of Kirkland, Washington, to Oracle and imbedded in Oracle Retail Mobile Store Inventory Management.
(iii) the software component known as Access Via™ licensed by Access Via of Seattle, Washington, and imbedded in Oracle Retail Signs and Oracle Retail Labels and Tags.
(iv) the software component known as Adobe Flex™ licensed by Adobe Systems Incorporated of San Jose, California, and imbedded in Oracle Retail Promotion Planning & Optimization application.
You acknowledge and confirm that Oracle grants you use of only the object code of the VAR Applications. Oracle will not deliver source code to the VAR Applications to you. Notwithstanding any other term or condition of the agreement and this ordering document, you shall not cause or permit alteration of any VAR

Applications. For purposes of this section, "alteration" refers to all alterations, translations, upgrades, enhancements, customizations or modifications of all or any portion of the VAR Applications including all reconfigurations, reassembly or reverse assembly, re-engineering or reverse engineering and recompilations or reverse compilations of the VAR Applications or any derivatives of the VAR Applications. You acknowledge that it shall be a breach of the agreement to utilize the relationship, and/or confidential information of the VAR Applications for purposes of competitive discovery.
The VAR Applications contain trade secrets of Oracle and Oracle's licensors and Customer shall not attempt, cause, or permit the alteration, decompilation, reverse engineering, disassembly or other reduction of the VAR Applications to a human perceivable form. Oracle reserves the right to replace, with functional equivalent software, any of the VAR Applications in future releases of the applicable program.

v
Contents
Send Us Your Comments ....................................................................................................................... xxi
Preface ............................................................................................................................................................. xxiii
Audience................................................................................................................................................... xxiii
Documentation Accessibility ................................................................................................................. xxiii
Related Documents ................................................................................................................................. xxiii
Improved Process for Oracle Retail Documentation Corrections .................................................... xxiv
Oracle Retail Documentation at the Oracle Help Center ................................................................. xxiv
Conventions ............................................................................................................................................. xxiv
1 Introduction
Overview .................................................................................................................................................... 1-1
Business Value.......................................................................................................................................... 1-2
Improved Customer Satisfaction ..................................................................................................... 1-2
Real-Time Inventory .......................................................................................................................... 1-2
Streamlined Inventory Processes..................................................................................................... 1-2
Assisted Inventory Ordering............................................................................................................ 1-2
Improved Corporate Control ........................................................................................................... 1-2
Full Transaction Views...................................................................................................................... 1-3
Enhanced Inventory Tracking.......................................................................................................... 1-3
Custom Flexible Attributes .............................................................................................................. 1-3
2 Common Usability and Navigation
Welcome / Login ....................................................................................................................................... 2-2
Menu/Drawer ............................................................................................................................................ 2-3
Store List .................................................................................................................................................... 2-4
Language .................................................................................................................................................... 2-5
Scan Type ................................................................................................................................................... 2-5
Scan Mode.................................................................................................................................................. 2-6
Unit of Measure ........................................................................................................................................ 2-6
Numeric Entry ........................................................................................................................................... 2-7
Filter Bar ..................................................................................................................................................... 2-8
Scan Bar ...................................................................................................................................................... 2-9
Search Criteria........................................................................................................................................ 2-10
Item Image and Item Description ...................................................................................................... 2-11

vi
Print.......................................................................................................................................................... 2-12
Print Tickets ........................................................................................................................................... 2-13
Select Printer .......................................................................................................................................... 2-14
Notes ........................................................................................................................................................ 2-15
Reset, Remove, and Restore Item ....................................................................................................... 2-15
Item Detail - UIN................................................................................................................................... 2-16
Item Detail - Attributes ........................................................................................................................ 2-17
Item Detail - Scan Details .................................................................................................................... 2-18
Configure Endpoints ............................................................................................................................ 2-19
Scanner Configuration ......................................................................................................................... 2-20
3 Open Transactions and Notifications
Open Transactions ................................................................................................................................... 3-2
Ad Hoc Notifications ............................................................................................................................... 3-3
System Notifications................................................................................................................................ 3-4
Search Criteria (Open Transaction) ...................................................................................................... 3-5
Notification List........................................................................................................................................ 3-6
Search Criteria (Notification)................................................................................................................. 3-7
Notification Detail ................................................................................................................................... 3-8
Notification Warning Display ............................................................................................................... 3-9
4 Lookups
Item Lookup .............................................................................................................................................. 4-1
Item Lookup Search Criteria ............................................................................................................ 4-3
Searching by Item............................................................................................................................... 4-5
Item ............................................................................................................................................... 4-5
Searching by Supplier........................................................................................................................ 4-6
Supplier ........................................................................................................................................ 4-6
Primary Supplier (Check Box) .................................................................................................. 4-6
Searching by Style .............................................................................................................................. 4-7
Style (Item ID).............................................................................................................................. 4-7
Searching by Finisher ........................................................................................................................ 4-8
Finisher ......................................................................................................................................... 4-8
Searching by Warehouse................................................................................................................... 4-9
Warehouse ................................................................................................................................... 4-9
Searching by UDA........................................................................................................................... 4-10
UDA ........................................................................................................................................... 4-10
Text............................................................................................................................................. 4-10
Value .......................................................................................................................................... 4-10
Date Range ................................................................................................................................ 4-10
Searching by Inventory Status....................................................................................................... 4-11
Inventory Status ....................................................................................................................... 4-11
Sub-Bucket ................................................................................................................................ 4-11
Item Detail ........................................................................................................................................ 4-12
Stock On Hand................................................................................................................................. 4-13
Stock On Hand Info ................................................................................................................. 4-14
Pricing ............................................................................................................................................... 4-14

vii
Item Attributes................................................................................................................................. 4-15
Item Attributes ......................................................................................................................... 4-15
Order Attributes .............................................................................................................................. 4-16
Merchandise Hierarchy.................................................................................................................. 4-17
Stock Locator.................................................................................................................................... 4-18
Deliveries.......................................................................................................................................... 4-19
Non-Sellable..................................................................................................................................... 4-20
Components ..................................................................................................................................... 4-21
Packs.................................................................................................................................................. 4-22
Item Locations ................................................................................................................................. 4-23
UDAs................................................................................................................................................. 4-24
RFID Locations ................................................................................................................................ 4-24
Item CFAs......................................................................................................................................... 4-25
Related Items ................................................................................................................................... 4-25
Customer Orders............................................................................................................................. 4-26
Suppliers........................................................................................................................................... 4-27
Universal Item Lookup ........................................................................................................................ 4-27
Supplier Lookup.................................................................................................................................... 4-29
Supplier Detail ................................................................................................................................. 4-31
Supplier CFAs.................................................................................................................................. 4-32
Container Lookup ................................................................................................................................. 4-33
Container Items ............................................................................................................................... 4-36
Container Lookup Item Detail ...................................................................................................... 4-37
Container Lookup Info ................................................................................................................... 4-38
RFID Locator .......................................................................................................................................... 4-38
Item EPCs ......................................................................................................................................... 4-39
RFID Tag Finder .............................................................................................................................. 4-40
5 Inventory Adjustments
Inventory Adjustments Mobile ............................................................................................................. 5-1
Inv Adjust List .................................................................................................................................... 5-3
Search Criteria (Inventory Adjustment) ......................................................................................... 5-4
Inv Adjust Items ................................................................................................................................. 5-5
Item Detail ........................................................................................................................................... 5-7
Edit CFAs ............................................................................................................................................ 5-8
Info Screen (Inv Adjust Items).......................................................................................................... 5-9
Inventory Adjustments Desktop........................................................................................................... 5-9
Inventory Adjustment List............................................................................................................. 5-11
Inventory Adjustment Search Criteria ........................................................................................ 5-12
Inventory Adjustment Detail......................................................................................................... 5-13
Inventory Adjustment - UIN ......................................................................................................... 5-15
Inventory Adjustment - Extended Attributes ............................................................................. 5-16
Edit Info Popup ............................................................................................................................... 5-17
Info Popup........................................................................................................................................ 5-18
Download Reports Popup ............................................................................................................. 5-18
Inventory Adjustments Process.......................................................................................................... 5-19

viii
6 Direct Store Delivery
Overview .................................................................................................................................................... 6-1
Business Cases .......................................................................................................................................... 6-2
DSD Receiving Process for PO Based Delivery with ASN........................................................... 6-2
DSD Receiving Process for PO Based Delivery without ASN..................................................... 6-2
DSD Receiving Process without PO ................................................................................................ 6-2
DSD Receiving Process via DEX/Nex ............................................................................................ 6-2
Screen Flow................................................................................................................................................ 6-3
Functionality ............................................................................................................................................. 6-4
DSD Receiving List ............................................................................................................................ 6-4
DSD Receiving List Search Criteria ................................................................................................. 6-5
Creating a New DSD Receipt ........................................................................................................... 6-6
DSD Receiving Containers................................................................................................................ 6-7
DSD Receiving Info......................................................................................................................... 6-11
Customer Orders............................................................................................................................. 6-12
Edit Receipt ...................................................................................................................................... 6-13
Edit CFA ........................................................................................................................................... 6-14
External Receiver Adjustments ..................................................................................................... 6-15
Container Items ............................................................................................................................... 6-16
Receiving Item Detail...................................................................................................................... 6-19
Over Receiving Validations.................................................................................................... 6-21
DSD Receiving Container Info ...................................................................................................... 6-22
Edit Container.................................................................................................................................. 6-24
Selecting a Purchase Order for a PO Based Delivery................................................................. 6-25
Purchase Order List ........................................................................................................................ 6-26
Purchase Order List Search Criteria ............................................................................................. 6-27
Purchase Order Items ..................................................................................................................... 6-28
Customer Order Reserve On Receipt / Auto Pick ..................................................................... 6-29
7 Transfers
Transfer Functionality ............................................................................................................................. 7-1
Business Case...................................................................................................................................... 7-2
Transfer Document .................................................................................................................................. 7-5
Destination Types............................................................................................................................... 7-6
Customer Orders................................................................................................................................ 7-6
Transfer List ........................................................................................................................................ 7-7
Search Criteria (Transfers) ................................................................................................................ 7-8
Create Request .................................................................................................................................... 7-9
Request Items................................................................................................................................... 7-10
Transfer Items .................................................................................................................................. 7-11
Footer Menu.............................................................................................................................. 7-12
Item Detail (Create/Edit/View Request) .................................................................................... 7-13
Item Detail (Accept/Reject Request) ............................................................................................ 7-14
Edit CFAs Screen............................................................................................................................. 7-15
Info Screen (Transfer Items)........................................................................................................... 7-15
Edit Transfer .................................................................................................................................... 7-16
Transfer Shipping ................................................................................................................................. 7-17

ix
Features............................................................................................................................................. 7-17
Tsf Ship List...................................................................................................................................... 7-19
Search Criteria (Transfer Shipment)............................................................................................. 7-20
Tsf Ship Containers......................................................................................................................... 7-21
Submit........................................................................................................................................ 7-21
Dispatch..................................................................................................................................... 7-21
Customer Orders...................................................................................................................... 7-21
Edit Shipment .................................................................................................................................. 7-23
Edit CFA ........................................................................................................................................... 7-24
Info (Shipment)................................................................................................................................ 7-24
BOL Info ........................................................................................................................................... 7-25
Customer Order List ....................................................................................................................... 7-26
Transfer Container Items ............................................................................................................... 7-27
Item Detail (Quantity) .................................................................................................................... 7-29
Select Document .............................................................................................................................. 7-30
Options to Add to Container.................................................................................................. 7-31
Edit Container.................................................................................................................................. 7-31
Limit Items to (Hierarchy Restriction) .................................................................................. 7-32
Edit CFAs Screen............................................................................................................................. 7-32
Info (Container) ............................................................................................................................... 7-33
Transfer Receiving ................................................................................................................................ 7-33
Tsf Rcv List ....................................................................................................................................... 7-35
Search Criteria (Transfer Receiving) ............................................................................................ 7-36
Tsf Rcv Containers .......................................................................................................................... 7-37
Edit Receipt ...................................................................................................................................... 7-39
Edit CFAs Screen............................................................................................................................. 7-39
Transfer Receiving Info (Receipt) ................................................................................................. 7-40
Misdirected Container.................................................................................................................... 7-41
Misdirected Items............................................................................................................................ 7-42
Customer Order List ....................................................................................................................... 7-43
Container Items ............................................................................................................................... 7-44
Item Detail ........................................................................................................................................ 7-47
Edit Container.................................................................................................................................. 7-48
Info (Container) ............................................................................................................................... 7-50
Quick Receiving............................................................................................................................... 7-51
Quick Rcv List.................................................................................................................................. 7-51
Processing......................................................................................................................................... 7-52
Available Versus Unavailable Inventory ............................................................................. 7-53
8 RTV and RTV Shipment
RTV Request and Shipment .................................................................................................................. 8-1
RTV Request........................................................................................................................................ 8-1
RTV Shipment..................................................................................................................................... 8-2
Business Cases .......................................................................................................................................... 8-3
Damage Item Process......................................................................................................................... 8-3
Recall Process...................................................................................................................................... 8-3
Screen Flow................................................................................................................................................ 8-4

x
Functionality ............................................................................................................................................. 8-5
RTV List ............................................................................................................................................... 8-6
RTV Search Criteria ........................................................................................................................... 8-7
RTV Request Items............................................................................................................................. 8-8
RTV Request Item Detail................................................................................................................ 8-10
Edit CFAs Screen............................................................................................................................. 8-11
RTV Info ........................................................................................................................................... 8-11
Edit RTV ........................................................................................................................................... 8-12
RTV Create Shipment ..................................................................................................................... 8-13
RTV Ship Containers ...................................................................................................................... 8-14
Edit CFAs Screen............................................................................................................................. 8-15
Shipment Info .................................................................................................................................. 8-16
BOL Detail ....................................................................................................................................... 8-17
Edit Shipment .................................................................................................................................. 8-18
RTV Ship Container Items ............................................................................................................. 8-19
Item Detail (Container)................................................................................................................... 8-21
RTV Container Default Item.......................................................................................................... 8-22
Container Info.................................................................................................................................. 8-23
Edit Container.................................................................................................................................. 8-24
Select Item ........................................................................................................................................ 8-25
Processing......................................................................................................................................... 8-26
9 Shipping and Receiving Common Components
Overview .................................................................................................................................................... 9-1
Manifesting ......................................................................................................................................... 9-1
Business Case............................................................................................................................... 9-1
Mobile......................................................................................................................................................... 9-3
Edit Shipment ..................................................................................................................................... 9-4
Motive........................................................................................................................................... 9-4
Carrier and Service Selection .................................................................................................... 9-4
Adjust Carrier (Transfer Shipment and RTV Shipment Only)............................................. 9-5
Edit Container..................................................................................................................................... 9-5
Weight and Package Validation................................................................................................ 9-6
Tracking ID .................................................................................................................................. 9-6
External Printing ................................................................................................................................ 9-7
Print...................................................................................................................................................... 9-8
10 In Store Replenishment
Overview ................................................................................................................................................. 10-1
Business Cases ....................................................................................................................................... 10-3
Replenishment of Shop Floor ........................................................................................................ 10-3
Moving Items to the Backroom..................................................................................................... 10-3
Screen Flow............................................................................................................................................. 10-4
Functionality .......................................................................................................................................... 10-5
Replenishment ................................................................................................................................. 10-5
Replenishment Pick List.......................................................................................................... 10-5
Replenishment List Search Criteria ....................................................................................... 10-6

xi
Create Replenishment Pick..................................................................................................... 10-7
Replenishment List Types ............................................................................................... 10-7
Replenishment Pick Items .................................................................................................... 10-10
Replenishment Info ........................................................................................................ 10-11
Edit CFA........................................................................................................................... 10-12
Replenishment Pick Item Detail ................................................................................... 10-13
Substitute Items...................................................................................................................... 10-14
Receive on Shop Floor ........................................................................................................... 10-14
Shelf Adjustment........................................................................................................................... 10-15
Shelf Adjust List ..................................................................................................................... 10-15
Create Shelf Adjust ................................................................................................................ 10-16
Shelf Adjust Items.................................................................................................................. 10-17
Shelf Adjust Info ............................................................................................................. 10-18
Edit CFA........................................................................................................................... 10-19
Shelf Adjust Item Detail................................................................................................. 10-20
Scan List.......................................................................................................................................... 10-21
Scan List................................................................................................................................... 10-21
Create Scan List ...................................................................................................................... 10-22
Scan List Items........................................................................................................................ 10-23
Scan List Info ................................................................................................................... 10-24
Edit CFA........................................................................................................................... 10-25
Scan List Item Detail....................................................................................................... 10-26
Most Common Functional Process ............................................................................................. 10-27
11 Stock Counts
Overview ................................................................................................................................................. 11-1
Types of Stock Counts .................................................................................................................... 11-2
Ad Hoc Stock Counts .............................................................................................................. 11-2
Unit Stock Counts .................................................................................................................... 11-2
Problem Line Stock Counts .................................................................................................... 11-3
Unit and Amount Stock Counts............................................................................................. 11-3
Summary ................................................................................................................................... 11-3
Counting Methods .......................................................................................................................... 11-4
Serialization...................................................................................................................................... 11-5
Functionality .......................................................................................................................................... 11-5
Features............................................................................................................................................. 11-5
Stock Count List .............................................................................................................................. 11-7
Ad Hoc Stock Count ....................................................................................................................... 11-8
Stock Count List Search Criteria ................................................................................................... 11-9
Child Count List ............................................................................................................................ 11-10
Edit Stock Count............................................................................................................................ 11-13
Edit CFA ......................................................................................................................................... 11-14
Stock Count Items and Stock Re-Count Items .......................................................................... 11-15
Info ........................................................................................................................................... 11-17
Product Group Info................................................................................................................ 11-18
Child Count Info .................................................................................................................... 11-19
Bulk Scan ................................................................................................................................. 11-20

xii
Bulk Items ............................................................................................................................... 11-21
Issues........................................................................................................................................ 11-22
Issue Detail.............................................................................................................................. 11-23
Issue Detail - UIN................................................................................................................... 11-24
Issues - Single Item ................................................................................................................ 11-25
Search Criteria - Stock Count Items and Stock Re-Count Items............................................. 11-26
Item Detail ...................................................................................................................................... 11-27
12 Customer Order Management
Customer Orders ................................................................................................................................... 12-1
Customer Order Status Flow......................................................................................................... 12-3
Customer Order Status Update Logic.......................................................................................... 12-5
Under Review Status ...................................................................................................................... 12-6
Customer Order List ....................................................................................................................... 12-7
Search Criteria (Customer Orders) ............................................................................................... 12-8
Customer Order Items.................................................................................................................... 12-9
Footer Menu.............................................................................................................................. 12-9
Edit Customer Order .................................................................................................................... 12-10
Info (Customer Orders) ................................................................................................................ 12-11
Edit CFAs Screen........................................................................................................................... 12-12
Customer ........................................................................................................................................ 12-12
Item Detail (Customer Orders) ................................................................................................... 12-13
Customer Order Picking .................................................................................................................... 12-14
Pick List .......................................................................................................................................... 12-16
Search Criteria (Pick List)............................................................................................................. 12-17
Create Pick...................................................................................................................................... 12-18
Pick Items ....................................................................................................................................... 12-21
Item Detail (Picking) .................................................................................................................... 12-23
Confirm Item/Confirm Bin ......................................................................................................... 12-24
Substitute Items ............................................................................................................................. 12-25
Info (Picking).................................................................................................................................. 12-26
Customer Order Deliveries ............................................................................................................... 12-26
Delivery List................................................................................................................................... 12-28
Delivery Items................................................................................................................................ 12-29
Item Detail (Customer Order Deliveries) .................................................................................. 12-31
Info (Customer Order Deliveries)............................................................................................... 12-32
BOL Info ......................................................................................................................................... 12-33
Edit Delivery .................................................................................................................................. 12-34
Customer Order Reverse Picks ......................................................................................................... 12-35
Reverse Pick List............................................................................................................................ 12-37
Reverse Pick Items ........................................................................................................................ 12-38
Item Detail (Customer Order Reverse Picks) ............................................................................ 12-40
Info (Customer Order Reverse Picks) ........................................................................................ 12-41
13 Item Basket
Item Basket ............................................................................................................................................. 13-2
Item Basket List ..................................................................................................................................... 13-3

xiii
Search Criteria (Item Basket) .............................................................................................................. 13-4
Create Item Basket ................................................................................................................................ 13-4
Item Basket Items .................................................................................................................................. 13-5
Item Detail .............................................................................................................................................. 13-6
Edit Item Basket..................................................................................................................................... 13-7
Edit CFAs ................................................................................................................................................ 13-8
Info Screen (Item Basket)..................................................................................................................... 13-9
Bulk Scanning ........................................................................................................................................ 13-9
Bulk Scan ........................................................................................................................................ 13-10
Bulk Items....................................................................................................................................... 13-11
Select Item Basket.......................................................................................................................... 13-12
14 Ticketing
Auto Print Item ...................................................................................................................................... 14-1
Manual Print Item ................................................................................................................................. 14-3
Default Attributes ................................................................................................................................. 14-4
Select Printer .......................................................................................................................................... 14-5
15 Store Orders
Business Case ......................................................................................................................................... 15-1
Store Order List...................................................................................................................................... 15-3
Search Criteria (Store Orders)............................................................................................................. 15-4
Create Store Order................................................................................................................................. 15-5
Store Order Items .................................................................................................................................. 15-6
Item Detail .............................................................................................................................................. 15-9
Edit Store Order ................................................................................................................................... 15-11
Edit CFAs .............................................................................................................................................. 15-12
Info Screen ........................................................................................................................................... 15-13
System Generated ............................................................................................................................... 15-14
Integration ........................................................................................................................................... 15-14
Manual and System Created ....................................................................................................... 15-14
Externally Created ....................................................................................................................... 15-14
RMFCS Processing for SIOCS Created Orders (Manual And System).................................... 15-15
Externally Created Store Orders....................................................................................................... 15-15

xv
List of Figures
2–1 Welcome Screen .......................................................................................................................... 2-22–2 Menu/Drawer ............................................................................................................................. 2-32–3 Store List....................................................................................................................................... 2-42–4 Language...................................................................................................................................... 2-52–5 Select Scan Type .......................................................................................................................... 2-52–6 Select Scan Mode......................................................................................................................... 2-62–7 Scan Mode.................................................................................................................................... 2-62–8 Select Unit of Measure................................................................................................................ 2-62–9 Unit of Measure........................................................................................................................... 2-62–10 Numeric Entry............................................................................................................................. 2-72–11 Filter Bar ....................................................................................................................................... 2-82–12 Scan Bar ........................................................................................................................................ 2-92–13 Search Criteria .......................................................................................................................... 2-102–14 Item Detail Item Image............................................................................................................ 2-112–15 Print............................................................................................................................................ 2-122–16 Print Tickets .............................................................................................................................. 2-132–17 Select Printer ............................................................................................................................. 2-142–18 Notes .......................................................................................................................................... 2-152–19 Item Detail - UIN...................................................................................................................... 2-162–20 Item Detail - Attributes ........................................................................................................... 2-172–21 Item Detail - Scan Details........................................................................................................ 2-182–22 Configure Endpoints ............................................................................................................... 2-192–23 Scanner Config ......................................................................................................................... 2-202–24 Scanner Detail........................................................................................................................... 2-213–1 Open Transactions Screen Flow................................................................................................ 3-13–2 Open Transactions ...................................................................................................................... 3-23–3 Select Users Popup ..................................................................................................................... 3-33–4 Search Criteria (Open Transaction) .......................................................................................... 3-53–5 Notification List........................................................................................................................... 3-63–6 Search Criteria (Notification) .................................................................................................... 3-73–7 Notification Detail....................................................................................................................... 3-83–8 Notification Display ................................................................................................................... 3-94–1 Item Lookup Screen Flow ......................................................................................................... 4-24–2 Item Lookup Screens .................................................................................................................. 4-34–3 Search Mode: Item ...................................................................................................................... 4-54–4 Search Mode: Supplier ............................................................................................................... 4-64–5 Search Mode: Style...................................................................................................................... 4-74–6 Search Mode: Finisher ................................................................................................................ 4-84–7 Search Mode: Warehouse .......................................................................................................... 4-94–8 Search Mode: UDA .................................................................................................................. 4-104–9 Search Mode: Inventory Status .............................................................................................. 4-114–10 Item Detail Screen .................................................................................................................... 4-124–11 Stock On Hand Screen............................................................................................................. 4-134–12 Pricing Screen ........................................................................................................................... 4-144–13 Item Attributes Screen............................................................................................................. 4-154–14 Order Attributes Screen .......................................................................................................... 4-164–15 Merchandise Hierarchy Screen .............................................................................................. 4-174–16 Stock Locator Screen................................................................................................................ 4-184–17 Deliveries Screen ...................................................................................................................... 4-194–18 Non-Sellable Screen ................................................................................................................. 4-204–19 Components Screen ................................................................................................................. 4-214–20 Packs Screen.............................................................................................................................. 4-22

xvi
4–21 Item Locations Screen.............................................................................................................. 4-234–22 UDAs Screen............................................................................................................................. 4-244–23 RFID Locations Screen ............................................................................................................ 4-244–24 Item CFAs Screen..................................................................................................................... 4-254–25 Related Items Screen................................................................................................................ 4-254–26 Customer Orders Screen ......................................................................................................... 4-264–27 Suppliers Screen ....................................................................................................................... 4-274–28 Universal Item Lookup Screen Flow .................................................................................... 4-284–29 Inv Adjust list ........................................................................................................................... 4-294–30 Supplier Lookup Screen Flow................................................................................................ 4-304–31 Supplier Lookup Screen.......................................................................................................... 4-304–32 Supplier Search Criteria Screen ............................................................................................. 4-314–33 Supplier Detail.......................................................................................................................... 4-314–34 Supplier CFAs .......................................................................................................................... 4-324–35 Container Lookup Screen Flow ............................................................................................. 4-334–36 Container Lookup Screen ...................................................................................................... 4-344–37 Container Lookup Details....................................................................................................... 4-344–38 Container Search Criteria Screen ........................................................................................... 4-354–39 Container Items (Transfer Receiving) ................................................................................... 4-364–40 Container Lookup Item Detail Screen (Transfer Receiving).............................................. 4-374–41 Container Lookup Info Screen (Transfer Receiving) .......................................................... 4-384–42 RFID Locator............................................................................................................................. 4-394–43 Item EPCs .................................................................................................................................. 4-394–44 Tag Finder ................................................................................................................................. 4-405–1 Inventory Adjustment Mobile Screen Flow ............................................................................ 5-25–2 Inv Adjust List Screen ................................................................................................................ 5-35–3 Search Criteria Screen (Inventory Adjustments).................................................................... 5-45–4 Inv Adjust Items Screen ............................................................................................................. 5-55–5 Item Detail Screen (Quantity).................................................................................................... 5-75–6 Edit CFAs Screen......................................................................................................................... 5-85–7 Inv Adjust Items Info Screen ..................................................................................................... 5-95–8 Inventory Adjustment Desktop Screen Flow....................................................................... 5-105–9 Inventory Adjustment List Screen......................................................................................... 5-115–10 Inventory Adjustment Search Criteria.................................................................................. 5-125–11 Inventory Adjustment Detail Screen..................................................................................... 5-135–12 Inventory Adjustment - UIN.................................................................................................. 5-155–13 Inventory Adjustment - UIN - Auto Generation................................................................. 5-155–14 Inventory Adjustment - UIN - Relocation............................................................................ 5-165–15 Inventory Adjustment - Extended Attributes...................................................................... 5-165–16 Edit Info Popup ........................................................................................................................ 5-175–17 Inventory Adjustment Info Popup ........................................................................................ 5-185–18 Select Report Popup (Download Report) ............................................................................. 5-186–1 Direct Store Delivery Mobile Screen Flow .............................................................................. 6-36–2 DSD RCV List .............................................................................................................................. 6-46–3 DSD Receiving List Search Criteria Screen ............................................................................. 6-56–4 Supplier Lookup ......................................................................................................................... 6-66–5 DSD Receiving Containers ........................................................................................................ 6-76–6 Receiving Info Screen .............................................................................................................. 6-116–7 Customer Orders Screen ......................................................................................................... 6-126–8 Edit Receipt ............................................................................................................................... 6-136–9 Edit CFAs .................................................................................................................................. 6-146–10 External Rcv Adjustments Screen.......................................................................................... 6-156–11 Container Items Screen ........................................................................................................... 6-166–12 Item Detail Screen .................................................................................................................... 6-196–13 DSD Receiving Container Info Screen .................................................................................. 6-22

xvii
6–14 Edit Container Screen.............................................................................................................. 6-246–15 Select Purchase Order Screen................................................................................................. 6-256–16 Purchase Order List Screen .................................................................................................... 6-266–17 Purchase Order List Search Criteria Screen ......................................................................... 6-276–18 Purchase Order Items Screen ................................................................................................. 6-287–1 Transfer Solution Flow............................................................................................................... 7-37–2 Transfer > Shipment > Receipt Status Flow............................................................................ 7-37–3 Supported Entity Flow ............................................................................................................... 7-47–4 Transfer Document Mobile Screen Flow ................................................................................. 7-57–5 Transfer List Screen .................................................................................................................... 7-77–6 Transfer Search Criteria Screen................................................................................................. 7-87–7 Create Request Popup................................................................................................................ 7-97–8 Request Items Screen............................................................................................................... 7-107–9 Transfer Items Screen .............................................................................................................. 7-117–10 Item Detail Screen (Requested Quantity) ............................................................................. 7-137–11 Item Detail Screen (Approved Quantity) ............................................................................. 7-147–12 Edit CFAs .................................................................................................................................. 7-157–13 Transfer Items Info Screen ...................................................................................................... 7-157–14 Edit Transfer Screen................................................................................................................. 7-167–15 Transfer Shipment Mobile Screen Flow ............................................................................... 7-187–16 Tsf Ship List Screen.................................................................................................................. 7-197–17 Search Criteria Screen.............................................................................................................. 7-207–18 Tsf Ship Containers Screen ..................................................................................................... 7-227–19 Edit Shipment Screen .............................................................................................................. 7-237–20 Edit CFAs .................................................................................................................................. 7-247–21 Info (Shipment) Popup............................................................................................................ 7-247–22 BOL Info Screen........................................................................................................................ 7-257–23 Cust Order List ......................................................................................................................... 7-267–24 Container Items Screen ........................................................................................................... 7-277–25 Item Detail (Quantity) Screen................................................................................................. 7-297–26 Select Document Screen .......................................................................................................... 7-307–27 Edit Container Screen.............................................................................................................. 7-317–28 Edit CFAs .................................................................................................................................. 7-327–29 Info (Container) Popup ........................................................................................................... 7-337–30 Transfer Receiving Mobile Screen Flow ............................................................................... 7-347–31 Tsf Rcv List Screen ................................................................................................................... 7-357–32 Search Criteria (Transfer Receiving) Screen......................................................................... 7-367–33 Tsf Rcv Containers Screen ...................................................................................................... 7-377–34 Edit Receipt Screen .................................................................................................................. 7-397–35 Edit CFAs .................................................................................................................................. 7-397–36 Info (Receipt) Popup................................................................................................................ 7-407–37 Misdirected Container Screen ................................................................................................ 7-417–38 Misdirected Items Screen........................................................................................................ 7-427–39 Cust Order List Screen ............................................................................................................ 7-437–40 Container Items Screen ........................................................................................................... 7-447–41 Item Detail (Container) Screen............................................................................................... 7-477–42 Edit Container Screen.............................................................................................................. 7-487–43 Info (Container) Popup ........................................................................................................... 7-507–44 Quick Rcv List Screen.............................................................................................................. 7-518–1 Supported Return Flows............................................................................................................ 8-38–2 RTV and RTV Shipment Mobile Screen Flow......................................................................... 8-48–3 RTV and RTV Shipment Status Flow....................................................................................... 8-48–4 RTV List Screen ........................................................................................................................... 8-68–5 RTV Search Criteria Screen........................................................................................................ 8-78–6 RTV Request Items Screen......................................................................................................... 8-8

xviii
8–7 Item Detail Screen .................................................................................................................... 8-108–8 Edit CFAs .................................................................................................................................. 8-118–9 RTV Info .................................................................................................................................... 8-118–10 Edit RTV Screen ....................................................................................................................... 8-128–11 Create Shipment Screen .......................................................................................................... 8-138–12 RTV Ship Containers Screen................................................................................................... 8-148–13 Edit CFAs .................................................................................................................................. 8-158–14 Shipment Info Screen............................................................................................................... 8-168–15 BOL Info Screen........................................................................................................................ 8-178–16 Edit Shipment Screen .............................................................................................................. 8-188–17 RTV Shipment Container Items Screen ................................................................................ 8-198–18 Container Item Detail Screen ................................................................................................. 8-218–19 Default Item Screen.................................................................................................................. 8-228–20 Container Info Screen .............................................................................................................. 8-238–21 Edit Container Screen.............................................................................................................. 8-248–22 Select Item ................................................................................................................................. 8-259–1 Integration - Flow-Ship Container............................................................................................ 9-29–2 Customer Order Delivery Flow ................................................................................................ 9-39–3 Edit Shipment Screen ................................................................................................................. 9-49–4 Edit Container Screen................................................................................................................. 9-59–5 External Printing Screen............................................................................................................. 9-79–6 Print............................................................................................................................................... 9-810–1 Shelf Replenishment ................................................................................................................ 10-110–2 In Store Replenishment Mobile Screen Flow ....................................................................... 10-410–3 Replenishment Pick List.......................................................................................................... 10-510–4 Replenishment List Search Criteria Screen .......................................................................... 10-610–5 Create Replenishment Pick Screen ........................................................................................ 10-710–6 Pick Items ................................................................................................................................ 10-1010–7 Replenishment Pick Items Info Screen................................................................................ 10-1110–8 Edit CFAs ................................................................................................................................ 10-1210–9 Replenishment Pick Item Detail .......................................................................................... 10-1310–10 Substitute Items Screen ......................................................................................................... 10-1410–11 Shelf Adjust List Screen......................................................................................................... 10-1510–12 Create Shelf Adjust Screen.................................................................................................... 10-1610–13 Shelf Adjust Items.................................................................................................................. 10-1710–14 Shelf Adjust Items Info Screen ............................................................................................. 10-1810–15 Edit CFAs ................................................................................................................................ 10-1910–16 Shelf Adjust Item Detail ........................................................................................................ 10-2010–17 Scan List................................................................................................................................... 10-2110–18 Create Scan List Screen ......................................................................................................... 10-2210–19 Scan List Items Screen ........................................................................................................... 10-2310–20 Scan List items Info Screen ................................................................................................... 10-2410–21 Edit CFAs ................................................................................................................................ 10-2510–22 Scan List Item Detail .............................................................................................................. 10-2611–1 Summary of Types of Stock Counts ...................................................................................... 11-411–2 Stock Count Mobile Screen Flow........................................................................................... 11-611–3 Stock Count List Screen........................................................................................................... 11-711–4 Add Stock Count Popup ......................................................................................................... 11-811–5 Search Criteria Screen.............................................................................................................. 11-911–6 Child Count List Screen ........................................................................................................ 11-1011–7 Child Count List Footer Menu ............................................................................................. 11-1211–8 Edit Stock Count .................................................................................................................... 11-1311–9 Edit CFAs ................................................................................................................................ 11-1411–10 Count Items and Re-Count Items Screens.......................................................................... 11-1511–11 Count Items and Re-Count Items Footer Menu ................................................................ 11-16

xix
11–12 Info Screen............................................................................................................................... 11-1711–13 Product Group Info Screen................................................................................................... 11-1811–14 Child Count Info Screen........................................................................................................ 11-1911–15 Bulk Scan Screen .................................................................................................................... 11-2011–16 Bulk Items Screen................................................................................................................... 11-2111–17 Issues Screen ........................................................................................................................... 11-2211–18 Issue Detail Screen ................................................................................................................. 11-2311–19 Issue Detail UIN Screen ........................................................................................................ 11-2411–20 Issues - Single Item Screen.................................................................................................... 11-2511–21 Search Criteria Screen............................................................................................................ 11-2611–22 Item Detail Screen .................................................................................................................. 11-2711–23 Item Detail Footer Menu....................................................................................................... 11-2912–1 Customer Order Screen Flow ................................................................................................ 12-212–2 Customer Order Status Flow when Picking is Required ................................................... 12-312–3 Customer Order Status Flow when Picking is Not Required ........................................... 12-412–4 Customer Order List Screen ................................................................................................... 12-712–5 Search Criteria Screen (Customer Orders) ........................................................................... 12-812–6 Customer Order Items Screen................................................................................................ 12-912–7 Edit Customer Order ............................................................................................................. 12-1012–8 Info Popup (Customer Orders) ............................................................................................ 12-1112–9 Edit CFAs Screen.................................................................................................................... 12-1212–10 Customer Popup .................................................................................................................... 12-1212–11 Item Detail Screen .................................................................................................................. 12-1312–12 Customer Order Picking Screen Flow ................................................................................ 12-1512–13 Pick List Screen....................................................................................................................... 12-1612–14 Search Criteria Screen (Pick List)......................................................................................... 12-1712–15 Create Pick Popup within a Customer Order.................................................................... 12-1812–16 Create Pick Popup within Picking....................................................................................... 12-1812–17 Bin List Screen ........................................................................................................................ 12-2012–18 Pick Items Screen ................................................................................................................... 12-2112–19 Item Detail Screen .................................................................................................................. 12-2312–20 Confirm Item/Confirm Bin Popup ..................................................................................... 12-2412–21 Substitute Items Screen ......................................................................................................... 12-2512–22 Info Pick Items Screen ........................................................................................................... 12-2612–23 Customer Order Delivery Screen Flow .............................................................................. 12-2712–24 Delivery List Screen............................................................................................................... 12-2812–25 Delivery Items List................................................................................................................. 12-2912–26 Item Detail (Customer Order Deliveries) Screen .............................................................. 12-3112–27 Info (Customer Order Deliveries) Popup........................................................................... 12-3212–28 BOL Info Screen...................................................................................................................... 12-3312–29 Edit Delivery Screen .............................................................................................................. 12-3412–30 Customer Order Reverse Picking Screen Flow ................................................................. 12-3612–31 Customer Order Reverse Pick List Screen.......................................................................... 12-3712–32 Reverse Pick Items Screen..................................................................................................... 12-3812–33 Item Detail (Customer Order Reverse Picks) Screen ....................................................... 12-4012–34 Customer Order Reverse Picks Info Screen ....................................................................... 12-4113–1 Item Basket Mobile Screen Flow............................................................................................ 13-213–2 Item Basket List Screen............................................................................................................ 13-313–3 Search Criteria Screen (Item Basket) ..................................................................................... 13-413–4 Create Item Basket ................................................................................................................... 13-413–5 Item Basket Items Screen ........................................................................................................ 13-513–6 Item Detail Screen (Quantity)................................................................................................. 13-613–7 Edit Item Basket Screen........................................................................................................... 13-713–8 Edit CFAs Screen...................................................................................................................... 13-813–9 Item Basket Items Info Screen ................................................................................................ 13-9

xx
13–10 Bulk Scan Screen .................................................................................................................... 13-1013–11 Bulk Items Screen................................................................................................................... 13-1113–12 Select Item Basket Screen ...................................................................................................... 13-1214–1 Auto Print Item ........................................................................................................................ 14-114–2 Manual Print Item.................................................................................................................... 14-314–3 Default Attributes .................................................................................................................... 14-414–4 Select Printer ............................................................................................................................. 14-515–1 Store Orders Mobile Screen Flow .......................................................................................... 15-215–2 Store Order List ........................................................................................................................ 15-315–3 Search Criteria Screen (Store Orders).................................................................................... 15-415–4 Create Store Order ................................................................................................................... 15-515–5 Store Order Items Screen ........................................................................................................ 15-615–6 Item Detail Screen ................................................................................................................... 15-915–7 Sales Data Screen ................................................................................................................... 15-1115–8 Edit Store Order Screen......................................................................................................... 15-1115–9 Edit CFAs Screen.................................................................................................................... 15-1215–10 Info Screen............................................................................................................................... 15-13

xxi
Send Us Your Comments
Oracle Retail Store Operations Cloud Service User Guide, Release 19.4
Oracle welcomes customers' comments and suggestions on the quality and usefulness of this document.
Your feedback is important, and helps us to best meet your needs as a user of our products. For example:
■ Are the implementation steps correct and complete?
■ Did you understand the context of the procedures?
■ Did you find any errors in the information?
■ Does the structure of the information help you with your tasks?
■ Do you need different information or graphics? If so, where, and in what format?
■ Are the examples correct? Do you need more examples?
If you find any errors or have any other suggestions for improvement, then please tell us your name, the name of the company who has licensed our products, the title and part number of the documentation and the chapter, section, and page number (if available).
Note: Before sending us your comments, you might like to check that you have the latest version of the document and if any concerns are already addressed. To do this, access the Online Documentation available on the Oracle Help Center (OHC) website. It contains the most current Documentation Library plus all documents revised or released recently.
Send your comments to us using the electronic mail address: [email protected]
Please give your name, address, electronic mail address, and telephone number (optional).
If you need assistance with Oracle software, then please contact your support representative or Oracle Support Services.
If you require training or instruction in using Oracle software, then please contact your Oracle local office and inquire about our Oracle University offerings. A list of Oracle offices is available on our Web site at http://www.oracle.com.

xxiii
Preface
This guide describes the Oracle Retail Store Operations Cloud Service store user interface. It provides step-by-step instructions to complete most tasks that can be performed through the user interface.
AudienceThis User Guide is for users and administrators of Oracle Retail Store Operations Cloud Service. This includes merchandisers, buyers, business analysts, and administrative personnel.
Documentation AccessibilityFor information about Oracle's commitment to accessibility, visit the Oracle Accessibility Program website at http://www.oracle.com/pls/topic/lookup?ctx=acc&id=docacc.
Access to Oracle Support
Oracle customers that have purchased support have access to electronic support through My Oracle Support. For information, visit http://www.oracle.com/pls/topic/lookup?ctx=acc&id=info or visit http://www.oracle.com/pls/topic/lookup?ctx=acc&id=trs if you are hearing impaired.
Related DocumentsFor more information, see the following documents in the Oracle Retail Store Operations Cloud Service Release 19.4 documentation set:
■ Oracle Retail Store Inventory Operations Cloud Services Release Notes
■ Oracle Retail Store Inventory Operations Cloud Services Implementation Guide
■ Oracle Retail Store Inventory Operations Cloud Services Data Model
■ Oracle Retail Enterprise Inventory Cloud Service Security Guide
■ Oracle Retail Enterprise Inventory Cloud Service Administration Guide
■ Oracle Retail Enterprise Inventory Cloud Service User Guide
■ Oracle Retail Store Operations Cloud Service Mobile Guide

xxiv
Improved Process for Oracle Retail Documentation CorrectionsTo more quickly address critical corrections to Oracle Retail documentation content, Oracle Retail documentation may be republished whenever a critical correction is needed. For critical corrections, the republication of an Oracle Retail document may at times not be attached to a numbered software release; instead, the Oracle Retail document will simply be replaced at the Oracle Help Center (OHC) website, or, in the case of Data Models, to the applicable My Oracle Support Documentation container where they reside.
This process will prevent delays in making critical corrections available to customers. For the customer, it means that before you begin installation, you must verify that you have the most recent version of the Oracle Retail documentation set. Oracle Retail documentation is available at the Oracle Help Center at the following URL:
https://docs.oracle.com/en/industries/retail/index.html
An updated version of the applicable Oracle Retail document is indicated by Oracle part number, as well as print date (month and year). An updated version uses the same part number, with a higher-numbered suffix. For example, part number F123456-02 is an updated version of a document with part number F123456-01.
If a more recent version of a document is available, that version supersedes all previous versions.
Oracle Retail Documentation at the Oracle Help Center Oracle Retail product documentation is available on the following website:
https://docs.oracle.com/en/industries/retail/index.html
(Data Model documents are not available through Oracle Help Center. You can obtain them through My Oracle Support.)
ConventionsThe following text conventions are used in this document:
Convention Meaning
boldface Boldface type indicates graphical user interface elements associated with an action, or terms defined in text or the glossary.
italic Italic type indicates book titles, emphasis, or placeholder variables for which you supply particular values.
monospace Monospace type indicates commands within a paragraph, URLs, code in examples, text that appears on the screen, or text that you enter.

1
Introduction 1-1
1 Introduction
This chapter provides a functional introduction to Store Operations Cloud Service (SOCS).
OverviewSOCS is a cloud service mobile UI which requires Enterprise Inventory Cloud Service (EICS) as a pre-requisite. It executes operational inventory transactions related to a store.
The application uses Oracle's Mobile Application Platform (MAF) and browser based Oracle JET desktop.
The UI is intended to be deployed on iOS Android, and Windows 10 mobile units, be it a handheld scanner or a tablet.
SOCS supports the following functions:
■ Scanning of barcodes (GS1, VPN, item, UIN, container ID) or waving an RFID wand to identify a SKU or container
■ Container, item and supplier lookup
■ Inventory adjustment with appropriate reason codes
■ Direct Store Deliveries with Purchase order (PO), without PO and against an ASN
■ Store Ordering
■ Creating, accepting, picking and rejecting transfer requests
■ Accepting Return to Vendor (RTV) request, creating RTVs and shipping to a vendor
■ Shipping to another warehouse, store or external finisher
■ Receiving from warehouse, store or external finisher
■ In Store Replenishment from backroom to shop floor
■ Management of inventory on shop floor and backroom
■ Adhoc, unit, problem line and unit and amount Stock counts
■ Customer order pick, pack and ship
■ Item Basket
■ Serialized inventory tracking
■ Capturing customer extended attributes at serial, item and transaction levels

Business Value
1-2 Oracle Retail Store Operations Cloud Service User Guide
■ Ticket printing
Business ValueThis section describes the business values of using SOCS.
Improved Customer SatisfactionSOCS allows a user to execute store inventory transactions and provide inventory positions to a customer across multiple stores. This means that no time is required to walk over to a fixed station since anyone with a mobile unit can answer inventory and location positions of an item in the store. It is even possible to look up inventory in other stores within the same workflow.
Real-Time InventorySOCS sources its data from a centralized point which is continuously updated with sales, receipt, shipping and adjustment data. This allows for a real-time cross enterprise inventory view.
Streamlined Inventory ProcessesAll the processes in the SOCS UI follow a similar pattern which means that learning to operate a single workflow allows a user to intuitively and quickly learn how to operate other workflows.
Assisted Inventory OrderingSome items require real time ordering review with up to date inventory positions to ensure a sufficient supply of inventory is available for customers. This is especially important for highly volatile selling items like fresh. SOCS supports this process through importing replenishment pre-generated orders and the creation of ad hoc orders based on accurate store inventory.
To make ordering easier, SOCS provides inventory information about last ordered quantity, inventory positions in the backroom and shop floor, days of supply, but also allows the user to review forecasted sales data from the planning applications.
Improved Corporate ControlSOCS can be configured through the use of over 200 permissions and configurations. It is for example possible to restrict the UI from manual entering quantities, or receiving processes can be configured to require a secondary person to approve the receipt.
Additional tracking features have been build out to help corporate or store managers to validate compliancy through several dashboards:
■ When leveraging GS1 databar functionality (manual or automatic through the databar), expiration dates and lot numbers can be tracked and through EICS we can evaluate which items have an expiration date.
■ When printing tickets a log is created for all tickets that have been printed.
■ A dashboard exists to enable a user to see which stock counts need to be authorized across a region.

Business Value
Introduction 1-3
■ A store shipping network function allows retailers to control which store locations a store can ship to or request inventory from beyond generic transfer zones that can be setup at corporate.
Full Transaction ViewsThe SOCS UI does not only serve as a mechanism to scan items and record them against transactions, but it also serves as a management application by allowing managers to look up transactions, view item lists and even edit or change (within a time frame) receipts.
Enhanced Inventory TrackingTwo features inside of SOCS allow the user improved inventory tracking.
Serialization tracks each individual item instance, and SOCS allows the user to track each item instance in any physical transaction flow like shipping and receiving, inventory adjustments, stock counts. This improved tracking increases security on high value items as each time a user touches the item a record is made of the transaction.
RFID real time streaming integration allows for accurate location level inventory. This allows a sales associate to quickly look up where an item is located, and have confidence that the RFID tracked information is accurate and up to date when serving a customer. In addition to the real time streaming from a third party system, SOCS also has the ability to execute stock counts with RFID items.
Custom Flexible Attributes SOCS allows the retailer to capture custom defined attributes at three levels:
■ Transactional
The retailer can define by transaction type what can be captured and if the new custom information is required to be captured or not.
■ Item
By leveraging the GS1 databar, retailers can define by subclass up to 10 attributes that can be captured automatically or manual at the item level. This for example can be leveraged to capture lot numbers, expiration dates.
■ UIN
The Item scan number feature allows the user to capture additional attributes for each UIN. This function is reserved for the Jet client at this point, but it does allow in SOCS to identify a single item instance with more than 1 scannable barcode. This is ideal for composite items with multiple unique identifiers for the same item like a computer with a hard drive, or a cellphone.

2
Common Usability and Navigation 2-1
2Common Usability and Navigation
This chapter describes the method by which you log in, and log out, and navigate. It also describes the common User Interface (UI) controls that are used throughout the mobile UI.
Features:
■ Welcome / Login
■ Menu/Drawer
■ Store List
■ Language
■ Scan Type
■ Scan Mode
■ Unit of Measure
■ Numeric Entry
■ Filter Bar
■ Scan Bar
■ Search Criteria
■ Item Image and Item Description
■ Print Tickets
■ Select Printer
■ Notes
■ Reset, Remove, and Restore Item
■ Item Detail - UIN
■ Item Detail - Attributes
■ Item Detail - Scan Details
■ Configure Endpoints
■ Scanner Configuration

Welcome / Login
2-2 Oracle Retail Store Operations Cloud Service User Guide
Welcome / Login
Figure 2–1 Welcome Screen
Upon launching the mobile UI application, the login screen is displayed. The first time a user logs into the system, if logon is successful, the system will log in to the user’s first assigned store. The system will remember the store the user were last logged into and log in to that store until the store is changed. Upon successful login, the system will navigate you to the Open Transactions dialog.

Menu/Drawer
Common Usability and Navigation 2-3
Menu/Drawer
Figure 2–2 Menu/Drawer
The mobile drawer is displayed as the menu panel on the left side of the screen upon tapping the drawer (hamburger stack which looks like three horizontal lines in the upper left-hand corner of the application). From the menu/drawer, you have access to various functionality of the application.

Store List
2-4 Oracle Retail Store Operations Cloud Service User Guide
Store List
Figure 2–3 Store List
The change stores function is available from the drawer/menu by tapping the store option. You are directed to the store list screen with an option to change stores.
The store list displays all of the stores that the user is authorized for. If needed, the user can search for a store by either the store ID or store name. The store list is narrowed down based upon the search. Selecting a store will display the new store in the store field of the drawer/menu as well as in the footer on Open Transactions. The user is then officially logged in to the new store. All data and transactions will be for the newly selected store. Every time the user logs in to the system, it will be for the store selected until a new store is selected. The system remembers/saves the store for the user.

Scan Type
Common Usability and Navigation 2-5
Language
Figure 2–4 Language
The Language screen is displayed by selecting the Language menu option within Configurations from the drawer/menu. Initially when a user is logging into the mobile for the first time ever, it will use the language of the device. The Language screen will display with a list of the available languages supported in the system. User selects a language and the language will change in the application to the language selected and user will navigate to the Open Transactions. That language will remain for the user (saved on the user) until the user change languages. The locale of the device (date format, currency format, and so on) will remain that of the device.
Scan Type
Figure 2–5 Select Scan Type
The Scan Type is a found in the mode bar. It is used whenever an item can be entered or scanned within a Scan Bar. The scan type allows you to tell the system what type of item or barcode is being entered.
The values for this include Auto which is represented by a lightning bolt, Bulk represented by a cube (user must have proper permissions), and UIN which is a barcode.
Auto is the default value when logging into the system. Auto assumes that you can enter or scan any of the supported barcode types such as SKU, type 2, UPC E, GS1, and so on, and the system will parse through the various algorithms to derive the item.

Scan Mode
2-6 Oracle Retail Store Operations Cloud Service User Guide
Bulk allows the user to bulk scan or enter one to many items within a bulk dialog and then apply them to the transaction and validate them all at once. An example would be doing a wave of multiple RFID items.
The final option of UIN, assumes that the user will enter in a serial number or AGSN and therefore the system will only run the algorithm to search for UINs. Scanning a UIN as part of the UIN option will be much faster and potentially be more accurate in case of overlapping UIN numbers.
Scan Mode
Figure 2–6 Select Scan Mode
Figure 2–7 Scan Mode
The Scan mode is a found in the mode bar. It is used whenever an item can be entered or scanned and the quantity is captured. The scan mode defines if the quantity from the barcode should be:
■ Added to the existing item quantity, indicated by Increase with a plus icon.
■ Removed from the exiting quantity indicated by reduce with a minus sign.
■ No change to the quantity, which is review mode represented by a barcode.
The default scan mode is set to Increase.
Unit of Measure
Figure 2–8 Select Unit of Measure
Figure 2–9 Unit of Measure

Numeric Entry
Common Usability and Navigation 2-7
The Unit of Measure selection is a found in the mode bar. It is used whenever a quantity is captured. The unit of measure defines if the quantity displayed is going to be represented in the item's standard unit of measure, cases, or transaction unit of measure.
When switching the Unit of Measure, the quantity on the screen will convert to that unit of measure. When first logging in, the default unit of measure will be set based upon the system configuration Default Unit of Measure. The Unit of Measure selected by the user will be displayed in the mode bar, and the selected UOM will remain as the UOM until the user logs out of the application.
Transaction Unit of Measure will only be used where applicable which is in Customer Orders as well as Shipping and Receiving for a Customer Order. If Transaction UOM is selected in dialogs where it is not applicable, the system will use the Standard Unit of Measure even though the Transaction UOM may be selected.
Numeric Entry
Figure 2–10 Numeric Entry
The Numeric Entry popup is used whenever there is an editable numeric field such as an item quantity field. The quantity that gets entered into the Numeric Entry popup will increase, reduce, or override the existing quantity on the screen. The mode on the Numeric Entry will be defaulted the system setting, Manual Quantity Entry Default Mode. When set to Scan Mode, the Numeric Entry popup defaults based upon what the Scan Mode is set to. When set to Override the default will be Override. In all cases, these are only defaults, and the user can always change mode of the Numeric Entry.
Examples:
■ Qty = 15, enter in 3 increase, Qty = 18
There is a quantity of 15 on the UI. In the popup, the user enters a quantity of three, selects the increase option, and apply. The new quantity is 18.

Filter Bar
2-8 Oracle Retail Store Operations Cloud Service User Guide
■ Qty = 15, enter in 3 reduce, Qty = 12
There is a quantity of 15. In the popup, the user enters a quantity of three, selects the reduce option, and apply. The new quantity is 12.
■ Qty = 15, enter in 3 override, Qty = 3
There is a quantity of 15. In the popup, the user enters a quantity of three, selects override, and apply. The new quantity is three.
Filter Bar
Figure 2–11 Filter Bar
The Filter bar is used to narrow down a list of things such as items, containers, child stock counts, and so on.
You can tap and type into the filter bar, or tap and scan into a filter bar. By default, the Filter bar will be displayed on the top of the list. When scrolling down in the list, the filter bar disappears and it reappears when scrolling back up in the list. The criteria that a user can filter on will be unique per functional area. For example, inventory adjustments the user can filter on Item ID, Item Description, reason code, and UOM. The search is not case sensitive. The filter can be cleared out to return the full list. The filter will retain the entered criteria until leaving the screen in which it will be cleared out.

Scan Bar
Common Usability and Navigation 2-9
Scan Bar
Figure 2–12 Scan Bar
The scan bar is at the top of the transaction lists, Item Lists, other lists such as Child Count and Container Lists, and Item Detail screens. It will be anywhere an item or some other attribute can be entered or scanned to be viewed or edited on a transaction.
This bar allows for one defined attribute to be scanned and that attribute will be stated in the text of the bar. For example: Item, Container or Customer Order ID.
In the Transaction List screens, the scan bar will further filter or funnel down the list of transactions when doing a scan. The scanned attribute will be added in addition to the existing search criteria. It will appear in the search criteria, eye glasses field.
In other areas such as lists, item lists, container lists, as well as Item Detail, and soon, the scan bar will go to the details for what was scanned. Quantity may be updated and the item may be added to the transaction depending on functionality.
If the system configuration Enable Device Camera Barcode Scan is set to Yes, then if a camera is detected on the device, the camera icon will be available. The camera icon will allow for scanning in the barcode via the camera on the device. The barcode will be parsed and processed the same as if the scanner was utilized.

Search Criteria
2-10 Oracle Retail Store Operations Cloud Service User Guide
Search Criteria
Figure 2–13 Search Criteria
The Search Criteria field is represented by an eye glasses icon in the header of the screen. Search criteria will be found on all transaction list screens, such as Inv Adjust List shown in this figure. Criteria will be listed. If there is more than one criteria, they will be separated by a pipe symbol. Initially when entering the dialog, the default search criteria for the functional area will be displayed. For example: in inventory adjustments it would show: Status = In Progress. If there is no default search criteria, the eye glasses will be displayed and the words Search Criteria will be listed.
Tapping the Search Criteria field, eye glasses, will navigate to the Search Criteria screen to select and or change criteria to search with. The search criteria field gets updated with the newly selected search criteria fields from the Search Criteria screen. When leaving the dialog, the search criteria will be reset back to the default search criteria.

Item Image and Item Description
Common Usability and Navigation 2-11
Item Image and Item Description
Figure 2–14 Item Detail Item Image
The item image is displayed throughout the application wherever an item is displayed. The item image will be displayed next to the Item ID and Item Description in all applicable screens. Each functional area has a parameter called Display Item Image. If it is set to Yes, the image will be displayed in that functional dialog. If it is set to No, the image will not be displayed.
The Item Description will display with the first line displaying the short or long description based upon as system configuration. The second line will display the diffs, diff1, diff2, diff3, diff4. If there are no diffs for the item, the second line will be blank. The second line is also displayed per a system configuration.

2-12 Oracle Retail Store Operations Cloud Service User Guide
Figure 2–15 Print
The Print dialog is accessed when selecting print within the application. It is available when selecting Print from the footer menu within a transaction.
The transaction format type or types that are applicable to the functional area will be available for selection. For example in Customer Order Deliveries, there may be format types of Customer Order Delivery and BOL. If there is only one applicable format type for the functional area it will be defaulted.
Once a format type is selected, the system will list all of the reports that are available to print for that format type. The report will default based upon the default format type. The user can choose to select a different report format to print if other report formats exist for this format type transaction. Once print has been selected for the report, the PDF is retrieved based upon the report format.

Print Tickets
Common Usability and Navigation 2-13
Print Tickets
Figure 2–16 Print Tickets
The Print Tickets dialog is accessed by the user to print the tickets for the container items. This dialog can be accessed by selecting the Print Tickets option from the footer menu.
The Print Tickets dialog is available on the following transactions container items screen both via transaction and lookup.
■ Direct Store Delivery
■ Transfer Receiving
■ Transfer Shipment
The system displays the following attributes for the user to select.
Format Type: This allows the user to select the format type. Item Ticket or Shelf Label. Default -Item Ticket.
Format: This will show the list of formats available for the selected format type for the user to select to which format the tickets should be assigned. Default format assigned for the selected format type will be shown as selected by default.
Quantity: This field indicates the quantity populated depending on the transaction and status. This is a read only field.
Values: Shipped, Received or Expected.
In case of Shelf Label, the quantity is 'Label Quantity or 1'.
Print Date: This field indicates the print date. This is a read only field.
When the user selects to print, the system displays the Select Printer screen for the user to select the printer to which the tickets need to be submitted to print.

Select Printer
2-14 Oracle Retail Store Operations Cloud Service User Guide
Select Printer
Figure 2–17 Select Printer
On this screen the user can select the printer to set for the ticket printing.
On the top of the lists the system displays the paired Bluetooth printers.
The Bluetooth printers are indicated with the Bluetooth symbol and prefix 'BT' and these printers cannot be scanned.
This screen is for the user to select or scan the barcode of the printer and submit the tickets for printing.
This screen is accessed from the Select Printer option on the Auto Print Item, Manual Print Item screens and Print Tickets popup that appears when printing tickets from the container items screen.
This screen lists all the printers that are available in the system for the item tickets and label type.
The selected printer is displayed on the Auto Print Item and Manual Print Item screens for the user to know to which printer the tickets/labels are submitted for printing.

Reset, Remove, and Restore Item
Common Usability and Navigation 2-15
Notes
Figure 2–18 Notes
The Notes function is used to capture one or more notes about the transaction. It also allows you to view history or a trail of notes for a transaction. It is an optional process. The notes feature will be accessed from the footer menu within a transaction using the Notes menu option. Notes is available from within all transactions.
To add a note, select the Add Note button. The Add Note popup displays. Enter the note and then select Post. The note will be posted to the top of the list of notes in the Notes dialog. All notes will be listed in read-only mode with the user who created them and the creation date. Notes will always be available and the user will always be able to add notes regardless of the transaction status. The user must have Create Notes permission to add notes.
Reset, Remove, and Restore ItemWithin the footer menu (ellipsis) on most Item Detail screens will be options for Reset, Remove, and Restore. Remove and Restore are also displayed on most list of items screens, that is, Inv Adjust Items.
Reset will take all changes that have been made during the session and "undo" them back to the way the item was prior to entering the session. This option is only available for items that were added previous to the current session and only applicable to items where updates can be made to the item.
Remove will allow for the removal of the item from the transaction. After selecting Remove the item will remain on the transaction, however it will be grayed out/disabled and changes cannot be made to the item. The item will remain on the transaction until it is saved/completed, which at that time the item will be deleted from the transaction.
Once an item has been marked for removal a Restore option will be available. Restore item allows for an item that is marked for removal to be unmarked. It will no longer be grayed out and the user will be able to edit the item where applicable.

Item Detail - UIN
2-16 Oracle Retail Store Operations Cloud Service User Guide
Item Detail - UIN
Figure 2–19 Item Detail - UIN
The UIN tab will be accessible from Item Detail screen from within a transaction. The system must be configured for UINs and the item must be a UIN item.
UINs can be added to the adjustment for UIN items via the scan enter item bar in the header. A UIN can be removed by tapping the trash can which will flag the UIN for removal and it will be deleted from the transaction upon saving or confirming the transaction. Lastly those UINs that have been flagged for removal can be added back to the transaction by selecting the Restore option.
Note: Some functional areas may have slight modifications to this screen to accommodate the functionality.

Item Detail - Attributes
Common Usability and Navigation 2-17
Item Detail - Attributes
Figure 2–20 Item Detail - Attributes
The Attributes screen is accessible from the Item Detail screen by selecting the Attributes icon. The system and store must be configured properly to allow for collection of attributes. In addition, the item must be configured to be an item that has extended attributes. This screen will display attributes that may have been captured automatically from a GS1 barcode, or they may have been manually captured in this screen.
Sets of attributes can be captured manually by selecting the Add Extended Attribute Set button. The attributes to be captured depend on the attribute configuration for the item. A popup will be displayed to enter the attributes. Sets can be removed and then they will be flagged for deletion. Upon saving or confirming the transaction the flagged sets will be removed. The Restore feature will be available to bring back the attributes if necessary.

Item Detail - Scan Details
2-18 Oracle Retail Store Operations Cloud Service User Guide
Item Detail - Scan Details
Figure 2–21 Item Detail - Scan Details
The last scan details is displayed on the bottom of all of the Item Detail screens in transactions of the mobile application. It includes the details from the barcode for the last item entered/scanned. This field is refreshed for each scan, so if an item has a quantity of 10, the Last Scan could have displayed different content for all ten barcodes/instances scanned.
■ GS1 barcode - the system will display the barcode, GTIN, and the contents of the barcode (that is, price, UIN, and so on).
■ Type 2, barcode and Price.
■ All other types of barcodes will display the actual barcode (UPC, UIN, and so on).

Configure Endpoints
Common Usability and Navigation 2-19
Configure Endpoints
Figure 2–22 Configure Endpoints
This dialog on mobile device is for the user to configure the endpoints.
The Configure Endpoints screen is displayed by selecting the Configure Endpoints menu option within Configurations from the drawer/menu. The following fields are available on this screen and the technical details of the configuration can be found in the technical documentation.
Configuration URL
Configuration Login URL
Open ID Connect Discovery URL
OAuth Client ID

Scanner Configuration
2-20 Oracle Retail Store Operations Cloud Service User Guide
Scanner Configuration
Figure 2–23 Scanner Config
■ This screen on the mobile application is to configure the external scanners.
■ The Scanner Config screen is displayed by selecting the Scanner Config menu option within Configurations from the drawer/menu.
■ This screen will list all the paired/connected scanners to the device.
■ Selecting the paired device will connect to the mobile device for the user in the application.
■ If the device does not find any scanners paired/connected, it displays a message to indicate no scanners found.
■ Identify - Upon selecting this button, the system makes the scanner you are connected to beep, so the user knows which one is used. Note: This button is displayed only in IOS.
Note: For the scanner to find the external device, the location permission should be assigned to the client.

Scanner Configuration
Common Usability and Navigation 2-21
Figure 2–24 Scanner Detail
This screen is accessed on the mobile application by selecting the Configure option from the external Scanner List screen after an external scanner has been connected.
■ Scanner Name: <Scanner Name> - the name of the connected scanners whose settings are displayed on the screen.
■ Battery Info Bar: Visual progress bar showing the amount of battery remaining in the scanner:
– The progress bar will be green if the battery remaining is greater than 30%.
– The progress bar will be yellow if the battery remaining is between 15% and 30%.
– The progress bar will be red if the battery remaining is less than 15%.
■ Battery %: Shows the amount of battery life remaining as a numeric value (0-100%).
■ Battery State: Will display either Charging or Discharging depending on if the battery is charging or discharging.
■ Scan Power Slider Bar: Displays the amount of power each scan takes on a slider bar. The slider bar can be dragged to a new value. The values are between 0 and 300 dBM.
■ Scan Power Input Field: Displays the amount of power each scan takes as a numeric value. A user can enter a new numeric value in this field. Any value less than 0 will be set to 0, and any value greater than 300 is set to 300. This value updates if the slider bar value is changed.
■ Scan Volume: Displays the current beep volume during a scan and presents values in a drop down to change. Values are: Quiet, Low, Medium, and High.
Buttons
■ Apply: Will apply the settings to the connected external scanner.
■ Identify: Upon selecting this button, the system makes the scanner you are connected to beep, so the user knows which one is used. Note: This button is displayed only in IOS.
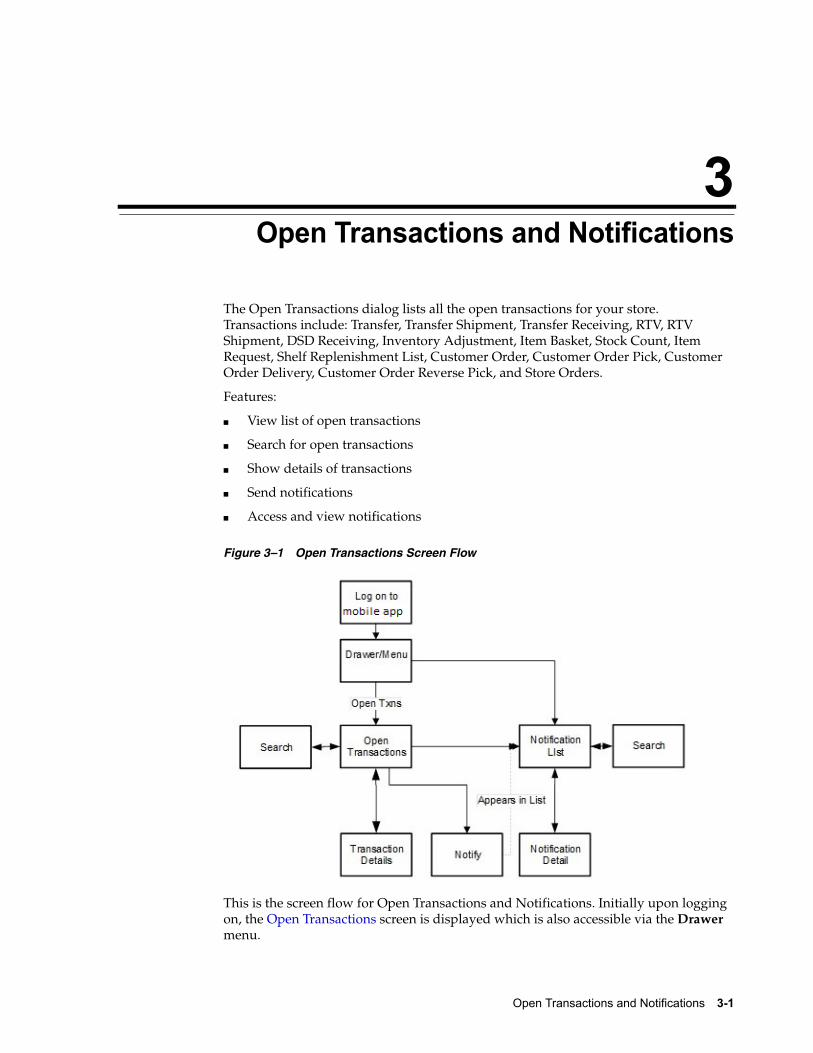
3
Open Transactions and Notifications 3-1
3Open Transactions and Notifications
The Open Transactions dialog lists all the open transactions for your store. Transactions include: Transfer, Transfer Shipment, Transfer Receiving, RTV, RTV Shipment, DSD Receiving, Inventory Adjustment, Item Basket, Stock Count, Item Request, Shelf Replenishment List, Customer Order, Customer Order Pick, Customer Order Delivery, Customer Order Reverse Pick, and Store Orders.
Features:
■ View list of open transactions
■ Search for open transactions
■ Show details of transactions
■ Send notifications
■ Access and view notifications
Figure 3–1 Open Transactions Screen Flow
This is the screen flow for Open Transactions and Notifications. Initially upon logging on, the Open Transactions screen is displayed which is also accessible via the Drawer menu.

Open Transactions
3-2 Oracle Retail Store Operations Cloud Service User Guide
The Open Transactions screen lists all of the Open status transactions within the system. From here, you can filter the open transactions, view transaction details, and send out notifications for the open transactions.
The Notification dialog is accessed from the Drawer menu as well as from Open Transactions. It lists all of the notifications and allows for further filtering of the notifications or viewing of the details of the notifications.
Open Transactions
Figure 3–2 Open Transactions
The Open Transactions screen is accessed upon logon as well as by selecting Open Transactions from the menu drawer. The Open Transactions screen lists all the open transactions for the store you have permission to access. Selecting one of these transactions navigates you to the details for that transaction. The transaction can be viewed, edited, deleted, and so on, just as it would be had you navigated directly into that specific functional area. Once leaving the transaction you navigate back to Open Transactions.
Each transaction has a transaction ID and transaction type such as inventory adjustment, stock counts, and so on, for identification. The status, last update date, user, SKUs and not after date for the transactions will be displayed.
Open transactions are sorted based upon the Sort button. The sort defaults to oldest first and tapping on Sort allows you to change the sort to newest first.
The search eye glasses icon opens up a search criteria screen that can be used to further narrow down the list of open transactions. All applied search criteria will be displayed in this field. The Open Transactions list screen does not have any default search criteria initially when entering the screen.

Ad Hoc Notifications
Open Transactions and Notifications 3-3
Figure 3–3 Select Users Popup
The Select Users popup is displayed by swiping a transaction on Open Transactions and selecting the Notify button. The select users popup is initially an empty list and you must enter in either a full or partial (at least two characters) first or last name to search on. The system will return a list of valid user names (Last Name, First Name, and Middle Initial) for the store you are logged in to.
Note: This popup is used to find user names and not roles.
Select a name from the list of results and the system will create an ad hoc notification for the open transaction to that user. The manually created ad hoc notification appears in the notification list screen of the selected user that was notified, upon logging in to that store. Open transactions can have more than one notification sent.
Ad Hoc NotificationsAd hoc notifications are notifications that are created in an ad hoc basis by notifying one or more users about an open transaction from the Open Transactions screen.
They are sent on one user at a time and each message is treated individually.
The notification will get updated to 'read' and 'unread' on an individual user/message basis as they are read or marked to 'unread'.
Ad hoc notifications can be created for each of the transaction types from the Open Transactions.
■ The notification ID will be system generated.
■ The notification name will be set to 'Fwd: < transaction type>'.
■ The transaction type will be set based upon the transaction that the notification was created from.

System Notifications
3-4 Oracle Retail Store Operations Cloud Service User Guide
■ Status will be 'Unread' for all users. Status will be updated for individual users as they get read.
■ Create Date will be defaulted to the date/time the notification was generated.
■ Description: ’Please look at this open transaction’.
■ User: The user that generated the notification clicked the 'Notify' button on the open transaction.
System NotificationsFor notifications that are created via the system, they are associated to a group (role) and as one user for that notification's role/store reads the notification (or unreads) it, it will update it for the entire group. The idea is that if you send out a notification to all store clerks you do not want to make them all read it.
The details of the notification will be populated as follows:
■ The notification ID will be system generated.
■ The notification name will be the Subject Line from the actual notification.
■ The transaction type will be based on transaction that is associated with the notification.
■ Transaction ID will be the actual transaction ID for the transaction.
■ Status will be 'Unread' for all users of the role. Status will be updated for all of the role users as they get read (or Unread).
■ Create Date will be defaulted to the date/time the notification was generated.
■ Description: Body per the email alert notification. Note this is restricted to 2000 characters, so it may get truncated.
■ User: The user that generated the notification, since these are system generated it may be a user who triggered it, a batch user, or a system user, and so on.

Search Criteria (Open Transaction)
Open Transactions and Notifications 3-5
Search Criteria (Open Transaction)
Figure 3–4 Search Criteria (Open Transaction)
From the Open Transactions screen, selecting the search criteria button, which looks like a pair of eye glasses, takes you to the Search Criteria screen. This screen is used to narrow down the open transactions further and search for open transactions with specific criteria.
The header shows the number of criteria that have been applied. The Home Page of open transactions displays all open transactions for the user's store by default and there will be no initial criteria applied. Open status is represented by an array of statuses and they can be different depending on the transaction. Open status will represent any status which is not completed, canceled or closed, in other words actions can still be taken.
Criteria include From and To Date which look at the last updated date on the transaction if one exists, otherwise the create date. The transaction type is the type of the transaction such as inventory adjustment, stock count, DSD receiving, and so on. The transaction ID will be the actual ID associated with the transaction, thus multiple transaction types may have the same transaction ID. The user allows for searching on the User ID, this may be the last updated user ID or the create user ID depending on the transaction. The search limit field is defaulted per the system admin setting and is used to determine the maximum number of records returned in the search.
Once search criteria have been selected and applied, you will navigate back to the Open Transactions screen with the list narrowed down per the entered criteria. The Reset button will clear out all entered search criteria and reset it back to the default criteria. Search criteria will be retained until being either reset or leaving the Open Transactions dialog.

Notification List
3-6 Oracle Retail Store Operations Cloud Service User Guide
Notification List
Figure 3–5 Notification List
The Notification List screen is accessed by tapping the notification (bell) icon, in the Drawer Menu. The Notification List defaults to display all unread notifications for the user at the user's store. The notification may be system generated or manually created (ad hoc).
By default, the screen will display the notifications with the unread notifications first. The sort can be changed to newest first or oldest first. Notifications can be in a read or unread state with unread being denoted with a dot in front. The notification names, transaction ID, transaction type, create date, and user will be displayed for the notifications in the list. The notification name is displayed in user's preferred language.
Swiping a read notification will display a Mark As Unread button. Selecting Mark As Unread will set the status of the notification from read back to unread. The Mark As Unread button will only be available for notifications that have been flagged. Selecting a notification will navigate the user to the details for that notification.
The search eye glass icon will open up a search criteria screen for the notifications which can be used to further narrow down the list of notifications. All applied search criteria will be displayed in this field. The default search criteria for the notifications will be for the unread status of notifications.

Search Criteria (Notification)
Open Transactions and Notifications 3-7
Search Criteria (Notification)
Figure 3–6 Search Criteria (Notification)
Selecting the search criteria button (eye glasses) from the Notification List screen, will take you to the Notification Search Criteria screen. This screen is used to search for notifications for the user's store with specific criteria. The header will show the number of criteria that have been applied. The Notifications search criteria will default to the status of unread.
Criteria include Create From and Create To Date, status, notification ID and type, transaction ID and type, user, and search limit. The search limit is defaulted per the system admin setting and is used to determine the maximum number of records returned in the search.
Once search criteria have been selected and applied, you will navigate back to the Notification List screen with the notifications narrowed down per the entered criteria. The search criteria will be retained until they are reset or when leaving the notifications dialog.

Notification Detail
3-8 Oracle Retail Store Operations Cloud Service User Guide
Notification Detail
Figure 3–7 Notification Detail
The Notification detail screen is accessed when selecting a notification from the Notification List screen. This screen displays the details of the notification.
The notification ID is a system-generated ID. The notification name is either ’Forward’ with the transaction type for ad hoc notifications, or the subject line of the system-generated email notifications. The transaction ID and transaction type are from the transaction of the notification. The create date is the date the notification was generated. The user is the user who created the notification; for system-generated notifications, the user is the user who triggered the notification such as the system or batch user. The status will either be read or unread. The notification name and description are displayed in user's preferred language.
When entering the notification, the status of the notification will automatically be marked to Read and the Mark As Unread option will be available within the footer menu. Selecting Mark as Unread will set the status back to Unread. Once the notification is in Unread status, the footer menu option will change to Mark As Read. The user can set the status back to Read by selecting this option.
Also within the footer will be a Notes option which navigates to the standard notes dialog for entering in notes about the notification. Lastly, in the footer is a Go to Transaction option which allows the user to jump into the transaction associated with the notification for the user's store. This option is only available to users that have access permission for the functional area. Once in the truncation transaction the user will be able to view, edit, delete, and so on, the transaction as they would had they entered it directly assuming the user has proper permissions. Once leaving the transaction the user will return back to the Notification Detail screen.

Notification Warning Display
Open Transactions and Notifications 3-9
Notification Warning Display
Figure 3–8 Notification Display
A notification warning bar is displayed at the top of the application on every screen within the mobile application whenever a new notification comes into the system and is saved. The system checks every 'x' seconds for a new notification, where 'x' is a system configured amount of time. If a new notification exists for the user logged into the system, and if the user has the permission to display the notification warning, then the notification will be displayed. The user can access the details for the notification from the notification warning. The notification warning bar will be displayed until the user views or dismisses the notification or the user logs into a new session.

4
Lookups 4-1
4Lookups
The lookup features provides a robust system for searching information. You are able to search for items, suppliers, and shipping containers.
■ Item Lookup
■ Universal Item Lookup
■ Supplier Lookup
■ Container Lookup
■ RFID Locator
Item LookupThe Item Lookup functionality provides the business user with the ability to view information related to an item. In addition, the Item lookup can also be used in conjunction with other screens to assign items to a transaction. The system provides real-time information on inventory positions and other item detail information. The following features are available:
■ Status
■ Item Suppliers
■ Item Attributes
■ Pricing and Price Information
■ Ordering Attributes
■ Stock on Hand and Non-sellable Inventory
■ Ordered Quantity
■ Merchandise Hierarchy
■ Pack / Component Details
■ Deliveries
■ Related Items
■ Stock Locator
■ UDA
■ RFID Locations
■ CFA

Item Lookup
4-2 Oracle Retail Store Operations Cloud Service User Guide
■ Customer Orders
Figure 4–1 Item Lookup Screen Flow
This is a screen flow for the Item Lookup functionality. Selecting Item Lookup from the menu drawer directs to the Item Lookup screen. From Item Lookup, you can search for items and view different details about the item. Details that can be viewed include:
■ Stock on Hand
■ Pricing
■ Item Attributes
■ Ordering Attributes
■ Merchandise Hierarchy
■ Stock Locator
■ UDAs
■ RFID Locations
■ CFAs
■ Non-Sellable
■ Item Locations
■ Deliveries
■ Show Packs
■ Show Components

Item Lookup
Lookups 4-3
■ Related Items
■ Customer Orders
■ Additional Suppliers
Figure 4–2 Item Lookup Screens
When navigating to Item Lookup, you are taken to a blank list screen where no item results are displayed.
Use the search criteria, eye glasses, to navigate to the Item Lookup Search Criteria screen to enter search criteria for items to find. After applying the search criteria, the results are listed on the screen and the criteria applied is shown next to the eye glasses.
The details of the item such as Item ID, Item Description, Available SOH, Price, Price Type and Item image (if configured) are displayed in this screen in order to provide certain basic information about the items. The pricing related information (Price and Price Type) are displayed only when the system configuration parameter 'Display Price in Search Result - Execution' is set to 'Yes'.
Selecting an item from the results list navigates to the item detail for that item.
When scanning or entering an item in the scan bar, the system ignores all entered search criteria and searches for the item entered. If it results in a single item, the system takes the user automatically to the item details. If more than one item is found, it provides an item selection to select the proper item.
Item Lookup Search CriteriaFrom Item Lookup, selecting the search criteria button, which looks like a pair of eye glasses, takes you to the Item Lookup Search Criteria screen. This screen is used to search for items using specific search criteria.
The Item Lookup Search Criteria screen will be different and contain different search criteria depending on the Search Mode. The user can choose to find items by item number, supplier, warehouse, finisher, UDA, Inventory Status, or style. Depending on

Item Lookup
4-4 Oracle Retail Store Operations Cloud Service User Guide
which search mode is selected, the search criteria fields change. All search modes, with the exception of searching by style, have common search criteria consisting of item description, brand, non-ranged indicator, search limit, department, class, and sub-class.
Item Description: This field holds an item description, which you enter to search. You can search on partial description as well, meaning that as long as the Item Description contains what is entered in this field, results are returned. This search criterion can be used for any other search type except when searching by Style.
Brand: This field holds the brand, where you enter to search. Enter a brand for the item. The system returns all items for the brand specified. This search criterion can be used for any other search type except when searching by Style.
Dept: This field allows you to select from a list of available Departments for the selected group. This search criterion can be used for any other search type except when searching by Style.
Class: This field allows you to select from a list of available classes for the selected department. This field is only enabled if a department has been selected. This search criterion can be used for any other search type except when searching by Style.
Sub-Class: This field allows you to select from a list of available sub-classes for the selected department/class. This field is only enabled if a department and class has been selected. This search criterion can be used for any other search type except when searching by Style.
Include Non-Ranged: When the Include Non-Ranged check box is checked, the system returns items that exist but may not have been ranged to your store, in other words, the item record does not exist for your store. When it is not checked, only those items that are for your store are returned. If searching for an item by item number, the system ignores this indicator and navigates to the details regardless if the item is ranged or non-ranged.

Item Lookup
Lookups 4-5
Searching by Item
Figure 4–3 Search Mode: Item
ItemThis field holds an item number, which you enter to search. Partial searches are not permitted on the item number. You can enter an item number, TUC, UPC/EAN, Type 2, GS1 Databar, VPN, or SEL (shelf edge label) into this field. The system is able to locate the specified item.

Item Lookup
4-6 Oracle Retail Store Operations Cloud Service User Guide
Searching by Supplier
Figure 4–4 Search Mode: Supplier
SupplierThis field holds a supplier number, which you enter to search. The user can search for items by primary and non-primary suppliers.
Primary Supplier (Check Box)The Primary Supplier Check Box determines whether to display all items supplied by the entered supplier (based on the Supplier or Supplier Name search fields) or only display items where the entered supplier is the primary supplier for that item:
If the indicator is checked, the system only displays items where the entered supplier is the primary supplier of the item. This is the default.
If the indicator is not checked, it displays all items supplied by the supplier ID that was entered in the search criteria field, regardless of whether or not the entered supplier is the primary supplier. In this case, you may see items in the search results that have a different supplier ID and name than what was entered in the search criteria. This means the item is supplied by the entered supplier, but has a different primary supplier.

Item Lookup
Lookups 4-7
Searching by Style
Figure 4–5 Search Mode: Style
Style (Item ID)You can search on a style item ID. The Item Description, Brand, Department, Class, and Sub-Class search options do not display when the Style Search option is selected. Enter in a style item (style is where the item level is above the transaction level), and the system returns all the transaction level children that are related to the style parent/grandparent.
Example:
Enter Style ID
10001001 Shirt Item level 1, tran level 2
Search Returns
10001011 Shirt 1, green shirt item level 2, tran level 2
10001012 Shirt 2, blue shirt item level 2, tran level 2
10001013 Shirt 3, red shirt item level 2, tran level 2

Item Lookup
4-8 Oracle Retail Store Operations Cloud Service User Guide
Searching by Finisher
Figure 4–6 Search Mode: Finisher
FinisherYou can search for items by Finisher by entering a Finisher number. The system returns all items belonging to the finisher. Searching by Finisher is only available if the system is configured to use Finishers.

Item Lookup
Lookups 4-9
Searching by Warehouse
Figure 4–7 Search Mode: Warehouse
WarehouseThis field is a drop down listing all of the warehouses by number and name in numerical order. You are able to select a specific warehouse and the system returns all items for the selected warehouse.

Item Lookup
4-10 Oracle Retail Store Operations Cloud Service User Guide
Searching by UDA
Figure 4–8 Search Mode: UDA
UDAThis field allows you to pick a specific User Defined Attribute (UDA) and enter the corresponding search criteria. In order for an item to be returned, it must match all criteria entered.
TextThis field allows you to enter any part of the UDA text. Wild card searches are also allowed.
ValueThis field allows you to select from a list of pre-defined values for the UDA.
Date RangeThis field allows you to enter a range of dates. Any item falling within that range is returned, providing any other criteria also matches.

Item Lookup
Lookups 4-11
Searching by Inventory Status
Figure 4–9 Search Mode: Inventory Status
Inventory StatusThis field allows you to search by available or unavailable inventory status. The system returns all items that match the status selected by you. If Available is selected, the system returns the items that have available inventory. If unavailable is selected, the system returns the items that have non-sellable unavailable inventory. This search feature gives you a way to search for items that have unavailable inventory which might need further action. It can be especially useful when looking up items when creating inventory adjustments.
Sub-BucketThis field allows you to continue to filter down by sub-bucket. Sub-buckets are only an option if the system is configured to use sub-buckets. The Inventory Status must be selected as Unavailable for the Sub-bucket filter to be enabled. The system returns all items that match the selected Inventory Status and Sub-bucket.

Item Lookup
4-12 Oracle Retail Store Operations Cloud Service User Guide
Item Detail
Figure 4–10 Item Detail Screen
Selecting an item on the Item Lookup screen brings you to the Item Detail screen. The header shows the item number, description, unit of measure, and item image if configured to show images. Additional header information includes the available stock on hand, price, status, primary supplier ID, and primary supplier name, Item Type (Owned/Consignment/Concession).
Upon scanning an item, the screen refreshes and the details for the newly found item are displayed. The bottom of the screen has various different features, that when selected, navigate to a screen to display the details for that feature such as stock on hand, pricing, item attributes, and so on.
The details include the following:
■ Stock on Hand
■ Pricing
■ Item Attributes
■ Ordering Attributes
■ Merchandise Hierarchy
■ Stock Locator
■ UDAs
■ RFID Locations
■ CFAs
■ Non-Sellable (only if configured for sub-buckets)
■ Item Locations (only if the Display Sequence Locations system admin = Yes)
■ Deliveries
■ Show Packs

Item Lookup
Lookups 4-13
■ Show Components (only for pack items)
■ Related Items
■ Customer Orders
■ Additional Suppliers
The footer menu includes options:
■ Print: Prints out the Item report.
■ Investigate: Adds the item being looked up to an investigate type item basket. If one or more 'in progress' status 'Investigate' type item baskets exist for the user's store, the system will add the item to the newest one. If one does not exist, the system will create one. The item basket will be 'static' and available in the Item Basket dialog of both the desktop and mobile.
Stock On Hand
Figure 4–11 Stock On Hand Screen
This is the Stock on Hand Details for an item. It was accessed by selecting the Stock on Hand option from the Item Detail screen within Item Lookup. This screen shows all the various stock on hand buckets including total SOH, available SOH, shopfloor, backroom, delivery bay, unavailable SOH, transfer reserved, RTV reserved, customer order, and nonsellable.
Note: The shopfloor and backroom buckets are only displayed when the parameter Display Shopfloor/Backroom quantity= Yes.
The delivery bay bucket is only displayed when the parameter called Replenishment - Delivery bay inventory is set to Yes.

Item Lookup
4-14 Oracle Retail Store Operations Cloud Service User Guide
Stock On Hand InfoTotal Stock on Hand = Available + Unavailable
Unavailable = Transfer Reserved + RTV Reserved + Non-sellable + Customer Order
Available = Shopfloor + Backroom + Delivery Bay
Pricing
Figure 4–12 Pricing Screen
Pricing is accessed by selecting the Pricing option on Item Detail. The Pricing screen displays the Pricing Details for the item and your store. Each price event is represented in as a set. The sets of price events are ordered by Effective Date with most recent on the top (descending).

Item Lookup
Lookups 4-15
Item Attributes
Figure 4–13 Item Attributes Screen
Item Attributes is accessed by selecting Item Attributes from Item Detail. It displays the Item Attributes for the item at your store.
Item AttributesAdditional information may also be helpful to view about an item. The following are some additional item attributes available on this screen.
Status: Item status as the location.
VPN: Vendor product number for the primary supplier of the item.
UPC: UPC for the item.
Brand: Brand of the item.
Pack Size: This field holds the pack size (number of items in a supplier case) of this item:
The pack size is populated from the item/supplier/country record for the primary supplier.
For non-ranged items, this value is pulled from the master item data, for the default supplier.
Ticket Type: Merchandising suggested ticket type code/format.
Orderable: Yes/No; indicates if the item can be ordered.
Sellable: Yes/No; indicates if the item is sellable.
Pack Item: Yes/No; indicates if the item is a pack item.
Consignment Item: Yes/No; indicates if the item is a consignment item.
Concession Item: Yes/No; indicates if the item is a concession item.
Non-inventory: Yes/No; indicates if the item is flagged as non-inventory.
Store Pack Inventory: Yes/No; indicates tells the system when an item will only be sold and tracked as a pack.

Item Lookup
4-16 Oracle Retail Store Operations Cloud Service User Guide
Customer Order Ship Alone: Yes/No; tells the system if an item needs to be shipped alone in customer order deliveries or not.
Note: SOH and any reference to inventory will not be available for non-inventory, consignment, or concession items.
Order Attributes
Figure 4–14 Order Attributes Screen
Order Attributes is accessed by selecting Order Attributes from Item Detail. It displays the Ordering Attributes of Replenishment Method, Reject Store Order, and Next Delivery Date (if they exist) for the item at your store.

Item Lookup
Lookups 4-17
Merchandise Hierarchy
Figure 4–15 Merchandise Hierarchy Screen
The Merchandise Hierarchy screen is accessed by selecting Merchandise Hierarchy from Item Detail. This screen displays the merchandise hierarchy associated to the item.
If the item has differences, those are also displayed:
■ <Diff1> <Diff 1 Value> if it exists
■ <Diff2> <Diff 2 Value> if it exists
■ <Diff3> <Diff 3 Value> if it exists
■ <Diff 4> <Diff 4 Value> if it exists

Item Lookup
4-18 Oracle Retail Store Operations Cloud Service User Guide
Stock Locator
Figure 4–16 Stock Locator Screen
The Stock Locator screen is accessed by selecting Stock Locator from Item Detail. This screen shows stock on hand for the item at other locations, which could be stores and warehouses. Each store or warehouse is grouped together in a set.
Stores are restricted to only SIOCS Managed stores. Stores have available SOH, received today and buddy store listed. If transfer zones are used, only the stores within the transfer zone should appear. If no transfer zone is associated, the store is available for all transfer zones. The stores listed must have the logged in store present in its shipping network in order to be listed in this screen.
Warehouses will only display the available SOH. The locations are ordered first by buddy stores (Yes) at the top and second by available SOH (greatest at the top).

Item Lookup
Lookups 4-19
Deliveries
Figure 4–17 Deliveries Screen
The Deliveries screen is accessed by selecting Deliveries from Item Detail. All quantities are in the SUOM.
The header contains:
Ordered: Displays the total quantity remaining on the order. (Transfers + Purchase Orders)
Inbound: Is the total shipped quantity from transfers, allocations, and POs on an ASN that have not been received yet.
Received Today: Is the total received quantity for the current date.
Last Received Date: The date when the item was last received (through a transfer delivery or a DSD/PO).
The list portion of the screen represents the deliveries for the item. You can scroll through the list of Deliveries that are coming from a Transfer or Purchase Order. The deliveries are ordered by Delivery Date with the oldest delivery at the top (ascending). If there are no deliveries, the list will be blank.

Item Lookup
4-20 Oracle Retail Store Operations Cloud Service User Guide
Non-Sellable
Figure 4–18 Non-Sellable Screen
Clicking the Non-Sellable option on Item Detail displays the Non-Sellable sub-bucket information for the item at your store. The system displays all sub-buckets that have inventory for the item at your store along with the corresponding inventory.
The Non-Sellable menu option only displays when the system is configured for sub-buckets.
The Non-Sellable field is displayed in the Stock On Hand tab as well. This field represents how much stock is unavailable not associated to customer orders, RTVs or transfers. It is increased or decreased every time an inventory adjustment is made to or from unavailable inventory. It also gets updated when receiving damaged items into the store as well as returning unavailable items.

Item Lookup
Lookups 4-21
Components
Figure 4–19 Components Screen
Selecting the Show Components option on Item Detaildisplays the components that exist for the item on the Components screen. The Show Components option is only available for those items which are a Pack item. All quantities are in the SUOM.
Tapping a component item navigates you to the item detail for that item. You remain in that item and do not return to the original item.

Item Lookup
4-22 Oracle Retail Store Operations Cloud Service User Guide
Packs
Figure 4–20 Packs Screen
Selecting the Show Packs option on Item Detail displays the packs that exist for the item on the Packs screen. The Show Packs option is available even if the item is not part of a pack. If it is not part of a pack, no content is displayed for the item. All quantities are in the SUOM.
Tapping a pack item navigates you to the item detail for that item. You remain in that item and do not return to the original item.

Item Lookup
Lookups 4-23
Item Locations
Figure 4–21 Item Locations Screen
Selecting the Item Locations option on Item Detail displays the sequenced locations that exist for the item on the Item Locations screen. The Item Locations menu option is only displayed when the system is configured for Display Sequence Fields = Yes. If the system is configured to display sequence fields but there are no locations defined for the item, the screen is blank.
The macro locations with the area are displayed. If the location is a primary location, it is indicated with a star.

Item Lookup
4-24 Oracle Retail Store Operations Cloud Service User Guide
UDAs
Figure 4–22 UDAs Screen
Selecting the UDA menu option displays the UDA information for the item at your store on the UDAs screen. Each UDA and value are represented in a set. The list is ordered by UDA. If there are no records, the details are blank.
RFID Locations
Figure 4–23 RFID Locations Screen
Selecting RFID Locations from Item Detail displays the RFID location wise inventory. This menu is available only if the item is RFID tag enabled item.
RFID locations are defined in the RFID solution and uploaded into system.
The inventory positions shown here are the accumulated numbers of the tags present in the location.

Item Lookup
Lookups 4-25
Item CFAs
Figure 4–24 Item CFAs Screen
Selecting the CFA option displays the CFA (Custom Flexible Attribute) information for the item at your store, on the CFAs screen. The CFAs are setup at merchandising system and the Enterprise Inventory system subscribe to this information. Each CFA and value are represented in a set. The list includes CFAs created at the item level and at the item-store level, if any. If there are no CFAs available, a message that no CFAs are available is displayed in the screen. The list is ordered by CFA.
Related Items
Figure 4–25 Related Items Screen
The Related Items screen is accessed by selecting the Related Items menu option on the Item Detail screen. The Related Items screen displays the related items for the item at your store. All quantities are in the SUOM. The related item types of cross sale, up sale, substitute, and style are listed. There is a type filter at the top of the screen allowing you to filter by the type of related item. All items display, even if they are not ranged to the store.

Item Lookup
4-26 Oracle Retail Store Operations Cloud Service User Guide
Only Active related items are listed, where today's date is within the effective date and end date for the related item. If there is no effective date, the item is assumed to be active.
If you select a related item record in the list, you navigate to the Item Detail screen for that item. You are in the details for that item. There is not a way to navigate back to the original item. If there are no related items, the details are blank.
Note: The Substitute item types are used within the Customer Order Picking and Shelf Replenishment Picking dialogues when a substitute item is allowed.
Customer Orders
Figure 4–26 Customer Orders Screen
Selecting the Customer Orders option on Item Detail displays the customer orders that exist for the item and store. All customer order details are grouped together in a set. The Customer Order sets are ordered by Customer Order ID in ascending order. If there are no open customer orders for the item at the user's store, nothing displays on this screen. All quantities are in the SUOM.

Universal Item Lookup
Lookups 4-27
Suppliers
Figure 4–27 Suppliers Screen
Selecting the Additional Suppliers option on Item Detail displays the Suppliers screen. This screen lists the additional suppliers that exist for the item. The primary supplier is not displayed. If there are no additional suppliers, this screen is blank.
Universal Item LookupUniversal Item Lookup is the Item Lookup dialog that is accessed from within another transaction or other area of the application. For example, when searching for an inventory adjustment, you must first lookup the item. Search for the item within the universal item lookup dialog and then navigate back to Inventory Adjustments.

Universal Item Lookup
4-28 Oracle Retail Store Operations Cloud Service User Guide
Figure 4–28 Universal Item Lookup Screen Flow
Access Universal Item Lookup via the magnifying glass. You will be directed to the Item Lookup Search Criteria screen. After entering search criteria, the list of items will be returned. From here an item can be selected from the list and applied to the original item field from where the universal item lookup was executed. Or, you can then choose to view the details of a specific item in Item Detailand apply from there.

Supplier Lookup
Lookups 4-29
Figure 4–29 Inv Adjust list
The item lookup dialog will be accessed via other areas within the application when an item can be scanned or typed in. Use the magnifying glass to navigate into the Item Lookup Search Criteria screen. Search for an item and once applied you will exit out of Item Lookup and return to the dialog in which you started with the selected item applied.
Supplier LookupThe Supplier Lookup functionality provides you with the ability to view information about the supplier. The following information is available, but is not limited to this list:
■ ID
■ Name
■ HQ Address, Phone, Contact, Contact Email
■ Return Address, Phone, Fax, Contact Email
■ Status
■ Return Allowed
■ Return Authorization Required
■ CFAs (Custom Flexible Attributes)
This dialog may be used in conjunction with other dialogs (Return to Vendor, Store Orders to a Vendor, Direct Store Delivery) to look up suppliers and assign the supplier to the transaction.
Note: A supplier in SIOCS is actually defined as a supplier site in the merchandising system.

Supplier Lookup
4-30 Oracle Retail Store Operations Cloud Service User Guide
Figure 4–30 Supplier Lookup Screen Flow
This is the screen flow for the Supplier Lookup functionality. Select Supplier Lookup from within the Lookups menu. Navigate to Supplier Lookup that lists the suppliers. Initially this screen will be empty with no suppliers listed. Search for suppliers by tapping the eye glasses (search criteria) and navigate to the search criteria screen.
Once a supplier is selected from the list, go to the Supplier Detail for that supplier and the header level supplier info will be displayed. You can view the details of the various addresses by selecting an address option.
Figure 4–31 Supplier Lookup Screen
When navigating to Supplier Lookup, you are taken to a blank list screen without any supplier results being displayed. The scan type is the only header function that is used in Supplier Lookup, which is used to determine what type of item is scanned when entering or scanning an item to identify the supplier.
Use the search criteria, eye glasses, to navigate to the Supplier Search Criteria screen to enter criteria search for suppliers. Search criteria include supplier ID, supplier name, and item. After applying the search criteria, the results are listed on the supplier lookup screen together with the applied criteria. Selecting a supplier from the results list navigates to the Supplier Detail screen for that supplier.
When scanning/entering an item in the scan bar, the system adds the scanned item to the entered search criteria and narrows down the list of suppliers by the item that was

Supplier Lookup
Lookups 4-31
scanned. If it results in a single item, the system finds the supplier(s) based upon that item and presents them in the list. If there is more than one item found based upon the scan it provides an item selection to select the proper item. The item is applied to the search criteria and the supplier results are returned.
Figure 4–32 Supplier Search Criteria Screen
The Supplier Search Criteria screen is accessed through the eye glasses search criteria function on Supplier Lookup. You can enter various search criteria to find a supplier. The results are listed on the Supplier Lookup screen.
Supplier Detail
Figure 4–33 Supplier Detail
From Supplier Lookup, selecting a supplier displays the Supplier Detail screen. This is a read-only screen to display the details of the supplier being looked up.

Supplier Lookup
4-32 Oracle Retail Store Operations Cloud Service User Guide
The header shows the supplier ID, supplier name, status of the supplier, whether returns are allowed, if a return authorization number is required, and if supplier deliveries allow for discrepancies. In the bottom of the screen there are options for various different address types for the supplier. The types may be different per supplier, and types may be duplicated per supplier. The types are based upon the types in the system which came from the merchandising system. Selecting a type will navigate to the details of that address. Address fields include address, phone, fax, contact name, and email if they exist for the supplier. The CFAs of the supplier can be viewed by selecting the CFAs option.
Supplier CFAs
Figure 4–34 Supplier CFAs
Selecting CFA from the Supplier Detail screen displays the CFA information for the supplier. The CFAs are setup at merchandising system and the Enterprise Inventory system subscribe to this information. Each CFA and value are represented in a set. If there are no CFAs available, a message that no CFAs are available is displayed in the screen. The list is ordered by CFA.

Container Lookup
Lookups 4-33
Container LookupThe Container Lookup functionality provides you with the ability to view information about a warehouse/finisher delivery container. The following information is available, but is not limited to this list:
■ Container ID
■ ASN Number
■ Status (Received, In Transit, and so on)
■ Receipt Date and Time
■ From Location
■ Number of Cases
■ Damages
Figure 4–35 Container Lookup Screen Flow
Container Lookup is accessed from the Container Lookup menu option within Lookups in the drawer menu. Enter the details, and you see the details for the

Container Lookup
4-34 Oracle Retail Store Operations Cloud Service User Guide
container based upon the type of container being looked up. No changes can be made to the container or its content from this screen.
Figure 4–36 Container Lookup Screen
Figure 4–37 Container Lookup Details

Container Lookup
Lookups 4-35
The Container Lookup screen is accessed using the Container Lookup menu option within Lookups in the drawer. The search criteria screen is accessed using the eye glasses where you can search for a container. You can also scan a container (External ID (SSCC), Internal ID, or Tracking ID) and the container will be presented in the list. You will be able to look up any container, regardless of store. Selecting the container will navigate to the details for that container. You will only be able to enter into containers where the Source or Destination is for your store.
Container Lookup can be used for looking up containers for Transfers Shipping and Receiving, DSD Receiving and RTV Shipment.
Figure 4–38 Container Search Criteria Screen
The Search Criteria screen is accessed using the eye glasses search criteria on Container Lookup. You can enter in various criteria and the system returns the results on the Container Lookup screen. The search restricts the containers to those for your store.

Container Lookup
4-36 Oracle Retail Store Operations Cloud Service User Guide
Container Items
Figure 4–39 Container Items (Transfer Receiving)
The Container Items screen is accessed after going into the details for a specific container. This screen lists the items in the container. The screen details vary depending on the type of container. For example, expected quantities for an outbound container will not be displayed.
On this screen, the user can select the Print Tickets option from the footer menu to access the Print Tickets dialog. Using Print Tickets dialog, the user can submit the ticket printing to the external service for the selected container items.
For more details on this screen, refer to the common usage section.

Container Lookup
Lookups 4-37
Container Lookup Item Detail
Figure 4–40 Container Lookup Item Detail Screen (Transfer Receiving)
The Item Details screen is accessed after going into the item details of an item on the container. The screen varies depending on the type of container.

RFID Locator
4-38 Oracle Retail Store Operations Cloud Service User Guide
Container Lookup Info
Figure 4–41 Container Lookup Info Screen (Transfer Receiving)
The Info screen is accessed after selecting the Info menu option from the footer menu of the Container Items screen. The screen varies depending on the type of container. The Info screen in Container Lookup is the same as that in the actual transaction, that is, Transfer Receiving. This screen is view only.
RFID LocatorThe RFID Locator functionality provides the user with the ability to locate the RFID tags in the store. This helps the store users to locate the items quickly by navigating the mobile device based on the signal strength.

RFID Locator
Lookups 4-39
Figure 4–42 RFID Locator
The RFID Locator dialog can be accessed from the Lookup menu.
The search field on the scan bar is item. The user can scan or enter the item barcodes.
This screen is used for locating the RFID Tag in the store. The purpose of the RFID Locator functionality is to enable the user to find the specific unit where it is placed in the store via RFID scanning.
If the user has scanned/entered an EPC and if the corresponding item of the scanned EPC contains more than one EPCs/Tags in the system, the system takes the user to the Item EPCs for the user to select the appropriate tag to find it.
If the user has scanned/entered an EPC and if the corresponding item of the scanned EPC contains only one EPC that is the scanned EPC, the system takes the user to the RFID Tag Finder showing the signal strength.
Item EPCs
Figure 4–43 Item EPCs

RFID Locator
4-40 Oracle Retail Store Operations Cloud Service User Guide
On this screen, the system displays the list of found active RFID tags based on the provided item.
From the list, the user can select a specific tag to start locating the tag or select Locate Tags option to start searching the listed tags using the radar and display the strength of the signal.
On the list, the system displays the Tag id and the description of the item along with the item information on the header.
RFID Tag Finder
Figure 4–44 Tag Finder
The user reaches this screen via the RFID Locator screen if the tag id was scanned or entered. Alternatively selecting the RFID Tag from the Item EPCs screen will bring the user here as well.
The system displays the signal strength to indicate how close the tag is while the user moves around the search area holding the trigger on the scanner.
When the user enters this screen, the system automatically starts the process to locate tags and the user can select to stop locating.
On the header, the system displays the item information.

5
Inventory Adjustments 5-1
5Inventory Adjustments
This chapter is divided into two sections:
■ Inventory Adjustments Mobile
■ Inventory Adjustments Desktop
■ Inventory Adjustments Process
Inventory Adjustments MobileInventory Adjustments allow a user to change the number of units in stock or mark them as non-sellable due to damage and other reasons:
The following features are available:
■ Search for inventory adjustments
■ Create a new inventory adjustment
■ Copy an existing inventory adjustment
■ View or edit an existing inventory adjustment
■ Delete In Progress adjustments
■ Print inventory adjustments
■ Enter values for CFAs (Custom Flexible Attributes)
The following topics are described in this section:
■ Inv Adjust List
■ Search Criteria (Inventory Adjustment)
■ Inv Adjust Items
■ Item Detail
■ Edit CFAs
■ Info Screen (Inv Adjust Items)

Inventory Adjustments Mobile
5-2 Oracle Retail Store Operations Cloud Service User Guide
Figure 5–1 Inventory Adjustment Mobile Screen Flow
Inventory Adjustments are accessed through the Inventory Adjustment menu within the drawer. Selecting the menu option takes you to the Inv Adjust List screen. On this screen, you have the option to search for adjustment records that are presented on the Inv Adjust List screen. You can create an inventory adjustment, edit, or view an adjustment. When creating, editing, or viewing an inventory adjustment, you are first directed to the list of items on the Inv Adjust Items screen. You can add, view, and edit the details of the items on the Item Detail screen. You can specify values for CFAs (Custom Flexible Attributes) set up for inventory adjustments via the Edit CFAs screen.

Inventory Adjustments Mobile
Inventory Adjustments 5-3
Inv Adjust List
Figure 5–2 Inv Adjust List Screen
When navigating to Inventory Adjustments, the Inv Adjust List screen displays the 'In Progress' adjustments as the default list. All manually created inventory adjustments as well as those created by an external system, such as through the web service, appear in the list screen.
You can use the search criteria eye glasses to navigate to the Search Criteria (Inventory Adjustment) screen to enter search criteria for inventory adjustments. When scanning/entering an item in the scan bar, the system adds the item to the entered search criteria and narrows down the current list of adjustments.
Creating a new adjustment directs you to the Inv Adjust Items screen with no details (items) to build a new inventory adjustment. Selecting an adjustment from the list navigates you to the details for that adjustment.

Inventory Adjustments Mobile
5-4 Oracle Retail Store Operations Cloud Service User Guide
Search Criteria (Inventory Adjustment)
Figure 5–3 Search Criteria Screen (Inventory Adjustments)
The Inventory Adjustment Search Criteria screen is accessed by the eye glasses on the Inventory Adjustment List (Inv Adjust List) screen. After applying the search criteria, the results are listed on the Inv Adjust List screen and the criteria applied is shown.

Inventory Adjustments Mobile
Inventory Adjustments 5-5
Inv Adjust Items
Figure 5–4 Inv Adjust Items Screen
The Inv Adjust Items screen is where a new adjustment is created. Initially, this screen will not have any items. The items screen is also displayed when selecting an existing adjustment, as well as from applying a template to the Inv Adjust List screen. The items are listed for the adjustment. The item image for the line items is displayed per configuration.
Line items appear in a list and selecting a line item navigates to the item details of that item. If the item scanned is a UIN item, the user will directly navigate to the UIN tab in the Item Detail screen.
If an item has been changed in the current session, it is indicated by a bar on the left of the item. Scrolling in the list of items displays a filter. The filter can be used to narrow down the list of items. Filtering can occur by item ID, description, reason, and unit of measure.
A reason code must be selected before being able to add or edit an item on the adjustment. The reason code selected is at the header level and is applied to all newly added items until it is changed to a different reason in which the newly changed reason is added to the items. The reason codes have a disposition associated to them which determines stock movement of the item. See Inventory Adjustments Process.
Scanning or entering an item in the scan bar navigates you to the Item Detail screen for that item. The quantity may be updated depending on the scan mode.
The item must be unique on the adjustment.
The ellipsis in the lower right hand corner accesses the footer menu which contains all of the functions that can be performed on an inventory adjustment.

Inventory Adjustments Mobile
5-6 Oracle Retail Store Operations Cloud Service User Guide
Footer Menu
The footer menu is accessed from the ellipsis footer menu on the Inv Adjust Items screen. The menu functions include the following:
■ Info: Accesses the Info popup.
■ Notes: Accesses the notes dialog to capture notes.
■ Edit CFA: Lets the user enter values for the CFAs that are set up for inventory adjustments.
■ Confirm: Confirms and completes the adjustment. All stock on hand updates are made and the adjustment is published out.
■ Save: Saves the adjustment in 'In Progress' status to be completed later.
Saving an adjustment does not publish the adjustment nor does it reserve any inventory; it simply saves it. The Save button can be used to implement a Save and Approval process. After saving, user will be taken to the Inv Adj List screen.
■ Save and Continue: This will perform the same function as 'Save' option however the user remains in the same screen after save.
■ Delete: Marks the inventory adjustment to 'Canceled' status.
■ Cancel: Exits the adjustment; changes made in that session are not saved.
■ Print: Displays the common print dialog to print the inventory adjustment report.
■ Copy: The copy function is only available for those adjustments in a 'Completed' status. It takes the current adjustment, copies the items, reasons and quantities, and creates a new editable adjustment with a new ID. It references the copied adjustment's ID.

Inventory Adjustments Mobile
Inventory Adjustments 5-7
Item Detail
Figure 5–5 Item Detail Screen (Quantity)
The Item Detail screen is used for selecting or scanning an item from the Inv Adjust Items screen. Scanning or entering an item on this screen in the scan bar, updates the quantity per the scan mode and refreshes the Item Detail screen for the item and quantity scanned.
The quantity can be edited and updated manually if permissions allow. The system validates the inventory bucket based upon the disposition associated to the reason code. A reduction adjustment in inventory may exceed available inventory, bringing total available as a negative value. However, an unavailable inventory adjustment can never make the non-sellable unavailable bucket go negative. The same is true for sub-buckets, when sub-buckets are used, the reduction of a sub-bucket must be less than or equal to total quantity of such a sub-bucket. Increases for available, or non-sellable unavailable have no restriction.
The item information including the image (which is system configured) displays in the header. The bottom portion of the screen contains information fields for reason code, disposition, sub-bucket (if system configured), and the stock on hand pertaining to the bucket in which the stock is coming from. At the bottom of the screen the details of the last scanned barcode will be displayed.
The footer menu, ellipsis button, contains a reset function as well as remove and restore functions. You can page through existing items on the adjustment using the arrows on the bottom.
The Item Detail screen has an UIN tab to take user to the UIN screen to add/remove UINs for UIN items (if system is configured to use UINs and if the item is a UIN item).

Inventory Adjustments Mobile
5-8 Oracle Retail Store Operations Cloud Service User Guide
If the user scans a UIN item, the user will directly navigate to the UIN tab in the Item Detail screen for that item.
■ All non-AGSN (Auto Generated Serial Numbers) UINs require UINs to be captured, regardless of the disposition of stock movement. The quantity field cannot be entered for non AGSN UIN items. It gets updated as the UINs get added and removed from the adjustment.
■ For AGSN items, if a reason code has a disposition of anything except Out of Stock to In Stock (+Stock on Hand), a UIN is required to be captured. This is because the UIN already exists in the system and the system needs to know which AGSN UIN is being adjusted. In this case, the quantity field cannot be entered; it is updated as the AGSN is added/removed.
■ For AGSNs being adjusted from Out of Stock to In Stock (+ Stock on Hand), the system auto generates the AGSN number and print upon completion of the adjustment. This means that capturing of the AGSN is not required and the quantity can be entered. However, you may still capture the serial number if one exists. In this case, the system auto-generates the serial numbers and print for those where the quantity entered exceeds the UINs captured.
The Extended Attributes tab enables the user to view/capture Extended Attributes for the item. If the item is not configured to capture extended attributes or there are no extended attributes captured, the list will be empty.
Edit CFAs
Figure 5–6 Edit CFAs Screen
The Edit CFAs screen displays the list of CFAs (flexible attributes) that have been set up for Inventory Adjustments in the desktop application, and lets you enter values for them. The CFAs that are set up as 'Required' must have a value entered for it before confirming the inventory adjustment. The value can be one of the following: Date, Text, Decimal, Long depending on the 'data type' set up for the CFAs, while creating them in the desktop application. Appropriate security permission is needed for entering CFA values.

Inventory Adjustments Desktop
Inventory Adjustments 5-9
Info Screen (Inv Adjust Items)
Figure 5–7 Inv Adjust Items Info Screen
The Info screen is an informational popup that contains read-only information about the header level of the adjustment. Details include adjustment ID, reference adjustment ID, status, create date, create user, approve date, approval user, and all the CFAs setup for inventory adjustments irrespective of whether a value has been captured or not. The value captured for the CFAs will also be displayed. If value has not been captured, it will display blank.
Inventory Adjustments DesktopInventory Adjustments allow a user to change the number of units in stock or mark them as non-sellable due to damage and other reasons.
The following features are available:
■ Search for inventory adjustments
■ Create a new inventory adjustment
■ View or edit an existing inventory adjustment
■ Delete In Progress adjustments
■ Copy an existing inventory adjustment
■ Download reports for inventory adjustments
■ Capture values for CFAs (Custom Flexible Attributes)
The following topics are described in this section:

Inventory Adjustments Desktop
5-10 Oracle Retail Store Operations Cloud Service User Guide
■ Inventory Adjustment List
■ Inventory Adjustment Search Criteria
■ Inventory Adjustment Detail
■ Inventory Adjustment - UIN
■ Edit Info Popup
■ Info Popup
■ Download Reports Popup
Figure 5–8 Inventory Adjustment Desktop Screen Flow
Inventory Adjustments are accessed through the Inventory Adjustment menu within the Main Menu\Inventory Management. Selecting the menu option takes you to the Inventory Adjustment List screen. This screen lists the inventory adjustments available for the store. On this screen, you can search for adjustment records. You can create an inventory adjustment, edit, or view an adjustment through this screen. When creating, editing, or viewing an inventory adjustment, you are directed to the Inventory Adjustment Detail screen where the list of items on the inventory adjustment are displayed. You can add items, view, and edit the details of the items on the Inventory Adjustment Detail screen. You can specify values for CFAs (Custom Flexible Attributes) set up for inventory adjustments. You can copy a completed inventory adjustment. An option to download reports is also available. Also, you will be able to capture UINs for the serialized items.

Inventory Adjustments Desktop
Inventory Adjustments 5-11
Inventory Adjustment List
Figure 5–9 Inventory Adjustment List Screen
The Inventory Adjustment List screen enables you to view the list of inventory adjustments available for the current store. All manually created inventory adjustments as well as those created by an external system, such as through the web service, appear in the list screen. The inventory adjustments are listed in the form of a grid. The screen displays the 'In Progress' adjustments as the default list. This list will be updated when a search is performed. The list is sortable and filterable.
Use the Search button to navigate to the Inventory Adjustment Search Criteria dialogue where you can enter search criteria to lookup inventory adjustments.
Clicking on Create button directs you to the Inventory Adjustment Detail screen with no details (items) to build a new inventory adjustment. You must have proper security permission for this button. Selecting an adjustment from the list navigates you to the details for that adjustment.
The Delete button enables you to delete an 'In progress' inventory adjustment. Appropriate security permission is needed.

Inventory Adjustments Desktop
5-12 Oracle Retail Store Operations Cloud Service User Guide
Inventory Adjustment Search Criteria
Figure 5–10 Inventory Adjustment Search Criteria
The Inventory Adjustment Search Criteria screen is accessed by clicking on Search on the Inventory Adjustment List screen. After applying the search criteria, the results are listed on the Inventory Adjustment List screen and the criteria applied is shown.

Inventory Adjustments Desktop
Inventory Adjustments 5-13
Inventory Adjustment Detail
Figure 5–11 Inventory Adjustment Detail Screen
The Inventory Adjustment Detail screen is where a new adjustment is created. Initially, this screen will not have any items.
The screen is also displayed when selecting an existing adjustment. The items displayed in this screen are for the adjustment. Line items appear in a grid and selecting a line item displays the item details of that item in the Detail Block which is on the right side of the screen. You can edit 'In progress' inventory adjustments. 'Completed' and 'Cancelled' adjustments will be View Only.
A reason code must be selected before being able to add or edit an item on the adjustment. The reason code selected is at the header level and is applied to all newly added items until it is changed to a different reason in which the newly changed reason is added to the items. The reason codes have a disposition associated to them which determines stock movement of the item.
Grid
The line items are displayed in the grid with information like item id, description, reason code, UOM, quantity and so on. Item ID is a hyperlink. Clicking on the link opens the Item Detail screen for that item in a new tab in the browser.
The grid is filterable and sortable.
To add a new item to the adjustment, click on '+' button and it enables the Detail Block in order to enter the item and the necessary details.
To delete an item from the adjustment, select the item and click on X button. Upon deletion of an item, UINs (if any) are deleted.
Detail Block
All the details of a line item are displayed in this block. When a new item is added, this block will be empty. Enter the item id in the Item field. Press Enter or press the arrow button, and the item's detail get displayed. Enter quantity as required. The item must be unique on the adjustment.
Clicking on an existing line item enables the detail block and the details of the item such as item id, description, reason code, disposition, sub-bucket, UOM, quantity, and so on, will be displayed.
Click Edit in this block in order to edit the details of an item. Reason code and quantity/UIN are editable.
The quantity can be updated manually if permissions allow. The system validates the inventory bucket based upon the disposition associated to the reason code. See

Inventory Adjustments Desktop
5-14 Oracle Retail Store Operations Cloud Service User Guide
Inventory Adjustments Process. A reduction adjustment in inventory may exceed available inventory, bringing total available as a negative value. However, an unavailable inventory adjustment can never make the non-sellable unavailable bucket go negative. The same is true for sub-buckets, when sub-buckets are used, the reduction of a sub-bucket must be less than or equal to total quantity of such a sub-bucket. Increases for available, or non-sellable unavailable have no restriction.
The item information including the image (which is system configured) displays in the detail block.
Click Apply to apply the changes to the adjustment and the grid will be refreshed to display the new details of the item.
Header Buttons
There are several buttons on the header of this screen which enables you to perform various actions on the adjustment:
■ Info: Accesses the Info popup which will display the details of the adjustment. View only.
■ Notes: Accesses the notes dialog to capture notes.
■ Edit Info: Accesses the Edit Info popup and lets you enter values for the CFAs (Custom Flexible Attributes) that are set up for inventory adjustments and also any other editable fields of the adjustment like Adjustment Date.
■ Confirm: Confirms and completes the adjustment. All stock on hand updates are made and the adjustment is published out.
■ Save: Saves the adjustment in ’In Progress’ status to be completed later.
Saving an adjustment does not publish the adjustment nor does it reserve any inventory; it simply saves it. The Save button can be used to implement a Save and Approval process.
■ Delete: Marks the inventory adjustment to ’Canceled’ status.
■ Back: Exits the adjustment; changes made in that session are not saved. If a new adjustment is being created, the adjustment (header) will remain saved in the database (as it was committed upon initial creation), however any items, modifications, and so on, will not be saved.
■ Download Report: Will download the Inventory Adjustment operational report for the current inventory adjustment.
■ Copy: The copy function is only available for those adjustments in a ’Completed’ status. It takes the current adjustment, copies the items, reasons and quantities, and creates a new editable adjustment with a new ID. It references the copied adjustment's ID.

Inventory Adjustments Desktop
Inventory Adjustments 5-15
Inventory Adjustment - UIN
Figure 5–12 Inventory Adjustment - UIN
Clicking on the UIN icon on the Detail Block brings up the UIN tab to add/remove UINs for UIN items (if system is configured to use UINs and if the item is a UIN item).
■ All non-AGSN (Auto Generated Serial Numbers) UIN items require UINs to be captured, regardless of the disposition of stock movement. The quantity field cannot be entered for non AGSN UIN items. It gets updated as the UINs get added and removed from the adjustment.
Figure 5–13 Inventory Adjustment - UIN - Auto Generation
■ For AGSN items, if a reason code has a disposition of anything except Out of Stock to In Stock (+Stock on Hand), a UIN is required to be captured. This is because the UIN already exists in the system and the system needs to know which AGSN UIN is being adjusted. In this case, the quantity field cannot be entered; it is updated as the AGSN is added/removed.
■ For AGSNs being adjusted from Out of Stock to In Stock (+ Stock on Hand), the system auto generates the AGSN number and print upon completion of the adjustment. This means that capturing of the AGSN is not required and the quantity can be entered. However, you may still capture the serial number if one exists. In this case, the system auto-generates the serial numbers and print for those where the quantity entered exceeds the UINs captured.

Inventory Adjustments Desktop
5-16 Oracle Retail Store Operations Cloud Service User Guide
Figure 5–14 Inventory Adjustment - UIN - Relocation
The Inventory Adjustment - Relocate UIN popup is used when a UIN is added that is for another store. This enables you to choose the UINs to relocate. System admin Allow Store UIN Relocation should be set to Yes.
Inventory Adjustment - Extended Attributes
Figure 5–15 Inventory Adjustment - Extended Attributes
The user will navigate to the Inventory Adjustment Extended Attributes screen upon clicking on the Extended Attributes icon on the Inventory Adjustment Detail screen. This screen is only available for items that are part of merchandise hierarchies that are configured/setup for extended attributes. Also, the store must be configured to capture Extended Attributes. This screen will display all extended attributes that get

Inventory Adjustments Desktop
Inventory Adjustments 5-17
auto captured from a GS1 barcode (per system configuration). The user is also able to enter extended attributes manually for the item here.
Edit Info Popup
Figure 5–16 Edit Info Popup
The Edit Info popup is accessed from Inventory Adjustment Detail screen by selecting Edit Info and can be accessed for editable Inventory Adjustments. Appropriate security permission is needed to access the popup.
You will be able to edit the Adjustment date as well via this popup. The adjustment date is an alternative date that allows you to identify when the inventory transaction happened if different from the time the transaction is created. The date has no impact on when the transaction is applied, the transaction will always be applied immediately when approved, regardless of this date. This is the date communicated to external systems.
The popup displays the list of CFAs (custom flexible attributes) that have been set up for Inventory Adjustments, in the desktop application and lets you enter values for them. The CFAs that are set up as 'Required' must have a value entered for it before confirming the inventory adjustment. The value can be one of the following: Date, Text, Decimal, Long depending on the 'data type' set up for the CFAs, while creating them in the desktop application. Appropriate security permission is needed for entering CFA values.

Inventory Adjustments Desktop
5-18 Oracle Retail Store Operations Cloud Service User Guide
Info Popup
Figure 5–17 Inventory Adjustment Info Popup
The Info screen is an informational popup that contains read-only information about the header level of the adjustment. Details include adjustment ID, reference adjustment ID, status, create date, create user, approve date, approval user, and the CFAs.
Download Reports Popup
Figure 5–18 Select Report Popup (Download Report)
This popup can be accessed by clicking on Download Report from the Inventory Adjustment Detail screen. Selecting a format and clicking on Download will download the Inventory Adjustment operational report for the current inventory adjustment.

Inventory Adjustments Process
Inventory Adjustments 5-19
Inventory Adjustments ProcessReason codes are defined on the desktop. When creating a reason code a disposition is assigned to the reason code and it defines how the stock will be moved. So adjustments are made to different buckets depending on the reason code's disposition. For example: a reason code of Stock - In has a disposition of + Stock on Hand which moves inventory from Out of the store to Available inventory where as a Reason if Damaged - Hold has a disposition of + Unavailable that moves inventory from Available to Unavailable.
The system will display the inventory value for the bucket in which inventory is being removed from.
Table 5–1 Inventory Adjustment Dependent on Reason Code Disposition
Reason Code Disposition Adjustment
If the reason code disposition is taking inventory out of the available bucket, then the Inventory field will display the available stock for the item at the store.
■ +Unavailable (Available -> Unavailable)
■ -Stock on Hand (Available -> Out)
■ +Customer Order Reserve (Available -> Customer Order)
If the reason code disposition is taking out of the unavailable bucket, and sub-buckets are not turned on, then the Inventory field will be display the unavailable stock for the item at the store.
■ -Unavailable (Unavailable -> Available)
■ -Stock on Hand & - Unavailable (Unavailable -> Out)
If the reason code disposition is taking out of unavailable stock and the system is configured to use sub-buckets, then the Inventory field will display the stock for the item/store's sub-bucket.
■ -Unavailable & + Unavailable (Unavailable -> Unavailable)
■ -Unavailable (Unavailable -> Available)
■ -Stock on Hand & - Unavailable (Unavailable -> Out)
If the reason code disposition is taking from Customer Order Reserved, the Inventory field will display the Customer Order Reserved qty.
■ -Customer Order Reserve (Customer Order -> Available)
If the reason code disposition is taking from "Out", meaning outside the store, the Inventory field will be not displayed, as there is not a way to know what "out" contains.
■ +Stock on Hand (Out -> Available)

6
Direct Store Delivery 6-1
6Direct Store Delivery
This chapter covers Direct Store Delivery (DSD). The following topics are covered:
Overview: Introduction to DSD.
Business Cases
Screen Flow
Functionality: Description of available screens.
OverviewA direct store delivery is a delivery in which the supplier drops off merchandise directly at the store. These deliveries, received directly at the store, can be against a planned delivery, an existing purchase order (PO) raised by the corporate or by the store, or a purchase order on the fly. The delivery supports containers coming in directly with Advance Shipment Notice (ASN) or the system will create a container when the ASN is loaded in the system. Even for receipts without ASN the system will allow you to create containers.
The store can receive partial shipments, resulting in multiple deliveries against a single purchase order.
Features
■ Direct deliveries against a Purchase Order (PO) and with Advance Shipment Notice (ASN) from the supplier. This feature also supports containers coming directly from the source and allows you to create additional containers.
■ Receive on shop floor directly or back room/delivery bay.
■ Direct deliveries against a PO and without ASN from the supplier. You can receive the delivery by creating one or more containers.
■ Direct deliveries without a PO.
■ Direct EXchange (DEX)/Nex type deliveries.
■ Capture values for Custom Flexible Attributes (CFA) at the direct store delivery and containers level.

Business Cases
6-2 Oracle Retail Store Operations Cloud Service User Guide
Business CasesFour business case examples are shown below:
DSD Receiving Process for PO Based Delivery with ASN1. Corporate office places a purchase order to the vendor and instructs the vendor to
supply the goods directly to the store.
2. Supplier ships the goods with the ASN to the store and the store receives the goods against the ASN.
DSD Receiving Process for PO Based Delivery without ASN1. Corporate office places a purchase order to the vendor and instructs the vendor to
supply the goods directly to the store.
2. Supplier ships the goods, but no ASN is sent to the store and the store receives the goods against the PO.
DSD Receiving Process without POStores that are allowed receiving the goods without purchase order can verbally place the order to the vendor and create those receipts on the fly.
DSD Receiving Process via DEX/NexDirect EXchange (DEX) is the electronic exchange of information between a vendor's hand-held computer and a store's direct store delivery (DSD) system.
DEX transmits data to a store's DSD system using the EDI transaction set 894 (Delivery/Return Base Record). The standard for this transaction set is UCS 004010 894 and is maintained by the UCC.
The system supports to create the DEX/Nex type deliveries using the web services. The functionality of DEX/Nex type deliveries within the DSD receiving module would be same as on the fly delivery created by you with the exception of originating type which is DEX/Nex.
The external system that is responsible to generate the DEX/Nex delivery would leverage the service exposed by the system to integrate and upload the DEX/Nex type deliveries in to the database.

Screen Flow
Direct Store Delivery 6-3
Screen Flow
Figure 6–1 Direct Store Delivery Mobile Screen Flow
You can access DSD Receiving and Purchase Order options from the Shipping and Receiving menu. The DSD Receiving List screen that appears after selecting DSD Receiving, lists all the active deliveries that are available and allows you to create or modify a receipt. You can also create a new receipt on the fly without any purchase order by selecting Create Receipt.
After selecting the ASN, active delivery, or supplier for creating an on the fly delivery, the DSD Receiving Containers screen appears and allows you to proceed with detailed receiving using the Container Items screen.
You can access various footer menu options such as Info, Edit Receipt, Edit CFA, Customer Orders, External Receiver Adjustments, Notes, and so on from the DSD Receiving Containers screen to perform various individual functions.
Similarly, you can access various footer menu options such as Default Qty, Edit CFA, Document option to select the PO for the PO based deliveries, Notes, and so on from the Container Items screen to perform various individual functions.
The Purchase Order List screen that appears after selecting Purchase Order allows you to view the purchase order detail and create a receipt against a PO.
When creating a receipt, the system takes you to the Receiving Item Detail screen and follows the same flow as described above.

Functionality
6-4 Oracle Retail Store Operations Cloud Service User Guide
FunctionalityThis section describes the available screens in Direct Store Delivery.
DSD Receiving List
Figure 6–2 DSD RCV List
The DSD Receiving List screen is accessed when you click on DSD Receiving from the Shipping and Receiving menu.
The DSD Receiving List by default shows all the active deliveries that are In-Progress and New for you to do the detailed receiving. It includes all types of deliveries. If the supplier has sent an ASN, it is uploaded and listed here with New status. You can select a delivery and do the detailed receiving. If the store has received a delivery via DEX/Nex service, it will be listed here and you can select to do the detailed receiving. If you have started the delivery process, it shows the delivery with the In-Progress status. You can select the In-Progress deliveries to continue the receiving. You can also select the completed deliveries to do the adjustment.
The deliveries created in the mobile application are shown with the type On the Fly.
The deliveries that have ASN from the source are shown with the type ASN.
The deliveries that are PO based and no ASN are shown with the type PO.
The deliveries that are of DEX/Nex based are shown with the type DEX/Nex.
DSD Receipts that are affiliated with a customer order will be indicated with the text 'CO' at the receipt level on this screen.
From the DSD Receiving List window, you can do the following:
■ Select the search criteria option which is shown with the pair of eye glasses to filter the list based on the given criteria. Selecting the search criteria option takes you to the Search Criteria screen which is described below.

Functionality
Direct Store Delivery 6-5
■ Select Create Receipt from the footer menu to create a delivery without any PO (on the fly). Upon selecting this option, you go to the DSD Receiving Containers screen.
■ Select the delivery from the list and perform detailed receiving or edit the delivery. Upon selecting the delivery record from the list, takes you to the DSD Receiving Containers screen to access the existing delivery.
DSD Receiving List Search Criteria
Figure 6–3 DSD Receiving List Search Criteria Screen
The DSD Receiving List Search Criteria screen is accessed by selecting the search criteria option with the pair of eye glasses from the DSD Receiving List screen (DSD Rcv List). By default, the DSD Receiving List screen lists the active deliveries; you can use this screen to search for deliveries on various other criteria. After applying the filter, you are returned to the DSD Receiving List screen with the deliveries displayed based on the entered criteria. You are able to filter on DSD Receipts that are for customer orders as well as search for receipts that are for a specific customer order or fulfillment orders.
The originating type includes ASN, On the Fly, DEX/Nex and PO.
Select the Include Item Packs check box which is enabled only if the item is entered, to search for deliveries that include the pack item of the entered item.
Use the Reset button on this screen to reset all the filtering criteria to default values.

Functionality
6-6 Oracle Retail Store Operations Cloud Service User Guide
Creating a New DSD ReceiptYou can create a new direct delivery on the fly without any ASN or PO by selecting Create Receipt from the DSD Receiving List screen. The system displays the Supplier Lookup screen to search the supplier. Select to create the delivery.
Figure 6–4 Supplier Lookup
This Supplier Lookup screen appears when Create Receipt is selected on the DSD Receiving List screen to create an on the fly receipt that does not have a PO in the system.
You can identify the supplier by entering or scanning the item id or select the search criteria option to filter the supplier based on the entered criteria.
Based on the item id or on the values entered in the search criteria, the supplier(s) are listed and allowed to select a supplier who delivered.
After selecting the supplier, the system takes you to the DSD Receiving Containers screen to create new containers and to perform detailed item level receiving.
The selected supplier must be allowed to Create New Purchase Orders or the Ignore the Supplier DSD indicator to create a PO on the fly parameter has to be set to Yes to receive a delivery without a PO from that supplier.

Functionality
Direct Store Delivery 6-7
DSD Receiving Containers
Figure 6–5 DSD Receiving Containers
You can see the DSD Receiving Containers (DSD Rcv Containers) screen for all type of deliveries. It appears under the following conditions:
■ When you select the delivery from the DSD Receiving List screen
■ When you select Create Receipt from the Purchase Order Items screen
■ After selecting the supplier, when you select Create Receipt from the DSD Receiving List to create an on the fly delivery
If you are receiving a delivery with an ASN type of delivery, it shows the containers. Select the container to go to the Container Items screen to do the detailed item level receiving. You can also create a new container using Create Container which takes you to the Container Items screen to receive unexpected containers or when adding a container for a delivery without ASN.
The Create option is only available if you have permission for the New and In-progress deliveries.
You can also optionally scan or enter the container id to do the detailed item level receiving for that container.
Tap on the filter field and perform text based searches on the containers to refine the search on what is listed.

Functionality
6-8 Oracle Retail Store Operations Cloud Service User Guide
The list will be empty with zero containers initially, in case you are creating a new receipt without a PO or with a PO and no ASN. Select Create Container in that case to start the receiving process.
On this screen, you can also perform other operations by selecting the respective option from the footer menu which can be accessed by selecting the ellipsis (…) from the lower right hand corner of the screen.
Footer Menu
Create: This menu is same as Create button to create a new container.
Info: Select the info option to view the invoice particulars and delivery related information. See DSD Receiving Container Info.
Edit Receipt: This menu option allows you to enter the receipt information such as carrier and invoice details. When selected navigates to the Edit Receipt screen. This menu option is available only for the deliveries in New or In-Progress status.
Edit CFA: This menu option allows you to capture values for the CFAs that are set up based on the type of delivery such as On the Fly, PO and PO and ASN. See Edit CFA.
Default Qty: The default quantity option will help you to default the remaining expected quantity to the received quantity in the containers. The system will not default the quantities for the items that are processed earlier and contains a value including zero. This button is not enabled for the On the Fly delivery. You can perform this process from this menu for all the containers in the current delivery with the New and In-Progress status. For specific containers, go into the detail, that is, Container Items screen.
■ If the delivery is flagged for quality control, you cannot default the quantity and would be prompted with a message.
■ Default Qty sets the status of the integrated UINs to In Receiving for the delivery.
■ In addition, a validation check is performed to ensure the expected quantity matches the serial numbers for items, if that is not the case, you will not be allowed to receive all. If there are no UINs available for an UIN required item, the quantity is set to zero.
Confirm: Upon selecting this option, the system will confirm the delivery. The status of the container is moved to Received or Damaged or Missing or Submitted.
■ If all the items in the container are zero received, the status of the container is updated to Missing.
See Delivery Rejections and Supplier Discrepancy Check section for more details.
Print: Upon selecting this menu, the system opens the print dialog to print the report.
Reject: Select the Reject menu if the delivery has to be rejected. This will reject the delivery and move all the containers to canceled status and move the status of the delivery to Rejected. Rejection of a delivery is possible only for the deliveries that are in In-Progress or New status and it will not allow rejecting if there are any received or damaged containers in the delivery. This will also remove any UINs present in the delivery.
Delete: Select the Delete menu if the delivery has to be deleted. This will cancel the delivery and all the containers inside the delivery.
Customer Orders: Select this menu to view the customer orders associated to the delivery. See Customer Orders.

Functionality
Direct Store Delivery 6-9
Ext. Adjustments: Select this menu to view any adjustments done by the external system for the delivery. See External Receiver Adjustments.
Notes: Use this option to access the Notes dialog to enter any notes for the delivery.
Back: Acts similar to the back button which returns you to the previous screen.
List header fields on this screen are as follows:
Field Description
Receipt ID Unique ID generated internally by the system.
X Containers X is the number of active containers currently shown on the list.
Detail fields on this screen are as follows:
Field Description
ID Unique container ID created by the system internally.
Status Current status of the container.
■ Valid values shown are: New, In-Progress, Missing, Damaged, Submitted and Received.
■ The following icon's will display next to the container based on the container status:
■ Green Circle with Check mark - Container is in a Received or Submitted status.
■ Orange Triangle with Exclamation point - Container is in a Damaged status.
■ Red Circle with Exclamation point - Container is in a Missing status.
Discrepant For containers in statuses 'Received' or 'Damaged', if they are 'discrepant', a label called 'Discrepant' will be displayed in red color if the received quantity does not match the expected.
Customer Order The DSD Receiving Containers has a customer order field at the container line level to indicate if the container is for a customer order. If all items in the container are for a customer order, it will be displayed as 'CO'. If no items in the container are for a customer order, it will be blank. Lastly, if some items are for a customer order and some are not, it will be shown as 'CO Mix.'
Container ID Container ID that came in ASN from the external vendor system.
Number(X) of SKUs Number of SKUs present in the container.
Number(X) of Orders Total number of purchase orders the container is associated to.
Tracking ID Tracking Id displayed if available.
Delivery Rejections and Supplier Discrepancy Check
The system performs the discrepancy check based on the supplier level Supplier Delivery Exception Attribute. The attribute can indicate to:
■ Allow Any Discrepancy
■ Do Not Allow Any Discrepancies
■ Allow Overages But Not Short Receipts

Functionality
6-10 Oracle Retail Store Operations Cloud Service User Guide
Discrepancy checking only happens for those deliveries that have an expected quantity; this includes DSD deliveries for PO deliveries with or without ASN. Deliveries on the fly do not check for any discrepancies.
Discrepancy checking is done at the container level against the expected quantity. For an ASN, this would be the expected quantity of the container, while for a delivery on the fly against an existing PO, it is the remaining quantity of the PO.
You can override the discrepancy check at the container level based on the Override supplier discrepancies security permission. Once a container is moved to Submitted or Received, no additional validation is performed.
Depending on the type of DSD, some containers will move to Submitted and require the whole delivery to be confirmed, while others will move to a Received status. The reason for this is transactional integrity.
With an ASN, the received container can move to a Received status, which indicates that the Stock on Hand is updated and the merchandising system is notified that the container is received. The transaction will automatically move to Confirmed status when all containers are received.
PO on the fly and DEX/Nex do not update inventory until the delivery is confirmed, hence the containers move to a Submitted state. At that time, the delivery transaction is confirmed, the merchandizing system is notified of the whole delivery, inventory is updated and the submitted containers move to Received status.
PO deliveries without an ASN fall into a unique case. If there is a discrepancy check performed, the container will move to Submitted and require the delivery to be completed for any updates and integration. If on the other hand, the supplier does not require a discrepancy check or the supplier allows overage and it is a short receipt that is overridden, the container will be moved to a Received state, the Stock on Hand will be updated, and the merchandizing system will be notified when it is confirmed. Manual closure of the delivery transaction is required in all cases because additional containers may need to be added.
The following table describes the state the container moves into or when you are stopped when confirming a container.
Table 6–1 Container States
Delivery Type On the Fly/DEX/Nex Without ASN With ASN
Discrepancy check on carton confirm No Yes Yes
Supplier Restricted, carton confirm status Submitted Submitted Received
Supplier Restricted and No override discrepancy allowed
Submitted Hard Stop Hard Stop
Supplier Restricted and override discrepancy allowed
Submitted Confirm Prompt
Submitted
Confirm Prompt
Received
Supplier Allow Overage, No override allowed and carton has short receiving
Submitted Hard Stop Hard Stop
Supplier Allow Overage, override allowed and carton has short receiving
Submitted Confirm Prompt
Received
Confirm Prompt
Received

Functionality
Direct Store Delivery 6-11
DSD Receiving Info
Figure 6–6 Receiving Info Screen
This screen is accessed from the DSD Receiving Containers screen when you select the Info option from the footer menu.
This screen provides the read only information such as ID which is internally created in the system, ASN, supplier, number of containers, status, create date, expected date, invoice particulars, carrier particulars, user details, custom flexible attributes if any, and so on.

Functionality
6-12 Oracle Retail Store Operations Cloud Service User Guide
Customer Orders
Figure 6–7 Customer Orders Screen
This screen appears when you select the Customer Orders footer menu option from the DSD Receiving Containers screen. It will display the customer order and fulfillment order IDs, along with the container ID, status, total number of orders and total SKUs. If there are no customer orders associated, it will display an error upon selecting the option. This menu option is available only for ASN and PO based deliveries regardless of delivery status and not for on the fly deliveries.

Functionality
Direct Store Delivery 6-13
Edit Receipt
Figure 6–8 Edit Receipt
This screen is used to capture the invoice and carrier particulars of the delivery.
This screen is accessed by selecting Edit Receipt from the footer menu on DSD Receiving Containers screen by selecting the ellipsis (…) on the right hand side lower corner.
Field Description
Invoice Number This field is to capture the supplier invoice number of the delivery received. This field will display depending on the configuration.
Invoice Date To capture the invoice date. This field will display depending on the configuration.
Invoice Cost This field is used to enter the invoice cost. This field will display depending on the configuration.
Carrier Info
Name This field holds the name of the carrier that delivers the products. This is a text entry field.
Type This field holds the type of carrier, whether it is Corporate or Third Party. This is a drop-down list.
Code This field holds the Standard Carrier Alpha Code if the carrier type is Third Party. This field is only available when Third Party is selected. This is a text field.
License Plate This field holds the license plate from the Carrier's delivery vehicle. This is a text field.
From Address This field holds the address where the delivery came from. This field is only available when Third Party is selected. This is a text field.

Functionality
6-14 Oracle Retail Store Operations Cloud Service User Guide
Edit CFA
Figure 6–9 Edit CFAs
The Edit CFAs screen displays the list of CFAs (custom flexible attributes) that have been set up for the DSD -On the Fly, DSD -PO, DSD PO & ASN and DSD Container in the system and allows you enter values for them.
The CFAs need to be configured for the each type of delivery and the container for the container items. The system displays the fields based on the setup for the type of delivery. The CFAs that are set up as 'Required' must have a value entered for it before confirming. The value can be one of the following: Date, Text, Decimal, Long depending on the 'data type' set up for the CFAs, while creating them in the desktop application. Appropriate security permission is needed and the transaction must be in editable status for entering CFA values.
Freight ID This field holds the industry standard freight codes. This is a text field.
Bill of Lading This field holds the bill of lading identification number and will default if included on the ASN. This is a text field.
Field Description

Functionality
Direct Store Delivery 6-15
External Receiver Adjustments
Figure 6–10 External Rcv Adjustments Screen
You can access this screen from the DSD Receiving Containers screen by selecting the Ext. Adjustments footer menu option. This read-only screen displays the ASN and supplier information at the header level and at detail level it displays Purchase Order Number, Date, Item, Description, adjusted quantity and its UOM for the external receiver adjustments that exists for the delivery. You can only access this screen when there are any adjustments created for the delivery from the external system. Store users internally adjusted deliveries in the system are not shown here.

Functionality
6-16 Oracle Retail Store Operations Cloud Service User Guide
Container Items
Figure 6–11 Container Items Screen
This screen is accessed when you select Create Container or selecting an existing container on the DSD Receiving Containers screen. This is the screen for detailed item level receiving irrespective of the type of deliveries.
You must have proper permissions assigned to access this screen for both creating a new container and editing an existing container.
This screen displays the list of items that are in the container and details for a container on an ASN, or on the fly delivery. All this information is initially from the supplier ASN with the exception of the received and damaged cases. For a new based delivery, the items from the container are pre-loaded on the container items screen from the source. You can add items to the container if permissions are granted for over receiving and adding items. The user will navigate to the Item Detail screen for the item scanned. If the item scanned is a UIN item, the user will navigate to the UIN tab within the Item Detail screen.
For ASN based deliveries, if the item added exists in more than one purchase order and if you have not set any PO for receiving, the system prompts you to select the PO to assign to the item. Use the Select Purchase Order screen by tapping the info bar or Select PO footer menu option to select the PO and add items from that PO.
For a new container created for the on the fly delivery/DEX/Nex, enter/scan the items to receive.
If the user scans a VPN, a validation is done to verify that the VPN scanned belongs to the supplier associated to the delivery.
For a new container created for a PO based but no ASN, use the Select Purchase Order screen by tapping the info bar or Select PO from the footer menu and add the items and also populate the remaining quantity optionally.

Functionality
Direct Store Delivery 6-17
On this screen, you can also perform other operations by selecting the respective option from the footer menu which can be accessed by selecting the ellipsis (…) from the lower right hand corner of the screen.
Footer Menu
Info: Select this option to access the DSD Receiving Info screen to capture the container information.
Notes: Use this option to enter any notes for the delivery.
Default Regular Qty: Default the expected quantity to the received quantity field. This menu option is only available when the container is in New or In-Progress status and you have the proper permissions.
■ If the expected quantity is zero (in the case of adding an unexpected item), the received quantity is updated to zero.
■ If the delivery is flagged for quality control, you cannot default the quantity.
Select PO: Select the Purchase Order for an ASN based delivery.
Clear Qty: Clears the received quantity and damaged quantity fields for all items. This menu option is only available when the container is in New or In-Progress status.
Damage Mode: Scan/enter items and update the Damage Qty field. Once selected, the list header bar is updated to 'Damages' and any item entered or scanned will update the damages quantity. This menu option is only available when all of the following conditions are met:
1. The Container status is New or In-Progress.
2. This menu option will display when you are in Regular Mode.
3. You have the proper permissions.
Regular Mode: This menu option will allow you to switch to scan/enter items and update the Received Qty field. Once selected, the list header bar is updated to 'Receiving' and any item entered or scanned will update the receiving quantity. This menu option will only display when all of the following conditions are met:
1. The Container status is New or In-Progress.
2. When the screen is set to Receiving Damages.
Edit Container: Used to enter container information.
Adjust: This option on the DSD Receiving Container Items screen allows the received container to be reopened for receiving. The system allows you to add items, delete items, modify the quantity, save, or confirm the delivery. All options are available as if the container was never received.
■ The period at which you are allowed to adjust the deliveries from the time the receipt is confirmed is based on the parameter and also you should also have security permissions to adjust the container. Once the container is moved back to In-Progress, you can work on it as if it was never received.
■ It is not allowed to move a container back to In-Progress if UINs that were in the container have been processed in another transaction.
Edit CFA: This menu option allows you to capture values for the CFAs that are set up for the DSD container.
Damage Remaining Qty: This menu option will allow you to update the Damaged Qty for all items in the container where Expected - Received Qty is greater than zero.

Functionality
6-18 Oracle Retail Store Operations Cloud Service User Guide
■ If you have not received any items in the container, all items in the container are marked as damaged.
■ If you have received some items and the Expected - Received Qty is greater than zero, the Damaged Qty field is updated with the remaining quantity.
■ This menu option is only available when the container status is in New or In-Progress.
Display Only Discrepancies: This menu option will allow you to display only items with a Received + Damaged Qty which does not equal the expected quantity.
■ This menu option is only available when the screen is in a 'Display All Items' mode.
■ The discrepancy check will apply to all items, even those with an expected quantity of zero. When an item is added to a container the Expected Qty will be zero. The unexpected items will always be discrepant.
Display All Items: This menu option will allow you to reset to display all items after selecting to Display Only Discrepancies. This menu option is not available for on the fly deliveries.
Confirm: Used to confirm the container. See Delivery Rejections and Supplier Discrepancy Check for additional information.
Save: Saves the container with current changes.
Delete: Deletes the container.
Back: Used to return to the previous screen.
Cancel: Used to cancel any changes and go back to the Containers screen.
Print: Opens the print dialog to print the report.
Print Tickets: Opens the Print Tickets dialog to print the tickets or labels for the current container items. This is described in common usage document with more details.

Functionality
Direct Store Delivery 6-19
Receiving Item Detail
Figure 6–12 Item Detail Screen
The Item Detail screen is accessed from the Container Items screen when scanning an item that is already in the container or adding a new item to the container.
Scanning or entering an item on this screen in the scan bar updates the quantity per the scan mode and refreshes the Item Detail screen for the item and quantity scanned. If the item scanned is a UIN item, the user will directly navigate to the UIN tab within the Item Detail screen.
If the user scans a VPN, a validation is done to verify that the VPN scanned belongs to the supplier associated to the delivery.
You can edit the received or damaged quantity if it is in edit mode and if you have permissions.
The item header portion displays the item information including the image if configured to show. The bottom portion which is detail allows you to edit the quantities if the state of the container allows and you have permissions. The system displays the following fields on the bottom portion.
Field Description
Received This field shows the UOM based on the UOM mode.
The value on this field is the received quantity. When this is editable, you can enter the quantity via a popup.
User needs permissions to edit the quantity
Damaged This field shows the UOM based on the UOM mode.
The value on this field is the damaged quantity. When this is editable, you can enter the quantity via a popup.
User needs permissions to edit the quantity.

Functionality
6-20 Oracle Retail Store Operations Cloud Service User Guide
You can navigate through the existing items on the container using the two arrows on the bottom. In between the arrows the system displays the current item number position out of the total number of items.
Perform further operations by selecting the respective footer menu options.
1. Damage Mode - This menu option will allow you to scan/enter items and update the Damage Qty.
■ The value selected will update any item entered or scanned after changing.
■ The receiving mode will stay the same until it is changed by selecting the footer menu again.
■ When you navigate to this screen from the Container Items screen, the receiving mode will be the same on this screen.
■ If the user changes the Receiving mode from this screen and navigates to the Container Items screen, the receiving mode will also be changed on the Container Items screen.
■ The user will remain on this screen.
2. Regular Mode - This menu option will allow the user to scan/enter items and update the Received Qty.
■ The value selected will update any item entered, scanned or tapped after changing.
■ The receiving mode will stay the same until it is changed by selecting the footer menu again.
■ When the user navigates to this screen from the Container Items screen, the receiving mode will be the same on this screen.
Pack Size This is the pack size of the item. This field is editable.
New Cost This field is populated with the item supplier cost in case of on the fly deliveries.
This field is displayed and editable for on the fly. You can enter the cost of the item at which the item is received from the supplier.
This field is displayed only if it is configured to show.
In general, if a PO was created by the merchandizing system, the system does not allow the store user to edit the cost as it was defined by the external system. It will also not communicate any cost information to the merchandising system.
If the delivery is on the fly, the system will use the cost based on item supplier country information. It is possible with the right permissions to edit this cost and the cost can be communicated to the external system
Original Cost This field is a read only field and only for PO and ASN based deliveries
Purchase Order PO assigned to the current item.
Expected Expected quantity to be delivered from the ASN/PO.
Remaining Balance quantity to be delivered in the order.
Last Scan The details of the last scanned barcode.
Field Description

Functionality
Direct Store Delivery 6-21
■ If the user changes the Receiving mode from this screen and navigates to the Container Items screen, the receiving mode will also be changed on the Container Items screen.
■ The user will remain on this screen.
The UIN tab on this screen is to take the user to the UIN screen to add/remove UINs for UIN items (if UIN processing is enabled and if the item is an UIN item).
When you enter the screen for the first time, the Status will display the following:
1. The UINs included on an incoming ASN will be displayed with a status of Shipped to Store.
2. The UINs manually added will be displayed with a status of Unconfirmed, if they do not previously exist.
3. The UINs manually added may have another status, if they already exist in the system.
■ When you re-enters this tab, the status will be updated to In Receiving.
■ When the transaction is no longer editable, the screen will be in view only mode.
4. You will not have the ability to change the Receiving Mode for the UIN.
■ For the ASN based delivery, any UINs present in the ASN will be ignored if the UIN type for the item is AGSN.
■ The Extended Attributes tab enables the user to view/capture Extended Attributes for the item. If the item is not configured to capture extended attributes or there are no extended attributes captured, the list will be empty.
Over Receiving ValidationsWhen receiving a direct delivery, the user must have the proper permission to be able to over receive. The validation occurs as the item is scanned and the quantity is updated or when the quantity is manually updated. The permissions are:
1. Allow ASN Over Receiving - when receiving against an ASN, the system will check if the received quantity is greater than the expected quantity (ASN quantity).
a. If the user does not have this permission, the user will be given an error and must update the quantity.
b. If the user does have this permission, then there will be no error and it is permitted to have a received quantity greater than the ASN.
2. Allow PO Over Receiving - when receiving against a Purchase Order with OR without an ASN, the system will check if the received quantity is greater than the expected quantity (PO remaining quantity).
a. If the user does not have this permission, the user will be given an error and must update the quantity.
b. If the user does have this permission, then there will be no error and it is permitted to have a received quantity greater than the PO remaining quantity.
Assuming the user has proper permission to over receive (as stated above). When receiving the user will be able to receive more than the expected quantity (ASN quantity / PO Remaining quantity) during the receiving process. Once confirming the container, the system will remove the over received quantities. There are two store configurations that are used:

Functionality
6-22 Oracle Retail Store Operations Cloud Service User Guide
1. Direct Delivery Auto Remove Over Received Quantity - at confirmation of the container any quantity received over the expected quantity will result in a prompt to the user and the overages will be removed by the system.
2. Direct Delivery Auto Remove Damaged Quantity - at confirmation of the container any damaged quantity received will result in a prompt to the user and all damaged quantities will be removed by the system.
DSD Receiving Container Info
Figure 6–13 DSD Receiving Container Info Screen
This screen is accessed from the Container Items screen when you select the Info option from the footer menu. This is a read-only screen and provides the following information about the container.
Field Description
ID Unique container ID created by the system internally.
Container ID Container ID that came in ASN from the external vendor system.
Reference Container This field is used to identify a misdirected container.
ASN Advance shipment number of this delivery.
Status Current status of the container
Supplier This field shows the supplier id and the name of the supplier who delivered.
Customer Order This indicates whether customer is associated. If a customer order is associated with all the items in the container, it will display <Yes> and if the container contains items with and without customer associated, it will display <Mix>. If there is no CO, it will display <No
Expected Date Original expected date of the delivery.

Functionality
Direct Store Delivery 6-23
Create Date Date of creation of the container in the system.
Create User User who created the container.
Updated Date The date on which the container was last update.
Updated User Person who updated the container last.
Received Date The date on which the container was received. Shown only after if it is received.
Received User Person who received the container. Shown only if it is received.
Total SKUs Total number of items.
Ordered Qty This field displays the total remaining ordered quantity. This appears only for the PO based delivery.
Expected Qty This field displays the total expected quantity. Unlike the Container Items screen at the individual item level this is not depending on the permission. This appears only for ASN based delivery.
Total Qty This field displays the total received quantity including the damaged.
Receive on Shop floor <Yes/No>
This field displays Yes or No, to indicate whether the receiving happens at the shop floor.
Damage Reason This field displays the damage reason if captured.
SSCC This field displays the GS1 barcode container id if one is entered on the DSD Receiving Edit Container screen.
Tracking ID This field displays the tracking id assigned to the container if one is entered on the DSD Receiving Edit Container screen.
CFAs This screen will show the CFAs captured.
Field Description

Functionality
6-24 Oracle Retail Store Operations Cloud Service User Guide
Edit Container
Figure 6–14 Edit Container Screen
This screen is for you to capture the container information such as reference container, to indicate whether the container is received at shop floor, damage reason, SSCC and Tracking Id of the container.
This screen is accessed by selecting the Edit Container option from the footer menu on Containers Items screen by selecting the ellipsis (…) on the right hand side lower corner.
You have to complete the following fields that are enabled and then Save to return to the Container Items screen:
Reference Container: This field is to capture a reference to a container that was not intended for the current location.
Receive on Shop Floor: The default will be based on the store parameter Direct Delivery Default to Shop floor Receiving. If set to Yes, the check box will default to marked.
You are required to have Receive Direct Delivery on Shop floor permissions to change the value.
This indicates whether the delivery will default to receive inventory into the shop floor instead of automatically receiving into the back room or delivery bay.
If this is set to receive on shop floor, the system increments the shop floor inventory bucket instead of the backroom or delivery bay bucket. If a capacity is defined for the item and Direct Delivery Receive Item Capacity is set to Yes, the maximum shop floor quantity will equal the capacity; otherwise, the shop floor will be updated to the entire receipt amount. If the capacity is used and if the receiving quantity is excess, the balance is incremented to delivery bay or back room depending on the Replenishment - Delivery Bay Inventory parameter.

Functionality
Direct Store Delivery 6-25
If receive on shop floor is not set on the delivery, the system increments the back room or delivery bay bucket depending on the Replenishment - Delivery Bay Inventory parameter. If this parameter is on, the system will increment the delivery bay bucket instead of back room. This will increase Stock On Hand as well.
Damage Reason: Identifies the reason for damage on the container, when items in the container have been damaged during transport. This field is optional.
SSCC: This field allows you to identify a GS1 bar code used with the container. There is no validation on this field and it is optional. This is the full 18 digit number.
Tracking ID: This field allows you to type in a tracking id from the delivery service. This is a text field and is not validated. This is an optional field used to track information only.
Selecting a Purchase Order for a PO Based Delivery
Figure 6–15 Select Purchase Order Screen
This screen can be reached through the Container Items screen by tapping the document bar or by selecting Select PO in the footer menu. This screen will show the purchase orders and, when you select the purchase order, you are prompted with a popup with the following options.
■ Use Purchase Order: This menu option will set the PO document referenced in the container to the user selection. Any items added will be updated to the selected document.
1. There will be validation to see if the item exists on the PO document, but the items are not automatically added to the container.
2. This will be the option by default selected.

Functionality
6-26 Oracle Retail Store Operations Cloud Service User Guide
■ Apply Item(s): This menu option will add all items from the selected PO document to the container without applying the remaining quantity to the received quantity and the system will default the received quantity to zero.
■ Add Item(s) & Remaining Qty: This menu option will add all items along with their corresponding remaining quantity to the received quantity in the container.
Purchase Order List
Figure 6–16 Purchase Order List Screen
This screen is accessed when you select Purchase Order from the Shipping / Receiving drawer menu.
The Purchase Order List is a screen that allows you to view purchase orders placed to the suppliers to supply goods for your store. The default is to display the list of all active status that is, Approved and In-Progress purchase orders. Use the search criteria screen to filter out the records.
This screen provides the following header level information about the Purchase Order including the ID which is system internally generated, External ID, Supplier, Not Before Date if available, Create date of the PO, current status of the PO, total number of SKUs, and customer order id and fulfillment order id if customer order is associated with the PO.
On the List header, it shows the total number of purchase orders listed.
From the Purchase Order List screen, select a purchase order to go the Purchase Order Items screen to view the item details for the PO.

Functionality
Direct Store Delivery 6-27
Purchase orders created internally in the system for on the fly deliveries are also shown in this list.
Purchase Order List Search Criteria
Figure 6–17 Purchase Order List Search Criteria Screen
This is the Purchase Order List Search Criteria screen. It is accessed by tapping the search criteria option shown with the pair of glasses from the Purchase Order List screen. You can filter the purchase orders with a variety of search criteria. After applying the criteria, you are returned to the Purchase Order List screen with the purchase orders displayed per the entered criteria.

Functionality
6-28 Oracle Retail Store Operations Cloud Service User Guide
Purchase Order Items
Figure 6–18 Purchase Order Items Screen
The Purchase Order Items screen is accessed when you select a purchase order record from the Purchase Order List screen.
The Purchase Order Items screen displays all of the purchase order header and item details for the selected purchase order. This screen is view-only for informational purposes.
The header contains the header information including: Supplier, system created unique Id, External Purchase Order ID, Customer Order (if applicable), Fulfillment Order (if applicable), current status of the PO, Create Date, Not before date, Not after Date, and UOM. You can select the UOM from the drop-down to view the items based on the selected UOM.
The ordered quantity is the total quantity remaining in the order for all the items, the expected quantity is the total ordered quantity in the order for all items and the received quantity is the total of how many quantities quantity received.
The detail level has the item, description, Pack Size, as well as the On Order, Expected and Received.
You can create a receipt from the Purchase Order Items screen by selecting Create Receipt which will navigate to the DSD Receiving Containers screen with the existing purchase order applied to the delivery. You can create container and start the receiving process as previously described.
On this screen, you can perform other operations by selecting the respective option from the footer menu which can be accessed by selecting the ellipsis (…) from the lower right hand corner of the screen.

Functionality
Direct Store Delivery 6-29
Footer Menu
Info: Views the PO details which includes the CFAs if available.
Print: Opens the print dialog to print the report.
Customer Order Reserve On Receipt / Auto PickDSD Receiving can be configured to reserve inventory for customer orders upon receiving and also to auto pick the inventory. For additional details on this process, see Customer Orders.

7
Transfers 7-1
7Transfers
This chapter covers the transferring of goods from one location to another. This chapter covers the following topics:
■ Transfer Functionality
■ Transfer Document
■ Transfer Shipping
■ Transfer Receiving
Transfer FunctionalityTransfers and allocations define the movement of goods between internal entities or trading partners. Requests from corporate or other stores for shipping inventory out can be auto approved without human interaction and it is possible to transfer unavailable inventory between all entities with a store as a starting or ending point of the transaction.
Transfer functionality in the mobile application is split up into three dialogs: Transfers (Documents), Transfer Shipping, and Transfer Receiving:
■ Transfer Documents define the logical movement of goods and are often created at corporate. They define the intent of what needs to be shipped.
■ Transfer Shipping is the physical task of shipping out goods to a store, warehouse, or external finisher.
■ Transfer Receiving is the physical task of receiving in goods from a store, warehouse, or external finisher.
Transferring features:
■ Transfer zone restrictions are enforced
■ Initially limit store selection to buddy stores
■ Transfers are restricted to store's shipping network
■ Auto receiving store to store transfers
■ Item with Non-Inventory Indicator set as Yes can also be included in a transfer

Transfer Functionality
7-2 Oracle Retail Store Operations Cloud Service User Guide
Business Case
Scenario 1: Warehouse Shipment
1. The store manager is notified that a request for transfer has been created by the merchandising system for a shipment back to warehouse 1.
2. The store manager goes into the transfer document dialog, looks up the request, and determines the request is for shipping back unavailable damaged items.
3. The store manager makes a decision to honor all the items needing shipment and accepts the entire request.
4. The store manager asks the shipping clerk to create a new shipment for warehouse.
5. The shipping clerk goes into the transfer shipment dialog and creates a new shipment and new container for warehouse.
6. The shipping clerk selects the transfer for unavailable damaged items and adds the entire transfer document into the container.
7. The shipping clerk updates the quantity to ship, confirms the container, and subsequently dispatches the shipment. The shipment is ready to go on the truck back to warehouse 1.
Scenario 2: Store to Store Transfer Receipt
1. A user in the convenience Petrol Store creates a transfer request for the main store located on same premises (for example, Fleet Farm and gas station \ can also be used for offsite backroom concept).
2. The user walks to the main store and fills the transfer from the backroom inventory. The shipment is dispatched.
3. The user in the Petrol Store goes into the Transfer Receiving dialog and locates the delivery.
4. The user updates the quantity received and confirms the entire delivery. The transfer document is updated with the received quantity (all items shipped) and closed.

Transfer Functionality
Transfers 7-3
Figure 7–1 Transfer Solution Flow
Figure 7–2 Transfer > Shipment > Receipt Status Flow

Transfer Functionality
7-4 Oracle Retail Store Operations Cloud Service User Guide
Figure 7–3 Supported Entity Flow

Transfer Document
Transfers 7-5
Transfer DocumentThe transfer document dialog allows you to create, accept, and reject transfer documents for the warehouse, store, and external finisher in a single dialog.
Transfer Document features:
■ Transfer documents allow the movement of goods between store, warehouse, and external finisher.
■ Transfer documents can only be created externally, through the creation of a shipment or are being made as part of a request from another store.
■ Transfer requests created externally can be approved or rejected.
■ A flow exists to pick items for the transfer document.
■ Transfers using unavailable inventory.
■ Visibility of shipment and receipt values after transfer approval.
■ This will also be a placeholder for Stock Order messages from external system for Store, Warehouse and Finisher deliveries.
Figure 7–4 Transfer Document Mobile Screen Flow
The transfer document you create explains what to ship from one location to another. This includes transfers to a warehouse, store, or external finisher. The following functions are included in the Transfer dialog:
■ View Transfer Documents and Requests for Transfer

Transfer Document
7-6 Oracle Retail Store Operations Cloud Service User Guide
■ Create, Accept, or Reject a Request
■ Look up Shipping and Receiving Details
■ Close a Transfer
■ Capture values for CFAs (Custom Flexible Attributes)
■ Print Reports
Destination Types■ Transfer Shipment to Store (Store to Store):
To create a Store Transfer Shipment, the destination type of ’Store’ must first be identified for the shipment. The system provides a list of valid store locations.
■ Transfer Shipment to Warehouse (RTW) and to Finisher (RTF):
To return items to a warehouse, the destination type of ’Warehouse’ must first be identified for the shipment. The system provides a list of valid warehouses. For a Return to Finisher, select a destination type of ’Finisher’ and select the destination for the shipment, or search for it using the lookup widget. Finishers are restricted to those which are for the same operating unit as the store.
Customer OrdersTransfer documents can come from the merchandising system to request goods from one store to another store that are for a customer order. These transfer documents will appear in the Transfer dialog.
There will be a customer order indicator on the transfer to denote that the transfer has a customer order affiliated with it. When searching for a transfer using the filter, you can search for those transfers that are for customer orders, or search for a transfer that contains a specific customer order and fulfillment order ID.
The details of the transfer will denote if the transfer is for a customer order and the Transfer Info screen will display the specific customer order and fulfillment order ID for that transfer if there is one. Allow Partial Delivery is populated based upon the customer order or the system can be configured to not allow partial customer order transfer shipments. If the box is not checked then, when accepting a transfer request, you must accept the full amount being requested. If system parameter Customer Order Fulfillment Restriction is set to Line Controlled, for transfer requests associated with a customer order, any item getting approved should get approved completely.

Transfer Document
Transfers 7-7
Transfer List
Figure 7–5 Transfer List Screen
When navigating to Transfers, you go to the Transfer List screen which lists the inbound and outbound transfer requests and documents for your store. This screen displays ’Active’ transfers by default. The Transfer List screen is accessed by selecting Transfers from the Shipping / Receiving menu drawer.

Transfer Document
7-8 Oracle Retail Store Operations Cloud Service User Guide
Search Criteria (Transfers)
Search Criteria (Transfers)
Figure 7–6 Transfer Search Criteria Screen
The Transfer Search Criteria Screen is accessed by the eye glasses on the Transfer List screen. After applying the search criteria, the results are listed on the Transfer List screen and the criteria applied is also shown.

Transfer Document
Transfers 7-9
Create Request
Figure 7–7 Create Request Popup
A request is created from the Transfer List screen when a store wants to receive items from another store. A request can be generated from an external system or be created in the mobile application. If the request has been created in the mobile application, then Source Type can only be a Store. The request can only be created if the store creating the request is not an excluded store for the Source store, that is, the requesting store must be in the shipping network of the source store in order to request items from a store. A store's shipping network is setup through the 'Store Shipping Network' screen in the desktop application. A store cannot create a transfer requesting for items from a warehouse or a finisher.
From the Transfer Create Request popup, if the Buddy Store field is checked, the stores field will automatically list only the buddy stores set up for the store you are logged into, however, any other store can also be searched and selected from the Source field as long as they are within the same transfer zone by unchecking the Buddy Store field.
If the store requesting items wants the items before a certain date, a date can be selected or typed into the Not After Date field. The request will automatically cancel if not accepted by this date. There are notifications in place to ensure the transaction is fulfilled in time, if configured.
The request needs to be accepted by the other store before a transfer can be shipped. Once accepted, the transfer document can be used to restrict or default items in a shipment/container.

Transfer Document
7-10 Oracle Retail Store Operations Cloud Service User Guide
Request Items
Figure 7–8 Request Items Screen
The Request Items screen is used when creating a new request. Initially this screen will not have any items. The items screen is also displayed when selecting a saved request from the Transfer List screen. The items are listed for the transfer request. The item image for the line items is displayed per configuration.
Line items appear in a list and selecting a line item navigates to the item details of that item. If an item has been changed in the current session, it is indicated by a bar on the left of the item. This screen also displays a filter. The filter can be used to narrow down the list of items. Filtering can occur by item ID and description. The filter disappears when you scroll down through the list of items.
Items with Non-Inventory set as Yes is also allowed to be added to the request.
Scanning or entering an item in the scan bar navigates to the Item Detail screen for that item. Quantity may be updated depending on the scan mode. All of those items are grouped together under a single Transfer ID having one header transaction. The item must be unique on the transfer.
The ellipsis in the lower right hand corner accesses the footer menu which contains all of the functions that can be performed on a transfer request.
Footer Menu
The footer menu is accessed from the ellipsis footer menu on the Request Items screen. The menu functions include the following:
■ Info: Accesses the Info popup.
■ Notes: The Notes option accesses the notes common dialog to capture notes.
■ Edit Transfer: This menu takes you to the Edit Transfer screen and will allow you to enter Context Type, Context Value, Not After Date, and so on.

Transfer Document
Transfers 7-11
■ Edit CFA: Lets you enter values for the CFAs that are set up for Transfer documents.
■ Request: Allows you to request the transfer.
■ Save: Saves changes without requesting the transfer.
■ Delete: Deletes the transfer before it is requested.
■ Cancel: Leave the screen without saving any changes.
■ Back: Return to previous screen.
■ Print: Opens the print dialog and allows you to print reports. This option will always be available regardless of the transfer status.
Transfer Items
Accepting/Picking Request
Once the requested transfer is created by the receiving store or in the merchandising system, the user on the shipping side of the transfer can enter approved quantities or pick items and set them aside for eventual shipment. Once the quantities are entered or picking is completed, the transfer moves to an Approved status.
Figure 7–9 Transfer Items Screen
The Transfer Items screen is displayed when opening a transfer request from the Transfer List screen in the requested store (source store). This screen enables you to pick and approve the quantities to ship, for the requested items. This screen will display the items that have been requested. The item image for the line items is displayed per configuration.
Line items appear in a list and selecting a line item navigates to the item details of that item. If an item has been changed in the current session, it is indicated by a bar on the left of the item. This screen also displays a filter. The filter can be used to narrow down

Transfer Document
7-12 Oracle Retail Store Operations Cloud Service User Guide
the list of items. Filtering can occur by item ID and description. The filter disappears when you scroll down through the list of items.
Scanning or entering an item in the scan bar navigates to the Item Detail screen for that item. Quantity may be updated depending on the scan mode.
Items with Non-Inventory as Yes are also allowed to be in the transaction and you can enter approved quantity for these items.
You can add (unexpected items) to ship along with the requested items if you have the necessary security permission.
The ellipsis in the lower right hand corner accesses the footer menu which contains all of the functions that can be performed in this screen.
Footer MenuThe footer menu is accessed from the ellipsis footer menu on the Transfer Items screen. The menu functions include the following:
■ Info: Accesses the Info popup.
■ Notes: The Notes option accesses the notes common dialog to capture notes.
■ Default Quantities: Allows you to default the requested quantity to the Approved quantity field for all the items in the transfer.
■ Edit CFA: Lets you enter values for the CFAs that are set up for transfer documents.
■ Accept: Accept to ship the items requested by the requesting store. Before accepting the transfer, the system should validate to ensure that the destination store is not an excluded store for the source store however if the user has Override Exclude Closed Stores, the system allows the user to proceed if he wants to.
If system parameter Customer Order Fulfillment Restriction is set to Line Controlled, for transfer requests associated with a customer order, any item that is getting approved should get approved in its entirety. Having zero Approved Qty for an item is allowed.
■ Reject: Rejects the transfer request.
■ Save: Saves the changes made to the transfer.
■ Close Transfer: Closes the transfer.
■ Cancel: Leaves the screen without saving any changes.
■ Back: Returns to the previous screen.
■ Print: Opens the print dialog and allows you to print reports. This option will always be available regardless of the transfer status.

Transfer Document
Transfers 7-13
Item Detail (Create/Edit/View Request)
Figure 7–10 Item Detail Screen (Requested Quantity)
The Item Detail screen is used when selecting or scanning an item from the Request Items screen. Scanning or entering an item on this screen in the scan bar updates the quantity per the scan mode and refreshes the Item Detail screen for the item and quantity scanned. This is the screen where you can enter the required quantity for the items that have been requested by the store.
The quantity can be edited and updated manually if permissions allow. The system validates whether the item that is getting requested has enough available inventory at the sending store. If the sending store doesn't have enough available inventory for the item, a soft warning is displayed. A transfer request created in the mobile application should request the item from the available inventory only. However, if the transfer request has been created in an external system, then it can be requested from unavailable inventory also.
Items with Non-Inventory set as Yes are also allowed to be added to the request.
The item information including the image (which is system configured) display in the header. The bottom portion of the screen contains fields for entering the quantity being requested, pack size of the item if the UOM mode is Cases and a field that displays the available quantity of the item in the sending store. Lastly, the details of the last scanned barcode will be displayed at the very bottom.
The footer menu, ellipsis button, contains a Reset function as well as Remove and Restore functions. Page through existing items on the adjustment using the arrows on the bottom.

Transfer Document
7-14 Oracle Retail Store Operations Cloud Service User Guide
Item Detail (Accept/Reject Request)
Figure 7–11 Item Detail Screen (Approved Quantity)
The Item Detail screen is used when selecting or scanning an item from the Transfer Items screen. Scanning or entering an item on this screen in the scan bar updates the quantity per the scan mode and refreshes the Item Detail screen for the item and quantity scanned. You can enter the approved quantity for the items that have been requested by another store.
The quantity can be edited and updated manually if permissions allow. Items with Non-Inventory set as Yes are also allowed to be in the transaction and you can enter approved quantity for these items.
The item information including the image (which is system configured) display in the header. The bottom portion of the screen contains fields for entering the quantity being approved, pack size of the item if the UOM mode is Cases, Primary Location where the item is present if sequencing has been done for the item, field that displays the requested quantity of the item, a field that displays the available/unavailable quantity depending on the inventory bucket from where the item has to be picked. This screen also displays certain fields depending on the status of the transfer request. For example, In Shipping field is displayed if the transfer is in 'In Shipping' status, Received and Damaged quantity fields are displayed if the transfer is getting received at the requesting store. You can view the list of locations where the item is available (if sequenced) to help you to pick the items faster. Lastly, the details of the last scanned barcode will be displayed at the very bottom.
The footer menu, ellipsis button, contains a reset function as well as remove and restore functions. Page through existing items on the adjustment using the arrows on the bottom.

Transfer Document
Transfers 7-15
Edit CFAs Screen
Figure 7–12 Edit CFAs
The Edit CFAs screen displays the list of CFAs (flexible attributes) that have been set up for Transfer Documents, in the desktop application and lets you enter values for them. The CFAs that are set up as 'Required' must have a value entered for it before creating/accepting the transfer. The value can be one of the following: Date, Text, Decimal, Long depending on the 'data type' set up for the CFAs, while creating them in the desktop application. Appropriate security permission is needed and the transaction must be in editable status for entering CFA values. For Transfers, the CFAs can be captured for the same transfer in both destination and source stores while creating and approving request respectively. In this case, same set of CFAs will be available at both the stores. The CFAs captured during request create will be available in the Edit CFA screen of request approve along with the values captured and the values can be overridden.
Info Screen (Transfer Items)
Figure 7–13 Transfer Items Info Screen
The Info screen is an informational popup that contains read-only information about the header level of the transfer. Details include Transfer Document ID, External

Transfer Document
7-16 Oracle Retail Store Operations Cloud Service User Guide
Transfer Document ID, Source/Destination Type, Source/Destination ID, Status, Context Type and value, Inventory bucket information (Available or Unavailable), Customer Order/Fulfilment Order info, Request Date/User, Create Date/User, Approve Date and Approval User, Close/Reject Date/User and the CFAs.
Edit Transfer
Figure 7–14 Edit Transfer Screen
This screen allows you to edit certain information of the transfer request like Context Type/Value, Not After Date, Allow Partial Delivery (Y/N). You need appropriate permission to edit these fields and this screen is available only when the transfer request is in 'New request' status.
A context type and value can be entered if necessary. The context type is used to give a reason or purpose for the request. For context types of ’PROM’, a promo ID will need to be entered or selected from the list of promotions in the lookup. If the promo ID exists, the description for the promotion will be displayed. If the promotion ID does not exist in the system the description displays as ’Unknown’. If the promotion ID is a transfer request from the external system, the context type is disabled.

Transfer Shipping
Transfers 7-17
Transfer ShippingThe Transfer Shipping dialog is focused on shipping out containers. Each container can be associated to one or more complete or partial transfer documents. Containers can also be restricted to specific merchandise hierarchies to prevent mixing of items.
Transfer Shipment features:
■ Supports shipping to the store, warehouse, or external finisher
■ Multiple transfer documents allowed in a single container
■ Create container without referencing a transfer document (on the fly)
■ Limit store selection by buddy store and transfer zone
■ Multiple containers allowed in a single shipment
■ Manifest system integration and package tracking ID processing
■ Two step approval process to warn of pending shipments
■ Restrict merchandise packaged together by merchandise hierarchy
Features■ Search for transfer shipments
■ Create a new shipment
■ Create a new container
■ View or edit an existing shipment or containers
■ Delete or cancel ’In Progress’ containers or shipments
■ Submit, cancel submit, or dispatch a shipment
■ Capture values for CFAs (Custom Flexible Attributes)
■ Print pre-shipment and manifest

Transfer Shipping
7-18 Oracle Retail Store Operations Cloud Service User Guide
Figure 7–15 Transfer Shipment Mobile Screen Flow
Transfer Shipments are accessed on mobile through the Shipping / Receiving menu within the drawer. Selecting the menu option will take you to the Tsf Ship List screen. On this screen, you can search for shipment records. You can create a shipment, edit or view a shipment.
When creating, editing, or viewing a shipment, you are directed to the list of containers within the shipment on the Tsf Ship Containers screen. Here, you can create a container, edit or view a container.
When creating, editing, or viewing a container, you are directed to the list of items in the container on the Transfer Container Items screen. You can add, view, and edit the details of the items on the Item Detail screen.
On the Item Detail screen, there will be tabs for UINs if the item is a UIN required item and the store is configured for the UIN processing.
You can specify values for CFAs (Custom Flexible Attributes) set up for shipments and containers via the Edit CFAs screen.

Transfer Shipping
Transfers 7-19
Tsf Ship List
Figure 7–16 Tsf Ship List Screen
When navigating to Transfer Shipping, you go to the Tsf Ship List screen with the default list being defined for ’Active’ shipments.
You can use the search criteria eye’ glasses to navigate to the transfer shipment search criteria screen to enter search criteria for transfer shipments. When scanning/entering a container ID in the scan bar, the system adds the container ID to the entered search criteria and narrows down the current list of shipments by the item scanned. Scan or enter the internal or external container IDs or the tracking ID to find the matching shipments. If there are multiple containers found with the same scanned or entered number, you are prompted to select the shipment/container to return.
The Create button prompts you to create a new shipment. You can create a shipment for store, warehouse, or finisher. The destination types for which a user can create a shipment is controlled by the data permission Transfer Destination Type.
In the case of a shipment to a store, the shipment is allowed to be created only if the destination store is not an excluded store for the source store. That is, the destination store has to be in the shipping network of the source store in order to ship items. However, if the user has Override Exclude Closed Stores permission, the system allows the user to proceed with creating the shipment if needed. The user can setup the shipping network for a store using Store Shipping Network screen in the desktop application.
Buddy stores are available to allow for searching for a location to ship to that are close in proximity. Creating a new shipment will direct you to the Tsf Ship Containers screen with no containers. If you select an existing shipment, the same screen displays a list of created containers.

Transfer Shipping
7-20 Oracle Retail Store Operations Cloud Service User Guide
Search Criteria (Transfer Shipment)
Figure 7–17 Search Criteria Screen
The Transfer Shipment Search Criteria screen is accessed by the eye glasses on the Tsf Ship List screen. After applying the search criteria, the results will be listed on the Tsf Ship List screen and the criteria applied will show. The following fields can be searched on from this screen: Last Updated, Destination Type, Destination ID, Destination, Document ID, ASN, Item, Container ID, Customer Order ID, Fulfillment Order ID, Customer Orders Exist, Shipment Status, Context Type, and Context Value.

Transfer Shipping
Transfers 7-21
Tsf Ship ContainersThe containers within a single shipment will display on this screen. If the shipment has just been created, the list will be blank. Several functions may be performed on this screen to include the following:
■ Viewing additional details
■ Updating authorization number
■ Creating a new container
■ Viewing existing customer orders
■ Set up the carrier shipment details
SubmitThe shipment can be saved in ’In Progress’ status to continue edits later or it may be submitted or dispatched. Submitting is possible when the store setting Dispatch Validate is configured for ’Ship Submit’. Submitting will set the shipment to a ’Submitted’ status and not allow for edits, there are no updates to inventory at this point. The only step possible will be to Cancel Submit or Dispatch.
DispatchWhen the shipment is dispatched, the transfer reserved quantity for the outbound location will decrease in addition to the stock on hand. If no shipping quantities are identified the transaction should be cancelled. Inbound is increased at the receiving store for what has been shipped.
Customer OrdersThe Tsf Ship Containers screen has a footer menu option called Customer Orders, which when clicked lists the customer orders associated with the containers if any. It will display the Customer Order and Fulfillment Order IDs, along with the Container ID, Status, Total SKUs, and Comments for the customer order.
When dispatching a transfer shipment, if the transfer associated to the shipment has Allow Partial set to No, then you must ship the full amount which is requested.
If any of the containers on the shipment references a transfer with a customer order with Allow Partial Delivery indicator is Yes and the system parameter Customer Order Restriction is set to Line Controlled, the items getting delivered has to be delivered in its entirety. Partial delivery of an item is not allowed. This validation is done on both Submit and Dispatch of a customer order.
Upon selecting a container on the Tsf Ship Containers screen, you go to the details of that container on the Transfer Container Items screen.

Transfer Shipping
7-22 Oracle Retail Store Operations Cloud Service User Guide
Figure 7–18 Tsf Ship Containers Screen
When creating or selecting an existing shipment from the Tsf Ship List screen, you go to the Tsf Ship Containers screen with the list being defaulted to Active containers. When scanning/entering a container ID in the scan bar, the system will navigate you to the Container Items screen and display the items currently in the selected container. Scan or enter the internal or external container IDs or the tracking ID to find the matching containers in the shipment.
The create button will create a new container for the shipment. Creating a new container will direct you to the Container Items screen with no details (items) in order to build a new container. Lastly, selecting a container from the list will navigate to the details for that container.
Footer Menu
Info: The Info option will access the Info (Shipment) popup.
BOL Info: The BOL Info option will access the BOL Info screen.
Note: The Notes option accesses the notes common dialog to capture notes.
Customer Orders: The Customer Orders option will access the Customer Order List screen.
Create: Create will create a new container in the shipment.
Edit Shipment: Edit Shipment will access the Edit Shipment screen.
Edit CFA: Enter values for the CFAs that are set up for Transfer Shipments.
Submit: Submit will perform validations for ’In Progress’ shipments including excluded store validation and lock the shipment for additional edits. The shipment will be ready for dispatch. This menu option will only be available when the store parameter ’Transfer Shipment Dispatch Validate’ is set equal to Ship Submit.

Transfer Shipping
Transfers 7-23
Cancel Submit: Cancel Submit will reverse the Submit and move the shipment back to ’In Progress’.
Dispatch: Dispatch will perform validations including excluded store validation and post transactions to finalize the shipment and no further changes are allowed.
Delete: Delete will mark the shipment to ’Canceled’ status.
Back: Back will exit the shipment.
External Printing: External Printing will display the External Printing popup to select a printer for the pre-shipment notice and manifest documents.
Print: Opens the print dialog and allows you to print various reports and container labels. The Transfer Shipment Container report and the BOL Detail report will be available on this screen.
Edit Shipment
Figure 7–19 Edit Shipment Screen
The Edit Shipment screen is used to enter details for the shipment including transportation details.
Details will include: BOL ID, motive, pickup date, ship to address, carrier type, carrier, carrier service and carrier address.
The Carrier Type will be defaulted based on the transfer carrier table; however, you can modify this if necessary. For carrier types of Third Party, the Service will need to be selected.
If the shipment is to a warehouse or finisher, you can enter an authorization number.
The Carrier information will be locked down once the container has been confirmed. At that time, the Adjust Carrier button will be available to move the containers back to ’In Progress’ which will allow you to make changes to the carrier and other shipment details.

Transfer Shipping
7-24 Oracle Retail Store Operations Cloud Service User Guide
Edit CFA
Figure 7–20 Edit CFAs
The Edit CFAs screen displays the list of CFAs (flexible attributes) that have been set up for Transfer shipments, in the desktop application and lets you enter values for them. The CFAs that are set up as 'Required' must have a value entered for it before confirming the container. The value can be one of the following: Date, Text, Decimal, Long depending on the 'data type' set up for the CFAs, while creating them in the desktop application. Appropriate security permission is needed and the shipment must be in editable state for entering CFA values.
Info (Shipment)
Figure 7–21 Info (Shipment) Popup
The Info (Shipment) is an informational popup that contains read-only information about the header level of the shipment. Details include: Destination Type, Destination, Shipment ID, ASN, Status, Auth Number, Total Container SKUs, Containers, Documents, Customer Order, Total Shipment Qty, Create Date, Create User, Last Update, Last Update User, Submit Date, Submit User, Dispatch Date, Dispatch User, and the CFAs.

Transfer Shipping
Transfers 7-25
BOL Info
Figure 7–22 BOL Info Screen
The Bill of Lading (BOL) Info is an informational screen that contains read-only information about the carrier details for the shipment. This screen is view only and the details are managed on the Edit Shipment screen. Details include: BOL ID, Dispatch Date, Motive, Pickup Date, Ship to Address, Carrier Type, Carrier, Carrier Service, and Carrier Address (if entered).

Transfer Shipping
7-26 Oracle Retail Store Operations Cloud Service User Guide
Customer Order List
Figure 7–23 Cust Order List
The Cust Ord List is an informational screen that contains read-only information about the customer orders within the shipment. The customer order information will be on the transfer documents selected for the shipment. Details include: Customer Order/Fulfillment Order, Status, Cnt ID, and Container ID.
Scrolling in the list of customer order/fulfillment orders on the left will display a filter. The filter can be used to narrow down the list of items. Filtering can occur by Customer Order ID, Fulfillment Order ID, Container ID, and Customer Order Status.

Transfer Shipping
Transfers 7-27
Transfer Container Items
Figure 7–24 Container Items Screen
The Container Items screen is used when creating a container or a new container.
There are several functions you can perform on this screen. Some of the features include:
■ Create, edit, delete, or confirm a container
■ Select transfer items or add loose items
■ Manage carrier shipping information
The container can be created with or without referencing a transfer document. When it is created without a transfer document, it can only be created to ship available inventory. With a transfer document, it can be for Available or Unavailable inventory.
When a container is created but not yet completed, the container will display a status of ’In Progress’. The transfer reserved bucket will update the moment the container is saved. When the shipment is dispatched, the saved quantity in the transfer reserved bucket will be removed. This will keep the available quantity accurate.
The items on the list are for the container.
The item image for the line items is displayed per configuration. Line items appear in a list and selecting a line item will navigate to the item details of the item. If an item has been changed in the current session, it will be indicated by a bar on the left of the item. Scrolling in the list of items on the left will display a filter. The filter can be used to narrow down the list of items. Filtering can occur by Item ID, Description, Document ID and Reason Code.
If the Non-Inventory indicator of the item is set as No, the SOH of the item is updated at the completion of the transaction.

Transfer Shipping
7-28 Oracle Retail Store Operations Cloud Service User Guide
If the Non-Inventory indicator of the item is set as Yes, the item can be added to the transaction however the SOH will not be updated on confirmation/completion of the transaction. That is, the item can be scanned/added to the transaction, and you will be able to enter/update quantity just like a normal (inventory enabled) item. All the processing rules and validations that apply to inventory enabled items would apply for non-inventoried items too except that the validations done on quantity against SOH will be ignored. On dispatch, the SOH of the item will not be updated since the application doesn't preserve the inventory details of the items with Non-Inventory indicator set as Yes. Publishing of non-inventory items can be restricted depending on administration integration settings.
Inventory Type of items (Available or Unavailable) in the container is held at a container header level. This means that all items in the container must be for the same inventory type, there cannot be a mixture. Once items from a transfer have been added to the container, the inventory type is set for the container and can no longer be changed. However, a shipment may have both unavailable and available containers.
If inventory is from unavailable inventory, the shipped quantity cannot exceed the unavailable stock. If the system is configured to use sub-buckets, then the sub-bucket associated to the reason codes which are for unavailable inventory will be displayed. The sub-bucket will be updated as the unavailable inventory is updated.
When a container is setup to use unavailable inventory, a reason code must first be selected before being able to add or edit an item in the container. The reason code is selected on the Edit Container screen. Containers that are setup to use available inventory will not use reason codes. The reason code selected is at the header level for the container and it will be applied to all newly added items until it is changed to a different reason, in which the newly changed reason will be added to the newly added items.
Scanning or entering an item in the scan bar will navigate you to the Item Detail screen for the item. Quantity may be updated, depending on the scan mode. If the user scans the Item ID of a UIN item or if he scans a UIN, he will be taken to the UIN tab of the Item Detail screen.
Directly below the scan bar, the currently selected transfer document will display. When first entering the container, ’No Document’ will be displayed. You will need special permissions to add items without selecting a document. Access the active documents by tapping on this bar which to take you to the Select Document screen.
Next to each item, the UIN icon will display if the UINs have been associated to the item.
The ellipsis in the lower right hand corner will access the footer menu which will contain all the functions that can be performed on a container.
Footer Menu
Info: Info will access the Info (Container) popup.
Notes: Accesses the notes common dialog to capture notes.
Edit Container: Accesses the Edit Container screen.
Edit CFA: Enter values for the CFAs that are set up for Transfer Shipment Containers.
Adjust: Reopens a container in Completed status and moves it back to In Progress.
Confirm: Moves the container in an In Progress status to Completed.
Save: Saves the container in 'In Progress’ status to be completed later. This option is only available when the screen is in edit mode.

Transfer Shipping
Transfers 7-29
Print: Opens the print dialog and allows you to select formats and print various reports and container labels. The Transfer Shipment Container report will be available on this screen.
Print Tickets: Opens the Print Tickets dialog to print the tickets or labels for the current container items. This is described in common usage chapter with more details.
Delete: Marks the container to ’Canceled’ status. This option will only be available for containers that are in a New or In Progress status.
Cancel: Exits the container and changes made in that session will not be saved. This screen is only available when the screen is in edit mode.
Back: Returns to the previous screen. This option is only available when the container is view only.
Item Detail (Quantity)
Figure 7–25 Item Detail (Quantity) Screen
The Item Detail screen is the screen is used when selecting or scanning an item from the Container Items screen. Scanning or entering an item on this screen in the scan bar will update the quantity per the scan mode and refresh the item detail screen for the item and quantity scanned. The quantity can be edited and updated manually if permissions allow. Items with Non-Inventory Indicator set as Yes are also allowed to be in the transaction and you can enter ship quantity for these items.
If the user scans the Item ID of a UIN item or if he scans a UIN, he will be taken to the UIN tab of the Item Detail screen.
The item information including the image which is system configured to display in the header. The bottom portion of the screen containers information fields of inventory qty, remaining qty, document qty and reason code (for unavailable inventory only) pertaining to the bucket stock is coming from. Lastly, the details of the last scanned barcode will be displayed at the very bottom.
The footer menu (ellipsis button), contains a reset function as well as remove and restore functions. Page through existing item in the container view the arrows on the bottom.
There is also a UIN tab to take you to the UIN screen to add and remove UINs for UIN items.

Transfer Shipping
7-30 Oracle Retail Store Operations Cloud Service User Guide
There is also an Extended Attributes tab that enables the user to view/capture Extended Attributes for the item. If the item is not configured to capture extended attributes or there are no extended attributes captured, the list will be empty.
Select Document
Figure 7–26 Select Document Screen
The Select Document screen is used for adding items to ship into the container. Access this screen by tapping the Document ID in the header bar of the Container Items screen. If there are no approved documents to display, the list will be empty. The list is sorted by documents with a remaining quantity on top, then by not after date, and then by document ID.
A list of documents for Inventory Type of ’Available’ or ’Unavailable’ will display based on the selected option on the Edit Container screen. The default will be to display documents with inventory type set to available.
Additionally, if you have placed a hierarchy restriction on the container using the Limit Item To drop-downs on the Edit Container screen, only those documents with items matching the criteria will display. This will happen once the restriction is set by adding the first item to the container. If the container is empty, all documents will be displayed for the appropriate inventory type.
Scanning or entering a document ID on this screen in the scan bar will display the Document Options popup if any are found. Scrolling in the list of documents on the left will display a filter. The filter can be used to narrow down the list of documents. Filtering can occur by Document ID, External ID, Customer Order ID, Fulfillment Order ID, Context type, and Context value.
The following icons will be displayed to indicate the status:
■ Green circle with check indicates the document has remaining quantities.
■ Orange triangle with exclamation point indicates the document has no remaining quantities.

Transfer Shipping
Transfers 7-31
Options to Add to ContainerYou can select an approved transfer document and have different options to apply the items. When you are working in the container screen, any items added manually, will be added to the selected transfer document. If you do not want to add the items to the transfer, select No Document from this screen, to clear out the selection. Items added manually will be added to the Ad Hoc transfer if no document is selected, otherwise they are added to the transfer doc selected. Adding loose items to a container is only allowed for Containers setup for Available inventory.
■ Apply Item(s): The items are pre-filled in the container without quantities.
■ Apply Item(s) & Quantity: The items with their remaining quantity are added into the container.
■ Use Document: Manually add the items to the container validating against the selected document. You are prompted when an item does not exist on the document. If not, you may or may not have the ability to add to the container or to the selected document.
Once the document and items are selected, the document ID is populated in the header of the container detail screen as well as next to each item added to the container. There are various permissions that will control which options you can perform.
The No Document button is used to clear the selected document. You need special permissions to use this button. Any items added to the container when No Document is selected, will be added to an ad hoc transfer created for the entire shipment for any unexpected items not associated with an existing transfer. The button will not be available when the container has been setup to pull items from unavailable inventory buckets since a pre-created transfer document is required.
Edit Container
Figure 7–27 Edit Container Screen

Transfer Shipping
7-32 Oracle Retail Store Operations Cloud Service User Guide
The Edit Container screen is used to enter details for the container including transportation details. You navigate to this screen from the footer menu on the Container items screen. Details will include: ID, Inventory Status, Container ID, Package Type, Weight, Tracking ID, and Container Restriction by Hierarchy. If the inventory status is Unavailable, the Reason Code and Sub-buckets (if configured to use sub-buckets) will also be available.
The inventory status and the container restriction by hierarchy will be locked down once the first item has been added to the container.
Limit Items to (Hierarchy Restriction)If you want to set up the container to restrict the container to hold the same type of items, set up the container to restrict by department, class, and subclass. You do not select the actual department, but set the hierarchy level to restrict by. When the first item is added to the container, the department, class, and/or subclass is set for the container based on the hierarchy the item is part of. The container detail screen will display the hierarchy that is locked in. Any items added subsequently must match the hierarchy of the first item. For example, if the restriction was set up to limit items to the same department and the first item added was for the Women's Department, only items that match the Women's Department can be added to the container, but it will not matter which class and subclass the item is in since the hierarchy level is set at Department.
The hierarchy level is auto defaulted depending on the permission you have been given.
If manifesting has been configured, the package type and weight may be required by the carrier selected for the shipment before you can confirm the container.
Edit CFAs Screen
Figure 7–28 Edit CFAs
The Edit CFAs screen displays the list of CFAs(flexible attributes) that have been set up for Transfer shipment containers, in the desktop application and lets you enter values for them. The CFAs that are set up as 'Required' must have a value entered for it before confirming the container. The value can be one of the following: Date, Text, Decimal, Long depending on the 'data type' set up for the CFAs, while creating them in the desktop application. Appropriate security permission is needed and the container must be in editable state for entering CFA values.

Transfer Receiving
Transfers 7-33
Info (Container)
Figure 7–29 Info (Container) Popup
The Info (Container) is an informational popup containing read-only information about the header level of the container. Details include: ID, Container ID, Shipment ID, Status, Destination Type and Destination, Create Date, Create User, Update, Update User, Approve Date, Approve User, Package Type, Weight, Tracking ID, Container Hierarchy Limit, Inventory Status, and the CFAs.
Transfer ReceivingThe receiving dialog allows users to receive store, warehouse and external finisher deliveries with containers. It allows these containers to be received blind, without you knowing the expected quantity. The containers can also be for unavailable inventory. Lastly, the mobile application supports misdirected containers or unexpected containers originally not listed on the delivery.
Transfer Receiving features:
■ Receive by Advance Shipment Notice (ASN), container, item level, or automatically
■ Record damages during receiving
■ Blind receiving
■ Manage container deliveries for another destination or creating an additional container
■ Multiple methods to scan and identify the container delivery (GS1, Container ID, Tracking ID)
■ Inventory updated immediately as containers are scanned and confirmed

Transfer Receiving
7-34 Oracle Retail Store Operations Cloud Service User Guide
Mobile Features
■ Search for transfer receipts
■ Create a new container
■ View or edit an existing receipts or containers
■ Capture values for CFAs (Custom Flexible Attributes) for the delivery and containers
■ Delete or cancel ’In Progress’ containers or receipts
■ Confirm, mark damage, mark missing, or receive a container
Figure 7–30 Transfer Receiving Mobile Screen Flow
Transfer Receiving is accessed on mobile through the Shipping / Receiving menu within the drawer. Selecting the menu option will take you to the Tsf Rcv List screen. On this screen, you can search for delivery/receipt records which will be presented on the Tsf Rcv List screen. You can edit or view a delivery/receipt.
When editing or viewing a delivery/receipt, you will first be directed to the list of containers within the delivery/receipt on the Tsf Rcv Containers screen. You can create a container, edit or view a container, capture values for CFAs.
When creating, editing, or viewing a container, you are directed to the list of items in the container on the Container Items screen. You can add, view and edit the details of the items on the Item Detail screen. The Item Detail screen has tab for UINs if the system and/or item is configured. You can also capture values for CFAs that are setup for the containers.

Transfer Receiving
Transfers 7-35
Tsf Rcv List
Figure 7–31 Tsf Rcv List Screen
When navigating to Transfer Receiving, you go to the Tsf Rcv List screen with the default list being defined for ’Active’ receipts meaning ’New’ or ’In Progress’ status.
These deliveries are all populated through the system from an internal or external source. The ASN corresponds to the Shipment ASN for a store to store transfer.
Use the search criteria eye glasses to navigate to the transfer receipt search criteria screen to enter search criteria for transfer receipts. When scanning/entering a container ID in the scan bar, the system adds the scanned container ID to the entered search criteria and narrows down the current list of receipts by the container ID scanned. Scan or enter the internal or external container IDs to find the matching containers in the receipt.
Selecting a receipt will direct you to the Tsf Rcv Containers screen and will display a list of containers.
An estimated expected date will be populated if one exists in the ASN. When the delivery has been received, the receive date field will be updated. You can identify any container marked as missing or holding customer orders.
This screen allows you to identify if the transfer being received is for a customer order.
If an unexpected container arrives, search for the container using the misdirected container screen. Receiving notes may also be captured at the receipt and container level.

Transfer Receiving
7-36 Oracle Retail Store Operations Cloud Service User Guide
Search Criteria (Transfer Receiving)
Figure 7–32 Search Criteria (Transfer Receiving) Screen
The Transfer Receiving Search Criteria screen is accessed by the eye glasses on the Tsf Rcv List screen. After applying the search criteria, the results will be listed on the Tsf Rcv List screen and the criteria applied will show. The fields available to search by include: expected date, received date, source type, source ID, source, delivery ID, asn, item, status, container ID, document ID, customer order ID, fulfillment order ID, customer orders exist, context type, and context value.

Transfer Receiving
Transfers 7-37
Tsf Rcv Containers
Figure 7–33 Tsf Rcv Containers Screen
When selecting a receipt from the Tsf Rcv List screen, you go to the Tsf Rcv Containers screen with the list showing ’Active’ containers above the rest. When scanning/entering a container ID in the scan bar, the system navigates you to the Container Items screen and display the items currently in the selected container.
You can scan or enter the internal or external container IDs to find the matching containers in the receipt.
The filter can be used to narrow down the list of containers. Filtering can occur by internal ID, container ID, and container status.
The following icons will be displayed to indicate the status of the container: green circle with check indicates the container is received, orange triangle with exclamation indicates the container is damaged, and the red circle with exclamation indicates the container is missing. If the container is in a ’New’ or ’In Progress’ status an icon will not display.
For containers in statuses 'Received' or 'Damaged', if they are 'discrepant', a label called 'Discrepant' will be displayed in red color.
Containers can be received individually by selecting the container. Click Default Qty and, all items received quantity for each container is set to the expected quantity. Containers can only be received at a container level if they have not been received at the item level.
If the delivery has already been received and if the receipt date is within the system configured number of days allowed to adjust a receipt, it is possible to reopen the

Transfer Receiving
7-38 Oracle Retail Store Operations Cloud Service User Guide
specific container on a receipt by clicking the container. Adjust the container from within the container dialog.
The receipt can be saved as ’In Progress’ to complete receiving at a later time. Saving the receipt will not make any updates to the stock on hand.
Confirming the receipt will mark all containers, with received quantities, to Received. Stock on hand is updated when the status of the container changes to Received, either from within the receipt details or from within the Container. Any containers with no received quantities will be marked as Missing.
When confirming the transfer receipt, if there are containers that are in 'New' status (the items will not have any quantities):
■ If the user has the Allow Default Zero at Confirmation permission, the system will prompt the user if they would like to set the quantities to 0. If the user chooses Yes to the prompt all items that have a blank quantity value will be set to 0. If the user chooses No, the user will return to the screen and nothing is updated.
■ If the user does not have the Allow Default Zero at Confirmation permission, the user will not be able to confirm the delivery and will return to the screen. At this point the user will have to either save it for someone else with proper permission to confirm, or receive the items that are blank.
When confirming the transfer receipt, if there are containers that are in 'In Progress' status with discrepant quantities (Received is not equal to Expected), the user will be prompted that there are discrepant items:
■ If the user has the Allow Default Zero at Confirmation permission, the system will prompt the user to set the quantities to 0. (Same as above)
■ If the user does not have the Allow Default Zero at Confirmation permission, the user will not be able to confirm the delivery and will return to the screen. (same as above)
Customer Orders
The screen has a footer menu option to go to the Customer Order List screen. This enables you to identify the list of customer orders associated with this delivery, if any.
Selecting a container from the list takes you to the Container Items screen.
Footer Menu
Info: Info will access the Info (Receipt) popup.
Notes: The Notes option accesses the notes common dialog to capture notes.
Customer Orders: Accesses the Customer Order List screen.
Create: Creates a new container in the receipt.
Edit Receipt: Accesses the Edit Receipt screen.
Edit CFA: Lets you enter values for the CFAs that are set up for transfer deliveries.
Default Qty: Copies the expected quantity to the received quantity field for all containers on the delivery/receipt.
Misdirected Container: Accesses the Misdirected Container screen.
Confirm: Confirm will set the receipt to a ’Received’ status.
Back: Exits the receipt.

Transfer Receiving
Transfers 7-39
Print: Opens the print dialog and allows you to select formats and print various reports and container labels. The Transfer Receipt report is available on this screen.
Edit Receipt
Figure 7–34 Edit Receipt Screen
The Edit Receipt screen is used to enter details for the delivery including transportation details. Details include: ASN, Carrier Name, Carrier Type, Carrier Code, License Plate, Freight ID, Bill of Lading, and Delivery From Address.
Edit CFAs Screen
Figure 7–35 Edit CFAs
The Edit CFAs screen displays the list of CFAs (flexible attributes) that have been set up for transfer delivery containers, in the desktop application and lets you enter values for them. The CFAs that are set up as 'Required' must have a value entered for it before confirming the receipt. The value can be one of the following: Date, Text, Decimal, Long depending on the 'data type' set up for the CFAs, while creating them in the desktop application. Appropriate security permission is needed and the delivery must be in editable state for entering CFA values.

Transfer Receiving
7-40 Oracle Retail Store Operations Cloud Service User Guide
Transfer Receiving Info (Receipt)
Figure 7–36 Info (Receipt) Popup
The Info (Receipt) is an informational popup that contains read-only information about the header level of the receipt. Details include: Source Type, Source, ID, ASN, Status, Expected Date, Create Date, Create User, Updated, Update User, Received, Received User, Carrier Entity, Carrier Type, Carrier Code, License Plate, From Address, Freight ID, Bill of Lading, and the CFAs. The License Plate and Freight ID fields may be used for other purposes, such as a Weigh Bill ID or BOL ID. The field names can be customized by the client.

Transfer Receiving
Transfers 7-41
Misdirected Container
Figure 7–37 Misdirected Container Screen
When selecting Misdirected Container from the Tsf Rcv Containers screen, you go to the Misdirected Container screen with the screen showing an empty list. When scanning/entering a container ID in the scan bar, the system will display matching containers available in the entire enterprise. Scan or enter the internal or external container IDs or Tracking ID to find the matching containers in the receipt.
When selecting a container within the list, you are taken to the Misdirected Items screen.

Transfer Receiving
7-42 Oracle Retail Store Operations Cloud Service User Guide
Misdirected Items
Figure 7–38 Misdirected Items Screen
The Misdirected Items screen used when selecting a container from the Misdirected Container screen. Details about the intended destination are displayed at the top of the screen. The details include: ID, Container Status, Source Type, Source, Destination Type, Destination, and Container ID. When scanning/entering an item in the scan bar, the system will update the filter bar and display the resulting item.
The filter can be used to narrow down the list of items. Filtering can occur by item ID and description.
The Copy button will copy all items from the container to a new container. A notification is sent to the original destination store to inform them the container intended for their location has been received in another location. The old container ID will be written into the reference container field for the newly created container and the old container will be moved to a ’Missing’ status.

Transfer Receiving
Transfers 7-43
Customer Order List
Figure 7–39 Cust Order List Screen
The Cust Ord List is an informational screen that contains read-only information about the customer orders within the receipt. Details include: Customer Order/Fulfillment Order, Status, Internal and External container ID.
Scrolling in the list of customer order/fulfillment orders on the left will display a filter. The filter can be used to narrow down the list of items. Filtering can occur by Customer Order ID, Fulfillment Order ID, Container ID, and Customer Order Status.

Transfer Receiving
7-44 Oracle Retail Store Operations Cloud Service User Guide
Container Items
Figure 7–40 Container Items Screen
The Container Items screen is used when selecting a container to receive from the Tsf Rcv Containers screen.
This screen is used to work with the contents and details within the container. Information is populated from an Advanced Shipment Notice (ASN) and you mark the items as received or damaged. The items on the list are for the container. The item image for the line items is displayed per configuration.
If the Non-Inventory indicator of the item is No, the SOH of the item is updated at the completion of the transaction.
If the Non-Inventory indicator of the item is Yes, the item can be added to the transaction however, the SOH will not be updated on confirmation of the receipt. Item can be scanned/added to the transaction, you can enter/update quantity just like a normal (inventory enabled) item. All the processing rules and validations that apply to inventory enabled items would apply for non-inventoried items too except that the validations done on quantity against SOH will be ignored. On confirmation of the receipt, the SOH of the item will not be updated since the application doesn't preserve the inventory details of the items with Non-Inventory set as Yes.
When the screen is set to regular receiving mode, the header bar will display the number of SKUs, ’Receiving’, and total expected quantity. Scanning/entering an item will update the received quantity. When the screen is set to damage receiving mode, the header bar will display the number of SKUs, ’Damages’, and total expected quantity. Scanning/entering an item will update the damaged quantity. Finally, when the screen is set to display only discrepancies, the number of discrepancies is displayed on the left.
Line items appear in a list and selecting a line item will navigate to the item details of the item. If an item has been changed in the current session, it will be indicated by a bar on the left of the item. The filter can be used to narrow down the list of items.

Transfer Receiving
Transfers 7-45
Filtering can occur by Item ID, Description, Expected Qty, Received Qty, and Damaged Qty.
Scanning or entering an item in the scan bar will navigate you to the Item Detail screen for the item. If the user scans the Item ID of a UIN item or if he scans a UIN, he will be taken to the UIN tab of the Item Detail screen.
Quantity may be updated, depending on the scan mode.
The following icons will be displayed next to the item: green circle with check indicates the item is not discrepant and the blue circle with an ’i’ indicates the item is discrepant. A discrepant item is when the received quantity plus the damaged quantity does not equal the expected quantity. If configured, unexpected items may be added to the container. A new transfer will be created for the unexpected items. There will only be one transfer created for the entire receipt.
The entire container may be marked as damaged and a reason for the damage from the Container Info screen. Additionally, the container can be marked to receive on the shopfloor directly.
Receive Transfer Delivery
When the delivery is being received, the status of the delivery/receipt will move to ’In Progress’ status at the receiving store. Press the Cancel button and the delivery/receipt will remain as ’New’. If configured for blind receiving, the expected inbound quantities will not display.
You may select to use Default Regular Qty option or change the quantity received and mark items as damaged if necessary.
When confirming a delivery, the status is updated to Received and inventory is updated. The merchandising system is also notified at the container level for the receipt. This provides an up to date view.
When damaged items are received the inventory for those items will be put into a Non-sellable Unavailable bucket. The total received is the sum of the received and the damaged quantities.
Receive Entire Delivery
If the system parameter Receive Entire Transfer is set equal to Yes, you cannot add or remove items from a delivery.
Managing Discrepancies
Deliveries can be received for over, short or the exact quantity dispatched. Discrepancies are easily managed with the Display Only Discrepancies footer menu option. When selected, the expected qty will be compared with the received plus damaged qty and only the items with a discrepancy will display. Unexpected items added during the session will not show up on the discrepancy list since there is no expected quantity.
Store to Store transfer receipt overages will adjust the difference out of the sending store's stock on hand. There is not an inventory adjustment created for this overage but an e-mail notification will be generated and sent to the sending store.
Adjust Container
After the delivery has been received, it is possible for a user to adjust each container on the receipt. This will depend on the Number of Days received transfers can be adjusted system parameter. Select the Adjust button and the container moves back to

Transfer Receiving
7-46 Oracle Retail Store Operations Cloud Service User Guide
’In Progress’. The entire container is reversed out and you will need to reconfirm. The full reversal will display in Transaction History.
Adjusting can only be done at the container level. The entire receipt cannot be adjusted at once. Once the original receipt has been confirmed, the inbound bucket will no longer see a change. In some cases, the container may be restricted from adjustments, such as when customer order reservations exist. If the container has been adjusted, a check box will be marked in the Container Info screen. The received quantity and damage quantity fields will be populated with the same value as when the container had been confirmed.
The ellipsis in the lower right hand corner will access the footer menu which will contain the functions that can be performed on a container.
Footer Menu
Info: Info will access the Info (Container) popup.
Notes: The Notes option accesses the notes common dialog to capture notes.
Default Regular Qty: Copies the expected quantity to the received quantity field.
Clear Qty: Clears the received quantity and damaged quantity fields for ALL items in order for you to start over.
Damage Mode: Scan/enter items and update the damage quantity field.
Regular Mode: Scan/enter items and update the received quantity field. This is the default mode.
Edit Container: Accesses the Edit Container screen.
Edit CFA: Enter values for the CFAs that are set up for transfer deliveries - containers.
Adjust: Reopens a container in Completed status and moves it back to In Progress.
Damage Remaining Qty: Updates the remaining quantity not yet received to be applied to the damaged quantity field.
Display Only Discrepancies: Shows only the items with a received quantity plus damaged quantity that do not match the expected quantity.
Display All Items: Revert back after displaying only discrepancies. This is the default display.
Confirm: Moves the container in an ’In Progress’ status to ’Received’.
Save: Saves the container in ’In Progress’ status to be completed later. This option is only available when the screen is in edit mode.
When the container is saved, the UINs flagged as Received or Damaged and are not flagged to remove, the UIN status is updated to 'In Receiving'.
■ If a UIN is flagged for removal, the UIN will be deleted if the UIN has a status of 'Unconfirmed' (this identifies the UIN as manually added).
■ If a UIN is flagged for removal, the UIN receiving mode is removed if the UIN has any status other than 'Unconfirmed' (this identifies the UIN as pre-existing from an ASN).
■ If an item is flagged for removal, when you save the container and returns, the item will no longer exist in the container. Note: Only unexpected items added can be removed.
■ If a UIN was relocated from another store:

Transfer Receiving
Transfers 7-47
1. The UIN status is updated from In Stock to In Receiving.
2. A notification is generated and sent to the store the UIN was relocated from.
Delete: Marks the container to ’Canceled’ or ’Missing’ status. If the container is from an external system, the container will be marked as ’Missing’, otherwise, it will be marked as ’Canceled’. This option will only be available for containers that are in a ’New’ or ’In Progress’ status.
Cancel: Exits the container and changes made in that session will not be saved. This screen is only available when the screen is in edit mode.
Back: Returns to the previous screen. This option is only available when the container is view only.
Print: Opens the print dialog and allows you to select formats and print various reports and container labels. The Transfer Receiving Container report will be available on this screen. This option will always be available regardless of the receipt or container status.
Print Tickets: Opens the Print Tickets dialog to print the tickets or labels for the current container items. This is described in common usage document with more details.
Item Detail
Figure 7–41 Item Detail (Container) Screen
The Item Detail screen is used when selecting or scanning an item from the Container Items screen. Scanning or entering an item on this screen in the scan bar will update the quantity per the scan mode and refresh the item detail screen for the item and quantity scanned. The quantity can be edited and updated manually if permissions allow. You can enter quantity for items with Non Inventory indicator as Yes.
The item information including the image which is system configured to display in the header. The bottom portion of the screen contains information fields of inventory qty, remaining qty, document qty, and reason code (for unavailable inventory only) pertaining to the bucket stock is coming from. Lastly, the details of the last scanned barcode will be displayed.

Transfer Receiving
7-48 Oracle Retail Store Operations Cloud Service User Guide
The footer menu (ellipsis button), contains a Reset function as well as Remove and Restore functions. Page through existing item in the container view the arrows on the bottom. If the container is displaying only discrepancies, you will page through only the discrepant items.
If the user scans the Item ID of a UIN item or if he scans a UIN, he will be taken to the UIN tab within the Item Detail screen, for that item.
In the UIN tab the system displays all the UINs for the selected item, if the UINs were part of the ASN. Otherwise, the screen will remain blank until UINs are scanned/entered for the item.
When entering the screen for the first time, the status will display the following:
1. The UINs included on an incoming ASN will be displayed with a status of "Shipped to Store'.
2. The UINs manually added will be displayed with a status of "Unconfirmed", if they do not previously exist.
3. The UINs manually added may have another status, if they already exist in the system.
When re-entering this tab, the status will be updated to "In Receiving".
When the transaction is no longer editable, the screen will be in view only mode.
You will not have the ability to change the Receiving Mode for the UIN.
There is also an Extended Attributes tab that enables the user to view/capture Extended Attributes for the item. If the item is not configured to capture extended attributes or there are no extended attributes captured, the list will be empty.
Edit Container
Figure 7–42 Edit Container Screen

Transfer Receiving
Transfers 7-49
The Edit Container screen is used to enter details for the container including transportation details. You navigate to this screen from the footer menu on the Container Items screen. Details include: Reference Container, Receive on Shopfloor, Damage Reason, SSCC, and Tracking ID.
The reference container field is used to identify the original container ID and will be filled in when you have copied a container from the Misdirected Items screen. If the container was manually created, you can enter the original container ID here.
Receive on Shop Floor: The default will be based on the store parameter Direct Delivery Default to Shop floor Receiving. If set to Yes, the check box will default to marked.
You are required to have Receive Direct Delivery on Shop floor permissions to change the value.
This indicates whether the delivery will default to receive inventory into the shop floor instead of automatically receiving into the back room or delivery bay.
If this is set to receive on shop floor, the system increments the shop floor inventory bucket instead of the backroom or delivery bay bucket. If a capacity is defined for the item and Direct Delivery Receive Item Capacity is set to Yes, the maximum shop floor quantity will equal the capacity; otherwise, the shop floor will be updated to the entire receipt amount. If the capacity is used and if the receiving quantity is excess, the balance is incremented to delivery bay or back room depending on the Replenishment - Delivery Bay Inventory parameter.
If Receive on Shopfloor is not set on the delivery, the system increments the back room or delivery bay bucket depending on the Replenishment - Delivery Bay Inventory parameter. If this parameter is on, the system will increment the delivery bay bucket instead of back room. Regardless the stock on hand will be updated.
The Receive on Shopfloor check box will only display for deliveries from a store or warehouse.
For additional details, see Chapter 10, "In Store Replenishment".

Transfer Receiving
7-50 Oracle Retail Store Operations Cloud Service User Guide
Info (Container)
Figure 7–43 Info (Container) Popup
The Info (Container) is an informational popup that contains read only information about the header level of the container. Details include: ID, container ID, reference, ASN, status, source type and source, expected date, create date, create user, update date, update user, receive date, receive user, adjusted container, receive on shopfloor, damage reason, SSCC, tracking ID, and the CFAs.

Transfer Receiving
Transfers 7-51
Quick ReceivingThe Quick Receiving dialog allows users to receive store, warehouse, and external finisher deliveries by scanning a container and marking the container as received immediately without scanning all the items within the container.
Quick Receiving features:
■ Receive entire container
■ Receive missing containers
■ Automatic confirm receipt
■ Multiple users scanning concurrently for same delivery
Mobile features:
■ Receive missing and misdirected containers
■ Update inventory immediately
■ Captures containers scanned, received, rejected, and invalid scans
Quick Rcv List
Figure 7–44 Quick Rcv List Screen
When navigating to Quick Receiving, you go to the Quick Rcv List screen. When you first go to this screen, an empty list will display. When scanning/entering a container ID in the scan bar the system searches for the container and will populate the list with the scanned value. Scan or enter the internal or external container IDs or the Tracking ID to find the matching shipments. The list will display anything that is scanned or entered including invalid scans.

Transfer Receiving
7-52 Oracle Retail Store Operations Cloud Service User Guide
The header of the screen list the number of containers that have been scanned/entered and their receiving status.
■ Total Scan: Total number of containers scanned during the session.
■ Rcvd Containers: Total number of containers that have been successfully received during the session.
■ Rejected Containers: Total number of container rejected (previously received containers) during the session.
■ Invalid Scans: Total number of container scanned which are invalid during the session.
■ Not Received: Total number of valid containers not received during the session. For example, when a misdirected container is scanned and not allowed to be received.
The following icons will be displayed to identify which scans are valid and which are in error:
■ Green circle with check indicates the container is received.
■ Orange triangle with exclamation point indicates the container was previously received.
■ Red circle with exclamation point indicates the container ID scanned or entered is invalid or not received.
■ Blue circle with up arrow indicates that the container scanned is pending processing.
Processing
Transfer Force Close Indicator
Transfer shortages will be adjusted based on the Transfer Force Close Indicator parameter settings NL, RL, or SL.
This indicator is used to determine the processing of a transfer when there is a short receipt.
■ No Loss: Sending store is incremented/decremented by the overage/shortage.
No Loss Shortage: Shortage is added back to the sending store.
Sending Store Receiving Store
Beginning SOH 1000 SOH 1000 SOH, 0 In Transit
Sent qty 50 950 SOH 1000 SOH, 50 In Transit
Received qty 30 (shortage)
970 SOH 1030 SOH, 0 In Transit
■ Sending Loss: For shortages, no perpetual inventory is sent back to the sending store. Sending store is financially responsible.
Note: This is handled on the merchandising side.
Sending Loss Shortage: Shortage is not added back.

Sending Store Receiving Store
Beginning SOH 1000 SOH 1000 SOH, 0 In Transit
Sent qty 50 950 SOH 1000 SOH, 50 In Transit
Received qty 30 (shortage)
950 SOH******** 1030 SOH, 0 In Transit
Transfer Receiving
Transfers 7-53
■ Receiving Loss: For shortages, no perpetual inventory is sent back to the sending store. Receiving store is financially responsible.
Note: This is handled on the merchandising side.
Receiving Loss Shortage: Shortage is not added back.
Sending Store Receiving Store
Beginning SOH 1000 SOH 1000 SOH, 0 In Transit
Sent qty 50 950 SOH 1000 SOH, 50 In Transit
Received qty 30 (shortage)
950 SOH******** 1030 SOH, 0 In Transit
Available Versus Unavailable InventoryWhen a transfer is saved, the system will move the items from either available or unavailable (non sellable) inventory, based on the inventory status, and move it to the reserved bucket within unavailable inventory. For warehouse and finisher returns, the Transfer Reserved bucket is updated. Upon dispatching of the transfer, the reserved buckets will be relieved and the stock on hand will be decremented. If sub-buckets are turned on, the appropriate sub-bucket associated with the shipment reason will be updated when transferring from unavailable inventory.
Example 1: Transfer TO Warehouse using Available Inventory
Item Lookup before:
■ Total SOH = 800
■ Available = 700
■ Unavailable = 100
■ Nonsellable = 100 Sub-bucket: Trouble 75, Admin 25
■ Reserved Qty = 0
1. Return Qty = 10 (Available), click Save.
Item Lookup:
■ Total SOH = 800
■ Available = 690
■ Unavailable = 110
■ Nonsellable = 100 Sub-bucket: Trouble 75, Admin 25
■ Reserved Qty = 10
2. Modify Transfer Qty to 8, click Dispatch.

Transfer Receiving
7-54 Oracle Retail Store Operations Cloud Service User Guide
Item Lookup:
■ Total SOH = 792
■ Available = 692
■ Unavailable = 100
■ Nonsellable = 100 Sub-bucket: Trouble 75, Admin 25
■ Reserved Qty = 0
3. Modify Return Qty to 8 and click Dispatch.
Item Lookup:
■ Total SOH = 698
■ Available = 698
■ Unavailable = 0
■ Reserved Qty = 0
Inventory Position Updates - Transfer Documents using Available Inventory
■ Approving a Transfer (All):
– Transfer Reserved (+)
– Available SOH (-)
■ Confirming a Container with a Transfer Document created on the fly:
– Transfer Reserved (+)
– Available SOH (-)
■ Confirming a Container with a Transfer Document previously created:
– No changes
■ Dispatching a Shipment:
– Transfer Reserved (-)
– Total SOH (-)
– In bound Qty (+) for Receiving Store
■ Confirming a Container at Receiving Store:
– Available SOH (+)
– Inbound Qty (-)
■ Confirming a Container at Receiving Store with Damages:
– Unavailable (+):
* Sub-bucket (+)
Note: Assumes Shipping Qty is less than or equal to Approved Transfer Document Qty.

Transfer Receiving
Transfers 7-55
Inventory Position Updates - Transfer Documents Using Unavailable Inventory
■ Approving a Requested Transfer Document:
– Transfer Reserve (+)
– Total SOH (no change)
– Nonsellable (-):
* Sub-bucket (no change)
■ Confirming a Container with a Transfer Document previously created:
– Transfer Reserve (no change)
– Nonsellable (no change):
* Sub-bucket (-)
■ Dispatching a Shipment:
– Transfer Reserve (no change)
– Total SOH (-)
– In bound Qty (+) at Receiving Store
■ Confirming a Container at Receiving Store:
– Unavailable (+):
* Sub-bucket (+)
– In bound Qty (-) at Receiving Store
Note: Assumes Shipping Qty less than or equal to Approved Transfer Document Qty; No Transfer Documents created on the fly allowed.

8
RTV and RTV Shipment 8-1
8RTV and RTV Shipment
The return's process in the mobile application supports the retailer with the reverse logistics flow. A reverse logistic flow means that inventory is shipped out of the store to a supplier or warehouse for redistribution or disposal. This particular workflow only supports shipping inventory back to the supplier.
Some examples around reverse logistics:
■ Regulatory when product has to be destroyed because of recalls.
■ Return of inventory to the vendor of items that are nearing their expiration date.
■ Return inventory back to the supplier because of malfunctions or poor quality.
This chapter is split into four sections:
■ RTV Request and Shipment
■ Business Cases
■ Screen Flow
■ Functionality
RTV Request and ShipmentReturn to Vendor (RTV) can be a request or a shipment.
RTV RequestA Return Request is a return to vendor that comes into the Store Inventory system from an external system. A Return Request is a request for items to be returned. You access the return request from the external system on the mobile application. The items, quantities requested to be returned and reasons (for RTV) will be listed. Enter in the return quantity approved for the items. You can also reject the request if needed. The system can be configured to allow you to add items to the return request. The system allows for items to be removed on a return request that were not initially added during the session. After the session has been saved, the quantity for the item is set to zero, similar to original requested items. Once the request has been accepted, the items are shipped to the supplier.

RTV Request and Shipment
8-2 Oracle Retail Store Operations Cloud Service User Guide
RTV ShipmentIf the store plans to return items to the vendor, it can be done by creating an RTV shipment to the vendor. The items, quantities to be returned and reasons (for RTV) will be added to the shipment and it can be dispatched.
To create an RTV shipment, a supplier must be identified for the return; this can be done by entering in the Supplier ID or using the widget to look up a supplier.
The Supplier must allow for returns. This is an indicator that is defined at the supplier level. The next validation will be to check the system setting DSD Delivery Supplier for RTV. This configuration (if set to Yes) requires that the supplier must also be a DSD Supplier (indicator on the supplier) in order to create the RTV. Lastly, if the system is configured to use Multiple Sets of Books, then the supplier is limited to the same operating unit as that of the store.
Items along with reasons can be added to the return. For Return to Vendors, the system allows a mix of available and unavailable inventory status items on the return; therefore, all reasons for the Return to Vendor type will be listed. All items on the return must be sourced by the supplier designated on the RTV. Authorization Number, which is required for certain suppliers, would need to be entered before dispatching.
Features:
■ RTV Request and RTV shipment support shipping to the supplier.
■ User can initiate a return from the mobile application by creating a shipment to the supplier.
■ A single RTV shipment supports multiple containers.
■ An RTV shipment can be tracked at the Container and Shipment levels.
■ Container hierarchy limitations.
■ BOL includes container details.
■ Support for multiple users working on different containers within the same shipment.
■ Each item has one or more reason codes explaining the reason it is shipped back.
■ BOL captures shipment purpose, tracking ID, shipment method, destination information, and container information.
■ Approval or rejection of externally-generated RTV requests.
■ Authorization Return ID.
■ Not after date facilitates you to ship the shipment before the shipment is expired.
■ Supplier-level RTV restrictions when creating an RTV.
■ Printing reports and labels.
■ Capturing values for CFAs (Custom flexible Attributes) for RTV Requests, Shipments and Containers.

Business Cases
RTV and RTV Shipment 8-3
Figure 8–1 Supported Return Flows
Business CasesTwo business case examples are shown below:
Damage Item ProcessTwo customers return DVD players that are not working. The POS transaction identifies them as damaged. This automatically associates the items to an unavailable bucket in the Store Inventory system.
The retailer creates a return to vendor for two DVD players which were damaged. They will be sent back to the vendor with a reason of Damaged using unavailable inventory.
Recall ProcessThe Store Inventory system receives communication from the vendor requesting 100 units of chicken to be returned back to the supplier.
The store user will create the RTV shipment on the mobile application and enters the quantity to be returned; in this case, the store returns 99 units, packs the goods in a container, confirms the container and dispatches the shipment.

Screen Flow
8-4 Oracle Retail Store Operations Cloud Service User Guide
Screen Flow
Figure 8–2 RTV and RTV Shipment Mobile Screen Flow
The RTV and RTV shipment flows exist under the Shipping/Receiving menu. From the RTV List screen, you can filter the records as needed. Both RTV requests and shipments are accessed from the RTV List screen.
Figure 8–3 RTV and RTV Shipment Status Flow

Functionality
RTV and RTV Shipment 8-5
FunctionalityThis section describes the available screens for the following functions:
■ RTV List
■ RTV Search Criteria
■ RTV Request Items
■ RTV Request Item Detail
■ RTV Info
■ Edit RTV
■ RTV Create Shipment
■ RTV Ship Containers
■ Shipment Info
■ BOL Detail
■ Edit Shipment
■ RTV Ship Container Items
■ Item Detail (Container)
■ RTV Container Default Item
■ Container Info
■ Edit Container
■ Select Item
■ Processing

Functionality
8-6 Oracle Retail Store Operations Cloud Service User Guide
RTV List
Figure 8–4 RTV List Screen
The RTV List screen displays a list of externally generated RTV requests and RTV Shipments for the store the use has logged into. The RTV List screen is accessible by clicking RTV from within the Shipping and Receiving menu. The system defaults to all RTV requests and Shipments which are in ’Active’ status. The Active statuses for an RTV request are any of the following statuses:
■ Request In Progress
■ Approved
■ Requested
The Active statuses for an RTV Shipment are any of the following statuses:
■ New
■ In Progress
■ Submitted
A Filter option is also available to further filter on the return and shipment records.
You can get into the details of a request or a shipment by tapping on it. You can also create a new shipment and filter records from the RTV List screen.

Functionality
RTV and RTV Shipment 8-7
RTV Search Criteria
Figure 8–5 RTV Search Criteria Screen
The Search Criteria screen is used to narrow down the list of RTV Requests and Shipments displayed on the RTV List screen. You can access this dialog by tapping on the eye glasses on the RTV list screen. This screen has three sections:
■ Common Criteria
■ Shipment Specific Criteria
■ Request Specific Criteria
The list of criteria displayed is dependent on what you select in the 'Search for' drop-down which has options: All, Requests, Shipments. If you want to search for shipments, select 'Shipment' from this drop-down and the search criteria applied would be 'Common search criteria' AND 'Shipment specific search criteria'. In this scenario, the Request specific criteria would not be visible to you. If you want to search for both shipments and requests together, select 'All' from 'Search for' drop-down and the search criteria applied would be ('Common search criteria' AND 'Shipment specific search criteria') OR ('Common search criteria' AND 'Request specific search criteria').
The result of the search is displayed in the RTV List screen.
There are pre-defined searches available as well: Active Request, Active Shipment, Active Request and Shipment.

Functionality
8-8 Oracle Retail Store Operations Cloud Service User Guide
RTV Request Items
Figure 8–6 RTV Request Items Screen
The Store Inventory system subscribes to RTV Requests from external systems that requests the store to send items back to vendor. You access the Request Items screen by selecting a request from the RTV List screen. This screen displays the list of items present in the RTV request and gives a summary of the various quantities of each item such as:
■ Requested quantity
■ Approved quantity
■ In Shipping quantity
■ Shipped quantity
■ Available quantity of the item at the source store (if the inventory to be returned has to come from Available inventory)
■ Unavailable quantity of the item at the source store (if the inventory of the item has to come from Unavailable inventory)
■ Items with Non-Inventory indicator as Yes are also allowed to be in the request
If sub-buckets is turned on, then the Unavailable field displays the stock for the item that is associated with the specific sub-bucket for the shipment reason code selected for the item.
Whether the screen is editable or not depends on your security permission, status of the request, Not after date. You must also have return reason code data permissions for all items on the request. You can also add items (belonging to the same supplier in the request) to be returned depending on the permissions set. Inactive/delete/discontinued status items can be added to the RTV.
The item image for the line items is displayed per configuration.

Functionality
RTV and RTV Shipment 8-9
Line items appear in a list and selecting a line item navigates to the item details of that item. If an item has been changed in the current session, it is indicated by a bar on the left of the item. Scrolling in the list of items displays a filter. The filter can be used to narrow down the list of items. Filtering can occur by Item ID, Description and Reason.
Scanning or entering an item in the scan bar navigates you to the Item Detail screen for that item. Approved Quantity may be updated depending on the scan mode. If the user scans a VPN, a validation is done to ensure that the VPN scanned belongs to the supplier associated to the delivery.
Footer Menu
The Footer menu is accessed from the ellipsis footer menu on the Request Items screen. The menu functions include the following:
■ Info: Accesses the Info popup.
■ Notes: Accesses the notes dialog to capture notes.
■ Edit RTV: To enter Auth number, and so on.
■ Default Qty: Defaults the requested quantity to the Approved quantity field for all the items in the request.
■ Accept: Accepts and approves the quantities to be returned. The request moves to 'Approved' status and the system will reserve inventory for the items to be returned.
■ Save: Saves the request in ’Request In Progress’ status to be completed later.
Saving a request does not publish any message nor does it reserve any inventory; it simply saves it.
■ Reject: This option allows you to reject the request and move the request to 'Rejected' status.
■ Edit CFA: Lets you enter values for the CFAs that are set up for RTV Requests.
■ Shipment: This menu option will allow you to ship the items in the approved request or view the shipment and container details if they exist. Security exists to create, view and edit the shipment.
■ Close RTV: This menu option will allow you to close the RTV request. After closing an 'Approved' RTV, for the items on return, reservation would be removed and will be moved to available or unavailable depending on where it was reserved from. A message is published to the merchandising system on the inventory reversal.
■ Back: This menu option will allow you to leave the screen. This is available when the screen is in view only mode.
■ Cancel: Exits the screen; changes made in that session are not saved.
■ Print: This option allows you to select formats and print various reports and container labels. The RTV report will be available on this screen. This option will always be available regardless of the return status.

Functionality
8-10 Oracle Retail Store Operations Cloud Service User Guide
RTV Request Item Detail
Figure 8–7 Item Detail Screen
The Item Detail screen is used when selecting or scanning an item from the Request Items screen. Scanning or entering an item on this screen in the scan bar updates the approved quantity per the scan mode and refreshes the Item Detail screen for the item and quantity scanned.
If the user scans a VPN, a validation is done to ensure that the VPN scanned belongs to the supplier associated to the delivery.
The approved quantity can be edited and updated manually if permissions allow. Items with Non-Inventory indicator as Yes are also allowed to be in the transaction and you can enter approved quantity for these items.
Whether the screen is editable or not depends on your security permission, Status of the request, Not After Date. User must also have return reason code data permissions for all items on the request.
You can add items (belonging to the same supplier in the request) to be returned depending on the permissions set for him.
The item information, including the image (which is system configured), displays in the header. The bottom portion of the screen contains information fields for reason code, disposition, sub-bucket (if system configured), and the stock on hand pertaining to the bucket in which the stock is coming from, Requested quantity, In shipping and Shipped quantity. The list of locations where the item is present is also displayed in this screen, if the item is sequenced. Lastly, the Last Scan will display the details of the last scanned barcode at the bottom of the screen.
The Footer menu, ellipsis button, contains a reset function as well as Remove and Restore functions. Page through existing items on the adjustment using the arrows on the bottom.

Functionality
RTV and RTV Shipment 8-11
Edit CFAs Screen
Figure 8–8 Edit CFAs
The Edit CFAs screen displays the list of CFAs (flexible attributes) that have been set up for RTV requests, in the desktop application and lets you enter values for them. The CFAs that are set up as Required must have a value entered for it before accepting the request. The value can be one of the following: Date, Text, Decimal, Long depending on the 'data type' set up for the CFAs, while creating them in the desktop application. Appropriate security permission is needed and the request must be in editable state for entering CFA values.
RTV Info
Figure 8–9 RTV Info
The Info screen is an informational popup that contains read-only information about the header level of the request. Details include:
■ RTV ID
■ RTV External ID (ID generated by the external system that has created the request)
■ Status

Functionality
8-12 Oracle Retail Store Operations Cloud Service User Guide
■ Not After Date
■ Auth Number
■ Total SKUs
■ Created Date
■ Create User
■ Approval Date
■ Approval User
■ User who has rejected the request
■ Rejected Date
■ Close Date
■ User who has closed the request
■ CFAs
Edit RTV
Figure 8–10 Edit RTV Screen
You can add or edit the Auth Number of the request using this screen. Access this screen from the Request Items screen by selecting the Edit RTV menu option in the Footer menu and needs the necessary permission to edit request details. The Status and the Not After Date are considered in order to display this screen. The status of the request must be either Requested or Request In progress, and the Not After Date must be today or later.

Functionality
RTV and RTV Shipment 8-13
RTV Create Shipment
Figure 8–11 Create Shipment Screen
This screen enables you to create a shipment in order to send back items to a vendor.
Access the RTV Create Shipment popup by tapping on the 'Create Shipment' button on the RTV List screen.
Select the supplier through the Supplier Lookup option or you can type in the Supplier ID, if known.
The Not After Date is defaulted from a parameter.
The Auth Number can be entered while creating the shipment. If not, it can be entered later while dispatching the shipment.
Select a Return Type, that is, the reason for the return. This can be configured to the business needs; some examples could be damaged goods, Invalid delivery, Seasonal.
When done, select Apply to create the RTV shipment for the supplier.

Functionality
8-14 Oracle Retail Store Operations Cloud Service User Guide
RTV Ship Containers
Figure 8–12 RTV Ship Containers Screen
The RTV Ship Containers screen displays the list of containers for a shipment or displays an empty list of containers if the shipment is new. The screen is accessed by opening a shipment from the RTV List screen or by tapping on the 'Create Shipment' button from the RTV List screen. This is the first screen displayed in a shipment flow.
The details of a container such as Tracking ID, Total SKUs and Status are available in this screen. You can identify a container by entering or scanning Internal Container ID, SSCC ID, Tracking ID or GS1 data bar. If the system finds the container, you will be navigated to the Container Items screen where the list of items inside the container are shown.
The filter present in this screen can be used to narrow down the list of containers. Filtering can occur by Container ID (Internal ID, SSCC ID), Tracking ID and Status.
The ellipsis in the lower right hand corner accesses the Footer menu which contains all of the functions that can be performed on a shipment.
Submit
The shipment can be saved to ’In Progress’ status to continue edits later or it may be set to Submitted or Dispatched. Submitting is possible when the store setting Dispatch Validate is configured for ’Ship Submit’.
Submitting sets the shipment to a Submitted status and does not allow for edits; there are no updates to inventory at this point. You can only Cancel Submit or Dispatch.
Dispatch
When the shipment is dispatched, the RTV reserved quantity for the source location will decrease in addition to the stock on hand. If no shipping quantities are identified the transaction should be cancelled.

Functionality
RTV and RTV Shipment 8-15
Footer Menu
The menu functions include the following:
■ Info: Accesses the Info popup.
■ Notes: Accesses the notes dialog to capture notes.
■ Create: Creates a new container in the shipment.
■ Edit Shipment: Accesses the Edit Shipment screen where details can be added/updated.
■ Submit: Submit performs validation for ’In Progress’ shipments and locks the shipment for additional edits. The shipment will be ready for dispatch. This menu option is only available when the store parameter ’RTV Shipment Dispatch Validate’ is set equal to Ship Submit.
■ Cancel Submit: Reverses the Submit and moves the shipment back to ’In Progress’.
■ Dispatch: Performs validation and dispatches the shipment. No further changes are allowed. The shipment is now ready to be physically shipped out of the store.
■ Edit CFA: Lets you enter values for the CFAs that are set up for RTV Shipments.
■ Close Shipment: Allows you to close the rtv shipment. If there are items within these containers, reservation would be removed and will be moved to available or unavailable depending on where it was reserved from. A message is published to the merchandising system on the inventory reversal.
■ Delete: Marks the shipment to ’Canceled’ status.
■ Back: Exits the shipment.
■ External Printing: Displays the External Printing popup to select a printer for the pre-shipment notice and manifest documents.
■ Print: This option allows you to select formats and print various reports and container labels. The RTV Shipment report and the BOL Detail report will be available on this screen. This option will always be available regardless of the shipment or container status.
Edit CFAs Screen
Figure 8–13 Edit CFAs
The Edit CFAs screen displays the list of CFAs (flexible attributes) that have been set up for RTV shipment, in the desktop application and lets you enter values for them. The CFAs that are set up as 'Required' must have a value entered for it before dispatching the shipment. The value can be one of the following: Date, Text, Decimal, Long depending on the 'data type' set up for the CFAs, while creating them in the desktop application. Appropriate security permission is needed and the shipment must be in editable state for entering CFA values.

Functionality
8-16 Oracle Retail Store Operations Cloud Service User Guide
Shipment Info
Figure 8–14 Shipment Info Screen
The Shipment Info screen is accessed by clicking the Info menu option in the RTV Ship Container screen footer menu. This screen is a view only screen and lists details about the return shipment such as:
■ Supplier
■ Not After Date
■ Auth Number
■ Return Type
■ Total number of containers
■ Total SKUs
■ Create Date/User
■ Submit Date/User
■ Dispatch Date/User
■ CFAs

Functionality
RTV and RTV Shipment 8-17
BOL Detail
Figure 8–15 BOL Info Screen
The BOL Info screen is an informational screen that contains read-only information about the carrier details for the shipment. This screen is view only and the details are managed on the Edit Shipment screen. Details include:
■ BOL ID
■ Dispatch Date
■ Auth Number
■ Motive
■ Pickup Date
■ Ship to Address
■ Carrier Type
■ Carrier
■ Carrier Service
■ Carrier Address (if entered)

Functionality
8-18 Oracle Retail Store Operations Cloud Service User Guide
Edit Shipment
Figure 8–16 Edit Shipment Screen
The Edit Shipment screen is used to enter details for the shipment including transportation details. Details include:
■ Not After Date
■ Auth Number
■ Return Type
■ Tax ID
■ Motive
■ Pickup Date
■ Ship to Address
■ Carrier Type: Default based on the store parameter 'RTV shipment Carrier Default' but can be modified if necessary. For carrier types of Third Party, the Service will need to be selected.
■ Carrier
■ Carrier Service
■ Carrier Address
The Carrier information is locked down once the container has been confirmed. At that time, the Adjust Carrier button will be available to move the containers back to ’In Progress’ to make changes to the carrier and other shipment details.

Functionality
RTV and RTV Shipment 8-19
RTV Ship Container Items
Figure 8–17 RTV Shipment Container Items Screen
The RTV Shipment Container Items screen can be reached once you tap on a container from RTV Ship Container screen. Many functions can be performed through this screen:
■ Add items to a container with reason codes for each item. If the user scans a VPN, a validation is done to ensure that the VPN scanned belongs to the supplier associated to the delivery.
■ The user will navigate to the Item Detail screen for the item scanned. If the item scanned is a UIN item, the user will navigate to the UIN tab within the Item Detail screen.
■ Items and quantities can be defaulted from an approved RTV document.
■ Items with Non-Inventory Indicator as Yes are also allowed to be in the transaction and you can enter ship quantity for these items.
■ Item can be added to the container manually which are not on the original RTV document. UOM is selected at the Mode bar of the screen and hence applies to all the items on the container. Toggling the UOM at the Mode bar will change the UOM and convert the quantity at the line item level.
■ You may choose to add notes to the container.
■ You can save, confirm, and delete a container from this screen.
■ Hierarchy limitation for the container can be defined from this screen.
■ UIN icon is displayed if the item is an UIN required item with Serial number or AGSN type.

Functionality
8-20 Oracle Retail Store Operations Cloud Service User Guide
Footer Menu
The menu functions include the following:
■ Info: Accesses the Info popup.
■ Notes: Accesses the notes dialog to capture notes.
■ Edit Container: Allows you to enter Container ID, weight, package size, tracking id, and so on. See Edit Container story for additional details.
■ Edit CFA: Lets you enter values for the CFAs that are set up for RTV Shipment Containers.
■ Default Item: Allows you to pull approved items from approved RTV documents to the shipment. This option is only available for shipments created for a return request.
■ Adjust: Allows you to move the container back to an editable state after it has been confirmed. User needs the necessary permission to adjust a container.
■ Confirm: Allows you to complete the container with no further edits. Appropriate security permission is necessary to confirm a container. The status of the container moves to 'Completed' status.
■ Save: This menu option will be available on the menu when the screen is in edit mode.
■ Cancel: Exits the screen without saving the changes made, if any. This option will be available when the screen is in edit mode.
■ Back: This allows you to exit the screen. This menu option will be available on the menu when the screen is view only.
■ Delete: This option will allow you to cancel the container. Reserved inventory is relieved appropriately and any RTV documents associated will set back the remaining quantities. Appropriate security permission is necessary to delete a container.
If the container contains UIN items, the UIN state should be set back to their previous state.
■ Print: This option allows you to select formats and print various reports and container labels. The RTV Shipment Container report will be available on this screen. This option will always be available regardless of the shipment or container status.

Functionality
RTV and RTV Shipment 8-21
Item Detail (Container)
Figure 8–18 Container Item Detail Screen
The Item Detail screen is used when selecting or scanning an item from the Container Items screen. Scanning or entering an item on this screen in the scan bar updates the quantity per the scan mode and refreshes the item detail screen for the item and quantity scanned. The quantity can be edited and updated manually if permissions allow. If the user scans a VPN, a validation is done to ensure that the VPN scanned belongs to the supplier associated to the delivery. The user will navigate to the Item Detail screen for the item scanned. If the item scanned is a UIN item, the user will navigate to the UIN tab of the Item Detail screen.
Items with Non-Inventory indicator as Yes are also allowed to be in the transaction and you can enter ship quantity for these items.
The item information includes the image that is system configured to display in the header. The bottom portion of the screen contains information fields showing:
■ Inventory Quantity
■ Remaining Quantity
■ Ship Quantity
■ Reason Code
■ Sub-Bucket (if sub-buckets are enabled, for unavailable inventory only) pertaining to the bucket stock is coming from.
■ Last Scan will display the details of the last scanned barcode at the bottom of the screen.
■ The UIN tab appears for you to navigate to the UIN details if the item is UIN item and the system is enabled for UIN processing for the store.
■ The Extended Attributes tab enables the user to view/capture Extended Attributes for the item. If the item is not configured to capture extended attributes or there are no extended attributes captured, the list will be empty.

Functionality
8-22 Oracle Retail Store Operations Cloud Service User Guide
The Footer menu (ellipsis button), contains a Reset function as well as Remove and Restore functions. Page through existing items in the container using the RTV Container Default Item navigating arrows on the bottom.
RTV Container Default Item
Figure 8–19 Default Item Screen
This screen allows you to pull approved items from approved RTV requests to the shipment. This screen is accessed from the RTV Ship Container Items screen of an approved request and this is only available for shipments created for a request.
The screen defaults items into the RTV Ship Container Items screen through the ’Apply Item’ and ’Apply Item and Quantity’ options. Apply item will default selected items to the container, while Apply Quantity will default the selected items and the corresponding remaining quantities.
Items that fall under the frozen container hierarchy will only be applied to the container. Also, only the items that has reason codes for which you have data permissions would be applied. The container hierarchy is frozen using the 'Limit Items To' feature in the Edit Container screen.
The remaining quantity column informs you about the quantity on the document that is not shipped yet, and can be used. The remaining quantity is not reduced until a container is confirmed for shipping.

Functionality
RTV and RTV Shipment 8-23
Container Info
Figure 8–20 Container Info Screen
The Container Info pop-up appears when a user clicks the Info menu option on the Footer menu of RTV Container Items screen. The Info (Container) is an informational popup containing read-only information about the header level of the container.
Details include:
■ ID
■ Container ID
■ Shipment ID
■ RTV ID
■ Status
■ Supplier
■ Create Date/User
■ Updated Date/User
■ Approve Date/User
■ Total SKUs/Remaining/Quantity
■ Package Type/Weight/Tracking ID
■ Container Hierarchy Limit

Functionality
8-24 Oracle Retail Store Operations Cloud Service User Guide
Edit Container
Figure 8–21 Edit Container Screen
The Edit Container screen is used to enter details for the container including transportation details. Access to this screen is from the Footer menu on the Container Items screen. Details include: ID, Container ID, Package Type, Weight, Tracking ID, and container restriction by hierarchy. The inventory status and the container restriction by hierarchy are locked down once the first item has been added to the container.
Limit Items to (Hierarchy Restriction)
If you want to set up the container to restrict the container to hold the same type of items, they can set up the container to restrict by department, class, and subclass. You do not select the actual department, but rather set the hierarchy level you want to restrict by. When the first item is added to the container, the department, class, and/or subclass is set for the container based on the hierarchy the item is part of. The container detail screen will display the hierarchy that is locked in. Any items added subsequently must match the hierarchy of the first item. For example, if the restriction was set up to limit items to the same department and the first item added was for the Women's Department, only items that match the Women's Department can be added to the container, but it will not matter which class and subclass the item is in since the hierarchy level is set at Department.
The hierarchy level is auto defaulted depending on the permission you have been given.
If manifesting has been configured, the package type and weight may be required by the carrier selected for the shipment before you can confirm the container.
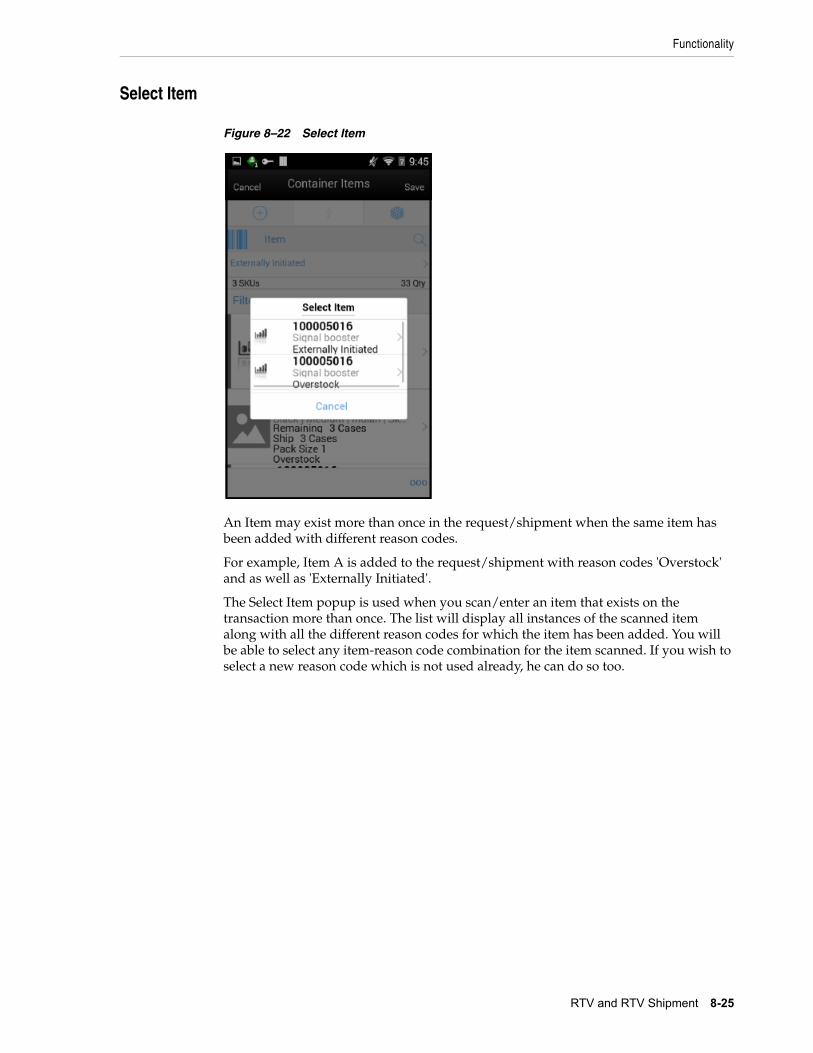
Functionality
RTV and RTV Shipment 8-25
Select Item
Figure 8–22 Select Item
An Item may exist more than once in the request/shipment when the same item has been added with different reason codes.
For example, Item A is added to the request/shipment with reason codes 'Overstock' and as well as 'Externally Initiated'.
The Select Item popup is used when you scan/enter an item that exists on the transaction more than once. The list will display all instances of the scanned item along with all the different reason codes for which the item has been added. You will be able to select any item-reason code combination for the item scanned. If you wish to select a new reason code which is not used already, he can do so too.

Functionality
8-26 Oracle Retail Store Operations Cloud Service User Guide
ProcessingWhen a return document is saved or updated from the RTV shipment, the system moves the items from either Available or Unavailable (non-sellable) inventory, based on the inventory status, and moves it to the Reserved bucket within unavailable inventory. The Return to Vendors uses the RTV Reserved bucket. Upon dispatching of the return, the Reserved buckets will be relieved and the stock on hand will be decremented. If sub-buckets are turned on, the appropriate sub-bucket associated with the return reason will be updated when returning from unavailable inventory.
Example 1: Return to Vendor using Available Inventory
Item Lookup before:
Store A:
■ Total SOH = 706
■ Available SOH = 706
■ Total Unavailable SOH = 0
■ RTV Reserved = 0
1. The user creates an RTV to move inventory from Store A to the Vendor using available inventory.
2. The user enters a return quantity of 6 and clicks Approve.
3. A quantity of 6 is placed into the reserved bucket in both the Store Inventory system and Merchandising. Merchandising is updated through sending a mod message.
4. The retail ordering system takes into account the saved (reserved) quantity when replenishing the item through its regular ordering (auto-replenishment) process.
5. Total SOH - Non sellable (Adjustment Unavailable Qty) - Transfer reserved quantity - RTV reserved quantity - Customer Reserved Qty = Available Quantity
Store A:
■ Total SOH = 706
■ Available SOH = 700
■ Total Unavailable = 6
■ RTV Reserved = 6
Note: Unavailable is a total of all sub-buckets.
6. Modify Return Qty to 8 and click Dispatch.
Item Lookup:
■ Total SOH = 698
■ Available = 698
■ Unavailable = 0
■ Reserved Qty = 0
Example 2: Return to Vendor using Unavailable Inventory
Item Lookup before:

Item Lookup Database
Total SOH = 800 RTV_Quantity =0
Available = 700 Nonsellable (Adjust Unavail) = 100
Unavailable = 100
Nonsellable = 100; Sub-bucket: Trouble 75, Admin 25
RTV Qty = 0
Functionality
RTV and RTV Shipment 8-27
1. The user creates a shipment and enters a return quantity of 10 (unavailable) and clicks Save.
Item Lookup Database
Total SOH = 800 RTV_Quantity =10
Available = 700 Nonsellable (Adjust Unavail) = 90
Unavailable = 100
Nonsellable = 90; Sub-bucket: Trouble 65, Admin 25
RTV Qty = 10
Note: The available quantity will still display as 700 on the UI and reports.
2. Modify Return Qty to 12 and click Dispatch.
Item Lookup:
■ Total SOH = 788
■ Available =700
■ Unavailable = 88
■ Nonsellable = 88; Sub-bucket: Trouble 63, Admin 25
■ RTV Qty = 0

9
Shipping and Receiving Common Components 9-1
9Shipping and Receiving Common Components
OverviewThe shipping and receiving functions in the mobile application have several common components. The following functional areas are included: Customer Order Deliveries, Return to Vendor Shipments, and Transfer Shipping/Receiving for store, warehouse, and external finisher. They include tasks usually performed by shipping or receiving associates. This also includes integrating to a third-party manifesting system for rate shopping to find the least expensive delivery method.
The feature of shipping and receiving available in mobile is:
■ Manifest web services for rate shopping
ManifestingManifesting systems help retailers create manifest documents, Bill of Lading (BOL), shipping container labels for shipments, and reduce cost through rate shopping by finding the least expensive delivery method for the given shipping criteria.
For larger shipments, multiple containers may exist and each container requires a separate tracking ID. For RTV Shipment and Transfer Shipment, the manifesting service will be called when confirming each container. The carrier and service are required to be the same for all containers within the same shipment. The container and shipment are all inclusive for Customer Order Deliveries.
Business CaseA user creates a shipment (store, warehouse, finisher, customer order delivery, or return to vendor) and enters in the package type of "Small" and Weight of 2.3 lbs. The Manifesting system will do the rate shopping for the carrier and service and automatically print out a label for the package.

Overview
9-2 Oracle Retail Store Operations Cloud Service User Guide
Figure 9–1 Integration - Flow-Ship Container
The above flow shows the confirmation of a container and how a call is made to the manifest system. The flow is highlighted in different colors to help identify different integration points.
When you confirm each container for an RTV or Transfer shipment, the system can invoke the web service to provide the required shipment details to the manifesting system and subsequently return a tracking ID for each container.
After all containers have received their tracking ID, you can ship the shipment, or an external system indicates to the Store Inventory system that the shipment is dispatched.
Note: Customer Order Deliveries only use the web service at submit or dispatch since the shipment will always be a single container.
If the Store Inventory system is configured to publish a pre-shipment, it sends the pre-shipment notice to the pre-shipment system.
If the carrier must be changed for the shipment with transfer shipment or RTV shipment, you adjust the carrier, which will cause all containers to move back to ’In Progress’. Once the shipment has been dispatched, you will no longer be able to adjust the carrier.

Mobile
Shipping and Receiving Common Components 9-3
Figure 9–2 Customer Order Delivery Flow
The above flow represents when a Customer Order Delivery is dispatched and a call is made to the manifest system. The flow is highlighted in different colors to help identify different integration points.
MobileFeatures:
■ Enter Carrier BOL Information
■ Enter Container ID, Weight, Package Type, and Tracking ID
■ View Carrier BOL Information
■ Set External Printer
■ Print Reports
You have the ability to enter the carrier details for Transfer Shipments, RTV Shipments and Customer Order Deliveries. You can access the Edit Shipment screen by navigating to the Shipment and selecting Edit Shipment from the Footer menu.

Mobile
9-4 Oracle Retail Store Operations Cloud Service User Guide
Edit Shipment
Figure 9–3 Edit Shipment Screen
For Transfer Shipments, if the shipment is for sending items to a warehouse or finisher, you have the option to enter an Authorization Number. This is not applicable to Transfer to Store or Customer Order Deliveries. Security permissions exist to enter an Authorization Number.
In order to prepare the shipment for manifesting, you are required to enter the carrier information on this screen. When the carrier Type is Third Party and the Carrier Service is a (P) parcel service, the manifesting service is called when you confirm the container. Security permissions exist for you to edit the Carrier BOL information.
MotiveThe motive for the shipment is based on the functional area and sequence number. The code with the sequence of 1 will be displayed by default. You can create and manage Motives through the desktop application.
Carrier and Service SelectionThe carrier type is defaulted based on the store parameter 'Carrier Default' set up for each type of transaction (store, finisher, warehouse, and RTV).
Delivery Type Default Carrier
Customer Order Delivery Third Party if the customer has identified a carrier to use on the customer order. If no carrier is identified on the customer order the Sender.
Ship To Customer Sender
Pick Up Receiver

Mobile
Shipping and Receiving Common Components 9-5
If the carrier type is Third Party, the Carrier is available for selection. This field may be overwritten by the manifesting system when used. You may select Other from the list of carriers. If Other carrier is selected, the Carrier Name and Address will be enabled.
When a carrier is selected, a list of services available for the carrier will be selectable. This field may be overwritten by the manifesting system when used in addition to the Carrier. The manifesting service call made can include checking for the best rate and will override what was selected by you.
Shipment Carriers, Shipment Carrier Services, Shipment Weight UOM, and Shipment Package Sizes are setup and maintained in the desktop application.
Each Carrier will have one of three manifest types: (P) Parcel, (H) Home Fleet, and (O) Other. Only carriers with a manifest type of (P) Parcel will be used with the manifesting integration service. Depending on the carrier service, weight and package size may be required. The system will alert you when the information is missing.
Adjust Carrier (Transfer Shipment and RTV Shipment Only)The BOL Details for a shipment gets frozen once the first container is confirmed and cannot be changed without moving all the containers for the shipment back to an ’In Progress’ state. This is done by using the Adjust Carrier feature. The BOL Details can be adjusted until the shipment is dispatched if you have the appropriate permissions. Once you select Adjust Carrier, a new carrier may be selected and each container will need to be reconfirmed to manifest again.
Edit Container
Figure 9–4 Edit Container Screen
The Edit Container screen is only applicable to Transfer Shipments and RTV Shipments, since Customer Order Deliveries shipment and container is all inclusive. You will enter the package type, weight, and other container details from this screen. Security permissions exist for you to edit this screen.

Mobile
9-6 Oracle Retail Store Operations Cloud Service User Guide
If manifesting is used, the manifesting service will return the tracking ID. The Edit Container screen is accessed from the Footer menu of Transfer/RTV Ship Container screen, RTV Ship Container Screen, and Transfer Receiving Container screens. Since the Edit Shipment screen defines the entire shipment, the Edit Container screen is used to identify the package type, weight, and tracking ID for each individual container.
The customer order feature does not use this screen. For customer order deliveries, the package type weight and tracking ID are entered directly on the Edit Shipment screen.
The Transfer Receiving feature also uses this screen to enter Reference Container ID, Damage Reason. The tracking ID may also be captured on this screen.
The validations listed below apply to Transfer Shipments, RTV Shipments, and Customer Order Deliveries. The validations for Transfer Shipments and RTV Shipments are performed at the time of confirming the container, while Customer Order Deliveries performs the validations upon submit or dispatch of the shipment.
Weight and Package ValidationThe weight field is used to enter in the weight of the package. The weight will be entered in the unit of measure based on the store admin Manifest weight UOM.
The package type is used to define the dimensions of package such as Large Envelope, Small Box, Medium Box, and so on. The package type will be selected from a defined list of packaged types in the Carton Dimension table.
Depending on the carrier/service selected for the shipment, the package type and weight may be required (this is only validated when the manifesting system is called). The Shipment Carrier Service table identifies when the weight and package type is required. This table is populated from a data script.
Note that when creating a transfer shipment container or RTV shipment container on the mobile, the carrier is defaulted based upon a store setting, Carrier Default. When the setting is Third Party, the carrier is Other and the service is blank. Therefore, you are not prompted for the weight and/or package type unless the carrier /service had been set as something different.
Tracking IDThe Tracking ID will contain a single ID for tracking the package; it can be entered by you, come from the manifesting system or come from the shipping ASN. It may get overwritten/updated by an external manifesting system. The tracking ID entered within the Transfer Receiving dialog can be leveraged to find a container.

Mobile
Shipping and Receiving Common Components 9-7
External Printing
Figure 9–5 External Printing Screen
This screen can be accessed within the Shipments by selecting External Printing from the Footer menu of Transfer/RTV Ship Containers screen. The external printer can be defined for the pre-shipment and manifest documents. These settings will remain until you log out of the application. This setting is applicable across all functional areas within the mobile application that use the Pre-Shipment and Manifest documents. If the printer is selected for Transfer Shipment, the same printers will be set for Customer Order Deliveries dialog and RTV Shipment and vice versa.

Mobile
9-8 Oracle Retail Store Operations Cloud Service User Guide
Figure 9–6 Print
The Print dialog is accessed when selecting print within the mobile application. It is available when selecting print from the footer menu within a transaction.
The transaction format type or types that are applicable to the functional area will be available for selection. For example in Customer Order Deliveries, there may be format types of Customer Order Delivery and BOL. If there is only one applicable format type for the functional area it will be defaulted.
Once a format type is selected, the system will list all of the reports that are available to print for that format type. The report will default based upon the default format type. You can choose to select a different report format to print if other report formats exist for this format type transaction. Once print has been selected for the report, the PDF is retrieved based upon the report format.

10
In Store Replenishment 10-1
10In Store Replenishment
This chapter covers shelf replenishment. The following topics are covered:
■ Overview
■ Business Cases
■ Screen Flow
■ Functionality
OverviewThe replenishment process attempts to ensure that the shop floor inventory is set at a level best suited for enticing customers to buy a product and to prevent empty shelves. Shelf replenishment functionality within the mobile application is related to the movement of goods from the back room to the shop floor and shop floor to back room. For example, when a certain soda quantity is low, you can initiate a replenishment process so that more of the soda is moved from the back room. Similarly, if there is excess stock on the shop floor, the mobile application supports processes to move inventory to the back room. Some of the processes require capacity setup and some form of plan-o-gram sequenced data, while others do not.
Figure 10–1 Shelf Replenishment
Overview
10-2 Oracle Retail Store Operations Cloud Service User Guide
Shelf replenishment-related processing within the mobile application includes the following features:
■ Six different replenishment methods:
– Capacity algorithm based on stock level percentages
– Sales based
– Gap empty shelf scanning
– Display stock replenishment
– Receiving on the shop floor
– Automatic
– Print Reports
■ The system can calculate the optimal quantity of inventory on what should be held on the shop floor to prevent empty shelves
■ On demand generation of pick lists with real-time data
■ Store employees are driven to replenish the most urgently needed items first
■ Optional item location guidance when picking items by back room micro sequence
■ Formal or informal picking dialog
■ Ad hoc update shop floor and back room process to balance and correct inventory positions
■ Optional substitution when lacking inventory
■ Within day partial or end of day full replenishment pick lists for user efficiency
Capacity replenishment uses shop floor capacity and back room inventory positions to calculate a pick list optimized to keep shelves on the shop floor well stocked. You have to indicate how many cases you want to replenish and which items by selecting the product group. This method is focused on those retailers and items which have a well-defined plan-o-gram.
The capacity-based replenishment method is best used by retailers who have a structured shop floor where it is easy to define capacity, items are fairly static, and multiple units are on the shop floor. This is especially useful for grocery retailers and mass merchandise retailers. The structured shop floor is important to this method since there is an inherent cost involved with the need to understand how much capacity exists on the shop floor. A dynamic environment with continuously changing assortments or single item counts often is too costly to maintain the plan-o-gram shop floor capacity.
Capacity based requires you to define product group components using the product group dialog which will be used to generate the pick list.
Gap scanning is focused on those retail environments who want to have a very simple easy to use shop floor replenishment system. You can scan items on the shop floor which become a back room pick list for someone to pick items on and bring to the shop floor.
Sales-based shelf replenishment is based on a process that records all sales coming into the store. The sold item is added to the pick list based on merchandize hierarchy. Similar to the ad hoc scanning process, this does not require plan-o-gram information. Sales-based shelf replenishment is especially well suited for fashion retailers who have constantly changing assortments and have many low, or even single instance items like special shoe sizes or undergarments.

Business Cases
In Store Replenishment 10-3
Display Stock is a replenishment method specifically geared towards single unit items that are used to sell to customers and are related to each other by style. The process allows a user to scan the items they have on the shop floor. The system will generate a pick list for those styles and differentiator combination not represented on the shop floor.
The Display List type shelf replenishment helps you to scan a list of items available on the shelf and create a list and compare it with the product group and identify the gap and replenish. The product group dialog allows you to select the diff through which the replenishment would be done. The Display list method requires you to define outside of the product group components to also define the differentiator. The combination of differentiator and product group used with a scanned list will provide you with a list of items that were not scanned.
Business Case example: A handbag retailer displays all the colors within a style for purses. Susan finds the perfect burgundy colored purse, picks it up from the shop floor, and goes to a sales counter. The sales associates on the sales floor do not notice that that particular color/model is not displayed anymore. Jane looked at a magazine and really wanted to have the featured red colored purse, but when shopping for that specific purse she does not see it on the shop floor and assumes it has sold out or was never carried. She decides to walk out of the store without a purchase and look at a different purse vendor who may have the red colored purse.
This scenario could easily have been resolved by the sales associate scanning periodically the items that are displayed on the shop floor and generating a list of missing items in inventory using the display replenishment methods.
Shop floor receiving will allow the receiving associate to indicate if they are receiving in the back room or directly on the shop floor. This method is most often used with those retailers that have daily deliveries and move delivered quantities directly to the shop floor since most of the delivered quantities are just in time deliveries as is the case in the grocery environment.
The automatic option will refresh the store shop floor quantities based on capacity and available inventory for a specific merchandise selection. This feature can be used by those retailers who have a process where the store is brought back into a refreshed state at the end of the day and do not want to run manual or calculated pick lists. Another possible scenario could be when a large refresh is required due to significant plan-o-gram changes or when initially configuring a store.
Business CasesTwo business case examples are shown below:
Replenishment of Shop FloorThis operation will help a retailer to move goods from the back room to the shop floor. This is done to achieve a better fill rate at the store; the more shelf space is utilized, the better sales. This is possible even if a retailer is not using sequencing.
Moving Items to the BackroomMoving of Items from Shop floor to the Backroom is possible. It helps a retailer to move extra goods from the shop floor, which could be an outcome of receiving the delivery at the shop floor itself or incorrect movement of goods. For example, if a retailer receives a delivery at the shop floor but there is not enough space to keep the full delivery, then the retailer can use this functionality to move the goods to the

Screen Flow
10-4 Oracle Retail Store Operations Cloud Service User Guide
backroom which are not required for that moment on shop floor. Secondly, if due to manual intervention there has been a movement of goods from the backroom to the shop floor and the shop floor cannot accommodate that much quantity, the retailer can push back the excess quantity to the backroom.
Screen Flow
Figure 10–2 In Store Replenishment Mobile Screen Flow
You can access the In Store Replenishment dialog from the Drawer menu on the mobile application.
The In Store Replenishment module in the mobile application contains Replenishment, Shelf Adjustment and Scan List features.

Functionality
In Store Replenishment 10-5
FunctionalityThis section describes the available screens for:
■ Replenishment
■ Shelf Adjustment
■ Scan List
Replenishment■ Replenishment Pick List
■ Replenishment List Search Criteria
■ Create Replenishment Pick
■ Replenishment Pick Items
■ Substitute Items
■ Receive on Shop Floor
Replenishment Pick List
Figure 10–3 Replenishment Pick List
The Replenishment Pick List screen can be accessed from the In Store Replenishment menu. When you access this screen, the system will by default list the New and In Progress pick list.
The Replenishment Pick List screen allows you to create a new pick list by selecting the Create button. All types of replenishment lists are displayed with the total quantity to pick. When you select a replenishment list the system takes you to the
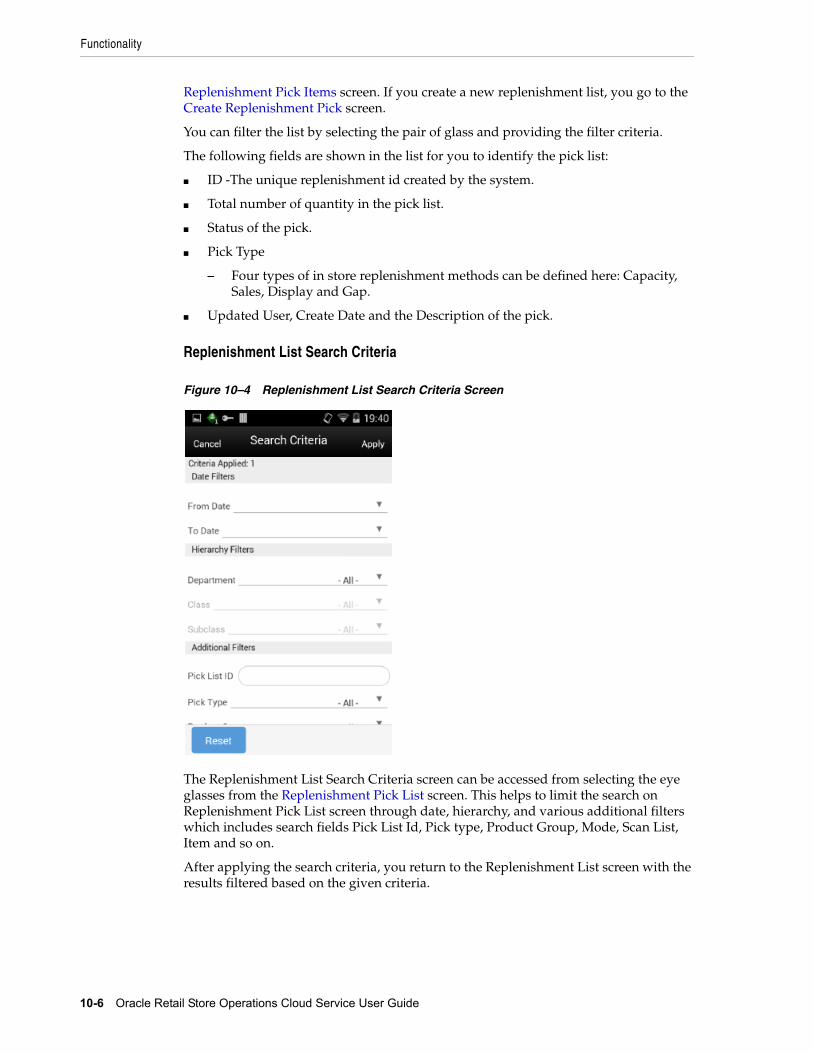
Functionality
10-6 Oracle Retail Store Operations Cloud Service User Guide
Replenishment Pick Items screen. If you create a new replenishment list, you go to the Create Replenishment Pick screen.
You can filter the list by selecting the pair of glass and providing the filter criteria.
The following fields are shown in the list for you to identify the pick list:
■ ID -The unique replenishment id created by the system.
■ Total number of quantity in the pick list.
■ Status of the pick.
■ Pick Type
– Four types of in store replenishment methods can be defined here: Capacity, Sales, Display and Gap.
■ Updated User, Create Date and the Description of the pick.
Replenishment List Search Criteria
Figure 10–4 Replenishment List Search Criteria Screen
The Replenishment List Search Criteria screen can be accessed from selecting the eye glasses from the Replenishment Pick List screen. This helps to limit the search on Replenishment Pick List screen through date, hierarchy, and various additional filters which includes search fields Pick List Id, Pick type, Product Group, Mode, Scan List, Item and so on.
After applying the search criteria, you return to the Replenishment List screen with the results filtered based on the given criteria.

Functionality
In Store Replenishment 10-7
Create Replenishment Pick
Figure 10–5 Create Replenishment Pick Screen
The Create Replenishment Pick screen is used to create a new shelf replenishment pick list based on various criteria specified by you. This screen is accessed by selecting the Create button from the Replenishment Pick List screen.
You are able to create four different types of shelf replenishment lists: Capacity, Sales, Display, and Gap based replenishment lists.
Based on the replenishment list type selected, some fields will display while others will not.
Replenishment List Types Capacity (Algorithm Based on Stock Level Percentages)
Capacity-based replenishment is dependent on the capacity defined for an item in sequencing at the shop floor. A user can choose to replenish within the day or end of the day. The difference between the capacity quantity and the actual stock on the shop floor becomes the suggested quantity to replenish. If you choose to replenish the stock within the day, you also have an option to enter a quantity to replenish taking into account the manpower availability. If you choose to replenish at the end of the day, it is assumed that you will have sufficient manpower and be able to replenish the full deficit.
Capacity-based replenishment uses the difference of the shop floor capacity and the shop floor quantity to calculate the gross need of how many units need to move to the shop floor. This need is constrained by several factors, how many units are present in the back room and how many units do you actually have time to pick and move to the shop floor.
Capacity-based replenishment uses a specific algorithm to define the optimal method to replenish the shop floor quantity:
■ The total capacity equals the sum of capacity for all shop floor locations.

Functionality
10-8 Oracle Retail Store Operations Cloud Service User Guide
■ The Out of stock % equals the total capacity minus the shop floor quantity divided by the total capacity times 100.
Calculation:
■ The Gross Need Units equals the total capacity minus the shop floor quantity.
■ The item list is sorted in the order of percentage Out of stock.
■ The Net Need calculation uses the total capacity, total max fill percentage, and the mode.
■ The total available replenish quantity equals the back room plus the delivery bay stock. This step is only used when checking available stock on hand.
■ The fill quantity equals the Net Need or the total available, whichever is smaller.
■ The Within day fill will create a list until units replenished meet the within day fill quantity.
■ The End of day fill will create a list with all items needing replenishment.
Sales Based
Sales-based replenishment uses a concept in which the shop floor is intact and accurate every morning. As units are sold, new units will take their place. Often if a unit is sold out, because of limited availability, a substitution will be used to replenish. When the substitute is sold, the substitute will be replenished. The advantage of this type of method is sequencing is not required, since everything replenished is based on sold units.
A user can choose to replenish within the day or at the end of the day. If you choose to replenish within the day, they have an option to enter the quantity they have time to replenish. This replenishment quantity is restricted by the quantity entered by you, and is pro-rated. If you choose to replenish at the end of the day, it assumes sufficient manpower will be able to replenish the suggested quantity.
This method is mostly used by fashion retailers who have no defined capacity and many items that are single size/color/style items. It often is used in conjunction with substitution to allow them to keep the shop floor looking filled by substituting the sold unit with one that is in the back room.
Note: This method will often be used with the option to ignore available inventory. This allows "out of stock" items on the replenishment list to be substituted.
Gap Scanning (Empty Shelf Scanning)
The Gap scanning method replenishment is the easiest method of all the various types of shelf replenishment. With this method, you scan the goods that need replenishment and a replenishment list is created from the units scanned.
The system uses this replenishment list to move the goods from the back room to the shop floor based on back room availability. The reason to have a separate process between scanning and generating is that one user can create a list and another user can execute the shelf replenishment allowing for distribution of workload.
Since this process does not have a dependency with either sales or capacity, it gives an advantage to the retailer to move goods without any complex setup.

Functionality
In Store Replenishment 10-9
Display (Sales Floor/ Shop Floor)
The shelf replenishment method of Display stock replenishment is fully based on the idea that if a customer does not see the item on the shop floor, they do not know the item exists.
This method provides a way to reduce the inefficiency of receiving new styles in the back room, and not having full knowledge of what is displayed and what should be moved from the back room to the shop floor.
The generic process is you will scan all display stock items, and then compare them against a product group with all the styles available for that department. You will then identify what is the differentiator needed to be displayed on the floor. Often this is color.
Because this type of method is often used in a fashion setting, it does not require sequencing or capacity at all. Capacity need is always one item per primary differentiator.
A product group is required to set up with all the items on a shelf. The following table is an example which shows six items with various colors and sizes. In order for the comparison between shop floor display and back room, all of the items need to be set up in the product group.
Next, a shelf adjustment list needs to be created by scanning the items on display. For this example, you only have item 124 on the display shelf.
Item ID Diff 1 Diff2
123 Black S
124 Black M
125 Black L
234 Red S
235 Red M
236 Red L
While creating the product group, you selected to sort by the color. Since the scanned item is black, the sorting is by color. The system will try to find a different color available in the back room. After the comparison between the two lists, the system tells you item 236 needs to be replenished.
Note: The suggested red item to be replenished will depend on available back room inventory and the sort of the second differentiator. If Diff 2 had been defined differently, such as L = 10, M = 08, and S = 06, then item 234 would have been recommended instead for replenishment.

Functionality
10-10 Oracle Retail Store Operations Cloud Service User Guide
Replenishment Pick Items
Figure 10–6 Pick Items
This screen is accessed by selecting a replenishment list from the Replenishment Pick List screen or when creating a new pick. You need proper permissions to reach this screen. Selecting an item from the pick items will take you to the Item Detail screen.
You can access the footer menu by selecting the ellipsis button and perform various functions like viewing the Information of the pick, Default the pick quantity with the actual quantity, confirm the pick, edit CFAs, save, cancel, print, and go back and delete the pick.

Functionality
In Store Replenishment 10-11
Replenishment Info
Figure 10–7 Replenishment Pick Items Info Screen
The Replenishment Info screen is accessed by selecting info option from the Replenishment Pick Items screen.
This screen provide the information about the pick which includes the Pick List Id, Pick type, Product Group, hierarchy info, scan list and so on.
This screen will also display the CFAs captured for the replenishment pick list.
This is an informational popup screen and it is read only.

Functionality
10-12 Oracle Retail Store Operations Cloud Service User Guide
Edit CFA Figure 10–8 Edit CFAs
The Edit CFAs screen displays the list of CFAs (flexible attributes) that have been set up for Replenishment Pick List in the system. This screen allows you to capture values for them. The fields displayed here are based on what is setup for the Replenishment Pick List. The CFAs that are set up as 'Required' must have a value entered for it before confirming the pick. The value can be one of the following: Date, Text, Decimal, Long depending on the 'data type' set up for the CFAs, while creating them in the mobile application. Appropriate security permission is needed and the list must be in editable state for entering CFA values.

Functionality
In Store Replenishment 10-13
Replenishment Pick Item Detail
Figure 10–9 Replenishment Pick Item Detail
This item detail screen is accessed by selecting an item or when scanning an item from the Replenishment Pick Items screen.
User may also scan the same item or a different item from this screen. The information will be retained for the replenishment pick list you are currently working in, until you leave the replenishment pick list. Select Save from the Replenishment Pick Items screen to permanently save the item information. There is no Save on the Item Detail screen.
Scanning or entering an item on this screen will refresh this screen for the item scanned/entered.
The substituted field displays whether an item has substitute item(s) associated with it and if selected it also allows you to navigate to the substitute items screen to add substitute items.
At the bottom of the screen the details of the last scanned barcode will be displayed.
You can access the footer menu by selecting the ellipsis button to reset the item or go to substitute items screen.

Functionality
10-14 Oracle Retail Store Operations Cloud Service User Guide
Substitute Items
Figure 10–10 Substitute Items Screen
The Substitute Items screen is used to find a substitute item when the requested item has no inventory. The Substitute Items screen can be accessed from the Replenishment Pick Item Detail screen by tapping the Substituted field. Using item substitution helps maintain a better fill rate within different areas of the store. The substitutions can be recommended by corporate or they can be ad hoc picked depending on system settings. Depending on security permissions, you can be restricted to just the corporate items or be free to select anything you want.
Receive on Shop FloorThe system allows you to indicate whether the inventory is received on the shop floor directly. The edit container screens in DSD Receiving and Transfer Receiving dialogs support to receive inventory on the shop floor. You can mark the check box Receive on shop floor. You can refer the screens in the respective sections for more details.

Functionality
In Store Replenishment 10-15
Shelf Adjustment■ Shelf Adjust List
■ Create Shelf Adjust
■ Shelf Adjust Items
Shelf Adjust List
Figure 10–11 Shelf Adjust List Screen
The Shelf Adjust List screen will list the Shelf Adjustment lists that are In Progress.
You can access this screen by selecting the Shelf Adjustment menu from the In Store Replenishment menu which is available on the drawer menu.
The list includes the Move to Back Room, Update Shop Floor and Update Back Room types of shelf adjustment.
You can find the Shelf Adjustment Id, total number of items, current status, type, and the date for the each adjustment list on this screen.
The Create button on this screen takes you to the Create Shelf Adjust Screen to create a new shelf adjustment list.
You can filter the list using the search criteria screen by selecting the eye glasses.

Functionality
10-16 Oracle Retail Store Operations Cloud Service User Guide
Create Shelf Adjust
Figure 10–12 Create Shelf Adjust Screen
The Create Shelf Adjust popup screen appears when you create a new Shelf Adjust by selecting the Create button on the Shelf Adjust List screen.
Select the Shelf Adjust type to create and select the Apply button to create a new list. After applying the system creates a new shelf adjustment and takes you to the Shelf Adjust Items screen.
You can create any of the following types of shelf adjustment:
■ Move to Back Room:
When this list is created, the quantities scanned will be moved from the shop floor to the Back room. The quantity scanned will be subtracted from the Shop floor and added to the Back Room inventory
■ Update Shop Floor:
When the list is created, the quantities scanned will update the current available Stock On Hand on the Shop floor and replace the current quantity.
■ Update Back Room:
When the list is created, the quantities scanned will update the current available SOH in the Back Room and replace the current quantity.

Functionality
In Store Replenishment 10-17
Shelf Adjust Items
Figure 10–13 Shelf Adjust Items
This screen is accessed by selecting a shelf adjust list from the Shelf Adjust List screen or when creating a new shelf adjustment. You need proper permissions to reach this screen. Selecting an item from the shelf adjust items will take you to the Item Detail screen.
You can access the footer menu by selecting the ellipsis button and perform various functions like viewing the information of the shelf adjust, Edit CFAs, confirm the shelf adjustment, save, cancel, print, and go back or delete.
The list displays the following fields with the image if configured.
Item Id, Description, Scan quantity, UOM and Pack Size.
The list also shows the following icons:
■ Remove Item (trash can icon) - Selecting Remove Item will flag the item in the list of items for removal.
1. Remove Item will be displayed upon swiping a line item from the list of items in the Shelf Adjust Items screen.
2. User must have the Edit Shelf Adjustment security permissions to remove items from a shelf adjustment.
3. The shelf adjustment must be in edit mode to remove an item.
■ Restore Item (circle arrow/undo icon) - Restore Item button will only be displayed for items marked for removal.

Functionality
10-18 Oracle Retail Store Operations Cloud Service User Guide
Shelf Adjust Info
Figure 10–14 Shelf Adjust Items Info Screen
The Shelf Adjust Info screen is accessed by selecting info option from the Shelf Adjust Items screen.
This screen provides the information about the shelf adjust which includes the Shelf Adjust Id, status, type, SKUs, total quantity, create date, update date and update user.
This is an informational popup screen and it is read only.
This screen will also display the CFAs captured for the shelf adjustment.

Functionality
In Store Replenishment 10-19
Edit CFA Figure 10–15 Edit CFAs
The Edit CFAs screen displays the list of CFAs (flexible attributes) that have been set up for Shelf Adjustment in the system. This screen allows you to capture values for them. The fields displayed here are based on what is setup for the Shelf Adjustment. The CFAs that are set up as 'Required' must have a value entered for it before confirming the adjustment. The value can be one of the following: Date, Text, Decimal, Long depending on the 'data type' set up for the CFAs, while creating them in the mobile application. Appropriate security permission is needed and the adjustment record must be in editable state for entering CFA values.

Functionality
10-20 Oracle Retail Store Operations Cloud Service User Guide
Shelf Adjust Item Detail
Figure 10–16 Shelf Adjust Item Detail
You are directed to the Item Detail screen upon tapping on an item from the Shelf Adjust Items screen.
You will also go to this screen when adding a valid item by scanning/entering from the Shelf Adjust Items screen.
User may also scan the same item or a different item from this screen. The information will be retained for the shelf adjustment you are currently working in, until you leave the shelf adjustment. Select Save from the Shelf Adjustment Items screen to permanently save the item information. There is no Save on the Item Detail screen.
Editable field are displayed at the top with chevrons and non-editable fields are grouped at the bottom of the pane.
Scanning or entering an item on this screen will refresh this screen for the item scanned/entered. At the bottom of the screen the details of the last scanned barcode will be displayed.
The screen will be in edit mode when all of the following conditions are met.
■ You have Edit Shelf Adjustment permissions.
■ The shelf adjustment is in 'New' status.
The screen will be in view only mode when one or more of the following conditions are met:
■ You have no Edit Shelf Adjustment permissions.
■ The shelf adjustment is in 'Completed' status.
You can access the footer menu by selecting the ellipsis button to Reset the item or Remove/Restore the item.
■ If the item is flagged to remove, the item will appear "grayed out" or disabled (just the header information).

Functionality
In Store Replenishment 10-21
Scan List■ Scan List
■ Create Scan List
■ Scan List Items
■ Most Common Functional Process
Scan List
Figure 10–17 Scan List
You can access the Scan List by selecting the Scan List option from the In Store Replenishment menu available on the drawer menu.
You must have proper permissions to access this screen.
The list displays the Display and Gap Scan type of Scan List.
You can create a new scan list by selecting the Create button and the system will take you to the Scan List Items screen for adding the items.
If you is selecting the particular scan list record from the list, the system will take you to the Scan List Items screen with the items listed.
You can filter the scan list records using the search criteria screen by selecting the eye glasses and applying the search criteria.
The screen provides the header level information such as Id, status of the scan list, type and the total SKUs of the each scan list.

Functionality
10-22 Oracle Retail Store Operations Cloud Service User Guide
Create Scan List
Figure 10–18 Create Scan List Screen
The Create Scan List screen is accessed when you select the Create button on the Scan List screen to create a new scan list.
You can create any of the below types of Scan List by selecting the option and applying. After Applying the system creates a new scan list of the selected type and takes you to the Scan List Items screen.
Display Scan:
This list is intended for you to scan the shop floor display items. The list of scanned items will be compared when generating a pick list.
Gap Scan:
For Gap Scanning, you will scan gaps on the shelf. When the list is complete, you can save it and have it executed.

Functionality
In Store Replenishment 10-23
Scan List Items
Figure 10–19 Scan List Items Screen
You can access the Scan List Items screen by selecting a scan list from the Scan List screen or when creating a new scan list after applying the selection on the Create Scan List screen.
This screen displays the items that are in the scan list.
The list displays the following fields with the image if configured.
Item Id, Description, Scan quantity, UOM and Pack Size.
The list also shows the following icons:
■ Remove Item (trash can icon) - Selecting Remove Item will flag the item in the list of items for removal.
1. Remove Item will be displayed upon swiping a line item from the list of items in the Scan List Items screen.
2. User must have the Edit Scan List security permissions to remove items from an Item Scan List.
3. The Scan List must be in edit mode to remove an item.
■ Restore Item (circle arrow/undo icon) - Restore Item button will only be displayed for items marked for removal.
You can access the footer menu by selecting the ellipsis button and perform various functions like viewing the Information of the scan list, Edit CFA, create a pick, confirm the scan list, save, print, and cancel to go back or delete.

Functionality
10-24 Oracle Retail Store Operations Cloud Service User Guide
Scan List Info
Figure 10–20 Scan List items Info Screen
The Scan List Info screen can be accessed by selecting the Info option from the footer menu on the Scan List Items screen.
This screen provides the information about the scan list which includes the Scan List Id, current status of the scan list, type of the scan list, SKUs, total quantity, create date, last update date and user.
This is an informational popup and view only.
This screen will display the CFAs captured for the scan list.

Functionality
In Store Replenishment 10-25
Edit CFA Figure 10–21 Edit CFAs
The Edit CFAs screen displays the list of CFAs (flexible attributes) that have been set up for Scan List in the system. This screen allows you to capture values for them. The fields displayed here are based on what is setup for the Scan List. The CFAs that are set up as 'Required' must have a value entered for it before confirming the scan list. The value can be one of the following: Date, Text, Decimal, Long depending on the 'data type' set up for the CFAs, while creating them in the mobile application. Appropriate security permission is needed and the scan list record must be in editable state for entering CFA values.

Functionality
10-26 Oracle Retail Store Operations Cloud Service User Guide
Scan List Item Detail
Figure 10–22 Scan List Item Detail
The scan list item detail screen can be accessed from the scan list items screen when selecting an item or when entering/scanning a new item to the list.
User may also scan the same item or a different item from this screen. The information will be retained for the item scan list you are currently working in, until you leave the transaction. At the bottom of the screen the details of the last scanned barcode will be displayed.
Select Save from the Scan List Items screen to permanently save the item information. There is no Save on the Item Detail screen.
For this screen to be in edit mode, you must have proper permissions.
This screen will be in view only mode if the status of the scan list is completed.
You can use the arrow buttons on the bottom to navigate items.
You can access the footer menu by selecting the ellipsis button on the bottom and Remove the item, Restore the item if flagged to remove and Reset item.

Functionality
In Store Replenishment 10-27
Most Common Functional ProcessThe following table describes the most common functional processes on the mobile.
VerticalReplenishment Method Complexity Use Case
Item Scan
Pick List Generate
Product Group
Likely Use Back Room/ Shop Floor
Plan-O-Gram
All Gap Scan Simple - Scan items
- Pick
Yes No No No No
All Gap Scan Medium - Scan items
- Generate pick list
- Pick
Yes Yes No Yes Optional
All Update Shop Floor
Simple - Scan items
- Complete updates to shop floor
Yes No No Yes Optional
All Update Back Room
Simple - Scan items
- Complete updates to back room
Yes No No Yes Optional
Fashion Fashion List Medium - Scan items
- Generate pick list based on product group
- Action pick list
Yes Yes Yes Yes No
Grocer Hard Line
Assisted Generation
High - Set parameters
- Create product group
- Action within/end of day pick list
- Pick
No Yes Yes Yes Yes
Fashion Sales Medium - Set up product group
- Action within/end of day pick list
- Pick
No Yes Yes No No
Fashion Sales Simple - Use merch hierarchy
- Action within/end of day pick list
- Pick
No Yes No No No

Functionality
10-28 Oracle Retail Store Operations Cloud Service User Guide
Description of columns in preceding table:
■ Vertical: Type of item vertical.
■ Complexity: Difficulty of execution.
■ Use Case: High-level steps.
■ Item scan: Scan a list of items.
■ Pick List Generate: Generate a pick list or not.
■ Product Group: Is product group setup required?
■ Likely use back room/shop floor quantities: does this replenishment method track inventory at the back room and shop floor or not.
■ Plan-o-gram: This indicates if capacity is required to be set up. Plan-o-gram integration reduces the need to maintain this manually in our system.
Grocer Receive Shop Floor
Medium - Receive transaction
- Indicates receive shop floor
- Update shop floor to max capacity, move rest to back room
No No No Yes Optional
Fashion Auto Shop Floor Update
Simple - Set up product group
- Schedule product group
- End of day, auto update shop floor to capacity
No No Yes Yes No
VerticalReplenishment Method Complexity Use Case
Item Scan
Pick List Generate
Product Group
Likely Use Back Room/ Shop Floor
Plan-O-Gram

11
Stock Counts 11-1
11Stock Counts
This chapter covers stock counts. The following topics are covered:
■ Overview: Introduction to stock counts
■ Functionality: Description of available screens.
OverviewThe desktop application provides the ability to schedule and authorize stock counts whereas the mobile application provides the ability to execute the stock counts.
Portions of the stock count functionality, such as the setup of product groups, schedules, and authorizations, are performed on the desktop application only. Users can configure and execute different types of stock counts such as cycle or annual counts, ad hoc counts, or counts that are based on inventory position or problems like negative stock on hand. Merchandising and individual level counting require setup and scheduling utilizing product groups, with the exception of Ad Hoc counts. The Ad Hoc count will allow you to decide which items you want to count by scanning from the shelf immediately.
Most of these counts can be scheduled to be executed repetitively on certain dates reducing the need for daily or weekly count management.
Because a variance percentage can be set, items within tolerance can, but do not have to be authorized individually.
Business Case
■ Ad Hoc Stock Count
A customer is looking for a blue tooth speaker in the color black. The customer finds the location on the shelf, but there are only bright pink speakers and asks a sales associate if there are any black speakers in the storage room. The sales associate looks up the inventory and the system shows there are three on hand. The sales associate looks in the backroom and cannot locate any in the store and informs the customer and reports to the store manager. The store manager instructs the sales associate to perform an ad hoc stock count to immediately correct the inventory.
■ Unit Stock Count
The dairy department of a grocery retailer orders milk on Tuesdays and Fridays. Before they get the order in, they are always running out of stock. The department manager decides to perform a unit count each day to determine when they are running short or if there might be some pilferage occurring.

Overview
11-2 Oracle Retail Store Operations Cloud Service User Guide
■ Problem Line Stock Count
Due to ineffective receiving processes or supply chain issues, items regularly have negative stock on hand. Inventory control schedules a stock count that tracks this behavior automatically to correct such problems without having to generate manual stock count lists for each store.
■ Unit and Amount Stock Count
The Store Manager is informed when it is time to financially report their store's current value of inventory. The corporate user will schedule the Unit and Amount stock count to be executed by Department and the store manager will schedule additional staff to count all items in the store. Each Department manager will be required to complete and approve their section of the stock count. When complete, the financial value will be associated with each item counted in the store and sent to the merchandising system to have it in a similar way corrected.
Types of Stock CountsEach type of stock count can be useful for a retailer and all play an important part in the management of inventory.
Ad Hoc Stock CountsUnlike the other stock count types, Ad Hoc stock counts are not scheduled, but rather performed at random times when a user decides to correct inventory.
Since this count type is performed randomly, there are no predefined lists and you can scan any item in any order. The scanned items can also be removed from the stock count, if needed.
You can count any inventory item even if the item has been discontinued.
The inventory snapshot is taken as each item is added to the stock count. Snapshot is a process in which the system will capture the current stock on hand quantity. For Ad Hoc counts, discrepancy thresholds are set up differently from other count types by accessing the Ad Hoc Stock Count screen.
Inventory Adjustments will be created and sent to the merchandising system when an inventory change is made in the system.
Unit Stock CountsThe unit stock count must be scheduled. They can be scheduled and executed the same day if you desire. This count type can be setup on a recurring basis: daily, weekly, monthly or yearly.
The items to include in the stock count are identified by setting up a product group. The product groups are a one-time setup and can be reused for future stock counts. Product groups are used for creating the list of items as well as identifying how the stock count is processed. When setting up the stock count, you can define which items to include by selecting by All department, item, supplier, style, item basket, or merchandise hierarchy level. There are various settings used to determine how an item will be identified as being discrepant.
Unit counts are the only stock count type that allows you to select any item status to include in the count. You can also select whether to include items that do not have any stock on hand.
Inventory Adjustments are created and sent to the Merchandising System for any inventory adjustments made.

Overview
Stock Counts 11-3
Problem Line Stock CountsThe problem line stock count is setup once and scheduled to run daily for a period of time. If there are no problem items, a stock count will not be created. Setup of the stock count can be done at the all department, item, supplier, style, item basket, or merchandise hierarchy level. Each day, the system will run the problem batch and find any problem items and populates those items on a stock count. Discrepancy Thresholds are defined the same as the Unit count, but there are additional criteria defined during Product Group Setup. The additional information you can select for the problem line counts includes, Actual Pick Amount less than Suggested Pick Amount and negative available inventory and UIN Discrepancies (Unique Identification Numbers).
Problem line stock counts follow exactly the same workflow as unit counts. The only exception is the product group setup.
Unit and Amount Stock CountsThe Unit and Amount stock counts must be scheduled for a specific date. These stock counts, need to be scheduled at least 1 day ahead of time. When the count is scheduled it is sent to the merchandising system so that it can also create a corresponding stock count.
Item lists are created by merchandise hierarchy or can include all departments. Unit and Amount counts cannot select by item, supplier, style, or item basket, because the merchandising system holds the valuation at the merchandise hierarchy level. Unexpected items can be added during the counting process so long as they are for the same merchandise hierarchy that the stock count was set up for.
The item status and SOH Quantity cannot be selected and are defined by the system. Inventory is updated in the system and a flat file is created with the new SOH quantity, rather than the delta. The file will be sent out externally for other systems such as merchandising.
SummaryThe following figure shows a summary of the similarities and differences between the various types of stock counts.

Overview
11-4 Oracle Retail Store Operations Cloud Service User Guide
Figure 11–1 Summary of Types of Stock Counts
Unit, Problem Line, Unit and Amount stock counts all use predefined items lists and must be scheduled. Ad Hoc stock counts do not use a predefined item list, are not scheduled. The snapshot for Unit, Problem Line and Unit & Amount stock counts is taken for all items on the count at the same time, while the Ad Hoc stock count takes the snapshot as each item is counted. Only the Unit and Problem Line allow the snapshot to be retaken during the recount. Ad Hoc stock counts never use guided counting and as a result files cannot be imported from a Third Party service. Only the Unit stock count can be scheduled on a recurring basis. The Problem Line can only be scheduled daily and Unit and Amount scheduled for a specific date.
Since the Ad Hoc stock count is not defined using product groups, it is the only type of count that does not have a recounting stage.
Counting MethodsThe counting process is identical among Unit, Unit and Amount, and Problem Line stock count types. What differs among these three stock count types is either the setup or the items being counted.
SIOCS includes the following types of counting methods for stock counts:
■ Un-guided
The Unguided count method allows the user to scan any item in any order. When the system parameter 'Unguided Stock Count Allow Multiple Users' is set to 'Yes', an unguided stock count will allow more than one user to scan simultaneously against the same stock count.
■ Guided
In Guided count method, the items are counted based on locations
■ Third Party
Here, the stock count will be done by a third party service provider and the result file will be uploaded into the system for further processing

Functionality
Stock Counts 11-5
SerializationRetailers who sell items such as electronics, cell phones, firearms, medications and fresh items, often have to track unique numbers or attributes for a single item or group of items. These identifiers might be serial numbers, unique identification numbers, FCC IDs, International Mobile Equipment Identity (IMEI) numbers, or other kinds of identifiers. Unique identification numbers aid the retailer in tracking expensive or controlled items, or items that may be subject to manufacturer recalls or investigations by legal authorities.
The system provides the capability to track items by unique identification numbers (UIN). If the system is not configured to use UINs, this does not apply. If the UINs are not used, fields and functions related to UINs are not available in the mobile application UI.
If UINs are required for an item, the UINs must be scanned, entered or automatically generated when stock is received. When UINs are generated for tracking items, users can print labels with the generated UINs.
If the store uses UINs, the snapshot captures the status of those items in the store as part of the store's stock on hand, as well as those UINs in missing status.
FunctionalityThis section covers the available screens.
FeaturesThe following is a list of features for Stock Counts in the mobile application:
■ Search for stock count
■ Create a new AdHoc stock count
■ View or edit an existing stock count
■ Count items for stock count
■ Count items through bulk scanning
■ UIN

Functionality
11-6 Oracle Retail Store Operations Cloud Service User Guide
Figure 11–2 Stock Count Mobile Screen Flow
After logging into the mobile application, the main menu drawer is displayed. You can select Stock Counts from the Inventory Management menu.
The Stock Counts module in the mobile application contains Stock Count List, Creating a new Ad hoc Stock count, Child Stock Count List and viewing the item details.

Functionality
Stock Counts 11-7
Stock Count List
Figure 11–3 Stock Count List Screen
You can select Stock Count from the Main Menu Drawer and be directed to the Stock Count List screen. You will need permissions to access this screen. When you enters the screen, the system will default to display records with a status of "Active" and type of "Active."
The transactions may include Ad hoc stock count, Unit count, Problem Line count, and Unit and Amount count:
■ You are required to have the Edit Adhoc Stock Count permission to edit an Adhoc stock count.
■ You are required to have the Edit Unit Stock Count permission to edit a Unit stock count.
■ You are required to have the Edit Unit Amount Stock Count permission to edit a Unit and Amount stock count.

Functionality
11-8 Oracle Retail Store Operations Cloud Service User Guide
Ad Hoc Stock Count
Figure 11–4 Add Stock Count Popup
You can select Create Ad Hoc from Stock Count List and be directed to the Add Stock Count popup to add a description for an adhoc stock count. You will need permissions to access this screen. When you enter the screen, the text box for entering description for Ad Hoc stock count is filled with highlighted <user ID> which, once written with text, goes off. After entering the description, the user can add items to the stock count and complete the count.
If needed, the retailers can create an adhoc stock count and yet not give the opportunity for an associate to continue adding items, basically, the stock count will be locked after adding the first set of items. This option of locking a stock count will be enabled when the system parameter Enable Adhoc Stock Count Locking is set to Yes. If this parameter is set to Yes, there will be new flag called Adhoc Stock Count Lock which comes into picture. If the user adds items via bulk scan or through an item basket, this flag is set to Yes automatically and additional items cannot be added henceforth. It can be edited from the Edit Stock Count screen as well, provided the user has appropriate permissions.

Functionality
Stock Counts 11-9
Stock Count List Search Criteria
Figure 11–5 Search Criteria Screen
You can select the eye glasses from the stock count list screen and be directed to the Search Criteria screen. When you enter the screen, the mobile application will default to display records with a status of Active and type of Active.
Fields
Criteria Applied <x>: The number of criteria applied to the search, where X is the number.
Scheduled Date: The date for which the scheduled stock count is scheduled. Defaults to blank.
Department: List of values containing all of the departments. The value will be defaulted to All. Since a Product Group can consist of more than one merchandise hierarchy, the filter will return all stock counts that are affiliated with the department or where the counting groups contains that hierarchy. When a department is cleared out, the class and sub-class will also be cleared out.
Class: List of values containing all of the classes for the selected department. You must select a department first for the class to be editable. The value will be defaulted to All. Since a Product Group can consist of more than one merchandise hierarchy, the filter will return all stock counts that are affiliated with the class and counting groups that contain that hierarchy. When a class is cleared out, the subclass will also be cleared out.
Sub-Class: List of values containing all of the sub-classes for the selected class. You must select a class first for the class to be editable. The value will be defaulted to All. Since a Product Group can consist of more than one merchandise hierarchy, the filter will return all stock counts affiliated with that subclass and counting groups that contain that hierarchy.
Count Group: List of all product groups that exists in the system. Defaults to All.

Functionality
11-10 Oracle Retail Store Operations Cloud Service User Guide
Type: List of values. Valid values are Stock Count, Re-Count, Authorize, Active, and All. Default value is Active. Active is a type represents Stock Count and Recount (not Authorize).
Status: valid values are New, In Progress, Processing, Completed, All, and Active. Default value is Active. Active will include New and In Progress stock counts.
Note: Confirmed is the status of a guided Unit and Amount stock count for all items that are in Authorize Type and have not yet moved to Completed due to not having the results exported. Once exported, the stock count will move to Completed status. If user selects a stock count in confirmed or completed status it will be in view only mode.
Search Limit: Entry field. You can define a search limit for the number of transactions being displayed. It is a Required Field. The value will default through a system admin setting, Search Limit Default for stock count list - Mobile.
Child Count List
Figure 11–6 Child Count List Screen
You can select Stock Count from the Stock Count List and be directed to the Child Count List screen. When you enter the screen, the system will sort the child count by ID. Closed child count should be at the bottom and Active child counts should be at the top and then this ID sorting should be applied.
Selecting a child count will take you to the Stock Count Items and Stock Re-Count Items screen. Ad hoc Stock Counts will automatically have a single child count created. (Ad hoc stock counts will have one stock count to one child). The child count will be automatically named the same as the stock count (assigned description by user) with the words (child) after it.

Functionality
Stock Counts 11-11
Snapshot: This will take snapshot for all the child counts on the stock count. This will take a snapshot for Problem line and Unit type of stock counts only. If any other type of stock count, this button will not be visible.
The snapshot of a stock count will happen as follows:
■ Unit or Problem Line: Can be taken from Child count list screen for the whole stock count or from the Stock count item screen if not in re-count mode. For Re-Count, it will be taken automatically.
■ Adhoc: Takes snapshot as items are added.
■ Unit and Amount: Snapshot for this type can be taken via the Snapshot batch within the desktop application.
– For unexpected items that get added during counting:
* If the snapshot has already been taken for the count, it will take the snapshot of the unexpected item as it gets added to the count.
* If the snapshot has not been taken for the count yet, then the snapshot for the unexpected item will not get taken as the item is added, rather when the snapshot is taken for the stock count.
You can access the Child Count List screen by creating an Adhoc stock count or selecting a stock count from the Stock Count List screen.
You must have the Edit Adhoc Stock Count permission to open the screen in edit mode when displaying an Adhoc count; otherwise the screen will open as view only.
Similar to a unit count, you must have the Edit Unit Stock Count permission to open the screen in edit mode when displaying a Unit count; otherwise, the screen will open as view only.
You must have the Edit Unit and Amount Stock Count permission to open the screen in edit mode when displaying a Unit and Amount count; otherwise the screen will open as view only.

Functionality
11-12 Oracle Retail Store Operations Cloud Service User Guide
Footer Menu
Figure 11–7 Child Count List Footer Menu
This opens up a footer menu with following options:
Info: Info popup will be displayed.
Product Group Info: Product Group Info popup will be displayed.
Notes: Notes dialog will be displayed.
Edit CFA: This will navigate you to the Edit CFAs screen to capture the Custom Flexible attributes for the stock count/recount.
Print: This will open the print dialogue.
Back: This will navigate you back to the Stock Count List screen.
Delete: This will delete the Stock Count that is under consideration and have not yet been authorized.
Close: This will navigate you to stock count list screen.

Functionality
Stock Counts 11-13
Edit Stock Count
Figure 11–8 Edit Stock Count
The Edit Stock Count screen enables the user to set the lock which decides whether additional items can be added to an adhoc stock count or not. This screen can be accessed by selecting Edit Stock Count option from the footer menu of Stock Count Child List screen and this option will be available when the following conditions are met
1. System parameter Enable Adhoc Stock Count Locking must be set to Yes.
2. The stock count is an adhoc stock count and the status is not Completed.
3. The user has security permission Edit Adhoc Stock Count Lock.

Functionality
11-14 Oracle Retail Store Operations Cloud Service User Guide
Edit CFA
Figure 11–9 Edit CFAs
The Edit CFAs screen displays the list of CFAs (flexible attributes) that have been set up for the Stock Count and Stock Recount in the system and that allows you to enter values for them.
The system displays the fields based on the setup for the type of delivery. The CFAs that are set up as Required must have a value entered. The value can be one of the following: Date, Text, Decimal, Long depending on the 'data type' set up for the CFAs, while creating them in the desktop application. Appropriate security permissions are needed and the count must be in editable status for entering CFA values. The CFA's captured will be displayed in the info screen.

Functionality
Stock Counts 11-15
Stock Count Items and Stock Re-Count Items
Figure 11–10 Count Items and Re-Count Items Screens
You can select a child count from the Child Count List screen and be directed to the Stock Count Items or Stock Re-Count items screen depending upon the status of the stock count. This screen appears when a child stock count is selected and the Child stock count type is Stock Count New or Stock Count In Progress. Item Images will be displayed per a system admin setting for stock counts. The system will default to show the "uncounted" records.
If the item has a UIN captured, it will have the UIN icon on the line item.
Selecting an item will go to the Item Detail for that item. If the item scanned/selected is a UIN item, the user will navigate to the UIN tab within the Item Detail screen.
All newly added items and modified items will have a bar on left to denote those have been modified.
When you enter the screen, the system will sort the items left to count as below:
■ If guided and if items are sequenced, then order by sequence order.
■ If it is un-sequenced, "no location" items falling at the end by item description order.
■ If unguided, items are always sorted by item description.
Variance: User will be able to view the difference between the 'snapshot' quantity and the 'Total quantity' counted, provided the user has 'View variance' security permission.
1. If the snapshot quantity < Total quantity, display '+' symbol before the variance value.
2. If the snapshot quantity > Total quantity, display '-' symbol before the variance value.
3. If the snapshot quantity = Total quantity, display '0' symbol before the variance value.

Functionality
11-16 Oracle Retail Store Operations Cloud Service User Guide
4. This field will be displayed only when the user has 'View Variance' security permission.
5. This value should be calculated dynamically after each scan (count) happens.
6. This value will be displayed only for 'counted' items.
Footer Menu
Figure 11–11 Count Items and Re-Count Items Footer Menu
Info: Info popup will be displayed.
Notes: Notes dialog will be displayed.
Bulk Scan: This will take the user to the Bulk Scan screen
Complete: This will complete the child count and navigate you to the Child Count List screen. You are required to have the Complete Stock Count permission for this menu option to display.
Save: This will save the child count and navigate you to Child count list screen.
Save & Continue: This will save the child count and user will be in the same dialog.
Cancel: This will discard changes to stock count / re-count and navigate you to Child count list screen. This will be "Back" when in view only mode.
Print: This will open the print dialogue.
Close: This will navigate you to Stock Count Items screen.

Functionality
Stock Counts 11-17
Info
Figure 11–12 Info Screen
The info screen is an informational popup that contains read-only information about the header level of the stock count. It is accessed through the Info menu option in the Footer menu on the Child Count List screen. Details include:
■ Count Description
■ Stock count date
■ Total Items
■ Count ID
■ Status
■ Type
■ Product Group Type
■ Product Group Description
■ Counting Method
■ Adhoc Stock Count Lock - If set to yes, the field does not allow the user to add additional items to the ad hoc count
■ CFAs and the corresponding value

Functionality
11-18 Oracle Retail Store Operations Cloud Service User Guide
Product Group Info
Figure 11–13 Product Group Info Screen
The Product Group Info screen is an informational popup that contains read-only information about the product group associated with the stock count. It is accessed through the Product Group Info menu option in the Footer menu on the Child Count List screen. Details include:
■ Product Group Type
■ Product Group Description
■ Variance SUOM
■ Variance %
■ Variance Value
■ Counting Method
■ Hierarchy Breakdown
■ Re-count Discrepancies
■ Auto Authorize
■ Active Item
■ Inactive Item
■ Discontinued Item
■ Deleted Item
■ SOH = 0

Functionality
Stock Counts 11-19
■ SOH > 0
■ SOH < 0
■ Prob Line-Actual Pick Amt less than Suggested Pick Amt
■ Prob Line-Actual Shelf Repl Amt less than Suggested Shelf Repl Amt
Child Count Info
Figure 11–14 Child Count Info Screen
The Child Count Info screen is an informational popup that contains read-only information about the child count. It is accessed by selecting Info from the Count Items screen. Details include:
■ Recount
■ Child Count Description
■ Stock Count Date
■ Count User
■ Re-Count User Total Items Counted
■ Total Line Items
■ Total Quantity

Functionality
11-20 Oracle Retail Store Operations Cloud Service User Guide
Bulk Scan
Figure 11–15 Bulk Scan Screen
The Bulk Scan screen is used to scan (or enter) one or more items to apply to a transaction in Bulk.
As Items are scanned/entered, they are accumulated on this screen with just item existence validation. It acts as a "counter" and "storage" of the valid scans until they are applied to the transaction. The screen is read-only.
The user can access the Bulk Scan screen by:
■ Selecting the Bulk Scan menu option from the footer menu of the Stock Count Items and Stock Re-Count Items screen. The user must have proper security permissions, Allow Bulk Scan, for the Bulk Scan menu option to be available.
■ Scanning/entering items on the Stock Count Items and Stock Re-Count Items screen, when the scan type is set to Bulk and one or more items are scanned. The user must have proper security permissions, Allow Bulk Scan, for the Bulk Scan type option to be available.
Footer Menu
Items: The user will be taken to the Bulk Items screen to view the items from the scan(s)
Import Basket: You will be taken to the Select Item Basket screen to select an item basket to import. User must have Import Item Basket permission for the respective functional area for this menu option to be available within a functional area. Only 'static' item baskets can be imported.

Functionality
Stock Counts 11-21
Apply: This will take all of the items found (valid scans) from the scan(s)/entries on the screen and validate them against the transaction. Any issues will be gathered to display on the Issues screen.
Clear: This will clear out anything that has been scanned/entered. All counters will reset back to 0.
Back: The user will navigate back to Stock Count Items and Stock Re-Count Items screen and the system will auto save the items scanned/entered.
Bulk Items
Figure 11–16 Bulk Items Screen
The Bulk Items screen displays all of the items that are affiliated with the items collected on the Bulk Scan screen. All scans that were valid/successful, meaning that they found an item in the system, will be displayed on this screen.

Functionality
11-22 Oracle Retail Store Operations Cloud Service User Guide
Issues
Figure 11–17 Issues Screen
This screen displays all of the Issues (alerts, warnings and errors) associated to the items that were scanned/entered on the Bulk Scan screen from Item Detail and Stock Count Items and Stock Re-Count Items screen.
Footer Menu
Yes to All: All warnings will be set to 'checked'/'yes'.
No to All: All warnings will be set to 'unchecked'/'no'.
Confirm: The system will apply the item(s) to the transaction that had no and those with issues based on the decisions taken by the user. If the item does not exist on the transaction yet, the item and quantities will be added to the transaction. If the item does exist on the transaction, the quantity will be added. All items that have only Alerts and all items that have only Warnings that were selected as 'Yes' will be applied to the stock count.
Cancel: Exits the screen and nothing is saved.

Functionality
Stock Counts 11-23
Issue Detail
Figure 11–18 Issue Detail Screen
This screen displays all of the items that are associated with a specific issue (Alert, Warning, or Error). The user can access the Issue Detail Screen by selecting an issue (Alert, Warning, or Error) from the Issues screen.
Footer Menu
Yes to All: All warnings will be set to 'checked'/'yes'.
No to All: All warnings will be set to 'unchecked'/'no'.
Cancel: This will take the user back to the Issues screen.

Functionality
11-24 Oracle Retail Store Operations Cloud Service User Guide
Issue Detail - UIN
Figure 11–19 Issue Detail UIN Screen
This is the Issues Detail screen for UINs. The screen displays all of the UINs that are associated with a specific issue (Alert, Warning, or Error), along with the item it belongs to. The user can access the Issue Detail screen by selecting an issue (Alert, Warning, or Error), from the Issues screen, which is of UINs.

Functionality
Stock Counts 11-25
Issues - Single Item
Figure 11–20 Issues - Single Item Screen
This is the Issues - Single Item screen which displays all of the issues (Alert, Warning, or Error) for an item scanned via regular scan. The screen is displayed when the user scans a single item in Auto/UIN scan type mode and if the item failed any validations.
Footer Menu
Apply: This button is displayed if there are warnings and alerts only. This lets the user to go ahead with the warning displayed and add the item to the transaction. After selecting 'Apply', the required action will take place depending on the requirements of the warning displayed.
Cancel: This button is displayed if there are warnings and alerts only. This allows the user to stop adding the item to the transaction. After selecting this button, the required action will take place depending on the requirements of the warning displayed.
OK: This button is displayed if there are errors and/or alerts only. By clicking 'OK', the user can acknowledge the error/alert.

Functionality
11-26 Oracle Retail Store Operations Cloud Service User Guide
Search Criteria - Stock Count Items and Stock Re-Count Items
Figure 11–21 Search Criteria Screen
You can select the eye glasses from the Stock Count Items and Stock Re-Count Items screen and be directed to the Search criteria screen.
The default will be:
Stock Count: Count / Re-Count Qty = 'uncounted'
Re-Count: Count / Re-Count Qty = 'uncounted', Filter = 'Discrepant'
The Count / Re-Count Qty will default as the filter on the top of the Stock Count / Stock Re-Count screen.
Fields
Criteria Applied <x>: - the number of criteria applied to the search, where X is the number.
Count / Re-Count Qty: Valid values are All, Counted and Uncounted.
Filter: Valid values are All Items and Discrepant Items. Displays only when it is a Re-Count.
Department: List of values containing all of the departments pertaining to that stock count. The value will be defaulted to All. Since a Product Group can consist of more than one merchandise hierarchy, the filter will return all stock counts that are affiliated with the dept or where the counting groups contains that hierarchy. When a department is cleared out, the class and sub-class will also be cleared out.
Class: List of values containing all of the classes for the selected Department. User must select a department first for the class to be editable. The value will be defaulted to All. Since a Product Group can consist of more than one merchandise hierarchy, the filter will return all stock counts that are affiliated with the class and counting groups

Functionality
Stock Counts 11-27
that contain that hierarchy. When a class is cleared out, the subclass will also be cleared out.
Sub-Class: List of values containing all of the sub-classes for the selected Class. You must select a Class first for the sub-class to be editable; the value will be defaulted to All. Since a Product Group can consist of more than one merchandise hierarchy, the filter will return all stock counts affiliated with that subclass and counting groups that contain that hierarchy.
Reset: Button will clear the screen of any previous search criteria that was entered by you and set back to the default values. The screen will remain open for you to enter in new search criteria.
Item Detail
Figure 11–22 Item Detail Screen
The Item Detail screen is displayed when selecting an item from the Stock Count Items and Stock Re-Count Items screen or an item is scanned. The image display will be controlled by the system parameter. This screen will help you to enter quantity for an item in the stock count. If stock count is not completed then the quantity fields will be editable and user can enter value for counting item. The quantity fields will be disabled for UIN items and RFID enabled items. The value for these fields will be based on the number of UINs/RFID tags scanned.
There is a UIN tab that enables the user to view/add/remove the UINs for the item, if the item is a serial number item. If the user scans a serial number item, they will be taken directly to the UIN tab within the Item Detail screen, for that item.
There is an Extended Attributes tab that enables the user to view/capture extended attributes for the item. If the item is not configured to capture extended attributes or there are no extended attributes captured, the list will be empty.

Functionality
11-28 Oracle Retail Store Operations Cloud Service User Guide
If the stock count is completed and where no further edits can be made, this will be a view only screen. Sorting of items will be, if guided and items are sequenced, then order by sequence order with non-sequenced "no location" items falling at the end by item description order. If unguided, items are always sorted by item description.
Removal of an item after it has been added is not allowed in Stock Count unless it is an Ad-hoc stock count. In that case removal of items is allowed.
Cases or Units is the sum of the quantity of the items scanned until a new item is scanned. This field indicates the number of items a user has in front of them they have scanned.
Variance: User will be able to view the difference between the 'snapshot' quantity and the 'Total quantity' counted, provided the user has 'View variance' security permission.
1. If the snapshot quantity < Total quantity, display '+' symbol before the variance value.
2. If the snapshot quantity > Total quantity, display '-' symbol before the variance value.
3. If the snapshot quantity = Total quantity, display '0' symbol before the variance value.
This field will be displayed only when the user has 'View Variance' security permission.
This value should be calculated dynamically after each scan (count) happens.
This value will be displayed only for 'counted' items.
Last Scan shows the details of the last scanned barcode.
User Quantity is the sum of all quantities for an item since the last time it was saved.
Total Quantity includes the quantities from the database when it was last read, increase with the user quantity.
Example: Assuming all items are units.
1. Scan item A.
User quantity 1
Session quantity 1
Total quantity 1
2. Scan item A again.
User quantity 2
Session quantity 2
Total quantity 2
3. Scan item B.
User quantity 1
Session quantity 1
Total quantity 1
4. Scan item A.
User quantity 1
Session quantity 3
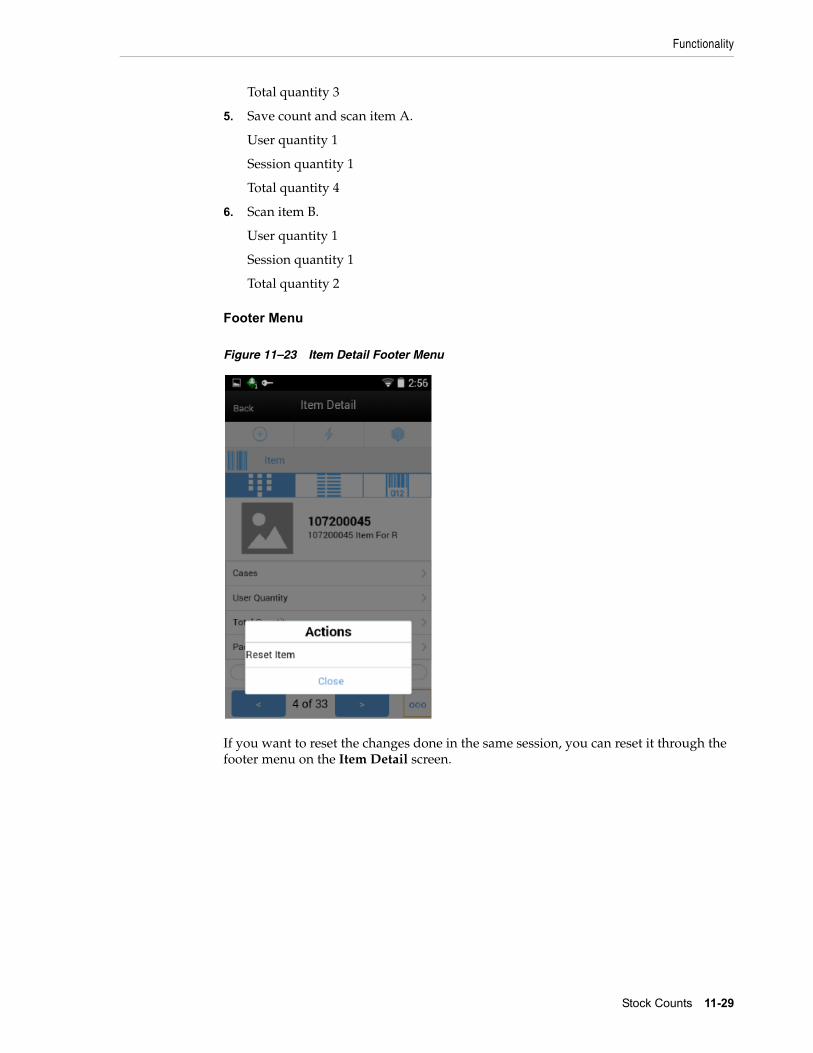
Functionality
Stock Counts 11-29
Total quantity 3
5. Save count and scan item A.
User quantity 1
Session quantity 1
Total quantity 4
6. Scan item B.
User quantity 1
Session quantity 1
Total quantity 2
Footer Menu
Figure 11–23 Item Detail Footer Menu
If you want to reset the changes done in the same session, you can reset it through the footer menu on the Item Detail screen.

12
Customer Order Management 12-1
12Customer Order Management
Customer OrdersCustomer Orders allows for the viewing of customer orders at the user's store. Customer orders may be web orders as well as non-web orders such as layaway, pick up, and so on.
■ Search for customer orders
■ View an existing customer order
■ Reject a customer order
■ View customer information
■ Print a customer order
■ Create a customer order pick for a specific customer order
■ Access the delivery dialog for a specific customer order
■ Enter values for CFAs (Custom Flexible Attributes)

Customer Orders
12-2 Oracle Retail Store Operations Cloud Service User Guide
Figure 12–1 Customer Order Screen Flow
Customer Orders covers the functionality of viewing, accepting, and rejecting a customer order as well as viewing the information and customer details, specifying values for CFAs. Deliveries and single order picks can be created from within a customer order, however, Deliveries and Picking will be covered as part of their own functionality.

Customer Orders
Customer Order Management 12-3
Customer Order Status FlowThis flowchart shows a simple, straight forward status flow of a customer order when picking is required.
Figure 12–2 Customer Order Status Flow when Picking is Required
The following table shows the different statuses that a customer order can take when picking is required for the customer order:
Table 12–1 Customer Order Status when Picking is Required
Status Meaning
New The order is created but not been accepted yet at the store.
Picking Required When no open pick exists and the Picked quantity is less than the Remaining quantity and Picking is required.
Pick in Progress A pick is open for an order.
Reverse Pick A reverse pick is open for an order.
Ready to Ship If the Picked quantity >= Remaining quantity and the order is not fully shipped yet and the order is of type 'Ship to Customer'.

Customer Orders
12-4 Oracle Retail Store Operations Cloud Service User Guide
The following flowchart shows a simple, straight forward status flow of a customer order when picking is not required.
Figure 12–3 Customer Order Status Flow when Picking is Not Required
The following table shows the different statuses that a customer order can take when picking is not required for the customer order:
Table 12–2 Customer Order Status when Picking is Not Required
Status Meaning
New The order is created but not been accepted yet at the store.
In Progress A customer order gets this status when it is being looked at and the order is not fully shipped by the store or picked up by the customer.
Completed This is one of the final states of a customer order. When the customer order is fully shipped or picked up, it goes to 'Completed' status.
Cancelled This is also one of the final states of a customer order. When the customer order is rejected or cancelled, it goes to 'Cancelled' status.
Ready for Pickup If the Picked quantity >= Remaining quantity and the order is not fully picked up yet and the order is of type 'Customer Pickup'.
Delivery in Progress If at least one delivery is available which is either saved or submitted but not dispatched yet.
Completed This is one of the final states of a customer order. When the customer order is fully shipped or picked up, it goes to 'Completed' status.
Cancelled This is also one of the final states of a customer order. When the customer order is rejected or cancelled, it goes to 'Cancelled' status.
Table 12–1 (Cont.) Customer Order Status when Picking is Required
Status Meaning

Customer Orders
Customer Order Management 12-5
Customer Order Status Update Logic
Picking Required for Customer Orders is set to Yes
When the store parameter Picking Required for Customer Orders is set to Yes, the status of customer orders will need to be checked for update whenever any of the following events occur on the customer order.
1. When the customer order is accepted at the store.
2. When a Reverse pick is saved, completed or cancelled, both internally in the system and externally.
3. When a pick is created, saved, completed or cancelled.
4. When a delivery record is created, cancelled, saved, submitted or partially/fully dispatched.
5. When POS sends a fulfilment record against the customer order, which partially/completely fulfilled the order.
6. When the customer order is rejected by the store or cancelled by the user or at Order management system.
Note: These events can be a manually created, system generated, internally created or externally created event.
After any of the events mentioned above occur, perform the following:
For the Customer Order, check if there is at least one open reverse pick exists:
If Yes, update the status of the customer order to Reverse Pick.
If No, check if there is a Pick in Progress, that is, Pick's status = New or In progress.
■ If Yes, update the status of the customer order to Pick In Progress.
■ If No, check if there is a Delivery In Progress, that is, at least one delivery which is either saved or submitted and not dispatched yet.
– If Yes, update the status of the customer order to Delivery In Progress.
– If No, check the Picked Qty of the items on the customer order.
* If Allow Partial Delivery = No,
If at least one item is not completely picked, update the status to Picking Required.
If all items are picked completely, then:
if the order is of type Ship to Customer, update the status of customer order to Ready to Ship, or,
if the order is of type Customer Pickup, update the status of customer order to Ready for Pickup.
* If Allow Partial Delivery = Yes,
If no item is picked yet, update the status to Picking Required.
If at least one item is picked partially or completely picked, then:
if the order is of type Ship to Customer, update the status of customer order to Ready to Ship, or,

Customer Orders
12-6 Oracle Retail Store Operations Cloud Service User Guide
if the order is of type Customer Pickup, update the status of customer order to Ready for Pickup.
Picking Required for Customer Orders is set to No
When the store parameter Picking Required for Customer Orders is set to No, the following is true:
If the store has decided to not pick the items before shipping, then if the Customer Order is accepted, the status will show In Progress.
If the store has decided to formally pick the items and ship, the status is derived as per the rules that apply when Picking Required is set to Yes.
Completed and Cancelled
Completed and Cancelled are the final states of a customer order, irrespective of whether picking is required or not.
The customer order moves into Completed status when:
■ a customer order is completely shipped by the store or picked up by the customer
■ a customer order is rejected and some items have been delivered already
The customer order moves into Cancelled status when:
■ a customer order is rejected and none of the items have been delivered
■ a customer order is cancelled by the user or at the Order management system
The customer order will become read-only once it reaches either Completed or Cancelled status.
Under Review StatusWhen the retailer has chosen to integrate with OBCS (Order Broker Cloud Services) and whenever a customer order goes through payment reauthorization, the Order Broker system informs the Store Inventory system about it and the status of the customer order would move to 'Under Review'. This is to indicate that the customer order is going through payment reauthorization and it is not in the state to be submitted/dispatched. The Store Inventory system would have to wait for the payment reauthorization to be successful in order to submit/dispatch the customer order.
Note: The status of the customer order is not updated to 'Under_Review' at DB rather the status displayed in the UI alone would show 'Under_Review'.
When the customer order moves to 'Under Review' mode, the user can still perform the same actions on the customer order as if it is in New/In Progress/Picking Required/Delivery In Progress, Ready to Ship/Ready for Pickup/Reverse Pick status. that is, the user will be able to approve/reject, create pick/reverse pick/delivery and so on, A validation will be done on Submit/Dispatch of customer order deliveries to ensure that the customer order is not in 'Under Review' mode.
Whenever OBCS informs Store Inventory system that the payment reauthorization has been successful, the status of the customer order moves back to its previous status or to an appropriate status based on the activities that had happened on the customer order while it was in 'Under Review' mode. The customer order would now be

Customer Orders
Customer Order Management 12-7
available for submit/dispatch. If the payment reauthorization fails, the customer order would get cancelled.
Customer Order List
Figure 12–4 Customer Order List Screen
The Cust Order List screen is accessed by selecting the Customer Order menu option from within the Customer Order Management menu in the drawer/menu.
When the store parameter Picking Required for Customer Orders is set to No, the screen will display the Active status customer orders by default which is all customer orders which are in New, In Progress, or Under Review status.
If the store parameter Picking Required for Customer Orders is set to Yes, the screen will display the Active status customer orders by default which is all customer orders which are in one of the following statuses: New, Picking Required, Pick In Progress, Reverse Pick, Ready to Ship, Ready for Pickup, Delivery In Progress, Under Review.
The user can click the eye glasses to direct to the Search Criteria (Customer Orders) screen. Selecting a customer order will navigate to the details for the customer order.

Customer Orders
12-8 Oracle Retail Store Operations Cloud Service User Guide
Search Criteria (Customer Orders)
Figure 12–5 Search Criteria Screen (Customer Orders)
The Customer Order Search Criteria screen is accessed by the eye glasses on the Customer Order List screen. After applying the search criteria, the results will be listed on the Customer Order List screen and the criteria applied will show.
■ From/To Release Date
■ Store Customer Order ID
■ Customer Order ID
■ Fulfillment Order ID
■ Bin ID
■ Item
■ Reservation Type
■ Delivery Type
■ Status
■ Customer Name
■ Tracking ID
■ Search Limit

Customer Orders
Customer Order Management 12-9
Customer Order Items
Figure 12–6 Customer Order Items Screen
The Cust Order Items screen is used to select a customer order from the Customer Order List screen. The items are listed for the customer order. The item image for the line items is displayed per configuration.
Line items appear in a list and selecting a line item will navigate to the item details of that item. Scrolling in the list of items on the left will display a filter. The filter can be used to narrow down the list of items. Filtering can occur by item ID or item description.
Scanning or entering an item in the scan bar will navigate to the Item Detail (Customer Orders) screen for that item. The ellipsis in the lower right hand corner will access the Footer menu which will contain all of the functions that can be performed on a customer order.
Note: If the order has duplicate items, meaning an item exists on the customer order more than once, the items will appear multiple times in the list with the corresponding line numbers listed as well. This applies to all screens that display the item within customer orders, customer order picking, customer order deliveries, and customer order reverse picking.
Footer MenuThe footer menu is accessed from the ellipsis footer menu on the Customer Order Items screen. The menu functions will include the following.
Info: Info will access the Info popup.

Customer Orders
12-10 Oracle Retail Store Operations Cloud Service User Guide
Notes: The Notes option accesses the notes common dialog to capture notes. Notes will always be available for viewing and user can create notes regardless of the status of the customer order, provided the user has Create Notes permission.
Edit CFA: This option takes the user to Edit CFAs screen to enter values for the CFAs that are set up for Customer Orders.
Edit Customer Order: This option takes the user to the Edit Customer Order screen to specify the Hold Location.
Customer: The customer information popup for the customer order will display, view only.
Pick: Pick will generate a pick for the customer order and navigate the user to the Pick Items screen for the new pick. All picking rules apply. If picking by Area is configured for the store, the user will navigate to the Create Pick popup to select an Area first. See Customer Order Picking.
Delivery: Navigates to the Delivery dialog (Delivery List screen) for the current customer order. See Customer Order Deliveries.
All states of customer orders as well as all types (web order, pick up, layaway, and so on).
The user must have ’Access Customer Order Delivery’ permission.
Accept: Accept will only be for web order types of customer orders of status 'New' or 'New but in Under Review mode' and after the customer order is accepted at the store, it will go through the required process for it to be shipped.
Reject: Reject will be available for web order types of customer orders in any status except 'Completed' and 'Cancelled'. All item quantities that have not yet been picked will be canceled/rejected. A system generated reverse pick will be created for the rejected items. For more information, see Customer Order Reverse Picks.
Back: Back will return to the Customer Orders List, no changes made to status.
Print: Print will display the common print dialog to print the customer order report.
Edit Customer Order
Figure 12–7 Edit Customer Order
This screen can be accessed by clicking on Edit Customer Order footer menu option from the Customer Order Items screen. This screen enables the user to specify the hold location of the customer order. This screen is available when the Customer Order status is in any status except ’Completed’ or ’Cancelled’. Also, system parameter Customer Order Fulfilment Restriction is set to Restricted for this screen to be available.
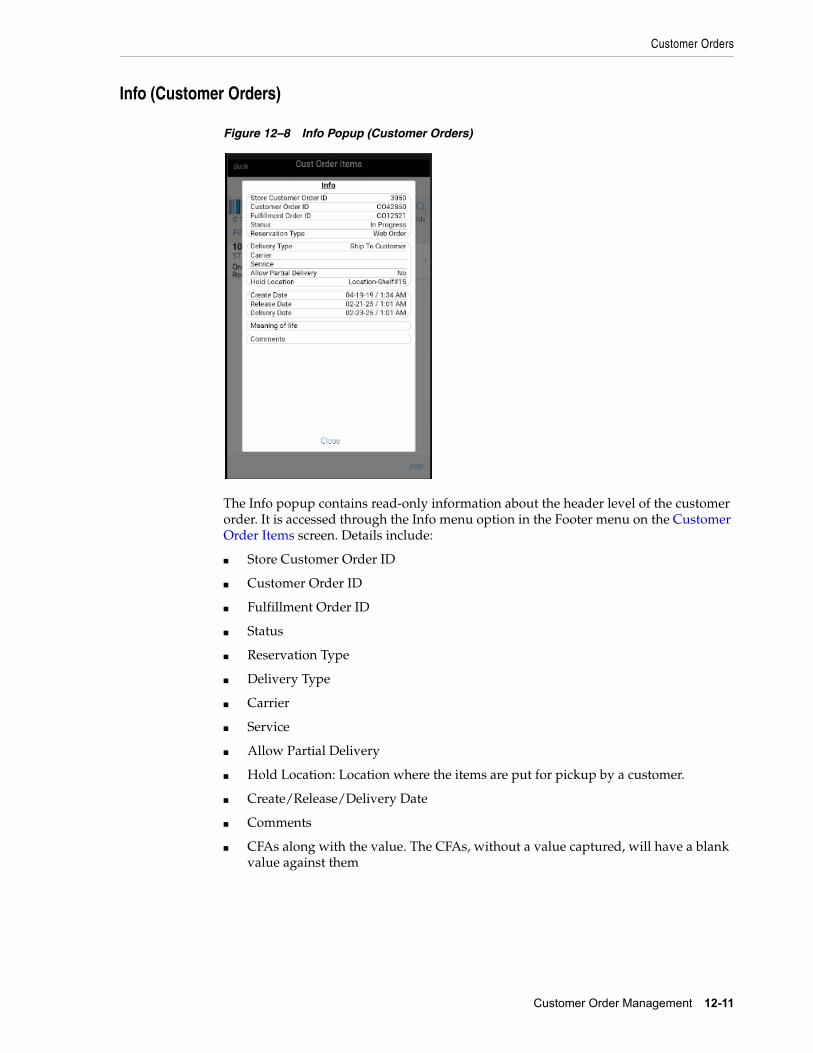
Customer Orders
Customer Order Management 12-11
Info (Customer Orders)
Figure 12–8 Info Popup (Customer Orders)
The Info popup contains read-only information about the header level of the customer order. It is accessed through the Info menu option in the Footer menu on the Customer Order Items screen. Details include:
■ Store Customer Order ID
■ Customer Order ID
■ Fulfillment Order ID
■ Status
■ Reservation Type
■ Delivery Type
■ Carrier
■ Service
■ Allow Partial Delivery
■ Hold Location: Location where the items are put for pickup by a customer.
■ Create/Release/Delivery Date
■ Comments
■ CFAs along with the value. The CFAs, without a value captured, will have a blank value against them

Customer Orders
12-12 Oracle Retail Store Operations Cloud Service User Guide
Edit CFAs Screen
Figure 12–9 Edit CFAs Screen
The Edit CFAs screen displays the list of CFAs (flexible attributes) that have been set up for Customer Orders, in the desktop application and lets the user enter values for them. The value can be one of the following: Date, Text, Decimal, Long depending on the 'data type' set up for the CFAs, while creating them in the desktop application. Appropriate security permission is needed for entering CFA values.
Customer
Figure 12–10 Customer Popup
The Customer popup has read-only information about the customer for web order types of customer orders. It is accessed through the Customer menu option in the Footer menu on the Customer Order Items screen. The user must have access customer details security permission.

Customer Orders
Customer Order Management 12-13
Item Detail (Customer Orders)
Figure 12–11 Item Detail Screen
The Item Detail screen allows selecting or scanning an item and is accessed from the Customer Order Items screen. Scanning or entering an item on this screen in the scan bar will refresh the item detail screen for the item on the customer order. The user can page through the items on the customer order. This screen is view only.
The item information including the image (which is system configured) displays in the header. The bottom portion of the screen contains information regarding the item such as:
■ UOM
■ Pack Size
■ Remaining Quantity
■ Order Quantity
■ Picked Quantity
■ Delivered Quantity
■ Canceled Quantity
■ Last Update
■ Comments
■ Last Scan: Displays the details of the last scanned barcode at the bottom of the screen.
Lastly, if the item is a substitute for another item, the Substitute For field will display with the original item listed.

Customer Order Picking
12-14 Oracle Retail Store Operations Cloud Service User Guide
Customer Order PickingThe Picking process is a formal process of the system telling the user what items need to be picked and the user going out, physically picking the items, and setting them aside. Once the items are set aside, they will then be used during the fulfillment process for shipping to, or pick up by the customer.
Features:
■ Search for customer order pick
■ View/edit an existing customer order pick
■ Delete a customer order pick
■ Create a customer order pick

Customer Order Picking
Customer Order Management 12-15
Figure 12–12 Customer Order Picking Screen Flow
The user will access the Customer Order Picking Dialog from the Customer Order Mgmt menu in the drawer. The Pick List screen will display the list of Active picks. The user can go to the Search Criteria (Pick List) screen to search for picks using alternate criteria.
From the Pick List screen, the user can select a pick to go to the Pick Items (detail of pick) for viewing or editing purposes.
Also from the Pick List screen, the user can Create a pick. The pick may be created by bin or customer order. When creating by customer order, the user will need to specify

Customer Order Picking
12-16 Oracle Retail Store Operations Cloud Service User Guide
which order is being picked and, once that is done, the system will generate a pick and navigate to the details of that Pick on the Pick Items screen. When creating by bin if the system is configured to automatically generate the bins, the user will go to the details of the Pick (Pick Items). Otherwise, if manual bin capture, the user must first capture the bins before going to the Pick Details.
Once in a pick, the user can pick items, add substitutes, print, add notes, view info, modify bins, save, or complete the pick.
Pick List
Figure 12–13 Pick List Screen
The Pick List screen is accessed by selecting the Customer Order Picking menu option from within the Customer Order Mgmt menu in the drawer/menu. The screen will display the Active status customer orders picks by default which is all picks which are in New or In Progress status. The user can click the eye glasses to go to the Search Criteria screen. Selecting a pick will navigate to the details for the customer order pick. Selecting Create will display the Create Pick popup.
Important fields on this screen include:
■ ID: System-generated Pick ID.
■ Status: Status of the customer order pick.
■ Type: Either Bin or Store Customer Order.
■ Suggested Pick Quantity: Total quantity to be picked across all line items.
■ Date: Date that the pick was either created or completed.
■ User: User that created or completed the pick.

Customer Order Picking
Customer Order Management 12-17
Search Criteria (Pick List)
Figure 12–14 Search Criteria Screen (Pick List)
This is the Customer Order Pick Search Criteria Screen. It is accessed by the eye glasses on the Pick List screen. After applying the search criteria, the results will be listed on the Pick List screen and the criteria applied will show. Search criteria includes:
■ From/To Date
■ Pick ID
■ Store Customer Order ID
■ Customer Order ID
■ Fulfillment Order ID
■ Bin ID
■ Item
■ Status
■ Reservation Type
■ User
■ Search Limit

Customer Order Picking
12-18 Oracle Retail Store Operations Cloud Service User Guide
Create Pick
Figure 12–15 Create Pick Popup within a Customer Order
Figure 12–16 Create Pick Popup within Picking
The Create Pick popup is accessed by selecting the Create button from the Pick List screen. The create pick allows for the creation of a customer order pick by either Store customer order ID or by bin. The type will default per the store setting Default Customer Order Picking Method. The store must be configured for Reserve

Customer Order Picking
Customer Order Management 12-19
Customer Order Inventory Upon Receiving set to No in order to create or generate a pick by bin or Store Customer Order. This means that inventory is reserved when the customer order arrives into the store and therefore it should be picked from inventory. When set to Yes, inventory is reserved based upon receipts and therefore should be picked from the receipt. The user would not want the store to pick from inventory when it should be picked based upon what was received on the delivery.
When selecting Store Customer Order, the user must enter in the Store customer order ID to be picked or use the search function to select one from the list. When creating a pick by Store Customer Order ID, there will only be one Customer Order Fulfillment Order per pick transaction.
When creating a pick by bin, the user will define the number of bins to be put on the pick. Initially, the bin quantity will be defaulted based upon the store admin setting Default Number of Bins. The user has the potential to override this quantity if the store admin setting Override Bin Quantity is set to Yes.
Picks created by Bin allows for multiple customer orders to be put on the pick; one store customer order per bin. It will first look to all store customer orders that are the oldest based upon release date. All other rules for creating the pick will be the same as those above for picking by store customer order ID.
In both by Store Customer Order ID and bin a pick can be created by Area. Picking by Area allows a user to create a pick for a customer order that is for a specific Area of the store. This is only possible if the store configuration Allow Picking by Area is set to Yes and the system admin of Customer Order Fulfillment Restriction is set to Transaction Controlled (meaning that the entire customer order does not have to be picked in one pick). Areas are set up in the desktop application in the Area dialog. If Area is an option, the system will give a list of Completed status Areas, with one of the options being None for no area.
Upon selecting Create, the user will navigate to the Pick Items screen for the generated pick.
Customer Orders that will be available for picking will follow these rules:
■ Customer order must be a web order type.
■ Customer order must still be open.
■ There cannot be an existing open pick for the customer order.
– If Area is being used, open picks are allowed for the customer order, so long as it is not for the same area.
■ Customer order must have at least one item on the order with items remaining to be picked.
■ If the system admin Customer Order Fulfillment Restriction equals Transaction Controlled, the system will also need to check that there is stock available to be picked for at least one item.
– If pick is by Area of None, all items from the customer order will be put on the pick.
– If the pick is for a specific area, the system will put the items from the customer order which are in the selected area.
■ If Customer Order Fulfillment Restriction equals Restricted, there must be enough available stock for all items on the pick to be fully picked in their entirety.

Customer Order Picking
12-20 Oracle Retail Store Operations Cloud Service User Guide
■ If Customer Order Fulfillment Restriction equals Line Controlled, user will not be able to create the pick if there is not enough available stock to pick at least one item fully.
■ Items that have substitute equal to Yes on the customer order (meaning they allow for substitutes) will have their stock ignored. This is because they can have items substituted for them.
Figure 12–17 Bin List Screen
The Bin List screen applies to those picks which are by bin. Picks by bin will have bins manually or system generated per the store admin setting. For manually-captured bins, the user will be directed to the Bin List screen immediately upon creating the pick prior to going to the Pick Items screen. Bins are only editable for manually-captured bins. System and manually captured bins can be viewed from the Bin option within the footer menu of the Pick Items screen. The bins can be printed through the Print button.

Customer Order Picking
Customer Order Management 12-21
Pick Items
Figure 12–18 Pick Items Screen
The Pick Items screen is accessed by selecting an existing pick from the Pick List screen, or by creating a new pick. The Pick Items displays all of the items on the pick including substitute items which will be listed below the original item with an arrow referencing up to the original item. Fields will include the suggested pick quantity, quantity (actual picked quantity) and store customer order ID or bin ID based upon the pick type.
Selecting an item will navigate to the Item Detail screen for that item. Scanning an item will also navigate to the Item Detail screen for that item and the quantity may be updated per the quantity scanned. If the pick is by bin, the user will go to the Confirm Bin screen to scan the bin prior to going to the Item Detail screen.
The items are listed in order with those items with stock on hand in the backroom being displayed first, followed by items with shopfloor stock on hand, and lastly those that do not have stock on hand in either the backroom or the shopfloor. All items are ordered by macro sequence location.
Items will have an icon displayed denoting the pick status of the item. If the item's pick quantity has quantity left to be picked there will be a blue circle with an 'i'. If the item's pick quantity is fully picked, it will be a green circle with a check mark. If the item's pick quantity has exceeded the amount to be picked (because changes to the customer order have been made such as a delivery or cancelation), there will be a red circle with a '!'.
Refresh will refresh the customer order pick and pull in any delivered or canceled quantities that have happened for the delivery. The Adjusted Pick Quantity will reflect the new suggested pick quantity.

Customer Order Picking
12-22 Oracle Retail Store Operations Cloud Service User Guide
Footer Menu
The footer menu is accessed from the ellipsis footer menu on the Pick Items screen. The menu functions will include the following:
Info: Info will access the Info popup.
Notes: The Notes option accesses the notes common dialog to capture notes. Notes can only be added for picks by Store Customer Order ID. The note will be saved on the customer order and not the pick.
Bins: Accesses the Bin List screen.
Refresh: Perform the same function as the refresh on the Pick Items screen.
Confirm: Confirms the pick and move it to Completed status and, the user returns to the Pick List screen.
Save: Saves the pick as In Progress status and return the user to the Pick List screen.
Delete: Allows for deleting of a New or In Progress status pick and moves it to Canceled status. The user will return to the Pick List screen.
Cancel: Exits to the Pick List screen and no changes will be saved.
Back: Back is only applicable to view only picks and will exit to the Pick List screen.
Print: Print will display the common print dialog to print the customer order pick report.
Quantity Validation
When confirming, if any of the store customer order quantities on the pick transaction have been canceled or delivered since the pick was created, and the total pick quantity for the item is now greater than the remaining pick quantity:
■ The Adjusted Pick Qty field will be updated to indicate to the user how much is needed to pick based upon the changes (delivery and cancels) that were made on the customer order.
Upon confirm, the system will check the system admin, Customer Order Fulfillment Restriction:
■ If it is set to Restricted, the entire customer order must be picked in its entirety.
■ If it is set to Line controlled, any item that is getting picked must be picked in its entirety.
■ If it is set to Transaction Controlled, no restrictions as above.
Tolerances
■ When the item has a variable unit of measure, it can be difficult to pick the exact amount suggested. For example: picking 2 pounds of bananas might end up truly being 2.2. The quantity picked may exceed the suggested if the defined tolerances are setup to allow for such.
Substitute Items
■ Substitute Items are considered in the Total Pick Qty when doing all quantity validations.
■ The reserved quantity for the original item is decreased by the rolled up pick quantities.
■ The substituted items that have an actual pick quantity greater than zero will have their reserved quantity increased for the amount being substituted.

Customer Order Picking
Customer Order Management 12-23
Item Detail (Picking)
Figure 12–19 Item Detail Screen
The Item Detail screen contains the details for the specific item on the customer order pick. Entering/scanning an item on this screen will refresh the screen and update item and the pick quantity for the item. If the pick is by bin, first the user will have to Confirm the bin before refreshing the details for the item. Once an item has been fully picked, the system will automatically navigate to the next item on the pick.
The Pick Quantity, represented by the field on the top of the screen with the UOM label is editable by the user and represents how many of this item is being picked. Editing the quantity is controlled by security. If the quantity is edited, the user will be prompted with the Confirm Items popup to confirm the proper item and also the confirm bin (if pick is by bin).
The suggested pick quantity displays the quantity the system suggests to be picked. The adjust pick qty is the suggested pick quantity that is updated by the system upon refresh or trying to confirm the pick. It reflects any deliveries or cancellations that have occurred on the customer order since the time the pick was generated. Total Picked is the total amount picked for the item along with all of its substitute items. Lastly, if the pick is by Store Customer Order ID, that ID will be displayed. Otherwise, if the pick is by bin, then the bin for the pick will be displayed.
If the item allows for substitute items, there will be a Substituted field that will state Yes if there is one or more items substituted, and No if there are no substitutes. Tapping on this field will navigate to the Substitute Items screen. If the item is being substituted for another item, there will be a Substituted For field and it will display the original item ID that the item is being substituted for.
If Display Sequence Fields equals Yes, the macro location and area for the item will be displayed. If it set to No, this field is not displayed.
If there is stock on hand in the backroom:

Customer Order Picking
12-24 Oracle Retail Store Operations Cloud Service User Guide
■ It will display the first available backroom location.
■ If no backroom location, it will display Backroom.
If there is no stock in the backroom and stock exists in the shopfloor:
■ It will display the first available shopfloor location.
■ If there is no shopfloor location, it will display Shopfloor.
If there is no stock on hand in the backroom or the shopfloor:
■ It will display the first backroom location.
■ If no backroom location, the first shopfloor location is displayed.
■ If no shopfloor location, it displays no location.
The screen has arrows on the bottom that will prompt the user to the next item on the pick.
Confirm Item/Confirm Bin
Figure 12–20 Confirm Item/Confirm Bin Popup
After editing the pick quantity the user will be required to confirm the item in the Confirm Item popup. This is to validate the proper item is being picked.
For picks that are by bin, the user also needs to validate that the items are being placed into the proper bin. When entering or scanning an item or editing the pick quantity, the user will be directed to the Confirm Bin popup to scan the bin for the item.
Note: The confirm bin will occur after the Confirm Item (if applicable).

Customer Order Picking
Customer Order Management 12-25
Substitute Items
Figure 12–21 Substitute Items Screen
The Substitute Items screen is accessed by selecting the Substituted field on the Item Detail (Picking) screen. This screen will list all of the available substitute items for the item being picked (if there are any). If the Item Substitution - Store Discretion equals Yes, the user does not have to use one of the items in the list, and can also enter/scan an item for substitution. It will be added to the pick as well as to the Substitute Items list. If the user does not have store discretion, only items from the list can be selected.

Customer Order Deliveries
12-26 Oracle Retail Store Operations Cloud Service User Guide
Info (Picking)
Figure 12–22 Info Pick Items Screen
The info screen is an informational popup that contains read-only information about the header level of the customer order pick. It is accessed through the Info menu option in the Footer menu on the Pick Items screen. Details include:
■ Pick ID
■ Status
■ Create Date
■ Create User
■ Complete Date
■ Complete User
Customer Order DeliveriesDelivering of a customer order consists of collecting the items that have been picked and then getting them to the customer (shipment or pickup). This might be for a customer pickup or shipping them to the customer.
Features:
■ View customer order delivery (web order and non-web orders)
■ Edit an existing customer order delivery (web order)
■ Delete a customer order delivery (web order)
■ Print a customer order delivery
■ Create a customer order delivery (web order)

Customer Order Deliveries
Customer Order Management 12-27
Figure 12–23 Customer Order Delivery Screen Flow

Customer Order Deliveries
12-28 Oracle Retail Store Operations Cloud Service User Guide
Customer order deliveries will be accessed from the Customer Order dialog on the Cust Order Items footer menu. Customer order deliveries can be created and edited for web order types, non web orders can only be viewed and are fulfilled through the POS system. Customer order deliveries will allow for viewing, creating, editing, saving, submitting, dispatching, printing, BOL, and deleting customer order deliveries
Delivery List
Figure 12–24 Delivery List Screen
The Delivery List screen is accessed by selecting the Delivery menu option within the footer menu of a specific customer order. The screen will display all of the customer orders delivery for the specific customer order delivery. The deliveries displayed may be for web orders that were created within the system, a third-party system such as POS, or they may be for POS on holds and layaways.
Since there will never be a large number of deliveries for a specific customer order, there is no search criteria screen. There is however a filter bar, which allows for filtering by: delivery ID, status, date, and user. Selecting a delivery will navigate to the details for the customer order delivery. The Create button will attempt to create the delivery and navigate to the Delivery Items screen.
Creating a new delivery is also an option. New Deliveries can only be created for web order customer orders that are not in 'New', 'Under Review mode but in New status', 'Completed' or 'Cancelled' status, which means there is remaining quantity yet to be fulfilled.
In case the system is configured to require picking, it will validate there are item quantities on the customer order that have been picked which have not yet been delivered prior to creating the delivery. Next, the system will check the Allow Partial Delivery indicator which is on the customer order fulfillment order. If this is set to No, it means that the entire order must be delivered together. The system would not allow the creation of the delivery unless the entire order has been picked. If picking is not

Customer Order Deliveries
Customer Order Management 12-29
required, the delivery will be created. The Allow Partial Delivery indicator will then be validated upon dispatch of the delivery.
Once the system creates the delivery, the delivery will consist of all of the items that were auto populated from the customer order fulfillment order including substitutes.
Delivery Items
Figure 12–25 Delivery Items List
The Delivery Items screen is accessed by selecting an existing Delivery from the Delivery List screen, or by creating a new delivery. Delivery Items displays all of the items on the delivery including the order and remaining quantities.
Selecting an item will navigate to the Item Detail (Customer Order Deliveries) screen for that item. Scanning an item will also navigate to the Item Detail screen for that item and the quantity may be updated per the quantity scanned. If the item scanned is a UIN item, the user will navigate to the UIN tab within the Item Detail screen.
The items are listed in ascending order by item ID. A Default Qty button will be displayed in the footer which will default in the delivery quantities on the delivery (non UIN items) to what is remaining to be delivered.
If any item in the customer order has Customer Order Ship Alone indicator set to Yes, then the system will not allow the user to deliver this item along with other items. Those items will need to be shipped alone.
Footer Menu
The footer menu is accessed from the ellipsis footer menu on the Pick Items screen. The menu functions will include the following:
Info: Info will access the Info popup.
BOL Info: Accesses the BOL Info popup.
Customer Order Deliveries
12-30 Oracle Retail Store Operations Cloud Service User Guide
Notes: The Notes option accesses the notes common dialog to capture notes. The note will be saved on the customer order and not the pick.
Default Qty: Default Qty will default in the delivery quantity to what is remaining.
Edit Delivery: Displays the Edit Delivery popup to edit header level information on the delivery.
Refresh: Refreshes the delivery by getting the most current customer order/fulfillment order information. There may be other picks or deliveries that have occurred in the time the delivery was originally created.
Cancel Submit: Sets a submitted status delivery back to In Progress.
Dispatch: Dispatch will check if Allow Partial Indicator is set to No, it will validate that the entire order is being delivered together. If not, the system will restrict the user from dispatching. Those users with certain privileges will be able to override this and it will be a warning. If Allow Partial Indicator is set to Yes, the customer order can be delivered partially. If system parameter 'Customer Order Fulfillment Restriction' is set to 'Line Controlled' and Allow Partial Indicator is set to Yes, if an item is getting delivered then it has to be delivered fully. Partial delivery of an item is not allowed. Also, if the store parameter Manifest Customer Order Deliveries is set to No and system parameter Tracking ID Required is set to Yes, the system should check if the Tracking ID has been captured or not, if not captured, an error message will be displayed. Upon dispatch of the delivery the delivery will move to Completed status, and user returns to the Delivery List screen. The stock on hand and customer order reserved quantities will be decremented by the delivered quantities. The customer order fulfillment order will have the delivered and remaining quantity updated. If the entire customer order has been fulfilled, meaning there is no remaining quantity, the customer order will be set to Completed status.
Submit: Submit will submit the delivery and set it to Submitted status. Submit is only available when store configured for Dispatch Validate to Ship Submit. Submitting will set the delivery to a Submitted status and not allow for edits, since there are no updates to inventory at this point. The only step possible will be to cancel Submit or Dispatch. When the system is configured for Ship Direct, submitting is not possible. Submit will check if Allow Partial Indicator is set to No, it will validate that the entire order is being delivered together. If not, the system will restrict the user from submitting. Those users with certain privileges will be able to override this and it will be a warning. If Allow Partial Indicator is set to Yes, the customer order can be delivered partially. If system parameter 'Customer Order Fulfillment Restriction' is set to 'Line Controlled' and Allow Partial Indicator is set to Yes, if an item is getting delivered then it has to be delivered fully. Partial delivery of an item is not allowed. If the store parameter Manifest Customer Order Deliveries is set to No and system parameter Tracking ID Required is set to Yes, the system should check if the Tracking ID has been captured or not, if not captured, an error message will be displayed.
Save: Saves the delivery as In Progress status and return to the Delivery List screen.
Delete: Deletion of an In Progress status delivery and move it to Canceled status. User will return to the Delivery List screen.
Back: Back is only applicable to view only deliveries and will exit to the Delivery List screen.
Cancel: Exits to the Delivery List screen and no changes will be saved.
External Printing: Displays the external printing dialog to select a printer for pre-shipment or manifesting.

Customer Order Deliveries
Customer Order Management 12-31
Print: Print will display the common print dialog to print the customer order delivery report.
Item Detail (Customer Order Deliveries)
Figure 12–26 Item Detail (Customer Order Deliveries) Screen
The Item Detail screen contains the details for the specific item on the customer order delivery. Entering/scanning an item on this screen will refresh the screen and update item and the delivery quantity for the item. If the item scanned is a UIN item, the user will automatically navigate to the UIN tab within the Item Detail screen for the item.
The delivery quantity, represented by the field on the top of the screen with the UOM label is editable by the user and represents how many of this item is being delivered. Editing the quantity is controlled by security. Users will enter in the quantity to be delivered. If picking is required, the quantity will not be allowed to exceed the pick quantity. If picking is not required, the quantity cannot exceed the remaining quantity.
If the item has Customer Order Ship Alone indicator set to Yes, then the system will not allow the user to deliver this item along with other items. Those items will need to be shipped alone.
The pack size will be displayed if the UOM is set to cases. The remaining, order, picked, delivered and canceled quantities for the customer order will be displayed. Lastly, if the item is a substitute for another item, the Substitute For field will display with the original item listed.
The Item Detail has an UIN tab to take user to the UIN screen to add/remove UINs for UIN items (if system is configured to use UINs and if the item is a UIN item).

Customer Order Deliveries
12-32 Oracle Retail Store Operations Cloud Service User Guide
There is an Extended Attributes tab that enables the user to view/capture Extended Attributes for the item. If the item is not configured to capture extended attributes or there are no extended attributes captured, the list will be empty.
Info (Customer Order Deliveries)
Figure 12–27 Info (Customer Order Deliveries) Popup
The Info popup contains read-only information about the header level of the customer order delivery. It is accessed through the Info menu option in the Footer menu on the Delivery Items screen. Delivery details include:
■ ID
■ Status
■ Create Date
■ Create User
Order details include:
■ Customer Order ID
■ Fulfillment Order ID
■ Store Customer Order ID
■ Status
■ Reservation Type
■ Create /Release/Delivery Date
■ Delivery Type
■ Carrier
■ Service

Customer Order Deliveries
Customer Order Management 12-33
■ Allow Partial Delivery
■ Comments
BOL Info
Figure 12–28 BOL Info Screen
The BOL Info screen contains read-only information about the Bill of Lading (BOL) for the customer order delivery. It is accessed through the BOL Info menu option in the Footer menu on the Delivery Items screen. Fields include:
■ Bill of Lading
■ Dispatch Date
■ Motive
■ Pickup Date
■ Package Type
■ Weight
■ Tracking ID
■ Ship to Address
■ Carrier Type
■ Carrier
■ Service
■ Carrier Name and Address
The Ship From section is populated with the information of the sending store. If Ship To details exist, a Ship To button will be displayed. Selecting Ship To will display the Ship To details which is the information of the customer.

Customer Order Deliveries
12-34 Oracle Retail Store Operations Cloud Service User Guide
Edit Delivery
Figure 12–29 Edit Delivery Screen
This is the Edit Delivery screen for Customer Order Deliveries. It allows the user to edit details on the Customer Order Delivery or BOL. It is accessed when selecting the Edit Delivery menu option from the Footer menu on Delivery Items. The Edit Delivery option is only editable when the delivery is in an editable status. The user must have proper permission to access this screen. Fields for edit include:
■ Motive
■ Pickup Date
■ Package Type
■ Weight
■ Tracking ID
■ Carrier Type
■ Carrier
■ Service
■ Carrier Name and Address
If the carrier is on the customer order, the carrier type will be defaulted to third party and the carrier will be populated from the customer order. If there is no carrier on the customer order, the type will default to the sender for shipments and receiver for pick-ups.
The Service, example 2 day, next day, and so on, are defaulted from the customer order. They are not required. For additional details on BOL, Manifesting, and pre-shipment, see Chapter 9, "Shipping and Receiving Common Components".

Customer Order Reverse Picks
Customer Order Management 12-35
Customer Order Reverse PicksCanceling of customer orders can come in from an external system, such as an Order Management System. When this happens, a reverse pick list will be generated. If there are items that physically need to be un-picked, the user will action the reverse pick list which will then take the items that were canceled and move the picked quantities back to the appropriate area in the store. If the items that are being canceled are not picked, then the system generated reverse pick will just be created in a Completed status with no action required through the application.
A system-generated reverse pick may get created if the user rejects an open customer order.
A manual reverse pick might also be necessary. This happens when the user discovers that something which was picked has to be unpicked, maybe because it has been damaged. The manual reverse pick will reverse the pick quantities.
Note that reverse picking and canceling is more of an exception process.
Features:
■ View customer order reverse picks
■ Edit an existing customer order reverse pick
■ Delete a customer order reverse pick
■ Print a customer order reverse pick
■ Create a customer order reverse pick

Customer Order Reverse Picks
12-36 Oracle Retail Store Operations Cloud Service User Guide
Figure 12–30 Customer Order Reverse Picking Screen Flow
Customer order reverse picking will be accessed from the Customer Order dialog on the Customer Order Items footer menu. Customer order reverse picks can be created and edited for web order types. Customer order reverse picking will allow for viewing, creating, saving, editing, confirming, and deleting of customer order reverse picks.

Customer Order Reverse Picks
Customer Order Management 12-37
Reverse Pick List
Figure 12–31 Customer Order Reverse Pick List Screen
The Reverse Pick List screen is accessed by selecting the Reverse Pick menu option within the footer menu of a specific customer order. The list will contain all of the Reverse Picks for the specific Customer Order. The screen will list both externally created system- generated reverse picks as well as manually created reverse picks. Reverse Picks are only for web orders. The Reverse Pick List screen lists reverse pick records for all statuses. This list screen does not have a filter as there normally would not be that many reverse picks for a customer order fulfilment order to filter on.
The fields will include the Reverse Pick ID, status, last update date, and user for the reverse pick.
A user can navigate to the details of a reverse pick by tapping on a reverse pick record. Finally, the user can create a new manually created reverse pick.
Manual Reverse Pick
■ New Reverse Picks can only be created for Web Order customer orders that are in any status except 'New', 'Under Review mode but in New status', 'Completed' or 'Cancelled'. The user might want to create a manual reverse pick because something that was picked might have become damaged and therefore it must be un-picked.
■ Before creating a new manual reverse pick, the system needs to perform some validations. The system must be configured for manual or auto picking and if so, then reverse picks can be created. This means that if Reserve on Receiving is set to Yes and Auto Picking is not turned on, then a reverse pick would not be allowed to be created. There must be at least one item on the customer order with a physical picked quantity. By physical picked quantity it means a quantity that is still physically sitting there as picked, and it has not been delivered (which means shipped or picked up by the customer). Once the reverse pick is created, it will

Customer Order Reverse Picks
12-38 Oracle Retail Store Operations Cloud Service User Guide
consist of all the items auto populated from the customer order fulfilment order including the substitute items. The Suggested Reverse Pick Quantity will be set to zero for manual picks. For manual reverse picks, the quantity cannot exceed the physical picked quantity.
External System-Generated Reverse Pick
■ When a system generated reverse pick is created, it will put all items on the reverse pick, including the substitute items. However, only those items that have a suggested quantity will be allowed to be reverse picked. The Suggested Reverse Pick Quantity will be populated with what should be reverse picked based upon the cancellation from the external system. For externally system generated reverse picks, the Quantity cannot exceed the remaining quantity or the suggested reverse pick quantity.
■ If a cancelation comes into the system that is for more than what is remaining on the order, the cancelation will be rejected and a system-generated reverse pick will not be created.
■ When creating the system generated reverse pick, the system will first try and cancel those items that have not been picked. If this quantity is exceeded, it will cancel those items already picked. When all items that are canceled have not been picked, there will not be anything to un-pick and therefore the reverse pick will be auto completed and put into a Completed status and updates will happen to the customer order and inventory as stated below. When some or all items that are canceled are picked, this creates a system-generated reverse pick in New status. This occurs so the user can action it and un-pick the items. Updates will occur upon confirmation of the reverse pick as described below.
Reverse Pick Items
Figure 12–32 Reverse Pick Items Screen

Customer Order Reverse Picks
Customer Order Management 12-39
The Reverse Pick Items screen is accessed by selecting an existing Reverse Pick from the Reverse Pick List screen, or by creating a new Reverse Pick. The Reverse Pick Items display the items in alphanumeric order by item description and the items are determined based upon the following rules:
■ Manually created reverse picks will put only the items that:
– Have a physical pick quantity, meaning they have been physically picked and therefore can be reverse picked.
– OR, if there is reverse pick qty, meaning one had already been entered by the user on the reverse pick and saved (the PPQ may not exist any longer on the customer order depending on what has happened to the order).
■ Externally generated (system) reverse picks will put all items on the reverse pick that have a suggested quantity. Meaning the items that are being canceled by the external system. If the item being canceled has a substitute(s) those will be put on the reverse pick along with the original item.
■ All completed and canceled status reverse picks will display all items from the customer order.
Selecting an item will navigate to the Item Detail screen for that item. Scanning an item will also navigate to the Item Detail screen for that item and the quantity may be updated per the quantity scanned.
Footer Menu
The footer menu is accessed from the ellipsis footer menu on the Reverse Pick Items screen. The menu functions will include the following:
Info: Info will access the Info popup.
Notes: The Notes option accesses the notes common dialog to capture notes. The note will be saved on the customer order.
Default Qty: Default Qty will default in the quantity.
■ Manually created reverse picks will default the quantity to the physical pick quantity.
■ Externally generated (system) reverse picks will default the quantity to that of the suggested quantity.
Confirm: Confirm will complete the Reverse Pick and move it to Completed status.
■ For manual reverse picks, the pick quantity on the customer order will be decremented by what was a Reverse picked. The Reserved quantity and the canceled quantity will not get updated as the items are not being canceled on the order, so they need to remain as reserved. They are simply being un-picked.
■ For the externally (system) generated reverse picks the pick quantity will be decremented on the customer order. The reserved quantity (if it had been reserved) will be decremented by what was reverse picked and put back to the backroom. The Canceled quantity on the customer order will be incremented by the reverse picked quantity. If all items have been canceled and there have been no deliveries, the status of the customer order will move to Cancelled. If there is no remaining order quantity on the order, and some of the items have been delivered, the customer order will move to Completed status.
Save: Saves the reverse pick as In Progress status and return to the Reverse Pick List screen.

Customer Order Reverse Picks
12-40 Oracle Retail Store Operations Cloud Service User Guide
Delete: Delete will allow for deleting of an In Progress status reverse pick and move it to Canceled status. User will return to the Reverse Pick List screen.
Back: Back is only applicable to view only reverse picks and will exit to the Reverse Pick List screen.
Cancel: Exits to the Reverse Pick List screen and no changes will be saved.
Print: Print will display the common print dialog to print the customer order reverse pick report.
Item Detail (Customer Order Reverse Picks)
Figure 12–33 Item Detail (Customer Order Reverse Picks) Screen
The Item Detail screen contains the details for the specific item on the customer order reverse pick. Entering/scanning an item on this screen will refresh the screen and update item and the reverse pick quantity for the item.
The reverse pick quantity, represented by the field on the top of the screen with the UOM label is editable by the user and represents how many of this item is being reverse picked. Editing the quantity is controlled by security. The suggested quantity will populate with the amount to be reversed for system generated reverse picks. Manually created will have the suggested quantity set to zero.
Users will enter in the quantity to be reverse picked.
■ For manual reverse picks, the user must enter in a quantity less than or equal to the physical pick quantity for the item.
■ For system generated (external) reverse picks the quantity must be less than or equal to the suggested quantity for items which are units. It must be less than or equal to the remaining quantity for variable UOM items (that is, Kg, Lbs, and so on).

Customer Order Reverse Picks
Customer Order Management 12-41
The pack size will be displayed if the UOM is set to cases. Other fields include remaining, order, picked, delivered and canceled quantities for the customer order will be displayed. Lastly, if the item is a substitute for another item, the Substitute For field will display with the original item listed.
Info (Customer Order Reverse Picks)
Figure 12–34 Customer Order Reverse Picks Info Screen
The Info popup contains read-only information about the header level of the customer order reverse pick. It is accessed through the Info menu option in the Footer menu on the Reverse Pick Items screen. Reverse Pick details include:
■ ID
■ Status
■ Create Date/User
Order details include:
■ Customer Order ID
■ Fulfillment Order ID
■ Store Customer Order ID
■ Status
■ Reservation Type
■ Create /Release/Delivery Date
■ Delivery Type
■ Carrier
■ Service

Customer Order Reverse Picks
12-42 Oracle Retail Store Operations Cloud Service User Guide
■ Allow Partial Delivery
■ Comments

13
Item Basket 13-1
13Item Basket
Item Basket is a way of creating a list of items that can be utilized for other things such as line busting, gift registries, and so on. Item Basket allows a user to capture items and their quantities.
Note: An item basket that has only items on it is considered 'static' meaning that the number of items does not change. An item basket that has only hierarchies or hierarchies and items is considered 'dynamic' meaning that the items on the basket can change based upon the items associated to the hierarchy. The desktop allows for item baskets that are 'dynamic' or 'static' to be created, viewed and edited. Whereas, on the mobile application only static item baskets (ones with items) can be created, viewed, and edited.
Features:
■ Create a new item basket
■ View or edit and existing item basket
■ Delete an In Progress Item Basket
■ Copy a Completed Item Basket

Item Basket
13-2 Oracle Retail Store Operations Cloud Service User Guide
Item Basket
Figure 13–1 Item Basket Mobile Screen Flow
Item Basket is accessed through the Item Basket menu within the drawer. Selecting the menu option takes the user to the Item Basket List screen. On this screen, the option is given to search for Item Basket records which will be presented on the Item Basket List screen. From here one can edit or view an item basket, or create an item basket, in all cases the user is directed to the list of items on the Item Basket Items screen. The user can select an existing item or scan/enter a new item directing to the Item Detail screen where functions allow the user to add, view, and edit the details of the items. The user can specify values for CFAs (Custom Flexible Attributes) that have been setup for the item basket within the Edit CFAs screen. Lastly, additional functions will include Notes, Print, Copy, Delete, Save, and Confirm.

Item Basket List
Item Basket 13-3
Item Basket List
Figure 13–2 Item Basket List Screen
When navigating to Item Basket, the Item Basket List screen displays the In Progress item baskets as the default list. The user can use the search criteria eye glasses to navigate to the Search Criteria (Item Basket) screen to enter search criteria for item baskets. When scanning/entering an item in the scan bar, the system adds the item to the entered search criteria and narrows down the current list of item baskets.
Creating a new item basket navigates to the Create Item Basket popup to enter in header level information, and then it will navigate to the Item Basket Items screen with no details (items) to build a new item basket. Selecting an item basket from the list navigates directs the user to the details for that item basket.

Search Criteria (Item Basket)
13-4 Oracle Retail Store Operations Cloud Service User Guide
Search Criteria (Item Basket)
Figure 13–3 Search Criteria Screen (Item Basket)
The Item Basket Search Criteria screen is accessed by the eye glasses on the Item Basket List screen. After applying the search criteria, the results are listed on the Item Basket List screen and the criteria applied is shown.
Create Item Basket
Figure 13–4 Create Item Basket

Item Basket Items
Item Basket 13-5
The Create Item Basket screen is used when creating a new item basket and it is accessed when selecting Create from the Item Basket List screen. All item baskets created on mobile will be static. A user must have create permissions to create a new item basket. The type of item basket is required to be selected from the list. The type is populated from the list of item basket types defined in Code Info dialog within the desktop application.
Description is an optional text field to describe the item basket. Alternate ID is also an optional field to hold an alternate ID given to the item basket by the user, different from that of the system generated item basket ID. Expiration date is a field to hold an optional expiration date used to update item baskets to 'canceled' status when the expiration date has passed. Lastly, the store field is required and the options will include the user's store or 'All Stores'. 'All Stores' is only available to users that have the proper permission, and this option will allow for the creation of item baskets in which all stores would have access to use.
Item Basket Items
Figure 13–5 Item Basket Items Screen
The Item Basket Items screen is where a new item basket is created. Initially, this screen will not have any items. The items screen is also displayed when selecting an existing item basket transaction from the Item Basket List. The items are listed for the item basket. The item image for the line items is displayed per configuration.
Line items appear in a list and selecting a line item navigates to the item details of that item. If an item has been changed in the current session, it is indicated by a bar on the left of the item. Scrolling in the list of items displays a filter. The filter can be used to narrow down the list of items. Filtering can occur by item ID and description.
Scanning or entering an item in the scan bar navigates you to the Item Detail screen for that item. The quantity may be updated depending on the scan mode. If the scan type is 'Bulk Scan' the user will navigate to the Bulk Scan screen.
The ellipsis in the lower right hand corner accesses the footer menu which contains all of the functions that can be performed on an item basket.

Item Detail
13-6 Oracle Retail Store Operations Cloud Service User Guide
Footer Menu
The footer menu is accessed from the ellipsis footer menu on the Item Basket Items screen. The menu functions include the following:
■ Info: Accesses the Info popup.
■ Notes: Accesses the notes dialog to capture notes.
■ Bulk Scan: Bulk Scan will navigate to the Bulk Scan screen. User must have proper permissions.
■ Edit Item Basket: The Edit Item basket option navigates to the Edit Item Basket screen. User must have proper permissions.
■ Edit CFA: Lets the user enter values for the CFAs that are set up for Item Basket.
■ Copy: The copy function is only available for those item baskets in a 'Completed' status. It takes the current item basket, copies the items and quantities, and creates a new editable item basket with a new ID. It references the copied item basket's ID.
■ Confirm: Confirms and completes the Item Basket setting it to 'Completed' status.
■ Save: Saves the item basket in 'In Progress' status to be completed later.
■ Delete: Marks the item basket to 'Canceled' status.
■ Cancel: Exits the item basket; changes made in that session are not saved.
■ Print: Displays the common print dialog to print the item basket report.
Item Detail
Figure 13–6 Item Detail Screen (Quantity)
The Item Detail screen is used for selecting or scanning an item from the Item Basket Items screen. Scanning or entering an item on this screen in the scan bar, updates the quantity per the scan mode and refreshes the Item Detail screen for the item and quantity scanned.

Edit Item Basket
Item Basket 13-7
The quantity can be edited and updated manually if permissions allow. The item information including the image (which is system configured) displays in the header. The bottom portion of the screen contains fields for quantity with UOM, pack size, and location. The Last Scan will display the contents of the last entered or scanned barcode. It is purely informational.
The footer menu, ellipsis button, contains a reset function as well as remove and restore functions. You can page through existing items on the item basket using the arrows on the bottom.
Edit Item Basket
Figure 13–7 Edit Item Basket Screen
The Edit Item Basket screen is used to edit header level information about the item basket. Edit Item Basket is accessed by selecting Edit Item Basket from within the footer menu of Item Basket Items, and a user must have proper permissions. The fields are the same as those on the Create Item Basket screen and include: type, description, alternate ID, expiration date, and store.

Edit CFAs
13-8 Oracle Retail Store Operations Cloud Service User Guide
Edit CFAs
Figure 13–8 Edit CFAs Screen
The Edit CFAs screen displays the list of CFAs (flexible attributes) that have been set up for Item Baskets in the desktop application and lets the user enter values for them. It is accessed by selecting the Edit CFAs menu option within the footer of Item Basket Items and the user must have proper permissions.
The CFAs that are set up as being required must have a value entered for it before confirming the item basket. The value can be one of the following: Date, Text, Decimal, Long depending on the 'data type' set up for the CFAs defined during setup in the desktop application. Appropriate security permission is needed for entering CFA values.

Bulk Scanning
Item Basket 13-9
Info Screen (Item Basket)
Figure 13–9 Item Basket Items Info Screen
The Info screen is an informational popup that contains read-only information about the header level of the item basket. Info is accessed by selecting Info from within the footer menu of Item Basket Items. Details include ID, description, alternate ID, reference ID, type, status, create date/user, last update date/user, expiration date, and store and the CFAs that have a value.
Bulk ScanningBulk scanning is the ability to be able to enter/scan one or more items on a transaction and apply them to the transaction all at once or in bulk. This enables retailers the ability to use RFID to scan many items to add to a transaction.
From the <transaction> items (Item Basket Items) screen, if the scan type is Bulk, after entering/scanning one or many items the user will be directed to the Bulk Scan screen. On the Bulk Scan screen, a counter will tally total, valid, invalid, and expected scans. The Bulk Scan screen can also be accessed via the Bulk Scan menu option from the footer menu on the <transaction> items screen.
Once on the Bulk Scan screen items can continue to be entered/scanned as well as the option to import an item basket.
Selecting the Items option from the footer menu will direct the user to the Bulk Items screen which will list all items that have been collected. Here the user can remove items from the bulk collection if necessary. Once complete, the user can select Apply and the system will apply the items and navigate back to the <transaction> items screen. Bulk scanning is currently used within Item Basket.

Bulk Scanning
13-10 Oracle Retail Store Operations Cloud Service User Guide
Bulk Scan
Figure 13–10 Bulk Scan Screen
The Bulk Scan screen can be accessed via the Bulk Scan footer menu option from the Item Basket Items screen if the user has proper security permissions. It can also be accessed when scanning/entering an item from the Item Basket Items screen when the scan type is set to Bulk. The Bulk Scan screen allows a user to enter/scan in multiple items at once (that is, RFID) or one by one. In both scenarios the system will gather the items and create a counter of the "scans" including: total, valid, and invalid as well as the total quantity. The system does not apply any validations when items are entered/scanned. Validation does not take place when scanning/entering an item on this screen. The validation takes place once all of the bulk scanning is complete and the user chooses to apply the items to the transaction.
Footer Menu
The footer menu is accessed from the ellipsis footer menu on the Bulk Scan screen. The menu functions include the following:
■ Items: Navigates to the Bulk Items screen to view the items that were scanned/entered on the Bulk Scan screen.
■ Import Basket: Navigates to the Select Item Basket screen to import an item basket into the Bulk Scan screen. Only 'static' item baskets can be imported.
■ Apply: Takes all of the items that were scanned/entered, as well as imported item baskets, and executes the item validations and applies the items to the transaction and the user is returned to the Item Basket Items screen with items in the list.
■ Clear: Clears out all of the items that were scanned/entered or imported from an item basket. All of the counters on the Bulk Scan screen are re-set to zero.
■ Back: Navigates back to the Item Basket Items screen and the items that were scanned/entered or imported via an item basket are saved to the Bulk Scan.

Bulk Scanning
Item Basket 13-11
Bulk Items
Figure 13–11 Bulk Items Screen
The Bulk Items screen is accessed via the Bulk Items menu option within the footer on the Bulk Scan screen. This screen lists all of the items that have been entered/scanned or imported from an item basket on the Bulk Scan screen. There is a filter at the top of the screen to allow for filtering on item ID and item description. The user is able to delete items that are not needed on the transaction. Deleted items can be restored if accidentally deleted. Save will save the deletions made and return to the Bulk Scan screen.

Bulk Scanning
13-12 Oracle Retail Store Operations Cloud Service User Guide
Select Item Basket
Figure 13–12 Select Item Basket Screen
The Select Item Basket screen is accessed via the Import Item Basket footer menu option on Bulk Scan. This screen allows a user to import a 'completed' status item basket that was created for the user's store or All Stores. Upon selecting the item basket the user will be given the option to add only the items without the quantities or add the items with the quantities to the bulk scan. A Delete Item Basket check box is available which will set the selected item basket to 'canceled' status upon import. This allows those item baskets that are no longer of use to not show up in the list anymore and it will get picked up in the purge.

14
Ticketing 14-1
14 Ticketing
Ticket printing on the mobile application is accessible from Inventory Management/Print Item menu. The system supports two types of ticketing that is, Item Ticket and Shelf Label. There are two modes of printing tickets, auto print and manual print.
The user is taken to the Auto Print Mode by default when the dialog is accessed. In auto print mode, the user can print tickets quickly with the pre-defined attributes by just scanning or entering the items. The user can change the ticket attributes or switch to the Manual mode using the Default Attributes option.
In manual print item mode, the user can pre-set the type, format, override price, quantity and change the attributes if required for every ticket on the fly. The user can select the country of manufacture for the ticket.
Auto Print Item
Figure 14–1 Auto Print Item
This screen is accessed from the Print Item menu under the Inventory Management in the mobile application. Auto Print Item mode is the default mode when the user enters the dialog.

Auto Print Item
14-2 Oracle Retail Store Operations Cloud Service User Guide
This screen allows the user to scan the items and submit the tickets for printing automatically.
The system by default sets the type to Item Ticket, default format set for the type, Price type based on the Print Item Events store parameter and quantity to 1. This helps the user to start scanning the items right from the time entering the screen.
The user can select the Default Attributes option to change the attributes. The system starts using the attributes set in this screen from the time the user has changed until the dialog is closed.
Based on the event(s) configured in the Print Item Events store parameter or the values set in the default attributes, the system determines what tickets need to be submitted by looking at the item meeting the configured event as described below.
Always Print: This option will always print a ticket regardless if there is a price change.
Clearance: Only print a ticket if on the specific date any clearance event is effective. So, for Clearance say 2, that means today's date + 2 days, if the item on that day has a clearance going on, the system prints the ticket.
Promotion: Only print a ticket if on the specific date any promotion event is effective.
Regular or Clearance: Only print a ticket if on the specific date any Regular or Clearance event is getting effective.
Regular: Only print a ticket if on the specific date any Regular even of getting effective.
Any Price Event: Based on the date selected, if any price event goes into effect (clearance, promotion or regular price) a ticket is generated. If there is no price event goes into effect, the system prints nothing.
The system needs a printer to be set as default, if no printer is set as default the user is shown an error on the first scan and can select the printer using the 'Select Printer' option from the footer menu.
If there are any overlapping events, the system displays a popup with the events and allows the user to select.
On this screen, the system displays the total scanned items, what is the printer assigned and total print quantity.
The user can change the mode to Manual Print on the Default Attributes screen.
On each row, the system displays the Item Image if configured, Item Id, Description, print status, type, format assigned, price type, effective date, event price, current price, override price if any, quantity and error if any.
The system generates the ticket after a valid scan and submits to the assigned printer.

Manual Print Item
Ticketing 14-3
Manual Print Item
Figure 14–2 Manual Print Item
This screen appears when the user changes the mode to Manual using the Default Attributes screen.
The system displays the values based on the default setting done for the fields on this screen.
The user can scan or enter the item for which the ticket or label must be printed.
On this screen, the user can edit the type, format, country of manufacture, override price if permission allowed and enter the quantities or can use the default values and print the ticket.
The system displays the country of manufacture of the item scanned and allows to edit.
On the first scan after entering on to the manual mode, the system displays an error if the default printer is not set. The user can change the printer using the Select Printer option from the footer menu.
The user can access the Default Attributes screen anytime to change the mode and set the default attributes.
The system displays the Stock on Hand, Available, Event and price along with the item information above the editable fields.

Default Attributes
14-4 Oracle Retail Store Operations Cloud Service User Guide
Default Attributes
Figure 14–3 Default Attributes
This screen is used by the user to set the default attribute values for the ticket generation for the Auto and Manual mode of printing.
This screen is accessed when the user selects the Default Attributes button on the Auto Print Item or Manual Print Item screen.
For the Auto Mode, the user can set the format type, format, event type, days range, number of days for range, override price and quantity.
The Event type field consists of following options. Always, Promotion, Clearance, Permanent, Clearance or Permanent and Any Price Event. The default value shown here is set from the Print Item Events store parameter.
The Days Range option includes, Specific Date, Range, Past and Future. For all the options the range cannot be more than 3 days.
Based on the range selected, the system determines whether the scanned item falls in the selected event and if an event exists, the system generates the ticket and submits to print.
For the Manual mode, the user can set the format type, format, override price and the override quantity.
For the both the modes, the system considers the override price and quantity and sets the value when the ticket is generated.
For the manual mode the override price and quantity are populated and allowed to edit on the Manual Print Item screen.

Select Printer
Ticketing 14-5
Select Printer
Figure 14–4 Select Printer
This screen is for the user to set the printer for the ticket printing.
On the top of the lists the system displays the paired Bluetooth printers.
The Bluetooth printers are indicated with the Bluetooth symbol and prefix 'BT' and these printers cannot be scanned.
On this screen the user can select or scan the barcode of the printer and submit the tickets for printing.
This screen is accessed from the Select Printer option on the Auto Print Item, Manual Print Item screens and Print Tickets popup that appears when printing tickets from the container items screen.
This screen lists all the printers that are available in the system for the item tickets and label type.
The selected printer is displayed on the Auto Print Item and Manual Print Item screens for the user to know to which printer the tickets/labels are submitted for printing.

15
Store Orders 15-1
15Store Orders
Store Orders allows a store to request items to be ordered to the store. The items being requested may come from a supplier or a warehouse. The system allows a user to capture items and their quantities to be ordered as well as define restrictions for the store order. The inventory is sourced to the store based on the corporate replenishment setup. This can be either a delivery from a warehouse or a drop ship from the supplier. The actual sourcing, delivery timings, and final quantities remain a function of the replenishment system. Store Orders may be created manually on the mobile application. They may also come in from an external system via a web service and the user can enter quantities against the external order quantity.
Features:
■ Create a new store order
■ View or edit and existing store order
■ Delete an In Progress store order
■ Copy a Completed store order
■ Print Store Order Report
Business Case■ A retailer has milk and eggs that are setup on semi auto replenishment. Purchase
Order gets generated in merchandising for the milk and eggs and it comes to SIOCS. Store manager opens the store order for the milk and eggs within the Store Orders dialog. Manager updates the quantities and approves the store order.
■ A retailer has a need to order more cornflakes due to the high demand of a current promotion. A retailer creates a store order for more boxes of cornflakes.
■ A retailer has certain items that are needed at different times of the day. Within a store order, a timeslot for the delivery can be specified, so it is possible to order doughnuts in the morning, sandwiches at lunch, and hot meals in the evening.
■ A retailer realizes that they are often out of dairy items because of very variable customer purchase habits. The store orders what is needed by scheduling a store order product group for the Dairy Department for each Monday. A system generated store order is created on Monday for the dairy items and the retailer walks through the items on the store order and enters in the needed quantity. The store order is approved and fired off to the merchandising system and three days later the items arrive at the store on a warehouse to store transfer or supplier direct delivery.

Business Case
15-2 Oracle Retail Store Operations Cloud Service User Guide
Figure 15–1 Store Orders Mobile Screen Flow
Store Orders are accessed within the Inventory Management menu by selecting Store Orders. Selecting the Store Orders menu option takes you to the Store Order List screen. On this screen, you have the option to search for existing store order records. You can create a store order, edit, or view a store order. When creating, editing, or viewing a store order, you are first directed to the list of items on the Store Order Items screen. You can add, view, and edit the details of the items on the Item Detail screen. You can specify values for CFAs (Custom Flexible Attributes) set up for store order via the Edit CFAs screen.

Store Order List
Store Orders 15-3
Store Order List
Figure 15–2 Store Order List
When navigating to Store Orders, the Store Order List screen displays the New and In Progress store orders as the default list and a red '!' icon will be displayed for those store orders that have a requested date before today.
The Store Order List will contain store orders for the following origins:
■ Manual: Store order was created manually in the system.
■ External: The store order was created in an external system such as a merchandising or forecasting system.
■ System: The store order was generated by the system from a scheduled store order product group
You can use the search criteria eye glasses to navigate to the Search Criteria (Store Orders) screen to enter search criteria for store orders. When scanning/entering an item in the scan bar, the system adds the item to the entered search criteria and narrows down the current list of store orders based upon the scanned/entered item.
Creating a new store order directs you to the Create Store Order popup to build a new store order. Selecting a store order from the list navigates you to the details for that existing store order.

Search Criteria (Store Orders)
15-4 Oracle Retail Store Operations Cloud Service User Guide
Search Criteria (Store Orders)
Figure 15–3 Search Criteria Screen (Store Orders)
The Store Orders Search Criteria screen is accessed by the eye glasses on the Store Order List screen. After applying the search criteria, the results are listed on the Store Order List screen and the criteria applied is shown.
Search criteria include: From/To Requested Date, From/To Last Update Date, Store Order ID, External ID, Item, Status, Description, Origin, Supplier, Warehouse, Area, Context, and User.
There is a search limit that will be used to return a set number of records, this is defaulted based upon a system admin setting.

Create Store Order
Store Orders 15-5
Create Store Order
Figure 15–4 Create Store Order
The Create Store Order screen is used when creating a new store order and it is accessed when selecting Create from the Store Order List screen. All store orders created on mobile will have an origin of 'manual'. A user must have create permissions to create a new store order.
Every newly created store order will have a system generated unique store order ID. The user may also choose to give the store order a description. The description is an optional text field to describe the store order. An optional context can be assigned to the store order, the context types are populated at setup within the Code Info dialog on the desktop. The last field in the header is the Requested Date, when the store order is wanted by. Requested Date is required and must be greater than or equal to today. The Requested Date may have additional date validations later on in the store order process (when adding items or at time of approval) depending on if the item is a 'Store Order' replenishment item.
Restrictions
The last piece of the create process is the restrictions section which is used to define what items the store order is restricted too, in other words what items are allowed to be added to the store order. Restrictions are not required, if not set up, then items will not be restricted. Restrictions can be defined by one or more of the following:
■ Supplier
■ Warehouse
■ Merchandise hierarchy
■ Area
■ Store Order replenishment items
More than one restriction can be defined for a store order.

Store Order Items
15-6 Oracle Retail Store Operations Cloud Service User Guide
Example: A restriction of Supplier 1212-Soda Supplier and Store Order Items of 'checked' would mean that all added to the store order must be a Store Order item for Supplier 1212-Soda Supplier.
Both Supplier and Warehouse restrictions can be configured at the store to be:
1. Enabled and optional
2. Enabled and required
3. Not displayed if not used
Supplier has one additional store configuration, DSD Delivery Supplier for Store Order, to check. If it is set to No, no additional validation is needed and the supplier can be added as a restriction. If it is set to Yes, when adding the supplier as a restriction, the DSD Allowed Indicator on the supplier must be set to Yes in order to add the supplier. If the supplier indicator is set to No then a store order cannot be created for that supplier.
An Area is setup on the desktop in the Area dialog. Areas can be used as restrictions on store orders if the store is configured to Yes for Enable Area for Store Orders.
Merchandise Hierarchy and Store Order Replenishment Items are always available to be selected for restrictions.
Note: Restrictions will already be set for store orders that are system or externally created.
Store Order Items
Figure 15–5 Store Order Items Screen
Initially, if the user is creating a new store order, this items screen will not have any items. When selecting an existing store order from the Store Order List screen, this screen will be displayed with the items for the store order. Line items appear in a list and selecting a line item navigates to the item details of that item.

Store Order Items
Store Orders 15-7
Fields will include, item, item description and item image depending on the system configuration. The quantity for the item on the store order will display once a quantity has been added for the item. If the store order is from an 'External' origin there will also be an external quantity representing the suggested quantity to be ordered.
Delivery Timeslot: Will be displayed if store is configured for delivery timeslots.
■ The Delivery Timeslot at the header level will be used as a default at the item level for the 'SO' (store order) items. Changing the timeslot at the header will only apply to newly added items on the store order.
■ If not Delivery Timeslot is selected at the header, the item level will default to 'None'.
■ The Delivery Timeslots list will be populated from the Delivery Timeslot Admin screen on the desktop. The list will have those delivery timeslots that the user has data permissions for.
If an item has been changed in the current session, it is indicated by a bar on the left of the item. Scrolling in the list of items displays a filter. The filter can be used to narrow down the list of items. Filtering can occur by item ID and description.
Items can be removed by swiping. Items added by the user will be flagged for removal. Items that were on the store order from an 'External' origin will have their store order quantity set to zero.
The ellipsis in the lower right hand corner accesses the footer menu which contains all of the functions that can be performed on the store order.
Item Validations
■ Scanning or entering an item in the scan bar navigates you to the Item Detail screen for that item. The quantity may be updated depending on the scan mode.
■ Items scanned will be restricted to those restrictions defined on create.
– Supplier: Restricts the store order to items only for that supplier.
– Warehouse: Restricts the store order to items only for that warehouse.
– Merchandise hierarchy: Restricts the store order to items only for that merchandise hierarchy.
– Area: Restricts the store order to items only defined for that area.
– Store Order replenishment items: When this restriction is checked the system restricts the store order to items that are only store order replenishment items.
■ Store Order Allowed: There is a store re-orderable indicator that is sent on from merchandising (ItemLocVirt). This must be Yes for the item to be put on the store order. If it is set to No, the user will get an error and the item cannot be store ordered.
■ If the item is an 'SO' (store order) replenishment item, and it has a store order reject indicator set to Yes the Request Date for the store order must be greater than or the Next Delivery Date for that item.
– If it is not then the item cannot be added to the store order.
Note: The 'SO' replenishment method, store order reject indicator and the next delivery date are defined in the merchandising system for the item and held in EICS on the item/store record.

Store Order Items
15-8 Oracle Retail Store Operations Cloud Service User Guide
■ UINS or GS1 databar data (extended attributes) are not captured in Store Orders.
Adding Items - System and External Store Orders
If the store order is a system or external store order, unexpected items (those not originally on the external store order), will only be able to be added if the store order has the Add Items indicator checked to Yes. If it is set to No the user will only be able to enter/scan items and quantities against the items that are originally on the store order.
Footer Menu
The footer menu is accessed from the ellipsis footer menu on the Store Order Items screen. The menu functions include the following:
Info: Accesses the Info popup.
Notes: Accesses the notes dialog to capture notes.
Refresh Cost: If the user has permission for cost to display in the store order, this button will go out and grab the latest costs for the items to be used in the Total Estimated Cost on the Store Order Info screen.
Default Qty: The Default Qty will update the store order quantities for all line items on the store order that do not have a quantity.
■ For manually created store orders the quantity will be set to the last requested quantity from the most recent approved store order.
■ For externally created store orders the quantity will be set to the external quantity.
Edit CFA: Lets the user enter values for the CFAs that are set up for store orders.
Approve: Approves and completes the store order. The store order is published out.
Save: Saves the store order 'In Progress' status to be completed later.
■ Saving a store order does not publish anything out; it simply saves it. The Save button can be used to implement a Save and Approval process.
Delete: Marks the store order to 'Canceled' status.
Cancel: Exits the store order; changes made in that session are not saved.
Print: Displays the common print dialog to print the store order report.
Copy: The copy function is only available for those store orders in a completed state which is 'Approved' or 'Canceled' status. It takes the current store order, copies the items and quantities (not external quantities), and creates a new editable store order with a new ID. It references the copied store order's ID.
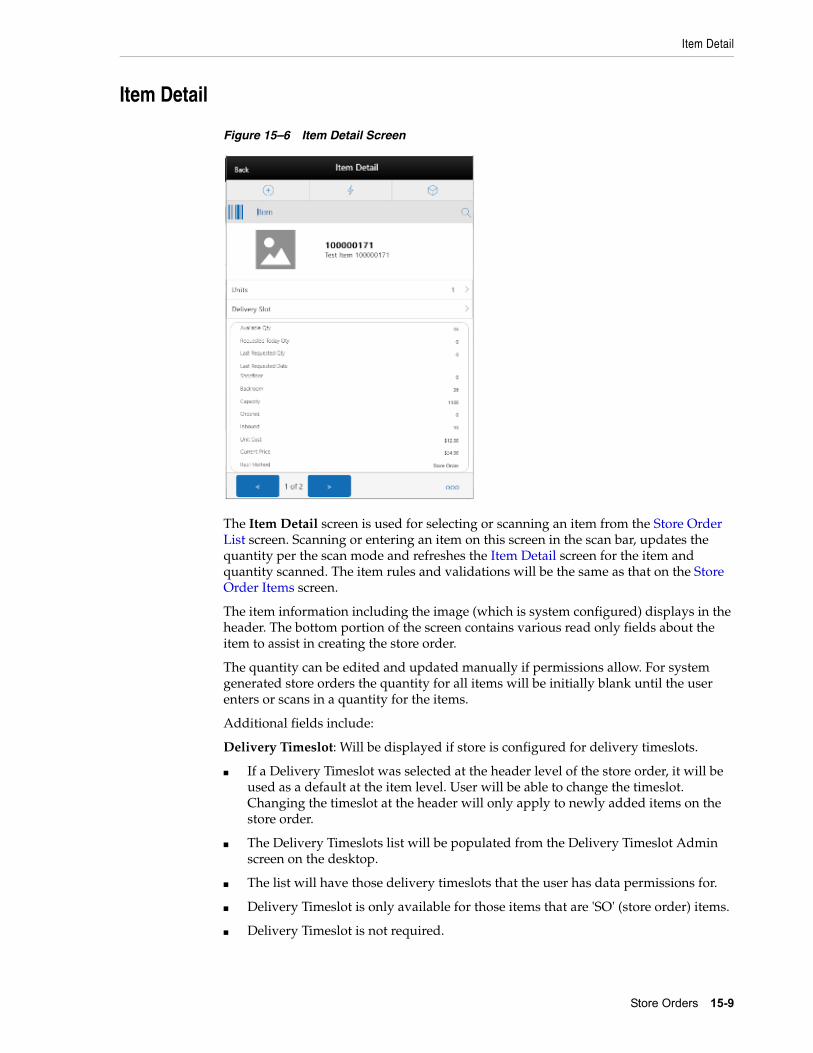
Item Detail
Store Orders 15-9
Item Detail
Figure 15–6 Item Detail Screen
The Item Detail screen is used for selecting or scanning an item from the Store Order List screen. Scanning or entering an item on this screen in the scan bar, updates the quantity per the scan mode and refreshes the Item Detail screen for the item and quantity scanned. The item rules and validations will be the same as that on the Store Order Items screen.
The item information including the image (which is system configured) displays in the header. The bottom portion of the screen contains various read only fields about the item to assist in creating the store order.
The quantity can be edited and updated manually if permissions allow. For system generated store orders the quantity for all items will be initially blank until the user enters or scans in a quantity for the items.
Additional fields include:
Delivery Timeslot: Will be displayed if store is configured for delivery timeslots.
■ If a Delivery Timeslot was selected at the header level of the store order, it will be used as a default at the item level. User will be able to change the timeslot. Changing the timeslot at the header will only apply to newly added items on the store order.
■ The Delivery Timeslots list will be populated from the Delivery Timeslot Admin screen on the desktop.
■ The list will have those delivery timeslots that the user has data permissions for.
■ Delivery Timeslot is only available for those items that are 'SO' (store order) items.
■ Delivery Timeslot is not required.

Item Detail
15-10 Oracle Retail Store Operations Cloud Service User Guide
■ When the store order is approved and published out, the Delivery Timeslot will only be sent on the message if the publish indicator is Yes.
External Order Qty: If the order was from an external origin. This is the quantity that is suggested to order by the external system.
Available: Available stock on hand for the item at the user's store.
Requested Today Qty: Sum of all requested quantities on all 'Approved' store orders for today's date for the item at the user's store.
Last Requested Qty: The store order quantity for the last/most recent 'Approved' store order for the item at the user's store.
Last Requested Date: The approved date for the store order that has the last requested quantity.
Next Delivery Date: The next delivery date for the item at the user's store.
■ This field is populated on the item location record from the merchandising system and only for 'SO' (store order) replenishment type items.
Shopfloor: Shopfloor inventory for the item at the user's store. Only displayed if store is configured to display shopfloor/backroom.
Backroom: Backroom inventory for the item at the user's store. Only displayed if store is configured to display shopfloor/backroom.
Capacity: The total summed up capacity for the item. Only displayed if store is configured to display sequence fields.
Note: Capacity is setup / defined via a third party upload.
Ordered: The total remaining ordered quantity for the item at the store. This is for transfers, allocations and purchase orders.
Inbound: The total quantity approved to be sent to the user's store. This is for store to store transfers, warehouse and finisher deliveries and RTV shipments.
Unit Cost: The unit cost for the item. Only displayed if user has proper permission.
Note: Unit cost will not be displayed if the currency of the store is different than that of the supplier (in the case that a supplier restriction is set up).
Price: Current price for the item.
Replenishment Method: The replenishment method for the item at the user's store, such as Store Order, Min Max, and so on.
Last Scan: Displays the details that are from the barcode.
■ GS1 - will display the barcode, GTIN, and the contents of the barcode such as price, UIN, and so on.
■ Type 2 - will display the barcode and the price.
■ All other barcodes - will display the barcode.
The footer menu, ellipsis button, contains a reset function as well as remove and restore functions. The Sales Data screen can also be accessed from this menu.

Edit Store Order
Store Orders 15-11
You can page through existing items on the store order using the arrows on the bottom.
Figure 15–7 Sales Data Screen
The Sales Data screen is used to display sales data for an item and store. It is accessed by selecting Sales Data from within the footer menu of the (Store Order) Item Detail screen. The screen allows a user to view two types of sales data: Sales History and Sales Forecast. A user must have permission to view Sales History as well as to view Sales Forecast. It the user does not have either permission, this screen will not be available.
Sales History: Will display the past 30 days (or less if 30 does not exist) of Sales History for the item at the user's store. Sales History is pulled from sales within the system that are found in Transaction History. This will display in a list with item and quantity.
Sales Forecast: Will display the next 30 days (or less if 30 does not exist) of future sales for the item at the user's store. Sales Forecast is retrieved via a web service from an external system such as merchandising. This will display in a list with item and quantity.
Lastly, the system will display the calculated Days of Supply.
Edit Store Order
Figure 15–8 Edit Store Order Screen

Edit CFAs
15-12 Oracle Retail Store Operations Cloud Service User Guide
The Edit Store Order screen is used to edit header level information about the store order. Edit Store Order is accessed by selecting Edit Store Order from within the footer menu of Store Order Items, and a user must have proper permissions. The fields are the same as those on the Create Store Order screen and include: description, context, and request date.
Request Date: If there are no 'SO' (store order) items on the store order, the request date needs to be greater than or equal to today. If there are 'SO' (store order) items that have a Store Order Reject indictor of Yes, the request date needs to be greater than the latest Next Delivery Date of the 'SO' items on the store order. This gets validated also upon approval of the store order.
Edit CFAs
Figure 15–9 Edit CFAs Screen
The Edit CFAs screen displays the list of CFAs (flexible attributes) that have been set up for Store Orders on the desktop, and lets you enter values for them. The CFAs that are set up as Required must have a value entered for it before approving the store order. The value can be one of the following: Date, Text, Decimal, Long depending on the 'data type' set up for the CFAs, while creating them on the desktop. Appropriate security permission is needed for entering CFA values.

Info Screen
Store Orders 15-13
Info Screen
Figure 15–10 Info Screen
The Info screen is an informational popup that contains read-only information about the header level of the store order.
Fields include:
ID: System generated ID for the store order.
External ID: The ID from the external system for externally created store orders.
Reference ID: ID associated to the store order that was copied.
Description: Description of the store order. For system generated store orders, this will be the description defined on the Product Group.
Status: Status of the store order: New, In Progress, Approved, and Canceled.
Context: The context type associated to the store order.
Origin: Where the store order originated: manual, system, or external.
Requested Date: The requested date for the store order.
Total Quantity: Total quantity of all items on the store order.
Total Estimated Cost: Total cost of all items on the store order. This field is only displayed if user has proper permission.
Add Items: Has a value of Yes or No and defines if items can be added to the store order. For manually created store orders this is defaulted to Yes. For store orders that are from an external system, or system generated, this may be set to Yes or No. Yes would mean that items can be added to the external store order, whereas No would be that items cannot be added and only the items originally on the store order can be ordered.
Product Group ID: For system generated store orders this will display the Product Group ID that the store order was generated from.

System Generated
15-14 Oracle Retail Store Operations Cloud Service User Guide
Product Group Description: For system generated store orders this will display the Product Group Description that the store order was generated from.
CFAs: Each CFA attribute and value for the store order.
Restrictions: The restrictions that were defined for the store order.
■ Supplier, warehouse, merchandise hierarchy, area, and store order items.
Create Date
Create User
Last Update Date
Last Update User
Approved Date
Approved User
Auto Approved Date: If the store order was auto approved this field will be displayed.
System GeneratedSystem Generated store orders are created on the desktop of the EICS application. See the Product Group & Product Group Schedule section of Oracle Retail Enterprise Inventory Cloud Service User Guide - Operations chapter. Those schedules created for today will generate the store order at the time of completing the schedule for stores on the schedule. Other store orders will be generated based upon their schedule in the nightly batch. System generated store orders will have an origin of 'system' and will be created in a status of 'New' with the items that were defined per the product group component without quantities. The request delivery date will be set per the Days before Delivery.
On the mobile the store order will allow the user to modify and save or approve it. Items can be added within the defined restrictions defined on the product group if the 'Add Items' indicator was selected on the product group.
Integration ■ Manual and System Created
■ Externally Created
Manual and System CreatedThose store orders that were created manually on the mobile or via a schedule in the system, will be sent out via RICS once approved. Any items with a zero quantity will not be sent. Non inventory items will be sent based upon a publish non inventory items configuration. If there are no items with quantities on the store order to send, the store order will not be sent. CFAs are also published based upon a publish attribute defined on the setup of the CFA. Delivery Timeslots will be published based upon the delivery timeslot publish attribute. Items will be sent and grouped together as being 'SO' store order items or NON store order items.
Externally Created Store orders can come from an external system into SIOCS via a web service. These store orders will have an external order quantity to be used as a suggested order quantity. The user will enter/scan a store order quantity for the actual order quantity.

Externally Created Store Orders
Store Orders 15-15
The order will also indicate if additional items can be added to the store order by the user.
Those store orders that originated from an external system will be sent out via web service. All items will be sent out those that were originally on the store order from external system as well as those added in addition by the user. Items with a zero quantity will also be sent back to the external system to indicate no quantities are required. The rules for non inventory and CFAs are the same as that above for manually created store orders.
RMFCS Processing for SIOCS Created Orders (Manual And System)A user is able to use store order functionality to request items regardless of the replenishment type normally used by the merchandising system to replenish the item. All items are sourced from either a warehouse or through a supplier depending on the sourcing parameters for the item specified in the replenishment system. Items specified as using Store Order replenishment (or items that are not set up for auto-replenishment at all) are sourced through the creation of one-off purchase orders or warehouse transfer requests only after the store has requested inventory using the Store Order functionality. There is no correlation between the purchase order/transfer and the item request. Any quantities requested for items that have a replenishment type other than Store Order are added above and beyond the quantity that is normally sourced through the replenishment system on the item's next replenishment review date. However, if the requested delivery date falls prior to the item's next replenishment review date, the request is sourced through the creation of a one-off purchase order or warehouse delivery instead. All inventory requested is sourced to the store at the earliest possible date given the replenishment review date, the supplier or warehouse lead time, and any other factors that may influence the time it takes a delivery to reach the store.
Externally Created Store OrdersThere are web services for creating, updating and deleting of store orders. Create allows for externally created store orders to come into SIOCS and simulates the SOCS store order create functionality. In addition it also has an external order number, external order quantity, and add items indicator. The add items indicator is used to determine if additional items can be added the store order when editing it within SOCS.
Note: At this time there is not a base integration for externally created store orders from RMFCS.