Oracle® Retail Price Management User Guide Release 13.2
306
Oracle® Retail Price Management User Guide Release 13.2 January 2011
-
Upload
khangminh22 -
Category
Documents
-
view
1 -
download
0
Transcript of Oracle® Retail Price Management User Guide Release 13.2

Oracle® Retail Price ManagementUser Guide
Release 13.2
January 2011

Oracle® Retail Price Management User Guide, Release 13.2
Copyright © 2011, Oracle and/or its affiliates. All rights reserved.
Primary Author: Uma Shankar
This software and related documentation are provided under a license agreement containing restrictions on use and disclosure and are protected by intellectual property laws. Except as expressly permitted in your license agreement or allowed by law, you may not use, copy, reproduce, translate, broadcast, modify, license, transmit, distribute, exhibit, perform, publish, or display any part, in any form, or by any means. Reverse engineering, disassembly, or decompilation of this software, unless required by law for interoperability, is prohibited.
The information contained herein is subject to change without notice and is not warranted to be error-free. If you find any errors, please report them to us in writing.
If this software or related documentation is delivered to the U.S. Government or anyone licensing it on behalf of the U.S. Government, the following notice is applicable:
U.S. GOVERNMENT RIGHTS Programs, software, databases, and related documentation and technical data delivered to U.S. Government customers are "commercial computer software" or "commercial technical data" pursuant to the applicable Federal Acquisition Regulation and agency-specific supplemental regulations. As such, the use, duplication, disclosure, modification, and adaptation shall be subject to the restrictions and license terms set forth in the applicable Government contract, and, to the extent applicable by the terms of the Government contract, the additional rights set forth in FAR 52.227-19, Commercial Computer Software License (December 2007). Oracle USA, Inc., 500 Oracle Parkway, Redwood City, CA 94065.
This software is developed for general use in a variety of information management applications. It is not developed or intended for use in any inherently dangerous applications, including applications which may create a risk of personal injury. If you use this software in dangerous applications, then you shall be responsible to take all appropriate fail-safe, backup, redundancy, and other measures to ensure the safe use of this software. Oracle Corporation and its affiliates disclaim any liability for any damages caused by use of this software in dangerous applications.
Oracle is a registered trademark of Oracle Corporation and/or its affiliates. Other names may be trademarks of their respective owners.
This software and documentation may provide access to or information on content, products, and services from third parties. Oracle Corporation and its affiliates are not responsible for and expressly disclaim all warranties of any kind with respect to third-party content, products, and services. Oracle Corporation and its affiliates will not be responsible for any loss, costs, or damages incurred due to your access to or use of third-party content, products, or services.

Value-Added Reseller (VAR) Language
Oracle Retail VAR Applications The following restrictions and provisions only apply to the programs referred to in this section and licensed to you. You acknowledge that the programs may contain third party software (VAR applications) licensed to Oracle. Depending upon your product and its version number, the VAR applications may include:
(i) The MicroStrategy Components developed and licensed by MicroStrategy Services Corporation (MicroStrategy) of McLean, Virginia to Oracle and imbedded in the MicroStrategy for Oracle Retail Data Warehouse and MicroStrategy for Oracle Retail Planning & Optimization applications.
(ii) The Wavelink component developed and licensed by Wavelink Corporation (Wavelink) of Kirkland, Washington, to Oracle and imbedded in Oracle Retail Mobile Store Inventory Management.
(iii) the software component known as Access Via™ licensed by Access Via of Seattle, Washington, and imbedded in Oracle Retail Signs and Oracle Retail Labels and Tags.
(iv) the software component known as Adobe Flex™ licensed by Adobe Systems Incorporated of San Jose, California, and imbedded in Oracle Retail Promotion Planning & Optimization application.
You acknowledge and confirm that Oracle grants you use of only the object code of the VAR Applications. Oracle will not deliver source code to the VAR Applications to you. Notwithstanding any other term or condition of the agreement and this ordering document, you shall not cause or permit alteration of any VAR Applications. For purposes of this section, “alteration” refers to all alterations, translations, upgrades, enhancements, customizations or modifications of all or any portion of the VAR Applications including all reconfigurations, reassembly or reverse assembly, re-engineering or reverse engineering and recompilations or reverse compilations of the VAR Applications or any derivatives of the VAR Applications. You acknowledge that it shall be a breach of the agreement to utilize the relationship, and/or confidential information of the VAR Applications for purposes of competitive discovery.
The VAR Applications contain trade secrets of Oracle and Oracle’s licensors and Customer shall not attempt, cause, or permit the alteration, decompilation, reverse engineering, disassembly or other reduction of the VAR Applications to a human perceivable form. Oracle reserves the right to replace, with functional equivalent software, any of the VAR Applications in future releases of the applicable program.


v
Contents
Send Us Your Comments ....................................................................................................................... xv
Preface .............................................................................................................................................................. xvii
Audience.................................................................................................................................................... xviiDocumentation Accessibility .................................................................................................................. xviiRelated Documents ................................................................................................................................. xviiiCustomer Support ................................................................................................................................... xviiiReview Patch Documentation ............................................................................................................... xviiiOracle Retail Documentation on the Oracle Technology Network ................................................... xixConventions ............................................................................................................................................... xix
1 Oracle Retail Price Management
2 Using RPM
Access the Workspace .............................................................................................................................. 2-1Log In to RPM..................................................................................................................................... 2-1Exit RPM.............................................................................................................................................. 2-1View the Workspace .......................................................................................................................... 2-1Resize Elements of the Workspace .................................................................................................. 2-3
RPM Window .............................................................................................................................. 2-3Toolbar.......................................................................................................................................... 2-3Workspace.................................................................................................................................... 2-4Task Pad ....................................................................................................................................... 2-4Pane............................................................................................................................................... 2-5
Look Up Field Level Data ................................................................................................................. 2-6Drop-Down List .......................................................................................................................... 2-6List of Values ............................................................................................................................... 2-7Multi-Select List of Values ......................................................................................................... 2-8
Open the Multi-Select LOV ................................................................................................ 2-9Select Contiguous (Adjoining) Rows................................................................................ 2-9Select Noncontiguous Rows............................................................................................... 2-9Add the Values..................................................................................................................... 2-9
Search For and Filter Records........................................................................................................ 2-10Filter Records in a Table.......................................................................................................... 2-10
View Margins (Margin Visibility)................................................................................................. 2-11View Price Change History ........................................................................................................... 2-11
Markup Change Date Dialog Fields...................................................................................... 2-12Aggregation .............................................................................................................................. 2-13
Access RSM ...................................................................................................................................... 2-13
3 System Options
System Defaults........................................................................................................................................ 3-1

vi
System Options Definitions................................................................................................................... 3-1Edit System Options .......................................................................................................................... 3-5View System Options ..................................................................................................................... 3-10System Defaults ............................................................................................................................... 3-10
Edit System Defaults ............................................................................................................... 3-11View System Defaults ............................................................................................................. 3-12
Aggregation Levels ......................................................................................................................... 3-13Maintain Aggregation Level Settings ................................................................................... 3-13
4 Pricing
Price Inquiry.............................................................................................................................................. 4-1Retrieve an Item Price........................................................................................................................ 4-2
Export Price Inquiry Results ..................................................................................................... 4-5Price Guides ........................................................................................................................................ 4-6
Create a Price Guide ................................................................................................................... 4-6Add Price Intervals Individually....................................................................................... 4-8Add Multiple Price Intervals.............................................................................................. 4-8Define Ends in Values ......................................................................................................... 4-9Complete the Price Guide................................................................................................... 4-9
Copy a Price Guide ..................................................................................................................... 4-9Link a Price Guide ................................................................................................................... 4-11Maintain a Price Guide............................................................................................................ 4-12
Candidate Rules .............................................................................................................................. 4-14Create a Candidate Rule and Define a Variable for the Rule ............................................ 4-15
Assign a Variable Value................................................................................................... 4-17Complete the Candidate Rule......................................................................................... 4-17
Maintain Rule Variables by Variable or by Department.................................................... 4-17Delete a Candidate Rule Variable .................................................................................. 4-18Update a Candidate Rule Variable................................................................................. 4-19
Maintain a Candidate Rule..................................................................................................... 4-19Delete a Candidate Rule.......................................................................................................... 4-21
Zone Structures................................................................................................................................ 4-22Zone Groups ............................................................................................................................. 4-22Zones.......................................................................................................................................... 4-22Primary Zone Groups.............................................................................................................. 4-22
Create a Zone Group ...................................................................................................................... 4-22Add Zones to a Zone Group .................................................................................................. 4-23Add Locations to a Zone......................................................................................................... 4-24Copy an Existing Zone Group ............................................................................................... 4-24
Maintain a Zone Group.................................................................................................................. 4-25Edit Zones ................................................................................................................................. 4-26Edit Locations ........................................................................................................................... 4-27Create a Primary Zone Group................................................................................................ 4-28Maintain a Primary Zone Group ........................................................................................... 4-31Delete a Primary Zone Group................................................................................................ 4-31
Codes................................................................................................................................................. 4-31Link Codes ................................................................................................................................ 4-32
vii
Market Basket Codes ............................................................................................................... 4-32Create a Code................................................................................................................................... 4-32Edit a Code....................................................................................................................................... 4-33Delete a Code ................................................................................................................................... 4-34Create Link Codes........................................................................................................................... 4-34Maintain Link Codes ...................................................................................................................... 4-36
Search for a Link Code ............................................................................................................ 4-36Maintain or Override a Link Code ........................................................................................ 4-37Update Link Codes .................................................................................................................. 4-38Delete a Link Code Relationship ........................................................................................... 4-38
Maintain Market Basket Codes ..................................................................................................... 4-38Search for a Market Basket Code........................................................................................... 4-38Maintain Market Basket Codes.............................................................................................. 4-39Update Market Basket Codes................................................................................................. 4-40Delete a Market Basket Code Relationship .......................................................................... 4-41
Calendars.......................................................................................................................................... 4-41Create a Calendar..................................................................................................................... 4-42Set Up the Calendar................................................................................................................. 4-42Set Up Review Periods ............................................................................................................ 4-43Maintain a Calendar ................................................................................................................ 4-44Delete a Calendar..................................................................................................................... 4-46
Maintain Location Move ................................................................................................................ 4-46Request a Location Move........................................................................................................ 4-46Create a Location Move Request ........................................................................................... 4-47Submit a Location Move Request for Approval.................................................................. 4-48Approve a Location Move Request ....................................................................................... 4-48Reject a Location Move Request ............................................................................................ 4-48Reset a Location Move Request to Worksheet Status......................................................... 4-48View Conflicts for a Failed Location Move Request........................................................... 4-49Delete a Location Move Request ........................................................................................... 4-49View Location Move Results.................................................................................................. 4-49
Finance Details................................................................................................................................. 4-50
5 Pricing Strategies
Maintain Pricing Strategies .................................................................................................................... 5-1Area Differential Pricing ................................................................................................................... 5-1
Create an Area Differential Pricing Strategy .......................................................................... 5-2Define Secondary Areas............................................................................................................. 5-3Exclude Items From the Area Differential .............................................................................. 5-4Complete the Area Differential................................................................................................. 5-4
Edit an Area Differential Pricing Strategy...................................................................................... 5-4Remove a Zone From an Area Differential Strategy ............................................................. 5-6Exclude Items From the Area Differential .............................................................................. 5-6Complete the Area Differential................................................................................................. 5-6
Clearance Pricing................................................................................................................................ 5-6Create a Clearance Pricing Strategy ......................................................................................... 5-6Define Clearance Strategy Details ............................................................................................ 5-8
viii
Edit a Clearance Pricing Strategy ............................................................................................. 5-8Edit a Price Guide .................................................................................................................... 5-10Change Calendars.................................................................................................................... 5-10Edit a Markdown ..................................................................................................................... 5-10Delete a Markdown ................................................................................................................. 5-10
Clearance Defaults Pricing............................................................................................................. 5-10Create a Clearance Defaults Pricing Strategy ...................................................................... 5-10
Define Clearance Strategy Details .................................................................................. 5-11Add Subsequent Markdowns ......................................................................................... 5-12
Edit a Clearance Defaults Price Strategy .............................................................................. 5-12Add Subsequent Markdowns ......................................................................................... 5-13Edit a Markdown .............................................................................................................. 5-14Delete a Markdown .......................................................................................................... 5-14
Competitive Pricing ........................................................................................................................ 5-14Create a Competitive Pricing Strategy.................................................................................. 5-14Define Competitive Strategy Details..................................................................................... 5-16Define Match Strategy Details................................................................................................ 5-17Define Price Above or Price Below Strategy Details........................................................... 5-17Define Price by Code Strategy Details .................................................................................. 5-17Define Reference Competitors ............................................................................................... 5-17
Create a Competitive Pricing Strategy Associated with an Area Differential ....................... 5-18Define Match Strategy Details................................................................................................ 5-18Define Price Above or Price Below Strategy Details........................................................... 5-18Define Price by Code Strategy Details .................................................................................. 5-19Define Reference Competitors ............................................................................................... 5-19
Edit a Competitive Pricing Strategy ............................................................................................. 5-20Edit a Price Guide .................................................................................................................... 5-22Change Calendars.................................................................................................................... 5-22Edit a Competitor..................................................................................................................... 5-22Edit Reference Competitors.................................................................................................... 5-22Complete the Competitive Price Strategy ............................................................................ 5-22
Margin Pricing ................................................................................................................................. 5-22Create a Margin Pricing Strategy........................................................................................... 5-22Define Margin Strategy Details.............................................................................................. 5-24
Edit a Margin Pricing Strategy...................................................................................................... 5-25Edit a Price Guide .................................................................................................................... 5-26Change Calendars.................................................................................................................... 5-27Edit Margin Details.................................................................................................................. 5-27Delete Margin Details.............................................................................................................. 5-27Edit Reference Competitors.................................................................................................... 5-27Complete the Margin Price Strategy ..................................................................................... 5-27
Maintain Margin Pricing................................................................................................................ 5-27Create a Maintain Margin Pricing Strategy ......................................................................... 5-27Define Maintain Margin Strategy Details............................................................................. 5-29Define Market Basket Margin ................................................................................................ 5-29Define Current Margin............................................................................................................ 5-30Define Reference Competitors ............................................................................................... 5-30

ix
Edit a Maintain Margin Pricing Strategy..................................................................................... 5-30Edit a Price Guide .................................................................................................................... 5-33Change Calendars.................................................................................................................... 5-33Edit Maintain Margin Details................................................................................................. 5-33Edit Market Basket Margin..................................................................................................... 5-33Edit Current Margin ................................................................................................................ 5-34Edit Reference Competitors.................................................................................................... 5-34Complete the Margin Price Strategy ..................................................................................... 5-34
Delete a Pricing Strategy ................................................................................................................ 5-34
6 Worksheets
Worksheet Detail ...................................................................................................................................... 6-1Worksheet Columns................................................................................................................................. 6-1
Change the Value in a Cell................................................................................................................ 6-9Change the Values of Multiple Cells........................................................................................ 6-9
Maintain Columns .......................................................................................................................... 6-10Hide and Position Columns ................................................................................................... 6-10Sort the Worksheet................................................................................................................... 6-11Adjust the Size of the Worksheet Content ........................................................................... 6-12Adjust Column Sizes ............................................................................................................... 6-12Set Non-Scrolling Columns .................................................................................................... 6-13
Maintain Views................................................................................................................................ 6-13Add a View ............................................................................................................................... 6-14Delete a View............................................................................................................................ 6-14Select a View............................................................................................................................. 6-14
Apply Filters .................................................................................................................................... 6-14Apply an Ad-Hoc Filter .......................................................................................................... 6-14Clear an Ad-Hoc Filter ............................................................................................................ 6-14Clear All Filters ........................................................................................................................ 6-15Apply an Advanced Filter ...................................................................................................... 6-15
Maintain Worksheet Detail Filters................................................................................................ 6-15Create a Worksheet Detail Filter............................................................................................ 6-16Apply a Worksheet Detail Filter ............................................................................................ 6-16Delete Worksheet Detail Filter Criteria ................................................................................ 6-17Delete a Worksheet Detail Filter ............................................................................................ 6-17
View Conflict Check Results ......................................................................................................... 6-17View Results ............................................................................................................................. 6-17Delete Conflict Check Results ................................................................................................ 6-18
View Tasks ....................................................................................................................................... 6-19Worksheet Status............................................................................................................................. 6-19
Maintain a Pricing Worksheet with Filter Disabled ........................................................... 6-19Maintain a Pricing Worksheet with Filter Enabled............................................................. 6-21Submit a Pricing Worksheet for Approval........................................................................... 6-23Approve a Pricing Worksheet................................................................................................ 6-24Reject a Pricing Worksheet ..................................................................................................... 6-24Reset the Status of a Pricing Worksheet ............................................................................... 6-24Delete a Pricing Worksheet .................................................................................................... 6-25
x
Worksheet Detail ............................................................................................................................. 6-25Maintain Worksheet Details ................................................................................................... 6-25Merchandise Extract Item Deletions ..................................................................................... 6-26Edit Proposed Retail Prices..................................................................................................... 6-28Take or Reject Proposed Price Changes................................................................................ 6-28View Totals ............................................................................................................................... 6-29View Price Change Totals....................................................................................................... 6-31View Sales Totals ..................................................................................................................... 6-31View Competitive Analysis Totals ........................................................................................ 6-31
What-If Analysis.............................................................................................................................. 6-31Perform What-if Analysis on a Clearance Pricing Strategy............................................... 6-33Perform What-if Analysis on a Competitive Pricing Strategy .......................................... 6-34Perform What-if Analysis on a Margin Pricing Strategy ................................................... 6-35Reset What-if Data ................................................................................................................... 6-36
Export a Worksheet......................................................................................................................... 6-36
7 Price Changes
Creating a Price Change .......................................................................................................................... 7-1Search for a Price Change ................................................................................................................. 7-2Conflict Checking............................................................................................................................... 7-4
Conflict Check Status ................................................................................................................. 7-5Create a Regular Price Change......................................................................................................... 7-6
Set Up Price Change Type ......................................................................................................... 7-8Select Locations ........................................................................................................................... 7-9Select Items................................................................................................................................... 7-9Complete the Price Change .................................................................................................... 7-11
Create a Vendor Funded Price Change........................................................................................ 7-12Select the Vendor and Deal .................................................................................................... 7-14Set Up Price Change Type ...................................................................................................... 7-14Select Locations ........................................................................................................................ 7-15Enter Funding Information .................................................................................................... 7-15Select Items................................................................................................................................ 7-15Complete the Price Change .................................................................................................... 7-16Price Change Exclusion........................................................................................................... 7-16
Create a Link Code Price Change ................................................................................................. 7-17Select Link Codes ..................................................................................................................... 7-18Set Up Price Change Type ...................................................................................................... 7-19Complete the Price Change .................................................................................................... 7-19
Change the Status of a Price Change............................................................................................ 7-20Maintain a Price Change ................................................................................................................ 7-21
Copy a Price Change ............................................................................................................... 7-23Delete a Price Change.............................................................................................................. 7-24Check for Conflicts................................................................................................................... 7-24Suggest a Date .......................................................................................................................... 7-24Create a Location Exception ................................................................................................... 7-24Create Item Exceptions at the Transaction Level ................................................................ 7-25
Create Price Changes for Area Differentials ............................................................................... 7-25

xi
8 Clearances
Creating Clearances ................................................................................................................................. 8-1Search for a Clearance ....................................................................................................................... 8-1Conflict Checking............................................................................................................................... 8-3
Conflict Check Status ................................................................................................................. 8-4Create a Regular Clearance............................................................................................................... 8-5
Set Up Clearance Type ............................................................................................................... 8-7Select Locations ........................................................................................................................... 8-7Select Items .................................................................................................................................. 8-8Complete the Clearance .......................................................................................................... 8-10Clearance Exclusion................................................................................................................. 8-10
Create a Vendor Funded Clearance ............................................................................................. 8-10Select the Vendor and Deal .................................................................................................... 8-12Select Locations ........................................................................................................................ 8-13Enter Funding Information .................................................................................................... 8-13Select Items ............................................................................................................................... 8-13Complete the Clearance .......................................................................................................... 8-13
Change the Status of a Clearance.................................................................................................. 8-13Maintain a Clearance ...................................................................................................................... 8-15
Copy a Clearance ..................................................................................................................... 8-17Delete a Clearance.................................................................................................................... 8-17Check for Conflicting Clearance ............................................................................................ 8-17Create a Location Exception ................................................................................................... 8-18Create Item Exceptions at the Transaction Level ................................................................ 8-18
Create Clearance Resets ................................................................................................................. 8-18Clearance Resets Inquiry................................................................................................................ 8-20
9 Promotions
Promotion Components .......................................................................................................................... 9-1Add Funding Information to a Promotion..................................................................................... 9-1
Create a Promotion................................................................................................................................... 9-2Conflict Checking............................................................................................................................... 9-3
Conflict Check Status ................................................................................................................. 9-3Associate a Deal with a Promotion.................................................................................................. 9-4Add Components to a Promotion.................................................................................................... 9-5
Select Items .................................................................................................................................. 9-7Copy Components to a New Promotion ..................................................................................... 9-10Create from an Existing Promotion Component........................................................................ 9-10
Search for a Promotion ......................................................................................................................... 9-11Maintain a Promotion........................................................................................................................... 9-12Create a Simple Component ............................................................................................................... 9-13
Add Items and Locations to a Promotion Component.............................................................. 9-15Add Funding to a Simple Component......................................................................................... 9-16Create a Threshold Component .................................................................................................... 9-18
Add Items and Locations to a Promotion Component ...................................................... 9-19Add Funding to a Threshold Component ................................................................................... 9-20

xii
Create a Multi-Buy Component ......................................................................................................... 9-21Create Buy Lists............................................................................................................................... 9-24
Create Reward Lists................................................................................................................. 9-25In the Reward List Area................................................................................................... 9-25Under Each Buy List......................................................................................................... 9-26
Add Items to a Multi-Buy Component ................................................................................. 9-26Add Locations and Save the Multi-Buy Component.......................................................... 9-27
Add Funding to a Multi-Buy Component................................................................................... 9-28Add Billing Information for a Deal to a Funded Component .................................................. 9-30Examples of Multi-Buy Components ........................................................................................... 9-30
Multi-Buy Meal Deal ............................................................................................................... 9-30Multi-Buy Link Saver .............................................................................................................. 9-31Multi-Buy Cheapest Free ........................................................................................................ 9-32Multi-Buy with Multiple Reward Lists................................................................................. 9-33Multi-Buy with AND or OR Conditions for Buy and Reward Lists ................................ 9-33
Create a Finance Component ........................................................................................................ 9-34Add Credit Card Details ......................................................................................................... 9-35Add Threshold Details ............................................................................................................ 9-36Promotion Component Detail Maintenance ........................................................................ 9-37
Item Selection .................................................................................................................... 9-37Item Exclusion................................................................................................................... 9-38
Locations Selection and Exclusion......................................................................................... 9-39Create a Finance Component .............................................................................................................. 9-39
Add Credit Card Details ................................................................................................................ 9-40Add Threshold Details ................................................................................................................... 9-41Promotion Component Detail Maintenance ............................................................................... 9-42
Item Selection............................................................................................................................ 9-42Item Exclusion................................................................................................................... 9-43
Locations Selection and Exclusion......................................................................................... 9-44Maintain a Promotion Component .................................................................................................... 9-45
Maintain Component Details ........................................................................................................ 9-46Delete Component Details ............................................................................................................. 9-47Define Item Exceptions and Exclusions....................................................................................... 9-47Define Location Exceptions and Exclusions................................................................................ 9-47
Promotion Events .................................................................................................................................. 9-48Create a Promotion Event .............................................................................................................. 9-48Add a Promotion to an Event........................................................................................................ 9-49Maintain a Promotion Event ......................................................................................................... 9-50Delete a Promotion Event .............................................................................................................. 9-51
Promotion Threshold............................................................................................................................ 9-51Create a Threshold .......................................................................................................................... 9-52Maintain a Threshold...................................................................................................................... 9-53
Vendor Funding Defaults .................................................................................................................... 9-54Create Vendor Funding Defaults.................................................................................................. 9-54Edit Vendor Funding Defaults ...................................................................................................... 9-55Delete a Vendor Funded Default .................................................................................................. 9-56
Promotion Constraints ......................................................................................................................... 9-56

xiii
Create a Promotion Constraint...................................................................................................... 9-57Maintain a Promotion Constraint ................................................................................................. 9-58
Search for a Promotion Constraint ........................................................................................ 9-58Maintain a Promotion Constraint.......................................................................................... 9-58Delete a Promotion Constraint............................................................................................... 9-59
10 Security Manager
Role Administration ............................................................................................................................. 10-1Roles .................................................................................................................................................. 10-1Workflows and Actions.................................................................................................................. 10-1Create a Role .................................................................................................................................... 10-2Edit a Role ........................................................................................................................................ 10-4Add Users to a Role ........................................................................................................................ 10-5Remove Users from a Role............................................................................................................. 10-6Add Workflow Permissions to a Role.......................................................................................... 10-7Delete a Workflow and Associated Action from a Role............................................................ 10-9Add Data Permissions to a Role ................................................................................................. 10-10Delete a Data Permission from a Role........................................................................................ 10-13
User Administration ........................................................................................................................... 10-14Assign Roles to Users ................................................................................................................... 10-14Add Roles to a User ...................................................................................................................... 10-15Remove Roles from a User........................................................................................................... 10-17

xiv

xv
Send Us Your Comments
Oracle® Retail Price Management User Guide, Release 13.2
Oracle welcomes customers' comments and suggestions on the quality and usefulness of this document.
Your feedback is important, and helps us to best meet your needs as a user of our products. For example:
■ Are the implementation steps correct and complete?
■ Did you understand the context of the procedures?
■ Did you find any errors in the information?
■ Does the structure of the information help you with your tasks?
■ Do you need different information or graphics? If so, where, and in what format?
■ Are the examples correct? Do you need more examples?
If you find any errors or have any other suggestions for improvement, then please tell us your name, the name of the company who has licensed our products, the title and part number of the documentation and the chapter, section, and page number (if available).
Send your comments to us using the electronic mail address: [email protected]
Please give your name, address, electronic mail address, and telephone number (optional).
If you need assistance with Oracle software, then please contact your support representative or Oracle Support Services.
If you require training or instruction in using Oracle software, then please contact your Oracle local office and inquire about our Oracle University offerings. A list of Oracle offices is available on our Web site at http://www.oracle.com.
Note: Before sending us your comments, you might like to check that you have the latest version of the document and if any concerns are already addressed. To do this, access the Online Documentation available on the Oracle Technology Network Web site. It contains the most current Documentation Library plus all documents revised or released recently.

xvi

xvii
Preface
The Oracle Retail Price Management User Guide describes the application user interface and how to navigate through it.
AudienceThis document is intended for the users and administrators of Oracle Retail Price Management. This may include merchandisers, buyers, and business analysts.
Documentation AccessibilityOur goal is to make Oracle products, services, and supporting documentation accessible to all users, including users that are disabled. To that end, our documentation includes features that make information available to users of assistive technology. This documentation is available in HTML format, and contains markup to facilitate access by the disabled community. Accessibility standards will continue to evolve over time, and Oracle is actively engaged with other market-leading technology vendors to address technical obstacles so that our documentation can be accessible to all of our customers. For more information, visit the Oracle Accessibility Program Web site at http://www.oracle.com/accessibility/.
Accessibility of Code Examples in DocumentationScreen readers may not always correctly read the code examples in this document. The conventions for writing code require that closing braces should appear on an otherwise empty line; however, some screen readers may not always read a line of text that consists solely of a bracket or brace.
Accessibility of Links to External Web Sites in DocumentationThis documentation may contain links to Web sites of other companies or organizations that Oracle does not own or control. Oracle neither evaluates nor makes any representations regarding the accessibility of these Web sites.
Access to Oracle SupportOracle customers have access to electronic support through My Oracle Support. For information, visit http://www.oracle.com/support/contact.html or visit http://www.oracle.com/accessibility/support.html if you are hearing impaired.

xviii
Related DocumentsFor more information, see the following documents in the Oracle Retail Price Management Release 13.2 documentation set:
■ Oracle Retail Price Management Release Notes
■ Oracle Retail Price Management Installation Guide
■ Oracle Retail Price Management User Guide
■ Oracle Retail Price Management Online Help
■ Oracle Retail Price Management Operations Guide
■ Oracle Retail Price Management Data Model
■ Oracle Retail Merchandising Batch Schedule
■ Oracle Retail Merchandising Implementation Guide
■ Oracle Retail Merchandising Data Conversion Operations Guide
■ Oracle Retail Merchandising Licensing Information
■ Oracle Retail Service Layer documentation
■ Oracle Retail Extract, Transform, and Load documentation
■ Oracle Retail Integration Bus documentation
Customer SupportTo contact Oracle Customer Support, access My Oracle Support at the following URL:
https://support.oracle.com
When contacting Customer Support, please provide the following:
■ Product version and program/module name
■ Functional and technical description of the problem (include business impact)
■ Detailed step-by-step instructions to re-create
■ Exact error message received
■ Screen shots of each step you take
Review Patch DocumentationWhen you install the application for the first time, you install either a base release (for example, 13.2) or a later patch release (for example, 13.2.1). If you are installing the base release, additional patch, and bundled hot fix releases, read the documentation for all releases that have occurred since the base release before you begin installation. Documentation for patch and bundled hot fix releases can contain critical information related to the base release, as well as information about code changes since the base release.

xix
Oracle Retail Documentation on the Oracle Technology NetworkDocumentation is packaged with each Oracle Retail product release. Oracle Retail product documentation is also available on the following Web site:
http://www.oracle.com/technology/documentation/oracle_retail.html
(Data Model documents are not available through Oracle Technology Network. These documents are packaged with released code, or you can obtain them through My Oracle Support.)
Documentation should be available on this Web site within a month after a product release.
ConventionsThe following text conventions are used in this document:
Convention Meaning
boldface Boldface type indicates graphical user interface elements associated with an action, or terms defined in text or the glossary.
italic Italic type indicates book titles, emphasis, or placeholder variables for which you supply particular values.
monospace Monospace type indicates commands within a paragraph, URLs, code in examples, text that appears on the screen, or text that you enter.

xx

Oracle Retail Price Management 1-1
1Oracle Retail Price Management
Oracle Retail Price Management (RPM) is a strategy-based pricing solution that suggests and assists with pricing decisions. With RPM, you are empowered to automate and streamline pricing strategies across the organization and yield a more predictable and profitable outcome. It provides decision support to all pricing-focused business information at your fingertips to validate and approve pricing and markdown suggestions. This approach results in higher margins, increased sales, and strengthened productivity, all while you remain competitive.
RPM includes Oracle Retail Security Manager (RSM). RSM gives system administrators a single point of security management for RPM.
Note: Access to Security Manager functions requires appropriate security privileges.

1-2 Oracle® Retail Price Management User Guide

Using RPM 2-1
2Using RPM
This chapter explains how to access and use the RPM application.
Access the WorkspaceIn this section, you will learn how to access the RPM workspace.
Log In to RPMHow you access Oracle Retail Price Management depends on how the application is set up at your location. Contact your system administrator for instructions. Use the exit procedure when you are done using the application.
Exit RPMTo log out and close RPM:
1. Click Logout in the global links area of the header.
If any tasks are open, you are prompted to confirm your decision to log out.
2. Select Exit from the File menu.
View the WorkspaceAfter logging in to RPM, you have access to the application window. The primary elements in the application window are as follows:

Access the Workspace
2-2 Oracle® Retail Price Management User Guide
Figure 2–1 RPM Workspace
The workspace is made up of all the elements within the application window. You can manage the application and perform tasks within the workspace. Many of the elements within the workspace can be minimized, maximized, or manually resized. This allows you to customize the workspace to fit your work habits. Any changes you make are remembered by the application. The next time you log in, the elements appear as you last left them.
Table 2–1 Workspace Elements
Element Purpose
A Title Bar Located at the top of the window. The title bar displays the product name. The three buttons at the far right on the title bar allow you to minimize, restore, maximize, and close the application window.
B Header Located below the title bar. The header provides access to commands that remain static across all tasks. The menu bar and welcome message appear here.
C Toolbar Located below the header. The toolbar contains paging control icons.
D Workspace Located next to the task pad and below the toolbar. What appears in the workspace depends on what you select on the task pad. The workspace is where you complete the tasks assigned to you.
E Task pad Located on the left side of the application window. From top to bottom, you can access an application, a task group, and then a task. When you select a task, the contents of the task are displayed in the workspace.
Access the Workspace
Using RPM 2-3
Resize Elements of the WorkspaceThe benefits of resizing become apparent as you customize the workspace to fit your work habits. You can hide or minimize elements that do not pertain to the current task. You can show or maximize the elements that are of greater importance.
RPM WindowYou can resize the RPM window to increase or decrease the amount of space it occupies on your desktop.
■ To manually resize the window, place the cursor over the edge of the window. When the cursor changes to a double arrow, press and hold the left mouse button. Move the cursor until the window is of the desired size. Release the left mouse button.
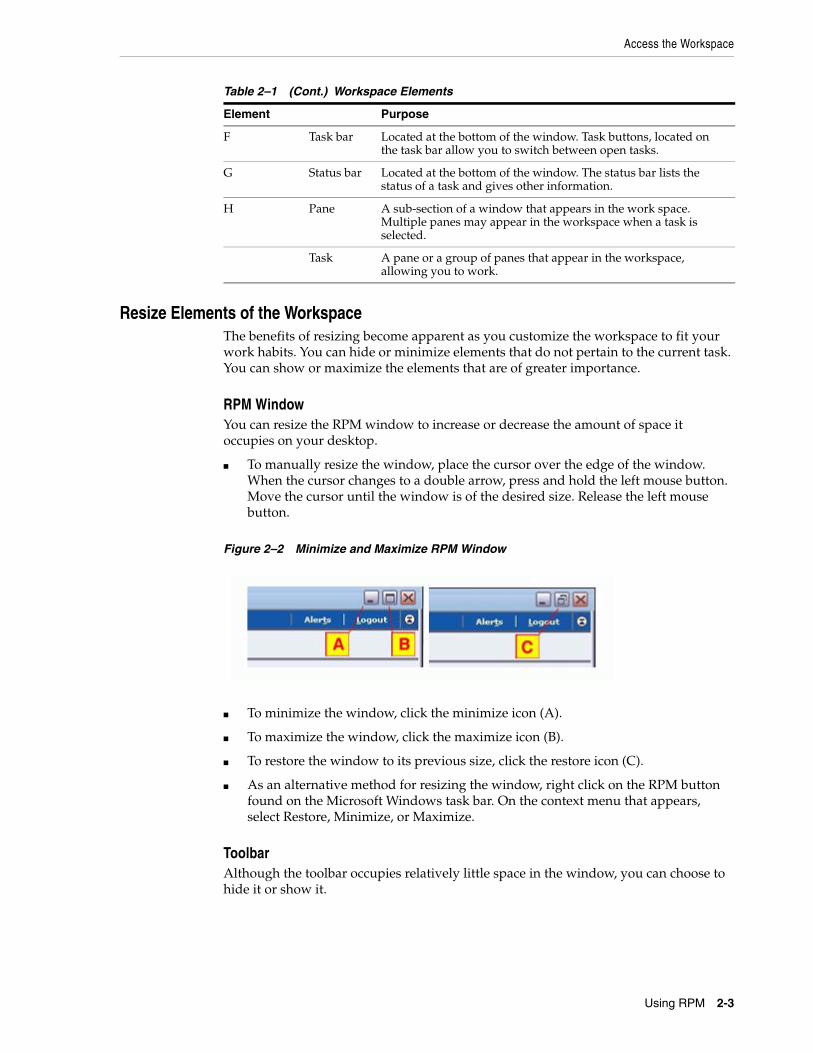
Figure 2–2 Minimize and Maximize RPM Window
■ To minimize the window, click the minimize icon (A).
■ To maximize the window, click the maximize icon (B).
■ To restore the window to its previous size, click the restore icon (C).
■ As an alternative method for resizing the window, right click on the RPM button found on the Microsoft Windows task bar. On the context menu that appears, select Restore, Minimize, or Maximize.
ToolbarAlthough the toolbar occupies relatively little space in the window, you can choose to hide it or show it.
F Task bar Located at the bottom of the window. Task buttons, located on the task bar allow you to switch between open tasks.
G Status bar Located at the bottom of the window. The status bar lists the status of a task and gives other information.
H Pane A sub-section of a window that appears in the work space. Multiple panes may appear in the workspace when a task is selected.
Task A pane or a group of panes that appear in the workspace, allowing you to work.
Table 2–1 (Cont.) Workspace Elements
Element Purpose

Access the Workspace
2-4 Oracle® Retail Price Management User Guide
Figure 2–3 RPM Toolbar
■ To collapse the toolbar (A), click the expand/collapse toolbar icon (B). The icon is located on the far right side of the header.
■ To expand the toolbar, click again on the same icon.
WorkspaceThe workspace is likely to be the most used element in the application. As such, you may want to maximize its size. Should you need to access the task pad, restore the content area to its original size.
Figure 2–4 Maximize and Restore RPM Workspace
■ To expand the workspace, click the arrow icon (B). The icon is located on the upper left corner of the content area. The content area expands to the width of the window. The task pad and the toolbar disappear.
■ To restore the window to its original size, click again on the arrow icon. The task pad and toolbar reappear.
Task PadThe task pad provides access to the tasks assigned to you. Once you are working on a task, you may want to reduce the size of the task pad. You may want to increase the size of the task pad in order to see the full names of the task. As you increase or decrease the width of the task pad, the width of the workspace is resized proportionally.
To maximize the task pad, click the right arrow on the separator bar (A). To minimize the task pad, click the left arrow.

Access the Workspace
Using RPM 2-5
Figure 2–5 RPM Task Pad
Note that the width of the task pad can be one of three sizes:
■ Maximized to the width of the application window
■ Minimized to where it is no longer visible
■ Restored to its previous size
To manually resize the width of the task pad or the length of the work areas within the task pad, place the cursor over the desired resizer. When the cursor changes to a left/right (or an up/down) arrow, press and hold the left mouse button. Drag the resizer until the task pad or work area is the desired size. Release the mouse button.
PaneOne or more panes appear in the workspace when you select a task on the task pad. You can minimize a pane so that it does not distract you from the panes you want to work on. Only the title bar of the pane is displayed after you minimize the pane.

Access the Workspace
2-6 Oracle® Retail Price Management User Guide
Figure 2–6 RPM Pane
■ To collapse a pane (A), click the collapse icon (B).
■ To expand a pane, click the expand icon (C).
Look Up Field Level DataThe basic method for entering data in a text field is to type the text in the field. Some fields are restricted, however, as to the type of data that may be entered. The options for entering or selecting data depend on the type of data that may be required or permitted in the field. For example, some fields permit only numeric data, while others permit only alphabetic or alphanumeric data. Some fields require a date to be entered in a specific format. Some fields permit only one value, while others permit multiple values.
Calendars, drop-down lists, lists of values, and transfer boxes provide you with access to preformatted or predefined values. Instructions for using these tools are provided below.
Drop-Down ListSome fields are restricted to a predefined list of values. You can access a drop-down list from which you can pick the desired value.
Access the Workspace
Using RPM 2-7
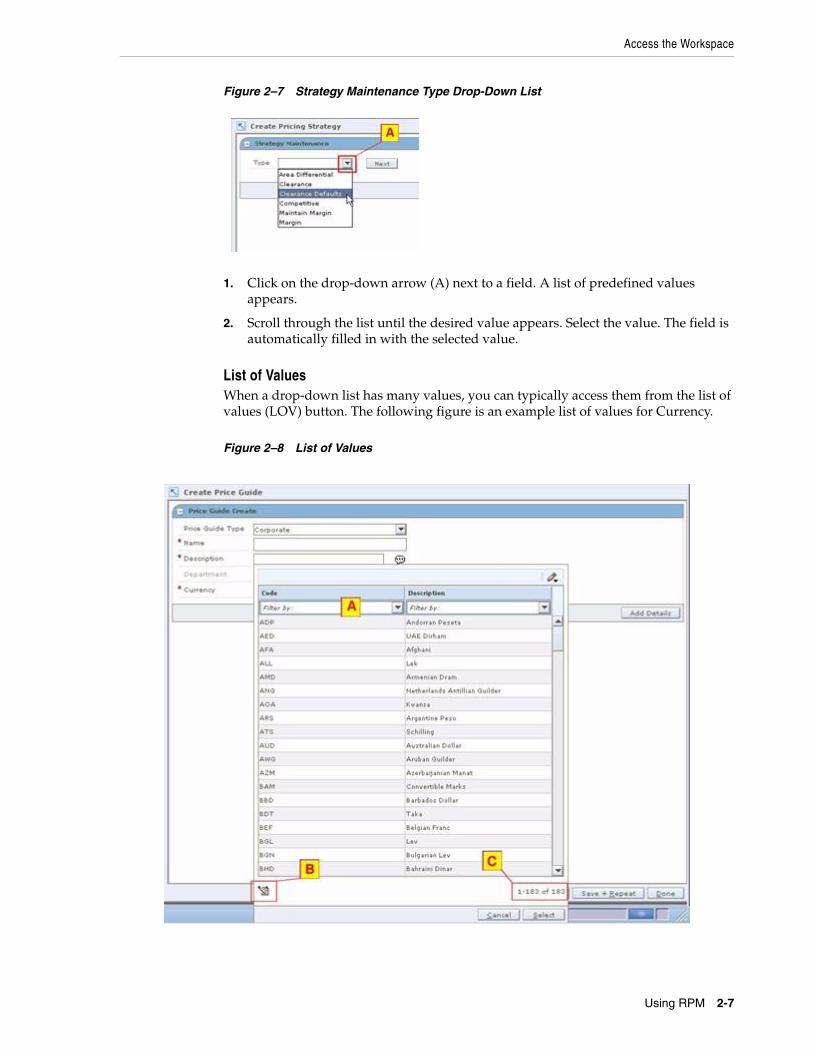
Figure 2–7 Strategy Maintenance Type Drop-Down List
1. Click on the drop-down arrow (A) next to a field. A list of predefined values appears.
2. Scroll through the list until the desired value appears. Select the value. The field is automatically filled in with the selected value.
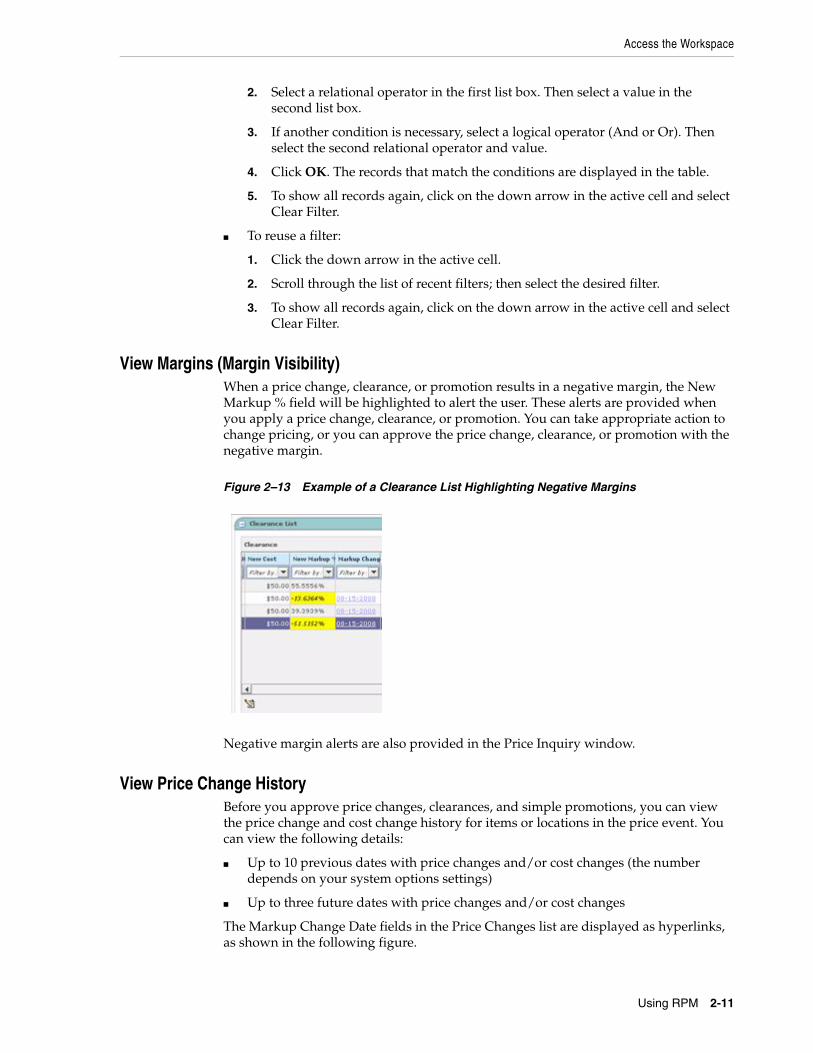
List of ValuesWhen a drop-down list has many values, you can typically access them from the list of values (LOV) button. The following figure is an example list of values for Currency.
Figure 2–8 List of Values

Access the Workspace
2-8 Oracle® Retail Price Management User Guide
1. Click the LOV button next to a text field (A). The list of values opens. The number of values in the list and the total number of values appears at the bottom (C) of the LOV.
■ Click the page icon (B) to open the Paging Configuration window and adjust the page size and page links.
Figure 2–9 Paging Configuration Window
2. To find a value, use one or a combination of the following methods:
■ Scroll through the list.
■ Enter a partial value in the Filter by text box (B) and press Enter. Select the desired value from the results.
■ Select the down arrow next to the Filter by text box (B) and use the Advanced Filter option. Enter conditions in the Advanced Filter and click OK.
■ Enter the wildcard (%) and letters before or after it in the Filter by text box (B) to limit values.
3. Select the value and click Select. The field is automatically filled in with the selected value.
Multi-Select List of ValuesSome lists of values allow you to select more than one value. These lists have a multi-select LOV button. You can select multiple rows by using the Shift and Control keys along with the mouse button, as you can with many other Windows applications. The following figure shows a multi-select list of values for Department.

Access the Workspace
Using RPM 2-9
Figure 2–10 Multi-Select List of Values
Open the Multi-Select LOV
Click the LOV button next to a text field, or click the down arrow. The list of values opens.
Select Contiguous (Adjoining) Rows
1. Select a row.
2. Press Shift and click on another row to select that row and all the rows in between.
Select Noncontiguous Rows
1. Select a row.
2. Press and hold down the Ctrl key, and click on other rows to select or deselect them.
Add the Values
1. Click the down arrow to add the values to the selected area.
2. Click the up arrow to remove a value from the selected area.

Access the Workspace
2-10 Oracle® Retail Price Management User Guide
Search For and Filter RecordsYou search for records when none are displayed. By entering search criteria, you indicate which records must be displayed for your use. Filtering, on the other hand, allows you to reduce the number of records (or values) displayed. Again, you enter criteria indicating which of the currently displayed records must remain visible. The unwanted records are hidden from view. In either case, you are restricting the number of records (or values) displayed to a more manageable and useful number.
Filter Records in a TableColumn-level filtering is available in tables that have drop-down lists.
■ To use a simple filter, select a filter value from the drop-down list:
Figure 2–11 Simple Filter
You can also enter a partial value to limit the choices in the list:
1. Enter a partial string in the active cell. For example: Enter D or d to retrieve all records that begin with D, such as Department.
2. Press the Enter key. The records that match the value you entered are displayed in the table.
3. To show all records again, select Clear Filter.
■ To use the advanced filter tool:
1. Click the down arrow in the active cell and select Advanced Filter. The Advanced Filter window opens.
Figure 2–12 Advanced Filter
Access the Workspace
Using RPM 2-11
2. Select a relational operator in the first list box. Then select a value in the second list box.
3. If another condition is necessary, select a logical operator (And or Or). Then select the second relational operator and value.
4. Click OK. The records that match the conditions are displayed in the table.
5. To show all records again, click on the down arrow in the active cell and select Clear Filter.
■ To reuse a filter:
1. Click the down arrow in the active cell.
2. Scroll through the list of recent filters; then select the desired filter.
3. To show all records again, click on the down arrow in the active cell and select Clear Filter.
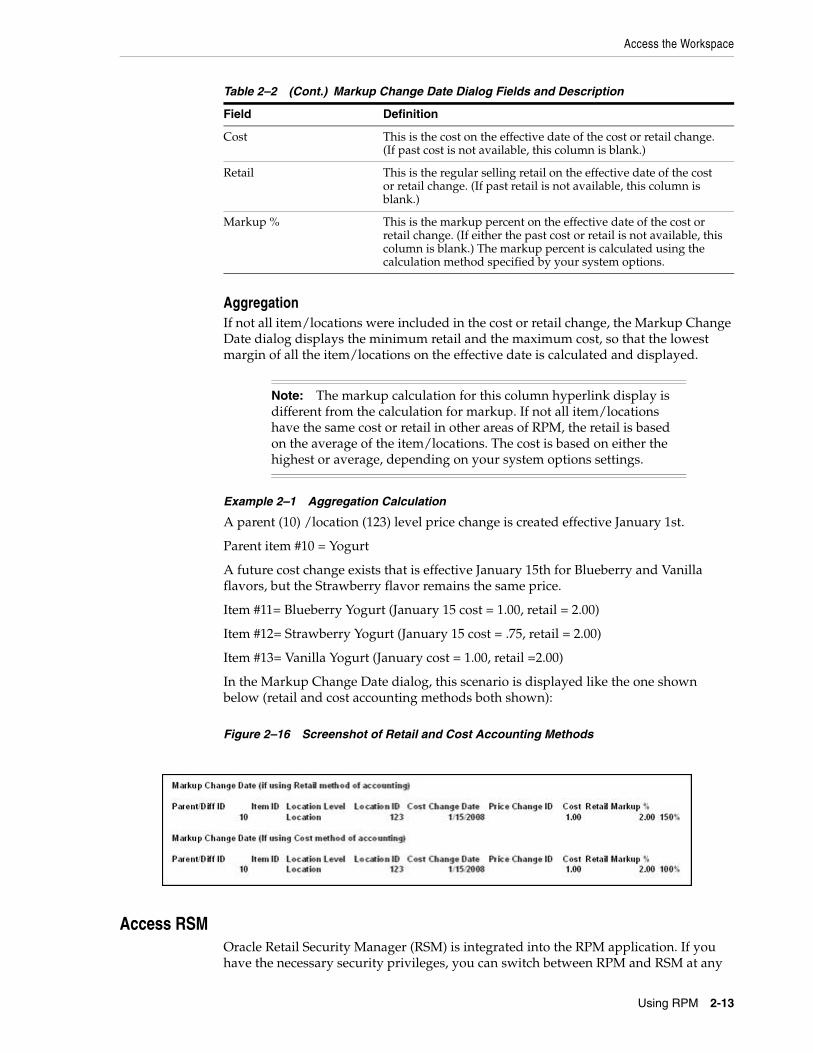
View Margins (Margin Visibility)When a price change, clearance, or promotion results in a negative margin, the New Markup % field will be highlighted to alert the user. These alerts are provided when you apply a price change, clearance, or promotion. You can take appropriate action to change pricing, or you can approve the price change, clearance, or promotion with the negative margin.
Figure 2–13 Example of a Clearance List Highlighting Negative Margins
Negative margin alerts are also provided in the Price Inquiry window.
View Price Change HistoryBefore you approve price changes, clearances, and simple promotions, you can view the price change and cost change history for items or locations in the price event. You can view the following details:
■ Up to 10 previous dates with price changes and/or cost changes (the number depends on your system options settings)
■ Up to three future dates with price changes and/or cost changes
The Markup Change Date fields in the Price Changes list are displayed as hyperlinks, as shown in the following figure.

Access the Workspace
2-12 Oracle® Retail Price Management User Guide
Figure 2–14 Markup Change Date
When you click on a link, the Markup Change Date dialog opens.
Figure 2–15 Markup Change Date Dialog
Markup Change Date Dialog FieldsThe information displayed in the Markup Change Date dialog is as follows:
Note: If a price change was created using a link code, or if a promotion was created at a level higher than the parent, the Markup Change Date column is empty.
Table 2–2 Markup Change Date Dialog Fields and Description
Field Definition
Parent ID/Diff This column has a value when the price event is created at the Parent ID/Diff level.
Item ID This column has a value when the price event is created at the transaction item level.
Location Level This column displays either Zone or Location.
Location ID This column displays either the Zone ID or the Location ID.
Cost Change Date This is the effective date of the past or future cost change.
Retail Change Date This is the effective date of the past or future retail change.
Price Change ID This column contains the ID of the price change for the retail change, if there was a retail change. This column is blank when only a cost change is effective for the date shown.
Access the Workspace
Using RPM 2-13
AggregationIf not all item/locations were included in the cost or retail change, the Markup Change Date dialog displays the minimum retail and the maximum cost, so that the lowest margin of all the item/locations on the effective date is calculated and displayed.
Example 2–1 Aggregation Calculation
A parent (10) /location (123) level price change is created effective January 1st.
Parent item #10 = Yogurt
A future cost change exists that is effective January 15th for Blueberry and Vanilla flavors, but the Strawberry flavor remains the same price.
Item #11= Blueberry Yogurt (January 15 cost = 1.00, retail = 2.00)
Item #12= Strawberry Yogurt (January 15 cost = .75, retail = 2.00)
Item #13= Vanilla Yogurt (January cost = 1.00, retail =2.00)
In the Markup Change Date dialog, this scenario is displayed like the one shown below (retail and cost accounting methods both shown):
Figure 2–16 Screenshot of Retail and Cost Accounting Methods
Access RSMOracle Retail Security Manager (RSM) is integrated into the RPM application. If you have the necessary security privileges, you can switch between RPM and RSM at any
Cost This is the cost on the effective date of the cost or retail change. (If past cost is not available, this column is blank.)
Retail This is the regular selling retail on the effective date of the cost or retail change. (If past retail is not available, this column is blank.)
Markup % This is the markup percent on the effective date of the cost or retail change. (If either the past cost or retail is not available, this column is blank.) The markup percent is calculated using the calculation method specified by your system options.
Note: The markup calculation for this column hyperlink display is different from the calculation for markup. If not all item/locations have the same cost or retail in other areas of RPM, the retail is based on the average of the item/locations. The cost is based on either the highest or average, depending on your system options settings.
Table 2–2 (Cont.) Markup Change Date Dialog Fields and Description
Field Definition

Access the Workspace
2-14 Oracle® Retail Price Management User Guide
time during your RPM session. (There is no separate login required for RSM, and you cannot start RSM separately from RPM.)
To switch between RPM and RSM, select from the drop-down list on the Task Pad.
Figure 2–17 RPM - RSM Task Switch Drop-Down List

System Options 3-1
3System Options
The system options workspace allows you to configure RPM to maximize the system. System options allow you to customize various parameters, defaults, and constants that are used throughout the system. Normally, these elements are set when RPM is installed by the system or database administrator. They tend to remain fixed unless a business practice is changed which necessitates a change in RPM. System options are the values used in your system that define the overall configuration of the system.
System DefaultsThe System Defaults Edit workspace allows you to configure RPM to maximize the system. Select the values that should be should be initially displayed when a user enters the workspace. This helps the user save time as they do not have to select the appropriate value each time they complete a task. The values entered will appear in other areas of the application.
System Options DefinitionsSystem options are organized on the following tabs:
■ General
■ Conflict Checking
■ Price Events
■ Location Moves
Table 3–1 System Options Fields and Descriptions
System Options Definition
General
Sales Calculation Method The method used by the merchandise extract program to populate the Projected Sales column in the worksheet.
Update Item Attributes When selected, the merchandise extract program updates certain item attributes during each extract that occurs during a worksheet review period.
Recognize WHs as Locations
When selected, indicates that warehouses can be assigned to regular and clearance price zones. They cannot be assigned to promotion price zones.
Open Zone Use When selected, indicates a zone can be used across different types of pricing, regardless of zone type.

System Options Definitions
3-2 Oracle® Retail Price Management User Guide
Exact Deal/Funded Promotion Dates
When selected, indicates that the dates of a deal associated with a vendor funded promotion must match the promotion component dates exactly. When selected, only deals with the same begin and end dates as the promotion component being created will appear in the deal.
Default Out of Stock Days The number of days that should be added to an items clearance effective date in order to calculate the Out of Stock date. The default is applied to generate the out of stock date when the clearance is first created.
# of Days Reject Held The number of days after the effective date of a rejected price change or clearance that it is purged from the system.
Ends in Digits for Zero Decimal Currencies
The number of digit fields set in system options that are available in the Ends In definition area. This field is used for currencies that do not contain a place after the decimal point. For currencies that contain places after the decimal point, the digit fields that are available.
External Prices Allowed When selected, RPM accepts pricing events created in other systems.
Zone/Parent Ranging When selected, RPM performs ranging checks for price changes, promotions, and clearances that are created at a higher level than transaction/location. If the indicator is set to yes, the system will not let you create a price change at the parent or zone level if none of the transaction item/location combinations are ranged. If the indicator is set to no, the system will let you create a price change at the parent or zone level even if none of the transaction item/location combinations are ranged.
Apply Promo Change Type 1st
Indicates which type of promotion change type should be applied first.
Pricing Strategy Default Effective Day
When selected, the user can choose which day of the week price changes will be effective.
Dynamic Area Differentials When selected, allows the worksheet to dynamically update secondary locations based on changes to the primary location.
Minimize Worksheet Data Filter Screen
When checked, the user is given an optional workflow which includes worksheet data filtering. When unchecked, the worksheet filter screen will not be accessible.
Maximum Worksheet Search Result
Indicates the maximum number of rows that are displayed based on the respective search criteria.
Allow Item List Explosion Allows you to select whether the item list should be exploded to the item level or left at itemlist level.
Valid values are:
Y – Yes/Checked. Two options are provided in the Item Level field: Item List and Item (when Item Type = Item List).
N – No/Unchecked. Item Level could only be Item List (when Item Type = Item List). The default value is N/Unchecked.
Conflict Check
# Days Event Displayed Before Vdate
The number of days before the VDATE that a pricing event is displayed in the Conflict Review Check window.
# Days Event Displayed After Vdate
The number of days after the VDATE that a pricing event is displayed in the Conflict Review Check window.
Table 3–1 (Cont.) System Options Fields and Descriptions
System Options Definition

System Options Definitions
System Options 3-3
Display Conflicts Only When selected, only the record that caused the conflict will be displayed in the lower portion of the Conflict Review List window.
When unchecked and the days before/after are provided, the system will search for all records using the price event’s effective date as the point to search forward and back. This will bring back all records within the window of time calculated.
Multiple records are displayed in the conflict review list window so that if one rule returns conflicts for multiple item/locs in a price event, all those conflicts are displayed. This is limited to a maximum of 100 records.
Unique UOM is used for all items
(DBA maintained) When selected, you have to specify which UOM should be used when fixed price events are created and the system will skip the UOM validation.
Unique UOM to be used for all items
(DBA maintained) Specifies which unique UOM needs to be used. This is a required field if "Unique UOM is used for all items" option is checked.
Do not run Conflict Check for Submit
When checked, the system will skip conflict checking process when the user clicks the Submit button.
Do not run Conflict Check for Complex Promotion Approval
When checked, the system will skip conflict checking process when the user approves a Complex Promotion.
Price Events
Price Change/Promotion Overlaps
When selected, indicates an item/location can have a price change occur during the middle of an active promotion.
Cost Calculation Method The way cost is determined for the zone. Choose Highest Location Cost or Average Location Cost.
Clearance/Promotion Overlaps
When selected, indicates an item/location can be on clearance and promotion at the same time.
Multiple Item/Loc Promotions
When selected, an item/location can exist on more than one promotion detail at any given time.
Maximum Number of Overlapping Promotion Component Details
The number of overlapping promotion components allowed for any single item/location. The default value is 4.
Allow Complex Promotions When selected, all promotion types are available.
Purge Reset Clearance Months
The number of months RPM will retain clearance price events that have reset before purging them.
Default Reset Date When selected, indicates a reset date should be defaulted when a clearance is created. The reset date is defaulted to one day greater than the out of stock date.
Promotion End Date Required
When selected, a promotion end date is required for the promotion header.
Promotion # Days Rejects Held
The number of days, set in system options, after the end date (or start date for promotions with no end date) of a rejected promotion that it is purged from the system.
Price Change Processing Days
The number of days, set in system options, between the creation date of a price change and the first date it can become effective. It allows the retailer to insure that price changes are created with enough advance timing that stores and other process areas can react.
Table 3–1 (Cont.) System Options Fields and Descriptions
System Options Definition
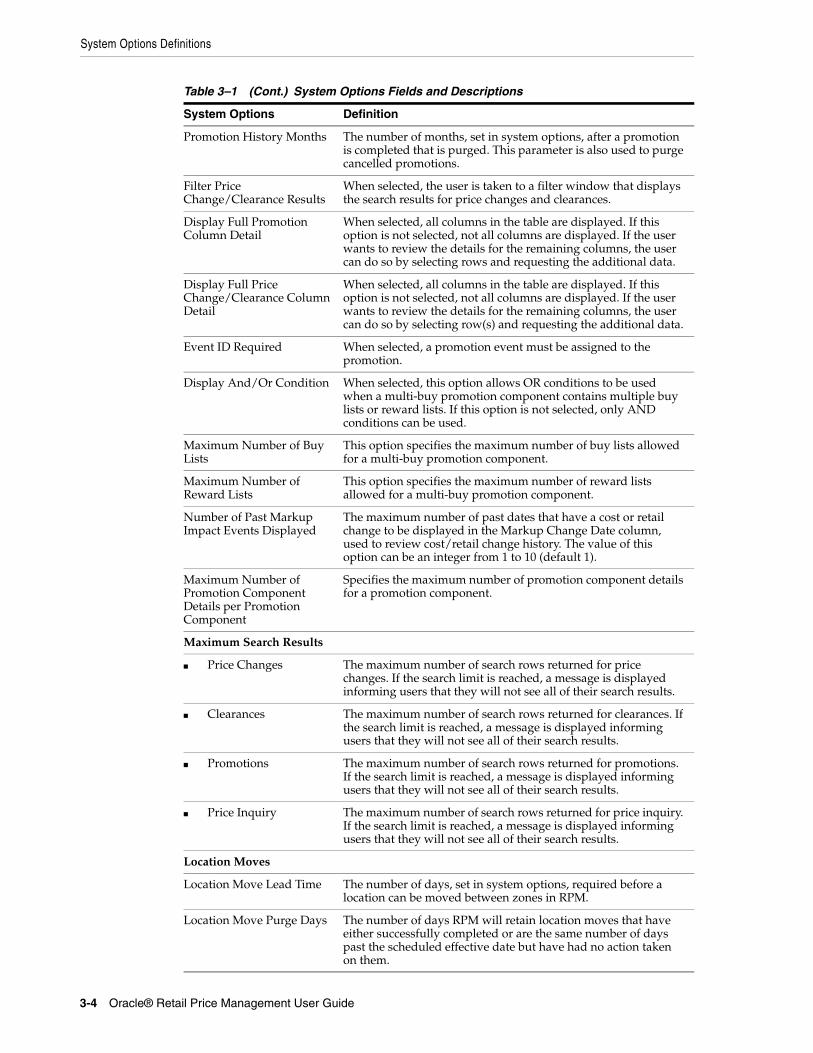
System Options Definitions
3-4 Oracle® Retail Price Management User Guide
Promotion History Months The number of months, set in system options, after a promotion is completed that is purged. This parameter is also used to purge cancelled promotions.
Filter Price Change/Clearance Results
When selected, the user is taken to a filter window that displays the search results for price changes and clearances.
Display Full Promotion Column Detail
When selected, all columns in the table are displayed. If this option is not selected, not all columns are displayed. If the user wants to review the details for the remaining columns, the user can do so by selecting rows and requesting the additional data.
Display Full Price Change/Clearance Column Detail
When selected, all columns in the table are displayed. If this option is not selected, not all columns are displayed. If the user wants to review the details for the remaining columns, the user can do so by selecting row(s) and requesting the additional data.
Event ID Required When selected, a promotion event must be assigned to the promotion.
Display And/Or Condition When selected, this option allows OR conditions to be used when a multi-buy promotion component contains multiple buy lists or reward lists. If this option is not selected, only AND conditions can be used.
Maximum Number of Buy Lists
This option specifies the maximum number of buy lists allowed for a multi-buy promotion component.
Maximum Number of Reward Lists
This option specifies the maximum number of reward lists allowed for a multi-buy promotion component.
Number of Past Markup Impact Events Displayed
The maximum number of past dates that have a cost or retail change to be displayed in the Markup Change Date column, used to review cost/retail change history. The value of this option can be an integer from 1 to 10 (default 1).
Maximum Number of Promotion Component Details per Promotion Component
Specifies the maximum number of promotion component details for a promotion component.
Maximum Search Results
■ Price Changes The maximum number of search rows returned for price changes. If the search limit is reached, a message is displayed informing users that they will not see all of their search results.
■ Clearances The maximum number of search rows returned for clearances. If the search limit is reached, a message is displayed informing users that they will not see all of their search results.
■ Promotions The maximum number of search rows returned for promotions. If the search limit is reached, a message is displayed informing users that they will not see all of their search results.
■ Price Inquiry The maximum number of search rows returned for price inquiry. If the search limit is reached, a message is displayed informing users that they will not see all of their search results.
Location Moves
Location Move Lead Time The number of days, set in system options, required before a location can be moved between zones in RPM.
Location Move Purge Days The number of days RPM will retain location moves that have either successfully completed or are the same number of days past the scheduled effective date but have had no action taken on them.
Table 3–1 (Cont.) System Options Fields and Descriptions
System Options Definition

System Options Definitions
System Options 3-5
Edit System OptionsNavigate:From the Task Pad, select System Options > System Options Edit. The System Options workspace opens.
Promotion Overlap When selected, promotions are allowed to overlap a scheduled location move. If Promotion Overlap is selected, a Promotion Overlap Behavior option must be selected.
If Promotion Overlap is not selected (default), promotions cannot overlap a scheduled location move.
Promotion Overlap Behavior
When Promotion Overlap is selected, one of these behavior options must also be selected:
■ Do not start existing promotion and inherit new promotion
The location does not start the promotion if the zone promotion overlaps the move date. The location inherits a promotion in the new zone that overlaps the move date. The inherited promotion starts on the same day that the zone-level promotion starts, or it starts the day the move is scheduled if the zone-level promotion is already active.
■ End existing promotion and inherit new promotion
The existing promotion ends at the location on the evening before the move date. The location inherits a promotion in the new zone that overlaps the move date, but the promotion starts on the location move date.
■ Extend existing promotion and do not inherit new promotion
The location continues to run the promotion from the old zone. The location does not inherit a zone-level promotion for the new zone if the promotion overlaps the move date.
Inherit New Zones Regular Retail
When selected, the location inherits the retails of the new zone.
If not selected (default), the zone keeps the existing retail.
Pricing Strategy Review Period Overlap
When selected, pricing strategies with review periods are allowed to overlap a move date. The validation of a worksheet review period is bypassed, and a location move can be scheduled.
When unchecked (default), validation is not bypassed.
Table 3–1 (Cont.) System Options Fields and Descriptions
System Options Definition

System Options 3-6
System Options Definitions
Figure 3–1 System Options Workspace - General
1. Update any enabled fields as necessary.
See , "System Defaults" for more information.
2. Click Save to commit any changes and close the workspace.

System Options 3-7
System Options Definitions
Figure 3–2 System Options Workspace - Conflict Check
1. Update any enabled fields as necessary.
See , "System Defaults" for more information.
2. Click Save to commit any changes and close the workspace.
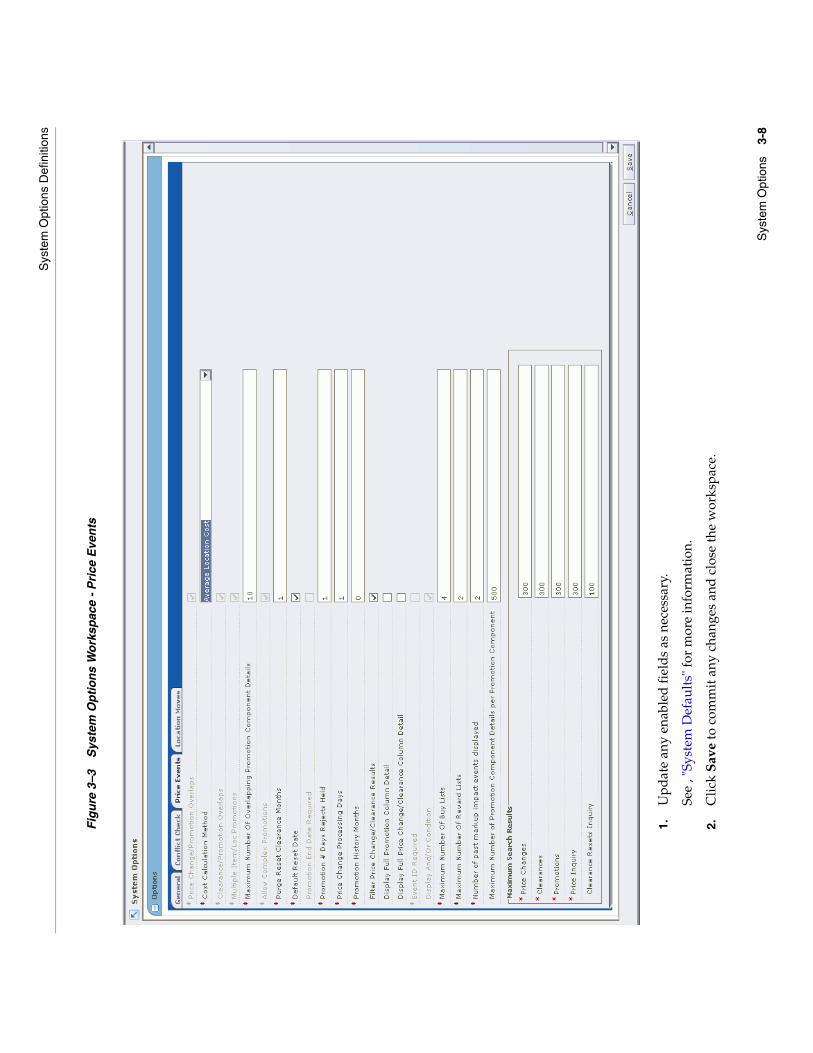
Sys
tem
Opt
ions
3-
8
Sys
tem
Opt
ions
Def
initi
ons
Fig
ure
3–3
S
yste
m O
pti
on
s W
ork
spac
e -
Pri
ce E
ven
ts
1.U
pd
ate
any
enab
led
fiel
ds
as n
eces
sary
.
See
, "Sy
stem
Def
ault
s" fo
r m
ore
info
rmat
ion.
2.C
lick
Sav
e to
com
mit
any
cha
nges
and
clo
se th
e w
orks
pace
.
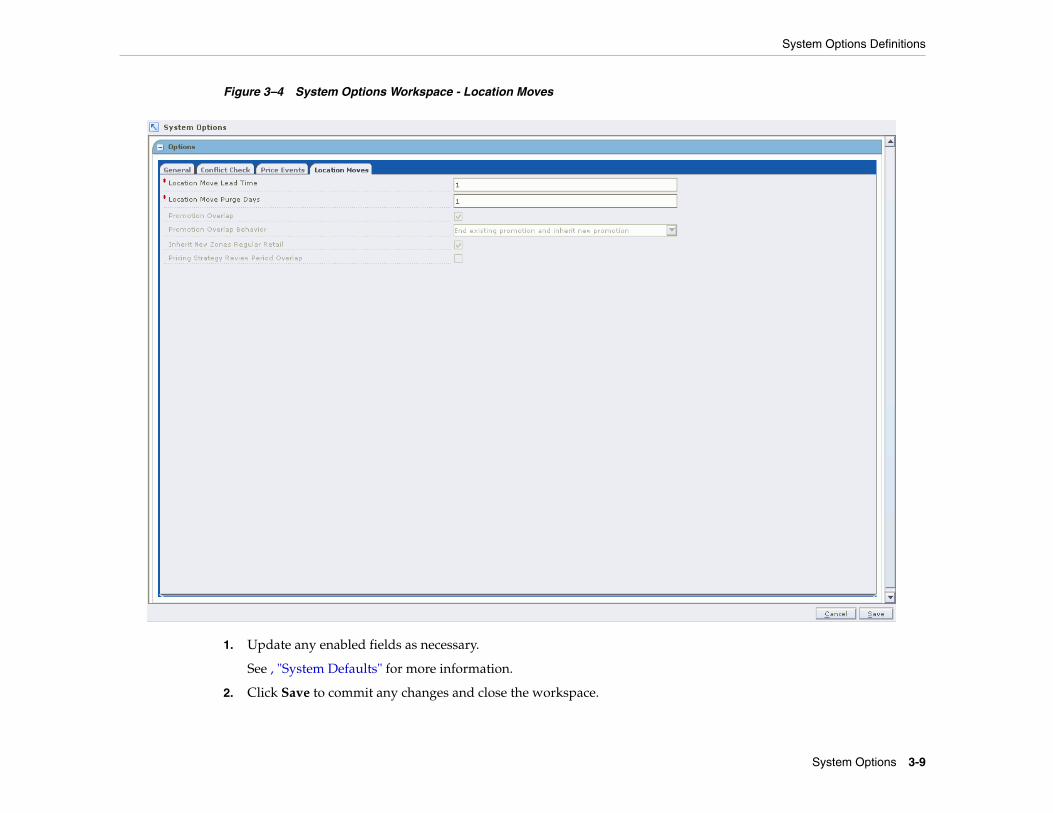
System Options 3-9
System Options Definitions
Figure 3–4 System Options Workspace - Location Moves
1. Update any enabled fields as necessary.
See , "System Defaults" for more information.
2. Click Save to commit any changes and close the workspace.

System Options 3-10
System Options Definitions
View System OptionsNavigate: From the Task Pad, select System Options > System Options View. The System Options View workspace opens.
Figure 3–5 System Options View Workspace
See , "System Defaults" for more information.
■ Click Close to exit the workspace.
System DefaultsThe following table lists the system defaults.
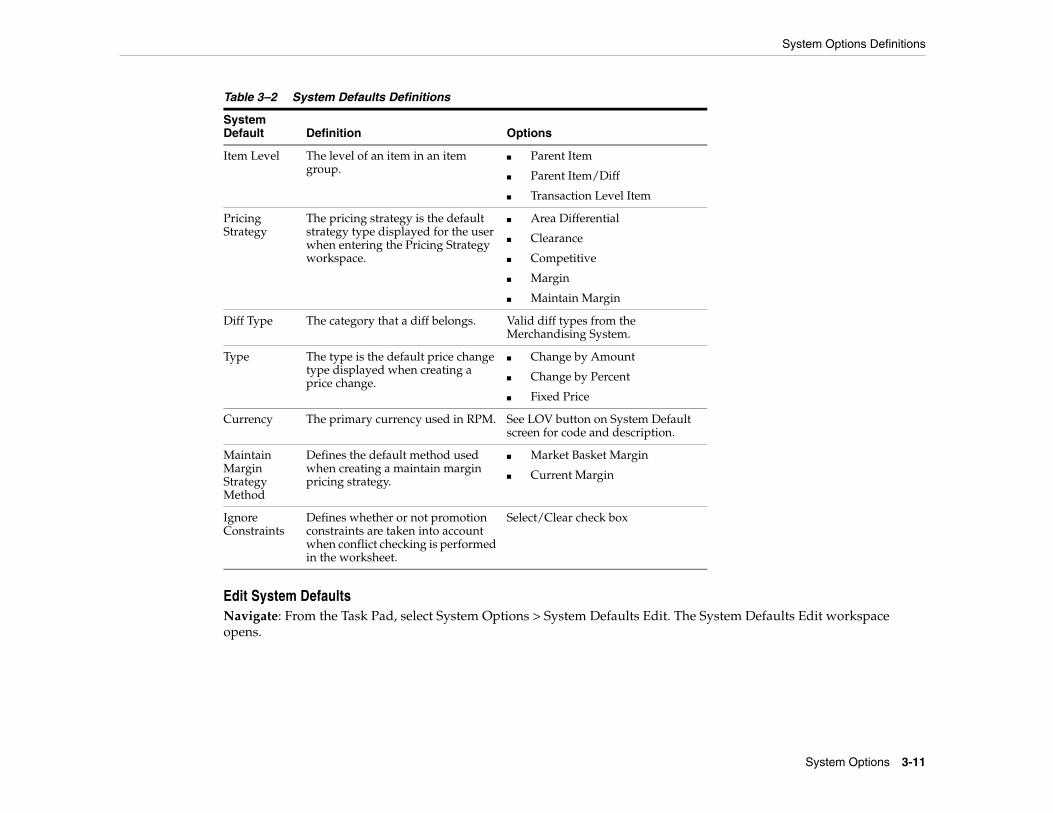
System Options 3-11
System Options Definitions
Edit System DefaultsNavigate: From the Task Pad, select System Options > System Defaults Edit. The System Defaults Edit workspace opens.
Table 3–2 System Defaults Definitions
System Default Definition Options
Item Level The level of an item in an item group.
■ Parent Item
■ Parent Item/Diff
■ Transaction Level Item
Pricing Strategy
The pricing strategy is the default strategy type displayed for the user when entering the Pricing Strategy workspace.
■ Area Differential
■ Clearance
■ Competitive
■ Margin
■ Maintain Margin
Diff Type The category that a diff belongs. Valid diff types from the Merchandising System.
Type The type is the default price change type displayed when creating a price change.
■ Change by Amount
■ Change by Percent
■ Fixed Price
Currency The primary currency used in RPM. See LOV button on System Default screen for code and description.
Maintain Margin Strategy Method
Defines the default method used when creating a maintain margin pricing strategy.
■ Market Basket Margin
■ Current Margin
Ignore Constraints
Defines whether or not promotion constraints are taken into account when conflict checking is performed in the worksheet.
Select/Clear check box

System Options 3-12
System Options Definitions
Figure 3–6 System Defaults Edit Workspace
1. Update enabled fields as necessary. See, "System Defaults" for more information.
2. Click Save to commit any changes and close the workspace.
View System DefaultsNavigate: From the Task Pad, select System Options > System Defaults View. The System Defaults View workspace opens.

System Options Definitions
System Options 3-13
Figure 3–7 System Defaults View Workspace
See , "System Defaults" for more information.
Click Close to exit the workspace.
Aggregation LevelsThe Aggregation Level Settings workspace allows you to define system parameters that vary for price strategies and price worksheet. When a department is created in the merchandising system, Oracle Retail Price Management assigns the default value for each parameter to the default or default level defined in the system. You may choose to define the aggregation level at a different parameter than the default. When a price strategy exists for a department, parameters are disabled and cannot be changed.
Maintain Aggregation Level SettingsNavigate: From the Task Pad, select Aggregation Level > Maintain Aggregation Levels. The Aggregation Level Settings workspace opens.

System Options Definitions
3-14 Oracle® Retail Price Management User Guide
Figure 3–8 Aggregation Level Settings Workspace
1. Select the record you want to update.
2. Click in the field that you want to change.
■ Lowest Definable Level: Select the lowest level of the merchandise hierarchy for which a price strategy can be defined.
■ Worksheet Level: Select the level of the merchandise hierarchy at which worksheets are generated.
■ Historical Sales: Select the sales period RPM should represent as historical on the worksheet.
■ Regular: Select the check box to indicate that regular sales should be included as part of historical sales in the price worksheet.
■ Clearance: Select the check box to indicate that clearance sales should be included as part of historical sales in on the price worksheet.
■ Promotion: Select the check box to indicate that promotional sales should be included as part of historical sales in on the price worksheet.
■ Include WH Inventory: Select the check box to indicate that warehouse inventory should be included in the calculations for sell through and price change impact in the price worksheet.
■ Include On Order In Sell Thru: Select the check box to indicate that inventory ordered is included in the sell through calculations on the price worksheet.

System Options Definitions
System Options 3-15
■ Price Change Amount Calc: Select the method of calculating the price change amount on the price worksheet.
– New-Current: The current price is subtracted from the new price.
– Current-New: The new price is subtracted from the current price.
■ Past Retail Change Highlight Days: Enter the number of days previous retail changes will cause the Last Price Change column of the pricing worksheet to be highlighted.
■ Past Cost Change Highlight Days: Enter the number of days previous cost changes will cause the Last Cost Change column on the pricing worksheet.
■ Pending Cost Change Window Days: Enter the number of days into the future the system should look for pending cost changes.
■ Pending Cost Change Highlight Days: Enter the number of days into the near future the system should look for pending cost changes. The Pending Cost Change column on the worksheet is highlighted if a cost change falls within the Pending Cost Change Highlight Days.
3. Click Done to save any changes and close the workspace.
Note: Pending Cost Change Highlight Days must be less than or equal to Pending Cost Change Window Days.

System Options Definitions
3-16 Oracle® Retail Price Management User Guide

Pricing 4-1
4Pricing
Price InquiryThe Price Inquiry workspace allows you to look up the price of an item for a selected date and location. The following information appears in the Price Inquiry Results table:
Regular retail and multi-unit prices are calculated as follows:
Table 4–1 Price Inquiry Results
Column Description
Item ID/Description Item ID/Description
Diff ID The differentiators for the parent item if Parent Item/Diff type is selected.
Location/Description The selected locations, zones, or zone groups depending on selected criteria.
Primary Zone Selected if the zone is within the primary zone group.
Date The selected date. The date the item/location price is valid far.
Regular Retail The regular price of the item/location for the specified date.
Regular Retail UOM The unit of measure of the regular item/location.
Regular Multi-Units The regular multi-units of the item/location.
Regular Multi-Units Retail The regular multi-unit price of the item/location.
Regular Multi-Units Retail UOM
The unit of measure of the regular item/location multi-unit.
Clearance Retail The clearance price of the item/location for the specified date.
Clearance Retail UOM The unit of measure of the clearance item/location.
Promotional Retail The promotional price of the item/location for the specified date.
Promotional Retail UOM The unit of measure of the promotional item/location.
Complex Promotion Selected if the item/location is included on a complex promotion.

Price Inquiry
4-2 Oracle® Retail Price Management User Guide
Clearance and promotion prices are calculated as follows:
Retrieve an Item PriceNavigate: From the Task Pad, select Price Inquiry > Retrieve Item Price. The Price Inquiry workspace opens.
Table 4–2 Regular Retail and Multi-unit Price Calculation
Location Hierarchy Transaction Level Item Parent Item Parent Item/Diff
Location Transaction level price at the location.
Average of prices for all transaction level items under parent at the location.
Average of prices for all transaction level items under parent/diff at the location.
Zone Average of transaction level prices for all locations in the zone.
Average of prices for all transaction level items under parent at all the locations in the zone.
Average of prices for all transaction level item sunder parent/diff at the locations in the zone.
Primary Zone Primary zone price. Average of prices for all transaction level items under parent in the primary zone.
Average of prices for all transaction level items under parent/diff in the primary zone.
Note: "Price" refers to Regular Retail or Regular Multi-Units Retail.
Table 4–3 Clearance and Promotion Price Calculation
Location Hierarchy
Transaction Level Item Parent Item Parent Item/Diff
Location Transaction level price at the location.
Average of prices for all transaction level items under parent at the location.
Average of prices for all transaction level items under parent/diff at the location.
Zone Average of transaction level prices for all locations in the zone.
Average of prices for all transaction level items under parent at all the locations in the zone.
Average of prices for all transaction level item sunder parent/diff at the locations in the zone.
Note: "Price" refers to Clearance Retail or Promotional Retail.

Price Inquiry
Pricing 4-3
Figure 4–1 Price Inquiry Workspace
1. Enter criteria as necessary to restrict the search to the price changes you want to maintain.
Table 4–4 Search Criteria
Field Criteria
Merchandise Level Select criteria in the following fields to search for prices in a specific merchandise level:
■ Department
■ Class
■ Subclass
■ Item Type
■ Item Level
■ Customer Type
■ Diff Type
■ Item
■ Diff
Customer Type Select the specific customer type that you want to search on. If no customer type is selected, data for all customer types will be available.

Price Inquiry
4-4 Oracle® Retail Price Management User Guide
2. Click Retrieve Price. Your results appear in the Price Inquiry Results table.
Figure 4–2 Price Inquiry Results Table
3. In the Customer Type column, click on the Exists link. The Customer Type Promotion Retail window opens with the customer type details.
Zone/Location Select Zone Groups, Zones, and Locations to search for prices from specific zones or locations.
Date Select the date you need to retrieve a price for.
Note: If the current margin on an item is negative, the Current Markup % field in the Price Inquiry Results table is highlighted to call your attention to the negative margin.
Table 4–4 (Cont.) Search Criteria
Field Criteria
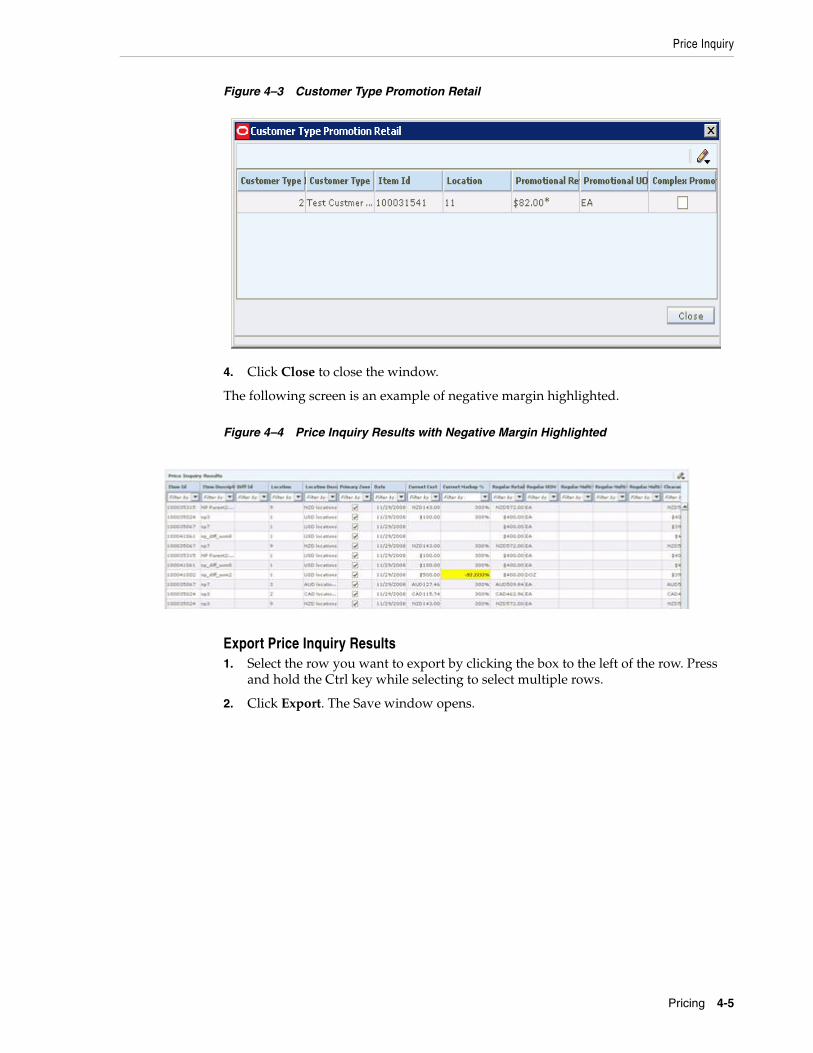
Price Inquiry
Pricing 4-5
Figure 4–3 Customer Type Promotion Retail
4. Click Close to close the window.
The following screen is an example of negative margin highlighted.
Figure 4–4 Price Inquiry Results with Negative Margin Highlighted
Export Price Inquiry Results1. Select the row you want to export by clicking the box to the left of the row. Press
and hold the Ctrl key while selecting to select multiple rows.
2. Click Export. The Save window opens.

Price Inquiry
4-6 Oracle® Retail Price Management User Guide
Figure 4–5 Save Window
3. Select a location to save the file to from the Save In drop-down list.
4. Enter a name for the file in the File Name field.
5. Click Save. The file is saved.
6. Open the file in the program of your choice, such as a spreadsheet or word processor.
Price GuidesA price guide allows you to create a uniform price strategy. You can use price guides to maintain consistent price points. You can determine if the prices in a guide should be rounded in the same manner or if they should all end in the same digits.
Price guides can be set up at the corporate level or at the department level. A corporate-level price guide is created and maintained at the corporate level, but can be referenced by many departments. If any changes are made to a corporate price guide, all departments that are linked to the corporate guide will reflect the updated changes. A department-level price guide is created and maintained at the department level.
After price guides are defined, they can be used when setting up pricing strategies, price changes, clearances, and promotions. Price guides are also used when creating the primary zone group for a merchandise level. When a price guide is attached to a primary zone group definition, it will be applied to the initial prices proposed by RPM during the initial price setting process in RMS (if the proposed price falls within one of the defined intervals on the guide).
Create a Price GuideNavigate: From the Task Pad, select Price Guides > Create Price Guide. The Create Price Guide workspace opens.
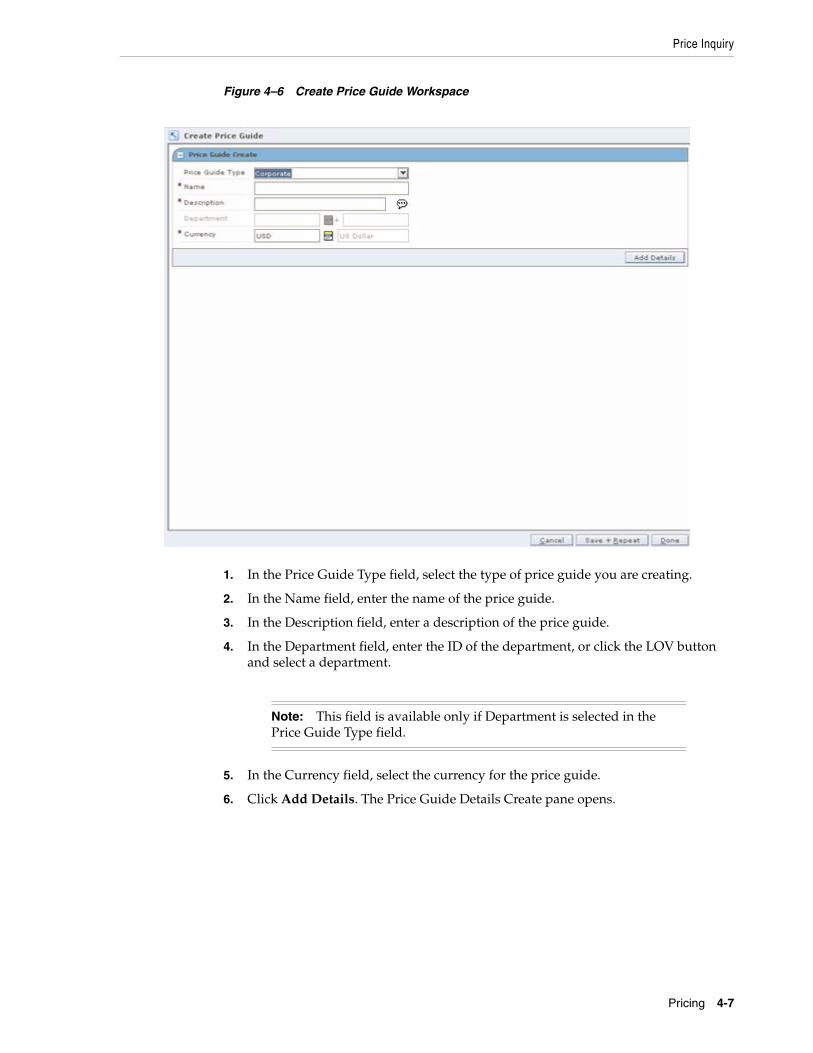
Price Inquiry
Pricing 4-7
Figure 4–6 Create Price Guide Workspace
1. In the Price Guide Type field, select the type of price guide you are creating.
2. In the Name field, enter the name of the price guide.
3. In the Description field, enter a description of the price guide.
4. In the Department field, enter the ID of the department, or click the LOV button and select a department.
5. In the Currency field, select the currency for the price guide.
6. Click Add Details. The Price Guide Details Create pane opens.
Note: This field is available only if Department is selected in the Price Guide Type field.

Price Inquiry
4-8 Oracle® Retail Price Management User Guide
Figure 4–7 Price Guide Details Create Pane
Add Price Intervals Individually
1. In the From field, enter the low price of the interval.
2. In the To field, enter the high price of the interval.
3. In the New Retail field, enter the price that all values in the interval adjust to.
4. Click Add. The information is added to the table.
Add Multiple Price Intervals
1. In the Start Price field, enter the low price of the block of intervals.
2. In the End Price field, enter the high price of the block of intervals.
3. In the Increment field, enter the amount each interval should increase by.
4. In the New Retail Based On field, select how the new retail price should be determined:
■ From Price: The new price will be set to the same value as the value in the From column on the list of intervals.
■ To Price: The new price will be set to the same value as the value in the To column on the list of intervals.
■ Average Price: The new retail will be set to the average of values in the From and To columns on the list of intervals.
5. Click Autofill. The information is added to the table.
Note: The value in the From field must be lower than the value in the To field.

Price Inquiry
Pricing 4-9
Define Ends in Values
1. Select the intervals you want to add ends in value.
2. In the New Retail Ends In field, enter the digits the price ends in.
3. Click Apply. The New Retail field on the selected intervals in the table is updated with the Ends In Digits specified by the user.
Complete the Price Guide
■ Click Done to save any changes and close the workspace.
Copy a Price GuideNavigate: From the Task Pad, select Price Guides > Copy Price Guide. The Copy Price Guide workspace opens.
Note: If the End Price is not divisible by the value in the Increment field, RPM will suggest the last valid price in the range. Click Yes to accept the price and continue, or click No to cancel the process.
Note: The number of fields available are determined at system set up. If your currency uses decimals the number of fields corresponds to the number of decimals used in the currency. If you currency does not use decimals, the number of digits is determined at system set up.

Price Inquiry
4-10 Oracle® Retail Price Management User Guide
Figure 4–8 Copy Price Guide Workspace
1. In the Price Guides Origin pane, select the type of the price guide you are copying.
If you select Department Pricing Guides, enter the department ID in the field to the right, or click the LOV button and select a department.
2. In the Price Guides Destination pane, select the type of the price guide you are creating.
If you select Department Pricing Guides, enter the department ID in the field to the right, or click the LOV button and select a department.
3. In the Create Copy Price Guide pane, select the price guide you want to copy.
4. Click Copy. The Pricing Guide Copy Details pane opens.
Note: Price guides that match the criteria entered appear in the Create Copy Price Guide pane.

Price Inquiry
Pricing 4-11
Figure 4–9 Pricing Guide Copy Details Pane
5. Maintain the price guide as necessary.
6. Click Done to save any changes and close the workspace.
Link a Price GuideNavigate: From the Task Pad, select Price Guides > Link Price Guide. The Link Price Guide workspace opens.

Price Inquiry
4-12 Oracle® Retail Price Management User Guide
Figure 4–10 Link Price Guide Workspace
1. In the Department field, enter the ID of the department that you want to link to a corporate price guide.
2. In the Price Guides List pane, select the corporate price guide you want to link to.
3. Click Link. A red X appears in the Linked column, indicating that the corporate price guide has been linked.
4. Click Done to save any changes and close the workspace.
Maintain a Price GuideNavigate: From the Task Pad, select Price Guides > Maintain Price Guide. The Price Guides Maintenance workspace opens.

Price Inquiry
Pricing 4-13
Figure 4–11 Price Guides Maintenance Workspace
1. From the Pricing Guides List, select the price guide you want to edit.
2. Click Edit. The Price Guide Maintenance Details pane opens.
Note: If you are copying a price guide, start from step 3.
Note: Linked department price guides cannot be edited. They can only be viewed. The details of a linked department price guide are owned at the corporate level, so changes must be made to the corporate price guide.

Price Inquiry
4-14 Oracle® Retail Price Management User Guide
Figure 4–12 Price Guide Maintenance Details Pane
3. Edit the enabled fields as necessary.
4. Update the intervals as necessary.
■ Add price intervals individually.
■ Add multiple price intervals.
■ Define the ends in price.
5. To delete an interval:
a. Select the intervals you want to delete.
b. Click Delete Intervals. The intervals are removed from the table.
6. To verify if the intervals are sequential:
a. Click Verify Intervals. If non-sequential intervals exist, an error message appears.
b. Click OK. The non-sequential values are highlighted in red.
c. Correct the intervals as necessary.
- Add price intervals individually.
- Delete an interval.
7. Click Done to save any changes and close the workspace.
Candidate RulesThe pricing office of your organization determines the optimum strategies for using RPM in your business. After these strategies are decided, you can define the candidate rules and set up the following parameters:

Price Inquiry
Pricing 4-15
■ Candidate rules
■ Variables for candidate rules
You use candidate rules to search the database for items that need to be highlighted for pricing review. Candidate rules determine which item/locations will have retail prices proposed in clearance worksheets. In other types of worksheets, they provide a way to identify and track specific items during the worksheet review process.
Candidate rules are defined at the corporate level. You can modify any of the candidate rule parameters. Some rules have variable values. These values are assigned and can be modified at the department level.
There are two types of candidate rules: Inclusion and Exclusion. Exclusion rules are always run first and identify items that will not be included in the worksheet review. Inclusion rules can contain a variable for Department level differences in the value to be searched against. Items that meet an inclusion candidate rule are flagged on the worksheet. Items that meet an exclusion candidate rule do not appear on the worksheet.
Create a Candidate Rule and Define a Variable for the RuleNavigate: From the Task Pad, select Candidate Rules > Create Candidate Rules. The Create Candidate Rule workspace opens.
Note: Rules that have variables defined are run only against items in Departments where a value has been assigned to the variable. If there is no variable value for a Department, the candidate rule will not run against items from that Department.
Note: Candidate rules are run against the worksheet when it is first created. They are not run again if the worksheet is updated.

Price Inquiry
4-16 Oracle® Retail Price Management User Guide
Figure 4–13 Create Candidate Rule Workspace
1. In the Name field, enter the name of the candidate rule.
2. In the Description field, enter a description of the candidate rule. This description can be up to 250 characters.
3. Against Type, select the kind of candidate rule that you are creating.
4. Against Status, select the active status of the rule. Only active rules are run during a review period.
5. In the Field column, select the field to which the candidate rule is applied.
6. In the Operator column, select the relationship that the Field item has to the Value or Variable Name.
Note: All options may not be available for some field types.
Table 4–5 Operator Field Relationship with Variable name
Operator Relationship
= Equal to
< Less than
> Greater than
Price Inquiry
Pricing 4-17
7. In the Value field, enter the ID of value or click the LOV button and select a value.
Assign a Variable Value
1. Select the Variable check box.
2. If the Variable is a new variable, select the New check box.
3. In the Value field, enter the name if it is a new variable or click the LOV button and select an existing variable.
Complete the Candidate Rule
1. Enter additional conditions as necessary.
2. Click Add. The condition opens in the conditions area.
3. Click Done to save any changes and close the window.
Maintain Rule Variables by Variable or by DepartmentNavigate: From the Task Pad, select Candidate Rules > Maintain Rule Variables. The Rule Variable Maintenance workspace opens.
<= Less than or equal to
.>= Greater than or equal to
<> Not equal to
Note: If you enter a Value, the rule runs against all Departments that use this value in the rule. If you enter a Variable, you can assign the value of the Variable by Department.
Note: A single rule can have multiple conditions. If multiple conditions exist for a rule, an item must meet all of the conditions in order for the rule to be met.
Table 4–5 (Cont.) Operator Field Relationship with Variable name
Operator Relationship

Price Inquiry
4-18 Oracle® Retail Price Management User Guide
Figure 4–14 Rule Variable Maintenance Workspace
1. In the Method field, select how you want to update the rule variables.
2. In the Variable/Department field, select the value you want to use to update the rule variable.
3. In the Variable Value field, enter the value to be associated with the variable when the rule is run against items in the department.
4. To update the values for multiple departments:
a. Multi-select the departments you want to update.
b. In the Value field below the Rule Variable Maintenance By Variable table, enter the value to be associated with the variable when the rule is run against items in the department.
c. Click Apply.
5. Click Done to save any changes and close the workspace.
Delete a Candidate Rule Variable
1. In the Department field, enter the Department number or click (LOV) and select from the list of values.
Note: If the variable is attached to a candidate rule, you must delete the candidate rule before you can delete the variable. To delete the candidate rule, see "Delete a Candidate Rule".
Price Inquiry
Pricing 4-19
2. Click View. A list of the defined variables with their assigned values appears.
3. Select the radio button for the candidate rule variable that you want to remove.
4. Click Delete. A message appears, "This variable will be deleted for all Departments. Do you want to continue?"
5. Click OK. The variable is removed from the list.
Update a Candidate Rule Variable
1. In the Department field, enter the Department number, or click the LOV button and select from the list of values.
2. Click View. A list of the defined variables with their assigned values appear.
3. In the Value field for the candidate rule variable that you want to edit, enter the appropriate value.
4. Click Save. The information is saved.
Maintain a Candidate RuleNavigate: From the Task Pad, select Candidate Rules > Maintain Candidate Rules. The Maintain Candidate Rules workspace opens.
Note: To leave the window without making changes, click Cancel.
Note: Rules that have variables defined are run only against items in Departments where a value has been assigned to the variable. If there is no variable value for a Department, the candidate rule will not run against items from that Department.
Note: To apply the same variable to more than one Department, select the desired Departments from the list.
Note: To exit the window without making changes, click Cancel.

Price Inquiry
4-20 Oracle® Retail Price Management User Guide
Figure 4–15 Maintain Candidate Rules Workspace
1. Select the candidate rule you want to change.
2. Click Edit. The Candidate Rule Maintenance workspace opens with information about the selected candidate rule.
3. Change information in any of the fields, as necessary.
4. If you want to use the value as a variable:
a. Check the box against Use value as variable.
b. Enter or click the LOV button to display a list of existing values.
c. Select an appropriate value from the list.
5. If you want to edit only the Condition portion of a rule:
a. In the Conditions box, select the Condition that you want to change.
Note: See "Create a Candidate Rule and Define a Variable for the Rule" for additional information.
Note: To add a new Condition to a rule without changing any existing Conditions, follow steps c-d below.

Price Inquiry
Pricing 4-21
b. Click Edit. The components of the selected condition are displayed in the Field, Operator, and Values or Variable Name fields.
c. Enter the appropriate information in the Field, Operator, and Values or Variable Name fields.
d. To include the new or updated Condition without removing the existing Condition, click Add.
Or
To substitute the existing Condition with the one you just created or edited, click Replace.
6. To return to the Candidate Rules window, click Cancel. All information that you did not save in the Candidate Rule Maintenance window is lost.
7. To delete a condition, select the condition in the Conditions box.
8. Click Delete. The condition is removed.
9. To apply all of the changes that you made in this window, click Save. You are returned to the Candidate Rules window.
Delete a Candidate RuleNavigate: From the Task Pad, select Candidate Rules > Maintain Candidate Rules. The Maintain Candidate Rules workspace opens with all of the current candidate rules listed.
Figure 4–16 Maintain Candidate Rules Workspace
Price Inquiry
4-22 Oracle® Retail Price Management User Guide
1. Select the candidate rule you want to delete.
2. Click Delete. A message appears, "Are you sure you want to delete the selected rule?"
3. Click OK to delete the rule. The rule is removed from the list.
Zone StructuresZone structures allow you to group locations that are priced the same. Additionally, you can identify the types of pricing the zone is used for; Regular, Promotional, or Clearance. There are several components that you need to define in order to use zone structures.
Zone GroupsZone groups are a collection of zones. You can define multiple zone groups that are suited to your business. After you define the zone group, you can define the zones in the zone group. A location (store or warehouse) can only exist once in a given zone group. Multiple currencies may exist within a zone group.
ZonesA zone is a group of locations that are priced the same within a zone group. Locations within a zone must have the same currency. Not all locations must be assigned to a zone.
Primary Zone GroupsThe primary zone group is used to determine how items are initially priced in the merchandising system. When you create a primary zone group, you identify the merchandise hierarchy level, the zone group, the markup percent, the markup type, and the price guide. The merchandise hierarchy assigned to a new item in merchandising system will determine the primary zone group definition in RPM used to initially price the item. Based on the information associated with the primary zone group and the cost of the item, as entered in the merchandising system, prices will be proposed. Additionally, price changes that are created against a zone in the primary zone group are stored at the zone level. These price changes can be displayed in the Price Inquiry window.
Create a Zone GroupNavigate: From the Task Pad, select Zone Structure > Create Zone Group. The Create Zone Group workspace opens.
Note: Variables are not deleted if you delete a rule that has a condition with variables and values assigned at the Department level. This feature allows you to use the existing variables and assigned values when you create a new rule. To delete the variables, see "Delete a Candidate Rule".

Price Inquiry
Pricing 4-23
Figure 4–17 Create Zone Group Workspace
1. In the Zone Group ID field, edit the generated Zone Group ID field as necessary.
2. In the Zone Group Name field, enter a description of the zone group.
3. In the Type field, enter the type of pricing this zone group is used for, or click the LOV button and select a type.
4. Click Next. Your zone group is created.
Add Zones to a Zone Group1. In the Zone ID field, edit the generated Zone Group ID field as necessary.
2. In the Zone Name field, enter a description for the zone.
Note: The Zone Group ID field appears with the next available number. If you choose to update the field, you must choose a unique ID.
Note: The Zone ID field appears with the next available number. If you choose to update the field, you must choose a unique ID.

Price Inquiry
4-24 Oracle® Retail Price Management User Guide
3. In the Currency field, enter the currency for the zone, or click the LOV button and select a currency.
4. Click Apply. Your zone is added to the table.
5. Add the appropriate number of zones for your zone group.
Add Locations to a Zone1. Select a zone.
2. Click Locations. The Zone Location Assignment pane opens.
Figure 4–18 Zone - Location Assignment Pane
3. In the Type field, select the type of location you want to add to the zone.
4. In the Value field, enter the ID of the location or location group, or click the LOV button and select a location or location group.
5. Click Apply to add the location or location group to the list of locations.
6. Click Save to commit any changes.
7. Click Done to save any changes and close the workspace.
Copy an Existing Zone Group1. In the Zone Group ID field, edit the generated Zone Group ID field as necessary.
Note: When you add a location to a zone, a location move request is created in Approved status. The location move request will wait for the next scheduling batch, and that batch program will process the addition. If you want to cancel the approved location addition request, you can change the location move request from Approved back to Worksheet status before the scheduling batch is run. See "Reset a Location Move Request to Worksheet Status" for more information.

Price Inquiry
Pricing 4-25
2. In the Zone Group Name field, enter a description for the zone group.
3. In the Type field, enter the pricing strategy that the zone group will use, or click the LOV button and select a type.
4. Select the Like Group check box.
5. Click Next. The Like Group pane opens.
6. Enter the ID of the zone group that you want to copy, or click the LOV button and select a group.
7. Click Done to save any changes and close the workspace.
Maintain a Zone GroupNavigate: From the Task Pad, select Zone Structure > Maintain Zone Group. The Maintain Zone Group workspace opens.
Note: The Zone Group ID field appears with the next available number. If you choose to update the field, you must choose a unique ID.
Note: To edit the newly created Zone Group, see "Maintain a Zone Group".
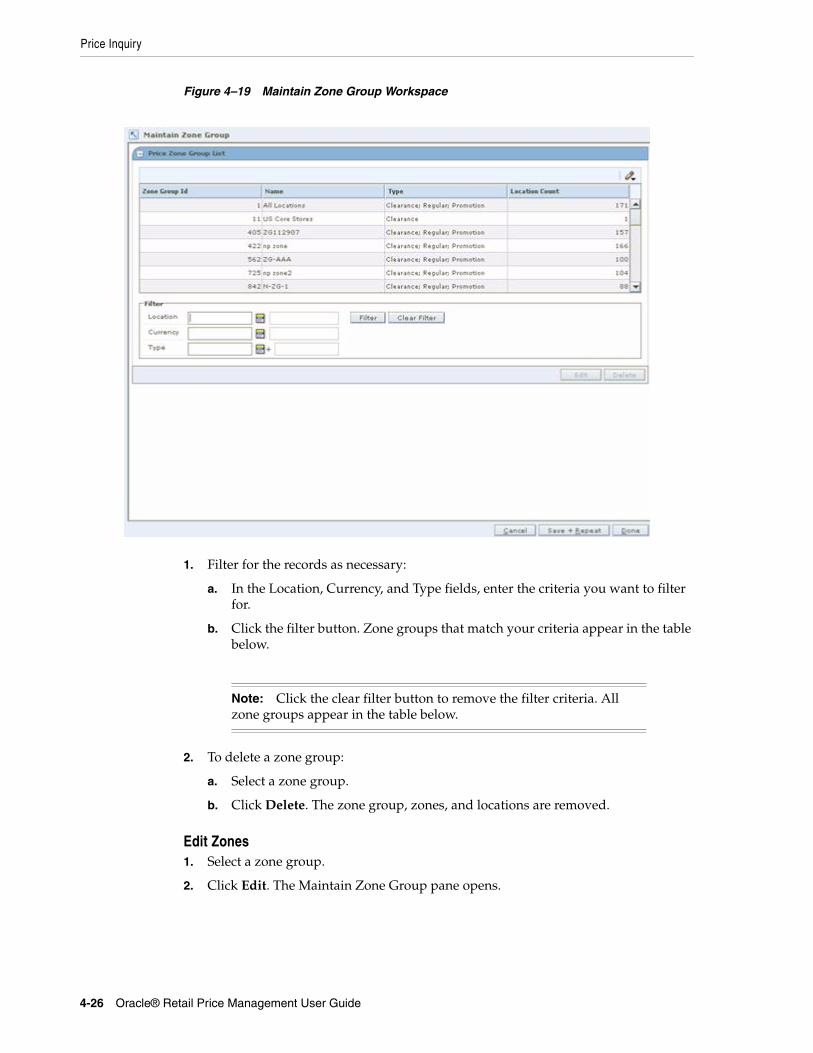
Price Inquiry
4-26 Oracle® Retail Price Management User Guide
Figure 4–19 Maintain Zone Group Workspace
1. Filter for the records as necessary:
a. In the Location, Currency, and Type fields, enter the criteria you want to filter for.
b. Click the filter button. Zone groups that match your criteria appear in the table below.
2. To delete a zone group:
a. Select a zone group.
b. Click Delete. The zone group, zones, and locations are removed.
Edit Zones1. Select a zone group.
2. Click Edit. The Maintain Zone Group pane opens.
Note: Click the clear filter button to remove the filter criteria. All zone groups appear in the table below.

Price Inquiry
Pricing 4-27
Figure 4–20 Maintain Zone Group (Edit) Pane
3. After the zone has been added to the zone group, the currency cannot be changed. The zone with the incorrect currency can be deleted and then re-created with the correct currency.
4. Add zones to the zone group.
5. To delete a zone:
a. Select a zone.
b. Click Delete. The zone is removed from the list of zones.
Edit Locations1. Select a zone.
2. Click Locations. The Zone - Location Assignment pane opens.
Note: If there are no locations in the zone, the currency field is editable. If locations exist in the zone, then the currency field is NOT editable.
Note: You must first delete all locations from the zone before you delete it.

Price Inquiry
4-28 Oracle® Retail Price Management User Guide
Figure 4–21 Zone - Location Assignment Pane
3. Add locations to the zone.
4. To delete a location from a zone.
a. Select a location.
b. Click Delete. The location is removed from the list of locations.
5. Click Done to save any changes close the workspace.
Create a Primary Zone GroupNavigate: From the Task Pad, select Zone Structure > Maintain Primary Zone Groups. The Maintain Primary Zone Group workspace opens.
Note: When you add a location to a zone that was previously saved, a location move is scheduled. See "Maintain Location Move".
Note: When you add or delete a location in a zone, a location move request is created in Approved status. The location move request will wait for the next scheduling batch, and that batch program will process the addition or deletion. If you want to cancel the approved location move request, you can change the location move request from Approved back to Worksheet status before the scheduling batch is run. See "Reset a Location Move Request to Worksheet Status" for more information.

Price Inquiry
Pricing 4-29
Figure 4–22 Maintain Primary Zone Group Workspace
1. Click Add. The Zone Retail Definition Maintenance pane opens.
Figure 4–23 Zone Retail Definition Maintenance Pane
2. In the Department field, enter the ID of the department, or click the LOV button and select a department.

Price Inquiry
4-30 Oracle® Retail Price Management User Guide
3. In the Class field, enter the ID of the class, or click the LOV button and select a class.
4. In the Subclass field, enter the ID of the subclass, or click the LOV button and select a subclass.
5. In the Zone Group field, enter the ID of the zone group you want to associate with the selected merchandise hierarchy level, or click the LOV button and select a zone group.
6. In the Initial Price Settings pane:
a. In the Markup % field, enter the percent of markup that is applied to the cost of the item.
b. Select either Retail Markup or Cost Markup to indicate how the markup is calculated.
7. To add a price guide, click Price Guides. The Price Guide Definition dialog opens.
Figure 4–24 Price Guide Definition Dialog
8. For each currency, enter a price guide ID, or click the LOV button and select a price guide.
Note: You must select the merchandise hierarchy levels above class and subclass before you identify class and subclass. Class and subclass are not required. You can define a primary zone group at the Department level.
Note: Regular price zone groups are the only type of zone groups that can be attached to a primary zone group.

Price Inquiry
Pricing 4-31
9. Click OK to save any changes and close the window.
10. Click Apply to add your changes to the table.
11. Click Done to save any changes and close the workspace.
Maintain a Primary Zone GroupNavigate: From the Zone Structure menu, select Maintain Primary Zone Groups. The Maintain Primary Zone Group workspace opens.
1. Click Edit. The Zone Retail Definition Maintenance pane opens.
Figure 4–25 Zone Retail Definition Maintenance Pane
2. Edit the enabled fields as necessary.
3. Click Apply.
4. Click Done to save any changes and close the workspace.
Delete a Primary Zone Group1. Select a primary zone group.
2. Click Delete. A message is displayed: "All selected rows will be deleted."
3. Click Yes. The primary zone group is removed from the table.
4. Click Done to save any changes and close the workspace.
CodesThe foundation area allows you to maintain reason codes and link codes. Reason codes are used to explain the rationale for clearances and price changes. Link codes are used to associate items to each other at a location and price them exactly the same.
Note: Only price guides that are associated with the department selected in the Zone Retail Definition Maintenance pane appear. For each currency, you can select a price guide, if a price guide has been set up for the currency and department.

Price Inquiry
4-32 Oracle® Retail Price Management User Guide
Link CodesThe Maintain Link Codes area allows you to assign link codes to a transaction level item/location. The items can be associated to the code through the merchandise hierarchy, at the item level, or through item attributes such as diff or diff type. Locations can be associated to the code through the zone group or zone or by entering the location directly.
Market Basket CodesThe Maintain Market Basket Codes area allows you to assign market baskets codes to an item/zone. The items can be associated to the code through the merchandise hierarchy, at the item level, or through item attributes such as diff or diff type.
Create a CodeNavigate: From the Task Pad, select Foundation > Code Maintenance. The Code Maintenance workspace opens.
Figure 4–26 Code Maintenance Window
1. Click New. The next line on the table is enabled.
2. In the Type field, select one of the following types of code you are creating.
■ Regular Price
■ Clearance Price
■ Link Code
■ Credit Type

Price Inquiry
Pricing 4-33
3. In the Code field, enter a unique identifier for the code.
4. In the Description field, enter description of the code.
5. In the SIM field, select the radio button to indicate that the reason code is used exclusively by Store Inventory Management (SIM).
6. Click Done to save any changes and close the workspace.
Edit a CodeNavigate: From the Task Pad, select Foundation > Code Maintenance. The Code Maintenance workspace opens.
Figure 4–27 Code Maintenance Window
1. Select the field you want to edit.
2. Make necessary changes.
3. In the SIM field, select the radio button to indicate that the reason code is used exclusively by Store Inventory Management (SIM).
You are prompted to confirm your choice to change the SIM reason code.
Note: Only one reason code for price changes and clearances can be assigned as a SIM reason code.
Note: Only one reason code for price changes and clearances can be assigned as a SIM reason code.

Price Inquiry
4-34 Oracle® Retail Price Management User Guide
4. Click Save + Repeat to commit your changes.
5. Click Done to save any changes and close the workspace.
Delete a CodeNavigate: From the Task Pad, select Foundation > Code Maintenance. The Code Maintenance workspace opens.
Figure 4–28 Code Maintenance Window
1. Select the record you want to delete.
2. Click Delete. The record is removed from the table.
3. Click Done to close the window.
Create Link CodesNavigate: From the Task Pad, select Link Codes > Create Link Codes. The Create Link Codes workspace opens.
Note: You cannot delete a reason or link code that is in use.

Price Inquiry
Pricing 4-35
Figure 4–29 Create Link Codes Window
1. Enter the Department for which you want to create the link code.
2. Select the item type for the link code from the Item Type drop-down list.
■ Item: Select an item for the link code.
a. In the Item Level drop-down list, select Parent Item, Parent Item/Diff, or Transaction Level Item.
b. If enabled, select a diff type from the Diff Type drop-down list.
c. In the Item field, enter the ID of the item(s) to which you want the link code, or click the LOV button and select an item.
d. If enabled, enter the ID of the diff(s), or click the LOV button and select a diff.
■ Item List: Select an item list for the link code.
Enter the ID of the item list you want the link code to apply to, or click the LOV button and select an item list.
3. Select the locations for the link code:
■ Zone Group: Enter the ID of the zone group that contains the zones to which the link code should apply, or click the LOV button and select a zone group.
Note: You must enter a department. Subsequent merchandise levels are enabled as you add the level above. You can enter more than one department, in which case you cannot enter class or subclass.

Price Inquiry
4-36 Oracle® Retail Price Management User Guide
■ Zone: Enter the ID of the zone that contains the locations to which the link code should apply, or click the LOV button and select a zone.
■ Location: Enter the ID of the location the link code should apply to, or click the LOV button and select a location.
4. Select the link code. Enter the ID of the link code that will be created, or click the LOV button and select a link code.
5. Click Apply. The following may occur:
a. A row is added to the table for each transaction level item/location that meets the selected criteria.
b. An existing row changes based on the selected criteria.
6. Click Done to save any changes and close the workspace.
Maintain Link CodesThis section describes how to search for a link code, override a link code, update link codes, and delete a link code relationship.
Search for a Link CodeNavigate: From the Task Pad, select Link Codes > Maintain Link Codes. The Maintain Link Codes workspace opens.
Figure 4–30 Maintain Link Codes Window
1. In the Link Codes Search pane, enter criteria as necessary to restrict the search to the link codes you want to maintain.

Price Inquiry
Pricing 4-37
2. Click Search. Your results appear in the Maintain Link Codes table.
Figure 4–31 Maintain Link Codes Table Window
Maintain or Override a Link Code1. Search for and retrieve the link codes you want to maintain. Your results appear in
the Maintain Link Codes table.
2. Select the locations for the link code:
■ Zone Group: Enter the ID of the zone group that contains the zones the link code should apply to, or click the LOV button and select a zone group.
■ Zone: Enter the ID of the zone that contains the locations the link code should apply to, or click the LOV button and select a zone.
■ Location: Enter the ID of the location the link code should apply to, or click the LOV button and select a location.
3. Select the item type for the link code from the Item Type drop-down list.
■ Item: Select an item or for the link code.
a. In the Item Level drop-down list, select Parent Item, Parent Item/Diff, or Transaction Level Item.
b. If enabled, select a diff type from the Diff Type drop-down list.
c. In the Item field, enter the ID of the item(s) you want the link code to apply to, or click the LOV button and select an item.
d. If enabled, enter the ID of the diff(s), or click the LOV button and select a diff.
■ Item List: Select an item list for the link code.
Enter the ID of the item list you want the link code to apply to, or click the LOV button and select an item list.
4. Click Apply. The following may occur:
Note: You must enter a department. Subsequent merchandise levels are enabled as you add the level above. You may enter more than one department, in which case you cannot enter class or subclass.

Price Inquiry
4-38 Oracle® Retail Price Management User Guide
■ A row is added to the table for each transaction level item/location that meets the selected criteria.
■ An existing row changes based on the selected criteria.
5. Click Done to save any changes and close the workspace.
Update Link Codes1. In the Maintain Link Codes table, select the rows you want to edit by clicking the
box to the left of the row. Press and hold the Ctrl key while selecting to select multiple rows. Click Select All to select all the rows.
2. Right-click in the Link Code field. The Link Code dialog opens.
Figure 4–32 Link Code Dialog Box
3. Enter the ID of the link code in the Edited Value field, or click the LOV button and select a code.
4. Click OK. Your changes appear in the table.
Delete a Link Code Relationship1. In the Maintain Link Codes table, select the row you want to delete by clicking the
box to the left of the row. Press and hold the Ctrl key while selecting to select multiple rows. Click Select All to select all the rows.
2. Click Delete. You are prompted to confirm your decision.
3. Click Yes. The link code relationship is deleted.
Maintain Market Basket CodesThis section describes how to search for a Market Basket Code, maintain Market Basket Codes, update Market Basket Codes, and delete a Market Basket Code Relationship.
Search for a Market Basket CodeNavigate: From the Task Pad, select Market Basket Codes > Maintain Market Basket Codes. The Maintain Market Basket Codes workspace opens.

Price Inquiry
Pricing 4-39
Figure 4–33 Maintain Market Basket Codes Window
1. Enter criteria as necessary to restrict the search to the market basket codes you want to maintain.
2. Click Search. Your results appear in the Market Basket Codes table.
Figure 4–34 Market Basket Codes Table
Maintain Market Basket Codes1. Search for and retrieve the market basket codes you want to maintain. Your results
appear in the Maintain Market Basket Codes table.
2. Enter the ID of the merchandise level you want to apply the market basket to, or click the LOV button and select the appropriate merchandise level.

Price Inquiry
4-40 Oracle® Retail Price Management User Guide
3. Select the zones for the market basket:
■ Zone Group: Enter the ID of the zone group that contains the zones the market basket should apply to, or click the LOV button and select a zone group.
■ Zone: Enter the ID of the zone the market basket should apply to, or click the LOV button and select a zone.
4. Select the item type for the market basket code from the Item Type drop-down list.
■ Item: Select an item for the market basket code.
a. In the Item Level drop-down list, select Parent Item, Parent Item/Diff, or Transaction Level Item.
b. If enabled, select a diff type from the Diff Type drop-down list.
c. In the Item field, enter the ID of the item(s) you want the market basket code(s) to apply to, or click the LOV button and select an item.
d. If enabled, enter the ID of the diff, or click the LOV button and select a diff.
■ Item List: Select an item list for the market basket code.
Enter the ID of the item list you want the market basket code(s) to apply to, or click the LOV button and select an item list.
5. In the Margin Market Basket Code field, enter the ID of the code, or click the LOV button and select the code.
OR
Select the Remove Margin Market Basket Code checkbox to disassociate the margin market basket code from the item(s)/zone(s) that meet the selected criteria.
6. In the Competitive Market Basket Code field, enter the ID of the code, or click the LOV button and select the code.
OR
Select the Remove Competitive Market Basket Code checkbox to disassociate the competitive market basket code from the item(s)/zone(s) that meet the selected criteria.
7. Click Apply. The following may occur:
■ A row is added to the table for each transaction level item/location that meets the selected criteria.
■ An existing row changes based on the selected criteria.
8. Click Done to save any changes and close the workspace.
Update Market Basket Codes1. In the Market Basket Codes table, select the row you want to edit by clicking the
box to the left of the row. Press and hold the Ctrl key while selecting to select multiple rows. Click Select All to select all the rows.
2. Right click the field you want to edit:
Note: You must enter a department. Subsequent merchandise levels are enabled as you add the level above. You may enter more than one department, in which case you cannot enter class or subclass.

Price Inquiry
Pricing 4-41
■ Margin Market Basket Code - The Margin Market Basket Code dialog opens.
Figure 4–35 Margin Market Basket Code Dialog
■ Competitive Market Basket Code - The Competitive Market Basket Code dialog opens.
Figure 4–36 Competitive Market Basket Code Dialog
3. Enter the ID of the Market Basket Code in the Edited Value field, or click the LOV button and select a code. Or Clear the field to dissociate the market basket code from the selected record.
4. Click OK. Your changes appear in the table.
Delete a Market Basket Code Relationship1. In the Market Basket Codes table, select the row you want to delete by clicking the
box to the left of the row. Press and hold the Ctrl key while selecting to select multiple rows. Click Select All to select all the rows.
2. Click Delete. You are prompted to confirm your decision.
3. Click Yes. The market basket code relationship is deleted.
CalendarsCalendars are used to define review periods for your pricing strategies. A review period is the amount of time that you have to act on pricing events generated in the worksheet before they expire.
After you create a calendar, you can maintain the different aspects of that calendar. You can modify the name, description, or end date of the calendar. You can also change the rules and exceptions for future review periods.

Price Inquiry
4-42 Oracle® Retail Price Management User Guide
Create a CalendarNavigate: From the Task Pad, select Calendar > Create Calendar. The Create Calendar workspace opens.
Figure 4–37 Create Calender Window
1. In the Calendar Setup pane, in the Name field, enter a name for the calendar.
2. In the Description field, you can enter a description for the Calendar. Click the button next to the description field to open an editing window.
Set Up the Calendar1. In the Calendar Setup area, in the Start Date field, enter the date the calendar
becomes active, or click the calendar button and select a date.
2. In the End Date field, enter the date the calendar is no longer active.
3. In the Review Period Duration field, enter the length of the review period in days.
4. In the Days Between Review Periods field, enter the number of days between review periods.
Note: The last review period duration plus the days between review periods must exactly reach the end date of the calendar. If this is not the case, the system can automatically adjust the end date, or you can chose to modify the Review Period Duration, Days Between Review Periods or End Date fields yourself.

Price Inquiry
Pricing 4-43
Set Up Review Periods1. In the Review Period Setup area, from the Rules drop-down list, select the type of
rules to apply for the review period.
■ Inclusion - Items that meet inclusion candidate rules will be highlighted in the worksheet.
■ Exclusion - Items that meet exclusion candidate rules will be excluded from the worksheet.
■ Both - Both, inclusion and exclusion candidate rules are applied for the review period.
■ None - No rules are applied for the review period.
2. In the Exception Frequency field, enter the frequency, in review periods, that RPM should process exceptions from the merchandising system.
■ Enter 1 for every review period.
■ Enter 2 for every other review period.
■ Enter 3 for every third review period.
■ Enter 0 if you never want RPM to process exceptions.
3. Click Calculate Review Periods. The review periods are calculated and the Review Period Details pane opens.
Figure 4–38 Review Period Details Window
4. In the Review Period Details pane, in the Rules and Exceptions fields, edit as necessary for each review period.
5. Click Done at the bottom of the workspace. The new calendar is added and the Maintain Calendar workspace closes.

Price Inquiry
4-44 Oracle® Retail Price Management User Guide
Maintain a CalendarNavigate: From the Task Pad, select Calendar > Maintain Calendar. The Maintain Calendar workspace opens.
Figure 4–39 Maintain Calender Window
1. Select the calendar you want to maintain from the Calendar List pane.
2. Click Edit. The Calendar Details and Review Period Details panes are displayed and the fields that can be changed are enabled.

Price Inquiry
Pricing 4-45
Figure 4–40 Review Period Details
Figure 4–41 Calender Details Window
3. Edit the enabled fields as necessary.
■ Calendar Detail
– End Date: Select the end date for the calendar.
– New Calendar to Assign to Strategies when Calendar expires: Select the calendar that replaces the current calendar after the end date.
■ Review Period Details
– Rules: Select Inclusion, Exclusion, Both, or None.

Price Inquiry
4-46 Oracle® Retail Price Management User Guide
– Exceptions: Select if exceptions, from the merchandising system, should be processed during the review period.
4. Click Calculate Review Periods. If edits are made to the calendar detail, you must press the Calculate Review Periods button.
5. Click Done.
Delete a Calendar1. Select the calendar you want to delete from the list.
2. Click Delete. You are prompted to confirm your decision.
3. Click Yes. The calendar is deleted.
4. Click Done to close the window.
Maintain Location MoveYou can move a location from one zone to another within a zone group. The process allows a location to keep all location level pricing events while it transfers from the old zone's pricing strategies to those of the new zone, while at the same time inheriting the pricing events of the new zone.
Request a Location MoveNavigate: From the Task Pad, select Zone Structure > Maintain Location Move. The Maintain Location Move workspace opens.
Note: System options control whether promotions are allowed to overlap a scheduled location move, and whether a location automatically inherits pricing of the new zone. See Section , "System Options Definitions" for more information about Location Moves options.

Price Inquiry
Pricing 4-47
Figure 4–42 Maintain Location Move Window
Create a Location Move Request1. Click New. The Zone Group Field is enabled on the Maintain Location Move pane.
2. In the Zone Group field, enter the zone group of the location you need to move, or click the LOV button and select a zone group.
3. In the Zone field, enter zone of the location you need to move, or click the LOV button and select a zone.
4. In the Location field, enter the location you need to move, or click the LOV button and select a Location.
5. In the New Zone field, enter the zone to move the location to, or click the LOV button and select the new zone.
6. In the Effective Date field, enter the date the location should move zones, or click the calendar button and select a date.
7. Click Apply. The location move request appears with a status of Worksheet on the Location Move list.
Note: The Effective Date you can set depends on the number of days set in the system option Location Move Lead Time. The earliest date a location move can be created is today's date plus the location move lead time.

Price Inquiry
4-48 Oracle® Retail Price Management User Guide
Submit a Location Move Request for Approval1. Select a location move request with a status of Worksheet.
2. Select Submit from the Action drop-down list.
3. Click Update.
4. A confirmation prompt is displayed. Click Yes.
5. The location move request is changed to a status of Pending.
6. If no conflicts are found, the location move request is changed to a status of Submitted.
After a location move request is in Submitted status, the request can be approved, rejected, or returned to Worksheet status.
Approve a Location Move Request1. Select Approve from the Action drop-down list.
2. Click Update.
3. A confirmation prompt is displayed. Click Yes.
4. The location move request is changed to a status of Pending.
5. If no conflicts are found, the location move request is changed to a status of Approved.
After a location move request is in Approved status, the move will be scheduled by the location move scheduling batch job. A location move request in Approved status can be changed back to Worksheet status, edited, and resubmitted if necessary. A location move in Scheduled status cannot be moved back to Approved, Worksheet, or Submitted status.
Reject a Location Move Request1. Select a location move request with a status of Submitted.
2. Select Reject from the Action drop-down list.
3. Click Update.
4. A confirmation prompt is displayed. Click Yes.
5. The location move request is changed to a status of Rejected.
A rejected location move can be changed back to Worksheet status. In Worksheet status, the request can be edited and resubmitted, or it can be deleted.
Reset a Location Move Request to Worksheet Status1. Select a location move with a status of Failed, Rejected, Submitted, or Approved.
2. Select Worksheet from the Action drop-down list.
3. Click Update. The location move request is changed back to Worksheet status.
4. Edit the location move request as needed. If the request failed, fix the conflicts that caused the failure.
After you edit a location move request, you can submit the request again.
Note: An alert is displayed when conflict checking is complete.

Price Inquiry
Pricing 4-49
View Conflicts for a Failed Location Move Request1. In the Conflict column, click the Failed link. The Conflict Review window opens
with the conflict information displayed.
Figure 4–43 Conflict Review Window
2. Click OK to close the Conflict Review window.
Delete a Location Move Request
1. Select a location move with a status of Worksheet.
2. Click Delete.
3. A confirmation prompt is displayed. Click Yes. The location move request is deleted.
View Location Move ResultsIf RPM created any exceptions or exclusions in order for the location to be moved successfully, those items are viewable in the move results column.
In the Move Results column, click the Completed link. The Conflict Review window opens, with move results information displayed.
Note: Only location moves in Worksheet status can be deleted.
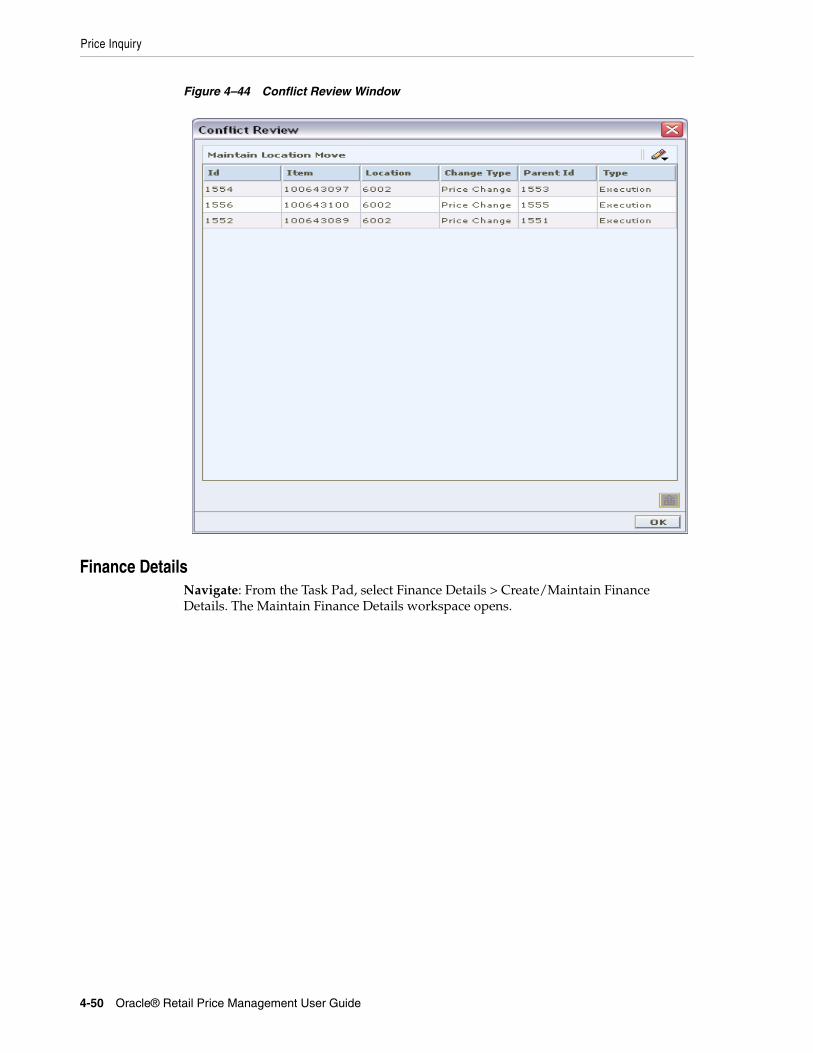
Price Inquiry
4-50 Oracle® Retail Price Management User Guide
Figure 4–44 Conflict Review Window
Finance DetailsNavigate: From the Task Pad, select Finance Details > Create/Maintain Finance Details. The Maintain Finance Details workspace opens.

Price Inquiry
Pricing 4-51
Figure 4–45 Maintain Finance Details window
1. To add a new credit card type, click New.
■ To create a new credit card type, refer to Section , "Create a Code"
2. In the Credit Type field, select the credit card type.
3. In the Bank Name field, enter the name of the credit card issuing bank.
4. In the BIN Number From and To fields, enter the respective bank index numbers.
5. Click Apply.

Price Inquiry
4-52 Oracle® Retail Price Management User Guide

Pricing Strategies 5-1
5Pricing Strategies
Maintain Pricing StrategiesPricing strategies allow you to define how prices are proposed when pricing worksheets are generated. You can define pricing strategies at the department, class, or subclass level to identify the items that are affected by the strategy. The lowest merchandise level you can define for a pricing strategy is determined by the aggregation levels defined for the department. An item/location can be on multiple regular pricing strategies as long as the review periods within the calendar assigned do not overlap (clearance, competitive, or margin) and one maintain margin pricing strategy which can overlap with a (clearance, competitive, or margin) strategy.
After you have created a pricing strategy, you can maintain different aspects of the pricing strategy.
Area Differential PricingArea differential pricing allows you to set prices for items at a particular zone or zone group differently than another zone or zone group. The price differential is based on the rules you define. Area differentials can be used when you create a price change to ensure consistent pricing. These price changes are generated by selecting Price Changes for Area Differentials within the Price Change task pad dialog. These price changes are generated by selecting Price Changes for Area Differentials within the Price Change task pad dialog. Differential pricing cannot be applied to other pricing events, such as clearances or promotions.
When creating an area differential:
■ You first establish a primary area, by defining the merchandise hierarchy and zone hierarchy for the primary area.
■ Next, select the zones that fall within the secondary area.
■ Then define how prices for the items in the hierarchy will differ in the secondary areas from the prices in the primary area. You can choose to price the item higher or lower by percent, or set the price to the same as the primary area.
■ You can choose to exclude certain items in the merchandise hierarchy from the secondary area differential prices.
Note: Updates to pricing strategies affect only future worksheets. Current worksheets will not be updated.
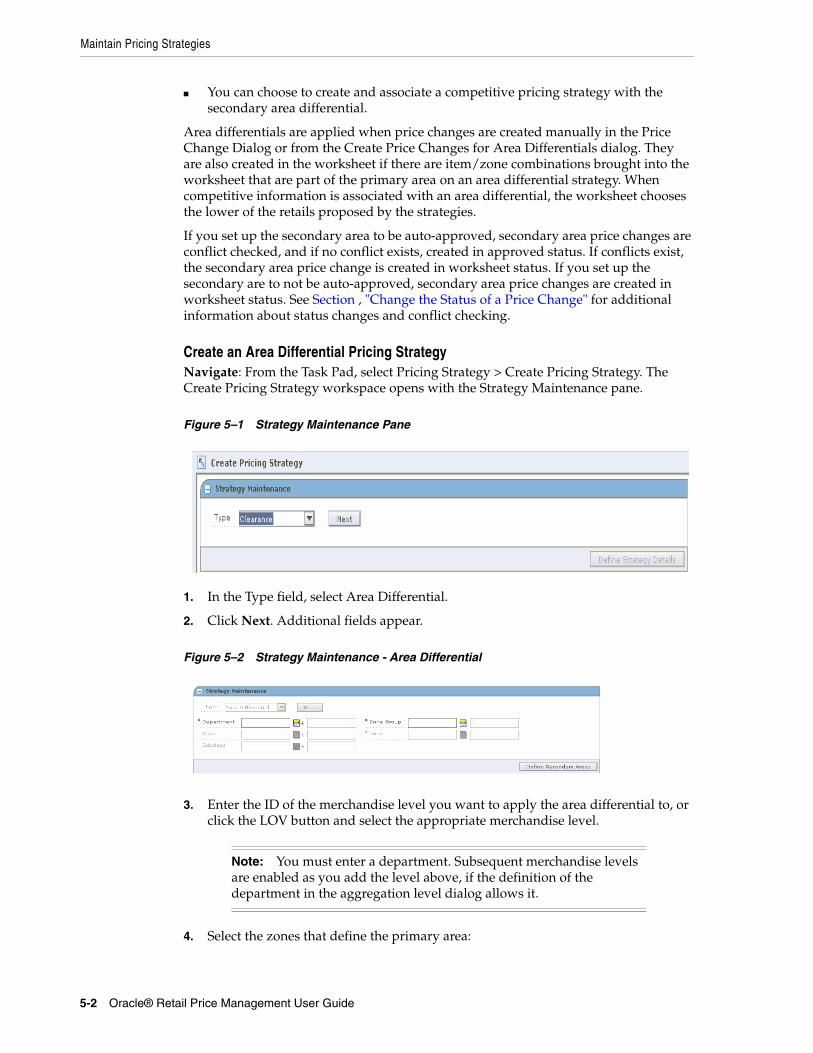
Maintain Pricing Strategies
5-2 Oracle® Retail Price Management User Guide
■ You can choose to create and associate a competitive pricing strategy with the secondary area differential.
Area differentials are applied when price changes are created manually in the Price Change Dialog or from the Create Price Changes for Area Differentials dialog. They are also created in the worksheet if there are item/zone combinations brought into the worksheet that are part of the primary area on an area differential strategy. When competitive information is associated with an area differential, the worksheet chooses the lower of the retails proposed by the strategies.
If you set up the secondary area to be auto-approved, secondary area price changes are conflict checked, and if no conflict exists, created in approved status. If conflicts exist, the secondary area price change is created in worksheet status. If you set up the secondary are to not be auto-approved, secondary area price changes are created in worksheet status. See Section , "Change the Status of a Price Change" for additional information about status changes and conflict checking.
Create an Area Differential Pricing StrategyNavigate: From the Task Pad, select Pricing Strategy > Create Pricing Strategy. The Create Pricing Strategy workspace opens with the Strategy Maintenance pane.
Figure 5–1 Strategy Maintenance Pane
1. In the Type field, select Area Differential.
2. Click Next. Additional fields appear.
Figure 5–2 Strategy Maintenance - Area Differential
3. Enter the ID of the merchandise level you want to apply the area differential to, or click the LOV button and select the appropriate merchandise level.
4. Select the zones that define the primary area:
Note: You must enter a department. Subsequent merchandise levels are enabled as you add the level above, if the definition of the department in the aggregation level dialog allows it.
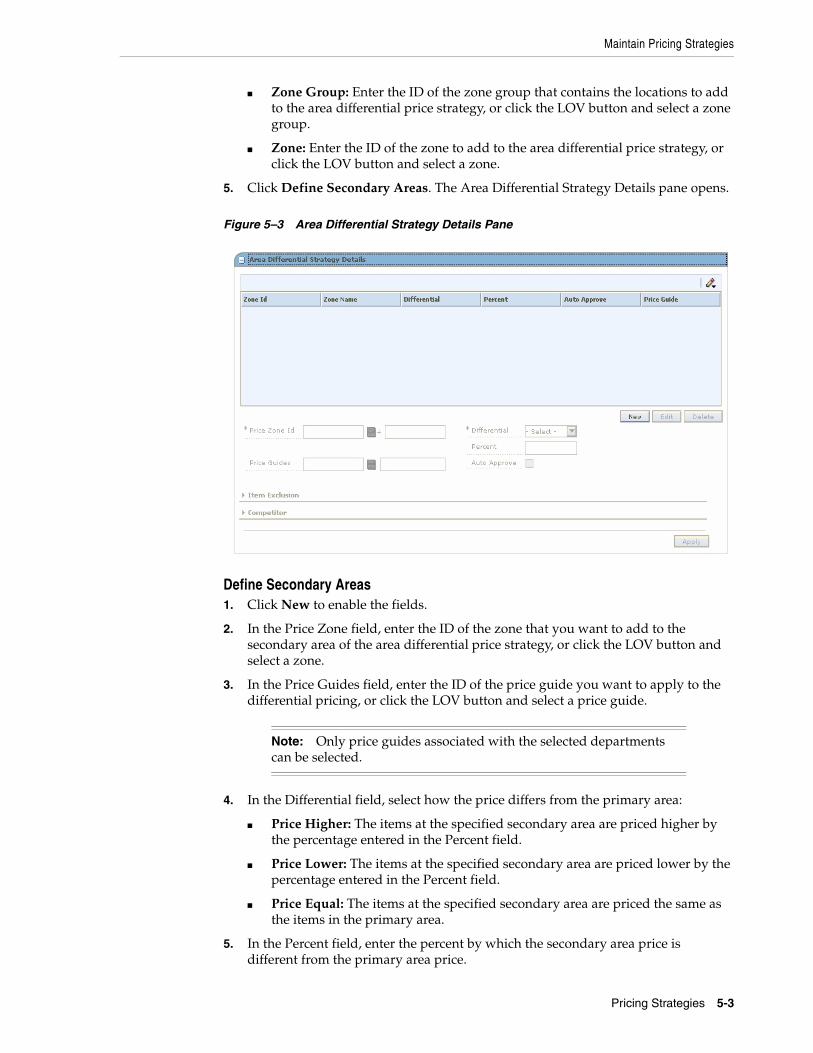
Maintain Pricing Strategies
Pricing Strategies 5-3
■ Zone Group: Enter the ID of the zone group that contains the locations to add to the area differential price strategy, or click the LOV button and select a zone group.
■ Zone: Enter the ID of the zone to add to the area differential price strategy, or click the LOV button and select a zone.
5. Click Define Secondary Areas. The Area Differential Strategy Details pane opens.
Figure 5–3 Area Differential Strategy Details Pane
Define Secondary Areas1. Click New to enable the fields.
2. In the Price Zone field, enter the ID of the zone that you want to add to the secondary area of the area differential price strategy, or click the LOV button and select a zone.
3. In the Price Guides field, enter the ID of the price guide you want to apply to the differential pricing, or click the LOV button and select a price guide.
4. In the Differential field, select how the price differs from the primary area:
■ Price Higher: The items at the specified secondary area are priced higher by the percentage entered in the Percent field.
■ Price Lower: The items at the specified secondary area are priced lower by the percentage entered in the Percent field.
■ Price Equal: The items at the specified secondary area are priced the same as the items in the primary area.
5. In the Percent field, enter the percent by which the secondary area price is different from the primary area price.
Note: Only price guides associated with the selected departments can be selected.

Maintain Pricing Strategies
5-4 Oracle® Retail Price Management User Guide
6. Select the Auto Approve check box to indicate price changes for the area differential should be created in Approved status.
Exclude Items From the Area Differential
1. Enter or select criteria ID of the items you want to exclude.
2. Click Add. The information is added to the item exclusion table.
3. To remove an item from the item exclusion table:
a. Select an item.
b. Click Remove. The item is removed from the item exclusion table.
Complete the Area Differential1. Click Apply. Any changes are added to the table
2. Click Done to save your changes and close the window.
Edit an Area Differential Pricing StrategyNavigate: From the Task Pad, select Pricing Strategy > Maintain Pricing Strategy. The Pricing Strategy Search workspace opens.
Figure 5–4 Pricing Strategy Search Workspace
Note: Expand the Item Exclusion section of the Area Differentials pane to complete the procedure.

Maintain Pricing Strategies
Pricing Strategies 5-5
1. Enter criteria as needed to limit your search.
2. Click Search. The results of your search are listed in the Pricing Strategies List.
Figure 5–5 Pricing Strategies List Window
3. From the Pricing Strategies List, select the area differential strategy you want to maintain.
4. Click Edit, or double-click the strategy selected. A Strategy Maintenance editing pane opens, and the fields that can be changed are enabled.
Figure 5–6 Strategy Maintenance Edit - Area Differential
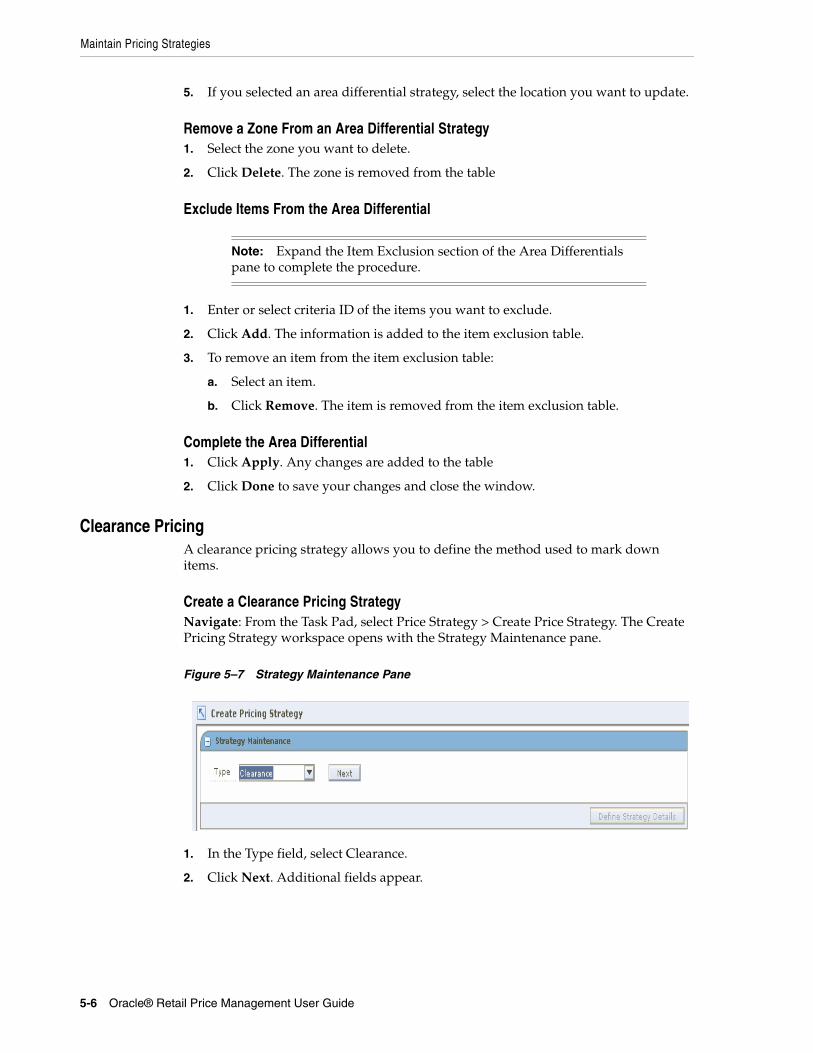
Maintain Pricing Strategies
5-6 Oracle® Retail Price Management User Guide
5. If you selected an area differential strategy, select the location you want to update.
Remove a Zone From an Area Differential Strategy1. Select the zone you want to delete.
2. Click Delete. The zone is removed from the table
Exclude Items From the Area Differential
1. Enter or select criteria ID of the items you want to exclude.
2. Click Add. The information is added to the item exclusion table.
3. To remove an item from the item exclusion table:
a. Select an item.
b. Click Remove. The item is removed from the item exclusion table.
Complete the Area Differential1. Click Apply. Any changes are added to the table
2. Click Done to save your changes and close the window.
Clearance PricingA clearance pricing strategy allows you to define the method used to mark down items.
Create a Clearance Pricing StrategyNavigate: From the Task Pad, select Price Strategy > Create Price Strategy. The Create Pricing Strategy workspace opens with the Strategy Maintenance pane.
Figure 5–7 Strategy Maintenance Pane
1. In the Type field, select Clearance.
2. Click Next. Additional fields appear.
Note: Expand the Item Exclusion section of the Area Differentials pane to complete the procedure.
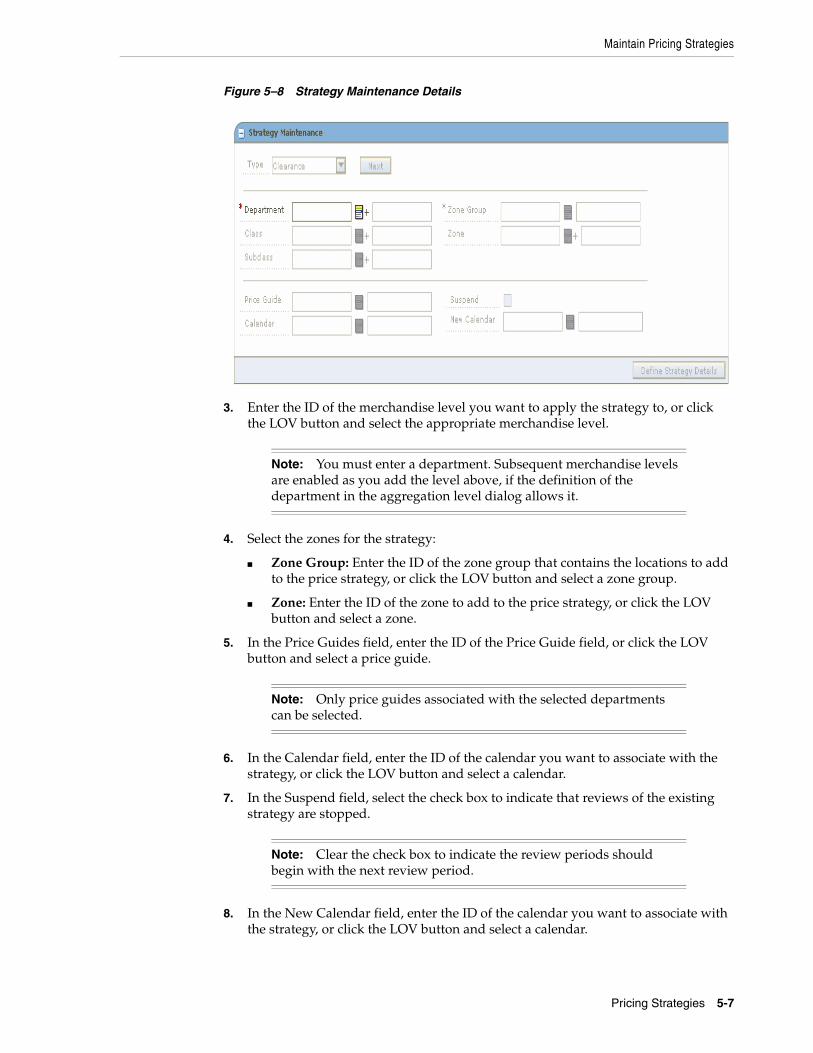
Maintain Pricing Strategies
Pricing Strategies 5-7
Figure 5–8 Strategy Maintenance Details
3. Enter the ID of the merchandise level you want to apply the strategy to, or click the LOV button and select the appropriate merchandise level.
4. Select the zones for the strategy:
■ Zone Group: Enter the ID of the zone group that contains the locations to add to the price strategy, or click the LOV button and select a zone group.
■ Zone: Enter the ID of the zone to add to the price strategy, or click the LOV button and select a zone.
5. In the Price Guides field, enter the ID of the Price Guide field, or click the LOV button and select a price guide.
6. In the Calendar field, enter the ID of the calendar you want to associate with the strategy, or click the LOV button and select a calendar.
7. In the Suspend field, select the check box to indicate that reviews of the existing strategy are stopped.
8. In the New Calendar field, enter the ID of the calendar you want to associate with the strategy, or click the LOV button and select a calendar.
Note: You must enter a department. Subsequent merchandise levels are enabled as you add the level above, if the definition of the department in the aggregation level dialog allows it.
Note: Only price guides associated with the selected departments can be selected.
Note: Clear the check box to indicate the review periods should begin with the next review period.

Maintain Pricing Strategies
5-8 Oracle® Retail Price Management User Guide
9. Click Define Strategy Details. The Clearance Strategy Details pane opens.
Define Clearance Strategy Details1. In the Markdown Percent field, select the price from which the clearance price is
calculated.
2. Click Add Row.
3. In the Discount Percent field, enter the percent of the markdown.
4. Click Apply.
Edit a Clearance Pricing StrategyNavigate: From the Task Pad, select Price Strategy > Maintain Price Strategy. The Pricing Strategy Search workspace opens.
Figure 5–9 Pricing Strategy Search Workspace
Note: You must select the Suspend check box before you can add a new calendar
Note: If the price from which the clearance price is calculated is Regular Retail, the Discount Percent fields must increase with each markdown added.

Maintain Pricing Strategies
Pricing Strategies 5-9
1. Enter criteria as needed to limit your search.
2. Click Search. The results of your search are listed in the Pricing Strategy Search List window.
Figure 5–10 Pricing Strategy List Window
3. From the Pricing Strategies List, select the clearance strategy you want to maintain.
4. Click Edit, or double-click the strategy selected. A second Strategy Maintenance pane opens and the fields that can be changed are enabled.
Figure 5–11 Strategy Maintenance - Edit Clearance
5. Make necessary changes.

Maintain Pricing Strategies
5-10 Oracle® Retail Price Management User Guide
6. Click Apply.
Edit a Price GuideChange or enter a price guide name, or click the LOV button and select the appropriate price guide if necessary.
Change Calendars
1. Select the Suspend check box.
2. Enter a calendar name, or click the LOV button and select a calendar
Edit a Markdown1. Select the Markdown number from the Clearance Strategies table.
2. Click Edit. The Discount Percent field is enabled.
3. Edit the discount percent.
4. Click Apply.
Delete a Markdown1. Select the highest Markdown number from the Clearance Strategies table.
2. Click Remove Markdown.
3. Click Apply.
Clearance Defaults PricingA clearance defaults pricing strategy allows you to set up a strategy for generating subsequent markdowns after an initial clearance event.
Create a Clearance Defaults Pricing StrategyNavigate: From the Task Pad, select Price Strategy > Create Price Strategy. The Create Pricing Strategy workspace opens with the Strategy Maintenance pane.
Figure 5–12 Strategy Maintenance Pane
1. In the Type field, select Clearance Defaults.
2. Click Next. Additional Strategy fields appear.
Note: Before you can specify a new calendar, the existing calendar must be suspended

Maintain Pricing Strategies
Pricing Strategies 5-11
Figure 5–13 Strategy Maintenance - Clearance Defaults
3. Enter the ID of the merchandise level you want to apply the strategy to, or click the LOV button and select the appropriate merchandise level.
4. Click Define Strategy Details. The Clearance Defaults Strategy Details pane opens.
Figure 5–14 Clearance Defaults Strategy Details Window
Define Clearance Strategy Details
1. Enter the percent of the first markdown after the initial markdown in the Discount Percent field.
2. Enter how many days after the first markdown that this markdown should be taken in the Days after First field.
3. Enter when to reset the price to regular price in the Reset Price this many days after out of stock date field.
Note: You must enter a department. Subsequent merchandise levels are enabled as you add the level above, if the definition of the department in the aggregation level dialog allows it.

Maintain Pricing Strategies
5-12 Oracle® Retail Price Management User Guide
4. Click Apply. A row is added to the table.
Add Subsequent Markdowns
1. Click Add Row.
2. Enter a percent in the Discount Percent field.
3. Enter a number of days in the Days after First field.
4. Click Apply. The markdown is added to the table.
Edit a Clearance Defaults Price StrategyNavigate: From the Task Pad, select Price Strategy > Maintain Price Strategy. The Pricing Strategy Search workspace opens.
Figure 5–15 Pricing Strategy Search Window
1. Enter criteria as needed to limit your search.
2. Click Search. The results of your search are listed in the Pricing Strategies List.
Note: Subsequent markdown percents must be greater than the previous.

Maintain Pricing Strategies
Pricing Strategies 5-13
Figure 5–16 Pricing Strategies List Window
3. From the Pricing Strategies List, select the clearance defaults strategy you want to maintain.
4. Click Edit, or double-click the strategy selected. A Strategy Maintenance pane opens and the fields that can be changed are enabled.
Figure 5–17 Strategy Maintenance Clearance Defaults Window
5. Make necessary changes.
Add Subsequent Markdowns
1. Select the row before which you want to add the markdown.
2. Click Add Row.
3. Enter a percent in the Discount Percent field.
Note: Subsequent markdown percents must be greater than the previous.

Maintain Pricing Strategies
5-14 Oracle® Retail Price Management User Guide
4. Enter a number of days in the Days after First field.
5. Click Apply. The markdown is added to the table.
Edit a Markdown
1. Select the Markdown number from the Clearance Strategies table.
2. Click Edit. The Discount Percent and Days after First fields are enabled.
3. Edit the discount percent and days after first values.
4. Click Apply.
Delete a Markdown
1. Select the highest Markdown number from the Clearance Strategies table.
2. Click Remove Markdown.
3. Click Apply.
Competitive PricingA competitive pricing strategy allows you to define your pricing strategy for items based on your primary competitor's prices
Note that all locations in a competitive pricing strategy must use the same currency.
You can also assign reference competitors to a competitive pricing strategy. This information allows you to compare the proposed prices to the prices available from other retailers. If the proposed prices vary from the target percentages defined for the reference competitors, you are prompted by the system, so that you can adjust the price in the pricing worksheet.
Create a Competitive Pricing StrategyNavigate: From the Task Pad, select Price Strategy > Create Price Strategy. The Create Pricing Strategy workspace opens with the Strategy Maintenance pane.
Figure 5–18 Strategy Maintenance Pane
1. In the Type field, select Competitive.
2. Click Next. Additional strategy fields appear.

Maintain Pricing Strategies
Pricing Strategies 5-15
Figure 5–19 Strategy Maintenance - Competitive
3. Enter the ID of the merchandise level you want to apply the strategy to, or click the LOV button and select the appropriate merchandise level.
4. Select the zones for the strategy:
■ Zone Group: Enter the ID of the zone group that contains the locations to add to the price strategy, or click the LOV button and select a zone group.
■ Zone: Enter the ID of the zone to add to the price strategy, or click the LOV button and select a zone.
5. In the Price Guides field, enter the ID of the Price Guide field, or click the LOV button and select a price guide.
6. In the Calendar field, enter the ID of the calendar you want to associate with the strategy, or click the LOV button and select a calendar.
7. In the Suspend field, select the check box to indicate that reviews of the existing strategy are stopped.
Note: You must enter a department. Subsequent merchandise levels are enabled as you add the level above, if the definition of the department in the aggregation level dialog allows it.
Note: Only price guides associated with the selected departments can be selected.
Note: Clear the check box to indicate the review periods should begin with the next review period.

Maintain Pricing Strategies
5-16 Oracle® Retail Price Management User Guide
8. In the New Calendar field, enter the ID of the new calendar you want to associate with the strategy, or click the LOV button and select a calendar.
9. Click Define Strategy Details. The Competitive Strategy Details pane opens.
Figure 5–20 Competitive Strategy Details Window
Define Competitive Strategy Details1. In the Competitor field, enter the ID of the primary competitor or click the LOV
button and select a competitor.
2. In the Competitor Store field, enter the ID of the store that proposed retails are being compared against.
3. In the Compete Type, select how the price strategy determines the prices:
■ Match: Prices are proposed to be the same as the primary competitor's prices.
■ Price Above: Prices are proposed to be a percentage above the primary competitor's prices.
■ Price Below: Prices are proposed to be a percentage below the primary competitor's prices.
■ Price by Code: Prices are proposed by the market basket code for the merchandise hierarchy/zone.
Note: You must select the Suspend check box before you can add a new calendar.
Note: The currency at the competitor store must be the same as the zones previously selected.

Maintain Pricing Strategies
Pricing Strategies 5-17
Define Match Strategy Details1. Define reference competitors as necessary.
2. Click Done to save any changes and close the workspace.
Define Price Above or Price Below Strategy Details1. In the Compete Percent field, enter the percent above or below the primary
competitor's price that the new price is set at.
2. Set up the acceptable range:
a. In the Acceptable Range From field, enter the bottom of the range.
b. In the Acceptable Range To field, enter the top of the range.
3. Define reference competitors as necessary.
4. Click Done to save any changes and close the workspace.
Define Price by Code Strategy Details1. In the Code field, select the competitive market basket code you want to use to set
the price.
2. In the Compete Type, select how the price strategy determines the prices:
■ Match: Prices are proposed to be the same as the primary competitor's prices.
■ Price Above: Prices are proposed to be a percentage above the primary competitor's prices.
■ Price Below: Prices are proposed to be a percentage below the primary competitor's prices.
3. In the Compete Percent field, enter the percent above or below the primary competitor's price that the new price is set at.
4. Set up the acceptable range:
a. In the Acceptable Range From field, enter the bottom of the range.
b. In the Acceptable Range To field, enter the top of the range.
5. Define reference competitors as necessary.
6. Click Done to save any changes and close the workspace.
Define Reference Competitors1. In the Reference Competitors section, enter the ID of the competitor in the
Competitor field, or click the LOV button and select a competitor.
Note: Acceptable range is the amount by percentage that a retail price can vary from a primary competitor before a price change is proposed.
Note: Acceptable range is the amount by percentage that a retail price can vary from a primary competitor before a price change is proposed.

Maintain Pricing Strategies
5-18 Oracle® Retail Price Management User Guide
2. In the Competitor Store field, enter the ID of the store, or click the LOV button and select a store.
3. In the Compete Type, select how to compare prices to the reference competitors:
■ Match: A pass or fail indicator appears on the worksheet depending on if the proposed price matches the referenced competitors price.
■ Price Above: A pass or fail indicator appears on the worksheet depending on if the proposed price is at least the specified percent above the referenced competitor's price.
■ Price Below: A pass or fail indicator appears on the worksheet depending on if the proposed price is at least the specified percent below the referenced competitor's price.
4. If you selected Price Above or Price Below, enter the percent above or below the competitor's price that the new price is compared.
5. Click Done to save any changes and close the workspace.
Create a Competitive Pricing Strategy Associated with an Area Differential
1. In the Competitor field, enter the ID of the competitor or click the LOV button and select a competitor.
2. In the Competitor Store field, enter the ID of the store that proposed retails are being compared against or click the LOV button and select a store.
3. In the Compete Type, select how the price strategy determines the prices:
■ Match: Prices are proposed to be the same as the competitor's prices.
■ Price Above: Prices are proposed to be a percentage above the competitor's prices.
■ Price Below: Prices are proposed to be a percentage below the competitor's prices.
■ Price by Code: Prices are proposed by the market basket code for the merchandise hierarchy/zone.
Define Match Strategy Details1. Define reference competitors as necessary.
2. Click Done to save any changes and close the workspace.
Define Price Above or Price Below Strategy Details1. In the Compete Percent field, enter the percent above or below the competitor's
price that the new price is set at.
Note: Expand the Competitor section of the Area Differentials pane to complete the procedure.
Note: The currency at the competitor store must be the same as the zones previously selected.
Maintain Pricing Strategies
Pricing Strategies 5-19
2. Set up the acceptable range:
a. In the Acceptable Range From field, enter the bottom of the range.
b. In the Acceptable Range To field, enter the top of the range.
3. Define reference competitors as necessary.
4. Click Done to save any changes and close the workspace.
Define Price by Code Strategy Details1. In the Code field, select the competitive market basket code you want to use to set
the price.
2. In the Compete Type, select how the price strategy determines the prices:
■ Match: Prices are proposed to be the same as the competitor's prices.
■ Price Above: Prices are proposed to be a percentage above the competitor's prices.
■ Price Below: Prices are proposed to be a percentage below the competitor's prices.
3. In the Compete Percent field, enter the percent above or below the competitor's price that the new price is set at.
4. Set up the acceptable range:
a. In the Acceptable Range From field, enter the bottom of the range.
b. In the Acceptable Range To field, enter the top of the range.
5. Define reference competitors as necessary.
6. Click Done to save any changes and close the workspace.
Define Reference Competitors
1. In the Reference Competitors section, enter the ID of the competitor in the Competitor field, or click the LOV button and select a competitor.
2. In the Competitor Store field, enter the ID of the store, or click the LOV button and select a store.
3. In the Compete Type, select how to compare prices to the reference competitors:
■ Match: A pass or fail indicator appears on the worksheet depending on if the proposed price matches the referenced competitors price.
Note: Acceptable range is the amount by percentage that a retail price can vary from a competitor before a price change is proposed.
Note: Acceptable range is the amount by percentage that a retail price can vary from a competitor before a price change is proposed.
Note: Expand the Reference Competitor section of the Area Differentials pane to complete the procedure.

Maintain Pricing Strategies
5-20 Oracle® Retail Price Management User Guide
■ Price Above: A pass or fail indicator appears on the worksheet depending on if the proposed price is at least the specified percent above the referenced competitor's price.
■ Price Below: A pass or fail indicator appears on the worksheet depending on if the proposed price is at least the specified percent below the referenced competitor's price.
4. If you selected Price Above or Price Below, enter the percent above or below the competitor's price that the new price is compared.
5. Click Done to save any changes and close the workspace.
Edit a Competitive Pricing StrategyNavigate: From the Task Pad, select Price Strategy > Maintain Price Strategy. The Pricing Strategy Search workspace opens.
Figure 5–21 Pricing Strategy Search Workspace
1. Enter criteria as needed to limit your search.
2. Click Search. The results of your search are listed in the Pricing Strategies List.

Maintain Pricing Strategies
Pricing Strategies 5-21
Figure 5–22 Pricing Strategies List Window
3. From the Pricing Strategies List, select the competitive strategy you want to maintain.
4. Click Edit, or double-click the strategy selected. A second Strategy Maintenance pane opens and the fields that can be changed are enabled.
Figure 5–23 Strategy Maintenance Competitive Window
5. Make necessary changes.

Maintain Pricing Strategies
5-22 Oracle® Retail Price Management User Guide
Edit a Price GuideTo edit a price guide:
■ Enter the price guide name, or click the LOV button and select the appropriate price guide.
Change Calendars
1. Select the Suspend checkbox.
2. Enter a calendar name, or click the LOV button and select a calendar
Edit a Competitor1. In the Competitor field, enter or change the competitor ID, or click the LOV button
and select the appropriate competitor.
2. In the Competitor Store field, enter a competitor store ID, or click the LOV button and select the appropriate store.
3. In the Compete Type drop-down field, select the compete type.
4. For Price Above and Price Below compete types, set up the acceptable range:
a. In the Acceptable Range From field, enter the bottom of the range.
b. In the Acceptable Range To field, enter the top of the range.
Edit Reference CompetitorsDefine reference competitors as necessary.
Complete the Competitive Price Strategy1. Click Save + Repeat to commit your changes.
2. Click Done to save any changes and close the workspace.
Margin PricingA margin pricing strategy allows you to define the pricing strategy for items based on margin targets.
Create a Margin Pricing StrategyNavigate: From the Task Pad, select Price Strategy > Create Price Strategy. The Create Pricing Strategy workspace opens with the Strategy Maintenance pane.
Note: In order to specify a new calendar, the existing calendar must be suspended.
Note: Acceptable range is the amount by percentage that a retail price can vary from a competitor before a price change is proposed.
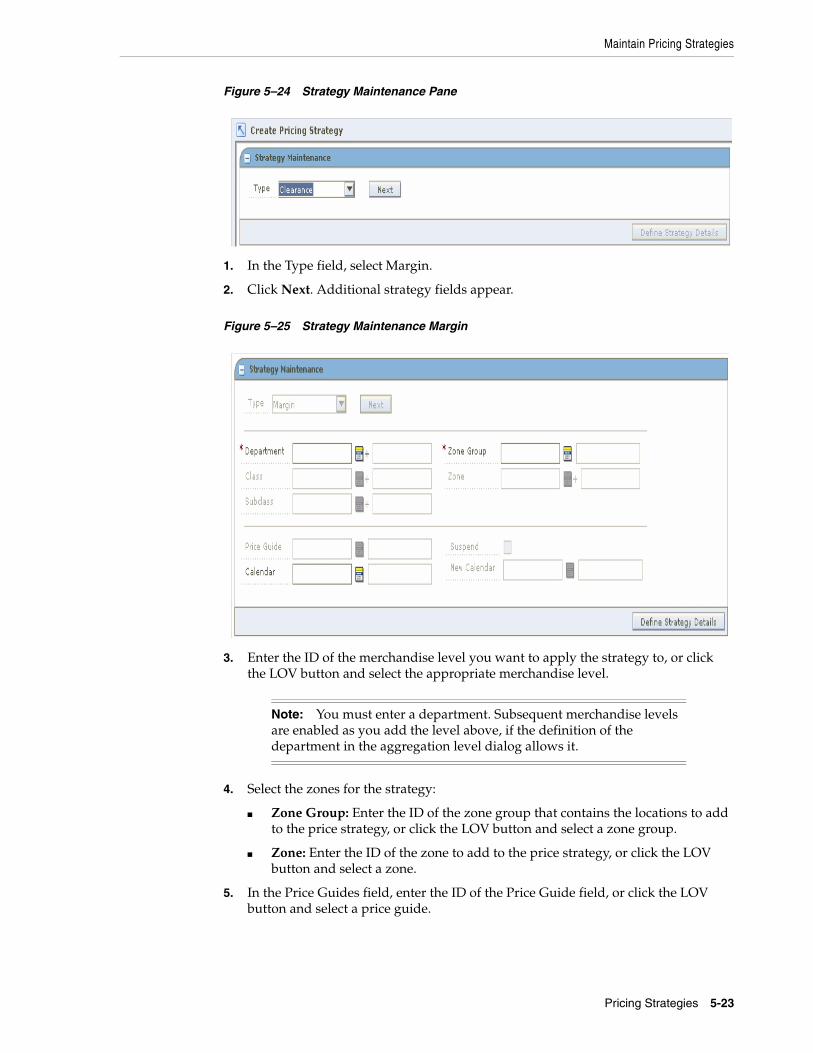
Maintain Pricing Strategies
Pricing Strategies 5-23
Figure 5–24 Strategy Maintenance Pane
1. In the Type field, select Margin.
2. Click Next. Additional strategy fields appear.
Figure 5–25 Strategy Maintenance Margin
3. Enter the ID of the merchandise level you want to apply the strategy to, or click the LOV button and select the appropriate merchandise level.
4. Select the zones for the strategy:
■ Zone Group: Enter the ID of the zone group that contains the locations to add to the price strategy, or click the LOV button and select a zone group.
■ Zone: Enter the ID of the zone to add to the price strategy, or click the LOV button and select a zone.
5. In the Price Guides field, enter the ID of the Price Guide field, or click the LOV button and select a price guide.
Note: You must enter a department. Subsequent merchandise levels are enabled as you add the level above, if the definition of the department in the aggregation level dialog allows it.

Maintain Pricing Strategies
5-24 Oracle® Retail Price Management User Guide
6. In the Calendar field, enter the ID of the calendar you want to associate with the strategy, or click the LOV button and select a calendar.
7. In the Suspend field, select the check box to indicate that reviews of the existing strategy are stopped.
8. In the New Calendar field, enter the ID of the calendar you want to associate with the strategy, or click the LOV button and select a calendar.
9. Click Define Strategy Details. The Margin Strategy Details pane opens.
Figure 5–26 Margin Strategy Details
Define Margin Strategy Details1. In the Code field, select the margin market basket code you want to use to set the
price.
2. In the Margin Target field, enter the percent of margin you want to earn on the item/zone.
3. Set up the acceptable range:
a. In the Acceptable Range From field, enter the bottom of the range.
b. In the Acceptable Range To field, enter the top of the range.
4. Click Apply. An entry is added to the Margin Strategy Details table.
5. Define reference competitors as necessary.
Note: Only price guides associated with the selected departments can be selected.
Note: Clear the check box to indicate the review periods should begin in the next period.
Note: You must select the Suspend check box before you can add a new calendar.
Note: Acceptable range is the amount by percentage that a margin can vary from the target before a price change is proposed.

Maintain Pricing Strategies
Pricing Strategies 5-25
6. Click Done to save any changes and close the workspace.
Edit a Margin Pricing StrategyNavigate: From the Task Pad, select Price Strategy > Maintain Price Strategy. The Pricing Strategy Search workspace opens.
Figure 5–27 Pricing Strategy Search Window
1. Enter criteria as needed to limit your search.
2. Click Search. The results of your search are listed in the Pricing Strategies List.

Maintain Pricing Strategies
5-26 Oracle® Retail Price Management User Guide
Figure 5–28 Pricing Strategies List Window
3. From the Pricing Strategies List, select the margin strategy you want to maintain.
4. Click Edit, or double-click the strategy selected. A Strategy Maintenance pane opens and the fields that can be changed are enabled.
Figure 5–29 Strategy Maintenance Margin Window
5. Make necessary changes.
Edit a Price GuideTo edit a price guide:
Maintain Pricing Strategies
Pricing Strategies 5-27
■ Enter the price guide name, or click the LOV button and select the appropriate price guide.
Change Calendars
1. Select the Suspend check box.
2. Enter a calendar name, or click the LOV button and select a calendar
Edit Margin Details1. Select a row in the Margin Strategy Details table.
2. In the Margin Target field, enter the percent of margin you want to earn on the item/zone.
3. In the Acceptable Range From field, enter the bottom of the range.
4. In the Acceptable Range To field, enter the bottom of the range.
5. Click Apply.
Delete Margin Details1. Select the margin detail from the Margin Strategy Details table.
2. Click Delete. The row is removed from the table.
Edit Reference CompetitorsDefine reference competitors as necessary.
Complete the Margin Price Strategy1. Click Save + Repeat to commit your changes.
2. Click Done to save any changes and close the workspace.
Maintain Margin PricingThe maintain margin pricing strategy allows you to define the pricing strategy for items based on future cost changes. The proposed retails can be based on current or market basket margin percentages. Reference competitors may be assigned for comparison purposes.
Create a Maintain Margin Pricing StrategyNavigate: From the Task Pad, select Price Strategy > Create Price Strategy. The Create Pricing Strategy workspace opens with the Strategy Maintenance pane.
Note: Before you can specify a new calendar, the existing calendar must be suspended.
Note: Acceptable range is the amount by percentage that a margin can vary from the target before a price change is proposed.

Maintain Pricing Strategies
5-28 Oracle® Retail Price Management User Guide
Figure 5–30 Strategy Maintenance Pane
1. In the Type field, select Maintain Margin.
2. Click Next. Additional strategy fields appear.
3. Enter the ID of the merchandise level you want to apply the strategy to, or click the LOV button and select the appropriate merchandise level.
4. Select the zones for the strategy:
■ Zone Group: Enter the ID of the zone group that contains the locations to add to the price strategy, or click the LOV button and select a zone group.
■ Zone: Enter the ID of the zone to add to the price strategy, or click the LOV button and select a zone.
5. In the Price Guides field, enter the ID of the Price Guide field, or click the LOV button and select a price guide.
6. In the Calendar field, enter the ID of the calendar you want to associate with the strategy, or click the LOV button and select a calendar.
7. In the Suspend field, select the check box to indicate that reviews of the existing strategy are stopped.
8. In the New Calendar field, enter the ID of the calendar you want to associate with the strategy, or click the LOV button and select a calendar.
9. Click Define Strategy Details. The Maintain Margin Strategy Details pane opens.
Note: You must enter a department. Subsequent merchandise levels are enabled as you add the level above, if the definition of the department in the aggregation level dialog allows it.
Note: Only price guides associated with the selected departments can be selected.
Note: Clear the check box to indicate the review periods should begin in the next period.
Note: You must select the Suspend check box before you can add a new calendar.

Maintain Pricing Strategies
Pricing Strategies 5-29
Figure 5–31 Maintain Margin Strategy Details Window
Define Maintain Margin Strategy Details1. Select the Auto Approve check box to indicate price changes should be created in
Approved status.
2. In the Cost Change Forward Days, enter the number of days into the next review period that the strategy will consider cost changes when proposing price changes.
3. Select the method for the strategy:
■ Market Basket Margin: Select to have the margin for the item's market basket applied to the item's new cost. A new Margin Strategy Details area appears.
Figure 5–32 Margin Strategy Details Window
■ Current Margin: Select to have the current margin applied to the item's new cost. The current margin fields are enabled.
Define Market Basket Margin1. In the Code drop-down field, select the margin market basket code you want to
use to set the price.
2. In the Margin Target field, enter the percent of margin you want to earn on the item/zone.
3. Set up the acceptable range:
Note: Cost Change Forward Days should not exceed the length of a review period.
Maintain Pricing Strategies
5-30 Oracle® Retail Price Management User Guide
a. In the Acceptable Range From field, enter the bottom of the range.
b. In the Acceptable Range To field, enter the top of the range.
4. Click Apply. An entry is added to the Maintain Strategy Details table.
5. Define reference competitors as necessary.
6. Click Done to save any changes and close the workspace.
Define Current Margin1. Select how the strategy will apply an increase in margin to a proposed retail:
■ Margin %: Select to have the percent of the cost change added to the basis retail to determine the proposed retail.
■ Change by Cost Change Amount: Select to have the amount of the cost change added to the basis retail.
2. Select how the strategy will apply a decrease in margin to a proposed retail:
■ Margin %: Select to have the percent of the cost change subtracted from the basis retail to determine the proposed retail.
■ Change by Cost Change Amount: Select to have the amount of the cost change subtracted from the basis retail.
3. Click Done to save any changes and close the workspace.
Define Reference Competitors1. In the Reference Competitors section, enter the ID of the competitor in the
Competitor field, or click the LOV button and select a competitor.
2. In the Competitor Store field, enter the ID of the store, or click the LOV button and select a store.
3. In the Compete Type, select how to compare prices to the reference competitors:
■ Match: A pass or fail indicator appears on the worksheet depending on if the proposed price matches the referenced competitors price.
■ Price Above: A pass or fail indicator appears on the worksheet depending on if the proposed price is at least the specified percent above the referenced competitor's price.
■ Price Below: A pass or fail indicator appears on the worksheet depending on if the proposed price is at least the specified percent below the referenced competitor's price.
4. If you selected Price Above or Price Below, enter the percent above or below the competitor's price that the new price is compared.
5. Click Done to save any changes and close the workspace.
Edit a Maintain Margin Pricing StrategyNavigate: From the Task Pad, select Price Strategy > Maintain Price Strategy. The Pricing Strategy Search workspace opens.
Note: Acceptable range is the amount by percentage that a margin can vary from the target before a price change is proposed.

Maintain Pricing Strategies
Pricing Strategies 5-31
Figure 5–33 Pricing Strategy Search Window
1. Enter criteria as needed to limit your search.
2. Click Search. The results of your search are listed in the Pricing Strategies List.
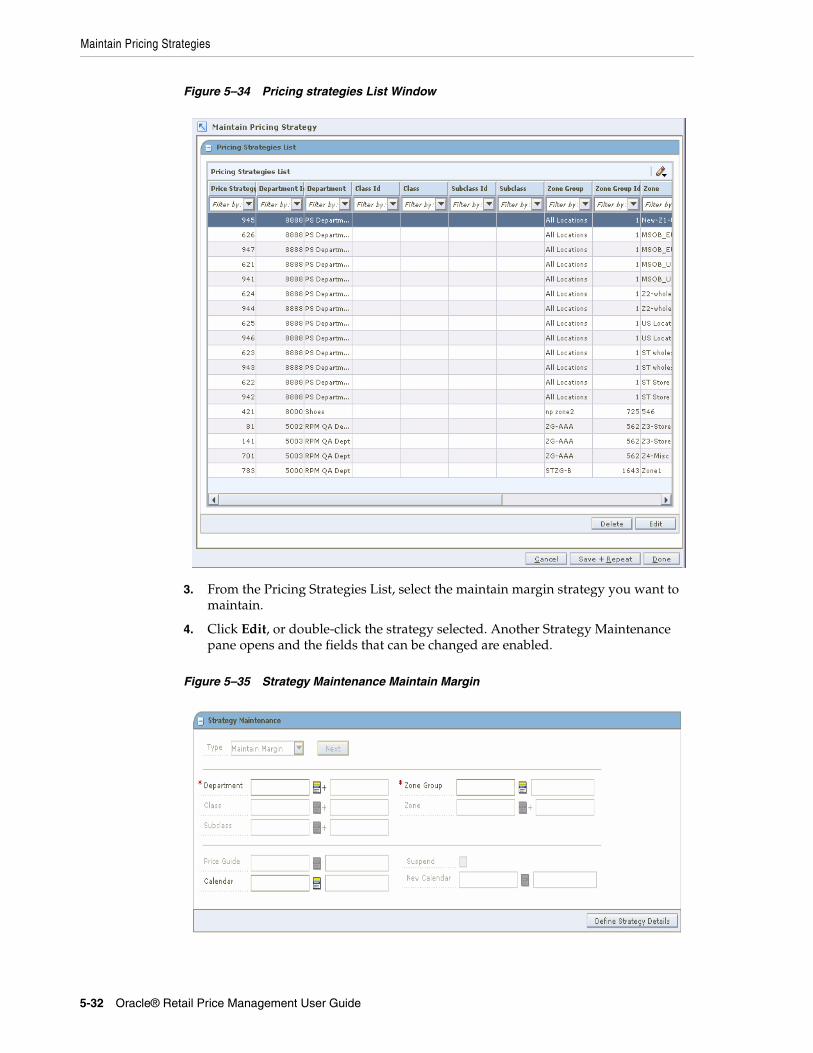
Maintain Pricing Strategies
5-32 Oracle® Retail Price Management User Guide
Figure 5–34 Pricing strategies List Window
3. From the Pricing Strategies List, select the maintain margin strategy you want to maintain.
4. Click Edit, or double-click the strategy selected. Another Strategy Maintenance pane opens and the fields that can be changed are enabled.
Figure 5–35 Strategy Maintenance Maintain Margin

Maintain Pricing Strategies
Pricing Strategies 5-33
5. Make necessary changes.
Edit a Price GuideTo edit a price guide:
■ Enter the price guide name, or click the LOV button and select the appropriate price guide.
Change Calendars
1. Select the Suspend check box.
2. Enter a calendar name, or click the LOV button and select a calendar.
Edit Maintain Margin Details1. Select the Auto Approve check box to indicate price changes should be created in
Approved status.
2. In the Cost Change Forward Days, enter the number of days into the next review period that the strategy will consider cost changes when proposing price changes.
3. Select the method for the strategy:
■ Market Basket Margin: Select to have the margin for the item's market basket applied to the item's new cost. A new Margin Strategy Details area appears.
Figure 5–36 Margin Strategy Details Window
■ Current Margin: Select to have the current margin applied to the item's new cost.
Edit Market Basket Margin1. In the Code drop-down field, select the margin market basket code you want to
use to set the price.
Note: Before you can specify a new calendar, the existing calendar must be suspended.
Note: Cost Change Forward Days should not exceed the length of a review period.

Maintain Pricing Strategies
5-34 Oracle® Retail Price Management User Guide
2. In the Margin Target field, enter the percent of margin you want to earn on the item/zone.
3. Set up the acceptable range:
a. In the Acceptable Range From field, enter the bottom of the range.
b. In the Acceptable Range To field, enter the top of the range.
4. Click Apply. An entry is added to the Maintain Strategy Details table.
5. Define reference competitors as necessary.
6. Click Done to save any changes and close the workspace.
Edit Current Margin1. Select how the strategy will apply an increase in margin to a proposed retail:
■ Margin %: Select to have the percent of the cost change added to the basis retail to determine the proposed retail.
■ Change by Cost Change Amount: Select to have the amount of the cost change added to the basis retail.
2. Select how the strategy will apply a decrease in margin to a proposed retail:
■ Margin %: Select to have the percent of the cost change subtracted from the basis retail to determine the proposed retail.
■ Change by Cost Change Amount: Select to have the amount of the cost change subtracted from the basis retail.
3. Click Done to save any changes and close the workspace.
Edit Reference CompetitorsDefine reference competitors as necessary.
Complete the Margin Price Strategy1. Click Save + Repeat to commit your changes.
2. Click Done to save any changes and close the workspace.
Delete a Pricing StrategyNavigate: From the Task Pad, select Pricing Strategy > Maintain Pricing Strategy. The Pricing Strategy Search workspace opens.
Note: Acceptable range is the amount by percentage that a margin can vary from the target before a price change is proposed.

Maintain Pricing Strategies
Pricing Strategies 5-35
Figure 5–37 Pricing Strategy Search Window
1. Enter criteria as needed to limit your search.
2. Click Search. The search results are listed in the Pricing Strategies List.

Maintain Pricing Strategies
5-36 Oracle® Retail Price Management User Guide
Figure 5–38 Pricing Strategies List Window
3. From the list, select the price strategy you want to delete.
4. Click Delete. You are prompted to confirm your decision.
5. Click Yes.
6. Click Done to close the window.

Worksheets 6-1
6Worksheets
RPM uses strategies, calendars, and item/location information to automatically generate worksheets. The Worksheet functionality allows you to maintain the proposed price changes automatically generated by RPM.
The worksheet may contain many different columns.
Worksheet DetailThe Worksheet Detail workspace allows you to:
■ Review the auto generated price change proposals.
■ Review items that met rules or were exceptions.
■ Make clearance decisions.
■ Delete the Pricing Worksheet if no price changes need to be made.
■ Examine the information about price change proposals and make decisions about which items to change and what retail prices to set.
■ Modify column values.
■ Perform what-if analysis on the Worksheet to help you make the best pricing decisions.
■ Export the worksheet to a Comma Separated Value (csv) file that can be opened in other applications such as spreadsheets and work processors.
Worksheet ColumnsThe worksheet may contain many different columns. See the descriptions and calculations for each column below.

Worksheet Columns
6-2 Oracle® Retail Price Management User Guide
Table 6–1 Worksheet Column Descriptions and Calculations
Column Description Editable Calculation
% off Regular Retail The percent difference between the basis regular retail and the new retail of the item.
No Price Change Amount divided by Basis Regular Retail (Before VAT)
Depending on your aggregation level settings:
Price Change Amount = Current Retail - New Retail
Price Change Amount = New Retail - Current Retail
The zone level regular retail is used if it exists.
% off Basis Retail The percent difference between the basis retail (regular or clearance) and the new retail of the item.
This value is the same as % off Regular Retail if there is no clearance retail.
No Price Change Amount divided by Basis Retail (Before VAT)
Price Change Amount equals the difference between the New Retail and the Clearance or Regular Retail
Depending on your aggregation level settings:
Price Change Amount = Current Retail - New Retail
Price Change Amount = New Retail - Current Retail
The zone level clearance retail is used if it exists.
Base Cost The base cost of the item on the effective date (including price change processing days).
No When the record is at a zone level, the zone level base cost is used in the calculation if one exists.
Basis Cost The pricing cost of the item on the effective date (including price change processing days).
No When the record is at a zone level, the zone level basis cost is used in the calculation if one exists.
Class ID The class hierarchy ID of the item's class.
No
Class Description The name of the class. No
Clearance Indicator Checked and disabled if the item is on active clearance. Unchecked if the item is not on clearance.
Yes
Clearance Hyperlink that opens a window with details on approved clearances. "Pending" appears if the item is on a pending clearance.
No
Competitor A Alert "Pass" appears if there is a competitor A and the strategy rules is met. "Fail" appears if the strategy rule is not met.
No
Competitor A Retail Competitor A's retail price. No
Competitor B Alert "Pass" appears if there is a competitor B and the strategy rules is met. "Fail" appears if the strategy rule is not met.
No
Competitor B Retail Competitor B's retail price. No

Worksheet Columns
Worksheets 6-3
Competitor C Alert "Pass" appears if there is a competitor C and the strategy rules is met. "Fail" appears if the strategy rule is not met.
No
Competitor C Retail Competitor C's retail price. No
Competitor D Alert "Pass" appears if there is a competitor D and the strategy rules is met. "Fail" appears if the strategy rule is not met.
No
Competitor D Retail Competitor D's retail price. No
Competitor E Alert "Pass" appears if there is a competitor E and the strategy rules is met. "Fail" appears if the strategy rule is not met.
No
Competitor E Retail Competitor E's retail price. No
Conflict An exclamation point appears if conflicts were found during conflict checking.
No When conflict checking is run again or the price change is taken or not taken, the column is reset.
Cost Changes During Review Period
"Yes" appears if there are approved cost changes that have an effective date during the review period of the worksheet.
No
Current Clearance Retail
The clearance retail for today if the item is on clearance.
No The zone level clearance retail appears if it exits.
Current Clearance Retail UOM
The unit of measure for the item clearance price.
No
Basis Retail The active retail (regular or clearance) on the effective date before the current price change.
No The zone level basis retail appears if it exists.
Basis Retail UOM The unit of measure for the item basis retail.
No
Basis Retail Multi-units The active multi-unit retail on the effective date before the current price change.
No The zone level multi-unit retail appears if it exists.
Basis Multi-unit Retail The active multi-unit retail on the effective date before the current price change.
No
Basis Multi-unit Retail UOM
The unit of measure for the active multi-unit retail on the effective date before the current price change.
No
Current Cost The pricing cost today. No
Current Cost Markup %.
The cost markup of the item based on current cost and current retail.
No Current Retail (regular or clearance, before VAT) minus Current Cost divided by Current Cost.
The zone level current cost is used if it exists.
Current Retail Markup %
The retail markup of the item based on current cost and current retail.
No Current Retail (regular or clearance, before VAT) minus Current cost divided by Current Retail.
The zone level current cost is used if it exists.
Table 6–1 (Cont.) Worksheet Column Descriptions and Calculations
Column Description Editable Calculation

Worksheet Columns
6-4 Oracle® Retail Price Management User Guide
Current Multi-Units The unit value of the multi-unit retail price.
For example: "2 ea." if there is a 2 for $5 multi-unit retail.
No The primary zone current multi-units will appear if it exists.
Current Multi-units Retail
The retail value of the multi-unit retail price.
For example: "$5.00" if there is a 2 for $5 multi-unit retail.
No
Current Multi-units UOM
The unit of measure for the item multi-unit.
No
Current Regular Retail The item's regular retail value today. No The zone level current retail appears if it exists.
Current Retail UOM The selling unit of measure for the current retail.
No
Current Retail/UOM The regular retail value per unit of measure in the package today.
For example: ".05/oz" if there is a 16 oz. can of soup that retails for .89.
No Current Retail divided by Package UOM
Diff One The differentiator 1 value for a transaction level item.
No
Diff Two The differentiator 2 value for a transaction level item.
No
Diff Three The differentiator 3 value for a transaction level item.
No
Diff Four The differentiator 4 value for a transaction level item.
No
Effective Date The date that price change goes into effect.
Yes End of Review Period plus Price Change Processing Days
New Item Location Ind An indicator appears if the item/location is a new combination in RPM.
No
First Received Date The date this item was first received into the location.
No
Historical Sales The monetary historical sales of the item based on the locations in the row.
No The weekly, monthly, half-yearly, or yearly historical sales depending on aggregation level setting.
Historical Sales Units The retail sales of the item for the current period.
No The weekly, monthly, half-yearly, or yearly historical sales depending on aggregation level setting.
Item Description The name of the item. No
Item ID The transaction or parent item ID. No
Last Cost Change The date of the last cost change.
Note: Place the cursor over this field to show the average or highest cost of the item over the locations in the zone
No
Table 6–1 (Cont.) Worksheet Column Descriptions and Calculations
Column Description Editable Calculation

Worksheet Columns
Worksheets 6-5
Last Price Change The date of last price change.
Note: Place the cursor over this field to show the items zone price.
No
Last Received Date The date the item was last received into the location.
No
Link Code The link code assigned to the transaction level item.
A hyperlink opens a link code information window.
No
Proposed Retail Markdown #.
The markdown number if there is a proposed clearance price change.
No
Margin Market Basket Code
The market basket code for transaction level items if one exists.
No
Cost Markup %. On New Retail
The cost markup of the item based on new cost and new retail.
No New Retail minus Basis Cost divided by Basis Cost
The zone level basis cost is used if it exists.
New Multi-Units The unit value of the new multi-unit retail price.
For example: "2 ea." if there is a 2 for $5 multi-unit retail.
Yes
New Multi-units Retail The retail value of the new multi-unit retail price.
For example: "$5.00" if there is a 2 for $5 multi-unit retail.
Yes
New Multi-units UOM The unit of measure of the new item multi-unit.
For example: ea. if there is a 2 for $5 multi-unit retail.
Yes
New Retail The new proposed retail value for the effective date.
Edit this field to override the proposed price.
Yes
New Retail/UOM The new retail value per unit of measure.
For example: ".05/oz" if there is a 16 oz. can of soup that retails for .89
No New Retail divided by the Unit Of Measure.
New Retail Markup %. The percent retail sales margin of the item based on the new retail.
No New Retail minus New Cost divided by New Retail (Before VAT)
The zone level basis cost if used if it exists.
New Retail UOM The unit of measure for the item's new retail.
If you enter a new retail, New Retail UOM is required.
Yes
Original Retail The original retail of the item. No
Table 6–1 (Cont.) Worksheet Column Descriptions and Calculations
Column Description Editable Calculation

Worksheet Columns
6-6 Oracle® Retail Price Management User Guide
Out of Stock Date The out of stock day for clearance price changes.
You can change this field.
Yes Default Out of Stock Days after the effective date
Package Size The package size of the item. No
Package UOM The package unit of measure of the item.
No
Parent ID The parent item ID if the worksheet is at transaction item level and the item has a parent.
No
Parent Item Description The name of the parent item. No
Pending Cost Changes The date of the earliest pending cost change for the item for the primary supplier.
A hyperlink opens a link to a window with more information.
No
Price Change Amount The monetary value of the price change for one unit of that item.
No New Retail minus Basis Retail at the location
Depending on your aggregation level settings:
Price Change Amount = Basis Retail - New Retail
Price Change Amount = New Retail - Current Basis
The zone level basis retail is used if it exists.
Price Change Indicator Select "Take" to accept the proposed price change for the transaction level item and lock the row for editing.
Select "Don't Take" to reject the proposed price change and lock the row for editing.
Yes
Price Changes A hyperlink "NONE" if no price changes exist during review period.
A hyperlink "Pending" if price changes exist during review period. Click the hyperlink to view pending price change records.
Note: During the review period means between today’s date and the end of the review period.
No
Primary Competitor Alert
"Pass" appears if there is a primary competitor and the strategy rules is met. "Fail" appears if the strategy rule is not met.
No
Primary Competitor Retail Changed Ind
"Yes" when a new or updated competitor retail is brought into RPM.
Note: If more than one strategy uses the same competitor, "Yes" will only appear in the worksheet for the first strategy to find it.
No
Table 6–1 (Cont.) Worksheet Column Descriptions and Calculations
Column Description Editable Calculation

Worksheet Columns
Worksheets 6-7
Primary Competitor Retail
The primary competitors retail. No
Primary Competitor Retail UOM.
The items selling unit of measure for the primary competitor.
No
Primary Competitor Multi-Units
The unit value of the multi-unit retail price on the most recent shop date.
For example: "2" if there is a 2 for $5 multi-unit retail
No
Primary Competitor Multi-Unit Retail
The primary competitors multi-unit retail with the number of units on the most recent shop date.
For example: 2 for $5
No
Primary Competitor Multi-units UOM.
The items unit of measure for the multi-unit price on the most recent shop date.
No
Primary Supplier The primary supplier ID for the item.
Note: Place the cursor over this field to view the supplier name.
No
Promotions Hyperlink that opens a window with details on approved current or pending (after the effective date of the current price change) promotions.
No
Proposed Cost Markup %.
The cost markup of the item based on proposed retail and basis cost.
No Proposed Retail minus Basis Cost divided by Basis Cost.
The zone level basis cost is used if it exists.
Proposed Retail The retail on the proposed effective date.
No Proposed Effective Date plus Price Prior Create Days
Proposed Retail/UOM The proposed retail per unit of measure in the package.
For example: ".05/oz" if there is a 16 oz. can of soup that retails for .89
No Proposed Retail divided by Package UOM
Proposed Retail UOM The unit of measure for the item's proposed retail.
No
Proposed Retail Markup %
The retail sales margin of the item based on the new retail.
No Proposed Retail minus Basis Cost divided by Proposed Retail (Before VAT)
The zone level basis cost if used if it exists.
For zone level records, if a zone level basis cost exists, use that value in the calculation
Replenishment Indicator
"Yes" if the item is on an active replenishment record.
No
Reset Date The reset date for the item. Enter a date to change the default.
Yes Defaults to Out of Stock Date plus one day
Retail Label Type The retail label type of the item. No
Retail Label Value The retail label value of the item. No
Table 6–1 (Cont.) Worksheet Column Descriptions and Calculations
Column Description Editable Calculation

Worksheet Columns
6-8 Oracle® Retail Price Management User Guide
Price Zone Group ID The price zone group ID for a zone level item.
Note: Place the cursor over this field to view the price zone group description.
No
Price Zone ID The price zone ID for a zone level item.
Note: The price zone description is available as a mouse over.
No
Rule Binocular icon appears if the item meets rules.
Click the icon to open a window and view details of the rules met by the record.
No
Projected Sales Units The smoothed average regular price sales based on the number of weeks of sales that have occurred.
No Total Sales divided by Total Weeks of Sales
Sales Change Amount The difference between the items new retail and the basis retail on the effective date multiplied by the projected sales for a week.
No Depending on your aggregation level settings:
Sales Change Amount = Basis Retail - New Retail
Sales Change Amount = New Retail - Current Basis
On Worksheet Status the sum of all individual records. On Worksheet Detail per item.
Seasonal Sell Thru % The sell through percent for the current season. Total sales for the stores in the zone or location divided by stock on hand for the zone/location.
No Total Sales For the Season divided by Stock On Hand
Depending on your aggregation level settings Warehouse Stock On Hand will be included or excluded.
Season/Phase Hyperlink opens Season/Phase detail window.
No
Sell Thru % The sell through percent for store locations in the zone.
No Sales divided by (Stock On Hand plus Sales)
Depending on your aggregation level settings Warehouse Stock On Hand will be included or excluded.
The type of sales and the amount of time to be considered is determined by the Sales Calculation Method.
State The status of the details of the record. No
Store On Hand The current stock on hand at store locations.
No
Store On Order The total on order qty for all stores in the price zone.
Note: On order is in the single unit size of the item, not case size.
No
Store total inventory Total inventory for all stores in the zone.
No Store On Hand plus Store On Order plus Store In_Transit + Store OBNP_INV
Table 6–1 (Cont.) Worksheet Column Descriptions and Calculations
Column Description Editable Calculation

Worksheet Columns
Worksheets 6-9
Change the Value in a Cell1. Double-click the cell.
2. Enter a value, change a value, or select from a drop-down list.
Change the Values of Multiple Cells1. Press and hold the Ctrl key while selecting cells or column headings to select
multiple cells or columns.
2. Right-click on the selected cells or columns. An editing window appears that allows you to edit the value for all selected cells.
Figure 6–1 Example Edit Value Window
Subclass ID The subclass hierarchy ID of the item's subclass.
Note: Place the cursor over the field to view the subclass description.
No
UDA Hyperlink opens UDA information for the item if it exists.
No
VPN The VPN for the primary supplier of the item.
No
Weeks of Sales Exposure
The number of weeks the item has had sales exposure (on had at location).
No
Weeks Since First Sale The number of weeks since the items first sale.
No
Total Inventory Total inventory for the item/location. No Total Warehouse Inventory plus Total Store Inventory
WH Stock On Hand The current stock on hand at warehouse locations in.
No
Warehouse On Order Total on order qty for all stores in the price zone.
Note: On order is in the single unit size of the item, not case size.
No
WH total Inventory The total inventory for all stores in the zone.
No Warehouse On Hand plus Warehouse On Order plus Warehouse In Transit
Table 6–1 (Cont.) Worksheet Column Descriptions and Calculations
Column Description Editable Calculation

Worksheet Columns
6-10 Oracle® Retail Price Management User Guide
3. Enter a value, change a value, or select from a drop-down list.
4. Click OK. The values for all selected cells change.
Maintain ColumnsYou can edit the worksheet to display only the columns you are concerned with, change the order the columns display, and change the number of rows that appear.
Hide and Position Columns1. In the Worksheet Details pane, click the drop-down button. A drop-down menu is
displayed.
Figure 6–2 Drop-down Menu
2. Select Column Display and Ordering from the drop-down menu. The Column Display and Ordering dialog opens.
Figure 6–3 Column Display and Ordering Dialog Box
3. To hide columns:
a. Select a column to hide in the Show these columns pane.
b. Click the left arrow button. The column name appears in the Hide these columns pane.
c. Repeat the steps above to hide additional columns.

Worksheet Columns
Worksheets 6-11
■ To hide individual columns, right-click on the column heading in the Worksheet Details pane and select Hide Column from the drop-down menu.
4. To position columns:
a. Select a column to re-position in the Show these columns pane.
b. Click the and right and left arrow buttons as necessary to move the columns. This determines the position of the columns from left to right.
c. Repeat the steps above to re-position additional columns.
■ To reposition individual columns, click on the column heading in the Worksheet Details pane and drag it to the desired position.
5. Click OK. The worksheet columns are repositioned to reflect your changes.
Sort the Worksheet1. In the Worksheet Details pane, click the drop-down menu button.
2. Select Sort Table from the drop-down menu. The Column Sorting and Sort Order dialog opens.
Figure 6–4 Column Sorting and Sort Order Window
3. Set the sort order of the worksheet:
a. Select a column from the Columns pane.
b. Click the right arrow button. The column name appears in the Priority Column pane.
c. Repeat the steps above to move additional columns.
d. Select a column in the Priority Column pane.
e. Click the right and left arrow buttons as necessary to move the columns. This determines the order by which the worksheet information is sorted.
f. Clear the Ascending column to have the column sort date in descending order.
g. Repeat the steps above as necessary.
4. Click OK. The worksheet columns are sorted to reflect your changes.
■ To sort based on individual columns, right-click on the column heading in the Worksheet Details pane and select either Make Primary Sort, Ascending or Make Primary Sort, Descending from the drop-down menu.

Worksheet Columns
6-12 Oracle® Retail Price Management User Guide
Adjust the Size of the Worksheet Content1. In the Worksheet Details pane, click the drop-down menu button.
2. Move the cursor over Size Content.
Figure 6–5 Worksheet Size Content
3. Select from the drop-down menu:
■ Smallest
■ Smaller
■ Standard
■ Larger
■ Largest
■ Fit All
4. The size of the content on the worksheet is adjusted.
Adjust Column Sizes1. In the Worksheet Details pane, click the button.
2. Move the cursor over Column Resizing.

Worksheet Columns
Worksheets 6-13
Figure 6–6 Column Resizing
3. Select from the drop-down menu:
■ Adjust Next Column Only
■ Adjust Subsequent Columns
■ Adjust Last Column Only
■ Adjust All Columns
4. The worksheet columns are adjusted.
■ To resize individual columns, position the cursor on the right-hand border of the column heading. The cursor will change to a double arrow. Click and drag right or left to resize the column.
Set Non-Scrolling ColumnsYou can set up to seven columns to be locked or non-scrolling. This allows comparison of values in the locked columns to all other columns in the worksheet.
1. In the Worksheet Details pane, click the drop-down button.
2. Select Column Locking from the drop-down menu. The Column Locking dialog opens.
Figure 6–7 Column Locking Dialog
3. Enter the number of columns to lock.
4. Click OK. The columns are locked (non-scrolling).
Maintain Views

Worksheet Columns
6-14 Oracle® Retail Price Management User Guide
Add a View1. Click Maintain View. The Maintain View dialog opens.
Figure 6–8 Maintain View Dialog
2. Click Add. A new line appears in the list.
3. Enter a name for the view in the Description field.
4. Select the Default View checkbox if you would like the view you created to be the default view.
5. Click Save. The view is saved and is accessible from the drop-down menu at the top of the Worksheet Details pane.
Delete a View1. Select the view you want to delete from the list.
2. Click Delete. The view is removed from the list.
Select a ViewSelect a saved view from the drop-down menu.
Apply FiltersSince worksheets may contain many detail records, RPM gives you the ability to filter those records so you see only the details that need attention. You can perform an ad-hoc filter on any column in the Worksheet Detail or you can create and save an advanced filter that you can continue to use in the future.
Apply an Ad-Hoc FilterIn the Worksheet Details pane, select a value from the Filter by: drop-down menu above the column you wish to filter the worksheet by. The worksheet view is refreshed, with the filter applied.
Clear an Ad-Hoc FilterIn the Worksheet Details pane, select Clear Filter from the Filter by: drop-down menu above the column that the filter was applied to. The filter is cleared and the worksheet returns to its previous state.

Worksheet Columns
Worksheets 6-15
Clear All FiltersIn the Worksheet Details pane, select Revert to Default from the Filter by: drop-down menu above any column. The filters are cleared and the worksheet returns to its original state.
Apply an Advanced Filter
1. In the Worksheet Details pane, select Advanced Filter from the Filter by: drop-down menu above the column you wish to filter the worksheet by. The Advanced Filter dialog opens.
Figure 6–9 Advanced Filter Window
2. Select a condition to apply to the column from the top drop-down list in the dialog.
3. Enter or select a value for the filter to look for in the next drop-down list.
4. You may enter an additional condition and value in the remaining drop downs.
5. Select a logical operator (And or Or) in the area between the drop downs.
6. Click OK to apply the filter to the worksheet. The worksheet refreshes, with the filter applied.
Maintain Worksheet Detail FiltersIn the Worksheet Details pane, click the Filter button. The Worksheet Detail Filter window opens.
Note: Any other filters applied are still applied to the worksheet.
Note: Advanced filters override any ad hoc filters previously applied to the worksheet.
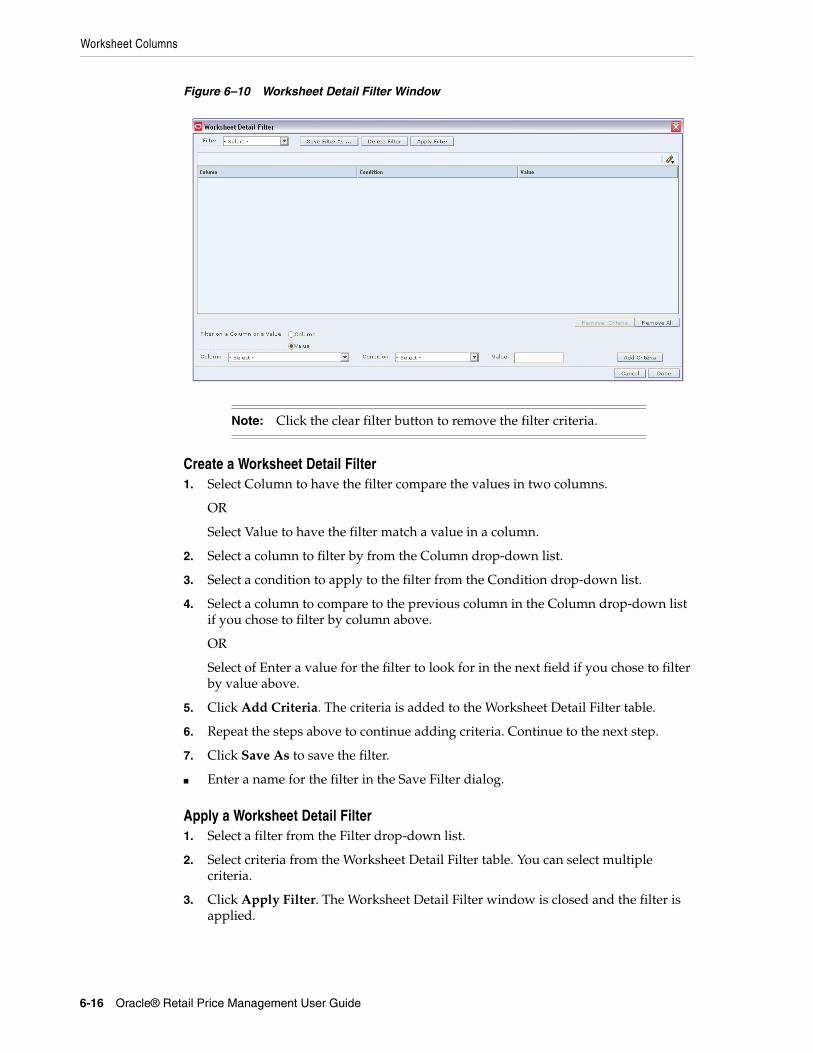
Worksheet Columns
6-16 Oracle® Retail Price Management User Guide
Figure 6–10 Worksheet Detail Filter Window
Create a Worksheet Detail Filter1. Select Column to have the filter compare the values in two columns.
OR
Select Value to have the filter match a value in a column.
2. Select a column to filter by from the Column drop-down list.
3. Select a condition to apply to the filter from the Condition drop-down list.
4. Select a column to compare to the previous column in the Column drop-down list if you chose to filter by column above.
OR
Select of Enter a value for the filter to look for in the next field if you chose to filter by value above.
5. Click Add Criteria. The criteria is added to the Worksheet Detail Filter table.
6. Repeat the steps above to continue adding criteria. Continue to the next step.
7. Click Save As to save the filter.
■ Enter a name for the filter in the Save Filter dialog.
Apply a Worksheet Detail Filter1. Select a filter from the Filter drop-down list.
2. Select criteria from the Worksheet Detail Filter table. You can select multiple criteria.
3. Click Apply Filter. The Worksheet Detail Filter window is closed and the filter is applied.
Note: Click the clear filter button to remove the filter criteria.

Worksheet Columns
Worksheets 6-17
Delete Worksheet Detail Filter Criteria1. Select a filter from the Filter drop-down list .
2. Select criteria from the Worksheet Detail Filter table.
3. Click Remove Criteria. The criteria is removed from the filter. Click Remove All, to remove all criteria from the filter.
Delete a Worksheet Detail Filter1. Select a filter from the Filter drop-down list.
2. Click Delete Filter. The filter is removed from the Filter drop-down list.
View Conflict Check ResultsThe Conflict Check Results workspace allows you to review the results of background conflict checking for worksheets, price changes, promotions, and clearances. If the background conflict checking system option is selected, conflict reviews occur in the background, or when the system is not busy performing other tasks. An alert appears in the Conflict column of the worksheet, price change, promotion, or clearance maintenance pane when conflict checking is complete. At that time, follow the procedures below to view the results of background conflict checking.
When background conflict checking is off the system performs conflict checks immediately when Conflict Check is clicked from the Price Change, Promotions, or Clearances workspaces.
View ResultsNavigate: From the Task Pad, select Conflict Check Results > View Conflict Check Results. The Conflict Check Results workspace opens.

Worksheet Columns
6-18 Oracle® Retail Price Management User Guide
Figure 6–11 Conflict Check Results Window
■ Select the conflict results you want to view.
Delete Conflict Check Results1. Select the conflict results to delete.
2. Click Delete.

Worksheet Columns
Worksheets 6-19
View TasksNavigate: From the Task Pad, select View Tasks > View Tasks. The View Tasks workspace opens.
1. In the Start Date field, enter the processing start date.
2. In the End date field, enter the processing end date.
3. Click Search. The tasks pertaining to the selected dates are listed.
Worksheet StatusThe pricing worksheet can be maintained either by enabling the filter or by having the filter disabled. To enable or disable the filter, see Edit System Options.
Maintain a Pricing Worksheet with Filter DisabledNavigate: From the Task Pad, select Worksheet > Worksheet Status. The Worksheet Status workspace opens.

Worksheet Columns
6-20 Oracle® Retail Price Management User Guide
Figure 6–12 Worksheet Status Window
1. Select the worksheet you want to maintain.
2. Click Worksheet Detail. The Worksheet Details screen is displayed.
Note: You can select multiple worksheets as long as they are for the same department and currency.
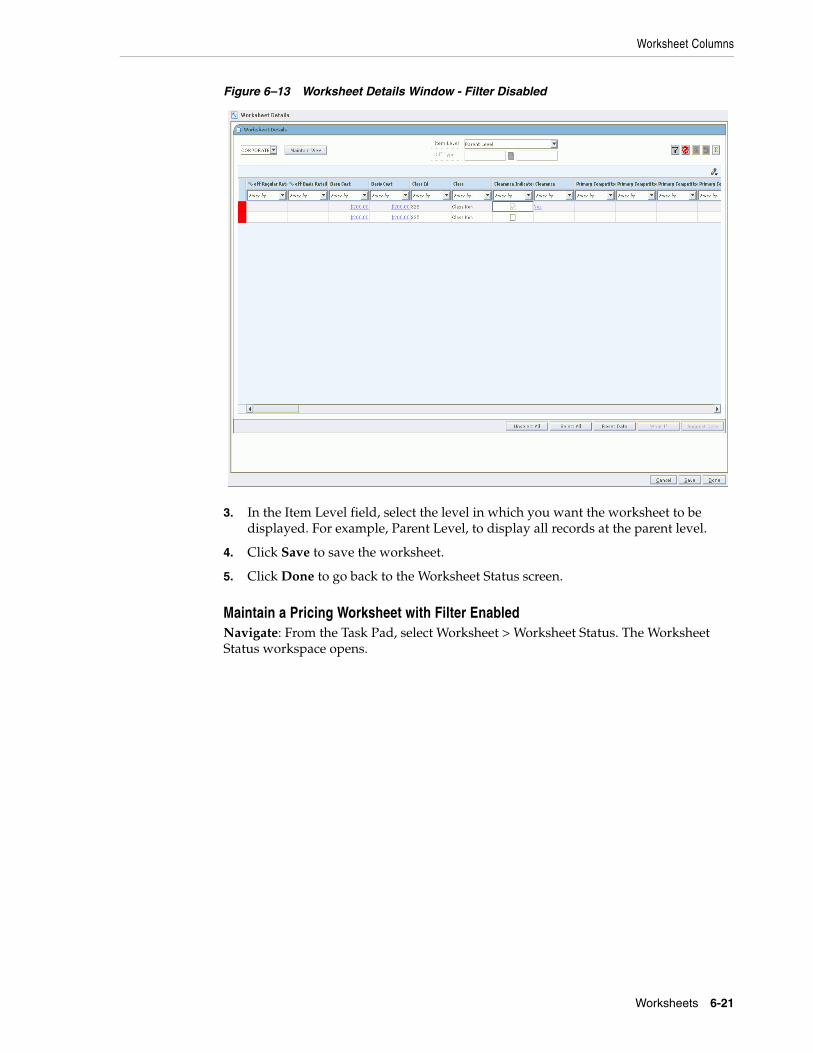
Worksheet Columns
Worksheets 6-21
Figure 6–13 Worksheet Details Window - Filter Disabled
3. In the Item Level field, select the level in which you want the worksheet to be displayed. For example, Parent Level, to display all records at the parent level.
4. Click Save to save the worksheet.
5. Click Done to go back to the Worksheet Status screen.
Maintain a Pricing Worksheet with Filter EnabledNavigate: From the Task Pad, select Worksheet > Worksheet Status. The Worksheet Status workspace opens.

Worksheet Columns
6-22 Oracle® Retail Price Management User Guide
Figure 6–14 Worksheet Status Window - Filter Enabled
1. Select the worksheet you want to maintain.
2. Click Worksheet Filter. The Worksheet Search screen is displayed.
■ Click Skip Filter to avoid the filtering.
Note: You can select multiple worksheets as long as they are for the same department and currency.

Worksheet Columns
Worksheets 6-23
Figure 6–15 Worksheet Search Window
3. In the Worksheet Search pane, select the necessary fields and click Search.
■ The records based on the search criteria are displayed in the Worksheet Filtered Result pane.
4. Click Done to go back to the Worksheet Status screen.
Submit a Pricing Worksheet for ApprovalThe Pricing Worksheet status must be in "In Progress" to enable the Submit action. To change the status of the Pricing Worksheet from New or Updated to In Progress, you need to have at least one row or item selected for price change.
1. Select the worksheet that you want to submit.
2. Review the information in the Worksheet Status window to ensure that it is correct.
3. From the Action drop-down list, click Submit.
4. Click Apply. The status is changed to Submitted and the Pricing Worksheet is ready for approval.
Note: Before the status changes to Submitted, RPM checks the Pricing Worksheet to ensure that there are no conflicts. The status options that are available from the Action drop-down list change based on current status of the worksheet's details.
Worksheet Columns
6-24 Oracle® Retail Price Management User Guide
Approve a Pricing Worksheet
1. Select the worksheet that you want to approve.
2. When you are ready to approve the submitted or delete Pending Pricing Worksheet, select Approve.
3. Click Apply. The Pricing Worksheet information is saved and applied.
Reject a Pricing WorksheetYou can reject a Pricing Worksheet that has a status as Submitted or Delete Pending. When you reject a submitted or delete pending Pricing Worksheet, its status changes to Rejected or Delete Rejected.
1. Select the worksheet that you want to reject.
2. You can enter a Reason for the rejection in the Reason field. Click the edit (dotted) button to open an editing window where you can enter a reason up to 250 characters long.
3. From the Action drop-down list, select Reject.
4. Click Apply. The status of the Pricing Worksheet changes to Rejected or Delete Rejected.
Reset the Status of a Pricing WorksheetUse the Reset action to return the worksheet to its previous status.
1. Select the worksheet that you need to reset the status of.
2. From the Action drop-down list, select Reset.
3. Click Apply. The Worksheet Status window refreshes and the worksheet is returned to its previous status.
Note: The Pricing Worksheet status must be in either Submitted or Delete Pending status before you can select the approve action.
Note: For worksheets in Submitted status, before the status changes to Approved, RPM checks the Pricing Worksheet to ensure that there are no conflicts. Delete pending status worksheets are not conflict checked before being moved to Deleted status. When the system option, Dynamic Area Differentials is off, secondary area worksheets are enabled when the primary area is approved. When the system option is on, changes to secondary areas happen dynamically after changes to the primary area.
Note: If you want to work with the Pricing Worksheet when its status is Rejected, Reset the status of the Pricing Worksheet (see the procedure below).
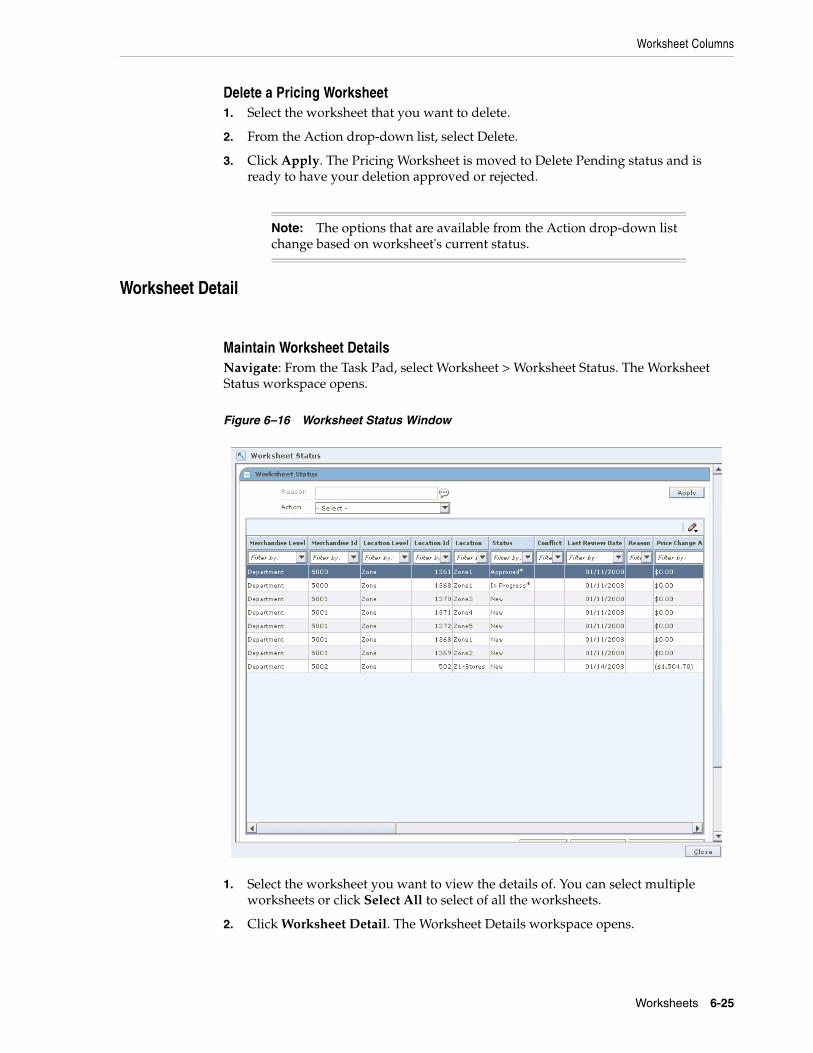
Worksheet Columns
Worksheets 6-25
Delete a Pricing Worksheet1. Select the worksheet that you want to delete.
2. From the Action drop-down list, select Delete.
3. Click Apply. The Pricing Worksheet is moved to Delete Pending status and is ready to have your deletion approved or rejected.
Worksheet Detail
Maintain Worksheet DetailsNavigate: From the Task Pad, select Worksheet > Worksheet Status. The Worksheet Status workspace opens.
Figure 6–16 Worksheet Status Window
1. Select the worksheet you want to view the details of. You can select multiple worksheets or click Select All to select of all the worksheets.
2. Click Worksheet Detail. The Worksheet Details workspace opens.
Note: The options that are available from the Action drop-down list change based on worksheet's current status.

Worksheet Columns
6-26 Oracle® Retail Price Management User Guide
Figure 6–17 Worksheet Details Window
Merchandise Extract Item DeletionsNavigate: From the Task Pad, select Worksheet > Merchandise Extract Item Deletions. The Merchandise Extract Item Deletions workspace opens.

Worksheet Columns
Worksheets 6-27
Figure 6–18 Merchandise Extract Item Deletions Window
1. Double-click on the row on the summary table that you would like to see more details. The details table is populated with the items and information that were excluded from the resulting worksheet for the particular run of the merchandise extract.
2. Filter the detail results by selecting the appropriate drop-down menus.
Table 6–2 Drop-down Menu Definitions
Column Definition
Area Differential Exclusion Item/location combinations that have been excluded from a Secondary Area Differential.
Invalid Maintain Margin Cost
The strategy is maintain margin and the item/location does not have a cost change in the cost review period.
Invalid Secondary Item Item/locations that meet one of the following conditions:
■ Does not belong to any link code whereas the same item belongs to a link code in the primary area.
■ Does not exist in the primary area AND does not belong to any link code in the secondary area.
■ Belongs to a link code that does not exist in the primary area.
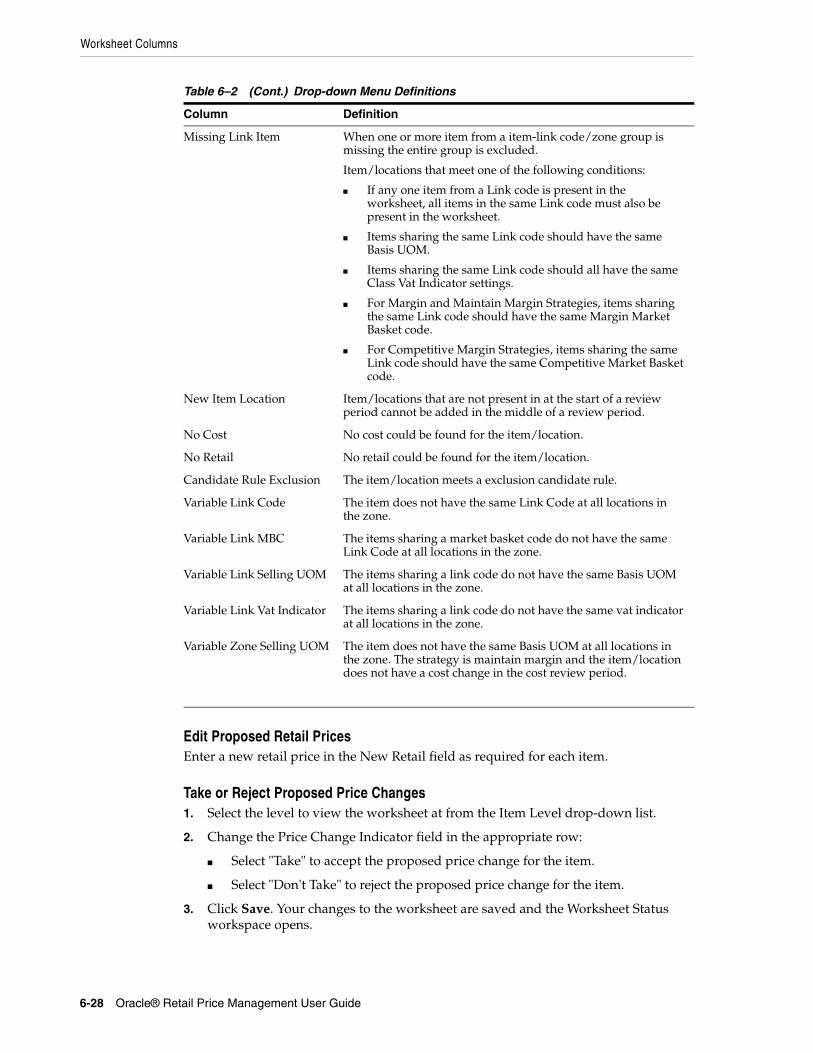
Worksheet Columns
6-28 Oracle® Retail Price Management User Guide
Edit Proposed Retail PricesEnter a new retail price in the New Retail field as required for each item.
Take or Reject Proposed Price Changes1. Select the level to view the worksheet at from the Item Level drop-down list.
2. Change the Price Change Indicator field in the appropriate row:
■ Select "Take" to accept the proposed price change for the item.
■ Select "Don't Take" to reject the proposed price change for the item.
3. Click Save. Your changes to the worksheet are saved and the Worksheet Status workspace opens.
Missing Link Item When one or more item from a item-link code/zone group is missing the entire group is excluded.
Item/locations that meet one of the following conditions:
■ If any one item from a Link code is present in the worksheet, all items in the same Link code must also be present in the worksheet.
■ Items sharing the same Link code should have the same Basis UOM.
■ Items sharing the same Link code should all have the same Class Vat Indicator settings.
■ For Margin and Maintain Margin Strategies, items sharing the same Link code should have the same Margin Market Basket code.
■ For Competitive Margin Strategies, items sharing the same Link code should have the same Competitive Market Basket code.
New Item Location Item/locations that are not present in at the start of a review period cannot be added in the middle of a review period.
No Cost No cost could be found for the item/location.
No Retail No retail could be found for the item/location.
Candidate Rule Exclusion The item/location meets a exclusion candidate rule.
Variable Link Code The item does not have the same Link Code at all locations in the zone.
Variable Link MBC The items sharing a market basket code do not have the same Link Code at all locations in the zone.
Variable Link Selling UOM The items sharing a link code do not have the same Basis UOM at all locations in the zone.
Variable Link Vat Indicator The items sharing a link code do not have the same vat indicator at all locations in the zone.
Variable Zone Selling UOM The item does not have the same Basis UOM at all locations in the zone. The strategy is maintain margin and the item/location does not have a cost change in the cost review period.
Table 6–2 (Cont.) Drop-down Menu Definitions
Column Definition

Worksheet Columns
Worksheets 6-29
■ See Section , "Worksheet Columns" for a complete list of the editable columns in the worksheet.
View TotalsNavigate: From the Task Pad, select Worksheet > Worksheet Status. The Worksheet Status workspace opens.
Figure 6–19 Worksheet Status Window
1. Select the worksheet you want to view the details of. You can select multiple worksheets or click Select All to select of all the worksheets.
2. Click Worksheet Detail. The Worksheet Details workspace opens.

Worksheet Columns
6-30 Oracle® Retail Price Management User Guide
Figure 6–20 Worksheet Details Window
3. Select the row you want to view totals for by clicking the box to the left of the row.
Press and hold the Ctrl key while selecting to select multiple rows. Click Select All to select all the rows.
4. Click the Totals button. The Totals window opens.
Note: If no items are selected, the totals appear for all items where a price change would occur.

Worksheet Columns
Worksheets 6-31
Figure 6–21 Worksheet Totals Window
View Price Change Totals1. Select the Price Change Totals tab. The totals for all of the item rows that you
selected appear on the Totals window.
2. Click Done. The Totals window is closed.
View Sales Totals1. Select the Sales Totals tab. The totals for the sales for the item rows that you
selected appear on the Totals window.
2. Click Done. The Totals window closes.
View Competitive Analysis Totals1. Select the Competitive Analysis Totals tab. The totals for how you are competing
in all retail zones that you have selected appear on the Totals window.
2. Click Done. The Totals window is closed.
What-If AnalysisNavigate: From the Task Pad, select Worksheet > Worksheet Status. The Worksheet Status workspace opens.

Worksheet Columns
6-32 Oracle® Retail Price Management User Guide
Figure 6–22 Worksheet Status Window
1. Select the worksheet you want to view the details of. You can select multiple worksheets or click Select All to select all of the worksheets.
2. Click Worksheet Detail. The Worksheet Details workspace opens.

Worksheet Columns
Worksheets 6-33
Figure 6–23 Worksheet Details Window
3. Select the row you want to perform a what-if analysis on by clicking the box to the left of the row.
■ Press and hold the Ctrl key while selecting to select multiple rows. Click Select All to select all the rows.
Perform What-if Analysis on a Clearance Pricing Strategy1. Click What If. The What If window opens.
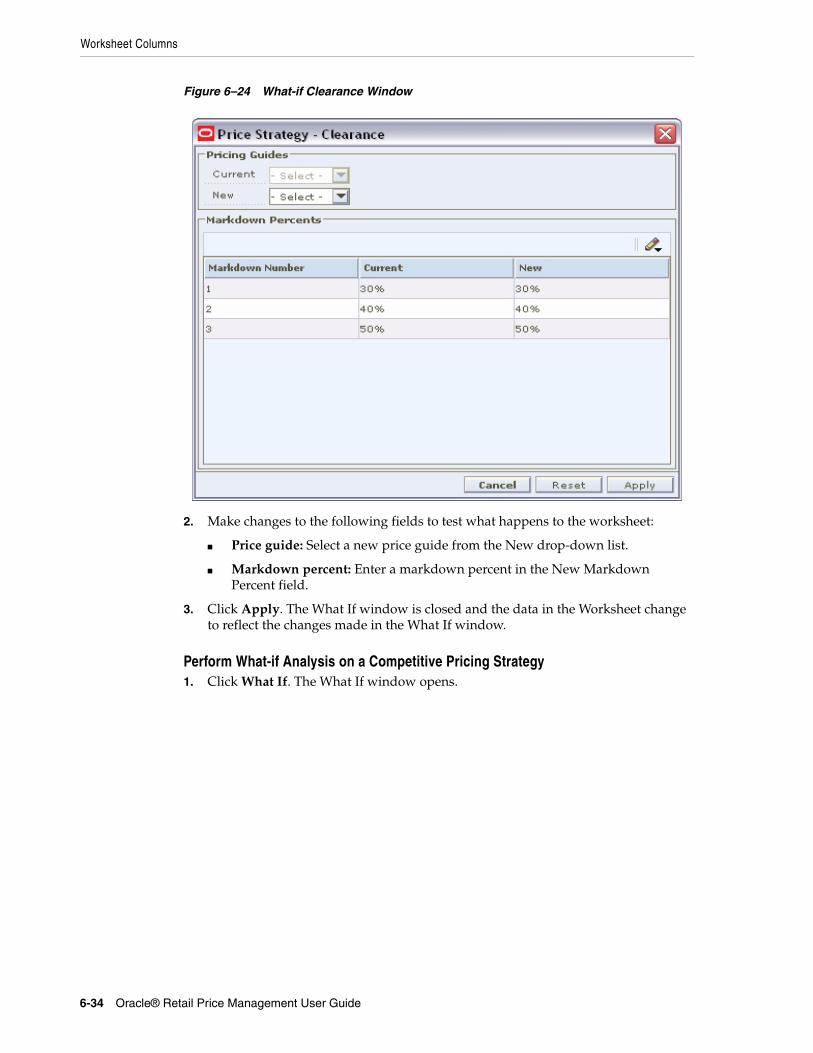
Worksheet Columns
6-34 Oracle® Retail Price Management User Guide
Figure 6–24 What-if Clearance Window
2. Make changes to the following fields to test what happens to the worksheet:
■ Price guide: Select a new price guide from the New drop-down list.
■ Markdown percent: Enter a markdown percent in the New Markdown Percent field.
3. Click Apply. The What If window is closed and the data in the Worksheet change to reflect the changes made in the What If window.
Perform What-if Analysis on a Competitive Pricing Strategy1. Click What If. The What If window opens.

Worksheet Columns
Worksheets 6-35
Figure 6–25 What-if Competitive Window
2. Make changes to the following fields to test what happens to the worksheet:
■ Price guide: Select a new price guide from the New drop down.
■ Compete type: Select a different compete type for the whole worksheet or by code by selecting from the New Compete Type drop downs.
■ Compete percent: Enter a new compete percent in the New Compete Percent field.
3. Click Apply. The What If window is closed and the data in the Worksheet change to reflect the changes made in the What If window.
Perform What-if Analysis on a Margin Pricing Strategy1. Click What If. The What If window opens.

Worksheet Columns
6-36 Oracle® Retail Price Management User Guide
Figure 6–26 What-if Margin Window
2. Make changes to the following fields to test what happens to the worksheet:
■ Price guide: Select a new price guide from the New drop down.
■ Margin target: Enter a margin target in the New Margin Target field.
3. Click Apply. The What If window is closed and the data in the Worksheet change to reflect the changes made in the What If window.
Reset What-if Data1. Click What If. The What If window opens.
2. Click Reset. The values are returned to their original value.
3. Click Apply. The What if window closes and the data in the worksheet returns to original values.
Export a WorksheetThe Export function allows you to export the current view of the worksheet to a Comma Separated Value (.CSV) file.
Navigate: From the Task Pad, select Worksheet > Worksheet Status. The Worksheet Status workspace opens.

Worksheet Columns
Worksheets 6-37
Figure 6–27 Worksheet Status Window
1. Select the worksheet you want to view the details of. You can select multiple worksheets or click Select All to select of all the worksheets.
2. Click Worksheet Detail. The Worksheet Details workspace opens.

Worksheet Columns
6-38 Oracle® Retail Price Management User Guide
Figure 6–28 Worksheet Details Window
3. Select the row you want to export by clicking the box to the left of the row.
■ Press and hold the Ctrl key while selecting to select multiple rows. Click Select All to select all the rows.
4. Click the Export (up arrow) button. The Save window opens.

Worksheet Columns
Worksheets 6-39
Figure 6–29 Worksheet Export save Window
5. Select a location to save the file to from the Save In drop down.
6. Enter a name for the file in the File Name field.
7. Click Save. The file is saved.
8. Open the file in the program of your choice such as a spreadsheet or word processor.

Worksheet Columns
6-40 Oracle® Retail Price Management User Guide
Price Changes 7-1
7Price Changes
Creating a Price ChangeA price change is the permanent change in the price of an item. You can use the price guides to move the new price to established price points or round the price.
The Create Price Change workspace allows you to establish the price changes for an item or group of items at a location or group of locations. When you open the window, the Price Change List and Price Change Maintenance panes open. After you create your price change in the Price Change Maintenance pane, it is added to the Price Change List pane.
If you select locations with multiple currencies, you can only choose to create a price change by percent or to reset the point of sale (POS) price. You cannot create multi-unit pricing across multiple currencies.
Create price change allows you to create the following types of price changes.
■ Regular: The price change is occurring at the retailer's initiative.
■ Vendor Funded: The supplier is subsidizing a portion of the price change.
■ Link codes: Associate items to each other at a location and price them exactly the same.
When a price change is added to RPM, it must go through a series of checks before it can be applied to an item/location. Depending on your user role, you may not be able to move the retail price change to the next status. A change to submitted or approved status, or from worksheet back to approved, results in a conflict check. A change to approved status results in the application of area differential strategies for the price change. A price change may be in any of the following statuses:
Table 7–1 Status of Price Changes
Status Definition
Worksheet The price change has been started, but not reviewed or sent out.
Submitted The price change has been completed and is pending review. Conflict checking has occurred for the price change.
Approved The price change has been reviewed and accepted. The price change is communicated to the locations for which the price change is effective.
Executed The new prices established are effective for the item/location.
Rejected The price change has been reviewed and declined.

Price Changes 7-2
Creating a Price Change
After you create a price change, you can maintain different aspects of the price change. You can create exceptions to the items and locations that exist on the price change, change the specifics of the price change, and can copy an existing price change.
The procedures below allow you to navigate and search for price changes through the Maintain Price Change task on the Task Pad; however, you can accomplish these same tasks after you create a price change and the price change is displayed in the Price Change List pane in the Create Price Change workspace.
Search for a Price ChangeNavigate: From the Task Pad, select Price Changes > Maintain Price Change. The Price Change Search pane opens.
Figure 7–1 Price Change Search Window

Creating a Price Change
Price Changes 7-3
1. Enter criteria as necessary to restrict the search to the price changes you want to maintain.
Table 7–2 Search Criteria
Field Criteria
Department Enter the Department ID or select a department from the list.
Class Enter the Class ID or select a class from the list.
Subclass Enter the Subclass ID or select a subclass from the list.
Price Change ID Select price change IDs to search for specific price changes.
Type Select Regular, Vendor Funded, Link Code, or All price change types.
Status Select Approved, Executed, Rejected, Submitted, or Worksheet status price changes.
Item Type Select the item type — Item or Item List.
Item Level Select the item level — Parent Item or Parent Item/Diff or Transaction Level Item.
Search On This Level Only Select the Search on this Level Only checkbox to restrict the search to the selected level. The item list level price events are displayed.
Diff Type Select a Diff type. This field is enabled only when you select Parent Item/Diff as item level.
Created By Enter a username to search for price changes created by a specific user.
Create Date Select a create date to search for price changes with a specific create date.
Effective Date Select an effective date to search for price changes with a specific effective date.
Item Enter the Item ID or select an item from the list.
Diff Enter the Differential value or select the value from the list. This field is enabled only when you select Parent Item/Diff as item level.
Zone Group Enter the Zone Group ID or select a zone group.
Zone/Location Select Zone Groups, Zones, and Locations to search for price changes from specific zones or locations.
Approved By Enter a username to search for price changes approved by a specific user.
Reason Code Select reason codes.
Deal ID Select deal IDs to search for price changes related to specific deals. First select Vendor Funded from the Type field.
Deal Detail ID Select deal detail IDs to search for price changes related to specific deal details. First select Vendor Funded from the Type field, then select a deal from the Deal ID field.
Approved Date Select an approved date to search for price changes with a specific approved date.
Price Guide Select price guides to search for price changes with specific price guides.

Creating a Price Change
7-4 Oracle® Retail Price Management User Guide
2. Click Search. Your results appear in the Price Change List pane.
Figure 7–2 Price Change List Window
Conflict CheckingWhenever the status of a price event changes, conflict checking is performed and the conflicts are displayed.
Conflict check is done for the following status only.
■ Worksheet to Approved
■ Worksheet to Submitted
■ Submitted to Approved
■ Approved to Worksheet
Market Basket Code Select a Market Basket Code to search for price changes with a specific Market Basket Code.
Link Code Select a Link Code to search for price changes with a specific Link Code.
Merchandise Level Select criteria in the following fields to search for price changes in a specific merchandise level:
■ Department
■ Class
■ Subclass
■ Item Type
■ Item Level
■ Diff Type
■ Item
■ Diff
Table 7–2 (Cont.) Search Criteria
Field Criteria

Creating a Price Change
Price Changes 7-5
The existence of any conflict is identified by a binocular icon in the conflicts column of the multi-record block. To review a conflict, click on the binocular icon, the Conflict Review List window opens.
Figure 7–3 Conflict Review List Window
If the event type is Price Change or Clearance, the promotion ID and promotion component ID are not displayed. The promotion ID and promotion component ID are displayed if the event type is Promotion.
Conflict Check StatusIn the Maintenance workspace, click Conflict Check Status. The Refresh Status window opens.
Figure 7–4 Refresh Status Window

Creating a Price Change
7-6 Oracle® Retail Price Management User Guide
1. Click Refresh to update the conflict checking state in the window.
2. Click Exit to go back to the price event window.
■ The status in the multi-record block is refreshed.
3. Click Cancel to close the status window without making any changes or refreshing the price event.
Create a Regular Price ChangeNavigate: From the Task Pad, select Price Changes > Create Price Change. The Create Price Change workspace opens.
Figure 7–5 Create Price Change Window

Creating a Price Change
Price Changes 7-7
1. In the Price Change Maintenance pane, in the Type field, select Regular.
Figure 7–6 Price Change Maintenance Window
2. In the Effective Date field, enter the date the price change should go into effect, or click the calendar button and select a date
3. In the Price Guide field, enter the ID of the price guide you want to apply to the price change, or click the LOV button and select a price guide.
Note: The Effective Date you set depends on the number of days set in the system option Price Change Processing Days. The earliest date that price changes can be created is the current date plus the price change processing days. If you have emergency price change permission, Price Change Processing Days will be ignored.
Note: The price guide only applies to the items in the same department as the price guide and locations that share the same currency as the currency on the price guide
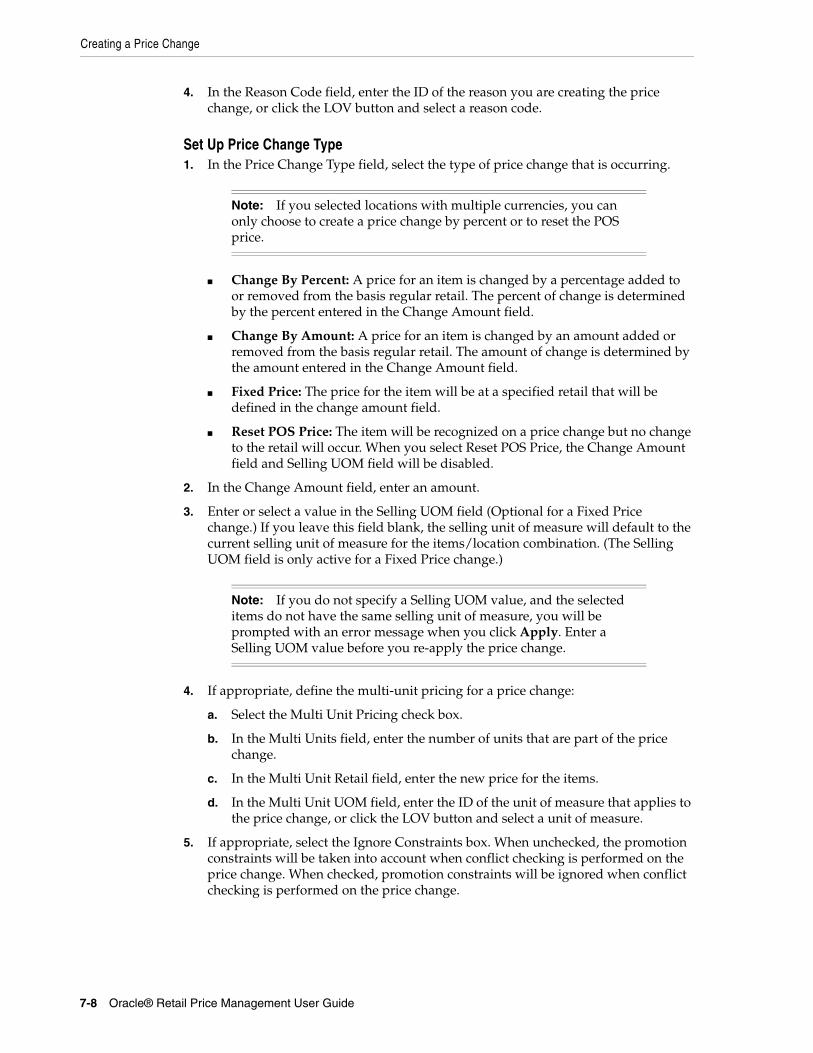
Creating a Price Change
7-8 Oracle® Retail Price Management User Guide
4. In the Reason Code field, enter the ID of the reason you are creating the price change, or click the LOV button and select a reason code.
Set Up Price Change Type1. In the Price Change Type field, select the type of price change that is occurring.
■ Change By Percent: A price for an item is changed by a percentage added to or removed from the basis regular retail. The percent of change is determined by the percent entered in the Change Amount field.
■ Change By Amount: A price for an item is changed by an amount added or removed from the basis regular retail. The amount of change is determined by the amount entered in the Change Amount field.
■ Fixed Price: The price for the item will be at a specified retail that will be defined in the change amount field.
■ Reset POS Price: The item will be recognized on a price change but no change to the retail will occur. When you select Reset POS Price, the Change Amount field and Selling UOM field will be disabled.
2. In the Change Amount field, enter an amount.
3. Enter or select a value in the Selling UOM field (Optional for a Fixed Price change.) If you leave this field blank, the selling unit of measure will default to the current selling unit of measure for the items/location combination. (The Selling UOM field is only active for a Fixed Price change.)
4. If appropriate, define the multi-unit pricing for a price change:
a. Select the Multi Unit Pricing check box.
b. In the Multi Units field, enter the number of units that are part of the price change.
c. In the Multi Unit Retail field, enter the new price for the items.
d. In the Multi Unit UOM field, enter the ID of the unit of measure that applies to the price change, or click the LOV button and select a unit of measure.
5. If appropriate, select the Ignore Constraints box. When unchecked, the promotion constraints will be taken into account when conflict checking is performed on the price change. When checked, promotion constraints will be ignored when conflict checking is performed on the price change.
Note: If you selected locations with multiple currencies, you can only choose to create a price change by percent or to reset the POS price.
Note: If you do not specify a Selling UOM value, and the selected items do not have the same selling unit of measure, you will be prompted with an error message when you click Apply. Enter a Selling UOM value before you re-apply the price change.

Creating a Price Change
Price Changes 7-9
Select Locations1. In the Location Selection area, select how you want to add locations to the price
change.
■ Zone Group: Enter the ID of the zone group that contains the locations to add to the price change, or click the LOV button and select a zone group.
■ Zone: Enter the ID of the zone to add to the price change, or click the LOV button and select a zone.
■ Location: Enter the ID of the location that you want to add to the price change, or click the LOV button and select a location.
2. Click Select. The zones and/or locations that meet your criteria are added to the table in the Location Selection table.
Select Items1. In the Price Change Maintenance pane, in the Item Selection area, select items on
the price change using the available fields.
To select items from all available items, enter an ID in the Item field, or click the LOV button and select item.
Or
a. Enter information in the enabled fields to limit the items available in the Item field.
■ In the Department field, enter a department number, or click the LOV button and select a department.
■ In the Class field, enter a class number, or click the LOV button and select a class.
■ In the Subclass field, enter a subclass number, or click the LOV button and select a subclass.
■ In the Item Type drop-down list, select Item or Item List.
■ In the Item Level drop-down list, select Parent Item, Parent Item/Diff, or Transaction Level Item.
Note: You can create price changes at the zone or location level.
Note: All fields with LOV buttons allow multiple selections.
Note: If you select Item List from the Item Type drop down, only item lists will be selectable from the Item field. If you select Item, only single items that conform to the other criteria specified will be selectable.
Note: The Diff Type and Diff fields are only enabled if Parent Item/Diff is selected.

Creating a Price Change
7-10 Oracle® Retail Price Management User Guide
■ In the Diff Type drop-down list, select a diff type.
■ In the Diff drop-down list, select a diff.
2. In the Item field, click the LOV button and select items.
Figure 7–7 Item Selection Pane
3. In the Item List field, enter the item list ID or select the item list from the LOV.
■ Click View Items. A pop-up window opens where the items in the item list are displayed.
4. Click Select. Items that meet your criteria are added to the Item Selection table.
Figure 7–8 Item Selection Table
Note: If the Item Type is selected as Item List, the Item Level is defaulted to Item List and the Item Editor defaults to Item List.

Creating a Price Change
Price Changes 7-11
Complete the Price Change1. In the Price Change Maintenance pane, click Apply to create price changes. One
price change will be created for each item/location intersection.
■ If the Item Type is Item List, then the item list ID is populated in the item column of the Price Change List MRB with a hyperlink. Click the hyperlink to view the items in the item list.
Figure 7–9 Price Change with Negative Margin Highlighted
2. Change the status of your price change as appropriate.
3. Click Done to save your changes and close the workspace.
Note: If a price change you apply results in a negative margin for an item/location combination, the New Markup field will be highlighted to call the negative margin to your attention. (If the Add Column Detail button is displayed, click the button to view full details, including negative margins.) See Section , "View Margins (Margin Visibility)" for more information.

Creating a Price Change
7-12 Oracle® Retail Price Management User Guide
Create a Vendor Funded Price ChangeNavigate: From the Task Pad, select Price Changes > Create Price Change. The Create Price Change workspace opens.
Figure 7–10 Create Price Change Window

Creating a Price Change
Price Changes 7-13
1. In the Price Change Maintenance pane, in the Type field, select Vendor Funded.
Figure 7–11 Price Change Maintenance Window
2. In the Effective Date field, enter the date the price change should go into effect, or click the calendar button and select a date.
3. In the Price Guide field, enter the ID of the price guide you want to apply to the price change, or click the LOV button and select a price guide.
4. In the Reason Code field, enter the ID of the reason you are creating the price change, or click the LOV button and select a reason code.
Note: The Effective Date you can set depends on the number of days set in the system option Price Change Processing Days. The earliest date price changes can be created is today's date plus the price change processing days. If you have emergency price change permission, Price Change Processing Days will be ignored.
Note: The price guide only applies to the items in the same department as the price guide.

Creating a Price Change
7-14 Oracle® Retail Price Management User Guide
Select the Vendor and Deal1. In the Price Change Maintenance pane, in the Partner Type drop-down list, select
the partner type.
■ Manufacturer
■ Distributor
■ Wholesaler
■ Supplier
2. In the Partner field, enter the ID of the partner with the deal, or click the LOV button and select a partner.
3. In the Deal ID field, enter the ID of the deal, or click the LOV button and select a deal.
4. In the Deal Detail ID field, enter the ID of the deal details, or click the LOV button and select the deal details.
Set Up Price Change Type1. In the Price Change Type field, select the type of price change that is occurring.
■ Change By Percent: A price for an item changed by is a percentage added to or removed from the basis regular retail. The percent of change is determined by the percent entered in the Change Amount field.
■ Change By Amount: A price for an item is changed by an amount added or removed from the basis regular retail. The amount of change is determined by the amount entered in the Change Amount field.
■ Fixed Price: The price for the item will be at a specified retail that will be defined in the change amount field.
■ Reset POS Price: The item will be recognized on a price change but no change to the retail will occur. When you select, the Change Amount field and Selling UOM field will be disabled.
■ Exclude: This field will be available to exclude items or locations only if an exception is pulled off the price change.
2. In the Change Amount field, enter an amount.
3. If appropriate, define the multi unit pricing for a price change:
a. Select the Multi Unit Pricing check box.
b. In the Multi Units field, enter the number of units that are part of the price change.
c. In the Multi Unit Retail field, enter the new price for the items.
d. In the Multi Unit UOM field, enter the ID of the unit of measure that applies to the price change, or click the LOV button and select a unit of measure.
Note: If you selected locations with multiple currencies, you can only choose to create a price change by percent or to reset the POS price.

Creating a Price Change
Price Changes 7-15
Select Locations1. In the location area of the Price Change Maintenance pane, in the Location field,
enter a location ID, or click the LOV button and select locations.
2. Click Select. Locations are added to the table in the Location Selection table.
Enter Funding Information1. In the Price Change Maintenance pane, in the Funding Type drop-down list, select
Percent or Amount.
2. In the Funding Amount field, enter an amount.
Select Items1. In the Item Selection area of the Price Change Maintenance pane, in the Item field,
enter an item ID, or click the LOV button and select items.
2. Click Select. The items appear in the Item Selection table.
Note: Only locations on the deal are selectable.
Note: If the selected locations have different currencies, only Percent is available.
Note: Only items on the deal are selectable.

Creating a Price Change
7-16 Oracle® Retail Price Management User Guide
Complete the Price Change1. In the Price Change Maintenance pane, click Apply to add all your changes.
Figure 7–12 Price Change with Negative Margin Highlighted
2. Change the status of your price change as appropriate.
3. Click Done to save your changes and close the workspace.
Price Change Exclusion1. Once the price change is completed, highlight and select the items you wish to
create an exception for.
2. Click Location Exception or the Tran Exception.
3. Navigate to location exception LOV or the tran exception LOV and choose the item or location you wish to create an exception for.
4. Navigate to the change type and select Exclude. The location is excluded from the price change. When the change type of exclude is selected, the change amount is disabled.
5. Apply the changes to the record block. The appropriate exclusion/exception flags will result.
6. Approve the price change event.
Note: If a price change you apply results in a negative margin for an item/location combination, the New Markup field will be highlighted to call the negative margin to your attention. (If the Add Column Detail button is displayed, click the button to view full details, including negative margins.) See Section , "View Margins (Margin Visibility)" for more information.
Note: Location exception and exclusion can be created at Item List level also.

Creating a Price Change
Price Changes 7-17
Create a Link Code Price ChangeNavigate: From the Task Pad, select Price Changes > Create Price Change. The Create Price Change workspace opens.
Figure 7–13 Create Price Change Window

Creating a Price Change
7-18 Oracle® Retail Price Management User Guide
1. In the Price Change Maintenance pane, select Link Code.
Figure 7–14 Price Change Maintenance Window
2. In the Effective Date field, enter the date the price change is should go into effect, or click the calendar button and select a date.
3. In the Reason Code field, enter the ID of the reason you are creating the price change, or click the LOV button and select a reason code.
Select Link Codes1. In the Link Code area of the Price Change Maintenance pane, in the Link Code
field, enter the ID of the link code, or click the LOV button and select a link code.
2. In the Currency field, enter the currency code, or click the LOV button and select the currency.
Note: The Effective Date you can set depends on the number of days set in the system option Price Change Processing Days. The earliest date price changes can be created is the current date plus the price change processing days. If you have emergency price change permission, Price Change Processing Days will be ignored.

Creating a Price Change
Price Changes 7-19
3. In the Zone Group field, enter the ID of the zone group that contains the locations you want to add to the price change, or click the LOV button and select a zone group.
4. In the Zone field, enter the ID of the zone that contains the locations you want to add to the price change, or click the LOV button and select a zone.
5. In the Location field, enter the ID of the location that you want to add to the price change, or click the LOV button and select a location.
Set Up Price Change Type1. In the Change Type field, select Fixed Price. The price for the item will be at a
specified retail that will be defined in the change amount field. Link code price changes can only be set up as fixed price.
2. In the Change Amount field, enter an amount.
3. If appropriate, define the multi unit pricing for a price change:
a. Select the Multi Unit Pricing check box.
b. In the Multi Units field, enter the number of units that are part of the price change.
c. In the Multi Unit Retail field, enter the new price for the items.
d. In the Multi Unit UOM field, enter the ID of the unit of measure that applies to the price change, or click the LOV button and select a unit of measure.
Complete the Price Change1. In the Price Change Maintenance pane, click Apply to add all your changes
2. Change the status of your price change as appropriate.
3. Click Done to save your changes and close the workspace.
Note: The Zone field is limited by the currency entered in step 2.
Note: You can create price changes at the zone level. Locations are not required.
Note: If a price change you apply results in a negative margin for an item/location combination, the New Markup field will be highlighted to call the negative margin to your attention. (If the Add Column Detail button is displayed, click the button to view full details, including negative margins.) See Section , "View Margins (Margin Visibility)" for more information.

Creating a Price Change
7-20 Oracle® Retail Price Management User Guide
Change the Status of a Price ChangeNavigate: From the Task Pad, select Price Changes > Maintain Price Change. The Price Change Search pane opens.
Figure 7–15 Price Change Search Window
1. Search for and retrieve the price change you want to maintain. Your results are displayed in the Price Change List pane.
Figure 7–16 Price Change List Window
Note: If you are in the Create Price Change workspace your price changes are displayed in the Price Change List pane when you click Apply. You do not need to open the Maintain Price Change workspace.

Creating a Price Change
Price Changes 7-21
2. Select the price change for which you want to change the status.
■ In the table, select a row.
■ Click Select All. All records in the Price Change List pane are selected.
3. In the Action field, select the status to which you want to move the price change.
4. Click Update. You are prompted to confirm your decision.
5. Click OK.
a. The current price change is displayed in the upper half of the window. Price changes promotions, and/or clearances for the same item/location are displayed in the lower half of the window.
b. Click Cancel to close the window. See Section , "Maintain a Price Change" for more information on how to adjust a price change.
6. Click Done to save any changes and close the window.
Maintain a Price ChangeNavigate: From the Task Pad, select Price Changes > Maintain Price Change. The Price Change Search window opens.
Figure 7–17 Price Changes Search Window
Creating a Price Change
7-22 Oracle® Retail Price Management User Guide
1. Search for and retrieve the price change you want to maintain. Your results appear in the Price Change List pane.
Figure 7–18 Price Change List Window
2. From the list of results, select the price change you want to maintain. The price change details appear in the Price Change Maintenance pane.

Creating a Price Change
Price Changes 7-23
Figure 7–19 Price Change Maintenance Window
3. If necessary, change the status of the price change to Worksheet.
4. Edit the enabled fields as necessary.
5. Click Apply to add all any changes.
6. Click Done to save any changes and close the window.
Copy a Price Change1. From the list of results, select the price change you want to copy.
2. Click Copy. The price change details appear in the Price Change Maintenance pane.
3. Edit the enabled fields as necessary.
4. Click Apply to add all any changes.
5. Click Done to save any changes and close the window.
Note: You cannot change the items and locations on a price change.
Note: Effective dates, exceptions, and status are not copied when copying a price change.

Creating a Price Change
7-24 Oracle® Retail Price Management User Guide
Delete a Price Change1. From the list of results, select the price change you want to delete.
2. Click Delete. You are prompted to confirm your decision.
3. Click Yes. The price change is deleted.
4. Click Done to close the window.
Check for Conflicts1. From the list of results, select the price change you want to check.
2. Click Conflict Check.
■ If no conflicts exist, click OK.
■ If conflicts exist, you must adjust the details of your price change before you can move the price change to the next status.
3. Click Done to save any changes and close the window.
Suggest a Date1. From the list of results, select the price change you want to suggest a date for.
2. Click Suggest Date. The system runs a check of promotion constraints, then calculates an appropriate date and places it in the effective date field.
3. Click Done to save any changes and close the window.
Create a Location Exception
1. From the list of results, select the price change.
2. Click Location Exceptions. The locations selection area of the Price Change Maintenance pane is enabled.
3. In the Location field, enter the ID of the location where items are different than the zone on the price change, or click the LOV button and select a location in the zone.
4. In the enable price change fields, enter information about the price change for the item/location.
5. Click Apply to add any changes.
6. Click Done to save any changes and close the window.
Note: Only price changes with a status of Worksheet can be deleted.
Note: Location exceptions can only be created for Zone Level price changes.
Note: To create a Location Exclusion, select the type Exclude.

Creating a Price Change
Price Changes 7-25
Create Item Exceptions at the Transaction Level
1. From the list of results, select the price change.
2. Click Tran Exceptions. The item selection area of the Price Change Maintenance pane is enabled.
3. In the Item field, enter the ID of the item for which items are different than the parent item on the price change, or click the LOV button and select an item.
4. In the enable price change fields, enter information about the price change for the item.
5. Click Apply to add any changes.
6. Click Done to save any changes and close the window.
Create Price Changes for Area DifferentialsNavigate: From Task Pad, select Price Changes> Price Changes for Area Differentials. The Price Changes for Area Differentials window opens.
Figure 7–20 Price Changes for Area Differentials
1. Select Primary area from the top Multi-Record Block.
Note: Item exceptions at the transaction level can occur only when the price change was created at the item parent or item parent/diff level.
Creating a Price Change
7-26 Oracle® Retail Price Management User Guide
2. Secondary areas for the Primary area will appear in the bottom Multi-Record Block. Select the secondary area you want to create price changes for.
3. Click Create Price Changes.
4. Enter an Effective Date.
5. Click Apply.

Clearances 8-1
8Clearances
Creating ClearancesA clearance is designed to move out-of-date merchandise and slow-selling merchandise out of a store. A clearance is considered a permanent price change, and inventory is consequently revalued. Once the reset date for a clearance has passed, the item's price and inventory value is returned to the regular price. The following clearances can be created:
■ Regular: The clearance is occurring at the retailer's initiative.
■ Vendor Funded: The supplier is subsidizing a portion of the clearance.
When a clearance is added to RPM, it must go through a series of checks before it can be applied to an item/location. Depending on your user role, you may not be able to move the clearance to the next status. A clearance may be in any of the following statuses:
After you create a clearance, you can maintain different aspects of the clearance. You can create exceptions to the items and locations that exist on the clearance, change the specifics of the clearance, and can copy an existing clearance.
There are procedures that allow you to navigate and search for clearances through the Maintain Clearances task on the Task Pad; however, you can accomplish these same tasks after you create a clearance and the clearance opens in the Clearance List pane in the Create Clearance workspace.
Search for a ClearanceNavigate: From the Task Pad, select Clearances > Maintain Clearances. The Maintain Clearances workspace opens.
Table 8–1 Status of Clearances
Status Definition
Worksheet The clearance has been started, but not reviewed or sent out.
Submitted The clearance has been completed and is pending review. Conflict checking has occurred for the price change.
Approved The clearance has been reviewed and accepted. The clearance is communicated to the locations for which the clearance is effective.
Executed The clearance prices established are effective for the item/location.
Rejected The clearance has been reviewed and declined.
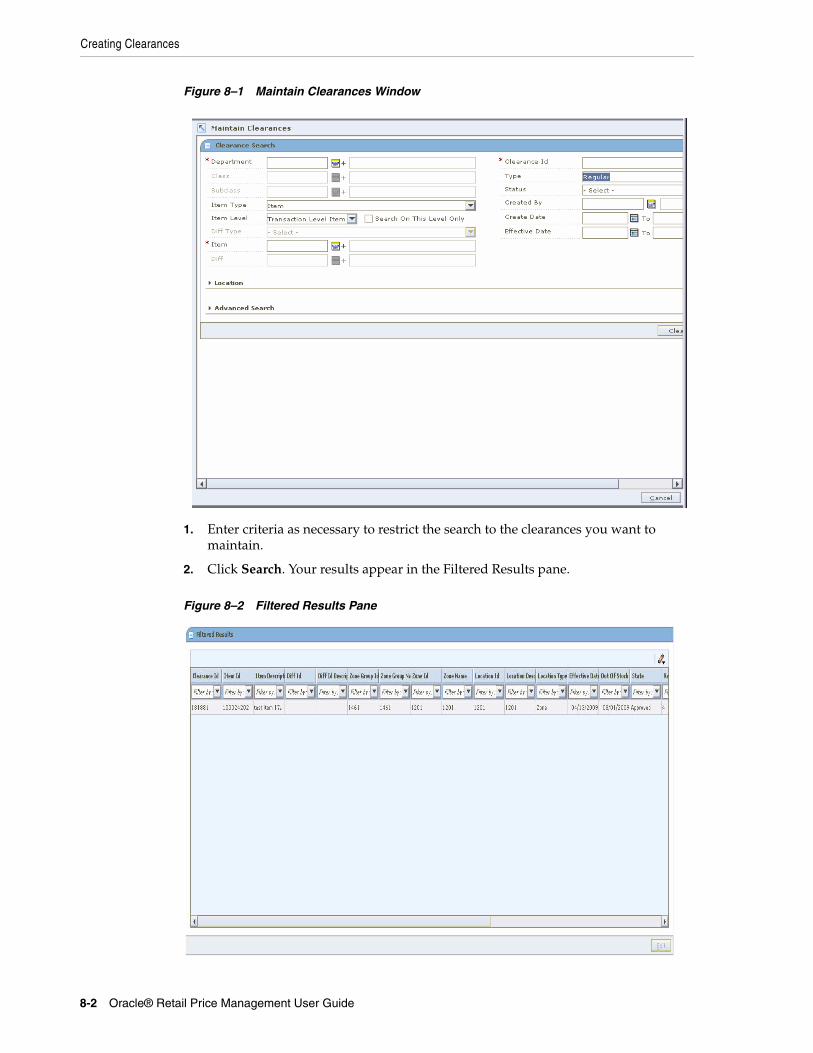
Creating Clearances
8-2 Oracle® Retail Price Management User Guide
Figure 8–1 Maintain Clearances Window
1. Enter criteria as necessary to restrict the search to the clearances you want to maintain.
2. Click Search. Your results appear in the Filtered Results pane.
Figure 8–2 Filtered Results Pane

Creating Clearances
Clearances 8-3
3. Select an item and click Edit. The Clearance List pane opens.
Figure 8–3 Clearance List Pane
Conflict CheckingWhenever the status of a price event changes, conflict checking is performed and the conflicts are displayed.
Conflict check is done for the following status only.
■ Worksheet to Approved
■ Worksheet to Submitted
■ Submitted to Approved
■ Approved to Worksheet
The existence of any conflict is identified by a binocular icon in the conflicts column of the multi-record block. To review a conflict, click on the binocular icon, the Conflict Review List window opens.

Creating Clearances
8-4 Oracle® Retail Price Management User Guide
Figure 8–4 Conflict Review List Window
If the event type is Price Change or Clearance, the promotion ID and promotion component ID are not displayed. The promotion ID and promotion component ID are displayed if the event type is Promotion.
Conflict Check StatusIn the Clearance Maintenance workspace, click Conflict Check Status. The Refresh Status window opens.
Figure 8–5 Refresh Status Window
1. Click Refresh to update the conflict checking state in the window.
2. Click Exit to go back to the price event window.
■ The status in the multi-record block is refreshed.

Creating Clearances
Clearances 8-5
3. Click Cancel to close the status window without making any changes or refreshing the price event.
Create a Regular ClearanceNavigate: From the Task Pad, select Clearances > Create Clearance. The Create Clearance workspace opens.
Figure 8–6 Create Clearance Window
1. In the Clearance Maintenance pane, in the Type field, select Regular.

Creating Clearances
8-6 Oracle® Retail Price Management User Guide
Figure 8–7 Clearance Maintenance Window
2. In the Effective Date field, enter the date the clearance is enabled, or click the calendar button and select a date.
3. In the Price Guide field, enter the ID of the price guide you want to apply to the clearance, or click the LOV button and select a price guide.
4. In the Reason Code field, enter the ID of the reason you are creating the clearance, or click the LOV button and select a reason code.
5. In the Out of Stock Date field, enter the date you expect the inventory to be consumed, or click the calendar button and select a date.
6. In the Reset Date field, enter the date the price of the item returns to regular price, or click the calendar button and select a date.
Note: The Effective Date you can set depends on the number of days set in the system option Price Change Processing Days. The earliest date clearances can be created is the current date plus the price change processing days, unless you have emergency privileges.
Note: The price guide only applies to the items in the same department as the price guide and locations that share the same currency as the currency on the price guide.
Note: Depending on your system settings the date may default.

Creating Clearances
Clearances 8-7
7. Select Apply Subclass Defaults to attach a Clearance Defaults Pricing Strategy to the clearance.
Set Up Clearance Type1. In the Price Change Type field, select the type of clearance that is occurring.
■ Change By Percent: A price for an item changed by is a percentage added to or removed from the basis retail price. The percent of change is determined by the percent entered in the Change Amount field.
■ Change By Amount: A price for an item is changed by an amount added or removed from the basis retail price. The amount of change is determined by the amount entered in the Change Amount field.
■ Fixed Price: The price for the item will be at a specified retail that will be defined in the change amount field.
■ Exclude: This field will be available to exclude items or locations only if an exception is pulled off the clearance.
2. In the Change Amount field, enter the amount, percent, or fixed amount for the clearance.
Select Locations1. In the Location Selection area, select how you want to add locations to the
clearance.
Figure 8–8 Location Selection Window
Note: Depending on your system settings the date may default.
Note: Set up a Clearance Pricing Strategy before creating a clearance. See the Section , "Clearance Defaults Pricing" for complete information on setting up a Clearance Defaults pricing strategy.
Note: If you selected locations with multiple currencies, you can only choose to create a clearance by percent.
Note: There is no need to enter a negative sign before the number entered in the Change Amount field. A clearance can only exist as a decrease in price.

Creating Clearances
8-8 Oracle® Retail Price Management User Guide
■ Zone Group: Enter the ID of the zone group that contains the locations to add to the clearance, or click the LOV button and select a zone group.
■ Zone: Enter the ID of the zone to add to the clearance, or click the LOV button and select a zone.
■ Location: Enter the ID of the location to add to the clearance, or click the LOV button and select a location.
2. Click Select. Locations that meet your criteria are added to the table in the Location Selection area.
Select Items1. In the Clearance Maintenance pane, in the Item Selection area, select items on the
clearance using the available fields.
Figure 8–9 Item Selection Window
■ To select items from all available items, enter an ID in the Item field, or click the LOV button and select item.
OR
■ Enter information in the enabled fields to limit the items available in the Item field.
a. In the Department field, enter a department number, or click the LOV button and select a department.
b. In the Class field, enter a class number, or click the LOV button and select a class.
c. In the Subclass field, enter a subclass number, or click the LOV button and select a subclass.
d. In the Item Type drop-down list, select Item or Item List.
e. In the Item Level drop-down list, select Parent Item, Parent Item/Diff, or Transaction Level Item.
Note: All fields with LOV buttons allow multiple items to be selected.
Note: If you select Item List from the Item Type drop-down list, only item lists will be selectable from the Item field. If you select Item, only single items that conform to the other criteria specified will be selectable.

Creating Clearances
Clearances 8-9
f. In the Diff Type drop-down list, select a diff type.
g. In the Diff drop-down list, select a diff.
h. In the Item field, click the LOV button and select items.
Figure 8–10 Item Selection Pane
i. In the Item List field, enter the item list ID or select the item list from the LOV.
Click View Items. A pop-up window opens where the items in the item list are displayed.
2. Click Select. Items that meet your criteria are added to the table in the Item Selection area.
Figure 8–11 Item List
■ If the Item Type is Item List, then the item list ID is populated in the ID column of the Item Selection MRB as a hyperlink. Click the hyperlink to view the items in the item list.
Note: The Diff Type and Diff fields are only enabled if Parent Item/Diff is selected.
Note: If the Item Type is selected as Item List, the Item Level is defaulted to Item List and the Item Editor defaults to Item List.

Creating Clearances
8-10 Oracle® Retail Price Management User Guide
Complete the Clearance1. Click Apply to add any changes.
2. Change the status of your clearance as appropriate.
3. Click Done to save any changes and close the workspace.
Clearance Exclusion1. Once the clearance is completed, highlight and select the items you wish to create
an exception for.
2. Click Location Exception or the Tran Exception.
3. Navigate to location exception LOV or the tran exception LOV and choose the item or location you wish to create an exception for.
4. Navigate to the change type and select Exclude. The location is excluded from the clearance. When the change type of exclude is selected, the change amount is disabled.
5. Apply the changes to the record block. The appropriate exclusion/exception flags will result.
6. Approve the clearance.
Create a Vendor Funded ClearanceNavigate: From the Task Pad, select Clearances > Create Clearance. The Create Clearance workspace opens.
Note: If any clearance pricing you apply results in a negative margin for an item, fields in the Clearance List pane are highlighted to call the negative margin to your attention. (If the Add Column Detail button is displayed, click the button to view full details, including negative margins.) See Section , "View Margins (Margin Visibility)" for more information.

Creating Clearances
Clearances 8-11
Figure 8–12 Create Clearance Window
1. In the Clearance Maintenance pane, in the Type field, select Vendor Funded.
Figure 8–13 Clearance Maintenance Window

Creating Clearances
8-12 Oracle® Retail Price Management User Guide
2. In the Effective Date field, enter the date the clearance is enabled, or click the calendar button and select a date.
3. In the Price Guide field, enter the ID of the price guide you want to apply to the clearance, or click the LOV button and select a price guide.
4. In the Reason Code field, enter the ID of the reason you are creating the clearance, or click the LOV button and select a reason code.
5. In the Out of Stock Date field, enter the date you expect the inventory to be consumed, or click the calendar button and select a date.
6. In the Reset Date field, enter the date the price of the item returns to regular price, or click the calendar button and select a date.
7. Select Apply Subclass Defaults to attach a Clearance Defaults Pricing Strategy to the clearance.
Select the Vendor and Deal1. In the Clearance Maintenance pane, in the Partner Type drop-down list, select the
partner type.
■ Manufacturer
■ Distributor
■ Wholesaler
■ Supplier
2. In the Partner field, enter the ID of the partner with the deal, or click the LOV button and select a partner.
3. In the Deal ID field, enter the ID of the deal, or click the LOV button and select a deal.
4. In the Deal Detail ID field, enter the ID of the deal details, or click the LOV button and select the deal details.
Note: The Effective Date you can set depends on the number of days set in the system option Price Change Processing Days. The earliest date clearances can be created is the current date plus the price change processing days, unless you have emergency privileges.
Note: The price guide only applies to the items in the same department as the price guide and locations that share the same currency as the currency on the price guide.
Note: Depending on your system settings the date may default.
Note: Depending on your system settings the date may default.

Creating Clearances
Clearances 8-13
Select Locations1. In the location area of the Clearance Maintenance pane, in the Location field, enter
a location ID, or click the LOV button and select locations.
2. Click Select. Locations are added to the table in the Location Selection table
Enter Funding Information1. In the Clearance Maintenance pane, in the Funding Type drop-down list, select
Percent or Amount.
2. In the Funding Amount field, enter an amount.
Select Items1. In the Item Selection area of the Clearance Maintenance pane, in the Item field,
enter an item ID, or click the LOV button and select items.
2. Click Select. The items appear in the Item Selection table.
Complete the Clearance1. Click Apply to add any changes.
2. Change the status of your clearance as appropriate.
3. Click Done to save any changes and close the workspace.
Change the Status of a ClearanceNavigate: From the Task Pad, select Clearances > Maintain Clearances. The Maintain Clearances workspace opens.
Note: Only locations on the deal are selectable.
Note: If the selected locations have different currencies, only Percent is available.
Note: Only items on the deal are selectable.
Note: If any clearance pricing you apply results in a negative margin for an item, fields in the Clearance List pane are highlighted to call the negative margin to your attention. (If the Add Column Detail button is displayed, click the button to view full details, including negative margins.) See Section , "View Margins (Margin Visibility)" for more information.

Creating Clearances
8-14 Oracle® Retail Price Management User Guide
Figure 8–14 Maintain Clearance Window
1. Search for and retrieve the clearance you want to maintain. Your results appear in the Clearance List pane.
Figure 8–15 Clearance List Window

Creating Clearances
Clearances 8-15
2. Select the price change for which you want to change the status.
a. In the table, select a row.
b. Click Select All. All records in the Clearance List pane are selected.
3. In the Action field, select the status to which you want to move the clearance.
4. Click Update. You are prompted to confirm your decision.
5. Click OK.
a. The current clearance opens in the upper half of the window. Price changes, promotions, and clearances affecting the same item/location appear in the lower half of the window.
b. Click Close to close the conflict review list. The Section , "Maintain a Clearance" contains additional information on how to adjust a clearance.
6. Click Done to save any changes and close the window.
Maintain a ClearanceNavigate: From the Task Pad, select Clearances > Maintain Clearances. The Maintain Clearances workspace opens.
Figure 8–16 Maintain Clearance Window
Note: If you are in the Create Clearance workspace, your clearances appear in the Price Change List pane when you click Apply. You do not need to open the Maintain Price Change workspace.

Creating Clearances
8-16 Oracle® Retail Price Management User Guide
1. Search for and Retrieve the clearance you want to maintain. Your results appear in the Clearance List pane.
Figure 8–17 Clearance List Window
2. From the list of results, select the clearance you want to maintain. The clearance details appear in the Clearance Maintenance pane.
Figure 8–18 Clearance Maintenance Window

Creating Clearances
Clearances 8-17
3. If necessary, change the status of the price change to Worksheet.
4. Edit the enabled fields as necessary.
5. Click Apply to add all any changes.
6. Click Done to save any changes and close the window.
Copy a Clearance1. From the list of results, select the clearance you want to copy.
2. Click Copy. The clearance details appear in the Clearance Maintenance pane.
3. Edit the enabled fields as necessary.
4. Click Apply to add all any changes.
5. Click Done to save any changes and close the window.
Delete a Clearance1. From the list of results, select the clearance you want to delete.
2. Click Delete. You are prompted to confirm your decision.
3. Click Yes. The clearance is deleted.
4. Click Done to close the window.
Check for Conflicting Clearance1. From the list of results, select the clearance you want to check.
2. Click Conflict Check.
■ If no conflicts exist, click OK.
■ If conflicts exist, you must adjust the details of your clearance before you can move the clearance to the next status.
3. Click Done to save any changes and close the window.
Note: You cannot change the items and locations on a clearance.
Note: If the clearance pricing you apply results in a negative margin for an item, fields in the Clearance List pane are highlighted to call the negative margin to your attention. (If the Add Column Detail button is displayed, click the button to view full details, including negative margins.) See Section , "View Margins (Margin Visibility)" for more information.
Note: Only clearances in Deleted status can be deleted.

Creating Clearances
8-18 Oracle® Retail Price Management User Guide
Create a Location Exception
1. From the list of results, select the clearance.
2. Click Location Exceptions. The locations selection area of the Clearance Maintenance pane is enabled.
3. In the Location field, enter the ID of the location where items are different than the zone on the clearance, or click the LOV button and select a location.
4. In the enabled clearance fields, enter information about the clearance for the item/location.
5. Click Apply to add any changes.
6. Click Done to save any changes and close the window.
Create Item Exceptions at the Transaction Level
1. From the list of results, select the clearance.
2. Click Tran Exceptions. The item selection area of the Clearance Maintenance pane is enabled.
3. In the Item field, enter the ID of the item for which items are different than the parent item on the clearance, or click the LOV button and select an item.
4. In the enabled clearance fields, enter information about the clearance for the item/location.
5. Click Apply to add any changes.
6. Click Done to save any changes and close the window.
Create Clearance ResetsClearance resets can be created independent of a clearance markdown. You can create a clearance reset for a location while creating a clearance record for the zone-level. You can also create a location-level clearance reset for an executed zone-level markdown.
Navigate: From the Task Pad, select Clearances > Create Clearance Resets. The Create Clearance Resets workspace opens.
Note: Location exceptions can only be created for Zone Level clearances.
Note: To create a Location Exclusion, select the type Exclude.
Note: Item exceptions at the transaction level can occur only when the clearance was created at the item parent or item parent/diff level.

Creating Clearances
Clearances 8-19
Figure 8–19 Create Clearance Resets
1. In the Reset Date field, enter the date to specify the day that the item or location’s unit retail should be reset to its regular unit retail, or click the calendar button and select a date.
2. In the Item Selection area, select items on the clearance resets using the available fields.
Figure 8–20 Items Selection Area
1. In the Department field, enter a department number, or click the LOV button and select a department.
Note: All fields with LOV buttons allow multiple selections.

Creating Clearances
8-20 Oracle® Retail Price Management User Guide
2. In the Class field, enter a class number, or click the LOV button and select a class.
3. In the Subclass field, enter a subclass number, or click the LOV button and select a subclass.
4. In the Item Type drop-down list, select Item or Item List.
5. In the Item Level drop-down list, select Parent Item, Parent Item/Diff, or Transaction Level Item.
6. In the Diff Type drop-down list, select a diff type.
7. In the Item field, enter the item ID or click the LOV button and select the item.
8. In the Diff field, enter the diff ID or click the LOV button and select the diff.
3. Click Select. The items that meet your criteria are added to the Item Selection table.
4. In the Location Selection area, select how you want to add locations to the clearance resets.
■ Zone Group: Enter the ID of the zone group that contains the locations to add to the clearance reset, or click the LOV button and select a zone group.
■ Zone: Enter the ID of the zone to add to the clearance reset, or click the LOV button and select a zone.
■ Location: Enter the ID of the location that you want to add to the clearance reset, or click the LOV button and select a location.
5. Click Select. The zones and/or locations that meet your criteria are added to the table in the Location Selection table.
6. Click Apply to create clearance resets. One clearance reset is be created for each item/location intersection, the records are be displayed at the Parent or Transaction level/Location level.
7. Select a record and Click Approve to update the clearance reset record.
■ Click Select All to select all records.
Clearance Resets InquiryClearance resets can be searched upon using the item or location criteria. The lowest definable level by which you can search for a clearance reset is a subclass/zone..
Note: If you select Item List from the Item Type drop-down list, only item lists will be selectable from the Item field. If you select Item, only single items that conform to the other criteria specified will be selectable.
Note: The Diff Type and Diff fields are only enabled if Parent Item/Diff is selected.
Note: You can create clearance resets at the zone or location level.

Creating Clearances
Clearances 8-21
Navigate: From the Task Pad, select Clearances > Clearance Resets Inquiry. The Clearance Resets Inquiry workspace opens.
Figure 8–21 Clearance Resets Inquiry
1. In the Department field, enter a department number, or click the LOV button and select a department.
2. In the Class field, enter a class number, or click the LOV button and select a class.
3. In the Subclass field, enter a subclass number, or click the LOV button and select a subclass.
4. In the Zone Group field, enter the ID of the zone group that contains the locations to add to the clearance reset, or click the LOV button and select a zone group.
5. In the Zone field, enter the ID of the zone to add to the clearance reset, or click the LOV button and select a zone.
6. In the Location field, enter the ID of the location that you want to add to the clearance reset, or click the LOV button and select a location.
7. In the Item Type drop-down list, select Item or Item List.
8. In the Item Level drop-down list, select Parent Item, Parent Item/Diff, or Transaction Level Item.
Note: All fields with LOV buttons allow multiple selections.
Note: If you select Item List from the Item Type drop-down list, only item lists will be selectable from the Item field. If you select Item, only single items that conform to the other criteria specified will be selectable.
Note: The Diff Type and Diff fields are only enabled if Parent Item/Diff is selected.

Creating Clearances
8-22 Oracle® Retail Price Management User Guide
9. In the Diff Type drop-down list, select a diff type.
10. In the Item field, enter the item ID or click the LOV button and select the item.
11. In the Diff field, enter the diff ID or click the LOV button and select the diff.
8. Click Retrieve Clearance Resets. Your results appear in the Clearance Resets Results table.
Promotions 9-1
9Promotions
A promotion is a temporary reduction in price. In addition, you can track sales at one or more locations for a given time period as well as track the sales of merchandise with no price reductions, at given locations for a set time period.
Updates can be made to the details of an existing promotion and promotion components can be added to an existing promotion.
Promotion ComponentsThe following are the promotion components that RPM mainly focuses on.
Simple Component - A simple promotion component consists of an item, item group, or merchandise level that receives a discount at a specific location or group of locations when the customer purchases an item.
Threshold Component - A threshold promotion component consists of an item, item group, or merchandise level that receives a discount at a location or group of locations when the customer purchases a quantity or a amount of an item. You must define the threshold levels before you can create the threshold component.
Multi-Buy Component - A multi-buy promotion component consists of an item, item group, or merchandise level. You can define the quantity of items or amount of purchase required for the customer to receive a discount or reward. For example, a promotion might include a reward of a third pair of shoes free with the purchase of any two pair of shoes from selected items or item groups. Another promotion might allow purchase of any five items from selected item groups at a fixed price or discount. See "Examples of Multi-Buy Components" for more detailed examples.
Changes can be made to the details of a promotion component, and new details can be added to promotion components.
In the Promotion Component Detail Maintenance pane, records that contain item/location exceptions or exclusions are indicated by a down arrow. Records that are item/location exceptions or exclusions are indicated by an up arrow.
Existing promotion components can be copied into a new promotion.
Finance Component - The finance component consists of the type of the credit card, index number of the card issuing bank, threshold details, items that will be included or excluded for promotion, and so on.
Add Funding Information to a PromotionFunding is added to a promotion at the component level so that you can indicate the vendor that is contributing to the promotion. If you choose to create deals, based on

Create a Promotion
9-2 Oracle® Retail Price Management User Guide
the funded component, you must indicate the billing information for the deal. If the promotion is associated with an existing deal, the billing information defaults from the existing deal.
Create a PromotionNavigate: From the Task Pad, select Promotion > Create Promotion.
OR
From the Maintain Promotion Events workspace, click New Promotion.
The Create Promotion workspace opens.
Figure 9–1 Create Promotion
1. In the Promotion field, enter the name of the promotion.
2. In the Description field, enter additional information as necessary.
3. In the Start Date field, enter the day the promotion begins.
4. In the End Date field, enter the day the promotion stops.
5. In the Event field, enter the ID of the event you want to associate with the promotion, or click the LOV button and select an event.
6. Update the Currency field as necessary.
7. Select Secondary Application of Discounts as necessary.
8. Click one of the following:
■ Click Cancel to go back to the Create Component workspace without saving the promotion details.
■ Click Save + Repeat to save the promotion and add a new promotion.

Create a Promotion
Promotions 9-3
■ Click Done to save the promotion details and go back to the Create Component workspace.
Conflict CheckingWhenever the status of a price event changes, conflict checking is performed and the conflicts are displayed.
Conflict check is done for the following status only.
■ Worksheet to Approved
■ Worksheet to Submitted
■ Submitted to Approved
■ Approved to Worksheet
The existence of any conflict is identified by a binocular icon in the conflicts column of the multi-record block. To review a conflict, click on the binocular icon, the Conflict Review List window opens.
Figure 9–2 Conflict Review List Window
If the event type is Promotion, the promotion ID and promotion component ID are displayed. In case of Price Change and Clearance, the promotion ID and promotion component ID are not displayed.
Conflict Check StatusIn the Maintenance workspace, click Conflict Check Status. The Refresh Status window opens.

Create a Promotion
9-4 Oracle® Retail Price Management User Guide
Figure 9–3 Refresh Status Window
1. Click Refresh to update the conflict checking state in the window.
2. Click Exit to go back to the price event window.
■ The status in the multi-record block is refreshed.
3. Click Cancel to close the status window without making any changes or refreshing the price event.
Associate a Deal with a Promotion1. Click Referenced Deals. The Referenced Deals window opens.

Create a Promotion
Promotions 9-5
Figure 9–4 Referenced Deals Window
2. Select the deals you want to add to the promotion.
3. Click Select. The window closes.
4. Click Done to save any changes and close the workspace.
Add Components to a Promotion1. In the Promotion Components pane, click Add Component. The Create
Component workspace opens.
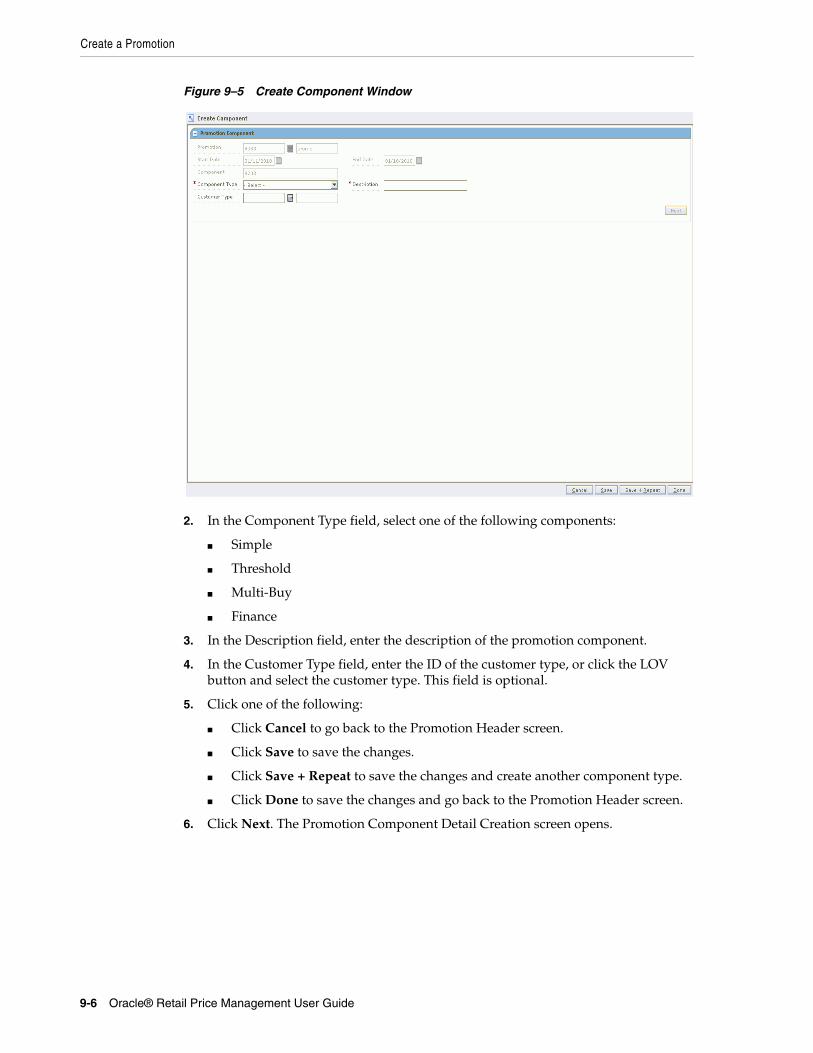
Create a Promotion
9-6 Oracle® Retail Price Management User Guide
Figure 9–5 Create Component Window
2. In the Component Type field, select one of the following components:
■ Simple
■ Threshold
■ Multi-Buy
■ Finance
3. In the Description field, enter the description of the promotion component.
4. In the Customer Type field, enter the ID of the customer type, or click the LOV button and select the customer type. This field is optional.
5. Click one of the following:
■ Click Cancel to go back to the Promotion Header screen.
■ Click Save to save the changes.
■ Click Save + Repeat to save the changes and create another component type.
■ Click Done to save the changes and go back to the Promotion Header screen.
6. Click Next. The Promotion Component Detail Creation screen opens.

Create a Promotion
Promotions 9-7
Figure 9–6 Promotion Component Detail Creation Window
Select Items1. In the Item Selection area, select items on the price change using the available
fields.
To select items from all available items, enter an ID in the Item field, or click the LOV button and select item.
Or
a. Enter information in the enabled fields to limit the items available in the Item field.
■ In the Department field, enter a department number, or click the LOV button and select a department.
■ In the Class field, enter a class number, or click the LOV button and select a class.
■ In the Subclass field, enter a subclass number, or click the LOV button and select a subclass.
■ In the Item Type drop-down list, select Item or Item List.
Note: All fields with LOV buttons allow multiple selections.

Create a Promotion
9-8 Oracle® Retail Price Management User Guide
■ In the Item Level drop-down list, select Parent Item, Parent Item/Diff, or Transaction Level Item.
■ In the Diff Type drop-down list, select a diff type.
■ In the Diff drop-down list, select a diff.
2. In the Item field, click the LOV button and select items.
Figure 9–7 Item Selection Pane
3. In the Item List field, enter the item list ID or select the item list from the LOV.
■ Click View Items. A pop-up window opens where the items in the item list are displayed.
4. Click Select. Items that meet your criteria are added to the Item Selection table.
Note: If you select Item List from the Item Type drop down, only item lists will be selectable from the Item field. If you select Item, only single items that conform to the other criteria specified will be selectable.
Note: The Diff Type and Diff fields are only enabled if Parent Item/Diff is selected.
Note: If the Item Type is selected as Item List, the Item Level is defaulted to Item List and the Item Editor defaults to Item List.

Create a Promotion
Promotions 9-9
Figure 9–8 Item Selection Table
■ If the Item Type is Item List, then the item list ID is populated in the ID column of the Item Selection MRB as a hyperlink. Click the hyperlink to view the items in the item list.
5. In the Location Selection area, filter and select the locations to be included..
6. Click Select. The locations are added to the Location Selection table.
7. In the Change Type field, select the price change that occurs during the promotion:
■ Amount Off: The items are reduced in price by the amount entered in the Change Amount field.
■ Exclude: The selected items are not be affected by price changes that occur as a result of the promotion.
■ Fixed Price: The items are priced at the amount entered in the Change Amount field.
■ No Change: The item prices are not changed. For reporting purposes, the selected items are recognized as being on promotion.
■ Percent Off: The items are reduced in price by the percentage entered in the Change Amount field.
8. In the Change Amount field, enter the amount off, percent off, or fixed price.
9. Enter or select a value in the Selling UOM field (Optional for a Fixed Price change.) If you leave this field blank, the selling unit of measure will default to the current selling unit of measure for the items/location combination. (The Selling UOM field is only active for a Fixed Price change.)
10. Update the Start Date & Time and End Date & Time fields if you want this promotion component to use start and end times different from those of the promotion.
11. In the Apply To field, select the types of item pricing to which you want to apply the promotion component:
■ Clearance Only
Note: Do not enter a negative sign before the number entered in the Change Amount field. The amount entered is assumed to be a decrease in price.
Note: If you do not specify a Selling UOM value, and the selected items do not all have the same selling unit of measure, UOM validation is moved to conflict checking engine.

Create a Promotion
9-10 Oracle® Retail Price Management User Guide
■ Regular Only
■ Regular and Clearance
12. If you want to apply a price guide to this promotion component, enter the price guide in the Price Guide field or click the LOV button and select the price guide.
13. Select the Ignore Constraints check box to override any constraints that apply to this promotion.
14. Click Apply. The promotion is displayed in the Promotion Component Detail Maintenance pane.
15. Click one of the following buttons:
■ Click Cancel to go back to the Create Promotion screen.
■ Click Save to save the promotion component.
■ Click Save + Repeat to save the promotion component and add another component.
■ Click Done to save the promotion component and close the workspace.
Copy Components to a New Promotion1. In the Promotion Components pane, select the components you want to copy to a
new promotion.
2. Click Copy to New. A dialog opens for you to enter details about the new promotion you want to create.
3. In the Description field, enter a description of the new promotion.
4. In the Start Date field, enter or select the start date of the new promotion.
5. In the End Date field, enter or select the end date of the new promotion (Optional).
6. To associate the new promotion with an event, enter or select the event in the Event field (Optional).
7. Click Create. The Create Promotion workspace opens. The header information is copied into the Promotion Header pane, and the selected components are copied into the Promotion Components pane.
8. Create the new promotion.
Create from an Existing Promotion Component1. Click Create from Existing. The Copy dialog opens.
Note: If a promotion component that you apply results in a negative margin for an item, fields in the Promotion Component Detail Maintenance list are highlighted to call the negative margin to your attention. (If the Add Column Detail button is displayed, click the button to view full details, including negative margins.) See "View Margins (Margin Visibility)" for more information.
Note: If funding exists for the copied components, you will be asked if you want to copy the funding information.

Search for a Promotion
Promotions 9-11
Figure 9–9 Copy Dialog
2. In the Department field, enter or select the department that participated in the promotion (Optional.) You can use this field to narrow the choices in the list of values in the Promotion field.
3. In the Promotion field, enter or select the ID with which the component is associated.
4. In the Component field, enter or select the ID of the component you want to copy.
5. Update the Start and End Date fields as necessary.
6. Click Copy. The component is added to the Promotion Components table.
Search for a PromotionNavigate: From the Task Pad, select Promotions > Maintain Promotion. The Promotions Search workspace opens.
Figure 9–10 Promotion Search Window

Maintain a Promotion
9-12 Oracle® Retail Price Management User Guide
1. Enter or select the criteria to limit your search.
2. Click Search. Promotions that match these criteria appear in the Promotion Search Results pane.
Maintain a PromotionNavigate: From the Task Pad, select Promotions > Maintain Promotion. The Promotions Search workspace opens.
Figure 9–11 Promotion Search Window
1. Search for a promotion.
2. In the Promotion Search Results pane, select the promotion you want to edit.
3. Click Edit. The Maintain Promotion workspace opens.

Create a Simple Component
Promotions 9-13
Figure 9–12 Maintain Promotion Window
4. In the Promotion Header pane, edit the enabled fields as necessary.
5. Click Done to save any changes and close the workspace.
Create a Simple ComponentNavigate: From the Task Pad, select Promotions > Create Component.
OR
From the Create Promotion workspace, click Add Component in the Promotion Components pane.
The Create Component workspace opens.
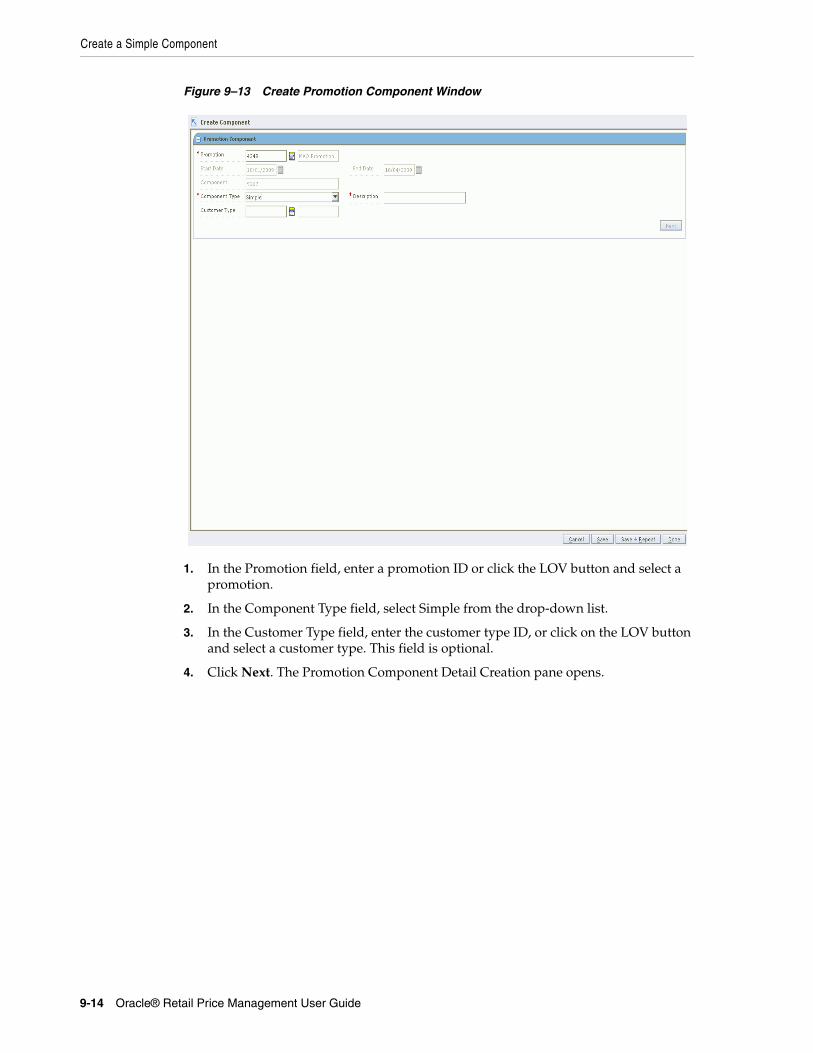
Create a Simple Component
9-14 Oracle® Retail Price Management User Guide
Figure 9–13 Create Promotion Component Window
1. In the Promotion field, enter a promotion ID or click the LOV button and select a promotion.
2. In the Component Type field, select Simple from the drop-down list.
3. In the Customer Type field, enter the customer type ID, or click on the LOV button and select a customer type. This field is optional.
4. Click Next. The Promotion Component Detail Creation pane opens.

Create a Simple Component
Promotions 9-15
Figure 9–14 Promotion Component Detail Creation Window
Add Items and Locations to a Promotion Component1. In the Item Selection area, filter and select the items to be included in the
promotion component.
2. Click Select. The items are added to the Item Selection table.
3. In the Location Selection area, filter and select the locations to be included..
4. Click Select. The locations are added to the Location Selection table.
5. In the Change Type field, select the price change that occurs during the promotion:
■ Amount Off: The items are reduced in price by the amount entered in the Change Amount field.
■ Exclude: The selected items are not be affected by price changes that occur as a result of the promotion.
■ Fixed Price: The items are priced at the amount entered in the Change Amount field.
■ No Change: The item prices are not changed. For reporting purposes, the selected items are recognized as being on promotion.
■ Percent Off: The items are reduced in price by the percentage entered in the Change Amount field.
6. In the Change Amount field, enter the amount off, percent off, or fixed price.

Create a Simple Component
9-16 Oracle® Retail Price Management User Guide
7. Enter or select a value in the Selling UOM field (Optional for a Fixed Price change.) If you leave this field blank, the selling unit of measure will default to the current selling unit of measure for the items/location combination. (The Selling UOM field is only active for a Fixed Price change.)
8. Update the Start Date & Time and End Date & Time fields if you want this promotion component to use start and end times different from those of the promotion.
9. In the Apply To field, select the types of item pricing to which you want to apply the promotion component:
■ Clearance Only
■ Regular Only
■ Regular and Clearance
10. If you want to apply a price guide to this promotion component, enter the price guide in the Price Guide field or click the LOV button and select the price guide.
11. Select the Ignore Constraints check box to override any constraints that apply to this promotion.
12. Click Apply. The promotion is displayed in the Promotion Component Detail Maintenance pane.
13. Click one of the following buttons:
■ Click Cancel to go back to the Create Promotion screen.
■ Click Save to save the promotion component.
■ Click Save + Repeat to save the promotion component and add another component.
■ Click Done to save the promotion component and close the workspace.
Add Funding to a Simple Component1. Create a simple component.
Note: Do not enter a negative sign before the number entered in the Change Amount field. The amount entered is assumed to be a decrease in price.
Note: If you do not specify a Selling UOM value, and the selected items do not all have the same selling unit of measure, UOM validation is moved to conflict checking engine.
Note: If a promotion component that you apply results in a negative margin for an item, fields in the Promotion Component Detail Maintenance list are highlighted to call the negative margin to your attention. (If the Add Column Detail button is displayed, click the button to view full details, including negative margins.) See "View Margins (Margin Visibility)" for more information.

Create a Simple Component
Promotions 9-17
2. Expand the Funding pane.
Figure 9–15 Funding Pane Simple Component Window
3. In the Corporate Funding Percent field, enter the percent that the retailer contributes to the promotion.
4. Select the Create Deals check box to create a deal based on this promotion component and funding.
5. In the Vendor Type field, select the type of vendor that is funding the component.
6. In the Vendor field, enter the ID of the vendor, or click the LOV button and select a vendor.
7. In the Deal ID field, enter the deal the promotion is associated with, or click the LOV button and select a deal.
8. In the Deal Comp ID, enter the ID of the deal component field, or click the LOV button and select a deal component.
9. In the Contribution % field, enter the percentage that this vendor contributes to the promotion component.
10. Select the Use Deal Locations check box to indicate that the locations on the deal should be used for the promotion.
11. Select the Use Deal Items check box to indicate that the items on the deal should be used for the promotion.
Note: The Deal and Deal ID field are disabled if you selected the Create Deals check box.

Create a Simple Component
9-18 Oracle® Retail Price Management User Guide
12. If you selected the Create Deals check box, add billing information for a deal to a funded component.
13. Click Apply to add your changes to the table.
14. Click Done to save any changes and close the workspace.
Create a Threshold ComponentNavigate: From the Task Pad, select Promotions > Create Component.
OR
From the Create Promotion workspace, click Add Component in the Promotion Components pane.
The Create Component workspace opens.
Figure 9–16 Create Component Window
1. In the Description field, enter a description of the component.
2. In the Component Type field, select Threshold.
Note: The Use Deal Locations and Use Deal Items check boxes are disabled if the promotion component already has items or locations.

Create a Simple Component
Promotions 9-19
3. In the Customer Type field, enter the ID of the customer type, or click the LOV button and select the customer type. This field is optional.
4. Click Next. The Promotion Component Detail Creation pane opens.
Figure 9–17 Promotion Component Detail Creation Window
Add Items and Locations to a Promotion Component1. In the Item Selection area, filter and select the items to be included in the
promotion component.
2. Click Select. The items are added to the Item Selection table.
3. In the Location Selection area, filter and select the locations to be included..
4. Click Select. The locations are added to the Location Selection table.
5. In the Threshold field, select the threshold you want to associate with the promotion, or click New Threshold to create a threshold definition.
6. Update the Start Date & Time and End Date & Time fields if you want this promotion component to use start and end times different from those of the promotion.
7. In the Apply To field, select the types of item pricing to which you want to apply the promotion component:
■ Clearance Only
■ Regular Only
■ Regular and Clearance
8. If you want to apply a price guide to this promotion component, enter the price guide in the Price Guide field or click the LOV button and select the price guide.

Create a Simple Component
9-20 Oracle® Retail Price Management User Guide
9. Select the Ignore Constraints check box to override any constraints that apply to this promotion.
10. Click Apply. The promotion is displayed in the Promotion Component Detail Maintenance pane.
11. Click one of the following buttons:
■ Click Save to save the promotion component.
■ Click Done to save the promotion component and close the workspace.
Add Funding to a Threshold Component1. Create a threshold component.
2. Expand the Funding pane.
Figure 9–18 Funding Pane Threshold Component Window
3. In the Corporate Funding Percent field, enter the percent that the retailer contributes to the promotion.
4. Select a threshold.
5. In the Uptake % field, enter the percentage of customers that you expect to take advantage of the promotion at this threshold.
6. Click Apply to add your changes to the table.

Create a Multi-Buy Component
Promotions 9-21
7. Select the Create Deals check box to create a deal based on this promotion component and funding.
8. In the Vendor Type field, select the type of vendor that is funding the component.
9. In the Vendor field, enter the ID of the vendor, or click the LOV button and select a vendor.
10. In the Deal ID field, enter the deal the promotion is associated with, or click the LOV button and select a deal.
11. In the Deal Comp ID, enter the ID of the deal component field, or click the LOV button and select a deal component.
12. In the Contribution % field, enter the percentage that this vendor contributes to the promotion component.
13. Select the Use Deal Locations check box to indicate that the locations on the deal should be used for the promotion.
14. Select the Use Deal Items check box to indicate that the items on the deal should be used for the promotion.
15. If you selected the Create Deals check box, add billing information for a deal to a funded component.
16. Click Apply to add your changes to the table.
17. Click Done to save any changes and close the workspace.
Create a Multi-Buy ComponentNavigate: From the Task Pad, select Promotions > Create Component.
OR
From the Create Promotion workspace, click Add Component in the Promotion Components pane. The Create Component workspace opens.
Note: The Deal and Deal ID field are disabled if you selected the Create Deals check box.
Note: Note: The Use Deal Locations and Use Deal Items check boxes are disabled if the promotion component already has items or locations.

Create a Multi-Buy Component
9-22 Oracle® Retail Price Management User Guide
Figure 9–19 Create Component Window
1. In the Description field, enter a description of the component.
2. In the Component Type field, select Multi-Buy.
3. In the Customer Type field, enter the ID of the customer type, or click the LOV button and select the customer type. This field is optional.
4. Click Next. The Promotion Component Detail Maintenance pane opens.

Create a Multi-Buy Component
Promotions 9-23
Figure 9–20 Promotion Component Detail Maintenance Pane
Create a Multi-Buy Component
9-24 Oracle® Retail Price Management User Guide
Create Buy ListsIn the Buy List area, you create one or more buy lists for a multi-buy promotion. Follow these steps to create a buy list:
1. Select how the items in the buy list must be purchased:
■ All: All the items in the buy list must be purchased to receive the discount, fixed price, or other reward.
■ Amount: A specified money amount must be spent on items from the buy list to receive the reward.
■ Quantity: A specified number of items in the buy list must be purchased to receive the reward.
2. In the next field, enter the quantity or amount of the required purchase:
■ If All is selected, enter the number of each item in the buy list that the customer must purchase. For example, if you enter 2, the customer must buy 2 of each item in the buy list.
■ If Amount is selected, enter the money amount that the customer must spend on items in the buy list. For example, if you enter 5 and your currency is dollars, the customer must spend 5 dollars on buy list items.
■ If Quantity is selected, enter the number of items that the customer must purchase from any items in the buy list. For example, if you enter 3, the customer must purchase any 3 buy list items.
3. Click Items to select the items for the buy list. The Selected Items window opens.
4. Add items to the buy list. See "Add Items to a Multi-Buy Component".
5. Enter a description for the buy list (optional).
6. To add another buy list, click Add Buy List and repeat steps 1 through 5.
7. When you have created all the buy lists for this component, select how to apply the reward:
■ All Buy Lists: The reward applies to the items that the customer purchased from all buy lists.
■ Each Buy List: For each buy list, a separate reward applies.
Note: See "Examples of Multi-Buy Components" for examples of different types of multi-buy promotion components and how to create them.
Note: If your system option settings allow, you can use either AND or OR conditions to connect multiple buy lists. If all buy lists are connected by AND, the customer must purchase items from all buy lists to qualify for the reward. If OR settings are allowed on your system, you can specify options for the buy lists from which customers can purchase qualifying items. See "Examples of Multi-Buy Components" for information about multiple buy lists with OR conditions.
Create a Multi-Buy Component
Promotions 9-25
■ Reward List: The reward applies to one or more separate reward lists. Because the customer purchased the required items, the customer can obtain a reward on one or more other items.
8. Click Create Reward.
Proceed to create the rewards for this promotion component.
Create Reward ListsThe procedures to create rewards are different, depending on how the reward applies:
■ If the reward applies to All Buy Lists or to the Reward List, you create the reward in the Reward List area.
■ If the reward applies to Each Buy List, you create the applicable reward under each buy list.
In the Reward List Area If rewards apply to all buy lists together, or to one or more reward lists, you create the reward in the Reward List area.
1. Select the number or amount of items included in the reward:
■ All: The reward includes all items in the reward list.
■ Amount: The reward applies to a purchase amount of the items in the reward list.
■ Quantity: The reward applies to a number of items in the reward list.
2. In the next field, enter the applicable quantity or currency amount for the reward.
3. Click Items to select the items for the reward list. The Selected Items window opens.
4. Add items to the reward list. See "Add Items to a Multi-Buy Component".
5. Enter a description for the reward list (optional).
6. Select the type of reward from the drop-down list:
■ Amount Off: The price for the item or items is reduced by a specified amount.
■ Cheapest Free: The cheapest item purchased is free.
■ Fixed Price: The price for the item or items is a fixed amount.
■ Percent Off: The price for the item or items is a specified percentage off.
7. In the next field, enter a value appropriate for the type of reward:
■ Amount Off: Enter the currency amount of the price reduction.
■ Cheapest Free: This field does not apply and is disabled.
■ Fixed Price: Enter the currency amount the customer must pay for the reward item (or all reward items together).
■ Percent Off: Enter the percentage amount to be taken off the price.
8. If the reward is Fixed Price, enter the unit of measure of the reward item in the Selling UOM field, or click the LOV button and select the selling UOM. (The Selling UOM field is active and required only for Fixed Price rewards.)
9. To add another reward list, click Add Reward List and repeat steps 1 through 8.

Create a Multi-Buy Component
9-26 Oracle® Retail Price Management User Guide
10. When you have created all the reward lists for this component, proceed to add locations. See "Add Locations and Save the Multi-Buy Component".
Under Each Buy List If rewards apply to each buy list, you create each reward separately under each buy list.
1. Select the type of reward from the drop-down list:
■ Amount Off: The price for the item or items is reduced by a specified amount.
■ Cheapest Free: The cheapest item purchased is free.
■ Fixed Price: The price for the item or items is a fixed amount.
■ Percent Off: The price for the item or items is a specified percentage off.
2. In the next field, enter a value appropriate for the type of reward:
■ Amount Off: Enter the currency amount of the price reduction.
■ Cheapest Free: This field does not apply and is disabled.
■ Fixed Price: Enter the currency amount the customer must pay for the reward item (or all reward items together).
■ Percent Off: Enter the percentage amount to be taken off the price.
3. If the reward is Fixed Price, enter the unit of measure of the reward item in the Selling UOM field, or click the LOV button and select the selling UOM. (The Selling UOM field is active and required only for Fixed Price rewards.)
If there are multiple buy lists, repeat steps 1 through 3 for each of the buy lists. Then proceed to add locations. See "Add Locations and Save the Multi-Buy Component".
Add Items to a Multi-Buy ComponentFor a buy list or reward list, select the transaction-level items for the list in the Selected Items window. You can select and filer items by any of the following:
Note: If your system option settings allow, you can use either AND or OR conditions to connect multiple reward lists. If all buy lists are connected by AND, the customer is eligible for reward from all reward lists. If OR settings are allowed on your system, you can specify options for the reward lists from which customers can select rewards. See "Examples of Multi-Buy Components" for information about multiple reward lists with OR conditions.

Create a Multi-Buy Component
Promotions 9-27
Figure 9–21 Selected Items Window
■ Department
■ Class
■ Subclass
■ Item Type
■ Item Level
■ Diff Type
■ Item
■ Diff
Perform the following steps:
1. Enter values or use LOV buttons to filter and select items.
2. Click Select to select items and move them to the Item Selection table.
3. Click Done when you are finished selecting items.
Add Locations and Save the Multi-Buy ComponentIn the Location Selection area, add locations for this promotion component. You can add locations by any combination of zone group, zone, and store.
1. Enter Zone Group, Zone, or Store values, or use the LOV buttons to select locations.
2. Click Select. The locations are added to the Location Selection table.
3. Correct the Start Date & Time and End Date & Time fields if needed.

Create a Multi-Buy Component
9-28 Oracle® Retail Price Management User Guide
4. In the Apply To field, select the types of item pricing to which you want to apply the promotion component:
■ Clearance Only
■ Regular Only
■ Regular and Clearance
5. Select the Ignore Constraints check box if you want this component to ignore all constraints for the associated promotion.
6. Use the fields Attribute 1, Attribute 2, and Attribute 3 if you want to enter any additional descriptive text about this promotion component. For example, you can enter "end-of-aisle promotion" or "advertised in weekly flyer" as information for future reference. You can click the comment icon to open the Description window to enter text.
7. The status of this promotion component is displayed in the Status field. To change the status:
■ In the Action field, select one of the following values from the drop-down list:
■ Submit: Save and submit this promotion component for approval.
■ Approve: Approve this promotion component.
8. Click Update.
9. Click one of the following buttons:
■ Click Save to save the promotion component.
■ Click Done to save the promotion component and close the workspace.
Add Funding to a Multi-Buy Component1. Create a multi-buy component.
2. Expand the Funding pane.

Create a Multi-Buy Component
Promotions 9-29
Figure 9–22 Funding Multi-Buy Component Window
3. In the Corporate Funding Percent field, enter the percent that the retailer contributes to the promotion.
4. Select the Create Deals check box to create a deal based on this promotion component and funding.
5. In the Vendor Type field, select the type of vendor that is funding the component.
6. In the Vendor field, enter the ID of the vendor, or click the LOV button and select a vendor.
7. In the Deal ID field, enter the deal the promotion is associated with, or click the LOV button and select a deal.
8. In the Deal Comp ID, enter the ID of the deal component field, or click the LOV button and select a deal component.
9. In the Contribution % field, enter the percentage that this vendor contributes to the promotion component.
10. Select the Use Deal Locations check box to indicate that the locations on the deal should be used for the promotion.
11. If you selected the Create Deals check box, add billing information for a deal to a funded component.
12. Click Apply to add your changes to the table.
Note: The Deal and Deal ID field are disabled if you selected the Create Deals check box.
Note: The Use Deal Locations check boxes are disabled if the promotion component already has locations.
Create a Multi-Buy Component
9-30 Oracle® Retail Price Management User Guide
13. Click Done to save any changes and close the workspace.
Add Billing Information for a Deal to a Funded Component1. Click Deal Billing. The Deal Billing window opens.
2. Select the information about the deal that you require:
■ Deal Reporting Level: The frequency that the deal is reported.
■ Bill Back Method: The type of invoice that is created for the supplier. Select the appropriate option.
■ Bill Back Period: The frequency that the vendor is charged for the bill back. Select when to charge the vendor.
■ Invoice Processing Logic: The method used to create invoices. Invoices are created automatically, manually, or not at all depending on the option selected.
■ Include VAT in Deal Billing: Select the check box to indicate that VAT should be included in the invoice information.
■ Include Deal Income in Stock Ledger: Select the check box to indicate that deal income accrual should be written to the stock ledger.
3. Click Done to save any changes and close the window.
Examples of Multi-Buy ComponentsMulti-buy components provide many flexible options to design a promotion component that gives the customer a discount, fixed price, or other reward for purchasing selected items. The component can specify either a quantity or purchase amount as the requirement to receive the reward.
A multi-buy component can be simple or complex. You can use AND and OR conditions to create components with numerous purchase and reward options.
All multi-buy promotion components share common characteristics, and you create them using the same interface. Any multi-buy component can be considered as one of the following general types:
■ Multi-buy "meal deal"
■ Multi-buy link saver
■ Multi-buy "cheapest free"
■ Multi-buy with multiple reward (get) lists
■ Multi-buy with AND or OR conditions for buy and reward lists
The following are examples of each of these types of multi-buy promotion components.
Multi-Buy Meal DealIn this example, the customer can buy one hamburger sandwich, an order of French fries, and a soda for a fixed price of five dollars. In the Buy List area, it is specified that the customer must purchase a quantity of 1 from each buy list. The AND connectors
Note: If the System Options "Do not run Conflict Check for Multi-Buy Promotion Approval" is checked, then the Funding panel is disabled for multi-buy promotion.

Create a Multi-Buy Component
Promotions 9-31
specify that the customer must buy the required quantity from all buy lists to qualify for the reward. The reward applies to all buy lists; that is, the reward is applied to the items purchased from the buy lists. The Reward List area specifies the reward as a fixed price of 5.00.
The items can be specific items or items from selected item lists. For example, any kind of soda might qualify, or the customer might be required to purchase a particular brand or flavor of soda.
Figure 9–23 Meal Deal Example
Multi-Buy Link SaverIn this example, the customer receives two dollars off the price of a winter scarf if it is purchased along with both a cap and gloves. In this case, the reward is not a fixed price or discount on the purchased items, but a special deal on an additional item.
In the Buy List area, it is specified that the customer must buy a quantity of 1 from each buy list. The AND connectors specify that the customer must buy the specified quantity from both buy lists to qualify for the reward. The reward applies to the separate reward list. The Reward List area specifies a selected item or item list and a price reduction (amount off) of 2.00 for the item from the reward list.
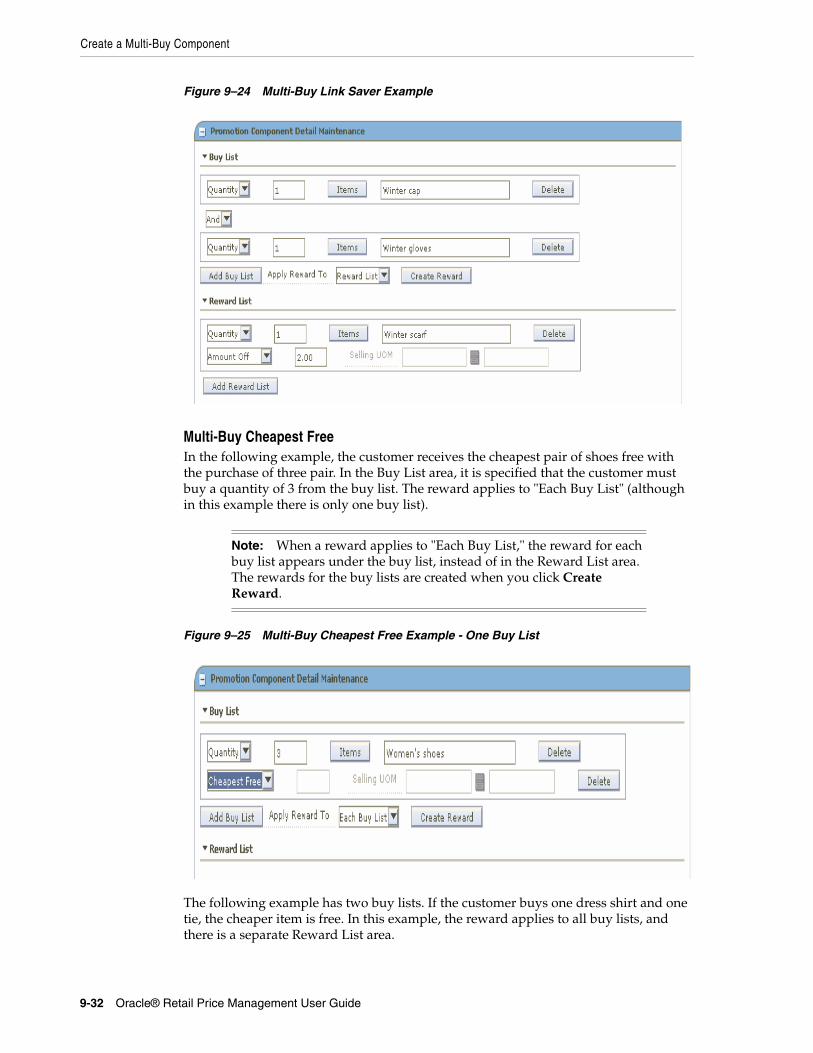
Create a Multi-Buy Component
9-32 Oracle® Retail Price Management User Guide
Figure 9–24 Multi-Buy Link Saver Example
Multi-Buy Cheapest FreeIn the following example, the customer receives the cheapest pair of shoes free with the purchase of three pair. In the Buy List area, it is specified that the customer must buy a quantity of 3 from the buy list. The reward applies to "Each Buy List" (although in this example there is only one buy list).
Figure 9–25 Multi-Buy Cheapest Free Example - One Buy List
The following example has two buy lists. If the customer buys one dress shirt and one tie, the cheaper item is free. In this example, the reward applies to all buy lists, and there is a separate Reward List area.
Note: When a reward applies to "Each Buy List," the reward for each buy list appears under the buy list, instead of in the Reward List area. The rewards for the buy lists are created when you click Create Reward.

Create a Multi-Buy Component
Promotions 9-33
Figure 9–26 Multi-Buy Cheapest Free Example - Multiple Buy Lists
Multi-Buy with Multiple Reward ListsIn this more complex example, when the customer buys one jacket and one pair of slacks, the customer can buy one shirt or two ties for a fixed price of five dollars more.
The Buy List area in this example is similar to other examples that have multiple buy lists. The customer must buy a quantity of 1 from all buy lists, and the reward applies to the reward list.
In this case, there are multiple reward lists. The OR connector specifies that the customer has the choice of a reward from either (but not both) of the reward lists. Each reward list specifies a fixed price and a quantity. In this example, the quantity is different for each reward list. (The fixed price could also be different for each reward list.)
Figure 9–27 Multi-Buy Example with Multiple Reward Lists
Multi-Buy with AND or OR Conditions for Buy and Reward ListsThe following example uses both multiple buy lists and multiple reward lists. The buy and reward lists use a combination of AND and OR conditions.

Create a Multi-Buy Component
9-34 Oracle® Retail Price Management User Guide
In this example, the customer buys either a hamburger or a chicken sandwich and an order of French fries. The reward is either a soft drink for 10 cents or ice cream for 25 cents.
Figure 9–28 Multi-Buy Example with AND and OR Conditions
Create a Finance ComponentNavigate: From the Task Pad, select Promotions > Create Component.
OR
From the Create Promotion workspace, click Add Component in the Promotion Components pane.
The Create Component workspace opens.

Create a Multi-Buy Component
Promotions 9-35
Figure 9–29 Create Promotion Component Window
1. In the Promotion field, enter a promotion ID or click the LOV button and select a promotion.
2. In the Component Type field, select Finance from the drop-down list.
3. In the Description field, enter the description of the promotion component.
4. In the Customer Type field, enter the customer type ID, or click on the LOV button and select a customer type. This field is optional.
5. Click Next. The details promotion component detail screen opens.
Add Credit Card DetailsThe type of credit card is required in order to qualify for the promotion.

Create a Multi-Buy Component
9-36 Oracle® Retail Price Management User Guide
Figure 9–30 Add Credit Card Details
1. In the credit details workspace, click Add Row.
2. In the Credit Type field, select the type of the credit card from the drop-down list.
3. In the BIN field, enter the Bank Index Number or click on the LOV button and select the bank name and index number.
4. In the Commission Rate field, enter the commission percentage that the Retailer has to pay to the Credit Card Company when a customer purchases using the Finance Promotion.
5. In the Comments field, enter the comments.
6. Click Apply.
■ The credit card details are displayed in the credit details table.
7. To edit the credit details, select a credit type and click Edit.
8. Make the necessary changes and click Apply to save the changes.
Add Threshold DetailsThreshold amount is the total amount that the customer has to spend in order to qualify for the Finance Promotion. For example, promotion is set up for Visa Credit Card with a threshold of $1,000 and promotion percentage of 0, with a duration of 18 months. If the customer spends $1,000 or more for the items in the promotion and pays using Visa Credit Card, the customer has an option to pay back the credit card company without any interest (0 %) in 18 months.
Figure 9–31 Add Threshold Details

Create a Multi-Buy Component
Promotions 9-37
1. In the Threshold Details workspace, click Add Row.
2. In the Threshold Amount Retail field, enter the threshold amount to be applied for the credit promotion.
3. In the Duration field, enter the month and day in the respective fields.
4. Click Apply.
■ The threshold details are displayed in the threshold details table.
5. To edit the threshold details, select a threshold and click Edit.
6. Make the necessary changes and click Apply to save the changes.
Promotion Component Detail MaintenanceYou can make your selection based on Department, Class, Subclass, Item Type, Item Level, Diff Type, Item, or Diff in order to specify the items that should be included in the promotion component.
Item Selection
1. In the Description field, enter the description based on the item selection.
Figure 9–32 Item Selection
You can select and filer items for inclusion by any of the following:
■ Department
■ Class

Create a Multi-Buy Component
9-38 Oracle® Retail Price Management User Guide
■ Subclass
■ Item Type
■ Item Level
■ Diff Type
■ Item
■ Diff
2. Enter values or use LOV buttons to filter and select items.
3. Click Select to select items and move them to the Item Selection table.
4. Click Done when you are finished selecting items.
Item Exclusion
1. In the Description field, enter the description.
Figure 9–33 Item Exclusion
You can select and filer items for exclusion by any of the following:
■ Department
■ Class
■ Subclass
■ Item Type

Create a Finance Component
Promotions 9-39
■ Item Level
■ Diff Type
■ Item
■ Diff
2. Enter values or use LOV buttons to filter and select items.
3. Click Select to select items and move them to the Item Selection table.
4. Click Done when you are finished selecting items.
Locations Selection and ExclusionYou can add locations by any combination of zone and store. You can also create item exclusion records for existing Item/Location records that have been created at a level above the transaction item level.
1. In the Location Selection area, Enter Zone Group, Zone, or Store values, or use the LOV buttons to select locations.
2. Click Select. The locations are added to the Location Selection table.
3. In the Location Exclusion area, enter the location ID to exclude, or click on the LOV button to select the location to be excluded from the selected list.
4. Click Select. The selected locations for exclusion are listed in the Location Selection table.
5. Correct the Start Date & Time and End Date & Time fields if needed.
6. Select the Ignore Constraints check box if you want this component to ignore all constraints for the associated promotion.
7. Use the fields Attribute 1, Attribute 2, and Attribute 3 if you want to enter any additional descriptive text about this promotion component. You can click the comment icon to open the Description window to enter text.
8. The status of this promotion component is displayed in the Status field. To change the status:
■ In the Action field, select one of the following values from the drop-down list:
– Submit: Save and submit this promotion component for approval.
– Approve: Approve this promotion component.
9. Click Update.
10. Click one of the following buttons:
■ Click Save to save the promotion component.
■ Click Done to save the promotion component and close the workspace.
Create a Finance ComponentNavigate: From the Task Pad, select Promotions > Create Component.
OR
From the Create Promotion workspace, click Add Component in the Promotion Components pane.
The Create Component workspace opens.

Create a Finance Component
9-40 Oracle® Retail Price Management User Guide
Figure 9–34 Create Promotion Component Window
1. In the Promotion field, enter a promotion ID or click the LOV button and select a promotion.
2. In the Component Type field, select Finance from the drop-down list.
3. In the Description field, enter the description of the promotion component.
4. In the Customer Type field, enter the customer type ID, or click on the LOV button and select a customer type. This field is optional.
5. Click Next. The details promotion component detail screen opens.
Add Credit Card DetailsThe type of credit card is required in order to qualify for the promotion.

Create a Finance Component
Promotions 9-41
Figure 9–35 Add Credit Card Details
1. In the credit details workspace, click Add Row.
2. In the Credit Type field, select the type of the credit card from the drop-down list.
3. In the BIN field, enter the Bank Index Number or click on the LOV button and select the bank name and index number.
4. In the Commission Rate field, enter the commission percentage that the Retailer has to pay to the Credit Card Company when a customer purchases using the Finance Promotion.
5. In the Comments field, enter the comments.
6. Click Apply.
■ The credit card details are displayed in the credit details table.
7. To edit the credit details, select a credit type and click Edit.
8. Make the necessary changes and click Apply to save the changes.
Add Threshold DetailsThreshold amount is the total amount that the customer has to spend in order to qualify for the Finance Promotion. For example, promotion is set up for Visa Credit Card with a threshold of $1,000 and promotion percentage of 0, with a duration of 18 months. If the customer spends $1,000 or more for the items in the promotion and pays using Visa Credit Card, the customer has an option to pay back the credit card company without any interest (0 %) in 18 months.
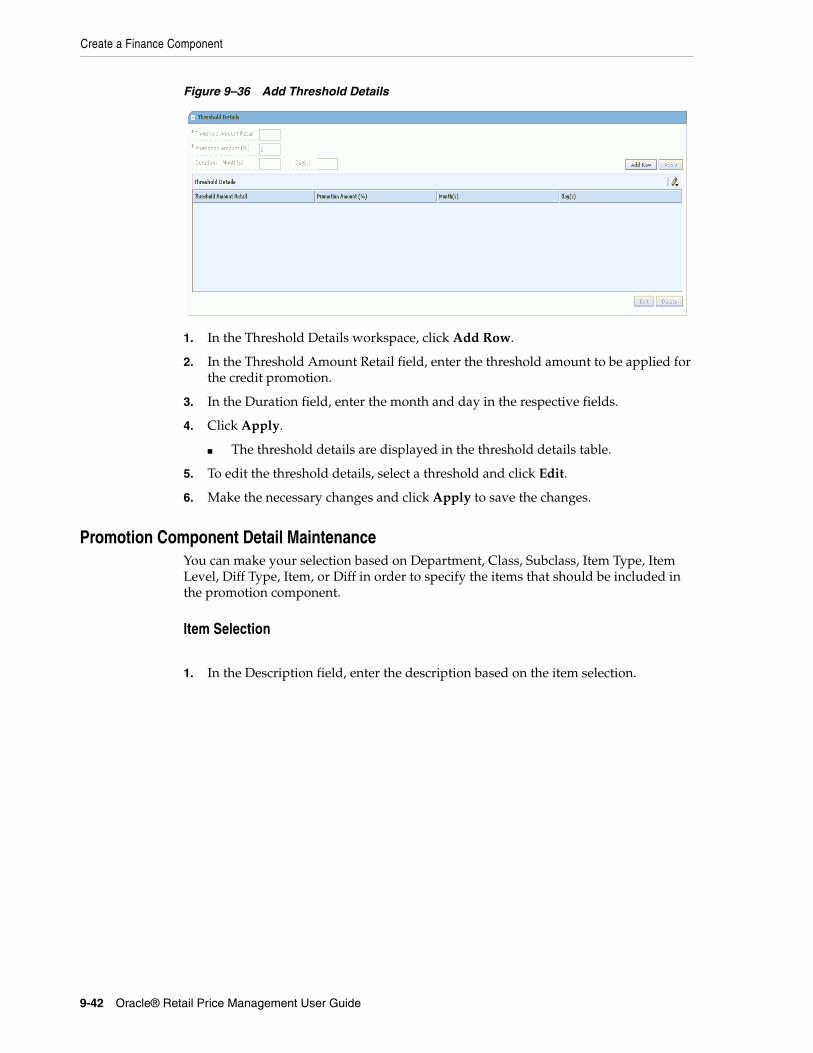
Create a Finance Component
9-42 Oracle® Retail Price Management User Guide
Figure 9–36 Add Threshold Details
1. In the Threshold Details workspace, click Add Row.
2. In the Threshold Amount Retail field, enter the threshold amount to be applied for the credit promotion.
3. In the Duration field, enter the month and day in the respective fields.
4. Click Apply.
■ The threshold details are displayed in the threshold details table.
5. To edit the threshold details, select a threshold and click Edit.
6. Make the necessary changes and click Apply to save the changes.
Promotion Component Detail MaintenanceYou can make your selection based on Department, Class, Subclass, Item Type, Item Level, Diff Type, Item, or Diff in order to specify the items that should be included in the promotion component.
Item Selection
1. In the Description field, enter the description based on the item selection.

Create a Finance Component
Promotions 9-43
Figure 9–37 Item Selection
You can select and filer items for inclusion by any of the following:
■ Department
■ Class
■ Subclass
■ Item Type
■ Item Level
■ Diff Type
■ Item
■ Diff
2. Enter values or use LOV buttons to filter and select items.
3. Click Select to select items and move them to the Item Selection table.
4. Click Done when you are finished selecting items.
Item Exclusion
1. In the Description field, enter the description.

Create a Finance Component
9-44 Oracle® Retail Price Management User Guide
Figure 9–38 Item Exclusion
You can select and filer items for exclusion by any of the following:
■ Department
■ Class
■ Subclass
■ Item Type
■ Item Level
■ Diff Type
■ Item
■ Diff
2. Enter values or use LOV buttons to filter and select items.
3. Click Select to select items and move them to the Item Selection table.
4. Click Done when you are finished selecting items.
Locations Selection and ExclusionYou can add locations by any combination of zone and store. You can also create item exclusion records for existing Item/Location records that have been created at a level above the transaction item level.
1. In the Location Selection area, Enter Zone Group, Zone, or Store values, or use the LOV buttons to select locations.
Maintain a Promotion Component
Promotions 9-45
2. Click Select. The locations are added to the Location Selection table.
3. In the Location Exclusion area, enter the location ID to exclude, or click on the LOV button to select the location to be excluded from the selected list.
4. Click Select. The selected locations for exclusion are listed in the Location Selection table.
5. Correct the Start Date & Time and End Date & Time fields if needed.
6. Select the Ignore Constraints check box if you want this component to ignore all constraints for the associated promotion.
7. Use the fields Attribute 1, Attribute 2, and Attribute 3 if you want to enter any additional descriptive text about this promotion component. You can click the comment icon to open the Description window to enter text.
8. The status of this promotion component is displayed in the Status field. To change the status:
■ In the Action field, select one of the following values from the drop-down list:
– Submit: Save and submit this promotion component for approval.
– Approve: Approve this promotion component.
9. Click Update.
10. Click one of the following buttons:
■ Click Save to save the promotion component.
■ Click Done to save the promotion component and close the workspace.
Maintain a Promotion ComponentNavigate: From the Task Pad, select Promotion > Maintain Component. The Maintain Component workspace opens.

Maintain a Promotion Component
9-46 Oracle® Retail Price Management User Guide
Figure 9–39 Maintain Promotion Component Workspace
1. In the Promotion field, enter the ID of the promotion that the component is associated with, or click the LOV button and select a promotion.
2. In the Component field, enter the ID of the component you want to maintain, or click the LOV button and select a component.
3. In the Customer Type field, enter the ID of the customer type, or click the LOV button and select the customer type. This field is optional.
4. Click Next. Additional component maintenance panes are displayed.
Maintain Component Details1. In the Promotion Component Detail Maintenance pane, edit the name of the
component as necessary.
2. Enter the consignment rate used for the item while it is on promotion, if necessary.
3. To edit a specific record, select a record, or click Select All to make changes to all records on the table.
4. Click Edit.
5. Edit the enabled fields as necessary.
6. Click Apply.
7. Click Done to save any changes and close the workspace.
Note: Collapse and expand areas and panes to view the information needed to complete the task.
Maintain a Promotion Component
Promotions 9-47
Delete Component Details1. In the Promotion Component Detail Maintenance pane, select the record you want
to delete:
■ To edit a specific record, select a record.
■ Click Select All to make changes to all records in the table.
2. Click Delete.
3. You are prompted to confirm your decision.
4. Click Yes. The item location is removed from the table.
5. Click Done to save any changes and close the workspace.
Define Item Exceptions and Exclusions1. In the Promotion Component Detail Maintenance pane, select the record for which
you want to create an item exception or exclusion. The Item Exceptions and Exclusion pane opens.
2. In the Location field, enter a location ID, or click the LOV button and select a location.
3. Create the exception or exclusion:
■ Click Create Exceptions to create an exception to the selected record.
■ Click Create Exclusion to create an exclusion.
4. The pane closes. In the Promotion Component Detail Maintenance pane exceptions and exclusions are indicated in the Exclusion/Exception Indicator column:
■ A down arrow indicates that the item/location records contains an exception or exclusion.
■ An up arrow indicates that the item/location records is an exception or exclusion.
5. Click Done to save any changes and close the pane.
Define Location Exceptions and Exclusions1. In the Promotion Component Detail Maintenance pane, select the record for which
you want to create a location exception or exclusion. The Location Exceptions and Exclusion pane opens.
2. In the Location field, enter a location ID, or click the LOV button and select a location.
Note: You can only create item exceptions or exclusions for items above the transaction level.
Note: Exceptions and exclusions can only be created and approved for details that are in worksheet status only.

Promotion Events
9-48 Oracle® Retail Price Management User Guide
3. Create the exception or exclusion:
■ Click Create Exceptions to create an exception to the selected record.
■ Click Create Exclusions to create an exclusion.
4. The pane closes. In the Promotion Component Detail Maintenance pane exceptions and exclusions are indicated in the Exclusion/Exception Indicator column:
■ A down arrow indicates that the item/location records that contain an exception or exclusion.
■ An up arrow indicates that the item/location records that is an exception or exclusion.
5. Click Done to save any changes and close the pane.
Promotion EventsA promotion event is a method of grouping promotions that occur during a period of time. Each event can be associated with many promotions, but a promotion can only be associated with one event.
Updates can be made to the details of existing promotion events.
Create a Promotion EventNavigate: From the Task Pad, select Promotion Events > Create/Maintain Events. The Maintain Promotion Events workspace opens.
Note: You can only create location exceptions or exclusions for locations at the zone level.
Note: Exceptions and exclusions can only be created and approved for details that are in worksheet status only.
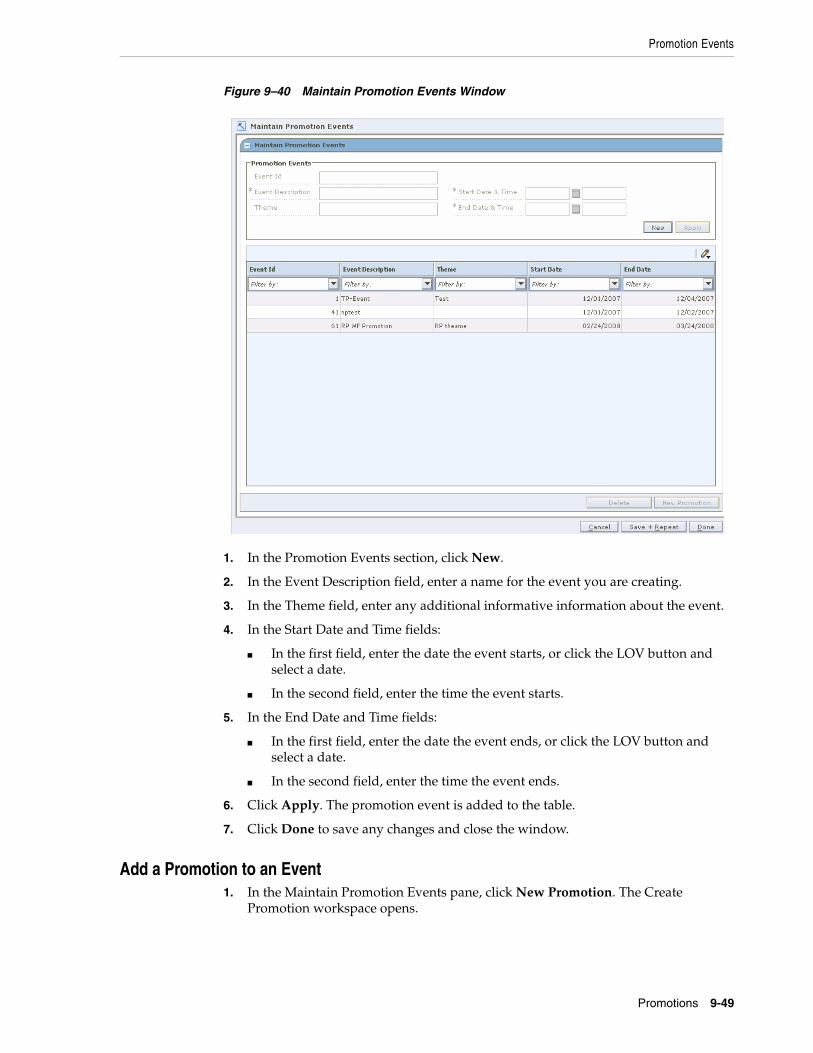
Promotion Events
Promotions 9-49
Figure 9–40 Maintain Promotion Events Window
1. In the Promotion Events section, click New.
2. In the Event Description field, enter a name for the event you are creating.
3. In the Theme field, enter any additional informative information about the event.
4. In the Start Date and Time fields:
■ In the first field, enter the date the event starts, or click the LOV button and select a date.
■ In the second field, enter the time the event starts.
5. In the End Date and Time fields:
■ In the first field, enter the date the event ends, or click the LOV button and select a date.
■ In the second field, enter the time the event ends.
6. Click Apply. The promotion event is added to the table.
7. Click Done to save any changes and close the window.
Add a Promotion to an Event1. In the Maintain Promotion Events pane, click New Promotion. The Create
Promotion workspace opens.
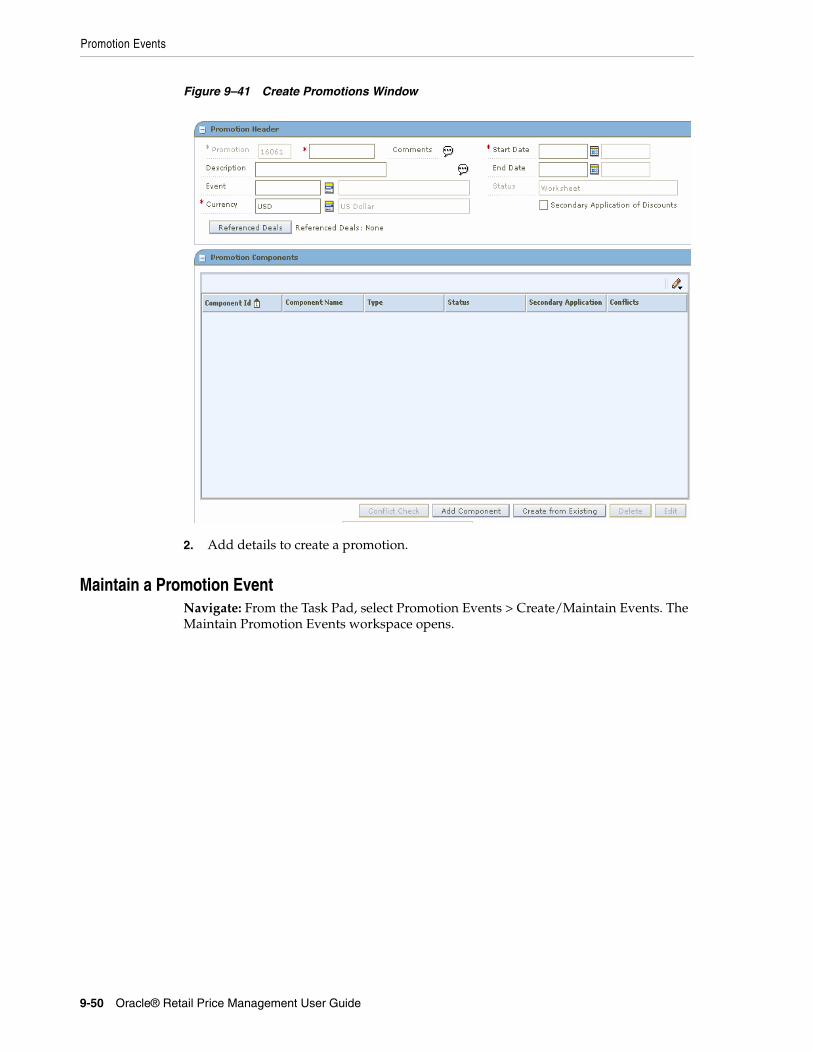
Promotion Events
9-50 Oracle® Retail Price Management User Guide
Figure 9–41 Create Promotions Window
2. Add details to create a promotion.
Maintain a Promotion EventNavigate: From the Task Pad, select Promotion Events > Create/Maintain Events. The Maintain Promotion Events workspace opens.

Promotion Threshold
Promotions 9-51
Figure 9–42 Maintain Promotion Events Window
1. Select the event you want to maintain from the table.
2. In the Promotion Events area, edit the enabled fields as necessary.
3. Click Apply. Your changes are added to the promotion event and appear on the table
4. Click Done to save any changes and close the window.
Delete a Promotion Event1. Select the event you want to delete from the table.
2. Click Delete. You are prompted to confirm your decision.
3. Click Yes. The record is removed from the table.
4. Click Done to close the window.
Promotion ThresholdA threshold is a discount that a customer receives for purchasing a pre-determined amount of an item. You must define the levels that exist in the threshold, then associate the threshold definition to the threshold component.

Promotion Threshold
9-52 Oracle® Retail Price Management User Guide
Create a ThresholdNavigate: From the Task Pad, select Promotion Threshold > Create Threshold. The Create Threshold workspace opens.
Figure 9–43 Create Threshold Window
1. In the Name field, enter a description of the threshold you are creating.
2. In the Currency field, enter the ID of the appropriate currency, or click the LOV button and select a currency.
3. In the Qualification Type field, select how the threshold is met:
■ Threshold Level: All items on the promotion can be counted together to meet the terms of the threshold and have the promotion applied.
■ Item Level: Each item on the promotion must meet the threshold to have the discount applied.
4. In the Threshold Type field, select the measure that indicates how the threshold is met:
■ Quantity: A number of units of an item must be purchased by the customer from the retailer.
■ Amount: A value of the item must by purchased by the customer from the retailer.
5. In the Discount Type field, select the method used to determine the new price of the item.

Promotion Threshold
Promotions 9-53
■ Percent Off: A price for an item is changed by a percentage removed from the original price. The percent of change is determined by the percent entered in the Change Amount field.
■ Amount Off: A price for an item is changed by an amount removed from the original price. The amount of change is determined by the amount entered in the Change Amount field.
■ Fixed Price: The price for the item will be at a specified retail that will be defined in the change amount field.
6. If you choose Fixed Price in the Discount type field, you must enter the Selling UOM for the item.
7. In the threshold area on the right, enter the amount or quantity that needs to be purchased in the Threshold Type field.
8. In the Discount Type field, enter the percent off, amount off, or fixed price received.
9. Press Tab to add additional threshold levels.
10. Click Done to save any changes and close the window.
Maintain a ThresholdNavigate: From the Task Pad, select Promotion Threshold > Maintain Threshold. The Maintain Threshold workspace opens.
Figure 9–44 Create Threshold Window
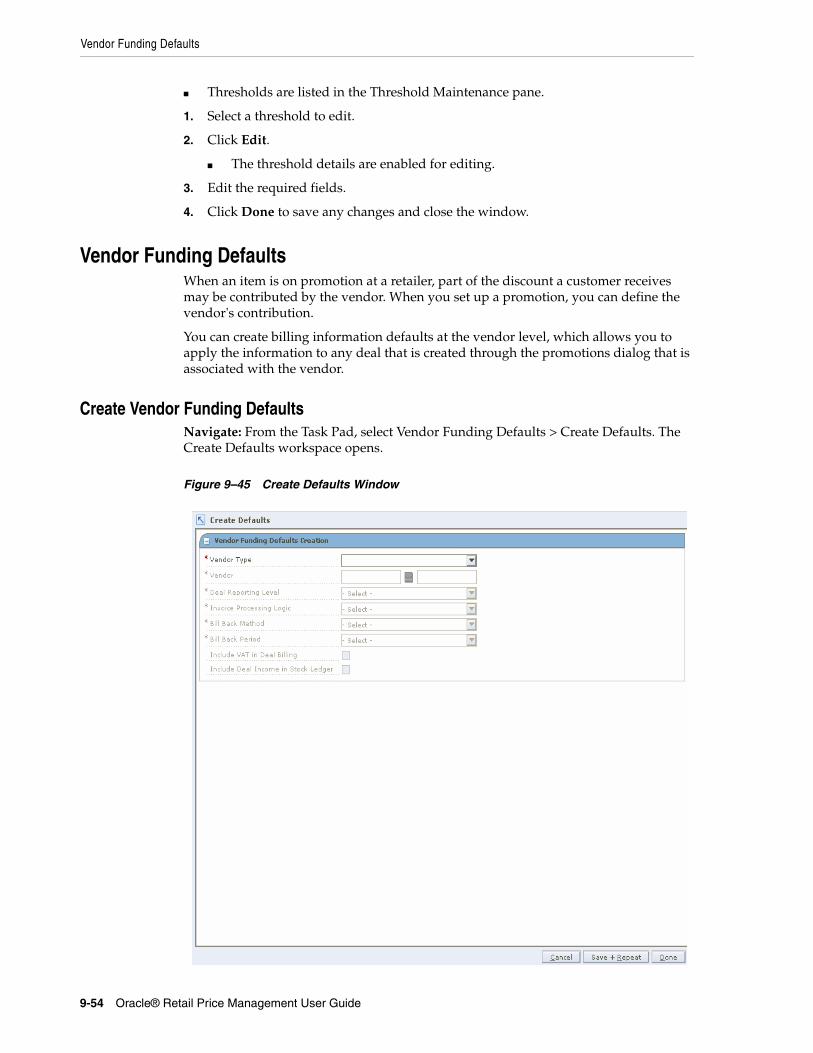
Vendor Funding Defaults
9-54 Oracle® Retail Price Management User Guide
■ Thresholds are listed in the Threshold Maintenance pane.
1. Select a threshold to edit.
2. Click Edit.
■ The threshold details are enabled for editing.
3. Edit the required fields.
4. Click Done to save any changes and close the window.
Vendor Funding DefaultsWhen an item is on promotion at a retailer, part of the discount a customer receives may be contributed by the vendor. When you set up a promotion, you can define the vendor's contribution.
You can create billing information defaults at the vendor level, which allows you to apply the information to any deal that is created through the promotions dialog that is associated with the vendor.
Create Vendor Funding DefaultsNavigate: From the Task Pad, select Vendor Funding Defaults > Create Defaults. The Create Defaults workspace opens.
Figure 9–45 Create Defaults Window

Vendor Funding Defaults
Promotions 9-55
1. In the Vendor Type field, select the type of vendor that is contributing to the promotion.
2. In the Vendor field, enter the ID of the vendor, or click the LOV button and select a vendor.
3. In the Deal Reporting Level field, select the frequency of deal reporting.
4. In the Bill Back Method field, select the type of invoice that is created for the supplier.
5. In the Bill Back Period field, select the frequency that the vendor is charged for the bill back.
6. In the Invoice Processing Logic field, select the method used to create invoices. Invoices are created automatically, manually, or not at all depending on the option selected.
7. Select the Include VAT in Deal Billing check box to indicate that VAT should be included in the invoice information.
8. Select the Include Deal Income in Stock Ledger check box to indicate that deal income accrual should be written to the stock ledger.
9. Click Done to save any changes and close the window.
Edit Vendor Funding DefaultsNavigate: From the Task Pad, select Vendor Funding Defaults > Maintain Defaults. The Maintain Defaults workspace opens.

Promotion Constraints
9-56 Oracle® Retail Price Management User Guide
Figure 9–46 Maintain Vendor Funding Defaults Window
1. On the table, select a vendor. The details area is enabled.
2. Update the enabled fields as necessary.
3. Click Apply to add your changes to the table.
4. Click Done to save any change and close the window.
Delete a Vendor Funded Default1. On the table, select a vendor.
2. Click Delete. You are prompted to confirm your decision.
3. Click Yes.
4. Click Done to save any change and close the window.
Promotion ConstraintsThe number of days before the promotion is called the promotion constraint. You can set up promotion constraints at the department, class, or subclass level for a particular zone or location. A warning will appear if a price change or promotion is created that would fall a certain number of days before or during another approved promotion or price change.

Promotion Constraints
Promotions 9-57
Create a Promotion ConstraintNavigate: From the Task Pad, select Promotion Constraints > Maintain Promotion Constraints. The Create Promotion Constraints workspace opens.
Figure 9–47 Create Promotion Constraints Window
1. Enter the ID of the merchandise level the promotion constraint should apply to, or click the LOV button and select the appropriate merchandise level
2. In the Location Selection area, select the locations the promotion constraint should apply to.
■ Zone Group: Enter the ID of the zone group the constraint should apply to, or click the LOV button and select a zone group.
■ Zone: Enter the ID of the zone the constraint should apply to, or click the LOV button and select a zone.
■ Location: Enter the ID of the location the constraint should apply to, or click the LOV button and select a location.
3. In the Constraint field, enter the number of days for the promotion constraint.
4. Click Apply. A row is added to the table.
5. Click Save.
6. Click Done to close the workspace.

Promotion Constraints
9-58 Oracle® Retail Price Management User Guide
Maintain a Promotion ConstraintThe Maintain Promotion Constraint workspace allows you to maintain promotion constraints.
Search for a Promotion ConstraintNavigate: From the Task Pad, select Promotion Constraints > Maintain Promotion Constraints. The Maintain Promotion Constraints workspace opens.
Figure 9–48 Maintain Promotion Constraints Window
1. Enter or select the criteria to limit your search.
2. Click Search. Your results appear in the Promotion Constraints list.
Maintain a Promotion Constraint1. Select the promotion constraint you want to edit.
2. Edit the Constraint value as needed.
3. Click Save.
4. Click Done to close the workspace.

Promotion Constraints
Promotions 9-59
Delete a Promotion Constraint1. In the Promotion Constraints table, select the row you want to delete by clicking
the box to the left of the row. Press and hold the Ctrl key while selecting to select multiple rows. Click Select All to select all the rows.
2. Click Delete. You are prompted to confirm your decision.
3. Click Yes.
4. Click Done to close the workspace.

Promotion Constraints
9-60 Oracle® Retail Price Management User Guide

Security Manager 10-1
10Security Manager
Oracle Retail Security Manager (RSM) gives the system administrator a single point of security management for RPM. Users with like functions are grouped together into roles. The roles are then assigned the types of permissions needed for each workflow and for the data within an application.
Access to RSM is restricted to those with appropriate security privileges.
Role AdministrationThis section describes how to create roles, edit roles, add users to a role, remove users from a role, add workflow permissions to a role, delete a workflow and associated action from a role, add data permissions to a role, and delete data permissions from a role.
RolesA role is a way to group workflows and actions of applications. When you create a role, you assign it a name. Each role can be used to give different levels of permissions to users who have that role. After you create the role, you can:
■ Add Users to a Role
■ Remove Users from a Role
■ Add Workflow Permissions to a Role
■ Delete a Workflow and Associated Action from a Role
■ Add Data Permissions to a Role
■ Delete a Data Permission from a Role
Workflows and ActionsA workflow is a secured task or group of tasks in an application. An action is the type of ability to which users associated with a role have access in an application work flow. When the role, workflow, and action are associated, users assigned to the role can complete their work.
Each application that uses RSM provides a list of workflows and actions that a user assigned to the appropriate role can access through RSM.
Note: Permissions are assigned to roles, then users are assigned roles. Permissions are not assigned directly to users.

Role Administration
10-2 Oracle® Retail Price Management User Guide
There are six types of actions that can be assigned to a role and workflow:
■ Access: Users associated with the role have access to the application, but are not allowed see any secured information within a workflow. Users must have access to an application in order to have any of the other permission types.
■ Edit: Users associated with the role are allowed to create, update, and save any changes to a workflow.
■ View: Users associated with the role are allowed to see to all secured information in a workflow, but not make any changes to the data in the workflow.
■ Approve: Users associated with the role are allowed to change the status of a workflow to Approved.
■ Submit: Users associated with the role are allowed to change the status of a workflow from Worksheet to Submitted.
■ Emergency: Users associated with the role are granted special access that goes beyond normal day-to-day access to functionality. This allows users to bypass normal delays in processing.
Create a RoleNavigate: From Tasks, select Role Administration > Role Administration. The Role Administration workspace opens.
Note: This action is the lowest level of permission a user associated with a role can have. You must assign Access to a role before any of the other permissions are available.
Note: Permissions are assigned to roles, then users are assigned to roles. Permissions are not assigned directly to users.
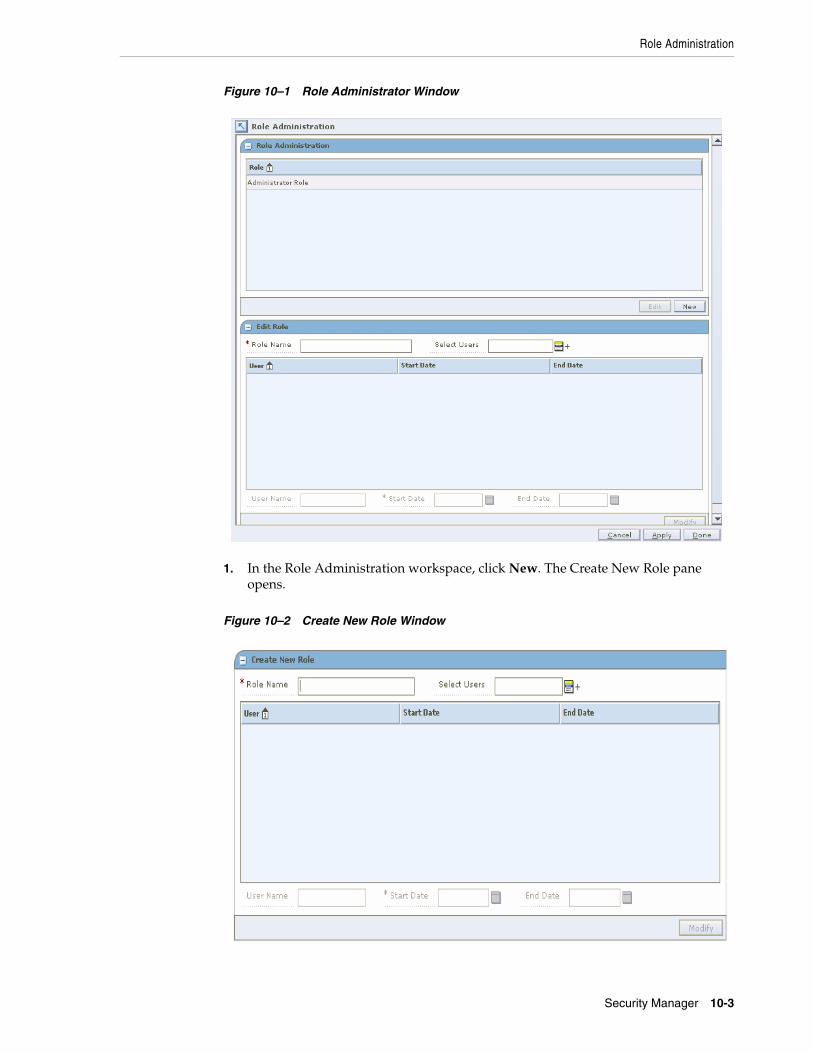
Role Administration
Security Manager 10-3
Figure 10–1 Role Administrator Window
1. In the Role Administration workspace, click New. The Create New Role pane opens.
Figure 10–2 Create New Role Window

Role Administration
10-4 Oracle® Retail Price Management User Guide
2. In the Role Name field, enter the name of the new role you are creating.
3. Click the LOV button next to the Select Users field.
a. Select a user from the left column.
b. Click the right arrow button . The user is listed in the right (selected users) column.
c. Repeat steps a and b until all users assigned to the role are selected.
d. Click Select. The user names appear in the table.
4. Modify the end date of a user.
a. Select a user name from the table.
b. Enter a different start date in the Start Date field, or click the calendar button and select a date.
c. Enter an end date in the End Date field, or click the calendar button and select a date. The End Date field can be left blank.
5. Click Modify. The role is added to the list of roles.
6. Apply your changes by doing one of the following:
■ Click Apply. The new role is saved.
■ Click Done. The new role is saved and the workspace is closed.
Edit a RoleNavigate: From Tasks, select Role Administration > Role Administration. The Role Administration workspace is displayed.

Role Administration
Security Manager 10-5
Figure 10–3 Role Administration Workspace
1. In the Role Administration pane, select a role.
2. Click Edit. The role name is displayed in the Edit Role pane. (You can also double-click on the role you want to edit.)
3. Edit the role as needed:
■ Add users to a role
■ Remove users from a role
■ Change the name of the role by editing the Role Name field.
4. Apply your changes by doing one of the following:
■ Click Apply. The changes to the role are saved.
■ Click Done. The changes to the role are saved and the workspace is closed.
Add Users to a RoleNavigate: From Tasks, select Role Administration > Role Administration. The Role Administration workspace is displayed.

Role Administration
10-6 Oracle® Retail Price Management User Guide
Figure 10–4 Role Administration Window
1. Click the LOV button next to the Select Users field.
2. Select a user to add from the left (available users) column.
3. Click the right arrow button . The user is displayed in the right (selected users) column.
4. Click Select. The users are added to the role.
5. Apply your changes by doing one of the following:
■ Click Apply. The changes are saved.
■ Click Done. The changes are saved and the workspace is closed.
Remove Users from a RoleNavigate: From Tasks, select Role Administration > Role Administration. The Role Administration workspace is displayed.

Role Administration
Security Manager 10-7
Figure 10–5 Role Administration Window
1. Click the LOV button next to the Select Users field.
2. Select a user to add from the right (selected users) column.
3. Click the left arrow button . The user is displayed in the right (available users) column.
4. Click Select. The users are removed from the role.
5. Apply your changes by doing one of the following:
■ Click Apply. The changes are saved.
■ Click Done. The changes are saved and the workspace is closed.
Add Workflow Permissions to a RoleNavigate: From Tasks, select Role Administration > Edit Workflow Permissions. The Edit Workflow Permissions workspace is displayed.

Role Administration
10-8 Oracle® Retail Price Management User Guide
Figure 10–6 Edit Workflow Permissions Workspace
1. In the Role area, select a role.
2. Click Edit. Information is displayed on the Edit Workflow Permissions pane. (You can also double-click the role you want to edit.)
Figure 10–7 Edit Workflow Permissions For Pane
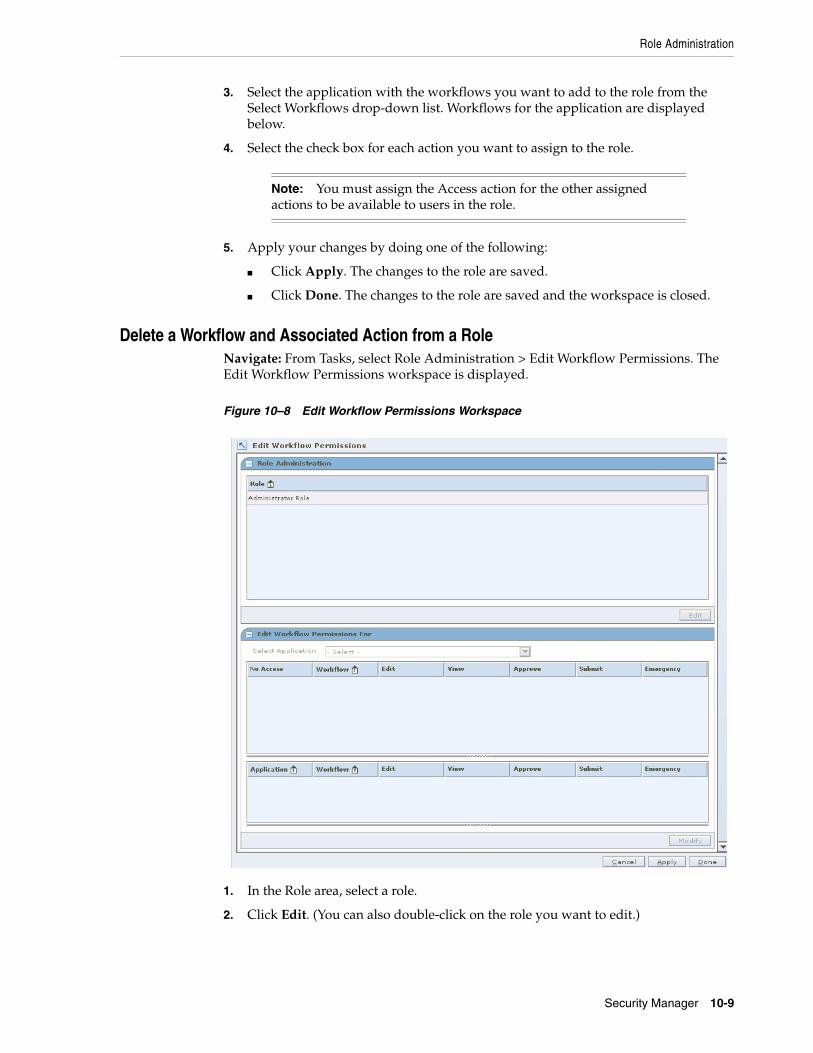
Role Administration
Security Manager 10-9
3. Select the application with the workflows you want to add to the role from the Select Workflows drop-down list. Workflows for the application are displayed below.
4. Select the check box for each action you want to assign to the role.
5. Apply your changes by doing one of the following:
■ Click Apply. The changes to the role are saved.
■ Click Done. The changes to the role are saved and the workspace is closed.
Delete a Workflow and Associated Action from a RoleNavigate: From Tasks, select Role Administration > Edit Workflow Permissions. The Edit Workflow Permissions workspace is displayed.
Figure 10–8 Edit Workflow Permissions Workspace
1. In the Role area, select a role.
2. Click Edit. (You can also double-click on the role you want to edit.)
Note: You must assign the Access action for the other assigned actions to be available to users in the role.

Role Administration
10-10 Oracle® Retail Price Management User Guide
3. In the lower pane, select the application with the workflows you want to add to the role from the Select Workflows drop-down list. Workflows for the application are displayed in the Edit Workflow Permissions pane.
Figure 10–9 Edit Workflow Permissions Pane
4. Deselect the check boxes for each type of action you want to remove from the role.
5. Apply your changes by doing one of the following:
■ Click Apply. The changes to the role are saved.
■ Click Done. The changes to the role are saved and the workspace is closed.
Add Data Permissions to a RoleNavigate: From Tasks, select Role Administration > Edit Data Permissions. The Edit Data Permissions workspace is displayed.
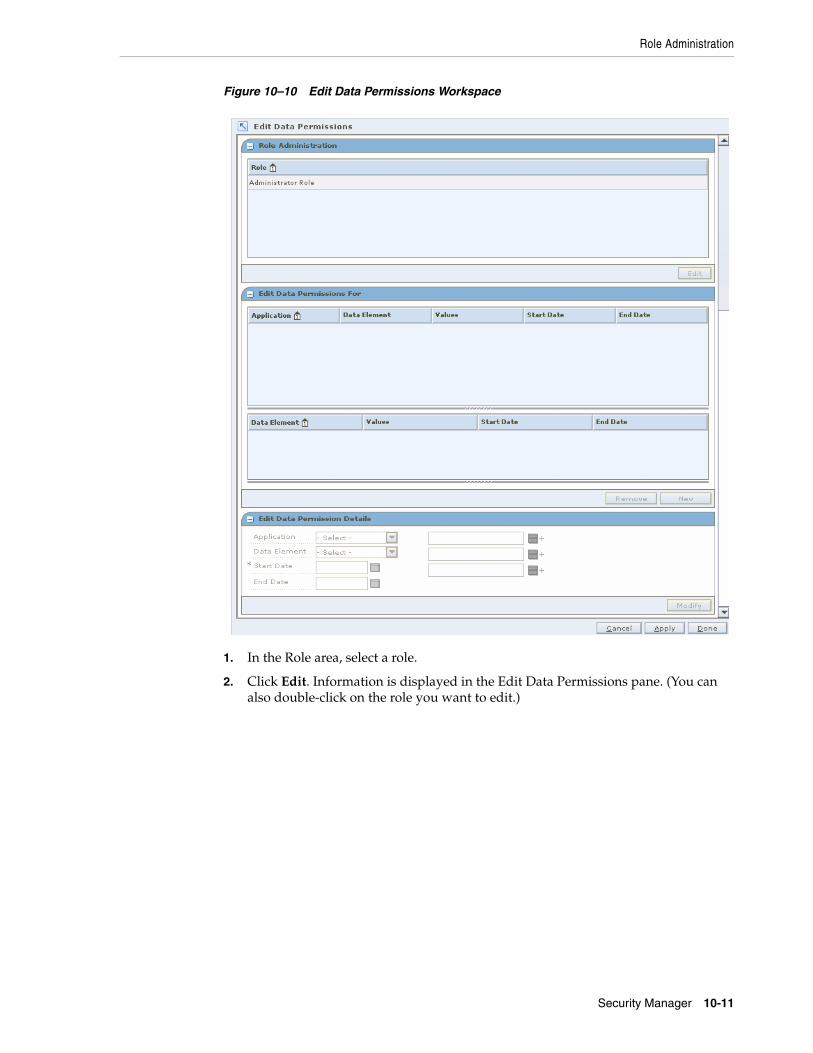
Role Administration
Security Manager 10-11
Figure 10–10 Edit Data Permissions Workspace
1. In the Role area, select a role.
2. Click Edit. Information is displayed in the Edit Data Permissions pane. (You can also double-click on the role you want to edit.)

Role Administration
10-12 Oracle® Retail Price Management User Guide
Figure 10–11 Edit Data Permissions For Pane
3. Click New. The Edit Data Permission Details pane is enabled.
Figure 10–12 Edit Data Permission Details Pane
4. Select an application from the Application drop-down list.
5. Select a data element from the Data Element drop-down list.
6. Enter a date in the Start Date field, or click the calendar button and select a date.
7. Enter a date in the End Date field, or click the calendar button and select a date. (You can leave the End Date field blank.)
8. Enter information in the rest of the enabled fields as required.
9. Apply your changes by doing one of the following:
■ Click Apply. The changes to the role are saved.
■ Click Done. The changes to the role are saved and the workspace is closed.

Role Administration
Security Manager 10-13
Delete a Data Permission from a RoleNavigate: From the Task Pad, select Role Administration > Edit Data Permissions. The Edit Data Permissions workspace is displayed.
Figure 10–13 Edit Data Permissions Workspace
1. In the Role area, select a role.
2. Click Edit. Information is displayed on the Edit Data Permissions pane. (You can also double-click on the role you want to edit.)

User Administration
10-14 Oracle® Retail Price Management User Guide
Figure 10–14 Edit Data Permissions Pane
3. Select the application from the Application drop-down list.
4. Select the data permission you want to remove from the Data Element drop-down list.
5. Click Remove. The data permission is removed from the list.
6. Apply your changes by doing one of the following:
■ Click Apply. The changes to the role are saved.
■ Click Done. The changes to the role are saved and the workspace is closed.
User AdministrationThis section describes how to assign roles to users, add roles to a user, and remove roles from a user.
Assign Roles to UsersUsers are not created in RSM. Rather, RSM looks up users in a directory service that complies with Lightweight Directory Access Protocol (LDAP). RSM retrieves the user information from the LDAP directory. You can then assign roles to the user.
Navigate: From Tasks, select User Administration > User Administration. The User Administration workspace is displayed.
Note: For additional information on RSM and LDAP-compliant directories, see the RSM Operations Guide.

User Administration
Security Manager 10-15
Figure 10–15 User Administration Workspace
Add Roles to a UserNavigate: From Tasks, select User Administration > User Administration. The User Administration workspace opens.
Note: Permissions are assigned to roles, then users are assigned to roles. Permissions are not assigned directly to users.
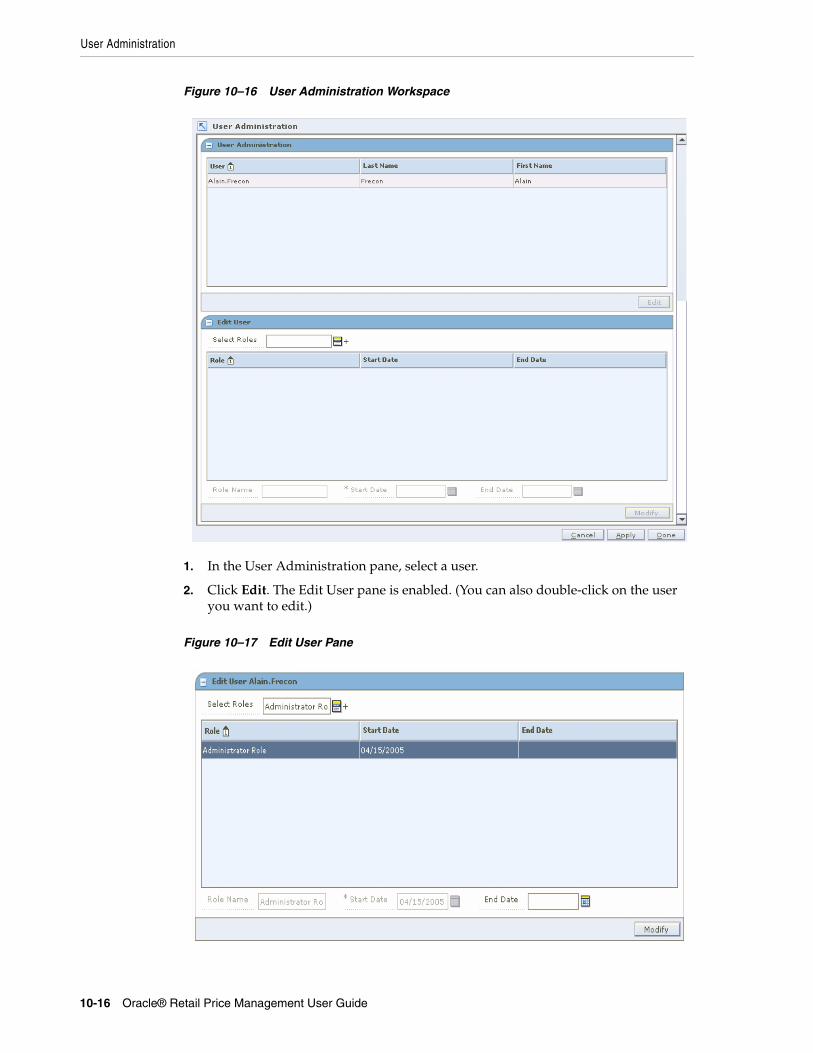
User Administration
10-16 Oracle® Retail Price Management User Guide
Figure 10–16 User Administration Workspace
1. In the User Administration pane, select a user.
2. Click Edit. The Edit User pane is enabled. (You can also double-click on the user you want to edit.)
Figure 10–17 Edit User Pane

User Administration
Security Manager 10-17
3. Click the LOV button next to the Select Roles field.
a. Select a role from the left column.
b. Click the right arrow button. The role is listed in the right (selected roles) column.
c. Repeat steps a and b until all roles for the user are selected.
d. Click Select. The roles are assigned to the user.
4. Apply your changes by doing one of the following:
■ Click Apply. The changes to the user are saved.
■ Click Done. The changes to the user are saved and the workspace is closed.
Remove Roles from a UserNavigate: From Tasks, select User Administration > User Administration. The User Administration workspace opens.
Figure 10–18 User Administration Workspace
1. In the User Administration window, select a user.
Note: Permissions are assigned to roles, then users are assigned roles. Permissions are not assigned directly to users.
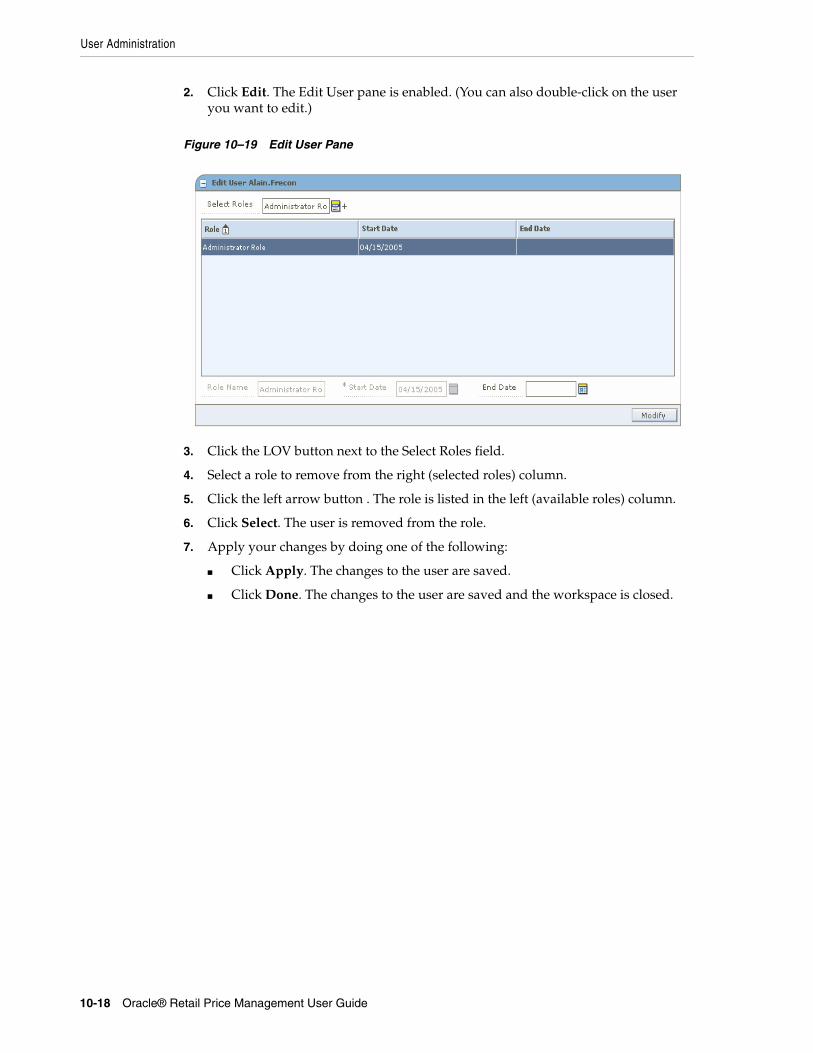
User Administration
10-18 Oracle® Retail Price Management User Guide
2. Click Edit. The Edit User pane is enabled. (You can also double-click on the user you want to edit.)
Figure 10–19 Edit User Pane
3. Click the LOV button next to the Select Roles field.
4. Select a role to remove from the right (selected roles) column.
5. Click the left arrow button . The role is listed in the left (available roles) column.
6. Click Select. The user is removed from the role.
7. Apply your changes by doing one of the following:
■ Click Apply. The changes to the user are saved.
■ Click Done. The changes to the user are saved and the workspace is closed.