Retek Active Retail Intelligence 10.0 - Oracle Help Center
165
Retek ® Active Retail Intelligence 10.0 User Guide
-
Upload
khangminh22 -
Category
Documents
-
view
3 -
download
0
Transcript of Retek Active Retail Intelligence 10.0 - Oracle Help Center
Retek® Active Retail Intelligence 10.0
User Guide

Retek Active Retail Intelligence
The software described in this documentation is furnished under a license agreement and may be used only in accordance with the terms of the agreement.
No part of this documentation may be reproduced or transmitted in any form or by any means without the express written permission of Retek Inc., Retek on the Mall, 950 Nicollet Mall, Minneapolis, MN 55403.
Information in this documentation is subject to change without notice.
Retek provides product documentation in a read-only-format to ensure content integrity. Retek Customer Support cannot support documentation that has been changed without Retek authorization. Corporate Headquarters:
Retek Inc.
Retek on the Mall
950 Nicollet Mall
Minneapolis, MN 55403
888.61.RETEK (toll free US)
+1 612 587 5000 European Headquarters: Retek
110 Wigmore Street
London
W1U 3RW
United Kingdom
Switchboard:
+44 (0)20 7563 4600
Sales Enquiries:
+44 (0)20 7563 46 46
Fax: +44 (0)20 7563 46 10
Retek® Active Retail Intelligence™ is a trademark of Retek Inc.
Retek and the Retek logo are registered trademarks of Retek Inc.
©2002 Retek Inc. All rights reserved.
All other product names mentioned are trademarks or registered trademarks of their respective owners and should be treated as such.
Printed in the United States of America.
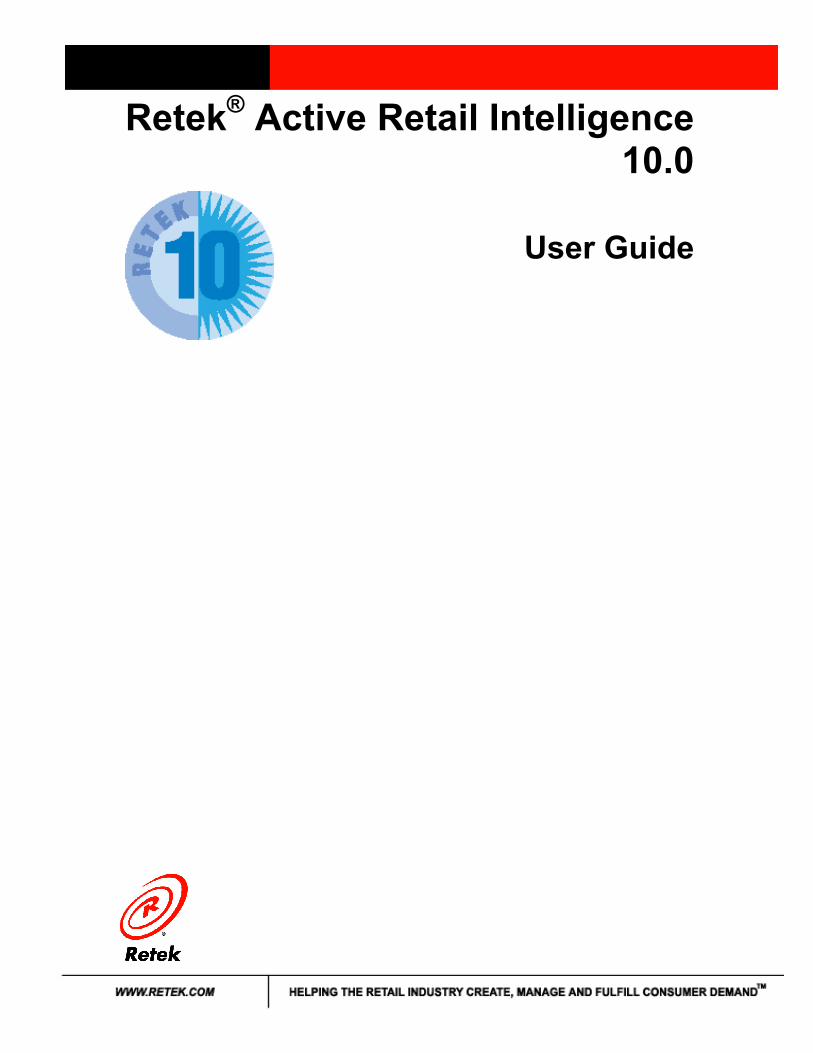
Customer Support
Customer Support hours:
8AM to 5PM Central Standard Time (GMT-6), Monday through Friday, excluding Retek company holidays (in 2002: Jan. 1, May 27, July 4, July 5, Sept. 2, Nov. 28, Nov. 29, and Dec. 25).
Customer Support emergency hours:
24 hours a day, 7 days a week.
Contact Method Contact Information
Phone US & Canada: 1-800-61-RETEK (1-800-617-3835) World: +1 612-587-5000
Fax (+1) 612-587-5100
E-mail [email protected]
Internet www.retek.com/support Retek’s secure client Web site to update and view issues
Mail Retek Customer Support Retek on the Mall 950 Nicollet Mall Minneapolis, MN 55403
When contacting Customer Support, please provide:
• Product version and program/module name.
• Functional and technical description of the problem (include business impact).
• Detailed step by step instructions to recreate.
• Exact error message received.
• Screen shots of each step you take.

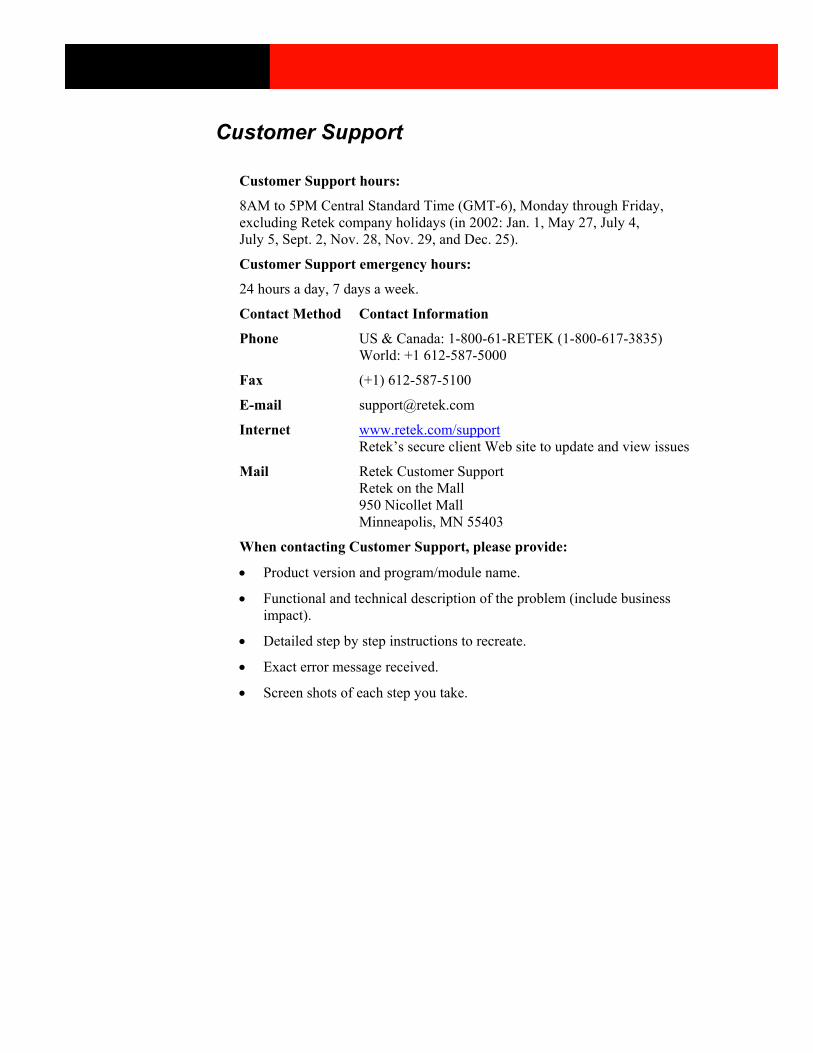
Contents i
Contents Chapter 1 - Active Retail Intelligence (ARI)........................... 1
Overview ............................................................................................................. 1 Active Retail Intelligence (ARI) help......................................................................... 1
Chapter 2 - ARI Setup and Maintenance ............................... 5
ARI Overview ..................................................................................................... 5 The Role of ARI in the Enterprise.............................................................................. 5 Key Data Objects in ARI............................................................................................ 8 Administrative Components ..................................................................................... 10 User Interface ........................................................................................................... 20 Start ARI................................................................................................................... 21 ARI setup user interface ........................................................................................... 21 ARI end user interface.............................................................................................. 21 Common buttons ...................................................................................................... 22 Common user interface controls in ARI................................................................... 23 Security considerations............................................................................................. 26 Customizing ARI...................................................................................................... 27
Metadata Maintenance ...................................................................................... 27 Overviews................................................................................................................. 27 Windows and Dialogs............................................................................................... 33
ARI User and Group Administration ................................................................ 53 Overviews................................................................................................................. 53 Windows and Dialogs............................................................................................... 61
Exception and Event Definition ........................................................................ 68 Overviews................................................................................................................. 68 Windows and Dialogs............................................................................................... 70 Procedures .............................................................................................................. 104
Schedules for Exception Scanning and Event Revalidation ........................... 106 Overviews............................................................................................................... 106 Windows and Dialogs............................................................................................. 108
Language Translation...................................................................................... 111 Language Translation Window [aritrans]............................................................... 111 Procedures .............................................................................................................. 112
Examples ......................................................................................................... 114 Overview ................................................................................................................ 114 Function Definitions ............................................................................................... 114 Action Definitions .................................................................................................. 115 Lookup Definitions................................................................................................. 116

ii Retek Active Retail Intelligence
Exception and Event Definition and Linking ......................................................... 116
Chapter 3 - ARI Use: View alerts and events .................... 125
Overview ......................................................................................................... 125 About ARI .............................................................................................................. 125
View Alerts ..................................................................................................... 126 Overviews............................................................................................................... 126 Windows and Dialogs............................................................................................. 128 Procedures .............................................................................................................. 131
View Events .................................................................................................... 133 Overviews............................................................................................................... 133 Windows and Dialogs............................................................................................. 134 Procedures .............................................................................................................. 139
Chapter 4 - ARI Analyst/Administrator Group .................. 141
Chapter 5 - ARI Error/Administrator Group ...................... 143
Chapter 6 - Example image as an event detail ................. 145
Glossary............................................................................... 147
Index..................................................................................... 157
Chapter 1 – Active Retail Intelligence (ARI) 1
Chapter 1 - Active Retail Intelligence (ARI) Overview
Active Retail Intelligence (ARI) help Active Retail Intelligence (ARI) is an exception management and resolution system driven by business rules that you define.
This guide shows you how to:
• Set up and maintain the business rules that drive your ARI system
• Define users of ARI and how they can use ARI
• Define exceptions and events
• View alerts and the events associated with them
Audiences for this guide This guide contains both information about setting up your ARI system, and procedures for using ARI once it is configured and running in your business.
The first part of this guide, Setting Up ARI, is directed toward ARI administrators. This second part of the guide, Using ARI, is directed toward end users.
ARI administrators
Most of this guide is directed toward the people in your business who are responsible for configuring and maintaining ARI. These users define the business rules under which ARI performs exception management. Ideally, configuring ARI is a cooperative effort involving the following types of people in your business:
• A business analyst, with both a functional understanding of the business and a technical understanding of the software used in the business.
• A database administrator with database knowledge and Oracle programming skills.
In this cooperative effort, business analysts work with members of the business to define requirements and with database administrators to implement the requirements. A business analyst may take on the major portion of those responsibilities.
If you are responsible for setting up and maintaining ARI, you should read the entire guide.

2 Retek Active Retail Intelligence
ARI end users
The ARI end user receives alerts and takes actions to resolve the alerts. Any user of Retek applications, such as the Retek Merchandising System (RMS), could be an ARI end user.
If you are an ARI end user, review the topics in Using ARI, including
• About ARI
• Viewing Alerts
• Viewing Events
Organization and intended audiences Following is a summary of the parts of this user guide, with comments about the intended audience for each part.
This guide is divided into two main parts: Setting Up and Maintaining ARI, and Using ARI. In addition, there is a glossary of ARI terms.
ARI Setup and Maintenance
ARI Setup and Maintenance describes how to configure and maintain ARI. This part of the guide covers the following topics.
ARI Overview is critical reading for business analysts. It introduces ARI terminology in context and should serve as a reference point when trying to understand the big picture of how the ARI application components fit together. It also contains sections on conventions used throughout the manual and common features used in many of the system interfaces.
Metadata Maintenance discusses how to create and maintain the metadata that you will use to build your business rules into the system, and to define exceptions, events, and alerts. This task is intended for technical analysts who understand data modeling, the Retek Data Model, PL/SQL, and/or any external data system that ARI is intended to monitor.
ARI User and Group Administration explains how to create ARI user and user group definitions. This task is intended for business administrators, though it may be set up initially by business analysts.
Exception and Event Definition describes how to define exceptions to your business rules, and the events associated with those exceptions. This task is intended for business analysts who have a clear understanding of the retailer's practices, ARI's capabilities, and some understanding of the data model to be monitored.
Schedules for Exception Scanning and Event Reevaluation explains how to use ARI’s scheduling feature to set up periodic scheduling of processes, customize the scheduling of exception scanning, and set when and how often events are reevaluated to determine whether they are still in effect. As with managing exceptions and events, this task is intended for business analysts.
Language Translation describes how to prepare ARI to run in one or more target languages. ARI includes a form for translating strings into the target languages.
Chapter 1 – Active Retail Intelligence (ARI) 3
Examples contains detailed examples using the ARI interfaces, focusing primarily on planning the resolution of a business problem and then explaining how ARI administrators and users would utilize the administrative and user interfaces to implement a solution.
ARI Use: View Alerts and Events
Using ARI describes how to use ARI once the business rules are in place, and exceptions and events are defined and scheduled. Tasks in this section are performed by ARI end users. This part of the guide includes the following topics.
About ARI provides a high-level overview of ARI.
View Alerts explains how to view and take actions on alerts sent to you.
View Events explains how to view and take action on events associated with an event details and enables users to act on events. This task is performed by ARI end users.
ARI Glossary
For ARI administrators, it is critical to understand and distinguish between key terms and concepts in ARI, such as exceptions and events. A glossary is available for you to review these terms.
Additional ARI-related documentation
The ARI Overview and other topics within the Setup and Maintenance section of this help system present a good deal of background on where to get started and how to use ARI. Additional operational information is included in the ARI Operations Guide, the Retek Installation Guide and Retek Batch Schedule document.

Chapter 2 – ARI Setup and Maintenance 5
Chapter 2 - ARI Setup and Maintenance ARI Overview
The Role of ARI in the Enterprise
Describes the basic functions of ARI and its interaction with other applications in the enterprise.
Key Data Objects
Describes exception types and event types, the key data constructs used to build, maintain, and operate ARI.
Administrative Components
Introduces metadata and other building blocks used to create and maintain the key data objects in ARI.
ARI User Interface
Describes how to access ARI, reviews the main dialogs and windows of the ARI user interface, and presents standard interface functions and features shared by more than one of the ARI's end-user and/or administrative interfaces.
The Role of ARI in the Enterprise ARI is a tool set for implementing exception management, workflow management, and business process modification. ARI sits over key business processes and delivers the right information to the right people at the right time for them to take action. In this role, ARI performs three basic functions in the enterprise:
• Rules-based exception detection and notification
ARI monitors products, including RMS, the Retek Data Warehouse, and external systems including other Oracle-based products for conditions that are of interest to business analysts and other users. ARI alerts users that an exception has occurred and presents the information and actions available for resolving the exception.
• Rules-based strategic workflow management – exception resolution
As a workflow tool, ARI interacts with the systems that it monitors, allowing users to take the actions necessary for exception resolution. In this role, ARI goes beyond simply notifying users of alerts, and closes the loop between information and action with its exception resolution and action capabilities.
6 Retek Active Retail Intelligence
• Flexible rules-based enterprise process modification
ARI can be used to modify and optimize your business processes. Its flexibility allows you to automate business processes and continually improve them without making extensive and costly hard-coded modifications to your retail software. For example, rather than customizing the purchase ordering and approval processes in your transaction system, you can use ARI to implement your custom approval process. And as ideas for improving the process arise, these process improvements can be implemented through ARI, with minimal modification to the transaction system’s code, enabling easier adherence to the upgrade path for, and application of patches to, the transaction system’s code.
Business rules and their role in ARI
Business rules drive the exception management process and govern the activities of ARI throughout the process of exception resolution. Rule-sets are used to:
• Define the conditions that constitute an exception.
• Identify the users that should be notified that an exception has occurred.
• Determine the actions available to resolve the exception or move the resolution process forward.
Exceptions, Events, and Alerts
ARI monitors systems for exception conditions in real-time or on a periodic “batch scan” basis. An exception definition is generally a minimal set of conditions that indicates a state of data requiring some kind of action. To minimize impact on the monitored systems, the exception monitoring process is broken into two steps. A subset of the conditions, such as a change in value in a column table, is used to identify exception candidates. When the monitor encounters an exception candidate, ARI first retrieves and evaluates additional data to validate that an actual exception (meeting all of the conditions) has occurred.
If the exception proves to be valid, ARI builds an event. The event contains additional information that a user might like to have to decide how to resolve the exception. An event also contains information about who should be notified of the exception, and links to take actions to help take corrective action. The event notification information is used to send alerts to the users to whom the event has been assigned.
An end-user resolves an exception by simply reversing the process. The end-user receives an alert, opens the event to which the alert refers and uses the information and action links in the event to alter the system data in some way that resolves the exception.
Chapter 2 – ARI Setup and Maintenance 7
Keys to success in implementing ARI
Implementing ARI is a business process modification. Therefore, understanding your existing business processes, and how you can use ARI to automate and improve processes, is as important as getting technical training on ARI. It is critical to understand how ARI fits into the business process, and to clearly define the rules you want to implement before beginning the process of automating those rules and developing exceptions. In addition, it is strongly recommended that you take advantage of ARI training and the knowledge base among Retek business analysts when deciding to implement ARI.
To ensure the best success in implementing ARI in your business, follow these recommendations:
• Involve key business users in the ARI implementation process. Make sure they get training in ARI and its capabilities as a business process modification tool.
• Understand how ARI fits into the business process.
• Clearly define rules before building exceptions. Automate only those rules that lead to process optimization and closing the loop between information and action.
• Establish technical ownership of ARI implementation and maintenance.
• Commit to managing by exceptions vs. simply using ARI to replace reports.
• Start with implementing the simplest rules first, then build on these to the more advanced rules.
• Recognize that ARI is a more powerful tool than a simple transaction system, but that it therefore requires more planning and commitment to use successfully. In recognition of this, Retek’s Strategic Retail Intelligence group has developed ARI specialist consultants who can help you learn how to use ARI and provide you with process and business rule templates to support anything from initial ARI implementation efforts to advanced exception development.
The ARI implementation process
To help you achieve the best return on investment in your products using ARI, Retek uses a process for implementing ARI that involves the following steps:
1 ARI planning session
2 Install ARI
3 Training and sample rule development
4 Build rules
5 Custom training
6 Go-live support
7 Advanced development
8 Retek Active Retail Intelligence
Detailed ARI concepts
The next section describes exceptions and events, the key data objects in the ARI system.
• Key data objects
• Administrative components
• User interface
• Security considerations
• Customizing ARI
Key Data Objects in ARI
Exception types and event types
The key data constructs in ARI are the exception types and event types. The instructions that govern the behavior of ARI are distributed between these objects.
Exception types are externally focused, describing conditions on data sets in monitored systems that are of interest to business analysts or other users. Event types are internally focused, describing data objects internal to ARI that are created from the values of exception data sets and other supplemental data, such as calculated fields. Event types also contain the instructions for handling this internalized information, including tracking, decision-flow, messaging, and presentation.
Although these objects are logically related and must be linked for operation of ARI, the distinction between the two types is an important one. The focus of an exception type is monitoring systems’ data. An event type, on the other hand, determines how to distribute and process the issues detected by monitoring.
Distinguishing between types is important for several reasons. Both architecturally and conceptually, exceptions and events separate monitoring from processing. The rules for either can be changed without impacting the other. For example, changing the value of a monitoring threshold or changing does not change who is notified or what actions may be taken, or changing a processing rule that alters the notification group will not impact which exceptions are actually detected. In addition, it is possible that several conditions monitored could all indicate the same kind of situation. Consequently, it may make sense to monitor for conditions in several ways that, when they occur, all require the same processing. Conversely, a single condition may prompt several independent decision/action processes. By distinguishing exception and event types, it is possible to increase the sophistication of your system through the reuse of these objects, but this flexibility does not prevent you from mapping them one-to-one for straightforward exception monitoring and resolution.
Chapter 2 – ARI Setup and Maintenance 9
Exception and event instances
An exception type is a data object that describes another data object, the exception instance. When an ARI monitor detects a condition defined by an exception type, we say that an exception instance has occurred. The exception instance contains the actual data values from the monitored system that conformed to the conditions defined by the exception type. When an exception instance is validated, ARI generates an event instance for the event type corresponding to the exception type of the exception instance. As with exception instances, event instances contain data and are the data objects processed according to their defining event type data objects. The user interface displays the data of event instances and presents actions and other options according to the definition data contained in the event instances’ event types.
The distinction between instances and types is important because types are critical to using ARI successfully, the key to its power and flexibility, and the factor that most distinguishes it from traditional retail systems. To better understand this distinction, consider a database-driven retail system, such as Retek's merchandise management system, as it compares with ARI.
In the RMS, rows of data are instances and tables that define the structure are types. The definitions of these types are the tables themselves, which are defined in the retail system's data dictionary. All of these tables are retail object types and they include, for example, orders, promotions, stores, and items. Specifically, the data describing a single order is an instance of a specific retail object type called an order. The retail object types are all pre-defined by Retek. Users, administrative and others, are focused strictly on manipulating the data on the tables (the instances). Adding or modifying additional object types is done by information services specialists. Because it is complicated, involving multiple tools from different toolsets, time consuming, and often has substantial functional impact, adding or modifying object types is rarely done once a system is in production.
In ARI, exception types are objects such as order overdue, order submitted for approval, and over-shipment received. Overdue tracking, order approval, and overstock processing are potentially corresponding event types. The ARI tables on which data comprising these definitions is held are like a retail system's data dictionary. However, creating new types, although requiring a business analyst's due care, requires neither the same effort as it does for the RMS, nor even any new tables or forms to be coded. To complete the comparison, instances of ARI types should be readily apparent. Exception instances are subsets of data available in a monitored retail system that match the exception type's specified conditions. Event instances hold the values of these subsets and are the objects that are manipulated by users, as are order instances or item instances in the RMS and, according to the event type's definition, the ARI system itself.

10 Retek Active Retail Intelligence
Although understanding the difference between types and instances is critical in understanding ARI, it is generally clear from context whether type or instance is meant without using either word. Henceforth in this overview and in most places in the ARI help, type and instance will be omitted where exception and event by themselves are unambiguous. For example, you define, build, edit, and create exceptions (types), whereas ARI monitors and records exceptions (instances) as they occur. Similarly, you define, edit, or create an event (definition) but you view and act on events (instances) that are caused/created by exceptions (instances).
The next section describes the administrative components used as building blocks in the construction of exceptions and events.
Administrative Components This section introduces the concepts and terminology of the components created by ARI's various administrative tools in the context of their acting as building blocks to define exceptions and events.
When you define an exception you specify a related set of data, from an internal or external system, and establish how ARI should monitor the data set and what conditions on the data set must be true to warrant further examination and possible action.
This further examination and action is accomplished by linking exceptions to events. Event definitions include a superset of an exception's data set, a collection of processing and analysis rules, information presentation and alert notification instructions, and action options.
Metadata
Both exception and event definitions are built around metadata. The function of metadata is to provide Both exception and event definitions are built around metadata. The function of metadata is to provide a description of tables, functions and other elements of systems that ARI is supposed to monitor and take action against. These descriptions enable administrators to direct ARI’s interaction with these systems consistently within the boundaries of the ARI framework.
Parameters
A related data set is defined in terms of parameters, not in terms of specific values. A parameter is a data identifier for a data location, such as a supplier number or an order number, not the actual data value such AH23D or 12345. For example, a parameter is a field in a report generated by the Retek Data Warehouse (RDW), or a column in the RMS, , or even a parameter of a PL/SQL function. An example of a specific data set is the set of parameters order number, order status, and total cost, where the parameters are related by the fact that they reference values all from the same set of data defining a single order.

Chapter 2 – ARI Setup and Maintenance 11
Realms
Parameters represent the building blocks of larger data objects. A group of parameters that are logically related and form a unique data object, either logical or functional, are referred to in ARI as a realm. In this release of ARI, realms refer to logical groups of data as defined by the data dictionary of the system monitored (though in theory realms could be more abstractly defined to include calculated fields or otherwise merge logical data groupings with the same key identifiers). Specifically, in table driven systems such as the RMS, a realm is a table just as a column is a parameter. In the data warehouse, a realm is a report and a field on that report is a parameter. In other external systems or data feeds, a realm would be a fully denormalized row of data and a parameter would be a data element of that row. A realm may also be the description of a set of parameters required to perform an action.
Key parameters
In order to identify a unique data set, realms have unique identifying parameters called key parameters. (In a relational database, these are the primary key columns on the tables.) For example, for the group of parameters forming an item information realm, the unique identifier is the item number (SKU). For the order header realm, it is the order number. For an inventory (item-location) realm, the unique identifiers are SKU and location. In the case of an action, key parameters are those required to successfully execute the action (some actions may have optional additional parameters).
Unique data sets
Starting with key parameters, you can build an exception or an event around parameters that represent a unique data set. This is important because when you evaluate data values and find an order total that exceeds some threshold, you need to know what order that is; in other words, you also need the value of the order header realm's key parameter, the order number. Given the order number, you can find out whatever other information about the order you need to know, such as the supplier who is filling the order or the buyer who placed it. Moreover, by using key parameters you can navigate through the data model, selecting additional parameters of interest to obtain more information about a situation. For example, if you start with an order number and then get the order supplier number, from that you can get additional information about the supplier. Even though supplier information is not part of the order realm, once you have the supplier number you have the key to the supplier realm and can get whatever information you need about the order's supplier.

12 Retek Active Retail Intelligence
Parameter types
Classifications that group parameters by the kind of data they represent are called parameter types. These classifications recognize that a supplier number is always a supplier number whether it is on the supplier table, the SKU supplier table, or the order header table in some vendor performance report. Parameter types enable the linking of realms through key parameters. When you have parameters whose set of parameter types include all of the parameter types of a realm's key parameters, you can then link to that realm and choose additional parameters, as in the order supplier example of the previous paragraph. This is analogous to the foreign key relationships used in a relational database. However, it is more flexible since it works in all cases, even where a foreign key is not enforced or can't be enforced because the relation exists across different systems.
As a cross-system example, consider an RDW report that detects a vendor problem and provides the supplier number but no additional supplier information. With correctly implemented parameter types, you can extract additional supplier information from the RMS even though there is no direct connection between the RMS and the RDW report. Although the idea of parameter types seems straightforward, because parameter types bridge the data dictionaries of the many systems ARI monitors and are such fundamental components of the metadata, it is critical that you maintain and use them with rigorous care.
Defining exceptions
Understanding parameters as metadata representing logical data structures is essential to understanding exception definitions. To define a data set to be monitored, you choose a realm to monitor and select parameters from that realm (the key parameters of the monitored realm are automatically included) and any related realms made available by the parameters types of the parameters added during the selection process. You then define data conditions on those parameters that constitute the case of interest. For example, you might like to monitor purchase order submissions that exceed a specific threshold when the purchase order is from a certain vendor. You would create the exception by adding the parameters order number, order status, total cost, and supplier number. Then you define conditions, such as order status changes to submitted, total cost exceeds fifty thousand dollars, and the supplier number is 12345. If instead of a specific vendor, you wanted to base the criteria on all vendors with a specific attribute, you could select that attribute from the supplier realm (already having its key identifier the supplier number) and base a condition on that attribute instead of the supplier number.
In addition to defining an exception from scratch, ARI provides several options that make it convenient to define exceptions:
• By using a wizard that walks through the necessary screens for defining exceptions
• By cloning, or creating a new exception from an existing exception
• By versioning, or creating a new exception from a version of an existing exception

Chapter 2 – ARI Setup and Maintenance 13
Monitoring exceptions
ARI has several ways of monitoring for exceptions that depend on whether the realm being monitored is considered internal or external, and whether the monitoring, in the case of internal realms, is for an active change or based on a periodic scan of all existing data in the realm.
Internal systems
An internal system is one that shares its DDL with ARI. Such systems are other Oracle based products that have been integrated with the ARI data structure in terms of the Oracle table definitions and share a common database. Currently the only such products are the RMS and ARI itself. However, a planning system or any number of other supply-chain applications based on the Oracle database system could conceivably be integrated with the ARI and RMS DDL. After this integration, straightforward metadata description would make such systems behave as systems internally available to ARI. The key feature of internal realms is that ARI can actively query and monitor up-to-date information from their data repositories (tables).
External Oracle systems
External Oracle systems are those from which ARI cannot actively query (because they do not share a DDL with ARI). Theoretically, ARI could actively query some external realms, but no such interface currently exists. External systems must interface with ARI by feeding data into temporary tables or other interfaces in which each row of data is its own data set and each temporary table or other interface object is a realm. External realms do not have key parameters defined for them since the use of key parameters is querying additional information, which is in direct opposition to the definition of external realms. Functionally, such identifying parameters may nevertheless exist, but they are not used with respect to ARI so they are not identified as such. For additional information on the differences and uses of the realm types, see the topics under Maintaining Metadata.
External foreign systems
From the perspective of ARI, a foreign system is any external system besides the Retek Data Warehouse. In contrast to the Retek Data Warehouse for which ARI has some specialized interfaces, foreign systems interface to ARI through a generic API.
Monitoring external realms
ARI monitors external realms by periodically (this could be more often than once a day if justified) scanning their temporary tables and processing, row-by-row, the data found there. Exceptions define rules on the data that, when all of the conditions are true, cause an exception instance to occur. Beyond simple monitoring, the process is somewhat more involved. A program first scans the interface objects available and describes them generically to ARI as headlines. Then a business analyst must translate the headlines into realms and then must define exceptions on these external realms. Note that, except when the external interface format of a realm changes, these earlier steps of the process do not require daily maintenance or repetition.
14 Retek Active Retail Intelligence
Monitoring internal realms
Monitoring internal realms occurs in one of two ways, depending on the exception, and it is critical from a performance standpoint to consider the realms being monitored when determining how best to define the exception. An exception that monitors a change will only process a data set when the value of the given parameter changes. This is accomplished by database triggers. An exception that does not monitor a column change as its key driver scans the entire table nightly and processes all rows (data sets) to determine whether any of them meet the conditions. Functional constraints may dictate which way an exception is defined, but most exceptions can be monitored in a number of ways and, on the technical side, performance must play a part in a business analyst's decision as to how to design an exception. This is why the business analyst defining these exceptions should understand the RMS or other internal systems both functionally and technically. Consider the following examples.
As in the ongoing purchase order example, monitoring purchase orders in submitted status from a certain vendor exceeding a specific amount could be done in one of two ways. You could not monitor any change, in which case all orders are scanned nightly for those meeting the conditions, or you could monitor a change in the order status column to be submitted, in which case the data set is processed immediately when an order status changes to submitted. The change method is better here since the volume is small and the notification is immediate. For a different example, suppose it is necessary to monitor orders that were approved more than a month ago but are still not complete. In this case, there is no active transaction to monitor, so the monitoring must be achieved through a nightly scan of the table. This works well for this example since, although the data columns in question are not indexed, the number of rows on the order table is not unreasonable for a nightly scan.
As an example of a more difficult business problem, it would be unrealistic to attempt to monitor a change in the stock-on-hand column of an item inventory table for every SKU-location in the system. Nightly POS updates to those tables could cause so many changes that either more rows would be processed than can be handled by the system in a night, or more exceptions would be generated than users could address in a day. A nightly full scan of this table would be equally cumbersome since the number of rows on the table is prohibitive and, again, the number of exceptions generated might not be able to be addressed. A creative solution, if existing replenishment were not already the whole solution, would be to feed a data warehouse report that shows a stock-on-hand trend. If the RDW report were not an option, it would be necessary to test both methods and see whether either of them provided acceptable performance. If the list of SKUs of interest were sufficiently restricted by a condition on some other parameter of the item inventory table itself, the monitoring change process might be the best way to go. These issues are examined further in the Exception Definition chapter.

Chapter 2 – ARI Setup and Maintenance 15
Linking exceptions and events
Exceptions define the conditions against data or changing data in the systems monitored by ARI. These exceptions are generally the minimal set of conditions that warrant further processing within ARI. They contain only as much information as is necessary to determine that an exception has occurred and that the data represents a condition that should be brought to the retailer's attention. Complementary to exceptions, events describe ARI's internalization of exception data and the representation of this and other data as information. Event definitions also include instructions for the analysis and classification of this information in terms of routing alerts to appropriate users or automatically acting on them, and the presentation of available actions that users can take to resolve the exception conditions that caused the event in the first place.
For exceptions to be noticed by end users, exceptions are linked to events and the detection of exceptions by the ARI monitors causes the ARI decision flow engine to create corresponding events. Whereas exceptions focus on monitoring external systems, events focus on processing and presenting information, and resolving issues identified by analyzing that information.
Defining events and states
Events are a collection of data passed from an exception's data set, plus additional information that can be ascertained via related metadata. Against this combined data set, events contain rules about how to route event notifications, to which roles and at what priority. Rules may also contain instructions for ARI to automatically perform actions. The event definition also includes potential actions, which users who receive notification of the events can take to resolve the exceptions.
In addition to defining an event from scratch, ARI provides several options that make it convenient to define events:
• By using a wizard that walks through the necessary screens for defining events
• By cloning, or creating a new event from an existing event
• By versioning, or creating a new event from a version of an existing event
States provide organization for the event as it progresses through the exception resolution process. A state consists of state rules and actions. State rules determine the state of an event. In addition, state rules specify the user to be notified of the event, the event priority, and any actions that are to be automatically executed. Actions are the user actions that are available when the event is in that state. ARI determines the initial state of the event by evaluating a set of event rules. Transitions from state to state are accomplished by periodic reevaluations of the event. At event is assigned to one (and only one) state at any time during the event life of the event.
To provide additional information that can help the user decide which action to take, while also resolving two events with maximum efficiency, event definitions include parameter relations between one event and another (such as overstock and under-stock being related by SKU). Finally, event definitions include the instructions for how an event is displayed in the event viewer interface.
16 Retek Active Retail Intelligence
The collected data of an event definition can go well beyond the minimal data set of interest used to define an exception. Ideally, parameters added to an event provide a complete enough picture of the data situation surrounding an exception instance that an end user, or a good rule set, can analyze the data and choose an appropriate action to address the situation with minimal additional research. Once it is determined that something must be done, additional information that may be useful can be gleaned from two previously unmentioned kinds of parameters that belong to special realms, unlike the internal and external data realms previously discussed: these are functions and lookups. Parameters from these realms may be used on exceptions as well, because they are essentially calculated fields. However, it is often better from a performance standpoint to define exceptions without them when feasible. Because calculated fields are mostly for the more in-depth analysis oriented part of ARI, the decision flow engine and the human mind component, these parameters have not been introduced until now.
Scheduling exception scanning and event revalidation
In ARI, you can define schedules to execute batch scans and to reevaluate events on a regular basis.
Functions
A function is any calculated field that can be defined using PL/SQL that, after being defined as a metadata function, is accessible to exceptions and events just as any other parameter is. The function's input parameters act like realm key parameters in terms of making the function available and the function's output acts just like any other parameter selected from a table. To the end user, the difference is transparent. They are all just parameters attached to the event and having some value. However, to the business analyst who would like to show an average or do some other data calculation, the ability to describe functions as metadata is extremely useful in terms of presenting additional information for more sophisticated decision analysis.
Lookups
Lookups are equally transparent to users and act much like functions, but with discrete values. They also allow virtual rows to be created or even virtual tables, though it would only be recommended for smaller tables and only as a temporary solution to customizing the RMS (or other system) if the values are likely to change often. An example of a lookup is a discrete function that accepts a department number as its input and returns the auto-order-approve-threshold for that department. No such column exists on the department table in the RMS, but it may be a useful piece of information to use for rule-processing/event-analysis. Similarly, a lookup may be created that takes the department as input and returns the approver role for that department. Consider that with these two lookups, I can write simple rules that tell ARI to auto-approve an order when the auto-order-approve threshold for a single department order exceeds the total order cost, or to route it to the approver role for that department otherwise. Without lookups this would require a whole series of rules, two for each department.
Chapter 2 – ARI Setup and Maintenance 17
From a maintenance standpoint, there are tradeoffs for a retailer adding the two columns from the foregoing example to the RMS department table instead of using a lookup. Such customizations must be redone each time a new version of the RMS is taken and the number of such discrete parameters or extended department attributes may increase the more you use ARI. However, although it implies data maintenance in two places, the lookup form and the department form, if the extended department parameters are only used in ARI, such dual maintenance may make sense. Lookups are at least preferable to having to maintain such thresholds as a set of rules on an event by event basis. Moreover, lookup maintenance can change event processing without having to modify an event. Finally, as an example of a virtual table usage, consider if you had an extended attribute you wanted to use that was a function of store and department. Although no store-department table exists currently, each lookup created based on those two inputs represents a column on a store-department virtual table.
Rules
In addition to being a repository of information, event definitions have rules that are processed when event instances occur. These rules are made up of conditions, which are like exception conditions in that they use simple operators on existing parameters of the event (any of them, including functions etc.). Rules are evaluated sequentially. When a rule is found for which all of its conditions are true, the processing stops and the instructions of that rule are carried out. The instructions determine the user to which the event notification should be routed, assign a notification priority, and take an automatic action if one is specified. Default rule processing, which is performed when none of the other rules are true, must be defined for each event.
Users and groups
Users and user groups provide the mechanism for routing events to the appropriate users. These objects are the targets for state rules that govern the event notification process.
Users correspond to individual users of the ARI system. A user group is a collection of users who share a characteristic. The user group may be a simple group or a parameter-driven group. Membership in a parameter-driven group is defined by the value of a specific parameter. For example, the membership in a group STORE could be defined by the value STORE NUMBER. Users in this group would be assigned a store number(s), for example 0001. A member of this group would then eligible to receive events directed to the STORE group with a parameter value of 0001. This type of group definition eliminates the need to create a separate group for each store and permits ARI to route events to specific users based on parameter values. Parameters used to define user groups must be a character string or a discrete number. Inexact comparisons (e.g., <, > or between) are not permitted.
Simple groups consist of users that share some common characteristic such as a job description or location. Simple groups are not defined by parameter values and have no internal routing mechanism.
18 Retek Active Retail Intelligence
Group hierarchies can be created by making a simple group a member of a parameter-driven group. When a simple group is a member of a parameter-driven group, values must be specified for the driving parameter. The association of a simple group with specific parameter values allows routing of events within the larger group. Moreover, a simple group can be made a member of another simple group and inherit the parameter values of that group.
Event notification (alerts)
Users who are assigned an event receive notification in the form of an alert, which is simply a notification that an event of a specific type (an instance of a specific event definition) has occurred. This notification comes through the integrated ARI/RMS interface. Additionally, an event can be set to send an email notification whenever the event is assigned to a user or changes its state. This email could potentially be sent as a page or a fax any other method that can be routed through an email gateway. Such a configuration is not supported by ARI but by a customer’s administrator or even potentially simply by choosing an email address that is automatically rerouted (such as for a cell phone that does text paging of messages sent to a specific email address).
Actions
Another attribute of an event is an action, which is a procedure that can be called via the event user interface to resolve the exception that triggered the event. These may include things such as approve order, create transfer, etc. These are usually PL/SQL procedures and must always be described by metadata so the ARI system can use them. When actions resolve exception conditions, some special actions, such as forwarding, do not close the event. Forwarding sends the event and all of the owner's rights to perform actions attached to the event on to another user, but does nothing to resolve the initial exception issues. Additional actions other than those provided with ARI can also be created and described to the system via metadata, such as launching a Windows application or opening an RMS interface form. Also, many other actions potentially (not yet described by metadata) already exist in the RMS packages and procedures stored on the database. An example of an action that opens a form is a manual purchase order action that opens the ordering dialog in new mode.
Some actions do not close events, but simply provide a gateway to additional information or manual action. An example of such an action is opening the purchase ordering dialog in Edit mode to examine an order in more detail prior to approving it or so that it can be approved manually.
Default layout (event interface)
The event viewer, which displays all of an event's parameters, actions, and related events, must have its default arrangement specified by the event definition. Users can personalize and customize this layout once they are assigned an event of a given type, but a default layout must be specified.
Chapter 2 – ARI Setup and Maintenance 19
Event history retention and duplicate event handling
The last attributes of an event are the number of days to retain history and the number of days to ignore/prohibit exceptions that would create duplicate events. History retention is straightforward enough. Event history, parameter values, actions taken, and so forth, are tracked and retained only for as many days as history retention is requested. Currently there is no easy way (user interface) for viewing history data, but history data still performs an important role with respect to ignoring exception instances that would create duplicate events (ones of the same type with identical key values). Ignoring duplicate events tracks both active events and historical events when determining whether an event is duplicated. Therefor, history must be retained for at least as long as you would like to ignore duplicates. The following paragraphs explain duplicates more specifically.
When one of the many ARI monitors determines that a data set meets the exception conditions, an exception instance occurs. A different set of values may also meet the conditions, or the same set of values may be scanned again at a later time by the monitor and still meet all of the conditions. In either case, another instance of the exception occurs. Both exceptions are of the same type, but their data values are tracked as separate exception instances even if the key values identifying the set of exception data are the same.
Having exact duplicate exception data values is OK because tracking and processing are done through an exception's linked events, for which only distinct instances are maintained. For example, if two distinct data sets trigger instances of the same exception, two different events with distinct identifying data values will be created. However, if the same data set scanned again creates an identical exception instance as when it was scanned the first time, and the event created the first time is still active, an identical event will not be created, though its parameters will be updated with the more current values. If the first event has been resolved and closed, then another event will be created. In this case, the assumption is that the resolution to the first event should have addressed the first exception instance, so an identical instance occurring again indicates that the exception has recurred and needs to be addressed again.
The assumption that only distinct active events should be maintained, but duplicate events can be created when the duplicates are historical, is usually valid for well-defined exceptions. The resolutions of well-defined events should adjust the data of the monitored system so that a scan for exceptions after the event's resolution will no longer yield the same exception. However, there are cases when the effects of an event resolution do not immediately prevent the re-creation of an exception. You can address this by setting the event's ignore duplicate days, delaying the creation of "duplicate" events by treating closed events (from the standpoint of violating the distinct active rule) as still active for a number of days. Alternatively, you can redefine the exception to better account for the event's resolution.

20 Retek Active Retail Intelligence
Redefining the exception is preferred since ignoring duplicates may occasionally miss valid exceptions that recur within the delay timeframe. There are cases in which redefining the exception is the only choice. One such is for events you are using strictly as informational messages. Another example is events whose exceptions are from a system whose data is updated, with some delay, from the data in the system the event resolution acted on (such as, potentially, the RDW).
For the "message" type event, without ignoring duplicates you would have to leave the event active even after receiving the message or face being bombarded with the same message each time the monitor runs after you have closed the existing event. Knowing the monitor's frequency, such as nightly instead of online, it may still be more acceptable to receive the same message daily rather than risk missing one because of an imposed delay. However, depending on the exception, putting on a week delay and thereby only checking weekly may be often enough, provided you resolve each message promptly.
In the RDW case, which is updated periodically rather than real-time, the issue is one of timing with respect to how long to delay duplicates. If the RDW is updated at least as often and immediately before the reports and then the monitors are run, no delay at all should be necessary. More information about scheduling is available in the Batch Processing chapter of this document.
Versioning
As a final note, both exception and event definitions can be modified. For the purposes of synchronization, a date-driven version protocol surrounds this process to ensure that users will know exactly when the old and newly modified versions of the exception or event will be active. The period of this date driven protocol is one day so an event or exception must be active for a whole number of days and the synchronization point is at the end of the nightly batch run before the system date is advanced. This versioning is discussed in more detail in the topics about defining exceptions and events.
User Interface Starting ARI
ARI is accessed from the ARI start form, or from any of several places in RMS, depending on whether you are using ARI or setting up and maintaining ARI.
Dialogs
The ARI user interface consists of two main parts:
• Dialogs for setting up and maintaining ARI for your business
• Dialogs and displays for end users to use ARI after it is set up
Common buttons and controls
All of these dialogs share a common set of buttons and use several common user interface controls, described in the following topics.
Chapter 2 – ARI Setup and Maintenance 21
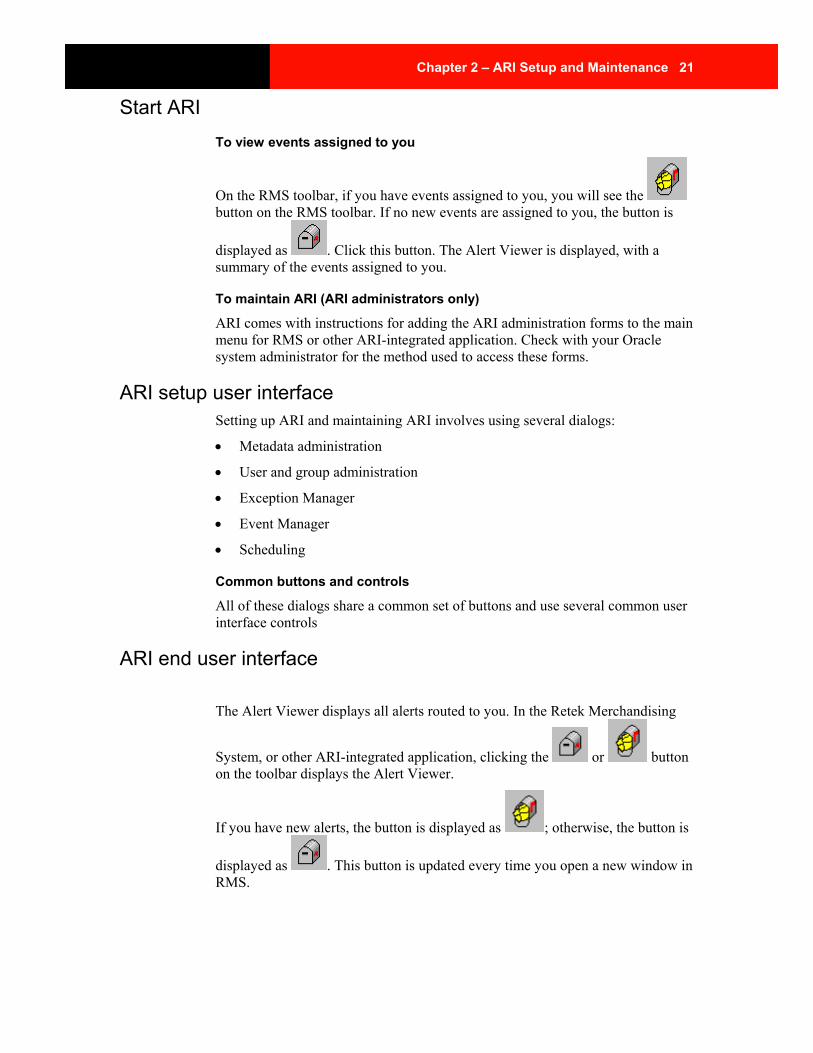
Start ARI To view events assigned to you
On the RMS toolbar, if you have events assigned to you, you will see the button on the RMS toolbar. If no new events are assigned to you, the button is
displayed as . Click this button. The Alert Viewer is displayed, with a summary of the events assigned to you.
To maintain ARI (ARI administrators only)
ARI comes with instructions for adding the ARI administration forms to the main menu for RMS or other ARI-integrated application. Check with your Oracle system administrator for the method used to access these forms.
ARI setup user interface Setting up ARI and maintaining ARI involves using several dialogs:
• Metadata administration
• User and group administration
• Exception Manager
• Event Manager
• Scheduling
Common buttons and controls
All of these dialogs share a common set of buttons and use several common user interface controls
ARI end user interface
The Alert Viewer displays all alerts routed to you. In the Retek Merchandising
System, or other ARI-integrated application, clicking the or button on the toolbar displays the Alert Viewer.
If you have new alerts, the button is displayed as ; otherwise, the button is
displayed as . This button is updated every time you open a new window in RMS.
22 Retek Active Retail Intelligence
The Alert Viewer shows end users the priority and a count of the number of instances of each event type assigned to them. New alerts can be deferred out of New status, but just opening the alert viewer does not take an alert out of New status. An alert is new until it is deferred or the event it represents is closed.
Clicking the Details button In the Alert Viewer displays events associated with an alert in the Event Viewer. The Event Viewer displays additional details about events, including actions to drill into the system to further examine the cause of the event, and other actions that you can take to resolve events.
Common buttons and controls
The Alert Viewer and Event Viewer share a common set of buttons and use several common user interface controls.
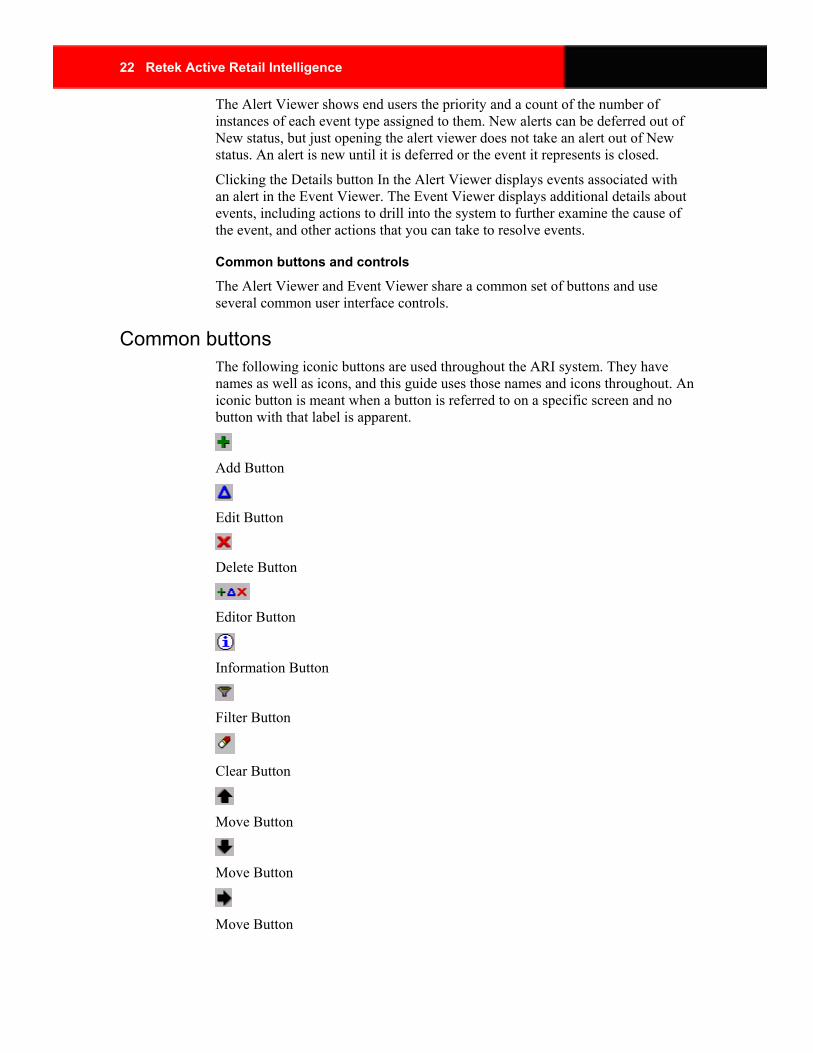
Common buttons The following iconic buttons are used throughout the ARI system. They have names as well as icons, and this guide uses those names and icons throughout. An iconic button is meant when a button is referred to on a specific screen and no button with that label is apparent.
Add Button
Edit Button
Delete Button
Editor Button
Information Button
Filter Button
Clear Button
Move Button
Move Button
Move Button
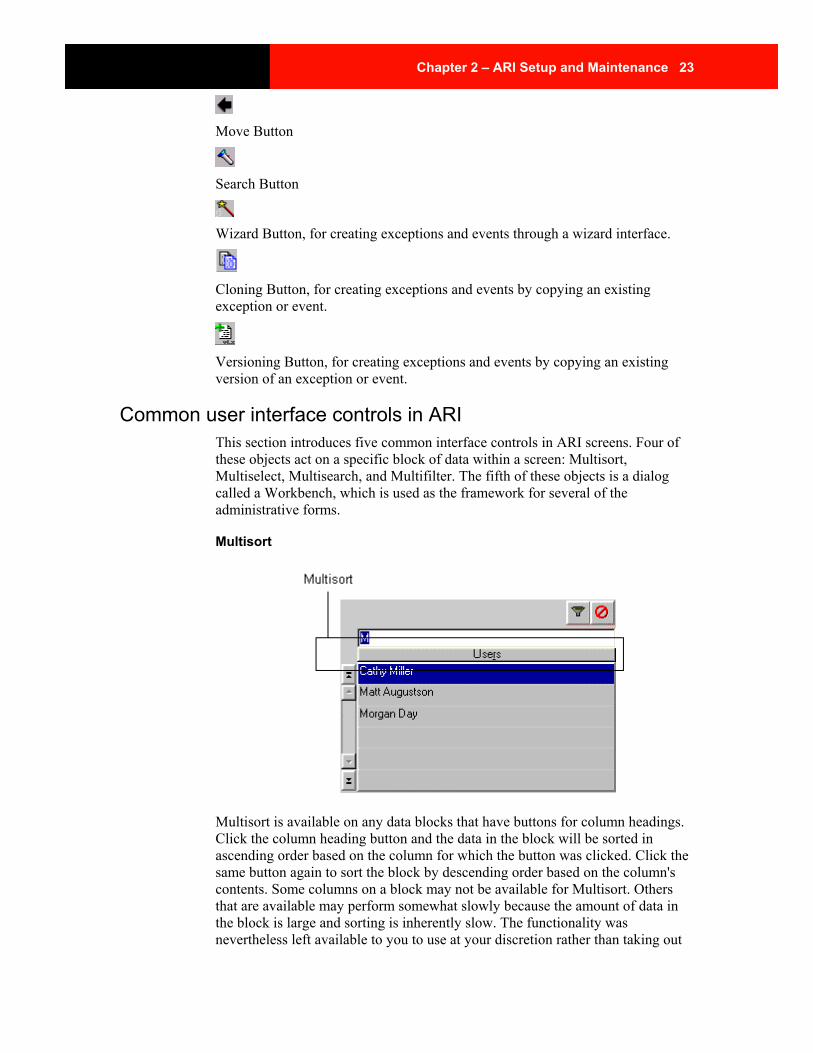
Chapter 2 – ARI Setup and Maintenance 23
Move Button
Search Button
Wizard Button, for creating exceptions and events through a wizard interface.
Cloning Button, for creating exceptions and events by copying an existing exception or event.
Versioning Button, for creating exceptions and events by copying an existing version of an exception or event.
Common user interface controls in ARI This section introduces five common interface controls in ARI screens. Four of these objects act on a specific block of data within a screen: Multisort, Multiselect, Multisearch, and Multifilter. The fifth of these objects is a dialog called a Workbench, which is used as the framework for several of the administrative forms.
Multisort
Multisort is available on any data blocks that have buttons for column headings. Click the column heading button and the data in the block will be sorted in ascending order based on the column for which the button was clicked. Click the same button again to sort the block by descending order based on the column's contents. Some columns on a block may not be available for Multisort. Others that are available may perform somewhat slowly because the amount of data in the block is large and sorting is inherently slow. The functionality was nevertheless left available to you to use at your discretion rather than taking out
24 Retek Active Retail Intelligence
functionality on the basis of what some users may consider too slow. With a little experience, you will learn which buttons perform reasonably and are useful. If you feel performance on a sort is critical, a system administrator could add an index to that column, but performance impacts elsewhere would warrant consideration before making such a change.
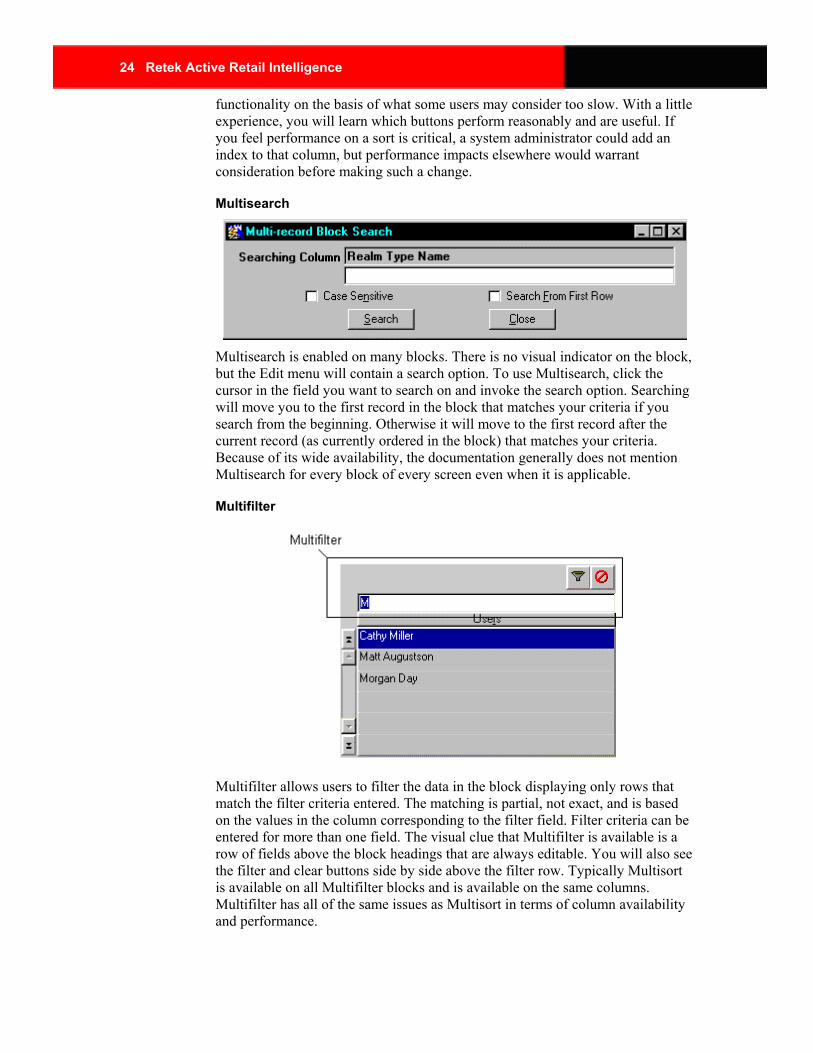
Multisearch
Multisearch is enabled on many blocks. There is no visual indicator on the block, but the Edit menu will contain a search option. To use Multisearch, click the cursor in the field you want to search on and invoke the search option. Searching will move you to the first record in the block that matches your criteria if you search from the beginning. Otherwise it will move to the first record after the current record (as currently ordered in the block) that matches your criteria. Because of its wide availability, the documentation generally does not mention Multisearch for every block of every screen even when it is applicable.
Multifilter
Multifilter allows users to filter the data in the block displaying only rows that match the filter criteria entered. The matching is partial, not exact, and is based on the values in the column corresponding to the filter field. Filter criteria can be entered for more than one field. The visual clue that Multifilter is available is a row of fields above the block headings that are always editable. You will also see the filter and clear buttons side by side above the filter row. Typically Multisort is available on all Multifilter blocks and is available on the same columns. Multifilter has all of the same issues as Multisort in terms of column availability and performance.

Chapter 2 – ARI Setup and Maintenance 25
Multiselect
Multiselect allows a user to select multiple rows in a single block by using the Shift and Control keys. This is so users can perform a single action on multiple rows. To use Multiselect, click on a row. Shift click on another row to select all the rows in between, inclusively. Control click on rows to select or deselect the individual rows clicked on (depending on whether they are currently selected) while leaving the other selected rows still selected. The functionality is analogous to the select functionality of other Windows applications. A known issue is that scrolling through a Multiselect block while Multiselecting can cause the first or last row to not appear selected (highlighted). Instead, only the text appears to be selected. This is an issue with the Oracle toolset's scrollbars not being widgets, so it is recommended that Multiselect actions involving scrolling be confirmed after they are performed.
Workbench
A workbench is an interface that contains several related dialogs in one form. A dialog is a screen or series of screens that performs a single logical unit of work, so each dialog could be presented in its own form or window. However, some tasks, though logically independent, are functionally closely related and likely to be performed together as part of a larger work plan. A workbench helps group these functionally related tasks and facilitate switching between them.
The standard workbench interface used in ARI has a common workbench area and a dialog specific area. The common area is a column of vertical buttons on the left side of the screen and a row of buttons across the bottom of the screen. This common area may include other features on specific workbenches, but these are the standard features:
Vertical buttons
Each of these represents one of the dialogs in the workbench. These are used to switch between dialogs.
OK button
Saves all changes made in any of the dialogs and exits the workbench.
Cancel button
Cancels all unapplied changes and exits the workbench. Unapplied changes are any that have been made since the last use of the Apply button or since the form was opened if the Apply button has not been used.

26 Retek Active Retail Intelligence
Apply button
Saves all changes made in any of the workbench's dialogs.
One of the unique features of the workbench is that none of the changes you make in a given dialog are saved to the database until you complete the dialog and use one of the main workbench buttons to either save or cancel your changes. While a dialog is in progress, the workbench buttons are disabled and the dialog specific buttons act on that dialog alone.
Reserving saving of work for the workbench level and making it available only at appropriate points in the dialog opens up a number of new working strategies. You can either do lots of work tentatively with the option of canceling it all, or you can apply your work often, reserving Cancel to undo only your most recent changes. Generally, it is a good idea to complete a dialog and apply changes, when leaving the workbench open but moving on to another task, to avoid inadvertently canceling when returning to the workbench and losing all the work completed during that session.
Posting and rollbacks
OK buttons within dialogs of a workbench are described throughout as posting changes. Cancel buttons are described as rolling changes back. Posting is like a temporary save that can still be undone manually (if the editor allows) or by the workbench's main Cancel button until a workbench's main Apply or OK button is used. Rollbacks just undo the changes made on the current screen.
Security considerations ARI provides no special security features or safeguards. Addressing any site-specific security issues involving ARI is the customer’s responsibility. Security settings in other applications with which ARI interacts will not be overridden or circumvented by ARI. Whereas this is generally desirable, it is a consideration when determining to whom ARI alerts should be routed. Sending an alert to a user who does not have the privileges to take the actions necessary to resolve the event may prove frustrating and counter-productive. Users should be educated about this issue so that they can avoid forward events that have actions with limited access as well.
At a data level, ARI detection is necessarily done with full access privileges to all data. Individual users with data level security may see different values for some parameters (in particular those involving sums) than the values seen by ARI. This may cause adverse effects such as a user looking at an event automatically causing it to close because the user’s limited data access causes the event to see values that make ARI think the exception is no longer an issue when in fact it still is. For this reason Retek urges extreme caution when designing ARI process that involve users with limited data access. The consequences of missing alerts can be great in an exception driven enterprise, so extra care is needed in the technical analysis of how such ARI processes will behave.
Chapter 2 – ARI Setup and Maintenance 27
Customizing ARI ARI is a product that allows you to implement your business rules with minimal customization of other products. ARI is not a product that should itself be customized, due to the complexity of the product and the proprietary nature of its code. In spite of the delivery of ARI source code, customer modification of ARI code is NOT supported.
Metadata Maintenance
Overviews Maintaining metadata is a key setup and maintenance task for ARI.
What is metadata?
Metadata is data about data; that is, it is a description of the data sources available to ARI, presented at a level above the actual data descriptions. This simpler level of data detail allows you to deal with the data along functional rather than structural lines. Metadata definitions are descriptions of data tables, with the added convenience of being able to provide additional information that was not in the original definitions of the tables and to logically group like data.
Metadata must be defined so that exceptions and events will process properly. Maintaining metadata involves defining and editing the data objects that you will use to set up and maintain rules, events, and actions for your ARI system.
Metadata concepts
ARI metadata consists of several concepts and types of information:
• Parameters
• Parameter types
• Realm types
• Realms
• Lookups
When to maintain metadata
Metadata must be defined before you can proceed with defining exceptions and events.
Metadata must be synchronized with and accurately reflect the data model that drives your system, or ARI will malfunction. This means that any changes made to tables and functions must be reflected in the ARI metadata.
Because you are modifying the data that drives your ARI system, metadata maintenance should be performed when there are no ARI users besides yourself on the system. Consult the ARI Operations Guide for more information.
28 Retek Active Retail Intelligence
Changes to metadata administration for ARI 3.0
In ARI 3.0, the overall changes to metadata are physically minor, but represent a major logical shift. In previous versions of ARI, Parameters were near the bottom of a hierarchy defined by Realm Type -> Realm -> Parameter. In ARI 3.0, this hierarchy has been leveled, and the Realm and Realm Type are now attributes of the parameter. This change allows a more general approach to handling a variety of data sources; for example, functions are logically treated identically to data tables.
Windows and Dialogs
You create, edit, and delete metadata definitions on the Metadata Maintenance form. This form has several views for working with the various types of metadata.
• Metadata Maintenance Form
• Realm Find screen
• Parameter Find screen
• Parameter Type Find screen
• Lookup Find screen
• Realm Maintenance screen
• Parameter Maintenance screen
• Parameter Type Maintenance screen
• Lookup Data Edit screen
• Change Effect Warning Dialog
Ongoing Metadata Maintenance Metadata maintenance is one of the most critical tasks in ARI. No matter how well a business analyst defines exceptions and events, if the metadata does not accurately describe the DDL, ARI will not work correctly. Fortunately, because metadata reflects data storage specification and code specifications, it is not likely to change often in a redundant environment.
Following are requirements and recommendations for maintaining metadata.
Before using ARI
Prior to the use of any ARI functions, the REALM.SCHEMA field must be updated to reflect that actual schema name in which the functions and tables are deployed. This can be done through the user interface for several 100 realms, but is better done in SQL*Plus by looking at what already has a schema name and validating against the DDL. A couple of update statements should be sufficient.
Chapter 2 – ARI Setup and Maintenance 29
Adding New Functions
A business analyst may define functions to calculate values not stored on the database or to act as action shells around existing Retek functionality so that actions available on an event can be created. In these cases, metadata for these new DDL objects can be created at any time without regard to the production schedule. This is generally true of any newly created objects, including new external data sources monitored via the API or new RDW reports.
Changing the DDL
When the DDL is changed, the metadata needs to be updated to reflect it immediately. ARI processes that expect data objects with one definition and instead find a different definition will, as a result, miss processing any exception candidates that might have occurred between the time that the DDL is changed and the metadata is updated.
Updating the metadata alone is not enough to start catching the new exceptions, but it will at least prevent time-wasting error generation. In some cases, the exception being monitored may not be critical enough that a gap in the exception record is even critical, or if it is not real-time monitored, a delay in detecting the exception (which is only periodically monitored anyway) may not be critical. However, in many cases the goal is in fact to catch all real-time exceptions.
In this case, after updating the DDL and the metadata, it is necessary to rerun the ARICNTRL processes to rebuild the monitors and associated support code. Of course, this process must run with no other user logged in or any other process running (as defined in the Retek Batch Schedule). This means that it may be difficult to rerun the process if the DDL and metadata are updating during the day; but this shouldn’t be a problem in a production environment since, in such an environment, DDL changes are not made during production hours anyway.
The recommended procedure for changing the DDL is: run the shutdown portion of the ARICNTRL procedure, disconnect users, change DDL, update metadata, run the build portion of ARICNTRL, bring the database back up, and run the restart portion of ARICNTRL.
RDW Reports
When an RDW report definition is changed, its corresponding metadata realm will be made inactive. A new realm will need to be defined to replace the old one (and any exceptions may need to be redefined as well) before the report can be used to drive exceptions again. This is not as critical as Oracle DDL changes, since the old report will no longer have meaningful data anyway and the new exception definition can be created at any time to monitor the new report which itself can be run on demand.
30 Retek Active Retail Intelligence
Creating Function Shells
Many actions within the Retek Enterprise Suite can be used directly from ARI simply by describing them in metadata. Others involve user interaction, depending on certain checks made as the process is performed. Generally it is best to take these actions by using ARI’s Event Viewer as a gateway into the appropriate GUI and then taking the action, using the traditional method defined in the GUI. In some cases, however, the user interactions have a limited number of outcomes and it may be useful to create a fully automated action that, when demanding user interaction, uses a predefined value.
An example of this is approving a purchase order check the open to buy. Two function shells could be created for approve order, one of which approves even if the OTB is exceeded. One does not proceed if the OTB is exceeded. The user can set up automated rules then to approve even if over the OTB, or can set up rules to approve but not if over the OTB. These action shells are described as two different actions in metadata and behave like two different functions, even thought they are coded around the same base ARI code. In fact, it is possible to create a single shell with two different INSTANCE IDs in the metadata that have different default values for an input parameter that determines whether to ignore the OTB warning.
Impact of RMS data dictionary on ARI metadata administration Data model irregularities are not unusual in complex systems, since performance, flexibility, and functionality are constant requirements that force many compromises. The same metadata that allows ARI's access to the RMS data model also exposes the irregularities of that same data model, unlike any existing RMS interface. This would be true in general for any system monitored by ARI via metadata, and is not in itself problematic. In fact, the metadata as designed has in some cases been used to build in compensation for these irregularities. Without regard for the benefits or reason for the RMS data model being constructed as it is, following are brief discussions of some of the specific areas of the RMS data model that impact ARI administration.
Split Item and Location Tables
Even though SKUs are unique, the item tables and location tables are split by item type (staple, fashion etc.) and location type (store and warehouse), respectively. Thus, to monitor certain kinds of item related exceptions, similar but distinct exceptions may need to be defined on more than one table. These exceptions may be the best example (see the Examples chapter) of multiple exceptions driving the same event, which could be done only if the event could get its additional information from the common item tables and precisely because the key identifiers are unique across the tables.
Chapter 2 – ARI Setup and Maintenance 31
DDL Navigation
To define conditions against a unique set of metadata requires that information can only be gathered from tables that are somehow the parents of whatever table is being monitored. You can only navigate "up" the foreign key chain. To navigate downward, to check whether a SKU exists on an order, or to compute a total, or otherwise check an attribute of detail information that can be treated as a single row of data, requires functions to return calculated fields. Details on setting up these functions are discussed elsewhere in this section and in the Examples section.
Metadata Definition ARI installation loads metadata appropriate to the release of RMS with which it is released. However, use of external data systems (the RDW) or custom modifications that add new tables or change existing ones both require metadata maintenance.
Internal System Metadata Maintenance
Internal metadata, describing ARI, the RMS, or some other integrated Oracle systems sharing the same DDL and owner as these products, is generally best defined before the systems are put into production.
Suppose that, through custom modifications, you add a new table to the RMS or modify an existing table. Before putting the system into production or creating ARI exceptions and events, you should always make the metadata accurate. This includes deleting parameters representing removed columns, adding parameters representing new columns, and modifying those representing changed columns. Depending on the change, the modification may simply be a change to a parameter type. Consider these examples:
Example 1
Suppose you add new columns to the RMS SKU tables to categorize items in terms of shelf life and, where applicable, record the duration of that shelf life. Using the auto-discovery feature of the Parameter dialog, you could start at the SKU table and auto-discovery would successively pre-populate data about these new columns. You would likely create a new parameter type for the shelf-life category, and use an existing parameter type such as number of days parameter type to describe the shelf-life duration.
Building on this example, if you added a code to the code_head and code_detail table to describe the various shelf-life categories, you might add a code type to the shelf-life category parameter as well. A code type such as SHLF could contain the codes FOOD and PHARM for food items and pharmaceuticals. If, instead, the number of categorizes were to be dynamically created by the buyers as needed, the categories might be stored on a new shelf-life category table with a code and description column. In this case you would first describe the new table and then use its description column as a decode column for the parameter representing the shelf-life category on the SKU tables.
32 Retek Active Retail Intelligence
Example 2
As another example, consider if you needed all SKU numbers to be able to have a length of 10 instead of only 8 as is currently the practice in the RMS. After making the changes in the RMS to tables and code, the only change that would be needed for ARI would be a modification to the SKU parameter type. Because all parameters that contain SKUs should already have a parameter type of SKU and it is the parameter type that contains the data length and type information, not the parameter itself, a single modification to the type modifies the whole system.
The difficulty in the parameter type example is that after the parameter types are in use (to describe parameters), they cannot be modified. Instead, a new parameter type (SKU-10, for example) must be created and then all of the SKUs must be assigned to it so that, no longer part of the definition of SKU parameters, the parameter type (SKU-8) can be deleted. Such a mass update is likely easier done in SQL*PLUS by a system administrator, but these illustrations are intended to show you both when and how to use the tools provided and when to use another method.
Challenges of changing table structures during production
As these examples show, there are inherent difficulties with changing the table structures of the RMS after it has been put into production. Data dependencies make certain changes difficult to make once the RMS system is in use, and so it is with ARI. As shown in the last example, some of these dependency difficulties exist in ARI as well. Thus, you should that pre-production metadata synchronization is critical and post-production changes, except possibly in the form of new tables, are more difficult (though still possible).
External System Metadata Maintenance
ARI does not come with any external realms pre-defined. This is because the external feeds that are available depend on the reports an individual retailer is interested in monitoring. Headlines are described for all RDW reports owned by the RDW user who specifically creates reports for ARI. However, even these headlines must be converted into realms before exceptions can be defined against their output values.
Describing a headline is a fairly straightforward process in which you define the realm and then one field at a time as parameters of that realm, just as you would do with a table and its columns for internal systems. However, tables rarely if ever change once in production, but RDW reports may change often. When these changes occur, a new realm must be created to describe the new report, and any exceptions based on that realm must also be re-created. This is because the previous exception version is monitoring the old realm, which is essentially inactivated by the new headline version replacing it.
This means that it might be helpful to describe the ARI realm table as internal metadata and define an exception against it notifying the ARI Administrator every time the active indicator is set to NO on a realm that has an active or future exception defined against it. This would prompt the ARI Administrator to define a new realm and create a new version of the exception to monitor this new realm, which describes the new version of the RDW report.

Chapter 2 – ARI Setup and Maintenance 33
Defining a realm for a new headline version is just like defining a realm for the first version of a headline. The process of creating a new exception version when the realm changes is discussed in a later example.
Windows and Dialogs
Metadata Maintenance Form [metadata]
From the Metadata Maintenance form, you can create, edit, and delete metadata such as parameters, realms, parameter types, and lookup data.
Accessing views of metadata
On the left side of the Metadata Maintenance form is a set of buttons for accessing the various views, or screens, for defining and maintaining metadata.
Realm
Displays the Realm Find view, from which you access the Realm Maintenance view for creating and editing realms.
More information
Parameter
Displays the Parameter Find view, from which you access the Parameter Maintenance dialog for creating and editing parameters.
More information
Parameter Type
Displays the Parameter Type Find screen, from which you access the Parameter Type Maintenance for creating and editing parameter types.
More information
Lookup Data
Displays the Lookup Find view, from which you access the Lookup Data Edit screen for creating and editing lookups.

34 Retek Active Retail Intelligence
Committing and canceling changes
At the bottom of the Metadata Maintenance form is a set of buttons for committing edits to the various views on the form, and for exiting the form.
OK
Commits all changes and closes the Metadata Maintenance form.
Cancel
Closes the Metadata Maintenance form without saving any changes.
Apply
Commits all changes. The Metadata Maintenance form remains open.
Realm Find screen The Realm Find screen lists all of the active realms in your ARI system. This
view is accessed by clicking the button on the Metadata Maintenance form.
Fields
Information displayed about each realm includes:
Realm
The realm name. This field is read-only.
Type
The realm type. This field is read-only.
Instance
The instance ID for the realm. The instance allows you to create more than one version of a realm in case of different database instances of the same realm.
Schema@DB_Link
The concatenation of the database link and schema for the realm, as defined on the Realm Maintenance screen, and displayed in the format schema@db_link.
Chapter 2 – ARI Setup and Maintenance 35
Sorting and filtering
You can sort the realms by the categories of information by clicking the column heading above each column.
You can filter the view or realms by filling in the fields above each column and
clicking the button. The clears any active filter.
Adding, deactivating, and editing realms
The three buttons at the bottom of the list are for adding, deactivating, and editing realms.
Adds a realm. The Realm Maintenance view is displayed, where you can add the new realm.
Deactivates the selected realm.
Edits the selected realm. The Realm Maintenance screen is displayed.
Realm Maintenance screen The Realm Maintenance screen is for editing the definition of a realm. This screen is accessed through several actions:
• Adding a realm by clicking the button on the Realm Find screen.
• Editing a realm by clicking the button on the Realm Find screen.
• Adding a realm by clicking the button next to the Realm Name field on the Parameter Maintenance screen.
Fields
Realm Maintenance has the following fields:
Physical Name
The physical name by which the realm is named in the database. The Physical Name field must be unique and cannot conflict with any active realms.
Realm Type
The source of the realm. A realm type is a set of properties common for all realms of a particular type. The list displays the possible realm types.
36 Retek Active Retail Intelligence
There are currently 4 built in action types.
• WINACT: Generic Windows action. This action type runs a Windows document. The full file system path of the document (including filename) should be stored in the FILE_PATH column on the REALM table. This document must have an extension that is registered with an application in the Windows Registry. Windows actions can only be run from Client/Server forms.
• WEBACT: Generic Web action. This action type runs a URL, which is stored in the URL column of the REALM table. In Client/Server forms, web actions are run in the default web browser (the browser that is registered with the .htm/.html file extension). The URL should include the scheme (http:, ftp:, etc.) and hostname (for example, //www.yahoo.com), as well as the path and filename.
• FRMACT: Forms Action. This action type runs an Oracle Form. The name of the Form is stored in the physical name column. Note that this the internal name of the form, not the filename (.fmb). Forms Actions are associated with Forms Deployments (on the table FORMS_DEPLOYMENT). Each Forms Deployment represents a Version of Forms on the Web or on Client/Server. For each Forms Deployment that a Forms action can be run in, a record is inserted into the table ACTION_FORMS_DEPLOYMENT. Windows deployments cannot be run from Web Forms, so if a Forms Action does not have any Web deployments then it cannot be run from the Web.
• PLSQLA: PL/SQL Action. This action type runs a PL/SQL function or procedure on the database.
Instance ID
This field allows you to create more than one version of a realm across more than one database instance.
Database Link
The name for connecting to remote databases. It is available for external tables and views and all PL/SQL realm types.
Schema
The name of the schema that contains the object. The field is available depending on the realm type chosen.
Display Name
The name to be used for the realm on screen displays. The display name must be unique within active realms. If you leave this field blank, the value in the Physical Name is used for the display name.
Can be Used on Multiselected Events
This check box is available only if the realm type is an action. It allows the action to be performed on multiple events at the same time.
Chapter 2 – ARI Setup and Maintenance 37
File_path
Used for document actions. Stores the full file system path and name of the document associated with the action. The filename should have an extension corresponding to a registered document type in windows. Either this field or the URL field must be filled in for document actions.
URL
Used for document actions. Stores the URL associated with the action. Either this field or the File_path field must be filled in for document actions.
Database_string
Used for forms actions. Stores the database connect string used when running the forms action. If null then the form is run on the same database instance as ARI.
Forms deployment information
This multirecord block is used for forms deployments. The first two fields contain the deployment type (Windows or Web) and forms version for each forms deployment, and are read - only fields. The third column, the available indicator, is a check box. This field is enabled for forms actions. Each row that is checked indicates that the forms action can be run in the corresponding deployment. At least one deployment must be selected for each forms action.
Adding a realm from Realm Find screen: enabled and required fields
• When entering the screen, everything is disabled except for Realm Type and the Cancel button. Once you choose a realm type, all other fields are enabled. The Can be Used on Multiselected Events indicator is only available if the realm type is an action. If the realm type does not require a database link, then the Database Link field is disabled. For document actions, either the File_path or URL field must be filled in. For forms actions, the Database_string field must be filled in. For Forms actions at least one deployment must be selected.
• Clicking OK validates all data, posts the data to the ARI database, and closes the Realm Maintenance screen. The Realm Find screen is displayed, showing the newly created realm in the realm list.
• Clicking OK+Repeat does the same things as OK, except that the Realm Maintenance screen is cleared, rather than exited, and everything except for Realm Type is disabled again.
• Clicking Cancel cancels your changes, closes the Realm Maintenance screen, and displays the Realm Find screen.
38 Retek Active Retail Intelligence
Editing a realm from Realm Find screen: enabled and required fields
• When editing a realm, depending on the realm’s type, fields are turned on or off as described in Adding a realm from the Realm Find screen. Realm Type, Instance ID, and the OK+Repeat button are never enabled.
• When the data is queried back, a set of package variables, corresponding to the fields listed below, is filled with the values from the fields. These variables will be used to determine whether anything has changed when the OK button is clicked.
• All items are still changeable, but the consequences of these changes must be assessed:
Item Changed Action
Physical name Notify exceptions & events
Database Link Notify exceptions & events
Schema Notify exceptions & events
• When you click OK, the database compares the current values to the persistent package variables. If any differences are found, they are handled according to these rules: when the change you are making will affect some other part of the system, a warning is issued. If you decide to continue with the change, the changes are committed to the database. Otherwise, the operation is simply cancelled. The Realm Maintenance screen is then deactivated, and the Realm Find screen is displayed, showing the realm ID you were editing.
• Clicking Cancel cancels any changes you have made, closes the Realm Maintenance screen, and displays the Realm Find screen.
Adding a realm from Parameter maintenance screen: enabled and required fields
There are only a few differences between adding a realm from the Parameter Maintenance screen and the Realm Find screen:
• The OK+Repeat button is never enabled.
• After clicking OK or Cancel, the screen returns to Parameter Maintenance, not Realm Find.
• If the parameter on the Parameter Maintenance screen is set to use Auto Discover, a realm name may have been passed in. If this has happened, the Physical Name is filled in, and the Display Name is defaulted to the same thing. The Display Name is not editable until a Realm Type is chosen. Physical Name is never editable.
Chapter 2 – ARI Setup and Maintenance 39
Validation sequences performed on this screen
Several validation sequences occur on this screen:
• Whenever you change the realm type, items are turned on and off appropriately, as described in the discussions of required and enabled fields. If any fields are deactivated, they are cleared as well.
• The Physical Name field is checked to make sure that the name does not conflict with any active realms. If it conflicts with an inactive realm, the sequence number is incremented to one higher than the last version. Otherwise, the sequence number is set to 1. If it conflicts with an active realm, an error is raised. If the Display Name field is empty, and the realm isn’t an action, or a function, it is set to the same value as the Physical Name field.
• The Display Name field is checked to make sure that no active realms with the same display name exist already. If the name already exists, an error is raised.
Parameter Find screen The Parameter Find screen lists all the parameters defined in your ARI system, by parameter name, parameter type, and the realm to which the parameter
belongs. This view is accessed by clicking the Parameter button on the tab bar. When you first open the Metadata Maintenance form, this is the first view displayed.
Fields
The Parameter Find view has the following fields.
For the data displayed in columns, you can sort the data by clicking the column headings, and sort in reverse order by clicking the column headings again. You can also use the filtering fields and buttons to filter the display of parameters according to the filtering criteria entered in the fields.
Parameter
The name of the parameter. This field is read-only.
Type
The name of the parameter type to which the parameter belongs. This field is read-only.
Realm
The name of the realm to which the parameter belongs. This field is read-only.
Realm Key?
Indicates whether the parameter is part of the key for the realm to which the parameter belongs. This field is read-only.

40 Retek Active Retail Intelligence
Sorting
You can sort the realms by the categories of information by clicking the column heading above each column.
Filtering
You can filter the view or realms by filling in the fields above each column and
clicking the button. The clears any active filter.
Adding, deactivating, and editing parameters
The three buttons at the bottom of the list are for adding, deactivating, and editing parameters.
Adds a parameter. The Parameter Maintenance screen is displayed, where you can add the new parameter.
Deactivates the selected parameter. You are notified of any impact of deactivating the parameter and asked whether you want to proceed.
Edits the selected parameter. Displays the Parameter Maintenance screen.
Parameter Maintenance screen The Parameter Maintenance screen contains the definition of a parameter. You access this screen by either:
• Adding a parameter by clicking on the Parameter Find screen
• Editing a parameter by clicking on the Parameter Find screen
Related screens
Actions performed on the Parameter Maintenance screen cause other metadata-related screens to be displayed, including:
Fields
Parameter Name
The name by which the parameter is referred throughout the rest of the metadata and the ARI system.
Action parameters can be passed using a named parameter syntax or a positional parameter syntax. Named parameters are passed using the syntax NAME=VALUE (NAME=>VALUE for PL/SQL actions).
Chapter 2 – ARI Setup and Maintenance 41
Positional parameters are passed in an ordered list. For positional parameters, the parameter name is stored as a number between 1 and 9: the numbering determines the order in which the parameters are passed. Positional parameters are only supported for windows and web actions. Positional parameters must be numbered consecutively beginning with 1. For Windows actions, positional parameters should be numbered beginning with 2, because the FILE_PATH is passed as parameter 1. For Windows actions, positional parameters (including the FILE_PATH) can be substituted into the Windows registry string that is used to run the action, with parameter n substituted for the string %n.
Realm
The realm to which the parameter belongs. Clicking the LOV button displays a list of realms from which you can choose. Clicking the displays the Parameter Type Maintenance screen, where you can add a new parameter type.
Parameter Type
The parameter type to which the parameter belongs. Clicking the LOV button displays a list of parameter types from which you can choose. Clicking the displays the Realm Maintenance screen, where you can add a new realm.
Realm Key check box
Indicates whether the parameter is part of its realm’s key.
Lookup Parameter check box
Indicates whether the parameter is used in a lookup function as an input. Only one parameter per parameter type may have this field set to ‘Y.’.
Group Lookup Parameter indicator check box
Indicates whether the parameter’s parameter type can be used to drive a group lookup in the Users and Groups dialog. Only one parameter per parameter type may have this set to ‘Y.’
Decode Realm and Parameter
The decode parameter is a parameter which holds a description of the value represented by the current parameter. For example, STORE.STORE_NAME is the decode parameter for WIN_STORE.STORE. The decode parameter’s realm must have its entire key on the current parameter’s realm. Clicking the LOV button displays a list of valid decode parameters from which you can choose.
Display Name
The name to be used for the parameter on screen displays.
Override Parameter check box
For functions and actions, indicates that the entered parameter will have a constant value, held in the override value.
Override Value
The value for the override parameter.
Default Value
For lookups, the default output value.
42 Retek Active Retail Intelligence
Error Message Parameter
For actions, indicates whether or not the action parameter is used for an error return value.
Current User Parameter
For actions, indicates whether or not the action parameter is used for the current user.
Comment Parameter
For actions, indicates whether or not the action parameter is used for a user inputted message.
LOV Where Clause, LOV From Clause, LOV Decode Column, LOV Value Column
For actions, these four fields are used to restrict the values that are considered valid as inputs. This restriction is done by building a select statement using these four columns. The "from" identifies the table; the "where" defines a where clause; and the first two fields are the value and description columns; that is, the value to be used as an input and the description to be used as help in picking the appropriate value. The data from these four columns is assembled in the event viewer when taking an action to help the user select a parameter value before the action is executed.
AutoDiscover radio group
Turns AutoDiscovery off and on.
OK button
Validates and posts all changes and closes the Parameter Maintenance form.
OK+Repeat button
Validates and posts all changes. The Parameter Maintenance form remains open.
Cancel button
Closes the Parameter Maintenance form without saving any changes.
Adding a parameter: enabled and required fields
Chapter 2 – ARI Setup and Maintenance 43
When adding a parameter, the following items are enabled:
• Parameter Name
• Realm Name, Realm LOV button, and Add Realm button
• Parameter Type field, parameter type LOV button, and Add Parameter button
• Realm Key check box
• Lookup Parameter check box
• Group Lookup Parameter check box
• Decode Parameter and LOV button
• AutoDiscover radio group
• OK button
• OK+Repeat button
• Cancel button
Depending on the realm type of the realm chosen, other items are enabled or disabled.
If the realm type is an action, the following items are enabled:
• Display name field
• Override Parameter check box
• Override Value
• LOV Decode Column
• LOV Value Column
• LOV From Clause and comment button
• LOV Where Clause and comment button
• Current User Parameter check box
• Comment Parameter check box
• Error Message Parameter check box
If the realm type is a function, the override check box and override value fields are also activated.
If the realm type is anything besides a table or a view, the AutoDiscover radio group and Start String field are turned off. The radio group is set to Off and the start string is cleared.
If the realm type is a lookup and the realm key indicator is not checked, the Default Value field is turned on. This field fills in a lookup output value for output sequence number 0 (default value). If the Realm Key check box is checked or the realm type is no longer a lookup, this field is disabled and cleared.
If the Override check box is checked, the Override Value field is enabled. If the box is not checked, the field is cleared and turned off again.
44 Retek Active Retail Intelligence
The Realm Name button allows you to create a new realm. The Realm Maintenance screen is displayed. When control returns to the Parameter Maintenance screen, the Realm Name field is filled in with the realm name defined on the Realm Maintenance screen.
The Parameter Type button allows you to create a new parameter type. The Parameter Type Maintenance screen is displayed. When control returns to the Parameter Maintenance screen, the Parameter Type field is filled in with the name defined on the Parameter Type Maintenance screen.
When AutoDiscover is turned on, the form checks Oracle’s DDL for any tables or views that haven’t been mapped to Retek metadata yet. Upon finding an unmapped parameter, AutoDiscover checks to see if the parameter’s realm has been discovered yet. If it hasn’t, AutoDiscover calls up the Realm Maintenance screen and forces the user to fill in information about the realm, with the physical name supplied by AutoDiscover. Once you finish creating the realm, AutoDiscover fills in the names of the realm, the physical name of the parameter, and checks the realm key check box, if necessary. You can then fill in the rest of the information.
If you run AutoDiscover with a not NULL start string, AutoDiscover limits its query to all parameters with names "greater than" the start string. When the DB_Link or schema fields are not NULL, they are used to connect to the correct session or limit the search to one schema.
When AutoDiscover is run for Retek Data Warehouse (RDW) reports, it will only search for reports stored in a single Datamart schema, which is named in the ARI configuration option RDW_OWNER. (The ARI configuration options are described in the ARI Operations Guide.) Autodiscovery stores these option settings in the SCHEMA field on the table REALM and it is this field that is used when searching for cached reports during exception monitoring. Therefore, it is possible to manually create metadata for reports with a different owner. If the schema held in the RDW_OWNER option is on another database, it must be accessible through a database link named in the ARI configuration option RDW_LINK
When you click OK, all fields are validated as described in Validation sequences, later in this screen description. In addition, if the Realm Key check box is checked and the realm is not NULL, a check is made to see if anything is currently using the parameter’s realm. If anything is using the parameter’s realm, the parameter must be versioned. If the parameter passes through all validation, active indicator is set to Y, all information is posted, and the Parameter Find screen is displayed.
Clicking OK+Repeat does the same thing as OK, except that the Parameter Maintenance screen remains open, and all fields are reset. However, if the AutoDiscover feature is set to On, the form will AutoDiscover the next parameter when OK+Repeat is pressed. The block is cleared, except for AutoDiscover start string, and the next undiscovered parameter is brought up, creating an undiscovered realm if necessary (as described above).
Clicking Cancel cancels any changes you’ve made, closes the Parameter Maintenance screen, and displays the Parameter Find screen.

Chapter 2 – ARI Setup and Maintenance 45
Editing a parameter: enabled and required fields
Depending on the realm’s type and the parameter’s type, fields are enabled or disabled as described in Adding a parameter, above. The following fields are never enabled:
• OK+Repeat button
• AutoDiscover radio group
• Start String
• Realm Name
• Parameter Type
When the data is queried back, a set of package variables, corresponding to the fields listed below, is filled with the values from the fields. These variables will be used to determine whether anything has changed the OK button is clicked.
The consequences of these changes must be assessed, as described in the following table:
Changed Item Action
Realm Key Indicator Notify realms of the change. Version the realm.
Override Parameter Indicator Notify exception & events of the change. Note that this change may prevent some exceptions from being rebuilt, due to the change in number of arguments.
Override Value Notify exception & events of the change.
Physical Name Notify exception & events of the change.
Comment Indicator Notify exception & events of the change.
Current Use Indicator Notify exception & events of the change.
Error Indicator Notify exception & events of the change.
Clicking OK causes the current values to be compared to the persistent package variables. If any differences are found, they are handled according to the below rules.
If the change you are making will affect some other part of the system, you are warned of this and asked whether you want to continue with the change.
Clicking the Cancel button cancels any changes, closes the Parameter Maintenance screen, and displays the Parameter Find screen.
46 Retek Active Retail Intelligence
Validation sequences performed on this screen
The Physical Name field is checked to make sure that the name doesn’t conflict with any active parameters in the same realm. If it conflicts with an inactive parameter, the sequence number is incremented to one higher than the last version. Otherwise, the sequence number is set to 1. If it conflicts with an active parameter, an error is raised. If the Display Name field is empty, it is set to the same value as the physical name field.
The Parameter Type field is checked to make sure that an active parameter type of that name exists on the database.
The Realm field is checked to make sure that an active realm of that name exists on the database.
Whenever the Comment check box, Current User check box, or Error Message check box is checked, a check is made that a maximum of one of these boxes is checked at any time.
Whenever the Override check box is unchecked, the Override Value field must be cleared and turned off. Whenever it is checked, the Override Value field is turned on.
Whenever the Lookup check box is checked, a check must be made that there are no other parameters of the same parameter type with the lookup indicator set to ‘Y’. If there are, an error will be raised. The same check is made if the parameter type changes while the Lookup check box is checked.
Whenever the Group Lookup check box is checked, a check must be made that there are no other parameters of the same parameter type with the group lookup indicator set to ‘Y’. If there are, an error will be raised. The same check is made if the parameter type changes while the Group Lookup check box is checked.
The Decode Parameter field, if not NULL, is checked to make sure that a parameter of that name exists on the database.
The Display Name field is checked to make sure that no active parameters with the same display name exist already. If the name already exists, an error is raised.
Whenever the AutoDiscover radio group is set to "On", the Start String field is enabled. This also cues the form to AutoDiscover the next parameter or realm. When the radio group is set to "Off", the start string is turned off and cleared.

Chapter 2 – ARI Setup and Maintenance 47
Parameter Type Find screen The Parameter Type Find screen displays all active parameter types, or parameter types currently defined in your ARI system. This screen is accessed by clicking
the Parameter Type button on the Metadata Maintenance form.
Fields
Information displayed on this screen includes the parameter type ID, parameter type name, data type, and parent parameter type name, displayed in a table of columns. All three displayed columns are sortable by clicking the sort buttons above each column. In addition, all three displayed columns are filterable by filling in the fields above each column and clicking the button.
Parameter Type
The name of the parameter type. This field is read-only.
Data Type
The name of the parameter type’s data type. This field is read-only.
Parent Parameter Type
The name of the parameter type’s parent’s name. This field is read-only.
Buttons
Adds a new parameter type. The Parameter Type Maintenance screen is displayed.
Edits the selected parameter type. The Parameter Type Maintenance screen is displayed.
Deletes the selected parameter type.
Parameter Type Maintenance screen The Parameter Type Maintenance screen displays the definition of a parameter type, which you can edit. This screen is accessed in several ways:
• By adding or editing a parameter type from the Parameter Type Find screen
• By adding a parameter type from the Parameter Maintenance screen.
Fields
The handling of the fields on this screen depend on the context in which you accessed the screen, and the activity you are performing. Descriptions of the different scenarios follow these field descriptions.
Parameter Type
The name of the parameter type.
48 Retek Active Retail Intelligence
Parent Parameter Type
Displays a list of available parent parameter types for the parameter. This list may be limited by data type, length, precision, or scale.
Data Type
Displays a list of available data types for the parameter.
Length
The data length for the parameter type. This field is editable if data type is VARCHAR2. If a parent parameter type has been chosen, the length must less than or equal to the length of the parent parameter type.
Precision
The data precision of the parameter type. This field is editable if the data type is NUMBER. If a parent parameter type has been chosen, the precision may be between 1 and 38. The precision must be less than or equal to the parent’s precision.
Scale
The data scale of the parameter type. This field is editable if the data type is NUMBER. The scale may be between -84 and 127. If a parent parameter type has been chosen, the precision minus the scale must be less than or equal to the parent’s precision minus the parent’s scale AND the scale must be less than or equal to the parent’s scale.
OK
Commits changes and closes the Parameter Type Maintenance screen.
OK+Repeat
This button is only enabled when adding a parameter type. Commits changes and clears the fields of the Parameter Type Maintenance screen, so you can add another parameter type.
Cancel
Cancels changes and closes the Parameter Type Maintenance screen.
Parameter Type Find, Add Mode
When coming from the Parameter Type Find screen in Add mode, all items are enabled.
If you change the data type, all items except for name are cleared, and items are activated or deactivated appropriately. Specifically:
• If the data type is NUMBER, length is set to 22 and deactivated. Precision and scale are activated.
• If the data type is VARCHAR2, length is activated. Precision and scale are deactivated and cleared.
• If the data type is DATE, length is set to 7 and deactivated. Precision and scale are cleared and deactivated.
Chapter 2 – ARI Setup and Maintenance 49
• If the data type is LONG or LONG RAW, length is set to 0 and deactivated. Precision and scale are cleared and deactivated.
• If the data type is BOOLEAN, length is set to 0 and deactivated. Precision and scale are cleared and deactivated.
• If the data type is NULL, all fields except for Name are reset to NULL.
When you choose a parent parameter type, if any of the other fields besides name are NULL, they are filled in with values from the parent. If Data Type is not NULL, the parent type chosen must be of that same type. If Length, Precision, or Scale are not NULL, the parent type must have equal or larger values for those fields. The choices in the LOV box are limited by these same constraints.
Parameter Type Find, Edit Mode
When coming from the Parameter Type Find screen in Edit mode, the Parameter Name field, the Parent Parameter Type field and LOV button, the OK button, and the Cancel button are activated. All other fields are activated or deactivated depending on data type (see above). All base table fields are filled in according to the parameter type ID passed in from the Parameter Type Find screen. The parent parameter type’s name is filled in the post query.
The OK+Repeat button is never enabled in Edit mode.
When the data is queried back, a set of package variables, corresponding to the fields listed below, is filled with the values from the fields. These variables are used to see if anything has changed when you click OK.
50 Retek Active Retail Intelligence
The same constraints and validation used in Add mode also apply in Edit mode. However, changes are tracked, and actions are taken because of them, as shown in the following table.
Changed Action
Parent Type If the new parent is an ancestor of the old parent, Notify exceptions& events and parameters of the change. If the new parent is a child of the old parent, version. If the new and old parents are not “related”, Notify exceptions & events and parameters of the change. In this case, NULL is considered the ancestor of any parameter type (used for creating or demoting base types).
Data Type Version
Length If the length has decreased, version
Precision If the parameter type’s new precision is less than its old precision, version
Scale If the parameter type’s new precision minus its new scale is less than its old precision minus its old scale OR its new scale is less than its old scale, version.
When you click OK, the database compares the current values to the persistent package variables. If any differences are found, they are handled according to these rules: If the change you are making will affect some other part of the system, a warning is displayed. If you choose to continue, changes are made and committed to the database. Otherwise, the operation is simply cancelled.
Clicking Cancel cancels any changes you have made and returns you to the Parameter Type Find screen.
Parameter Maintenance, Add Mode
When coming from the Parameter Maintenance screen, everything behaves the same as in Add mode from the Parameter Type Find screen. The only difference is that OK+Repeat is never available, and when OK or Cancel is clicked, control is returned to the Parameter Maintenance screen, passing back the ID of the new parameter type.
Validation sequences
The name in the Parameter Type field is checked to make sure that the name doesn’t conflict with any active parameter types. If it conflicts with an inactive parameter type, the sequence number is incremented to one higher than the last version. Otherwise, the sequence number is set to 1. If it conflicts with an active type, an error is raised.

Chapter 2 – ARI Setup and Maintenance 51
The Parent Parameter Type field is checked to make sure that a parameter type of that name exists on the database and is the correct data type if the Data Type field is not NULL.
The Length field is checked that it is less than or equal to the length of the parent parameter type, if a parent parameter type has been chosen.
The precision may be between 1 and 38. The precision must be less than or equal to the parent’s precision, if a parent parameter type has been chosen.
The scale may be between -84 and 127. The precision minus the scale must be less than or equal to the parent’s precision minus the parent’s scale AND the scale must be less than or equal to the parent’s scale, if a parent parameter type has been chosen.
If the data type is changed, the parent parameter type is set to NULL.
Lookup Find screen The Lookup Find screen lists all of the active realms that are lookups on the ARI
system. This screen is accessed by clicking the Lookup button button on the Metadata Maintenance form. From this screen, you can view and edit lookups on the Lookup Data Edit screen.
Fields
Lookup
This column displays the text of the lookup. This column is sortable by clicking the sort buttons above it. You can filter the view of the Lookup column by filling in the field above it and clicking the button. To clear an active filter, click the
button. Although the filter field is editable, the list of lookups in the column is read-only.
To edit a lookup, select it and click the button. The Lookup Data Edit screen is displayed.
Lookup Data Edit screen
Input Parameters
This column displays a list of each lookup’s input parameter set. This set is comprised of the parameters’ names concatenated together, with semicolons separating them.
Output Parameter
The output value column displays a list of each lookup’s output parameter.
52 Retek Active Retail Intelligence
Lookup Data Edit screen The Lookup Data Edit screen displays the input values and output values for lookups in your system and allows you to edit them.
Fields
There are two parts to the Lookup Data Edit screen.
Top half: existing input and output values
The top part of the screen displays all the existing input and output values for the lookup. All of the inputs for the retrieved output are retrieved and strung together in the same way that the input parameters were in the header; that is, delimited by semicolons and ordered by parameter ID. Filling in these values may take a significant amount of time. If the output sequence number is 0, this means that this output is the default value, so the input values field for this record will be "Default Value".
When this screen is displayed, a check is made to make sure that for every parameter in the lookup, there is a parameter of the same parameter type with a lookup indicator on ‘Y’. If this check fails, then all buttons except for Cancel are disabled and a message is displayed stating that because the form is unable to validate all values, you may not enter any more data until the situation is fixed.
button
Adds a new set of input and output parameters and values. The bottom half of the screen is enabled for entering the values.
Edits a selected set of input and output values. When both creating and editing, the top of half of the screen is disabled and the fields in the bottom half of the screen are enabled.
Deletes a selected set of input and output values.
OK
Saves changes to the input and output values and closes the screen.
Cancel
Cancels any edits and closes the screen, returning to the Lookup Find screen.
Bottom half: new and edited input and output values
The bottom half of the screen is for entering new input and output values for the lookup, or editing existing input and output values. Clicking or moves the cursor to this part of the screen.
Input Parameter
The name of the input parameter.
Chapter 2 – ARI Setup and Maintenance 53
Value
The value of the input parameter. To display a list of valid values for a parameter, click the LOV button in the value column.
Output Parameter
The name of the output parameter.
Value
The value of the output parameter. To display a list of valid values for a parameter, click the LOV button in the value column.
Apply
Verifies and applies the changes you have made in the lookup editor part of the screen. The input and output value fields are checked to make sure they are not blank, and the database is queried to make sure that the input value set is unique. Control is returned to the upper part of the screen.
Cancel
Cancels any changes to the lookup’s input and output parameters and returns control to the upper half of the screen.
Change Effect Warning Dialog [metadata]
This dialog displays which other objects will be impacted by the current change you are making to metadata. You can choose whether you want to continue with the change or cancel it.
ARI User and Group Administration
Overviews
ARI User and Group Administration Setting up ARI in your business involves defining users and user groups to which events will be routing. In its role as a business rule monitoring tool and messaging/workflow system, ARI routes event to particular users of the system to be dealt with. To add flexibility to this routing, and to provide a framework for other aspects of the application such as security), users are consolidated into groups. These groups can be set up to mirror aspects of a company’s business model, with groups reflecting job functions, for example, Buyers and Invoice Matching Teams. Groups can also be made members of other groups, allowing for the creation of multi-layered group hierarchies to reflect more complex organizations (e.g. employee supervision).
The Users and Groups dialog
Users and groups are defined and maintained through the Users and Groups dialog. This dialog is accessed by choosing Setup+Users and Groups from the Retek main menu. There are several main aspects to the Users and Groups dialog:
54 Retek Active Retail Intelligence
• User setup and maintenance
• Group setup and maintenance
• User membership: Mapping a single user or group into multiple groups
• Group membership: Mapping multiple users or groups into a single group
• Maintaining user preferences
• For a description of the Users and Groups dialog, click the following link.
Users Users correspond to actual individuals working in the ARI system. Oracle user functionality tracks system users. User definitions extend this Oracle user functionality by tracking additional user attributes and preferences, such as the user to whom events should be forwarded in the event that a user is unable to receive alerts, for example, out of the office on vacation.
User attributes
A user definition is maintained in a table, and includes such attributes as
• The name of the user.
• The name of the user to receive this user’s alerts when this user is inactive.
• Notification Information: Miscellaneous information on external notification options, including numbers and addresses for notifying the user via e-mail, fax, and pager.
• List of Group Memberships: All of the groups to which the user belongs.
• Status (Active/Inactive):Whether the user is active or inactive, that is, available or unavailable for event routing in ARI. A user can be deactivated at any time. If the user has any active events assigned at the time of deactivation, the user is given the option to forward those events on to other users.
• A target user for any automatically forwarded events.
Groups
What are groups?
A group is used to combine users based on some common characteristics. The most typical use for groups is to represent aspects of the company’s business model that need to be mapped back to individual users. For example, you can define groups to reflect employee work areas, such as store or department, or to reflect job roles such as buyer roles, or invoice matching teams.
Beginning in ARI 3.0, user groups replace the previous concept of user roles, since roles are used by Oracle to aggregate privileges, whereas groups are used to aggregate users.

Chapter 2 – ARI Setup and Maintenance 55
Groups and event routing
Within ARI, user groups are used to route events. A user group or groups can be linked with event conditions, so that when the event conditions are met, the routing process uses that group or groups to build a list of users eligible to receive the event.
This routing group can be setup as either the intersection or the union of all groups associated with the event condition. The intersection or union is taken over all users who are members of those groups either directly or through nested group membership.
From this routing group a user or set of users will be selected for the event assignment, in accordance with the routing rules associated with the event, such as workload-based distribution, random or even-based distribution, or distribution to all group members.
A user group can have a parameter associated with it, and the resolution of state rules may resolve to several groups.
An example of how this routing could work is a group is set up using the store parameter and another just of buyers. By assigning to both the store parameter is evaluated and only users associated with that parameter in the store group and also in the buyer group will fill the resultant routing set, so store buyers are effectively found specific to the instance.
Group Attributes
• Name: The name of the group.
• List of Members: A list of the users and groups that belong to this particular group.
• Group Type: Whether the group is a simple group or parameter-driven group, described below.
• For parameter-driven groups only, there is an additional group attribute, Parameter Type, which is the parameter type associated with the group.
Group types
There are two types of groups: parameter-driven groups and simple groups.
Parameter-driven groups
Parameter-driven groups are groups where membership is driven by a specific parameter value. These group types are used to simplify the assignment of users into what would otherwise be extremely large numbers of group specifications. For example, an assignment may be made to a Store group, driven by a Store Number parameter. Subsequently, when users were made members of the group, they would be assigned a value (or values) for the parameter.
56 Retek Active Retail Intelligence
To illustrate, Joe Smith could be made a member of the Store group with a Store Number of 1001. This group assignment means that Joe Smith is eligible to receive events that were routed to the Store group with parameter value 1001. This grouping not only saves the effort of defining a separate group for each store, but it also allows ARI to route events to a specific users within a group based on the value of an event parameter. For example, a quality control event could be assigned to the Store group, and when a shipment requiring quality control was received it would be routed only to those members of the store group whose Store Number matched that of the store receiving the merchandise.
The parameters used to drive these groups must be of either a character, or a discrete numeric data type. Parameters such as date, or currency values, cannot be used to drive a group since inexact comparisons (>, <, between, etc.) are not possible within the group resolution, although they can be part of ARI event rules.
Parameter based groups can also be set to use exclusion values, that is, all values except some specified. These exclusion values do not contradict other values a user may have assigned through other group membership: they are just a convenient way to choose most, but not all, values. All values are also an option. Composite groups can also be created, though they can contain at most one group that requires a parameter.
Simple groups
Simple groups are groups that are not driven by any parameters. Simple groups can be based on values that align with aspects of a company’s business model. Such groups may be location based, for example, Northeast, Midwest, Southeast, or function-based, for example, Buyer or Sr Buyer. Simple groups are purely structural, with no internal routing mechanisms.
Making users and groups members of another group
Users and groups can be connected by making a user or group a member of another group. However, a user or a group cannot be made a member of another user. When a user or a group is made a member of a parameter-driven group, values must be specified for the driving parameter. This will allow for parameter-driven routing within the group. Parameter driven groups cannot be made a member of another group. This ability to nest groups within groups allows for the definition of group hierarchies that can parallel a specific business model, or provide a more general grouping.
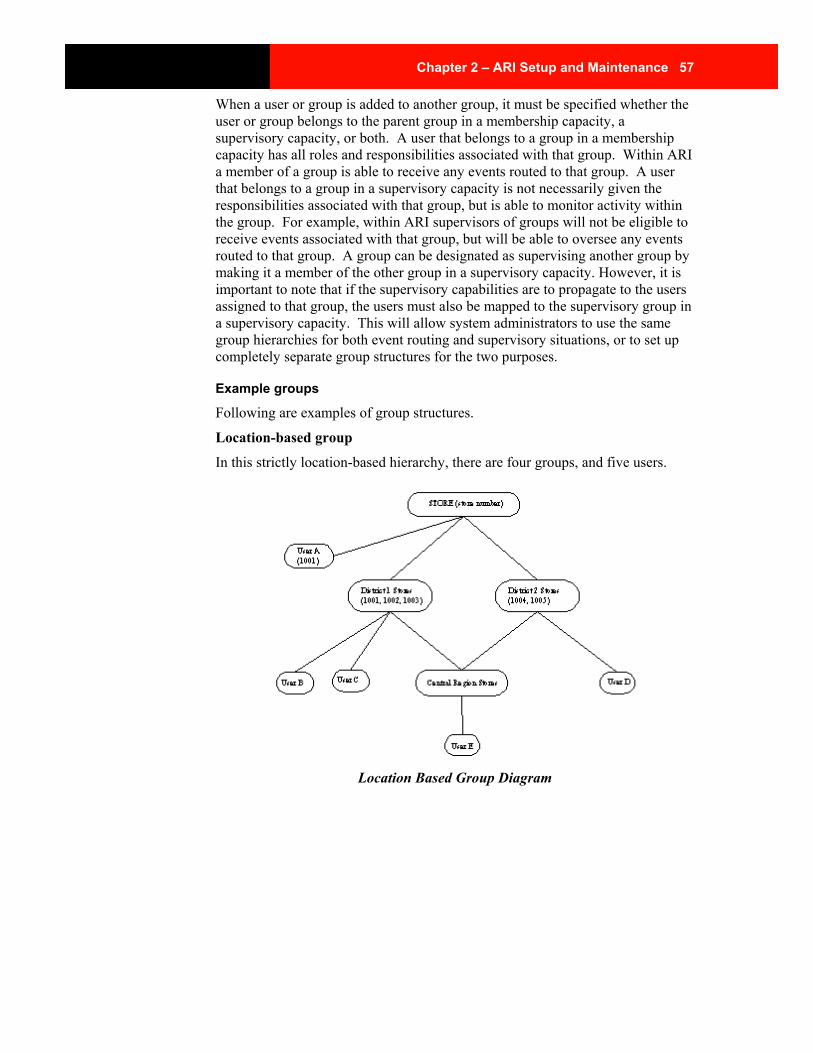
Chapter 2 – ARI Setup and Maintenance 57
When a user or group is added to another group, it must be specified whether the user or group belongs to the parent group in a membership capacity, a supervisory capacity, or both. A user that belongs to a group in a membership capacity has all roles and responsibilities associated with that group. Within ARI a member of a group is able to receive any events routed to that group. A user that belongs to a group in a supervisory capacity is not necessarily given the responsibilities associated with that group, but is able to monitor activity within the group. For example, within ARI supervisors of groups will not be eligible to receive events associated with that group, but will be able to oversee any events routed to that group. A group can be designated as supervising another group by making it a member of the other group in a supervisory capacity. However, it is important to note that if the supervisory capabilities are to propagate to the users assigned to that group, the users must also be mapped to the supervisory group in a supervisory capacity. This will allow system administrators to use the same group hierarchies for both event routing and supervisory situations, or to set up completely separate group structures for the two purposes.
Example groups
Following are examples of group structures.
Location-based group
In this strictly location-based hierarchy, there are four groups, and five users.
Location Based Group Diagram
58 Retek Active Retail Intelligence
The Store group is a parameter driven group, driven by store number. The other groups (District 1 Stores, District 2 Stores, and Central Region Stores) are all simple groups. The District 1 Stores and District 2 Stores groups are members of the Store group, with associated parameter values, while the Central Region Stores group is a member of both the District 1 Stores group and the District 2 Stores group. User A is a member of the Store group directly, with a parameter value of 1001. Users B and C are members of the District 1 Stores group, making them indirectly members of the STORE group with parameter values 1001, 1002, and 1003. Similarly, User D is a member of the District 2 Stores group, and User E is a member of the Central Region Stores group.
This group model allows us to access the data in a number of ways. In the case of event routing, we can start with the routing group and trace through the tree to find all the users eligible to receive that event. For example, if an Out of Stock event occurred at Store 1001, the event could be routed to User A directly, Users B and C through the District 1 Stores group, or to User E through the Central Region Stores group. In the case of event supervision (considering all relationships to be supervisory for this example), we can start with a particular user and trace through the tree in the opposite direction to find which events the user is eligible to supervise. For example, User A would be able to supervise events routed to Store 1001, where User D would be able to supervise events routed to Stores 1004 and 1005. User E would have the ability to supervise the stores in either the District 1 Stores or the District 2 Stores groups through supervision of the Central Region Stores Group.

Chapter 2 – ARI Setup and Maintenance 59
Location- and business-role-based group
In the following group configuration, we have set up groups to encompass both location and business role functionality.
Location and Business Role Based Group Diagram
Again we have our store group, driven by a store number, and we also have a simple group called Buyer. We can then create two other simple groups, Buyers for District 1 Stores and Buyers for District 2 Stores, that are members of both the Store and Buyer groups, thereby combining the aspects and privileges of those groups. In this situation one might route an event to both the Buyer and the Store groups. In this case the set of users eligible to receive the event instances would be the intersection of the Users assigned to the Buyer group and the Store group. This would mean Users A, B, and C would be eligible for any events whose Store parameter value was 1001,1002, or 1003, and Users D and E would be eligible for events whose Store parameter value was 1004 or 1005. Users F and G would not be eligible for any events of this type, since the event is routed to both the Store and the Buyer groups, and they are not members of both groups.
Supervision and groups
It is possible that one group can supervise another; however, because routing groups are determined dynamically, supervision can be elusive, so it may be helpful to assign an entirely distinct set of groups to form a supervision hierarchy. Supervision works such that a supervisor can view all of the events owned by a supervised user. Alternatively, without assigning supervision rights, an ARI supervisor user attribute allows supervisors to view all events whose signature is contained in the union of all possible event signatures that could have been routed to the supervisor.
60 Retek Active Retail Intelligence
Security considerations
The previous release of ARI attempted to implement application level security that allowed supervisors to add and remove users from a user group, but this left a security gap allowing a user-level supervisor to elevate his rights by adding more powerful users to the supervised role. Application security is not implemented elsewhere in the enterprise application at lower than menu level, so it is being removed here for consistency. Any user with access to the user group and user forms can add and remove users from user groups as appropriate.
Special user groups
Two special user groups exist for ARI administration and ARI error processing. The administrative user group is notified when an event process enters an infinite reevaluation/action loop or can be used as a user-group assignment target for events that require administrative access for any kind of self-monitoring rules that may be setup for ARI. Likely a client using menu level security would allow ARI administrators access to the user/user-group form and other ARI administrative forms. The error user group is used for events that encounter fatal processing errors, and though it is not restricted from use by business analysts, it is difficult to justify when its use as an assignment target (other than in the ARI code itself) would be appropriate.
Predefined ARI user groups Operating ARI requires two predefined user groups:
• ARI Analyst/Administrator Group
• ARI Error/Administrator Group
Chapter 2 – ARI Setup and Maintenance 61
Windows and Dialogs
Users and Groups Dialog [usergrp]
Users and groups are set up and maintained through the Users and Groups dialog.
If you are an ARI administrator, you can access all the screens of this dialog to perform these tasks.
From this dialog, you can perform these tasks:
• Set up and maintain user definitions
• Set up and maintain user groups
• Assign a user to multiple user groups
• Assign multiple users or groups to a single group
• Maintain user preferences
If you do not have ARI administrator user privileges, you only have access to the User Details screen, with your own user details displayed.
Buttons
When the Users and Groups dialog is first opened, the Group Setup and Maintenance screen is displayed. You can access other screens of the Users and Groups dialog by clicking the buttons on the left side of the dialog.
- Groups
Displays the Group Setup and Maintenance screen where you can add, edit, and delete user groups.
- Groups -> Users
Displays the User Membership screen, where you add and change group assignments for a user.
- User -> Groups
Displays the Group Members screen, where usera and groups can be added or removed from the selected group.
- Users
Displays the User Setup / Maintenance screen, where you can add, edit, and delete user definitions.
OK
Commits changes to the ARI database and closes the Users and Groups dialog.
62 Retek Active Retail Intelligence
Cancel
Closes the Users and Groups dialog without saving any changes.
Apply
Commit changes to the ARI database but keeps the Users and Groups dialog open.
User Setup/Maintenance screen The User Setup/Maintenance screen displays all users currently defined in the ARI system. From this screen, you can add and delete users and access the detailed user definition information for users.
Fields
User ID
The user group ID for the user, which must be a valid Oracle user ID. This field is enabled only for user records that have not been posted to the ARI database. It is not enabled for existing users.
User Name
The screen name for the user. The user name must be unique in the ARI system.
Status
Identifies whether the user is active or inactive. This field is always enabled.
User Detail
Displays the detailed user definition for the selected user.
button
Adds a user to the list.
button
Deletes the selected user from the list. This button is enabled only if the user does not own any active events. If any other users have specified the user you are trying to delete as an auto-forwarding target, a warning is displayed, and those users will lose their auto-forwarding specifications.
Filtering and sorting
Entering values into the fields above the User ID and User Name columns and
clicking the button filters the records in the user list. Clicking the button clears the filter criteria and removes the filter from the user list. The user list can be sorted by any of the displayed columns by pressing the button above the column. Pressing the same button multiple times sorts the user list in the reverse order.
Chapter 2 – ARI Setup and Maintenance 63
User Details screen The User Details screen contains detailed user definition information for an ARI user. If you are an ARI administrator, this screen is accessed by clicking the User Detail button for a particular user on the Users screen. If you are an ARI user, this screen is automatically displayed, with your current user details, when you select Control+Setup+Users and Groups from the RMS main menu.
Fields
User name
The screen name of the current user. This field is read-only.
Notification check box
Indicates whether the user wants to receive email notification of their events. Note that even if the user selects email notification (which is in addition to normal Alert notification), email will be sent only for events that are set up to send email.
Notification Address
The email address for the current user. This field is editable at all times.
Notification Type
The type of email notifications the user would like to receive. Notifications can be either Short or Long. The Short version is kept under 100 characters, and is recommended for sending notifications to cell phones and other embedded devices.
Language
The user’s language preference for the entire system. Clicking the list of values button displays a list of all valid languages in the system. Leaving this field blank indicates that the system’s primary language will be used.
Status
Indicates whether the user definition is active or inactive. An active user is currently in the office, and therefore eligible to receive events. A user can also be deactivated, which means that the user is not eligible to receive alerts. If the user has any active events assigned at the time of deactivation, the events can be automatically forwarded to another user by specifying a user in the Auto Forward Events to User field. While a user is inactive, it will be unable to receive any events, either new or forwarded. Any events routed to the inactive user are re-routed to the user specified by the forward_to_user attribute. When you deactivate a user, the system is checked to determine whether the user has any active events. If the user has active events, a warning is displayed.
Auto Forward Events to User
Displays the automatic forwarding target, or the name of the user to receive this user’s alerts when this user is inactive. Clicking the list of values button displays all users in the system, except the current user.

64 Retek Active Retail Intelligence
Group Setup/Maintenance screen The Groups screen is for setting up and maintaining user groups.
Fields
Group list
The top portion of the Groups screen is a list of all groups defined in the system in a read-only list. Below the list is an editor in which you can add and edit group definitions.
Filtering and sorting
The group list can be filtered by entering values into the fields above the columns
and clicking the button. Clicking the button clears any values from the filter fields and removes the filter from the group list. The group list can be sorted by any of the displayed columns by pressing the button above the column. Pressing the same button multiple times sorts the list in the reverse order.
Adds a new group. The cursor will be positioned in the first field of the group editor, Group Name.
Pressing the Add Group (green plus symbol) button will enable the lower block of items, and disable all other action buttons displayed in the form. The user can then enter information into the fields.
Group Name
A unique name by which the group is known in the ARI system. This field is required.
Group Type
Identifies whether the group is a simple group or a parameter-driven group.
Parameter Type
For parameter-driven groups, this field specifies the parameter type. This field is required for parameter-driven groups, and must be left blank for simple groups. Clicking the list of values button displays a list of valid parameter types from which you can choose. . A valid parameter type has a group lookup parameter associated with it. If you enter a value that does not correspond to exactly one parameter type ID, a warning is displayed, prompting you to use the LOV to select a value. Any values entered into this field will restrict the values displayed in the LOV.
Event Target
Indicates whether the group may be used as a target for assigning events. The default setting is Yes (checked).

Chapter 2 – ARI Setup and Maintenance 65
Allow Empty
Identifies whether it is valid for the routing group to be empty when an event is assigned to this group. This could happen as a result of a simple group having no members, a parameter-driven group having no member associated with a parameter value, or if the routing group is the intersection of multiple groups, of groups that have no members in common. If Yes, then the event will not be assigned to any user. If No, then the event will be assigned to the error group. The default setting is No (unchecked). This field is available only when the Event Target field is set to Yes.
button
Edits the selected group. The group’s definition is displayed in the group editor at the bottom of the screen. The user group name field is always editable, the event assignment target check box is only editable if ARI is installed and no events have been assigned to the group. The group type and parameter type fields are only editable if no events or users (or groups) have been assigned to the group.
button
Deletes the selected group. This button is enabled only for groups that do not have events currently being routing to them. A check is made to determine if the any users (or groups) have been assigned to the selected group. If no users (or groups) have been assigned, the group is deleted. If users (or groups) have been assigned to the selected group, a warning is displayed. If you choose to continue, the group and all mappings to that group are deleted.
User Membership screen The User Membership screen is one of two screens used to link users and groups with groups. In the User Membership screen, you first select a user or group, and then all of the groups to which the user belongs are displayed in the bottom part of the screen. You can then edit the user membership, for example, add or remove groups from the selected user.
Fields
User/Group list
In this part of the screen, you can view users, groups, or users and groups, by clicking the radio buttons located above the list. Select a user or group from the list. The groups which the chosen user or group is a member of will be displayed in the lower part of the screen. Filtering and sorting buttons are available to aid your search on the users and groups list.
Member of (group list for selected user)
Displays the groups to which the selected user belongs.
Parameter Values
Displays any parameter values associated with a particular group.

66 Retek Active Retail Intelligence
Available groups
The upper right part of the screen displays all the groups to which the selected user does not belong, along with the parameter type associated with the group. You can use the to add the user to a selected group.
and buttons
The removes the selected group from the Members list and returns it to the Available groups list. The button adds the a group from the Available groups list to the Member of list, making the user a member of that group.
Group Members screen The Group Members screen shows all users and groups that are members of the selected group. Users and groups can then be added or removed from the selected group.
In both screens the button below the parameter values block will call up the parameter values screen, in which the user can add or remove parameter values associated with the user group linkage. Also in both screens the user and groups blocks can be filtered and sorted using the fields and buttons above the blocks. The radio group above the users block will filter the block to display only system users, only simple groups, or both.
Fields
Group list
The upper left part of the screen displays a list of groups and associated parameter types. Select a group from this list. The members of the group and any associated parameters are then displayed in the lower part of the screen. This list can be filtered and sorted using the filter fields and buttons above the list.
Members
Displays the members (users and groups) of the selected group.
Parameter Values
Displays the parameter values associated with the groups in the Members list.
Available Users and Groups
The upper right part of the screen displays all users and groups that are available to be added to the selected group. This list can be filtered and sorted using the filter fields and buttons above the list.
and buttons
The button adds any users or groups selected in the Available Users and Groups list to the selected group. The button removes any users or groups selected in the Members list from the group and returns them to the Available Users and Groups list.

Chapter 2 – ARI Setup and Maintenance 67
Parameter Values screen On the Parameter Values screen, you choose values for user or group mappings to parameter-driven groups. This screen is displayed when adding new users (or groups) to a parameter driven group, defining linking for users on the User Membership or Group Members screen, or editing the values for an existing group mapping. On this screen, you can add and delete parameter values for the user/group mapping.
User and group names
The top of the screen displays the user or group name, and the group that is having new members being added to it. If multiple users or groups are being mapped, these fields will display Multiple Users and Multiple groups.
All Values check box
Indicates whether the user/group mapping is valid for all values of the parameter. If the check box is checked, the parameter type/name list is blank, because the user will have access to all values for the parameter type.
Other Values check box
Indicates whether the user/group mapping is valid for all values of the parameter that are not assigned to any user. This field can be checked in addition to any individual parameter values that are selected. It is not available if the all values field is set to Yes.
Parameter value
This field will contain the parameter value associated with the user/group mapping. This field will be enabled for records that have not been written to the database. When a new value is specified for this field, a check will be made against the record group containing all valid values for the parameter type. The list of values associated with this field will display all records in the record group of valid values. Clicking the list of values button displays the list of parameter values from which you can choose.
To add a parameter value to an existing user/group mapping, click the button. To delete a parameter value from the list, click the button.

68 Retek Active Retail Intelligence
Parameter description
A description of the parameter value. This field is read-only at all times. After selecting a parameter value, the parameter description field is automatically filled in with the parameter value’s associated parameter description value.
OK
Validates the information you have entered, posts the information to the database, and closes the Parameter Values screen.
Cancel
Cancels any changes and closes the Parameter Values screen.
Exception and Event Definition
Overviews
Exception and Event Definition The main jobs performed by ARI are detecting exceptions and guiding a user through a set of workflows or events to respond to the exceptions.
Revalidation of External Realm Exceptions When an exception occurs and an event is created, that event stays active until you close it by your actions or the event fails reevaluation. Events are reevaluated before actions on them are processed, and, depending on how your user preferences are set, as you open the event viewer to examine and act on them. Event reevaluation verifies that the exception data conditions that caused the event are still true. Clearly, reevaluation is critical because it prevents you from taking action to correct data conditions that no longer exist. For example, if an order is submitted and an event is created, then the order is unsubmitted, and then you try to approve it from ARI without first reevaluating, you would be trying to approve an order that is no longer submitted. This would cause various processing errors and be a waste of your time, but not nearly as big of an issue as if you had acted to order more stock for an out-of-stock event, only to find that in the meantime other stock had been transferred in.
Usually revalidation is not a concern since it always happens before action processing. However, you can save some time by using the revalidation user option to reevaluate when viewing events as well, since you can weed out many invalidated events before even trying to decide how to process them.
One case where revalidation is an issue is when the realm causing the exception is part of an external (non-queriable and therefore non-revalidatable) system. In this case, there is no way to ensure that you are not acting to correct a problem that no longer exists. In other words, even if it is not so, external realm exceptions are treated as if they are valid until the event is closed. The only workarounds are to be aware of the issue and do the following:
Take advantage of the creation date parameter added by default to all exceptions, and add it to the event as a parameter that must come from the exception. This gives it visibility, so take it into consideration when acting on such events.
Chapter 2 – ARI Setup and Maintenance 69
Name the events that are driven by external systems with some convention that users will no require immediate action, or make all such events high priority.
Manually revalidate exception data by doing additional investigation, outside of the data that ARI offers you, before taking a corrective action.
When possible, reserve external monitoring for events that do not require system critical actions, focusing more on informational notifications.
An issue such as this prompts the question of why revalidation does not work in some other way (internally at least, since it does not work at all externally). For example, why does ARI not automatically invalidate a purchase order approval event immediately when the order is unsubmitted back to Worksheet status, and could such a method work for external revalidation?
Most automatic event invalidation strategies are either administratively cumbersome for you or performance prohibitive for the database, so on-demand revalidation seems the best way to go. Even so, Retek has a continued interest in investigating ways to auto-invalidate external-realm-exception-driven events or to make those external realms better accessible (queriable) for on-demand revalidation. Before reevaluation or revalidation all parameters that can be refreshed ARE refreshed. An exception driven by an "external" (non-refreshable) realm is an "external realm exception", though some of its parameters added from other realms may be refreshable, so the idea that an entire exception is external is somewhat incorrect.
However, the driving realm of an exception does determine how it can be monitored. A non-refreshable (external) driving realm means that the exception monitoring is either trickle monitoring (when the realm is an external data feed realm) using the external monitoring APIs, or batch monitoring if Data Warehouse reports, also non-refreshable, are being monitored.
Tables deployed in the same database instance (internal) as ARI can be monitored either in real-time or with batch. Oracle tables deployed in a different database instance (external to the ARI instance) but connected with an appropriate link can be monitored via batch. In both cases these parameters can be refreshed, so probably we should dump the association of external with revalidation and use the external/internal to simply refer to internal/external database instances and EXTERNAL DATA FEEDS, then detailing for each of these types which can be monitored how and which have refreshable parameters and which don’t.
Testing Exception and Event Processes As you are learning to use ARI, and even as you gain proficiency, you should try to test all new exception and event processes in a special development environment before using them in production. This is important because of performance issues and so you can ensure that the functionality is correct. Although creating ARI processes is much simpler than doing customization work on the RMS, if these processes are critical, or destined to become critical to your operation as their definitions become more and more refined, then they should be treated as customizations from the perspective of planning, testing, and management.
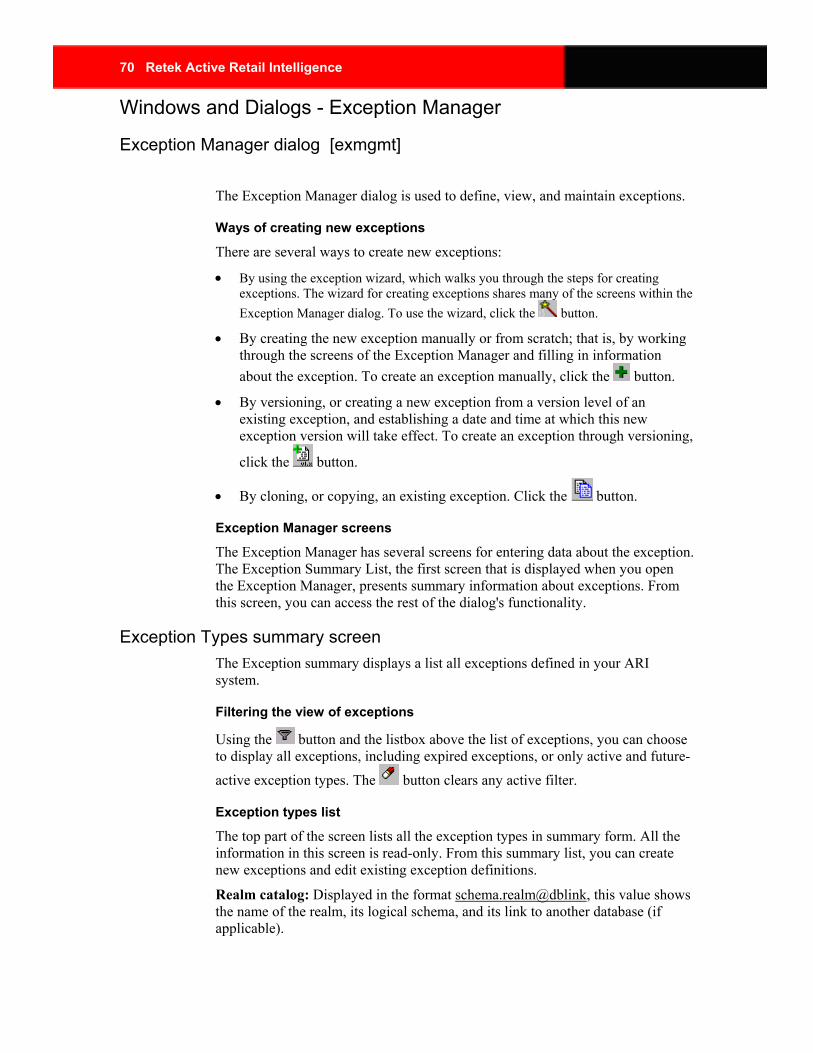
70 Retek Active Retail Intelligence
Windows and Dialogs - Exception Manager
Exception Manager dialog [exmgmt]
The Exception Manager dialog is used to define, view, and maintain exceptions.
Ways of creating new exceptions
There are several ways to create new exceptions:
• By using the exception wizard, which walks you through the steps for creating exceptions. The wizard for creating exceptions shares many of the screens within the Exception Manager dialog. To use the wizard, click the button.
• By creating the new exception manually or from scratch; that is, by working through the screens of the Exception Manager and filling in information about the exception. To create an exception manually, click the button.
• By versioning, or creating a new exception from a version level of an existing exception, and establishing a date and time at which this new exception version will take effect. To create an exception through versioning,
click the button.
• By cloning, or copying, an existing exception. Click the button.
Exception Manager screens
The Exception Manager has several screens for entering data about the exception. The Exception Summary List, the first screen that is displayed when you open the Exception Manager, presents summary information about exceptions. From this screen, you can access the rest of the dialog's functionality.
Exception Types summary screen The Exception summary displays a list all exceptions defined in your ARI system.
Filtering the view of exceptions
Using the button and the listbox above the list of exceptions, you can choose to display all exceptions, including expired exceptions, or only active and future-
active exception types. The button clears any active filter.
Exception types list
The top part of the screen lists all the exception types in summary form. All the information in this screen is read-only. From this summary list, you can create new exceptions and edit existing exception definitions.
Realm catalog: Displayed in the format schema.realm@dblink, this value shows the name of the realm, its logical schema, and its link to another database (if applicable).
Chapter 2 – ARI Setup and Maintenance 71
Monitor Type: Identifies the type of monitoring for the exception: batch, trickle, or real-time.
Start Date/Time: The date and time the exception starts being monitored.
End Date/Time: The date and time exception monitoring ends.
Exception Name: The name by which the exception is referred to in the ARI system.
Version: The version number of the exception.
Buttons
Several action buttons are available to go from this screen that allow creation, editing and deletion of exception types.
Starts the wizard for creating a new exception type. This button is active at all times.
Creates a new exception type manually. This means you work through the screens of the Exception Manager yourself to define the new exception type, rather than using the wizard. This button is active at all times.
Creates a new version of an existing exception type, and establishes a date and time for the new version to take effect. The version button is available at all times that an exception is displayed in the summary list.
Clones, or copies, an existing exception type.
Edits an exception type that is not yet active.
Deletes an exception type. This button is enabled only for future exceptions and expired exceptions for which no active exception instances remain. Expired exceptions are those for which the end date has passed and the instances have been cleared. Because the latter type of exceptions may auto-purge depending on system settings, it is more likely that future exceptions will be deleted unless the user chooses to set these for manual deletion only.
Displays additional header information about an existing exception type.
Exception details
The lower half of the screen shows details about the currently selected exception in the top half of the screen, depending on which button is selected in the center of the screen, parameters, conditions, schedules or events.

72 Retek Active Retail Intelligence
Parameters
Clicking the Parameters button displays the parameters for the selected exception type, as defined on the Exception Type Parameters screen. See the Exception Type Parameters screen description for field descriptions.
Conditions
Clicking the Conditions button displays the conditions associated with the exception, as defined on the Exception Type Conditions screen. For more information on setting up conditions for an exception, click the following link.
Schedules
Clicking the Schedules button displays the schedules that are attached to the exception type, and indicates which schedules are active now, in the future, or in the past, as defined on the Exception Type Schedules screen. From this list of schedules, you can add, edit, and delete schedules for active and future-active exceptions types. The comments box on the right side of each schedule item displays a description of the schedule.
Event Types
Clicking the Event Types button displays the events that are linked to the exception and the window when the link will be valid, as defined on the Exception Type-Event Type Link screen. From this list of event types, you can add, edit, and delete links to event types.
The window of time when the link is valid depends on the link period, and the exception type and event type’s active dates and is computed dynamically for display here. Like schedules, event mappings may be edited in for all exceptions that are active and future active. The comments box on the right side of each event type displays a description of the event type.
Exception Type Header screen The Exception Type Header screen is used to set up exception type header information. This screen has the following fields:
Exception name
A unique name by which the exception is known in your system.
Version number
The version number of the exception.
Realm type
The kind of realm to be monitored as the exception driver. Different realms allow different kinds of monitoring. For more information on realm types, see the description of the Realm Maintenance screen, which is part of metadata maintenance.
Realm monitored
The monitored data realm that will drive the exception.
Chapter 2 – ARI Setup and Maintenance 73
Schema
The database schema that owns the monitored realm. This field is for informational purposes only.
Database
The database instance identifier of the database to which the database schema belongs. This field is for informational purposes only.
Start date/time
The date and time at which the exception takes effect.
End date/time
The date and time at which the exception expires.
Monitor Type
The type of monitoring used for the exception, which may be batch, real-time, or trickle. All new exceptions have either batch or trickle monitoring until conditions are added that monitor change, in which case the monitoring for the exceptions transitions to real-time monitoring. Whether exceptions are of batch or trickle monitoring type depends on whether they are monitoring "external" data realms (RDW or External through the API).
Description
An explanation of exception purpose, or any other notes that are appropriate to include with the exception’s definition.
Creating exception types
When creating the first version of a new exception, the following fields are enabled and editable: Exception name, realm type, realm monitored, description and start and end date. Except for end date, all of these fields are required, as is version number, which is populated to 1.
Editing exception types: active and required fields
For future exception types, the following fields are editable: name, start and end date and description.
For active exception types (that is, exception types for which the start date has passed), the start date is not editable.
To change a realm or realm type on a future exception can be accomplished by deleting the future version. This is very high impact, so it is left to be done via deleting, meaning these fields are not editable in Edit mode.
Viewing exceptions: active and required fields
In View mode nothing is editable. The screen returns to the calling screen when called in View mode.
74 Retek Active Retail Intelligence
Cloning exceptions: active and required fields
Cloning acts like Edit mode, except that you are working on a new record that has been created and manually populated with a version number of one and the name is left blank.
Versioning: active and required fields
During versioning based on an exception with an active realm (cloned version), versioning acts just like cloning, except that the version number is the next highest version number based on the exception type.
During versioning that is to be the next version of an exception type, but is not directly based on a known exception (either because the driving realm needs to change either functionally or because it was deactivated) then versioning acts like New mode (new version). This second kind of versioning can be in either standard or wizard format and is in all ways like New mode except that the exception type ID and version number are known.
Start Date, End Date, and Versions
In every instance of working with exception types, start dates cannot be set to be before now (current date and time) or before the end date of the previous exception version, whichever is greater. End dates cannot be set later than the start date of the next version, if one exists, and also become required fields if a later version exists. When creating a new version, if not already set, the previous version’s end date is updated to equal the new start date of the new version and the user is notified of the update.
Note: Changing start and end dates may impact mappings to schedules and events. You are notified of this potential impact before leaving the screen.
Exception Type Parameters screen On the Exception Type Parameters screen, parameters are added to the exception. The top half of the screen shows available realms, the parameters of the currently selected realm, and unavailable realms. The bottom half shows the actual parameters on the exception and the links that map those parameters based on other parameters that had been added to the exception previously.
Available Realms and Unavailable Realms lists
The available and unavailable realm lists show the realms from which you can choose parameters. Realms whose set of key parameters' parameter types is a subset of the parameter type set of the parameters already on the exception are available. Other realms are unavailable. Every time a parameter is added to or removed from an exception, the list of available and unavailable realms is updated.
Available Realms
The Available Realms section displays realms from which parameters can be selected and added to the exception type.
The filter button allows you to filter the view of exception type parameters by the available realms defined in your system.
Chapter 2 – ARI Setup and Maintenance 75
Using the radio buttons, you restrict the list of available realms. Monitored shows only the monitored realm so that you can quickly find the monitored realm, which is probably where most of your parameters will come from. All shows all available realms.
Based on your selection, all realms that could be mapped based on parameters already on the exception are displayed.
To filter the view, select a realm from the list and click the button. To clear an active filter, click the button.
Unavailable Realms
The unavailable realms list shows realms from which parameters could be selected if the appropriate driving parameters already had been added to the exception type. The list of unavailable realms does not include realms that are non-queriable (external system realms), since no choice of parameters will ever make them available. Such a realm will only be available if it is the monitored realm of the exception.
Double clicking one of the unavailable realms in the list or pressing F9 displays the Needed Types screen, which shows a list of parameter types that are needed in order to access an unavailable realm.
Parameters in available realm (Parameter/Parameter Type list)
The parameter list between the Available Realms and Unavailable Realms displays the parameters associated with the currently selected available realm, and the parameter type for each parameter. Parameter names are displayed using the format [realm name:parm name].
Parameter Alias
An alias for the parameter. Although it is rare on an exception, it is possible to add the same parameter twice using a different mapping each time. To distinguish these parameters from one another later, when building conditions or mapping an event, the option of creating an alias for each parameter is provided. However, it is typically not necessary and so is not required. Consider the following example:
Suppose you are monitoring the transfer table for transfers between two stores that are not in the same promotion zone. In this case, you would have to add the store promotion zone parameter once for each store. These parameters would be indistinguishable on other screens, which show only the realm/parameter name, unless they were aliased (for example, as to store promo zone and from store promo zone).
and buttons
Parameters are added to and deleted from the exception by clicking the and buttons.
76 Retek Active Retail Intelligence
The (Move Down) button adds the select parameter to the exception. The added parameter is displayed in the Parameters section in the lower half of the screen. If the parameter is not from the monitored realm, or if more than one option to map to the realm is available, then the Exception Parameter-Mapping screen is displayed.
The button removes the selected parameter and any of its dependent parameters, link dependencies, and any conditions or event mappings dependent on it from the exception.
Parameters associated with exception
The parameters list on the bottom of the screen shows the parameters on the exception, in the order in which they were added.
Parameter Mapping Link
The Parameter Mapping Link section shows, for the currently selected exception parameter, how that parameter is mapped based on the parameters already on the exception.
In this list, the Realm Link parameter column shows the key parameter, of the selected parameter's realm, that was needed to map to that realm. The Link Number column displays the number of the parameter on the exception that was used to make that mapping. For example:
You base an exception off of order status changing by monitoring the ordering realm. In the parameters screen creation date, creation user ID, and the key parameter of the order realm, order number, are already added to the exception. When the order status is added, the realm link parameter is shown as order number, since that is the key parameter needed to get the status column from the order header table, and the link number is the sequence number of order number parameter already added to the exception.
Alias Name / Parameter Name selections
The Alias Name / Parameter Name radio group selections determine whether the list of parameters will be displayed by parameter alias or parameter name.
Exception type parameters list
The exception type parameters are displayed by parameter type name, realm/logical realm name, and parameter name.

Chapter 2 – ARI Setup and Maintenance 77
Parameter Mapping Link
This part of the screen shows the dependencies by which a selected parameter is mapped to the exception. Included here are the realm:parm name of the needed input parameter for the realm of the selected parameter, and the parameter number that was used as the input to this realm. Clicking the button displays the Exception Type Parameter Mapping screen, where you can specify details about the mapping between the parameters and the exception.
Viewing exception type parameters: active and required fields
In this mode only the parameters and link blocks are populated with data. Other blocks are entirely disabled. Everything is read-only.
Maintaining exception type parameters: active and required fields
In this mode, you are adding, editing, and deleting exception type parameters.
Any available parameter can be added to the list of parameters on the exception type by using the down (add) arrow. Exception type parameters must have unique names. If no alias is specified the parameter name is used, though uniqueness must be checked. When adding a parameter, the mapping for the parameter must be specified. If it can only be specified one way (based on existing parameter types and those required by the realm) then the mapping is performed automatically. Otherwise the parameter-mapping screen is invoked.
There are several special conditions that must be noted when adding a parameter. Parameters that are added from this exception realm must be added as invariant and require no special mapping. This is also true of any parameters mapped from the monitored exception realm if and only if that realm does not have any key parameters.
Removing exception type parameters
Removing parameters has several implications:
• Realm key parameters of the monitored realm (which are pre-added when the exception is created) cannot be removed.
• Any parameters that are linked via a removed parameter must also be removed, and in fact removed first, as must their dependents etc.
• All dependent event type mappings to the exception must be removed, as must any conditions depending on the removed parameters. In the case of key parameters that cannot be removed, you are informed of the reason.
If an attempt to remove a parameter affects dependent parameters, conditions, or event types, a warning is displayed asking whether you want to continue with the removal.

78 Retek Active Retail Intelligence
Exception Type Parameter Mapping screen When you choose a parameter from a realm outside of the exception realm, or one that can be mapped in more than one way, the Exception Type Parameter Mapping screen is displayed to illustrate how the parameter will be queried.
Key parameters needed to link to selected parameter
On the left side are the key parameters of the realm of the parameter you want to fetch.
Exception Type parameters used to make the key links
On the right side are the parameters on the exception that are of the appropriate types to make the mapping. The exception type parameters are displayed using the exception parameter name (alias).
Mapping the parameters
Using the LOV button on the right of the screen, you select the parameters of the type needed for the key parameters of the realm being mapped. However, the combination must ultimately be unique to allow the completion of the parameter mapping. For key parameters that have only one mapping option from the set of exception type parameters, that value is automatically filled in.
In several cases, this screen is shown even when there is only one mapping combination. This is so that you can be clear about how the data-model navigation is occurring, even when there is only the one mapping option.
Exception Type Conditions screen The Exception Type Conditions screen is used to add, edit, and delete conditions of an exception. On this screen, you define the conditions that drive the exception and that, when all of them are true, cause an exception instance to occur.
Exception header
At the top of the screen is header information about the exception type for which conditions are being defined or edited. This information is read-only.
Exception conditions
The rest of the screen details information about exception conditions. It consists of an editor for creating or editing conditions, and a list of all the conditions defined for the exception.
Condition editor
The condition editor is used to add, edit, and delete conditions showing that a parameter changes or that a relationship exists between two parameters or a parameter and a value
Chapter 2 – ARI Setup and Maintenance 79
Exception condition list
The bottom part of the screen displays all the conditions currently defined for the exception. Each entry shows the details of each condition. Conditions are moved to and from this list by the and buttons.
Exception Type Schedules screen This screen is used to add, edit, and delete exception type schedules. The screen is divided into several sections, a header, a list of available schedules, an add/remove section and a schedules section.
Exception header information
The header section displays information about the current exception type. This information is read-only.
Available Schedules
The Available Schedules section shows a list of all active schedules. This list includes the schedule type and a brief description of the frequency of the schedule or the signal associated with the schedule, as specified in the schedule’s definition.
Active Link Period
This is the period when the schedule is used to drive this exception’s monitors. Scheduling exception monitoring is achieved by applying fixed schedules over a period of time. It may be that during certain periods, you would like to use a more or less frequent monitoring schedule. Setting an appropriate link period enables this kind of variation in monitoring.
The active link period must fall within the exception type’s active period and the start date cannot be set to be before the current date. Also, the link period cannot overlap any periods already established for the same schedule. When removing a schedule its active link period is copied into this active link period section and that schedule is selected in the available schedules block (unless it has become inactive before it was removed).
button
Adds, or attaches, a schedule to the exception. The schedule is then displayed in the Schedules list in the lower part of the screen.
button
Deletes the schedule from the exception’s definition. The schedule is then displayed in the Available Schedules list.

80 Retek Active Retail Intelligence
Schedules
The Schedules section contains a list of all the schedules mapped to the exception. The start and end dates are editable, provided they have not already passed and in no case can they be set before the current date. These are in fact date/times, not just dates. Once a start date has occurred, the date cannot be removed or changed.
The and buttons are for adding and removing schedules to and from the exception. The button is essentially a delete button, but instead of just deleting it moves the schedule up into the Available Schedules list, highlights it and keeps the link period intact so you can "undo" the action by re-adding the schedule to the exception.
Schedules determine when batch scans are run for batch monitored exceptions, and thus are only meaningful for batch-monitored exceptions. Schedules for trickle and real-time monitored exceptions are not used in this ARI release, though they may be defined. The active link period of a schedule determines the period during which the schedule will be used to drive exception monitoring. Multiple schedules with overlapping periods will all drive the exception. In this way schedules of different periods may be reused across multiple exceptions, and sophisticated monitoring patterns may be built up from a combination of simple schedules.
Exception Type - Event Type Link Parameter Mapping screen The Exception Type - Event Type Link Parameter Mapping screen is used to add/edit links between exception types and event types. This screen is available from both the Exception Manager and Event Manager dialogs.
Event/Exception Type Header
The header section displays the name and version of the event type and exception type for which a link is being established or edited. None of these fields are editable.
Event Parameters / Required / Exception Parameters
This section lists all of the event parameters for which parameters of corresponding type exist on the linked exception.
Parameters labeled Required must be mapped to complete a valid link between an exception and an event. These are also referred to in ARI as "event key parameters." The exception parameter being mapped to the event parameter must be of the same type or a more specific type than the event parameter. Non-required parameters may be mapped, in which case the value of the event parameter will be passed from the exception, even though it could also be fetched from an online system (as the event is currently defined).
Use the LOVs and Clear buttons to select exception parameters or clear them from the list.
Chapter 2 – ARI Setup and Maintenance 81
Exception Type - Event Type Link screen The Exception Type - Event Type Link screen is used to add, edit, and delete links between event types and an exception type.
If you are using the exception wizard to define an exception, this is the last screen of the wizard.
Viewing exception type-event type links
When viewing exception and event type links, only the OK button is enabled, and all fields are read-only.
Maintaining exception type-event type links
When using this dialog to add, edit, and delete exception and event type links, you use the following sections of the screen: a header, a list of available events, a list of unavailable events, an add/remove section, a linked events section, and a link mapping section.
Exception header
The header section displays information about the current exception type. All of these fields are read-only.
Available Event Types
Available event types show event types that are valid, have some overlap in their start and end dates with those of the exception type, and for which the exception type has appropriate parameter types to map to the events key parameters. The comments button in this section displays the event type description in a pop-up comments window.
Unavailable Event Types
Unavailable event types are like available events with respect to validity and an existing overlap period, but the exception is missing one or more of the event’s key parameter types. Double-clicking or pressing the key-list-value key displays a list of needed parameter types.
Active Link Period
The active link period is a pair of dates that are used when the exception type and event type are linked to set the active period of the mapping. These dates are used with the Add button. An exception type can be mapped to an event type more than once and the validation for these dates is somewhat complicated. In every case it is necessary to account for the fact that a null end date acts like an infinity end date. The start and end date must be between the minimum of the exception type and event types end dates and the maximum of its start dates. The start date is further restricted in that it must be later than the current date. Finally, if the event type is already mapped to the exception type, the start and end dates must define a period that does not overlap with an existing mapping. If valid date have been entered, the link mapping screen is invoked to complete the process of specifying how the key event type parameters will be populated from the exception type.
82 Retek Active Retail Intelligence
Linked Event Types
The linked event types section shows already mapped event types. A radio group toggles between link period dates and event type activity dates. None of the fields are editable except the link start date and end dates. These are both editable, subject to the aforementioned date rules, provided that the start date is always later than the current date. Once the start date had passed only the end date is editable; in which case the end date cannot be set earlier than the current date. Note also with respect to date validation that when editing already linked events, there is no visibility to the event start and end date so a special error message should be given if the user attempts to choose a date outside of this range. Only events that have not entered the active link period (mapping start date has not yet passed) can be removed. Finally, if the end date has passed, neither date is editable.
Parameter Mapping
The parameter mapping section of the screen shows which event type parameters are mapped from which exception type parameters. The mapping is editable only before the start date of the linkage has passed. The button displays the Exception Type - Event Type Link Parameter Mapping screen.
Exception Type - Event Type Link Parameter Mapping screen
Needed Parameter Types Window [exmgmt]
The Needed Parameter Types window is displayed in several situations when defining exception types:
• In the Exception Type Parameters screen, when you double-click on or press F9 on an unavailable realm.
• In the Exception Type – Event Type Link Parameter Mapping screen, when you are attempting to map to an unavailable realm by double-clicking or pressing F9 on the realm.
• This screen shows a list of additional parameter types needed on an exception to make a given event available for mapping.
Chapter 2 – ARI Setup and Maintenance 83
Condition editor Several exception and event management screens involve defining conditions associated with the exception or event, including
• Exception Type Conditions
• Event Type State – Event Attribute Rules
• Event Type – State Rules
• Event Type – Closure Rules
Following is a description of how to create and edit conditions on these screens.
How the condition editor works
In all the screens that involve conditions, you use the condition editor to add, edit, and delete conditions showing that a parameter changes or that a relationship exists between two parameters or a parameter and a value. The basic layout of a condition is a comparison between a parameter and a value or another parameter, using an operator such as = or >. Exception definitions have an additional setting for the condition, Monitor Change, which specifies whether you want to be notified when the parameter change occurs. It is also possible for a parameter to change and have a relationship condition simultaneously.
Once the condition is defined, you add it to the list of exception or event-rule conditions below the editor by clicking the button. When you need to change a condition, you click the button to move the condition into the editor, and when done changing the condition, you click to move it back into the condition list for the exception or rule.
The conditions defined for an exception or event are treated as logical AND conditions. That is, when a monitor detects candidate exception instances, or when an event is evaluated against the rules defined for it, the exception or event is tested against all of these conditions. If they are not all true, the candidate is discarded and ignored without further processing. For example, if all the conditions for candidate instance are true, then the candidate instance becomes an actual exception instance, at which time linked events are created.
Fields
The condition editor is displayed above the list of existing conditions, and consists of the following fields and controls.
84 Retek Active Retail Intelligence
Parameter
The parameter on which the condition is based. This parameter is compared to a value or another parameter. Click the LOV button to display allowable parameters for the exception or event.
The parameter chosen to drive the condition determines:
• Which operators are available
• For exceptions, whether the exception can be monitored online
• Whether other parameters or special values can be used for the comparison created.
All parameters allow comparison to NULL values. Only parameters from the monitored realm, if the realm can be monitored in real time, allow change detection. Some parameters have a constrained set of valid values that can be used for comparison, such as the store number parameter only allowing valid store numbers. Also, the data type of the parameter, character, Boolean, date, or number, determines which comparisons can be made to other parameters (that is, those of the same data type). Actually, many times such comparisons are not meaningful, unless the two parameter types are the same, such as comparing two store numbers, as opposed to comparing a dollar amount and a store number.
Monitor Change (for Exception Type Conditions screen only)
Monitoring a change is only possible on parameters that come from the monitored realm, and even then only on a realm with active, query-able data. So, monitioring change is impossible for external systems. For internal systems, however, whether an exception monitors transactions online or through a nightly batch sweep depends on whether at least one of the conditions is set to monitor a change.
Operator
The operator used to compare the parameter with a value or another parameter.
For Exceptions only, an operator is required for all conditions except for those in which a change is being monitored.
Available operators depend on the data type of the specified parameter. Specifically, text parameters do not support inequality operators. In addition, any exception parameters with a Long or Long Raw Data type are not available for defining conditions, since they cannot be used to perform comparisons anyway. The only reason to add such parameters to an exception is to pass them from a non-queried data source through to an event as additional information to present to users in the event interface.
For all data types, if you use the operators IS and IS NOT, the value must be specified as NULL.
For varchar2 and Boolean data types, the only other options are = and !=.
For date and number data types, the operators <, <=, >, >=, =, and != are also available.
Character and Boolean parameters allow = and != operators.
Chapter 2 – ARI Setup and Maintenance 85
Numbers and dates allow inequality operators as well.
Parameter or Value radio buttons
Specifies whether the selected parameter is being compared to a parameter or a parameter value. The default setting is Value, with the Value field set up for the appropriate data type.
A parameter can only be compared to another parameter when a parameter of the same type exists on the exception or event (that is, if there are available parameters to compare the parameter against). Otherwise, the parameter must be compared to a value.
Parameter or Value
This field specifies the parameter or value to which the selected parameter is being compared.
Depending on the data type of the parameter, the controls on this field change. In some cases, when making a value comparison, a list item, a date button, or an LOV button is available to help you choose an appropriate value. For example, for dates, a date button is displayed to enable entering a date. For parameters with a code type, clicking the LOV button displays a list of appropriate code values from which you can choose.
button
Adds the condition in the condition editor into the condition list for the exception or rule. The fields of the condition editor remain filled with the values for the condition. You can either continue to define more conditions on the same
parameter, or click the to clear the fields.
button
Removes the condition from the condition list, and puts it in the condition editor. Click this button to edit or delete existing conditions.
button
Clears the condition editor fields.
Conditions list
Below the condition editor is a list of the conditions currently defined for the exception or rule. The conditions defined for an exception or event are treated as logical AND conditions, as described earlier in this topic.
Adding a condition
1 Choose a parameter from the list.
2 (For exceptions only) Specify whether you want to be notified of the change to the parameter.
3 Choose an operator from the list.
86 Retek Active Retail Intelligence
4 Choose whether you want to compare the parameter to a value or another parameter.
5 Specify the value or parameter to which the parameter will be compared.
6 Click the button. The condition is added to the condition list below the editor.
Editing a condition
1 Select the condition from the condition list.
2 Click the button to move it into the condition editor.
3 Modify the definition as needed, for example, changing the operator or the value to which the parameter is compared.
4 When done, click the button to add the condition back to the condition list for the exception or rule.
5 Deleting a condition
6 Select the condition from the condition list.
7 Click the button to move it into the condition editor. The exception condition is left in the edit section, since the only way to edit a condition is remove it, change it, then add it back to the exception conditions.
8 If you want to remove an exception condition and then add another, remove
the condition, and then change the first parameter. Or, click the button to clear the fields and start with a new exception condition.

Chapter 2 – ARI Setup and Maintenance 87
Windows and Dialogs - Event Manager
Event Manager dialog [evmgmt]
The Event Manager dialog is used to define, view, and maintain events.
Ways of creating new events
There are several ways to create new events:
• By using the event wizard, which walks you through the steps for creating events. The wizard for creating events shares many of the screens within the Event Manager dialog. To use the wizard, click the button.
• By creating the new event manually; that is, by working through the screens of the Event Manager and filling in information about the event. To create an event manually, click the button.
• By versioning, or creating a new event from a version level of an existing event, and establishing a date and time at which this new event version will
take effect. To create an event through versioning, click the button.
• By cloning, or copying, an existing event. Click the button.
Event Manager Screens
The Event Manager has several screens for entering data about events. The Event Summary List, the first screen that is displayed when you open the Event Manager, presents summary information about exceptions. From this screen, you can access the rest of the dialog's functionality.
Event Types summary screen The event summary screen displays all the exception types defined in your system. All the information in this screen is read-only.
Filtering the view of events
This view may be filtered. Using the radio buttons and the button, you can choose to display all events, including expired events, or only active and future events. The button clears any active filter.
Event types list
The top part of the screen lists all the event types in summary form. All the information in this screen is read-only. From this summary list, you can create new exceptions and edit existing exception definitions.
Buttons
Several action buttons are available to go from this screen that allow creation, editing and deletion of event types.
88 Retek Active Retail Intelligence
From left to right the buttons are used to:
Starts the wizard for creating a new event type. This button is active at all times.
Creates a new event type manually. This means you work through the screens of the Event Manager yourself to define the new event type, rather than using the wizard. This button is active at all times.
Creates a new version of an existing event type, and establishes a date and time for the new version to take effect. The version button is available at all times that an event is displayed in the summary list.
Clones, or copies, an existing event type.
Edits an exception type that is not yet active.
Deletes an expired or not-yet-active event type.
Displays additional header information about an existing event type.
Event details
The lower half of the screen shows details about the currently selected event in the top half of the screen, depending on which button is selected in the center of the screen: parameters, states, state assignment rules, schedules, exceptions, or closure rules.
Parameters
The first stacked detail screen for the bottom half of the summary view is the parameters screen. This screen is the default when the form is first launched. This screen shows the parameters for the selected event type and has a button for accessing the add/edit/delete parameters screen. This button is available for the same records that the edit button for the header is available for and disabled for past and active events. The info button is available whenever the version button is available.
Layouts
The Layouts detail lists the layouts that have been set up for displaying instances of this event type in the Event Viewer.
Chapter 2 – ARI Setup and Maintenance 89
States
The States detail displays states and state rules defined for the event type. The button displays the state editing screen. The Info button is enabled
whenever the versioning button is available. The Edit button is enabled only for future exceptions.
Clicking the Actions button displays all of the actions associated with the event state on the right side of the state detail.
Clicking the Attribute Rules button displays the possible results of conditional evaluations in terms of priority assignment, routing method, automatic action and, behind the comments button, group assignments.
State Assignment Rules
The state assignment rules detail shows both the evaluation sequence and the state that is assigned if all of the conditions are true.
Schedules for Revalidation
The Schedules for Revalidation detail shows which schedules are attached to the event type, and which of them are active now, in the future or in the past. These values for active are updated using the view the schedule block is based on each time the query is performed.
Schedules can be added/edited/deleted for all active and future active event types. The comments box displays the schedule description. The Info button is available when the selected event type is not blank.
Exception Types
The Exception Types detail shows the exception types that are linked to the event type and the window when the link will be valid. Like schedules, exception type mappings may be edited in for all event types that are active and future active. The comments button displays a comments window with a description of the exception type.
Closure Rules
The Closure Rules detail shows the conditions evaluated to determine whether the event is closed. The evaluation sequence is just a rule number and the order of evaluation is not important since if any of the sets of conditions is true the event will be closed. Closure rules cannot be edited for active exceptions.

90 Retek Active Retail Intelligence
Event Type Header screen The Event Type Header screen defines header information, such as the event name, its lifecycle, and start and end times. The Event Type Header has the following fields:
Event Type Name
A unique name for the event type.
Version Number
The version number of the event.
Time to Live
The number of days that the event "lives" after it is closed. This will prevent a creation of an identical even during this period.
History Retention Days
The number of days that history for the event is retained in the ARI database.
Start Date and Time
The date and time at which the event becomes active.
End Date and Time
The date and time at which the event becomes obsolete.
Event Type Description
A text description of the event and its purpose, including such information as what the event type does, or the exceptions to which the event type is mapped. The comments button on the right side of the description opens a comment window for entering or editing the description.
Notification check box
Indicates whether the event supports email notification when the event occurs.
Creating event types
When you are creating version one of a new event, the following fields are all enabled and editable: Event Type Name, Time to Live, History Retention Days, Event Type Description, and Start Date and Time and End Date and Time are all enabled and editable.
Except for End Date and Time, all of these fields are required, as is Version Number, which is given a value of 1.
Editing event types
For future event types, all displayed fields except Version Number are editable. For active event types (start date has passed), the Start Date and Time is not editable.

Chapter 2 – ARI Setup and Maintenance 91
Viewing event types
When viewing event types, all fields are read-only.
Cloning event types
Cloning acts like Edit mode, except that you are working on a new record that has been created and manually populated with a version number of one and the name is left blank.
Versioning event types
During versioning based on an event that is not in Disabled (D) status, versioning acts just like cloning, except that the version number is the next highest version number based on the event type’s highest existing version number, also, start and end date are both blank.
During versioning that is to be the next version of an event type, but is not directly based on a known event type (because previous versions have been disabled), versioning acts like New mode (new version). This second kind of versioning can be either in standard or wizard format and is in all ways just like New mode, except that the event type ID and version number are known.
Start Date, End Date, and Versions
In every case, start dates cannot be set to be before or equal to the current date or before or equal to the end date of the previous event version, whichever is greater. End dates cannot be set later than or equal to the start date of the next version, if one exists, and also become required fields if a later version exists. When creating a new version, if not already set, the previous version’s end date is updated to one second less than the new start date of the new version and the user is notified of the update. Changing start and end dates map impact mapping to schedule, exceptions, and related events, and this must be addressed when changes are saved to the screen (OK, NEXT, BACK). These date related items must be dropped if they fall out of range, or updated accordingly if they are still partially within range. Ideally any tracking tables used by various linking processes (re-evaluation, etc.) would be updated as well.
92 Retek Active Retail Intelligence
Event Type Parameters screen The Event Type Parameters screen is used to add, edit, and delete parameters associated with an event. The screen is divided into six main sections.
Available Realms / All Parameter Types / Exception Context buttons
This section of the dialog is a set of radio buttons for switching between editing parameters or purely parameter types. Your choice here affects what is displayed in the list in the middle center of the screen.
• Available Realms: Displays realms from which parameters may be selected and added to the event type.
• All Parameter Types: Displays a list of all parameter types in the system.
• Exception Context: Displays the parameters of a specific exception. However, only these parameters’ types are actually of interest. Any parameter type can be added to an event. However, since parameter types play a critical role in exception mapping, the exception mapping context can be useful for restricting the list.
The parameter type list is queried each time the exception context is changed. It is also queried every time the radio group is set to either Exception context or All Parameter Types. Parameter names are blank when All parameter types is selected and use the exception parameter names when exception context is selected.
Available Realms list
The Available Realms section displays realms from which parameters can be selected and added to the event type.
Parameters list
The section in the top center displays the parameters of the currently selected realms or all parameter types or the parameters of the specified exception, depending on the radio group selection.
Event Key
This field helps determine to which exception type the event type can be mapped. The exception must possess the same parameter types as those parameter types to which the event type’s key parameter’s belong.
Display
Determines whether a parameter should be shown in the header or in the detail section of the Event Viewer. If header is chosen, the parameter will be a sortable field in the Event Viewer.
Parameter Alias
An alias for the parameter.
Chapter 2 – ARI Setup and Maintenance 93
It is possible to add the same parameter twice using a different mapping each time. To distinguish these parameters from one another later, when building conditions, the option of creating an alias for each parameter is provided.
Unavailable Realms list
The unavailable realms list shows realms from which parameters could be selected if the appropriate driving parameters already had been added to the event type. Double-clicking a realm or pressing F9 displays a list of needed parameter types to be able to access an unavailable realm.
Parameters
The Parameters section shows the parameters already mapped to the event.
Parameter Mapping Link
The Parameter Mapping Link section shows the link basis by which a given parameter is mapped to the event. That is, it shows the mapping dependencies of the selected parameter. The mappings are displayed as the key parameters for the parameter’s realm, and the number of the event type parameter used to invoke each key parameter. To modify the parameter mappings, click the button.
Adding parameters to event types
Any available parameter or parameter type can be added to the list of parameters on the event type by using the down (add) arrow. Event type parameters must have unique names. If no alias is specified, the parameter name is used unless it is a parameter type out of exception context. In this case, the parameter type name is used. When adding a parameter, the mapping for the parameter must be specified. If it can only be specified one way (based on existing parameter types and those required by the realm), then the mapping is performed automatically. Otherwise, the parameter-mapping screen is invoked.
Several special conditions apply when adding a parameter:
• Parameters that are added from the this event realm require no special mapping.
• Parameter types do not require mapping.
• When automapping parameters, unique names must be derived. The Display attribute is set to Detail and the Event Key attribute is set to No.
Removing parameters and parameter types from event types
By pressing the up (remove) arrow, you can remove parameters from the event type. However, removing parameters/types has several implications. Specifically, when a parameter or parameter type is removed, the following must also occur:
• Actions mapped with parameters that cannot be overridden must be removed.
• States that have all actions removed must be removed from the state rules. If that means the default state is removed, all state rules must be removed.
• Conditions of attribute rules must be removed and the entire rule must be removed if no conditions remain and it is not the default (rule #0).
94 Retek Active Retail Intelligence
• Conditions of state rules must be removed, and if no conditions remain and it is not the default state rule, the entire state rule must be removed.
• Related event links must be removed if no parameter relation remains.
• Exception mappings must be removed if no parameter mappings remain.
• Conditions of closure rules must be removed.
If an attempt to remove a parameter affects dependent parameters, conditions, or event types, a warning is displayed asking whether you want to continue with the removal.
Event Type Parameter Mapping screen When you choose a parameter from a realm outside of the event realm, or one that can be mapped in multiple ways, The Event Type Parameter Mapping screen is displayed to illustrate how the parameter will be queried.
The left side of the Event Type Parameter Mapping screen displays a list of the key parameters of the newly mapped parameter’s realm. The right side shows the parameters of the event that are of the appropriate types to make the mapping. The event type parameters are displayed using the event parameter name (alias).
Note that in several cases this screen is shown even when there is only one mapping combination. This is so that you can be clear about how the data-model navigation is occurring, even when there is only the one mapping option.
Using the LOV, you can select from all of the parameters or parameter types of the type needed for the key parameters of the realm being mapped. However, the combination must ultimately be unique to allow the completion of the parameter mapping. For key parameters that have only one mapping option from the set of event type parameters, that value is automatically filled in.
Issues
For example, an external data source exception and an internal exception may both cause the same event, but the one from the external data source provides information which is more accurate than the internal system (such as a recalculated open-to-buy). In this case, you might prefer to use the external calculation as opposed to the internally accessible data when the event is generated from the external data source. Note, however, that if the internal exception occurs later than the external one, the value will be overwritten with the newer internal value anyway. Thus in cases where parameters other than event key parameters come from two different exceptions, it is best to use a one-to-one exception-event mapping to ensure that the external data source values are maintained in the rare cases where preserving those values is critical.

Chapter 2 – ARI Setup and Maintenance 95
Event Viewer Layouts screen The Event Viewer Layout screen defines the layouts for instances of this event type when the events are displayed in the Event Viewer. Each layout can be used as the default layout for one or more Event States.
The button adds a new layout. The button deletes a new layout. You cannot delete a layout if it is selected as the default layout for any Event Type State.
For each layout you can adjust the column width and order of the header columns, and determine which header columns will be displayed by default. As you change the layout for a header column, the Preview area at the topic of the screen shows how the parameter will look in the Event viewer. Users can adjust all of the settings in the Event Viewer.
You can also select which parameters will be displayed in the detail section and the order in which they will be displayed. The detail settings are not adjustable in the event viewer.
You can adjust the order of both the header and detail parameters by using the up and down arrows next to the appropriate block. For each layout you must specify at least one header parameter and one detail parameter to be displayed in order to exit this screen.
Event Type States screen The Event Type States screen and the set of screens associated with it is used to maintain or add, edit, and delete, the states names of an event and the layouts of the state.
As the data set of an event is refreshed, it may be that the data set changes in a way that the event is used to track several stages of a process. For each state a layout must be selected. It will be used as the default layout when events in that state are displayed in the event viewer.
Typically at each step in a process, different actions are appropriate. Also, the rules used to assign the events priority, routing, and any automatic actions may be different at each step of the process. States provide the functionality to support tracking multi-stage processes.
From the Event Type States screen, you can create the event states. On subsequent screens, you define actions to be mapped to the states, and attribute rules defined to dynamically assign priority, routing method, assignment group and automatic action attributes that apply whenever the event is re-evaluated.
The screen is divided into three sections: States, Actions, and Attribute Rules.
96 Retek Active Retail Intelligence
States
The States section displays the state names of the event. State names are editable at any time.
The button adds a new state.
The button deletes the selected state.
Actions
The Actions section displays the actions of a given state. Using the control, you can edit the actions.
Attribute Rules
The Attribute rules section displays the attributes that could be assigned to the event and the order in which the underlying rules used to assign the attributes are evaluated. Using the control, you can edit the attribute rules.
Adding and deleting states
States can be added or deleted directly on this screen. Deleting a state that is used in a state rule results in deleting the rule as well. If this implies deleting the default rule, then all exception mappings must be removed from the event. A different warning should be given to you in each case, asking whether you would like to proceed.
When you click OK on the dialog, or Next or Back when using the event wizard, a message is displayed indicating that any states that do not have at least one action and a default attribute rule will be deleted.
Event Type State - Action screen The Event Type State – Action screen defines the actions associated with the event state.
This screen is divided into five sections.
Header
The header section is read-only.
Actions
The Actions section shows actions currently mapped to the state.
The up and down arrows can be used to reorder the actions. The resulting order will be used when displaying the list of actions in both the Event Manager and the Event Viewer.
Add/remove actions buttons
The and buttons in the middle of the screen are for adding and removing actions for the event state.
Chapter 2 – ARI Setup and Maintenance 97
Available Actions
The available action section shows actions that can be added. The parameter mapping area shows how event parameters have been mapped to add the currently selected action to the event.
Actions can be added or removed at any time. However, removing and action may modify an attribute rule by removing it from being an auto-action for that rule. In this case, you are notified and prompted to proceed. Adding an action opens the parameter mapping screen, unless all of the parameters of the action are override, error, or current user parameters.
For the actions that are already mapped to the event state, the action names are editable at any time. These action names must be unique within a given event type, state, and action designation. These uniqueness is necessary to allow an action to be added multiple times (potentially with different overriding parameter values).
Parameter mappings can be edited by invoking the parameter mapping screen, but only if there are any parameters that can be mapped (not having at least one override/error/current user parameter).
Event Type State - Action Parameter Mapping screen The Event Type State - Action Parameter Mapping screen is for adding and editing the values of parameter mappings that are used to populate action parameters. In addition, this screen specifies whether the values are just defaults or can be edited by the user at runtime.
This screen has the following sections:
Action/Event/State header
Displays the action name and the event type’s name, version number, and state.
Action Parameter
The action parameter that needs to be mapped.
Editable
Indicates whether the parameter is editable or read-only.
This field is used to enable or disable editing of this action input value in the end user interface. For example, for a reorder action, the SKU may not be editable, but the quantity would be. This would prevent the user from reordering the wrong SKU but give them flexibility to adjust the quantity.
98 Retek Active Retail Intelligence
Override Value
The constant value of the parameter that is being mapped.
As an alternative to mapping a parameter to a parameter, it may be appropriate to put in a harcoded value. In most cases, this hard-coded value will be the same always for a given action. So, the value will be set as non-editable, which makes the value an override value. These values may be specified at the action definition level (in the metadata), in which case the values don’t show appear as action parameters that can be mapped. However, the metadata can be made more general so that override values, which may be the same for all instances of an event type but vary between event types, can be specified here at the event-state-action level.
Event Parameter
The event parameter name mapped to the action.
Event Type State - Event Attribute Rules screen The Event Type State - Event Attribute Rules establishes rules for routing events of the particular state to users. This screen has the following sections:
Header
The header at the top of the screen shows header information for the current event state.
Attribute Assignment Rules
This section of the screen is for adding and removing event attribute rules, and for editing the attributes. It includes the priority, auto-action, and routing method assigned if the rule is true.
• Priority: The priority that you want to assign to the event type, that is, High, Medium, or Low. If the priority is High, the group/user who receives the event will know that it should be dealt with first.
• Routing Method: Available choices are All, Random, and Balanced. All assigns the event to all candidates, Balance assigns the event to the candidate with the fewest events in their work load. Random assigns the event randomly to one of the candidates.
• Auto-Action: Identifies an automatic action tied to the event type. For example, if an order that is submitted involves less than 100 SKUs, automatically approve the order (it is not necessary for any users to manually approve the order). Otherwise, route them to users so that they can view the information and manually approve it.
• Single Eval Action: When selected, the Auto-Action is executed only when the event is reassigned. Otherwise, the Auto-Action is executed every time the event is re-eevaluated. This is useful when you have an action that should be performed only once for each user when the event is first assigned or when it changes state. This field is available only when an Auto-Action has been selected.
Chapter 2 – ARI Setup and Maintenance 99
• Assign to Union: When selected, the event will be routed to the union of all users that are members of any group in the assignment list. Otherwise, the event will be routed to the intersection of users that are members of every group in the list.
In these assignment rules, Priority and Routing Method are required. Auto-Action is optional. Auto-actions can be any action for which all of the actions input parameters are that can be mapped are mapped. Each rule must have at least one group assignment and one condition, except the default rule does not require any conditions, to be complete. When you click OK on this screen, all rules are validated by checking that at least one condition is defined for each rule. The up and down arrows beside the block are used to reorder the rules for evaluation. The default rule cannot be moved up or down.
Group Assignment
This section of the screen specifies the groups assigned if the rule is true, and the conditions that must all be true for the rule to be true.
Clicking the button displays the Event Type State – Event Attribute Rules: Assignment Groups screen for editing the group assignment.
Conditions
The conditions part of the screen is for defining the conditions that constitute the event attribute rules. This part of the screen consists of a condition editor and a list of conditions for the rule.
Condition editor
The condition editor is for defining conditions associated with the rule.
Event Type State - Event Attribute Rules: Assignment Groups screen On the Event Type State - Event Attribute Rules: Assignment Groups screen, you assign groups for routing. The intersection of the sets of users in these groups ultimately determines the set of candidates to whom an event can be routed.
Header
The header displays header information about the event and state. This information is read-only.
Group / Parameter List
Some groups require a parameter mapping, the main action in this field is to choose groups. At runtime, users who belong to all of the groups selected are used to route the event using either workload, random, or all routing, as discussed in the overview of groups.
Validation is performed row by row, so that only one group can be in the process of being added/mapped at any given moment.
100 Retek Active Retail Intelligence
Buttons
The and buttons are for adding and deleting group assignments.
Event Type - State Rules screen The Event Type - State Rules screen is used to add, edit, and delete rules to assign to an event’s state, and to change the conditions that make up those rules. The result of a set of rules being true is that a state is assigned to the event.
When the screen is launched, if a default rule does not already exist, one is added. A state must be assigned for each rule. The default state cannot be deleted or moved, though buttons allow changing the order of all other rules. Except for the default state, all rules must have at least one condition. When you click the OK, Next, or Back button on this screen, the rules are checked to determine whether they have at least one condition. This check is done by looping through all rules and offering to delete any but the default that do not have conditions.
The screen is divided into several sections:
Event type information
The top of the screen displays the name and version number of the event type associated with the state rules.
State Assignment Rules
The second section lists the states that will be assigned and the sequence in which the rules to assign those states will be tested.
Conditions
This section is used for adding, editing, and deleting the conditions that make up the state rule. It consists of a condition editor, controls for moving conditions into and out of the condition editor, and a list of conditions currently defined for the state rule.
Condition editor
The condition editor is for defining conditions that make up the state rule. For more information on setting up conditions for an event type, click the following link.
Event type rule condition list
This section lists the conditions of the rule selected in the State Assignment Rules list.
Chapter 2 – ARI Setup and Maintenance 101
Event Type Revalidation Schedules screen
The screen is divided into several sections:
Event Type Header
The header section displays information about the current event type. These fields are read-only.
Available Schedules
Available schedules shows a list of all schedules that are available to attach to the schedule. To attach them to the event type, click the button.
Active Link Period
The Active Link Period establishes how long the schedule is attached to the event type. This period is defined by start and end dates and times.
The active link period must fall within the event type’s active period and the start date/time cannot be set to be before the current date (sysdate). Also, the link period cannot overlap any periods already established for the same schedule.
When removing a schedule, its active link period is copied into this active link period section and that schedule is selected in the Available Schedules list, unless it has become inactive before it is removed, in which case it is simply removed.
Schedules
The Schedules part of the screens shows all the schedules currently attached to the event type. To add an available schedule to this list, click the . To remove a schedule from this list, click the button.
Event Type - Exception Type Link screen The Event Type - Exception Type Link screen is used to add, edit, and delete links between an event type and exception types.
To link an event to an exception, the exception must be able to provide parameter mappings (by parameters of the same type) for all of the event's parameters that are declared as coming from an exception context. Optionally, additional parameters can be fed to the event from the exception, overriding whatever method the event would normally use to fetch those other values. For more information on this, see the Event Parameters Screen section of the Event Manager dialog.
Other conditions for triggering an event from an exception are that the active dates must overlap and the definition of the event being mapped must be complete. All of these factors determine whether an event will show in the available or unavailable mapping area, or not at all. Also, there is no simple window that can be popped up to explain that a mapping cannot be made as there is for parameters with the Needed Parameter Types window.
The screen is divided into several sections:

102 Retek Active Retail Intelligence
Header
The header section displays information about the current event type. None of these fields are editable.
Available Exception Types
The Available Exception Types list shows exception types that are valid to link to the event type. These exception types have some overlap in their start and end dates with those of the event type, and for which the exception type has appropriate parameter types to map to the events key parameters. The comments button in this section displays the exception type description in a pop-up comments window.
Unavailable Exception Types
Unavailable exception types are like available exceptions with respect to validity and an existing overlap period, but they are missing one or more of the event’s key parameter types. Double-clicking or pressing F9 on an unavailable exception type displays a list of needed parameter types.
and buttons
The button adds an available exception type to the list of linked exception types. The button removes the selected exception type from the linked exception types list and returns it to the list of available exception types.
Active Link Period
The active link period is an editable pair of dates that are used when the event type and exception type are linked to set the active period of the mapping. These dates are used with the button.
An event type can be mapped to an exception type more than once and the validation for these dates is somewhat complicated. In every case, it is necessary to account for the fact that a null end date acts like an infinity end date. The start and end dates must be between the minimum of the event type and exception types end dates and the maximum of its start dates. The start date is further restricted in that it must be later than the current date. Finally, if the exception type is already mapped to the event type, the start and end dates must define a period that does not overlap with an existing mapping. If valid dates have been entered, the link mapping screen is invoked to complete the process of specifying how the key event type parameters will be populated from the exception type.
Linked Exception Types
The Linked Exception Types section shows already mapped exception types. The Link Period and Exception Active selections toggles the display between link period dates and exception type activity dates.
The only editable fields in this list are the link start date and end dates. These dates are subject to the date rules for the Active Link Period, and the Start Date is editable only if the date is later than the current date. Once the start date had passed, only the end date is editable; in this case, the end date cannot be set earlier than the current date.
Chapter 2 – ARI Setup and Maintenance 103
When editing already linked exceptions, if you try to choose a date outside the start and end dates, an error is displayed. Only exceptions that have not entered the active link period (that is, exceptions for which the mapping start date has not yet passed) can be removed. If the end date has passed, both dates are read-only.
Parameter Mapping
The parameter mapping section shows which event type parameters are mapped from which exception type parameters. The mapping is editable only before the start date of the linkage has passed. Clicking the button displays the Exception-Event Link Mapping screen, where you can edit the link mapping for the selected event type-exception type pair.
Event Type - Closure Rules screen The Event Type - Closure Rules screen is used to add, edit, and delete rules for closing event types, to assign these closure rules to an event’s state, and to change the conditions that make up the closure rules. The result of a set of rules being true is that the event is closed.
The screen is divided into four sections:
Event type header
The header displays the event type and version number for which closure rules are being defined.
Closure Rules: Evaluation sequence
The Closure Rules section lists the rules that are identified by the sequence number designating the order in which they will be tested, along with a brief (optional) user-defined rule description. Rules can be reordered using the up and down arrow buttons.
Conditions required for closure
For the closure rule selected in the Closure Rules section, this section lists the conditions that must be met in order for the event type to be closed. All rules must have at least one condition. This section is used to add, edit, and delete rule conditions. It consists of a condition editor, buttons for moving conditions into and out of the condition editor, and the list of conditions currently defined for the closure rule.
Condition editor
The condition editor is for defining conditions associated with the rule. For more information on setting up conditions for an event type, click the following link.
About the condition editor
Condition list
Below the condition editor is the list of conditions already defined for the closure rule. This part of the screen is also described in the condition editor description.

104 Retek Active Retail Intelligence
Needed Parameter Types Window [evmgmt]
The Needed Types window is displayed in several situations when defining and editing event types:
• When defining event parameters and parameter types, this window is available from the Event Type Parameters screen. In this case, this window shows a list of additional parameter types needed to make that realm available.
• When defining event-exception links, this window is available from the Exception Type - Event Type Link Parameter Mapping screen. In this case, the window shows which parameters are needed on an exception to make a given event available for mapping.
Procedures Define an exception
The general process for defining an exception is as follows:
1 Open the Exception Manager dialog. The Exception Types summary screen is displayed. From this point, you can create the exception through the following methods:
Using the exception wizard—click the button.
Manually, by working through all the exception definition screens—click the button.
By creating a new version of an existing exception—click the button.
By cloning, or copying an existing exception—click the button.
2 Identify the exception on the Exception Type Header screen.
3 Identify the parameters involved in the exception on the Exception Type Parameters screen.
4 Identify the conditions that trigger the exception on the Exception Type Conditions screen.
5 Associate a schedule with the exception on the Exception Type Schedules screen.
6 Link the exception to an event on the Exception Type – Event Type Link screen.
Chapter 2 – ARI Setup and Maintenance 105
Define an event type
The general process for defining an exception is as follows:
1 Open the Event Manager dialog. The Event Types summary screen is displayed. From this point you can create the event through the following methods.
Using the event wizard—click the button.
Manually, by working through all the event definition screens—click the button.
By creating a new version of an existing event—click the button.
By cloning, or copying an existing event—click the button.
2 Identify the event type on the Event Type Header screen.
3 Specify the parameters and parameter types associated with the event type.
4 Parameters are entered on the Event Type Parameters screen.
5 Set up layouts that will be used when displaying instances of this event type in the Event Viewer. Layouts are defined on the Event Viewer Layouts screen. Specify the states for an event type on the Event Type States screen. Defining states involves:
Identifying the state.
Choosing a layout that will be used by the Event Viewer to display events in that state.
Defining the actions for the state.
Defining the action parameter mapping, where you indicate whether the value of the mapped parameter will be a constant value or the value that the event parameter produces.
Defining the rules and conditions for routing events of the particular state to users.
Defining assignment groups to be used for routing events of the particular state to users.
6 Define rules to assign to event states on the State Rules screen.
7 Define schedules for reevaluating the event on the Event Type Revalidation Schedules screen.
8 Link the event to exceptions on the Event Type – Exception Type Link screen.
9 Specify rules for closing the event on the Event Type - Closure Rules screen.
106 Retek Active Retail Intelligence
Schedules for Exception Scanning and Event Revalidation
Overviews
Schedules for exception scanning and event reevaluation Schedules serve two purposes:
• You can attach a schedule to a batch (periodic) exception type that governs when batch scanning of the exception type occurs. Note that exception scans can be done throughout the day so that the ARI administrator can do some manual load balancing of ARI processes.
• You can attach a schedule to an event type that defines how frequently events of that type are automatically reevaluated by the system. Volatile events that use data that is changed often or by many users or components of the system may benefit from periodic reevaluation both to save users having to reevaluate manually and to reduce their alert inbox traffic by removing resolved events before the user even sees them. As a rule events shouldn’t be terribly volatile, but there may be some applications for it.
• ARI has a schedule process that every few minutes checks all schedules and, for those that are due to execute (or past due if the ARI schedule process has been inactive for a period of time). ARI then finds the associated exceptions that need scanned and events that need reevaluated and executes the scans and reevaluations accordingly.
Schedule types
There are three types of schedules:
• Recurring: This kind of schedule starts at a specified day and time, and then recurs every “x” hours, days, weeks or months. A schedule that occurs on the 29th, 30th or 31st of the month will not execute in a month that does not have a day with that number. After execution the schedule is incremented according to the repeat interval until the next execution date is incremented to some date and time later then the current time. By using multiple recurring schedules together (because an exception or event can have multiple schedules) a sophisticated recurring schedule pattern can be created from these simple schedules.
• Once: A schedule can be set up to be executed once at a specific day and time. Provided that the ARI scheduler is running (it should run constantly in production) the schedule will be executed within a few minutes of the requested time. If the scheduler is not running when the schedule is due, it will execute as soon as the scheduler is restarted.
Chapter 2 – ARI Setup and Maintenance 107
• Signal Driven: A signal driven schedule accepts a signal by calling the PL/SQL application programmer interface “ARI_SCHEDULE_SQL.ACCEPT_SIGNAL” and sending the exact signal text that the schedule requires. This will cause the schedule to set the next execute date to “right now”, and so, provided the scheduler is running it will run immediately, or as soon as the scheduler is restarted. This API allows linking of one process to another. Consider that you may want to monitor for a certain exception only after some daily or weekly process occurs, and always after it occurs. However, it may be that the process doesn’t occur on a rigorous schedule, so you can modify the process to call this API when it completes and so thereby link ARI to the other process.
Using signals with schedules
In a schedule definition, a signal is simply a text field passed to a method defined in the scheduler package, such as “nightly batch run completed.” Using a signal for a schedule, you can have a simple SQL*Plus command send the signal from a shell script as:
SQL>execute scheduler.send_signal(‘nightly batch run completed’)
It is the responsibility of the business analyst to keep the signal text consistent between the external processes and the internal schedules, as well as to coordinate the text messages used in internal definitions. That is, if two exception scans are driven from the ‘nightly batch run completed’ signal, it is the analyst’s responsibility to make sure the text strings are properly specified in the exception schedules.
Specifying an exclusion window
Schedules have an option of setting an exclusion window. An exclusion window applies to the schedule and thus to exception and events using the schedule. For events, an exclusion window means that an event will not reevaluate, at least not based on the schedule, during that period. For an exception, it means an hourly scan, for example, will be hourly but not during the exclusion window. A signal sent during an exclusion window will set the next execution date to the end of the exclusion window, but will not execute immediately.
You can use an exclusion window to keep an event out of the way during periods of heavy processing on related data. For example, you could disable the reevaluation of existing low-inventory events during nightly point-of-sale updates. The reevaluation of the event is then forced when the event emerges from the exclusion window. Exclusion windows don’t apply to reevaluations in response to user actions.
The Schedule dialog
Schedules are added, edited, and deleted in the Schedule dialog.
Attaching schedules to exceptions
Schedules are attached to exceptions on the Exception Type Schedules screen of the Exception Manager.
108 Retek Active Retail Intelligence
Attaching schedules to events
Schedules are attached to events on the Event Type Revalidation Schedules screen of the Event Manager.
Windows and Dialogs
Schedule Dialog [schedule] FM_SCHEDULEW_SCHED_MAIN
From the Schedule dialog, you can add, edit, and delete schedules.
Filtering buttons
You can filter the view of schedules by using the filtering buttons and fields above the schedule list.
Filter button
Applies the filter values specified in the filter fields and re-queries the list of schedules to restrict the view to those meeting the filtering criteria.
Clear Filter button
Clears the filtering criteria at the top of the column, and returns the view of schedules to the normal view.
Filter fields
These fields allow you to enter filtering criteria for the view of schedules.
The schedule list
Below the filtering buttons is a list of schedules currently defined in your ARI system. This list has the following fields.
• Schedule Name: The name of the schedule, such as “General batch scans.”
• Schedule Description: Tells what kind of schedule and its signal text, single occurrence time, or repeat frequency details.
• Exclusion Window: Identifies the exclusion window during which the schedule will not execute. If the first time is greater than the second the exclusion is from the first time through midnight until the second time on the following day.
Adds a schedule.
Deletes the selected schedule, unless it cannot be deleted because it is associated with either an exception or an event.

Chapter 2 – ARI Setup and Maintenance 109
A schedule can only be deleted if it is not currently in use by an active exception type definition or an event type definition. If the schedule you are attempting to delete is in use, an error message is displayed, listing the names of the event or exception definitions that are using the schedule. Once those definitions have had their schedules reassigned or cleared, the schedule can be deleted. Assigning and reassigning schedules to exceptions and events is performed in the mapping screens for the Exception Manager and Event Manager dialogs.
Schedule Details
The bottom part of the dialog is used for adding schedules
Schedule Name
The name of the schedule.
Schedule Type
Repeating, Once or Signal Driven.
Execute-on Signal
For a Signal Driven schedule this is the text string that must be sent to the accept signal API to execute the schedule.
Execute Once At
Execute once at indicates the time date and time when a schedule will execute. An exclusion window used with this type of schedule forces the schedule to wait until after the exclusion window. This may seem like something that would not apply to an execute-once schedule, but an exclusion window can act as a safeguard against delayed execution (due to the scheduler not being active) occurring at an undesirable time (such as during the RMS batch window, for example).
Repeat Every
Select a whole number of hours, days, weeks or months. Depending on the interval selected additional fields for selecting the day of the week or month and the hour and minute of the day or minutes past the hour will become enabled for specification.
Exclusion Window
This window is available for load balancing of ARI exceptions or simplifying otherwise complex scheduling processes. When incrementing to the next execution date, repeating schedules increment to the next valid date beyond the exclusion window. Signal driven and execute-once schedules that are supposed to execute immediately or during the exclusion window execute as soon as the exclusion window ends. Repeating schedules execute at the exclusion window end if they are delayed (due to an inactive schedule process, not typical in production) from their normal time until after the exclusion window begins.
110 Retek Active Retail Intelligence
OK
Commits changes and returns to the summary view, re-enabling the schedule dialog main buttons that had been disabled by adding a new schedule.
OK + Repeat
Posts the added schedule and begins the addition of a new one.
Cancel
Discards the schedule currently being added and re-enables the schedule dialog main buttons.
Schedule dialog confirm and cancel buttons
OK
Commits all changes made in the Schedule dialog and closes the dialog.
Cancel
Cancels all changes made in the Schedule dialog since the last Apply and closes the dialog.
Apply
Commits all edits made in the Schedule dialog, leaving the dialog open.
To attach schedules to exceptions and events
Schedules are attached to exceptions on the Exception Type Schedules screen of the Exception Manager.
Schedules are attached to events on the Event Type Revalidation Schedules screen of the Event Manager.
Chapter 2 – ARI Setup and Maintenance 111
Language Translation
Language Translation Window [aritrans]
The Language Translation window allows you to translate one or more values of the same type from a primary language into a target language.
The Internationalization function provides support for organizations with differing native languages across the organization. A user can translate and view most descriptive text into another valid language.
English is the default primary language. The data entered by users, however, can be entered in any language that the organization selects (configured as an ARI Option; see the Operations Guide for more information). All descriptive text fields should be entered first in the primary language. These values can then be translated into other beneficial languages. If a value has been translated to a language that matches the preferred language of the current user, it is displayed in the user’s preferred language. If it has not been translated, the user sees the information in the primary language. These translations are supported in the end user interfaces (Event Viewer, Alert Viewer), but not in the administrative forms which are single language (very few users will have admin access).
If an organization supports a multiple-language environment, members of the organization should plan for periodic review and translation of new descriptive text values.
Field Descriptions - Search Window
Action
Select the task that you want to perform.
To translate elements of the same type, select New.
To view all translatable elements of the same type , select View.
To edit elements of the same type that have already been translated, select Edit.
To edit all translatable items of the same type, select Edit All.
Language to Translate Into
Enter the ID of the destination language, or click the LOV button and select a language. This is a required field.
Description Type to Translate
Click the LOV button and select a data element. This is a required field.
Selection Criteria From
Enter the primary language string to limit the query. This field is used to limit the lower range of values displayed. This field is optional.
112 Retek Active Retail Intelligence
Selection Criteria To
Enter the primary language string to limit the query. This field is used to limit the upper range of values displayed. This field is optional.
Field Descriptions - Edit/View Window
Selected Element
Displays the task that is string to be translated in case it is too long to be easily read in the multi-record block. This field is read-only in all modes.
Destination Language
Enter the corresponding translation, the translated value, for each string displayed in the primary language column.
Procedures Translate values into a target language
1 Access the Language Translation window.
The default location in the RMS main menu is Control + System + Language Translation. Contact your system administrator for details on accessing this form in your own application.
2 In the Action field, select New.
3 In the Language to Translate Into field, enter the ID of the destination language, or click the LOV button and select a language.
4 In the Description Type to Translate field, enter the ID of the type of description to be translated, or click the LOV button and select a description type.
5 To restrict the search, enter the range of elements that you want to include in the translation in the From and To fields. These entries are in the primary language. These fields are optional.
6 Click the Search button. The elements for the selected description type are displayed in the left field of the table in their primary language.
7 In the right field of the table, enter the translation for each item in the left field.
8 Click OK to exit.
Edit translations in a target language
1 Access the Language Translation window.
The default location in the RMS main menu is Control + System + Language Translation. Contact your system administrator for details on accessing this form in your own application.
2 In the Action field, select:
Chapter 2 – ARI Setup and Maintenance 113
a Edit to edit existing translations, or
b Edit All to create new and edit existing translations for the selected description type.
3 In the Language to Translate Into field, enter the ID of the destination language, or click the LOV button and select a language.
4 In the Description Type to Translate field, enter the ID of the type of description to be translated, or click the LOV button and select a description type.
5 To restrict the search, enter the range of elements that you want to include in the translation in the From and To fields. These entries are in the primary language. These fields are optional.
6 Click the Search button. The elements for the selected description type are displayed in the left field of the table in their primary language.
7 In the right field of the table, enter or edit the translation for each item in the left field.
8 Click OK to exit.
View translations in a target language
1 Access the Language Translation window.
The default location in the RMS main menu is Control + System + Language Translation. Contact your system administrator for details on accessing this form in your own application.
2 In the Action field, select View.
3 In the Language to Translate Into field, enter the ID of the language that you want to view, or click the LOV button and select a destination language.
4 In the Description Type to Translate field, enter the ID of the type of description that you want to view, or click the LOV button and select a description type.
5 To restrict the search, enter the range of elements that you want to view in the From and To fields. These entries are in the primary language. These fields are optional.
6 Click the Search button. The elements for the selected description type are displayed in the left field of the table in their primary language.
7 Translations for the elements appear in the right field of the table.
8 Click OK to exit.

114 Retek Active Retail Intelligence
Examples
Overview Following are several discussions of performing ARI administrative tasks, often in the context of solving a specific business problem with specific examples. These examples are disproportionately focused on the more administrative tasks, since those are usually the more difficult tasks.
• Function definitions
• Action definitions
• Lookup definitions
• Exception and event definition and linking
Function Definitions Defining new functions to act as calculated field parameters involves first writing or identifying existing PL/SQL code that performs the correct calculations and/or table updates, and then describing this information to the system appropriately.
Suppose you need to create an exception to monitor when purchase orders have been submitted over seven days ago but still are not in Approved status. In this case you cannot monitor a specific transaction, so this is an example of an exception that checks each order nightly. Furthermore, to create a condition that can be monitored requires a data difference function that subtracts the previous date from today's date to see how many days have passed. By adding this difference function to the exception, you can set up a condition that says:
date difference (submitted, today) > 7 (days).
Here, date difference is a function that returns a number of days.
To create such a function requires writing a PL/SQL function that accepts two dates as inputs, and an error code and the resulting number of days as outputs. The specification of such a function might look like this:
Date_Difference (
O_error_message OUT,
I_first_date IN,
I_second_date IN,
O_no_of_days OUT) return Boolean.
The Boolean is a standard requirement of functions (as used by Retek) indicating whether execution is successful.

Chapter 2 – ARI Setup and Maintenance 115
The code behind this function is simple but is not shown since such a function already exists in ARI and its code is irrelevant to this illustration. Nonetheless, based on this specification, you can use the Parameters screen of the Metadata Maintenance dialog to describe this new function to the system. Once this is done, the function can be added to any exception or event that has the appropriate parameter types to map to the function's input parameters' types.
Action Definitions Defining new actions is very similar to defining functions, and in many cases the logic needed to perform an action is already a part of the RMS and a new shell simply needs to be wrapped around it for use with ARI. Consider this example:
Suppose you want to do a transfer as a possible action to resolve a certain kind of event, such as an inventory overage or shortage. The RMS already has a transfer package that, when called with the appropriate passed-in variables, will automatically do the entire transfer creation process. All you would need to do is identify this program unit and describe its specification to ARI, similar to describing a function.
Now suppose you made custom modifications to the RMS that allowed you to do transfers across transfer zones at the buyer's discretion (intended for certain big-ticket type items). You most likely would have just modified the transfer code into two pieces, one to verify the zone and prompt the user for confirmation and the other to create the transfer as before.
In the ARI environment, you cannot interactively respond to such prompting since the prompting is built into the transfer form around the breaks. Instead, you would build a shell that calls both pieces. It would have as one of its inputs a flag, which either overrides the different zone transfer automatically and proceeds, or fails when such a transfer is attempted. You would then describe this shell as two different actions, one called transfer override zone change and one called transfer, no zone change. The difference would be in the override value passed into the zone override input flag, which, when the transfer zones of the source and destination are different, would either cause the shell to return a failure at the break or not, depending on the "action" called.
An example of where this is done in the pre-packaged ARI actions is in ordering where you can override all open-to-buy and other checks or fail on any one of them being an issue, depending on which action is chosen.
Note that technically these kinds of errors, which in the online system require user interaction, are non-fatal. That is, they are not unaccountable numeric or processing errors, they are simply conditions where processing should stop. When a fatal error occurs, the event is routed to the ARI Error role whose member users should investigate the technical cause of the failure. In the case of non-fatal errors, the event is routed back to the user taking the action, who can investigate the functional reason for the failure (OTB exceeded), and who can then approve the order manually or not, depending on whether it makes sense based on the type of error.
116 Retek Active Retail Intelligence
The ARI Action Engine processes a Boolean return value of NULL as a non-fatal error and FALSE as a fatal error, and it uses the error message in both cases to give the user more information. So, when coding these shells, be sure to use a NULL when appropriate, and remember that an error message such as 'OTB Exceeded' is helpful when set just before returning NULL.
Lookup Definitions Lookups are like functions with a limited number of values. They do not require coding, just some planning. They can be used either to return role IDs, in which case they show up as available roles when creating event rules, or they can return other parameter types.
Consider that you may have a new attribute that is based on Store and Department. You would like to base some ARI processing on this attribute but cannot justify creating a new table and form to track Store-Department attributes, or you would just like to pilot the attribute for a while to test its usefulness. Using lookups, you can create a virtual column with store and department inputs and a parameter type of whatever you would like as an output. By creating many lookups with the same inputs, you create an entire virtual table. A Store-Department lookup is less desirable to maintain than using a new Store-Department form, and can even be forgotten (unless you put a trigger on the department table that notifies you whenever a department number is not NULL—this will catch new department entries only). However, that may not matter if the virtual Store-Department table is seldom updated or contains only one column, or for any of the other reasons already listed.
Under some circumstances, including changing a lookup value without changing a rule, lookups are preferable to customization projects.
Exception and Event Definition and Linking Creating and linking exceptions and events define the key processes of ARI, and are straightforward to do with appropriate functions, actions, and roles setup.
The following examples shift focus from defining the components to defining the exceptions and event themselves. Usually it is easiest to define the exception first and then define the processing rules (the event), and a one-to-one mapping between the two can make it easier for most users to track and manage.
• Online triggered processes
• Scheduled batch monitored processes
• External monitored processes
• Multiple exception-event links
Online Triggered Processes Online monitoring is the most immediate way to get feedback via ARI. You do not have to wait for scheduled reports to run, or, when none of the conditions being monitored is transaction driven, nightly processes that scan entire tables. Online monitoring is possible on internal systems such as ARI and RMS.
Chapter 2 – ARI Setup and Maintenance 117
Example
A simple example of online monitoring is monitoring submitted orders and routing them to appropriate managers for approval.
Exception definition
The exception in this case would monitor the PO Header realm and include the order number and status parameters. These are the minimal parameters needed to uniquely define the event and monitor the conditions of interest. With online monitoring, this minimization is the best practice.
Conditions
Next consider the conditions. To watch for the status changing to submitted requires only a single condition, and that single condition including a change monitor makes this exception an online monitored exception. Online exceptions process every transaction on the table monitored and validate the exception conditions against the data and, when true, create exception instances.
Event definition
To create the event, the duplicate days are set to zero since you always want to be notified if the order is submitted. Suppose the order is un-submitted while it is in your queue. When you open the event, reevaluation will abort it since the exception that caused it is no longer valid. However, if immediately after that the order were resubmitted, you would want to create another event.
Most online exceptions should have duplicate days set to zero. The impact of any actions taken, if the exception takes that impact into account in its definition, should be immediate so any recurrence of the exception and event truly represents another situation to be investigated. If this is not the case, you should consider redefining the exception before setting Ignore Duplicate Days to a value greater than zero.
Consider a transfer done to remedy a low stock situation. If the low stock exception accounts for transfers in progress, then a new exception will not immediately reoccur, unless suddenly you sell out completely and even place additional customer orders and force some items onto back order that even the en route stock will not cover. However, if low stock does not account for transfers, and cannot be changed effectively to account for them, then and only then might it make sense to increase Ignore Duplicate Days, acknowledging that you could miss two important occurrences if they are within the ignored timeframe.
Purge history is just a matter of preference as far as its setting, but it must remain greater than Ignore Duplicate Days. History retention may be important to monitor ARI's performance when automatic actions are used.
Event parameters
When adding event parameters, it is easiest to map only the key identifiers from the exception (that is, as parameter types instead of actual queriable parameters). Then re-map all others by linking functions, realm parameters, and so forth, even though this may mean querying the same values more than once. Primarily this is useful for giving your event the most reusability and flexibility in terms of linking it to additional or simply a different exception at some future date.
118 Retek Active Retail Intelligence
Key identifiers are critical, however, to distinguishing one instance of an event from another. If the identifiers are too narrowly defined then events will be counted as duplicates of each other when they are not. To understand why this is a problem, consider that, irrespective of ignore duplicates, duplicate events (when the event is active) essentially overwrite one another so that only one exists at a time. The assumption is that the duplicate event is being caused by another exception with more up-to-date information than the previous exception, so its values are used in preference to the old ones.
As an example of when key parameters cause replacement of older values, consider an order being submitted and triggering an event. Then it is un-submitted. Meanwhile, the person to whom the event is routed has not yet examined it (thereby not forcing it to abort because the exception is no longer valid) by the time it is resubmitted with a new order total. The new exception tries to create the same event and, noticing that there is an active duplicate (according to key parameter values), updates its values (like order total). Now, if this had been a stock-out event, which should have key parameters of store and SKU, but only store was set as key, then you can see that every stock-out SKU would overwrite the other and you would lose information.
Parameter mapping
Map the key identifiers by using the exception context or any parameter type from the parameter type list. Map all other parameters from available or system realms. All parameters mapped as parameter types, whether key or not, will have to come from the exception, so generally it is a good idea to use the exception context whenever possible to restrict the types of parameters that can be added (another reason to create the exception first). The only reason mapping parameter types exists is to allow events to be created before exceptions if an advanced user really wishes to do so.
Event rules
Having mapped the parameters, you can create rules based on those parameters. The simplest rules will be ones where you are able to use a few conditions to define the entire functionality of the event. For example, perhaps you would like to have an auto-approve threshold and a district manager approve threshold for orders, with the thresholds set by department. You can do custom modifications to add these two thresholds to your department tables, you can create and maintain these thresholds as lookups, or you can create a rule for every threshold and department combination.
Chapter 2 – ARI Setup and Maintenance 119
For a variety of reasons, including having to maintain the rules by constantly creating new versions of an event, the last method is the least desirable. However, either of the other methods, with their advantages and disadvantages already discussed, would allow very simple rule based processing, and instant response to changes in thresholds. Consider that you might have the following two rules, each with only one condition, and the third rule as the default, which is processed when the others are false.
1 Rule: Route to Department Buyer, Normal Priority and Auto-Approve (overriding OTB and all other checks) when
Condition: Order total < department auto-approve threshold
2 Rule: Route to District Manager, High Priority when
Condition: Order total > department district approve threshold
3 Default: Route to Department Manager, Normal Priority when
Condition: none of the above is true
Compared to having two rules per department, this is clearly the better choice.
Actions
Adding actions to an event should be done with some consideration for who will be able to take the actions. Even if a person would normally be restricted from approving an order, if the action were added to an ARI event, then any recipient can perform it (including people to whom an event is forwarded). This is considered normal in a workflow tool and is considered standard for ARI's decision-flow as well. You actually have better control with ARI over what someone can and cannot do because you can restrict them from taking a specific action most of the time but then give them specific rights to do so under certain circumstances (when a specific event occurs).
Scheduled Batch Monitored Processes Some processes are not driven by transactions so they cannot be monitored online. These processes are monitored nightly after all of the POS uploads and other batch processes have been run, but before the date is advanced to the next working day. Essentially, they run once a day at the very end of the day, which is a factor to consider when setting the exception conditions in terms of how many days old something is. Note that, as with online monitoring, batch monitoring is available for internal data systems such as RMS and ARI.
Time is a special consideration since exceptions that cannot be monitored based on a transaction occurring usually involve such things as data sitting on a table with nothing happening to it, which is of interest only because of the passage of time. An example of a date function computing the number of days between two date parameters is in the topic on defining functions. That function is one of the primary factors in defining at least one condition of many batch processed exceptions.
120 Retek Active Retail Intelligence
Aside from no parameter being set to monitor a change, and the frequent use of a date difference function, batch processes are defined similarly to online processes (refer to that section). In some cases it is unclear, for performance reasons (as discussed in the Overview), whether an internal system exception should be defined as online or batch.
It is unclear because either solution could have performance issues, so testing should be done when the key table to monitor is an extraordinarily large one. However, as a rule, if performance is acceptable with online monitoring and the exception can be defined appropriately, try that definition first.
Example
An example of when trying online first is not even an option is the case of monitoring purchase orders that have been in Submitted status for a certain period of time. From a timing perspective, if a purchase order is submitted on a given day, such as the first of a month, and you want to know when it is over seven days old, the purchase order will not show up as over seven days old until the late-night batch process of the eighth. This means you will not likely find out until you come into work on the morning of the ninth, at which time it may seem to be eight days old, not seven, which some can be confusing but is easily adjusted for in the exception definition.
Similarly, if you want a batch exception to start monitoring on the third, it will do so, but the actual process will not run until late on the third and you will not see any results from it until the fourth.
External Monitored Processes External monitored processes are for external systems. The principles for defining and linking exceptions and events related to these processes are roughly the same as for online processes (refer to that section), with a few differences, which will be described. The logical, behind-the-scenes process has a few more steps to it than for internal system monitoring processes.
Validation
First, an ARI program checks all of the headlines to see that they are still valid and replaces those that have new versions with the new descriptions, thereby invalidating any realms defined on old versions and any exceptions defined on those realms. Then an ARI program checks all of the actual headline data against any exceptions that may be defined against the realms that describe those headlines and begins the exception-event decision-flow processing that drives ARI. Before the latter of these things can happen, the first process must have at some time run at least once and a realm described, then an exception must have been built on that realm. After that, headlines are constantly available to be described as realms and those realms made into exceptions, just as for any other monitoring flow.
Chapter 2 – ARI Setup and Maintenance 121
Monitoring
External realms are monitored similarly to batch, in that the data available from those realms is only scanned periodically (nightly according to the current schedule). You could probably run it every few hours if it made sense to, such as if the RDW were updated more often and the number of headlines monitored or even the size of the UNIX box were such that overall performance did not suffer. External realms are also similar to batch because you do not monitor for a change; you just monitor based on whatever data the realm might contain. The closest thing to a transaction that occurs is the actual running of the report, but ARI essentially monitors the static data from that report.
Considerations for mapping exceptions to events
As a rule, external realms when mapped should use the same parameter types as internal realms (SKU, store, etc.). Thus, additional information can be queried from the online realms. A report containing a SKU can still be the source of an event that has a SKU description because the exception can pass the SKU to the event, which can then query the RMS to get the SKU description. Even RMS decode columns and codes, such as the SKU description or order status, can be assigned to parameters of the appropriate type.
The key distinction about external realms is that their data cannot be actively queried, it can only be had on whatever schedule it is made available. If the exception doesn't read in a piece of the data, you cannot go back to the headline and get it. For this reason, the only place you will ever see an external realm as an available realm is in the initial exception definition, at which point you are always able to choose any parameters directly from the monitored realm (whether internal or external).
This distinction has strong implications for what parameters on an event come from an exception and what parameters from the database. To get information from the realm where the exception occurred, which could not be re-queried more accurately from an internal realm, the parameters must be added as parameter types, which forces them to be mapped from the exception.
Suppose you create an RDW report that analyzes a trend in a more sophisticated way than you can do readily online. In this case, the trend may predict an inventory level on which you would like to base a stock out condition for a hot selling non-replenishment item. If you want to act on this prediction, then you want the predicted inventory level from the RDW to be part of the event, not just the SKU and the Store, and not the actual inventory level.
You may want other numbers from the report, such as the last few weeks' inventory levels, all of which may be time-consuming to compute by querying online. All of these parameters would be ones that would be passed from the exception to the event.
These differences have a significant impact on your ability to map exceptions to events flexibly. In these cases the exceptions and events are closely connected.
122 Retek Active Retail Intelligence
Changes in external realms
The other distinction with external realms is more administrative, but also significant. Unlike internal realms, which will seldom change once the system is in production, external realms are subject to frequent change. For this reason, when you monitor an external realm that you can control, such as an RDW report, you should keep control of the changes to those realms as much as functionally possible. For example, with RDW reports, keep a duplicate set of the ones specifically used by ARI and use them exclusively for ARI to better control their change schedules.
Changes in external realms invalidate the exceptions they were based on and require defining a new realm from scratch. The versioning feature of the Exception dialog will attempt to identify the replacement realm to create a new version replacing the old (if the new headline has been described as a new realm). However, unlike in the internal system case where one version is a copy of the previous version, the versioning is little more than a functional link between the old and new version. This is because changes to a realm can force the removal of so many parameters and exceptions. The exception must be entirely redefined. If by good fortune the exception ends up resembling the previous one closely enough, the existing event may be able to be mapped to it without completely redefining the event as well. This sounds grim, and it can be, which is why you should control your external realms to the extent that you can.
Multiple Exception-Event Links Note that for a novice ARI user, it is better to map exceptions and events one-to-one for clarity. For a more advanced user, it still tends to be better in most cases due to subtle differences between the events (processing rules and presentation) you want to assign to one exception versus another.
The flexibility to map multiple events to an exception and vice-versa does have some uses, but they are less frequent. Each of the following examples is an over-simplification, but presents the basic idea.
Example 1
Suppose any time a stock out occurs in a certain department, you want to immediately reorder the item, but you also want to run a loss prevention report of some kind. These two processing changes can be represented by one exception (stock out) linked to two different events. One event does an auto re-order and you only see it if a processing error occurs. The other event alerts you to the condition and one of the available actions may be to run a loss prevention analysis.
Example 2
Similarly, suppose you want to address a stock out issue that can be detected either by prediction from a trend analyzed in the RDW, or from actual inventory dropping below a specific threshold (online internal monitor).
There are several issues with this latter example, each of which may be less complicated under different definitions. These include mapping issues, reevaluation issues, and the likelihood of wanting to actually process both exceptions in the same way.
Chapter 2 – ARI Setup and Maintenance 123
First suppose the event were initially created to get a data feed from the RDW exception. It would have many parameters required to come from the exception and you probably could not even provide it with the necessary parameters to map from an online exception. Creating the event from the online exception would make for fewer required parameters which might ease the mapping but may also miss vital data available in the RDW realm. The point either way is that such a dual mapping is likely to require considerable forethought. Such might not be the case if both exceptions were somehow defined internally. In this case, the minimal data passed from the exceptions to the events make such a mapping easier without necessarily so much design overhead.
From a revalidation standpoint, suppose both exceptions, the RDW and the internal one, were valid but had different values (actual versus predicted) for the inventory level. The one displayed would depend on the order in which they were monitored. It might be better to have two different exceptions, where resolving either one would resolve the other. Or, if they were that closely related and able to monitor all the appropriate data, you would question whether you would even need two different exceptions at all.
Finally, if the exceptions were in fact different enough that one was not sufficient, it is unlikely that you would want to process them according to exactly the same rules and give the users notified exactly the same options.
From the foregoing examples you can see that, whereas one exception triggering multiple events is an uncommon but feasible scenario, multiple exceptions triggering a single event is far less likely. Moreover, it is even questionable whether one event caused by many exceptions is worth the planning effort required.

Chapter 3 – ARI Use: View alerts and events 125
Chapter 3 - ARI Use: View alerts and events Overview
About ARI The role of ARI in the enterprise is exception management. In this role, ARI performs three basic functions in the enterprise:
• Exception detection
ARI monitors RMS, the Retek Data Warehouse, and external systems for conditions that are of interest to business analysts and other users.
• Exception notification and presentation
ARI alerts users that an exception has occurred and presents the information and actions available for resolving the exception.
• Exception resolution
As a workflow tool, ARI interacts with the systems that it monitors, allowing users to take the actions necessary for exception resolution.
Business rules drive the exception management process and govern the activities of ARI throughout the process of exception resolution. Rule-sets are used to:
• Define the conditions that constitute an exception.
• Identify the users that should be notified that an exception has occurred.
• Determine the actions available to resolve the exception or move the resolution process forward.
ARI monitors systems in real-time, or as a batch scan for exception conditions. An exception definition is generally a minimal set of conditions, such a change in value in a column table. When the monitor encounters an exception condition, ARI first retrieves and evaluates additional data to verify that an exception has occurred. If the exception proves to be valid, ARI builds an event. The event contains all of the information that is required for notification and processing of the exception condition.
You interact with ARI through the Alert Viewer and the Event Viewer.

126 Retek Active Retail Intelligence
View Alerts
Overviews The Alert Viewer interface alerts you to new events assigned to you. It is your first look at events to which you are assigned individually or as part of a group. From the Alert Viewer, you link to more details about the event and actions you can perform to resolve the event, as displayed in the Event Viewer.
Access alerts
The Alert Viewer is accessed either through the RMS toolbar or main menu. If there are events assigned to you, the button for accessing the Alert Viewer is
displayed as . Otherwise, the button is displayed as . The menu choice is Action+ARI+Alert Viewer.
Filter events
Events displayed in the Alert Viewer are selected using a filter. Filters consist of an event type, state, and other criteria, such as date and priority of the event.
Using the Alert Viewer, you can:
• Retrieve events by applying default or user-defined filters to event data.
• Add and maintain user-defined filters.
For example, you can filter the view of events to see events from a certain date, of a certain state, or a combination of filtering criteria.
Windows and dialogs
• Alert Viewer dialog
• Alert Viewer Filter Definition Dialog
• Event Version Selection dialog
Procedures
• Access the Alert Viewer
• Apply filter to event data
• Open an event in the Event Viewer
• Defer alerts
• View supervised events
• Create a new filter
• Modify a user-defined filter
• Delete a user-defined filter

Chapter 3 – ARI Use: View alerts and events 127
Filter event data in the Alert Viewer Using filters in the Alert Viewer, you can retrieve event data according to a number of criteria, such as event type, state, date, and priority. Filters restrict the event data displayed in the Alert Viewer.
Filter Types
There are two types of filters available in the Alert Viewer
• Default filters. These are filters that will exist for all users, such as New Alerts, All Alerts, and Deferred Alerts.
• User-created filters. In addition to the default filters, you can define, save and reuse filters for your own use.
Available criteria for filter creation
When setting up a user-defined filter, you can filter by the following criteria:
• Event
• State
• Event Creation Date
• Priority
• Whether the alerts are deferred or not deferred
Displaying owned and supervised events
If you are supervisor of other ARI users, you can view events that you supervise in addition to the events routed to you by using the radio buttons at the top of the Alert Viewer.
• Owned events: Individual or group based assignments.
• Supervised events: Displays events that you supervise.
The default setting for the event type list is Owned Events.
Windows and dialogs
Alert Viewer Filter Definition Dialog
Procedures
• Apply filter to event data
• View supervised events
• Create a new filter
• Modify a user-defined filter
• Delete a user-defined filter
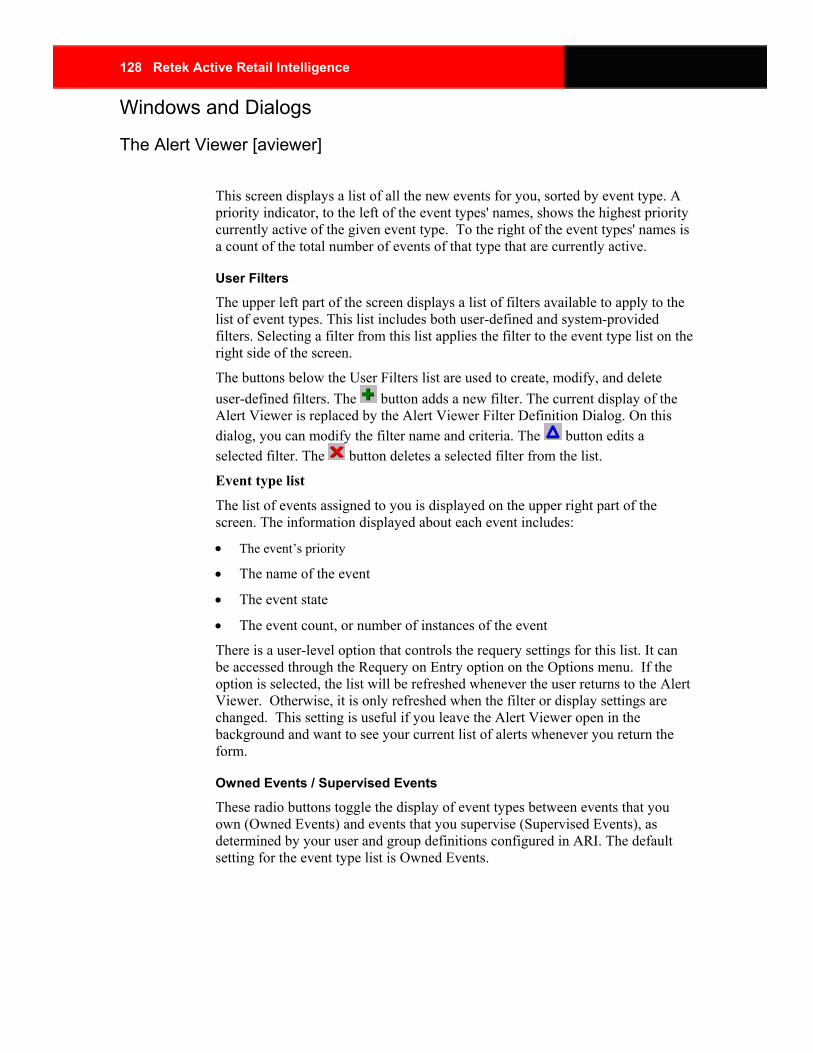
128 Retek Active Retail Intelligence
Windows and Dialogs
The Alert Viewer [aviewer]
This screen displays a list of all the new events for you, sorted by event type. A priority indicator, to the left of the event types' names, shows the highest priority currently active of the given event type. To the right of the event types' names is a count of the total number of events of that type that are currently active.
User Filters
The upper left part of the screen displays a list of filters available to apply to the list of event types. This list includes both user-defined and system-provided filters. Selecting a filter from this list applies the filter to the event type list on the right side of the screen.
The buttons below the User Filters list are used to create, modify, and delete user-defined filters. The button adds a new filter. The current display of the Alert Viewer is replaced by the Alert Viewer Filter Definition Dialog. On this dialog, you can modify the filter name and criteria. The button edits a selected filter. The button deletes a selected filter from the list.
Event type list
The list of events assigned to you is displayed on the upper right part of the screen. The information displayed about each event includes:
• The event’s priority
• The name of the event
• The event state
• The event count, or number of instances of the event
There is a user-level option that controls the requery settings for this list. It can be accessed through the Requery on Entry option on the Options menu. If the option is selected, the list will be refreshed whenever the user returns to the Alert Viewer. Otherwise, it is only refreshed when the filter or display settings are changed. This setting is useful if you leave the Alert Viewer open in the background and want to see your current list of alerts whenever you return the form.
Owned Events / Supervised Events
These radio buttons toggle the display of event types between events that you own (Owned Events) and events that you supervise (Supervised Events), as determined by your user and group definitions configured in ARI. The default setting for the event type list is Owned Events.
Chapter 3 – ARI Use: View alerts and events 129
Filtering and sorting buttons
To temporarily filter the event type list to a particular event or state, use the filter fields and button above the event type list. clears any filtering.
To sort the events types by priority, event type name, state, or count, click the column headings.
Defer Alert Button
Marks the alert of the selected event type and state to be deferred. You have the option to defer an alert. That is, you can view all New Alerts and decide to perform actions on them immediately, or defer an alert or alerts and resolve them later. If you choose to defer alerts, you can still view those deferred alerts by using the Deferred Alerts filter.
Defer All Button
Marks all alerts in the event type list to be deferred. To view these deferred alerts, choose the Deferred Alerts filter.
Defer Individual Event Button
Marks the event currently selected in the Event Summary block at the bottom of the screen to be deferred. The other events under the same alert will not be deferred. To view the deferred event, choose the Deferred Alerts filter.
Details Button
Launches the Event Viewer, which displays the current events of the selected event. If multiple versions of an event are active, a window asking you which version to show is displayed. Multiple versions can be active because some open events of an older version can still exist even as the newer active version is the only one being created currently. Selecting a version is necessary because the Event Viewer can only display one version at a time, and from a processing perspective, older versions of events are like a different event type.
Close
Closes the Alert Viewer.
Event Summary
The Event Summary displays summary information about the events listed in the event type list, such as the status and the values of the key parameters of the event.

130 Retek Active Retail Intelligence
Related dialogs
Alert Viewer Filter Definition Dialog
Procedures
• Access the Alert Viewer
• Apply filter to event data
• Open an event in the Event Viewer
• Defer alerts
• View supervised events
• Create a new filter
• Modify a user-defined filter
• Delete a user-defined filter
Alert Viewer Filter Definition Dialog [aviewer]
When you add or edit a user-defined filter for events displayed in the Alert Viewer, this screen is displayed. On this screen, you define the criteria for the filter.
Filter Name
The name of the filter. This name is displayed in the User Filters list on the Alert Viewer. This value is required.
Sort By
Identifies the field used to sort alerts that meet the filtering criteria in the Alert Viewer. You must choose a value.
Filter criteria
The middle part of the screen identifies the filter criteria. This filter limits the display of alerts in the Alert Viewer. All the filter criteria fields have lists from which you can choose values.
Descriptions of the possible filtering criteria follow. The Event Name, State Name, and Priority must be valid types, states, or priorities that exist in the ARI database.
Event Type
Limits the display of alerts to the specified event type.
State
Limits the display of alerts to the specified state for the event type.
Event Creation Date: After and Before
Limits the display of alerts to events that fall within the range of dates selected.
Chapter 3 – ARI Use: View alerts and events 131
Priority
Limits the display of alerts to events of the selected priority.
Deferred
Limits the display of alerts to deferred or not deferred alerts.
Add Filter Criteria button
Saves the filter criteria in the ARI database.
Filter summary
The list at the bottom of the screen displays the filtering criteria in summary form. This list shows all edits to the criteria used for this filter. You can use this list to create and reuse versions of the filter. Using the help0003.bmp button, you can also delete particular edits, or delete all edits and create an entirely new set of filtering criteria.
button
Deletes the currently selected record in the filter criteria.
OK button
Saves edits to the filter criteria, closes the screen, and returns you to the Alert Viewer.
Cancel button
Cancels all edits, closes the Alert Viewer Filter Definition Dialog, and returns you to the Alert Viewer.
Event Version Selection dialog [aviewer]
This screen is displayed when you click the Details button for an event that has event instances from multiple versions that are active simultaneously.
Multiple versions can be active because some open events of an older version can still exist even as the newer active version is the only one being created currently. Selecting a version is necessary because the Event Viewer can only display one version at a time, and from a processing perspective, older versions of events are like a different event type.
Procedures Access the Alert Viewer
On the RMS toolbar, if you have events assigned to you, you will see the button.
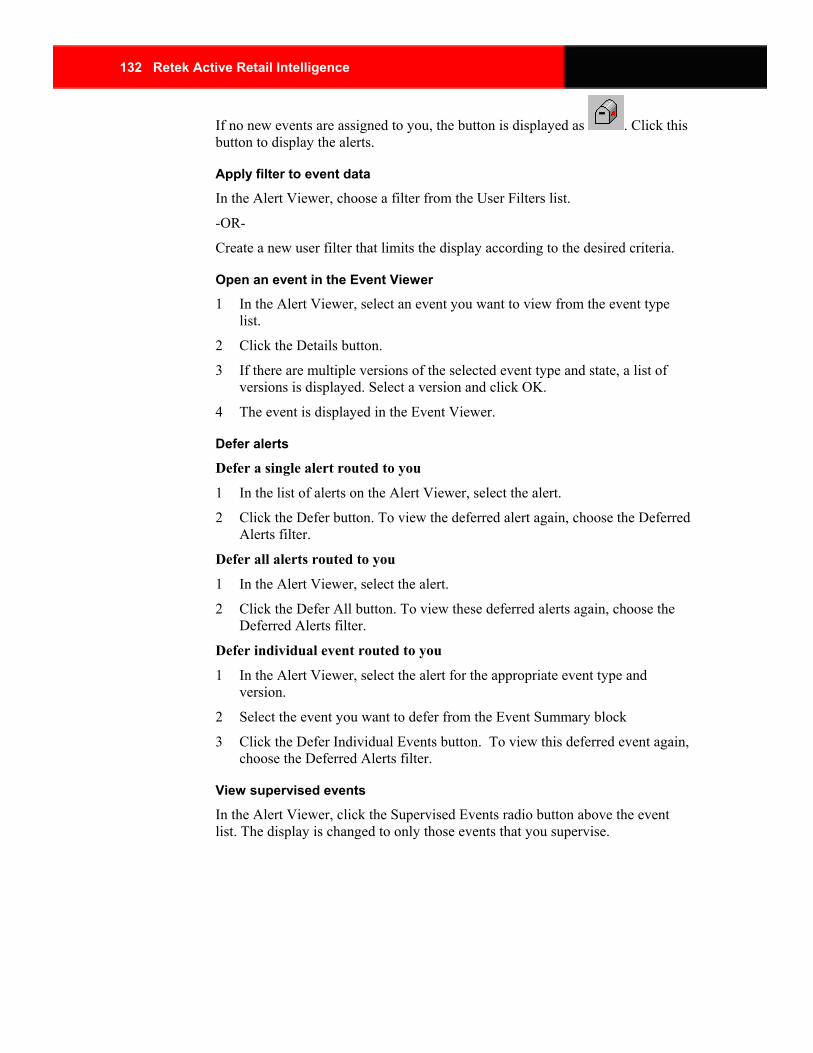
132 Retek Active Retail Intelligence
If no new events are assigned to you, the button is displayed as . Click this button to display the alerts.
Apply filter to event data
In the Alert Viewer, choose a filter from the User Filters list.
-OR-
Create a new user filter that limits the display according to the desired criteria.
Open an event in the Event Viewer
1 In the Alert Viewer, select an event you want to view from the event type list.
2 Click the Details button.
3 If there are multiple versions of the selected event type and state, a list of versions is displayed. Select a version and click OK.
4 The event is displayed in the Event Viewer.
Defer alerts
Defer a single alert routed to you
1 In the list of alerts on the Alert Viewer, select the alert.
2 Click the Defer button. To view the deferred alert again, choose the Deferred Alerts filter.
Defer all alerts routed to you
1 In the Alert Viewer, select the alert.
2 Click the Defer All button. To view these deferred alerts again, choose the Deferred Alerts filter.
Defer individual event routed to you
1 In the Alert Viewer, select the alert for the appropriate event type and version.
2 Select the event you want to defer from the Event Summary block
3 Click the Defer Individual Events button. To view this deferred event again, choose the Deferred Alerts filter.
View supervised events
In the Alert Viewer, click the Supervised Events radio button above the event list. The display is changed to only those events that you supervise.
Chapter 3 – ARI Use: View alerts and events 133
Create a new filter
1 In the Alert Viewer, click the button below the User Filters list. The Alert Viewer Filter Definition Dialog is displayed.
2 Specify a name for the filter in the Filter Name field, and specify how the alerts that meet the filtering criteria should be sorted in the Alert Viewer.
3 Specify the filtering criteria. Make the filter as restrictive as possible, so that the filter will display only the event data that you want.
4 Click Add Filter Criteria.
5 Click OK to close the Alert Viewer Filter Definition Dialog. The filter will be displayed in the User Filters list on the Alert Viewer.
Modify a user-defined filter
1 In the Alert Viewer, select a filter from the User Filters list.
2 Click the button. The Alert Viewer Filter Definition Dialog is displayed.
3 Modify the filtering criteria as needed.
4 Click Add Filter Criteria. The edits to the filter are displayed in the list at the bottom of the screen.
5 Click OK to close the Alert Viewer Filter Definition Dialog.
Delete a user-defined filter
1 In the Alert Viewer, select a filter from the User Filters list.
2 Click the button.
View Events
Overviews The Event Viewer allows you to work with the specific events of a selected event type and state that were assigned to you.
Overviews
Revalidating events
Windows and Dialogs
• The Event Viewer
• Action dialog
• Expanded Details dialog

134 Retek Active Retail Intelligence
Procedures
• Start the Event Viewer
• Revalidate events
• Search in the Event Viewer
• Sort events and event details
• Display the complete event message or detail
• Save an event detail image to a file
• Perform an action on an event
Revalidate events Revalidating events ensures that all your events are current and should still be assigned to you. Events are reevaluated in two ways: automatically when you start the Event Viewer, and through the Revalidate Events button once the Event Viewer is open.
Automatic event reevaluation
When you open the Event Viewer, ARI automatically attempts to reevaluate the currently selected event.
Revalidate Events buttons
Once the Event Viewer is open, you can revalidate events by clicking the Revalidate Events buttons to do all events or only the currently selected one. A refresh button re-queries in case new events have occurred since you entered the form.
Windows and Dialogs
The Event Viewer [arieview]
The Event Viewer displays all the events of a particular event type that are assigned to you.
The Event Viewer has several parts:
Event type and event state
At the top of the screen are the event type and state.
Events assigned to you
Below the event type and event state are listed the events of that type that have been assigned to you. This part of the Event Viewer includes several items:
Chapter 3 – ARI Use: View alerts and events 135
List of Events
The top portion of the Event Viewer lists the events of a particular event type assigned to you, along with the critical details of the event. The most important of these details is the event priority of the event. High-priority events are indicated by an exclamation mark on an envelope. Normal priority events are indicated by a plain envelope with no exclamation mark.
You can sort these events by parameter, by clicking on the column headings for the event details.
Reevaluate Events button
Clicking the Reevaluate Events button below the event list checks the events list to ensure that all your events are current and should still be assigned to you.
Refresh Events button
Refreshes the display of the event list.
User Events button
Clicking the User Events button displays all events assigned to you by the ARI administrator.
Supervised Events button
Clicking the Supervised Events button displays events assigned to you as an ARI supervisor. This button is activated only if you have ARI supervisor user privileges.
Event Messages
Below the event list are messages about the event selected in the list. The messages include such things as why the event was created, a list of every user who has forwarded the event, messages included with the forwarded event, and errors encountered during the event’s lifecycle.
Details of Event
At the bottom left corner of the screen are further details about the selected event. The event details tell you more about the event and allow you to go to the event’s source.
The event details are displayed with a label for the detail in the left column, and the detail value in the right column.
If the event detail is an image or a long-text file, the detail’s value in the right column is a hypertext link. Clicking the hypertext link displays the image or text file in a separate viewer.
Expand button
If the text of the details is cut off, click the Expand button to display the event details in a larger window. Pressing F9 with focus on an event detail does the same thing.
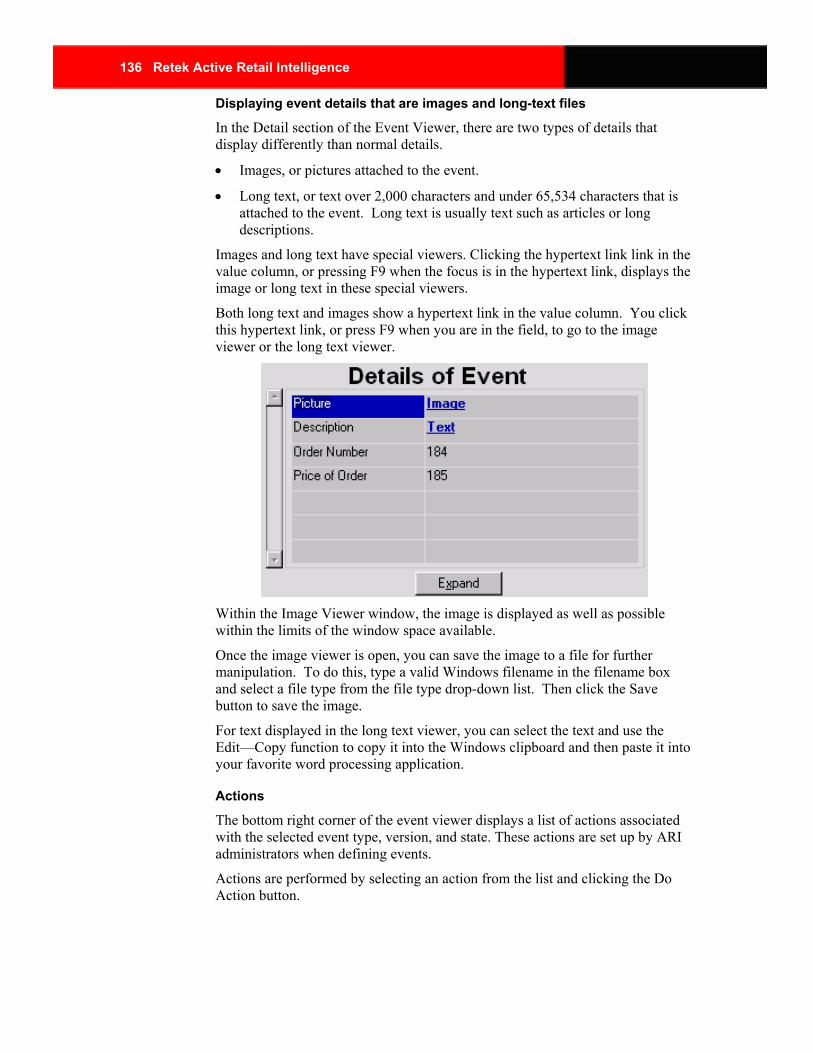
136 Retek Active Retail Intelligence
Displaying event details that are images and long-text files
In the Detail section of the Event Viewer, there are two types of details that display differently than normal details.
• Images, or pictures attached to the event.
• Long text, or text over 2,000 characters and under 65,534 characters that is attached to the event. Long text is usually text such as articles or long descriptions.
Images and long text have special viewers. Clicking the hypertext link link in the value column, or pressing F9 when the focus is in the hypertext link, displays the image or long text in these special viewers.
Both long text and images show a hypertext link in the value column. You click this hypertext link, or press F9 when you are in the field, to go to the image viewer or the long text viewer.
Within the Image Viewer window, the image is displayed as well as possible within the limits of the window space available.
Once the image viewer is open, you can save the image to a file for further manipulation. To do this, type a valid Windows filename in the filename box and select a file type from the file type drop-down list. Then click the Save button to save the image.
For text displayed in the long text viewer, you can select the text and use the Edit—Copy function to copy it into the Windows clipboard and then paste it into your favorite word processing application.
Actions
The bottom right corner of the event viewer displays a list of actions associated with the selected event type, version, and state. These actions are set up by ARI administrators when defining events.
Actions are performed by selecting an action from the list and clicking the Do Action button.
Chapter 3 – ARI Use: View alerts and events 137
One action commonly found on events is the close action, which deletes the event. Deleting the event is useful if you wish to ignore the event or act on the event outside of the Event Viewer, perhaps in a way not specified in the list of actions.
Do Action button
Performs the selected action. Actions can vary greatly by event, and are set up by the business analysts at your site. The action may take you to portions of the merchandising system to perform actions such as approving purchase orders or creating new purchase orders, or cause a message about the action to be displayed.
Procedures
• Revalidate events
• Search in the Event Viewer
• Sort events and event details
• Display complete event message or detail
• Save an event detail image to a file
• Perform an action on an event
Action Dialog [arieview]
Click the Do Action button from the Event Viewer screen to access the Action dialog. At the top of the Action dialog, the action you are about to perform is displayed. Directly below that, a description of the action is displayed.
In the center of the screen is a list of parameters that will be used to take the action. Required parameters appear first and are displayed with a yellow background. Optional parameters follow and are displayed with a white background. Parameters that are read-only are displayed last and have a gray background. Click the comment button to display the full text of the parameter value if it is too long to fit on the screen. Note that you cannot directly edit parameters within the comment box.
When you click inside a parameter field, the Show List button will be enabled if there is a list associated with the parameter. If this button is enabled, click it or press the F9 key to bring up the list associated with the value and you will be able to select a value.
Beneath the parameter list is the optional note to attach. If the action being taken allows comments, the note will be attached to the action as a comment. If the action being taken will route the event to another user, the note will be displayed as a user message from you.

138 Retek Active Retail Intelligence
To perform the action, click the Do Action button.
Expanded Details Dialog The Expanded Details dialog is a mirror of the Detail section of the Event Viewer, expanded for easier viewing. To access it, click the Expand button on the Detail section.
Chapter 3 – ARI Use: View alerts and events 139
Procedures Access the Event Viewer
In the Alert Viewer, select an event in the event list, and click the Details button.
Revalidate events
Events are not automatically revalidated in the Event Viewer. You must explicitly request event revalidation.
Click the Revalidate Events button. A progress bar showing progress of the event revalidation is displayed. Depending on the number of events assigned to you, this may take a few seconds or several mintues. Any errors detected during event revalidation cause the event to be rerouted to the ARI Error Administration group. The event revalidation is complete when the progress bar is no longer displayed.
Search in the Event Viewer
To search a multi-record block in the Event Viewer:
1 Select, or click on, a column in the Event Viewer, such as store name or quantity, in which you want to search.
2 Select Edit+Search from the Event Viewer menu.
3 Enter the text you want to search for. ARI searches through the records in the column until data matching the text you entered is displayed in the selected column.
Sort events and event details
You can sort events and event details by any of the details listed at the top of the screen.
• Click the button, or column heading, describing the field you wish to sort by.
• To sort the events by the field, but in reverse order, click the button, or column heading, again.
• You can also dynamically change, and save, the columns that are displayed at the top of the screen, using Multiview.
Save an event detail image to a file
Event details that are images can be saved to a file for further manipulation.
1 In the Event Viewer, if the image is not already open, click the hypertext link in the Details of Event list to open the image in the image viewer.
2 Click the Save button.
3 In the Filename box, type a valid Windows filename in the filename box, and select a file type from the File Type drop-down list.
4 Click the Save button to save the image.
140 Retek Active Retail Intelligence
Display complete event message or detail
• To display the complete text of an event message, with the focus in an event message, click the button or press F9.
• To display an expanded version of an event detail, with the focus in an event detail, click the Expand button or press F9.
• If an event detail is an image or a long text (>2,000 characters) file, the event detail’s value will be a hypertext link. Click this hypertext link, or press F9 with the focus on the hypertext link. The image or text file will be opened in a separate viewer.
Perform an action on an event
1 In the Actions section of the Event Viewer, select an action from the Actions list.
2 Click the Do Action button.
Chapter 4 – ARI Analyst/Administrator Group 141
Chapter 4 - ARI Analyst/Administrator Group The ARI Analyst/Administrator user group is a group that receives notification when Data Warehouse reports definitions are changed or when the are no users in any of the groups to which an event is assigned. In both cases the ARI analyst can use to ARI tools to correct the problem by redefining the RDW report metadata to match the new report specification or by adding users to the groups that have no users.
ARI Analysts/Administrators are generally business consultants with technical analysis and/or development skills.
The ARI Analyst/Administrator user group is notified when an event process enters an infinite reevaluation/action loop. In addition, this group can be used as a user-group assignment target for events that require administrative access for any kind of self-monitoring rules that may be set up for ARI.

Chapter 5 - ARI Error/Administrator Group 143
Chapter 5 - ARI Error/Administrator Group The ARI Error Administrator Group receives notification when un-handled or fatal processing errors occur anywhere within ARI. The ARI code handles routing such events to the ARI Error user group.
Processing such errors must usually be done by looking into code issues or identifying some problem that has arisen with the database. The people responsible for processing such errors are generally database administrators and/or system administrators.
Although there are no restrictions on your using the ARI Error Administrator Group as a target for assigning events, it is difficult to justify any situations other than this internal error handling where the ARI Error user group should be used as an event assignment target.

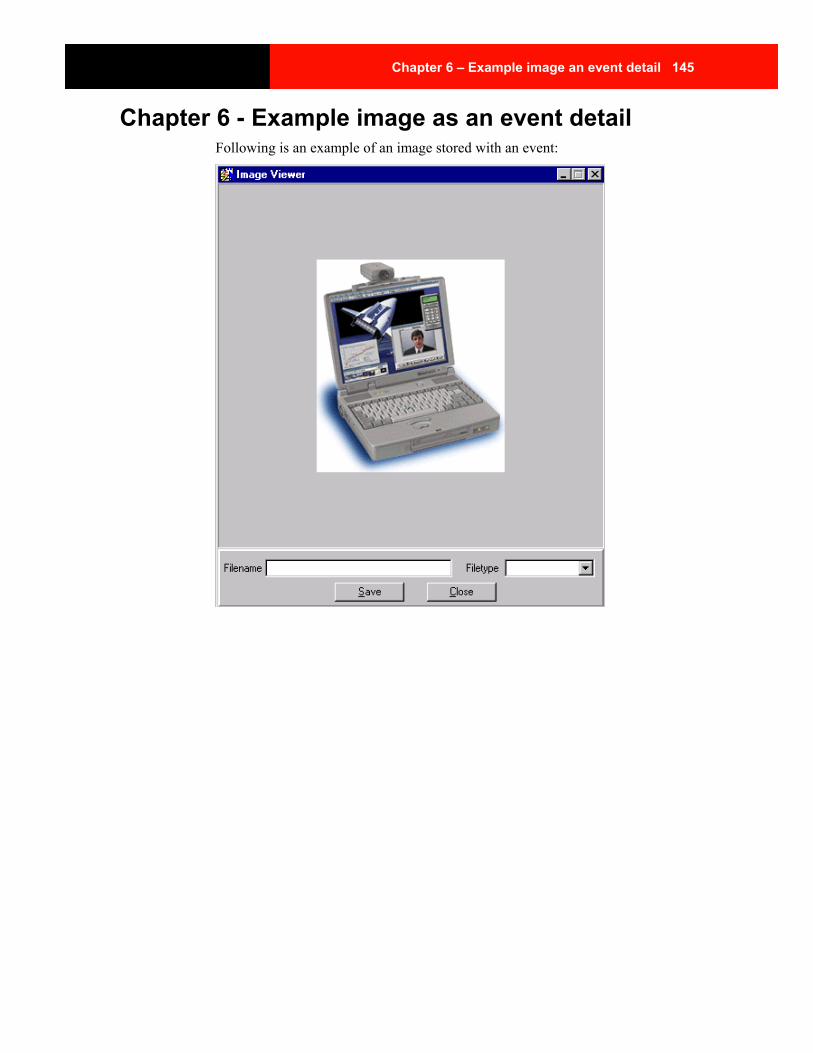
Chapter 6 – Example image an event detail 145
Chapter 6 - Example image as an event detail Following is an example of an image stored with an event:


Glossary 147
Glossary action
A procedure that can be called via the event user interface to resolve the exception that triggered the event. Actions may include tasks such as approve order, create transfer, etc. Actions are usually PL/SQL procedures, and must always be described by metadata so the ARI system can use them.
Some actions provide the user with a gateway into more information about the event, or a manual action. An example of such an action would be opening the purchase ordering dialog in Edit mode to examine an order in more detail prior to approving it or so that it can be approved manually.
alert A notification to a user that an event of a specific type (that is, an instance of a specific event definition) has occurred. This notification comes through the integrated ARI/RMS interface.
Also known as event notification.
ARI supervisor See supervisory group.
batch monitoring Exception monitoring for a system that is performed on a batch or recurring basis. Contrast with real-time monitoring and trickle monitoring.
business rules Definitions about how your business operates that are configured into the ARI system.
Business rules circumscribe the entire exception management process from monitoring through to resolution. They define not only what constitutes exceptions, but also the workflow process that should be followed when exceptions occur to determine whether a user should be notified or an automatic action should be executed.
cloning definitions Basing the definition of an exception or event on another exception or event definition.
closure rules A set of predefined conditions that must occur before an event can be moved to the closed state.
148 Retek Active Retail Intelligence
Normally, there will be a single closure rule set that requires that the exception no longer be true. However, a special case might be a notification-only event whose only purpose is to highlight that an exception has occurred. In this case, there may be a single rule set with closure rules, which depend on the user to close the event manually.
event A collection of data passed from an exception's data set, plus additional information that can be determined through related metadata. Against this combined data set, events contain rules about how to route event notifications or alerts, which users or user groups to route them to, and at what priority.
Events are defined through the Event Manager.
event instance Organizational objects that contain all of the rules, states, and actions required for workflow processing. An event instance consists of the following attributes and objects:
• A copy of the exception instance that generated the event instance.
• The definitions and rules from the corresponding event type.
• Priority of the event.
• State of the event.
• User assignments for the event.
event reevaluation The process of determining whether an event is still open and what its state is. This process involves evaluating a set of closure rules that define the conditions under which an event can be closed.
event schedule A set of date, time, and cycle information that specifies when an event should be reevaluated. Schedules are defined in the Schedule dialog, and attached to events through the Event Manager dialog.
event rules Rules sets used to assign an event instance to an event state. Event rules are an attribute of the event type.
event state rules A rule set used to route and assign priority to an event when it is in a particular state.

Glossary 149
event type A series of attributes and objects that define how an event instance will be presented and processed. The event type contains the following attributes and objects:
• Parameters
• Actions
• States
• Event rules
• Closure rules
• Schedules
• Exception type
exception A condition in the data set of a monitored system that is of interest to the business analyst or other user. Detecting exceptions is a key focus of the ARI system.
See also exception type.
exception instance When an ARI monitor detects a condition defined by an exception type. The exception instance contains the actual data values monitored that satisfied the specific conditions defined by the exception type.
An exception type is a data object that describes another data object, the exception instance.
exception management The process of monitoring data in a system for exceptions to a set of business rules, notifying users that an exception has occurred, and facilitating the exception resolution process.
exception schedule A set of date, time, and cycle information that specifies when the system is scanned for instances of the exception. If an exception is not change-driven, it must be scheduled. Schedules are defined in the Schedule dialog, and attached to events through the Exception Manager dialog.
exception type A definition of a data condition in a monitored system that is of interest to the business analyst or other user.

150 Retek Active Retail Intelligence
exception versioning The process of cloning an active exception type and allowing modifications to its definition to become effective at some future time. This process allows modified versions of an exception to go into service without impacting exceptions and events based on older versions of the exception that may still be awaiting resolution.
execute once A description of a schedule’s execution cycle, where the schedule is executed once. Contrast with execute repeatedly.
execute repeatedly A description of a schedule’s execution cycle, where the schedule is executed repeatedly at specified times and frequency. Contrast with execute once.
external monitoring Exception monitoring on a system that is deployed on a separate database from ARI.
See also trickle monitoring.
function Any calculated field that can be defined using PL/SQL that, after being defined as a metadata function, is accessible to exceptions and events just as any other parameter is. The function's input parameters act like the key parameters of a realm in terms of making the function available and the function's output acts just like any other parameter selected from a table. To the end user, the difference between functions and realm key parameters is transparent. They are all just parameters attached to the event and having some value. However, to the business analyst who would like to show an average or do some other data calculation, the ability to describe functions as metadata is extremely useful in terms of presenting additional information for more sophisticated decision analysis.
group See user group.
key parameters Unique identifying parameters within a realm.
See also parameters.
layout Each Event Type State has an associated layout, which determines the default settings for the event header and parameter detail displays in the Event Viewer when viewing events in that state.
Glossary 151
lookup An ARI metadata object. Lookups create virtual tables in which a set of coordinates (inputs) defines a specific value (output). The output value is assigned a parameter type and a lookup acts like a parameter in a manner similar to a function (they are accessible through their input parameters, not through tables' primary keys).
Lookups prove particularly useful in their ability to define the routing of events to specific roles, depending upon the values of the event's parameters. As an oversimplified example, one lookup might be Store Manager, which is set up as a role ID parameter type (for its output) that accepts store number as its input. If such a lookup were attached as a parameter to an event, a rule could be built to route to the store manager when a specific store-related event occurs, without having to specify a specific rule for each store.
metadata Data about data. In ARI, metadata is a non-technical translation or description of the data sources available to the ARI system, such as the data dictionary and other computer language objects, that has been abstracted to a level above the actual data specifications. The purpose of the abstraction is to allow the business analyst to deal with the data in terms of its functionality rather than its structure.
Metadata is an insulating layer that gives business analysts direct access to the system's internal structures without having to fully understand the programming languages or other technical aspects of the underlying systems. Metadata is the key to shifting the focus away from programming and onto rule building.
ARI metadata includes realms, parameters, parameter types, and lookups.
metadata administration The process of defining and editing metadata such as realms, realm groups, parameter types, parameters, lookups, functions, and actions. This definition and editing is done through ARI’s Metadata Maintenance dialog.
on-demand An option for reevaluating event types, where the event isn’t reevaluated except when a user accesses it through the Event Viewer.
on-schedule An option for reevaluating event types, where the event periodically reevaluates its rule set to move towards resolution, according to the date, time, and cycle details specified in an event schedule.
152 Retek Active Retail Intelligence
on-signal An option for reevaluating event types or validating exception types, where the event reevaluation or exception validation is controlled by an external process sending a signal to ARI to initiate the process. The signal can be as simple as a simple text string such as "Batch processing completed" that is sent from the external process to ARI. ARI has a programming object called the schedule application programming interface (API) that sends this string into the scheduler process to trigger the schedule.
parameters Data identifiers such as a supplier number or an order number. A parameter is an identifier, rather than the actual data value, such AH23D or 12345. For example, a parameter is a field in a report generated by the Retek Data Warehouse (RDW), or a column in the RMS. An example of a specific data set is the set of parameters order number, order status, and total cost, where the parameters are related by the fact that they reference values all from the same set of data defining a single order.
A related data set is defined in terms of parameters, not in terms of specific values.
parameter types Classifications that group parameters by the kind of data they represent. These classifications recognize that a supplier number is always a supplier number, whether it is on the supplier table, the SKU supplier table, or the order header table in some vendor performance report. Parameter types enable the linking of realms through key parameters.
periodic monitoring Monitoring a system for exceptions by periodically scanning the system’s temporary tables and processing the data in the tables, row by row.
Contrast with real-time monitoring.
realm The actual data source that contains the parameter. A realm is frequently the name of an Oracle table or linked table. It can also be the name of a function or a headline name from the Retek Data Warehouse.
See also realm type.
realm type Defines the basic attributes of a realm. Realm types include Oracle tables, local or remote views of data, functions, and Retek Data Warehouse headlines.
See also realm.

Glossary 153
real-time monitoring Exception monitoring for a system that occurs during real-time system processing. Real-time monitoring is only available when a business rule that drives an exception management system identifies an exception that is driven by a change in the state of data.
routing Sending events to specific individuals for processing. You can establish routing rules that specify how events are routed to users and user groups.
routing group A user group that is linked with event conditions, so that when the event conditions are met, the routing process will use that group (or groups) to build a list of users eligible to receive the event. This routing group is the intersection of all users who are members (either directly or through nested group membership) of all groups associated with the event condition. From this routing group, a user or set of users is selected for the event assignment, according to the routing rules associated with the event (for example, randomly, workload, or all users).
rule In ARI, in general, a rule is a statement about your business practices to which the data monitored by ARI is subject.
Business rules govern the entire exception management process. Rules trigger the exception and guide the process of building, evaluating, resolving, and closing the event.
Events defined in ARI have a more specific set of rules that govern the states of the event and the rules for closing the event. See event rules, state rules, and closure rules.
Whenever rules are used (closure rules, event state rules and state attribute rules) the rules are evaluated sequentially starting with number 1. For a rule to be true, all of its conditions must be true. The first rule to be found true is used, which makes rule order an important factor. If all rules are false, then rule 0 (the default) is used.
schedule A specification of time, date, and cycle information that can be attached to exception and event types.
• For exception types, a schedule can be attached to an exception type to govern when batch scanning of the exception type occurs.
• For event types, a schedule can be attached to an event type that defines how frequently events of that type are reevaluated.
Schedules are defined in the Schedule dialog, and attached to exceptions and events through the Schedules screen of the Exception Manager and Event Manager dialog.

154 Retek Active Retail Intelligence
scheduler An ARI component that manages the execution of the batch scans and the frequency at which events are automatically reevaluated. The scheduler is responsible for monitoring the schedule objects and re-evaluating events as called for by the schedule. It is only responsible for those events whose schedule object contains an on schedule component.
schedule-driven Event reevaluation or exception validation that is performed on a periodic basis, as set in the event or exception definition. Contrast with signal-driven.
signal-driven Event reevaluation or exception validation that is controlled by an external process sending a signal to ARI. The signal can be as simple as a text field, such as "Nightly batch run completed," that passed to the scheduler component in ARI. Contrast with schedule-driven.
state An object that provides organization to the workflow associated with an event type. When ARI launches an event, event rules are used to assign the event to a state. An event resides in only one state at any given time in the life of the event. The state represents a location in the exception resolution process, and also defines the actions available for resolving the exception or transitioning to the next state.
The definition of a state includes:
• A set of state rules that determine the routing of an event and its priority. Each state rule contains an optional action that is executed if the rule evaluates to TRUE.
• Default values for the ownership group, priority and optional action for events in this state. These values are used whenever the assignment rules fail to find a suitable owner or explicitly set a priority for the event.
• A list of the user actions available in that state. For example, when an order-tracking event is in the awaiting approval state, the option to un-approve the order should not be available. Likewise, if the order has been created and is now in the approved state, the option to unapprove the order should be visible until the first receipt is made against the order. After the first receipt, the event enters yet another state, partially received, that allows cancellation of the outstanding quantities on order but not un-approval.
state rules A set of rules that govern the transition of an event type from one state to another. These rules are expressed as a set of conditions that must be met for the state transition to occur.
Glossary 155
supervisory group A type of user group where the users have supervisory privileges over other ARI users. Events are assigned to groups. Some groups can be designated as supervisory. The two hierarchies overlay one another so an event may be assigned to users via either their membership in a supervisory group or their membership in a regular group. For each end user, the way this assignment occurs determines whether the user sees the event as a supervisor or a user.
A user’s supervision rights are determined by the group hierarchy used to assign the event, not on user A supervising user B. The advantage of this setup is that only events pertaining to issues a supervisor oversees are routed to a supervisor, not all events. Suppose you do not want user A to see all of user B’s events, only those that pertain to issues user A oversees. User B has another boss, user C, who supervises other work user B does. The group hierarchy and event routing setup in ARI makes routing to both the user and the two supervisors possible.
trickle monitoring Monitoring of an external system for exceptions where data is processed as it is sent from the external system.
Contrast with batch monitoring and real-time monitoring.
user In ARI, a user is an object representing the individual users working in the system. An ARI user definition consists of such things as data relating to the individual, preferences for working in the system, information on advanced options for notification, status, and any specific rules for routing events to that user.
See also user group.
user group A set of ARI users to which alerts can be routed as a group.
User groups are designed to allow easy event routing. A user group may have a parameter associated with it, and the resolution of state rules may resolve to several groups.
versioning The process of attaching a version number to each edit of an exception or event definition. Versioning allows users to know exactly when the old and newly modified versions of the exception or event are active.

Index 157
Index About ARI.................................................125 Defer events ............................................ 132 About This Guide: .......................................1 Define an event type ............................... 105
Define an exception ................................ 104 Access the Alert Viewer .............................131 Delete a condition..................................... 83 action ........................................................147 Delete a user-defined filter ..................... 133 Action Definitions:.....................................115
Add a condition .........................................83 Display complete event message or detail:... 140 Edit a condition......................................... 86 Administrative Components ..........................10
alert ..........................................................147 Edit translations in a target language ........... 112 Alert Viewer [aviewer] ...............................128 enterprise process modification....................... 5
event ........................................................ 148 Alert Viewer Filter Definition Dialog [aviewer].............................................................130 event instance ....................................... 8, 148
Apply filter to event data ............................132 Event Manager dialog [evmgmt] .............. 87 ARI Analyst/Administrator Group: ..............141 event reevaluation ..................................... 148 ARI end user interface ..................................21 event rules ................................................ 148 ARI Overview ...............................................5 event schedule........................................... 148
ARI as a rules-based exception detection and notification tool.........................................5
event state rules......................................... 148 event type ................................................. 149
ARI as a rules-based strategic workflow management tool.......................................5
Event Type - Closure Rules screen... 83, 103 Condition editor .............................. 83, 85, 86
ARI as an enterprise process modification tool ............................................................5 Event Type - Exception Type Link screen ... 101
Event Type - State Rules screen ....... 83, 100 ARI's role in the enterprise ............................5 Condition editor .......................................... 83 Business rules and their role in ARI ..............6
Event Type Header screen ........................ 90 Keys to success in implementing ARI ...........7 Event Type Parameter Mapping Screen: ........ 94 Process for implementing ARI ......................7 Event Type Parameters screen.................. 92 ARI Overview: ..............................................5 Event Type Revalidation Schedules screen
............................................................ 101 ARI setup user interface................................21 ARI supervisor...........................................147
Event Type State - Action Parameter Mapping screen..................................................... 97
ARI User and Group Administration:.............53 ARI User Groups.......................................54
Event Type State - Action screen .................. 96 ARI_Error/Administrator_Group:................143 Event Type State - Event Attribute Rules screen
.............................................................. 98 Attaching schedules to exceptions and events106 batch monitoring ........................................147
Event Type State - Event Attributes screen.............................................................. 83
business administrator's role in ARI implementation........................................1
Condition editor .......................................... 83 business analyst's role in ARI implementation........................................1 Event Type States screen.............................. 95
Event types ............................................. 8, 9 business rules.............................................147 Event Types summary screen ....................... 87 business rules and their role in ARI..................5 Event Version Selection dialog [aviewer] .... 131 Change Effect Warning Dialog [metadata] .....53 Event Viewer [arieview] ........................... 134 cloning definitions......................................147 Event Viewer Default Layout screen: ............ 95 closure rules.............................................148 Events Common user interface controls in ARI: ........23 Defining ...................................................... 68 Condition editor.........................................83 Scheduling ................................................ 106
Conventions Used in this Manual: .................22 Example image ......................................... 145 Create a new filter ...................................133 Examples:................................................. 114 Currency Codes: ..........................................30 exception .................................................. 149 Customizing ARI .........................................27 Exception and Event Definition and Linking:116 DDL Navigation: .........................................30 Exception candidate....................................... 8

158 Retek Active Retail Intelligence
exception detection.........................................5 Metadata maintenance .......................... 27, 28 Overview..................................................... 10 exception instance ..................................9, 149
Metadata Administration:........................... 151 exception management ...............................149 Metadata Definition:.................................... 31 Exception Manager dialog [exmgmt] ........70 Metadata Maintenance ................................. 28 exception notification .....................................5 Metadata Maintenance Form [metadata]........ 33 exception schedule .....................................149 Metadata Maintenance: ................................ 27 exception type............................................149 Modify a user-defined filter.................... 133 Exception Type - Event Type Link
Parameter Mapping screen....................80 Multiple Exception-Event Links: ................ 122 Needed Parameter Types Window [evmgmt]
............................................................ 104 Exception Type - Event Type Link screen ......81 Exception Type Conditions Screen
Needed Parameter Types Window [exmgmt].............................................................. 82
Condition editor ...........................................83 Exception Type Conditions Screen: ...............78
on-demand .............................................. 151 Exception Type Header screen..................72 Ongoing Metadata Maintenance ................... 28 Exception Type Parameter Mapping Screen:...78 Online Triggered Processes: ....................... 116 Exception Type Parameters Screen: ...............74 on-schedule............................................... 151 Exception Type Schedules screen ..................79 on-signal................................................... 152 Exception types .......................................8, 9 Open an event in the Event Viewer ........ 132 Exception Types summary screen..................70 Parameter Find screen.................................. 39 exception versioning...................................150 Parameter Maintenance screen.......... 40, 44, 45 Exceptions .................................................68 Parameter Type Find screen ......................... 47 Defining.......................................................68 Parameter Type Maintenance screen ....... 47, 48 Scheduling .................................................106
execute once ..............................................150 parameter types ......................................... 152 execute repeatedly......................................150 Parameter Values screen ........................ 67, 68 Expanded Details Dialog: ...........................138 parameters ................................................ 152 External Monitored Processes: ....................120 Perform an action on an event: ............... 140 external monitoring ....................................150 periodic monitoring ................................... 152 External System Metadata Maintenance: ........32 Predefined ARI user groups:......................... 60 Filter event data in the Alert Viewer ............127 process modification.............................. 5, 6, 7 function.....................................................150 realm........................................................ 152 Function Definitions:..................................114 Realm Find screen ....................................... 34 group ........................................................150 Realm Maintenance ......................... 35, 37, 38 Group Setup/Maintenance screen...................64 realm type................................................. 152 Groups ...................54, 55, 56, 57, 58, 59, 60 real-time monitoring .................................. 153 Impact ofRMS data dictionary on ARI metadata
administration:.........................................30 Revalidate events .............................. 134, 139 Revalidation of External Realm Exceptions: .. 68
Internal System Metadata Maintenance: .........31 routing...................................................... 153 Key Data Objects in ARI: ...............................8 routing group ............................................ 153 key parameters ...........................................150 rule .......................................................... 153 Language Translation Window [aritrans]......111 rules-based exception detection and notification5 layout........................................................150 rules-based strategic workflow management .... 5 lookup.......................................................151 Save an event detail image to a file ............. 139 Lookup Data Edit screen...............................52 schedule .................................................. 153 Lookup Definitions: ...................................116 Schedule Dialog [schedule] .................... 108 Lookup Find screen......................................51 Scheduled Batch Monitored Processes: ....... 119 Maintaining ARI Users and Groups: ..............53 schedule-driven ......................................... 154 Maintaining exceptions and events ...........68 scheduler................................................. 154 Maintaining Metadata:..................................27 Schedules ................................. 106, 107, 108 metadata....................................................151 Overview................................................... 106 Metadata Administration...............................10 Schedule dialog................................. 108, 110

Index 159
Schedules for exception scanning and event reevaluation...........................................106
Search in the Event Viewer: ........................139 Security considerations .................................26 signal-driven..............................................154 Single Group to Multiple User Mapping screen
...............................................................66 Sort events and event details .......................139 Split Item and Location Tables: .....................30 Start ARI....................................................21 Start the Event Viewer ............................139 state ..........................................................154 state rules ..................................................154 strategic workflow management ......................5 supervisory group ....................................155 Taking an action on an event:..................140 Testing Exception and Event Processes: .........69 Translate values into a target language ...112 trickle monitoring.......................................155
user .......................................................... 155 User and Group Maintenance: ...................... 53 User Details screen ...................................... 63 user group................................................. 155 User Interface: .......................................... 20 User Membership screen.............................. 65 User Setup/Maintenance screen .................... 62 Users.......................................................... 54 Users and Groups Dialog [usergrp] ............... 61 Versioning: ............................................... 155 View Alerts:.............................................. 126 View Events: ............................................ 133 View supervised events.............................. 132 View translations in a target language.... 113 What are events? ........................................... 8 What Are Schedules?................................. 106 What Is Metadata? .................................... 27 workflow management................................... 5