Oracle® Retail Financial Integration Cloud Service for Oracle ...
Upload
khangminh22Category
view
3download
0
Oracle® Retail Merchandising System
User Guide Release 12.0.3
April 2007

Oracle® Retail Merchandising System User Guide, Release 12.0.3
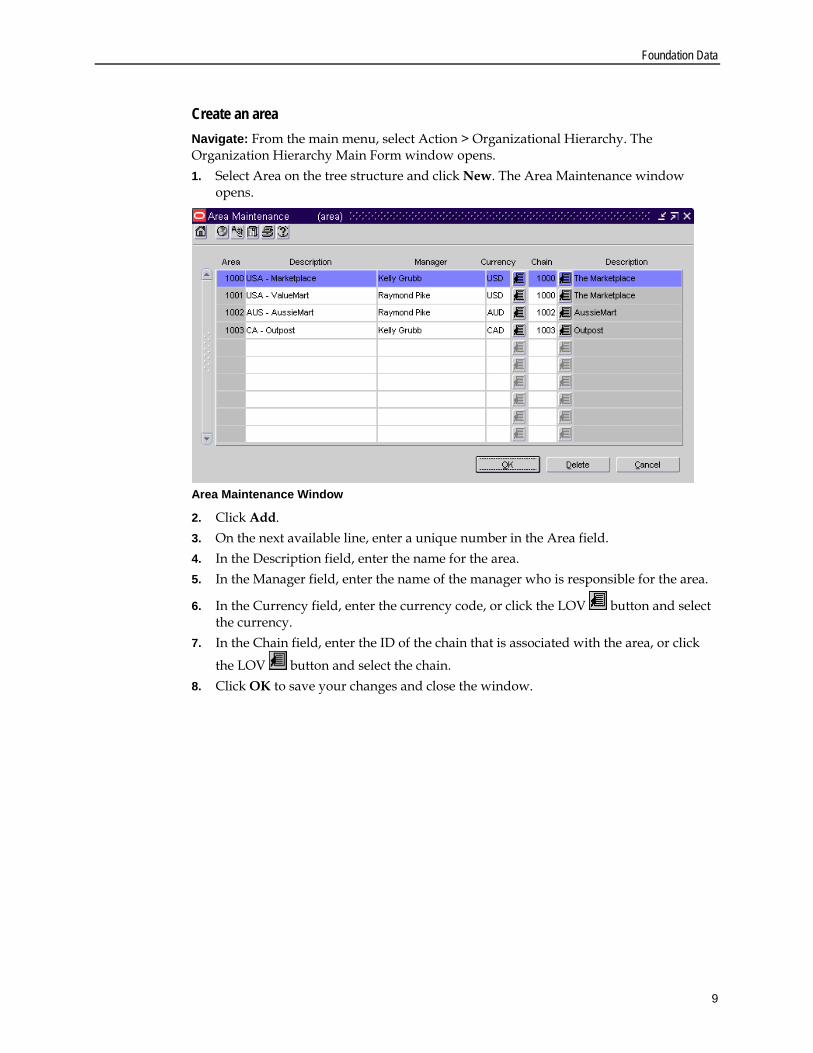
Copyright © 2007, Oracle. All rights reserved.
Primary Author: Kris Sorensen
Contributors: Charles Reichow
The Programs (which include both the software and documentation) contain proprietary information; they are provided under a license agreement containing restrictions on use and disclosure and are also protected by copyright, patent, and other intellectual and industrial property laws. Reverse engineering, disassembly, or decompilation of the Programs, except to the extent required to obtain interoperability with other independently created software or as specified by law, is prohibited.
The information contained in this document is subject to change without notice. If you find any problems in the documentation, please report them to us in writing. This document is not warranted to be error-free. Except as may be expressly permitted in your license agreement for these Programs, no part of these Programs may be reproduced or transmitted in any form or by any means, electronic or mechanical, for any purpose.
If the Programs are delivered to the United States Government or anyone licensing or using the Programs on behalf of the United States Government, the following notice is applicable:
U.S. GOVERNMENT RIGHTS Programs, software, databases, and related documentation and technical data delivered to U.S. Government customers are "commercial computer software" or "commercial technical data" pursuant to the applicable Federal Acquisition Regulation and agency-specific supplemental regulations. As such, use, duplication, disclosure, modification, and adaptation of the Programs, including documentation and technical data, shall be subject to the licensing restrictions set forth in the applicable Oracle license agreement, and, to the extent applicable, the additional rights set forth in FAR 52.227-19, Commercial Computer Software—Restricted Rights (June 1987). Oracle Corporation, 500 Oracle Parkway, Redwood City, CA 94065
The Programs are not intended for use in any nuclear, aviation, mass transit, medical, or other inherently dangerous applications. It shall be the licensee's responsibility to take all appropriate fail-safe, backup, redundancy and other measures to ensure the safe use of such applications if the Programs are used for such purposes, and we disclaim liability for any damages caused by such use of the Programs.
Oracle, JD Edwards, PeopleSoft, and Siebel are registered trademarks of Oracle Corporation and/or its affiliates. Other names may be trademarks of their respective owners.
The Programs may provide links to Web sites and access to content, products, and services from third parties. Oracle is not responsible for the availability of, or any content provided on, third-party Web sites. You bear all risks associated with the use of such content. If you choose to purchase any products or services from a third party, the relationship is directly between you and the third party. Oracle is not responsible for: (a) the quality of third-party products or services; or (b) fulfilling any of the terms of the agreement with the third party, including delivery of products or services and warranty obligations related to purchased products or services. Oracle is not responsible for any loss or damage of any sort that you may incur from dealing with any third party.

iii
Contents Preface .............................................................................................................................. xi
Audience ................................................................................................................................ xi Related Documents............................................................................................................... xi Customer Support................................................................................................................. xi Conventions........................................................................................................................... xi
1 Navigate RMS............................................................................................................... 1 Log on to and exit RMS..........................................................................................................1
Log on to RMS..................................................................................................................1 Exit RMS............................................................................................................................1
Navigate within a window....................................................................................................1 Use a drop-down list .......................................................................................................1 Use a List of Values button.............................................................................................2
Sort information ......................................................................................................................2 2 Business Processes.................................................................................................... 3 3 Foundation Data........................................................................................................... 5
Foundation Data .....................................................................................................................5 Organizational hierarchy................................................................................................5 Merchandise hierarchy....................................................................................................5 Supplier and partner management ...............................................................................5
Organizational Hierarchy ......................................................................................................6 Create the organizational hierarchy..............................................................................6 Set up channels...............................................................................................................12 Maintain locations .........................................................................................................13 Define location traits .....................................................................................................24 Set up location lists ........................................................................................................29 Maintain location attributes .........................................................................................40
Merchandise Hierarchy........................................................................................................46 Create merchandise hierarchy .....................................................................................46 Set up merchandise hierarchy defaults.......................................................................54 Set up merchandisers ....................................................................................................56 Maintain value added taxes (VAT) .............................................................................57 Maintain user defined attributes .................................................................................64 Maintain item lists .........................................................................................................74 Maintain item attributes................................................................................................87

iv
Suppliers.................................................................................................................................93 Record EDI capability for a supplier...........................................................................93 Define supplier traits.....................................................................................................94 Maintain suppliers.........................................................................................................97 Maintain supplier attributes.......................................................................................103 Maintain partners ........................................................................................................106
4 Item Maintenance..................................................................................................... 111 Item Maintenance................................................................................................................111 Set up diffs ...........................................................................................................................111
Set up diffs ....................................................................................................................111 Add a diff ......................................................................................................................112 Add a diff group ..........................................................................................................113 Add a diff type .............................................................................................................115 Create a diff range .......................................................................................................116 Create a diff ratio .........................................................................................................117 Create a pack template................................................................................................120 Search for a diff ratio ...................................................................................................121
Define item/location traits ................................................................................................122 Define item/location traits .........................................................................................122 Change item traits for a location................................................................................123 Change item traits for multiple locations .................................................................124
Create items .........................................................................................................................125 Create items ..................................................................................................................125 Create a one level item ................................................................................................127 Create a two level item with diffs..............................................................................129 Create a two level item without diffs........................................................................133 Create a three level item .............................................................................................136 Create an item using quick item entry......................................................................137 Create a transformable item .......................................................................................138 Create a deposit item...................................................................................................140 Create a concession/consignment item....................................................................142 Create a simple pack from an existing item .............................................................143 Create a complex pack ................................................................................................145
Item approval process ........................................................................................................148 Item approval process .................................................................................................148 Submit an item for approval ......................................................................................148 Submit a child item for approval ...............................................................................150 Approve an item ..........................................................................................................152 Approve list children...................................................................................................154

v
Accept item changes received via EDI .............................................................................156 Update the status of an EDI item...............................................................................156 Edit seasons/phases, or user defined attributes for an accepted item .................157 Process a new item.......................................................................................................157 Review the details of any cost changes that are associated with an item ............158
Reclassify items ...................................................................................................................159 Reclassify Items............................................................................................................159 Create a reclassification event for an item................................................................161 Create a reclassification event for an item list..........................................................162 Search for a pending merchandise hierarchy change .............................................163 Edit the pending merchandise hierarchy .................................................................163
5 Purchasing ............................................................................................................... 165 Purchase Orders ..................................................................................................................165
Set up buyers ................................................................................................................165 Maintain open to buy amounts..................................................................................166 Auto generate purchase orders..................................................................................169 Manually create a purchase order .............................................................................175 Add items to a purchase order...................................................................................185 Distribute a purchase order........................................................................................189 Purchase order approval process ..............................................................................200
6 Contracts .................................................................................................................. 207 Create contracts ...................................................................................................................207
Create contracts............................................................................................................207 Create a Type A contract.............................................................................................208 Create a Type B contract .............................................................................................212 Create a Type C contract.............................................................................................218 Create a Type D contract.............................................................................................221 Search for a contract ....................................................................................................224 Add an item to a contract ...........................................................................................225 Distribute items on a contract by commitment date...............................................227 Distribute items on a contract by location................................................................229
Contract approval process .................................................................................................231 Contract approval process..........................................................................................231 Submit a contract for approval ..................................................................................232 Approve a contract ......................................................................................................233 Complete a contract.....................................................................................................234 Cancel a contract ..........................................................................................................235 Reinstate a cancelled contract ....................................................................................236 Unapprove a contract ..................................................................................................237

vi
7 Complex Deals ......................................................................................................... 239 Create deals..........................................................................................................................239
Create deals ..................................................................................................................239 Create a deal .................................................................................................................240 Create a fixed deal .......................................................................................................242 Create a PO-specific deal ............................................................................................245 Add Bill Back Information to a Deal .........................................................................246
Deals approval process ......................................................................................................248 Deals approval process ...............................................................................................248 Submit a deal ................................................................................................................249 Approve a deal .............................................................................................................250 Reject a deal ..................................................................................................................251 Close a deal ...................................................................................................................252
8 Cost Management.................................................................................................... 253 Set up cost changes .............................................................................................................253
Set up cost changes ......................................................................................................253 Add a cost change reason ...........................................................................................254 Add a cost zone group ................................................................................................255
Set up estimated landed costs ...........................................................................................258 Set up expenses ............................................................................................................258 Define a computation value base...............................................................................258 Define an assessment...................................................................................................260 Define an expense ........................................................................................................261
Set up outside locations......................................................................................................263 Set up outside locations ..............................................................................................263 Create an outside location ..........................................................................................263
Set up up charges ................................................................................................................264 Set up up charges.........................................................................................................264 Add an up charge to an item......................................................................................265 Add an up charge to items on an item list................................................................266 Add up charges to items in a department ................................................................268
Create a cost change ...........................................................................................................269 Create a cost change ....................................................................................................269 Accept cost changes received via EDI.......................................................................270 Search for a cost change ..............................................................................................271 Create a cost change ....................................................................................................272

vii
Cost change approval process...........................................................................................275 Cost change approval process....................................................................................275 Submit a cost change for approval ............................................................................276 Approve a cost change ................................................................................................277 Reject a submitted cost change ..................................................................................278 Cancel an approved cost change ...............................................................................279
9 281Inventory Control ............................................................................................... 281 Inventory Control ...............................................................................................................281 Shipping ...............................................................................................................................281
Maintain shipment schedules ....................................................................................281 Maintain activity schedules........................................................................................285 Maintain return to vendor (RTV) shipments ...........................................................292
Transfers...............................................................................................................................303 Set up transfers.............................................................................................................303 Create transfers ............................................................................................................307 Create transfers with finishing...................................................................................318 Transfer approval process ..........................................................................................326
Mass Returns Transfer........................................................................................................330 Create mass return transfers ......................................................................................330 Mass returns approval process ..................................................................................338
Inventory adjustments........................................................................................................344 Set up inventory adjustments ....................................................................................344 Adjust inventory ..........................................................................................................346
10 Replenishment ......................................................................................................... 351 Replenishment.....................................................................................................................351 Set up investment buy parameters ...................................................................................351
Set up investment buy parameters............................................................................351 Add inventory management constraints to a PO at the order, item, or location level................................................................................................................................351 Add inventory management information for a supplier........................................355 Add investment buy attributes to a warehouse ......................................................357
Set up replenishment parameters .....................................................................................359 Set up replenishment parameters..............................................................................359 Add a delivery schedule at the store or warehouse level ......................................359 Add a delivery schedule for a supplier ....................................................................362 Add inventory management constraints to a PO at the order, item, or location level................................................................................................................................364 Add inventory management constraints to a supplier...........................................367 Add inventory management information for a supplier........................................371

viii
Apply replenishment to an item .......................................................................................373 Apply replenishment to an item................................................................................373 Add replenishment attributes to an item or item list..............................................375 Add a substitute item for an item on replenishment ..............................................379 Review items on replenishment.................................................................................381
Review recommended order quantities...........................................................................383 Review recommended order quantities....................................................................383 Filter the buyer worksheet..........................................................................................383 Add an item to an existing PO from the buyer worksheet ....................................384 Add an item to the buyer worksheet ........................................................................385 Create a PO from a buyer worksheet ........................................................................387
Split an order by truckload................................................................................................388 Split an order by truckload.........................................................................................388 Add inventory management information for a supplier........................................389 Create a truck split at the order level ........................................................................391
11 Financial Management ............................................................................................ 393 Financial Management .......................................................................................................393 Maintain budgets ................................................................................................................393
Maintain budgets .........................................................................................................393 Edit a budget by the half.............................................................................................394 Edit a budget by the month........................................................................................395
Stock Ledger ........................................................................................................................396 Maintain stock counts .................................................................................................396 Maintain the stock ledger ...........................................................................................400 Maintain general ledger cross reference ...................................................................403
Sales Taxes ...........................................................................................................................406 Set up sales taxes..........................................................................................................406 Associate geocodes with a store or tax code ............................................................414 Associate tax codes with a merchandise hierarchy.................................................418
12 User Tools ................................................................................................................ 427 User Tools ............................................................................................................................427 Timelines ..............................................................................................................................427
Define a timeline step..................................................................................................427 Define a timeline ..........................................................................................................429 Associate a timeline with an activity.........................................................................431
Document Maintenance .....................................................................................................437 Maintain documents....................................................................................................437 Associate a document with a RMS element .............................................................438

ix
Maintain tickets and labels ................................................................................................445 Maintain tickets and labels .........................................................................................445 Add ticket types ...........................................................................................................446 Request tickets or labels ..............................................................................................448 Edit ticket types for an item........................................................................................449 Edit ticket types for multiple items ...........................................................................451
13 System Administration............................................................................................ 453 System Administration ......................................................................................................453 Maintain system parameters .............................................................................................453
Maintain system parameters ......................................................................................453 Edit audit trails.............................................................................................................456 Edit batch controls .......................................................................................................458 Edit dynamic hierarchies ............................................................................................460 Edit halves.....................................................................................................................461 Edit multi-view columns ............................................................................................462 Edit system code types................................................................................................464 Edit system error messages ........................................................................................466 Edit system printers.....................................................................................................468 Edit system variables...................................................................................................469 Edit the navigator toolbar...........................................................................................470 Edit the system main menu........................................................................................472
Maintain system security ...................................................................................................474 Maintain system security............................................................................................474 Add a regionality relationship ...................................................................................475 Add a security group ..................................................................................................476 Add a user.....................................................................................................................477 Add location security by group .................................................................................479
Internationalize RMS..........................................................................................................480 Internationalize RMS...................................................................................................480 Edit a value in multiple languages............................................................................482 Edit countries................................................................................................................484 Edit currencies..............................................................................................................485 Edit currency exchange rates .....................................................................................486 Edit languages ..............................................................................................................487 Edit translations in a target language .......................................................................488 Map currency exchange types....................................................................................489
POS Configuration..............................................................................................................490 Create point of sale configurations............................................................................490 Maintain items associated with point of sale configurations.................................501


Preface xi
Preface The Oracle Retail Merchandising System User Guide describes the application’s user interface and how to navigate through it.
Audience This document is intended for the users and administrators of Oracle Retail Merchandising System. This may include merchandisers, buyers, and business analysts.
Related Documents For more information, see the following documents in the Oracle Retail Merchandising System Release 12.0.3 documentation set: Oracle Retail Merchandising System Installation Guide Oracle Retail Merchandising System Release Notes Oracle Retail Merchandising System Operations Guide Oracle Retail Merchandising SystemData Model Oracle Retail Merchandising System Online Help
Customer Support https://metalink.oracle.com
When contacting Customer Support, please provide: Product version and program/module name. Functional and technical description of the problem (include business impact). Detailed step-by-step instructions to recreate. Exact error message received. Screen shots of each step you take.
Conventions Navigate: This is a navigate statement. It tells you how to get to the start of the procedure and ends with a screen shot of the starting point and the statement “the Window Name window opens.”
Note: This is a note. It is used to call out information that is important, but not necessarily part of the procedure.
This is a code sample It is used to display examples of code A hyperlink appears like this.


1
1 Navigate RMS
This section describes how to navigate within RMS. The following topics are included: Instructions to log on to and exit RMS Instructions to navigate within a window Instructions to sort and filter columns
Log on to and exit RMS Note: The way that you access RMS depends on how the system is set up at your location. Contact you system administrator for instructions. After you have started RMS, you are prompted to log on to the system.
Log on to RMS 1. On the Login window, enter your user name in the Username field. 2. In the Password field, enter your password. 3. In the Connect String field, enter the connect string for the application. 4. Click Logon. The Oracle Retail Enterprise Start window opens.
Exit RMS 1. From the Action menu, select Close. 2. Select Close until the application closes.
Navigate within a window Use a drop-down list
Some fields can accept values only from a predefined list of options. Such fields have a down arrow button on the right side of the field.
1. Click the down arrow button. A drop-down list of options displays. 2. Select a value from the drop-down list. The selected option is entered in the
appropriate field.

Oracle Retail Merchandising System
2
Use a List of Values button The List of Values button is found to the right of a field. The button displays all defined values or options available for the field. The List of Values button is often referred to as a LOV button.
Security in lists of value Lists of values for items and locations are limited by the security levels assigned to your user group. Other types of lists of values, such as supplier LOVs, are not limited by security levels.
1. Click the LOV button. A list of options opens.
Note: The list of values is empty if no values are defined for the list.
2. Select an option from the list. 3. Click OK. The selected option is entered in the appropriate field.
Note: You may also double click on an option in the list to populate a field.
Sort information Many windows use column headings that are also buttons. Column heading button are used to sort table data. 1. To sort the list, click any column heading button. You can only sort by one column at
a time. 2. To reverse the current sort order, click the same column heading button again.

3
2 Business Processes
The following functional areas exist in the Oracle Retail Merchandising System (RMS). Each functional area has business processes designed to help you complete a task. Cost management Financial management Foundation data Inventory control Item maintenance Purchasing Replenishment Oracle Retail Sales Audit Oracle Retail Trade Management System administration User and grouping tools


5
3 Foundation Data
Foundation Data Organizational hierarchy
Create the organizational hierarchy Set up channels Define location traits Maintain locations Maintain location lists Maintain location attributes
Merchandise hierarchy Create the merchandise hierarchy Set up merchandise hierarchy defaults Set up merchandisers Maintain value added tax (VAT) codes Maintain user defined attributes Maintain item lists Maintain item attributes
Supplier and partner management Upload suppliers via electronic data interchange (EDI) Define supplier traits Maintain suppliers Maintain supplier attributes Maintain partners

Oracle Retail Merchandising System
6
Organizational Hierarchy Create the organizational hierarchy
Organizational hierarchy overview The organizational hierarchy allows you to create the relationships that are necessary in order to support the operational structure of a company. You can create a preferred organizational structure to support consolidated reporting at various levels of the company. Also, you can assign responsibility for any level of the hierarchy to a person or persons in order to satisfy internal reporting requirements. The following default levels are used within RMS: Company: The highest organizational and merchandise unit defined in RMS. Only
one company can be defined. Chain: The first level below the company level in the organizational hierarchy. The
definition of a chain is based on the needs of the company, but a chain can be used to group various store formats, concepts, and geographical locations within the organization.
Area: The second level below the company level in the organizational hierarchy. The definition of an area is based on the needs of the company, but an area is used typically to define a geographical group within the organization. An area can belong to only one chain.
Region: The third level below the company level in the organizational hierarchy. The definition of a region is based on the needs of the company, but a region can be used to group geographical locations within the organization. A region can belong to only one area.
District: The fourth level below the company level in the organizational hierarchy. The definition of a district is based on the needs of the company, but a district is used typically to group geographical locations within the organization. A district can belong to only one region.
Channel: A channel grouping mechanism for a multi-channel environment. You can associate a channel with a location when you create or edit a store or virtual warehouse.

Foundation Data
7
View the organizational hierarchy Navigate: From the main menu, select Action > Organizational Hierarchy. The Organization Hierarchy Main Form window opens.
Organization Hierarchy Main Form Window
1. On the tree structure, select the hierarchy level that you want to view. The members of the hierarchy level appear in the table.
2. To look up a specific member of the hierarchy level:
a. Enter the ID of the member in the Filter field, or click the LOV button and select the member.
b. Click the filter button.
Note: To clear the filter criterion, click the clear button. All the members of the selected hierarchy level are again displayed.
3. Click Close to close the window.
Note: You can easily view the members of the next lower level in the hierarchy. For example, if you double-click a chain in the table, the areas appear in the table. If you double-click a district, the stores appear.

Oracle Retail Merchandising System
8
Create a chain Navigate: From the main menu, select Action > Organizational Hierarchy. The Organization Hierarchy Main Form window opens. 1. Select Chain on the tree structure. 2. Click New. The Chain Maintenance window opens.
Chain Maintenance Window
3. Click Add. 4. On the next available line, enter a unique number in the Chain field. 5. In the Description field, enter the name for the chain. 6. In the Manager field, enter the name of the manager who is responsible for the chain.
7. In the Currency field, enter the currency code, or click the LOV button and select the currency.
8. Click OK to save your changes and close the window.
Foundation Data
9
Create an area Navigate: From the main menu, select Action > Organizational Hierarchy. The Organization Hierarchy Main Form window opens. 1. Select Area on the tree structure and click New. The Area Maintenance window
opens.
Area Maintenance Window
2. Click Add. 3. On the next available line, enter a unique number in the Area field. 4. In the Description field, enter the name for the area. 5. In the Manager field, enter the name of the manager who is responsible for the area.
6. In the Currency field, enter the currency code, or click the LOV button and select the currency.
7. In the Chain field, enter the ID of the chain that is associated with the area, or click
the LOV button and select the chain. 8. Click OK to save your changes and close the window.

Oracle Retail Merchandising System
10
Create a region Navigate: From the main menu, select Action > Organizational Hierarchy. The Organization Hierarchy Main Form window opens. 1. Select Region on the tree structure. 2. Click New. The Region Maintenance window opens.
Region Maintenance Window
3. Click Add. 4. On the next available line, enter a unique number in the Region field. 5. In the Description field, enter the name for the region.
6. In the Currency field, enter the currency code, or click the LOV button and select the currency.
7. In the Manager field, enter the name of the manager who is responsible for the region.
8. In the Area field, enter the ID of the area that is associated with the region, or click
the LOV button and select the area. 9. Click OK to save your changes and close the window.

Foundation Data
11
Create a district Navigate: From the main menu, select Action > Organizational Hierarchy. The Organization Hierarchy Main Form window opens. 1. Select District on the tree structure and click New. The District Maintenance window
opens.
District Maintenance Window
2. Click Add. 3. On the next available line, enter a unique number in the District field. 4. In the Description field, enter the name for the district.
5. In the Currency field, enter the currency code, or click the LOV button and select the currency.
6. In the Manager field, enter the name of the manager who is responsible for the district.
7. In the Region field, enter the ID of the region associated with the district, or click the
LOV button and select the region. 8. Click OK to save your changes and close the window.

Oracle Retail Merchandising System
12
Set up channels Set up channels In a multi-channel environment, you can set up the channels by which inventory and profitability is to be tracked. When adding a store, you associate the store with a channel. A store may be either a stockholding location, such as a brick-and-mortar location, or a non-stockholding location, such as a web site or catalog. A physical warehouse must be divided into one or more virtual warehouses. Each virtual warehouse is associated with a channel. To better track the movement of goods by channel, warehouses are restricted to providing goods for stores that are members of the same channel. The physical warehouse is considered a non-stockholding location. The virtual warehouses within the physical warehouse are considered stockholding locations.
Add a banner Navigate: From the main menu, select Control > Setup > Banner> Edit. The Banner Maintenance window opens.
Banner Maintenance Window
1. Click Add. The next available line is enabled. 2. Enter a unique ID for the new banner. 3. Enter a description for the Banner ID. 4. Click OK to save your changes and close the window.

Foundation Data
13
Add a channel Navigate: From the main menu, select Control > Setup > Channels > Edit. The Channel Maintenance window opens.
Channel Maintenance Window
1. Click Add. The next available line is enabled. 2. In the Channel ID field, enter a unique ID for the channel. 3. In the Description field, enter the description of the channel. 4. In the Channel Type field, select the type of channel.
5. In the Banner ID field, enter a valid banner ID number, or click the LOV button and select a banner.
6. Click OK to save your changes and close the window.
Maintain locations Maintain locations A location is either a store or a warehouse. The store is usually the physical retail outlet. The store is critical because it is the level at which business transactions are processed. These transactions include sales, receipts, adjustments, and cycle counts. A store can belong to only one district. You can create store formats to help store set up, and you can create store grades to group like stores. In a multi-channel environment, you must associate a channel with the store. The warehouse is the physical storage, cross-dock, or distribution facility. A warehouse has all of the transaction capability of a store, except for sales and price changes. You can specify at which organizational level the warehouse is to be reported. In a multi-channel environment, you partition a physical warehouse into one or more virtual warehouses. Each virtual warehouse is associated with a channel. At least one of the virtual warehouses must be a replenishable location.

Oracle Retail Merchandising System
14
Create a store Navigate: From the main menu, select Action > Organizational Hierarchy. The Organization Hierarchy Main Form window opens. 1. Select Store on the tree structure. 2. Click New. The Store Maintenance window opens.
Store Maintenance Window
3. In the Store fields, enter a unique ID and description for the store. 4. In the (10 chars) and (3 chars) fields, enter 10-character and 3-character abbreviations
for the store. 5. In the Manager field, enter the name of the manager who is responsible for the store.
6. In the VAT Region field, enter the ID of the VAT region, or click the LOV button and select the VAT region.
7. In the District field, enter the ID of the district, or click the LOV button and select the district.
8. In the Store Open Date field, enter the date when the store opens, or click the calendar button and select the date.
9. In the Start Order Days field, enter the number of days before the store opens that merchandise should be ordered.
10. In the Channel field, enter the ID of the channel to which the store belongs, or click
the LOV button and select the channel.
Note: The Channel field is enabled in a multi-channel environment.

Foundation Data
15
11. In the Currency field, enter the currency code, or click the LOV button and select the currency.
12. In the Language field, enter the language code, or click the LOV button and select the language.
13. In the Transfer Entity field, enter the transfer entity ID, or click the LOV button and select the transfer entity.
Note: This field is only available if your organization uses transfer entities.
14. In the Org Unit ID field, enter the org unit ID, or click the LOV button and select the organizational unit.
Note: This field is only available if your organization uses Oracle Financials, version 11.5.10 or later.
15. Enter optional information in the remaining fields as necessary. 16. Add the address to the store. 17. To associate retail price and cost locations with the store:
a. Click Zoning Locs. The Zoning Locations window opens.
Zoning Locations Window
b. In the Pricing Store field, enter the ID of the store with the base retail prices that
you want to apply to the current store, or click the LOV button and select the store.
c. In the Cost Location, select Store or Warehouse. Then enter the ID of the location with the base costs that you want to apply to the current store, or click the LOV
button and select the location. d. Click OK to exit the Zoning Locations window.
18. Click OK to save your changes and close the window.

Oracle Retail Merchandising System
16
Add a store grade information Navigate: From the main menu, select Control > Setup > Store Grade Group > Edit. The Store Grade Group window opens.
Store Grade Group Window
Define the store grade group
1. In the Buyer field, enter the ID of a buyer, or click the LOV button and select the buyer. Any existing store grade groups for the selected buyer appear.
2. Click Add. 3. On the next available line, enter a unique number in the Store Grade Group field. 4. In the Description field, enter a description for the store grade group. 5. Click Add.

Foundation Data
17
Add store grades 1. Click Store Grade. The Store Grade window opens.
2. Click Add. 3. On the next available line, enter a unique code in the Store Grade field.
4. If necessary, enter a comment in the Comments field, or click the comments button and enter the comment.
5. Click OK to close the Store Grade window.

Oracle Retail Merchandising System
18
Add stores to a store grade 1. Click Store. The Store Grade Store Detail window opens.
2. Click Add. 3. In the Group Type field, select a group type.
4. In the Group field, enter the ID of a group, or click the LOV button and select the group.
5. In the Store Grade field, enter the code for the store grade to associate with the group
of stores, or click the LOV button and select the store grade. 6. Click Apply. The stores in the group are added to the store grade group. 7. Click OK to save any changes and close the window.

Foundation Data
19
Search for stores assigned to a warehouse Navigate: From the main menu, select Control > Setup > Warehouse Store Assignment > View Assignments. The Warehouse Store Assignment View window opens.
Warehouse Store Assignment View Window
1. In the Warehouse field, enter the ID of a warehouse, or click the LOV button and select the warehouse.
2. In the Assignment Date field, enter the date that you want to search by, or click the calendar button and select the date.
3. Click Search. The stores that match the criteria appear. 4. Click Refresh to clear the fields for another search, or click Close to exit.

Oracle Retail Merchandising System
20
Create a warehouse Navigate: From the main menu, select Action > Organizational Hierarchy. The Organization Hierarchy Main Form window opens. 1. Select Warehouse on the tree structure and click New. The Warehouse Maintenance
window opens.
Warehouse Maintenance Window
2. In the Warehouse fields, enter a unique ID and description for the warehouse.
3. In the Currency Code field, enter the currency code, or click the LOV button and select the currency.
4. In the VAT Region field, enter the ID of a VAT region, or click the LOV button and select the VAT region.
5. In the Org Unit ID field, enter the ID of the org unit, or click the LOV button and select a organizational unit.
Note: This field is required if your organization uses Oracle Financials, version 11.5.10 or later and you are working in a single channel environment.

Foundation Data
21
6. Add the address information to the warehouse. 7. Enter optional information in the remaining fields as necessary.
Primary Virtual Warehouse: The virtual warehouse that will be used for all transactions in which a virtual warehouse has not been otherwise specified.
Email: The email of the primary contact at the warehouse. Break Pack Warehouse: When selected, indicates that packs are broken apart at
the warehouse. Redistribution Warehouse: When selected, indicates that the warehouse is used
to receive items on a purchase order when the actual distribution is yet to be determined.
Delivery Policy: The delivery policy of the warehouse when a receiving location is closed. In New and Edit modes, select the appropriate option. – Next day: Deliver the merchandise on the next day. – Next delivery day: Deliver on the next regularly scheduled delivery date.
Inbound handling days: The number of days that the warehouse requires to receive any item and get it to the shelf so that it is ready to pick.
DUNS Number: The 9-digit ID number of the company as provided by Dun & Bradstreet.
DUNS Location: The 4-digit ID number of the location as provided by Dun & Bradstreet.
Associate a cost location with the warehouse 1. Click Zoning Locs. The Zoning Locations window opens.
Zoning Locations Window
2. In the Cost Location field, select the type of location whose base costs you want to copy to the current warehouse.
3. In the fields next to the Cost Location field, enter the ID of the location, or click the
LOV button and select the location. 4. Click OK to close the Zoning Locations window.

Oracle Retail Merchandising System
22
Complete the warehouse information 1. Add virtual warehouses as necessary.
Note: Virtual warehouses are required for multi-channel environments only.
2. Add warehouse attributes as necessary. 3. Add delivery schedules as necessary. 4. Add activity schedules as necessary. 5. Click OK to save any changes and close the window.
Add a virtual warehouse to a physical warehouse Navigate: From the main menu, select Action > Organizational Hierarchy. The Organization Hierarchy Main Form window opens. 1. Select Warehouse on the tree structure. The warehouses appear in the table. 2. Select a warehouse and click Edit. The Warehouse Maintenance window opens. 3. From the Options menu, select Virtual Warehouses. The virtual warehouses appear
in the Virtual Warehouse Maintenance window.
Virtual Warehouse Maintenance Window
4. From the Options menu, select Virtual Warehouses. The Virtual Warehouse Maintenance window opens. In the Virtual Warehouse field, enter the unique ID for the virtual warehouse.
5. In the Virtual Warehouse Name field, enter a description for the virtual warehouse. 6. In the Channel field, enter the ID of the channel that is associated with the virtual
warehouse, or click the LOV button and select the channel. 7. In the Transfer Entity field, enter the ID of the transfer entity that is associated with
the virtual warehouse, or click the LOV button and select the transfer entity.
Note: This field is only available if your organization uses transfer entities.

Foundation Data
23
8. In the Finisher field, select the check box to indicate the virtual warehouse is used for finishing.
9. In the Org Unit ID field, enter the ID of the org unit, or click the LOV button and select a organizational unit.
Note: This field is required if your organization uses Oracle Financials, or later 11.5.10.
10. If you want to set up a virtual warehouse to receive replenishments:
Note: A warehouse can be setup and used in RMS without specifying a replenishable virtual warehouse. You will receive a warning when you close the window. Click OK to continue.
a. Select the desired virtual warehouse. b. From the Options menu, select Warehouse/Inventory Attributes. The Warehouse
Inventory Attributes window opens. c. Select the Replenishment Warehouse check box. d. Click OK to save any changes and close the window.
11. Click OK to save any changes and close the window.
Edit warehouse assignments Navigate: From the main menu, select Control > Setup > Warehouse/Store Assignment > Create Assignments > Edit. The current assignments appear in the Warehouse Store Assignment window.
Warehouse Store Assignment Window

Oracle Retail Merchandising System
24
Add an assignment 1. Click New. The fields in the Apply area are cleared.
2. In the Warehouse field, enter the ID of the warehouse, or click the LOV button and select the warehouse.
3. In the Assign Date field, enter the date on which the assignment becomes effective, or click the calendar button and select the date.
4. In the Group Type field, select a grouping mechanism for the locations to be assigned to the warehouse.
5. In the Group field, enter the ID of the specific group or location, or click the LOV button and select the group or location.
6. Click Apply. The assignments are added to the table. 7. A prompt opens if you attempt to create any assignments with conflicting
assignment dates. To view the conflicting assignments, click Yes. The conflicting assignments appear in the Conflicting Stores window.
8. Click OK to save your changes and close the window.
Delete an assignment 1. Select an assignment and click Delete. 2. When prompted to delete the record, click Yes. 3. Click OK to save your changes and close the window.
Define location traits Define location traits With location traits, you can group areas, regions, districts, or stores by traits. When a trait is associated with an area, region, or district, the trait is applied automatically to the stores within those entities. A trait can be deleted only at the level of the organizational hierarchy with which it was originally associated. You can create reports based on location traits.

Foundation Data
25
Add a location trait Navigate: From the main menu, select Control > Traits > Location Traits > Edit. The Location Traits Maintenance window opens.
Location Traits Maintenance Window
1. Click Add Trait. On the next available line, the Location Trait field is filled in automatically with a unique ID number.
2. In the Description field, enter a description for the trait. 3. In the organization hierarchy field, enter the ID of the member of the hierarchy level,
or click the LOV button and select a member. 4. Click OK to save your changes and close the window.

Oracle Retail Merchandising System
26
Associate a location trait with an organization level Navigate: From the main menu, select Action > Organizational Hierarchy. The Organization Hierarchy Main Form window opens.
Organization Hierarchy Main Form Window
1. To associate a location trait with a/n: Area
a. Select Area on the tree structure, and click Edit. The Area Maintenance window opens.
b. Select an area. c. From the Options menu, select Location Traits. The Traits Associated with
Areas window opens. Region
a. Select Region on the tree structure, and click Edit. The Region Maintenance window opens.
b. Select a region. c. From the Options menu, select Location Traits. The Traits Associated with
Regions window opens. District
a. Select District on the tree structure, and click Edit. The District Maintenance window opens.
b. Select a district. c. From the Options menu, select Location Traits. The Traits Associated with
Districts opens.

Foundation Data
27
Store a. Select Store on the tree structure, and click Edit. The Store Maintenance window
opens. b. Select a store. c. From the Options menu, select Location Traits. The Traits Associated with Store
window opens. 2. Click Add Trait.
3. In the next available line, enter the ID of the location trait, or click the LOV button and select the location trait.
4. Click OK to save your changes and close the window.
Associate an organization level with a location trait Navigate: From the main menu, select Control > Traits > Location Traits > Edit. The Location Traits Maintenance window opens.
Location Traits Maintenance Window

Oracle Retail Merchandising System
28
1. Select a location trait. 2. From the Options menu, select the organization level. The appropriate trait window
opens. 3. Click Add.
4. In the next available line, enter the ID of the organization level, or click the LOV button and select the area.
5. Click OK to save your changes and close the window.
Change location traits by location list Navigate: From the main menu, select Control > Location Lists. The Location List Search window opens. Search for and retrieve a location list in Use mode. The Location List Head window opens. From the Options menu, select Create Location Traits Change. The Location Traits - Mass Change window opens.
Location Traits - Mass Change Window

Foundation Data
29
1. In the Action field on the first line of the table, select whether you want to add or delete the trait.
2. In the Location Trait field, enter the ID of the trait, or click the LOV button and select a trait.
3. To add another mass change request for the location list: a. Click Add. b. In the Action field, select whether you want to add or delete the trait.
c. In the Location Trait field, enter the ID of the trait, or click the LOV button and select a trait.
4. To delete a mass change request from the location list: a. Select the mass change request. b. Click Delete.
5. Click OK to save your changes and close the window.
Set up location lists Set up location lists The location list feature allows you to create, copy, edit, view, and use a group of locations that are identified by one ID. You can add locations to a list one by one, or you can enter criteria in order to group the locations. It becomes much simpler to apply changes to multiple locations when the locations are grouped on a location list.

Oracle Retail Merchandising System
30
Create a location list Navigate: From the main menu, select Control > Location List. The Location List Search window opens.
Location List Search Window
1. In the Action field, select New. 2. Click OK. The Location List Head window opens. The ID of the location list is filled
in automatically.
Location List Head Window

Foundation Data
31
3. In the List Number field, enter the description of the location list. 4. In the organization hierarchy field, enter the ID of the member of the hierarchy level,
or click the LOV button and select a member. 5. Enter optional information in the remaining fields as necessary.
Add locations individually 1. From the Options menu, select Locations. The Location List Detail Maintenance
window opens.
Location List Detail Maintenance Window
2. Click Add. 3. In the Location Type field, select either Store or Warehouse.
Note: Only locations that are in the area associated with the location list can be added to the list.
4. In the Location field, enter the ID of the location, or click the LOV button and select the location.
5. Click OK to save your changes and close the window.

Oracle Retail Merchandising System
32
Add locations by group 1. From the Options menu, select Criteria. The Location List Criteria window opens.
Location List Criteria Window
2. In the Location Type field, select either Store or Warehouse. 3. Click Insert. 4. Enter the criteria in the enabled fields as necessary.
Note: Each record in the table is the equivalent of a condition in the Where clause of a SQL statement.
5. Click Test SQL to test the validity of the criteria. You are prompted if any errors occur.
Note: Only locations that are in the area associated with the location list can be added to the list.
6. Click OK to save your changes and close the window.

Foundation Data
33
Add locations to a location list Navigate: From the main menu, select Control > Location List. The Location List Search window opens. Search for and retrieve a location list in Edit mode. The Location List Head window opens.
Location List Head Window
Add locations individually 1. From the Options menu, select Locations. The Location List Detail Maintenance
window opens.
Location List Detail Maintenance Window

Oracle Retail Merchandising System
34
2. Click Add. 3. In the Location Type field, select either Store or Warehouse.
4. In the Location field, enter the ID of the location, or click the LOV button and select the location.
5. Click Rebuild to rebuild the location list. 6. Click OK to save your changes and close the window.
Add locations by group 1. From the Options menu, select Criteria. The Location List Criteria window opens.
Location List Criteria Window
2. In the Location Type field, select either Store or Warehouse. 3. Click Insert. 4. Enter the criteria in the enabled fields as necessary.
Note: If the Element is Cost Zone, Price Zone, or Store Grade, you can specify which group (cost zone group, price zone group, or store grade group) the zone or grade is a member of. In the Related Value field, enter the ID of the
group, or click the LOV button and select the group.
5. Click Test SQL to test the validity of the criteria. You are prompted if any errors occur.
6. To view the SQL statement, select Results of Last SQL Test from the Options menu.
The SQL Statement window opens. Click the comments button to view the entire statement. Click OK to close the SQL Statement window.

Foundation Data
35
SQL Statement Window
7. Click Build List to rebuild the location list. 8. Click OK to save your changes and close the window.
Copy a location list Navigate: From the main menu, select Control > Location List. The Location List Search window opens. Search for and retrieve a location list in Create from Existing mode. The Location List Head window opens.
Location List Head Window
1. Edit the description, comments, and indicators as necessary. 2. Rebuild the location list.

Oracle Retail Merchandising System
36
Edit the locations individually 1. From the Options menu, select Locations. The Location List Detail Maintenance
window opens.
Location List Detail Maintenance Window
2. To add a location, click Add. Enter the location information on the next available line. 3. To mark a location for deletion, select the location and click Delete. 4. Click OK to save your changes and close the window.
Edit locations by group 1. From the Options menu, select Criteria. The Location List Criteria window opens.
Location List Criteria Window

Foundation Data
37
2. To add criteria, select a record and click Insert. 3. Enter the criteria on the next available line. 4. To delete criteria, select the record and click Delete. When prompted to delete the
record, click Yes. 5. Click Test SQL to test the validity of the criteria. You are prompted if any errors
occur. 6. Click OK to save your changes and close the window.
Review and complete the location list 1. Rebuild the location list. 2. Click OK to exit.
Rebuild a location list Navigate: From the main menu, select Control > Location List. The Location List Search window opens. Search for and retrieve a location list in Edit or Use mode. The Location List Head window opens.
Location List Head Window

Oracle Retail Merchandising System
38
1. From the Options menu, select Rebuild Location List. The Rebuild Location List window opens.
Rebuild Location List Window
2. Select the Rebuild Location List check box. 3. Click OK to save your changes and close the window.
Note: If an item list was set up with user security, only the creator is able to rebuild the list.
Search for a location list Navigate: From the main menu, select Control > Location List. The Location List Search window opens.
Location List Search Window

Foundation Data
39
1. In the Action field, select either View, Edit, Create from Existing, or Use. 2. Enter additional criteria as desired to make the search more restrictive. 3. Click Search. The Location List Search window shows the location lists that match
the search criteria.
Location List Search Window
4. Select a task: To perform another search, click Refresh. To display a location list, select a record and click OK. The Location List Head
window opens.
Location List Head Window

Oracle Retail Merchandising System
40
Click Close to close the window.
Use a location list Navigate: From the main menu, select Control > Location List. The Location List Search window opens. Search for and retrieve a location list in Use mode. The Location List Head window opens.
Location List Head Window
1. To change the price and cost zones, select Create Price/Cost Zone Change from the Options menu. The Price/Cost Zone - Mass Change window opens.
2. To change the locations traits, select Create Location Trait Change from the Options menu. The Location Traits - Mass Change window opens.
3. To change the store attributes, select Create Store Attribute Change from the Options menu. The Store Attribute - Mass Change window opens.
4. Click OK to save your changes and close the window.
Maintain location attributes Maintain location attributes The location attributes feature provides a way to record specific information about locations. An attribute may be associated with multiple locations. There are quick ways to make mass changes to attributes for locations: Use a location list to change attributes for all stores on the location list. Change attributes for all locations that are associated with an item.
Attributes are used to record specific information relating to various elements in RMS. In some cases, attributes affect how the element is handled throughout RMS. In other cases, the attributes feature is an easy way of tracking additional information. Using the reporting feature of RMS, you can create custom reports based on the attributes you record.

Foundation Data
41
Edit attributes at a warehouse for inventory segregation Navigate: From the main menu, select Action > Organizational Hierarchy. The Organization Hierarchy Main Form window opens. 1. Select Warehouse on the tree structure. The warehouses appear in the table. 2. Select a warehouse and click Edit. The Warehouse Maintenance window opens.
In a single-channel environment: – From the Options menu, select Attributes.
In a multi-channel environment: a. Select Virtual Warehouses from the Options menu. The Virtual Warehouse
Maintenance window opens. b. From the Options menu, select Warehouse/Inventory Attributes. The current
attributes appear in the Warehouse/Inventory Attributes window.
Warehouse/Inventory Attributes Window
3. Select or clear the check boxes next to the appropriate attributes. 4. In a multi-channel environment, enter the ID of the rounding sequence and
warehouse links, or click the LOV buttons and select the rounding sequence and warehouse links as necessary.
5. In a multi-channel environment, enter the order in which inventory is sourced in the Source Order field as necessary.
6. Click OK to save your changes and close the window.

Oracle Retail Merchandising System
42
Edit attributes at multiple stores by location list Navigate: From the main menu, select Control > Location List. The Location List Search window opens. Search for and retrieve a location list in Use mode. The Location List Head window opens.
Location List Head Window
1. From the Options menu, select Create Store Attribute Change. The Store Attribute Mass Change window opens.
Store Attribute Mass Change Window

Foundation Data
43
2. Select the check boxes in the Update column next to the fields that you want to change.
3. Select or enter the new values in the Change Value To column.
Note: If you update the VAT Region, District, Language, Store Class, or Store Open Date fields, you must enter a new value. For the other fields, the new value can be left blank.
4. Click OK to save your changes and close the window.
Record attributes for a store Navigate: From the main menu, select Action > Organizational Hierarchy. The Organization Hierarchy Main Form window opens.
Organization Hierarchy Main Form Window

Oracle Retail Merchandising System
44
1. Select Store on the tree structure. 2. Select a store on the table and click Edit. The Store Maintenance window opens. 3. From the Options menu, select Attributes. The Store Attributes window opens.
Store Attributes Window
4. Enter or select the attributes that apply to the current store. 5. Click OK to save your changes and close the window.

Foundation Data
45
Record attributes for a warehouse Navigate: From the main menu, select Action > Organizational Hierarchy. The Organization Hierarchy Main Form window opens. 1. Select Warehouse on the tree structure. 2. Select a warehouse on the table and click Edit. The Warehouse Maintenance window
opens. 3. From the Options menu, select Attributes. The Warehouse Attributes window opens.
Warehouse Attributes Window
4. Enter or select the attributes that apply to the current warehouse. 5. Click OK to save your changes and close the window.

Oracle Retail Merchandising System
46
Merchandise Hierarchy Create merchandise hierarchy
Create merchandise hierarchy The merchandise hierarchy allows you to create the relationships that are necessary in order to support the product management structure of a company. You can assign a buyer and merchandiser at the division, group, and department levels of the merchandise hierarchy. You can also link a lower level to the next higher level. For example, you can indicate which group a department belongs to or which division a group belongs to. The following default levels are used within RMS: Company: The highest organizational and merchandise unit defined in RMS. Only
one company can be defined. Division: The highest category of merchandise within an organization. Typically, the
division is used to signify the overall type of merchandise that a retailer offers, such as hardlines or apparel.
Group: The next level below division in the merchandise hierarchy of a company. A division can have multiple groups.
Department: The next level below group in the merchandise hierarchy of a company. A group can have multiple departments. Key information about how inventory is tracked and reported is stored at the department level.
Class: The next level below department in the merchandise hierarchy of a company. A department can have multiple classes. A class provides the means to group products within a department.
Subclass: The next level below class in the merchandise hierarchy of a company. A class can have multiple subclasses. A subclass provides the means to classify products within a department/class combination.

Foundation Data
47
View the merchandise hierarchy Navigate: From the main menu, select Action > Merchandise Hierarchy. The Merchandise Hierarchy Main Form window opens.
Merchandise Hierarchy Main Form Winodw
1. On the tree structure, select the hierarchy level that you want to view. The members of the hierarchy level appear in the table.
If you select Class, enter an ID in the Department field, or click the LOV button and select the department.
If you select Subclass, enter an ID, or click the LOV button in both the Department and Class fields.
2. To look up a specific member of the hierarchy level:
a. Enter the ID of the member in the Filter field, or click the LOV button and select the member.
b. Click the filter button.
Note: To clear the filter criterion, click the clear button. All the members of the selected hierarchy level are again displayed.
3. Click Close to close the window.
Note: You can easily view the members of the next lower level in the hierarchy. For example, if you double-click a department in the table, the classes in the department appear. If you double-click a class, the subclasses in the class appear.

Oracle Retail Merchandising System
48
Create a division Navigate: From the main menu, select Action > Merchandise Hierarchy. The Merchandise Hierarchy Main Form window opens. 1. Select Division on the tree structure and click New. The Division Maintenance
window opens.
Division Maintenance Window
2. Click Add. 3. On the next available line, enter a unique number in the Division field. 4. In the Description field, enter the name for the division. 5. In the Buyer field, enter the ID of the buyer who is responsible for the division, or
click the LOV button and select the buyer. 6. In the Merch field, enter the ID of the merchandiser who is responsible for the
division, or click the LOV button and select the merchandiser. 7. In the Total Market Amount field, enter the amount of annual sales that the division
is expected to generate. 8. Click OK to save your changes and close the window.

Foundation Data
49
Create a group Navigate: From the main menu, select Action > Merchandise Hierarchy. The Merchandise Hierarchy Main Form window opens. 1. Select Group on the tree structure and click New. The Group Maintenance window
opens.
Group Maintenance Window
2. Click Add Group. 3. On the next available line, enter a unique number in the Group field. 4. In the Description field, enter the name for the group. 5. In the Division field, enter the ID of the division associated with the group, or click
the LOV button and select the division. 6. In the Buyer field, enter the ID of the buyer who is responsible for the group, or click
the LOV button and select the buyer. 7. In the Merch field, enter the ID of the merchandiser who is responsible for the group,
or click the LOV button and select the merchandiser. 8. Click OK to save your changes and close the window.

Oracle Retail Merchandising System
50
Create a department Navigate: From the main menu, select Action > Merchandise Hierarchy. The Merchandise Hierarchy Main Form window opens. 1. Select Department on the tree structure and click New. The Department Maintenance
window opens.
Department Maintenance Window
2. In the Department fields, enter a unique ID and description for the department.
Note: You cannot enter an ID if your system is set up to automatically generate IDs.
3. In the Group field, enter the ID of the group associated with the department, or click
the LOV button and select the group. 4. Select the appropriate markup, profit, and open to buy (OTB) calculations. 5. In the Purchase Type area, indicate the type of merchandise sold in the department.
Normal: The items in the department are ordered, invoiced, and recorded in the stock ledger.
Consignment: The items in the department are ordered, invoiced, and recorded in the stock ledger. Accounts receivable and accounts payable are not recorded for this item type. The consignment rate is recorded at the item/supplier level.
Concession: The items in the department are ordered, invoiced, and recorded in the stock ledger. Accounts receivable and accounts payable are not recorded for this item type. The concession rate is recorded at the item/supplier level.
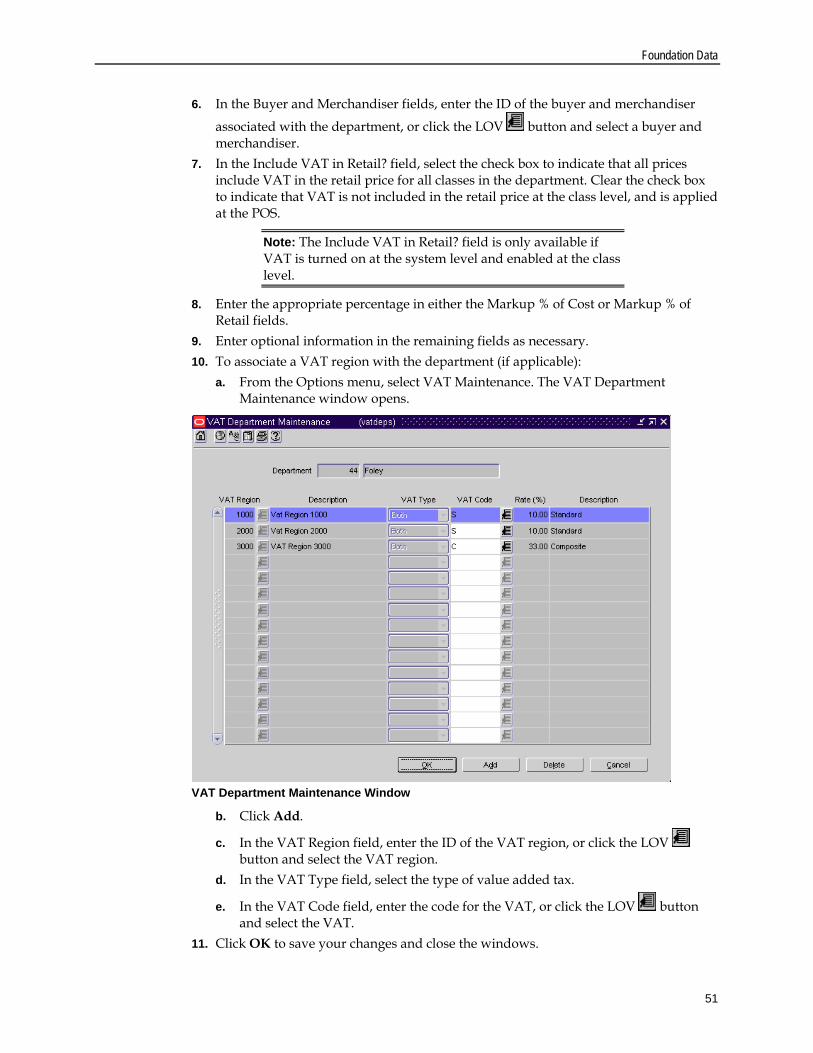
Foundation Data
51
6. In the Buyer and Merchandiser fields, enter the ID of the buyer and merchandiser
associated with the department, or click the LOV button and select a buyer and merchandiser.
7. In the Include VAT in Retail? field, select the check box to indicate that all prices include VAT in the retail price for all classes in the department. Clear the check box to indicate that VAT is not included in the retail price at the class level, and is applied at the POS.
Note: The Include VAT in Retail? field is only available if VAT is turned on at the system level and enabled at the class level.
8. Enter the appropriate percentage in either the Markup % of Cost or Markup % of Retail fields.
9. Enter optional information in the remaining fields as necessary. 10. To associate a VAT region with the department (if applicable):
a. From the Options menu, select VAT Maintenance. The VAT Department Maintenance window opens.
VAT Department Maintenance Window
b. Click Add.
c. In the VAT Region field, enter the ID of the VAT region, or click the LOV button and select the VAT region.
d. In the VAT Type field, select the type of value added tax.
e. In the VAT Code field, enter the code for the VAT, or click the LOV button and select the VAT.
11. Click OK to save your changes and close the windows.
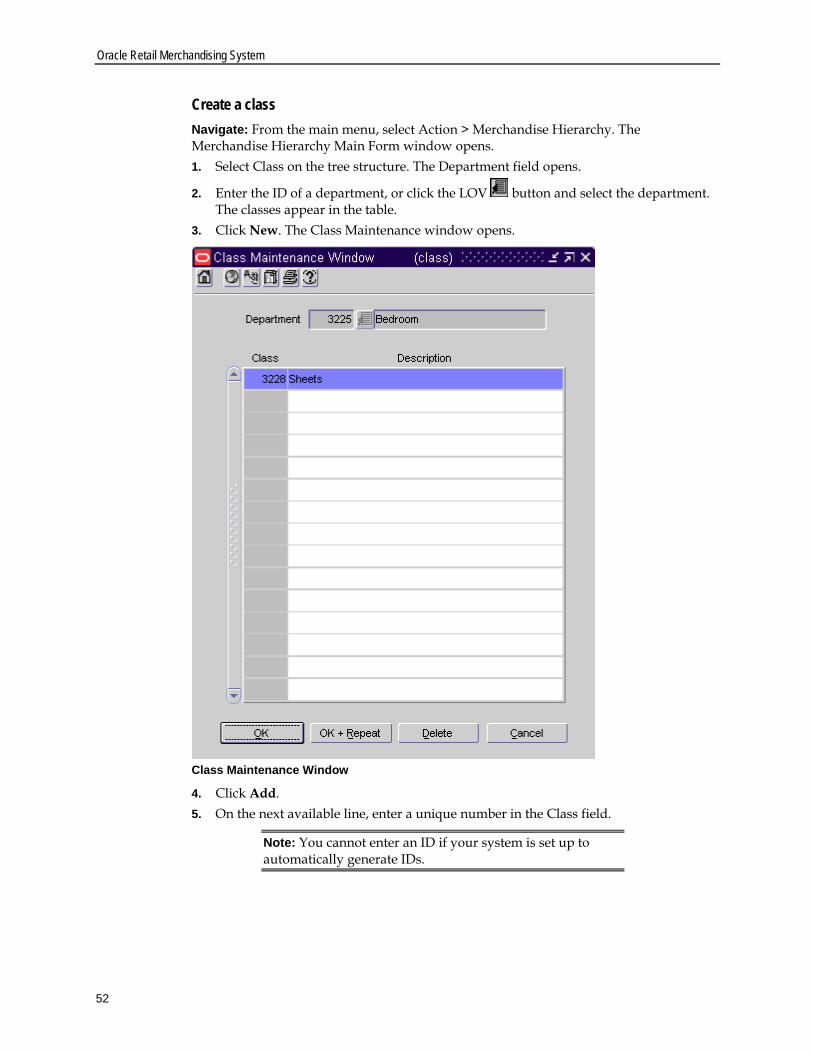
Oracle Retail Merchandising System
52
Create a class Navigate: From the main menu, select Action > Merchandise Hierarchy. The Merchandise Hierarchy Main Form window opens. 1. Select Class on the tree structure. The Department field opens.
2. Enter the ID of a department, or click the LOV button and select the department. The classes appear in the table.
3. Click New. The Class Maintenance window opens.
Class Maintenance Window
4. Click Add. 5. On the next available line, enter a unique number in the Class field.
Note: You cannot enter an ID if your system is set up to automatically generate IDs.

Foundation Data
53
6. In the Description field, enter the name for the class. 7. If VAT at the class level is indicated in the RMS system settings, the Include VAT in
Retail? field appears. Select the check box to indicate that the retail price includes VAT.
Note: If you choose not to select the check box, you should indicate that VAT should be applied to the retail price at the point of sale when setting up a store.
8. Click OK to save your changes and close the window.
Create a subclass Navigate: From the main menu, select Action > Merchandise Hierarchy. The Merchandise Hierarchy Main Form window opens. 1. Select Subclass on the tree structure. The Department and Class fields appear.
2. In the Department field, enter the ID of a department, or click the LOV button and select the department.
3. In the Class field, enter the ID of a class, or click the LOV button and select the class. The subclasses appear in the table.
4. Click Edit. The Subclass Maintenance window opens.
Subclass Maintenance Window

Oracle Retail Merchandising System
54
5. Click Add. 6. On the next available line, enter a unique number in the Subclass field.
Note: You cannot enter an ID if your system is set up to automatically generate IDs.
7. In the Description field, enter the name for the subclass. 8. Click OK to save your changes and close the window.
Set up merchandise hierarchy defaults Set up merchandise hierarchy defaults A wide variety of options can be made available regarding items. You can indicate which options are made available and, of those that are available, which are required. Some examples include: diffs, expenses, locations, seasons, and tax codes. You can set which the default options by department, class, or subclass. If you set a default at the department level, it also becomes the default for all classes and subclasses within the department. Likewise, if you set a default at the class level, it becomes the default for all subclasses with the class. The required defaults are enforced when you attempt to approve an item in RMS. If have not provided the required details, the system displays a message. At that time, you can either enter the required details or override the requirement.
Add item defaults Navigate: From the main menu, select Action > Merchandise Hierarchy. The Merchandise Hierarchy Main Form window opens. 1. Select the hierarchy level you want to add the item default to.
Department a. Select Department on the tree structure. The departments appear in the table. b. Select a department and click Edit. The Department Maintenance window
opens. Class
a. Select Class on the tree structure. The Department field opens.
b. In the Department field, enter the ID of a department, or click the LOV button and select the department. The classes appear in the table.
c. Click Edit. The Class Maintenance window opens. d. Select a class.
Subclass a. Select Subclass on the tree structure. The Department and Class fields
appear.
b. In the Department field, enter the ID of a department, or click the LOV button and select the department.
c. In the Class field, enter the ID of a class, or click the LOV button and select the class. The subclasses appear in the table.
d. Click Edit. The Subclass Maintenance window opens. e. Select a subclass.

Foundation Data
55
2. Select Options > Merchandise Hierarchy Defaults. The Merchandise Hierarchy Default Maintenance window opens.
Merchandise Hierarchy Default Maintenance Window
3. Click Add. The fields in the Apply area are enabled.
4. In the Info field, enter the code for the default, or click the LOV button and select the default.
5. In the Subclass field, enter the ID of the subclass as necessary, or click the LOV button and select the subclass.
6. To make the default available to items in the selected merchandise levels, select the Available check box.
7. To make the default required for items in the selected merchandise levels, select the Required check box.
8. Click Apply. The default is added to the table. 9. Click OK to save your changes and close the window.
Copy merchandise hierarchy defaults Navigate: From the main menu, select Action > Merchandise Hierarchy. The Merchandise Hierarchy Main Form window opens. 1. Select Subclass on the tree structure. The Department and Class fields appear.
2. In the Department field, enter the ID of a department, or click the LOV button and select the department.
3. In the Class field, enter the ID of a class, or click the LOV button and select the class. The subclasses appear in the table.
4. Click Edit. The Subclass Maintenance window opens. 5. Select a subclass. From the Options menu, select Merchandise Hierarchy Defaults.
The Merchandise Hierarchy Default Maintenance window opens. 6. Click Copy All. The Copy window opens.

Oracle Retail Merchandising System
56
Copy Window
7. In the merchandise hierarchy fields, enter the IDs of each merchandise level, or click
the LOV button and select the merchandise levels. 8. Click OK to exit the Copy window. 9. When prompted to override any existing defaults, click Yes. The defaults are copied
to the Merchandise Hierarchy Default Maintenance window. 10. Edit the defaults as necessary. 11. Click OK to save your changes and close the window.
Set up merchandisers Set up merchandisers The merchandiser function allows you to create, edit, view, and delete merchandisers. You can record the name, phone number, and fax number for each merchandiser. Merchandisers are responsible for the selection of brands, products, sizes, and prices for consumer appeal and the point - of - sale. Because there can be many buyers and merchandisers at the division or group level, you may prefer to record the GMM (general merchandise manager) or DMM (division merchandise manager) at these levels.

Foundation Data
57
Create a merchandiser Navigate: From the main menu, select Control > Merchandiser > New. The Merchandiser Maintenance window opens.
Merchandiser Maintenance Window
1. In the Merchandiser field, the ID is filled in automatically. Enter the merchandiser's name in the field to the right of the ID.
2. In the Merchandiser Phone field, enter the merchandiser's telephone number. 3. In the Merchandiser Fax field, enter the merchandiser's fax number. 4. Click OK to save your changes and close the window.
Maintain value added taxes (VAT) Maintain value added taxes (VAT) VAT functionality is optional in RMS. In several countries, value added taxes (VAT) must be considered when determining the retail price of the items. VAT amounts appear in several modules of the system, such as purchase orders, contracts, stock ledger, and invoice matching. Prior to using the VAT functionality, you must set up a list of VAT regions and VAT codes. For each VAT code, you enter the tax rate to be used in monetary calculations. The following types of VAT regions may be set up: Base EU Region: The VAT region encompasses the entire European Union. Only one
VAT region can be designated as the Base EU Region. EU Member: The VAT region is located within the European Union. Non-Member: The VAT region is not located within the European Union.
As you add departments to the system, you must associate one or more VAT regions with the department. Each VAT region must have one or more VAT codes. VAT codes entered at the department level become the default VAT codes for items within the department. You can edit the default VAT codes at the item level.

Oracle Retail Merchandising System
58
VAT rates are identified by VAT code. When VAT codes are associated with a VAT region, they are assigned a VAT type. The VAT type indicates where the tax rate is included when determining the price. The VAT type can be included in the: Cost: The tax rate is applied to cost of the items. Retail Price: The tax rate is applied to retail price of the items. Both: The tax rate is applied to the cost and the retail price of the items.
Value added taxes are reflected in the stock ledger when the retail method of accounting is used and the system is set up to include VAT in retail calculations. As you add stores and warehouses to the system, you must associate a VAT region with each location. If you indicate that class level VAT will be used, you can indicate by class whether retail prices should be displayed in RMS including or excluding the retail price. For maintenance purposes, you can set the inclusion or exclusion to default to the class level by department.
Edit VAT codes Navigate: From the main menu, select Control > Setup > VAT Code Maintenance > Edit. The VAT Code Maintenance window opens.
VAT Code Maintenance Window
Edit the descriptions as necessary.

Foundation Data
59
Add a VAT code 1. Click Add. The next available line is enabled. 2. In the VAT code field, enter a code for the VAT. 3. In the VAT Code Description field, enter a description for the VAT code. 4. Click OK to save your changes and close the window.
Edit tax rates for a VAT code 1. Select a VAT code and click Rates. Any existing tax rates appear in the Rates
Maintenance window.
Rates Maintenance Window
2. To add a tax rate, click Add. 3. In the Rate (%) field, enter the tax rate. 4. In the Active Date field, enter the date on which the tax rate becomes effective, or
click the calendar button and select the date. 5. To delete a tax rate, select the tax rate and click Delete. 6. When prompted to delete the record, click Yes. 7. Click OK to save your changes and close the windows.

Oracle Retail Merchandising System
60
Delete a VAT code 1. Select a VAT code and click Delete. 2. When prompted to delete the record, click Yes. 3. Click OK to save your changes and close the window.
Edit VAT codes for a department Navigate: From the main menu, select Action > Merchandise Hierarchy. The Merchandise Hierarchy Main Form window opens. 1. Select Department on the tree structure. The departments appear on the table. 2. Select a department and click Edit. The Department Maintenance window opens. 3. From the Options menu, select VAT Maintenance. The VAT Department
Maintenance window opens.
VAT Department Maintenance Window
4. Edit the VAT codes as necessary.
Add a VAT region for a department 1. Click Add. The next available line is enabled.
2. In the VAT Region field, enter the ID of a VAT region, or click the LOV button and select the VAT region.
3. In the VAT Type field, select the type of calculations in which VAT amounts should be included.
4. In the VAT Code field, enter the code for the VAT, or click the LOV button and select the VAT code.
5. Click OK to save your changes and close the window.

Foundation Data
61
Delete a VAT region for a department 1. Select a VAT region and click Delete. 2. When prompted to delete the record, click Yes. 3. Click OK to save your changes and close the window.
Edit VAT codes for an item Navigate: From the main menu, select Items > Items. The Item Search window opens. Search for and retrieve an item in Edit mode. The Item Maintenance window opens. 1. Click on the VAT Maintenance option. The VAT Item Maintenance window opens.
VAT Item Maintenance Window
2. In the VAT Region field, enter the ID of the VAT region, or click the LOV button and select the VAT region. Any existing VAT codes appear.
Add a VAT code for an item 1. Click Add VAT Code. The next available line is enabled.
2. In the VAT Code field, enter the code for the VAT, or click the LOV button and select the VAT code.
3. In the VAT Type field, select the type of calculations in which VAT amounts should be included.
4. In the Active Date field, enter the date on which the VAT code becomes effective, or click the calendar button and select the date.
5. Click OK to save your changes and close the window.

Oracle Retail Merchandising System
62
Delete a VAT code for an item 1. Select a VAT code and click Delete. 2. When prompted to delete the record, click Yes. 3. Click OK to save your changes and close the window.
Note: When editing VAT codes for an item above the transaction level, you are prompted to update the VAT codes for the subordinate items down to the transaction level. Click Yes or No as applicable.
Edit VAT codes for multiple items Navigate: From the main menu, select Items > Item List. The Item List Search window opens. Search for and retrieve an item list in Use mode. The Item List Header window opens. 1. From the Options menu, select Create Mass Item Change > VAT Rates. The Item
VAT Rate - Mass Change window opens.
Item VAT Rate - Mass Change Window
2. In the VAT Region field, enter the ID of the VAT region, or click the LOV button and select the VAT region.
3. In the VAT Type field, select the type of calculations in which VAT amounts should be included.
4. In the VAT Code field, enter the code for the VAT, or click the LOV button and select the VAT code.
5. In the Active Date field, enter the date on which the VAT code becomes effective, or click the calendar button and select the date.
6. Click OK to save your changes and close the window.

Foundation Data
63
Edit VAT regions Navigate: From the main menu, select Control > Setup > VAT Region Maintenance > Edit. Any existing VAT regions appear in the VAT Region Maintenance window.
VAT Region Maintenance Window
Edit the descriptions and types as necessary.
Add a VAT region 1. Click Add. The next available line is enabled. 2. In the VAT Region field, enter a unique ID. 3. In the VAT Region Description field, enter a description for the VAT region. 4. In the VAT Region Type field, select the type of VAT region. 5. Click OK to save your changes and close the window.
Delete a VAT region 1. Select a VAT region and click Delete. 2. When prompted to delete the VAT region, click Yes. 3. Click OK to save your changes and close the window.

Oracle Retail Merchandising System
64
Maintain user defined attributes Maintain user defined attributes The User Defined Attributes (UDA) feature provides a method for defining attributes and associating the attributes with specific items, items on an item list, or items in a specific department, class, or subclass. UDAs are useful for informational and reporting purposes. Unlike traits or indicators, UDAs are not interfaced with external systems. UDAs can be displayed in three different types: free form text; date; or list of values. These types can be displayed in alphanumeric, number, or date format. To use UDAs effectively, you must first add the UDAs to the system. You can then add UDAs to a department, class, subclass, item, or item list. Alternatively, you can add departments, classes, subclasses, or items to a UDA.
Add a user defined attribute Navigate: From the main menu, select Items > User Defined Attributes > Edit. The UDA window opens.
UDA Window
1. Click Add UDA. The UDA ID is filled in automatically. 2. In the UDA Description field, enter the description of the user defined attribute. 3. In the Dialog field, select the type of dialog in which you want the attribute to
appear. 4. In the Display Type field, select the type of UDA. 5. In the Data Type field, select the type of data that is permitted. This field is enabled
when you select List of Values in the Display Type field. 6. In the Data Length field, enter the maximum number of characters that is permitted.
This field is disabled when you select Date in the Data Type field. 7. In the merchandise hierarchy fields, enter the ID of the member of each hierarchy
level, or click the LOV button and select a member. 8. If you want to limit the field to a single value, select the Single Value? check box. 9. To add a value to a list of values type of UDA:

Foundation Data
65
10. Click Add Value. The ID is filled in automatically. 11. Enter the description of the UDA value. 12. Click OK to save any changes and close the window.
Add a merchandise level to a user defined attribute Navigate: From the main menu, select Items > User Defined Attributes > Edit. The UDA window opens.
UDA Window

Oracle Retail Merchandising System
66
Add a department to a user defined attribute 1. Select a user defined attribute. 2. From the Options menu, select Department. The UDA Default Matrix window opens.
UDA Default Matrix Window
3. Click Add Default. The fields in the Apply area are cleared.
4. In the Department field, enter the ID of the department, or click the LOV button and select the department.
5. If the UDA is a list of values, enter the ID of the default value in the Default Value
field, or click the LOV button and select the value. This step is optional. 6. If the UDA is a required field, select the UDA Required? check box. 7. Click Apply. The department and value information are added to the table. 8. Click OK to save your changes and close the window.
Foundation Data
67
Add a class to a user defined attribute 1. Select a user defined attribute. 2. From the Options menu, select Class. The UDA Default Matrix window opens. 3. Click Add Default. The fields in the Apply area are cleared.
4. In the Department field, enter the ID of the department, or click the LOV button and select the department.
5. In the Class field, enter the ID of the class, or click the LOV button and select the class.

Oracle Retail Merchandising System
68
6. If the UDA is a list of values, enter the ID of the default value in the Default Value
field, or click the LOV button and select the value. This step is optional. 7. If the UDA is a required field, select the UDA Required? check box. 8. Click Apply. The class and value information are added to the table. 9. Click OK to save your changes and close the window.
Add a subclass to a user defined attribute 1. Select a user defined attribute. 2. From the Options menu, select Subclass. The UDA Default Matrix window opens. 3. Click Add Default. The fields in the Apply area are cleared.
4. In the Department field, enter the ID of the department, or click the LOV button and select the department.
5. In the Class field, enter the ID of the class, or click the LOV button and select the class.
6. In the Subclass field, enter the ID of the subclass, or click the LOV button and select the subclass.
7. If the UDA is a list of values, enter the ID of the default value in the Default Value
field, or click the LOV button and select the value. This step is optional. 8. If the UDA is a required field, select the UDA Required? check box. 9. Click Apply. The subclass and value information are added to the table. 10. Click OK to save your changes and close the window.
Add a user defined attribute to a merchandise level Navigate: From the main menu, select Action > Merchandise Hierarchy. The Merchandise Hierarchy Main Form window opens.
Merchandise Hierarchy Main Form Window

Foundation Data
69
Add a user defined attribute to a department 1. Select Department on the tree structure. The departments appear on the table. 2. Select a department and click Edit. The Department Maintenance window opens. 3. From the Options menu, select User Defined Attributes. The User Defined
Attribute/Item Default List window opens.
User Defined Attribute/Item Default List Window
4. Click Add UDA. The fields in the Apply area are cleared.
5. In the UDA field, enter the ID of the UDA, or click the LOV button and select the UDA.
6. If the UDA is a list of values, enter the ID of the default value, or click the LOV button and select the default value. This step is optional.
7. To indicate that the UDA is required for all items in the department, select the UDA Required? check box.
8. Click Apply. The UDA is added to the table. 9. Click OK to save your changes and close the window.

Oracle Retail Merchandising System
70
Add a user defined attribute to a class 1. Select Class on the tree structure.
2. In the Department field, enter the ID of the department, or click the LOV button and select the department.
3. Click Edit. The Class Maintenance window opens. 4. Select a class. 5. From the Options menu, select User Defined Attributes. The User Defined
Attribute/Item Default List window opens. 6. Click Add UDA. The fields in the Apply area are cleared.
7. In the UDA field, enter the ID of the UDA, or click the LOV button and select the UDA.
8. If the UDA is a list of values, enter the ID of the default value, or click the LOV button and select the default value. This step is optional.
9. To indicate that the UDA is required for all items in the class, select the UDA Required? check box.
10. Click Apply. The UDA is added to the table. 11. Click OK to save your changes and close the window.
Add a user defined attribute to a subclass 1. Select Subclass on the tree structure.
2. In the Department field, enter the ID of the department, or click the LOV button and select the department.
3. In the Class field, enter the ID of the class, or click the LOV button and select the class.
4. Click Edit. The Subclass Maintenance window opens. 5. Select a subclass. 6. From the Options menu, select User Defined Attributes. The User Defined
Attribute/Item Default List window opens. 7. Click Add UDA. The fields in the Apply area are cleared.
8. In the UDA field, enter the ID of the UDA, or click the LOV button and select the UDA.
9. If the UDA is a list of values, enter the ID of the default value, or click the LOV button and select the default value. This step is optional.
10. To indicate that the UDA is required for all items in the subclass, select the UDA Required? check box.
11. Click Apply. The UDA is added to the table. 12. Click OK to save your changes and close the window.

Foundation Data
71
Add a user defined attribute to an item Navigate: From the main menu, select Items > Items. The Item Search window opens. Search for and retrieve an item in Edit mode. The Item Maintenance window opens. Click on the User Defined Attributes option. The Item UDA List window opens.
Item UDA List Window
Add a list of values type of UDA 1. Click Add Values.
2. In the User Defined Attributes field, enter the ID of the UDA, or click the LOV button and select the UDA.
3. In the UDA Value field, enter the ID of the value, or click the LOV button and select the value.
4. Click OK to save your changes and close the window.
Add a date type of UDA 1. Click Add Dates.
2. In the User Defined Attributes field, enter the ID of the UDA, or click the LOV button and select the UDA.
3. In the UDA Date field, enter the date, or click the calendar button and select the date.
4. Click OK to save your changes and close the window.

Oracle Retail Merchandising System
72
Add a free form text type of UDA 1. Click Add Text.
2. In the User Defined Attributes field, enter the ID of the UDA, or click the LOV button and select the UDA.
3. In the UDA Text field, enter the text, or click the comments button and enter the text.
4. Click OK to save your changes and close the window.
Add an item to a user defined attribute Navigate: From the main menu, select Items > User Defined Attributes > Edit. The UDA window opens.
UDA Window
1. Select a user defined attribute. 2. From the Options menu, select Item. The Item UDA Matrix window opens.

Foundation Data
73
Item UDA Matrix Window
3. Click Add. The next available line becomes enabled.
4. In the Item field, enter the ID of the item, or click the LOV button and select the item.
5. Enter the applicable information:
a. In the UDA Value field, enter the ID of the default value, or click the LOV button and select the value.
b. In the Date field, enter the default date, or click the calendar button and select the date.
c. In the Comments field, enter the default text, or click the comments button and enter the text.
Note: The field that opens depends on the type of user defined attribute.
d. Click OK to save your changes and close the window.

Oracle Retail Merchandising System
74
Maintain item lists Maintain item lists Item lists are set up by selecting items either individually or by a group characteristic. At any time you may add items to or delete items from an item list. Item lists may also be linked with Location Lists using the Scheduled Item Maintenance window. You can add items to a list one by one, or you can enter criteria in order to group the items. It becomes much simpler to apply changes to multiple items when the items are grouped on an item list. The item list feature allows you to create, copy, edit, view, and use a group of items that are identified by one ID.
Create an item list Navigate: From the main menu, select Items > Item List. The Item List Search window opens.
Item List Search Window

Foundation Data
75
1. In the Action field, select New. 2. Click OK. The Item List Header window opens. The ID of the item list is filled in
automatically.
Item List Header Window
3. Enter the description of the item list. 4. Select the Static Ind, Tax Product Group Ind, and User Security Ind check boxes as
necessary. 5. In the organization hierarchy field, enter the ID of the member of the hierarchy level,
or click the LOV button and select a member. 6. To associate an item list with a department:
a. In the Group Type field, select the merchandise hierarchy level that you want to use to search for departments.
b. In the Group Value field, enter the ID of merchandise hierarchy level that the
item list is associated with, or click the LOV button and select an item list. c. Click Apply. The departments that are associated with the item list opens.
2. Enter any additional comments in the comments field, or click the comments button and enter additional comments.

Oracle Retail Merchandising System
76
Add items individually 1. From the Options menu, select Select Items. The Add Items to Item List Individually
window opens.
Add Items to Item List Individually Window
2. Click Add. 3. On the next available line, enter the item number in the Item field, or enter a partial
item number and click the LOV button to select the item from a list. 4. Click OK to save your changes and close the window.

Foundation Data
77
Add items by group 5. From the Options menu, select By Group. The Add Items to Item List by Group
window opens.
Add Items to Item List by Group Window
6. Select or enter the criteria in the Criteria fields. 7. Click Add. The items that match the criteria are added to the item list. 8. Click OK to save your changes and close the window.
Add items to an item list Navigate: From the main menu, select Items > Item List. The Item List Search window opens. Search for and retrieve an item list in Edit mode. The Item List Header window opens.
Item List Header Window
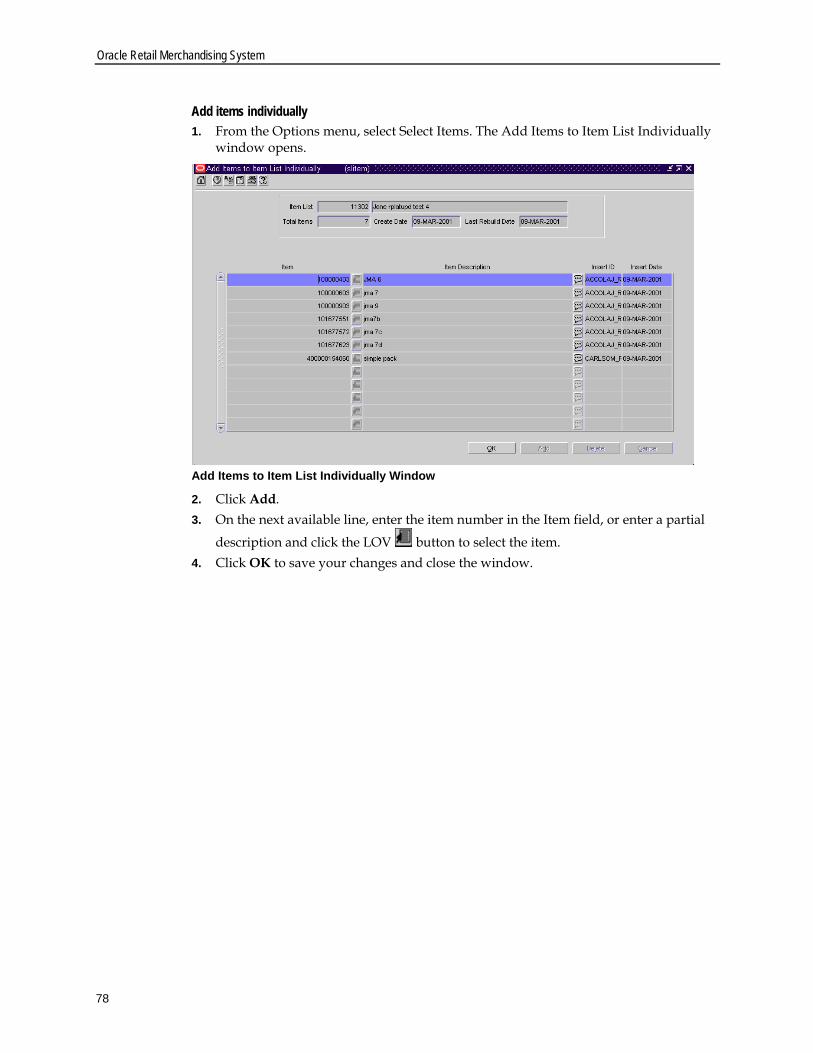
Oracle Retail Merchandising System
78
Add items individually 1. From the Options menu, select Select Items. The Add Items to Item List Individually
window opens.
Add Items to Item List Individually Window
2. Click Add. 3. On the next available line, enter the item number in the Item field, or enter a partial
description and click the LOV button to select the item. 4. Click OK to save your changes and close the window.

Foundation Data
79
Add items by group 1. From the Options menu, select Select By Group. The Add Items to Item List by
Group window opens.
Add Items to Item List by Group Window
2. Select or enter criteria in the Criteria fields. 3. Click Add. The items that match the criteria are added to the item list. 4. Click Exists in Criteria to calculate the number of items that match the current
criteria. 5. Click Exists in List to calculate the total number of items that make up the item list. 6. Click OK to save your changes and close the windows.

Oracle Retail Merchandising System
80
Add an item list/location list link Navigate: From the main menu, select Items > Scheduled Item Maintenance > New. The Scheduled Item Maintenance window opens.
Scheduled Item Maintenance Window
1. In the Item/Location Link ID field, enter a name for the link you are creating. The ID number will be created by RMS.
2. In the Item List field, enter an item list ID, or click the LOV button to select an ID.
3. In the Location List field, enter a location list ID, or click the LOV button to select an ID.
Note: You will only be able to add item and location lists that do not have user security, or were created by you.

Foundation Data
81
4. Click Add Detail to highlight the first row in the Detail Information table.
5. In the Effective Date field, click the calendar button and select the date for this link to become effective in RMS.
6. In the Status field, select the status that will be applied to this link on the effective date.
7. To add another effective date and status for this link, click Add. 8. Click OK to save your changes and close the window.
Copy an item list Navigate: From the main menu, select Items > Item List. The Item List Search window opens. Search for and retrieve an item list in Create from Existing mode. The Item List Header window opens.
Item List Header Window
Edit the description, comments, and static indicator as necessary.

Oracle Retail Merchandising System
82
Add items individually 1. From the Options menu, select Select Items. The Add Items to Item List Individually
window opens.
Add Items to Item List Individually Window
2. Click Add. 3. On the next available line, enter the item number in the Item field, or enter a partial
description and click the LOV button to select the item.
Note: Only items that are in the departments associated with the item list will be added to the list.
4. Click OK to save your changes and close the window.
Delete items individually 1. From the Options menu, select Select Items. The Add Items to Item List Individually
window opens. 2. Select an item and click Delete. 3. When prompted to delete the record, click Yes. 4. Click OK to save your changes and close the window.

Foundation Data
83
Add items by group 1. From the Options menu, select Select By Group. The Add Items to Item List by
Group window opens.
Add Items to Item List by Group Window
2. Select or enter the criteria in the Criteria fields. 3. Click Add. The items that match the criteria are added to the item list.
Note: Only items that are in the departments associated with the item list will be added to the list.
4. Click OK to save your changes and close the window.

Oracle Retail Merchandising System
84
Delete items by group 1. From the Options menu, select View Criteria. The Item List Criteria window opens.
Item List Criteria Window
2. Select or enter the criteria in the Criteria fields. 3. Click Delete. When prompted to delete the record, click Yes. The items that match
the criteria are deleted from the item list. 4. Click OK to save your changes and close the window.
Rebuild an item list Navigate: From the main menu, select Items > Item List. The Item List Search window opens. Search for and retrieve an item list in Edit mode. The Item List Header window opens.
Item List Header Window

Foundation Data
85
1. From the Options menu, select Rebuild Item List. The Rebuild Item List window opens.
Rebuild Item List Window
2. Select the Rebuild Item List check box. 3. Click OK to save your changes and close the windows.
Note: Whenever you select an item list in any window, you can rebuild the list. From the Options menu, select Rebuild Item List. This ensures that all items in a department are included on the list. You cannot rebuild a static item list.
Note: If an item list was set up with user security, only the creator is able to rebuild the list.

Oracle Retail Merchandising System
86
Search for an item list Navigate: From the main menu, select Items > Item List. The Item List Search window opens.
Item List Search Window
1. In the Action field, select View, Edit, Create from Existing, or Use. 2. Enter additional criteria as desired to make the search more restrictive. 3. Click Search. The Item List Search window displays the item lists that match the
search criteria. 4. Select a task:
To perform another search, click Refresh. To display an item list, select a record and click OK. The Item List Header
window opens.
Item List Header Window
Click Close to close the window.

Foundation Data
87
Use an item list Navigate: From the main menu, select Items > Item List. The Item List Search window opens. Search for and retrieve an item list in Use mode. The Item List Header window opens.
Item List Header Window
1. To use the item list to make changes to items, from the Options menu, select Create Mass Item Change and select the appropriate change task.
2. Click OK to save your changes and close the window.
Maintain item attributes Maintain item attributes The item attributes feature provides a way to record specific information about items. An attribute may be associated with multiple items. There are quick ways to make mass changes to attributes for items: Use an item list to change attributes at multiple locations for all items on the item list. Use an item list to change attributes for all items on the item list. Change attributes for all subordinate items that are associated with a level 1 or level 2
item. Attributes are used to record specific information relating to various elements in RMS. In some cases, attributes affect how the element is handled throughout RMS. In other cases, the attributes feature is an easy way of tracking additional information. Using the reporting feature of RMS, you can create custom reports based on the attributes you record.

Oracle Retail Merchandising System
88
Record attributes for an item Navigate: From the main menu, select Items > Items. The Item Search window opens. Search for and retrieve an item in Edit mode. The Item Maintenance window opens. 1. From the Option list, click the Item Attributes. The Item Attributes window opens.
Item Attributes Window
2. Enter or select the attributes that apply to the current item. 3. Click OK to exit.

Foundation Data
89
Record grocery attributes for an item Navigate: From the main menu, select Items > Items. The Item Search window opens. Search for and retrieve an item in Edit mode. The Item Maintenance window opens. 1. Click Groc Attributes. The Item Grocery Attributes window opens.
Item Grocery Attributes Window
2. In the Package Size and Package UOM field, enter the size and unit of measure for a retail package of the current item.
3. In the Retail Label Type and Retail Label Value fields select the type of label applied to the package and its value.
4. In the Handling Sensitivity and Handling Temp fields, select any special handling instructions.
5. In the Wastage Type field, select the type of wastage. 6. In the Default Daily Wastage % field, enter the average percentage of spoilage an
item is subject to on a daily basis. 7. In the Wastage Percentage field, enter the average percentage of waste an item is
subject to over its shelf life. 8. Click OK to save your changes and close the window.

Oracle Retail Merchandising System
90
Record import attributes for an item Navigate: From the main menu, select Items > Items. The Item Search window opens. Search for and retrieve an item in Edit mode. The Item Maintenance window opens. 1. From the Options list, select Import Attributes. The Item Import Attributes window
opens.
Item Import Attributes Window
2. Enter or edit the attributes that apply to the current item. 3. Click OK to save your changes and close the window.
Edit attributes for an item by item Navigate: From the main menu, select Items > Items. The Item Search window opens. Search for and retrieve an item in Edit mode. The Item Maintenance window opens.
Item Maintenance Window

Foundation Data
91
1. Click on the Mass Change Item option. The Change Item Indicator Attributes window opens.
Change Item Indicator Attributes Window
Note: Items need to be at the transaction level to change the attributes.
2. Select the check boxes in the Update column next to the fields that you want to change.
3. Select or enter the new values in the Change Value To column. 4. To edit attributes for subordinate level items:
a. Click on the List Children option. The Item Children window opens b. Click on the Mass Change Item option. The Change Item Indicator Attributes
window opens. c. Select the check boxes in the Update column next to the fields that you want to
change. d. Select or enter the new values in the Change Value To column.
5. Click OK to save your changes and close the window.

Oracle Retail Merchandising System
92
Edit attributes for items by item list Navigate: From the main menu, select Items > Item List. The Item List Search window opens. Search for and retrieve an item list in Use mode. The Item List Header window opens.
1. From the Options menu, select Create Mass Item Change > Item Indicator. The
Change Item Indicator Attributes window opens.
2. Select the check boxes in the Update column next to the fields that you want to
change. 3. Select or enter the new values in the Change Value To column. 4. Click OK to save your changes and close the window.

Foundation Data
93
Suppliers Record EDI capability for a supplier
Navigate: From the main menu, select Control > Supplier. The Supplier Search window opens. Search for and retrieve a supplier in Edit mode. The Supplier Maintenance window opens.
Note: If the Financials module is installed, select Control > Supplier > Maintenance from the main menu.
1. From the Options menu, select EDI. The Supplier EDI Information window opens.
Supplier EDI Information Window
2. In the EDI Transactions fields, select the activities that the supplier can process via EDI.
3. In the Sales field, select how often product activity data must be generated for the supplier.
4. In the Amount and Percent fields, enter a currency amount and a percentage to indicate by how much a cost change can vary from the current cost and still be automatically approved.
5. Click OK to save your changes and close the window.

Oracle Retail Merchandising System
94
Define supplier traits Define supplier traits With supplier traits, you can group suppliers based on a trait. You can also group suppliers by associating them with a trait that indicates that they share a master supplier. A master supplier is an outside source that provides merchandise to your suppliers, such as a manufacturer, distributor, or wholesaler. You can also enter an external ID for the master supplier. Based on the traits you associate with your suppliers, you can create reports.
Add a supplier trait Navigate: From the main menu, select Control > Traits > Supplier Traits > Edit. The Supplier Traits Maintenance window opens.
Supplier Traits Maintenance Window

Foundation Data
95
1. Click Add Trait. 2. In the Supplier trait field on the next available line, enter a unique ID for the trait. 3. In the Description field, enter the description for the trait. 4. Enter or select the optional information in the remaining fields as necessary. 5. Click OK to save your changes and close the window.
Associate a supplier trait with a supplier Navigate: From the main menu, select Control > Supplier > Edit. The Supplier Maintenance window opens. From the Options menu, select Supplier Traits. The Supplier Traits List window opens.
Supplier Traits List Window
1. Click Add Trait. 2. In the Supplier Trait field on the next available line, enter the ID of the trait, or click
the LOV button and select the trait. 3. Click OK to save your changes and close the window.
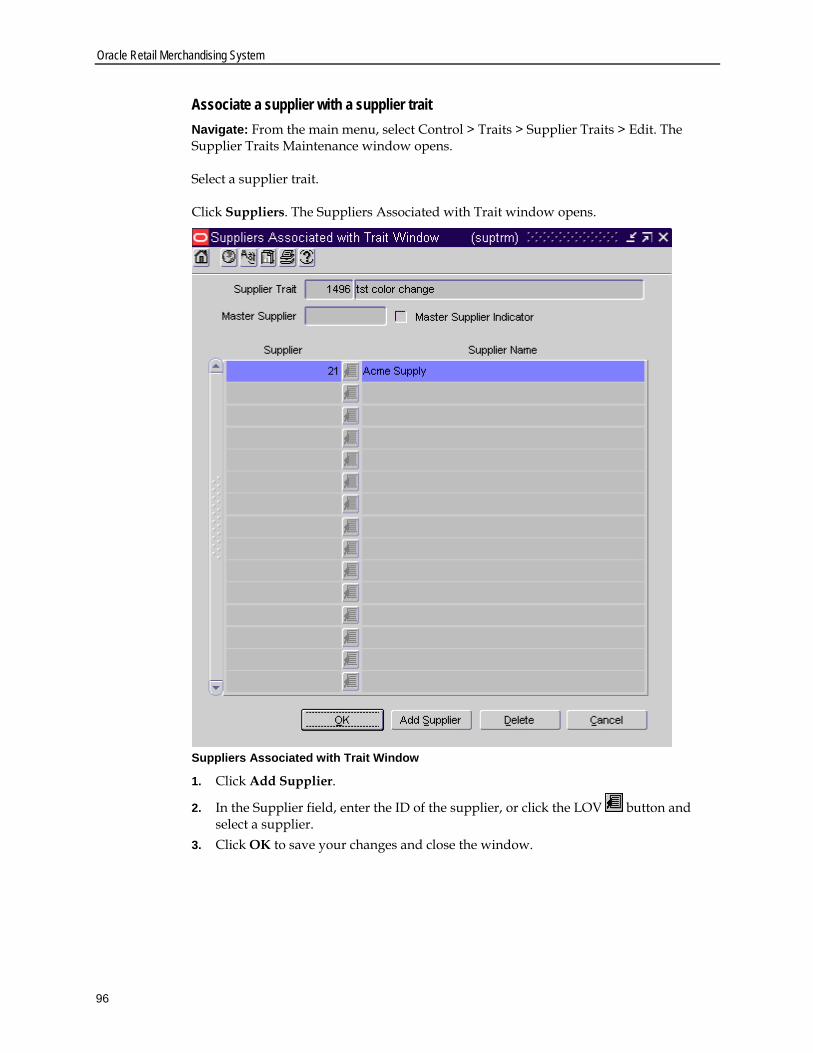
Oracle Retail Merchandising System
96
Associate a supplier with a supplier trait Navigate: From the main menu, select Control > Traits > Supplier Traits > Edit. The Supplier Traits Maintenance window opens. Select a supplier trait. Click Suppliers. The Suppliers Associated with Trait window opens.
Suppliers Associated with Trait Window
1. Click Add Supplier.
2. In the Supplier field, enter the ID of the supplier, or click the LOV button and select a supplier.
3. Click OK to save your changes and close the window.

Foundation Data
97
Maintain suppliers Supplier management overview The supplier management feature allows you to add, edit, and view the following information about suppliers: Multiple contact persons and addresses: You can enter multiple addresses of
different types, such as business, invoice, order, postal, remittance, and returned goods.
Financial arrangements: You can indicate the payment terms, freight terms, currency, settlement code, and payment method.
Inventory management parameters: You can set up a replenishment cycle, order attributes, scaling attributes and constraints, order minimum constraints, and due order processing. You can also indicate whether quality control checking is required and what percentage of the received goods must be checked.
Return to vendor (RTV) requirements: You can indicate whether returns are allowed, whether an authorization number is required, the minimum value of a return, the preferred courier, and the handling charge.
Required documents You can select which documents, if any, are required by the supplier.
Expense profiles: You can enter the supplier's costs by country or by cost zone. Types of electronic data interchange (EDI) transactions: You can indicate which
EDI transactions the supplier can process. Generic attributes: You can indicate which attributes apply to the supplier, such as
co-op agreement terms, volume rebate terms, whether a PO is required, or whether items are pre-ticketed.
Import attributes: You can enter import-related information such as agent, advising and issuing banks, lading and discharge ports, manufacturer ID, and beneficiary.
Invoice matching attributes: You can indicate when debit memos are sent, whether invoices and debit memos are approved automatically, whether supplier is allowed to charge freight, and whether invoices are pre-paid. (Oracle Retail Invoice Matching must be installed.)
Supplier traits: You can select the traits by which you want to group the supplier with other suppliers.
Payment types by store: You can select the methods by which the supplier can be paid, such as cash, money order, and invoice. You can also indicate the payment type by store.
Delivery schedules at stores and warehouses: After you create a delivery schedule, you can specify which items are not to be delivered to the location on a specific delivery day.
Vendor managed inventory (VMI): Use VMI to allow a supplier to manage the inventory levels of designated product at the warehouse. Inventory data is shared with the supplier, who uses the information to create inbound purchase orders, which will achieve and/or maintain budgeted inventory and service levels in the warehouse.

Oracle Retail Merchandising System
98
Create a supplier
Note: If the Financials module is installed, new suppliers are created via a file transmission. You cannot create a supplier manually.
Navigate: From the main menu, select Control > Supplier. The Supplier Search window opens. 1. In the Action field, select New. 2. Click OK. The Supplier Maintenance window opens.
Supplier Maintenance Window

Foundation Data
99
3. In the Supplier fields, enter an ID and description for the supplier. 4. In the Status field, indicate whether the supplier is active or inactive. 5. In the Contact fields, enter the name, telephone number, fax number, telex, and e-
mail for the primary contact person at the supplier's location. 6. In the Details fields, select the payment terms, freight terms, currency, language,
VAT region, and shipping method. 7. In the Settlement Code and Payment Method fields, select the appropriate options. 8. In the Lead Time field, enter the amount of time a supplier needs between receiving
an order and having the order ready to ship. This value will be defaulted to item/supplier relationships.
9. In the DUNS Supplier Number and DUNS Location Number fields, enter the appropriate Dun and Bradstreet codes to identify the supplier and its location.
10. Select the DSD check box to indicate that the supplier can provide direct store deliveries.
11. If you will be allowing vendor managed inventory with this supplier, select Worksheet or Approved in the VMI Order Status field.
12. In the Inventory Mgmt Info Level, select Supplier, Supplier/Loc, Supplier/Dept, or Supplier/Dept/Loc.
13. Select the appropriate indicators as necessary for the supplier. In the Indicators area: a. Select the QC Required check box, to indicate that goods received from the
supplier must be inspected for quality. b. In the QC Pct field, enter what percentage of the goods must be inspected. c. In the QC Freq field, enter how often the items will be inspected. d. Select the Auto Contract Approval check box to indicate that contract orders are
created in Approved status. e. Select the Pre-Mark Indicator check box to indicate that the supplier will break
orders into separate, marked boxes that can be shipped directly to stores. f. Select the Bracket Costing check box to indicate this supplier uses bracket costing
in its pricing. g. Select the Back Orders check box to indicate the supplier accepts back orders.
14. Add an address for a supplier 15. Click OK to save any changes and close the window.

Oracle Retail Merchandising System
100
Add an address for a vendor Navigate: From the Partner Maintenance or Supplier Maintenance window, select Address from the Options menu. The Address window opens.
Address Window
1. In the Address Type field, enter the address type code, or click the LOV button and select an address type.
2. In the address area, enter the necessary address information. 3. If the address is the primary address for an address type, select the Primary Address
check box.
Note: The Primary Address check box is only available if you are adding more than one address to an address type.
4. In the contact area, enter the necessary contact information. 5. Click Apply. The address is added to the table. 6. Click OK to close the window and save any changes.
Note: You will not be able to close the window until you have added all the mandatory address types.

Foundation Data
101
Record return requirements for a supplier Navigate: From the main menu, select Control > Supplier. The Supplier Search window opens. Search for and retrieve a supplier in Edit mode.
Note: If the Financials module is installed, select Control > Supplier > Maintenance from the main menu.
1. From the Options menu, select Returns. The Supplier Returns window opens.
Supplier Returns Window
2. If the supplier allows goods to be returned, select the Returns Allowed check box. 3. If the supplier requires returned goods to have an authorization number, select the
Authorization Required check box. 4. In the Minimum Return Amount field, enter the minimum value of the returned
goods that the supplier will accept. 5. In the Courier field, enter the supplier's preferred shipper for returned goods. 6. In the Handling % field, enter the percentage added to the value of the returned
goods as a handling charge.

Oracle Retail Merchandising System
102
7. To enter the address to which returned goods should be shipped: a. Click Address. The Address window opens.
Address Window
b. Enter the address in the Address, City, State, Postal Code, and Country fields. c. In the Contact fields, enter the name, telephone number, fax number, telex, and
e-mail for the primary contact person at the supplier's location. d. Click OK to exit the Address window.
8. Click OK to save your changes and close the window.

Foundation Data
103
Search for a supplier Navigate: From the main menu, select Control > Supplier. The Supplier Search window opens.
Supplier Search Window
Note: If the Financials module is installed, select Control > Supplier > Maintenance from the main menu.
1. In the Action field, select either Edit or View. 2. Enter additional criteria as desired to make the search more restrictive. 3. Click Search. 4. Select a task: 5. To perform another search, click Refresh. 6. To display the supplier information, select a record and click OK. The Supplier
Maintenance window opens. 7. Click Close to close the window.
Maintain supplier attributes Maintain supplier attributes The supplier attributes feature provides a way to record specific information about suppliers. Attributes are used to record specific information relating to various elements in RMS. In some cases, attributes affect how the element is handled throughout RMS. In other cases, the attributes feature is an easy way of tracking additional information. Using the reporting feature of RMS, you can create custom reports based on the attributes you record.

Oracle Retail Merchandising System
104
Record attributes for a supplier Navigate: From the main menu, select Control > Supplier. The Supplier Search window opens. Search for and retrieve a supplier in Edit mode. The Supplier Maintenance window opens. 1. From the Options menu, select Attributes. The Supplier Attributes window opens.
Supplier Attributes Window
2. Enter or select the attributes that apply to the current supplier. 3. Click OK to save your changes and close the window.

Foundation Data
105
Record import attributes for a supplier Navigate: From the main menu, select Control > Supplier. The Supplier Search window opens. Search for and retrieve a supplier in Edit mode. The Supplier Maintenance window opens. 1. From the Options menu, select Import Attributes. The Supplier Import Attributes
window opens.
Supplier Import Attributes Window
2. Enter or select the import attributes that apply to the current supplier. 3. Click OK to save your changes and close the window.

Oracle Retail Merchandising System
106
Maintain partners Maintain partners A partner is a person or entity that has an association with your organization in various areas of the procurement process. Partners can include those involved in transporting goods, escheatment, providing credit, and providing services. For bank partners, you can track the status of your line of credit. Manufacturer, distributor, and wholesaler partners are considered part of the supplier hierarchy. These are default names and can be edited in the Dynamic Hierarchy window.
Create a partner Navigate: From the main menu, select Control > Partner. The Partner Find window opens.
Partner Find Window
1. In the Action field, select New. 2. In the Partner Type field, select the type of partner. 3. Click OK. The Partner Maintenance window opens.

Foundation Data
107
Partner Maintenance Window
4. In the first field, enter an ID and description for the partner.
Note: The label for this field depends on the type of partner.
Note: You cannot enter an ID if your system is set up to automatically generate IDs.

Oracle Retail Merchandising System
108
5. In the Currency field, enter the code for the partner's currency, or click the LOV button and select the currency.
6. In the Language field, enter the ID of the partner's language, or click the LOV button and select the language.
7. In the Status field, indicate whether the partner is active or inactive. 8. In the Contact fields, enter the name, telephone number, fax number, telex, and e-
mail for the primary contact person at the partner's location. 9. If you are creating a Bank partner, enter an amount in the Line of Credit field in the
currency of the partner. 10. For all partners but banks, enter the applicable details in the Details area. 11. Add an address for the partner. 12. Click OK to save your changes and close the window.
Add an address for a vendor Navigate: From the Partner Maintenance or Supplier Maintenance window, select Address from the Options menu. The Address window opens.
Address Window

Foundation Data
109
1. In the Address Type field, enter the address type code, or click the LOV button and select an address type.
2. In the address area, enter the necessary address information. 3. If the address is the primary address for an address type, select the Primary Address
check box.
Note: The Primary Address check box is only available if you are adding more than one address to an address type.
4. In the contact area, enter the necessary contact information. 5. Click Apply. The address is added to the table. 6. Click OK to close the window and save any changes.
Note: You will not be able to close the window until you have added all the mandatory address types.
Search for a partner Navigate: From the main menu, select Control > Partner. The Partner Find window opens.
Partner Find Window

Oracle Retail Merchandising System
110
1. In the Action field, select either Edit or View. 2. In the Partner Type field, select the type of partner. 3. Enter additional criteria as desired to make the search more restrictive. 4. Click Search. The Partner Find window displays the partners that match the search
criteria. 5. Select a task: 6. To perform another search, click Refresh. 7. To display the partner information, select a record and click OK. The Partner
Maintenance window opens. 8. Click Close to close the window.
111
4 Item Maintenance
Item Maintenance Set up diffs Create an item Submit and approve the item Accept EDI items Reclassify items
Set up diffs Set up diffs
RMS item creation allows you to create simple or complex items. Complex items are created by defining each variation of the item as an Item Level. A diff allows you to distinguish an item by characteristic. For items that do vary, you can use diffs to create up to three levels of an item.
Diff Types Up to 30 different diff types can be created in RMS. Examples of diff types are color, size, flavor or pattern. By tracking information based on diffs you are able to identify which variety of an item has the best rate of sale, expedite ordering and transferring goods, and generate detailed reports.
Diff Ratio Diff ratios are used to designate the quantity of each diff that should be fulfilled as a percentage of the total diff quantity. You are able to view and edit the results of a diff ratio that has been calculated by a batch program, base a store's diff ratios on those for another store, and you edit the quantity for each diff or diff combination.

Oracle Retail Merchandising System
112
Add a diff Navigate: From the main menu, select Items > Diffs > Diff IDs > Edit. The Diff ID Maintenance window opens.
Diff ID Maintenance Window
1. Click Add. The fields in the apply block are cleared.
2. In the Diff Type field, enter a diff type, or click the LOV button and select a diff type.
3. In the Diff ID field, enter a unique ID for the new diff. 4. In the Diff Description field, enter a diff description. 5. In the Industry Code field, if the diff is a size, you may enter a valid National Retail
Federation (NRF) size code. 6. In the Industry Subgroup field, if the diff is a color, you may enter a valid National
Retail Federation (NRF) color code. 7. Click Apply. The diff is added to the table. 8. Click OK to save your changes and close the window.

Item Maintenance
113
Add a diff group Navigate: From the main menu, select Items > Diffs > Diff Group > Edit. The Diff Group Maintenance window opens.
Diff Group Maintenance Window
1. Click Add. The next available line is enabled. 2. In the Diff Group field, enter a unique ID for the diff group. 3. In the Diff Group Description field, enter a description for the diff group.
4. In the Diff Type field, click the LOV button and select a diff type for the new group.
5. In the merchandise hierarchy fields, enter the ID of the member of each hierarchy
level, or click the LOV button and select a member. 6. Click Detail. The Diff Group Maintenance - Detail window opens.

Oracle Retail Merchandising System
114
Diff Group Maintenance - Detail Window
Note: Click OK in response to the message confirming the addition of the diff group. Click OK when prompted that there are no details for the group.
7. Click Add. 8. In the Seq field, enter a numeric value for each diff ID in the diff group. When the
diffs appear on RMS windows, they will be sequenced in the order indicated in the Seq field.
9. In the Diff ID field, enter the ID of the diff, or click the LOV button and select the diff. The label for the Diff ID field will display the diff type assigned to this group.
10. Click OK to save your changes and close the window.

Item Maintenance
115
Add a diff type Navigate: From the Main Menu, select Items > Diffs > Diff Types > Edit. The Diff Type Maintenance window opens.
Diff Type Maintenance Window
1. Click Add. A blank row is highlighted. 2. In the Diff Type field, enter a unique diff type ID. 3. In the Description field, enter a description for the new diff type. 4. Click Add to add any additional diff types.
Note: You may have up to 30 diff types in RMS.
5. Click OK to save your changes and close the window.

Oracle Retail Merchandising System
116
Create a diff range Navigate: From the main menu, select Items > Diffs > Diff Range > New. The Diff Range Maintenance window opens.
Diff Range Maintenance Window
1. In the Diff Range field, enter the ID and description of the diff range. 2. In the Diff Type field, select a type of diff that you want to include in the range. 3. In the Diff Group field, enter the ID of a group of diffs that you want to include in the
range, or click the LOV button and select the diff group. 4. Repeat steps 2 and 3 for up to 3 total diff type/group combinations. 5. Click Add Details to enable the first row in the table.
6. Enter a valid diff ID to include in the diff range, or click the LOV button and select the diff range. The diff types selected in step 2 above appear as the labels for Diff ID fields in table.
7. Select additional diff IDs as needed to complete the diff range record. 8. Click Add, and repeat steps 6 and 7 above, to add another diff ID to the range. 9. If Percent or Ratio were selected in the Diff Range Type field, enter a percent or ratio
in the last column of the table, for each diff detail. 10. Click OK to save your changes and close the window.

Item Maintenance
117
Create a diff ratio Navigate: From the main menu, select Control > Diff Ratios. The Diff Ratio Find window opens.
Diff Ratio Find Window
1. In the Action field, select New. 2. Click OK. The Diff Ratio Head window opens.
Diff Ratio Head Window
Note: The diff ratio ID is filled in automatically.

Oracle Retail Merchandising System
118
1. In the Diff Ratio ID field, enter the description of the diff ratio. 2. Select either the System or Manual option. 3. If you select System: 4. Enter the ID of the department, class, and subclass in the appropriate fields, or click
the LOV buttons and select them.
5. Enter up to three diff groups to be associated with this ratio, or click the LOV buttons and select them.
6. In the Sales Type area, select the types of sales that you want to include in the size ratio.
7. In the Build Time Period, select the type of time period. Then enter the dates or the number of weeks in the appropriate fields.
8. In the Review Every Weeks field, enter how often the size ratio should be recalculated.
9. If you select Manual: a. Click Like Diff Ratio. The Like Diff Ratio window opens.
b. In the Diff Ratio ID field, enter the ID of the diff ratio that you want to copy, or
click the LOV button and select the diff ratio. c. Click OK to close the window. The merchandise levels, sales types, diff groups,
and time period information are copied to the current sales ratio.

Item Maintenance
119
10. Click Detail. The Diff Ratio Detail Maintenance window opens.
11. In the Subclass/Store field, select either Store or Subclass. If you select Store, enter
the ID of the store, or click the LOV button and select the store. The quantity and ratio for each diff at the store (or all stores if you selected Subclass) appear.
Note: If you select a store that is not yet associated with the diff ratio, you are prompted to add the store and copy the settings from another store.
12. Edit the quantities as necessary. 13. Click Recalculate. 14. Click OK to save your changes and close the windows.

Oracle Retail Merchandising System
120
Create a pack template Navigate: From the main menu, select Items > Diffs > Pack Templates > New. The Pack Template Maintenance window opens.
Pack Template Maintenance Window
Note: A Pack Template ID is automatically generated and displayed.
1. In the Pack Template ID field, enter a description for the template. 2. In each Diff Type field, enter the ID of a diff type you want to assign to this template
for up to four diff types, or click the LOV button and select the diff type. 3. In each Diff Group field, select the diff group you want to assign to this template, for
up to four diff groups. 4. Click Add Details.
5. For each Diff field, enter a diff ID, or click the LOV button and select a diff for each diff group/type combination. The field label will display the value that you selected in the Diff Type field.
6. In the Quantity field, enter the quantity to include in the pack. 7. Click OK to save your changes and close the window.

Item Maintenance
121
Search for a diff ratio Navigate: From the main menu, select Control > Diff Ratios. The Diff Ratio Find window opens.
Diff Ratio Find Window
1. In the Action field, select either Edit or View. 2. Enter additional criteria as desired to make the search more restrictive. 3. Click Search. The Diff Ratio Find window displays the diff ratios that match your
search criteria. 4. Select a task: 5. To perform another search, click Refresh. 6. To display the diff ratio information, select a record and click OK. The Diff Ratio
Head window opens.

Oracle Retail Merchandising System
122
Diff Ratio Head Window
7. Click Close to close the window.
Define item/location traits Define item/location traits
Item location traits are set at the item/location level. Many of the traits are downloaded to the POS. Other traits may be downloaded to a ticketing system. The remaining traits are entered for information only and drive no processing.

Item Maintenance
123
Change item traits for a location Navigate: From the main menu, select Items > Items. The Item Search window is displayed. Search for and retrieve an item. The Item Maintenance window opens. Click on the Locations option. The Item Location window opens. Select a location and click on the Item/Single Loc Attrib option. The Item Location Traits window opens.
Item Location Traits Window
1. Select or enter the new values for the desired traits. 2. Click OK to save your changes and close the window.

Oracle Retail Merchandising System
124
Change item traits for multiple locations Navigate: From the main menu, select Items > Items. The Item Search window is displayed. Search for and retrieve an item. The Item Maintenance window opens. Click on the Locations option. The Item Location window opens. Click on the Item/Multi Loc Attrib option. The Item Location Traits window opens.
Item Location Traits Window
1. In the Group Type field, select a grouping mechanism. 2. In the Group Value field, enter the ID of the group or location, or click the LOV
button and select the group or location. 3. Select the check boxes in the Update column next to the fields that you want to
change. 4. Select or enter the new values in the Change Value To column. 5. Click OK to save your changes and close the window.

Item Maintenance
125
Create items Create items
Items can be grouped into a one, two, or three level hierarchy. The naming conventions for the three item levels may vary by organization, but they are referred to here as item levels 1, 2, and 3. All item hierarchies begin at item level 1. After creating a level 1 item, you can create level 2 items for the item. If a third level is desired, you can select a level 2 item and create level 3 items.
Regular items
Item groups An item group is an item hierarchy in which an item is broken into levels. The entire set of items (level 1 - 3) is an item group. The item is broken down in to factors which allow it to be distinguished from the more generic item. After you have defined the item structure, you must add a supplier to the item, determine item cost, and assign the item to a location.
Diffs A differntiatior (diff) is a characteristic that can be used to make items distinct from one another. You can add levels to an item group if you identify a set of diffs or diff groups. Each unique diff or combination of diffs creates a new level in the item group. If you choose not to use diffs, you can manually create item levels. Once you have selected the diffs, you can create all of the items for that item level, through RMS.
Deposit items A deposit item is an item that has a portion which is returnable by the customer after it has been sold to the customer. A deposit is taken from the customer for the returnable portion. A deposit item is broken into the components of the item, and each item is track separately in RMS. Deposit Contents Item: The item that is sold to the customer. Deposit Container Item: The item for which the deposit is taken. The deposit
container item holds the deposit contents item. Deposit Crate Item: The item which holds the container and contents items. Deposit Returned Item: The item that is returned to the retailer by the customer and
for which the deposit is returned to the customer.

Oracle Retail Merchandising System
126
Deposit items can be maintained as a complex pack or a single item. Maintaining the deposit items as a complex pack ensures the appropriate components are grouped together and facilitates ordering. If you maintain the deposit items individually, you must associate the item with the appropriate container item.
Packs A pack is way of tracking multiple items under one item number. The Pack Item Overview contains additional information on simple and complex packs.
Simple packs A simple pack contains multiples of one component item.
Complex packs A complex pack contains multiple component items.
Concession items/Consignment items
Consignment items A consignment item is a marketing arrangement where physical control of merchandise, but not the title of ownership is transferred from one business, the consignor (the supplier) to another, the consignee, (the retailer). The title to the goods remains with the consignor until the goods are sold. Upon sale of the goods, the consignor bills the consignee via an invoice.
Concession items A concession item is similar to a consignment item in that the retailer does not own the inventory being sold. Concession items differ from consignment in that the ownership is not transferred when the items are sold. A retailer rents floor space to a supplier on which the supplier sells their goods. A record of concession sales is recorded and the retailer then bills the supplier using their chosen method.
Transformable items A transformable item is an item that can be ordered as one item and the broken into smaller items. The smaller items can them be resold in the store. There are two types of transformable items: Transformed Orderable: The item is ordered from the supplier in one form, but
changed by the retail and sold to the customer in a different form. Transformed Sellable: The item that is sold to the customer. A transformed sellable
item is ordered from the supplier in a different form than it is sold.

Item Maintenance
127
Create a one level item Navigate: From the main menu, select Items > Items. The Item Search window opens.
Item Search Window
1. In the Action field, select New Item. 2. In the Item Type field, select Regular Item. 3. Select the item type indicators:
Inventory: When Yes is selected, inventory is tracked and held in RMS for an item.
Sellable: When Yes is selected, an item can be sold and is sent to the POS. Orderable: When Yes is selected, an item can be ordered, set up on
replenishment, and can have HTS and expenses set up.
Note: The indicators that you select for the Level 1 item will be applied to all items in the item group and cannot be changed.
4. In the Department, Class, and Subclass fields, enter the IDs of the merchandise
hierarchy, or click the LOV buttons and select the merchandise hierarchy. 5. Click OK. The Item Maintenance window opens.

Oracle Retail Merchandising System
128
Item Maintenance Window
6. In the Item Number Type field, select the type of item number that you want to associate with the item.
7. In the Item field, enter the item number and description of the item.
Note: If you select Oracle Retail Item Number or UPC-A in the Item Type field, the item number is automatically added. If you select EAN/UCC-13, you can automatically generate the EAN number by clicking Auto-generate.
8. In the Tran Level field, select Level 1. 9. In the Attributes area, select or clear the check boxes as needed. 10. In the Pricing area, in the Cost Zone Group field, enter the cost zone group ID or
click the LOV buttons and select the cost zone group. 11. Add a supplier for an item. 12. Add an origin country for a supplier of an item. 13. Edit the retail price of an item. 14. Click OK to save any changes and close the window

Item Maintenance
129
Create a two level item with diffs Navigate: From the main menu, select Items > Items. The Item Search window opens.
Item Search Window
1. In the Action field, select New Item. 2. In the Department, Class, and Subclass fields, enter the IDs of the merchandise
hierarchy, or click the LOV buttons and select the merchandise hierarchy. 3. In the Item Type field, select Regular Item. 4. Select the item type indicators:
Inventory: When Yes is selected, inventory is tracked and held in RMS for an item.
Sellable: When Yes is selected, an item can be sold and is sent to the POS. Orderable: When Yes is selected, an item can be ordered, set up on
replenishment, and can have HTS and expenses set up.
Note: The indicators that you select for the Level 1 item will be applied to all items in the item group and cannot be changed.
5. Click OK. The Item Maintenance window opens.
Oracle Retail Merchandising System
130
Item Maintenance Window
6. In the Item Number Type field, select the type of item number that you want to associate with the item.
7. In the Item field, enter the item number and description of the item.
Note: If you select Oracle Retail Item Number or UPC-A in the Item Type field, the item number is automatically added. If you select EAN/UCC-13, you can automatically generate the EAN number by clicking Auto-generate.
8. In the Tran Level field, select Level 2. 9. In the Attributes area, select or clear the check boxes as needed. 10. In the Pricing area, in the Cost Zone Group field, enter the cost zone group ID or
click the LOV buttons and select the cost zone group. 11. Add a supplier for an item. 12. Add an origin country for a supplier of an item. 13. Edit the retail price of an item. 14. In the Diffs area, select either the Group or Value option for up to four diffs. 15. In the Type field, select up to four diff types that you want to assign to this item. The
Diff Type values appear as the label for all corresponding diff fields on the Item Children window.
16. In the Group or Value fields, enter up to four IDs for the diff group or diff, or click
the LOV button and select a diff value or diff group. 17. Click Create Children. The Item Diff Apply window opens.

Item Maintenance
131
Item Diff Apply Window
18. In the Item Number Type field, select the type of item number that you want to associate with the items that are added to the item group at this level.
Identify the diff combinations
Individually Select the check box next to each diff you want to use to create a new item.
By group In the Item Diff Apply window, click Select All next to any of the enabled diff tables.
By range
1. In any Diff Range field, you can enter an ID of a diff range, or click the LOV button and select the diff range.
2. Click Apply Range.
Note: You can enter a diff range for each diff group that is associated with the item. Each diff range can contain diffs from up to three diff groups. The diff type and diff groups appear in the List of Values (LOV) window. If a diff range is used, you cannot use the associated diff groups while creating the same set of items.

Oracle Retail Merchandising System
132
Complete the diff combinations 1. Click OK. The Diff Combinations window opens.
Note: You must select at least one diff from each diff group table.
2. Select an item on the table. 3. In the Item field, edit the item number and description of the item . 4. Click Apply. Edits are added to the table. 5. Click OK to create the item children. Click Yes when prompted to approve the
creation of item children. The Item Children Diff window opens.
Item Children Diff Window
Complete the level two items
Filter the level two items 1. In the Filter area, enter the ID of the criteria you want to filter for, or click the LOV
button and select a criterion.
2. Click the filter button. The level two items appear on the table.

Item Maintenance
133
Update the level two items 1. In the Apply area, enter the new values for the criteria you want to update. 2. Click Apply. 3. On the table, you can update:
EAN 13: Enter the European Article Number (EAN) for the item. Auto: The Auto generated numbers for the level two items. VPN: Enter the Vendor Product Number (VPN) for the item.
Note: Before you update the the VPN, the records must be filtered by supplier.
4. Click OK to save any changes and close the window.
Create a two level item without diffs Navigate: From the main menu, select Items > Items. The Item Search window opens.
Item Search Window
1. In the Action field, select New Item. 2. In the Department, Class, and Subclass fields, enter the IDs of the merchandise
hierarchy, or click the LOV buttons and select the merchandise hierarchy. 3. In the Item Type field, select Regular Item.

Oracle Retail Merchandising System
134
4. Select the item type indicators: Inventory: When Yes is selected, inventory is tracked and held in RMS for an
item. Sellable: When Yes is selected, an item can be sold and is sent to the POS. Orderable: When Yes is selected, an item can be ordered, set up on
replenishment, and can have HTS and expenses set up.
Note: The indicators that you select for the Level 1 item will be applied to all items in the item group and cannot be changed.
5. Click OK. The Item Maintenance window opens.
Item Maintenance Window
6. In the Item Number Type field, select the type of item number that you want to associate with the item.
7. In the Item field, enter the item number and description of the item.
Note: If you select Oracle Retail Item Number or UPC-A in the Item Type field, the item number is automatically added. If you select EAN/UCC-13, you can automatically generate the EAN number by clicking Auto-generate.
8. In the Tran Level field, select Level 2. 9. In the Attributes area, select or clear the check boxes as needed. 10. In the Pricing area, in the Cost Zone Group field, enter the cost zone group ID or
click the LOV buttons and select the cost zone group. 11. Add a supplier for an item. 12. Add an origin country for a supplier of an item. 13. Edit the retail price of an item. 14. Click Create Children. The Item Children window opens.

Item Maintenance
135
Item Children Window
15. In the Item Number Type field, select the type of item number for the item.
Note: If you select Oracle Retail Item Number or UPC-A in the Item Type field, the item number is automatically added. If you select EAN/UCC-13, you can automatically generate the EAN number by clicking Auto-generate.
16. In the Item fields, edit the item number and description as needed. 17. On the Item Children window, click Apply. The item is added to the table.
Note: When you click Apply, the supplier, origin country, and retail price information is defaulted to the Level 2 item.
18. Click OK to save your changes and close the window.

Oracle Retail Merchandising System
136
Create a three level item 1. Create a two level item with diffs or create a two level item without diffs. The Item
Children Diff window opens.
Item Children Diff Window
2. Select the level 2 item from which to create the level 3 item. 3. Click Create Children. The Item Children window opens.
Item Children Window

Item Maintenance
137
4. In the Item Number Type field, select the type of item number that you want to associate with the item.
5. In the Item field, enter or edit the item number and description of the item.
Note: If you select Oracle Retail Item Number or UPC-A in the Item Type field, the item number is automatically added. If you select EAN/UCC-13, you can automatically generate the EAN number by clicking Auto-generate.
6. Click Apply. Your changes are added to the table. 7. Click Add to continue adding level three items, or click OK to save any changes and
close the window.
Create an item using quick item entry Navigate: From the main menu, select Items > Quick Item Entry. The Quick Item Entry window opens. 1. In the Department, Class, and Subclass fields, enter the IDs of the merchandise
hierarchy, or click the LOV buttons and select the merchandise hierarchy. 2. In the Item Type field, select the type of item number that you want to associate with
the item. 3. In the Tran Level field, select the item level at which transactions will be tracked for
this item group. 4. In the Item field, enter the item number and description of the item.
Note: If you select Oracle Retail Item Number or UPC-A in the Item Type field, the item number is automatically added.
5. You can edit the abbreviated description in the Short Desc field. 6. In the General Information area:
a. In the Store Order Mult, Standard UOM, and UOM Conversion Factor fields, select how stores will order the item and how that compares with the standard unit of measure.
b. Select or clear the check boxes as needed. 7. In the Primary Sourcing area:
a. In the Supplier field, at the bottom of the window, enter the ID of the supplier, or
click the LOV button and select the supplier for this item. b. In the Origin Country field, enter the code for the country, or click the LOV
button and select the country. c. Enter additional information as necessary.
8. In the Pricing area: a. In the Cost Zone field, enter the cost zone ID the item is associated with, or click
the LOV button and select the cost zone. b. In the Unit Cost field, enter the cost of one item. c. Enter additional information as necessary.

Oracle Retail Merchandising System
138
9. In the Case Pack area, enter inner size and the case size. 10. In the Differentiators area:
a. In the Diffs area, select either the Group or Value option for up to four diffs. b. In the Type field, select up to four diff types that you want to assign to this item.
The Diff Type values appear as the label for all corresponding diff fields on the Item Children window.
c. In the Group or Value fields, enter up to four IDs for the diff group or diff, or
click the LOV button and select a diff value or diff group. 11. Click OK to save any changes and close the window.
Create a transformable item Navigate: From the main menu, select Items > Items. The Item Search window opens.
Item Search Window
1. In the Action field, select New Item. 2. In the Department, Class, and Subclass fields, enter the IDs of the merchandise
hierarchy, or click the LOV buttons and select the merchandise hierarchy. 3. In the Item Type field, select the type of transformable item you are creating:
Transformed Orderable: The item is ordered from the supplier in one form, but changed by the retailer and sold to the customer in a different form.
Transformed Sellable: The item that is sold to the customer. A transformed sellable item is ordered from the supplier in a different form than it is sold.
4. Create the one level item, two level item or three level item.
Note: If you are creating a transformed orderable item, you will not be able to select the Retail by Zone option from the options list. If you are creating a transformed sellable item, you will not be able to select the Supplier option from the options list.

Item Maintenance
139
5. Click Transformation. The Transformation Maintenance window opens.
Transformation Maintenance Window
Note: This is available only for transformed orderable items.
6. In the Item Transformation Description field, enter the description of the transformation.
7. In the Production Loss field, enter the percentage of the orderable item which is wasted in producing the sellable items.
8. In the Detail Item field, enter the ID of the sellable item that is created from the orderable item, or click the LOV button and select an item.
9. In the Yield % field, enter percentage of the orderable item used to create the sellable item.
10. Click Apply.
Note: The Total Yield % field must equal 100% for the orderable item. The Total Yield % field is calculated by adding the Yield % and the Production Loss % field.
11. Define the yield details for any sellable items that are associated with multiple orderable items.
12. Click OK to save any changes and close the window.

Oracle Retail Merchandising System
140
Create a deposit item Navigate: From the main menu, select Items > Items. The Item Search window opens.
Item Search Window
1. In the Action field, select New Item. 2. In the Department, Class, and Subclass fields, enter the IDs of the merchandise
hierarchy, or click the LOV buttons and select the merchandise hierarchy. 3. In the Item Type field, select the type of deposit item you are creating:
Deposit Contents Item: The item that is sold to the customer. Deposit Container Item: The item for which the deposit is taken. The deposit
container item holds the deposit contents item. Deposit Crate Item: The item which holds the container and contents items. Deposit Returned Item: The item that is returned to the retailer by the customer
and for which the deposit is returned to the customer. 4. Create the one level item , two level item, or three level item.
Note: Only Deposit Contents items must be associated to the container items. If the item is another Deposit type, click OK to save any changes and close the window.
5. Click Groc Attributes. The Item Grocery Attributes window opens.

Item Maintenance
141
Item Grocery Attributes Window
6. In the Deposit Item area: a. In the Container Item field, enter the ID of the container item, or click the LOV
button and select the container item.
Note: Only Deposit Contents items must be associated to the container items. The container item must already exist to associate it to the contents item.
b. In the Price Per UOM Calculation Type field, select how the price for one unit of the item is calculated. – Inclusive of Deposit Amount: At the point of sale, the price/UOM is
calculated as the price per UOM of the item plus the retail price of the returnable item.
– Exclusive of Deposit Amount: At the point of sale, the price/UOM is calculated as the price per UOM of the item.
c. Click OK to save any changes and close the window. 7. Click OK to save any changes and close the window.

Oracle Retail Merchandising System
142
Create a concession/consignment item Navigate: From the main menu, select Items > Items. The Item Search window opens.
Item Search Window
1. In the Action field, select New Item. 2. In the Department, Class, and Subclass fields, enter the IDs of the merchandise
hierarchy, or click the LOV buttons and select the merchandise hierarchy. 3. In the Item Type field, select Concession/consignment. 4. Click OK. The Item Maintenance window opens.
Item Maintenance Window
5. Create the one level item or two level item.
Item Maintenance
143
Create a simple pack from an existing item Navigate: From the main menu, select Items > Items. The Item Search window opens. Search for the item that will be the component of the simple pack. Retrieve the item in Edit mode. The Item Maintenance window opens.
Item Maintenance Window
1. On the Options list, Click on the Simple Pack Setup option. The Simple Pack Setup window opens.
Simple Pack Setup Window

Oracle Retail Merchandising System
144
2. In the Apply Pack Information area: a. In the Item No. Type field, select the type of item number that you want to
associate with the pack item. b. In the Pack Number field, enter the pack number and description of the pack
item.
Note: If you select Oracle Retail Item Number or UPC-A in the Item Type field, the item number is automatically added.
c. Enter additional information as necessary.
Note: The Catch Weight and Tolerance areas are enabled only if you selected Catch Weight in the Attributes area of the Item Maintenance window. Catch Weight average weight is only maintained for simple packs.
3. In the Dimension Information area, enter the necessary information about the simple pack.
4. In the Copy Info from Component Item area, select which details you want to copy from the component item to the simple pack.
5. Click Apply. The simple pack is added to the table. 6. Click Create Packs. The Exists check box is automatically selected and the selected
component details are copied to the simple pack.
Note: When you click Create Packs, component details are copied to the new simple packs. If simple packs already exist, their details are not updated.
7. Click OK to save your changes and close the window.

Item Maintenance
145
Create a complex pack Navigate: From the main menu, select Items > Items. The Item Search window opens.
Item Search Window
1. In the Action field, select New Item. 2. In the Item Type field, select Complex Pack 3. Select the item type indicators:
Sellable: When Yes is selected, an item can be sold and is sent to the POS. Orderable: When Yes is selected, an item can be ordered, set up on
replenishment, and can have HTS and expenses set up. Inventory: This field defaults to Yes. Complex packs always have inventory
tracked and held in RMS. 4. In the Department, Class, and Subclass fields, enter the IDs of the merchandise
hierarchy, or click the LOV buttons and select the merchandise hierarchy. 5. Click OK. The Item Maintenance window opens.

Oracle Retail Merchandising System
146
Item Maintenance Window
Add pack item details 1. In the Item Number Type field, select the type of item number that you want to
associate with the item. 2. In the Item field, enter the item number and description of the item.
Note: If you select Oracle Retail Item Number or UPC-A in the Item Type field, the item number is automatically added.
3. You can edit the abbreviated description in the Short Desc field. 4. In the Attributes area, select or clear the check boxes as needed. 5. In the Pricing area, in the Cost Zone Group field, enter the cost zone group ID or
click the LOV buttons and select the cost zone group. 6. Add a supplier for an item. 7. Add an origin country for a supplier of an item.

Item Maintenance
147
Create the pack 1. On the Item Maintenance window, in the Pack area, if the pack will contain inner
containers, select the Contains Inners check box. 2. In the Pack Type field, select:
Buyer Pack: if you are create an orderable pack that is used by a retailer to order multiple items on a single line item on a purchase order.
Vendor Pack: if you are create an orderable pack that is used by a vendor to sell multiple items on a single line item on a purchase order.
3. If you created a buyer pack, in the Order As field, select pack or eaches to indicate how the item should be ordered.
4. Click Pack Details. The Pack Item Detail Maintenance window opens.
Pack Item Detail Maintenance Window
5. In Item field, enter the item number of the component item, or click the LOV button and select the item.
6. In the Quantity field, enter how many units of the component item belong in the pack.
7. Click Apply. The component item is added to the table. 8. To add additional items, click Add Item. 9. When you have finished adding the components of the pack, click OK to close the
Pack Item Detail Maintenance window and save your changes. The Item Maintenance window opens.
Complete the pack item 1. Edit the retail price of an item. 2. Click OK to save any changes and close the window

Oracle Retail Merchandising System
148
Item approval process Item approval process
When an item is added to the system, it must go through a series of checks before it is accessible in the system. Depending on your user role, you may not be able to move the item to the next status. An item may be in any of the following statuses:
Status Definition
Worksheet The item has been started, but not completed.
Submitted The item has been completed and is pending review.
Approved The item has been reviewed and has been approved.
Rejected The item has been submitted, reviewed, and has been rejected.
Deleted The item has been marked for deletion. It will be deleted by a regularly scheduled batch program.
Submit an item for approval Navigate: From the main menu, select Items > Items. The Item Search window opens. Search for and retrieve an item in Edit mode. Restrict the search to items in Worksheet status. The Item Maintenance window opens.
Item Maintenance Window

Item Maintenance
149
1. Click on the Submit option on the Options list. 2. If necessary, respond to the following messages: 3. If you are prompted approve item children, click Yes or No to indicate approval of
subordinate level items. 4. If any errors are detected by the system, a prompt opens. Click Yes to acknowledge
the message.
Respond to errors 1. Click on the Approval Errors option on the Options list of the Item Maintenance
window. The errors appear in the Item Approval Error window.
Item Approval Error Window
2. If an option is not required by the system and you want to override the error message, select the Override check box.
3. If an option is required by the system, make a note of the error and click OK to exit. 4. Resolve the errors and reapprove the item.

Oracle Retail Merchandising System
150
Submit a child item for approval Navigate: From the main menu, select Items > Items. The Item Search window opens. Search for and retrieve an item in Edit mode. Restrict the search to items in Worksheet status. The Item Maintenance window opens. Click on the List Children option on the Options list. The Item Children window opens.
Item Children Window
1. Select a subordinate level item (child item) in the items table. 2. Click on the Submit option on the Options list. The Update Record Status window
opens.
Update Record Status Window

Item Maintenance
151
3. Select one of the following options:
Note: Not all options may be available.
Submit the child item at the line item level only. Submit the line item and all children of that item. Submit all items. Submit all items and all their children.
4. Click OK. If the item or items could not be submitted, a message prompts you to view the approval errors screen. a. Click OK. b. Click on the Approval Errors option on the Options list. The Item Approval Error
window opens. The reason for the error appears in the error field.
Item Approval Error Window
c. If allowed, you may select the Override option for each error. Or, click OK and correct the error before attempting to resubmit the child item.

Oracle Retail Merchandising System
152
Approve an item Navigate: From the main menu, select Items > Items. The Item Search window opens. Search for and retrieve an item in Edit mode. Restrict the search to items in Submitted status. The Item Maintenance window opens.
Item Maintenance Window
1. Click on the Approve option on the Options list. If you are prompted approve item children, click Yes or No to indicate approval
of subordinate items. If any errors are detected by the system, a prompt opens.
2. Click Yes to acknowledge the message. 3. Click on the Approval Errors option on the Options list of the Item Maintenance
window. The errors appear in the Item Approval Error window.

Item Maintenance
153
Item Approval Error Window
4. If an option is not required by the system and you want to override the error message, select the Override check box.
5. If an option is required by the system, make a note of the error and click OK to exit. 6. Resolve any errors and reapprove the item.

Oracle Retail Merchandising System
154
Approve list children Navigate: From the main menu, select Items > Items. The Item Search window opens. Search for and retrieve an item in Edit mode. Restrict the search to items in Worksheet status. The Item Maintenance window opens. Click on the List Children option on the Options list. The Item Children window opens.
Item Children Window
1. Select a level 2 or level 3 item in the items table. 2. Click on the Approve option on the Options list. The Update Record Status window
opens.
Update Record Status Window

Item Maintenance
155
3. Select one of the following options:
Note: Not all options may be available.
Approve the child item at the line item level only. Approve the line item and all children of that item. Approve all items. Approve all items and all their children.
4. Click OK to save your changes and close the window. 5. If the item or items could not be approved, a message will prompt you to view the
approval errors screen. a. Click OK. b. Click on the Approval Errors option on the Options list. The Item Approval Error
window opens. The reason for each error will be displayed in the error field.
Item Approval Error Window
c. If allowed, you may select the Override option for each error. Or, click OK and correct each error before attempting to approve the subordinate item.

Oracle Retail Merchandising System
156
Accept item changes received via EDI Navigate: From the main menu, select Items > EDI New Items. The EDI New Items window opens.
EDI New Items Window
1. Enter or select the criteria you want to search by.
Note: Supplier is a required field.
2. Click Search. The items that match the specified criteria appear.
Update the status of an EDI item In the Status field next to each item, select the appropriate status.
– Accepted: The item change was reviewed and accepted. – Rejected: The item change was reviewed and rejected. Rejected item changes are
purged from the system after a predefined number of days. – Not Reviewed: The item change has not yet been reviewed. The change cannot
take effect and it cannot be purged from the system. – Failed: The item was not received.
Change the status multiple items 1. Click Select All. All the items in the table are selected. 2. In the Sel column, you can select or clear the items you want to include. 3. Click Accept or Reject. The status is changed.

Item Maintenance
157
Edit seasons/phases, or user defined attributes for an accepted item 1. Select an item. 2. From the Options menu, select either Seasons/Phases or User Defined Attributes. 3. Edit the details in the Item/Season Matrix window or Item UDA List window as
necessary. 4. Click OK to save your changes and close the window.
Process a new item 1. Select an item with New Item column selected 2. Click New Item. The New Item window opens.
New Item Window

Oracle Retail Merchandising System
158
3. Enter details in any enabled fields. 4. To copy details from an existing item:
a. On the New Item window, click Like Item. The Like Item window opens.
Like Item Window
b. In the From Existing field, enter the item number of the item to be copied, or click
the LOV button and select the item. c. To copy details from the selected item to the new item, select the enabled check
boxes as necessary. d. Click OK to save your changes and close the window.
5. Click OK to save your changes and close the window.
Review the details of any cost changes that are associated with an item 1. Select an item on the EDI New Items window. 2. From the Options menu, select EDI Costing. The details appear in the EDI Cost by
Location window.

Item Maintenance
159
EDI Cost by Location Window
3. Click OK to save your changes and close the window.
Reclassify items Reclassify Items
Item reclassification allows you to move an item or item list from one department/class/subclass to another. You can reclassify an item or a list of items. You determine which item or item list is to be reclassified, under which department, class, subclass, and the effective date. A batch process reclassifies those items whose effective date is the next day.
The Effects of Reclassifying Items When items are moved from one department, class, and subclass combination to another, several other modules can be affected. Sales history: A reclassification event does not rebuild sales history automatically. A
reclassification does not affect previously recorded sales history. RMS maintains three levels of rolled up sales history: department, class, and subclass. Optional batch programs are available that can be used to rebuild the rolled up sales history.
Stock ledger: Stock ledger transactions are written to move the inventory amount associated with an item from the old department, class, and subclass to the new. Existing stock ledger transactions are not updated to reflect the hierarchy change.
Open to buy: Open to buy (OTB) records are updated for all orders that are approved, but have not yet been received.

Oracle Retail Merchandising System
160
Forecasts: If the reclassified item is forecastable and the new hierarchy values move the item to a new forecast domain, then an indicator is reset for the item at the item/store level. This change indicates to the program responsible for extracting sales history that the next time sales history is extracted from RMS for that item and store combination, all sales history should be extracted. Normally, only the sales history that occurred since the last data export is extracted.
Reclassification Edit Checks
Online Edit Checks The following edit checks are performed as you set up a reclassification event. The event cannot be created if: The item exists in another reclassification event. The item is in a consignment department, but the new department is not a
consignment department. Likewise, if the item is in a department that is not a consignment department, but the new department is a consignment department.
One or more items on the reclassification event exist on approved partially received orders.
Batch Processing Edit Checks Other edit checks that can cause a reclassification event to fail also occur during the batch processing of the event. A reclassification cannot occur if: The item is on a Unit and Dollar stock count. The items to be counted have already
been determined based on the department, class, and subclass specified when the stock count was created. The stock count is scheduled after the effective date of the reclassification event.
The item is forecastable, but the new hierarchy values with which the item is associated do not have an associated forecast domain.
The new department, class, and subclass contain a required user defined attribute that must be entered at the item level.
The new department, class, and subclass contain a user defined attribute that defaults at the item level, but the item does not have this UDA defined.
Item Maintenance
161
Create a reclassification event for an item Navigate: From the main menu, select Items > Reclassification > Reclassify One Item. The Reclassify Item window opens.
Reclassify Item Window
1. In the Item field, enter the ID of the item to be reclassified, or click the LOV button and select the item.
2. In the Reclassification Description field, enter a description of the reclassification event.
3. In the Effective Date field, enter the date on which the reclassification must occur, or click the calendar button and select the date.
4. In the Department, Class, and Subclass fields, enter the IDs of the Department, Class,
and Subclass under which you want the item to be classified, or click the LOV buttons and select them.
5. Click OK to save your changes and close the window.
Note: A batch process reclassifies the items on the night before the effective date that you selected. Therefore, the earliest that you can schedule an effective date is for the next day.

Oracle Retail Merchandising System
162
Create a reclassification event for an item list Navigate: From the main menu, select Items > Item List. The Item List Search window opens. Search for and retrieve an item list in Use mode. The Item List Header window opens. From the Options menu, select Create Mass Item Change > Reclassification. The Reclassify Item window opens.
Reclassify Item Window
1. In the Reclassification Description field, enter a description of the reclassification event.
2. In the Effective Date field, enter the date on which the reclassification must occur, or click the calendar button and select the date.
3. In the Department, Class, and Subclass fields, enter the IDs of the Department, Class,
and Subclass under which you want the items to be classified, or click the LOV buttons and select them.
4. Click OK to save your changes and close the window.
Note: A batch process reclassifies the items on the night before the effective date that you selected. Therefore, the earliest that you can schedule an effective date is for the next day.

Item Maintenance
163
Search for a pending merchandise hierarchy change Navigate: From the main menu select Action > Pending Merchandise Hierarchy. The Pending Merchandise Hierarchy Search window opens.
Pending Merchandise Hierarchy Search Window
1. In the Action field, select either Edit or View. 2. Enter additional criteria as desired to make the search more restrictive. 3. Click Search. 4. Select a task: 5. To perform another search, click Refresh. 6. To display the supplier information, select a record and click OK. The Pending
Merchandise Hierarchy Search window opens. 7. Click Close to close the window.
Edit the pending merchandise hierarchy Navigate: From the main menu select Action > Pending Merchandise Hierarchy. The Pending Merchandise Hierarchy Search window opens. Search for and retrieve a merchandise change in Edit mode.
Pending Merchandise Hierarchy Search Window

Oracle Retail Merchandising System
164
1. Edit the enabled fields as necessary.
Note: Fields are enabled based on the merchandise level selected.
2. Click OK to save any changes and close the window.

165
5 Purchasing
Purchase Orders Set up buyers
Set up buyers The buyer functions allow you to create, edit, view, and delete buyers. You can record the name, phone number, and fax number for each buyer. Buyers are responsible for maintaining store stock levels with merchandise that matches consumer demand. Because there can be many buyers and merchandisers at the division or group level, you may prefer to record the GMM (general merchandise manager) or DMM (division merchandise manager) at these levels.
Create a buyer Navigate: From the main menu, select Control > Buyer > New. The Buyer Maintenance window opens.
Buyer Maintenance Window
1. In the Buyer field, the ID is filled in automatically. Enter the buyer's name in the field to the right of the ID.
2. In the Buyer Phone field, enter the buyer's telephone number. 3. In the Buyer Fax field, enter the buyer's fax number. 4. Click OK to save your changes and close the window.

Oracle Retail Merchandising System
166
Maintain open to buy amounts Maintain open to buy amounts Open to buy (OTB) budgets are usually maintained by an external planning system. OTB, purchase order, and stock ledger data are extracted from RMS. In return, the planning system provides up-to-date budget and forward limit data. OTB functionality operates on the retail (4-5-4) calendar. OTB records are maintained at the subclass/week level. OTB is allotted to three purchasing categories: Order of non-basic goods (N/B) Buyer replenishment of basic goods (BRB) Automatic replenishment of basic goods (ARB)
Within each category, monetary amounts are segregated by status. The statuses are Approved, Received, and Budgeted. Cancelled amounts are maintained outside of any category. Whether the amounts reflect cost value or retail value depends on the type of OTB calculation selected for each department. As you create and edit departments in RMS, you must indicate whether direct cost or retail inventory amounts are used to calculate OTB. When you create a purchase order, the OTB module monitors the available OTB. You, as the buyer, are warned if an order that you want to approve exceeds the amount budgeted for the OTB end-of-week date entered on the order. If you have sufficient authority, you may force the system to approve the order despite the warning. Although purchasing budgets may be received from an external planning system, you can maintain the purchasing budgets online by subclass and purchasing category. Forward limits may also be maintained online. A manager may limit how much of the OTB budget for a particular subclass and week may be used by the buyer. The manager may prevent buyers from committing too much of the available funds too early in the season, leaving no flexibility should conditions change or profitable opportunities arise unexpectedly.

Purchasing
167
Edit forward limits for OTB budgets Navigate: From the main menu, select Finance > OTB > Forward Limits. The OTB Forward Limits Maintenance window opens.
OTB Forward Limits Maintenance Window
1. In the Department, Class, and Subclass fields, enter the ID of each, or click the LOV
button and select the department, class, and subclass. Any existing forward limits appear.
2. Edit the percentages as necessary. 3. To add a forward limit:
a. Click Add Period. The next available line is enabled. b. In the Period field, enter the number of weeks ahead of the current week for
which you want to set a limit. c. In the Forward Limit Percent field, enter the percentage of the OTB that the
buyer may use from the period.

Oracle Retail Merchandising System
168
2. To delete a forward limit, select a forward limit and click Delete. The selected record is deleted.
3. Click OK to save your changes and close the window.
Edit open to buy budgets Navigate: From the main menu, select Finance > OTB > Budgets. The OTB Budget Maintenance window opens.
OTB Budget Maintenance Window
1. In the Department, Class, and Subclass fields, enter the ID of each, or click the LOV
button and select the department, class, and subclass. Any existing weekly budget records appear.
2. To add the next weekly period, click Add Week. Repeat as necessary. 3. In the Non Basic Allocations, Buyer Basic Allocations, and Auto Basic Allocations
fields next to each weekly period, enter or edit the monetary amount to be budgeted for each type of purchase.
4. Click OK to save your changes and close the window.

Purchasing
169
Auto generate purchase orders Auto generate purchase orders Purchase orders may be automatically generated through several ways: Replenishment: When inventory levels reach a point determined by the
replenishment method assigned to an item, a purchase order can be created in Worksheet or Approved status.
Investment Buying: When the investment buy calculations indicate a benefit to the company by purchasing additional inventory, a purchase order can be created in Worksheet or Approved status.
Vendor managed inventory (VMI): If your supplier uses a VMI system, the supplier can create purchase orders in Worksheet or Approved status.
Truck splitting: When a purchase order is split into two purchase orders to accommodate truck splitting, a purchase order can be created in Worksheet status.
Warehouse Stocked/Cross Dock Docked Stock: Accumulates store need at the item/location level. If the need cannot be fulfilled by the warehouse, a worksheet PO is created.
Generate an order revision report Navigate: From the main menu, select Action > View Reports. The Oracle Retail Printing window opens.
1. In the Module field, click the LOV button and select Orders.
2. In the Report field, click the LOV button and select the Purchase Order Revisions Summary.
3. Click Print. The Report Parameters Web page opens. 4. In the Destination field, select where you want the finished report to be sent. Select
Cache to view the report online. 5. To restrict the report to a range of revision dates, enter the first and last date of the
range in the Minimum Date and Maximum Date fields. 6. Click Submit Report. The report is generated and sent to the destination that you
selected.

Oracle Retail Merchandising System
170
Generate Pre-Issued Order Numbers (Manual) Navigate: From the main menu, select Ordering > Pre-Issue Order Numbers > Edit. The Pre-Issue of Order Numbers window opens.
1. Click Add. 2. In the Quantity of Order Numbers field, enter the quantity of purchase order
numbers you want to issue. 3. In the Days until Expiration field, enter the number of days that should elapse
between the date each set of purchase orders is created and when the purchase order numbers expire.
Note: Do NOT enter a value in the Days Between Gen. field as this is only used when recurring reports (batch) are needed.

Purchasing
171
4. Enter the ID of the supplier that will receive the PO numbers, or click the LOV button and select a supplier.
5. In the Next Gen Date field, enter the next date that this group of POs should be created, or click the Calendar button to select a specific date.
6. Click Apply. The new pre-issue order of numbers record is added to the table. 7. The Report Parameters Web page opens. 8. In the Destination field, select where you want the finished report to be sent. Select
Cache to view the report online. 9. Click Submit Query. The report is generated and sent to the destination that you
selected.
Generate Pre-Issued Order Numbers (Batch) Navigate: From the main menu, select Ordering > Pre-Issue Order Numbers > Edit. The Pre-Issue of Order Numbers window opens.

Oracle Retail Merchandising System
172
1. In the filter area, enter a supplier ID in the Supplier field, or enter a partial
description and click the LOV button to select a supplier.
2. Click the filter button. The results appear on the table. 3. If there are order request for this supplier, you may edit information in the apply
block. 4. If there are no order requests for this supplier, click Add.
a. In the Quantity field, enter the quantity of orders to be created. b. In the Days Until Expiration field, enter the number of days between order
number creation date the numbers will expire.
Note: Do NOT enter a value in the Days Between Gen. field as this is only used when recurring reports (batch) are needed.
c. In the Supplier field, enter the supplier who will use the order numbers. d. Enter the Next Gen Date. It defaults to today's date. This field can be modified. e. Click Apply to add the record to the table.
5. Order numbers will be created for supplier records with a Next Generation Date equal to today.
6. After the first report is created, the supplier records that were processed will have the Next Gen Day incremented by the number displayed in the Days Between Generation field.

Purchasing
173
Accept a revision or version of a purchase order Navigate: From the main menu, select Ordering > Orders. The Order Search window opens. Search for and retrieve a purchase order in Edit mode. Restrict the search to purchase orders in Approved status. The PO Header Maintenance window opens. From the Options menu, select Order Revisions. The PO Revisions window opens.

Oracle Retail Merchandising System
174
1. In the Type area, select Revision or Version. 2. In the Type field, select Revision to review supplier changes, or Version to review
buyer changes. 3. In the Revision or Version field, enter the number of the revision or version, or click
the LOV button and select the revision or version. The details of the revision or version appear in the table.
Note: If you don't know which revision or version number you want, you can select it by date. In the Date field, enter
the date, or click the LOV button and select the date.
4. Select the Accept check box next to each detail that you want to accept. If you want to accept all of the details, click Accept All.
5. Click OK to save your changes and close the window.

Purchasing
175
Manually create a purchase order Manually create a purchase order You can create a purchase order manually. Many purchase orders are created through an auto generation process in RMS. Occasionally, you may need to write purchase order. After you create the purchase order header and add the appropriate details, you need to add items to a purchase order and distribute the items on the purchase order.
Create a purchase order for a customer Navigate: From the main menu, select Ordering > Orders. The Order Search window opens. 1. In the Action field, select New Order and click OK. The PO Header Maintenance
window opens.
2. In the Order Type field, select the order type. 3. In the Import Country field, enter the code for the import country, or click the LOV
button and select the import country.
4. In the Supplier field, enter the ID of the supplier, or click the LOV button and select the supplier. The supplier defaults for other fields are filled in automatically.

Oracle Retail Merchandising System
176
5. In the Department field, enter the ID of the Department, or click the LOV button and select the department.
Note: The department may be required depending on how the system was set up.
6. In the Pickup Date field, enter a date, or click the calendar button and select a date.
7. In the Not Before Date and Not After Date fields, enter the dates, or click the calendar button and select the dates.
8. Select the Customer Order check box. 9. Enter or edit the enabled fields as necessary.
Add the customer information 1. From the Options menu, select Customer. The PO Customer Maintenance window
opens.
2. In the Customer field, enter the ID of the customer, or click the LOV button and
select the customer. For a new customer, enter the name of the customer in the second field.
3. Enter the address, the delivery address and any additional information as necessary. 4. Click OK to exit the PO Header Maintenance window.

Purchasing
177
Create a purchase order for a pack item Navigate: From the main menu. Select Ordering > Orders. The Order Search window opens.
1. In the Action field, select New Order and click OK. The PO Header Maintenance
window opens.

Oracle Retail Merchandising System
178
2. In the Order Type field, select the order type. 3. In the Import Country field, enter the code for the import country, or click the LOV
button and select the import country.
4. In the Supplier field, enter the ID of the supplier, or click the LOV button and select the supplier. The supplier defaults for other fields are filled in automatically.
5. In the Department field, enter the ID of the Department, or click the LOV button and select the department.
Note: The department may be required depending on how the system was set up.
6. In the Not Before Date and Not After Date fields, enter the dates, or click the calendar button and select the dates.
7. Select the Prepack check box. 8. Enter or edit the enabled fields, as necessary.
Add the prepack to the purchase order 1. Click Items. The Order Distribution Worksheet window opens.
Note: Depending on the options you select on the PO Header Maintenance window, you may be prompted to provide additional information in other windows.
Purchasing
179
2. Click Add Item. 3. In the Enter As field, select Item, Ref Item, or Item List. 4. Enter the information for the item, ref item, or item list in the apply block. 5. Click Apply Template. The Prepack Creation window opens.
Create the prepack template 1. In the Pack Type field, select Buyer or Vendor. 2. If you select Buyer in the Pack Type field, select an option in the Order As and
Receive As fields. 3. If you select Vendor in the Pack Type field, enter the cost per component unit in the
Unit Cost field. 4. Click Add Diff. 5. In the Diff area, select either diff or diff Range.
6. Enter the diff ID or diff range, or click the LOV button and select a value. 7. Click Apply. 8. In the Diff fields, select Diff ID, Diff Range, or Diff Template.
9. Enter a description, or click the LOV button and select a value. 10. In the Quantity field, enter the quantity that you want to distribute among the diff
combinations. 11. If you selected Buyer in the Pack Type field, enter a sequence number in the Seq No
field. 12. Click Apply to add the diffs to the selected record, or click Apply All to add the diffs
to all records in the current range. 13. Click Build Cost to calculate the unit cost of the prepack. 14. Click OK to exit the Prepack window. The Order Distribution Worksheet window
opens.

Oracle Retail Merchandising System
180
Distribute the prepack(s) 1. You may filter the items to apply a method of distribution to a specific set of items. 2. Select a distribution method and enter the appropriate information in the window
that opens: To distribute the items by location, click Location. The Location Distribution
window opens.

Purchasing
181
To distribute the items by store grade, click Store Grade. The Store Grade Distribution window opens.
3. When you have finished distributing the items, click OK to exit the Order
Distribution Worksheet window. The PO Item Maintenance window is displayed.
Review and complete the purchase order 1. Click Recalculate to calculate the costs and retail value. 2. Click Apply Deals to include any deals that pertain to the items. 3. When prompted to include the deals, click OK. 4. Click OK to exit.

Oracle Retail Merchandising System
182
Create a purchase order from contracted items Navigate: From the main menu, select Ordering > Orders. The Order Search window opens.
1. In the Action field, select New Order with Contract and click OK. The Contracted
Items to be Ordered window opens.
2. In the Item List field, enter the ID of an item list, or click the LOV button and
select the item list. The items on the item list appear.

Purchasing
183
Select the contracts and distribute the items 1. Click Location. The Contracted Items Order Locations window opens.
2. In the Contract field, enter the ID of the contract, or click the LOV button and
select the contract. 3. In the Group Type field, select the grouping mechanism for the destination locations.
4. In the Value field, enter the ID of the group, or click the LOV button and select the group.
5. In the Quantity field, enter the number of units to distribute to each location. 6. Click Apply. The locations and quantities are added to the table. 7. Click Next Item to select a contract for and distribute the next item on the item list. 8. After all the items are distributed, click OK to exit the Contracted Items Order
Locations window.
Build the purchase orders 1. Click Build Orders. The Build Orders from Contracts window opens.
2. In the Order Type field, select the type of order. 3. In the Not Before Date and Not After Date fields, enter the dates, or click the calendar
buttons and select the dates. 4. In the Create Status field, select Generated for each record. 5. Click Create Orders. 6. When prompted to create the orders, click Yes. 7. Click OK to save your changes and close the window.

Oracle Retail Merchandising System
184
Complete the purchase order 8. Click OK to save your changes and close the window.
Copy a purchase order Navigate: From the main menu, select Ordering > Orders. The Order Search window is displayed. Search for and retrieve a purchase order in Create Order from Existing mode. The PO Header Maintenance window opens.

Purchasing
185
1. Edit the enabled fields as necessary. 2. To edit the items and locations:
a. Click Items. The PO Header Maintenance window opens. b. Edit as necessary. c. Click Locations. The PO Item/Location window opens.
d. Edit as necessary. e. Click OK to exit each window. The PO Header Maintenance window opens.
3. Click Recalc Totals to update the monetary amounts. 4. Click Apply Process. 5. Select the Apply Deals options to include any deals that pertain to the items. You are
prompted to include the deals. 6. Click Yes to approve the inclusion of deals. 7. Click OK to save your changes and close the window.
Add items to a purchase order Add items to a purchase order overview Items can be added to a purchase order (PO) one-by-one or by item list. You can choose to expand a buyer pack to its component items. You can choose to expand a level 1 or level 2 item to its component level 2 or level 3 items. You may also choose to apply an existing item pack template to a PO or create a temporary item pack template. Level 1 or level 2 items can be distributed on a PO by diffs. Quantities can be entered on a PO based on the unit of purchase or the standard unit of measure.

Oracle Retail Merchandising System
186
Add an item to a purchase order Navigate: From the main menu, select Ordering > Orders. The Order Search window is displayed. Search for and retrieve a purchase order in Edit mode. Restrict the search to purchase orders in Worksheet status. The PO Header Maintenance window opens. Click Items. The PO Item Maintenance window opens. Click Add to Order the Order Distribution Worksheet window opens.

Purchasing
187
1. Click Add Item. 2. In the Enter As area, select the Item, Ref Item, or Item List option. 3. In the Item field, enter the item number of the item or the ID of the item list, or click
the LOV button and select the item or item list.
4. If required, enter the Origin Country code for the country, or click the LOV button and select the country.
5. In the Quantity field, enter the number of units to be distributed of the item or among the components of an item list or item parent.
6. Enter or edit the Unit of Purchase and Supplier Pack Size fields as necessary. 7. Click the appropriate button to add the item or items to the table: 8. To add an item or the items on an item list, click Apply Item, Apply Ref Item, or
Apply Item List. 9. To add the component items of an item parent or pack, click Expand Item. 10. To add a pack, click Apply Template. The Prepack window or the New Prepack
Template window opens so that you may identify or create the template. 11. Filter and distribute the items as necessary. 12. Click OK to save your changes and close the window.

Oracle Retail Merchandising System
188
Edit the items on a purchase order Navigate: From the main menu, select Ordering > Orders. The Order Search window is displayed. Search for and retrieve a purchase order in Edit mode. Restrict the search to purchase orders in Worksheet status. The PO Header Maintenance window opens. Click Item. The PO Item Maintenance window opens.

Purchasing
189
1. Edit the enabled fields as necessary. 2. Click OK to save your changes and close the window.
Distribute a purchase order Distribute a purchase order You have several options for distributing items when a purchase order is created. Before distributing items, you can filter the items in order to display a subset of the items. Any distribution instructions that you enter are then applied only to the subset of items. The options for distribution may be: Distribution by diff: Distribute items by any diff value associated with the purchase
order. Distribution by store grade: Select the final destinations by store grade group and
store grade. Enter the distribution amounts by percentage or ratio. Distribution by location: Select the final destinations one-by-one or by a list of
values. Enter the distribution amounts by percentage or ratio.

Oracle Retail Merchandising System
190
Apply a diff ratio to a diff distribution Navigate: From the main menu, select Ordering > Orders. The Order Search window is displayed. Search for and retrieve a purchase order in Edit mode. Restrict the search to purchase orders in Worksheet status. The PO Header Maintenance window opens. Click Items. The PO Header Maintenance window opens. Click Add to Order the Order Distribution Worksheet window opens. Distribute items on the purchase order

Purchasing
191
Diff ratios can be applied to: The X axis The Y axis The Z axis The diff matrix table The diff matrix table and the Z axis
The following rules apply: If a ratio is applied to the diff matrix table, the matrix must be distributed by ratio. If a ratio is applied to only the Z axis, the Z axis must be distributed by ratio. If the ratio affects the matrix and the Z, both the matrix and the Z must be distributed
by ratio. If Ratio is selected in the Distribute Matrix By field, you can use an existing diff ratio
to modify data in the diff matrix table.
1. To apply diff ratios to the diff matrix table, enter a diff ratio, or click the LOV button and select a ratio.
2. After a ratio is selected, you can view data for this item at a specific store. Enter a
store ID, or click the LOV button and select an ID. 3. Click Apply Ratio. 4. Click OK to save your changes and close the window.

Oracle Retail Merchandising System
192
Distribute items by individual diff Navigate: From the main menu, select Ordering > Orders. The Order Search window is displayed. Search for and retrieve an order in Edit mode. Restrict the search to orders in Worksheet status. The PO Header Maintenance window opens. Click Items. The Order Distribution window opens.
1. Click any of the Diff buttons to distribute by diff value. The Distribution Diff Apply
window opens.

Purchasing
193
2. To limit the available diffs, in the range field, enter a diff range ID, or click the LOV
button and select a diff range. 3. In the Available Diff area:
4. Select a diff and click the right arrow button. The diff is moved to the applied diff area.
5. Click the move all right arrow button. All diff are moved to the applied diff area.
6. If you selected the following distribution method: Quantity: enter the number of items you want of each diff.
Note: You can distribute by quantity only if you did not enter a quantity on the Order Distribution Worksheet window.
Distribution %: enter the percentage of the items you want of each diff. Ratio: enter the proportion of items that you want of each diff.
Note: You can distribute the diffs and enter a quantity, distribution or ratio of zero (0).
7. Click OK to save any changes and close the window.

Oracle Retail Merchandising System
194
Distribute items on a purchase order by location Navigate: From the main menu, select Ordering > Orders. The Order Search window is displayed. Search for and retrieve a purchase order in Edit mode. Restrict the search to purchase orders in Worksheet status. The PO Header Maintenance window opens. Click Items. The ordered items appear in the Order Distribution Worksheet window.
1. Filter the items as necessary. 2. Click Location. The Location Distribution window opens.

Purchasing
195
3. In the Distribute By area, select the method of distribution. 4. In the Location Type field, select the type of location.
5. In the Location field, enter the ID of the location, or click the LOV button and select the location.
6. If you selected the following distribution method: Quantity: enter the number of items you want at each location, or the total items
you want at each location.
Note: You can distribute by quantity only if you did not enter a quantity on the Order Distribution Worksheet window.
Distribution %: enter the percentage of the items you want at each location. Ratio: enter the proportion of items that you want at each location.
Note: You can distribute to a location and enter a quantity, distribution or ratio of zero (0).
7. Click OK to save your changes and close the window.

Oracle Retail Merchandising System
196
Distribute items on a purchase order by store grade Navigate: From the main menu, select Ordering > Orders. The Order Search window is displayed. Search for and retrieve a purchase order in Edit mode. Restrict the search to purchase orders in Worksheet status. The PO Header Maintenance window opens. Click Items. The Order Distribution Worksheet window opens.
1. Filter the items as necessary. 2. Click Store Grade. The Store Grade Distribution window opens.

Purchasing
197
3. In the Buyer field, enter the ID of the buyer, or click the LOV button and select
the buyer. 4. In the Store Grade Group field, enter the ID of the store grade group, or click the
LOV button and select the store grade group. The store grades and number of stores in each store grade appear.
5. In the Distribute By area, select the method of distribution. 6. If you selected the following distribution method:
Quantity: enter the number of items you want at each store, or the total items you want for each store grade.
Note: You can distribute by quantity only if you did not enter a quantity on the Order Distribution Worksheet window.
Distribution %: enter the percentage of the items you want at each store grade. Ratio: enter the proportion of items that you want at each store grade.
7. Click OK to save your changes and close the window.

Oracle Retail Merchandising System
198
Distribute items with the diff matrix Navigate: From the main menu, select Ordering > Orders. The Order Search window is displayed. Search for and retrieve a purchase order in Edit mode. Restrict the search to purchase orders in Worksheet status. The PO Header Maintenance window opens. Click Items. The ordered items appear in the Order Distribution Worksheet window.
1. In the Axes Diff Groups area, enter the ID of the diff group, or click the LOV button and select a diff group.
Note: The number of diff group fields that are enabled is based on the number of diff groups that were assigned to this item. All enabled diff group fields are required.
2. In the Diff Range Limiting area, enter a diff range ID, or click the LOV button and select a diff range to limit the diff values displayed in the matrix table.
3. In the Distribute Matrix By area, select how quantities in the matrix appear for the X and Y axis.
4. In the Distribute Z Axis area, select how quantities in the matrix appear for the Z axis.
Note: Quantity is automatically select if the Worksheet quantity on the Order Distribution Worksheet window was not entered.
5. Click Apply. The matrix table is updated to show the data matching your distribution parameters.
X Y Distribution 1. In the Distribute X By field, indicate that you want to enter values for the X axis in
either quantities, ratios, or percentages. The fields above the matrix table are enabled. 2. In the Distribute Y By field, indicate that you want to enter values for the Y axis in
either quantities, ratios, or percentages. The fields left of the matrix table are enabled.
Note: If a quantity was not entered on the Order Distribution Worksheet window, one of the values for the X-Y Distribution field must be quantity.
3. In the X Distribution row, enter the values for the corresponding diff. 4. In the Y Distribution column, enter the values for the corresponding diff. 5. Click Apply Dist. A message opens notifying you that the current data will be
overwritten. 6. Click Yes. 7. You can repeat these steps until you are satisfied with the data. The values in the
table will be saved when you exit this window.

Purchasing
199
Ratio If Ratio is selected in the Distribute Matrix By field, you can use an existing diff ratio to modify data in the diff matrix table.
1. In the diff ration area, enter a diff ratio ID in the Diff Ratio field, or click the LOV button and select a ratio.
2. After a ratio is selected, you can view data for this item at a specific store. Enter a
store ID, or click the LOV button and select an ID. 3. Click Apply Ratio. 4. Click OK+Repeat to save your changes and copy values from another diff group, or
click OK to save your changes and close the window.
Note: After saving the distribution data in this window, you must distribute by diff 4 (if a fourth diff exists for this item) and by Location on the Order Distribution Matrix window. You cannot submit the order for approval until the item is completely distributed.
Z Axis 1. If quantity was not entered on the Order Distribution Worksheet window, enter the
value for the first diff in the Z distribution. 2. To use the existing X-Y distribution for all Z axis diffs, click Copy. The Z Axis Copy
window opens. a. In the Copy from Diff field, enter the ID of the Z diff that you want to copy from b. Click Get List. The diffs that are not yet associate to the X-Y distribution appear. c. In the Copy field, select each diff group that should have the same value as the
diff group selected in the Copy from Diff field. d. Click OK to save any changes and close the window.
3. After entering data in the Z axis table, you can click Convert to Qty to change all percent and ration values on the matrix to quantity.
4. Click OK to save any changes and close the window.

Oracle Retail Merchandising System
200
Purchase order approval process Purchase order approval process When a purchase order is added to the system, it must go through a series of checks before it is accessible in the system. Depending on your user role, you may not be able to move the purchase order to the next status. A purchase order may be in any of the following statuses:
Status Definition
Worksheet The purchase order has been started, but not completed.
Submitted The purchase order has been completed and is pending review.
Approved The purchase order has been reviewed and has been approved.
Delete The purchase order is marked for deletion. It will be deleted by a regularly scheduled batch program.
Closed The purchase order is complete.

Purchasing
201
Submit a purchase order for approval Navigate: From the main menu, select Ordering > Orders. The Order Search window is displayed. Search for and retrieve a purchase order in Edit mode. Restrict the search to purchase orders in Worksheet status. The PO Header Maintenance window opens.
1. From the options menu, select Submit. You are prompted to submit the purchase
order. 2. Click Yes. 3. Click OK to save your changes and close the window.

Oracle Retail Merchandising System
202
Approve a purchase order Navigate: From the main menu, select Ordering > Orders. The Order Search window opens. Search for and retrieve a purchase order in Edit mode. Restrict the search to purchase orders in Submitted status. The PO Header Maintenance window opens.
1. From the options menu, select Approve. You are prompted to approve the purchase
order. 2. Click Yes. 3. Click OK to save your changes and close the window.

Purchasing
203
Cancel a purchase order Navigate: From the main menu, select Ordering > Orders. The Order Search window opens. Search for and retrieve a purchase order in Edit mode. Restrict the search to purchase orders in Approved status. The PO Header Maintenance window opens.
1. From the options menu, select Cancel All Items. You are prompted to cancel all the
items on the purchase order. 2. Click Yes. The Order Mass Item Cancel window opens.
3. In the Cancel Reason field, select the reason for canceling the items on the purchase
order. 4. Click OK. The status of the purchase order is changed to Closed. 5. Click OK to save your changes and close the window.

Oracle Retail Merchandising System
204
Reinstate a cancelled purchase order Navigate: From the main menu, select Ordering > Orders. The Order Search window is displayed. Search for and retrieve a purchase order in Edit mode. Restrict the search to closed purchase orders that you know have been cancelled. The PO Header Maintenance window opens.
1. From the options menu, select Reinstate All Items. You are prompted to reinstate all
the items on the purchase order 2. Click Yes. The status of the purchase order is changed to Worksheet. 3. Click OK to save your changes and close the window. You are prompted to approve
the purchase order. 4. Click either Yes or No. If you select No, the purchase order remains in Worksheet
status.

Purchasing
205
Delete a purchase order Navigate: From the main menu, select Ordering > Orders. The Order Search window is displayed. Search for and retrieve a purchase order in Edit mode. Restrict the search to purchase orders in Worksheet or Submitted status. The PO Header Maintenance window opens.
1. From the options menu, select Delete. You are prompted to delete the purchase
order. 2. Click Yes. 3. Click OK to save your changes and close the window.


207
6 Contracts
Create contracts Create contracts
A contract is a legally binding agreement with a supplier to supply items at a negotiated price. In RMS, the contracting functions fit closely with the replenishment and ordering functions. The main function of the Contracts windows is to source stock from the best contract, track supplier availability and commitments, and match them with business requirements. The main business benefit of contracting is to achieve supplier involvement during the planning phase of your business. The following types of contracts can be created and maintained: Type A (Plan/Availability): The contract contains a plan of manufacturing quantity
by ready date. Supplier availability is matched to the ready date. Orders are raised against the plan as suggested by replenishment requirements, provided there is sufficient supplier availability. The user can also raise manual orders.
Type B (Plan/No Availability): The contract contains a plan of manufacturing quantity by ready date and dispatch-to location or locations. There are one or more ready dates, which is the date that the items are due at the dispatch-to location. Supplier availability is not required. Orders are raised automatically from the contract based on ready dates.
Type C (No Plan/No Availability): The contract is an open contract with no production schedule and no supplier availability declared. The contract lists the items that will be used to satisfy a total commitment cost. Orders are raised against the contract based on replenishment requirements. The user can also raise manual orders.
Type D (No Plan/Availability): The contract is an open contract with no production schedule. The supplier declares availability as stock is ready. The contract lists the items that will be used to satisfy a total commitment cost. Orders are raised against the contract, based on replenishment requirements and supplier availability. The user can raise manual orders.

Oracle Retail Merchandising System
208
Create a Type A contract Navigate: From the main menu, select Ordering > Contracts. The Contract Search window opens.
Contract Search Window
1. In the Action field, select New. 2. Click OK. The Contract Header window opens.
Contract Header Window

Contracts
209
3. In the Type field, select Plan/Availability.
4. In the Supplier field, enter the ID of the supplier, or click the LOV button and select the supplier. The supplier defaults for other fields are filled in automatically.
5. In the Department field, enter the ID of the department, or click the LOV button and select the department. Only items from this department can be placed on contract.
6. In the Start Date and End Date fields, enter the dates, or click the calendar button and select the dates.
7. In the Country of Origin field, enter the code for the country, or click the LOV button and select the country.
8. Enter or edit the enabled fields as necessary.
Note: Select the Orderable Check box to indicate that orders can be placed against this contract. Select Manual Approval to indicate that all purchase orders will be created in Worksheet status and must be manually approved.

Oracle Retail Merchandising System
210
Add items to the contract 1. From the Contract Header window, click Detail. The Contract Details Maintenance
window opens.
Contract Details Maintenance Window
2. Click Add Item to add an item or Add Item Parent to add a item parent. The Contract Distribution window opens.
Contract Distribution Window
3. In the Enter As field, select an item type. 4. Enter a specific item in the available field, or enter a partial description and click the
LOV button to select a value. 5. In the Dist Qty field, enter the number of units to be distributed.

Contracts
211
Note: When selecting items for a contract, the number of levels in the group and the transaction level of the item group must be considered. Items above the transaction level can only be added to a contract if the Soft Contract Indicator is selected in System Variables.
6. Click Apply.
Distribute the items by commitment date 1. Click Date. The Date Distribution window opens.
Date Distribution Window
2. Click Add. 3. In the Commitment Date field, enter the date. 4. In the Distribution field, enter the percentage of the goods that are due by the
commitment date. 5. Click OK to save your changes and close the windows until you are returned to the
Contract Header window.

Oracle Retail Merchandising System
212
Verify or edit the cost of the items 1. Click Cost. The Contract Cost Maintenance window opens.
Contract Cost Maintenance Window
2. Edit the default unit cost as necessary. 3. Click OK to save your changes and close the window.
Review and complete the contract 4. Click Recalculate to update the costs and retail value. 5. Click OK to save your changes and close the window.
Create a Type B contract Navigate: From the main menu, select Ordering > Contracts. The Contract Search window opens.
Contract Search Window

Contracts
213
Note: When using a Type B contract, purchase orders are generated automatically. Manual and Replenishment orders are never created from a type B contract.
1. In the Action field, select New. 2. Click OK. The Contract Header window opens.
Contract Header Window
3. In the Type field, select Plan/No Availability.
4. In the Supplier field, enter the ID of the supplier, or click the LOV button and select the supplier. The supplier defaults for other fields are filled in automatically.
5. In the Department field, enter the ID of the department, or click the LOV button and select the department. Only items from this department can be placed on contract.
6. In the Start Date and End Date fields, enter the dates, or click the calendar button and select the dates.
7. In the Country of Origin field, enter the code for the country, or click the LOV button and select the country.
8. Enter or edit the enabled fields as necessary.

Oracle Retail Merchandising System
214
Add items to the contract 1. Click Detail. The Contract Details Maintenance window opens.
Contract Details Maintenance Window
2. Click Add Item to add an item or Add Item Parent to add a item parent. The Contract Distribution window opens.
Contract Distribution Window
3. To add an item, click Add Item. Enter the information on the next available line. 4. If you select item parent and want to list all the component items, click Explode
Items. 5. To add an item list, click Add Item List. Select the item list from the list of values that
pop up. 6. In the Dist Qty field, enter the number of units to be distributed.
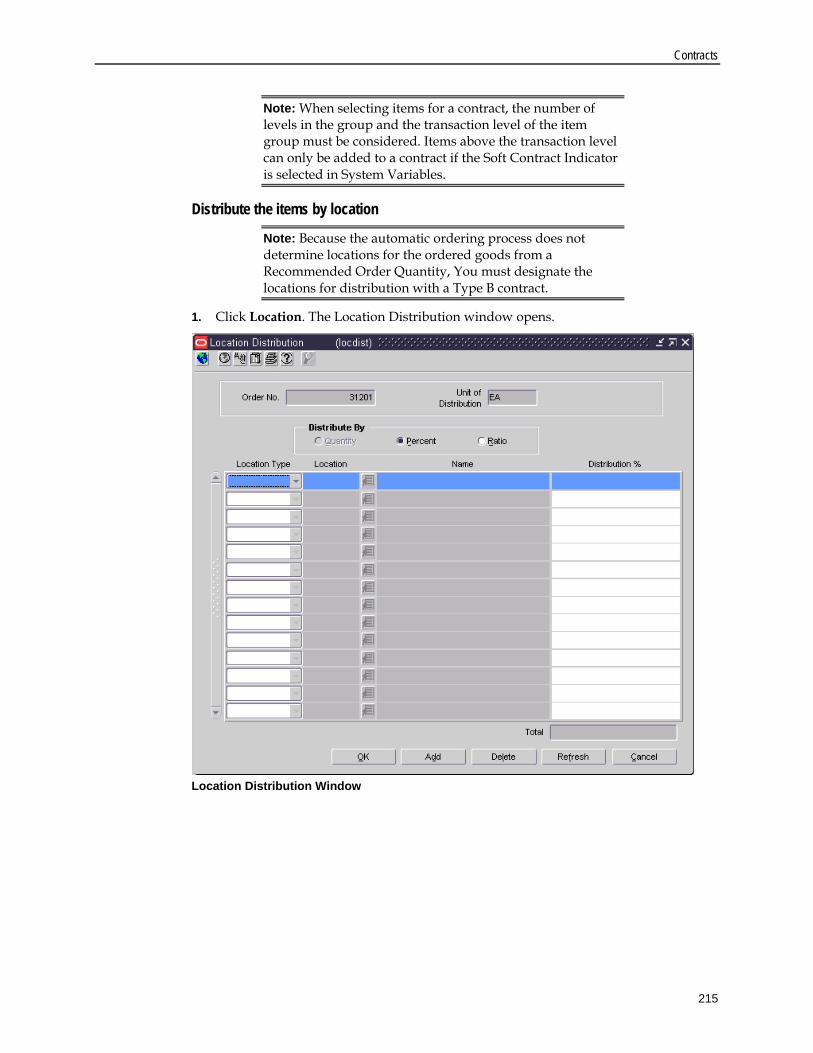
Contracts
215
Note: When selecting items for a contract, the number of levels in the group and the transaction level of the item group must be considered. Items above the transaction level can only be added to a contract if the Soft Contract Indicator is selected in System Variables.
Distribute the items by location
Note: Because the automatic ordering process does not determine locations for the ordered goods from a Recommended Order Quantity, You must designate the locations for distribution with a Type B contract.
1. Click Location. The Location Distribution window opens.
Location Distribution Window

Oracle Retail Merchandising System
216
2. To distribute the items by location: a. Select the method of distribution. b. Click Add.
3. In the Location Type field, select the type of location.
4. In the Location field, enter the ID of the location, or click the LOV button and select the location.
5. In the next field, enter the quantity, percentage, or ratio of items to be distributed to the location.
6. Click OK to save your changes and close the window.
Distribute the items by commitment date 1. On the Contract Distribution window, click Date. The Date Distribution window
opens.
Date Distribution Window

Contracts
217
2. Click Add. 3. In the Commitment Date field, enter the date on which the supplier must provide the
goods. 4. In the Distribution field, enter the percentage of the goods that are due by the
commitment date. 5. Click OK to exit until you are returned to the Contract Header window.
Note: RMS will generate orders on the plan dates whether or not the specified locations need the items. Therefore, it is possible that orders will be placed which the supplier cannot fulfill.
Verify or edit the cost of the items 1. Click Cost. The Contract Cost Maintenance window opens.
Contract Cost Maintenance Window
2. Edit the default unit cost as necessary. 3. Click OK to exit the Contract Cost Maintenance window.
Review and complete the contract 1. Click Recalculate to update the costs and retail value. 2. Click OK to save your changes and close the window.

Oracle Retail Merchandising System
218
Create a Type C contract Navigate: From the main menu, select Ordering > Contracts. The Contract Search window opens.
Contract Search Window
1. In the Action field, select New. 2. Click OK. The Contract Header window opens.
Contract Header Window

Contracts
219
3. In the Type field, select No Plan/No Availability.
4. In the Supplier field, enter the ID of the supplier, or click the LOV button and select the supplier. The supplier defaults for other fields are filled in automatically.
Note: A Type C contract does not require a supplier to provide availability information; therefore, it is possible that an order can be placed that a supplier cannot fulfill.
5. In the Department field, enter the ID of the department, or click the LOV button and select the department. Only items from this department can be placed on contract.
6. In the Start Date and End Date fields, enter the dates, or click the calendar button and select the dates.
7. In the Country of Origin field, enter the code for the country, or click the LOV button and select the country.
8. In the Cost field, enter the monetary commitment. 9. Enter or edit the enabled fields as necessary.
Note: To indicate that orders created via replenishment should be created in Worksheet status and then approved manually, select the Manual Approval option.
Add items to the contract 1. Click Cost. The Contract Cost Maintenance window opens. 2. Click Add Item to add an item or Add Item Parent to add a ref item. The Contract
Distribution window opens.
Contract Distribution Window

Oracle Retail Merchandising System
220
3. To add an item, click Add Item. Enter the information on the next available line. 4. If you added a item parent and want to list all the component items, click Explode
Items. 5. To add an item list, click Add Item List. Select the item list from the list of values that
pop up.
Note: When selecting items for a contract, the number of levels in the group and the transaction level of the item group must be considered. Items above the transaction level can only be added to a contract if the Soft Contract Indicator is selected in System Variables.
6. Click OK to return to the Contract Cost Maintenance window.
Verify or edit the cost of the items 1. On the Contract Cost Maintenance window, edit the default unit cost as necessary.
Contract Cost Maintenance Window
2. Click OK to save your changes and close the windows.

Contracts
221
Create a Type D contract Navigate: From the main menu, select Ordering > Contracts. The Contract Search window opens.
Contract Search Window
1. In the Action field, select New. 2. Click OK. The Contract Header window opens.
Contract Header Window

Oracle Retail Merchandising System
222
3. In the Type field, select No Plan/Availability.
4. In the Supplier field, enter the ID of the supplier, or click the LOV button and select the supplier. The supplier defaults for other fields are filled in automatically.
5. In the Department field, enter the ID of the department, or click the LOV button and select the department. Only items from this department can be placed on contract.
6. In the Start Date and End Date fields, enter the dates, or click the calendar button and select the dates.
7. In the Country of Origin field, enter the code for the country, or click the LOV button and select the country.
8. In the Cost field, enter the monetary commitment. 9. Enter or edit the enabled fields as necessary.
Add items to the contract 1. Click Cost. The Contract Cost Maintenance window opens.
Contract Cost Maintenance Window

Contracts
223
2. Click Add Item to add an item or Add Item Parent to add a item parent. The Contract Distribution window opens.
3. To add an item or item parent, click Add Item. Enter the information on the next available line.
4. If you added a item parent and want to list all the component Items, click Explode Items.
5. To add an item list, click Add Item List. Select the item list from the list of values that pop up.
Note: When selecting items for a contract, the number of levels in the group and the transaction level of the item group must be considered. Items above the transaction level can only be added to a contract if the Soft Contract Indicator is selected in System Variables.
6. Click OK to save your changes and close the window.
Verify or edit the cost of the items 1. On the Contract Cost Maintenance window, Edit the default unit cost as necessary.
Contract Cost Maintenance Window
2. Click OK to save your changes and close the window.

Oracle Retail Merchandising System
224
Search for a contract Navigate: From the main menu, select Ordering > Contracts. The Contract Search window opens.
Contract Search Window
1. In the Action field, select either Create from Existing, Edit, or View. 2. Enter additional criteria as desired to make the search more restrictive. 3. Click Search. The Contract Search window displays the contracts that match the
search criteria.
Contract Search Window

Contracts
225
4. Select a task: 5. To perform another search, click Refresh. 6. To display the details of a contract, select a record and click OK. The Contract
Header window opens.
Contract Header Window
7. Click Close to exit.
Add an item to a contract Navigate: From the main menu, select Ordering > Contracts. The Contract Search window opens. Search for and retrieve a contract in Edit mode. Restrict the search to records in Worksheet status. The Contract Header Maintenance window opens. Click Cost or Detail. Either the Contract Cost Maintenance window or the Contract Details Maintenance window opens.

Oracle Retail Merchandising System
226
Contract Details Maintenance Window
1. Click Add Item(s) to add an item. The Contract Distribution window opens.
Contract Distribution Window
Note: When selecting items for a contract, the number of levels in the group and the transaction level of the item group must be considered. Items above the transaction level can only be added to a contract if the Soft Contract Indicator is selected in System Variables.

Contracts
227
2. In the Enter As selection field, click an option to enter the new item as a contract item, reference item, or item list.
3. Enter a valid item or item list for the department that opens, or select an item or item
list using the LOV button. 4. Enter a Distribution Quantity. 5. Click Apply to add the new item or item list to the contract. 6. Click OK to return to the Contract Cost Maintenance window or the Contract Details
window. 7. If you are in the Contract Cost Maintenance window, edit the unit cost of the items as
necessary. 8. If you are in the Contract Details Maintenance window, enter the number of units to
be distributed. 9. Click OK to save your changes and close the window.
Distribute items on a contract by commitment date Navigate: From the main menu, select Ordering > Contracts. The Contract Search window opens. Search for and retrieve a contract in Edit mode. Restrict the search to Type A and Type B contracts in Worksheet status. The Contract Header Maintenance window opens. Click Detail. The Contract Details Maintenance window opens. Click Distribute. The Contract Distribution window opens.
Contract Details Maintenance Window

Oracle Retail Merchandising System
228
Contract Details Maintenance Window
1. Filter the items as necessary. 2. Click Date. The Date Distribution window opens.
Contract Details Maintenance Window

Contracts
229
3. Click Add. The next available line becomes enabled. 4. In the Commitment Date field, enter the date. 5. In the Distribution % field, enter the appropriate percentage for each date. 6. Click OK to save your changes and close the window.
Distribute items on a contract by location Navigate: From the main menu, select Ordering > Contracts. The Contract Search window opens. Search for and retrieve a contract in Edit mode. Restrict the search to contracts in Worksheet status. The Contract Header window opens. Click Detail. The contracted items appear in the Contract Details Maintenance window. Click Distribute. The Contract Distribution window opens.
Contract Distribution Window

Oracle Retail Merchandising System
230
Contract Details Maintenance Window
1. Filter the items as necessary. 2. Click Location. The Location Distribution window opens.
Location Distribution Window

Contracts
231
3. In the Distribute By area, select the method of distribution. 4. In the Location Type field, select the type of location.
5. In the Location field, enter the ID of the location, or click the LOV button and select the location.
6. In the Quantity, Distribution %, or Ratio field, enter the appropriate amount for the location.
7. Click OK to save your changes and close the window.
Contract approval process Contract approval process
When a contract is added to the system, it must go through a series of checks before it is accessible in the system. Depending on your user role, you may not be able to move the contract to the next status. A contract may be in any of the following statuses:
Status Definition
Worksheet The contract has been started, but not completed.
Submitted The contract has been completed and is pending review.
Approved The contract has been reviewed and has been approved.
Canceled The contract has been manually closed and is no longer valid.
Completed The contract is complete.
Reviewed The contract has been reviewed, but not completed.

Oracle Retail Merchandising System
232
Submit a contract for approval Navigate: From the main menu, select Ordering > Contracts. The Contract Search window opens. Search for and retrieve a contract in Edit mode. Restrict the search to contracts in Worksheet status. The Contract Header window opens.
Contract Header Window
1. From the Options menu, select Submit. 2. When prompted to submit the contract, click Yes. The status of the contract is
changed to Submitted. 3. Click OK to save your changes and close the window.
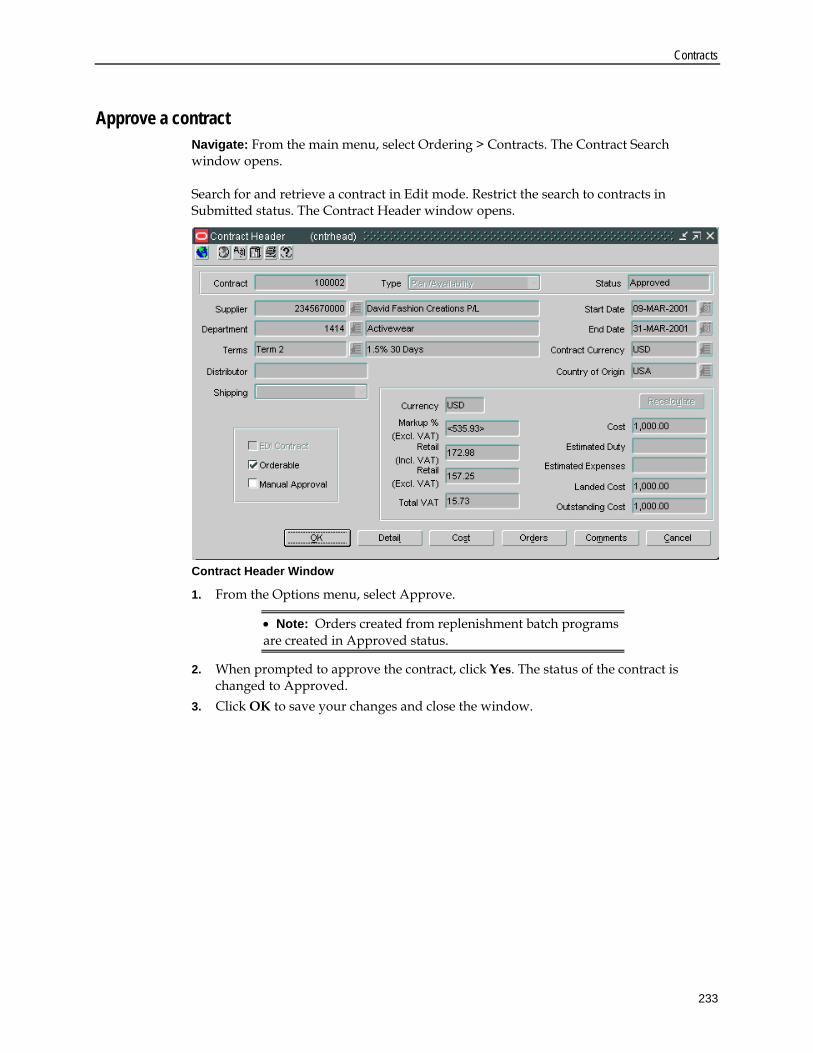
Contracts
233
Approve a contract Navigate: From the main menu, select Ordering > Contracts. The Contract Search window opens. Search for and retrieve a contract in Edit mode. Restrict the search to contracts in Submitted status. The Contract Header window opens.
Contract Header Window
1. From the Options menu, select Approve.
• Note: Orders created from replenishment batch programs are created in Approved status.
2. When prompted to approve the contract, click Yes. The status of the contract is changed to Approved.
3. Click OK to save your changes and close the window.

Oracle Retail Merchandising System
234
Complete a contract Navigate: From the main menu, select Ordering > Contracts. The Contract Search window opens. Search for and retrieve a contract in Edit mode. Restrict the search to contracts in Approved status. The Contract Header window opens.
Contract Header Window
1. From the Options menu, select Complete. 2. When prompted to complete the contract, click Yes. The status of the contract is
changed to Complete. 3. Click OK to save your changes and close the window.

Contracts
235
Cancel a contract Navigate: From the main menu, select Ordering > Contracts. The Contract Search window opens. Search for and retrieve a contract in Edit mode. Restrict the search to contracts in Approved status. The Contract Header window opens.
Contract Header Window
1. From the Options menu, select Cancel. 2. When prompted to cancel the contract, click Yes. The status of the contract is
changed to Cancelled. 3. Click OK to save your changes and close the window.
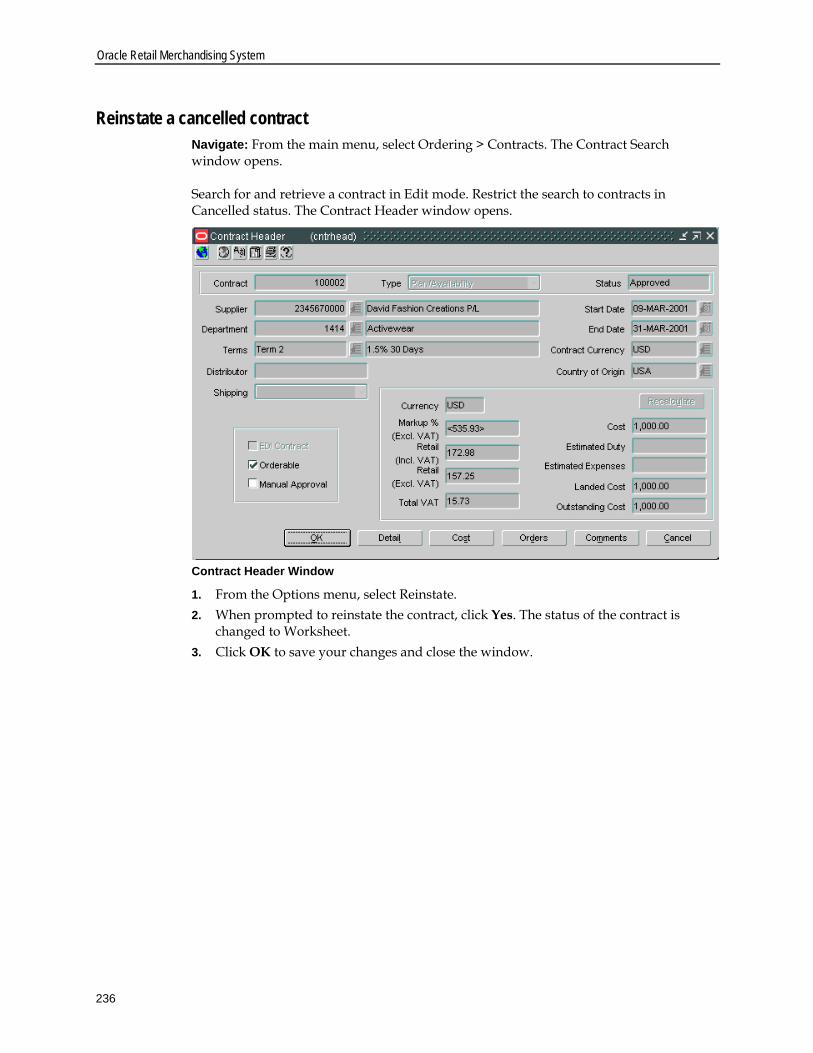
Oracle Retail Merchandising System
236
Reinstate a cancelled contract Navigate: From the main menu, select Ordering > Contracts. The Contract Search window opens. Search for and retrieve a contract in Edit mode. Restrict the search to contracts in Cancelled status. The Contract Header window opens.
Contract Header Window
1. From the Options menu, select Reinstate. 2. When prompted to reinstate the contract, click Yes. The status of the contract is
changed to Worksheet. 3. Click OK to save your changes and close the window.

Contracts
237
Unapprove a contract Navigate: From the main menu, select Ordering > Contracts. The Contract Search window opens. Search for and retrieve a contract in Edit mode. Restrict the search to contracts in Approved status. The Contract Header window opens.
Contract Header Window
1. From the Options menu, select Unapprove. 2. When prompted to unapprove the contract, click Yes. The status of the contract is
changed to Worksheet. 3. Click OK to save your changes and close the window.


239
7 Complex Deals
Create deals Create deals
Deals management allows you to create and maintain deals with partners or suppliers. Deal partners can be suppliers, wholesalers, distributors, and manufactures. Within a deal, you create deal components, specify the items for each deal component, and define thresholds. Components are deals or parts of that deal you receive from a supplier. Multiple components can exist in a single deal. After you add the components, you define thresholds to define the quantity or amount that must be purchased or sold to receive the deal. Finally, you define the items and locations where the deal can be applied. You can choose to include or exclude locations as necessary. Additionally, you can define the proof of performance (POP) terms for a deal. POP terms are defined by the deal vendor that offers the deal. For deals, POP terms can be defined at the deal, deal/component or deal/component/item-loc combination. For fixed deals, the POP terms are defined at the deal level.
Types of deals
Off-invoice deals Off-invoice deals are created when your organization receives a decrease in cost. The decrease in cost will be applied against the cost on the invoice.
Bill Back deals Bill back deals allow your organization to receive money back after a specific event. Bill backs are calculated based on individual purchase orders or receipts. Since an individual PO can be set up at a higher level, you can set up multiple threshold levels for a bill back purchase order . A receipt-based bill back on the other can only contain one threshold.
Types of special bill backs:
Rebates: Deals are created when your organization receives money back from the supplier after you achieve a certain performance. Rebate deals can be based on: – Sales – Purchase Order (at receipt or PO approval time)
Vendor Funded Promotions: Deals are calculated on promotions through RPM and allow you to invoice your supplier or partner a certain percentage they contributed.
Vendor Funded Markdowns: Deals are calculated on the retail markdown taken multiplied by the SOH.

Oracle Retail Merchandising System
240
Fixed deals Fixed deals are created when your organization receives payments from suppliers in return for mentioning their products in promotions, or for displaying their products on prime shelf space. You can create fixed deals and set up a collection schedule, from which you can make claims against the supplier and receive payments. Fixed deal payments can be claimed from the supplier either incrementally or all at once.
Bracket deals Bracket costing deals are created when your organization receives a certain deal price on an order depending on the size of the order. Different types of brackets can be established, based on mass, volume, pallet, case, each, or stat case. The supplier establishes brackets and corresponding prices; for example, 0-99 sweatshirts cost $19 each, 100-199 sweatshirts cost $17 each, 200-299 sweatshirts cost $15 each, and 300-399 sweatshirts cost $13 each. You can indicate whether or not a particular supplier uses bracket costing, and you can choose whether or not to apply bracket costing to a particular order.
Create a deal Navigate: From the main menu, select Ordering > Deals Management. The Deal Find window opens.
Deal Find Window

Complex Deals
241
1. In the Action field, select New. 2. Click OK. The Deal Maintenance window opens.
Deal Maintenance Window
3. In the Vendor field, select the type of deal vendor.
4. Enter the ID of the deal vendor, or click the LOV button and select the deal vendor.
5. In the Deal Timing field, select the type of deal. Annual: A yearlong deal you have with a deal partner. Only one annual deal can
be applied to an item at a time. You close the deal manually when it expires, or the deal is closed automatically when you create another annual deal with the deal partner. Only an Off Invoice deal can be annual.
Promotional: A deal that is generally shorter than an annual deal. Multiple promotional deals can be applied to an item at the same time. The deal closes automatically on the specified end date. Bill Back, Vendor Funded Promotion, Vendor Funded Markdown and off invoice can all be promotional deals.
6. In the Active Date field, enter the date on which the deal becomes active, or click the calendar button and select the date.
7. In the Close Date field, enter the date on which the deal ends, or click the calendar button and select the date.
Note: This field is not required for annual deals.

Oracle Retail Merchandising System
242
8. In the Billing Type field, select how monies from the deal are received.
Note: If you selected Annual in the Deal Timing field, Off-Invoice is the default for the Billing Type and cannot be changed.
Off-Invoice: The deal is reflected as an amount decremented from the cost on the invoice.
Bill Back: The deal income amount is invoiced to the supplier after the goods are purchased. A special type of a bill back is a rebate, which can be calculated on sales, purchase orders or receipts.
Vendor Funded Promotion: A promotion sponsored by the deal vendor. The deal will close automatically on the end date. Multiple vendor-funded promotional deals can be applied to an item at the same time.
Vendor Funded Markdown: A markdown sponsored by the deal vendor. The deal will close automatically on the end date. Multiple vendor-funded markdown deals can be applied to an item at the same time.
9. In the Threshold Limit Type field, select how the threshold is defined. 10. Enter optional information as necessary. 11. If the deal has a Billing Type of Bill Back, Vendor Funded Promotion, or Vendor
Funded Markdown, add the bill back information to the deal. 12. Click Apply. 13. Add deal components. 14. Add item/locations to a deal. 15. Add proof of performance definitions as necessary.
Create a fixed deal Navigate: From the main menu, select Ordering > Fixed Deals > Edit. The Fixed Deals window opens.
Fixed Deals Window

Complex Deals
243
1. In the Partner Type field, select the type of vendor for which you are creating the fixed deal. Enter the ID of the supplier for which you want to create a deal, or click
the LOV button and select the vendor. 2. Click Search. The Deal No field is filled in automatically with a unique ID for the
fixed deal. 3. In the Deal Description field, enter a description of the deal. 4. In the Collect By field, select how often payment for the fixed deal is collected from
the supplier.
5. In the First Collect field, enter the date, or click the calendar button and select the date.
6. In the Collect Period field, enter the number of collection periods.
Note: If you select Date in the Collect By field, the number of collection periods is always one.
7. In the Amount field, enter the payment amount from the supplier. 8. In the Status field, select the status of the deal. 9. In the Invoice Processing Logic field, select how invoices are created for the fixed
deal. 10. If the deal is associated to the merchandise hierarchy, select the Merch check box.
The Fixed Merchandise window opens.
Fixed Merchandise Window

Oracle Retail Merchandising System
244
a. In the Merch Level field, select the merchandise level that the deal information is held at.
b. In the Apply area, enter the ID of the department, class and subclass in the
appropriate fields, or click the LOV button and select the department, class, and subclass.
c. Click Apply. The merchandise level is added to the table. d. Click Locations. The Fixed Merchandise Locations window opens.
Fixed Merchandise Locations Window
i. In the Group Type field, select the location type you want to add to the deal. ii. In the Group Value field, enter the ID of the location group or click the LOV
button and select the group. iii. In the Ratio field, indicate what percentage of the deal the location
contributes. iv. Click Apply. The location and ratio is added to the table. v. Click OK to save any changes and close the window.
e. Click OK to save any changes and close the window. 11. If the Debit Memo/Credit Note Ind, select whether you want to send a Debit Memo
or Credit Note request to the supplier. 12. In the Non Merch Code field, select the appropriate code.
Note: The Non Merch field is required only if the Merch check box is not selected.

Complex Deals
245
13. If VAT is included in the deal, select the VAT check box. a. Click VAT. The Value Added Tax window opens.
Value Added Tax Window
b. In the VAT Code field, enter the VAT code to apply to the fixed deal, or click the
LOV button and select a VAT code. c. Click OK to save any changes and close the window.
14. In the Type field, select the type of allowance you receive for completing the deal. 15. Add proof of performance definitions as necessary. 16. Click OK to save your changes and close the window.
Create a PO-specific deal Navigate: From the main menu, select Ordering > Orders. The Order Selection window opens. Search for and retrieve a purchase order in Edit mode. The PO Header Maintenance window opens. Click Items. The PO Item Maintenance window opens. From the Options menu, select PO-Specific Deal > Create/Edit. The Deal Maintenance window opens.
Deal Maintenance Window

Oracle Retail Merchandising System
246
1. On the Deal Head tab, In the Threshold Limit Type field, select how the threshold is defined.
2. Add deal components. 3. Add item/locations to a deal. 4. Add threshold information. 5. Click Close to exit. 6. When prompted to save the changes, click Yes.
Add Bill Back Information to a Deal Navigate: From the main menu, select Ordering > Deals Management. The Deal Find window opens.
Deal Find Window
1. In the Action field, select New. 2. Click OK. The Deal Maintenance window opens.

Complex Deals
247
Deal Maintenance Window
3. In the Vendor field, select the type of deal vendor.
4. Enter the ID of the deal vendor, or click the LOV button and select the deal vendor.
5. In the Deal Timing field, select Promotional. Promotional: A deal that is generally shorter than an annual deal. Multiple
promotional deals can be applied to an item at the same time. The deal closes automatically on the specified end date. Bill Back, Vendor Funded Promotion, Vendor Funded Markdown and off invoice can all be promotional deals.
6. In the Active Date field, enter the date on which the deal becomes active, or click the calendar button and select the date.
7. In the Close Date field, enter the date on which the deal ends, or click the calendar button and select the date.
8. In the Billing Type field, select how the bill back monies from the deal are received. Bill Back: The deal income amount is invoiced to the supplier after the goods
are purchased. Bill Back Rebate: A special type of a bill back is a rebate, which can be calculated
on sales, purchase orders or receipts. 9. In the Threshold Limit Type field, select how the threshold is defined. 10. Enter optional information as necessary. 11. Click Apply. 12. Click the Bill Back tab. 13. Select the Deal Reporting Level. 14. Enter the Rebates information as necessary. 15. Click Apply.

Oracle Retail Merchandising System
248
16. Add deal components. 17. Add item/locations to a deal. 18. Add proof of performance definitions as necessary.
Deals approval process Deals approval process
When a deal is added to the system, it must go through a series of checks before it is accessible in the system. Depending on your user role, you may not be able to move the deal to the next status. A deal may be in any of the following statuses:
Status Definition
Worksheet The deal has been started, but not completed.
Submitted The deal has been completed and is pending review.
Approved The deal has been reviewed and has been approved.
Rejected The deal has been submitted, reviewed, and has been rejected.
Closed The deal is complete.

Complex Deals
249
Submit a deal Navigate: From the main menu, select Ordering > Deals Management. The Deal Find window opens. Search for and retrieve a deal in Edit mode. Restrict the search to deals in Worksheet status. The Deal Maintenance window opens.
Deal Maintenance Window
1. From the Options menu, select Submit. The Status field changes to Submitted. 2. Click Close to exit. You are prompted to save the changes. 3. Click Yes.

Oracle Retail Merchandising System
250
Approve a deal Navigate: From the main menu, select Ordering > Deals Management. The Deal Find window opens. Search for and retrieve a deal in Edit mode. Restrict the search to deals in Submitted status. The Deal Maintenance window opens.
Deal Maintenance Window
1. From the Option menu, select Approve. The Status field changes to Approved. 2. Click Close to exit. 3. When prompted to save the changes, click Yes.

Complex Deals
251
Reject a deal Navigate: From the main menu, select Ordering > Deals Management. The Deal Find window opens. Search for and retrieve a deal in Edit mode. Restrict the search to deals in Submitted status. The Deal Maintenance window opens.
Deal Maintenance Window
1. From the Options menu, select Reject. The Status field changes to Rejected. 2. Click Close to exit. You are prompted to save the changes. 3. Click Yes.

Oracle Retail Merchandising System
252
Close a deal Navigate: From the main menu, select Ordering > Deals Management. The Deal Find window opens. Search for and retrieve a deal in Edit mode. Restrict the search to annual deals. The Deal Maintenance window opens.
Deal Maintenance Window
1. From the Option menu, select Close. The Status field changes to Closed. 2. Click Close to exit. 3. When prompted to save the changes, click Yes.

253
8 Cost Management
Set up cost changes Set up cost changes
A cost change is an adjustment to the cost of an item, either up or down. Before you can create a cost change, a list of user defined cost change reasons are created and then applied to each cost change. If you are tracking Estimated Landed Costs (ELC), you set up cost zones to facilitate a cost change at the location or zone level. All items are associated with zones upon item set up. RMS uses cost zone groups to implement the most effective pricing strategy for each item. There are two types of costing strategies. Zone level: The cost for the item is the same across all locations in a price zone. The
landed cost for an item and supplier relationship is the same across a zone. Location level: Each location can have a unique retail price for an item. The landed
cost for an item and supplier relationship can also be different at each location.

Oracle Retail Merchandising System
254
Add a cost change reason Navigate: From the main menu, select Control > Setup > Cost Change Reason > Edit. The Cost Change Reason Maintenance window opens.
Cost Change Reason Maintenance Window
1. Click Add. The next available line is enabled. 2. In the Code field, enter an ID for the reason. 3. In the Description field, enter a description for the reason. 4. Click OK to save your changes and close the window.

Cost Management
255
Add a cost zone group Navigate: From the main menu, select Control > Setup > Cost Zone Group > Edit. The Cost Zone Groups window opens.
Cost Zone Groups Window
Add a cost zone group 1. Click Add. The next line on the table is enabled. 2. In the Zone Group field, enter a unique ID. 3. In the Cost Level field, select Zone.
Note: If a location cost level is not set up, you may select Location in the Cost Level field. You can create only one cost zone group at the location cost level
4. In the Description field, enter the description of the cost zone group. 5. To copy the zones and locations from an existing cost zone group, in the Like Group
field enter the ID of the cost zone group or click the LOV button and select a cost zone group.

Oracle Retail Merchandising System
256
Add cost zones to a cost zone group 1. On the Cost Zone Groups window, click Zones to add zones to the new cost zone
group. The Cost Zones window opens.
Cost Zones Window
2. Click Add. The next line on the table is enabled. 3. In the Zone field, enter a unique zone ID. 4. In the Description field, enter a cost zone description. 5. In the Currency field, enter the code for the currency to be used in the cost zone or
click the LOV button and select the currency.

Cost Management
257
Add locations to a cost zone 1. On the Cost Zone Groups window, click Zones. The Cost Zones window opens. 2. On the Cost Zones window, click Locations. The Cost Zone Locations window
opens.
Cost Zone Locations Window
3. To add a location that has not been assigned to a cost zone group, click Add. a. In the Location Type field, select store or warehouse.
b. In the Location field, enter the location ID, or click the LOV button and select the location.
4. To add a location to a cost zone that is currently in a different cost zone: a. On the Cost Zones window, select the Zone that contains the location you want
to put in the new zone. b. Click Locations. The Cost Zone Locations window opens. c. In the New Zone field, enter the zone ID of the cost zone that you would like the
location to appear in, or click the LOV button and select the new cost zone

Oracle Retail Merchandising System
258
Exit the cost zone windows Click OK to save your changes and close the windows.
Set up estimated landed costs Set up expenses
The landed costs functions allow you to define expenses, assessments upcharges, and combinations of both in order to track the costs involved in purchasing and moving goods from the manufacturer to the distribution center or store. Within RMS, landed cost is defined using computation value bases (CVB), expenses, and assessments. Expenses and assessments are more generically referred to as cost components. Computation value bases describe how expenses and assessments are combined in order to provide a base for the calculation of other expenses and assessments. Assessments differ from expenses in that they are defined by a government agency. An expense is cost component associated with moving a product from a supplier to the retailer, primarily dealing with importing. Examples include freight costs, shipping insurance, etc. Expenses can be set up to apply to different legs of the shipment. For example, there may be an ocean freight charged for transporting goods across the ocean (between the discharge and lading ports) and then other charges associated with moving the goods from the lading port to the warehouse that is inland (e.g. land freight).
Define a computation value base Navigate: From the main menu, select Control > Landed Cost > CVB Maintenance > New. The CVB Maintenance window opens.
CVB Maintenance Window

Cost Management
259
1. Click Add. The next available line is enabled. 2. Enter an ID and description for the Computation Value Base (CVB). 3. Select the types of calculations that will use the CVB. 4. Click OK to exit, or continue to select CVB components.
Select CVB components 1. Click Details. The CVB Details window opens.
CVB Details Window
2. Click Add.
3. In the Component field, enter the ID of the component, or click the LOV button and select the component.
4. In the Combination Operator field, select: 5. + (plus sign) to add the component. 6. - (minus sign) to subtract the component in the CVB. 7. Click OK to save your changes and close the window.

Oracle Retail Merchandising System
260
Define an assessment Navigate: From the main menu, select Control > Landed Cost > Cost Component Maintenance > New. The Cost Component Maintenance window opens.
Cost Component Maintenance Window
1. In the Component fields, enter an ID and description of the component. 2. In the Component Type field, select Assessment.
3. In the Assessment Type field, enter the ID of the tax or fee, or click the LOV button and select the tax or fee as necessary.
4. In the Import Country field, enter the code for the country importing the goods, or
click the LOV button and select the import country.
Define assessments based on the quantity or dimensions of the goods 1. In the Calculation Basis field, select Specific. 2. In the Component Rate field, enter the monetary amount per unit. 3. In the Component Per Count field, enter the number of units to which the rate
applies. 4. In the Component Per Count UOM, enter the abbreviation for the unit of measure to
which the rate applies, or click the LOV button and select the unit of measure. 5. Click OK to save your changes and close the window.

Cost Management
261
Define assessments based on a percentage of the goods' value 1. In the Calculation Basis field, select Value. 2. In the Component Rate field, enter the percentage per unit. 3. In the Computation Value Base, enter the ID of the CVB to which you want to attach
the assessment, or click the LOV button and select the CVB. This field is optional. 4. In the Computation Level field, enter a number to indicate the sequence in which this
component should be computed in regards to other components. For example, if it should be computed first, enter 1.
5. In the Component Currency field, enter the code for the currency in which the
assessment is denominated, or click the LOV button and select the currency. 6. In the Component Nomination fields, select the status of the assessment in relation to
the other components in a CVB. 7. Select N/A if the assessment is not included in the calculation. 8. Select + (plus sign) to add the assessment. 9. Select - (minus sign) to subtract the assessment. 10. Click OK to save your changes and close the window.
Define an expense Navigate: From the main menu, select Control > Landed Cost > Cost Component Maintenance > New. The Cost Component Maintenance window opens.
Cost Component Maintenance Window

Oracle Retail Merchandising System
262
1. In the Component fields, enter an ID and description of the component. 2. In the Component Type field, select Expense. 3. In the Expense Type field, select either Zone or Country. 4. For expenses based on the quantity or dimensions of the goods:
a. In the Calculation Basis field, select Specific. b. In the Component Rate field, enter the monetary amount per unit. c. In the Component Per Count field, enter the number of units to which the rate
applies. d. In the Component Per Count UOM, enter the code for the unit of measure to
which the rate applies, or click the LOV button and select the unit of measure. 5. For expenses based on a percentage of the value of the goods:
a. In the Calculation Basis field, select Value. b. In the Order Cost Basis field, select the base for calculating the Expense. c. In the Component Rate field, enter the percentage per unit. d. In the Computation Value Base, enter the ID of the CVB to which you want to
attach the expense, or click the LOV button and select the CVB. 6. In the Component Currency field, enter the ID of the currency in which the expense
is denominated, or click the LOV button and select the currency. 7. In the Component Nomination fields, select the status of the expense in relation to
the other components in a CVB: 8. Select N/A if the expense is not included in a calculation. 9. Select + (plus sign) to add the expense. 10. Select - (minus sign) to subtract the expense. 11. Click OK to save your changes and close the window.

Cost Management
263
Set up outside locations Set up outside locations
Outside locations are those locations that are not part of the organizational hierarchy. Some examples of outside locations are entry ports, discharge ports, lading ports, return centers, bill-to locations, and destination locations.
Create an outside location Navigate: From the main menu, select Control > Setup > Outside Locations > New. The Outside Locations window opens.
Outside Locations Window

Oracle Retail Merchandising System
264
1. In the Location Type field, select the type of location that you want to create. 2. In the Location field, enter a unique ID and description for the outside location.
3. In the Currency field, enter the currency code for the location, or click the LOV button and select the currency.
4. In the Country field, enter the ID of the country in which the outside location is located.
5. Enter optional information in the remaining fields as necessary. 6. Click OK to save your changes and close the window.
Set up up charges Set up up charges
An up charge is a cost associated with moving items between locations in the merchandising system. Up charges are included since there is work associated with the transfer of goods (e.g. cost that the origin location incurs to prepare the items for shipping) and since locations can exist in different legal entities there is accounting between the different locations. Each up charge has a calculation basis of value or specific, a cost basis of either weighted average cost (when using average cost method) or unit cost (when using standard cost method), component currency, and up charge group, which is used to group up charge components together to show a total sum on the Transfer Up Charge window. The following up charge types can be applied: Department up charges: Incurred when transferring items within the department or
within the from and the to locations. Location up charges: Tracked when both average costing (as opposed to standard
costing) and estimated landed cost (ELC) is used. Transfer up charges: Associated with a specific Transfer/Item/From Location/To
Location combination. Up charge groups: A combination of up charge components. Up charge components: Charges that are incurred when transferring from a RMS
store or warehouse to another RMS store or warehouse.

Cost Management
265
Add an up charge to an item Navigate: From the Main menu, select Items> Items. The Item Search window opens. Search for and retrieve an item in edit mode. The Item Maintenance window opens. From the Options list, select Item Up Charges. The Item Up Charges window opens.
Item Up Charges Window
1. In the From Group Type field of the Apply block, select the locations from which the items originate.
2. If available, enter a From Group value, or click the LOV button and select a value. 3. Select a value in the To Group Type field.
4. If available, enter a To Group value, or click the LOV button and select a value.
5. In the Component field, enter an up charge component ID or click the LOV button and select an up charge component.

Oracle Retail Merchandising System
266
6. Update the following fields as necessary: Up Charge Group: Used to group up charges together on the Transfer Up
Charge window. All up charge components with the same up charge group are summed together.
Component Rate: The rate to be charged against the weighted average cost of the Item/To Location combinations within the department. The value in this field is a percentage if the calculation basis is Value, and a monetary amount if the calculation basis is Specific.
Per Count: The amount of the Per Count Unit of Measure to which the rate applies. For example, when creating an up charge that is defined as $.20 for every 10 kilograms of an item, the Per Count would be 10. This field is enabled if the calculation basis is Specific.
Per Count UOM: Displays the unit of measure in which the Per Count is specified. This field is enabled if the calculation basis is Specific
7. Click Apply. The Component table is updated. 8. Click OK to save your changes and close the window.
Add an up charge to items on an item list Navigate: From the Main menu, select Items> Item List. The Item List Search window opens. Search for and retrieve an item list in use mode. The Item List Header window opens. From the Options list, select Create Mass Item Charge > Up Charges. The Item Up Charges window opens.
Item Up Charges Window

Cost Management
267
1. In the From Group Type field of the Apply block, select the locations from which the items originate.
2. If available, enter a From Group value, or click the LOV button and select a value. 3. Select a value in the To Group Type field.
4. If available, enter a To Group value, or click the LOV button and select a value.
5. In the Component field, enter an up charge component ID or click the LOV button and select an up charge component.
6. Update the following fields as necessary: Up Charge Group: Used to group up charges together on the Transfer Up
Charge window. All up charge components with the same up charge group are summed together.
Component Rate: The rate to be charged against the weighted average cost of the Item/To Location combinations within the department. The value in this field is a percentage if the calculation basis is Value, and a monetary amount if the calculation basis is Specific.
Per Count: The amount of the Per Count Unit of Measure to which the rate applies. For example, when creating an up charge that is defined as $.20 for every 10 kilograms of an item, the Per Count would be 10. This field is enabled if the calculation basis is Specific.
Per Count UOM: Displays the unit of measure in which the Per Count is specified. This field is enabled if the calculation basis is Specific
7. Click Apply. The Component table is updated. 8. Click OK to save your changes and close the window.

Oracle Retail Merchandising System
268
Add up charges to items in a department Navigate: From the Main menu, select Action > Merchandise Hierarchy. The Merchandise Hierarchy Main Form window opens. Search for and retrieve a department in edit mode. The Department Maintenance window opens. From the Options menu, select Up Charges. The Department Up Charges window opens.
Department Up Charges Window
1. In the From Group Type field of the Apply block, select the locations from which the items originate.
2. If available, enter a From Group value, or click the LOV button and select a value. 3. Select a value in the To Group Type field.
4. If available, enter a To Group value, or click the LOV button and select a value.
5. In the Component field, enter an up charge component ID or click the LOV button and select an up charge component.

Cost Management
269
6. Update the following fields as necessary: Up Charge Group: Used to group up charges together on the Transfer Up
Charge window. All up charge components with the same up charge group are summed together.
Component Rate: The rate to be charged against the weighted average cost of the Item/To Location combinations within the department. The value in this field is a percentage if the calculation basis is Value, and a monetary amount if the calculation basis is Specific.
Per Count: The amount of the Per Count Unit of Measure to which the rate applies. For example, when creating an up charge that is defined as $.20 for every 10 kilograms of an item, the Per Count would be 10. This field is enabled if the calculation basis is Specific.
Per Count UOM: Displays the unit of measure in which the Per Count is specified. This field is enabled if the calculation basis is Specific
7. Click Apply. The Component table is updated. 8. Click OK to save your changes and close the window.
Create a cost change Create a cost change
The initial cost of an item is established at item set-up. The cost of the item can be adjusted in the item record until the status of the item is Approved or Unapproved. Any cost changes will need to be handled through the cost change windows. When submitted via EDI, you review the cost change, then submit the cost change for approval. When entered manually, you enter the cost change, an event description, an effective date, and a reason code. Then submit the cost change for approval.
Note: You cannot create a cost changes for a transformed sellable item.
After you approve the cost change, the Item/Supplier cost record is updated and any outstanding purchase orders that have not been received are recalculated.

Oracle Retail Merchandising System
270
Accept cost changes received via EDI Navigate: From the main menu, select Items > EDI Cost Changes. The New EDI Cost Changes window opens.
New EDI Cost Changes Window
1. In the Supplier field, enter the ID of the supplier, or click the LOV button and select the supplier.
2. In the Create Date field, enter the date on which the cost changes were received, or
click the LOV button and select the date. The items that match the criteria appear. 3. In the Description field, enter a description for the cost change event. 4. In the Reason field, enter the ID of the reason for the cost change, or click the LOV
button and select the reason. 5. In the Cost Change Approval Method area, select an approval method. 6. In the Status fields, select either Accepted or Rejected for each cost change.
Note: To accept all the cost changes, click Accept All.
7. Select the Recalc Orders check box next to each cost change if you want to update the cost on unapproved purchase orders.
8. Select the Update Children check box next to each cost change if you want to apply the change to subordinate items.
9. Click OK to save your changes and close the window.
View additional details about the item 1. Select an item. 2. Click Item Detail. The details appear in the Item Maintenance window. 3. Click OK to close the windows.

Cost Management
271
Search for a cost change Navigate: From the main menu, select Costing > Cost Change. The Cost Change Search window opens.
Cost Change Search Window
1. In the Action field, select either Edit or View. 2. In the Origin field, select Cost. 3. Enter additional criteria as desired to make the search more restrictive. 4. Click Search. The Price Change Search window displays the cost changes that match
the search criteria. 5. Select a task: 6. To perform another search, click Refresh. 7. To display the details of a cost change, select a record and click OK. The details
appear in the Cost Change by Supplier window.

Oracle Retail Merchandising System
272
Cost Change by Supplier Window
8. Click Close to close the window
Create a cost change Navigate: From the main menu, select Costing > Cost Change. The Cost Change Search window opens.
Cost Change Search Window

Cost Management
273
Note: There are two additional ways in which to access the Cost Change by Supplier window: - From the main menu, select Items > Items. In the Item Search window, select New Cost Change in the Action field and search for the item to be edited; - From the main menu, select Items > Item List. In the Item List Search window, select Use in the Action field and search for an item list to be edited. Select Create Cost Change from the Options menu.
1. In the Action field, select New. 2. Click OK. The Cost Change by Supplier window opens.
Cost Change by Supplier Window
3. In the Cost Change field, enter a description for the cost change. 4. In the Item, Supplier, and Country field, enter the item number or ID of each as
necessary, or click the LOV button and select the item, supplier, or country. 5. In the Reason field, enter the ID of the reason for the cost change, or click the LOV
button and select the reason. 6. In the Effective Date field, enter the date on which the cost changes become effective. 7. Click Search. The records that match the search criteria appear.

Oracle Retail Merchandising System
274
Change cost at the item/supplier/origin country level 1. In the box on the left, select the type of item number you want to view.
Item: Displays the item ID. Ref Item: Displays the ID of the child item. VPN: Displays the vendor product number for the item.
2. Select the type of adjustment in the Apply block. 3. Enter the change in the box next to the selected option.
Change in Percent: Enter the percent by which the cost changes. Use a negative symbol (-) before the percent to indicate a decrease in cost by percent.
Change in Amount: Enter the amount by which the cost changes. Use a negative symbol (-) before the percent to indicate a decrease in cost by amount.
Fixed Cost: Enter the new cost of the item. The amount entered becomes the cost of all items selected for cost change.
4. Click Apply. The new costs per unit are calculated. 5. Edit the monetary amounts in the New Unit Cost field next to each item as necessary. 6. Select the Recalc Orders check box next to each item or supplier if you want to
update the costs on approved or unapproved purchase orders.
Change costs at the item/supplier/origin country/location level 1. Select a supplier or item record and click Locations. The locations associated with the
item/supplier/origin country appear in the Cost Change by Location window.
Cost Change by Location Window

Cost Management
275
2. Select the type of adjustment in the Apply block. 3. Enter the change in the box next to the selected option.
Change in Percent: Enter the percent by which the cost changes. Use a negative symbol (-) before the percent to indicate a decrease in cost by percent.
Change in Amount: Enter the amount by which the cost changes. Use a negative symbol (-) before the percent to indicate a decrease in cost by amount.
Fixed Cost: Enter the new cost of the item. The amount entered becomes the cost of all items selected for cost change.
4. In the Loc Type field, select a grouping mechanism. 5. In the Location field, enter the ID of the specific location or group, or click the LOV
button and select the location or group.
In the Bracket field, enter the bracket, or click the LOV button and select the bracket.
Note: The Bracket field is enabled when you select warehouse group type in the Loc. Type field.
6. Click Apply. The new costs per unit are calculated. 7. Edit the monetary amounts in the New Unit Cost field next to each item as necessary. 8. Select the Recalc Orders check box if you want to update the costs on approved or
unapproved purchase orders. 9. Click OK to save your changes and close the window.
Cost change approval process Cost change approval process
For a cost change to take affect, it needs to be in approved status. Depending on your user role, you may not be able to move the cost change to the next status. A cost change may be in any of the following statuses:
Status Status definition
Worksheet The cost change event is incomplete. You can edit, submit, or delete the cost change event.
Submitted The cost change event is complete and submitted for approval. You can approve, reject, or delete the cost change event.
Approved The cost change event is complete and has been approved. You can return the cost change event to Worksheet status for editing or cancel the cost change event.
Rejected The cost change event is complete and has been approved. You can return the cost change event to Worksheet status for editing or cancel the cost change event.
Extracted The details of the cost change event were extracted to the locations affected by the cost change event. Only cost change events in Approved status are extracted.

Oracle Retail Merchandising System
276
Status Status definition
Canceled The details of the cost change event were extracted to the locations affected by the cost change event. Only cost change events in Approved status are extracted.
Submit a cost change for approval Navigate: From the main menu, select Costing > Cost Change. The Cost Change Search window opens. Search for and retrieve a cost change in Edit mode. Restrict the search to cost changes in Worksheet status. The Cost Change by Supplier window opens.
Cost Change by Supplier Window
1. From the Options menu, select Submit. 2. When prompted to submit the cost change, click Yes. The status of the cost change
changes to Submitted. 3. Click OK to save your changes and close the window.

Cost Management
277
Approve a cost change Navigate: From the main menu, select Costing > Cost Change. The Cost Change Search window opens. Search for and retrieve a cost change in Edit mode. Restrict the search to cost changes in Submitted status. The Cost Change by Supplier window opens.
Cost Change by Supplier Window
1. From the Options menu, select Approve. 2. When prompted to approve the cost change, click Yes. The status of the cost change
changes to Approved. 3. Click OK to save your changes and close the window.

Oracle Retail Merchandising System
278
Reject a submitted cost change Navigate: From the main menu, select Costing > Cost Change. The Cost Change Search window opens. Search for and retrieve a cost change event in Edit mode. Restrict the search to cost changes in Submitted status. The Cost Change by Supplier window opens.
Cost Change by Supplier Window
1. From the Options menu, select Reject. You are prompted to reject the cost change. 2. Click Yes. The status of the cost change changes to Rejected. 3. Click OK to save your changes and close the window.

Cost Management
279
Cancel an approved cost change Navigate: From the main menu, select Costing > Cost Change. The Cost Change Search window opens. Search for and retrieve a cost change in Edit mode. Restrict the search to cost changes in Approved status. The Cost Change by Supplier window opens.
Cost Change by Supplier Window
1. From the Options menu, select Cancel. You are prompted to cancel the cost change. 2. Click Yes. The status of the cost change changes to Cancelled. 3. Click OK to save your changes and close the window.


281
9 Inventory Control
Inventory Control
Shipping Maintain shipment schedules
Maintain shipment schedules You can view and maintain shipments by shipment number. You can also view outstanding shipments for a purchase order. Shipments originate from a variety of sources: ASN shipments: Shipments are created automatically from advance shipping notices
(ASN) that are received from suppliers via electronic data interface (EDI). System: Shipments are transmitted by an external system, such as a warehouse
management system. System ASN: Shipments are created automatically when a shipment is received
before the ASN is received via EDI or from an external system. Items may be received online against shipments that are created by system ASN.
System UCC-128: Shipments for cartons are transmitted by an external system. Cartons and their associated items may be received online against shipments created by UCC-128.
ASN UCC-128: Shipments are created automatically from carton-level ASNs that are received from suppliers via EDI.
In a multi-channel environment, suppliers and external systems are aware of warehouses at the physical warehouse level. Within RMS, shipments to warehouses are maintained at the virtual warehouse level. When quantities are unspecified at the virtual warehouse level, the quantities are distributed among the virtual warehouses based on the default distribution rule.

Oracle Retail Merchandising System
282
Edit a shipping schedule for a warehouse Navigate: From the main menu, select Control > Setup > Store Ship Schedule > Store Ship Schedule. The Store Ship Schedule Maintenance window opens.
Store Ship Schedule Maintenance Window
1. In the Warehouse field, enter the ID of a physical warehouse, or click the LOV button and select the warehouse.
2. In the Action area, select a task: To add stores to the schedule, select the Add option. To delete stores from the schedule, select the Delete option.
3. Select the ship dates: To schedule shipments for a specific date, select Specific Date in the Type field.
Then enter the date in the Value field, or click the calendar button and select the date.
To schedule shipments for a specific day at regular intervals, select Every, Every Second, Every Third, or Every Fourth in the Type field. In the Value field, select the day. Then enter the start and end dates in the From and To fields, or click the calendar buttons and select the dates.
To schedule daily shipments for a range of dates, select All Dates in Range in the Type field. Then enter the start and end dates in the From and To fields, or click the calendar buttons and select the dates.

Inventory Control
283
4. Select the stores: a. Click Add. The Apply area becomes enabled. b. In the Group Type field, select the grouping mechanism.
c. In the Value field, enter the ID of the store or group, or click the LOV button and select the location or group.
d. Click Apply. The stores are added to the table. 5. Click OK to save your changes and close the window.
Edit a shipping schedule for a warehouse by ship date Navigate: From the main menu, select Control > Setup > Store Ship Schedule > Ship Schedule by Ship Date > Edit. The Store Shipment Schedule Dates window opens.
Store Shipment Schedule Dates Window

Oracle Retail Merchandising System
284
1. In the Warehouse field, enter the ID of the physical warehouse, or click the LOV button and select the warehouse.
2. In the Ship Date field, enter the date, or click the calendar button and select the date. The stores on the schedule appear.
3. To add a stockholding store to the schedule: a. Click Add. The next available line is enabled.
b. In the Store field, enter the ID of the store, or click the LOV button and select the store.
4. To delete a store from the schedule: a. Select a store and click Delete. b. When prompted to delete the record, click Yes.
5. Click OK to save your changes and close the window.
Edit a shipping schedule for a warehouse by store Navigate: From the main menu, select Control > Setup > Store Ship Schedule > Ship Schedule by Store > Edit. The Store Shipment Schedule Stores window opens.
Store Shipment Schedule Stores Window

Inventory Control
285
1. In the Warehouse field, enter the ID of the physical warehouse, or click the LOV button and select the warehouse.
2. In the Store field, enter the ID of the stockholding store, or click the LOV button and select the store. The ship dates on the schedule appear.
3. To add a ship date to the schedule: a. Click Add. The next available line is enabled.
b. In the Ship Date field, enter the date, or click the calendar button and select the date.
4. To delete a ship date from the schedule: a. Select a ship date and click Delete. b. When prompted to delete the record, click Yes.
5. Click OK to save your changes and close the window.
Maintain activity schedules Maintain activity schedules Activity schedules allow you to add, edit, and view dates on which a location is closed. You indicate that a group of locations or a single location is closed on a particular date. You can also specify what operations the locations can perform on that date. For example, you can specify that a store cannot perform sales on that date; that is, the store is closed for sales that day, but it can receive and ship shipments. When you view close dates for a group of locations, the locations are listed by date, and only the locations in the group with close dates are displayed. Non-stockholding stores can remain open or closed for sales only. By their nature, they cannot ship or receive items. In a multi-channel environment, changes made to a physical warehouse are applied to the virtual warehouses within the physical warehouse. When the Use Location Activity Schedule system parameter is selected, the replenishment feature uses the location close schedule to dynamically calculate lead times for the items at the location. When a purchase order cannot be delivered to a location because it is closed, the lead time is calculated by taking the minimum lead time and adding additional days to reach the next valid delivery day. In effect, the lead time is extended until the next delivery day for the location.

Oracle Retail Merchandising System
286
Edit an activity schedule for a store Navigate: From the main menu, select Action > Organizational Hierarchy. The Organization Hierarchy Main Form window opens. Select Store on the tree structure. The stores appear on the table. Select a store and click Edit. The Store Maintenance window opens. From the Options menu, select Activity Schedule. The Location Close window opens.
Location Close Window
Edit the activity schedule 1. Select a record. The details appear in the Apply area. 2. Edit the activities and reason as necessary. 3. Click the Apply. The details are updated in the table. 4. Click OK to save your changes and close the window.

Inventory Control
287
Add closing dates 1. Click Add. The fields in the Apply area are cleared.
2. In the Close Date field, enter the date, or click the calendar button and select the date.
3. In the Closed For area, select the check box next to each activity for which the locations are closed.
4. In the Reason field, enter the reason why the location is closed. 5. Click Apply. The closing date is added to the table. 6. Click OK to save your changes and close the window.
Delete a closing date 1. Select a closing date and click Delete. 2. When prompted to delete the record, click Yes. 3. Click OK to save your changes and close the window.
Edit an activity schedule for a warehouse Navigate: From the main menu, select Action > Organizational Hierarchy. The Organization Hierarchy Main Form window opens. Select Warehouse on the tree structure. The warehouses appear on the table. Select a warehouse and click Edit. The Warehouse Maintenance window opens. From the Options menu, select Activity Schedule. The Location Close window opens.
Location Close Window

Oracle Retail Merchandising System
288
Edit the activity schedule 1. Select a record. The details appear in the Apply area. 2. Edit the activities and reason as necessary. 3. Click Apply. The details are updated in the table. 4. Click OK to save your changes and close the window.
Add closing dates 1. Click Add. The fields in the Apply area are cleared. 2. Click Add. The fields in the Apply area are cleared. 3. In the Location Type field of the Apply area, select a grouping mechanism.
4. In the Location field, enter the ID of the group or location, or click the LOV button and select the group.
5. In the Close Date field, enter the date, or click the calendar button and select the date.
6. In the Closed For area, select the check box next to each activity for which the locations are closed.
7. In the Reason field, enter the reason why the location is closed. 8. Click Apply. The closing date is added to the table. 9. Click OK to save your changes and close the window.
Delete a closing date 1. Select a closing date and click Delete. 2. When prompted to delete the record, click Yes. 3. Click OK to save your changes and close the window.

Inventory Control
289
Edit an activity schedule for multiple locations Navigate: From the main menu, select Control > Setup > Location Activity Schedule > Location Closings > Edit. The Location Close window opens.
Location Close Window
Edit an activity schedule 1. In the Search area, enter location, date, or activity criteria to restrict the search. 2. Click Search. The locations that match the criteria appear. 3. Select a record. The details appear in the Apply area. 4. Edit the activities and reason as necessary. 5. Click Apply. The details are updated on the table. 6. Click OK to save your changes and close the window.

Oracle Retail Merchandising System
290
Add closing dates 1. Click Add. The fields in the Apply area are cleared. 2. In the Location Type field, select a grouping mechanism. 3. In the Location field, enter the ID of the specific group or location, or click the LOV
button and select the group or location.
4. In the Close Date field, enter the date, or click the calendar button and select the date.
5. In the Closed For area, select the check box next to each activity for which the locations are closed.
6. In the Reason field, enter the reason why the locations are closed. 7. Click Apply. The selected locations are added to the table. 8. Click OK to save your changes and close the window.
Delete a closing date 1. Select a closing date and click Delete. 2. When prompted to delete the record, click Yes. 3. Click OK to save your changes and close the window.
Edit an activity schedule for the company Navigate: From the main menu, select Control > Setup > Location Activity Schedule > Company Closings > Edit. The Company Close window opens.
Company Close Window

Inventory Control
291
Add a date on which the company is closed 1. Click Add. The next available line is enabled.
2. In the Close Date field, enter the date, or click the calendar button and select the date.
3. In the Close Description field, enter the reason why the company is closed.
Delete a date on which the company is closed 1. Select a date and click Delete. 2. When prompted to delete the record, click Yes.
Add locations to the exception list 1. To indicate which locations remain open when the company is closed, select a date
and click Exceptions. The Location Exceptions window opens.
Location Exceptions Window
Oracle Retail Merchandising System
292
2. Click Add. The fields in the Apply area are enabled. 3. In the Group Type field of the Apply area, select a grouping mechanism. 4. In the Group Value field, enter the ID of the group or location, or click the LOV
button and select the group. 5. In the Open For area, select the check box next to each activity for which the locations
are open. 6. Click Apply. The locations are added to the table. 7. Click OK to save your changes and close the window.
Delete a location from the exception list 1. On the Location Exceptions window, select a location and click Delete. 2. When prompted to delete the location, click Yes. 3. Click OK to save your changes and close the window.
Edit the details for a location 1. On the Location Exceptions window, select the location. The details appear in the
Apply area. 2. Edit the enabled fields as necessary. 3. Click Apply. 4. Click OK to save your changes and close the window.
Maintain return to vendor (RTV) shipments Maintain Return to Vendor (RTV) Shipments A return to vendor (RTV) order is used to send merchandise back to the supplier. RTV orders may be received from an external system, such as a warehouse management system. The items on these RTV orders are already shipped, so their status in RMS is Shipped. One or more items may be included on the RTV order, but only one supplier and location can be entered. If the RTV was created as the result of an mass return transfer (MRT), the MRT number will be displayed on the RTV. You can view the details of the MRT by searching for the MRT.
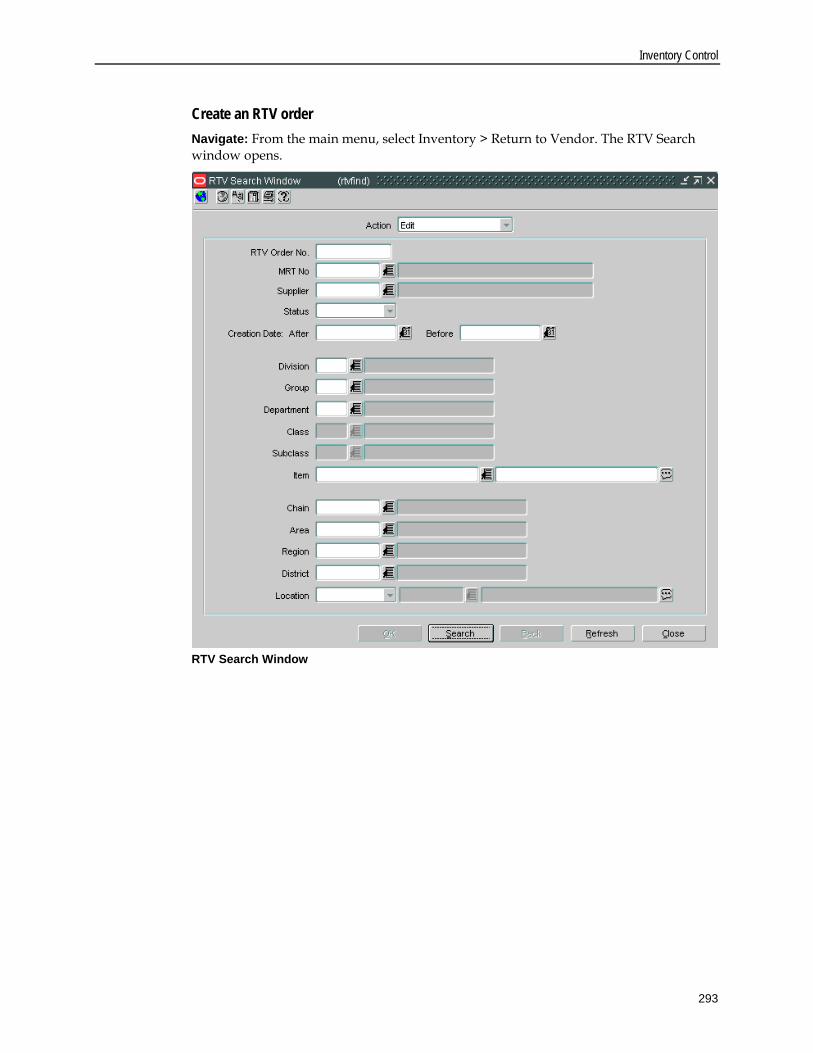
Inventory Control
293
Create an RTV order Navigate: From the main menu, select Inventory > Return to Vendor. The RTV Search window opens.
RTV Search Window

Oracle Retail Merchandising System
294
1. In the Action field, select New. Click OK. The RTV Maintenance window opens.
RTV Maintenance Window
Note: You can also access the RTV Maintenance window directly from the Quality Control window.
2. In the Supplier field, enter the ID of the supplier, or click the LOV button and select the supplier.
3. In the Location area a. Select the type of location.
b. Enter the ID of the location that is returning the item, or click the LOV button and select the location.
4. In the Ret Auth No field, enter the supplier's return authorization number as necessary.
5. In the Comments field, enter any comments as necessary. 6. In the Default Restocking % field, enter what percentage, if any, the supplier charges
for returns.

Inventory Control
295
7. To edit the supplier's return address and courier information: a. Click Ship Info. The Shipment Info window opens.
Shipment Info Window
b. Click Search and select an alternative return address as necessary. Otherwise, enter or edit the default information.
c. Click OK to save any changes and close the window.
Add items to the RTV order 1. Click Add. The fields in the Apply area are cleared. 2. In the Item Type field, select how you want to add items to the RTV order. 3. In the Item field, enter the item ID or click the LOV button and select the item. 4. Select the quantity you want to return: 5. To return all items at the location, select the SOH Default check box. 6. To return a set quantity, in the Quantity Returned field, enter the appropriate
number. 7. In the Unit Cost field, adjust the amount of the cost of the item as necessary.
Note: The unit cost defaults to the last receipt cost at the origin location for the supplier, if the receipt still exists in RMS.

Oracle Retail Merchandising System
296
8. In the Type of Reason field, select the appropriate option. 9. The Restocking % field is defaulted from the Default Restocking % field in the header
area. Update the Restocking % field as necessary for the item. 10. Click Apply. The item or items are added to the RTV order. 11. Click OK to save any changes and close the window.
Search for an RTV order Navigate: From the main menu, select Inventory > Return to Vendor. The RTV Search window opens.
RTV Search Window

Inventory Control
297
1. In the Action field, select either Edit or View. 2. Enter additional criteria as desired to make the search more restrictive. 3. Click Search. The RTV Search window displays the RTV orders that match the search
criteria. 4. Select a task: 5. To perform another search, click Refresh. 6. To display the details of an RTV order, select a record and click OK. The details
appear in the RTV Maintenance window.
RTV Maintenance Window
7. Click Close to exit.

Oracle Retail Merchandising System
298
Edit an RTV order Navigate: From the main menu, select Inventory > Return to Vendor. The RTV Search window opens. Search for and retrieve an RTV order in Edit mode. Restrict the search to RTV orders in Input status. The details of the RTV order appear in the RTV Maintenance window.
RTV Maintenance Window
Edit the Ret Auth No, Handling Pct, and Comments fields as necessary.

Inventory Control
299
Edit the supplier's return address and courier information 1. Click Ship Info. The Shipment Info window opens.
Shipment Info Window
2. Click Search and select an alternative return address as necessary. Otherwise, enter or edit the default information.
3. Click OK to save your changes and close the window.
Edit the items on the RTV order 1. Select an item on the table. 2. Enter or edit any additional details as necessary. 3. Click Apply. 4. Click OK to save your changes and close the window.
Delete an item from the RTV order 1. Select an item and click Delete. 2. When prompted to delete the record, click Yes. 3. Click OK to save your changes and close the window.

Oracle Retail Merchandising System
300
Approve an RTV order Navigate: From the main menu, select Inventory > Return to Vendor. The RTV Search window opens. Search for and retrieve an RTV order in Edit mode. Restrict the search to RTV orders in Input status. The RTV Maintenance window opens.
RTV Maintenance Window
1. From the Options menu, select Approve. 2. When prompted to approve the RTV order, click Yes. The status of the RTV order is
changed to Approved. 3. Click OK to save your changes and close the window.

Inventory Control
301
Cancel an RTV order Navigate: From the main menu, select Inventory > Return to Vendor. The RTV Search window opens. Search for and retrieve an RTV order in Edit mode. Restrict the search to RTV orders in Input status. The RTV Maintenance window opens.
RTV Maintenance Window
1. From the Options menu, select Cancel. 2. When prompted to cancel the RTV order, click Yes. The status of the RTV order is
changed to Cancelled. 3. Click OK to save your changes and close the window.

Oracle Retail Merchandising System
302
Unapprove an RTV order Navigate: From the main menu, select Inventory > Return to Vendor. The RTV Search window opens. Search for and retrieve an RTV order in Edit mode. Restrict the search to RTV orders in Approved status. The RTV Maintenance window opens.
RTV Maintenance Window
4. From the Options menu, select Unapprove. 5. When prompted to unapprove the RTV order, click Yes. The status of the RTV order
is changed to Input. 6. Click OK to save your changes and close the window.

Inventory Control
303
Transfers Set up transfers
Set up transfers Transfers zones are grouping of locations within an area. Transfer zones are set up to restrict the transfer of items to locations within the transfer zone. You can assign a store to a transfer zone when you create or edit the store. Transfer entities define which locations in an organization are grouped together due to legal requirements. Transfer entities can be defined by brand, geography, country or other grouping defined by your company. Moving items between transfer entities is treated as a sale from the origin location and purchase by the receiving location. Items that have been transferred between entities and may require a change in cost and retail pricing as well as ownership. Finally, you may set up the additional information required to complete a transfer that has finishing. You need to create activities that are used on the work orders. If there are certain activities that you regularly assign, you can create a work order template that will allow you to apply the set of activities to a work order on a transfer.
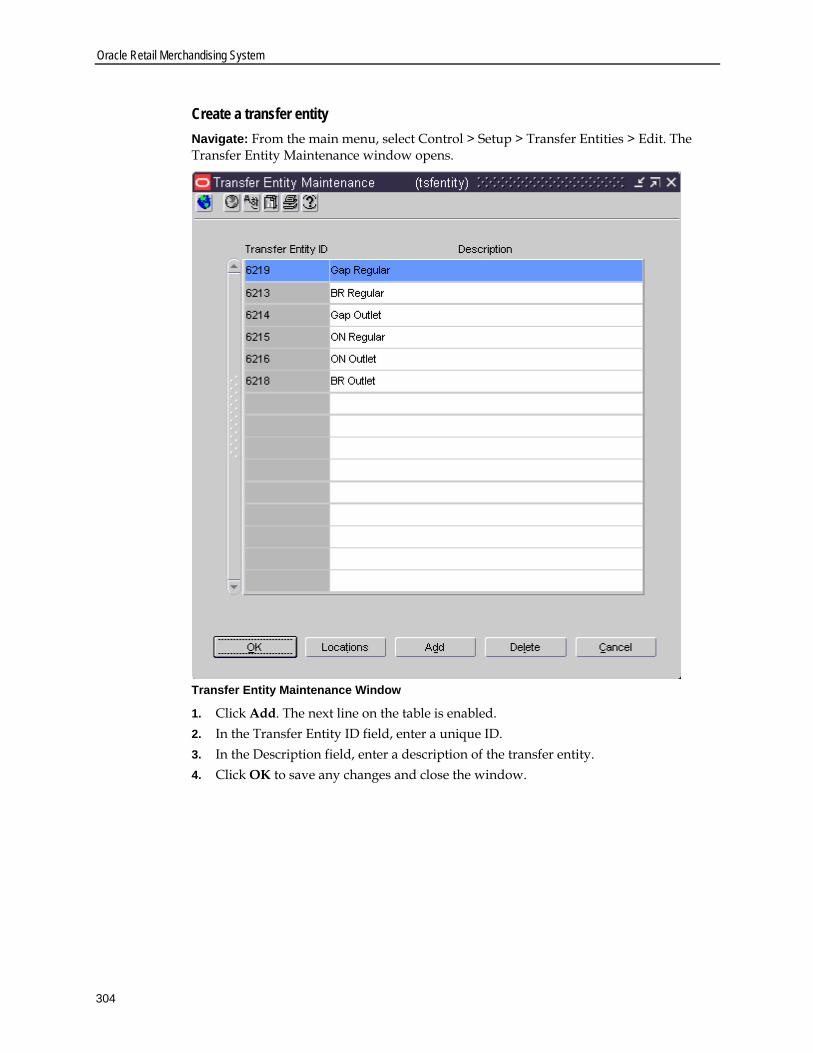
Oracle Retail Merchandising System
304
Create a transfer entity Navigate: From the main menu, select Control > Setup > Transfer Entities > Edit. The Transfer Entity Maintenance window opens.
Transfer Entity Maintenance Window
1. Click Add. The next line on the table is enabled. 2. In the Transfer Entity ID field, enter a unique ID. 3. In the Description field, enter a description of the transfer entity. 4. Click OK to save any changes and close the window.
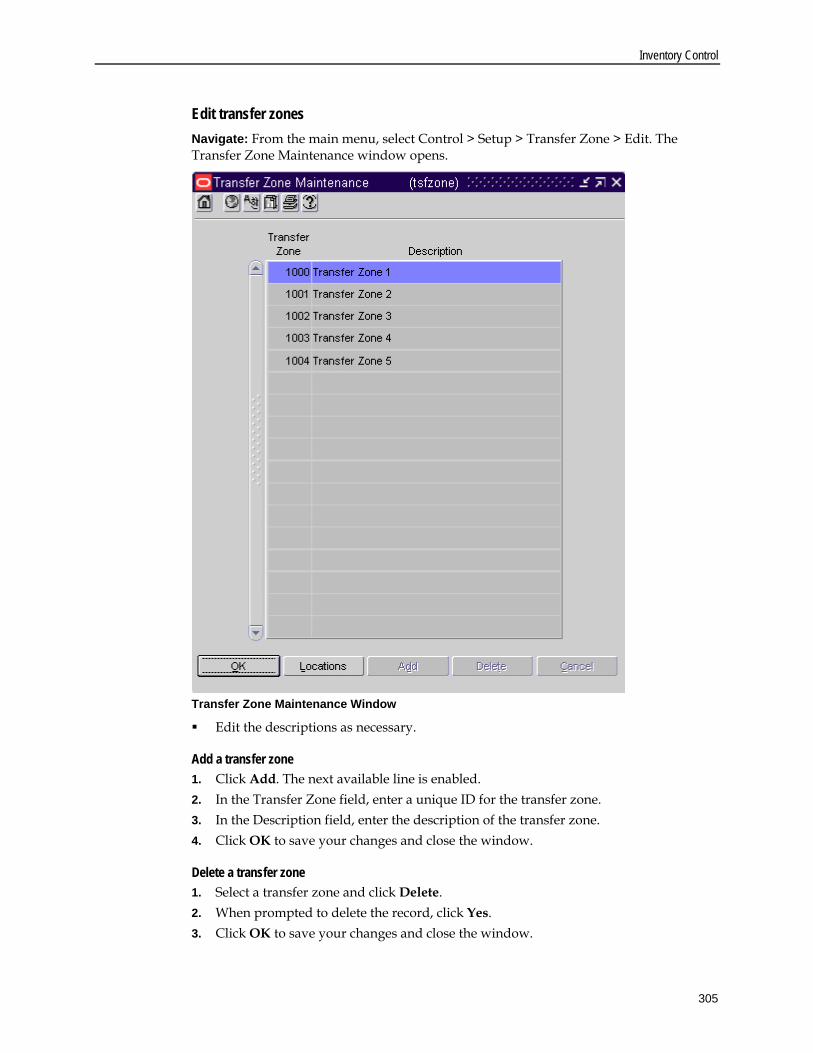
Inventory Control
305
Edit transfer zones Navigate: From the main menu, select Control > Setup > Transfer Zone > Edit. The Transfer Zone Maintenance window opens.
Transfer Zone Maintenance Window
Edit the descriptions as necessary.
Add a transfer zone 1. Click Add. The next available line is enabled. 2. In the Transfer Zone field, enter a unique ID for the transfer zone. 3. In the Description field, enter the description of the transfer zone. 4. Click OK to save your changes and close the window.
Delete a transfer zone 1. Select a transfer zone and click Delete. 2. When prompted to delete the record, click Yes. 3. Click OK to save your changes and close the window.

Oracle Retail Merchandising System
306
Add a transfer work order activity Navigate: From the main menu, select Control > Setup > Transfer Work Order Activity > Edit. The Transfer Work Order - Activity Set Up window opens.
Transfer Work Order - Activity Set Up Window
1. Click Add. The next line on the table is enabled. 2. In the Activity ID field, enter the ID of the activity. 3. In the Activity Description field, enter a description of the activity. 4. In the Unit Cost field, enter the amount per unit that it will cost to add finishing to
the transfer. 5. In the Cost Type field, select the method used to distribute the cost of finishing. 6. Click OK to save any changes and close the window.
Add a work order template Navigate: From the main menu, select Inventory > Work Order Templates > New. The Work Order Template window opens. 1. In the Work Order Template field, enter a description of the template
2. In the Apply area, enter an Activity ID, or click the LOV button and select an activity.
3. If necessary, in the Activity Cost field, edit the amount it costs to complete the activity.
Note: The activity cost and cost type default from the information defined during activity set up.

Inventory Control
307
4. In the Comments field, enter comments as necessary. 5. Click Apply. The activity is added to the template. 6. Click OK to save any changes and close the window.
Create transfers Create transfers A transfer is a movement of stock on hand from one stockholding location within the company to another. You can choose from the following types of transfers: Administrative: Stock is transferred for administrative purposes rather than
merchandising. Book transfer: Stock is transferred between two virtual warehouses within the same
physical warehouse. The transfer is created, approved, and closed in one step. No shipment records are created. This option is available in a multi-channel environment.
Combined transfer: The system automatically combines store requisition and cross-dock PO transfers that have the same origin and destination locations into one transfer. The store requisition and cross-dock PO transfers are deleted after they are merged into the combined transfer.
Confirmation: The details of the transfer are entered after the transfer has already occurred.
Cross-dock PO: A transfer is created automatically when stock is received with the following characteristics: the items are part of a purchase order that is already allocated, cross-docked, and not pre-marked.
Customer order: Stock is reserved for a customer. The stock may be shipped to the customer's address or held for pickup by the customer.
Intercompany: Stock is transferred between two transfer entities. The transfer may have three locations associated with it: an origin location, a finishing location, and a destination location, or two locations associated with it: an origin location and a destination location. The finishing location on an intercompany transfer with finishing must have the same transfer entity as either the origin location or the destination location.
Manual requisition: A manual requisition is used as a general purpose transfer when no other type of transfer is applicable. An example might be a store to store transfer.
Non-salable book transfer: Stock that is marked as non-salable is moved from one virtual warehouse’s unavailable inventory area to another virtual warehouse’s unavailable inventory area within the same physical warehouse. The transfer is created, approved, and closed in one step. No shipment records are created. This option is available in a multi-channel environment.
Non-salable merchandise: Stock that is marked as non-salable is moved from one unavailable inventory area to another, such as to a repair center.
PO-linked transfer: When not enough stock is available at a warehouse in order to fill a store order, the transfer is linked to a purchase order that was created in order to satisfy the remaining need. The transfer is created automatically by the system.
Reallocation: Stock that is marked is as reallocation is transferred to a consolidation location to be distributed to other stores.

Oracle Retail Merchandising System
308
Return to vendor: Stock that is marked as a return to vendor is transferred to a consolidation location to be returned to the supplier.
Store requisition: Stock is transferred based on replenishment needs. The transfer is created automatically by the system.
Store requisition, cross-dock PO, PO-linked, and combined transfers are created automatically. All other types of transfers are created manually for a variety of purposes. There are two transfer types that can be created: an intercompany or intracompany transfer. An intercompany transfer must occur between two different transfer entities. An intracompany transfer must occur within the same transfer entity. When you create an inter company transfer, you are required to enter the transfer price of items on the transfer. Transfer prices are at the weighted average cost of the item, the standard cost, or the retail-based cost, depending on the accounting method used by your company. For intracompany transfers, you can enter the transfer cost, however it is not required. If you do not enter the transfer cost, it will default to one of the prices mentioned above at the time of shipment. Transfers with an intercompany transfer type are considered intercompany transfer. Return to vendor and reallocation transfers can either be intracompany or intercompany depending on the user and system selection. All other transfers are considered intracompany transfers.
Note: If the system level RTV/RAC Transfer indicator is set to intracompany, return to vendor and reallocation transfers are treated as intracompany transfers.
If the transfer was created as the result of an mass return transfer (MRT), the MRT number will be displayed on the transfer. You can view the details of the MRT by searching for the MRT. If you have access to a warehouse management system, transfer, shipment, and receipt details can be transmitted between the two systems.

Inventory Control
309
Copy a transfer Navigate: From the main menu, select Inventory > Transfer. The Transfer Search window opens. Search for and retrieve a transfer in New from Existing mode. The Transfer Maintenance window opens.
Transfer Maintenance Window
Edit the enabled fields as necessary.
Add items to the transfer 1. Click Items. The Transfer Detail window opens.

Oracle Retail Merchandising System
310
Transfer Detail Window
2. In the Apply area, select a grouping mechanism in the Item Type field.
3. In the Item field, enter the ID of the item or item list, or click the LOV button and select the item or item list.
4. Enter any additional details in the enabled fields. 5. Click Apply. The details are added to the table. 6. Click OK to save your changes and close the window.

Inventory Control
311
Copy a customer order transfer 1. On the Transfer Maintenance window, click Customer. The PO Customer
Maintenance window opens.
PO Customer Maintenance Window
2. Enter or edit any additional details in the enabled fields. 3. Click OK to save your changes and close the window.

Oracle Retail Merchandising System
312
Create a transfer Navigate: From the main menu, select Inventory > Transfer. The Transfer Search window opens.
Transfer Search Window
1. In the Action field, select New. 2. In the Type field select the type of transfer that you want to create. 3. Click OK. The Transfer Maintenance window opens.
Transfer Maintenance Window
4. In the Delivery Date field, enter the last date the transfer can be received, or click the calendar button and select a date.

Inventory Control
313
5. If you are creating an reallocation or return to vendor transfer, in the Transfer Entity Type field, select intercompany or intracompany to indicate which type of transfer is created.
6. Enter information in the enabled fields as necessary. 7. In the From area:
a. In the From Entity field, enter the ID of the origin entity, or click the LOV button and select a location.
b. In the Location Type field, select the type of location the transfer originates from.
c. In the Location field, enter the location ID or click the LOV button and select a location.
d. Select the appropriate freight type and carrier. 8. In the Finisher area:
Note: Finishers are required for transfer that will have work orders, transformations, or packing instructions.
a. In the Location Type field, select the type of finisher the item is going to.
b. In the Location field, enter the location ID or click the LOV button and select a finisher.
c. Select the appropriate freight type and carrier. 2. In the To area:
a. In the To Entity field, enter the ID of the destination entity, or click the LOV button and select a location.
Note: If you selected Intercompany Transfer as the Transfer Type, the To Entity must be different than the From Entity that you entered in the From area.
b. In the Location Type field, select the type of location the transfer is going to.
c. In the Location field, enter the location ID or click the LOV button and select a location.

Oracle Retail Merchandising System
314
Add items to the transfer 1. On the Transfer Maintenance window click Items. The Transfer Detail window
opens.
Transfer Detail Window
2. In the Apply area, select a grouping mechanism in the Item Type field.
3. In the next field, enter the ID of the item or item list, or click the LOV button and select the item or item list.
4. If you are adding items by diff, in the Diff ID field, enter the ID of the diff, or click the
LOV button and select the diff.
5. In the Inv Status field, enter the inventory status type, or click the LOV button and select the inventory status type.
Note: You can only enter a value in the Inv Status field if you selected Unavailable in the Inventory Status field on Transfer Maintenance.

Inventory Control
315
6. In the Qty Type field, select how you want to determine the quantity on the transfer Total stock on hand: All stock on hand at the origin location is added to the
transfer. Manual: The Trans Qty field is enabled so that you can enter the quantity to be
added to the transfer. 7. If you selected Manual, in the Transfer Qty field enter the number of items to
transfer. 8. In the Trans Qty field enter the number that will be transferred.
Note: If you select Total Stock on Hand in the Qty Type field, all stock at the location will be transferred. You cannot enter a transfer quantity.
9. If this is an intercompany transfer, set the transfer price: a. In the Transfer Price Adjustment Type field, indicate how you want to adjust the
price. b. In the Adjustment Value field, enter the price or percent that you are adjusting
by. c. Click Apply. The details are added to the table.
Review and complete the transfer Click OK to save your changes and close the window.
Search for a transfer Navigate: From the main menu, select Inventory > Transfer. The Transfer Search window opens.
Transfer Search Window

Oracle Retail Merchandising System
316
1. In the Action field, select either Edit or View. 2. Enter additional criteria as desired to make the search more restrictive. 3. Click Search. The Transfer Search window displays the transfers that match the
search criteria. 4. Select a task: 5. To perform another search, click Refresh. 6. To display the details of a transfer, select a record and click OK. The details appear in
the Transfer Maintenance window.
Transfer Maintenance Window
7. Click Close to exit.

Inventory Control
317
Print a transfer Navigate: From the main menu, select Inventory > Transfer. The Transfer Search window opens. Search for and retrieve a transfer in Edit mode. The Transfer Maintenance window opens.
Transfer Maintenance Window
1. From the Options menu, select Print. The Report Parameters page opens. 2. In the Destination field, select the destination for the report. 3. In the Destination Printer field, the default printer name is filled in automatically.
Note: Default printers are assigned by user name. If the field is empty, enter the ID of a printer.
4. In the Transfer Number field, the current transfer number is filled in automatically. To print a different transfer, edit the transfer number.
5. Click Submit Query. The report is sent to the destination selected in the Destination field.
Oracle Retail Merchandising System
318
Create transfers with finishing Create transfers with finishing Transfers with finishing require that the items on the transfer are worked on before they arrive to a final location. Work on items are complete at a finishers. Finishers can be internal or external. Internal finishers are part of the company, and are typically located in an area of the warehouse. External finishers are set up as a partner to the company, and may be located off site. You can set up the activities that are required for an item before the transfer is complete. The following are the activities that require finisher be identified for a transfer. Work order: Work orders are a request that work be done to an item before it arrives
at the final location. You assign specific activities that need to be completed by the finisher.
Transformation: Transformation is a request that one item is converted to a second item before it arrives to the final location.
Packing: Packing request are completed at the finishers when the request accompanies a transfer the items are packaged in certain groupings before the transfer is sent to the final location.

Inventory Control
319
Add a work order to a transfer Navigate: From the main menu, select Inventory > Transfer. The Transfer Search window opens.
Transfer Search Window
1. Create a transfer with finishing. 2. On the Transfer Detail window, click Work Order. The Transfer Work Order
Maintenance window opens.
Transfer Work Order Maintenance Window

Oracle Retail Merchandising System
320
3. Select the item you want to add an activity to. 4. To add a single activity to an item:
a. In the Activity Type field, select Activity. b. In the Activity field, enter the ID of the activity you want to use, or click the LOV
button and select an activity. c. Edit the Activity Cost as necessary. The activity cost is defaulted from the
activity cost entered when the activity was set up. d. Add additional comments as necessary. e. Click Apply. The details appear on the table.
5. To add multiple activities to an item. a. In the Activity Type field, select Template to add multiple activities as indicated
on the template. b. In the Template field, enter the ID of the template you want to use, or click the
LOV button and select an template. c. Click Apply. The details appear on the table.
6. Click OK to save any changes and close the window.
Review and complete the transfer Click OK to save any changes and close the window.

Inventory Control
321
Pack an item on a transfer Navigate: From the main menu, select Inventory > Transfer. The Transfer Search window opens. 1. Create a transfer. 2. Add a transfer work order activity 3. On the Transfer Detail window, click Packing. The Item Packing window opens.
Item Packing Window
Break a pack into its components 1. In the Item field, select a pack item that is on the transfer. 2. Click Explode Pack. The component items appear in the Results area.
Change the pack 1. In the Item field, select a pack item that is on the transfer.
Note: You may need to transform the items on a transfer before they can be packed.
2. In the Pack No. field, enter the ID of the new pack. 3. Click Build Pack. The new pack is created and displayed in the Results area.
Create a pack based on component items 1. In the Item field, select bulk items on that are on the transfer. 2. In the Pack No. field, enter the ID of the new pack. 3. Click Build Pack. The new pack is created and displayed in the Results area.
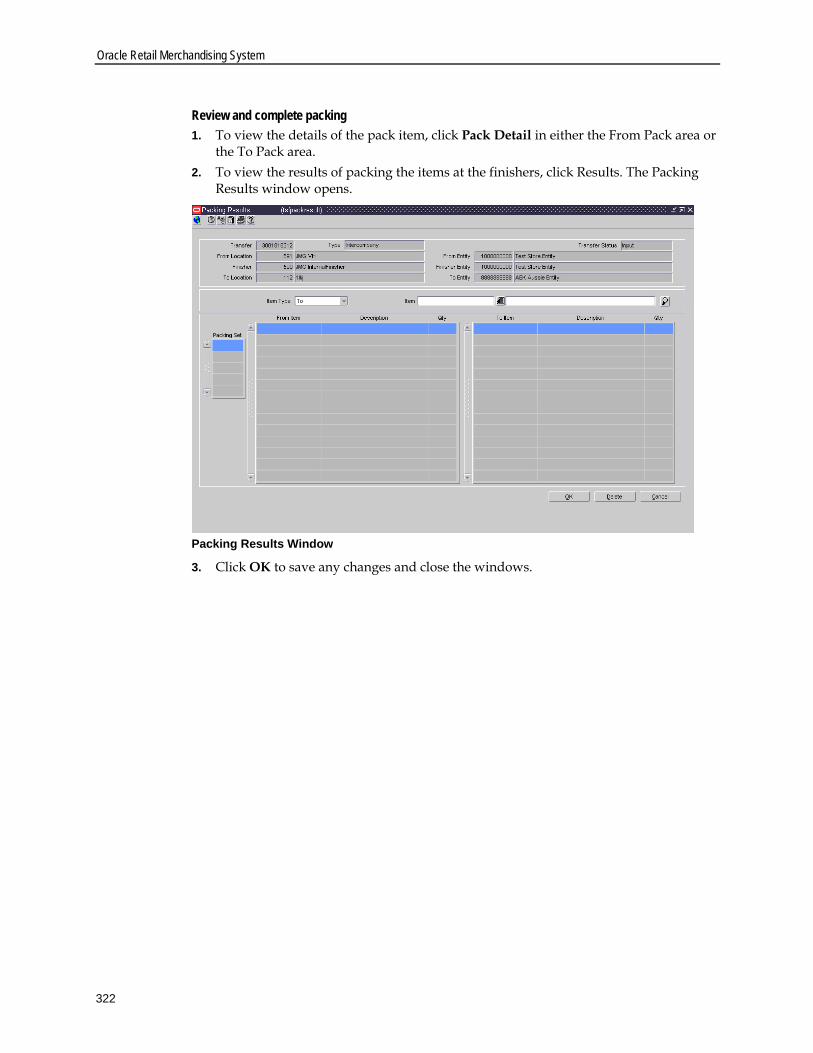
Oracle Retail Merchandising System
322
Review and complete packing 1. To view the details of the pack item, click Pack Detail in either the From Pack area or
the To Pack area. 2. To view the results of packing the items at the finishers, click Results. The Packing
Results window opens.
Packing Results Window
3. Click OK to save any changes and close the windows.
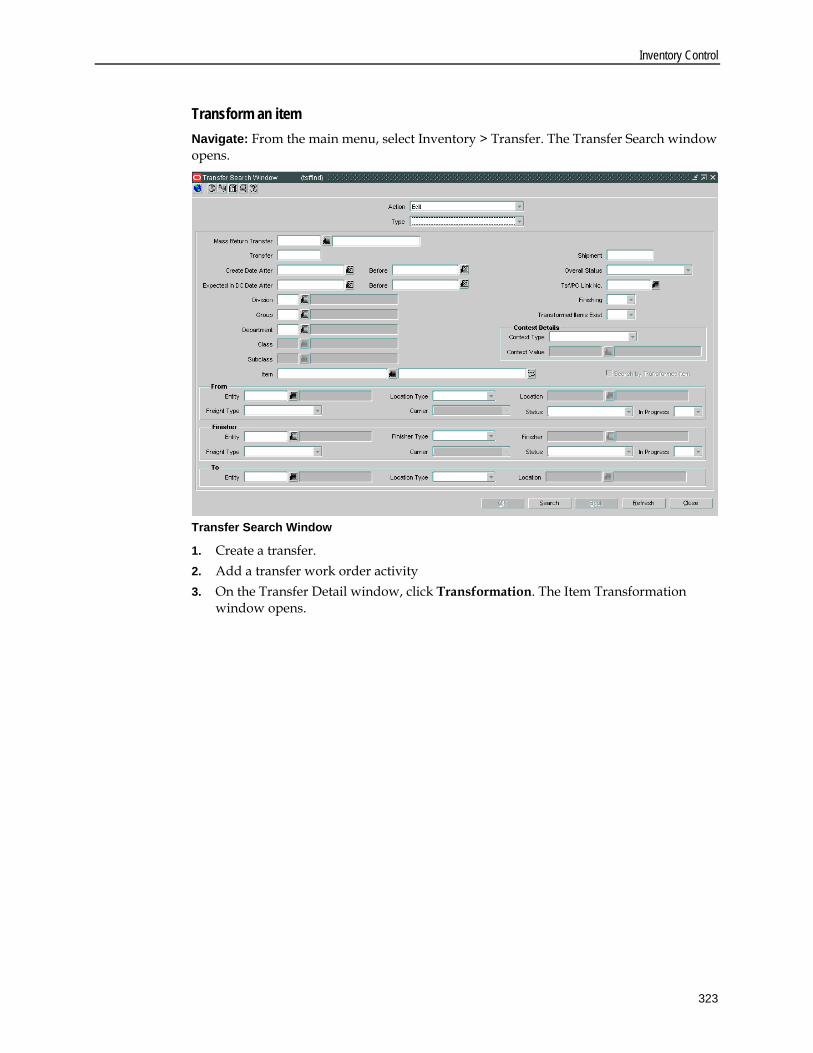
Inventory Control
323
Transform an item Navigate: From the main menu, select Inventory > Transfer. The Transfer Search window opens.
Transfer Search Window
1. Create a transfer. 2. Add a transfer work order activity 3. On the Transfer Detail window, click Transformation. The Item Transformation
window opens.

Oracle Retail Merchandising System
324
Item Transformation Window
4. In the From Item area: a. In the From Item field, enter the item ID of the item or parent item you want to
convert, or click the LOV button and select an item. b. If the parent item has diffs, in the Diff ID field, enter the diff ID of the item that
you want to convert, or click the LOV button and select a diff. 5. In the To Item area:
a. In the To Item field, enter the ID of the item or parent item that you want the
From Item to become, or click the LOV button and select an item.
Note: The To Item you select must be an approved item in the merchandising system.
b. If the item selected in the To Item field is a parent item, In the Diff ID field, enter the diff ID of the item that you want the From item to become, or click the LOV
button and select a diff. If you want the diffs of the From Items to become one item with no diffs, leave the Diff ID field blank.
c. Click Transform. The transformed items are displayed in the Transformation area.

Inventory Control
325
6. To view the results of all the items that have been transformed for the transfer, click Results. The Item Transformation Matrix window opens.
Item Transformation Matrix Window
a. In the Filter area, enter the search criteria as necessary, or click the LOV button and select the appropriate information.
b. Click the filter button. The items that match the criteria appear in the results area.
c. To clear search criteria, click the clear filter button. Data in all fields is cleared.
d. Click Delete to remove a transformed item from the results area. You are prompted to confirm the deletion.
e. Click OK. 7. Click OK to save any changes and close the windows.

Oracle Retail Merchandising System
326
Transfer approval process Transfer approval process When a transfer is added to the system, it must go through a series of checks before it is accessible in the system. Depending on your user role, you may not be able to move the transfer to the next status. A transfer may be in any of the following statuses:
Status Definition
Input The transfer has been started, but not completed.
Submitted The transfer has been completed and is pending review.
Approved The transfer has been reviewed and has been approved.
Picked Items on the transfer have been selected for shipping to the next receiver.
In Progress The transfer has been shipped to the next receiver in the transfer.
Deleted The transfer is marked for deletion. It will be deleted by a regularly scheduled batch program.
Closed The transfer has been received at the final location and is complete.
Submit a transfer for approval Navigate: From the main menu, select Inventory > Transfer. The Transfer Search window opens. Search for and retrieve a transfer in Edit mode. Restrict the search to transfers in Input status. The Transfer Maintenance window opens.
Transfer Maintenance Window

Inventory Control
327
1. From the Options menu, select Submit. The status of the transfer changes to Submitted.
2. Click OK to save your changes and close the window.
Approve a transfer Navigate: From the main menu, select Inventory > Transfer. The Transfer Search window opens. Search for and retrieve a transfer in Edit mode. Restrict the search to transfers in Input status. The Transfer Maintenance window opens.
Transfer Maintenance Window
1. From the Options menu, select Approve. The status of the transfer changes to Approved.
2. Click OK to save your changes and close the window.

Oracle Retail Merchandising System
328
Delete a transfer Navigate: From the main menu, select Inventory > Transfer. The Transfer Search window opens. Search for and retrieve a transfer in Edit mode. Restrict the search to transfers in Input or Approved status. The Transfer Maintenance window opens.
Transfer Maintenance Window
1. From the Options menu, select Delete. When prompted to delete the record, click Yes. You are returned to the Transfer Search window.
2. Click Close to exit.

Inventory Control
329
Close a transfer Navigate: From the main menu, select Inventory > Transfer. The Transfer Search window opens. Search for and retrieve a transfer in Edit mode. Restrict the search to transfers in Shipped status. The Transfer Maintenance window opens.
Transfer Maintenance Window
1. From the Options menu, select Close. The status of the transfer is changed to Closed.
Note: If there are any open appointments assigned to this transfer, that message displays stating that the transfer cannot be closed.
2. Click OK to save your changes and close the window.
Oracle Retail Merchandising System
330
Mass Returns Transfer Create mass return transfers
Create mass return transfers Mass return transfers (MRTs) allow you to create transfers from multiple locations to a single warehouse. There are two types of MRTs that you can create. Mass returns: Items are transferred from multiple locations to a consolidation
location in order to redistribute them to other stores. A transfer is created with a transfer type of reallocation
Return To Vendors (RTV): Items are transferred from multiple location to a consolidation location and then returned to the vendor. If you set up the RTV to create automatically, the RTV is created on the date you enter. Alternatively, you can manually create the RTV.
When you create the MRT, you select a warehouse that is the receiving locations for the transfers. This warehouse will also be the sending location for the RTV. If the MRT will result in an RTV, you must also identify which supplier will receive the items and whether or not to include the warehouse stock in the RTV. Next you must identify which items are included on the MRT. You can indicate the amount that will be charged to restock the item as well as select the item for the budget. Finally you must indicate which locations are consolidating to the warehouse. You can indicate the number of items you want to transfer as well as the cost of the item for that item/location.

Inventory Control
331
Create a mass return transfer for reallocation Navigate: From the main menu, select Inventory > Mass Return Transfers. The Mass Return Transfer Search window opens.
Mass Return Transfer Search Window
1. In the Action field, select New. 2. Click OK. The Mass Return Transfers window opens. 3. In the MRT Details area:
a. In the MRT No. field, enter the MRT description. b. In the Wh field, enter the ID of the warehouse that the items are being returned
to, or click the LOV and select a warehouse.
Note: You cannot select a finisher or, in a multi-channel environment, a physical warehouse.
c. In the Type field, select the type of MRT you are creating. – Inter-company: The transfer can occur between locations in different transfer
entities. – Intra-company: The transfer can occur between locations in the same transfer
entity.
Note: If your system settings do not allow inter-company transfers, this field will default to intra-company.

Oracle Retail Merchandising System
332
d. In the Inventory Type field, enter the ID of the type of merchandise you want to
transfer, or click the LOV button and select a merchandise type. e. In the Quantity Type field, select how you will determine the number of items to
transfer. – Manual: After selecting the item, you must enter the number of items to
transfer. The quantity will default to the stock on hand (SOH), but if the SOH falls below the defined transfer quantity, the transfer will be created in input status.
– All Inventory: Transfers are created for all stock on hand and the user can not specify how much to transfer,
f. In the Tsf Not After Date field, enter the last date the transfer can occur, or click the calendar button and select a date.
4. Add items to a mass return transfer. 5. Add locations to a mass return transfer
Edit a mass return transfer Navigate: From the main menu, select Inventory > Mass Return Transfers. The Mass Return Transfer Search window opens. Search for and retrieve a transfer in Edit mode. Restrict the search to transfers in Input status. The Mass Return Transfers window opens.
Mass Return Transfers Window

Inventory Control
333
Mass Return Transfer Search Window
In the MRT Details area, update the enabled fields as necessary.
Maintain items on the mass return transfer 1. Filter the mass return transfer as necessary. 2. Edit the enabled fields. 3. Click Apply.
Add items to the mass return transfer
1. Click Add. The Add Items area is enabled. 2. In the Item Type field, select the type of item you want to add to the transfer.
3. In the Item field, enter the item ID or click the LOV button and select an item. 4. In the Restock % field, enter the percentage that is applied as a restocking fee to the
item.
Note: This field is available only for RTV MRTs.
5. Click Apply. The Items are added to the table.
Delete an item from the mass return transfer
1. Select an item in the Item Details area. 2. Click Delete Item. You are prompted to confirm the deletion. 3. Click Yes.

Oracle Retail Merchandising System
334
Maintain locations on the mass return transfer 1. Click Locations. The Mass Return Transfers - Location window opens.
Mass Return Transfers - Location Window
2. Filter the mass return transfer as necessary. 3. Edit the enabled fields. 4. Click Apply.
Add locations to the mass return transfer
1. In the Group Type field, select the type of locations you want to add. 2. In the Value field, enter the ID of the location or the location group or click the LOV
button and select a location. 3. In the Transfer Quantity field, enter the number of items you want to transfer.
Note: If you selected All Inventory in the Quantity Type field, on the Mass Return Transfers window, this field is disabled.
4. In the Transfer Price field, enter the total amount of the item, including the cost of the item.
5. Apply the locations and costs to the transfer. 6. Click Apply to associate the costs and locations to the selected item on the transfer. 7. Click Apply All to associate the locations and items on the transfer.
a. Select the option that identifies how you want the location and items associated. b. Click OK to save any changes and close the window.
8. Click OK to save any changes and close the window.

Inventory Control
335
Delete locations from the mass return transfer
1. Select an item in the Locations Details area. 2. Delete the location and cost from the transfer. 3. Click Apply to associate the costs and locations to the selected item on the transfer 4. Click Apply All to associate the locations and items on the transfer.
a. Select the option that identifies how you want the location and items associated. b. Click OK to save any changes and close the window.
5. Click OK to save any changes and close the window.
Filter a mass return transfer Navigate: From the main menu, select Inventory > Mass Return Transfers. The Mass Return Transfer Search window opens. Search for and retrieve a transfer in Edit mode. Restrict the search to transfers in Worksheet status. The Mass Return Transfers window opens.
Mass Return Transfers Window

Oracle Retail Merchandising System
336
Mass Return Transfer Search Window
1. In the Filter area, enter an item ID, or click the LOV button and select an item.
2. Click the filter button. Matching results appear in the Item Details area.
3. Click the clear filter button to display all item on the mass return transfer.
Filter by item/location 1. On the Mass Returns Transfer window, click Locations. The Mass Return Transfers -
Locations window opens.
Mass Return Transfers - Locations Window

Inventory Control
337
2. In the Filter area, enter the ID of the criteria you want to limit your search by in the appropriate field.
3. Click the filter button. Matching results appear in the Item Details area.
4. Click the clear filter button to display all item on the mass return transfer.
Search for a mass return transfer Navigate: From the main menu, select Inventory > Mass Return Transfers. The Mass Return Transfers Search window opens.
Mass Return Transfers Search Window
1. In the Action field, select either Edit or View. 2. Enter additional criteria as desired to make the search more restrictive. 3. Click Search. The Mass Return Transfer Search window displays the transfers that
match the search criteria. 4. Select a task: 5. To perform another search, click Refresh. 6. To display the details of a transfer, select a record and click OK. The details appear in
the Mass Return Transfers window. 7. Click Close to exit.

Oracle Retail Merchandising System
338
Mass returns approval process Mass return transfer approval process When a mass return transfer is added to the system, it must go through a series of checks before it is accessible in the system. Depending on your user role, you may not be able to move the mass return transfer to the next status. A mass return transfer may be in any of the following statuses:
Status Definition
Input, The mass return transfer has been started, but not completed.
Submitted The mass return transfer has been completed and is pending review.
Approved The mass return transfer has been reviewed and has been approved.
Rejected The mass return transfer has been submitted, reviewed, and has been rejected.
Closed The mass return transfer is complete.
Canceled, Cancel The mass return transfer has been manually closed and is no longer valid.
RTV Created The mass return transfer has an associated RTV order for the MRT has been created

Inventory Control
339
Submit a mass return transfer Navigate: From the main menu, select Inventory > Mass Return Transfers. The Mass Return Transfer Search window opens. Search for and retrieve a transfer in Edit mode. Restrict the search to transfers in Input status. The Mass Return Transfers window opens.
Mass Return Transfers Window
Mass Return Transfer Search Window

Oracle Retail Merchandising System
340
1. From the Options menu, select Submit. The status of the transfer changes to Submitted.
2. Click OK to save any changes and close the window.
Approve a mass return transfer Navigate: From the main menu, select Inventory > Mass Return Transfers. The Mass Return Transfer Search window opens. Search for and retrieve a transfer in Edit mode. Restrict the search to transfers in Submitted status. The Mass Return Transfers window opens.
Mass Return Transfers Window

Inventory Control
341
Mass Return Transfer Search Window
1. From the Options menu, select Approve. The status of the transfer changes to Approved.
2. Click OK to save any changes and close the window.

Oracle Retail Merchandising System
342
Reject a mass return transfer Navigate: From the main menu, select Inventory > Mass Return Transfers. The Mass Return Transfer Search window opens. Search for and retrieve a transfer in Edit mode. Restrict the search to transfers in Worksheet status. The Mass Return Transfers window opens.
Mass Return Transfers Window
Mass Return Transfer Search Window

Inventory Control
343
1. From the Options menu, select Reject. The status of the transfer changes to Rejected. 2. Click OK to save any changes and close the window.
Close a mass return transfer Navigate: From the main menu, select Inventory > Mass Return Transfers. The Mass Return Transfer Search window opens. Search for and retrieve a transfer in Edit mode. The Mass Return Transfers window opens.
Mass Return Transfers Window
Mass Return Transfer Search Window

Oracle Retail Merchandising System
344
1. From the Options menu, select Close . The status of the transfer changes to Closed. 2. Click OK to save any changes and close the window.
Inventory adjustments Set up inventory adjustments
Set up inventory adjustments Inventory adjustments can be made online or they can be received from an external system, such as a warehouse management system. There are two types of adjustments that can be made to inventory: Stock on hand: The quantity of stock on hand, or salable stock, is increased or
decreased. Both the quantity and value of the stock on hand are adjusted in the stock ledger.
Unavailable inventory: The quantity of stock on hand does not change, but the quantity of unavailable stock, or non-salable stock, is increased or decreased. In the stock ledger, the adjustment is recorded as a transfer between stock on hand and unavailable inventory. No adjustment is made to the stock value.
Prior to using the inventory adjustment functionality, status types and reasons for adjustments must be set up in the system. The Total Stock on Hand status type is reserved for adjustments made to salable goods. Any additional status types are user-defined and are reserved for adjustments made to non-salable goods. The user-defined status types indicate why the goods are non-salable. When adjusting total stock on hand, you must select a reason for the adjustment. The reason indicates why the total stock on hand must be adjusted.

Inventory Control
345
Add an inventory adjustment reason Navigate: From the main menu, select Control > Setup > Inventory Adjustment Reason > Edit. The Inventory Adjustment Reason Code Maintenance window opens.
Inventory Adjustment Reason Code Maintenance Window
1. Click Add. The next available line is enabled. 2. In the Reason field, enter a unique ID for the reason. 3. In the Description field, enter the description of the reason. 4. In the Cost of Good Sold field, select the check box to indicate that associating this
reason with an inventory adjustment will affect the cost of goods sold. 5. Click OK to save your changes and close the window.

Oracle Retail Merchandising System
346
Add an inventory status type Navigate: From the main menu, select Control > Setup > Inventory Status Types > Edit. The Inventory Status Types window opens.
Inventory Status Types Window
1. Click Add. The next available line is enabled. 2. In the Status field, enter a unique ID for the status type. 3. In the Description field, enter the description of the status type. 4. Click OK to save your changes and close the window.
Adjust inventory Adjust inventory Inventory adjustments can be made online or they can be received from an external system, such as a warehouse management system. There are two types of adjustments that can be made to inventory: Stock on hand: The quantity of stock on hand, or salable stock, is increased or
decreased. Both the quantity and value of the stock on hand are adjusted in the stock ledger.
Unavailable inventory: The quantity of stock on hand does not change, but the quantity of unavailable stock, or non-salable stock, is increased or decreased. In the stock ledger, the adjustment is recorded as a transfer between stock on hand and unavailable inventory. No adjustment is made to the stock value.

Inventory Control
347
You can choose to adjust the inventory of one item at multiple locations, multiple items at one location, or a transformed item at one location. An example of a transformed item might be a watermelon that is sliced into smaller chunks for sale. You reduce the stock on hand for whole watermelons and increase the stock on hand for sliced pieces of watermelon. When you edit or view an item, you can choose to view the quantity of unavailable, or non-salable, stock on hand. You can restrict the view to one or all inventory status types at one or all locations.
Adjust inventory by item Navigate: From the main menu, select Inventory > Inventory Adjustments > By Item. The Inventory Adjustment by Item window opens.
Inventory Adjustment by Item Window
1. In the Item field, enter the item number of the item, or click the LOV button and select the item.
2. In the Inventory Status field, select the status that you want to apply to the item.
3. In the Reason field, enter the ID of the reason for the adjustment, or click the LOV button and select the reason.
Note: A reason is required if you select Total Stock on Hand in the Inventory Status field.
4. In the Location Type field, select the type of location where the adjustment is needed.
Note: Pack items can be adjusted only at warehouses.
5. In the Location field enter the ID of the location, or click the LOV button and select the location.
6. In the Adjustment Qty field enter the number of units that you want to add or subtract. Use a negative number to subtract from the total.
7. Click OK to save your changes and close the window.

Oracle Retail Merchandising System
348
Adjust inventory by location Navigate: From the main menu, select Inventory > Inventory Adjustments > By Store/Warehouse. The Inventory Adjustment by Location window opens.
Inventory Adjustment by Location Window
1. In the Location Type field, select the type of location where the adjustment must be made.
2. In the Location field, enter the ID of the location, or click the LOV button and select the location.
3. In the Inventory Status field, select the status that you want to apply to the items at the selected location.
4. In the Reason field, enter the ID of the reason for the adjustment, or click the LOV button and select the reason.
Note: A reason is required if you select Total Stock on Hand in the Inventory Status field.
5. In the Item field, enter the item number of the item, or click the LOV button and select the item.
6. In the Adjustment Qty field enter the number of units that you want to add or subtract. Use a negative number to subtract from the total.
7. Click OK to save your changes and close the window.

Inventory Control
349
Adjust inventory of transformed items Navigate: From the main menu, select Inventory > Inventory Adjustments > Product Transformation. The Product Transformation window opens.
Product Transformation Window
1. In the Location Type field, select the type of location where the adjustment must be made.
2. In the Location field, enter the ID of the location, or click the LOV button and select the location.
3. In the Item field, enter the item number of the item to be transformed, or click the
LOV button and select the item.
4. In the Reason field, enter the ID of the reason for the adjustment, or click the LOV button and select the reason.
5. In the Quantity Removed field, enter the number of units subtracted from stock on hand.
6. In the Item field, enter the item number of the item derived from the transformed
item, or click the LOV button and select the item. 7. In the Quantity Added field, enter the number of units added to the stock on hand. 8. In the New Cost field, edit the default cost per unit as necessary. 9. Add any additional items that are derived from the transformed item. 10. Click OK to save your changes and close the window.


351
10 Replenishment
Replenishment
Set up investment buy parameters Set up investment buy parameters
Investment buy is the process of purchasing inventory in excess of the replenishment recommendation to take advantage of a supplier deal or to leverage inventory against a cost increase. To utilize the investment buy process: 1. Set up suppliers, indicating the level of inventory management. 2. Indicate that the suppliers are investment buy eligible. 3. Identify investment buy warehouses, indicate limiting parameters for the warehouse
in a single channel or multi-channel environment. 4. Recommended order quantities appear on a buyer worksheet or are automatically
added to purchase order, as defined in setup. 5. If you choose to utilize the buyer worksheet, verify replenishment recommended
order quantities, determine the actual order quantities, and add items as necessary. 6. Select items on the buyer worksheet and create a purchase order. Add inventory management information for a supplier Add investment buy attributes to a warehouse
Add inventory management constraints to a PO at the order, item, or location level Navigate: From the main menu, select Ordering > Orders. The Order Selection window opens. Search for and retrieve a purchase order in Edit mode. Restrict the search to purchase orders in Worksheet status. The PO Header Maintenance window opens. (Optional): Click Items. The PO Item Maintenance window opens. Select an item on the table. (Optional): Click Locations. The PO Item/Location window opens. Select a location on the Order Detail table. From the Options menu, select Inventory Mgmt./Totals. The Order Inventory Maintenance window opens.

Oracle Retail Merchandising System
352
Order Inventory Maintenance Window
Define scaling constraints 1. In the Scaling Constraints area, select the Scale to Order check box. The Scaling
Constraints area is enabled. 2. In the Scaling Objective field, select whether purchase orders are scaled to the
minimum or maximum values of the scaling constraints. 3. In the Scaling Level field, select the level at which the scaling is performed. 4. In the Maximum Iterations field, enter the maximum number of times that the
scaling process is performed for the purchase order. 5. In the Scaling Constraints Primary column, complete the following fields:
Type: Select the primary type of constraint to use when scaling orders. UOM/Currency: If you selected Mass or Volume as the primary type, enter the
UOM code, or click the LOV button and select the UOM. If you selected
Amount as the primary type, enter the currency code, or click the LOV button and select the currency code.
Max Value: Enter the maximum value of the constraint. Max Value Tolerance: Enter the percentage tolerance for the maximum value of
the constraint. Min Value: Enter the minimum value of the constraint. Min Value Tolerance: Enter the percentage tolerance for the minimum value of
the constraint.

Replenishment
353
6. In the Scaling Constraints Secondary column, complete the following fields: Type: Select the secondary type of constraint to use when scaling orders.
Note: The Secondary Type cannot be the same as the Primary Type.
UOM/Currency: if you selected Mass or Volume as the secondary type, enter the
UOM code, or click the LOV button and select the UOM. If you selected
Amount as the secondary type, enter the currency code, or click the LOV button and select the currency code.
Max Value: Enter the maximum value of the constraint. Max Value: Enter the maximum value of the constraint. Max Value Tolerance: Enter the percentage tolerance for the maximum value of
the constraint. Min Value: Enter the minimum value of the constraint. Min Value Tolerance: Enter the percentage tolerance for the minimum value of
the constraint.
Define minimum constraints 1. In the Level field, select the level at which the minimum order requirements of the
supplier must be met 2. In the Minimum 1 column, complete the following fields:
Type: Select how the first minimum order requirement is expressed. UOM/Currency: If you selected Mass or Volume as the primary type, enter the
UOM code, or click the LOV button and select the UOM. If you selected
Amount as the primary type, enter the currency code, or click the LOV button and select the currency code.
Value: Enter the value of the first minimum order requirement of the supplier. 3. When you define two minimum order requirements, select the relationship between
the requirements in the Conjunction field. 4. In the Minimum 2 column, complete the following fields:
Type: Select how the second minimum order requirement is expressed.
Note: The Minimum 2 Type cannot be the same as the Minimum 1 Type.
UOM/Currency: If you selected Mass or Volume as the secondary type, enter the UOM code, or select it from the LOV. If you selected Amount as the secondary type, enter the currency code, or select it from the LOV.
Value: Enter the value of the first minimum order requirement of the supplier.

Oracle Retail Merchandising System
354
Define truck splitting constraints 1. In the Truck Splitting Constraints area, select the Split Order into Truckloads check
box. The Truck Splitting Constraints area is enabled. 2. In the Constraint 1 column, complete the following fields:
Type: Select the primary type of constraint to use when splitting orders into truckloads.
UOM/Currency: If you selected Mass or Volume as the primary type, enter the UOM code, or select it from the LOV. If you selected Amount as the primary type, enter the currency code, or select it from the LOV.
Value: Enter the value of the constraint. Tolerance: Enter the percentage tolerance for the maximum value of the
constraint. 3. In the Constraint 2 column, complete the following fields:
Type: Select the primary type of constraint to use when splitting orders into truckloads.
Note: The Constraint 2 Type cannot be the same as the Constraint 1 Type.
UOM/Currency: If you selected Mass or Volume as the secondary type, enter the UOM code, or select it from the LOV. If you selected Amount as the secondary type, enter the currency code, or select it from the LOV.
Value: Enter the value of the constraint. Tolerance: Enter the percentage tolerance for the maximum value of the
constraint.
Add a pooled supplier 1. In the Supplier field, enter the supplier ID or click the LOV button and select the
supplier.
2. In the File ID field, enter the file ID or click the LOV button and select the file ID.
Define order quantity scaling In the UOM field select the code to display the scaled and prescaled quantities.
Recalculate the purchase order 1. Click Recalc. Qtys. The Pre-Scaled and Scaled information opens in the appropriate
fields. 2. Click OK to save your changes and close the window.

Replenishment
355
Add inventory management information for a supplier Navigate: From the main menu, select Control > Supplier. The Supplier Search window opens. Search for and retrieve a supplier in Edit mode. The Supplier Maintenance window opens. From the Options menu, select Inventory Management. The Supplier Inventory Management Information window opens.
Supplier Inventory Management Information Window
In the Supplier, Department, and Location fields, enter the ID of the supplier,
department, and location as appropriate, or click the LOV button and select supplier, department, and location as appropriate.
Define replenishment review attributes 1. In the Review Cycle field, select the frequency that the item is reviewed for
replenishment. 2. To select the day on which the item is reviewed:
If the review cycle is every day, all the days of the week are selected automatically for the delivery schedule.
If the review cycle is every week, select the days of the week. You may select more than one day.
If the frequency is every two or more weeks, select the day of the week. 3. In the Order Control field, select how POs are processed for the supplier. 4. Select the Single Loc on Order check box if only one location can be on an order.

Oracle Retail Merchandising System
356
Define due order processing parameters 1. Select the Due Order Processing check box to have due order processing performed
for replenishment items from the supplier. 2. Select the Create Non-Due orders check box to have purchase orders created in
Worksheet status for items that are not due to be ordered. 3. In the Due Order Level field, select the level at which the due order processing is
based. 4. In the Service Basis field, select the parameter that is used in calculating the stock out
levels.
Define supplier minimum attributes 1. In the Minimum Level field, select the minimum order quantity at which the supplier
accepts orders. 2. Select the Purge Orders Failing Minimums check box to create POs that meet the
supplier minimum.
Specify scaling attributes 1. Select the Scale Order to Constraints check box to have items on purchase orders for
the supplier scaled to meet the scaling constraints. 2. In the Scaling Objective field, select whether purchase orders are scaled to the
minimum or maximum values of the scaling constraints. 3. In the Scaling Level field, indicate if the PO should be scaled to the location need or
to the entire order. 4. Select the Multiple Vehicles check box to indicate that multiple vehicles may be used
when delivering the order.
Define other attributes 1. In the Pooled Supplier field enter the ID of the supplier, or click the LOV button
and select a supplier. 2. In the Purchase Type field, select the purchase type method. 3. In the Pick Up field, enter the location of the pick up. This field is enabled if Free on
Board or Backhaul has been selected in the Purchase Type field.
Define truck splitting attributes
1. Select the Split Orders into Truckloads checkbox to indicate that orders that exceed a truckload should be split.
2. To allow Less than Truckload (LTL) orders, select the Auto Approve LTL Orders check box.
3. In the Truck Split Method field, select the method of truck splitting used with this supplier.
Define investment buy attributes 1. Select the Investment Buy Eligibility check box to enable investment buy attributes. 2. In the Order Control field, select how POs are processed for the investment buy
orders.

Replenishment
357
Define rounding attributes 1. In the Rounding Level field, select the level to which quantities should be rounded. 2. In the Round to Inner Threshold field, enter the percent of the inner needed to round
to an additional inner. 3. In the Round to Case Threshold field, enter the percent of the case needed to round
to an additional case. 4. In the Round to Layer Threshold field, enter the percent of the layer needed to round
to an additional level. 5. In the Round to Pallet Threshold field, enter the percent of the pallet needed to round
to an additional pallet.
Add investment buy attributes to a warehouse Navigate: From the main menu, select Actions > Organizational Hierarchy. The Organization Hierarchy Main Form window opens. Select Warehouse on the tree structure. The warehouses appear in the table. Select a warehouse and click Edit. The Warehouse Maintenance window is displayed. In a multi-channel environment: From the Options menu, select Virtual Warehouse. The Virtual Warehouse Maintenance window opens. From the Options menu, select Warehouse Department Parameters > Edit. The Warehouse Department Parameters window opens. In a single channel environment: From the Options menu, select Warehouse Department Parameters>Edit. The Warehouse Department Parameters window opens.

Oracle Retail Merchandising System
358
Warehouse Department Parameters Window
1. In the Apply area, enter the department ID, or click the LOV button and select a department.
2. In the Wh. Storage Cost Measure, select the warehouse storage cost measure.
Note: To enter the system control information for investment buy, click Default. The Wh. Storage Cost UOM, the Weekly Cost of Warehouse Storage, the Outside Storage Cost UOM, the Weekly Cost of Outside Storage, the Storage Type, the Maximum Weeks of Supply, the Target ROI, and the Cost of Money are filled in.
3. In the Wh. Storage Cost UOM, select the unit of measure if appropriate. 4. In the Weekly Cost of Warehouse Storage field, enter the weekly cost of warehouse
storage. 5. In the Outside Storage Cost Measure, select the outside storage cost measure. 6. In the Outside Storage Cost UOM, select the unit of measure if appropriate. 7. In the Weekly Cost of Outside Storage field, enter the weekly cost of outside storage. 8. Enter the Maximum Weeks of Supply, Target ROI, and Cost of Money. 9. Click Apply to enter the information into the table. This information will be used in
investment buy calculations. 10. Click OK to save your changes and close the window.

Replenishment
359
Set up replenishment parameters Set up replenishment parameters
The replenishment feature allows you to automate the ordering process for items by constantly monitoring inventory conditions, and creating orders to fulfill consumer demand according to predefined replenishment parameters.
Add a delivery schedule at the store or warehouse level Navigate: From the main menu, select Action > Organizational Hierarchy. The Organization Hierarchy Main Form window opens. Select Store on the tree structure. The stores appear on the table. Select a store and click Edit. The Store Maintenance window opens. From the Options menu, select Delivery Schedule. The Delivery Schedule window opens. OR Navigate: From the main menu, select Action > Organizational Hierarchy. The Organization Hierarchy Main Form window opens. Select Warehouse on the tree structure. The warehouses appear on the table. Select a warehouse and click Edit. The Warehouse Maintenance window is displayed. From the Options menu, select Delivery Schedule. The Delivery Schedule window opens.
Delivery Schedule Window
Oracle Retail Merchandising System
360
In the Source Type field, select the type of source for the delivery schedule. 1. In the Source field, enter the ID of the supplier or source warehouse, or click the LOV
button and select the supplier or warehouse. 2. In the Group Type field, select the type of grouping mechanism or location for the
delivery schedule. 3. In the Group Value field, enter the ID of the grouping mechanism or location for the
delivery schedule, or click the LOV button and select a grouping mechanism or location.
Note: You can also use the Organizational Hierarchy Tree to navigate to the grouping mechanism or location to which you are adding a delivery schedule. The Group Type and Group Value fields are filled in automatically.
4. In the Frequency field, select how often you want the supplier to deliver to the locations.
5. In the Start Date field, enter the date on which the delivery schedule is effective. 6. In the Start Time field, enter the time that the delivery is scheduled to begin at the
location. 7. In the End Time field, enter the time that the delivery is scheduled to end at the
location. 8. To select the delivery day for a delivery schedule:
a. If the frequency is every day, all the days of the week are selected automatically for the delivery schedule.
b. If the frequency is every week, select the day of the week.
Note: You can select more than one delivery day if the frequency is every week.
c. If the frequency is every two or more weeks, select the day of the week. d. Click Apply.

Replenishment
361
9. To add an exception to a delivery: a. Click Exceptions. The Exceptions window opens.
Exceptions Window
b. Click Add Exceptions to enable the next available line. c. In the Item Type field, select Item or Item List. d. In the Day field, select the day on which you do not want the item or item list
delivered. e. In the Item field, enter the item number or the ID of the item list, or enter a
partial description and click the LOV button to select the item or item list. f. Click Apply. g. Click OK to exit the Exceptions window.
10. Click OK to save your changes and close the window.

Oracle Retail Merchandising System
362
Add a delivery schedule for a supplier Navigate: From the main menu, select Control > Supplier. The Supplier Search window opens. Search for and retrieve a supplier in Edit mode. The Supplier Maintenance window opens. From the Options menu, select Delivery Schedule. The Delivery Schedule window opens.
Delivery Schedule Window
1. In the Group Type field, select the type of grouping mechanism or location for the delivery schedule.
2. In the Group Value field, enter the ID of the grouping mechanism or location for the
delivery schedule, or click the LOV button and select a grouping mechanism or location.
Note: You can also use the Organizational Hierarchy Tree to navigate to the grouping mechanism or location to which you are adding a delivery schedule. The Group Type and Group Value fields are filled in automatically.
3. In the Frequency field, select how often you want the supplier to deliver to the locations.
4. In the Start Date field, enter the date on which the delivery schedule is effective. 5. In the Start Time field, enter the time that the delivery is scheduled to begin at the
location. 6. In the End Time field, enter the time that the delivery is scheduled to end at the
location.

Replenishment
363
7. To select the delivery day for a delivery schedule: a. If the frequency is every day, all the days of the week are selected automatically
for the delivery schedule. b. If the frequency is every week, select the day of the week. You can select more
than one delivery day. c. If the frequency is every two or more weeks, select the day of the week. d. Click Apply.
8. To add an exception to a delivery: a. Click Exceptions. The Exceptions window opens.
Exceptions Window
b. Click Add Exceptions to enable the next available line. c. In the Item Type field, select Item or Item List. d. In the Day field, select the day on which you do not want the item or item list
delivered. e. In the Item field, enter the item number or the ID of the item list, or enter a
partial description and click the LOV button to select the item or item list. f. Click Apply. g. Click OK to exit the Exceptions window.
9. Click OK to save your changes and close the window.

Oracle Retail Merchandising System
364
Add inventory management constraints to a PO at the order, item, or location level Navigate: From the main menu, select Ordering > Orders. The Order Selection window opens. Search for and retrieve a purchase order in Edit mode. Restrict the search to purchase orders in Worksheet status. The PO Header Maintenance window opens. (Optional): Click Items. The PO Item Maintenance window opens. Select an item on the table. (Optional): Click Locations. The PO Item/Location window opens. Select a location on the Order Detail table. From the Options menu, select Inventory Mgmt./Totals. The Order Inventory Maintenance window opens.
Order Inventory Maintenance Window
Define scaling constraints 1. In the Scaling Constraints area, select the Scale to Order check box. The Scaling
Constraints area is enabled. 2. In the Scaling Objective field, select whether purchase orders are scaled to the
minimum or maximum values of the scaling constraints. 3. In the Scaling Level field, select the level at which the scaling is performed. 4. In the Maximum Iterations field, enter the maximum number of times that the
scaling process is performed for the purchase order.

Replenishment
365
5. In the Scaling Constraints Primary column, complete the following fields: Type: Select the primary type of constraint to use when scaling orders. UOM/Currency: If you selected Mass or Volume as the primary type, enter the
UOM code, or click the LOV button and select the UOM. If you selected
Amount as the primary type, enter the currency code, or click the LOV button and select the currency code.
Max Value: Enter the maximum value of the constraint. Max Value Tolerance: Enter the percentage tolerance for the maximum value of
the constraint. Min Value: Enter the minimum value of the constraint. Min Value Tolerance: Enter the percentage tolerance for the minimum value of
the constraint. 6. In the Scaling Constraints Secondary column, complete the following fields:
Type: Select the secondary type of constraint to use when scaling orders.
Note: The Secondary Type cannot be the same as the Primary Type.
UOM/Currency: if you selected Mass or Volume as the secondary type, enter the
UOM code, or click the LOV button and select the UOM. If you selected
Amount as the secondary type, enter the currency code, or click the LOV button and select the currency code.
Max Value: Enter the maximum value of the constraint. Max Value: Enter the maximum value of the constraint. Max Value Tolerance: Enter the percentage tolerance for the maximum value of
the constraint. Min Value: Enter the minimum value of the constraint. Min Value Tolerance: Enter the percentage tolerance for the minimum value of
the constraint.
Define minimum constraints 1. In the Level field, select the level at which the minimum order requirements of the
supplier must be met 2. In the Minimum 1 column, complete the following fields:
Type: Select how the first minimum order requirement is expressed. UOM/Currency: If you selected Mass or Volume as the primary type, enter the
UOM code, or click the LOV button and select the UOM. If you selected
Amount as the primary type, enter the currency code, or click the LOV button and select the currency code.
Value: Enter the value of the first minimum order requirement of the supplier. 3. When you define two minimum order requirements, select the relationship between
the requirements in the Conjunction field.
Oracle Retail Merchandising System
366
4. In the Minimum 2 column, complete the following fields: Type: Select how the second minimum order requirement is expressed.
Note: The Minimum 2 Type cannot be the same as the Minimum 1 Type.
UOM/Currency: If you selected Mass or Volume as the secondary type, enter the UOM code, or select it from the LOV. If you selected Amount as the secondary type, enter the currency code, or select it from the LOV.
Value: Enter the value of the first minimum order requirement of the supplier.
Define truck splitting constraints 1. In the Truck Splitting Constraints area, select the Split Order into Truckloads check
box. The Truck Splitting Constraints area is enabled. 2. In the Constraint 1 column, complete the following fields:
Type: Select the primary type of constraint to use when splitting orders into truckloads.
UOM/Currency: If you selected Mass or Volume as the primary type, enter the UOM code, or select it from the LOV. If you selected Amount as the primary type, enter the currency code, or select it from the LOV.
Value: Enter the value of the constraint. Tolerance: Enter the percentage tolerance for the maximum value of the
constraint. 3. In the Constraint 2 column, complete the following fields:
Type: Select the primary type of constraint to use when splitting orders into truckloads.
Note: The Constraint 2 Type cannot be the same as the Constraint 1 Type.
UOM/Currency: If you selected Mass or Volume as the secondary type, enter the UOM code, or select it from the LOV. If you selected Amount as the secondary type, enter the currency code, or select it from the LOV.
Value: Enter the value of the constraint. Tolerance: Enter the percentage tolerance for the maximum value of the
constraint.
Add a pooled supplier 1. In the Supplier field, enter the supplier ID or click the LOV button and select the
supplier.
2. In the File ID field, enter the file ID or click the LOV button and select the file ID.
Define order quantity scaling In the UOM field select the code to display the scaled and prescaled quantities.

Replenishment
367
Recalculate the purchase order 1. Click Recalc. Qtys. The Pre-Scaled and Scaled information opens in the appropriate
fields. 2. Click OK to save your changes and close the window.
Add inventory management constraints to a supplier Navigate: From the main menu, select Control > Supplier. The Supplier Search window opens. Search for and retrieve a supplier in Edit mode. The Supplier Maintenance window opens. From the Options menu, select Inventory Management. The Supplier Inventory Management Information window opens. On the Supplier Inventory Management Information window, click Constraints. The Supplier Inventory Management Constraint Information window opens.
Supplier Inventory Management Constraint Information Window
Define scaling constraints
Note: To define scaling constraints, you must have selected the Scale Orders to Constraints check box on the Supplier Inventory Management Information window.

Oracle Retail Merchandising System
368
3. In the Scaling Constraints Primary column, complete the following fields: Type: Select the primary type of constraint to use when scaling orders. UOM/Currency: If you selected Mass or Volume as the primary type, enter the
UOM code, or click the LOV button and select the UOM. If you selected
Amount as the primary type, enter the currency code, or click the LOV button and select the currency code.
Max Value: Enter the maximum value of the constraint. Max Value Tolerance: Enter the percentage tolerance for the maximum value of
the constraint. Min Value: Enter the minimum value of the constraint. Min Value Tolerance: Enter the percentage tolerance for the minimum value of
the constraint. 4. In the Scaling Constraints Secondary column, complete the following fields:
Type: Select the secondary type of constraint to use when scaling orders.
Note: The Secondary Type cannot be the same as the Primary Type.
UOM/Currency: if you selected Mass or Volume as the secondary type, enter the
UOM code, or click the LOV button and select the UOM. If you selected
Amount as the secondary type, enter the currency code, or click the LOV button and select the currency code.
Max Value: Enter the maximum value of the constraint. Max Value Tolerance: Enter the percentage tolerance for the maximum value of
the constraint. Min Value: Enter the minimum value of the constraint. Min Value Tolerance: Enter the percentage tolerance for the minimum value of
the constraint. 5. To default the scaling constraints to other areas:
Click Truck Constraints to apply the scaling constraints to the Truck Splitting Constraints area.
Click Minimum Constraints to apply the scaling constraints to the Minimum Constraints area.
Click Bracket Constraints to apply the scaling constraints to the Bracket Costing Constraints area.

Replenishment
369
Define truck splitting constraints
Note: To define truck splitting constraints, you must have selected the Split Orders Into Truckloads check box and the Truck Split method on the Supplier Inventory Management Information window.
1. In the Constraint 1 column, complete the following fields: Type: Select the primary type of constraint to use when splitting orders into
truckloads. UOM/Currency: If you selected Mass or Volume as the primary type, enter the
UOM code, or select it from the LOV. If you selected Amount as the primary type, enter the currency code, or select it from the LOV.
Max Value: Enter the maximum value of the constraint. Value: Enter the value of the constraint. Tolerance: Enter the percentage tolerance for the maximum value of the
constraint. 2. In the Constraint 2 column, complete the following fields:
Type: select the primary type of constraint to use when splitting orders into truckloads.
Note: The Constraint 2 Type cannot be the same as the Constraint 1 Type.
UOM/Currency: If you selected Mass or Volume as the secondary type, enter the UOM code, or select it from the LOV. If you selected Amount as the secondary type, enter the currency code, or select it from the LOV.
Max Value: Enter the maximum value of the constraint. Value: Enter the value of the constraint. Tolerance: Enter the percentage tolerance for the maximum value of the
constraint.
Define minimum constraints
Note: To define minimum constraints, you must have selected an option in the Minimum Level field on the Supplier Inventory Management Information window.
3. In the Minimum 1 column, complete the following fields: Type: Select how the first minimum order requirement is expressed. UOM/Currency: If you selected Mass or Volume as the primary type, enter the
UOM code, or click the LOV button and select the UOM. If you selected
Amount as the primary type, enter the currency code, or click the LOV button and select the currency code.
Max Value: Enter the maximum value of the constraint. Value: Enter the value of the first minimum order requirement of the supplier.
4. When you define two minimum order requirements, select the relationship between the requirements in the Conjunction field.

Oracle Retail Merchandising System
370
5. In the Minimum 2 column, complete the following fields: Type: Select how the second minimum order requirement is expressed.
Note: The Minimum 2 Type cannot be the same as the Minimum 1 Type.
UOM/Currency: If you selected Mass or Volume as the secondary type, enter the UOM code, or select it from the LOV. If you selected Amount as the secondary type, enter the currency code, or select it from the LOV.
Max Value: Enter the maximum value of the constraint. Value: Enter the value of the first minimum order requirement of the supplier.
Define bracket costing constraints 6. In the Threshold % field, enter the percentage of the bracket value that the order
must meet in order to be rounded up to that bracket. 7. In the Primary column, complete the following fields:
Type: Select how the first bracket costing constraint is expressed. UOM: If you selected Mass or Volume as the primary type, enter the UOM code,
or click the LOV button and select the UOM. 8. In the Secondary column, complete the following fields:
Type: Select how the second bracket costing constraint is expressed.
Note: The Secondary Type cannot be the same as the Primary Type.
UOM: If you selected Mass or Volume as the secondary type, enter the UOM
code, or click the LOV button and select the UOM. 9. Click OK to save your changes and exit.

Replenishment
371
Add inventory management information for a supplier Navigate: From the main menu, select Control > Supplier. The Supplier Search window opens. Search for and retrieve a supplier in Edit mode. The Supplier Maintenance window opens. From the Options menu, select Inventory Management. The Supplier Inventory Management Information window opens.
Supplier Inventory Management Information Window
In the Supplier, Department, and Location fields, enter the ID of the supplier,
department, and location as appropriate, or click the LOV button and select supplier, department, and location as appropriate.
Define replenishment review attributes 1. In the Review Cycle field, select the frequency that the item is reviewed for
replenishment. 2. To select the day on which the item is reviewed:
If the review cycle is every day, all the days of the week are selected automatically for the delivery schedule.
If the review cycle is every week, select the days of the week. You may select more than one day.
If the frequency is every two or more weeks, select the day of the week. 3. In the Order Control field, select how POs are processed for the supplier. 4. Select the Single Loc on Order check box if only one location can be on an order.

Oracle Retail Merchandising System
372
Define due order processing parameters 1. Select the Due Order Processing check box to have due order processing performed
for replenishment items from the supplier. 2. Select the Create Non-Due orders check box to have purchase orders created in
Worksheet status for items that are not due to be ordered. 3. In the Due Order Level field, select the level at which the due order processing is
based. 4. In the Service Basis field, select the parameter that is used in calculating the stock out
levels.
Define supplier minimum attributes 1. In the Minimum Level field, select the minimum order quantity at which the supplier
accepts orders. 2. Select the Purge Orders Failing Minimums check box to create POs that meet the
supplier minimum.
Specify scaling attributes 1. Select the Scale Order to Constraints check box to have items on purchase orders for
the supplier scaled to meet the scaling constraints. 2. In the Scaling Objective field, select whether purchase orders are scaled to the
minimum or maximum values of the scaling constraints. 3. In the Scaling Level field, indicate if the PO should be scaled to the location need or
to the entire order. 4. Select the Multiple Vehicles check box to indicate that multiple vehicles may be used
when delivering the order.
Define other attributes 1. In the Pooled Supplier field enter the ID of the supplier, or click the LOV button
and select a supplier. 2. In the Purchase Type field, select the purchase type method. 3. In the Pick Up field, enter the location of the pick up. This field is enabled if Free on
Board or Backhaul has been selected in the Purchase Type field.
Define truck splitting attributes 1. Select the Split Orders into Truckloads checkbox to indicate that orders that exceed a
truckload should be split. 2. To allow Less than Truckload (LTL) orders, select the Auto Approve LTL Orders
check box. 3. In the Truck Split Method field, select the method of truck splitting used with this
supplier.
Define investment buy attributes 1. Select the Investment Buy Eligibility check box to enable investment buy attributes. 2. In the Order Control field, select how POs are processed for the investment buy
orders.

Replenishment
373
Define rounding attributes 1. In the Rounding Level field, select the level to which quantities should be rounded. 2. In the Round to Inner Threshold field, enter the percent of the inner needed to round
to an additional inner. 3. In the Round to Case Threshold field, enter the percent of the case needed to round
to an additional case. 4. In the Round to Layer Threshold field, enter the percent of the layer needed to round
to an additional level. 5. In the Round to Pallet Threshold field, enter the percent of the pallet needed to round
to an additional pallet.
Apply replenishment to an item Apply replenishment to an item
The replenishment feature allows you to automate the ordering process for items by constantly monitoring inventory conditions, and creating orders to fulfill consumer demand according to predefined replenishment parameters. To utilize replenishment, you can select one of the following replenishment methods for an item: Constant: A stock-oriented replenishment method used without a forecasting
application. Enter a maximum stock level at which you want the stock level maintained. As soon as the stock level drops below the maximum stock, a request is generated for the difference.
Min/Max: A stock-oriented replenishment method used without a forecasting application. Enter a maximum stock and minimum stock level. Once the stock level drops below the minimum stock, a request is generated to raise the stock level to the maximum stock.
Floating Point: A stock-oriented replenishment method used without a forecasting application. The system compares the sales trend of the upcoming 12 weeks to the same period one year ago, and then calculates a maximum stock amount. Once stock levels fall below the calculated maximum stock amount, a request is generated to raise the stock level to the maximum stock. It also incorporates the idea of service level, which is used to calculate safety stock. Safety stock is additional inventory carried in a location to prevent stock outs.
Time Supply: A stock-oriented replenishment method used with a forecasting application. You control stock levels through days of supply in the store rather than specifying an exact amount. Based on forecasted sales data from the Oracle Retail Demand Forecasting System, the minimum time supply number of days is used to determine the minimum stock level, while the maximum time supply number of days determines the maximum stock level. These min/max levels change based on the current forecasted sales data. The time supply horizon number of days is an optional field used to calculate an average daily sales rate that is multiplied against the minimum time supply days and maximum time supply days to determine a min/max. This field is useful if the time supply days extends past the number of days with forecasted data. A replenishment order is made when the net available inventory reaches the minimum days of supply and the order quantity placed is based on the rate of sale from forecasted sales over the specified period (time supply horizon) and the maximum days of supply value.

Oracle Retail Merchandising System
374
Time Supply - Seasonal: A stock-oriented replenishment method used with a forecasting application. Time Supply - Seasonal combines the basic Time supply algorithm with the end of season terminal stock goal. The additional fields for this algorithm include Season ID, Phase ID, and terminal stock value. This replenishment method compares the current replenishment requests and the forecasted demand until the end of the season. Replenishment requests are created according to the end of season Terminal Stock goal.
Time Supply - Issues: A stock-oriented replenishment method used with a forecasting application used exclusively for warehouses. Replenishment calculations function just as they do for stores except that the warehouse issues forecasts are used. All other calculations are consistent with store Time Supply replenishment.
Dynamic: A service-oriented replenishment method used with a forecasting application. The goal is to have only enough stock on hand in a given location to capture all sales between replenishment cycles. The time frame used to determine stock levels depends on the review time and lead time before stock levels in the location can be affected by an incoming shipment. The service level percentage is used to calculate the necessary amount of safety stock.
Dynamic - Seasonal: A service-oriented replenishment method used with a forecasting application. In the same manner as Time Supply - Seasonal, Dynamic - Seasonal combines the basic Dynamic algorithm with the end of season terminal stock goal. The additional fields for this algorithm include a Season ID, Phase ID, and Terminal stock value. This replenishment method compares the current replenishment requests and the forecasted demand until the end of the season. Replenishment requests are created according to the end of season terminal stock goal
Dynamic - Issues: A service-oriented replenishment method used with a forecasting application used exclusively for warehouses. Replenishment calculations function just they do for stores, except that the warehouses issues forecasts are used. All other calculations are consistent with store dynamic replenishment.
Store Orders - A store driven replenishment method which allows stores to place orders based on need. Orders are incorporated into RMS via an overnight batch. Recommended order quantities are based on the store request and the ability to deliver the product with in lead time.
The dynamic replenishment methods are the most complex and powerful replenishment methods. Each location that stocks the item can use a different replenishment method.

Replenishment
375
Add replenishment attributes to an item or item list Navigate: From the main menu, select Items > Items. The Item Search window opens. Search for and retrieve an item in Edit mode. The Item Maintenance window opens. On the Options list, select the Replenishment option. The Replenishment Attribute Maintenance window opens. OR Search for and retrieve an item list in Use mode. The Item List Header window opens. From the Options menu, select Create Mass Item Change > Replenishment. The Replenishment Attribute Maintenance window opens.
Replenishment Attribute Maintenance Window

Oracle Retail Merchandising System
376
Replenishment Attribute Maintenance Window
1. In the Group Type field, select the group type. 2. In the Group Type Value field, enter the ID of the group or location, or click the LOV
button and select a group or location. 3. In the Replenishment Attribute Maintenance Action area, select Activate. 4. In the Scheduled Active Date field, select the date the new replenishment attributes
become active.
Note: For a single item, leave the field blank to make the replenishment attributes effective immediately.
5. In the Master Administration area, select: Update Master to update the master replenishment attributes with the
replenishment attributes you are adding. Update From Master to update the replenishment attributes with the attributes
recorded on item master. 6. In the Stock Category field, select the method by which the item is sourced and
delivered to the stores. 7. In the Order Control field, select how purchase orders are created for the item. 8. In the Source WH field, enter the ID of the warehouse from which the item is sent, or
click the LOV button and select a warehouse.
Select a replenishment method 1. In the Replenishment Method field, select the replenishment method for the item. 2. Enter the replenishment parameters in the associated replenishment fields.

Replenishment
377
Specify the replenishment dates 3. In the Activate Date field, enter the date on which the replenishment attributes are
effective for the item, or click the calendar button and select the date. 4. In the Deactivate Date field, enter the date on which the replenishment attributes are
no longer effective for the item, or click the calendar button and select the date.
Define the primary replenishment pack 1. Enter the pack ID number that identifies the pack, or click the LOV button and
select the replenishment pack. 2. Select the Default Primary Costing Pack to indicate the pack is the costing pack for
replenishment. 3. Select Remove Primary Replenishment Pack to indicate the primary replenishment
pack is removed.
Specify the supplier for the replenishment of the item 1. In the Supplier field, enter the ID of the supplier for the item, or click the LOV
button and select a supplier. 2. In the Origin Country field, enter the code of the country of origin, or click the LOV
button and select a country.
Define the replenishment cycle 1. In the Review Cycle field, select the frequency that the item is reviewed for
replenishment. 2. To select the day on which the item is reviewed:
If the review cycle is every day, all the days of the week are selected automatically for the delivery schedule.
If the review cycle is every week, select the days of the week. You may select more than one day.
If the frequency is every two or more weeks, select the day of the week. 3. To view the Delivery Schedule for the item, click Delivery. The Delivery Schedule
window opens.

Oracle Retail Merchandising System
378
Delivery Schedule Window
Define allowable order change tolerances
Note: Order change tolerances do not apply to replenishment transfers.
1. In the Use? field, select whether replenishment order quantities can be changed. 2. To define the amount of change allowed:
a. In the Percent field, enter the percentage by which you can change the order quantity.
b. In the Units field, enter the amount by which you can change the order quantity.
Define stock values 1. In the Presentation Stock field, enter the quantity of presentation stock for the item. 2. In the Demo Stock field, enter the quantity of the demonstration stock for the item.
Note: This field is not required when you are adding replenishment attributes for an item at a warehouse.

Replenishment
379
Specify the lead times for the item 1. In the Supplier Lead Time field, enter the number of lead days the supplier needs. 2. In the Pickup to Location field, enter the number of days it takes for the item to reach
the store or warehouse.
Note: This field is required for direct to store and cross-docked items.
3. In the Warehouse to Locn field, enter the number of days it takes for the item to reach the store.
Note: This field is required for cross-docked and warehouse stocked items.
4. Click OK to save your changes and close the window.
Add a substitute item for an item on replenishment Navigate: From the main menu, select Items > Items. The Item Search window opens. Search for and retrieve an item on replenishment in Edit mode. The Item Maintenance window is displayed. From the Options list, select Substitute Items. The Substitute Items window opens.
Substitute Items Window

Oracle Retail Merchandising System
380
1. Click Add Locations. The fields in the apply block are enabled. 2. In the Group Type field, select the type of grouping mechanism or location for the
item substitution. 3. In the Group Value field, enter the ID of the grouping mechanism or location for the
item substitution, or click the LOV button and select a grouping mechanism or location.
4. In the Fill Priority area, select the appropriate indicator to determine the basis of the item substitution.
5. Select the check box next to the replenishment calculation indicator. Use Stock Ind: When selected, indicates that the substitute item is included in to
determine the net inventory of the main item. Use Sales Ind: When selected, indicates that the sales history for the substitute
item is included in determining the maximum stock level. Use Forecast Sales Ind: When selected, indicates that sales forecasts for the
substitute items is used in calculation location demand for the main item.
6. In the Substitute Item field, enter the ID of the substitution item, or click the LOV button and select the substitution item.
Note: To view items the main item is a substitute item for, from the options menu, select Main Item View. The Main Item View window opens.
7. In the Substitute Primary Replenishment Pack field, enter the ID of the substitute
primary replenishment pack, or click the LOV button and select the substitute primary replenishment pack.
8. In the Pick Priority field, enter the priority level of the substitute Item 9. Click Apply. 10. To add a substitute item/location to a main item, click Add Location. Applicable
fields in the Apply Block area are cleared. 11. To add a multiple substitute items to a main item, click Add Sub. Item. Applicable
fields in the Apply Block area are cleared. 12. Click OK to save your changes and close the window.

Replenishment
381
Review items on replenishment Navigate: From the main menu, select Items > Replenishment. The Replenishment Attribute View window opens.
Replenishment Attribute View Window
1. Enter as much information as necessary to limit the search. 2. Click Search. Results appear on the table. 3. To perform a new search, click Refresh. 4. To display alternate information pertinent to replenishment, from the view menu,
select an applicable view.
Oracle Retail Merchandising System
382
Add a delivery schedule 1. Click Delivery. The Delivery Schedule window opens.
Delivery Schedule Window
2. In the Group Type field, select the type of grouping mechanism or location for the delivery schedule.
3. In the Group Value field, enter the ID of the grouping mechanism or location for the
delivery schedule, or click the LOV button and select a grouping mechanism or location.
Note: You can also use the Organizational Hierarchy Tree to navigate to the grouping mechanism or location to which you are adding a delivery schedule. The Group Type and Group Value fields are filled in automatically.
4. In the Frequency field, select how often you want the supplier to deliver to the locations.
5. In the Start Date field, enter the date on which the delivery schedule is effective. 6. In the Start Time field, enter the time that the delivery is scheduled to begin at the
location. 7. In the End Time field, enter the time that the delivery is scheduled to end at the
location. 8. To select the delivery day for a delivery schedule: 9. If the frequency is every day, all the days of the week are selected automatically for
the delivery schedule. 10. If the frequency is every week, select the day of the week.
Note: You can select more than one delivery day if the frequency is every week.
11. If the frequency is every two or more weeks, select the day of the week.

Replenishment
383
12. Click Apply. 13. To add an exception to a delivery:
a. Click Exceptions. The Exceptions window is displayed. b. Click Add Exceptions to enable the next available line. c. In the Item Type field, select Item or Item List. d. In the Day field, select the day on which you do not want the item or item list
delivered. e. In the Item field, enter the item number or the ID of the item list, or enter a
partial description and click the LOV button to select the item or item list. f. Click Apply. g. Click OK to save your changes and close the window.
14. Click OK to save your changes and close the window.
Review recommended order quantities Review recommended order quantities
Items that are on investment buy and replenishment are can be set up for review by a buyer. When the inventory levels indicate that a purchase order should be created a recommended order quantity (ROQ) for a purchase order is sent to the buyer worksheet. The buyer can accept or reject the ROQ and create purchase orders.
Filter the buyer worksheet Navigate: From the main menu, select Ordering > Buyer Worksheet > Edit. The Buyer Worksheet opens.
Buyer Worksheet

Oracle Retail Merchandising System
384
1. In the Filter Criteria area, enter the search criteria as necessary, or click the LOV button and select the appropriate information.
2. In the Source Type field, select the origin of the requirement (replenishment, investment buy, or manual) to filter by a specific method. To select all requirements, select the blank field.
3. Click the filter button. The items that match the criteria appear in the details frame.
4. To clear search criteria, click the clear filter button. Data in all fields is cleared. To select all items in the detail area, click Select All. To clear all item in the detail area, click Clear All. To view item details, highlight an item and click Item Detail. To view replenishment results for an item, click Repl Results. To view deal information for an item, click Deal Info.
5. To perform another search, click Refresh. 6. Click OK to save changes, or click Cancel to exit without saving changes.
Add an item to an existing PO from the buyer worksheet Navigate: From the main menu, select Ordering > Buyer worksheet > Edit. The Buyer Worksheet opens. Filter the Buyer Worksheet to retrieve items
Buyer Worksheet

Replenishment
385
1. In the Details area, select the check box next to the items you want to add to the PO. 2. Click Add to PO. The Purchase Order List window opens.
Purchase Order List Window
3. Enter the PO number that you would like to add the item to, or leave the field blank to display a list of valid PO's. Click Search.
Select the PO to which you wish to add the item. 4. Click Add to PO.
Note: Once an item is added to a PO, it can no longer be edited from the Buyer Worksheet module.
5. Click Yes to add the item to the PO. 6. Click OK to save your changes and close the window.
Add an item to the buyer worksheet Navigate: From the main menu, select Ordering > Buyer worksheet > Edit. The Buyer Worksheet opens.
Buyer Worksheet

Oracle Retail Merchandising System
386
1. Click Add Item. The Add Item window opens.
Add Item Window
2. Enter the ID of the item, or click the LOV button and select the item.
3. Enter the ID of the supplier, or click the LOV button and select the supplier.
4. Enter the ID of the origin country, or click the LOV button and select the origin country.
5. In the location field, select the location type. Enter the ID of the location, or click the
LOV button and select the location. 6. In the AOQ field, enter the adjusted order quantity. 7. Modify the unit cost in the unit cost field, if required. 8. Click OK to add the item to the buyer worksheet, or click OK+Repeat to add the
item to the buyer worksheet and add a new item. 9. When prompted to requery, click Yes. 10. Click OK to save your changes and close the window.

Replenishment
387
Create a PO from a buyer worksheet Navigate: From the main menu, select Ordering > Buyer Worksheet > Edit. The Buyer Worksheet opens. Search for and retrieve items in the Buyer Worksheet.
Buyer Worksheet
Select the items to be included on the PO by selecting the check box for each item.
Note: If you wish to scale or split a PO, create the PO in Worksheet status. Submitted/Approved purchase orders cannot be scaled or split.
Create the PO in Approved status 1. Click Submitted/Approved PO.
Note: This button is labeled either Submitted or Approved, depending on your user privileges.
2. When prompted to continue, click Yes. The system groups the line items together by the inventory management level and creates a Submitted or Approved PO. The Order Selection window opens.
3. Search for and retrieve the orders in Edit mode, by searching the Written Date Field, using today's date as the creation date, to search for your PO. The PO Header Maintenance window opens.
4. Edit the PO as necessary. 5. Click OK to save your changes and close the window.

Oracle Retail Merchandising System
388
Create the PO in Worksheet status 1. Click Worksheet PO. 2. When prompted to continue, click Yes. The system groups the line items together by
the inventory management level and creates a Submitted or Approved PO. The Order Selection window opens.
3. Search and retrieve the order in Edit mode, by searching the Written Date Field, using the creation date as today to search for your PO. The PO Header Maintenance window opens.
4. Edit the PO as necessary. 5. Click OK to save your changes and close the window.
Split an order by truckload Split an order by truckload
Truck splitting is the process that allows you split a purchase order when a truckload is exceeded. Truck splitting is required in some industries, where protocol dictates that each truck load must have one purchase order. You can indicated truck splitting at the supplier, supplier/department, supplier/location, or supplier/department/location level. Trucks can be split by one of two methods: Item sequence: All quantity of one item is loaded onto a different truck. Any partial
groups of an item go into a final truck. Balanced assortment: Equal quantities of each item is loaded on to the truck.

Replenishment
389
Add inventory management information for a supplier Navigate: From the main menu, select Control > Supplier. The Supplier Search window opens. Search for and retrieve a supplier in Edit mode. The Supplier Maintenance window opens. From the Options menu, select Inventory Management. The Supplier Inventory Management Information window opens.
Supplier Inventory Management Information Window
In the Supplier, Department, and Location fields, enter the ID of the supplier,
department, and location as appropriate, or click the LOV button and select supplier, department, and location as appropriate.
Define replenishment review attributes 1. In the Review Cycle field, select the frequency that the item is reviewed for
replenishment. 2. To select the day on which the item is reviewed:
If the review cycle is every day, all the days of the week are selected automatically for the delivery schedule.
If the review cycle is every week, select the days of the week. You may select more than one day.
If the frequency is every two or more weeks, select the day of the week. 3. In the Order Control field, select how POs are processed for the supplier. 4. Select the Single Loc on Order check box if only one location can be on an order.

Oracle Retail Merchandising System
390
Define due order processing parameters 1. Select the Due Order Processing check box to have due order processing performed
for replenishment items from the supplier. 2. Select the Create Non-Due orders check box to have purchase orders created in
Worksheet status for items that are not due to be ordered. 3. In the Due Order Level field, select the level at which the due order processing is
based. 4. In the Service Basis field, select the parameter that is used in calculating the stock out
levels.
Define supplier minimum attributes 1. In the Minimum Level field, select the minimum order quantity at which the supplier
accepts orders. 2. Select the Purge Orders Failing Minimums check box to create POs that meet the
supplier minimum.
Specify scaling attributes 1. Select the Scale Order to Constraints check box to have items on purchase orders for
the supplier scaled to meet the scaling constraints. 2. In the Scaling Objective field, select whether purchase orders are scaled to the
minimum or maximum values of the scaling constraints. 3. In the Scaling Level field, indicate if the PO should be scaled to the location need or
to the entire order. 4. Select the Multiple Vehicles check box to indicate that multiple vehicles may be used
when delivering the order.
Define other attributes 1. In the Pooled Supplier field enter the ID of the supplier, or click the LOV button
and select a supplier. 2. In the Purchase Type field, select the purchase type method. 3. In the Pick Up field, enter the location of the pick up. This field is enabled if Free on
Board or Backhaul has been selected in the Purchase Type field.
Define truck splitting attributes
1. Select the Split Orders into Truckloads checkbox to indicate that orders that exceed a truckload should be split.
2. To allow Less than Truckload (LTL) orders, select the Auto Approve LTL Orders check box.
3. In the Truck Split Method field, select the method of truck splitting used with this supplier.
Define investment buy attributes 1. Select the Investment Buy Eligibility check box to enable investment buy attributes. 2. In the Order Control field, select how POs are processed for the investment buy
orders.

Replenishment
391
Define rounding attributes 1. In the Rounding Level field, select the level to which quantities should be rounded. 2. In the Round to Inner Threshold field, enter the percent of the inner needed to round
to an additional inner. 3. In the Round to Case Threshold field, enter the percent of the case needed to round
to an additional case. 4. In the Round to Layer Threshold field, enter the percent of the layer needed to round
to an additional level. 5. In the Round to Pallet Threshold field, enter the percent of the pallet needed to round
to an additional pallet.
Create a truck split at the order level Navigate: From the main menu, select Ordering > Orders. The Order Search window is displayed. Search for an order in Worksheet status you would like to split. The Order Search window opens.
Order Search Window
Note: To split an order, the order must: - originate from a supplier who uses truck splitting and truck splitting constraints. - exceed the constraints.

Oracle Retail Merchandising System
392
1. Select the order you want to split from the table. Click Split Order. 2. To view the newly created orders, click Yes.
To continue, click No. The new orders appear in the table area.
3. Open each new order and submit it for approval.
Note: Orders created by this method are linked by a split reference order number. This link number can be used to search for all orders associated with the link.

393
11 Financial Management
Financial Management
Maintain budgets Maintain budgets
Budgets are maintained at the half level and month level. By entering various percentages at the half level and monetary amounts at the month level, you set the goals against which performance can be tracked. At the half level, you can maintain planned percentages for markup (cumulative markon), markdown (as a percentage of sales), shrinkage (as a percentage of sales), and gross profit (as a percentage of sales) by department/half/location. A system option may be set that disallows use of the budgeted shrinkage percentage in budget and stock ledger calculations. At the month level, you can maintain monetary amounts for many of the same budget types that are found in the stock ledger. These include opening inventory, closing inventory, net sales, purchases, and so on. They are also maintained by department/half/location/month. In addition to viewing and maintaining budgets at the half level and month level, you can view budgets at the budget type level by month.

Oracle Retail Merchandising System
394
Edit a budget by the half Navigate: From the main menu, select Finance > Half Budget Information > Edit. The Half Budget Information window opens.
Half Budget Information Window
1. In the Department field, enter the ID of the department, or click the LOV button and select the department.
2. In the Half field, enter the ID of the half, or click the LOV button and select the half. The budget details appear by location.
3. In the Location Type field, select the type of location.
Note: The selection you make in this field affects the results displayed on the table. The field label on the first column in the table will display your selection from the Location Type field. Values in the Description column are limited to valid values for the selection you made in the Location Type field.
4. Edit the markup, markdown, and shrinkage percentages as necessary. The gross profit percentage is adjusted based on the changes that you make.
5. Click OK to save your changes and close the window.

Financial Management
395
Edit a budget by the month Navigate: From the main menu, select Finance > Monthly Budget Information > Edit. The Monthly Budget window opens.
Monthly Budget Window
1. In the Department field, enter the ID of the department, or click the LOV button and select the department.
2. In the Half field, enter the ID of the fiscal half, or click the LOV button and select the fiscal half.
3. In the Location Type field, select the type of location.
4. In the Location field, enter the ID of the location, or click the LOV button and select the location. The budget details appear by the month.
Note: This is a dynamic field. The field label will display your selection from the Location Type field. Values in the List of Values are limited to valid values for the selection you made in the Location Type field.
5. Edit the monetary amounts under each month as necessary. 6. Click OK to save your changes and close the window.

Oracle Retail Merchandising System
396
Stock Ledger Maintain stock counts
Stock counts overview Stock counts can be requested and processed in one of two ways: By unit and dollar: Requests are made at product level. The results of a physical
stock count are used to adjust the quantity of the stock on hand and the monetary value of the stock in the stock ledger.
By unit: Requests are made for multiple items using an item list. The results of the physical stock count are used to adjust the quantity of the stock on hand. The stock ledger is not adjusted.
You can request a stock count as needed or create a schedule of stock counts. If you have access to Oracle Retail Data Warehouse, you can create item lists based on ABC classifications. The item lists can be used in requests for stock counts by unit. Immediately prior to the scheduled date of the physical stock count, a snapshot is taken of the stock on hand, stock in transit, retail value, and weighted average cost. If the stock on hand has not yet been adjusted as a result of the physical count, the snapshot continues to be adjusted automatically as late transactions are received from the point of sale and the warehouse management system. The results of a physical stock count may be received from an external system or entered manually. You can print a variance report which allows you to review any variances between the book count and physical count. After reviewing the report, you can edit the quantities for stock counts by unit or by unit and dollar as necessary. For stock counts by unit and dollar, you can also edit the monetary value of the stock as necessary. After editing quantities and monetary values, you can force the system to adjust the stock on hand and post the updated monetary values to the stock ledger. In a multi-channel environment, you may request a stock count at a physical warehouse. The system automatically distributes the results among the virtual, or stockholding, warehouses based on the default distribution method. You can edit the results at the virtual warehouse level.

Financial Management
397
Search for a stock count Navigate: From the main menu, select Inventory > Stock Count. The Stock Count Search window opens.
Stock Count Search Window
1. In the Action field, select any action except New. 2. If you select Edit or View in the Action field, select either Request or Count Quantity
in the Action Type field. 3. Enter additional criteria as desired to make the search more restrictive. 4. Click Search. The Stock Count Search window displays the stock counts or requests
that match the search criteria. 5. Select a task: 6. To perform another search, click Refresh. 7. To display the details of a stock count, select a record and click OK. The details
appear in the appropriate maintenance window. 8. Click Close to exit.

Oracle Retail Merchandising System
398
Request a stock count Navigate: From the main menu, select Inventory > Stock Count. The Stock Count Search window opens. Search for and retrieve a stock count in New mode and with an Action Type of Request. The Stock Count Request Maintenance window opens.
Stock Count Request Maintenance Window
1. In the Stock Count field, enter a description for the stock count. 2. In the Stock Count Type field, select the type of count. 3. In the Stock Count Date field, enter the scheduled date for the stock count, or click
the calendar button and select the date.

Financial Management
399
4. Depending on which option you selected in the Stock Count Type field, enter one of the following details: Unit: In the Select Items By area, select Item List or Product Group.
– If you select Item List, in the Item List field, enter the ID of the item list, or click the LOV button and select the item list.
– If you select Product Group, in the Product Group field, select the merchandise level. Next, click Product. On the Select Product Level window, select the departments, classes, and subclasses that you want to include in the request. Click OK to exit the Select Product Level window.
Unit & Value: In the Product Group field, select the merchandise level. Next, click Product. On the Select Product Level window, select the departments, classes, and subclasses that you want to include in the request. Click OK to exit the Select Product Level window.
5. In the Group Type field, select a grouping mechanism. 6. In the Group field, enter the ID of the specific location or group, or click the LOV
button and select the location or group. 7. Click Apply. The locations are added to the table. 8. To delete a location from the table:
a. Select a location and click Delete. b. When prompted to delete the record, click Yes.
9. Click OK to save your changes and close the window.
Schedule stock counts Navigate: From the main menu, select Inventory > Stock Count Schedule > Edit. The Stock Count Schedule opens.
Stock Count Schedule

Oracle Retail Merchandising System
400
1. In the Location Type field, select the type of location. 2. In the Location field, enter the ID of the location or the location list, or click the LOV
button and select the location or location list. 3. In the Stocktake Type field, select type of count. If a stock count schedule already
exists for the selected location, it opens in the table. 4. Click Add. The fields in the Apply area are cleared. 5. Depending on the type of stock count, enter either of the following details:
Units: In the Item List field, enter the ID of the item list, or click the LOV button and select the item list.
Units & Dollars: In the Department field, enter the ID of the department, or click
the LOV button and select the department. Enter the class and subclass in their respective fields as necessary.
6. In the Start Date and End Date fields, enter the dates on which the schedule becomes effective and expires.
7. In the Count Time field, enter the time of day at which the stock count begins. Use international standard time (24-hour clock).
8. In the Cycle field, select the frequency of the stock counts. 9. In the Days of Count field, select the day of the week for the stock count.
Note: If the cycle is every day, all of the days are automatically selected. If the frequency is every week, you can select more than one day.
10. Click Apply. The schedule is added to the table. 11. Click OK to save your changes and close the window.
Maintain the stock ledger Maintain the stock ledger The stock ledger provides access to financial records based on a variety of transaction types. Some of the details are captured within RMS; other details are received from external systems. The remaining fields are calculated. The stock ledger supports both the retail and cost methods of accounting. The cost method may use standard cost or average cost depending on how the system is set up. The stock ledger supports both the retail (4-5-4) and the normal (Julian) calendar. If the retail calendar is used, data can be maintained by the month and the week. If the normal calendar is used, data can be maintained only by the month.
Financial Management
401
Search for Inventory by Item and Location Navigate: From the main menu, select Inventory > Item Inventory by Location. The Item Location Inventory window opens.
Item Location Inventory Window
Note: You can also access this window from the Item Master window, Item Children window, Item Location window, and Store Sales/Warehouse Issues window. Some search criteria are automatically filled in depending on how you access the Item Location Inventory window.
1. In the Item field, enter the item number of the item, or click the LOV button and select the item.
2. In the Group Type field, select a grouping mechanism. 3. In the Group Value field, enter the ID of the specific location or group, or click the
LOV button and select the location or group. 4. Click Search. The inventory details appear in the table. Corporate totals are
displayed in the All Locations area.

Oracle Retail Merchandising System
402
5. To filter the results by location: a. In the Location field of the Filter area, enter the ID of the location, or click the
LOV button and select the location.
b. Click the filter button. The inventory details for the selected location appear.
Note: The corporate totals in the All Locations area do not change.
c. Click the clear filter button to redisplay the previous inventory details. 6. To view the results in a partial view, select the Partial View checkbox. 7. To view the monetary amounts in the primary currency of the company or the local
currency of the location, select the appropriate option from the Options > Currency menu.
8. To view additional inventory details, select the appropriate option from the View menu.
9. Click OK to save your changes and close the window.
Edit the stock ledger Navigate: From the main menu, select Finance > Stock Ledger Maintenance > Edit. The Stock Ledger Maintenance Search window opens.
Stock Ledger Maintenance Search Window
1. In the Location Type field, select the type of location.
2. In the Location field, enter the ID of a specific location, or click the LOV button and select the location.
3. In the Month and Year fields, enter the month and year for which you want to edit the stock ledger records.
4. In the Department, Class, and Subclass fields, enter the ID of a specific member at
each product level, or click the LOV buttons and select the members. 5. Click either Retail or Cost. The details appear in the Stock Ledger Maintenance
window.

Financial Management
403
6. Edit the details as necessary.
Note: If you are editing the retail information, click the Next button to view and edit additional fields.
7. Click OK to save your changes and close the window.
Maintain general ledger cross reference Maintain the general ledger cross reference The general ledger cross reference allows you to cross-reference the merchandise hierarchy levels and transaction codes from RMS with the appropriate general ledger accounts within your financial system.
Create a general ledger cross reference Navigate: From the main menu, select Finance > GL Cross Reference. The General Ledger Search window opens.
General Ledger Search Window
Oracle Retail Merchandising System
404
1. In the Action field, select New. 2. Click OK. The GL Cross Reference window opens.
GL Cross Reference Window
3. Enter the merchandise hierarchy information as necessary, or click the LOV button and select the merchandise hierarchy information.
4. In the Tran Code field, select the transaction type. The Line Type field is filled. 5. In the Tran Ref No. field, select the reference information associated with the
transaction code.
Note: This field is enabled only for certain transactions. It is a dynamic field and will be labeled depending on the transaction code selected. If the field is enabled, you are required to enter a value.
6. In the Cost/Retail field, select the accounting method. 7. In the Debit Account area, enter the segments that make up the account. 8. Click Find Account. The Debit Account field is displays the account number. 9. In the Credit Account area, enter the segments that make up the account. 10. Click Find Account. The Credit Account field is displays the account number. 11. Click OK to save your changes and close the window.

Financial Management
405
Search for a general ledger cross reference Navigate: From the main menu, select Finance > GL Cross Reference. The General Ledger Search window opens.
General Ledger Search Window
1. In the Action field, select either Edit or View. 2. If necessary, enter additional criteria to make the search more restrictive. 3. Click Search. The General Ledger Search window displays the cross references that
match the search criteria. 4. Select a task: 5. To perform another search, click Refresh. 6. To display the cross reference information, select a record and click OK. The GL
Cross Reference window opens. 7. Click Close to close the window.

Oracle Retail Merchandising System
406
Sales Taxes Set up sales taxes
Set up sales taxes When you define sales tax information, you must first add geocodes to RMS. A geocode is a geographical region, such as a state or county, with its own tax codes. You can add geocodes for the following: Countries States Counties Cities Districts
You then create the tax codes. A tax code consists of a tax jurisdiction and a tax type with associated tax rates. The tax code determines the tax rate that is applied to an item at the store. You can then associate tax codes and stores with a geocode and associate tax codes with items.
Add a geocode Navigate: From the main menu, select Control > Sales Tax > Geocode Maintenance > Edit. The Geocode Hierarchy Maintenance window opens.
Geocode Hierarchy Maintenance Window
Click Search. The geocode tables and buttons are enabled.

Financial Management
407
Add a geocode at the country level 1. Click Add. 2. In the Country field, enter the geocode for the country. 3. In the Country Description field, enter the description of the country.
Add a geocode at the state level 1. Click on the State tab. 2. Click Add.
3. In the Country field, enter the geocode of the country, or click the LOV button and select a country.
4. In the State field, enter the geocode for the state. 5. In the State Description field, enter the description of the state.
Add a geocode at the county level 1. Click on the County tab. 2. Click Add.
3. In the Country field, enter the geocode of the country, or click the LOV button and select a country.
4. In the State field, enter the geocode of the state, or click the LOV button and select a state.
5. In the County field, enter the geocode for the county. 6. In the County Description field, enter the description of the county.
Add a geocode at the city level 1. Click on the City tab. 2. Click Add.
3. In the Country field, enter the geocode of the country, or click the LOV button and select a country.
4. In the State field, enter the geocode of the state, or click the LOV button and select a state.
5. In the County field, enter the geocode of the county, or click the LOV button and select the county.
6. In the City field, enter the geocode for the city. 7. In the City Description field, enter the description for the city.

Oracle Retail Merchandising System
408
Add a geocode at the district level 1. Click on the District tab. 2. Click Add.
3. In the Country field, enter the geocode of the country, or click the LOV button and select a country.
4. In the State field, enter the geocode of the state, or click the LOV button and select a state.
5. In the County field, enter the geocode of the county, or click the LOV button and select the county.
6. In the City field, enter the geocode of the city, or click the LOV button and select the city.
7. In the District field, enter the geocode for the district. 8. In the District Description field, enter a description for the district.
Review and complete the geocode 1. Click Close to close the window. 2. When prompted to save the changes, click the Yes.
Create a tax code Navigate: From the main menu, select Control > Sales Tax > Tax Rate Maintenance > Edit. The Tax Hierarchy window opens.
Tax Hierarchy Window

Financial Management
409
1. On the Tax Jurisdictions tab, select a tax jurisdiction. 2. Click on the Tax Codes & Rates tab. 3. Click Add Code. 4. In the Tax Type field, select the type of tax. 5. Click Add Rate. 6. In the Tax Rate field, enter the tax rate. 7. In the Start Date field, enter the date on which the tax rate is effective, or click the
calendar button and select the date. 8. When applicable, enter the date on which the tax rate ends in the End Date field, or
click the calendar button and select the date.
Note: Tax rates for the same tax type cannot have overlapping start and end dates.
9. Click Close to close the window. 10. When prompted to save the changes, click Yes.
Associate a department with a tax code 1. Click Item/Geocode. The Tax Codes Form window opens.

Oracle Retail Merchandising System
410
2. Click on the Department tab. 3. Click the Add.
4. In the Department field, enter the ID of the department, or click the LOV button and select a department.
5. In the Start Date field, enter the date on which the tax code is effective for the department, or click the calendar button and select a date.
6. When applicable, enter the date on which the tax code ends in the End Date field, or click the calendar button and select the date.
7. Click Close to exit. When prompted to save the changes, click Yes.
Note: Tax codes for a department are applied when an item is sold at the department level
Associate a geocode with a tax code 1. Click Item/Geocode. The Tax Codes Form window opens. 2. Click on the Geocodes tab. 3. Click Add. 4. To associate a country geocode with a tax code:
5. In the Country ID field, enter the geocode of the country, or click the LOV button and select a country.
6. To associate a state geocode with a tax code: a. Associate geocode as described in step 4.
b. In the State ID field, enter the geocode of the state, or click the LOV button and select a state.
7. To associate a county geocode with a tax code: a. Associate geocodes as described in steps 4 - 5.
b. In the County ID field, enter the geocode of the county, or click the LOV button and select a county.
8. To associate a city geocode with a tax code: a. Associate geocodes as described in steps 4 - 6.
b. In the City field, enter the geocode of the city, or click the LOV button and select a city.
9. To associate a district geocode with a tax code: a. Associate geocodes as described in steps 4 - 7.
b. In the District field, enter the geocode of the district, or click the LOV button and select a district.
10. In the Start Date field, enter the date on which the tax code is effective for the department, or click the calendar button and select a date.
11. When applicable, enter the date on which the tax code ends in the End Date field, or click the calendar button and select the date.
12. Click Close to close the window. 13. When prompted to save the changes, click Yes.

Financial Management
411
Associate an item with a tax code 1. Click Item/Geocode. The Tax Codes Form window opens. 2. Click Add. 3. In the Item field, enter the item number, or enter a partial description of the item and
click the LOV button to select an item. 4. In the Start Date field, enter the date on which the tax code is effective for the item, or
click the calendar button and select a date. 5. When applicable, enter the date on which the tax code ends in the End Date field, or
click the calendar button and select the date. 6. Click Close to close the window. 7. When prompted to save the changes, click Yes.
Create a tax jurisdiction Navigate: From the main menu, select Control > Sales Tax > Tax Rate Maintenance > Edit. The Tax Hierarchy window opens.
Tax Hierarchy Window
1. Click Add. The fields in the Apply area are cleared. 2. In the Tax Jurisdiction field, enter a unique ID for the tax jurisdiction in the first field
and a description in the second field. 3. In the Tax Level field, select the tax level of the tax jurisdiction. 4. Click Apply. The tax jurisdiction is added to the table. 5. Click Close to close the window. When prompted to save the changes, click Yes.

Oracle Retail Merchandising System
412
Search for a geocode Navigate: From the main menu, select Control > Sales Tax > Geocode Maintenance > Edit or View. The Geocode Hierarchy Maintenance window opens.
Geocode Hierarchy Maintenance Window
1. Enter search criteria as desired to make the search more restrictive. 2. Click Search. The geocodes that match the search criteria appear on the results table. 3. Click on the appropriate tab in order to display a geocode level 4. Select the geocode with which you want to work. 5. Click Close to close the window. 6. When prompted to save any changes, click Yes to save or No to close without saving.

Financial Management
413
Search for a tax code Navigate: From the main menu, select Control > Sales Tax > Tax Rate Maintenance > Edit. The Tax Hierarchy window opens.
Tax Hierarchy Window
1. Enter search criteria as desired to make the search more restrictive. 2. Click Search. The tax jurisdictions that match the search criteria appear on the results
table. 3. Select a tax jurisdiction. Click the Tax Code Rates tab in order to display the tax code
level with which you want to work. 4. Click Close to close the window. 5. When prompted to save any changes, click Yes to save or No to close without saving.

Oracle Retail Merchandising System
414
Associate geocodes with a store or tax code Associate geocodes with a store or tax code The sales tax feature allows you to specify the tax codes that apply to an item at a specific store. To ensure that stores have accurate sales tax information, the tax codes are sent through the nightly batch process two days in advance of when they are effective at the stores. The association of the tax codes and stores with a geocode determines which tax codes are effective at a specific store. You associate stores with a geocode. You then associate the tax codes with a geocode. As a result, all of the tax codes associated with a geocode are effective at all of the stores associated with a geocode. When an item is sold at a specific store, the tax rates of the applicable tax codes are applied to the item.
Search for a geocode Navigate: From the main menu, select Control > Sales Tax > Geocode Maintenance > Edit or View. The Geocode Hierarchy Maintenance window opens.
Geocode Hierarchy Maintenance Window
1. Enter search criteria as desired to make the search more restrictive. 2. Click Search. The geocodes that match the search criteria appear on the results table. 3. Click on the appropriate tab in order to display a geocode level 4. Select the geocode with which you want to work. 5. Click Close to close the window. 6. When prompted to save any changes, click Yes to save or No to close without saving.

Financial Management
415
Add a geocode Navigate: From the main menu, select Control > Sales Tax > Geocode Maintenance > Edit. The Geocode Hierarchy Maintenance window opens.
Geocode Hierarchy Maintenance Window
Click Search. The geocode tables and buttons are enabled.
Add a geocode at the country level 1. Click Add. 2. In the Country field, enter the geocode for the country. 3. In the Country Description field, enter the description of the country.
Add a geocode at the state level 1. Click on the State tab. 2. Click Add.
3. In the Country field, enter the geocode of the country, or click the LOV button and select a country.
4. In the State field, enter the geocode for the state. 5. In the State Description field, enter the description of the state.

Oracle Retail Merchandising System
416
Add a geocode at the county level 1. Click on the County tab. 2. Click Add.
3. In the Country field, enter the geocode of the country, or click the LOV button and select a country.
4. In the State field, enter the geocode of the state, or click the LOV button and select a state.
5. In the County field, enter the geocode for the county. 6. In the County Description field, enter the description of the county.
Add a geocode at the city level 1. Click on the City tab. 2. Click Add.
3. In the Country field, enter the geocode of the country, or click the LOV button and select a country.
4. In the State field, enter the geocode of the state, or click the LOV button and select a state.
5. In the County field, enter the geocode of the county, or click the LOV button and select the county.
6. In the City field, enter the geocode for the city. 7. In the City Description field, enter the description for the city.
Add a geocode at the district level 1. Click on the District tab. 2. Click Add.
3. In the Country field, enter the geocode of the country, or click the LOV button and select a country.
4. In the State field, enter the geocode of the state, or click the LOV button and select a state.
5. In the County field, enter the geocode of the county, or click the LOV button and select the county.
6. In the City field, enter the geocode of the city, or click the LOV button and select the city.
7. In the District field, enter the geocode for the district. 8. In the District Description field, enter a description for the district.

Financial Management
417
Review and complete the geocode 1. Click Close to close the window. 2. When prompted to save the changes, click the Yes.
Associate a geocode with a store Navigate: From the main menu, select Action > Organizational Hierarchy. The Organization Hierarchy Main Form window opens. Select Store on the tree structure. The stores appear in the table. Select a store and click Edit. The Store Maintenance window opens. From the Options menu, select Geocodes. The Geocodes window opens. 1. To associate a country geocode with a store, in the Country ID field, enter the
geocode of the country, or click the LOV button and select a country. 2. To associate a state geocode with a store:
a. Associate geocodes as described in step 1.
b. In the State ID field, enter the geocode of the state, or click the LOV button and select a state.
3. To associate a county geocode with a store: a. Associate geocodes as described in step 1 - 2.
b. In the County ID field, enter the geocode of the county, or click the LOV button and select a county.
4. To associate a city geocode with a store: a. Associate geocodes as described in step 1 - 3.
b. In the City field, enter the geocode of the city, or click the LOV button and select a city.
5. To associate a district geocode with a store: a. Associate geocodes as described in step 1 - 4.
b. In the District field, enter the geocode of the district, or click the LOV button and select a district.
6. Click OK to save your changes and close the window.

Oracle Retail Merchandising System
418
Associate tax codes with a merchandise hierarchy Associate tax codes with a merchandise hierarchy The sales tax feature allows you to specify the tax codes that apply to an item at a specific store. To ensure that stores have accurate sales tax information, the tax codes are sent through the nightly batch process two days in advance of when they are effective at the stores. You apply a tax code to items, departments, and item lists. You can create tax product group item lists that include items that share the same tax codes. The tax codes that are ultimately applied to an item at a store are determined by the tax codes that the item shares with the store. The tax codes of a store are determined by the tax codes that are associated with the geocode to which the store belongs. You can view the tax rates that apply to the item at a specific store, or you can view all of the tax codes associated with an item, department, or item list. You can only view item lists that are tax product groups.
Create a tax code Navigate: From the main menu, select Control > Sales Tax > Tax Rate Maintenance > Edit. The Tax Hierarchy window opens.
Tax Hierarchy Window
1. On the Tax Jurisdictions tab, select a tax jurisdiction. 2. Click on the Tax Codes & Rates tab. 3. Click Add Code. 4. In the Tax Type field, select the type of tax. 5. Click Add Rate. 6. In the Tax Rate field, enter the tax rate.

Financial Management
419
7. In the Start Date field, enter the date on which the tax rate is effective, or click the calendar button and select the date.
8. When applicable, enter the date on which the tax rate ends in the End Date field, or click the calendar button and select the date.
Note: Tax rates for the same tax type cannot have overlapping start and end dates.
9. Click Close to close the window. 10. When prompted to save the changes, click Yes.
Associate a department with a tax code 1. Click Item/Geocode. The Tax Codes Form window opens.
2. Click on the Department tab. 3. Click the Add.
4. In the Department field, enter the ID of the department, or click the LOV button and select a department.
5. In the Start Date field, enter the date on which the tax code is effective for the department, or click the calendar button and select a date.
6. When applicable, enter the date on which the tax code ends in the End Date field, or click the calendar button and select the date.
7. Click Close to exit. When prompted to save the changes, click Yes.
Note: Tax codes for a department are applied when an item is sold at the department level

Oracle Retail Merchandising System
420
Associate a geocode with a tax code 1. Click Item/Geocode. The Tax Codes Form window opens. 2. Click on the Geocodes tab. 3. Click Add. 4. To associate a country geocode with a tax code:
5. In the Country ID field, enter the geocode of the country, or click the LOV button and select a country.
6. To associate a state geocode with a tax code: a. Associate geocode as described in step 4.
b. In the State ID field, enter the geocode of the state, or click the LOV button and select a state.
7. To associate a county geocode with a tax code: a. Associate geocodes as described in steps 4 - 5.
b. In the County ID field, enter the geocode of the county, or click the LOV button and select a county.
8. To associate a city geocode with a tax code: a. Associate geocodes as described in steps 4 - 6.
b. In the City field, enter the geocode of the city, or click the LOV button and select a city.
9. To associate a district geocode with a tax code: a. Associate geocodes as described in steps 4 - 7.
b. In the District field, enter the geocode of the district, or click the LOV button and select a district.
10. In the Start Date field, enter the date on which the tax code is effective for the department, or click the calendar button and select a date.
11. When applicable, enter the date on which the tax code ends in the End Date field, or click the calendar button and select the date.
12. Click Close to close the window. 13. When prompted to save the changes, click Yes.
Associate an item with a tax code 1. Click Item/Geocode. The Tax Codes Form window opens. 2. Click Add. 3. In the Item field, enter the item number, or enter a partial description of the item and
click the LOV button to select an item. 4. In the Start Date field, enter the date on which the tax code is effective for the item, or
click the calendar button and select a date. 5. When applicable, enter the date on which the tax code ends in the End Date field, or
click the calendar button and select the date. 6. Click Close to close the window. 7. When prompted to save the changes, click Yes.

Financial Management
421
Create a tax jurisdiction Navigate: From the main menu, select Control > Sales Tax > Tax Rate Maintenance > Edit. The Tax Hierarchy window opens.
Tax Hierarchy Window
1. Click Add. The fields in the Apply area are cleared. 2. In the Tax Jurisdiction field, enter a unique ID for the tax jurisdiction in the first field
and a description in the second field. 3. In the Tax Level field, select the tax level of the tax jurisdiction. 4. Click Apply. The tax jurisdiction is added to the table. 5. Click Close to close the window. When prompted to save the changes, click Yes.

Oracle Retail Merchandising System
422
Search for a tax code Navigate: From the main menu, select Control > Sales Tax > Tax Rate Maintenance > Edit. The Tax Hierarchy window opens.
Tax Hierarchy Window
1. Enter search criteria as desired to make the search more restrictive. 2. Click Search. The tax jurisdictions that match the search criteria appear on the results
table. 3. Select a tax jurisdiction. Click the Tax Code Rates tab in order to display the tax code
level with which you want to work. 4. Click Close to close the window. 5. When prompted to save any changes, click Yes to save or No to close without saving.

Financial Management
423
Copy tax codes to a department Navigate: From the main menu, select Action > Merchandise Hierarchy. The Merchandise Hierarchy Main Form window opens Select Department on the tree structure. The departments appear in the table. Select a department and click the Edit button. The Department Maintenance window opens. From the Options menu, select Apply Tax Codes. The Item Tax Codes window opens.
Item Tax Codes Window
1. Click Copy. The Copy window opens.
Copy Window
2. Enter the item number of the item that you want to copy from. You can also enter a
partial description of the item and click the LOV button to select the item. 3. Click Copy to copy the tax codes from the selected item to the department and close
the window. The copied tax codes appear in the table on the Item Tax Codes window.
4. Click OK to save your changes and close the window.

Oracle Retail Merchandising System
424
Copy tax codes to a tax product group item list Navigate: From the main menu, select Items > Item List. The Item List Search window opens. Search for and retrieve an item list in Use mode. The Item List Header window opens. From the Options menu, select Create Tax Code Change. The Item Tax Codes window opens.
Item Tax Codes Window
1. Click Copy. The Copy window opens.
Copy Window
2. Enter the item number of the item that you want to copy from. You can also enter a
partial description of the item and click the LOV button to select the item. 3. Click Copy to copy the tax codes from the selected item to the current items and
close the window. The copied tax codes appear in the table on the Item Tax Codes window.
4. Click OK to save your changes and close the window.

Financial Management
425
Copy tax codes to an item Navigate: From the main menu, select Items > Items. The Item Search window opens. Search for and retrieve an item in Edit mode. The Item Maintenance window opens. Select the Apply Tax Codes option. The Item Tax Codes window opens.
Item Tax Codes Window
1. Click Copy. The Copy window opens.
Copy Window
2. Enter the item number of the item that you want to copy from. You can also enter a
partial description of the item and click the LOV button to select the item. 3. Click Copy to copy the tax codes from the selected item to the current items and
close the window. The copied tax codes appear in the table on the Item Tax Codes window.
4. Click OK to save your changes and close the window.


427
12 User Tools
User Tools
Timelines Define a timeline step
Define a timeline step The steps used to create timelines allows you to create and maintain the timelines that are used to track an activity. The type of timeline you create determines what activities you can attach a timeline to. After you create the steps, you can define a series of steps to be used in a timeline. You can use a timeline to track the completion of an activity. When creating a timeline, you can pick which steps to include and the order of the steps. You can include any number of steps in a timeline.
Define a timeline step Navigate: From the main menu, select Control > Setup > Timeline Step Components > Edit. The Timeline Step Components window opens.

Oracle Retail Merchandising System
428
Timeline Step Components Window
1. In the Timeline Type field, select the activity for which you want to define a timeline step.
2. Click Add. The step number is filled in automatically in the Step No. field. 3. In the Step Description field, enter a description of the step. 4. Click OK to save your changes and close the window.

User Tools
429
Define a timeline Define a timeline A timeline is a schedule of events. To track the life cycle of an activity, you can attach a timeline to the activity. You can enter dates with which to track the completion of the timeline steps. You can revise dates and record the reason for the revision.
Define a timeline Navigate: From the main menu, select Control > Setup > Timeline > New. The Timeline Steps window opens.
Timeline Steps Window
1. Enter a description of the timeline in the box to the right of the Timeline Number field.
2. In the Timeline Type field, select the activity for which you want to define a timeline. 3. If the Timeline Type is Purchase Order or Order/Item, select a base in the Timeline
Base field. This field is optional.

Oracle Retail Merchandising System
430
4. Select the steps that you want to include in the timeline:
a. Enter the step number in the Step Number field, or click the LOV button and select the step.
b. In the Days to Complete field, enter the number of days that you want to allot for completion of the step.
c. In the Display Sequence field, enter the order in which you want to display the step. You may need to edit the sequence number for other steps in the timeline.
d. Repeat steps a through c for each additional step. 5. Click OK to save your changes and close the window.
Copy a timeline Navigate: From the main menu, select Control > Setup > Timeline > New. The Timeline Steps window opens.
Timeline Steps Window
User Tools
431
1. Enter a description of the timeline in the box to the right of the Timeline Number field.
2. In the Timeline Type field, select the activity for which you want to copy a timeline. 3. If the Timeline Type is Purchase Order or Order/Item, select a base in the Timeline
Base field. This field is optional. 4. Click Like Timeline. The Copy Like Timeline Step window opens.
a. Enter the ID of the timeline that you want to copy, or click the LOV button and select the timeline.
b. Click OK to exit the Copy Like Timeline Step window. The description and steps of the selected timeline are copied to the Timeline Steps window.
5. Edit the Days to Complete and Display Sequence fields as needed. 6. Add, delete, or sort the steps as needed. 7. Click OK to save your changes and close the window.
Associate a timeline with an activity Associate a timelines with an activity Within RMS, timelines can be attached to an item, a purchase order, and a line item within a purchase order. You can associate timelines with a variety of activities in Oracle Retail Trade Management (RTM). One or multiple timelines can be attached to activities in the following modules:

Oracle Retail Merchandising System
432
Associate a timeline with a customs entry Navigate: From the main menu, select Inventory > Customs Entry. The Customs Entry Search window opens. Search for and retrieve a customs entry in Edit mode. The Customs Entry Header window opens. From the Options menu, select Timelines > New. The Timeline window opens.
Timeline Window
1. In the Timeline Number field, enter the ID of the timeline, or click the LOV button and select the timeline.
2. Choose one of the following methods to enter the original dates: 3. In the Base Date field, enter the date on which to begin the timeline, or click the
calendar button and select the date. The original dates for each step are filled in automatically.
4. In any one of the Original Date fields, enter a date; then click Calculate Dates. The Base Date field and remaining Original Date fields are filled in automatically.
5. To add a comment to a step, select the Comments option. Then type the comment in
the Comments field, or click the comments button and enter the comment. 6. Click OK to save your changes and close the window.

User Tools
433
Associate a timeline with a purchase order Navigate: From the main menu, select Ordering > Orders. The Order Selection window opens. Search for and retrieve a purchase order in Edit mode. The PO Header Maintenance window opens. From the Options menu, select Timelines > New. The Timeline window opens.
Timeline Window
Note: You may also access the Timelines window from the PO Item Maintenance window. To access the window, click Items. The PO Item Maintenance window opens. From the Options menu, select Timelines > New. The Timeline window is displayed.

Oracle Retail Merchandising System
434
1. In the Timeline Number field, enter the timeline ID, or click the LOV button and select a timeline. The timeline information opens in the table.
2. If necessary, click the calendar button to change the date the date. 3. If necessary, click Delete to remove a step from the timeline. 4. To enter a reason for any timeline changes, select the Reason radio button and enter
the reason code, or click the LOV button and select a reason. 5. To enter a comment for any timeline changes, select the Comments radio button and
enter the comments. Click OK to save your changes and close the window.
Associate a timeline with a transportation element Navigate: From the main menu, select Inventory > Transportation > Maintenance. The Transportation Selection window opens. Search for and retrieve a transportation record in Edit mode. The Transportation window opens. OR From the main menu, select Inventory > Transportation > PO-Level Maintenance > Edit. The PO-Level Transportation window opens.
Transportation Window

User Tools
435
1. To associate a timeline with transportation records at the following levels: Bill of lading: From the Options menu, select Timelines > BL/AWB > New. The
Timeline window opens. Commercial invoice: From the Options menu, select Timelines > Commercial
Invoice > New. The Timeline window opens. Container: From the Options menu, select Timelines > container > New. The
Timeline window opens. PO/Item: From the Options menu, select Timelines > PO/Item > New. The
Timeline window opens. Transportation record: From the Options menu, select Timelines >
Transportation Record > New. The Timeline window opens. PO-specific bill of lading: From the Options menu, select Timelines > PO/BL
AWB > New. The Timeline window opens.
Note: This level of timeline is only available from the PO-Level Transportation window.
2. In the Timeline Number field, enter the ID of the timeline, or click the LOV button and select the timeline.
3. Choose one of the following methods to enter the original dates. 4. In the Base Date field, enter the date on which to begin the timeline, or click the
calendar button and select the date. The original dates for each step are filled in automatically.
5. In any one of the Original Date fields, enter a date; then click Calculate Dates. The Base Date field and remaining Original Date fields are filled in automatically.
6. To add a comment to a step, select the Comments option. Enter the comment in the
Comments field, or click the comments button and enter the comment. 7. Click OK to save your changes and close the window.

Oracle Retail Merchandising System
436
Associate a timeline with an item Navigate: From the main menu, select Items > Items. The Item Search window is displayed. Search for and retrieve an item in Edit mode. The Item Maintenance window opens. Select the Timelines option. The Timeline window opens.
Timeline Window
1. In the Timeline Number field, enter the ID of the timeline, or click the LOV button and select the timeline.
2. Choose one of the following methods to enter the original dates: 3. In the Base Date field, enter the date on which to begin the timeline, or click the
calendar button and select the date. The original dates for each step are filled in automatically.
4. In any one of the Original Date fields, enter a date; then click Calculate Dates. The Base Date field and remaining Original Date fields are filled in automatically.
5. To add a comment to a step, select the Comments option. Then type the comment in
the Comments field, or click the comments button and enter the comment. 6. Click OK to save your changes and close the window.
User Tools
437
Document Maintenance Maintain documents
Maintain documents The Document Maintenance feature allows you to create, edit, and view documents required for letter of credit processing. Documents can also be designated as not required for the Letter of Credit and can be used for other purposes within the organization.
Add a document Navigate: From the main menu, select Control > Document Maintenance > Edit. The Document Maintenance window opens.
Document Maintenance Window
1. Click Add. The Document field is filled in automatically with a unique ID number for the document.
2. In the Document Description field, enter a description for the document. 3. In the Document Type field, select the document type. The Swift Tag field is filled in
automatically. 4. In the Sequence field, enter the sequence number, if required. 5. In the Document Text field, enter document text. 6. If this document has a letter of credit, select the LC Document check box. 7. Click OK to save your changes and close the window.

Oracle Retail Merchandising System
438
Associate a document with a RMS element Associate a document with a RMS element Any documents associated with the following elements default to a purchase order when the purchase order is created. When you associate a purchase order with a letter of credit, the required documents are then applied to the letter of credit. Required documents applied to the letter of credit are transmitted to the bank through an electronic exchange. You can add or delete required documents associated with: Suppliers Partners Countries Items Purchase orders
Using Oracle Retail Trade Management (RTM), you can add required documents to the letters of credit or HTS chapters. The remaining entities are accessible in the Oracle Retail Merchandising System program.
Add a required document to a country Navigate: From the main menu, select Control > Setup > Country > Edit. The Country Maintenance window opens.
Country Maintenance Window

User Tools
439
1. Select the country. 2. From the Options menu, select Documents. The Required Documents window opens.
Required Documents Window
3. Click Add.
4. In the Document field, enter a document number, or click the LOV button to select a document.
5. Click OK to save your changes and close the window.
Add a required document to a letter of credit Navigate: From the main menu, select Finance > Payments > Letter of Credit. The Letter of Credit Find window opens. Search for and retrieve a letter of credit in the Edit mode. Restrict the search to letters of credit in either Worksheet status or Confirmed status. The Letter of Credit Application Header window opens. If the status is Confirmed, select Amendments from the Options menu. The Letter of Credit Amendments window opens. From the Options menu, select Required Documents. The Required Documents window opens.

Oracle Retail Merchandising System
440
Required Documents Window
1. Click Add.
2. In the Document field, enter a document number, or click the LOV button to select a document.
3. Click OK to save your changes and close the window.
Add a required document to a partner Navigate: From the main menu, select Control > Partner. The Partner Find window opens. Search for and retrieve a partner in the Edit mode. You can add required documents only to importers, brokers, factories, consolidators, applicants, and consignees. The Partner Maintenance window opens. From the Options menu, select Documents. The Required Documents window opens.

User Tools
441
Required Documents Window
1. Click Add.
2. In the Document field, enter the Document ID, or click the LOV button to select the document.
3. Click OK to save your changes and close the window.
Add a required document to a supplier Navigate: From the main menu, select Control > Supplier. The Supplier Search window opens. Search for and retrieve a supplier in the Edit mode. The Supplier Maintenance window opens. From the Options menu, select Documents. The Required Documents window opens.

Oracle Retail Merchandising System
442
Required Documents Window
1. Click Add.
2. In the Document field, enter the Document ID, or click the LOV button to select the document.
3. Click OK to save your changes and close the window.

User Tools
443
Add a required document to an HTS heading Navigate: From the main menu, select Control > Landed Cost > HTS Maintenance > HTS Heading Maintenance > Edit. The current HTS headings appear in the HTS Heading Maintenance window. Select an HTS heading. From the Options menu, select HTS Heading Documents. The Required Documents window opens.
Required Documents Window
1. Click Add.
2. In the Document field, enter the document number, or click the LOV button to select the document.
3. Click OK to save your changes and close the window.

Oracle Retail Merchandising System
444
Add a required document to an item Navigate: From the main menu, select Items > Items. The Item Search window is displayed. Search for and retrieve a item in the Edit Item mode. The Item Maintenance window opens. Select the Required Documents option. The Required Documents window opens.
Required Documents Window
1. Click Add.
2. In the Document field, enter a document number, or click the LOV button to select a document.
3. Click OK to save your changes and close the window.
User Tools
445
Maintain tickets and labels Maintain tickets and labels
Items generally have tickets or labels affixed to them in the store. While shoppers may note the price and size, sales clerks may glean quite a bit of additional information from the tickets and labels. An item may have multiple tickets and labels. You can choose what information is printed on tickets and labels and under what circumstances they should be automatically printed. When necessary, you can choose to print tickets on demand. Ticket requests are transmitted to an external ticketing system for printing. Before you can use tickets and labels, you must add the types of tickets to the system. After entering a unique ID and description for a ticket type, you choose which attributes of an item are to be printed on the ticket type. You also indicate whether the ticket type is a shelf edge label. If the ticket type is a shelf edge label, only one label per request is printed. After the ticket types are defined, you can associate one or more ticket types with an item. You can associate ticket types with multiple items by using an item list. At this point, you indicate the circumstances under which tickets are automatically printed. The circumstances are: When a purchase order is approved When a an order is received When a permanent price change takes effect.
If you use an item list, the ticket types that you add to the item list supersede existing ticket types associated with the items on the item list. A message appears requesting if the same ticket types to any subordinate level items. Should the need arise, you can request tickets on demand. The request may be for a single item, items on an item list, or items on a purchase order. Requests may be edited until the tickets are printed.

Oracle Retail Merchandising System
446
Add ticket types Navigate: From the main menu, select Items > Ticket Type > Edit. The Ticket Types window opens.
Ticket Types Window
Add a ticket type 1. Click Add. The next available line is enabled. 2. In the Ticket Type field enter a unique ID for the ticket type. 3. In the Ticket Description field, enter the description of the ticket type. 4. In the merchandise hierarchy fields, enter the ID of the member of each hierarchy
level, or click the LOV button and select a member. 5. If the ticket is used as shelf edge label, select the Shelf Edge Label check box.
Add an attribute to a ticket type 1. Select the ticket type and click Detail. The Ticket Items window opens.

User Tools
447
Ticket Items Window
2. Click Add. The next available line is enabled. 3. In the Attribute field, select the type of attribute.
4. In the Attribute ID field, enter the ID of the attribute, or click the LOV button and select the attribute.
5. Click OK to save your changes and close the window.

Oracle Retail Merchandising System
448
Request tickets or labels Navigate: From the main menu, select Items > Request Tickets. The Request Manual Ticketing window opens.
Request Manual Ticketing Window
1. Click New. The Apply area is enabled. 2. In the Items field, select the grouping mechanism for the items to be ticketed. 3. In the next field, enter the ID of the specific item, item list, or purchase order, or click
the LOV button and select the group. 4. In the Location Type field, select the type of location. This field is not required for
purchase orders.
5. In the Location field, enter the ID of the specific location, or click the LOV button and select the location. This field is not required for purchase orders.
6. In the Quantity field, enter the number of tickets to be printed. This field is not required for purchase orders.
7. In the Ticket Type field, enter the ID of the ticket type, or click the LOV button and select the ticket type.
8. In the Origin Country field, enter the code for the origin country, or click the LOV button and select the origin country. The origin country is optional.
9. Click Apply. The ticket requests are added to the table. 10. Click OK to save your changes and close the window.

User Tools
449
Edit ticket types for an item Navigate: From the main menu, select Items > Items. The Item Search window is displayed. Search for and retrieve an item in Edit mode. The Item Maintenance window opens.
Item Maintenance Window
1. Click on the Ticket Type option on the Options list. The ticket types appear on the Item Ticket Detail window.

Oracle Retail Merchandising System
450
Item Ticket Detail Window
Note: To edit a ticket type for a subordinate item, click on the List Children option on the Options list. The Item Children window opens. Next, select an item; then click on the Ticket Type option on the Options list.
2. Edit the PO Print Type, Print on Price Change, and Percent Over Quantity fields as necessary.
Add a ticket type 1. Click Add. The next available line is enabled.
2. In the Ticket Type field, enter the code for the ticket type, or click the LOV button and select the ticket type.
3. In the PO Print Type field, select when the tickets should be printed. 4. To indicate that the ticket type should be printed when a permanent price change
becomes effective, select the Print on Price Change checkbox. 5. In the Percent Over Quantity field, enter or edit the percentage of extra tickets to be
printed as necessary.
Delete a ticket type 1. Select a ticket type and click Delete. 2. When prompted to delete the record, click Yes.

User Tools
451
Review and complete the ticket type 3. Click OK to save your changes and close the window. 4. If prompted to overwrite the ticket types for children (subordinate level items) of the
current item, click either Yes or No as necessary.
Edit ticket types for multiple items Navigate: From the main menu, select Items > Item List. The Item List Search window opens. Search for and retrieve an item list in Use mode. The Item List Header window opens. From the Options menu, select Create Mass Item Change > Ticket Type. The Item Ticket Detail window opens.
Item Ticket Detail Window
1. In the Ticket Type field, enter the ID of the ticket type, or click the LOV button and select the ticket type.
2. In the PO Print Type field, select when the tickets are printed. 3. If you want tickets printed automatically when a permanent price change becomes
effective, select the Print on Price Change check box. 4. In the Percent Over Quantity field, enter or edit the percentage of extra tickets to be
printed. 5. To add another ticket type, click Add.

Oracle Retail Merchandising System
452
6. Enter the details on the next available line. 7. Click OK to save your changes and close the window. 8. When warned about overwriting existing ticket types, click OK. 9. When prompted to overwrite the ticket types for children (subordinate level items) of
the items on the item list, click either Yes or No as necessary.

System Administration 453
13 System Administration
System Administration
Maintain system parameters Maintain system parameters
The following areas can be maintained in order to optimize system performance.
Maintain audit trails Audit trails can be set up to track who makes changes to a selected table and when such changes are made. Whenever a record is added, changed, or deleted on the selected table, a record is added to the audit table. The record includes the primary key, date/time stamp, and user ID. If fields are audited, the before and after values, as well as the standard audit information, are tracked. It is recommended that you do not audit the primary key field.
Dynamic hierarchies Default names are used for the elements in the merchandise, organizational, supplier, and item hierarchies. You replace the default names with customized names. For example, you may chose to replace the term Department with Category. The user-supplied term is substituted for the Oracle Retail term throughout the system. The default names for the merchandise, organizational, and supplier hierarchies are maintained in the Dynamic Hierarchy window. The default names for the item hierarchy are maintained in the System Parameter Maintenance window.

Maintain system parameters
454 Oracle Retail Merchandising System
Error message and multi-view maintenance Implementation personnel have access to an error message tool and a multi-view tool. The error message tool is used to maintain the RTK_ERRORS table. By placing error messages in a table, the messages are more easily maintained and internationalized. The RTK_ERRORS table is usually populated during system installation. The multi-view tool is used to maintain the MULTIVIEW_DEFAULT_45 and MULTIVIEW_SAVED_45 tables. Multi-views allow the user to view predefined subsets of columns on a form when the number of available columns exceeds the available space. The MULTIVIEW tables are usually populated during system installation. However, a user may also choose to customize and save the content of a multi-view from within a form that contains a multi-view.
Code maintenance Code types provide the values that appear in drop-down lists throughout the system. The values entered on the code windows become useful when 1) windows in the system are coded to display fields containing the values and 2) the values are coded to cause some action to occur when a user selects the value.
Batch maintenance The batch module allows you to monitor the batch programs used by the system. You can view the history of a batch program in order to verify when it was run or how long it ran. You can maintain the number of threads used by a batch program or the number of saves performed during the run.

User Tools
455
System variables Users gain the most value from software when the system is optimized to meet their needs. The system variables module provides a means of maintaining the relatively static information about a retailer's business. Many of the system variables must be set during installation and cannot be changed without major implications. Most system variables are specific to functional areas such as ordering, pricing, transfers, stock ledger and history. While some indicators dictate the level at which these functions perform, others indicate the length of time that the data is maintained for these areas. In addition to the functional variables, other variables span all functional areas and determine how the system must perform as a whole. Some of these variables include the multiple currency indicator, primary language, and system dates.
Printers One or more printers may be set up for or by end users. Whichever printer is marked as Active becomes the default printer when the user chooses to print a report.
Main menu The main menu is very flexible. You can add and delete folders and elements on the tree structure. Some examples of elements are forms, internal items, Oracle reports, user applications, and web pages. You can secure any type of element so that only selected user roles have access to the element. Users inherit the permissions that are associated with their user role. Users also can customize the main menu for their own use. As a user, you can add folders and elements in order to personalize your workspace.
Calendar overview Two types of calendars are supported by the system: Normal (Julian) calendar: Results in uneven yearly, quarterly, and monthly
comparisons since calendar dates generally fall on different days from one year to the next. The number of weekdays differs from one year to the next. For example: There may be four Saturdays in a month one year, but five Saturdays the next year. A month may have between 28 and 31 days. Once every four years, an extra day is added to compensate for leap year.
Retail (4-5-4) calendar: Each quarter contains 13 full weeks divided into a 4-5-4 format. That is, the first month of the quarter has four weeks, the second month has five weeks, and the third month has four weeks. The number of days in the retail year, except leap year, equals only 364 days. To compensate for the missing day in non-leap years, an extra week is added to the calendar once every seven years. The retail calendar provides consistent inclusion of weekends for yearly comparisons by month and a consistent day for month-end processing.
Sales history is always based on the retail calendar. The calendar begins at least 18 months prior to the earliest stock ledger and sales history data. The calendar also contains dates at least three years into the future. The calendar is set up by the system administrator. You can identify the half-year periods used in the system. Half-year periods are entered in the format YYYYn, where YYYY is the four-digit year and n is the period. The period may be 1 or 2. For example: The first half of 2002 is entered as 20021.

Maintain system parameters
456 Oracle Retail Merchandising System
Edit audit trails Navigate: From the main menu, select Control > System > Audit Trail > Edit. The list of audited tables appear in the Audit Trail Field Selection window.
Audit Trail Field Selection Window
1. Select a table. 2. Edit the Purge Frequency and the Field Level fields as necessary.

User Tools
457
Edit the fields to be audited 1. Select a table and click Fields. The Audit Fields window opens.
Audit Fields Window
2. In the Fields to be Audited field, enter the name of the field, or click the LOV button and select the field.
3. To delete a field, select the field and click Delete. 4. Click OK to save your changes and close the window.
Delete a table from the list of audited tables 1. Select a table and click Delete. 2. When prompted to delete the record, click Yes. 3. Click OK to save your changes and close the window.

Maintain system parameters
458 Oracle Retail Merchandising System
Edit batch controls Navigate: From the main menu, select Control > System > Batch Maintenance > Batch Control. The Batch Control window opens.
Batch Control Window
1. In the Program Name field, enter the name of a batch program, or click the LOV button and select the batch program.
2. In the Commit Max Ctr field, enter or edit the maximum value for the commit counter as necessary
3. In the Number of Threads field, enter or edit the number of threads.

User Tools
459
4. To view details about previous executions of the batch program: a. Click History. The Batch Control History window opens
Batch Control History Window
b. Click OK to exit the Batch Control History window. 5. Click OK to save your changes and close the window.

Maintain system parameters
460 Oracle Retail Merchandising System
Edit dynamic hierarchies Navigate: From the main menu, select Control > System > Dynamic Hierarchies > Edit. The Dynamic Hierarchy window opens.
Dynamic Hierarchy Window
1. In the Client Name field, enter or edit the customized name for an element named in the Oracle Retail Name field.
2. In the Abbreviation field, enter or edit the abbreviation for a customized name in the Client Name field.
Note: It is recommended that you do not exceed 15 characters as anything over 15 characters may not be displayed on most forms.
3. Click OK to save your changes and close the window.

User Tools
461
Edit halves Navigate: From the main menu, select Control > Setup > Half > Edit. The current halves appear in the Half window.
Half Window
1. Edit the descriptions or dates as necessary. 2. Click OK to save your changes and close the window.
Add a half 1. Click Add. The next available line is enabled. 2. In the Half Number field, enter an ID for the half. Use the format YYYYn, where
YYYY is the 4-digit year and n is the half-year period (either 1 or 2). 3. In the Description field, enter a description for the half. 4. In the Dates field, enter the date range for the half. 5. Click OK to save your changes and close the window.

Maintain system parameters
462 Oracle Retail Merchandising System
Delete a half 1. Select a half and click Delete. 2. When prompted to delete the record, click OK. 3. Click OK to save your changes and close the window.
Edit multi-view columns Navigate: From the main menu, select Control > System > Multiview Search Tool. The Multisearch Editor window opens. Search for and retrieve a multi-view column. The results appear in the table.
Multisearch Editor Window

User Tools
463
Edit a multi-view column 1. Select the form and column and click Edit. The details appear in the Multiview Edit
window.
Multiview Edit Window
2. Enter or edit the details as necessary. 3. Click OK to save your changes and close the windows.
Delete a multi-view column 1. Select the form and column and click Edit. The details appear in the Multiview Edit
window. 2. Click Delete. 3. When prompted to delete the record, click Yes. 4. Click OK to save your changes and close the windows.
Add a multi-view column 1. Click Add. The Multiview Edit window opens. 2. Enter the form and column information in the appropriate fields. 3. Click OK to save your changes and close the windows.

Maintain system parameters
464 Oracle Retail Merchandising System
Edit system code types Navigate: From the main menu, select Control > System > Codes Maintenance > Edit. The code types appear in the Codes Header Maintenance window.
Codes Header Maintenance Window
Edit the descriptions as necessary.
Add a code type 1. Click Add. The next available line is enabled. 2. In the Code Type field, enter a code for the code type. 3. In the Description field, enter a description of the code type. 4. Click OK to save your changes and close the window.

User Tools
465
Add values to a code type 1. Select the code type and click Detail. The Code Detail Maintenance window opens.
Code Detail Maintenance Window
2. Click Add. The next available line is enabled. 3. In the Code field, enter an code for the value. 4. In the Description field, enter the value as you want it to appear to users. 5. In the Display Order field, enter the sequence number to indicate the order in which
the value should appear in drop-down lists. 6. Select the System Required check box as necessary. 7. Click OK to save your changes and close the window.
Delete values from a code type 1. Select the code type and click Detail. The values appear in the Code Detail
Maintenance window. 2. Select a value and click Delete. 3. When prompted to delete the record, click Yes. 4. Click OK to save your changes and close the window.
Delete a code type 1. Select a code type and click Delete. 2. When prompted to delete the record, click Yes. 3. Click OK to save your changes and close the window.

Maintain system parameters
466 Oracle Retail Merchandising System
Edit system error messages Navigate: From the main menu, select Control > System > Message Search Tool. The Error Message Search window opens.
Error Message Search Window
1. Enter search criteria in the Key, Text, View, and Language fields as necessary. 2. Click Search. The error messages that match the search criteria appear.
Edit an error message 1. Select an error message and click Edit. The Error Message Maintenance window
opens. 2. Edit the details as necessary. 3. Click OK to save your changes and close the window.

User Tools
467
Add an error message 1. Click Add. The Error Message Maintenance window opens. 2. Enter the details of the message. 3. To see how the message will be displayed, click Preview. On the Preview Parameter
window, enter one to three parameters as necessary and click OK. The message opens.
Preview Parameter Window
4. To see how the message will be displayed on an RF device, click RF Preview. On the Preview Parameter window, enter one to three parameters as necessary and click OK. The message opens.
5. Click OK to save your changes and close the window.
Delete an error message 1. Select a message and click Edit. The message opens on the Error Message
Maintenance window. 2. Click Delete. 3. When prompted to delete the record, click Yes. 4. Click OK to save your changes and close the window.

Maintain system parameters
468 Oracle Retail Merchandising System
Edit system printers Navigate: From the main menu, select Control > Setup > Printer Maintenance > Edit. The Printer Maintenance window opens.
Printer Maintenance Window
1. In the Description field, edit the brief description of the printer. 2. To designate that the printer is active, select the Active Ind check box. To designate
that the printer is not active, clear the Active Ind check box.
Add a printer 1. Click Add. The next available row is enabled. 2. In the Printer field, enter the system-defined printer name. 3. In the Description field, enter a brief description of the printer. 4. If the printer is not active, clear the Active Ind. check box. 5. Click OK to save your changes and close the window.
Delete a printer 1. Click Delete to delete the printer. 2. When prompted to delete the printer, click Yes. 3. Click OK to save your changes and close the window.

User Tools
469
Edit system variables Navigate: From the main menu, select Control > System > System Variables. The System Parameter Maintenance window opens.
System Parameter Maintenance Window
1. Edit options and enter values as needed. 2. There are several screens associated with this window.
To view and edit the next screen, click Next. To view and edit the previous screen, click Previous.
3. Click OK to save your changes and close the window.

Maintain system parameters
470 Oracle Retail Merchandising System
Edit the navigator toolbar Navigate: Close all windows except the Oracle Retail Enterprise Start window. From the Options menu, select Start Options. The Navigator User Options window opens.
Navigator User Options Window

User Tools
471
Oracle Retail Enterprise Start Window
1. To display and add buttons to the toolbar: a. Select the Show Multiview check box. The check boxes are enabled. b. Select the check box next to each toolbar button that you want to include on the
toolbar. 2. To delete a button from the toolbar, clear the check box next to the button. 3. To delete the toolbar, clear the Show Multiview check box. 4. Click OK to save your changes and close the window.

Maintain system parameters
472 Oracle Retail Merchandising System
Edit the system main menu Navigate: From the main menu, select Control > System > Tree Administration. The Oracle Retail Start Tree Administration window opens. Navigate to the folder that you want to edit.
Oracle Retail Start Tree Administration Window
Add a folder 1. Click Add Folder. The New Item window opens.
New Item Window

User Tools
473
2. In the Folder Name field, enter the name of the folder. 3. Click OK to save your changes and close the window.
Add an element 1. Double-click the folder in which the element belongs. 2. Click Add Element. The New Item window opens. 3. In the Element Name field, enter the name of the element. 4. In the Type field, select the type of element. 5. Click Next. Enter the details on the next window or windows.
Note: The windows and fields that appear next depend on the type of element that you select.
6. Click OK to save your changes and close the window.
Edit security for an element 1. Select an element and click Security. The Security Control window opens.
Security Control Window

Maintain system security
474 Oracle Retail Merchandising System
2. To allow access to the current element, select one or more user roles on the Roles
Available table. Then click the move left button. 3. To deny access to the current element, select one or more user roles on the Roles
Allowed table. Then click the move right button. 4. Click OK to save your changes and close the window.
Delete a folder or element 1. Select the folder or element and click the Delete button. 2. When prompted to delete the record, click the Yes button. 3. Click OK to save your changes and close the window.
Maintain system security Maintain system security
RMS has several built in methods that you can use to leverage system security.
Maintain users The Security feature allows you to give users either full or limited access to certain areas of RMS. The users must be valid system users.
Maintain security groups The Security feature allows you to group users by access. Users with limited access can be linked to one or more groups. The users within the groups share the same permissions to view, add, edit, and delete records.
Assign regionality relationships You can further secure RMS by assigning regions to a user. The users within the groups share the same permissions to specified functional areas, merchandise levels, organizational levels, and price zones.
Maintain secure areas You can assign access to groups at the product level, location level, or price zone level. The security restrictions that you set up at the group level are applied to all users that are linked to the group. Any changes that you make to the security settings become effective after a scheduled or ad hoc batch program rebuilds the security records.

User Tools
475
Add a regionality relationship Navigate: From the Main Menu, select Control > System > Regionality > Regionality Matrix > Edit. The Regionality Maintenance window opens.
Regionality Maintenance Window
Add a new group/location combination 1. Click Add Group/Loc.
2. Enter a group ID, or click the LOV button to select a group. 3. Select an organizational level.
4. Enter an organizational value, or click the LOV button to select a value. 5. Click OK to save your changes and close the window.
Add elements to a group/location combination 1. Select a group/location record. 2. Click Add Elements under the Supplier, Supplier/Department, or Department table. 3. Enter the supplier and/or department IDs to add to the selected group/location
combination, or click the LOV button to select a supplier and/or department. 4. Click OK to save your changes and close the window.

Maintain system security
476 Oracle Retail Merchandising System
Add a security group Navigate: From the main menu, select Control > System > Location/Product Security > Group > Edit. The Security Group Maintenance window opens.
Security Group Maintenance Window
1. Click Add. The Group ID is filled in automatically. 2. In the Group Name field, enter a description of the security group. 3. Select a Business Role for the new security group.
4. In the Comments field, enter a comment, or click the comments button and enter the comment.
5. Click OK to save any changes and close the window.

User Tools
477
Add a user Navigate: From the main menu, select Control > Setup > User Attributes > New. The User Attributes window opens.
User Attributes Window
1. In the User fields, enter the ID and name of the user. The user must be a valid system user.
2. In the Lang field, enter the ID of the user's language, or click the LOV button and select the language.
3. Enter information in the optional fields as necessary. 4. To select the user's security level:
a. From the Security menu, select Privileges. The User Privileges window opens.

Maintain system security
478 Oracle Retail Merchandising System
User Privileges Window
b. Select either Full or Limited. c. Click OK to save your changes and close the window.
5. Click OK to save any changes and close the window.

User Tools
479
Add location security by group Navigate: From the main menu, select Control > System > Location/Product Security > Location Security Matrix > Edit. The Location Security Matrix window opens.
Location Security Matrix Window
1. Click Add. The fields in the Apply area are cleared.
2. In the Group field, enter the ID of the security group, or click the LOV button and select the group.
3. In the Functional Area field, select the area to be secured. 4. Select the Select check box in order to allow the group of users to view the selected
entities. 5. Select the Update check box in order to allow the group of users to add, edit, and
delete the selected entities. 6. In the Hierarchy Level field, select the organizational level to be secured. 7. In the value field, enter the ID of the region, district, store, or warehouse, or click the
LOV button and select the value. 8. Click Apply. The selected group and entities are added to the table. 9. Click OK to save your changes and close the window.

Internationalize RMS
480 Oracle Retail Merchandising System
Internationalize RMS Internationalize RMS
You may need to maintain the internationalized aspects of RMS.
Maintain countries You can maintain a list of country codes and descriptions. Country codes are used when entering: Origin, import, export, and consolidating countries Supplier, partner, outside location, and customer addresses Company, store, and warehouse addresses Company and store addresses of competitors Country level geocodes and sales taxes
Maintain currencies If the system is set up to support multiple currencies, monetary amounts may be displayed in any of the currencies that are defined in the system. In addition to identifying the currencies, the number of decimal places to display and the format for both cost and retail amounts must be entered for each currency. One or more types of exchange rates may be entered for each currency. The types of exchange rates are: operational, consolidated, letter of credit/bank, purchase order, customs entry, and transportation. Exchange rates are used to convert a monetary amount from any currency to the primary currency of the company. If the exchange rates are shared with an external system, you can map the types of exchange rates found in the external system to the types of exchange rates in RMS. The types of exchange rates are: operational, consolidated, letter of credit/bank, purchase order, customs entry, and transportation. In many areas of the system, monetary values can be viewed in the primary currency of the company, the currency of the European Union, or the local currency of the location.
Maintain languages By default, all values appear in the primary language of the company. However, you can choose to: Translate a value when you encounter it in a window. You have the option of
translating the value into one or multiple target languages, or you can copy existing translations from a similar value.
Translate one or multiple values of the same type, such as item or department descriptions, into one target language.
Users who are set up to view values in the target language will see the translated version, rather than the primary language version, of the values.

User Tools
481
Maintain units of measure You can view, but not edit, a list of the units of measure that are available in the system for defining area, dimension, volume, and weight. Units of measure are used in a variety of ways: Standard unit of measure (SUOM): The unit of measure by which stock is tracked at
the corporate level. The SUOM may be measured by weight, volume, area, or dimension. The size of the standard unit of measure is set up at the item level. If a measurement, rather than the term "each", is selected as the SUOM, a conversion factor must be entered. The conversion factor indicates many units of the selected SUOM make up an each. For example: If the size of an each is 5 kilograms, then the SUOM is kilogram and the conversion factor is 5.
Store order multiple: The unit of measure by which items are shipped to stores. The store order multiple may be each, inner, or case. The default store order multiple is set up at the item level. Store order multiples for specific locations are set up at the item/location level.
Unit of purchase (UOP): The unit of measure by which an item is purchased. The UOP may be each, case, or pallet. The default UOP is set up at the item/supplier/origin country level. The default UOP may be superceded when adding items to a purchase order.
Unit of Transfer: The unit of measure by which an item is transferred. The unit of transfer may be each, case, or pallet. The unit of transfer is entered when adding items to a transfer.
Unit of Receipt (UOR): The unit of measure by which an item is received on a shipment. The UOR may be each, case, or pallet. The UOR is entered when receiving items.
The standard unit of measure is the equivalent of an each. A case (or its equivalent, such as a box, bushel, barrel, or roll) may correlate with a supplier's pack size. The unit of purchase, unit of transfer, and unit of receipt may default to either the standard unit of measure or case. If a quantity is entered by the pallet for the unit of purchase, unit of transfer, or unit of receipt, the quantity is converted to the default measurement. The terms inner, case, and pallet are used as generic terms in RMS. You can select different terms for the same concepts at the item/supplier level.

Internationalize RMS
482 Oracle Retail Merchandising System
Edit a value in multiple languages 1. Place the cursor in the Description field of a window.
2. Click the Translator button located on the toolbar. The current translations of the value appear in the Translation Maintenance window.
Translation Maintenance Window
3. Edit the translations as necessary.
Add translations 1. Click Add. The next available line is enabled.
2. In the Language field, enter the ID of the target language, or click the LOV button and select the target language.
3. In the Translated Description field, enter the translation of the value. 4. Click OK to save your changes and close the window.

User Tools
483
Copy translations from a similar value 1. Click Copy Like. The Like Description window opens.
Like Description Window
2. Enter the ID of the value whose translations are to be copied, or click the LOV button and select the value.
3. Click OK to save your changes and close the window.
Delete a translation 1. Select a translation and click Delete. 2. When prompted to delete the record, click Yes. 3. Click OK to save your changes and close the window.

Internationalize RMS
484 Oracle Retail Merchandising System
Edit countries Navigate: From the main menu, select Control > Setup > Country > Edit. The Country Maintenance window opens.
Country Maintenance Window
Edit the codes or descriptions as necessary.
Add a country 1. Click Add. 2. Enter the code and description in the enabled fields. 3. Click OK to save your changes and close the window.
Delete a country 1. Select a country and click Delete. 2. When prompted to delete the record, click OK. 3. Click OK to save your changes and close the window.

User Tools
485
Edit currencies Navigate: From the main menu, select Control > Setup > Currency > Edit. The Currency Maintenance window opens.
Currency Maintenance Window
Edit the enabled fields as necessary.
Add a currency 1. Click Add. 2. Enter the details on the next available line. 3. Click OK to save your changes and close the window.
Delete a currency that was just added to the table 1. Select the currency and click Delete. 2. When prompted to delete the record, click Yes. 3. Click OK to save your changes and close the window.

Internationalize RMS
486 Oracle Retail Merchandising System
Edit currency exchange rates Navigate: From the main menu, select Control > Setup > Currency > Edit. The Currency Maintenance window opens.
Currency Maintenance Window
Note: If your organization uses Oracle Financials, version 11.5.10 or later you cannot add or edit an exchange rate. This form opens in view mode.
1. Select a currency and click Exchange Rates. The rates of exchange appear in the Currency Exchange Rates window.
2. Edit the exchange rates as necessary.
Add an exchange rate 1. Click Add. The next available line is enabled. 2. In the Exchange Type field, select the type of exchange rate. 3. In the Exchange Rate field, enter the value of the exchange rate to be used for
currency conversions. 4. In the Effective Date field, enter the date on which the exchange rate becomes
effective. 5. Click OK to save your changes and close the window.
Delete an exchange rate 1. Select an exchange rate and click Delete. 2. When prompted to delete the record, click Yes. 3. Click OK to save your changes and close the window.

User Tools
487
Edit languages Navigate: From the main menu, select Control > Setup > Language Maintenance > Edit. The Language Maintenance window opens.
Language Maintenance Window
4. Edit the enabled fields as necessary.
Add a language 1. Click Add. The next available line is enabled. 2. In the Language field, enter the ID of the language. 3. In the Description field, enter the description of the language. 4. In the ISO code field, enter the code for the language. 5. In the Server fields, enter the server addresses as necessary. 6. Click OK to save your changes and close the window.
Delete a language 1. Select a language and click Delete. 2. When prompted to delete the record, click Yes. 3. Click OK to save your changes and close the window.

Internationalize RMS
488 Oracle Retail Merchandising System
Edit translations in a target language Navigate: From the main menu, select Control > System > Language Translation. The Language Translation window opens.
Language Translation Window
1. In the Action field, select a task: To translate values of the same type that were not yet translated, select New. To edit existing translations only, select Edit. To enter new and edit existing translations, select Edit All.
2. In the Language to Translate Into field, enter the ID of the target language, or click
the LOV button and select the target language. 3. In the Description Type to Translate field, enter the ID of the type of the type of
values to be translated, or click the LOV button and select a type. 4. To restrict the search to a subset of values, enter partial descriptions in the From and
To fields as necessary. These entries are made in the primary language. 5. Click Search. The values that match the search criteria appear. 6. In the Target Language field, enter or edit the translation for each value. 7. Click OK to save your changes and close the window.

User Tools
489
Map currency exchange types Navigate: From the main menu, select Action > Currency Exchange Types. The Currency Exchange Type Mapping window opens.
Currency Exchange Type Mapping Window
1. Next to each external exchange type, select the appropriate RMS exchange type. 2. Click OK to save your changes and close the window.

POS Configuration
490 Oracle Retail Merchandising System
POS Configuration Create point of sale configurations
Create point of sale configurations The point of sale (POS) configurations feature allows you to create and maintain configurations that are downloaded to the POS registers at stores. You can create the following types of configurations: Touch button: You can use this configuration to determine the appearance of touch
buttons on the point of sale register. You can associate items with each button. Coupon: You can create a configuration for each expense coupon that can be used at
stores. You can also indicate the items for which the coupon can be used. Money order: You can use this configuration to enable stores to sell money orders on
the point of sale register. Product restriction: You can restrict the sale of items for various reasons with this
configuration. Pay in/pay out: You can use this configuration to enable stores to remove or add
money to the register for miscellaneous services and items received or sold. Supplier payment type: You can use this configuration to specify the method of
payment that may be used at each store to pay suppliers. Tender type: You can create configurations that provide information about how each
type of tender is handled at the POS register.

User Tools
491
Create a coupon configuration Navigate: From the main menu, select Control > POS Configuration > Coupon. The POS Coupon window opens.
POS Coupon Window
1. In the Action field, select New. The Enter/Maintain tab opens, and a unique coupon configuration ID is filled in automatically.
2. In the Coupon ID field, enter a description for the coupon.
3. In the Currency Code field, enter the code for the currency, or click the LOV button and select a currency.
4. In the Coupon Type/Amt field, select the type of coupon. Then enter the value of the coupon.
5. In the Tax Class field, select the tax code for the coupon. 6. In the Effective Date field, enter the date on which the coupon configuration is active,
or click the calendar button and select a date. 7. In the Expiration Date field, enter the date on which the coupon configuration
expires, or click the calendar button and select a date. 8. Enter optional information as necessary.

POS Configuration
492 Oracle Retail Merchandising System
9. To associate stores with the configuration: a. Click Stores. The Stores window opens.
Stores Window
b. In the Location Type field, enter the ID of the location or group, or click the LOV
button and select a location or group. c. Click Apply. d. Click OK to save your changes and close the window.
10. Associate items with a POS configuration. 11. Exclude items from a POS configuration. 12. Click Save to save your changes and close the window.

User Tools
493
Create a money order configuration Navigate: From the main menu, select Control > POS Configuration > Money Order. The Money Order window opens.
1. In the Action field, select New. The Enter/Maintain tab opens. 2. In the Money Order ID field, enter a description for the configuration. 3. In the Effective Date field, enter the date on which the configuration is effective, or
click the calendar button and select the date. 4. In the Expiration Date field, enter the date on which the configuration expires, or
click the calendar button and select the date. 5. In the Fee Amount field, enter the amount of the fee. 6. In the Max Sale Amt field, enter the maximum amount allowable per transaction. 7. In the Max Face Amt field, enter the maximum amount for which a money order can
be sold. 8. In the Tax Class, select the tax class for the money order. 9. In the Pack Size field, enter the number of money orders in a pack of money orders.

POS Configuration
494 Oracle Retail Merchandising System
10. To associate stores with the configuration: a. Click Stores. The Stores window opens.
b. In the Location Type field, enter the ID of the location or group, or click the LOV
button and select a location or group. c. Click Apply. d. Click OK to save your changes and close the window.
11. Click Save to save your changes and close the window.

User Tools
495
Create a pay in/pay out configuration Navigate: From the main menu, select Control > POS Configuration > Pay In/Pay Out. The Pay In/Out window opens.
Pay In/Out Window
1. In the Action field, select New. The Enter/Maintain tab opens, and a unique pay in/pay out configuration ID is filled in automatically.
2. In the Pay In/Out ID field, enter a description for the configuration. 3. In the Pay In/Out Type field, select the type of configuration. 4. In the Effective Date field, enter the date on which the pay in/pay out configuration
is active, or click the calendar button and select a date. 5. Enter optional information as necessary.
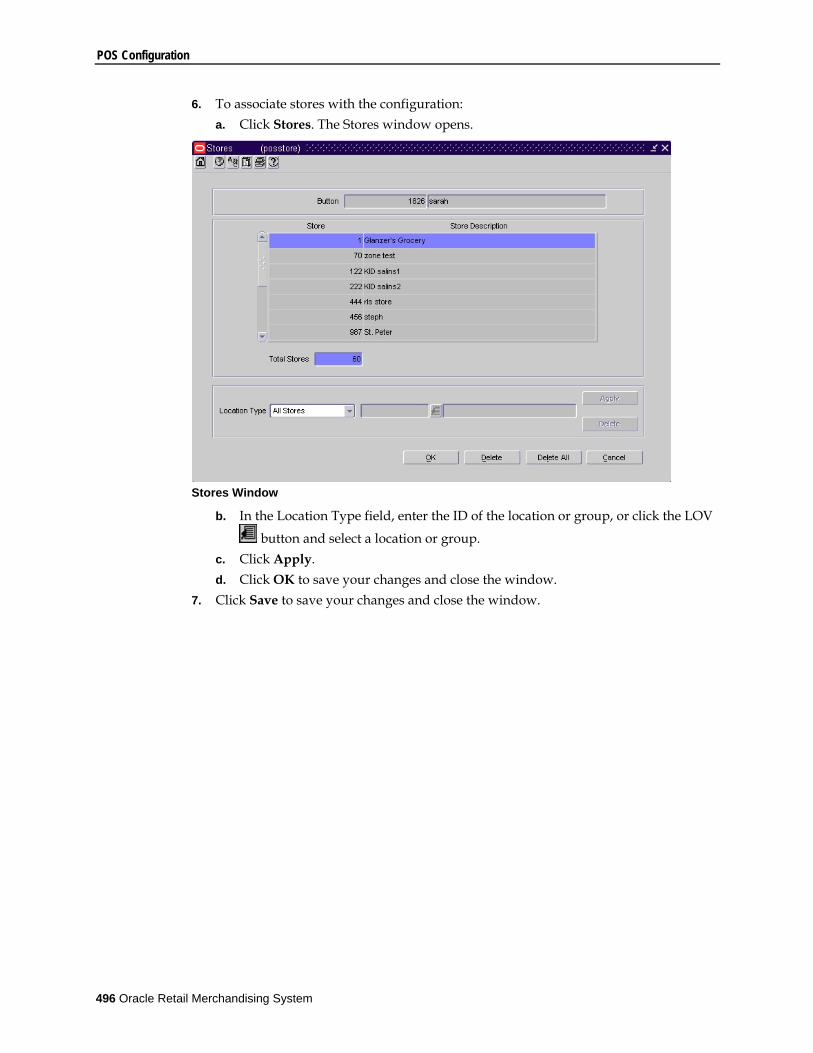
POS Configuration
496 Oracle Retail Merchandising System
6. To associate stores with the configuration: a. Click Stores. The Stores window opens.
Stores Window
b. In the Location Type field, enter the ID of the location or group, or click the LOV
button and select a location or group. c. Click Apply. d. Click OK to save your changes and close the window.
7. Click Save to save your changes and close the window.

User Tools
497
Create a product restriction configuration Navigate: From the main menu, select Control > POS Configuration > Product Restriction. The POS Product Restriction window opens.
POS Product Restriction Window
1. In the Action field, select New. The Enter/Maintain tab opens, and a unique product restriction configuration ID is filled in automatically.
2. In the Prod Rest ID field, enter a description for the product restriction configuration. 3. In the Prod Rest Type field, select the appropriate restriction type. 4. In the Currency field, enter the currency code of the configuration, or click the LOV
button and select a currency. 5. For the following restriction types, additional information is required: 6. Container Deposit Restriction: Enter the deposit amount. 7. Container Redemption Value Restriction: Enter the amount. 8. Minimum Age Restriction: Enter the age a customer must be to purchase the
product. 9. Day/Time/Date Restriction: Enter the Day/Time/Date that goods cannot be sold. 10. Tender Type Restriction: Select the tender type. 11. Quantity Limit Restriction: Enter the maximum a customer can purchase. 12. Enter optional information as necessary.

POS Configuration
498 Oracle Retail Merchandising System
13. To associate stores with the configuration: a. Click Stores. The Stores window opens.
Stores Window
b. In the Location Type field, enter the ID of the location or group, or click the LOV
button and select a location or group. c. Click Apply. d. Click OK to save your changes and close the window.
14. Associate items with a POS configuration. 15. Exclude items from the configuration. 16. Click Save to save your changes and close the window.

User Tools
499
Create a tender type configuration Navigate: From the main menu, select Control > POS Configuration > Tender Type. The Tender Type window opens.
Tender Type Window
1. In the Action field, select New. The Enter/Maintain tab opens, and a unique tender type configuration ID is filled in automatically.
2. In the Tender Type ID field, enter a description for the tender type. 3. In the Tender Type Group, select the type of tender group. 4. In the Effective Date field, enter the date on which the tender type configuration is
active, or click the calendar button and select a date.
5. In the Currency Code field, enter the code for the currency, or click the LOV button and select a currency.
6. In the Processor Type field, select the type of credit card processor. 7. Enter or select optional information as necessary.

POS Configuration
500 Oracle Retail Merchandising System
8. To associate stores with the configuration: a. Click Stores. The Stores window opens.
Stores Window
b. In the Location Type field, enter the ID of the location or group, or click the LOV
button and select a location or group. c. Click Apply. d. Click OK to save your changes and close the window.
9. Click Save to save your changes and close the window.

User Tools
501
Maintain items associated with point of sale configurations Maintain the items associated with point of sale configurations After you have created a configuration, you may associate items with the POS configurations.
Associate items with a POS configuration 1. Click Items. The POS Merchandise Criteria window opens.
POS Merchandise Criteria Window
2. To associate a single item with the configuration: a. In the Include area, enter the item number in the Item field, or enter a partial
description and click the LOV button to select an item. b. Click Apply Inclusions.
Note: You can limit the items that appear when you click the
LOV button by selecting the group, department, class, and subclass to which the item belongs.
3. To associate multiple items with the configuration: a. In the Include area, click List of Items. The List of Items window opens. b. Select the Include check box next to the items you want to associate with the
configuration. To associate all of the items with the configuration, click Include All.
c. Click Apply.
Note: You can limit the items that appear in the List of Items window by selecting a group, department, class, and subclass. You can also limit the items by entering a partial description of the item in the Item field.

POS Configuration
502 Oracle Retail Merchandising System
4. To associate all items within a single group, department, class, or subclass with the configuration: a. In the Include area, enter the ID of the group, department, class, or subclass in
the appropriate field, or click the LOV button and select a group, department, class, or subclass.
b. Click Apply Inclusions.
Note: To associate all items in a class or subclass with the configuration, you must first specify the department.
5. To associate all items within a multiple groups, departments, classes, or subclasses with the configuration: a. In the Include area, click the appropriate List of button, depending on the
hierarchy level you want to associate with the configuration. b. Select the Include check box next to the members of the hierarchy level you want
to associate with the configuration. To associate all of the members of the hierarchy level with the configuration, click Include All.
c. Click Apply.
Note: To associate all items within multiple classes or subclasses with the configuration, you must first specify the department.
6. To associate all items within an item list with the configuration: a. In the Include area, enter the ID of the item list in the item list field, or click the
LOV button and select an item list. b. Click Apply Inclusions.
7. Click Save to save your changes and close the window.
Exclude items from a POS configuration 1. To exclude a single item from the configuration:
a. In the Exclude area, enter the item number in the Item field, or enter a partial
description and click the LOV button to select an item. b. Click Apply Exclusions.
Note: You can limit the items that appear when you click the
LOV button by selecting the group, department, class, and subclass to which the item belongs.

User Tools
503
2. To exclude multiple items from the configuration: a. In the Exclude area, click List of Items. The List of Items window opens. b. Select the Exclude check box next to the items you want to exclude from the
configuration. To exclude all of the items from the configuration, click Exclude All.
c. Click Apply.
Note: You can limit the items that appear in the List of Items window by selecting a group, department, class, and subclass. You can also limit the items by entering a partial description of the item in the Item field.
3. To exclude all items within an item list from the configuration: a. In the Exclude area, enter the ID of the item list in the item list field, or click the
LOV button and select an item list. b. Click Apply Exclusions.
4. Click Save to exit.
Copyright © 2022 FDOKUMEN