Oracle Applications Cloud
88
Oracle Applications Cloud Using Functional Setup Manager 22A
-
Upload
khangminh22 -
Category
Documents
-
view
3 -
download
0
Transcript of Oracle Applications Cloud

Oracle ApplicationsCloud
Using Functional Setup Manager
22A

Oracle Applications CloudUsing Functional Setup Manager
22A
F48571-02
Copyright © 2011, 2022, Oracle and/or its affiliates.
Authors: P. S. G. V. Sekhar
This software and related documentation are provided under a license agreement containing restrictions on use and disclosure and are protectedby intellectual property laws. Except as expressly permitted in your license agreement or allowed by law, you may not use, copy, reproduce, translate,broadcast, modify, license, transmit, distribute, exhibit, perform, publish, or display in any part, in any form, or by any means. Reverse engineering,disassembly, or decompilation of this software, unless required by law for interoperability, is prohibited.
The information contained herein is subject to change without notice and is not warranted to be error-free. If you find any errors, please reportthem to us in writing.
If this is software or related documentation that is delivered to the U.S. Government or anyone licensing it on behalf of the U.S. Government, thefollowing notice is applicable:
U.S. GOVERNMENT END USERS: Oracle programs, including any operating system, integrated software, any programs installed on the hardware,and/or documentation, delivered to U.S. Government end users are "commercial computer software" pursuant to the applicable Federal AcquisitionRegulation and agency-specific supplemental regulations. As such, use, duplication, disclosure, modification, and adaptation of the programs,including any operating system, integrated software, any programs installed on the hardware, and/or documentation, shall be subject to licenseterms and license restrictions applicable to the programs. No other rights are granted to the U.S. Government.
This software or hardware is developed for general use in a variety of information management applications. It is not developed or intended foruse in any inherently dangerous applications, including applications that may create a risk of personal injury. If you use this software or hardwarein dangerous applications, then you shall be responsible to take all appropriate fail-safe, backup, redundancy, and other measures to ensure its safeuse. Oracle Corporation and its affiliates disclaim any liability for any damages caused by use of this software or hardware in dangerous applications.
Oracle and Java are registered trademarks of Oracle and/or its affiliates. Other names may be trademarks of their respective owners.
Intel and Intel Xeon are trademarks or registered trademarks of Intel Corporation. All SPARC trademarks are used under license and are trademarks orregistered trademarks of SPARC International, Inc. AMD, Opteron, the AMD logo, and the AMD Opteron logo are trademarks or registered trademarksof Advanced Micro Devices. UNIX is a registered trademark of The Open Group.
This software or hardware and documentation may provide access to or information about content, products, and services from third parties. OracleCorporation and its affiliates are not responsible for and expressly disclaim all warranties of any kind with respect to third-party content, products, andservices unless otherwise set forth in an applicable agreement between you and Oracle. Oracle Corporation and its affiliates will not be responsiblefor any loss, costs, or damages incurred due to your access to or use of third-party content, products, or services, except as set forth in an applicableagreement between you and Oracle.

Oracle Applications CloudUsing Functional Setup Manager
Contents
Get Help ................................................................................................................................ i
1 Overview 1Overview of Functional Setup Manager .................................................................................................................................... 1
Who Uses the Functional Setup Manager ................................................................................................................................ 1
How Functional Setup Manager Components Work Together ............................................................................................. 1
Functional Setup Manager Work Areas ..................................................................................................................................... 2
Implementation Process ............................................................................................................................................................... 3
2 Application Implementation Planning 5Plan Your Implementation ............................................................................................................................................................ 5
Use Promotion Codes ................................................................................................................................................................... 6
3 Offering Configuration 7Overview of Configuring Offerings ............................................................................................................................................ 7
Configure Offerings ....................................................................................................................................................................... 7
Opt In To New Features After Update ....................................................................................................................................... 8
Review Feature Updates ............................................................................................................................................................... 9
Review Opt-In History ................................................................................................................................................................. 10
FAQs for Offering Configuration ................................................................................................................................................ 11
4 Manage Setup Using Functional Areas 13How You Use Functional Areas to Manage Setup ................................................................................................................. 13
Set Up an Offering ....................................................................................................................................................................... 14
Set Up an Offering with Scope .................................................................................................................................................. 14
Update Existing Setup Data ....................................................................................................................................................... 15
FAQs for Manage Setup Using Functional Areas .................................................................................................................. 16
5 Manage Setup Using Implementation Projects 17How You Use Implementation Projects to Manage Setup ................................................................................................... 17

Oracle Applications CloudUsing Functional Setup Manager
Manage Setup Using Implementation Projects ..................................................................................................................... 18
Assign Setup Tasks ...................................................................................................................................................................... 20
How You Use Assigned Tasks to Enter Setup Data .............................................................................................................. 20
Enter Setup Data Using Assigned Tasks .................................................................................................................................. 21
How You Monitor Progress of Implementation Projects ..................................................................................................... 22
Monitor Progress of an Implementation Project ................................................................................................................... 23
FAQs for Manage Setup Using Implementation Projects ................................................................................................... 24
6 Manage Setup Using CSV File Packages 27Export and Import of CSV File Packages ................................................................................................................................ 27
Export and Import CSV File Packages ..................................................................................................................................... 27
Import Offering Setup Data from a CSV File ......................................................................................................................... 29
Compare Task Setup Data ......................................................................................................................................................... 30
Automate Export and Import of CSV File Packages ............................................................................................................. 31
7 Setup Data Export and Import 35Overview of Setup Data Export and Import .......................................................................................................................... 35
Key Information About Setup Data Export and Import Processes .................................................................................... 35
Review of Setup Data .................................................................................................................................................................. 39
Best Practices for Migrating Setup Data from Test to Production .................................................................................... 39
Setup Data Export and Import Using an Offering or a Functional Area .......................................................................... 43
Export Setup Data Using Offering or Functional Area ........................................................................................................ 44
Export a Subset of an Offering or Functional Area Setup Data ........................................................................................ 45
Import Setup Data Using Offering or Functional Area ........................................................................................................ 47
Compare Offering Setup Data During Import ....................................................................................................................... 49
Compare Setup Data Using Offering or Functional Area .................................................................................................... 51
Setup Data Export and Import Using Implementation Project .......................................................................................... 52
Export Setup Data Using Implementation Project ............................................................................................................... 53
Import Setup Data Using Implementation Project ............................................................................................................... 55
Compare Setup Data Using Implementation Project ........................................................................................................... 57
Setup Data Comparison Results ............................................................................................................................................... 58
Setup Data Reports ..................................................................................................................................................................... 59
Generate Setup Data Reports ................................................................................................................................................... 59
Review of Export and Import Process Results ...................................................................................................................... 60
Additional Access Required for Exporting and Importing Setup Data ............................................................................. 61
Additional Settings for Setup Data Export and Import Processes .................................................................................... 65
Guidelines for Troubleshooting Errors from Setup Data Export and Import Processes ............................................... 67

Oracle Applications CloudUsing Functional Setup Manager
FAQs for Setup Data Export and Import ................................................................................................................................ 69
8 Setup Security 71Security Requirements ................................................................................................................................................................. 71
Mapping of Setup Activities and Required Roles .................................................................................................................. 71
Why do I have access to more setup tasks than my granted access? .............................................................................. 75
9 Additional Functionality 77How Copying Setup Configuration Helps ............................................................................................................................... 77
Copy Setup Configuration .......................................................................................................................................................... 77
Search for a Task .......................................................................................................................................................................... 79
Manage Integration of Additional Applications .................................................................................................................... 79

Oracle Applications CloudUsing Functional Setup Manager

Oracle Applications CloudUsing Functional Setup Manager
Get Help
Get Help
Get Help in the ApplicationsUse help icons to access help in the application. If you don't see any help icons on your page, click your user imageor name in the global header and select Show Help Icons.
Get SupportYou can get support at My Oracle Support. For accessible support, visit Oracle Accessibility Learning and Support.
Get TrainingIncrease your knowledge of Oracle Cloud by taking courses at Oracle University.
Join Our CommunityUse Cloud Customer Connect to get information from industry experts at Oracle and in the partner community. You canjoin forums to connect with other customers, post questions, and watch events.
Learn About AccessibilityFor information about Oracle's commitment to accessibility, visit the Oracle Accessibility Program. Videos included inthis guide are provided as a media alternative for text-based topics also available in this guide.
Share Your FeedbackWe welcome your feedback about Oracle Applications user assistance. If you need clarification, find an error, or justwant to tell us what you found helpful, we'd like to hear from you.
You can email your feedback to [email protected].
Thanks for helping us improve our user assistance!
i

Oracle Applications CloudUsing Functional Setup Manager
Get Help
ii

Oracle Applications CloudUsing Functional Setup Manager
Chapter 1Overview
1 Overview
Overview of Functional Setup Manager Oracle Functional Setup Manager provides an integrated, end-to-end process for functional administrators to managethe implementation and maintenance of Oracle Applications Cloud.
Functional Setup Manager offers the following:
• Standardized application configuration and setup experience
• Feature opt-in for a best fit configuration
• Guided task list for end-to-end setup requirements
• Export and import services for setup data migration between environments
• Comprehensive reporting on setup data
Who Uses the Functional Setup Manager Business users who are responsible for configuring feature opt-in and managing setup data are the primary users ofFunctional Setup Manager.
Security AccessThe Application Implementation Consultant job role has full access to perform all Functional Setup Manager-relatedactivities. Other user must include the Functional Setups User role in addition to other roles or privileges needed toperform specific setup activities.
For more detailed information about security requirements for Functional Setup Manager, refer to the OracleApplications Cloud Security Reference for Common Features guide on the Oracle Help Center (docs.oracle.com).
How Functional Setup Manager Components WorkTogether Offerings, functional areas, features, and setup tasks work together in your implementation.
OfferingsAn offering represents a collection of business processes that are supported by Oracle Applications Cloud. Eachsubscription of Oracle Cloud provides license to use one or more offerings and they're the starting point of allimplementations. An offering consists of multiple functional areas and features.
1

Oracle Applications CloudUsing Functional Setup Manager
Chapter 1Overview
Functional AreasA functional area represents one or more business sub-processes and activities within its parent offering. It mayrepresent a core operation of the offering or may represent an optional activity which may or may not be applicable toyour business. When you start to implement an offering by enabling it, core functional areas are enabled automatically.You have a choice to opt in to and enable an optional functional area or to opt out of it. A functional area may be dividedinto smaller functional areas creating a hierarchy to help you to decide what to opt in to one step at a time. Someof the functional areas may be applicable to more than one offering. Once you set up a shared functional area, youdon't have to set it up again when implementing another parent offering. However, Oracle recommends that duringsuccessive implementation of the other parents you verify if there are any offering-specific tasks that may still requireyour attention.
FeaturesFeatures are optional business practices or methods applicable to the functional areas. Like functional areas, you candecide to opt in to or opt out of features depending on the requirements of your business processes. Features can beone of three different types:
• Yes or No: These features allow you either to opt in to or to opt out of them and are represented by a singlecheck box. You select them to opt in to or deselect them to opt out.
• Single Choice: These features offer multiple choices but allow you to select only one option. Select the optionapplicable to your business processes.
• Multi-Choice: These features offer multiple choices but allow you to select more than one of the choices.Each choice is presented with a check box. Select all that apply to your business processes by checking theappropriate choices.
Setup TasksSetup tasks represent the work necessary to set up an offering and the business processes and activities that theoffering represents to make them ready for transaction processing. Perform these tasks to enter setup data when youimplement an offering.
Tasks representing setup requirements of the offerings and the functional areas are grouped into task lists and areorganized in a hierarchy. For example, all setup tasks of an offering are grouped into a task list which includes subtasklists that represent setup of functional areas within the offering. This helps you gain visibility into setup data that arerelated to each other, helping you to manage setup.
Functional Setup Manager Work Areas Use the My Enterprise work areas to manage feature opt-in and setup of your subscribed offerings. To view the workareas, click Navigator > My Enterprise .
My Enterprise Work Area GroupThe following work areas are part of the My Enterprise work area group:
• Offerings
• New Features
2

Oracle Applications CloudUsing Functional Setup Manager
Chapter 1Overview
• Feature Updates
• Enterprise
• Setup and Maintenance
OfferingsUse this work area to view all the offerings available for implementation. To start with, review the description of theofferings and their related documents. Then, determine what to opt in to and what to exclude. And when you're ready toimplement, opt in to the offerings based on your enterprise requirements. You can start using Oracle Applications Cloudonly after opting in to the relevant offerings and their related features.
New FeaturesIn this work area, you can review what's available in the latest version of Oracle Applications Cloud and decide whetherto opt in to any new feature or not.
Feature UpdatesGo to this work area to learn about the features whose behavior is planned to change in the future.
EnterpriseUse this work area to manage environment-level settings applicable to your enterprise.
Setup and MaintenanceIn this work area, you can set up an offering or the functional areas in an offering. Using this work area, you can alsoupdate setup data for existing offerings and add or remove tasks to modify an implementation project.
Implementation Process A functional implementation of Oracle Applications Cloud typically includes the following steps.
• Plan
• Configure
• Setup
• Deploy
• Maintain
PlanIdentify the offerings you want to implement. Evaluate what functional areas and features to opt in to and prepareaccordingly for their setup requirements.
For more detailed information, refer to the Application Implementation Planning chapter in the Using Functional SetupManager guide.
3

Oracle Applications CloudUsing Functional Setup Manager
Chapter 1Overview
ConfigureOpt in to the offerings, functional areas, and features that best fit your business requirements by enabling them.
For more detailed information, refer to the Offering Configuration chapter in the Using Functional Setup Managerguide.
SetupUse setup tasks to enter setup data necessary for your enabled offerings and functional areas. Typically, you set up andverify your transaction processes in a test environment before starting to transact in a production environment.
For more detailed information, refer to the following chapters in the Using Functional Setup Manager guide:
• Manage Setup Using Functional Areas
• Manage Setup Using Implementation Projects
• Manage Setup Using CSV File Packages
DeployMove your verified setup data from the test environment to a production environment and deploy to all users to starttransaction processing.
For more detailed information, refer to the Setup Data Export and Import chapter in the Using Functional SetupManager guide.
MaintainUpdate setup data or opt in to configuration of the functional areas and features as necessary when your businessrequirements change over time.
4

Oracle Applications CloudUsing Functional Setup Manager
Chapter 2Application Implementation Planning
2 Application Implementation Planning
Plan Your Implementation Use the Offerings page to learn about the opt-in configuration and the setup requirements of an offering. To view thepage, you must have the Review Applications Offering privilege (ASM_REVIEW_APPLICATIONS_OFFERINGS_PRIV).
1. Click Navigator > My Enterprise > Offerings .2. On the Offerings page, explore the list and select the offering you want to implement. For the selected offering,
you can read the offering description.3. Click Related Documents and review the following reports to learn more about the offering.
Document Contents
Associated Features Report
Lists the functional areas and features associated with the offering.
Setup Task Lists and Tasks Report
Shows the list of task lists and tasks required for implementing the offering. You can also findinformation about export and import, and the business objects that each task handles. Use thisdocument to identify these implementation requirements:
◦ If a task is optional or required
◦ Whether export and import functionality is supported
◦ If you can export or import the setup data into a CSV file
◦ The business objects or setup data that the task handles
◦ If scope or setup data filtering is supported, and view the business objects available foruse in filtering
Related Business Objects Report
Shows all setup data required for implementing the offering. The report lists all businessobjects associated with the setup tasks belonging to the offering. You can also find informationabout export and import and scope filtering for each business object. Use this document toidentify these implementation requirements:
◦ Whether export and import functionality is supported
◦ If you can export or import the business objects into a CSV file
◦ If the business object supports scope or setup data filtering
◦ The task to be used for filtering scope or setup data for the business object
5
Oracle Applications CloudUsing Functional Setup Manager
Chapter 2Application Implementation Planning
Use Promotion Codes If you received a promotion code to activate a functional area or feature of an offering, follow these steps to use it. Youneed the Configure Oracle Fusion Applications Offering privilege (ASM_CONFIGURE_OFFERING_PRIV) to enter thepromotion code in the application.
1. Click Navigator > My Enterprise > Enterprise work area.2. On the Enterprise Information page, click Manage Promotion Code.3. On the Manage Promotion Codes page, click Enter Promotion Code.4. On the Enter Promotion Code dialog box, enter the promotion code and click Save and Close.
The promotion code you entered appears in the Part Number column on the Manage Promotion Codes page.
6

Oracle Applications CloudUsing Functional Setup Manager
Chapter 3Offering Configuration
3 Offering Configuration
Overview of Configuring Offerings To configure an offering for implementation, you opt in to its functional areas and features that are applicable to yourbusiness operations. You start your opt-in configuration by enabling the offering. The offering and its functional areasare shown in a hierarchy to help you decide, step-by-step, what to opt in to. When an offering is enabled, all functionalareas and features representing core functionality of the offering are also automatically enabled. You decide which ofthe optional functional areas and features to opt in to by specifically enabling them.
After the initial implementation of the offering, if you must change the opt-in configuration to enable additionalfunctional areas or features at a later time, use the same procedure to enable them as well.
You can also use the procedure for reviewing and opting in to new features that are introduced for your enabledofferings in each update of Oracle Applications Cloud.
In some cases, opt-in selection of a functional area or a feature may be locked once enabled due to the businessoperation it represents and its selection can't be changed.
Related Topics• Configure Offerings
Configure Offerings
Configure offerings to modify functionality so that it matches the services you plan to implement. You can review thecurrent functional areas and features within an offering and make changes. To perform these tasks, you need theConfigure Oracle Fusion Applications Offering privilege (ASM_CONFIGURE_OFFERING_PRIV).
To configure offerings, follow these steps:
1. Click Navigator > My Enterprise > Offerings work area.2. On the Offerings page, select the offering you want to implement.3. Click the Opt In Features button.4. On the Opt In page, review the functional hierarchy. Select the check box in the Enable column to opt in to the
offerings and functional areas as applicable to your business operation.5. Click the Features icon in the Features column for the enabled offering to enable features at the offering level.
Or, click the Features icon for functional areas to enable applicable features.6. On the Edit Features page, enable a feature using these options:
◦ To enable a Yes or No feature, select the check box in the Enable column.
◦ To enable a Single Choice or a Multi-Choice feature, click the Features icon in the Enable column andmake the required selection.
◦ To enable a feature using an opt-in task because the Enable check box isn't available for selection, clickthe icon in the Opt In Task column.
7

Oracle Applications CloudUsing Functional Setup Manager
Chapter 3Offering Configuration
To save the changes, click Done.7. On the Opt In page, click Done to save the changes and return to the Offerings page.
Repeat these steps for each offering you want to implement. You can use this procedure to change the opt-inconfiguration of any functional areas or features of an enabled offering.
Opt In To New Features After Update
New functional areas and features for an offering you have implemented are often introduced in the later updates ofOracle Applications Cloud. You can use the New Features work area to explore and decide whether to opt in to them.
You need the following privileges to opt in to:
• Review Applications Offering (ASM_REVIEW_APPLICATIONS_OFFERINGS_PRIV)
• Configure Oracle Fusion Applications Offering (ASM_CONFIGURE_OFFERING_PRIV)
To opt in to new functional areas and features, follow these steps.
1. Click Navigator > My Enterprise > New Features .2. On the Features Overview page:
◦ Use the New Features tab to review and opt in to new functional areas and features that were introducedin the last update of the offerings.
◦ Use the Available Features tab if you would like to review a comprehensive list of new functional areasand features that are currently available for use, but were introduced through several previous updates.
3. Leave the Feature Overview value to its default selection of All Enabled Offerings so that you can reviewfeatures related to all your enabled offerings. Or, select a specific offering from the menu to review featuresspecific to that offering.
4. On the New Features and Available Features tabs, for each new functional area or feature, review theinformation in these columns:
◦ Functional Area: To determine the related functional module or business process. You can use the filterto limit the list of the features to specific functional areas.
Note: Features that are directly associated with the offering will show offering name followed by theword Common.
◦ Learn More: To find additional help topics.
Tip: If the Learn More column isn't visible, go to the global header, click your user image or name, andselect Show Help Icons.
◦ Enabled: To view the opt-in status. You will see a check mark if it's already enabled. Otherwise, you willsee an icon to enable it.
◦ Allows Opt-In: To find out whether you have a choice to opt in to a feature or not. A check mark indicatesthat you can opt in to or out of that feature. If the column shows nothing, it means that once the featureis enabled, it remains always enabled and you can't opt out of it.
◦ Requires Setup: To learn whether setup is required, and to plan accordingly.
8

Oracle Applications CloudUsing Functional Setup Manager
Chapter 3Offering Configuration
◦ Changes To and Changes In: To find out whether the feature's behavior will change in the future, and ifyes, in which update.
A feature that allows opt-in may change to always enabled or obsolete in the future. Similarly, an always-enabled feature may become obsolete in the future.
5. If you decide to opt in to any functional area or feature, here are the next steps.
◦ To enable a new functional area, click the icon in the Enabled column. On the Opt In page, select theEnable check box for the specific functional area and click Done.
◦ To enable a new feature, click the icon in the Enabled column. On the Edit Features page, select theEnable check box for the specific feature. For features with multiple choices, select the applicablechoices. After all selections are complete, click Done.
If the Enable check box isn't available for selection, click the icon in the Opt In Task column to enable afeature using an opt-in task.
Review Feature Updates
Some features may change their behavior in a future update. For example, a feature that was available for opting in tocould change to being always enabled, thereby preventing you from opting in to or opting out of it. Or, the feature couldbecome obsolete and therefore, is no longer applicable. Likewise, a feature that's set to remain always enabled couldbecome obsolete in the future.
You can use the Feature Updates work area to review the features whose behavior will change in the future and prepareaccordingly. You need the following privileges to review feature updates:
• Review Applications Offering (ASM_REVIEW_APPLICATIONS_OFFERINGS_PRIV)
• Configure Oracle Fusion Applications Offering (ASM_CONFIGURE_OFFERING_PRIV)
Here's how you can review feature updates.
1. Click Navigator > My Enterprise > Feature Updates .2. Leave the Feature Overview value to its default selection of All Enabled Offerings so that you can review
features related to all your enabled offerings. Or, select an offering from the menu to review features specific tothat offering.
9

Oracle Applications CloudUsing Functional Setup Manager
Chapter 3Offering Configuration
3. On the Features Updates tab, for each updated feature, review the information in these columns:
◦ Functional Area: To determine the related functional module or business process. You can use the filterto limit the list of the features to specific functional areas.
Note: Features that are directly associated with the offering will show offering name followed by theword Common.
◦ Available In: To know when the feature was introduced. Use the filter to limit the feature list to a specificupdate.
◦ Learn More: To find additional help topics.
Tip: If the Learn More column isn't visible, go to the global header, click your user image or name, andselect Show Help Icons.
◦ Enabled: To view the opt-in status. You will see a check mark if it's already enabled. Otherwise, you willsee an icon to enable it.
◦ Changes From, Changes To, and Changes In: To find out whether the feature's behavior will change inthe future, and if yes, in which update. A feature may change:
- From Allows Opt-In to Always Enabled- From Always Enabled to Obsolete- From Allows Opt-In to Obsolete
For features whose behavior will change in the next update, the Change In value is highlighted to drawyour attention. You can also use the filters for these columns to focus on changes from one specificbehavior to another, or on all upcoming changes in a specific update.
Review Opt-In History Since opt-in configuration directly influences the behavior of setup and transactional processes, a history of all suchchanges is maintained on the Opt-In History page. If you experience an unexpected change in the behavior of theapplication, you can review the opt-in history to find out these details:
• Who made the changes
• When the changes were made
• How the opt-in selections changed
To review the change history of the opt-in configuration, you need the Configure Oracle Fusion Applications Offering(ASM_CONFIGURE_OFFERING_PRIV) privilege.
To review the change history, follow these steps:
1. Click Navigator > My Enterprise > Offerings work area.2. In the Offerings page, select the offering whose opt in history you want to review.3. Click the Opt In Features button.
10

Oracle Applications CloudUsing Functional Setup Manager
Chapter 3Offering Configuration
4. In the Opt In page, click the View All History button to open the Opt In History page to view changes made toall functional areas and features of an offering.
Note: Alternatively, click the View History icon corresponding to a specific functional area or feature fromthe Opt In page or the Edit Features page. This displays the change history of that specific functional area orfeature respectively.
Review the change history. Changes made to the opt-in configuration are shown from most recent to least recent. Thechange history includes the following information:
• Name of the offering, functional area or feature whose opt in selection changed.
• Type, that indicates whether it's an offering, functional area, or a feature.
• Old value, refers to the opt-in selection before the change was made.
• New value, refers to the new opt in selection.
• User ID of the user who made the change.
• Date and time of the change.
You can also download the change history in CSV format. Click Actions > Download and save the file.
FAQs for Offering Configuration
Why can't I enable a feature? A feature can be enabled only when its parent is also enabled. You must enable the parent before you enable the feature.
Why is the opt-in setting of an enabled functional area or featureread-only? The opt-in setting of a functional area or feature is shown as read-only due to one of the following two reasons:
• If a functional area or feature represents a core functionality of the offering, it automatically inherits theenabled or disabled status of its parent.
• The opt-in setting of the functional area or feature may be locked once enabled due to the business operation itrepresents.
Why is a functional area or feature enabled when its parent isn'tyet enabled? If a functional area or feature is shared by multiple offerings, and if you have enabled any one of those offerings, thenthat functional area or feature is shown as enabled for all of those offerings. However, you can manage setup data ofthe functional area only by using the offerings that are enabled.
11

Oracle Applications CloudUsing Functional Setup Manager
Chapter 3Offering Configuration
Why is the Setup icon not displayed for a functional area orfeature? If the Setup icon isn't displayed, then the functional area or feature doesn't require any setup before you can start to usethe related transactions.
Why is the Setup icon disabled for a functional area or feature? Unless a functional area or feature is enabled, you can't manage its setup data. Therefore, the Setup icon is enabled onlyafter you enable the functional area or feature.
Why does the icon in the Requires Setup column show read-only? If you don't have permission to perform a setup task, then the Requires Setup column shows read-only to inform youthat a functional area or feature requires setup before the related transactions can be performed. However, you can'tuse the icon to go to the Setup page to manage setup data since you don't have permission. Contact the person withpermission to set up the functional area or feature before you start processing the related transactions.
Why doesn't a feature allow opt-in when it's not enabled? How do Ienable it? An always-enabled feature won't be enabled until the parent of the feature is also enabled. Therefore, even though theAllows Opt-In column of that feature doesn't show a check mark indicating that it's always enabled, its Enabled columnmay not show a check mark. In such cases, use the Go to icon in the Enabled column to enable the parent feature. Oncethe parent is enabled, a check mark automatically appears in the Enabled column, for that feature.
Why do some values in the Changes In column show anexclamation mark? If the behavior of a feature is planned to change in the next update, an exclamation mark is shown to draw yourattention to them.
12

Oracle Applications CloudUsing Functional Setup Manager
Chapter 4Manage Setup Using Functional Areas
4 Manage Setup Using Functional Areas
How You Use Functional Areas to Manage Setup After you enable an offering and configure the opt-in selection of its functional areas and features, you can set up theoffering by using its functional areas as a guide. This adopt-as-you-go approach to functional setup gives you theflexibility to set up different functional areas of the offering at different times.
For example, you can begin with setup of the functional areas you require immediately to start transactions. You canthen set up other functional areas as you adopt additional offering functionality over time. This setup process is idealfor an enterprise looking for a simpler implementation approach that follows setup best practices.
Functional AreasWhen using this method, you start by selecting one of the offerings you enabled. Based on your opt-in configuration,all its enabled functional areas, which include core and optional functional areas, are automatically displayed in a list toguide you through the setup tasks. The display order reflects the sequence in which the functional areas should be setup because setup data of the functional areas listed higher up in the list are usually prerequisite for those shown lowerin the list. Any functional area for which setup is mandatory is marked with an asterisk.
Functional areas that are applicable to more than one of your enabled offerings are marked as shared to allow you toevaluate whether they were previously set up during the implementation of another offering. Even if a shared functionalarea was set up previously, you may still need to evaluate if it requires additional setup data for the offering you'represently implementing.
For some functional areas, Quick Setup may be available to implement its basic functionality quickly. A Quick Setupicon next to a functional area indicates if Quick Setup is available. You can use this task instead of the setup task list toset up those functional areas.
Setup TasksFor each functional area, a sequenced list of tasks representing the setup best practices according to your opt-inconfiguration of the features is shown to guide you through optimal implementation requirements. Use the tasks toenter the setup data they represent. Like functional areas, the display order of the tasks always reflects the sequence inwhich they should be performed to address setup data dependencies.
Required Tasks
Only the required setup tasks are shown by default to minimize your setup effort and to make the offering ready fortransactions sooner. However, you can also review the rest of the tasks in the list, which are typically optional or havepredefined default values based on common use cases, and decide whether your implementation must change theirdefault setup data.
Tasks with Scope
If any setup data is segmented by a specific attribute or scope, you may need to perform the task iteratively. If so,you must select a qualifying scope value prior to performing the task. You can pick a scope value that was previouslyselected, select a new scope value, or create a new scope value and then select it. The selected value is a qualifyingattribute of the setup data and therefore, different setup data can be entered for the different scope values.
13

Oracle Applications CloudUsing Functional Setup Manager
Chapter 4Manage Setup Using Functional Areas
Note: You can't perform a task if you don't have the proper security privileges.
Set Up an Offering
Use the Setup and Maintenance work area to directly implement an entire offering or the functional areas within anoffering. You need the Functional Setups User role (ORA_ASM_FUNCTIONAL_SETUPS_USER_ABSTRACT) to set up anoffering, and a role with task-specific privileges to enter and modify setup data. Refer to the Oracle Applications CloudSecurity Reference for Common Features guide for more information about task-specific privileges.
To set up an offering using its functional areas, follow these steps.
1. Click Navigator > My Enterprise > Setup and Maintenance .2. In the Setup and Maintenance work area, select the offering you want to implement.3. Review the list of functional areas. If a functional area isn't listed, then it's not enabled. To enable the functional
area, follow the steps in the Configure Offerings topic.4. If you're setting up this offering for the first time, select the functional areas one at a time in the order they're
listed. If you're making changes to existing setup data, select the applicable functional area.5. If Quick Setup is available for the functional area, then you can use Quick Setup to enter data instead of using
the related setup tasks. Click the icon and proceed.6. Enter setup data for a functional area by selecting its tasks in the order they're listed. Select a task to open
the page where you enter setup data for that task. To modify existing setup data, just select the relevant taskdirectly.
Note: If the functional area requires any mandatory setup, then only the tasks for entering the required setupdata are shown by default. If all setup data is optional for the functional area, then all tasks are shown bydefault. To see the full list of required and optional tasks for the functional area, select All Tasks from theShow list.
7. Enter setup data. When you finish, close the page, which returns you to the setup task list.8. Continue to select other tasks from the list as needed and enter setup data for them.
Related Topics• Configure Offerings
Set Up an Offering with Scope
Use the Setup and Maintenance work area to directly implement an entire offering or the functional areas within anoffering. You need the Functional Setups User role (ORA_ASM_FUNCTIONAL_SETUPS_USER_ABSTRACT) to set up anoffering, and a role with task-specific privileges to enter and modify setup data. Refer to the Oracle Applications CloudSecurity Reference for Common Features guide for more information about task-specific privileges.
To set up an offering using its functional areas, follow these steps.
1. Click Navigator > My Enterprise > Setup and Maintenance .
14

Oracle Applications CloudUsing Functional Setup Manager
Chapter 4Manage Setup Using Functional Areas
2. In the Setup and Maintenance work area, select the offering you want to implement.3. Review the list of functional areas. If a functional area isn't listed, then it's not enabled. To enable the functional
area, follow the steps in the Configure Offerings topic.4. If you're setting up this offering for the first time, select the functional areas one at a time in the order they're
listed. If you're making changes to existing setup data, select the applicable functional area.5. If Quick Setup is available for the functional area, then you can use Quick Setup to enter data instead of using
the related setup tasks. Click the icon and proceed.6. Enter setup data for a functional area by selecting its tasks in the order they're listed. Select a task to open
the page where you enter setup data for that task. To modify existing setup data, just select the relevant taskdirectly.
Note: If the functional area requires any mandatory setup, then only the tasks for entering the required setupdata are shown by default. If all setup data is optional for the functional area, then all tasks are shown bydefault. To see the full list of required and optional tasks for the functional area, select All Tasks from theShow list.
7. If the task requires a scope, select a scope value before you proceed. If you previously selected a scope value,then that value is listed in the Scope column. Ensure it's the correct value and if needed, select a different value.You can create a new value, select and add an existing value, or select one from the list of previously selectedvalues. Click Apply and Go to Task when you finished your selection. Unless you change it, the selected scopevalue is used for all tasks that use the same scope.
8. Enter setup data. When you finish, close the page, which returns you to the setup task list.9. Continue to select other tasks from the list as needed and enter setup data for them.
Related Topics• Configure Offerings
Update Existing Setup Data Use the Setup and Maintenance work area to update the existing setup data within an offering.
To update the existing setup data, follow these steps.
1. Click Navigator > My Enterprise > Setup and Maintenance .2. In the Setup and Maintenance work area, select an offering.3. Select the functional area, and from the list of tasks, select the setup task that you want to update. If you don't
find the task in the default list of required tasks, select All Tasks from the Show list to display all tasks.
Tip: If Quick Setup is available for the functional area, click the icon and proceed to update data instead ofusing the related setup tasks.
4. Do one of the following:
◦ For tasks that require a scope, if you previously selected a scope value, the existing value appears in theScope column. You may retain the same value or update a new scope value. If no value was set, ensurethat you set a correct scope value and click Apply and Go to Task. The selected scope value is used forall tasks that use the same scope.
◦ If the task doesn't require a scope, click the task and proceed.
15

Oracle Applications CloudUsing Functional Setup Manager
Chapter 4Manage Setup Using Functional Areas
5. Update the setup data on the corresponding task page.6. Save the changes and close the page to return to the task list.
Related Topics• Configure Offerings
FAQs for Manage Setup Using Functional Areas
Why can't I find the offering I want to set up in page header menu? You can't set up an offering that you haven't enabled yet. First, follow the steps for configuring offerings and enablethe offering you want to set up. If you don't have permission to configure offerings, then contact the person in yourorganization who configures the offerings and ask them to enable it. Once the offering is configured and enabled,return to the Setup page. You can find the offering in the page title menu and start its setup.
Why can't I find a functional area I want to set up for my offering inthe list of the functional areas shown on the Setup page? For a functional area to appear on the list, it must have been enabled as part of the feature opt-in configuration. Ifyou have permission to configure offerings, then you can select Change Feature Opt In to open the offering Opt Inpage and enable the functional area. If you don't have permission to configure offerings, then contact the person inyour organization who configures the offerings and ask them to enable the functional area. Once the functional area isenabled, return to the Setup page. The functional area is now listed in the Setup page.
How can I find a task when I don't know which functional area it'srelated to? Enter the full or partial name of the task in the Search Tasks field then click the Search icon. The search results areshown in a window. All tasks that meet the search criteria, along with their related functional areas, are shown. Selectthe appropriate task name from the search results to go to the task in the Task table.
16

Oracle Applications CloudUsing Functional Setup Manager
Chapter 5Manage Setup Using Implementation Projects
5 Manage Setup Using ImplementationProjects
How You Use Implementation Projects to Manage Setup An implementation project is a list of setup tasks you use to implement your Oracle Applications Cloud. Using thismethod, you create an implementation project to generate a list of setup tasks, assign tasks to various users who areresponsible for managing setup data, and monitor progress of the completion of the setup tasks.
This method is best suited to modify the default setup best practices, or manage setup as a project by assigningresponsibility of managing setup data to a broad group of users while monitoring their progress.
Generating a Task ListWhen you create an implementation project, typically you generate its initial list of tasks by selecting one of yourenabled offerings. If you plan to use more than one offering, create a separate implementation project for each oneof them. In addition to selecting an offering, which automatically selects its core functional areas, you may also selectnone, some, or all of the optional functional areas of the offering that are also enabled.
Note: If you create an implementation project with more than one offering, you can't use it to export and importsetup data. The export and import process fails.
Using your selection of the offering and the functional areas as a template, a task list hierarchy is generated for theimplementation project. The task list hierarchy includes the tasks that are associated at the time with your selectedoffering and functional areas, and their dependent features that are enabled.
Within the task list hierarchy, the tasks are organized according to prerequisite and dependency requirements of thesetup data that they represent. Oracle recommends that you enter setup data in the same sequence as the tasks toavoid errors due to missing prerequisite data.
Modifying a Task ListYou can modify the task list hierarchy of an implementation project if needed, by adding, removing, or reordering itstasks. If you modify the task list hierarchy, you must consider and maintain data dependency requirements. Otherwiseyour users encounter errors when using the implementation project either to enter setup data or to export and importsetup data to a different environment.
Note: Once an implementation project is created, it no longer has any relationship with the offering and functionalareas you used to create it. Therefore, after you create an implementation project, you can't modify its task listhierarchy by changing the opt-in configuration of those offering functional areas, or by changing the task listassociated with them.
Any modification you make to an implementation project's task list is strictly applicable to that implementation projectonly and doesn't affect any other projects with similar lists of tasks.
Modifications to the task list don't affect setup data represented by the tasks in the list. Once setup data is entered youcan't identify its source, such as which implementation project or any other method was used to enter or update the
17

Oracle Applications CloudUsing Functional Setup Manager
Chapter 5Manage Setup Using Implementation Projects
data. Likewise, if you remove a task from an implementation project, any setup data entered using the task continues toexist in the environment unless you explicitly delete the data using an appropriate user interface.
Assigning Setup TasksYou can assign the tasks of an implementation project to the users who are responsible for managing setup datarepresented by those tasks. Typically, each setup task is assigned to a single individual. However, you can also assignmultiple individuals to the same task if your implementation project requires such assignment. Each of the individualshas the flexibility to perform the task and manage setup data independently of the other users assigned to the sametask.
If you specify due dates for completing the assigned tasks, it helps you monitor the progress of the task assignmentsand monitor the progress of the overall implementation project. If you assign multiple people to a task, you can assignthe same due date to each person or you can assign a different due date to each assigned individual.
You can reassign tasks to a different user, or specify a new due date at any time.
Note: If you assign a task list to a user, then all the tasks included in the task list are assigned to that user.
Manage Setup Using Implementation Projects
Before creating an implementation project, ensure that you configured the offerings and opted into theirfunctional areas and features you plan to use. You need the Manage Implementation Project privilege(ASM_MANAGE_IMPLEMENTATION_PROJECT_PRIV) to create and manage implementation projects.
Create an Implementation ProjectTo create an implementation project, follow these steps:
1. Click Navigator > My Enterprise > Setup and Maintenance .2. In the Setup and Maintenance work area, select Manage Implementation Projects from the Tasks panel tab.3. On the Manage Implementation Projects page, select Create from the Actions menu, or click the Create icon.4. On the Create Implementation Project: Basic Information page, enter a meaningful name and a brief
description to describe your project.5. Optionally, assign the project to a user and specify a start date.6. Click Next. All enabled offerings and functional areas are listed on the Create Implementation Project: Select
Offerings to Implement page.7. Select the offering and its functional areas you want to use to generate the task list for this project.8. Click Save and Open Project when you complete your selection.9. A page with the name you specified for your implementation project opens, displaying its task list. The default
task list is generated based on your offering and functional area selection in the previous step. You can modifythe task list if needed, and begin to assign the tasks to the appropriate users.
Modify an Implementation ProjectThe default task list generated for an implementation project is always organized in the proper sequence to addressdata dependency requirements of the setup data they represent. The best practice is to not modify the task list unlessit's unavoidable for your business requirements.
18

Oracle Applications CloudUsing Functional Setup Manager
Chapter 5Manage Setup Using Implementation Projects
You can add, remove or reorder tasks within an implementation project. Before you make any such modifications toyour implementation projects, ensure that data dependency requirements aren't compromised.
Add TasksTo add setup tasks to an implementation project, follow these steps:
1. Click Navigator > My Enterprise > Setup and Maintenance .2. In the Setup and Maintenance work area, select Manage Implementation Projects from the Tasks panel tab.3. On the Manage Implementation Projects page, open the implementation project you want to modify to view its
task list hierarchy.4. Select the task or task list you want to add the new task after, and click the Add icon.5. In the Add Task Lists and Tasks page, search for the task or task list you want to add, select it, and click Apply.
Your selection is added after the task or task list you selected in the previous step.6. Repeat search select and apply to add additional tasks or task lists, as required. Click Done when you finished
to return to your implementation project.
Reorder TasksTo reorder setup tasks of an implementation project, follow these steps.
1. Click Navigator > My Enterprise > Setup and Maintenance .2. In the Setup and Maintenance work area, select Manage Implementation Projects from the Tasks panel tab.3. On the Manage Implementation Projects page, open the implementation project you want to modify to view its
task list hierarchy.4. Select the task you want to move.5. Click Actions > Reorder .
Follow the same steps to move a task list.
Remove TasksTo remove setup tasks from an implementation project, follow these steps.
1. Click Navigator > My Enterprise > Setup and Maintenance .2. In the Setup and Maintenance work area, select Manage Implementation Projects from the Tasks panel tab.3. On the Manage Implementation Projects page, open the implementation project you want to modify to view its
task list hierarchy.4. Select the task or task list you want to remove.5. Click the Remove icon.
Note: When you remove a task, any setup data you entered using the task isn't removed.
Related Topics• Opt In To New Features After Update
• Configure Offerings
19

Oracle Applications CloudUsing Functional Setup Manager
Chapter 5Manage Setup Using Implementation Projects
Assign Setup Tasks If users with various functional responsibilities within your organization are entering setup data related to theirfunctional expertise, then assign the appropriate setup tasks to those users. Assign due dates to monitor their progress.If needed, you can also reassign tasks from one user to another.
Initial AssignmentTo assign setup tasks to functional users for the first time, follow these steps:
1. Click Navigator > My Enterprise > Setup and Maintenance .2. In the Setup and Maintenance work area, select Manage Implementation Projects from the Tasks panel tab.3. On the Manage Implementation Projects page, open the implementation projects whose tasks you want to
assign to users.4. Select one or more tasks or task lists from the task list hierarchy.5. Click Assign Tasks to go to the Assign Tasks window.6. Search and select one or more users to whom you want to assign your selected tasks or task lists and click
Apply. Selected users are added to the Assigned Users table in the Assign Tasks window.7. Repeat search, select and apply to add additional users if needed. Click Done when you finish adding to return
to the Assign Tasks window.8. To assign the same due date to all the assigned users, select the Assign same date check box.9. To assign a different due date to each assigned user, click the Due Date column in the Assigned Users table
and select a due date for each assigned user.10. Add notes for your assigned users, if necessary. Click Save and Close to return to the implementation project.
ReassignmentTo reassign setup tasks from one user to another, follow these steps:
1. Click Navigator > My Enterprise > Setup and Maintenance .2. In the Setup and Maintenance work area, select Manage Implementation Projects from the Tasks panel tab.3. Click Overview.4. On the Implementation Projects: Overview page, from the Assigned Users table, search and select the
implementation project whose assignment you want to change.5. Click the Assignment Details tab in the Implementation Project Details region.6. Search and select the task whose assignment you want to change and click Reassign Tasks.7. In the Reassign Tasks window, select the user to whom you want to reassign the task from the New User menu.8. Select a new due date if necessary.9. Click Save and Close.
10. Repeat the steps to reassign more tasks if necessary.
How You Use Assigned Tasks to Enter Setup Data If you're a user to whom setup tasks from an implementation project have been assigned, then a consolidated list of allof your assigned tasks is presented to you. Use each task from the list to enter setup data that the task represents. If you
20

Oracle Applications CloudUsing Functional Setup Manager
Chapter 5Manage Setup Using Implementation Projects
have a long list of assigned tasks, you can filter the list by due date, task status, or implementation project name to finda task more easily. In addition, you can search for a specific task in the list by the task name.
Note: You must have the proper security privileges to perform a task.
Tasks with ScopeIf any setup data is segmented by a specific attribute or scope, you may need to perform the task iteratively. If so,you must select a qualifying scope value prior to performing the task. You can pick a scope value that was previouslyselected, select a new scope value, or create a new scope value and then select it. The selected value is a qualifyingattribute of the setup data and therefore, different setup data can be entered for the different scope values.
Predecessor TasksSome setup tasks may represent setup data that are a prerequisite for other setup data. These setup tasks are known asthe predecessor tasks.
Your assigned task list will indicate if any of the tasks has dependency on a predecessor task and will provide thefollowing information:
• Which tasks are the predecessors of a given task.
• What are the present statuses of the predecessor tasks.
• What statuses are recommended for each of the predecessor task before entering setup data.
Setting Task StatusBy default the status of all assigned tasks are set to Not Started. When you start to enter data for a task, you canchange the task status to In Progress and when you finish entering data you can change it to Completed. Althoughstatus of a task doesn't determine whether or not you can continue to enter setup data for the task or whether you canexport and import the data, it helps the implementation manager monitor the progress of the assignments.
Adding NotesYou can add a file, URL, or free-format text as notes to your assigned tasks. These notes are accessible not only to you,but also to the implementation manager and other assignees if multiple users are assigned to the same task. This helpsyou communicate and collaborate with others assignees.
Enter Setup Data Using Assigned Tasks
You can enter setup data using assigned tasks from the Assigned Implementation Tasks page.
To enter setup data using assigned tasks, follow these steps:
1. Click Navigator > My Enterprise > Setup and Maintenance .2. In the Setup and Maintenance work area, select Assigned Implementation Tasks from the Tasks panel tab.3. On the Assigned Implementation Tasks page, find the task for which you want to enter data. Use filters if
necessary to help you find the task.
21

Oracle Applications CloudUsing Functional Setup Manager
Chapter 5Manage Setup Using Implementation Projects
4. Check if the task has dependencies on predecessor tasks. If so, check the statuses and recommended statusesfor the predecessor tasks.
5. Click Go to Task to go to the page for entering setup data for the task. You need task-specific privileges toperform this step. Refer to the Oracle Applications Cloud Security Reference for Common Features guide formore details on task-specific privilege requirements.
6. If the task requires a scope, then select a scope value. If you previously selected a scope value then that valueis listed in the Scope column. Verify that the correct scope value is selected and if needed, select a differentvalue by clicking it. You can Create a new value, Select and Add an existing value, or select one from the listof previously selected values. Click Apply and Go to Task when you finish your selection. The selected scopevalue is used for all tasks that use the same scope unless you change it.
7. Enter the setup data. When you finish, close the page to return to the setup task list.8. Click the icon in the Status column to change status9. Click the number in the Notes column to add a note if necessary.
10. Select other tasks from the list and repeat the steps to enter setup data for them.
How You Monitor Progress of Implementation Projects Several graphical reports are available for you to monitor and analyze the progress of the assigned tasks in yourimplementation project. You can drill down on the graphs on the Overview page to get all of the information you want totrack the progress of your project.
Assignment by StatusThis pie chart shows the statuses of the assigned tasks as percentages of the total number of tasks in theimplementation project. The pie chart also shows the actual number of tasks with the specific status. The task statusesare predefined and used to indicate the progress. The available statuses are as follows:
• Not Started
• In Progress
• Completed
• Execution Frozen
• Submitted
• Completed with Errors
• Completed with Warnings
Assignment by Due DatesThis stacked column graph shows the number of assignments with due dates in various predefined time periods,broken down by different task statuses. Time periods are represented by columns while task statuses are representedby stacks within each column. The report compares due dates of the assigned tasks with the current date to determinewhich time period a task belongs to. The predefined due date periods are as follows:
• Past Due (one week or more)
• This Week
• Next Week
• In 3 Weeks
22

Oracle Applications CloudUsing Functional Setup Manager
Chapter 5Manage Setup Using Implementation Projects
• In 4 Weeks
• After 4 Weeks
• None (no due date)
Task Status by Task ListThis stacked column graph shows the total number of tasks for each of the task lists in an implementation project ascolumns. The total number includes tasks from all subsequent levels of the task list. Each column is further brokendown by task statuses, which are represented by stacks within a column. Since the task lists are organized in a hierarchyin an implementation project, the graph displays only the root nodes of an implementation project at first. You can drilldown on each graph to view the next level of details.
Top 5 Assigned Users with Incomplete Tasks by Due DatesThis stacked column graph shows the top five users who have the most number of incomplete tasks, such as tasks witha status anything other than Completed, as columns. Each column is further broken down by due date periods, whichare represented by stacks within a column.
Top 5 Task AllocationsThis stacked column graph shows the top five users with the most assignments and is filtered by due date periods. Eachuser's allocation is further broken down by task statuses, which are represented by stacks within a column. The defaultfiltering is set to This Week.
Related Topics• Monitor Progress of an Implementation Project
Monitor Progress of an Implementation Project Use the Implementation Projects: Overview page to monitor the progress of an implementation project. You needthe Review Implementation Project Overview privilege (ASM_REVIEW_IP_OVERVIEW_PAGE_PRIV) to perform thisprocedure.
Monitor Implementation ProgressTo monitor the progress of an implementation project, follow these steps:
1. Click Navigator > My Enterprise > Setup and Maintenance .2. In the Setup and Maintenance work area, select Manage Implementation Projects from the Tasks panel tab.3. On the Manage Implementation Projects page, click Overview.4. On the Implementation Projects: Overview page, search and select the implementation project you want to
monitor from list of projects.5. In the Implementation Project Details region:
◦ Click the Assignment Status tab to view the Assignment by Status and the Assignment by Due Datereports.
◦ Click the Assignment Status by Task Lists tab to view the Assignment Status by Task List report.
23

Oracle Applications CloudUsing Functional Setup Manager
Chapter 5Manage Setup Using Implementation Projects
◦ Click the Resource Status tab to view the Top 5 Assigned Users with Incomplete Tasks by Due Dates andthe Top 5 Task Allocations reports.
FAQs for Manage Setup Using Implementation Projects
Why doesn't my implementation project show the tasks for afunctional area or feature I recently enabled? If you enabled a functional area or feature after creating the implementation project, then the implementation projectwon't show the tasks related to the newly enabled functional area or feature. The task list for an implementation projectis created based on the enabled status of the functional areas and features at the time you created the implementationproject. Once the task list is generated, it doesn't change if the opt-in configuration changes at a later time.
Why do my implementation projects include some common tasksregardless of which offering I use to create it? Every offering is self-contained, for example, its default setup task list contains all tasks, including the prerequisites, tocomplete its end-to-end implementation. If there are setup tasks that are needed by multiple offerings, then each ofthem include those tasks.
Does a common task duplicate setup data if I use it in multipleimplementation projects? No, a task used in multiple implementation projects doesn't create duplicate data. Setup data isn't segmented by animplementation project or any other method you use to enter it. Each task points to the same setup data irrespective ofthe implementation project from which you perform it. Therefore, when you use a task from a different implementationproject, you can also review the existing data and update it if necessary.
How can I see what types of setup data I enter using animplementation project? An implementation project shows the hierarchy of setup tasks by default. You can toggle to view the business objecthierarchy instead. Each business object represents a type of setup data. The sequence of the business objects in thehierarchy indicates the order in which the setup data is exported and imported when the implementation project is usedfor export or import processes.
24

Oracle Applications CloudUsing Functional Setup Manager
Chapter 5Manage Setup Using Implementation Projects
Why didn't the task show as completed when I returned to myassigned task list after entering data? After entering setup data, when you return to the assigned task list, it doesn't necessarily mean that you havecompleted entering data. You may need to return to the task to enter additional information. Therefore, a task is nevermarked as completed automatically. When you know that you finished entering all data necessary for the task, you canset the task status to completed.
Why did a common task I already performed and set to completednot show as completed in every instance of the task acrossmultiple implementation projects? You must set the task status individually for each task in each implementation project. The setup data for a task mightneed a different set of data for a different implementation. The status of a task doesn't update based on its status ina previous implementation. For example, you implement Financial Control and Reporting and complete the currencysetup. Later, when you implement Procurement, you want a few additional currencies for paying suppliers but not forfinancial reporting.
What happens if I change the task list of an implementationproject after I start entering data? You can modify an implementation project's task list at any time. Your changes become effective immediately. If youadd a new task, it becomes immediately available for assignment, status reporting, and execution. If you remove anytask, it doesn't remain a part of the task list any longer. However, any data entered using the task isn't removed.
How can I view implementation-specific reports? You can download and print a set of reports at each level of the implementation task list hierarchy. These reports showthe relevant information for the task list and all dependent task lists and tasks. The available reports are the Setup TaskLists and Tasks report, the Related Business Objects report, and the Related Enterprise Applications report.
25

Oracle Applications CloudUsing Functional Setup Manager
Chapter 5Manage Setup Using Implementation Projects
26

Oracle Applications CloudUsing Functional Setup Manager
Chapter 6Manage Setup Using CSV File Packages
6 Manage Setup Using CSV File Packages
Export and Import of CSV File Packages When you enter or update a large volume of setup data, using the setup task UI to mange them individually may not bethe most efficient method.
To create or update setup data in bulk, use the export and import of CSV file packages. Use CSV file packages tomanage setup data of a specific task or a group of tasks associated with a functional area or offering.
Export and Import CSV File Packages
To export and import CSV file packages, you must have the Application Implementation Consultant role. You alsorequire additional roles as specified in the Additional Access Required for Exporting and Importing Setup Data topic ifyou're exporting tasks related to specific business objects.
Alternatively, you can export and import CSV file packages if you have these privileges:
• Submit Export Setup Data Process (ASM_SUBMIT_EXPORT_SETUP_DATA_PROCESS_PRIV)
• Submit Import Setup Data Process (ASM_SUBMIT_IMPORT_SETUP_DATA_PROCESS_PRIV)
• Task-specific privileges
For detailed information about task-specific privileges, refer to the Oracle Applications Cloud Security Reference forCommon Features guide.
Note: You can't export or import seeded data because it's created and updated when an environment is created orupdated.
Export Setup Data to a CSV FileTo export setup data to a CSV file, follow these steps:
1. Click Navigator > My Enterprise > Setup and Maintenance .2. In the Setup and Maintenance work area, select the offering whose task requires setup data entry using CSV
file.3. Identify the setup data as appropriate:
◦ For all tasks associated with the offering, click Actions > Export to CSV File .
◦ For all tasks associated with a functional area, select the functional area and click Actions > Export toCSV File .
◦ For specific tasks:
i. Select the appropriate functional area and go to the Tasks table.ii. Select Columns > View > Actions to make the applicable task actions visible.
27

Oracle Applications CloudUsing Functional Setup Manager
Chapter 6Manage Setup Using CSV File Packages
iii. Select the task, and from the corresponding Actions menu, select Export to CSV File.
Note: The Export to CSV file option is disabled if the task doesn't support export.
4. Select Create New. You can export all existing setup data represented by the task.
◦ If Scope is supported for any of the selected setup tasks, you can select appropriate scope values to filterthe setup data you want to export.
◦ You can also download the template for managing setup data without exporting the existing setup datain the environment. To do so, select the Export only template files check box.
5. Click Submit to start the export process.6. Select Export to CSV file for the offering, or functional area, or task as appropriate, to see the latest process.
Monitor the process at any level until it completes.7. Select the process after it's complete and review the results. Verify that the process completed without any error
before you download the CSV file package.
If there are more than one business objects associated with the task, you may find more than one CSV files.
Modify Setup Data in a CSV FileTo enter or modify setup data before importing it into the target environment, you need to edit the CSV file. Whileediting, ensure that you maintain the exact format for dates, numbers, and any other value that's present in the originalexported CSV file.
CAUTION: Never delete any CSV file from the downloaded CSV package. Deleting a CSV file will cause errors duringimport. If you don't want to include setup data from a particular CSV file, remove all records (rows) from the CSV fileexcept the heading row. Even if that CSV file is empty, you must include it in the CSV package to be imported.
If your file contains setup data with Date attributes, you must specify the correct date format that appears in theexported setup data file.
1. Open the original exported file using a CSV editor such as WordPad and review the date format attribute (forexample, 2015/10/25).
2. Open the CSV file using Microsoft Excel.3. Select the Date attribute and click Format Cells. Change the Category to Custom and provide the same format
that appeared in the original file. In the same way, provide the format for all date columns.
Note: Depending on the setup data, you must use the custom format to match the correct data format incolumns as suggested in the following table.
Columns Data in CSV Custom Format Cells
Date
2018/03/02
yyyy/mm/dd
Date and Time
2018/02/28 12:07:48:48
yyyy/mm/dd hh:mm:ss.SSS
Long Number
123456789123
Custom > 0
28

Oracle Applications CloudUsing Functional Setup Manager
Chapter 6Manage Setup Using CSV File Packages
4. Modify the remaining setup data as per your requirement.
Tip: If you require further information to understand how to fill up the CSV file, refer to the Help associatedwith the task.
5. Save the file in CSV format and immediately close it to prevent any other change. Ensure that the CSV file sizedoesn't exceed 10MB. The CSV file is ready for import.
If your file contains setup data with special characters for other languages such as Chinese, you might need to specifyText as the column format to represent such information.
1. Open Microsoft Excel and click the Data tab.2. In the Get External Data group, click From Text.3. Navigate to and select the CSV file you downloaded. .4. Select Delimited as Data Type and click Next.5. Select Comma as delimiter and click Next.6. Select Text as column data format for all columns and click Finish. You can now edit the file.7. Save the file as file type Unicode Text (.txt) and close it.8. Open the file again using Notepad++:
a. Find and replace all tab characters with commas.b. Change the encoding to Encode in UTF-8.
9. Save and close the file.10. Change the file extension from .txt to .csv.11. Save the CSV into a .zip file. Ensure that the CSV file size doesn't exceed 10MB. You can now import the file.
Import Setup Data from a CSV FileTo upload the new or modified setup data, follow these steps:
1. Select Import from CSV file from the Actions menu of an offering, a functional area, or a task as appropriate.2. Select Create New.3. Select the appropriate .zip file. The application validates that the file corresponds to the selected offering,
functional area, or task before you can submit the process.4. Click Submit.5. Select Import from CSV file to see the latest processes. Monitor the process until it completes.6. Select the process once it completes to review the results. If any error occurs, review the details listed in Status
Details in the Business Objects section. Fix the issues and import again, if necessary.7. After you import the setup data successfully, you can verify the loaded data by selecting the task from the
Setup page.
Import Offering Setup Data from a CSV File
This procedure shows you how to import offering setup data from a CSV file. You must have the ApplicationImplementation Consultant (ORA_ASM_APPLICATION_IMPLEMENTATION_CONSULTANT_JOB) role to import setupdata.
To import offering setup data from a CSV file, follow these steps.
1. In the Setup and Maintenance work area, select the offering into which you want to import the setup data.
29

Oracle Applications CloudUsing Functional Setup Manager
Chapter 6Manage Setup Using CSV File Packages
2. Click Actions and select Import from CSV File > Create New to begin the import process.3. On the Import Setup Data from CSV File page, click Browse.4. Select the CSV file package containing the exported setup data and click Open. The details of the package
appear.5. Verify the details to make sure you selected the correct CSV file. If the details appear to be from another CSV
file, click Update and select the correct file.6. Expand the Import Options section.
◦ The Pause process each time an error occurs option is selected by default. If an error occurs, the importprocess pauses so that you can take corrective action and resume the import. If you don't want theimport process to be interrupted even if there are errors, deselect the option. However, note that if anyprerequisite data fails, additional dependent data might not be imported correctly.
◦ The Pause process each time manual import setup data is required option is selected by default. Theimport process pauses each time there's some data that you must manually import. You can deselect thisoption if the data to be imported manually already exists in your target environment.
7. Click Submit. The import process begins.8. To review the import summary after the process completes, go to Actions > Import from CSV File and click
the process that you submitted. The Import Setup Data from CSV File Results page appears with details.9. In the Post-Import Tasks section, check and complete if any task is listed.
CAUTION: If post-import tasks are listed and you don't complete them, the imported data won't be ready foruse.
10. In the Business Objects section, review the status of the imported business objects and take suggested action ifany errors are reported.
Compare Task Setup Data
This procedure shows you how to compare exported setup data of a task before you import it. For example, you havemade some changes to the setup data in a test environment and exported it. Now, you want to import the same datainto a production environment. But before you import, you can compare the exported data of the test environment withthe existing production data or another configuration package. You can preview how the setup data in production willchange after the import.
To compare setup data, you must have the Application Implementation Consultant role(ORA_ASM_APPLICATION_IMPLEMENTATION_CONSULTANT_JOB).
To compare task setup data, follow these steps.
1. In the production environment, go to the Setup and Maintenance work area.2. In your offering, navigate to the setup task for which you want to compare the setup data.
Tip: If you can't see your task, click Show > All Tasks . If you don't see the Actions column, click View >Columns > Actions to enable it.
3. Select the task and click Actions > Compare Setup Data > Create New . The compare setup data processbegins.
4. On the Compare Setup Data page, for Configuration 1, click the CSV File Package list and select Upload New.
30

Oracle Applications CloudUsing Functional Setup Manager
Chapter 6Manage Setup Using CSV File Packages
5. On the Upload Setup Data page, browse and select the CSV file package containing the exported task setupdata and click Open.
6. In the CSV File Package Details section, verify the details to be sure of selecting the correct exported file. If it'snot the correct file, click Update to browse and select the correct file.
7. For Configuration 2, the option Data in this environment is selected by default to compare with the existingdata in the environment. But if you want to compare with another configuration package, click Source andupload another configuration package file.
8. Enter a name in the Process Name field.9. Click Submit. The comparison process starts.
10. To review the comparison summary after the process completes, go to Actions > Compare Setup Data andclick the process that you submitted. The latest process appears at the top of the list. The Comparison ProcessResults page appears with details.
11. Review the details in each section. The details from the CSV file package and the production environment areseparately displayed so that you can compare the results.
12. Examine the contents and check for discrepancies, if any.
Note: Configuration 1 refers to the contents of the CSV file package, and Configuration 2 refers to the datain the production environment. For detailed description of the comparison results, see topic Setup DataComparison Results.
13. Click the value in the relevant column. A spreadsheet appears listing the discrepant details.14. Scroll through the listed entries to examine the details. If you need to correct any data before the import, make
sure that the modifications are included in the exported files you selected for comparison.
Note: Importing the CSV file doesn't delete data records in the production environment. Therefore, if youwant to remove anything from the production data, you must manually delete the specific records.
15. Import the CSV file package once you're satisfied with the comparison results and have made the necessarychanges in the CSV file package and the production environment.
Automate Export and Import of CSV File Packages You can use the SOAP web services or the REST APIs if you want to export and import CSV file packages outside of theSetup and Maintenance work area.
To submit export and import processes using web services or APIs, you need the Application ImplementationConsultant role. Even if you don't have the Application Implementation Consultant role, you can submit the processes ifyou have these privileges:
• Submit Export Setup Data Process privilege
• Submit Import Setup Data Process privilege
• Task-specific privileges
Refer to the Additional Access Required for Exporting and Importing Setup Data topic to know if you need access to anyadditional roles. For detailed information about task-specific privileges, refer to the Oracle Applications Cloud SecurityReference for Common Features guide.
The following graphic represents a high-level overview of the process to be followed for automating the export andimport of CSV file packages.
31

Oracle Applications CloudUsing Functional Setup Manager
Chapter 6Manage Setup Using CSV File Packages
SOAP Web Services and REST APIsRefer to the following documents for detailed information about using web services and REST APIs to export and importCSV file packages.
• In the SOAP Web Services for Common Features guide, go to Business Object Services > Setup Data Exportand Import .
• In the REST API for Common Features in Oracle Applications Cloud guide, go to the Tasks section and refer tothese topics:
◦ Setup Offering CSV Exports
◦ Setup Offering CSV Imports
◦ Setup Offering CSV Template Exports
◦ Setup Task CSV Exports
◦ Setup Task CSV Imports
◦ Setup Task CSV Template Exports
32

Oracle Applications CloudUsing Functional Setup Manager
Chapter 6Manage Setup Using CSV File Packages
Offering, Functional Area, or Task CodeTo initiate the export or import process using an API, you must provide the code of the offering, functional area, or task.You must also have the Application Implementation Consultant role.
To find the relevant code, follow these steps:
1. Click Navigator > My Enterprise > Setup and Maintenance .2. In the Setup and Maintenance work area, click Manage Setup Content from the Tasks panel tab.3. Follow these instructions to obtain the required code:
To search for the code of an offeringor a functional area
To search for the code of a task
a. On the Manage Setup Contentpage, click Manage Offeringsand Functional Area.
b. In the Search field, selectOfferings or Functional Areadepending upon the code you'researching for, and click Search.
c. In the search results, click thename of the offering or thefunctional area.
d. On the Enter Basic Informationpage, look for value that appearsagainst Code.
e. Copy the code and use it wherenecessary.
a. On the Manage Setup Content page, click Manage Task Lists and Tasks.b. In the Search field, select Tasks and click Search.c. In the search results, click the name of the task.d. On the Task page, look for value that appears against Code.e. Copy the code and use it where necessary.
Apply Scope to Filter Exported Setup DataWhen you export setup data using web services or APIs, you can optionally apply scope to filter the data. To applyscope, you must provide values to the following parameter attributes.
• BusinessObjectCode - Code of the business object whose attribute is used as the scope
• AttributeName - Name of the attribute of the business object used as the scope
• AttributeValue - Value of the named attribute that defines the filter criteria
Follow these steps to find values for required parameters.
1. Follow the procedure in the Export and Import CSV File Packages topic and select these options.
◦ The same offering, functional area or task for which you want to automate the export process.
◦ The same scope-enabled business objects and their values to be used as the filter criteria in theautomation process. Also note the names of the selected business objects.
2. Complete the export and save the downloaded CSV file package. The attribute values from the downloadedfiles are used in the filter criteria when running the APIs.
3. Complete these steps to find the code of the business object whose attribute is used as scope.
a. In the Setup and Maintenance work area, select Manage Setup Content from the Tasks panel tab.b. On the Manage Setup Content page, click Manage Business Objects.
33

Oracle Applications CloudUsing Functional Setup Manager
Chapter 6Manage Setup Using CSV File Packages
c. Search for the business object that you identified in step 1 to set the scope and click that business objectfrom the search results.
d. Note down the code of the business object so that you can use it as the value for the BusinessObjectCodeparameter in the API.
4. Find the list of attributes that you want to use as filters and note down their values.
a. From the CSV file packages exported and saved as instructed in step 2, find and open the file that has thesame name as the business object used as scope.
b. Note the column names and their values you want to use as filters. Use the column names as values forthe AttributeName parameter and the column values as values for the AttributeValue parameter in theAPI.
Modify Setup Data in a CSV FileTo enter or modify the setup data in the CSV file, follow these steps:
1. Extract files from the downloaded CSV file package to a local folder..2. Open Microsoft Excel and click the Data tab.3. In the Get External Data group, click From Text.4. Navigate to and select the CSV file you downloaded.5. Select Delimited as Data Type and click Next.6. Select Comma as delimiter and click Next.7. Select Text as column data format for all columns and click Finish. You can now edit the file.8. Make the necessary changes and save the CSV into a .zip file. Make sure that the CSV file size doesn't exceed
10MB. You can now import the file.
34

Oracle Applications CloudUsing Functional Setup Manager
Chapter 7Setup Data Export and Import
7 Setup Data Export and Import
Overview of Setup Data Export and Import Any implementation of Oracle Applications Cloud usually requires migrating setup data from one environment toanother at various points in the subscription lifecycle. For example, a subscribed offering is typically set up in the testenvironment first, and is moved to the production environment only after proper testing and verification. Setup exportand import processes help you migrate setup data from test to production.
Two distinct methods are available for migrating setup data:
• Export and import an entire offering or any of its functional areas. In this method, setup data of the businessobjects associated with the offering or the selected functional area is migrated.
• Export and import an implementation project. In this method, setup data of the business objects associatedwith the implementation project is migrated.
Note: You can't combine the export and import processes of these different methods. When an offering or functionalarea is exported, that setup data can only be imported using the same offering or functional area. Similarly, whenan implementation project is exported, that setup data can only be imported using implementation project-basedimport.
Key Information About Setup Data Export and ImportProcesses Use the information in this topic to effectively manage the setup data export and import processes.
Here are the key components of the setup data export and import process.
• Setup Business Objects
• Configuration Packages
• Scope to Filter Exported Setup Data
• Importing Feature Opt-In
• Setup Data Update Rules During Import
• Import Sequence of Setup Data
• Export and Import Process Results
Setup Business ObjectsSetup business objects are the logical representations of setup data. The export and import processes use thesebusiness objects and their associated web services to read and write the appropriate set of setup data from source tothe target environments respectively.
35

Oracle Applications CloudUsing Functional Setup Manager
Chapter 7Setup Data Export and Import
Configuration PackagesA configuration package is the medium used to move setup data from one environment to another. When you exportsetup, a configuration package is created which includes the following:
• A list of setup tasks based on the offering, functional area or implementation project you used for the exportprocess.
• The business objects associated with those tasks.
• Exported setup data of those business objects
After an export process runs successfully, you can download the configuration package as a .zip file. You can then movethis configuration package to the environment where you plan to import the same setup, upload the file, and run theimport.
Scope to Filter Exported Setup DataWhen a business object is exported, all its setup data (except the ready to use data that's not yet modified) is exportedby default. You may optionally select one or more Scope values to filter setup data of the business objects and limit theexported data. The resulting configuration package from that export process contains only the setup data that matchesthe Scope criteria you specified. However, if you include the ready to use setup data in scope, it doesn't get exportedunless it was previously modified. This condition applies to the following ready to use setup data:
• Application Taxonomy
• Application Reference Data Set
• Application Reference Data Set Assignment
• Application Lookup
• Data Security Policy
• Application Tree Structure
• Application Tree Label
• Application Tree
• Application Flex Value Set
• Application Descriptive Flexfield
• Application Extensible Flexfield
36

Oracle Applications CloudUsing Functional Setup Manager
Chapter 7Setup Data Export and Import
• Application Key Flexfield
Additionally, make sure that you deploy the ready to use setup data for the following business objects:
• Application Descriptive Flexfield
• Application Extensible Flexfield
• Application Key Flexfield
Note:• You can't migrate the translation data for these business objects using the Export to CSV File or Import from
CSV File functionality. Instead, use the standard export or import functionality that uses XML files. For details,see Export Setup Data Using Offering or Functional Area.
• You can never export user level profile values.
Importing Feature Opt-InWhen you export an offering or a functional area, the configuration package includes the opt-in configuration ofall their dependent functional areas and features as they were set in the source environment at the time of export.However, the import of the same configuration package doesn't automatically import the opt-in configurations to thetarget environment.
You may choose to import the opt-in configuration from the source to the target when you import the configurationpackage. The import process enables the dependent functional areas and features that were enabled in the source butaren't enabled in the target. The opt-in configuration of any other dependents in the target remains unchanged.
Note: This option isn't available when you use an implementation project to export and import setup data.
Setup Data Update Rules During ImportWhen you import a configuration package to the target environment, setup data in the target is modified as follows:
• If a record exists in the configuration package but doesn't exist in the target, then import creates the record.
• If a record doesn't exist in the configuration package but exists in the target, then import doesn't modify therecord in the target.
Note: Import doesn't delete the records in the target that don't exist in the configuration package. You mustdelete these records or make them obsolete manually, if necessary.
• If a record exists both in the configuration package and in the target, then:
◦ If all attribute values are the same, import doesn't modify the record in the target.
◦ If values of any attributes of the record are different, then import updates the record in the target with thevalues in the configuration package.
Import Sequence of Setup DataSome setups are prerequisites for other setups and thus, have data dependencies. Therefore, the sequence in whichsetup data is imported from a configuration package is important to prevent any failure due to data dependency.
37

Oracle Applications CloudUsing Functional Setup Manager
Chapter 7Setup Data Export and Import
The sequence of the tasks within the offering, functional area or implementation project, which you used during exportto create the configuration package, determines the sequence in which their related business objects, and consequently,the setup data are imported. The following business objects, on the other hand, are exceptions to the default task-basedsequence rule. They're always exported and imported before any other business objects in the sequence specified inthis table:
Business Object Name Business Object ID
Application Taxonomy
FND_APP_TAXONOMY
Application Reference Data Set
FND_APP_REFERENCE_DATA_SET
Application Reference Data SetAssignment
FND_APP_REFERENCE_DATA_SET_ASSIGNMENT
Application Lookup
FND_APP_SET_ENABLED_LOOKUP
Data Security Policy
FND_APP_DATA_SECURITY_POLICY
Application Tree Structure
FND_APP_TREE_STRUCTURE
Application Tree Label
FND_APP_TREE_LABEL
Application Tree
FND_APP_TREE
Application Flex Value Set
FND_APP_FLEX_VALUE_SET
Application Descriptive Flexfield
FND_APP_EXTENSIBLE_FLEXFIELD
Application Extensible Flexfield
FND_APP__FLEXFIELD
Application Key Flexfield
FND_APP_KEY_FLEXFIELD
Export and Import Process ResultsYou can review and analyze results of setup export and import processes. The results show what setup data wasexported or imported, and are listed in the order in which the business objects were processed. The results also includeinformation about any errors encountered during the export or import process to help you analyze and resolve thoseerrors. You can download the information about the process results in a file to review them offline.
38

Oracle Applications CloudUsing Functional Setup Manager
Chapter 7Setup Data Export and Import
Review of Setup Data You can review setup data prior to or after the export or import process using the Setup Data Reports and ComparisonReports.
Setup Data ReportAfter an export process completes successfully, you can download the setup data reports to review and analyze the datathat was exported. You can also save the reports for future reference.
A separate report is generated for each business object processed during export, which shows the data that wasexported from that business object. If you specified Scope values to filter exported data, the report shows only the datathat matches those Scope values.
Comparison ReportYou can use the comparison report to review the differences between setup data in two different environments, such astest and production. For example, before running an import process on your production environment, you may want tocompare the setup data in your exported configuration package with that in your production environment to avoid anyunwanted override.
The comparison report shows you the following:
• Which data exists in the source only.
• Which data exists in the target only.
• Which data exists in both but is identical.
• Which data exists in both but has differences, and what the differences are.
You can then determine how the production data changes after the import by applying the rules as stated in the sectionSetup Data Update Rules during Import in the Key Information About Setup Data Export and Import Processes topic.
Related Topics• Key Information About Setup Data Export and Import Processes
Best Practices for Migrating Setup Data from Test toProduction The following best practices help you optimize setup data migration between your test and production environments.
Prepare Environments for MigrationWhen exporting and importing, the Oracle Cloud Applications revision of both source and target environments mustbe the same. Ensure that your test and production environments are at the same revision level before your export andimport.
39

Oracle Applications CloudUsing Functional Setup Manager
Chapter 7Setup Data Export and Import
Some setup data may not be supported for automatic migration through export and import. Review the Setup Task Listsand Tasks report from the Offerings page to identify the setup tasks that don't have associated setup services. Setupdata of these tasks require you to migrate them manually to production using an alternative method.
Manage Setup Data in Gold EnvironmentIf you use a Gold environment to manage your setup data, follow these steps.
1. Enter setup data in the Gold environment.2. When ready to verify, export the setup data from the Gold environment and import into test.3. Verify setup data in the test environment.4. If the setup data requires update, repeat the previous steps with the updates.
Note: Always maintain setup data in the Gold environment, because this environment is used to recordand manage your setup data. Never update data directly in the test environment. Otherwise, the Goldenvironment no longer remains the source of truth for your setup data.
5. After setup data passes verification, export from the Gold and import into the production environment.6. In the next testing cycle, if the test environment requires a refresh from the production environment, use
production to test (P2T) refresh cloud service.7. If the Gold environment requires refreshing setup data from the production environment, you can use
production to test (P2T) refresh, and synchronize your Gold environment with your production environment.
Note: If you follow the best practices, you may never require to refresh the Gold environment with the setupdata in the production environment.
40

Oracle Applications CloudUsing Functional Setup Manager
Chapter 7Setup Data Export and Import
Manage Setup Data in Test EnvironmentIf you don't use a Gold environment, but use the test environment for both maintaining and verifying setup data, followthese steps.
1. Enter and verify setup data in the test environment.2. After setup data passes verification, export from the test and import into the production environment.3. If the test environment requires refreshing with setup data from the production environment, use production to
test (P2T) refresh cloud service.
Additional Points to ConsiderHere are some additional points to consider while exporting and importing setup data.
1. Ensure that all setup data is thoroughly tested and verified before you import into the production environment.Similarly, if export and import processes aren't available for any setup data and you enter it manually intothe production environment, ensure that you created and verified the same data in your gold and testenvironments first before entering it into the production environment.
2. If you enter any setup data manually into the source environment (Gold or Test as applicable), as well as into thetarget environment (Test or Production as applicable), and later use the export and import processes to migratethe same data, the import process might fail. This happens because those records are rarely an exact duplicateof each other in both the environments. As a result, row key validation of those records fail during import.
3. When exporting setup data using an implementation project, export only one offering at a time. For moredetails, refer to the topic Setup Data Export and Import Using Implementation Project.
4. Use the scope value to limit the volume of exported setup data. Scope is particularly useful when you'remigrating only the incremental changes to setup data after you completed the initial deployment of an offeringto the production environment.
5. Source control the exported configuration package files to keep a history of setup changes that were applied tothe production environment.
6. Consider running comparison of the setup data in the configuration package file with that in the productionenvironment before starting the import process. This lets you review how import changes the production dataand help you to avoid making unwanted changes in production. For more details, refer to the topic Setup DataComparison Results.
7. Don't ignore the tasks you must perform before and after import. You must migrate their data manually.Otherwise, setup data in production remains incomplete, causing errors during transaction processing.
41
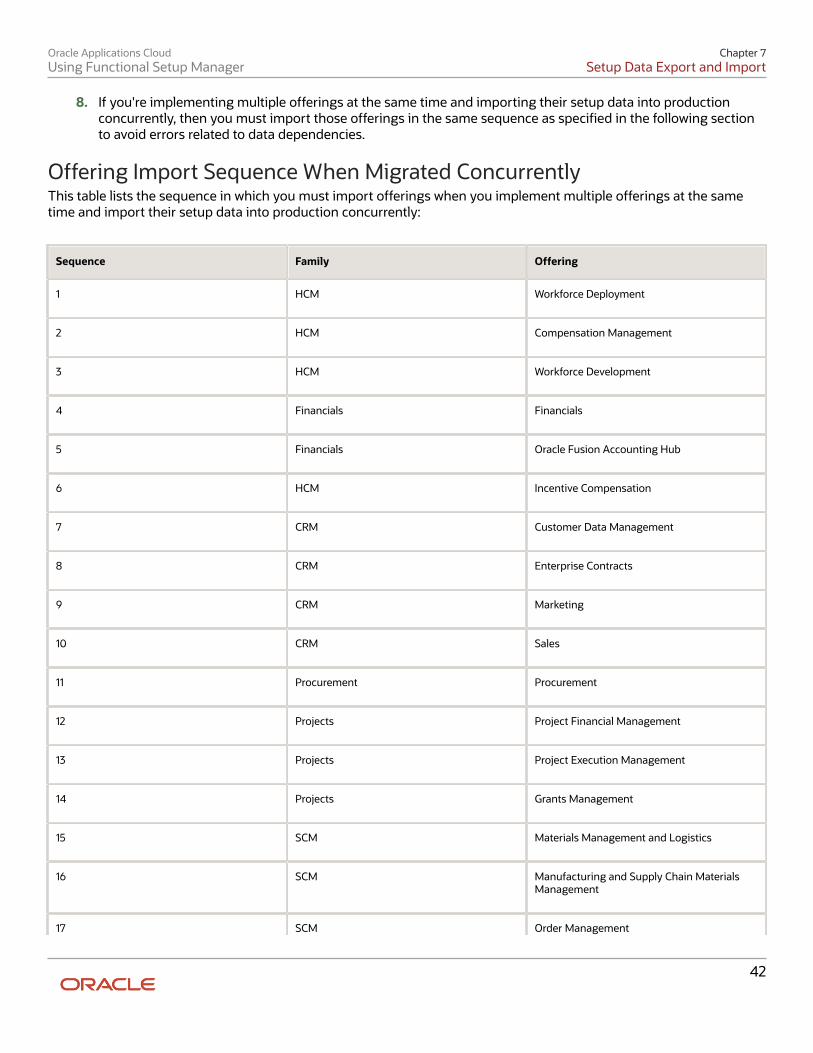
Oracle Applications CloudUsing Functional Setup Manager
Chapter 7Setup Data Export and Import
8. If you're implementing multiple offerings at the same time and importing their setup data into productionconcurrently, then you must import those offerings in the same sequence as specified in the following sectionto avoid errors related to data dependencies.
Offering Import Sequence When Migrated ConcurrentlyThis table lists the sequence in which you must import offerings when you implement multiple offerings at the sametime and import their setup data into production concurrently:
Sequence Family Offering
1
HCM
Workforce Deployment
2
HCM
Compensation Management
3
HCM
Workforce Development
4
Financials
Financials
5
Financials
Oracle Fusion Accounting Hub
6
HCM
Incentive Compensation
7
CRM
Customer Data Management
8
CRM
Enterprise Contracts
9
CRM
Marketing
10
CRM
Sales
11
Procurement
Procurement
12
Projects
Project Financial Management
13
Projects
Project Execution Management
14
Projects
Grants Management
15
SCM
Materials Management and Logistics
16
SCM
Manufacturing and Supply Chain MaterialsManagement
17 SCM Order Management
42

Oracle Applications CloudUsing Functional Setup Manager
Chapter 7Setup Data Export and Import
Sequence Family Offering
18
SCM
Price Management
19
SCM
Product Management
20
SCM
Supply Chain Financial Orchestration
21
SCM
Supply Chain Managerial Accounting
22
SCM
Value Chain Planning
23
GRC
Risk and Controls
Related Topics• Setup Data Export and Import Using Implementation Project
• Setup Data Comparison Results
Setup Data Export and Import Using an Offering or aFunctional Area In this method, you may choose to export and import setup data of an entire offering, or limit the processes to oneof its functional areas. This method is a simplified export and import process, which doesn't require understandingcomplexities of data dependencies and setup tasks.
By OfferingYou typically export and import an entire offering when you migrate setup data of the offering to the targetenvironment for the first time. Setup data related to all enabled functional areas and features of the offering is exportedand imported.
By Functional AreaWhen setup data specific to a functional area changes over time, you might decide to export and import only theaffected functional area. This helps to limit export and import of setup data to a smaller range and therefore, migrationprocesses take less time to complete than that of the entire offering.
If you select a specific functional area to export, only the setup data related to that functional area and its enabledfeatures is exported and imported.
Note: You must ensure that all prerequisite setup data needed by the setup data of the exported functional area isavailable in the target environment before you start import. Otherwise, the import process might fail.
43

Oracle Applications CloudUsing Functional Setup Manager
Chapter 7Setup Data Export and Import
Same Levels of Export and ImportYou must start the import process from the same offering or the functional area that was used to create theconfiguration package file you want to import. Otherwise, you receive an error message until you upload the correctconfiguration package file. All setup data in the configuration package file is imported irrespective of whether or not thecorresponding functional areas or features are enabled in the target environment.
Setup Data ComparisonYou can compare setup data of an offering or functional area in an exported configuration package file with that of thesame offering or functional area in an environment. Setup data comparison is integrated with the import process asan option to compare and analyze which setup data is imported. Alternatively, you can also use setup data comparisonindependent of an import process. For example, to compare how the setup data of an environment has changed over acertain period, you can start the comparison outside of an import process.
Export Setup Data Using Offering or Functional Area
This procedure shows you how to export setup data using offering or functional area. You need the ApplicationImplementation Consultant role (ORA_ASM_APPLICATION_IMPLEMENTATION_CONSULTANT_JOB) to export setupdata. You also need access to additional roles if you're exporting certain business objects. For more information aboutthese additional roles, refer to the topic Additional Access Required for Exporting and Importing Setup Data.
To export setup data using offering or functional area, follow these steps.
1. Click Navigator > My Enterprise > Setup and Maintenance .2. In the Setup and Maintenance work area, select the offering you want to export from the Offering menu.3. To export setup data:
◦ For an entire offering, select and open the Actions menu in the page header, and then select Export.
◦ For a specific functional area, select and open the Actions menu corresponding to the functional area,and then select Export.
4. Select Create New to create a new export process.5. Optionally, specify appropriate scope values to filter exported setup data. By default, all existing setup data
is exported for each business object processed during export. However, if scope is supported by any of thosebusiness objects, you can select scope values to filter the exported setup data. To specify scope values for oneor more of the business objects:
a. Select the applicable business object from the Business Objects table and then click Add. If no relatedbusiness object supports scope, then the table remains empty.
b. Search and select the value you want to use as scope for the business object and click Apply.c. Repeat the previous step to add more scope values if needed. Click Done when finished.
6. Click Submit to start the export process.7. Monitor the status of the export process until it completes by selecting Export from the Actions menu. Up to
three most recent processes are listed, and are ordered from newest to oldest. Each process indicates its statusat the time, and if it was completed already, then the time stamp when it was processed.
8. While the process is still in progress, you may select the status to view how much progress the process hasmade at the time. A message shows you how many business objects were already processed out of the total
44

Oracle Applications CloudUsing Functional Setup Manager
Chapter 7Setup Data Export and Import
number of objects to be processed. Click View Progress to review the details on the business objects that werealready processed. Click the Refresh button to get the most recent information. Refer to the topic Review ofExport and Import Process Results for detailed description of the process results.
9. When the export process completes, select the status link to go to the Export Offering Data Results page.
◦ If the process completes successfully, the status is set to Ready to download.
i. Click Download File to download the configuration package .zip file and save it at an appropriatelocation. Use this file to import setup data in the target environment.
ii. In addition, review the list of post export tasks. If any tasks are listed, then those tasks aren'tmigrated by export and import process. You must migrate that data manually in the targetenvironment.
◦ On the other hand, if the process completes with errors, the status displays Ready for error review.
i. The Business Objects table shows all business objects that had errors during processing. Referto the topic Review of Export and Import Process Results for detailed description of the processresults.
ii. Click Download Log File from the page header, which includes the error log of all businessobjects that experienced error. Alternatively, you can also click Actions > Download Log File corresponding to a specific business object to download error log specific to that business object.
iii. After correcting the cause of the errors, create a new export process.
Related Topics• Additional Access Required for Exporting and Importing Setup Data
• Review of Export and Import Process Results
Export a Subset of an Offering or Functional Area SetupData
If there were any changes to the setup data since the previous export, you don't have to export the entire setup dataall over again for an offering or a functional area. Instead, you can select and export only the specific setup data thatchanged. However, make sure that the prerequisite data was already migrated to prevent any errors during import.
This procedure shows you how to export a subset of setup data using an offering or a functional area. You need theApplication Implementation Consultant role (ORA_ASM_APPLICATION_IMPLEMENTATION_CONSULTANT_JOB) toexport setup data. You also need access to additional roles if you're exporting certain business objects. For moreinformation about these additional roles, refer to the topic Additional Access Required for Exporting and ImportingSetup Data.
To export a subset of setup data using an offering or a functional area, follow these steps.
1. Click Navigator > My Enterprise > Setup and Maintenance .2. In the Setup and Maintenance work area, select the offering you want to export from the Offering menu.
45

Oracle Applications CloudUsing Functional Setup Manager
Chapter 7Setup Data Export and Import
3. To export setup data:
◦ For an entire offering, select and open the Actions menu in the page header, and then select Export.
◦ For a specific functional area, select and open the Actions menu corresponding to the functional area,and then select Export.
4. Select Create New to create a new export process.5. On the Export Offering Setup Data page, in the Business Objects section, click the Show drop-down list and
select All.6. In the Export column, deselect the check boxes of business objects that you want to exclude from the export.
Business objects with a check mark remain selected for export.
CAUTION:
◦ If the setup data in any of the excluded business objects is a prerequisite for the importedsetup data in the target environment, then the import might fail. Therefore, exclude or includebusiness objects after assessing the dependencies, if any.
◦ If the export service used by the selected business objects is also associated with any businessobject that you excluded, you're prompted to either export all related business objects or none ofthem.
7. Optionally, specify appropriate scope values to filter exported setup data. By default, all existing setup data isexported for each selected business object processed during export. However, if scope is supported by any ofthose business objects, you can select scope values to filter the exported setup data. To specify scope values forone or more of the business objects:
a. Select the applicable business object from the Business Objects table and then click Add. If no relatedbusiness object supports scope, then the table remains empty.
b. Search and select the value you want to use as scope for the business object and click Apply.c. Repeat the previous step to add more scope values if needed. Click Done when finished.
You can also remove a scope value if it's no longer required.8. Click Submit to start the export process.9. Monitor the status of the export process until it completes by selecting Export from the Actions menu. Up to
three most recent processes are listed, and are ordered from newest to oldest. Each process indicates its statusat the time, and if it was completed already, then the time stamp when it was processed.
10. While the process is still in progress, you may select the status to view how much progress the process hasmade at the time. A message shows you how many business objects were already processed out of the totalnumber of objects to be processed. Click View Progress to review the details on the business objects that werealready processed. Click the Refresh button to get the most recent information. Refer to the topic Review ofExport and Import Process Results for detailed description of the process results.
11. When the export process completes, select the status link to go to the Export Offering Data Results page.
◦ If the process completes successfully, the status is set to Ready to download.
i. Click Download File to download the configuration package .zip file and save it at an appropriatelocation. Use this file to import setup data in the target environment.
ii. In addition, review the list of post export tasks. If any tasks are listed, then those tasks aren'tmigrated by export and import process. You must migrate that data manually in the target
46

Oracle Applications CloudUsing Functional Setup Manager
Chapter 7Setup Data Export and Import
environment. For instance, the excluded business objects are listed in the Manual Tasks section.You can download the Manual Tasks Report from the Actions menu.
◦ On the other hand, if the process completes with errors, the status displays Ready for error review.
i. The Business Objects table shows all business objects that had errors during processing. Referto the topic Review of Export and Import Process Results for detailed description of the processresults.
ii. Click Download Log File from the page header, which includes the error log of all businessobjects that experienced error. Alternatively, you can also click Actions > Download Log File corresponding to a specific business object to download error log specific to that business object.
iii. After correcting the cause of the errors, create a new export process.
Related Topics• Additional Access Required for Exporting and Importing Setup Data
• Review of Export and Import Process Results
Import Setup Data Using Offering or Functional Area
This procedure explains how to import setup data for an offering or functional area. You need the ApplicationImplementation Consultant role (ORA_ASM_APPLICATION_IMPLEMENTATION_CONSULTANT_JOB) to import setupdata. You also need access to additional roles if you're importing certain business objects. For more information aboutadditional roles to import these business objects, refer to the topic Additional Access Required for Exporting andImporting Setup Data.
To import setup data for an offering or functional area, follow these steps.
1. Click Navigator > My Enterprise > Setup and Maintenance .2. In the Setup and Maintenance work area, select the offering you want to import from the Offering menu.3. If the configuration package you want to import was created by exporting:
◦ An offering, select Import from the Actions menu in the page header.
◦ A functional area, select Import from the Actions menu corresponding to that functional area.
4. Select Create New to create a new import process.5. Browse and select the configuration package file that contains the setup data you want to import. View the
Configuration Package Details to verify that you selected the correct file.
◦ If the offering or functional area selected during export doesn't match the offering or functional area youchose for the import process, an error message appears. Click the Update button to browse and selectthe correct file.
47

Oracle Applications CloudUsing Functional Setup Manager
Chapter 7Setup Data Export and Import
6. Expand the Import Options section.
◦ Best practice is to select the Compare setup data prior to import option. If you select this option, theimport process automatically runs a comparison of the setup data in the configuration package file withthat in the target environment before importing the setup data.
Note: Comparing setup data prior to import requires additional time. You may skip this step by notselecting the Compare setup data prior to import option. However, if you skip this step, you can'treview how the setup data is similar or different in the source and target, and how the import processchanges setup data in the target environment.
◦ Optionally, select the Import feature selection option to import the opt-in configuration of the offeringor functional area you're importing. This imports the enabled dependent functional areas and features ofthe offering or functional area.
◦ The Pause process each time an error occurs option is selected by default. If an error occurs, the importprocess pauses so that you can take corrective action and resume the import. If you don't want theimport process to be interrupted even if there are errors, deselect the option. However, note that if anyprerequisite data fails, additional dependent data might not be imported correctly.
◦ The Pause process each time manual import setup data is required option is selected by default. Theimport process pauses each time there's some data that you must manually import. You can deselect thisoption if the data to be imported manually already exists in your target environment.
7. Click Submit to start the import process.8. If any setup data requires manual entry before the import can start, a warning message appears. This message
shows you the tasks you must perform before submitting the process.
◦ If you verified that the setup data for those tasks are already entered in the target environment, clickSubmit.
◦ Otherwise, click Cancel. Create a new import process after you ensure that the setup data is entered inthe target environment.
9. Monitor the import process by clicking Actions > Import . Up to three most recent processes are listed andordered from newest to oldest. Each process indicates its status at the time and, if the process is completed, thetime stamp when it was processed.
10. While the process is in progress, you can select the status to view how much progress the process made atthe time. A message shows you how many business objects were already processed out of the total numberof the objects to be processed. Click View Progress to review the details of the business objects that finishedprocessing. Click the Refresh button to view the most recent information. Refer to the topic Review of Exportand Import Process Results for detailed information about the process results.
11. If you selected the Compare setup data prior to import option, once the comparison completes, the statusreads Waiting for comparison review. Select the status to go to the Import Offering Data Results page toreview the comparison results. Refer to the topic Compare Setup Data Using Offering or Functional Area for adetailed description of the comparison results.
12. Click Continue to Import from the Import Offering Data Results page to start the import process if you'resatisfied with the comparison results.
13. Alternatively, if you didn't select the Compare setup data prior to import option, the import process startsautomatically.
14. Monitor the process as before, until it completes.
48

Oracle Applications CloudUsing Functional Setup Manager
Chapter 7Setup Data Export and Import
15. If any setup data requires manual data entry during import, the process pauses, and the status reads Waitingfor manual import.
a. Select the status to go to the Import Offering Data Results page and review the details.b. A list displays the business objects that require manual data entry before import.c. For each of the listed business objects, click Go to task. This displays a list of related tasks. Select each
task to enter the required data.d. After you enter the setup data for all the listed business objects, click Resume from the Import Offering
Data Results page to restart the import process.e. Click Confirm in the confirmation message that appears to resume the import process.
16. Continue to monitor the process until it completes.17. If the import process completes successfully:
a. Review the results to verify successful completion.b. If any post import tasks are listed, ensure that their setup data is entered. Otherwise, the setup data
remains incomplete, and you experience errors when processing transactions.18. If the import process completes with errors:
a. The Business Objects table displays all business objects which encountered errors while processing. Referto the topic Review of Export and Import Process Results for a detailed description of the process results.
b. Click the Download Log File from the page header level. This includes the error log of all businessobjects that encountered errors. Alternatively, click Actions > Download Log File corresponding to aspecific business object to download the error log specific to that business object.
c. Create a new import process after correcting the errors.
Related Topics• Review of Export and Import Process Results
• Additional Access Required for Exporting and Importing Setup Data
• Compare Setup Data Using Offering or Functional Area
Compare Offering Setup Data During Import
This procedure explains how to compare setup data for an offering or functional areaduring the import process. You need the Application Implementation Consultant role(ORA_ASM_APPLICATION_IMPLEMENTATION_CONSULTANT_JOB) to import setup data. You also need access toadditional roles if you're importing certain business objects. For more information about additional roles to import thesebusiness objects, refer to the topic Additional Access Required for Exporting and Importing Setup Data.
To compare setup data for an offering or functional area during an import process, follow these steps.
1. Click Navigator > My Enterprise > Setup and Maintenance .2. In the Setup and Maintenance work area, select the offering you want to import from the Offering menu.3. If the configuration package you want to import was created by exporting:
◦ An offering, select Import from the Actions menu in the page header.
◦ A functional area, select Import from the Actions menu corresponding to that functional area.
49

Oracle Applications CloudUsing Functional Setup Manager
Chapter 7Setup Data Export and Import
4. Select Create New to create a new import process.5. Browse and select the configuration package file that contains the setup data you want to import. View the
Configuration Package Details to verify that you selected the correct file.
◦ If the offering or functional area selected during export doesn't match the offering or functional area youchose for the import process, an error message appears. Click the Update button to browse and selectthe correct file.
6. Expand the Import option.
◦ Best Practice is to select the Compare setup data prior to import option. If you select this option, theimport process automatically runs a comparison of the setup data in the configuration package file withthat in the target environment before importing the setup data.
Note: Comparing setup data prior to import requires additional time. You may skip this step by notselecting the Compare setup data prior to import option. However, if you skip this step, you can'treview how the setup data is similar or different in the source and target, and how the import processchanges setup data in the target environment.
◦ Optionally, select the Import feature selection option to import the opt-in configuration of the offeringor functional area you're importing. This imports the enabled dependent functional areas and features ofthe offering or functional area.
7. Click Submit to start the import process.8. If any setup data requires manual entry before the import can start, a warning message appears. This message
shows you the tasks you must perform before submitting the process.
◦ If you verified that the setup data for those tasks are already entered in the target environment, clickSubmit.
◦ Otherwise, click Cancel. Create a new import process after you ensure that the setup data is entered inthe target environment.
9. Monitor the import process by clicking Actions > Import . Up to three most recent processes are listed andordered from newest to oldest. Each process indicates its status at the time and, if the process is completed, thetime stamp when it was processed.
◦10. While the process is in progress, you can select the status to view how much progress the process made at
the time. A message shows you how many business objects were already processed out of the total numberof the objects to be processed. Click View Progress to review the details of the business objects that finishedprocessing. Click the Refresh button to view the most recent information. Refer to the topic Review of Exportand Import Process Results for detailed information about the process results.
11. If you selected the Compare setup data prior to import option, once the comparison completes, the statusreads Waiting for comparison review. Select the status to go to the Import Offering Data Results page toreview the comparison results. Refer to the topic Compare Setup Data Using Offering or Functional Area for adetailed description of the comparison results.
12. Click Continue to Import from the Import Offering Data Results page to start the import process if you'resatisfied with the comparison results.
13. Alternatively, if you didn't select the Compare setup data prior to import option, the import process startsautomatically.
14. Monitor the process as before, until it completes.15. If any setup data requires manual data entry during import, the process pauses, and the status reads Waiting
for manual import.a. Select the status to go to the Import Offering Data Results page and review the details.b. A list displays the business objects that require manual data entry before import.
50

Oracle Applications CloudUsing Functional Setup Manager
Chapter 7Setup Data Export and Import
c. For each of the listed business objects, click Go to task. This displays a list of related tasks. Select eachtask to enter the required data.
d. After you enter the setup data for all the listed business objects, click Resume from the Import OfferingData Results page to restart the import process.
e. Click Confirm in the confirmation message that appears to resume the import process.16. Continue to monitor the process until it completes.17. If the import process completes successfully:
a. Review the results to verify successful completion.b. If any post import tasks are listed, ensure that their setup data is entered. Otherwise, the setup data
remains incomplete, and you experience errors when processing transactions.18. If the import process completes with errors:
a. The Business Objects table displays all business objects which encountered errors while processing. Referto the topic Review of Export and Import Process Results for a detailed description of the process results.
b. Click the Download Log File from the page header level. This includes the error log of all businessobjects that encountered errors. Alternatively, click Actions > Download Log File corresponding to aspecific business object to download the error log specific to that business object.
c. Create a new import process after correcting the errors.
Related Topics• Additional Access Required for Exporting and Importing Setup Data
Compare Setup Data Using Offering or Functional Area
This topic explains how to compare setup data outside of the import process. To compare setup data during import,refer to the topic Import Setup Data Using Offering or Functional Area.
You need the Application Implementation Consultant role(ORA_ASM_APPLICATION_IMPLEMENTATION_CONSULTANT_JOB) to compare setup data. You also need access toadditional roles to compare certain business objects. For more information about access to additional roles, refer to thetopic Additional Access Required for Exporting and Importing Setup Data.
You can compare setup data using offering or functional area, in either of these ways:
• Compare setup data in one configuration package with another configuration package
• Compare setup data in one configuration package with the setup data in the environment
To start the comparison, follow these steps.
1. Click Navigator > My Enterprise > Setup and Maintenance .2. In the Setup and Maintenance work area, select the offering whose setup data you want to compare.3. If the configuration package you intend to compare was created by exporting:
◦ An offering, then select and open the Actions menu in the page header, and then select Compare SetupData > Create New .
◦ A functional area, then select and open the Actions menu corresponding to the functional area, and thenselect Compare Setup Data > Create New .
51

Oracle Applications CloudUsing Functional Setup Manager
Chapter 7Setup Data Export and Import
4. For Configuration 1, upload the base configuration package file whose data you want to compare with that inthe environment or with another configuration file. To upload the configuration package file, follow these steps.
a. Click the Configuration Package list and select Upload new.b. Browse to find the configuration package file, select it and click Open.c. Optionally, open Configuration Package Details to verify that you have selected the correct file. If it's
not the correct file, then click Update to browse and select the correct file.d. Click Submit to upload the configuration package.
5. For Configuration 2, the option Data in this environment is selected by default to compare with the existingdata in the environment. But if you want to compare with another configuration package, click Source andupload another configuration package file.
6. Once the sources are ready, the process for setup data comparison is ready to be submitted. Optionally, you canchange the default process name that's automatically assigned.
7. Click Submit to start the comparison process.8. Monitor the status of the process by selecting Action > Compare Setup Data . Up to three most recent
processes are listed and are ordered from the newest to oldest. Each process indicates its status at the timeand, if the process has completed, then the time stamp when it was processed.
9. When the process completes, the status shows Ready for comparison review. Select the status to go toComparison Process Results to review the details of the results. Refer to the topic Setup Data ComparisonResults for detailed descriptions of the comparison results.
Related Topics• Additional Access Required for Exporting and Importing Setup Data
• Import Setup Data Using Offering or Functional Area
• Setup Data Comparison Results
Setup Data Export and Import Using ImplementationProject If you used an implementation project to enter setup data, then you can use your implementation project to export andimport setup data. In this alternative method, the tasks in your implementation project and their sequence determinethe list of setup business objects whose data is exported and imported, and in which order.
Note: Even if you used an implementation project to enter setup data, you can still use an offering or a functionalarea to export and import the same setup data, to ensure that all data dependencies are migrated properly.
Select your implementation project, and create a configuration package to generate the ordered list of business objectsfor export and import.
Exporting One Offering at a TimeThe implementation project you use to create a configuration package must contain only one offering. The importprocess fails otherwise.
52

Oracle Applications CloudUsing Functional Setup Manager
Chapter 7Setup Data Export and Import
If you included multiple offerings in an implementation project to enter setup data, don't use it to create a configurationpackage for setup data export and import. Instead, create new implementation projects with only one offering in each,and use these to create separate configuration packages.
Partial Data MigrationAlthough best practice is to select an offering and its functional areas to create an implementation project, you mayhave created an implementation project by selecting specific tasks and task lists instead. Such implementation projectsare often created to update and maintain a small set of setup data after the initial migration of an offering to a targetenvironment has completed.
When using such implementation projects to create configuration packages for setup data export and import, considerthe following requirements carefully to ensure the success of the process:
• If any setup data in the configuration package has a dependency on any other setup data, then thatprerequisite data must be available in your target environment before you start the import process using theconfiguration package. Otherwise, consider including the prerequisite task in the implementation project beforeyou create the configuration package.
• The sequence of the task list and tasks, and therefore the business objects, in your implementation projectmust align with the setup data dependency requirements. The import process may fail if you don't ensure thecorrect order of the task lists and tasks in the implementation project.
Comparing Setup Data Before ImportWhen using an implementation project to migrate setup data, the comparison report isn't integrated with the importprocess. However, best practice is still to compare the setup data in the exported configuration page with the dataexisting in the target environment before starting the import process.
Export Setup Data Using Implementation Project
This procedure explains how to export setup data for an implementation project that youalready completed setting up. You need the Application Implementation Consultant role(ORA_ASM_APPLICATION_IMPLEMENTATION_CONSULTANT_JOB) to export setup data. You also need access toadditional roles if you're exporting certain business objects. For more information about access to the additional roles,refer to the topic Additional Access Required for Exporting and Importing Setup Data.
To export setup data using an implementation project, follow these steps.
1. Click Navigator > My Enterprise > Setup and Maintenance .2. In the Setup and Maintenance work area, select Manage Configuration Packages from the Tasks panel tab.3. On the Manage Configuration Packages page, select Create from the Actions menu, or click the Create icon
from the Search Results table in the Manage Configuration Packages page to go to the Create ConfigurationPackage: Enter Basic Information page.
4. In the Source Implementation Project:
a. Select the implementation project you want to use for the setup data export from the Name menu.b. Leave the default selection for Export, Setup task list and setup data, unchanged.
53

Oracle Applications CloudUsing Functional Setup Manager
Chapter 7Setup Data Export and Import
5. In Configuration Package Details, you can use the default field values for Name, Code and Description, orassign unique values.
6. Click Next to go to the Create Configuration Packages: Select Objects for Export page.7. The first table displays the list of business objects whose setup data is exported. The implementation project
you selected as the source of this configuration package in the previous step determines the business objectlist.
◦ The Type column indicates the export and import behavior of the business object as follows:
i. If export and import services are available for a business object then the type is business objectservice.
ii. If the type is specified as Scope, then the business object can be used to select a scope value tofilter the exported data. However, the setup data of the business object itself in not exported.
iii. If the setup data of any business object must be migrated manually using alternative methods thatare external to setup export and import processes, the type is Manual data loading.
◦ All business objects whose type is Business object service have their Export column checked by default.You typically keep this selection unchanged.
Note: If a business object has identical setup data in both source and target environments, then youcan optionally exclude it from export, and consequently, from import, to reduce processing time.However, if any excluded setup data is prerequisite to import any other setup data in this configurationpackage, then your import process fails. Therefore, you should use this option cautiously and onlywhen you're certain that the target environment contains the prerequisite data before you start yourimport process.
8. When you select a business object in the first table, if it supports scope to filter exported setup data, you canselect appropriate scope values in the second table.
◦ If the business object you selected has predefined scope values, then scope table lists all of them bydefault. You could decide to remove one or more of the listed scope values but you can't add othervalues.
◦ If the business object you selected supports scope but doesn't have predefined value, then you can addone or more scope values.
i. Click the Create icon in the scope table.ii. Search and select each of the values you want to use as scope to export data for and click Apply.
iii. Click Done when you finish selecting all desired scope values.9. Click Submit to submit the setup data export process and confirm when the confirmation message appears.
10. Monitor the process from Manage Configuration Package until it completes.11. While the process is in progress, you may select the status to go to the Export and Import Process Results page
to view how much progress the process has made at the time. Click the Refresh button to get the most recentinformation. Refer to the topic Review of Export and Import Process Results for detailed descriptions of theprocess results.
12. Once the export process completes successfully, click Download to download the configuration package. Usethis .zip file to import setup data in the target environment. Optionally, select the status to go to the Export andImport Process Results page to view the result details.
54

Oracle Applications CloudUsing Functional Setup Manager
Chapter 7Setup Data Export and Import
13. If the export process completes with errors, then fix the errors according to the following instructions.a. Select the status to go to the Export and Import Process Result page to view the error details.b. Download the log file for the setup business objects with errors by clicking Actions > Download > Log
file .c. Fix the errors as needed. To modify or enter any data to fix the error, click Go to Task to open the
corresponding setup page.14. Create a new export process after the errors are corrected.
Related Topics• Additional Access Required for Exporting and Importing Setup Data
• Review of Export and Import Process Results
Import Setup Data Using Implementation Project
This procedure explains how to import setup data for an implementation project. You need the ApplicationImplementation Consultant role (ORA_ASM_APPLICATION_IMPLEMENTATION_CONSULTANT_JOB) to import setupdata. You also need access to additional roles if you're importing certain business objects. For more informationabout additional role to import those business objects, refer to the topic Additional Access Required for Exporting andImporting Setup Data.
To import setup data from a configuration package, follow these steps.
1. Click Navigator > My Enterprise > Setup and Maintenance .2. In the Setup and Maintenance work area, select Manage Configuration Packages from the Tasks panel tab.3. On the Manage Configuration Packages page, click the Upload button from the Search Results table to go to
the Upload Configuration Package page.4. Click the Browse button to browse and select the configuration package you want to import.5. Click the Get Details button and review the information in Configuration Package Details and Implementation
Project Details to verify that you uploaded the correct configuration package for import. If you didn't upload thecorrect configuration package file, click the Update button to upload the correct file and verify again.
6. Click Submit to start the upload process.7. Your configuration package is listed in the Search Results table in the Manage Configuration Package page.8. Select the configuration package from the Search Results table to view its process details in the Export and
Import Processes table.9. Monitor the upload process until it completes. Once the upload process completes successfully, your
configuration package is ready for import.10. Select the upload process from the Export and Import Processes table and click Import Setup Data.11. On the Import Setup Data: Enter Basic Information page, click Submit to start the import process with the
default settings.12. You can also make the following modifications before submitting the import process:
◦ On the Import Setup Data: Basic Information page, you can change the default process name anddescription, to help you identify the process later.
◦ On the Import Setup Data: Basic Information page, the Pause process each time an error occurs optionis selected by default, to indicate that the import process pauses each time it encounters an error. Thisgives you an opportunity to take corrective action. You can deselect this option so that the importprocess continues despite the errors. A summary of all the errors is displayed after the process finishes.
55

Oracle Applications CloudUsing Functional Setup Manager
Chapter 7Setup Data Export and Import
Note: If the import process doesn't pause for each error, it doesn't require your attention throughoutthe process. However, this also increases the possibility of additional business objects failing importdue to dependencies.
◦ The import process also pauses by default for each task that requires manual data loading. To overridethis pausing, follow these steps:
- Click Next to go to the Import Setup Data: Select Pause for External Import page.- Select Manual data loading from the Type menu.- The Pause column displays a check mark for the tasks that require manual data loading before the
import can resume. If manual data loading can be performed before or after the import process,this column doesn't display a check mark.
- Review the list of tasks and deselect the Pause column corresponding to the tasks for which youdon't want the import process to pause.
Note: Use this option only when you're certain that the setup data for these tasks already existsin the target environment. Import of setup data whose prerequisite is the data that requiresmanual data loading may fail if this prerequisite data doesn't exist when the dependent data isimported.
◦ The import process runs immediately when submitted. However, you can also schedule the importprocess to start at a certain time. To schedule a time, click Next to go to the Import Setup Data: Scheduleand Notifications page. Select Use a schedule and specify a start time.
13. Monitor the import process until it completes. The process status changes according to the state of the process.Select the status to go to the Export and Import Process Results page, and take the appropriate action asfollows.
◦ In Progress: While the process is still in progress, you may review how much progress the process madeat the time. Click the Refresh button to get the most recent information.
◦ Completed Successfully: Review the process results to determine if any setup tasks must be performedmanually after the import to properly complete migration of the setup data. If yes, perform those tasks.
◦ Waiting for Manual Import: If a setup task requires manual data entry before the import process cancontinue, the status reads Waiting for Manual Import. Click Go to Task for the corresponding businessobject to open the setup user interface. Alternatively, you can enter the setup data manually. After youenter the required setup data, click Resume from the Export and Import Process Results page, or fromthe Manage Configuration Packages page to restart the import process.
◦ Waiting to review errors: If you selected the Pause process each time an error occurs option whenyou created the import process, this status displays when the import process encounters an error whilerunning. Click Actions > Download log file corresponding to the specific business object to review theerror details. Take appropriate corrective action and click Resume from the Export and Import ProcessResults page, or from the Manage Configuration Package page.
Optionally, you may skip the business object that generated the error, and continue from the next object.However, skip these business objects only if you're certain that the error was fixed in the environment,and that the import process doesn't require reprocessing the business object.
◦ Completed with errors: When the process completes with errors, click Actions > Download log file corresponding to the business objects with errors, to review the error details.
14. Create a new import process after you correct the errors.
56

Oracle Applications CloudUsing Functional Setup Manager
Chapter 7Setup Data Export and Import
Related Topics• Additional Access Required for Exporting and Importing Setup Data
• Review of Export and Import Process Results
Compare Setup Data Using Implementation Project
This topic explains how to compare setup data using an implementation project. You need the ApplicationImplementation Consultant role (ORA_ASM_APPLICATION_IMPLEMENTATION_CONSULTANT_JOB) to compare setupdata. You also need access to additional roles if you're comparing certain business objects. For more information aboutadditional roles for these business objects, refer to the topic Additional Access Required for Exporting and ImportingSetup Data.
To compare setup data using an implementation project, follow these steps:
1. Click Navigator > My Enterprise > Setup and Maintenance .2. In the Setup and Maintenance work area, run an export process at the target environment to prepare for
setup data comparison. Create an implementation project in the target environment that matches exactly thesame task lists and tasks as the implementation project you used at your source environment to create theconfiguration package file you want to import. Use this implementation project to run the export process at thetarget environment.
3. Once the export process completes, upload the configuration package file from your source environment intothe target environment. Follow the same process as needed, to upload a configuration package for import.However, don't run the import process.
4. Once the upload process completes successfully, select Manage Export and Import Processes from the Taskspanel tab.
5. On the Manage Export and Import Processes page, click Compare.6. On the Comparison Processes page, select the Create new icon to create a new comparison process.
a. Select the configuration package you uploaded from your source environment as Source 1. If you havemultiple versions of the same configuration package available, then select the correct process date toidentify the correct version of the file.
b. Select the configuration package you created by running the export process at the target environment toprepare for comparison, as Source 2. Like Source 1, if the configuration package you selected for Source2 has multiple versions available in the target environment, select the correct process date to identify thecorrect version.
c. Change the default process name, if required and click Submit.7. Once the comparison process is submitted, the new process is listed on the Comparison Processes page.8. The Status column displays the status of the process. Monitor the status until the process completes.9. When the Status column reads Completed successfully, select the process name to go to the Configuration
Package Comparison page to review the details of the results.10. If the comparison process doesn't complete successfully, select the status to go to the Comparison Process
Results page and review the error details.
Related Topics• Additional Access Required for Exporting and Importing Setup Data
• Setup Data Comparison Results
57

Oracle Applications CloudUsing Functional Setup Manager
Chapter 7Setup Data Export and Import
Setup Data Comparison Results Setup data comparison results are listed in three sections:
• Comparison Summary
• Comparison Details
• Failed Objects
Comparison SummaryThis section provides an overview of the results from comparing the setup data, which includes:
• Total number of business objects compared.
• How many of them processed successfully.
• How many of them failed, if any.
• How many of them have records that exist only in the configuration package created from the sourceenvironment.
• How many of them have records that exist only in the target environment.
• How many of them have records that exist in both the configuration package and the target environment, buthave some data mismatch.
Comparison DetailsThis section lists each of the business objects that were compared successfully between the source and targetenvironments. For each business object, details of the records that have data mismatch between the source andtarget environments are displayed. By default, the list includes only the business objects that have data discrepancies.However, you can select All from the Show filter to also include the business objects that have identical setup data inboth the source and target environments.
For each business object, a summary table displays the number of records it has in the following categories. Thenumbers which aren't zero are displayed as links. Select the numbers to open a detailed report.
• Only in Configuration 1 displays the records that exist only in the exported configuration package file, but notin the target environment. Therefore, when you import this configuration package, these records are created inthe target environment.
• In Both with Mismatch displays the records that exist in both the source and target environments. buthave different values in one or more of the attributes. Consequently, these records are updated in the targetenvironment with their values in the configuration package when you import. The detailed report displays tworows for each record, with one row each representing the source and target environments.
• Only in Configuration 2 displays the records that exist only in the target environment and not in theconfiguration package file. These records therefore, remain unchanged when the configuration package isimported in the target environment. You must use the manual process to remove these records from the target.
• Identical in Both displays the records that exist in both the source and target environments, and have identicalvalues in all of their attributes. This column is displayed only when the Show filter is set to All. In addition, thiscategory doesn't provide any detailed reports on the records and therefore, the number in the summary table isalways read-only.
58

Oracle Applications CloudUsing Functional Setup Manager
Chapter 7Setup Data Export and Import
Failed ObjectsIn case the comparison report failed to process any business objects due to errors, this section displays a list of thoseobjects. For each object, you can use the Feature Details icon to view or save its error log file.
Downloading ReportsOptionally, click the Download button from the Comparison Details section to download and save the reports.
• The Comparison Report provides .zip files that contain comparison reports for each of the business objectsthat were processed. For each business object, a report each for Only in Configuration 1, In Both With Mismatch,and Only In Configuration 2, as applicable is provided.
• The Comparison Results report provides a summary of the comparison process and represents the tableshown in the Comparison Details section of the user interface.
• The Comparison Process Results Summary provides a summary of the process results, which displays a list ofall the processed business objects, and whether their processing completed successfully, or with errors.
• The Comparison Log File provides a detailed log of the entire comparison process.
Setup Data Reports Setup data reports are generated automatically every time you run an export process by using an offering, functionalarea or implementation project.
You can also generate setup data reports for an offering or functional area without running an export process. However,this option isn't available for implementation projects.
You can download and use these reports to verify the setup data as it exists in the environment. You can also save thereports as documents of the state of your setup data at the time of export, for future reference.
Generate Setup Data Reports
This procedure explains how to generate setup data reports. You can download and review a consolidated report ofsetup data for all exported business objects, or for a specific business object.
To download and review setup data reports, follow these steps.
1. If you ran an export process already and want to use the setup data reports that were generated as a result,then select the export process status to go to process results page once the process completes successfully.
2. To generate setup data reports for an offering or a functional area without running an export process, followthese steps.
a. Click Actions > Setup Data Reports > Create New for an offering or a functional area as applicable.b. Accept the confirmation message.c. Continue to monitor the process until it completes successfully.d. Select the status to go to the Export and Import Process Results page.
59

Oracle Applications CloudUsing Functional Setup Manager
Chapter 7Setup Data Export and Import
3. Use Download Setup Data Reports:
◦ At the page level to download a consolidated report of setup data from all exported business objects.
◦ Or, at the individual business object level to download the report for that specific business object.
4. Save and open the .zip file to review the details. If you download the consolidated report, then the .zip filecontains one .zip file for each of the exported business object.
Review of Export and Import Process Results Export and import process results help you monitor the progress of setup data export or import processes while they'rerunning, and to review their results after the processes complete.
The results are shown in three sections:
• Summary
• Business Objects
• Post-Export or Post-Import Tasks.
SummaryThis section shows a summary of the export or import process, which includes:
• The date and time of the export or import process, and its completion status.
• Total number of business objects processed.
• How many business objects were processed successfully.
• How many business objects completed processing with errors.
• How many business objects completed processing with warnings.
• How many setup objects require manual export or import.
Business ObjectsThis section lists the business objects whose setup data was exported and imported. The sequence of the results is thesame sequence in which the business objects were processed.
If the process completes successfully, all business objects are listed. If the process completes with errors or warnings,the list includes only those business objects that encountered errors or warnings.
Review the status details for each business object, which shows you how many records were processed. If the statusdetails of a business object indicate that the object was already processed and references another object in themessage, then locate the referenced object to review its status details.
If the business object encountered errors, the status details also include detailed information about the errors, andrefer to the product which supports the business object. When you log bugs on this business object, use the referencedproduct and attach the corresponding log file with the bug.
Post-Export or Post-Import TasksSome of the setup data for a configuration can't be automatically exported and imported since export or importservices may not be available for them. You must manually export or import this setup data to ensure that all the
60

Oracle Applications CloudUsing Functional Setup Manager
Chapter 7Setup Data Export and Import
relevant setup data is migrated. This section shows you which setup data you must manually export or import after theexport or import process completes. Oracle recommends that you follow the same method you used to enter the setupdata for each of these tasks.
Note: When reviewing the results of export and import processes based on implementation projects, the Post-Exportor Post-Import Tasks are available from the Export and Import Process Results page. Click the Review Tasks forExternal Import button from the Object Details table to access the Post-Export and Post-Import Tasks.
Export and Import Process ReportsEach time you run an export or import setup data process, a Process Results Summary, a Process Results report, anda Log File generate automatically.
• Process Results Summary report is a text file that displays summary information and the status details of eachsetup business object processed by the export or import process.
• Process Results report is a text file that displays the status of an export or import process, and detailedinformation about encountered during the process. These reports show the same information as the exportand import results seen directly in the application.
• Log File is a text file that displays detailed information for about each setup object processed by the export orimport process.
You can download the export and import process results report from the Actions menu. Alternatively, you click theDownload button from the Export and Import Process Results page, and select the report you want to download.
Additional Access Required for Exporting and ImportingSetup Data You must have the Application Implementation Consultant role(ORA_ASM_APPLICATION_IMPLEMENTATION_CONSULTANT_JOB) to export or import setup data. However, yourequire additional roles to export and import certain business objects.
This table lists the business objects for which additional roles are required, and the role required for each businessobject.
Business Object Name Required Role Name
Corporate Card Expense Type MappingRule
Corporate Card Administrator
Corporate Card Company Account
Corporate Card Administrator
Corporate Card Program
Corporate Card Administrator
Corporate Card Transaction DownloadParameter
Corporate Card Administrator
61

Oracle Applications CloudUsing Functional Setup Manager
Chapter 7Setup Data Export and Import
Business Object Name Required Role Name
Corporate Card Transaction Upload Rule
Corporate Card Administrator
Corporate Card Usage Limit Rule
Corporate Card Administrator
Bank Statement Reconciliation Tolerance
Cash Manager
Bank Statement Automatic ReconciliationMatching Rule Set
Cash Manager
Bank Statement Automatic ReconciliationMatching Rule
Cash Manager
Bank Statement Transaction Creation Rule
Cash Manager
Cash Transaction Type
Cash Manager
Bank Transaction Code
Cash Manager
Bank Statement Parsing Rule
Cash Manager
Bank Account
Cash Manager
Bank Branch
Cash Manager
Bank
Cash Manager
Collections Aging Bucket
Collections Manager
Collections Dunning Configuration
Collections Manager
Collections Preference
Collections Manager
Collector
Collections Manager
Expense Audit Rule
Expense Manager
Expense Audit List Rule
Expense Manager
Expense Receipt Management Rule
Expense Manager
Incentive Compensation Participant
Incentive Compensation Application Administrator
62

Oracle Applications CloudUsing Functional Setup Manager
Chapter 7Setup Data Export and Import
Business Object Name Required Role Name
Department
Human Capital Management Application Administrator
Legal Employer
Human Capital Management Application Administrator
Payroll Statutory Unit
Human Capital Management Application Administrator
Division
Human Capital Management Application Administrator
Job
Human Capital Management Application Administrator
Location
Human Capital Management Application Administrator
Enterprise Information
Human Capital Management Application Administrator
Legislative Data Group
Human Capital Management Application Administrator
Spreadsheet Business Object SecurityMapping
Human Capital Management Integration Specialist
Performance Goal Plan
Human Resource Specialist or the Manage Performance Goal by HR privilege
Payment Process Request Templates
Manage Payables Payment Process Request Template privilege
Role Provisioning Associated Role List
IT Security Manager
Role Provisioning Rule
IT Security Manager
Country Security Profile Country List
IT Security Manager
Country Security Profile
IT Security Manager
HR Document Type Security Profile List
IT Security Manager
HR Document Type Security Profile
IT Security Manager
Legislative Data Group Security Profile List
IT Security Manager
Legislative Data Group Security Profile
IT Security Manager
Organization Security Profile ClassificationList
IT Security Manager
63

Oracle Applications CloudUsing Functional Setup Manager
Chapter 7Setup Data Export and Import
Business Object Name Required Role Name
Organization Security Profile
IT Security Manager
Organization Security Profile OrganizationList
IT Security Manager
Payroll Security Profile Pay
IT Security Manager
Payroll Security Profile
IT Security Manager
Payroll Flow Security Profile Pay
IT Security Manager
Payroll Flow Security Profile
IT Security Manager
Person Security Profile Manager Type
IT Security Manager
Person Security Profile Person Type
IT Security Manager
Person Security Profile
IT Security Manager
Person Security Profile Area ofResponsibility Scope
IT Security Manager
Position Security Profile Position List
IT Security Manager
Position Security Profile
IT Security Manager
Position Security Profile Area ofResponsibility Scope
IT Security Manager
Transaction Security Profile
IT Security Manager
Transaction Security Profile Entries
IT Security Manager
Transaction Security Profile SubCategories
IT Security Manager
HCM Data Role Security Profile
IT Security Manager
HCM Data Role
IT Security Manager
China Ledger Option
Enterprise Financial Data Export Options Management for China
64

Oracle Applications CloudUsing Functional Setup Manager
Chapter 7Setup Data Export and Import
Business Object Name Required Role Name
China Depreciation Method Formula
Enterprise Financial Data Export Options Management for China
China Financial Information Option
Enterprise Financial Data Export Options Management for China
China Golden Tax Miscellaneous Option
Golden Tax Administration for China
China Value Added Tax Invoice Option
Golden Tax Administration for China
China Golden Tax Transfer Rule
Golden Tax Management for China Duty
China Golden Tax Transfer Rule Line
Golden Tax Management for China Duty
China Golden Tax Transfer Rule LineTransaction Type
Golden Tax Management for China Duty
China Golden Tax Miscellaneous Option
Golden Tax Management for China Duty
China Value Added Tax Invoice Option
Golden Tax Management for China Duty
China Value Added Tax InvoiceAssignment
Golden Tax Management for China Duty
China Golden VAT Limit
Golden Tax Management for China Duty
China Golden VAT Type
Golden Tax Management for China Duty
Italian VAT Letter of Intent Limit Setup
EMEA Financial Reporting Duty
Spreadsheet Business ObjectSecurSpreadsheet Business ObjectSecurity Mapping
Human Capital Management Integration Specialist
HCM Spreadsheet Data Loader Template
Human Capital Management Integration Specialist
Additional Settings for Setup Data Export and ImportProcesses In general, you won't need these additional settings for your export and import processes. To know whether you needthem, review the special requirements explained in this topic.
65

Oracle Applications CloudUsing Functional Setup Manager
Chapter 7Setup Data Export and Import
Manage Import-only Setup ModeYou may have to operate one of your environments, such as your production environment, in import-only setup mode.Then, you can manage the setup data in that environment through the setup import process.
When an environment is in import-only setup mode, users won't be able to use any of the setup user interfaces tomanage setup data. If anyone wants to use import processes to manage setup data, they must have the Manage SetupMigration Settings (ASM_MANAGE_SETUP_MIG_SETTINGS_PRIV) privilege to run setup data import. This privilege isn'tincluded in any roles delivered by Oracle and must be granted explicitly to you.
To specify your environment as import-only, follow these steps.
1. Click Navigator > My Enterprise > Enterprise .2. On the Enterprise Information page, go to the Functional Setup Settings section and enable Import-only Setup
Mode.
Mange Export of Externally Mastered Setup DataYou may have some of your setup data sourced from an external master system. If you want to exclude those externallymastered data from the setup export process, follow the instructions and make the required changes. You need theManage Setup Migration Settings (ASM_MANAGE_SETUP_MIG_SETTINGS_PRIV) privilege for this task. This privilegeisn't included in any roles delivered by Oracle and must be granted explicitly to you.
1. Click Navigator > My Enterprise > Enterprise .2. On the Enterprise Information page, go to the Functional Setup Settings section and click Manage Export of
Externally Mastered Setup Data. The Manage Export of Externally Mastered Setup Data page lists all businessobjects sourced from an external master system.
3. Select the Include in Export check box to include a business object in the export process. If you want toexclude a business object, deselect the check box.
4. Click Save and Close.
Change Export File SizeThe default size of setup data export files is usually sufficient for most export requirements. If you're exporting largevolumes of setup data for any tasks, Oracle might advise you to increase the export file size. That would also addressthe size-related warning message that you might see during the export process.
Note: Don't change the file size unless Oracle advises you to do so.
For this task, you need the Application Implementation Consultant(ORA_ASM_APPLICATION_IMPLEMENTATION_CONSULTANT_JOB) role and the Manage Setup Migration Settings(ASM_MANAGE_SETUP_MIG_SETTINGS) privilege. To change the export file size, follow these steps.
1. Click Navigator > My Enterprise > Enterprise .2. On the Enterprise Information page, go to the Functional Setup Settings section and click Manage Setup Data
File Sizes.3. Select the file type and change its value as per the recommendation from Oracle Support. If you want to set a
larger file size, consider the available memory in your environment before changing the value.4. Click Save and Close.
66

Oracle Applications CloudUsing Functional Setup Manager
Chapter 7Setup Data Export and Import
Guidelines for Troubleshooting Errors from Setup DataExport and Import Processes Use the information in this topic to troubleshoot warning or error messages that you might receive when you run setupdata export and import related processes. You might receive errors when you:
• Export or import XML based configuration packages
• Export or import CSV file packages
• Compare setup data
If there are any exceptions, the process completes with the status: Completed with warnings, or Completed witherrors. Click Status to view the exception details on the process results page.
Review Process ResultsThe process results page lists all business objects whose setup data couldn't be processed successfully. You could alsodownload a summary report of the process results from the Actions > Download > Process Results Summary Report. Download the summary and review log files of each failed business object to identify what type of error occurred, andtake appropriate corrective actions.
Download Log FilesClick Download Log File button on the Process Results page to download the file that includes error details of all failedbusiness objects when running a process for an offering, a functional area or a task. Alternatively, use the BusinessObjects table to select a specific business object and then go to Action > Download Log File to download error detailsof a specific business object.
For export and import of implementation project-based configuration packages, click the Status Details link on theProcess Results page and download the error log. The log file includes information about all the business objects thatfailed.
For the comparison of two configuration packages, click the Status link on the Process Results page and download theerror log. The log file includes information about all the failed business objects. Alternatively, you can use the BusinessObjects table to select a specific business object and then use Status Details column to download error details of aspecific business object.
Examine Log FilesThe text in a log file begins with general information about the process. All business objects are listed in the same orderas they were processed. For each business object, you will find a summary of the total number of records processed andhow many of those records failed processing. If any record or a business object fails, then its status details shows therelevant error message along with the name of the product that owns the business object. Detailed information aboutthe cause of failure for each record appears in the Row Identifier.
Setup data of certain business objects are processed in batches. In those cases, detailed information for the failedrecord will also include the batch file name in which the record is created.
67

Oracle Applications CloudUsing Functional Setup Manager
Chapter 7Setup Data Export and Import
Note: Review detailed information provided for the failed objects and determine if you can fix the cause of the error.Resubmit the export or import process once you have fixed the issue. If, on the other hand, you determine that youcan't fix the cause of the error, report it to the product shown in the status detail of the business object. Include thelog file in your service request so that the product owner has relevant details to analyze the error.
Common Error TypesHere are some of the common errors seen at the time of running setup data export and import related processes.
Error Type Example Error Message Description Suggested Action
Access Related
Access Denied
The user doesn't have thenecessary permissions to export orimport setup data of the businessobject.
Refer to the Using FunctionalSetup Manager guide to findout which role is needed besidesthe Application ImplementationConsultant role. Grant that role tothe user before the user runs theprocess again.
Setup Data Processing Related
• Review and report the errorsfor this business object toproduct <product name>
• The values <reference key>aren't valid for the attribute<attribute name>.
One or more records of a businessobject caused an exception whenthe setup data is processed. Anerror can also occur if the record ofa dependent business object can'tfind the reference to its parentrecord.
• Download and review the logfile for detailed informationand take the necessaryaction.
• If the error indicates invalidattribute values, find themissing dependent businessobject and fix the referencebetween the parent and childbusiness objects.
• If nothing is reported in thelog file, report the error to theproduct shown in the statusdetails
Multiple Business Objects Sharingthe Export or Import Service
This object was already processed.The import or export detailswere listed along with <name ofthe business object processedpreviously>
If multiple business objects areprocessed by the same export orimport service and an error occursduring the process, error detailsare reported on the first businessobject processed by the export orimport service, while the statusdetails of the remaining businessobjects sharing the service displaysthe error message.
Fix the error reported on the firstbusiness object.
Invalid File Format
The format of the file <filename>is invalid. The XML should have thesame number of attributes for allrows within a node path.
This error message is applicableonly to the export or import ofCSV file packages and setup datacomparison process.
Download the log file and reportthe error to the product specified inthe error message.
Export or Import Service Invocation
NA
You might find a business objectfailing with the message thatan error was experienced whileinvoking the export or importservice.
Download the log file and reportthe error to the product specified inthe error message.
68

Oracle Applications CloudUsing Functional Setup Manager
Chapter 7Setup Data Export and Import
Error Type Example Error Message Description Suggested Action
FAQs for Setup Data Export and Import
How can I view and print any errors generated while importing orexporting offering setup data? Follow the steps to open export or import process results as specified in the procedure topics for exporting andimporting setup data. Download the log file for either the entire process, or for a specific business object.
Why is an import process stuck with User Action Required status? An import process is set to User Action Required when the process paused because certain data must be imported.This occurs when the standard service to automate the setup data export and import for a business object which ismarked as required for other data isn't available. You must migrate or enter the data manually using another applicationor process external to the Setup and Maintenance work area. Review the process results to identify the business objectand resume the process after you take appropriate action to externally import the required setup data.
How can I exclude a business object from exporting? You can exclude a business object from exporting by deselecting the Export column while creating the configurationpackage. However, business objects that are exported might have data dependencies on the excluded business objects,which may cause the setup data import of those business objects to fail. Therefore, be cautious when deciding toexclude business objects from the export process.
Why does the configuration package show preselected scopevalues for some business objects? For a business object, scope values are selected by default if you selected any scope value when you performed a taskto enter setup data, or if it's one of the application core tasks, such as task for defining profile options, which havepredefined parameters to filter setup data. You can remove any of these preselected values from the configurationpackage, if appropriate, for export purposes. Similarly, you can also add more scope values to the configuration packageif applicable for your export process.
69

Oracle Applications CloudUsing Functional Setup Manager
Chapter 7Setup Data Export and Import
How can I cancel an export or import process that I submitted? You can cancel an export or import process from the Manage Export and Import Processes page. Select Cancel Processfrom the Actions menu on the Manage Export and Import Processes page. Once you confirm to cancel the process,it completes processing the business object that already started, doesn't process the remaining business objects. Theprocess status is changed to Canceled, and you can't resume the process.
Why can't I modify a configuration package I recently created? You can modify a configuration package only if its status displays Definition in progress. Once you submit theconfiguration package for export, or upload it for import, its status displays Locked. You can't modify a configurationpackage whose status displays Locked.
Why aren't all ready to use setup data exported? By default, the export process includes only ready to use setup data that's modified. You can't export ready to use setupdata for the following business objects unless it's modified:
• Application Taxonomy
• Application Reference Data Set
• Application Reference Data Set Assignment
• Application Lookup
• Data Security Policy
• Application Tree Structure
• Application Tree Label
• Application Tree
• Application Flex Value Set
• Application Descriptive Flexfield
• Application Extensible Flexfield
• Application Key Flexfield
Additionally, make sure that you deploy the ready to use setup data for the following business objects:
• Application Descriptive Flexfield
• Application Extensible Flexfield
• Application Key Flexfield
Note: You can never export user level profile values.
70

Oracle Applications CloudUsing Functional Setup Manager
Chapter 8Setup Security
8 Setup Security
Security Requirements The Application Implementation Consultant job role has full access to perform all offering opt-in and setup relatedactivities. However, not all activities require this role. Other roles are available with limited access to a subset ofactivities. Review the requirements and grant users roles that are required to complete a specific activity. Also,refer to the Oracle Applications Cloud Security Reference for Common Features guide on the Oracle Help Center(docs.oracle.com) for more details.
Limit Access to Specific Setup TasksTo limit a user's access to specific setup tasks, grant both these roles to the user:
• Functional Setups User Role (ORA_ASM_FUNCTIONAL_SETUPS_USER_ABSTRACT)
• A role with the task-specific privilege
If you also want to allow the same user to export and import task-related setup data, additionally grant the ExportImport Functional Setups User (ORA_ASM_EXPORT_IMPORT_FUNCTIONAL_SETUPS_USER) role.
For details about setup tasks and task-specific privileges, refer to the product-specific Security Reference guides.
Related Topics
Mapping of Setup Activities and Required Roles Review a summary of opt-in and setup activities, and the roles that can perform those activities. For full details aboutroles and privileges related to the Functional Setup Manager, refer to the Oracle Applications Cloud Security Referencefor Common Features guide on the Oracle Help Center (docs.oracle.com).
Details about how roles and activities are mapped are presented in two sections. The first section introduces the opt-inand setup activities, and indicates which roles are required to complete those activities. The second section introducesthe roles, and highlights the activities that each role is entitled to perform.
Setup Activities and the Required RolesIn this table, review the opt-in and setup activities, and the roles that are required to perform those activities. The firstcolumn lists all the setup activities and the second one lists the roles.
Opt-In and Setup Activity Roles and Privileges
Review offering features:
• Review offerings
One of these roles is required:
• Application Implementation Consultant (Job)
71

Oracle Applications CloudUsing Functional Setup Manager
Chapter 8Setup Security
Opt-In and Setup Activity Roles and Privileges
• Review new and available features
• Review upcoming feature updates
• Application Implementation Manager (Job)
• Functional Setups User (Abstract)
Configure offering features:
• Opt in offerings and edit featureselections
• Review new and available features
• Review upcoming feature updates
• Enter Promotion Codes (whenapplicable)
Either of these roles is required:
• Application Implementation Consultant (Job)
• Application Implementation Manager (Job)
Manage implementation projects:
• Create, view, edit, or removeimplementation projects
• Modify task list
• Assign tasks to users
• Monitor progress of the projects
Either of these roles is required:
• Application Implementation Consultant (Job)
• Application Implementation Manager (Job)
Perform all setup tasks and manage setupdata using:
• Offerings and functional areas
• Implementation projects
Application Implementation Consultant (Job) Certain data may require additional roles. For additional information, see topic Additional AccessRequired for Exporting and Importing Setup Data.
Perform specific setup tasks and managesetup data
Both these roles are required:
• Functional Setups User (Abstract)
• A role with the task-specific privilege
Export and import setup data using:
• Offerings and functional areas
• Configuration packages forimplementation projects
• CSV file packages for offerings, functional areas, or tasks
Either of these roles is required:
• Application Implementation Consultant
• Export Import Functional Setups User (Abstract) and additional roles with the task-specific setupdata privileges
If you have the Application Implementation Consultant role, note that certain data may requireadditional roles. For additional information, see topic Additional Access Required for Exporting andImporting Setup Data.
Compare setup data
Either of these roles is required:
• Application Implementation Consultant
• Export Import Functional Setups User (Abstract) and additional roles with the task-specific setupdata privileges
If you have the Application Implementation Consultant role, note that certain data may requireadditional roles. For additional information, see topic Additional Access Required for Exporting andImporting Setup Data.
Generate setup data reports Either of these roles is required:
72

Oracle Applications CloudUsing Functional Setup Manager
Chapter 8Setup Security
Opt-In and Setup Activity Roles and Privileges
• Application Implementation Consultant
• Export Import Functional Setups User (Abstract) and additional roles with the task-specific setupdata privileges
If you have the Application Implementation Consultant role, note that certain data may requireadditional roles. For additional information, see topic Additional Access Required for Exporting andImporting Setup Data.
Monitor export/import processes
One of these roles is required:
• Application Implementation Consultant (Job)
• Application Implementation Manager (Job)
• Export Import Functional Setups User (Abstract) and additional roles with the task-specific setupdata privileges
Additional settings for setup data export/import
• Import-only setup mode
• Export of externally mastered setupdata
• Export file size change
Manage Setup Migration Settings (Privilege)
Manage integration of additionalapplications
Either of these roles is required:
• Application Implementation Consultant (Job)
• Manage Third Party Applications (Privilege)
Roles and the Allowed ActivitiesIn this table, review the roles and the various activities that each role can perform. The first column lists all the roles andthe second one lists the activities.
Role Allowed Activities
Application Implementation Consultant(Job)
• Review offering features:
◦ Review offerings
◦ Review new and available features
◦ Review upcoming feature updates
• Configure offering features:
◦ Opt in to offerings and edit feature selections
◦ Enter promotion codes (when applicable)
73

Oracle Applications CloudUsing Functional Setup Manager
Chapter 8Setup Security
Role Allowed Activities
• Perform all setup tasks and manage setup data using:
◦ Offerings and functional areas
◦ Implementation projects
• Export and import all setup data using:
◦ Offerings and functional areas
◦ Configuration packages for implementation projects
◦ CSV file packages for offerings, functional areas, or tasks
• Compare setup data
• Generate setup data reports
• Create, submit, and monitor export/import and comparison processes
• Manage implementation projects
◦ Create, view, edit, or remove implementation projects
◦ Modify task list
◦ Assign tasks to users
◦ Monitor progress of the projects
• Manage integration of additional applications
Certain data may require additional roles. For additional information, see topic Additional AccessRequired for Exporting and Importing Setup Data.
Application Implementation Manager (Job)
• Review offering features:
◦ Review offerings
◦ Review new and available features
◦ Review upcoming feature updates
• Configure offering features:
◦ Opt in to offerings and edit feature selections
◦ Enter promotion codes (when applicable)
• Manage implementation projects:
◦ Create, view, edit, or remove implementation projects
◦ Modify task list
◦ Assign tasks to users
◦ Monitor progress of the projects
• Create, submit, and monitor export/import and comparison processes
74

Oracle Applications CloudUsing Functional Setup Manager
Chapter 8Setup Security
Role Allowed Activities
Functional Setups User (Abstract)
• Review offering features:
◦ Review offerings
◦ Review new and available features
◦ Review upcoming feature updates
• Review assigned tasks from implementation projects (when applicable)
• Perform setup tasks and manage setup data using:
◦ Offerings and functional areas
◦ Implementation projects
Note:A user performing a setup task must also be granted access to the corresponding task. For detailsabout setup tasks and task-specific privileges, refer to the product-specific Security Referenceguides.
Export Import Functional Setups User(Abstract)
• Export and import setup data using:
◦ Offerings and functional areas
◦ Configuration packages for implementation projects
◦ CSV file packages for offerings, functional areas, or tasks
• Compare setup data
• Generate setup data
• Create, submit, and monitor export/import and comparison processes
Note:This role must be granted to users having the Functional Setups User (Abstract) role so that they canalso export and import setup data of the tasks for which they already have access.
Related Topics• Additional Access Required for Exporting and Importing Setup Data
Why do I have access to more setup tasks than mygranted access? If you find that you have access to more setup tasks than your granted roles permit, then the additional tasks aren'tsecured. As a result, all users have access to them. To limit users from accessing those tasks, contact the concernedproduct team and request them to secure those tasks.
75

Oracle Applications CloudUsing Functional Setup Manager
Chapter 8Setup Security
76

Oracle Applications CloudUsing Functional Setup Manager
Chapter 9Additional Functionality
9 Additional Functionality
How Copying Setup Configuration Helps You can copy an interdependent setup data configuration to create a new set of interdependent setup data similar tothe original one. This process helps to create data faster, especially for setup requirements that are complex but similar.
For example, create a business unit structure and then copy its setup to create a new business unit structure whosesetup data requirements are similar to the original business unit, except for a few exceptions specific to the newbusiness unit.
How Copy Configuration WorksStart the copy process by selecting an existing setup configuration, whose setup data is then copied to a staging area.Next, modify the setup data in the staging area according to the requirements of the new setup configuration youwant to create. Since the purpose of copying setup is to create a new set of setup data quickly and easily, only thoseattributes that are minimally required to be set up are available for edit.
After you complete making modification to the staged setup data, submit an import process which creates the newsetup configuration by copying setup data from the original and changing the data where applicable based on themodifications you made.
Once the import process completes, Oracle recommends that you review your new setup configuration to ensure itmeets your requirements. You can also make additional changes to the data of the new setup if needed.
The following figure illustrates the steps in the copy configuration process.
Related Topics• Copy Setup Configuration
Copy Setup Configuration This procedure explains how to copy an existing setup configuration and use it for other setup requirements that aresimilar.
You need the following privileges to copy a setup configuration:
• Submit Export Setup Data Process (ASM_SUBMIT_EXPORT_SETUP_DATA_PROCESS_PRIV)
• Submit Import Setup Data Process (ASM_SUBMIT_IMPORT_SETUP_DATA_PROCESS_PRIV)
• Task-specific privileges
Refer to the Oracle Applications Cloud Security Reference for Common Features guide for detailed information abouttask-specific privileges.
77

Oracle Applications CloudUsing Functional Setup Manager
Chapter 9Additional Functionality
To copy a setup configuration, follow these steps:
1. Click Navigator > My Enterprise > Setup and Maintenance .2. In the Setup and Maintenance work area, select Copy Configuration from the Tasks panel tab.3. To create Copy Configuration Request:
a. In the Copy Configuration Requests region, select Create from the Actions menu. Alternatively, you canalso click the Create icon.
b. On the Create Configuration Request page, select the setup configuration you want to copy from CopyConfiguration menu.
c. Select the scope of your copy. For example, if you copy setup configuration of business units, then youmust select one of the existing business units to copy its setup.
d. You can change the default request name if necessary.e. Click Submit.
4. To edit the staged configuration:
a. Monitor the Status column of the request in the Copy Configuration Requests table. Click Ready toEdit when the status updates.
b. Enter or update the values for the displayed attributes, which represent the minimum set of setup datarequired for the new setup configuration to function.
c. Click Save and Close when you complete making changes.5. To import the staged configuration:
a. Click Ready to import in the Status column in the Copy Configuration Requests table when the statusupdates.
b. The same set of attributes shown in the previous step is displayed for your final review. You can comparethe values of the source setup with the values of the new setup. Select Edit to make modifications ifnecessary.
Note: You can't edit the values after the new setup is created.
c. Click Import.d. The Status column of Copy Configuration Requests table now shows Import in progress. Click the link
to monitor the import process. To get updated information click the Refresh icon.6. To fix copy setup configuration errors:
a. Click Ready to fix errors in the Status column in the Copy Configuration Requests table.b. Review the report and identify where the error occurred. The report lists all business objects in the order
they were processed.
- If the error is due to data conflicts such as attempting to create an object that already exists, useEdit Staged Configuration to fix the error and resubmit the import process.
- Otherwise, report the issue to your help desk indicating the owning product as indicated in theerror. Download and attach the process status details report when reporting the issue.
7. To review the copied setup configuration, click Ready to review in the Status column of the Copy ConfigurationRequests column. You can select the Go to Task icon for each setup task displayed to verify accuracy of thesetup data.
78

Oracle Applications CloudUsing Functional Setup Manager
Chapter 9Additional Functionality
Search for a Task This procedure explains how to search for a specific task to manage the data it represents. You can't perform thisprocedure unless you have task-specific privileges. Refer to the Oracle Applications Cloud Security Reference forCommon Features guide for detailed information about task-specific privileges.
To search for a specific task, follow these steps:
1. Click Navigator > My Enterprise > Setup and Maintenance .2. In the Setup and Maintenance work area, select Search from the Tasks panel tab.3. In the Search page, enter a string that matches the complete or partial name of the task and click Search.
The string is matched with the names of tasks, lists and business objects by default.4. Click the Tasks, Task Lists, Business Objects link to change the matching criteria. Select the criteria from the
available options and click Done.5. From the search results:
◦ If you matched with task, click the link in the Name column to go to the page for entering the setup datait represents.
◦ If you matched with task list or business object name, click the link in the Name column to go to a listof tasks that are associated with the task list or business object. Follow the previous step to manage thesetup data of each task in the list.
◦ If you matched with functional area, click the link in the Name column to go to a list of the parentofferings of the functional area. Select the applicable offering to find the list of tasks in the task region.Follow the previous step to manage the setup data of each task in the list.
◦ If you matched with offering name, click the link in the Name column to go to the offering. Follow thesteps in the topic Update Existing Setup Data to manage the setup data of the offering.
Related Topics• Update Existing Setup Data
Manage Integration of Additional Applications In your application, if you want to reference and use data that's available in another application, you must first have thatapplication integrated with Oracle Applications Cloud. Thereafter, you can configure how to dynamically link to it andkeep the reference up-to-date so that you always have access to the latest content.
Follow these steps to create the application integration.
1. Click Navigator > My Enterprise > Setup and Maintenance .2. In the Setup and Maintenance work area, click Manage Setup Content from the Tasks panel tab.3. On the Manage Setup Content page, click Manage Integration of Additional Applications.4. On the Manage Integration of Additional Applications page, click Actions > Create .5. Enter the application details in the relevant fields. Ensure that the information you provide is complete and
accurate. For example,
79

Oracle Applications CloudUsing Functional Setup Manager
Chapter 9Additional Functionality
◦ Begin the URL with http:// or https://.
◦ Provide correct access credentials for the selected security policy.
Note: You can't edit the Application Name and Partner Name once you save the details.
6. Click Save and Close.
80