Developing Applications with Oracle JET
444
Oracle® JavaScript Extension Toolkit (Oracle JET) Developing Applications with Oracle JET 10.0.0 F35950-02 February 2021
-
Upload
khangminh22 -
Category
Documents
-
view
2 -
download
0
Transcript of Developing Applications with Oracle JET

Oracle® JavaScript Extension Toolkit(Oracle JET)Developing Applications with Oracle JET
10.0.0F35950-02February 2021

Oracle JavaScript Extension Toolkit (Oracle JET) Developing Applications with Oracle JET, 10.0.0
F35950-02
Copyright © 2014, 2021, Oracle and/or its affiliates.
Primary Author: Ralph Gordon
Contributing Authors: Walter Egan
This software and related documentation are provided under a license agreement containing restrictions onuse and disclosure and are protected by intellectual property laws. Except as expressly permitted in yourlicense agreement or allowed by law, you may not use, copy, reproduce, translate, broadcast, modify, license,transmit, distribute, exhibit, perform, publish, or display any part, in any form, or by any means. Reverseengineering, disassembly, or decompilation of this software, unless required by law for interoperability, isprohibited.
The information contained herein is subject to change without notice and is not warranted to be error-free. Ifyou find any errors, please report them to us in writing.
If this is software or related documentation that is delivered to the U.S. Government or anyone licensing it onbehalf of the U.S. Government, then the following notice is applicable:
U.S. GOVERNMENT END USERS: Oracle programs (including any operating system, integrated software,any programs embedded, installed or activated on delivered hardware, and modifications of such programs)and Oracle computer documentation or other Oracle data delivered to or accessed by U.S. Governmentend users are "commercial computer software" or "commercial computer software documentation" pursuantto the applicable Federal Acquisition Regulation and agency-specific supplemental regulations. As such,the use, reproduction, duplication, release, display, disclosure, modification, preparation of derivative works,and/or adaptation of i) Oracle programs (including any operating system, integrated software, any programsembedded, installed or activated on delivered hardware, and modifications of such programs), ii) Oraclecomputer documentation and/or iii) other Oracle data, is subject to the rights and limitations specified in thelicense contained in the applicable contract. The terms governing the U.S. Government’s use of Oracle cloudservices are defined by the applicable contract for such services. No other rights are granted to the U.S.Government.
This software or hardware is developed for general use in a variety of information management applications.It is not developed or intended for use in any inherently dangerous applications, including applications thatmay create a risk of personal injury. If you use this software or hardware in dangerous applications, then youshall be responsible to take all appropriate fail-safe, backup, redundancy, and other measures to ensure itssafe use. Oracle Corporation and its affiliates disclaim any liability for any damages caused by use of thissoftware or hardware in dangerous applications.
Oracle and Java are registered trademarks of Oracle and/or its affiliates. Other names may be trademarks oftheir respective owners.
Intel and Intel Inside are trademarks or registered trademarks of Intel Corporation. All SPARC trademarks areused under license and are trademarks or registered trademarks of SPARC International, Inc. AMD, Epyc,and the AMD logo are trademarks or registered trademarks of Advanced Micro Devices. UNIX is a registeredtrademark of The Open Group.
This software or hardware and documentation may provide access to or information about content, products,and services from third parties. Oracle Corporation and its affiliates are not responsible for and expresslydisclaim all warranties of any kind with respect to third-party content, products, and services unless otherwiseset forth in an applicable agreement between you and Oracle. Oracle Corporation and its affiliates will notbe responsible for any loss, costs, or damages incurred due to your access to or use of third-party content,products, or services, except as set forth in an applicable agreement between you and Oracle.
Contents
Preface
Audience xiv
Documentation Accessibility xiv
Related Resources xiv
Conventions xv
What’s New in This Guide for Release 10.0.0
1 Getting Started with Oracle JavaScript Extension Toolkit (JET)
The Oracle JET Architecture 1-1
What's Included in Oracle JET 1-5
Third Party Libraries Used by Oracle JET 1-5
Typical Workflow for Getting Started with Oracle JET Application Development 1-6
Choose a Development Environment for Oracle JET 1-7
Choose a Development Environment 1-7
Install Oracle JET Tooling 1-9
Install Node.js 1-9
Install the Oracle JET Command-Line Interface 1-9
Configure Oracle JET Applications for TypeScript Development 1-10
Work with the Oracle JET Starter Templates 1-12
About the Starter Templates 1-12
About Modifying Starter Templates 1-15
Modify Starter Template Content 1-16
Work with the Oracle JET Base Distribution 1-19
About the Oracle JET Base Distribution 1-20
Add Oracle JET to an Existing JavaScript Application 1-20
Optimize Application Startup Using Oracle CDN and Oracle JET Libraries 1-21
2 Understanding the Web Application Workflow
Scaffold a Web Application 2-1
iii
About ojet create Command Options for Web Applications 2-3
About Scaffolding a Web Application 2-4
About the Web Application File Structure 2-5
Modify the Web Application’s File Structure 2-7
Add Hybrid Mobile Features to Web Applications 2-8
Add Progressive Web App Support to Web Applications 2-9
Build a Web Application 2-11
About ojet build Command Options for Web Applications 2-12
Serve a Web Application 2-12
About ojet serve Command Options and Express Middleware Functions 2-13
Serve a Web Application to a HTTPS Server Using a Self-signed Certificate 2-15
Serve a Web Application Using Path-based Routing 2-18
Customize the Web Application Tooling Workflow 2-20
About the Script Hook Points for Web Applications 2-21
About the Process Flow of Script Hook Points 2-23
Change the Hooks Subfolder Location 2-25
Create a Hook Script for Web Applications 2-26
Pass Arguments to a Hook Script for Web Applications 2-28
3 Understanding the Hybrid Mobile Application Workflow
Install the Mobile Tooling 3-1
Install Apache Cordova 3-2
Install Android Development Tools 3-2
Install an Emulator Accelerator 3-3
Create an Android Virtual Device 3-3
Set Up Your Android Device to Install an App from Your DevelopmentMachine 3-4
Install Gradle and Configure Gradle Proxy Settings 3-4
Configure Environment Variables to Reference JDK and Android SDKInstallations 3-5
Install iOS Development Tools 3-7
Install Windows Development Tools 3-7
Enable Developer Mode on Windows 10 3-7
Install Visual Studio 3-8
Configure Environment Variable to Reference Microsoft Build Tools 3-9
Install a Personal Information Exchange File in Your Computer’s CertificateStore 3-9
Create a Hybrid Mobile Application Using the Oracle JET Command-Line Interface 3-11
Scaffold a Hybrid Mobile Application 3-11
About ojet create Command Options for Mobile Hybrid Applications 3-14
About the Hybrid Mobile Application File Structure 3-15
iv

Modify the Hybrid Mobile Application’s File Structure 3-16
Add Web Browser Capability to Hybrid Mobile Applications 3-17
Build a Hybrid Mobile Application 3-18
About ojet build Command Options for Hybrid Mobile Applications 3-19
Serve a Hybrid Mobile Application 3-21
About ojet serve Command Options for Hybrid Mobile Applications 3-22
Review Your Application Settings in the config.xml File 3-25
Change the Splash Screen and App Launcher Icon 3-26
Customize the Hybrid Mobile Application Tooling Workflow 3-28
About the Script Hook Points for Hybrid Mobile Applications 3-28
About the Process Flow of Script Hook Points 3-31
Change the Hooks Subfolder Location 3-33
Create a Hook Script for Hybrid Mobile Applications 3-34
Pass Arguments to a Hook Script for Hybrid Mobile Applications 3-36
Use Cordova Plugins to Access Mobile Device Services 3-37
About Apache Cordova and Cordova Plugins 3-38
Use a Plugin in Your App 3-39
Use a Different Web View in Your JET Hybrid Mobile App 3-40
4 Designing Responsive Applications
Typical Workflow for Designing Responsive Applications in Oracle JET 4-1
Oracle JET and Responsive Design 4-2
Media Queries 4-2
Oracle JET Flex, Grid, Form, and Responsive Helper Class Naming Convention 4-4
Oracle JET Flex Layouts 4-5
About Modifying the flex Property 4-6
About Wrapping Content with Flex Layouts 4-7
About Customizing Flex Layouts 4-7
Oracle JET Grids 4-8
About the Grid System 4-8
The Grid System and Printing 4-9
Grid Convenience Classes 4-11
Responsive Form Layouts 4-13
Add Responsive Design to Your Application 4-13
Use Responsive JavaScript 4-14
The Responsive JavaScript Classes 4-14
Change a Custom Element’s Attribute Based on Screen Size 4-15
Conditionally Load Content Based on Screen Size 4-16
Create Responsive Images 4-17
Use the Responsive Helper Classes 4-18
v

Create Responsive CSS Images 4-19
Change Default Font Size 4-20
Change Default Font Size Across the Application 4-20
Change Default Font Size Based on Device Type 4-20
Control the Size and Generation of the CSS 4-21
5 Using RequireJS for Modular Development
Typical Workflow for Using RequireJS 5-1
About Oracle JET and RequireJS 5-2
About Oracle JET Module Organization 5-2
About RequireJS in an Oracle JET Application 5-7
Use RequireJS in an Oracle JET Application 5-8
Add Third-Party Tools or Libraries to Your Oracle JET Application 5-9
Troubleshoot RequireJS in an Oracle JET Application 5-12
About JavaScript Partitions and RequireJS in an Oracle JET Application 5-12
6 Creating Single-Page Applications
Typical Workflow for Creating Single-Page Applications in Oracle JET 6-1
Design Single-Page Applications Using Oracle JET 6-1
Understand Oracle JET Support for Single-Page Applications 6-2
Create a Single-Page Application in Oracle JET 6-2
Use the oj-module Element 6-3
Work with oj-module’s ViewModel Lifecycle 6-4
7 Understanding Oracle JET User Interface Basics
Typical Workflow for Working with the Oracle JET User Interface 7-1
About the Oracle JET User Interface 7-2
Identify Oracle JET UI Components, Patterns, and Utilities 7-2
About Common Functionality in Oracle JET Components 7-2
About Oracle JET Reserved Namespaces and Prefixes 7-6
About Binding and Control Flow 7-6
Use oj-bind-text to Bind Text Nodes 7-6
Bind HTML attributes 7-7
Use oj-bind-if to Process Conditionals 7-8
Use oj-bind-for-each to Process Loop Instructions 7-10
Bind Style Properties 7-11
Bind Event Listeners to JET and HTML Elements 7-12
Bind Classes 7-14
Add an Oracle JET Component to Your Page 7-17
vi

Add Animation Effects 7-18
Manage the Visibility of Added Component 7-19
8 Working with Oracle JET User Interface Components
Work with Oracle JET UI Components - A Typical Workflow 8-1
Work with the Oracle JET Cookbook 8-2
Work with Collections 8-3
Choose a Table, Data Grid, or List View 8-4
About DataProvider Filter Operators 8-6
Work with Controls 8-7
Work with Forms 8-7
Work with Layout and Navigation 8-7
Work with Visualizations 8-8
Choose a Data Visualization Component for Your Application 8-8
Use Attribute Groups With Data Visualization Components 8-13
9 Working with Oracle JET Web Components
Typical Workflow for Working with Oracle JET Web Components 9-1
Design Custom Web Components 9-2
About Web Components 9-4
Web Component Files 9-8
Web Component Slotting 9-9
Web Component Template Slots 9-10
Web Component Events 9-11
Web Component Examples 9-12
Best Practices for Web Component Creation 9-12
Recommended Standard Patterns and Coding Practices 9-13
CSS and Theming Standards 9-17
Version Numbering Standards 9-18
Create Web Components 9-20
Create Standalone Web Components 9-21
Create JET Packs 9-29
Create Resource Components for JET Packs 9-34
Create Reference Components for Web Components 9-37
Test Web Components 9-40
Add Web Components to Your Page 9-40
Build Web Components 9-43
Package Web Components 9-44
Create a Project to Host a Shared Oracle Component Exchange 9-44
vii
Publish Web Components to Oracle Component Exchange 9-47
Upload and Consume Web Components on a CDN 9-48
10
Using the Common Model and Collection API
Typical Workflow for Binding Data in Oracle JET 10-1
About Oracle JET Data Binding 10-1
About the Oracle JET Common Model and Collection Framework 10-2
About the Oracle JET Common Model and Collection API 10-2
About Oracle JET Data Binding and Knockout 10-3
Use the Oracle JET Common Model and Collection API 10-3
Integrate REST Services 10-5
About Oracle JET Support for Integrating REST Services 10-5
Pass Custom AJAX Options in Common Model CRUD API calls 10-6
Supply a customURL Callback Function 10-6
Replace sync or ajax Functions 10-7
Create a CRUD Application Using Oracle JET 10-8
Define the ViewModel 10-8
Read Records 10-15
Create Records 10-16
Update Records 10-19
Delete Records 10-23
11
Validating and Converting Input
Typical Workflow for Validating and Converting Input 11-1
About Oracle JET Validators and Converters 11-2
About Validators 11-2
About the Oracle JET Validators 11-3
About Oracle JET Component Validation Attributes 11-3
About Oracle JET Component Validation Methods 11-4
About Converters 11-4
About Oracle JET Component Converter Options 11-5
About Oracle JET Converters 11-7
Use Oracle JET Converters with Oracle JET Components 11-8
About Oracle JET Converters Lenient Parsing 11-11
Understand Time Zone Support in Oracle JET 11-12
Use Custom Converters in Oracle JET 11-15
Use Oracle JET Converters Without Oracle JET Components 11-18
About Oracle JET Validators 11-20
Use Oracle JET Validators with Oracle JET Components 11-20
viii
Use Custom Validators in Oracle JET 11-24
About Asynchronous Validators 11-26
12
Working with User Assistance
Typical Workflow for Working with User Assistance 12-1
Understand Oracle JET's Messaging APIs on Editable Components 12-2
About Oracle JET Editable Component Messaging Attributes 12-3
About Oracle JET Component Messaging Methods 12-4
Understand How Validation and Messaging Works in Oracle JET EditableComponents 12-4
Understand How an Oracle JET Editable Component Performs NormalValidation 12-5
About the Normal Validation Process When User Changes Value of anEditable Component 12-6
About the Normal Validation Process When Validate() is Called on EditableComponent 12-6
Understand How an Oracle JET Editable Component Performs DeferredValidation 12-7
About the Deferred Validation Process When an Oracle JET EditableComponent is Created 12-7
About the Deferred Validation Process When value Property is ChangedProgrammatically 12-7
Use Oracle JET Messaging 12-8
Notify an Oracle JET Editable Component of Business Validation Errors 12-8
Use the messages-custom Attribute 12-8
Use the showMessages() Method on Editable Components 12-10
Understand the oj-validation-group Component 12-10
Track the Validity of a Group of Editable Components Using oj-validation-group 12-11
Create Page Level Messaging 12-13
Create Messages with oj-message 12-15
Configure an Editable Component's oj-label Help Attribute 12-17
Configure an Editable Component's help.instruction Attribute 12-18
Control the Display of Hints, Help, and Messages 12-20
13
Developing Accessible Applications
Typical Workflow for Developing Accessible Oracle JET Applications 13-1
About Oracle JET and Accessibility 13-1
About the Accessibility Features of Oracle JET Components 13-2
Create Accessible Oracle JET Pages 13-3
Configure WAI-ARIA Landmarks 13-3
ix
Configure High Contrast Mode 13-5
Understand Color and Background Image Limitations in High Contrast Mode 13-6
Add High Contrast Mode to Your Oracle JET Application 13-6
Add High Contrast Images or Icon Fonts 13-7
Test High Contrast Mode 13-7
Hide Screen Reader Content 13-8
Use ARIA Live Region 13-8
14
Internationalizing and Localizing Applications
Internationalize and Localize Oracle JET Applications - A Typical Workflow 14-1
About Internationalizing and Localizing Oracle JET Applications 14-1
Internationalize and Localize Oracle JET Applications 14-4
Use Oracle JET's Internationalization and Localization Support 14-4
Enable Bidirectional (BiDi) Support in Oracle JET 14-5
Set the Locale Dynamically 14-6
Work with Currency, Dates, Time, and Numbers 14-9
Work with Oracle JET Translation Bundles 14-10
About Oracle JET Translation Bundles 14-10
Add Translation Bundles to Oracle JET 14-13
15
Using CSS and Themes in Applications
About the Redwood Theme Included with Oracle JET 15-1
Typical Workflow for Working with Themes in Oracle JET Applications 15-2
CSS Files Included with the Redwood Theme 15-3
Create an Application with the Redwood Theme 15-4
Best Practices for Using CSS and Themes 15-5
DOCTYPE Requirement 15-8
ThemeUtils 15-8
Set the Text Direction 15-8
Work with Images 15-9
Image Considerations 15-9
Icon Font Considerations 15-10
Work with Custom Themes and Component Styles 15-10
About CSS Variables and Custom Themes in Oracle JET 15-10
Add Custom Theme Support with the JET CLI 15-11
Customize the Redwood Theme with the JET CLI 15-14
Customize the Redwood Theme with Theme Builder 15-17
Customize JET Component CSS with the JET CLI 15-19
Optimize the CSS in a Custom Theme 15-23
x
Style Component Instances with CSS Variables 15-24
Disable JET Styling of Base HTML Tags 15-25
16
Securing Applications
Typical Workflow for Securing Oracle JET Applications 16-1
About Securing Oracle JET Applications 16-1
Oracle JET Components and Security 16-2
Oracle JET Security and Developer Responsibilities 16-2
Oracle JET Security Features 16-2
Oracle JET Secure Response Headers 16-4
Content Security Policy Headers 16-5
Use OAuth in Your Oracle JET Application 16-9
Initialize OAuth 16-10
Verify OAuth Initialization 16-10
Obtain the OAuth Header 16-11
Use OAuth with Oracle JET Common Model 16-11
Embed OAuth in Your Application's ViewModel 16-11
Add OAuth as a Plugin in Your ViewModel 16-12
Integrate OAuth with Oracle Identity Management (iDM) Server 16-13
About Securing Hybrid Mobile Applications 16-14
Manage Authentication in JET Hybrid Mobile Apps 16-14
Manage App Configuration for JET Hybrid Mobile Apps 16-14
About Cross-Origin Resource Sharing (CORS) 16-15
17
Configuring Data Cache and Offline Support
About the Oracle Offline Persistence Toolkit 17-1
Install the Offline Persistence Toolkit 17-2
18
Optimizing Performance
Typical Workflow for Optimizing Performance of Oracle JET Applications 18-1
About Performance and Oracle JET Applications 18-1
Add Performance Optimization to an Oracle JET Application 18-2
About Configuring the Application for Oracle CDN Optimization 18-7
Configure Bundled Loading of Libraries and Modules 18-8
Configure Individual Loading of Libraries and Modules 18-9
Understand the Path Mapping Script File and Configuration Options 18-10
xi

19
Auditing Application Files
20
Testing and Debugging
Typical Workflow for Testing and Debugging an Oracle JET Application 20-1
Test Oracle JET Applications 20-1
Test Applications 20-2
Test Hybrid Mobile Applications 20-2
Use BusyContext API in Automated Testing 20-3
Debug Oracle JET Applications 20-7
Debug Web Applications 20-8
Debug Hybrid Mobile Applications 20-9
21
Packaging and Deploying Applications
Typical Workflow for Packaging and Deploying Applications 21-1
Package and Deploy Web Applications 21-1
Package Web Applications 21-2
Deploy Web Applications 21-2
Package and Publish Hybrid Mobile Applications 21-2
About Packaging and Publishing Hybrid Mobile Applications 21-3
Package a Hybrid Mobile App on Android 21-3
Package a Hybrid Mobile App on iOS 21-4
Package a Hybrid Mobile App on Windows 21-6
Create the Build Configuration File to Package Your Application on Windows 21-7
Build Your Application for Windows 21-7
Remove and Restore Non-Source Files from Your JET Application 21-8
A Troubleshooting
B Oracle JET Application Migration for Release 10.0.0
Migrate Alta-themed Applications from Releases Prior to 8.3.0 to Release 10.0.0 B-1
Migrate to the Redwood Theme CSS B-6
Migrate Redwood-themed Applications from Releases 9.x.0 to Release 10.0.0 B-8
C Alta Theme in Oracle JET v9.0.0 and Later
Consider Using the Redwood Theme in Applications C-1
xii

CSS Files Included in Alta C-2
Understand the Color Palette in Alta C-3
Customize Alta Themes Using the Tooling C-3
Work with Sass C-5
SCSS Variables C-6
SCSS File Organization and Naming Convention C-7
Use Variables to Control CSS Content C-7
Work with Icon Fonts in Alta C-8
Work with Image Files in Alta C-10
Use Tag Selectors or Style Classes with Alta C-10
Use Normalize with Alta C-12
D Oracle JET References
Oracle Libraries and Tools D-1
Third-Party Libraries and Tools D-1
xiii

Preface
Developing Applications with Oracle JET describes how to build responsive web andhybrid mobile applications using Oracle JET.
Topics:
• Audience
• Documentation Accessibility
• Related Resources
• Conventions
AudienceDeveloping Applications with Oracle JET is intended for intermediate to advancedJavaScript developers who want to create pure client-side, responsive web or hybridmobile applications based on JavaScript, HTML5, and CSS3.
Documentation AccessibilityFor information about Oracle's commitment to accessibility, visit theOracle Accessibility Program website at http://www.oracle.com/pls/topic/lookup?ctx=acc&id=docacc.
Access to Oracle Support
Oracle customers that have purchased support have access to electronic supportthrough My Oracle Support. For information, visit http://www.oracle.com/pls/topic/lookup?ctx=acc&id=info or visit http://www.oracle.com/pls/topic/lookup?ctx=acc&id=trsif you are hearing impaired.
Related ResourcesFor more information, see these Oracle resources:
• Oracle JET Web Site
• API Reference for Oracle® JavaScript Extension Toolkit (Oracle JET)
• Oracle® JavaScript Extension Toolkit (JET) Keyboard and Touch Reference
• Oracle® JavaScript Extension Toolkit (JET) Styling Reference
Preface
xiv
ConventionsThe following text conventions are used in this document:
Convention Meaning
boldface Boldface type indicates graphical user interface elements associatedwith an action, or terms defined in text or the glossary.
italic Italic type indicates book titles, emphasis, or placeholder variables forwhich you supply particular values.
monospace Monospace type indicates commands within a paragraph, URLs, codein examples, text that appears on the screen, or text that you enter.
Preface
xv
What’s New in This Guide for Release10.0.0
For Oracle JET release 10.0.0 this guide has been updated in the following ways.
New features described in this guide
• Progressive Web App support can now be added using Oracle JET tooling. SeeAdd Progressive Web App Support to Web Applications.
• The before_serve hook point now includes three options (middleware,preMiddleware, and postMiddleware) that you use to replace the middleware,or add middleware that runs before or after the middleware provided by OracleJET tooling. For more details about usage of these options, see About ojetserve Command Options and Express Middleware Functions and Serve a WebApplication Using Path-based Routing.
• Support for theming Redwood and working with JET CSS variables is production-ready in release 10.0.0. You can start with the Redwood theme and change thelook and feel for your application or you can override CSS variables to stylecomponent instances. To get started with theming an application and stylingindividual components, see Typical Workflow for Working with Themes in OracleJET Applications .
Other changes in this guide
• Removed references to Internet Explorer. Oracle JET has deprecated the use ofInternet Explorer 11 and will remove it completely in release 11.0.0. For detailsabout the other browsing platforms that Oracle JET supports, see What platformsare supported by Oracle JET?
• Work with the Oracle JET Cookbook added to describe how to make best use ofthe cookbook. Content for individual components which repeated information thatyou can find in a more interactive format in the Oracle JET Cookbook has beenremoved from this guide.
Migration information
• Migrate Alta-themed Applications from Releases Prior to 8.3.0 to Release 10.0.0describes the steps to migrate an application from release 8.3.0 or earlier to thecurrent release.
• Migrate to the Redwood Theme CSS updated to describe how to migrate anAlta-themed application to the Redwood theme. As the topic describes, starting inrelease 9.0.0 it is possible to migrate and either remain on the Alta theme or tomigrate to the Redwood theme.
• Migrate Redwood-themed Applications from Releases 9.x.0 to Release 10.0.0describes the steps to migrate an application from a 9.x.0 release to the currentrelease.
What’s New in This Guide for Release 10.0.0
xvi
For other changes made to Oracle JET for this release, see the product ReleaseNotes.
What’s New in This Guide for Release 10.0.0
xvii
1Getting Started with Oracle JavaScriptExtension Toolkit (JET)
Oracle JET is a collection of Oracle and open source JavaScript libraries engineeredto make it as simple and efficient as possible to build client-side web and hybrid mobileapplications based on JavaScript, HTML5, and CSS.
To begin using Oracle JET, you do not need more than the basics of JavaScript,HTML, and CSS. Many developers learn about these related technologies in theprocess of learning Oracle JET.
Oracle JET is designed to meet the following application needs:
• Add interactivity to an existing page.
• Create a new end-to-end client-side web application using JavaScript, HTML5,CSS, and best practices for responsive design.
• Create a hybrid mobile application that looks and feels like a native iOS, Androidor Windows application.
Topics:
• The Oracle JET Architecture
• What's Included in Oracle JET
• Third Party Libraries Used by Oracle JET
• Typical Workflow for Getting Started with Oracle JET Application Development
• Choose a Development Environment for Oracle JET
• Work with the Oracle JET Starter Templates
• Work with the Oracle JET Base Distribution
• Optimize Application Startup Using Oracle CDN and Oracle JET Libraries
You can also view videos that provide an introduction to Oracle JET in the Oracle JETVideos collection.
The Oracle JET ArchitectureOracle JET supports the Model-View-ViewModel (MVVM) architectural design pattern.
In MVVM, the Model represents the application data, and the View is the presentationof the data. The ViewModel exposes data from the Model to the view and maintainsthe application's state.
1-1
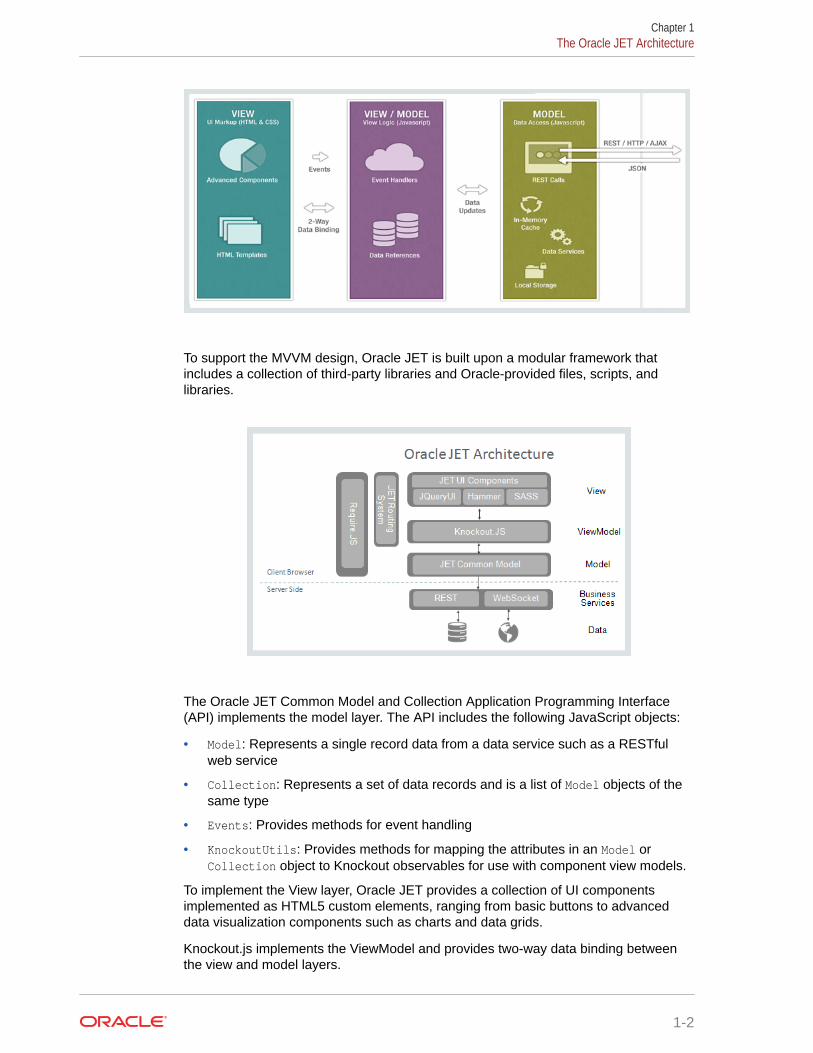
To support the MVVM design, Oracle JET is built upon a modular framework thatincludes a collection of third-party libraries and Oracle-provided files, scripts, andlibraries.
The Oracle JET Common Model and Collection Application Programming Interface(API) implements the model layer. The API includes the following JavaScript objects:
• Model: Represents a single record data from a data service such as a RESTfulweb service
• Collection: Represents a set of data records and is a list of Model objects of thesame type
• Events: Provides methods for event handling
• KnockoutUtils: Provides methods for mapping the attributes in an Model orCollection object to Knockout observables for use with component view models.
To implement the View layer, Oracle JET provides a collection of UI componentsimplemented as HTML5 custom elements, ranging from basic buttons to advanceddata visualization components such as charts and data grids.
Knockout.js implements the ViewModel and provides two-way data binding betweenthe view and model layers.
Chapter 1The Oracle JET Architecture
1-2
Oracle JET Features
Oracle JET features include:
• Messaging and event services for both Model and View layers
• Validation framework that provides UI element and component validation and dataconverters
• Caching services at the Model layer for performance optimization of paginationand virtual scrolling
• Filtering and sorting services provided at the Model layer
• Connection to data sources through Web services, such as Representational StateTransfer (REST) or WebSocket
• Management of URL and browser history using Oracle JET CoreRouter and oj-module components
• Integrated authorization through OAuth 2.0 for data models retrieved from RESTServices
• Resource management provided by RequireJS
• API compatibility with Backbone.js Model, Collection, and Events classes, exceptfor Backbone.js Underscore methods.
• JavaScript logging
• Popup UI handling
Hybrid Mobile Application Development Toolkit Features
Oracle JET includes support for hybrid mobile applications that run on iOS, Android,and Windows mobile devices within the Apache Cordova container.
Apache Cordova enables you to use web technologies such as HTML5, CSS, andJavaScript to develop applications that you can deploy to mobile devices. Using theCordova JavaScript APIs to access native device services, major mobile platformssuch as Android, iOS, and Windows can be supported from a common code base.
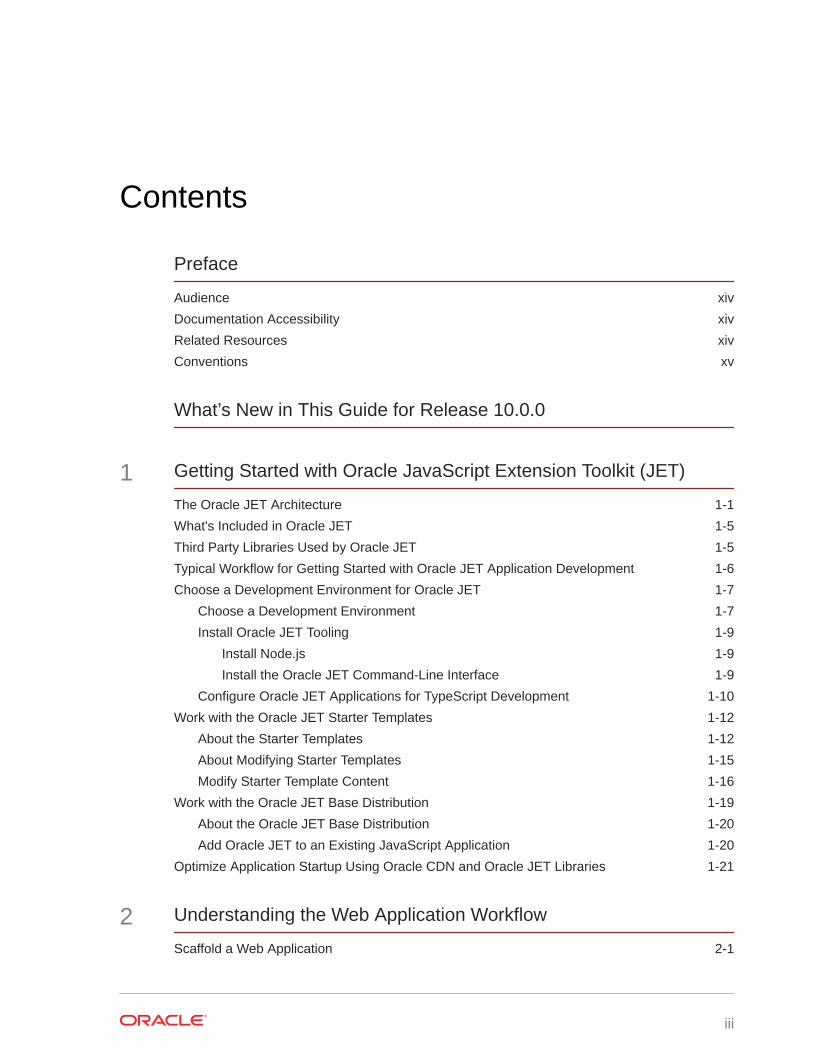
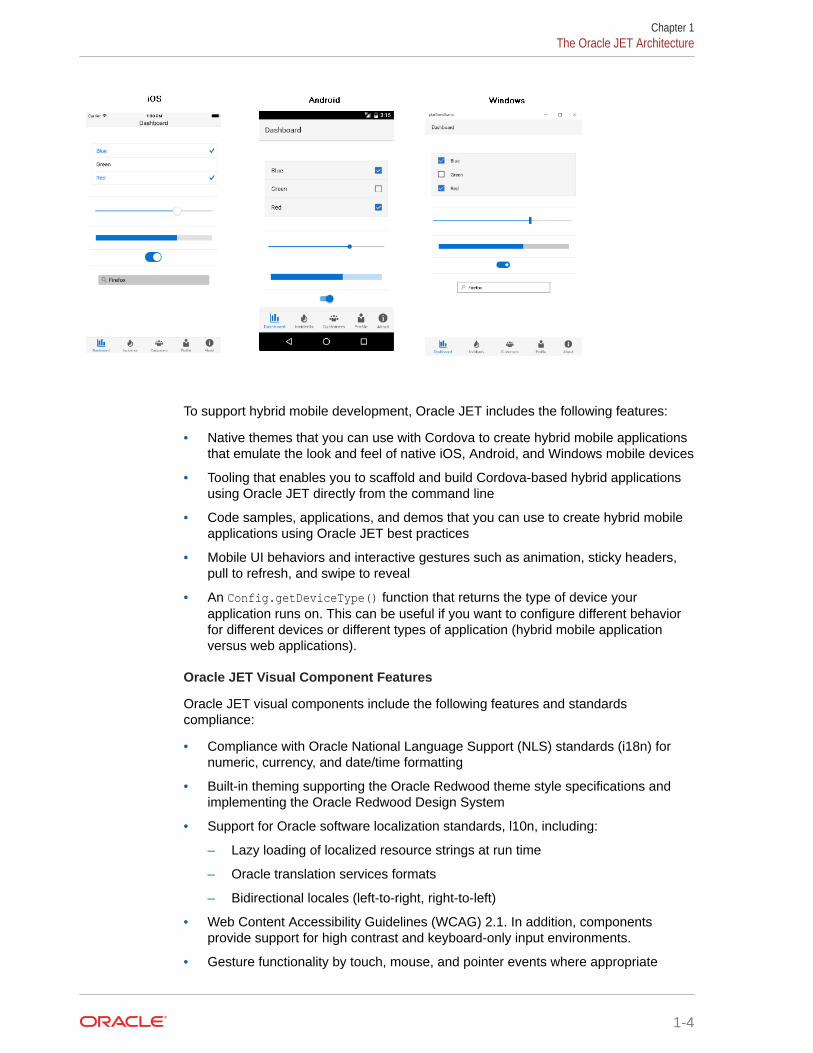
The following image shows the same application code rendered on an iOS, Android,and Windows mobile device. Oracle JET automatically applies the native theme whenyou configure the application for the desired platform.
Chapter 1The Oracle JET Architecture
1-3
To support hybrid mobile development, Oracle JET includes the following features:
• Native themes that you can use with Cordova to create hybrid mobile applicationsthat emulate the look and feel of native iOS, Android, and Windows mobile devices
• Tooling that enables you to scaffold and build Cordova-based hybrid applicationsusing Oracle JET directly from the command line
• Code samples, applications, and demos that you can use to create hybrid mobileapplications using Oracle JET best practices
• Mobile UI behaviors and interactive gestures such as animation, sticky headers,pull to refresh, and swipe to reveal
• An Config.getDeviceType() function that returns the type of device yourapplication runs on. This can be useful if you want to configure different behaviorfor different devices or different types of application (hybrid mobile applicationversus web applications).
Oracle JET Visual Component Features
Oracle JET visual components include the following features and standardscompliance:
• Compliance with Oracle National Language Support (NLS) standards (i18n) fornumeric, currency, and date/time formatting
• Built-in theming supporting the Oracle Redwood theme style specifications andimplementing the Oracle Redwood Design System
• Support for Oracle software localization standards, l10n, including:
– Lazy loading of localized resource strings at run time
– Oracle translation services formats
– Bidirectional locales (left-to-right, right-to-left)
• Web Content Accessibility Guidelines (WCAG) 2.1. In addition, componentsprovide support for high contrast and keyboard-only input environments.
• Gesture functionality by touch, mouse, and pointer events where appropriate
Chapter 1The Oracle JET Architecture
1-4
• Support for Oracle test automation tooling
• Responsive layout framework
What's Included in Oracle JETThe Oracle JET zip distribution includes Oracle JET libraries and all third party librariesthat the toolkit uses.
Specifically, Oracle JET includes the following files and libraries:
• CSS and CSS files for the Redwood theme (starting with JET release 9.0.0)
• CSS and SCSS files for the Alta theme (support for releases before JET release9.0.0)
• Minified and debug versions of the Oracle JET libraries
• Data Visualization Tools (DVT) CSS and JavaScript
• Knockout and Knockout Mapping libraries
• jQuery libraries
• RequireJS, RequireJS text plugin, and RequireJS CSS plugin
• js-signals
• es6-promise polyfill
• Hammer.js
Oracle JET components use Hammer.js internally for gesture support. Do not addto Oracle JET components or their associated DOM nodes.
• Oracle JET dnd-polyfill HTML5 drag and drop polyfill
• proj4js library
• webcomponentsjs polyfill
Third Party Libraries Used by Oracle JETTo begin using Oracle JET, you do not need to understand more than the basics ofJavaScript, HTML, and CSS or the third party libraries and technologies that OracleJET uses. In fact, many developers learn about these related technologies in theprocess of learning Oracle JET.
Name Description More Information
CSS Cascading Style Sheets http://www.w3.org/Style/CSS
HTML5 Hypertext Markup Language 5 http://www.w3.org/TR/html5
JavaScript Programming language https://developer.mozilla.org/en-US/docs/Web/JavaScript/About_JavaScript
TypeScript Typed superset of JavaScript that enablesyou to support typechecking against theTypeScript API of JET elements and non-element classes.
http://www.typescriptlang.org
Chapter 1What's Included in Oracle JET
1-5
Name Description More Information
jQuery JavaScript library designed for HTMLdocument traversal and manipulation, eventhandling, animation, and Ajax. jQueryincludes an API that works across mostbrowsers.
http://jquery.com
Knockout JavaScript library that provides support fortwo-way data binding
http://www.knockoutjs.com
RequireJS JavaScript file and module loader usedfor managing library references and lazyloading of resources. RequireJS implementsthe Asynchronous Module Definition (AMD)API.
RequireJS: http://www.requirejs.org
AMD API: http://requirejs.org/docs/whyamd.html
SASS SASS (Syntactically Awesome Style Sheets)extends CSS3 and enables you to usevariables, nested rules, mixins, and inlineimports to customize your application’sthemes. Oracle JET uses the SCSS (SasyCSS) syntax of SASS.
http://www.sass-lang.com
If you will be using Oracle JET tooling to create web or hybrid mobile applications, youmay also want to familiarize yourself with the following technologies.
Name Description More Information
Apache Cordova(Hybrid only)
Open source mobile developmentframework that allows you to use HTML5,CSS3, and JavaScript for cross-platformdevelopment targeted to multiple platformswith one code base
http://cordova.apache.org/
Node.js Open source, cross-platform runtimeenvironment for developing server-side webapplications, used by Oracle JET forpackage management. Node.js includes thenpm command line tool.
https://nodejs.org
Typical Workflow for Getting Started with Oracle JETApplication Development
Familiarize yourself with the third party tools that Oracle JET uses before you startdevelopment. Depending on your installation method, you may also need to installprerequisite packages. After you’ve created your application, you can customize yourconfiguration or load Oracle JET from the Oracle Content Delivery Network (CDN).
To get started developing Oracle JET applications, refer to the typical workflowdescribed in the following table. After you verify your prerequisites, you can chooseto create a web or hybrid mobile application.
Chapter 1Typical Workflow for Getting Started with Oracle JET Application Development
1-6
Task Description More Information
Verify prerequisites Verify that you meet theprerequisite knowledge and choosea development environment. If youwill be using the recommendedtooling, install the prerequisitepackages.
Choose a Development Environment for OracleJET
Create a web application Create a web application using thetooling.
Note: You must not use morethan one version of Oracle JET tocreate your application. Oracle JETdoes not support running multipleversions of Oracle JET componentsin the same HTML document.
Understanding the Web Application Workflow
or
Add Oracle JET to an Existing JavaScriptApplication
Create a hybrid mobileapplication
Install Cordova and optionalAndroid, iOS, and Windowstools. Scaffold, build, and servedevelopment versions of Android,iOS, and Windows hybrid mobileapplications.
Understanding the Hybrid Mobile ApplicationWorkflow
Modify a starter template Understand the structure of OracleJET starter templates and how tomodify them with examples from theOracle JET cookbook.
Work with the Oracle JET Starter Templates
Load Oracle JET fromCDN
Load Oracle JET files and librariesfrom the Oracle Content DeliveryNetwork (CDN).
Optimize Application Startup Using Oracle CDNand Oracle JET Libraries
Choose a Development Environment for Oracle JETYou can decide what development environment you want to use before you startdeveloping Oracle JET applications. If you will use Oracle JET tooling to develop webor hybrid mobile applications, you must install the Oracle JET packages.
Topics:
• Choose a Development Environment
• Install Oracle JET Tooling
• (Optional) Configure Oracle JET Applications for TypeScript Development
Choose a Development EnvironmentYou can develop Oracle JET applications in virtually any integrated developmentenvironment (IDE) that supports JavaScript (or TypeScript), HTML5, and CSS3.However, an IDE is not required for developing Oracle JET applications, and you canuse any text editor to develop your application.
You can use an IDE in conjunction with the Oracle JET command-line tooling, whereyou scaffold web applications by using one of the provided starter templates. You canproceed to develop the scaffolded application in the IDE of your choice by openingthe project that was created using the JET tooling, in that IDE. After saving changes
Chapter 1Choose a Development Environment for Oracle JET
1-7
your application files in the IDE, you use the JET tooling to build and run the JETapplication.
If you are using Microsoft Visual Studio Code (VS Code) as your editor, you canadd the Visual Studio Code Extension of Oracle JET Core to support developingOracle JET applications. Specifically, the Oracle JET extension for VS Code improvesdeveloper productivity for creating clientside JavaScript or TypeScript web applicationsby providing:
• Code completion against the JET API and JET component metadata.
• Ability to work with code snippets for the most commonly used Oracle JETcomponents.
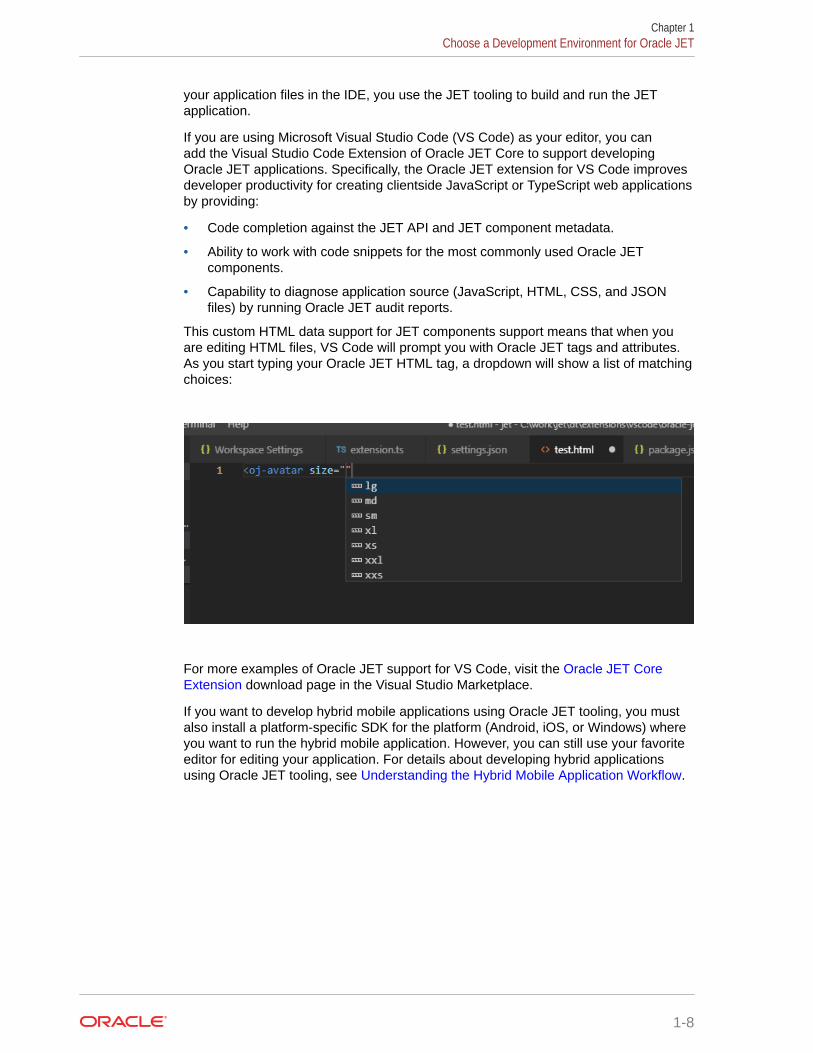
• Capability to diagnose application source (JavaScript, HTML, CSS, and JSONfiles) by running Oracle JET audit reports.
This custom HTML data support for JET components support means that when youare editing HTML files, VS Code will prompt you with Oracle JET tags and attributes.As you start typing your Oracle JET HTML tag, a dropdown will show a list of matchingchoices:
For more examples of Oracle JET support for VS Code, visit the Oracle JET CoreExtension download page in the Visual Studio Marketplace.
If you want to develop hybrid mobile applications using Oracle JET tooling, you mustalso install a platform-specific SDK for the platform (Android, iOS, or Windows) whereyou want to run the hybrid mobile application. However, you can still use your favoriteeditor for editing your application. For details about developing hybrid applicationsusing Oracle JET tooling, see Understanding the Hybrid Mobile Application Workflow.
Chapter 1Choose a Development Environment for Oracle JET
1-8
Install Oracle JET ToolingIf you plan to use Oracle JET tooling to develop web or hybrid mobile applications, youmust install Node.js and the Oracle JET command-line interface (CLI), ojet-cli.
Note:
If you already have Oracle JET tooling installed on your developmentplatform, check that you are using the minimum versions supported byOracle JET and upgrade as needed. For the list of minimum supportedversions, see Oracle JET Support.
To install the prerequisite packages:
1. Install Node.js
2. Install the Oracle JET Command-Line Interface
Install Node.jsInstall Node.js on your development machine.
From a web browser, download and install one of the installers appropriate for yourOS from the Node.js download page. Oracle JET recommends that you install thelatest LTS version. Node.js is pre-installed on macOS, but is likely an old version, soupgrade to the latest LTS version if necessary.
After you complete installation and setup, you can enter npm commands from acommand prompt to verify that your installation succeeded. For example, to configurea proxy server, use npm config.
npm config set proxy http-proxy-server-URL:proxy-portnpm config set https-proxy https-proxy-server-URL:proxy-port
Include the complete URL in the command. For example:
npm config set proxy http://my.proxyserver.com:80npm config set https-proxy http://my.proxyserver.com:80
Install the Oracle JET Command-Line InterfaceUse npm to install the Oracle JET command-line interface (ojet-cli).
• At the command prompt of your development machine, enter the followingcommand as Administrator on Windows or use sudo on Macintosh and Linuxmachines:
[sudo] npm install -g @oracle/ojet-cli
Chapter 1Choose a Development Environment for Oracle JET
1-9

It may not be obvious that the installation succeeded. Enter ojet help to verifythat the installation succeeded. If you do not see the available Oracle JETcommands, scroll through the install command output to locate the source of thefailure.
– If you receive an error related to a network failure, verify that you have set upyour proxy correctly if needed.
– If you receive an error that your version of npm is outdated, type the followingto update the version: [sudo] npm install -g npm.
You can also verify the Oracle JET version with ojet --version to display thecurrent version of the Oracle JET command-line interface.If the current versionis not displayed, please reinstall by using the npm install command for yourplatform.
Configure Oracle JET Applications for TypeScript DevelopmentIf you plan to build an Oracle JET application or Oracle JET Web Component inTypeScript, your application project requires the TypeScript type definitions that Oraclebundles with the Oracle JET npm package.
When you install Oracle JET from npm, the TypeScript type definitions for version4.0.0 get installed with the JET bundle and are available for use when you developapplications. To begin application development using TypeScript, Oracle JET toolingsupports scaffolding your application by using a variety of Oracle JET StarterTemplates that have been optimized for TypeScript development, with the default ES6implementation. For details, see Scaffold a Web Application and Scaffold a HybridMobile Application.
If you have already created an application and you want to switch to developing withTypeScript, you can use the Oracle JET tooling to add support for type definitions andcompiler configuration. To add TypeScript version 4.0.0 to an existing application, useojet add typescript from your application root.
ojet add typescript
When you add TypeScript support to an existing application, Oracle JET toolinginstalls TypeScript locally with an npm install. The tooling also creates thetsconfig.json compiler configuration file at your application root.
You can use the compiler configuration file, for example, to specify compiling ES6application source files into ES5 JavaScript code and AMD format modules. Duringthe build process JET tooling overwrites compiler options that you may have modify. Ifneeded, you can revert overwritten options by customizing a JET hook script template,before_app_typescript and before_component_typescript, for invocation during theJET tooling build process. For details about hook scripts, see Create a Hook Script forWeb Applications.
When you begin development with TypeScript, you can you can import TypeScriptdefinition modules for Oracle JET custom elements, as well as non-element classes,namespaces, and interfaces. For example, in this Oracle JET application, the oj-chartimport statement supports typechecking against the element’s TypeScript API.
Chapter 1Choose a Development Environment for Oracle JET
1-10

And, your editor can leverage the definition files for imported modules to display typeinformation.
Note that the naming convention for JET custom element types is changing. The typename that you specify within your TypeScript project to import a JET component'sexported interface will follow one of these two naming conventions:
• componentName + Element (new "suffix" naming convention)
For example, oj-input-search and the oj-stream-list have the type nameInputSearchElement and StreamListElement, respectively.
Chapter 1Choose a Development Environment for Oracle JET
1-11
or
• oj + componentName ("oj" prefix naming convention of not yet migratedcomponents)
For example, oj-chart and oj-table continue to adhere to the old-style typenaming with "oj" prefix: ojChart and ojTable, respectively.
Until all JET component interface type names have been migrated to follow the newstandard, suffix naming convention, some JET core components will continue to followthe old "oj" prefix naming convention (without the "Element" suffix). To find out the typename to specify in your TypeScript project, view the Module Usage section of the APIdocumentation for the component.
For more information about working with TypeScript in JET, see API Reference forOracle® JavaScript Extension Toolkit (Oracle JET) - JET In Typescript Overview.
Work with the Oracle JET Starter TemplatesThe Oracle JET Starter Templates provide everything you need to start working withcode immediately. Use them as the starting point for your own application or tofamiliarize yourself with the JET components and basic structure of an Oracle JETapplication.
Each template is designed to work with the Oracle JET Cookbook examples andfollows current best practice for application design.
Topics:
• About the Starter Templates
• Modify Starter Template Content
You can also view a video that shows how to work with the Oracle JET StarterTemplates in the Oracle JET Videos collection.
About the Starter TemplatesEach template in the Starter Template collection is a single page application thatis structured for modular development. The collection of available Starter Templatessupports JavaScript or TypeScript development and will depend on the template typeyou add to your application.
Instead of storing all the application markup in the index.html file, the application usesthe oj-module component to bind either a view template containing the HTML markupfor the section or both the view template and JavaScript or TypeScript file that containsthe viewModel for any components defined in the section.
The following code shows a portion of the index.html file in the Web Nav DrawerStarter Template that highlights the oj-module component definition. For the sake ofbrevity, most of the code and comments are omitted. Comments describe the purposeof each section, and you should review the full source code for accessibility and usagetips.
<!DOCTYPE html><html lang="en-us"> <head> <title>Oracle JET Starter Template - Web Nav Drawer</title> ... contents omitted
Chapter 1Work with the Oracle JET Starter Templates
1-12
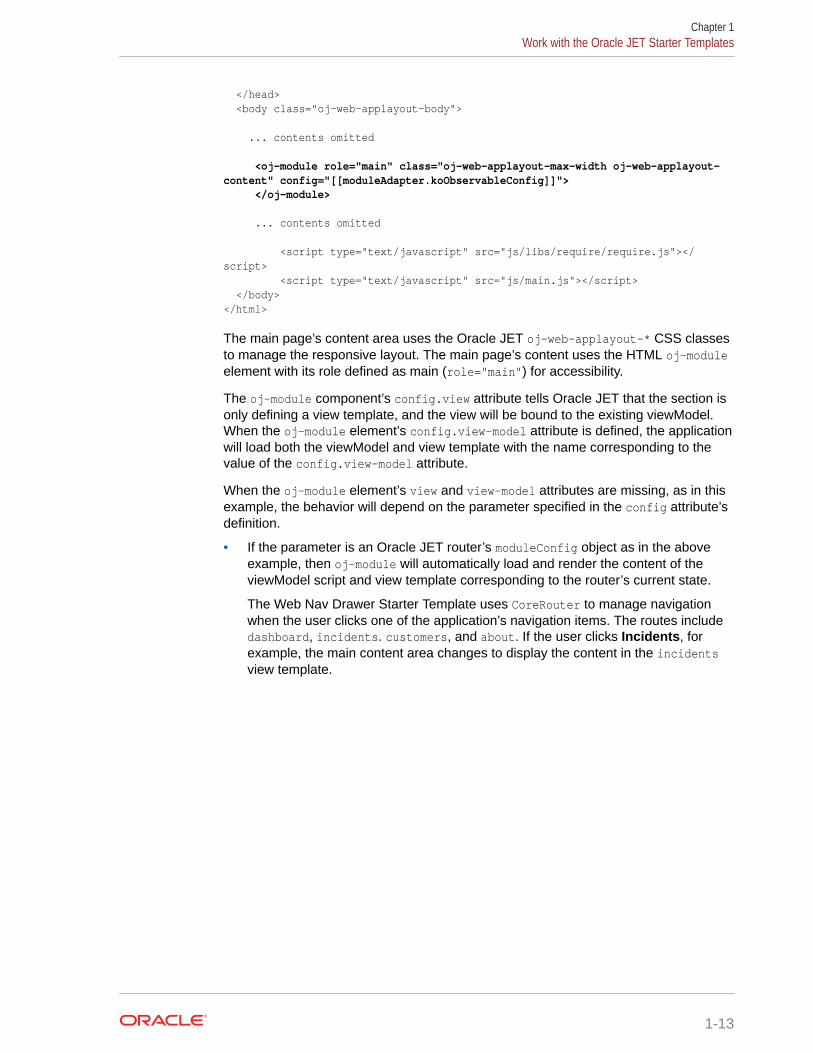
</head> <body class="oj-web-applayout-body">
... contents omitted
<oj-module role="main" class="oj-web-applayout-max-width oj-web-applayout-content" config="[[moduleAdapter.koObservableConfig]]"> </oj-module> ... contents omitted
<script type="text/javascript" src="js/libs/require/require.js"></script> <script type="text/javascript" src="js/main.js"></script> </body></html>
The main page’s content area uses the Oracle JET oj-web-applayout-* CSS classesto manage the responsive layout. The main page’s content uses the HTML oj-moduleelement with its role defined as main (role="main") for accessibility.
The oj-module component’s config.view attribute tells Oracle JET that the section isonly defining a view template, and the view will be bound to the existing viewModel.When the oj-module element’s config.view-model attribute is defined, the applicationwill load both the viewModel and view template with the name corresponding to thevalue of the config.view-model attribute.
When the oj-module element’s view and view-model attributes are missing, as in thisexample, the behavior will depend on the parameter specified in the config attribute’sdefinition.
• If the parameter is an Oracle JET router’s moduleConfig object as in the aboveexample, then oj-module will automatically load and render the content of theviewModel script and view template corresponding to the router’s current state.
The Web Nav Drawer Starter Template uses CoreRouter to manage navigationwhen the user clicks one of the application’s navigation items. The routes includedashboard, incidents. customers, and about. If the user clicks Incidents, forexample, the main content area changes to display the content in the incidentsview template.
Chapter 1Work with the Oracle JET Starter Templates
1-13
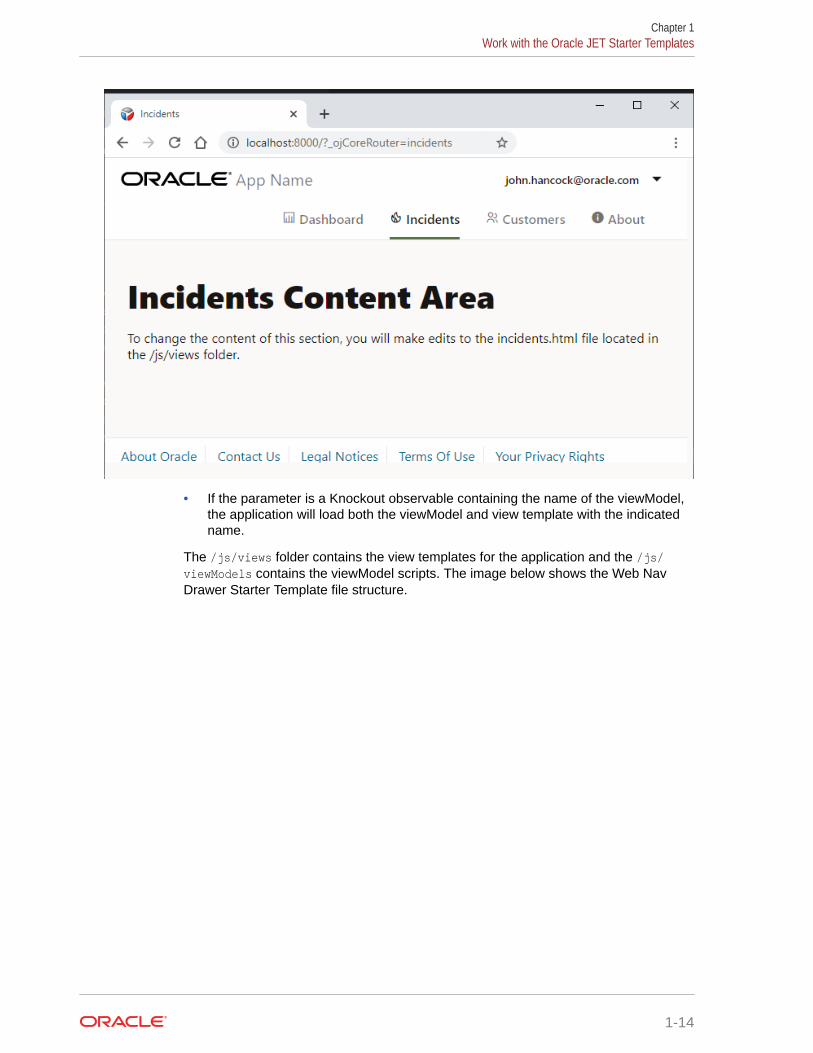
• If the parameter is a Knockout observable containing the name of the viewModel,the application will load both the viewModel and view template with the indicatedname.
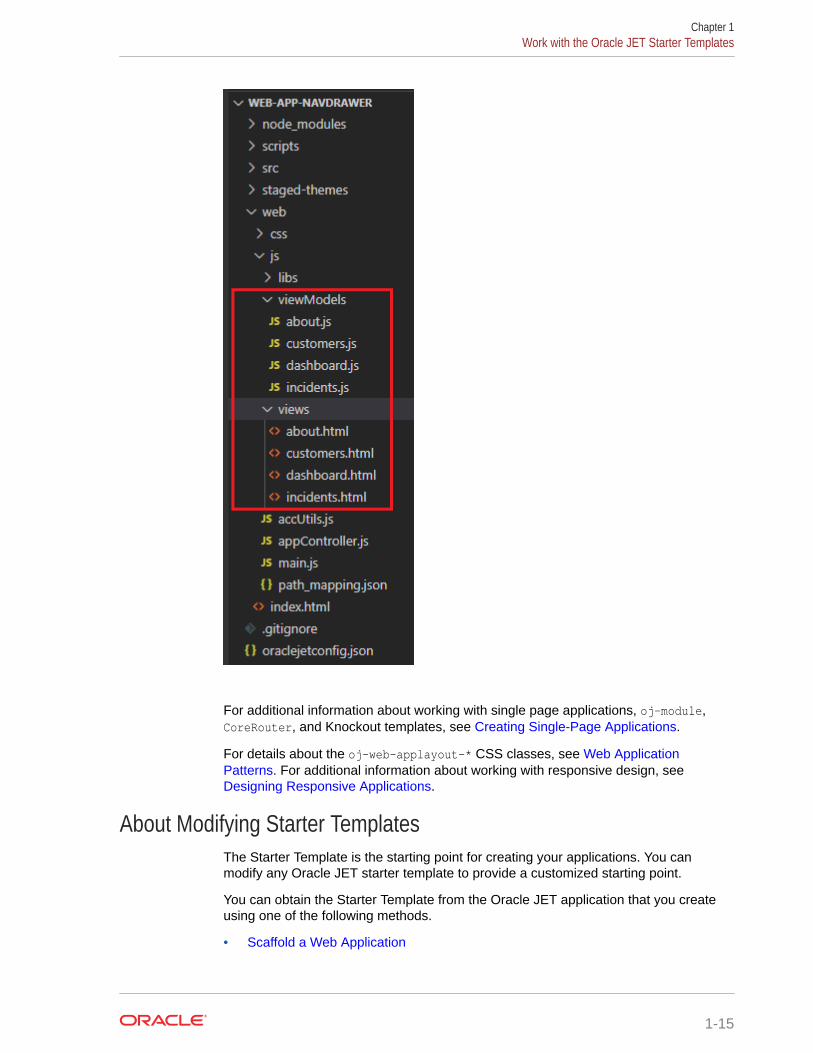
The /js/views folder contains the view templates for the application and the /js/viewModels contains the viewModel scripts. The image below shows the Web NavDrawer Starter Template file structure.
Chapter 1Work with the Oracle JET Starter Templates
1-14
For additional information about working with single page applications, oj-module,CoreRouter, and Knockout templates, see Creating Single-Page Applications.
For details about the oj-web-applayout-* CSS classes, see Web ApplicationPatterns. For additional information about working with responsive design, seeDesigning Responsive Applications.
About Modifying Starter TemplatesThe Starter Template is the starting point for creating your applications. You canmodify any Oracle JET starter template to provide a customized starting point.
You can obtain the Starter Template from the Oracle JET application that you createusing one of the following methods.
• Scaffold a Web Application
Chapter 1Work with the Oracle JET Starter Templates
1-15
• Scaffold a Hybrid Mobile Application
Load the starter template into your favorite IDE, or extract the zip file into adevelopment folder.
Tip:
If you used the command line tooling to scaffold your application, you canstill use an IDE like Visual Studio Code for editing. For example, in VisualStudio Code, choose File –> Open Folder and select the folder containingthe application you created. Edit your application as needed, but use thetooling commands in a terminal window to build and serve your application.
To modify the template you can remove unneeded content and add new content.Content that you add can be your own or you can reuse content from Oracle JETCookbook samples. When you copy markup from a Cookbook sample, you copy thedesired HTML and the supporting JavaScript.
Included in the code you add will be the RequireJS module dependency for thecode. The application's main.js file contains the list of RequireJS modules currentlyincluded in the application. If you are using the Cookbook sample, you can determinemodules that you need to add by comparing list of libraries in the application's main.jsfile to the list in the Cookbook sample. You will add any missing modules to thedefine() function in the JavaScript file for your application. For example, to add theoj-input-date-time component from the Cookbook, you would need to add the ojs/ojdatetimepicker module to the dashboard.js viewModel file since it's not alreadydefined in dashboard.js.
To familiarize yourself with the RequireJS module to add for a Cookbook sample or foryour own code, see the table at About Oracle JET Module Organization.
If you add content to a section that changes its role, then be sure to change therole associated with that section. Oracle JET uses the role definitions for accessibility,specifically WAI-ARIA landmarks. For additional information about Oracle JET andaccessibility, see Developing Accessible Applications.
Modify Starter Template ContentTo add content, modify the appropriate view template and ViewModel script (if it exists)for the section that you want to update. Add any needed RequireJS modules to theViewModel’s define() definition, along with functions to define your ViewModel.
The example below uses the Web Nav Drawer Starter Template, but you can use thesame process on any of the Starter Templates.
Before you Begin:
• See the Date and Time Pickers demo in the Oracle JET Cookbook. This task usescode from this sample.
To modify the Starter Template content:
1. In your application’s index.html file, locate the oj-module element for the sectionyou want to modify and identify the template and optional ViewModel script.
Chapter 1Work with the Oracle JET Starter Templates
1-16
In the Web Nav Drawer Starter Template, the oj-module element is usingthe config attribute. The following code sample shows the mainContentHTML oj-module definition in index.html, where the moduleAdapterobservable, a ModuleAdapterClass object, obtains the configuration from itskoObservableConfig field.
<oj-module role="main" class="oj-web-applayout-max-width oj-web-applayout-content" config="[[moduleAdapter.koObservableConfig]]"></oj-module>
The return value of the [[moduleAdapter.koObservableConfig]] observable isset to the current state of the CoreRouter object. The CoreRouter object is definedwith an initial value of dashboard in the application's appController.js script,where the page initially loads and no path is yet specified, as shown in thenavData array below for the empty path case. The router object is created fromthe array and then passed to the moduleAdapter declaration.
let navData = [ { path: '', redirect: 'dashboard' }, { path: 'dashboard', detail: { label: 'Dashboard', iconClass: 'oj-ux-ico-bar-chart' } }, { path: 'incidents', detail: { label: 'Incidents', iconClass: 'oj-ux-ico-fire' } }, { path: 'customers', detail: { label: 'Customers', iconClass: 'oj-ux-ico-contact-group' } }, { path: 'about', detail: { label: 'About', iconClass: 'oj-ux-ico-information-s' } }];
// Router setuplet router = new CoreRouter(navData, { urlAdapter: new UrlParamAdapter()});router.sync();
this.moduleAdapter = new ModuleRouterAdapter(router);this.selection = new KnockoutRouterAdapter(router);
The navigation data provider for oj-navigation-list element is created as anArrayDataProvider object that associates the available navData routes by usingthe slice(1) function to remove the first path definition in the navdata array thatspecifically handles the "empty path" case.
// Setup the navDataProvider with the routes, excluding the first redirected route.this.navDataProvider = new ArrayDataProvider(navData.slice(1), {keyAttributes: "path"});
To modify the starter templates, for example, the Dashboard Content Area, you willmodify both dashboard.html and dashboard.js.
2. To modify the view template, remove unneeded content, and add the new contentto the view template file.
For example, if you are working with an Oracle JET Cookbook sample, youcan copy the markup into the view template you identified in the previousstep (dashboard.html). Replace everything after the <h1>Dashboard ContentArea</h1> markup in the template with the markup from the sample.
Chapter 1Work with the Oracle JET Starter Templates
1-17

The following code shows the modified markup if you replace the existing contentwith a portion of the content from the Date and Time Pickers demo.
<div id="div1"> <oj-label for="dateTime">Default</oj-label> <oj-input-date-time id="dateTime" value='{{value}}'> </oj-input-date-time> <br/><br/> <span class="oj-label">Current component value is:</span> <span><oj-bind-text value="[[value]]"></oj-bind-text></span> </div>
3. To modify the ViewModel, remove unneeded content, and add the new contentas needed. Include any additional RequireJS modules that your new content mayneed.
The application's main.js file contains the list of RequireJS modules currentlyincluded in the application. Compare the list of libraries with the list you needfor your application, and add any missing modules to your define() functionin the ViewModel script. For example, to use the oj-input-date-time elementshown in the demo and to use the IntlConverterUtils namespace API, addojs/ojdatetimepicker and add ojs/ojconverterutils-i18n modules to thedashboard.js ViewModel script since it's not already defined in dashboard.js.
The sample below shows a portion of the modified dashboard.js file, with thechanges highlighted in bold.
define(['knockout', 'ojs/ojconverterutils-i18n', 'ojs/ojknockout', 'ojs/ojdatetimepicker', 'ojs/ojlabel' ], function(ko, ConverterUtilsI18n) { /** * The view model for the main content view template */ function DashboardViewModel() { var self = this; self.value = ko.observable(ConverterUtilsI18n.IntlConverterUtils.dateToLocalIso(new Date(2020, 0, 1))); }
return DashboardViewModel;});
Note:
In this example, you are not copying the entire code section. TheCookbook uses a require() call to load and use the needed librariesin a single bootstrap file. The Starter Template that you are pasting usesdefine() to create a RequireJS module that can be used by other partsof your application.
Chapter 1Work with the Oracle JET Starter Templates
1-18

4. If you want to add, change, or delete modules or templates in the application,modify the main.js RequireJS bootstrap file and appController.js file asneeded.
The appController.js file also contains the event handler that responds when auser clicks one of the navigation items. Depending upon your modifications, youmay need to update this method as well.
5. Verify the changes in your favorite browser.
The following image shows the runtime view of the Web Nav Drawer StarterTemplate with the new Dashboard Content Area content showing oj-input-date-time with its current value.
Work with the Oracle JET Base DistributionThe Oracle JET Base Distribution provides an alternative to creating your applicationby using an Oracle JET Starter Template. It also provides the open source librariesfor Oracle JET, the Oracle JET components, and the Oracle JET stylesheets. Youcan also use the base distribution to add Oracle JET functionality to your existingJavaScript application.
Topics:
• About the Oracle JET Base Distribution
• Add Oracle JET to an Existing JavaScript Application
Chapter 1Work with the Oracle JET Base Distribution
1-19
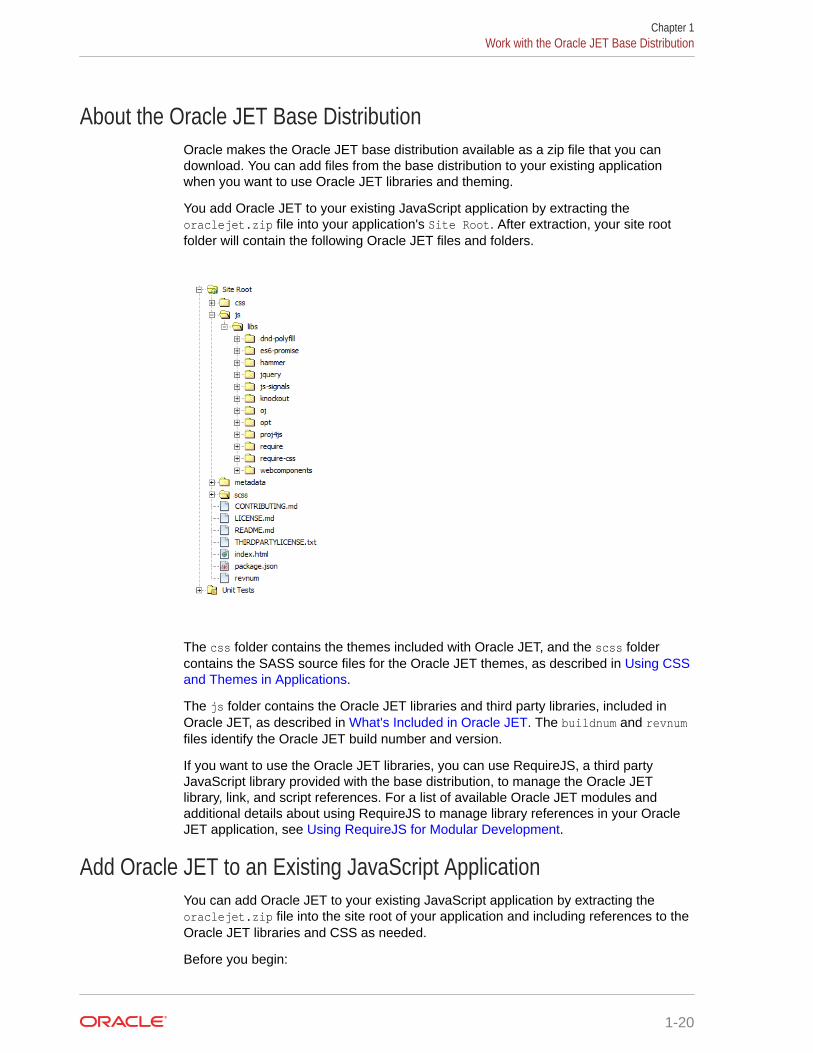
About the Oracle JET Base DistributionOracle makes the Oracle JET base distribution available as a zip file that you candownload. You can add files from the base distribution to your existing applicationwhen you want to use Oracle JET libraries and theming.
You add Oracle JET to your existing JavaScript application by extracting theoraclejet.zip file into your application's Site Root. After extraction, your site rootfolder will contain the following Oracle JET files and folders.
The css folder contains the themes included with Oracle JET, and the scss foldercontains the SASS source files for the Oracle JET themes, as described in Using CSSand Themes in Applications.
The js folder contains the Oracle JET libraries and third party libraries, included inOracle JET, as described in What's Included in Oracle JET. The buildnum and revnumfiles identify the Oracle JET build number and version.
If you want to use the Oracle JET libraries, you can use RequireJS, a third partyJavaScript library provided with the base distribution, to manage the Oracle JETlibrary, link, and script references. For a list of available Oracle JET modules andadditional details about using RequireJS to manage library references in your OracleJET application, see Using RequireJS for Modular Development.
Add Oracle JET to an Existing JavaScript ApplicationYou can add Oracle JET to your existing JavaScript application by extracting theoraclejet.zip file into the site root of your application and including references to theOracle JET libraries and CSS as needed.
Before you begin:
Chapter 1Work with the Oracle JET Base Distribution
1-20
• Oracle JET can be downloaded at: Oracle JET Downloads.
To add Oracle JET to an existing JavaScript application:
1. Navigate to the Oracle JET download location.
2. Choose Accept License Agreement.
3. Download Oracle JavaScript Extension Toolkit: Base Distribution.
4. Extract oraclejet.zip into the site root of your application.
5. If you want to use one of the themes included with Oracle JET, add the appropriatelink to the CSS.
a. Create a new index.html file in the project root.
b. In the application’s main page, index.html, add the HTML link element andpoint it to the CSS theme that you will use.
For example, to use the Oracle JET Alta web theme:
<!-- Oracle JET CSS files --><link rel="stylesheet" href="css/libs/oj/version/alta/oj-alta-min.css" type="text/css"/>
c. If you will be using the CSS included with Oracle JET, add the following line tothe top of your application’s main HTML page:
<!DOCTYPE html>
This line is needed for the Oracle JET CSS to function as expected.
6. If you want to use the Oracle JET libraries, you can use RequireJS to manage theOracle JET library, link, and script references.
a. Copy js/libs/oj/version/main-template.js to the js folder.
b. In the js folder, rename main-template.js to main.js.
c. Add the following script reference to your index.html file:
<script data-main="js/main" src="js/libs/require/require.js"></script>
d. Update main.js as needed to reference Oracle JET modules or your ownscripts.
Optimize Application Startup Using Oracle CDN and OracleJET Libraries
You can configure the Oracle JET application to minimize the network load atapplication startup through the use of Oracle Content Delivery Network (CDN) andthe Oracle JET distributions that the CDN supports.
When your production application supports users who access the application fromdiverse geographical locations, you can perform a significant performance optimizationby configuring the Oracle JET application to access Oracle CDN as its source forloading the required Oracle JET libraries and modules. Oracle maintains its CDN withthe libraries and modules that are specific to a given Oracle JET release. The CDNsupport for each release is analogous to the way Oracle JET tooling also supportscopying these files into the local src folder of the application for a particular release.In both cases, access to the appropriate libraries and modules is automated for the
Chapter 1Optimize Application Startup Using Oracle CDN and Oracle JET Libraries
1-21

application developer. You configure the application to determine where you want theapplication to load the libraries and modules from.
After you create your application, the application is configured by default to load theneeded libraries and modules from the local src folder. This allows you to create theapplication without the requirement for network access. Then, when you are readyto test in a staging environment or to move to production, you can configure theOracle JET application to use CDN server replication to reduce the network load thatoccurs when users access the application at the start of a browser session. When theuser initially starts the application in their browser, Oracle CDN ensures a distributedserver closest to the geographic location of the user is used to deliver the application'sneeded third party libraries and Oracle JET modules to the user's browser.
Configuring the application to load from CDN offers these advantages over loadingfrom the application src folder:
• Once loaded from a CDN distribution server, the required libraries and moduleswill be available to other applications that the user may run in the same browsersession.
• Enables the option to load bundled libraries and modules using a bundlesconfiguration file that Oracle maintains on CDN. The bundles configuration filegroups the most commonly accessed libraries and modules into content packagesthat are specific to the release and makes them available for delivery to theapplication as a bundle.
Tip:
Configuring your application to reference the bundles configuration on OracleCDN is recommended because Oracle maintains the configuration for eachrelease. By pointing your application to the current bundles configuration,you will ensure that your application runs with the latest supported libraryand module versions. For information about how to enable this bundleloading optimization, see About Configuring the Application for Oracle CDNOptimization.
Chapter 1Optimize Application Startup Using Oracle CDN and Oracle JET Libraries
1-22
2Understanding the Web ApplicationWorkflow
Developing client-side web applications with Oracle JET is designed to be simple andefficient using the development environment of your choice and Starter Templates toease the development process.
Oracle JET supports creating web applications from a command-line interface:
• Before you can create your first Oracle JET web application using the CLI, youmust install the prerequisite packages if you haven’t already done so. For details,see Install Oracle JET Tooling.
• Then, use the Oracle JET command-line interface package (ojet-cli) to scaffolda web application containing either a blank template or a complete pre-configuredsample application that you can modify as needed.
• After you have scaffolded the application, use the ojet-cli to build theapplication, serve it in a local web browser, and create a package readyfor deployment. This approach also supports easily creating hybrid mobileapplications.
Note:
For additional information about creating hybrid mobile applications, seeUnderstanding the Hybrid Mobile Application Workflow.
You must not use more than one version of Oracle JET to add components to thesame HTML document of your web application. Oracle JET does not support runningmultiple versions of Oracle JET components in the same web page.
Topics:
• Scaffold a Web Application
• Build a Web Application
• Serve a Web Application
• Customize the Web Application Tooling Workflow
• Serve a Web Application to a HTTPS Server Using a Self-signed Certificate
Scaffold a Web ApplicationUse the Oracle JET command-line interface (CLI) to scaffold an application thatcontains a blank template or one pre-configured Starter Template with a basiclayout, navigation bar, or navigation drawer. Each Starter Template is optimized forresponsive web or hybrid mobile applications. Additionally, Starter Templates support
2-1
TypeScript development should you wish to create your application in TypeScript. Afterscaffolding, you can modify the application as needed.
Before you can create your first Oracle JET web application using the CLI, you mustalso install the prerequisite packages if you haven’t already done so. For details, seeInstall Oracle JET Tooling.
To scaffold an Oracle JET web application:
1. At a command prompt, enter ojet create with optional arguments to create theOracle JET application and scaffolding.
ojet create [directory] [--template={template-name:[web|hybrid]|template-url|template-file}] [--typescript] [--help]
Tip:
You can enter ojet help at a terminal prompt to get additional help withthe Oracle JET CLI.
For example, the following command will create a web application in the web-app-navbar directory using the web version of the navbar template:
ojet create web-app-navbar --template=navbar
To scaffold the web application using the same Starter Template but with supportfor TypeScript version 4.0.0 development, add the --typescript argument to thecommand:
ojet create web-app-navbar --template=navbar --typescript
To scaffold the web application with the hybrid mobile version of the navbartemplate, enter the following command:
ojet create web-app-navbar --template=navbar:hybrid
2. Wait for confirmation.
The scaffolding will take some time to complete. When successful, the displays:
Oracle JET: Your app is ready! Change to your new app directory web-app-navbar and try ojet build and serve...
3. In your development environment, update the code for your application.
Chapter 2Scaffold a Web Application
2-2
Tip:
If you selected the blank template during scaffolding, you can still followthe same process to add cookbook samples or other content to yourapplication. However, it will be up to you to create the appropriate viewtemplates or viewModel scripts.
About ojet create Command Options for Web ApplicationsUse ojet create with optional arguments to create the Oracle JET web applicationand scaffolding.
The following table describes the available ojet create command options andprovides examples for their use.
Option Description
directory Application location. If not specified, the application iscreated in the current directory. The directory will becreated during scaffolding if it doesn’t already exist.
template Template to use for the application. Specify one of thefollowing:
• template-name
Predefined template. You can enter blank, basic,navbar or navdrawer . Defaults to blank if notspecified.
Optionally, add :web or :hybrid to the templatename to specify web or hybrid mobile styling. Bydefault template will use the web styling, but youcan add :hybrid to change the styling to hybridmobile, typically basic:hybrid, navbar:hybridor navdrawer:hybrid.
• template-URL
URL to zip file containing the name of azipped application: http://path-to-app/app-name.zip.
• template-file
Path to zip file on your local file system containingthe name of a zipped application: "path-to-app/app-name.zip". For example:
--template="C:\Users\SomeUser\app.zip"--template="/home/users/SomeUser/app.zip"--template="~/projects/app.zip"
If the src folder is present in the zip file, then allcontent will be placed under the src directory ofthe application, except for the script folder whichremains in the root. If no src folder is present, thecontents of the zip file will be placed at the root ofthe new application.
Chapter 2Scaffold a Web Application
2-3
Option Description
help Displays a man page for the ojet create command,including usage and options: ojet create --help.
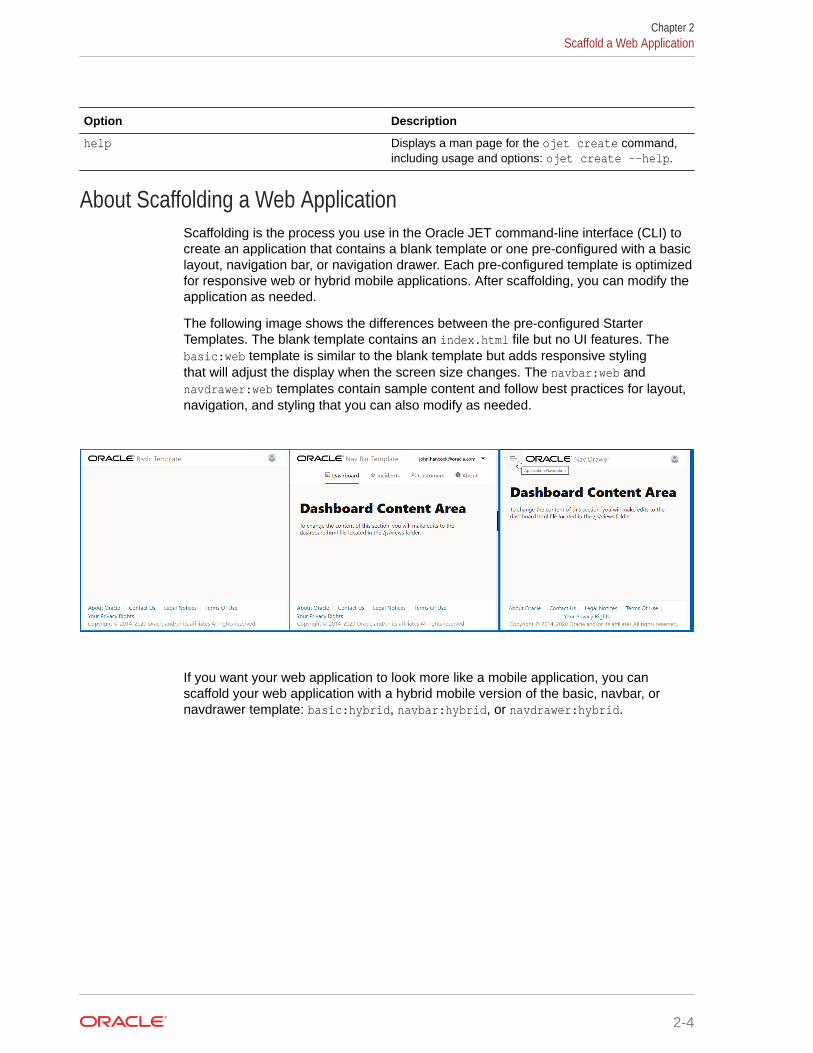
About Scaffolding a Web ApplicationScaffolding is the process you use in the Oracle JET command-line interface (CLI) tocreate an application that contains a blank template or one pre-configured with a basiclayout, navigation bar, or navigation drawer. Each pre-configured template is optimizedfor responsive web or hybrid mobile applications. After scaffolding, you can modify theapplication as needed.
The following image shows the differences between the pre-configured StarterTemplates. The blank template contains an index.html file but no UI features. Thebasic:web template is similar to the blank template but adds responsive stylingthat will adjust the display when the screen size changes. The navbar:web andnavdrawer:web templates contain sample content and follow best practices for layout,navigation, and styling that you can also modify as needed.
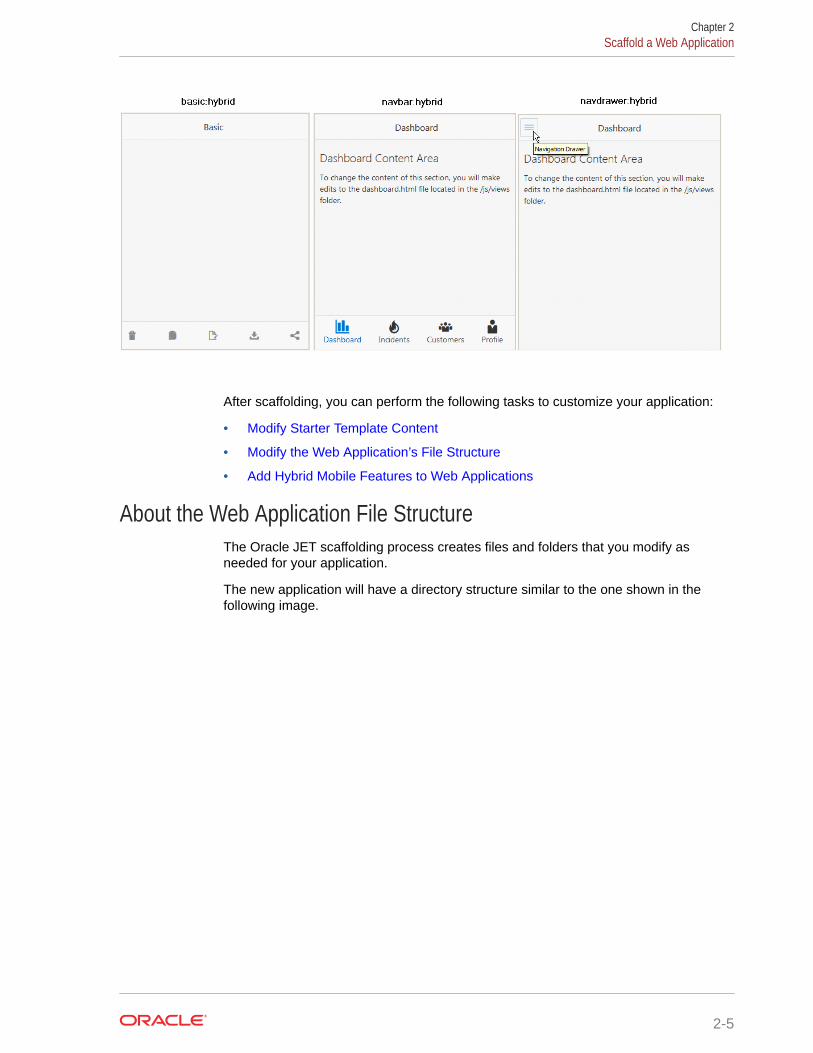
If you want your web application to look more like a mobile application, you canscaffold your web application with a hybrid mobile version of the basic, navbar, ornavdrawer template: basic:hybrid, navbar:hybrid, or navdrawer:hybrid.
Chapter 2Scaffold a Web Application
2-4
After scaffolding, you can perform the following tasks to customize your application:
• Modify Starter Template Content
• Modify the Web Application’s File Structure
• Add Hybrid Mobile Features to Web Applications
About the Web Application File StructureThe Oracle JET scaffolding process creates files and folders that you modify asneeded for your application.
The new application will have a directory structure similar to the one shown in thefollowing image.
Chapter 2Scaffold a Web Application
2-5
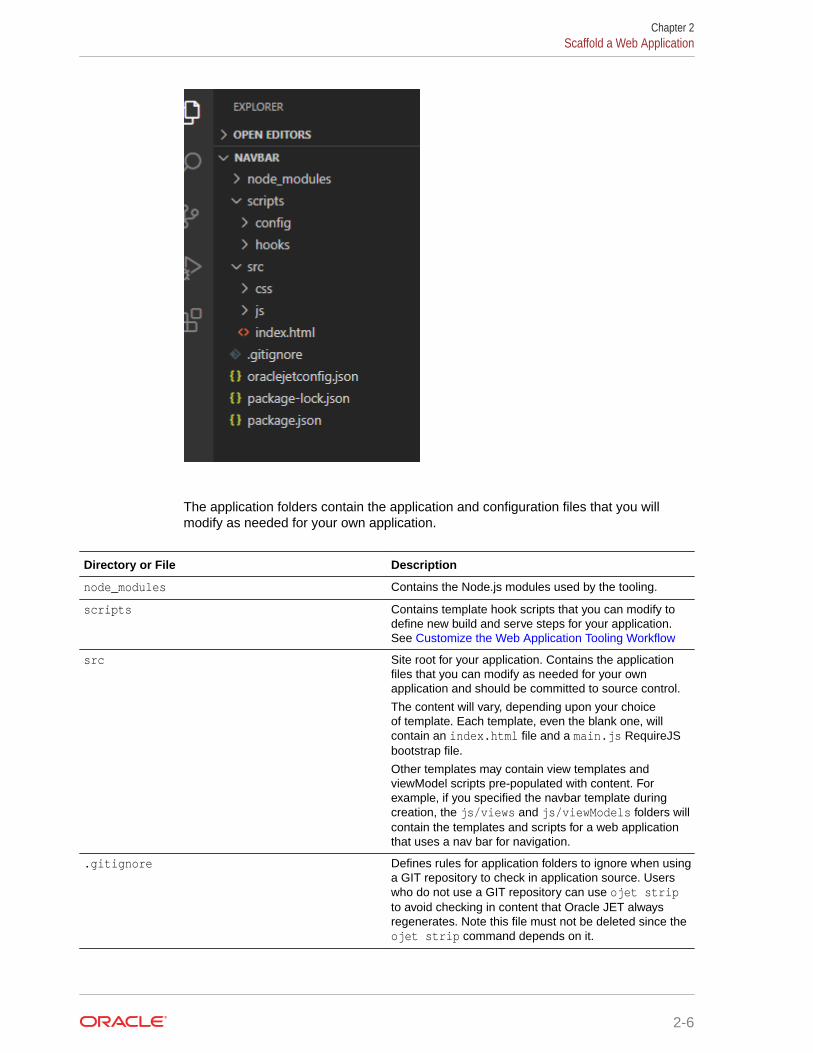
The application folders contain the application and configuration files that you willmodify as needed for your own application.
Directory or File Description
node_modules Contains the Node.js modules used by the tooling.
scripts Contains template hook scripts that you can modify todefine new build and serve steps for your application.See Customize the Web Application Tooling Workflow
src Site root for your application. Contains the applicationfiles that you can modify as needed for your ownapplication and should be committed to source control.
The content will vary, depending upon your choiceof template. Each template, even the blank one, willcontain an index.html file and a main.js RequireJSbootstrap file.
Other templates may contain view templates andviewModel scripts pre-populated with content. Forexample, if you specified the navbar template duringcreation, the js/views and js/viewModels folders willcontain the templates and scripts for a web applicationthat uses a nav bar for navigation.
.gitignore Defines rules for application folders to ignore when usinga GIT repository to check in application source. Userswho do not use a GIT repository can use ojet stripto avoid checking in content that Oracle JET alwaysregenerates. Note this file must not be deleted since theojet strip command depends on it.
Chapter 2Scaffold a Web Application
2-6
Directory or File Description
oraclejetconfig.json Contains the default source and staging file paths thatyou can modify if you need to change your application'sfile structure.
package.json Defines npm dependencies and project metadata.
After scaffolding, you can perform the following tasks to customize your application:
• Modify Starter Template Content
• Modify the Web Application’s File Structure
• Add Hybrid Mobile Features to Web Applications
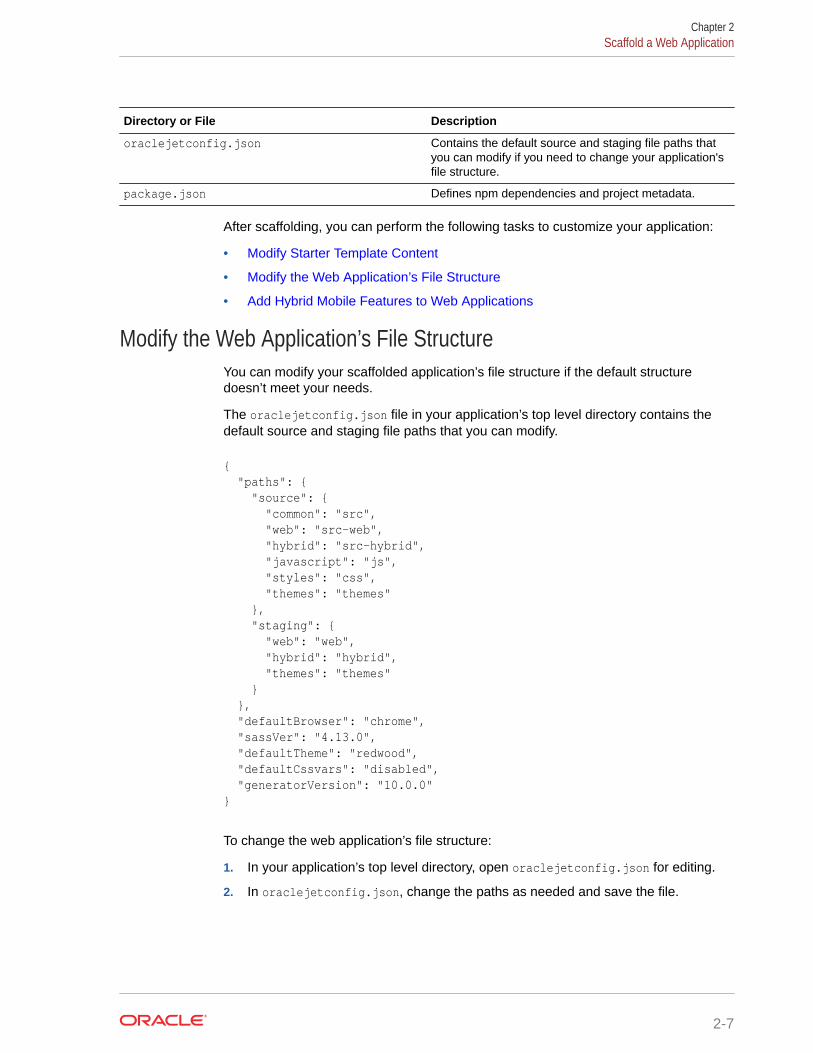
Modify the Web Application’s File StructureYou can modify your scaffolded application’s file structure if the default structuredoesn’t meet your needs.
The oraclejetconfig.json file in your application’s top level directory contains thedefault source and staging file paths that you can modify.
{ "paths": { "source": { "common": "src", "web": "src-web", "hybrid": "src-hybrid", "javascript": "js", "styles": "css", "themes": "themes" }, "staging": { "web": "web", "hybrid": "hybrid", "themes": "themes" } }, "defaultBrowser": "chrome", "sassVer": "4.13.0", "defaultTheme": "redwood", "defaultCssvars": "disabled", "generatorVersion": "10.0.0"}
To change the web application’s file structure:
1. In your application’s top level directory, open oraclejetconfig.json for editing.
2. In oraclejetconfig.json, change the paths as needed and save the file.
Chapter 2Scaffold a Web Application
2-7
For example, if you want to change the default styles path from css to app-css,edit the following line in oraclejetconfig.json:
"styles": "app-css"
3. Rename the directories as needed for your application, making sure to changeonly the paths listed in oraclejetconfig.json.
For example, if you changed styles to app-css in oraclejetconfig.json, changethe application’s css directory to app-css.
4. Update your application files as needed to reference the changed path.
For example, if you modified the path to the CSS for your application to app-css,update the links appropriately in your application’s index.html.
<link rel="icon" href="app-css/images/favicon.ico" type="image/x-icon" />
<!-- This is the main css file for the default Alta theme --> <!-- injector:theme --> <link rel="stylesheet" href="app-css/libs/oj/v10.0.0/redwood/oj-redwood-min.css" type="text/css"/> <!-- endinjector -->
5. At the command prompt, from the application root directory, build your applicationto use the new paths.
ojet build
Add Hybrid Mobile Features to Web ApplicationsAdd Cordova hybrid mobile platforms to your web application using the ojet addhybrid command. When you run this command, the tooling creates a Cordova projectand new src-hybrid and src-web directories, enabling you to create both web andhybrid mobile applications from the same source.
Since mobile applications typically provide a very different user experience to webapplications, taking this approach allows you to add view and viewModel files thatyou create specifically for a mobile device user experience. Then when you build theoriginal application by using the command ojet build hybrid, the tooling will copyyour added files from the src-hybrid folder and merge them with the contents of theapplication's src folder. Finally, serving the application, by using the command ojetserve hybrid, populates the web staging folder with the merged source files and thetooling runs the application in the desired environment (browser, simulator, or mobiledevice) from this location.
Before you begin:
• If needed, install the mobile tooling packages, as described in Understanding theHybrid Mobile Application Workflow.
• Familiarize yourself with the folder structure of your web application. The filelocations will vary in this procedure if you modified your directory structure, as
Chapter 2Scaffold a Web Application
2-8
described in Modify the Web Application’s File Structure or Modify the HybridMobile Application’s File Structure.
To add hybrid mobile platforms to your web application:
1. At a terminal prompt, in your application’s top level directory, enter the followingcommand to add hybrid mobile features to your web application:
ojet add hybrid [--platforms=android,ios,windows] [--appid=application-id] [--appname=application-name] [--help]
You should specify at least one platform for the platforms value. Add additionalplatforms as needed, separated by commas. If you don’t specify a platform, thecommand will attempt to locate available platforms and prompt for your selection.
--platforms=android--platforms=ios,android
When you run the command, Oracle JET tooling creates the Cordova project andtwo new empty source directories that you can use for platform specific content:src-hybrid and src-web.
2. To make changes to content that apply to both web and hybrid platforms, editcontent in src.
3. To make changes to content that apply only to the web or hybrid mobile platform,add the new content to src-web or src-hybrid as needed.
When you build your application, the content in the platform specific file takesprecedence over content in src. For example, if you create a new src-hybrid/js/viewModels/dashboard.html file, content in that file will take precedence overthe src/js/viewModels/dashboard.html file when you build the application as ahybrid mobile application.
Note:
It is important that files you add to the src-web or src-hybrid foldermaintain the same folder structure as the src merge target folder. Forexample, based on the original application's default folder structure,view or viewModel files specific to the hybrid mobile platform thatyou add should appear in the src-hybrid/js/view and src-hybrid/js/viewModels directories.
Add Progressive Web App Support to Web ApplicationsAdd Progressive Web App (PWA) support to your JET web application if you want togive users a native-like mobile app experience on the device where they access yourJET web application.
Using the ojet add pwa command, you add both a service worker script and a webmanifest to your JET web application. You can customize these artifacts to determinehow your JET web application behaves when accessed as a PWA.
Chapter 2Scaffold a Web Application
2-9
To add PWA support to your web app:
• At a terminal prompt, in your application's top level directory, enter the followingcommand to add PWA support to your JET web application:
ojet add pwa
When you run the command, Oracle JET tooling makes the following changes to yourJET web application:
• Adds the following two files to the app’s src folder:
– manifest.jsonThis file tells the browser about the PWA support in your JET web application,and how it should behave when installed on a user's desktop or mobile device.Use this file to specify the app name to appear on a user’s device, plusdevice-specific icons. For information about the properties that you can specifyin this file, see Add a web app manifest.
– sw.js
This is the service worker script that the browser runs in the background. Usethis file to specify any additional resources from your JET app that you wantto cache on a user’s device if the PWA service worker is installed. By default,JET specifies the following resources to cache:
const resourcesToCache = [ 'index.html', 'manifest.json', 'js/', 'css/'];
• Registers the manifest file and the service worker script in the JET webapplication's ./src/index.html file:
<html lang="en-us"> <head> ... <link rel="manifest" href="manifest.json"></head>...<script type="text/javascript"> if ('serviceWorker' in navigator) { navigator.serviceWorker.register('sw.js').then(function(registration) { // Registration was successful console.log('myPWAapp ServiceWorker registration successful with scope: ', registration.scope); }).catch(function(err) { // registration failed console.log('myPWAapp ServiceWorker registration failed: ', err); }); }
Chapter 2Scaffold a Web Application
2-10

</script></body>
With these changes, a user on a mobile device, such as an Android phone, can initiallyaccess your JET web application through its URL using the Chrome browser, add it tothe Home screen of the device, and subsequently launch it like any other app on thephone. Note that browser and platform support for PWA is not uniform. To ensure anoptimal experience, test your PWA-enabled JET web application on your users' targetplatforms (Android, iOS, and so on) and the browsers (Chrome, Safari, and so on).
PWA-enabled JET web applications and service workers require HTTPS. Theproduction environment where you deploy your PWA-enabled JET web applicationwill serve the app over HTTPS. If, during development, you want to serve your JETweb application to a HTTPS-enabled server, see Serve a Web Application to a HTTPSServer Using a Self-signed Certificate.
Build a Web ApplicationUse the Oracle JET command-line interface (CLI) to build a development version ofyour web application before serving it to a browser. This step is optional.
Change to the application’s root directory and use the ojet build command to buildyour application.
ojet build [--cssvars=enabled|disabled --theme=themename --themes=theme1,theme2,... --sass]
Tip:
You can enter ojet help at a terminal prompt to get help for specific OracleJET CLI options.
The command will take some time to complete. If it’s successful, you’ll see thefollowing message:
Done.
The command will also create a web folder in your application’s root to contain the builtcontent.
Note:
You can also use the ojet build command with the --release optionto build a release-ready version of your application. For information, seePackage and Deploy Web Applications.
Chapter 2Build a Web Application
2-11

About ojet build Command Options for Web ApplicationsUse the ojet build command with optional arguments to build a development versionof your web application before serving it to a browser.
The following table describes the available options and provides examples for theiruse.
Option Description
--theme Theme to use for the application. The theme defaultsto redwood for web applications and hybrid mobileapplications.
Note: If you have migrated to JET 9.0.0 and later, andwant to continue building with your Alta theme, youcan specify alta:web, or for hybrid mobile themes:alta:android, alta:ios, alta:windows). Note thatthe Alta theme is supported through JET 10.0.0 but isexpected to become deprecated beyond that. For detailsabout migrating applications, see Oracle JET ApplicationMigration for Release 10.0.0.
You can also enter a different themename for a customtheme as described in About CSS Variables and CustomThemes in Oracle JET for Redwood themes and, for amigrated custom Alta theme, in Customize Alta ThemesUsing the Tooling.
--themes Themes to include in the application, separated bycommas.
If you don’t specify the --theme flag as describedabove, Oracle JET will use the first element that youspecify in --themes as the default theme.
--cssvars Injects a Redwood theme CSS file that supports workingwith CSS custom properties when you want to overrideCSS variables to customize the Redwood theme, asdescribed in About CSS Variables and Custom Themesin Oracle JET.
--sass Manages Sass compilation. If you add Sass and specifythe --theme or --themes option, Sass compilationoccurs by default and you can use --sass=false or--no-sass to turn it off.
If you add Sass and do not specify a theme option,Sass compilation will not occur by default, and you mustspecify --sass=true or --sass to turn it on. For detailsabout theming with Sass, see Work with Sass.
Serve a Web ApplicationUse ojet serve to run your web application in a local web server for testing anddebugging. By default, the Oracle JET live reload option is enabled which lets youmake changes to your application code that are immediately reflected in the browser.
To run your web application from a terminal prompt:
Chapter 2Serve a Web Application
2-12
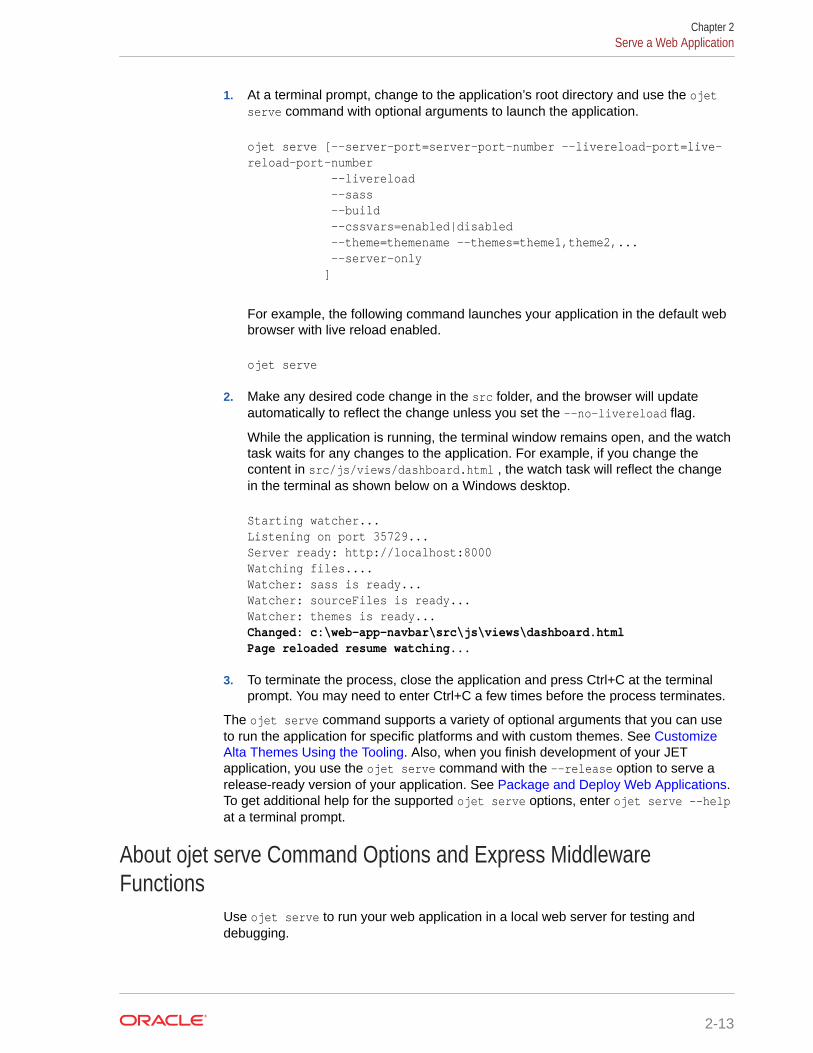
1. At a terminal prompt, change to the application’s root directory and use the ojetserve command with optional arguments to launch the application.
ojet serve [--server-port=server-port-number --livereload-port=live-reload-port-number --livereload --sass --build --cssvars=enabled|disabled --theme=themename --themes=theme1,theme2,... --server-only ]
For example, the following command launches your application in the default webbrowser with live reload enabled.
ojet serve
2. Make any desired code change in the src folder, and the browser will updateautomatically to reflect the change unless you set the --no-livereload flag.
While the application is running, the terminal window remains open, and the watchtask waits for any changes to the application. For example, if you change thecontent in src/js/views/dashboard.html , the watch task will reflect the changein the terminal as shown below on a Windows desktop.
Starting watcher...Listening on port 35729...Server ready: http://localhost:8000Watching files....Watcher: sass is ready...Watcher: sourceFiles is ready...Watcher: themes is ready...Changed: c:\web-app-navbar\src\js\views\dashboard.htmlPage reloaded resume watching...
3. To terminate the process, close the application and press Ctrl+C at the terminalprompt. You may need to enter Ctrl+C a few times before the process terminates.
The ojet serve command supports a variety of optional arguments that you can useto run the application for specific platforms and with custom themes. See CustomizeAlta Themes Using the Tooling. Also, when you finish development of your JETapplication, you use the ojet serve command with the --release option to serve arelease-ready version of your application. See Package and Deploy Web Applications.To get additional help for the supported ojet serve options, enter ojet serve --helpat a terminal prompt.
About ojet serve Command Options and Express MiddlewareFunctions
Use ojet serve to run your web application in a local web server for testing anddebugging.
Chapter 2Serve a Web Application
2-13
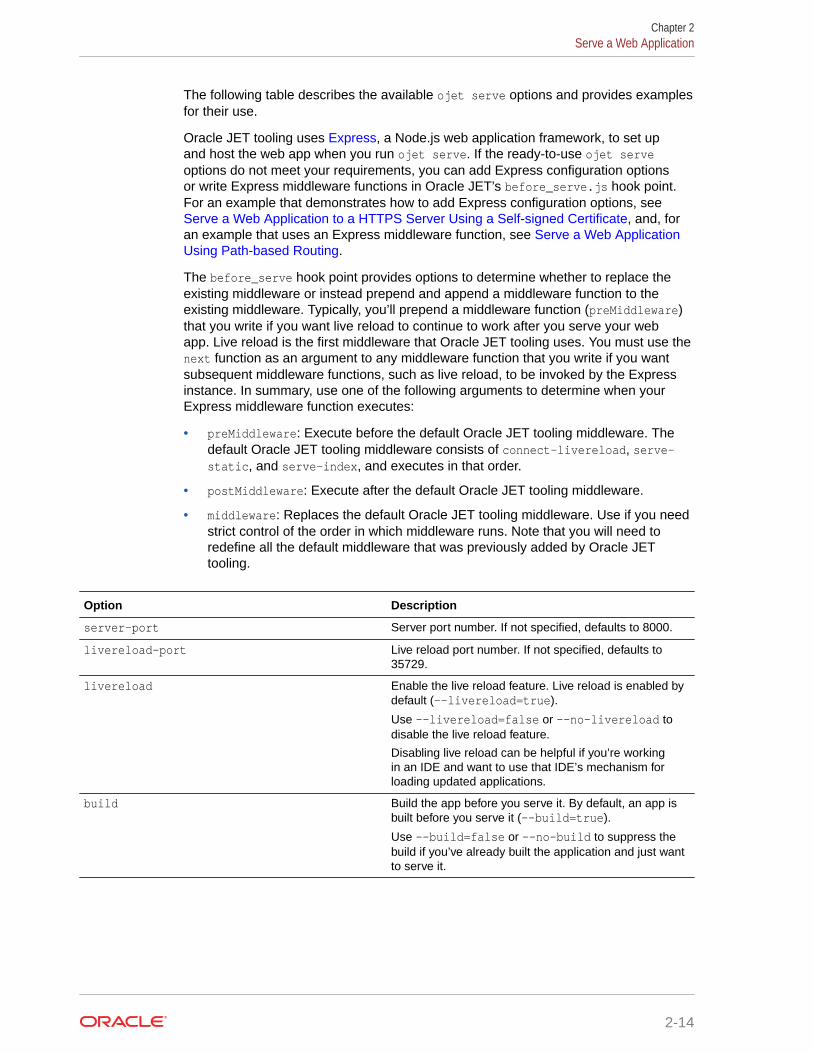
The following table describes the available ojet serve options and provides examplesfor their use.
Oracle JET tooling uses Express, a Node.js web application framework, to set upand host the web app when you run ojet serve. If the ready-to-use ojet serveoptions do not meet your requirements, you can add Express configuration optionsor write Express middleware functions in Oracle JET’s before_serve.js hook point.For an example that demonstrates how to add Express configuration options, seeServe a Web Application to a HTTPS Server Using a Self-signed Certificate, and, foran example that uses an Express middleware function, see Serve a Web ApplicationUsing Path-based Routing.
The before_serve hook point provides options to determine whether to replace theexisting middleware or instead prepend and append a middleware function to theexisting middleware. Typically, you’ll prepend a middleware function (preMiddleware)that you write if you want live reload to continue to work after you serve your webapp. Live reload is the first middleware that Oracle JET tooling uses. You must use thenext function as an argument to any middleware function that you write if you wantsubsequent middleware functions, such as live reload, to be invoked by the Expressinstance. In summary, use one of the following arguments to determine when yourExpress middleware function executes:
• preMiddleware: Execute before the default Oracle JET tooling middleware. Thedefault Oracle JET tooling middleware consists of connect-livereload, serve-static, and serve-index, and executes in that order.
• postMiddleware: Execute after the default Oracle JET tooling middleware.
• middleware: Replaces the default Oracle JET tooling middleware. Use if you needstrict control of the order in which middleware runs. Note that you will need toredefine all the default middleware that was previously added by Oracle JETtooling.
Option Description
server-port Server port number. If not specified, defaults to 8000.
livereload-port Live reload port number. If not specified, defaults to35729.
livereload Enable the live reload feature. Live reload is enabled bydefault (--livereload=true).
Use --livereload=false or --no-livereload todisable the live reload feature.
Disabling live reload can be helpful if you’re workingin an IDE and want to use that IDE’s mechanism forloading updated applications.
build Build the app before you serve it. By default, an app isbuilt before you serve it (--build=true).
Use --build=false or --no-build to suppress thebuild if you’ve already built the application and just wantto serve it.
Chapter 2Serve a Web Application
2-14
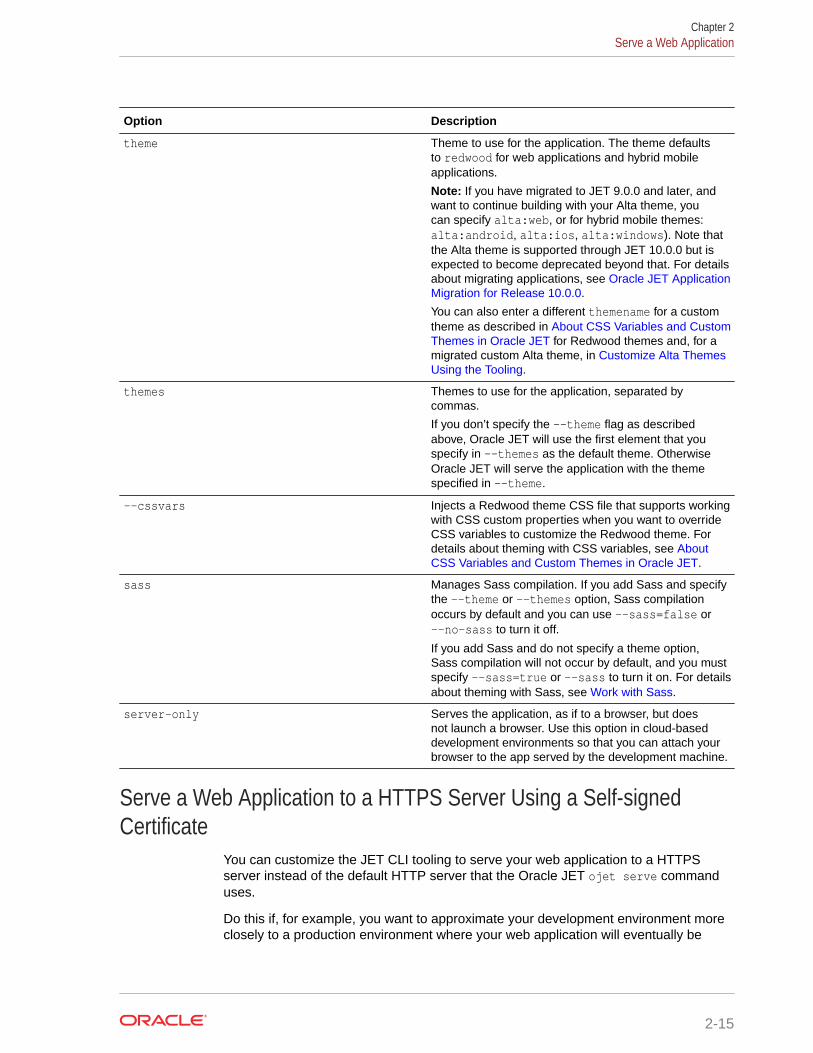
Option Description
theme Theme to use for the application. The theme defaultsto redwood for web applications and hybrid mobileapplications.
Note: If you have migrated to JET 9.0.0 and later, andwant to continue building with your Alta theme, youcan specify alta:web, or for hybrid mobile themes:alta:android, alta:ios, alta:windows). Note thatthe Alta theme is supported through JET 10.0.0 but isexpected to become deprecated beyond that. For detailsabout migrating applications, see Oracle JET ApplicationMigration for Release 10.0.0.
You can also enter a different themename for a customtheme as described in About CSS Variables and CustomThemes in Oracle JET for Redwood themes and, for amigrated custom Alta theme, in Customize Alta ThemesUsing the Tooling.
themes Themes to use for the application, separated bycommas.
If you don’t specify the --theme flag as describedabove, Oracle JET will use the first element that youspecify in --themes as the default theme. OtherwiseOracle JET will serve the application with the themespecified in --theme.
--cssvars Injects a Redwood theme CSS file that supports workingwith CSS custom properties when you want to overrideCSS variables to customize the Redwood theme. Fordetails about theming with CSS variables, see AboutCSS Variables and Custom Themes in Oracle JET.
sass Manages Sass compilation. If you add Sass and specifythe --theme or --themes option, Sass compilationoccurs by default and you can use --sass=false or--no-sass to turn it off.
If you add Sass and do not specify a theme option,Sass compilation will not occur by default, and you mustspecify --sass=true or --sass to turn it on. For detailsabout theming with Sass, see Work with Sass.
server-only Serves the application, as if to a browser, but doesnot launch a browser. Use this option in cloud-baseddevelopment environments so that you can attach yourbrowser to the app served by the development machine.
Serve a Web Application to a HTTPS Server Using a Self-signedCertificate
You can customize the JET CLI tooling to serve your web application to a HTTPSserver instead of the default HTTP server that the Oracle JET ojet serve commanduses.
Do this if, for example, you want to approximate your development environment moreclosely to a production environment where your web application will eventually be
Chapter 2Serve a Web Application
2-15
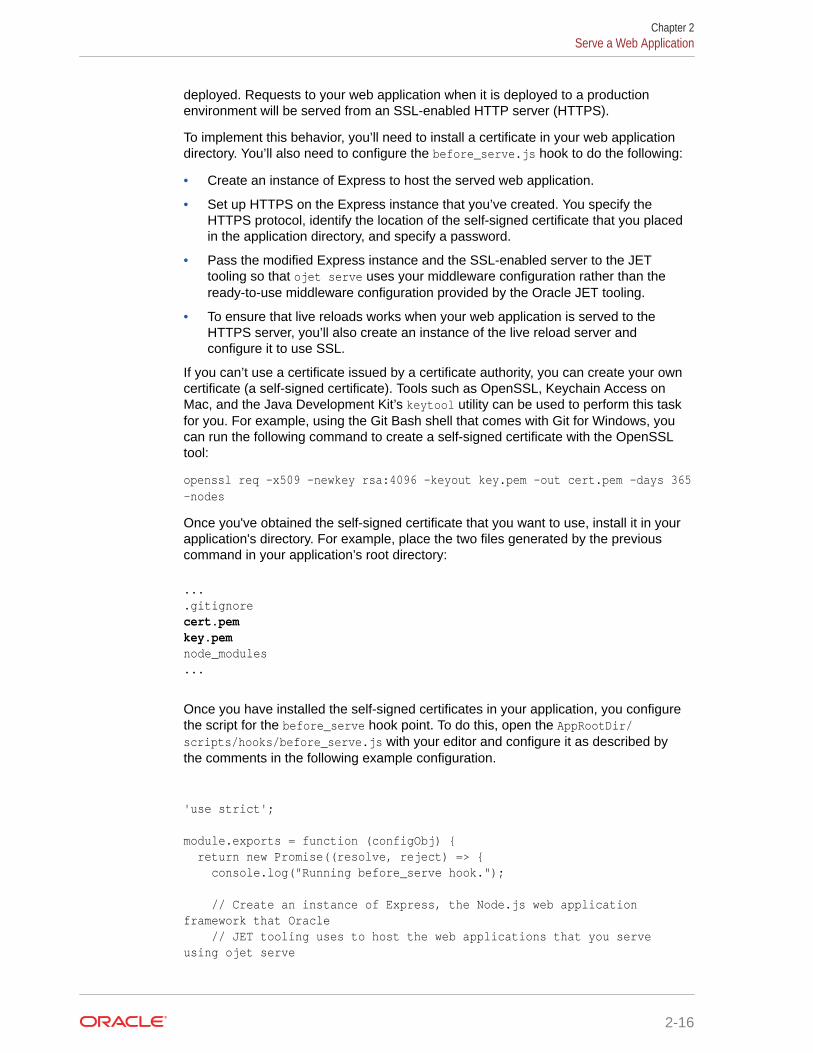
deployed. Requests to your web application when it is deployed to a productionenvironment will be served from an SSL-enabled HTTP server (HTTPS).
To implement this behavior, you’ll need to install a certificate in your web applicationdirectory. You’ll also need to configure the before_serve.js hook to do the following:
• Create an instance of Express to host the served web application.
• Set up HTTPS on the Express instance that you’ve created. You specify theHTTPS protocol, identify the location of the self-signed certificate that you placedin the application directory, and specify a password.
• Pass the modified Express instance and the SSL-enabled server to the JETtooling so that ojet serve uses your middleware configuration rather than theready-to-use middleware configuration provided by the Oracle JET tooling.
• To ensure that live reloads works when your web application is served to theHTTPS server, you’ll also create an instance of the live reload server andconfigure it to use SSL.
If you can’t use a certificate issued by a certificate authority, you can create your owncertificate (a self-signed certificate). Tools such as OpenSSL, Keychain Access onMac, and the Java Development Kit’s keytool utility can be used to perform this taskfor you. For example, using the Git Bash shell that comes with Git for Windows, youcan run the following command to create a self-signed certificate with the OpenSSLtool:
openssl req -x509 -newkey rsa:4096 -keyout key.pem -out cert.pem -days 365-nodes
Once you've obtained the self-signed certificate that you want to use, install it in yourapplication's directory. For example, place the two files generated by the previouscommand in your application’s root directory:
...
.gitignorecert.pemkey.pemnode_modules...
Once you have installed the self-signed certificates in your application, you configurethe script for the before_serve hook point. To do this, open the AppRootDir/scripts/hooks/before_serve.js with your editor and configure it as described bythe comments in the following example configuration.
'use strict';
module.exports = function (configObj) { return new Promise((resolve, reject) => { console.log("Running before_serve hook.");
// Create an instance of Express, the Node.js web application framework that Oracle // JET tooling uses to host the web applications that you serve using ojet serve
Chapter 2Serve a Web Application
2-16

const express = require("express");
// Set up HTTPS const fs = require("fs"); const https = require("https"); // Specify the self-signed certificates. In our example, these files exist // in the root directory of our project. const key = fs.readFileSync("./key.pem"); const cert = fs.readFileSync("./cert.pem"); // If the self-signed certificate that you created or use requires a // password, specify it here: const passphrase = "1234";
const app = express();
// Pass the modified Express instance and the SSL-enabled server to the Oracle JET tooling configObj['express'] = app; configObj['urlPrefix'] = 'https'; configObj['server'] = https.createServer({ key: key, cert: cert, passphrase: passphrase }, app);
// Enable the Oracle JET live reload option using its default port number so that // any changes you make to application code are immediately reflected in the browser after you // serve it const tinylr = require("tiny-lr"); const lrPort = "35729";
// Configure the live reload server to also use SSL configObj["liveReloadServer"] = tinylr({ lrPort, key, cert, passphrase });
resolve(configObj); });};
Once you have completed these configuration steps, run the series of commands(ojet build and ojet serve, for example) that you typically run to build and serveyour web application. As the certificate that you are using is a self-signed certificaterather than a certificate issued by a certificate authority, the browser that you use toaccess the web application displays a warning the first time that you access the webapplication. Acknowledge the warning and click the options that allow you to accessyour web application. On Google Chrome, for example, you click Advanced andProceed to localhost (unsafe) if your web application is being served to https://localhost:8000/.
Chapter 2Serve a Web Application
2-17
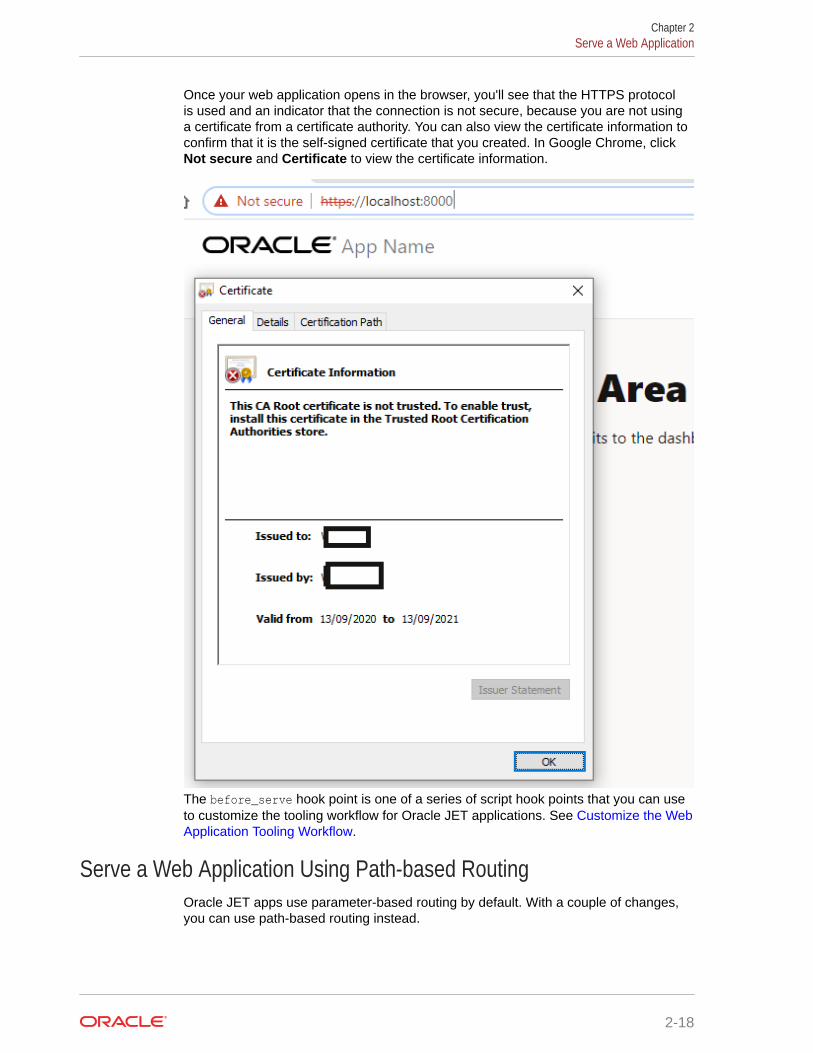
Once your web application opens in the browser, you'll see that the HTTPS protocolis used and an indicator that the connection is not secure, because you are not usinga certificate from a certificate authority. You can also view the certificate information toconfirm that it is the self-signed certificate that you created. In Google Chrome, clickNot secure and Certificate to view the certificate information.
The before_serve hook point is one of a series of script hook points that you can useto customize the tooling workflow for Oracle JET applications. See Customize the WebApplication Tooling Workflow.
Serve a Web Application Using Path-based RoutingOracle JET apps use parameter-based routing by default. With a couple of changes,you can use path-based routing instead.
Chapter 2Serve a Web Application
2-18
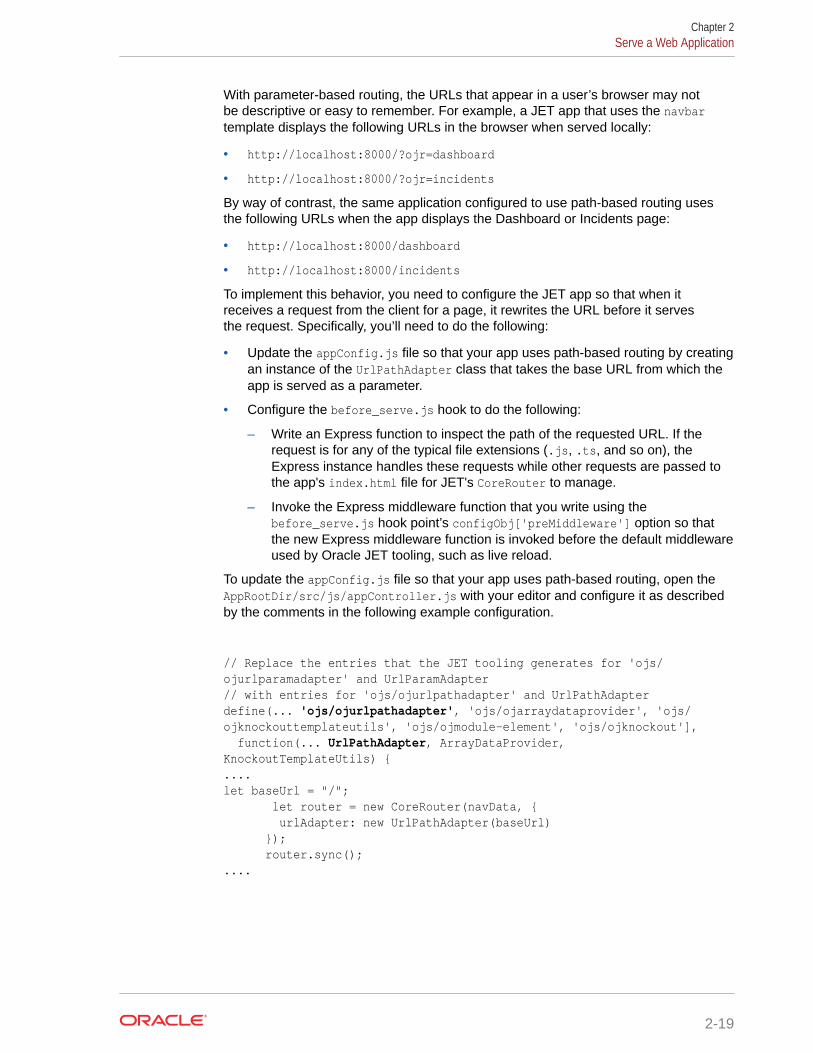
With parameter-based routing, the URLs that appear in a user’s browser may notbe descriptive or easy to remember. For example, a JET app that uses the navbartemplate displays the following URLs in the browser when served locally:
• http://localhost:8000/?ojr=dashboard
• http://localhost:8000/?ojr=incidents
By way of contrast, the same application configured to use path-based routing usesthe following URLs when the app displays the Dashboard or Incidents page:
• http://localhost:8000/dashboard
• http://localhost:8000/incidents
To implement this behavior, you need to configure the JET app so that when itreceives a request from the client for a page, it rewrites the URL before it servesthe request. Specifically, you’ll need to do the following:
• Update the appConfig.js file so that your app uses path-based routing by creatingan instance of the UrlPathAdapter class that takes the base URL from which theapp is served as a parameter.
• Configure the before_serve.js hook to do the following:
– Write an Express function to inspect the path of the requested URL. If therequest is for any of the typical file extensions (.js, .ts, and so on), theExpress instance handles these requests while other requests are passed tothe app's index.html file for JET's CoreRouter to manage.
– Invoke the Express middleware function that you write using thebefore_serve.js hook point’s configObj['preMiddleware'] option so thatthe new Express middleware function is invoked before the default middlewareused by Oracle JET tooling, such as live reload.
To update the appConfig.js file so that your app uses path-based routing, open theAppRootDir/src/js/appController.js with your editor and configure it as describedby the comments in the following example configuration.
// Replace the entries that the JET tooling generates for 'ojs/ojurlparamadapter' and UrlParamAdapter // with entries for 'ojs/ojurlpathadapter' and UrlPathAdapterdefine(... 'ojs/ojurlpathadapter', 'ojs/ojarraydataprovider', 'ojs/ojknockouttemplateutils', 'ojs/ojmodule-element', 'ojs/ojknockout'], function(... UrlPathAdapter, ArrayDataProvider, KnockoutTemplateUtils) { ....let baseUrl = "/"; let router = new CoreRouter(navData, { urlAdapter: new UrlPathAdapter(baseUrl) }); router.sync();....
Chapter 2Serve a Web Application
2-19
To configure the script for the before_serve hook point, open the AppRootDir/scripts/hooks/before_serve.js with your editor and configure it as described bythe comments in the following example configuration.
'use strict';
module.exports = function (configObj) {
/* Write an Express middleware function to inspect the path of the requested URL. If the request is for any of the extensions (js, ts, and so on), the Express instance handles these requests while other requests are passed to the app’s index.html file for the JET CoreRouter to manage. */ function urlRewriteMiddleware(req, res, next) { const matchStaticFiles = req.url.match(/\/(js|css)\/.*/); req.url = matchStaticFiles ? matchStaticFiles[0] : '/index.html'; next(); } return new Promise((resolve, reject) => { /* Call the Express middleware function that inspects the URL to rewrite and prepend it to JET’s default middleware so that other options provided by JET’s default middleware, such as live reload continue to work. */ configObj['preMiddleware'] = [urlRewriteMiddleware] resolve(configObj); });};
Customize the Web Application Tooling WorkflowHook points that Oracle JET tooling defines let you customize the behavior of the JETbuild and serve processes when you want to define new steps to execute during thetooling workflow using script code that you write.
When you create an application, Oracle JET tooling generates script templates in the /scripts/hooks application subfolder. To customize the Oracle JET tooling workflowyou can edit the generated templates with the script code that you want the tooling toexecute for specific hook points during the build and serve processes. If you do notcreate a custom hook point script, Oracle JET tooling ignores the script templates andfollows the default workflow for the build and serve processes.
To customize the workflow for the build or serve processes, you edit the generatedscript template file named for a specific hook point. For example, to trigger a scriptat the start of the tooling's build process, you would edit the before_build.js scriptnamed for the hook point triggered before the build begins. That hook point is namedbefore_build.
Chapter 2Customize the Web Application Tooling Workflow
2-20

Therefore, customization of the build and serve processes that you enforce on OracleJET tooling workflow requires that you know the following details before you can writea customization script.
• The type of application that you created: either a web application or a hybridmobile application.
• The Oracle JET build or serve mode that you want to customize:
– Debug — The default mode when you build or serve your application, whichproduces the source code in the built application.
– Release — The mode when you build the application with the --releaseoption, which produces minified and bundled code in a release-readyapplication.
• The appropriate hook point to trigger the customization.
• The location of the default hook script template to customize.
About the Script Hook Points for Web ApplicationsThe Oracle JET hooks system defines various script trigger points, also called hookpoints, that allow you to customize the create, build, serve and restore workflow acrossthe various command-line interface processes. Customization relies on script files andthe script code that you want to trigger for a particular hook point.
The following table identifies the hook points and the workflow customizations theysupport in the Oracle JET tooling create, build, serve, and restore processes. Unlessnoted, hook points for the build and serve processes support both debug and releasemode.
Hook Point SupportedToolingProcess
Description
after_app_create
create This hook point triggers the script with the defaultname after_app_create.js immediately after the toolingconcludes the create application process. A script for thishook point can be used with a web application or a hybridmobile application.
after_app_restore
restore This hook point triggers the script with the default nameafter_app_restore.js immediately after the toolingconcludes the restore application process. A script for thishook point can be used with a web application or a hybridmobile application.
before_build build This hook point triggers the script with the default namebefore_build.js immediately before the tooling initiatesthe build process. A script for this hook point can be usedwith a web application or a hybrid mobile application.
before_release_build
build(releasemode only)
This hook point triggers the script with the default namebefore_release_build.js before the minification stepand the requirejs bundling step occur. A script for this hookpoint can be used with a web application or a hybrid mobileapplication.
Chapter 2Customize the Web Application Tooling Workflow
2-21
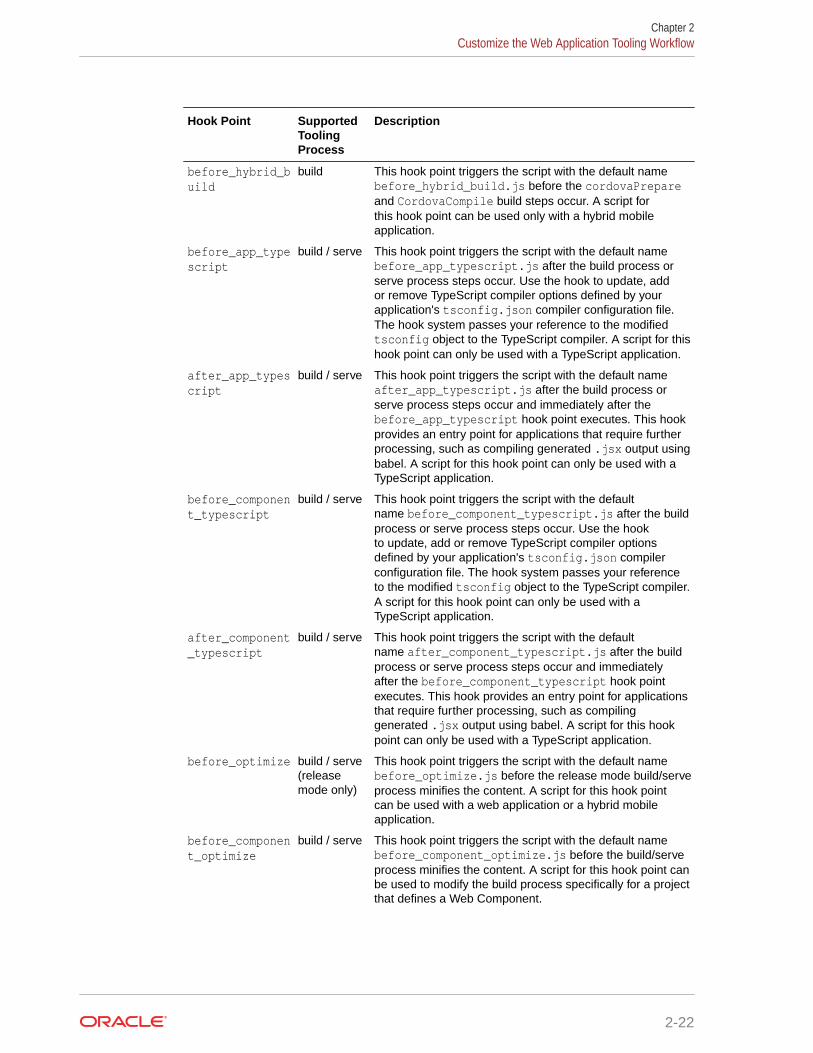
Hook Point SupportedToolingProcess
Description
before_hybrid_build
build This hook point triggers the script with the default namebefore_hybrid_build.js before the cordovaPrepareand CordovaCompile build steps occur. A script forthis hook point can be used only with a hybrid mobileapplication.
before_app_typescript
build / serve This hook point triggers the script with the default namebefore_app_typescript.js after the build process orserve process steps occur. Use the hook to update, addor remove TypeScript compiler options defined by yourapplication's tsconfig.json compiler configuration file.The hook system passes your reference to the modifiedtsconfig object to the TypeScript compiler. A script for thishook point can only be used with a TypeScript application.
after_app_typescript
build / serve This hook point triggers the script with the default nameafter_app_typescript.js after the build process orserve process steps occur and immediately after thebefore_app_typescript hook point executes. This hookprovides an entry point for applications that require furtherprocessing, such as compiling generated .jsx output usingbabel. A script for this hook point can only be used with aTypeScript application.
before_component_typescript
build / serve This hook point triggers the script with the defaultname before_component_typescript.js after the buildprocess or serve process steps occur. Use the hookto update, add or remove TypeScript compiler optionsdefined by your application's tsconfig.json compilerconfiguration file. The hook system passes your referenceto the modified tsconfig object to the TypeScript compiler.A script for this hook point can only be used with aTypeScript application.
after_component_typescript
build / serve This hook point triggers the script with the defaultname after_component_typescript.js after the buildprocess or serve process steps occur and immediatelyafter the before_component_typescript hook pointexecutes. This hook provides an entry point for applicationsthat require further processing, such as compilinggenerated .jsx output using babel. A script for this hookpoint can only be used with a TypeScript application.
before_optimize build / serve(releasemode only)
This hook point triggers the script with the default namebefore_optimize.js before the release mode build/serveprocess minifies the content. A script for this hook pointcan be used with a web application or a hybrid mobileapplication.
before_component_optimize
build / serve This hook point triggers the script with the default namebefore_component_optimize.js before the build/serveprocess minifies the content. A script for this hook point canbe used to modify the build process specifically for a projectthat defines a Web Component.
Chapter 2Customize the Web Application Tooling Workflow
2-22

Hook Point SupportedToolingProcess
Description
after_build build This hook point triggers the script with the default nameafter_build.js immediately after the tooling concludesthe build process. A script for this hook point can be usedwith a web application or a hybrid mobile application.
after_component_create
build This hook point triggers the script with the defaultname after_component_create.js immediately afterthe tooling concludes the create Web Component process.A script for this hook point can be used to modify thebuild process specifically for a project that defines a WebComponent.
after_component_build
build (debugmode only)
This hook point triggers the script with the defaultname after_component_build.js immediately after thetooling concludes the Web Component build process. Ascript for this hook point can be used to modify thebuild process specifically for a project that defines a WebComponent.
before_serve serve This hook point triggers the script with the default namebefore_serve.js before the web serve process connectsto and watches the application. In the case of hybrid builds,it also precedes the cordovaClean and cordovaServestep. A script for this hook point can be used with a webapplication or a hybrid mobile application.
after_serve serve This hook point triggers the script with the default nameafter_serve.js after all build process steps completeand the tooling serves the application. A script for this hookpoint can be used with a web application or a hybrid mobileapplication.
before_watch serve This hook point triggers the script with the default namebefore_watch.js after the tooling serves the applicationand before the tooling starts watching for applicationchanges. A script for this hook point can be used with aweb application or a hybrid mobile application.
after_watch serve This hook point triggers the script with the default nameafter_watch.js after the tooling starts the watch andafter the tooling detects a change to the application. Ascript for this hook point can be used with a web applicationor a hybrid mobile application.
About the Process Flow of Script Hook PointsThe Oracle JET hooks system defines various script trigger points, also called hookpoints, that allow you to customize the create, build, serve, and restore workflowacross the various command-line interface processes.
The following diagram shows the script hook point flow for the create process.
Chapter 2Customize the Web Application Tooling Workflow
2-23
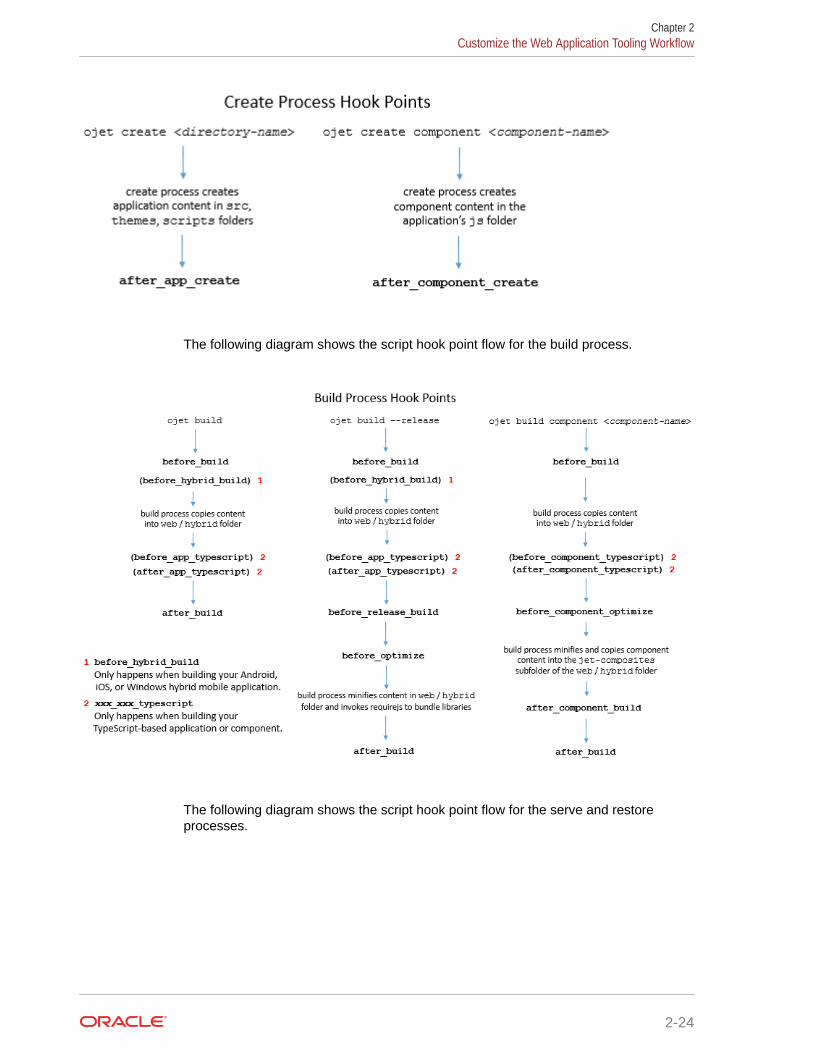
The following diagram shows the script hook point flow for the build process.
The following diagram shows the script hook point flow for the serve and restoreprocesses.
Chapter 2Customize the Web Application Tooling Workflow
2-24
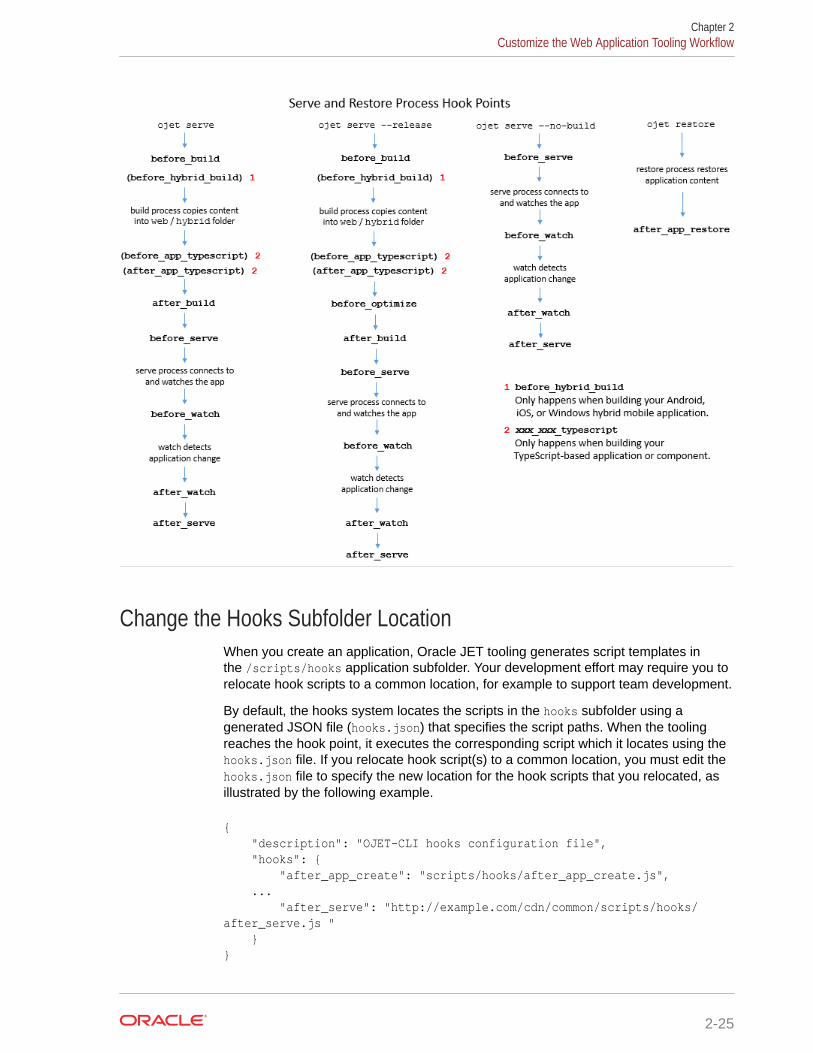
Change the Hooks Subfolder LocationWhen you create an application, Oracle JET tooling generates script templates inthe /scripts/hooks application subfolder. Your development effort may require you torelocate hook scripts to a common location, for example to support team development.
By default, the hooks system locates the scripts in the hooks subfolder using agenerated JSON file (hooks.json) that specifies the script paths. When the toolingreaches the hook point, it executes the corresponding script which it locates using thehooks.json file. If you relocate hook script(s) to a common location, you must edit thehooks.json file to specify the new location for the hook scripts that you relocated, asillustrated by the following example.
{ "description": "OJET-CLI hooks configuration file", "hooks": { "after_app_create": "scripts/hooks/after_app_create.js", ... "after_serve": "http://example.com/cdn/common/scripts/hooks/after_serve.js " }}
Chapter 2Customize the Web Application Tooling Workflow
2-25
Create a Hook Script for Web ApplicationsYou can create a hook point script to define a new command-line interface processstep for your web application. To create a hook script, you edit the hook script templateassociated with a specific hook point in the tooling build and serve workflow.
The Oracle JET hooks system defines various script trigger points, also called hookpoints, that allow you to customize the build and serve workflow across the variousbuild and serve modes. Customization relies on script files and the script code that youwant to trigger for a particular hook point. Note that the generated script templates thatyou modify with your script code are named for their corresponding hook point.
To customize the workflow for the build or serve processes, you edit the generatedscript template file named for a specific hook point. For example, to trigger a scriptat the start of the tooling's build process, you would edit the before_build.js scriptnamed for the hook point triggered before the build begins. That hook point is namedbefore_build.
A basic example illustrates a simple customization using the before_optimize hook,which allows you to control the RequireJS properties shown in bold to modify theapplication's bundling configuration.
requirejs.config({ baseUrl: "web/js", name: "main-temp", paths: { // injector:mainReleasePaths "knockout":"libs/knockout/knockout-3.x.x.debug", "jquery":"libs/jquery/jquery-3.x.x", "jqueryui-amd":"libs/jquery/jqueryui-amd-1.x.x", ... } // endinjector out: "web/js/main.js"}...
A script for this hook point might add one line to the before_optimize script template,as shown below. When your build the application with this customization script filein the default location, the tooling triggers the script before calling requirejs.out()and changes the out property setting to a custom directory path. The result is theapplication-generated main.js is output to the named directory instead of the defaultweb/js/main.js location.
module.exports = function (configObj) { return new Promise((resolve, reject) => { console.log("Running before_optimize hook."); configObj.requirejs.out = 'myweb/js/main.js'; resolve(configObj); });};
Chapter 2Customize the Web Application Tooling Workflow
2-26
Tip:
If you want to change application path mappings, it is recommended toalways edit the path_mappings.json file. An exception might be when youwant application runtime path mappings to be different from the mappingsused by the bundling process, then you might use a before_optimize hookscript to change the requirejs.config paths property.
The following example illustrates a more complex build customization using theafter_build hook. This hook script adds a customize task after the build finishes.
'use strict’;
const fs = require('fs');const archiver = require('archiver');
module.exports = function (configObj) { return new Promise((resolve, reject) => { console.log("Running after_build hook.");
//Set up the archive const output = fs.createWriteStream('my-archive.war'); const archive = archiver('zip');
//Callbacks for the archiver output.on('close', () => { console.log('Files were successfully archived.'); resolve(); }); archive.on('warning', (error) => { console.warn(error); }); archive.on('error', (error) => { reject(error); }); //Archive the web folder and close the file archive.pipe(output); archive.directory('web', false); archive.finalize(); });};
In this example, assume the script templates reside in the default folder generatedwhen you created the application. The goal is to package the application into a ZIPfile. Because packaging occurs after the application build process completes, thisscript is triggered for the after_build hook point. For this hook point, the modifiedscript template after_build.js will contain the script code to zip the application, andbecause the .js file resides in the default location, no hooks system configurationchanges are required.
Chapter 2Customize the Web Application Tooling Workflow
2-27
Tip:
OJET tooling reports when hook points are executed in the message logfor the build and serve process. You can examine the log in the consoleto understand the tooling workflow and determine exactly when the toolingtriggers a hook point script.
Pass Arguments to a Hook Script for Web ApplicationsYou can pass extra values to a hook script from the command-line interface whenyou build or serve the web application. The hook script that you create can use thesevalues to perform some workflow action, such as creating an archive file from thecontents of the web folder.
You can add the --user-options flag to the command-line interface for Oracle JET todefine user input for the hook system when you build or serve the web application. The--user-options flag can be appended to the build or serve commands and takes asarguments one or more space-separated, string values:
ojet build --user-options="some string1" "some string2" "some stringx"
For example, you might write a hook script that archives a copy of the buildoutput after the build finishes. The developer might pass the user-defined parameterarchive-file set to the archive file name by using the --user-options flag on theOracle JET command line.
ojet build web --user-options="archive-file=deploy.zip"
If the flag is appended and the appropriate input is passed, the hook script codemay write a ZIP file to the /deploy directory in the root of the project. The followingexample illustrates this build customization using the after_build hook. The scriptcode parses the user input for the value of the user defined archive-file flag witha promise to archive the application after the build finishes by calling the NodeJSfunction fs.createWriteStream(). This hook script is an example of taking userinput from the command-line interface and processing it to achieve a build workflowcustomization.
'use strict';const fs = require('fs');const archiver = require('archiver');const path = require('path');
module.exports = function (configObj) { return new Promise((resolve, reject) => { console.log("Running after_build hook.");
//Check to see if the user set the flag //In this case we're only expecting one possible user defined //argument so the parsing can be simple const options = configObj.userOptions; if (options){
Chapter 2Customize the Web Application Tooling Workflow
2-28
const userArgs = options.split('='); if (userArgs.length > 1 && userArgs[0] === 'archive-file'){ const deployRoot = 'deploy'; const outputArchive = path.join(deployRoot,userArgs[1]);
//Ensure the output folder exists if (!fs.existsSync(deployRoot)) { fs.mkdirSync(deployRoot); }
//Set up the archive const output = fs.createWriteStream(outputArchive); const archive = archiver('zip');
//callbacks for the archiver output.on('close', () => { console.log(`Archive file ${outputArchive} successfully created.`); resolve(); });
archive.on('error', (error) => { console.error(`Error creating archive ${outputArchive}`); reject(error); });
//Archive the web folder and close the file archive.pipe(output); archive.directory('web', false); archive.finalize(); } else { //Unexpected input - fail with information message reject(`Unexpected flags in user-options: ${options}`); } } else { //nothing to do resolve(); } });};
Chapter 2Customize the Web Application Tooling Workflow
2-29
3Understanding the Hybrid MobileApplication Workflow
Oracle JET includes support for hybrid mobile application development using ApacheCordova. The toolkit provides iOS, Android, and Windows Alta themes and UIbehavior on Oracle JET components, starter applications, design patterns, and toolingsupport.
Before you can create your first hybrid mobile application, you should become familiarwith the Oracle JET mobile features and third-party technologies. You must also installthe prerequisite packages and Oracle JET mobile tools.
Topics
• Install the Mobile Tooling
• Create a Hybrid Mobile Application Using the Oracle JET Command-Line Interface
• Use Cordova Plugins to Access Mobile Device Services
Once you have created a hybrid mobile application, added Cordova plugins,and familiarized yourself with Oracle JET’s mobile features, refer to the followinginformation for details about other tasks that you need to do to complete your hybridmobile application.
• About Securing Hybrid Mobile Applications
• Test Hybrid Mobile Applications
• Debug Hybrid Mobile Applications
• Package and Publish Hybrid Mobile Applications
Tip:
If you’re strictly interested in developing web applications that run in desktopand mobile browsers, you don’t need to install the mobile tooling. Forinformation on developing web applications, see Understanding the WebApplication Workflow
Install the Mobile ToolingTo create Oracle JET hybrid mobile applications, you must first install Cordova onyour development machine. To develop hybrid mobile applications for Android, iOS, orWindows, you must also install the Android, iOS, or Windows development tools.
To install the mobile tooling:
If needed, install the tooling prerequisites as described in Install Oracle JET Tooling.
1. Install Apache Cordova
3-1

2. (Optional) Install Android Development Tools
3. (Optional) Install iOS Development Tools
4. (Optional) Install Windows Development Tools
Install Apache CordovaInstall Apache Cordova on your development machine.
Oracle JET uses plugins developed with the Apache Cordova framework to accessthe capabilities of the devices on which your JET mobile application is installed suchas, for example, camera and GPS. JET also uses Cordova to build and serve hybridmobile applications by invoking the Cordova command-line interface that you installwith Cordova.
• As Administrator on Windows or using sudo on Macintosh and Linux systems,enter the following command at a terminal prompt to install Cordova:
[sudo] npm install -g cordova
For additional information about Cordova, see Overview in Cordova’s documentation.
Install Android Development ToolsInstall the Android SDK to deploy a JET hybrid mobile application to Android devices.
The Android SDK provides the tools that build and package your application intoan .APK file (the file type that installs applications on Android devices), an emulatorto create Android Virtual Devices (AVD) where you can test your application if you donot have access to a physical Android device, and an OEM USB driver to connectyour development machine to a physical Android device through a USB cable if youdo have a device. This last option enables you to deploy an application from yourdevelopment machine to the Android device.
Android Studio, Google’s IDE for Android development, includes the Android SDK inits installation and provides wizard options that simplify the management of the SDKplatforms and tools that you need.
Install Android Studio, and the Android SDK that it includes, by downloadingthe installation file from https://developer.android.com/studio/index.html. The AndroidDeveloper’s website provides installation instructions for Windows, Mac, and Linux.See https://developer.android.com/studio/install.html.
Once you have installed Android Studio, perform the tasks described in the followingtopics:
• Install an Emulator Accelerator
• Create an Android Virtual Device
• Set Up Your Android Device to Install an App from Your Development Machine
• Install Gradle and Configure Gradle Proxy Settings
• Configure Environment Variables to Reference JDK and Android SDK Installations
Android requires that all .APK files be digitally signed with a certificate before theycan be installed. For apps in development, the Android SDK automatically createsa debug keystore and certificate and sets the keystore and key passwords the first
Chapter 3Install the Mobile Tooling
3-2
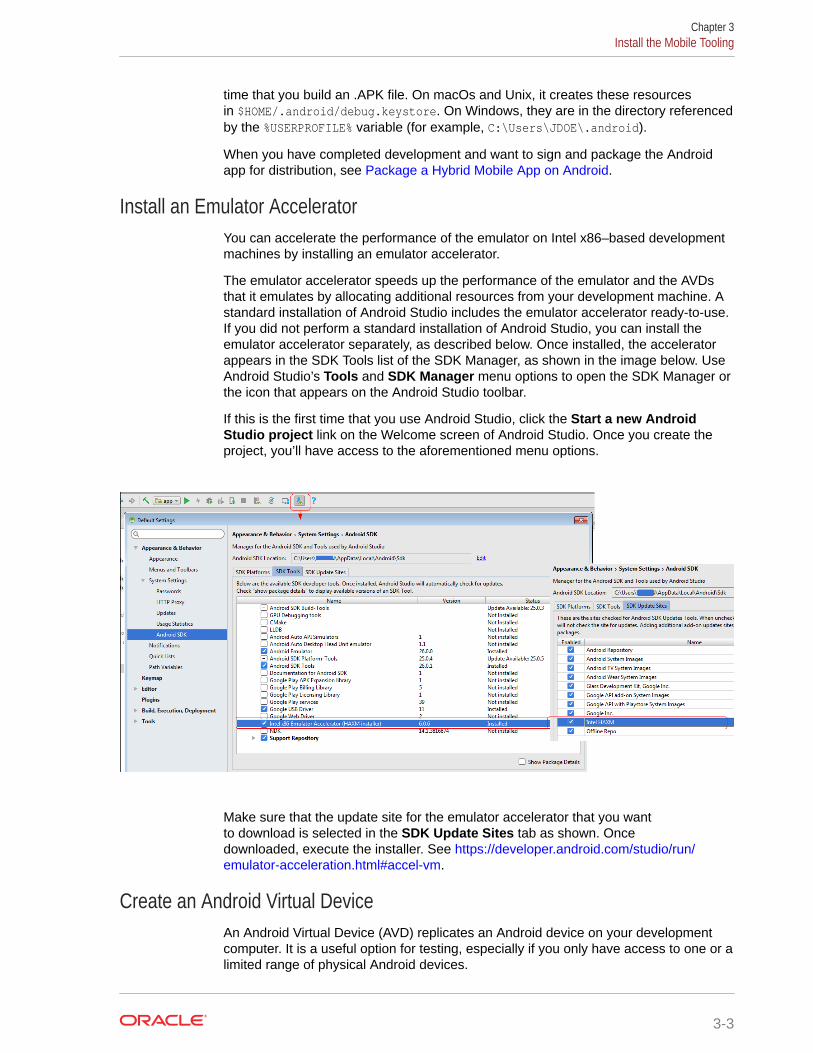
time that you build an .APK file. On macOs and Unix, it creates these resourcesin $HOME/.android/debug.keystore. On Windows, they are in the directory referencedby the %USERPROFILE% variable (for example, C:\Users\JDOE\.android).
When you have completed development and want to sign and package the Androidapp for distribution, see Package a Hybrid Mobile App on Android.
Install an Emulator AcceleratorYou can accelerate the performance of the emulator on Intel x86–based developmentmachines by installing an emulator accelerator.
The emulator accelerator speeds up the performance of the emulator and the AVDsthat it emulates by allocating additional resources from your development machine. Astandard installation of Android Studio includes the emulator accelerator ready-to-use.If you did not perform a standard installation of Android Studio, you can install theemulator accelerator separately, as described below. Once installed, the acceleratorappears in the SDK Tools list of the SDK Manager, as shown in the image below. UseAndroid Studio’s Tools and SDK Manager menu options to open the SDK Manager orthe icon that appears on the Android Studio toolbar.
If this is the first time that you use Android Studio, click the Start a new AndroidStudio project link on the Welcome screen of Android Studio. Once you create theproject, you’ll have access to the aforementioned menu options.
Make sure that the update site for the emulator accelerator that you wantto download is selected in the SDK Update Sites tab as shown. Oncedownloaded, execute the installer. See https://developer.android.com/studio/run/emulator-acceleration.html#accel-vm.
Create an Android Virtual DeviceAn Android Virtual Device (AVD) replicates an Android device on your developmentcomputer. It is a useful option for testing, especially if you only have access to one or alimited range of physical Android devices.
Chapter 3Install the Mobile Tooling
3-3
The AVD Manager that you launch from Android Studio by clicking Tools andAVD Manager has a range of ready-to-use virtual devices, mostly of those devicesdeveloped by Google itself, such as the Nexus and Pixel XL range. Other Androiddevice vendors, such as Samsung, provide specifications on their websites that youcan use to create the AVD yourself.
Google maintains documentation describing how to manage AVDs. See https://developer.android.com/studio/run/managing-avds.html.
If this is the first time that you use Android Studio, click the Start a new AndroidStudio project link on the Welcome screen. Once you create the project, you’ll haveaccess to the Android Studio menu options described in the following procedure.
To create an AVD:
1. In Android Studio, launch the Android Virtual Device Manager by selecting Tools >AVD Manager.
2. In the Your Virtual Devices screen, click Create Virtual Device.
3. In the Select Hardware screen, select a phone device, such as Pixel, and thenclick Next.
4. In the System Image screen, click Download for one of the recommended systemimages. Agree to the terms to complete the download.
5. After the download completes, select the system image from the list and clickNext.
6. On the next screen, leave all the configuration settings unchanged and clickFinish.
7. In the Your Virtual Devices screen, select the device you just created and clickLaunch this AVD in the emulator.
Set Up Your Android Device to Install an App from Your Development MachineYou can install your app directly from your development machine to your Androiddevice by configuring the Android device and connecting it to your developmentmachine using a USB cable.
If you are developing on Windows, you might need to install the appropriate USBdriver for your device. For help installing drivers, see the document OEM USB Drivers.
To set up your Android device:
1. Connect your device to your development machine with a USB cable.
2. On Android 4.2 and newer, go to Settings > About phone and tap Build numberseven times. Return to the previous screen to find Developer options.
3. On earlier versions of Android (pre-4.2), enable USB debugging on your device bygoing to Settings > Developer options.
Install Gradle and Configure Gradle Proxy SettingsGradle is the tool that the Android SDK invokes to build the apps that you deploy toyour AVD or Android device.
Prior to the release of [email protected], you could use the instance ofGradle that Android Studio installed to build the apps you deploy. With the cordova-
Chapter 3Install the Mobile Tooling
3-4
[email protected] release (and later), you must install Gradle separately from AndroidStudio. For information about how to do this, see Gradle's documentation.
Once you have installed Gradle, you must configure proxy settings if you work insidea corporate network. To do this, create a gradle.properties file in your ~/.gradledirectory that includes the following properties so that you can successfully serve yourapp to the AVD or physical device.
systemProp.http.proxyHost=www-proxy.server.url.comsystemProp.http.proxyPort=proxy-port-numbersystemProp.https.proxyHost=www-proxy.server.url.comsystemProp.https.proxyPort=proxy-port-number
If you are a Windows user, you locate your ~/.gradle directory by navigating to%USERPROFILE%\.gradle. If you are a macOS or Linux user, navigate to ~/.grade.
Configure Environment Variables to Reference JDK and Android SDKInstallations
To function correctly, the Cordova CLI that the Oracle JET CLI communicates withrequires that you configure certain environment variables.
The Cordova CLI attempts to set these environment variables for you, but in certaincases you may need to set them manually. In any event, it is a good idea toreview and confirm the values of the following environment variables before you startdevelopment:
• Set JAVA_HOME to the location of your JDK installation
For example, on Windows, set JAVA_HOME to a value similar to C:\ProgramFiles\Java\jdk1.8.0_171.
• Set ANDROID_HOME to the location of your Android SDK installation
For example, on Windows set ANDROID_HOME to a value similar toC:\Users\John\AppData\Local\Android\Sdk. You can obtain the Android SDKlocation from the Android SDK page of the Default Settings dialog that you accessby selecting Tools > SDK Manager in Android Studio.
We also recommend that you add the Android SDK's tools, tools/bin, andplatform-tools directories to your PATH environment variable.
The process to set the environment variables depends upon your developmentenvironment:
• Windows
Set the variables permanently in Control Panel > System and Security >System > Advanced System Settings > Environment Variables.
For example, to include the Android SDK's tools and platform-tools directories inyour PATH environment variable, modify the entry that the Environment Variablesdialog displays to include entries similar to the following:
Path=C:\Users\JET\AppData\Local\Android\sdk\tools;C:\Users\JET\AppData\Local\Android\sdk\platform-tools;C:\Users\JET\AppData\Roaming\npm
To set the JAVA_HOME and ANDROID_HOME environment variables, click New in theEnvironment Variables dialog and set the values of the variables to the location ofthe JDK and Android SDK locations, as shown in the following image.
Chapter 3Install the Mobile Tooling
3-5
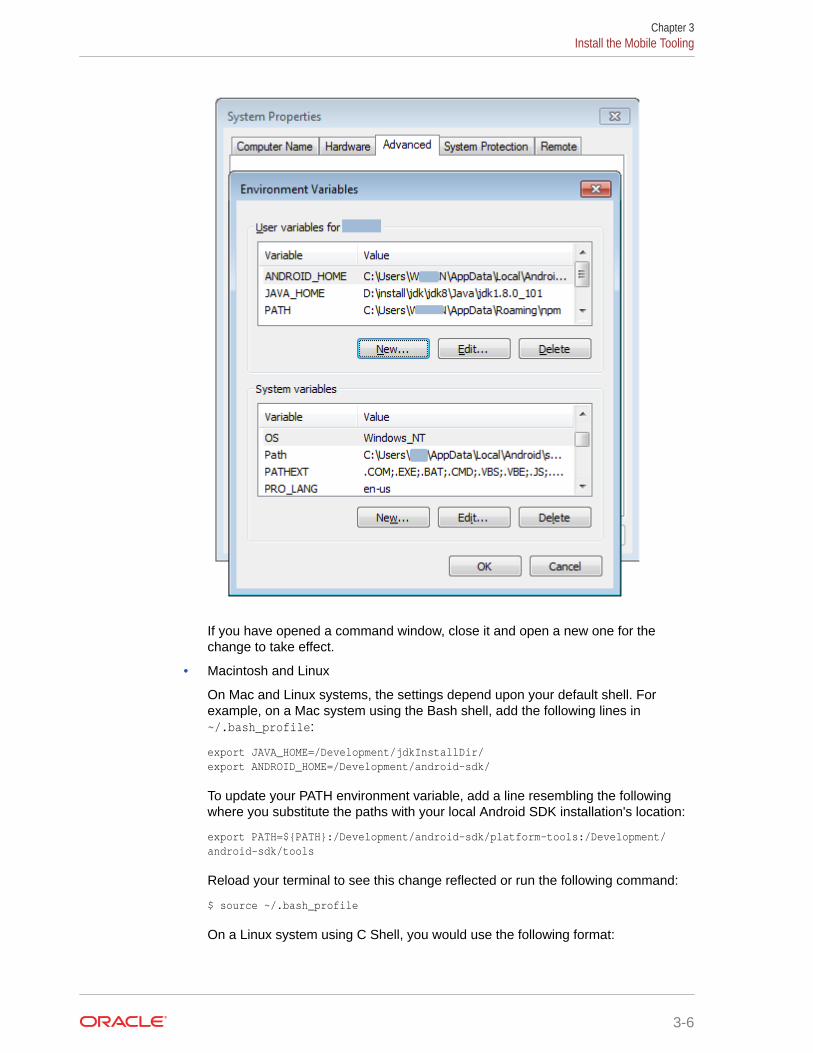
If you have opened a command window, close it and open a new one for thechange to take effect.
• Macintosh and Linux
On Mac and Linux systems, the settings depend upon your default shell. Forexample, on a Mac system using the Bash shell, add the following lines in~/.bash_profile:
export JAVA_HOME=/Development/jdkInstallDir/export ANDROID_HOME=/Development/android-sdk/
To update your PATH environment variable, add a line resembling the followingwhere you substitute the paths with your local Android SDK installation's location:
export PATH=${PATH}:/Development/android-sdk/platform-tools:/Development/android-sdk/tools
Reload your terminal to see this change reflected or run the following command:
$ source ~/.bash_profile
On a Linux system using C Shell, you would use the following format:
Chapter 3Install the Mobile Tooling
3-6
setenv JAVA_HOME=/Development/jdkInstallDir/setenv ANDROID_HOME=/Development/android-sdk/
Reload your terminal to see this change reflected or run the following command:
~/.cshrc
Install iOS Development ToolsTo develop applications for the iOS platform, you must install the Xcode developmentenvironment from the App Store which is only available on macOS.
After installing Xcode, execute the following command in a terminal window to installthe Xcode command-line tools:
xcode-select –-install
These steps are sufficient for developing iOS applications and testing on iOSsimulators. If, however, you want to use an actual iOS device for testing or to publishyour application to the App Store, you must join the Apple iOS Developer programand create an appropriate provisioning profile. For additional information, see Manageprofiles in Apple’s documentation. For details about using the Oracle JET tooling topackage and deploy your hybrid mobile application, see Package a Hybrid Mobile Appon iOS.
In addition you must install a tool that is used by the Oracle JET CLI to deploy apps toiOS devices by executing the following command in a terminal window:
sudo npm install -g ios-deploy --unsafe-perm=true --allow-root
Once you have installed the iOS development tools, you can create a hybrid mobileapplication, as described in Create a Hybrid Mobile Application Using the Oracle JETCommand-Line Interface.
Install Windows Development ToolsJET hybrid mobile apps for Windows devices must be developed on computers thatrun the Windows 10 operating system.
JET supports the creation of hybrid mobile apps that are Universal Windows Platform(UWP) apps. UWP is the platform for Windows 10. For more information, see What's aUniversal Windows Platform (UWP) app? in Microsoft’s documentation.
Enable Developer Mode on Windows 10Developer mode allows you to install any signed and trusted apps to your Windowsdevelopment machine, whereas the default Windows 10 setting only permits theinstallation of apps from the Windows Store.
1. From the For developers settings dialog, choose Developer mode.
2. Read the disclaimer in the dialog that appears and click Yes to accept the change.
Chapter 3Install the Mobile Tooling
3-7
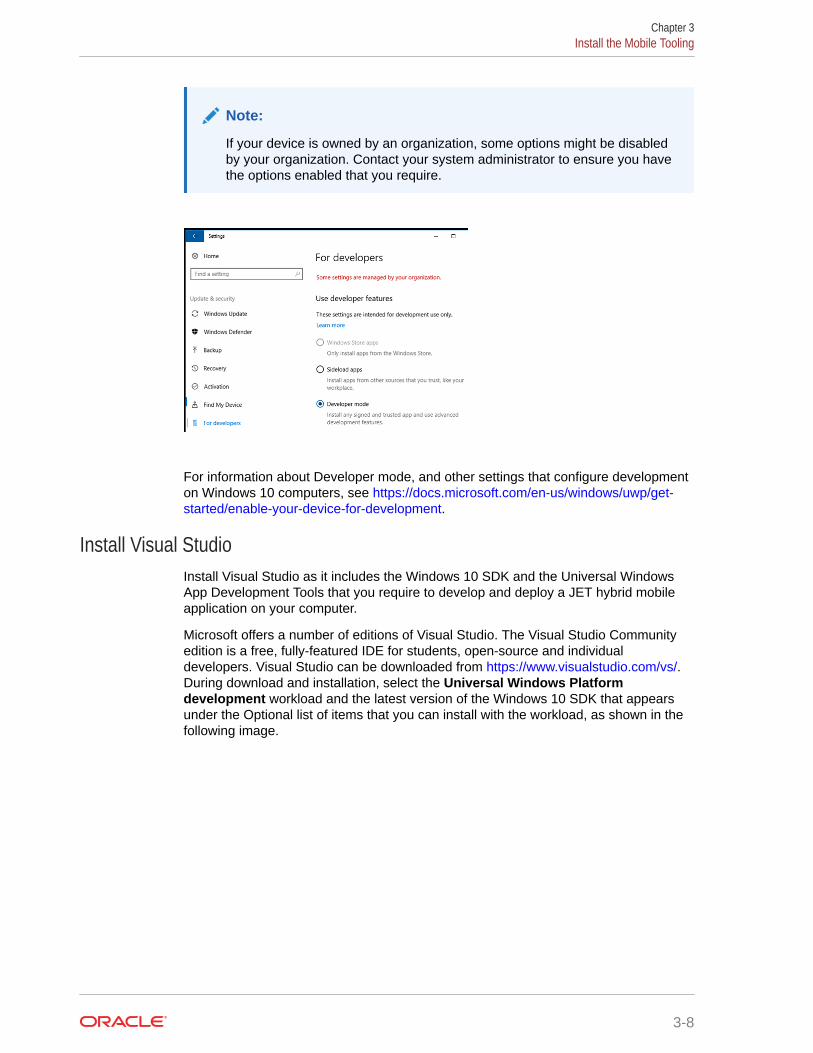
Note:
If your device is owned by an organization, some options might be disabledby your organization. Contact your system administrator to ensure you havethe options enabled that you require.
For information about Developer mode, and other settings that configure developmenton Windows 10 computers, see https://docs.microsoft.com/en-us/windows/uwp/get-started/enable-your-device-for-development.
Install Visual StudioInstall Visual Studio as it includes the Windows 10 SDK and the Universal WindowsApp Development Tools that you require to develop and deploy a JET hybrid mobileapplication on your computer.
Microsoft offers a number of editions of Visual Studio. The Visual Studio Communityedition is a free, fully-featured IDE for students, open-source and individualdevelopers. Visual Studio can be downloaded from https://www.visualstudio.com/vs/.During download and installation, select the Universal Windows Platformdevelopment workload and the latest version of the Windows 10 SDK that appearsunder the Optional list of items that you can install with the workload, as shown in thefollowing image.
Chapter 3Install the Mobile Tooling
3-8
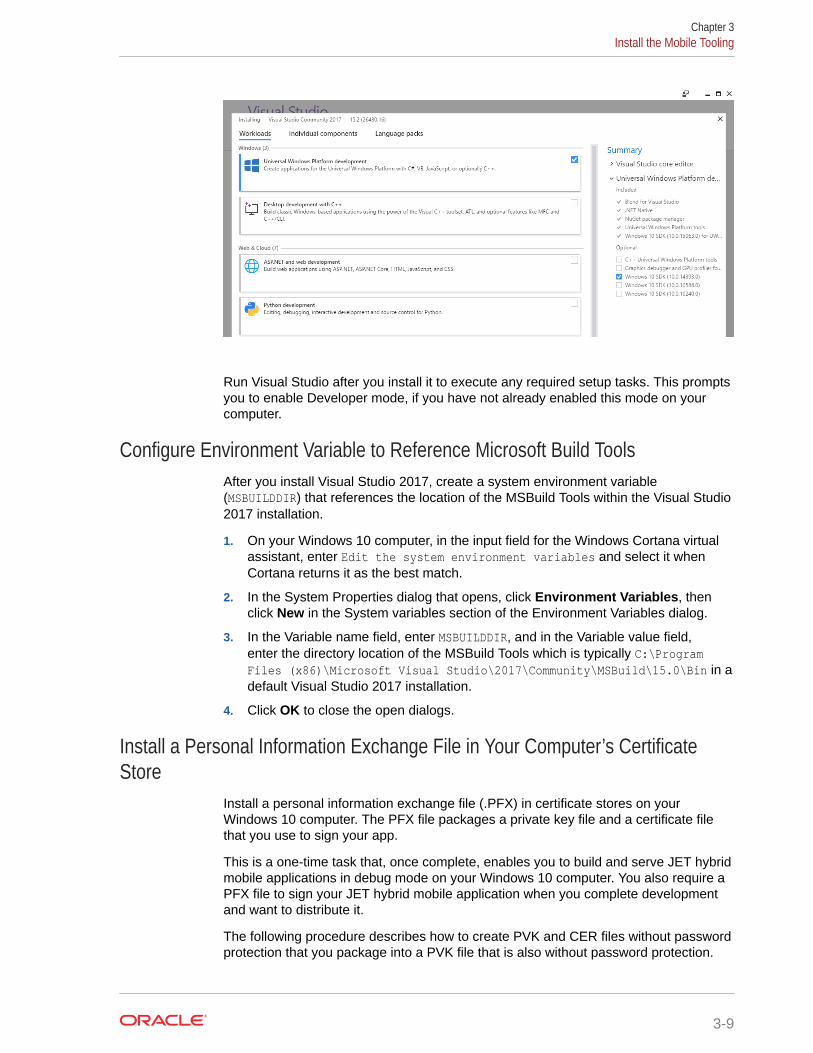
Run Visual Studio after you install it to execute any required setup tasks. This promptsyou to enable Developer mode, if you have not already enabled this mode on yourcomputer.
Configure Environment Variable to Reference Microsoft Build ToolsAfter you install Visual Studio 2017, create a system environment variable(MSBUILDDIR) that references the location of the MSBuild Tools within the Visual Studio2017 installation.
1. On your Windows 10 computer, in the input field for the Windows Cortana virtualassistant, enter Edit the system environment variables and select it whenCortana returns it as the best match.
2. In the System Properties dialog that opens, click Environment Variables, thenclick New in the System variables section of the Environment Variables dialog.
3. In the Variable name field, enter MSBUILDDIR, and in the Variable value field,enter the directory location of the MSBuild Tools which is typically C:\ProgramFiles (x86)\Microsoft Visual Studio\2017\Community\MSBuild\15.0\Bin in adefault Visual Studio 2017 installation.
4. Click OK to close the open dialogs.
Install a Personal Information Exchange File in Your Computer’s CertificateStore
Install a personal information exchange file (.PFX) in certificate stores on yourWindows 10 computer. The PFX file packages a private key file and a certificate filethat you use to sign your app.
This is a one-time task that, once complete, enables you to build and serve JET hybridmobile applications in debug mode on your Windows 10 computer. You also require aPFX file to sign your JET hybrid mobile application when you complete developmentand want to distribute it.
The following procedure describes how to create PVK and CER files without passwordprotection that you package into a PVK file that is also without password protection.
Chapter 3Install the Mobile Tooling
3-9
For more information about the switches and arguments supported by the Microsofttools that you use to create and package a PFX file, see the following Microsoftdocumentation:
• MakeCert
• Pvk2Pfx
For more information about packaging a completed JET hybrid app for Windows, seePackage a Hybrid Mobile App on Windows.
To create and install a PFX file:
1. At a command prompt with Administrator privileges, enter the followingcommands:
a. Change to the directory that contains the Windows SDK. For example:
chdir "C:\Program Files (x86)\Windows Kits\10\bin\x64"
b. Use the MakeCert tool to create certificate files with the specified parameters.For example:
makecert.exe -sv C:\aDirectory\doc.pvk -n
"CN=Doc Example,OU=JET,O=Oracle,C=US" -r -h
0 -eku "1.3.6.1.5.5.7.3.3,1.3.6.1.4.1.311.10.3.13"
C:\aDirectory\doc.cer
c. Package the resulting certificate files into a PFX file. For example:
pvk2pfx.exe -pvk C:\aDirectory\doc.pvk -spc
C:\aDirectory\doc.cer -pfx C:\aDirectory\doc.pfx
This creates a PFX file named doc.pfx in the C:\aDirectory\ directory.
2. Install the PFX file in the following Certificate Stores on your computer
Store Location Certificate Store
Current User Personal
Current User Trusted People
Local Machine Trusted People
3. To do this, double-click the PFX file to invoke the Certificate Import Wizard,choose the appropriate store location (for example, Current User) and click Nextto proceed to the page where you choose the Certificate Store, as shown by thefollowing figure where the Trusted People certificate store is selected.
Note:
The file created in our previous example is not password-protected, soleave the Password input field blank in the Private key protection page ofthe wizard.
Chapter 3Install the Mobile Tooling
3-10
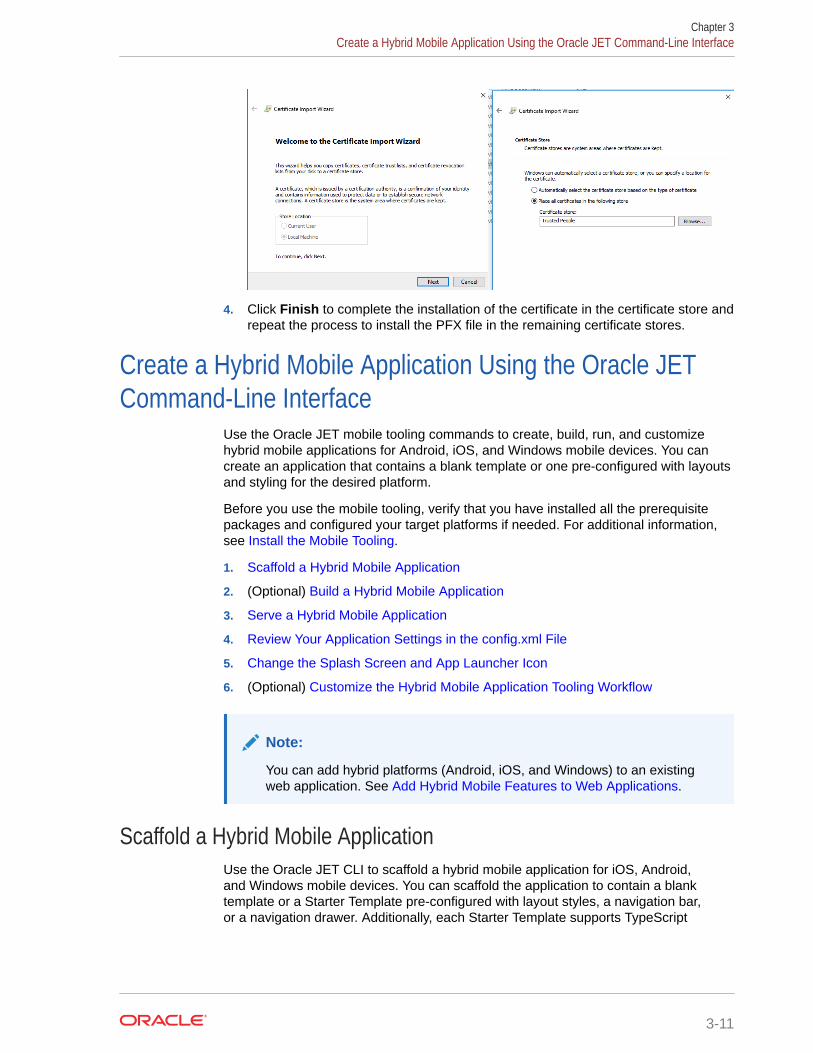
4. Click Finish to complete the installation of the certificate in the certificate store andrepeat the process to install the PFX file in the remaining certificate stores.
Create a Hybrid Mobile Application Using the Oracle JETCommand-Line Interface
Use the Oracle JET mobile tooling commands to create, build, run, and customizehybrid mobile applications for Android, iOS, and Windows mobile devices. You cancreate an application that contains a blank template or one pre-configured with layoutsand styling for the desired platform.
Before you use the mobile tooling, verify that you have installed all the prerequisitepackages and configured your target platforms if needed. For additional information,see Install the Mobile Tooling.
1. Scaffold a Hybrid Mobile Application
2. (Optional) Build a Hybrid Mobile Application
3. Serve a Hybrid Mobile Application
4. Review Your Application Settings in the config.xml File
5. Change the Splash Screen and App Launcher Icon
6. (Optional) Customize the Hybrid Mobile Application Tooling Workflow
Note:
You can add hybrid platforms (Android, iOS, and Windows) to an existingweb application. See Add Hybrid Mobile Features to Web Applications.
Scaffold a Hybrid Mobile ApplicationUse the Oracle JET CLI to scaffold a hybrid mobile application for iOS, Android,and Windows mobile devices. You can scaffold the application to contain a blanktemplate or a Starter Template pre-configured with layout styles, a navigation bar,or a navigation drawer. Additionally, each Starter Template supports TypeScript
Chapter 3Create a Hybrid Mobile Application Using the Oracle JET Command-Line Interface
3-11
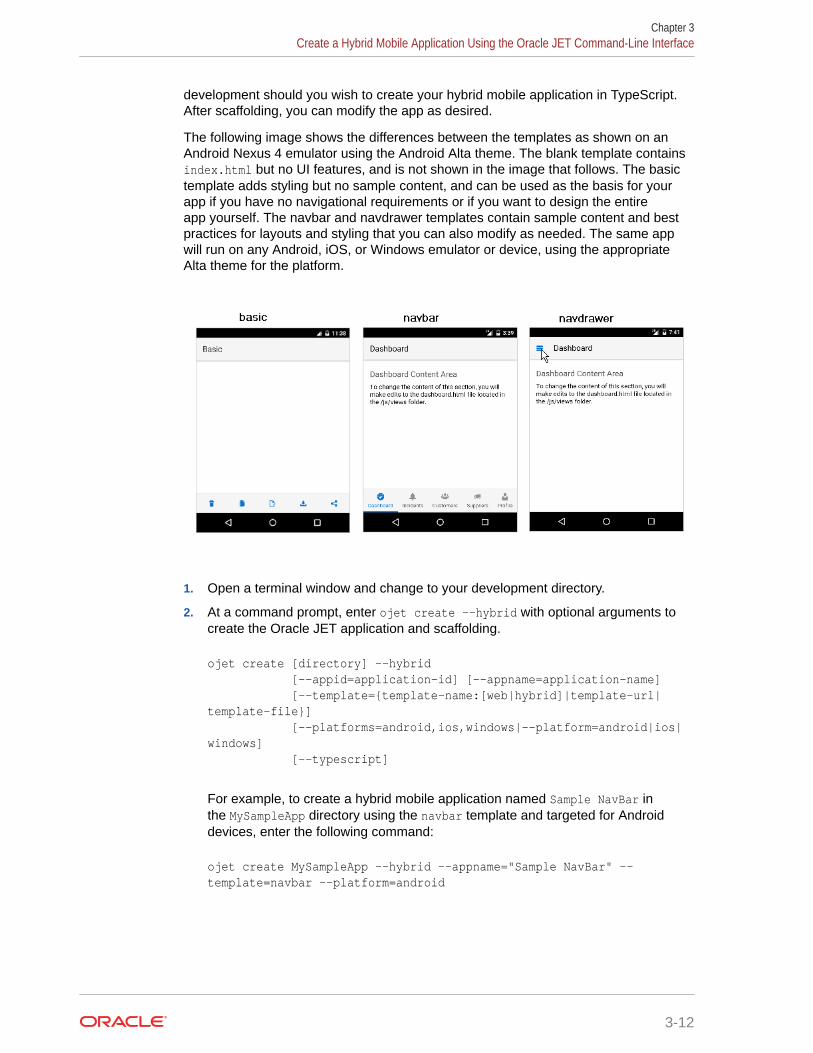
development should you wish to create your hybrid mobile application in TypeScript.After scaffolding, you can modify the app as desired.
The following image shows the differences between the templates as shown on anAndroid Nexus 4 emulator using the Android Alta theme. The blank template containsindex.html but no UI features, and is not shown in the image that follows. The basictemplate adds styling but no sample content, and can be used as the basis for yourapp if you have no navigational requirements or if you want to design the entireapp yourself. The navbar and navdrawer templates contain sample content and bestpractices for layouts and styling that you can also modify as needed. The same appwill run on any Android, iOS, or Windows emulator or device, using the appropriateAlta theme for the platform.
1. Open a terminal window and change to your development directory.
2. At a command prompt, enter ojet create --hybrid with optional arguments tocreate the Oracle JET application and scaffolding.
ojet create [directory] --hybrid [--appid=application-id] [--appname=application-name] [--template={template-name:[web|hybrid]|template-url|template-file}] [--platforms=android,ios,windows|--platform=android|ios|windows] [--typescript]
For example, to create a hybrid mobile application named Sample NavBar inthe MySampleApp directory using the navbar template and targeted for Androiddevices, enter the following command:
ojet create MySampleApp --hybrid --appname="Sample NavBar" --template=navbar --platform=android
Chapter 3Create a Hybrid Mobile Application Using the Oracle JET Command-Line Interface
3-12

To scaffold the same hybrid mobile application but with support for TypeScriptdevelopment, add the --typescript argument to the command:
ojet create MySampleApp --hybrid --appname="Sample NavBar" --template=navbar --platform=android --typescript
Tip:
You can also enter ojet help create at a terminal prompt to get helpwith the Oracle JET CLI create arguments.
The scaffolding will take some time to complete. When successful, the terminalwill display: Your app is ready! Change to your new app directoryMySampleApp...
The new application will have a directory structure similar to the one shown in thefollowing image.
The application folders contain the application and configuration files that you willmodify as needed for your own application. See About the Hybrid Mobile ApplicationFile Structure.
Chapter 3Create a Hybrid Mobile Application Using the Oracle JET Command-Line Interface
3-13
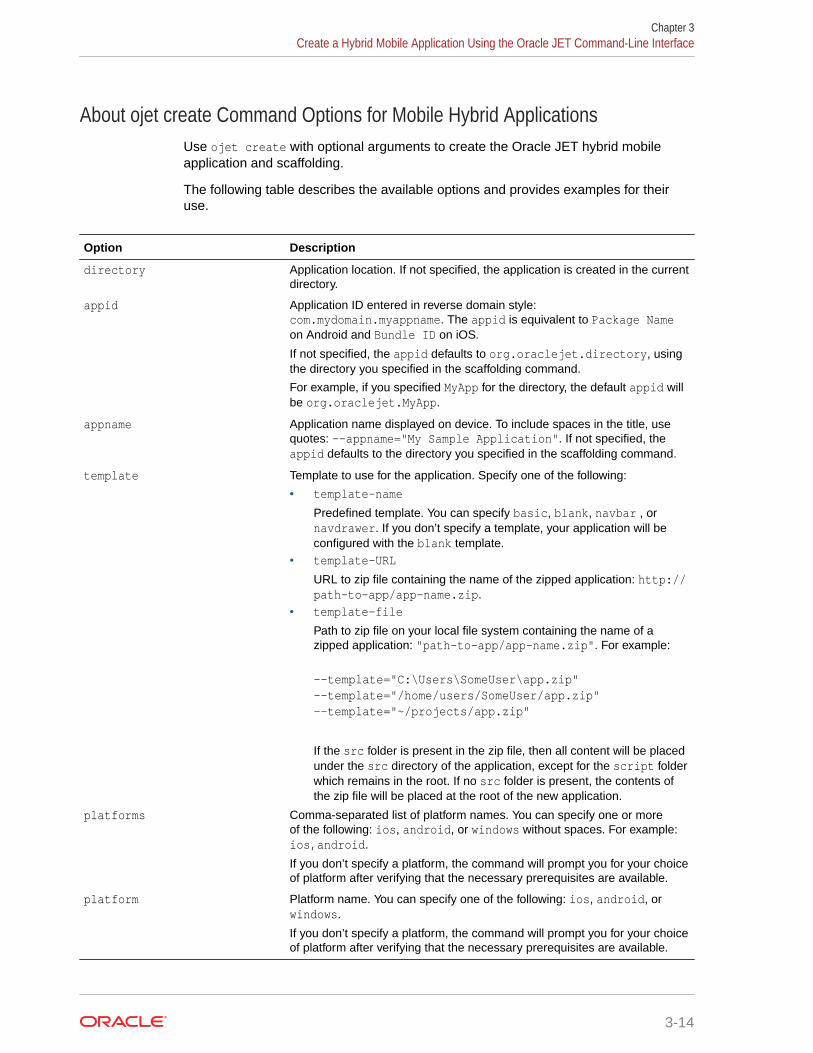
About ojet create Command Options for Mobile Hybrid ApplicationsUse ojet create with optional arguments to create the Oracle JET hybrid mobileapplication and scaffolding.
The following table describes the available options and provides examples for theiruse.
Option Description
directory Application location. If not specified, the application is created in the currentdirectory.
appid Application ID entered in reverse domain style:com.mydomain.myappname. The appid is equivalent to Package Nameon Android and Bundle ID on iOS.
If not specified, the appid defaults to org.oraclejet.directory, usingthe directory you specified in the scaffolding command.
For example, if you specified MyApp for the directory, the default appid willbe org.oraclejet.MyApp.
appname Application name displayed on device. To include spaces in the title, usequotes: --appname="My Sample Application". If not specified, theappid defaults to the directory you specified in the scaffolding command.
template Template to use for the application. Specify one of the following:
• template-name
Predefined template. You can specify basic, blank, navbar , ornavdrawer. If you don’t specify a template, your application will beconfigured with the blank template.
• template-URL
URL to zip file containing the name of the zipped application: http://path-to-app/app-name.zip.
• template-file
Path to zip file on your local file system containing the name of azipped application: "path-to-app/app-name.zip". For example:
--template="C:\Users\SomeUser\app.zip"--template="/home/users/SomeUser/app.zip"--template="~/projects/app.zip"
If the src folder is present in the zip file, then all content will be placedunder the src directory of the application, except for the script folderwhich remains in the root. If no src folder is present, the contents ofthe zip file will be placed at the root of the new application.
platforms Comma-separated list of platform names. You can specify one or moreof the following: ios, android, or windows without spaces. For example:ios,android.
If you don’t specify a platform, the command will prompt you for your choiceof platform after verifying that the necessary prerequisites are available.
platform Platform name. You can specify one of the following: ios, android, orwindows.
If you don’t specify a platform, the command will prompt you for your choiceof platform after verifying that the necessary prerequisites are available.
Chapter 3Create a Hybrid Mobile Application Using the Oracle JET Command-Line Interface
3-14
About the Hybrid Mobile Application File StructureThe Oracle JET scaffolding process creates files and folders that you modify asneeded for your application.
Directory or File Description
hybrid Contains platform-specific files that are merged in with a copy of theapplication files at build time. Most of the files in this directory are stagingfiles that you should not commit to your source control system. Oneexception is the hybrid/config.xml file.
hybrid/config.xml Contains the Cordova global configuration settings. You can edit theconfig.xml file to specify core Cordova API features, plugins, andplatform-specific settings.
For example, the following entry sets the application’s orientation tolandscape-only on all platforms.
<?xml version='1.0' encoding='utf-8'?><widget ... contents omitted <preference name="Orientation" value="landscape" /></widget>
Commit the config.xml file to your source control system, if you useone. For more information about the config.xml file, see Review YourApplication Settings in the config.xml File.
scripts Contains template hook scripts that you can modify to define new buildand serve steps for your application. See Customize the Hybrid MobileApplication Tooling Workflow.
node_modules Contains the Node.js modules used by the tooling.
src Site root for your application. Contains the application files that you canmodify as needed for your own application and should be committed tosource control.
The content will vary, depending upon your choice of template. Eachtemplate, even the blank one, will contain an index.html file and amain.js RequireJS bootstrap file.
Other templates may contain view templates and viewModel scripts pre-populated with content. For example, if you specified the navbar templateduring creation, the js/views and js/viewModels folders will contain thetemplates and scripts for a hybrid mobile application that uses a nav bar fornavigation.
.gitignore Defines rules for application folders to ignore when using a GIT repositoryto check in application source. Users who do not use a GIT repositorycan use ojet strip to avoid checking in content that Oracle JET alwaysregenerates. Note this file must not be deleted since the ojet stripcommand depends on it.
oraclejetconfig.json Contains the default source and staging file paths that you can modify ifyou need to change your application's file structure.
package.json Defines npm dependencies and project metadata.
Chapter 3Create a Hybrid Mobile Application Using the Oracle JET Command-Line Interface
3-15
Modify the Hybrid Mobile Application’s File StructureYou can modify your scaffolded application’s file structure if the default structuredoesn’t meet your needs.
The oraclejetconfig.json file in your application’s top level directory contains thedefault source and staging file paths that you can modify.
{ "paths": { "source": { "common": "src", "web": "src-web", "hybrid": "src-hybrid", "javascript": "js", "styles": "css", "themes": "themes" }, "staging": { "web": "web", "hybrid": "hybrid", "themes": "themes" } },"serveToBrowser": "chrome","generatorVersion": "10.0.0"}
To change the hybrid mobile application’s file structure:
1. In your application’s top level directory, open oraclejetconfig.json for editing.
2. In oraclejetconfig.json, change the paths as needed and save the file.
For example, if you want to change the default styles path from css to app-css,edit the following line in oraclejetconfig.json:
"styles": "app-css"
3. Rename the directories as needed for your application, making sure to changeonly the paths listed in oraclejetconfig.json. For example, if you changedstyles to app-css in oraclejetconfig.json, change the application’s cssdirectory to app-css.
4. Update your application files as needed to reference the changed path
For example, if you modify the path to the CSS for your application, update thelinks appropriately in your application’s index.html.
<link rel="icon" href="app-css/images/favicon.ico" type="image/x-icon" />
<!-- This is the main css file for the default Alta theme --> <!-- injector:theme --> <link rel="stylesheet" href="app-css/libs/oj/v10.0.0/alta/oj-
Chapter 3Create a Hybrid Mobile Application Using the Oracle JET Command-Line Interface
3-16
alta-min.css" type="text/css"/> <!-- endinjector --> <!-- This contains icon fonts used by the starter template --> <link rel="stylesheet" href="app-css/demo-alta-site-min.css" type="text/css"/>
<!-- This is where you would add any app specific styling --> <link rel="stylesheet" href="app-css/override.css" type="text/css"/>
To use the new paths, in your application’s top level directory, build your applicationusing the appropriate command-line arguments.
Add Web Browser Capability to Hybrid Mobile ApplicationsAdd pages designed to run in a web browser to your hybrid mobile application byusing the ojet add web command. When you run this command, the tooling creates anew src-web directory, enabling you to create both hybrid mobile and web applicationsfrom the same source.
Since applications that you intend to run in a browser or on a mobile device aredesigned for very different screen sizes, this approach allows you to add view andviewModel files that you create specifically for the browser. Then when you buildthe original application by using the command ojet build web, the tooling will copyyour added files from the src-web folder and merge them with the contents of theapplication's src folder. Finally, serving the application, by using the command ojetserve web, populates the web staging folder with the merged source files and thetooling runs the application in the browser from this location.
Before you begin:
• Familiarize yourself with the folder structure of your hybrid mobile application. Thefile locations will vary in this procedure if you modified your directory structure, asdescribed in Modify the Hybrid Mobile Application’s File Structure or Modify theWeb Application’s File Structure.
To add web browser capability to your hybrid mobile application:
1. At a terminal prompt, in your application’s top level directory, enter the followingcommand to add hybrid mobile features to your web application:
ojet add web
When you run the command, Oracle JET tooling creates two new empty sourcedirectories that you can use for platform specific content: src-hybrid and src-web.
2. To make changes to content that apply to both web and hybrid platforms, editcontent in src.
3. To make changes to content that apply only to the web or hybrid platform, add thenew content to src-web or src-hybrid as needed.
When you build your application, the content in the platform specific file takesprecedence over content in src. For example, if you create a new src-web/js/viewModels/dashboard.html file, content in that file will take precedence over
Chapter 3Create a Hybrid Mobile Application Using the Oracle JET Command-Line Interface
3-17

the src/js/viewModels/dashboard.html file when you build the application as ahybrid mobile application with the web option.
Note:
It is important that files you add to the src-web or src-hybrid foldermaintain the same folder structure as the src merge target folder. Forexample, based on the original application's default folder structure, viewor viewModel files specific to the web platform that you add shouldappear in the src-web/js/view and src-web/js/viewModels directories.
Build a Hybrid Mobile ApplicationUse Oracle JET CLI to build your Android, iOS, or Windows hybrid mobile applicationfor testing and debugging.
Change to the application’s root directory and use the ojet build command for eachplatform that your hybrid mobile application will support.
ojet build [android|ios|windows] [--build-config=path/buildConfig.json --destination=device|emulator --cssvars=enabled|disabled --theme=themename --themes=theme1,theme2,... --sass --platform-options="string"]
Tip:
You can also enter ojet help at a terminal prompt to get help for specificOracle JET CLI options.
For example, the following command will build the sample Android application shownin Scaffold a Hybrid Mobile Application
ojet build android
The command will take some time to complete. If it’s successful, you’ll see thefollowing message: Done. The command will also output the name and location of thebuilt application in hybrid/platforms/android , hybrid/platforms/ios, or hybrid/platforms/windows.
By default ojet build creates a debug version of your application. You can alsouse the ojet build command with the –-release option to build a release-readyversion of your application. For information, see Package and Publish Hybrid MobileApplications.
Chapter 3Create a Hybrid Mobile Application Using the Oracle JET Command-Line Interface
3-18
WARNING:
If you use a proxy server and specify the Android platform, the buildcommand will fail the first time you issue it. To resolve this, create agradle.properties file in your HOME/.gradle directory and rerun the buildcommand. The file should contain the following:
systemProp.http.proxyHost=proxy-server-URLsystemProp.http.proxyPort=80systemProp.https.proxyHost=proxy-server-URLsystemProp.https.proxyPort=80
About ojet build Command Options for Hybrid Mobile ApplicationsUse the ojet build command with optional arguments to build a development versionof your hybrid mobile application before serving it to a browser.
The following table describes the commonly-used options and provides examples fortheir use.
Option Description
[android|ios|windows] Desired platform. Enter android, ios, or windows.
build-config Path to buildConfig.json. The buildConfig.json filecontains details that Cordova can use to sign the application.
You do not need this file when building a debug version of yourapp for Android or Windows, or if you are building your app fordeployment to an iOS simulator. However, you must configure onefor testing on an iOS device and when you’re ready to release yourAndroid, iOS, or Windows application. For additional information,see Package and Publish Hybrid Mobile Applications.
destination Required for iOS applications. Specify one of the following:
• emulator: builds your application for deployment to the iOSSimulator.
• device: builds your application for deployment to an iOSdevice. Be aware, though, if you want to deploy yourapplication to an iOS device, you must take additional stepsas described in Package a Hybrid Mobile App on iOS.Typically, you can develop and test your iOS application inthe simulator or web browser until you’re ready to build yourrelease.
device Equivalent to destination=device.
emulator Equivalent to destination=emulator.
Chapter 3Create a Hybrid Mobile Application Using the Oracle JET Command-Line Interface
3-19
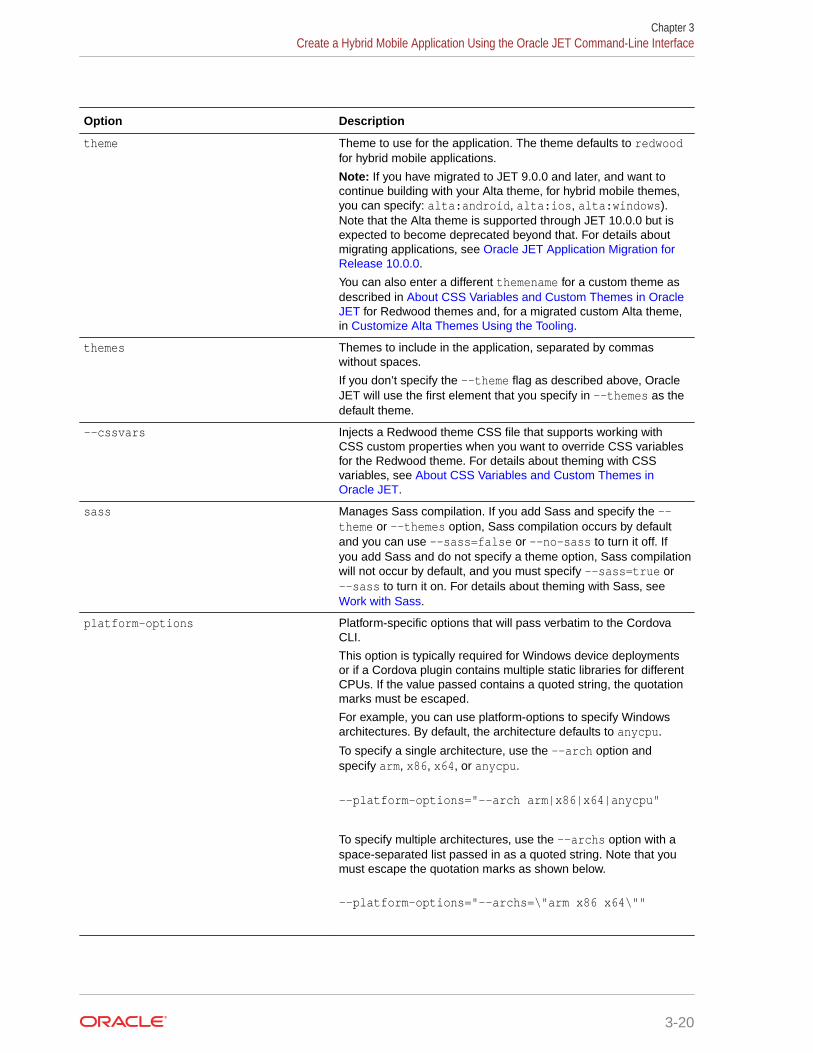
Option Description
theme Theme to use for the application. The theme defaults to redwoodfor hybrid mobile applications.
Note: If you have migrated to JET 9.0.0 and later, and want tocontinue building with your Alta theme, for hybrid mobile themes,you can specify: alta:android, alta:ios, alta:windows).Note that the Alta theme is supported through JET 10.0.0 but isexpected to become deprecated beyond that. For details aboutmigrating applications, see Oracle JET Application Migration forRelease 10.0.0.
You can also enter a different themename for a custom theme asdescribed in About CSS Variables and Custom Themes in OracleJET for Redwood themes and, for a migrated custom Alta theme,in Customize Alta Themes Using the Tooling.
themes Themes to include in the application, separated by commaswithout spaces.
If you don’t specify the --theme flag as described above, OracleJET will use the first element that you specify in --themes as thedefault theme.
--cssvars Injects a Redwood theme CSS file that supports working withCSS custom properties when you want to override CSS variablesfor the Redwood theme. For details about theming with CSSvariables, see About CSS Variables and Custom Themes inOracle JET.
sass Manages Sass compilation. If you add Sass and specify the --theme or --themes option, Sass compilation occurs by defaultand you can use --sass=false or --no-sass to turn it off. Ifyou add Sass and do not specify a theme option, Sass compilationwill not occur by default, and you must specify --sass=true or--sass to turn it on. For details about theming with Sass, seeWork with Sass.
platform-options Platform-specific options that will pass verbatim to the CordovaCLI.
This option is typically required for Windows device deploymentsor if a Cordova plugin contains multiple static libraries for differentCPUs. If the value passed contains a quoted string, the quotationmarks must be escaped.
For example, you can use platform-options to specify Windowsarchitectures. By default, the architecture defaults to anycpu.
To specify a single architecture, use the --arch option andspecify arm, x86, x64, or anycpu.
--platform-options="--arch arm|x86|x64|anycpu"
To specify multiple architectures, use the --archs option with aspace-separated list passed in as a quoted string. Note that youmust escape the quotation marks as shown below.
--platform-options="--archs=\"arm x86 x64\""
Chapter 3Create a Hybrid Mobile Application Using the Oracle JET Command-Line Interface
3-20
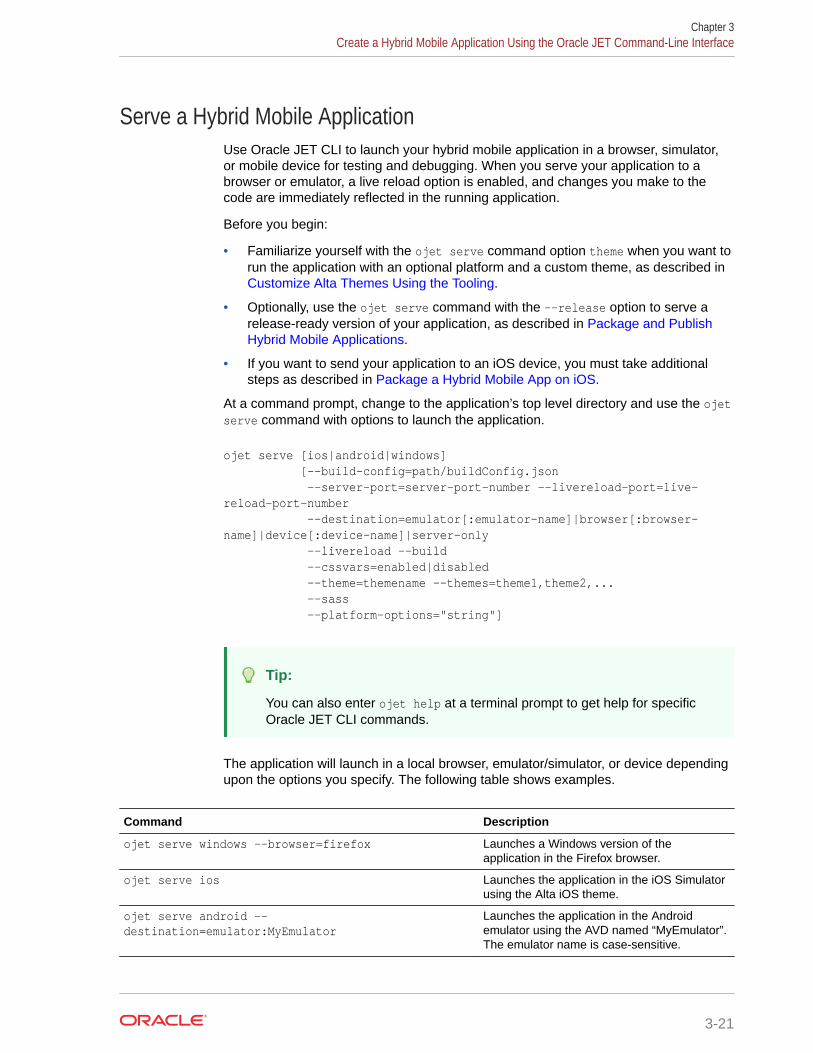
Serve a Hybrid Mobile ApplicationUse Oracle JET CLI to launch your hybrid mobile application in a browser, simulator,or mobile device for testing and debugging. When you serve your application to abrowser or emulator, a live reload option is enabled, and changes you make to thecode are immediately reflected in the running application.
Before you begin:
• Familiarize yourself with the ojet serve command option theme when you want torun the application with an optional platform and a custom theme, as described inCustomize Alta Themes Using the Tooling.
• Optionally, use the ojet serve command with the --release option to serve arelease-ready version of your application, as described in Package and PublishHybrid Mobile Applications.
• If you want to send your application to an iOS device, you must take additionalsteps as described in Package a Hybrid Mobile App on iOS.
At a command prompt, change to the application’s top level directory and use the ojetserve command with options to launch the application.
ojet serve [ios|android|windows] [--build-config=path/buildConfig.json --server-port=server-port-number --livereload-port=live-reload-port-number --destination=emulator[:emulator-name]|browser[:browser-name]|device[:device-name]|server-only --livereload --build --cssvars=enabled|disabled --theme=themename --themes=theme1,theme2,... --sass --platform-options="string"]
Tip:
You can also enter ojet help at a terminal prompt to get help for specificOracle JET CLI commands.
The application will launch in a local browser, emulator/simulator, or device dependingupon the options you specify. The following table shows examples.
Command Description
ojet serve windows -–browser=firefox Launches a Windows version of theapplication in the Firefox browser.
ojet serve ios Launches the application in the iOS Simulatorusing the Alta iOS theme.
ojet serve android --destination=emulator:MyEmulator
Launches the application in the Androidemulator using the AVD named “MyEmulator”.The emulator name is case-sensitive.
Chapter 3Create a Hybrid Mobile Application Using the Oracle JET Command-Line Interface
3-21
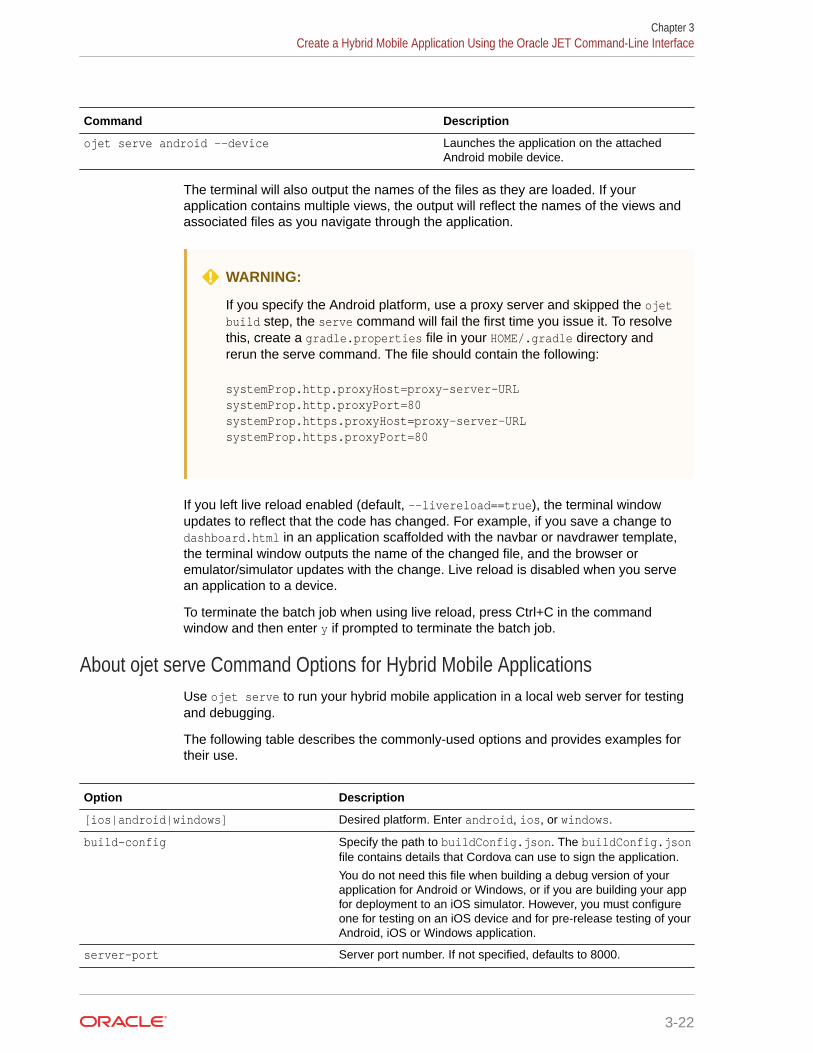
Command Description
ojet serve android --device Launches the application on the attachedAndroid mobile device.
The terminal will also output the names of the files as they are loaded. If yourapplication contains multiple views, the output will reflect the names of the views andassociated files as you navigate through the application.
WARNING:
If you specify the Android platform, use a proxy server and skipped the ojetbuild step, the serve command will fail the first time you issue it. To resolvethis, create a gradle.properties file in your HOME/.gradle directory andrerun the serve command. The file should contain the following:
systemProp.http.proxyHost=proxy-server-URLsystemProp.http.proxyPort=80systemProp.https.proxyHost=proxy-server-URLsystemProp.https.proxyPort=80
If you left live reload enabled (default, --livereload==true), the terminal windowupdates to reflect that the code has changed. For example, if you save a change todashboard.html in an application scaffolded with the navbar or navdrawer template,the terminal window outputs the name of the changed file, and the browser oremulator/simulator updates with the change. Live reload is disabled when you servean application to a device.
To terminate the batch job when using live reload, press Ctrl+C in the commandwindow and then enter y if prompted to terminate the batch job.
About ojet serve Command Options for Hybrid Mobile ApplicationsUse ojet serve to run your hybrid mobile application in a local web server for testingand debugging.
The following table describes the commonly-used options and provides examples fortheir use.
Option Description
[ios|android|windows] Desired platform. Enter android, ios, or windows.
build-config Specify the path to buildConfig.json. The buildConfig.jsonfile contains details that Cordova can use to sign the application.
You do not need this file when building a debug version of yourapplication for Android or Windows, or if you are building your appfor deployment to an iOS simulator. However, you must configureone for testing on an iOS device and for pre-release testing of yourAndroid, iOS or Windows application.
server-port Server port number. If not specified, defaults to 8000.
Chapter 3Create a Hybrid Mobile Application Using the Oracle JET Command-Line Interface
3-22

Option Description
livereload-port Live reload port number. If not specified, defaults to 35729.
destination Specify one of the following:
• emulator: Displays your application in the default AndroidAVD, iOS Simulator, or Windows Emulator.
To use a different emulator, append its name to the emulatoroption: --destination=emulator:emulator-name.
Tip:
You can view the list of available emulators foreach platform by invoking the following from yourapp's top-level folder:
hybrid/platforms/{platform}/cordova/lib/list-emulator-images
where {platform} is one of android, ios, orwindows.
• browser: Displays your application in the Chrome browser onyour local machine.
If you don’t have Chrome installed or want to use a differentbrowser, append the name of the desired browser to thebrowser option:
--destination=browser:firefox|edge|ie|opera|safari|chrome
Tip:
To change your application’s default browser fromChrome, open oraclejetconfig.json in theapplication's top level directory and change thename of the browser in defaultBrowser. Forexample, to change the default browser to Firefox,edit oraclejetconfig.json as shown below.
"defaultBrowser": "firefox"
• device: Sends the application to an attached device.
Optionally, append the name of the device to device option:--destination=device:myDevice.
• server-only: Serves the application, as if to a browser,but does not launch a browser. Use this option in cloud-based development environments so that you can attach yourbrowser to the app served by the development machine.
browser[=browser-name] Equivalent to destination=browser[:browser-name].
emulator[=emulator-name] Equivalent to destination=emulator[:emulator-name].
device[=device-name] Equivalent to destination=device[:device-name].
server-only Equivalent to destination=server-only.
Chapter 3Create a Hybrid Mobile Application Using the Oracle JET Command-Line Interface
3-23
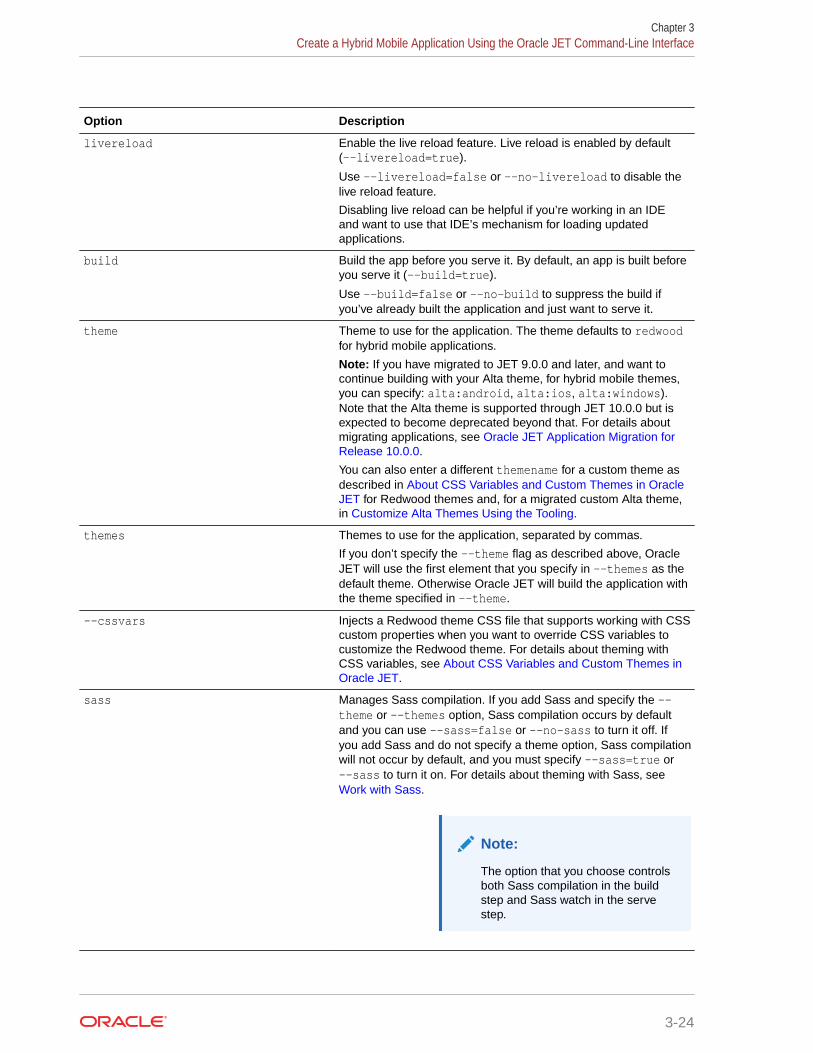
Option Description
livereload Enable the live reload feature. Live reload is enabled by default(--livereload=true).
Use --livereload=false or --no-livereload to disable thelive reload feature.
Disabling live reload can be helpful if you’re working in an IDEand want to use that IDE’s mechanism for loading updatedapplications.
build Build the app before you serve it. By default, an app is built beforeyou serve it (--build=true).
Use --build=false or --no-build to suppress the build ifyou’ve already built the application and just want to serve it.
theme Theme to use for the application. The theme defaults to redwoodfor hybrid mobile applications.
Note: If you have migrated to JET 9.0.0 and later, and want tocontinue building with your Alta theme, for hybrid mobile themes,you can specify: alta:android, alta:ios, alta:windows).Note that the Alta theme is supported through JET 10.0.0 but isexpected to become deprecated beyond that. For details aboutmigrating applications, see Oracle JET Application Migration forRelease 10.0.0.
You can also enter a different themename for a custom theme asdescribed in About CSS Variables and Custom Themes in OracleJET for Redwood themes and, for a migrated custom Alta theme,in Customize Alta Themes Using the Tooling.
themes Themes to use for the application, separated by commas.
If you don’t specify the --theme flag as described above, OracleJET will use the first element that you specify in --themes as thedefault theme. Otherwise Oracle JET will build the application withthe theme specified in --theme.
--cssvars Injects a Redwood theme CSS file that supports working with CSScustom properties when you want to override CSS variables tocustomize the Redwood theme. For details about theming withCSS variables, see About CSS Variables and Custom Themes inOracle JET.
sass Manages Sass compilation. If you add Sass and specify the --theme or --themes option, Sass compilation occurs by defaultand you can use --sass=false or --no-sass to turn it off. Ifyou add Sass and do not specify a theme option, Sass compilationwill not occur by default, and you must specify --sass=true or--sass to turn it on. For details about theming with Sass, seeWork with Sass.
Note:
The option that you choose controlsboth Sass compilation in the buildstep and Sass watch in the servestep.
Chapter 3Create a Hybrid Mobile Application Using the Oracle JET Command-Line Interface
3-24
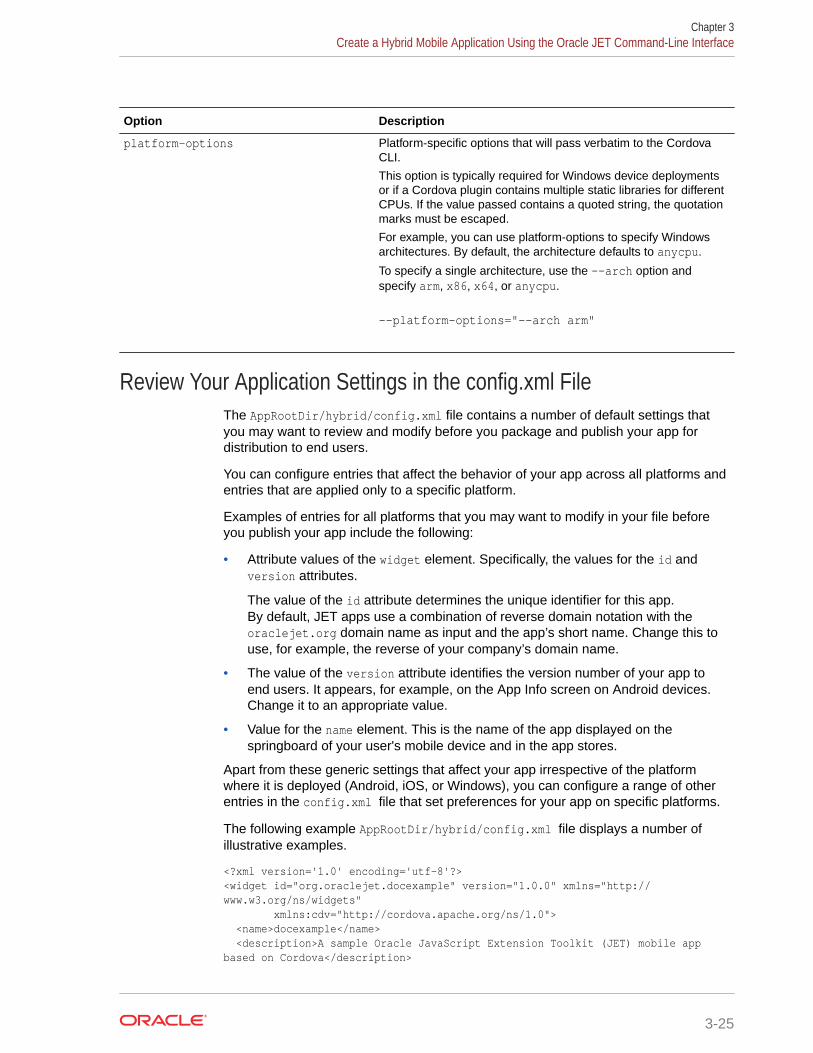
Option Description
platform-options Platform-specific options that will pass verbatim to the CordovaCLI.
This option is typically required for Windows device deploymentsor if a Cordova plugin contains multiple static libraries for differentCPUs. If the value passed contains a quoted string, the quotationmarks must be escaped.
For example, you can use platform-options to specify Windowsarchitectures. By default, the architecture defaults to anycpu.
To specify a single architecture, use the --arch option andspecify arm, x86, x64, or anycpu.
--platform-options="--arch arm"
Review Your Application Settings in the config.xml FileThe AppRootDir/hybrid/config.xml file contains a number of default settings thatyou may want to review and modify before you package and publish your app fordistribution to end users.
You can configure entries that affect the behavior of your app across all platforms andentries that are applied only to a specific platform.
Examples of entries for all platforms that you may want to modify in your file beforeyou publish your app include the following:
• Attribute values of the widget element. Specifically, the values for the id andversion attributes.
The value of the id attribute determines the unique identifier for this app.By default, JET apps use a combination of reverse domain notation with theoraclejet.org domain name as input and the app’s short name. Change this touse, for example, the reverse of your company’s domain name.
• The value of the version attribute identifies the version number of your app toend users. It appears, for example, on the App Info screen on Android devices.Change it to an appropriate value.
• Value for the name element. This is the name of the app displayed on thespringboard of your user's mobile device and in the app stores.
Apart from these generic settings that affect your app irrespective of the platformwhere it is deployed (Android, iOS, or Windows), you can configure a range of otherentries in the config.xml file that set preferences for your app on specific platforms.
The following example AppRootDir/hybrid/config.xml file displays a number ofillustrative examples.
<?xml version='1.0' encoding='utf-8'?><widget id="org.oraclejet.docexample" version="1.0.0" xmlns="http://www.w3.org/ns/widgets" xmlns:cdv="http://cordova.apache.org/ns/1.0"> <name>docexample</name> <description>A sample Oracle JavaScript Extension Toolkit (JET) mobile app based on Cordova</description>
Chapter 3Create a Hybrid Mobile Application Using the Oracle JET Command-Line Interface
3-25
<author email="undefined" href="http://www.oraclejet.org">Oracle Jet Team</author> <content src="index.html"/> <plugin name="cordova-plugin-whitelist" spec="1"/> <access origin="*"/> <allow-intent href="http://*/*"/> ... <allow-intent href="geo:*"/> <platform name="windows"> <preference name="windows-target-version" value="10.0"/> <icon src="res/icon/windows/Square30x30Logo.scale-100.png" width="30" height="30"/> ... <splash src="res/screen/windows/SplashScreenPhone.scale-240.png" width="1152" height="1920"/> </platform> <platform name="android"> <allow-intent href="market:*"/> <preference name="DisallowOverscroll" value="true"/><!-- The following entry displays your app using the full screen of the Android device and thus hides the Android device’s status bar and menu button.--> <preference name="Fullscreen" value="true" /> <icon src="res/icon/android/icon-ldpi.png" width="36" height="36"/> ... <splash src="res/screen/android/splash-port-xxxhdpi.9.png" density="port-xxxhdpi"/> </platform> <platform name="ios"> <allow-intent href="itms:*"/> <allow-intent href="itms-apps:*"/> <preference name="Orientation" value="all"/> <icon src="res/icon/ios/icon-small.png" width="29" height="29"/> ... <splash src="res/screen/ios/Default-Portrait~ipad.png" width="768" height="1024"/> </platform> ...</widget>
For more information about the AppRootDir/hybrid/config.xml file, see https://cordova.apache.org/docs/en/latest/config_ref/.
Change the Splash Screen and App Launcher IconReplace the JET-provided images with those that you want your app to use as asplash screen or an app launcher icon.
The default splash screen behavior of your app depends on the platform where yourun the app. On Android, for example, the default behavior is to display a white screen.JET provides a set of splash screen images for each platform that can be used inyour app. These images are stored in the following sub-directories of your app’s hybriddirectory.
AppRootDirectory/hybrid/res/screen+---android| splash-land-hdpi.9.png| ...| splash-port-xxxhdpi.9.png
Chapter 3Create a Hybrid Mobile Application Using the Oracle JET Command-Line Interface
3-26
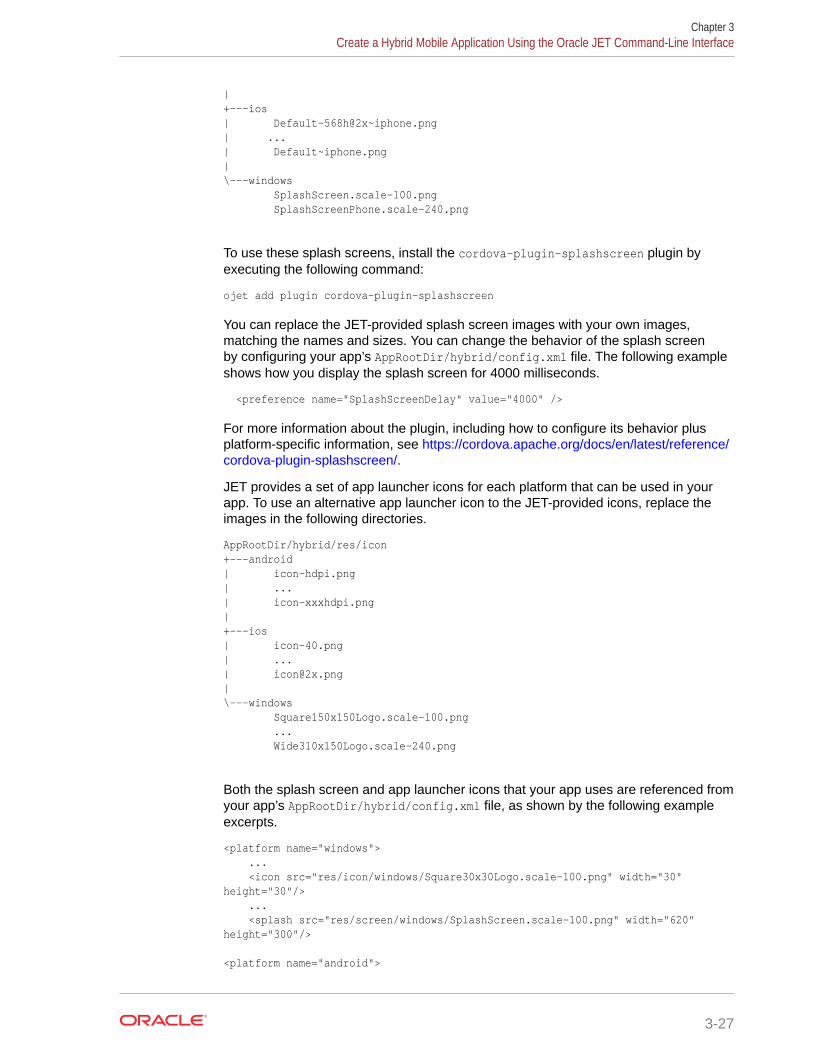
|+---ios| Default-568h@2x~iphone.png| ...| Default~iphone.png|\---windows SplashScreen.scale-100.png SplashScreenPhone.scale-240.png
To use these splash screens, install the cordova-plugin-splashscreen plugin byexecuting the following command:
ojet add plugin cordova-plugin-splashscreen
You can replace the JET-provided splash screen images with your own images,matching the names and sizes. You can change the behavior of the splash screenby configuring your app’s AppRootDir/hybrid/config.xml file. The following exampleshows how you display the splash screen for 4000 milliseconds.
<preference name="SplashScreenDelay" value="4000" />
For more information about the plugin, including how to configure its behavior plusplatform-specific information, see https://cordova.apache.org/docs/en/latest/reference/cordova-plugin-splashscreen/.
JET provides a set of app launcher icons for each platform that can be used in yourapp. To use an alternative app launcher icon to the JET-provided icons, replace theimages in the following directories.
AppRootDir/hybrid/res/icon+---android| icon-hdpi.png| ...| icon-xxxhdpi.png|+---ios| icon-40.png| ...| [email protected]|\---windows Square150x150Logo.scale-100.png ... Wide310x150Logo.scale-240.png
Both the splash screen and app launcher icons that your app uses are referenced fromyour app’s AppRootDir/hybrid/config.xml file, as shown by the following exampleexcerpts.
<platform name="windows"> ... <icon src="res/icon/windows/Square30x30Logo.scale-100.png" width="30" height="30"/> ... <splash src="res/screen/windows/SplashScreen.scale-100.png" width="620" height="300"/>
<platform name="android">
Chapter 3Create a Hybrid Mobile Application Using the Oracle JET Command-Line Interface
3-27
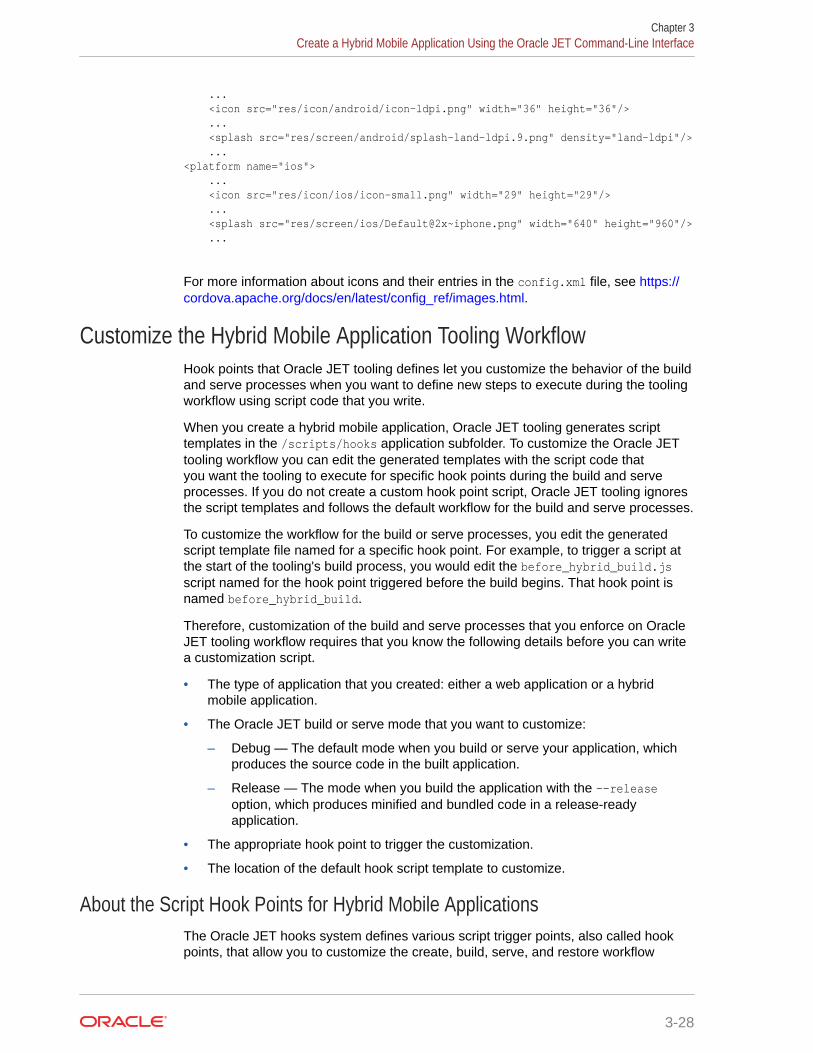
... <icon src="res/icon/android/icon-ldpi.png" width="36" height="36"/> ... <splash src="res/screen/android/splash-land-ldpi.9.png" density="land-ldpi"/> ...<platform name="ios"> ... <icon src="res/icon/ios/icon-small.png" width="29" height="29"/> ... <splash src="res/screen/ios/Default@2x~iphone.png" width="640" height="960"/> ...
For more information about icons and their entries in the config.xml file, see https://cordova.apache.org/docs/en/latest/config_ref/images.html.
Customize the Hybrid Mobile Application Tooling WorkflowHook points that Oracle JET tooling defines let you customize the behavior of the buildand serve processes when you want to define new steps to execute during the toolingworkflow using script code that you write.
When you create a hybrid mobile application, Oracle JET tooling generates scripttemplates in the /scripts/hooks application subfolder. To customize the Oracle JETtooling workflow you can edit the generated templates with the script code thatyou want the tooling to execute for specific hook points during the build and serveprocesses. If you do not create a custom hook point script, Oracle JET tooling ignoresthe script templates and follows the default workflow for the build and serve processes.
To customize the workflow for the build or serve processes, you edit the generatedscript template file named for a specific hook point. For example, to trigger a script atthe start of the tooling's build process, you would edit the before_hybrid_build.jsscript named for the hook point triggered before the build begins. That hook point isnamed before_hybrid_build.
Therefore, customization of the build and serve processes that you enforce on OracleJET tooling workflow requires that you know the following details before you can writea customization script.
• The type of application that you created: either a web application or a hybridmobile application.
• The Oracle JET build or serve mode that you want to customize:
– Debug — The default mode when you build or serve your application, whichproduces the source code in the built application.
– Release — The mode when you build the application with the --releaseoption, which produces minified and bundled code in a release-readyapplication.
• The appropriate hook point to trigger the customization.
• The location of the default hook script template to customize.
About the Script Hook Points for Hybrid Mobile ApplicationsThe Oracle JET hooks system defines various script trigger points, also called hookpoints, that allow you to customize the create, build, serve, and restore workflow
Chapter 3Create a Hybrid Mobile Application Using the Oracle JET Command-Line Interface
3-28
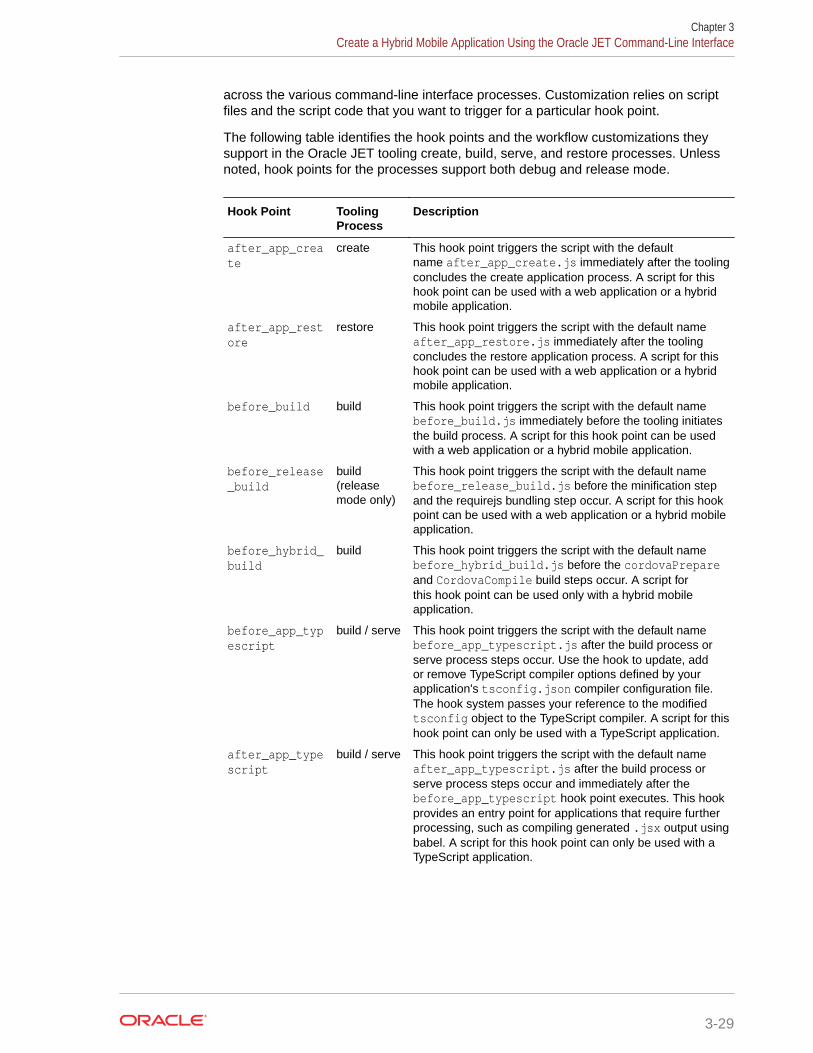
across the various command-line interface processes. Customization relies on scriptfiles and the script code that you want to trigger for a particular hook point.
The following table identifies the hook points and the workflow customizations theysupport in the Oracle JET tooling create, build, serve, and restore processes. Unlessnoted, hook points for the processes support both debug and release mode.
Hook Point ToolingProcess
Description
after_app_create
create This hook point triggers the script with the defaultname after_app_create.js immediately after the toolingconcludes the create application process. A script for thishook point can be used with a web application or a hybridmobile application.
after_app_restore
restore This hook point triggers the script with the default nameafter_app_restore.js immediately after the toolingconcludes the restore application process. A script for thishook point can be used with a web application or a hybridmobile application.
before_build build This hook point triggers the script with the default namebefore_build.js immediately before the tooling initiatesthe build process. A script for this hook point can be usedwith a web application or a hybrid mobile application.
before_release_build
build(releasemode only)
This hook point triggers the script with the default namebefore_release_build.js before the minification stepand the requirejs bundling step occur. A script for this hookpoint can be used with a web application or a hybrid mobileapplication.
before_hybrid_build
build This hook point triggers the script with the default namebefore_hybrid_build.js before the cordovaPrepareand CordovaCompile build steps occur. A script forthis hook point can be used only with a hybrid mobileapplication.
before_app_typescript
build / serve This hook point triggers the script with the default namebefore_app_typescript.js after the build process orserve process steps occur. Use the hook to update, addor remove TypeScript compiler options defined by yourapplication's tsconfig.json compiler configuration file.The hook system passes your reference to the modifiedtsconfig object to the TypeScript compiler. A script for thishook point can only be used with a TypeScript application.
after_app_typescript
build / serve This hook point triggers the script with the default nameafter_app_typescript.js after the build process orserve process steps occur and immediately after thebefore_app_typescript hook point executes. This hookprovides an entry point for applications that require furtherprocessing, such as compiling generated .jsx output usingbabel. A script for this hook point can only be used with aTypeScript application.
Chapter 3Create a Hybrid Mobile Application Using the Oracle JET Command-Line Interface
3-29
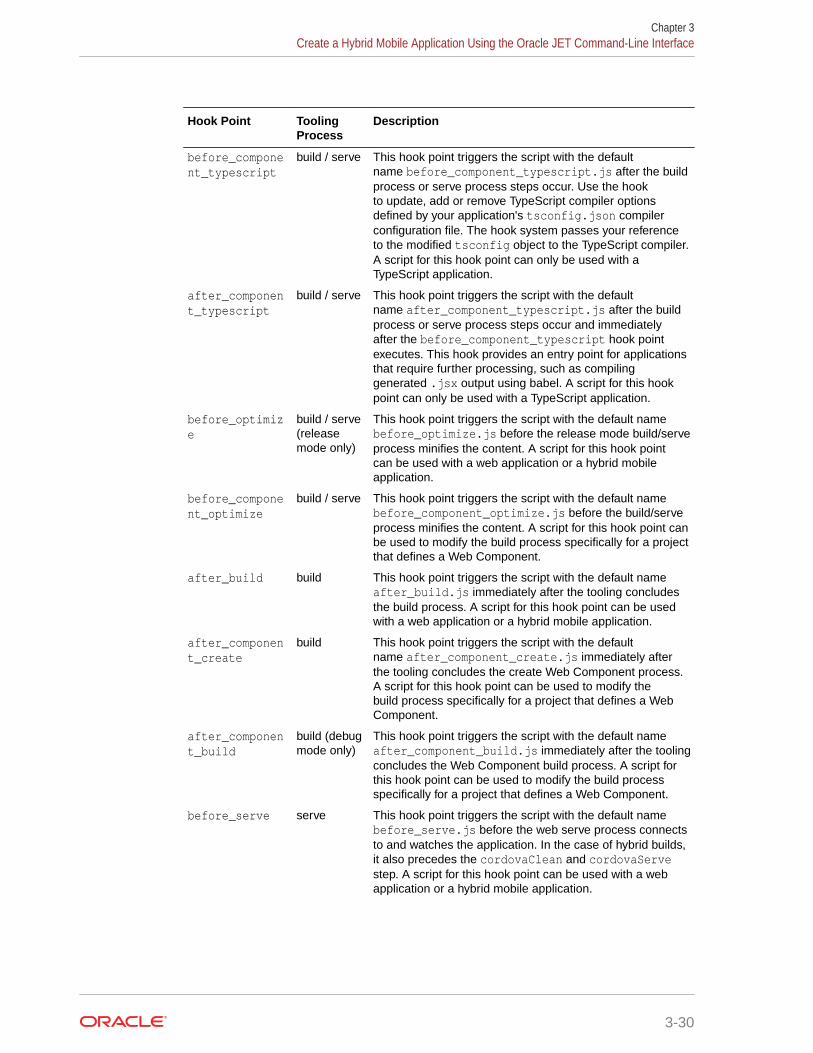
Hook Point ToolingProcess
Description
before_component_typescript
build / serve This hook point triggers the script with the defaultname before_component_typescript.js after the buildprocess or serve process steps occur. Use the hookto update, add or remove TypeScript compiler optionsdefined by your application's tsconfig.json compilerconfiguration file. The hook system passes your referenceto the modified tsconfig object to the TypeScript compiler.A script for this hook point can only be used with aTypeScript application.
after_component_typescript
build / serve This hook point triggers the script with the defaultname after_component_typescript.js after the buildprocess or serve process steps occur and immediatelyafter the before_component_typescript hook pointexecutes. This hook provides an entry point for applicationsthat require further processing, such as compilinggenerated .jsx output using babel. A script for this hookpoint can only be used with a TypeScript application.
before_optimize
build / serve(releasemode only)
This hook point triggers the script with the default namebefore_optimize.js before the release mode build/serveprocess minifies the content. A script for this hook pointcan be used with a web application or a hybrid mobileapplication.
before_component_optimize
build / serve This hook point triggers the script with the default namebefore_component_optimize.js before the build/serveprocess minifies the content. A script for this hook point canbe used to modify the build process specifically for a projectthat defines a Web Component.
after_build build This hook point triggers the script with the default nameafter_build.js immediately after the tooling concludesthe build process. A script for this hook point can be usedwith a web application or a hybrid mobile application.
after_component_create
build This hook point triggers the script with the defaultname after_component_create.js immediately afterthe tooling concludes the create Web Component process.A script for this hook point can be used to modify thebuild process specifically for a project that defines a WebComponent.
after_component_build
build (debugmode only)
This hook point triggers the script with the default nameafter_component_build.js immediately after the toolingconcludes the Web Component build process. A script forthis hook point can be used to modify the build processspecifically for a project that defines a Web Component.
before_serve serve This hook point triggers the script with the default namebefore_serve.js before the web serve process connectsto and watches the application. In the case of hybrid builds,it also precedes the cordovaClean and cordovaServestep. A script for this hook point can be used with a webapplication or a hybrid mobile application.
Chapter 3Create a Hybrid Mobile Application Using the Oracle JET Command-Line Interface
3-30
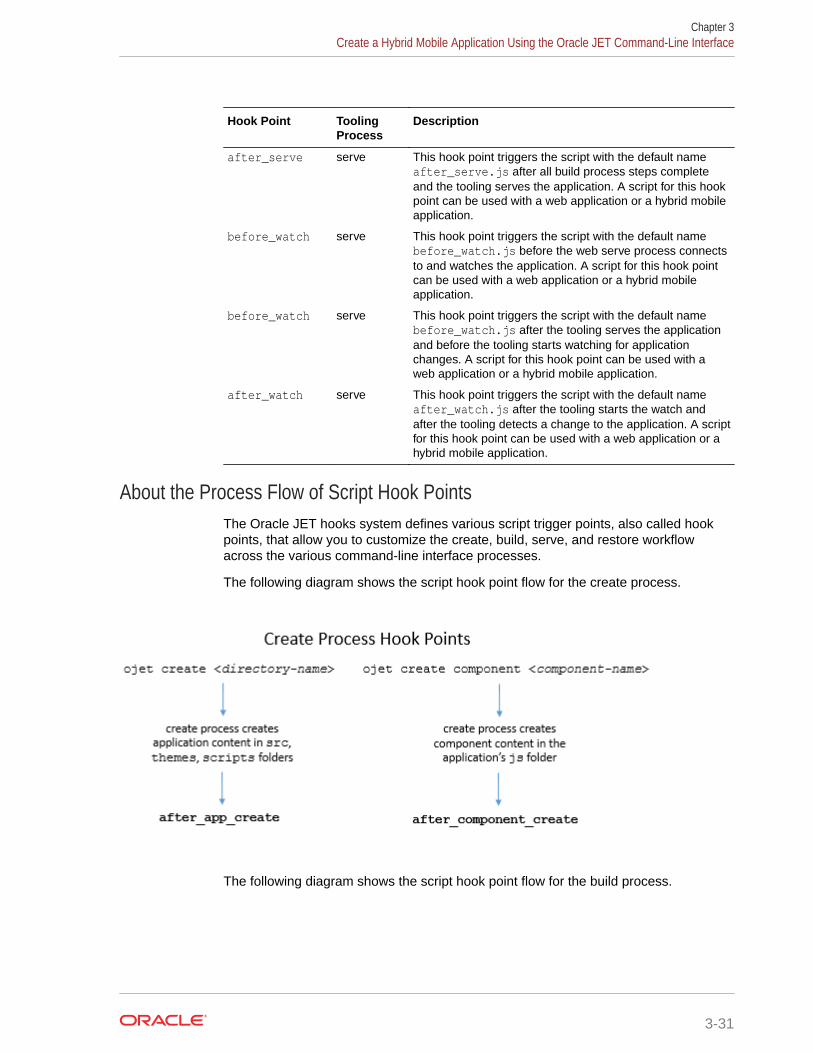
Hook Point ToolingProcess
Description
after_serve serve This hook point triggers the script with the default nameafter_serve.js after all build process steps completeand the tooling serves the application. A script for this hookpoint can be used with a web application or a hybrid mobileapplication.
before_watch serve This hook point triggers the script with the default namebefore_watch.js before the web serve process connectsto and watches the application. A script for this hook pointcan be used with a web application or a hybrid mobileapplication.
before_watch serve This hook point triggers the script with the default namebefore_watch.js after the tooling serves the applicationand before the tooling starts watching for applicationchanges. A script for this hook point can be used with aweb application or a hybrid mobile application.
after_watch serve This hook point triggers the script with the default nameafter_watch.js after the tooling starts the watch andafter the tooling detects a change to the application. A scriptfor this hook point can be used with a web application or ahybrid mobile application.
About the Process Flow of Script Hook PointsThe Oracle JET hooks system defines various script trigger points, also called hookpoints, that allow you to customize the create, build, serve, and restore workflowacross the various command-line interface processes.
The following diagram shows the script hook point flow for the create process.
The following diagram shows the script hook point flow for the build process.
Chapter 3Create a Hybrid Mobile Application Using the Oracle JET Command-Line Interface
3-31
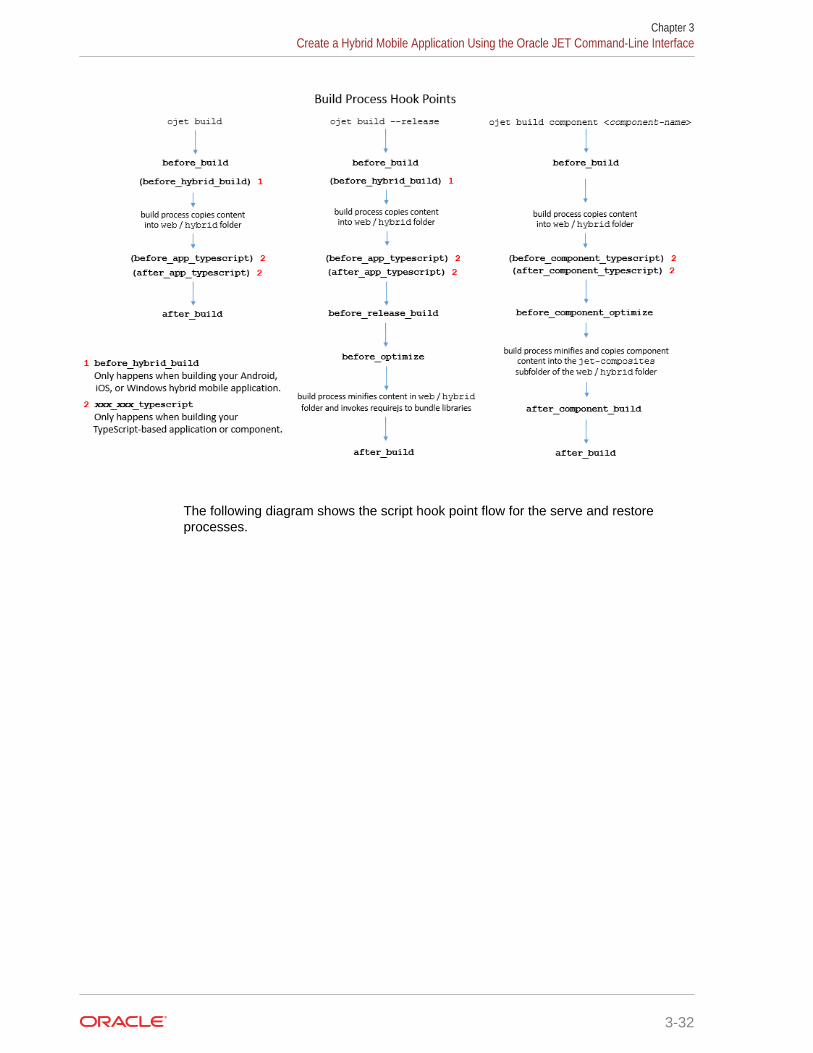
The following diagram shows the script hook point flow for the serve and restoreprocesses.
Chapter 3Create a Hybrid Mobile Application Using the Oracle JET Command-Line Interface
3-32
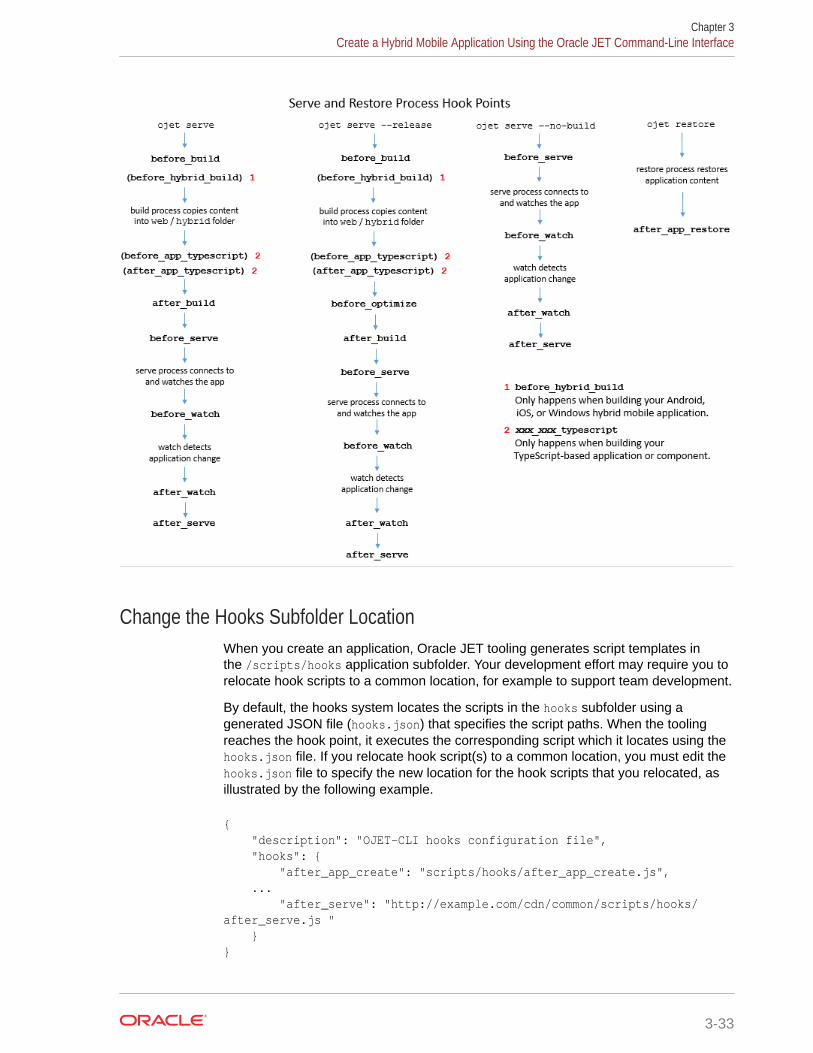
Change the Hooks Subfolder LocationWhen you create an application, Oracle JET tooling generates script templates inthe /scripts/hooks application subfolder. Your development effort may require you torelocate hook scripts to a common location, for example to support team development.
By default, the hooks system locates the scripts in the hooks subfolder using agenerated JSON file (hooks.json) that specifies the script paths. When the toolingreaches the hook point, it executes the corresponding script which it locates using thehooks.json file. If you relocate hook script(s) to a common location, you must edit thehooks.json file to specify the new location for the hook scripts that you relocated, asillustrated by the following example.
{ "description": "OJET-CLI hooks configuration file", "hooks": { "after_app_create": "scripts/hooks/after_app_create.js", ... "after_serve": "http://example.com/cdn/common/scripts/hooks/after_serve.js " }}
Chapter 3Create a Hybrid Mobile Application Using the Oracle JET Command-Line Interface
3-33
Create a Hook Script for Hybrid Mobile ApplicationsYou can create a hook point script to define a new command-line interface processstep for your hybrid mobile application. To create a hook script, you edit the scripttemplate associated with a specific hook point in the tooling build and serve workflow.
The Oracle JET hooks system defines various script trigger points, also called hookpoints, that allow you to customize the build and serve workflow across the variousbuild and serve modes. Customization relies on script files and the script code that youwant to trigger for a particular hook point. Note that the generated script templates thatyou modify with your script code are named for their corresponding hook point.
To customize the workflow for the build or serve processes, you edit the generatedscript template file named for a specific hook point. For example, to trigger a script atthe start of the tooling's build process, you would edit the before_hybrid_build.jsscript named for the hook point triggered before the build begins. That hook point isnamed before_hybrid_build.
A basic example illustrates a simple customization using the before_optimize hook,which allows you to control the RequireJS properties shown in bold to modify theapplication's bundling configuration.
requirejs.config({ baseUrl: "web/js", name: "main-temp", paths: { // injector:mainReleasePaths "knockout":"libs/knockout/knockout-3.x.x.debug", "jquery":"libs/jquery/jquery-3.x.x", "jqueryui-amd":"libs/jquery/jqueryui-amd-1.x.x", ... } // endinjector out: "web/js/main.js"}...
A script for this hook point might add one line to the before_optimize script template,as shown below. When your build the application with this customization script filein the default location, the tooling triggers the script before calling requirejs.out()and changes the out property setting to a custom directory path. The result is theapplication-generated main.js is output to the named directory instead of the defaultweb/js/main.js location.
module.exports = function (configObj) { return new Promise((resolve, reject) => { console.log("Running before_optimize hook."); configObj.requirejs.out = 'myweb/js/main.js; resolve(configObj); });};
Chapter 3Create a Hybrid Mobile Application Using the Oracle JET Command-Line Interface
3-34
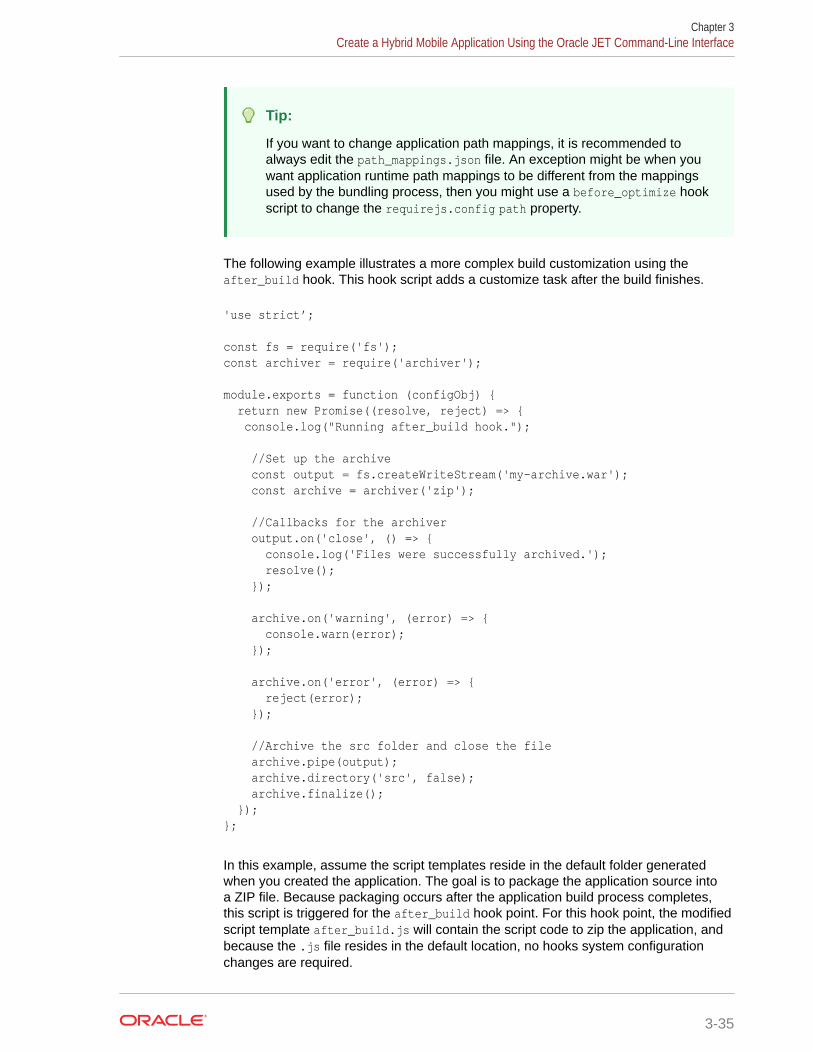
Tip:
If you want to change application path mappings, it is recommended toalways edit the path_mappings.json file. An exception might be when youwant application runtime path mappings to be different from the mappingsused by the bundling process, then you might use a before_optimize hookscript to change the requirejs.config path property.
The following example illustrates a more complex build customization using theafter_build hook. This hook script adds a customize task after the build finishes.
'use strict’;
const fs = require('fs');const archiver = require('archiver');
module.exports = function (configObj) { return new Promise((resolve, reject) => { console.log("Running after_build hook.");
//Set up the archive const output = fs.createWriteStream('my-archive.war'); const archive = archiver('zip'); //Callbacks for the archiver output.on('close', () => { console.log('Files were successfully archived.'); resolve(); }); archive.on('warning', (error) => { console.warn(error); }); archive.on('error', (error) => { reject(error); }); //Archive the src folder and close the file archive.pipe(output); archive.directory('src', false); archive.finalize(); });};
In this example, assume the script templates reside in the default folder generatedwhen you created the application. The goal is to package the application source intoa ZIP file. Because packaging occurs after the application build process completes,this script is triggered for the after_build hook point. For this hook point, the modifiedscript template after_build.js will contain the script code to zip the application, andbecause the .js file resides in the default location, no hooks system configurationchanges are required.
Chapter 3Create a Hybrid Mobile Application Using the Oracle JET Command-Line Interface
3-35
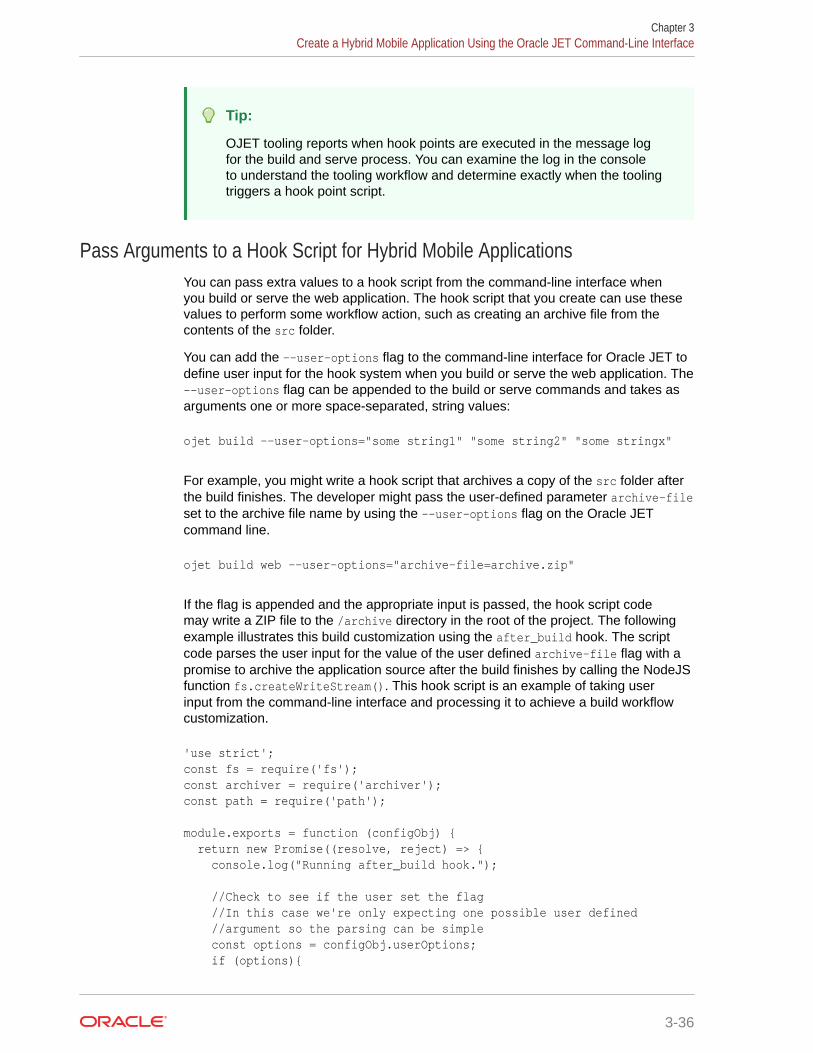
Tip:
OJET tooling reports when hook points are executed in the message logfor the build and serve process. You can examine the log in the consoleto understand the tooling workflow and determine exactly when the toolingtriggers a hook point script.
Pass Arguments to a Hook Script for Hybrid Mobile ApplicationsYou can pass extra values to a hook script from the command-line interface whenyou build or serve the web application. The hook script that you create can use thesevalues to perform some workflow action, such as creating an archive file from thecontents of the src folder.
You can add the --user-options flag to the command-line interface for Oracle JET todefine user input for the hook system when you build or serve the web application. The--user-options flag can be appended to the build or serve commands and takes asarguments one or more space-separated, string values:
ojet build --user-options="some string1" "some string2" "some stringx"
For example, you might write a hook script that archives a copy of the src folder afterthe build finishes. The developer might pass the user-defined parameter archive-fileset to the archive file name by using the --user-options flag on the Oracle JETcommand line.
ojet build web --user-options="archive-file=archive.zip"
If the flag is appended and the appropriate input is passed, the hook script codemay write a ZIP file to the /archive directory in the root of the project. The followingexample illustrates this build customization using the after_build hook. The scriptcode parses the user input for the value of the user defined archive-file flag with apromise to archive the application source after the build finishes by calling the NodeJSfunction fs.createWriteStream(). This hook script is an example of taking userinput from the command-line interface and processing it to achieve a build workflowcustomization.
'use strict';const fs = require('fs');const archiver = require('archiver');const path = require('path');
module.exports = function (configObj) { return new Promise((resolve, reject) => { console.log("Running after_build hook.");
//Check to see if the user set the flag //In this case we're only expecting one possible user defined //argument so the parsing can be simple const options = configObj.userOptions; if (options){
Chapter 3Create a Hybrid Mobile Application Using the Oracle JET Command-Line Interface
3-36

const userArgs = options.split('='); if (userArgs.length > 1 && userArgs[0] === 'archive-file'){ const archiveRoot = 'archive'; const outputArchive = path.join(archiveRoot,userArgs[1]);
//Ensure the output folder exists if (!fs.existsSync(archiveRoot)) { fs.mkdirSync(archiveRoot); }
//Set up the archive const output = fs.createWriteStream(outputArchive); const archive = archiver('zip');
//callbacks for the archiver output.on('close', () => { console.log(`Archive file ${outputArchive} successfully created.`); resolve(); });
archive.on('error', (error) => { console.error(`Error creating archive ${outputArchive}`); reject(error); });
//Archive the web folder and close the file archive.pipe(output); archive.directory('src', false); archive.finalize(); } else { //Unexpected input - fail with information message reject(`Unexpected flags in user-options: ${options}`); } } else { //nothing to do resolve(); } });};
Use Cordova Plugins to Access Mobile Device ServicesYou can enable user access to device features, such as camera, geolocation and thelocal file system, by including Cordova plugins into your JET app.
Topics
• About Apache Cordova and Cordova Plugins
• Use a Plugin in Your App
• Use a Different Web View in Your JET Hybrid Mobile App
Chapter 3Use Cordova Plugins to Access Mobile Device Services
3-37

About Apache Cordova and Cordova PluginsJET uses plugins developed with the Apache Cordova framework to access thecapabilities of the devices on which your hybrid mobile application is installed.
Apache Cordova is an open-source cross-platform development framework thatenables application developers to use standard web technologies (HTML, CSS, andJavaScript) to develop hybrid mobile applications. A hybrid mobile application refersto mobile applications that are native applications which are installed onto mobiledevices in the usual manner, but which use a web view to render the UI ratherthan using the platform's native UI components. For additional information aboutApache Cordova, see the Overview page at http://cordova.apache.org/docs/en/latest/guide/overview/index.html.
Since a hybrid mobile application is developed using standard web technologies, thesame code can be reused across the supported platforms (such as Android, iOS andWindows). Apache Cordova provides tools that enable you to add support for theplatforms that the application will run on independent of this code.
JET uses Apache Cordova to develop web technology-based applications for some ofthe mobile platforms supported by Apache Cordova. So, one could say that the JEThybrid mobile application that you develop is an Apache Cordova application whereJET provides features such as components and themes that determine the look andfeel of your application.
A plugin is a package of code that allows the Cordova web view within which yourapplication renders to communicate with the native platform on which it runs. Theplugin does this by providing a JavaScript interface to native components that allowsyour application to use native device capabilities, such as camera, geolocation, and soon.
So, assume for example, that you want your application to use a camera. In that case,you look for an existing plugin to provide access to the camera on the platform(s)where your application will be installed as there is a good possibility that someone hasalready developed a plugin to address this requirement.
If you cannot find a plugin that meets your requirements, you can develop yourown plugin. Although this blog post makes reference to another mobile developmentframework (MAF), it provides a suitable introduction to creating a Cordova plugin thatcould be used in a JET application or any Cordova-based application.
To find a plugin to use in your application, go to the Plugins page at https://cordova.apache.org/plugins/ that provides a registry of core and third-party Cordovaplugins. Core plugins are plugins provided by Apache Cordova while third-partyplugins are those developed by independent developers. Core plugins display ablue vertical strip to the left of the card that describes the plugin, as shown in thefollowing figure, where two core plugins (cordova-plugin-media and cordova-plugin-contacts) appear after a third-party plugin named cordova-plugin-ble-peripheral.
Chapter 3Use Cordova Plugins to Access Mobile Device Services
3-38
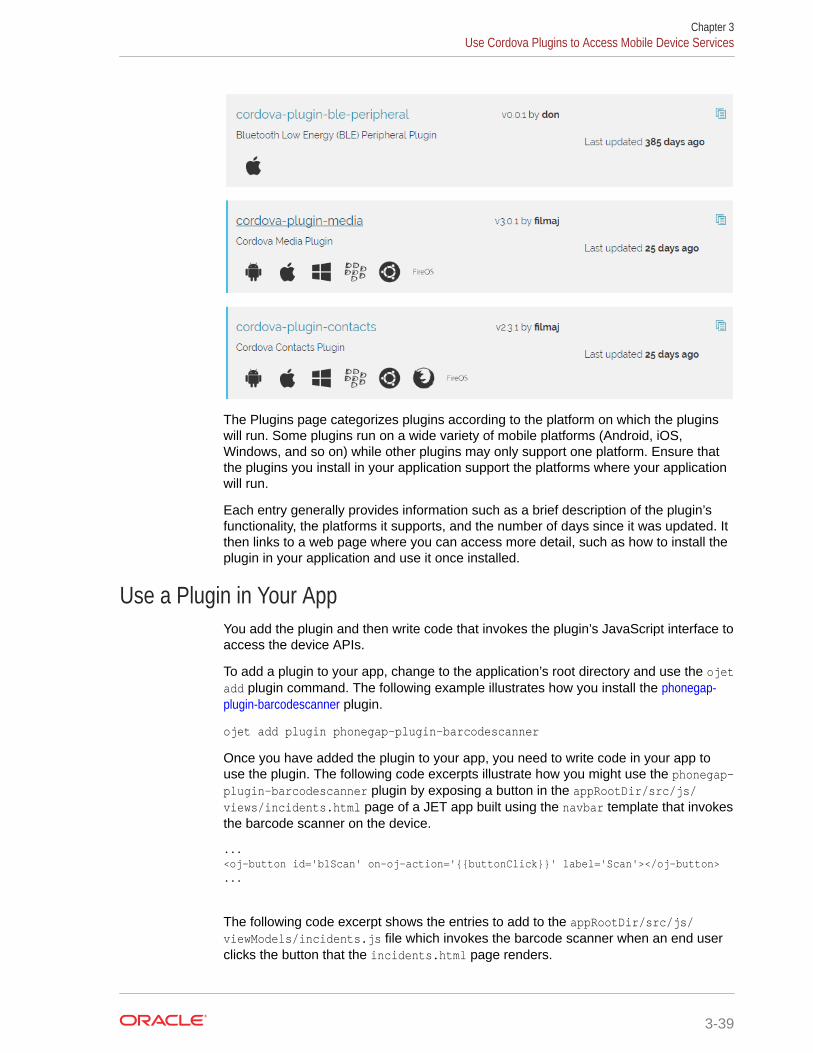
The Plugins page categorizes plugins according to the platform on which the pluginswill run. Some plugins run on a wide variety of mobile platforms (Android, iOS,Windows, and so on) while other plugins may only support one platform. Ensure thatthe plugins you install in your application support the platforms where your applicationwill run.
Each entry generally provides information such as a brief description of the plugin’sfunctionality, the platforms it supports, and the number of days since it was updated. Itthen links to a web page where you can access more detail, such as how to install theplugin in your application and use it once installed.
Use a Plugin in Your AppYou add the plugin and then write code that invokes the plugin’s JavaScript interface toaccess the device APIs.
To add a plugin to your app, change to the application’s root directory and use the ojetadd plugin command. The following example illustrates how you install the phonegap-plugin-barcodescanner plugin.
ojet add plugin phonegap-plugin-barcodescanner
Once you have added the plugin to your app, you need to write code in your app touse the plugin. The following code excerpts illustrate how you might use the phonegap-plugin-barcodescanner plugin by exposing a button in the appRootDir/src/js/views/incidents.html page of a JET app built using the navbar template that invokesthe barcode scanner on the device.
...<oj-button id='b1Scan' on-oj-action='{{buttonClick}}' label='Scan'></oj-button>...
The following code excerpt shows the entries to add to the appRootDir/src/js/viewModels/incidents.js file which invokes the barcode scanner when an end userclicks the button that the incidents.html page renders.
Chapter 3Use Cordova Plugins to Access Mobile Device Services
3-39

self.buttonClick = function(data, event){ cordova.plugins.barcodeScanner.scan( function (result) { alert("We got a barcode\n" + "Result: " + result.text + "\n" + "Format: " + result.format + "\n" + "Cancelled: " + result.cancelled); }, function (error) { alert("Scanning failed: " + error); } ); }
Use a Different Web View in Your JET Hybrid Mobile AppJET hybrid mobile apps use the default web view supplied by each mobile operatingsystem.
On the Android platform, this is the Android platform’s WebView. A number of Cordovaplugins exist that enable you to use a different web view in your hybrid mobile app.One example for the Android platform is the cordova-plugin-crosswalk-webviewplugin that configures your app to use the Crosswalk web view to bring performanceimprovements and compatibility improvements across older Android versions. Installthis plugin in your app using the following command:
ojet add plugin cordova-plugin-crosswalk-webview
For more information about the cordova-plugin-crosswalk-webview plugin, read itsdocumentation.
For apps that run on the iOS platform, consider adding the cordova-plugin-wkwebview-file-xhr plugin to your app so that your app uses the more performantWKWebView instead of the default UIWebView used on iOS devices.
ojet add plugin cordova-plugin-wkwebview-file-xhr
For more information about the cordova-plugin-wkwebview-file-xhr plugin, read itsdocumentation.
Chapter 3Use Cordova Plugins to Access Mobile Device Services
3-40

4Designing Responsive Applications
Oracle JET includes classes that support a flexbox–based layout, 12-columnresponsive grid system, responsive form layout, and responsive JavaScript that youcan use to design responsive web and hybrid mobile applications.
Topics:
• Typical Workflow for Designing Responsive Applications in Oracle JET
• Oracle JET and Responsive Design
• Media Queries
• Oracle JET Flex, Grid, Form, and Responsive Helper Class Naming Convention
• Oracle JET Flex Layouts
• Oracle JET Grids
• Responsive Form Layouts
• Add Responsive Design to Your Application
• Use Responsive JavaScript
• Use the Responsive Helper Classes
• Create Responsive CSS Images
• Change Default Font Size
• Control the Size and Generation of the CSS
Typical Workflow for Designing Responsive Applications inOracle JET
Oracle JET includes classes for creating responsive applications. After you create yourapplication, you can fine tune your design using Oracle JET responsive JavaScript andhelper classes.
To design responsive applications in Oracle JET, refer to the typical workflowdescribed in the following table:
Task Description More Information
Understand Oracle JET'ssupport for responsivedesign
Understand the Oracle JET flex layout,12–column mobile-first grid, and formlayout framework classes, and theresponsive class naming conventions.
Oracle JET and Responsive Design
Media Queries
Oracle JET Flex, Grid, Form, andResponsive Helper Class NamingConvention
Oracle JET Flex Layouts
Oracle JET Grids
Responsive Form Layouts
4-1
Task Description More Information
Create a responsiveapplication using the OracleJET responsive classes.
Add application, flex, grid, and form layoutclasses to your application.
Add Responsive Design to YourApplication
Fine tune your responsivedesign
Use responsive JavaScript, helperclasses, and responsive CSS images tocomplete the responsive design. Changedefault font size across your application.
Use Responsive JavaScript
Use the Responsive Helper Classes
Create Responsive Images
Change Default Font Size
Oracle JET and Responsive DesignResponsive design describes a design concept that uses fluid grids, scalable images,and media queries to present alternative layouts based on the media type. Withresponsive design, you can configure Oracle JET applications to be visually appealingon a wide range of devices, ranging from small phones to wide-screen desktops.
Oracle JET includes classes that support a flexible box layout. In a flex layout, you canlay out the children of a flex container in any direction, and the children will grow to fillunused space or shrink to avoid overflowing the parent. You can also nest boxes (forexample, horizontal inside vertical or vertical inside horizontal) to build layouts in twodimensions.
Oracle JET also provides a 12-column grid system and form layout classes thatinclude styles for small, medium, large, and extra large screens or devices that youcan use in conjunction with the flex layout classes to achieve finer control of yourapplication’s layout. The grid system and form classes use media queries to set thestyle based on the width of the screen or device, and you can use them to customizeyour page layout based on your users' needs.
In addition, media queries form the basis for responsive helper classes that show orhide content, align text, or float content based on screen width. They are also the basisfor responsive JavaScript that loads content conditionally or sets a component's optionbased on screen width.
Media QueriesCSS3 media queries use the @media at-rule, media type, and expressions thatevaluate to true or false to define the cases for which the corresponding style ruleswill be applied. Media queries form the basis for Oracle JET’s responsive classes.
<style>@media media_types (expression){ /* media-specific rules */}</style>
The CSS3 specification defines several media types, but specific browsers may notimplement all media types. The media type is optional and applies to all types if notspecified. The following media query will display a sidebar only when the screen iswider than 767 pixels.
@media (max-width: 767px){ .facet_sidebar {
Chapter 4Oracle JET and Responsive Design
4-2

display: none; }}
Oracle JET defines CSS3 media queries and style class custom properties to definescreen widths for all themes included with Oracle JET.
Width and Custom PropertyName
Redwood Theme:Default Range inPixels
Alta Theme:Default Range inPixels
Device Examples
small
$screenSmallRange
0-599 0-767 phones
medium
$screenMediumRange
600-1023 768-1023 tablet portrait
large
$screenLargeRange
1024-1439 1024-1280 tablet landscape,desktop
extra large
$screenXlargeRange
1440 and up 1281 and up large desktop
For printing, Oracle JET uses the large screen layout for printing in landscape modeand the medium screen layout for printing in portrait mode.
Oracle JET's size defaults and media queries are defined in the Sass variablescontained in site_root/scss/oj/10.0.0/common/_oj.common.variables.scss and areused in the grid, form, and responsive helper style classes. The following code sampleshows the responsive screen width variables and a subset of the responsive mediaqueries. In most cases the defaults are sufficient, but be sure to check the file foradditional comments that show how you might modify the variables for your applicationif needed.
// responsive screen widths$screenSmallRange: 0, 767px !default;$screenMediumRange: 768px, 1023px !default;$screenLargeRange: 1024px, 1280px !default;$screenXlargeRange: 1281px, null !default;
// responsive media queries$responsiveQuerySmallUp: "print, screen" !default;$responsiveQuerySmallOnly: "screen and (max-width: #{upper-bound($screenSmallRange)})" !default;
$responsiveQueryMediumUp: "print, screen and (min-width: #{lower-bound($screenMediumRange)})" !default;$responsiveQueryMediumOnly: "print and (orientation: portrait), screen and (min-width: #{lower-bound($screenMediumRange)}) and (max-width: #{upper-bound($screenMediumRange)})" !default;$responsiveQueryMediumDown: "print and (orientation: portrait), screen and (max-width: #{upper-bound($screenMediumRange)})" !default;
$responsiveQueryLargeUp: "print and (orientation: landscape), screen and (min-width: #{lower-bound($screenLargeRange)})" !default;$responsiveQueryLargeOnly: "print and (orientation: landscape), screen and (min-width: #{lower-bound($screenLargeRange)}) and (max-width:
Chapter 4Media Queries
4-3
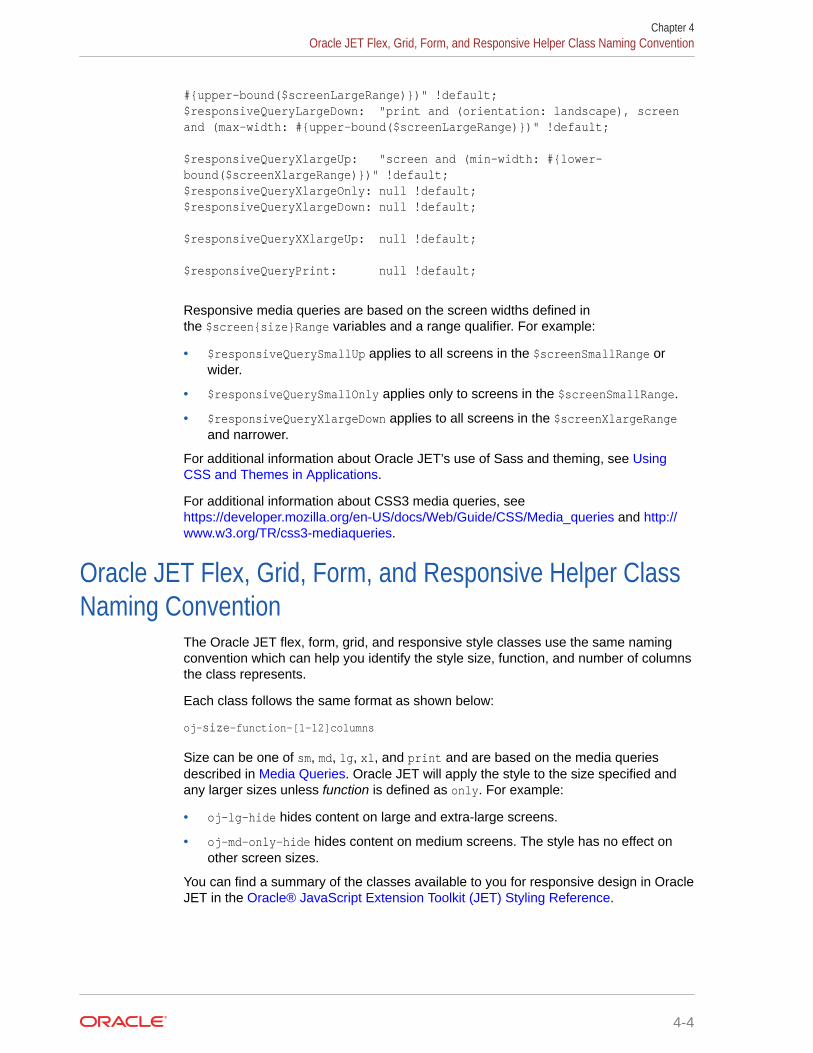
#{upper-bound($screenLargeRange)})" !default;$responsiveQueryLargeDown: "print and (orientation: landscape), screen and (max-width: #{upper-bound($screenLargeRange)})" !default;
$responsiveQueryXlargeUp: "screen and (min-width: #{lower-bound($screenXlargeRange)})" !default;$responsiveQueryXlargeOnly: null !default;$responsiveQueryXlargeDown: null !default;
$responsiveQueryXXlargeUp: null !default;
$responsiveQueryPrint: null !default;
Responsive media queries are based on the screen widths defined inthe $screen{size}Range variables and a range qualifier. For example:
• $responsiveQuerySmallUp applies to all screens in the $screenSmallRange orwider.
• $responsiveQuerySmallOnly applies only to screens in the $screenSmallRange.
• $responsiveQueryXlargeDown applies to all screens in the $screenXlargeRangeand narrower.
For additional information about Oracle JET’s use of Sass and theming, see UsingCSS and Themes in Applications.
For additional information about CSS3 media queries, seehttps://developer.mozilla.org/en-US/docs/Web/Guide/CSS/Media_queries and http://www.w3.org/TR/css3-mediaqueries.
Oracle JET Flex, Grid, Form, and Responsive Helper ClassNaming Convention
The Oracle JET flex, form, grid, and responsive style classes use the same namingconvention which can help you identify the style size, function, and number of columnsthe class represents.
Each class follows the same format as shown below:
oj-size-function-[1-12]columns
Size can be one of sm, md, lg, xl, and print and are based on the media queriesdescribed in Media Queries. Oracle JET will apply the style to the size specified andany larger sizes unless function is defined as only. For example:
• oj-lg-hide hides content on large and extra-large screens.
• oj-md-only-hide hides content on medium screens. The style has no effect onother screen sizes.
You can find a summary of the classes available to you for responsive design in OracleJET in the Oracle® JavaScript Extension Toolkit (JET) Styling Reference.
Chapter 4Oracle JET Flex, Grid, Form, and Responsive Helper Class Naming Convention
4-4
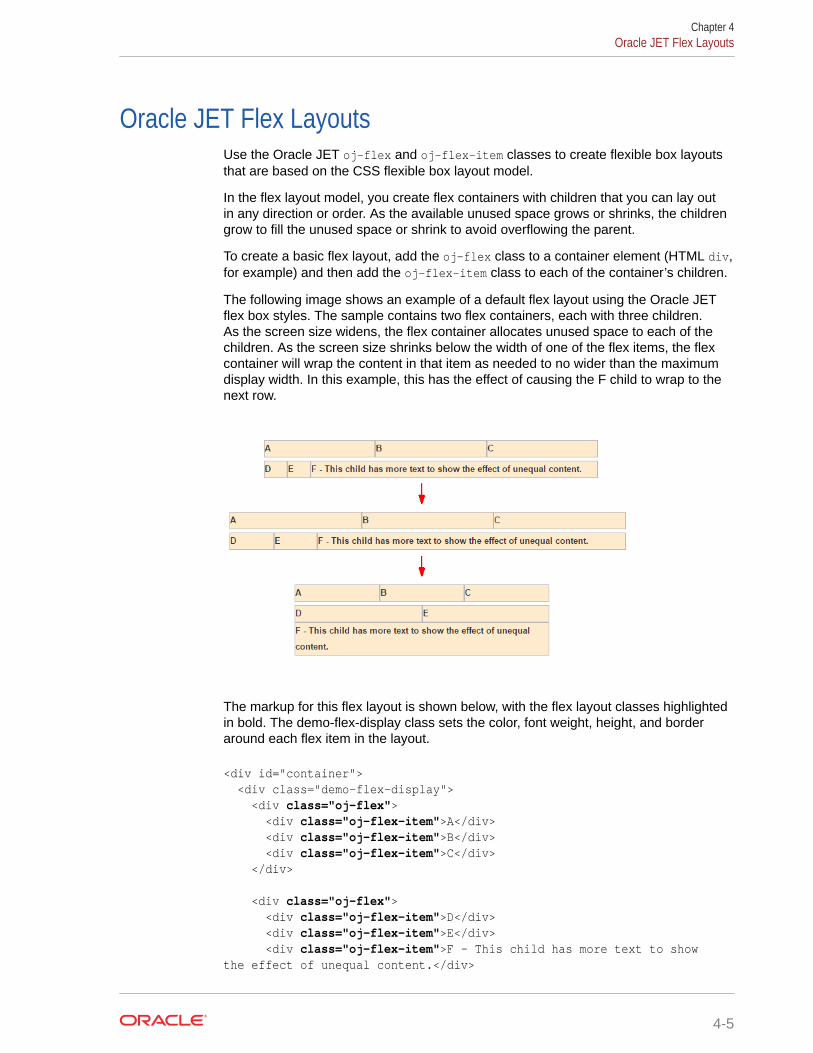
Oracle JET Flex LayoutsUse the Oracle JET oj-flex and oj-flex-item classes to create flexible box layoutsthat are based on the CSS flexible box layout model.
In the flex layout model, you create flex containers with children that you can lay outin any direction or order. As the available unused space grows or shrinks, the childrengrow to fill the unused space or shrink to avoid overflowing the parent.
To create a basic flex layout, add the oj-flex class to a container element (HTML div,for example) and then add the oj-flex-item class to each of the container’s children.
The following image shows an example of a default flex layout using the Oracle JETflex box styles. The sample contains two flex containers, each with three children.As the screen size widens, the flex container allocates unused space to each of thechildren. As the screen size shrinks below the width of one of the flex items, the flexcontainer will wrap the content in that item as needed to no wider than the maximumdisplay width. In this example, this has the effect of causing the F child to wrap to thenext row.
The markup for this flex layout is shown below, with the flex layout classes highlightedin bold. The demo-flex-display class sets the color, font weight, height, and borderaround each flex item in the layout.
<div id="container"> <div class="demo-flex-display"> <div class="oj-flex"> <div class="oj-flex-item">A</div> <div class="oj-flex-item">B</div> <div class="oj-flex-item">C</div> </div> <div class="oj-flex"> <div class="oj-flex-item">D</div> <div class="oj-flex-item">E</div> <div class="oj-flex-item">F - This child has more text to show the effect of unequal content.</div>
Chapter 4Oracle JET Flex Layouts
4-5
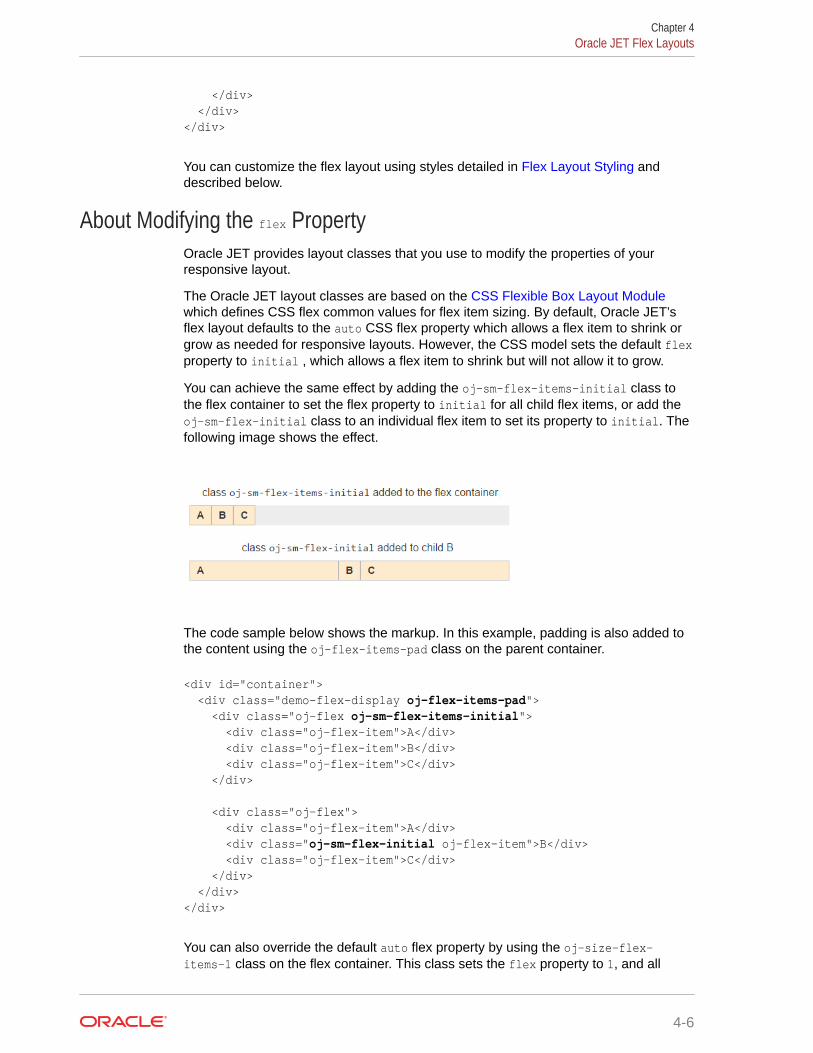
</div> </div></div>
You can customize the flex layout using styles detailed in Flex Layout Styling anddescribed below.
About Modifying the flex PropertyOracle JET provides layout classes that you use to modify the properties of yourresponsive layout.
The Oracle JET layout classes are based on the CSS Flexible Box Layout Modulewhich defines CSS flex common values for flex item sizing. By default, Oracle JET’sflex layout defaults to the auto CSS flex property which allows a flex item to shrink orgrow as needed for responsive layouts. However, the CSS model sets the default flexproperty to initial , which allows a flex item to shrink but will not allow it to grow.
You can achieve the same effect by adding the oj-sm-flex-items-initial class tothe flex container to set the flex property to initial for all child flex items, or add theoj-sm-flex-initial class to an individual flex item to set its property to initial. Thefollowing image shows the effect.
The code sample below shows the markup. In this example, padding is also added tothe content using the oj-flex-items-pad class on the parent container.
<div id="container"> <div class="demo-flex-display oj-flex-items-pad"> <div class="oj-flex oj-sm-flex-items-initial"> <div class="oj-flex-item">A</div> <div class="oj-flex-item">B</div> <div class="oj-flex-item">C</div> </div> <div class="oj-flex"> <div class="oj-flex-item">A</div> <div class="oj-sm-flex-initial oj-flex-item">B</div> <div class="oj-flex-item">C</div> </div> </div></div>
You can also override the default auto flex property by using the oj-size-flex-items-1 class on the flex container. This class sets the flex property to 1, and all
Chapter 4Oracle JET Flex Layouts
4-6
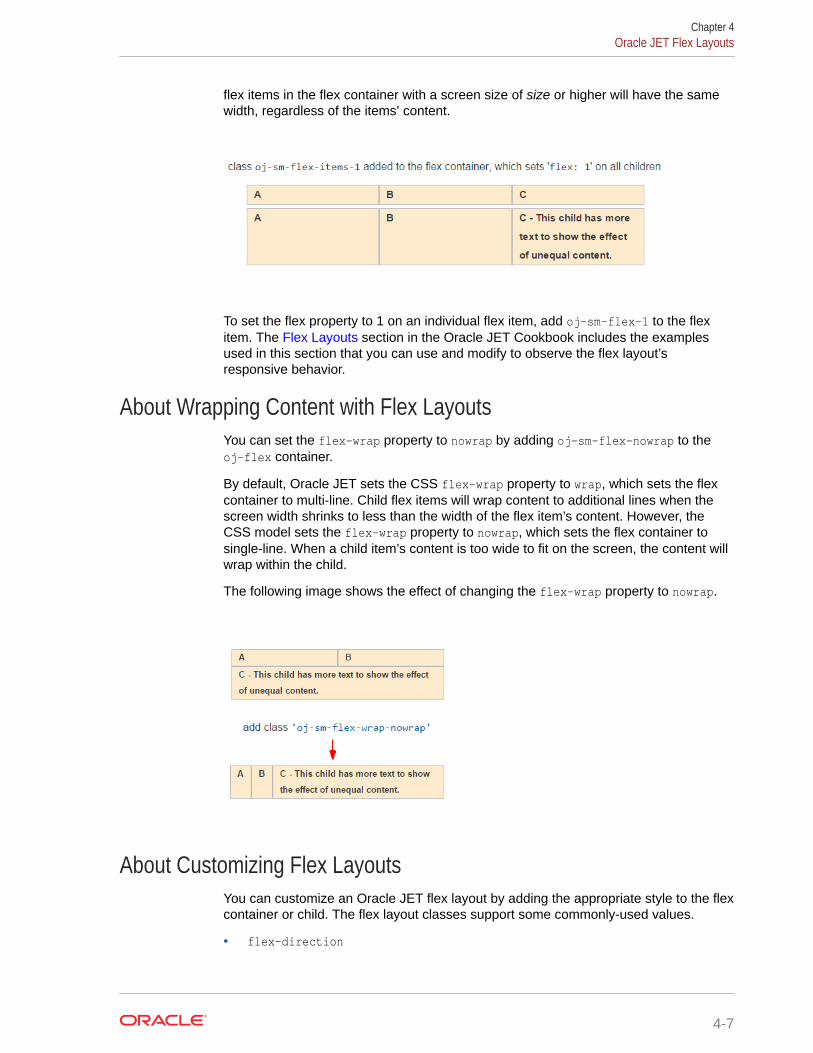
flex items in the flex container with a screen size of size or higher will have the samewidth, regardless of the items’ content.
To set the flex property to 1 on an individual flex item, add oj-sm-flex-1 to the flexitem. The Flex Layouts section in the Oracle JET Cookbook includes the examplesused in this section that you can use and modify to observe the flex layout’sresponsive behavior.
About Wrapping Content with Flex LayoutsYou can set the flex-wrap property to nowrap by adding oj-sm-flex-nowrap to theoj-flex container.
By default, Oracle JET sets the CSS flex-wrap property to wrap, which sets the flexcontainer to multi-line. Child flex items will wrap content to additional lines when thescreen width shrinks to less than the width of the flex item’s content. However, theCSS model sets the flex-wrap property to nowrap, which sets the flex container tosingle-line. When a child item’s content is too wide to fit on the screen, the content willwrap within the child.
The following image shows the effect of changing the flex-wrap property to nowrap.
About Customizing Flex LayoutsYou can customize an Oracle JET flex layout by adding the appropriate style to the flexcontainer or child. The flex layout classes support some commonly-used values.
• flex-direction
Chapter 4Oracle JET Flex Layouts
4-7
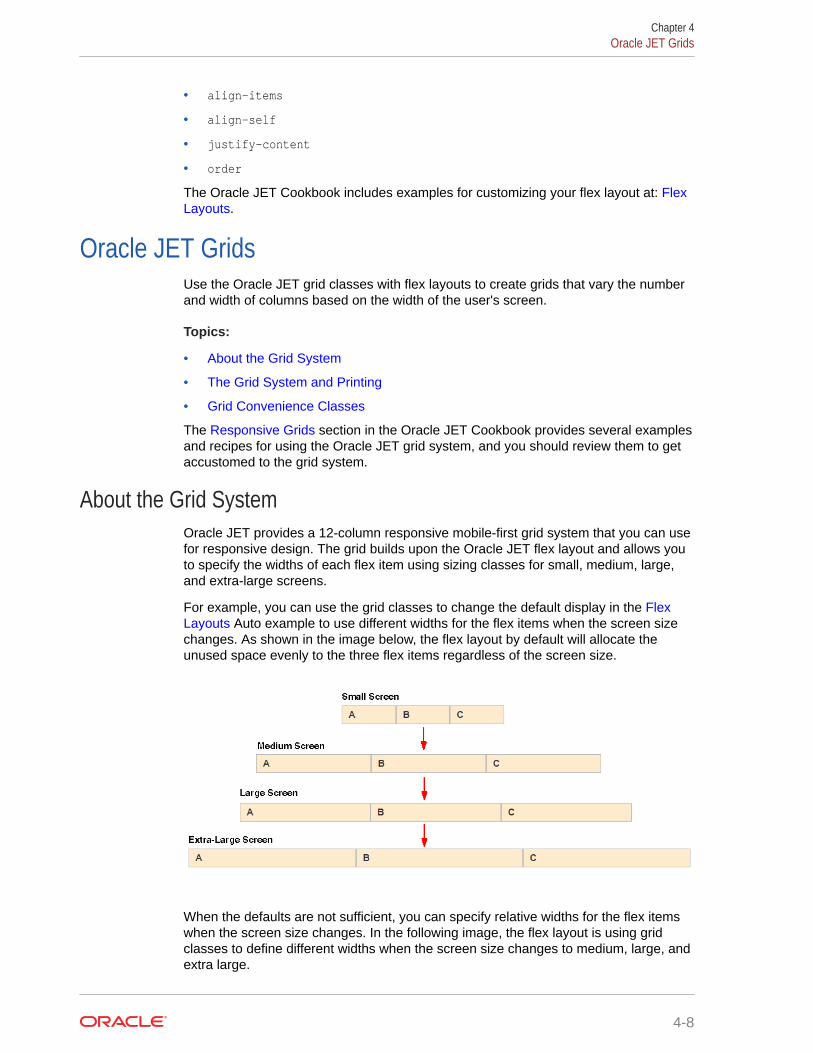
• align-items
• align-self
• justify-content
• order
The Oracle JET Cookbook includes examples for customizing your flex layout at: FlexLayouts.
Oracle JET GridsUse the Oracle JET grid classes with flex layouts to create grids that vary the numberand width of columns based on the width of the user's screen.
Topics:
• About the Grid System
• The Grid System and Printing
• Grid Convenience Classes
The Responsive Grids section in the Oracle JET Cookbook provides several examplesand recipes for using the Oracle JET grid system, and you should review them to getaccustomed to the grid system.
About the Grid SystemOracle JET provides a 12-column responsive mobile-first grid system that you can usefor responsive design. The grid builds upon the Oracle JET flex layout and allows youto specify the widths of each flex item using sizing classes for small, medium, large,and extra-large screens.
For example, you can use the grid classes to change the default display in the FlexLayouts Auto example to use different widths for the flex items when the screen sizechanges. As shown in the image below, the flex layout by default will allocate theunused space evenly to the three flex items regardless of the screen size.
When the defaults are not sufficient, you can specify relative widths for the flex itemswhen the screen size changes. In the following image, the flex layout is using gridclasses to define different widths when the screen size changes to medium, large, andextra large.
Chapter 4Oracle JET Grids
4-8
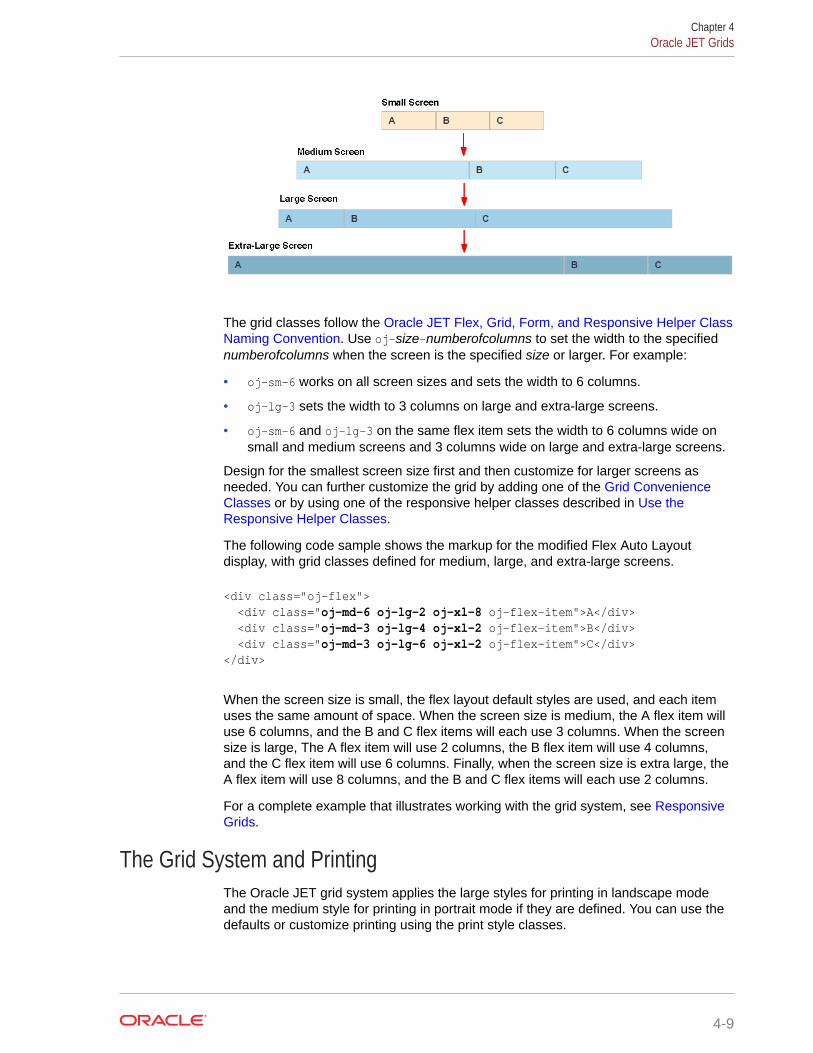
The grid classes follow the Oracle JET Flex, Grid, Form, and Responsive Helper ClassNaming Convention. Use oj-size-numberofcolumns to set the width to the specifiednumberofcolumns when the screen is the specified size or larger. For example:
• oj-sm-6 works on all screen sizes and sets the width to 6 columns.
• oj-lg-3 sets the width to 3 columns on large and extra-large screens.
• oj-sm-6 and oj-lg-3 on the same flex item sets the width to 6 columns wide onsmall and medium screens and 3 columns wide on large and extra-large screens.
Design for the smallest screen size first and then customize for larger screens asneeded. You can further customize the grid by adding one of the Grid ConvenienceClasses or by using one of the responsive helper classes described in Use theResponsive Helper Classes.
The following code sample shows the markup for the modified Flex Auto Layoutdisplay, with grid classes defined for medium, large, and extra-large screens.
<div class="oj-flex"> <div class="oj-md-6 oj-lg-2 oj-xl-8 oj-flex-item">A</div> <div class="oj-md-3 oj-lg-4 oj-xl-2 oj-flex-item">B</div> <div class="oj-md-3 oj-lg-6 oj-xl-2 oj-flex-item">C</div></div>
When the screen size is small, the flex layout default styles are used, and each itemuses the same amount of space. When the screen size is medium, the A flex item willuse 6 columns, and the B and C flex items will each use 3 columns. When the screensize is large, The A flex item will use 2 columns, the B flex item will use 4 columns,and the C flex item will use 6 columns. Finally, when the screen size is extra large, theA flex item will use 8 columns, and the B and C flex items will each use 2 columns.
For a complete example that illustrates working with the grid system, see ResponsiveGrids.
The Grid System and PrintingThe Oracle JET grid system applies the large styles for printing in landscape modeand the medium style for printing in portrait mode if they are defined. You can use thedefaults or customize printing using the print style classes.
Chapter 4Oracle JET Grids
4-9

In the grid example below, Row 2 and Row 4 include the oj-md-* style classes. Row 3and Row 4 include the oj-lg-4 style for all columns in the row.
<div class="demo-grid-sizes demo-flex-display"> <div class="oj-flex oj-flex-items-pad"> <div class="oj-sm-9 oj-flex-item"></div> <div class="oj-sm-3 oj-flex-item"></div> </div> <div class="oj-flex oj-flex-items-pad"> <div class="oj-sm-6 oj-md-9 oj-flex-item"></div> <div class="oj-sm-6 oj-md-3 oj-flex-item"></div> </div> <div class="oj-flex oj-flex-items-pad"> <div class="oj-sm-6 oj-lg-4 oj-flex-item"></div> <div class="oj-sm-4 oj-lg-4 oj-flex-item"></div> <div class="oj-sm-2 oj-lg-4 oj-flex-item"></div> </div> <div class="oj-flex oj-flex-items-pad "> <div class="oj-sm-8 oj-md-6 oj-lg-4 oj-xl-2 oj-flex-item"></div> <div class="oj-sm-2 oj-md-3 oj-lg-4 oj-xl-8 oj-flex-item"></div> <div class="oj-sm-2 oj-md-3 oj-lg-4 oj-xl-2 oj-flex-item"></div> </div></div>
As shown in the following print preview, when you print this grid in landscape mode,the oj-lg-4 style classes will be applied on Row 3 and Row 4. When you print the gridin portrait mode, the oj-md-* style classes apply on Row 2 and Row 4.
If you want to change the printing default, you can set theSass $responsiveQueryPrint variable to print in a custom settings file. After youenable the print classes, you can add the oj-print-numberofcolumns style class tothe column definition. This has the effect of changing the column sizes for printingpurposes only. In the following example, Row 1 includes the oj-print-6 class for eachcolumn in the row.
<div class="oj-flex oj-flex-items-pad"> <div class="oj-sm-9 oj-print-6 oj-flex-item"></div>
Chapter 4Oracle JET Grids
4-10
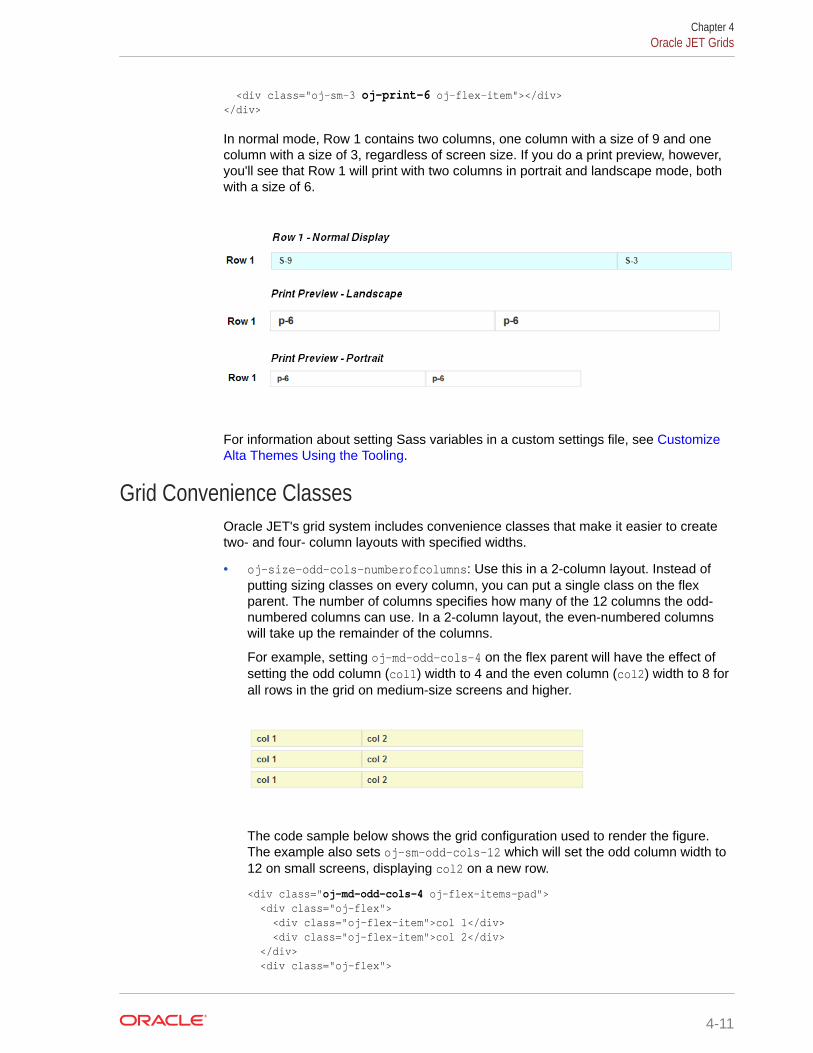
<div class="oj-sm-3 oj-print-6 oj-flex-item"></div></div>
In normal mode, Row 1 contains two columns, one column with a size of 9 and onecolumn with a size of 3, regardless of screen size. If you do a print preview, however,you'll see that Row 1 will print with two columns in portrait and landscape mode, bothwith a size of 6.
For information about setting Sass variables in a custom settings file, see CustomizeAlta Themes Using the Tooling.
Grid Convenience ClassesOracle JET's grid system includes convenience classes that make it easier to createtwo- and four- column layouts with specified widths.
• oj-size-odd-cols-numberofcolumns: Use this in a 2-column layout. Instead ofputting sizing classes on every column, you can put a single class on the flexparent. The number of columns specifies how many of the 12 columns the odd-numbered columns can use. In a 2-column layout, the even-numbered columnswill take up the remainder of the columns.
For example, setting oj-md-odd-cols-4 on the flex parent will have the effect ofsetting the odd column (col1) width to 4 and the even column (col2) width to 8 forall rows in the grid on medium-size screens and higher.
The code sample below shows the grid configuration used to render the figure.The example also sets oj-sm-odd-cols-12 which will set the odd column width to12 on small screens, displaying col2 on a new row.
<div class="oj-md-odd-cols-4 oj-flex-items-pad"> <div class="oj-flex"> <div class="oj-flex-item">col 1</div> <div class="oj-flex-item">col 2</div> </div> <div class="oj-flex">
Chapter 4Oracle JET Grids
4-11
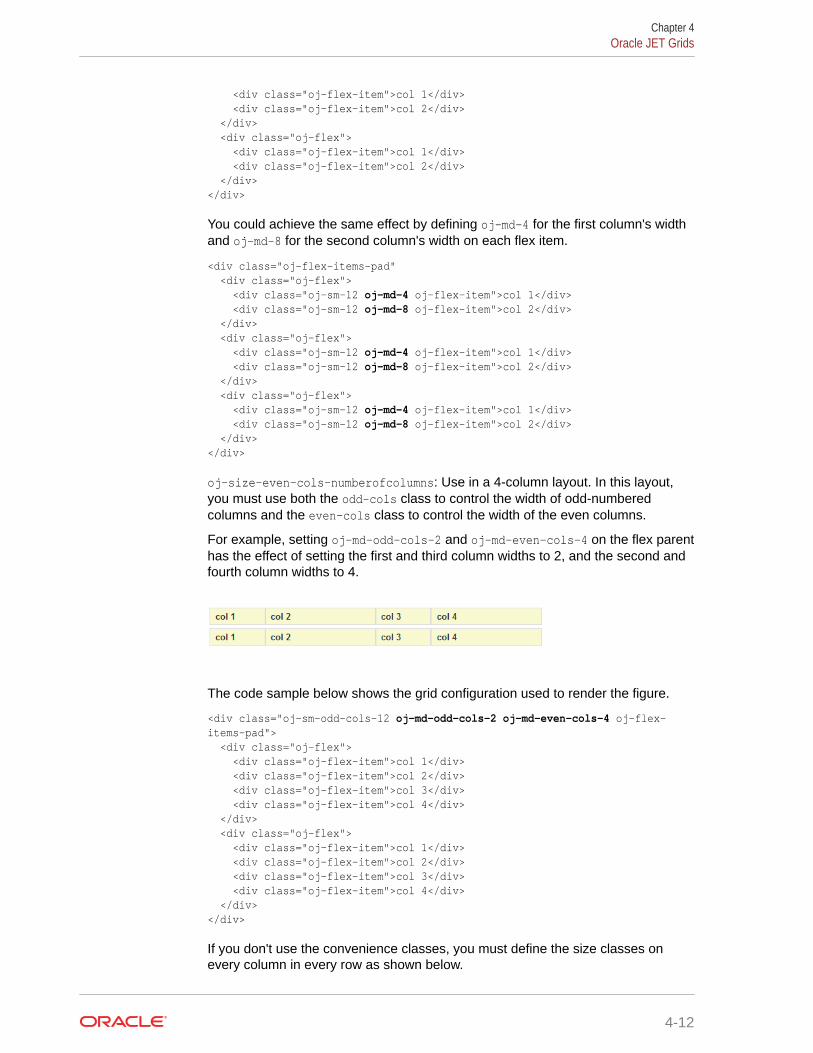
<div class="oj-flex-item">col 1</div> <div class="oj-flex-item">col 2</div> </div> <div class="oj-flex"> <div class="oj-flex-item">col 1</div> <div class="oj-flex-item">col 2</div> </div></div>
You could achieve the same effect by defining oj-md-4 for the first column's widthand oj-md-8 for the second column's width on each flex item.
<div class="oj-flex-items-pad" <div class="oj-flex"> <div class="oj-sm-12 oj-md-4 oj-flex-item">col 1</div> <div class="oj-sm-12 oj-md-8 oj-flex-item">col 2</div> </div> <div class="oj-flex"> <div class="oj-sm-12 oj-md-4 oj-flex-item">col 1</div> <div class="oj-sm-12 oj-md-8 oj-flex-item">col 2</div> </div> <div class="oj-flex"> <div class="oj-sm-12 oj-md-4 oj-flex-item">col 1</div> <div class="oj-sm-12 oj-md-8 oj-flex-item">col 2</div> </div></div>
oj-size-even-cols-numberofcolumns: Use in a 4-column layout. In this layout,you must use both the odd-cols class to control the width of odd-numberedcolumns and the even-cols class to control the width of the even columns.
For example, setting oj-md-odd-cols-2 and oj-md-even-cols-4 on the flex parenthas the effect of setting the first and third column widths to 2, and the second andfourth column widths to 4.
The code sample below shows the grid configuration used to render the figure.
<div class="oj-sm-odd-cols-12 oj-md-odd-cols-2 oj-md-even-cols-4 oj-flex-items-pad"> <div class="oj-flex"> <div class="oj-flex-item">col 1</div> <div class="oj-flex-item">col 2</div> <div class="oj-flex-item">col 3</div> <div class="oj-flex-item">col 4</div> </div> <div class="oj-flex"> <div class="oj-flex-item">col 1</div> <div class="oj-flex-item">col 2</div> <div class="oj-flex-item">col 3</div> <div class="oj-flex-item">col 4</div> </div> </div>
If you don't use the convenience classes, you must define the size classes onevery column in every row as shown below.
Chapter 4Oracle JET Grids
4-12
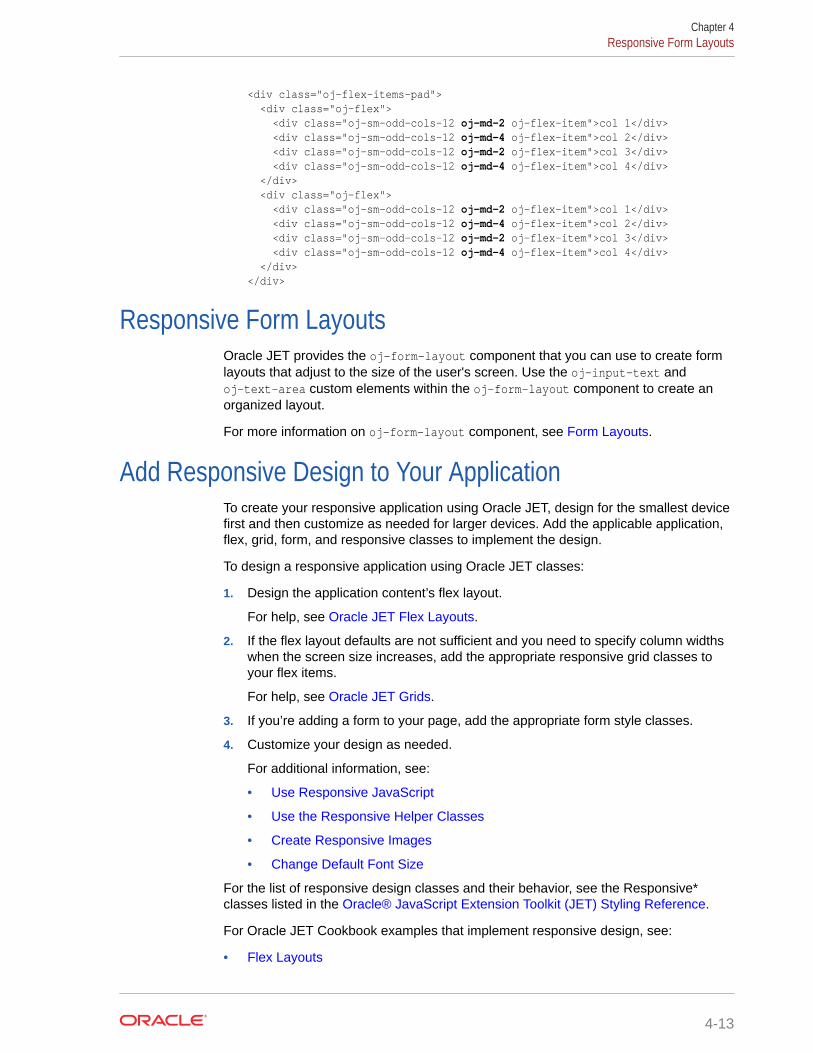
<div class="oj-flex-items-pad"> <div class="oj-flex"> <div class="oj-sm-odd-cols-12 oj-md-2 oj-flex-item">col 1</div> <div class="oj-sm-odd-cols-12 oj-md-4 oj-flex-item">col 2</div> <div class="oj-sm-odd-cols-12 oj-md-2 oj-flex-item">col 3</div> <div class="oj-sm-odd-cols-12 oj-md-4 oj-flex-item">col 4</div> </div> <div class="oj-flex"> <div class="oj-sm-odd-cols-12 oj-md-2 oj-flex-item">col 1</div> <div class="oj-sm-odd-cols-12 oj-md-4 oj-flex-item">col 2</div> <div class="oj-sm-odd-cols-12 oj-md-2 oj-flex-item">col 3</div> <div class="oj-sm-odd-cols-12 oj-md-4 oj-flex-item">col 4</div> </div></div>
Responsive Form LayoutsOracle JET provides the oj-form-layout component that you can use to create formlayouts that adjust to the size of the user's screen. Use the oj-input-text andoj-text-area custom elements within the oj-form-layout component to create anorganized layout.
For more information on oj-form-layout component, see Form Layouts.
Add Responsive Design to Your ApplicationTo create your responsive application using Oracle JET, design for the smallest devicefirst and then customize as needed for larger devices. Add the applicable application,flex, grid, form, and responsive classes to implement the design.
To design a responsive application using Oracle JET classes:
1. Design the application content’s flex layout.
For help, see Oracle JET Flex Layouts.
2. If the flex layout defaults are not sufficient and you need to specify column widthswhen the screen size increases, add the appropriate responsive grid classes toyour flex items.
For help, see Oracle JET Grids.
3. If you’re adding a form to your page, add the appropriate form style classes.
4. Customize your design as needed.
For additional information, see:
• Use Responsive JavaScript
• Use the Responsive Helper Classes
• Create Responsive Images
• Change Default Font Size
For the list of responsive design classes and their behavior, see the Responsive*classes listed in the Oracle® JavaScript Extension Toolkit (JET) Styling Reference.
For Oracle JET Cookbook examples that implement responsive design, see:
• Flex Layouts
Chapter 4Responsive Form Layouts
4-13

• Responsive Grids
• Form Layouts
• Responsive Behaviors
Use Responsive JavaScriptOracle JET includes the ResponsiveUtils and ResponsiveKnockoutUtils utilityclasses that leverage media queries to change a component's value option or loadcontent and images based on the user's screen size or device type.
Topics:
• The Responsive JavaScript Classes
• Change a Custom Element’s Attribute Based on Screen Size
• Conditionally Load Content Based on Screen Size
• Create Responsive Images
The Responsive JavaScript ClassesThe ResponsiveUtils and ResponsiveKnockoutUtils responsive JavaScript classesprovide methods that you can use in your application's JavaScript to obtain the currentscreen size and use the results to perform actions based on that screen size. Inaddition, the ResponsiveUtils provides a method that you can use to compare twoscreen sizes, useful for performing actions when the screen size changes.
JavaScript Class Methods Description
responsiveUtils compare(size1, size2) Compares two screen size constants. Returns a negativeinteger if the first argument is less than the second, a zero ifthe two are equal, and a positive integer if the first argumentis more than the second.
The screen size constants identify the screensize range media queries. For example, theResponsiveUtils.SCREEN_RANGE.SM constant corresponds tothe Sass $screenSmallRange variable and applies to screensizes smaller than 768 pixels in width.
responsiveUtils getFrameworkQuery(frameworkQueryKey)
Returns the media query to use for the framework query keyparameter.
The framework query key constant corresponds toa Sass responsive query variable. For example,the ResponsiveUtils.FRAMEWORK_QUERY_KEY.SM_UP constantcorresponds to the $responsiveQuerySmallUp responsivequery which returns a match when the screen size is smalland up.
Chapter 4Use Responsive JavaScript
4-14

JavaScript Class Methods Description
responsiveKnockoutUtils
createMediaQueryObservable(queryString)
Creates a Knockout observable that returns true or falsebased on a media query string. For example, the followingcode will return true if the screen size is 400 pixels wide orlarger.
var customQuery = ResponsiveKnockoutUtils.createMediaQueryObservable( '(min-width: 400px)');
responsiveKnockoutUtils
createScreenRangeObservable()
Creates a computed Knockout observable, the value of whichis one of the ResponsiveUtils.SCREEN_RANGE constants.
For example, on a small screen (0 - 767 pixels), thefollowing code will create a Knockout observable that returnsResponsiveUtils.SCREEN_RANGE.SM.
self.screenRange = ResponsiveKnockoutUtils.createScreenRangeObservable();
For additional detail about responsiveUtils, see the ResponsiveUtils APIdocumentation. For more information about responsiveKnockoutUtils, seeResponsiveKnockoutUtils.
Change a Custom Element’s Attribute Based on Screen SizeYou can set the value for a custom element’s attribute based on screen size usingthe responsive JavaScript classes. For example, you may want to add text to a buttonlabel when the screen size increases using the oj-button element's display attribute.
In this example, the oj-button element’s display attribute is defined for icons. Thecode sample below shows the markup for the button.
<div id="optioncontainer"> <oj-button display="[[large() ? 'all' : 'icons']]"> <span slot='startIcon' class="oj-fwk-icon oj-fwk-icon-calendar"></span> calendar </oj-button></div>
The code sample also sets the oj-button display attribute to all, which displays boththe label and icon when the large() method returns true, and icons only when thelarge() method returns false.
The code sample below shows the code that sets the value for large()and completes the knockout binding. In this example, lgQuery is set tothe LG_UP framework query key which applies when the screen size is
Chapter 4Use Responsive JavaScript
4-15
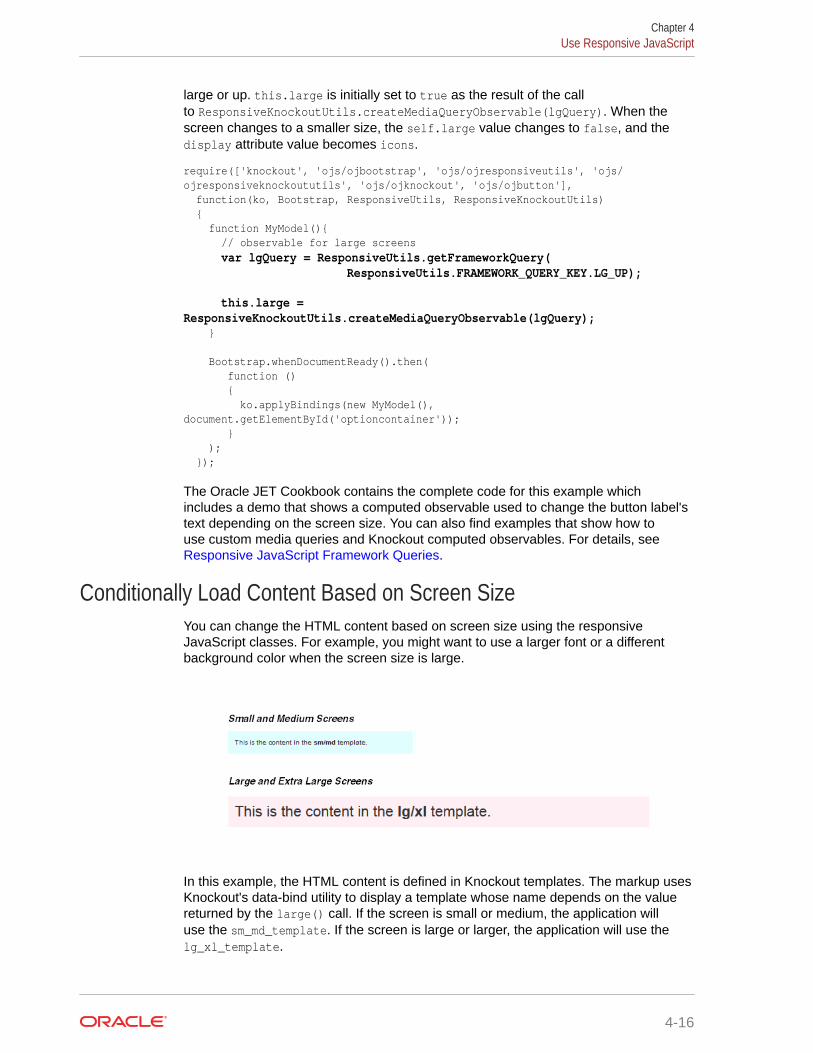
large or up. this.large is initially set to true as the result of the callto ResponsiveKnockoutUtils.createMediaQueryObservable(lgQuery). When thescreen changes to a smaller size, the self.large value changes to false, and thedisplay attribute value becomes icons.
require(['knockout', 'ojs/ojbootstrap', 'ojs/ojresponsiveutils', 'ojs/ojresponsiveknockoututils', 'ojs/ojknockout', 'ojs/ojbutton'], function(ko, Bootstrap, ResponsiveUtils, ResponsiveKnockoutUtils) { function MyModel(){ // observable for large screens var lgQuery = ResponsiveUtils.getFrameworkQuery( ResponsiveUtils.FRAMEWORK_QUERY_KEY.LG_UP);
this.large = ResponsiveKnockoutUtils.createMediaQueryObservable(lgQuery); }
Bootstrap.whenDocumentReady().then( function () { ko.applyBindings(new MyModel(), document.getElementById('optioncontainer')); } ); });
The Oracle JET Cookbook contains the complete code for this example whichincludes a demo that shows a computed observable used to change the button label'stext depending on the screen size. You can also find examples that show how touse custom media queries and Knockout computed observables. For details, seeResponsive JavaScript Framework Queries.
Conditionally Load Content Based on Screen SizeYou can change the HTML content based on screen size using the responsiveJavaScript classes. For example, you might want to use a larger font or a differentbackground color when the screen size is large.
In this example, the HTML content is defined in Knockout templates. The markup usesKnockout's data-bind utility to display a template whose name depends on the valuereturned by the large() call. If the screen is small or medium, the application willuse the sm_md_template. If the screen is large or larger, the application will use thelg_xl_template.
Chapter 4Use Responsive JavaScript
4-16
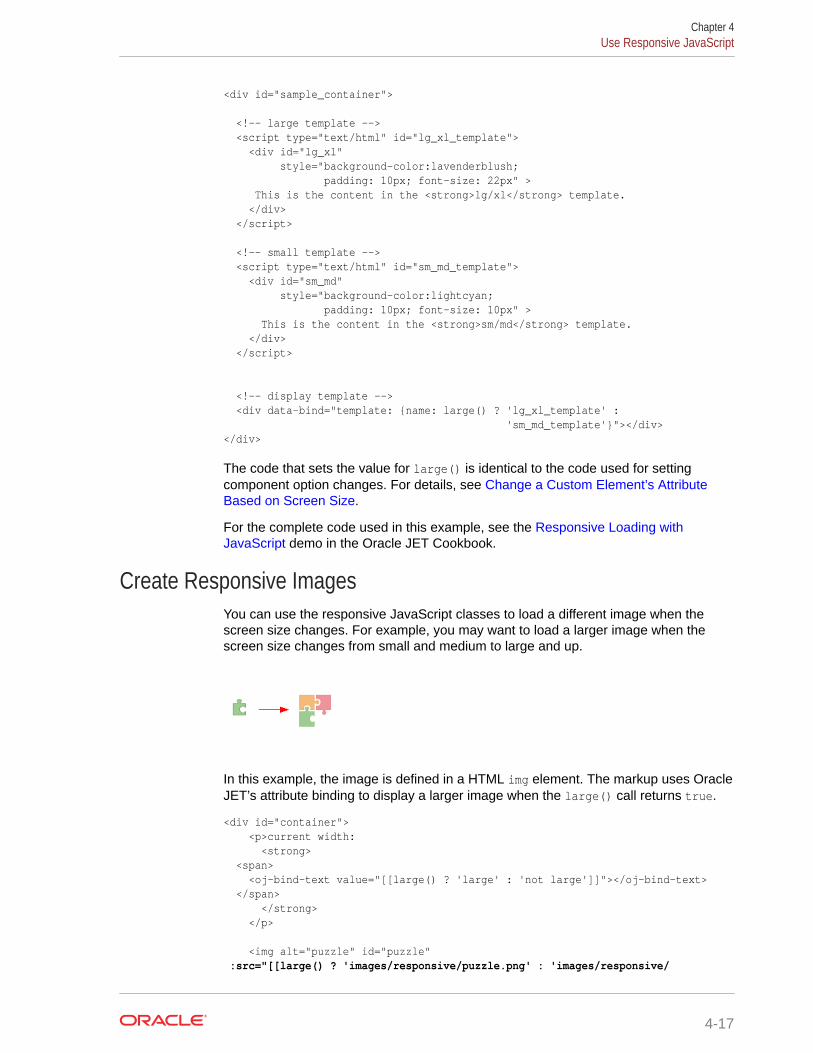
<div id="sample_container"> <!-- large template --> <script type="text/html" id="lg_xl_template"> <div id="lg_xl" style="background-color:lavenderblush; padding: 10px; font-size: 22px" > This is the content in the <strong>lg/xl</strong> template. </div> </script> <!-- small template --> <script type="text/html" id="sm_md_template"> <div id="sm_md" style="background-color:lightcyan; padding: 10px; font-size: 10px" > This is the content in the <strong>sm/md</strong> template. </div> </script> <!-- display template --> <div data-bind="template: {name: large() ? 'lg_xl_template' : 'sm_md_template'}"></div></div>
The code that sets the value for large() is identical to the code used for settingcomponent option changes. For details, see Change a Custom Element’s AttributeBased on Screen Size.
For the complete code used in this example, see the Responsive Loading withJavaScript demo in the Oracle JET Cookbook.
Create Responsive ImagesYou can use the responsive JavaScript classes to load a different image when thescreen size changes. For example, you may want to load a larger image when thescreen size changes from small and medium to large and up.
In this example, the image is defined in a HTML img element. The markup uses OracleJET’s attribute binding to display a larger image when the large() call returns true.
<div id="container"> <p>current width: <strong> <span> <oj-bind-text value="[[large() ? 'large' : 'not large']]"></oj-bind-text> </span> </strong> </p>
<img alt="puzzle" id="puzzle" :src="[[large() ? 'images/responsive/puzzle.png' : 'images/responsive/
Chapter 4Use Responsive JavaScript
4-17
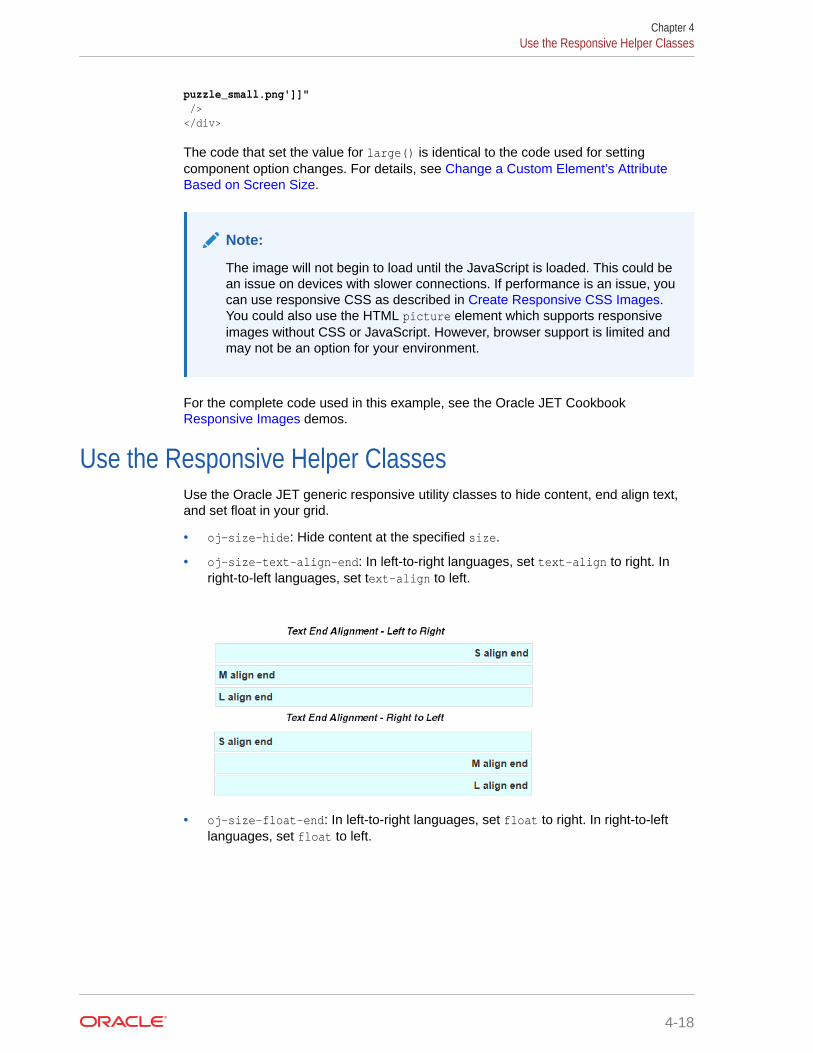
puzzle_small.png']]" /></div>
The code that set the value for large() is identical to the code used for settingcomponent option changes. For details, see Change a Custom Element’s AttributeBased on Screen Size.
Note:
The image will not begin to load until the JavaScript is loaded. This could bean issue on devices with slower connections. If performance is an issue, youcan use responsive CSS as described in Create Responsive CSS Images.You could also use the HTML picture element which supports responsiveimages without CSS or JavaScript. However, browser support is limited andmay not be an option for your environment.
For the complete code used in this example, see the Oracle JET CookbookResponsive Images demos.
Use the Responsive Helper ClassesUse the Oracle JET generic responsive utility classes to hide content, end align text,and set float in your grid.
• oj-size-hide: Hide content at the specified size.
• oj-size-text-align-end: In left-to-right languages, set text-align to right. Inright-to-left languages, set text-align to left.
• oj-size-float-end: In left-to-right languages, set float to right. In right-to-leftlanguages, set float to left.
Chapter 4Use the Responsive Helper Classes
4-18
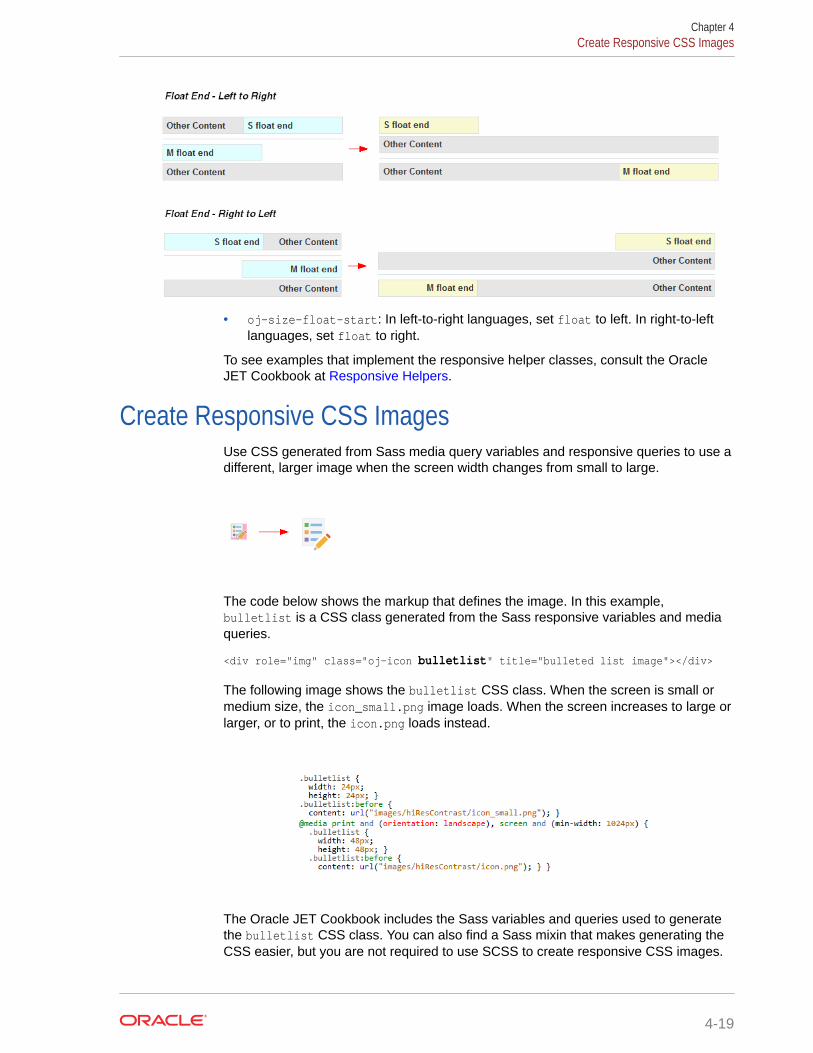
• oj-size-float-start: In left-to-right languages, set float to left. In right-to-leftlanguages, set float to right.
To see examples that implement the responsive helper classes, consult the OracleJET Cookbook at Responsive Helpers.
Create Responsive CSS ImagesUse CSS generated from Sass media query variables and responsive queries to use adifferent, larger image when the screen width changes from small to large.
The code below shows the markup that defines the image. In this example,bulletlist is a CSS class generated from the Sass responsive variables and mediaqueries.
<div role="img" class="oj-icon bulletlist" title="bulleted list image"></div>
The following image shows the bulletlist CSS class. When the screen is small ormedium size, the icon_small.png image loads. When the screen increases to large orlarger, or to print, the icon.png loads instead.
The Oracle JET Cookbook includes the Sass variables and queries used to generatethe bulletlist CSS class. You can also find a Sass mixin that makes generating theCSS easier, but you are not required to use SCSS to create responsive CSS images.
Chapter 4Create Responsive CSS Images
4-19
In addition, the Oracle JET Cookbook includes examples that show high resolutionimages, sprites, button images, and more. For details, see Responsive CSS Images.
Note:
You can also use responsive JavaScript to change the images based onscreen size. For details, see Create Responsive Images.
Change Default Font SizeBy default, Oracle JET includes the Redwood theme, starting in JET release 9.0.0,that set a default font size of 1em (16px) on the root (html) element. This font size isoptimized for visibility and touchability on mobile devices, but you can customize thesize as needed for your application.
Topics
• Change Default Font Size Across the Application
• Change Default Font Size Based on Device Type
Change Default Font Size Across the ApplicationThe browser's font size is defined in the Sass $rootFontSize variable and included inthe generated CSS html class. You can use Sass to change the variable or overridethe generated CSS.
To change the browser default font size across your application, do one of thefollowing:
• In a custom Sass settings file, modify the Sass $rootFontSize variable, andregenerate the CSS.
For details about customizing Oracle JET themes, see Customize Alta ThemesUsing the Tooling.
• In your application-specific CSS, override the font-size setting for the html class.
For example, to set the browser's default font size to 12 pixels, add the following toyour application-specific CSS:
html { font-size: 12px;}
Change Default Font Size Based on Device TypeYou can change the default font size based on device type by detecting the devicetype used to access the browser and then setting the appropriate style on the htmlelement.
To change the browser default font size based the user’s device type:
Chapter 4Change Default Font Size
4-20
1. Use whatever means you like to detect that the browser is running on the specifieddevice.
For example, you may want to change the browser’s default font size on a desktopdevice. Use your own code or a third party tool to detect the device type.
2. When your application detects that the user is accessing the browser with thespecified device, on the html element in your markup, set style="font-size:xxpx". Substitute the desired pixel size for xx.
For example, to set the font size to 12 pixels when the application detects thespecified device, add logic to your application to add the highlighted code to yourmarkup.
<html style="font-size: 12px"> ... contents omitted</html>
Perform this step before initializing components to avoid issues with some OracleJET components that measure themselves.
Control the Size and Generation of the CSSYou can change the size of the CSS content automatically generated by Oracle JETso that unused classes or particular types of classes are compressed, removed,excluded, or not generated.
When you use the responsive framework classes, Oracle JET generates a largenumber of classes that you may not need. Here are some steps you can take tocontrol the size and generation of the CSS.
• Use compression.
The responsive classes are often repetitive and compress well. For details aboutcompressing your CSS, see Optimizing Performance.
• Remove unused classes.
By default, Oracle JET generates responsive classes small, medium, large, andxlarge screens. If you know that your application will not use some of theseclasses, you can set the associated $responsiveQuery* variables to none.
// If you don't want xlarge classes, you could set:$screenXlargeRange: none;$responsiveQueryLargeOnly: none;$responsiveQueryXlargeUp: none;
• Exclude unused classes from the application layout, flex, grid, form layout, andresponsive helper groups.
You can use the following variables to exclude classes from these groupsaltogether:
– $includeAppLayoutClasses
– $includeAppLayoutWebClasses
– $includeFlexClasses
– $includeGridClasses
Chapter 4Control the Size and Generation of the CSS
4-21
– $includeFormLayoutClasses
– $includeResponsiveHelperClasses
For additional information about using the $include* variables, see Use Variablesto Control CSS Content.
• Stop generation of a particular responsive helper class.
For finer-grained control, there are additional variables that you can set to false togeneration of a particular type of class.
Variable Description
$responsiveGenerateHide
Generate hide classes like .oj-md-hide.
$responsiveGenerateTextAlignEnd
Generate text-align end classes like .oj-md-text-align-end.
$responsiveGenerateFloatStart
Generate float start classes like .oj-md-float-start.
$responsiveGenerateFloatEnd
Generate float end classes like .oj-md-float-end.
Chapter 4Control the Size and Generation of the CSS
4-22
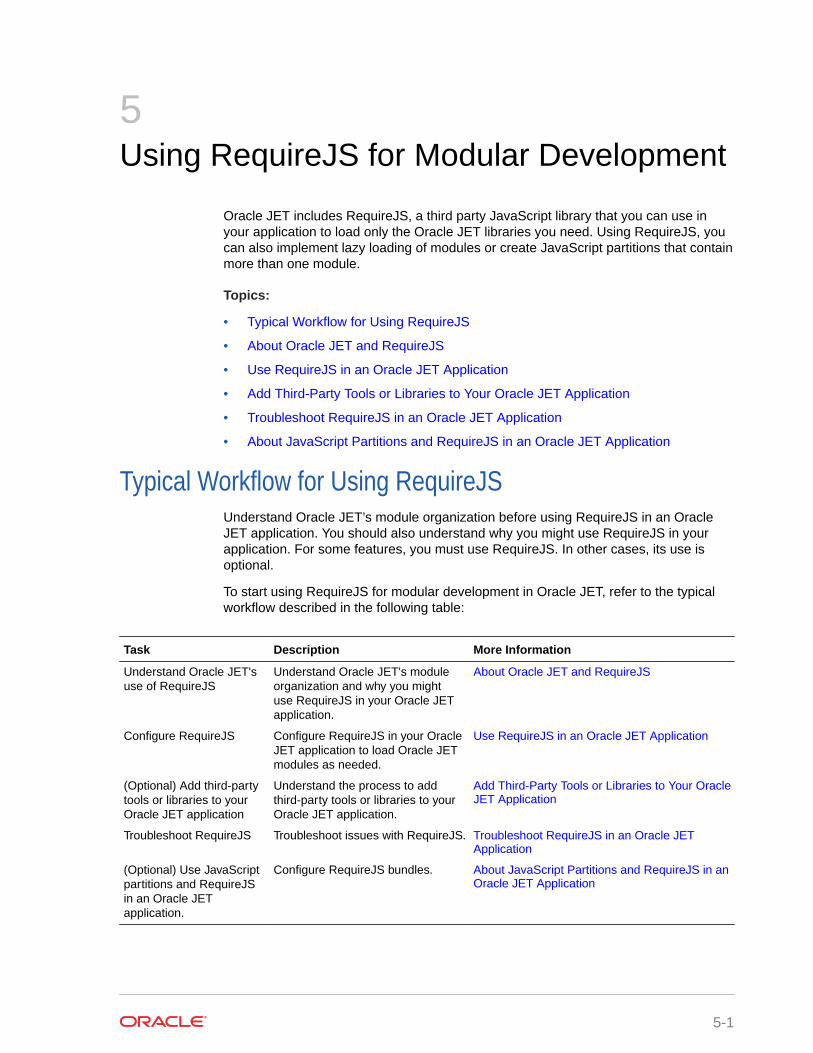
5Using RequireJS for Modular Development
Oracle JET includes RequireJS, a third party JavaScript library that you can use inyour application to load only the Oracle JET libraries you need. Using RequireJS, youcan also implement lazy loading of modules or create JavaScript partitions that containmore than one module.
Topics:
• Typical Workflow for Using RequireJS
• About Oracle JET and RequireJS
• Use RequireJS in an Oracle JET Application
• Add Third-Party Tools or Libraries to Your Oracle JET Application
• Troubleshoot RequireJS in an Oracle JET Application
• About JavaScript Partitions and RequireJS in an Oracle JET Application
Typical Workflow for Using RequireJSUnderstand Oracle JET’s module organization before using RequireJS in an OracleJET application. You should also understand why you might use RequireJS in yourapplication. For some features, you must use RequireJS. In other cases, its use isoptional.
To start using RequireJS for modular development in Oracle JET, refer to the typicalworkflow described in the following table:
Task Description More Information
Understand Oracle JET'suse of RequireJS
Understand Oracle JET's moduleorganization and why you mightuse RequireJS in your Oracle JETapplication.
About Oracle JET and RequireJS
Configure RequireJS Configure RequireJS in your OracleJET application to load Oracle JETmodules as needed.
Use RequireJS in an Oracle JET Application
(Optional) Add third-partytools or libraries to yourOracle JET application
Understand the process to addthird-party tools or libraries to yourOracle JET application.
Add Third-Party Tools or Libraries to Your OracleJET Application
Troubleshoot RequireJS Troubleshoot issues with RequireJS. Troubleshoot RequireJS in an Oracle JETApplication
(Optional) Use JavaScriptpartitions and RequireJSin an Oracle JETapplication.
Configure RequireJS bundles. About JavaScript Partitions and RequireJS in anOracle JET Application
5-1
About Oracle JET and RequireJSRequireJS is a JavaScript file and module loader that simplifies managing libraryreferences and is designed to improve the speed and quality of your code.
RequireJS implements the Asynchronous Module Definition (AMD) API which providesa mechanism for asynchronously loading a module and its dependencies.
Oracle JET's modular organization enables application developers to load a subset ofneeded features without having to execute require() calls for each referenced object.Each Oracle JET module represents one functional area of the toolkit, and it typicallydefines more than one JavaScript object.
You do not have to use RequireJS to reference Oracle JET libraries, but it is requiredif you plan to use Oracle JET's internationalization or data visualization componentsin your application. The Oracle JET download includes the RequireJS library, and it isused by default in the Oracle JET Starter Templates and Cookbook examples.
For more information about RequireJS, see http://requirejs.org.
About Oracle JET Module OrganizationThe Oracle JET modules are listed in the following table with description and usagetips. Use this table to determine which modules you must load in your application.Where your application can directly interact with a module API, the available objectsthat the module returns also appear in the table. Your application would typicallycall functions on the returned object or instantiate new objects via the constructorfunction. For more information about module loading in Oracle JET applications, seeAPI Reference for Oracle® JavaScript Extension Toolkit (Oracle JET) - JET ModuleLoading Overview.
Note:
Certain functionality that had been previously available from the nowdeprecated ojcore, ojvalidation-base, ojvalidation-datetime, andojvalidation-number modules is provided by refactored modules that returntheir own object. The table indicates which modules have been refactored.You should explicitly import needed modules in the dependency list of yourrequire function to use its classes.
Oracle JET Module Refactored Available Objects Description When to Use
ojs/ojmodel No Collection
Events
Model
OAuth
URLError
Classes of the JETCommon Model
Use if your applicationuses the Oracle JETCommon Model.
Chapter 5About Oracle JET and RequireJS
5-2
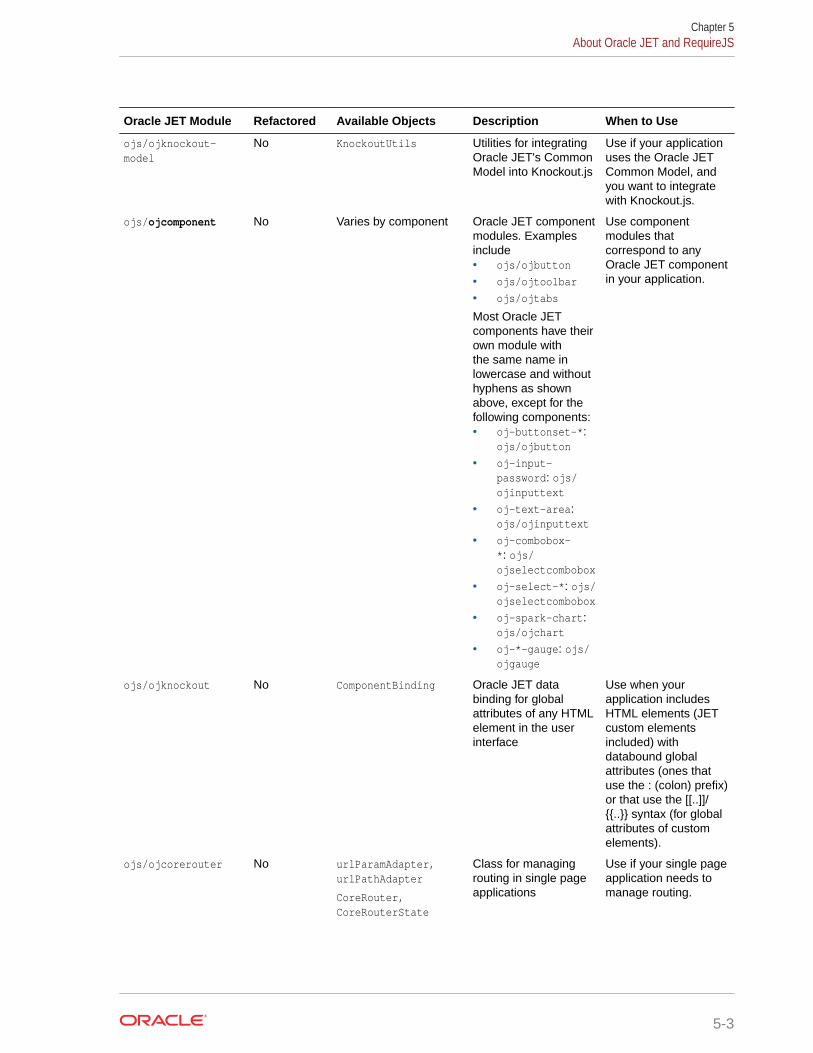
Oracle JET Module Refactored Available Objects Description When to Use
ojs/ojknockout-model
No KnockoutUtils Utilities for integratingOracle JET's CommonModel into Knockout.js
Use if your applicationuses the Oracle JETCommon Model, andyou want to integratewith Knockout.js.
ojs/ojcomponent No Varies by component Oracle JET componentmodules. Examplesinclude• ojs/ojbutton
• ojs/ojtoolbar
• ojs/ojtabs
Most Oracle JETcomponents have theirown module withthe same name inlowercase and withouthyphens as shownabove, except for thefollowing components:• oj-buttonset-*:
ojs/ojbutton
• oj-input-password: ojs/ojinputtext
• oj-text-area:ojs/ojinputtext
• oj-combobox-*: ojs/ojselectcombobox
• oj-select-*: ojs/ojselectcombobox
• oj-spark-chart:ojs/ojchart
• oj-*-gauge: ojs/ojgauge
Use componentmodules thatcorrespond to anyOracle JET componentin your application.
ojs/ojknockout No ComponentBinding Oracle JET databinding for globalattributes of any HTMLelement in the userinterface
Use when yourapplication includesHTML elements (JETcustom elementsincluded) withdatabound globalattributes (ones thatuse the : (colon) prefix)or that use the [[..]]/{{..}} syntax (for globalattributes of customelements).
ojs/ojcorerouter No urlParamAdapter,urlPathAdapter
CoreRouter,CoreRouterState
Class for managingrouting in single pageapplications
Use if your single pageapplication needs tomanage routing.
Chapter 5About Oracle JET and RequireJS
5-3
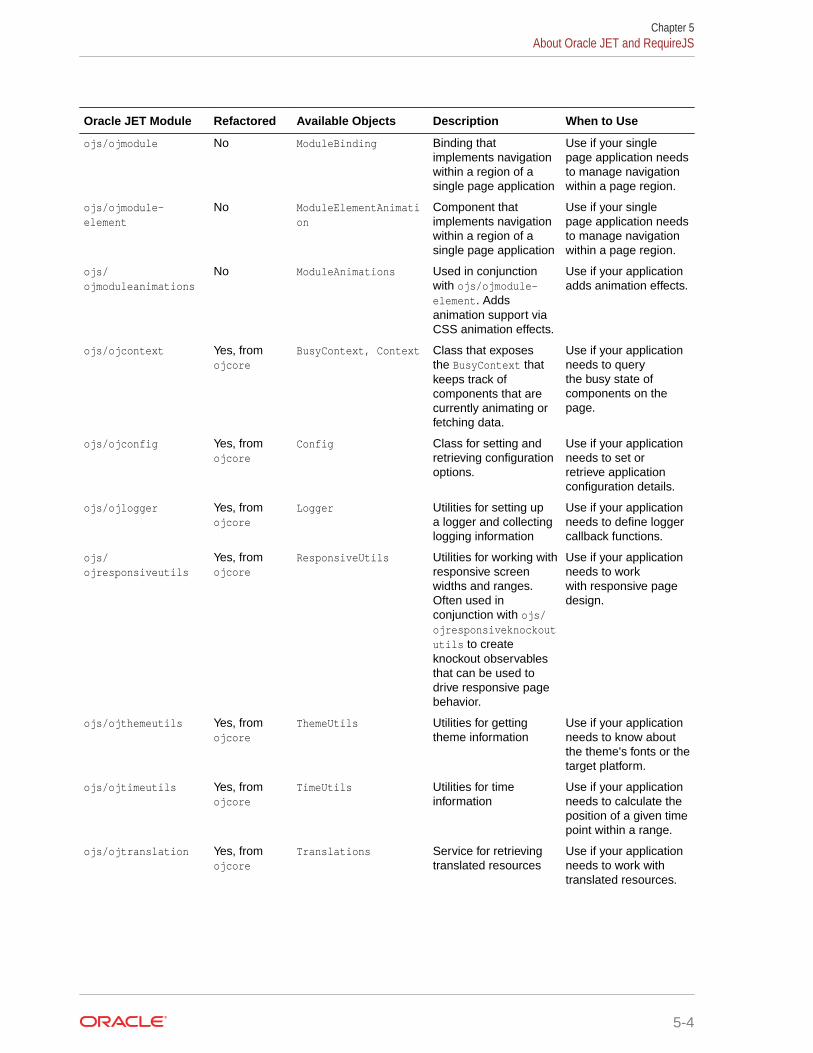
Oracle JET Module Refactored Available Objects Description When to Use
ojs/ojmodule No ModuleBinding Binding thatimplements navigationwithin a region of asingle page application
Use if your singlepage application needsto manage navigationwithin a page region.
ojs/ojmodule-element
No ModuleElementAnimation
Component thatimplements navigationwithin a region of asingle page application
Use if your singlepage application needsto manage navigationwithin a page region.
ojs/ojmoduleanimations
No ModuleAnimations Used in conjunctionwith ojs/ojmodule-element. Addsanimation support viaCSS animation effects.
Use if your applicationadds animation effects.
ojs/ojcontext Yes, fromojcore
BusyContext, Context Class that exposesthe BusyContext thatkeeps track ofcomponents that arecurrently animating orfetching data.
Use if your applicationneeds to querythe busy state ofcomponents on thepage.
ojs/ojconfig Yes, fromojcore
Config Class for setting andretrieving configurationoptions.
Use if your applicationneeds to set orretrieve applicationconfiguration details.
ojs/ojlogger Yes, fromojcore
Logger Utilities for setting upa logger and collectinglogging information
Use if your applicationneeds to define loggercallback functions.
ojs/ojresponsiveutils
Yes, fromojcore
ResponsiveUtils Utilities for working withresponsive screenwidths and ranges.Often used inconjunction with ojs/ojresponsiveknockoututils to createknockout observablesthat can be used todrive responsive pagebehavior.
Use if your applicationneeds to workwith responsive pagedesign.
ojs/ojthemeutils Yes, fromojcore
ThemeUtils Utilities for gettingtheme information
Use if your applicationneeds to know aboutthe theme's fonts or thetarget platform.
ojs/ojtimeutils Yes, fromojcore
TimeUtils Utilities for timeinformation
Use if your applicationneeds to calculate theposition of a given timepoint within a range.
ojs/ojtranslation Yes, fromojcore
Translations Service for retrievingtranslated resources
Use if your applicationneeds to work withtranslated resources.
Chapter 5About Oracle JET and RequireJS
5-4
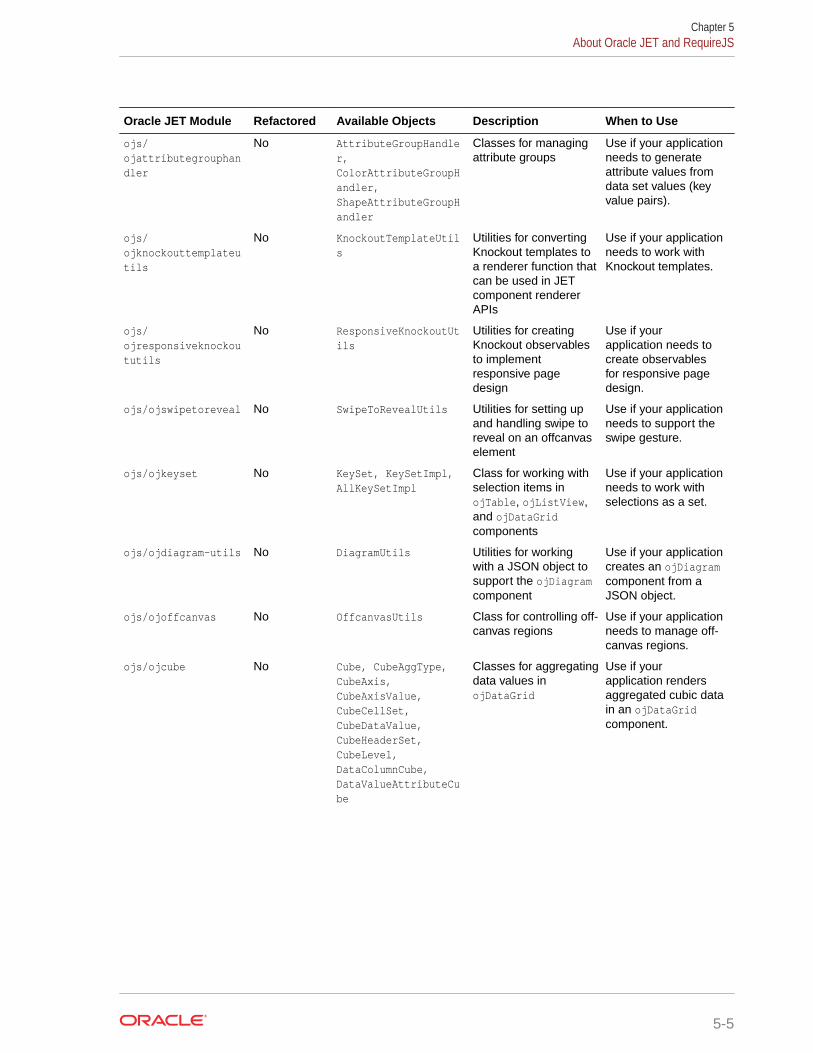
Oracle JET Module Refactored Available Objects Description When to Use
ojs/ojattributegrouphandler
No AttributeGroupHandler,ColorAttributeGroupHandler,ShapeAttributeGroupHandler
Classes for managingattribute groups
Use if your applicationneeds to generateattribute values fromdata set values (keyvalue pairs).
ojs/ojknockouttemplateutils
No KnockoutTemplateUtils
Utilities for convertingKnockout templates toa renderer function thatcan be used in JETcomponent rendererAPIs
Use if your applicationneeds to work withKnockout templates.
ojs/ojresponsiveknockoututils
No ResponsiveKnockoutUtils
Utilities for creatingKnockout observablesto implementresponsive pagedesign
Use if yourapplication needs tocreate observablesfor responsive pagedesign.
ojs/ojswipetoreveal No SwipeToRevealUtils Utilities for setting upand handling swipe toreveal on an offcanvaselement
Use if your applicationneeds to support theswipe gesture.
ojs/ojkeyset No KeySet, KeySetImpl,AllKeySetImpl
Class for working withselection items inojTable, ojListView,and ojDataGridcomponents
Use if your applicationneeds to work withselections as a set.
ojs/ojdiagram-utils No DiagramUtils Utilities for workingwith a JSON object tosupport the ojDiagramcomponent
Use if your applicationcreates an ojDiagramcomponent from aJSON object.
ojs/ojoffcanvas No OffcanvasUtils Class for controlling off-canvas regions
Use if your applicationneeds to manage off-canvas regions.
ojs/ojcube No Cube, CubeAggType,CubeAxis,CubeAxisValue,CubeCellSet,CubeDataValue,CubeHeaderSet,CubeLevel,DataColumnCube,DataValueAttributeCube
Classes for aggregatingdata values inojDataGrid
Use if yourapplication rendersaggregated cubic datain an ojDataGridcomponent.
Chapter 5About Oracle JET and RequireJS
5-5
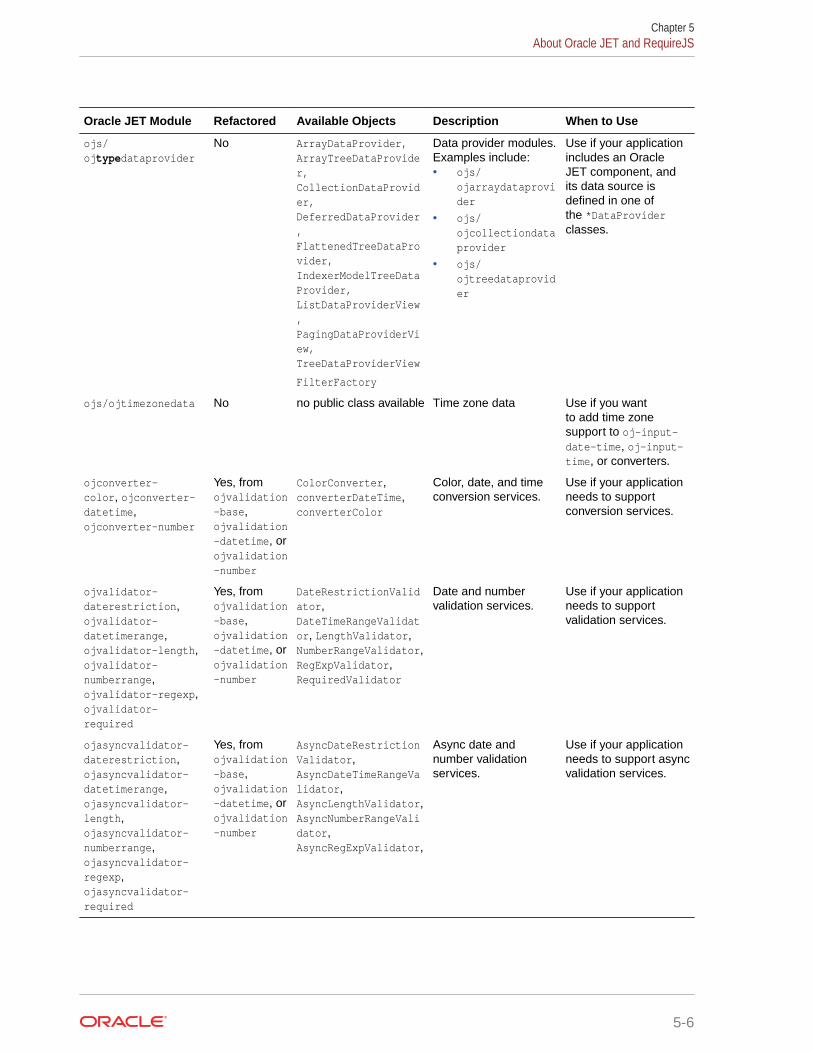
Oracle JET Module Refactored Available Objects Description When to Use
ojs/ojtypedataprovider
No ArrayDataProvider,ArrayTreeDataProvider,CollectionDataProvider,DeferredDataProvider,FlattenedTreeDataProvider,IndexerModelTreeDataProvider,ListDataProviderView,PagingDataProviderView,TreeDataProviderView
FilterFactory
Data provider modules.Examples include:• ojs/
ojarraydataprovider
• ojs/ojcollectiondataprovider
• ojs/ojtreedataprovider
Use if your applicationincludes an OracleJET component, andits data source isdefined in one ofthe *DataProviderclasses.
ojs/ojtimezonedata No no public class available Time zone data Use if you wantto add time zonesupport to oj-input-date-time, oj-input-time, or converters.
ojconverter-color, ojconverter-datetime,ojconverter-number
Yes, fromojvalidation-base,ojvalidation-datetime, orojvalidation-number
ColorConverter,converterDateTime,converterColor
Color, date, and timeconversion services.
Use if your applicationneeds to supportconversion services.
ojvalidator-daterestriction,ojvalidator-datetimerange,ojvalidator-length,ojvalidator-numberrange,ojvalidator-regexp,ojvalidator-required
Yes, fromojvalidation-base,ojvalidation-datetime, orojvalidation-number
DateRestrictionValidator,DateTimeRangeValidator, LengthValidator,NumberRangeValidator,RegExpValidator,RequiredValidator
Date and numbervalidation services.
Use if your applicationneeds to supportvalidation services.
ojasyncvalidator-daterestriction,ojasyncvalidator-datetimerange,ojasyncvalidator-length,ojasyncvalidator-numberrange,ojasyncvalidator-regexp,ojasyncvalidator-required
Yes, fromojvalidation-base,ojvalidation-datetime, orojvalidation-number
AsyncDateRestrictionValidator,AsyncDateTimeRangeValidator,AsyncLengthValidator,AsyncNumberRangeValidator,AsyncRegExpValidator,
Async date andnumber validationservices.
Use if your applicationneeds to support asyncvalidation services.
Chapter 5About Oracle JET and RequireJS
5-6
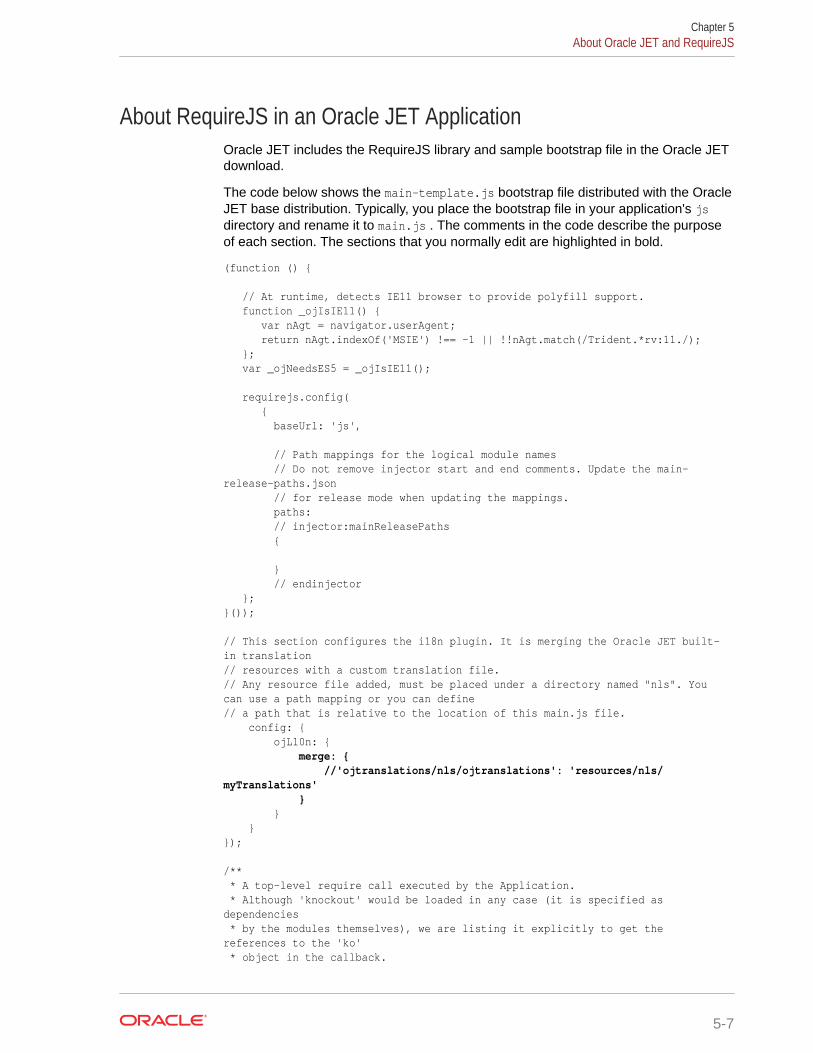
About RequireJS in an Oracle JET ApplicationOracle JET includes the RequireJS library and sample bootstrap file in the Oracle JETdownload.
The code below shows the main-template.js bootstrap file distributed with the OracleJET base distribution. Typically, you place the bootstrap file in your application's jsdirectory and rename it to main.js . The comments in the code describe the purposeof each section. The sections that you normally edit are highlighted in bold.
(function () {
// At runtime, detects IE11 browser to provide polyfill support. function _ojIsIE11() { var nAgt = navigator.userAgent; return nAgt.indexOf('MSIE') !== -1 || !!nAgt.match(/Trident.*rv:11./); }; var _ojNeedsES5 = _ojIsIE11();
requirejs.config( { baseUrl: 'js',
// Path mappings for the logical module names // Do not remove injector start and end comments. Update the main-release-paths.json // for release mode when updating the mappings. paths: // injector:mainReleasePaths {
} // endinjector };}());
// This section configures the i18n plugin. It is merging the Oracle JET built-in translation // resources with a custom translation file.// Any resource file added, must be placed under a directory named "nls". You can use a path mapping or you can define// a path that is relative to the location of this main.js file. config: { ojL10n: { merge: { //'ojtranslations/nls/ojtranslations': 'resources/nls/myTranslations' } } }}); /** * A top-level require call executed by the Application. * Although 'knockout' would be loaded in any case (it is specified as dependencies * by the modules themselves), we are listing it explicitly to get the references to the 'ko' * object in the callback.
Chapter 5About Oracle JET and RequireJS
5-7
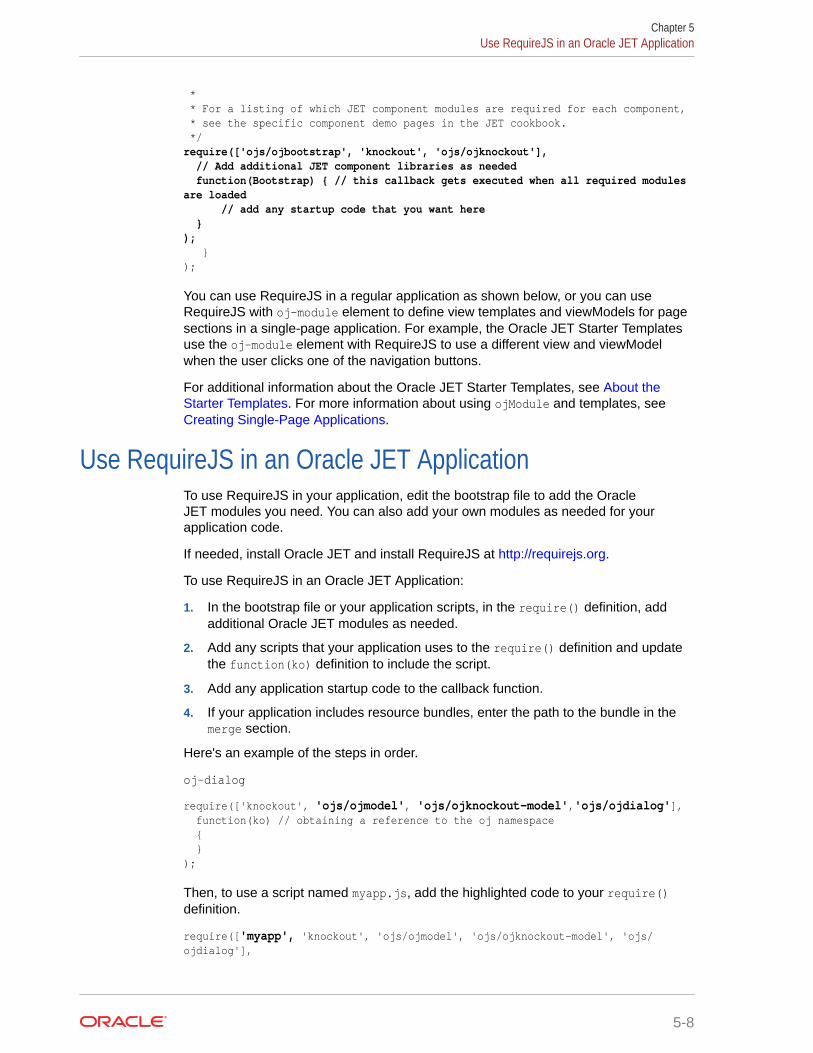
* * For a listing of which JET component modules are required for each component, * see the specific component demo pages in the JET cookbook. */require(['ojs/ojbootstrap', 'knockout', 'ojs/ojknockout'], // Add additional JET component libraries as needed function(Bootstrap) { // this callback gets executed when all required modules are loaded // add any startup code that you want here }); });
You can use RequireJS in a regular application as shown below, or you can useRequireJS with oj-module element to define view templates and viewModels for pagesections in a single-page application. For example, the Oracle JET Starter Templatesuse the oj-module element with RequireJS to use a different view and viewModelwhen the user clicks one of the navigation buttons.
For additional information about the Oracle JET Starter Templates, see About theStarter Templates. For more information about using ojModule and templates, seeCreating Single-Page Applications.
Use RequireJS in an Oracle JET ApplicationTo use RequireJS in your application, edit the bootstrap file to add the OracleJET modules you need. You can also add your own modules as needed for yourapplication code.
If needed, install Oracle JET and install RequireJS at http://requirejs.org.
To use RequireJS in an Oracle JET Application:
1. In the bootstrap file or your application scripts, in the require() definition, addadditional Oracle JET modules as needed.
2. Add any scripts that your application uses to the require() definition and updatethe function(ko) definition to include the script.
3. Add any application startup code to the callback function.
4. If your application includes resource bundles, enter the path to the bundle in themerge section.
Here's an example of the steps in order.
oj-dialog
require(['knockout', 'ojs/ojmodel', 'ojs/ojknockout-model','ojs/ojdialog'], function(ko) // obtaining a reference to the oj namespace { });
Then, to use a script named myapp.js, add the highlighted code to your require()definition.
require(['myapp', 'knockout', 'ojs/ojmodel', 'ojs/ojknockout-model', 'ojs/ojdialog'],
Chapter 5Use RequireJS in an Oracle JET Application
5-8
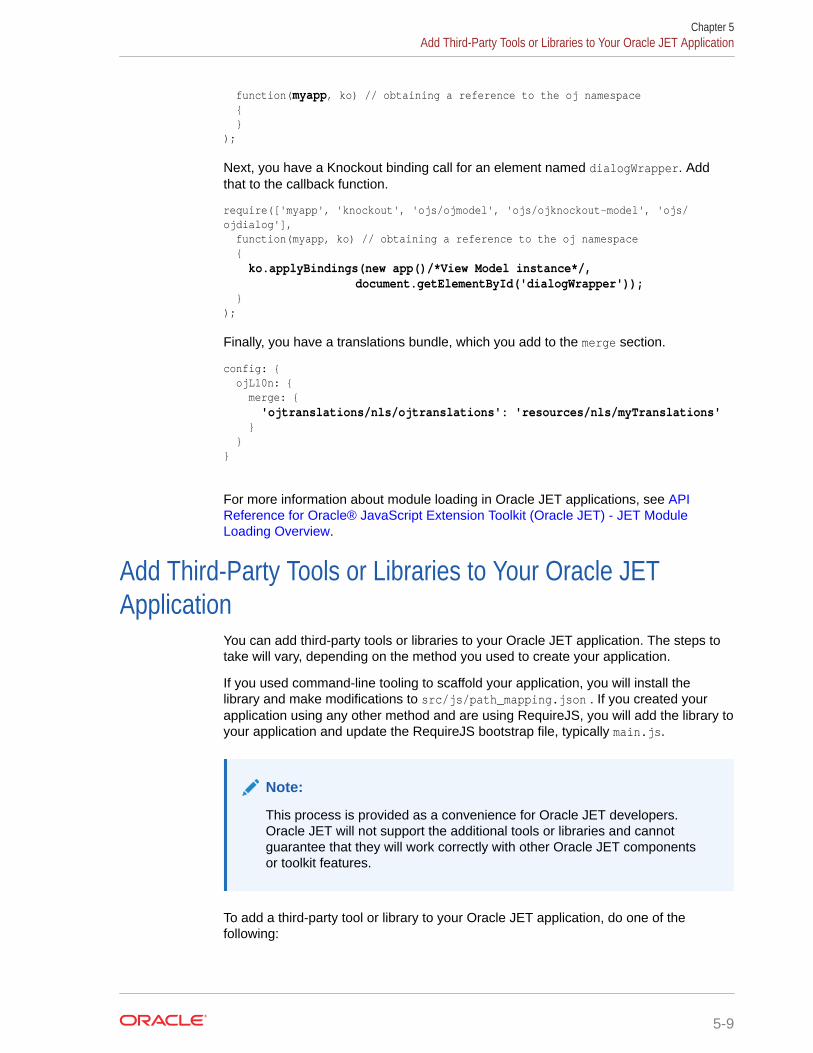
function(myapp, ko) // obtaining a reference to the oj namespace { });
Next, you have a Knockout binding call for an element named dialogWrapper. Addthat to the callback function.
require(['myapp', 'knockout', 'ojs/ojmodel', 'ojs/ojknockout-model', 'ojs/ojdialog'], function(myapp, ko) // obtaining a reference to the oj namespace { ko.applyBindings(new app()/*View Model instance*/, document.getElementById('dialogWrapper')); });
Finally, you have a translations bundle, which you add to the merge section.
config: { ojL10n: { merge: { 'ojtranslations/nls/ojtranslations': 'resources/nls/myTranslations' } }}
For more information about module loading in Oracle JET applications, see APIReference for Oracle® JavaScript Extension Toolkit (Oracle JET) - JET ModuleLoading Overview.
Add Third-Party Tools or Libraries to Your Oracle JETApplication
You can add third-party tools or libraries to your Oracle JET application. The steps totake will vary, depending on the method you used to create your application.
If you used command-line tooling to scaffold your application, you will install thelibrary and make modifications to src/js/path_mapping.json . If you created yourapplication using any other method and are using RequireJS, you will add the library toyour application and update the RequireJS bootstrap file, typically main.js.
Note:
This process is provided as a convenience for Oracle JET developers.Oracle JET will not support the additional tools or libraries and cannotguarantee that they will work correctly with other Oracle JET componentsor toolkit features.
To add a third-party tool or library to your Oracle JET application, do one of thefollowing:
Chapter 5Add Third-Party Tools or Libraries to Your Oracle JET Application
5-9
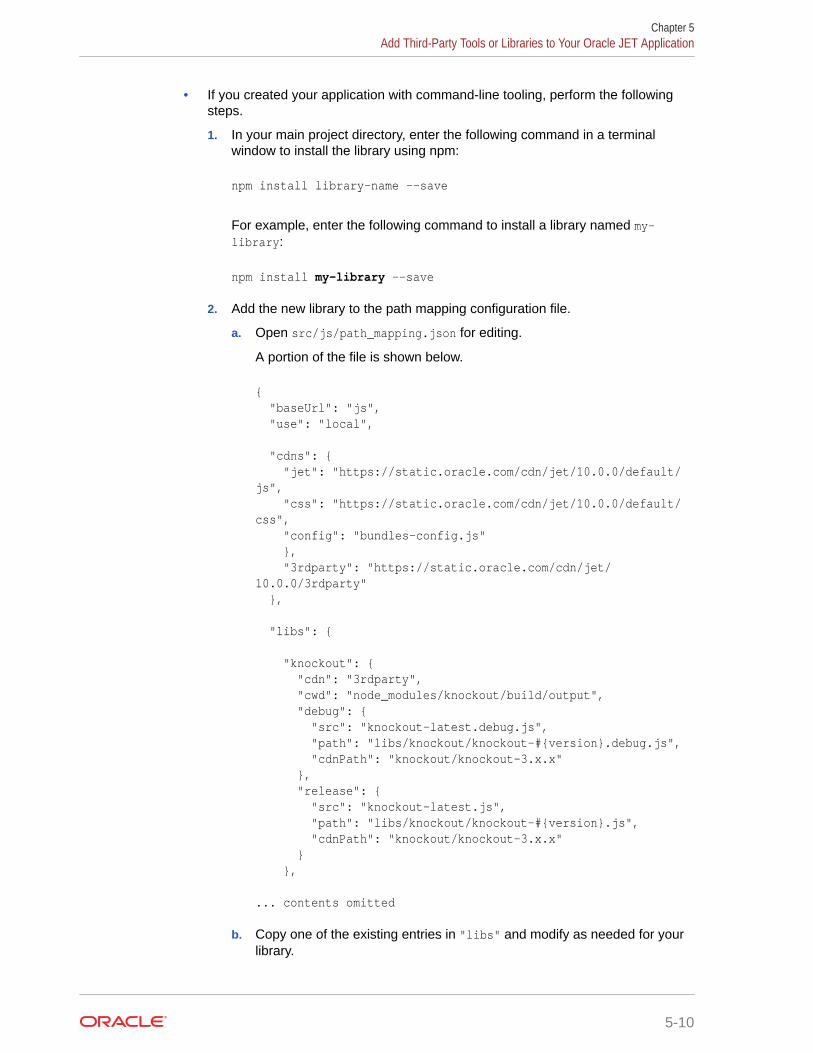
• If you created your application with command-line tooling, perform the followingsteps.
1. In your main project directory, enter the following command in a terminalwindow to install the library using npm:
npm install library-name --save
For example, enter the following command to install a library named my-library:
npm install my-library --save
2. Add the new library to the path mapping configuration file.
a. Open src/js/path_mapping.json for editing.
A portion of the file is shown below.
{ "baseUrl": "js", "use": "local",
"cdns": { "jet": "https://static.oracle.com/cdn/jet/10.0.0/default/js", "css": "https://static.oracle.com/cdn/jet/10.0.0/default/css", "config": "bundles-config.js" }, "3rdparty": "https://static.oracle.com/cdn/jet/10.0.0/3rdparty" },
"libs": {
"knockout": { "cdn": "3rdparty", "cwd": "node_modules/knockout/build/output", "debug": { "src": "knockout-latest.debug.js", "path": "libs/knockout/knockout-#{version}.debug.js", "cdnPath": "knockout/knockout-3.x.x" }, "release": { "src": "knockout-latest.js", "path": "libs/knockout/knockout-#{version}.js", "cdnPath": "knockout/knockout-3.x.x" } },
... contents omitted
b. Copy one of the existing entries in "libs" and modify as needed for yourlibrary.
Chapter 5Add Third-Party Tools or Libraries to Your Oracle JET Application
5-10
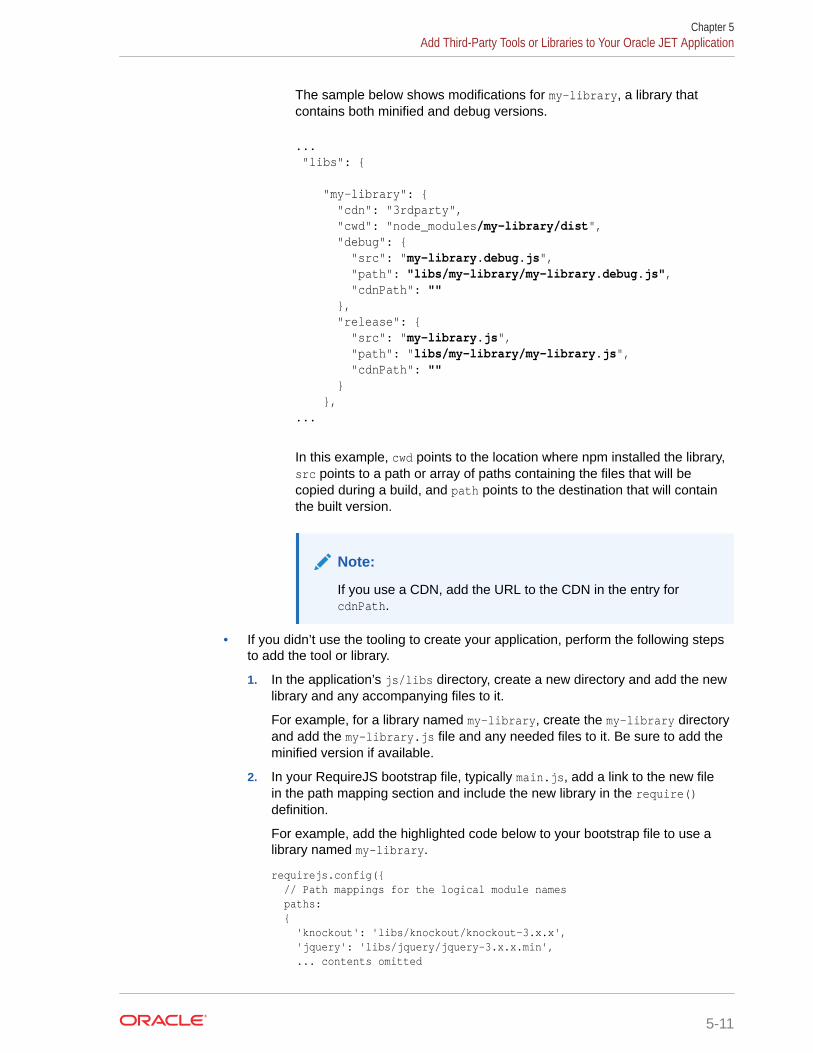
The sample below shows modifications for my-library, a library thatcontains both minified and debug versions.
... "libs": {
"my-library": { "cdn": "3rdparty", "cwd": "node_modules/my-library/dist", "debug": { "src": "my-library.debug.js", "path": "libs/my-library/my-library.debug.js", "cdnPath": "" }, "release": { "src": "my-library.js", "path": "libs/my-library/my-library.js", "cdnPath": "" } },...
In this example, cwd points to the location where npm installed the library,src points to a path or array of paths containing the files that will becopied during a build, and path points to the destination that will containthe built version.
Note:
If you use a CDN, add the URL to the CDN in the entry forcdnPath.
• If you didn’t use the tooling to create your application, perform the following stepsto add the tool or library.
1. In the application’s js/libs directory, create a new directory and add the newlibrary and any accompanying files to it.
For example, for a library named my-library, create the my-library directoryand add the my-library.js file and any needed files to it. Be sure to add theminified version if available.
2. In your RequireJS bootstrap file, typically main.js, add a link to the new filein the path mapping section and include the new library in the require()definition.
For example, add the highlighted code below to your bootstrap file to use alibrary named my-library.
requirejs.config({ // Path mappings for the logical module names paths: { 'knockout': 'libs/knockout/knockout-3.x.x', 'jquery': 'libs/jquery/jquery-3.x.x.min', ... contents omitted
Chapter 5Add Third-Party Tools or Libraries to Your Oracle JET Application
5-11
'text': 'libs/require/text', 'my-library': 'libs/my-library/my-library }, require(['knockout', 'my-library'], function(ko) // this callback gets executed when all required modules are loaded { // add any startup code that you want here });
For additional information about using RequireJS to manage your application'smodules, see Using RequireJS for Modular Development.
Troubleshoot RequireJS in an Oracle JET ApplicationRequireJS issues are often related to modules used but not defined.
Use the following tips when troubleshooting issues with your Oracle JET applicationthat you suspect may be due to RequireJS:
• Check the JavaScript console for errors and warnings. If a certain object in theoj namespace is undefined, locate the module that contains it based on theinformation in About Oracle JET Module Organization or the Oracle JET Cookbookand add it to your application.
• If the components you specified using Knockout.js binding are not displayed andyou are not seeing any errors or warnings, verify that you have added the ojs/ojknockout module to your application.
About JavaScript Partitions and RequireJS in an Oracle JETApplication
RequireJS supports JavaScript partitions that contain more than one module.
You must name all modules using the RequireJS bundles option and supply a pathmapping with the configuration options.
requirejs.config( { bundles: { 'commonComponents': ['ojL10n', 'ojtranslations/nls/ojtranslations', 'ojs/ojknockout', 'ojs/ojcomponentcore', 'ojs/ojbutton', 'ojs/ojpopup'], 'tabs': ['ojs/ojtabs', 'ojs/ojconveyorbelt'] } });
In this example, two partition bundles are defined: commonComponents and tabs.
RequireJS ships with its own Optimizer tool for creating partitions and minifyingJavaScript code. The tool is designed to be used at build time with a completeproject that is already configured to use RequireJS. It analyzes all static dependenciesand creates partitions out of modules that are always loaded together. The OracleJET team recommends that you use an optimizer to minimize the number of HTTPrequests needed to download the modules.
Chapter 5Troubleshoot RequireJS in an Oracle JET Application
5-12

For additional information about the RequireJS Optimizer tool, see http://requirejs.org/docs/optimization.html.
For additional information about optimizing performance of Oracle JET applications,see Optimizing Performance.
Chapter 5About JavaScript Partitions and RequireJS in an Oracle JET Application
5-13
6Creating Single-Page Applications
Oracle JET includes the oj-module component and CoreRouter framework class thatyou can use to create single-page applications that simulate the look and feel ofdesktop applications.
Topics:
• Typical Workflow for Creating Single-Page Applications in Oracle JET
• Design Single-Page Applications Using Oracle JET
• Use the oj-module Element
Typical Workflow for Creating Single-Page Applications inOracle JET
Understand Oracle JET support for designing single-page applications. Learn how touse oj-module component and oj-module lifecycle listeners in your application.
To create a single-page application (SPA) in Oracle JET, refer to the typical workflowdescribed in the following table:
Task Description More Information
Create a single-pageOracle JET application
Identify Oracle JET support forsingle-page applications and how touse it to design your Oracle JETapplication.
Design Single-Page Applications Using OracleJET
Create view templates andviewModels
Identify the features and benefits ofoj-module and how to use it inyour Oracle JET application.
Use the oj-module Element
Design Single-Page Applications Using Oracle JETOracle JET includes Knockout for separating the model layer from the view layer andmanaging the interaction between them. Using Knockout, the Oracle JET oj-modulecomponent, and the Oracle JET CoreRouter framework class, you can create single-page applications that look and feel like a standalone desktop application.
Topics:
• Understand Oracle JET Support for Single-Page Applications
• Create a Single-Page Application in Oracle JET
6-1
Understand Oracle JET Support for Single-Page ApplicationsSingle-page applications (SPAs) are typically used to simulate the look and feel ofa standalone desktop application. Rather than using multiple web pages with linksbetween them for navigation, the application uses a single web page that is loadedonly once. If the page changes because of the user's interaction, only the portion ofthe page that changed is redrawn.
Oracle JET includes support for single page applications using the CoreRouter classfor virtual navigation in the page, the oj-module component for managing viewtemplates and viewModel scripts, and Knockout for separating the model layer fromthe view layer and managing the binding between them. In the Oracle JET Cookbook,you can view a number of implementations that use the CoreRouter class. Theseimplementations range from the simple, that switch tabs, to more complex examplesthat use parameters and child routers. See the CoreRouter demo in the Oracle JETCookbook.
When routing a single-page application, the page doesn't reload from scratch but thecontent of the page changes dynamically. In order to be part of the browser history andprovide bookmarkable content, the Oracle JET CoreRouter class emulates the act ofnavigating using the HTML5 history push state feature. The CoreRouter also controlsthe URL to look like traditional page URLs. However, there are no resources at thoseURLs, and you must set up the HTML server. This is done using a simple rule for arewrite engine, like mod rewrite module for Apache HTTP server or a rewrite filter likeUrlRewriteFilter for servlets.
In general, use query parameters when your application contains only a few views thatthe user will bookmark and that are not associated with a complex state. Use pathsegments to display simpler URLs, especially for nested paths such as customers/cust/orders.
The Oracle JET Cookbook uses the Oracle JET oj-module feature to manage theKnockout binding. With oj-module, you can store your HTML content for a pagesection in an HTML fragment or template file and the JavaScript functions that containyour viewModel in a viewModel file.
When oj-module and CoreRouter are used in conjunction, you can configure an oj-module object where the module name is the router state. When the router changesstate, oj-module will automatically load and render the content of the module namespecified in the value of the current RouterState object.
Create a Single-Page Application in Oracle JETThe Oracle JET Cookbook includes complete examples and recipes for creating asingle-page application using path segments and query parameters for routing andexamples that use routing with the oj-module component. Regardless of the routingmethod you use, the process to create the application is similar.
To create a single-page application in Oracle JET:
If needed, create the application that will house your main HTML5 page andsupporting JavaScript. For additional information, see Understanding the WebApplication Workflow or Understanding the Hybrid Mobile Application Workflow.
Chapter 6Design Single-Page Applications Using Oracle JET
6-2
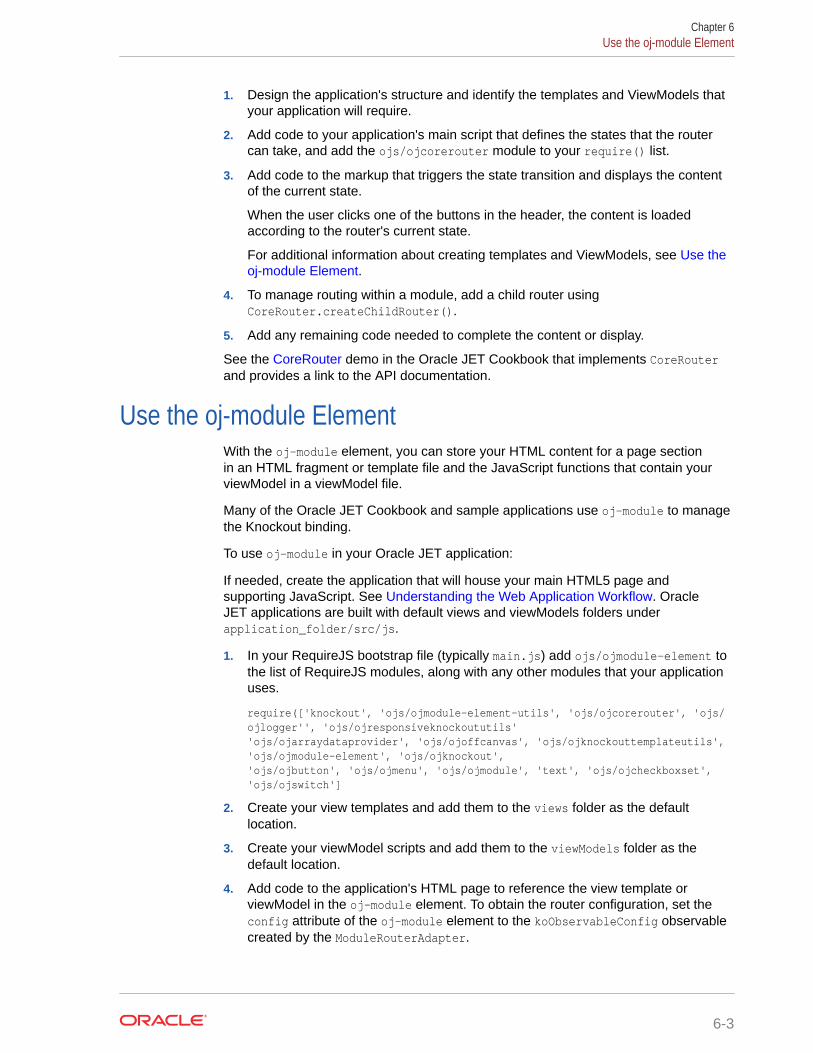
1. Design the application's structure and identify the templates and ViewModels thatyour application will require.
2. Add code to your application's main script that defines the states that the routercan take, and add the ojs/ojcorerouter module to your require() list.
3. Add code to the markup that triggers the state transition and displays the contentof the current state.
When the user clicks one of the buttons in the header, the content is loadedaccording to the router's current state.
For additional information about creating templates and ViewModels, see Use theoj-module Element.
4. To manage routing within a module, add a child router usingCoreRouter.createChildRouter().
5. Add any remaining code needed to complete the content or display.
See the CoreRouter demo in the Oracle JET Cookbook that implements CoreRouterand provides a link to the API documentation.
Use the oj-module ElementWith the oj-module element, you can store your HTML content for a page sectionin an HTML fragment or template file and the JavaScript functions that contain yourviewModel in a viewModel file.
Many of the Oracle JET Cookbook and sample applications use oj-module to managethe Knockout binding.
To use oj-module in your Oracle JET application:
If needed, create the application that will house your main HTML5 page andsupporting JavaScript. See Understanding the Web Application Workflow. OracleJET applications are built with default views and viewModels folders underapplication_folder/src/js.
1. In your RequireJS bootstrap file (typically main.js) add ojs/ojmodule-element tothe list of RequireJS modules, along with any other modules that your applicationuses.
require(['knockout', 'ojs/ojmodule-element-utils', 'ojs/ojcorerouter', 'ojs/ojlogger'', 'ojs/ojresponsiveknockoututils' 'ojs/ojarraydataprovider', 'ojs/ojoffcanvas', 'ojs/ojknockouttemplateutils', 'ojs/ojmodule-element', 'ojs/ojknockout', 'ojs/ojbutton', 'ojs/ojmenu', 'ojs/ojmodule', 'text', 'ojs/ojcheckboxset', 'ojs/ojswitch']
2. Create your view templates and add them to the views folder as the defaultlocation.
3. Create your viewModel scripts and add them to the viewModels folder as thedefault location.
4. Add code to the application's HTML page to reference the view template orviewModel in the oj-module element. To obtain the router configuration, set theconfig attribute of the oj-module element to the koObservableConfig observablecreated by the ModuleRouterAdapter.
Chapter 6Use the oj-module Element
6-3
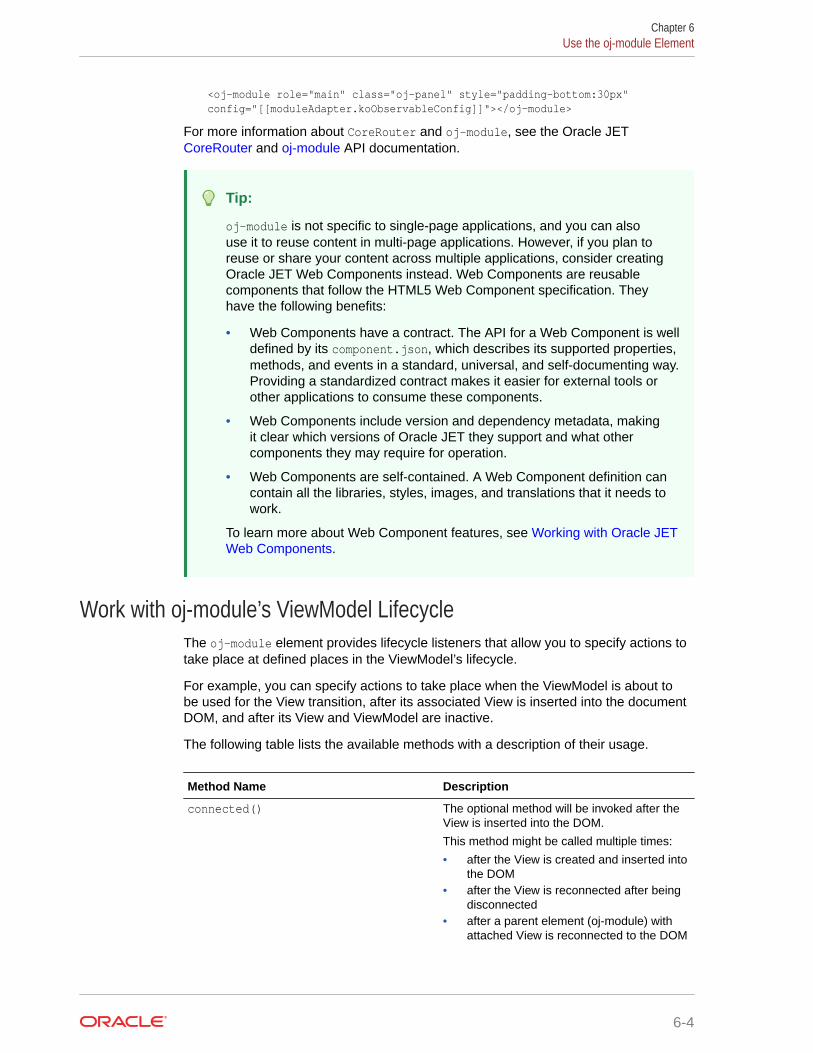
<oj-module role="main" class="oj-panel" style="padding-bottom:30px" config="[[moduleAdapter.koObservableConfig]]"></oj-module>
For more information about CoreRouter and oj-module, see the Oracle JETCoreRouter and oj-module API documentation.
Tip:
oj-module is not specific to single-page applications, and you can alsouse it to reuse content in multi-page applications. However, if you plan toreuse or share your content across multiple applications, consider creatingOracle JET Web Components instead. Web Components are reusablecomponents that follow the HTML5 Web Component specification. Theyhave the following benefits:
• Web Components have a contract. The API for a Web Component is welldefined by its component.json, which describes its supported properties,methods, and events in a standard, universal, and self-documenting way.Providing a standardized contract makes it easier for external tools orother applications to consume these components.
• Web Components include version and dependency metadata, makingit clear which versions of Oracle JET they support and what othercomponents they may require for operation.
• Web Components are self-contained. A Web Component definition cancontain all the libraries, styles, images, and translations that it needs towork.
To learn more about Web Component features, see Working with Oracle JETWeb Components.
Work with oj-module’s ViewModel LifecycleThe oj-module element provides lifecycle listeners that allow you to specify actions totake place at defined places in the ViewModel’s lifecycle.
For example, you can specify actions to take place when the ViewModel is about tobe used for the View transition, after its associated View is inserted into the documentDOM, and after its View and ViewModel are inactive.
The following table lists the available methods with a description of their usage.
Method Name Description
connected() The optional method will be invoked after theView is inserted into the DOM.
This method might be called multiple times:
• after the View is created and inserted intothe DOM
• after the View is reconnected after beingdisconnected
• after a parent element (oj-module) withattached View is reconnected to the DOM
Chapter 6Use the oj-module Element
6-4

Method Name Description
transitionCompleted() This optional method will be invoked aftertransition to the new View is complete. Thisincludes any possible animation between theold and the new View.
disconnected() This optional method will be invoked when theView is disconnected from the DOM.
This method might be called multiple times:
• after the View is disconnected from theDOM
• after a parent element (oj-module) withattached View is disconnected from theDOM
You can also find stub methods for using the oj-module lifecycle methods in someof the Oracle JET templates. For example, the navbar template, available as atemplate when you Scaffold a Web Application, defines stub methods for connected(),disconnected(), and transitionCompleted(). Comments describe the expectedparameters and use cases.
function DashboardViewModel() { var self = this; // Below are a set of the ViewModel methods invoked by the oj-module component. // Please reference the oj-module jsDoc for additional information.
/** * Optional ViewModel method invoked after the View is inserted into the * document DOM. The application can put logic that requires the DOM being * attached here. * This method might be called multiple times - after the View is created * and inserted into the DOM and after the View is reconnected * after being disconnected. */ self.connected = function() { // Implement if needed };
/** * Optional ViewModel method invoked after the View is disconnected from the DOM. */ self.disconnected = function() { // Implement if needed };
/** * Optional ViewModel method invoked after transition to the new View is complete. * That includes any possible animation between the old and the new View. */ self.transitionCompleted = function() { // Implement if needed }; }
/*
Chapter 6Use the oj-module Element
6-5

* Returns an instance of the ViewModel providing one instance of the ViewModel. If needed, * return a constructor for the ViewModel so that the ViewModel is constructed * each time the view is displayed. */ return DashboardViewModel; }
For more, see the oj-module API documentation.
Chapter 6Use the oj-module Element
6-6
7Understanding Oracle JET User InterfaceBasics
Oracle JET User Interface (UI) components extend the htmlElement prototype toimplement the World Wide Web Consortium (W3C) web component specification forcustom elements. Custom elements provide a more declarative way of working withOracle JET components and allow you to access properties and methods directly onthe DOM layer.
Topics:
• Typical Workflow for Working with the Oracle JET User Interface
• About the Oracle JET User Interface
• About Binding and Control Flow
• Add an Oracle JET Component to Your Page
Typical Workflow for Working with the Oracle JET UserInterface
Identify Oracle JET user interface components, understand their common functionality,and identify reserved words. You should also understand the steps required to add acomponent to your HTML5 page.
To work with the Oracle JET user interface, refer to the typical workflow described inthe following table.
Task Description More Information
Understand the UIframework
Identify Oracle JET UI components,understand their common functionality,and identify Oracle JET reserved words.
About the Oracle JET User Interface
Understand Oracle JET’sbinding and control flow
Identify Oracle JET binding elementsand how to use them in your application.
About Binding and Control Flow
Add an Oracle JETcomponent to your page
Identify the steps you must take toadd an Oracle JET component to yourHTML5 page. Optionally, add animationeffects to your application.
Add an Oracle JET Component to YourPage
7-1
About the Oracle JET User InterfaceOracle JET includes components, patterns, and utilities to use in your application.The toolkit also includes an API specification (if applicable) and one or more codeexamples in the Oracle JET Cookbook.
Topics:
• Identify Oracle JET UI Components, Patterns, and Utilities
• About Common Functionality in Oracle JET Components
• About Oracle JET Reserved Namespaces and Prefixes
Identify Oracle JET UI Components, Patterns, and UtilitiesThe Oracle JET Cookbook lists all the components, design patterns, and utilitiesavailable for your use. By default, the cookbook is organized into functional sections,but you can also click Sort to arrange the contents alphabetically.
The Cookbook contains samples that you can edit online and see the effects of yourchanges immediately. You’ll also find links to the API documentation, if applicable.
About Common Functionality in Oracle JET ComponentsAll Oracle JET components are implemented as custom HTML elements, andprogrammatic access to these components is similar to interacting with any HTMLelement.
Custom Element Structure
Oracle JET custom element names start with oj-, and you can add them to your pagethe same way you would add any other HTML element. In the following example, theoj-label and oj-input-date-time custom elements are added as child elements to astandard HTML div element.
<div id="div1"> <oj-label for="dateTime">Default</oj-label> <oj-input-date-time id="dateTime" value='{{value}}'> </oj-input-date-time></div>
Each custom element can contain one or more of the following:
• Attributes: Modifiers that affect the functionality of the element.
String literals will be parsed and coerced to the property type. Oracle JET supportsthe following string literal type coercions: boolean, number, string, Object, Array,and any. The any type, if used by an element, is marked with an asterisk (*) in theelement’s API documentation and coerced to Objects, Arrays, or strings.
In the oj-input-date-time element defined above, value is an attribute thatcontains a Date object. It is defined using a binding expression that indicates
Chapter 7About the Oracle JET User Interface
7-2
whether the element’s ViewModel should be updated if the attribute’s value isupdated.
<oj-input-date-time id="dateTime" value='{{value}}'>
The {{...}} syntax indicates that the element’s value property will be updatedin the element’s ViewModel if it’s changed. To prevent the attribute’s value fromupdating the corresponding ViewModel, use the [[...]] syntax.
• Methods: Supported methods
Each custom element’s supported method is documented in its API.
• Events: Supported events
Events specific to the custom element are documented in its API. Define thelistener’s method in the element’s ViewModel.
var listener = function( event ){ // Check if this is the end of "inline-open" animation for inline message if (event.detail.action == "inline-open") { // Add any processing here }};
Reference the listener using the custom element’s DOM attribute, JavaScriptproperty, or the addEventListener().
– Use the DOM attribute.
Declare a listener on the custom element using on-event-name syntax.
<oj-input-date-time on-oj-animate-start='[[listener]]'</oj-input-date-time>
Note that in this example the listener is declared using the [[...]] syntaxsince its value is not expected to change.
– Use the JavaScript property.
Specify a listener in your ViewModel for the .onEventName property.
myInputDateTime.onOjAnimateEnd = listener
Note that the JavaScript property uses camelCase for the onOjAnimateEndproperty. The camelCased properties are mapped to attribute names byinserting a dash before the uppercase letter and converting that letter to lowercase, for example, on-oj-animate-end.
– Use the addEventListener() API.
myInputDateTime.addEventListener('ojAnimateEnd', listener);
Chapter 7About the Oracle JET User Interface
7-3
By default, JET components will also fire propertyChanged custom eventswhenever a property is updated, for example, valueChanged. You can defineand add a listener using any of the three methods above. When referencing apropertyChanged event declaratively, use on-property-changed syntax.
<oj-input-date-time value="{{currentValue}}" on-value-changed="{{valueChangedListener}}" </oj-input-date-time>
• Slots
Oracle JET elements can have two types of child content that determine thecontent’s placement within the element.
– Any child element with a supported slot attribute will be moved into that namedslot. All supported named slots are documented in the element’s API. Childelements with unsupported named slots will be removed from the DOM.
<oj-table> <div slot='bottom'<oj-paging-control></oj-paging-control></div></oj-table>
– Any child element lacking a slot attribute will be moved to the default slot, alsoknown as a regular child.
A custom element will be recognized only after its module is loaded by the application.Once the element is recognized, Oracle JET will register a busy state for the elementand will begin the process of upgrading the element from a normal element to acustom element. The element will not be ready for interaction until the upgradeprocess is complete. The application should listen to either the page-level or element-scoped BusyContext before attempting to interact with any JET custom elements.However, property setting (but not property getting) is allowed before the BusyContextis initialized. See the BusyContext API documentation on how BusyContexts can bescoped.
The upgrade of custom elements relies on a binding provider which manages thedata binding. The binding provider is responsible for setting and updating attributeexpressions. Any custom elements within its managed subtree will not finish upgradinguntil the provider applies bindings on that subtree. By default, there is a singlebinding provider for a page, but subtree specific binding providers can be addedby using the data-oj-binding-provider attribute with values of none and knockout.The default binding provider is knockout, but if a page or DOM subtree does notuse any expression syntax or knockout, the application can set data-oj-binding-provider=”none" on that element so that its dependent JET custom elements do notwait for bindings to be applied to finish upgrading.
Other Common Functionality
Oracle JET custom elements also have the following functionality in common:
• Context menus
Custom elements support the slot attribute to add context menus to Oracle JETcustom elements, described in each element’s API documentation.
<oj-some-element> <-- use the contextMenu slot to designate this as the context menu for this component -->
Chapter 7About the Oracle JET User Interface
7-4
<oj-menu slot="contextMenu" style="display:none" aria-label="Some element's context menu" ... </oj-menu></oj-some-element>
• Keyboard navigation and other accessibility features
Oracle JET components that support keyboard navigation list the end userinformation in their API documentation. For additional information about OracleJET components and accessibility, see Developing Accessible Applications.
• Drag and drop
Oracle JET includes support for standard HTML5 drag and drop and providesthe dnd-polyfill library to extend HTML5 drag and drop behavior to supportedmobile and desktop browsers. In addition, some Oracle JET custom elementssuch as oj-table support drag and drop behavior through the dnd attribute. Forspecific details, see the component’s API documentation and cookbook examples.To learn more about HTML5 drag and drop, see http://www.w3schools.com/html/html5_draganddrop.asp.
• Deferred rendering
Many Oracle JET custom elements support the ability to defer rendering untilthe content shown using oj-defer. To use oj-defer, wrap it around the customelement.
<oj-collapsible id="defer"> <h4 id="hd" slot="header">Deferred Content</h4> <oj-defer> <oj-module config='[[deferredRendering/content]]'> </oj-module> </oj-defer></oj-collapsible>
Add the deferred content to the application’s view and ViewModel, content.htmland content.js, as specified in the oj-module definition. For the complete codeexample, see Collapsibles - Deferred Rendering.
For a list of custom elements that support oj-defer, see oj-defer.
Custom Element Examples and References
The Oracle JET Cookbook and API Reference for Oracle® JavaScript ExtensionToolkit (Oracle JET) provide examples that illustrate how to work with customelements. In addition, the Cookbook provides demos with editing capability thatallow you to modify the sample code directly and view the results without having todownload the sample.
To learn more about the World Wide Web Consortium (W3C) web componentspecification for custom elements, see Custom Elements.
Chapter 7About the Oracle JET User Interface
7-5
About Oracle JET Reserved Namespaces and PrefixesOracle JET reserves the oj namespace and prefixes. This includes, but is not limitedto component names, namespaces, pseudo-selectors, public event prefixes, CSSstyles, Knockout binding keys, and so on.
About Binding and Control FlowOracle JET includes components and expressions to easily bind dynamic elements toa page in your application using Knockout.
Topics
• Use oj-bind-text to Bind Text Nodes
• Bind HTML attributes
• Use oj-bind-if to Process Conditionals
• Use oj-bind-for-each to Process Loop Instructions
• Bind Style Properties
• Bind Event Listeners to JET and HTML Elements
Use oj-bind-text to Bind Text NodesOracle JET supports binding text nodes to variables using the oj-bind-text elementand by importing the ojknockout module.
The oj-bind-text element is removed from the DOM after binding is applied. Forexample, the following code sample shows an oj-input-text and an oj-button witha text node that are both bound to the buttonLabel variable. When the input text isupdated, the button text is automatically updated as well.
<div id='button-container'> <oj-button id='button1'> <span><oj-bind-text value="[[buttonLabel]]"></oj-bind-text></span> </oj-button> <br><br> <oj-label for="text-input">Update Button Label:</oj-label> <oj-input-text id="text-input" value="{{buttonLabel}}"></oj-input-text></div>
The script to create the view model for this example is shown below.
require(['ojs/ojbootstrap', 'knockout', 'ojs/ojknockout', 'ojs/ojbutton', 'ojs/ojinputtext', 'ojs/ojlabel'], function(Bootstrap, ko) { function ButtonModel() { this.buttonLabel = ko.observable("My Button"); }
Bootstrap.whenDocumentReady().then( function () { ko.applyBindings(new ButtonModel(), document.getElementById('button-
Chapter 7About Binding and Control Flow
7-6
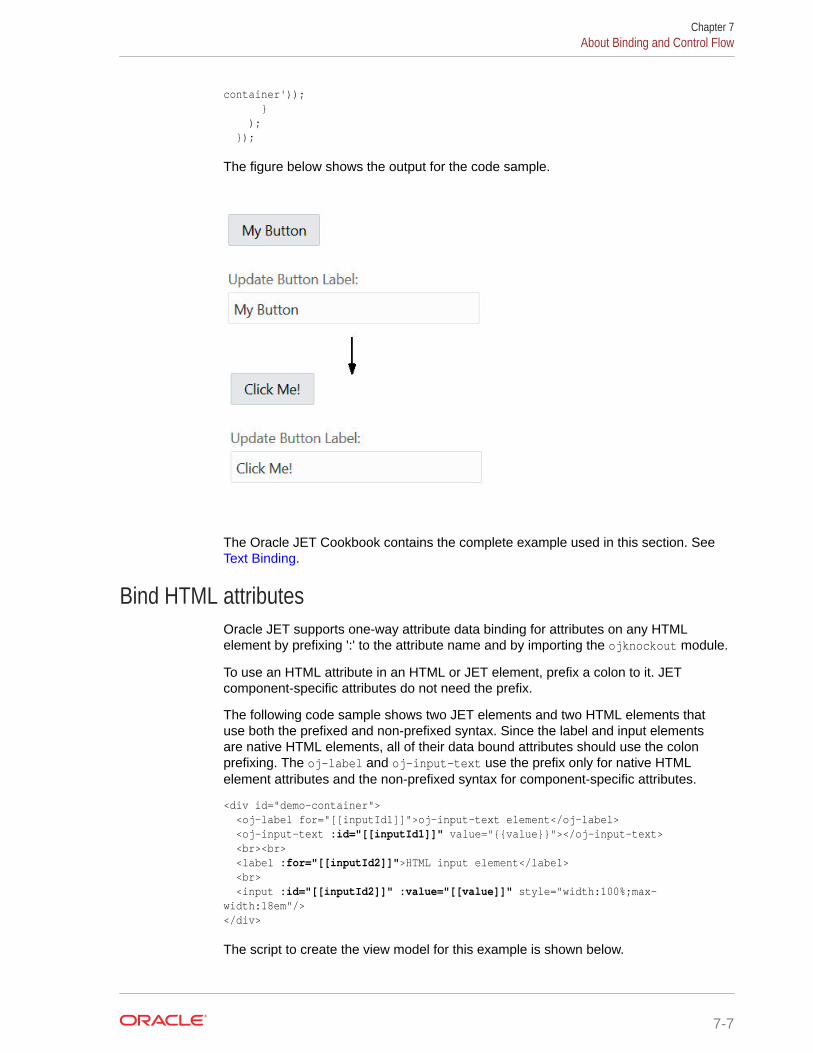
container')); } ); });
The figure below shows the output for the code sample.
The Oracle JET Cookbook contains the complete example used in this section. SeeText Binding.
Bind HTML attributesOracle JET supports one-way attribute data binding for attributes on any HTMLelement by prefixing ':' to the attribute name and by importing the ojknockout module.
To use an HTML attribute in an HTML or JET element, prefix a colon to it. JETcomponent-specific attributes do not need the prefix.
The following code sample shows two JET elements and two HTML elements thatuse both the prefixed and non-prefixed syntax. Since the label and input elementsare native HTML elements, all of their data bound attributes should use the colonprefixing. The oj-label and oj-input-text use the prefix only for native HTMLelement attributes and the non-prefixed syntax for component-specific attributes.
<div id="demo-container"> <oj-label for="[[inputId1]]">oj-input-text element</oj-label> <oj-input-text :id="[[inputId1]]" value="{{value}}"></oj-input-text> <br><br> <label :for="[[inputId2]]">HTML input element</label> <br> <input :id="[[inputId2]]" :value="[[value]]" style="width:100%;max-width:18em"/></div>
The script to create the view model for this example is shown below.
Chapter 7About Binding and Control Flow
7-7
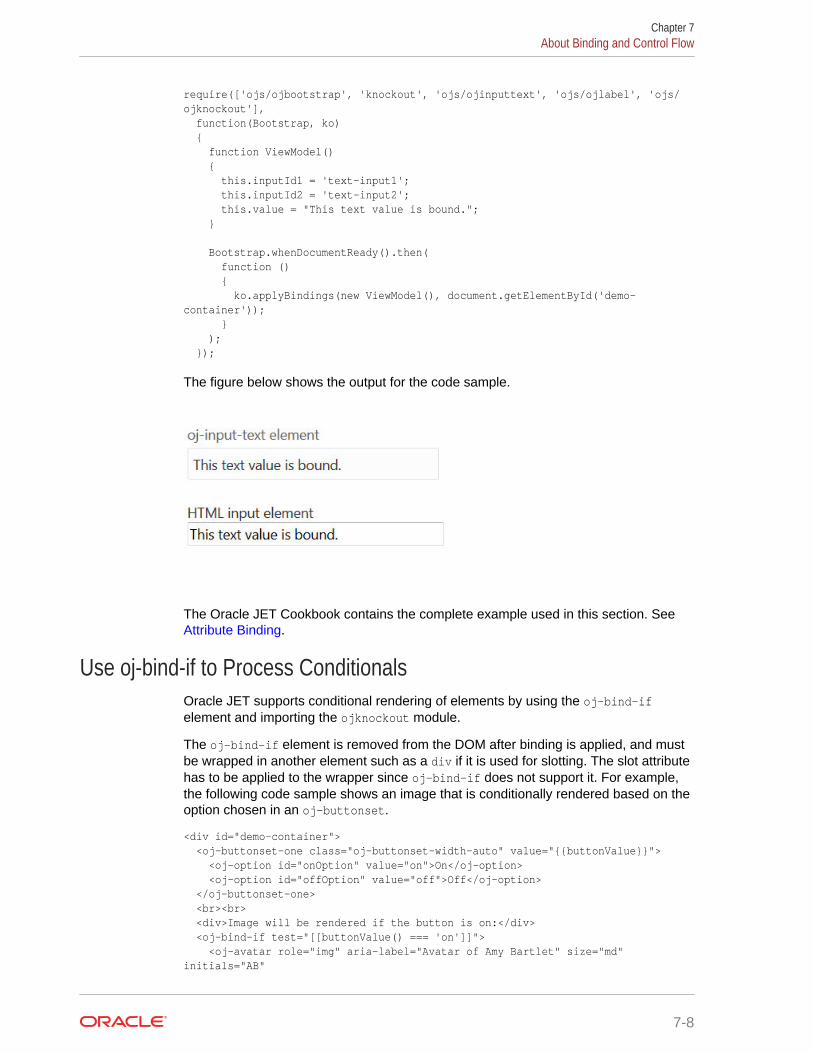
require(['ojs/ojbootstrap', 'knockout', 'ojs/ojinputtext', 'ojs/ojlabel', 'ojs/ojknockout'], function(Bootstrap, ko) { function ViewModel() { this.inputId1 = 'text-input1'; this.inputId2 = 'text-input2'; this.value = "This text value is bound."; }
Bootstrap.whenDocumentReady().then( function () { ko.applyBindings(new ViewModel(), document.getElementById('demo-container')); } ); });
The figure below shows the output for the code sample.
The Oracle JET Cookbook contains the complete example used in this section. SeeAttribute Binding.
Use oj-bind-if to Process ConditionalsOracle JET supports conditional rendering of elements by using the oj-bind-ifelement and importing the ojknockout module.
The oj-bind-if element is removed from the DOM after binding is applied, and mustbe wrapped in another element such as a div if it is used for slotting. The slot attributehas to be applied to the wrapper since oj-bind-if does not support it. For example,the following code sample shows an image that is conditionally rendered based on theoption chosen in an oj-buttonset.
<div id="demo-container"> <oj-buttonset-one class="oj-buttonset-width-auto" value="{{buttonValue}}"> <oj-option id="onOption" value="on">On</oj-option> <oj-option id="offOption" value="off">Off</oj-option> </oj-buttonset-one> <br><br> <div>Image will be rendered if the button is on:</div> <oj-bind-if test="[[buttonValue() === 'on']]"> <oj-avatar role="img" aria-label="Avatar of Amy Bartlet" size="md" initials="AB"
Chapter 7About Binding and Control Flow
7-8
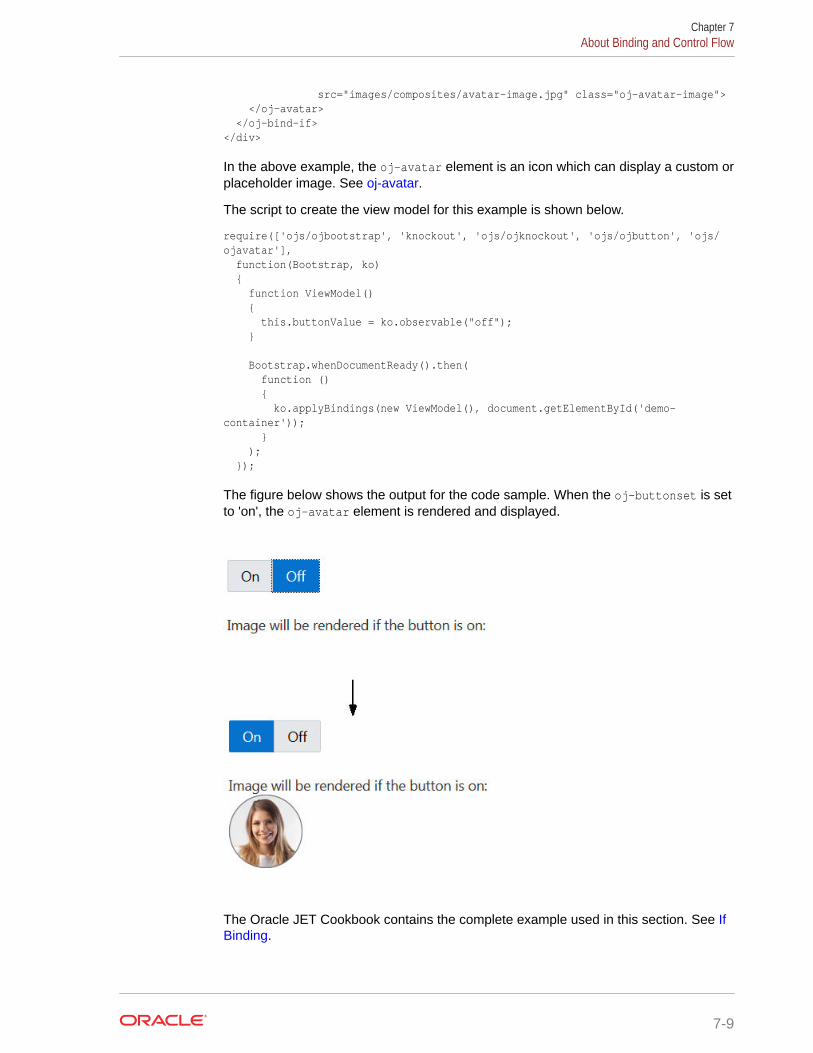
src="images/composites/avatar-image.jpg" class="oj-avatar-image"> </oj-avatar> </oj-bind-if></div>
In the above example, the oj-avatar element is an icon which can display a custom orplaceholder image. See oj-avatar.
The script to create the view model for this example is shown below.
require(['ojs/ojbootstrap', 'knockout', 'ojs/ojknockout', 'ojs/ojbutton', 'ojs/ojavatar'], function(Bootstrap, ko) { function ViewModel() { this.buttonValue = ko.observable("off"); }
Bootstrap.whenDocumentReady().then( function () { ko.applyBindings(new ViewModel(), document.getElementById('demo-container')); } ); });
The figure below shows the output for the code sample. When the oj-buttonset is setto 'on', the oj-avatar element is rendered and displayed.
The Oracle JET Cookbook contains the complete example used in this section. See IfBinding.
Chapter 7About Binding and Control Flow
7-9
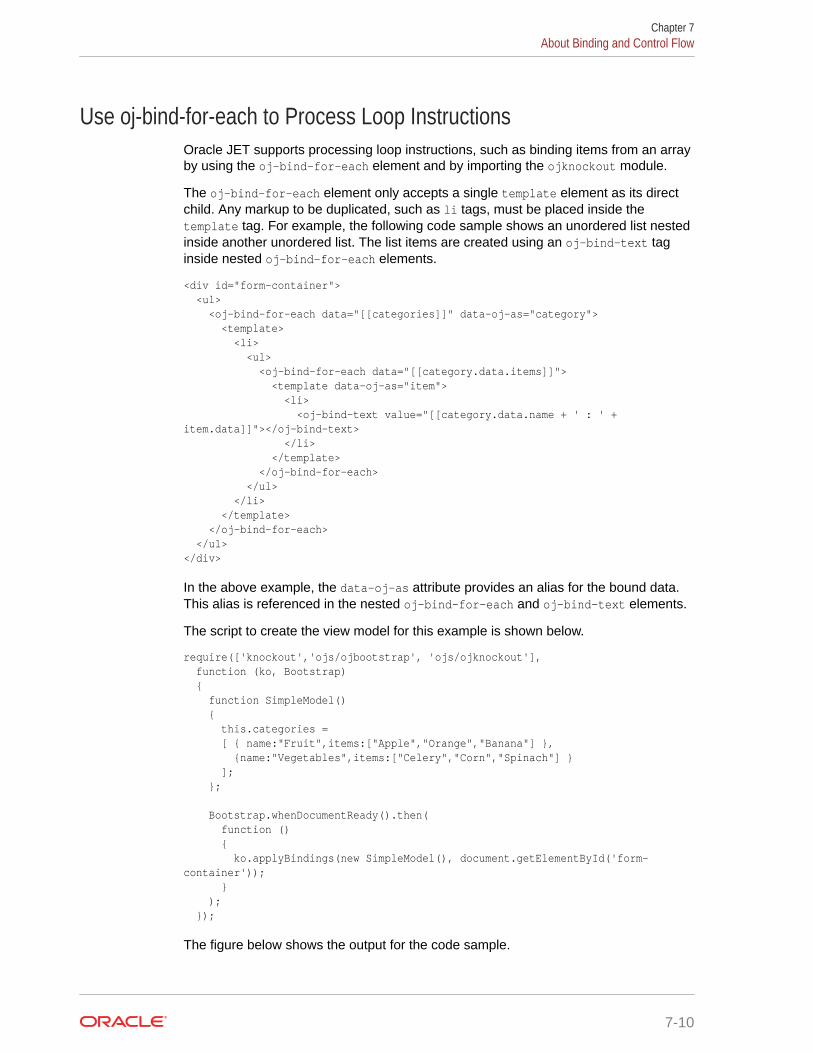
Use oj-bind-for-each to Process Loop InstructionsOracle JET supports processing loop instructions, such as binding items from an arrayby using the oj-bind-for-each element and by importing the ojknockout module.
The oj-bind-for-each element only accepts a single template element as its directchild. Any markup to be duplicated, such as li tags, must be placed inside thetemplate tag. For example, the following code sample shows an unordered list nestedinside another unordered list. The list items are created using an oj-bind-text taginside nested oj-bind-for-each elements.
<div id="form-container"> <ul> <oj-bind-for-each data="[[categories]]" data-oj-as="category"> <template> <li> <ul> <oj-bind-for-each data="[[category.data.items]]"> <template data-oj-as="item"> <li> <oj-bind-text value="[[category.data.name + ' : ' + item.data]]"></oj-bind-text> </li> </template> </oj-bind-for-each> </ul> </li> </template> </oj-bind-for-each> </ul></div>
In the above example, the data-oj-as attribute provides an alias for the bound data.This alias is referenced in the nested oj-bind-for-each and oj-bind-text elements.
The script to create the view model for this example is shown below.
require(['knockout','ojs/ojbootstrap', 'ojs/ojknockout'], function (ko, Bootstrap) { function SimpleModel() { this.categories = [ { name:"Fruit",items:["Apple","Orange","Banana"] }, {name:"Vegetables",items:["Celery","Corn","Spinach"] } ]; };
Bootstrap.whenDocumentReady().then( function () { ko.applyBindings(new SimpleModel(), document.getElementById('form-container')); } ); });
The figure below shows the output for the code sample.
Chapter 7About Binding and Control Flow
7-10
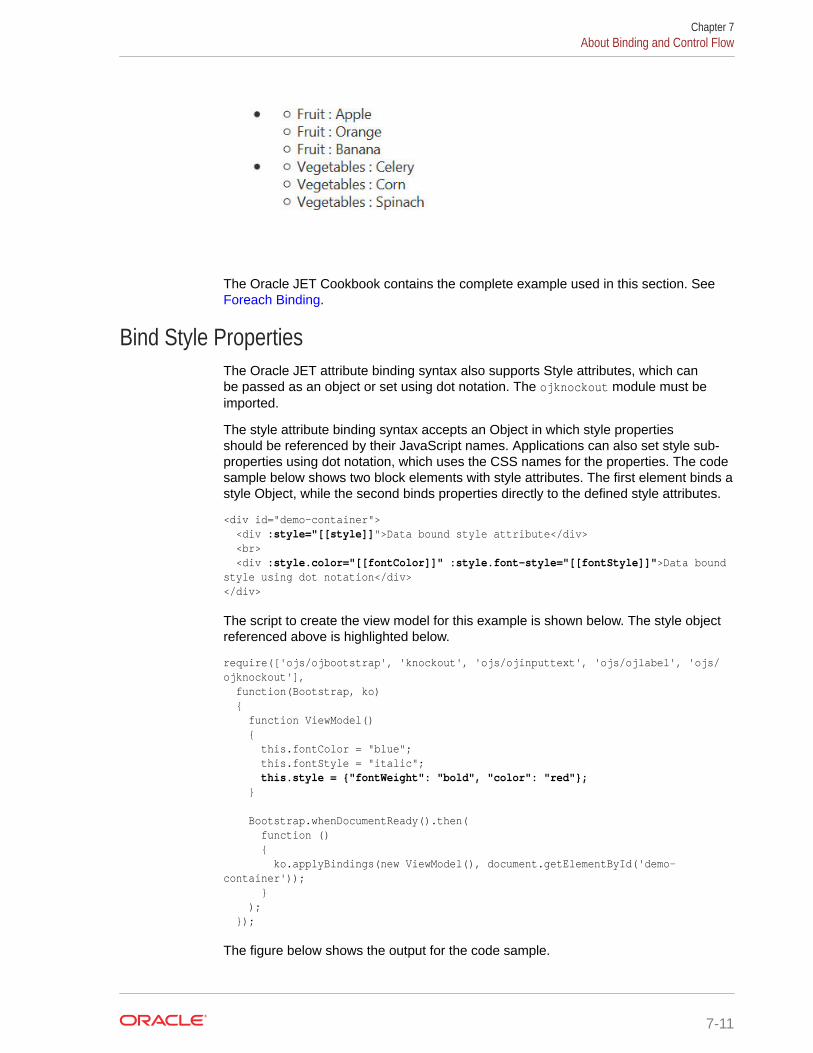
The Oracle JET Cookbook contains the complete example used in this section. SeeForeach Binding.
Bind Style PropertiesThe Oracle JET attribute binding syntax also supports Style attributes, which canbe passed as an object or set using dot notation. The ojknockout module must beimported.
The style attribute binding syntax accepts an Object in which style propertiesshould be referenced by their JavaScript names. Applications can also set style sub-properties using dot notation, which uses the CSS names for the properties. The codesample below shows two block elements with style attributes. The first element binds astyle Object, while the second binds properties directly to the defined style attributes.
<div id="demo-container"> <div :style="[[style]]">Data bound style attribute</div> <br> <div :style.color="[[fontColor]]" :style.font-style="[[fontStyle]]">Data bound style using dot notation</div></div>
The script to create the view model for this example is shown below. The style objectreferenced above is highlighted below.
require(['ojs/ojbootstrap', 'knockout', 'ojs/ojinputtext', 'ojs/ojlabel', 'ojs/ojknockout'], function(Bootstrap, ko) { function ViewModel() { this.fontColor = "blue"; this.fontStyle = "italic"; this.style = {"fontWeight": "bold", "color": "red"}; }
Bootstrap.whenDocumentReady().then( function () { ko.applyBindings(new ViewModel(), document.getElementById('demo-container')); } ); });
The figure below shows the output for the code sample.
Chapter 7About Binding and Control Flow
7-11
The Oracle JET Cookbook contains the complete example used in this section. SeeStyle Binding.
Bind Event Listeners to JET and HTML ElementsOracle JET provides one-way attribute data binding for event listeners on JET andHTML elements using the on-[eventname] syntax and by importing the ojknockoutmodule.
Oracle JET event attributes provide two key advantages over native HTML eventlisteners. First, they provide three parameters to the listener:
• event: The DOM event, such as click or mouse over.
• data: equal to bindingContext['$data']. When used in iterations, such as in anoj-bind-for-each, this parameter is the same as bindingContext['$current'].
• bindingContext: The entire data binding context (or scope) that is applied to theelement.
Second, they have access to the model state and can access functions defined in theViewModel using the data and bindingContext parameters.
Note:
The this context is not directly available in the event listeners. This is thesame behavior as native HTML event listeners.
For example, the following code sample shows an oj-button that uses the on-oj-action event attribute and an HTML button that uses the on-click event attribute toaccess custom functions defined in the ViewModel shown below.
<div id="demo-container"> <oj-label for="button1">oj-button element</oj-label> <oj-button id="button1" on-oj-action="[[clickListener1]]">Click me!</oj-button> <br><br> <label for="button2">HTML button element</label> <br> <button id="button2" on-click="[[clickListener2]]">Click me!</button> <br><br> <div style="font-weight:bold;color:#ea5b3f;"> <oj-bind-text value="[[message]]"></oj-bind-text> </div></div>
Chapter 7About Binding and Control Flow
7-12
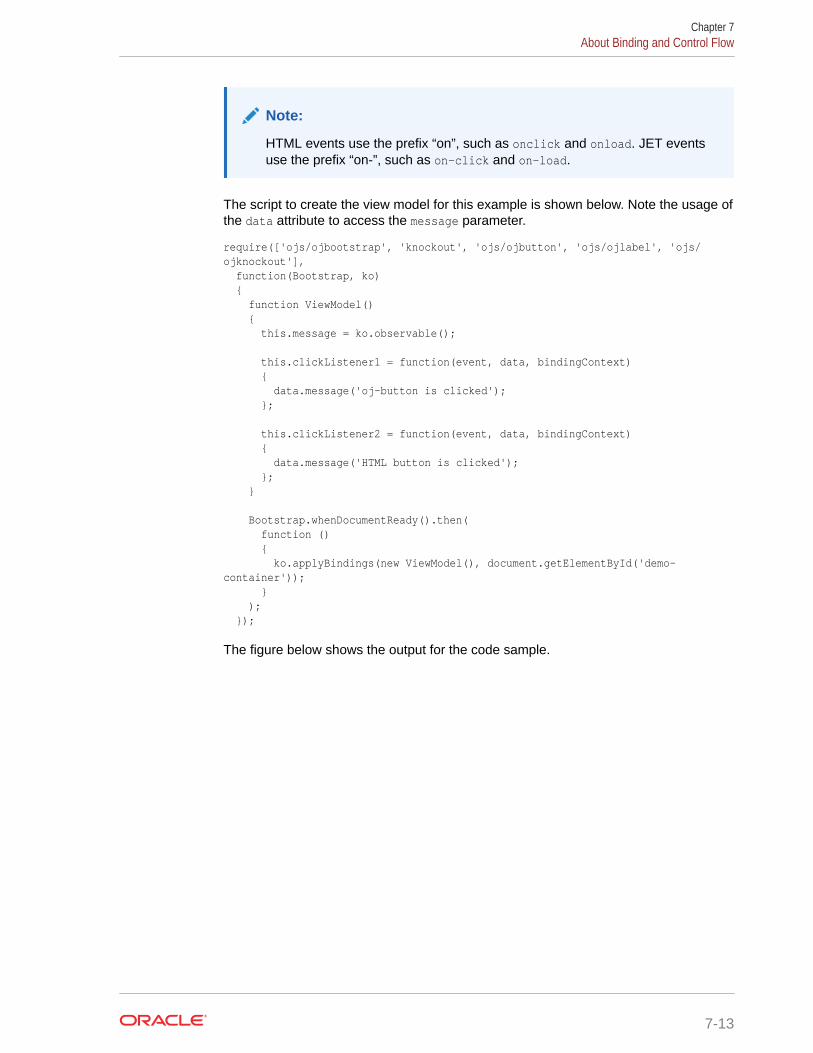
Note:
HTML events use the prefix “on”, such as onclick and onload. JET eventsuse the prefix “on-”, such as on-click and on-load.
The script to create the view model for this example is shown below. Note the usage ofthe data attribute to access the message parameter.
require(['ojs/ojbootstrap', 'knockout', 'ojs/ojbutton', 'ojs/ojlabel', 'ojs/ojknockout'], function(Bootstrap, ko) { function ViewModel() { this.message = ko.observable();
this.clickListener1 = function(event, data, bindingContext) { data.message('oj-button is clicked'); };
this.clickListener2 = function(event, data, bindingContext) { data.message('HTML button is clicked'); }; }
Bootstrap.whenDocumentReady().then( function () { ko.applyBindings(new ViewModel(), document.getElementById('demo-container')); } ); });
The figure below shows the output for the code sample.
Chapter 7About Binding and Control Flow
7-13
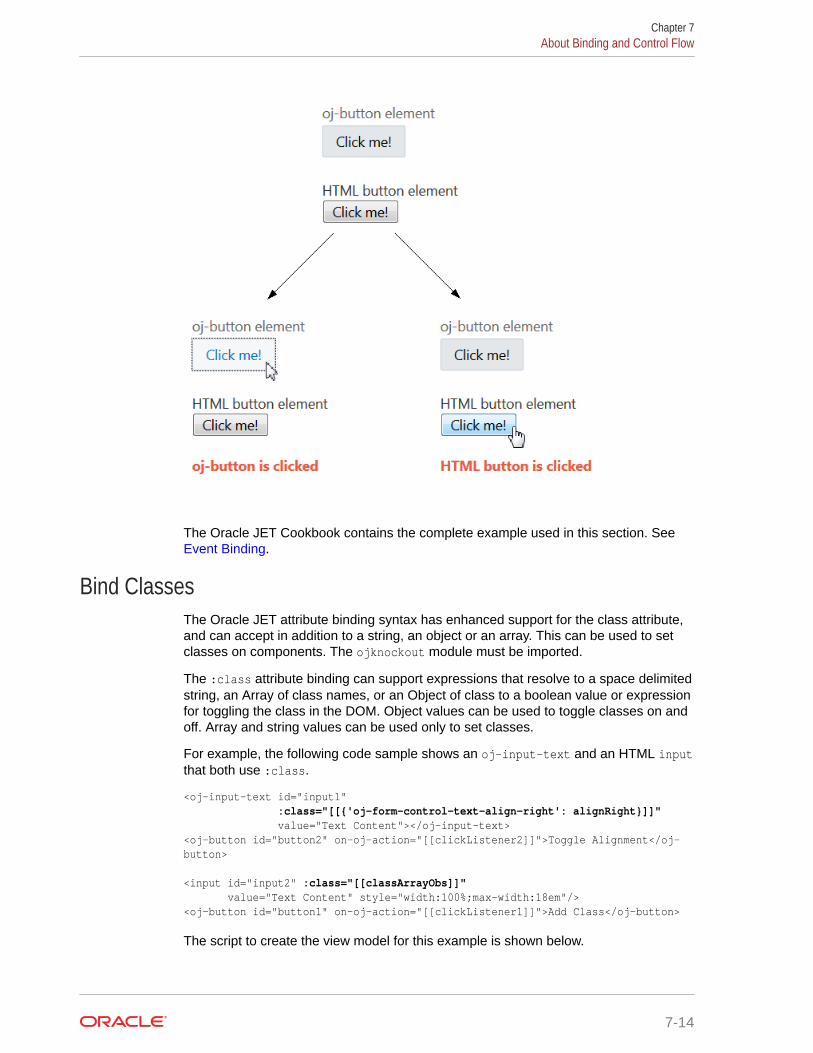
The Oracle JET Cookbook contains the complete example used in this section. SeeEvent Binding.
Bind ClassesThe Oracle JET attribute binding syntax has enhanced support for the class attribute,and can accept in addition to a string, an object or an array. This can be used to setclasses on components. The ojknockout module must be imported.
The :class attribute binding can support expressions that resolve to a space delimitedstring, an Array of class names, or an Object of class to a boolean value or expressionfor toggling the class in the DOM. Object values can be used to toggle classes on andoff. Array and string values can be used only to set classes.
For example, the following code sample shows an oj-input-text and an HTML inputthat both use :class.
<oj-input-text id="input1" :class="[[{'oj-form-control-text-align-right': alignRight}]]" value="Text Content"></oj-input-text><oj-button id="button2" on-oj-action="[[clickListener2]]">Toggle Alignment</oj-button>
<input id="input2" :class="[[classArrayObs]]" value="Text Content" style="width:100%;max-width:18em"/><oj-button id="button1" on-oj-action="[[clickListener1]]">Add Class</oj-button>
The script to create the view model for this example is shown below.
Chapter 7About Binding and Control Flow
7-14
require(['ojs/ojbootstrap', 'knockout', 'ojs/ojlabel', 'ojs/ojinputtext', 'ojs/ojbutton', 'ojs/ojknockout'], function(Bootstrap, ko) { function ViewModel() { this.alignRight = ko.observable(false); this.classArrayObs = ko.observableArray(); var classList = ['pink', 'bold', 'italic']; var self = this;
this.clickListener1 = function(event, data, bindingContext) { var newClass = classList.pop(); this.classArrayObs.push(newClass);
// Disable the add button once we're out of classes if (classList.length === 0) document.getElementById('button1').disabled = true; }.bind(this);
this.clickListener2 = function(event, data, bindingContext) { self.alignRight(!this.alignRight()); }.bind(this);; }
Bootstrap.whenDocumentReady().then( function () { ko.applyBindings(new ViewModel(), document.getElementById('demo-container')); } ); });
The CSS class styles used by the classList variable above are shown below.
.bold { font-weight: bold;}.italic { font-style: italic;}.pink { color: #ff69b4;}
The figure below shows the first of the two outputs for the code sample. The buttonacts as a toggle to switch on and off the oj-form-control-text-align-right classproperty and hence change the alignment of the text.
Chapter 7About Binding and Control Flow
7-15
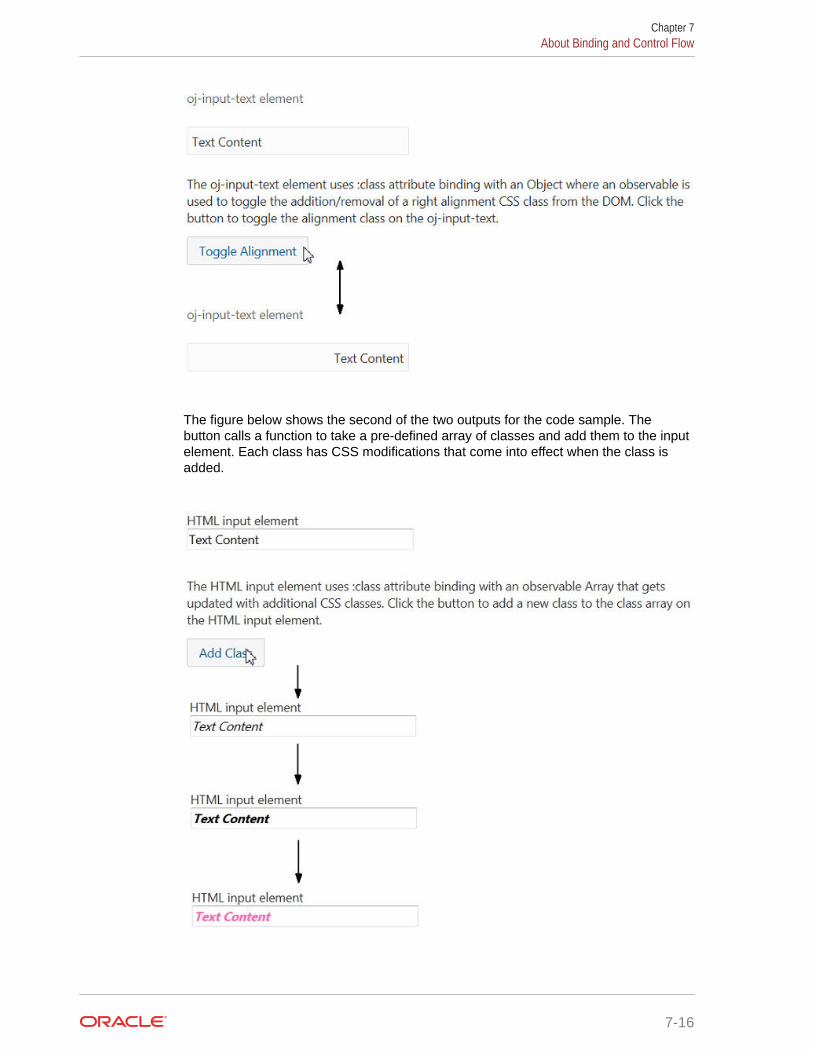
The figure below shows the second of the two outputs for the code sample. Thebutton calls a function to take a pre-defined array of classes and add them to the inputelement. Each class has CSS modifications that come into effect when the class isadded.
Chapter 7About Binding and Control Flow
7-16
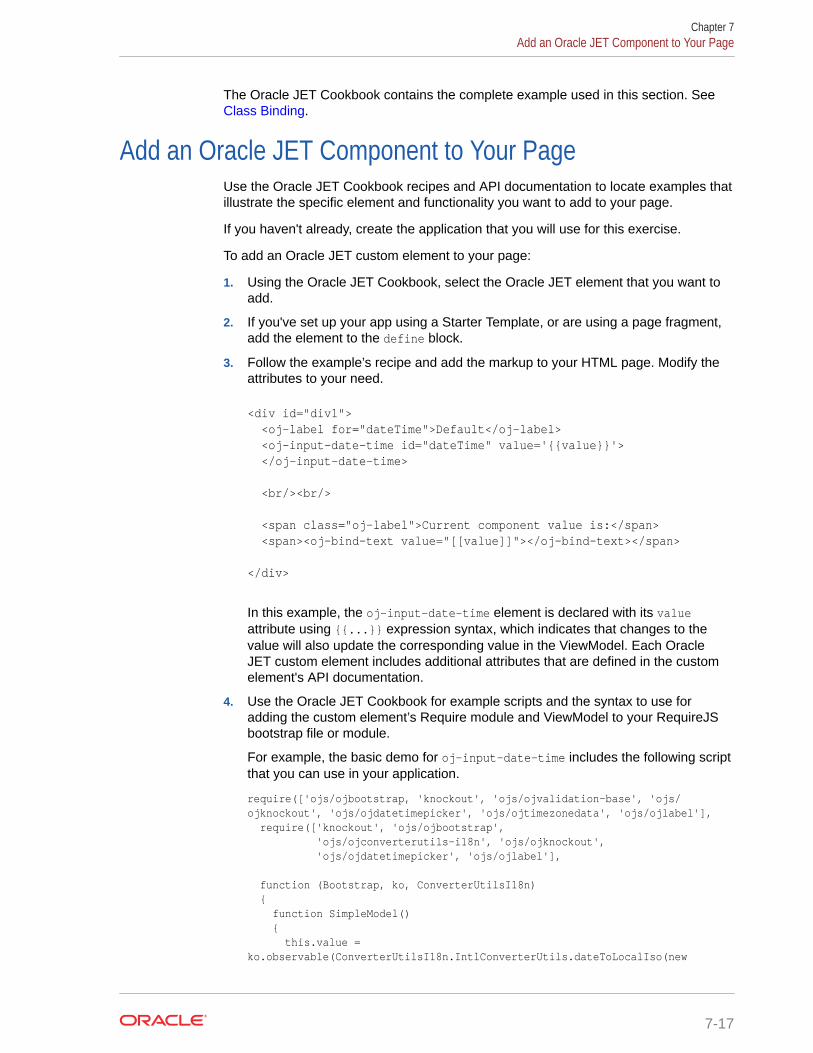
The Oracle JET Cookbook contains the complete example used in this section. SeeClass Binding.
Add an Oracle JET Component to Your PageUse the Oracle JET Cookbook recipes and API documentation to locate examples thatillustrate the specific element and functionality you want to add to your page.
If you haven't already, create the application that you will use for this exercise.
To add an Oracle JET custom element to your page:
1. Using the Oracle JET Cookbook, select the Oracle JET element that you want toadd.
2. If you've set up your app using a Starter Template, or are using a page fragment,add the element to the define block.
3. Follow the example’s recipe and add the markup to your HTML page. Modify theattributes to your need.
<div id="div1"> <oj-label for="dateTime">Default</oj-label> <oj-input-date-time id="dateTime" value='{{value}}'> </oj-input-date-time> <br/><br/> <span class="oj-label">Current component value is:</span> <span><oj-bind-text value="[[value]]"></oj-bind-text></span> </div>
In this example, the oj-input-date-time element is declared with its valueattribute using {{...}} expression syntax, which indicates that changes to thevalue will also update the corresponding value in the ViewModel. Each OracleJET custom element includes additional attributes that are defined in the customelement's API documentation.
4. Use the Oracle JET Cookbook for example scripts and the syntax to use foradding the custom element’s Require module and ViewModel to your RequireJSbootstrap file or module.
For example, the basic demo for oj-input-date-time includes the following scriptthat you can use in your application.
require(['ojs/ojbootstrap, 'knockout', 'ojs/ojvalidation-base', 'ojs/ojknockout', 'ojs/ojdatetimepicker', 'ojs/ojtimezonedata', 'ojs/ojlabel'], require(['knockout', 'ojs/ojbootstrap', 'ojs/ojconverterutils-i18n', 'ojs/ojknockout', 'ojs/ojdatetimepicker', 'ojs/ojlabel'],
function (Bootstrap, ko, ConverterUtilsI18n) { function SimpleModel() { this.value = ko.observable(ConverterUtilsI18n.IntlConverterUtils.dateToLocalIso(new
Chapter 7Add an Oracle JET Component to Your Page
7-17
Date(2020, 0, 1))); }
Bootstrap.whenDocumentReady().then( function () { ko.applyBindings(new SimpleModel(), document.getElementById('div1')); } ); });
If you already have a RequireJS bootstrap file or module, compare your file withthe Cookbook sample and merge in the differences. For details about working withRequireJS, see Using RequireJS for Modular Development.
The Cookbook sample used in this section is the Date and Time Pickers demo.
Add Animation EffectsYou can use the oj-module component’s animation property in conjunction withthe ModuleAnimations namespace to configure animation effects when the usertransitions between or drills into views. If you’re not using oj-module, you can usethe AnimationUtils namespace instead to add animation to Oracle JET componentsor HTML elements.
Adding Animation Effects Using the oj-module Component
The ModuleAnimations namespace includes pre-configured implementations that youcan use to configure the following animation effects:
• coverStart: The new view slides in to cover the old view.
• coverUp: The new view slides up to cover the old view.
• drillIn: Animation effect is platform-dependent.
– Web and iOS: coverStart
– Android: coverUp
– Windows: zoomIn
• drillOut: Animation effect is platform-dependent.
– Web and iOS: revealEnd
– Android: revealDown
– Windows: zoomOut
• fade: The new view fades in and the old view fades out.
• goLeft: Navigate to sibling view on the left. Default effect is platform-dependent.
– Web and iOS: none
– Android and Windows: pushRight
• goRight: Navigate to sibling view on the right. Default effect is platform-dependent.
– Web and iOS: none
– Android and Windows: pushLeft
• pushLeft: The new view pushes the old view out to the left.
Chapter 7Add an Oracle JET Component to Your Page
7-18
• pushRight: The new view pushes the old view out to the right.
• revealDown: The old view slides down to reveal the new view.
• revealEnd: The new view slides left or right to reveal the new view, depending onthe locale.
• zoomIn: The new view zooms in.
• zoomOut: The old view zooms out.
For examples that illustrate how to add animation with the oj-module component, seeAnimation Effects with Module Component.
Adding Animation Effects Using AnimationUtils
The AnimationUtils namespace includes methods that you can use to configure thefollowing animation effects on HTML elements and Oracle JET components:
• collapse: Use for collapsing the element
• expand: Use for expanding the element
• fadeIn and fadeOut: Use for fading the element into and out of view.
• flipIn and flipOut: Use for rotating the element in and out of view.
• ripple: Use for rippling the element.
• slideIn and slideOut: Use for sliding the element into and out of view.
• zoomIn and zoomOut: Using for zooming the element into and out of view.
Depending on the method’s options, you can configure properties like delay,duration, and direction. For examples that illustrate how to configure animationusing the AnimationUtils namespace, see Animation Effects.
Manage the Visibility of Added ComponentFollow the recommended best practice when you programmatically manage thedisplay of Oracle JET components in the DOM.
If you manage the display of collection components and other complex componentby using the CSS display property values of none or block, you may alsoneed to use Components.subtreeHidden(node) when you hide a component andComponents.subtreeShown(node) when you display the component. The nodeparameter refers to the root of the subtree in the DOM for the component that youare hiding or displaying. You need to notify Oracle JET if you change the display statusof these types of component to ensure that the component instance continues to workcorrectly in the application.
Use of these methods is demonstrated in Masonry Layout Deferred Rendering in theOracle JET Cookbook where they hide and show additional content in a tile that theoj-masonry-layout component resizes.
Not all components where you programmatically manage the display requireyou to notify Oracle JET when you change their display state. Componentssuch as oj-collapsible, oj-dialog, and oj-popup are examples ofcomponents where you do not need to call Components.subtreeHidden(node)or Components.subtreeShown(node). These components manage rendering whenvisibility is changed and also manage any components that they contain. Similarly,
Chapter 7Add an Oracle JET Component to Your Page
7-19

you do not need to use these methods in conjunction with the oj-bind-if componentbecause Oracle JET rewrites the appropriate part of the DOM in response to theevaluation of the oj-bind-if component’s test condition.
Failure to use the subtreeHidden and subtreeShown methods to notify Oracle JETwhen you hide or show a component can result in unexpected behavior for thecomponent, such as failure to render data or failure to honor other component attributesettings. For more information about the subtreeHidden and subtreeShown methods,see API Reference for Oracle® JavaScript Extension Toolkit (Oracle JET).
Chapter 7Add an Oracle JET Component to Your Page
7-20
8Working with Oracle JET User InterfaceComponents
Oracle JET provides a variety of user interface (UI) components that you can configurefor use in your application. The Oracle JET Cookbook includes an example of eachcomponent for working with collections, controls, forms, visualizations, and otherfeatures.
Topics
• Work with Oracle JET UI Components - A Typical Workflow
• Work with the Oracle JET Cookbook
• Work with Collections
• Work with Controls
• Work with Forms
• Work with Layout and Navigation
• Work with Visualizations
Work with Oracle JET UI Components - A Typical WorkflowTo work with the Oracle JET user interface components, refer to the typical workflowdescribed in the following table. Use the task descriptions to locate the component thatyou want to add to your application from the Description column.
Task Description More Information
Work with collections Identify tips and tricks for working withdata grids, list views, pagination, rowexpanders, tables, and trees.
Work with Collections
Work with controls Identify tips and tricks for working withbuttons, button sets, conveyor belts,film strips, menus, progress indicators,HTML tags, toolbars, and trains.
Work with Controls
Work with forms Identify tips and tricks for workingwith form elements, including checkboxand radio sets, comboboxes, formcontrols, form layout, input, labels,selection, validation and user assistancecomponents.
Work with Forms
Work with layout andnavigation components,elements, and patterns
Identify tips and tricks for working withaccordions, collapsibles, dialogs, drawerutilities, panels, popups, and tabs.
Work with Layout and Navigation
8-1
Task Description More Information
Work with visualizations Identify tips and tricks for working withdata visualizations, including charts,diagrams, gauges, NBoxes, sunbursts,tag clouds, thematic maps, timelines,and treemaps.
Work with Visualizations
Work with the Oracle JET CookbookThe Oracle JET Cookbook includes an implementation of each JET component, alongwith samples that demonstrate how to implement common usage patterns using oneor more of the JET components.
Each cookbook demo includes a brief introduction, the demo implementation, and,following the implementation, tabs (Info, demo.html, and so on) that describe howto implement the demo, show the source HTML, JavaScript/TypeScript, and, whereapplicable, the CSS and JSON.
Effective use of the cookbook will make your development task easier. You can, forexample, copy code from the cookbook to your own applications, or you can modifycode directly in your browser and click Apply Changes to preview changes in yourbrowser.
• API Doc: Navigates to the API doc for the components that are used in the demo.
• (Setting button): Displays additional controls that allow you to change thetheme, the font size, reading direction, and debug mode of the demo code inthe browser. Note that these changes affect only the portion of the browser thatrenders the demo implementation. If, for example, you change the theme to Alta,the component implementation renders using the Alta theme but the remainder ofthe cookbook continues to use the Redwood theme.
• JS/TS: Toggle this button to view the demo implementation in JavaScript orTypeScript.
• Apply Changes: You can edit the HTML and JS/TS of the demo in the browserand click Apply Changes to see your changes in the browser. This is useful if youwant to test the behavior or a component when you change an attribute value, forexample.
Chapter 8Work with the Oracle JET Cookbook
8-2
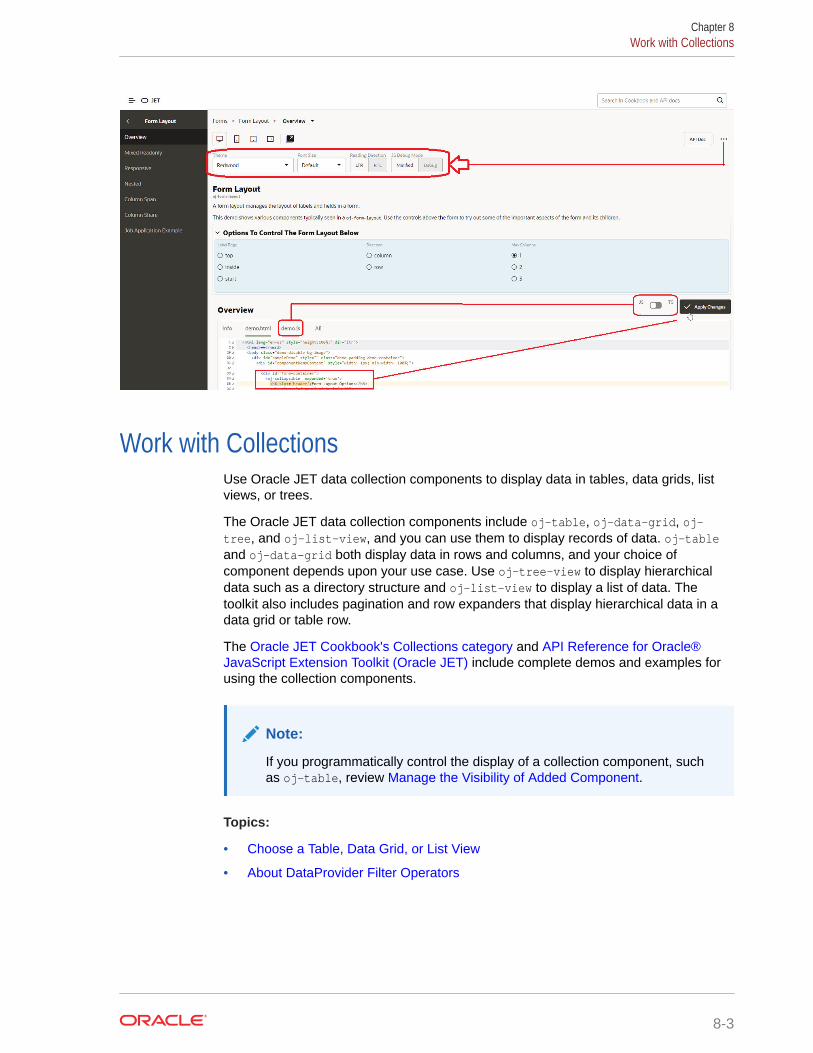
Work with CollectionsUse Oracle JET data collection components to display data in tables, data grids, listviews, or trees.
The Oracle JET data collection components include oj-table, oj-data-grid, oj-tree, and oj-list-view, and you can use them to display records of data. oj-tableand oj-data-grid both display data in rows and columns, and your choice ofcomponent depends upon your use case. Use oj-tree-view to display hierarchicaldata such as a directory structure and oj-list-view to display a list of data. Thetoolkit also includes pagination and row expanders that display hierarchical data in adata grid or table row.
The Oracle JET Cookbook's Collections category and API Reference for Oracle®JavaScript Extension Toolkit (Oracle JET) include complete demos and examples forusing the collection components.
Note:
If you programmatically control the display of a collection component, suchas oj-table, review Manage the Visibility of Added Component.
Topics:
• Choose a Table, Data Grid, or List View
• About DataProvider Filter Operators
Chapter 8Work with Collections
8-3

Choose a Table, Data Grid, or List ViewOracle JET provides the oj-table, oj-data-grid, and oj-list-view components fordisplaying records of data in rows and columns, and this section can help you decidewhich component to use in your application.
The oj-table component displays records of data on a row basis. It's best used whenyou have simple data that can be presented as rows of fields, and it should be yourfirst choice as it provides a simpler layout to represent the data and also supports mostof the common features, unless you require advanced features. A selection in the tableprovides you with the row of data and all of the fields in that row or record. The sizingof the table is based on the content itself. The height and width of the cells is adjustedfor the content included. You can write templates using oj-table elements such as tr,td, th, and so on.
The oj-data-grid is designed to provide grid functionality. It provides the ability toselect individual or ranges of cells of data. It's best used when you need to displaytotals or tallies of data across columns or rows of data. The oj-data-grid is designedto be much more flexible in its layout and functionality than the oj-table component.It's a low-level component that you can shape in your application to how you want thedata to be displayed. The overall size of the data grid is not determined by its content,and the developer specifies the exact height and width of the container. The data gridacts as a viewport to the contents, and unlike a table its size is not determined by thesize of the columns and rows. With this custom HTML oj-data-grid element, you canhost the template content inside it.
The oj-list-view element displays a list of data or a list of grouped data. It is bestused when you need to display a list using an arbitrary layout or content. You can alsouse oj-list-view to display hierarchical data that contains nested lists within the rootelement.
The table below provides a feature comparison of the oj-table, oj-data-grid, andoj-list-view components.
Feature oj-table oj-data-grid oj-list-view
Column/Row sizing Controlled by contentor fixed by CSSstyles. All CSS sizingstrings are supportedfor width and height.
Controlled by celldimensions. Doesnot support percentvalues for width andheight.
No
User-resizable column Yes Yes No
User-resizable row No Yes No
Row reordering No Yes No
Column sorting Yes Yes No
Column selection Yes Yes No
Row selection Yes Yes Yes
Cell selection No Yes No
Marquee selection No Yes No
Row header support No Yes No
Pagination Yes Yes Yes
Chapter 8Work with Collections
8-4
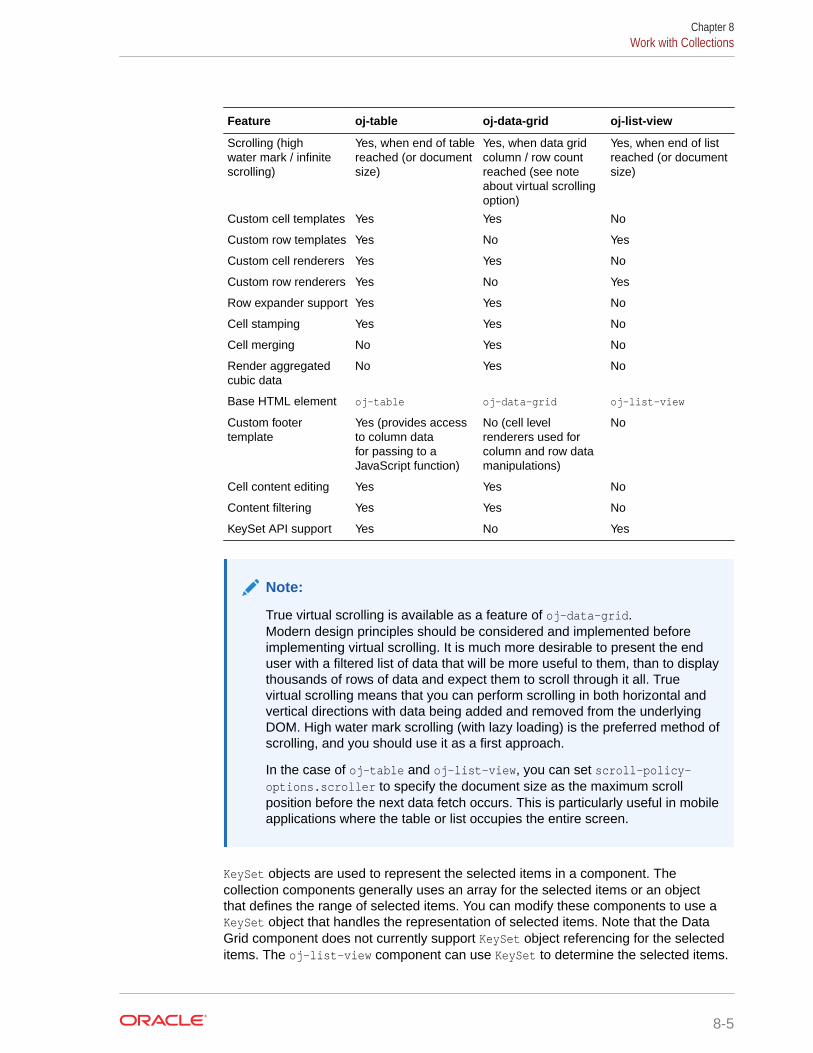
Feature oj-table oj-data-grid oj-list-view
Scrolling (highwater mark / infinitescrolling)
Yes, when end of tablereached (or documentsize)
Yes, when data gridcolumn / row countreached (see noteabout virtual scrollingoption)
Yes, when end of listreached (or documentsize)
Custom cell templates Yes Yes No
Custom row templates Yes No Yes
Custom cell renderers Yes Yes No
Custom row renderers Yes No Yes
Row expander support Yes Yes No
Cell stamping Yes Yes No
Cell merging No Yes No
Render aggregatedcubic data
No Yes No
Base HTML element oj-table oj-data-grid oj-list-view
Custom footertemplate
Yes (provides accessto column datafor passing to aJavaScript function)
No (cell levelrenderers used forcolumn and row datamanipulations)
No
Cell content editing Yes Yes No
Content filtering Yes Yes No
KeySet API support Yes No Yes
Note:
True virtual scrolling is available as a feature of oj-data-grid.Modern design principles should be considered and implemented beforeimplementing virtual scrolling. It is much more desirable to present the enduser with a filtered list of data that will be more useful to them, than to displaythousands of rows of data and expect them to scroll through it all. Truevirtual scrolling means that you can perform scrolling in both horizontal andvertical directions with data being added and removed from the underlyingDOM. High water mark scrolling (with lazy loading) is the preferred method ofscrolling, and you should use it as a first approach.
In the case of oj-table and oj-list-view, you can set scroll-policy-options.scroller to specify the document size as the maximum scrollposition before the next data fetch occurs. This is particularly useful in mobileapplications where the table or list occupies the entire screen.
KeySet objects are used to represent the selected items in a component. Thecollection components generally uses an array for the selected items or an objectthat defines the range of selected items. You can modify these components to use aKeySet object that handles the representation of selected items. Note that the DataGrid component does not currently support KeySet object referencing for the selecteditems. The oj-list-view component can use KeySet to determine the selected items.
Chapter 8Work with Collections
8-5
The oj-table component can use KeySet to determine the selected items for the rowsor columns. If both values are specified, then row will take precedence and column willbe reset to an empty KeySet.
About DataProvider Filter OperatorsThe DataProvider interface is used to get runtime data for JET components thatdisplay list of items. DataProvider implementations use filter operators for filtering.
You can specify two types of filters:
• Attribute Filter: Provides filters with the functionality of attribute operator filtering.
interface AttributeFilter<D> extends AttributeFilterDef<D>{ filter(item: D, index?: number, array?: Array<D>): boolean;}type Filter<D> = AttributeFilter<D> | CompoundFilter<D>;
type RecursivePartial<T> = { [P in keyof T]?: T[P] extends (infer U)[] ? RecursivePartial<U>[] : T[P] extends object ? RecursivePartial<T[P]> : T[P];};
interface AttributeFilterDef<D> { readonly op: AttributeFilterOperator.AttributeOperator; readonly attribute?: keyof D; readonly value: RecursivePartial<D>;} type AttributeFilterAttributeExpression = '*';
• Compound Filter: Provides filter operators for compound operations.
interface CompoundFilter<D> extends CompoundFilterDef<D>, BaseFilter<D> {}
interface CompoundFilterDef<D> { readonly op: CompoundFilterOperator.CompoundOperator; readonly criteria: Array<AttributeFilterDef<D> | CompoundFilterDef<D>>;}
Filter definition which filters on DepartmentId value 10:
{op: '$eq', value: {DepartmentId: 10}}
Filter definition which filters on DepartmentId value 10 and DepartmentName is Hello:
{op: '$eq', value: {DepartmentId: 10, DepartmentName: 'Hello'}}
Filter definition which filters on subobject Location where State is California andDepartmentName is Hello:
Chapter 8Work with Collections
8-6
{op: '$eq', value: {DepartmentName: 'Hello', Location: {State:'California'}}}
For additional detail and the complete list of operators that you can use with Attributefilters, see the AttributeFilterDef API documentation.
For additional detail and the complete list of operators that you can use withCompound filters, see the CompoundFilterDef API documentation.
Work with ControlsOracle JET includes buttons, menus, and container elements to control user actions ordisplay progress against a task. For HTML elements such as simple lists, you can usethe standard HTML tags directly on your page, and Oracle JET will apply styling basedon the application's chosen theme.
For example, you can use the oj-button element as a standalone element or includein oj-buttonset , oj-menu, and oj-toolbar container elements.
Navigation components such as oj-conveyor-belt, oj-film-strip, and oj-trainuse visual arrows or dots that the user can select to move backward or forwardthrough data.
To show progress against a task in a horizontal meter, you can use the oj-progress-bar element. To show progress against a task in a circle, you can use the oj-progress-circle element.
The Oracle JET Cookbook's Controls category and API Reference for Oracle®JavaScript Extension Toolkit (Oracle JET) include complete demos and examples forusing Oracle JET controls.
Work with FormsOracle JET includes classes to create responsive form layouts and components thatyou can add to your form to manage labels, form validation and messaging, input, andselection. The input components also include attributes to mark an input as disabled orread-only when appropriate.
The Oracle JET Cookbook's Forms category and API Reference for Oracle®JavaScript Extension Toolkit (Oracle JET) includes complete demos and examplesfor using forms.
Important:
When working with forms, use the HTML div element to surround anyOracle JET input components. Do not use the HTML form element becauseits postback behavior can cause unwanted page refreshes when the usersubmits or saves the form.
Work with Layout and NavigationUse the Oracle JET oj-accordian, oj-collapsible, oj-dialog, oj-flex*, oj-masonry-layout, oj-navigation-list, offCanvasUtils, oj-panel, oj-popup, oj-
Chapter 8Work with Controls
8-7
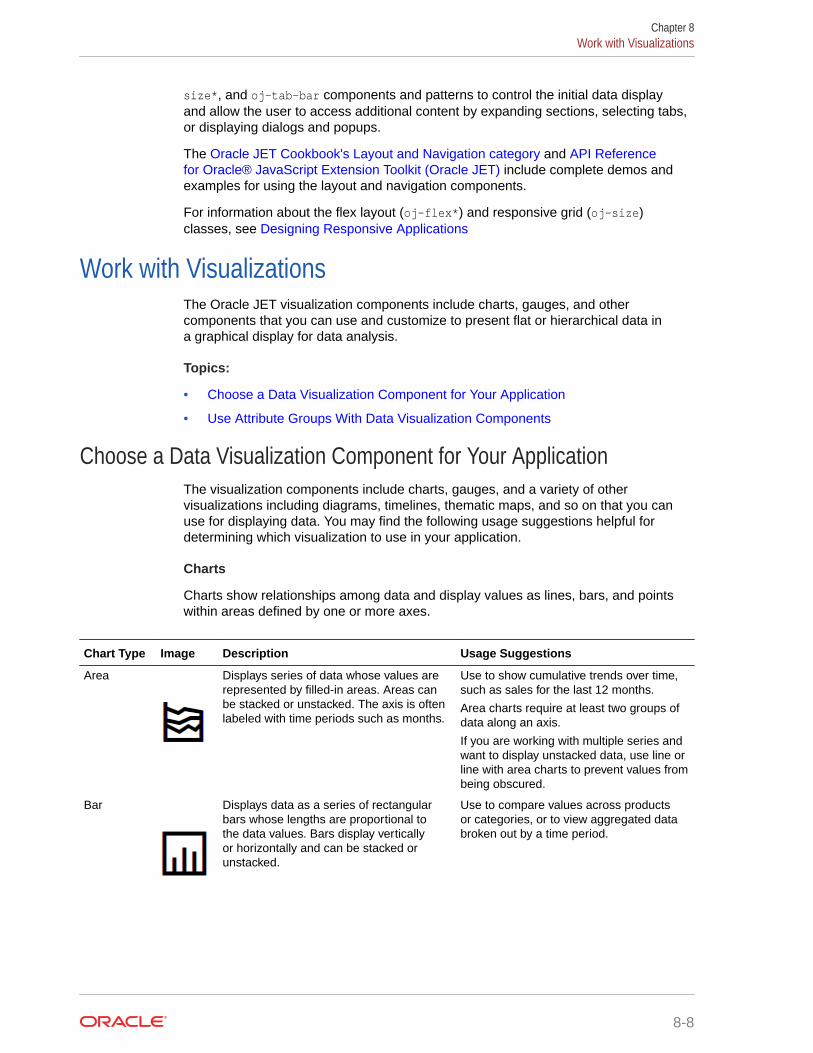
size*, and oj-tab-bar components and patterns to control the initial data displayand allow the user to access additional content by expanding sections, selecting tabs,or displaying dialogs and popups.
The Oracle JET Cookbook's Layout and Navigation category and API Referencefor Oracle® JavaScript Extension Toolkit (Oracle JET) include complete demos andexamples for using the layout and navigation components.
For information about the flex layout (oj-flex*) and responsive grid (oj-size)classes, see Designing Responsive Applications
Work with VisualizationsThe Oracle JET visualization components include charts, gauges, and othercomponents that you can use and customize to present flat or hierarchical data ina graphical display for data analysis.
Topics:
• Choose a Data Visualization Component for Your Application
• Use Attribute Groups With Data Visualization Components
Choose a Data Visualization Component for Your ApplicationThe visualization components include charts, gauges, and a variety of othervisualizations including diagrams, timelines, thematic maps, and so on that you canuse for displaying data. You may find the following usage suggestions helpful fordetermining which visualization to use in your application.
Charts
Charts show relationships among data and display values as lines, bars, and pointswithin areas defined by one or more axes.
Chart Type Image Description Usage Suggestions
Area Displays series of data whose values arerepresented by filled-in areas. Areas canbe stacked or unstacked. The axis is oftenlabeled with time periods such as months.
Use to show cumulative trends over time,such as sales for the last 12 months.
Area charts require at least two groups ofdata along an axis.
If you are working with multiple series andwant to display unstacked data, use line orline with area charts to prevent values frombeing obscured.
Bar Displays data as a series of rectangularbars whose lengths are proportional tothe data values. Bars display verticallyor horizontally and can be stacked orunstacked.
Use to compare values across productsor categories, or to view aggregated databroken out by a time period.
Chapter 8Work with Visualizations
8-8
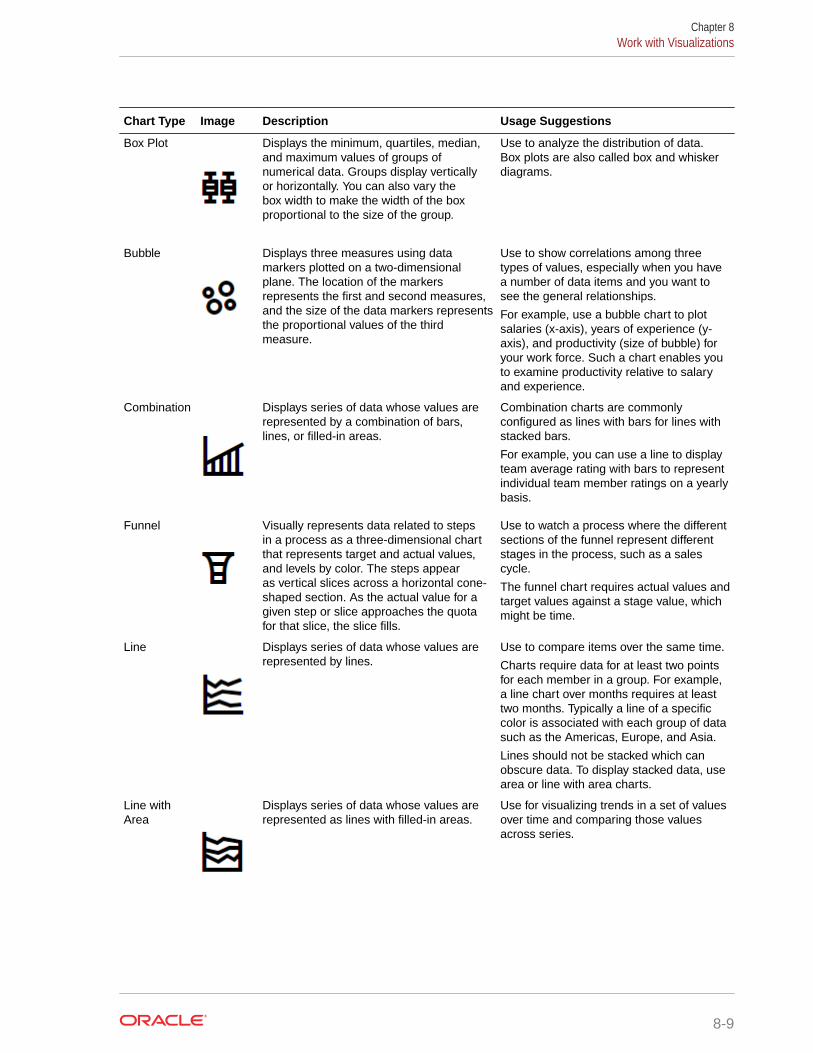
Chart Type Image Description Usage Suggestions
Box Plot Displays the minimum, quartiles, median,and maximum values of groups ofnumerical data. Groups display verticallyor horizontally. You can also vary thebox width to make the width of the boxproportional to the size of the group.
Use to analyze the distribution of data.Box plots are also called box and whiskerdiagrams.
Bubble Displays three measures using datamarkers plotted on a two-dimensionalplane. The location of the markersrepresents the first and second measures,and the size of the data markers representsthe proportional values of the thirdmeasure.
Use to show correlations among threetypes of values, especially when you havea number of data items and you want tosee the general relationships.
For example, use a bubble chart to plotsalaries (x-axis), years of experience (y-axis), and productivity (size of bubble) foryour work force. Such a chart enables youto examine productivity relative to salaryand experience.
Combination Displays series of data whose values arerepresented by a combination of bars,lines, or filled-in areas.
Combination charts are commonlyconfigured as lines with bars for lines withstacked bars.
For example, you can use a line to displayteam average rating with bars to representindividual team member ratings on a yearlybasis.
Funnel Visually represents data related to stepsin a process as a three-dimensional chartthat represents target and actual values,and levels by color. The steps appearas vertical slices across a horizontal cone-shaped section. As the actual value for agiven step or slice approaches the quotafor that slice, the slice fills.
Use to watch a process where the differentsections of the funnel represent differentstages in the process, such as a salescycle.
The funnel chart requires actual values andtarget values against a stage value, whichmight be time.
Line Displays series of data whose values arerepresented by lines.
Use to compare items over the same time.
Charts require data for at least two pointsfor each member in a group. For example,a line chart over months requires at leasttwo months. Typically a line of a specificcolor is associated with each group of datasuch as the Americas, Europe, and Asia.
Lines should not be stacked which canobscure data. To display stacked data, usearea or line with area charts.
Line withArea
Displays series of data whose values arerepresented as lines with filled-in areas.
Use for visualizing trends in a set of valuesover time and comparing those valuesacross series.
Chapter 8Work with Visualizations
8-9
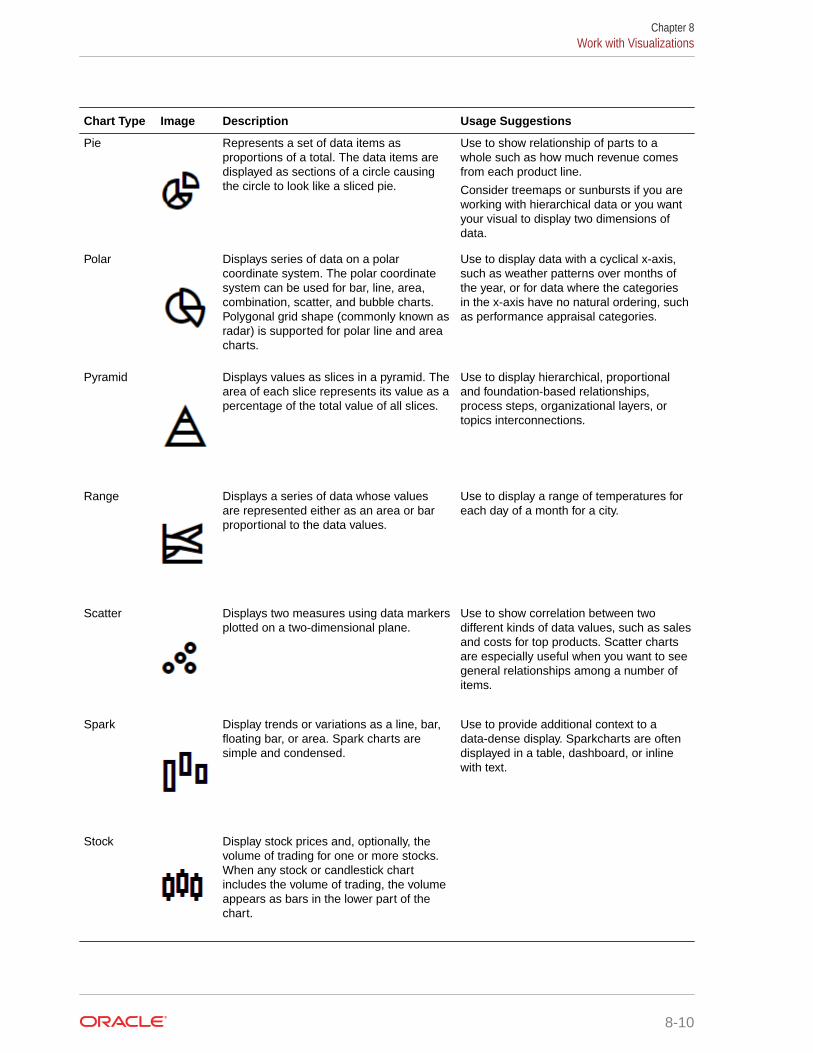
Chart Type Image Description Usage Suggestions
Pie Represents a set of data items asproportions of a total. The data items aredisplayed as sections of a circle causingthe circle to look like a sliced pie.
Use to show relationship of parts to awhole such as how much revenue comesfrom each product line.
Consider treemaps or sunbursts if you areworking with hierarchical data or you wantyour visual to display two dimensions ofdata.
Polar Displays series of data on a polarcoordinate system. The polar coordinatesystem can be used for bar, line, area,combination, scatter, and bubble charts.Polygonal grid shape (commonly known asradar) is supported for polar line and areacharts.
Use to display data with a cyclical x-axis,such as weather patterns over months ofthe year, or for data where the categoriesin the x-axis have no natural ordering, suchas performance appraisal categories.
Pyramid Displays values as slices in a pyramid. Thearea of each slice represents its value as apercentage of the total value of all slices.
Use to display hierarchical, proportionaland foundation-based relationships,process steps, organizational layers, ortopics interconnections.
Range Displays a series of data whose valuesare represented either as an area or barproportional to the data values.
Use to display a range of temperatures foreach day of a month for a city.
Scatter Displays two measures using data markersplotted on a two-dimensional plane.
Use to show correlation between twodifferent kinds of data values, such as salesand costs for top products. Scatter chartsare especially useful when you want to seegeneral relationships among a number ofitems.
Spark Display trends or variations as a line, bar,floating bar, or area. Spark charts aresimple and condensed.
Use to provide additional context to adata-dense display. Sparkcharts are oftendisplayed in a table, dashboard, or inlinewith text.
Stock Display stock prices and, optionally, thevolume of trading for one or more stocks.When any stock or candlestick chartincludes the volume of trading, the volumeappears as bars in the lower part of thechart.
Chapter 8Work with Visualizations
8-10
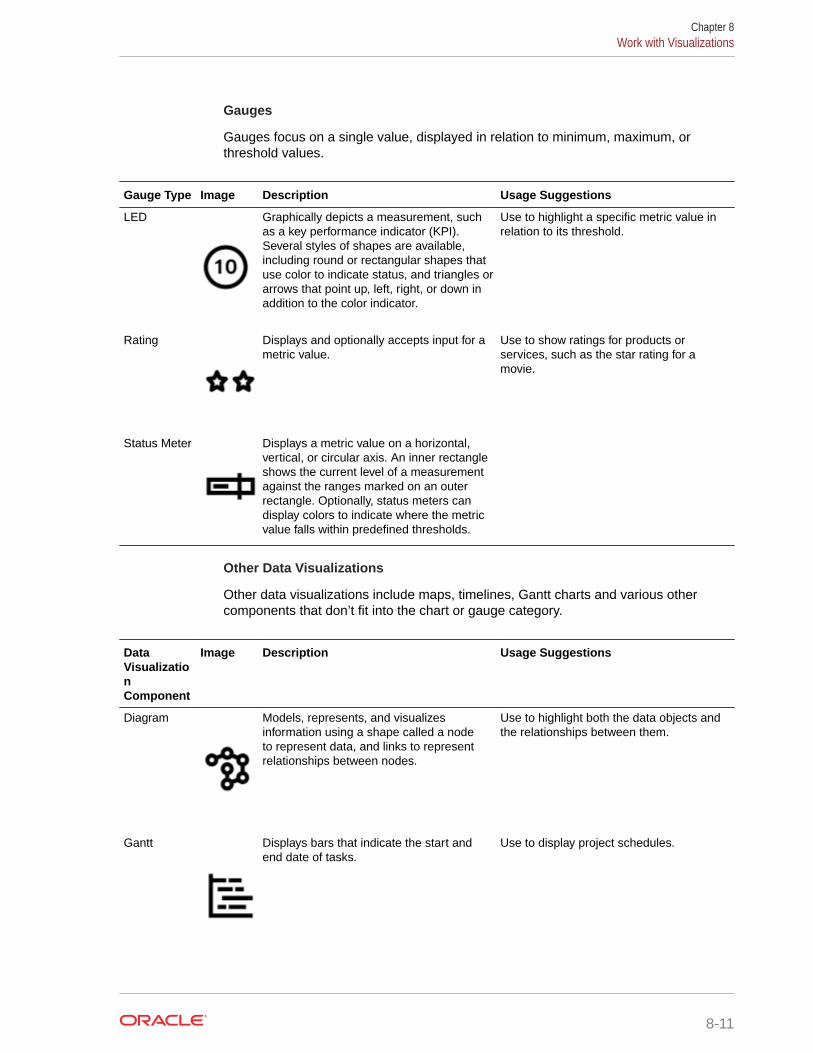
Gauges
Gauges focus on a single value, displayed in relation to minimum, maximum, orthreshold values.
Gauge Type Image Description Usage Suggestions
LED Graphically depicts a measurement, suchas a key performance indicator (KPI).Several styles of shapes are available,including round or rectangular shapes thatuse color to indicate status, and triangles orarrows that point up, left, right, or down inaddition to the color indicator.
Use to highlight a specific metric value inrelation to its threshold.
Rating Displays and optionally accepts input for ametric value.
Use to show ratings for products orservices, such as the star rating for amovie.
Status Meter Displays a metric value on a horizontal,vertical, or circular axis. An inner rectangleshows the current level of a measurementagainst the ranges marked on an outerrectangle. Optionally, status meters candisplay colors to indicate where the metricvalue falls within predefined thresholds.
Other Data Visualizations
Other data visualizations include maps, timelines, Gantt charts and various othercomponents that don’t fit into the chart or gauge category.
DataVisualizationComponent
Image Description Usage Suggestions
Diagram Models, represents, and visualizesinformation using a shape called a nodeto represent data, and links to representrelationships between nodes.
Use to highlight both the data objects andthe relationships between them.
Gantt Displays bars that indicate the start andend date of tasks.
Use to display project schedules.
Chapter 8Work with Visualizations
8-11
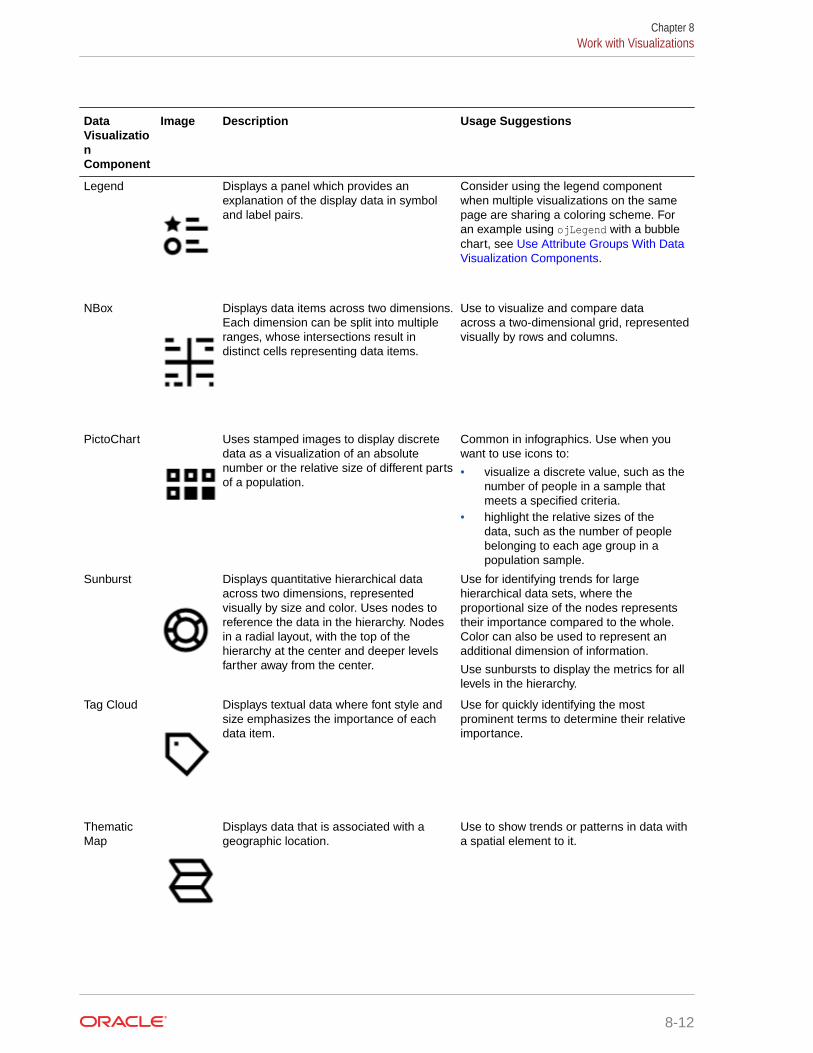
DataVisualizationComponent
Image Description Usage Suggestions
Legend Displays a panel which provides anexplanation of the display data in symboland label pairs.
Consider using the legend componentwhen multiple visualizations on the samepage are sharing a coloring scheme. Foran example using ojLegend with a bubblechart, see Use Attribute Groups With DataVisualization Components.
NBox Displays data items across two dimensions.Each dimension can be split into multipleranges, whose intersections result indistinct cells representing data items.
Use to visualize and compare dataacross a two-dimensional grid, representedvisually by rows and columns.
PictoChart Uses stamped images to display discretedata as a visualization of an absolutenumber or the relative size of different partsof a population.
Common in infographics. Use when youwant to use icons to:
• visualize a discrete value, such as thenumber of people in a sample thatmeets a specified criteria.
• highlight the relative sizes of thedata, such as the number of peoplebelonging to each age group in apopulation sample.
Sunburst Displays quantitative hierarchical dataacross two dimensions, representedvisually by size and color. Uses nodes toreference the data in the hierarchy. Nodesin a radial layout, with the top of thehierarchy at the center and deeper levelsfarther away from the center.
Use for identifying trends for largehierarchical data sets, where theproportional size of the nodes representstheir importance compared to the whole.Color can also be used to represent anadditional dimension of information.
Use sunbursts to display the metrics for alllevels in the hierarchy.
Tag Cloud Displays textual data where font style andsize emphasizes the importance of eachdata item.
Use for quickly identifying the mostprominent terms to determine their relativeimportance.
ThematicMap
Displays data that is associated with ageographic location.
Use to show trends or patterns in data witha spatial element to it.
Chapter 8Work with Visualizations
8-12
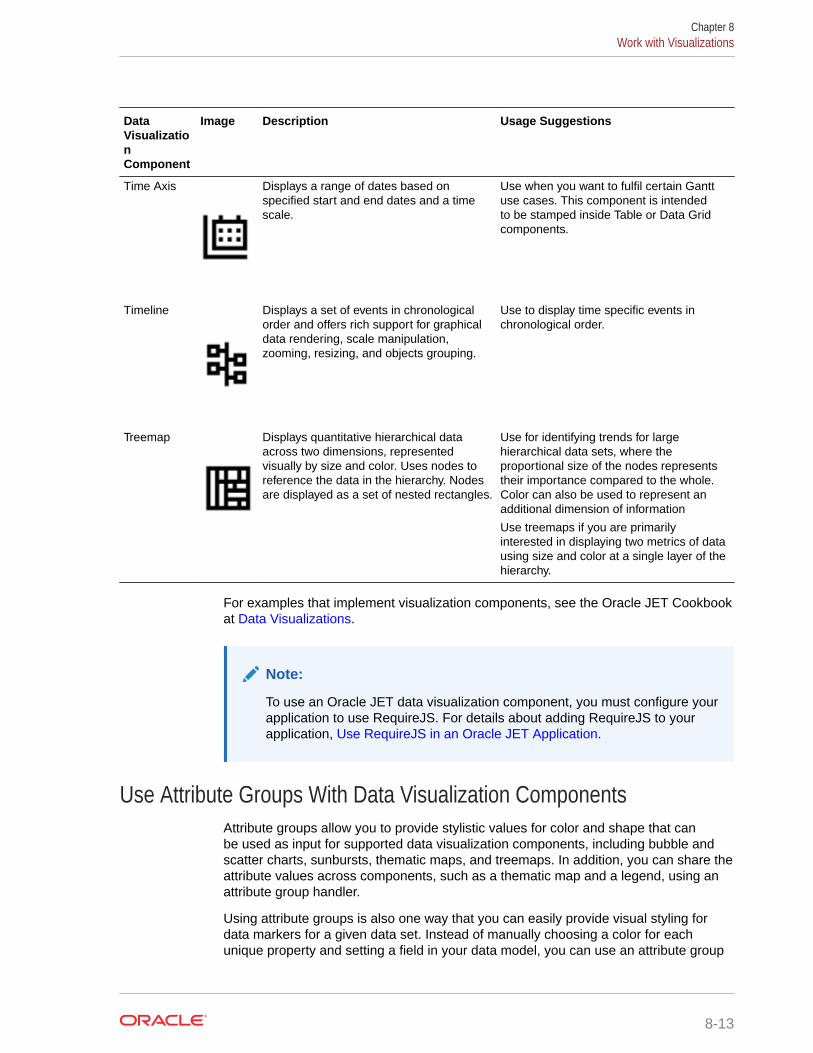
DataVisualizationComponent
Image Description Usage Suggestions
Time Axis Displays a range of dates based onspecified start and end dates and a timescale.
Use when you want to fulfil certain Ganttuse cases. This component is intendedto be stamped inside Table or Data Gridcomponents.
Timeline Displays a set of events in chronologicalorder and offers rich support for graphicaldata rendering, scale manipulation,zooming, resizing, and objects grouping.
Use to display time specific events inchronological order.
Treemap Displays quantitative hierarchical dataacross two dimensions, representedvisually by size and color. Uses nodes toreference the data in the hierarchy. Nodesare displayed as a set of nested rectangles.
Use for identifying trends for largehierarchical data sets, where theproportional size of the nodes representstheir importance compared to the whole.Color can also be used to represent anadditional dimension of information
Use treemaps if you are primarilyinterested in displaying two metrics of datausing size and color at a single layer of thehierarchy.
For examples that implement visualization components, see the Oracle JET Cookbookat Data Visualizations.
Note:
To use an Oracle JET data visualization component, you must configure yourapplication to use RequireJS. For details about adding RequireJS to yourapplication, Use RequireJS in an Oracle JET Application.
Use Attribute Groups With Data Visualization ComponentsAttribute groups allow you to provide stylistic values for color and shape that canbe used as input for supported data visualization components, including bubble andscatter charts, sunbursts, thematic maps, and treemaps. In addition, you can share theattribute values across components, such as a thematic map and a legend, using anattribute group handler.
Using attribute groups is also one way that you can easily provide visual styling fordata markers for a given data set. Instead of manually choosing a color for eachunique property and setting a field in your data model, you can use an attribute group
Chapter 8Work with Visualizations
8-13

handler to get back a color or shape value given a data value. Once an attribute grouphandler retrieves a color or shape value given a data value, all subsequent calls thatpass in the same data value will always return that color or shape.
Oracle JET provides the following classes that you can use for adding attribute groupsto your data visualization components:
• ColorAttributeGroupHandler: Creates a color attribute group handler that willgenerate color attribute values.
Colors are generated using the values in the .oj-dvt-category-index* tagselectors.
• ShapeAttributeGroupHandler: Creates a shape attribute group handler that willgenerate shape attribute values.
Supported shapes include square, circle, human, triangleUp, triangleDown,diamond, and plus.
You can see the effect of applying attribute groups to a bubble chart in the followingfigure. In this example, the shape of the markers (round, diamond, and square)indicates the year for which the data applies. The color differentiates the brand. Theexample also uses the Legend data visualization component to provide a legend for thebubble chart.
The bubble chart's legend uses the same attribute group handlers for color and shape.
The Oracle JET Cookbook provides the complete code for implementing bubble chartsat Bubble Charts.
You can also initialize an attribute group with match rules which consist of a map ofkey value pairs for categories and the matching attribute values. For example, if you
Chapter 8Work with Visualizations
8-14
wanted to specify colors for specific categories instead of using the default colors, youcould define the color attribute group with match rules.
var colorHandler = new ColorAttributeGroupHandler({"soda":"#336699", "water":"#CC3300", "iced tea":"#F7C808"});
For detailed information about ColorAttributeGroupHandler, see theColorAttributeGroupHandler API documentation. For more information aboutShapeAttributeGroupHandler, see the ShapeAttributeGroupHandler APIdocumentation.
Chapter 8Work with Visualizations
8-15
9Working with Oracle JET Web Components
Oracle JET Web Components are reusable pieces of user interface code that youcan embed as custom HTML elements. Web Components can contain Oracle JETcomponents, other Web Components, HTML, JavaScript, and CSS. You can createyour own Web Component or add one to your page.
Topics
• Typical Workflow for Working with Oracle JET Web Components
• Design Custom Web Components
• About Web Components
• Best Practices for Web Component Creation
• Create Web Components
• Test Web Components
• Add Web Components to Your Page
• Build Web Components
• Package Web Components
• Create a Project to Host a Shared Oracle Component Exchange
• Publish Web Components to Oracle Component Exchange
• Upload and Consume Web Components on a CDN
Typical Workflow for Working with Oracle JET WebComponents
Understand Oracle JET Web Components and the steps required to create and addthem to your page.
To work with Web Components, refer to the typical workflow described in the followingtable.
Task Description More Information
Understand the OracleJET Web Componentarchitecture
Understand the structure andfunctionality of Web Components.
About Web Components
Decide how you wantto organize custom WebComponents
Learn about the various customcomponent types and how they are usedby developers,
Design Custom Web Components
Review best practices forWeb Component creation
Understand best practices for creatingyour Web Component, includingdesign, coding, versioning, and stylingstandards.
Best Practices for Web ComponentCreation
9-1

Task Description More Information
Create your WebComponents
Identify the steps you must take tocreate the various types of Oracle JETWeb Components.
Create Web Components
Test your WebComponents
Understand the testing guidelines forWeb Components.
Test Web Components
Use standalone WebComponents in yourapplication
Identify the steps you must take to adda standalone Web Component to yourpage.
Add Web Components to Your Page
Build a Web Component Understand the command used to buildand optimize a Web Component that youwant to share.
Build Web Components
Package your WebComponents
Understand the command used topackage a Web Component as asharable zip archive file.
Package Web Components
Publish your WebComponents
Identify the steps you can take to publishto Oracle Component Exchange or toupload to a CDN.
Publish Web Components to OracleComponent Exchange and Upload andConsume Web Components on a CDN
Design Custom Web ComponentsOracle JET Web Components are custom components that include multiplecomponent types. Web components that you create can be used in your application orthey can be uploaded to Oracle Component Exchange to share with other developers.
The variety of component types supported by Oracle JET and Oracle ComponentExchange are:
• Standalone Web Components are classic UI components with some kind ofUI along with a defined set of properties, methods, events and slots. They canrepresent everything from a simple better-button type of widget all the way to asuper complex whole page component such as a calendar.
• Pack components, also called a JET Pack, represents a versioned stripe ofrelated components designed to be used together. When consumers pick up acomponent that is a member of a JET Pack they associate their application withthe version of the pack as a whole, not the individual components within it. TheJET Pack simplifies the setup of such projects and the dependency managementas a whole.
• Resource components are re-usable libraries of assets used by WebComponents contained in JET Packs. Resource components typically containthings like shared images, resource bundles, utility classes and so forth. Aresource component has no hard and fast predefined structure so can containanything that you want. However, it does not itself provide any UI components.Instead conventional standalone components would depend on one of these forshared resources. We only expect resource components to be used in concertwith JET Packs.
• Reference components define a look-up reference to third party code. As such,reference components are a pointer to that code either as a NPM module and/oras a CDN location. Reference components don't actually include the third partylibraries, they just point to it.
Chapter 9Design Custom Web Components
9-2

You can create standalone Web Components to support your specific applicationneeds. You can also create sets of Web Components that you intend to be usedtogether and assemble those in a JET Pack, or pack component type. The packcomponent contains the Web Components and configuration files that define theversion stripe of each component in the pack. When Web Components are part ofa pack, changes to their definition file are required to differentiate them from the samecomponent used as a standalone component.
Tip:
When you assemble components into a small number of packs, from theconsumer's point of view, it makes path setup and dependency managementmuch simpler.
You can enhance JET Pack components by using resource components when youhave re-usable libraries of assets that are themselves not specifically UI components.The resource component structure is flexible so you add anything that you want, suchas shared images, resource bundles, utility classes and so forth.
If you need to reference third-party code in a Web Component, you can createa reference component. The reference component doesn't include any third-partylibraries, but it can define a pointer to that code either as a NPM module and/oras a CDN location. Although it is possible to embed third party library code into thepackaged distribution of a given component, by separating it out you get two particularbenefits:
• The dependency is clear and declared up front. This is an important considerationfor organizations that care about third party liability and license usage. It alsomakes reacting to security vulnerabilities in third party code much easier.
• You can maximize re-use of these libraries - particularly with common libraries,such as moment.js.
The only component type that is not allowed in packs are reference components.
When creating JET Packs it is important to think about how their components canevolve over time in relation to the consuming applications. A common mistake is tostart out syncing the component version numbers to the version number of the primaryconsuming application. This relationship can break down, however, for example whena breaking API change in one of your components forces a major version changewhich now takes you out of sync. The best practice is to adopt Semantic Versioning(SemVer) of components from the start and not to sync versions with the consumingapplication. Take the time to understand how SemVer works, particularly in relation tore-release versions. For more information, see Version Numbering Standards.
You should maintain the source code for your component sets separately from theapplications that will consume them. Remember that components will evolve overtime at a separate rate from the consuming application so having the source codedecoupled into a separate source code project and repository makes a huge amountof sense.
The recommended project layout for your component source project is based on thedefault project layout created by Oracle JET CLI tooling. The JET CLI supports thecreation of TypeScript components as well as standard ES5/6 based components. If
Chapter 9Design Custom Web Components
9-3
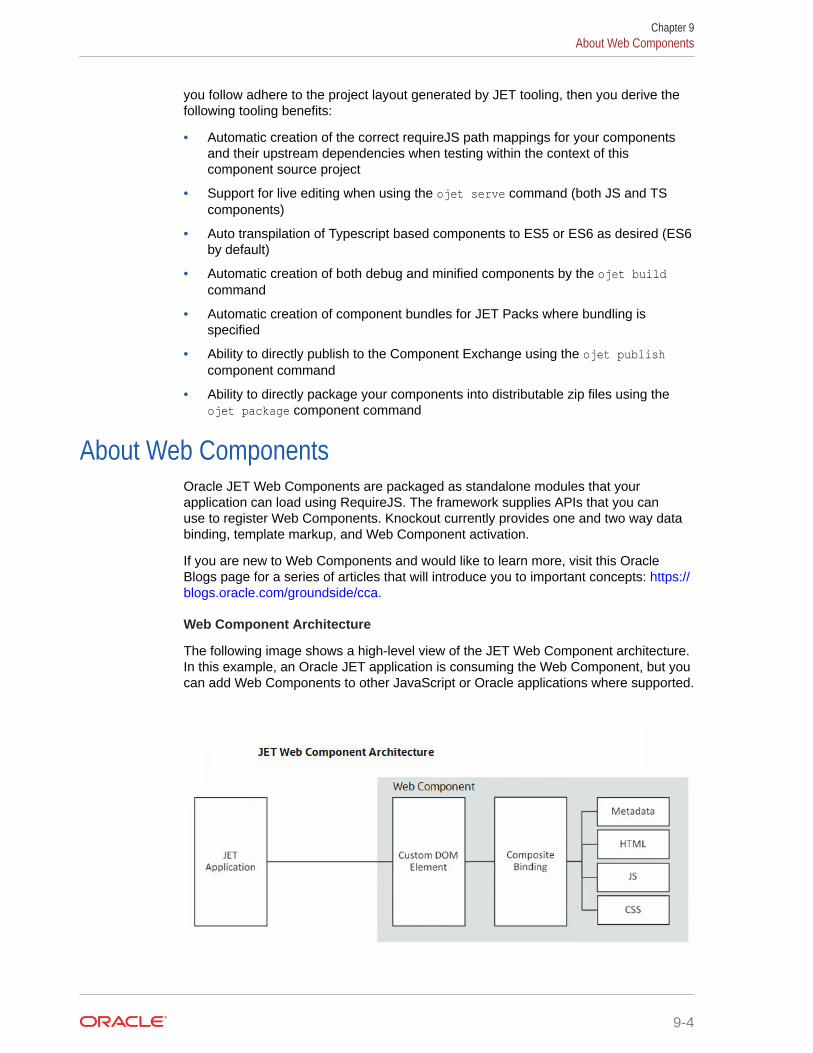
you follow adhere to the project layout generated by JET tooling, then you derive thefollowing tooling benefits:
• Automatic creation of the correct requireJS path mappings for your componentsand their upstream dependencies when testing within the context of thiscomponent source project
• Support for live editing when using the ojet serve command (both JS and TScomponents)
• Auto transpilation of Typescript based components to ES5 or ES6 as desired (ES6by default)
• Automatic creation of both debug and minified components by the ojet buildcommand
• Automatic creation of component bundles for JET Packs where bundling isspecified
• Ability to directly publish to the Component Exchange using the ojet publishcomponent command
• Ability to directly package your components into distributable zip files using theojet package component command
About Web ComponentsOracle JET Web Components are packaged as standalone modules that yourapplication can load using RequireJS. The framework supplies APIs that you canuse to register Web Components. Knockout currently provides one and two way databinding, template markup, and Web Component activation.
If you are new to Web Components and would like to learn more, visit this OracleBlogs page for a series of articles that will introduce you to important concepts: https://blogs.oracle.com/groundside/cca.
Web Component Architecture
The following image shows a high-level view of the JET Web Component architecture.In this example, an Oracle JET application is consuming the Web Component, but youcan add Web Components to other JavaScript or Oracle applications where supported.
Chapter 9About Web Components
9-4
Web Components contain:
• A custom DOM element: Named element that functions as a HTML element.
<my-web-component attribute1="value1" attribute2="value2" ...></my-web-component>
• Web Component binding definition: Knockout expression for setting WebComponent attributes.
<my-web-component attribute1="value1" attribute2="[[value2]]" attribute3="{{value3}}"></my-web-component>
attribute1’s value can be a primitive JavaScript type (boolean, number, string) ora JSON object, attribute2’s value uses one way data binding, and attribute3 ‘svalue uses a two way binding. One way bindings on Web Components specify thatthe expression will not update the application’s ViewModel if the value changes.In two way bindings, the expression will update and the value written back to theapplication’s ViewModel.
In the following code sample, the Web Component is declared with threeattributes: type, data, and axis-labels.
<my-chart type=bubble data="[[salesData]]" axis-labels={{showAxisLabels}} ... </my-chart>
Because the salesData expression is declared using one way binding([[salesData]]), it will not be written back to if the data property is updated by theWeb Component's ViewModel. The data property will contain the current value,but the salesData expression will not be updated. Alternatively, if the axisLabelsproperty is updated by the ViewModel, both the axisLabel property and the{{showAxisLabels}} expression will contain the updated value.
• Metadata: Data provided in JSON format which defines the Web Component’srequired properties: name, version, and jetVersion. Metadata may also defineoptional properties, including description, displayName, dependencies, icon,methods, events, and slots.
Web Components support both runtime and design time metadata. Design timemetadata isn’t required at runtime and is useful for design time tools and propertyeditors. Design time tools can define tools-specific metadata extensions to theWeb Component’s metadata. For any tool-specific metadata extensions, refer tothe documentation for that specific tool. For additional information about metadataproperties, see Composite in the API documentation.
The following sample shows some of the available metadata fields withdescriptions of their content and whether they are not used at run time. Requiredmetadata are highlighted in bold.
{ "name": "The component tag name", "version": "The component version. Note that changes to the metadata even for minor updates like updating the jetVersion should result in at least a minor Web Component version change, e.g. 1.0.0
Chapter 9About Web Components
9-5
-> 1.0.1.", "jetVersion": "The semantic version of the supported JET version(s). Web Component authors should not specify a semantic version range that includes unreleased JET major versions as major releases may contain non backwards compatible changes. Authors should instead recertify Web Components with each major release and update the component metadata or release a new version that is compatible with the new release changes.", "description": "A high-level description for the component. Not used at run time.", "displayName": "A user friendly, translatable name of the component. Not used at run time.",
"properties": { "property1": { "description": "A description for the property. Not used at run time.", "displayName": "A user friendly, translatable name of the property. Not used at run time.", "readOnly": "Boolean that determines whether a property can be updated outside of the ViewModel. False by default.", "type": "The type of the property, following Google's Closure Compiler syntax.", "value": "Object containing an optional default value for a property.", "writeback": "Boolean that determines whether an expression bound to this property should be written back to. False by default.", "enumValues": "An optional array of valid enum values for a string property. An error is thrown if a property value does not match one of the provided enumValues.", "properties": "A nested properties object for complex properties. Subproperties exposed using nested properties objects in the metadata can be set using dot notation in the attribute. See the Subproperties section for more details on working with subproperties." },
"property2": { ... contents omitted } },
"methods": { "method1": { "description": "A description for the method. Not used at run time.", "displayName": "A user friendly, translatable name of the method. Not used at run time.", "internalName": "An optional ViewModel method name that is different from, but maps to this method.", "params": "An array of objects describing the method parameter . Not used at run time.", "return": "The return type of the method, following Closure Compiler syntax. Not used at run time."
Chapter 9About Web Components
9-6

}, "method2": { ... contents omitted } },
"events": { "event1": { "bubbles": "Boolean that indicates whether the event bubbles up through the DOM or not. Defaults to false. Not used at run time.", "cancelable": "Boolean that Indicates whether the event is cancelable or not. Defaults to false. Not used at run time.", "description": "A description for the event. Not used at run time.", "displayName": "A user friendly, translatable name of the method. Not used at run time.", "detail": { "field name": "Describes the properties available on the event's detail property which contains data passed when initializing the event. Not used at run time." } }, "event2": { ... contents omitted } },
"slots": { "slot1": { "description": "A description for the slot. Not used at run time.", "displayName": "A user friendly, translatable name of the method. Not used at run time." } }}
• HTML markup: (Required) Contains the View definition which describes how torender the Web Component. The Web Component's View has access to several $variables along with any public variables defined in the Web Component'sViewModel. Some of the variables that can be used in the Web Component's Vieware:
Variables Description
$properties A map of the Web Component's currentproperty values
$slotCounts A map of slot names containing a number ofassociated child nodes assigned to that slot
$unique A unique string value provided for everycomponent instance that can be used forunique ID generation
$uniqueId The ID of the Web Component, if specified.Otherwise, it is the same as unique
Chapter 9About Web Components
9-7
Variables Description
$props Deprecated since 5.0.0, use $propertiesinstead
$slotNodeCounts Deprecated since 5.0.0, use $slotCountsinstead
• JavaScript: Optional script for defining the ViewModel and custom events.
The ViewModel is also where you define callbacks for various stages of the WebComponent’s lifecycle. Web Components support the following optional lifecyclemethods: activated (context), connected (context), bindingsApplied(context), propertyChanged (context), and disconnected (element). For moreinformation on lifecycle methods, see Composite - Lifecycle.
• CSS: Optional styling for the Web Component.
CSS is not scoped to Web Components, and you must define styles appropriately.
• SCSS: Optional files containing Sass variables to generate the Web Component’sCSS.
If you’re defining only a few styles for your component, then adding the CSSmanually may be sufficient. However, there may be use cases where you wantto use Sass variables to generate the CSS. In those cases, create and place theSCSS files in the Web Component’s folder and use the tooling to add node-sass toyour application. See Step 8 - Creating Web Components.
Important:
You must add the Sass files manually to the Web Component’s folder.The tooling will compile any Sass files if they exist, but it will not createthem for you.
Web Component FilesWeb Components can contain CSS, HTML, JavaScript, and metadata files that youcan modify according to your application requirements.
You can create a Web Component manually by creating a folder and adding therequired files within the folder. You can also create a Web Component by usingthe Oracle JET CLI command ojet create component <component-name> thatautomatically generates the Web Component folder with the required files for yourapplication.
When you create a Web Component manually, place the Web Component filesin a folder with the same name as the Web Component tag. Typically, you placethe folder within your application in a jet-composites folder: application-path/jet-composites/my-web-component/.
You can also place your Web Component in a different file location or reference a WebComponent on a different server using RequireJS path mapping. For examples, seeComposite - Packaging and Registration.
Each Web Component file should use the following naming convention to match thepurpose:
• my-web-component—view.html: view template
Chapter 9About Web Components
9-8
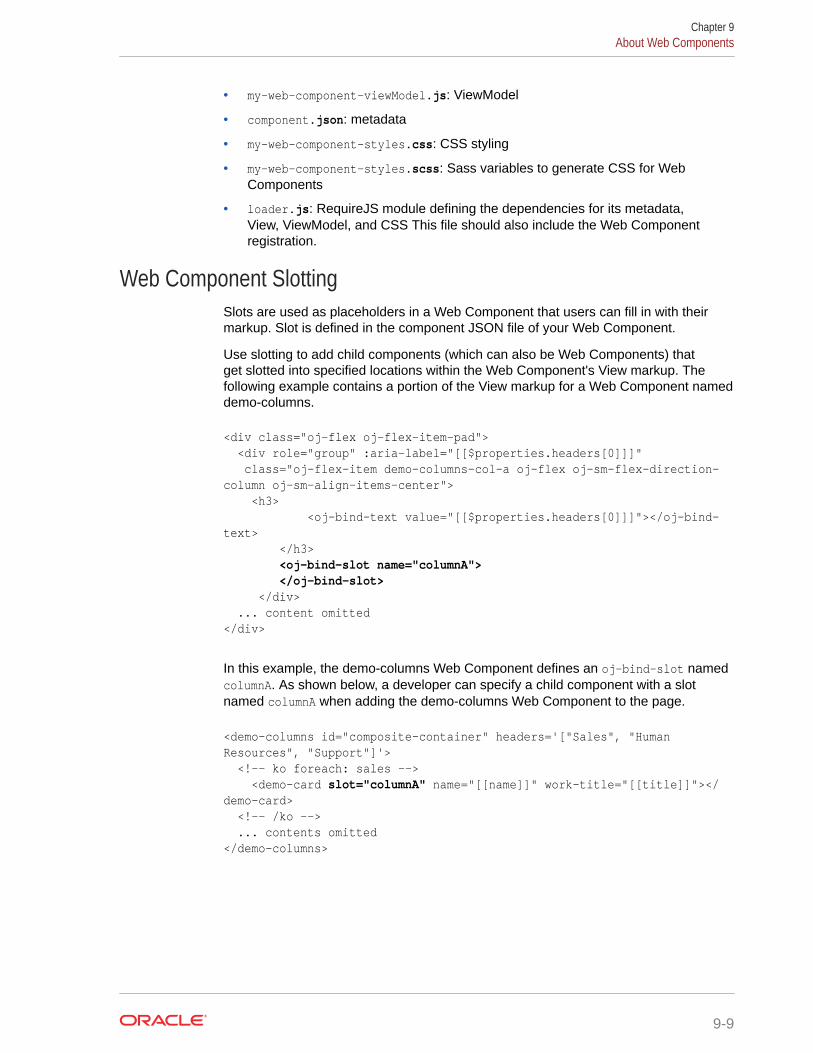
• my-web-component—viewModel.js: ViewModel
• component.json: metadata
• my-web-component-styles.css: CSS styling
• my-web-component-styles.scss: Sass variables to generate CSS for WebComponents
• loader.js: RequireJS module defining the dependencies for its metadata,View, ViewModel, and CSS This file should also include the Web Componentregistration.
Web Component SlottingSlots are used as placeholders in a Web Component that users can fill in with theirmarkup. Slot is defined in the component JSON file of your Web Component.
Use slotting to add child components (which can also be Web Components) thatget slotted into specified locations within the Web Component's View markup. Thefollowing example contains a portion of the View markup for a Web Component nameddemo-columns.
<div class="oj-flex oj-flex-item-pad"> <div role="group" :aria-label="[[$properties.headers[0]]]" class="oj-flex-item demo-columns-col-a oj-flex oj-sm-flex-direction-column oj-sm-align-items-center"> <h3> <oj-bind-text value="[[$properties.headers[0]]]"></oj-bind-text> </h3> <oj-bind-slot name="columnA"> </oj-bind-slot> </div> ... content omitted</div>
In this example, the demo-columns Web Component defines an oj-bind-slot namedcolumnA. As shown below, a developer can specify a child component with a slotnamed columnA when adding the demo-columns Web Component to the page.
<demo-columns id="composite-container" headers='["Sales", "Human Resources", "Support"]'> <!-- ko foreach: sales --> <demo-card slot="columnA" name="[[name]]" work-title="[[title]]"></demo-card> <!-- /ko --> ... contents omitted</demo-columns>
Chapter 9About Web Components
9-9
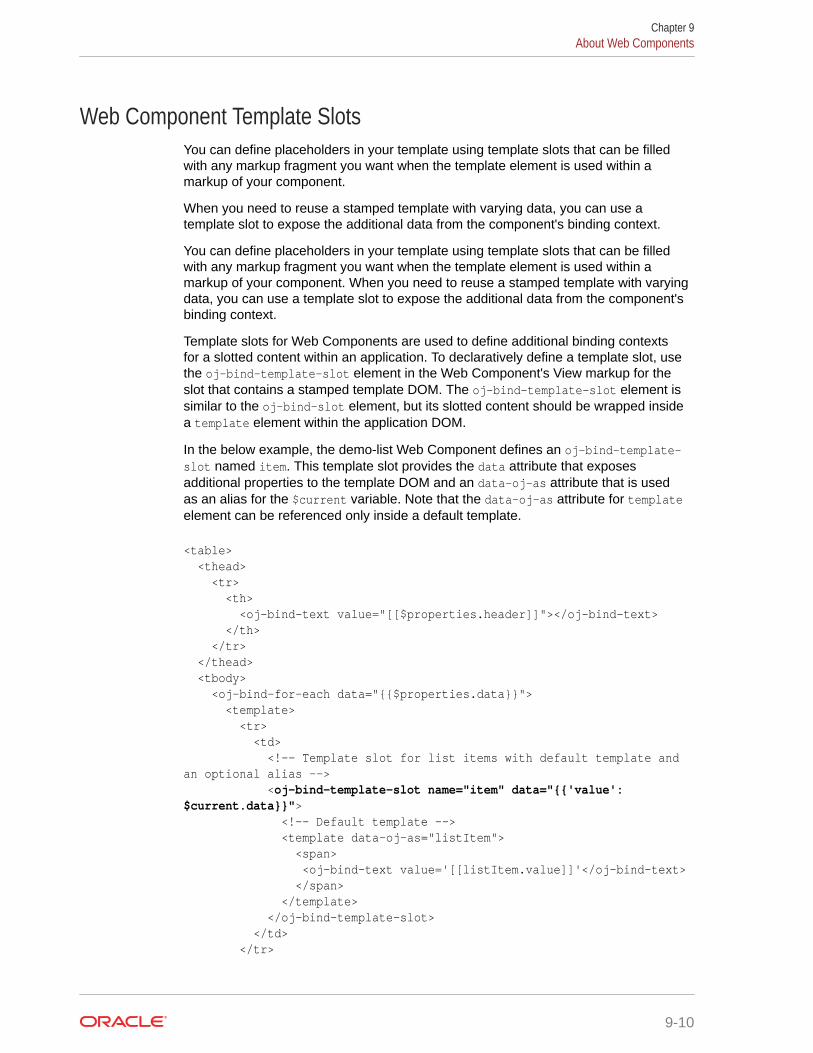
Web Component Template SlotsYou can define placeholders in your template using template slots that can be filledwith any markup fragment you want when the template element is used within amarkup of your component.
When you need to reuse a stamped template with varying data, you can use atemplate slot to expose the additional data from the component's binding context.
You can define placeholders in your template using template slots that can be filledwith any markup fragment you want when the template element is used within amarkup of your component. When you need to reuse a stamped template with varyingdata, you can use a template slot to expose the additional data from the component'sbinding context.
Template slots for Web Components are used to define additional binding contextsfor a slotted content within an application. To declaratively define a template slot, usethe oj-bind-template-slot element in the Web Component's View markup for theslot that contains a stamped template DOM. The oj-bind-template-slot element issimilar to the oj-bind-slot element, but its slotted content should be wrapped insidea template element within the application DOM.
In the below example, the demo-list Web Component defines an oj-bind-template-slot named item. This template slot provides the data attribute that exposesadditional properties to the template DOM and an data-oj-as attribute that is usedas an alias for the $current variable. Note that the data-oj-as attribute for templateelement can be referenced only inside a default template.
<table> <thead> <tr> <th> <oj-bind-text value="[[$properties.header]]"></oj-bind-text> </th> </tr> </thead> <tbody> <oj-bind-for-each data="{{$properties.data}}"> <template> <tr> <td> <!-- Template slot for list items with default template and an optional alias --> <oj-bind-template-slot name="item" data="{{'value': $current.data}}"> <!-- Default template --> <template data-oj-as="listItem"> <span> <oj-bind-text value='[[listItem.value]]'</oj-bind-text> </span> </template> </oj-bind-template-slot> </td> </tr>
Chapter 9About Web Components
9-10
</template> </oj-bind-for-each> </tbody> ... contents omitted</table>
The oj-bind-template-slot children are resolved when the Web Component Viewbindings are applied and are then resolved in the application's binding contextextended with additional properties provided by the Web Component. These additionalproperties are available on the $current variable in the application provided templateslot. The application can use an optional data-oj-as attribute as an alias in thetemplate instead of the $current variable. The following example contains a portion ofthe application’s markup named demo-list.
<demo-list data="{{groceryList}}" header="Groceries"> <template slot="item" data-oj-as="groceryItem"> <oj-checkboxset> <oj-option value="bought"><oj-bind-text value='[[groceryItem.value]]'></oj-bind-text></oj-option> </oj-checkboxset> </template>... contents omitted</demo-list>
The Oracle JET Cookbook at Web Component - Template Slots includes completeexamples for using template slots. oj-bind-template-slot API documentation describesthe attributes and other template slot properties.
Web Component EventsOracle JET Web Components can fire automatic property changed events that aremapped to the properties defined in the component metadata. These components willalso fire custom events for the events delared in the component metadata.
Web Components can internally listen to the automatically generatedpropertyChanged events that are mapped to the properties in the componentmetadata using the propertyChanged lifecycle method. For example, apropertyChanged event is fired when a property is updated. This propertyChangedevent contains the following properties:
• property: Name of the property that changed.
• value: Current value of the property.
• previousValue: Previous value of the property that changed.
• updatedFrom: The location from where the property was updated.
• Subproperty: An object holding information about the subproperty that changed.
When there is a need to declaratively define a custom event for a Web Component,you must declare the event in the component's metadata file. These events willonly be fired if the code of the Web Component calls the dispatchEvent()method. The application can listen to these events by declaring the event listenerattributes and property setters. These event listeners can be added declaratively orprogrammatically.
Chapter 9About Web Components
9-11
For the declarative specification of event listeners, use the on-[event-name] syntax forthe attributes. For example, on-click, on-value-changed, and so on.
<oj-element-name value="{{currentValue}}" on-value-changed="{{valueChangedListener}}"></oj-element-name>
The programmatic specification of event listeners may use the DOMaddEventListener mechanism or by using the custom element property.
The DOM addEventListener mechanism uses the elementName.addEventListenermethod. For example:
elementName.addEventListener("valueChanged", function(event) {...});
The custom element property uses the elementName.onEventName syntax for theproperty setter. For example:
elementName.onValueChanged = function(event) {...};
For more information, see the Web Components - Events and Listeners APIdocumentation.
Web Component ExamplesWeb Components can contain slots, data binding, template slots, nested WebComponents, and events. You can use the examples provided in the Oracle JETCookbook for these Web Component features.
The Oracle JET Cookbook contains complete examples for creating basic andadvanced Web Components. You can also find examples that use slotting and databinding. For details, see Web Component - Basic.
For additional information about Web Component fields and methods, see Compositein the API documentation.
Best Practices for Web Component CreationBest practices for creating Oracle JET Web Components include required andrecommended patterns, configuration, coding practices, version numbering, andstyling standards. Follow best practices to ensure interoperability with other WebComponents and consuming frameworks.
Topics
• Recommended Standard Patterns and Coding Practices
• CSS and Theming Standards
• Version Numbering Standards
Chapter 9Best Practices for Web Component Creation
9-12

Recommended Standard Patterns and Coding PracticesRecommended patterns and coding practices for Oracle JET Web Componentsinclude standards for configuration, versioning, coding, and archival.
Component Versioning
Your Web Component must be assigned a version number in semantic version format.
When assigning and incrementing the version number associated with yourcomponents, be sure to follow semantic version rules and update Major, Minor andPatch version numbers appropriately. By doing so, component consumers will have aclear understanding about the compatibility and costs of migrating between differentversions of your component.
To assign a version number to your Web Component, see semantic version.
JET Version Compatibility
You must use the semantic version rules to specify the jetVersion of the supportedJET version(s). Web Component authors should not specify a semantic version rangethat includes unreleased JET major versions as major releases may contain nonbackwards compatible changes. Authors should instead recertify Web Componentswith each major release and update the component metadata or release a new versionthat is compatible with the new release changes.
Translatable Resources
Developers who want to localize Web Component translatable resources now geta resource bundle (template) when they create their Web Component. Thesecomponents should use the standard Oracle JET mechanism using the ojL10nrequireJS plugin. You must store the translation bundles in a resources/nlssubdirectory within your Web Component’s root folder. You can declare the languagesand locales that you support in the Web Component metadata.
Peer-to-Peer Communication
Components must prefer a shared observable provided by the consumer over anykind of secret signaling mechanism when you are dealing with a complex integration.For example, a filter component and a data display component. By using a sharedobservable you can pre-seed and programmatically interact with the componentsthrough the filter.
Alternatively, you can use events and public methods based on one of the followingapproaches being used:
• A hierarchical relationship between the source and receiver of the event.
• The identity of the source being passed to the receiver.
Note that in some runtime platforms, the developer doing the wiring may not haveaccess to component IDs to pass the relevant identity.
• Listeners attached by components at the document level.
In this case, you are responsible for the cleanup of those listeners, managementof duplicates, and so on. Also, such listeners should preferably be based on Web
Chapter 9Best Practices for Web Component Creation
9-13
Component events, not common events such as click, which might be overriddenby intermediate nodes.
Note:
Under the web-component standards (shadow DOM), events will be re-targeted as they transition the boundary between the component and theconsuming view. That is, the apparent identity of the raising element mightbe changed, particularly in the case of Nested Web Component architecturewhere the event would get tagged with the element representing the outerWeb Component rather than the inner Web Component. Therefore, youshould not rely on the event.target attribute to identify the Web Componentsource when listening at the document level. Instead, the event.deepPathattribute can be used to understand the actual origin of the event.
Access to External Data
Web Components do not permit the usage of the knockout binding hierarchy to obtaindata from outside the Web Component context, for example, $root, $parent[1], andso on. All data transfer in and out of the component must be through the formalproperties, methods, and events.
Object Scope
All properties and functions of Web Components should be confined to the scope ofthe view model. No window or global scope objects should be created. Similarly, theexistence of window scope objects should not be assumed by the Web Componentauthor. If a consumer Web Component defined externally at window or global level isrequired for read or write then that component must be passed in by the consumingview model through a formal property. Even if a well known global reference isneeded from outside of the component, it should be formally injected using the requiredefine() function and declared as a dependency in the Web Component metadata.
External References
If a Web Component must reference an external component, it should be part ofthe formal API of the component. The formal API passes the component referencethrough a property. For example, to allow the registration of a listener, the WebComponent code requires a component reference defined externally. You must notallow Web Components to obtain IDs from hard-coded values, global storage, orwalking the DOM.
Subcomponent IDs
Within the framework if any component needs a specific ID, use context.unique orcontext.uniqueId value to generate the ID. This ID is unique within the context of thepage.
ID Storage
Any generated IDs should not be stored across invocation, such as in local storage orin cookies. The context.unique value for a particular Web Component may changeeach time a particular view is executed.
Chapter 9Best Practices for Web Component Creation
9-14
LocalStorage
It is difficult to consistently identify a unique instance of a Web Component withinan application. So, it is advised not to allow a Web Component to utilize the localstorage of a browser for persisting information that is specific to an instance of thatWeb Component. However, if the application provides a unique key through thepublic properties of the component you can then identify the unique instance of thecomponent.
Additionally, do not use local storage as a secret signaling mechanism betweencomposites. You cannot assure the availability of the capability and so it isrecommended to exchange information through a shared JavaScript object or eventsas part of the public API for the component(s).
String Overrides
Web Components will often contain string resources internally to service theirdefault needs for UI and messages. However, sometimes you may want to allowthe consumer to override these strings. To do this, expose a property for thispurpose on the component. By convention such a property would be calledtranslations, and within it you can have sub-properties for each translatable stringthat relates to a required property on the component, for example requiredHint,requiredMessageSummary, and so on. These properties can then be set on thecomponent tag using sub-property references. For example:
"properties" : { "translations": { "description": "Property to allow override of default messages", "writeback" : false, "properties" : { "requiredHint": { "description": "Change the text of the required hint", "type": "string" }, "requiredMessageSummary": { "description": "...", "type": "string" }, "requiredMessageDetail": { "description": "...", "type": "string" } } } }}
Logging
Use Logger to write log messages from your code in preference to console.log().The Web Components should respect the logging level of the consuming applicationand not change it. You should ideally prefix all log messages emitted from thecomponent with an identification of the source Web Component. As a preference, youcan use the Web Component name. The components should not override the writerdefined by the consuming application.
Chapter 9Best Practices for Web Component Creation
9-15
Expensive Initialization
Web Components should carry out minimum work inside the constructor function.Expensive initialization should be deferred to the activated lifecycle method or later.The constructor of a Web Component is invoked even if the component is not actuallyadded to the visible DOM. For example, if a constructor is invoked within a Knockoutif block. The further lifecycle phases will only occur when the component is actuallyneeded.
Service Classes
The use of global service classes, that is functionality shared across multiple WebComponents, can constitute an invisible contract that the consumer of your WebComponent has to know about. To avoid this, we recommend:
• Create the service as a module that every Web Component can explicitly set it asrequire() block, thus removing the need for the consumer to do this elsewhere.
• Consider the timing issues that might occur if your service class needs some timeto initialize, for example fetching data from a remote service. In such cases, youshould be returning promises to the service object so that the components cansafely avoid trying to use the information before it is actually available.
Using ojModule
If you use ojModule in a Web Component and plan to distribute the Web Componentoutside of your application, you must take additional steps to ensure that the containedojModule could be loaded from the location relative to the location of the WebComponent. Unless the View and ViewModel instances are being passed to ojModuledirectly, you will need to provide the require function instance and the relative pathsfor views and view models. The require function instance should be obtained by thecomponent loader module by specifying require as a dependency.
<div data-bind="ojModule: {require: {instance: require_instance, viewPath: "path_to_Web_Component_Views", modelPath: "path_to_cWeb_Component_ViewModels"}}"></div>
require Option Type Description
instance Function Function defining the require instance
viewPath String String containing the path to the WebComponent’s Views
modelPath String String containing the path to the WebComponent’s ViewModels
For additional information about working with ojModule, see ojModule.
Archiving Web Components for Distribution
If you want to create a zip file for packaging, create an archive with the same nameas the component itself. You may add version-identifying suffixes to the zip file namefor operational reasons. The Web Component artifacts must be placed in the root ofthe zip file, and there should be no intermediate directory structure before reaching thefiles.
Chapter 9Best Practices for Web Component Creation
9-16
Using Lifecycle Methods
If a ViewModel is provided for a Web Component, the following optional callbackmethods can be defined on its ViewModel that will be called at each stage of theWeb Component's lifecycle. Some of the callback methods that can be used are listedbelow:
• activated(context): Invoked after the ViewModel is initialized.
• connected(context): Invoked after the View is first inserted into the DOM andthen each time the Web Component is reconnected to the DOM after beingdisconnected.
• bindingsApplied(context): Invoked after the bindings are applied on the View.
• propertyChanged(context): Invoked when properties are updated before the[property]Changed event is fired.
• disconnected(element): Invoked when this Web Component is disconnectedfrom the DOM.
For additional information on Web Component lifecycle methods, see Composite -Lifecycle.
Template Aliasing
JET components that support inline templates can now use an optional data-oj-asattribute to provide template specific aliases for $current variable at the applicationlevel. In the instances where the component must support multiple template slots asin the case of chart and table components, a single alias may not be sufficient. Insuch cases, you can use an optional data-oj-as attribute on the template element.For more information on the usage of this optional attribute with template slots, seeoj-bind-template-slot API documentation.
CSS and Theming StandardsOracle JET Web Components should comply with all recommended styling standardsto ensure interoperability with other Web Components and consuming applications.
For information on the generic best practices for using CSS and Themes, see BestPractices for Using CSS and Themes.
Standard Details Example
Preventflash ofunstyledcontent
Oracle JET will add the oj-complete class to the WebComponent DOM element after metadata properties havebeen resolved. To prevent a flash of unstyled contentbefore the component properties have been setup, thecomponent’s CSS should include a rule to hide thecomponent until the oj-complete class is set on theelement.
Note that this is an element selector, and there should notbe a dot (.) before acme-branding.
acme-branding:not(.oj-complete) { visibility: hidden;}
Chapter 9Best Practices for Web Component Creation
9-17
Standard Details Example
Add scoping Use an element selector to minimize the chance thatone of your classes is used by someone outside ofyour component and becomes dependent on your internalimplementation. In the example to the right, if someone triesto apply the class acme-branding-header, it will have noeffect if it's not within an acme-branding tag.
acme-branding .acme-branding-header { color: white; background: blue;}
IMPORTANT: If your component alsoincludes a dialog, then when displayed,that dialog will be attached to the maindocument DOM tree and will not bea child of your component. Therefore,if you define a style to apply to adialog defined by your component,you cannot scope it to the componentname as that's not the actual containerfor the dialog when displayed.
To resolve, use the component nameas the prefix instead:
.acme-branding-dialog-background{ color: white; background: blue;}
Avoidelementstyling
The application will often style HTML tag elements likeheaders, links, and so on. In order to blend in with theapplication, avoid styling these elements in your WebComponent. For information about Oracle JET’s use ofstyles on HTML tags, see Use Tag Selectors or StyleClasses with Alta.
Avoid styling on elements likeheaders.
acme-branding .acme-branding-header h3{ font-size: 45px;}
Version Numbering StandardsAll types of Web Components, including standalone, JET Pack, and Resourcecomponents, require a version number and that number should adhere to a semanticversioning (SemVer) scheme that ensures a standard for development teams to followsimilar to the approach adopted by Oracle JET release versioning.
Reference components are a slightly special case as the version of the referencecomponent will always match the version of the NPM library that it references.
All other Web Component types, rely on semantic versioning to designate a versionof the component. Semantic versioning defines a version number which has threeprimary segments and an optional fourth segment. The first three segments aredefined as MAJOR.MINOR.PATCH with these meanings:
• MAJOR version when you make incompatible API changes
Chapter 9Best Practices for Web Component Creation
9-18

• MINOR version when you add functionality in a backward compatible manner
• PATCH version when you make backward compatible bug fixes
Note:
For background on semantic versioning, visit https://semver.org.
When defining a version number for your Web Component, you must define all three ofthese core segments:
1.0.0
Additionally after the PATCH version, you can append an optional extension segmentwhich can consist of two additional pieces of information:
• A segment delimited by a leading hyphen which allows you to assign a pre-releaseversion
• A purely informational segment preceded by a plus sign (+) that you might use tohold a GIT commit hash or other control information. This segment plays no part inthe comparison of component versions.
Here's an example of a fully-defined version number for a pre-release version of acomponent:
1.0.1-beta.1+332
In this case beta.1 is a pre-release indicator and 332 is a build number.
The change in version number for a Web Component should indicate to consumersthe risk level of consuming that new version. Consumers should know that they candrop in a new MINOR or PATCH release of your components without needing to revisetheir code. If you make changes to the Web Component source code that forces theconsuming application to do more than just refresh the Web Component's directory orchange a CDN reference, then you should revise the MAJOR version to indicate this.
The Web Component metadata file component.json lets you define the supportedversion of Oracle JET that the component can work with. This is the jetVersionattribute which can be set to a specific version or version range, as defined by npm-semver. For example, the jetVersion attribute will be set to one of the following:
• Preferred: All MINOR and PATCH versions from the specified version forwarduntil there is a change in MAJOR release number. For example: "jetVersion::"^9.1.0", , which indicates support for that release and all subsequent MINORand PATCH versions, up to (but not including) the next MAJOR release and it isequivalent to ">=9.1.0 <10.0.0".
• The exact semantic version of exact version of Oracle JET that the WebComponent supports. For example: "jetVersion" : "9.1.0", which implies thatthis Web Component supports only Oracle JET 9.1.0.
• All PATCH versions of Oracle JET within a specific MAJOR.MINOR release.For example: "jetVersion" : "9.0.x", which implies that this Web Component
Chapter 9Best Practices for Web Component Creation
9-19
supports every release of JET between JET 9.0.0 and JET 9.1.0 (but specificallynot JET 9.1.0 itself).
• A specific range of Oracle JET versions. For example: "jetVersion" : "9.0.0-9.1.0", which implies that this Web Component supports every release of JETbetween JET 9.0.0 and JET 9.1.0 inclusive (so not including, for example, JET9.2.0 or JET 8.0.0).
Tip:
The Oracle JET recommended format is the first case defined similarto "^9.1.0". Given that JET itself follows the semantic versioning rules,changes that occur in MINOR or PATCH versions ought not break your WebComponent source code. This also means that you don't have to release anupdate to all your Web Components for every MINOR release of Oracle JET(unless you choose to make use of a new feature).
Note:
For background on npm-semver, visit npm documentation at this web sitehttps://docs.npmjs.com/misc/semver.
In the case of JET Packs, you should pay attention to the dependencies attribute inthe component.json file located in the pack. You should strive to require the variouscomponents bundled into the pack to be consumed together, and as such, you shoulddefine such dependencies with absolute version matches rather than version ranges toindicate this. For example, in this case the demo-memory-game component at version1.0.2 will only expect to host a demo-memory-card at exactly version 1.0.2.
{ "name": "demo-memory-game", "version": "1.0.2", "type": "pack", "displayName": "JET Memory Game", "description": "A memory game element with a configurable card set and attempt counter.", "dependencies": { "demo-memory-card": "1.0.2" }}
Create Web ComponentsOracle JET supports a variety of custom Web Component component types. You cancreate standalone Web Components or you can create sets of Web Componentsthat you intend to be used together and you can then assemble those in a JETPack, or pack component type. You can enhance JET Packs by creating resourcecomponents when you have re-usable libraries of assets that are themselves not
Chapter 9Create Web Components
9-20
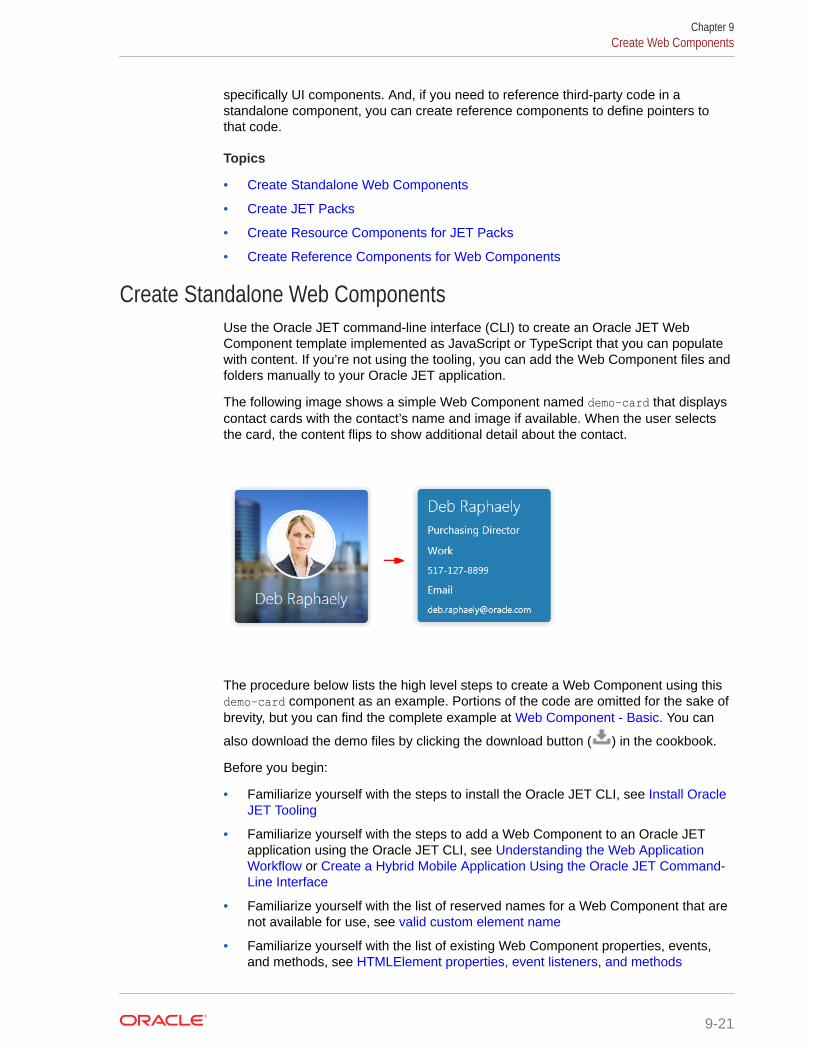
specifically UI components. And, if you need to reference third-party code in astandalone component, you can create reference components to define pointers tothat code.
Topics
• Create Standalone Web Components
• Create JET Packs
• Create Resource Components for JET Packs
• Create Reference Components for Web Components
Create Standalone Web ComponentsUse the Oracle JET command-line interface (CLI) to create an Oracle JET WebComponent template implemented as JavaScript or TypeScript that you can populatewith content. If you’re not using the tooling, you can add the Web Component files andfolders manually to your Oracle JET application.
The following image shows a simple Web Component named demo-card that displayscontact cards with the contact’s name and image if available. When the user selectsthe card, the content flips to show additional detail about the contact.
The procedure below lists the high level steps to create a Web Component using thisdemo-card component as an example. Portions of the code are omitted for the sake ofbrevity, but you can find the complete example at Web Component - Basic. You can
also download the demo files by clicking the download button ( ) in the cookbook.
Before you begin:
• Familiarize yourself with the steps to install the Oracle JET CLI, see Install OracleJET Tooling
• Familiarize yourself with the steps to add a Web Component to an Oracle JETapplication using the Oracle JET CLI, see Understanding the Web ApplicationWorkflow or Create a Hybrid Mobile Application Using the Oracle JET Command-Line Interface
• Familiarize yourself with the list of reserved names for a Web Component that arenot available for use, see valid custom element name
• Familiarize yourself with the list of existing Web Component properties, events,and methods, see HTMLElement properties, event listeners, and methods
Chapter 9Create Web Components
9-21
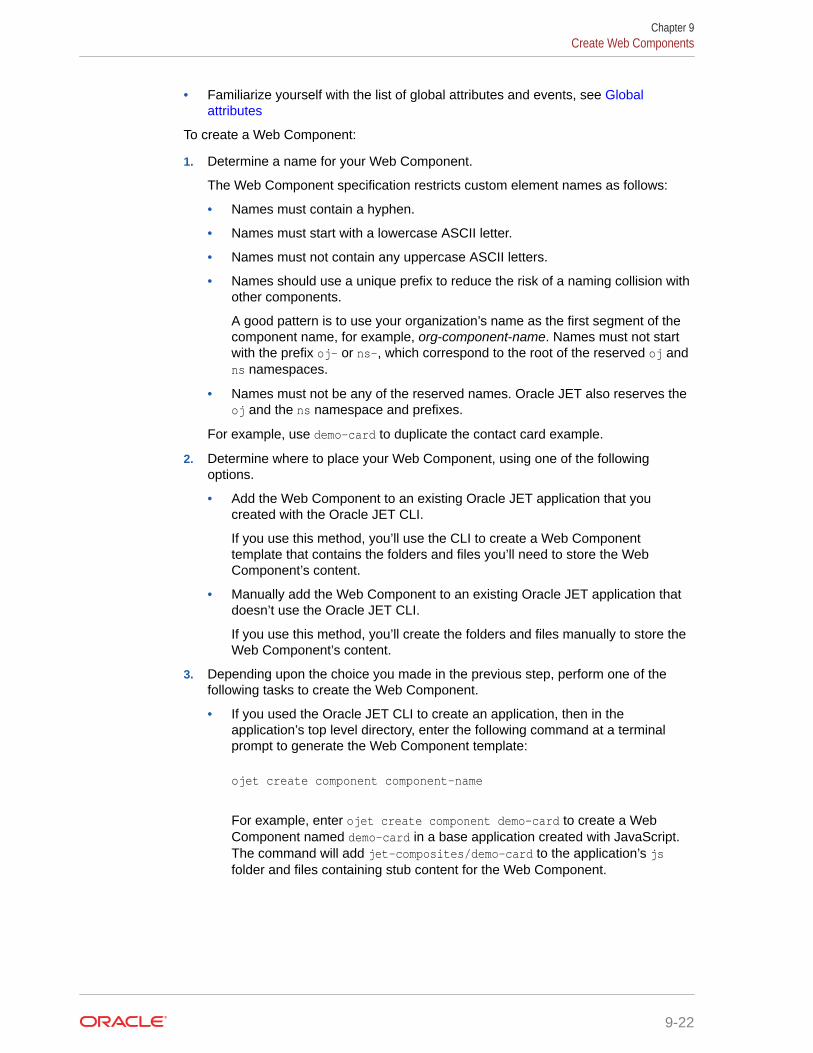
• Familiarize yourself with the list of global attributes and events, see Globalattributes
To create a Web Component:
1. Determine a name for your Web Component.
The Web Component specification restricts custom element names as follows:
• Names must contain a hyphen.
• Names must start with a lowercase ASCII letter.
• Names must not contain any uppercase ASCII letters.
• Names should use a unique prefix to reduce the risk of a naming collision withother components.
A good pattern is to use your organization’s name as the first segment of thecomponent name, for example, org-component-name. Names must not startwith the prefix oj- or ns-, which correspond to the root of the reserved oj andns namespaces.
• Names must not be any of the reserved names. Oracle JET also reserves theoj and the ns namespace and prefixes.
For example, use demo-card to duplicate the contact card example.
2. Determine where to place your Web Component, using one of the followingoptions.
• Add the Web Component to an existing Oracle JET application that youcreated with the Oracle JET CLI.
If you use this method, you’ll use the CLI to create a Web Componenttemplate that contains the folders and files you’ll need to store the WebComponent’s content.
• Manually add the Web Component to an existing Oracle JET application thatdoesn’t use the Oracle JET CLI.
If you use this method, you’ll create the folders and files manually to store theWeb Component’s content.
3. Depending upon the choice you made in the previous step, perform one of thefollowing tasks to create the Web Component.
• If you used the Oracle JET CLI to create an application, then in theapplication’s top level directory, enter the following command at a terminalprompt to generate the Web Component template:
ojet create component component-name
For example, enter ojet create component demo-card to create a WebComponent named demo-card in a base application created with JavaScript.The command will add jet-composites/demo-card to the application’s jsfolder and files containing stub content for the Web Component.
Chapter 9Create Web Components
9-22
The base application's implementation of JavaScript or TypeScript determinesthe folder and implementation of the Web Component. If your base applicationhas a TypeScript implementation, then the ts folder, not the js folder, containsthe stub contents of the Web Component.
• If you’re not using the Oracle JET CLI, create a jet-composites folder in yourapplication’s js folder or ts folder, and add folders containing the name ofeach Web Component you will create.
For the demo-card example, create the jet-composites folder and add ademo-card folder to it. You’ll create the individual Web Component files in theremaining steps.
4. Determine the properties, methods, and events that your Web Component willsupport and add them to the component.json file in the Web Component’s rootfolder, creating the file if needed.
The name of the Web Component properties, event listeners, and methods shouldavoid collision with the existing HTML element properties, event listeners, andmethods. Additionally, the property name slot should not be used. Also, you mustnot re-define the global attributes and events.
The demo-card example defines properties for the Web Component and thecontact’s full name, employee image, title, work number, and email address. Therequired properties are highlighted in bold.
{ "name": "demo-card", "description": "A card element that can display an avatar or initials on one side and employee information on the other.", "version": "1.0.2", "displayName": "Demo Card", "jetVersion": ">=6.0.0 <10.0.0", "properties": { "name": { "description": "The employee's full name.", "type": "string" }, "avatar": { "description": "The url of the employee's image.", "type": "string"
Chapter 9Create Web Components
9-23
}, "workTitle": { "description": "The employee's job title.", "type": "string" }, "workNumber": { "description": "The employee's work number.", "type": "number" }, "email": { "description": "The employee's email.", "type": "string" } }}
This basic demo-card example only defines properties for the Web Component.You can also add metadata that defines methods and events as shown below. Themetadata lists the name of the method or event and supported parameters.
{ "properties": { ... contents omitted }, "methods": { "flipCard": { "description": "Method to toggle flipping a card" }, "enableFlip": { "description": "Enables or disables the ability to flip a card.", "params": [ { "name": "bEnable", "description": "True to enable card flipping and false otherwise.", "type": "boolean" } ] }, }, "events": { "cardClick": { "description": "Triggered when a card is clicked and contains the value of the clicked card..", "bubbles": true, "detail": { "value": { "description": "The value of the card.", "type": "string" } } }
Chapter 9Create Web Components
9-24

}}
5. If your Web Component contains a ViewModel, add its definition to web—component-name-viewModel.js in the Web Component’s root folder, creating thefile if needed.
The code sample below shows the ViewModel for the demo-card WebComponent. Comments describe the purpose, parameters, and return value ofeach function.
define(['knockout', 'ojs/ojknockout'], function(ko) { function model(context) { var self = this; self.initials = null; self.workFormatted = null; var element = context.element;
/** * Formats a 10 digit number as a phone number. * @param {number} number The number to format * @return {string} The formatted phone number */ var formatPhoneNumber = function(number) { return Number(number).toString().replace(/(\d{3})(\d{3})(\d{4})/, '$1-$2-$3'); }
if (context.properties.name) { var initials = context.properties.name.match(/\b\w/g); self.initials = (initials.shift() + initials.pop()).toUpperCase(); } if (context.properties.workNumber) self.workFormatted = formatPhoneNumber(context.properties.workNumber);
/** * Flips a card * @param {MouseEvent} event The click event */ self.flipCard = function(event) { if (event.type === 'click' || (event.type === 'keypress' && event.keyCode === 13)) { // It's better to look for View elements using a selector // instead of by DOM node order which isn't guaranteed. $(element).children('.demo-card-flip-container').toggleClass('demo-card-flipped'); } }; }
Chapter 9Create Web Components
9-25
return model; })
6. In the Web Component’s root folder, add the View definition to web—component-name-view.html, creating the file if needed.
The View for the demo-card Web Component is shown below. Any propertydefined in the component’s metadata is accessed using the $properties propertyof the View binding context.
<div tabindex="0" role="group" class="demo-card-flip-container" on-click="[[flipCard]]" on-keypress="[[flipCard]]" :aria-label="[[$properties.name + ' Press Enter for more info.']]"> <div class="demo-card-front-side"> <oj-avatar class="demo-card-avatar" role="img" size="lg" initials="[[initials]]" src="[[$properties.avatar]]" :aria-label="[['Avatar of ' + $properties.name]]"> </oj-avatar> <h2> <oj-bind-text value="[[$properties.name]]"></oj-bind-text> </h2> </div>
<div class="demo-card-back-side"> <div class="demo-card-inner-back-side"> <h2> <oj-bind-text value="[[$properties.name]]"></oj-bind-text> </h2> <h5> <oj-bind-text value="[[$properties.workTitle]]"></oj-bind-text> </h5> <oj-bind-if test="[[$properties.workNumber != null]]"> <h5>Work</h5> <span class="demo-card-text"><oj-bind-text value="[[workFormatted]]"></oj-bind-text></span> </oj-bind-if> <oj-bind-if test="[[$properties.email != null]]"> <h5>Email</h5> <span class="demo-card-text"><oj-bind-text value="[[$properties.email]]"></oj-bind-text></span> </oj-bind-if> </div> </div></div>
For accessibility, the View’s role is defined as group, with aria-label specifiedfor the contact’s name. In general, follow the same accessibility guidelines for
Chapter 9Create Web Components
9-26
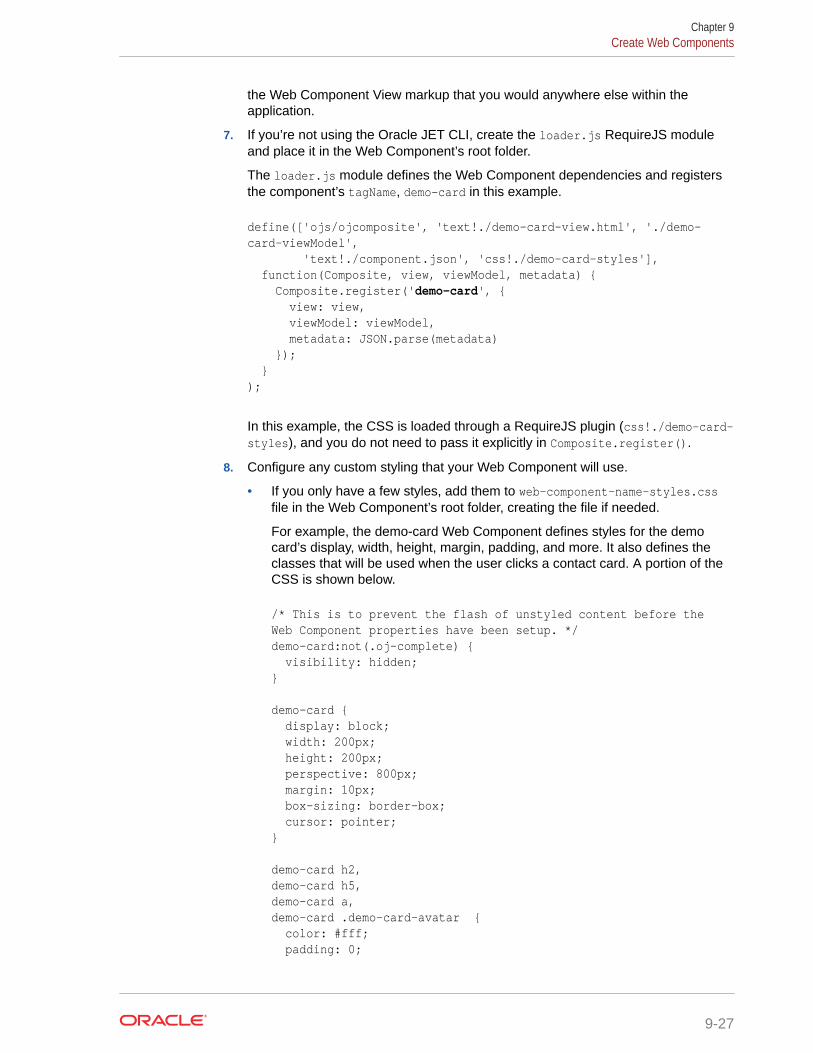
the Web Component View markup that you would anywhere else within theapplication.
7. If you’re not using the Oracle JET CLI, create the loader.js RequireJS moduleand place it in the Web Component’s root folder.
The loader.js module defines the Web Component dependencies and registersthe component’s tagName, demo-card in this example.
define(['ojs/ojcomposite', 'text!./demo-card-view.html', './demo-card-viewModel', 'text!./component.json', 'css!./demo-card-styles'], function(Composite, view, viewModel, metadata) { Composite.register('demo-card', { view: view, viewModel: viewModel, metadata: JSON.parse(metadata) }); });
In this example, the CSS is loaded through a RequireJS plugin (css!./demo-card-styles), and you do not need to pass it explicitly in Composite.register().
8. Configure any custom styling that your Web Component will use.
• If you only have a few styles, add them to web—component-name-styles.cssfile in the Web Component’s root folder, creating the file if needed.
For example, the demo-card Web Component defines styles for the democard’s display, width, height, margin, padding, and more. It also defines theclasses that will be used when the user clicks a contact card. A portion of theCSS is shown below.
/* This is to prevent the flash of unstyled content before the Web Component properties have been setup. */demo-card:not(.oj-complete) { visibility: hidden;}
demo-card { display: block; width: 200px; height: 200px; perspective: 800px; margin: 10px; box-sizing: border-box; cursor: pointer;}
demo-card h2,demo-card h5,demo-card a, demo-card .demo-card-avatar { color: #fff; padding: 0;
Chapter 9Create Web Components
9-27
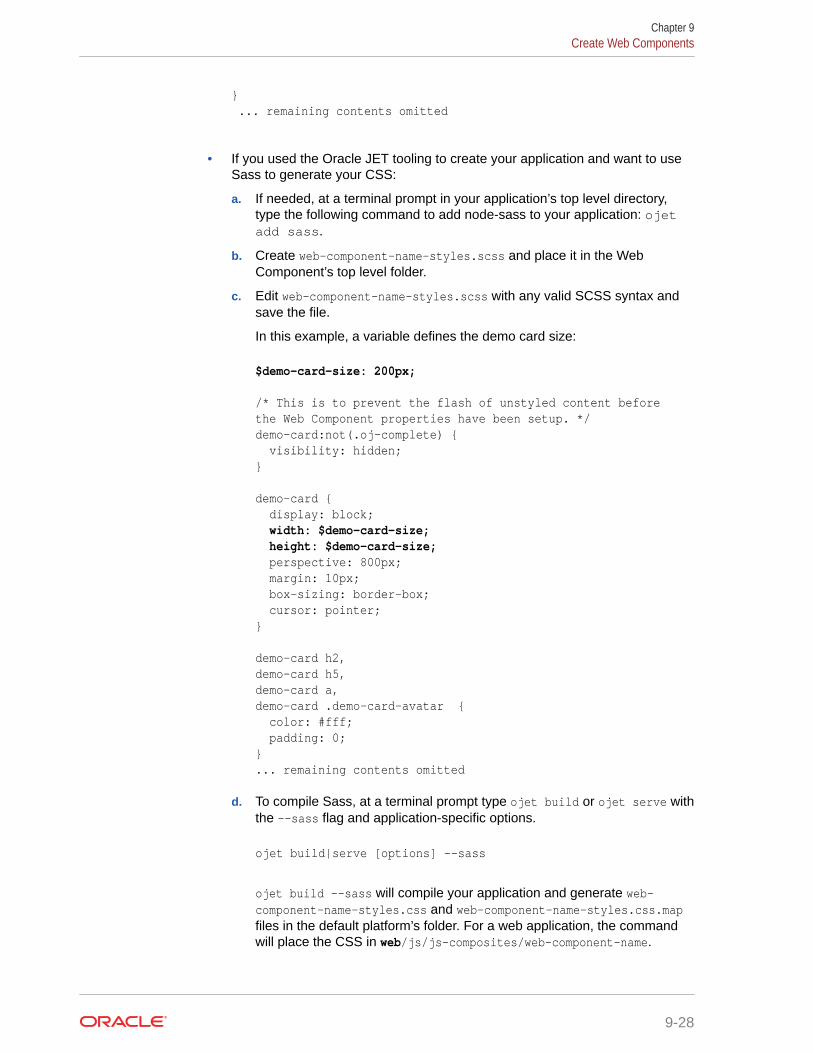
} ... remaining contents omitted
• If you used the Oracle JET tooling to create your application and want to useSass to generate your CSS:
a. If needed, at a terminal prompt in your application’s top level directory,type the following command to add node-sass to your application: ojetadd sass.
b. Create web—component-name-styles.scss and place it in the WebComponent’s top level folder.
c. Edit web—component-name-styles.scss with any valid SCSS syntax andsave the file.
In this example, a variable defines the demo card size:
$demo-card-size: 200px;
/* This is to prevent the flash of unstyled content before the Web Component properties have been setup. */demo-card:not(.oj-complete) { visibility: hidden;}
demo-card { display: block; width: $demo-card-size; height: $demo-card-size; perspective: 800px; margin: 10px; box-sizing: border-box; cursor: pointer;}
demo-card h2,demo-card h5,demo-card a,demo-card .demo-card-avatar { color: #fff; padding: 0;}... remaining contents omitted
d. To compile Sass, at a terminal prompt type ojet build or ojet serve withthe --sass flag and application-specific options.
ojet build|serve [options] --sass
ojet build --sass will compile your application and generate web—component-name-styles.css and web—component-name-styles.css.mapfiles in the default platform’s folder. For a web application, the commandwill place the CSS in web/js/js-composites/web—component-name.
Chapter 9Create Web Components
9-28
ojet serve --sass will also compile your application but will displaythe web application in a running browser with livereload enabled.If you save a change to web—component-name-styles.scss in theapplication’s src/js/jet-composites/web—component-name folder, OracleJET will compile Sass again and refresh the display.
Tip:
For help with ojet command syntax, type ojet help at aterminal prompt.
9. If you want to add documentation for your Web Component, add content toREADME.md in your Web Component's root folder, creating the file if needed.
Your README.md file should include an overview of your component with well-formatted examples. Include any additional information that you want to provide toyour component’s consumers. The recommended standard for README file formatis markdown.
For help with markdown, refer to https://guides.github.com/features/mastering-markdown/.
For the complete code of the demo-card Web Component CSS styles, see demo-card-styles.css in the Web Component - Basic cookbook sample.
For information on adding Web Component metadata that defines methods andevents, see the Web Component - Events cookbook sample.
Create JET PacksCreate JET Packs to simplify project management for consumers who might pick upa component that is related to one or more components. You may require specificversions of the referenced components for individual JET Packs.
Fundamentally, the JET Pack is a library of related Web Components that does notdirectly include those assets, but is as an index to a particular versioned stripe ofcomponents.
Note:
Note there is one exception to the pack as a reference mechanism forrelated components. A pack might include one or more RequireJS bundlefiles which package up optimized forms of the component set into a smallnumber of physical downloads. This, however, is always in addition tothe actual components being available as independent entities in OracleComponent Exchange.
The components referenced by the JET Pack are intended to be used together andtheir usage is restricted by individual component version. Thus the JET Pack thatyou create will tie very specific versions of each component into a relationship withvery specific, fixed versions of the other components in the same set. Thus a JETPack itself has a "version stripe" which determines the specific components that usersimport into their applications. Since the version number of individual components may
Chapter 9Create Web Components
9-29
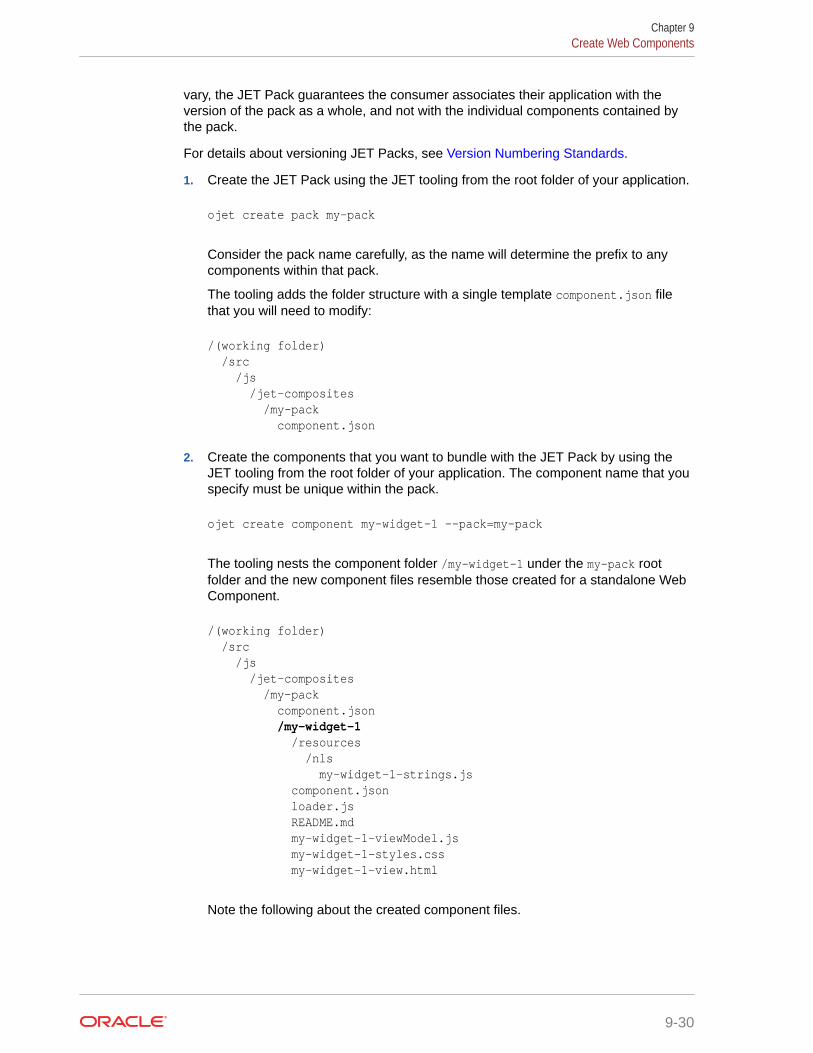
vary, the JET Pack guarantees the consumer associates their application with theversion of the pack as a whole, and not with the individual components contained bythe pack.
For details about versioning JET Packs, see Version Numbering Standards.
1. Create the JET Pack using the JET tooling from the root folder of your application.
ojet create pack my-pack
Consider the pack name carefully, as the name will determine the prefix to anycomponents within that pack.
The tooling adds the folder structure with a single template component.json filethat you will need to modify:
/(working folder) /src /js /jet-composites /my-pack component.json
2. Create the components that you want to bundle with the JET Pack by using theJET tooling from the root folder of your application. The component name that youspecify must be unique within the pack.
ojet create component my-widget-1 --pack=my-pack
The tooling nests the component folder /my-widget-1 under the my-pack rootfolder and the new component files resemble those created for a standalone WebComponent.
/(working folder) /src /js /jet-composites /my-pack component.json /my-widget-1 /resources /nls my-widget-1-strings.js component.json loader.js README.md my-widget-1-viewModel.js my-widget-1-styles.css my-widget-1-view.html
Note the following about the created component files.
Chapter 9Create Web Components
9-30

• component.js specifies the name of the component as my-widget-1 and thepack is set to my-pack, providing the complete definition of the component'sidentity.
• loader.js registers the HTML tag for the new component as my-pack-my-widget-1. This is the full name of the component, which is a concatenationof the pack name and the component name. When you need to refer to thiscomponent in a dependency from another component's metadata or in HTML,you will use the full name.
3. Optionally, for any Resource components that you created, as described in CreateResource Components for JET Packs, add the component's working folder with itsown component.json file to the pack file structure.
The tooling nests the component folder /my-widget-1 under the my-pack rootfolder and the new component files resemble those created for a standalone WebComponent.
/(working folder) /src /js /jet-composites /my-pack component.json /my-widget-1 /resources /nls my-widget-1-strings.js component.json loader.js README.md my-widget-1-viewModel.js my-widget-1-styles.css my-widget-1-view.html /my-resource-component-1 component.json /converters file1.js ... /resources /nls string-file1.js /root strings-file.js /validators file1.js ...
4. Optionally, generate any required bundled for desired components of the pack.Refer to RequireJS documentation for details at the https://requirejs.org web site.
Chapter 9Create Web Components
9-31
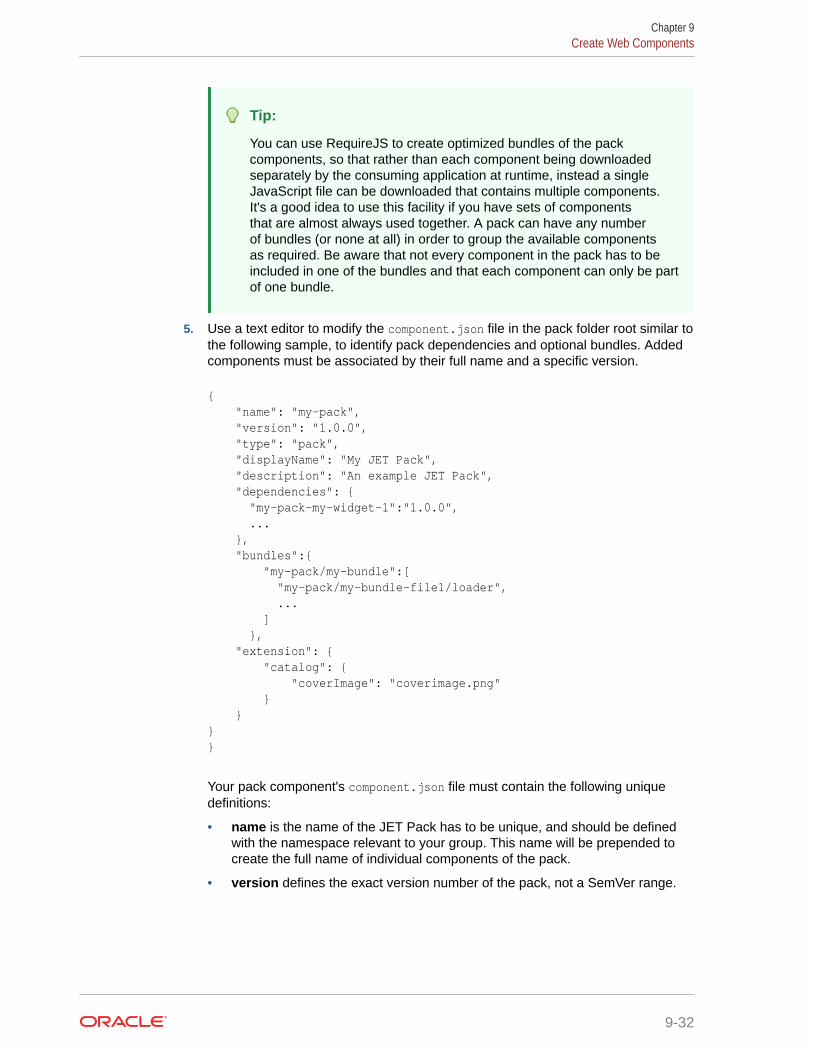
Tip:
You can use RequireJS to create optimized bundles of the packcomponents, so that rather than each component being downloadedseparately by the consuming application at runtime, instead a singleJavaScript file can be downloaded that contains multiple components.It's a good idea to use this facility if you have sets of componentsthat are almost always used together. A pack can have any numberof bundles (or none at all) in order to group the available componentsas required. Be aware that not every component in the pack has to beincluded in one of the bundles and that each component can only be partof one bundle.
5. Use a text editor to modify the component.json file in the pack folder root similar tothe following sample, to identify pack dependencies and optional bundles. Addedcomponents must be associated by their full name and a specific version.
{ "name": "my-pack", "version": "1.0.0", "type": "pack", "displayName": "My JET Pack", "description": "An example JET Pack", "dependencies": { "my-pack-my-widget-1":"1.0.0", ... }, "bundles":{ "my-pack/my-bundle":[ "my-pack/my-bundle-file1/loader", ... ] }, "extension": { "catalog": { "coverImage": "coverimage.png" } }}}
Your pack component's component.json file must contain the following uniquedefinitions:
• name is the name of the JET Pack has to be unique, and should be definedwith the namespace relevant to your group. This name will be prepended tocreate the full name of individual components of the pack.
• version defines the exact version number of the pack, not a SemVer range.
Chapter 9Create Web Components
9-32
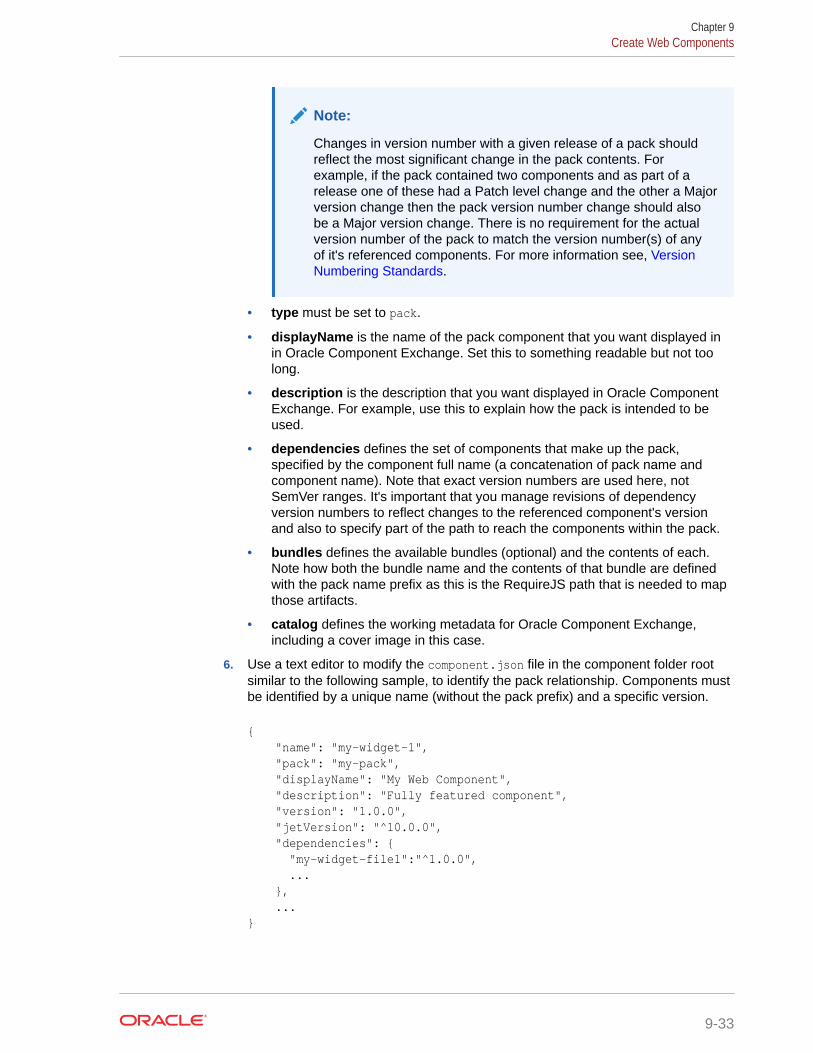
Note:
Changes in version number with a given release of a pack shouldreflect the most significant change in the pack contents. Forexample, if the pack contained two components and as part of arelease one of these had a Patch level change and the other a Majorversion change then the pack version number change should alsobe a Major version change. There is no requirement for the actualversion number of the pack to match the version number(s) of anyof it's referenced components. For more information see, VersionNumbering Standards.
• type must be set to pack.
• displayName is the name of the pack component that you want displayed inin Oracle Component Exchange. Set this to something readable but not toolong.
• description is the description that you want displayed in Oracle ComponentExchange. For example, use this to explain how the pack is intended to beused.
• dependencies defines the set of components that make up the pack,specified by the component full name (a concatenation of pack name andcomponent name). Note that exact version numbers are used here, notSemVer ranges. It's important that you manage revisions of dependencyversion numbers to reflect changes to the referenced component's versionand also to specify part of the path to reach the components within the pack.
• bundles defines the available bundles (optional) and the contents of each.Note how both the bundle name and the contents of that bundle are definedwith the pack name prefix as this is the RequireJS path that is needed to mapthose artifacts.
• catalog defines the working metadata for Oracle Component Exchange,including a cover image in this case.
6. Use a text editor to modify the component.json file in the component folder rootsimilar to the following sample, to identify the pack relationship. Components mustbe identified by a unique name (without the pack prefix) and a specific version.
{ "name": "my-widget-1", "pack": "my-pack", "displayName": "My Web Component", "description": "Fully featured component", "version": "1.0.0", "jetVersion": "^10.0.0", "dependencies": { "my-widget-file1":"^1.0.0", ... }, ...}
Chapter 9Create Web Components
9-33
Your pack component's component.json file must contain the following uniquedefinitions:
• name is the name of the component has to be unique. This name willbe prepended with the pack name to create the component full name. Forexample,
• pack is the name of the JET Pack that the component is a part of.
• displayName is the name of the component that you want displayed in OracleComponent Exchange.
• description is the description that you want displayed in Oracle ComponentExchange. For example, use this to explain the role of the components in thepack as they are intended to be used.
• version defines the exact version number of the component, not a SemVerrange.
• jetVersion defines the compatible version(s) of Oracle JET, specified by asemantic version (SemVer) range. It's important that you manage revisions ofthis version number to inform consumers of the compatibility of a given changeand also to specify part of the path to reach the components within the pack.For more information see, Version Numbering Standards.
• dependencies defines the set of libraries and other components that make upthe component within the pack. In the case where a dependent component isalso listed as a member of the JET Pack, specify components here by theirfull name (a concatenation of pack name and component name). For example,my-pack-my-component. Note that SemVer ranges are allowed. It's importantthat the range selected for a component within a particular JET Pack versionoverlaps with the members of that stripe.
7. Optionally, create a readme file in the root of your working folder. This should bedefined as a plain text file called README.txt (or README.md when using markdownformat).
8. Optionally, create a cover image in the root of your working folder to display thecomponent on Oracle Exchange. The file name can be the same as the nameattribute in the component.json file.
9. Use the JET tooling to create a zip archive of the JET Pack working folder whenyou want to upload the component to Oracle Component Exchange, as describedin Package Web Components.
10. Support consuming the JET Pack in Oracle Visual Builder projects by uploadingthe component to Oracle Component Exchange, as describe in Publish WebComponents to Oracle Component Exchange.
Create Resource Components for JET PacksCreate a resource component when you want to reuse assets across web componentsthat you assemble into JET Packs. The resource component can be reused bymultiple JET Packs.
When dealing with complex sets of components you may find that makes sense toshare certain assets between multiple components. In such cases, the componentscan all be included into a single JET Pack and then a resource component can beadded to the pack in order to hold the shared assets. There is no constraint on whatcan be stored in a pack, typically it may expose shared JavaScript, CSS, and JSON
Chapter 9Create Web Components
9-34
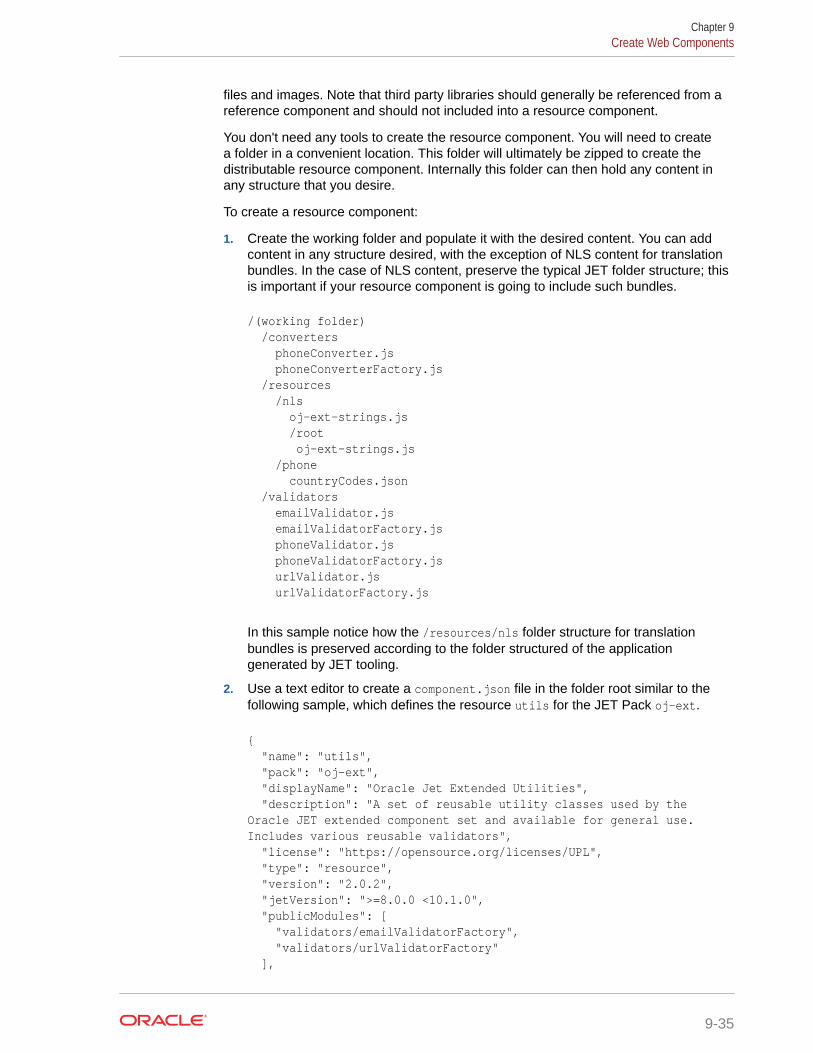
files and images. Note that third party libraries should generally be referenced from areference component and should not included into a resource component.
You don't need any tools to create the resource component. You will need to createa folder in a convenient location. This folder will ultimately be zipped to create thedistributable resource component. Internally this folder can then hold any content inany structure that you desire.
To create a resource component:
1. Create the working folder and populate it with the desired content. You can addcontent in any structure desired, with the exception of NLS content for translationbundles. In the case of NLS content, preserve the typical JET folder structure; thisis important if your resource component is going to include such bundles.
/(working folder) /converters phoneConverter.js phoneConverterFactory.js /resources /nls oj-ext-strings.js /root oj-ext-strings.js /phone countryCodes.json /validators emailValidator.js emailValidatorFactory.js phoneValidator.js phoneValidatorFactory.js urlValidator.js urlValidatorFactory.js
In this sample notice how the /resources/nls folder structure for translationbundles is preserved according to the folder structured of the applicationgenerated by JET tooling.
2. Use a text editor to create a component.json file in the folder root similar to thefollowing sample, which defines the resource utils for the JET Pack oj-ext.
{ "name": "utils", "pack": "oj-ext", "displayName": "Oracle Jet Extended Utilities", "description": "A set of reusable utility classes used by the Oracle JET extended component set and available for general use. Includes various reusable validators", "license": "https://opensource.org/licenses/UPL", "type": "resource", "version": "2.0.2", "jetVersion": ">=8.0.0 <10.1.0", "publicModules": [ "validators/emailValidatorFactory", "validators/urlValidatorFactory" ],
Chapter 9Create Web Components
9-35
"extension":{ "catalog": { "category": "Resources", "coverImage": "cca-resource-folder.svg" } }}
Your resource component's component.json file must contain the following uniquedefinitions:
• name is the name of the resource component has to be unique, and should bedefined with the namespace relevant to your group.
• pack is the name of the JET Pack containing the resource component.
• displayName is the name of the resource component as displayed in OracleComponent Exchange. Set this to something readable but not too long.
• description is the description that you want displayed in Oracle ComponentExchange. For example, use this to explain the available assets provided bythe component.
• type must be set to resource.
• version defines the semantic version (SemVer) of the resource component asa whole. It's important that you manage revisions of this version number toinform consumers of the compatibility of a given change.
Note:
Changes to the resource component version should roll up all ofthe changes within the resource component, which might not berestricted to changes only in .js files. A change to a CSS selectordefined in a shared .css file can trigger a major version changewhen it forces consumers to make changes to their downstreamuses of that selector. For more information see, Version NumberingStandards.
• jetVersion defines the supported Oracle JET version range using SemVernotation. This is optional and depends on the nature of what you includeinto the resource component. If the component contains JavaScript codeand any of that code makes reference to Oracle JET APIs, then you reallyshould include a JET version range in that case. For more information aboutspecifying semantic versions see Version Numbering Standards.
• publicModules lists entry points within the resource component that youconsider as being public and intend to be consumed by any component thatdepends on this component. Any API not listed in the array is considered to bepack-private and therefore can only be used by components within the samepack namespace, but may not be used externally.
• catalog defines the working metadata for Oracle Component Exchange,including a cover image in this case.
Chapter 9Create Web Components
9-36
3. Optionally, create a readme file in the root of your working folder. A readme canbe used to document the assets of the resource. This should be defined as a plaintext file called README.txt (or README.md when using markdown format).
Tip:
Take care to explain the state of the assets. For example, you mightchoose to include utility classes in the resource component that aredeemed public and can safely be used by external consumers (forexample, code outside of the JET Pack that the component belongs to).However, you may want to document other assets as private to the packitself.
4. Optionally, create a change log file in the root of your working folder. Thechange log can detail significant changes to the pack over time and is stronglyrecommended. This should be defined as a text file called CHANGELOG.txt (orCHANGELOG.md when using markdown format).
5. Optionally, include a License file in the root of your working folder.
6. Optionally, create a cover image in the root of your working folder to display thecomponent on Oracle Exchange. Using the third party logo can be helpful here toidentify the usage. The file name can be the same as the name attribute in thecomponent.json file.
7. Create a zip archive of the working folder when you want to upload thecomponent to Oracle Component Exchange. Oracle recommends using theformat <fullName>-<version>.zip for the archive file name. For example, oj-ext-utils-2.0.2.zip.
For information about using the resource component in a JET Pack, see Create JETPacks.
Create Reference Components for Web ComponentsCreate a reference component when you need to obtain a pointer to third-partylibraries for use by Web Components.
Sometimes your JET Web Components need to use third party libraries to function andalthough it is possible to embed such libraries within the component itself, or within aresource component, it generally better to reference a shared copy of the library bydefining a reference component.Create the Reference Component
You don't need any tools to create the reference component. You will need to createa folder in a convenient location where you will define metadata for the referencecomponent in the component.json file. This folder will ultimately be zipped to createthe distributable reference component.
Reference components are generally standalone, so the component.json file youcreate must not be contained within a JET Pack.
To create a reference component:
Chapter 9Create Web Components
9-37
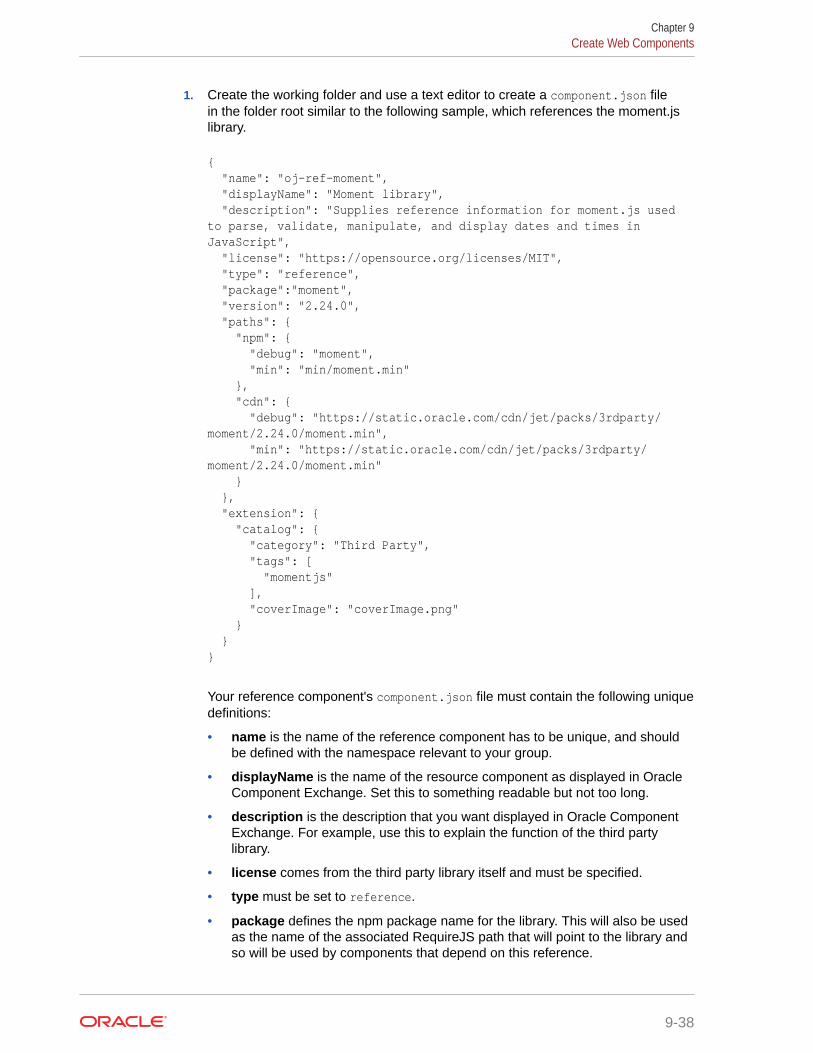
1. Create the working folder and use a text editor to create a component.json filein the folder root similar to the following sample, which references the moment.jslibrary.
{ "name": "oj-ref-moment", "displayName": "Moment library", "description": "Supplies reference information for moment.js used to parse, validate, manipulate, and display dates and times in JavaScript", "license": "https://opensource.org/licenses/MIT", "type": "reference", "package":"moment", "version": "2.24.0", "paths": { "npm": { "debug": "moment", "min": "min/moment.min" }, "cdn": { "debug": "https://static.oracle.com/cdn/jet/packs/3rdparty/moment/2.24.0/moment.min", "min": "https://static.oracle.com/cdn/jet/packs/3rdparty/moment/2.24.0/moment.min" } }, "extension": { "catalog": { "category": "Third Party", "tags": [ "momentjs" ], "coverImage": "coverImage.png" } }}
Your reference component's component.json file must contain the following uniquedefinitions:
• name is the name of the reference component has to be unique, and shouldbe defined with the namespace relevant to your group.
• displayName is the name of the resource component as displayed in OracleComponent Exchange. Set this to something readable but not too long.
• description is the description that you want displayed in Oracle ComponentExchange. For example, use this to explain the function of the third partylibrary.
• license comes from the third party library itself and must be specified.
• type must be set to reference.
• package defines the npm package name for the library. This will also be usedas the name of the associated RequireJS path that will point to the library andso will be used by components that depend on this reference.
Chapter 9Create Web Components
9-38

• version should reflect the version of the third party library that this referencecomponent defines. If you need to be able to reference multiple versions of agiven library then you will need multiple versions of the reference componentin order to map each one.
• paths defines the CDN locations for this library. See below for moreinformation about getting access to the Oracle CDN.
• min points to the optimal version of the library to consume. The debug pathcan point to a debug version or just the min version as here.
• catalog defines the working metadata for Oracle Component Exchangeincluding a cover image in this case.
2. Optionally, create readme file in the root of your working folder. A readme can beused to point at the third party component web site for reference. This should bedefined as a plain text file called README.txt (or README.md when using markdownformat).
3. Optionally, create a cover image in the root of your working folder to display thecomponent on Oracle Exchange. Using the third party logo can be helpful here toidentify the usage. The file name can be the same as the name attribute in thecomponent.json file.
4. Create a zip archive of the working folder when you want to upload thecomponent to Oracle Component Exchange. Oracle recommends using theformat <fullName>-<version>.zip for the archive file name. For example, oj-ref-moment-2.24.0.zip.
5. Support consuming the reference component in Oracle Visual Builder projects byuploading the component to a CDN. See below for more details.
Consume the Reference Component
When your Web Components need access to the third party library defined in oneof these reference components, you use the dependency attribute metadata in thecomponent.json to point to either an explicit version of the reference component oryou can specify a semantic range. Here's a simple example of a component thatconsumes two such reference components at specific versions:
{ "name":"calendar", "pack":"oj-sample", "displayName": "JET Calendar", "description": "FullCalendar wrapper with Accessibility added.", "version": "1.0.2", "jetVersion": "^9.0.0", "dependencies": { "oj-ref-moment":"2.24.0", "oj-ref-fullcalendar":"3.9.0" }, ...
When the above component is added to an Oracle JET or Oracle Visual Builder projectthis dependency information will be used to create the correct RequireJS paths for thethird party libraries pointed to be the reference component.
Chapter 9Create Web Components
9-39
For more information about semantic version usage, see Version NumberingStandards.
Alternatively, when you install a Web Component that depends on a referencecomponent and you use Oracle JET CLI, the tooling will automatically do an npminstall for you so that the libraries are local. However, with the same component usedin Oracle Visual Builder, a CDN location must be used and therefore the referencecomponent must exist on the CDN in order to be used in Visual Builder.
Test Web ComponentsTest Oracle JET Web Components using your favorite testing tools for client-sideJavaScript applications.
Regardless of the test method you choose, be sure that your tests fully exercise theWeb Component’s:
• ViewModel (if it exists)
Ideally, your test results should be verifiable via code coverage numbers.
• HTML view
Be sure to include any DOM branches that might be conditionally rendered, andtest all slots with and without default content.
• Properties and property values
• Events
• Methods
• Accessibility
• Security
For additional information about testing Oracle JET applications, see Test Oracle JETApplications.
Add Web Components to Your PageTo use an Oracle JET Web Component, you must register the Web Component’sloader file in your application and you must also include the Web Component elementin the application’s HTML. You can add any supporting CSS or files as needed.
1. In the Web Components’s root folder, open component.json and verify that yourversion of Oracle JET is compatible with the version specified in jetVersion.
For example, the demo-card example specifies the following jetVersion:
"jetVersion": ">=3.0.0 <10.0.0"
This indicates that the component is compatible with JET versions greater than orequal to 3.0.0 and less than 10.0.0.
If your version of Oracle JET is lower than the jetVersion, you must update yourversion of Oracle JET before using the component. If your version of Oracle JETis greater than the jetVersion, contact the developer to get an updated version ofthe component.
Chapter 9Test Web Components
9-40
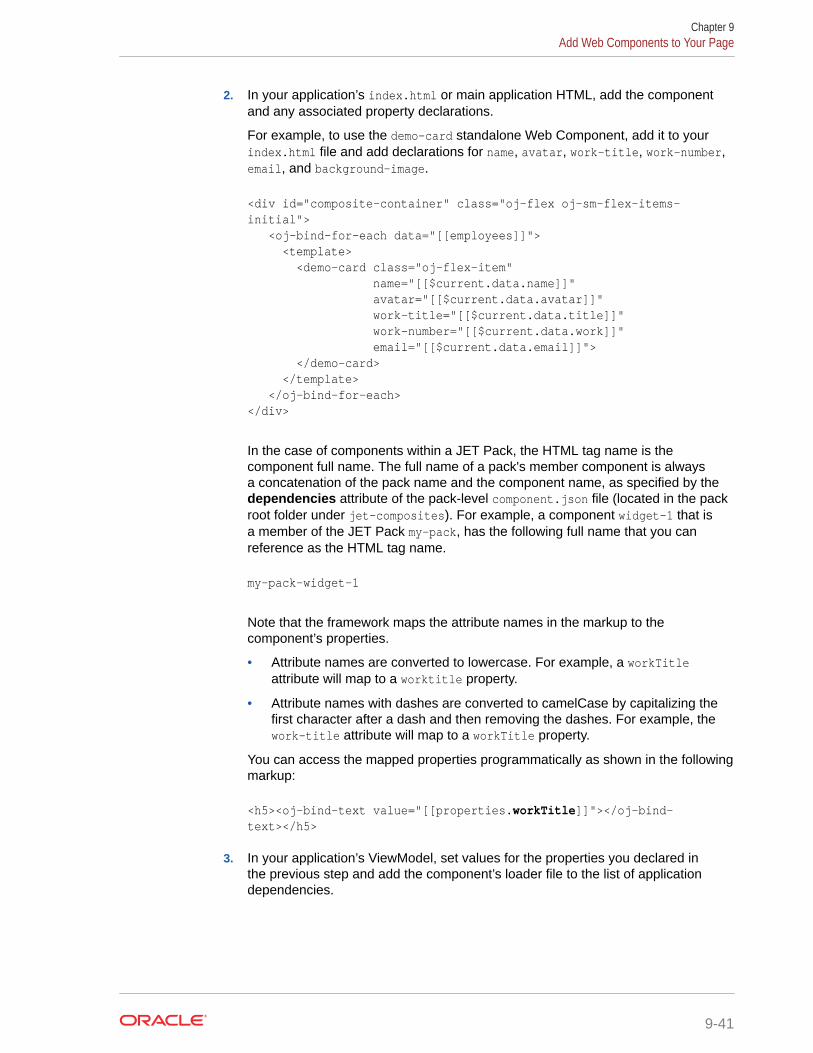
2. In your application’s index.html or main application HTML, add the componentand any associated property declarations.
For example, to use the demo-card standalone Web Component, add it to yourindex.html file and add declarations for name, avatar, work-title, work-number,email, and background-image.
<div id="composite-container" class="oj-flex oj-sm-flex-items-initial"> <oj-bind-for-each data="[[employees]]"> <template> <demo-card class="oj-flex-item" name="[[$current.data.name]]" avatar="[[$current.data.avatar]]" work-title="[[$current.data.title]]" work-number="[[$current.data.work]]" email="[[$current.data.email]]"> </demo-card> </template> </oj-bind-for-each></div>
In the case of components within a JET Pack, the HTML tag name is thecomponent full name. The full name of a pack's member component is alwaysa concatenation of the pack name and the component name, as specified by thedependencies attribute of the pack-level component.json file (located in the packroot folder under jet-composites). For example, a component widget-1 that isa member of the JET Pack my-pack, has the following full name that you canreference as the HTML tag name.
my-pack-widget-1
Note that the framework maps the attribute names in the markup to thecomponent’s properties.
• Attribute names are converted to lowercase. For example, a workTitleattribute will map to a worktitle property.
• Attribute names with dashes are converted to camelCase by capitalizing thefirst character after a dash and then removing the dashes. For example, thework-title attribute will map to a workTitle property.
You can access the mapped properties programmatically as shown in the followingmarkup:
<h5><oj-bind-text value="[[properties.workTitle]]"></oj-bind-text></h5>
3. In your application’s ViewModel, set values for the properties you declared inthe previous step and add the component’s loader file to the list of applicationdependencies.
Chapter 9Add Web Components to Your Page
9-41
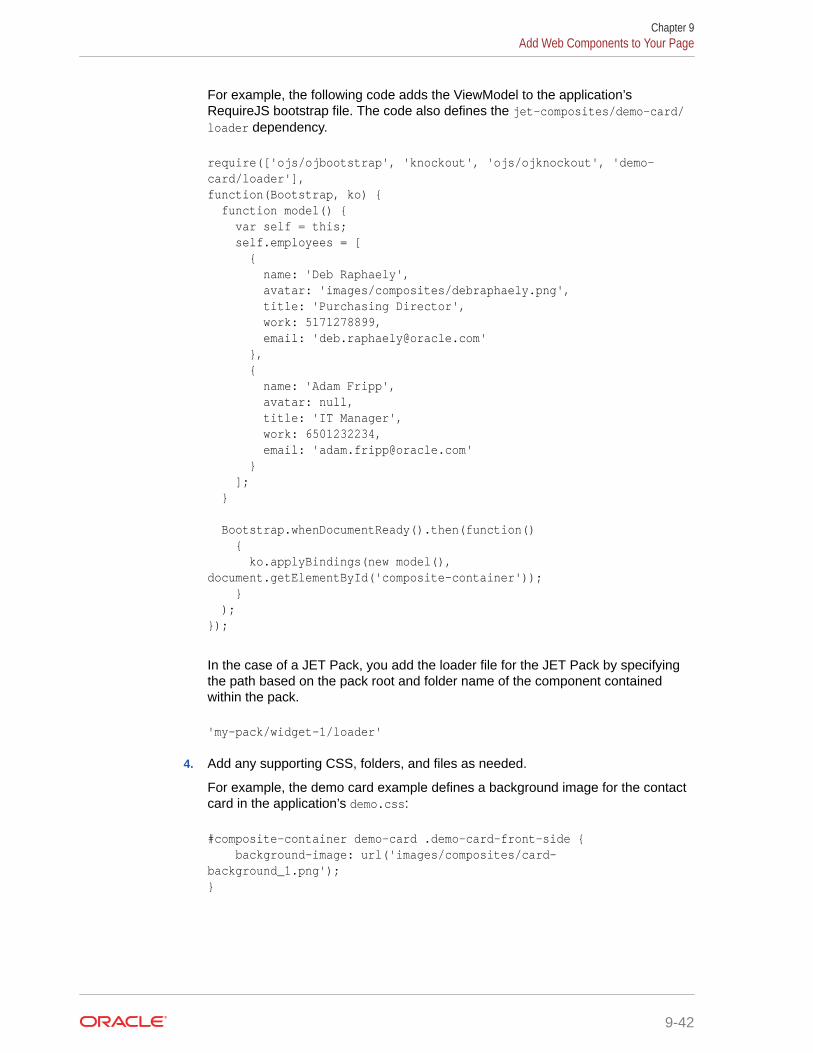
For example, the following code adds the ViewModel to the application’sRequireJS bootstrap file. The code also defines the jet-composites/demo-card/loader dependency.
require(['ojs/ojbootstrap', 'knockout', 'ojs/ojknockout', 'demo-card/loader'],function(Bootstrap, ko) { function model() { var self = this; self.employees = [ { name: 'Deb Raphaely', avatar: 'images/composites/debraphaely.png', title: 'Purchasing Director', work: 5171278899, email: '[email protected]' }, { name: 'Adam Fripp', avatar: null, title: 'IT Manager', work: 6501232234, email: '[email protected]' } ]; }
Bootstrap.whenDocumentReady().then(function() { ko.applyBindings(new model(), document.getElementById('composite-container')); } );});
In the case of a JET Pack, you add the loader file for the JET Pack by specifyingthe path based on the pack root and folder name of the component containedwithin the pack.
'my-pack/widget-1/loader'
4. Add any supporting CSS, folders, and files as needed.
For example, the demo card example defines a background image for the contactcard in the application’s demo.css:
#composite-container demo-card .demo-card-front-side { background-image: url('images/composites/card-background_1.png');}
Chapter 9Add Web Components to Your Page
9-42

Build Web ComponentsYou can build your Oracle JET Web Component to optimize the files and to generate aminified folder of the component that can be shared with the consumers.
When your Web Component is configured and is ready to be used in differentapplications, you can build the Web Components of the type: standalone WebComponent, JET Pack, and Resource component. Building these components usingJET tooling generates a minified content with the optimized component files. Thisminified version of the component can be easily shared with the consumers for use.For example, you would build the component before publishing it to Oracle ComponentExchange. To build the Web Component, use the following command from the rootfolder of the JET application containing the component:
ojet build component my-web-component-name
For example, if your Web Component name is demo-card-example, use the followingcommand:
ojet build component demo-card-example
For a JET Pack, specify the pack name.
ojet build component my-pack-name
Note that the building individual components within the pack is not supported, and thewhole pack must be built at once.
This command creates a /min folder in the web/js/jet-composites/demo-card-example/x.x.x directory of your Oracle JET web application, where x.x.x is theversion number of the component. The /min folder contains the minified (release)version of your Web Component files.
Reference component do not require minification or bundling and therefore do notneed to be built.
When you build Web Components:
• If your JET application contains more than one component, you can build thecontaining JET application to build and optimize all components together. Thebuild component command with the component name provides the capability tobuild a single component.
• You can optionally use the --release flag with the build command, but it is notnecessary since the build command generates both the debug and minifiedversion of the component.
• You can optionally use the --optimize=none flags with the build command whenyou want to generate compiled output that is more readable and suitable fordebugging. The component's loader.js file will contain the minified applicationsource, but content readability is improved, as line breaks and white space will bepreserved from the original source.
Chapter 9Build Web Components
9-43
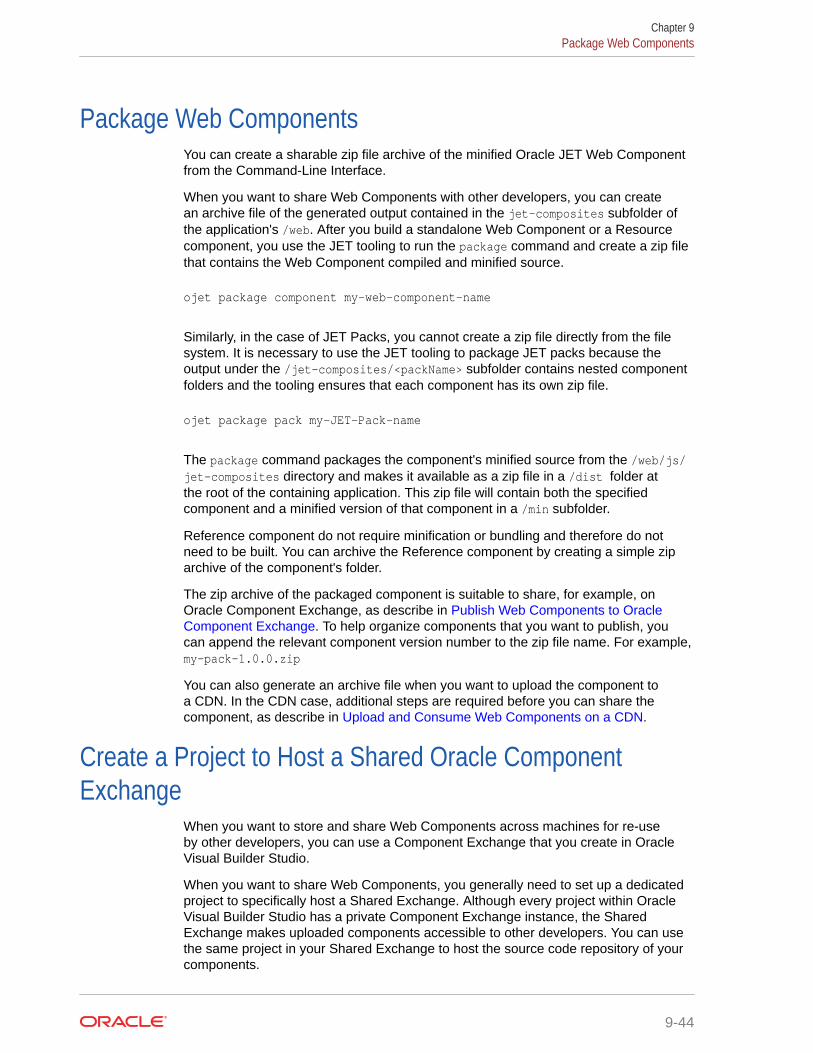
Package Web ComponentsYou can create a sharable zip file archive of the minified Oracle JET Web Componentfrom the Command-Line Interface.
When you want to share Web Components with other developers, you can createan archive file of the generated output contained in the jet-composites subfolder ofthe application's /web. After you build a standalone Web Component or a Resourcecomponent, you use the JET tooling to run the package command and create a zip filethat contains the Web Component compiled and minified source.
ojet package component my-web-component-name
Similarly, in the case of JET Packs, you cannot create a zip file directly from the filesystem. It is necessary to use the JET tooling to package JET packs because theoutput under the /jet-composites/<packName> subfolder contains nested componentfolders and the tooling ensures that each component has its own zip file.
ojet package pack my-JET-Pack-name
The package command packages the component's minified source from the /web/js/jet-composites directory and makes it available as a zip file in a /dist folder atthe root of the containing application. This zip file will contain both the specifiedcomponent and a minified version of that component in a /min subfolder.
Reference component do not require minification or bundling and therefore do notneed to be built. You can archive the Reference component by creating a simple ziparchive of the component's folder.
The zip archive of the packaged component is suitable to share, for example, onOracle Component Exchange, as describe in Publish Web Components to OracleComponent Exchange. To help organize components that you want to publish, youcan append the relevant component version number to the zip file name. For example,my-pack-1.0.0.zip
You can also generate an archive file when you want to upload the component toa CDN. In the CDN case, additional steps are required before you can share thecomponent, as describe in Upload and Consume Web Components on a CDN.
Create a Project to Host a Shared Oracle ComponentExchange
When you want to store and share Web Components across machines for re-useby other developers, you can use a Component Exchange that you create in OracleVisual Builder Studio.
When you want to share Web Components, you generally need to set up a dedicatedproject to specifically host a Shared Exchange. Although every project within OracleVisual Builder Studio has a private Component Exchange instance, the SharedExchange makes uploaded components accessible to other developers. You can usethe same project in your Shared Exchange to host the source code repository of yourcomponents.
Chapter 9Package Web Components
9-44
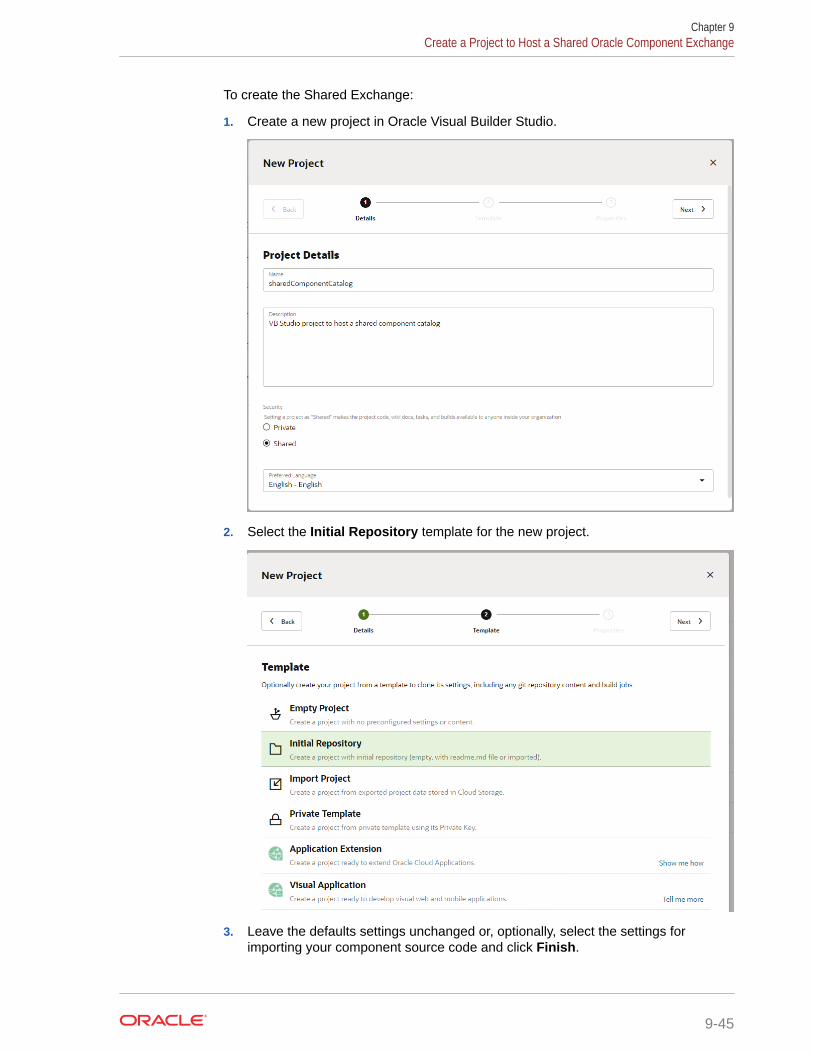
To create the Shared Exchange:
1. Create a new project in Oracle Visual Builder Studio.
2. Select the Initial Repository template for the new project.
3. Leave the defaults settings unchanged or, optionally, select the settings forimporting your component source code and click Finish.
Chapter 9Create a Project to Host a Shared Oracle Component Exchange
9-45

4. In the project provisioning screen, verify that Component Exchange is one of theservices being created.
5. Share the project with all users who will need to access published components byadding them as members to the project. They will then use their own user nameand password to access the Shared Component Exchange.
Chapter 9Create a Project to Host a Shared Oracle Component Exchange
9-46

Once the project is created you can obtain the correct URL for use with the OracleJET tooling to access the Shared Component Exchange, as described in Publish WebComponents to Oracle Component Exchange.
Publish Web Components to Oracle Component ExchangeWhen you want to store and share Web Components across machines for re-useby other developers, you can use the Oracle JET CLI (Command-Line Interface) toconfigure access to a Shared Component Exchange defined in Oracle Visual BuilderStudio and then publish components to a public project.
When you want to share Web Components, you can use Oracle JET CLI to configureaccess to a Shared Component Exchange by supplying the URL to the targetComponent Exchange. Once you have configured the JET tooling for a specificComponent Exchange, you can run the publish component command in the JET CLIto upload specified components. Users with access rights can use the CLI to searchthe Component Exchange for components by keyword and add components to theirweb application project.
Before you begin:
• Create a project in a Shared Component Exchange, as described in Create aProject to Host a Shared Oracle Component Exchange.
• Share the project with all users who will need to access components by addingthem as members to the project, as described in Create a Project to Host aShared Oracle Component Exchange. Users will need to create their own username and password to access the Shared Component Exchange.
To publish components to a Shared Component Exchange:
1. Obtain the URL to the Shared Component Exchange that you can use to configureOracle JET tooling.
a. From the Shared Component Exchange that you created, copy the URL thatyou would use to clone the GIT repository. The URL will look similar to this.
https://[email protected]@xxxxx-cloud01.developer.ocp.oraclecloud.com/xxxxx-cloud01/s/xxxxx-cloud01_sharedcomponentcatalog_8325/scm/sharedcomponentcatalog.git
b. Using the copied URL, remove the user name prefix (for example,[email protected]@) and remove elements from /scm onwards to obtain aroot of just the project, similar to this.
https://xxxxx-cloud01.developer.ocp.oraclecloud.com/xxxxx-cloud01/s/xxxxx-cloud01_sharedcomponentcatalog_8325
c. Next, append /compcatalog/0.2.0.
In this example, the Exchange URL that you need for the Oracle JET toolinglooks like this.
https://xxxxx-cloud01.developer.ocp.oraclecloud.com/xxxxx-cloud01/s/xxxxx-cloud01_sharedcomponentcatalog_8325/compcatalog/0.2.0
Chapter 9Publish Web Components to Oracle Component Exchange
9-47

2. Configure Oracle JET tooling to access the Component Exchange project byrunning the ojet configure command in the Oracle JET CLI. Set the --exchange-url flag on the command to pass the Component Exchange URL youobtained.
ojet configure --exchange-url=https://xxxxx-cloud01.developer.ocp.oraclecloud.com/xxxxx-cloud01/s/xxxxx-cloud01_sharedcomponentcatalog_8325/compcatalog/0.2.0
Tip:
You can use the JET CLI to define an Exchange URL that is global to allprojects for your user:
ojet configure --global --exchange-url=myExchange.org
The URL that you pass to the ojet configure command at the projectlevel, overrides the global definition.
3. In the Oracle JET CLI, publish a component to the configured ComponentExchange by running the publish component command.
ojet publish component my-demo-card
Optionally, you can supply Component Exchange login user name and passwordwith the publish command. For more information, enter ojet help publish in theCLI.
Oracle JET tooling supports searching the configured Component Exchange byrunning the search exchange command with a keyword, such as the componentname. Additionally, you can add components to your web application by runningthe add component command for the configured Component Exchange. For moreinformation, use ojet help in the JET CLI.
Upload and Consume Web Components on a CDNYou can package a Web Component to make it available on a Content DeliveryNetwork (CDN) and you can reuse the component in your application.
You can include the CDN location of the component in the component metadata asdefined in the component's component.json file. By doing this, tools such as OracleJET tooling and Oracle Visual Builder will be able to point to the CDN location whenyou build your applications in release mode.
CDN information is encoded by using the paths attribute in the component.json file. Atypical example looks similar to this.
{ "name": “demo-samplecomponent", "displayName": “Sample component", "version": "1.0.0",
Chapter 9Upload and Consume Web Components on a CDN
9-48
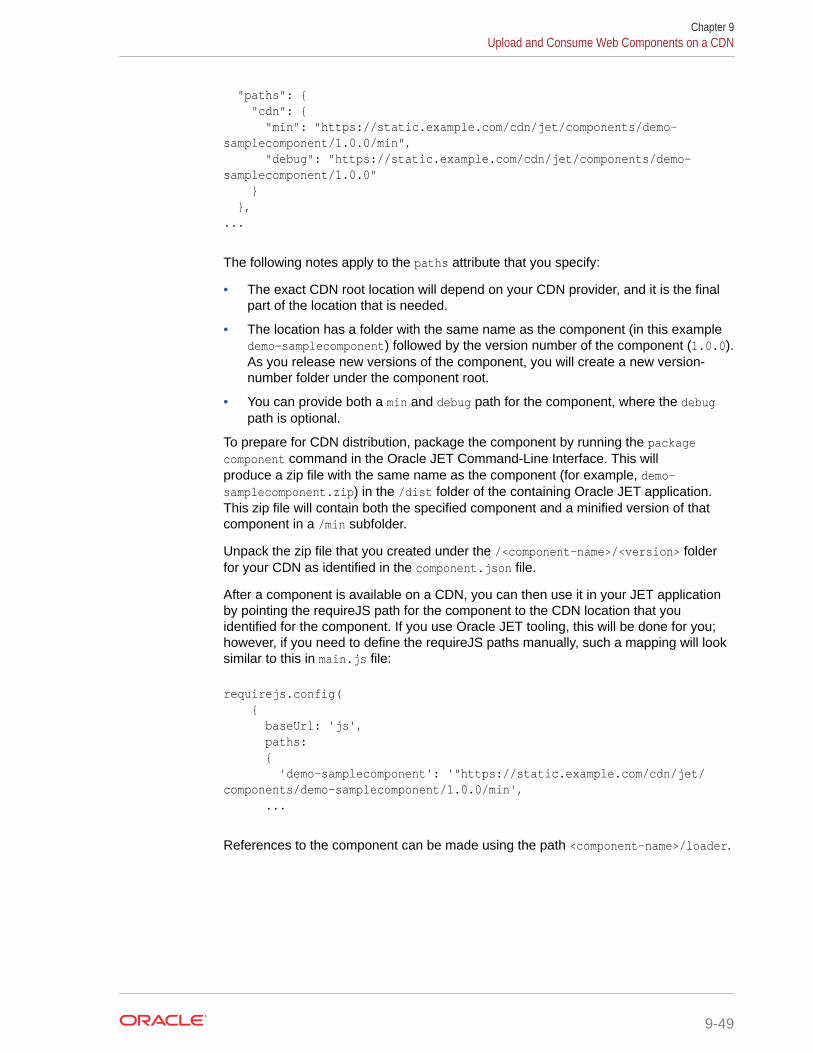
"paths": { "cdn": { "min": "https://static.example.com/cdn/jet/components/demo-samplecomponent/1.0.0/min", "debug": "https://static.example.com/cdn/jet/components/demo-samplecomponent/1.0.0" } },...
The following notes apply to the paths attribute that you specify:
• The exact CDN root location will depend on your CDN provider, and it is the finalpart of the location that is needed.
• The location has a folder with the same name as the component (in this exampledemo-samplecomponent) followed by the version number of the component (1.0.0).As you release new versions of the component, you will create a new version-number folder under the component root.
• You can provide both a min and debug path for the component, where the debugpath is optional.
To prepare for CDN distribution, package the component by running the packagecomponent command in the Oracle JET Command-Line Interface. This willproduce a zip file with the same name as the component (for example, demo-samplecomponent.zip) in the /dist folder of the containing Oracle JET application.This zip file will contain both the specified component and a minified version of thatcomponent in a /min subfolder.
Unpack the zip file that you created under the /<component-name>/<version> folderfor your CDN as identified in the component.json file.
After a component is available on a CDN, you can then use it in your JET applicationby pointing the requireJS path for the component to the CDN location that youidentified for the component. If you use Oracle JET tooling, this will be done for you;however, if you need to define the requireJS paths manually, such a mapping will looksimilar to this in main.js file:
requirejs.config( { baseUrl: 'js', paths: { 'demo-samplecomponent': '"https://static.example.com/cdn/jet/components/demo-samplecomponent/1.0.0/min', ...
References to the component can be made using the path <component-name>/loader.
Chapter 9Upload and Consume Web Components on a CDN
9-49
10Using the Common Model and CollectionAPI
The Oracle JET Common Model and Collection API provides a two-way data bindingmodel using Knockout. Use the Model and Collection classes to build Create, Read,Update, Delete (CRUD) applications that integrate REST services or data from anyweb service that returns data in the form of JSON objects.
Topics:
• Typical Workflow for Binding Data in Oracle JET
• About Oracle JET Data Binding
• About the Oracle JET Common Model and Collection Framework
• Integrate REST Services
• Create a CRUD Application Using Oracle JET
Typical Workflow for Binding Data in Oracle JETUnderstand Oracle JET's support for the Model-View-ViewModel design. Learn how touse the Oracle JET Common Model and Collection API and how to integrate RESTservices into your Oracle JET application.
To use the Oracle JET Common Model for building CRUD applications, refer to thetypical workflow described in the following table:
Task Description More Information
Understand Oracle JETsupport for data binding
Identify Oracle JET's support for theModel-View-ViewModel design.
About Oracle JET Data Binding
Use Oracle JET'sCommon Model andCollection
Identify the Oracle JET Common Modeland Collection API, its relationship withKnockout, and how to use it in yourOracle JET application.
About the Oracle JET Common Model andCollection Framework
Integrate REST services Understand how to integrate RESTservices into your Oracle JETapplication.
Integrate REST Services
Create a CRUDapplication
Create a CRUD application usingthe Oracle JET Common Model andCollection API.
Create a CRUD Application Using OracleJET
About Oracle JET Data BindingOracle JET supports two-way data binding between the View and Model layers in theModel-View-ViewModel (MVVM) design. Data changes in the ViewModel are sent to
10-1

the UI components, and user input from the UI components is written back into theViewModel.
Oracle JET uses Knockout to perform the data binding between the UI elements andthe ViewModel. The ViewModel normally contains data fields for the UI state as wellas references to external data. One of the ways to provide external data is to use theCommon Model and Collection API.
Data for an Oracle JET application can come from any web data source that generatesJSON data, such as a REST service, Server Sent Event (SSE), or WebSocket. Inaddition, Oracle JET also provides specific support for integrating web service databased on the Oracle REST standard.
Oracle JET also provides UI components for the View layer that include propertiesfor data binding with Knockout. For additional information about Oracle JET's UIcomponents and data binding options, see Understanding Oracle JET User InterfaceBasics.
About the Oracle JET Common Model and CollectionFramework
The Oracle JET Common Model and Collection API provides a collection-of-recordsobject model that includes classes for bringing external data into an Oracle JETapplication and mapping the data to the application’s view model.
Topics:
• About the Oracle JET Common Model and Collection API
• About Oracle JET Data Binding and Knockout
• Use the Oracle JET Common Model and Collection API
About the Oracle JET Common Model and Collection APIThe Oracle JET Common Model and Collection API provides a collection-of-recordsobject model that includes the following classes:
• Model: Represents a single record from a data service such as a REST service
• Collection: Represents a set of data records and is a list of Model objects of thesame type
Chapter 10About the Oracle JET Common Model and Collection Framework
10-2
• Events: Provides methods for event handling
• KnockoutUtils: Provides methods for mapping the attributes in a Model orCollection object to Knockout observables for use with component ViewModels
Model and Collection include client-side API that provides one way to bring externaldata into an Oracle JET application. KnockoutUtils provides the map() method to mapthe attributes in a model object or the attributes of all models in a collection object tothe application's view data model.
About Oracle JET Data Binding and KnockoutKnockout provides bindings between components as well as binding data from aViewModel to components or HTML elements in an Oracle JET application. Knockoutis an integral part of Oracle JET's toolkit and is included in the Oracle JET distribution.
The Oracle JET Model and Collection API includes the KnockoutUtils class whichcontains the map() method to convert the attributes in a model object (or theattributes of all models in a collection object) into Knockout observables for use withcomponents' ViewModels.
The example below maps the data collection to the tasks ViewModel.
renderTaskViews = function(tasksData) { this.tasks = KnockoutUtils.map(data);}
To utilize the data model in Oracle JET applications, Oracle JET provides customelements which support Knockout variables in the data attribute. For additionalinformation about working with Oracle JET UI components, see Understanding OracleJET User Interface Basics.
<oj-table data="[[dataProvider]]"></oj-table>
For additional information about Knockout, see http://www.knockoutjs.com.
Use the Oracle JET Common Model and Collection APITo use a Model or Collection class, an application must extend Model or Collectionto create a foundation object to represent a data record or list of records from itsdata service. The application provides the data service's URL used for fetching andupdating task records (when a task record's ID is appended), along with variousoptions giving users the ability to map data service records to their client-sideViewModel and vice versa.
To use the Oracle JET Common Model and Collection API:
1. Add JavaScript code to your application that extends Model.
The following script shows a simple example of extending Model to create a modelobject which defines a Department. In this example, the data is returned from theREST service at the indicated URL. The parse callback parses the data and mapsthe attributes received from the REST service to desired ViewModel attributenames.
var self = this;self.serviceURL = 'http://RESTServerIP:port/stable/rest/Departments';self.Department = Model.extend({
Chapter 10About the Oracle JET Common Model and Collection Framework
10-3
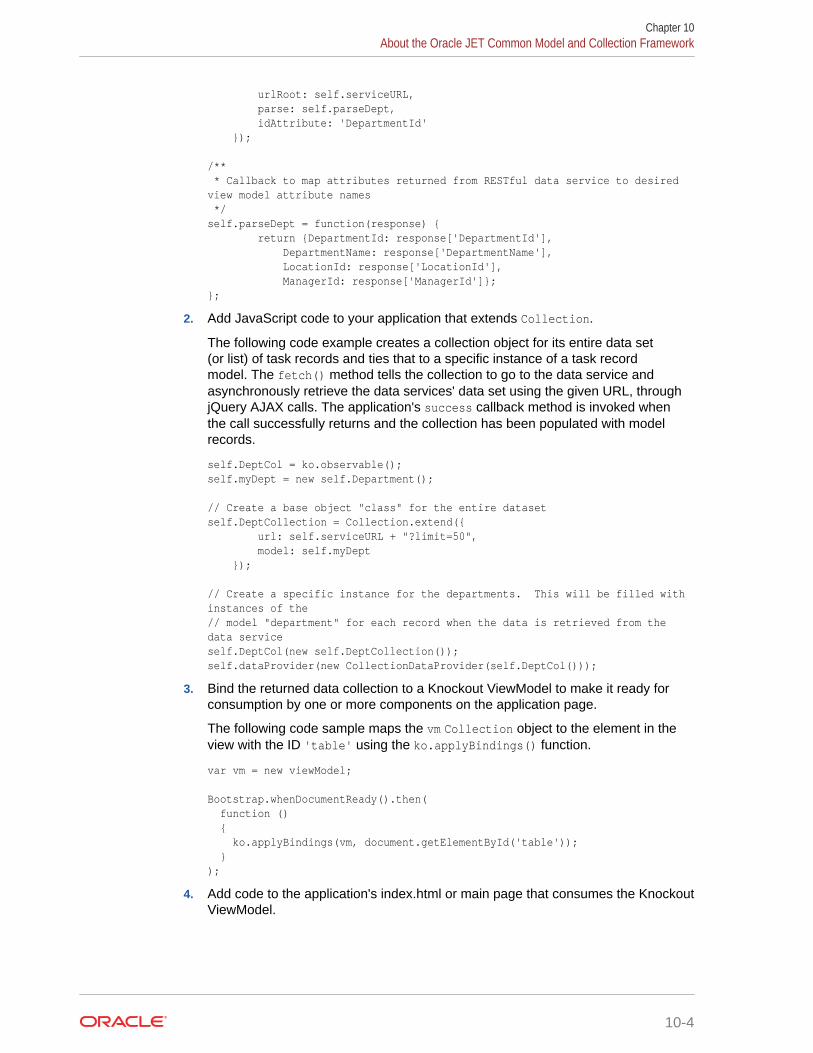
urlRoot: self.serviceURL, parse: self.parseDept, idAttribute: 'DepartmentId' }); /** * Callback to map attributes returned from RESTful data service to desired view model attribute names */self.parseDept = function(response) { return {DepartmentId: response['DepartmentId'], DepartmentName: response['DepartmentName'], LocationId: response['LocationId'], ManagerId: response['ManagerId']};};
2. Add JavaScript code to your application that extends Collection.
The following code example creates a collection object for its entire data set(or list) of task records and ties that to a specific instance of a task recordmodel. The fetch() method tells the collection to go to the data service andasynchronously retrieve the data services' data set using the given URL, throughjQuery AJAX calls. The application's success callback method is invoked whenthe call successfully returns and the collection has been populated with modelrecords.
self.DeptCol = ko.observable();self.myDept = new self.Department();
// Create a base object "class" for the entire datasetself.DeptCollection = Collection.extend({ url: self.serviceURL + "?limit=50", model: self.myDept });
// Create a specific instance for the departments. This will be filled with instances of the// model "department" for each record when the data is retrieved from the data serviceself.DeptCol(new self.DeptCollection());self.dataProvider(new CollectionDataProvider(self.DeptCol()));
3. Bind the returned data collection to a Knockout ViewModel to make it ready forconsumption by one or more components on the application page.
The following code sample maps the vm Collection object to the element in theview with the ID 'table' using the ko.applyBindings() function.
var vm = new viewModel;
Bootstrap.whenDocumentReady().then( function () { ko.applyBindings(vm, document.getElementById('table')); });
4. Add code to the application's index.html or main page that consumes the KnockoutViewModel.
Chapter 10About the Oracle JET Common Model and Collection Framework
10-4
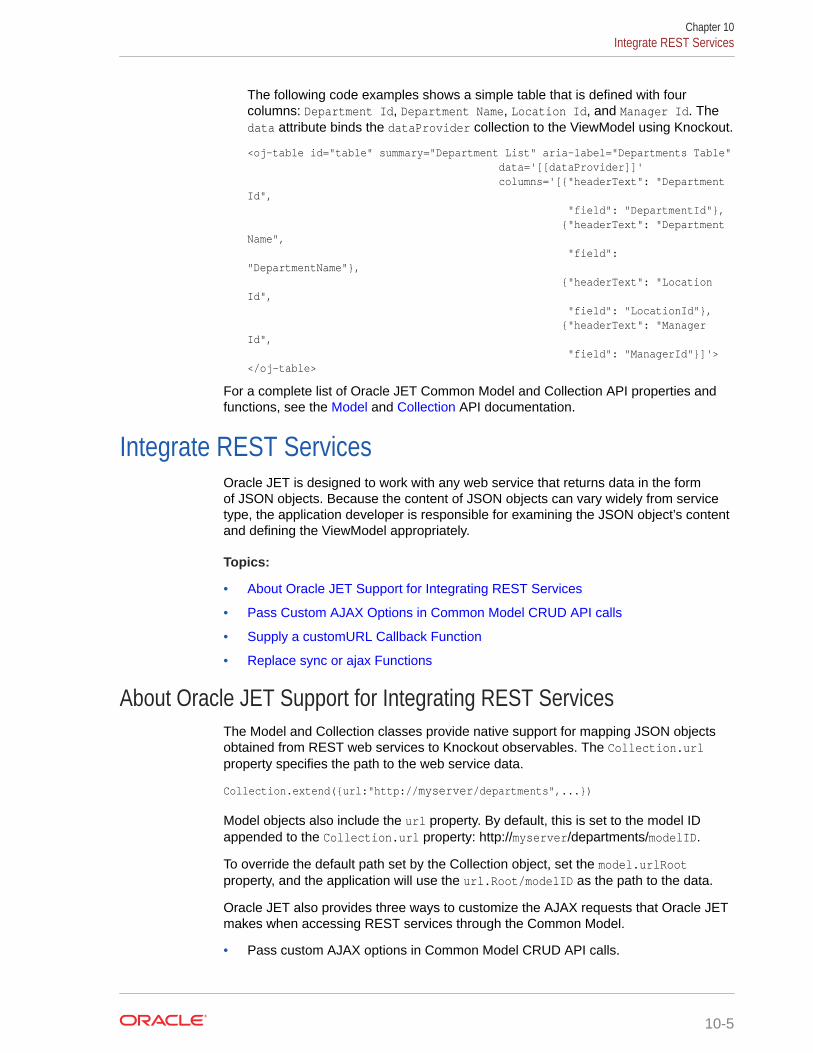
The following code examples shows a simple table that is defined with fourcolumns: Department Id, Department Name, Location Id, and Manager Id. Thedata attribute binds the dataProvider collection to the ViewModel using Knockout.
<oj-table id="table" summary="Department List" aria-label="Departments Table" data='[[dataProvider]]' columns='[{"headerText": "Department Id", "field": "DepartmentId"}, {"headerText": "Department Name", "field": "DepartmentName"}, {"headerText": "Location Id", "field": "LocationId"}, {"headerText": "Manager Id", "field": "ManagerId"}]'></oj-table>
For a complete list of Oracle JET Common Model and Collection API properties andfunctions, see the Model and Collection API documentation.
Integrate REST ServicesOracle JET is designed to work with any web service that returns data in the formof JSON objects. Because the content of JSON objects can vary widely from servicetype, the application developer is responsible for examining the JSON object’s contentand defining the ViewModel appropriately.
Topics:
• About Oracle JET Support for Integrating REST Services
• Pass Custom AJAX Options in Common Model CRUD API calls
• Supply a customURL Callback Function
• Replace sync or ajax Functions
About Oracle JET Support for Integrating REST ServicesThe Model and Collection classes provide native support for mapping JSON objectsobtained from REST web services to Knockout observables. The Collection.urlproperty specifies the path to the web service data.
Collection.extend({url:"http://myserver/departments",...})
Model objects also include the url property. By default, this is set to the model IDappended to the Collection.url property: http://myserver/departments/modelID.
To override the default path set by the Collection object, set the model.urlRootproperty, and the application will use the url.Root/modelID as the path to the data.
Oracle JET also provides three ways to customize the AJAX requests that Oracle JETmakes when accessing REST services through the Common Model.
• Pass custom AJAX options in Common Model CRUD API calls.
Chapter 10Integrate REST Services
10-5
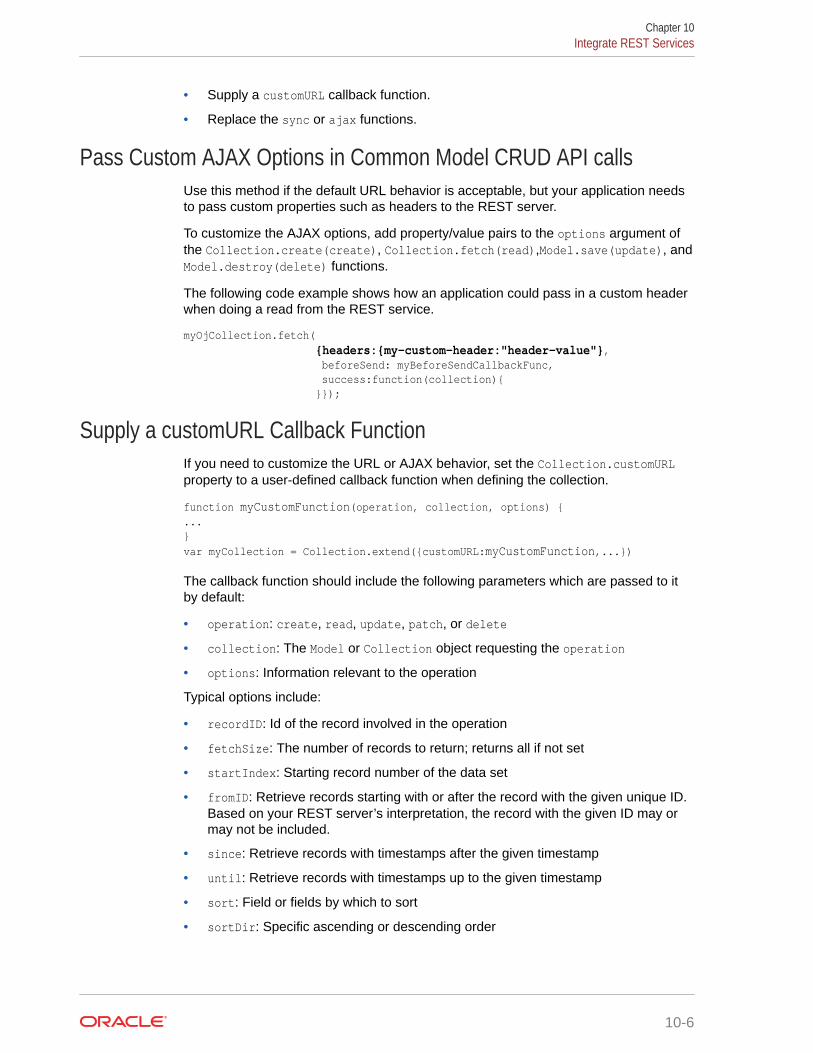
• Supply a customURL callback function.
• Replace the sync or ajax functions.
Pass Custom AJAX Options in Common Model CRUD API callsUse this method if the default URL behavior is acceptable, but your application needsto pass custom properties such as headers to the REST server.
To customize the AJAX options, add property/value pairs to the options argument ofthe Collection.create(create), Collection.fetch(read),Model.save(update), andModel.destroy(delete) functions.
The following code example shows how an application could pass in a custom headerwhen doing a read from the REST service.
myOjCollection.fetch( {headers:{my-custom-header:"header-value"}, beforeSend: myBeforeSendCallbackFunc, success:function(collection){ }});
Supply a customURL Callback FunctionIf you need to customize the URL or AJAX behavior, set the Collection.customURLproperty to a user-defined callback function when defining the collection.
function myCustomFunction(operation, collection, options) {...}var myCollection = Collection.extend({customURL:myCustomFunction,...})
The callback function should include the following parameters which are passed to itby default:
• operation: create, read, update, patch, or delete
• collection: The Model or Collection object requesting the operation
• options: Information relevant to the operation
Typical options include:
• recordID: Id of the record involved in the operation
• fetchSize: The number of records to return; returns all if not set
• startIndex: Starting record number of the data set
• fromID: Retrieve records starting with or after the record with the given unique ID.Based on your REST server’s interpretation, the record with the given ID may ormay not be included.
• since: Retrieve records with timestamps after the given timestamp
• until: Retrieve records with timestamps up to the given timestamp
• sort: Field or fields by which to sort
• sortDir: Specific ascending or descending order
Chapter 10Integrate REST Services
10-6
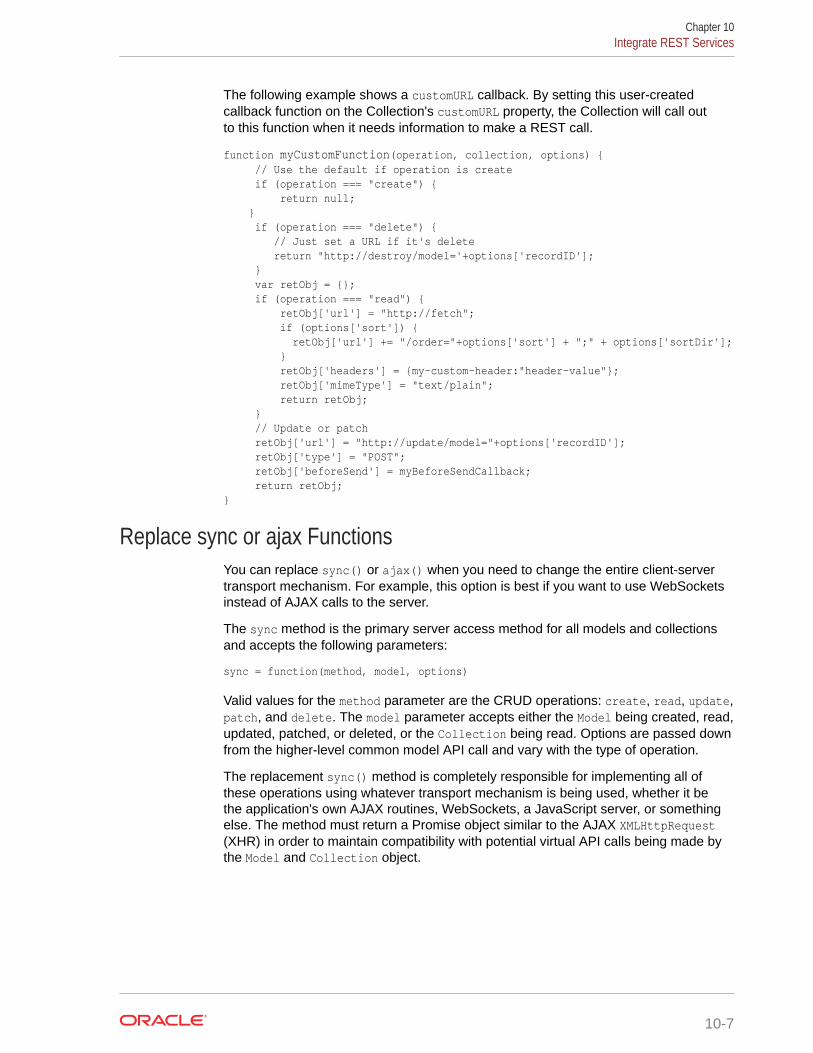
The following example shows a customURL callback. By setting this user-createdcallback function on the Collection's customURL property, the Collection will call outto this function when it needs information to make a REST call.
function myCustomFunction(operation, collection, options) { // Use the default if operation is create if (operation === "create") { return null; } if (operation === "delete") { // Just set a URL if it's delete return "http://destroy/model='+options['recordID']; } var retObj = {}; if (operation === "read") { retObj['url'] = "http://fetch"; if (options['sort']) { retObj['url'] += "/order="+options['sort'] + ";" + options['sortDir']; } retObj['headers'] = {my-custom-header:"header-value"}; retObj['mimeType'] = "text/plain"; return retObj; } // Update or patch retObj['url'] = "http://update/model="+options['recordID']; retObj['type'] = "POST"; retObj['beforeSend'] = myBeforeSendCallback; return retObj;}
Replace sync or ajax FunctionsYou can replace sync() or ajax() when you need to change the entire client-servertransport mechanism. For example, this option is best if you want to use WebSocketsinstead of AJAX calls to the server.
The sync method is the primary server access method for all models and collectionsand accepts the following parameters:
sync = function(method, model, options)
Valid values for the method parameter are the CRUD operations: create, read, update,patch, and delete. The model parameter accepts either the Model being created, read,updated, patched, or deleted, or the Collection being read. Options are passed downfrom the higher-level common model API call and vary with the type of operation.
The replacement sync() method is completely responsible for implementing all ofthese operations using whatever transport mechanism is being used, whether it bethe application's own AJAX routines, WebSockets, a JavaScript server, or somethingelse. The method must return a Promise object similar to the AJAX XMLHttpRequest(XHR) in order to maintain compatibility with potential virtual API calls being made bythe Model and Collection object.
Chapter 10Integrate REST Services
10-7
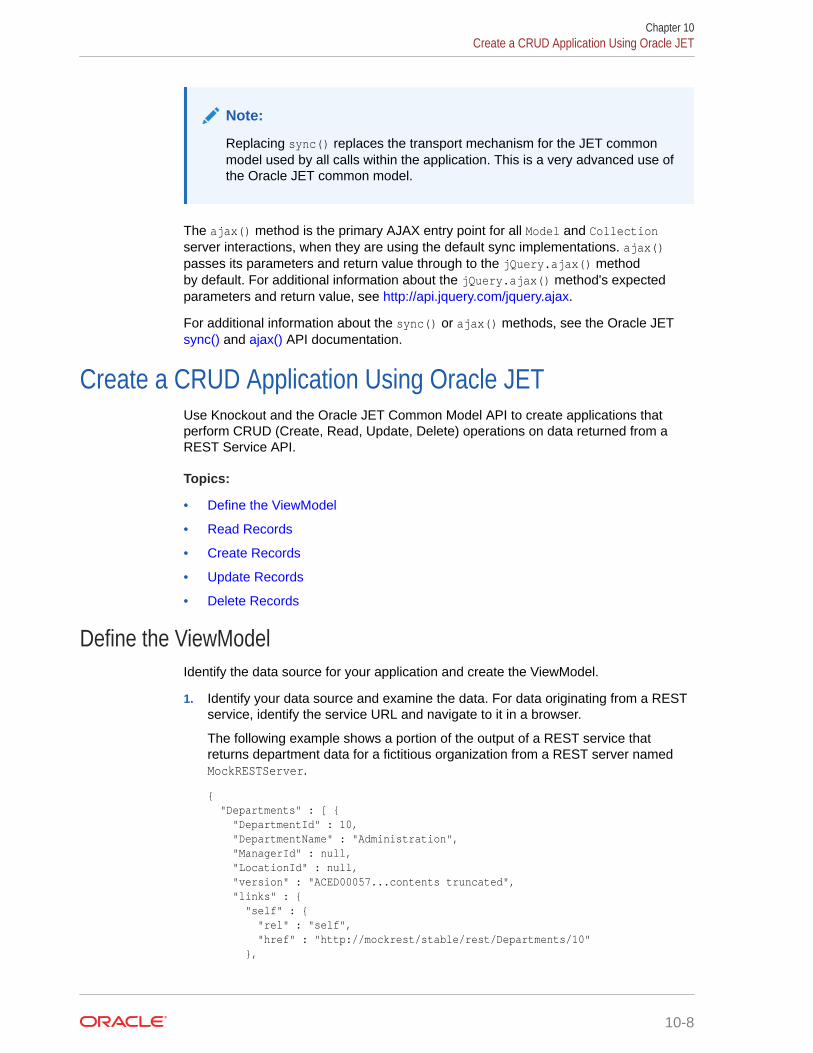
Note:
Replacing sync() replaces the transport mechanism for the JET commonmodel used by all calls within the application. This is a very advanced use ofthe Oracle JET common model.
The ajax() method is the primary AJAX entry point for all Model and Collectionserver interactions, when they are using the default sync implementations. ajax()passes its parameters and return value through to the jQuery.ajax() methodby default. For additional information about the jQuery.ajax() method's expectedparameters and return value, see http://api.jquery.com/jquery.ajax.
For additional information about the sync() or ajax() methods, see the Oracle JETsync() and ajax() API documentation.
Create a CRUD Application Using Oracle JETUse Knockout and the Oracle JET Common Model API to create applications thatperform CRUD (Create, Read, Update, Delete) operations on data returned from aREST Service API.
Topics:
• Define the ViewModel
• Read Records
• Create Records
• Update Records
• Delete Records
Define the ViewModelIdentify the data source for your application and create the ViewModel.
1. Identify your data source and examine the data. For data originating from a RESTservice, identify the service URL and navigate to it in a browser.
The following example shows a portion of the output of a REST service thatreturns department data for a fictitious organization from a REST server namedMockRESTServer.
{ "Departments" : [ { "DepartmentId" : 10, "DepartmentName" : "Administration", "ManagerId" : null, "LocationId" : null, "version" : "ACED00057...contents truncated", "links" : { "self" : { "rel" : "self", "href" : "http://mockrest/stable/rest/Departments/10" },
Chapter 10Create a CRUD Application Using Oracle JET
10-8

"canonical" : { "rel" : "canonical", "href" : "http://mockrest/stable/rest/Departments/10" }, "Employees" : { "rel" : "child", "href" : "http://mockrest/stable/rest/Departments/10/Employees" } } }, { "DepartmentId" : 20, "DepartmentName" : "Marketing", "ManagerId" : null, "LocationId" : null, "version" : "ACED00057...contents truncated", "links" : { "self" : { "rel" : "self", "href" : "http://mockrest/stable/rest/Departments/20" }, "canonical" : { "rel" : "canonical", "href" : "http://mockrest/stable/rest/Departments/20" }, "Employees" : { "rel" : "child", "href" : "http://mockrest/stable/rest/Departments/20/Employees" } } }, { ... contents omitted } ], "links" : { "self" : { "rel" : "self", "href" : "http://mockrest/stable/rest/Departments" } }, "_contextInfo" : { "limit" : 25, "offset" : 0 }}
In this example, each department is identified by its DepartmentId and containsinformation about its name (DepartmentName), manager (ManagerId), and location(LocationId). Each department also contains employees (Employees) which arechildren of each department.
Tip:
The Oracle JET Common Model CRUD sample application uses JSONdata returned from a mock rest service. You can find the mockrest service scripts in the public_html/js/rest folder. You can findthe sample JSON data in the departments.json file located in thepublic_html/js folder.
2. Determine the data you will need for your collection.
Chapter 10Create a CRUD Application Using Oracle JET
10-9
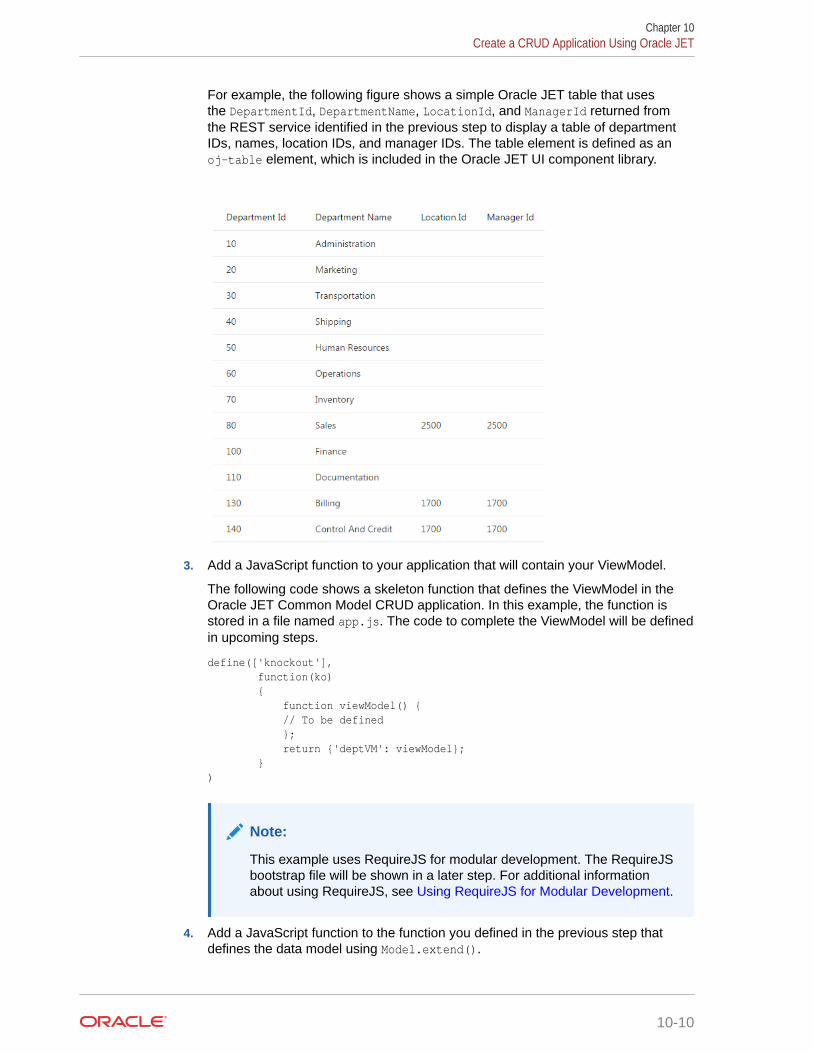
For example, the following figure shows a simple Oracle JET table that usesthe DepartmentId, DepartmentName, LocationId, and ManagerId returned fromthe REST service identified in the previous step to display a table of departmentIDs, names, location IDs, and manager IDs. The table element is defined as anoj-table element, which is included in the Oracle JET UI component library.
3. Add a JavaScript function to your application that will contain your ViewModel.
The following code shows a skeleton function that defines the ViewModel in theOracle JET Common Model CRUD application. In this example, the function isstored in a file named app.js. The code to complete the ViewModel will be definedin upcoming steps.
define(['knockout'], function(ko) { function viewModel() { // To be defined }; return {'deptVM': viewModel}; })
Note:
This example uses RequireJS for modular development. The RequireJSbootstrap file will be shown in a later step. For additional informationabout using RequireJS, see Using RequireJS for Modular Development.
4. Add a JavaScript function to the function you defined in the previous step thatdefines the data model using Model.extend().
Chapter 10Create a CRUD Application Using Oracle JET
10-10
The highlighted code in the example below defines the data model for theapplication shown in the preceding figure. The Department variable representsa single record in the database and is displayed as a row in the table. Departmentis declared using the Model.extend function call and instantiated in the declarationfor myDept. The urlRoot property defines the data source, which in this case is theREST service URL.
define(['knockout', 'ojs/ojknockouttemplateutils', 'ojs/ojmodel', 'MockRESTServer'], function(ko, KnockoutTemplateUtils, model) { function viewModel() { var self = this; self.KnockoutTemplateUtils = KnockoutTemplateUtils; self.serviceURL = 'http://mockrest/stable/rest/Departments';;
function parseDept(response) { if (response['Departments']) { var innerResponse = response['Departments'][0]; if (innerResponse.links.Employees == undefined) { var empHref = ''; } else { empHref = innerResponse.links.Employees.href; } return {DepartmentId: innerResponse['DepartmentId'], DepartmentName: innerResponse['DepartmentName'], links: {Employees: {rel: 'child', href: empHref}}}; } return {DepartmentId: response['DepartmentId'], DepartmentName: response['DepartmentName'], LocationId:response['LocationId'], ManagerId:response['ManagerId'], links: {Employees: {rel: 'child', href: response['links']['Employees'].href}}}; }
// Think of this as a single database record or a single table row. var Department = model.Model.extend({ urlRoot: self.serviceURL, parse: parseDept, idAttribute: 'DepartmentId' }); var myDept = new Department(); };
return {'deptVM': viewModel}; };}
The parse property is an optional user callback function to allow parsingof JSON record objects as they are returned from the data service. In thisexample, parseDept is the callback function and simply maps the DepartmentIdand DepartmentName returned from the REST service to DepartmentId andDepartmentName. If the LocationId or ManagerId records contain data, parseDeptmaps the attributes to LocationId and ManagerId.
Chapter 10Create a CRUD Application Using Oracle JET
10-11
The parse callback can be useful for mapping database attribute names to namesthat may make more sense. For example, if your database uses Id and Name asthe attributes that represent the department ID and department name, you couldreplace the return call in the parseDept function with:
return {DepartmentId: response['Id'], DepartmentName: response['Name']};
For a complete list of Model properties and functions, see the Model APIdocumentation.
5. Define the collection that will hold the data model object you defined in theprevious step using Collection.extend().
The highlighted code in the example below defines the collection object forthe Department model object. The DeptCollection variable is declared in theviewModel() function using the Collection.extend function and instantiated inthe declaration for self.DeptCol. The url property defines the data source, whichin this case is the REST service URL, and limits the collection to 50 records.
define([knockout', 'ojs/ojknockouttemplateutils', 'ojs/ojmodel', 'ojs/ojcollectiondataprovider', 'MockRESTServer'], function(ko, KnockoutTemplateUtils, model, CollectionDataProvider){ function viewModel() { var self = this; self.KnockoutTemplateUtils = KnockoutTemplateUtils; self.serviceURL = 'http://mockrest/stable/rest/Departments'; self.Departments = ko.observableArray([]); self.DeptCol = ko.observable(); self.dataProvider = ko.observable();
var parseDept = function(response) { ... contents omitted };
var Department = model.Model.extend({ urlRoot: self.serviceURL, parse: parseDept, idAttribute: 'DepartmentId' });
var myDept = new Department();
// this defines our collection and what models it will hold var DeptCollection = model.Collection.extend({ url: self.serviceURL + "?limit=50", model: myDept, });
self.DeptCol(new DeptCollection()); self.dataProvider(new CollectionDataProvider(self.DeptCol()));
} return {'deptVM': viewModel}; });
Both the DeptCol and dataProvider objects are defined as Knockout observablesso that changes to the data collection can be handled. The dataProvider object
Chapter 10Create a CRUD Application Using Oracle JET
10-12
will contain the column data needed by the oj-table element and is passed theDeptCol observable as a parameter to CollectionDataProvider().
The Departments object is defined as a Knockout observable array and will bepopulated in a later step.
For a complete list of Collection properties and functions, see the Collection APIdocumentation.
6. Populate the collection with data by calling Collection.fetch() to read the datafrom the data service URL.
The highlighted code in the code sample below calls collection.fetch() to adddata to the DeptCol data collection and complete the ViewModel.
define(['knockout', 'ojs/ojknockouttemplateutils', 'ojs/ojmodel', 'ojs/ojcollectiondataprovider', 'MockRESTServer'], function(ko, KnockoutTemplateUtils, model, CollectionDataProvider){ function viewModel() { var self = this; self.KnockoutTemplateUtils = KnockoutTemplateUtils; self.serviceURL = 'http://mockrest/stable/rest/Departments'; self.Departments = ko.observableArray([]); self.DeptCol = ko.observable(); self.dataProvider = ko.observable();
self.fetch = function(successCallBack) { // populate the collection by calling fetch() self.DeptCol().fetch({ success: successCallBack, error: function(jqXHR, textStatus, errorThrown){ console.log('Error in fetch: ' + textStatus); } }); };
var parseDept = function(response) { ... contents omitted };
var Department = model.Model.extend({ urlRoot: self.serviceURL, parse: parseDept, idAttribute: 'DepartmentId' });
var myDept = new Department();
var DeptCollection = model.Collection.extend({ url: self.serviceURL + "?limit=50", model: myDept });
self.DeptCol(new DeptCollection()); self.dataProvider(new CollectionDataProvider(self.DeptCol()));
} return {'deptVM': viewModel}; });
Chapter 10Create a CRUD Application Using Oracle JET
10-13
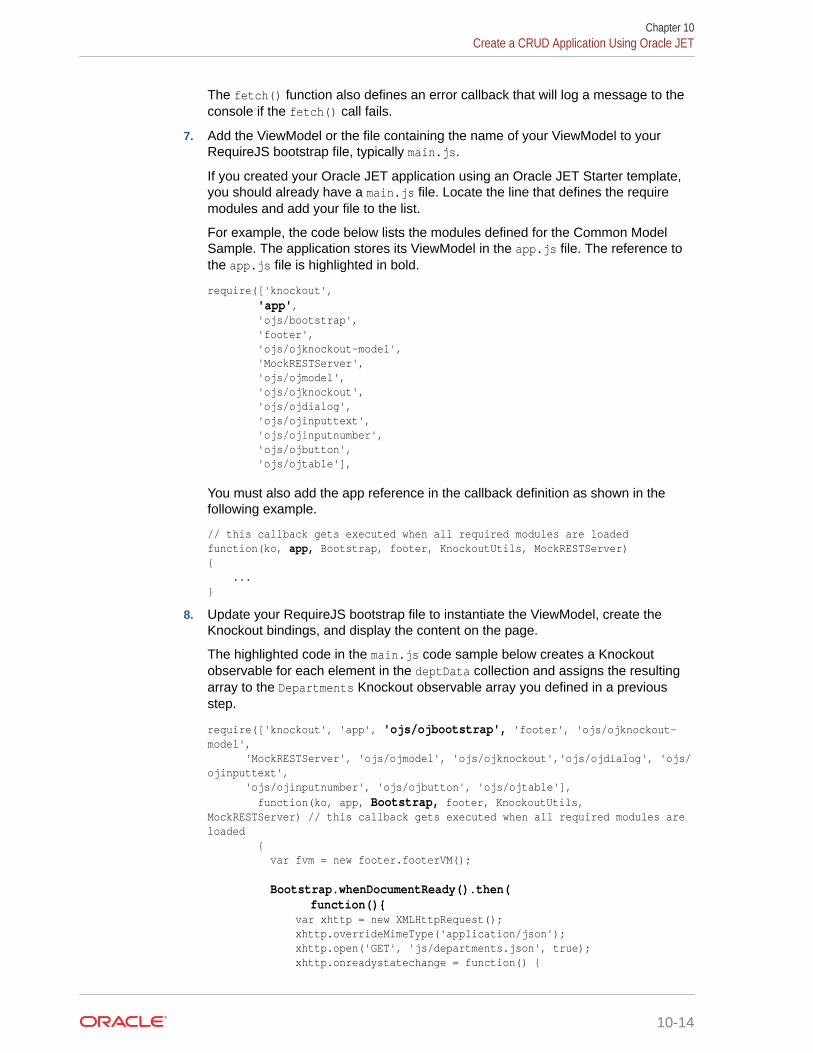
The fetch() function also defines an error callback that will log a message to theconsole if the fetch() call fails.
7. Add the ViewModel or the file containing the name of your ViewModel to yourRequireJS bootstrap file, typically main.js.
If you created your Oracle JET application using an Oracle JET Starter template,you should already have a main.js file. Locate the line that defines the requiremodules and add your file to the list.
For example, the code below lists the modules defined for the Common ModelSample. The application stores its ViewModel in the app.js file. The reference tothe app.js file is highlighted in bold.
require(['knockout', 'app', 'ojs/bootstrap', 'footer', 'ojs/ojknockout-model', 'MockRESTServer', 'ojs/ojmodel', 'ojs/ojknockout', 'ojs/ojdialog', 'ojs/ojinputtext', 'ojs/ojinputnumber', 'ojs/ojbutton', 'ojs/ojtable'],
You must also add the app reference in the callback definition as shown in thefollowing example.
// this callback gets executed when all required modules are loadedfunction(ko, app, Bootstrap, footer, KnockoutUtils, MockRESTServer){ ...}
8. Update your RequireJS bootstrap file to instantiate the ViewModel, create theKnockout bindings, and display the content on the page.
The highlighted code in the main.js code sample below creates a Knockoutobservable for each element in the deptData collection and assigns the resultingarray to the Departments Knockout observable array you defined in a previousstep.
require(['knockout', 'app', 'ojs/ojbootstrap', 'footer', 'ojs/ojknockout-model', 'MockRESTServer', 'ojs/ojmodel', 'ojs/ojknockout','ojs/ojdialog', 'ojs/ojinputtext', 'ojs/ojinputnumber', 'ojs/ojbutton', 'ojs/ojtable'], function(ko, app, Bootstrap, footer, KnockoutUtils, MockRESTServer) // this callback gets executed when all required modules are loaded { var fvm = new footer.footerVM();
Bootstrap.whenDocumentReady().then( function(){ var xhttp = new XMLHttpRequest(); xhttp.overrideMimeType('application/json'); xhttp.open('GET', 'js/departments.json', true); xhttp.onreadystatechange = function() {
Chapter 10Create a CRUD Application Using Oracle JET
10-14
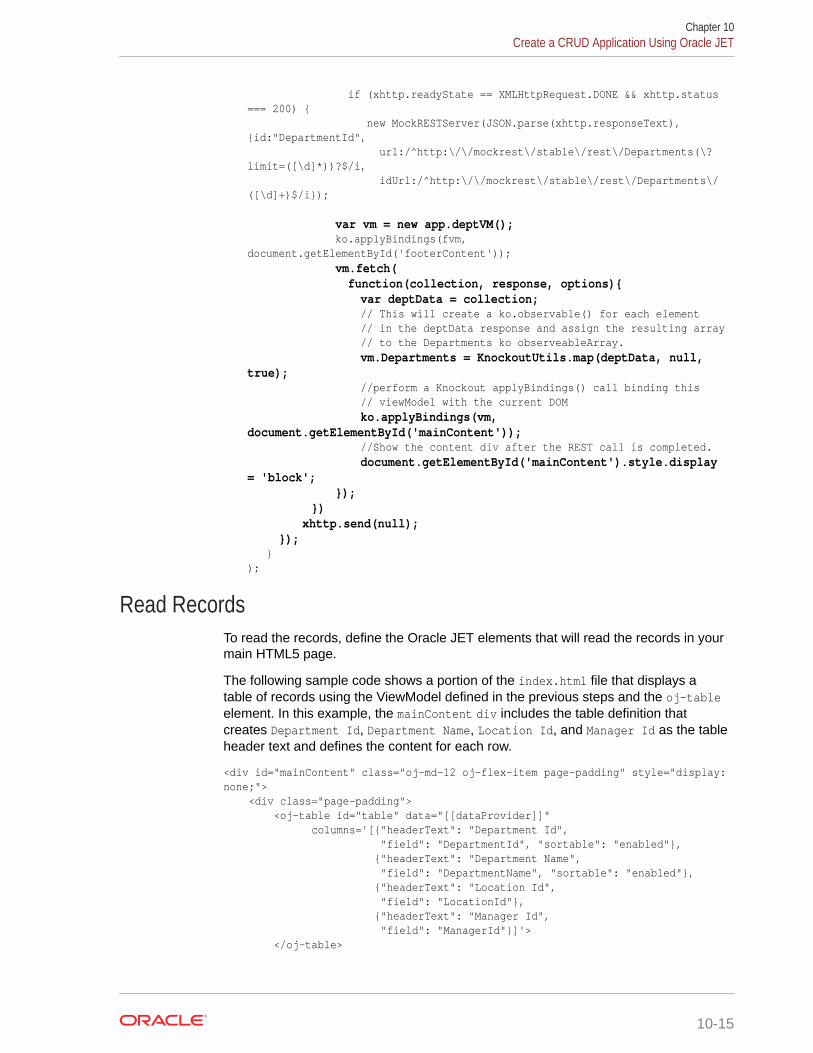
if (xhttp.readyState == XMLHttpRequest.DONE && xhttp.status === 200) { new MockRESTServer(JSON.parse(xhttp.responseText), {id:"DepartmentId", url:/^http:\/\/mockrest\/stable\/rest\/Departments(\?limit=([\d]*))?$/i, idUrl:/^http:\/\/mockrest\/stable\/rest\/Departments\/([\d]+)$/i});
var vm = new app.deptVM(); ko.applyBindings(fvm, document.getElementById('footerContent')); vm.fetch( function(collection, response, options){ var deptData = collection; // This will create a ko.observable() for each element // in the deptData response and assign the resulting array // to the Departments ko observeableArray. vm.Departments = KnockoutUtils.map(deptData, null, true); //perform a Knockout applyBindings() call binding this // viewModel with the current DOM ko.applyBindings(vm, document.getElementById('mainContent')); //Show the content div after the REST call is completed. document.getElementById('mainContent').style.display = 'block'; }); }) xhttp.send(null); }); });
Read RecordsTo read the records, define the Oracle JET elements that will read the records in yourmain HTML5 page.
The following sample code shows a portion of the index.html file that displays atable of records using the ViewModel defined in the previous steps and the oj-tableelement. In this example, the mainContent div includes the table definition thatcreates Department Id, Department Name, Location Id, and Manager Id as the tableheader text and defines the content for each row.
<div id="mainContent" class="oj-md-12 oj-flex-item page-padding" style="display: none;"> <div class="page-padding"> <oj-table id="table" data="[[dataProvider]]" columns='[{"headerText": "Department Id", "field": "DepartmentId", "sortable": "enabled"}, {"headerText": "Department Name", "field": "DepartmentName", "sortable": "enabled"}, {"headerText": "Location Id", "field": "LocationId"}, {"headerText": "Manager Id", "field": "ManagerId"}]'> </oj-table>
Chapter 10Create a CRUD Application Using Oracle JET
10-15
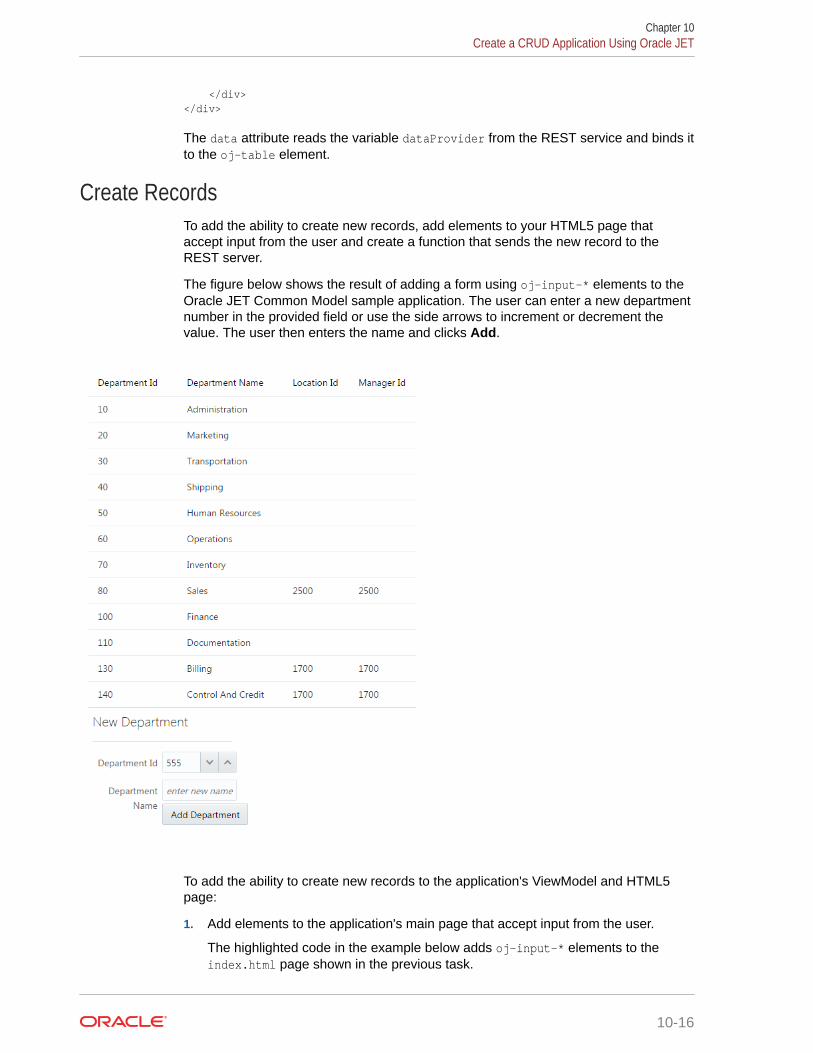
</div></div>
The data attribute reads the variable dataProvider from the REST service and binds itto the oj-table element.
Create RecordsTo add the ability to create new records, add elements to your HTML5 page thataccept input from the user and create a function that sends the new record to theREST server.
The figure below shows the result of adding a form using oj-input-* elements to theOracle JET Common Model sample application. The user can enter a new departmentnumber in the provided field or use the side arrows to increment or decrement thevalue. The user then enters the name and clicks Add.
To add the ability to create new records to the application's ViewModel and HTML5page:
1. Add elements to the application's main page that accept input from the user.
The highlighted code in the example below adds oj-input-* elements to theindex.html page shown in the previous task.
Chapter 10Create a CRUD Application Using Oracle JET
10-16

<div id="mainContent" class="oj-md-12 oj-flex-item page-padding" style="display: none;"> <div class="page-padding"> <div id="deptList" class="oj-md-9 oj-flex-item"> <oj-table id="table" summary="Demo Table" ... contents omitted </oj-table> <br/> <div id="addDept" class="oj-flex-item oj-md-3 oj-sm-12 right"> <div id="quickUpdate" class="frame"> <h3>New Department</h3><hr/> <oj-form-layout id="newDeptForm" label-edge="inside"> <oj-input-number id="newDepartId" value= "555" label-hint="Department Id"></oj-input-number> <oj-label-value> <oj-label slot="label" for="newDepartName">Department Name</oj-label> <oj-input-text slot="value" id="newDepartName" maxlength='30' placeholder="enter new name"></oj-input-text> <oj-button slot="value" id="saveBtn" on-oj-action="[[addDepartment]]" label='Add Department'></oj-button> </oj-label-value> </oj-form-layout> </div> </div> </div> </div></div>
The form is defined to contain two input fields: an oj-input-number for thedepartment ID, and an oj-input-text for the department name. The oj-buttoncomponent is used for the form's button.
The oj-button's on-oj-action attribute is bound to the addDepartment functionwhich is defined in the next step.
2. Add code to the ViewModel to add the user's input as a new record (model) in thedata collection.
The highlighted code in the example below shows the addDepartment() functionthat adds the new department number and department name to the DeptCol datacollection. In this example, the function calls the Collection.create() methodwhich creates the new model instance, adds it to the data collection, and savesthe new DepartmentId and DepartmentName to the data service.
define([knockout', 'ojs/ojknockouttemplateutils', 'ojs/ojmodel', 'ojs/ojcollectiondataprovider', 'MockRESTServer'], function(ko, KnockoutTemplateUtils, model, CollectionDataProvider) { function viewModel() { var self = this; se;f.KnockoutTemplateUtils = KnockoutTemplateUtils; self.serviceURL = 'http://mockrest/stable/rest/Departments'; self.Departments = ko.observableArray([]); self.DeptCol = ko.observable(); self.dataProvider = ko.observable();
self.fetch = function(successCallBack) { ... contents omitted };
function parseDept(response){
Chapter 10Create a CRUD Application Using Oracle JET
10-17

... contents omitted };
var Department = model.Model.extend({ urlRoot: self.serviceURL, parse: parseDept, parseSave:parseSaveDept, idAttribute: 'DepartmentId' });
var myDept = new Department();
var DeptCollection = model.Collection.extend({ url: self.serviceURL + "?limit=50", model: myDept, comparator: 'DepartmentId' });
self.DeptCol(new DeptCollection()); self.dataProvider(new CollectionDataProvider(self.DeptCol()));
function parseSaveDept(response){ return {DepartmentId: response['DepartmentId'], DepartmentName: response['DepartmentName'], LocationId: response['LocationId'], ManagerId: response['ManagerId'], links: {Employees: {rel: 'child', href: response['links']['Employees'].href}}}; };
self.addDepartment = function (formElement, event) { var id = document.getElementById("newDepartId").value; var recordAttrs = {DepartmentId: id, DepartmentName: document.getElementById("newDepartName").value, ManagerId: "", LocationId: "", links: {Employees: {rel: 'child', href: self.serviceURL + '/' + id + '/Employees'}}};
this.DeptCol().create(recordAttrs,{ wait: true, contentType: 'application/vnd.oracle.adf.resource+json', success: function (model, response) { console.log('Success in Create'); }, error: function(jqXHR, textStatus, errorThrown){ console.log('Error in Create: ' + textStatus); } }); } } return {'deptVM': viewModel}; });
The Collection.create() function accepts options to control the record save. Inthis example, simple error checking is added. In addition, the create() function
Chapter 10Create a CRUD Application Using Oracle JET
10-18

sends a contentType to the REST server. Depending upon the REST service youare using, this option may not be required or may need modification.
Update RecordsTo add the ability to update records, add elements to your HTML5 page that acceptinput from the user and create a function that sends the updated record to the RESTserver.
The figure below shows the Oracle JET Common Model sample application configuredto allow updates to the department name. When the user moves the focus over adepartment name, a tooltip appears that prompts the user to click to edit. departmentname, a tooltip prompts the user to click to edit. If the user clicks the departmentname, a dialog appears that enables the user to change the name. The user can typein a new department name and click Change to update the record or Cancel to keepthe existing department name.
To add the ability to update records to the application's ViewModel and HTML5 page:
1. Add elements to the application's main page that identifies updatable elementsand enables the user to perform an action to update them.
The highlighted code in the example below adds the oj-dialog element to thepage and provides the prompt to the user to click to edit the page.
<div id="mainContent" class="oj-flex-item oj-sm-12 oj-md-12 demo-page-content-area page-padding" style="display: none;"> <div class="page-padding"> <div id="deptList" class="oj-flex-item oj-md-9 oj-sm-12"> <oj-table id="table" data="[[dataProvider]]" columns='[{"headerText": "Remove", "id": "column1",
Chapter 10Create a CRUD Application Using Oracle JET
10-19
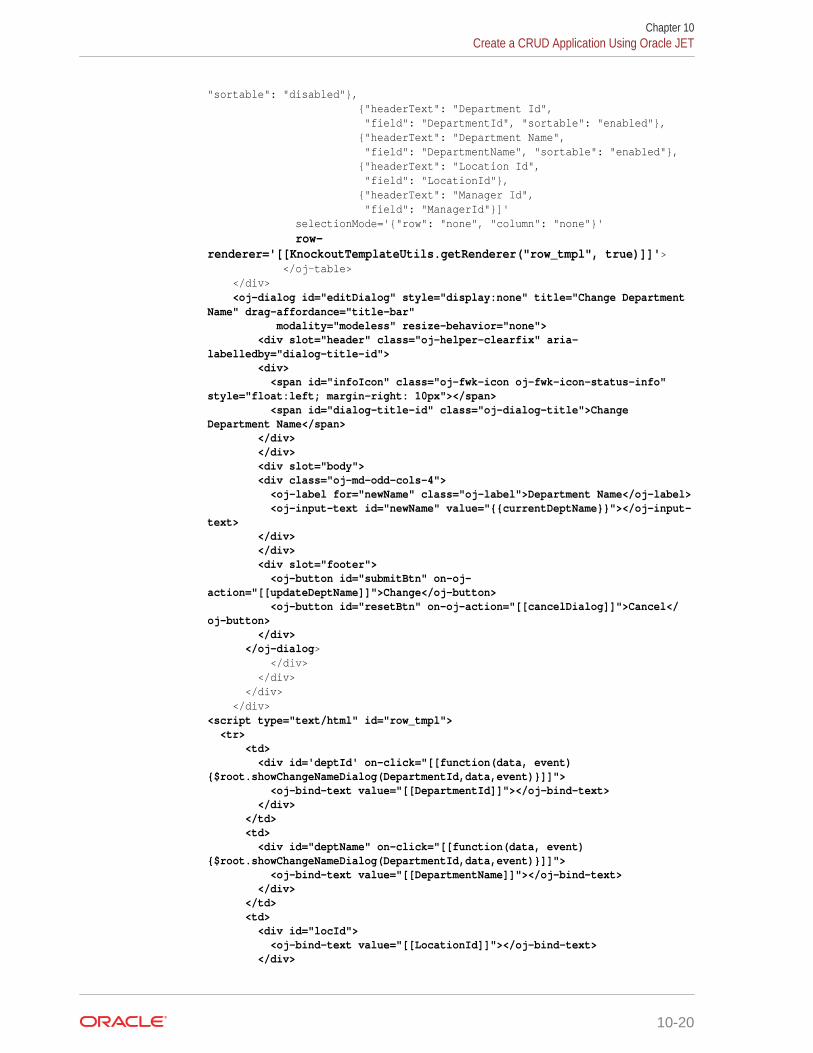
"sortable": "disabled"}, {"headerText": "Department Id", "field": "DepartmentId", "sortable": "enabled"}, {"headerText": "Department Name", "field": "DepartmentName", "sortable": "enabled"}, {"headerText": "Location Id", "field": "LocationId"}, {"headerText": "Manager Id", "field": "ManagerId"}]' selectionMode='{"row": "none", "column": "none"}' row-renderer='[[KnockoutTemplateUtils.getRenderer("row_tmpl", true)]]'> </oj-table> </div> <oj-dialog id="editDialog" style="display:none" title="Change Department Name" drag-affordance="title-bar" modality="modeless" resize-behavior="none"> <div slot="header" class="oj-helper-clearfix" aria-labelledby="dialog-title-id"> <div> <span id="infoIcon" class="oj-fwk-icon oj-fwk-icon-status-info" style="float:left; margin-right: 10px"></span> <span id="dialog-title-id" class="oj-dialog-title">Change Department Name</span> </div> </div> <div slot="body"> <div class="oj-md-odd-cols-4"> <oj-label for="newName" class="oj-label">Department Name</oj-label> <oj-input-text id="newName" value="{{currentDeptName}}"></oj-input-text> </div> </div> <div slot="footer"> <oj-button id="submitBtn" on-oj-action="[[updateDeptName]]">Change</oj-button> <oj-button id="resetBtn" on-oj-action="[[cancelDialog]]">Cancel</oj-button> </div> </oj-dialog> </div> </div> </div> </div><script type="text/html" id="row_tmpl"> <tr> <td> <div id='deptId' on-click="[[function(data, event){$root.showChangeNameDialog(DepartmentId,data,event)}]]"> <oj-bind-text value="[[DepartmentId]]"></oj-bind-text> </div> </td> <td> <div id="deptName" on-click="[[function(data, event){$root.showChangeNameDialog(DepartmentId,data,event)}]]"> <oj-bind-text value="[[DepartmentName]]"></oj-bind-text> </div> </td> <td> <div id="locId"> <oj-bind-text value="[[LocationId]]"></oj-bind-text> </div>
Chapter 10Create a CRUD Application Using Oracle JET
10-20

</td> <td> <div id="mgrId"> <oj-bind-text value="[[ManagerId]]"></oj-bind-text> </div> </td> </tr></script>
The oj-dialog element includes the oj-dialog-header, oj-dialog-body, and oj-dialog-footer formatting classes. The oj-dialog-header class is optional and isused in this example to format the Info icon and title.
The oj-dialog-body class formats the dialog body which includes the oj-labelfor Department Name and an oj-input-text element to capture the user'sinput. The oj-dialog-footer defines two oj-button components which add theChange and Cancel buttons to the dialog. When the user clicks Change, theupdateDepartmentName() function handles the updates to the record.
The original table is also modified to define the row-renderer attribute whichspecifies the row_tmpl template to use for the row display. The template scriptcalls the showChangeNameDialog() function to display the dialog.
The updateDepartmentName() and showChangeNameDialog() functions are definedin the next step. For additional information about the oj-dialog component, seethe oj-dialog API documentation.
2. Add code to the ViewModel to update the record.
The highlighted code in the example below shows the updateDepartment() andshowChangeNameDialog() functions.
define(['knockout', 'ojs/ojknockouttemplateutils', 'ojs/ojmodel', 'ojs/ojcollectiondataprovider', 'MockRESTServer'], function(ko, KnockoutTemplateUtils, model, CollectionDataProvider) { function viewModel() { var self = this; self.KnockoutTemplateUtils = KnockoutTemplateUtils; self.serviceURL = 'http://mockrest/stable/rest/Departments'; self.Departments = ko.observableArray([]); self.DeptCol = ko.observable(); self.dataProvider = ko.observable(); self.currentDeptName = ko.observable('default'); self.workingId = ko.observable('');
self.fetch = function(successCallBack) { ... contents omitted };
function parseDept(response){ ... contents omitted }
function parseSaveDept(response){ ... contents omitted }
var Department = model.Model.extend({ urlRoot: self.serviceURL,
Chapter 10Create a CRUD Application Using Oracle JET
10-21

parse: parseDept, parseSave:parseSaveDept, idAttribute: 'DepartmentId' });
var myDept = new Department();
var DeptCollection = model.Collection.extend({ url: self.serviceURL + "?limit=50", model: myDept, comparator: 'DepartmentId' });
self.DeptCol(new DeptCollection()); self.dataProvider(new CollectionDataProvider(self.DeptCol()));
self.showChangeNameDialog = function(deptId, data, event) { var currName = data.DepartmentName; self.workingId(deptId); self.currentDeptName(currName); document.getElementById("editDialog").open(); } self.updateDeptName = function(formData, event) { var currentId = self.workingId(); var myCollection = self.DeptCol(); var myModel = myCollection.get(currentId); var newName = self.currentDeptName(); if (newName != myModel.get('DepartmentName') && newName != '') { myModel.save({'DepartmentName': newName}, { success: function(myModel, response, options) { document.getElementById("editDialog").close(); }, error: function(jqXHR, textStatus, errorThrown) { alert("Update failed with: " + textStatus); document.getElementById("editDialog").close(); } }); } else { alert('Department Name is not different or the new name is not valid'); document.getElementById("editDialog").close(); } }; return {'deptVM': viewModel}; });
The showChangeNameDialog() function stores the selected department detail andopens the dialog with the existing department name shown in the oj-input-textfield.
Chapter 10Create a CRUD Application Using Oracle JET
10-22
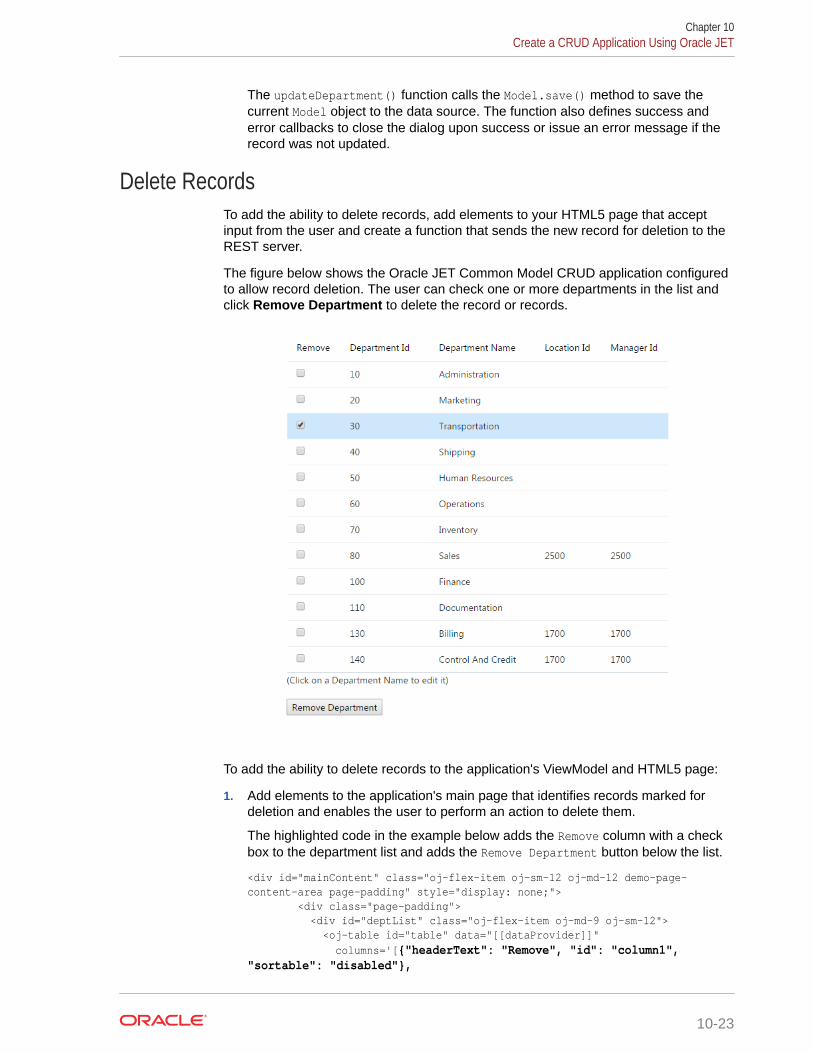
The updateDepartment() function calls the Model.save() method to save thecurrent Model object to the data source. The function also defines success anderror callbacks to close the dialog upon success or issue an error message if therecord was not updated.
Delete RecordsTo add the ability to delete records, add elements to your HTML5 page that acceptinput from the user and create a function that sends the new record for deletion to theREST server.
The figure below shows the Oracle JET Common Model CRUD application configuredto allow record deletion. The user can check one or more departments in the list andclick Remove Department to delete the record or records.
To add the ability to delete records to the application's ViewModel and HTML5 page:
1. Add elements to the application's main page that identifies records marked fordeletion and enables the user to perform an action to delete them.
The highlighted code in the example below adds the Remove column with a checkbox to the department list and adds the Remove Department button below the list.
<div id="mainContent" class="oj-flex-item oj-sm-12 oj-md-12 demo-page-content-area page-padding" style="display: none;"> <div class="page-padding"> <div id="deptList" class="oj-flex-item oj-md-9 oj-sm-12"> <oj-table id="table" data="[[dataProvider]]" columns='[{"headerText": "Remove", "id": "column1", "sortable": "disabled"},
Chapter 10Create a CRUD Application Using Oracle JET
10-23
{"headerText": "Department Id", "field": "DepartmentId", "sortable": "enabled"}, {"headerText": "Department Name", "field": "DepartmentName", "sortable": "enabled"}, {"headerText": "Location Id", "field": "LocationId"}, {"headerText": "Manager Id", "field": "ManagerId"}]' selectionMode='{"row": "none", "column": "none"}' row-renderer='[[KnockoutTemplateUtils.getRenderer("row_tmpl", true)]]'> </oj-table> <br/> <oj-button id="deleteDept_btn" disabled="[[!somethingChecked()]]" on-oj-action="[[deleteDepartment]]">Remove Department</oj-button> </div> </div> </div>
<script type="text/html" id="row_tmpl"> <tr> <td> <oj-checkboxset aria-hidden='true' on-value-changed="[[$parent.enableDelete]]" class='oj-checkboxset-no-chrome'> <oj-option :id="[[DepartmentId]]" value="[[DepartmentId]]"></oj-option> </oj-checkboxset> </td> <td> <div id='deptId' on-click="[[function(data, event){$root.showChangeNameDialog(DepartmentId,data,event)}]]"> <oj-bind-text value="[[DepartmentId]]"></oj-bind-text> </div> </td> <td> <div id="deptName" on-click="[[function(data, event){$root.showChangeNameDialog(DepartmentId,data,event)}]]"> <oj-bind-text value="[[DepartmentName]]"></oj-bind-text> </div> </td> <td> <div id="locId"> <oj-bind-text value="[[LocationId]]"></oj-bind-text> </div> </td> <td> <div id="mgrId"> <oj-bind-text value="[[ManagerId]]"></oj-bind-text> </div> </td> </tr></script>
The original table is modified to include the Remove column. The row-rendererattribute specifies the row_tmpl template to use for the row display. The templatescript adds the checkbox input element to the first column and the value ofDepartmentId, DepartmentName, and LocationId to the remaining columns.
The button's click action is bound to the deleteDepartment function which iscreated in the next step.
Chapter 10Create a CRUD Application Using Oracle JET
10-24

2. Add code to the ViewModel to delete the record or records submitted by the user.
The highlighted code in the example below shows the deleteDepartment()function. In this example, the function calls the collection.remove() methodwhich removes the model or models from the data collection. To delete the recordfrom the data source, the function calls the model.destroy() method.
define(['knockout', 'ojs/ojknockouttemplateutils', 'ojs/ojmodel', 'ojs/ojcollectiondataprovider', 'MockRESTServer'], function(ko, KnockoutTemplateUtils, model, CollectionDataProvider) { function viewModel() { var self = this; self.KnockoutTemplateUtils = KnockoutTemplateUtils; self.serviceURL = 'http://mockrest/stable/rest/Departments'; self.Departments = ko.observableArray([]); self.DeptCol = ko.observable(); self.dataProvider = ko.observable(); self.currentDeptName = ko.observable('default'); self.workingId = ko.observable(''); self.somethingChecked = ko.observable(false);
self.fetch = function(successCallBack) { ... contents omitted }
var Department = model.Model.extend({ urlRoot: self.serviceURL, idAttribute: 'DepartmentId' });
var myDept = new Department();
var DeptCollection = Collection.extend({ url: self.serviceURL + "?limit=50", model: myDept, comparator: 'DepartmentId' });
self.DeptCol(new DeptCollection()); self.dataProvider(new CollectionDataProvider(self.DeptCol()));
self.enableDelete = function(event) { self.somethingChecked(event && event.target && event.target.value && event.target.value.length); }.bind(this); self.deleteDepartment = function(event, data, bindingContext) { var deptIds = []; deptIds = self.findDeptIds(); var collection = data.DeptCol(); deptIds.forEach(function(value, index, arr) { var model = collection.get(parseInt(value)); if (model) { collection.remove(model); model.destroy(); } });
Chapter 10Create a CRUD Application Using Oracle JET
10-25

self.enableDelete(); document.getElementById("table").refresh(); }.bind(this); self.findDeptIds = function() { var selectedIdsArray = []; var divs = document.querySelectorAll('input[type=checkbox]:checked'); for (var i = 0; i < divs.length; i++) { selectedIdsArray.push(divs[i].id); } return selectedIdsArray; } } return {'deptVM': viewModel}; });
The deleteDepartment() function calls the findDeptIds() function which returnsthe list of selected departments marked for deletion. The enableDelete() functionresets the check box after the department list is deleted.
Chapter 10Create a CRUD Application Using Oracle JET
10-26

11Validating and Converting Input
Oracle JET includes validators and converters on a number of Oracle JET editableelements, including oj-combobox, oj-input*, and oj-text-area. You can use them asis or customize them for validating and converting input in your Oracle JET application.Some editable elements such as oj-checkboxset, oj-radioset, and oj-select havea simple attribute for required values that implicitly creates a built-in validator.
Note:
The oj-input* mentioned above refers to the family of input componentssuch as oj-input-date-time, oj-input-text, and oj-input-password,among others.
Topics:
• Typical Workflow for Validating and Converting Input
• About Oracle JET Validators and Converters
• About Oracle JET Converters
• About Oracle JET Validators
Typical Workflow for Validating and Converting InputUnderstand Oracle JET's validation and conversion framework before working withit. Optionally, learn how to create custom converters and validators to extend theframework.
To validate and convert input in Oracle JET, refer to the typical workflow described inthe following table:
Task Description More Information
Understand Oracle JET'svalidation and conversionframework
Understand the validators andconverters included in Oracle JET andidentify when you might need a customvalidator or converter.
About Oracle JET Validators and Converters
Use Oracle JET convertersin your application
Use ColorConverter,IntlNumberConverter, andIntlDateTimeConverter to convertcolor, number, and date-time inputs tovalues expected by the view model.
About Oracle JET Converters
Use a custom converterin your Oracle JETapplication
How to reference a custom converter inan Oracle JET application.
Use Custom Converters in Oracle JET
11-1
Task Description More Information
Use Oracle JET validatorsin your application
Use DateTimeRangeValidator,DateRestrictionValidator,LengthValidator,NumberRangeValidator,RegExpValidator, andRequiredValidator to validate userinput.
About Oracle JET Validators
Use a custom validatorin your Oracle JETapplication
How to reference a custom validator inan Oracle JET application.
Use Custom Validators in Oracle JET
About Oracle JET Validators and ConvertersOracle JET provides converter classes that convert user input strings into the datatype expected by the application and validator classes that enforce a validation rule onthose input strings.
For example, you can use Oracle JET's IntlDateTimeConverter to convert a user-entered date to a Date object for use by the application's ViewModel and then useDateTimeRangeValidator to validate that input against a specified time range. You canalso use converters to convert Date or Number objects to a string suitable for display orconvert color object formats.
To retrieve the converter or validator factory for a registered type, Oracle JET providesthe Validation class which includes methods to register and retrieve converter andvalidator factories.
If the converters or validators included in Oracle JET are not sufficient for yourapplication, you can create custom converters or validators. Optionally, you canprovide a custom factory that implements the contract for a converter usingConverterFactory or a validator using ValidatorFactory and register the converter orvalidator with the Validation class. The Validation class enables you to access yourcustom converter or validator using the same mechanisms as you would use with theOracle JET standard converters and validators.
Topics:
• About Validators
• About Converters
About ValidatorsAll Oracle JET editable elements support a value attribute and provide UI elementsthat allow the user to enter or choose a value. These elements also support otherattributes that page authors can set that instruct the element how it should validate itsvalue.
An editable element may implicitly create a built-in converter and/or built-in validatorsfor its normal functioning when certain attributes are set.
For example, editable elements that support a required property create the requiredvalidator implicitly when the property is set to true. Other elements like oj-input-
Chapter 11About Oracle JET Validators and Converters
11-2

date, oj-input-date-time, and oj-input-time create a datetime converter toimplement its basic functionality.
Topics
• About the Oracle JET Validators
• About Oracle JET Component Validation Attributes
• About Oracle JET Component Validation Methods
About the Oracle JET ValidatorsThe following table describes the Oracle JET validators and provides links to the APIdocumentation:
Validator Description Link to API Module
DateTimeRangeValidator
Validates that the inputdate is between two dates,between two times, or withintwo date and time ranges
DateTimeRangeValidator ojvalidation-datetimerange
DateRestrictionValidator
Validates that the input dateis not a restricted date
DateRestrictionValidator ojvalidation-daterestriction
LengthValidator Validates that an input stringis within a specified length
LengthValidator ojvalidation-length
NumberRangeValidator
Validates that an inputnumber is within a specifiedrange
NumberRangeValidator ojvalidation-numberrange
RegExpValidator Validates that the regularexpression matches aspecified pattern
RegExpValidator ojvalidation-regexp
RequiredValidator Validates that a requiredentry exists
RequiredValidator ojvalidation-required
About Oracle JET Component Validation AttributesThe attributes that a component supports are part of its API, and the followingvalidation specific attributes apply to most editable elements.
Element Attribute Description
converter When specified, the converter instance is used over any internal converter theelement might create. On elements such as oj-input-text, you may need to specifythis attribute if the value must be processed to and from a number or a date value.
countBy When specified on LengthValidator, countBy enables you to change the validator’sdefault counting behavior. By default, this property is set to codeUnit, which usesJavaScript's String length property to count a UTF-16 surrogate pair as length === 2.Set this to codePoint to count surrogate pairs as length ===1.
max When specified on an Oracle JET element like oj-input-date or oj-input-number,the element creates an implicit range validator.
min When specified on an Oracle JET element like oj-input-date or oj-input-number,the component creates an implicit range validator.
Chapter 11About Oracle JET Validators and Converters
11-3
Element Attribute Description
pattern When specified on an Oracle JET element like oj-input-text, oj-input-password,or oj-text-area, the component creates an implicit regExp validator using the patternspecified. If the regular expression pattern requires a backslash, while specifying theexpression within an Oracle JET element, you need to use double backslashes. Formore information, see Use Oracle JET Validators with Oracle JET Components.
placeholder When specified, it displays placeholder values in most elements.
required When specified on an Oracle JET element, the element creates an implicit requiredvalidator.
validators When specified, the element uses these validators along with the implicit validators tovalidate the UI value. Can be implemented with Validators or AsyncValidators tovalidate the user input on the server asynchronously.
Some editable elements do not support specific validation attributes as they might beirrelevant to its intrinsic functioning. For example, oj-radioset and oj-checkboxsetdo not support a converter attribute since there is nothing for the converter toconvert. For an exact list of attributes and how to use them, refer to the Attributessection in the element’s API documentation. For Oracle JET API documentation, seeAPI Reference for Oracle® JavaScript Extension Toolkit (Oracle JET). Select thecomponent you're interested in viewing from the API list.
About Oracle JET Component Validation MethodsOracle JET editable elements support the following methods for validation purposes.For details on how to call this method, its parameters and return values, refer to thecomponent’s API documentation.
Element Method Description
refresh() Use this method when the DOM the element relies on changes, such as the help attributetooltip on an oj-label changing due to a change in locale.
reset() Use this method to reset the element by clearing all messages and messages attributes -messagesCustom - and update the element’s display value using the attribute value. Userentered values will be erased when this method is called.
validate() Use this method to validate the component using the current display value.
For details on calling a element's method, parameters, and return values, See theMethods section of the element's API documentation in API Reference for Oracle®JavaScript Extension Toolkit (Oracle JET). You can also find detail on how to registera callback for or bind to the event and for information about what triggers the events.Select the component you're interested in viewing from the API list.
About ConvertersThe Oracle JET converters include date-time, number, and color converters and aredescribed in the following table.
Converter Description Link to API
ColorConverter Converts Color object formats ColorConverter
Chapter 11About Oracle JET Validators and Converters
11-4
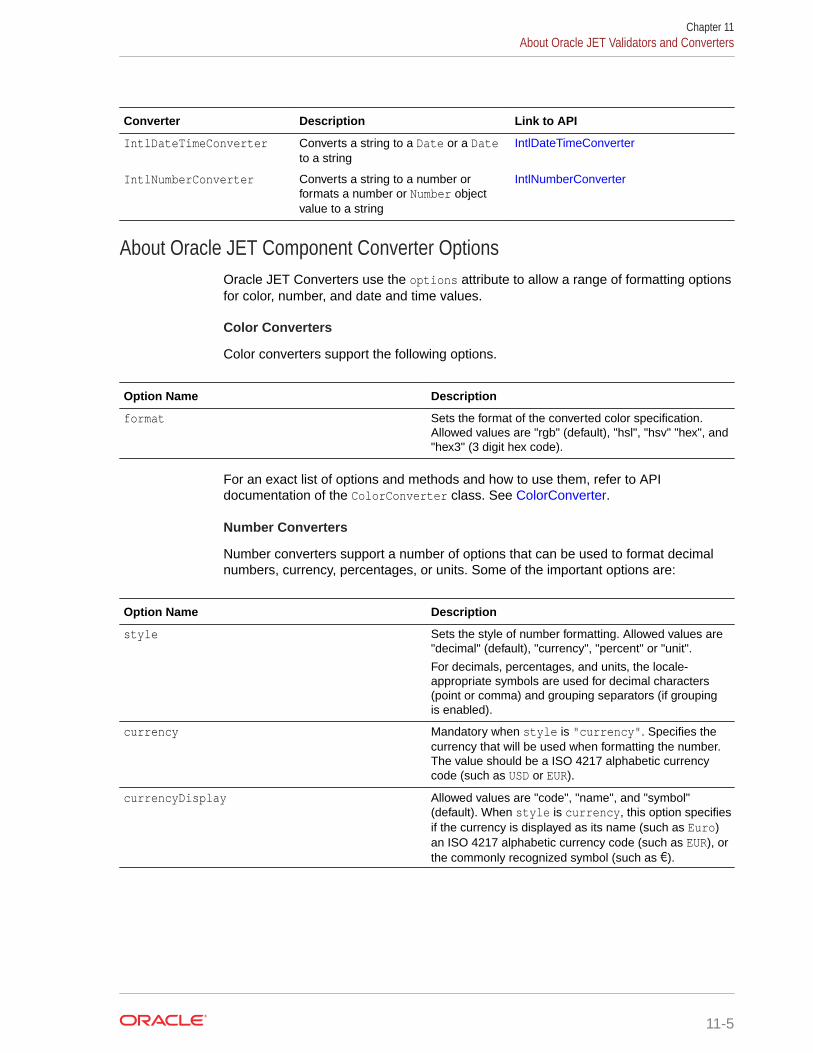
Converter Description Link to API
IntlDateTimeConverter Converts a string to a Date or a Dateto a string
IntlDateTimeConverter
IntlNumberConverter Converts a string to a number orformats a number or Number objectvalue to a string
IntlNumberConverter
About Oracle JET Component Converter OptionsOracle JET Converters use the options attribute to allow a range of formatting optionsfor color, number, and date and time values.
Color Converters
Color converters support the following options.
Option Name Description
format Sets the format of the converted color specification.Allowed values are "rgb" (default), "hsl", "hsv" "hex", and"hex3" (3 digit hex code).
For an exact list of options and methods and how to use them, refer to APIdocumentation of the ColorConverter class. See ColorConverter.
Number Converters
Number converters support a number of options that can be used to format decimalnumbers, currency, percentages, or units. Some of the important options are:
Option Name Description
style Sets the style of number formatting. Allowed values are"decimal" (default), "currency", "percent" or "unit".
For decimals, percentages, and units, the locale-appropriate symbols are used for decimal characters(point or comma) and grouping separators (if groupingis enabled).
currency Mandatory when style is "currency". Specifies thecurrency that will be used when formatting the number.The value should be a ISO 4217 alphabetic currencycode (such as USD or EUR).
currencyDisplay Allowed values are "code", "name", and "symbol"(default). When style is currency, this option specifiesif the currency is displayed as its name (such as Euro)an ISO 4217 alphabetic currency code (such as EUR), orthe commonly recognized symbol (such as €).
Chapter 11About Oracle JET Validators and Converters
11-5

Option Name Description
unit Mandatory when style is "unit". Allowed values are"byte" or "bit". This option is used for formatting only andcannot be used for parsing.
Use this option to format digital units like 10Mb for bitunit or 10MB for byte unit. Note that scale is formattedautomatically. For example, 1024 (with the byte unit set)is interpreted as 1 KB.
minimumIntegerDigits Sets the minimum number of digits before the decimalplace. The number is padded with leading zeros if itwould not otherwise have enough digits. Allowed valuesare any integer from 1 to 21.
minimumFractionDigits Sets the minimum number of digits after the decimalplace. The number is padded with trailing zeros if itwould not otherwise have enough digits. Allowed valuesare any integer from 0 to 20.
maximumFractionDigits Sets the maximum number of digits after the decimalplace. The number is rounded if it has more than theset maximum number of digits. Allowed values are anyinteger from 0 to 20.
pattern Sets a pattern to use for the number, overriding otheroptions. The pattern uses the symbols specified inthe Unicode CLDR for numbers, percent, and currencyformats.
For the currency format, the currency option must beset. Use of the currency symbol (¤) indicates whether itwill be displayed or not. For example, {pattern: '¤#,##0',currency: 'USD'}.
For the percentage format, if the style option is set to'percent', use of the percentage symbol (%) indicateswhether it will be displayed or not. If the style optionis not set to percent, the percentage symbol is required.For example, {style: 'percent', pattern: "#,##0"}.
For the decimal or exponent patterns, the example is{pattern: "#,##0.00"} or {pattern: "0.##E+0"}.
roundingMode Specifies the rounding behavior. Allowed values areHALF_UP, HALF_DOWN, and HALF_EVEN.
roundDuringParse Specifies whether or not to round during parse. Defaultsto false; the number converter rounds during format butnot during parse.
For an exact list of options and methods and how to use them, refer to APIdocumentation of the IntlNumberConverter class. See IntlNumberConverter.
For an example illustrating the use of Number Converter options, see NumberConverter.
DateTime Converters
DateTime converters support a wide array of options that can be used to format dateand time values in all common styles across locales. Some of the important optionsare:
Chapter 11About Oracle JET Validators and Converters
11-6
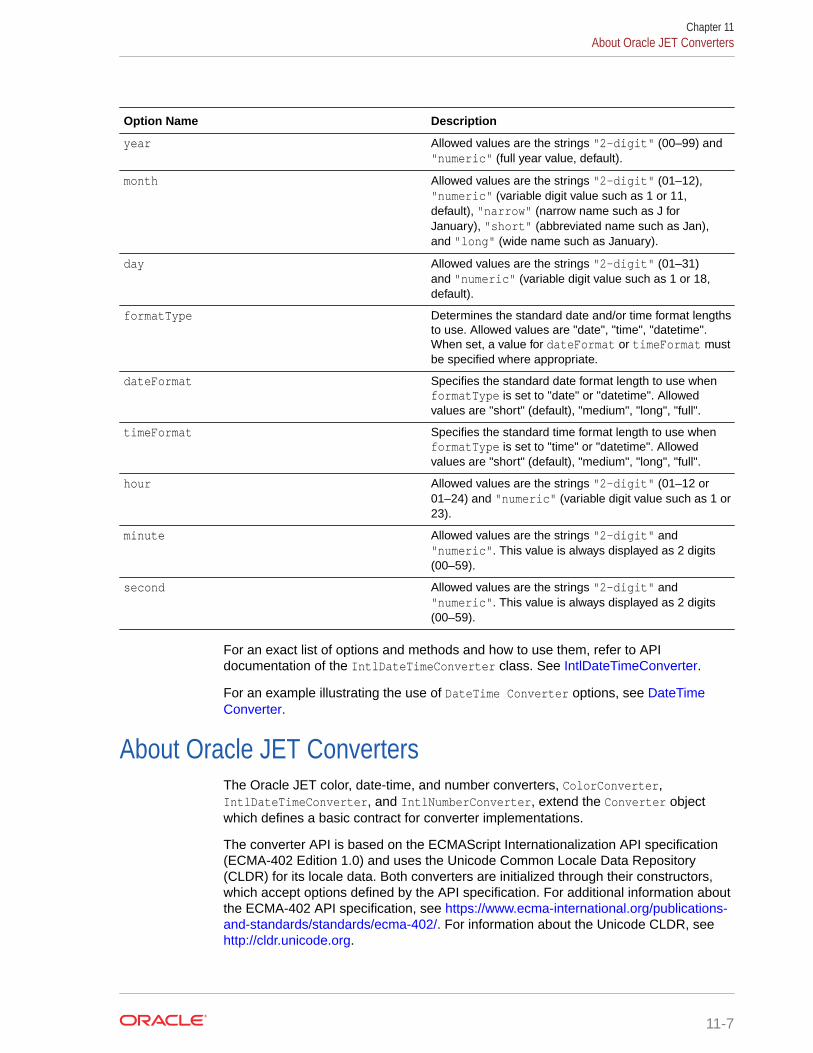
Option Name Description
year Allowed values are the strings "2–digit" (00–99) and"numeric" (full year value, default).
month Allowed values are the strings "2–digit" (01–12),"numeric" (variable digit value such as 1 or 11,default), "narrow" (narrow name such as J forJanuary), "short" (abbreviated name such as Jan),and "long" (wide name such as January).
day Allowed values are the strings "2–digit" (01–31)and "numeric" (variable digit value such as 1 or 18,default).
formatType Determines the standard date and/or time format lengthsto use. Allowed values are "date", "time", "datetime".When set, a value for dateFormat or timeFormat mustbe specified where appropriate.
dateFormat Specifies the standard date format length to use whenformatType is set to "date" or "datetime". Allowedvalues are "short" (default), "medium", "long", "full".
timeFormat Specifies the standard time format length to use whenformatType is set to "time" or "datetime". Allowedvalues are "short" (default), "medium", "long", "full".
hour Allowed values are the strings "2–digit" (01–12 or01–24) and "numeric" (variable digit value such as 1 or23).
minute Allowed values are the strings "2–digit" and"numeric". This value is always displayed as 2 digits(00–59).
second Allowed values are the strings "2–digit" and"numeric". This value is always displayed as 2 digits(00–59).
For an exact list of options and methods and how to use them, refer to APIdocumentation of the IntlDateTimeConverter class. See IntlDateTimeConverter.
For an example illustrating the use of DateTime Converter options, see DateTimeConverter.
About Oracle JET ConvertersThe Oracle JET color, date-time, and number converters, ColorConverter,IntlDateTimeConverter, and IntlNumberConverter, extend the Converter objectwhich defines a basic contract for converter implementations.
The converter API is based on the ECMAScript Internationalization API specification(ECMA-402 Edition 1.0) and uses the Unicode Common Locale Data Repository(CLDR) for its locale data. Both converters are initialized through their constructors,which accept options defined by the API specification. For additional information aboutthe ECMA-402 API specification, see https://www.ecma-international.org/publications-and-standards/standards/ecma-402/. For information about the Unicode CLDR, seehttp://cldr.unicode.org.
Chapter 11About Oracle JET Converters
11-7
The Oracle JET implementation extends the ECMA-402 specification by introducingadditional options, including an option for user-defined patterns. For thelist of additional options, see the ColorConverter, IntlDateTimeConverter, andIntlNumberConverter API documentation.
For examples that illustrate the date-time and number converters in action, seethe Converters section in the Oracle JET Cookbook. For examples using the colorconverter, see the Color Palette and Color Spectrum Cookbook samples.
Note:
The bundles that hold the locale symbols and data used by the Oracle JETconverters are downloaded automatically based on the locale set on thepage when using RequireJS and the ojs/ojvalidation-datetime or ojs/ojvalidation-number module. If your application does not use RequireJS,the locale data will not be downloaded automatically.
You can use the converters with an Oracle JET component or instantiate and use themdirectly on the page.
Topics:
• Use Oracle JET Converters with Oracle JET Components
• About Oracle JET Converters Lenient Parsing
• Understand Time Zone Support in Oracle JET
• Use Custom Converters in Oracle JET
• Use Oracle JET Converters Without Oracle JET Components
Use Oracle JET Converters with Oracle JET ComponentsOracle JET elements that accept user input, such as oj-input-date, already includean implicit converter that is used when parsing user input. However, you can alsospecify an explicit converter on the element which will be used instead whenconverting data from the model for display on the page and vice versa. An explicitconverter is required if you want to include time zone data.
For example, the following code sample shows a portion of a form containing anoj-input-date component that uses the default converter supplied by the componentimplicitly. The highlighted code shows the oj-input-date component.
<oj-form-layout id="datetime-converter-example"> ... contents omitted <oj-input-date id="date1" value="{{date}}" name="date1" label-hint="input date with no converter" help.instruction="enter a date in your preferred format and we will attempt to figure it out"> </oj-input-date></oj-form-layout>
The script to create the view model for this example is shown below.
require(['knockout', 'ojs/ojbootstrap', 'ojs/ojknockout', 'ojs/ojdatetimepicker', 'ojs/ojlabel'],
Chapter 11About Oracle JET Converters
11-8

function(ko, Bootstrap) { function MemberViewModel() { var self = this; self.date = ko.observable(); self.datetime = ko.observable(); self.time = ko.observable(); };
Bootstrap.whenDocumentReady().then( function () { ko.applyBindings(new MemberViewModel(), document.getElementById('datetime-converter-example')); } ); });
When the user runs the page, the oj-input-date element displays an input field withthe expected date format. In this example, the element also displays a hint whenthe user hovers over the input field, and displays a calendar when the user clicks inthe input field. If the user inputs data that is not in the expected format, the built-inconverter displays an error message with the expected format.
Chapter 11About Oracle JET Converters
11-9

The error that the converter throws when there are errors during parsing or formattingoperations is represented by the ConverterError object, and the error message isrepresented by an object that duck-types Message. The messages that Oracle JETconverters use are resources that are defined in the translation bundle included withOracle JET. For more information about messaging in Oracle JET, see Working withUser Assistance.
You can also specify the converter directly on the element's converter attribute, if itexists. The code excerpt below defines another oj-input-date element on the sampleform and specifies the IntlDateTimeConverter converter with options that will convertthe user's input to a numeric year, long month, and numeric day according to theconventions of the locale set on the page. The options parameter is an object literalthat contains the ECMA-402 options as name-value pairs.
<div class="oj-flex"> <div class="oj-flex-item"> <oj-label for="date2">input date</oj-label> </div> <div class="oj-flex-item"> <oj-input-date id="date2" value="{{date}}" name="date2" help.instruction="enter a date in your preferred format and we will attempt to figure it out" converter= '{ "type":"datetime", "options": {"year": "numeric", "month": "long", "day": "numeric"}}'> </oj-input-date> </div></div>
When the user runs the page in the en-us locale, the oj-input-date element displaysan input field that expects the user's input date to be in the mmmm d, yyyy format. Theconverter will accept alternate input if it makes sense, such as 18/07/17 (MM/dd/yy),and perform the conversion, but will throw an error if it cannot parse the input. Fordetails about Oracle JET converters and lenient parsing support, see About OracleJET Converters Lenient Parsing.
Chapter 11About Oracle JET Converters
11-10
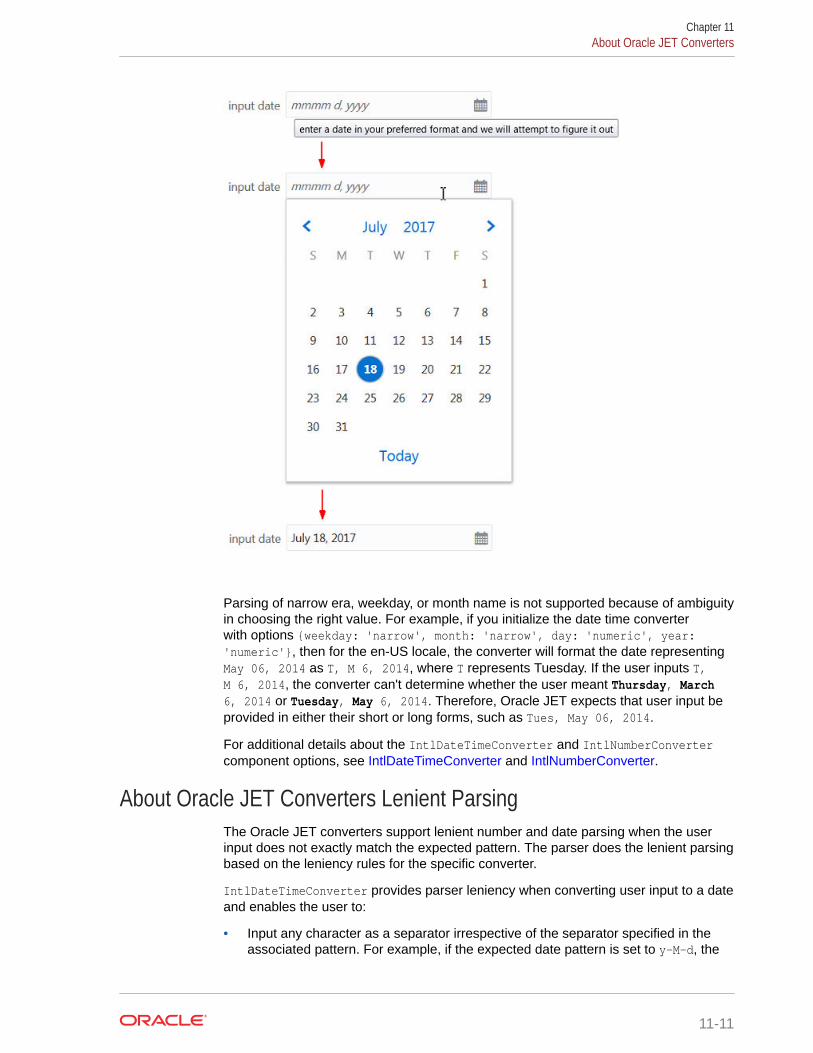
Parsing of narrow era, weekday, or month name is not supported because of ambiguityin choosing the right value. For example, if you initialize the date time converterwith options {weekday: 'narrow', month: 'narrow', day: 'numeric', year:'numeric'}, then for the en-US locale, the converter will format the date representingMay 06, 2014 as T, M 6, 2014, where T represents Tuesday. If the user inputs T,M 6, 2014, the converter can't determine whether the user meant Thursday, March6, 2014 or Tuesday, May 6, 2014. Therefore, Oracle JET expects that user input beprovided in either their short or long forms, such as Tues, May 06, 2014.
For additional details about the IntlDateTimeConverter and IntlNumberConvertercomponent options, see IntlDateTimeConverter and IntlNumberConverter.
About Oracle JET Converters Lenient ParsingThe Oracle JET converters support lenient number and date parsing when the userinput does not exactly match the expected pattern. The parser does the lenient parsingbased on the leniency rules for the specific converter.
IntlDateTimeConverter provides parser leniency when converting user input to a dateand enables the user to:
• Input any character as a separator irrespective of the separator specified in theassociated pattern. For example, if the expected date pattern is set to y-M-d, the
Chapter 11About Oracle JET Converters
11-11
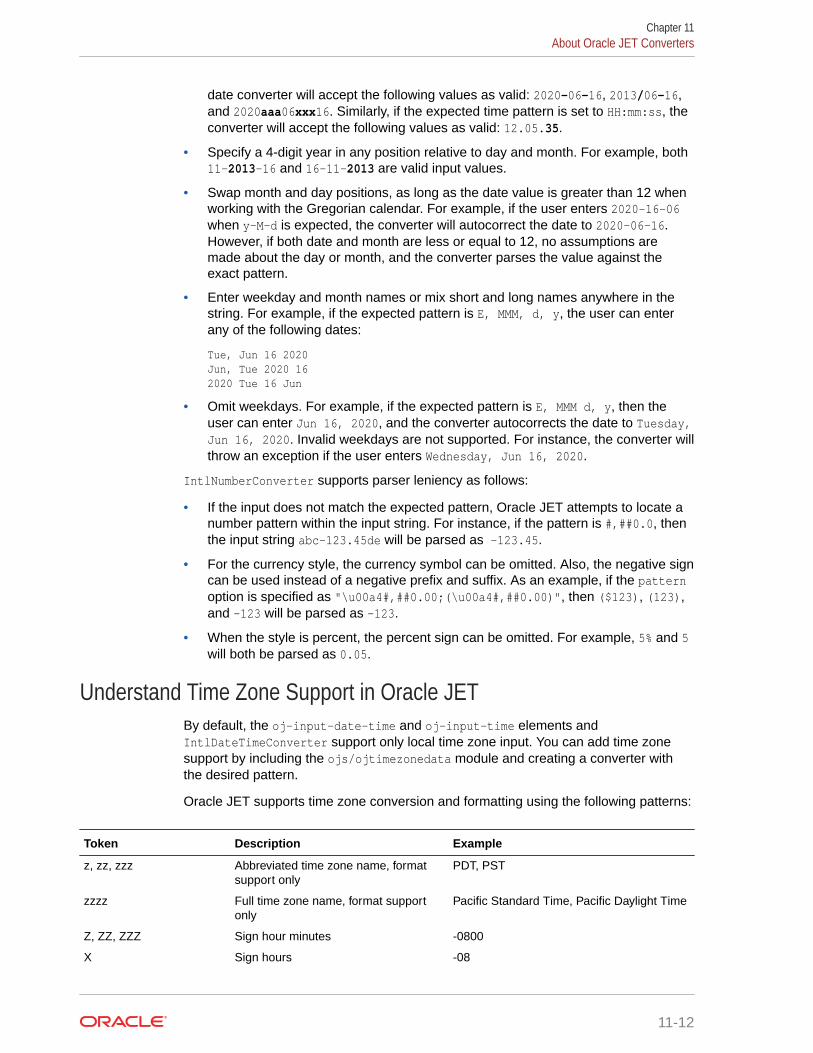
date converter will accept the following values as valid: 2020-06-16, 2013/06-16,and 2020aaa06xxx16. Similarly, if the expected time pattern is set to HH:mm:ss, theconverter will accept the following values as valid: 12.05.35.
• Specify a 4-digit year in any position relative to day and month. For example, both11-2013-16 and 16-11-2013 are valid input values.
• Swap month and day positions, as long as the date value is greater than 12 whenworking with the Gregorian calendar. For example, if the user enters 2020-16-06when y-M-d is expected, the converter will autocorrect the date to 2020-06-16.However, if both date and month are less or equal to 12, no assumptions aremade about the day or month, and the converter parses the value against theexact pattern.
• Enter weekday and month names or mix short and long names anywhere in thestring. For example, if the expected pattern is E, MMM, d, y, the user can enterany of the following dates:
Tue, Jun 16 2020Jun, Tue 2020 162020 Tue 16 Jun
• Omit weekdays. For example, if the expected pattern is E, MMM d, y, then theuser can enter Jun 16, 2020, and the converter autocorrects the date to Tuesday,Jun 16, 2020. Invalid weekdays are not supported. For instance, the converter willthrow an exception if the user enters Wednesday, Jun 16, 2020.
IntlNumberConverter supports parser leniency as follows:
• If the input does not match the expected pattern, Oracle JET attempts to locate anumber pattern within the input string. For instance, if the pattern is #,##0.0, thenthe input string abc-123.45de will be parsed as -123.45.
• For the currency style, the currency symbol can be omitted. Also, the negative signcan be used instead of a negative prefix and suffix. As an example, if the patternoption is specified as "\u00a4#,##0.00;(\u00a4#,##0.00)", then ($123), (123),and -123 will be parsed as -123.
• When the style is percent, the percent sign can be omitted. For example, 5% and 5will both be parsed as 0.05.
Understand Time Zone Support in Oracle JETBy default, the oj-input-date-time and oj-input-time elements andIntlDateTimeConverter support only local time zone input. You can add time zonesupport by including the ojs/ojtimezonedata module and creating a converter withthe desired pattern.
Oracle JET supports time zone conversion and formatting using the following patterns:
Token Description Example
z, zz, zzz Abbreviated time zone name, formatsupport only
PDT, PST
zzzz Full time zone name, format supportonly
Pacific Standard Time, Pacific Daylight Time
Z, ZZ, ZZZ Sign hour minutes -0800
X Sign hours -08
Chapter 11About Oracle JET Converters
11-12
Token Description Example
XX Sign hours minutes -0800
XXX Sign hours:minutes -08:00
VV Time Zone ID America/Los Angeles
The image below shows the basic oj-input-date-time element configured for timezone support. In this example, the component is converted using the Z pattern.
The oj-input-date-time element is initialized with its converter attribute, in this casea method named dateTimeConverter.
<div id="div1"> <oj-label for="timezone">InputDateTime Timezone converter</oj-label> <oj-input-date-time id="timezone" value={{dateTimeValue}} converter=[[dateTimeConverter]]> </oj-input-date-time> <br/><br/> <p> <oj-label for="patternSelector">Pattern options:</oj-label> <oj-combobox-one id="patternSelector" value="{{patternValue}}"> <oj-option value="MM/dd/yy hh:mm:ss a Z">MM/dd/yy hh:mm:ss a Z</oj-option> <oj-option value="MM-dd-yy hh:mm:ss a VV">MM-dd-yy hh:mm:ss a VV</oj-option> <oj-option value="MM-dd-yy hh:mm X">MM-dd-yy hh:mm X</oj-option> </oj-combobox-one> </p> <p> <oj-label for="isoStrFormatSelector">isoStrFormat options:</oj-label> <oj-combobox-one id="isoStrFormatSelector" value="{{isoStrFormatValue}}">
Chapter 11About Oracle JET Converters
11-13
<oj-option value="offset">offset</oj-option> <oj-option value="zulu">zulu</oj-option> <oj-option value="local">local</oj-option> </oj-combobox-one> </p> <br/> <span class="oj-label">Current dateTime value is: </span> <span><oj-bind-text value="[[dateTimeValue]]"></oj-bind-text></span> //...contents omitted</div>
The ViewModel contains the dateTimeConverter() definition. Note that you must alsoadd the ojs/ojconverter-datetime module to use its DateTimeConverter API andadd the ojs/timezonedata module to your RequireJS definition to access the timezone data files.
require(['knockout', 'ojs/ojbootstrap', 'ojs/ojconverter-datetime', 'ojs/ojknockout', 'ojs/ojdatetimepicker', 'ojs/ojselectcombobox', 'ojs/ojtimezonedata', 'ojs/ojlabel'], function (ko, Bootstrap, DateTimeConverter,) { function FormatModel() { var self = this;
this.dateTimeValue = ko.observable("2020-06-16T20:00:00-08:00"); this.patternValue = ko.observable("MM/dd/yy hh:mm:ss a Z"); this.isoStrFormatValue = ko.observable("offset"); this.dateTimeConverter = ko.observable( new DateTimeConverter.IntlDateTimeConverter( { pattern : self.patternValue(), isoStrFormat: self.isoStrFormatValue(), timeZone:'Etc/GMT-08:00' }));
//Note that ojCombobox's value is always encapsulated in an array this.patternValue.subscribe(function (newValue) { this.dateTimeConverter new DateTimeConverter.IntlDateTimeConverter( { pattern : newValue, isoStrFormat: self.isoStrFormatValue(), timeZone:'Etc/GMT-08:00' })); }.bind(this));
this.isoStrFormatValue.subscribe(function (newValue) { this.dateTimeConverter( new DateTimeConverter.IntlDateTimeConverter( { pattern : self.patternValue(),
Chapter 11About Oracle JET Converters
11-14
isoStrFormat: newValue, timeZone:'Etc/GMT-08:00' })); }.bind(this)); //...contents omitted Bootstrap.whenDocumentReady().then( function () { ko.applyBindings(new FormatModel(), document.getElementById('div1')); } ); });
For an additional example illustrating how to add time zone support to oj-input-date-time and oj-input-time elements, see Input Date and Time - Time Zone.
Use Custom Converters in Oracle JETYou can create custom converters in Oracle JET by extending Converter or by ducktyping it. You can also create a custom converter factory to register the converter withOracle JET and make it easier to instantiate the converter.
Custom converters can be used with Oracle JET components, provided they don'tviolate the integrity of the component. As with the built-in Oracle JET converters, youcan also use them directly on the page.
The figure below shows an example of a custom converter used to convert the currentdate to a relative term. The Schedule For column uses a RelativeDateTimeConverterto convert the date that the page is run in the en-US locale to display Today, Tomorrow,and the date in two days.
Chapter 11About Oracle JET Converters
11-15
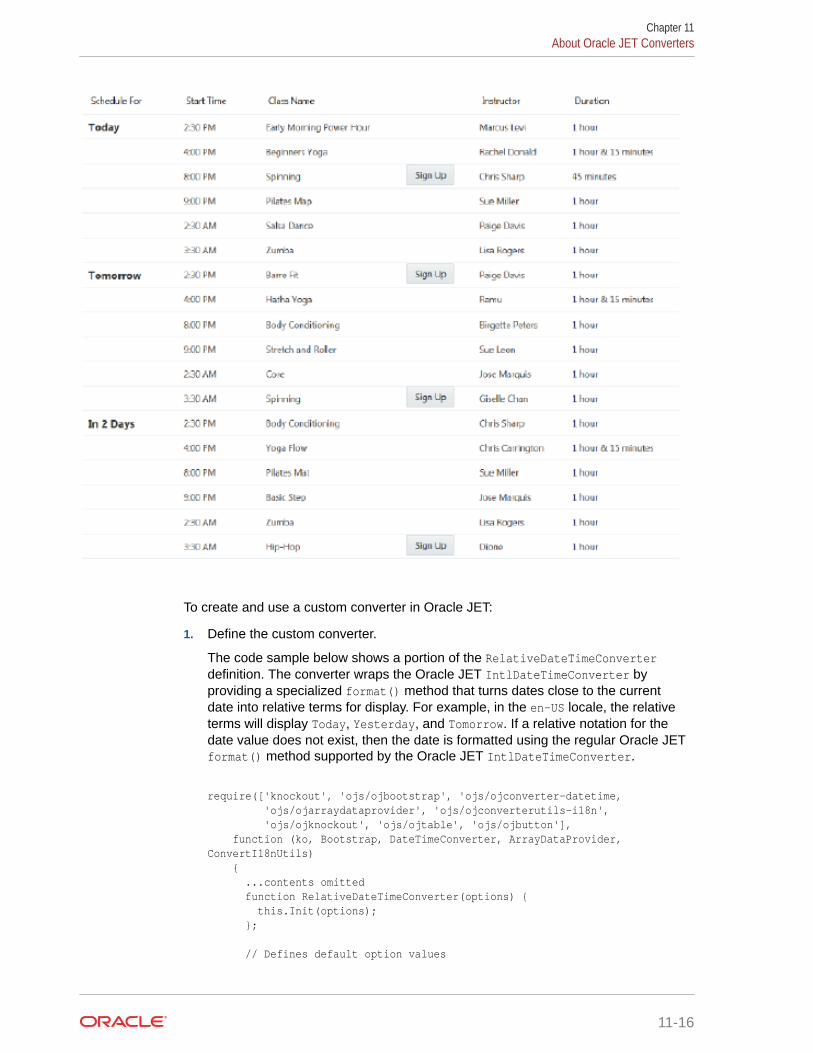
To create and use a custom converter in Oracle JET:
1. Define the custom converter.
The code sample below shows a portion of the RelativeDateTimeConverterdefinition. The converter wraps the Oracle JET IntlDateTimeConverter byproviding a specialized format() method that turns dates close to the currentdate into relative terms for display. For example, in the en-US locale, the relativeterms will display Today, Yesterday, and Tomorrow. If a relative notation for thedate value does not exist, then the date is formatted using the regular Oracle JETformat() method supported by the Oracle JET IntlDateTimeConverter.
require(['knockout', 'ojs/ojbootstrap', 'ojs/ojconverter-datetime, 'ojs/ojarraydataprovider', 'ojs/ojconverterutils-i18n', 'ojs/ojknockout', 'ojs/ojtable', 'ojs/ojbutton'], function (ko, Bootstrap, DateTimeConverter, ArrayDataProvider, ConvertI18nUtils) { ...contents omitted function RelativeDateTimeConverter(options) { this.Init(options); };
// Defines default option values
Chapter 11About Oracle JET Converters
11-16
RelativeDateTimeConverter._DEFAULT_RELATIVE_DATETIME_CONVERTER_OPTIONS = { 'formatUsing' : "displayName", 'dateField' : "week" };
// Initializes converter instance with the set options RelativeDateTimeConverter.prototype.Init = function(options) { this._options = options; //create datetime converter and use this as the wrapper converter. this._wrappedConverter = new DateTimeConverter.IntlDateTimeConverter(options); };
// Returns the options set on the converter instance RelativeDateTimeConverter.prototype.getOptions = function () { return this._options; };
// Does not support parsing RelativeDateTimeConverter.prototype.parse = function(value) { return null; };
// Formats a value using the relative format options. Returns the formatted // value and a title that is the actual date, if formatted value is a relative date. RelativeDateTimeConverter.prototype.format = function(value) { var base; var formattedRelativeDate;
// We get our wrapped converter and call its formatRelative function and store the // return value ("Today", "Tomorrow" or null) in formatted variable // See IntlDateTimeConverter#formatRelative(value, relativeOptions) // where relativeOptions has formatUsing and dateField options. dateField is // 'day', 'week', 'month', or 'year'. formattedRelativeDate = this._getWrapped().formatRelative(value, this._getRelativeOptions()); // We get our wrapped converter and call its format function and store the returned // string in base variable. This will be the actual date, not a relative date. base = this._getWrapped().format(value);
// Capitalize the first letter of the string if (formattedRelativedate && typeof formattedRelativeDate === "string") { formattedRelativeDate = formattedRelativeDate.replace(/(\w)(\w*)/g, function (match, i, r) { return i.toUpperCase() + (r !== null ? r : ""); });
Chapter 11About Oracle JET Converters
11-17
} return {value: formatted || base, title: formattedRelativeDate ? base : ""} };
// Returns a hint RelativeDateTimeConverter.prototype.getHint = function () { return null; };
RelativeDateTimeConverter.prototype._getWrapped = function () { return this._wrappedConverter; };
RelativeDateTimeConverter.prototype._getRelativeOptions = function () { var options = this._options; var relativeOptions = {};
if (options && options["relativeField"]) { relativeOptions['formatUsing'] = "displayName"; relativeOptions['dateField'] = options["relativeField"]; } else { relativeOptions = RelativeDateTimeConverter._DEFAULT_RELATIVE_DATETIME_CONVERTER_OPTIONS; }
return relativeOptions; }; ... contents omitted});
The custom converter relies on the IntlDateTimeConverterconverter's formatRelative() method. For additional details aboutthe IntlDateTimeConverter converter's supported methods, see theIntlDateTimeConverter API documentation.
2. Add code to your application that uses the custom converter.
The code sample below shows how you could add code to your script to use thecustom converter.
var relativeDayOptions = {relativeField: 'day', year: "numeric", month: "numeric", day: "numeric"};var rdConverter = new RelativeDateTimeConverter(relativeDayOptions);
3. Add the Oracle JET element or elements that will use the custom converter to yourpage.
For the code sample that creates the oj-table element and displays the ScheduleFor column in relative dates, see Converters (Custom).
Use Oracle JET Converters Without Oracle JET ComponentsIf you want to use a converter without binding it to an Oracle JET component, createthe converter using the constructor for the converter of your choice.
Chapter 11About Oracle JET Converters
11-18
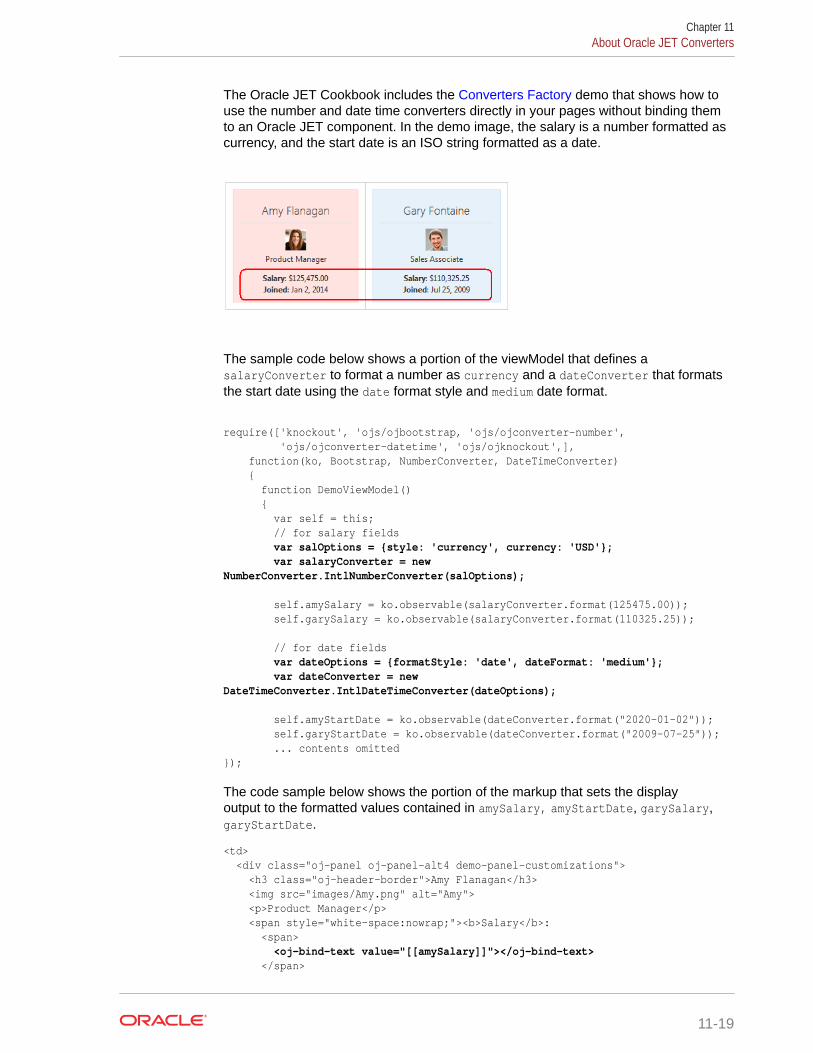
The Oracle JET Cookbook includes the Converters Factory demo that shows how touse the number and date time converters directly in your pages without binding themto an Oracle JET component. In the demo image, the salary is a number formatted ascurrency, and the start date is an ISO string formatted as a date.
The sample code below shows a portion of the viewModel that defines asalaryConverter to format a number as currency and a dateConverter that formatsthe start date using the date format style and medium date format.
require(['knockout', 'ojs/ojbootstrap, 'ojs/ojconverter-number', 'ojs/ojconverter-datetime', 'ojs/ojknockout',], function(ko, Bootstrap, NumberConverter, DateTimeConverter) { function DemoViewModel() { var self = this; // for salary fields var salOptions = {style: 'currency', currency: 'USD'}; var salaryConverter = new NumberConverter.IntlNumberConverter(salOptions);
self.amySalary = ko.observable(salaryConverter.format(125475.00)); self.garySalary = ko.observable(salaryConverter.format(110325.25));
// for date fields var dateOptions = {formatStyle: 'date', dateFormat: 'medium'}; var dateConverter = new DateTimeConverter.IntlDateTimeConverter(dateOptions); self.amyStartDate = ko.observable(dateConverter.format("2020-01-02")); self.garyStartDate = ko.observable(dateConverter.format("2009-07-25")); ... contents omitted});
The code sample below shows the portion of the markup that sets the displayoutput to the formatted values contained in amySalary, amyStartDate, garySalary,garyStartDate.
<td> <div class="oj-panel oj-panel-alt4 demo-panel-customizations"> <h3 class="oj-header-border">Amy Flanagan</h3> <img src="images/Amy.png" alt="Amy"> <p>Product Manager</p> <span style="white-space:nowrap;"><b>Salary</b>: <span> <oj-bind-text value="[[amySalary]]"></oj-bind-text> </span>
Chapter 11About Oracle JET Converters
11-19
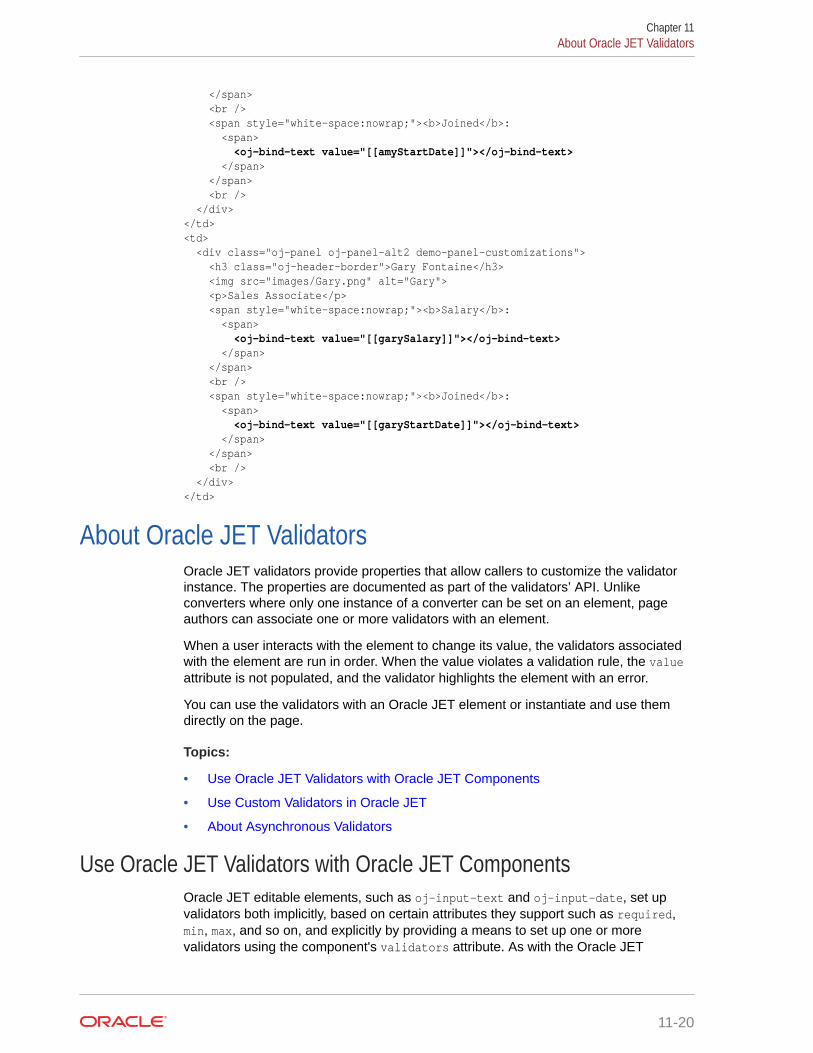
</span> <br /> <span style="white-space:nowrap;"><b>Joined</b>: <span> <oj-bind-text value="[[amyStartDate]]"></oj-bind-text> </span> </span> <br /> </div></td><td> <div class="oj-panel oj-panel-alt2 demo-panel-customizations"> <h3 class="oj-header-border">Gary Fontaine</h3> <img src="images/Gary.png" alt="Gary"> <p>Sales Associate</p> <span style="white-space:nowrap;"><b>Salary</b>: <span> <oj-bind-text value="[[garySalary]]"></oj-bind-text> </span> </span> <br /> <span style="white-space:nowrap;"><b>Joined</b>: <span> <oj-bind-text value="[[garyStartDate]]"></oj-bind-text> </span> </span> <br /> </div></td>
About Oracle JET ValidatorsOracle JET validators provide properties that allow callers to customize the validatorinstance. The properties are documented as part of the validators’ API. Unlikeconverters where only one instance of a converter can be set on an element, pageauthors can associate one or more validators with an element.
When a user interacts with the element to change its value, the validators associatedwith the element are run in order. When the value violates a validation rule, the valueattribute is not populated, and the validator highlights the element with an error.
You can use the validators with an Oracle JET element or instantiate and use themdirectly on the page.
Topics:
• Use Oracle JET Validators with Oracle JET Components
• Use Custom Validators in Oracle JET
• About Asynchronous Validators
Use Oracle JET Validators with Oracle JET ComponentsOracle JET editable elements, such as oj-input-text and oj-input-date, set upvalidators both implicitly, based on certain attributes they support such as required,min, max, and so on, and explicitly by providing a means to set up one or morevalidators using the component's validators attribute. As with the Oracle JET
Chapter 11About Oracle JET Validators
11-20
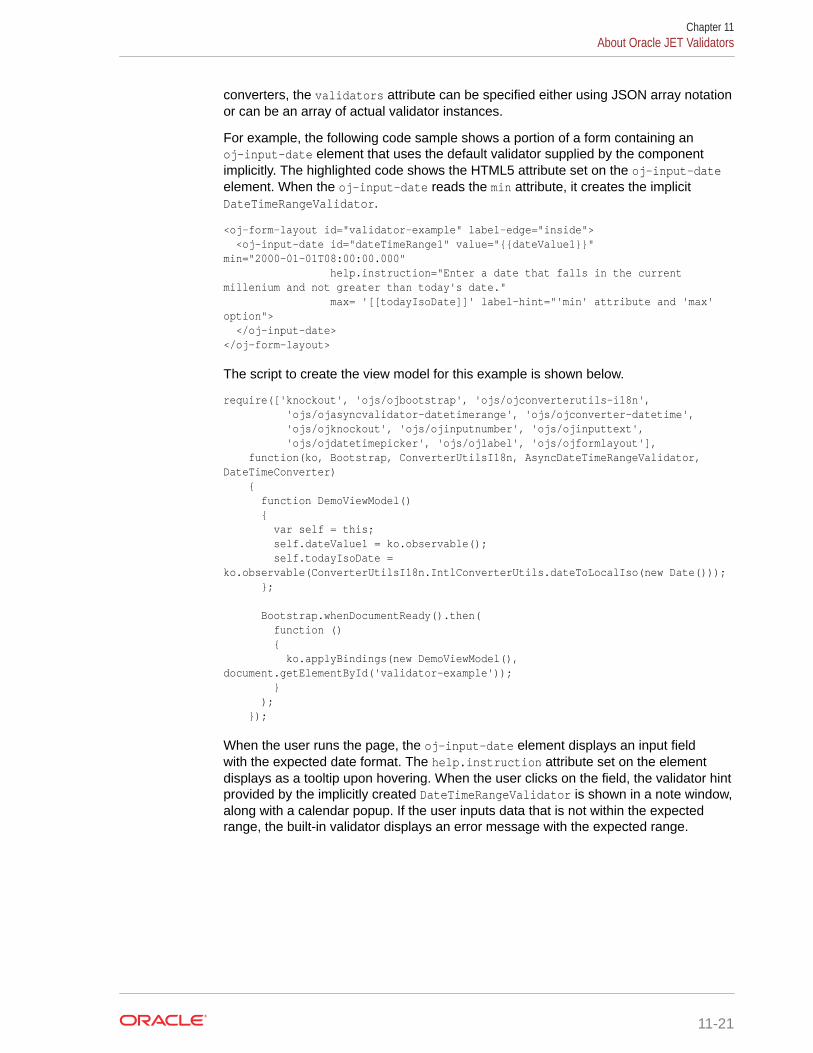
converters, the validators attribute can be specified either using JSON array notationor can be an array of actual validator instances.
For example, the following code sample shows a portion of a form containing anoj-input-date element that uses the default validator supplied by the componentimplicitly. The highlighted code shows the HTML5 attribute set on the oj-input-dateelement. When the oj-input-date reads the min attribute, it creates the implicitDateTimeRangeValidator.
<oj-form-layout id="validator-example" label-edge="inside"> <oj-input-date id="dateTimeRange1" value="{{dateValue1}}" min="2000-01-01T08:00:00.000" help.instruction="Enter a date that falls in the current millenium and not greater than today's date." max= '[[todayIsoDate]]' label-hint="'min' attribute and 'max' option"> </oj-input-date></oj-form-layout>
The script to create the view model for this example is shown below.
require(['knockout', 'ojs/ojbootstrap', 'ojs/ojconverterutils-i18n', 'ojs/ojasyncvalidator-datetimerange', 'ojs/ojconverter-datetime', 'ojs/ojknockout', 'ojs/ojinputnumber', 'ojs/ojinputtext', 'ojs/ojdatetimepicker', 'ojs/ojlabel', 'ojs/ojformlayout'], function(ko, Bootstrap, ConverterUtilsI18n, AsyncDateTimeRangeValidator, DateTimeConverter) { function DemoViewModel() { var self = this; self.dateValue1 = ko.observable(); self.todayIsoDate = ko.observable(ConverterUtilsI18n.IntlConverterUtils.dateToLocalIso(new Date())); };
Bootstrap.whenDocumentReady().then( function () { ko.applyBindings(new DemoViewModel(), document.getElementById('validator-example')); } ); });
When the user runs the page, the oj-input-date element displays an input fieldwith the expected date format. The help.instruction attribute set on the elementdisplays as a tooltip upon hovering. When the user clicks on the field, the validator hintprovided by the implicitly created DateTimeRangeValidator is shown in a note window,along with a calendar popup. If the user inputs data that is not within the expectedrange, the built-in validator displays an error message with the expected range.
Chapter 11About Oracle JET Validators
11-21

The error thrown by the Oracle JET validator when validation fails is represented bythe ValidatorError object, and the error message is represented by an object thatduck-types Message. The messages and hints that Oracle JET validators use whenthey throw an error are resources that are defined in the translation bundle includedwith Oracle JET. For more information about messaging in Oracle JET, see Workingwith User Assistance.
You can also specify the validator on the element's validators attribute, if itexists. The code sample below adds another oj-input-date element to the sampleform and calls a function which specifies the DateTimeRangeValidator validator(dateTimeRange) in the validators attribute.
<oj-form-layout id="validator-example" label-edge="inside"> <oj-input-date id="dateTimeRange2" value="{{dateValue2}}" validators="[[validators]]" label-hint="'validators' attribute"> </oj-input-date></oj-form-layout>
The highlighted code below shows the additions to the viewModel, including thedefined function, with options that set the valid minimum and maximum dates anda hint that displays when the user sets the focus in the field.
require(['knockout', 'ojs/ojbootstrap', 'ojs/ojconverterutils-i18n', 'ojs/ojasyncvalidator-datetimerange', 'ojs/ojconverter-datetime', 'ojs/ojknockout', 'ojs/ojinputnumber', 'ojs/ojinputtext', 'ojs/ojdatetimepicker', 'ojs/ojlabel', 'ojs/ojformlayout'], function(ko, Bootstrap, ConverterUtilsI18n, AsyncDateTimeRangeValidator, DateTimeConverter)
Chapter 11About Oracle JET Validators
11-22
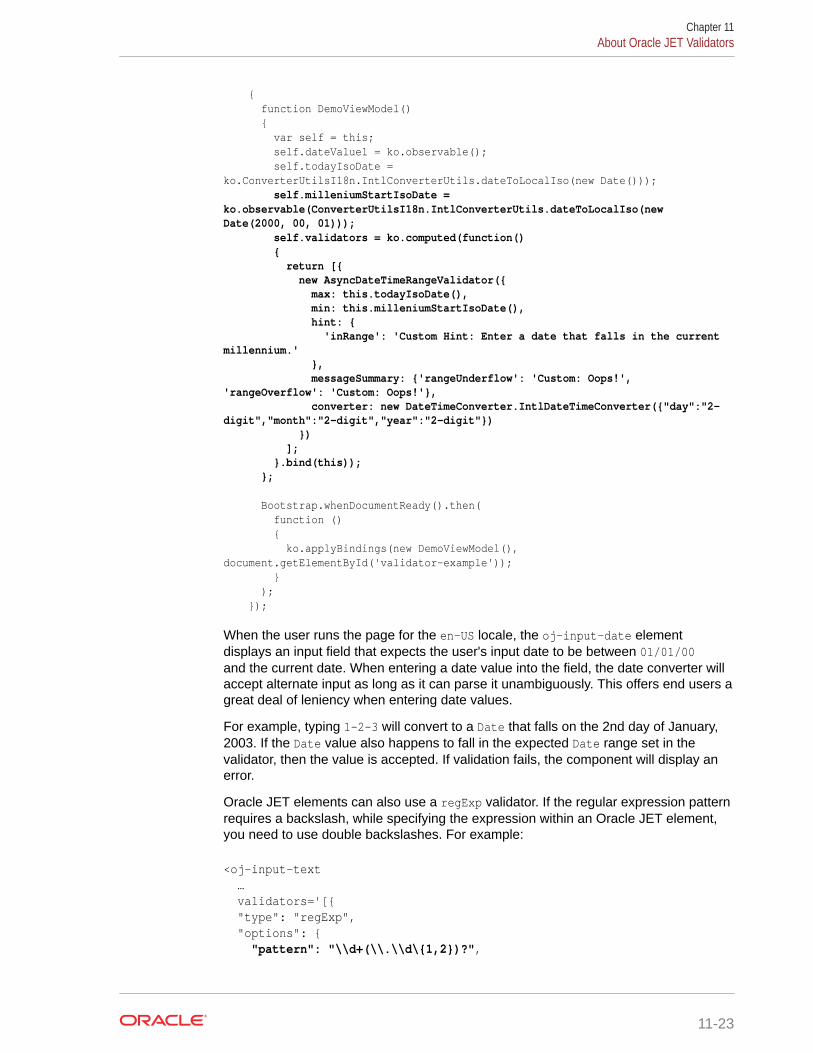
{ function DemoViewModel() { var self = this; self.dateValue1 = ko.observable(); self.todayIsoDate = ko.ConverterUtilsI18n.IntlConverterUtils.dateToLocalIso(new Date())); self.milleniumStartIsoDate = ko.observable(ConverterUtilsI18n.IntlConverterUtils.dateToLocalIso(new Date(2000, 00, 01))); self.validators = ko.computed(function() { return [{ new AsyncDateTimeRangeValidator({ max: this.todayIsoDate(), min: this.milleniumStartIsoDate(), hint: { 'inRange': 'Custom Hint: Enter a date that falls in the current millennium.' }, messageSummary: {'rangeUnderflow': 'Custom: Oops!', 'rangeOverflow': 'Custom: Oops!'}, converter: new DateTimeConverter.IntlDateTimeConverter({"day":"2-digit","month":"2-digit","year":"2-digit"}) }) ]; }.bind(this)); };
Bootstrap.whenDocumentReady().then( function () { ko.applyBindings(new DemoViewModel(), document.getElementById('validator-example')); } ); });
When the user runs the page for the en-US locale, the oj-input-date elementdisplays an input field that expects the user's input date to be between 01/01/00and the current date. When entering a date value into the field, the date converter willaccept alternate input as long as it can parse it unambiguously. This offers end users agreat deal of leniency when entering date values.
For example, typing 1-2-3 will convert to a Date that falls on the 2nd day of January,2003. If the Date value also happens to fall in the expected Date range set in thevalidator, then the value is accepted. If validation fails, the component will display anerror.
Oracle JET elements can also use a regExp validator. If the regular expression patternrequires a backslash, while specifying the expression within an Oracle JET element,you need to use double backslashes. For example:
<oj-input-text … validators='[{ "type": "regExp", "options": { "pattern": "\\d+(\\.\\d\{1,2})?",
Chapter 11About Oracle JET Validators
11-23
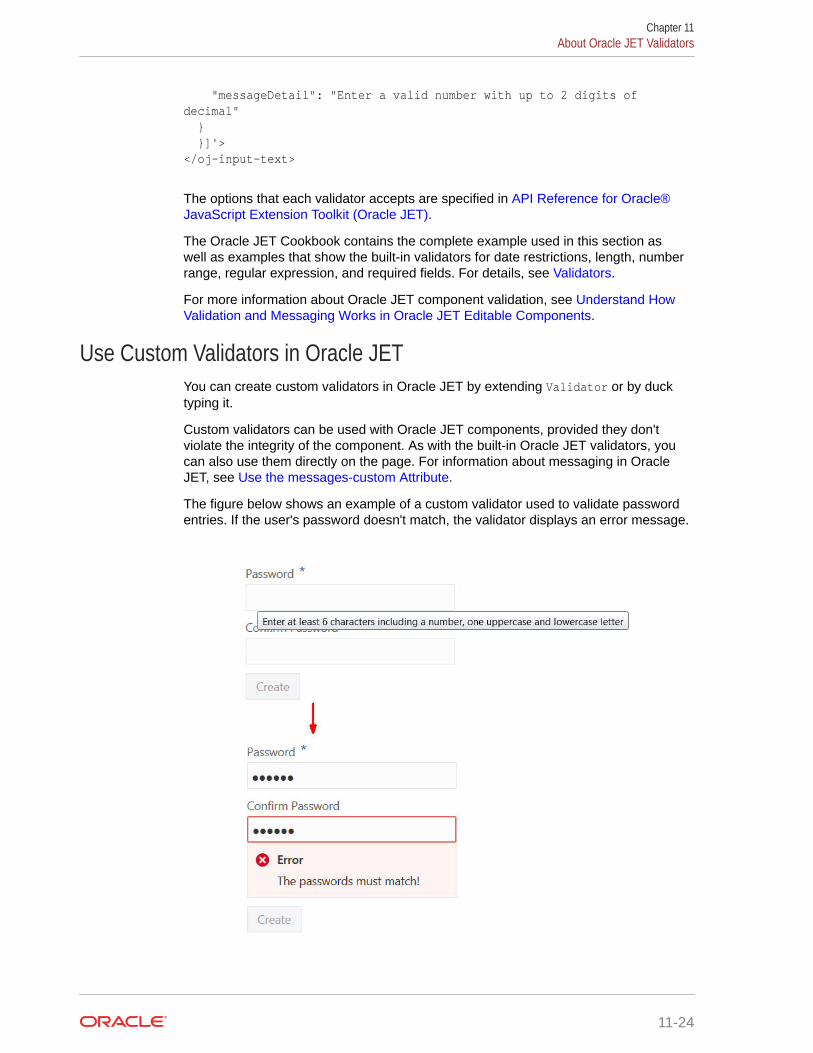
"messageDetail": "Enter a valid number with up to 2 digits of decimal" } }]'></oj-input-text>
The options that each validator accepts are specified in API Reference for Oracle®JavaScript Extension Toolkit (Oracle JET).
The Oracle JET Cookbook contains the complete example used in this section aswell as examples that show the built-in validators for date restrictions, length, numberrange, regular expression, and required fields. For details, see Validators.
For more information about Oracle JET component validation, see Understand HowValidation and Messaging Works in Oracle JET Editable Components.
Use Custom Validators in Oracle JETYou can create custom validators in Oracle JET by extending Validator or by ducktyping it.
Custom validators can be used with Oracle JET components, provided they don'tviolate the integrity of the component. As with the built-in Oracle JET validators, youcan also use them directly on the page. For information about messaging in OracleJET, see Use the messages-custom Attribute.
The figure below shows an example of a custom validator used to validate passwordentries. If the user's password doesn't match, the validator displays an error message.
Chapter 11About Oracle JET Validators
11-24
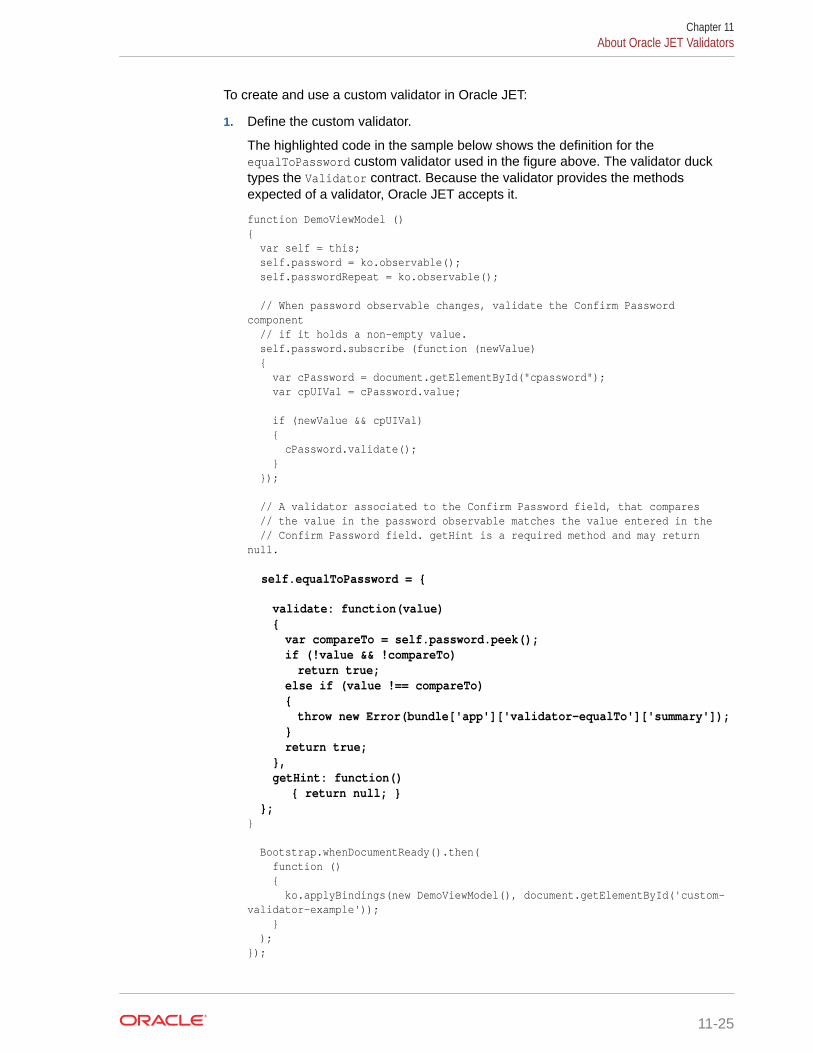
To create and use a custom validator in Oracle JET:
1. Define the custom validator.
The highlighted code in the sample below shows the definition for theequalToPassword custom validator used in the figure above. The validator ducktypes the Validator contract. Because the validator provides the methodsexpected of a validator, Oracle JET accepts it.
function DemoViewModel (){ var self = this; self.password = ko.observable(); self.passwordRepeat = ko.observable();
// When password observable changes, validate the Confirm Password component // if it holds a non-empty value. self.password.subscribe (function (newValue) { var cPassword = document.getElementById("cpassword"); var cpUIVal = cPassword.value;
if (newValue && cpUIVal) { cPassword.validate(); } });
// A validator associated to the Confirm Password field, that compares // the value in the password observable matches the value entered in the // Confirm Password field. getHint is a required method and may return null.
self.equalToPassword = {
validate: function(value) { var compareTo = self.password.peek(); if (!value && !compareTo) return true; else if (value !== compareTo) { throw new Error(bundle['app']['validator-equalTo']['summary']); } return true; }, getHint: function() { return null; } };}
Bootstrap.whenDocumentReady().then( function () { ko.applyBindings(new DemoViewModel(), document.getElementById('custom-validator-example')); } );});
Chapter 11About Oracle JET Validators
11-25

2. Add code to your application that uses the custom validator.
The code sample below shows how you could add code to your page to usethe custom validator. In this example, both input fields are defined as oj-input-password elements. The first oj-input-password element uses RegExpValidatorto validate that the user has input a password that meets the application'spassword requirements. The second oj-input-password element uses theequalToPassword validator to verify that the password in the second field is equalto the password entered in the first field.
<oj-form-layout id="custom-validator-example" label-edge="inside"> <oj-input-password id="password" name="password" required value="{{password}}" label-hint="Password" help.instruction="Enter at least 6 characters including a number, one uppercase and lowercase letter" validators= '[{ "type": "regExp", "options" : { "pattern": "(?=.*\\d)(?=.*[a-z])(?=.*[A-Z]).{6,}", "label": "Password", "messageSummary" : "{label} too Weak", "messageDetail": "You must enter a password that meets our minimum security requirements."}}]'> </oj-input-password> <oj-input-password id="cpassword" name="cpassword" value="{{passwordRepeat}}" label-hint="Confirm Password" validators="[[[equalToPassword]]]"></oj-input-password></oj-form-layout>
For the complete code sample used in this section, see Validators (Custom).
About Asynchronous ValidatorsOracle JET input components support asynchronous server-side validation via thevalidators attribute. That means you can check input values against server datawithout the need to submit a form or refresh a page.
For example, in a form that collects new user data, you can have a validator on thee-mail field to check if the input value has been registered previously.
You can also set number range validators that check against volatile data. Forexample, on an e-commerce website, you can check the user’s cart against theavailable inventory, and inform the user if the goods are unavailable without themsubmitting the cart for checkout.
The Oracle JET Cookbook has a sample that uses the validators attribute anddummy data to simulate server-side validation.
The following code shows an oj-input-text element with the validators attributeset to validators and asyncValidator observables in the JavaScript code. Thevalidators attribute must duck-type AsyncValidator to fulfill the API contract requiredto create the asynchronous validator.
<oj-form-layout id="fl1" label-edge="top"> <oj-input-text id="text-input" required label-hint="Quantity Limit" on-valid-changed="[[validChangedListener]]"
Chapter 11About Oracle JET Validators
11-26
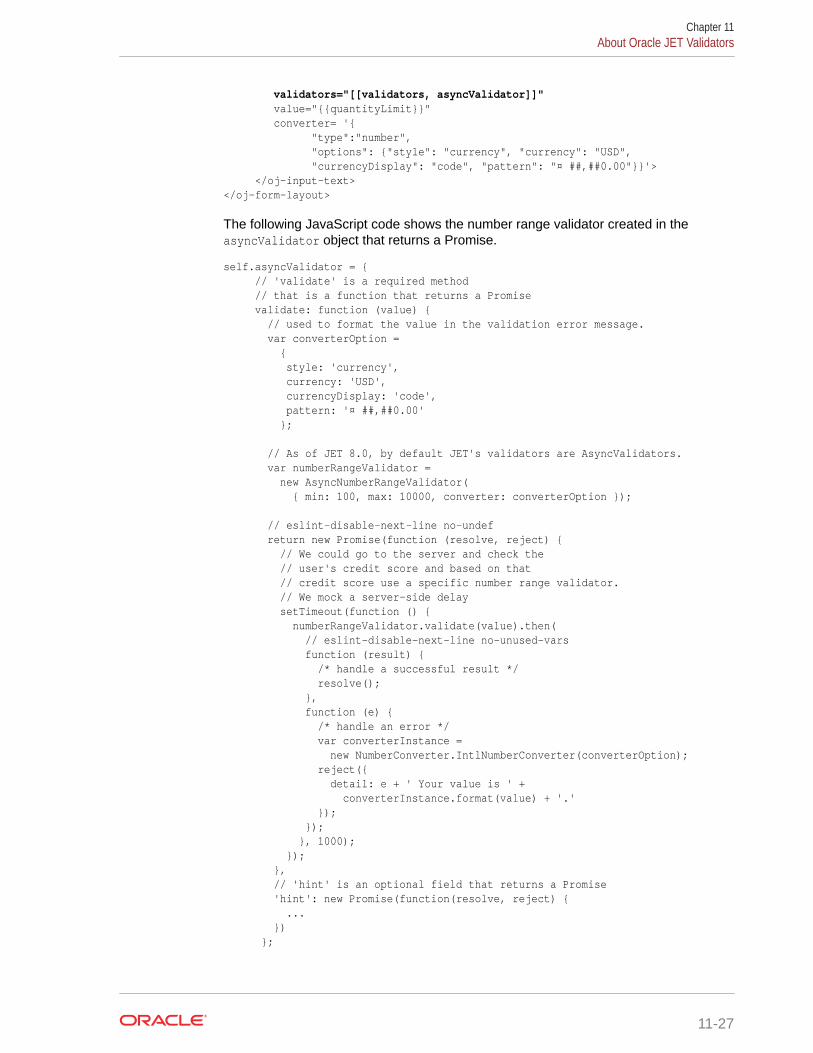
validators="[[validators, asyncValidator]]" value="{{quantityLimit}}" converter= '{ "type":"number", "options": {"style": "currency", "currency": "USD", "currencyDisplay": "code", "pattern": "¤ ##,##0.00"}}'> </oj-input-text> </oj-form-layout>
The following JavaScript code shows the number range validator created in theasyncValidator object that returns a Promise.
self.asyncValidator = { // 'validate' is a required method // that is a function that returns a Promise validate: function (value) { // used to format the value in the validation error message. var converterOption = { style: 'currency', currency: 'USD', currencyDisplay: 'code', pattern: '¤ ##,##0.00' }; // As of JET 8.0, by default JET's validators are AsyncValidators. var numberRangeValidator = new AsyncNumberRangeValidator( { min: 100, max: 10000, converter: converterOption }); // eslint-disable-next-line no-undef return new Promise(function (resolve, reject) { // We could go to the server and check the // user's credit score and based on that // credit score use a specific number range validator. // We mock a server-side delay setTimeout(function () { numberRangeValidator.validate(value).then( // eslint-disable-next-line no-unused-vars function (result) { /* handle a successful result */ resolve(); }, function (e) { /* handle an error */ var converterInstance = new NumberConverter.IntlNumberConverter(converterOption); reject({ detail: e + ' Your value is ' + converterInstance.format(value) + '.' }); }); }, 1000); }); }, // 'hint' is an optional field that returns a Promise 'hint': new Promise(function(resolve, reject) { ... }) };
Chapter 11About Oracle JET Validators
11-27

Note:
A Promise object in JavaScript represents a value that may not be availableyet, but will be resolved at some point in the future. In asynchronousvalidation, the AsyncValidator.validate() function returns a Promise thatevaluates to Boolean true if validation passes and if validation fails, it returnsan Error. For more, see the validators attribute section of ojInputText or seePromise (MDN).
For the full Cookbook sample, see Async Validators.
Chapter 11About Oracle JET Validators
11-28
12Working with User Assistance
The Oracle JET user assistance framework includes support for user assistanceon the editable components in the form of help, hints, and messaging that youcan customize as needed for your application. Editable components include oj-checkboxset, oj-color*, oj-combobox*, oj-input*, oj-radioset, oj-select*, oj-slider, oj-switch, and oj-text-area.
Note:
The oj-input* mentioned above refers to the family of input componentssuch as oj-input-date-time, oj-input-text, and oj-input-password,among others. oj-color*, oj-combobox*, and oj-select* each representtwo components.
Topics:
• Typical Workflow for Working with User Assistance
• Understand Oracle JET's Messaging APIs on Editable Components
• Understand How Validation and Messaging Works in Oracle JET EditableComponents
• Use Oracle JET Messaging
• Configure an Editable Component's oj-label Help Attribute
• Configure an Editable Component's help.instruction Attribute
• Control the Display of Hints, Help, and Messages
Tip:
To add tooltips to plain text or other non-editable components, use oj-popup.See the Tooltip example in the Oracle JET Cookbook at Popups.
Typical Workflow for Working with User AssistanceUnderstand Oracle JET's user assistance capabilities and how to add user assistanceto your Oracle JET application.
To add user assistance to your Oracle JET application, refer to the typical workflowdescribed in the following table:
12-1
Task Description More Information
Identify Oracle JET's userassistance capabilities oneditable components
Identify the editable componentsand their messaging APIs.
Understand Oracle JET's Messaging APIs onEditable Components
Understand Oracle JETeditable componentvalidation and messagingprocess
Understand the normal, deferred,and mixed validation processesand the messaging associated witheach.
Understand How Validation and MessagingWorks in Oracle JET Editable Components
Use Oracle JET validationand messaging on editablecomponents
Learn how to track the validity of agroup of editable components andconfigure an Oracle JET applicationto notify editable components ofbusiness validation failures and toreceive notification of an editablecomponent's events and messages.
Use Oracle JET Messaging
Configure the helpattribute on the oj-labelcomponent
Add a help icon to your oj-labelthat includes a URL foradditional information or addsexplanatory text that appears whenthe user hovers over the icon.
Configure an Editable Component's oj-labelHelp Attribute
Configure thehelp.instructionattribute on editablecomponents
Configure the help.instructionattribute to add advisory informationto an input field that appears whenthe field has focus.
Configure an Editable Component'shelp.instruction Attribute
Control the display ofhints, help, and messages
Use the editable component'sdisplay-options attribute tocontrol the display type of converterand validator hints, messaging, andhelp instruction properties.
Control the Display of Hints, Help, andMessages
Understand Oracle JET's Messaging APIs on EditableComponents
Oracle JET provides a messaging API to support messaging on Oracle JET editablecomponents.
Editable components include the following:
• oj-checkboxset
• oj-color-palette
• oj-color-spectrum
• oj-combobox-many
• oj-combobox-one
• oj-input-date
• oj-input-date-time
• oj-input-number
• oj-input-password
Chapter 12Understand Oracle JET's Messaging APIs on Editable Components
12-2

• oj-input-text
• oj-input-time
• oj-radioset
• oj-select-many
• oj-select-one
• oj-slider
• oj-switch
• oj-text-area
Topics:
• About Oracle JET Editable Component Messaging Attributes
• About Oracle JET Component Messaging Methods
The Oracle JET Cookbook also includes descriptions and examples for working witheach component at: Form Controls.
About Oracle JET Editable Component Messaging AttributesThe following attributes impact messaging on editable elements.
Element Attribute Description
converter Default converter hint displayed as placeholder text when a placeholder attribute is notalready set.
display-options JSON object literal that specifies the location where the element should display auxiliarycontent such as messages, converterHint, validatorHint, and helpInstructionin relation to itself. Refer to the element's API documentation for details.
help Help message displayed on an oj-label element when the user hovers over the Helpicon. No formatted text is available for the message. The oj-label has two exclusiveattributes, help.definition and help.source.
The help.definition attribute's value appears and the attribute's value is read by ascreen reader when you hover with a mouse, when you tab into the Help icon, or whenyou press and hold on a device. The default value is null.
The help.source attribute’s value is a link, which is opened when you click with amouse or tap on a device. The default value is null.
help.instruction Displays text in a note window that displays when the user sets focus on the input field.You can format the text string using standard HTML formatting tags.
messages-custom List of messages that the application provides when it encounters business validationerrors or messages of other severity type.
placeholder The placeholder text to set on the element.
translations Object containing all translated resources relevant to the component and all itssuperclasses. Use sub-properties to modify the component's translated resources.
validators List of validators used by element when performing validation. Validator hints aredisplayed in a note window by default.
See the Attributes section of the element's API documentation in API Referencefor Oracle® JavaScript Extension Toolkit (Oracle JET) for additional details about its
Chapter 12Understand Oracle JET's Messaging APIs on Editable Components
12-3

messaging properties. Select the component you're interested in viewing from the APIlist.
About Oracle JET Component Messaging MethodsEditable value components support the following method for messaging purposes.
Component Event Description
showMessages Takes all deferred messages and shows them. If there were no deferred messages thismethod simply returns. When the user sets focus on the component, the deferred messageswill display inline.
See the Methods section of the component's API documentation in the API Referencefor Oracle® JavaScript Extension Toolkit (Oracle JET) for details on how to call themethod, its parameters, and return value. Select the component you're interested inviewing from the list.
Understand How Validation and Messaging Works in OracleJET Editable Components
The actions performed on an Oracle JET component, the properties set on it, and themethods called on it, all instruct the component on how it should validate the value andwhat content it should show as part of its messaging.
Editable components always perform either normal or deferred validation in somesituations. In other situations, the editable component decides to perform either normalor deferred validation based on the component's state. Understanding the normal anddeferred validation process may be helpful for determining what message properties toset on your components.
• Normal Validation: During normal validation, the component clears all messagesproperties (messages-custom), parses the UI value, and performs validation.Validation errors are reported to the user immediately. If there are no validationerrors, the value attribute is updated, and the value is formatted and pushed to thedisplay.
The editable component always runs normal validation when:
– The user interacts with an editable component and changes its value in the UI.
– The application calls validate() on the component.
Note:
When the application changes certain properties, the component mightdecide to run normal validation depending on its current state. SeeMixed Validation below for additional details.
• Deferred Validation: Uses the required validator to validate the component'svalue. The required validator is the only validator that participates in deferredvalidation. During deferred validation all messages properties are cleared unless
Chapter 12Understand How Validation and Messaging Works in Oracle JET Editable Components
12-4
specified otherwise. If the value fails deferred validation, validation errors are notshown to the user immediately.
The editable component always runs deferred validation when:
– A component is created. None of the messages properties are cleared.
– The application calls the reset() method on the component.
– The application changes the value property on the componentprogrammatically.
Note:
When the application changes certain properties programmatically, thecomponent might decide to run deferred validation depending on itscurrent state. See Mixed Validation below for additional details.
• Mixed Validation: Runs when the following properties are changed or methods arecalled by the application. Either deferred or normal validation is run based on thecomponent's current state, and any validation errors are either hidden or shown tothe user. Mixed validation runs when:
– converter property changes
– disabled property changes
– readOnly properties change
– required property changes
– validators property changes
– refresh() method is called
Topics:
• Understand How an Oracle JET Editable Component Performs Normal Validation
• Understand How an Oracle JET Editable Component Performs Deferred Validation
The Oracle JET Cookbook includes additional examples that show normal anddeferred validation at Validators (Component). For additional information about thevalidators and converters included with Oracle JET, see Validating and ConvertingInput.
Understand How an Oracle JET Editable Component Performs NormalValidation
An Oracle JET editable component runs normal validation when the user changes thevalue in the UI or when the application calls the component's validate() method. Inboth cases, error messages are displayed immediately.
Topics:
• About the Normal Validation Process When User Changes Value of an EditableComponent
Chapter 12Understand How Validation and Messaging Works in Oracle JET Editable Components
12-5
• About the Normal Validation Process When Validate() is Called on EditableComponent
About the Normal Validation Process When User Changes Value of an EditableComponent
When a user changes an editable value:
1. All messages-custom messages are cleared. An onMessagesCustomChanged eventis triggered if applicable and if the change in value is obvious.
2. If a converter is set on the component, the UI value is parsed. If there is a parseerror, then processing jumps to step 5.
3. If one or more validators are set on the component:
a. The parsed (converted) value is validated in sequence using the specifiedvalidators, with the implicit required validator being the first to run if present.The value that is passed to the implicit required validator is trimmed of whitespace.
b. If the validator throws an error, the error is remembered, and the next validatorruns if it exists.
After all validators complete, if there are one or more errors, processing jumpsto step 5.
4. If all validations pass:
a. The parsed value is written to the component's value attribute, and anonValueChanged event is triggered for the value attribute.
b. The new value is formatted for display using the converter again and displayedon the component.
Note:
If the component's value property happens to be bound to a Knockoutobservable, then the value is written to the observable as well.
5. If one or more errors occurred in an earlier step:
a. The component's value property remains unchanged.
b. Errors are displayed by default inline with the component. The user can alsoview the details of the error by setting focus on the component.
6. When the user fixes the error, the validation process begins again.
About the Normal Validation Process When Validate() is Called on EditableComponent
The validate() method validates the component's current display value using theconverter and all validators registered on the component and updates the valueattribute if validation passes.
Chapter 12Understand How Validation and Messaging Works in Oracle JET Editable Components
12-6
The method is only available on editable components where it makes sense, forexample, oj-input-number. For details about the validate() method, see validate().
Understand How an Oracle JET Editable Component PerformsDeferred Validation
An Oracle JET editable component runs deferred validation when the component iscreated, when its value or required property is changed programmatically, or whenthe component's reset() method is called. This section provides additional detailabout the deferred validation process when an Oracle JET editable component iscreated and when the value property is changed programmatically.
Topics:
• About the Deferred Validation Process When an Oracle JET Editable Componentis Created
• About the Deferred Validation Process When value Property is ChangedProgrammatically
You can also find additional detail in the API Reference for Oracle® JavaScriptExtension Toolkit (Oracle JET). Select the component you’re interested in from thenavigation list.
About the Deferred Validation Process When an Oracle JET EditableComponent is Created
When an editable element is created, as one of the last steps, it runs deferredvalidation on the component's initialized value.
1. The required validator is run, and a validation error raised if the value is empty ornull.
2. If a validation error is raised, the component updates the messaging framework.No messaging themes are applied on the component nor does it show the errormessage in the note window because the validation error message is deferred.
Note:
Page authors can call showMessages() at any time to reveal deferredmessages.
About the Deferred Validation Process When value Property is ChangedProgrammatically
An Oracle JET editable element’s value property can change programmatically if:
• The page has code that changes the element's value attribute, or
• The page author refreshes the ViewModel observable with a new server value.
In both cases, the element will update itself to show the new value as follows:
Chapter 12Understand How Validation and Messaging Works in Oracle JET Editable Components
12-7
1. All messages properties are cleared on the editable element andonMessagesCustomChanged events triggered if applicable.
2. An onValueChanged event is triggered for the value attribute if applicable.
3. If a converter is set on the element, the value attribute is retrieved and formattedbefore it's displayed. If there is a format error, then processing jumps to step 5.Otherwise the formatted value is displayed on the element.
4. Deferred validators are run on the new value. Any validation errors raised arecommunicated to the messaging framework, but the errors themselves are notshown to the user.
5. If there was a formatting error, the validation error message is processed andthe component's messages-custom attribute updated. Formatting errors are shownright away.
Note:
Page authors should ensure that the value you set is the expected type asdefined by the component's API and that the value can be formatted withoutany errors for display.
Use Oracle JET MessagingUse the Oracle JET messaging framework to notify an Oracle JET application of acomponent's messages and validity as well as notify an Oracle JET component of abusiness validation failure.
Topics:
• Notify an Oracle JET Editable Component of Business Validation Errors
• Understand the oj-validation-group Component
• Create Page Level Messaging
Notify an Oracle JET Editable Component of Business ValidationErrors
You can notify Oracle JET editable elements of business validation errors using themessages-custom attribute and the showMessages() method.
Topics:
• Use the messages-custom Attribute
• Use the showMessages() Method on Editable Components
Use the messages-custom AttributeYour application can use this attribute to notify Oracle JET components to show newor updated custom messages. These could be a result of business validation thatoriginates in the viewModel layer or on the server. When this property is set, the
Chapter 12Use Oracle JET Messaging
12-8
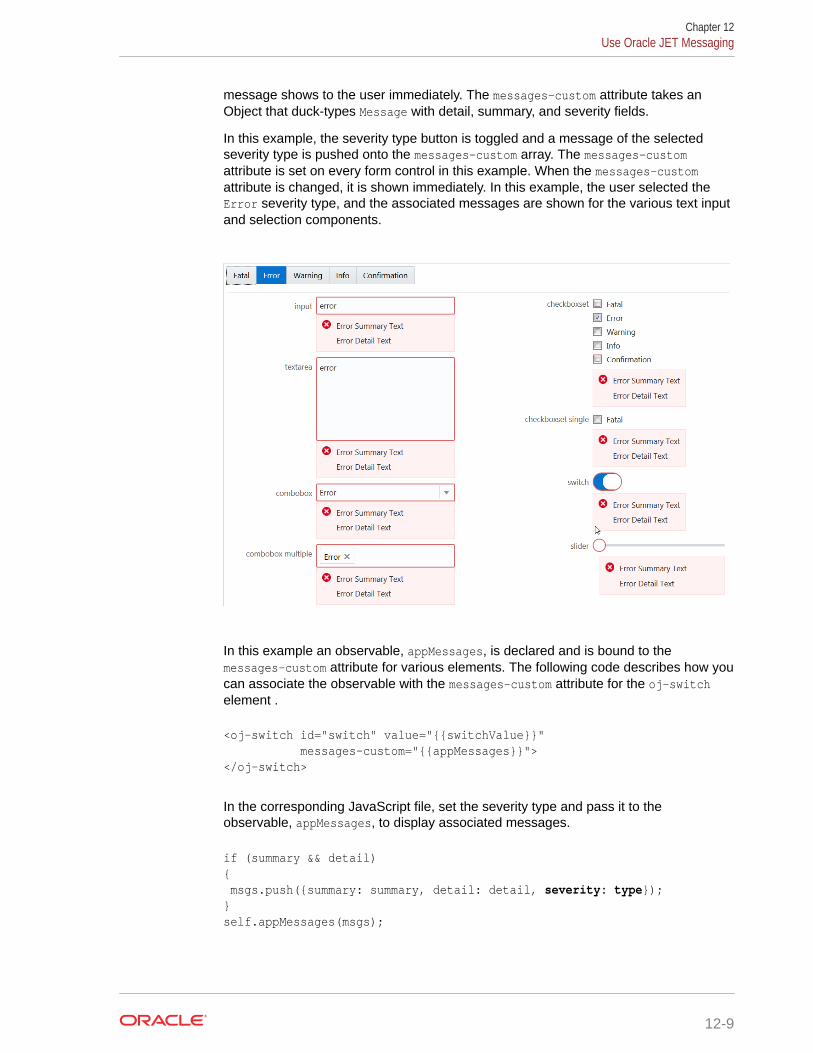
message shows to the user immediately. The messages-custom attribute takes anObject that duck-types Message with detail, summary, and severity fields.
In this example, the severity type button is toggled and a message of the selectedseverity type is pushed onto the messages-custom array. The messages-customattribute is set on every form control in this example. When the messages-customattribute is changed, it is shown immediately. In this example, the user selected theError severity type, and the associated messages are shown for the various text inputand selection components.
In this example an observable, appMessages, is declared and is bound to themessages-custom attribute for various elements. The following code describes how youcan associate the observable with the messages-custom attribute for the oj-switchelement .
<oj-switch id="switch" value="{{switchValue}}" messages-custom="{{appMessages}}"></oj-switch>
In the corresponding JavaScript file, set the severity type and pass it to theobservable, appMessages, to display associated messages.
if (summary && detail){ msgs.push({summary: summary, detail: detail, severity: type});}self.appMessages(msgs);
Chapter 12Use Oracle JET Messaging
12-9
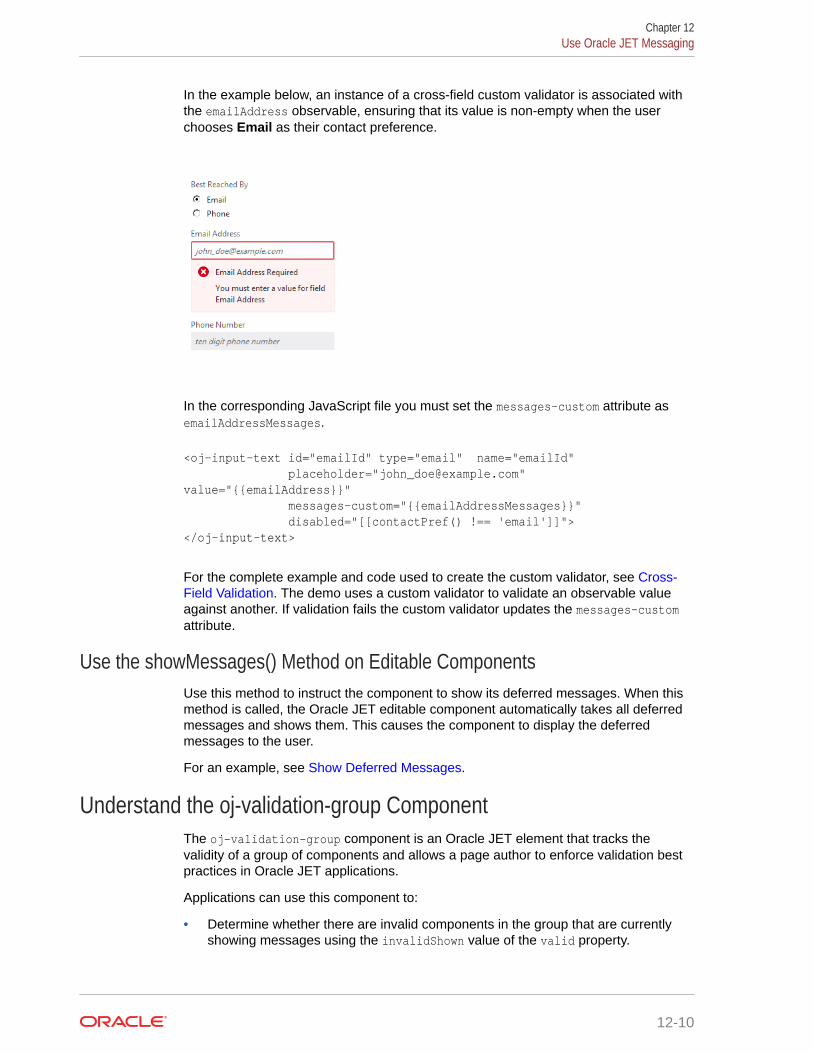
In the example below, an instance of a cross-field custom validator is associated withthe emailAddress observable, ensuring that its value is non-empty when the userchooses Email as their contact preference.
In the corresponding JavaScript file you must set the messages-custom attribute asemailAddressMessages.
<oj-input-text id="emailId" type="email" name="emailId" placeholder="[email protected]" value="{{emailAddress}}" messages-custom="{{emailAddressMessages}}" disabled="[[contactPref() !== 'email']]"></oj-input-text>
For the complete example and code used to create the custom validator, see Cross-Field Validation. The demo uses a custom validator to validate an observable valueagainst another. If validation fails the custom validator updates the messages-customattribute.
Use the showMessages() Method on Editable ComponentsUse this method to instruct the component to show its deferred messages. When thismethod is called, the Oracle JET editable component automatically takes all deferredmessages and shows them. This causes the component to display the deferredmessages to the user.
For an example, see Show Deferred Messages.
Understand the oj-validation-group ComponentThe oj-validation-group component is an Oracle JET element that tracks thevalidity of a group of components and allows a page author to enforce validation bestpractices in Oracle JET applications.
Applications can use this component to:
• Determine whether there are invalid components in the group that are currentlyshowing messages using the invalidShown value of the valid property.
Chapter 12Use Oracle JET Messaging
12-10

• Determine whether there are invalid components that have deferred messages,such as messages that are currently hidden in the group, using the invalidHiddenvalue of the valid property.
• Set focus on the first enabled component in the group using the focusOn()method. They can also focus on the first enabled component showing invalidmessages using focusOn("@firstInvalidShown").
• Show deferred messages on all tracked components using the showMessages()method.
For details about the oj-validation-group component's attributes and methods, seeoj-validation-group.
Track the Validity of a Group of Editable Components Using oj-validation-groupYou can track the validity of a group of editable components by wrapping them in theoj-validation-group component.
The oj-validation-group searches all its descendants for a valid property, and addsthem to the list of components it is tracking. When it adds a component, it doesnot check the tracked component’s children since the component’s valid state shouldalready be based on the valid state of its children, if applicable.
When it finds all such components, it determines its own valid property value basedon all the enabled (including hidden) components it tracks. Any disabled or readonlycomponents are ignored in calculating the valid state.
The most invalid component's valid property value will be the oj-validation-groupelement’s valid property value. When any of the tracked component's valid valuechanges, oj-validation-group will be notified and will update its own valid value if ithas changed.
The following code sample shows how an oj-validation-group can be used to trackthe overall validity of a typical form.
<div id="validation-usecase"> <oj-validation-group id="tracker" valid="{{groupValid}}"> <oj-form-layout label-edge="inside" id="fl1"> <oj-input-text id="firstname" required autocomplete="off" label-hint="First Name" name="firstname" > </oj-input-text> <oj-input-text id="lastname" required value="{{lastName}}" autocomplete="off" label-hint="Last Name"> </oj-input-text> <oj-input-text id="email" on-value-changed="[[firstEmailValueChanged]]" autocomplete="off" label-hint="Email" value="{{email}}" > </oj-input-text> <oj-input-text id="email2" autocomplete="off" label-hint="Confirm Email" validators="[[emailMatchValidator]]"
Chapter 12Use Oracle JET Messaging
12-11
value="{{email2}}"> </oj-input-text> <oj-checkboxset id="colors" label-hint="Favorite Colors"> <oj-option id="blueopt" value="blue">Blue</oj-option> <oj-option id="greenopt" value="green">Green</oj-option> <oj-option id="pinkopt" value="pink">Pink</oj-option> </oj-checkboxset> </oj-form-layout> </oj-validation-group> <hr/> <div class="oj-flex"> <div class="oj-flex-item"> </div> <div class="oj-flex-item"> <oj-button id="submitBtn" on-oj-action="[[submit]]">Submit</oj-button> </div> </div> <hr/> <span>oj-validation-group valid property: </span> <span id="namevalid"> <oj-bind-text value="[[groupValid]]"></oj-bind-text> </span></div>
A portion of the script to create the view model for this example is shown below. Thisportion pertains to the oj-validation-group used above. The full script is contained inthe Cookbook sample linked below.
require([ 'knockout', 'ojs/ojbootstrap', 'ojs/ojknockout', 'ojs/ojbutton', 'ojs/ojcheckboxset', 'ojs/ojformlayout', 'ojs/ojinputtext', 'ojs/ojvalidationgroup'], function (ko, Bootstrap) // this callback gets executed when all required modules // for validation are loaded { function DemoViewModel() { var self = this; self.tracker = ko.observable();
...
// to show the oj-validation-group's valid property value self.groupValid = ko.observable(); // User presses the submit button self.submit = function () { var tracker = document.getElementById("tracker");
if (tracker.valid === "valid") { // submit the form would go here alert("everything is valid; submit the form"); } else { // show messages on all the components that have messages hidden. tracker.showMessages(); tracker.focusOn("@firstInvalidShown"); } }; };
Bootstrap.whenDocumentReady().then(
Chapter 12Use Oracle JET Messaging
12-12
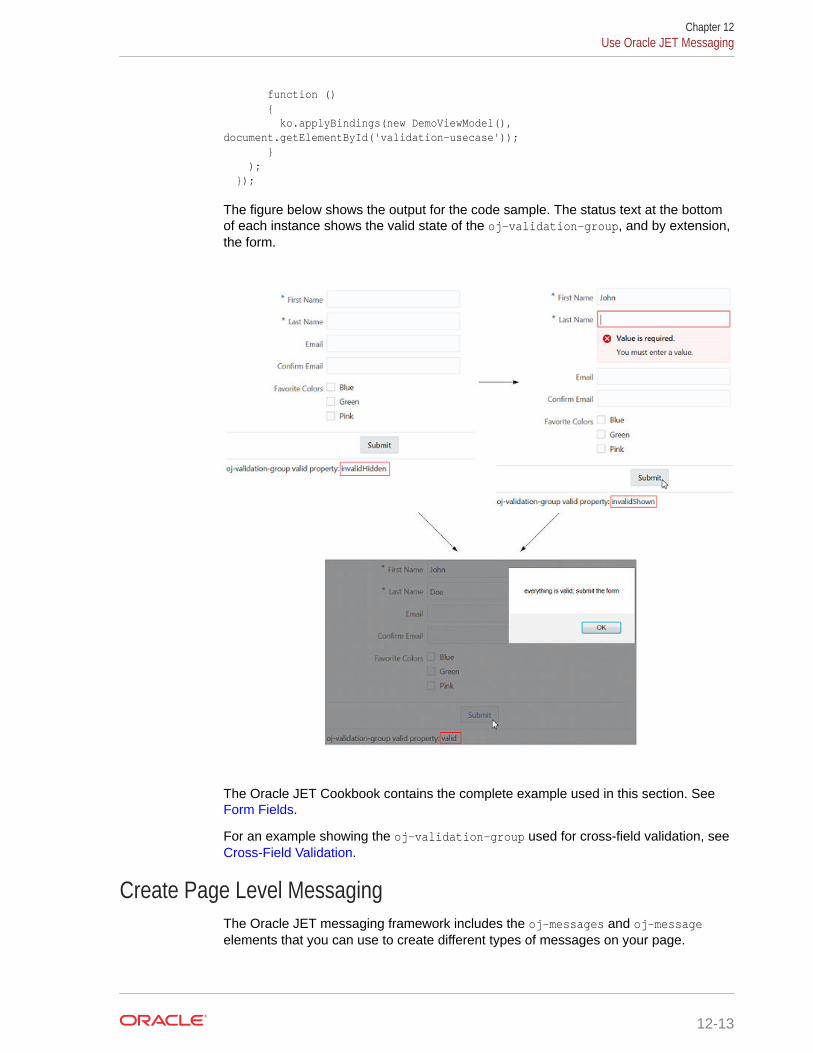
function () { ko.applyBindings(new DemoViewModel(), document.getElementById('validation-usecase')); } ); });
The figure below shows the output for the code sample. The status text at the bottomof each instance shows the valid state of the oj-validation-group, and by extension,the form.
The Oracle JET Cookbook contains the complete example used in this section. SeeForm Fields.
For an example showing the oj-validation-group used for cross-field validation, seeCross-Field Validation.
Create Page Level MessagingThe Oracle JET messaging framework includes the oj-messages and oj-messageelements that you can use to create different types of messages on your page.
Chapter 12Use Oracle JET Messaging
12-13
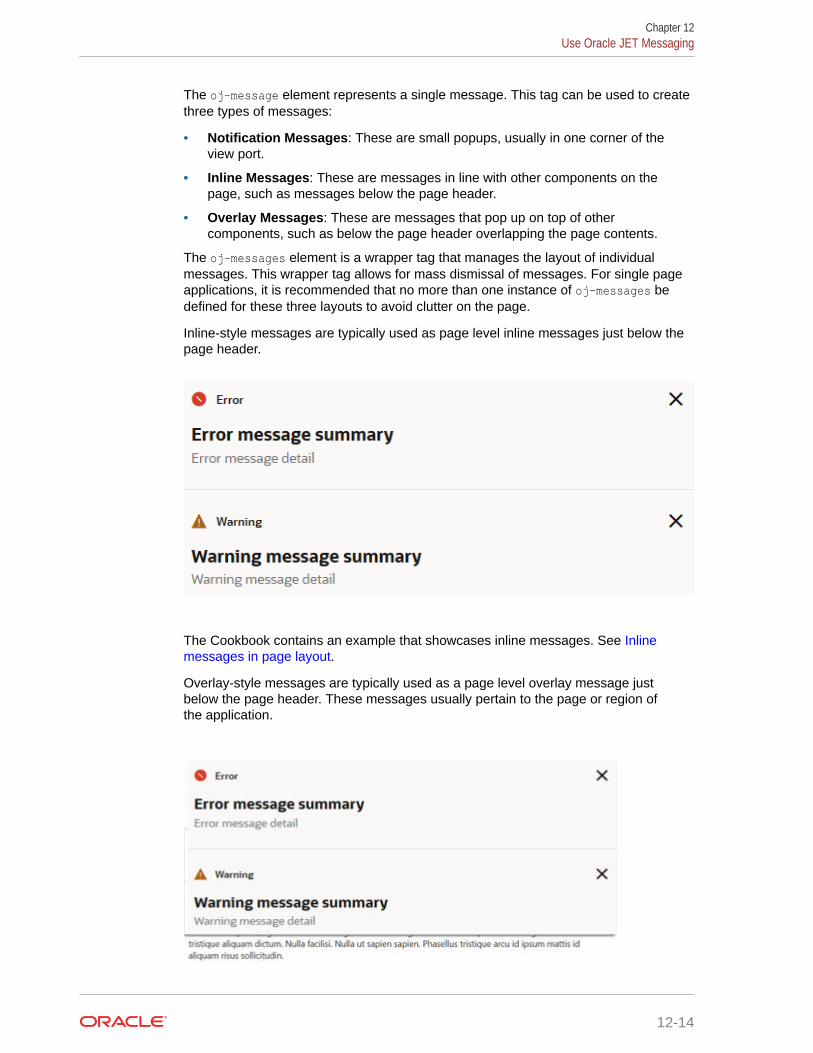
The oj-message element represents a single message. This tag can be used to createthree types of messages:
• Notification Messages: These are small popups, usually in one corner of theview port.
• Inline Messages: These are messages in line with other components on thepage, such as messages below the page header.
• Overlay Messages: These are messages that pop up on top of othercomponents, such as below the page header overlapping the page contents.
The oj-messages element is a wrapper tag that manages the layout of individualmessages. This wrapper tag allows for mass dismissal of messages. For single pageapplications, it is recommended that no more than one instance of oj-messages bedefined for these three layouts to avoid clutter on the page.
Inline-style messages are typically used as page level inline messages just below thepage header.
The Cookbook contains an example that showcases inline messages. See Inlinemessages in page layout.
Overlay-style messages are typically used as a page level overlay message justbelow the page header. These messages usually pertain to the page or region ofthe application.
Chapter 12Use Oracle JET Messaging
12-14
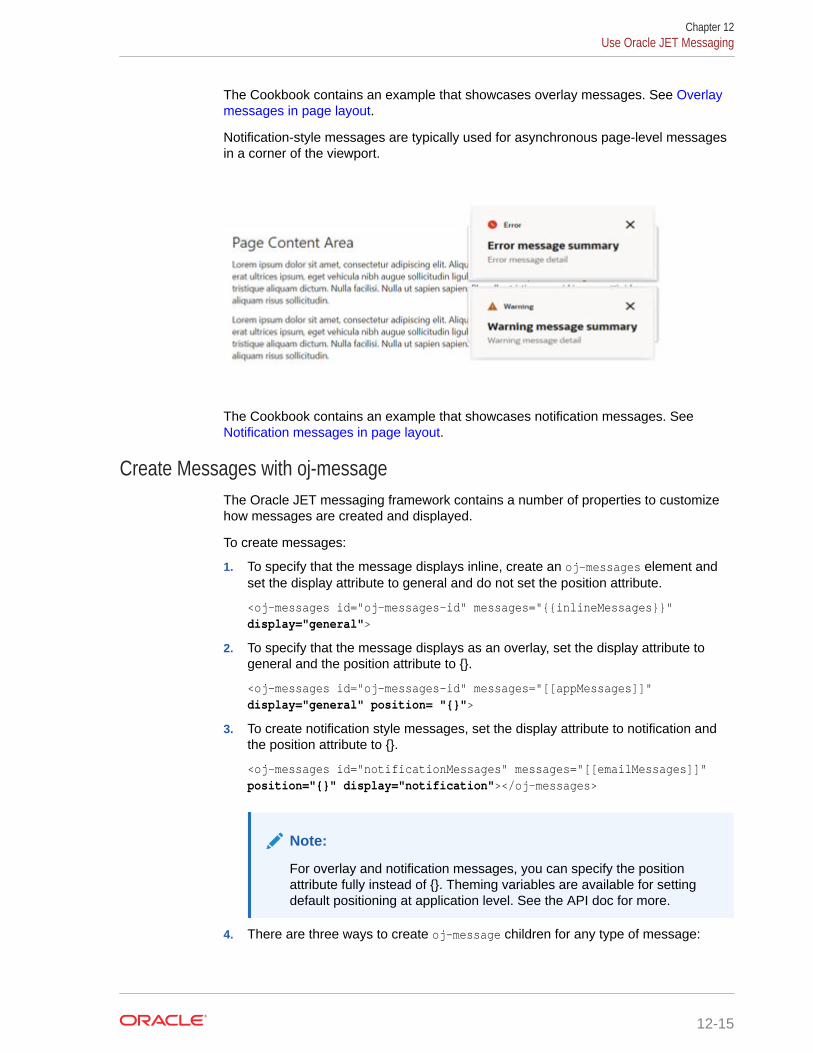
The Cookbook contains an example that showcases overlay messages. See Overlaymessages in page layout.
Notification-style messages are typically used for asynchronous page-level messagesin a corner of the viewport.
The Cookbook contains an example that showcases notification messages. SeeNotification messages in page layout.
Create Messages with oj-messageThe Oracle JET messaging framework contains a number of properties to customizehow messages are created and displayed.
To create messages:
1. To specify that the message displays inline, create an oj-messages element andset the display attribute to general and do not set the position attribute.
<oj-messages id="oj-messages-id" messages="{{inlineMessages}}"display="general">
2. To specify that the message displays as an overlay, set the display attribute togeneral and the position attribute to {}.
<oj-messages id="oj-messages-id" messages="[[appMessages]]"display="general" position= "{}">
3. To create notification style messages, set the display attribute to notification andthe position attribute to {}.
<oj-messages id="notificationMessages" messages="[[emailMessages]]"position="{}" display="notification"></oj-messages>
Note:
For overlay and notification messages, you can specify the positionattribute fully instead of {}. Theming variables are available for settingdefault positioning at application level. See the API doc for more.
4. There are three ways to create oj-message children for any type of message:
Chapter 12Use Oracle JET Messaging
12-15
http://www.oracle.com/webfolder/technetwork/jet/jetCookbook.html?component=messages&demo=pageOverlay
a. Include oj-message as direct children of oj-messages.
<oj-messages id="inlineMessages"> <oj-message message='{"summary": "Some summary", "detail": "Some detail", "autoTimeout": 5000}'></oj-message> <oj-message message="[[surveyInstructions]]"></oj-message> <oj-message message="[[surveySubmitConfirmation]]"></oj-message></oj-messages>
b. Use oj-bind-for-each to generate oj-message children.
<oj-messages id="pageOverlayMessages" position="{}" display="notification"> <oj-bind-for-each data="[[serviceRequestStatusUpdateMessages]]"> <template> <oj-message message="[[$current.data]]"></oj-message> </template> </oj-bind-for-each> <oj-bind-for-each data="[[criticalIncidentMessages]]"> <template> <oj-message message="[[$current.data]]"></oj-message> </template> </oj-bind-for-each></oj-messages>
c. Specify the messages attribute on oj-messages to a message object thatprogrammatically generates messages.
<oj-messages id="notificationMessages" messages="[[emailMessages]]" position="{}" display="notification"></oj-messages>
5. Set the message.auto-timeout subproperty to the number of milliseconds before itshould close itself, or set to –1 to disable auto timeout.
6. Set the message.close-affordance subproperty to 'defaults' to allow users todismiss messages, or 'none' to disallow it.
Note:
The close-affordance attribute should be set to none only when theuser cannot dismiss messages manually. Messages can still be closedprogrammatically by calling the close() method on oj-message.
7. Set the message.timestamp subproperty with an ISOString to specify a timestampdisplayed in the message header.
8. Set the message.sound subproperty to a URL to play a custom sound foraccessibility purposes. Set it to 'defaults' for a default sound, or 'none' to disable it.
Chapter 12Use Oracle JET Messaging
12-16
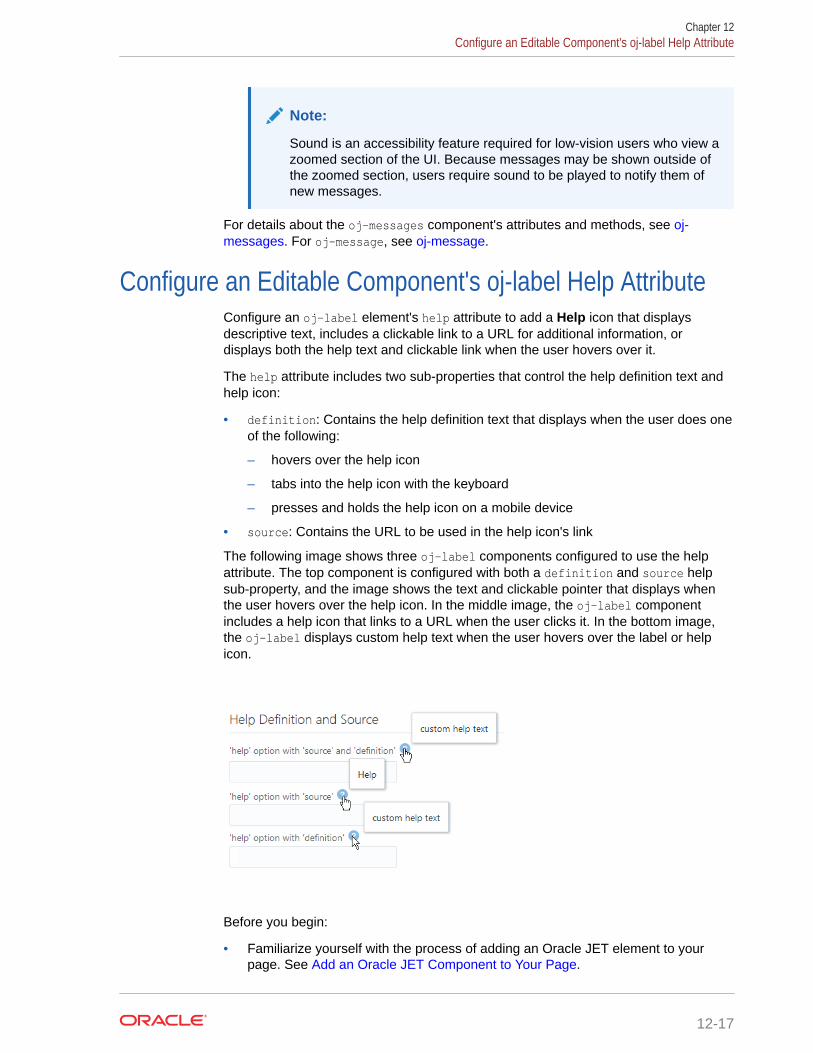
Note:
Sound is an accessibility feature required for low-vision users who view azoomed section of the UI. Because messages may be shown outside ofthe zoomed section, users require sound to be played to notify them ofnew messages.
For details about the oj-messages component's attributes and methods, see oj-messages. For oj-message, see oj-message.
Configure an Editable Component's oj-label Help AttributeConfigure an oj-label element's help attribute to add a Help icon that displaysdescriptive text, includes a clickable link to a URL for additional information, ordisplays both the help text and clickable link when the user hovers over it.
The help attribute includes two sub-properties that control the help definition text andhelp icon:
• definition: Contains the help definition text that displays when the user does oneof the following:
– hovers over the help icon
– tabs into the help icon with the keyboard
– presses and holds the help icon on a mobile device
• source: Contains the URL to be used in the help icon's link
The following image shows three oj-label components configured to use the helpattribute. The top component is configured with both a definition and source helpsub-property, and the image shows the text and clickable pointer that displays whenthe user hovers over the help icon. In the middle image, the oj-label componentincludes a help icon that links to a URL when the user clicks it. In the bottom image,the oj-label displays custom help text when the user hovers over the label or helpicon.
Before you begin:
• Familiarize yourself with the process of adding an Oracle JET element to yourpage. See Add an Oracle JET Component to Your Page.
Chapter 12Configure an Editable Component's oj-label Help Attribute
12-17
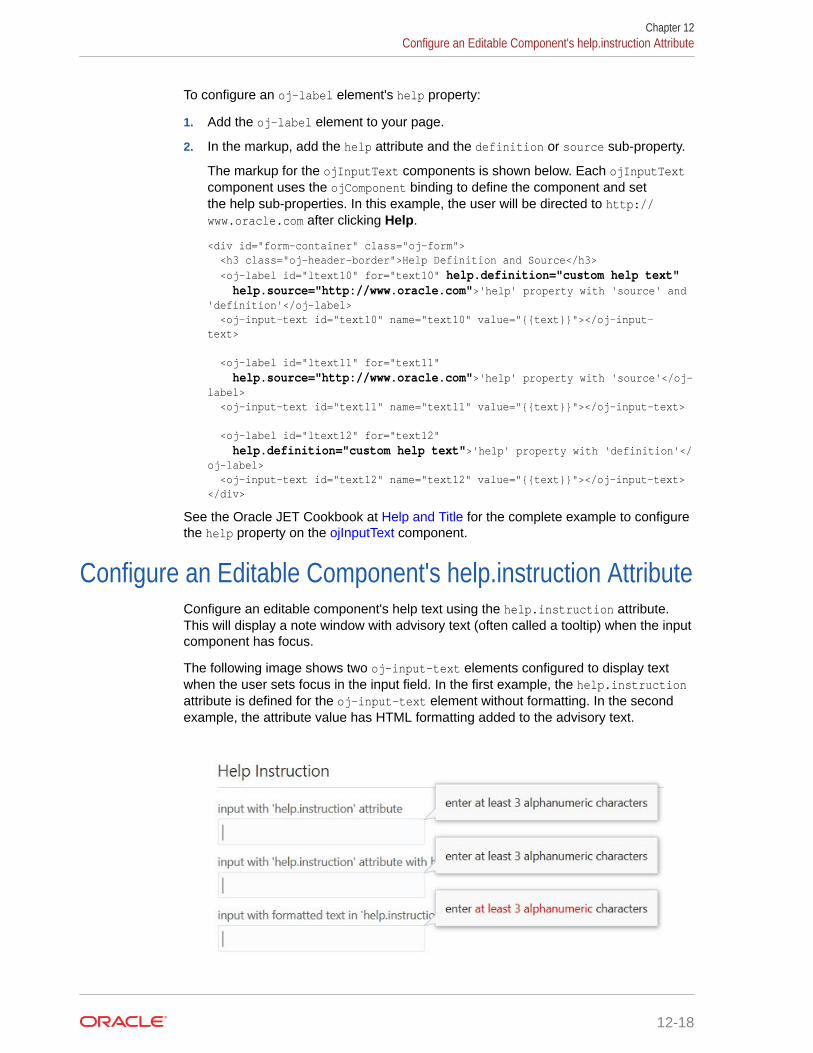
To configure an oj-label element's help property:
1. Add the oj-label element to your page.
2. In the markup, add the help attribute and the definition or source sub-property.
The markup for the ojInputText components is shown below. Each ojInputTextcomponent uses the ojComponent binding to define the component and setthe help sub-properties. In this example, the user will be directed to http://www.oracle.com after clicking Help.
<div id="form-container" class="oj-form"> <h3 class="oj-header-border">Help Definition and Source</h3> <oj-label id="ltext10" for="text10" help.definition="custom help text" help.source="http://www.oracle.com">'help' property with 'source' and 'definition'</oj-label> <oj-input-text id="text10" name="text10" value="{{text}}"></oj-input-text> <oj-label id="ltext11" for="text11" help.source="http://www.oracle.com">'help' property with 'source'</oj-label> <oj-input-text id="text11" name="text11" value="{{text}}"></oj-input-text> <oj-label id="ltext12" for="text12" help.definition="custom help text">'help' property with 'definition'</oj-label> <oj-input-text id="text12" name="text12" value="{{text}}"></oj-input-text></div>
See the Oracle JET Cookbook at Help and Title for the complete example to configurethe help property on the ojInputText component.
Configure an Editable Component's help.instruction AttributeConfigure an editable component's help text using the help.instruction attribute.This will display a note window with advisory text (often called a tooltip) when the inputcomponent has focus.
The following image shows two oj-input-text elements configured to display textwhen the user sets focus in the input field. In the first example, the help.instructionattribute is defined for the oj-input-text element without formatting. In the secondexample, the attribute value has HTML formatting added to the advisory text.
Chapter 12Configure an Editable Component's help.instruction Attribute
12-18
Before you begin:
• Familiarize yourself with the process of adding an Oracle JET element to yourpage. See Add an Oracle JET Component to Your Page.
To configure an editable element's help.instruction attribute:
1. Add the editable element to your page.
2. In the markup, add the help.instruction attribute in the element tag.
The following code sample shows the markup for defining the three oj-input-text components.
<div id="form-container" class="oj-form"> <h3 class="oj-header-border">Help Instruction</h3> <oj-label for="text20">input with 'help.instruction' attribute</oj-label> <oj-input-text id="text20" name="text20" autocomplete="off" validators="[[validators]]" help.instruction="enter at least 3 alphanumeric characters" value="{{text}}"></oj-input-text> <oj-label for="text21">input with 'help.instruction' attribute with binding</oj-label> <oj-input-text id="text21" name="text21" autocomplete="off" validators="[[validators]]" help.instruction="{{helpInstruction}}" value="{{text}}"></oj-input-text> <oj-label for="text22">input with formatted text in 'help.instruction' attribute</oj-label> <oj-input-text id="text22" name="text22" autocomplete="off" validators="[[validators]]" help.instruction="<html>enter <span style='color:red'>at least 3 alphanumeric</span> characters</html>" value="{{text}}"></oj-input-text></div>
3. In your application script, bind the component's value to a Knockout observable.
In this example, each oj-input-text element's value attribute is defined as textwhich is set to a Knockout observable in the following script. The script alsodefines regular expression validators to ensure that the user enters at least threeletters or numbers.
require(['knockout', 'ojs/ojbootstrap, 'ojs/ojknockout', 'ojs/ojinputtext', 'ojs/ojlabel'], function(ko, Bootstrap) { function MemberViewModel() { var self = this; self.text = ko.observable();
self.validators = ko.computed(function() { return [{ type: 'regExp', options: { pattern: '[a-zA-Z0-9]{3,}', messageDetail: 'You must enter at least 3 letters or numbers'}}];
Chapter 12Configure an Editable Component's help.instruction Attribute
12-19
}); self.helpInstruction = "enter at least 3 alphanumeric characters"; };
Bootstrap.whenDocumentReady().then( function () { ko.applyBindings(new MemberViewModel(), document.getElementById('form-container')); } ); });
For the complete example, see Help and Title in the Oracle JET Cookbook. Foradditional detail about the oj-input-text component, see the ojInputText APIdocumentation.
For additional information about the regular expression validator, see About OracleJET Validators and Converters.
Control the Display of Hints, Help, and MessagesUse the display-options attribute to control the placement and visibility of converterand validator hints, messages, and help instructions.
The following image shows the default placement and visibility of help, converter andvalidator hints, and messages. This example uses the oj-input-date component, butthe behavior is the same on all editable components where it makes sense:
• validator hint: Displays in a note window on focus
• converter hint: Used as the input field's placeholder, or displays in a note windowif the placeholder attribute is defined.
• messages: Displays inline on error
• help.instruction: Displays in a note window on focus
The oj-label exclusive attribute help.definition displays in a note window onhover.
Chapter 12Control the Display of Hints, Help, and Messages
12-20

The code sample below shows the markup for the oj-input-date component used inthis example. The example includes definitions for help.instruction, validator hints,and a data value for custom messages on validation failure. The sample also showsthe markup for a oj-label element with the help attribute.
<div id="form-container" class="oj-form"> <h3 class="oj-header-border">Default Display of Messages, Hints, Help Instruction</h3> <oj-label for="date10" help.definition="custom help text"> Input Date</oj-label> <oj-input-date id="date10" size="30" name="date10" required placeholder="month day, year" help.instruction='enter a date in your preferred format and we will attempt to figure it out' converter="[[longDateConverter]]" value="{{birthdate}}" validators="[[validators]]" translations='{ "required": { "hint": "validator hint: required", "messageSummary": "<html>custom summary: {label} <b>Required</b></html>", "messageDetail": "<html>custom detail: A value is required for this field</html>"}}'> </oj-input-date>
The code sample below shows the custom messages on validation failure set in theapplication’s script.
function MemberViewModel() {
Chapter 12Control the Display of Hints, Help, and Messages
12-21
var self = this; self.validators = ko.computed(function() { return [{ type: 'datetimeRange', options: { min: ValidationBase.IntlConverterUtils.dateToLocalIso(new Date(1930, 00, 01)), max: ValidationBase.IntlConverterUtils.dateToLocalIso(new Date(1995, 11,31)), hint: { inRange: 'Validator hint: datetimeRange: January 1, 1930 - November 30, 1995 years'}, messageSummary:{ rangeOverflow: 'Date later than max.', rangeUnderflow: 'Date earlier than min.'}, messageDetail: { rangeOverflow: 'The value \'{value}\' is not in the expected range; it is too high.', rangeUnderflow: 'The value \'{value}\' is not in the expected range; it is too low.'} }}]; }); //...Contents Omitted
}
Bootstrap.whenDocumentReady().then( function () { ko.applyBindings(new MemberViewModel(), document.getElementById('form-container')); } );});
Using the display-options element attribute in your markup, you can change thedefault behavior of the hints, help, and messaging properties of a single editablecomponent on your page. To control the behavior of all editable components on thepage, you can use the Component.setDefaultOptions() method in your applicationscript to set displayOptions values.
display-options allows you to change the default behavior as follows:
• helpInstruction: Set to none to turn off the help instruction display.
• converterHint: Set to none to turn off the display or set to notewindow to changethe default placement from placeholder text to a note window.
• validatorHint: Set to none to turn off the display.
• messages: Set to none to turn off the display or set to notewindow to change thedefault placement from inline to a note window.
Before you begin:
• Familiarize yourself with the process of adding an Oracle JET element to yourpage. See Add an Oracle JET Component to Your Page.
To change the default display type (inline or note window) and display options for hints,help, and messages:
Chapter 12Control the Display of Hints, Help, and Messages
12-22

1. Add the editable element to your page.
2. To change the default display type (inline or note window) for an individual editablecomponent, add the display-options attribute to your component definition andset it as needed.
For example, to turn off the display of hints and help.instruction and to displaymessages in a note window, add the highlighted markup to your componentdefinition:
<oj-input-date id="date12" required value="{{birthdate}}" converter="[[longDateConverter]]" validators="[[validators]]" help.instruction="enter a date in your preferred format and we will attempt to figure it out" display-options='{"converterHint": "none", "validatorHint": "none", "helpInstruction": "none", "messages": "notewindow"}' ... contents omitted}"
3. To change the default display and location for all editable components inyour application, add the Component.setDefaultOptions() method to yourapplication's script and specify the desired displayOptions.
For example, to turn off the display of hints and help and to display messagesin a note window, add the ojComponent.setDefaultOptions() method with thearguments shown below.
Components.setDefaultOptions({ 'editableValue': { 'displayOptions': { 'converterHint': ['none'], 'validatorHint': ['none'], 'messages': ['notewindow'], 'helpInstruction': ['none'] } }});
The Oracle JET cookbook contains the complete code for this example at UserAssistance. You can also find additional examples that illustrate hints, help, andmessaging configuration.
Chapter 12Control the Display of Hints, Help, and Messages
12-23

13Developing Accessible Applications
Oracle JET and Oracle JET components have built-in accessibility features forpersons with disabilities. Use these features to create accessible Oracle JET weband hybrid mobile application pages.
Topics:
• Typical Workflow for Developing Accessible Oracle JET Applications
• About Oracle JET and Accessibility
• About the Accessibility Features of Oracle JET Components
• Create Accessible Oracle JET Pages
Typical Workflow for Developing Accessible Oracle JETApplications
Understand accessibility features included in Oracle JET and the components that itprovides. You should also understand which tasks are needed for specific componentsand which tasks are needed at the page level to ensure accessibility.
To develop accessible Oracle JET applications, refer to the typical workflow describedin the following table:
Task Description More Information
Identify accessibilityfeatures included withOracle JET
Identify the accessibility featuresincluded in Oracle JET and OracleJET components.
About Oracle JET and Accessibility
Create accessible OracleJET components
Identify tasks needed for specificcomponents to ensure accessibility.
About the Accessibility Features of Oracle JETComponents
Create accessible OracleJET pages
Identify tasks needed at the pagelevel to ensure accessible OracleJET pages.
Create Accessible Oracle JET Pages
About Oracle JET and AccessibilityOracle JET components have built-in accessibility support that conforms with theWeb Content Accessibility Guidelines version 2.1 at the AA level (WCAG 2.1 AA),developed by the World Wide Web Consortium (W3C).
Accessibility involves making your application usable for persons with disabilities suchas low vision or blindness, deafness, or other physical limitations. This means, forexample, creating applications that can be:
• Used without a mouse (keyboard only).
• Used with assistive technologies such as screen readers and screen magnifiers.
13-1
• Used without reliance on sound, color, animation, or timing.
Oracle JET components provide support for:
• Keyboard and touch navigation
Oracle JET components follow the Web Accessibility Initiative - Accessible RichInternet Application (WAI-ARIA) Developing a Keyboard Interface guidelines. TheAPI documentation for each Oracle JET component lists its keyboard and touchend user information when applicable, including a few deviations from the WAI-ARIA guidelines.
• Zoom
Oracle JET supports browser zooming up to 400%. For example, on the Firefoxbrowser, you can choose View -> Zoom -> Zoom In.
• Screen reader
Oracle JET supports screen readers such as JAWS, Apple VoiceOver, and GoogleTalkbalk by generating content that complies with WAI-ARIA standards, and nospecial mode is needed.
• Oracle JET component roles and names
Each Oracle JET component has an appropriate role, such as button, link, andso on, and each component supports an associated name (label), if applicable.
• Sufficient color contrast
Oracle JET provides the Redwood theme, starting in Oracle JET release 9.0.0,which is designed to provide a luminosity contrast ratio of at least 4.5:1.
Oracle JET does not support the use of access keys due to their negative impact onassistive tooling and accessibility.
Oracle documents the degree of conformance of each product with the applicableaccessibility standards using the Voluntary Product Accessibility Template (VPAT). Youshould review the appropriate VPAT for the version of Oracle JET that you are usingfor important information including known exceptions and defects, if any.
While Oracle JET is capable of rendering an application that conforms to WCAG 2.1AA to the degree indicated by the VPAT, it is the responsibility of the applicationdesigner and developer to understand the applicable accessibility standards fully, useJET appropriately, and perform accessibility testing with disabled users and assistivetechnology.
About the Accessibility Features of Oracle JET ComponentsOracle JET components are designed to generate content that conforms to the WCAG2.1 AA standards. In most cases, you don't need to do anything to add accessibilityto the Oracle JET component. However, there are some components where you mayneed to supply a label or other property.
For those components, the component's API documentation contains an Accessibilitysection that provides the information you need to ensure the component's accessibility.
Chapter 13About the Accessibility Features of Oracle JET Components
13-2

Note:
Some Oracle products have run-time accessibility modes that render contentoptimized for certain types of users, such as users of screen readers. Forthe most part, Oracle JET renders all accessibility-related content all of thetime. There is only a mode for users that rely on the operating system's highcontrast mode, which is described in Create Accessible Oracle JET Pages.
Oracle JET components that provide keyboard and touch navigation list the keystrokeand gesture end user information in their API documentation. Since the navigation isbuilt into the component, you do not need to do anything to configure it.
You can access an individual Oracle JET component's accessibility features andrequirements in the API Reference for Oracle® JavaScript Extension Toolkit (OracleJET). Select the component you're interested in from the list on the left. You can alsofind the list of supported keystrokes and gestures for each Oracle JET component thatsupports keystrokes and gestures in the Oracle® JavaScript Extension Toolkit (JET)Keyboard and Touch Reference.
Create Accessible Oracle JET PagesContent generated by Oracle JET is designed to conform to the WCAG 2.1 AAstandards. However, many standards are not under the complete control of OracleJET, such as overall UI consistency, the use of color, the quality of on-screen text andinstructions, and so on.
A complete product development plan that addresses accessibility should includeproper UI design, coding, and testing with an array of tools, assistive technology, anddisabled users.
Note:
In most cases, end-user documentation for your application must describeinformation about accessibility, such as example keystrokes needed tooperate certain components.
Topics:
• Configure WAI-ARIA Landmarks
• Configure High Contrast Mode
• Hide Screen Reader Content
• Use ARIA Live Region
Configure WAI-ARIA LandmarksWAI-ARIA landmarks provide navigational information to assistive technology users.Landmark roles identify the purpose of a page region and allow the user to navigate
Chapter 13Create Accessible Oracle JET Pages
13-3
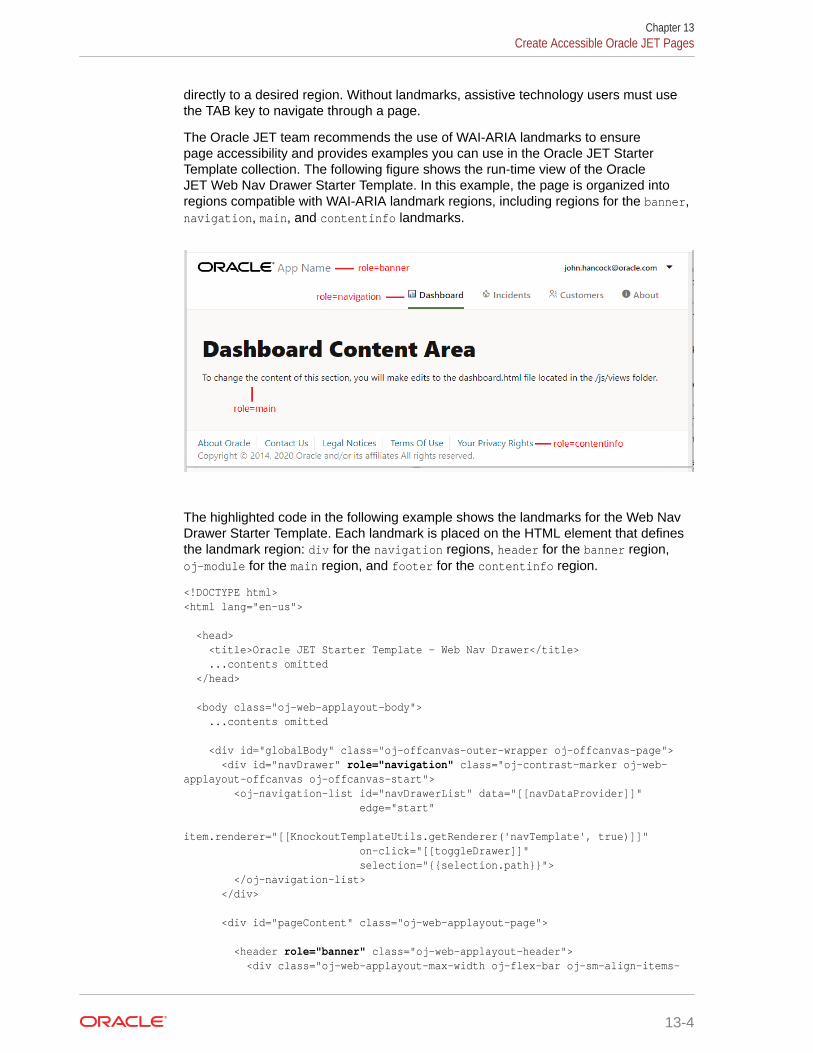
directly to a desired region. Without landmarks, assistive technology users must usethe TAB key to navigate through a page.
The Oracle JET team recommends the use of WAI-ARIA landmarks to ensurepage accessibility and provides examples you can use in the Oracle JET StarterTemplate collection. The following figure shows the run-time view of the OracleJET Web Nav Drawer Starter Template. In this example, the page is organized intoregions compatible with WAI-ARIA landmark regions, including regions for the banner,navigation, main, and contentinfo landmarks.
The highlighted code in the following example shows the landmarks for the Web NavDrawer Starter Template. Each landmark is placed on the HTML element that definesthe landmark region: div for the navigation regions, header for the banner region,oj-module for the main region, and footer for the contentinfo region.
<!DOCTYPE html><html lang="en-us"> <head> <title>Oracle JET Starter Template - Web Nav Drawer</title> ...contents omitted </head> <body class="oj-web-applayout-body"> ...contents omitted
<div id="globalBody" class="oj-offcanvas-outer-wrapper oj-offcanvas-page"> <div id="navDrawer" role="navigation" class="oj-contrast-marker oj-web-applayout-offcanvas oj-offcanvas-start"> <oj-navigation-list id="navDrawerList" data="[[navDataProvider]]" edge="start" item.renderer="[[KnockoutTemplateUtils.getRenderer('navTemplate', true)]]" on-click="[[toggleDrawer]]" selection="{{selection.path}}"> </oj-navigation-list> </div>
<div id="pageContent" class="oj-web-applayout-page">
<header role="banner" class="oj-web-applayout-header"> <div class="oj-web-applayout-max-width oj-flex-bar oj-sm-align-items-
Chapter 13Create Accessible Oracle JET Pages
13-4

center"> ...contents omitted </div> <div role="navigation" class="oj-web-applayout-max-width oj-web-applayout-navbar"> <oj-navigation-list id="navTabBar" class="oj-sm-only-hide oj-md-condense oj-md-justify-content-flex-end" data="[[navDataProvider]]" edge="top" item.renderer="[[KnockoutTemplateUtils.getRenderer('navTemplate', true)]]" selection="{{selection.path}}"> </oj-navigation-list> </div> </header>
<oj-module role="main" class="oj-web-applayout-max-width oj-web-applayout-content" config="[[moduleAdapter.koObservableConfig]]"> </oj-module>
<footer class="oj-web-applayout-footer" role="contentinfo"> ...contents omitted </footer>
</div> </div> <script type="text/javascript" src="js/libs/require/require.js"></script> <script type="text/javascript" src="js/main.js"></script>
</body></html>
If your application includes a complementary region, add role="complementary" to theHTML div element:
<div role="complementary"></div>
For additional information about WAI-ARIA landmark roles, see landmark_roles.
Configure High Contrast ModeHigh contrast mode is for people who require a very high level of contrast in order todistinguish components on the page. Operating systems such as Microsoft Windowsand MacOS provide methods for users to run in high contrast mode.
The graphic below shows the effect of changing to high contrast mode on Oracle JETicon font images.
Chapter 13Create Accessible Oracle JET Pages
13-5

Oracle JET provides the oj-hicontrast class that you can use to configure highcontrast mode in your application.
Topics:
• Understand Color and Background Image Limitations in High Contrast Mode
• Add High Contrast Mode to Your Oracle JET Application
• Add High Contrast Images or Icon Fonts
• Test High Contrast Mode
Understand Color and Background Image Limitations in High Contrast ModeThere are color and background image limitations in high contrast mode that yourapplication may need to work around.
In high contrast mode the colors in the CSS may be ignored or overridden, includingbackground, border, and text colors. Therefore, in high contrast mode you may need tofind an alternative way to show state. For example, you might need to add or changethe border to show that something is selected.
Also, your application may need to show alternate high contrast images that workon dark or light background color. Some operating systems, like Microsoft Windows,offer multiple display profiles for high contrast mode, including a black-on-white andwhite-on-black mode.
Consider providing an image that includes a background, so either black on a whitebackground or white on a black background. That way it won’t matter what thebackground color is on the page since the contrast is in the image itself.
Add High Contrast Mode to Your Oracle JET ApplicationIn most cases, you do not need to do anything to enable high contrast mode inyour Oracle JET application. If you're using RequireJS to load Oracle JET componentmodules, Oracle JET loads a script that attempts to detect if a user is running in highcontrast mode. If the script succeeds at detection, it places the oj-hicontrast classon the body element.
There is a serious limitation to this method, however. There is no standard way todetect high contrast mode, and we can't guarantee that the script works in all caseson all browsers. For example, on Windows, the script detects high contrast mode on
Chapter 13Create Accessible Oracle JET Pages
13-6

Microsoft Edge and Mozilla Firefox browsers, but it does not detect high contrast modeon Chrome.
To guarantee that the .oj-hicontrast styles are applied, add a user preferencesetting for high contrast to your application and configure the application to add theoj-hicontrast class to the body element when the preference is set.
When the class is added, the .oj-hicontrast CSS styles are applied to the pagewhere defined. The code below shows an excerpt from the Redwood CSS whichchanges the outline-width to 3 on the ojButton component when the button hasfocus.
.oj-hicontrast .oj-button.oj-focus .oj-button-button { outline-width: 3px; }
Note:
For disabled content, JET supports an accessible luminosity contrast ratio,as specified in WCAG 2.1 - Success Criterion 1.4.3 Contrast (Minimum), inthe themes that are accessible.
Section 1.4.3 says that text or images of text that are part of an inactiveuser interface component have no contrast requirement. Because disabledcontent may not meet the minimum contrast ratio required of enabledcontent, it cannot be used to convey meaningful information. For example,a checkbox may still appear checked in disabled mode, but since the colorsmay not pass contrast ratio, you cannot rely on all users being able tosee that it's checked. If the information is needed to interact with the pagecorrectly, you must convey it using a different method, for example as plaintext.
Add High Contrast Images or Icon FontsTo support high contrast image files, Oracle JET provides Sass mixins that you canuse to generate the correct CSS in high contrast mode to:
• Use an alternate image.
• Use images without using background images.
The Oracle JET cookbook provides examples that you can use at: CSS Images.
You can also use icon fonts instead of image files to support high contrast mode. Thelimitation is that icon fonts use a single color. Since these icons are text, they will beguaranteed to contrast against the background color on systems that ignore colors inthe CSS. However, if you use color to show state (for example, changing an icon toblue when selected), the colors may be ignored in high contrast modes. You may needto find an alternative like setting a border instead. The Oracle JET cookbook providesicon font demos at: Icon Fonts.
Test High Contrast ModeThe recommended way to test high contrast mode in Oracle JET applications is to sethigh contrast mode at the operating system level. Note also that the Google Chromebrowser does not remove background images in high contrast mode, and unless this
Chapter 13Create Accessible Oracle JET Pages
13-7
is the only browser you plan to support, you should test high contrast with MicrosoftEdge or Mozilla Firefox.
For information about enabling high contrast mode, see the operating systemdocumentation for your computer’s operating system. For example, to turn highcontrast mode on and off in Microsoft Windows, use the following key combination:Left Alt+Left Shift+PrtScn. You may need to refresh your browser to see the newmode.
Hide Screen Reader ContentSometimes you want to have some text on the page that is read to the screen readeruser, but the sighted user doesn't see. Oracle JET provides the oj-helper-hidden-accessible class that you can use to hide content.
You can find the .oj-helper-hidden-accessible style defaults in the Oracle JETCSS file. For the Redwood theme, the CSS file is: web/css/redwood/x.x.x/web/redwood.css. For the Alta theme, the CSS file is: web/css/alta/x.x.x/web/oj-alta.css. For additional information about theming and Oracle JET, see Using CSSand Themes in Applications.
Use ARIA Live RegionAn ARIA live region is a mechanism to notify assistive technologies when a web pagecontent is updated.
When using a single page application, if there are any changes to the page orthe page region, the user using assistive technologies like screen readers are notnotified about the changes in the page content since the URL of the applicationhas not changed. To help provide a notification to the screen readers when a pageor segments of a page change, an ARIA live region can be used to announce thedynamic changes within a web page. When the update takes place within an ARIAlive region, a screen reader is automatically notified, wherever its focus is at the time,and it announces the updated content to the user. This can be achieved by using thearia-live attribute.
The aria-live attribute identifies an element as a live region. It takes three possiblevalues:
• off: No notification
• polite: Screen reader notifies user once the current task is complete
• assertive: Screen reader interrupts the current task to notify user
If the value of the aria-live attribute defined for an element is set to polite, yourscreen reader will not be interrupted and will announce the changes in the ARIA liveregion when the user has no activity on the screen. If the value is set to assertive,the new information has high priority and should be notified or announced to the userimmediately.
You can also use some of the advanced ARIA live region attributes to intimateinformation of the entire live region or only a portion of the live region to assistivetechnologies. Some of the advanced live region attributes to use are:
• aria-atomic: The aria-atomic attribute is used along with aria-live attributewhen the page contains live regions. This attribute is used to set whether theassistive technologies should present the entire live region as a single unit or to
Chapter 13Create Accessible Oracle JET Pages
13-8

only announce the regions that have been changed. The possible values are trueor false. The default value is false.
• aria-relevant: This attribute is used in conjunction with the aria-live attributeto describe the types of changes that have occurred within a givenlive region that should be announced to the user. The possible settingsare additions, removals, text, and all. The default setting is additions text.
The following example shows a sample of the ARIA live region defined in theindex.html file of an application. In this example, the aria-live attribute is set toassertive and the aria-atomic attribute is set to true:
<div id="globalBody" class="oj-offcanvas-outer-wrapper oj-offcanvas-page"> <!-- Region for announcing messages to Screen Readers --> <div id="announce" class="sendOffScreen" :aria-live="[[manner() ? manner() : 'assertive']]" aria-atomic="true"> <p id="ariaLiveMessage"><oj-bind-text value="[[message]]"></oj-bind-text> </div> <div id="navDrawer" role="navigation" class="oj-contrast-marker oj-web-applayout-offcanvas oj-offcanvas-start"> <oj-navigation-list id="navDrawerList" data="[[navDataProvider]]" edge="start" item.renderer="[[KnockoutTemplateUtils.getRenderer('navTemplate', true)]]" on-click="[[toggleDrawer]]" selection="{{selection.path}}"> </oj-navigation-list> </div> <div id="pageContent" class="oj-web-applayout-page"> ... contents omitted
The following example shows how to set up the observables and event listeners in theappController.js file of the application.
define(['knockout', 'ojs/ojresponsiveutils', 'ojs/ojresponsiveknockoututils', 'ojs/ojcorerouter', 'ojs/ojarraydataprovider', 'ojs/ojknockout', 'ojs/ojoffcanvas'], function (ko, ResponsiveUtils, ResponsiveKnockoutUtils, CoreRouter, ArrayDataProvider) { function ControllerViewModel() { var self = this;
self.manner = ko.observable('assertive'); self.message = ko.observable(); function announcementHandler(event) { self.message(event.detail.message); self.manner(event.detail.manner); };
document.getElementById('globalBody').addEventListener('announce', announcementHandler, false);
Chapter 13Create Accessible Oracle JET Pages
13-9

var smQuery = ResponsiveUtils.getFrameworkQuery(ResponsiveUtils.FRAMEWORK_QUERY_KEY.SM_ONLY); self.smScreen = ResponsiveKnockoutUtils.createMediaQueryObservable(smQuery); var mdQuery = ResponsiveUtils.getFrameworkQuery(ResponsiveUtils.FRAMEWORK_QUERY_KEY.MD_UP); self.mdScreen = ResponsiveKnockoutUtils.createMediaQueryObservable(mdQuery);
let navData = [ { path: '', redirect: 'dashboard' }, { path: 'dashboard', detail: { label: 'Dashboard', iconClass: 'oj-ux-ico-bar-chart' } }, { path: 'incidents', detail: { label: 'Incidents', iconClass: 'oj-ux-ico-fire' } }, { path: 'customers', detail: { label: 'Customers', iconClass: 'oj-ux-ico-contact-group' } }, { path: 'about', detail: { label: 'About', iconClass: 'oj-ux-ico-information-s' } } ];
// Router setup let router = new CoreRouter(navData, { urlAdapter: new UrlParamAdapter() }); router.sync();
this.moduleAdapter = new ModuleRouterAdapter(router);
this.selection = new KnockoutRouterAdapter(router);
// Setup the navDataProvider with the routes, excluding the first redirected // route. this.navDataProvider = new ArrayDataProvider(navData.slice(1), {keyAttributes: "path"}); ... contents omitted
To send the announcement, you can use a dispatcher that can be defined within thepage viewModel files or in the router enter method. The following example shows apage viewModel file that fires a dispatch in the self.transitionCompleted lifecyclemethod.
define(['knockout','ojs/ojpopup'], function (ko) {
function DashboardViewModel() { var self = this;
self.transitionCompleted = function (info) { var message = "Loaded Dashboard page" var params = {
Chapter 13Create Accessible Oracle JET Pages
13-10
'bubbles': true, 'detail': { 'message': message, 'manner': 'assertive' } }; document.getElementById('globalBody').dispatchEvent(new CustomEvent('announce', params)); };
For more information on using an ARIA live region, see ARIA Live Regions.
Chapter 13Create Accessible Oracle JET Pages
13-11
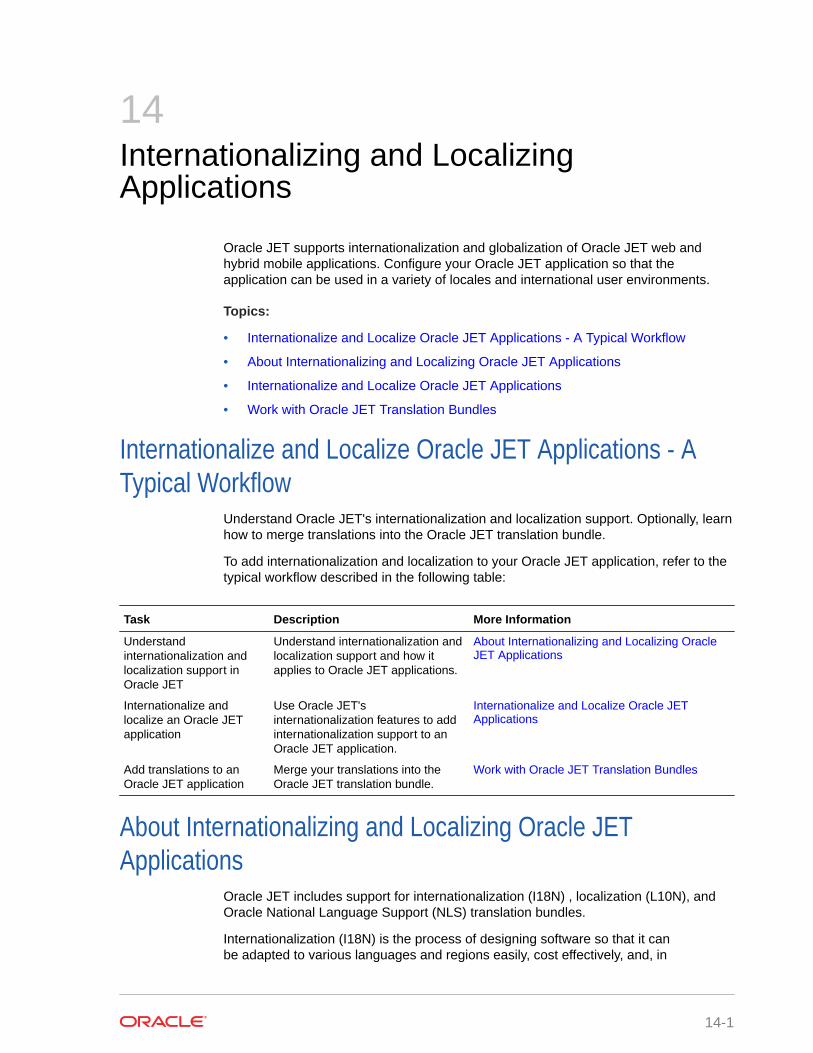
14Internationalizing and LocalizingApplications
Oracle JET supports internationalization and globalization of Oracle JET web andhybrid mobile applications. Configure your Oracle JET application so that theapplication can be used in a variety of locales and international user environments.
Topics:
• Internationalize and Localize Oracle JET Applications - A Typical Workflow
• About Internationalizing and Localizing Oracle JET Applications
• Internationalize and Localize Oracle JET Applications
• Work with Oracle JET Translation Bundles
Internationalize and Localize Oracle JET Applications - ATypical Workflow
Understand Oracle JET's internationalization and localization support. Optionally, learnhow to merge translations into the Oracle JET translation bundle.
To add internationalization and localization to your Oracle JET application, refer to thetypical workflow described in the following table:
Task Description More Information
Understandinternationalization andlocalization support inOracle JET
Understand internationalization andlocalization support and how itapplies to Oracle JET applications.
About Internationalizing and Localizing OracleJET Applications
Internationalize andlocalize an Oracle JETapplication
Use Oracle JET'sinternationalization features to addinternationalization support to anOracle JET application.
Internationalize and Localize Oracle JETApplications
Add translations to anOracle JET application
Merge your translations into theOracle JET translation bundle.
Work with Oracle JET Translation Bundles
About Internationalizing and Localizing Oracle JETApplications
Oracle JET includes support for internationalization (I18N) , localization (L10N), andOracle National Language Support (NLS) translation bundles.
Internationalization (I18N) is the process of designing software so that it canbe adapted to various languages and regions easily, cost effectively, and, in
14-1
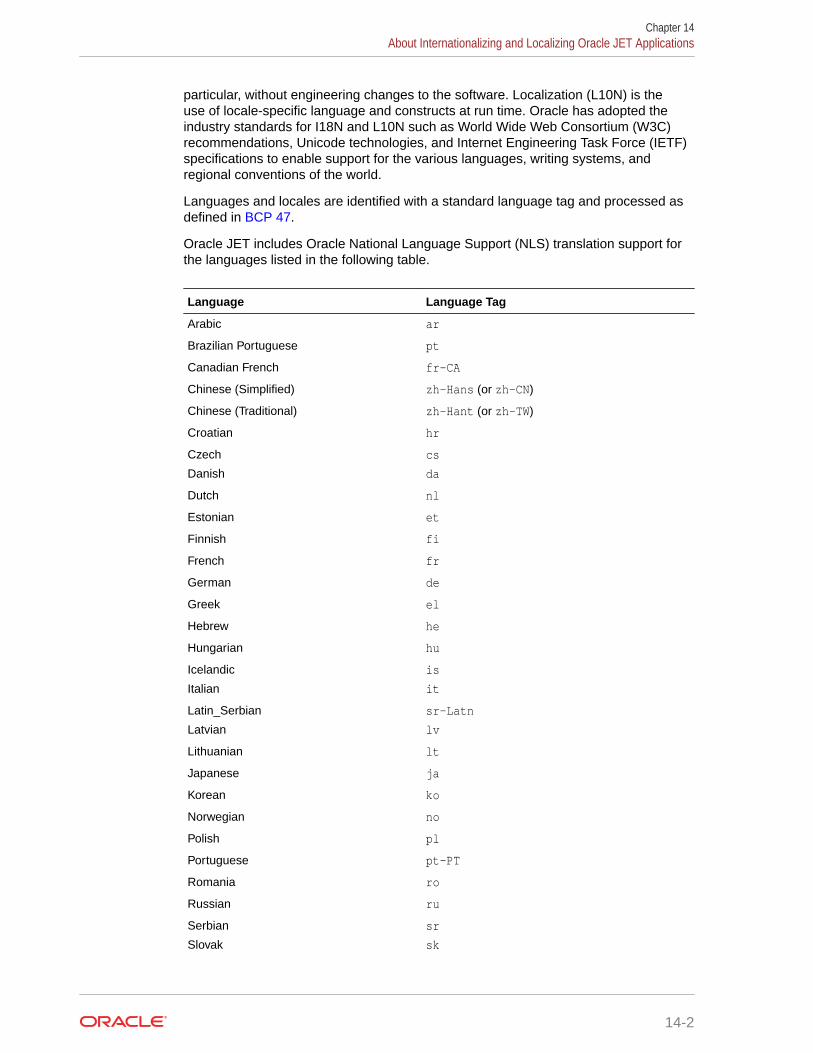
particular, without engineering changes to the software. Localization (L10N) is theuse of locale-specific language and constructs at run time. Oracle has adopted theindustry standards for I18N and L10N such as World Wide Web Consortium (W3C)recommendations, Unicode technologies, and Internet Engineering Task Force (IETF)specifications to enable support for the various languages, writing systems, andregional conventions of the world.
Languages and locales are identified with a standard language tag and processed asdefined in BCP 47.
Oracle JET includes Oracle National Language Support (NLS) translation support forthe languages listed in the following table.
Language Language Tag
Arabic ar
Brazilian Portuguese pt
Canadian French fr-CA
Chinese (Simplified) zh-Hans (or zh-CN)
Chinese (Traditional) zh-Hant (or zh-TW)
Croatian hr
Czech cs
Danish da
Dutch nl
Estonian et
Finnish fi
French fr
German de
Greek el
Hebrew he
Hungarian hu
Icelandic is
Italian it
Latin_Serbian sr-Latn
Latvian lv
Lithuanian lt
Japanese ja
Korean ko
Norwegian no
Polish pl
Portuguese pt-PT
Romania ro
Russian ru
Serbian sr
Slovak sk
Chapter 14About Internationalizing and Localizing Oracle JET Applications
14-2

Language Language Tag
Slovenian sl
Spanish es
Swedish sv
Thai th
Turkish tr
Oracle JET translations are stored in a resource bundle. You can add your owntranslations to the bundles. For additional information see Add Translation Bundles toOracle JET.
Oracle JET also includes formatting support for over 180 locales. Oracle JET localeelements are based upon the Unicode Common Locale Data Repository (CLDR) andare stored in locale bundles. For additional information about Unicode CLDR, seehttp://cldr.unicode.org. You can find the supported locale bundles in the Oracle JETdistribution:
js/libs/oj/vxxx/resources/nls
It is the application's responsibility to determine the locale used on the page. Typicallythe application determines the locale by calculating it on the server side from thebrowser locale setting or by using the user locale preference stored in an identity storeand the supported translation languages of the application.
Once the locale is determined, your application must communicate this locale toOracle JET for its locale sensitive operations such as loading resource bundlesand formatting date-time data. Oracle JET determines the locale for locale sensitiveoperations in the following order:
1. Locale specification in the RequireJS configuration.
2. lang attribute of the html tag.
3. navigator.language browser property.
Setting the lang attribute on the html tag is the recommended practice because, inaddition to setting the locale for Oracle JET, it sets the locale for all HTML elements aswell. Oracle JET automatically loads the translations bundle for the current languageand the locale bundle for the locale that was set. If you don't set a locale, Oracle JETwill default to the browser property.
Note:
The locale and resource bundles are loaded automatically only when yourapplication uses the RequireJS ojl10n plugin. For information about usingRequireJS in your Oracle JET application, see Using RequireJS for ModularDevelopment.
Finally, Oracle JET includes validators and converters that use the locale bundles.When you change the locale on the page, an Oracle JET component has built in
Chapter 14About Internationalizing and Localizing Oracle JET Applications
14-3
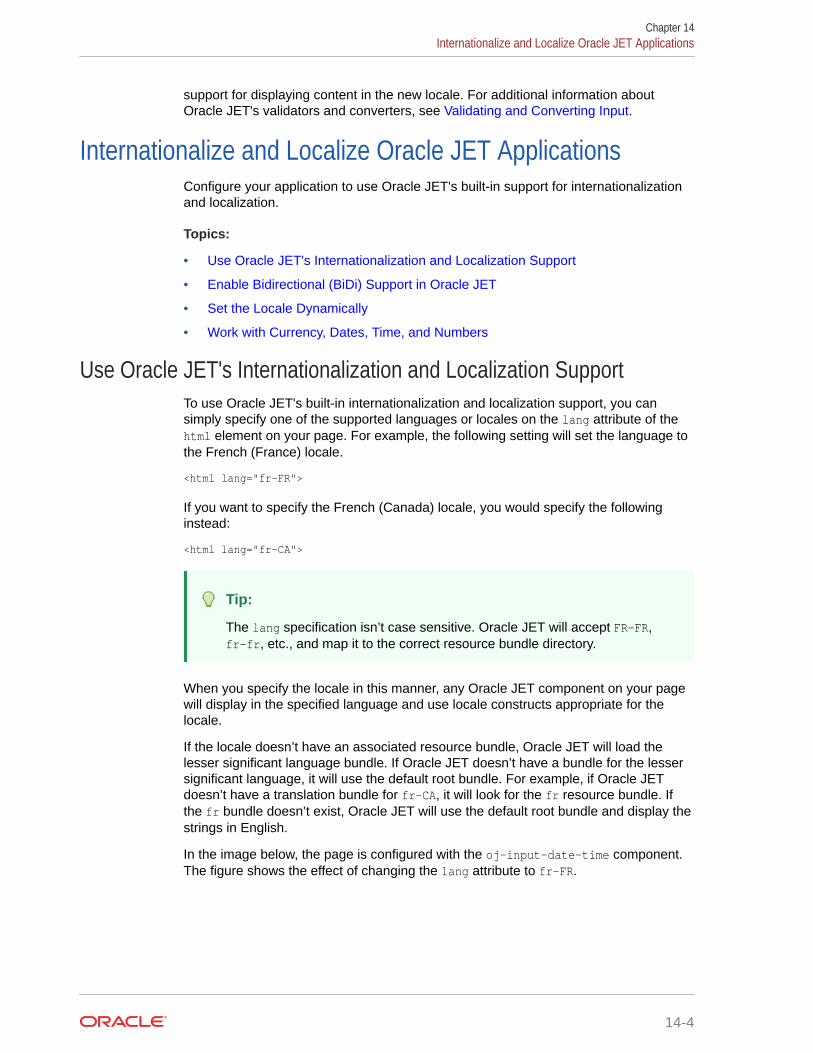
support for displaying content in the new locale. For additional information aboutOracle JET's validators and converters, see Validating and Converting Input.
Internationalize and Localize Oracle JET ApplicationsConfigure your application to use Oracle JET's built-in support for internationalizationand localization.
Topics:
• Use Oracle JET's Internationalization and Localization Support
• Enable Bidirectional (BiDi) Support in Oracle JET
• Set the Locale Dynamically
• Work with Currency, Dates, Time, and Numbers
Use Oracle JET's Internationalization and Localization SupportTo use Oracle JET's built-in internationalization and localization support, you cansimply specify one of the supported languages or locales on the lang attribute of thehtml element on your page. For example, the following setting will set the language tothe French (France) locale.
<html lang="fr-FR">
If you want to specify the French (Canada) locale, you would specify the followinginstead:
<html lang="fr-CA">
Tip:
The lang specification isn’t case sensitive. Oracle JET will accept FR-FR,fr-fr, etc., and map it to the correct resource bundle directory.
When you specify the locale in this manner, any Oracle JET component on your pagewill display in the specified language and use locale constructs appropriate for thelocale.
If the locale doesn’t have an associated resource bundle, Oracle JET will load thelesser significant language bundle. If Oracle JET doesn’t have a bundle for the lessersignificant language, it will use the default root bundle. For example, if Oracle JETdoesn’t have a translation bundle for fr-CA, it will look for the fr resource bundle. Ifthe fr bundle doesn’t exist, Oracle JET will use the default root bundle and display thestrings in English.
In the image below, the page is configured with the oj-input-date-time component.The figure shows the effect of changing the lang attribute to fr-FR.
Chapter 14Internationalize and Localize Oracle JET Applications
14-4
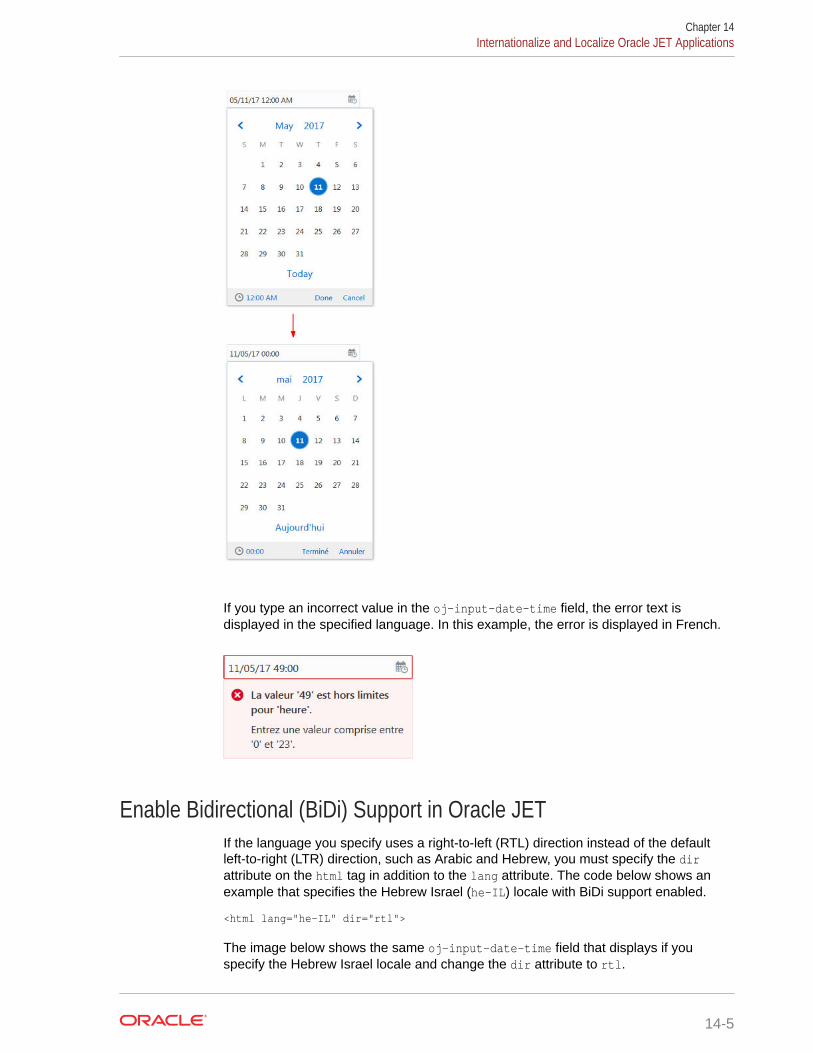
If you type an incorrect value in the oj-input-date-time field, the error text isdisplayed in the specified language. In this example, the error is displayed in French.
Enable Bidirectional (BiDi) Support in Oracle JETIf the language you specify uses a right-to-left (RTL) direction instead of the defaultleft-to-right (LTR) direction, such as Arabic and Hebrew, you must specify the dirattribute on the html tag in addition to the lang attribute. The code below shows anexample that specifies the Hebrew Israel (he-IL) locale with BiDi support enabled.
<html lang="he-IL" dir="rtl">
The image below shows the same oj-input-date-time field that displays if youspecify the Hebrew Israel locale and change the dir attribute to rtl.
Chapter 14Internationalize and Localize Oracle JET Applications
14-5
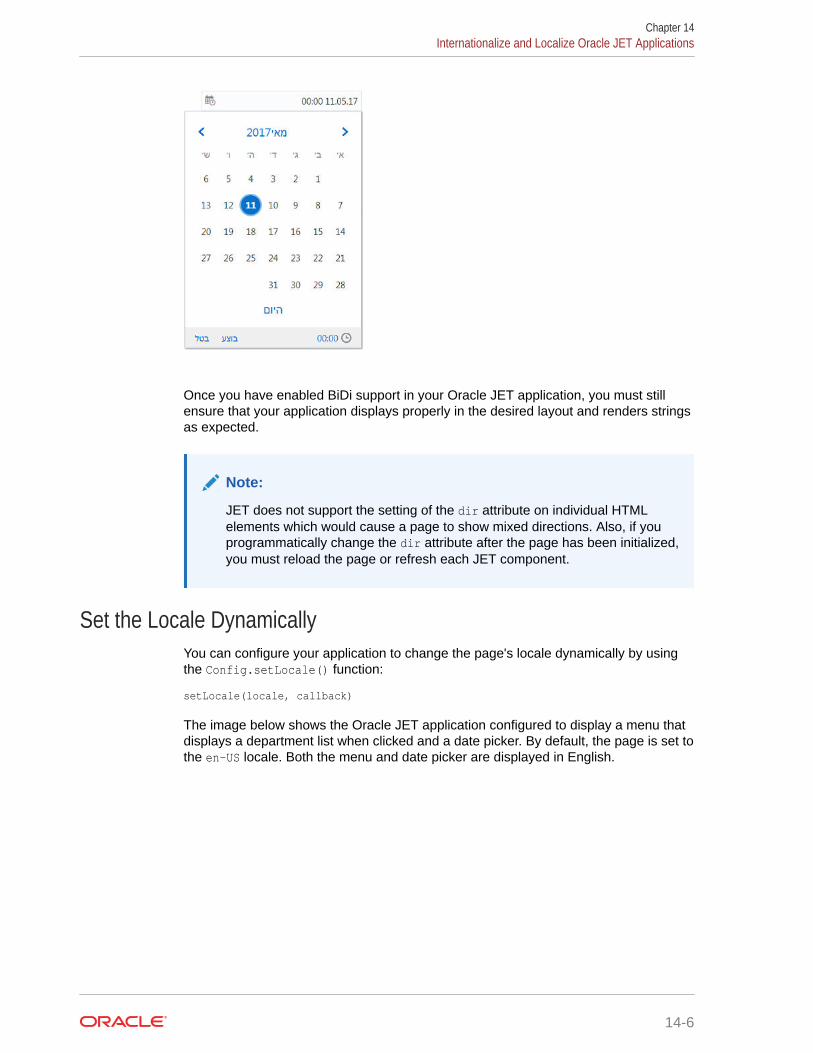
Once you have enabled BiDi support in your Oracle JET application, you must stillensure that your application displays properly in the desired layout and renders stringsas expected.
Note:
JET does not support the setting of the dir attribute on individual HTMLelements which would cause a page to show mixed directions. Also, if youprogrammatically change the dir attribute after the page has been initialized,you must reload the page or refresh each JET component.
Set the Locale DynamicallyYou can configure your application to change the page's locale dynamically by usingthe Config.setLocale() function:
setLocale(locale, callback)
The image below shows the Oracle JET application configured to display a menu thatdisplays a department list when clicked and a date picker. By default, the page is set tothe en-US locale. Both the menu and date picker are displayed in English.
Chapter 14Internationalize and Localize Oracle JET Applications
14-6
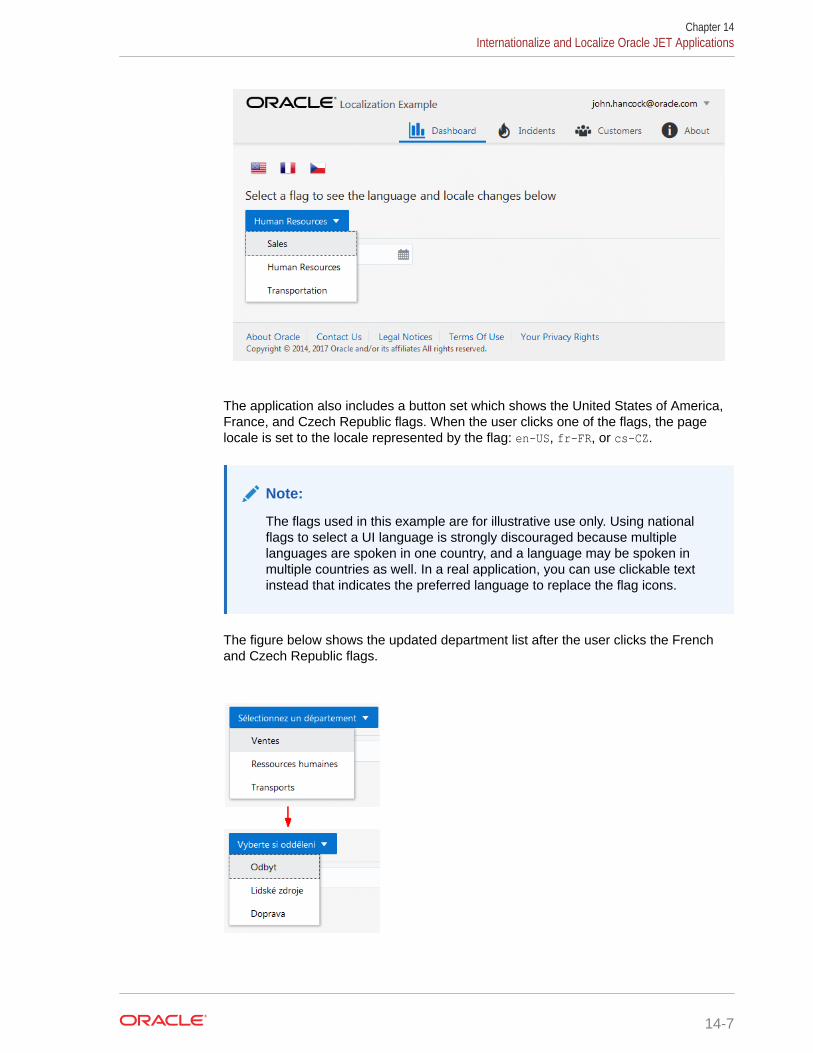
The application also includes a button set which shows the United States of America,France, and Czech Republic flags. When the user clicks one of the flags, the pagelocale is set to the locale represented by the flag: en-US, fr-FR, or cs-CZ.
Note:
The flags used in this example are for illustrative use only. Using nationalflags to select a UI language is strongly discouraged because multiplelanguages are spoken in one country, and a language may be spoken inmultiple countries as well. In a real application, you can use clickable textinstead that indicates the preferred language to replace the flag icons.
The figure below shows the updated department list after the user clicks the Frenchand Czech Republic flags.
Chapter 14Internationalize and Localize Oracle JET Applications
14-7
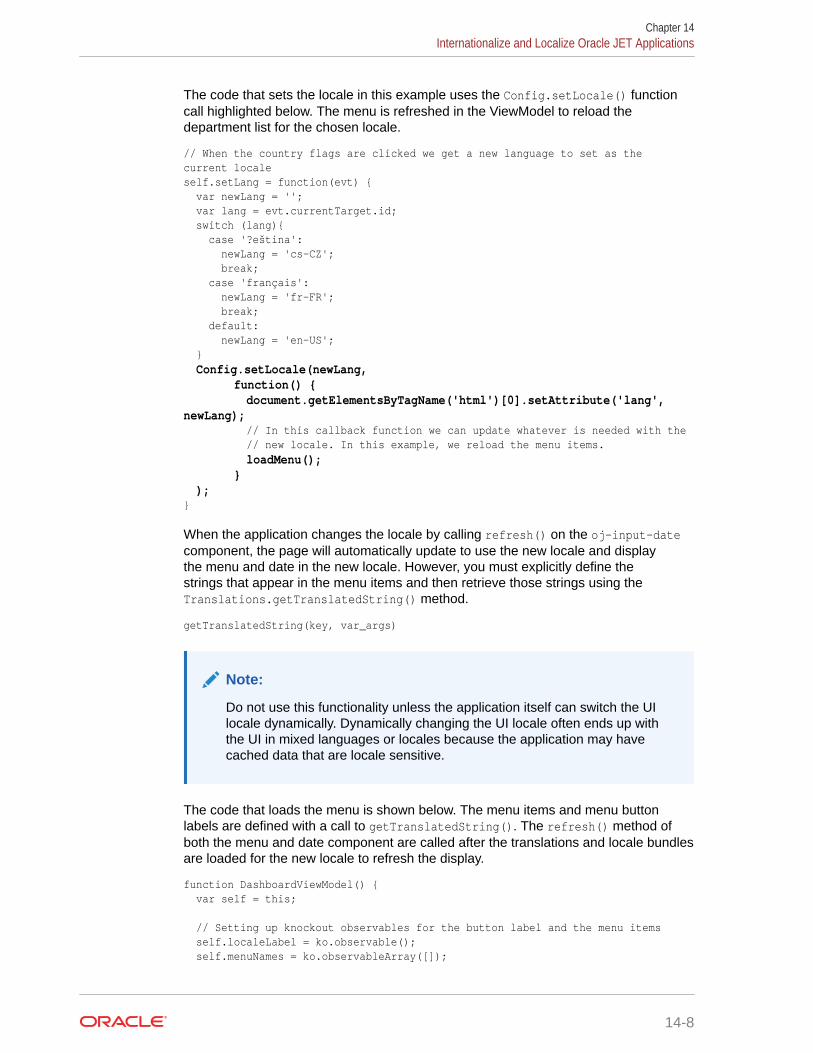
The code that sets the locale in this example uses the Config.setLocale() functioncall highlighted below. The menu is refreshed in the ViewModel to reload thedepartment list for the chosen locale.
// When the country flags are clicked we get a new language to set as the current localeself.setLang = function(evt) { var newLang = ''; var lang = evt.currentTarget.id; switch (lang){ case '?eština': newLang = 'cs-CZ'; break; case 'français': newLang = 'fr-FR'; break; default: newLang = 'en-US'; } Config.setLocale(newLang, function() { document.getElementsByTagName('html')[0].setAttribute('lang', newLang); // In this callback function we can update whatever is needed with the // new locale. In this example, we reload the menu items. loadMenu(); } );}
When the application changes the locale by calling refresh() on the oj-input-datecomponent, the page will automatically update to use the new locale and displaythe menu and date in the new locale. However, you must explicitly define thestrings that appear in the menu items and then retrieve those strings using theTranslations.getTranslatedString() method.
getTranslatedString(key, var_args)
Note:
Do not use this functionality unless the application itself can switch the UIlocale dynamically. Dynamically changing the UI locale often ends up withthe UI in mixed languages or locales because the application may havecached data that are locale sensitive.
The code that loads the menu is shown below. The menu items and menu buttonlabels are defined with a call to getTranslatedString(). The refresh() method ofboth the menu and date component are called after the translations and locale bundlesare loaded for the new locale to refresh the display.
function DashboardViewModel() { var self = this;
// Setting up knockout observables for the button label and the menu items self.localeLabel = ko.observable(); self.menuNames = ko.observableArray([]);
Chapter 14Internationalize and Localize Oracle JET Applications
14-8

self.changeLabel = function (evt) { self.localeLabel(Translations.getTranslatedString(evt.target.value)); }
self.setLang = function (evt) { ...contents omitted }
// This function loads the menu items. function loadMenu() { // These two lines are pulling the translated values for the menu items from the // appropriate resource file in the /resources/nls directory self.menuNames( [ {'itemName': Translations.getTranslatedString('menu1')}, {'itemName': Translations.getTranslatedString('menu2')}, {'itemName': Translations.getTranslatedString('menu3')} ] ); self.localeLabel(Translations.getTranslatedString('label')); // Since we've modified the children of a jqueryUI component, we need // to refresh it to get all of the build in styling again document.getElementById('buttonMenu').refresh(); document.getElementById('dateInput').refresh(); }
For information about defining your own translation strings and adding them to theOracle JET resource bundle, see Add Translation Bundles to Oracle JET.
When you use this approach to internationalize and localize your application, you mustconsider every component and element on your page and provide translation stringswhere needed. If your page includes a large number of translation strings, the pagecan take a performance hit.
Also, if SEO (Search Engine Optimization) is important for your application, be awarethat search engines normally do not run JavaScript and access static text only.
Tip:
To work around issues with performance or SEO, you can add pages to yourapplication that are already translated in the desired language. When youuse pages that are already translated, the Knockout bindings are executedonly for truly dynamic pieces.
Work with Currency, Dates, Time, and NumbersWhen you use the converters included with Oracle JET, dates, times, numbers, andcurrency are automatically converted based on the locale settings. You can alsoprovide custom converters if the Oracle JET converters are not sufficient for yourapplication. For additional information about Oracle JET converters, see About OracleJET Converters. For information about adding custom converters to your application,see Use Custom Converters in Oracle JET.
Chapter 14Internationalize and Localize Oracle JET Applications
14-9

Work with Oracle JET Translation BundlesOracle JET includes a translation bundle that translates strings generated by OracleJET components into all supported languages. Add your own translation bundle bymerging it with the Oracle JET bundle.
Topics
• About Oracle JET Translation Bundles
• Add Translation Bundles to Oracle JET
About Oracle JET Translation BundlesOracle JET includes a translation bundle that translates strings generated by OracleJET components into all supported languages. You can add your own translationbundle following the same format used in Oracle JET.
The Oracle JET translation bundle follows a specified format for the content anddirectory layout but also allows some leniency regarding case and certain characters.
Translation Bundle Location
The RequireJS bootstrap file (usually main.js) contains the location of the Oracle JETtranslation bundle, which is named ojtranslations.js.
libs/oj/vxxx/resources/nls/ojtranslations
Each supported language is contained in a directory under the nls directory. Thedirectory names use the following convention:
• lowercase for the language sub-tag (zh, sr, etc.)
• title case for the script sub-tag (Hant, Latn, etc.)
• uppercase for the region sub-tag (HK, BA, etc.)
The language, script, and region sub-tags are separated by hyphens (-). The followingimage shows a portion of the directory structure.
Chapter 14Work with Oracle JET Translation Bundles
14-10

Top Level Module
The ojtranslations.js file contains the strings that Oracle JET translates and liststhe languages that have translations. This is the top level module or root bundle. Inthe root bundle, the strings are in English and are the runtime default values when atranslation isn’t available for the user’s preferred language.
Translation Bundle Format
Oracle JET expects the top level root bundle and translations to follow a specifiedformat. The root bundle contains the Oracle JET strings with default translations andthe list of locales that have translations. // indicates a comment.
define({// root bundle root: { "oj-message":{ fatal:"Fatal", error:"Error", warning:"Warning", info:"Info", confirmation:"Confirmation", "compact-type-summary":"{0}: {1}" }, // ... contents omitted },
// supported locales. "fr-CA":1, ar:1, ro:1, "zh-Hant":1, nl:1,
Chapter 14Work with Oracle JET Translation Bundles
14-11
it:1, fr:1, // ... contents omitted tr:1,fi:1});
The strings are defined in nested JSON objects so that each string is referenced by aname with a prefix: oj-message.fatal, oj-message.error, etc.
The language translation resource bundles contain the Oracle JET string definitionswith the translated strings. For example, the following code sample shows a portionof the French (Canada) translation resource bundle, contained in nls/fr-CA/ojtranslations.js.
define({ "oj-message":{ fatal:"Fatale", error:"Erreur", warning:"Avertissement", info:"Infos", confirmation:"Confirmation", "compact-type-summary":"{0}: {1}" }, // ... contents omitted});
When there is no translation available for the user's dialect, the strings in the baselanguage bundle will be displayed. If there are no translations for the user's preferredlanguage, the root language bundle, English, will be displayed.
Named Message Tokens
Some messages may contain values that aren't known until runtime. For example, inthe message "User foo was not found in group bar", the foo user and bar groupis determined at runtime. In this case, you can define {username} and {groupname} asnamed message tokens as shown in the following code.
"MyUserKey":"User {username} was not found in group {groupname}."
At runtime, the actual values are replaced into the message at the position of thetokens by calling Translations.getTranslatedString() with the key of the messageas the first argument and the parameters to be inserted into the translated pattern asthe second argument.
var params = {'username': 'foo', 'groupname': 'bar'};Translations.getTranslatedString("MyUserKey", params);
Numeric Message Tokens
Alternatively, you can define numeric tokens instead of named tokens. For example,in the message "This item will be available in 5 days", the number 5 isdetermined at runtime. In this case, you can define the message with a messagetoken of {0} as shown in the following code.
"MyKey": "This item will be available in {0} days."
Chapter 14Work with Oracle JET Translation Bundles
14-12
A message can have up to 10 numeric tokens. For example, the message "Salesorder {0} has {1} items" contains two numeric tokens. When translated, the tokenscan be reordered so that message token {1} appears before message token {0} inthe translated string, if required by the target language grammar. The JavaScript codethat calls getTranslatedString() remains the same no matter how the tokens arereordered in the translated string.
Tip:
Use named tokens instead of numeric tokens to improve readability andreuse.
Escape Characters in Resource Bundle Strings
The dollar sign, curly braces and square brackets require escaping if you want themto show up in the output. Add a dollar sign ($) before the characters as shown in thefollowing table.
Escaped Form Output
$$ $
${ {
$} }
$[ [
$] ]
For example, if you want your output to display [Date: {01/02/2020}, Time: {01:02PM}, Cost: $38.99, Book Name: John's Diary], enter the following in your resourcebundle string:
"productDetail": "$[Date: ${01/02/2020$}, Time: ${01:02 PM$}, Cost: $$38.99, Book Name: John's Diary$]"
Add Translation Bundles to Oracle JETYou can add a translation bundle to Oracle JET by merging your new bundle with theexisting Oracle JET translation bundle.
To add translation bundles to Oracle JET:
1. Define the translations.
For example, the following code defines a translation set for a menu containing abutton label and three menu items. The default language is set to English, and thedefault label and menu items will be displayed in English. The root object in the fileis the default resource bundle. The other properties list the supported locales, frand cs.
define({ "root": { "label": "Select a department", "menu1": "Sales", "menu2": "Human Resources",
Chapter 14Work with Oracle JET Translation Bundles
14-13
"menu3": "Transportation"}, "fr": true, "cs": true});
To add a prefix to the resource names (for example, department.label,department.menu1, and so on), add it to your bundles as shown below.
define({ "root": { "department": { "label": "Select a department", "menu1": "Sales", "menu2": "Human Resources", "menu3": "Transportation" } }}, "fr": true, "cs": true});
When the locale is set to a French locale, the French translation bundle is loaded.The code below shows the definition for the label and menu items in French.
define({ "label": "Sélectionnez un département", "menu1": "Ventes", "menu2": "Ressources humaines", "menu3": "Transports"})
You can also provide regional dialects for your base language bundle by justdefining what you need for that dialect.
define({ "label": "Canadian French message here"});
When there is no translation available for the user's dialect, the strings in thebase language bundle will be displayed. In this example, the menu items will bedisplayed using the French translations. If there are no translations for the user'spreferred language, the root language bundle, whatever language it is, will bedisplayed.
2. Include each definition in a file located in a directory named nls.
For example, the default translation in the previous step is placed in a file namedmenu.js in the js/resources/nls directory. The French translation is located in afile named menu.js in the js/resources/nls/fr directory.
3. In the application's requireJS bootstrap file (typically main.js), add the bundle tothe merge option in the ojL10n definition.
// This section configures the i18n plugin.// It is merging the Oracle JET built-in translation resources// with a custom translation file for the menu items used in this example.// Any resource file added, must be placed under a directory named "nls".// You can use a path mapping or you can define// a path that is relative to the location of this main.js file.
Chapter 14Work with Oracle JET Translation Bundles
14-14
config: { ojL10n: { merge: { 'ojtranslations/nls/ojtranslations': 'resources/nls/menu' } }}
Oracle JET supports only one custom bundle to be merged with the defaultJET translation bundle. If your application has more than one translation bundle,combine them into one and then add the bundle to the merge option.
Chapter 14Work with Oracle JET Translation Bundles
14-15
15Using CSS and Themes in Applications
Oracle JET includes the Redwood theme that provides styling across web or hybridmobile applications and implements Oracle Redwood Design System. The Redwoodtheme provides hundreds of custom properties (also called CSS variables) to achieveits look and feel. You can use the Redwood theme as provided, or you can customizethe custom properties manually.
Note:
Starting in Oracle JET release 9.0.0, the Redwood theme is the defaulttheme for all new JET web and mobile applications.
Topics:
• About the Redwood Theme Included with Oracle JET
• Typical Workflow for Working with Themes in Oracle JET Applications
• CSS Files Included with the Redwood Theme
• Create an Application with the Redwood Theme
• Best Practices for Using CSS and Themes
• Work with Images
• Work with Custom Themes and Component Styles
About the Redwood Theme Included with Oracle JETOracle Redwood Design System is the new Oracle standard for application look andfeel. It is being implemented company-wide to unify the user interface of all Oracleproduct offerings and is implemented in Oracle JET as the Redwood theme.
Oracle JET takes this opportunity to refresh the toolkit look and feel with this dynamic,forward thinking design system and also to introduce all new components that rely onthe user experience of Oracle Redwood Design System, such as JET waterfall layoutand JET stream list component.
All starter templates for web applications and hybrid mobile applications use theRedwood theme. Because all applications will be created with the Redwood themeby default, you no longer need to specify the theme type when using the JET Toolingcreate and serve commands. There are no theme variations specific to the mobileplatforms. For details, see Create an Application with the Redwood Theme.
If you have an existing application that you want to migrate from the Alta theme, youcan migrate to the current JET release and configure the application to run with theout of the box CSS for the Redwood theme. For details, see Migrate to the RedwoodTheme CSS.
15-1
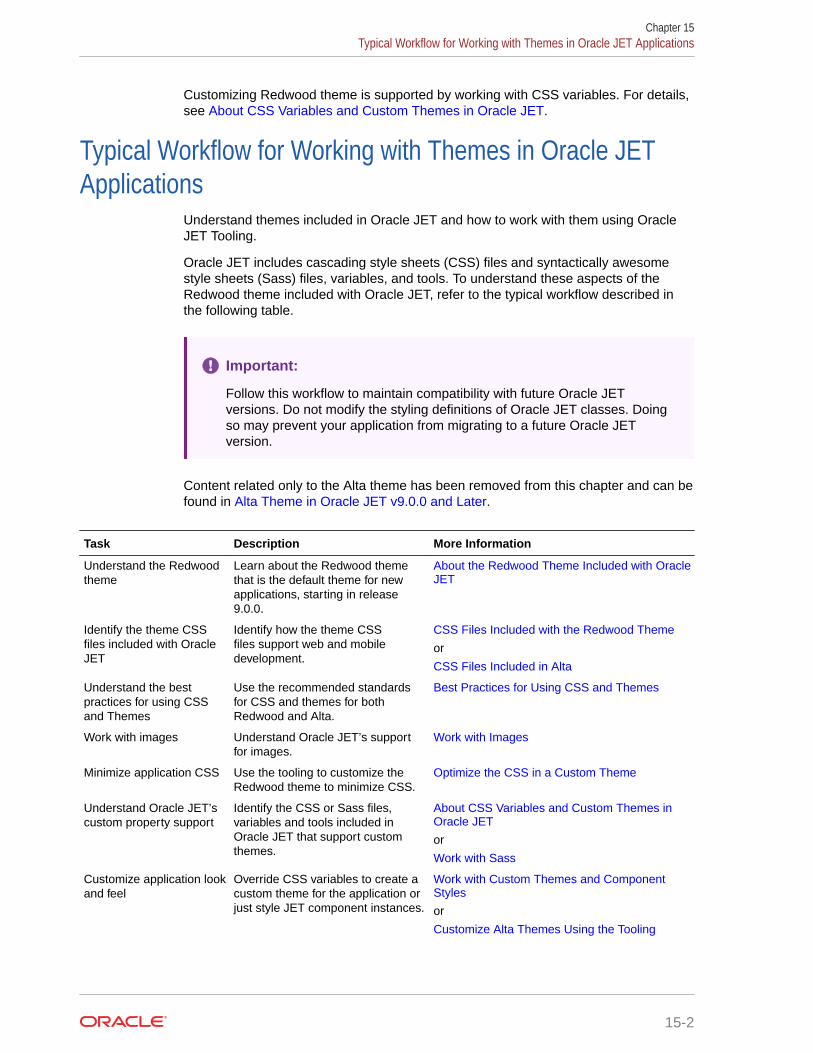
Customizing Redwood theme is supported by working with CSS variables. For details,see About CSS Variables and Custom Themes in Oracle JET.
Typical Workflow for Working with Themes in Oracle JETApplications
Understand themes included in Oracle JET and how to work with them using OracleJET Tooling.
Oracle JET includes cascading style sheets (CSS) files and syntactically awesomestyle sheets (Sass) files, variables, and tools. To understand these aspects of theRedwood theme included with Oracle JET, refer to the typical workflow described inthe following table.
Important:
Follow this workflow to maintain compatibility with future Oracle JETversions. Do not modify the styling definitions of Oracle JET classes. Doingso may prevent your application from migrating to a future Oracle JETversion.
Content related only to the Alta theme has been removed from this chapter and can befound in Alta Theme in Oracle JET v9.0.0 and Later.
Task Description More Information
Understand the Redwoodtheme
Learn about the Redwood themethat is the default theme for newapplications, starting in release9.0.0.
About the Redwood Theme Included with OracleJET
Identify the theme CSSfiles included with OracleJET
Identify how the theme CSSfiles support web and mobiledevelopment.
CSS Files Included with the Redwood Theme
or
CSS Files Included in Alta
Understand the bestpractices for using CSSand Themes
Use the recommended standardsfor CSS and themes for bothRedwood and Alta.
Best Practices for Using CSS and Themes
Work with images Understand Oracle JET’s supportfor images.
Work with Images
Minimize application CSS Use the tooling to customize theRedwood theme to minimize CSS.
Optimize the CSS in a Custom Theme
Understand Oracle JET’scustom property support
Identify the CSS or Sass files,variables and tools included inOracle JET that support customthemes.
About CSS Variables and Custom Themes inOracle JET
or
Work with Sass
Customize application lookand feel
Override CSS variables to create acustom theme for the application orjust style JET component instances.
Work with Custom Themes and ComponentStyles
or
Customize Alta Themes Using the Tooling
Chapter 15Typical Workflow for Working with Themes in Oracle JET Applications
15-2
Task Description More Information
Re-generate your customtheme CSS
Migrate your application to a laterJET release and rebuild the themeCSS using Oracle JET Tooling, thenmigrate your theme to work with theRedwood theme or Alta theme.
Oracle JET Application Migration for Release10.0.0
CSS Files Included with the Redwood ThemeOracle JET includes CSS files designed for display on web browsers and hybridmobile applications that implement Oracle Redwood Design System. In JET, theRedwood theme includes minified and readable versions of the CSS.
Starting in Oracle JET release 9.0.0, application themes are based on Redwoodtheme, a single design system for both mobile and browser applications that replacesthe multiple themes needed in prior releases.
The Redwood CSS is included with the Oracle JET distribution and is located inthe /<app_root>/node_modules/@oracle/oraclejet/dist/css/redwood folder. TheRedwood CSS distribution contains the following files:
• oj-redwood.css: Readable version of the CSS for the out of the box Redwoodtheme
• oj-redwood-min.css: Minified version of the CSS for the out of the box Redwoodtheme
In addition, the Redwood theme includes the following CSS:
• oj-redwood-notag.css: Readable version of the CSS without tag selectors
• oj-redwood-notag-min.css: Minified version of the CSS without tag selectors.
For additional details about Oracle JET theming and tag selectors, see Disable JETStyling of Base HTML Tags.
If the CSS files provided by Oracle JET are sufficient and you only want to add a fewapplication-specific styles, you may find that adding the classes to app.css in yourapplication’s /src/css folder will meet your needs.
Always use the recommended standards to work with your CSS and themes. For moreinformation, see Best Practices for Using CSS and Themes.
Important:
Do not override the style classes in the Oracle JET CSS distribution. TheCSS files shipped with Oracle JET are considered private and must not bemodified. Such modifications may prevent you from migrating your theme toa future release.
Chapter 15CSS Files Included with the Redwood Theme
15-3
Create an Application with the Redwood ThemeThe Redwood theme is the Oracle JET implementation of Oracle Redwood DesignSystem and is the default theme for applications that you create in JET release 9.0.0and later.
Oracle Redwood Design System is the new Oracle user experience design language,and Redwood theme is the recommended theme if you are creating a new JET web orhybrid mobile application.
You use the ojet create command to scaffold an application that by default uses theRedwood CSS files provided with the Redwood theme distribution. When you build theapplication, the JET Tooling loads redwood.css.
When you create your application, JET Tooling will use the out of the boxRedwood theme file as configured by the property defaultTheme=redwood in theoraclejetconfig.json file. There are no other configuration settings needed for thetooling to use the redwood.css when you build and run the application.
{ "paths": { ... }, "defaultBrowser": "chrome", "sassVer": "x.x.x", "defaultTheme": "redwood", "generatorVersion": "10.0.0"}
Customization of the theme and styling of individual JET components is supported byoverriding JET CSS variables. For details about overriding CSS variables, see Workwith Custom Themes and Component Styles.
To create an application with the Redwood theme:
1. Create the application.
ojet create my-web-app
The tooling creates the index.html file in the src folder with a stylesheet link thatwill load the CSS for the out of the box Redwood theme.
<!-- injector:theme --><link rel="stylesheet" href="css/libs/oj/v10.0.0/redwood/oj-redwood-min.css" id="css" /><!-- endinjector -->
2. Build a development version of your application.
ojet build
The tooling outputs the built application source to the web build folder in theapplication's root and populates the /web/css/redwood/10.0.0/web folder with the
Chapter 15Create an Application with the Redwood Theme
15-4
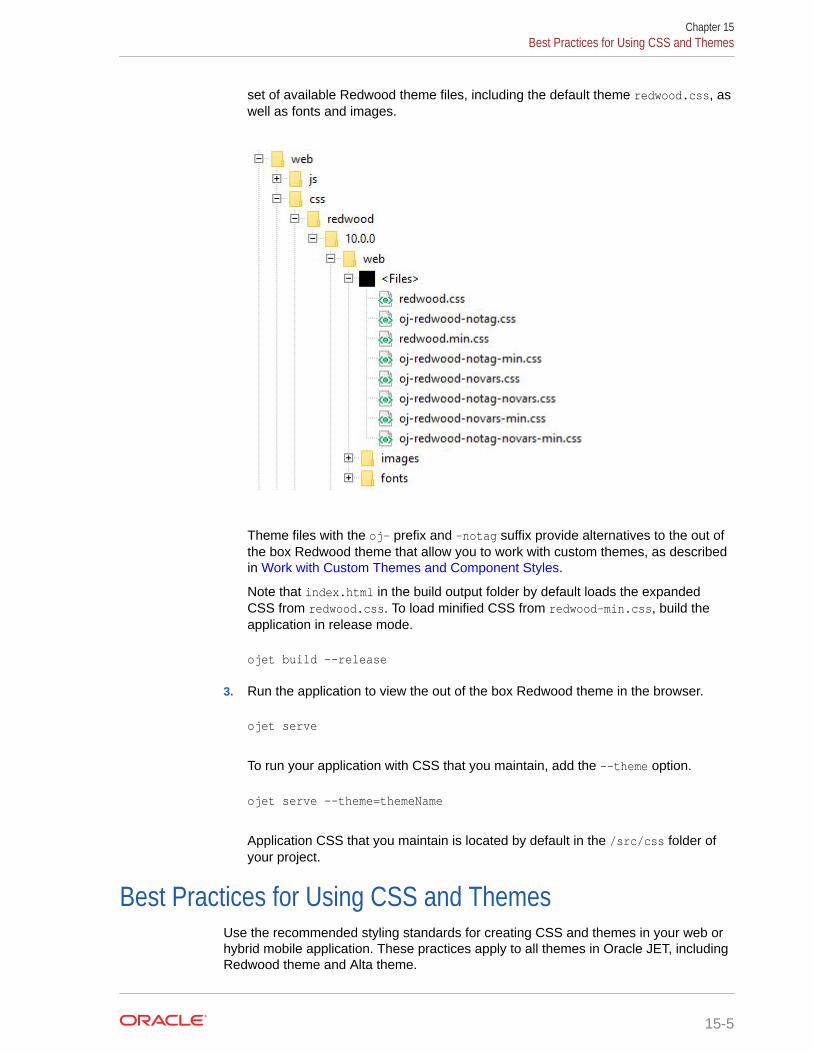
set of available Redwood theme files, including the default theme redwood.css, aswell as fonts and images.
Theme files with the oj- prefix and -notag suffix provide alternatives to the out ofthe box Redwood theme that allow you to work with custom themes, as describedin Work with Custom Themes and Component Styles.
Note that index.html in the build output folder by default loads the expandedCSS from redwood.css. To load minified CSS from redwood-min.css, build theapplication in release mode.
ojet build --release
3. Run the application to view the out of the box Redwood theme in the browser.
ojet serve
To run your application with CSS that you maintain, add the --theme option.
ojet serve --theme=themeName
Application CSS that you maintain is located by default in the /src/css folder ofyour project.
Best Practices for Using CSS and ThemesUse the recommended styling standards for creating CSS and themes in your web orhybrid mobile application. These practices apply to all themes in Oracle JET, includingRedwood theme and Alta theme.
Chapter 15Best Practices for Using CSS and Themes
15-5
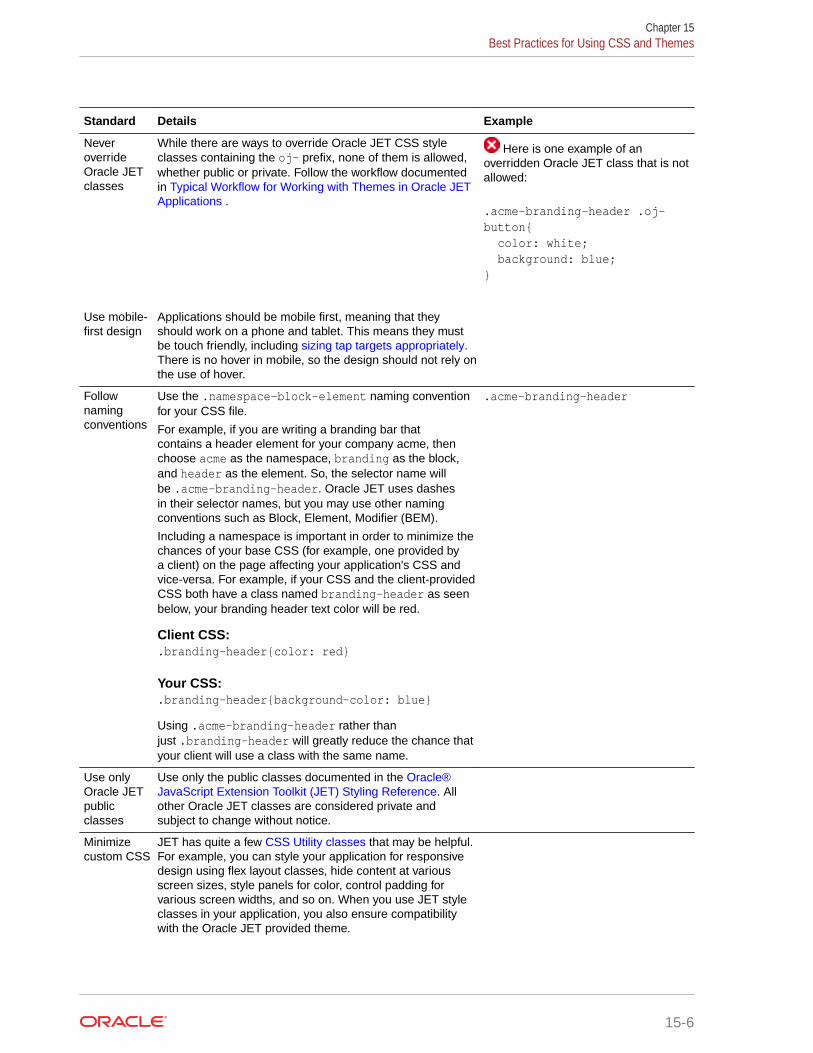
Standard Details Example
NeveroverrideOracle JETclasses
While there are ways to override Oracle JET CSS styleclasses containing the oj- prefix, none of them is allowed,whether public or private. Follow the workflow documentedin Typical Workflow for Working with Themes in Oracle JETApplications .
Here is one example of anoverridden Oracle JET class that is notallowed:
.acme-branding-header .oj-button{ color: white; background: blue;}
Use mobile-first design
Applications should be mobile first, meaning that theyshould work on a phone and tablet. This means they mustbe touch friendly, including sizing tap targets appropriately.There is no hover in mobile, so the design should not rely onthe use of hover.
Follownamingconventions
Use the .namespace-block-element naming conventionfor your CSS file.
For example, if you are writing a branding bar thatcontains a header element for your company acme, thenchoose acme as the namespace, branding as the block,and header as the element. So, the selector name willbe .acme-branding-header. Oracle JET uses dashesin their selector names, but you may use other namingconventions such as Block, Element, Modifier (BEM).
Including a namespace is important in order to minimize thechances of your base CSS (for example, one provided bya client) on the page affecting your application's CSS andvice-versa. For example, if your CSS and the client-providedCSS both have a class named branding-header as seenbelow, your branding header text color will be red.
Client CSS:.branding-header{color: red}
Your CSS:.branding-header{background-color: blue}
Using .acme-branding-header rather thanjust .branding-header will greatly reduce the chance thatyour client will use a class with the same name.
.acme-branding-header
Use onlyOracle JETpublicclasses
Use only the public classes documented in the Oracle®JavaScript Extension Toolkit (JET) Styling Reference. Allother Oracle JET classes are considered private andsubject to change without notice.
Minimizecustom CSS
JET has quite a few CSS Utility classes that may be helpful.For example, you can style your application for responsivedesign using flex layout classes, hide content at variousscreen sizes, style panels for color, control padding forvarious screen widths, and so on. When you use JET styleclasses in your application, you also ensure compatibilitywith the Oracle JET provided theme.
Chapter 15Best Practices for Using CSS and Themes
15-6
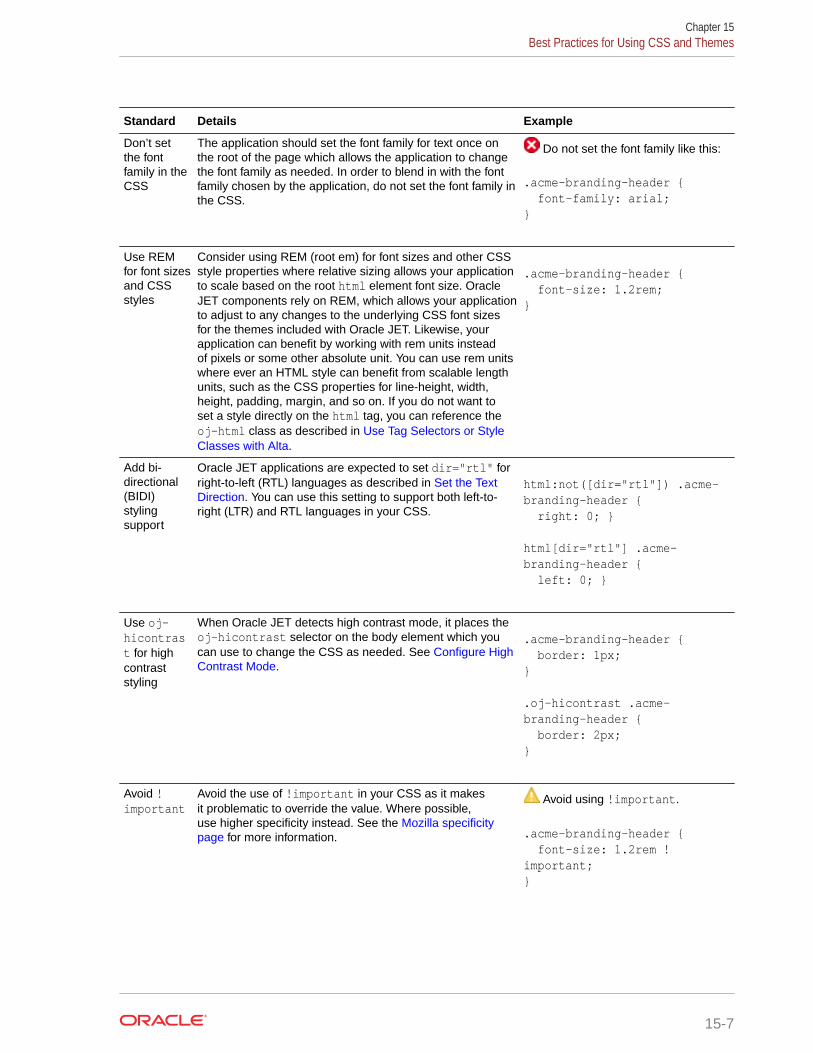
Standard Details Example
Don’t setthe fontfamily in theCSS
The application should set the font family for text once onthe root of the page which allows the application to changethe font family as needed. In order to blend in with the fontfamily chosen by the application, do not set the font family inthe CSS.
Do not set the font family like this:
.acme-branding-header { font-family: arial;}
Use REMfor font sizesand CSSstyles
Consider using REM (root em) for font sizes and other CSSstyle properties where relative sizing allows your applicationto scale based on the root html element font size. OracleJET components rely on REM, which allows your applicationto adjust to any changes to the underlying CSS font sizesfor the themes included with Oracle JET. Likewise, yourapplication can benefit by working with rem units insteadof pixels or some other absolute unit. You can use rem unitswhere ever an HTML style can benefit from scalable lengthunits, such as the CSS properties for line-height, width,height, padding, margin, and so on. If you do not want toset a style directly on the html tag, you can reference theoj-html class as described in Use Tag Selectors or StyleClasses with Alta.
.acme-branding-header { font-size: 1.2rem;}
Add bi-directional(BIDI)stylingsupport
Oracle JET applications are expected to set dir="rtl" forright-to-left (RTL) languages as described in Set the TextDirection. You can use this setting to support both left-to-right (LTR) and RTL languages in your CSS.
html:not([dir="rtl"]) .acme-branding-header { right: 0; }
html[dir="rtl"] .acme-branding-header { left: 0; }
Use oj-hicontrast for highcontraststyling
When Oracle JET detects high contrast mode, it places theoj-hicontrast selector on the body element which youcan use to change the CSS as needed. See Configure HighContrast Mode.
.acme-branding-header { border: 1px;}
.oj-hicontrast .acme-branding-header { border: 2px;}
Avoid !important
Avoid the use of !important in your CSS as it makesit problematic to override the value. Where possible,use higher specificity instead. See the Mozilla specificitypage for more information.
Avoid using !important.
.acme-branding-header { font-size: 1.2rem !important;}
Chapter 15Best Practices for Using CSS and Themes
15-7
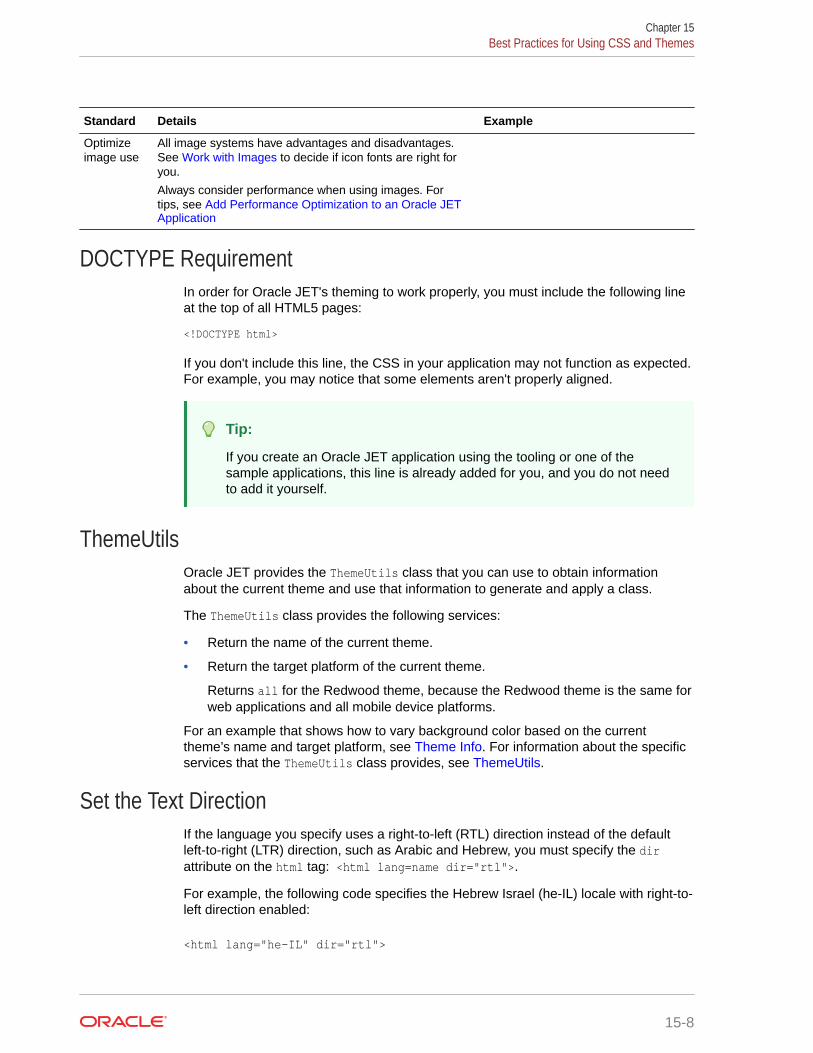
Standard Details Example
Optimizeimage use
All image systems have advantages and disadvantages.See Work with Images to decide if icon fonts are right foryou.
Always consider performance when using images. Fortips, see Add Performance Optimization to an Oracle JETApplication
DOCTYPE RequirementIn order for Oracle JET's theming to work properly, you must include the following lineat the top of all HTML5 pages:
<!DOCTYPE html>
If you don't include this line, the CSS in your application may not function as expected.For example, you may notice that some elements aren't properly aligned.
Tip:
If you create an Oracle JET application using the tooling or one of thesample applications, this line is already added for you, and you do not needto add it yourself.
ThemeUtilsOracle JET provides the ThemeUtils class that you can use to obtain informationabout the current theme and use that information to generate and apply a class.
The ThemeUtils class provides the following services:
• Return the name of the current theme.
• Return the target platform of the current theme.
Returns all for the Redwood theme, because the Redwood theme is the same forweb applications and all mobile device platforms.
For an example that shows how to vary background color based on the currenttheme’s name and target platform, see Theme Info. For information about the specificservices that the ThemeUtils class provides, see ThemeUtils.
Set the Text DirectionIf the language you specify uses a right-to-left (RTL) direction instead of the defaultleft-to-right (LTR) direction, such as Arabic and Hebrew, you must specify the dirattribute on the html tag: <html lang=name dir="rtl">.
For example, the following code specifies the Hebrew Israel (he-IL) locale with right-to-left direction enabled:
<html lang="he-IL" dir="rtl">
Chapter 15Best Practices for Using CSS and Themes
15-8

Oracle JET does not support multiple directions on a page. The reason this is notsupported is that the proximity of elements in the document tree has no effect on theCSS specificity, so switching directions multiple times in the page may not work theway you might expect. The code sample below shows an example.
<style> [dir=ltr] .foo {color: blue} [dir=rtl] .foo {color: red}</style><span dir="rtl"> <span dir="ltr"> <span class="foo">You might think I will be blue because dir=ltr is on, a closer ancestor than dir=rtl. But css doesn't care about proximity, so instead I am red (because [dir=rtl] .foo {color: red} was defined last). Isn't that surprising? </span> </span></span>
For more information about localizing your application and adding bidirectionalsupport, see Enable Bidirectional (BiDi) Support in Oracle JET. Formore information about CSS specificity, see https://developer.mozilla.org/en-US/docs/Web/CSS/Specificity.
Work with ImagesOracle JET uses icon fonts whenever possible to render images provided by theRedwood theme. When icon fonts are not possible, Oracle JET uses SVG images.
You may also find the following topics helpful when working with images.
Topics:
• Image Considerations
• Icon Font Considerations
Image ConsiderationsThere are a variety of ways to load icons, such as sprites, data URIs, icon fonts, andso on. Factors to consider when choosing an image strategy include:
• Themable: Can you use CSS to change the image? Can you replace a singleimage easily?
• High contrast mode: Does the image render properly in high contrast mode foraccessibility?
• High resolution support: Does the image look acceptable on high resolution(retina) displays?
• Image limitations: Are there limitations that impact your use case? For example,icon fonts are a single color, and small SVG images often do not render well.
• Performance: Is image size a factor? Do you need alternate versions of an imagefor different resolutions or states such as disabled, enabled, hover, and active?
Chapter 15Work with Images
15-9

Icon Font ConsiderationsOracle JET uses icon fonts whenever possible because icon fonts have certainadvantages over other formats.
• Themable: You can use style classes to change their color instead of having toreplace the image, making them very easy to theme.
• High contrast mode: Icon fonts are optimal for high contrast mode as they areconsidered text. However, keep in mind that you can't rely on color in high contrastmode, and you may need to indicate state (active, hover, and so on) using anothervisual indicator. For example, you can add a border or change the icon font'ssize. For additional information about Oracle JET and high contrast mode, seeConfigure High Contrast Mode.
• High resolution: Icon fonts look good on a high resolution (retina) display withoutproviding alternate icons.
• Performance: You can change icon font colors using CSS so alternate icons arenot required to indicate state changes. Alternate images are also not required forhigh resolution displays.
Icon fonts also have disadvantages. It can be difficult to replace a single image, andthey only show one color. You can use text shadows to provide some depth to the iconfont.
Work with Custom Themes and Component StylesWhen you add a custom theme to your scaffolded application, Oracle JET adds CSSvariable definition files that you can optionally modify to customize your application’slook and feel.
Topics:
• About CSS Variables and Custom Themes in Oracle JET
• Add Custom Theme Support with the JET CLI
• Customize JET Component CSS with the JET CLI
• Customize the Redwood Theme with the JET CLI
• Customize the Redwood Theme with Theme Builder
• Optimize the CSS in a Custom Theme
• Style Component Instances with CSS Variables
• Disable JET Styling of Base HTML Tags
About CSS Variables and Custom Themes in Oracle JETJET supports theming based on the out of the box Redwood theme with CSS variablesinstead of Sass variables, starting with JET release 9.0.0.
Starting with JET 9.0.0, you can use the Redwood CSS out of the box, without anychanges. Starting with release 10.0.0, you can customize the Redwood theme usingCSS variable overrides.
Chapter 15Work with Custom Themes and Component Styles
15-10
There are a few options for theming applications using CSS variables.
• Application CSS overrides - use the Redwood CSS file and then add variableoverrides in your application CSS file.
In this scenario, your application runs with the redwood.css CSS file and you canadd variable overrides in your separate application CSS file. This may be desirablewhen you cannot easily rely on a subset of the Redwood CSS, for example,because your theme may be shared by multiple applications. You can use theonline demo application CSS Variable Theme Builder to learn the variable namesand find out general information on variables.
• JET CLI and Theme Builder - allows merging all the CSS into one file, optimizeyour CSS to include only the CSS your application uses, and more.
In this scenario, you can optimize your CSS to include the CSS for only the JETcomponents that your application uses. The JET Theme Builder application letsyou use JET Tooling to create a theme and reuse the generated theme in yourown application.
The advantage of overriding CSS variables in a separate file is that you will notneed to rebuild your application with each new version of JET. Whenever the defaultRedwood theme changes in a future release, the changes will be picked up by yourapplication CSS files without requiring changes. The CSS file that you generate withTheme Builder still requires that you rebuild your CSS for each JET release.
Note that Sass is not completely eliminated in JET; JET continues to use Sass whenyou work with the Redwood theme for bundling and there are a few cases, for examplein media queries, where CSS variables aren't supported. For the few exceptions, Sassvariables are needed (such as $screenSmallMinWidth and $screenSmallMaxWidth).Therefore Sass is still part of the tooling chain when you use ojet add theming in theJET CLI. If you use Sass to generate your own styles and don't rely on any JET Sassvariables, then you can continue to use Sass as before. However, if you do rely onJET Sass variables, then most of those Sass variables will no longer be available, seethe Theme Builder - Migration tab for how to migrate variables.
Alta themes have been deprecated in JET release 10.0.0. If you have an existingtheme that extends Alta and you want to migrate it to extend the Redwood theme(and use CSS variables), it is a manual process. There is information on variablemigration on the Theme Builder - Migration tab. More information about migrating yourapplication to a Redwood theme can also be found in Migrate to the Redwood ThemeCSS. Note that Alta themes will continue to use Sass, and they will not switch to useCSS variables.
Use these links to view Theme Builder pages:
• CSS Variable Theme Builder
• CSS Variable Theme Builder - Instruction Tab
• CSS Variable Theme Builder - Migration Tab
Add Custom Theme Support with the JET CLIYou can use Oracle JET Tooling to add support for creating a custom theme to yourapplication.
When you want to create a custom theme to your application, you use the JETTooling to add theming support to your application that includes adding Redwood
Chapter 15Work with Custom Themes and Component Styles
15-11
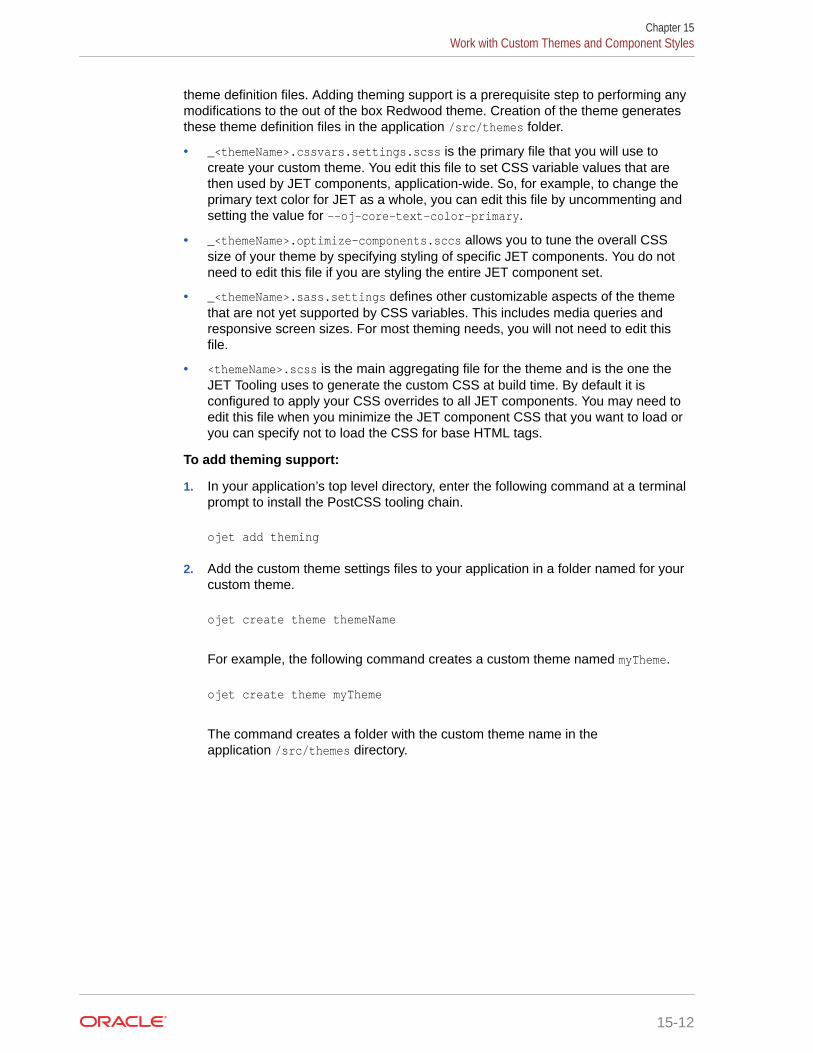
theme definition files. Adding theming support is a prerequisite step to performing anymodifications to the out of the box Redwood theme. Creation of the theme generatesthese theme definition files in the application /src/themes folder.
• _<themeName>.cssvars.settings.scss is the primary file that you will use tocreate your custom theme. You edit this file to set CSS variable values that arethen used by JET components, application-wide. So, for example, to change theprimary text color for JET as a whole, you can edit this file by uncommenting andsetting the value for --oj-core-text-color-primary.
• _<themeName>.optimize-components.sccs allows you to tune the overall CSSsize of your theme by specifying styling of specific JET components. You do notneed to edit this file if you are styling the entire JET component set.
• _<themeName>.sass.settings defines other customizable aspects of the themethat are not yet supported by CSS variables. This includes media queries andresponsive screen sizes. For most theming needs, you will not need to edit thisfile.
• <themeName>.scss is the main aggregating file for the theme and is the one theJET Tooling uses to generate the custom CSS at build time. By default it isconfigured to apply your CSS overrides to all JET components. You may need toedit this file when you minimize the JET component CSS that you want to load oryou can specify not to load the CSS for base HTML tags.
To add theming support:
1. In your application’s top level directory, enter the following command at a terminalprompt to install the PostCSS tooling chain.
ojet add theming
2. Add the custom theme settings files to your application in a folder named for yourcustom theme.
ojet create theme themeName
For example, the following command creates a custom theme named myTheme.
ojet create theme myTheme
The command creates a folder with the custom theme name in theapplication /src/themes directory.
Chapter 15Work with Custom Themes and Component Styles
15-12
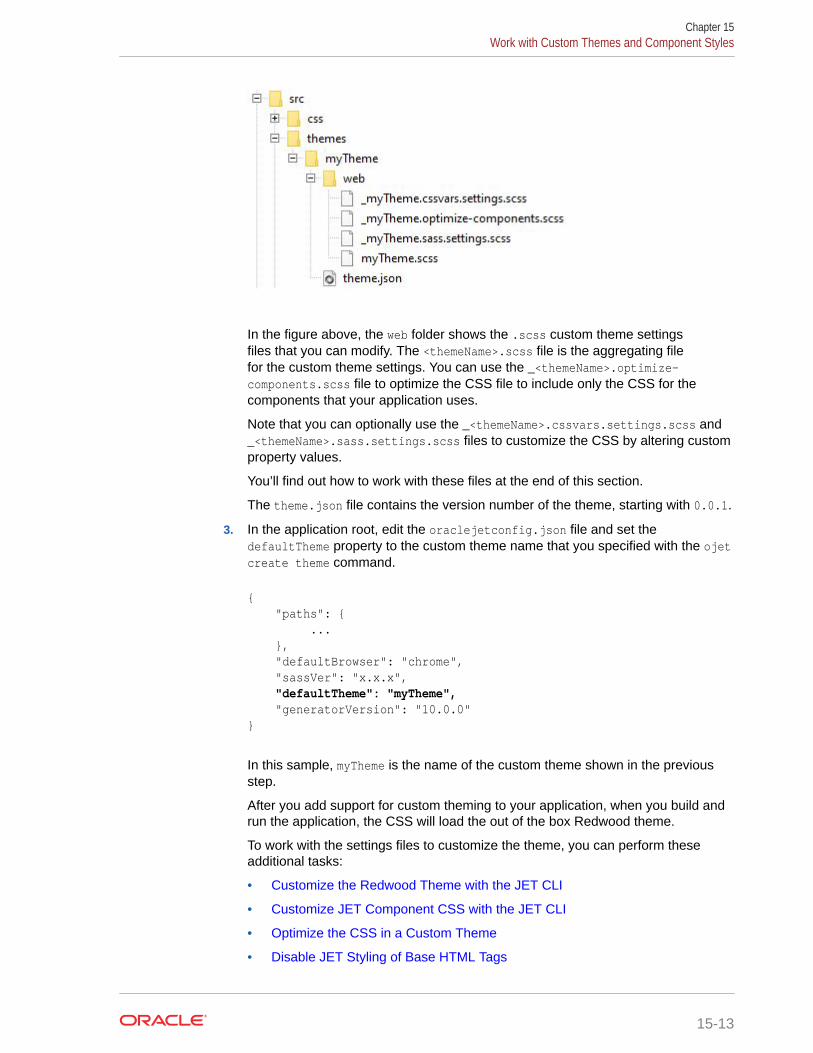
In the figure above, the web folder shows the .scss custom theme settingsfiles that you can modify. The <themeName>.scss file is the aggregating filefor the custom theme settings. You can use the _<themeName>.optimize-components.scss file to optimize the CSS file to include only the CSS for thecomponents that your application uses.
Note that you can optionally use the _<themeName>.cssvars.settings.scss and_<themeName>.sass.settings.scss files to customize the CSS by altering customproperty values.
You’ll find out how to work with these files at the end of this section.
The theme.json file contains the version number of the theme, starting with 0.0.1.
3. In the application root, edit the oraclejetconfig.json file and set thedefaultTheme property to the custom theme name that you specified with the ojetcreate theme command.
{ "paths": { ... }, "defaultBrowser": "chrome", "sassVer": "x.x.x", "defaultTheme": "myTheme", "generatorVersion": "10.0.0"}
In this sample, myTheme is the name of the custom theme shown in the previousstep.
After you add support for custom theming to your application, when you build andrun the application, the CSS will load the out of the box Redwood theme.
To work with the settings files to customize the theme, you can perform theseadditional tasks:
• Customize the Redwood Theme with the JET CLI
• Customize JET Component CSS with the JET CLI
• Optimize the CSS in a Custom Theme
• Disable JET Styling of Base HTML Tags
Chapter 15Work with Custom Themes and Component Styles
15-13
Additionally, the CSS Variables section in the Oracle JET Cookbook includesexamples of the type of look and feel customizations described in the above list oftopics.
Customize the Redwood Theme with the JET CLIYou can override CSS variables defined by the Redwood theme in your own CSS.
The process of customizing the default Redwood theme to achieve a custom look andfeel is supported by the use of custom properties known as CSS variables. By default,when you add theming support with the JET CLI, your application is enabled to loadthe full Redwood theme. This makes it easy to build an application and quickly deliverit with a sophisticated look and feel.
If you have any look and feel changes to make, you modify the generated file_<themeName>.cssvars.settings.scss located in the /src/themes/<themeName>/webfolder. This file contains the list of available JET CSS variables in :root where you setvalues for the variables to apply application-wide to the JET components.
To customize the JET CSS, you will want to learn the names of the CSS variablesthat control the styles that you want to override. You can use the JET Theme Builderapplication for this purpose. Theme Builder lets you use JET Tooling to create a themeand provides a variety of components to easily see the look and feel changes. TheTheme Builder - Instruction tab includes steps to try it out. Additionally, referenceinformation about JET CSS variables is available in the JET API doc.
Before you begin:
• Install the theme tooling chain and configure a custom theme, as described in AddCustom Theme Support with the JET CLI. The themes folder with custom themesettings files are added to your application source.
• Examine the App Wide Theming section in the Oracle JET Cookbook forexamples.
• Refer to the JET CSS Variables section of the JET API reference doc for anoverview of the CSS variables and their values.
• Optionally, download and install the CSS Variable Theme Builder - InstructionTab application when you want to learn about the available CSS variables in thisinteractive demo application. Follow the instructions online to modify the themedefinition files to learn how CSS variable overrides change the demo tool UI.
To override Redwood CSS variables in your application CSS:
1. In the /src/themes/<themeName>/web folder, edit the generated_<themeName>.cssvars.settings.scss theme file and modify the CSS variablesunder :root that you want to override.
For example, to change the height of all JET buttons in your application, you canoverride the JET CSS variable --oj-button-height, like this:
:root { ... --oj-button-height: 4rem; ... }
And then the customization will apply application wide.
Chapter 15Work with Custom Themes and Component Styles
15-14
2. Optionally, when you want the custom theme to be the default theme, editthe oraclejetconfig.json file at the application root and set the defaultThemeproperty to identify the name of the custom theme.
{ "paths": { ... }, "defaultBrowser": "chrome", "sassVer": "x.x.x", "defaultTheme": "myThemeName", "generatorVersion": "10.0.0"}
When you edit the configuration file, each time you build or serve the application,you can omit the --theme=<themeName> build command option, and the tooling willload the Redwood CSS and override the appropriate CSS variables.
3. In the /src/themes/<themeName>/web folder, edit the CSS aggregating file<themeName>.scss and comment out the import for SASS variable overrides andalso comment out the import for all JET component styles.
The bolded lines in this sample show the imports for_<themeName>.sass.settings.scss and _oj-all-components.scss are nowcommented out and the import for _<themeName>.cssvars.settings.scssremains uncommented.
...// import SASS custom variable overrides//@import "_myTheme.sass.settings.scss";
// Imports all jet components styles//@import "oj/all-components/themes/redwood/_oj-all-components.scss";
// To optimize performance, consider commenting out the above oj-all-components// import and uncomment _myTheme.components.scss below.// Then in _myTheme.components.scss uncomment only the component // imports that your application needs.
//@import "_myTheme.optimize-components.scss";
// import CSS Custom properties@import "_myTheme.cssvars.settings.scss";
4. In the /src/themes/<themeName> folder, open the generated theme.jsonconfiguration file and verify that the generatedFileType property has the defaultvalue add-on.
{ "version": "0.0.1", "generatedFileType": "add-on"}
The default generatedFileType setting ensures that each time you build or servethe application, the tooling will load the Redwood CSS and override CSS variables
Chapter 15Work with Custom Themes and Component Styles
15-15
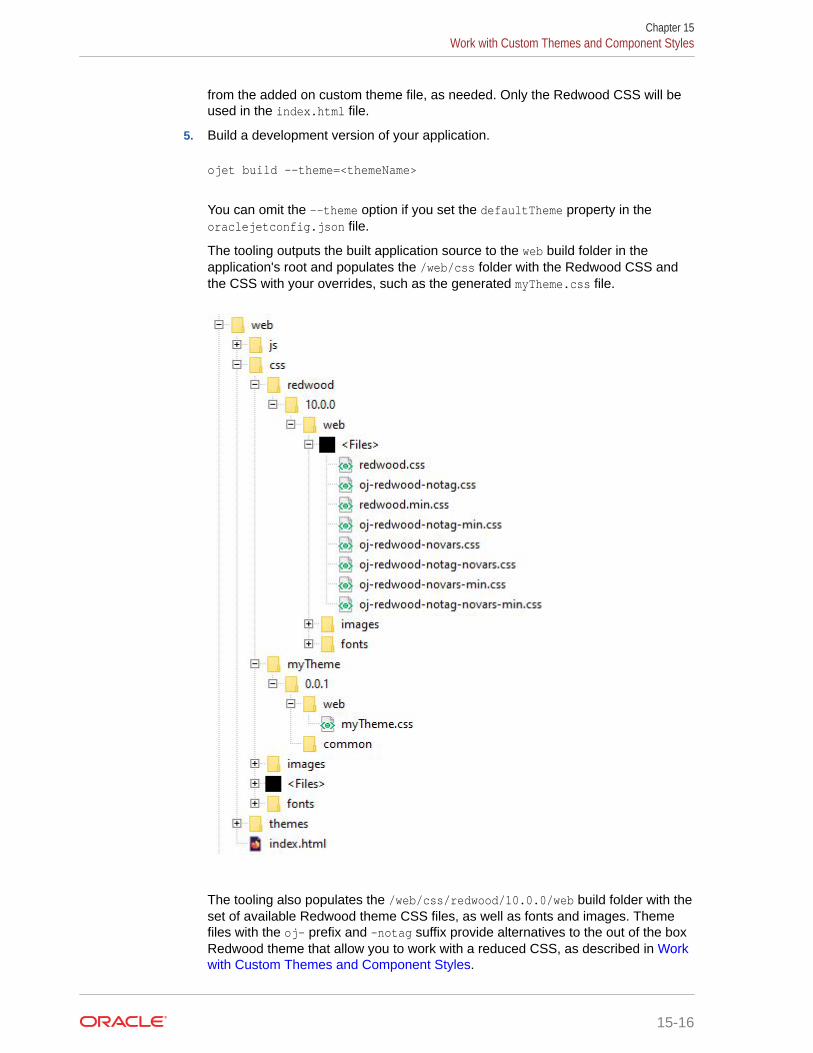
from the added on custom theme file, as needed. Only the Redwood CSS will beused in the index.html file.
5. Build a development version of your application.
ojet build --theme=<themeName>
You can omit the --theme option if you set the defaultTheme property in theoraclejetconfig.json file.
The tooling outputs the built application source to the web build folder in theapplication's root and populates the /web/css folder with the Redwood CSS andthe CSS with your overrides, such as the generated myTheme.css file.
The tooling also populates the /web/css/redwood/10.0.0/web build folder with theset of available Redwood theme CSS files, as well as fonts and images. Themefiles with the oj- prefix and -notag suffix provide alternatives to the out of the boxRedwood theme that allow you to work with a reduced CSS, as described in Workwith Custom Themes and Component Styles.
Chapter 15Work with Custom Themes and Component Styles
15-16
The tooling creates the index.html file in the src folder with a stylesheet link thatwill load the CSS for the out of the box Redwood theme and a link to add on theCSS for your overrides.
<!-- injector:theme --><link rel="stylesheet" href="css/redwood/10.0.0/web/redwood.css" id="css" /><link rel="stylesheet" href="css/<themeName>/<version>/web/<themeName>.css" id="css" /><!-- endinjector -->
To load minified CSS from redwood.min.css, build the application in releasemode.
ojet build --release
6. Run your application.
ojet serve --theme=<themeName>
Again, you can omit the --theme option if you set the defaultTheme property in theoraclejetconfig.json file.
7. Optionally, to refine the theme, modify CSS variables in your application's_<themeName>.cssvars.settings.scss theme file.
The Oracle JET serve process will immediately reload the running application inthe browser where you can observe the effect of any CSS variable overrides.
8. To exit the application, press Ctrl+C at the terminal prompt.
Customize the Redwood Theme with Theme BuilderYou can use the JET Theme Builder application to override CSS variables defined bythe Redwood theme and reuse the generated theme definition files to theme your ownapplication.
Theme Builder is a JET application that contains a variety of JET components thatallow you to visualize look and feel changes that you make by overriding RedwoodCSS variables. Because Theme Builder is a JET application, the process of theminguses the same theme definition files that your application relies on when you createa custom theme. This allows you to use the Theme Builder application to create acustom theme and then reuse those generated theme definition files in your ownapplication. Alternatively, you can use Theme Builder strictly as a tool to learn thenames of the CSS variables, and then work with JET Tooling to create a custom themein your own application, as described in Customize the Redwood Theme with the JETCLI.
To work with Theme Builder, you will need to download the application as describedin the Theme Builder - Instruction tab. You then need to use the ojet add themingand ojet create theme commands in the JET CLI to generate the needed themedefinition files that allow you to override CSS variables and create a custom themeCSS. When you are satisfied with the custom CSS in Theme Builder, you will thenprepare your own application to generate CSS from theme definition files beforecopying over the theme definition files you modified in Theme Builder.
Chapter 15Work with Custom Themes and Component Styles
15-17

Before you begin:
• Download and install the CSS Variable Theme Builder - Instruction Tabapplication. You will modify the generated theme definition files to overrideRedwood CSS variables and reuse the modified files in your application.
• In the application that you want to reuse the Theme Builder generated CSS,install the theme tooling chain and configure a custom theme, as described in AddCustom Theme Support with the JET CLI. The themes folder with custom themedefinition files is added to your application source. This is the folder that you willcopy Theme Builder theme definition files into.
To reuse a Theme Builder generated CSS in your application:
1. After you have downloaded Theme Builder and run the commands to supporttheming, in Theme Builder edit the generated /src/themes/<themeName>/web/_<themeName>.cssvars.settings.scss theme file and begin modifying theRedwood CSS variables under :root that you want to override.
See the Before You Begin section in this topic for information about setting upTheme Builder.
2. While the Theme Builder application is running, modify CSS variables andvisualize the changes in the running application until you are satisfied with thelook and feel that you have created.
3. When you are satisfied with the look and feel in Theme Builder and have nofurther customizations, press Ctrl+C at the terminal prompt to exit the application.
4. In the Theme Builder application copy all theme definition files in the /src/themes/<themeName>/web folder and paste them into the /src/themes/<themeName>/webfolder of the target application that you have already prepared to work withtheming.
See the Before You Begin section in this topic for information about preparing thetarget application to receive the copied theme definition files.
5. Build a development version of the application where you added the themedefinition files.
ojet build --theme=<themeName>
You can omit the --theme option if you set the defaultTheme property in theoraclejetconfig.json file.
The tooling creates the index.html file in the src folder with a stylesheet link thatwill load the CSS for the out of the box Redwood theme and a link to add on theCSS for your overrides generated from the pasted theme definition files.
<!-- injector:theme --><link rel="stylesheet" href="css/redwood/10.0.0/web/redwood.css" id="css" /><link rel="stylesheet" href="css/<themeName>/<version>/web/<themeName>.css" id="css" /><!-- endinjector -->
Chapter 15Work with Custom Themes and Component Styles
15-18
6. Run your application.
ojet serve --theme=<themeName>
Again, you can omit the --theme option if you set the defaultTheme property in theoraclejetconfig.json file.
7. Optionally, to refine the theme, modify CSS variables in your target application's_<themeName>.cssvars.settings.scss theme file.
The Oracle JET serve process will immediately reload the running application inthe browser where you can observe the effect of any CSS variable overrides.
8. To exit the application, press Ctrl+C at the terminal prompt.
Customize JET Component CSS with the JET CLIYou can replace the default Redwood theme CSS file and create your own theme witha CSS file that contains only the JET component CSS, including CSS variables andselectors, and your theme's custom CSS variable overrides.
When you add theming support to your application with the JET CLI, by default, yourapplication is enabled to load the Redwood CSS and your CSS variable overrides. Ifyour application does not require the full Redwood theme, you can instead configurethe application to load only the JET component CSS and customize component lookand feel with CSS variable overrides. You can also further optimize the JET CSS toinclude the CSS for only the JET components that your application uses.
To customize the JET component CSS, you will want to learn the names of the CSSvariables that control the styles that you want to override. You can use the JET ThemeBuilder application for this purpose. Theme Builder lets you use JET Tooling to createa theme and provides a variety of components to easily see the look and feel changes.The Theme Builder - Instruction tab includes steps to try it out. Additionally, referenceinformation about JET CSS variables is available in the JET API doc.
Before you begin:
• Install the theme tooling chain and configure a custom theme, as described in AddCustom Theme Support with the JET CLI. The themes folder with custom themesettings files are added to your application source.
• Examine the App Wide Theming section in the Oracle JET Cookbook forexamples.
• Refer to the JET CSS Variables section of the JET API reference doc for anoverview of the CSS variables and their values.
• Optionally, download and install the CSS Variable Theme Builder - InstructionTab application when you want to learn about the available CSS variables in thisinteractive demo application. Follow the instructions online to modify the themedefinition files to learn how CSS variable overrides change the demo tool UI.
To override JET component CSS variables in your application CSS:
1. In the /src/themes/<themeName>/web folder, edit the generated_<themeName>.cssvars.settings.scss CSS variables definition file and modifythe CSS variables under :root that you want to override.
Chapter 15Work with Custom Themes and Component Styles
15-19
For example, to change the height of all JET buttons in your application, you canoverride the JET CSS variable --oj-button-height, like this:
:root { ... --oj-button-height: 4rem; ... }
And then the variable overrides will apply application wide.
2. In the /src/themes/<themeName> folder, edit the generated theme.jsonconfiguration file and set the generatedFileType property to combined.
{ "version": "0.0.1", "generatedFileType": "combined"}
When you edit the configuration file, each time you build or serve the application,the tooling will load a single CSS file in the theme name that is compiled from theJET component CSS and the CSS variable overrides. Only that combined CSSwill be used in the index.html file.
3. Optionally, when you want the custom theme to be the default theme, editthe oraclejetconfig.json file at the application root and set the defaultThemeproperty to identify the name of custom theme.
{ "paths": { ... }, "defaultBrowser": "chrome", "sassVer": "x.x.x", "defaultTheme": "myCustomThemeName", "generatorVersion": "10.0.0"}
When you edit the configuration file, each time you build or serve the application,you can omit the --theme=<themeName> build command option, and the tooling willload the Redwood CSS and override the appropriate CSS variables.
4. Optionally, when you want to limit the CSS to only what's needed for thecomponents used in your application, do the following:
a. In the /src/themes/<themeName>/web folder, edit the CSS aggregating file<themeName>.scss and comment out the import for all JET components anduncomment the import that will optimize the CSS.
The bolded lines in this sample show the import for _oj-all-components.scssis now commented out and the import for _<themeName>.optimize-component.scss is uncommented.
...// import SASS custom variable overrides@import "_myTheme.sass.settings.scss";
// Imports all jet components styles
Chapter 15Work with Custom Themes and Component Styles
15-20

//@import "oj/all-components/themes/redwood/_oj-all-components.scss";
// To optimize performance, consider commenting out the above oj-all-components// import and uncomment _myTheme.components.scss below.// Then in _myTheme.components.scss uncomment only the component // imports that your application needs.
@import "_myTheme.optimize-components.scss";
// import CSS Custom properties@import "_myTheme.cssvars.settings.scss";
b. Then, in the component CSS optimizing file <themeName>.optimize-components.scss, uncomment only the component imports required by yourapplication.
For example, to enable CSS for just oj-scrollbar and oj-accordioncomponents, only uncomment their imports, as shown by the bolded lines inthis partial imports list.
...////@import "oj/tags/themes/redwood/oj-tags.scss";@import "oj/scrollbar/themes/redwood/oj-scrollbar.scss";//@import "oj/animation/themes/redwood/oj-animation.scss";//@import "oj/helpers/themes/redwood/oj-helpers.scss";//@import "oj/helpers/themes/redwood/oj-responsive.helpers.scss";////@import "oj/app-layout-hybrid/themes/redwood/oj-app-layout-hybrid.scss";//@import "oj/app-layout-web/themes/redwood/oj-app-layout-web.scss";//@import "oj/accordion/themes/redwood/oj-accordion.scss";//@import "oj/action-card/themes/redwood/oj-action-card.scss";//@import "oj/avatar/themes/redwood/oj-avatar.scss";//@import "oj/badge/themes/redwood/oj-badge.scss";...
And then when you build the application, the generated CSS file will containonly the CSS you need for your components.
5. Build a development version of your application.
ojet build --theme=<themeName>
You can omit the --theme option if you set the defaultTheme property in theoraclejetconfig.json file.
The tooling outputs the built application source to the web build folder in theapplication's root and populates the /web/css folder with the JET component CSScombined with the CSS with your overrides, such as in the generated myTheme.cssfile.
Chapter 15Work with Custom Themes and Component Styles
15-21
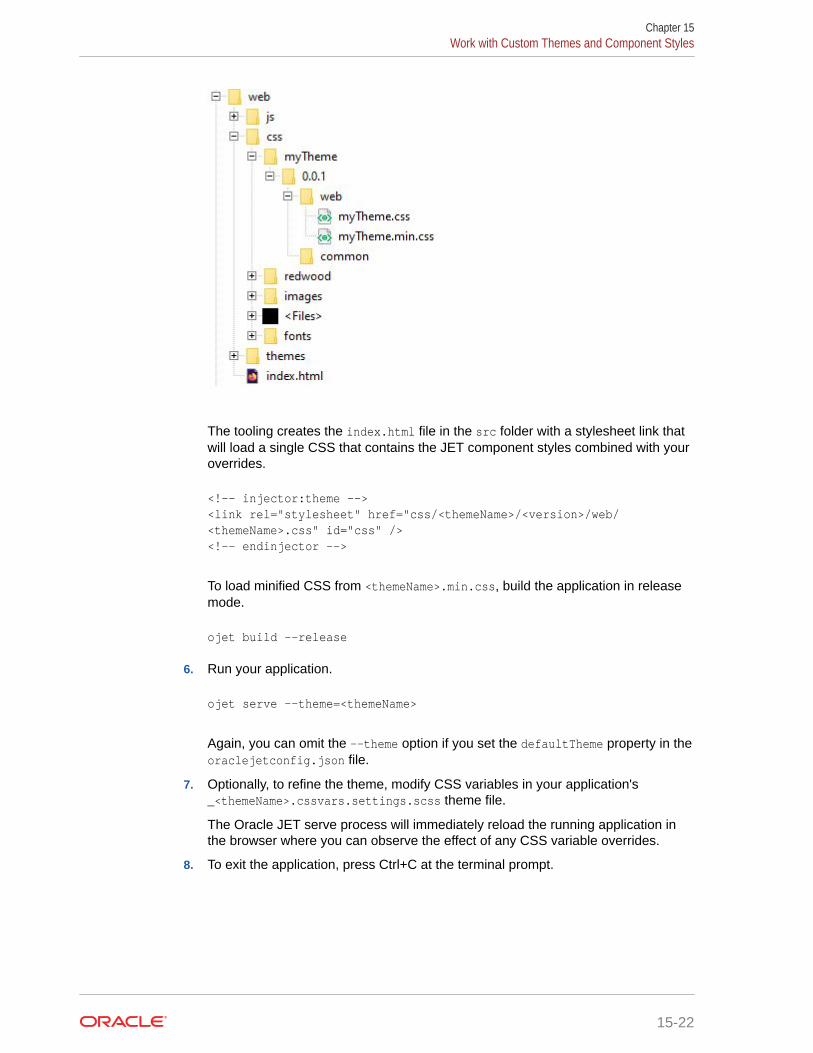
The tooling creates the index.html file in the src folder with a stylesheet link thatwill load a single CSS that contains the JET component styles combined with youroverrides.
<!-- injector:theme --><link rel="stylesheet" href="css/<themeName>/<version>/web/<themeName>.css" id="css" /><!-- endinjector -->
To load minified CSS from <themeName>.min.css, build the application in releasemode.
ojet build --release
6. Run your application.
ojet serve --theme=<themeName>
Again, you can omit the --theme option if you set the defaultTheme property in theoraclejetconfig.json file.
7. Optionally, to refine the theme, modify CSS variables in your application's_<themeName>.cssvars.settings.scss theme file.
The Oracle JET serve process will immediately reload the running application inthe browser where you can observe the effect of any CSS variable overrides.
8. To exit the application, press Ctrl+C at the terminal prompt.
Chapter 15Work with Custom Themes and Component Styles
15-22
Optimize the CSS in a Custom ThemeBy default when you build the application, JET Tooling loads CSS with all Redwoodstyle classes enabled. You can configure the CSS to use just the styles required by thecomponents of your application.
With the custom theme settings files added to the /src/themes folder of your projectby the JET Tooling, you can reduce the size of the Redwood CSS by commenting anduncommenting import statements in the settings files for specific JET component styleclasses. With the appropriate import settings completed, JET Tooling will process theCSS settings files and load CSS for only the JET components you specified.
Before you begin:
• Install the Redwood theme tooling chain and configure a custom theme, asdescribed in Add Custom Theme Support with the JET CLI. The themes folderwith custom theme settings files are added to your application source.
To reduce CSS by limiting component CSS:
1. In the /src/themes/themeName/web folder of your application, edit the aggregatingthemeName.scss file, and comment out the import statement that by defaultenables importing all JET component styles.
//@import "oj/all-components/themes/redwood/_oj-all-components.scss";
And, then remove the comment on the import to enable compiling with the file thatcontrols the CSS to include.
@import "_themeName.optimize-components.scss";
2. Edit the _themeName.optimize-components.scss file and remove the comment onthe import statements for the JET components in your application.
...//@import "oj/avatar/themes/redwood/oj-avatar.scss";//@import "oj/badge/themes/redwood/oj-badge.scss";@import "oj/button/themes/redwood/oj-button.scss";@import "oj/buttonset-one/themes/redwood/oj-buttonset-one.scss";@import "oj/buttonset-many/themes/redwood/oj-buttonset-many.scss";//@import "oj/card/themes/redwood/oj-card.scss";//@import "oj/chart/themes/redwood/oj-chart.scss";...
In this example, only the import statement for buttons and button sets areuncommented to include the CSS for those components. All import statementsin the _themeName.omptimize-components.scss file remain commented out, bydefault.
3. If your application is already running, you can immediately observe the effectof commenting and uncommenting import statements, after you save thechanges in the _themeName.optimize-components.scss file. Otherwise, serveyour application to enable live reload.
ojet serve
Chapter 15Work with Custom Themes and Component Styles
15-23

4. To exit the application, press Ctrl+C at the terminal prompt.
Style Component Instances with CSS VariablesWhen you want to customize the look and feel of a component instance, you canoverride JET CSS variables in a styling class.
When you do not want certain look and feel customizations to apply to yourentire application, you can create style classes that overrides the desired JET CSSvariables at the selector level and then apply the style classes to just the desiredcomponents in your application HTML. You can define style classes optionally inyour application CSS in the /src/css folder or, when you theme your application, inthe generated _<themeName>.cssvars.settings.scss theme file located in the /src/themes/<themeName>/web folder.
When you add theming to your application, the generated file_<themeName>.cssvars.settings.scss is where you customize your application lookand feel if you have any changes to make. The file contains the list of availableJET CSS variables in :root, where you can set values for the variables to applyapplication-wide to the JET components. When you want to define a style classto customized individual JET component instances, you must add your style classdefinitions with JET CSS overrides so they appear at the end of the file, after all JETCSS variables and they must not be contained within :root.
Note that while most customization is done with CSS variables, but in a few cases,such as for media queries, Sass variables are needed.
Before you begin:
• Examine the Component Styling section in the Oracle JET Cookbook forexamples.
• Refer to the JET CSS Variables section of the JET API reference doc for anoverview of the CSS variables and their values.
• Optionally, download and install the CSS Variable Theme Builder - InstructionTab application when you want to learn about the available CSS variables in thisinteractive demo application. Follow the instructions online to modify the themedefinition files to learn how CSS variable overrides change the demo tool UI.
To override JET CSS variables to style component instances:
1. If you have not added theming support to the application, open the /src/css folderof your application and edit the application CSS that you maintain. You can adda style class that defines the CSS variable overrides that you intend to apply tocertain components.
For example, to change the height of certain buttons in your application, youcan create a style class .demo-jumbo-button and override the JET CSS variable--oj-button-height in the class, like this:
.demo-jumbo-button { --oj-button-height: 4rem; }
And then, in your application HTML, you can style buttons with the class asneeded.
<oj-button class="demo-jumbo-button"></button>
Chapter 15Work with Custom Themes and Component Styles
15-24
2. Alternatively, if you are theming your application, you can add the style class to thegenerated _<themeName>.cssvars.settings.scss theme file located in the /src/themes/<themeName>/web folder.
When you edit the generated file, you must add your style class definitions withJET CSS overrides so they appear at the end of the file, after all JET CSSvariables and they must not be contained within :root.
3. To run your application with live reload enabled, enter ojet serve with the --theme option to specify the CSS that you maintain for your application.
ojet serve --theme=themeName
You do not need to specify the custom theme that you configured in theoraclejetconfig.json file.
4. Use Oracle JET live reload to immediately observe the effect of any CSS variableoverrides.
5. To exit the application, press Ctrl+C at the terminal prompt.
Disable JET Styling of Base HTML TagsBy default, Oracle JET applies styles to HTML tag elements such as a, h1, h2, andso on. This feature makes it easier to code a page since you do not have to applyselectors to each occurrence of the element. You can optionally directly style these tagelements.
If you do not want to apply styles to all base HTML tags by default, you can specifythat Oracle JET use style classes instead of tag selectors. The Redwood CSS stylesloaded at build time are controlled by import statements in custom theme settings filesthat you can optionally add to your project. To work with the CSS settings files in yourproject, you need to add theming support to the application and then create a customtheme.
With the custom theme settings files added to the /src/themes folder of your project,you can comment out an import statement that by default enables importing all JETcomponent styles and add in its place the no-tag version of the import statement. Withthe appropriate import setting completed, when you build your application, JET Toolingwill process the CSS settings files and load CSS for all JET components, but withoutthe JET style classes for HTML base tags. To apply JET style to the HTML tags withthe no-tag import enabled, you must explicitly set the JET style class on the desiredHTML tag. For example, you can apply the JET style for links on the HTML anchor tag,like this <a class=oj-link>.
The following table lists the HTML tags with default Oracle JET tag styles and thecorresponding Oracle JET style class that you can optionally apply when you enablethe no-tag import statement.
HTML Tag Oracle JET Style Class
html oj-html
body oj-body
a oj-link
h1, h2, h3, h4 oj-header
Chapter 15Work with Custom Themes and Component Styles
15-25
HTML Tag Oracle JET Style Class
hr oj-hr
p oj-p
ul, ol oj-ul, oj-ol
Before you begin:
• Install the Redwood theme tooling chain and configure a custom theme, asdescribed in Add Custom Theme Support with the JET CLI. The themes folderwith custom theme settings files are added to your application source.
To disable JET styling of base HTML tag:
1. In the /src/themes/themeName/web folder of your application, edit the aggregatingthemeName.scss file, and comment out the import statement that enables importingall JET component styles.
//@import "oj/all-components/themes/redwood/_oj-all-components.scss";
And, then add the import statement to enable compiling with Oracle JET styleclasses that you can optionally apply to HTML tags.
@import "oj/all-components/themes/redwood/_oj-all-components-notag.scss";
This will generate style classes that you can apply to HTML tags, for example <aclass=oj-link>.
2. If your application is already running, you can immediately observe the stylingchanges. Otherwise, serve your application to enable live reload.
ojet serve
3. To exit the application, press Ctrl+C at the terminal prompt.
Chapter 15Work with Custom Themes and Component Styles
15-26
16Securing Applications
Oracle JET follows security best practices for Oracle JET components and providesthe OAuth class to help you manage access to users' private data.
Topics:
• Typical Workflow for Securing Oracle JET Applications
• About Securing Oracle JET Applications
• Use OAuth in Your Oracle JET Application
• About Securing Hybrid Mobile Applications
• About Cross-Origin Resource Sharing (CORS)
Typical Workflow for Securing Oracle JET ApplicationsUnderstand how to secure your Oracle JET application. Optionally, understand how touse the OAuth plugin to manage access to client (end user) private data.
To develop secure Oracle JET applications, refer to the typical workflow described inthe following table:
Task Description More Information
Understand Oracle JETapplication security
Identify Oracle JET security featuresand which tasks you should take tosecure your Oracle JET application.
About Securing Oracle JET Applications
Use OAuth Use Oracle JET OAuth plugin. Use OAuth in Your Oracle JET Application
About Securing Oracle JET ApplicationsOracle JET applications are client-side HTML applications written in JavaScript, andyou should follow best practices for securing your Oracle JET applications.
There are a number of Internet resources available that can assist you, including theOpen Web Application Security Project (OWASP), Web Application Security Project(WASP), Web Application Security Working Group (WASWG), and various commercialsites.
Topics:
• Oracle JET Components and Security
• Oracle JET Security and Developer Responsibilities
• Oracle JET Security Features
• Oracle JET Secure Response Headers
16-1
Oracle JET includes components that follow best practices for security and providesthe OAuth plugin for providing secure access to a user's private data. However, theapplication developer is expected to perform tasks that are not included in Oracle JET.
Oracle JET Components and SecurityOracle JET components follow best practices for security. In particular:
• All JavaScript code is executed in strict mode using the use strict directive.
Strict mode changes warnings about poor syntax, such as using undeclaredvariables, into actual errors that you must correct. For more information, see http://www.w3schools.com/js/js_strict.asp.
• Oracle JET code does not use inline script elements.
Because browsers can't tell where the inline script originated, the World WideWeb Consortium (W3C) Content Security Policy prohibits the use of inlinescripts. For additional information, see https://w3c.github.io/webappsec/specs/content-security-policy.
• Oracle JET code does not generate random numbers.
• Any HTML generated by an Oracle JET component is either escaped or sanitized.
For information about why this is needed, see https://www.owasp.org/index.php/DOM_based_XSS_Prevention_Cheat_Sheet#Guidelines_for_Developing_Secure_Applications_Utilizing_JavaScript.
Oracle JET Security and Developer ResponsibilitiesOracle JET components follow established security guidelines and ensure that stringsprovided as options and user input will never be executed as JavaScript to preventXSS attacks. However, Oracle JET does not include a mechanism for sanitizingstrings, and you should consult established guidelines for dealing with XSS attacksin your own code and content.
You can find more information about securing JavaScript applications at https://www.owasp.org/index.php/DOM_based_XSS_Prevention_Cheat_Sheet#Guidelines_for_Developing_Secure_Applications_Utilizing_JavaScript.
Oracle JET Security FeaturesThe Oracle JET API provides the OAuth authorization plugin which supports the OAuth2.0 open protocol. OAuth standardizes the way desktop and web applications accessa user's private data. It provides a mechanism for users to grant access to private datawithout sharing their private username and password credentials.
OAuth 2.0 defines the following roles:
• Resource owner: An entity that can grant access to a protected resource, such asthe end user.
• Client: Application making protected and authorized resource requests on behalfof the resource owner.
• Resource server: Server hosting the protected resources that can accept andrespond to protected resource requests using access tokens.
Chapter 16About Securing Oracle JET Applications
16-2

• Authorization server: Server that issues access tokens to the client after itsuccessfully authenticates the resource owner and obtains authorization. Theauthorization server can be the same server as the resource server. In addition,an authorization server can issue access tokens accepted by multiple resourceservers.
OAuth 2.0 Request for Comments (RFC) 6749 describes the interaction between thefour roles as an abstract flow.
1. The client requests authorization from the resource owner, either directly orthrough the authorization server. Note that the RFC specifies that the authorizationserver is preferred.
2. The client receives an authorization grant, which is defined as the credentialrepresenting the resource owner's authorization.
3. The client requests an access token from the authorization server byauthenticating with the server and presenting the authorization grant.
4. The authorization server issues the access token after authenticating the clientand validating the authorization grant.
5. The client presents the access token to the resource server and requests theprotected resource.
6. The resource server validates the access token and serves the request ifvalidated.
The access token is a unique identifier issued by the server and used by the clientto associate authenticated requests with the resource owner whose authorization isrequested or has been obtained by the client.
The Oracle JET OAuth plugin provides functions for the following tasks:
• Getting access token credentials if initialized by client credentials.
• Caching access token credentials.
• Creating the header array with bearer token.
Chapter 16About Securing Oracle JET Applications
16-3
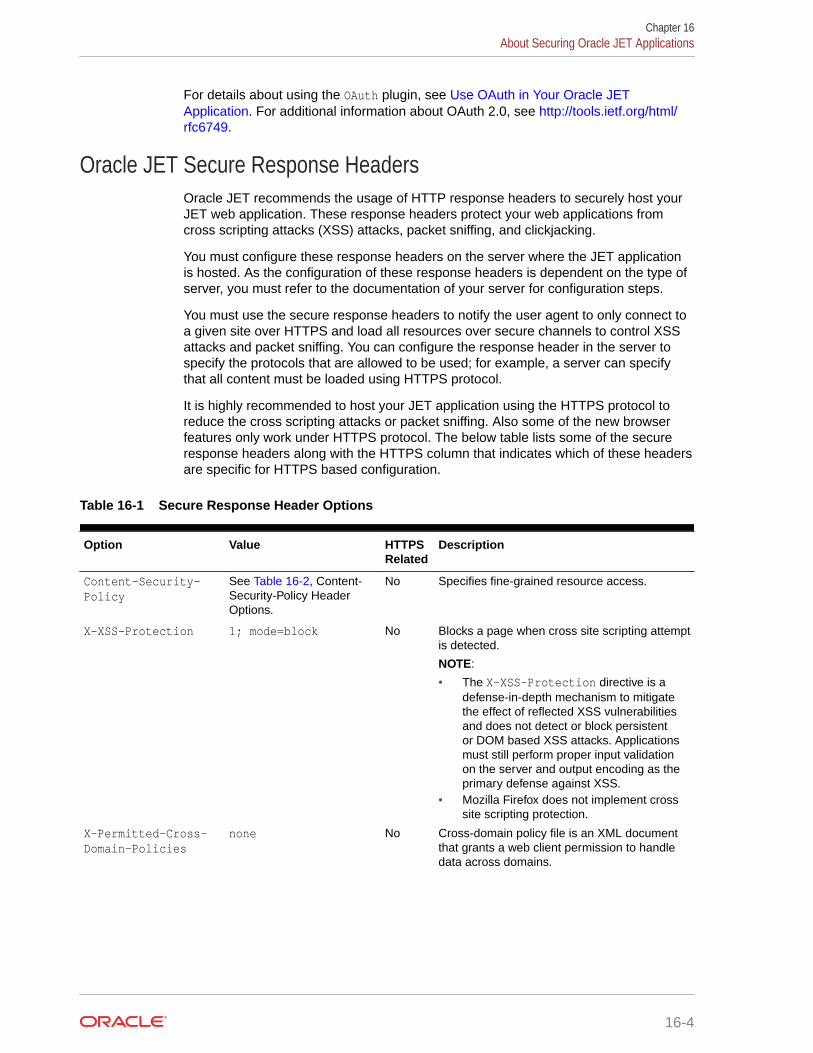
For details about using the OAuth plugin, see Use OAuth in Your Oracle JETApplication. For additional information about OAuth 2.0, see http://tools.ietf.org/html/rfc6749.
Oracle JET Secure Response HeadersOracle JET recommends the usage of HTTP response headers to securely host yourJET web application. These response headers protect your web applications fromcross scripting attacks (XSS) attacks, packet sniffing, and clickjacking.
You must configure these response headers on the server where the JET applicationis hosted. As the configuration of these response headers is dependent on the type ofserver, you must refer to the documentation of your server for configuration steps.
You must use the secure response headers to notify the user agent to only connect toa given site over HTTPS and load all resources over secure channels to control XSSattacks and packet sniffing. You can configure the response header in the server tospecify the protocols that are allowed to be used; for example, a server can specifythat all content must be loaded using HTTPS protocol.
It is highly recommended to host your JET application using the HTTPS protocol toreduce the cross scripting attacks or packet sniffing. Also some of the new browserfeatures only work under HTTPS protocol. The below table lists some of the secureresponse headers along with the HTTPS column that indicates which of these headersare specific for HTTPS based configuration.
Table 16-1 Secure Response Header Options
Option Value HTTPSRelated
Description
Content-Security-Policy
See Table 16-2, Content-Security-Policy HeaderOptions.
No Specifies fine-grained resource access.
X-XSS-Protection 1; mode=block No Blocks a page when cross site scripting attemptis detected.
NOTE:
• The X-XSS-Protection directive is adefense-in-depth mechanism to mitigatethe effect of reflected XSS vulnerabilitiesand does not detect or block persistentor DOM based XSS attacks. Applicationsmust still perform proper input validationon the server and output encoding as theprimary defense against XSS.
• Mozilla Firefox does not implement crosssite scripting protection.
X-Permitted-Cross-Domain-Policies
none No Cross-domain policy file is an XML documentthat grants a web client permission to handledata across domains.
Chapter 16About Securing Oracle JET Applications
16-4
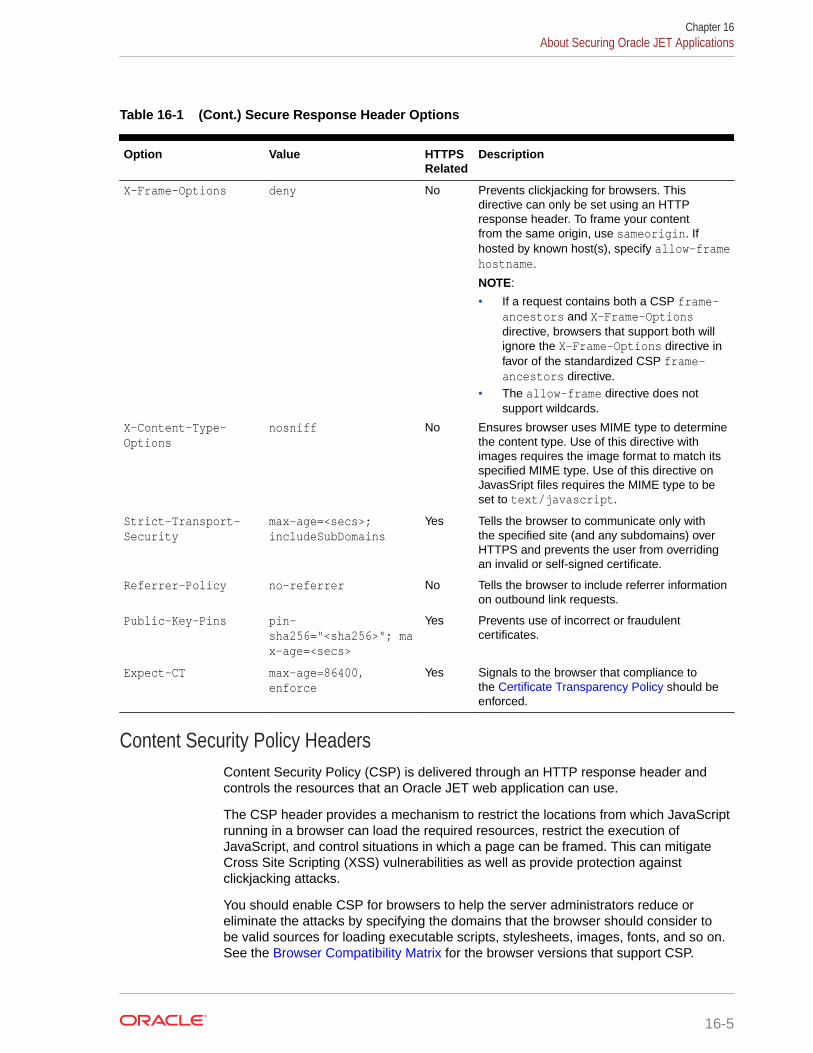
Table 16-1 (Cont.) Secure Response Header Options
Option Value HTTPSRelated
Description
X-Frame-Options deny No Prevents clickjacking for browsers. Thisdirective can only be set using an HTTPresponse header. To frame your contentfrom the same origin, use sameorigin. Ifhosted by known host(s), specify allow-framehostname.
NOTE:
• If a request contains both a CSP frame-ancestors and X-Frame-Optionsdirective, browsers that support both willignore the X-Frame-Options directive infavor of the standardized CSP frame-ancestors directive.
• The allow-frame directive does notsupport wildcards.
X-Content-Type-Options
nosniff No Ensures browser uses MIME type to determinethe content type. Use of this directive withimages requires the image format to match itsspecified MIME type. Use of this directive onJavasSript files requires the MIME type to beset to text/javascript.
Strict-Transport-Security
max-age=<secs>;includeSubDomains
Yes Tells the browser to communicate only withthe specified site (and any subdomains) overHTTPS and prevents the user from overridingan invalid or self-signed certificate.
Referrer-Policy no-referrer No Tells the browser to include referrer informationon outbound link requests.
Public-Key-Pins pin-sha256="<sha256>"; max-age=<secs>
Yes Prevents use of incorrect or fraudulentcertificates.
Expect-CT max-age=86400,enforce
Yes Signals to the browser that compliance tothe Certificate Transparency Policy should beenforced.
Content Security Policy HeadersContent Security Policy (CSP) is delivered through an HTTP response header andcontrols the resources that an Oracle JET web application can use.
The CSP header provides a mechanism to restrict the locations from which JavaScriptrunning in a browser can load the required resources, restrict the execution ofJavaScript, and control situations in which a page can be framed. This can mitigateCross Site Scripting (XSS) vulnerabilities as well as provide protection againstclickjacking attacks.
You should enable CSP for browsers to help the server administrators reduce oreliminate the attacks by specifying the domains that the browser should consider tobe valid sources for loading executable scripts, stylesheets, images, fonts, and so on.See the Browser Compatibility Matrix for the browser versions that support CSP.
Chapter 16About Securing Oracle JET Applications
16-5
Configuring CSP involves adding the Content-Security-Policy HTTP header to aweb page and giving it values to control resources the user agent is allowed to load forthat page. To add Content-Security-Policy HTTP header to a web page, configureyour web server to return the Content-Security-Policy HTTP response header. Forexample, here is a basic CSP response header, where script-src directive specifiesan executable script as the resource type and 'self' is a constant that specifies thecurrent domain as the approved source that the browser may load script from:
Content-Security-Policy: script-src 'self'
CSP has some of the following commonly used constants:
• 'none': Blocks the use of certain resource type.
• 'self': Matches the current origin (but not subdomains).
• 'unsafe-inline': Allows the use of inline JS and CSS.
• 'unsafe-eval': Allows the use of mechanisms like eval().
Note as an alternative to the unsafe-eval CSP domain, JET provides anexpression evaluator that allows JET expression syntax to be evaluated in a waythat is compliant with Content Security Policies that prohibit unsafe evaluations.The default CSP use of the unsafe-eval domain remains unchanged, butapplications can opt into the JET behavior with some restrictions on the typesof expressions that are supported. See details on creation, usage, supportedexpressions and limitations in the CspExpressionEvaluator API documentation.
Alternatively, you can also use the HTML meta tags to configure CSP. For example:
<meta http-equiv="Content-Security-Policy" content="default-src 'self'; img-src https://*; frame-src 'none';">
Note that some of the CSP directives do not work with the HTML meta tags, forexample frame-ancestors.
The below table describes the out-of-box settings required by a JET web applicationto run in its most secure mode without changing the JET functionality. The JET webapplication may need to modify these settings for additional resource origins. The tablelists the different response header directives that can be used while enabling CSPbased on the two following scenarios:
• Co-Hosted: When the JET and the Application source codes are hosted on thesame server
• Content Delivery Network (CDN): When the JET code is from the JET CDN andthe Application code is from a different server
Chapter 16About Securing Oracle JET Applications
16-6
Table 16-2 Content-Security-Policy Header Options
CSP Version Header Options Co-Hosted CDN Description
CSP 1.0 default-src 'none' 'none' Serves as adefault settingthat ensuresresource loadingis blocked if theresource type isnot specified. Allother settingsneed to beexplicitly enabledfor specificresource origins.
CSP 1.0 connect-src 'self' 'self' Manages theREST and WebSockets to beaccessed.
CSP 1.0 font-src 'self' 'self'static.oracle.com
Specifies validsources for fonts.
CSP 1.0 img-src data: 'self' 'self' data:static.oracle.com
Specifies validsources forimages. AllowsJET inlineimages.
CSP 1.0 media-src 'none' 'none' Specifies validsources forloading mediausing the<audio>,<video>, and<track>elements.
CSP 1.0 object-src 'none' 'none' Specifies validsources for the<object>,<embed>, and<applet>elements.
Chapter 16About Securing Oracle JET Applications
16-7
Table 16-2 (Cont.) Content-Security-Policy Header Options
CSP Version Header Options Co-Hosted CDN Description
CSP 1.0 script-src 'self''unsafe-eval'
'self'static.oracle.com 'unsafe-eval';
Specifies validsources forJavaScript. Thisdirective is usedfor knockoutexpressions andJET functioncreation.
Note: The use ofunsafe-eval iscurrently requiredby Knockout toresolveexpressions, butJET provides analternativeexpressionevaluator whenyou require yourapplication to runin a strict ContentSecurity Policyenvironment. Forusageinformation, seethe CspExpressionEvaluator APIdocumentation.
CSP 1.0 style-src 'self''unsafe-inline'
'self'static.oracle.com 'unsafe-inline'
Specifies validsources forstylesheets. Thisdirective is usedto set styles fromJavaScript.
CSP 1.0 sandbox - - Runs the page asin a sandboxediframe.
CSP 2.0 form-action - - This directive isused for formsubmits. Notapplicable forJET.
Chapter 16About Securing Oracle JET Applications
16-8
Table 16-2 (Cont.) Content-Security-Policy Header Options
CSP Version Header Options Co-Hosted CDN Description
CSP 2.0 frame-ancestors
'none' 'none' Specifies validsources fornested browsingcontexts loadingusing elementssuch as <frame>and <iframe>and preventsclickjacking forbrowsers. Thisdirective can onlybe set using anHTTP responseheader. To frameyour content fromthe same origin,use 'self'. Ifhosted by knownhost(s), specifythe hosts.
When default-src is set to none, you must explicitly enable all the other neededsettings for specific resource origins.
The following example shows how to set up CSP if a website administrator wants toallow content from a trusted domain and all its subdomains:
Content-Security-Policy: default-src 'self' *.trusted.com
The following example shows how to set up CSP if a website administrator wantsto allow users of a web application to include images from any origin in their owncontent, but to restrict audio or video media to trusted providers, and all scripts only toa specific server that hosts trusted code.
Content-Security-Policy: default-src 'self'; img-src *; media-src media1.com media2.com; script-src userscripts.example.com
Use OAuth in Your Oracle JET ApplicationYou can use the OAuth plugin to manage access to client (end user) private data. TheOracle JET API includes the OAuth class which provides the methods you can use toinitialize the OAuth object, verify initialization, and calculate the authorization headerbased on client credentials or access token.
Topics:
• Initialize OAuth
• Verify OAuth Initialization
• Obtain the OAuth Header
Chapter 16Use OAuth in Your Oracle JET Application
16-9
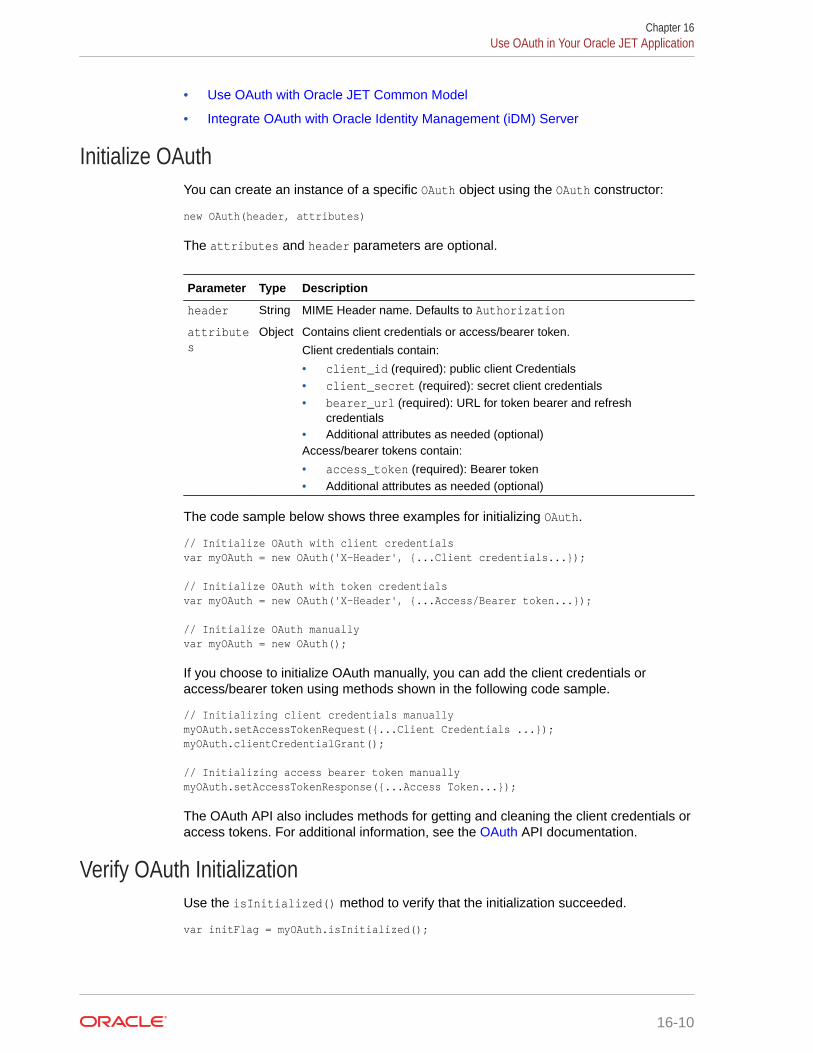
• Use OAuth with Oracle JET Common Model
• Integrate OAuth with Oracle Identity Management (iDM) Server
Initialize OAuthYou can create an instance of a specific OAuth object using the OAuth constructor:
new OAuth(header, attributes)
The attributes and header parameters are optional.
Parameter Type Description
header String MIME Header name. Defaults to Authorization
attributes
Object Contains client credentials or access/bearer token.
Client credentials contain:
• client_id (required): public client Credentials• client_secret (required): secret client credentials• bearer_url (required): URL for token bearer and refresh
credentials• Additional attributes as needed (optional)Access/bearer tokens contain:
• access_token (required): Bearer token• Additional attributes as needed (optional)
The code sample below shows three examples for initializing OAuth.
// Initialize OAuth with client credentialsvar myOAuth = new OAuth('X-Header', {...Client credentials...});
// Initialize OAuth with token credentialsvar myOAuth = new OAuth('X-Header', {...Access/Bearer token...});
// Initialize OAuth manuallyvar myOAuth = new OAuth();
If you choose to initialize OAuth manually, you can add the client credentials oraccess/bearer token using methods shown in the following code sample.
// Initializing client credentials manuallymyOAuth.setAccessTokenRequest({...Client Credentials ...});myOAuth.clientCredentialGrant();
// Initializing access bearer token manuallymyOAuth.setAccessTokenResponse({...Access Token...});
The OAuth API also includes methods for getting and cleaning the client credentials oraccess tokens. For additional information, see the OAuth API documentation.
Verify OAuth InitializationUse the isInitialized() method to verify that the initialization succeeded.
var initFlag = myOAuth.isInitialized();
Chapter 16Use OAuth in Your Oracle JET Application
16-10
Obtain the OAuth HeaderUse the getHeader() method to get the OAuth header. The method calculates theauthorization header based on the client credentials or access token.
// Client credentialsvar myOAuth = new OAuth('New-Header', {...Client credentials...});var myHeaders = myOAuth.getHeader();
// Access tokenvar myOAuth = new OAuth('New-Header', {...Access/Bearer token...});var myHeaders = myOAuth.getHeader();
// Manual initialization, client credentialsvar myOAuth = new OAuth();myOAuth.setAccessTokenRequest({...Client credentials...});var myHeaders = myOAuth.getHeader();
// Manual initialization, access tokenvar myOAuth = new OAuth('New-Header', {...Access/Bearer token...});var myHeaders = myOAuth.getHeader();
Use OAuth with Oracle JET Common ModelYou can add the OAuth object to your ViewModel, either embedded or as an externalplugin.
Topics:
• Embed OAuth in Your Application's ViewModel
• Add OAuth as a Plugin in Your ViewModel
For information about Oracle JET's Common Model, see Using the Common Modeland Collection API.
Embed OAuth in Your Application's ViewModelThe code sample below shows how you could embed the OAuth object in yourViewModel. This example initializes OAuth with client credentials.
function viewModel() { var self = this; ... self.myOAuth = new OAuth('X-Authorization', {...Client credentials...}); var tweetModel = Model.extend({ ... }); var myTweet = new tweetModel(); ... var tweetCollection = Collection.extend({ model: myTweet, oauth: self.myOAuth, // using embedded feature ... }); self.myTweetCol = new tweetCollection(); ...
Chapter 16Use OAuth in Your Oracle JET Application
16-11
self.myTweetCol.fetch({ success: function(collection, response, options) { ... }, error: function(jqXHR, textStatus, errorThrown) { ... // process errors } });}
To embed the OAuth object in your ViewModel and initialize it with a bearer/accesstoken:
function viewModel() { var self = this; ... self.myOAuth = new OAuth('X-Authorization', {...Access/Bearer token...}); var tweetModel = Model.extend({ ... }); var myTweet = new tweetModel(); ... var tweetCollection = Collection.extend({ model: myTweet, oauth: self.myOAuth, // using embedded feature ... }); self.myTweetCol = new tweetCollection(); ... self.myTweetCol.fetch({ success: function(collection, response, options) { ... }, error: function(jqXHR, textStatus, errorThrown) { ... // process errors or insert new access_token and re-fetch } });}
Add OAuth as a Plugin in Your ViewModelThe code sample below shows how you could add the OAuth object as a plugin in yourViewModel. This example initializes OAuth with client credentials.
var viewModel() { var self = this; ... self.myOAuth = new OAuth('X-Authorization', {...Client credentials...}); var tweetModel = Model.extend({ ... }); var myTweet = new tweetModel(); ... var tweetCollection = Collection.extend({ model: myTweet, ... }); self.myTweetCol = new tweetCollection(); ...
Chapter 16Use OAuth in Your Oracle JET Application
16-12

self.preFetch = function() { var header = self.myOAuth.getHeader(); $.ajaxSetup({ beforeSend: function (xhr){ for(var hdr in header ) { if(header.hasOwnProperty(hdr)) xhr.setRequestHeader(hdr, header[hdr]); } } } }); self.myTweetCol.fetch({ success: function(collection, response, options) { ... }, error: function(jqXHR, textStatus, errorThrown) { ... // process errors } }); }}
Integrate OAuth with Oracle Identity Management (iDM) ServerOracle iDM servers use a two-legged authorization (Resource Owner PasswordCredentials Grant). In addition, the iDM servers require that you do the following:
• Keep client credentials on your own proxy server. If you don't have one, you mustcreate one.
• iDM servers use a non standard authorization header and require thatAuthorization:access_token be used instead of Authorization: Beareraccess_token. To supply the custom header, you must rewrite the OAuth headerfor specific Authorization using the getHeader() method.
The code except below shows an example that adds the OAuth object with amodified header to the application's viewModel.
function viewModel() { var self = this; self.bearer = { access_token: ..., token_type: "Bearer", expires_in: ..., ... } ... self.myOAuth = new OAuth(); // Rewrite oAuth header for specific Authorization self.myOAuth.getHeader = function() { var headers = {}; headers['X-Authorization']=self.bearer.access_token; return headers; } var idmModel = Model.extend({... }); var myIDM = new idmModel(); ... var idmCollection = Collection.extend ({ model: myIDM, oauth: self.myOAuth, // using embedded feature ...
Chapter 16Use OAuth in Your Oracle JET Application
16-13
}); self.myIDMCol = new idmCollection(); ... self.myIDMCol.fetch({ success: function(collection, response, options) { ... }, error: function(jqXHR, textStatus, errorThrown) { ... // process errors or insert new access_token and re-fetch } });}
About Securing Hybrid Mobile ApplicationsSince hybrid mobile applications are JavaScript HTML5 applications, many of thesame security practices that apply to web applications apply to hybrid mobileapplications. However, there are additional considerations when you’re deploying tomobile devices.
The Cordova documentation includes a Security Guide that provides some securitybest practices for Cordova applications. You can use this guide as a starting point tosecure your hybrid mobile application. However, as Cordova points out, security is acomplicated topic, and its guide is not exhaustive.
JET adopts the AppConfig approach to manage mobile applications in the enterprise.AppConfig is an industry-sponsored community that provides tools and best practicesto configure and secure mobile applications. Oracle JET provides the cordova-plugin-emm-app-config plugin, described in Manage App Configuration for JETHybrid Mobile Apps, to facilitate this process.
Manage Authentication in JET Hybrid Mobile AppsAuthenticating end users of a hybrid mobile app and propagating the identity of theauthenticated end users to back-end systems so that the end user can access securedresources is a requirement that you will have to frequently implement.
Oracle JET provides a Cordova plugin, cordova-plugin-oracle-idm-auth, to assistyou with these tasks. Add this plugin to hybrid mobile apps that you deploy to Androidand iOS devices using the Oracle JET CLI as follows:
ojet add plugin cordova-plugin-oracle-idm-auth
For more information about using this plugin in your hybrid mobile app, see https://github.com/oracle/cordova-plugin-oracle-idm-auth. This plugin can be used in anyCordova-based hybrid mobile app, not just JET hybrid mobile apps.
Manage App Configuration for JET Hybrid Mobile AppsMany enterprises make use of Enterprise Mobility Management (EMM) software tomanage mobile devices, applications, wireless networks, and other mobile computingservices.
EMM software allows administrators to configure mobile apps via a web consoleand apply the configuration to the app on every managed device as part of the appinstallation process. This configuration typically consists of generic name-value pairs
Chapter 16About Securing Hybrid Mobile Applications
16-14

defined by the app developer, such as URI, port numbers, tenant IDs, or CSS skinconfigurations.
The Android and iOS platforms support this functionality natively, but retrieving appconfiguration data and being alerted when it has changed is just as important forCordova-based hybrid mobile apps. To make this possible, Oracle JET provides thecordova-plugin-emm-app-config Cordova plugin that can be used to implement appconfiguration in JET mobile apps on the Android and iOS platforms. Using this plugin,you can retrieve the app configuration data at any point in the app lifecycle, includingwhen the EMM server changes the app configuration.
You can add the cordova-plugin-emm-app-config to your hybrid mobile app using theOracle JET CLI as follows:
ojet add plugin cordova-plugin-emm-app-config
For more information about this plugin, see https://github.com/oracle/cordova-plugin-emm-app-config. This plugin can be used in any Cordova-based hybrid mobile app,not just JET hybrid apps.
Vendors and other stakeholders in the application configuration software sector formedthe AppConfig community to provide tools and best practices. For more information,see http://appconfig.org/.
About Cross-Origin Resource Sharing (CORS)CORS is a mechanism that allows restricted resources on a web page to be requestedfrom another domain outside the domain from which the first resource was served.The same-origin security policy of JavaScript forbids certain cross-domain requests,notably Ajax requests, by default.
Rejected resource requests due to CORS can affect web or hybrid mobile applications.Applications that encounter a rejection receive messages such as the followingexample in response to resource requests:
No 'Access-Control-Allow-Origin' header is present on the requestedresource.
Server-side administrators can specify the origins allowed to access their resourcesby modifying the policy used by their remote server to allow cross-site requests fromtrusted clients. For example, to access a remote service managed by Oracle’s MobileCloud Service (MCS), an MCS administrator configures MCS’s Security_AllowOriginenvironment policy with a comma-separated list of URL patterns that identify theremote services that serve resources from different domains.
If you serve your web or hybrid mobile application to the local browser fortesting, you may encounter CORS rejections. Some browsers provide optionsto disable CORS, such as Chrome's --disable-web-security and Firefox'ssecurity.fileuri.strict_origin_policy and some browsers support plugins thatwork around CORS.
Only use these options when testing your application and ensure that you completefurther testing in a production-like environment without these options to be sure thatyour application will not encounter CORS issues in production.
The default web views used by hybrid mobile applications do not implement CORSand therefore hybrid mobile applications will not encounter CORS issues when run ona device in the default web view. However, if you use an alternative web view, such as
Chapter 16About Cross-Origin Resource Sharing (CORS)
16-15

WKWebView on iOS, you may encounter CORS issues. To work around this on iOS,consider using the cordova-plugin-wkwebview-file-xhr plugin in your hybrid mobileapplication as an alternative to WKWebView. For additional information, see Use aDifferent Web View in Your JET Hybrid Mobile App.
Chapter 16About Cross-Origin Resource Sharing (CORS)
16-16
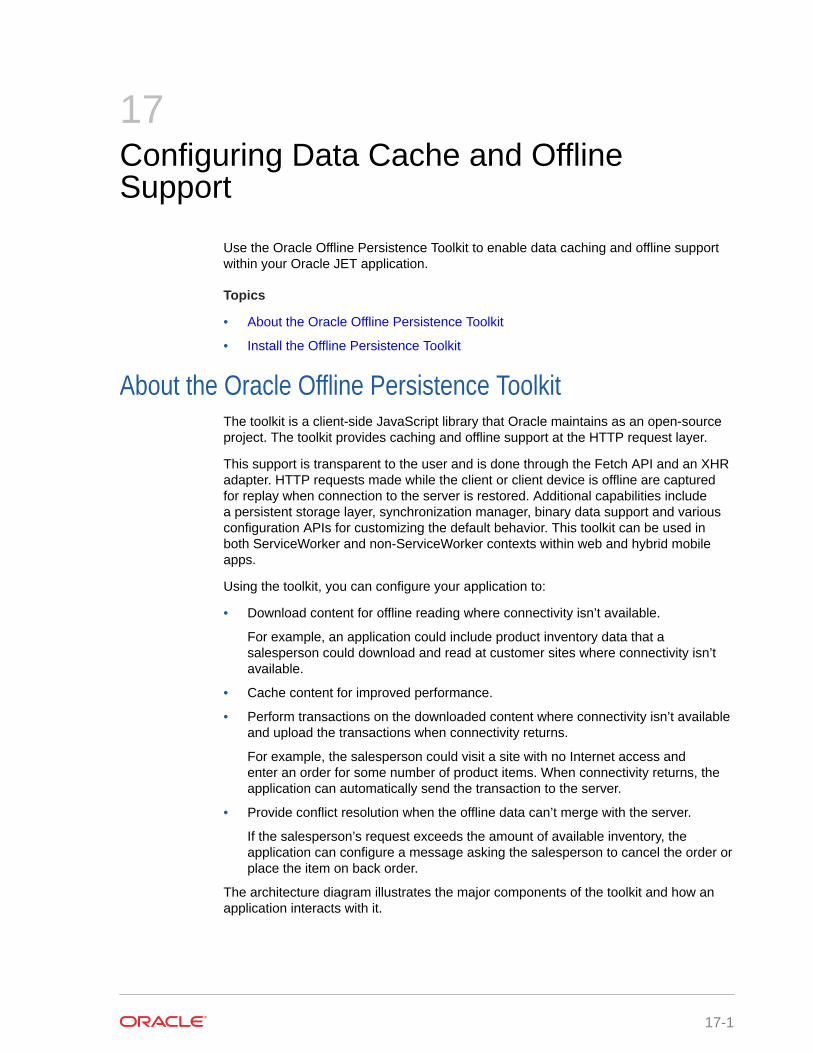
17Configuring Data Cache and OfflineSupport
Use the Oracle Offline Persistence Toolkit to enable data caching and offline supportwithin your Oracle JET application.
Topics
• About the Oracle Offline Persistence Toolkit
• Install the Offline Persistence Toolkit
About the Oracle Offline Persistence ToolkitThe toolkit is a client-side JavaScript library that Oracle maintains as an open-sourceproject. The toolkit provides caching and offline support at the HTTP request layer.
This support is transparent to the user and is done through the Fetch API and an XHRadapter. HTTP requests made while the client or client device is offline are capturedfor replay when connection to the server is restored. Additional capabilities includea persistent storage layer, synchronization manager, binary data support and variousconfiguration APIs for customizing the default behavior. This toolkit can be used inboth ServiceWorker and non-ServiceWorker contexts within web and hybrid mobileapps.
Using the toolkit, you can configure your application to:
• Download content for offline reading where connectivity isn’t available.
For example, an application could include product inventory data that asalesperson could download and read at customer sites where connectivity isn’tavailable.
• Cache content for improved performance.
• Perform transactions on the downloaded content where connectivity isn’t availableand upload the transactions when connectivity returns.
For example, the salesperson could visit a site with no Internet access andenter an order for some number of product items. When connectivity returns, theapplication can automatically send the transaction to the server.
• Provide conflict resolution when the offline data can’t merge with the server.
If the salesperson’s request exceeds the amount of available inventory, theapplication can configure a message asking the salesperson to cancel the order orplace the item on back order.
The architecture diagram illustrates the major components of the toolkit and how anapplication interacts with it.
17-1
Install the Offline Persistence ToolkitUse npm to install the offline persistence toolkit. After installation, you must updateyour application’s src/js/path_mapping.json file to recognize the new package.
1. Change to your application’s top level directory and open a terminal window.
2. At the terminal prompt, enter the following command to install the toolkit: npminstall @oracle/offline-persistence-toolkit --save.
3. Change to your application’s src/js directory and open path_mapping.json forediting.
4. Add the persistence toolkit to the "libs" entry.
The easiest way to add the toolkit is to copy an existing entry that’s similar to yourlibrary and modify as needed. A sample entry for offline-persistence-toolkit,which started with a copy of the "ojs" entry, is shown below.
"libs": {
"offline-persistence-toolkit": { "cdn": "", "cwd": "node_modules/@oracle/offline-persistence-toolkit/dist", "debug": { "cwd": "debug", "src": ["**"], "path": "libs/offline-persistence-toolkit/debug", "cdn": ""
Chapter 17Install the Offline Persistence Toolkit
17-2
}, "release": { "cwd": "min", "src": ["**"], "path": "libs/offline-persistence-toolkit/min", "cdn": "" }},
For information about using the toolkit once you have it installed in your Oracle JETapplication, see the README.md and Wiki for the persistence toolkit on Github at https://github.com/oracle/offline-persistence-toolkit.
Chapter 17Install the Offline Persistence Toolkit
17-3

18Optimizing Performance
Oracle JET applications are client-side HTML5 applications. Most performanceoptimization recommendations relating to client-side HTML applications also apply toapplications developed using Oracle JET or to Oracle JET components. In addition,some Oracle JET components have performance recommendations that are specificto the component.
Topics:
• Typical Workflow for Optimizing Performance of Oracle JET Applications
• About Performance and Oracle JET Applications
• Add Performance Optimization to an Oracle JET Application
• About Configuring the Application for Oracle CDN Optimization
• Understand the Path Mapping Script File and Configuration Options
Typical Workflow for Optimizing Performance of Oracle JETApplications
Understand performance optimization recommendations related to Oracle JETapplications and components.
To optimize performance of an Oracle JET application, refer to the typical workflowdescribed in the following table:
Task Description More Information
Identify generalperformance optimizationgoals
Identify performance optimizationgoals for client-side HTML5applications.
About Performance and Oracle JET Applications
Apply performanceoptimization to your OracleJET application
Take specific steps to optimizeperformance of your application.
Add Performance Optimization to an Oracle JETApplication
About Performance and Oracle JET ApplicationsIn general, you can optimize an Oracle JET application the same way that you wouldoptimize performance for any client-side HTML5 application.
There are many online resources that provide tips for performance optimization.For example, the Google Developers website describes their tools for improving theperformance of the application.
Most of the recommendations made by the Google tools are up to you to implement,but Oracle JET includes features that can reduce the payload size and the number
18-1
of trips to retrieve the Oracle JET application's CSS. In general, strive to follow theseguidelines.
1. Always minify and bundle application resources to reduce the number of requestsfrom the server.
2. Configure the application to load resources from Oracle CDN to minimize networkusage.
3. Configure the application to use the Oracle JET library on CDN so that thebundles-config.js script will load minified bundles and modules by default.
4. Compress the application with gzip to reduce the size (and enable compression onthe web server.)
5. Enable HTTP caching on web server so that some requests can be served fromthe cache instead of from the server. Use ETags on files that should always beserved from the server.
6. Take advantage of HTTP/2 to serve page resources faster than is possible withHTTP/1.1.
7. Use a single page application, so that the browser isn’t forced to tear down andrebuild the whole application.
8. Avoid putting too many data-centric components into a single page.
9. Optimize graphic images: prefer vector format; choose the appropriate imageformat based on the best overall compression available.
For more information about these optimization tips and others, see Add PerformanceOptimization to an Oracle JET Application.
Add Performance Optimization to an Oracle JET ApplicationMost tips for optimizing performance of web and hybrid mobile applications alsoapply to Oracle JET applications. However, there are some steps you can take thatapply specifically to Oracle JET applications to optimize JavaScript, CSS, Oracle JETcomponents, REST calls, and images.
JavaScript Performance Tips
Performance Tip Details
Maintain the expected JavaScriptfolder structure
Use folder organization generated by the Oracle JET tooling and maintain allJavaScript files inside the js folder of the application root.
Chapter 18Add Performance Optimization to an Oracle JET Application
18-2
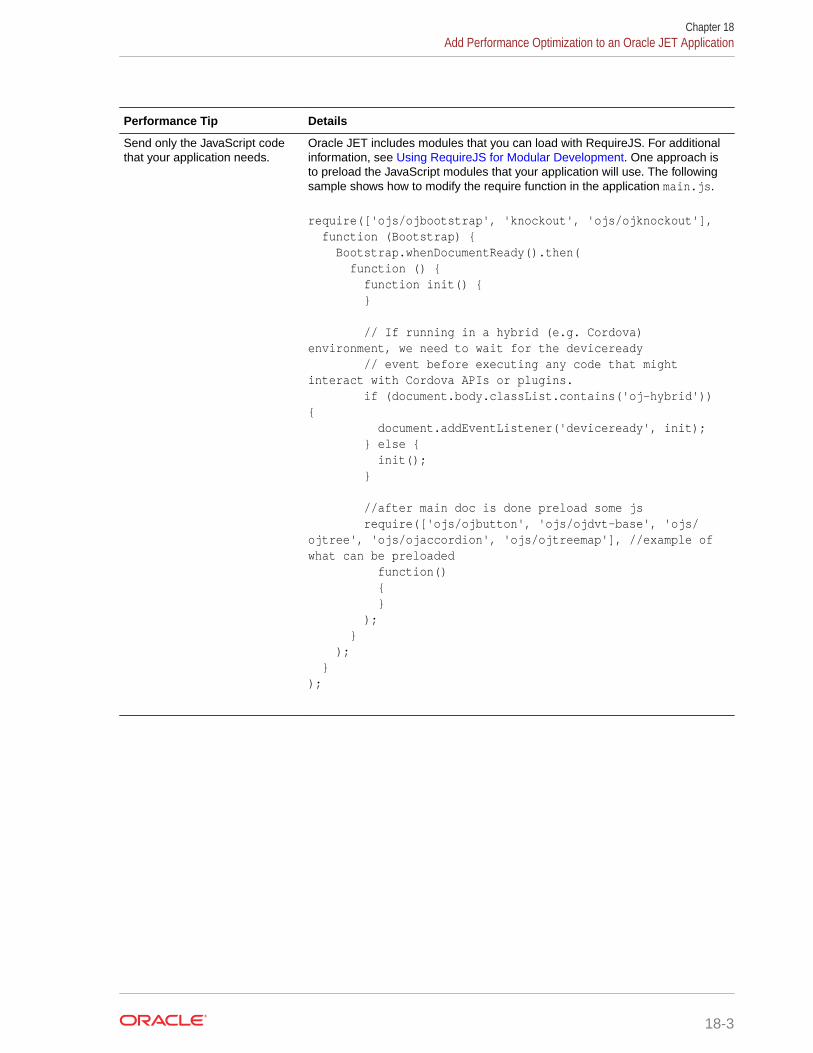
Performance Tip Details
Send only the JavaScript codethat your application needs.
Oracle JET includes modules that you can load with RequireJS. For additionalinformation, see Using RequireJS for Modular Development. One approach isto preload the JavaScript modules that your application will use. The followingsample shows how to modify the require function in the application main.js.
require(['ojs/ojbootstrap', 'knockout', 'ojs/ojknockout'], function (Bootstrap) { Bootstrap.whenDocumentReady().then( function () { function init() { }
// If running in a hybrid (e.g. Cordova) environment, we need to wait for the deviceready // event before executing any code that might interact with Cordova APIs or plugins. if (document.body.classList.contains('oj-hybrid')) { document.addEventListener('deviceready', init); } else { init(); }
//after main doc is done preload some js require(['ojs/ojbutton', 'ojs/ojdvt-base', 'ojs/ojtree', 'ojs/ojaccordion', 'ojs/ojtreemap'], //example of what can be preloaded function() { } ); } ); });
Chapter 18Add Performance Optimization to an Oracle JET Application
18-3
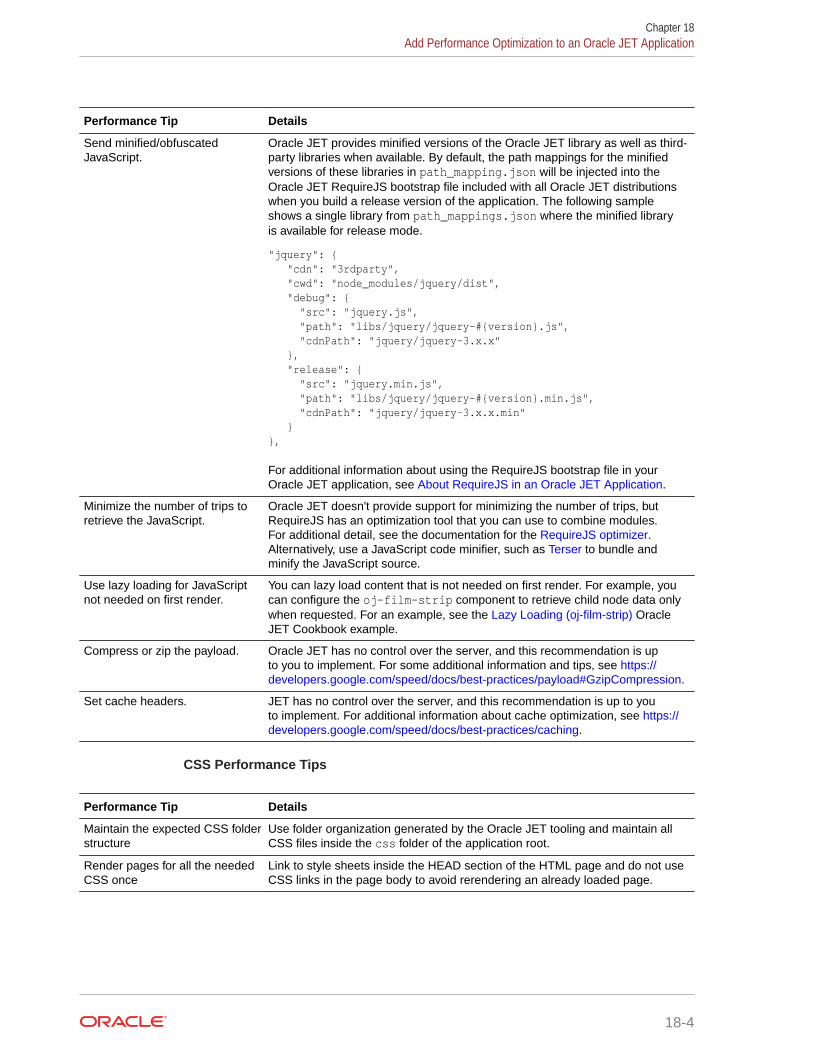
Performance Tip Details
Send minified/obfuscatedJavaScript.
Oracle JET provides minified versions of the Oracle JET library as well as third-party libraries when available. By default, the path mappings for the minifiedversions of these libraries in path_mapping.json will be injected into theOracle JET RequireJS bootstrap file included with all Oracle JET distributionswhen you build a release version of the application. The following sampleshows a single library from path_mappings.json where the minified libraryis available for release mode.
"jquery": { "cdn": "3rdparty", "cwd": "node_modules/jquery/dist", "debug": { "src": "jquery.js", "path": "libs/jquery/jquery-#{version}.js", "cdnPath": "jquery/jquery-3.x.x" }, "release": { "src": "jquery.min.js", "path": "libs/jquery/jquery-#{version}.min.js", "cdnPath": "jquery/jquery-3.x.x.min" }},
For additional information about using the RequireJS bootstrap file in yourOracle JET application, see About RequireJS in an Oracle JET Application.
Minimize the number of trips toretrieve the JavaScript.
Oracle JET doesn't provide support for minimizing the number of trips, butRequireJS has an optimization tool that you can use to combine modules.For additional detail, see the documentation for the RequireJS optimizer.Alternatively, use a JavaScript code minifier, such as Terser to bundle andminify the JavaScript source.
Use lazy loading for JavaScriptnot needed on first render.
You can lazy load content that is not needed on first render. For example, youcan configure the oj-film-strip component to retrieve child node data onlywhen requested. For an example, see the Lazy Loading (oj-film-strip) OracleJET Cookbook example.
Compress or zip the payload. Oracle JET has no control over the server, and this recommendation is upto you to implement. For some additional information and tips, see https://developers.google.com/speed/docs/best-practices/payload#GzipCompression.
Set cache headers. JET has no control over the server, and this recommendation is up to youto implement. For additional information about cache optimization, see https://developers.google.com/speed/docs/best-practices/caching.
CSS Performance Tips
Performance Tip Details
Maintain the expected CSS folderstructure
Use folder organization generated by the Oracle JET tooling and maintain allCSS files inside the css folder of the application root.
Render pages for all the neededCSS once
Link to style sheets inside the HEAD section of the HTML page and do not useCSS links in the page body to avoid rerendering an already loaded page.
Chapter 18Add Performance Optimization to an Oracle JET Application
18-4
Performance Tip Details
Send only the CSS that yourapplication needs.
You can control the CSS content that goes into your application. For additionalinformation, see Use Variables to Control CSS Content.
If you're using the Oracle JET grid system, you can also control whichresponsive classes get included in the CSS. For details, see Control the Sizeand Generation of the CSS.
Send minified/obfuscated CSS. By default, Oracle JET includes minified CSS. However, if you wantto modify the CSS to send only what your application needs, youcan use Sass to minimize your output. For additional information,see the :compressed option at: http://sass-lang.com/documentation/file.SASS_REFERENCE.html#output_style.
Oracle JET Application and Component Performance Tips
Performance Tip Details
Configure your application toload bundled JET modules andlibraries using Oracle CDN andthe bundle configuration supportit provides for JET.
Leveraging the Oracle Content Delivery Network (CDN) and bundleconfiguration support optimizes the application startup performance ofenterprise applications and also ensures that your application builds with themodule and library versions required for a particular Oracle JET release.Referring directly to the bundles within the application is not recommendedand that includes adding or modifying links that make direct reference to theconfiguration of the bundles. For additional information, see About Configuringthe Application for Oracle CDN Optimization.
Consider using plain HTMLcomponents were possible.
For stamping components (like Table or ListView) or declarative components(like a composite component), if you embed a simple Oracle JET componentlike a read-only input component or button, consider using a plain HTMLcomponent instead. The plain HTML component can be lighter weight (lessDOM), and if the component is stamped that can add up. However, notethat with plain HTML, you also won't have access to any built-in accessibilitysupport, such as converters and validators, which the Oracle JET componentprovides.
Follow Oracle JET componentbest practices.
Consult the API documentation for the Oracle JET component. The APIReference for Oracle® JavaScript Extension Toolkit (Oracle JET) includes aperformance section for a component when applicable. For example, see theojDataGrid—Performance section.
Limit number of Oracle JETcomponents per page.
The number of components on the page will impact the page load time. If youwant to reduce the load time, place fewer data-centric components in the page.
Use the oj-defer element todelay binding execution
When a component contains hidden content to display, the oj-defer elementdelays the process of applying bindings to the child components until the hiddencontent becomes visible. For additional information on oj-defer, see the oj-defer API documentation.
Limit the fetch size for collectioncomponents
Set the collection component scroll-policy-options.fetch-size attributeequal to the number the number of items to display in the component viewport.Also set scroll-policy="loadMoreOnScroll" to ensure that the fetch foradditional items occurs only when the user scrolls toward the end of the fetchedlist.
Chapter 18Add Performance Optimization to an Oracle JET Application
18-5
REST Request Performance Tips
Performance Tip Details
Reduce the number of roundtripsbetween client and server.
There are a number of techniques that you can use to reduce the number ofroundtrips, and here are some examples:
• The number of REST requests on the page will impact the page load time.If you need to reduce the load time, simplify your page and make fewerREST requests.
• A REST call that needs data from a previous REST call createsa dependency that triggers serialization and increases the data fetchresponse time. To reduce response time, minimize the number ofdependent REST calls by redefining your REST calls to fetch only the datayour UI requires. Ideally, the REST endpoint supports fetching of the exactdata or can be redesigned as needed.
• All REST operations should be executed asynchronously. To manageasync state, invoke REST endpoints with a method to return a Promisefrom the start.
• If the REST endpoint is slow to respond, and the data is essential to theapplication, consider prefetching the data in a non-blocking REST endpointinvocation.
• The REST endpoint should be designed to support pagination.
Image Optimization
Performance Tip Details
Maintain the expected imagesfolder structure
Use folder organization generated by the Oracle JET tooling and maintain allimage files inside the images folder of the application root.
Reduce image size. Reducing the size of the images will result in faster downloads and reduce thetime it takes to render the content on the screen. For example, Scalable VectorGraphics (SVG) images are usually smaller than Portable Network Graphics(PNG) images and scale on high resolution devices.
There are also a number of third-party tools that you can use to reduce thesize of your images. The tool that you select will depend on the image type, forexample:
• imagemin: Utility to compress PNG images• svgomg: Utility to compress SVG images. You can use this tool online or
download svgo to work with the images on your own system.
Chapter 18Add Performance Optimization to an Oracle JET Application
18-6

Performance Tip Details
Reduce the number of roundtripsbetween client and server.
There are a number of techniques that you can use to reduce the number ofroundtrips, and here are some examples:
• Icon fonts
Icon fonts are useful when your icon uses a single color.
Oracle JET uses icon fonts, and you can see examples of them at: IconFonts.
You can find utilities on the Internet such as IcoMoon that you can use togenerate icon fonts.
• Image Sprites
An image sprite is a collection of images combined into a single image,reducing the number of server requests. You can find examples of them athttp://www.w3schools.com/css/css_image_sprites.asp.
• Lazy loading
You can use lazy loading to defer the loading of images not in the user’sviewport. You can find many examples and utilities on the Internet that usethis technique.
• Base64 Encoding
You can use Base64 Encoding to inline image data. They arecommonly used in data Uniform Resource Indicators (URIs), and youcan find additional information about them at https://developer.mozilla.org/docs/Web/HTTP/data_URIs.
For additional performance tips, see the Google Developers documentation forimproving the quality of web pages, including how to audit for performance.
About Configuring the Application for Oracle CDNOptimization
You can configure the Oracle JET application to minimize the network load atapplication startup through the use of Oracle Content Delivery Network (CDN) andthe Oracle JET distributions that the CDN supports.
The local loading of the required Oracle JET libraries and modules, as configuredby default when you create the application, is not recommended for a productionapplication since it does not use Oracle CDN and requires each application runningin the browser to load libraries and modules in a standalone manner. This defaultconfiguration can be used when you build and serve the application locally until youneed to stage the application in a test environment to simulate network access.
To enable Oracle CDN optimization, you configure the path_mapping.json file in yourapplication. The choices you make in the path mapping file determine the libraries andmodules settings for the entire application. With this file, you will not need to edit thepath URL of the required libraries and modules in any other application file. Whenyou configure path mapping for CDN optimization, you will determine how the toolingupdates the require block of the main.js file and how the application will load modulesand libraries as follows:
• If you configure path mappings to use CDN without accessing the bundlesconfiguration, so that modules and libraries will be loaded individually from CDN,the tooling injects the URLs from the path mapping file into the requirejs block ofmain.js.
Chapter 18About Configuring the Application for Oracle CDN Optimization
18-7
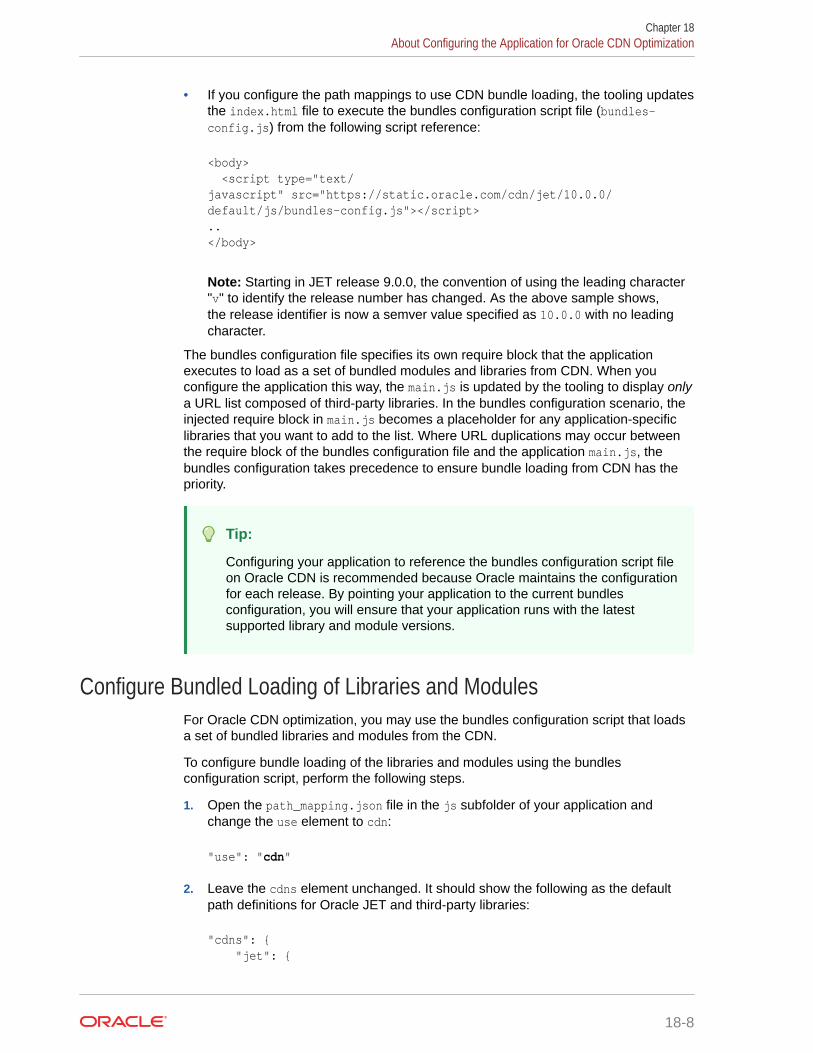
• If you configure the path mappings to use CDN bundle loading, the tooling updatesthe index.html file to execute the bundles configuration script file (bundles-config.js) from the following script reference:
<body> <script type="text/javascript" src="https://static.oracle.com/cdn/jet/10.0.0/default/js/bundles-config.js"></script>..</body>
Note: Starting in JET release 9.0.0, the convention of using the leading character"v" to identify the release number has changed. As the above sample shows,the release identifier is now a semver value specified as 10.0.0 with no leadingcharacter.
The bundles configuration file specifies its own require block that the applicationexecutes to load as a set of bundled modules and libraries from CDN. When youconfigure the application this way, the main.js is updated by the tooling to display onlya URL list composed of third-party libraries. In the bundles configuration scenario, theinjected require block in main.js becomes a placeholder for any application-specificlibraries that you want to add to the list. Where URL duplications may occur betweenthe require block of the bundles configuration file and the application main.js, thebundles configuration takes precedence to ensure bundle loading from CDN has thepriority.
Tip:
Configuring your application to reference the bundles configuration script fileon Oracle CDN is recommended because Oracle maintains the configurationfor each release. By pointing your application to the current bundlesconfiguration, you will ensure that your application runs with the latestsupported library and module versions.
Configure Bundled Loading of Libraries and ModulesFor Oracle CDN optimization, you may use the bundles configuration script that loadsa set of bundled libraries and modules from the CDN.
To configure bundle loading of the libraries and modules using the bundlesconfiguration script, perform the following steps.
1. Open the path_mapping.json file in the js subfolder of your application andchange the use element to cdn:
"use": "cdn"
2. Leave the cdns element unchanged. It should show the following as the defaultpath definitions for Oracle JET and third-party libraries:
"cdns": { "jet": {
Chapter 18About Configuring the Application for Oracle CDN Optimization
18-8
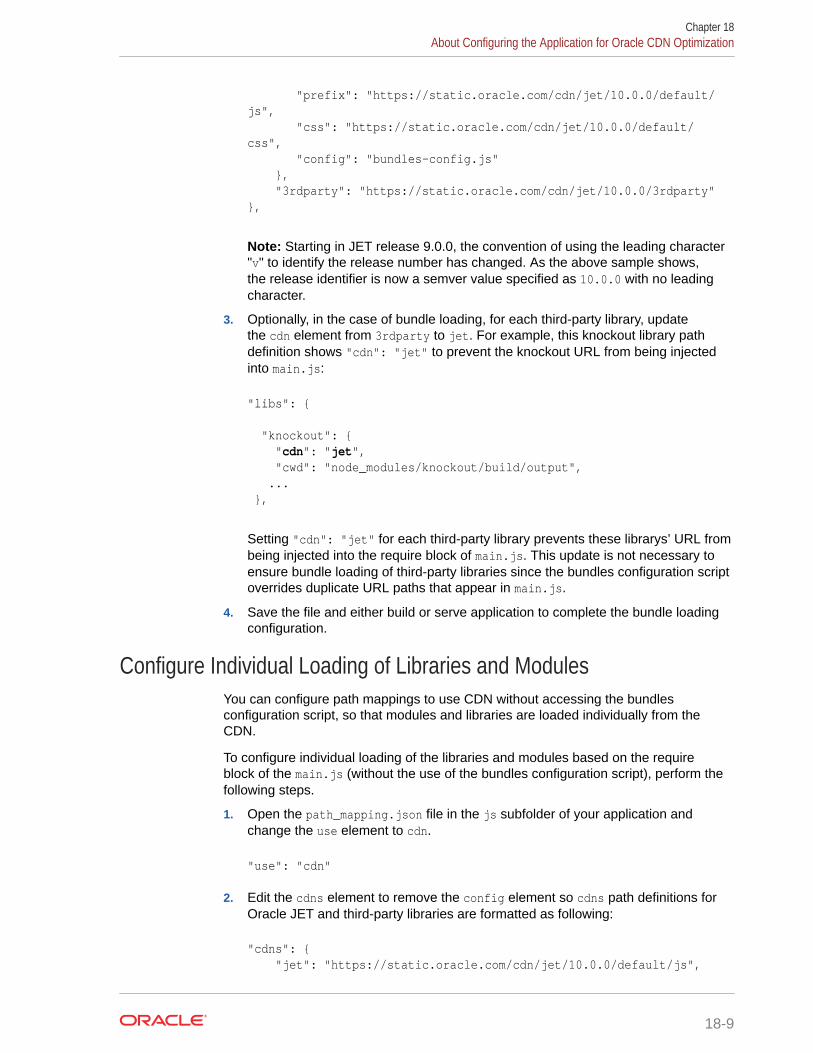
"prefix": "https://static.oracle.com/cdn/jet/10.0.0/default/js", "css": "https://static.oracle.com/cdn/jet/10.0.0/default/css", "config": "bundles-config.js" }, "3rdparty": "https://static.oracle.com/cdn/jet/10.0.0/3rdparty"},
Note: Starting in JET release 9.0.0, the convention of using the leading character"v" to identify the release number has changed. As the above sample shows,the release identifier is now a semver value specified as 10.0.0 with no leadingcharacter.
3. Optionally, in the case of bundle loading, for each third-party library, updatethe cdn element from 3rdparty to jet. For example, this knockout library pathdefinition shows "cdn": "jet" to prevent the knockout URL from being injectedinto main.js:
"libs": {
"knockout": { "cdn": "jet", "cwd": "node_modules/knockout/build/output", ... },
Setting "cdn": "jet" for each third-party library prevents these librarys’ URL frombeing injected into the require block of main.js. This update is not necessary toensure bundle loading of third-party libraries since the bundles configuration scriptoverrides duplicate URL paths that appear in main.js.
4. Save the file and either build or serve application to complete the bundle loadingconfiguration.
Configure Individual Loading of Libraries and ModulesYou can configure path mappings to use CDN without accessing the bundlesconfiguration script, so that modules and libraries are loaded individually from theCDN.
To configure individual loading of the libraries and modules based on the requireblock of the main.js (without the use of the bundles configuration script), perform thefollowing steps.
1. Open the path_mapping.json file in the js subfolder of your application andchange the use element to cdn.
"use": "cdn"
2. Edit the cdns element to remove the config element so cdns path definitions forOracle JET and third-party libraries are formatted as following:
"cdns": { "jet": "https://static.oracle.com/cdn/jet/10.0.0/default/js",
Chapter 18About Configuring the Application for Oracle CDN Optimization
18-9
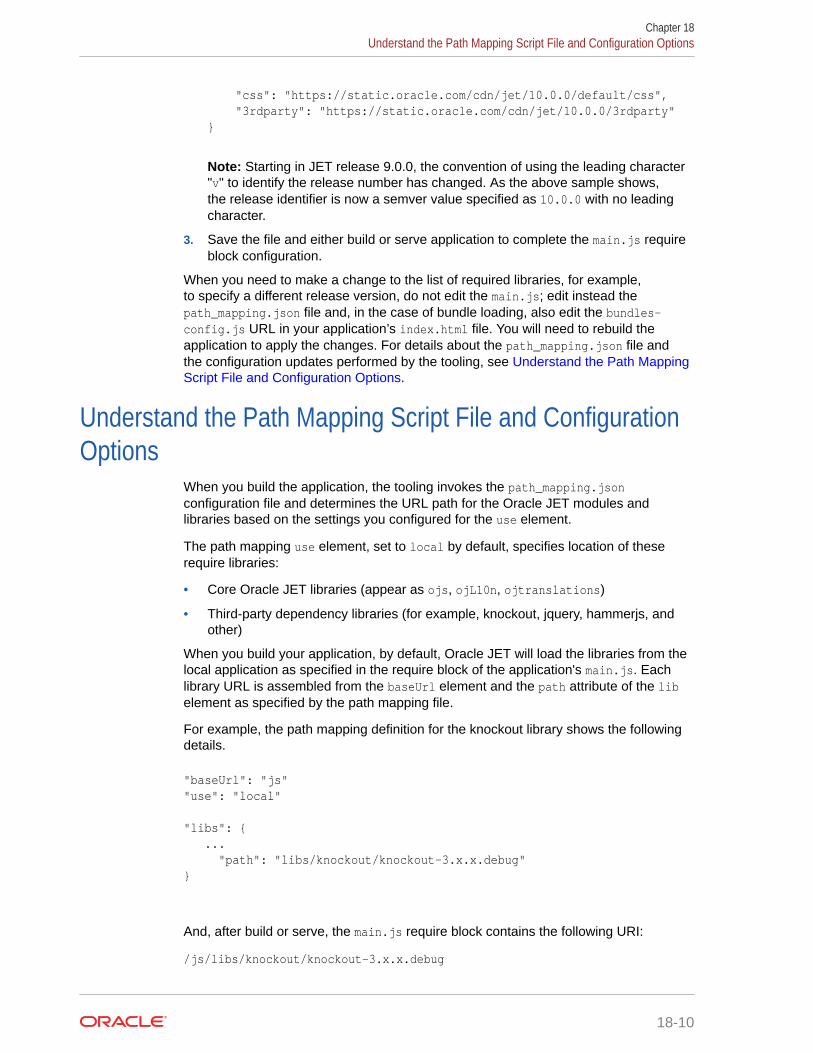
"css": "https://static.oracle.com/cdn/jet/10.0.0/default/css", "3rdparty": "https://static.oracle.com/cdn/jet/10.0.0/3rdparty"}
Note: Starting in JET release 9.0.0, the convention of using the leading character"v" to identify the release number has changed. As the above sample shows,the release identifier is now a semver value specified as 10.0.0 with no leadingcharacter.
3. Save the file and either build or serve application to complete the main.js requireblock configuration.
When you need to make a change to the list of required libraries, for example,to specify a different release version, do not edit the main.js; edit instead thepath_mapping.json file and, in the case of bundle loading, also edit the bundles-config.js URL in your application’s index.html file. You will need to rebuild theapplication to apply the changes. For details about the path_mapping.json file andthe configuration updates performed by the tooling, see Understand the Path MappingScript File and Configuration Options.
Understand the Path Mapping Script File and ConfigurationOptions
When you build the application, the tooling invokes the path_mapping.jsonconfiguration file and determines the URL path for the Oracle JET modules andlibraries based on the settings you configured for the use element.
The path mapping use element, set to local by default, specifies location of theserequire libraries:
• Core Oracle JET libraries (appear as ojs, ojL10n, ojtranslations)
• Third-party dependency libraries (for example, knockout, jquery, hammerjs, andother)
When you build your application, by default, Oracle JET will load the libraries from thelocal application as specified in the require block of the application's main.js. Eachlibrary URL is assembled from the baseUrl element and the path attribute of the libelement as specified by the path mapping file.
For example, the path mapping definition for the knockout library shows the followingdetails.
"baseUrl": "js""use": "local"
"libs": { ... "path": "libs/knockout/knockout-3.x.x.debug"}
And, after build or serve, the main.js require block contains the following URI:
/js/libs/knockout/knockout-3.x.x.debug
Chapter 18Understand the Path Mapping Script File and Configuration Options
18-10
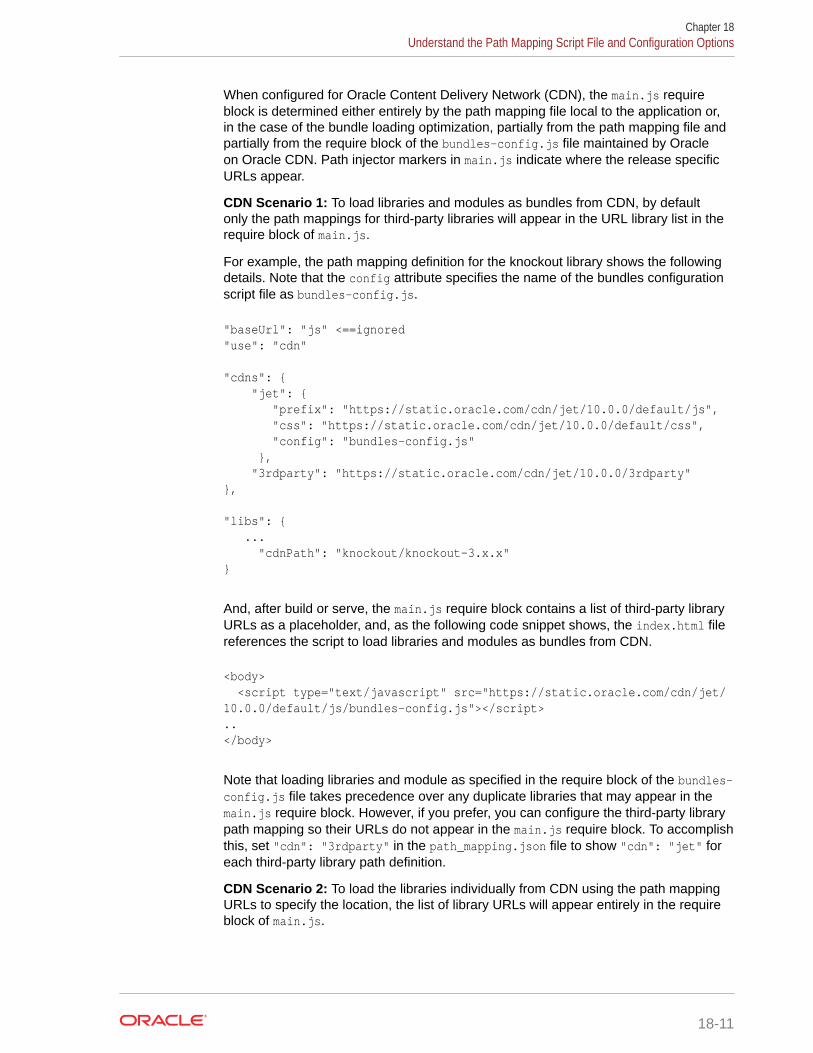
When configured for Oracle Content Delivery Network (CDN), the main.js requireblock is determined either entirely by the path mapping file local to the application or,in the case of the bundle loading optimization, partially from the path mapping file andpartially from the require block of the bundles-config.js file maintained by Oracleon Oracle CDN. Path injector markers in main.js indicate where the release specificURLs appear.
CDN Scenario 1: To load libraries and modules as bundles from CDN, by defaultonly the path mappings for third-party libraries will appear in the URL library list in therequire block of main.js.
For example, the path mapping definition for the knockout library shows the followingdetails. Note that the config attribute specifies the name of the bundles configurationscript file as bundles-config.js.
"baseUrl": "js" <==ignored"use": "cdn"
"cdns": { "jet": { "prefix": "https://static.oracle.com/cdn/jet/10.0.0/default/js", "css": "https://static.oracle.com/cdn/jet/10.0.0/default/css", "config": "bundles-config.js" }, "3rdparty": "https://static.oracle.com/cdn/jet/10.0.0/3rdparty"},
"libs": { ... "cdnPath": "knockout/knockout-3.x.x"}
And, after build or serve, the main.js require block contains a list of third-party libraryURLs as a placeholder, and, as the following code snippet shows, the index.html filereferences the script to load libraries and modules as bundles from CDN.
<body> <script type="text/javascript" src="https://static.oracle.com/cdn/jet/10.0.0/default/js/bundles-config.js"></script>..</body>
Note that loading libraries and module as specified in the require block of the bundles-config.js file takes precedence over any duplicate libraries that may appear in themain.js require block. However, if you prefer, you can configure the third-party librarypath mapping so their URLs do not appear in the main.js require block. To accomplishthis, set "cdn": "3rdparty" in the path_mapping.json file to show "cdn": "jet" foreach third-party library path definition.
CDN Scenario 2: To load the libraries individually from CDN using the path mappingURLs to specify the location, the list of library URLs will appear entirely in the requireblock of main.js.
Chapter 18Understand the Path Mapping Script File and Configuration Options
18-11
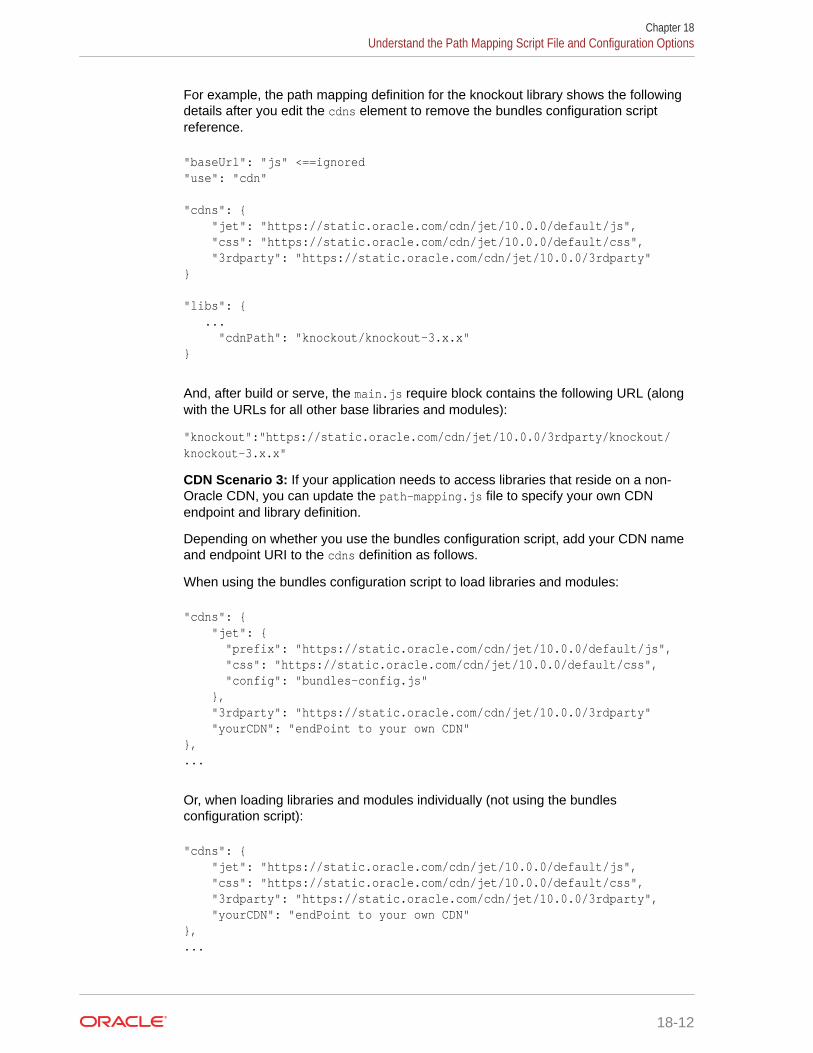
For example, the path mapping definition for the knockout library shows the followingdetails after you edit the cdns element to remove the bundles configuration scriptreference.
"baseUrl": "js" <==ignored"use": "cdn"
"cdns": { "jet": "https://static.oracle.com/cdn/jet/10.0.0/default/js", "css": "https://static.oracle.com/cdn/jet/10.0.0/default/css", "3rdparty": "https://static.oracle.com/cdn/jet/10.0.0/3rdparty"}
"libs": { ... "cdnPath": "knockout/knockout-3.x.x"}
And, after build or serve, the main.js require block contains the following URL (alongwith the URLs for all other base libraries and modules):
"knockout":"https://static.oracle.com/cdn/jet/10.0.0/3rdparty/knockout/knockout-3.x.x"
CDN Scenario 3: If your application needs to access libraries that reside on a non-Oracle CDN, you can update the path-mapping.js file to specify your own CDNendpoint and library definition.
Depending on whether you use the bundles configuration script, add your CDN nameand endpoint URI to the cdns definition as follows.
When using the bundles configuration script to load libraries and modules:
"cdns": { "jet": { "prefix": "https://static.oracle.com/cdn/jet/10.0.0/default/js", "css": "https://static.oracle.com/cdn/jet/10.0.0/default/css", "config": "bundles-config.js" }, "3rdparty": "https://static.oracle.com/cdn/jet/10.0.0/3rdparty" "yourCDN": "endPoint to your own CDN"},...
Or, when loading libraries and modules individually (not using the bundlesconfiguration script):
"cdns": { "jet": "https://static.oracle.com/cdn/jet/10.0.0/default/js", "css": "https://static.oracle.com/cdn/jet/10.0.0/default/css", "3rdparty": "https://static.oracle.com/cdn/jet/10.0.0/3rdparty", "yourCDN": "endPoint to your own CDN"},...
Chapter 18Understand the Path Mapping Script File and Configuration Options
18-12

Then, in the list of libraries, define your library entry similar to the following sample.
"yourLib": { "cdn": "yourCDN", "cwd": "node_modules/yourLib", "debug": { "src": "yourLib.js", "path": "libs/yourLib/yourLib.js", "cdnPath": "yourLib/yourLib.js" }, "release": { "src": "yourLib.min.js", "path": "libs/yourLib/yourLib.min.js", "cdnPath": "yourLib/yourLib.min.js" }},
Chapter 18Understand the Path Mapping Script File and Configuration Options
18-13
19Auditing Application Files
An Oracle JET audit runs against the application files of your JET project andperforms a static analysis of the source code from an Oracle JET perspective. Auditdiagnostic messages result from an invocation of the Oracle JET Audit Framework(JAF) command-line utility and are governed by rules that are specific to a JET releaseversion.Oracle JET Audit Framework (JAF) relies on the configuration file created by the JETtooling when you invoke the JAF initialization command ojaf --init in a CommandPrompt window on the JET application.
The oraclejafconfig.json file that you create when you initialize Oracle JAF thefirst time defines the properties that you can use to control many aspects of yourJET application audit. For example, by configuring the JAF audit, you can perform thefollowing.
• Specify the JET version when you want to use audit rules that are specific to aJET version. This is configured by default as the JET version of the application tobe audited.
• Specify the file set when you want to exclude application directories and file types.This is configured by default to include all files of the application to be audited.
• Invoke custom audit rules that are user-defined and assembled as a JAF rule packfor distribution.
• Prevent specific audit rules from running in the audit or limiting the audit to onlyrules of a certain severity level.
• Include the metadata of Oracle JET Web Components to audit the HTML files ofyour application's custom components.
• Control the JavaScript source code to audit based on JAF comments that youembed in your source files.
• Work with the output of the audit to customize the presentation of audit messagesor to suppress audit messages.
The properties in the oraclejafconfig.json file configuration settings are up to youto specify. By doing so, you can fine-tune the audit to focus audit results on only thesource that you intend. Multiple configuration files can created for specific runtimecriteria or projects. The configuration files are JSON format, but JavaScript stylecomments are permitted for documentation purposes. The configuration file to be usedcan be specified on the command-line.
Each time you run the audit from a Command Prompt window, Oracle JAFsearches the directory in which you initiated the audit for the JAF configuration fileoraclejafconfig.json. If no configuration file is found there, then JAF processes onlyHTML files found in the current directory. In that case, the default JAF configurationsettings are used for the audit.
If the built-in audit rules provided with the JAF installation do not meet all thediagnostic requirements of your application, you can write custom audit rules to extendJAF. You implement user-defined audit rules as JavaScript files. The JAF API allows
19-1
you to register event listeners and handle the audit context created by JAF on the fileset of your JET projects. Custom audit rules can be assembled into distributable rulepacks and invoked by developers on any Oracle JET application.
For more information about JAF, see Using and Extending the Oracle JET AuditFramework.
Chapter 19
19-2
20Testing and Debugging
Test and debug Oracle JET web applications using your favorite testing and debuggingtools for client-side JavaScript applications. You can use a similar process to debughybrid mobile applications when run in the browser, and you can also test and debughybrid mobile applications on a simulator, emulator, or device.
Topics:
• Typical Workflow for Testing and Debugging an Oracle JET Application
• Test Oracle JET Applications
• Debug Oracle JET Applications
Typical Workflow for Testing and Debugging an Oracle JETApplication
Understand testing tools and debugging options for Oracle JET web and hybrid mobileapplications.
To test and debug an Oracle JET application, refer to the typical workflow described inthe following table:
Task Description More Information
Test Oracle JETapplications
Identify testing tools for web andhybrid mobile applications.
Test Oracle JET Applications
Debug Oracle JETapplications
Identify debugging options forOracle JET web and hybrid mobileapplications.
Debug Oracle JET Applications
Test Oracle JET ApplicationsUse third-party tools such as QUnit or Selenium WebDriver to test your Oracle JETapplication. Google, Apple, and Microsoft also provide instructions for testing Andoid,iOS, and Windows applications.
Topics:
• Test Applications
• Test Hybrid Mobile Applications
• Use BusyContext API in Automated Testing
20-1

Test ApplicationsYou can use virtually any testing tool that tests client-side HTML applications written inJavaScript for testing Oracle JET applications.
For internal development, Oracle JET uses the following tools for testing Oracle JETcomponents and toolkit features:
• QUnit: JavaScript unit testing framework capable of testing any generic JavaScriptproject and used by the jQuery, jQuery UI, and jQuery Mobile projects.
QUnit requires configuration on your test page to include library and CSSreferences. You must also add the HTML div element to your page. In theexample below, the highlighted code shows additions required by QUnit. Theactual paths will vary, depending upon where you install QUnit.
<!doctype html><html lang="en"> <head> <link rel="stylesheet" href="../../../../code/css/libs/oj/v10.0.0/alta/oj-alta-min.css"></link> <link rel="stylesheet" href="../../../css/qunit.css"> <script type="text/javascript" src="../../../js/qunit.js"></script> <script> QUnit.config.autoload = false; QUnit.config.autostart = false; </script> <script data-main="js/main" src="../../../../code/js/libs/require/require.js"></script> </head> <body> <div id="qunit"></div> <div id="qunit-fixture"> <oj-slider id="slider1"></oj-slider> </div> </body></html>
For more information about QUnit, see http://qunitjs.com.
• Selenium WebDriver: Alternative method of testing applications that you do notwant to modify for QUnit or that contain multiple HTML pages.
For additional information, see http://docs.seleniumhq.org/projects/webdriver.
Test Hybrid Mobile ApplicationsYou can test your hybrid mobile application in a local browser, using an emulator orsimulator, and on an attached device.
• Testing in a local browser
When you invoke ojet serve with the –-browser option to serve your hybridmobile application in a local browser, you can use the same method for testingAndroid, iOS, and Windows applications that you would use for testing any webapplication. However, this method can only approximate the end user experienceand is most useful early in the development process.
Chapter 20Test Oracle JET Applications
20-2

Depending upon your use case, you may need to add Cordova plugins to addfunctionality to your mobile hybrid app. Many Cordova plugins provide mock datawhen deploying to the browser platform. If, however, you add a Cordova pluginthat doesn’t have browser platform support, you can add objects that representmock data to cordovaMock.js in src/js.
• Testing in an emulator or simulator
You can invoke ojet serve with the --emulator option to test the functionalityof your application in the iOS Simulator, Windows emulator, or Android VirtualDevices (AVDs) using the Android emulator. These methods can approximate thelook and feel of an actual device, but you won’t be able to test performance orresponsiveness to touch reliably. For additional information, see
– iOS Simulator
– Android Emulator
– Windows Emulator
• Testing on attached physical devices
You can invoke ojet serve with the destination=device option to test thefunctionality on attached physical devices. This provides the most reliable formof testing, but you may not have access to all the devices that your users mightuse to run your application.
If you want to serve your application to an iOS device, you must take additionalsteps as described in Package and Publish Hybrid Mobile Applications.
• Working around cross-origin resource sharing (CORS) issues
Hybrid mobile applications that communicate with remote services may encounterissues if they request resources that originate in difference domains. An exampleincludes a response such as the following:
No 'Access-Control-Allow-Origin' header is present on the requested resource.
To work around these types of issue, your server-side administrator may needto modify the policy used by the remote server to allow cross-site requests.For example, to access a remote service managed by Oracle’s Mobile CloudService (MCS), an MCS administrator configures MCS’s Security_AllowOriginenvironment policy with a comma separated list of URL patterns that identify theremote services that serve a resource from different domains.
For additional information about testing hybrid mobile applications on specificplatforms, see the following resources:
• Android Testing
• iOS Testing
• Windows Debugging, testing, and performance
Use BusyContext API in Automated TestingUse BusyContext to wait for a component or other condition to complete some actionbefore interacting with it.
The purpose of the BusyContext API is to accommodate sequential dependencies ofasynchronous operations. Typically, you use BusyContext in test automation when you
Chapter 20Test Oracle JET Applications
20-3

want to wait for an animation to complete, a JET page to load, or a data fetch tocomplete.
Wait Scenarios
The Busy Context API will block until all the busy states resolve or a timeout periodlapses. There are four primary wait scenarios:
• Components that implement animation effects
• Components that fetch data from a REST endpoint
• Pages that load bootstrap files, such as the Oracle JET libraries loaded withRequireJS
• Customer-defined scenarios that are not limited to Oracle JET, such as blockingconditions associated with application domain logic
Determining the Busy Context’s Scope
The first step for waiting on a busy context is to determine the wait condition. You canscope the granularity of a busy context for the entirety of the page or limit the scope toa specific DOM element. Busy contexts have hierarchical dependencies mirroring thedocument's DOM structure with the root being the page context. Depending on yourparticular scenario, target one of the following busy context scopes:
• Scoped for the page
Choose the page busy context to represent the page as a whole. Automationdevelopers commonly need to wait until the page is fully loaded before startingautomation. Also, automation developers are usually interested in testing thefunctionality of an application having multiple Oracle JET components rather thana single component.
var busyContext = Context.getPageContext().getBusyContext();
• Scoped for the nearest DOM element
Choose a busy context scoped for a DOM node when your application must waituntil a specific component’s operation completes. For example, you may want towait until an ojPopup completes an open or close animation before initiating thenext task in the application flow. Use the data-oj-context marker attribute todefine a busy context for a DOM subtree.
<div id="mycontext" data-oj-context> ... <!-- JET content --> ...</div>
var node = document.querySelector("#mycontext");var busyContext = Context.getContext(node).getBusyContext();
Determining the Ready State
After obtaining a busy context, the next step is to inquire the busy state. BusyContexthas two operations for inquiring the ready state: isReady() and whenReady(). TheisReady() method immediately returns the state of the busy context. The whenReady()
Chapter 20Test Oracle JET Applications
20-4
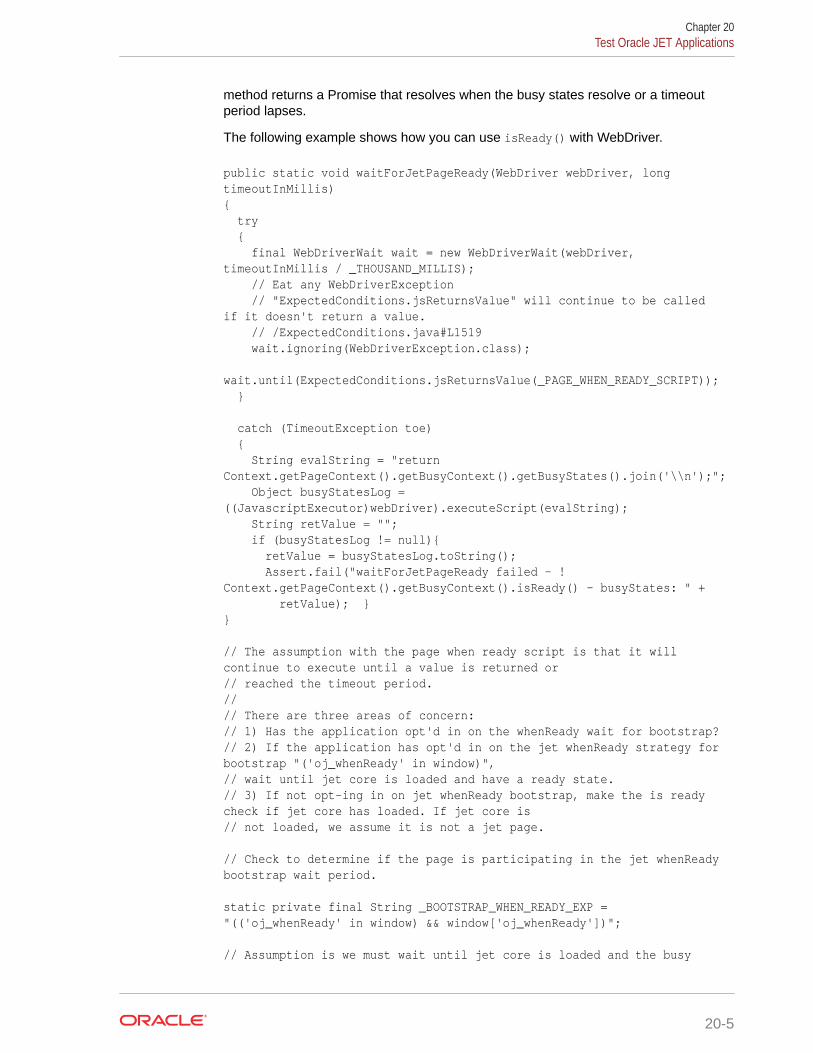
method returns a Promise that resolves when the busy states resolve or a timeoutperiod lapses.
The following example shows how you can use isReady() with WebDriver.
public static void waitForJetPageReady(WebDriver webDriver, long timeoutInMillis){ try { final WebDriverWait wait = new WebDriverWait(webDriver, timeoutInMillis / _THOUSAND_MILLIS); // Eat any WebDriverException // "ExpectedConditions.jsReturnsValue" will continue to be called if it doesn't return a value. // /ExpectedConditions.java#L1519 wait.ignoring(WebDriverException.class); wait.until(ExpectedConditions.jsReturnsValue(_PAGE_WHEN_READY_SCRIPT)); }
catch (TimeoutException toe) { String evalString = "return Context.getPageContext().getBusyContext().getBusyStates().join('\\n');"; Object busyStatesLog = ((JavascriptExecutor)webDriver).executeScript(evalString); String retValue = ""; if (busyStatesLog != null){ retValue = busyStatesLog.toString(); Assert.fail("waitForJetPageReady failed - !Context.getPageContext().getBusyContext().isReady() - busyStates: " + retValue); }} // The assumption with the page when ready script is that it will continue to execute until a value is returned or// reached the timeout period.//// There are three areas of concern:// 1) Has the application opt'd in on the whenReady wait for bootstrap?// 2) If the application has opt'd in on the jet whenReady strategy for bootstrap "('oj_whenReady' in window)",// wait until jet core is loaded and have a ready state.// 3) If not opt-ing in on jet whenReady bootstrap, make the is ready check if jet core has loaded. If jet core is// not loaded, we assume it is not a jet page.
// Check to determine if the page is participating in the jet whenReady bootstrap wait period.
static private final String _BOOTSTRAP_WHEN_READY_EXP = "(('oj_whenReady' in window) && window['oj_whenReady'])"; // Assumption is we must wait until jet core is loaded and the busy
Chapter 20Test Oracle JET Applications
20-5
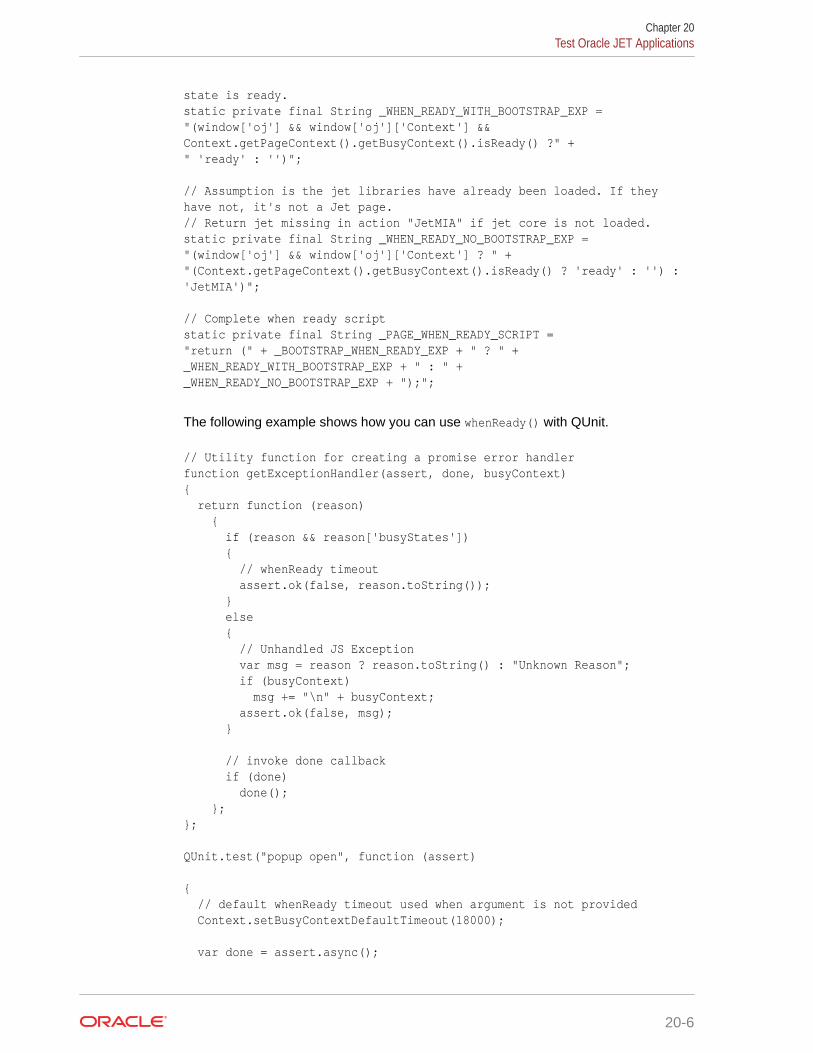
state is ready.static private final String _WHEN_READY_WITH_BOOTSTRAP_EXP ="(window['oj'] && window['oj']['Context'] && Context.getPageContext().getBusyContext().isReady() ?" +" 'ready' : '')";
// Assumption is the jet libraries have already been loaded. If they have not, it's not a Jet page.// Return jet missing in action "JetMIA" if jet core is not loaded.static private final String _WHEN_READY_NO_BOOTSTRAP_EXP ="(window['oj'] && window['oj']['Context'] ? " +"(Context.getPageContext().getBusyContext().isReady() ? 'ready' : '') : 'JetMIA')";
// Complete when ready scriptstatic private final String _PAGE_WHEN_READY_SCRIPT ="return (" + _BOOTSTRAP_WHEN_READY_EXP + " ? " + _WHEN_READY_WITH_BOOTSTRAP_EXP + " : " +_WHEN_READY_NO_BOOTSTRAP_EXP + ");";
The following example shows how you can use whenReady() with QUnit.
// Utility function for creating a promise error handlerfunction getExceptionHandler(assert, done, busyContext){ return function (reason) { if (reason && reason['busyStates']) { // whenReady timeout assert.ok(false, reason.toString()); } else { // Unhandled JS Exception var msg = reason ? reason.toString() : "Unknown Reason"; if (busyContext) msg += "\n" + busyContext; assert.ok(false, msg); }
// invoke done callback if (done) done(); };};
QUnit.test("popup open", function (assert)
{ // default whenReady timeout used when argument is not provided Context.setBusyContextDefaultTimeout(18000);
var done = assert.async();
Chapter 20Test Oracle JET Applications
20-6
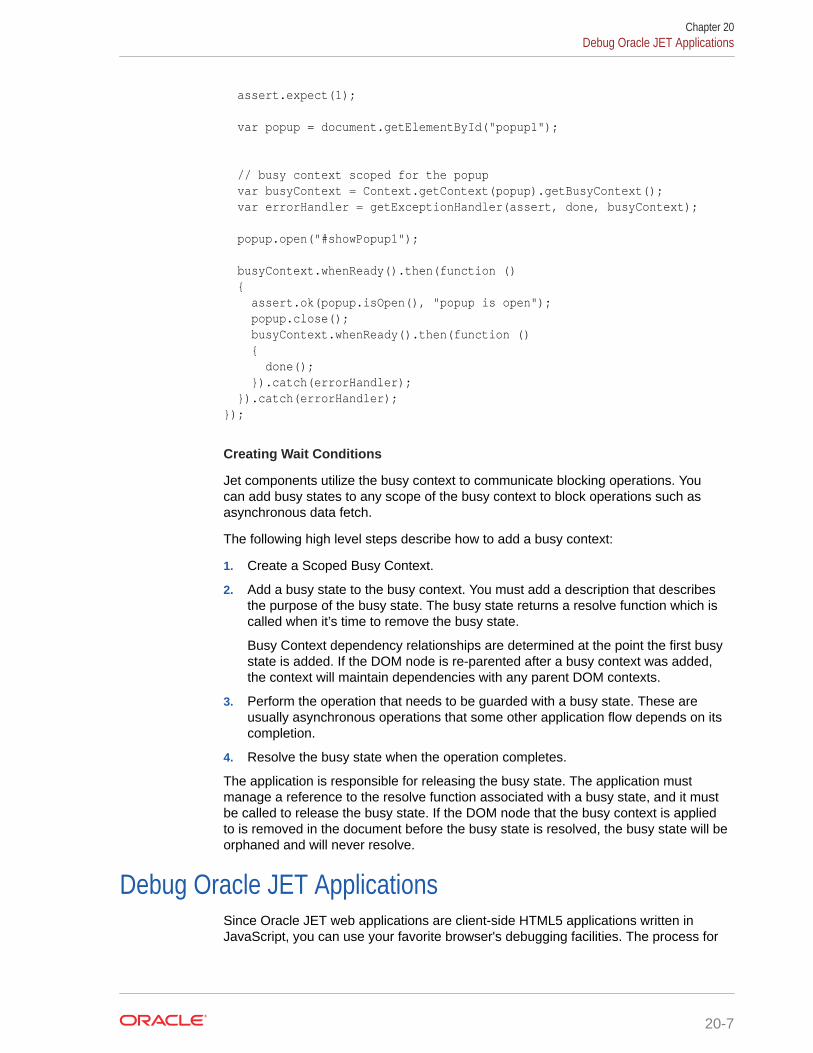
assert.expect(1);
var popup = document.getElementById("popup1"); // busy context scoped for the popup var busyContext = Context.getContext(popup).getBusyContext(); var errorHandler = getExceptionHandler(assert, done, busyContext);
popup.open("#showPopup1");
busyContext.whenReady().then(function () { assert.ok(popup.isOpen(), "popup is open"); popup.close(); busyContext.whenReady().then(function () { done(); }).catch(errorHandler); }).catch(errorHandler);});
Creating Wait Conditions
Jet components utilize the busy context to communicate blocking operations. Youcan add busy states to any scope of the busy context to block operations such asasynchronous data fetch.
The following high level steps describe how to add a busy context:
1. Create a Scoped Busy Context.
2. Add a busy state to the busy context. You must add a description that describesthe purpose of the busy state. The busy state returns a resolve function which iscalled when it’s time to remove the busy state.
Busy Context dependency relationships are determined at the point the first busystate is added. If the DOM node is re-parented after a busy context was added,the context will maintain dependencies with any parent DOM contexts.
3. Perform the operation that needs to be guarded with a busy state. These areusually asynchronous operations that some other application flow depends on itscompletion.
4. Resolve the busy state when the operation completes.
The application is responsible for releasing the busy state. The application mustmanage a reference to the resolve function associated with a busy state, and it mustbe called to release the busy state. If the DOM node that the busy context is appliedto is removed in the document before the busy state is resolved, the busy state will beorphaned and will never resolve.
Debug Oracle JET ApplicationsSince Oracle JET web applications are client-side HTML5 applications written inJavaScript, you can use your favorite browser's debugging facilities. The process for
Chapter 20Debug Oracle JET Applications
20-7
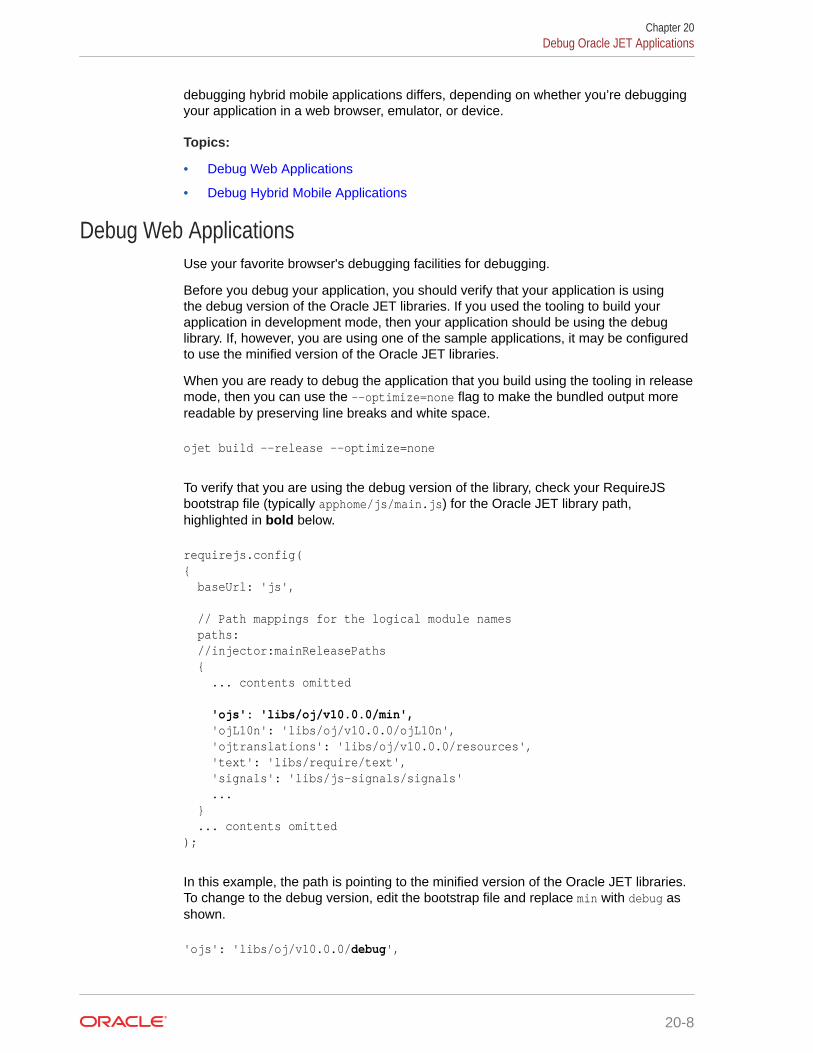
debugging hybrid mobile applications differs, depending on whether you’re debuggingyour application in a web browser, emulator, or device.
Topics:
• Debug Web Applications
• Debug Hybrid Mobile Applications
Debug Web ApplicationsUse your favorite browser's debugging facilities for debugging.
Before you debug your application, you should verify that your application is usingthe debug version of the Oracle JET libraries. If you used the tooling to build yourapplication in development mode, then your application should be using the debuglibrary. If, however, you are using one of the sample applications, it may be configuredto use the minified version of the Oracle JET libraries.
When you are ready to debug the application that you build using the tooling in releasemode, then you can use the --optimize=none flag to make the bundled output morereadable by preserving line breaks and white space.
ojet build --release --optimize=none
To verify that you are using the debug version of the library, check your RequireJSbootstrap file (typically apphome/js/main.js) for the Oracle JET library path,highlighted in bold below.
requirejs.config({ baseUrl: 'js',
// Path mappings for the logical module names paths: //injector:mainReleasePaths { ... contents omitted
'ojs': 'libs/oj/v10.0.0/min', 'ojL10n': 'libs/oj/v10.0.0/ojL10n', 'ojtranslations': 'libs/oj/v10.0.0/resources', 'text': 'libs/require/text', 'signals': 'libs/js-signals/signals' ... } ... contents omitted);
In this example, the path is pointing to the minified version of the Oracle JET libraries.To change to the debug version, edit the bootstrap file and replace min with debug asshown.
'ojs': 'libs/oj/v10.0.0/debug',
Chapter 20Debug Oracle JET Applications
20-8
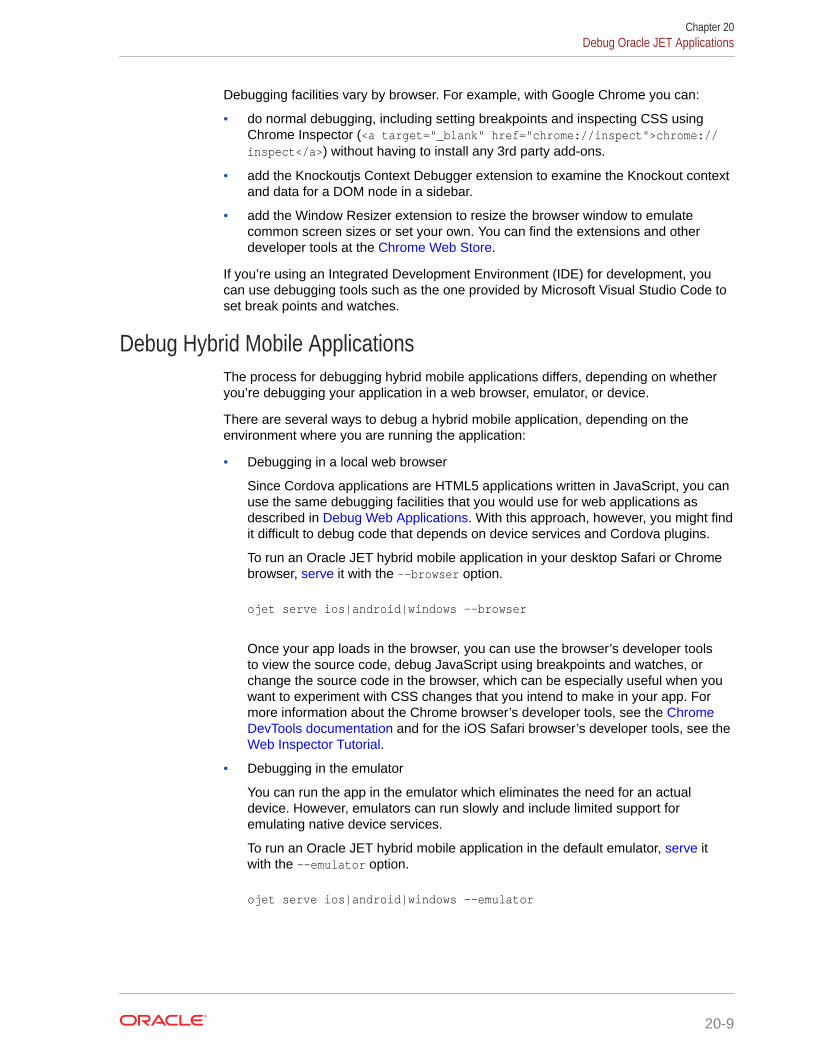
Debugging facilities vary by browser. For example, with Google Chrome you can:
• do normal debugging, including setting breakpoints and inspecting CSS usingChrome Inspector (<a target="_blank" href="chrome://inspect">chrome://inspect</a>) without having to install any 3rd party add-ons.
• add the Knockoutjs Context Debugger extension to examine the Knockout contextand data for a DOM node in a sidebar.
• add the Window Resizer extension to resize the browser window to emulatecommon screen sizes or set your own. You can find the extensions and otherdeveloper tools at the Chrome Web Store.
If you’re using an Integrated Development Environment (IDE) for development, youcan use debugging tools such as the one provided by Microsoft Visual Studio Code toset break points and watches.
Debug Hybrid Mobile ApplicationsThe process for debugging hybrid mobile applications differs, depending on whetheryou’re debugging your application in a web browser, emulator, or device.
There are several ways to debug a hybrid mobile application, depending on theenvironment where you are running the application:
• Debugging in a local web browser
Since Cordova applications are HTML5 applications written in JavaScript, you canuse the same debugging facilities that you would use for web applications asdescribed in Debug Web Applications. With this approach, however, you might findit difficult to debug code that depends on device services and Cordova plugins.
To run an Oracle JET hybrid mobile application in your desktop Safari or Chromebrowser, serve it with the --browser option.
ojet serve ios|android|windows --browser
Once your app loads in the browser, you can use the browser’s developer toolsto view the source code, debug JavaScript using breakpoints and watches, orchange the source code in the browser, which can be especially useful when youwant to experiment with CSS changes that you intend to make in your app. Formore information about the Chrome browser’s developer tools, see the ChromeDevTools documentation and for the iOS Safari browser’s developer tools, see theWeb Inspector Tutorial.
• Debugging in the emulator
You can run the app in the emulator which eliminates the need for an actualdevice. However, emulators can run slowly and include limited support foremulating native device services.
To run an Oracle JET hybrid mobile application in the default emulator, serve itwith the --emulator option.
ojet serve ios|android|windows --emulator
Chapter 20Debug Oracle JET Applications
20-9
You can also specify a named emulator or simulator on Android or iOS devices:
ojet serve ios|android|windows --emulator=emulator-name
To determine the emulator or simulator name:
– For Android emulators, run android avd at a command prompt.
– For iOS simulators, at a command prompt in the application’s hybrid directory,enter the following: ios-sim showdevicetypes.
• Debugging on the device
Debugging the application on a real device provides the most accurateexperience, but the development cycle can take longer since you must packagethe application, deploy it to the device, and use a desktop browser or otherdevelopment tool to connect to it running on the device.
To run an Oracle JET hybrid mobile application on the device, serve it with the--device option.
ojet serve ios|android|windows --device
Once the app installs and runs on the device or on the emulator, you can useyour browser’s developer tools to debug and inspect your application’s code as itexecutes. The browser developer tools that you use depend on the platform whereyour application runs.
Use the Safari browser’s Web Inspector, described in the Web Inspector Tutorial, ifyou run your app an iOS device or simulator.
Use the Chrome browser’s developer tools if your app runs on an Android emulatoror device. For the Android platform, once JET has served the app to the emulatoror device, enter chrome://inspect/ in the Chrome browser’s address bar to accessthe developer tools. This renders the Inspect with Chrome Developer Tools page thatlists the connected devices and the applications on these devices that you can inspectusing the developer tools. Click the inspect link beside the app you want to inspect, asillustrated by the following figure which shows the developer tools in the foreground forthe application running in the emulator.
Chapter 20Debug Oracle JET Applications
20-10
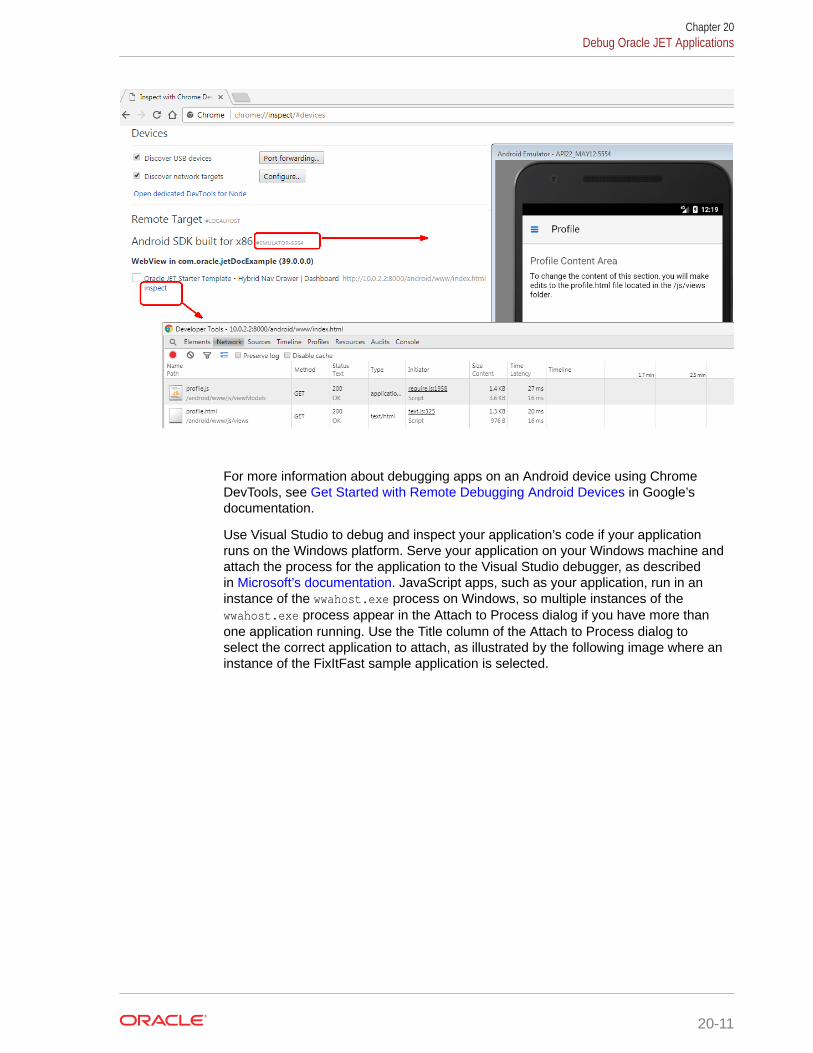
For more information about debugging apps on an Android device using ChromeDevTools, see Get Started with Remote Debugging Android Devices in Google’sdocumentation.
Use Visual Studio to debug and inspect your application’s code if your applicationruns on the Windows platform. Serve your application on your Windows machine andattach the process for the application to the Visual Studio debugger, as describedin Microsoft’s documentation. JavaScript apps, such as your application, run in aninstance of the wwahost.exe process on Windows, so multiple instances of thewwahost.exe process appear in the Attach to Process dialog if you have more thanone application running. Use the Title column of the Attach to Process dialog toselect the correct application to attach, as illustrated by the following image where aninstance of the FixItFast sample application is selected.
Chapter 20Debug Oracle JET Applications
20-11
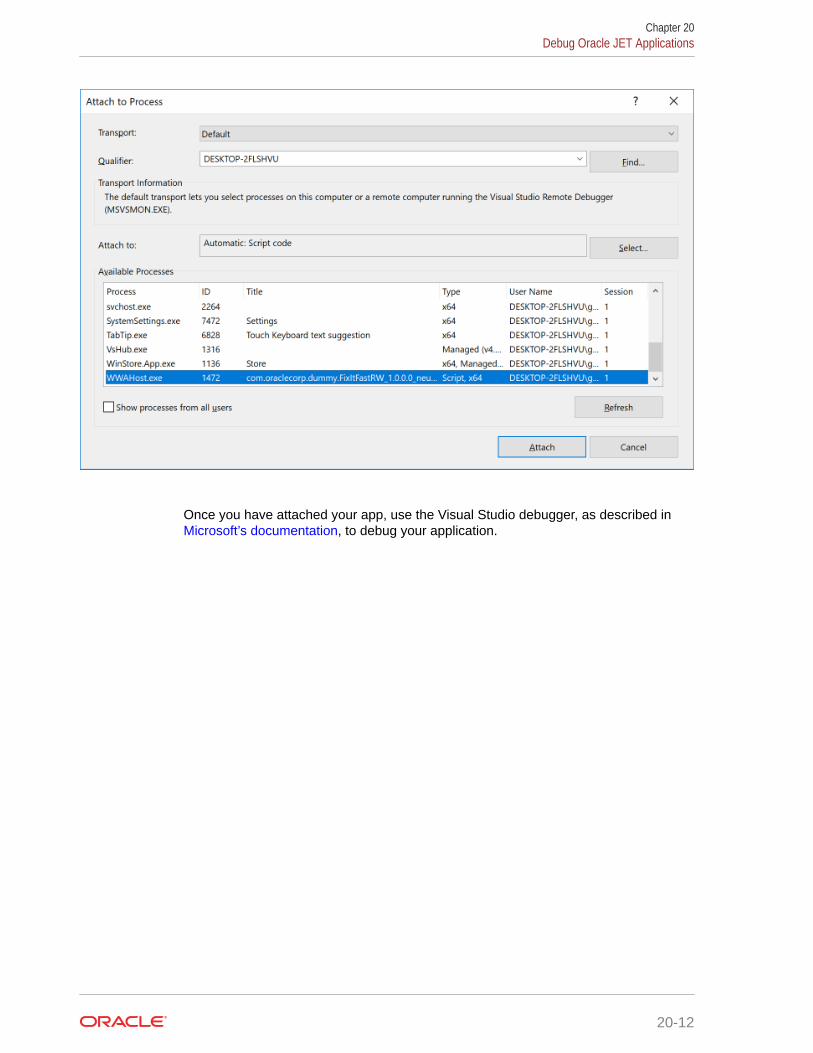
Once you have attached your app, use the Visual Studio debugger, as described inMicrosoft’s documentation, to debug your application.
Chapter 20Debug Oracle JET Applications
20-12
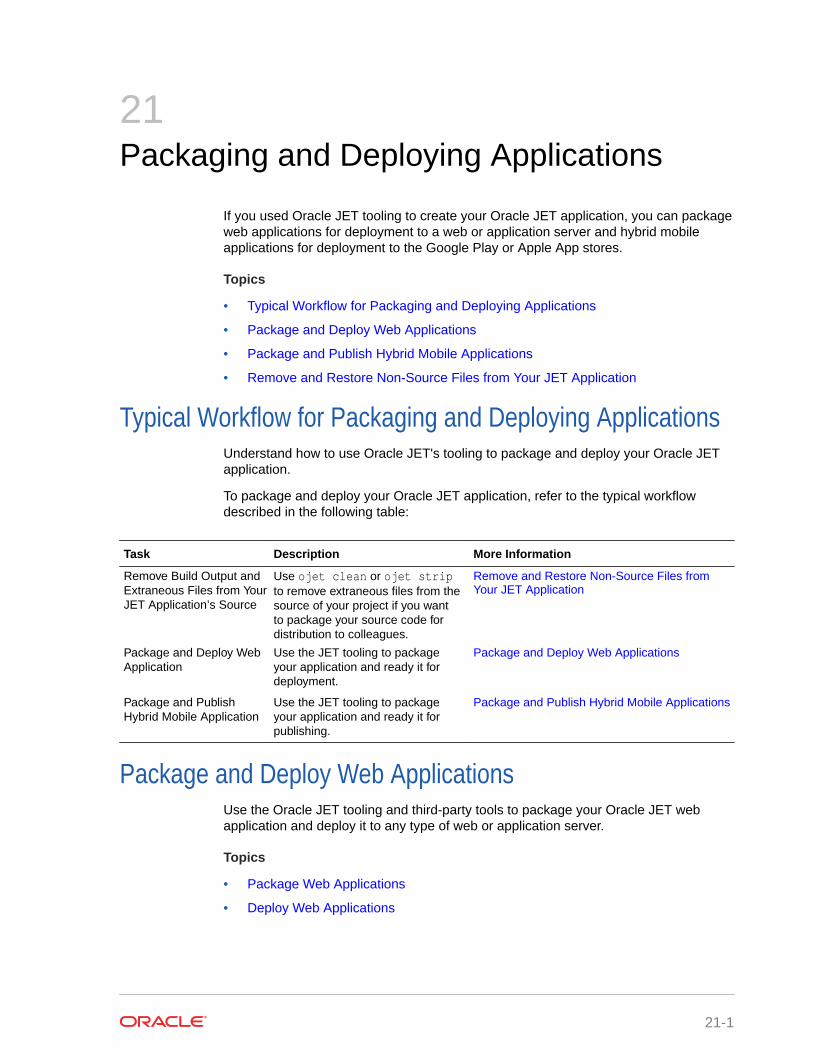
21Packaging and Deploying Applications
If you used Oracle JET tooling to create your Oracle JET application, you can packageweb applications for deployment to a web or application server and hybrid mobileapplications for deployment to the Google Play or Apple App stores.
Topics
• Typical Workflow for Packaging and Deploying Applications
• Package and Deploy Web Applications
• Package and Publish Hybrid Mobile Applications
• Remove and Restore Non-Source Files from Your JET Application
Typical Workflow for Packaging and Deploying ApplicationsUnderstand how to use Oracle JET's tooling to package and deploy your Oracle JETapplication.
To package and deploy your Oracle JET application, refer to the typical workflowdescribed in the following table:
Task Description More Information
Remove Build Output andExtraneous Files from YourJET Application’s Source
Use ojet clean or ojet stripto remove extraneous files from thesource of your project if you wantto package your source code fordistribution to colleagues.
Remove and Restore Non-Source Files fromYour JET Application
Package and Deploy WebApplication
Use the JET tooling to packageyour application and ready it fordeployment.
Package and Deploy Web Applications
Package and PublishHybrid Mobile Application
Use the JET tooling to packageyour application and ready it forpublishing.
Package and Publish Hybrid Mobile Applications
Package and Deploy Web ApplicationsUse the Oracle JET tooling and third-party tools to package your Oracle JET webapplication and deploy it to any type of web or application server.
Topics
• Package Web Applications
• Deploy Web Applications
21-1
Package Web ApplicationsIf you created your application using the tooling, use the Oracle JET command-line interface (CLI) to create a release version of your application containing yourapplication scripts and applicable Oracle JET code in minified format.
1. From a terminal prompt in your application’s root directory, enter the followingcommand: ojet build --release.
The command will take some time to complete. When it’s successful, you’ll see thefollowing message: Build finished!.
The command replaces the development version of the libraries and scripts inweb/js/ with minified versions where available.
2. To verify that the application still works as you expect, run ojet serve with therelease option.
The ojet serve --release command takes the same arguments that you used toserve your web application in development mode.
ojet serve --release [--serverPort=server-port-number --serverOnly]
Tip:
For a complete list of options, type ojet help serve at the terminalprompt.
Deploy Web ApplicationsOracle JET is a collection of HTML, JavaScript, and CSS files that you can deploy toany type of web or application server. There are no unique requirements for deployingOracle JET applications.
Deployment methods are quite varied and depend upon the type of serverenvironment your application is designed to run in. However, you should be able touse the same method for deploying Oracle JET applications that you would for anyother client interface in your specific environment.
For example, if you normally deploy applications as zip files, you can zip the webdirectory and use your normal deployment process.
Package and Publish Hybrid Mobile ApplicationsYou can use the Oracle JET command line tooling to package your hybrid mobile appfor publishing to Google Play, Windows Store, or Apple App Store.
Topics
• About Packaging and Publishing Hybrid Mobile Applications
• Package a Hybrid Mobile App on Android
• Package a Hybrid Mobile App on iOS
Chapter 21Package and Publish Hybrid Mobile Applications
21-2
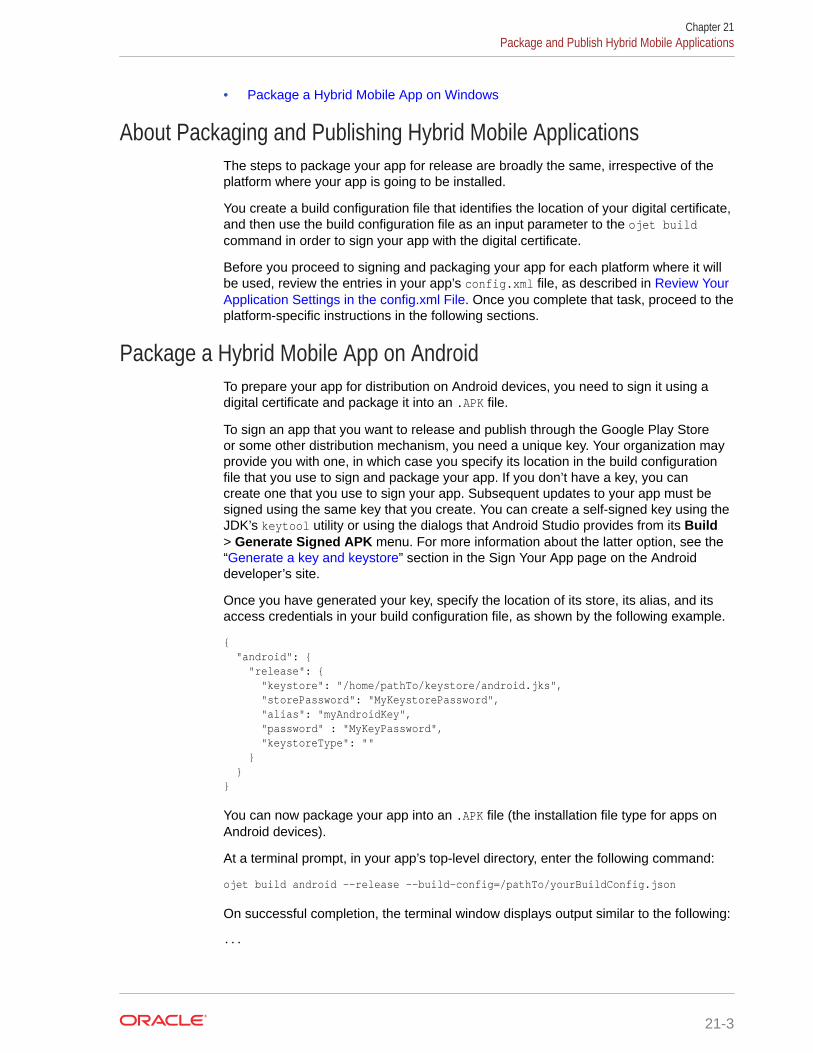
• Package a Hybrid Mobile App on Windows
About Packaging and Publishing Hybrid Mobile ApplicationsThe steps to package your app for release are broadly the same, irrespective of theplatform where your app is going to be installed.
You create a build configuration file that identifies the location of your digital certificate,and then use the build configuration file as an input parameter to the ojet buildcommand in order to sign your app with the digital certificate.
Before you proceed to signing and packaging your app for each platform where it willbe used, review the entries in your app’s config.xml file, as described in Review YourApplication Settings in the config.xml File. Once you complete that task, proceed to theplatform-specific instructions in the following sections.
Package a Hybrid Mobile App on AndroidTo prepare your app for distribution on Android devices, you need to sign it using adigital certificate and package it into an .APK file.
To sign an app that you want to release and publish through the Google Play Storeor some other distribution mechanism, you need a unique key. Your organization mayprovide you with one, in which case you specify its location in the build configurationfile that you use to sign and package your app. If you don’t have a key, you cancreate one that you use to sign your app. Subsequent updates to your app must besigned using the same key that you create. You can create a self-signed key using theJDK’s keytool utility or using the dialogs that Android Studio provides from its Build> Generate Signed APK menu. For more information about the latter option, see the“Generate a key and keystore” section in the Sign Your App page on the Androiddeveloper’s site.
Once you have generated your key, specify the location of its store, its alias, and itsaccess credentials in your build configuration file, as shown by the following example.
{ "android": { "release": { "keystore": "/home/pathTo/keystore/android.jks", "storePassword": "MyKeystorePassword", "alias": "myAndroidKey", "password" : "MyKeyPassword", "keystoreType": "" } }}
You can now package your app into an .APK file (the installation file type for apps onAndroid devices).
At a terminal prompt, in your app’s top-level directory, enter the following command:
ojet build android --release --build-config=/pathTo/yourBuildConfig.json
On successful completion, the terminal window displays output similar to the following:
...
Chapter 21Package and Publish Hybrid Mobile Applications
21-3
... Oracle JET CLIRunning "build:release" (build) taskRunning "oraclejet-build:release" (oraclejet-build) task Oracle JET Toolingcleaning staging path........BUILD SUCCESSFUL
Total time: 4.376 secs
Built the following apk(s): /appRootDir/hybrid/platforms/android/build/outputs/apk/android-release.apkCordova compile finished....
Done.
The build command outputs the .APK file that packages your app to the followinglocation:
/appRootDir/hybrid/platforms/android/build/outputs/apk/android-release.apk.
Use this file to release your app through a public app marketplace, such as GooglePlay, a private app store, or some other means. End users who install your app froma location other than Google Play need to configure their device to opt in to installthe app from an unknown source. For information about all these options, see https://developer.android.com/studio/publish/index.html#publishing-release.
Package a Hybrid Mobile App on iOSTo prepare your app for distribution on iOS devices, you need to sign it and package itinto an .IPA file.
Joining the Apple Developer Program is the first step to submit your iOS app to theApple App Store, to distribute an in-house app, or to sign an app that you distributeoutside the Apple App Store. As a member, you have access to the resources youneed to configure app services and to submit new apps and updates. For moreinformation on the Apple Developer Program, see Apple Developer Program in Apple’sdocumentation.
Code signing your app allows users to trust that your app has been created by asource known to Apple and that it hasn’t been tampered with. All apps must be codesigned and provisioned to deploy to an iOS device, to use certain Apple services, to bedistributed for testing on iOS devices, or to be uploaded to the Apple App Store.
Signing identities are used to sign your app or installer package. A signing identityconsists of a public-private key pair that Apple issues. The public-private key pairis stored in your keychain, and is used by cryptographic functions to generate thesignature. A certificate stored in your developer account contains the associated publickey. An intermediate certificate is also required to be in your keychain to ensure thatyour certificate is issued by a certificate authority.
Chapter 21Package and Publish Hybrid Mobile Applications
21-4
Code signing requires that you have both the signing identity and the intermediatecertificate installed in your keychain. When you install Xcode, Apple’s intermediatecertificates are added to your keychain for you.
There are different types of certificates. A development certificate identifies a personon your team and is used to run an app on a single device. A distribution certificateidentifies the team and is used to submit your app to the Apple App store orto distribute it outside of the store. Within an enterprise (organization) distributioncertificates can be shared by team members in order to deploy various apps to anumber of different devices. Certificates are issued and authorized by Apple.
If you are a member of an organization membership in the Apple Developer Program,you should request your team agent to provide your required signing identifies andcertificates. Otherwise, you can create all the types of certificates and signing identitiesyou need using the Apple Developer portal at https://developer.apple.com/account.
For more information on managing signing identities and certificates, see CodeSigning in Apple’s documentation.
When you code sign an app, a provisioning profile is installed into the package thatassociates one or more certificates and one or more devices with an applicationID. Provisioning profiles are created using the Apple Developer portal and must bedownloaded and installed into Xcode on your development machine.
An application ID is a two-part string used to identify one or more apps from a singledevelopment team. The string consists of a Team ID and a bundle ID search string,with a period (.) separating the two parts. The Team ID is supplied by Apple and isunique to a specific development team, while the bundle ID search string is suppliedby you to match either the bundle ID of a single app or a set of bundle IDs for a groupof your apps.
Application IDs and devices are registered with your team account using the AppleDeveloper portal.
For more information on managing application IDs, devices and provisioning profiles,see Apple’s documentation.
Once you have created and installed the necessary code signing artifacts, specify thedetails in your build configuration file, as shown in the following example:
{ "ios": { "debug": { "provisioningProfile": "My Developer Provisioning Profile ID", "developmentTeam": "My Team ID", "codeSignIdentity": "iPhone Developer", "packageType": "development" }, "release": { "provisioningProfile": "My Distribution Provisioning Profile ID", "developmentTeam": "My Team ID", "codeSignIdentity": "iPhone Distribution", "packageType": "enterprise" } }}
At time of writing, Apache Cordova does not support the new build system thatXcode 10, the latest release of Xcode, uses by default. If you use Xcode 10, youcan work around this issue until Apache Cordova supports Xcode 10 by including the
Chapter 21Package and Publish Hybrid Mobile Applications
21-5

buildFlag command-line argument in your build configuration file, as demonstrated bythe following example, so that the older build system builds your app.
{ ... "codeSignIdentity": "iPhone Distribution", "packageType": "enterprise", "buildFlag": [ "-UseModernBuildSystem=0" ] } }}
You can now package your app into an .IPA file (the installation file type for apps oniOS devices).
At a terminal prompt, in your app’s top-level directory, enter the following command:
ojet build ios --device --release --build-config=/pathTo/yourBuildConfig.json
On successful completion, the terminal window displays output similar to the following:
...** ARCHIVE SUCCEEDED **
Exported appName.xcarchive to: appDir/hybrid/platforms/ios/build/device
** EXPORT SUCCEEDED **
Cordova compile finished....
Done.
The resulting .IPA file will be located at:
appDir/hybrid/platforms/ios/build/device/appName.ipa
This file can be deployed to an iOS device that matches the installed provisioningprofile using iTunes, or you can release your app through the public marketplace,Apple App Store, a private app store, or some other means. For information aboutsubmitting your app to the Apple App Store, see Distribute an app through the AppStore in Apple’s documentation.
Package a Hybrid Mobile App on WindowsTo prepare your app for distribution on Windows devices or submission to theWindows Store, you need to sign it and package it into an .APPX file.
To complete this task, you need access to a digital certificate (a .PFX file) to sign yourapp. You must also create a build configuration file (build.json) where you specifythe location of the digital certificate and a number of other parameters. You use thebuild.json file as an input parameter to the ojet build command that JET uses topackage your app for Windows.
Chapter 21Package and Publish Hybrid Mobile Applications
21-6
Create the Build Configuration File to Package Your Application on WindowsYou need to create a build configuration file in JSON format that passes details, suchas the location of your PFX file, to the ojet build command that JET uses to packageyour app for Windows.
The following example build configuration file shows sample entries that you can useto package an app in debug and release mode.
{ "windows": { "debug": { "packageCertificateKeyFile": "C:\\AppRootDir\hybrid\platforms\windows\CordovaApp_TemporaryKey.pfx" }, "release": { "packageCertificateKeyFile": "c:\\path-to-key\\keycert.pfx", "packageThumbprint": "ABCABCABCABC123123123123", "publisherId": "CN=Doc Example,OU=JET,O=Oracle,C=US" } }}
Create your build.json file using the previous example as a reference. Forinformation about creating and installing a PFX file, see Install a Personal InformationExchange File in Your Computer’s Certificate Store. Obtain the values for thepackageThumbprint and the publisherID entries by running the following commandin a PowerShell command window:
Get-PfxCertificate -FilePath "c:\path-to-key\keycert.pfx"
PowerShell prompts you for the PFX file’s password if the file is password protected.Output similar to the following then appears:
Thumbprint Subject---------- -------702F25BA3FED453A3F8ADCC13900A6353703AB54 CN=Doc Example, OU=JET, O=Oracle, C=US
For more information about the Get-PfxCertificate command, see Microsoft’sdocumentation.
Build Your Application for WindowsExecute the ojet build command with the release flag from your app’s top leveldirectory to build the app.
You must specify the architecture that you want the app to target when you packagethe app for release, as demonstrated by the following example that targets the x64 andx86 architectures.
ojet build windows --release --platform-options="--archs=\"x64 x86\"" --build-config=pathTo\build.json
On successful completion, the following directory contains the application package andother resources for your app:
Chapter 21Package and Publish Hybrid Mobile Applications
21-7
AppRootDir\hybrid\platforms\windows\AppPackages\
The AppPackages directory contains another directory(CordovaApp.Windows10_*_Test). The actual name of the directory depends onthe version number of your app and the architecture that it targets. Forexample, a version 1 app that targets the x64 architecture will be namedCordovaApp.Windows10_1.0.0.0_x64_Test.
Submit the application package (.appx) in the directory to the Windows App Store ordistribute the contents to end users with Windows devices who want to install yourapp. The directory includes a PowerShell script (Add-AppDevPackage.ps1) that endusers execute to install the application. In addition to the script, the directory containsdependent packages and the certificate that signed the application. The followingexample lists the contents:
Add-AppDevPackage.ps1 Add-AppDevPackage.resourcesCordovaApp.Windows10_1.0.0.0_x64.appxCordovaApp.Windows10_1.0.0.0_x64.cer
For information about how to submit your app to the Windows Store, see https://developer.microsoft.com/en-us/store/publish-apps.
Remove and Restore Non-Source Files from Your JETApplication
The Oracle JET CLI provides commands (clean, strip, and restore) that manage thesource code of your JET application by removing extraneous files, such as the buildoutput for the platforms your JET application supports or npm modules installed intoyour project.
Consider using these commands when you want to package your source code fordistribution to colleagues or others who may work on the source code with you. Useof these commands may not be appropriate in all circumstances. Use of the cleanand strip commands will, for example, remove the build output for hybrid mobileapplications that includes the installation files to install the application on a user’sdevice.
ojet clean
Use the ojet clean command to clean the build output of your JET application.Specify the appropriate parameter with the ojet clean command to clean the buildoutput on the platform(s) that your JET application supports (android, ios, windows,and web). This command can be useful when developing a hybrid mobile applicationthat makes use of staging files as you can make sure that all staging files are removedbetween builds. These staging files will be regenerated the next time that you build orserve the hybrid mobile application. Run the following command in your application’stop level directory to clean the output of your application that targets the Androidplatform:
ojet clean android
Similarly, run ojet clean web to remove the contents of your application’s rootdirectory’s web directory.
Chapter 21Remove and Restore Non-Source Files from Your JET Application
21-8
ojet strip
Use ojet strip when you want to remove all non-source files from your JETapplication. In addition to the build output removed by the ojet clean command, ojetstrip removes additional dependencies, such as Cordova plugins, and npm modulesinstalled into your project. A typical usage scenario for the ojet strip command iswhen you want to distribute the source files of your JET application to a colleague andyou want to reduce the number of files to transmit to the minimum.
The ojet strip command relies on the presence of the .gitignore file in the rootdirectory of your application to determine what to remove. The file lists the directoriesthat are installed by the tooling and can therefore be restored by the tooling. Onlythose directories and files listed will be removed when you run ojet clean on theapplication folder.
If you do not use Git as your SCM tool and you want to run ojet strip to makea project easier to transmit, you can create the .gitignore file and add it to yourapplication's root folder with a list of the folders and files to remove, like this:
#List of web application folders to remove/node_modules/bower_components/themes/web
#List of hybrid mobile application folders to remove/hybrid/node_modules/hybrid/platforms/hybrid/www
#List of exceptions not to remove from above folder list!hybrid/pluginshybrid/plugins/*!hybrid/plugins/fetch.json
ojet restore
Use the ojet restore command to restore the dependencies, plugins, libraries, andWeb Components that the ojet strip command removes. After the ojet restorecommand completes, use the ojet build and/or ojet serve commands to build andserve your JET application.
For additional help with CLI commands, enter ojet help at a terminal prompt.
Chapter 21Remove and Restore Non-Source Files from Your JET Application
21-9

ATroubleshooting
Follow the same procedure for troubleshooting your Oracle JET application that youwould follow for any client-side JavaScript application.
If you're having issues troubleshooting a specific Oracle JET component or toolkitfeature, see Oracle JET Support. Before requesting support, be sure to check theproduct Release Notes.
A-1

BOracle JET Application Migration forRelease 10.0.0
If you used Oracle JET tooling to scaffold your application with Oracle JET version5.x.0 or later, you can migrate your application manually to version 10.0.0.
Before you migrate your application, be sure to check the Oracle JET Release Notesfor any component, framework, or other change that could impact your application.
Important:
This process is not supported for Oracle JET releases prior to version 5.0.0.
Topics:
• Migrate Alta-themed Applications from Releases Prior to 8.3.0 to Release 10.0.0
• Migrate to the Redwood Theme CSS
• Migrate Redwood-themed Applications from Releases 9.x.0 to Release 10.0.0
Migrate Alta-themed Applications from Releases Prior to8.3.0 to Release 10.0.0
To migrate your Oracle JET application source from version 5.x.0 through version8.3.0 to the latest version 10.0.0, you must upgrade npm packages, update themeand library reference paths, and replace the path_mapping.json file. Additionally, youmust update the oraclejetconfig.json file to enable Alta CSS support in JET release10.0.0. Migration to the Redwood CSS theme, if desired, should be performed onlyafter successful migration of the application source has been verified.
Before You Begin:
• Due to potential incompatibilities with releases prior to JET version 9.0.0, Oraclestrongly recommends that you audit your application with Oracle JET AuditFramework (JAF). The built-in audit rules provided with JAF will help you toidentify and fix invalid functionality, including deprecated components and APIs.Implement the audit results with some attention to detail to ensure a successfulmigration to JET release 10.0.0.
As Administrator on Windows or using sudo as needed on Macintosh and Linuxsystems, enter the following command in a terminal window:
npm install -g @oracle/oraclejet-audit
B-1

On your application root, run the following JAF commands to audit yourapplication.
ojaf --initojaf
For details about JAF, see Initialize Oracle JAF and Run an Audit in Using andExtending the Oracle JET Audit Framework.
• A minimum version of 10.0.0 of Node.js is required. Open a Command Promptwindow as an administrator and check your Node.js version.
node -v
If your Node.js version isn't 10.0.0 or later, then go to the Nodejs.org website.Under LTS Version (Recommended for Most Users), download the installer foryour system. In the Download dialog box, choose a location for the file and clickSave. Run the downloaded installer as an administrator and follow the steps in theinstallation wizard to install Node.js.
• Starting in JET release 9.0.0, applications configured for TypeScript developmentrequire a local installation of the TypeScript library to perform compilation. Toensure that your application has a local installation, run the following commandfrom the root of your application.
ojet add typescript
The JET Tooling installs the latest supported version of the TypeScript language:4.0.0.
To migrate your application:
1. Remove the existing version of the ojet-cli tooling package and install the latestversion.
As Administrator on Windows or using sudo as needed on Macintosh and Linuxsystems, enter the following commands in a terminal window:
[sudo] npm uninstall -g ojet-clinpm install -g @oracle/ojet-cli@~10.0.0
2. Enter the following commands to change to the application’s top level directoryand upgrade local npm dependencies:
cd appDirnpm uninstall @oracle/oraclejet @oracle/oraclejet-toolingnpm install @oracle/oraclejet@~10.0.0 @oracle/oraclejet-tooling@~10.0.0 --save
3. In the application’s src directory, replace any hardcoded references to a previousversion.
Appendix BMigrate Alta-themed Applications from Releases Prior to 8.3.0 to Release 10.0.0
B-2
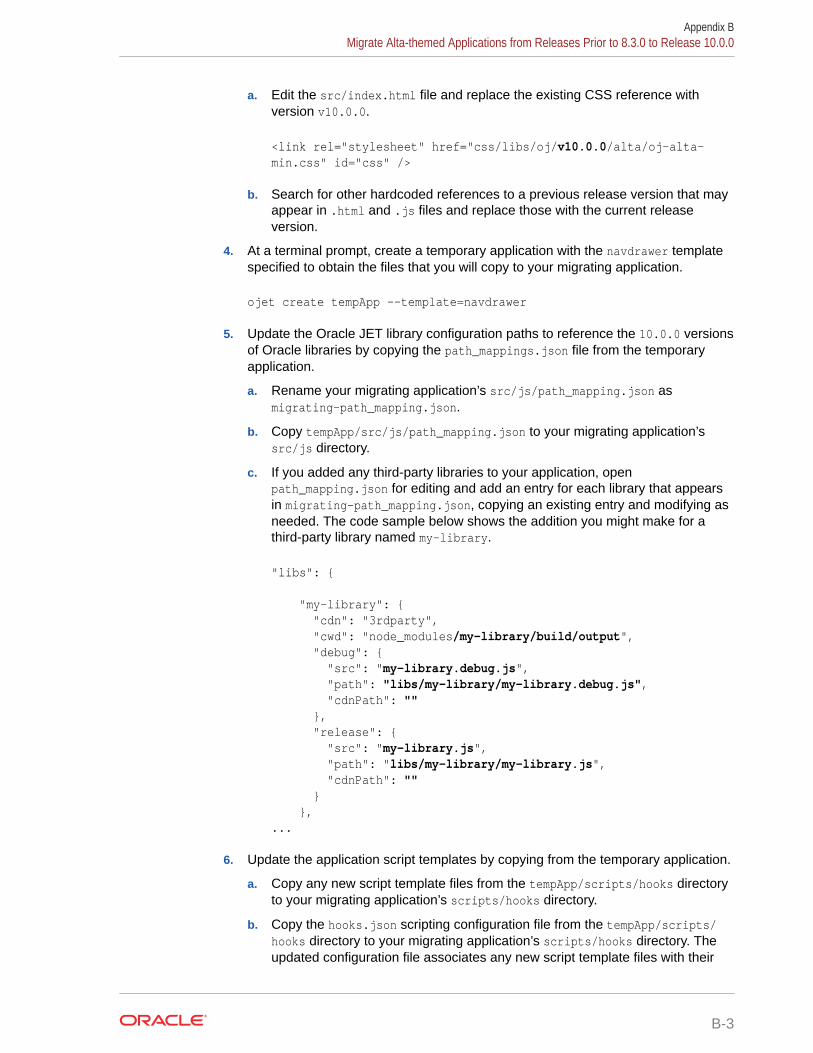
a. Edit the src/index.html file and replace the existing CSS reference withversion v10.0.0.
<link rel="stylesheet" href="css/libs/oj/v10.0.0/alta/oj-alta-min.css" id="css" />
b. Search for other hardcoded references to a previous release version that mayappear in .html and .js files and replace those with the current releaseversion.
4. At a terminal prompt, create a temporary application with the navdrawer templatespecified to obtain the files that you will copy to your migrating application.
ojet create tempApp --template=navdrawer
5. Update the Oracle JET library configuration paths to reference the 10.0.0 versionsof Oracle libraries by copying the path_mappings.json file from the temporaryapplication.
a. Rename your migrating application’s src/js/path_mapping.json asmigrating-path_mapping.json.
b. Copy tempApp/src/js/path_mapping.json to your migrating application’ssrc/js directory.
c. If you added any third-party libraries to your application, openpath_mapping.json for editing and add an entry for each library that appearsin migrating-path_mapping.json, copying an existing entry and modifying asneeded. The code sample below shows the addition you might make for athird-party library named my-library.
"libs": {
"my-library": { "cdn": "3rdparty", "cwd": "node_modules/my-library/build/output", "debug": { "src": "my-library.debug.js", "path": "libs/my-library/my-library.debug.js", "cdnPath": "" }, "release": { "src": "my-library.js", "path": "libs/my-library/my-library.js", "cdnPath": "" } },...
6. Update the application script templates by copying from the temporary application.
a. Copy any new script template files from the tempApp/scripts/hooks directoryto your migrating application’s scripts/hooks directory.
b. Copy the hooks.json scripting configuration file from the tempApp/scripts/hooks directory to your migrating application’s scripts/hooks directory. Theupdated configuration file associates any new script template files with their
Appendix BMigrate Alta-themed Applications from Releases Prior to 8.3.0 to Release 10.0.0
B-3
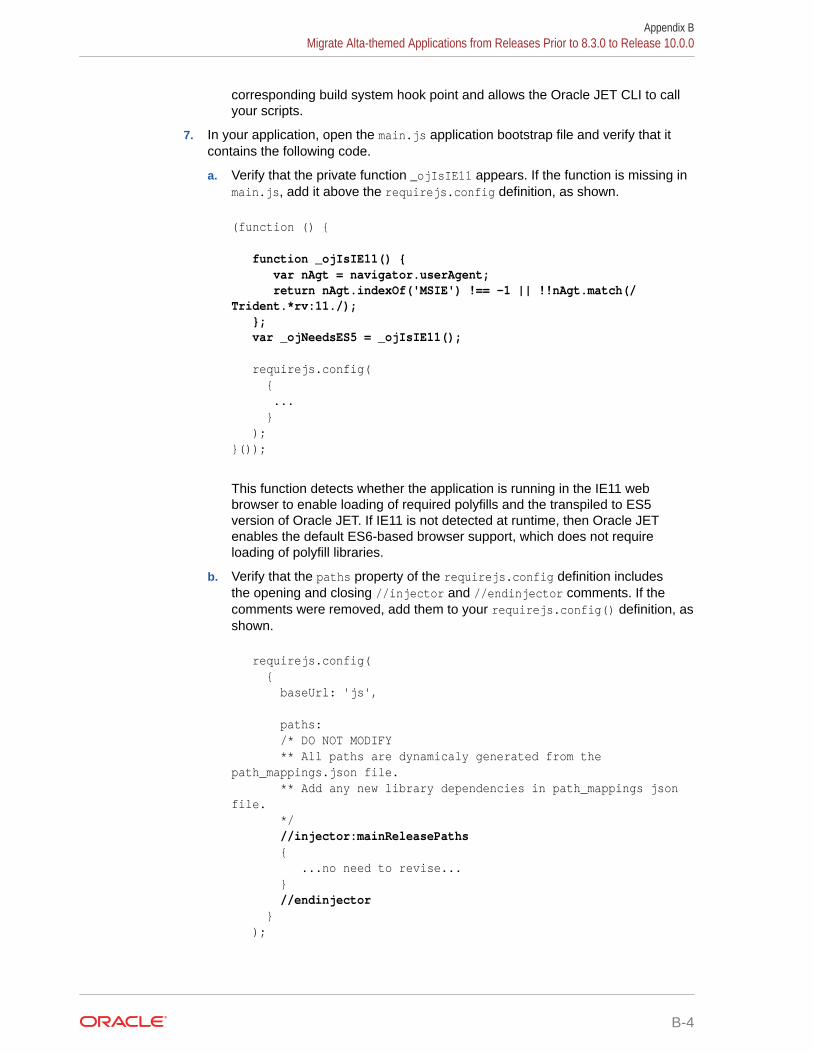
corresponding build system hook point and allows the Oracle JET CLI to callyour scripts.
7. In your application, open the main.js application bootstrap file and verify that itcontains the following code.
a. Verify that the private function _ojIsIE11 appears. If the function is missing inmain.js, add it above the requirejs.config definition, as shown.
(function () {
function _ojIsIE11() { var nAgt = navigator.userAgent; return nAgt.indexOf('MSIE') !== -1 || !!nAgt.match(/Trident.*rv:11./); }; var _ojNeedsES5 = _ojIsIE11();
requirejs.config( { ... } );}());
This function detects whether the application is running in the IE11 webbrowser to enable loading of required polyfills and the transpiled to ES5version of Oracle JET. If IE11 is not detected at runtime, then Oracle JETenables the default ES6-based browser support, which does not requireloading of polyfill libraries.
b. Verify that the paths property of the requirejs.config definition includesthe opening and closing //injector and //endinjector comments. If thecomments were removed, add them to your requirejs.config() definition, asshown.
requirejs.config( { baseUrl: 'js',
paths: /* DO NOT MODIFY ** All paths are dynamicaly generated from the path_mappings.json file. ** Add any new library dependencies in path_mappings json file. */ //injector:mainReleasePaths { ...no need to revise... } //endinjector } );
Appendix BMigrate Alta-themed Applications from Releases Prior to 8.3.0 to Release 10.0.0
B-4
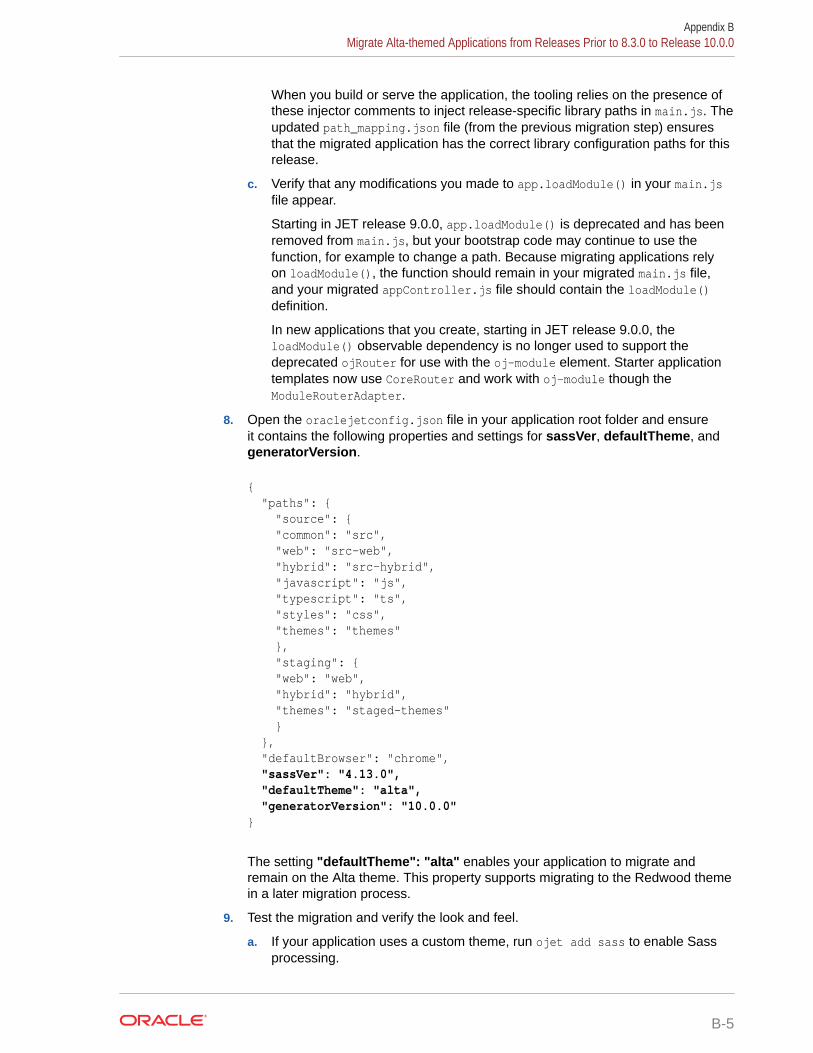
When you build or serve the application, the tooling relies on the presence ofthese injector comments to inject release-specific library paths in main.js. Theupdated path_mapping.json file (from the previous migration step) ensuresthat the migrated application has the correct library configuration paths for thisrelease.
c. Verify that any modifications you made to app.loadModule() in your main.jsfile appear.
Starting in JET release 9.0.0, app.loadModule() is deprecated and has beenremoved from main.js, but your bootstrap code may continue to use thefunction, for example to change a path. Because migrating applications relyon loadModule(), the function should remain in your migrated main.js file,and your migrated appController.js file should contain the loadModule()definition.
In new applications that you create, starting in JET release 9.0.0, theloadModule() observable dependency is no longer used to support thedeprecated ojRouter for use with the oj-module element. Starter applicationtemplates now use CoreRouter and work with oj-module though theModuleRouterAdapter.
8. Open the oraclejetconfig.json file in your application root folder and ensureit contains the following properties and settings for sassVer, defaultTheme, andgeneratorVersion.
{ "paths": { "source": { "common": "src", "web": "src-web", "hybrid": "src-hybrid", "javascript": "js", "typescript": "ts", "styles": "css", "themes": "themes" }, "staging": { "web": "web", "hybrid": "hybrid", "themes": "staged-themes" } }, "defaultBrowser": "chrome", "sassVer": "4.13.0", "defaultTheme": "alta", "generatorVersion": "10.0.0"}
The setting "defaultTheme": "alta" enables your application to migrate andremain on the Alta theme. This property supports migrating to the Redwood themein a later migration process.
9. Test the migration and verify the look and feel.
a. If your application uses a custom theme, run ojet add sass to enable Sassprocessing.
Appendix BMigrate Alta-themed Applications from Releases Prior to 8.3.0 to Release 10.0.0
B-5
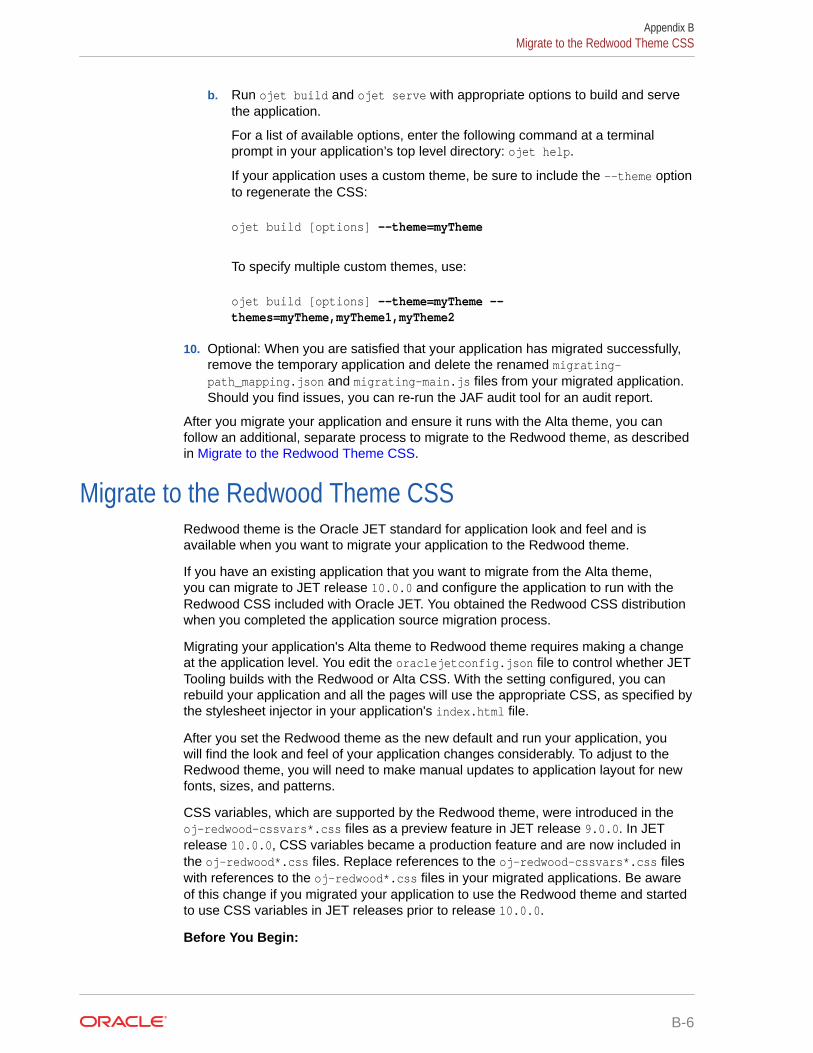
b. Run ojet build and ojet serve with appropriate options to build and servethe application.
For a list of available options, enter the following command at a terminalprompt in your application’s top level directory: ojet help.
If your application uses a custom theme, be sure to include the --theme optionto regenerate the CSS:
ojet build [options] --theme=myTheme
To specify multiple custom themes, use:
ojet build [options] --theme=myTheme --themes=myTheme,myTheme1,myTheme2
10. Optional: When you are satisfied that your application has migrated successfully,remove the temporary application and delete the renamed migrating-path_mapping.json and migrating-main.js files from your migrated application.Should you find issues, you can re-run the JAF audit tool for an audit report.
After you migrate your application and ensure it runs with the Alta theme, you canfollow an additional, separate process to migrate to the Redwood theme, as describedin Migrate to the Redwood Theme CSS.
Migrate to the Redwood Theme CSSRedwood theme is the Oracle JET standard for application look and feel and isavailable when you want to migrate your application to the Redwood theme.
If you have an existing application that you want to migrate from the Alta theme,you can migrate to JET release 10.0.0 and configure the application to run with theRedwood CSS included with Oracle JET. You obtained the Redwood CSS distributionwhen you completed the application source migration process.
Migrating your application's Alta theme to Redwood theme requires making a changeat the application level. You edit the oraclejetconfig.json file to control whether JETTooling builds with the Redwood or Alta CSS. With the setting configured, you canrebuild your application and all the pages will use the appropriate CSS, as specified bythe stylesheet injector in your application's index.html file.
After you set the Redwood theme as the new default and run your application, youwill find the look and feel of your application changes considerably. To adjust to theRedwood theme, you will need to make manual updates to application layout for newfonts, sizes, and patterns.
CSS variables, which are supported by the Redwood theme, were introduced in theoj-redwood-cssvars*.css files as a preview feature in JET release 9.0.0. In JETrelease 10.0.0, CSS variables became a production feature and are now included inthe oj-redwood*.css files. Replace references to the oj-redwood-cssvars*.css fileswith references to the oj-redwood*.css files in your migrated applications. Be awareof this change if you migrated your application to use the Redwood theme and startedto use CSS variables in JET releases prior to release 10.0.0.
Before You Begin:
Appendix BMigrate to the Redwood Theme CSS
B-6
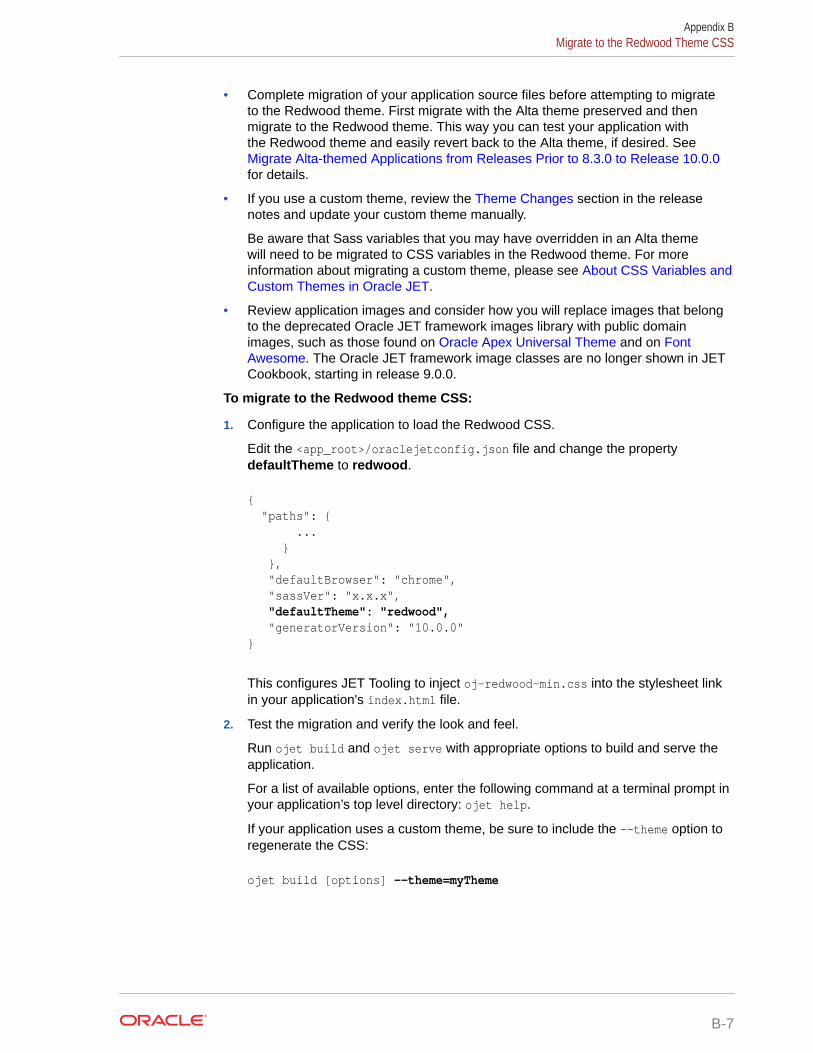
• Complete migration of your application source files before attempting to migrateto the Redwood theme. First migrate with the Alta theme preserved and thenmigrate to the Redwood theme. This way you can test your application withthe Redwood theme and easily revert back to the Alta theme, if desired. SeeMigrate Alta-themed Applications from Releases Prior to 8.3.0 to Release 10.0.0for details.
• If you use a custom theme, review the Theme Changes section in the releasenotes and update your custom theme manually.
Be aware that Sass variables that you may have overridden in an Alta themewill need to be migrated to CSS variables in the Redwood theme. For moreinformation about migrating a custom theme, please see About CSS Variables andCustom Themes in Oracle JET.
• Review application images and consider how you will replace images that belongto the deprecated Oracle JET framework images library with public domainimages, such as those found on Oracle Apex Universal Theme and on FontAwesome. The Oracle JET framework image classes are no longer shown in JETCookbook, starting in release 9.0.0.
To migrate to the Redwood theme CSS:
1. Configure the application to load the Redwood CSS.
Edit the <app_root>/oraclejetconfig.json file and change the propertydefaultTheme to redwood.
{ "paths": { ... } }, "defaultBrowser": "chrome", "sassVer": "x.x.x", "defaultTheme": "redwood", "generatorVersion": "10.0.0"}
This configures JET Tooling to inject oj-redwood-min.css into the stylesheet linkin your application's index.html file.
2. Test the migration and verify the look and feel.
Run ojet build and ojet serve with appropriate options to build and serve theapplication.
For a list of available options, enter the following command at a terminal prompt inyour application’s top level directory: ojet help.
If your application uses a custom theme, be sure to include the --theme option toregenerate the CSS:
ojet build [options] --theme=myTheme
Appendix BMigrate to the Redwood Theme CSS
B-7
To specify multiple custom themes, use:
ojet build [options] --theme=myTheme --themes=myTheme,myTheme1,myTheme2
Migrate Redwood-themed Applications from Releases 9.x.0to Release 10.0.0
To migrate your Oracle JET application source from version 9.x.0 to the latest version10.0.0, you must upgrade npm packages, update theme and library reference paths,and replace the path_mapping.json file. Additionally, you replace references to theoj-redwood-cssvars*.css files that introduced CSS variables as a preview feature inJET release 9.0.0. CSS variables are a production feature in JET release 10.0.0.
Before You Begin:
• Oracle strongly recommends that you audit your application with Oracle JETAudit Framework (JAF) before any migration. The built-in audit rules providedwith JAF will help you to identify and fix invalid functionality, including deprecatedcomponents and APIs. Implement the audit results with some attention to detail toensure a successful migration to JET release 10.0.0.
As Administrator on Windows or using sudo as needed on Macintosh and Linuxsystems, enter the following command in a terminal window:
npm install -g @oracle/oraclejet-audit
On your application root, run the following JAF commands to audit yourapplication.
ojaf --initojaf
For details about JAF, see Initialize Oracle JAF and Run an Audit in Using andExtending the Oracle JET Audit Framework.
• A minimum version of 10.0.0 of Node.js is required. Open a Command Promptwindow as an administrator and check your Node.js version.
node -v
If your Node.js version isn't 10.0.0 or later, then go to the Nodejs.org website.Under LTS Version (Recommended for Most Users), download the installer foryour system. In the Download dialog box, choose a location for the file and clickSave. Run the downloaded installer as an administrator and follow the steps in theinstallation wizard to install Node.js.
• Starting in JET release 9.0.0, applications configured for TypeScript developmentrequire a local installation of the TypeScript library to perform compilation. To
Appendix BMigrate Redwood-themed Applications from Releases 9.x.0 to Release 10.0.0
B-8
ensure that your application has a local installation, run the following commandfrom the root of your application.
ojet add typescript
The JET Tooling installs the latest supported version of the TypeScript language:4.0.0.
To migrate your application:
1. Remove the existing version of the ojet-cli tooling package and install the latestversion.
As Administrator on Windows or using sudo as needed on Macintosh and Linuxsystems, enter the following commands in a terminal window:
[sudo] npm uninstall -g ojet-clinpm install -g @oracle/ojet-cli@~10.0.0
2. Enter the following commands to change to the application’s top level directoryand upgrade local npm dependencies:
cd appDirnpm uninstall @oracle/oraclejet @oracle/oraclejet-toolingnpm install @oracle/oraclejet@~10.0.0 @oracle/oraclejet-tooling@~10.0.0 --save
3. In the application’s src directory, replace any hardcoded references to a previousversion.
a. Edit the src/index.html file and replace the existing CSS reference withversion v10.0.0.
<link rel="stylesheet" href="css/libs/oj/v10.0.0/redwood/oj-redwood-min.css" id="css" />
If you are not using the JET CLI to build your app, you'll need to search forhardcoded references to the oj-redwood-cssvars-min.css file and replacewith references to oj-redwood-min.css. CSS variables were introduced in theoj-redwood-cssvars*.css files as a preview feature in JET release 9.0.0. InJET release 10.0.0, CSS variables became a production feature and are nowincluded in the oj-redwood*.css files.
b. Search for other hardcoded references to a previous release version that mayappear in .html and .js files and replace those with the current releaseversion.
4. At a terminal prompt, create a temporary application with the navdrawer templatespecified to obtain the files that you will copy to your migrating application.
ojet create tempApp --template=navdrawer
5. Update the Oracle JET library configuration paths to reference the 10.0.0 versionsof Oracle libraries by copying the path_mappings.json file from the temporaryapplication.
Appendix BMigrate Redwood-themed Applications from Releases 9.x.0 to Release 10.0.0
B-9

a. Rename your migrating application’s src/js/path_mapping.json asmigrating-path_mapping.json.
b. Copy tempApp/src/js/path_mapping.json to your migrating application’ssrc/js directory.
c. If you added any third-party libraries to your application, openpath_mapping.json for editing and add an entry for each library that appearsin migrating-path_mapping.json, copying an existing entry and modifying asneeded. The code sample below shows the addition you might make for athird-party library named my-library.
"libs": {
"my-library": { "cdn": "3rdparty", "cwd": "node_modules/my-library/build/output", "debug": { "src": "my-library.debug.js", "path": "libs/my-library/my-library.debug.js", "cdnPath": "" }, "release": { "src": "my-library.js", "path": "libs/my-library/my-library.js", "cdnPath": "" } },...
6. Update the application script templates by copying from the temporary application.
a. Copy any new script template files from the tempApp/scripts/hooks directoryto your migrating application’s scripts/hooks directory.
b. Copy the hooks.json scripting configuration file from the tempApp/scripts/hooks directory to your migrating application’s scripts/hooks directory. Theupdated configuration file associates any new script template files with theircorresponding build system hook point and allows the Oracle JET CLI to callyour scripts.
7. In your application, open the main.js application bootstrap file and verify that itcontains the following code.
a. Verify that the private function _ojIsIE11 appears. If the function is missing inmain.js, add it above the requirejs.config definition, as shown.
(function () {
function _ojIsIE11() { var nAgt = navigator.userAgent; return nAgt.indexOf('MSIE') !== -1 || !!nAgt.match(/Trident.*rv:11./); }; var _ojNeedsES5 = _ojIsIE11();
requirejs.config(
Appendix BMigrate Redwood-themed Applications from Releases 9.x.0 to Release 10.0.0
B-10
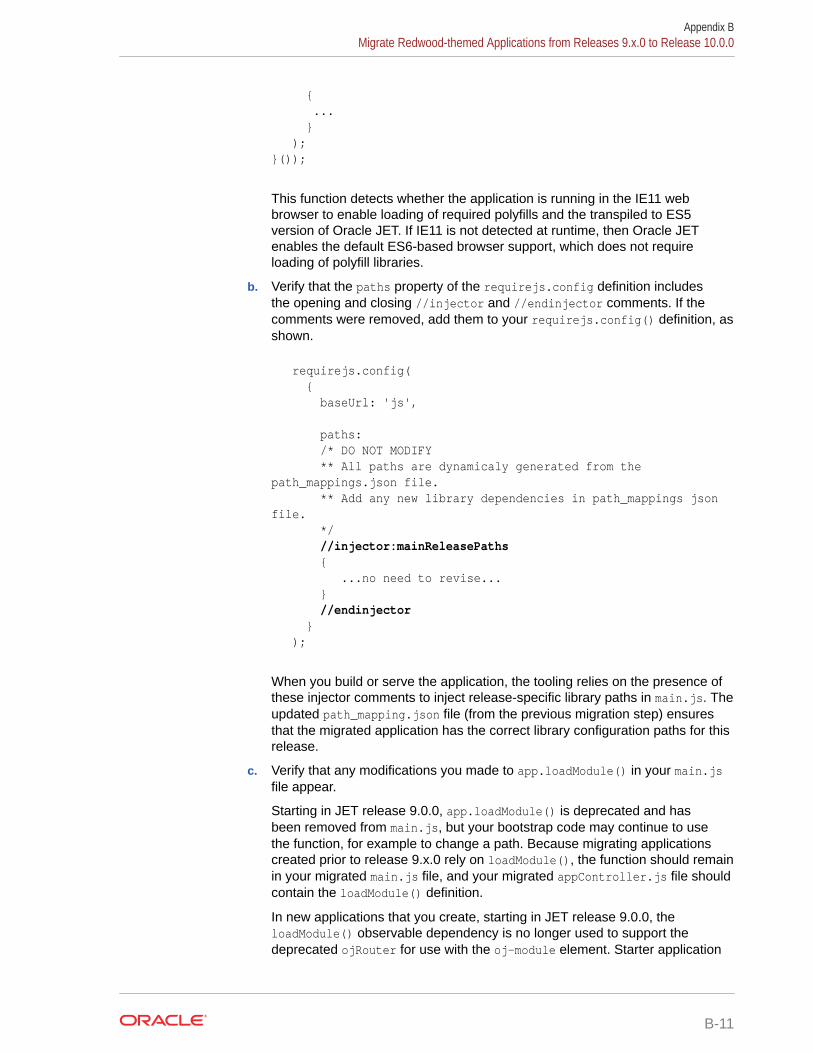
{ ... } );}());
This function detects whether the application is running in the IE11 webbrowser to enable loading of required polyfills and the transpiled to ES5version of Oracle JET. If IE11 is not detected at runtime, then Oracle JETenables the default ES6-based browser support, which does not requireloading of polyfill libraries.
b. Verify that the paths property of the requirejs.config definition includesthe opening and closing //injector and //endinjector comments. If thecomments were removed, add them to your requirejs.config() definition, asshown.
requirejs.config( { baseUrl: 'js',
paths: /* DO NOT MODIFY ** All paths are dynamicaly generated from the path_mappings.json file. ** Add any new library dependencies in path_mappings json file. */ //injector:mainReleasePaths { ...no need to revise... } //endinjector } );
When you build or serve the application, the tooling relies on the presence ofthese injector comments to inject release-specific library paths in main.js. Theupdated path_mapping.json file (from the previous migration step) ensuresthat the migrated application has the correct library configuration paths for thisrelease.
c. Verify that any modifications you made to app.loadModule() in your main.jsfile appear.
Starting in JET release 9.0.0, app.loadModule() is deprecated and hasbeen removed from main.js, but your bootstrap code may continue to usethe function, for example to change a path. Because migrating applicationscreated prior to release 9.x.0 rely on loadModule(), the function should remainin your migrated main.js file, and your migrated appController.js file shouldcontain the loadModule() definition.
In new applications that you create, starting in JET release 9.0.0, theloadModule() observable dependency is no longer used to support thedeprecated ojRouter for use with the oj-module element. Starter application
Appendix BMigrate Redwood-themed Applications from Releases 9.x.0 to Release 10.0.0
B-11
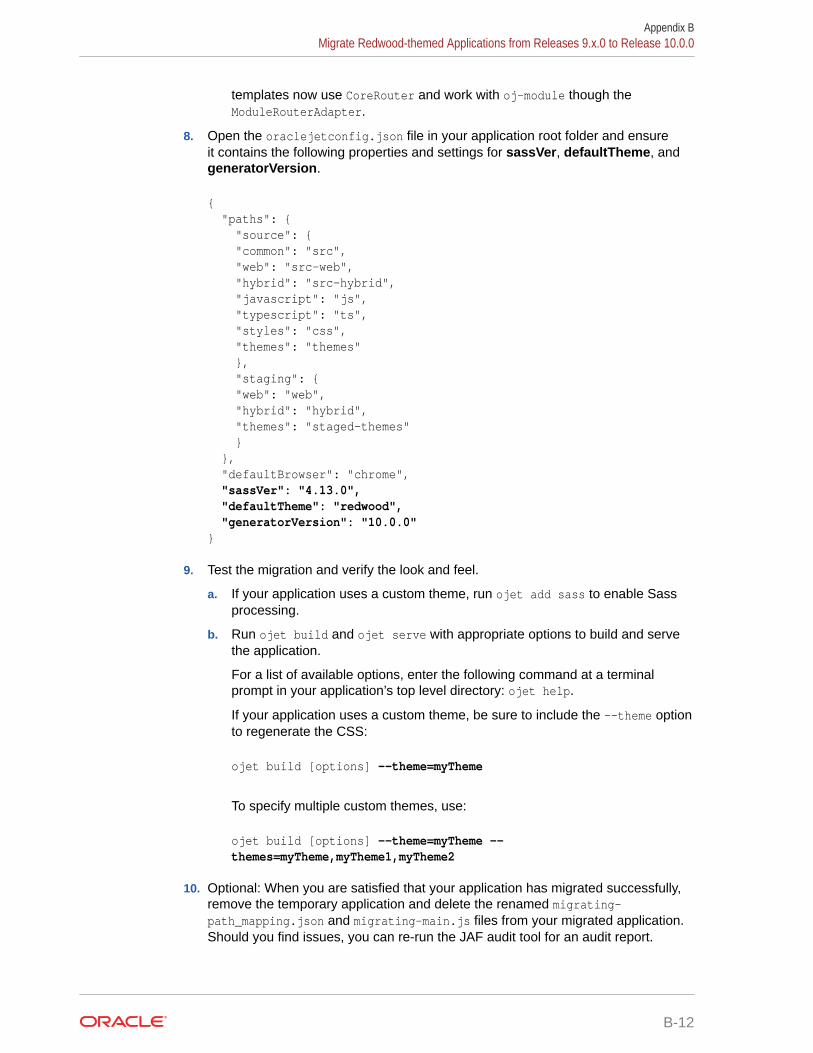
templates now use CoreRouter and work with oj-module though theModuleRouterAdapter.
8. Open the oraclejetconfig.json file in your application root folder and ensureit contains the following properties and settings for sassVer, defaultTheme, andgeneratorVersion.
{ "paths": { "source": { "common": "src", "web": "src-web", "hybrid": "src-hybrid", "javascript": "js", "typescript": "ts", "styles": "css", "themes": "themes" }, "staging": { "web": "web", "hybrid": "hybrid", "themes": "staged-themes" } }, "defaultBrowser": "chrome", "sassVer": "4.13.0", "defaultTheme": "redwood", "generatorVersion": "10.0.0"}
9. Test the migration and verify the look and feel.
a. If your application uses a custom theme, run ojet add sass to enable Sassprocessing.
b. Run ojet build and ojet serve with appropriate options to build and servethe application.
For a list of available options, enter the following command at a terminalprompt in your application’s top level directory: ojet help.
If your application uses a custom theme, be sure to include the --theme optionto regenerate the CSS:
ojet build [options] --theme=myTheme
To specify multiple custom themes, use:
ojet build [options] --theme=myTheme --themes=myTheme,myTheme1,myTheme2
10. Optional: When you are satisfied that your application has migrated successfully,remove the temporary application and delete the renamed migrating-path_mapping.json and migrating-main.js files from your migrated application.Should you find issues, you can re-run the JAF audit tool for an audit report.
Appendix BMigrate Redwood-themed Applications from Releases 9.x.0 to Release 10.0.0
B-12
CAlta Theme in Oracle JET v9.0.0 and Later
Oracle recommends that you use the Redwood theme when you create newapplications. However, you can migrate your existing application to JET 9.0.0 andcontinue to work with the Alta theme.
Topics:
• Consider Using the Redwood Theme in Applications
• CSS Files Included in Alta
• Understand the Color Palette in Alta
• Customize Alta Themes Using the Tooling
• Work with Sass
• Work with Icon Fonts in Alta
• Work with Image Files in Alta
• Use Tag Selectors or Style Classes with Alta
• Use Normalize with Alta
Consider Using the Redwood Theme in ApplicationsStarting in JET 9.0.0, when you build a new JET application, Oracle recommends thatyou use the new Redwood theme to benefit from Oracle Redwood Design System.JET Tooling supports the Redwood theme as the default choice.
Oracle JET is committed to the Oracle standard, Oracle Redwood Design System.For example, starting with JET release 9.0.0, certain new UX features will only beavailable in the Redwood theme. These features, such as Waterfall Layout and StreamList, illustrate the rich UX supported by Oracle Redwood Design System.
Important:
For details about how you can use the Redwood theme to create newapplications or to migrate an existing Alta-themed application, see TypicalWorkflow for Working with Themes in Oracle JET Applications .
Note that JET Tooling generates different sets of theme definition files to supporteither Redwood theme or Alta theme. These definition files contain an extensive set ofCSS custom properties to enable component style class overrides that safely abstractyour customizations away from the styles implemented by components for a particulartheme. In Alta, these custom properties are Sass variables, whereas, in Redwood,they are CSS variables. The use of style variables to customize a theme ensures thatstyle changes you make can be migrated to a later JET release without overridingstyle changes by the component itself.
C-1
CSS Files Included in AltaWith the Alta theme, Oracle JET includes CSS files designed for display on webbrowsers and hybrid mobile applications. Each theme includes minified and readableversions of the CSS and source maps.
The Alta theme is based on Oracle Alta UI, a mobile and browser application designsystem. There are two types of themes included in Oracle JET, both based on OracleAlta UI:
• alta web theme
Web themes are designed to be used in a browser on all platforms, and the sametheme can be used regardless of whether you are looking at a web page on adesktop Firefox, Android Chrome, or iOS Safari browser.
• android , ios, and windows hybrid mobile themes for Android, iOS, and Windows
Hybrid themes are designed to be used with Cordova to create a hybrid mobileapplication. The colors use Oracle's Alta look and feel, but otherwise these themestry to match the look and feel of a native mobile application.
The Alta CSS included with the Oracle JET distribution are generated by the Sasspreprocessor and include the following files:
• oj-alta*.css: Readable version of the CSS
• oj-alta*-min.css: Minified version of the CSS
• oj-alta*.css.map: CSS source map
In addition, the Alta web theme includes the following generated CSS:
• oj-alta-notag.css: Readable version of the CSS generated without tag selectors
For additional details about Oracle JET theming and tag selectors, see Use TagSelectors or Style Classes with Alta.
• oj-alta-notag-min.css: Minified version of the CSS generated without tagselectors.
If the CSS files provided by Oracle JET with your application are sufficient and youonly want to add a few application-specific styles, you may find that adding the classesto app.css in your application’s src/css folder will meet your needs.
If, however, you want to use a different theme or add more than a few application-specific classes, then you can use Oracle JET Tooling to generate your own CSS. Forinstructions, see Customize Alta Themes Using the Tooling.
Use the recommended standards to generate your CSS and Themes. For moreinformation, see Best Practices for Using CSS and Themes.
Important:
Do not override Oracle JET CSS. Oracle JET’s CSS is considered privateand can change at any time.
Appendix CCSS Files Included in Alta
C-2
Understand the Color Palette in AltaOracle JET defines four sets of colors including branding ramps, neutral ramps, textcolors, and accent colors. Each set supports the Alta look and feel, but you cancustomize them for your needs.
The four color sets include:
• Branding ramp: a progressive set of colors generated by tinting (mixture of acolor with white) and shading (mixture of a color with black) a primary brand color($brandColor).
In the Oracle look and feel the branding colors are blue.
• Neutral ramp: a progressive set of neutral colors based on the same hue($neutralHue) and saturation ($neutralSaturation), but with varied levels oflightness.
In the Oracle look and feel the neutral colors are gray.
• Text colors: text colors created from a base color of #000 with various opacities.
Text with opacity looks better on colored backgrounds.
• Accent colors: special colors that are used in things like messaging, drag anddrop, and data visualization components.
To look at examples of the different color sets and associated variables, see AltaTheme Builder.
Customize Alta Themes Using the ToolingUse the Oracle JET command-line interface (CLI) to add Sass support and customizeyour application’s Alta theme or specify an alternate theme.
By default, the SCSS files are not included with applications that you scaffold withthe Oracle JET CLI. However, you can use tooling commands as described in theprocedure below to add node-sass and skeleton theme files to your application. Youcan then modify the skeleton theme files while the application is running and observethe effect of the change immediately using the live reload feature.
Before you begin:
• Scaffold an application. See Scaffold a Web Application or Scaffold a HybridMobile Application.
• If you want to modify your directory structure, see Modify the Web Application’sFile Structure or Modify the Hybrid Mobile Application’s File Structure.
• Learn about Oracle JET and SCSS variables. See SCSS Variables.
• Learn about Oracle JET's use of tag selectors. See Use Tag Selectors or StyleClasses with Alta.
• Learn about using variables to include only the CSS you need. See Use Variablesto Control CSS Content.
To customize an Oracle JET theme using the tooling:
Appendix CUnderstand the Color Palette in Alta
C-3
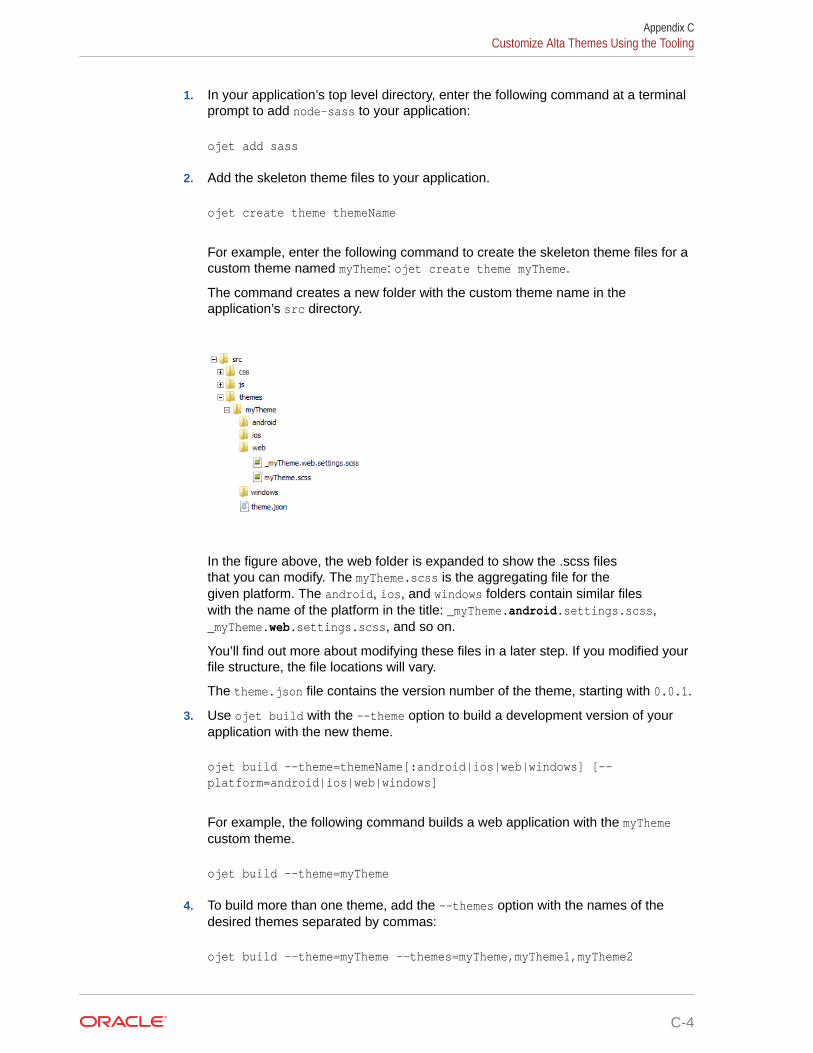
1. In your application’s top level directory, enter the following command at a terminalprompt to add node-sass to your application:
ojet add sass
2. Add the skeleton theme files to your application.
ojet create theme themeName
For example, enter the following command to create the skeleton theme files for acustom theme named myTheme: ojet create theme myTheme.
The command creates a new folder with the custom theme name in theapplication’s src directory.
In the figure above, the web folder is expanded to show the .scss filesthat you can modify. The myTheme.scss is the aggregating file for thegiven platform. The android, ios, and windows folders contain similar fileswith the name of the platform in the title: _myTheme.android.settings.scss,_myTheme.web.settings.scss, and so on.
You’ll find out more about modifying these files in a later step. If you modified yourfile structure, the file locations will vary.
The theme.json file contains the version number of the theme, starting with 0.0.1.
3. Use ojet build with the --theme option to build a development version of yourapplication with the new theme.
ojet build --theme=themeName[:android|ios|web|windows] [--platform=android|ios|web|windows]
For example, the following command builds a web application with the myThemecustom theme.
ojet build --theme=myTheme
4. To build more than one theme, add the --themes option with the names of thedesired themes separated by commas:
ojet build --theme=myTheme --themes=myTheme,myTheme1,myTheme2
Appendix CCustomize Alta Themes Using the Tooling
C-4
5. To run your application with live reload enabled, enter ojet serve with the themeoption and optional platform.
ojet serve --theme=themeName[:android|ios|web|windows] [--platform=android|ios|web|windows]
For example, the following command serves a web application with the myThemecustom theme in the default browser.
ojet serve --theme=myTheme
6. Edit the themeName.platform.settings.scss file to set variables as needed foryour application.
For example, to turn off tag selectors, remove the comment fromthe $allowTagSelectors variable if needed and set it to false.
$allowTagSelectors: false;
When you use the Oracle JET CLI to serve your application, live reload will reloadthe page, and any changes you make to your theme files will display in thebrowser.
7. To optimize performance, consider the use of variables to include only the CSSthat your application needs. Use Oracle JET live reload to observe the effect ofany changes immediately, if you’re not sure whether your application needs agiven variable.
8. To exit the application, save your changes, and press Ctrl+C at the terminalprompt.
To make working with themes easier, Oracle JET provides Alta Theme Builder, anexample application and tutorial. You can work with it online to see the effect ofchanges before you apply them to your own application. You can also download thesample and create your own themes offline for sharing.
Work with SassOracle JET provides its own Sass mixins and uses Sass tools postcss-calc, postcss-custom-properties, autoprefixer and node-sass. When you use the ojet add themingcommand, the JET Tooling adds these to the tooling chain for compilation by thePostCSS tool. Sass is used for bundling and there are a few cases, for examplein media queries, where CSS variables aren't supported and SCSS variables areneeded.
Topics
• SCSS Variables
• SCSS File Organization and Naming Convention
• Use Variables to Control CSS Content
When working with the Alta theme, Oracle JET provides its own Sass mixins anddoesn’t use the Sass tools used by the Redwood tooling.
Only when working with the Alta theme, Oracle JET supports Sass source mapsto work with a large number of partial files. The toolkit includes source maps for
Appendix CWork with Sass
C-5

the default and no tag selector versions of the generated CSS for the Alta theme:oj-alta.css.map, and oj-alta-notag.css.map.
For additional information about source maps, see https://developers.google.com/chrome-developer-tools/docs/css-preprocessors.
SCSS VariablesIf you use Sass to generate your own styles and don't rely on any JET Sass variablesthen you can continue using Sass as before. However if you rely on JET SCSSvariables, then most of those SCSS variables will no longer be available starting inJET release 9.0.0.
The SCSS variables that Oracle JET uses to generate the application use the samenaming convention and are grouped together according to function. Oracle JET alsouses SCSS variables to default some component options, such as the oj-buttonchroming option.
Variable Naming Convention
Oracle JET variables names use a camel case naming structure:<widgetName><Element><Property><State>.
Type Description Examples
widgetName Component or pattern name dataGrid, button
Element (Optional) Component subsection Cell, Header
Property Property affected BgColor, BorderColor, TextColor
State (Optional) Widget’s state when applied Hover, Active, Focus, Selected,Disabled
Using this convention, the following are all valid Oracle JET SCSSvariables: $buttonHeight, $sliderThumbWidth, $dataGridCellBgColorHover, $treeNodeBorderColorSelected
Variable Documentation
Variable names are typically self-documenting. In cases where additionaldocumentation is needed, the SCSS file will contain comments above the variabledefinition.
Variable Categories
The following table lists the high level variable categories.
Category Description
Logistical Affects logistics, such as the path to an imagedirectory or text direction.
Performance Set these variables to include only the CSS yourapplication uses.
Palette Application’s color palette. Examplesinclude $interaction1Color, $background1Color, and $border1Color.
Appendix CWork with Sass
C-6
Category Description
Text Controls text appearance. Widget files use thesevariables extensively. Examplesinclude $fontFamily, $rootFontSize, $textColor, and $linkTextColor.
General Sets general theme properties such as drag anddrop colors, border radius defaults, and animationduration defaults.
Widget Affects specific widgets or widget groups,such as button or form control variables.Some component default options are includedhere. For example, you can changethe ojButton component’s chroming optionusing $buttonChromingOptionDefault.
SCSS File Organization and Naming ConventionOracle JET follows the Sass underscore naming convention. Files that start with anunderscore are called partials and are not compiled independently with Sass. Instead,the partials are imported into an aggregating file. There is one partial file per module,for example, _oj.table.scss, _oj.formcontrol.inputnumber.scss, and so on.
The following table lists the directory structure for the files contained within the altadirectory.
File Description
widgets/_oj.alta.formcontrol.inputnumber.scss
widgets/_oj.alta.table.scss
etc.
Alta widget partial files
_oj.alta.variables.scss Contains the SCSS variables
_oj.alta.settings.scss Contains a commented version of the variablesfile that you can remove the comments from andmodify
_oj.alta.widgets.scss Imports widget partial files
oj-alta.scss Generates the oj-alta.css and oj-alta-min.css files
oj-alta-notag.scss Generates the oj-alta-notag.css and oj-alta-notag-min.css files
Use Variables to Control CSS ContentYou can use the $includeAllClasses variable in your SCSS settings file to controlcontent for the entire application. By default, the variable is set to true as shown below.
// by default everything is included, but you can also start by setting// $includeAllClasses to false and then just add in what you want.$includeAllClasses: true !default;
Appendix CWork with Sass
C-7
Some partials also allow you to control their content with a variable. For example,the ojButton component has the $includeButtonClasses variable near the top of thesettings file.
$includeButtonClasses: $includeAllClasses !default;
To exclude the ojButton style classes, you can set $includeButtonClasses to falseas shown below.
$includeButtonClasses: false;
Oracle JET also uses several higher level groupings that let you control the CSS for alogical group of components. The table lists the groups that are available for your use.
Group SCSS Variable File Names
Tags (headers, links,and so on)
$includeTagClasses: $includeAllClasses !default;
Files with tag in name, as in:
_oj.alta.tags.typography
Data visualizations(charts, gauges, andso on)
$includeDvtClasses: $includeAllClasses !default;
Files with dvt in name, as in:
_oj.alta.dvt.chart
Form controls (labels,combo box, and soon)
$includeFormControlClasses: $includeAllClasses !default;
Files with formcontrol in name, asin:
_oj.alta.formcontrol.label
You can include or exclude classes and groups as shown in the following examples.
// Example: Exclude the dvt classes$includeDvtClasses: false;
// Example: Include only the dvt classes, exclude everything else$includeAllClasses: false;$includeDvtClasses: true;
// Example: Include the chart and sunburst classes, exclude everything else$includeAllClasses: false;$includeChartClasses: true;$includeSunburstClasses: true;
Note:
Some components depend on others. For example, the ojInputNumber usesojButton internally, so if you include the ojInputNumber classes, you willalso get the ojButton classes automatically.
Work with Icon Fonts in AltaOracle JET uses icon fonts whenever possible because icon fonts have certainadvantages over other formats.
• Themable: You can use style classes to change their color instead of having toreplace the image, making them very easy to theme.
Appendix CWork with Icon Fonts in Alta
C-8

• High contrast mode: Icon fonts are optimal for high contrast mode as they areconsidered text. However, keep in mind that you can't rely on color in high contrastmode, and you may need to indicate state (active, hover, and so on) using anothervisual indicator. For example, you can add a border or change the icon font'ssize. For additional information about Oracle JET and high contrast mode, seeConfigure High Contrast Mode.
• High resolution: Icon fonts look good on a high resolution (retina) display withoutproviding alternate icons.
• Performance: You can change icon font colors using CSS so alternate icons arenot required to indicate state changes. Alternate images are also not required forhigh resolution displays.
Icon fonts also have disadvantages. It can be difficult to replace a single image, andthey only show one color. You can use text shadows to provide some depth to the iconfont.
Oracle JET supports two generic classes for setting the icon font colors in the followingAltaSCSS: $iconColorDefault, $iconColorHover, $iconColorActive, $iconColorSelected, and $iconColorDisabled.
• oj-clickable-icon
• oj-clickable-icon-nocontext
These classes, when used in conjunction with an anchor tag and/or marker classeslike oj-default, oj-hover, oj-focus, oj-active, oj-selected, and oj-disabled, willuse the variables $iconColor*.
The oj-clickable-icon class is optionally contextual, meaning the anchor or markerstyle can be on an ancestor, as shown in the example below. The example assumesthat a JavaScript method is replacing oj-default as needed with oj-hover, oj-focus,oj-active, oj-selected, and oj-disabled.
<div class="oj-default"> <span class="oj-clickable-icon demo-icon-font demo-icon-gear"></span></div><a href="http://www.oracle.com"> <span class="oj-clickable-icon demo-icon-font demo-icon-gear"></span></a>
The oj-clickable-icon-nocontext class is not contextual and must be placed on thesame tag as shown in the example below. oj-clickable-icon would also work in thisexample.
<span class="oj-default oj-clickable-icon-nocontext demo-icon-font demo-icon-gear"></span><a href="http://www.oracle.com" class="oj-clickable-icon-nocontext demo-icon-font demo-icon-gear"></a>
For an example that illustrates icon font classes on a link, see Icon Fonts.
Appendix CWork with Icon Fonts in Alta
C-9

Work with Image Files in AltaOracle JET uses images when icon fonts can't be used. Informational images mustappear in high contrast mode for accessibility, as described in Configure High ContrastMode.
In the Alta theme, you can replace any of the SVG images in the following applicationdirectories. Note that your new image must use the same name as the original image.
staged-themes/alta/android/imagesstaged-themes/alta/common/imagesstaged-themes/alta/ios/imagesstaged-themes/alta/web/imagesstaged-themes/alta/windows/images
To improve performance, the SVG images used by JET components are sprited. JETdoes not support creating custom image sprites, and you must use a third-party tool tocreate them. However, if you use Oracle JET tooling, you can overwrite some of thedefault SVG images and use the tooling to combine them into a single sprite.svg file.
When you build your application using ojet build or ojet serve commands, JETwill automatically combine the SVG images into the sprite.svg file in the appropriatethemes/alta/*/images/sprites/ directory.
Note:
Starting in release 9.1.0, JET does not install the node module svg-sprite bydefault when you scaffold a new application with the JET CLI. As a result, ifyour application will contain modified JET SVG image files, the JET CLI willissue a build warning and the application will fail to build. To support workingwith SVG images in Alta theme-based applications you can manually installthe svg-sprite module by running this command from the application rootdirectory:
npm install svg-sprite
You can also use custom images that are not sprited using CSS, but the improvedperformance gained by using sprited images will be lost. To do so, you must overridethe image style classes with {background-position: 0% 0%;}.
Oracle JET provides Sass mixins that you can use to create CSS for your own icons.For examples, see CSS Images.
Use Tag Selectors or Style Classes with AltaIn Alta themed applications that you create, by default Oracle JET applies stylesdirectly to HTML tag elements such as a, h1, h2, and so on. This feature makes iteasier to code a page since you do not have to apply selectors to each occurrence ofthe element.
Appendix CWork with Image Files in Alta
C-10
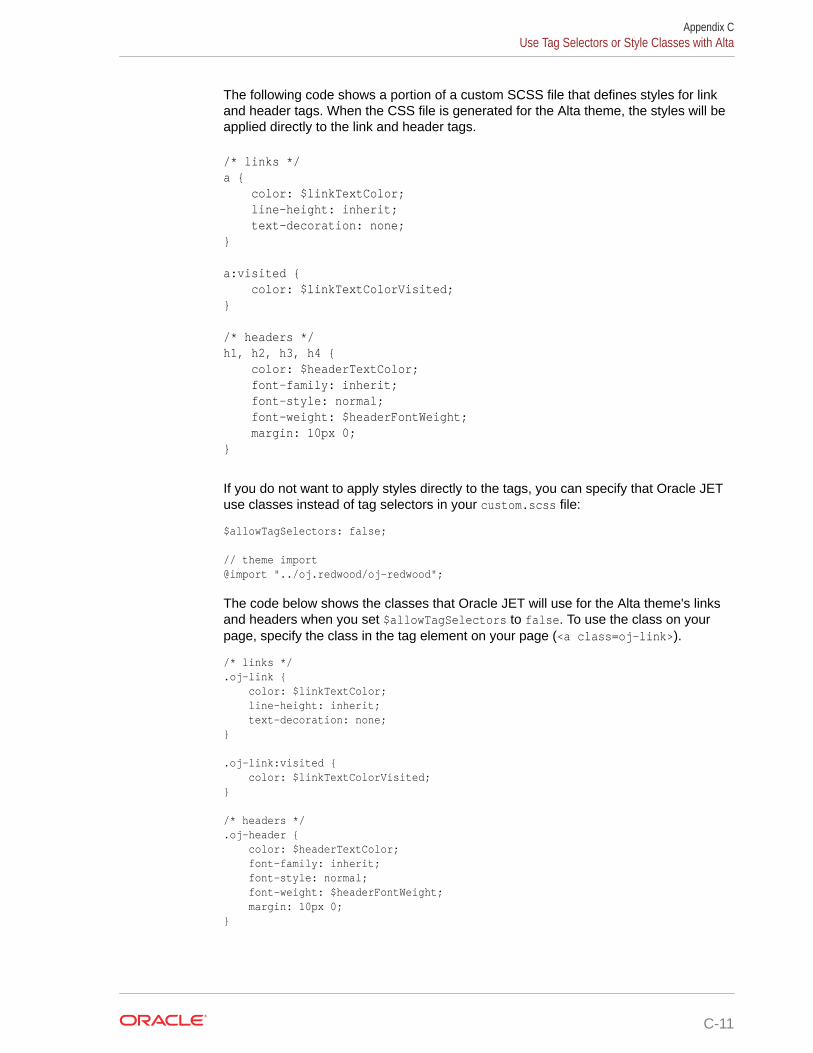
The following code shows a portion of a custom SCSS file that defines styles for linkand header tags. When the CSS file is generated for the Alta theme, the styles will beapplied directly to the link and header tags.
/* links */a { color: $linkTextColor; line-height: inherit; text-decoration: none;} a:visited { color: $linkTextColorVisited;} /* headers */h1, h2, h3, h4 { color: $headerTextColor; font-family: inherit; font-style: normal; font-weight: $headerFontWeight; margin: 10px 0;}
If you do not want to apply styles directly to the tags, you can specify that Oracle JETuse classes instead of tag selectors in your custom.scss file:
$allowTagSelectors: false;
// theme import@import "../oj.redwood/oj-redwood";
The code below shows the classes that Oracle JET will use for the Alta theme's linksand headers when you set $allowTagSelectors to false. To use the class on yourpage, specify the class in the tag element on your page (<a class=oj-link>).
/* links */.oj-link { color: $linkTextColor; line-height: inherit; text-decoration: none;} .oj-link:visited { color: $linkTextColorVisited;} /* headers */.oj-header { color: $headerTextColor; font-family: inherit; font-style: normal; font-weight: $headerFontWeight; margin: 10px 0;}
Appendix CUse Tag Selectors or Style Classes with Alta
C-11
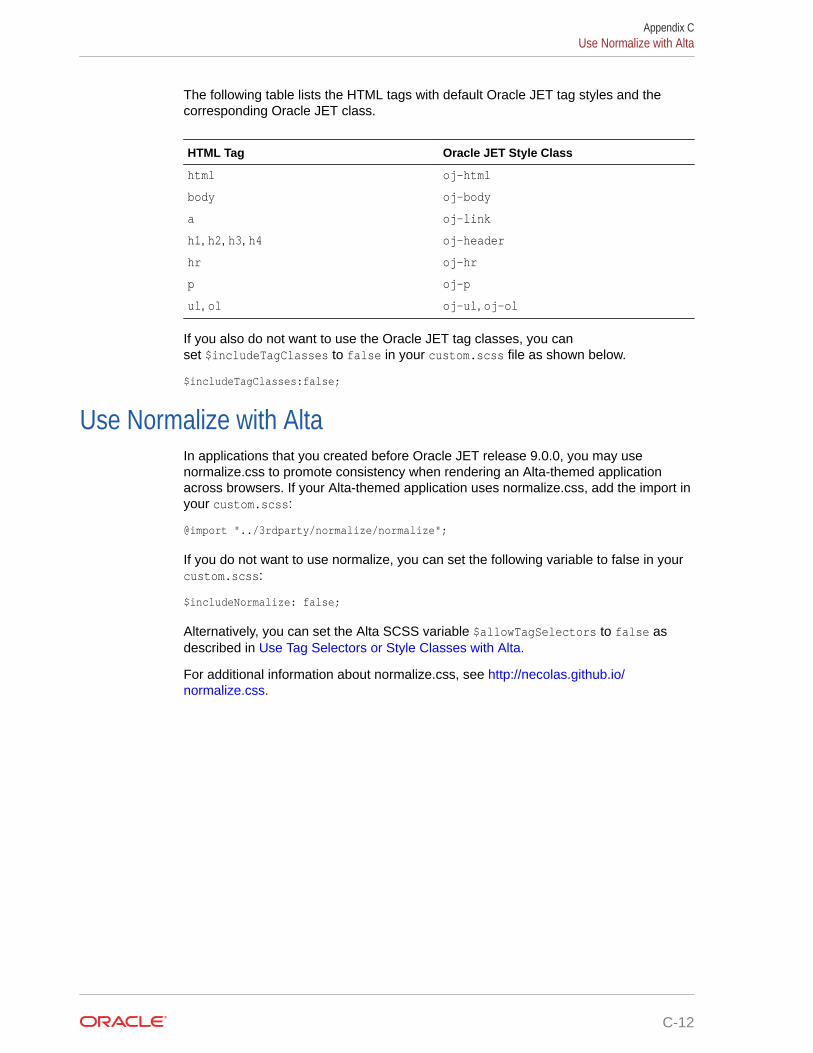
The following table lists the HTML tags with default Oracle JET tag styles and thecorresponding Oracle JET class.
HTML Tag Oracle JET Style Class
html oj-html
body oj-body
a oj-link
h1, h2, h3, h4 oj-header
hr oj-hr
p oj-p
ul, ol oj-ul, oj-ol
If you also do not want to use the Oracle JET tag classes, you canset $includeTagClasses to false in your custom.scss file as shown below.
$includeTagClasses:false;
Use Normalize with AltaIn applications that you created before Oracle JET release 9.0.0, you may usenormalize.css to promote consistency when rendering an Alta-themed applicationacross browsers. If your Alta-themed application uses normalize.css, add the import inyour custom.scss:
@import "../3rdparty/normalize/normalize";
If you do not want to use normalize, you can set the following variable to false in yourcustom.scss:
$includeNormalize: false;
Alternatively, you can set the Alta SCSS variable $allowTagSelectors to false asdescribed in Use Tag Selectors or Style Classes with Alta.
For additional information about normalize.css, see http://necolas.github.io/normalize.css.
Appendix CUse Normalize with Alta
C-12
DOracle JET References
Oracle JET includes third-party libraries and tools that are referenced throughoutthe guide. Oracle also provides optional tools and libraries to assist with applicationdevelopment.
Topics:
• Oracle Libraries and Tools
• Third-Party Libraries and Tools
Oracle Libraries and ToolsOracle provides optional tools and libraries to use in conjunction with Oracle JET. Usethis reference to locate additional information about the Oracle products referencedthroughout the guide.
Name Description Additional Information
Voluntary ProductAccessibility Template(VPAT)
Documentation of Oracle’s degree of conformance withapplicable accessibility standards
Voluntary ProductAccessibility Template(VPAT)
CSS Variable ThemeBuilder
An interactive demo application that you can use to tryout custom Redwood themes by downloading the sampleapplication.
CSS Variable ThemeBuilder
SCSS Variable ThemeBuilder
An interactive demo application that you can use totry out custom Alta themes by downloading the sampleapplication.
Alta Theme Builder
Third-Party Libraries and ToolsUse this reference to locate additional information about the third-party libraries andtools used by Oracle JET and referenced throughout the guide.
Name Description Additional Information
Apache Cordova(Mobile only)
Open source mobile development framework thatallows you to use HTML5, CSS3, and JavaScriptfor cross-platform development targeted tomultiple platforms with one code base
http://cordova.apache.org/
CSS3 (Cascading StyleSheets)
Used for adding style to Web applications http://www.w3.org/Style/CSS
Hammer.js JS library used for multi-touch gestures http://hammerjs.github.io/getting-started
HTML5 (HypertextMarkup Language 5)
Core language of the World Wide Web http://www.w3.org/TR/html5
D-1
Name Description Additional Information
JavaScript Scripting language used in client-sideapplications
https://developer.mozilla.org/en-US/docs/Web/JavaScript/About_JavaScript
js-signals JS library used for custom event/messagingsystem
http://millermedeiros.github.io/js-signals
jQuery JS library designed for HTML document traversaland manipulation, event handling, animation, andAjax
http://jquery.com
jQuery UI JS library built on top of jQuery for UIdevelopment. Oracle JET includes the UI Coredownload only.
http://www.jqueryui.com
Knockout JS library used for two-way data binding http://www.knockoutjs.com
Visual Studio Code Microsoft Integrated Development Environment(IDE) with available Oracle JET CoreComponents extension for applicationdevelopment.
https://marketplace.visualstudio.com/items?itemName=Oracle.oracle-jet-core
Node.js Open source, cross-platform runtime environmentfor developing server-side web applications, usedby Oracle JET for package management.
https://nodejs.org
proj4js JavaScript library designed for transforming pointcoordinates from one coordinate system toanother, including datum transformations.
http://proj4js.org/
QUnit JavaScript unit testing framework http://qunitjs.com
RequireJS JS file and module loader used for managinglibrary references and lazy loading of resources
http://www.requirejs.org
RequireJS CSS RequireJS CSS plugin that allows to load CSSfiles.
http://requirejs.org/docs/faq-advanced.html
SASS (SyntacticallyAwesome Style Sheets)
Extends CSS3 and enables you to use variables,nested rules, mixins, and inline imports
http://www.sass-lang.com
Selenium WebDriver Alternative method of testing applications http://docs.seleniumhq.org/projects/webdriver
Appendix DThird-Party Libraries and Tools
D-2