Operating Instructions - Washing Machine - Product Review
28
Before Use Basic Operations Advanced Operations Reference Thank you for purchasing this Panasonic product. Please read these instructions carefully before using this product, and save this manual for future use. This product is intended for household use and is not intended for commercial use. Refer to the warranty for details. Operating Instructions Washing Machine Maintenance ................................... 22 Troubleshooting .............................. 24 Error Codes ..................................... 26 Specifications .................................. 27 Safety Precautions ............................ 2 Name of Parts/Accessories ............... 4 Installation ......................................... 6 Washing .......................................... 10 Cycle Guide .................................... 12 Getting the Laundry Ready ............. 14 Cotton-Eco Cycle ............................ 15 Washing Delicate Clothes ............... 16 Washing Blankets ........................... 17 Wash/Rinse/Spin Individually .......... 18 Air Dry ............................................. 19 About Detergent .............................. 20 Contents Model No. NA-FS95G3WAU/NA-FS85G3WAU NA-FS95G3WNZ/NA-FS85G3WNZ (Domestic use)
-
Upload
khangminh22 -
Category
Documents
-
view
5 -
download
0
Transcript of Operating Instructions - Washing Machine - Product Review

Bef
ore
Use
Bas
icO
pera
tions
Adv
ance
dO
pera
tions
Ref
eren
ce
Thank you for purchasing this Panasonic product.Please read these instructions carefully before using this product, and save this manual for future use.This product is intended for household use and is not intended for commercial use. Refer to the warranty for details.
Operating InstructionsWashing Machine
Maintenance ................................... 22Troubleshooting .............................. 24Error Codes ..................................... 26Specifications .................................. 27
Safety Precautions ............................ 2Name of Parts/Accessories ............... 4Installation ......................................... 6
Washing .......................................... 10Cycle Guide .................................... 12
Getting the Laundry Ready ............. 14Cotton-Eco Cycle ............................ 15Washing Delicate Clothes ............... 16Washing Blankets ........................... 17Wash/Rinse/Spin Individually .......... 18Air Dry ............................................. 19About Detergent .............................. 20
Contents
Model No.
NA-FS95G3WAU/NA-FS85G3WAUNA-FS95G3WNZ/NA-FS85G3WNZ(Domestic use)

2
Safety Precautions These must be observed.
The following information describes the precautions that must be observed to prevent human injury or damage to property.
The following expressions are used to describe and classify the degree of injury or ■damage that occurs with incorrect use.
WARNING CAUTIONThis indicates “content that involves a risk of serious injury or death”.
This indicates “content that involves a risk of injury or damage to property”.
The following symbols describe content to be observed. (The following symbols are ■examples.)
This indicates “content that must NOT be performed”.
This indicates “content that MUST be performed”.
To prevent fire, electric shock, or injury
WARNINGAppliance
Do not allow children or persons with reduced physical, sensory or mental capabilities, or lack of experience and knowledge to use the washing machine, unless they have been given supervision or instruction. Children must be supervised not to play with the appliance.Do not allow a child to peer over the tub. (This may cause the child to fall into the tub and drown or suffer injury.)
Do not place a stool or similar objects ●near the washing machine.
Never disassemble, repair or remodel the washing machine. (This may cause fire or abnormal operation that may result in injury.)Do not place any burning objects near the washing machine. (This may cause fire.)
Cigarettes, candles, etc. ●Do not apply water directly to the washing machine (particularly the control panel) or place it in a wet or humid location. (This may cause electric shock or fire.)When opening the lid, do not place your fingers in the hinge mechanism. (This may cause injury.)
ApplianceDo not subject the glass lid to impact. (If it should break, stop the use of the washing machine immediately.)
TubWhen unloading the laundry or other objects in the tub, do not touch them until the tub stops completely. (Even when the tub is rotating slowly, there is a danger of injury when your hand becomes entangled with the clothes.)If the tub does not stop within 15 seconds after you have opened the lid during the spin cycle, stop the use of the washing machine immediately. (Contact your dealer for service and repair.)
During useNever place any flammable substances or clothing, etc. saturated with such substances in the tub or bring them near the washing machine. (This may cause an explosion or fire.)
Kerosene, gasoline, benzine, thinner, ●alcohol, etc.
When using hot water, do not touch the hot parts. (This may cause a burn.)
Water supply hose, water drain hose, etc. ●Do not open the lid. ●

3
WARNINGPower plug and cord
Do not perform the following:(This may cause fire or electric shock.)
Do not scratch, modify, bend forcibly, ●twist, pull, place heavy items upon, bundle or place near hot devices.Do not connect or disconnect the power ●plug with a wet hand.Do not pull the power cord to disconnect ●the power plug.When the power cord or plug is damaged ●or the electrical outlet is loose, do not use the washing machine. (Contact your dealer for repair.)
Observe the following:(Not doing so may cause fire or electric shock.)
Use a dedicated household AC outlet ●rated at 10 A, 220 V to 240 V. (Sharing an electrical outlet with other devices may cause fire due to overheating.)Securely insert the power plug into the ●electrical outlet.Wipe the power plug with a dry cloth on a ●regular basis. (If dust collects on the power plug, humidity, etc. may impair insulation and cause fire.)When the washing machine is not to be ●used for a long period of time or when performing maintenance, be sure to disconnect the power plug.
If abnormal conditions or malfunctions occur, stop the use of the washing machine immediately and disconnect the power plug. (Not doing so may cause smoke, fire or electric shock.)Examples of abnormal conditions and malfunctions:
Even if you turn on the washing machine, ●it does not operate.The power plug is dusty or wet. ●You notice an abnormal noise during use. ●You notice a burning smell. ●
(Contact your dealer immediately for check and repair.)
To prevent water leaks, injury or other damage
CAUTIONDo not wash, rinse or spin waterproof sheets or clothes. (This may cause violent shaking and falling during the spin cycle. Damage to the washing machine, wall, floor, laundry or other objects may result. Water leaks may also occur.)
Raincoats, sauna suits, wet suits, diaper ●covers, sleeping bags, ski wear, bicycle covers or similar articles, tarpaulins, etc.
Do not perform the following:Do not put your hand or foot under the ●washing machine. (A rotating mechanism under the washing machine may cause injury.)Do not climb on the washing machine or ●place heavy objects on top of it. (This may deform or damage the washing machine. Injury may result.)Do not directly fill the tub with hot water ●of 60 °C or higher or connect the washing machine to a water heater. (This may deform or damage the plastic parts. A short circuit or electric shock may result.)
Observe the following:(Not doing so may cause water leaks.)
Check the hose connections by turning ●on the water taps before use.Be sure to turn off the water taps after ●use.

4
Name of Parts/Accessories
Wash/Rinse/Spin (P.11, 18)You can select the desired combination of these cycles.Press repeatedly until the desired cycles light up.
Cycle Selection (P.12)You can select a cycle that suits the amount or type of clothes or the level of dirt and stains.Press the [Program] button repeatedly until the lamp on the left of the desired cycle lights up.
Child Lock (P.5) Display Area (P.5)
Control panel
Progress IndicatorIndicates the cycle in progress by flashing.
Air Dry (P.19)Timer Delay (P.11)Water Level (P.11, 20)Setting can be changed according to your preference. Press the [Water Level] button repeatedly until the desired water level indicator lights up.
Water supply hose (HOT) (P.7, 23)
Control panel (Refer to below)
Air inlet (P.22)
Spirit level (P.9)
PulsatorPower cord and plug (P.8)
Adjustable leg (P.9)
Washing/spinning tub (P.23)
Water drain hose (P.7)
Lint filter (Large) (P.22)
Balance ring
Bottom cover (P.6)
Liquid detergent inlet/Liquid bleach inlet (P.21)
Powdered detergent inlet (P.21, 23)
Lid Softener inlet (P.21, 23)
Water supply hose (COLD) (P.7, 23)
Air inlet (P.22)
Lint filter (Small) (P.22)

5
Start/PausePress to start.Press to pause during a cycle. Press again to restart.
Power SwitchTurns on/off the washing machine.
The washing machine turns off automatically at the ●end of a cycle.It turns off automatically if you do not start a cycle ●within 10 minutes after turning it on.
About the display area
Air Dry (hours) The drying time is displayed when you press the [Air Dry] button. (P.19)
Reserve (hours)The finishing time of a cycle is displayed when you press the [Timer Delay] button. (P.11)
Time Left (min) The remaining time is displayed during a cycle.
L The water level (P.20) is displayed when a cycle starts.
NoteAny time exceeding 99 minutes is displayed as “--”. ●
Child LockThis is an emergency alarming mode to prevent a child from drowning by falling into the tub filled with water.If you open the lid when the washing machine is running and the tub is filled with water, the washing machine will pause and you will hear warning beeps. When this happens, check immediately if there is any problem. If you leave the lid open for more than 10 seconds, “U99” (P.26) will appear, the Child Lock lamp will flash, and the water will be drained.
How to set/cancel the mode ■Before you begin
Close the lid. ●You cannot set or cancel the Child Lock when the lid is open.Turn on the washing machine. ●
Hold down the [Program] button for more than 5 seconds.When the Child Lock is set, you will hear two short beeps and the Child Lock lamp will light up.When the Child Lock is cancelled, you will hear two short beeps twice and the Child Lock lamp will turn off.
NoteWhen Child Lock is being set, “CL” is shown for 2 seconds in the display area each time you turn on the washing machine.
Water Temperature Settings (P.11)Press the [Temp Setting] button repeatedly until the lamp on the left of the desired water temperature lights up.
1 Water supply hose for COLD(Grey)
1 Water supply hose for HOT(White)
1 Bottom cover(Anti-vermin cover)
(This cover is attached to the back of the washing machine at the time of purchase.)
2 Levelling rubber pads
Accessories
ECONAVI (P.14)

6
1
54
3
72 6
Check the installation location.1Do not install the washing machine in the ●following locations:
A wet or humid location –A location exposed to direct sunlight –A location subject to freezing temperatures –An uneven or unstable location –A slippery location, such as a tiled floor –
Keep the washing machine at least 10 cm ●away from the wall to minimise noise.
Do not block the opening on the bottom with ●an object, such as a carpet.
Attach the bottom cover.2The bottom cover (Anti-vermin cover) is designed to prevent rats from damaging the internal parts of the washing machine. In addition, the cover provides safety by protecting you from the electrical parts and the rotating parts.
Remove the bottom cover from the back of
the washing machine.
Bottom cover
Align the bottom cover with the grooves at
the bottom of the washing machine, and insert it all the way in.
If it does not slide in easily, tilt the washing ●machine slightly forward.
Bottom cover
Insert so that the side with the arrow and text faces up and the arrow points to the front.
InstallationUnless the washing machine is installed and inspected according to these installation instructions, ●Panasonic is not liable for any accident or damage caused.Be sure to request your dealer or a contractor to do the installation work. Care should be taken if you ●are installing the washing machine by yourself.

7
Install the water drain hose.3Detach the water drain hose from the hose holder on the back of the washing machine, and place it in a tub, sink, wash-basin, standpipe, etc.
When draining to a tub, ●sink or wash-basin:
When draining to a ●standpipe:
Hose guide
Water drain hose
Stand pipe
Fit the hose guide to the water drain hose to ●guide the water drain hose over the tub, sink, wash-basin, standpipe, etc.Install the water drain hose as below to prevent ●siphoning.
Do not extend the –water drain hose more than 20 mm beyond the end of the hose guide. Max.
20 mm
Water drain hose
Hose guide
Install the end of –the water drain hose at a height of 0.7 m to 1.1 m. Max. 1.1 m
Min. 0.7 m
Install so that the end of the water drain hose –will not be soaked in water.To prevent siphoning, do not fit directly to a –drain spigot unless an air gap is present.
If it is impossible to install the water drain hose as instructed above, adjust its length by trimming it to length or by extending it with an extension drain hose. Limit the total length of the extended hose to 2 m or less.
Regularly check that the tub, standpipe, etc. ●is free from lint or other obstructions. (Not doing so may affect how the washing machine works or may cause flooding.) Draining must comply with local by-laws. ●
Connect the water supply hoses to the washing machine.
4
Press the end of the supplied water supply
hose (grey) with an elbow straight against the water supply valve screw on the back of the washing machine indicated as “COLD”, and tighten the nut clockwise with your hand.
Water supply valve screw
ElbowWater supply hose (HOT)
Water supply hose (COLD)
NutNut
Likewise, connect the supplied water
supply hose (white) to the water supply valve screw on the back of the washing machine indicated as “HOT”.
Check whether or not the elbows are ●unsteady or loose.

8
Installation (Continued)Connect the water supply hoses to water taps.
5
Press the other end of the water supply hose
(grey) connected to the washing machine straight against the cold water tap, and tighten the nut clockwise with your hand.
Likewise, connect the other end of the
water supply hose (white) connected to the washing machine to the hot water tap.
Turn on the water taps to check that water ●leaks from neither the water supply valves of the washing machine nor the water taps.Be sure to plumb the washing machine into ●both hot and cold water supplies. Otherwise, some cycles may not function correctly. (The washing machine is not equipped with an internal heater to heat water.)Water-flow from the tap should be more than ●5 L/min.Do not use hot water above 60 °C (for hot ●water supply) and cold water above 25 °C (for cold water supply) to prevent a fault or damage to the washing machine.If you have an uncontrolled water heating ●source (e.g., wet back, solar heating), fit a tempering device (e.g., a safe valve). This will ensure the hot water temperature remains within safe limits. Contact a local plumber or plumbing supply merchant for the most suitable type of tempering device.
Connect the power plug.6Plug the power cord into a dedicated household 3-pin AC outlet rated at 10 A, 220 V to 240 V. If you are not sure, contact a qualified electrician.

9
Check if the washing machine is level.
7
When the installation is complete, look at the spirit level of the washing machine to check if it is installed level.
If the bubble is inside the circle mark at the ●centre of the spirit level, the washing machine is installed level.If the bubble is not inside the circle mark at the ●centre of the spirit level, correct the position.
Bubble
Circle mark
When using the levelling rubber pad ●(supplied):Attach the levelling rubber pad to the leg of which you want to raise the height.To raise the height by 5 mm: attach the pad as is.To raise the height by 10 mm: fold the pad in half and attach it.
When using the adjustable leg on the front ●right of the bottom of the washing machine:
Loosen Tighten
Adjust
LowerHigher
NoteTo prevent water leaks: ●
Use the supplied brand new water supply –hoses.Do not connect the water supply hoses for –hot/cold water to the wrong water taps.Tighten the nuts firmly. –Do not forcibly bend the water supply hoses. –(This will cause the hoses to crack.)
The installation shall be in accordance with the ●requirements of AS/NZS 3500.1.
Cautions for useDo not add too much detergent. (This will ●cause poor rinsing or cause the foam to overflow and wet the floor.)Do not load too many clothes. Limit the load ●size to a level below the balance ring. (Not doing so will tear clothes and damage the resin parts of the washing machine.)Do not place objects on the washing ●machine during use. (This will cause the objects to shake and fall. Malfunction may result.)Do not place a TV, radio, or other electronic ●devices near the washing machine. (This will cause images to appear distorted and create noise.)Do not bring magnets or any magnetic ●objects over the washing machine. (Malfunction may result.)If detergent or softener comes in contact with ●the washing machine (particularly the lid or the control panel), wipe it off immediately with a towel wrung out of water or similar cloth. (Not doing so will cause the printed information to come off, damage the resin parts, corrode the metal parts or result in malfunction.) Exercise extra care when using concentrated liquid detergent. If the resin parts come in contact with the detergent, it may cause cracks on the parts.Do not directly cover the washing machine ●with a cover made of vinyl chloride. (This may damage the surface of the washing machine.)Do not spray pesticides, hair products, ●deodorants or other such liquids. (This may cause the washing machine to malfunction or damage it.)

Display Area(P.5)
10
Washing
Press .
Close the lid.
Press repeatedly to select a cycle. (P.12)
Open the lid, and add detergent to the liquid detergent inlet or powdered detergent inlet in the amount appropriate for the water level.
If using softener, add it to the softener inlet. ●
Press . The washing machine will measure the ●laundry load by churning the laundry without any water, and display the water level.
5
21
4
3
The cycle is complete when the washing machine beeps. (P.15)Turn off the water taps and take out the clothes.
NoteYou cannot change the cycle once you ●press the [Start] button. To change the cycle, turn off and on the washing machine, and set cycle settings again.
Select the water temperature (P.11) ►Select the wash/rinse/spin settings (P.11) ►Set the finish time (P.11, Timer Delay) ►
Select the water level (P.11) ►
About Detergent (P.20) ►
Before you beginLoad clothes in the tub, close the lid, and turn on the water taps. ●

11
Customise the settingsYou can customise the water temperature setting for the wash stage of a cycle, the wash/rinse/spin settings and the water level setting.
Set the water temperature for main ■wash fill
Water temperatureHot: Approx. 40 °CWarm: Approx. 30 °CCold: Approx. 20 °CAfter performing Step 2 on page 10, press the [Temp Setting] button repeatedly until the lamp of the desired water temperature lights up.
Set the wash/rinse/spin settings ■After performing Step 2 on page 10, press the [Wash], [Rinse] or [Spin] button repeatedly until the lamps of the desired cycles light up.
To change the wash/rinse/spin settings ●after a cycle has started:
Press the [Pause] button, and change
the settings. Press the [Start] button to restart.
Set the water level ■After performing Step 3 on page 10, press the [Water Level] button repeatedly until the desired water level indicator lights up.Note
You cannot change the water temperature ●setting once a cycle starts. Some settings may not be available ●depending on the cycle. (P.12)
Timer Delay functionYou can select the finish time of a cycle 2–24 hours from the current time.After performing Step 2 on page 10, press the [Timer Delay] button and select the finish time (hours).
The time is shown in the display area. ●The time increases by an hour each time you ●press the button.
Check the set details ■Press the [Timer Delay] button when the timer is set.
The cycle, wash/rinse/spin settings, water ●temperature setting, water level and finish time will be displayed.
Cancel or change the finish time ■Press the [Power Off] button to turn off the washing machine, and repeat the operations from Step 1 on page 10.
NoteAll indicators, lamps and displays except for ●the “Reserve” information on the display area and the ECONAVI display go off 2 minutes after pressing the [Start] button.Do not use soap powder. ●The finish time can exceed the programmed ●time due to the water feeding and draining condition.This function is not available depending on ●the cycle. (P.12)
12
Cycle Guide
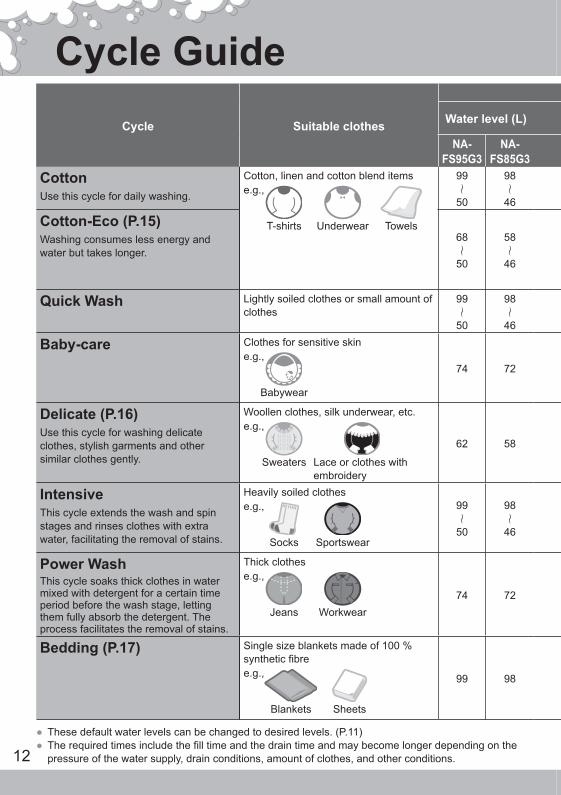
These default water levels can be changed to desired levels. (P.11) ●The required times include the fill time and the drain time and may become longer depending on the ●pressure of the water supply, drain conditions, amount of clothes, and other conditions.
Cycle Suitable clothes Water level (L)
NA-FS95G3
NA-FS85G3
CottonUse this cycle for daily washing.
Cotton, linen and cotton blend items
T-shirts Underwear Towels
e.g.,99
50
98
46
Cotton-Eco (P.15)Washing consumes less energy and water but takes longer.
68
50
58
46
Quick Wash Lightly soiled clothes or small amount of clothes
99
50
98
46
Baby-care Clothes for sensitive skin
Babywear
e.g.,74 72
Delicate (P.16)Use this cycle for washing delicate clothes, stylish garments and other similar clothes gently.
Woollen clothes, silk underwear, etc.
Sweaters Lace or clothes with embroidery
e.g.,62 58
IntensiveThis cycle extends the wash and spin stages and rinses clothes with extra water, facilitating the removal of stains.
Heavily soiled clothes
SportswearSocks
e.g., 99
50
98
46
Power WashThis cycle soaks thick clothes in water mixed with detergent for a certain time period before the wash stage, letting them fully absorb the detergent. The process facilitates the removal of stains.
Thick clothes
Jeans Workwear
e.g.,
74 72
Bedding (P.17) Single size blankets made of 100 % synthetic fibre
SheetsBlankets
e.g., 99 98

13The pulsator rotates during the first 3 minutes to fully dissolve detergent. After this operation, the * pulsator rotates and stops periodically to soak the load.
Default setting
RemarksWash (min) Rinse
(times)Spin(min)
Required time(approx., min)
NA-FS95G3
NA-FS85G3
NA-FS95G3
NA-FS85G3
12
92 6
65
53
33 (Soaking
time)*+6
34 (Soaking
time)*+6
325
(“9” min. lights up.)
98 99
This cycle is recommended for a ●normally soiled cotton load.The water temperature setting is fixed to ●“Hot”.Customising the wash/rinse/spin setting ●is not possible.
9
6
1(Refill)
6
3
45
31
Customising the wash/rinse/spin setting ●is not possible.
9 2(Refill) 6 67
The rinse setting is fixed to “Refill”. ●
6 2 1 47
The function of water temperature ●setting is disabled.Customising the wash/rinse/spin setting ●is not possible.The Timer Delay function is disabled. ●
12 2(Refill) 9
79
63
The rinse setting is fixed to “Refill”. ●
22 (Soaking time)*+12
2 6 91
12 2(Refill) 6 73
The rinse setting is fixed to “Refill”. ●

14
Getting the Laundry ReadyBefore washing, look at the care label to check if the clothes can be washed in a washing machine.
Sort the clothes ■Wash the following clothes separately ●
Coloured clothes or clothes that fade easily –Towels and other clothes that produce lint –
Place delicate underwear and smaller items in a ●washing net
Bras and stockings –Clothes with lace parts or lingerie –
Pre-wash partially-soiled clothes ■Stains on collars, sleeves ●
Apply detergent for collars and sleeves before →washing
Spotty stains ●Apply detergent for spotty stains or oxygen- →based bleach before washing
Muddy dirt ●Apply detergent for partial stains or bath soap, →and wring with your hands before washing
Check the clothes ■Do up buttons and close fasteners ●Tie up string and other similar items ●Turn clothes that can easily cause pilling inside ●outRemove metallic pieces, coins and other similar ●itemsClean off pet hair, human hair, sand and other ●foreign objects with a brush
Order for loading clothes in the tub ■Load bulky clothes or clothes that will float in water first
After the tub has been refilled, pause and press ●down the clothes from the top so that the clothes absorb sufficient water
ECONAVIDuring the “Cotton” cycle, the washing machine optimises the water level and washing time, based on the amount of clothes and water temperature. Description of lamp display
Flashing: The lamp flashes from the time water starts filling the tub until the water temperature detection is complete. The measurement starts as soon as the tub is filled. The time required to measure the temperature is 5 minutes.
On: ECONAVI is activated. If the water temperature measured meets the temperature requirement, the lamp lights up and stays lit up until the end of the cycle.
Off: ECONAVI is not activated. If conditions do not meet the requirements, ECONAVI does not start.
NoteECONAVI might not operate correctly under the following conditions: ●
The tub was filled with water before you started running the washing machine. –The wash/rinse/spin settings are customised. –
Even when ECONAVI is not activated, the washing machine runs with the same sequence of stages.

15
Cotton-Eco CycleWith the “Cotton-Eco” cycle the washing machine consumes less energy and water.
We recommend using high efficiency (HE) or low-sudsing detergent. ●
Before you beginLoad clothes in the tub, close the lid, and turn on the water taps and the washing machine. ●
Press 1 repeatedly to select the “Cotton-Eco” cycle.Press 2 .
Change the water level (P.4) ●Open the lid, add detergent, and close the lid.3
About Detergent (P.20) ●The dosage of detergent should be:Powdered detergent: 118 g – 119 gLiquid detergent: 118 ml – 119 mlThe cycle is complete when the washing machine beeps. ●
NoteDo not use softener. ●During continuous use, the washing machine may add an extra amount of water to prevent the motor ●from overheating. To fully utilise the water saving function, we recommend leaving the washing machine for at least 1 hour between each use.If “U13” (P.26) appears, clothes in the tub are out of balance. Follow the loading procedure above to ●distribute the clothes evenly, and close the lid.
The End-Of-Cycle BeepsThe washing machine beeps when a cycle is complete. The beeps can be turned off.
How to cancel/set the End-Of-Cycle Beeps ■When the washing machine is turned off:Press the [Power On/Off] button while pressing the [Start/Pause] button, and hold them down for 3 seconds or longer.When the End-Of-Cycle Beep is turned off, you will hear two short beeps.When the End-Of-Cycle Beep is turned on, you will hear two short beeps twice.

16
Washing Delicate ClothesWash delicate clothes, stylish garments and other similar clothes gently. (This differs to dry cleaning, which uses a chemical solvent.)
The amount of clothes that can be washed each time is 1.5 k ● g or less.Use a neutral liquid detergent (for wool yarn, silk). ●
Before you beginLoad clothes in the tub, close the lid, and turn on the water taps and the washing machine. ●
Lay the clothes on top of each other ■so that they are loaded horizontally
Do the following in advance: ■Turn clothes that attract lint inside out. ●Apply detergent without fluorescing agent to ●sebum, dust and dirt on collars, sleeves and other similar parts, and tap lightly with a soft-bristled brush to clean.Tie pleats with string. ●Wrap up dark-coloured buttons. ●
Also be sure to check “Getting the Laundry Ready” (P.14) ►
How to load delicate clothes
Press 1 repeatedly to select the “Delicate” cycle.Change the water level (P.4) ●Selectable water level:NA-FS95G3: 50 L – 62 LNA-FS85G3: 46 L – 58 L
Press 2 .Open the lid, add liquid detergent to the liquid detergent inlet in the 3 amount appropriate for the water level, and close the lid.
About Detergent (P.20) ●The cycle is complete when the washing machine beeps. ●
NoteDo not use bleach. ●Remove the clothes and dry them as soon as the cycle is complete. ●(Not doing so will cause wrinkling and colour transfer.)Do not use hot water. ●
Clothes that might get ■wrinkled (shirts, blouses, trousers, etc.)
Dry on hangersWrap a towel around to suit the shoulder width
(Do not hang dry knitwear.)
Knitwear ■With rough stitching ●
Dry flat →
To prevent discolouration ■and wrinkles
Dry light-coloured clothes, ●white clothes, wool or synthetic clothes in the shade.Carefully pat out any wrinkles ●of knitwear or new synthetic materials with your palm, and pull into shape before drying.
Other types of knitwear ●Dry on pole →
How to dry delicate clothes

17
Washing BlanketsYou can wash single size blankets made of 100 % synthetic fibre.
We recommend using a liquid detergent. ●
Before you beginLoad the blanket into the tub, close the lid, and turn on the water taps and the washing machine. ●
Fold in quarter. Load the blanket into the tub, and press it
down lightly.
To prevent the blanket from flying out during the spin cycle, place both ends facing down.
Fold into an M-shape.
How to load the blanket
Press 1 repeatedly to select the “Bedding” cycle.Change the water level (P.4) ●Selectable water level:NA-FS95G3: 74 L – 99 LNA-FS85G3: 72 L – 98 LSelect the water temperature (P.5) ●Set the finish time (P.11) ●
Press 2 .Open the lid, add detergent in the amount appropriate for the water 3 level, and close the lid.
About Detergent (P.20) ●Blankets do not absorb water easily. After the tub has been refilled, pause and press down the ●blanket from the top.The cycle is complete when the washing machine beeps. ●

18
Wash/Rinse/Spin IndividuallyYou can select the desired cycle combination, such as “wash and rinse” or “spin only”. (These are not saved.)
Before you beginLoad clothes in the tub, close the lid, and turn on the water taps and the washing machine. ●
When the “Cotton” cycle is selected: 1 Press , or repeatedly to select the combination of cycles.
Select the water temperature (P.5) ●Set the finish time (P.11) ●
Press 2 . Change the water level (P.4) ●About Detergent (P.20) ●The selected cycles are complete when the washing machine beeps. ●
Setting the advanced optionsSettings Used for Buttons used Remarks
Wash only Using washing liquid twice ● The washing liquid stays in ●the tub.
Wash and rinse Reusing the rinsing water ● The rinsing water stays in the ●tub.
Wash and spin Washing clothes with ●laundry starch
Rinse only Rinsing washed clothes ● The rinsing water stays in the ●tub.
Rinse and spin Rinsing and spinning ●washed clothes
Spin only Spinning washed clothes ●Draining water in the tub ●
NoteIf you start from the “Rinse” or “Spin” cycle when the tub is filled with water, draining will take place first. ●If the tub is empty, the “Spin” cycle will be performed first.If you have used laundry starch, rinse off the starch after the cycle is complete. (Run the “Cotton” cycle ●with the water level set to “Middle” or higher. Do not load any clothes.)

19
Air DryThe “Air Dry” cycle removes the moisture remaining in clothes using a current of air created by the rotation of the tub. Air is drawn in through the air inlets on the lid. You can reduce the drying time with this cycle. (This drying does not heat the air.)This cycle is designed specifically for synthetic clothes (up to 3 kg).
Before you beginAfter the spin cycle, untangle the clothes in the tub, distribute them evenly, close the lid, and turn on the ●washing machine.
Press 1 repeatedly to select the drying time (hours).The time is shown in the display area. ●The time changes each time you press the button. ●
Press 2 .The “Air Dry” cycle is complete when the washing machine beeps. ●
NoteSince the “Air Dry” cycle is timer-controlled, it terminates regardless of the dryness. If the clothes are ●still wet, run an additional “Air Dry” cycle.The laundry may not be dry enough depending on the size of the load, type of clothes, temperature, ●humidity and installation conditions of the washing machine. (As no heater is used for this function, some users may feel the laundry is cold and not dry.)
Drying the tub (P.23) ►

20
About DetergentDosage guide (detergent/softener)
Approximate weight of clothes ■Approximate weight per article (The numbers vary depending on the materials used.)
600 g Jacket 300 g Bath towel (100 % cotton)
500 g Bed sheet (100 % cotton)Pyjamas (100 % cotton) 200 g Dress shirt (blended fabric)
Blouse
400 gSweaterSkirt (chemical fibre)Trousers
50 g Pair of socks (blended fabric)Boxer briefs (100 % cotton)
Lighting patterns of the water level indicators
Water level (L) / Amount of laundry (kg)
NA-FS95G338 /2 or less
45 /3 or less
50 /4 or less
55 /4~6
62 /4~7
68 /5~7
74 /6~8
80 /7~9
86 /8~9.5
92 /8~9.5
99 /8~9.5
NA-FS85G342 /3 or less
46 /4 or less
52 /4~6
58 /4~7
65 /5~7
72 /6~8
80 /7~8.5
86 /8~8.5
92 /8~8.5
98 /8~8.5
DetergentPowdered (g)20 g for 30 L of water
32 36 40 48 52 56 64 64 118 118 119
Liquid (ml)20 ml for 30 L of water
32 36 40 48 52 56 64 64 118 118 119
Softener (ml)Normal20 ml for 30 L of water
27 33 41 49 57 63
Concentrated6.6 ml for 30 L of water
9 11 14 16 19 21
Some detergents/softeners have their own prescribed methods of use. Please read the instructions for ●your detergent/softener.Dosage of detergent for the “Cotton-Eco” cycle (P.15) ►

21
How to add detergentLoad clothes in the tub, and 1 Press .
The washing machine displays the water level ●appropriate for the laundry load. (P.20)
Add detergent in the amount 2 appropriate for the water level.(Detergent compartment locations are illustrated below.)
Liquid detergentLiquid detergent
Powdered detergentPowdered detergent
Powder bleachPowder bleach
SoftenerSoftener
Soap powderTo dissolve soap powder:
Pour 5 litres of water at about
30 °C into a container.Dissolve the soap powder by
adding it little by little while churning the water.
Liquid bleachLiquid bleach
NoteBefore adding detergent, bleach, softener or soap ●power, read its directions and precautions carefully.We recommend using low-sudsing detergent. ●
Powdered detergent:Wipe dry the powdered detergent inlet if it is wet. ●(Failure to do so may cause detergent to remain.)
Softener:Keep the level of the softener ●below the “MAX” indication to prevent the softener from flowing immediately.Softener is automatically ●added to the tub at the end of the rinse cycle.Since softener solidifies easily, do not leave it in ●the softener inlet for a long period of time (12 hours or longer).
Powder bleach:When using the Timer Delay function, wrap ●bleach around a white article before adding it to the tub to prevent other clothes from discolouring.
Soap powder:In order to keep the soap powder from ●hardening or sticking, mix it well and dissolve it.Be certain to rinse thoroughly. (Failure to do so ●may cause clothes to become tinged with yellow or the smell of soap.)Do not add too much, or add directly into low ●temperature water. (Doing so may cause soap to not completely dissolve, or soap scum to adhere inside the hose or the tub. The soap scum may float and stain clothes.)
MAX

22
Maintenance
Wipe the appliance with a soft cloth.If the dirt is heavy, wipe with mild dish soap. (Do not use abrasive cleansers, thinner, benzine, alcohol, kerosene, etc. or apply water directly to the appliance.)
When the air inlet is clogged: ●Remove the dirt.
Appliance
Hold the top of the filter to
detach it.
Remove the lint.Before removing the lint, ●open the lint filter (Large).
If the lint is stubborn, ●rinse the filter.
Put it back into place.
Before putting it back into ●place, close the lint filter (Large).
NoteDo not operate the washing machine without the filters. ●(This will damage the clothes.)When the filter is torn, purchase a replacement from ●your dealer.
Lint filters(After each use)

23
Remove and rinse the case.
Powdered detergent/ softener case
Disconnect the water supply hoses, and clean the water supply filters with a toothbrush.
Disconnecting the water supply hoses: ●Be absolutely sure to follow the procedure as described below. Otherwise, water will spray out.
Close the lid and turn off the water taps.
Press the [Power On] button to turn on
the washing machine.Press the [Start] button.
Wait for a few seconds, and press the
[Power Off] button to turn off the washing machine.Disconnect the water supply hoses from
the washing machine.
NutHose
When the cleaning is complete, reconnect the ●water supply hoses back to the washing machine. (P.7)
Water supply filters(When the water pressure is low)
Drying the tub ■(About once a week)Do not load clothes.
Close the lid and press the [Power On]
button to turn on the washing machine.Press the [Air Dry] button to select
“0.5” hours.Press the [Start] button.
If you notice mould or an odour ■Clean the washing machine with a commercially-available tub cleaner. (Read the instructions of the cleaner carefully for information on its use.)
Preventing mould and odours

24
TroubleshootingBefore requesting service, make the following checks. If the problem still persists, consult your dealer for instructions.
Problem Check points Page
App
lianc
e
The washing machine does not turn on.
Is there a power failure? ●Did you press the [Power On] button? ●Is the power plug connected securely? ●Is the power fuse broken or the breaker turned off? ●
––––
Buttons do not work.
You cannot operate the [Temp Setting] button once a cycle ●starts. You can operate the [Water Level] button until the end of the wash stage of a cycle. You can operate the [Wash], [Rinse] and [Spin] buttons after pressing the [Pause] button until the end of the wash stage of a cycle. To change the other settings, turn off and on the washing machine.
11
There is an unusual noise or vibration.
Do not place the washing machine on an uneven or unstable ●surface.Are the clothes out of balance? ●
Press the [Pause] button, redistribute the clothes, and restart →the cycle.
6
–
Was
h cy
cle
Water is not supplied.Water pressure is low.
Are the water taps turned on? ●Is the water supply cut off? ●Is the water pipe or are the water supply hoses frozen? ●Are the water supply filters clogged? ●
Clean the water supply filters. →
––2523
Water level is too high for the amount of laundry being washed.
If you load clothes drenched in water or if the tub was filled ●with some water before the cycle started, the water level may become high.
Press the [Water Level] button repeatedly to change the →water level.
11
Water level is too low for the amount of laundry being washed.
Light clothes made of synthetic or blended fabric may lower the ●water level.
Press the [Water Level] button repeatedly to change the →water level.
11
Water starts filling the tub in the middle of the wash cycle.
When the water level goes down, the tub will be filled ●automatically.The tub may be filled automatically when the amount of laundry ●is large.
–
–
Rin
se
cycl
e When I start the rinse cycle, water does not fill the tub.
If the tub is empty, it will be filled after the spin cycle. ●If the tub is filled, it will be drained first. ●
––
Spin
cy
cle A rinse starts suddenly
during the spin cycle.
If the clothes are out of balance, the washing machine starts a ●rinse automatically to rebalance them.
Try to load the clothes evenly. →
–

25
Problem Check points Page
Air
Dry
cyc
le
Doesn’t dry well.
Did you load clothes made of materials other than synthetic ●fibres or do the clothes weigh 3 kg or more?Did you wring the clothes by hand? If so, the water is not ●removed enough.Is the drying time set too short? ●Is the air inlet clogged? ●
Remove the lint and dust on the air inlet. →Since the “Air Dry” cycle is timer-controlled, it terminates ●regardless of the dryness.
If the clothes are still wet, run an additional “Air Dry” cycle. →
19
–
1922
19
Det
erge
nt
Synthetic powdered detergent does not dissolve completely.
Did you add the synthetic powdered detergent directly to the ●tub?
Add it to the powdered detergent inlet. →
21
There is hardly any foam.
Did you add the synthetic powdered detergent to the powdered ●detergent inlet?Did you add too little detergent? ●Did you load too many clothes or are they soiled heavily? ●Depending on the type (low foam detergent, etc.) or amount of ●your detergent or the hardness, temperature, and amount of water, there may be hardly any foam.
21
20––
There is too much foam.
Depending on the type (neutral liquid detergent, etc.) or ●amount of your detergent or the hardness, temperature, and amount of water, there may be too much foam.
Add less detergent. → 20
Oth
ers
Power failure/Circuit breaker has tripped.
Even if a power failure occurs, the washing machine restarts ●automatically when the power supply is restored. To discontinue the use, press the [Power Off] button.
–
Water supply is disrupted.
When the water supply is restored, it may be impure at first. ●Disconnect the water supply hoses and drain away the →impure water through the taps.
23
The washing machine keeps beeping and the water is being drained.
Is the Child Lock set? ●To stop the water from draining, disconnect the power plug, →wait for 5 seconds, and reconnect it.
5
The water supply hoses are frozen.
Wrap warm towels around the joints of the water supply hoses. Disconnect the water supply hoses, and soak them in warm
water (50°C or lower). Add 2 L to 3 L of warm water (50°C or lower) to the tub.
–

26
Error CodesWhen the washing machine beeps and “U” and a number appear alternately, make the following checks.If the problem still persists, consult your dealer for instructions.
Display Check points Page
Unable to drain
Check the water drain hose for any of following problems: ●Is the hose crushed? –Is the end of the water drain hose soaked in water? –Is the end of the water drain hose installed at a height of 0.7 m –to 1.1 m?Is the extension hose longer than 2 m? –Is the water drain hose frozen? –After correcting the problem, restart the operation by opening →and closing the lid.
–
The lid is open
Is the lid open? ●Close the lid. →
–
Unable to spin/air dry
Are the clothes out of balance? ●Redistribute the clothes, and close the lid. →
Is the washing machine wobbly or placed on an uneven surface? ●After correcting the problem, restart the operation by opening →and closing the lid.
15
6, 9
Unable to supply water
Check for any of the following problems: ●Are the water taps turned on? –Is the water supply cut off? –Is the water pipe or are the water supply hoses frozen? –Are the water supply filters clogged? –After correcting the problem, restart the operation by opening →and closing the lid.
2523
Child Lock
If the amount of water in the tub exceeds a certain level when the ●lid is open and Child Lock is set, you will hear warning beeps. If you leave the washing machine with the lid open for another 10 seconds, “U99” appears and draining starts automatically. To stop the draining, disconnect the power plug, wait for 5 seconds, and reconnect it.If the draining does not stop even after you have performed the procedure above, check if the water drain hose is connected correctly.
5
7
When “H” and a number appear alternately, service is required.Display Check points
Check the displayed number (two-digit number following “H”), disconnect ●the power plug, and consult your dealer for service.

27
Domestic Use OnlyIf this product is being purchased for a business purpose then the purchaser acknowledges that the Consumer Guarantees Act will not apply.
SpecificationsModel name NA-FS95G3WAU/
NA-FS95G3WNZNA-FS85G3WAU/NA-FS85G3WNZ
Power source AC 220 V – 240 V, 50 HzPower consumption rating 360 W 325 WDimensions (WDH) 640 mm690 mm1070 mmMass 52 kgStandard wash/spin load capacity(dry clothes) 9.5 kg 8.5 kg
Tap water pressure 30 kPa to 1000 kPa(0.3 kgf/cm2 to 10 kgf/cm2)

Printed in Taiwan 2014. 07W9901-S95G30
Panasonic CorporationWeb Site: http://panasonic.net
© Panasonic Taiwan Co., Ltd. 2014
(For Australia)Phone: 132 600Open: 8:30 a.m. to 6:00 p.m. Monday to Friday
(For New Zealand)Phone: 09 272 0178Open: 8:30 a.m. to 5:00 p.m. Monday to Friday
Panasonic Customer Care Centre