适用于OpenShift 的NSX Container Plug-in - 安装和管理指南
46
适用于 OpenShift 的 NSX Container Plug-in - 安装和 管理指南 NSX Container Plug-in 3.1、3.1.1、3.1.2 VMware NSX-T Data Center 3.1
-
Upload
khangminh22 -
Category
Documents
-
view
0 -
download
0
Transcript of 适用于OpenShift 的NSX Container Plug-in - 安装和管理指南
适用于 OpenShift 的 NSX Container Plug-in - 安装和管理指南
NSX Container Plug-in 3.1、3.1.1、3.1.2
VMware NSX-T Data Center 3.1

您可以从 VMware 网站下载最新的技术文档:
https://docs.vmware.com/cn/。
VMware, Inc.3401 Hillview Ave.Palo Alto, CA 94304www.vmware.com
威睿信息技术(中国)有限公司北京办公室北京市朝阳区新源南路 8 号启皓北京东塔 8 层 801www.vmware.com/cn
上海办公室上海市淮海中路 333 号瑞安大厦 804-809 室www.vmware.com/cn
广州办公室广州市天河路 385 号太古汇一座 3502 室www.vmware.com/cn
版权所有 ©
2017-2021 VMware, Inc. 保留所有权利。 版权和商标信息
适用于 OpenShift 的 NSX Container Plug-in - 安装和管理指南
VMware, Inc. 2
目录
适用于 OpenShift 的 NSX-T Container Plug-in - 安装和管理指南 4
1 NSX Container Plugin 概述 5兼容性要求 6
安装概述 6
2 设置 NSX-T 资源 7配置 NSX-T 资源 7
3 Preparing NCP for OpenShift 4 10
4 安装 OpenShift 4 16
5 配置负载均衡 18
6 Upgrade NCP 24
7 管理 NSX Container Plug-in 26清理 NSX-T 环境 26
更改正在运行的集群的名称 28
CLI 命令 29
错误代码 40
VMware, Inc. 3

适用于 OpenShift 的 NSX-T Container Plug-in - 安装和管理指南
本指南介绍了如何安装和管理 NSX Container Plug-in (NCP) 以提供 NSX-T Data Center 和 OpenShift 之间的集成。
目标读者
本指南适用于系统和网络管理员。假定用户熟悉 NSX-T Data Center 和 OpenShift 4 的安装和管理。
VMware 技术出版物术语表
VMware 技术出版物提供了一个术语表,其中包含一些您可能不熟悉的术语。有关 VMware 技术文档中
使用的术语的定义,请访问 http://www.vmware.com/support/pubs。
VMware, Inc. 4
NSX Container Plugin 概述 1NSX Container Plugin (NCP) 提供 NSX-T Data Center 和容器协调器(如 Kubernetes)之间的集成,
以及 NSX-T Data Center 和基于容器的 PaaS(平台即服务)的软件产品(如 OpenShift)之间的集成。
本指南介绍了如何使用 OpenShift 4 设置 NCP。要使用 OpenShift 3 设置 NCP,请参阅本指南的 NCP 2.5 版本。
NCP 的主要组件在容器中运行,并与 NSX Manager 和 OpenShift 控制平面进行通信。NCP 通过调用
NSX-T 策略 API 来监控对容器和其他资源的更改以及管理网络资源,如容器的逻辑端口、交换机、路由器
和安全组。
NSX CNI 插件在每个 OpenShift 节点上运行。它监控容器生命周期事件,将容器接口连接到客户机
vSwitch,并对客户机 vSwitch 进行编程以标记和转发容器接口和 vNIC 之间的容器流量。
NCP 提供了以下功能:
n 自动为 OpenShift 集群创建 NSX-T 逻辑拓扑,并为每个 OpenShift 命名空间创建一个单独的逻辑网
络。
n 将 OpenShift pod 连接到逻辑网络,并分配 IP 和 MAC 地址。
n 支持网络地址转换 (NAT) 并为每个 OpenShift 命名空间分配一个单独的 SNAT IP。
注 配置 NAT 时,转换后 IP 的总数不能超过 1000。
n 使用 NSX-T 分布式防火墙实现 OpenShift 网络策略。
n 支持输入和输出网络策略。
n 支持网络策略中的 IPBlock 选择器。
n 为网络策略指定标签选择器时,支持 matchLabels 和 matchExpression。
n 使用 NSX-T 第 7 层负载均衡器实现 OpenShift 路由。
n 通过 TLS Edge 终止支持 HTTP 路由和 HTTPS 路由。
n 支持具有备用后端和通配符子域的路由。
n 在 NSX-T 逻辑交换机端口上为命名空间、pod 名称和 pod 标签创建标记,并允许管理员根据标记定
义 NSX-T Data Center 安全组和策略。
本章讨论了以下主题:
n 兼容性要求
VMware, Inc. 5

n 安装概述
兼容性要求
有关兼容性要求,请参见发行说明。
NCP 3.1 发行说明:https://docs.vmware.com/cn/VMware-NSX-T-Data-Center/3.1/rn/NSX-Container-Plugin-31-Release-Notes.html
NCP 3.1.1 发行说明:https://docs.vmware.com/cn/VMware-NSX-T-Data-Center/3.1/rn/NSX-Container-Plugin-311-Release-Notes.html
NCP 3.1.2 发行说明:https://docs.vmware.com/cn/VMware-NSX-T-Data-Center/3.1/rn/NSX-Container-Plugin-312-Release-Notes.html
安装概述
安装和配置 NCP 包括以下步骤。要成功执行这些步骤,您必须熟悉 NSX-T Data Center 和 OpenShift 4 安装和管理。
请注意,所有 NSX-T 对象都必须使用策略 UI 创建。
1 安装 NSX-T Data Center。
2 创建一个覆盖网络传输区域。
3 创建覆盖网络分段和 Tier-1 网关,并将 OpenShift 节点连接到此分段。
4 安装 OpenShift 和 NCP。
适用于 OpenShift 的 NSX Container Plug-in - 安装和管理指南
VMware, Inc. 6

设置 NSX-T 资源 2在安装 NCP 之前,您需要设置某些 NSX-T 资源。
注意:安装 NSX-T 时,默认许可证不允许创建或更新支持 NCP 所需的对象。有关详细信息,请参见
https://docs.vmware.com/cn/VMware-NSX-T-Data-Center/3.1/administration/GUID-8E665EAC-A44D-4FB3-B661-E00C467B2ED5.html。
NSX Manager Web UI 提供了 2 种配置网络资源的方法:策略模式和管理器模式。有关详细信息,请参
见 https://docs.vmware.com/cn/VMware-NSX-T-Data-Center/3.1/administration/GUID-BB26CDC8-2A90-4C7E-9331-643D13FEEC4A.html。
对于 OpenShift 4,您必须使用策略模式或策略 API 来配置 NSX-T 资源。
以下各节假定您熟悉 NSX-T Data Center 的安装和管理。有关详细信息,请参见《NSX-T Data Center 安装指南》和《NSX-T Data Center 管理指南》。
本章讨论了以下主题:
n 配置 NSX-T 资源
配置 NSX-T 资源
本节介绍如何在 NSX Manager 策略模式下配置资源。
在 NCP 配置文件 ncp.ini 中,您可以使用 UUID 或名称指定 NSX-T 资源。
网关和分段
1 为 Kubernetes 节点创建分段,例如 ocp4-segment。
2 创建 Tier-0 网关,例如 T0GW1。如果您没有共享的 Tier-1 拓扑,请在 ncp.ini 的 [nsx_v3] 部分
使用网关 ID 设置 top_tier_router 选项。有关配置共享 Tier-1 拓扑的信息,请参见下文。如果您
打算在此网关上配置 NAT 规则,请将 HA 模式设置为活动-备用。否则,将其设置为活动-活动状态。
启用路由重新分发。还要配置此网关以访问外部网络。
3 创建 Tier-1 网关,例如 T1GW1。将此网关连接到 Tier-0 网关。
4 为 T1GW1 配置路由器通告。至少,应启用 NSX 连接和 NAT 路由。
5 将 T1GW1 连接至 ocp4-segment。请确保网关端口的 IP 地址与 Kubernetes 节点的 IP 地址不冲
突。
VMware, Inc. 7
6 对于每个节点虚拟机,请确保容器流量的 vNIC 连接到自动创建的分段。您可以在网络 > 分段中找到该
vNIC,其名称与分段相同(即 ocp4-segment)。
7 如果使用 DHCP,可以在节点的分段上提供 DHCP 静态绑定。
NCP 必须知道 vNIC 的 VIF ID。您可以通过导航到网络 > 分段查看自动创建的 ocp4-segment 的端口。
这些端口不可编辑,但其标记属性除外。这些端口必须具有以下标记:
n 标记:<cluster_name>,范围:ncp/cluster
n 标记:<node_name>,范围:ncp/node_name
注意:无需手动添加上述标记。NCP 网络运营商将自动添加这些标记。
Kubernetes pod 的 IP 块
NCP 将自动创建 IP 块。NSX 网络运营商将在 install-config.yaml 的
networking.clusterNetwork 部分中传递 cidr 参数的值。例如:
networking: networkType: ncp clusterNetwork: - cidr: 10.4.0.0/16 hostPrefix: 23 machineCIDR: 10.114.16.0/24 serviceNetwork: - 172.30.0.0/16
OpenShift 4 适配器将为 install-config.yaml 文件中配置的每个 CIDR 创建一个新的 IP 块。如果任
何现有 IP 块具有相同的 CIDR,请务必小心。不建议使用重叠的 IP 块,因为 NCP 支持在 Tier-0 和 Tier-1 之间进行已连接子网路由通告。
外部 IP 池
将使用外部 IP 池分配 IP 地址,这些地址将用于通过 SNAT 规则转换 pod IP 以及通过 SNAT/DNAT 规则
公开 Ingress 控制器和 LoadBalancer 型服务,就像 Openstack 浮动 IP 一样。这些 IP 地址也称为外部
IP。
导航到网络 > IP 地址管理 > IP 地址池以创建 IP 池。将 ncp.ini(NCP 网络运营商的一部分)的
[nsx_v3] 部分中的 external_ip_pools 选项设置为 IP 池的 UUID。如果希望 NCP 自动创建 IP 池,
您可以使用 CIDR 格式的以逗号分隔的地址列表或 IP 范围设置 external_ip_pools 选项。
多个 Kubernetes 集群使用相同的外部 IP 池。每个 NCP 实例将该池的一部分用于它管理的 Kubernetes 集群。默认情况下,将使用 pod 子网的相同子网前缀。要使用不同的子网大小,请更新 ncp.ini 的
[nsx_v3] 部分中的 external_subnet_prefix 选项。
部署集群后,可以通过更改 nsx-system-operator 项目中的 nsx-ncp-operator-config configmap 来更改为其他 IP 池。
适用于 OpenShift 的 NSX Container Plug-in - 安装和管理指南
VMware, Inc. 8
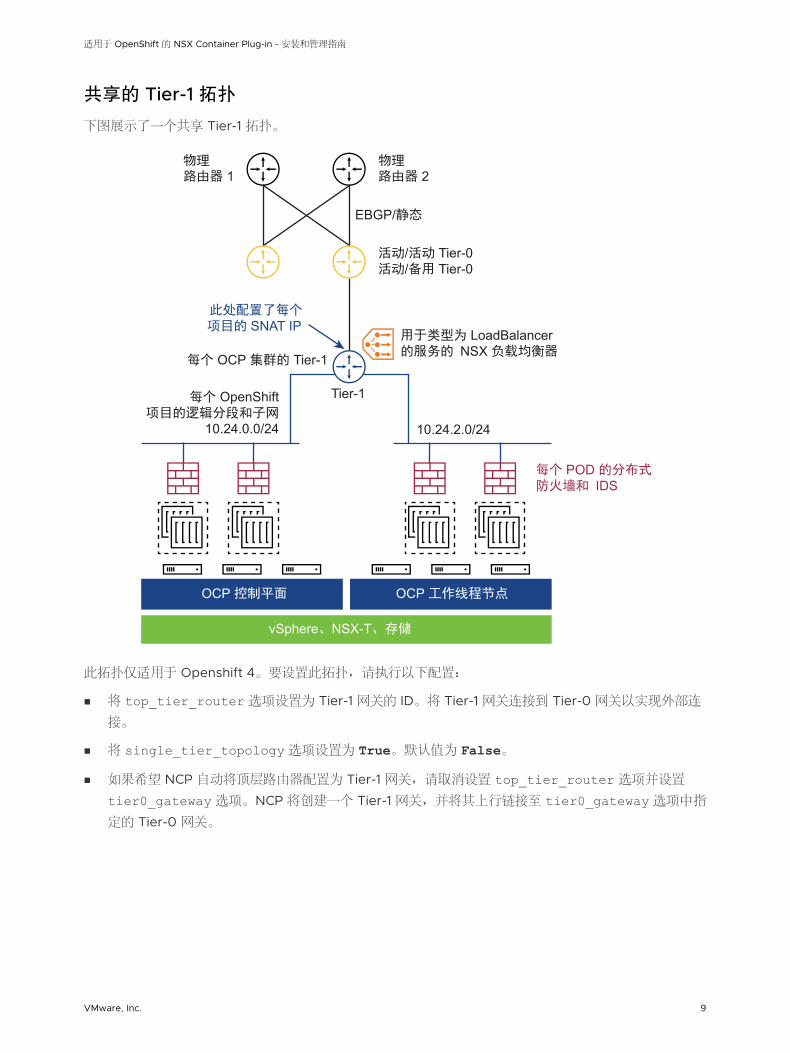
共享的 Tier-1 拓扑
下图展示了一个共享 Tier-1 拓扑。
物理路由器 1
物理路由器 2
EBGP/静态
活动/活动 Tier-0活动/备用 Tier-0
用于类型为 LoadBalancer 的服务的 NSX 负载均衡器
每个 POD 的分布式防火墙和 IDS
此处配置了每个项目的 SNAT IP
每个 OCP 集群的 Tier-1
每个 OpenShift项目的逻辑分段和子网
10.24.0.0/24 10.24.2.0/24
vSphere、NSX-T、存储
OCP 控制平面 OCP 工作线程节点
Tier-1
此拓扑仅适用于 Openshift 4。要设置此拓扑,请执行以下配置:
n 将 top_tier_router 选项设置为 Tier-1 网关的 ID。将 Tier-1 网关连接到 Tier-0 网关以实现外部连
接。
n 将 single_tier_topology 选项设置为 True。默认值为 False。
n 如果希望 NCP 自动将顶层路由器配置为 Tier-1 网关,请取消设置 top_tier_router 选项并设置
tier0_gateway 选项。NCP 将创建一个 Tier-1 网关,并将其上行链接至 tier0_gateway 选项中指
定的 Tier-0 网关。
适用于 OpenShift 的 NSX Container Plug-in - 安装和管理指南
VMware, Inc. 9
Preparing NCP for OpenShift 4 3Before installing OpenShift 4, you must update some NCP configuration files.
Starting with NCP 3.1.1 the YAML files are included in the NCP download file from download.vmware.com. You can go to https://github.com/vmware/nsx-container-plugin-operator/releases, find the corresponding operator release (for example, v3.1.1) and download openshift4.tar.gz.
For NCP 3.1.0, check out v0.2.0 from https://github.com/vmware/nsx-container-plugin-operator/releases.
The following files are in the nsx-container-plugin-operator/deploy folder:
n configmap.yaml – Update this file with the NSX-T information.
n operator.yaml – Specify the NCP image location in this file.
n namespace.yaml – The namespace specification for the operator. Do not edit this file.
n role_binding.yaml - The role binding specefication for the operator. Do not edit this file.
n role.yaml - The role specification for the operator. Do not edit this file.
n service_account.yaml - The service account specification for the operator. Do not edit this
file.
n lb-secret.yaml - Secret for the default NSX-T load balancer certificate.
n nsx-secret.yaml - Secret for certificate-based authentication to NSX-T. This is used instead
of nsx_api_user and nsx_api_password in the configmap.yaml.
n operator.nsx.vmware.com_ncpinstalls_crd.yaml - Operator-owned Customer
Resource Definition.
n operator.nsx.vmware.com_v1_ncpinstall_cr.yaml - Operator-owned Customer
Resource.
The following connfigmap.yaml example shows a basic configuration. See configmap.yaml in
the deploy folder for more options. You must specify values for the following parameters
according to your environment:
n cluster
n nsx_api_managers
VMware, Inc. 10

n nsx_api_user
n nsx_api_password
n external_ip_pools
n tier0_gateway
n overlay_tz
n edge_cluster
n apiserver_host_ip
n apiserver_host_port
kind: ConfigMap metadata: name: nsx-ncp-operator-config namespace: nsx-system-operator data: ncp.ini: | [vc]
[coe]
# Container orchestrator adaptor to plug in. adaptor = openshift4
# Specify cluster name. cluster = ocp
[DEFAULT]
[nsx_v3] policy_nsxapi = True # Path to NSX client certificate file. If specified, the nsx_api_user and # nsx_api_password options will be ignored. Must be specified along with # nsx_api_private_key_file option #nsx_api_cert_file = <None>
# Path to NSX client private key file. If specified, the nsx_api_user and # nsx_api_password options will be ignored. Must be specified along with # nsx_api_cert_file option #nsx_api_private_key_file = <None>
nsx_api_managers = 10.114.209.10,10.114.209.11,10.114.209.12
nsx_api_user = admin nsx_api_password = VMware1!
# Do not use in production insecure = True
# Choices: ALL DENY <None> log_firewall_traffic = DENY
适用于 OpenShift 的 NSX Container Plug-in - 安装和管理指南
VMware, Inc. 11
external_ip_pools = 10.114.17.0/25 #top_tier_router = <None> tier0_gateway = t0a single_tier_topology = True overlay_tz = 3efa070d-3870-4eb1-91b9-a44416637922 edge_cluster = 3088dc2b-d097-406e-b9de-7a161e8d0e47
[ha]
[k8s] # Kubernetes API server IP address. apiserver_host_ip = api-int.ocp.yasen.local
# Kubernetes API server port. apiserver_host_port = 6443
client_token_file = /var/run/secrets/kubernetes.io/serviceaccount/token
# Choices: <None> allow_cluster allow_namespace baseline_policy_type = allow_cluster enable_multus = False process_oc_network = False [nsx_kube_proxy]
[nsx_node_agent]
ovs_bridge = br-int
# The OVS uplink OpenFlow port ovs_uplink_port = ens192
[operator]
# The default certificate for HTTPS load balancing. # Must be specified along with lb_priv_key option. # Operator will create lb-secret for NCP based on these two options. #lb_default_cert = <None>
# The private key for default certificate for HTTPS load balancing. # Must be specified along with lb_default_cert option. #lb_priv_key = <None>
In operator.yaml, you must specify the location of NCP image in the env section.
kind: Deploymentmetadata: name: nsx-ncp-operator namespace: nsx-system-operator spec: replicas: 1 selector: matchLabels: name: nsx-ncp-operator template:
适用于 OpenShift 的 NSX Container Plug-in - 安装和管理指南
VMware, Inc. 12
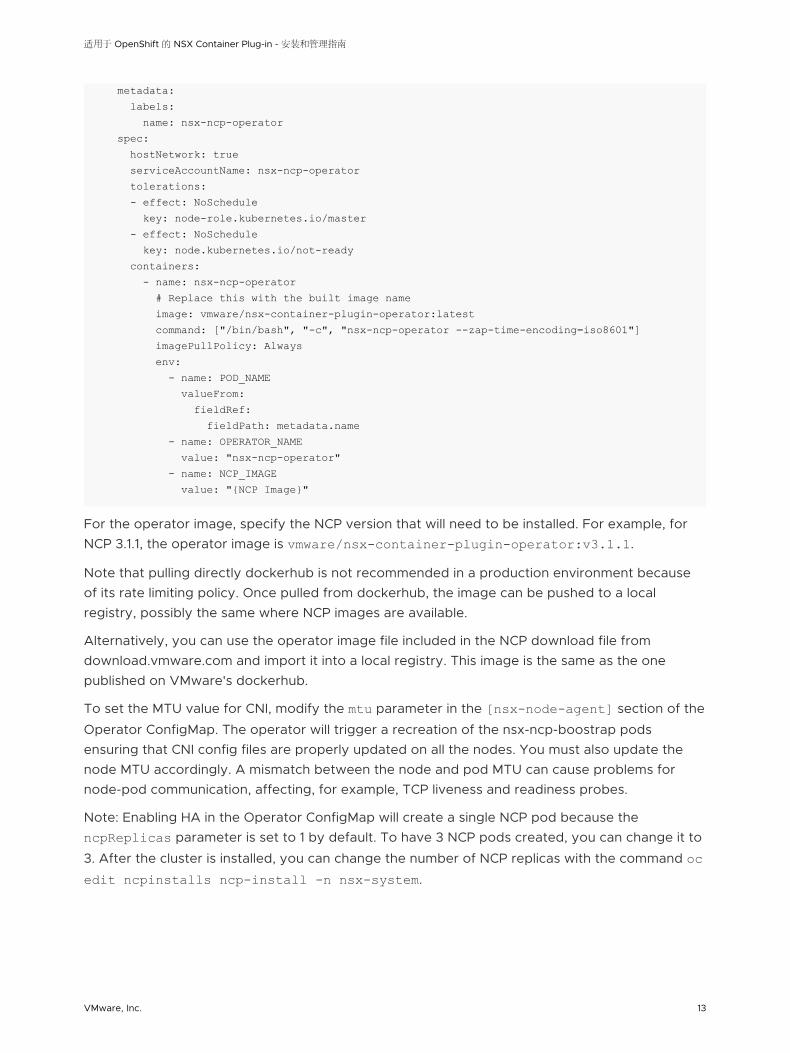
metadata: labels: name: nsx-ncp-operator spec: hostNetwork: true serviceAccountName: nsx-ncp-operator tolerations: - effect: NoSchedule key: node-role.kubernetes.io/master - effect: NoSchedule key: node.kubernetes.io/not-ready containers: - name: nsx-ncp-operator # Replace this with the built image name image: vmware/nsx-container-plugin-operator:latest command: ["/bin/bash", "-c", "nsx-ncp-operator --zap-time-encoding=iso8601"] imagePullPolicy: Always env: - name: POD_NAME valueFrom: fieldRef: fieldPath: metadata.name - name: OPERATOR_NAME value: "nsx-ncp-operator" - name: NCP_IMAGE value: "{NCP Image}"
For the operator image, specify the NCP version that will need to be installed. For example, for NCP 3.1.1, the operator image is vmware/nsx-container-plugin-operator:v3.1.1.
Note that pulling directly dockerhub is not recommended in a production environment because of its rate limiting policy. Once pulled from dockerhub, the image can be pushed to a local registry, possibly the same where NCP images are available.
Alternatively, you can use the operator image file included in the NCP download file from download.vmware.com and import it into a local registry. This image is the same as the one published on VMware's dockerhub.
To set the MTU value for CNI, modify the mtu parameter in the [nsx-node-agent] section of the
Operator ConfigMap. The operator will trigger a recreation of the nsx-ncp-boostrap pods ensuring that CNI config files are properly updated on all the nodes. You must also update the node MTU accordingly. A mismatch between the node and pod MTU can cause problems for node-pod communication, affecting, for example, TCP liveness and readiness probes.
Note: Enabling HA in the Operator ConfigMap will create a single NCP pod because the ncpReplicas parameter is set to 1 by default. To have 3 NCP pods created, you can change it to
3. After the cluster is installed, you can change the number of NCP replicas with the command oc edit ncpinstalls ncp-install -n nsx-system.
适用于 OpenShift 的 NSX Container Plug-in - 安装和管理指南
VMware, Inc. 13
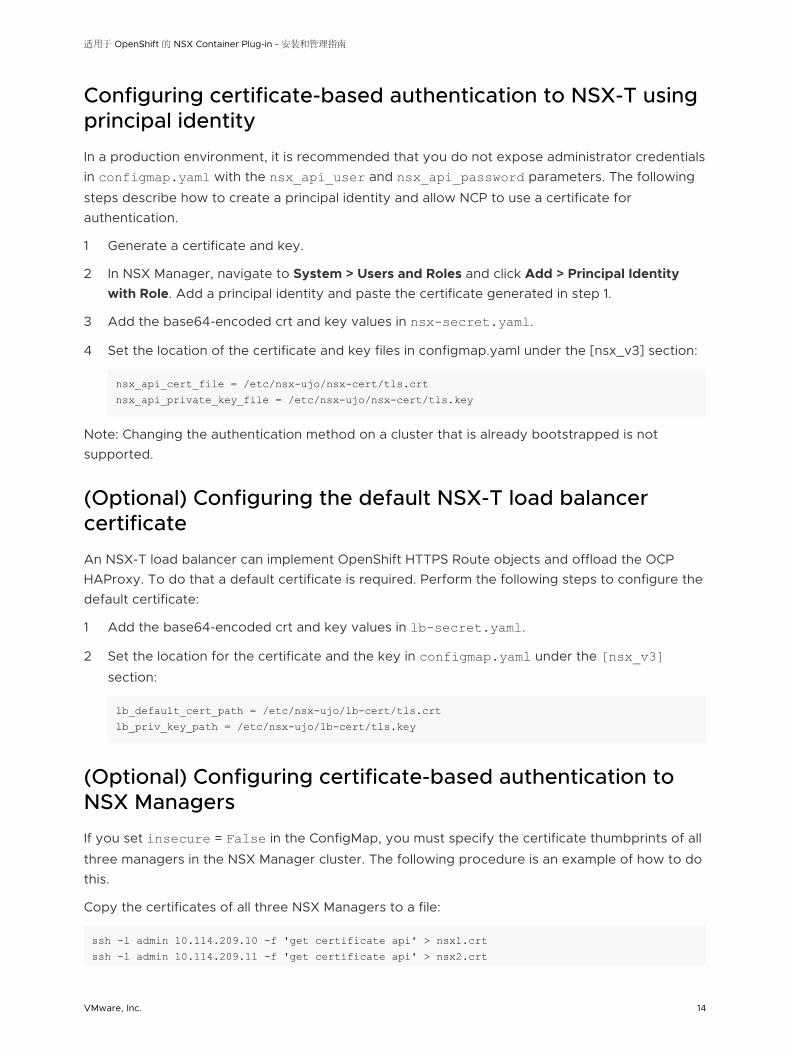
Configuring certificate-based authentication to NSX-T using principal identity
In a production environment, it is recommended that you do not expose administrator credentials in configmap.yaml with the nsx_api_user and nsx_api_password parameters. The following
steps describe how to create a principal identity and allow NCP to use a certificate for authentication.
1 Generate a certificate and key.
2 In NSX Manager, navigate to System > Users and Roles and click Add > Principal Identity with Role. Add a principal identity and paste the certificate generated in step 1.
3 Add the base64-encoded crt and key values in nsx-secret.yaml.
4 Set the location of the certificate and key files in configmap.yaml under the [nsx_v3] section:
nsx_api_cert_file = /etc/nsx-ujo/nsx-cert/tls.crtnsx_api_private_key_file = /etc/nsx-ujo/nsx-cert/tls.key
Note: Changing the authentication method on a cluster that is already bootstrapped is not supported.
(Optional) Configuring the default NSX-T load balancer certificate
An NSX-T load balancer can implement OpenShift HTTPS Route objects and offload the OCP HAProxy. To do that a default certificate is required. Perform the following steps to configure the default certificate:
1 Add the base64-encoded crt and key values in lb-secret.yaml.
2 Set the location for the certificate and the key in configmap.yaml under the [nsx_v3] section:
lb_default_cert_path = /etc/nsx-ujo/lb-cert/tls.crtlb_priv_key_path = /etc/nsx-ujo/lb-cert/tls.key
(Optional) Configuring certificate-based authentication to NSX Managers
If you set insecure = False in the ConfigMap, you must specify the certificate thumbprints of all
three managers in the NSX Manager cluster. The following procedure is an example of how to do this.
Copy the certificates of all three NSX Managers to a file:
ssh -l admin 10.114.209.10 -f 'get certificate api' > nsx1.crtssh -l admin 10.114.209.11 -f 'get certificate api' > nsx2.crt
适用于 OpenShift 的 NSX Container Plug-in - 安装和管理指南
VMware, Inc. 14
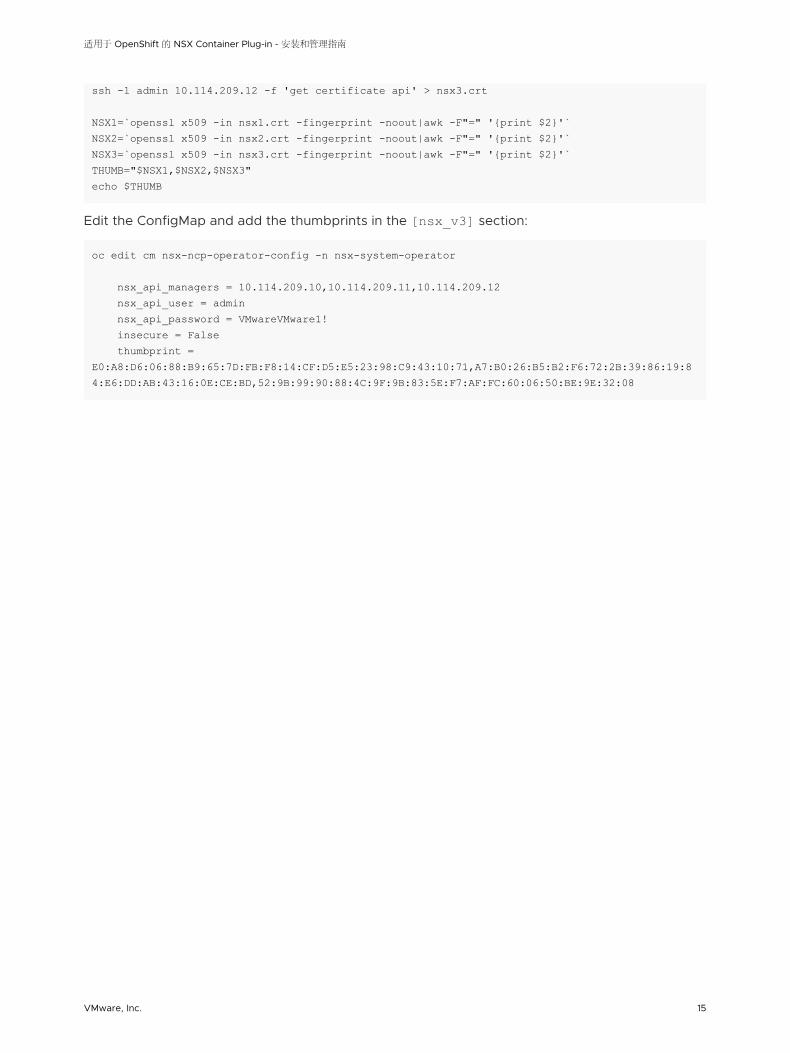
ssh -l admin 10.114.209.12 -f 'get certificate api' > nsx3.crt
NSX1=`openssl x509 -in nsx1.crt -fingerprint -noout|awk -F"=" '{print $2}'`NSX2=`openssl x509 -in nsx2.crt -fingerprint -noout|awk -F"=" '{print $2}'`NSX3=`openssl x509 -in nsx3.crt -fingerprint -noout|awk -F"=" '{print $2}'`THUMB="$NSX1,$NSX2,$NSX3"echo $THUMB
Edit the ConfigMap and add the thumbprints in the [nsx_v3] section:
oc edit cm nsx-ncp-operator-config -n nsx-system-operator
nsx_api_managers = 10.114.209.10,10.114.209.11,10.114.209.12 nsx_api_user = admin nsx_api_password = VMwareVMware1! insecure = False thumbprint = E0:A8:D6:06:88:B9:65:7D:FB:F8:14:CF:D5:E5:23:98:C9:43:10:71,A7:B0:26:B5:B2:F6:72:2B:39:86:19:84:E6:DD:AB:43:16:0E:CE:BD,52:9B:99:90:88:4C:9F:9B:83:5E:F7:AF:FC:60:06:50:BE:9E:32:08
适用于 OpenShift 的 NSX Container Plug-in - 安装和管理指南
VMware, Inc. 15
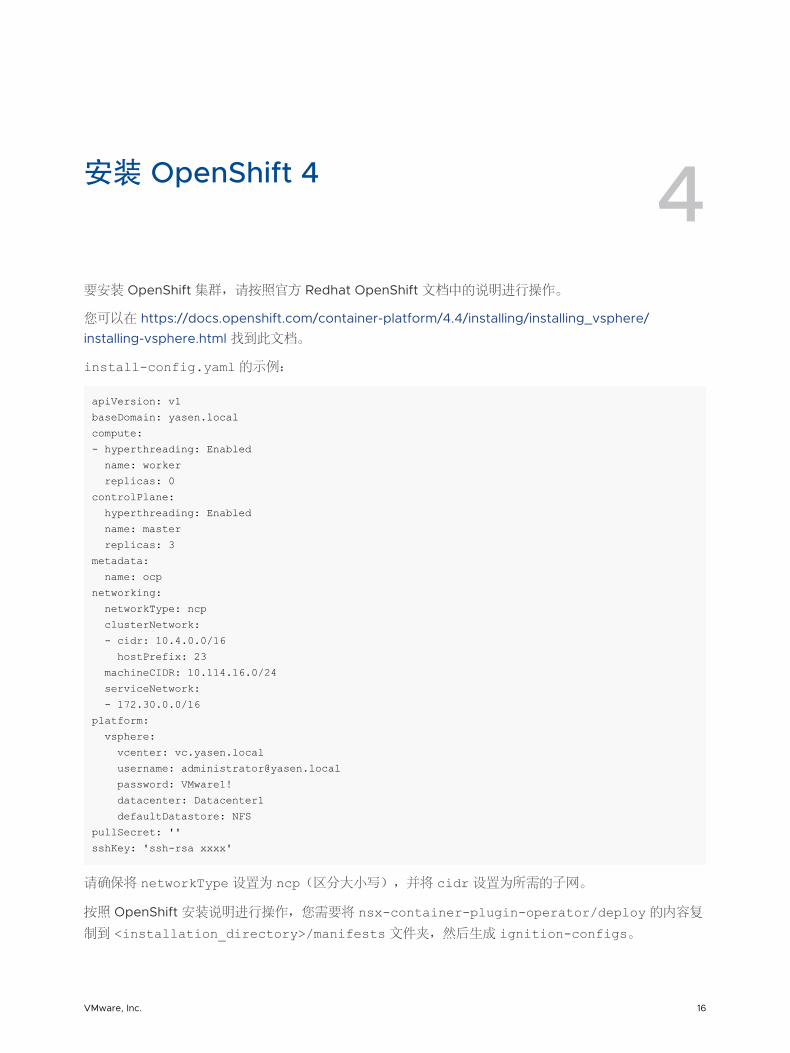
安装 OpenShift 4 4要安装 OpenShift 集群,请按照官方 Redhat OpenShift 文档中的说明进行操作。
您可以在 https://docs.openshift.com/container-platform/4.4/installing/installing_vsphere/installing-vsphere.html 找到此文档。
install-config.yaml 的示例:
apiVersion: v1 baseDomain: yasen.local compute: - hyperthreading: Enabled name: worker replicas: 0 controlPlane: hyperthreading: Enabled name: master replicas: 3 metadata: name: ocp networking: networkType: ncp clusterNetwork: - cidr: 10.4.0.0/16 hostPrefix: 23 machineCIDR: 10.114.16.0/24 serviceNetwork: - 172.30.0.0/16 platform: vsphere: vcenter: vc.yasen.local username: [email protected] password: VMware1! datacenter: Datacenter1 defaultDatastore: NFS pullSecret: '' sshKey: 'ssh-rsa xxxx'
请确保将 networkType 设置为 ncp(区分大小写),并将 cidr 设置为所需的子网。
按照 OpenShift 安装说明进行操作,您需要将 nsx-container-plugin-operator/deploy 的内容复
制到 <installation_directory>/manifests 文件夹,然后生成 ignition-configs。
VMware, Inc. 16
要生成清单,请运行以下命令:
$ ./openshift-install create manifests --dir=<installation_directory>
要将 NCP 网络运营商 YAML 文件复制到 manifests 文件夹中,请运行以下命令:
$ cp nsx-container-plugin-operator/deploy/*.yaml <installation_directory>/manifests
要生成 ignition-configs,请运行以下命令:
$ ./openshift-install create ignition-configs --dir=<installation_directory>
将 DDNS 与 OpenShift 节点结合使用
您可以将 DDNS 与运行 CoreOS 的 OpenShift 节点结合使用。当 nsx-ovs 容器运行时,它会停止使用
DHCP 的主机上的活动连接,然后从中克隆新的连接,并在现有连接名称前面附加“NSX”。此 NSX 连接具有来自原始连接的动态 IP 信息(地址、网关、DNS 和域)的 IP 配置。将在容器内启动新的 DHCP 客户端以维护和续订租约。如果在 nsx-ovs 运行时 DNS 或域名发生更改,则会退出并重新启动。这样做是
为了确保先通过 NetworkManager,然后再通过 nsx-ovs 获取 IP 信息。在 NSX 连接处于活动状态时无
法覆盖其属性。
适用于 OpenShift 的 NSX Container Plug-in - 安装和管理指南
VMware, Inc. 17

配置负载均衡 5NSX-T Data Center 负载均衡器与 OpenShift 集成,并充当 OpenShift 路由器。
NCP 监视 OpenShift 路由和端点事件,并根据路由规范在负载均衡器上配置负载均衡规则。因此,NSX-T Data Center 负载均衡器会根据规则将入站第 7 层流量转发到适当的后端容器。
配置负载均衡需要配置 Kubernetes LoadBalancer 服务或 OpenShift 路由。此外,还需要配置 NCP 复制控制器。LoadBalancer 服务用于第 4 层流量,而 OpenShift 路由用于第 7 层流量。
配置 Kubernetes LoadBalancer 服务时,会从您配置的外部 IP 块为该服务分配一个 IP 地址。会在此 IP 地址和服务端口上公开负载均衡器。可以使用 loadBalancerIP 规范在 LoadBalancer 定义中指定 IP 池
的名称或 ID。将从该 IP 池分配 Loadbalancer 服务的 IP。如果 loadBalancerIP 规范为空,将从您配
置的外部 IP 块分配 IP。
loadBalancerIP 指定的 IP 池必须具有标记 scope: ncp/owner, tag: cluster:<cluster_name>。
要使用 NSX-T Data Center 负载均衡器,必须在 NCP 中配置负载均衡。在 ncp_rc.yml 文件中,执行
以下操作:
1 将 use_native_loadbalancer 设置为 True。
2 将 pool_algorithm 设置为 WEIGHTED_ROUND_ROBIN。
3 将 lb_default_cert_path 和 lb_priv_key_path 分别设置为 CA 签名证书文件和私钥文件的完
整路径名称。有关用于生成 CA 签名证书的示例脚本,请参见下文。此外,将默认证书和密钥挂载到
NCP pod 中。有关说明,请参见下文。
4 (可选)使用参数 l4_persistence 和 l7_persistence 指定持久性设置。可用于设置第 4 层持
久性的选项为源 IP。可用于设置第 7 层持久性的选项为 cookie 和源 IP。默认值为 <None>。例如,
# Choice of persistence type for ingress traffic through L7 Loadbalancer. # Accepted values: # 'cookie' # 'source_ip' l7_persistence = cookie
# Choice of persistence type for ingress traffic through L4 Loadbalancer. # Accepted values: # 'source_ip' l4_persistence = source_ip
5 (可选)将 service_size 设置为 SMALL、MEDIUM 或 LARGE。默认值为 SMALL。
VMware, Inc. 18
6 如果运行的是 OpenShift 3.11,则必须执行以下配置,OpenShift 才不会向 LoadBalancer 服务分配
IP。
n 在 /etc/origin/master/master-config.yaml 文件中的 networkConfig 下,将
ingressIPNetworkCIDR 设置为 0.0.0.0/32。
n 使用以下命令重新启动 API 服务器和控制器:
master-restart api master-restart controllers
适用于 OpenShift 的 NSX Container Plug-in - 安装和管理指南
VMware, Inc. 19
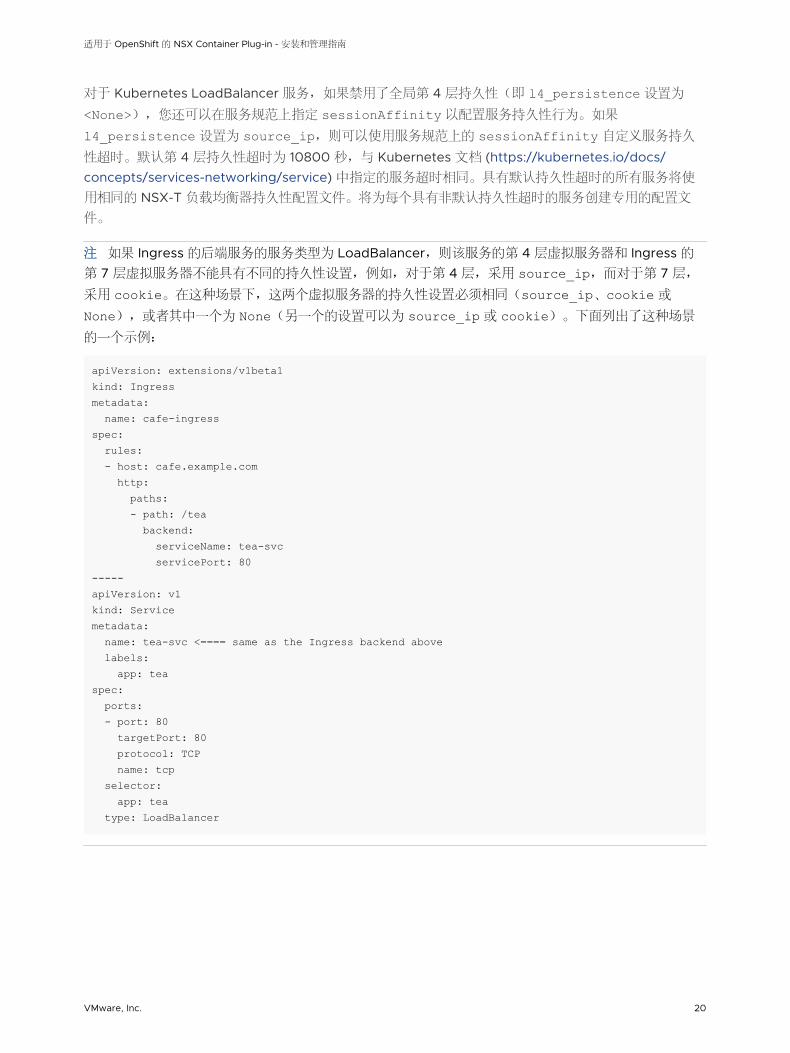
对于 Kubernetes LoadBalancer 服务,如果禁用了全局第 4 层持久性(即 l4_persistence 设置为
<None>),您还可以在服务规范上指定 sessionAffinity 以配置服务持久性行为。如果
l4_persistence 设置为 source_ip,则可以使用服务规范上的 sessionAffinity 自定义服务持久
性超时。默认第 4 层持久性超时为 10800 秒,与 Kubernetes 文档 (https://kubernetes.io/docs/concepts/services-networking/service) 中指定的服务超时相同。具有默认持久性超时的所有服务将使
用相同的 NSX-T 负载均衡器持久性配置文件。将为每个具有非默认持久性超时的服务创建专用的配置文
件。
注 如果 Ingress 的后端服务的服务类型为 LoadBalancer,则该服务的第 4 层虚拟服务器和 Ingress 的第 7 层虚拟服务器不能具有不同的持久性设置,例如,对于第 4 层,采用 source_ip,而对于第 7 层,
采用 cookie。在这种场景下,这两个虚拟服务器的持久性设置必须相同(source_ip、cookie 或
None),或者其中一个为 None(另一个的设置可以为 source_ip 或 cookie)。下面列出了这种场景
的一个示例:
apiVersion: extensions/v1beta1kind: Ingressmetadata: name: cafe-ingressspec: rules: - host: cafe.example.com http: paths: - path: /tea backend: serviceName: tea-svc servicePort: 80-----apiVersion: v1kind: Servicemetadata: name: tea-svc <==== same as the Ingress backend above labels: app: teaspec: ports: - port: 80 targetPort: 80 protocol: TCP name: tcp selector: app: tea type: LoadBalancer
适用于 OpenShift 的 NSX Container Plug-in - 安装和管理指南
VMware, Inc. 20
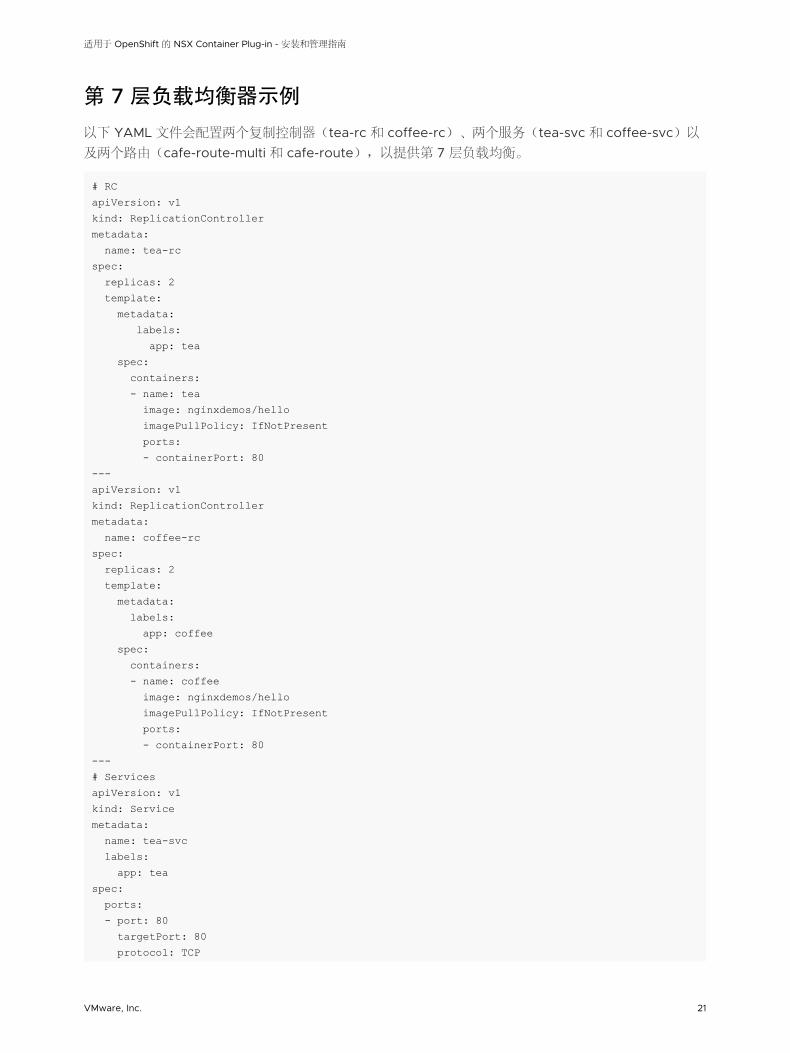
第 7 层负载均衡器示例
以下 YAML 文件会配置两个复制控制器(tea-rc 和 coffee-rc)、两个服务(tea-svc 和 coffee-svc)以
及两个路由(cafe-route-multi 和 cafe-route),以提供第 7 层负载均衡。
# RCapiVersion: v1kind: ReplicationControllermetadata: name: tea-rcspec: replicas: 2 template: metadata: labels: app: tea spec: containers: - name: tea image: nginxdemos/hello imagePullPolicy: IfNotPresent ports: - containerPort: 80---apiVersion: v1kind: ReplicationControllermetadata: name: coffee-rcspec: replicas: 2 template: metadata: labels: app: coffee spec: containers: - name: coffee image: nginxdemos/hello imagePullPolicy: IfNotPresent ports: - containerPort: 80---# ServicesapiVersion: v1kind: Servicemetadata: name: tea-svc labels: app: teaspec: ports: - port: 80 targetPort: 80 protocol: TCP
适用于 OpenShift 的 NSX Container Plug-in - 安装和管理指南
VMware, Inc. 21
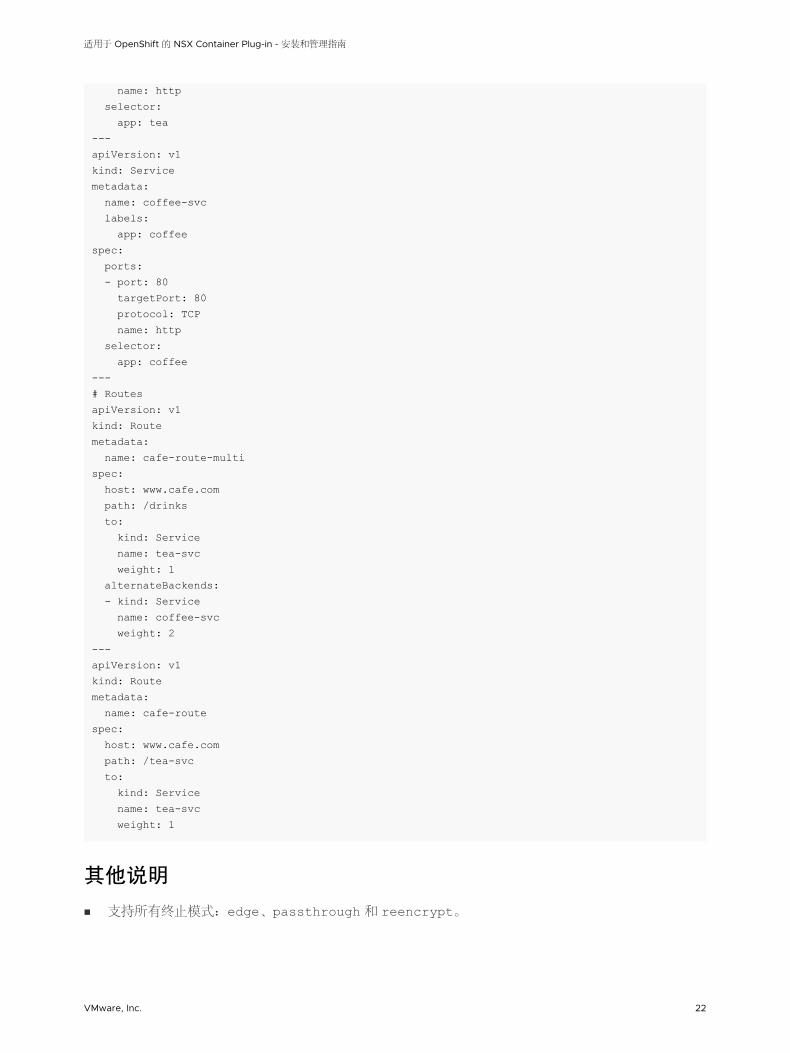
name: http selector: app: tea---apiVersion: v1kind: Servicemetadata: name: coffee-svc labels: app: coffeespec: ports: - port: 80 targetPort: 80 protocol: TCP name: http selector: app: coffee---# RoutesapiVersion: v1kind: Routemetadata: name: cafe-route-multispec: host: www.cafe.com path: /drinks to: kind: Service name: tea-svc weight: 1 alternateBackends: - kind: Service name: coffee-svc weight: 2---apiVersion: v1kind: Routemetadata: name: cafe-routespec: host: www.cafe.com path: /tea-svc to: kind: Service name: tea-svc weight: 1
其他说明
n 支持所有终止模式:edge、passthrough 和 reencrypt。
适用于 OpenShift 的 NSX Container Plug-in - 安装和管理指南
VMware, Inc. 22
n 支持通配符子域。例如,如果 wildcardPolicy 设置为 Subdomain,且主机名设置为
wildcard.example.com,则会处理针对 *.example.com 的任何请求。
n 如果 NCP 在处理路由事件期间由于配置错误而引发错误,则需要更正路由 YAML 文件,删除并重新
创建路由资源。
n NCP 不按命名空间实施主机名所有权。
n 每个 Kubernetes 集群支持一个 Loadbalancer 服务。
n NSX-T Data Center 将为每个 LoadBalancer 服务端口创建一个第 4 层负载均衡器虚拟服务器和池。
TCP 和 UDP 均受支持。
n NSX-T Data Center 负载均衡器有多种不同大小。有关配置 NSX-T Data Center 负载均衡器的信
息,请参见《NSX-T Data Center 管理指南》。
创建负载均衡器后,无法通过更新配置文件来更改负载均衡器大小,但是可以通过 UI 或 API 进行更
改。
n 支持自动缩放第 4 层负载均衡器。如果创建或修改 Kubernetes LoadBalancer 服务以便需要更多的
虚拟服务器,而现有的第 4 层负载均衡器没有足够的容量,将创建新的第 4 层负载均衡器。NCP 也将
删除不再连接虚拟服务器的第 4 层负载均衡器。默认情况下,将启用该功能。可以通过在 NCP ConfigMap 中将 l4_lb_auto_scaling 设置为 false 禁用此功能。
n 在路由规范中,参数 destinationCACertificate 不受支持,且将被 NCP 忽略。
n 每个 TLS 路由必须具有不同的 CA 签名证书。
用于生成 CA 签名证书的示例脚本
以下脚本可分别生成存储在文件 <filename>.crt 和 <finename>.key 中的 CA 签名证书和私钥。genrsa 命令可生成 CA 密钥。应对 CA 密钥进行加密。您可以使用 aes256 等命令指定加密方法。
#!/bin/bashhost="www.example.com"filename=server
openssl genrsa -out ca.key 4096openssl req -key ca.key -new -x509 -days 365 -sha256 -extensions v3_ca -out ca.crt -subj "/C=US/ST=CA/L=Palo Alto/O=OS3/OU=Eng/CN=${host}"openssl req -out ${filename}.csr -new -newkey rsa:2048 -nodes -keyout ${filename}.key -subj "/C=US/ST=CA/L=Palo Alto/O=OS3/OU=Eng/CN=${host}"openssl x509 -req -days 360 -in ${filename}.csr -CA ca.crt -CAkey ca.key -CAcreateserial -out ${filename}.crt -sha256
适用于 OpenShift 的 NSX Container Plug-in - 安装和管理指南
VMware, Inc. 23
Upgrade NCP 6NSX Container Plugin Operator is responsible for managing the life cycle of NCP.
Upgrade of NCP is done by updating the NCP Operator and NCP image. Before performing the upgrade, check the release notes for product compatibility.
前提条件
Download the latest nsx-container zip file (nsx-container-x.x.x.y.zip) from https://
downloads.vmware.com.
The following tar files are needed for the upgrade:
n nsx-container-x.x.x.y/Kubernetes/nsx-container-plugin-operator-x.x.x.y.tar
n nsx-container-x.x.x.y/Kubernetes/nsx-ncp-ubi-x.x.x.y.tar
The two images must be uploaded to your container registry.
步骤
1 Edit operator.yaml.
Modify the nsx-ncp-container image:
containers: - name: nsx-ncp-operator image: <URL to the NCP operator in your container registry>
Modify the NCP_IMAGE URL:
- name: nsx-ncp-operator image: <URL to the NCP operator in your container registry>
2 Update configmap.yaml with any new required fields for this release. The information about
any new required attributes is available in the release notes.
3 Apply role.yaml with the following command.
oc apply -f role.yaml -n nsx-system-operator
VMware, Inc. 24

4 Apply operator.yaml (and confimap.yaml if changed) in the nsx-system-operator namespace with the following command.
oc apply -f operator.yaml -n nsx-system-operator
There is no need to edit the running config.
适用于 OpenShift 的 NSX Container Plug-in - 安装和管理指南
VMware, Inc. 25

管理 NSX Container Plug-in 7您可以从 NSX Manager GUI 或命令行界面 (Command Line Interface, CLI) 中管理 NSX Container Plug-in。
注 如果容器主机虚拟机在 ESXi 6.5 上运行,并且该虚拟机通过 vMotion 迁移到另一个 ESXi 6.5 主机,
则运行在容器主机上的容器将断开与运行在其他容器主机上的容器的连接。您可以通过先断开然后重新连
接容器主机的 vNIC 来解决该问题。ESXi 6.5 Update 1 或更高版本不会出现此问题。
Hyperbus 会在管理程序中保留 VLAN ID 4094 用于 PVLAN 配置,且不能更改此 ID。为避免任何
VLAN 冲突,请勿将 VLAN 逻辑交换机或 VTEP vmknic 配置为具有相同的 VLAN ID。
本章讨论了以下主题:
n 清理 NSX-T 环境
n 更改正在运行的集群的名称
n CLI 命令
n 错误代码
清理 NSX-T 环境
如有必要,您可以通过运行脚本来移除 NCP 创建的所有 NSX-T 对象。
安装文件中包含以下清理脚本:
n nsx_policy_cleanup.py - 如果 NSX-T 资源是使用策略模式创建的,请使用此脚本。
n nsx_cleanup.py - 如果 NSX-T 资源是使用管理器模式创建的,请使用此脚本。
在运行脚本之前,必须先停止 NCP。
策略模式
Usage: nsx_policy_cleanup.py [options]
Options: -h, --help show this help message and exit --mgr-ip=MGR_IP NSX Manager IP address -u USERNAME, --username=USERNAME NSX Manager username, ignored if nsx-cert is set
VMware, Inc. 26
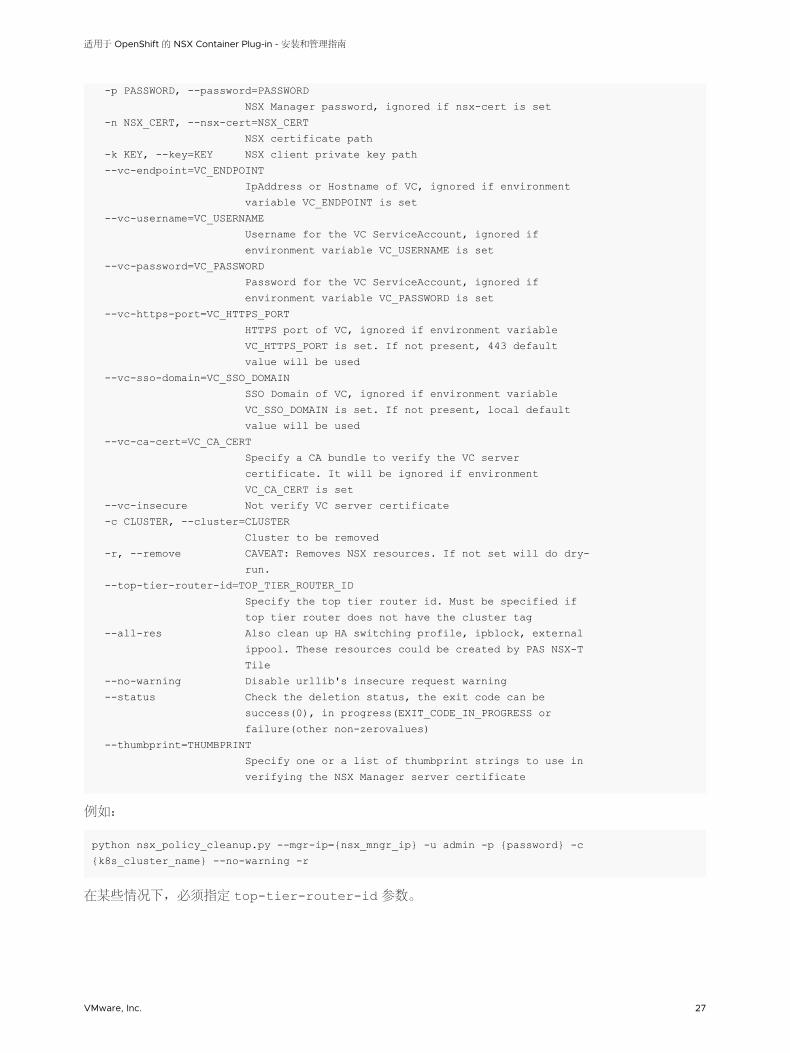
-p PASSWORD, --password=PASSWORD NSX Manager password, ignored if nsx-cert is set -n NSX_CERT, --nsx-cert=NSX_CERT NSX certificate path -k KEY, --key=KEY NSX client private key path --vc-endpoint=VC_ENDPOINT IpAddress or Hostname of VC, ignored if environment variable VC_ENDPOINT is set --vc-username=VC_USERNAME Username for the VC ServiceAccount, ignored if environment variable VC_USERNAME is set --vc-password=VC_PASSWORD Password for the VC ServiceAccount, ignored if environment variable VC_PASSWORD is set --vc-https-port=VC_HTTPS_PORT HTTPS port of VC, ignored if environment variable VC_HTTPS_PORT is set. If not present, 443 default value will be used --vc-sso-domain=VC_SSO_DOMAIN SSO Domain of VC, ignored if environment variable VC_SSO_DOMAIN is set. If not present, local default value will be used --vc-ca-cert=VC_CA_CERT Specify a CA bundle to verify the VC server certificate. It will be ignored if environment VC_CA_CERT is set --vc-insecure Not verify VC server certificate -c CLUSTER, --cluster=CLUSTER Cluster to be removed -r, --remove CAVEAT: Removes NSX resources. If not set will do dry- run. --top-tier-router-id=TOP_TIER_ROUTER_ID Specify the top tier router id. Must be specified if top tier router does not have the cluster tag --all-res Also clean up HA switching profile, ipblock, external ippool. These resources could be created by PAS NSX-T Tile --no-warning Disable urllib's insecure request warning --status Check the deletion status, the exit code can be success(0), in progress(EXIT_CODE_IN_PROGRESS or failure(other non-zerovalues) --thumbprint=THUMBPRINT Specify one or a list of thumbprint strings to use in verifying the NSX Manager server certificate
例如:
python nsx_policy_cleanup.py --mgr-ip={nsx_mngr_ip} -u admin -p {password} -c {k8s_cluster_name} --no-warning -r
在某些情况下,必须指定 top-tier-router-id 参数。
适用于 OpenShift 的 NSX Container Plug-in - 安装和管理指南
VMware, Inc. 27
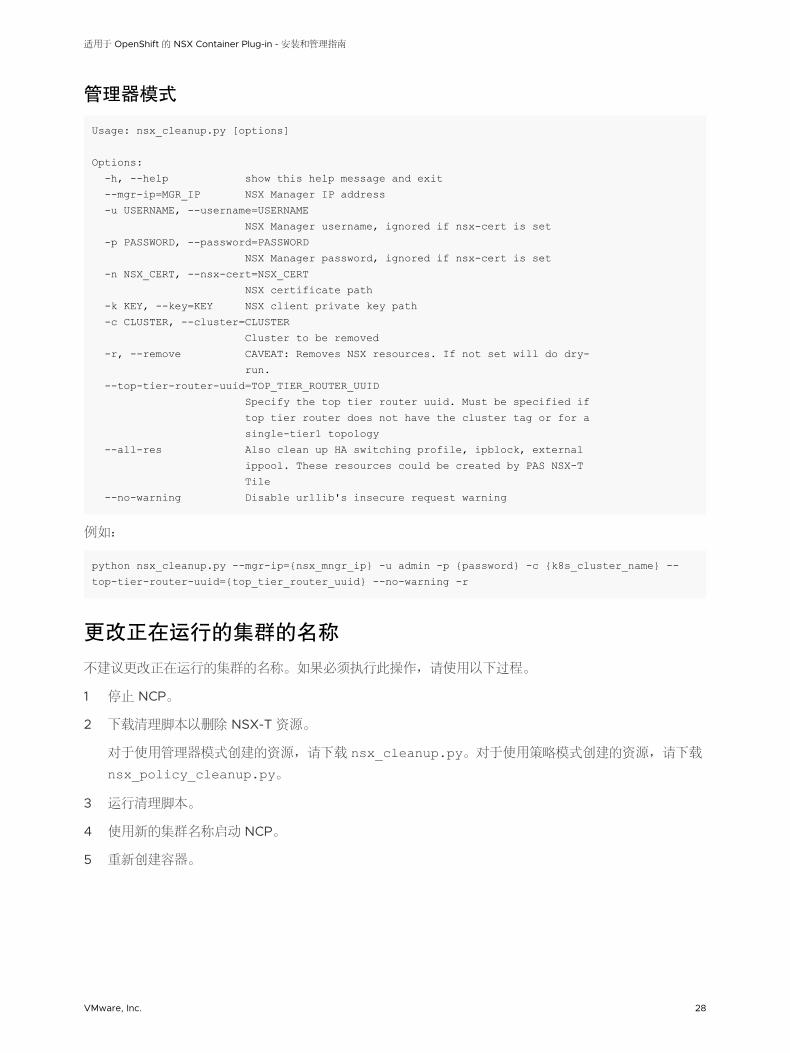
管理器模式
Usage: nsx_cleanup.py [options]
Options: -h, --help show this help message and exit --mgr-ip=MGR_IP NSX Manager IP address -u USERNAME, --username=USERNAME NSX Manager username, ignored if nsx-cert is set -p PASSWORD, --password=PASSWORD NSX Manager password, ignored if nsx-cert is set -n NSX_CERT, --nsx-cert=NSX_CERT NSX certificate path -k KEY, --key=KEY NSX client private key path -c CLUSTER, --cluster=CLUSTER Cluster to be removed -r, --remove CAVEAT: Removes NSX resources. If not set will do dry- run. --top-tier-router-uuid=TOP_TIER_ROUTER_UUID Specify the top tier router uuid. Must be specified if top tier router does not have the cluster tag or for a single-tier1 topology --all-res Also clean up HA switching profile, ipblock, external ippool. These resources could be created by PAS NSX-T Tile --no-warning Disable urllib's insecure request warning
例如:
python nsx_cleanup.py --mgr-ip={nsx_mngr_ip} -u admin -p {password} -c {k8s_cluster_name} --top-tier-router-uuid={top_tier_router_uuid} --no-warning -r
更改正在运行的集群的名称
不建议更改正在运行的集群的名称。如果必须执行此操作,请使用以下过程。
1 停止 NCP。
2 下载清理脚本以删除 NSX-T 资源。
对于使用管理器模式创建的资源,请下载 nsx_cleanup.py。对于使用策略模式创建的资源,请下载
nsx_policy_cleanup.py。
3 运行清理脚本。
4 使用新的集群名称启动 NCP。
5 重新创建容器。
适用于 OpenShift 的 NSX Container Plug-in - 安装和管理指南
VMware, Inc. 28
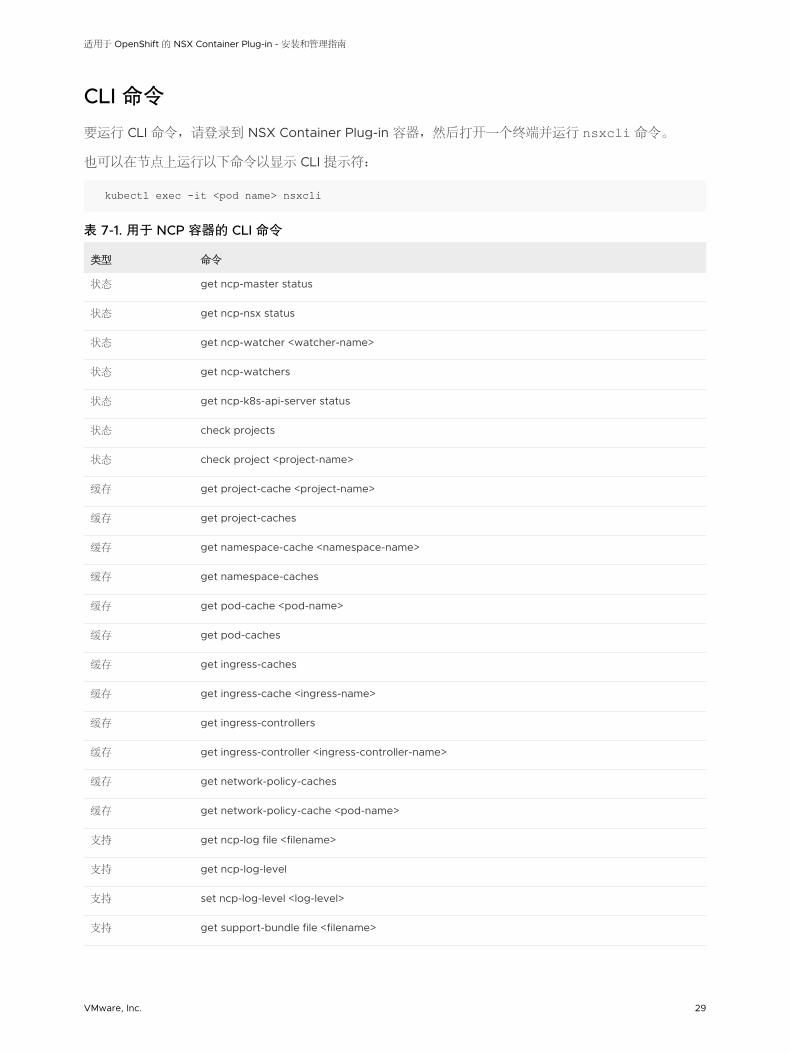
CLI 命令
要运行 CLI 命令,请登录到 NSX Container Plug-in 容器,然后打开一个终端并运行 nsxcli 命令。
也可以在节点上运行以下命令以显示 CLI 提示符:
kubectl exec -it <pod name> nsxcli
表 7-1. 用于 NCP 容器的 CLI 命令
类型 命令
状态 get ncp-master status
状态 get ncp-nsx status
状态 get ncp-watcher <watcher-name>
状态 get ncp-watchers
状态 get ncp-k8s-api-server status
状态 check projects
状态 check project <project-name>
缓存 get project-cache <project-name>
缓存 get project-caches
缓存 get namespace-cache <namespace-name>
缓存 get namespace-caches
缓存 get pod-cache <pod-name>
缓存 get pod-caches
缓存 get ingress-caches
缓存 get ingress-cache <ingress-name>
缓存 get ingress-controllers
缓存 get ingress-controller <ingress-controller-name>
缓存 get network-policy-caches
缓存 get network-policy-cache <pod-name>
支持 get ncp-log file <filename>
支持 get ncp-log-level
支持 set ncp-log-level <log-level>
支持 get support-bundle file <filename>
适用于 OpenShift 的 NSX Container Plug-in - 安装和管理指南
VMware, Inc. 29

表 7-1. 用于 NCP 容器的 CLI 命令 (续)
类型 命令
支持 get node-agent-log file <filename>
支持 get node-agent-log file <filename> <node-name>
表 7-2. 用于 NSX 节点代理容器的 CLI 命令
类型 命令
状态 get node-agent-hyperbus status
缓存 get container-cache <container-name>
缓存 get container-caches
表 7-3. 用于 NSX Kube 代理容器的 CLI 命令
类型 命令
状态 get ncp-k8s-api-server status
状态 get kube-proxy-watcher <watcher-name>
状态 get kube-proxy-watchers
状态 dump ovs-flows
用于 NCP 容器的状态命令
n 显示 NCP 主节点的状态
get ncp-master status
示例:
kubenode> get ncp-master statusThis instance is not the NCP masterCurrent NCP Master id is a4h83eh1-b8dd-4e74-c71c-cbb7cc9c4c1cLast master update at Wed Oct 25 22:46:40 2017
n 显示 NCP 和 NSX Manager 之间的连接状态
get ncp-nsx status
示例:
kubenode> get ncp-nsx statusNSX Manager status: Healthy
适用于 OpenShift 的 NSX Container Plug-in - 安装和管理指南
VMware, Inc. 30

n 显示 Ingress、命名空间、pod 和服务的监视程序状态
get ncp-watcher <watcher-name>get ncp-watchers
示例 1:
kubenode> get ncp-watcher pod Average event processing time: 1174 msec (in past 3600-sec window) Current watcher started time: Mar 02 2017 10:47:35 PST Number of events processed: 1 (in past 3600-sec window) Total events processed by current watcher: 1 Total events processed since watcher thread created: 1 Total watcher recycle count: 0 Watcher thread created time: Mar 02 2017 10:47:35 PST Watcher thread status: Up
示例 2:
kubenode> get ncp-watchers pod: Average event processing time: 1145 msec (in past 3600-sec window) Current watcher started time: Mar 02 2017 10:51:37 PST Number of events processed: 1 (in past 3600-sec window) Total events processed by current watcher: 1 Total events processed since watcher thread created: 1 Total watcher recycle count: 0 Watcher thread created time: Mar 02 2017 10:51:37 PST Watcher thread status: Up namespace: Average event processing time: 68 msec (in past 3600-sec window) Current watcher started time: Mar 02 2017 10:51:37 PST Number of events processed: 2 (in past 3600-sec window) Total events processed by current watcher: 2 Total events processed since watcher thread created: 2 Total watcher recycle count: 0 Watcher thread created time: Mar 02 2017 10:51:37 PST Watcher thread status: Up ingress: Average event processing time: 0 msec (in past 3600-sec window) Current watcher started time: Mar 02 2017 10:51:37 PST Number of events processed: 0 (in past 3600-sec window) Total events processed by current watcher: 0 Total events processed since watcher thread created: 0 Total watcher recycle count: 0 Watcher thread created time: Mar 02 2017 10:51:37 PST Watcher thread status: Up service: Average event processing time: 3 msec (in past 3600-sec window) Current watcher started time: Mar 02 2017 10:51:37 PST Number of events processed: 1 (in past 3600-sec window)
适用于 OpenShift 的 NSX Container Plug-in - 安装和管理指南
VMware, Inc. 31
Total events processed by current watcher: 1 Total events processed since watcher thread created: 1 Total watcher recycle count: 0 Watcher thread created time: Mar 02 2017 10:51:37 PST Watcher thread status: Up
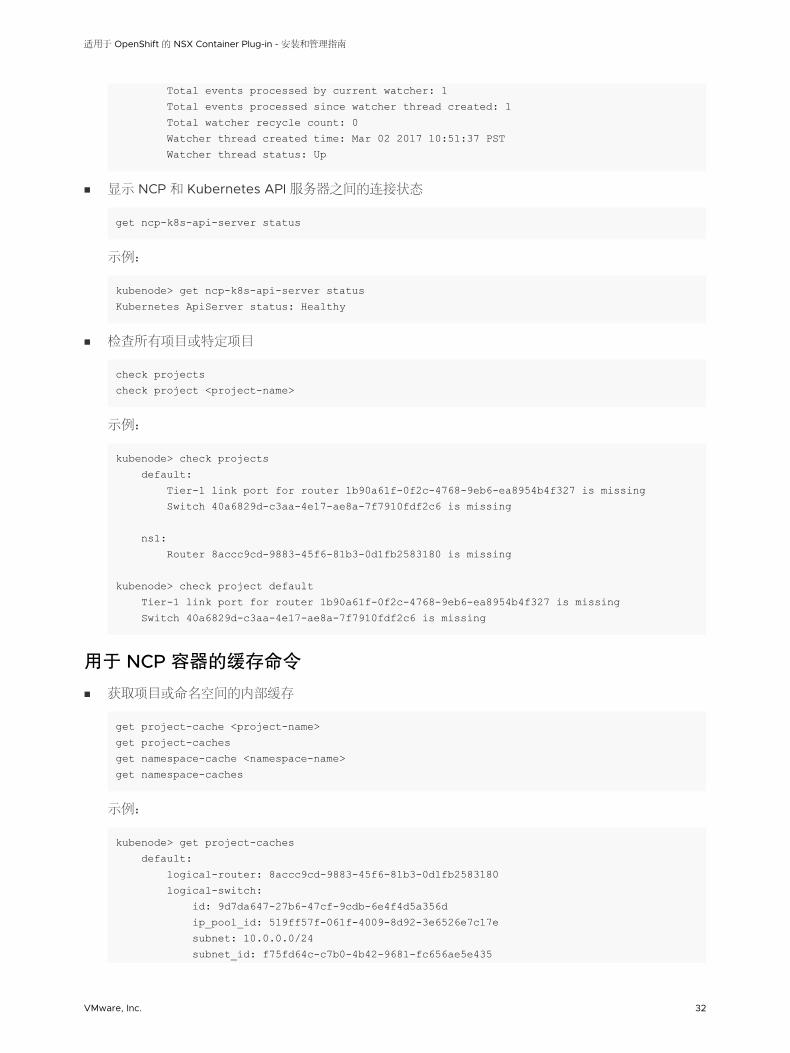
n 显示 NCP 和 Kubernetes API 服务器之间的连接状态
get ncp-k8s-api-server status
示例:
kubenode> get ncp-k8s-api-server statusKubernetes ApiServer status: Healthy
n 检查所有项目或特定项目
check projectscheck project <project-name>
示例:
kubenode> check projects default: Tier-1 link port for router 1b90a61f-0f2c-4768-9eb6-ea8954b4f327 is missing Switch 40a6829d-c3aa-4e17-ae8a-7f7910fdf2c6 is missing
ns1: Router 8accc9cd-9883-45f6-81b3-0d1fb2583180 is missing
kubenode> check project default Tier-1 link port for router 1b90a61f-0f2c-4768-9eb6-ea8954b4f327 is missing Switch 40a6829d-c3aa-4e17-ae8a-7f7910fdf2c6 is missing
用于 NCP 容器的缓存命令
n 获取项目或命名空间的内部缓存
get project-cache <project-name>get project-cachesget namespace-cache <namespace-name>get namespace-caches
示例:
kubenode> get project-caches default: logical-router: 8accc9cd-9883-45f6-81b3-0d1fb2583180 logical-switch: id: 9d7da647-27b6-47cf-9cdb-6e4f4d5a356d ip_pool_id: 519ff57f-061f-4009-8d92-3e6526e7c17e subnet: 10.0.0.0/24 subnet_id: f75fd64c-c7b0-4b42-9681-fc656ae5e435
适用于 OpenShift 的 NSX Container Plug-in - 安装和管理指南
VMware, Inc. 32
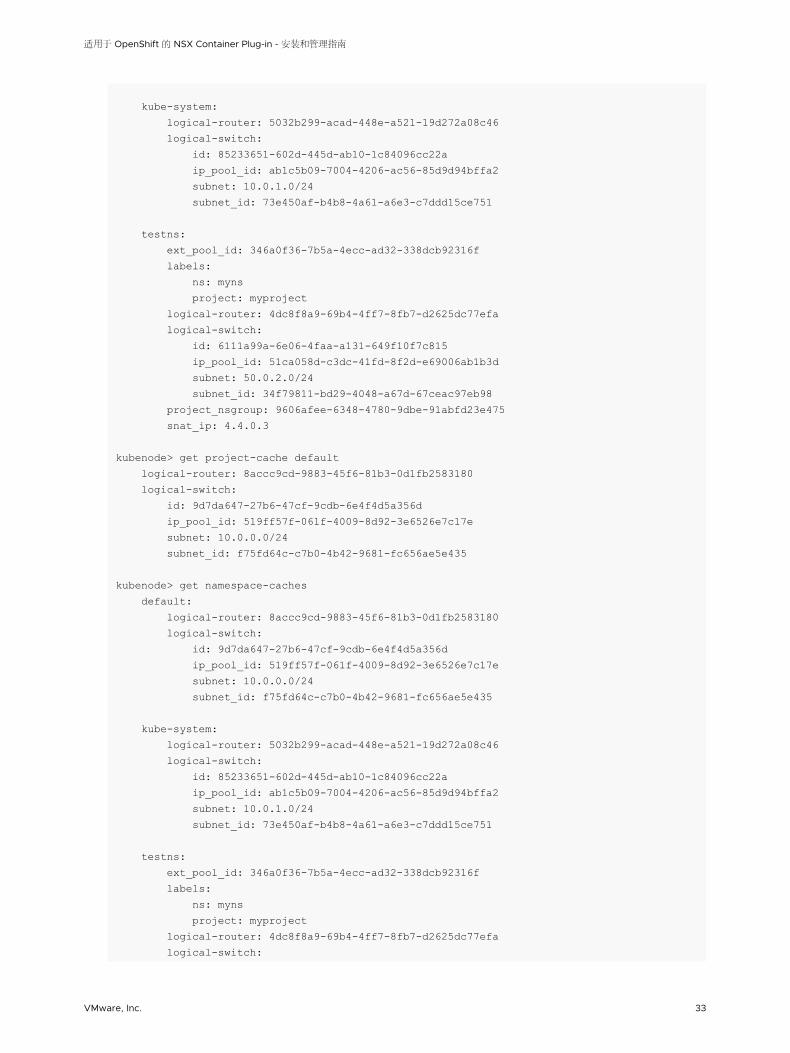
kube-system: logical-router: 5032b299-acad-448e-a521-19d272a08c46 logical-switch: id: 85233651-602d-445d-ab10-1c84096cc22a ip_pool_id: ab1c5b09-7004-4206-ac56-85d9d94bffa2 subnet: 10.0.1.0/24 subnet_id: 73e450af-b4b8-4a61-a6e3-c7ddd15ce751
testns: ext_pool_id: 346a0f36-7b5a-4ecc-ad32-338dcb92316f labels: ns: myns project: myproject logical-router: 4dc8f8a9-69b4-4ff7-8fb7-d2625dc77efa logical-switch: id: 6111a99a-6e06-4faa-a131-649f10f7c815 ip_pool_id: 51ca058d-c3dc-41fd-8f2d-e69006ab1b3d subnet: 50.0.2.0/24 subnet_id: 34f79811-bd29-4048-a67d-67ceac97eb98 project_nsgroup: 9606afee-6348-4780-9dbe-91abfd23e475 snat_ip: 4.4.0.3
kubenode> get project-cache default logical-router: 8accc9cd-9883-45f6-81b3-0d1fb2583180 logical-switch: id: 9d7da647-27b6-47cf-9cdb-6e4f4d5a356d ip_pool_id: 519ff57f-061f-4009-8d92-3e6526e7c17e subnet: 10.0.0.0/24 subnet_id: f75fd64c-c7b0-4b42-9681-fc656ae5e435
kubenode> get namespace-caches default: logical-router: 8accc9cd-9883-45f6-81b3-0d1fb2583180 logical-switch: id: 9d7da647-27b6-47cf-9cdb-6e4f4d5a356d ip_pool_id: 519ff57f-061f-4009-8d92-3e6526e7c17e subnet: 10.0.0.0/24 subnet_id: f75fd64c-c7b0-4b42-9681-fc656ae5e435
kube-system: logical-router: 5032b299-acad-448e-a521-19d272a08c46 logical-switch: id: 85233651-602d-445d-ab10-1c84096cc22a ip_pool_id: ab1c5b09-7004-4206-ac56-85d9d94bffa2 subnet: 10.0.1.0/24 subnet_id: 73e450af-b4b8-4a61-a6e3-c7ddd15ce751
testns: ext_pool_id: 346a0f36-7b5a-4ecc-ad32-338dcb92316f labels: ns: myns project: myproject logical-router: 4dc8f8a9-69b4-4ff7-8fb7-d2625dc77efa logical-switch:
适用于 OpenShift 的 NSX Container Plug-in - 安装和管理指南
VMware, Inc. 33
id: 6111a99a-6e06-4faa-a131-649f10f7c815 ip_pool_id: 51ca058d-c3dc-41fd-8f2d-e69006ab1b3d subnet: 50.0.2.0/24 subnet_id: 34f79811-bd29-4048-a67d-67ceac97eb98 project_nsgroup: 9606afee-6348-4780-9dbe-91abfd23e475 snat_ip: 4.4.0.3
kubenode> get namespace-cache default logical-router: 8accc9cd-9883-45f6-81b3-0d1fb2583180 logical-switch: id: 9d7da647-27b6-47cf-9cdb-6e4f4d5a356d ip_pool_id: 519ff57f-061f-4009-8d92-3e6526e7c17e subnet: 10.0.0.0/24 subnet_id: f75fd64c-c7b0-4b42-9681-fc656ae5e435
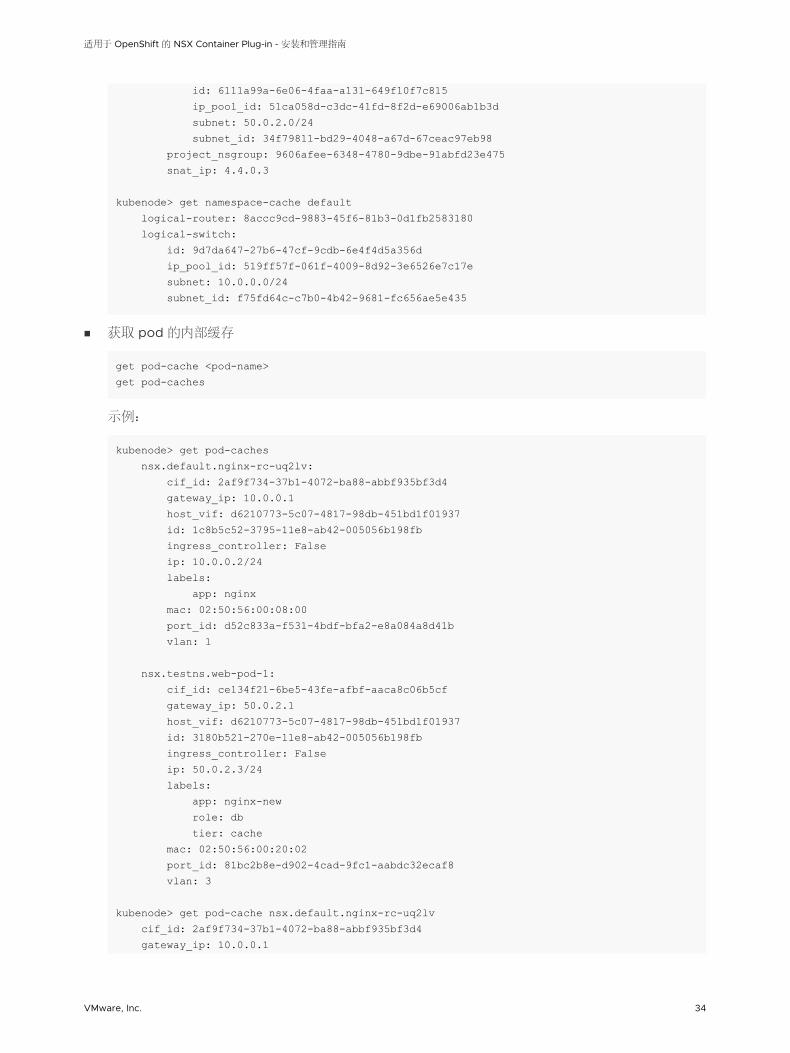
n 获取 pod 的内部缓存
get pod-cache <pod-name>get pod-caches
示例:
kubenode> get pod-caches nsx.default.nginx-rc-uq2lv: cif_id: 2af9f734-37b1-4072-ba88-abbf935bf3d4 gateway_ip: 10.0.0.1 host_vif: d6210773-5c07-4817-98db-451bd1f01937 id: 1c8b5c52-3795-11e8-ab42-005056b198fb ingress_controller: False ip: 10.0.0.2/24 labels: app: nginx mac: 02:50:56:00:08:00 port_id: d52c833a-f531-4bdf-bfa2-e8a084a8d41b vlan: 1
nsx.testns.web-pod-1: cif_id: ce134f21-6be5-43fe-afbf-aaca8c06b5cf gateway_ip: 50.0.2.1 host_vif: d6210773-5c07-4817-98db-451bd1f01937 id: 3180b521-270e-11e8-ab42-005056b198fb ingress_controller: False ip: 50.0.2.3/24 labels: app: nginx-new role: db tier: cache mac: 02:50:56:00:20:02 port_id: 81bc2b8e-d902-4cad-9fc1-aabdc32ecaf8 vlan: 3
kubenode> get pod-cache nsx.default.nginx-rc-uq2lv cif_id: 2af9f734-37b1-4072-ba88-abbf935bf3d4 gateway_ip: 10.0.0.1
适用于 OpenShift 的 NSX Container Plug-in - 安装和管理指南
VMware, Inc. 34
host_vif: d6210773-5c07-4817-98db-451bd1f01937 id: 1c8b5c52-3795-11e8-ab42-005056b198fb ingress_controller: False ip: 10.0.0.2/24 labels: app: nginx mac: 02:50:56:00:08:00 port_id: d52c833a-f531-4bdf-bfa2-e8a084a8d41b vlan: 1
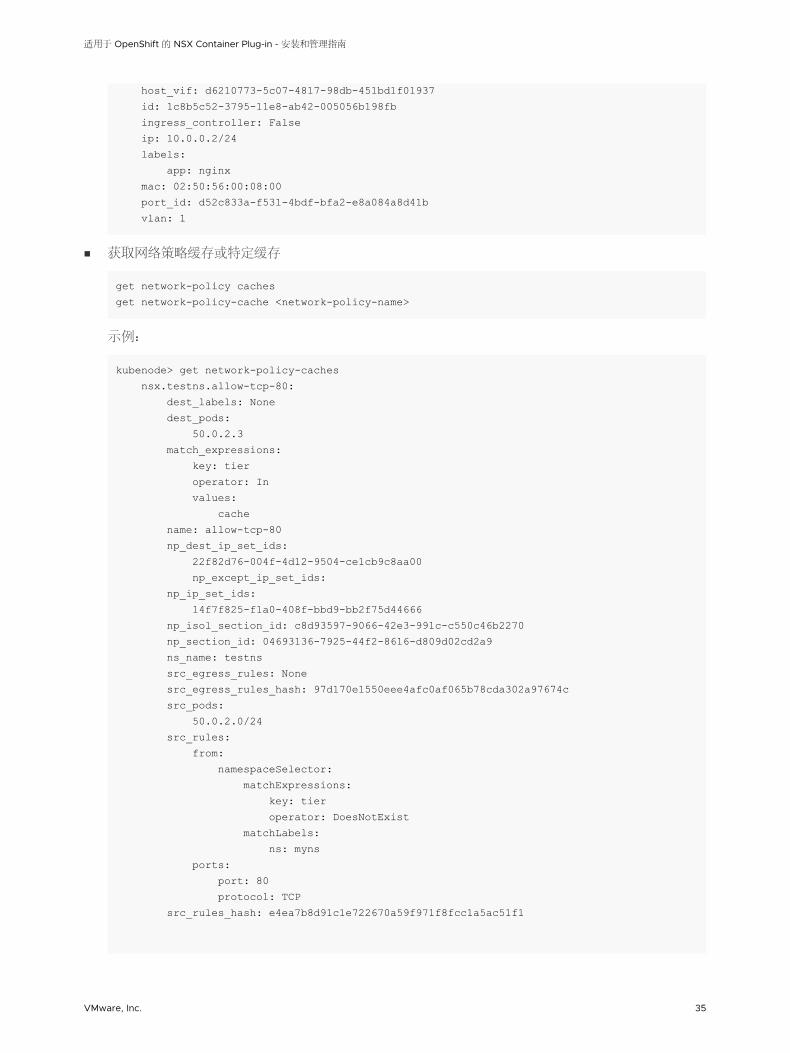
n 获取网络策略缓存或特定缓存
get network-policy cachesget network-policy-cache <network-policy-name>
示例:
kubenode> get network-policy-caches nsx.testns.allow-tcp-80: dest_labels: None dest_pods: 50.0.2.3 match_expressions: key: tier operator: In values: cache name: allow-tcp-80 np_dest_ip_set_ids: 22f82d76-004f-4d12-9504-ce1cb9c8aa00 np_except_ip_set_ids: np_ip_set_ids: 14f7f825-f1a0-408f-bbd9-bb2f75d44666 np_isol_section_id: c8d93597-9066-42e3-991c-c550c46b2270 np_section_id: 04693136-7925-44f2-8616-d809d02cd2a9 ns_name: testns src_egress_rules: None src_egress_rules_hash: 97d170e1550eee4afc0af065b78cda302a97674c src_pods: 50.0.2.0/24 src_rules: from: namespaceSelector: matchExpressions: key: tier operator: DoesNotExist matchLabels: ns: myns ports: port: 80 protocol: TCP src_rules_hash: e4ea7b8d91c1e722670a59f971f8fcc1a5ac51f1
适用于 OpenShift 的 NSX Container Plug-in - 安装和管理指南
VMware, Inc. 35
kubenode> get network-policy-cache nsx.testns.allow-tcp-80 dest_labels: None dest_pods: 50.0.2.3 match_expressions: key: tier operator: In values: cache name: allow-tcp-80 np_dest_ip_set_ids: 22f82d76-004f-4d12-9504-ce1cb9c8aa00 np_except_ip_set_ids: np_ip_set_ids: 14f7f825-f1a0-408f-bbd9-bb2f75d44666 np_isol_section_id: c8d93597-9066-42e3-991c-c550c46b2270 np_section_id: 04693136-7925-44f2-8616-d809d02cd2a9 ns_name: testns src_egress_rules: None src_egress_rules_hash: 97d170e1550eee4afc0af065b78cda302a97674c src_pods: 50.0.2.0/24 src_rules: from: namespaceSelector: matchExpressions: key: tier operator: DoesNotExist matchLabels: ns: myns ports: port: 80 protocol: TCP src_rules_hash: e4ea7b8d91c1e722670a59f971f8fcc1a5ac51f1
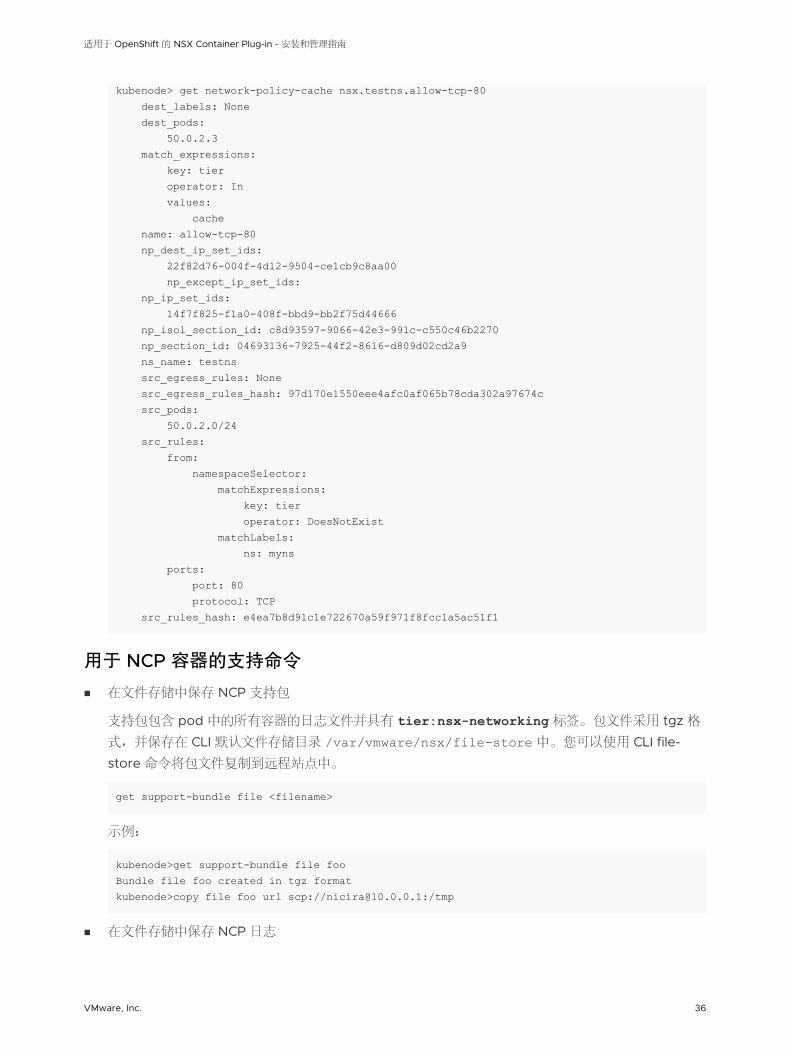
用于 NCP 容器的支持命令
n 在文件存储中保存 NCP 支持包
支持包包含 pod 中的所有容器的日志文件并具有 tier:nsx-networking 标签。包文件采用 tgz 格
式,并保存在 CLI 默认文件存储目录 /var/vmware/nsx/file-store 中。您可以使用 CLI file-
store 命令将包文件复制到远程站点中。
get support-bundle file <filename>
示例:
kubenode>get support-bundle file fooBundle file foo created in tgz formatkubenode>copy file foo url scp://[email protected]:/tmp
n 在文件存储中保存 NCP 日志
适用于 OpenShift 的 NSX Container Plug-in - 安装和管理指南
VMware, Inc. 36
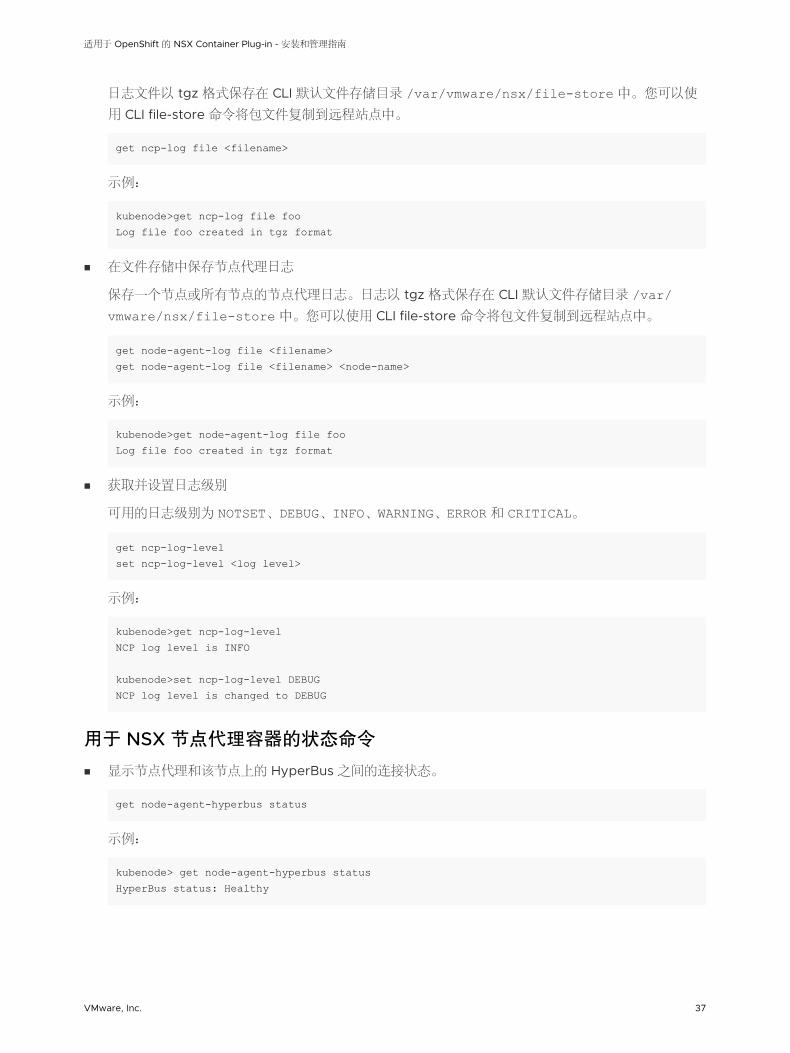
日志文件以 tgz 格式保存在 CLI 默认文件存储目录 /var/vmware/nsx/file-store 中。您可以使
用 CLI file-store 命令将包文件复制到远程站点中。
get ncp-log file <filename>
示例:
kubenode>get ncp-log file fooLog file foo created in tgz format
n 在文件存储中保存节点代理日志
保存一个节点或所有节点的节点代理日志。日志以 tgz 格式保存在 CLI 默认文件存储目录 /var/vmware/nsx/file-store 中。您可以使用 CLI file-store 命令将包文件复制到远程站点中。
get node-agent-log file <filename>get node-agent-log file <filename> <node-name>
示例:
kubenode>get node-agent-log file fooLog file foo created in tgz format
n 获取并设置日志级别
可用的日志级别为 NOTSET、DEBUG、INFO、WARNING、ERROR 和 CRITICAL。
get ncp-log-levelset ncp-log-level <log level>
示例:
kubenode>get ncp-log-levelNCP log level is INFO kubenode>set ncp-log-level DEBUGNCP log level is changed to DEBUG
用于 NSX 节点代理容器的状态命令
n 显示节点代理和该节点上的 HyperBus 之间的连接状态。
get node-agent-hyperbus status
示例:
kubenode> get node-agent-hyperbus statusHyperBus status: Healthy
适用于 OpenShift 的 NSX Container Plug-in - 安装和管理指南
VMware, Inc. 37
用于 NSX 节点代理容器的缓存命令
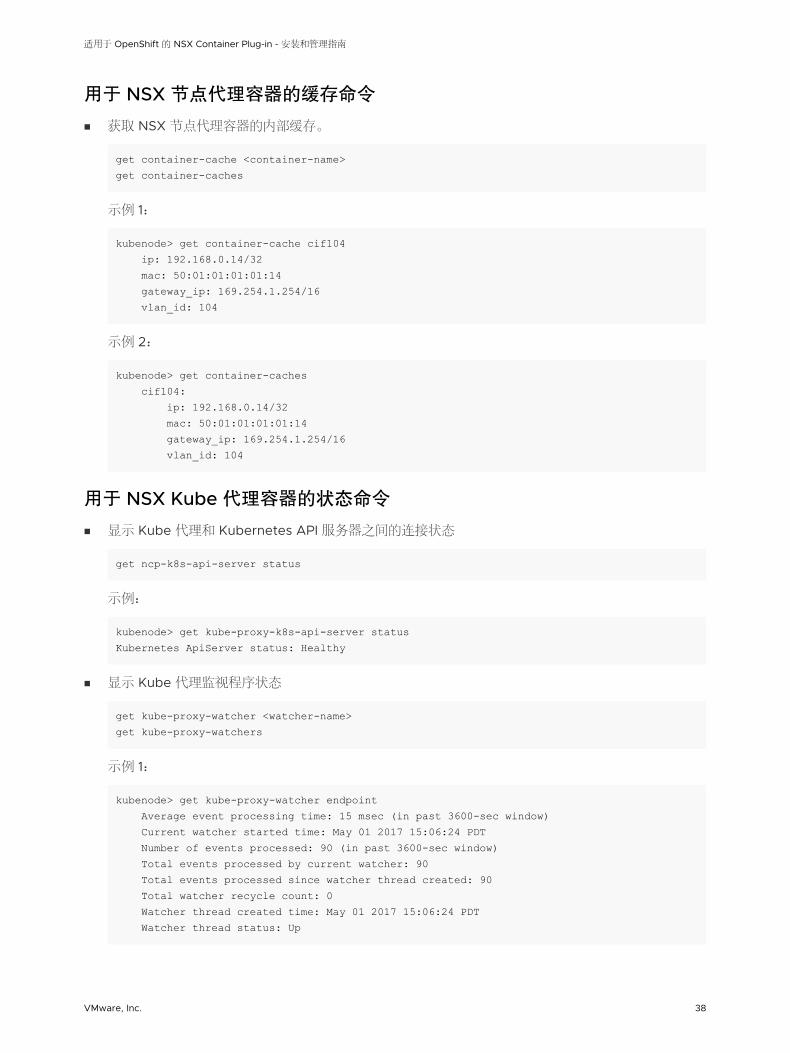
n 获取 NSX 节点代理容器的内部缓存。
get container-cache <container-name>get container-caches
示例 1:
kubenode> get container-cache cif104 ip: 192.168.0.14/32 mac: 50:01:01:01:01:14 gateway_ip: 169.254.1.254/16 vlan_id: 104
示例 2:
kubenode> get container-caches cif104: ip: 192.168.0.14/32 mac: 50:01:01:01:01:14 gateway_ip: 169.254.1.254/16 vlan_id: 104
用于 NSX Kube 代理容器的状态命令
n 显示 Kube 代理和 Kubernetes API 服务器之间的连接状态
get ncp-k8s-api-server status
示例:
kubenode> get kube-proxy-k8s-api-server statusKubernetes ApiServer status: Healthy
n 显示 Kube 代理监视程序状态
get kube-proxy-watcher <watcher-name>get kube-proxy-watchers
示例 1:
kubenode> get kube-proxy-watcher endpoint Average event processing time: 15 msec (in past 3600-sec window) Current watcher started time: May 01 2017 15:06:24 PDT Number of events processed: 90 (in past 3600-sec window) Total events processed by current watcher: 90 Total events processed since watcher thread created: 90 Total watcher recycle count: 0 Watcher thread created time: May 01 2017 15:06:24 PDT Watcher thread status: Up
适用于 OpenShift 的 NSX Container Plug-in - 安装和管理指南
VMware, Inc. 38
示例 2:
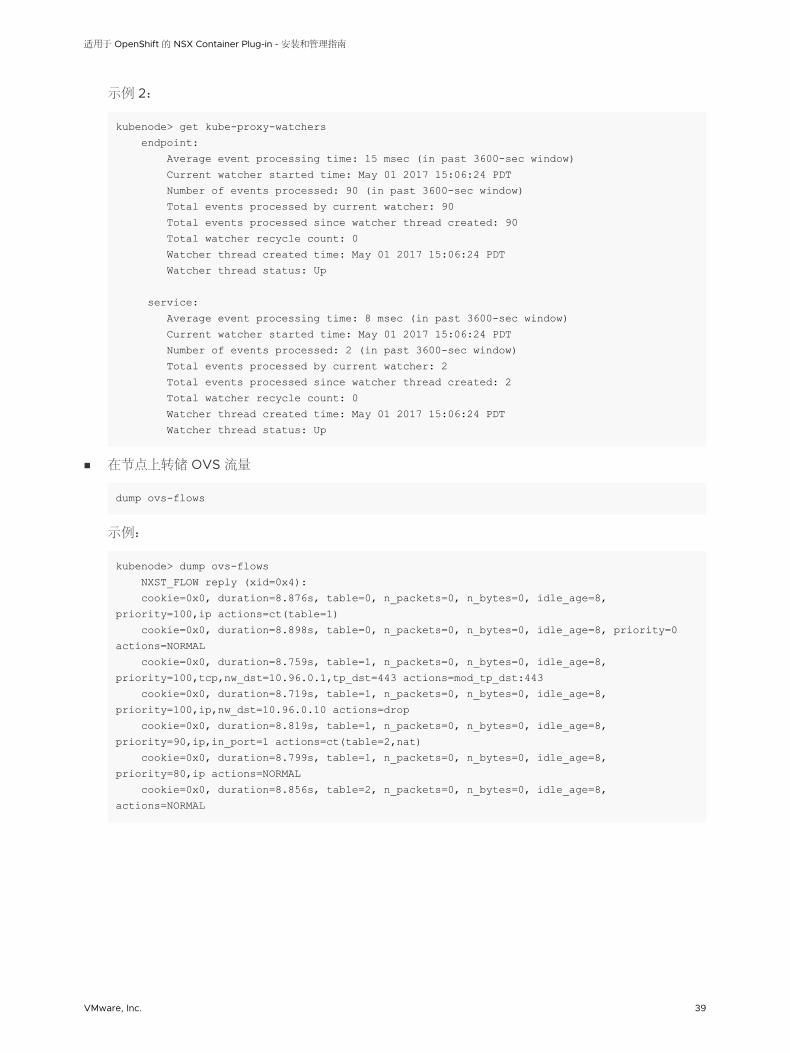
kubenode> get kube-proxy-watchers endpoint: Average event processing time: 15 msec (in past 3600-sec window) Current watcher started time: May 01 2017 15:06:24 PDT Number of events processed: 90 (in past 3600-sec window) Total events processed by current watcher: 90 Total events processed since watcher thread created: 90 Total watcher recycle count: 0 Watcher thread created time: May 01 2017 15:06:24 PDT Watcher thread status: Up
service: Average event processing time: 8 msec (in past 3600-sec window) Current watcher started time: May 01 2017 15:06:24 PDT Number of events processed: 2 (in past 3600-sec window) Total events processed by current watcher: 2 Total events processed since watcher thread created: 2 Total watcher recycle count: 0 Watcher thread created time: May 01 2017 15:06:24 PDT Watcher thread status: Up
n 在节点上转储 OVS 流量
dump ovs-flows
示例:
kubenode> dump ovs-flows NXST_FLOW reply (xid=0x4): cookie=0x0, duration=8.876s, table=0, n_packets=0, n_bytes=0, idle_age=8, priority=100,ip actions=ct(table=1) cookie=0x0, duration=8.898s, table=0, n_packets=0, n_bytes=0, idle_age=8, priority=0 actions=NORMAL cookie=0x0, duration=8.759s, table=1, n_packets=0, n_bytes=0, idle_age=8, priority=100,tcp,nw_dst=10.96.0.1,tp_dst=443 actions=mod_tp_dst:443 cookie=0x0, duration=8.719s, table=1, n_packets=0, n_bytes=0, idle_age=8, priority=100,ip,nw_dst=10.96.0.10 actions=drop cookie=0x0, duration=8.819s, table=1, n_packets=0, n_bytes=0, idle_age=8, priority=90,ip,in_port=1 actions=ct(table=2,nat) cookie=0x0, duration=8.799s, table=1, n_packets=0, n_bytes=0, idle_age=8, priority=80,ip actions=NORMAL cookie=0x0, duration=8.856s, table=2, n_packets=0, n_bytes=0, idle_age=8, actions=NORMAL
适用于 OpenShift 的 NSX Container Plug-in - 安装和管理指南
VMware, Inc. 39
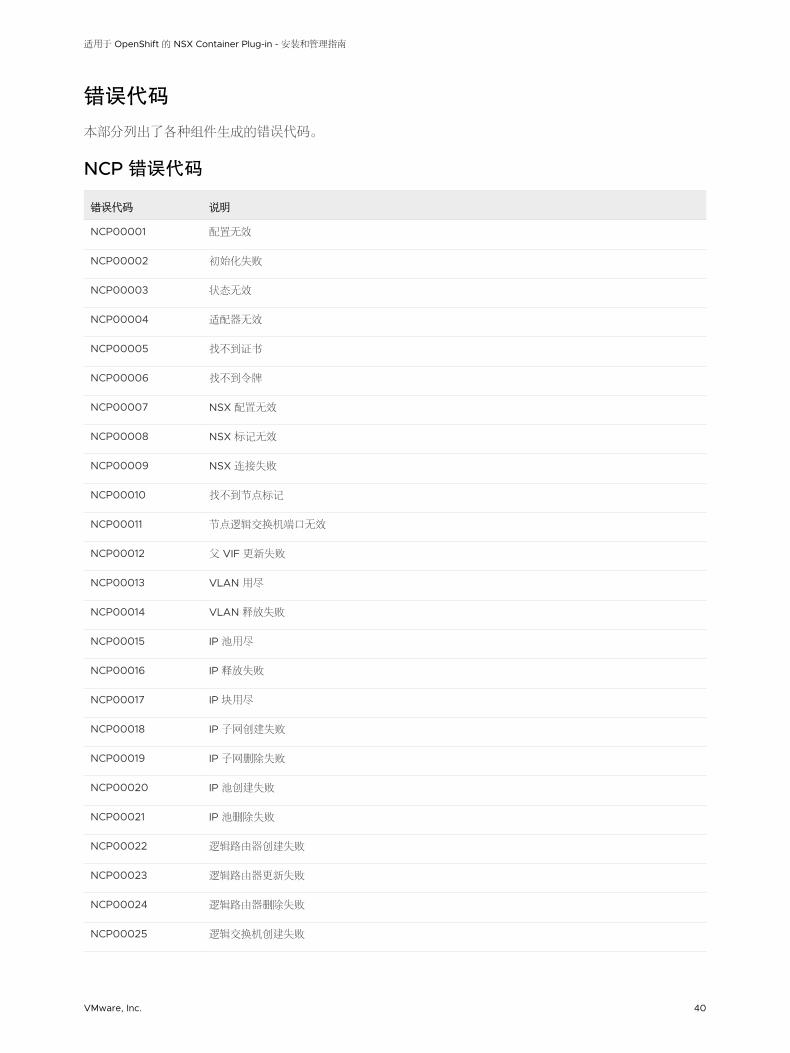
错误代码
本部分列出了各种组件生成的错误代码。
NCP 错误代码
错误代码 说明
NCP00001 配置无效
NCP00002 初始化失败
NCP00003 状态无效
NCP00004 适配器无效
NCP00005 找不到证书
NCP00006 找不到令牌
NCP00007 NSX 配置无效
NCP00008 NSX 标记无效
NCP00009 NSX 连接失败
NCP00010 找不到节点标记
NCP00011 节点逻辑交换机端口无效
NCP00012 父 VIF 更新失败
NCP00013 VLAN 用尽
NCP00014 VLAN 释放失败
NCP00015 IP 池用尽
NCP00016 IP 释放失败
NCP00017 IP 块用尽
NCP00018 IP 子网创建失败
NCP00019 IP 子网删除失败
NCP00020 IP 池创建失败
NCP00021 IP 池删除失败
NCP00022 逻辑路由器创建失败
NCP00023 逻辑路由器更新失败
NCP00024 逻辑路由器删除失败
NCP00025 逻辑交换机创建失败
适用于 OpenShift 的 NSX Container Plug-in - 安装和管理指南
VMware, Inc. 40

错误代码 说明
NCP00026 逻辑交换机更新失败
NCP00027 逻辑交换机删除失败
NCP00028 逻辑路由器端口创建失败
NCP00029 逻辑路由器端口删除失败
NCP00030 逻辑交换机端口创建失败
NCP00031 逻辑交换机端口更新失败
NCP00032 逻辑交换机端口删除失败
NCP00033 找不到网络策略
NCP00034 防火墙创建失败
NCP00035 防火墙读取失败
NCP00036 防火墙更新失败
NCP00037 防火墙删除失败
NCP00038 找到多个防火墙
NCP00039 NS 组创建失败
NCP00040 NS 组删除失败
NCP00041 IP 集创建失败
NCP00042 IP 集更新失败
NCP00043 IP 集删除失败
NCP00044 SNAT 规则创建失败
NCP00045 SNAT 规则删除失败
NCP00046 适配器 API 连接失败
NCP00047 适配器监控程序异常
NCP00048 负载均衡器服务删除失败
NCP00049 负载均衡器虚拟服务器创建失败
NCP00050 负载均衡器虚拟服务器更新失败
错误代码 说明
NCP00051 负载均衡器虚拟服务器删除失败
NCP00052 负载均衡器池创建失败
适用于 OpenShift 的 NSX Container Plug-in - 安装和管理指南
VMware, Inc. 41
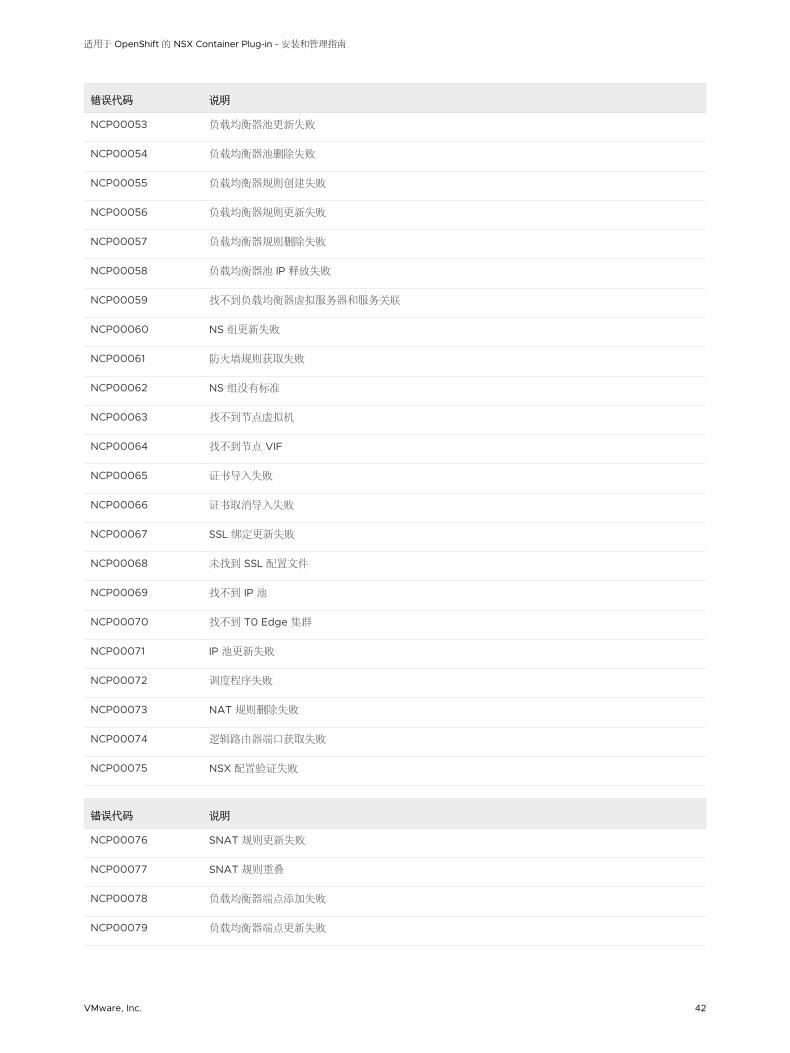
错误代码 说明
NCP00053 负载均衡器池更新失败
NCP00054 负载均衡器池删除失败
NCP00055 负载均衡器规则创建失败
NCP00056 负载均衡器规则更新失败
NCP00057 负载均衡器规则删除失败
NCP00058 负载均衡器池 IP 释放失败
NCP00059 找不到负载均衡器虚拟服务器和服务关联
NCP00060 NS 组更新失败
NCP00061 防火墙规则获取失败
NCP00062 NS 组没有标准
NCP00063 找不到节点虚拟机
NCP00064 找不到节点 VIF
NCP00065 证书导入失败
NCP00066 证书取消导入失败
NCP00067 SSL 绑定更新失败
NCP00068 未找到 SSL 配置文件
NCP00069 找不到 IP 池
NCP00070 找不到 T0 Edge 集群
NCP00071 IP 池更新失败
NCP00072 调度程序失败
NCP00073 NAT 规则删除失败
NCP00074 逻辑路由器端口获取失败
NCP00075 NSX 配置验证失败
错误代码 说明
NCP00076 SNAT 规则更新失败
NCP00077 SNAT 规则重叠
NCP00078 负载均衡器端点添加失败
NCP00079 负载均衡器端点更新失败
适用于 OpenShift 的 NSX Container Plug-in - 安装和管理指南
VMware, Inc. 42
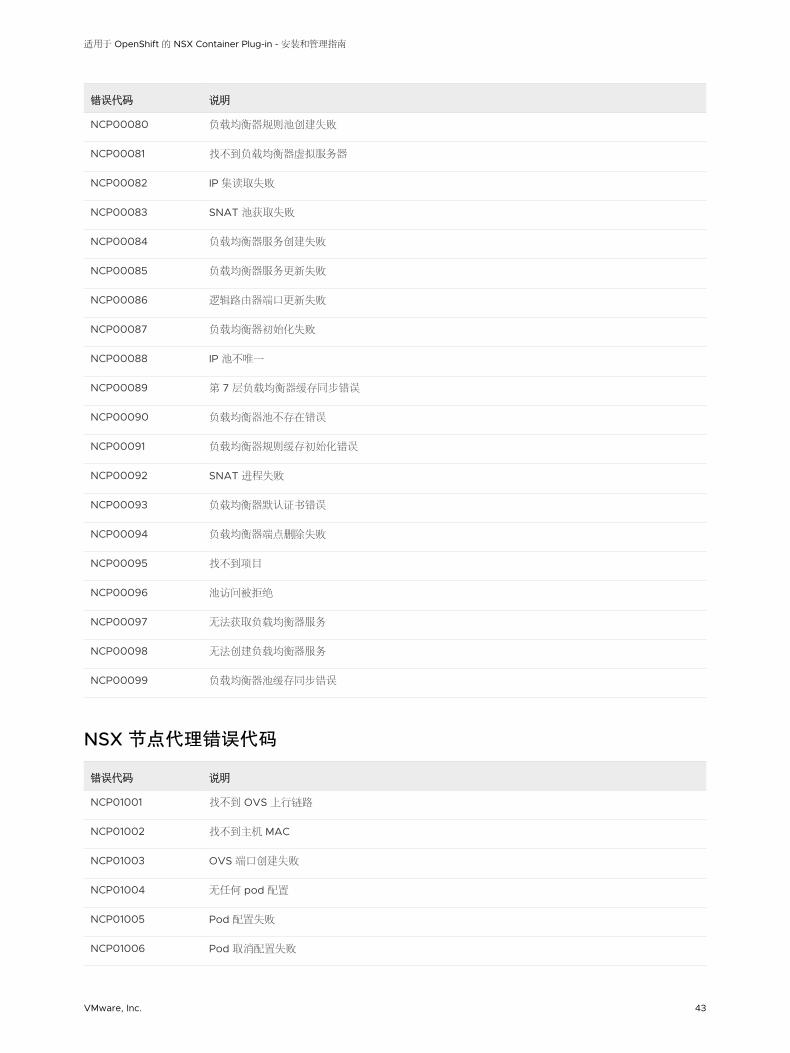
错误代码 说明
NCP00080 负载均衡器规则池创建失败
NCP00081 找不到负载均衡器虚拟服务器
NCP00082 IP 集读取失败
NCP00083 SNAT 池获取失败
NCP00084 负载均衡器服务创建失败
NCP00085 负载均衡器服务更新失败
NCP00086 逻辑路由器端口更新失败
NCP00087 负载均衡器初始化失败
NCP00088 IP 池不唯一
NCP00089 第 7 层负载均衡器缓存同步错误
NCP00090 负载均衡器池不存在错误
NCP00091 负载均衡器规则缓存初始化错误
NCP00092 SNAT 进程失败
NCP00093 负载均衡器默认证书错误
NCP00094 负载均衡器端点删除失败
NCP00095 找不到项目
NCP00096 池访问被拒绝
NCP00097 无法获取负载均衡器服务
NCP00098 无法创建负载均衡器服务
NCP00099 负载均衡器池缓存同步错误
NSX 节点代理错误代码
错误代码 说明
NCP01001 找不到 OVS 上行链路
NCP01002 找不到主机 MAC
NCP01003 OVS 端口创建失败
NCP01004 无任何 pod 配置
NCP01005 Pod 配置失败
NCP01006 Pod 取消配置失败
适用于 OpenShift 的 NSX Container Plug-in - 安装和管理指南
VMware, Inc. 43
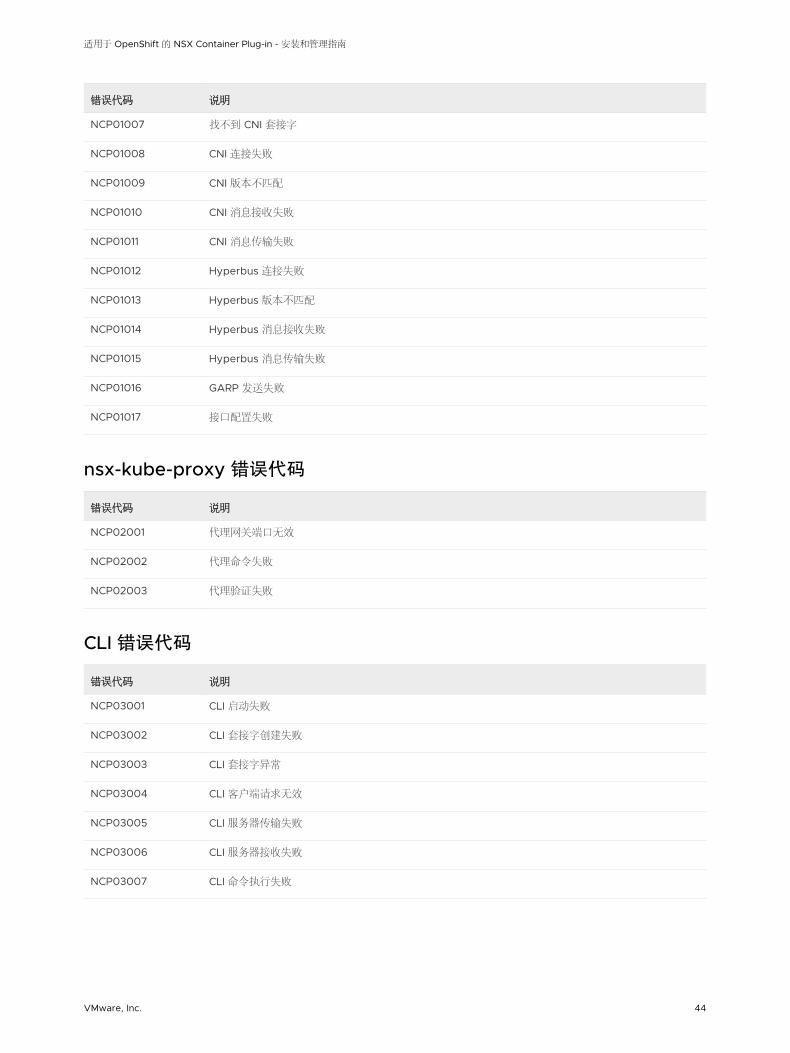
错误代码 说明
NCP01007 找不到 CNI 套接字
NCP01008 CNI 连接失败
NCP01009 CNI 版本不匹配
NCP01010 CNI 消息接收失败
NCP01011 CNI 消息传输失败
NCP01012 Hyperbus 连接失败
NCP01013 Hyperbus 版本不匹配
NCP01014 Hyperbus 消息接收失败
NCP01015 Hyperbus 消息传输失败
NCP01016 GARP 发送失败
NCP01017 接口配置失败
nsx-kube-proxy 错误代码
错误代码 说明
NCP02001 代理网关端口无效
NCP02002 代理命令失败
NCP02003 代理验证失败
CLI 错误代码
错误代码 说明
NCP03001 CLI 启动失败
NCP03002 CLI 套接字创建失败
NCP03003 CLI 套接字异常
NCP03004 CLI 客户端请求无效
NCP03005 CLI 服务器传输失败
NCP03006 CLI 服务器接收失败
NCP03007 CLI 命令执行失败
适用于 OpenShift 的 NSX Container Plug-in - 安装和管理指南
VMware, Inc. 44
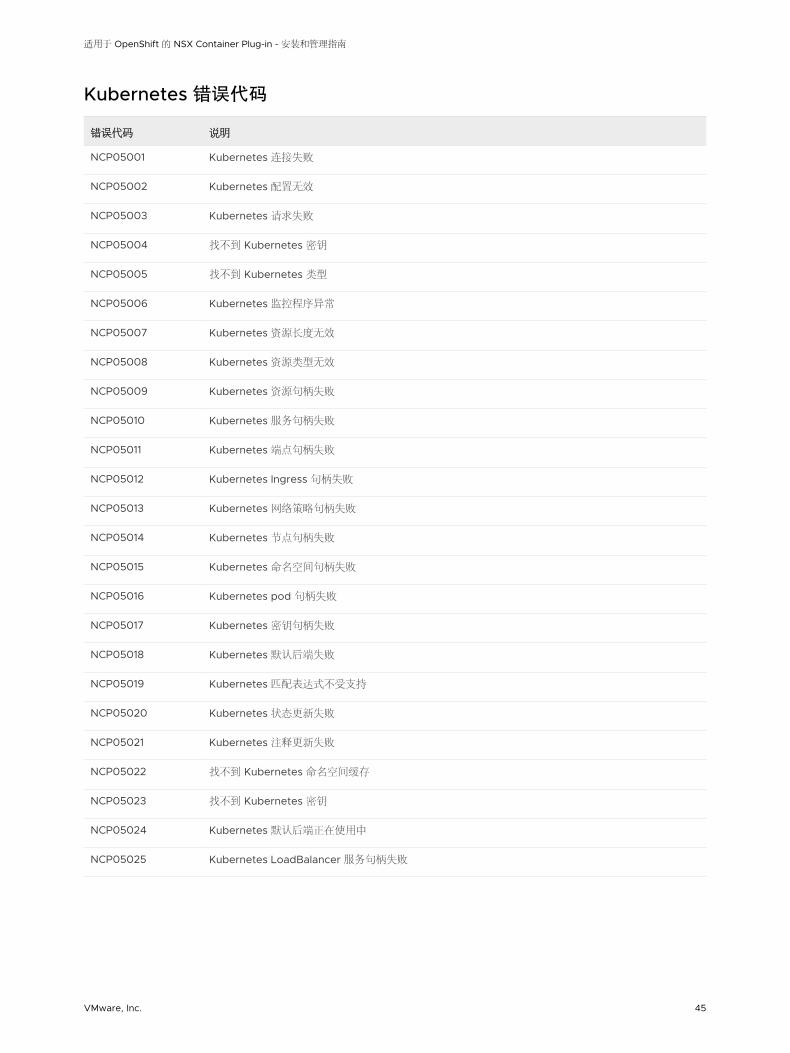
Kubernetes 错误代码
错误代码 说明
NCP05001 Kubernetes 连接失败
NCP05002 Kubernetes 配置无效
NCP05003 Kubernetes 请求失败
NCP05004 找不到 Kubernetes 密钥
NCP05005 找不到 Kubernetes 类型
NCP05006 Kubernetes 监控程序异常
NCP05007 Kubernetes 资源长度无效
NCP05008 Kubernetes 资源类型无效
NCP05009 Kubernetes 资源句柄失败
NCP05010 Kubernetes 服务句柄失败
NCP05011 Kubernetes 端点句柄失败
NCP05012 Kubernetes Ingress 句柄失败
NCP05013 Kubernetes 网络策略句柄失败
NCP05014 Kubernetes 节点句柄失败
NCP05015 Kubernetes 命名空间句柄失败
NCP05016 Kubernetes pod 句柄失败
NCP05017 Kubernetes 密钥句柄失败
NCP05018 Kubernetes 默认后端失败
NCP05019 Kubernetes 匹配表达式不受支持
NCP05020 Kubernetes 状态更新失败
NCP05021 Kubernetes 注释更新失败
NCP05022 找不到 Kubernetes 命名空间缓存
NCP05023 找不到 Kubernetes 密钥
NCP05024 Kubernetes 默认后端正在使用中
NCP05025 Kubernetes LoadBalancer 服务句柄失败
适用于 OpenShift 的 NSX Container Plug-in - 安装和管理指南
VMware, Inc. 45
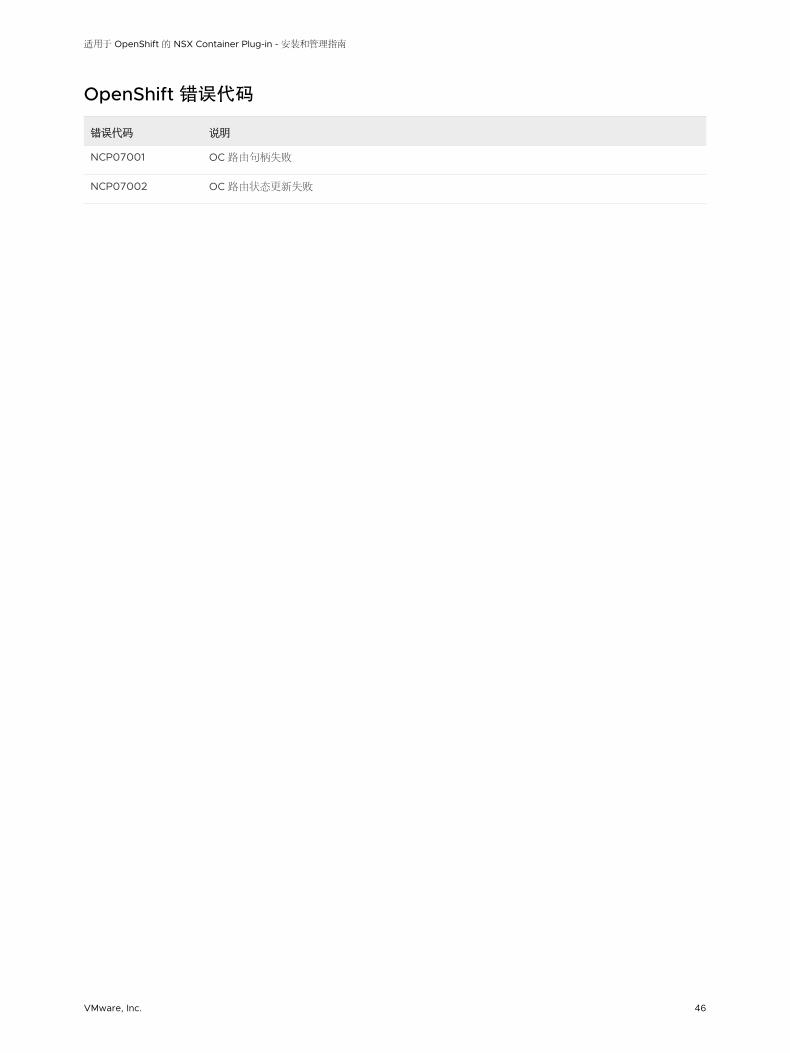
OpenShift 错误代码
错误代码 说明
NCP07001 OC 路由句柄失败
NCP07002 OC 路由状态更新失败
适用于 OpenShift 的 NSX Container Plug-in - 安装和管理指南
VMware, Inc. 46