Online Quilt Magazine.com
33
Standard Online Quilt Magazine – Vol. 5 No. 6 © Online Quilt Magazine.com All Rights Reserved Page | 1 Online Quilt Magazine.com Free Standard Issue Vol.5 No.6 – June 2014 How To Start & Stop Quilting PROJECT – Modern Jelly Roll Throw Pillows New Block Pattern To Make Find Your Niche In A Quilting Business
-
Upload
khangminh22 -
Category
Documents
-
view
3 -
download
0
Transcript of Online Quilt Magazine.com

Standard Online Quilt Magazine – Vol. 5 No. 6
© Online Quilt Magazine.com All Rights Reserved P a g e | 1
Online Quilt Magazine.com
Free Standard Issue Vol.5 No.6 – June 2014
How To
Start &
Stop
Quilting
PROJECT –
Modern Jelly
Roll Throw
Pillows
New
Block
Pattern
To Make
Find Your
Niche In A
Quilting
Business

Standard Online Quilt Magazine – Vol. 5 No. 6
© Online Quilt Magazine.com All Rights Reserved P a g e | 2
Online Quilt Magazine Table of Contents
How To Start and Stop Quilting …………………………………..……………………………………..………………………………………………………………….. Page 4
PROJECT –Modern Jelly Roll Throw Pillows …....…….….…………………………..………….……………..……….………………………..……..………….. Page 9
Find Your Niche in the Quilting Business; Make and Sell Quilted Accessories …………………………………………………………………………..
What’s New From The Fat Quarter Shop …………………………………………………………………………………………………………………………………
Book Reviews …………………….…………………..……..………………………………………………………………………………………………………………………..
Recipe Corner – Chocolate-fudge brownies (wheat and gluten free) …………………….………………………………………………………………..
Page 13
Page 17
Page 19
Page 24
Reader “Show and Tell” ………………………………………………………………………………………………………………………………….…….…………...…..
BLOCK OF THE MONTH – Bird’s Nest Block ……………….…………….……..……………............................................................................
Page 25
Page 29
Today's Tips.................................................................................................................................................................................. Page 32
YES – We Want To hear From You............................................................................................................................................... Page 32
Upgrade Today to our Premium Online Quilt Magazine for Only $10 for the
Year – that’s less than $1 per issue!
This Month’s Premium Issue has Nearly 60 Pages Packed Full of More Great Articles and Projects for
You to Make. To Upgrade, go to www.OnlineQuiltMagazine.com , Register in the Right-Hand Box and
Don’t Miss Another Issue!
Standard Online Quilt Magazine – Vol. 5 No. 6
© Online Quilt Magazine.com All Rights Reserved P a g e | 3
Letter from the Editor
Jody Anderson
Hi!
Well we’re now halfway through the year, and I have to say it’s just flown by so far! Some of us are
heading into Winter, and others are enjoying Spring, and I feels it’s definitely a time for change and
shaking off the cobwebs and getting stuck into the second half of this year properly. Of course, by
properly, I really mean sticking to those sewing “To Do” lists, as it’ll be Christmas again before we know
it, and all those gifts and decorations just won’t make themselves…
This issue we have more interesting articles for you, including some practical advice from Leah on how to
start and stop quilting, and Penny’s discussion on all sorts of different options for you to turn your
quilting hobby into a money-maker.
There’s new projects too, with a couple of fun and quick Modern Jelly Roll Throw Pillow patterns, and
your regular favourites including some great Readers’ T-shirt quilts!
Have a great month!
Jody

Standard Online Quilt Magazine – Vol. 5 No. 6
© Online Quilt Magazine.com All Rights Reserved P a g e | 4
We're off to a great start now quilting Wiggly U
shapes in our four patch blocks. Super thank you
to everyone who commented with support for
Josh's first free motion quilting video. You guys
are such an awesome group to make videos for!
So now that we've started free motion quilting
I've been getting a lot of questions here, on
YouTube, and on the Facebook group about
starting and stopping quilting.
Specifically - how do we secure our threads as
we start quilting and as we end the line so our
quilting stitches don't come out?
Here's the way I do this:
1. Start quilting by pulling the bobbin thread up
to the top of the quilt. Using the handwheel on
the right of your machine, rotate towards
yourself to drop the needle down, then keep
rotating until it comes ALL the way up and is even
starting to dip back down again. This ensures the
top thread has made a full rotation through the
bobbin case and has caught the bobbin thread.
(Alternative - if you have a needle up / down
button, just hit that button 2 times to drop the
needle and bring it up)
Now give the top thread a tug and a loop should
pop up - that is the bobbin thread. Give that loop
a tug and tuck both threads under your darning
foot so they are out of your way.
I showed this in our first video on Wiggly U
How To Start and Stop Quilting
By Leah Day from www.FreeMotionQuilting.blogspot.com.au

Standard Online Quilt Magazine – Vol. 5 No. 6
© Online Quilt Magazine.com All Rights Reserved P a g e | 5
shapes, so watch that video again and closely pay
attention to everything I do BEFORE I started
quilting.
Note: This set of steps sounds very simple and I
can certainly fly through these steps because I
have done them thousands of times. Josh has fits
with it every time, so if you struggle with it too,
don't worry, it takes some practice to get the
hang of bringing the bobbin thread up!
Why do you need to do this?
If you leave your bobbin thread on the bottom,
where you can't see it, there's a very good chance
you will stitch through it as you quilt the block
and it will become embedded in the stitching.
Short answer - it looks terrible!
So bringing the bobbin thread up ensures there's
no nasty surprises left for us on the back of the
quilt, and tucking both threads under the foot
makes it far less likely they will be sucked into the
Standard Online Quilt Magazine – Vol. 5 No. 6
© Online Quilt Magazine.com All Rights Reserved P a g e | 6
machine or become unthreaded as we get
started.
2. Start quilting - Don't build up thread. Don't
stitch in place. Don't backstitch. Don't overlock.
Don't pass go. Don't collect $200.
Just start quilting!
Why? Because if you do any of those things, you
will end up with a very noticeable glob of thread
on the top and back of your quilt. You can not
only see it, you can feel it too - it will be a hard
lump sitting on the surface.
Many quilters have been taught to build up
thread this way to "secure" the thread and clip
off the thread tails immediately after. Personally,
I don't think this is secure because with wear and
washing those knots come out and the thread will
start unraveling.
So don't build up thread, just start quilting and
we will return to those thread tails after the block
is complete.
3. Stop quilting - Just STOP. Don't build up
thread. Don't stitch in place. Don't backstitch.
Don't overlock...you get the idea!
We don't build up thread at the end for the same
reason we don't build up thread at the beginning.
When you finish a line of quilting just stop, rotate
your handwheel to bring your needle all the way
up, lift your foot, and pull the block off your
machine.
NOW cut your threads leaving thread tails at least
4 - 6 inches long. You will have a single thread on
the top of your quilt and a single thread on the
back. Give one of these threads a tug (doesn't
matter which side) to bring up a loop, which will
be the other thread. Pull both to one side.
4. Tie, bury, and clip - You should now have your
Standard Online Quilt Magazine – Vol. 5 No. 6
© Online Quilt Magazine.com All Rights Reserved P a g e | 7
starting 2 threads and your ending 2 threads
together on one side of the quilt.
Watch this video to see how this works step by
step:
Click here to check out the Hide Your Threads Kit
which comes with a pack of cheater needles and
a pin place to keep them handy next to your
machine!
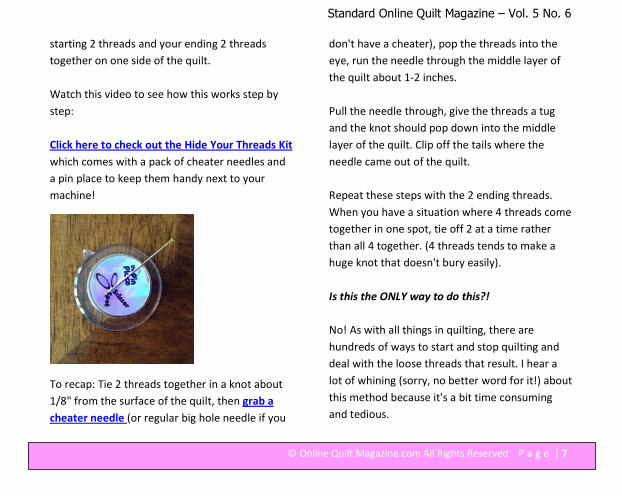
To recap: Tie 2 threads together in a knot about
1/8" from the surface of the quilt, then grab a
cheater needle (or regular big hole needle if you
don't have a cheater), pop the threads into the
eye, run the needle through the middle layer of
the quilt about 1-2 inches.
Pull the needle through, give the threads a tug
and the knot should pop down into the middle
layer of the quilt. Clip off the tails where the
needle came out of the quilt.
Repeat these steps with the 2 ending threads.
When you have a situation where 4 threads come
together in one spot, tie off 2 at a time rather
than all 4 together. (4 threads tends to make a
huge knot that doesn't bury easily).
Is this the ONLY way to do this?!
No! As with all things in quilting, there are
hundreds of ways to start and stop quilting and
deal with the loose threads that result. I hear a
lot of whining (sorry, no better word for it!) about
this method because it's a bit time consuming
and tedious.

Standard Online Quilt Magazine – Vol. 5 No. 6
© Online Quilt Magazine.com All Rights Reserved P a g e | 8
However, this is the only method use, so it's the
only method I teach! I personally find it to be far
faster, easier, and less frustrating than the build-
a-glob-and-clip method. I figure if I take the time
to put these quilting lines in the quilt, I want to
make sure they are secure and will stay put and
not come unraveled eventually with wear.
The method you use to deal with your thread tails
is entirely up to you, so I'd suggest trying a lot of
different methods from different teachers and
find what works best for you!
Let's go quilt,
Leah Day
About the Author: Leah Day is the author of the Free
Motion Quilting Project, a blog project dedicated to
creating new free motion quilting designs each week and
sharing them all for FREE! Leah is also the author of From
Daisy to Paisley - 50 Beginner Free Motion Quilting Designs,
a spiral bound book featuring 50 designs from the project,
and she now has three Free Motion Quilting classes
available through Craftsy.com. www.daystyledesigns.com
Standard Online Quilt Magazine – Vol. 5 No. 6
© Online Quilt Magazine.com All Rights Reserved P a g e | 9
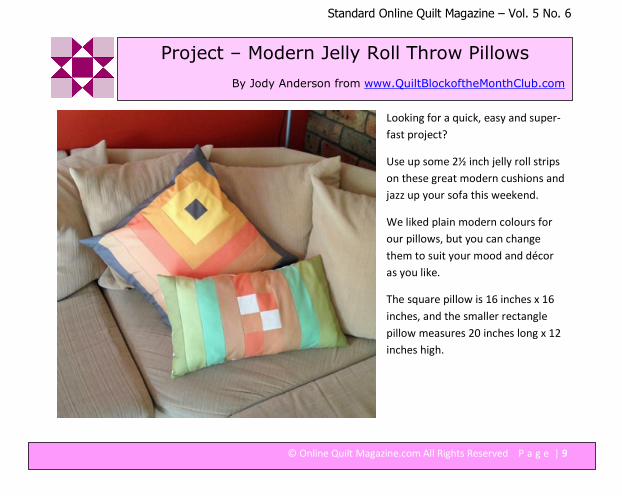
Project – Modern Jelly Roll Throw Pillows
By Jody Anderson from www.QuiltBlockoftheMonthClub.com
Looking for a quick, easy and super-
fast project?
Use up some 2½ inch jelly roll strips
on these great modern cushions and
jazz up your sofa this weekend.
We liked plain modern colours for
our pillows, but you can change
them to suit your mood and décor
as you like.
The square pillow is 16 inches x 16
inches, and the smaller rectangle
pillow measures 20 inches long x 12
inches high.
Standard Online Quilt Magazine – Vol. 5 No. 6
© Online Quilt Magazine.com All Rights Reserved P a g e | 10
You Will Need:
Square Pillow -
A selection of 2½ inch (Jelly Roll) strips. We used
1 strip of each of 5 different colours, plus 2 strips
of charcoal grey.
½ metre ( ½ yard) matching fabric for cushion
back
Cushion insert to fit
Rectangle Pillow –
A selection of 2½ inch (Jelly Roll) strips. We used
1 strip of each of 7 different colours.
Piece of matching fabric measuring 20½ x 12½
inches for the pillow back.
Cushion stuffing
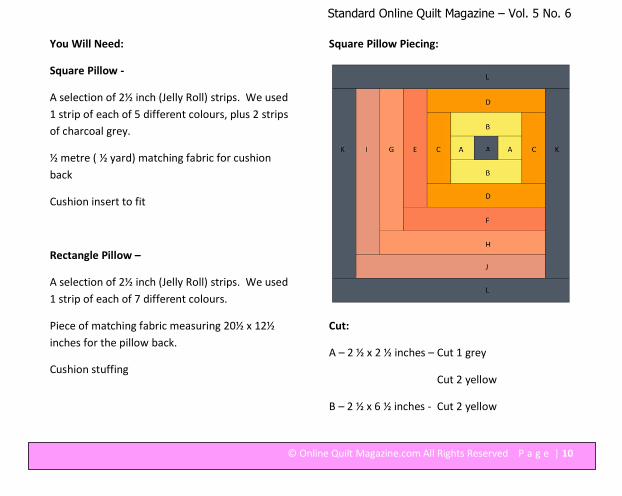
Square Pillow Piecing:
Cut:
A – 2 ½ x 2 ½ inches – Cut 1 grey
Cut 2 yellow
B – 2 ½ x 6 ½ inches - Cut 2 yellow
Standard Online Quilt Magazine – Vol. 5 No. 6
© Online Quilt Magazine.com All Rights Reserved P a g e | 11
C – 2 ½ x 6 ½ inches - Cut 2 mustard
D – 2 ½ x 10 ½ inches - Cut 2 mustard
E – 2 ½ x 10 ½ inches - Cut 1 salmon
F – 2 ½ x 12 ½ inches - Cut 1 salmon
G –2 ½ x 12 ½ inches - Cut 1 peach
H – 2 ½ x 14 ½ inches - Cut 1 peach
I – 2 ½ x 14 ½ inches – Cut 1 light brown
J – 2 ½ x 16 ½ inches - Cut 1 light brown
K – 2 ½ x 16 ½ inches -Cut 2 grey
L – 2 ½ x 20 ½ inches – Cut 2 grey
Refer to the diagram and photo and start by
sewing the three “A” pieces together with ¼ inch
seams. Add the “B” strips, then the “C” strips and
so on, until you have pieced the cushion top in
order.
Press all seams well.
Assembly:
From the fabric for the back, cut two rectangles
measuring 20 ½ inches x 15 inches.
Hem one full width (20 1/2inch) edge on each
piece. Fold down the edge a ½ inch, then fold
over again about 1 inch and pin and topstitch to
hem that edge.
Lay the pieced square face up on a flat surface,
then lay the two back pieces on top. Match all
side edges, and overlap the two hemmed edges.
Pin and sew around all sides. Clip corners and
turn right sides out before stuffing with a cushion
insert to finish.
Standard Online Quilt Magazine – Vol. 5 No. 6
© Online Quilt Magazine.com All Rights Reserved P a g e | 12
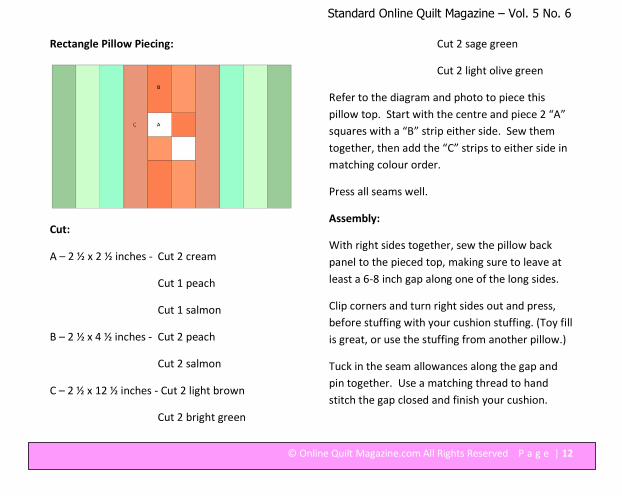
Rectangle Pillow Piecing:
Cut:
A – 2 ½ x 2 ½ inches - Cut 2 cream
Cut 1 peach
Cut 1 salmon
B – 2 ½ x 4 ½ inches - Cut 2 peach
Cut 2 salmon
C – 2 ½ x 12 ½ inches - Cut 2 light brown
Cut 2 bright green
Cut 2 sage green
Cut 2 light olive green
Refer to the diagram and photo to piece this
pillow top. Start with the centre and piece 2 “A”
squares with a “B” strip either side. Sew them
together, then add the “C” strips to either side in
matching colour order.
Press all seams well.
Assembly:
With right sides together, sew the pillow back
panel to the pieced top, making sure to leave at
least a 6-8 inch gap along one of the long sides.
Clip corners and turn right sides out and press,
before stuffing with your cushion stuffing. (Toy fill
is great, or use the stuffing from another pillow.)
Tuck in the seam allowances along the gap and
pin together. Use a matching thread to hand
stitch the gap closed and finish your cushion.

Standard Online Quilt Magazine – Vol. 5 No. 6
© Online Quilt Magazine.com All Rights Reserved P a g e | 13
In the home decor category, your business could
make and sell quilted potholders and matching
aprons with pockets that coordinate with the
potholder pattern. You could make and sell
quilted oven mitts.
Table runners and mantel drapes are also popular
quilted items for the home. Quilted placemats
and coasters are also ideas.
For a living room, den, bedroom, dining room or
kitchen quilted wall hangings are popular. These
can be custom made to coordinate with your
client's own interior colors and style.
For a guest room or bathroom, why not quilt
covers for a tissue box or photo or mirror frame?
Photo from www.sewwequilt.com
Quilted pillowcases are also good sellers.
Find Your Niche in the Quilting Business; Make
and Sell Quilted Accessories
By Penny Halgren from www.How-To-Quilt.com
Standard Online Quilt Magazine – Vol. 5 No. 6
© Online Quilt Magazine.com All Rights Reserved P a g e | 14
Take the idea of home decor to a smaller scale
and perhaps your quilting business could be
making quilted items for doll houses.
Many collectors will pay top dollar to have their
dollhouse beds accented with tiny little quilts.
Such quilts would also be a niche business for
baby dolls.
Little girls love their dolls and many parents,
grandparents, aunts and uncles would pay good
money to have a special quilt made for a special
doll!
Holidays open up a wide range of options for
home decor as well. Keep that in mind if your
quilting business will focus on home decor. In
fact, your quilting business could actually focus
on holiday items.
Christmas ornaments, stockings, wall hangings,
table decorations...the possibilities for that one
holiday alone are endless! Imagine if your quilting
business focused on all holidays.
For January, quilted decorations featuring
snowmen and snowflakes would be popular for
the winter theme.
February is Valentine's Day. Focus for that holiday
would be on quilted items with hearts, cupids,
etc.
March brings St. Patricks' Day and Spring.
April is Easter, and brings another slew of quilted
holiday items to mind. Baskets made from quilted
strips of fabric would be gorgeous. Patchwork
eggs stuffed to perfection would also be fun
items.
May and June bring graduations along with
Mother's and Father's days. These months are
great for quilted photo frames or scrapbooks with
a quilted cover.
July's patriotic theme would be great inspiration
for quilted home decor as well.

Standard Online Quilt Magazine – Vol. 5 No. 6
© Online Quilt Magazine.com All Rights Reserved P a g e | 15
August and September sends children (and
teachers) back to school. Quilted notebooks, tote
bags, pencil cases would be great accessories for
those months.
Halloween and Thanksgiving in October and
November also offer endless possibilities for
home décor, too. Use your imagination!
Quilted apparel is another area, and could include
a number of items as well. Belts and headbands
are popular accessories.
Quilted jackets are a higher ticket item you could
make and sell. You could add small quilt blocks to
simple cardigans as pockets. Combine your
jackets with a matching quilted cap or tote bag
and increase your price accordingly!
Other quilted accessories you could make include
cell phone holders, lip gloss pouches, and eye
glass cases.
Coin purses and wallets are other ideas for
quilted accessories. Purses and tote bags are also
very popular items that translate nicely into
quilted products.
The pet niche can be so much fun too. People of
all ages love to buy things for their pets. For cats
and dogs, quilted carrying cases are good sellers.
Pet beds are another top item.
Pet clothing is also very popular. Small dogs
generally need the added warmth of a coat in the
winter.
Standard Online Quilt Magazine – Vol. 5 No. 6
© Online Quilt Magazine.com All Rights Reserved P a g e | 16
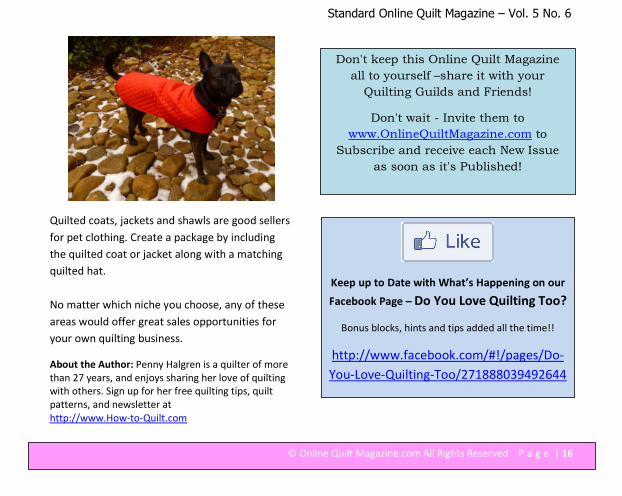
Quilted coats, jackets and shawls are good sellers
for pet clothing. Create a package by including
the quilted coat or jacket along with a matching
quilted hat.
No matter which niche you choose, any of these
areas would offer great sales opportunities for
your own quilting business.
About the Author: Penny Halgren is a quilter of more
than 27 years, and enjoys sharing her love of quilting
with others. Sign up for her free quilting tips, quilt
patterns, and newsletter at
http://www.How-to-Quilt.com
Don't keep this Online Quilt Magazine
all to yourself –share it with your
Quilting Guilds and Friends!
Don't wait - Invite them to
www.OnlineQuiltMagazine.com to
Subscribe and receive each New Issue
as soon as it's Published!
Keep up to Date with What’s Happening on our
Facebook Page – Do You Love Quilting Too?
Bonus blocks, hints and tips added all the time!!
http://www.facebook.com/#!/pages/Do-
You-Love-Quilting-Too/271888039492644

Standard Online Quilt Magazine – Vol. 5 No. 6
© Online Quilt Magazine.com All Rights Reserved P a g e | 17
We're pleased to be able to bring you a selection
each month of the Newest Fabric Releases and
the new season fabric "must haves".
25TH AND PINE BY BASICGREY FOR MODA FABRICS
All roads lead to holiday magic at 25th
& Pine,
where timeless traditions meet modern design.
This collection is decked out with a mix of candy
cane red, peppermint green, snowy white, dusty
blue and soft creams.
25th & Pine is the perfect way to start your
holiday season.
Available in all the cut goods, yardage and our
delightful Down the Lane Quilt Kit.
Check it out at:
http://www.fatquartershop.com/moda-fabric/25th-
pine-basicgrey-moda-fabrics/
What's New from The Fat Quarter Shop
From Kimberly Jolly at www.FatQuarterShop.com
Standard Online Quilt Magazine – Vol. 5 No. 6
© Online Quilt Magazine.com All Rights Reserved P a g e | 18
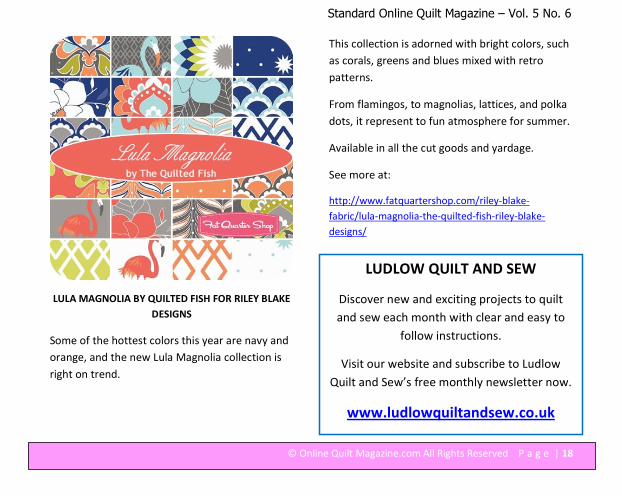
LULA MAGNOLIA BY QUILTED FISH FOR RILEY BLAKE
DESIGNS
Some of the hottest colors this year are navy and
orange, and the new Lula Magnolia collection is
right on trend.
This collection is adorned with bright colors, such
as corals, greens and blues mixed with retro
patterns.
From flamingos, to magnolias, lattices, and polka
dots, it represent to fun atmosphere for summer.
Available in all the cut goods and yardage.
See more at:
http://www.fatquartershop.com/riley-blake-
fabric/lula-magnolia-the-quilted-fish-riley-blake-
designs/
LUDLOW QUILT AND SEW
Discover new and exciting projects to quilt
and sew each month with clear and easy to
follow instructions.
Visit our website and subscribe to Ludlow
Quilt and Sew’s free monthly newsletter now.
www.ludlowquiltandsew.co.uk
Standard Online Quilt Magazine – Vol. 5 No. 6
© Online Quilt Magazine.com All Rights Reserved P a g e | 19
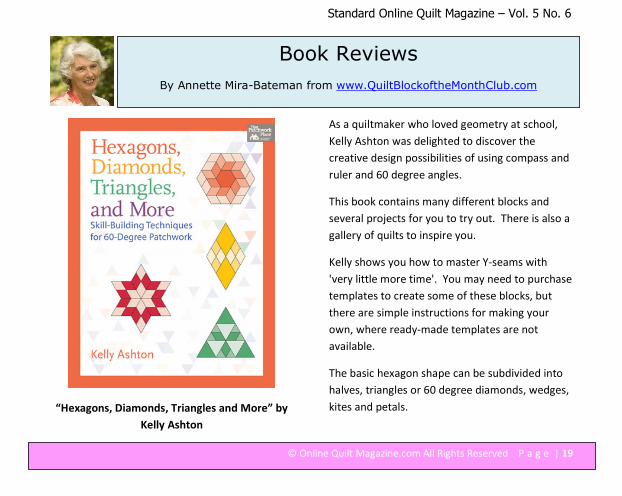
“Hexagons, Diamonds, Triangles and More” by
Kelly Ashton
As a quiltmaker who loved geometry at school,
Kelly Ashton was delighted to discover the
creative design possibilities of using compass and
ruler and 60 degree angles.
This book contains many different blocks and
several projects for you to try out. There is also a
gallery of quilts to inspire you.
Kelly shows you how to master Y-seams with
'very little more time'. You may need to purchase
templates to create some of these blocks, but
there are simple instructions for making your
own, where ready-made templates are not
available.
The basic hexagon shape can be subdivided into
halves, triangles or 60 degree diamonds, wedges,
kites and petals.
Book Reviews
By Annette Mira-Bateman from www.QuiltBlockoftheMonthClub.com
Standard Online Quilt Magazine – Vol. 5 No. 6
© Online Quilt Magazine.com All Rights Reserved P a g e | 20
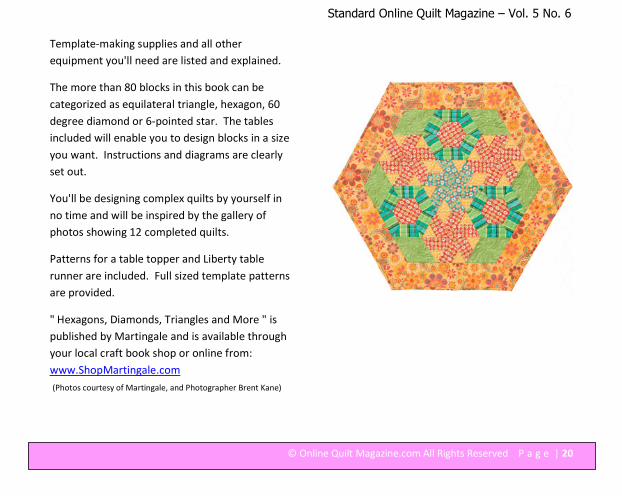
Template-making supplies and all other
equipment you'll need are listed and explained.
The more than 80 blocks in this book can be
categorized as equilateral triangle, hexagon, 60
degree diamond or 6-pointed star. The tables
included will enable you to design blocks in a size
you want. Instructions and diagrams are clearly
set out.
You'll be designing complex quilts by yourself in
no time and will be inspired by the gallery of
photos showing 12 completed quilts.
Patterns for a table topper and Liberty table
runner are included. Full sized template patterns
are provided.
" Hexagons, Diamonds, Triangles and More " is
published by Martingale and is available through
your local craft book shop or online from:
www.ShopMartingale.com
(Photos courtesy of Martingale, and Photographer Brent Kane)

Standard Online Quilt Magazine – Vol. 5 No. 6
© Online Quilt Magazine.com All Rights Reserved P a g e | 21
“English Paper Piecing II” by Vicki Bellino
This book is a follow-up to the first book "English
Paper Piecing - Fresh New Quilts from Bloom
Creek".
Vicki has aimed to include projects for the
beginner paper piecer as well as some more
ambitious ones for those looking for a challenge.
The history of paper piecing goes back to the
early 1700s at least and is a method which
eliminates stretching and distortion along bias
edges of small cut pieces of fabric.
Vicki prefers purchasing ready-cut paper
templates, but you can make your own.
Templates are provided. (You can buy shapes
from www.paperpieces.com or most quilt shops.)
She advises on fussy-cutting (if you wish), basting
and preparing different shapes and whipstitching
them together or appliqueing.
Vicky explains several different techniques for
this work and tells us which ways she prefers.
The diagrams and directions are clear.

Standard Online Quilt Magazine – Vol. 5 No. 6
© Online Quilt Magazine.com All Rights Reserved P a g e | 22
There are 10 very attractive and varied projects in
this book ranging from small to large
wallhangings, a bed runner, tote bag and two
sizes and styles of sewing machine covers.
If you wish to learn about paper piecing, then this
is the book for you.
"English Paper Piecing II" by Vicki Bellino is
published by Martingale and is available through
your local craft book shop or online from:
www.ShopMartingale.com
(Photos courtesy of Martingale, and Photographer Brent Kane)
Standard Online Quilt Magazine – Vol. 5 No. 6
© Online Quilt Magazine.com All Rights Reserved P a g e | 23
Join The Club!
LUDLOW QUILT AND SEW
Discover new and exciting projects to quilt and sew
each month with clear and easy to follow instructions.
Visit our website and subscribe to Ludlow Quilt and
Sew’s free monthly newsletter now.
www.ludlowquiltandsew.co.uk

Standard Online Quilt Magazine – Vol. 5 No. 6
© Online Quilt Magazine.com All Rights Reserved P a g e | 24
Ingredients
1/2 cup rice flour
1/2 cup plain gluten-free flour (we used Orgran
brand)
1/4 teaspoon baking powder
1/3 cup cocoa powder
1 1/4 cups caster sugar
2 eggs, lightly beaten
150g butter, melted
Method
Preheat oven to 180°C. Grease a 4cm-deep, 20cm
x 30cm (base) slab pan. Line with baking paper,
allowing a 2cm overhang at both long ends.
Sift flours, baking powder and cocoa into a large
bowl. Add sugar. Stir to combine. Make a well in
the centre. Add eggs and melted butter to flour
mixture. Using a metal spoon, mix until just
smooth.
Spread mixture into prepared pan. Bake for 20 to
25 minutes or until a skewer inserted in the
centre comes out with crumbs clinging.
Remove from oven. Allow to cool in pan. Lift from
pan. Cut into squares.
(Note- Brownies can be made up to 3 days ahead. Store in
an airtight container in a cool, dry place.)
Recipe Corner – Chocolate-fudge brownies
(wheat and gluten free)

Standard Online Quilt Magazine – Vol. 5 No. 6
© Online Quilt Magazine.com All Rights Reserved P a g e | 25
This month we continue our regular segment of
“Show and Tell” quilts made by our Online Quilt
Magazine Readers. It’s been another busy month
too!
We will include them as long as you can send
them to us, and that way we can all share in the
wealth of creativity and inspiration abundant
within our quilting community.
~~~~~~~~~~~~~~~~~~~~~~~~~~~~~~~~~~~~~~~~~~
Following on from last month’s article on T-Shirt
quilts…
“Here are photos of the quilts I made for a friend.
She wanted to surprise her son and daughter for
Christmas with quilts made from all of their sports
jerseys, favorite pillow case and
other mementos that were important to them. I
had fun making these.”
- Linda M., USA
Reader “Show and Tell”

Standard Online Quilt Magazine – Vol. 5 No. 6
© Online Quilt Magazine.com All Rights Reserved P a g e | 26
~~~~~~~~~~~~~~~~~~~~~~~~~~~~~~~~~~~~~~~~
“These are pictures of a reversible t-shirt quilt
that I made for my granddaughter's high school
graduation. These are her t-shirts.”
- Melva M., MN, USA
~~~~~~~~~~~~~~~~~~~~~~~~~~~~~~~~~~~~~~~~
Standard Online Quilt Magazine – Vol. 5 No. 6
© Online Quilt Magazine.com All Rights Reserved P a g e | 27
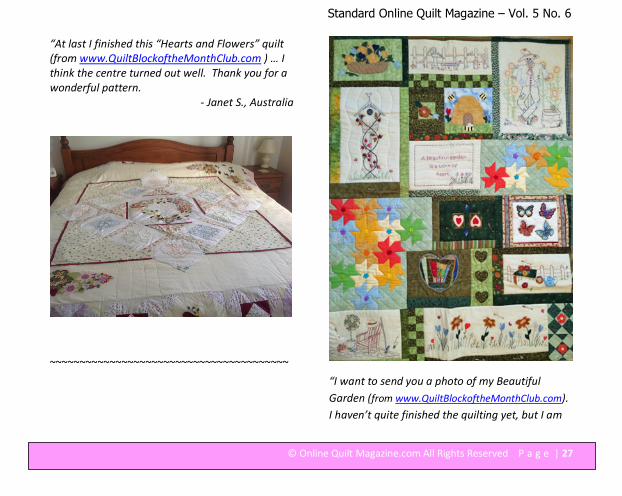
“At last I finished this “Hearts and Flowers” quilt
(from www.QuiltBlockoftheMonthClub.com ) … I
think the centre turned out well. Thank you for a
wonderful pattern.
- Janet S., Australia
~~~~~~~~~~~~~~~~~~~~~~~~~~~~~~~~~~~~~~~~
“I want to send you a photo of my Beautiful
Garden (from www.QuiltBlockoftheMonthClub.com).
I haven’t quite finished the quilting yet, but I am
Standard Online Quilt Magazine – Vol. 5 No. 6
© Online Quilt Magazine.com All Rights Reserved P a g e | 28
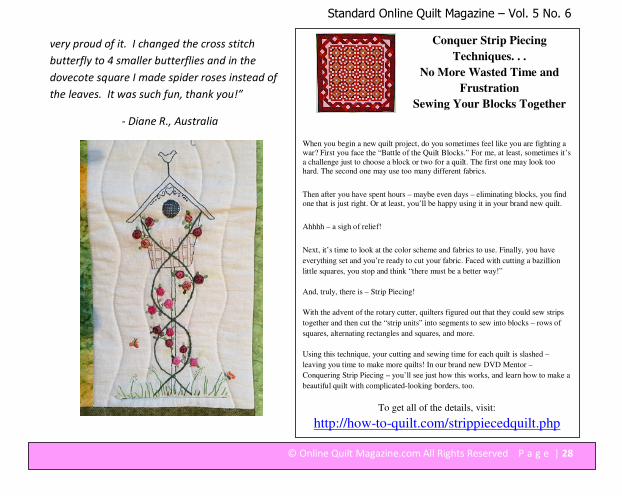
very proud of it. I changed the cross stitch
butterfly to 4 smaller butterflies and in the
dovecote square I made spider roses instead of
the leaves. It was such fun, thank you!”
- Diane R., Australia
Conquer Strip Piecing
Techniques. . .
No More Wasted Time and
Frustration
Sewing Your Blocks Together
When you begin a new quilt project, do you sometimes feel like you are fighting a
war? First you face the “Battle of the Quilt Blocks.” For me, at least, sometimes it’s
a challenge just to choose a block or two for a quilt. The first one may look too
hard. The second one may use too many different fabrics.
Then after you have spent hours – maybe even days – eliminating blocks, you find
one that is just right. Or at least, you’ll be happy using it in your brand new quilt.
Ahhhh – a sigh of relief!
Next, it’s time to look at the color scheme and fabrics to use. Finally, you have
everything set and you’re ready to cut your fabric. Faced with cutting a bazillion
little squares, you stop and think “there must be a better way!”
And, truly, there is – Strip Piecing!
With the advent of the rotary cutter, quilters figured out that they could sew strips
together and then cut the “strip units” into segments to sew into blocks – rows of
squares, alternating rectangles and squares, and more.
Using this technique, your cutting and sewing time for each quilt is slashed –
leaving you time to make more quilts! In our brand new DVD Mentor –
Conquering Strip Piecing – you’ll see just how this works, and learn how to make a
beautiful quilt with complicated-looking borders, too.
To get all of the details, visit:
http://how-to-quilt.com/strippiecedquilt.php

Standard Online Quilt Magazine – Vol. 5 No. 6
© Online Quilt Magazine.com All Rights Reserved P a g e | 29
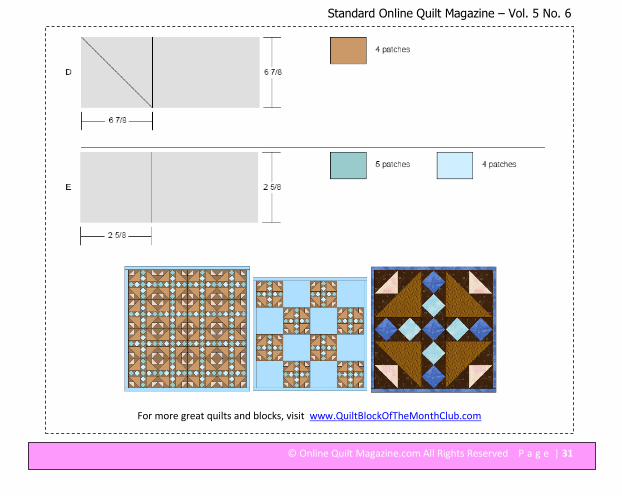
This block is a striking but moderately complex
block to piece together. You may even like to
enlarge the block and use one as the basis for a
lap sized quilt.
To make this 15 inch block as shown, you will
need 5 different fabrics, and once you have
rotary cut the pieces according to the Cutting
Diagram, you can piece them together as shown.
Block of the Month

Standard Online Quilt Magazine – Vol. 5 No. 6
© Online Quilt Magazine.com All Rights Reserved P a g e | 30
Standard Online Quilt Magazine – Vol. 5 No. 6
© Online Quilt Magazine.com All Rights Reserved P a g e | 31
For more great quilts and blocks, visit www.QuiltBlockOfTheMonthClub.com

Standard Online Quilt Magazine – Vol. 5 No. 6
© Online Quilt Magazine.com All Rights Reserved P a g e | 32
Today’s Tips:
These tips work equally well for quilting, or
embroidering -
• Hold your thumb over the exit point to
prevent knots as you pull the thread taut.
• If your thread tends to kink, you may be
rolling the needle. Try rotating the needle
once between each set of stitches, first in
one direction, then the other, to see
which works for you.
• Hold the free end of the thread and
unwind until the spool reaches your
elbow. Cut at this length. The thread will
be used up before it begins to wear out.
~~~~~~~~~~~~~~~~~~~~~~~~~~~~~~~~~~~~~~~~
Dawn sent in a tip this week, that we wanted to
share with you:
"A baby change table is great to turn into a
cutting table, in a small space, once you don't
need it any more for baby, it is a great height and
takes quite a large mat."
(I didn't think of that when I still had my change
table here, but it makes great sense!! It ties in
too with our other tip - it's kind of obvious, but
sometimes hearing it again helps too...)
• Purchase the largest rotary cutting mat
you can afford and have room for.
Keep the tips coming! We all love
reading hints that work for you.
Please send them all to

Standard Online Quilt Magazine – Vol. 5 No. 6
© Online Quilt Magazine.com All Rights Reserved P a g e | 33
YES, We Want to Hear From
You!
As our Online Magazine continues to grow each
month, we need your feedback in order for us to
continue to improve our publication for you.
• We want to know how you liked it.
• We want to know the topics you're
interested in.
• We want to know if you have any
suggestions, Hints or Tips of your own that
you'd like included, or if you know anyone
we should include a story on!
Please send me an email with your Testimonial,
Tip, Suggestion, “Show and Tell” Quilt or
Enhancement – I'd love to hear from you!
Send all emails to:
If you'd like to submit an Article, or a Project for
Publication, or take advantage of our Very Very
Reasonable Advertising Rates, please email details
or queries to Jody at
To subscribe to our Monthly Online Quilt
Magazine, please go to
www.OnlineQuiltMagazine.com and
register so you don’t miss another issue!
"Quilt-y" Quotes…
“The sewing machine joins what the
scissors have cut asunder, plus whatever
else comes in its path.” ~Mason Cooley
“I keep my end tables full of needlework
and quilting so I don't have to dust
them.” ~Author Unknown