Object Oriented Concepts and Programming
388
MSCIT - 201 Master of Science Informaon Technology BAOU BAOU BAOU Educaon Educaon Educaon for All for All for All ___________ ___________ ___________ BAOU Educaon for All ___________ (Established by Government of Gujarat) Dr. Babasaheb Ambedkar Open University Object Oriented Concepts and Programming OBJECT ORIENTED PROGRAMMING SYSTEM
-
Upload
khangminh22 -
Category
Documents
-
view
3 -
download
0
Transcript of Object Oriented Concepts and Programming

MSCIT - 201
Master of Science Informa�on Technology
BAOUBAOUBAOUEduca�onEduca�onEduca�onfor Allfor Allfor All
_________________________________BAOUEduca�onfor All
___________
(Established by Government of Gujarat)
Dr. Babasaheb Ambedkar Open University
Object Oriented Concepts and Programming
OBJECTORIENTED
PROGRAMMING SYSTEM

Object Oriented Concepts and Programming
2022
Dr. Babasaheb Ambedkar Open University

Object Oriented Concepts and Programming
Expert Committee
Prof. (Dr.) Nilesh K. Modi Professor and Director, School of Computer Science, Dr. Babasaheb Ambedkar Open University, Ahmedabad
(Chairman)
Prof. (Dr.) Ajay Parikh Professor and Head, Department of Computer Science Gujarat Vidyapith, Ahmedabad
(Member)
Prof. (Dr.) Satyen Parikh Dean, School of Computer Science and Application Ganpat University, Kherva, Mahesana
(Member)
M. T. Savaliya Associate Professor and Head Computer Engineering Department Vishwakarma Engineering College, Ahmedabad
(Member)
Mr. Nilesh Bokhani Assistant Professor, School of Computer Science, Dr. Babasaheb Ambedkar Open University, Ahmedabad
(Member)
Dr. Himanshu Patel Assistant Professor, School of Computer Science, Dr. Babasaheb Ambedkar Open University, Ahmedabad
(Member Secretary)
Course Writer
Dr. Kajal Patel Associate Professor, Vishwakarma Government Engineering
College, Ahmedabad
Dr. Kamlesh Salunke Assistant Professor, Gujarat Vidyapith, Ahmedabad
Dr. Vinod Desai Assistant Professor, Gujarat Vidyapith, Ahmedabad
Content Reviewer and Editor
Prof. (Dr.) Nilesh K. Modi Professor and Director, School of Computer Science,
Dr. Babasaheb Ambedkar Open University, Ahmedabad
Copyright © Dr. Babasaheb Ambedkar Open University – Ahmedabad. June 2019
ISBN - 978-81-940577-1-0
Printed and published by: Dr. Babasaheb Ambedkar Open University, Ahmedabad While all efforts have been made by editors to check accuracy of the content, the representation of facts, principles, descriptions and methods are that of the respective module writers. Views expressed in the publication are that of the authors, and do not necessarily reflect the views of Dr. Babasaheb Ambedkar Open University. All products and services mentioned are owned by their respective copyrights holders, and mere presentation in the publication does not mean endorsement by Dr. Babasaheb Ambedkar Open University. Every effort has been made to acknowledge and attribute all sources of information used in preparation of this learning material. Readers are requested to kindly notify missing attribution, if any.

Dr. Babasaheb Ambedkar Open University
MSCIT-201
Object Oriented Concepts and Programming Block-1: Basics of Classes, Objects and Methods in
Java
UNIT-1 Basics of Java 02 UNIT-2 Class and Object 29 UNIT-3 Inheritance and Interface 64 UNIT-4 More on class and object 100
Block-2: Packages, Interfaces and Exception Handling
UNIT-1 Package 131 UNIT-2 Collection Framework 160 UNIT-3 Introduction of Exception 185
UNIT-4 Exception classes 214

iv
Block-3: Multithreaded Programming
UNIT-1 Multithreaded Programming-I 242 UNIT-2 Multithreaded Programming-II 261
Block-4: AWT and Event Handling
UNIT-1 AWT Controls 273 UNIT-2 Event Delegation Model 303 UNIT-3 Graphics Class 320 UNIT-4 I/O FIles in Java 349

1
Block-1
Basics of Classes, Objects and Methods in Java
2
Unit 1: Basics of Java
Unit Structure
1.1. Learning Objectives
1.2. Introduction
1.3. Implementation of O.O.P concept in java
1.4. Java Environment
1.5. Java Features and support
1.6. Sample program & Compilation
1.7. Using block of code
1.8. Lexical Issues
1.9. Java Class Library
1.10. Data type
1.11. Operators
1.12. Control Structures
1.13. Let us sum up
1.14. Check your Progress
1.15. Check your Progress: Possible Answers
1.16. Further Reading
1.17. Assignments
1

3
1.1 LEARNING OBJECTIVE
After studying this unit student should be able to:
Understand the structure of java program
Implement and run a “hello world” program.
Differentiate among various types of tokens.
Understand the basic data types, operators,arrays, libraries etc.
1.2 INTRODUCTION Java is an object oriented programming language. Before starting with how to
do programming using java, we will briefly discuss about the object oriented
concepts and their implementation in java.
1.3 IMPLEMENTATION OF O.O.P CONCEPT IN JAVA Object-oriented language uses a unique programming pattern compare to
structural programming like C. Object Oriented programming supports a
programming using the concepts like class/object, Inheritance, Encapsulation,
Abstraction, and Polymorphism. The structural programming is mainly based on
data. It uses various data structures and write program to perform action on those
data. However object oriented programming language like java uses concept of
encapsulation which combines data and program code together in object. Thus here
the data and program are combined. Also using abstraction concept, class attributes
or behavior can be made hidden from the other external objects. Polymorphism
concept use to represent an object in many forms. One task can be performed in
different ways. A common use of polymorphism is use when a parent class reference
is used to refer to a child class object in a program.
An object is an entity which has several attributes and behavior. A number of
objects sharing same attributes and behavior form a Class. For example: parrot,
peacock, hen, dove are objects of class birds. They share attributes like color of
eyes, size, shape of beak, their food habit etc. and behavior like laying eggs, flying,
constructing nest etc. An object/class may also relate with other objects/classes
through parent-child relationship which is called inheritance. A child object looks

4
similar to its parent but with some unique specialized attributes. Hence child inherits
the properties of parents. Parents have all common attributes and behavior of the
child class. And each child class has its additional attributes and behavior. For
example:
Birds can be parent with size, weight, eating habit and living place as common
attribute. The class Water and Land can be children of Birds class with based on
where they live. Birds live in water have unique attributes than birds live on land. The
pictorial representation of this example shown in figure 1.1.
Figure-1 Attributes of Class
1.4 JAVA ENVIRONMENT Java Runtime Environment (JRE) consists of various software tools used for
java application development. It is also called Java Runtime. It has the Java Virtual
Machine (JVM), core classes and supporting libraries. To develop a java application
we must install Java Development Kit (JDK) in our computer. It includes JRE as its
part. It was developed by Sun Microsystems which is now owned by Oracle
Corporation. You can download latest version JDK from Website of Oracle
Corporation. The list of components which are part of JRE are deployment tools,
user interface toolkits, integration and other base libraries, language and utility base
library, and Java Virtual Machine.
1.5 JAVA FEATURES AND SUPPORT We can develop four types of applications using Java. They are desktop
applications, web applications, enterprise application and mobile applications. These
applications can be developed using four types of java platforms such as Java SE,
Java EE, and Java ME. Java Standard Edition(Java SE) is a programming platform
for java application development. It supports core concept like implementation of
Birds
Water Land

5
OOPs, String, Exception, Inner classes, Multithreading, I/O Stream, Networking,
AWT, Swing, Reflection, Collection, etc. Java Enterprise Edition(Java EE) mainly
used to develop web applications and enterprise application. It consists of libraries
for servlet, JSP, JDBC, Web Service, EJB etc. Java Micro Edition(Java ME) is used
to develop mobile applications using java.
Features of java
Java includes various features like simple, object oriented, distributed,
complied and interpreted, robust, secure, platform independent, multithreaded,
portable and dynamic.
Simple: Java is easy to learn compared to C++. For C/C++ programmer, it
will be easier to learn java as basic syntax is almost same.
Object oriented: Java syntax supports the concept of object oriented
programming.
Distributed: we can develop distributed application using java.
Compiled and interpreted: Java first compile the program (.java file) and
generate the bytecode (.class file). This byte code is then interpreted using
java interpreter.
Robust: Java develops robust applications using strong memory
management and error handling using garbage collector and exception
handling.
Platform independent: Platform means Operating system and hardware.
Java programs run in same way with any Operating system and hardware
combination.
Secure: Java is secure because it runs inside Java Virtual Machine(JVM)
which verifies code before execution. It also handles run time errors using
exception handling mechanism.
Multithreading: This feature enables a java program to perform multiple task
simultaneously.
Portable: Due to platform independent nature of java program, it is portable.
We can shift program to any environment without any side effect.

6
Dynamic: As java supports dynamic loading of classes, it is dynamic. The
classes are loaded run time when needed. Java also executes functions from
its native languages like C and C++.
1.6 SAMPLE PROGRAM & COMPILATION
For running any java program we must install java(Java SE) in our computer.
For installing java we must download latest version of java using Oracle Corporation
website (https://www.oracle.com). After installation you can find java in java/jdk
folder. In the jdk folder you have java compiler(javac) and java interpreter(java),
which are used to run java program. For writing your first java application, you can
use any text editor and write following code in file. Save this file as “MyFirst.java”. if
you are creating class in this java file the class name should be same as file
name(here MyFirst). This is not compulsory if class is not declared as public. Then
compile this java code using java compiler,
/javac MyFirst.java
This command will create MyFirst.class file, which is a bytecode. To run this program
we have to use following command,
/java MyFirst
Hello World
This will run your program and print “HelloWorld” as an output.
Figure-2 Compiling and Running First Java Program
class MyFirst { public static void main(String args[]) { System.out.println(“Hello World”); } }

7
A java program must have at-least one class. Each class has a class name. In
above example MyFirst is a class name. After compilation of MyFirst.java file, we get
MyFirst.class. We have to use this class file to run the program.
Figure-3 Flow of Program
The first line in the program defines a class. After that the second line has
curly bracket which shows staring of class definition. The last line of program must
be end of the curly bracket. Within the class we have defined a main() method.
Same as C/C++, when we run program the execution starts by calling main method.
The main method is declared public, which means this method can be called by code
outside this program. The method is static, which means method can be called using
class name without using any object. Void means main function return nothing. The
main function accepts array of string( args[]) as an argument, which is use to stored
command line arguments when we run the program.
In main method we can write our program instructions. In above example we
have used System.out.println function to print a message(Hello World) on output
screen. This function is same as cout and printf of C and C++ respectively. Here
System is a class available in java.lang package. out is an object of PrintStream
class which is declared static in System class. println is a method of PrintStream
class which accepts a string and print it.
1.7 USING BLOCK OF CODE
/* comments section */ // documentation
Package declaration
Import statements which use to specifies the external packages used in program
MyFirst.java Text
editor
MyFirst.class java Interpreter
JVM
javac compiler
output

8
The above diagram shows the block structure of the program written in java.
The first part of the program is documentation section. We can write
explanation of the program or usage of program in this section. It can start with /*
and end with */(Multiline comment). We can write number of line in between them. If
you want to write only one line(single line comment), you can use // at the beginning
of the line. For example
/* this program is for adding n elements of an array. We have to provide n numbers
as a command line arguments */
//This program adds n numbers passing as command line argument
In second part of the block, we can declare packages. This is used only if we
want to create a class in a specific package. In java, packages are used to create a
group of classes which are related.
In third part we have to import all the packages whose classes we are using in
our program. It is like include statement of C/C++. In java library functions are
available as a part of classes inside the package. if we want to use library function,
we have to import appropriate package.
After import statements, we can define classes. For this we have to use class
key word followed by class name. we can define class within curly braces as shown
in above example. A class can have variable names and methods defined in it.
The last section is the definition of class which has main method. It is the
method from where execution of our program starts.
1.8 LEXICAL ISSUES
While compiling java program statements, the words/characters in source
code are separated as tokens. Tokens are the atomic elements of java program. The
java compiler identified the tokens as white space or saperators, identifiers,
comments, keywords, operators, literals
class definitions
class with main() method

9
During compilation, the characters in Java source code are reduced to a
series of tokens. The Java compiler recognizes five kinds of tokens: identifiers,
keywords, literals, operators, and miscellaneous separators. Comments and white
space such as blanks, tabs, line feeds, and are not tokens, but they often are used to
separate tokens.
White space
White space such as blanks, tabs, line feeds, form feed, carriage return, new
line etc are not the tokens. They are used to separate tokens.
Identifiers
In java, identifies are the names given to variables, methods, class, interfaces
and packages. In the above mentioned sample program (figure 1), MyFirst, main,
String, args, println etc. are identifiers. Rules for identifier in java are listed below:
1) An identifier must begin with letter, underscore or ‘$’
2) Identifiers can not start with digits
3) There is no limit for length of identifiers
4) A keyword (reserved word) can not be identifier. i.e. class is invalid
identifier.
5) Identifiers are case sensitive. i.e. Name and name are different
Literals
Literals are the representation of data. They can be numeric, boolean,
character or string data. They are actually represents the value of the variables. For
example in program statement int x=25; x is a variable and 25 is numeric literal.
Following are the example of various literals
Numeric literals : 12, 45, 0x345, 101, 12.4, 0.980, -2
String literals: “hello”,”hello\nworld”
Character literals: ‘a’,’\n’,’\t’, ‘c’
Boolean literals: true, false
Comments

10
Comments are the text in program which is not compiled. They are used in a
program for documentation. In java, comment can be written in between /* and */ or
after //. We can write number of line in between /* and */. If you want to write only
one line (single line comment), you can use // at the beginning of the line. For
example
/* this program is for adding n elements of an array. We have to provide n numbers
as a command line arguments */
//This program adds n numbers passing as command line argument
Keywords
Keyword are the words reserved for java compiler. They have a pre-defined
meaning in java, hence they can not be used as identifiers. The following is the list
of java keywords.
abstract Continue for new switch
assert Default goto package synchronized
boolean Do if private this
break Double implements protected throw
byte Else import public throws
case Enum instanceof return transient
catch Extends int short try
char Final interface static void
class Finally long strictfp volatile
const* Float native super while
1.9 JAVA CLASS LIBRARY
Java Class Library(JCL) is a collection of libraries that java programs can call
at run time. Java is platform independent, so it does not use any Operating System
library. Java provides a standard class library which contains the functions
commonly available in all operating systems. All JCL implementations are available
in single jar file (rt.jar). This jar file is available with JDK/JRE installation and always
located in bootstrap classpath.
JCL can be used through classes provided in following packages. One must
use import statement for using them in program.

11
java.lang : for fundamental classes and interfaces related to the language
and runtime system.
I/O and networking access: They access the file system, and networks
through the java.io, java.nio and java.net packages.
Mathematics package: java.math provides mathematical expressions and
evaluation
Collections and Utilities : java.util for Regular expressions, Concurrency,
logging and Data compression.
GUI: The java.awt package for basic GUI components/operations which
bound to the underlying operating system. It also contains the 2D Graphics
API. The package (javax.swing) is built on AWT and provides a platform-
independent GUI components/operations.
Applets: java.applet are the java class stored on web server and downloaded
over a network for execution on client machine.
Introspection and reflection: The package java.lang.Class use to represent
a class, but other classes such as Method and Constructor are available in
java.lang.reflect package.
1.10 DATA TYPES
Data types can specify the sizes and values stored in any variable. Data types
can be identified value type and reference type. The value type has a value stored in
a stack. The reference type stores a reference of data and stored in heap. In java
data types are classified into two categories
Primitive data types: byte, int, short, long, float, double, boolean and char
are primitive data types in java.
Non- primitive data types: class, array, String, Vector, LinkedList etc are non
primitive data types.

12
Figure-4 Data Types in Java
boolean: The boolean data type can be use to store two values: true or false.
This data types are used to defined a flag. It occupies 1 bit space in memory.
byte: it is used to store 8 bit integer value. It can store value from -128 to 127
in it.
short: it is used to store 16 bit number. It can store value from -32768 to
32767.
int: it occupies 32 bit area in memory. It can store a number between -
2,147,483,648 and 2,147,483,647.
long: it occupies 64 bit memory area. It can store a number between -264 to
(264)-1.
char: It occupies 16bit and can store 0 to 65536 representing Unicode for
different characters.
float : it is of 32 bit and store number in 1.4x10-45 to 3.4x1038 range.
double: it occupies 64 bit memory and can store a number in 4.9x10-324 to
1.8x10308.
Example:
In this example we have used Scanner class to read value from keyboard.
Scanner class is available in java.util package which is used to obtain input of the
primitive types like int, double etc. and Strings from input stream. It is the easiest
way to read input in a Java program. To use this class we have to keep following
points in mind.

13
1) We need to create an object of Scanner class with System.in( for
standard input stream).
2) To read integer value we have to use nextInt() function. We can also
use nextLong(), nextShort(), nextByte() etc. for String input we have to
use nextLine() function of Scanner class.
The following is the program to get roll number and name of the student through
keyboard and display them as output. The program is written in MyExa1.java file.
import java.util.Scanner;
class MyExa1
{
public static void main(String args[])
{
int rno=null;
String name=null;
Scanner x=new Scanner(System.in);
System.out.println(“Enter name:”);
name=x.nextLine();
System.out.println(“Enter number:”);
rno=x.nextInt();
System.out.println(“\nRoll number:”+rno);
System.out.println(“\Name:”+name);
}
}
The output of the above program is shown in Figure-5.
Figure-5 Output of Program

14
1.11 OPERATORS
They are the characters/symbols used to manipulate data. Operators can
have one or more operand on which they perform a function. The operators in java
can be classified in to following categories:
Arithmetic Operators
Operator Use
+ Addition of two values Ex: 20+10 gives 30
- Subtraction of two values Ex: 20-10 gives 10
* Multiplication of two values Ex: 20*10 gives 200
/ Division of two values Ex: 20/10 gives 2
% Reminder/Modulus gives reminder of division of
two numbers Ex: 21%2 gives 1
++ Increment operator increase value by 1 **
-- Decrement operator decrease value by 1 **
Table-1 Arithmetic Operators
** if we use ++/-- before operand, the increment/decrement is performed first
before using the operand and if we use ++/-- after operand, the increment/decrement
is performed first after using the operand.
For Example ,
a=4;
b=++a; //give 5 in b and 5 in a;
a=4;
b=a--; //gives 4 in b and 3 in a
Example:
import java.util.Scanner;
public class MyExa2
{
public static void main(String args[])

15
{
int a,b;
Scanner sc=new Scanner(System.in);
System.out.println("Enter a:");
a=sc.nextInt();
System.out.println("Enter b:");
b=sc.nextInt();
System.out.println("Addition:"+(a+b));
System.out.println("Subtraction:"+(a-b));
System.out.println("Multiplication:"+(a*b));
System.out.println("Division:"+(a/b));
System.out.println("Reminder:"+(a%b));
System.out.println("Increment:"+(a++));
System.out.println("Decrement:"+(a--));
}
}
Figure-6 Output of Program
Assignment Operators
This operators are used to assign value to the operand.= is assignment
operator. It assigns value to its operand for Ex: a=5;
+=, -=, *=, /= and %= are the shorthand operators. They perform operation as shown
below:

16
Operator Use Meaning
= a=5; value 5 is assigned to a
+= a+=5; it performs a=a+5.
-= a-=5; it performs a=a-5.
*= a*=5; it performs a=a*5.
/= a/=5; it performs a=a/5.
%= a%=5; it performs a=a%5.
Table-2 Assignment Operators
Relational Operators
They are also called comparison operators. They are used to compare two
operands and returns Boolean value.
Operator Meaning Use
== equality a==b
!= not equal a!=b
> greater than a>b
< less than a<b
>= greater than or equal to a>=b
<= less than or equal to a<=b
Table-3 Relational Operators
They are used with if…else statement to build a condition. For example (a>b)
returns true if a is greater than b else it returns false.
Logical Operators
&&, || and ! are the logical operators. They are used to check for two
conditions simultaneously.
Operator Meaning Usage
&& logical and (a>b && a>c) check both condition

17
|| logical or (a>b || a>c) check either of one condition
! logical not !(a>b) check not of condition
Table-4 Logical Operators
Bitwise Operators
&, |, ^, << and >> are bitwise operators. They are used to perform bitwise
operations.
Operator Meaning Usage
& AND a&b
| OR a|b
^ EXOR a^b
<< left shift a<<b
>> right shift a>>b
Table-5 Bitwise Operators
The AND, OR and EXOR operations are shown below in truth table.
A b a&b a|b a^b
0 0 0 0 0
0 1 0 1 1
1 0 0 1 1
1 1 1 1 0
Table-6 Truth Table
The shift operator shift the value of operand specific number of time in left(<<) or
right(>>). The left operand specifies the value to be shifted and right operand
specifies number of shift.
Miscellaneous Operators
instance of operator
it is used to check whether an object is of a specific class type or not.

18
For example,
String s=”hello”;
if( s instance of String)
{
System.out.println(“s is of String type”);
}
Ternary operator
?: is used as a ternary operator. It has three operands. It is shorter
replacement of if…else statement.
Syntax: var=(expression)?value1:value2;
Example: c=(a>b)?a:b; It means c is largest of a or b.
1.12 CONTROL STRUCTURES
1.12.1 CONDITIONAL STATEMENTS
Conditional statements are used to run block of java code based on a
condition. The java has various ways to execute conditional statements. They are
using if, if…else, if else ladder, nested if…else, and switch…case. All can be used
same as C/C++ syntax.
if…else and its variations
The syntax of if…else is,
if(condition) { Code block } else { Code block }
We can omit the braces ({…}), if the code block has only one program
statement.

19
if…else statements of java are identical to C/C++. We can use if without else.
For example to check whether a is even we can use following statements .
if(a%2==0)
System.out.println(a+” is even”);
We can also use if…else together. For example to check whether a is even or
odd we can use following code.
if(a%2==0)
System.out.println(a+” is even”);
else
System.out.println(a+” is odd”);
If we use if…else inside if or else block, it will be nested if… else. For example
to find out largest of three numbers a, b and c the following code can be used.
if(a>b)
{
if(a>c)
System.out.println(“a is greatest”);
else
System.out.println(“c is greatest”);
}
else
{
If(b>c)
System.out.println(“a is greatest”);
else
System.out.println(“c is greatest”);
}
We can also use if…else in ladder pattern. For example from current time if
you want a java program to wish “good morning”, “good afternoon”, “good evening”
or “good night”, we can use following if…else ladder.

20
if(current_time>5 && current_time<12)
System.out.println(“good morning”);
else if(current_time>12 && current_time<5)
System.out.println(“good afternoon”);
else if(current_time>5 && current_time<8)
System.out.println(“good evening”);
else
System.out.println(“good night”);
switch…case can be used to execute different code block for different value of
input. For example if based on input value of arithmetic operator we want to perform
the operation, we may use following code in java. In switch…case, each case should
end with break statement. And default case is match if input is not match with any
case.
switch(opr)
{
case ‘+’:
System.out.println(a+b);
break;
case ‘-’:
System.out.println(a-b);
break;
case ‘*’:
System.out.println(a*b);
break;
case ‘/’:
System.out.println(a/b);
break;
case ‘%’:
System.out.println(a%b);
break;
default:
System.out.println(“Invalid operation”);}

21
Examples
A program to which reads two integers and perform the arithmetic operation on them
based on user’s choice.
import java.util.Scanner; public class Ex_if { public static void main(String args[]) { int ch=0; Scanner sc=new Scanner(System.in); System.out.println("Enter a:"); int a=sc.nextInt(); System.out.println("Enter b:"); int b=sc.nextInt(); System.out.println("1. add"); System.out.println("2. subtract"); System.out.println("3. multiply"); System.out.println("4. divide"); System.out.println("Enter your choice:"); ch=sc.nextInt(); if(ch!=5) { switch(ch) { case 1: System.out.println(a+b); break; case 2: System.out.println(a-b); break; case 3: System.out.println(a*b); break; case 4: System.out.println(a/b); break; default: System.out.println("Invalid choice"); } } } }

22
Figure-7 Output of Program
1.12.2 LOOPING
In a program when we want to execute a code block more than once, we
need to put it in a loop. In java loop can be a for loop, while loop and do…while loop.
The syntax of these loop are same as C/C++. The Java 5 introduce foreach loop. It
is used to access the array or collection elements.
For
The for loop executes a statement or block of statements repeatedly until a
condition is matched. For loops are normally used to execute the code block for
more than one number of times. The syntax of for loop is given below.
for (initialization; test; increment) { statements; }
We can omit the braces if for loop has only one statement. As you can see in
the syntax for loop has three parts in bracket.
initialization is used to initialize the counter used in loop to keep track on
number of iteration. -for example, int i=0 OR i=0.
test must be the condition which must be true to enter in the loop. If the
condition is false the loop terminates. Test is used to control the iteration
count. For example i<10 terminates the loop when i is greater or equal to 10.
increment is used to change value of variable used in initialization
For example the below for loop prints “Hello” 10 times with value of i each
time. The output will print Hello0, Hello1,…..Hello9.
for(int i=0;i<10;i++)
System.out.println(“Hello”+i);
while and do…while
while and do…while loops are also used to repeatedly execute a block of
Java code until a condition is true. The syntax of these loops are same as C/C++.
The only difference between while and do…while loop is the timing of
checking the condition. The while loop checks the condition before entering the loop.

23
If condition is true it enters. The do…while loop first enter into the loop and check
condition at the end.
They syntax of these loops are
while(test)
{
Statements;
}
do
{
Statements;
}while(test);
The example in above section can be implemented using while and do…while
as below.
int i=0; while(i<10) { System.out.println(“Hello”+i); i++; }
OR
int i=0; do { System.out.println(“Hello”+i); i++; } while(i<10);
for-each
This loop is not available in C/C++. The Java 5 introduce foreach loop. It is
used to access the array or collection elements. The purpose of this loop is to make
our program code bug free and more readable. The syntax of this loop is :
for(data_type variable : array | collection) {

24
Statements; }
For example, the following code will print content of array arr. The for-each
loop will execute 3 time. First time i will be 18, second time i will be 23 and then 45.
int[] arr={18,23,45}; for(int i:arr) { System.out.println(i); }
Example of loop:
A program to find factorial of a number.
Note: factorial of 5 is 1*2*3*4*5
import java.util.Scanner; public class Ex_loop { public static void main(String args[]) { long fact=1; Scanner sc=new Scanner(System.in); System.out.println("Enter n:"); int n=sc.nextInt(); //using for loop for(int i=1;i<=n;i++) fact*=i; System.out.println("for:Factorial of "+n+" is :"+fact); //using while loop fact=1; int i=1; while(i<=5) { fact*=i; i++; } System.out.println("while:Factorial of "+n+" is :"+fact); } }

25
Figure-8 Output of Program
Use of continue and break in loops
In any loop, we can use break to terminate the loop and continue to skip
existing iteration and start new iteration of the loop.
We can further understand the break and continue using example.
for(int i = 0; i < 5; i++) { if ( i < 3 ) System.out.println( “Hello” + i ); else break; }
In above loop the Hello will be printed for i = 0, 1 and 2. The loop terminates
as soon as (i >= 3) because we used break in else part. Here loop will be executed
three times only.
The use of continue explained in following code block.
for(int i = 0; i < 5; i++) { if ( i ==3 ) continue; else System.out.println( “Hello” + i ); }
In above example, the loop will be executed 5 times. However hello will be
print only four times. Because when i==3 we use continue that means all the
statements in a loop after continue will not be executed and next iteration is stared
after increasing i.
Labeled loops

26
Loop can also have a loop inside it. This is called nesting of loop. When we
are using nest loop the inside loop is called inner loop and outside loop is called
outer loop. When we use break in inner loop the inner loop will be terminated. But if
we want to terminate outer loop by using break statement in inner loop, we have to
used the concept of labeled loop and continue/break with label.
For example
i = 0; while( i < 3) { j = 0; while( j < 3) { if(j==2) break; j++; } i++; }
In above example, the inner while loop will be break when j is 2. Inner loop will
execute twice. Now if we want to break outer loop when in inner loop j is 2, we
should use following code
i = 0; outer: while( i < 3) { j = 0; while( j < 3) { if(j==2) break outer; j++; } i++; } Here we have labeled outer loop with label outer: and with break w have to used
label of outer loop.
Similarly continue can also be used with labeled loop.
Example:
public class Exa2 { public static void main(String args[]) { first: for (int i = 0; i < 3; i++)

27
{ for (int j = 0; j< 3; j++) {if(i == 1) continue first; System.out.print(" [i = " + i + ", j = " + j + "] "); } } System.out.println(); second: for (int i = 0; i < 3; i++) { for (int j = 0; j< 3; j++) {if(i == 1) break second; System.out.print(" [i = " + i + ", j = " + j + "] "); } } } }
Figure-9 Output of Program
1.13 LET US SUM UP Java compiler and interpreter using javac.exe and java.exe
Java virtual machine: runs a byte code
Features of java: simple, object oriented, distributed, complied and interpreted,
robust, secure, platform independent, multithreaded, portable and dynamic
Running sample java program: program file has .java extension and class name
should equal to file name.
Java program structure: various block of java programs
Java tokens: whitespaces, keywords, literals, identifiers/variables etc
Java class libraries: readily available class file which can be imported in program
Data types: byte, short, int, long, float, double, char, and boolean
Operators: arithmetic, assignment, logical, relational, and miscellaneous operators
Conditional statement: if...else, if...else ladder, nested if...else, switch...case

28
Loops: for loop, while loop do...while loop and for-each loop
Array: one dimensional and multi dimensional arrays
1.14CHECK YOUR PROGRESS True-False with reason.
1. Keyword can be identifier.
2. = is assignment operator.
3. ++ will increment operators.
4. For loop can not be terminated until condition is false.
5. Conditional operator can be used using if…else.
6. javac is compile and java is interpreter.
7. While loop is entry control loop.
8. ?: can be replaced with if…else.
Which of the following is valid identifier?
1. abc
2. Xyx
3. $abc
4. a12
5. a_23
6. int_1
7. XYZ
8. 1plus
MatchA and B.
A B
1)Variable a)“hello”
2)int literal b)abc
3)String c)23
4)Boolean literal d)for
5)Keyword e)false
1.15 CHECK YOUR PROGRESS: POSSIBLE ANSWERS
True-False with reason.
1. Keyword can be identifier.
2. = is assignment operator.

2
3. ++ will increment value of a variable.
4. For loop can not be terminated until condition is false.
5. Conditional operator can be used using if…else.
6. javac is compiler and java is interpreter.
7. While loop is entry control loop.
8. ?: can be replaced with if…else.
Which of the following is valid identifier?
9. abc
10. Xyx
11. $abc
12. a12
13. a_23
14. int_1
15. XYZ
16. 1plus
Answer: abc, Xyz, a12, a_23, int_1 and XYZ are valid identifiers.
Match A and B.
A B
1)Variable a)“hello”
2)int literal b)abc
3)String c)23
4)Boolean literal d)for
5)Keyword e)false
Answer:
1) – b, 2)- c, 3)- a, 4) – e, 5) – d
1.16 FURTHER READING
1. “Java 2: The Complete Reference” by Herbert Schildt, McGraw Hill Publications.
2. “Effective Java” by Joshua Bloch, Pearson Education.
1.17 ASSIGNMENTS Write java program for following:
1) Print largest of two numbers.
2) Print largest of three numbers.
3) Check number is even or odd.

28
4) Print first five even numbers.
5) Print a number in reverse.
6) Add n numbers.
7) Print first 10 prime numbers.
8) Find factorial of a number n.
9) Print Fibonacci series upto n elements.
10) Print sum of first 10 odd numbers.

29
Unit 2: Class and Object
Unit Structure
2.1 Learning Objectives
2.2 Arrays
2.3 class, object & method
2.4 Defining class
2.5 Adding variables
2.6 Adding methods
2.7 Creating objects
2.8 Constructor
2.9 this keyword
2.10 Garbage collection
2.11 finalize() method
2.12 Accessing class members
2.13 Methods overloading
2.14 Static members
2.15 Nesting of methods
2.16 Vectors
2.17 Wrapper classes
2.18 Let us sum up
2.19 Check your Progress
2.20 Check your Progress: Possible Answers
2.21 Further Reading
2.22 Assignments
2

30
2.1 LEARNING OBJECTIVE
After studying this unit student should be able to:
Understand the basics of array and its usage
Understand and use the class and object
Function of Garbage collector
Use method overloading, nested function and static members of class
Explain the usage of wrapper classes.
2.2 ARRAYS
2.2.1 ONE DIMENSIONAL ARRAY
An array is a container in which we can store multiple values of a single type.
For example, we can create an array that can that stores 10 values of int type.
The syntax for array declaration is:
datatype[] arrayname;
here datatype can be any primitive data type and arrayname can be an identifier.
For example
double[] s;
it means s is an array which stores double type values.
We cannot use array after declaration. We have to allocate memory to the
array.
The syntax for memory allocation of array is:
double[] s;
s=new double[10];
it means s can hold 10 values which are of double type.
We can also declare and allocate memory of an array simulataneously.
double[] s=new double[10];

31
The first element of array can be s[0]. The other elements are s[1], s[2],
….s[9].
We can also initialize the array while declaration. For example,
int[] age = {12, 4, 5, 2, 5};
For accessing an array we have to use integer index starting from 0 to n-1 (n
is length of array). In java, array length can be accessed using arrayname.length, as
the length is property of array in java.
For example
int[] age = {12, 4, 5, 2, 5};
For(int i=0; i<age.length; i++)
{
System.out.println(age[i]);
}
2.2.2 MULTIDIMENSIONAL ARRAY
Multidimensional array is an array of an array. We can create multidimentional
array in java. For example.
int[][]x = new int[2][3];
This array x can store 2 rows of integer values and each row has three
integers in it. This is a two dimensional array and it can store 2*3=6 integers in it.
We can also create three dimensional in java.
int [][][] x= new int [2][3][4];
it represents 3 dimension and can store 2*3*4 integers in it.
Unlike C/C++, multidimensional arrays in java can have different number of
integer in each row.
For example
int[][] a = {
{1, 2, 3},
{4, 5, 6, 9},
{7}, };

32
In this array a, first row has 3 values, second row has four values and third
row has only one value stored in it.
For accessing elements of multidimensional array multiple loops can be used.
For example:
class MultidimensionalArray {
public static void main(String[] args) {
int[][] a = {
{1, -2, 3},
{-4, -5, 6, 9},
{7},
};
for (int[] innerArray: a) {
for(int data: innerArray) {
System.out.println(data);
}
}
}
}
Array Example 1
A program to sort 5 integers in ascending order.
public class Ex_ary1
{
public static void main(String args[])
{
int[] a={23,45,67,8,3};
System.out.print("Before Sorting :");
for(int i=0;i<a.length;i++)
System.out.print(" "+a[i]);
for(int i=0;i<a.length;i++)
for(int j=i+1; j<a.length; j++)
33
{
if(a[i]>a[j])
{
int t=a[i];
a[i]=a[j];
a[j]=t;
}
}
System.out.print("\nAfter Sorting :");
for(int i=0;i<a.length;i++)
System.out.print(" "+a[i]);
}
}
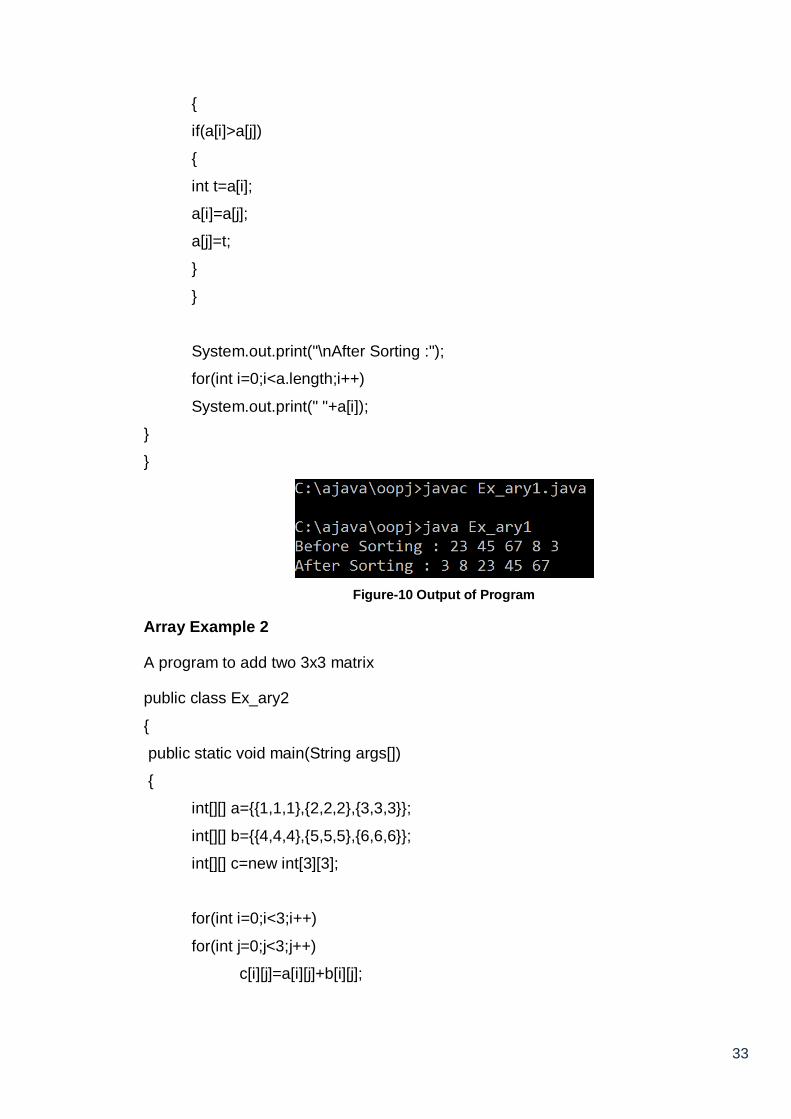
Figure-10 Output of Program
Array Example 2
A program to add two 3x3 matrix
public class Ex_ary2
{
public static void main(String args[])
{
int[][] a={{1,1,1},{2,2,2},{3,3,3}};
int[][] b={{4,4,4},{5,5,5},{6,6,6}};
int[][] c=new int[3][3];
for(int i=0;i<3;i++)
for(int j=0;j<3;j++)
c[i][j]=a[i][j]+b[i][j];

34
System.out.print("Result matrix:\n");
for(int i=0;i<3;i++)
{
for(int j=0;j<3;j++)
System.out.print(c[i][j]+" ");
System.out.print("\n");
}
}
}
Figure-11 Output of Program
2.3 CLASS, OBJECT & METHOD An object is an entity which has several attributes and behavior. A number of
objects sharing same attributes and behavior form a Class. For example: parrot,
peacock, hen, dove are objects of class birds. They have attributes like colour,
eating habit, shape of beak etc and behavior like fly, build nest, lay eggs etc. in java
we can create a class using class keyword and declare various variables in it for its
attributes and create a function for its behavior. In java for creating a class, the class
keyword is used. The attributes of the class can be defined as member variable of
the class and behaviour of class can be methods of class in java.
2.4 DEFINING CLASS In java, class can be defined using class keyword follow by class name as
shown in example. The definition of class is written within braces. The class name
should start with capital letter. If class name has multiple words first letter of each
word should be capital. For example: Student, Bird, StringBuffer etc.

35
class Student { }
2.5 ADDING VARIABLES We can add variables in class by declaring them within class. for each
attribute of class we can create variable in it. For example class Student can have
attributes like rollNumber, name, course etc. The variable name in class should be in
lower case. If variable name has more than one word each word should start with
capital letter except first word. For example rollNumber. The student class can be
created as follows
class Student { int rollNumber; String name; String course; }
2.6 ADDING METHODS We can define methods in class. The syntax is return type then name of
method followed by arguments in bracket ( ). The function definition is written within
braces. For example in Student class we can create two functions getData for
assigning values to its variable and printData to print is variables.
class Student {
int rollNumber; String name; 1String course; void getData(int r, Srting n, String c) { rollNumber=r; name=n; course=c; } Void printData() { System.out.println(rollNumber+” “+name+” “+course); }
}
36
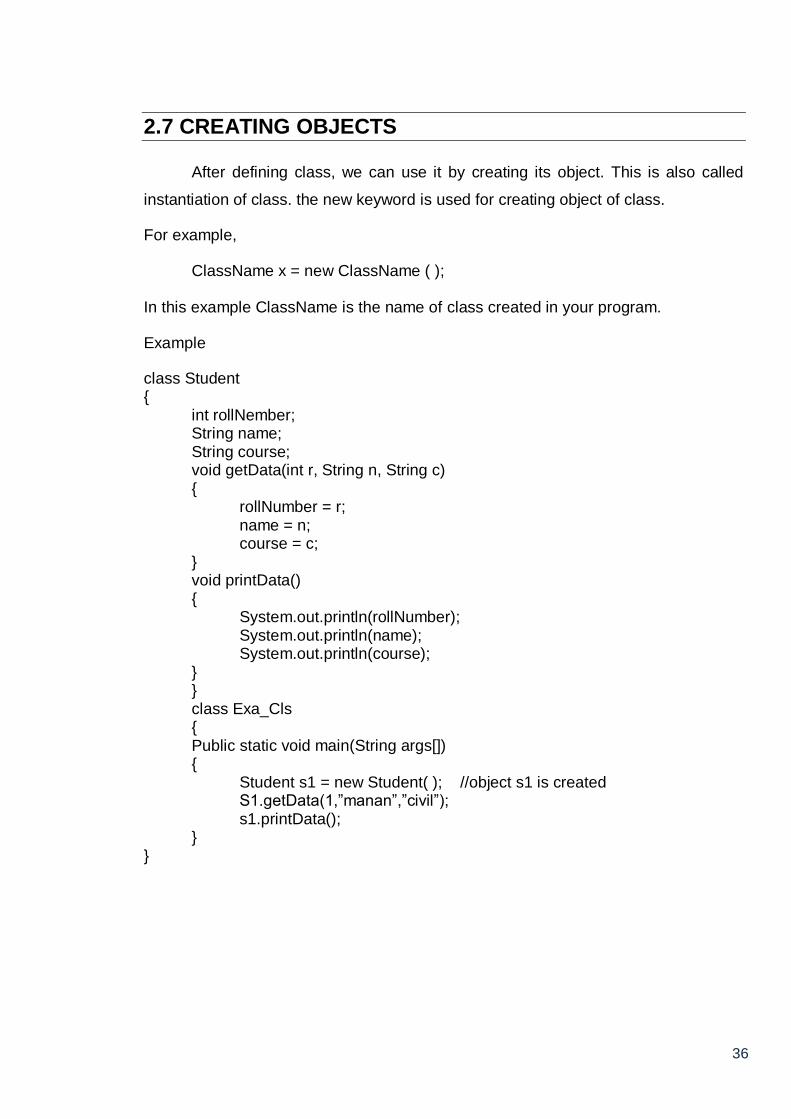
2.7 CREATING OBJECTS
After defining class, we can use it by creating its object. This is also called
instantiation of class. the new keyword is used for creating object of class.
For example,
ClassName x = new ClassName ( );
In this example ClassName is the name of class created in your program.
Example
class Student {
int rollNember; String name; String course; void getData(int r, String n, String c) { rollNumber = r; name = n; course = c; } void printData() { System.out.println(rollNumber); System.out.println(name); System.out.println(course); } } class Exa_Cls { Public static void main(String args[]) { Student s1 = new Student( ); //object s1 is created S1.getData(1,”manan”,”civil”); s1.printData(); }
}

37
Figure-12 Output of Program
2.8 CONSTRUCTOR
In java, we can define Constrictors in a class. Constructor is a function which
has same name as class name. This function will be called when we create object
using new keyword. The constructors are mainly used to initialize the
attributes/variables of the class. Constructor can be default constructor or
parameterized constructor. In default constructor, nothing is passed as an argument.
However in parameterized constructor the parameter values must be passed as
arguments of constructor function.
For example:
class Student {
int rollNember; String name; String course; Student() //default constructor { rollNumber=0; name=””; course=””; } Student(int r, String n, String c) //parameterized constructor { rollNumber=r; name=n; course=c; } void printData() { System.out.println(rollNumber); System.out.println(name); System.out.println(course); }

38
}
class Exa_Cls {
Public static void main(String args[]) { Student s1 = new Student(1,”manan”,”civil”); s1.printData(); }
}
Figure-13 Output of Program
2.9 THIS KEYWORD
this is reference variable of java which points to the current object. It can also
be used to point instance of the current class as shown in following example.
class abc { int a,b,c; abc(){ a = 0; b = 0; c = 0;} abc( int a,int b, int c) { this.a = a; this.b = b; this.c = c; } } class MyExa { public static void main(String args[]) { abc x = new abc(1,2,3); } } In above example, in class abc, this.a, this.b and this.c are referring the
variable of class abc and a,b and c are the parameters of constructor.

39
2.10 GARBAGE COLLECTION
In C, when we allocate memory at runtime using malloc() function, at the end
of program we have to free them using free() function. Similarly in C++, when we
create memory for any object/variable using new, we should free them using delete.
In java when we are creating memory for reference variable/object,
programmer don’t care about destroying them. There is a special component in JVM
called garbage collector which will take care of deletion of all memory occupied by
java programs. It frees the heap memory occupied by reference variables which are
not in use. Java has an automatic garbage collection.
2.11 FINALIZE() METHOD
The finalize() is a method of java.lan.Object class which is called by garbage
collector for the which is identified to be destroyed. It is because there are no
reference to that object in program. In a class we can override (redefine) the finalize
method to perform the cleanup of system resources.
2.12 ACCESSING CLASS MEMBERS
To access the member variables and methods of the class, we should create
the object of the class using new keyword. And using the object name and
variable/method name separated by . we can access the member variable the
example is shown in section 2.7 and 2.6.
2.13 METHODS OVERLOADING
Method overloading is the feature of object oriented programming. It is used
to implement polymorphism. In java in a same class we can define more than one
method with same but different signature, this concept is called method overloading.
In method overloading same method can be used in different manners. For
example in class Add, we can define 3 addition methods shown below,
class Add

40
{ int addition(int a,int b){ return ( a+b ); } float addition(float a,float b) { return ( a+b ); } String addition(String a, String b) { return a+b; } } public class Sum { public static void main(String args[]) { Sum s1 = new Sum(); System.out.println(s1.addition(10,20)); System.out.println(s1.addition(10.56,20.78)); System.out.println(s1.addition(“abc”,”def”)); }
}
Figure-14 Output of Program
2.14 STATIC MEMBERS
2.14.1 STATIC MEMBER VARIABLES
The variables declared in class can be categorized into two: Class variable
and instance variable.
Instance variables are the variable of class which can be access using
object/instance of the class. The variable we have used in example of section are the
instance variable. For each object the instance variables are separately created in
memory.
Class variable are the variables which are shared by all objects of the class.
These variables are created in memory once for the class and shared by all objects
of the class. The class variables can be accessed using class name then . and the
static variable name. No need to create object of class to access the class variable.
For creating class variable static keyword is used before its declaration.

41
Example: In the following example static int n can be used to count number of object
created.
class Student {
static int n = 0; int rollNumber = 0; String name = ""; String course = ""; Student()//default constructor { rollNumber = 0; name = ""; course = ""; Student.n++; } Student(int r, String n, String c) //parameterized constructor { rollNumber = r; name = n; course = c; Student.n++; } void printData() { System.out.println(rollNumber); System.out.println(name); System.out.println(course); }
} class Exa_Cls
{
public static void main(String args[])
{
Student s1 = new Student(1,"manan","civil");
Student s2 = new Student();
System.out.println("number of objects:"+Student.n);
}
}

42
Figure-15 Output of Program
2.14.2 STATIC MEMBER FUNCTION
We can also declare a static method in a class as a member function. For
calling static method we need to use class name instead of object name. Hence we
can call the static function without creating object of the class. Also only a static
method can be called inside the static function of the class.
Example1
class A {
static int sum(int a, int b) { int c = a + b; return c; }
} public class ExStatic1 {
public static void main(String args[]) { System.out.println(“ sum : “ + A.sum(10,30) ); }
}
Figure-16 Output of Program
Example 2
class A {
static void sum(int a, int b) { int c = a + b; printA(c); // printA must be static if it is called inside static function sum. } static void printA(int x)

43
{ System.out.println(“ sum : “ + x ); }
} public class ExStatic2 {
public static void main(String args[]) { A.sum(10,30); }
}
Figure-17 Output of Program
2.15 NESTING OF METHODS
When a method of class calling the other method of the same class is called nesting
of methods. The following example uses nesting of method.
import java.util.Scanner; class Circle {
int radius; void getRadius() { Scanner sc=new Scanner(System.in); Radius = sc.nextInt(); } double area() { getRadius(); return(3.14*radius*radius); }
} public class Exa {
public static void main(String args[]) { Circle c1 = new Circle(); System.out.println (c1.area()); }
}

44
Figure-18 Output of Program
2.16 VECTORS Vector class is available in java.util package. In java array can not be shrink or
expand once it is created. Vector is a dynamic array in java which can be shrink or
grow as per the requirement. The followings are some of the constructors of Vector
class.
Vector() it creates a vector with capacity 10.
Vector(int size) it creates a vector with capacity specified by size.
Methods of Vector class
1. boolean add(Object obj): it appends obj at the end of the Vector. It returns
true if the obj is successfully added.
2. void add(int index, Object obj): it inserts an obj at location specified by
index.
3. boolean addAll(Collection c): it is used to add a Vector c in calling Vector. It
returns true if the Vector c is successfully added.
4. void addAll(int index, Collection c): it inserts a Vector c at location specified
by index.
5. void clear(): it removes all elements in Vector.
6. Object clone(): it creates a clone of this Vector.
7. boolean contains(Object obj): it checks whether the obj exists in Vector or
not.
8. void ensureCapacity(int minCapacity): it increases the capacity of vector
ensuring that minCapacity elements can be stored in Vector.
9. Object get(int index): it returns object stored at index position in Vector
10. int indexOf(Object obj): it search the first occurrence of the obj and returns
its position in Vector.

45
11. boolean isEmpty(): checks if the Vector has elements in it.
12. Int lastIndexOf(Object obj): it search the last occurrence of the obj and
returns its position in Vector.
13. boolean remove(Object obj): it removes the first occurrence of obj in
Vector.
14. boolean equals(Object obj): it compares Vector with other Vector
15. Object firstElement(): it returns first element in the Vector.
16. Object lastElement(): it returns last element in the Vector.
17. Void trimToSize(): it trim the capacity of Vector to its size.
18. String toString(): it returns String form of Vector.
19. Object[] toArray(): it converts a Vector into array of Objects.
20. int size(): it returns number of elements stored in Vector.
21. int capacity(): it returns the capacity of vector.
22. void setSize ( int nSize): it set the size of the Vector.
23. void setElementAt(Object obj, int index): it replace an object at index
position with obj
Example: import java.util.Vector; public class Exa1 {
public static void main(String args[]) { Vector v1=new Vector(20); v1.add("A"); v1.add("C"); v1.add(1,"B"); System.out.println("size: " + v1.size()); System.out.println("capacity " + v1.capacity()); Vector v2=(Vector)v1.clone(); System.out.println(" Vector v1 " + v1); System.out.println(" Vector v2 " + v2); v1.addAll(v2); System.out.println(" Vector v1.addAll(v2): " + v1); System.out.println( " Is B in v1:"+ v1.contains("B")); System.out.println(" element at 2 : " + v1.get(2)); System.out.println(" POsition of A : " + v1.indexOf("A")); System.out.println(" Check for empty v1: " + v1.isEmpty()); System.out.println(" Last index of A: " + v1.lastIndexOf("A")); v1.remove("C"); System.out.println(" After removing C in v1 : " + v1); System.out.println("Compare v1 and v2 : " + v1.equals(v2));

46
System.out.println( " Fisrt element of v1 : " + v1.firstElement()); System.out.println(" Last element of v1 : " + v1.lastElement()); System.out.println(" v1 to String : " + v1.toString()); }
}
Figure-19 Output of Program
2.17 WRAPPER CLASSES Wrapper classes are the classes whose objects wrap the primitive data types.
To treak primitive data type as a Class and Object, java provide a wrapper class for
each primitive data types. The following is the list of wrapper classes and their
corresponding primitive data types.
Primitive Data type Wrapper Class
boolean Boolean
byte Byte
short Short
int Integer
long Long
float Float
double Double
char Character
Table-7 list of wrapper classes and their corresponding primitive data types

47
Advantages of wrapper class:
1). They convert a primitive data type into object when we need to pass them as
reference argument to the function. By default the primitive data types are
passed as value into the function.
2). The Vector can store objects only. If we want to store primitive data values in
Vector, we need to convert them into objects.
Autoboxing is an important concept related to wrapper classes. Autoboxing is
an automatic conversion of primitive data types into object of its wrapper class. The
reverse process of autoboxing is called unboxing. Unboxing is automatical
conversion of object of wrapper class into its corresponding primitive data type.
For example
1) int a = 5; Integer aa = a; //autoboxing 2) Vector v1 = new Vector();
v1.add(24); //autoboxing 24 into Integer object v1.add(89); int n=v1.firstElemen(); //unboxing
Example class Exa3 {
public static void main(String args[]) { //Autoboxing byte a = 10; Byte aobj = new Byte(a); int b = 289; Integer bobj = new Integer(b); float c = 508.5f; Float cobj = new Float(c); double d = 90.3; Double dobj = new Double(d); char e='x'; Character eobj=e; System.out.println("Autoboxing"); System.out.println(aobj); System.out.println(bobj);

48
System.out.println(cobj); System.out.println(dobj); System.out.println(eobj); //Unboxing byte v = aobj; int w = bobj; float x = cobj; double y = dobj; char z = eobj; System.out.println("Unboxing"); System.out.println(v); System.out.println(w); System.out.println(x); System.out.println(y); System.out.println(z); }
}
Figure-20 Output of Program
Methods of wrapper classes
The following are some of the methods of wrapper class.
valueOf(String s)
All wrapper class except Character class have this function. It is a
static function hence called using class name. This function coverts a String
representation of any primitive value into its corresponding wrapper class
object.
Example:

49
Integer a=Integer.valueOf(“100”);
Byte b=Byte.valueOf(“8”);
Double c=Double.valueOf(“10.80”);
valueOf(String s, int radix):
This is a static function of Byte, Short, Inetger and Long wrapper class.
This function converts a string into corresponding wrapper class object.
However the String stores the value represented in radix form. Radix 2 is for
binary, 8 is for octal, 16 is for hexadecimal and so on.
For example
Integer a=Integer.valueOf(“101”,2);//store 7 in a because 101 is binary of 7.
valueOf(primitive_data_type x):
All wrapper classes have this static function which converts a primitive
data value into its corresponding wrapper class object.
For example
Integer a = Integer.valueOf(100);
Double b = Double.valueOf(34.6);
Example
public class ExWrap1 {
public static void main(String args[]) { // example of valueOf System.out.println(" valueOf converts String into Wrapper class object"); Integer a=Integer.valueOf("100"); Byte b=Byte.valueOf("8"); Double c=Double.valueOf("10.80"); System.out.println("Integer: " + a); System.out.println("Byte: " + b); System.out.println("Double: " + c); System.out.println(" valueOf converts String with differnt base into Wrapper
class object"); Integer a1=Integer.valueOf("1110",2); System.out.println("Integer: " + a1); System.out.println(" valueOf converts primitive data type into Wrapper class
object");

50
Integer a2 = Integer.valueOf(100); Double b2 = Double.valueOf(34.6); System.out.println("Integer: " + a2); System.out.println("Integer: " + b2); }
}
Figure-21 Output of Program
Primitive data type conversion functions
public byte byteValue(), public short shortValue(), public int intValue(), public
long longValue(), public float floatValue(), public float doubleValue() are the non
static functions. They need object of Wrapper class to call. The numeric wrapper
classes like Byte, Short, Integer, Long, Float, and Double has these all methods
defined in them. These methods are used to return corresponding primitive data type
value.
For example,
Integer x = new Integer(189);
int y = x.intValue();
byte z = x.byteValue();
float a = x.floatValue();
Example:
public class ExWrap2 {
public static void main(String args[]) { System.out.println(" xxxValue functions converts one numeric datatype into
other "); Integer x = new Integer(122);

51
int y = x.intValue(); byte z = x.byteValue(); float a = x.floatValue(); System.out.println(" int :" + y); System.out.println(" byte :" + z); System.out.println(" float :" + a); }
}
Figure-22 Output of Program
String to primitive data type conversion functions
public static int parseInt(String s), public static byte parseByte(String s), public
static short parseShort(String s), public static long parseLong(String s), public static
float parseFloat(String s), public static double parseDoublet(String s), public static
boolean parseBoolean(String s)
All the wrapper class except Character class has parse function. This function
is used to convert a String argument into corresponding primitive data type value.
For example:
int x = Integer.parseInt(“123”);
double y = Double.parseDouble(“123.56”);
boolean z = Boolean.parseBoolean(“false”);
The parse function has one more version which is,
public static int parseInt(String s, int radix) for Integer class.
Similarly the wrapper classes Byte, Short and Long have this function. It
converts a String s, which represents a number with base radix into primitive data
types.
For example,
int x=Integer.parseInt(“1111”,2); //this converts a binary 1111 into integer.

52
This function can be used to convert string representation of binary (radix 2),
octal(radix 8) or hexadecimal (radix 16) number into decimal value.
Example:
public class ExWrap3 {
public static void main(String args[]) { System.out.println(" parseXXX functions converts String to primitive data type"); int x = Integer.parseInt("123"); double y = Double.parseDouble("123.56"); boolean z = Boolean.parseBoolean("false"); System.out.println(" int :" + x); System.out.println(" double :" + y); System.out.println(" boolean :" + z); System.out.println(" parseXXX functions converts a String representation of a
number with base radix into primitive data types."); int x1=Integer.parseInt("1111",2); System.out.println(" decimal of 1111 is int :" + x1); }
}
Figure-23 Output of Program
public String toString() every wrapper class has this function. It is used to convert a wrapper class
object into String.
For example,
Double d=new Double(123.88);
String s=d.toString(); //stores “123.88” into s
public static String toString(primitive p)

53
every wrapper class has this function. It is used to convert a primitive data
type value into String.
For example,
String s=Double.toString(123.89);
Example:
public class ExWrap4 { public static void main(String args[]) { System.out.println( "non static toString functions converts wrapper object to String "); Double d = new Double(123.88); String s = d.toString(); System.out.println(" String : " + s); System.out.println(" static toString functions converts primitive data type into String "); String x1 = Double.toString(123.89); System.out.println(" String :" + x1); } }
Figure-24 Output of Program
2.18 LET US SUM UP Array: one dimensional and multi dimensional arrays
class: a non primitive data type which encapsulates variables and function in it.
object: an instance of class or variable of type class. The new keyword is used to
create object.
member variable: list of variables defined in class
member function: methods/functions defined within class
constructor: It is a function of a class having same name as class name. It is called
to initialized object when it is created.

54
Garbage collection: it automatically frees the unnecessary memory area of the
program.
finalize(): this method will be called by garbage collector before destroying the
object.
method overloading:In a class we can write more than one method with same
name and different signature.
static variables:They are also the class variable. All objects of a class share the
static variables defined in the class. They can be accessed using class name.
static methods:They are the method of class which calls static method inside it.
They can also be called using class name.
vector:It is a dynamic array which can be grow and shrink run time as per
requirement. It is in java.util package.
wrapper classes:For each primitive data type there is a class in java which is called
wrapper class. The wrapper class wraps the primitive data value as an object and
can have various data conversion functions.
2.19 CHECK YOUR PROGRESS True-False with reason:
1. Class and object are same.
2. Static member function can be called without object.
3. We can enhance capacity of Vector at rum time.
4. Constructor function can have any name.
5. We can write only one constructor function for a class.
6. We can not call static function inside non static function.
7. Instance variables are shared by all objects of the class
8. A[1] refer to the first element of the array
9. Array can be initialized.
10. We can implement matrix using single dimensional array.
Answer the followings:
1. List all wrapper class.
2. How can we create an object of wrapper class?
55
3. How can we create an array of 10 integers?
4. How can we create an object of a class?
5. Give example of method overloading.
6. How can we convert a string “102” into a number?
7. How can we find size of a vector object?
8. Compare class variable and instance variable
9. Compare Vector and array.
10. Compare class and object.
Identify the class and its attributes and methods from following problem
statement.
1. In school software, they are storing information of each students and staff.
2. In library software, they are allowing issue and return of the book by library
members.
3. We want to design software for restaurant bill generation.
Multiple choice questions:
1) What is output of the following code,
class Test {
int i;
}
class Main {
public static void main(String args[]) {
Test t = new Test();
System.out.println(t.i);
}
}
(a) garbage value (b) 0
(c) compilation error (d) run time error
2) What is output of the following code,
class Test {
int i;
}

56
class Main {
public static void main(String args[]) {
Test t;
System.out.println(t.i);
}
}
(a) garbage value (b) 0
(c) compilation error (d) run time error
3) The default value of a static integer variable of a class in Java is?
(a) 0 (b) 1
(c) Garbage value (d) Null (e) -1
4) What will be printed as the output of the following program?
public class testincr
{
public static void main(String args[])
{
int i = 0;
i = i++ + i;
System.out.println(“I = ” +i);
}
}
(a) I = 0 (b) I = 1
(c) I = 2 (d) I = 3
(e) Compile-time Error.
5) What is the stored in the object obj in following lines of code?
box obj;
a) Memory address of allocated memory of object
b) NULL
c) Any arbitrary pointer
d) Garbage

57
6) Which of these keywords is used to make a class?
a) class b) struct
c) int d) none of the mentioned
7) Which of these operators is used to allocate memory for an object?
a) malloc b) alloc
c) new d) give
8) What is the output of this program?
class box
{
int width;
int height;
int length;
}
class mainclass
{
public static void main(String args[])
{
box obj = new box();
System.out.println(obj);
}
}
a) 0
b) 1
c) Runtime error
d) classname@hashcode in hexadecimal form
9) Which keyword is used by the method to refer to the object that invoked it?
a) import b) catch
c) abstract d) this
10) Which of the following is a method having same name as that of its class?
a) finalize b) delete
c) class d) constructor

58
11) Which operator is used by Java run time implementations to free the
memory of an object when it is no longer needed?
a) delete b) free
c) new d) none of the mentioned
12) Which function is used to perform some action when the object is to be
destroyed?
a) finalize() b) delete()
c) main() d) none of the mentioned
13) What is the output of this program?
class box
{
int width;
int height;
int length;
int volume;
box()
{
width = 5;
height = 5;
length = 6;
}
void volume()
{
volume = width*height*length;
}
}
class constructor_output
{
public static void main(String args[])
{
box obj = new box();
obj.volume();
System.out.println(obj.volume);

59
}
}
a) 100 b) 150
c) 200 d) 250
14) Which of the following statements are incorrect?
a) default constructor is called at the time of object declaration
b) Constructor can be parameterized
c) finalize() method is called when a object goes out of scope and is no
longer needed
d) finalize() method must be declared protected
2.20 CHECK YOUR PROGRESS: POSSIBLE ANSWERS True-False with reason:
1. False. Objects are the instance of class.
2. True.
3. True.
4. False. Constructor function must have name as class name.
5. False. We can write multiple constructor for a class with different argument
in each.
6. False. We can call static function inside non static function.
7. False. Class variables/static variables are shared by all objects of the
class
8. False. A[0] refer to the first element of the array
9. True.
10. False. We can implement matrix using two dimensional array
Answer the followings:
1. Wrapper Classes:
Boolean, Byte, Short, Integer, Long, Float, Double, Character
2. To create an object of wrapper class:
Boolean a=true;
Boolean x=a;

60
3. To create an array of 10 integers :
int[] a=new int[10];
4. To create an object of a class:
Class_Name obj= new Class_Name();
5. Example of method overloading:
class Ex_Add
{
static int add(int a,int b){return a+b;}
static int add(int a,int b,int c){return a+b+c;}
}
class ExOverloading
{
public static void main(String[] args)
{
System.out.println(Adder.add(11,11));
System.out.println(Adder.add(11,11,11));
}
}
6. To convert a string “102” into a number:
int a= Integer.parseInt(“102”);
7. The size() method of Vector class in Java is used to get the size of the
Vector.
8. Class variable v/s Instance variable
Class variable Instance variable
They are static member
variables of class
They are non static member
variables of class
They are shared among all
object of class
They are separately created
for each object
To access class variable
class name is used.
To access instance variable
object name is used.
9. Vector v/s array.

61
Vector Array
Vector is resizable array The length of an Array is
fixed.
Vector is synchronized Array is not synchronized.
Vector can store any type of
objects
Array can store same type of
objects
Vector is slow to access. Array supports efficient
random access to the
members
10. Class v/s object.
Class Object
It is a blueprint/structure of
object.
It is an instance of class
Class is a group of similar
entities
Object is a real world entity
Class is declared once Object is created many times
as per requirement.
Class doesn't allocated
memory when it is created.
Object allocates memory
when it is created.
Identify the class and its attributes and methods from following problem
statement.
1. In school software, they are storing information of each students and staff.
Class name : Student
Attributes : enrollment number, name, course, address, phone number,
semester
Methods: enroll_course(int enr_no, String crs), print_data(), get_data()

62
Class name : Staff
Attributes : Employ ID, name, designation, address, phone number,
qualification
Methods: enroll_course(int enr_no, String crs), print_data(), get_data()
2. In library software, they are allowing issue and return of the book by library
members.
a. Class name: Member
b. Attributes : Library ID, name, address, phone number
c. Methods: add_member(), searchMember(), printAllMembers(),
deleteMember()
d. Class name: Book
e. Attributes : bookID, title, author, publisher, price, qty
f. Methods: addBook(), searchBook(), printAllBooks(), deleteBook()
g. Class name: Book_transaction
h. Attributes: bookID, Library ID, date_issue, date_return, fine.
i. Methods : bookIssue(), bookReturn()
3. We want to design software for restaurant bill generation.
a. Customer : custId, custName, custAddr, custPhone
b. Methods : addCust(), searchCust(), deleteCust()
c. Item: itemID, itemName, itemCategory, itemPrice
d. Methods : addItem(), searchItem(), deleteItem()
e. Bill : billID, custID, itemID, qty, billDate, billAmount
f. Methods : billGeneration(), billPayment(), printBill()
Multiple choice questions.
1) b
2) c
3) a
4) b
5) b
6) a
7) c
8) d
9) d
10) d
11) d 12) b

63
13) a
2.21 FURTHER READING
1. “Java 2: The Complete Reference” by Herbert Schildt, McGraw Hill Publications.
2. “Effective Java” by Joshua Bloch, Pearson Education.
2.22 ASSIGNMENTS Write java program for following:
1) Create a class name meter which represents a distance in meter and
centimeter. Also create class name kilometer which represents distance in km
and meter. In both class write a function which converts one class to other.
2) Create a class name Doctor with properties and methods. The properties can
be name, phone number, qualification, specialization etc. The methods
include getting information of doctor and printing them.
3) Sort numbers in descending order.
4) Create a menu driven program for matrix operations like add, subtract, and
multiply.
5) Find maximum and minimum from the n numbers.
6) Create a class student with necessary properties, methods and constructor.
Overload a function name search in this class which allows us to search
student based on roll number, name and city.
7) To print transpose of matrix.
8) To implement pop and push operation of stack using array.
Unit 3: Inheritance and Interface
Unit Structure
3

64
3.1 Learning Objectives
3.2 Inheritance
3.3 Subclass
3.4 Subclass constructor
3.5 Hierarchical inheritance 3.6 Overriding methods
3.7 Final variables
3.8 Final methods
3.9 Final classes
3.10 Abstract Class
3.11 Multiple inheritance
3.12 The Object Class
3.13 Let us sum up
3.14 Check your Progress
3.15 Check your Progress: Possible Answers
3.16 Further Reading
3.17 Assignments
3.18 Case Study
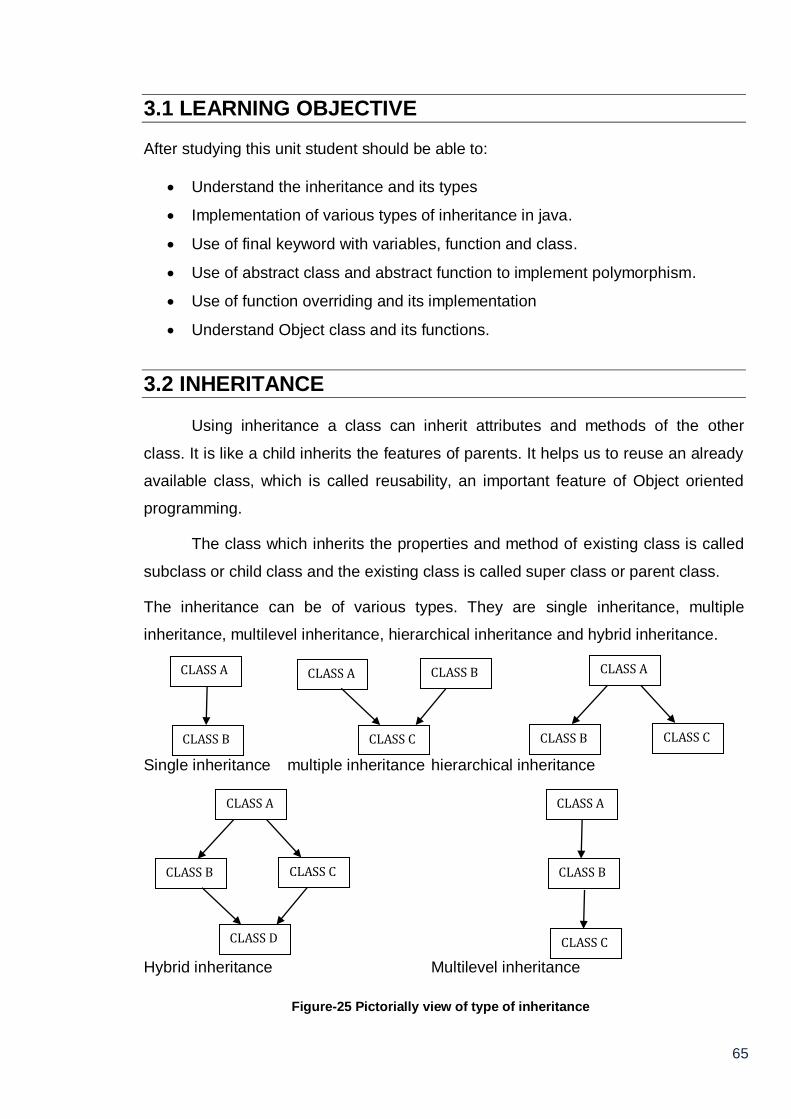
65
3.1 LEARNING OBJECTIVE
After studying this unit student should be able to:
Understand the inheritance and its types
Implementation of various types of inheritance in java.
Use of final keyword with variables, function and class.
Use of abstract class and abstract function to implement polymorphism.
Use of function overriding and its implementation
Understand Object class and its functions.
3.2 INHERITANCE Using inheritance a class can inherit attributes and methods of the other
class. It is like a child inherits the features of parents. It helps us to reuse an already
available class, which is called reusability, an important feature of Object oriented
programming.
The class which inherits the properties and method of existing class is called
subclass or child class and the existing class is called super class or parent class.
The inheritance can be of various types. They are single inheritance, multiple
inheritance, multilevel inheritance, hierarchical inheritance and hybrid inheritance.
Single inheritance multiple inheritance hierarchical inheritance
Hybrid inheritance Multilevel inheritance
Figure-25 Pictorially view of type of inheritance
CLASS A
CLASS B CLASS C
CLASS D
CLASS A
CLASS B
CLASS C
CLASS A
CLASS B
CLASS A CLASS B
CLASS C
CLASS A
CLASS B CLASS C

66
Single inheritance : Class B is inherited from Class A.
Multiple inheritance : Class C is inherited from both Class A and Class B.
Hierarchical inheritance: Class B and Class C are inherited from a single
Class A.
Multilevel inheritance: Class B inherited from Class A and Class C is
inherited from Class B. here class C has properties and methods of Class A
also through Class B.
Hybrid inheritance: it is combination of two inheritance that are hierarchical
and multiple inheritance
In java we can implement single inheritance, hierarchical inheritance and
multilevel inheritance using class.For implementation of multiple and hybrid
inheritance in java interfaces are used.
3.3 SUB CLASS In java for implementing inheritance extends keyword is used. The syntax is
as below,
class X { } class Y extends X { }
Here X is a super class or parent class and Y is a sub class or child class. Class Y
inherits class X.
Example,
class A {
int a; A() {a = 0; } A( int x ) { a = x; } void printA() { System.out.println(“ a = “ + a); }
} class B extends A {
int b; B() { a = 0; b = 0; } B(int x, int y) { a = x; b = y; }

67
void printB() { printA(); System.out.println(“ b = “ + b); }
} The above example shows single inheritance.
3.4 SUBCLASS CONSTRUCTOR In above example, the class B has its own constructor in which it initializes the
value of parameters of both class B (child) as well as class A (parent). We can also
call constructor of parent class in child class for that super keyword is used. The
super keyword is used to store reference of parent class object in child class. The
method and properties of parent class can be accessed using super keyword in child
class.
For example:
class A {
int a; A() {a = 0; } A( int x ) { a = x; } void printA() { System.out.println(“ a = “ + a); }
} class B extends A {
int b; B() {super(); b = 0; } B(int x, int y) { super(x); b = y; } void printB() { super.printA(); System.out.println(“ b = “ + b); }
}
Example:
class Person {
String name; String address; int phno;

68
Person(){ name = ""; address = ""; phno = 0;} Person(String n, String a, int p){ name = n; address = a; phno = p;} void printP() { System.out.println("Name : " + name); System.out.println("Address : " + address); System.out.println("Phone Number : " + phno); }
}
class Student extends Person {
int rollNumber; String course; Student(){ super(); rollNumber = 0; course = "";} Student(String n, String a, int p,int r, String c) { super(n,a,p); rollNumber = r; course = c; } void printS() { printP(); System.out.println("Roll number : " + rollNumber); System.out.println("Course : " + course); }
} public class ExSimple {
public static void main(String args[]) { Student s1=new Student("Aryan","Surat",34567890,12,"Computer"); s1.printS(); }
}
Figure-26Output of program

69
3.5 HIERARCHICAL INHERITANCE This inheritance can be implemented using extends key word in java. In
hierarchical inheritance more than one child can be inherited from the same parent
class.
For example,
class Parent
{
}
class child1 extends Parent
{
}
class child2 extends Parent
{
}
Here, class Parent is the super class/parent class, which has two children
class Child1 and Child2. Child1 and Child2 are also called sibling as they have same
parent.
Example:
class A {
int a; A() {a = 0; } A( int x ) { a = x; } void printA() { System.out.println(“ a = “ + a); }
} class B extends A {
int b; B() {super(); b = 0; } B(int x, int y) { super(x); b = y; } void printB() { super.printA();

70
System.out.println(“ b = “ + b); }
} class C extends A {
int c; C() {super(); c = 0; } C(int x, int z) { super(x); c = z; } void printB() { super.printA(); System.out.println(“ c = “ + c); }
} public class ExInh {
public static void main(String args[]) {
B b1 = new B(10,20);
C c1 = new C(23,34); b1. printB();
c1. printC(); }
}
Figure-27 Output of program
3.6 OVERRIDING METHODS
When a child class inherits a parent class, we can redefine a method of
parent class in child class. This concept is called method overriding.
For example,
class A {
int a; A() {a = 0; }

71
A( int x ) { a = x; } void printData() { System.out.println(“ a = “ + a); }
} class B extends A {
int b; B() {super(); b = 0; } B(int x, int y) { super(x); b = y; } void printData() //the method of parent class is redefined { System.out.println(“ a = “ + a); System.out.println(“ b = “ + b); }
}
public class ExInh {
public static void main(String args[]) { A a1 = new A(10); B b1 = new B(23,34); a1. printData(); b1. printData(); }
}
Figure-28 Output of program
In above example printData() method of parent class A is override in child
class B. when we call printData method using object of child class, the method of
child class will be called. When we call same method using object of parent class,
the parent class printData method will be called.
We can also call child class method using reference of parent class. That
means when parent class refer parent object it will call parent class’s method. And
when parent class refers child class object, it will call child class’s method.
It is decided at run time which method will be called using reference of parent
class. This concept is called dynamic binding or dynamic method dispatch.
For example,

72
class B extends A {
int b; B() {super(); b = 0; } B(int x, int y) { super(x); b = y; } void printData() //the method of parent class is redefined { System.out.println(" a = " + a); System.out.println(" b = " + b); }
} public class ExInh {
public static void main(String args[]) { A a1=new A(10); B b1=new B(23,34); b1.printData(); a1=b1; b1.printData(); }
} In this example in main method b1.printData() method is called twice. Both
time it will run different method. This is due to runtime binding of object with class. It
decides at run time which method will be called. This can also be an example of
polymorphism.
3.7 FINAL VARIABLE
In java, when a variable is declared as final, it is constant. We have to assign
value to this variable while declaring them final. We cannot change value of final
variables in our program. Final variables are same as constant variables of C++ and
C.
For example,
final int N=50; Using final variable in java program public class ExInh {
public static void main(String args[]) {

73
final int x=80; int[] a=new int[x]; //we can use x but can not modify it
x=90; //this gives compilation error as x is constant }
}
Figure-29 Output of program
3.8 FINAL METHOD
We can also declare method of a class final. If any method of class defined
final it cannot be override/redefine in its child class. Final methods of parent calss
can not be overridden in child class. The final methods cannot be changed outside
the class.
For example,
class A {
int a; A() {a = 0; } A( int x ) { a = x; } final void printData() { System.out.println(“ a = “ + a); } // can not override
} class B extends A {
int b; B() {super(); b = 0; } B(int x, int y) { super(x); b = y; } void printB() { Super.printData(); System.out.println(“ b = “ + b); }
} However, if we override the method declared final it gives us a compilation error. For example, class A {
int a;

74
A(){ a=0;} A(int x){ a=x;} final void printA() { System.out.println(" a = " + a); }
} class B extends A {
int b; B(){ super(); b=0;} B(int x, int y) { super(x); b=y;} int printA(){ return a+b;}
} public class ExFinal {
public static void main(String args[]) { B b1=new B(10,20); System.out.println(b1.printA()); }
}
Figure-30 Output of program
3.9 FINAL CLASS
In java class can also be final. The final class restrict them from inheritance.
We cannot inherit a class if it is declared as final.
final class A { } We can not create any class B which inherits class A. For example, final class A {
int a; A(){ a=0;}

75
A(int x){ a=x;} void printA() { System.out.println(" a = " + a); }
} class B extends A {
int b; B(){ super(); b=0;} B(int x, int y) { super(x); b=y;}
} public class ExFinal {
public static void main(String args[]) { B b1=new B(10,20); b1.printA(); }
} This program gives compilation error because we try to inherit final class A in this program.
Figure-31 Output of program
3.10 ABSTRACT CLASS
Abstract class is used to implement abstraction which is am important OOP
concept. It is used to create a class with partial implementation. The subclass of
abstract class must complete the implementation left in abstract class.
In java, abstract class can be created using abstract keyword. The abstract
class is a class which has at least one method declared as an abstract method.
Abstract methods are the methods of a class which are declared in class and
have no definition. These methods must be defined in the child classes which are
inherited from that abstract class.

76
We cannot create an object of abstract class. The abstract class can define
constructor, non abstract methods, static methods as well as final methods.
Abstract class enforces inheritance. To use abstract class we have to create a
class which inherits an abstract class. We can access the method of subclass using
the parent class reference.
For example,
abstract class A {
int a; A() {a = 0; } A( int x ) { a = x; } abstract void printData();
} class B extends A {
int b; B() {super(); b = 0; } B(int x, int y) { super(x); b = y; } void printData() //definition of abstract method of parent class A { System.out.println(“ a = “ + a); System.out.println(“ b = “ + b); }
} Example:
abstract class Shape {
double ar; double peri; Shape() { ar = 0.0; peri = 0.0; } final double PI=3.14; abstract void area(); abstract void perimeter(); void printArea() { System.out.println("Area : " + ar); } void printPerimeter() { System.out.println("Perimeter : " + peri);

77
} } class Circle extends Shape {
int r; Circle(){ r = 0; } Circle(int r){ this.r = r; } void area() { ar = PI*r*r; } void perimeter() { peri = 2*PI*r; }
} class Square extends Shape {
int s; Square(){ s = 0; } Square(int s){ this.s = s; } void area() { ar = s * s; } void perimeter() { peri = 4 * s; }
} public class ExInh1 {
public static void main(String args[]) { Shape c1=new Circle(2); c1.area(); c1.printArea(); c1.perimeter(); c1.printPerimeter(); c1=new Square(2); c1.area(); c1.printArea(); c1.perimeter(); c1.printPerimeter();

78
} }
Figure-32 Output of program
In the above example in main method, we are using reference of Shape class
to call methods of child class. When reference of Shape (c1) refers to circle
object(line 1) it calls method of Circle class. Same reference can also be used to call
the method of Square class. You can see in the main method, line number 2,3,4,5
and line 7,8,9,10 are same in syntax but the line 2,3,4 and 5 calls method of Circle
class where as late four lines calls methods of square class. Thus same line code
can be executed differently which is an implementation of polymorphism concept of
OOP.
3.11 MULTIPLE INHERITANCE
The multiple inheritance cannot be implemented in java using class. We have
to use interface. For creating interface we need to use interface keyword. Interface
are created with declaration of methods and constant variables in it. All the methods
of interface are either abstract or final. All variables in interface are final and static.
We cannot create an instance of interface. We need to implement it in its child class.
Interface can extend other interface. A class can implement one or more interface
using implement keyword. By default, all the method in interface are abstract and all
the variables are final and static. The method in interface must be declared public.
For example multiple inheritance can be implemented as below,
interface A {
int x = 5; public void getData(); public void printData();
}

79
interface B {
int y = 2; public void getD(); public void printD();
} class C implements A,B {
int [] data; C () { int [] data = new int[ x + y ]; } public void getData() { for( int i = 0; i < x ; i++) data[i] = 10 * ( i + 1 ); } public void printData() { for( int i = 0; i < x ; i++) System.out.println( data[i] ); } public void getD() { for( int i = x; i < x+y ; i++) data[i] = 10 * ( i + 1 ); } public void printD() { for( int i = x; i < x+y ; i++) System.out.println( data[i] ); }
}
Example:
interface Shape {
double PI=3.14; public double area(); public double perimeter(); public void printData();
} class Circle implements Shape {
int r; Circle(){ r = 0; } Circle(int r){ this.r = r; }

80
public double area() { return PI*r*r; } public double perimeter() { return 2*PI*r; } public void printData() { System.out.println("Area : " + area()); System.out.println("Perimeter : " + perimeter()); }
}
class Square implements Shape {
int s; Square(){ s = 0; } Square(int s){ this.s = s; } public double area() { return s*s*1.0; } public double perimeter() { return 4.0*s; } public void printData() { System.out.println("Area : " + area()); System.out.println("Perimeter : " + perimeter()); }
}
public class ExInf {
public static void main(String args[]) { Shape c1=new Circle(5); c1.printData(); }
}
Figure-33 Output of program

81
3.12 THE OBJECT CLASS
Object class is available in java.lang package in java. Any class created in
java, automatically derived from Object class. Hence methods of Object class
available in all classes of java. The Object class is root of all class.
Some of the methods of Object class:
String toString():
it converts an object into String. It returns a string consists of name of class,
‘@’ and hashcode of the object. We can customize the output of toString()
function by overriding it in our class.
Example,
class A { int a; A() { a = 0; } A( int x ) { a = x; } } public class ObjEx { public static void main(String args[]) { A x1 = new A( 5 ); System.out.println( “ toString “ + x1.toString() ); } }
Figure-34 Output of program
Example of overriding toString()
class A { int a; A() { a = 0; } A( int x ) { a = x; } public String toString()

82
{ return “ Object of Class A ”; } } public class ObjEx { public static void main(String args[]) { A x1 = new A( 5 ); System.out.println( “ toString “ + x1.toString() ); } }
Figure-35 Output of program
int hashCode():
it is used to get hashvalue of object which can be used to search for object.
Hashcode is unique for each object.
Example,
public class ObjEx { public static void main(String args[]) { String s = new String(" Hello "); Class c = s.getClass(); System.out.println ( " class of object s is :" + c.getName() ); } }
Figure-36 Output of program
boolean equals(Object obj):
compare object obj with this object and returns true if equal else false.
For example,
class A { int a;

83
A() { a = 0; } A( int x ) { a = x; } } public class ObjEx { public static void main(String args[]) { A x1 = new A( 5 ); A x2 = x1; if ( x1.equals(x2)) System.out.println( " x1 and x2 are equal" ); else System.out.println( " x1 and x2 are not equal" ); } }
Figure-37 Output of program
Class getClass():
Returns Class object of this object. The Class object has method name
getName() which returns name of class which of the type of this object.
For example:
A a = new A(15); Class c = a.getClass(); // print A as class name System.out.println( “ class of object s is :” + c.getName());
Example,
public class ObjEx { public static void main(String args[]) { String s = new String(" Hello "); Class c = s.getClass(); System.out.println( " class of object s is :" + c.getName()); } }

84
Figure-38 Output of program
finalize():
This method is called before call of garbage collector in java. this method is
called for each object once.
for example,
class A { int a; A(){ a = 0; } A(int x) { a = x; } protected void finalize() { System.out.println(“ finalize method is called “ ); } } public class ExFin { public static void main(String args[]) { A a1=new A(4); a1 = null; System.gc(); } }
Figure-39 Output of program
Object clone():
This method returns an object that is same as this object. For using clone()
function the class must implements Cloneable interface and implements a
function name clone in it. Also the method which calling clone function must
handle the CloneNotSupportedException. We will discuss more about
Exception in unit 6 of this book.
For example,
class A implements Cloneable { int a; A() { a = 0; } A( int x ) { a = x; }

85
public Object clone() throws CloneNotSupportedException { return super.clone(); } public void printData() { System.out.println(" a : " + a ); } } public class ObjEx { public static void main(String args[]) throws CloneNotSupportedException { A x1 = new A( 5 ); A x2 = ( A ) x1.clone(); x1.printData(); x2.printData(); } }
Figure-40 Output of program
3.13 LET US SUM UP Inheritance: it is an important object oriented programming features in which we can
reuse existing class by adding new features and methods in it.
Subclass: in inheritance the class which derives the existing class is called subclass
Super class: in inheritance class from which a subclass is derived is called super
class
super keyword: in child class, super is a reference to object of parent class. We can
access parent class properties and method using super key word.
method overriding: The function of parent class and be redefined in child class, this
is called method overriding.
final variable: it is used to define constant variables in java.
final function: it is a function of parent class which cannot be overridden in child
class.

86
final class: the final class cannot be inherited. We cannot create a child of final
class.
abstract class: Abstract class is a class which has at least one abstract method
declared in it. This class cannot be instantiated. We have to inherit this class to used
it.
abstract function: this methods have only signature in class. The subclass which
inherits the parent class must define all the abstract methods in it.
Interface: it must have only static final variables and abstract and final methods in it.
It supports multiple inheritance in java.
Object class: Object class is available in java.lang package library. It is the parent of
each class created in java program
3.14 CHECK YOUR PROGRESS True-False with reason
1. extends keyword is used to inherit a class.
2. implements keyword is used to inherit a class.
3. abstract class cannot be inherited.
4. Final class cannot be inherited.
5. Final method cannot be overloaded.
6. Interface and class are same.
7. Object class is parent of each class created in java.
8. Interface can have at least one abstract function in it.
9. All the variable declared in interface are final and static.
10. All variables declared in abstract class are final.
11. Method overriding is writing more than one method in a class with same
name.
12. Super is a reference to object which is accessing the variable or method
of class.
13. We can call constructor of parent class using super keyword.
14. Multilevel inheritance is not supported in java using class.
15. Multiple inheritance is possible using interface.
Compare the followings

87
1. Class and interface
2. Abstract class and interface
3. Method overloading and method overriding
4. Constructor and finalize method
5. Final class and abstract class.
6. Final variable and static variable
7. Final method and abstract method
MCQ.
1) In following Java Program which sow method is called in main()?
class Base {
public void show() {
System.out.println("Base::show() called");
}
}
class Derived extends Base {
public void show() {
System.out.println("Derived::show() called");
}
}
public class Main {
public static void main(String[] args) {
Base b = new Derived();
b.show();
}
}
(a) show method of Derived Class
(b) show method of Base Class
2) In following Java Program which sow method is called in main()?
88
class Base {
final public void show() {
System.out.println("Base::show() called");
}
}
class Derived extends Base {
public void show() {
System.out.println("Derived::show() called");
}
}
class Main {
public static void main(String[] args) {
Base b = new Derived();;
b.show();
}
}
(a) show method of Derived (b) show method of Base
(c) compile time error (d) run time error
3) . ……………….. helps to extend the functionality of an existing by adding
more methods to the subclass.
a) Mutual Exclusion b) Inheritance
c) Package d) Interface
4) An …………………. is an incomplete class that requires further
specification.
a) abstract class b) final class
c) static class d) super class
5) A class can be declared as ………………………. if you do not want the
class to be sub-classed.
a) abstract b) final

89
c) static d) super
6) The …………………….. keyword is used to derive a class from a super-
class.
a) adds b) extends
c) duplicate d) inherit
7) If a class that implements an interface does not implement all the methods
of the interface, then the class becomes a/an …………………….. class.
a) abstract b) final
c) static d) super
8) Does a subclass inherit both member variables and methods?
a) No--only member variables are inherited.
b) No--only methods are inherited.
c) Yes--both are inherited
d) Yes--but only one or the other are inherited.
9) How many objects of a given class can there be in a program?
a) One per defined class.
b) One per constructor definition.
c) As many as the program needs.
d) One per main() method.
10) Say that there are three classes: Computer, AppleComputer, and
IBMComputer. What are the likely relationships between these classes?
a) Computer is the superclass, AppleComputer and IBMComputer are
subclasses of Computer.
b) IBMComputer is the superclass, AppleComputer and Computer are
subclasses of IBMComputer.
c) Computer, AppleComputer and IBMComputer are sibling classes.

90
d) Computer is a superclass, AppleComputer is a subclass of Computer,
and IBMComputer is a subclass of AppleComputer
11) Which of these is correct way of inheriting class A by class B?
a) class B + class A {} b) class B inherits class A {}
c) class B extends A {} d) class B extends class A {}
12) What is the output of this program?
class A
{
int i;
void display()
{
System.out.println(i);
}
}
class B extends A
{
int j;
void display()
{
System.out.println(j);
}
}
class inheritance_demo
{
public static void main(String args[])
{
B obj = new B();
obj.i=1;
obj.j=2;
obj.display();
}
}

91
a) 0
b) 1
c) 2
d) Compilation Error
13) What is the output of this program?
class A
{
int i;
}
class B extends A
{
int j;
void display()
{
super.i = j + 1;
System.out.println(j + " " + i);
}
}
class inheritance
{
public static void main(String args[])
{
B obj = new B();
obj.i = 1;
obj.j = 2;
obj.display();
}
}
a) 2 2 b) 3 3
c) 2 3 d) 3 2
14) What is the output of this program?

92
class A
{
public int i;
public int j;
A()
{
i = 1;
j = 2;
}
}
class B extends A
{
int a;
B()
{
super();
}
}
class super_use
{
public static void main(String args[])
{
B obj = new B();
System.out.println(obj.i + " " + obj.j)
}
}
a) 1 2 b) 2 1
c) Runtime Error d) Compilation Error
3.15 CHECK YOUR PROGRESS: POSSIBLE ANSWERS
True-False with reason
1. True

93
2. False. implements keyword is used to inherit an interface.
3. False. abstract class has to be inherited.
4. True
5. False. Final methods cannot be overridden.
6. False. Class does not support multiple inheritance where as interface
does.
7. True
8. False.Interface has all abstract functions in it.
9. True
10. False. At least one method in abstract class must be abstract.
11. False. Method overriding is writing a definition of a parent class’s method
in subclass.
12. False. Super is a reference to object which is accessing the variable or
method of parent class
13. True.
14. False. Multilevel inheritance is supported in java using class.
15. True.
Compare the followings
1. Class v/s interface
Class Interface
Class can have member variables
and functions
Interface can have final and static
member variables and abstract or
final methods.
It does not support multiple
inheritance
It supports multiple inheritance
It can be instantiated It can not directly be instantiated
2. Abstract class v/s Interface
Abstract Class Interface
It must have at least one abstract
method
It has abstract or final methods.

94
It does not support multiple
inheritance
It supports multiple inheritance
All member variables are not final. All member variables must be final
3. Method overloading v/sMethod overriding
Method overloading Method overriding
Writing method with same name and
different arguments in a class
Writing a method which is defined in
parent class again in child class with
new definition.
Method overloading is not compulsory Abstract methods must be override
4. Constructor v/sFinalize method
Constructor Finalizemethod
It is a function in a class which has
same name as class name.
It is a protected function of Object
class which can be called at the end
of the program.
It is called when object is created It is called when object are
destroyed by garbage collector.
It is used to initialize the object It is used to run some code when
object is deleted.
5. Final class v/sAbstract class.
Final class Abstract class
The restricts inheritance They enforce inheritance
The method of this class can not be
abstract
At least one method of this class
must be abstract.
final keyword is used abstract keyword is used.
6. Final variable v/sStatic variable

95
Final variable Static variable
They used to defined constant in java They used to define class variable in
java
They are not shared among all
objects of class
They are shared among all objects
of class.
They can be accessed using object
name
They can be accessed using class
name
7. Final method v/s abstract method
Final methods Static methods
They are the method in parent class
which can not be redefine in child
class
They are the methods of class which
can access only static members of
class.
They can be accessed using object
name
They can be accessed using class
name
MCQ.
1) a
2)c
3) b
4) a
5) b
6) b
7) a
8) c
9) c
10) a
11) c
12) c
13) a
14) a
3.16 FURTHER READING
1. Java Inheritance (Subclass and Superclass) - W3Schools https://www.w3schools.com/java/java_inheritance.asp
2. Inheritance in Java OOPs with Example - Guru99https://www.guru99.com/java-
class-inheritance.html
3. “Java 2: The Complete Reference” by Herbert Schildt, McGraw Hill Publications.

96
4. “Effective Java” by Joshua Bloch, Pearson Education
3.17ASSIGNMENTS Write java program for following
1) Create a class to find out the Area and perimeter of rectangle.
2) Create a class quadrilateral and create two methods each for
calculating area & perimeter of the quadrilateral with one & two
parameters respectively Check number is even or odd.
3) Define a class student with the following specifications:
Private members of the class:
Admission Number - An Integer
Name - string of 20 characters
Class - Integer
Roll Number - Integer
Public members of the class:
getdata() - To input the data
showdata() - To display the data
Write a program to define an array of 10 objects of this class, input the
data in this array and then display this list.
4) A class STUDENT has 3 data members:
Name, Roll Number, Marks of 5 subjects, Stream
and member functions to input and display data. It also has a function
member to assign stream on the basis of the table given below:
Average Marks Stream
96% or more Computer Science
91% - 95% Electronics
86% - 90% Mechanical
81% - 85% Electrical
75% - 80% Chemical
71% - 75% Civil
Declare a structure STUDENT and define the member functions.
Write a program to define a structure STUDENT and input the marks of
n (<=20) students and for each student allot the stream.

97
5) Define a POINT class for two-dimensional points (x, y). Include
constructors, a negate() function to transform the point into its negative,
a norm() function to return the point's distance from the origin (0,0), and
a print() function besides the functions to input and display the
coordinates of the point. Use this class in a menu driven program to
perform various operations on a point.
6) Write a program implement a class 'Complex' of complex numbers.
The class should be include member functions to add and subtract two
complex numbers.
7) Write a Program to implement a sphere class with appropriate
members and member function to find the surface area and the
volume. (Surface = 4 π r2 and Volume = 4/ 3 π r3 ).
8) Write a program to implement an Account Class with member functions
to Compute Interest, Show Balance, Withdraw and Deposit amount
from the Account.
3.18 CASE STUDY
File Player.java contains a class that holds information about an athlete: name,
team, and uniform number. File ComparePlayers.java contains a skeletal program
that uses the Player class to read in information about two baseball players and
determine whether or not they are the same player.
1. Fill in the missing code in ComparePlayers so that it reads in two players and
prints "Same player" if they are the same, "Different players" if they are different. Use
the equals method, which Player inherits from the Object class, to determine whether
two players are the same. Are the results what you expect?
2. The problem above is that as defined in the Object class, equals does an address
comparison. It says that two objects are the same if they live at the same memory
location, that is, if the variables that hold references to them are aliases. The two
Player objects in this program are not aliases, so even if they contain exactly the
same information they will be "not equal." To make equals compare the actual
information in the object, you can override it with a definition specific to the class. It

98
might make sense to say that two players are "equal" (the same player) if they are
on the same team and have the same uniform number. Use this strategy to define
an equals method for the Player class. Your method should take a Player object and
return true if it is equal to the current object, false otherwise. Test your
ComparePlayers program using your modified Player class. It should give the results
you would expect.
import java.util.Scanner;
public class Player
{
private String name;
private String team;
private int jerseyNumber;
public void readPlayer()
{ Scanner scan = new Scanner(System.in);
System.out.print("Name: ");
name = scan.nextLine();
System.out.print("Team: ");
team = scan.nextLine();
System.out.print("Jersey number: ");
jerseyNumber = Scan.nextInt();
}
}
import java.util.Scanner;
public class ComparePlayers
{
public static void main(String[] args)
{
Player player1 = new Player();
Player player2 = new Player();

99
Scanner scan = new Scanner();
// Read player 1
// Read player 2
// compare player1 and player2
} }

100
Unit 4: More on Class and Object
Unit Structure
4.1 Learning Objectives
4.2 Visibility control
4.3 public access
4.4 friendly access
4.5 protected access
4.6 private access
4.7 Rules of thumb
4.8 Object as parameters
4.9 Returning Objects
4.10 Recursion
4.11 Nested and inner class
4.12 String class
4.13 StringBuffer class
4.14 Command line argument
4.15 Generic in Java
4.16 Let us sum up
4.17 Check your Progress
4.18 Check your Progress: Possible Answers
4.19 Further Reading
4.20 Assignments
4

101
4.1 LEARNING OBJECTIVE
After studying this unit student should be able to:
Understand and use of access modifiers.
Use of recursion in java program.
Input data using command line argument.
To manipulate the string using String and StringBuffer class
Understand various types of inner class and its usage.
4.2 VISIBILITY CONTROL Visibility control means controlling the access of java class, data members
and methods of class, constructor, and variables. The visibility control can be
implemented with the help of access modifier. The access modifier restrict the
access of class, constructor, data members and methods of the class and variables
in its scope. There are four access modifiers in java:
1. Default – no keyword specified
2. Private- using private keyword.
3. Protected- using protected keyword
4. Public- using public keyword.
Access
modifier
Scope
Default private protected public
In same class Yes Yes Yes Yes
In child class of same package Yes No Yes Yes
In other class of same package Yes No Yes Yes
In child class of other package No No Yes Yes
In other class of other packages No No No Yes
Table-8 Scope of aceess modifiers

102
4.3 PUBLIC ACCESS The variable, class, and methods must be declared public using public access
modifier. for this it uses the keyword public. This access specifier has the widest
scope. The public class, methods or variables can be access from everywhere.
There is no restriction for public data. The public class, method and variable can be
access within class, sub class, class outside the package and class within the
package.
class A {
public int a; public A() { a = 0; } public A(int x) { a = x; } public void printA() { System.out.println(“ a = “ + a); }
} public class ExDefault // if a class containing main method is public, we have to
//create that class name.java file for that program. // Ex: ExDefault.java for this program
{ public static void main(String args[]) { A a1 = new A(9); A1.printA(); }
}
4.4 FRIENDLY ACCESS It is also called Default access. When no access modifier used to declare any
class, method or data member, it has friendly access. They can only be accessed
within all classes of the same package i.e. the package in which the class is created.
For Example,
class A {
int a; A() { a = 0; } A(int x) { a = x; } void printA() {

103
System.out.println(“ a = “ + a); } } class ExDefault { public static void main(String args[]) { A a1 = new A(9); A1.printA(); //printA can be access other class in same package //similarly we can access data member a also. }
}
4.5 PROTECTED ACCESS It uses protected keyword to assign protected access modifier. The methods
and member variables of a class can be declared protected. It means they can be
access within class, within package, and only subclass of the package and subclass
of the outside package.
For Example,
class A {
protected int a; A() { a = 0; } A(int x) { a = x; } protected void printA() { System.out.println(“ a = “ + a); }
} class B extends A {
B(){ super(); } B(int x) { super(x); } void printB() { printA(); //can access in subclass of A, as it is protected }
} class ExDefault { public static void main(String args[]) { A a1 = new A(9); A1.printA(); //printA can be access other class in same package as it is protected

104
a1.a=10; //we can access data member a here because it is protected. } }
4.6 PRIVATE ACCESS
The private keyword is used to declare private access modifier. The methods
and member variables of class declared as private can be access within class only.
For Example,
class A {
private int a; A() { a = 0; } A(int x) { a = x; } void printA() { System.out.println(“ a = “ + a); }
} class ExDefault {
public static void main(String args[]) { A a1 = new A(9); A1.printA(); //printA can be access other class in same package a1.a=10; //we can not access data member a here because it is private. }
}
4.7 RULE OF THUMB
All important member variables of class should be declared private.
The final variable should declare public.
The methods can be declared private only when you want not others to
access it.
Private and protected access modifier should not be used for top level
classes. They can be used for inner class declared in nested classes.
4.8 OBJECT AS PARAMETERS

105
In java, class can have member functions and constructors defined in it. We can
pass various arguments to this function. The arguments can be various primitive
data types, array or objects. We can pass object of any class as an argument to the
function.
For example,
class A {
int a; A() { a = 0; } A(int x) { a = x; } void printA() { System.out.println(“ a = “ + a); }
} public class ExObjArg {
public static void main(String args[]) { A a1 = new A(9); A a2 = new A(8); add(a1 , a2); } static void add(A a1, A a2) //function with objects as arguments { int sum = a1.a + a2.a; System.out.println(“ sum = “ + sum); }
}
Figure-41 Output of program
4.9 RETURNING OBJECT
A member function of a class can also return an object of any class. The
return type of that function must be class type.
For example,
class A

106
{ int a; A() { a = 0; } A(int x) { a = x; } void printA() { System.out.println(“ a = “ + a); }
} public class ExObjArg {
public static void main(String args[]) { A a1 = new A(9); A a2 = new A(8); A a3 = add(a1 , a2); a3.printA(); } static A add(A a1, A a2) //function with objects as arguments and returns object { A a3 = new A(); a3.a = a1.a + a2.a; return a3; }
}
Figure-42 Output of program
4.10 RECURSION
A function can call itself within its definition. Such function is called recursive
function. Programming approach which solves problems using recursive function is
called recursion.
For example,
long factorial( int n) {
long fact = 1; if( n == 1 || n == 0) return fact; else fact = n * factorial(n-1); return fact;
}

107
Example public class Factorial {
public static void main(String args[]) { long f=factorial(5); System.out.println(f); } static long factorial( int n) { long fact = 1; if( n == 1 || n == 0) return fact; else fact = n * factorial(n-1); return fact; }
}
Figure-43 Output of program
4.11 NESTED AND INNER CLASS
In java, class can also be created within a class. This is called nested class.
Here the class which holds class definition inside it is called outer class and the class
inside the outer class is called inner class.
Nested class can be categorized into two. Non-static nested class and static
nested class. In nonstatic nested class, the inner class is not static. In static nested
class the inner class is declared as static.
4.11.1NON STATIC NESTED CLASS
Non static nested class are also categorized into three types
1) Inner class
2) Method local inner class
3) Anonymous inner class

108
Inner class
It is simple to create an inner class. We have to create a class
definition inside the class. The inner class can be declared private or public. If it is
declared private, we cannot access it outside the outer class. We have to use inner
class within the outer class only. The public inner class can be access outside the
outer class and the other class also.
For example (private inner class),
class OuterClass { int n; private class InnerClass { public void sayHello() { System.out.println("Hello, from inner class"); } } void useInner() { InnerClass x = new InnerClass(); x.sayHello(); } } public class ExInnerClass { public static void main(String args[]) { OuterClass a = new OuterClass(); a.useInner(); } }
Figure-44 Output of program
For example (public inner class),
In this example the inner class is used to get private member variable of the outer
class.
class OuterClass { private int n = 50; public class InnerClass { public int getN() { return n; } } } public class ExInnerClass1 {

109
public static void main(String args[]) { OuterClass x = new OuterClass(); OuterClass.InnerClass y = x.new InnerClass(); System.out.println(y.getN()); } }
Figure-45 Output of program
Method local inner class
In this type of inner class, we can create a class within a function. This class
will be the local to the method. This class can be used only inside the method.
For example,
class OuterClass { void innerFun() { int n = 50; class InnerClass { //class inside the method innerFun() public void sayHello() { System.out.println("Hello from method inner class "); } } InnerClass x = new InnerClass(); x.sayHello(); } } public class ExInnerClass2 { public static void main(String args[]) { OuterClass y = new OuterClass(); y.innerFun(); } }
Figure-46 Output of program
Anonymous inner class

110
This type of inner class is use to declare without class name. They are
declared and instantiate simultaneously. They are mainly used to override the
abstract methods of class or interface.
Example,
abstract class InnerClass { public abstract void sayHello(); } public class ExInnerClass3 { public static void main(String args[]) { InnerClass x = new InnerClass() { public void sayHello() { System.out.println("Hello from anonymous inner class"); } }; x.sayHello(); } }
Figure-47 Output of program
4.11.2 STATIC NESTED CLASS
In static nested class, the inner class is declared; hence it is a static member
of the outer class. To access this class, the object of outer class is not required. This
static inner class can not access the member variables and methods of outer class.
For example,
class OuterClass {
static class InnerClass { void sayHello() { System.out.println(" Hello, this is inner class"); } }
} public class ExStNested {
public static void main(String args[]) { OuterClass.InnerClass x=new OuterClass.InnerClass();

111
x.sayHello(); }
}
Figure-48 Output of program
4.12 STRING CLASS
Strings are the sequence of characters. We can store name, address etc. as
string. In java string is treated as an object of String class which is available in
java.lang package. String class has various methods using which we can create and
manipulate the strings.
To create a string in java program following syntax is used.
String s=”Hello”;
Here “Hello” is a string literal. For each string literal java compiler creates a String
object. We can create a String object using new keyword and constructor. In java
strings are non-mutable (non modifiable).
String s=new String(“Hello”);
We can also create a String from an array of characters.
char[] s1 = { 'h', 'e', 'l', 'l', 'o', '.' };
String s = new String(s1);
Functions of String class
The following is the list of methods of String class
1) char charAt(int index) : this function returns the character at the index
position
2) int compareTo(String str) : it compares a String with the other String we
pass as an argument lexicographically and return difference of those two
strings.
3) int compareToIgnoreCase(String str) : it compares strings , ignoring case.
4)String concat(String str) : it concatenate a string with the specified string passed
as an argument.

112
5) boolean contentEquals(StringBuffer sb) : returns true if content of String
and StringBuffer is same.
6) static String copyValueOf(char[] data) : returns a String having sequence of
characters stored in an array.
7) static String copyValueOf(char[] data, int offset, int count): returns a
String having count number of characters stored in an array starting from
offset.
8) boolean endsWith(String suffix) : returns true if String ends with specified
String.
9) boolean equals(String str) :returns true is both String objects have same
content.
10) boolean equalsIgnoreCase(String anotherString) : returns true if both
String are equal ignoring case. Ex: Hello and hello are equal for this function.
11) byte getBytes() : returns a byte array containing String characters.
12) int hashCode() : returns a hashcode of the String
13) int indexOf(int ch) : returns position of character ch(first occurrence) in the
String.
14) int indexOf(int ch, int fromIndex) : returns position of character ch in the
String after fromIndex.
15) int indexOf(String str) : returns position of String str(first occurrence) in the
String.
16) int indexOf(String str, int fromIndex) : returns position of String str in the
String after fromIndex.
17) int lastIndexOf(int ch) :returns the position of last occurrence of ch in String.
18) int lastIndexOf(int ch, int fromIndex) : returns the position of last
occurrence of ch in String. It searches in backward starting from the
fromIndex.
19) int lastIndexOf(String str) : returns the position of last occurrence of str in
String.

113
20) int lastIndexOf(String str, int fromIndex) : returns the position of last
occurrence of str in String. It searches in backward starting from the
fromIndex.
21) int length() :returns the length of the String.
22) String replace(char oldChar, char newChar) : returns a new String in which
oldChar is replace with newChar in specified String.
23) boolean startsWith(String prefix) :returns true if String start with strings
specified by prefix.
24) String substring(int beginIndex) :return a new String that is a substring start
with beginIndex till the end.
25) String substring(int beginIndex, int endIndex) : return a new String that is
a substring start with beginIndex till the endIndex.
26) char[] toCharArray() :converts a string into character array.
27) String toLowerCase() : returns a new String which is lower case conversion
of specified String.
28) String toUpperCase() : returns a new String which is upper case conversion
of specified String.
29) String trim() :returns a copy of String after removing starting and ending
spaces.
30) static String valueOf(primitive data type x) :returns String conversion of
primitive data value.
Example,
public class ExString{ public static void main(String args[]) { String s1 = "hello"; String s2 = "whatsup"; String s3 = new String( "Hello" ); char[] s4 = { 'a' , 'b' }; System.out.println("charAt : " + s1.charAt(2)); System.out.println("compareTo s1 and s3: " + s1.compareTo(s3)); System.out.println("compareTo ignore case s1 and s3: " +
s1.compareToIgnoreCase(s3)); System.out.println("concat s1 and s2: " + s1.concat(s2));

114
System.out.println("copy value of: " + String.copyValueOf(s4)); System.out.println("ends with o: " + s1.endsWith("o")); System.out.println("equal s1 and s3: " + s1.equals(s3)); System.out.println("euals ignore case s1 and s3: " + s1.equalsIgnoreCase(s3)); byte[] b=s1.getBytes(); System.out.println("hash code: " + s1.hashCode()); System.out.println("indexOf: " + s1.indexOf('l')); System.out.println("Last indexOf: " + s1.lastIndexOf('l')); System.out.println("String length: " + s1.length()); System.out.println("replace: " + s1.replace('l','i')); System.out.println("starts with : " + s1.endsWith("h")); System.out.println("substring: " + s1.substring(3)); char ar1 [] = s1.toCharArray(); System.out.println("Uppercase: " + s1.toUpperCase()); System.out.println("Lowercase: " + s1.toLowerCase()); System.out.println("valueOf: " + String.valueOf(123)); }
}
Figure-49 Output of program
4.13 STRINGBUFFER CLASS StringBuffer is also a class of java.lang package. It is also used to create and
manipulate the strings in java. The StringBuffer is used to create mutable strings.
We can create StringBuffer using following constructors,
StringBuffer() : creates an empty string buffer with the initial capacity of 16.

115
StringBuffer(String str) : creates a string buffer with the specified string.
StringBuffer(int capacity) : creates an empty string buffer with the specified capacity
as length.
1) StringBuffer append(String s): is used to append the specified string with
this string.
2) StringBuffer insert(int offset, String s): is used to insert a string with this
string at the specified position.
3) StringBuffer replace(int startIndex, int endIndex, String str): is used to
replace the string from specified startIndex and endIndex.
4) StringBuffer delete(int startIndex, int endIndex): is used to delete the
string from specified startIndex and endIndex.
5) StringBuffer reverse(): is used to reverse the string.
6) int capacity(): is used to return the current capacity.
7) char charAt(int index): is used to return the character at the specified
position.
8) int length(): is used to return the length of the string i.e. total number of
characters.
9) String substring(int beginIndex): is used to return the substring from the
specified beginIndex.
10) String substring(int beginIndex, int endIndex): is used to return the
substring from the specified beginIndex and endIndex.
Example,
public class ExStrBuf{ public static void main(String args[]) { StringBuffer s1 = new StringBuffer("Hello"); s1.append( " world" ); System.out.println( s1 ); s1.insert ( 1 , "!!!"); System.out.println( s1 ); s1.replace ( 2, 4, "***" ); System.out.println( s1 ); s1.delete( 2, 4); System.out.println( s1 ); s1.reverse(); System.out.println( s1 );

116
System.out.println( s1.capacity() ); System.out.println( s1.charAt(2) ); System.out.println( s1.length() ); System.out.println( s1.substring(2,4) ); }
}
Figure-50 Output of program
4.14 COMMAND LINE ARGUMENTS
Command line arguments are the arguments pass to java program when we
run it. They are always in form of String. We can pass one or more string separated
by space while running java program using java.exe. The java program accepts
those strings in a String array as a parameter of main method. These arguments
passed from the console to main method and can be received in the java program.
They can be used as an input.
For example,
In this example, the command line arguments stored inside the array args[] and can
be used inside the program.
public class ExCmdArg{ public static void main(String args[]) { for( int j = 0; j < args.length ; j++) System.out.println(args[j]); }
}

117
Figure-51 Output of program
Here, the strings “abc”, “xyz”, “hello” and “aryan” are command line arguments.
4.15GENERIC IN JAVA
Java Generics were introduced in JDK 5.0 with the aim of reducing bugs and
adding an extra layer of abstraction over types. Generics in Java is similar to
templates in C++. The idea is to allow type (user defined types) to be a parameter to
methods, classes and interfaces. For example, classes like HashSet, ArrayList,
HashMap, etc use generics very well. We can use them for any type.
Like C++, we use <> to specify parameter types in generic class creation. To create
objects of generic class, we use following syntax.
BaseType <Type> obj = new BaseType <Type>()
For example,
class Test<T> // generic class { T obj; Test(T obj) { this.obj = obj; } public T getObject() { return this.obj; } }
class ExGen { public static void main (String[] args) { Test <Integer> Obj1 = new Test<Integer>(15); System.out.println( Obj1.getObject() ); Test <String> Obj2 = new Test<String>( " Hello world " ); System.out.println( Obj2.getObject() ); } }

118
Figure-52 Output of program
4.16 LET US SUM UP Access modifier: They are the key words which are use to restrict access of class
member variables and methods.
public: This key word allows access of member functions and methods of class
everywhere outside the class.
private: This key word allows access of member functions and methods of class
only inside the class in which they are declared.
protected: This key word allows access of member functions and methods of class
inside the class in which they are declared and in subclass of the class.
default: This key word allows access of member functions and methods of class
only inside the classes of the package in which class resides.
recursion: It is a call of the function in itself.
nested class: We can create a class as a member of the class. This concept is
called nested class.
outer class and inner class: In nested class, the class in which the member class
is defined is called outer class. And the member class is called inner class.
String class:Strings are the non mutable sequence of characters.
StringBuffer class:They are mutable sequence of characters.
Command line arguments: They can be used to input in java program while
running them on command prompt.
Generic: The idea of Generic is to allow type to be a parameter to methods, classes
and interfaces like template of C++.
4.17CHECK YOUR PROGRESS True-False with reason.
1. The recursion is calling a member function of a class into other member
function.
2. Command line arguments can be used to give input to program.

119
3. Nested class is defining more than one class in same java program file.
4. We can not declare a class static.
5. Private member of the class can be accessed outside the class which is
subclass.
6. Protected members of the class can be accessed inside the class in which
they are declared.
7. Public members of a class can be accessed from everywhere.
8. For default access modifier the friendly keyword is used.
9. We can only pass strings as a command line arguments.
10. String is non mutable series of characters.
MCQ.
1) The output of the following fraction of code is
public class Test{
public static void main(String args[]){
String s1 = new String("Hello");
String s2 = new String("Hellow");
System.out.println(s1 = s2);
}
}
a. Hello
b. Hellow
c. Compilation error
d. Throws an exception
2) What will be the output of the following program code?
class LogicalCompare{
public static void main(String args[]){
String str1 = new String("OKAY");
String str2 = new String(str1);
System.out.println(str1 == str2);
}
}
a.true
b.false
c.0
d.1

120
3) What will be the output of the following program?
public class Test{
public static void main(String args[]){
String s1 = "java";
String s2 = "java";
System.out.println(s1.equals(s2));
System.out.println(s1 == s2);
}
}
a.false true
b.false false
c.true false
d.true true
4) Determine output:
public class Test{
public static void main(String args[]){
String s1 = "SITHA";
String s2 = "RAMA";
System.out.println(s1.charAt(0) > s2.charAt(0));
}
}
a.true
b.false
c.0
d.Compilation error
5) toString() method is defined in
a. java.lang.String
b. java.lang.Object
c. java.lang.util
d. None of these
6) The String method compareTo() returns
a. true
b. false
c. an int value
d. 1
7) What will be the output?
String str1 = "abcde";
System.out.println(str1.substring(1, 3));
a abc
b. bc
c. bcd
d. abcd

121
8) What is the output of the following println statement?
String str1 = "Hellow";
System.out.println(str1.indexOf('t'));
a. true
b. false
c. 1
d. -1
9) What will be the output of the following program?
public class Test{
public static void main(String args[]){
String str1 = "one";
String str2 = "two";
System.out.println(str1.concat(str2));
}
}
a. one
b. two
c. onetwo
d. twoone
e. None of these
10)String str1 = "Kolkata".replace('k', 'a');
In the above statement, the effect on string Kolkata is
a. The first occurrence of k is replaced by a.
b. All characters k are replaced by a.
c. All characters a are replaced by k.
d. Displays error message
11)Which statement, if placed in a class other than MyOuter or MyInner, instantiates
an instance of the nested class?
public class MyOuter
{
public static class MyInner
{
public static void foo() { }
}
}
a. MyOuter.MyInner m = new MyOuter.MyInner();
b. MyOuter.MyInner mi = new MyInner();

122
c. MyOuter m = new MyOuter();
MyOuter.MyInner mi = m.new MyOuter.MyInner();
d. MyInner mi = new MyOuter.MyInner();
12)Which statement, inserted at line 10, creates an instance of Bar?
class Foo
{
class Bar{ }
}
class Test
{
public static void main (String [] args)
{
Foo f = new Foo();
/* Line 10: Missing statement ? */
}
}
a) Foo.Bar b = new Foo.Bar();
b) Foo.Bar b = f.new Bar();
c) Bar b = new f.Bar();
d) Bar b = f.new Bar();
13)Which constructs an anonymous inner class instance?
a) Runnable r = new Runnable() { };
b) Runnable r = new Runnable(public void run() { });
c) Runnable r = new Runnable { public void run(){}};
d) System.out.println(new Runnable() {public void run() { }});
14)What will be the output of the program?
public abstract class AbstractTest
{
public int getNum()
{
return 45;
}
public abstract class Bar
{
public int getNum()

123
{
return 38;
}
}
public static void main (String [] args)
{
AbstractTest t = new AbstractTest()
{
public int getNum()
{
return 22;
}
};
AbstractTest.Bar f = t.new Bar()
{
public int getNum()
{
return 57;
}
};
System.out.println(f.getNum() + " " + t.getNum());
}
}
a) 57 22
b) 45 38
c) 45 57
d) An exception occurs at runtime.
15)Which statement is true about a static nested class?
a)You must have a reference to an instance of the enclosing class in order to instantiate it.
b) It does not have access to nonstatic members of the enclosing class.
c) It's variables and methods must be static.
d) It must extend the enclosing class.
16)What will be the output of the program?
public class TestObj

124
{
public static void main (String [] args)
{
Object o = new Object() /* Line 5 */
{
public boolean equals(Object obj)
{
return true;
}
} /* Line 11 */
System.out.println(o.equals("Fred"));
}
}
a) It prints "true".
b) It prints "Fred".
c) An exception occurs at runtime.
d) Compilation fails
17)What is Recursion in Java?
a) Recursion is a class
b) Recursion is a process of defining a method that calls other methods repeatedly
c) Recursion is a process of defining a method that calls itself repeatedly
d) Recursion is a process of defining a method that calls other methods which in turn call again this method
18)Which of these data types is used by operating system to manage the Recursion in Java?
a) Array
b) Stack
c) Queue
d) Tree
19) Which type of variable or method can ONLY be used within the current package?
a) Protected
b) Private
c) Public
d) Void
20)What is the output of this program?
class recursion
{

125
int func (int n)
{
int result;
result = func (n - 1);
return result;
}
}
class Output
{
public static void main(String args[])
{
recursion obj = new recursion() ;
System.out.print(obj.func(12));
}
}
a) 0
b) 1
c) Compilation Error
d) Runtime Error
21)What is the output of this program?
class recursion
{
int fact(int n)
{
int result;
if (n == 1)
return 1;
result = fact(n - 1) * n;
return result;
}
}
class Output
{
public static void main(String args[])
{
recursion obj = new recursion() ;

126
System.out.print(obj.fact(5));
}
}
a) 24
b) 30
c) 120
d) 720
22)You have the following code in a file called Test.java
class Base{
public static void main(String[] args){
System.out.println("Hello");
}
}
public class Test extends Base{}
What will happen if you try to compile and run this?
a. It will fail to compile.
b. Runtime error
c. Compiles and runs with no output.
d. Compiles and runs printing
23)Examine the following code. Where can the program use the variable fte?
public class Employee_Public_View {
public String employeeName = new String ();
public int jobCode;
private float fte;
float getFTE( float fte ) {
this.fte = 1;
return fte;
}
}
a) In all classes within the program
b) Only in the Employee_Public_View class
c) It cannot be used
d) In the main function
24)Examine the following code. What is true about the variables and methods within
the class NYCustomer?

127
class NYCustomer{
public long customerPhone;
public void getCustomerPhone() {
}
}
a) They are private
b) They can be accessed by other packages and classes
c) They can be accessed only in subclasses
d) They are protected
4.18 CHECK YOUR PROGRESS: POSSIBLE ANSWERS
True-False with reason
1. False. The recursion is calling a function of a class into the function itself.
2. True
3. False. Nested class is defining a class inside a class.
4. False. We can declare inner class of nested class static.
5. False. Private members of a class can be accessed inside a class only.
6. False. Protected members of the class can be accessed inside the class in
which they are declared and inside the subclass.
7. True.
8. False. No keyword is used for default access.
9. True.
10. True.
MCQ.
1) b
2)b
3) c
4) a
5) b
6) c
7) b
8) d
9) c
10) b
11) c
12) b
13) d
14) a
15) d
16) a
17) c
18) b
19) d
20) c
21) d
22) b
23) d
24) b

128
4.19 FURTHER READING
1) “Java 2: The Complete Reference” by Herbert Schildt, McGraw Hill
Publications.
2) “Effective Java” by Joshua Bloch, Pearson Education
3) Nested classes in Java | Core Java Tutorial' | Studytonight
https://www.studytonight.com/ java/ nested-classes.php
4) What Is Recursion in Java Programming ? - dummies
5) https:// www.dummies.com/ programming/ java/ what-is-recursion-in-java-
programming/
4.20 ASSIGNMENTS Write java program for following
1) Print Fibonacci series up to n elements using recursion.
2) Implement binary search using recursion.
3) Create a class Student with attributes roll number, name, address, phone
numbers. To store address, create an Address class. An Address class can
have PhoneNumbers inner class which holds all the phone numbers
associated with an address and may have some extra functionality, like
returning the best phone number ( the most used one ). All classes have get
methods and print methods to input and print the data values respectively.
4) Find GCD of a number using recursion.
5) Create a class Customer with properties customer ID, name, address,
phone number, date of birth and function to get and print these attributes.
Inherit the class Account from Customer class with account number,
account type, rate of interest and balance properties and functions to get
and print these properties. Also in account class implement the deposit and
withdraw function. Use appropriate access modifier with attributes and
methods of each class.
6) Implement the above example considering customer as an abstract class
which is inherited as Account class. Also inherit the Loan class from the
Customer class which has properties like loan number, rate of interest, loan
duration, loan amount, date of installment etc and methods to get and print

129
value of these attributes. The Loan class also has method to pay
installment. Use appropriate access modifier with attributes and methods of
each class.After implementation of classes show their use in main method.
7) For educational institute design an application in which a Person with person
id, name, address, department and phone number can be a faculty or a
student. A faculty can have other attributes like degree, designation,
specialization, experience etc. A student can have attributes like semester;
results etc. create appropriate classes and methods in the classes. Use
appropriate access modifier with attributes and methods of each class. Also
show their use in main method.
8) Implement a java program to input a String from command line argument
and convert it into upper case without using toUpperCase function.
9) Implement a MyString class with your own reverse, getBytes and parseInt
function in it. ( Do not use readymade functions available in String class).
10) To input a paragraph from console and convert word at even position into
upper case.
11) To input a paragraph from console and replace a word “is” with “are” in the
input paragraph.

130
Block-2
Packages, Interfaces and Exception Handling

131
Unit 1: Package
Unit Structure
1.1. Learning Objectives
1.2. Introduction
1.3. Defining Package
1.4. Understanding CLASSPATH
1.5. Access Protection
1.6. Importing Package
1.7. Built in package
1.8. Let us sum up
1.9. Check your Progress
1.10. Check your Progress: Possible Answers
1.11. Further Reading
1.12. Assignments
1

132
1.1 LEARNING OBJECTIVE After studying this unit student should be able to:
Understand need of package in java.
Know how to create package
Know about classpath and method to set classpath.
Understand the jar file, how it is created and its usage.
Utilize import statement
Study various built in packages
1.2 INTRODUCTION In java package can be used to create a group of classes and interfaces in
same category based on their functionality. They provide the access protection and
namespace. Actually package is a folder which contains other package folder or the
list of class or interface files which are part of that package. when we need to use
some classes or interfaces more than one place we may put them in a package and
reuse them importing package when needed.
The package can be built in package or user define package.
java.lang, java.io, java.util etc are the example of built in packages. They are also
called API (Application Programming Interface)
User defined package is created by the user whenever required.
The following are the benefits of using packages.
Reuse the class
Create a category of classes and interface
Same class name can be use in different packages.
Control the access of class variables and methods.

133
1.3 DEFINING PACKAGE
For creating a package a package keyword is used in a java file following a
space and a package name. Package name can be any variable name. The java file
in which we have declared the package should contain all the class and interface
definitions which we want to put in the package. Also package declaration must be
the first line of the java program file. We also have to store this java file in the folder
with same name as package name. To compile the java file which has package
declaration in it we have to move to parent directory of package folder. Make sure
that your java file must be in package folder. For compiling we have to use “ javac
package_name\program_file.java”. This will create appropriate classes in package
folder.
We can also define a package within a package. The inner package is called sub
package.
For example,
Step 1 :
Create directory with package name let say mypack in your current directory.
Move to mypack folder.
Create a java file MyClass.java as follows,
package mypack; //package declaration class Hello { public void sayHello ( String nm ) { System. out. println ( “ hello from “ + nm ); } } public class MyClass { public static void main ( String args[] ) { Hello h1=new Hello(); h1.sayHello( “ Aryu “ ); } }

134
Now come out of the mypack directory or folder.
Compile MyClass.java file using “javac mypack/MyClass.java”
This will compile MyClass. Java file and create a MyClass.class and Hello.class files
in the directory mypack.
OR
We can create a MyClass.java file in current directory same as step 1. And comile it
using following command
javac -d . MyClass.java
This command will compile the MyClass.java file and –d option will create a folder
name with package name in . (current working ) directory and put MyCLass.class
file in that directory. i. e. the –d option will automatically create a package folder in
folder mention after –d option and our class file will be stored in that folder.
Step 2:
The program can be compiled using following command
java mypack.MyClass
Figure-53 Output of program
1.4 UNDERSTANDING CLASSPATH
CLASSPATH is an environment variable. To view value of current
CLASSPATH variable we can use echo command like following,
echo %CLASSPATH%
CLASSPATH variable is used to search for location of class file used to run
java program by java compiler and JVM. JVM use this variable to search compiled
classes. We can assign a path of folder containing class file or a path of jar file as a
value of classpath variable. It can store path of multiple folders or jar file. Each path

135
should be separated by ; symbol. We can assign value to classpath using following
command,
set CLASSPATH = %CLASSPATH%;c:\oopj
In above command we have added path of oopj folder in existing classpath value.
We can also assign path of a jar ( java archive ) file in classpath. Jar file is an
archive which stores all class file as one file. We can create a package consists of
various classes and create a jar file for that package using following command,
jar cf pack.jar pack
This will create a pack.jar file for package pack.
For example,
We want to create three class in our package mypack. For this we have to create
three java files each for one class ( A.java, B.java, and C.java) file in current
directory and comile them using following command
javac -d . A.java
javac -d . B.java
javac -d . C.java
This command will compile all java files and –d option will create a folder name with
package name in . (current working ) directory and put all class files in that directory.
i. e. the –d option will automatically create a package folder in folder mention after –d
option and our class files will be stored in that folder.
A.java
B.java
package mypack; //package declaration public class A { int a; A() {a = 0; } A( int x ) { a = x; } void printA() { System. out. println (“ a = “ + a); } }
package mypack; //package declaration public class B { int b; B() {b = 0; } B( int y ) { b = y; } void printB() { System. out. println (“ b = “ + b); } }

136
C.java
After compilation the mypack folder is created with three class file in it. Now to create
a jar file we have to execute following command,
jar cf pack.jar mypack
To include this package in class path we can use the pack.jar file as follows,
set CLASSPATH = %CLASSPATH%;c:\oopj\pack.jar
Now, we can use these three classes in all our java files by importing them in
program.
1.5 ACCESS PROTECTION
The purpose of creating package is to encapsulate the similar classes as a
container of classes, interfaces and sub packages. Classes and interfaces act as a
container of member variables and member functions. In java we can have four
categories of regarding the access of class members and classes among packages.
These categories are,
1) Subclass of a class within same package i.e. class and subclass are in same
folder.
2) Independent classes of the same package
3) Class and subclass both stored in different package
4) Independent classes which are not stored in same package
package mypack; //package declaration public class C { int c; C() {c = 0; } C( int z ) { c = z; } void printC() { System. out. println ( “ c = “ + c); }
}

137
There are mainly four access modifiers use to set the protection of the class
members within the package or outside the package. They are friendly, private,
protected and public.
We have already discuss them with example in section 4.2 of Block-1 chapter 4
(recall the Table 8). The private member of the class cannot be access anywhere
outside the class whereas public member of the class can be accessed from
everywhere. The protected member of a class can be accessed within the class as
well as the subclass inside or outside the package.
The class can also be declared either friendly (default) or public. The default access
allows calss to be used within the package only. The public class can be used inside
as well as outside of the package.
For Example:
// MyPack1_A1.java
package mypack1;
public class MyPack1_A1 {
int a ;
private int pri_a ;
protected int pro_a ;
public int pub_a ;
public MyPack1_A1() {
System. out. println ("Base class constructor called");
a = 0;
pri_a = 0;
pro_a = 0;
pub_a = 0;
}
public MyPack1_A1(int w, int x, int y, int z) {
System. out. println ("Base class constructor called");
a = w;
pri_a = x;
pro_a = y;
pub_a = z;
}

138
public printA1()
{
System. out. println ( a );
System. out. println ( pri_a );
System. out. println ( pro_a );
System. out. println ( pub_a );
}
}
This class MyPack1_A1 is in package mypack1 and has four data members which
are of default, private, protected and public type.
// MyPack1_A2.java
package mypack1;
class MyPack1_A2 extends MyPack1_A1 {
public MyPack1_A2() {
System. out. println ("Derived class constructor called");
a = 0;
pri_a = 0; // error1
pro_a = 0;
pub_a = 0;
}
public MyPack1_A2(int w, int x, int y, int z) {
System. out. println ("Derived class constructor called");
a = w;
pri_a = x; //error2
pro_a = y;
pub_a = z;
}
public printA2()
{
System. out. println ( a );
System. out. println ( pri_a ); //error3
System. out. println ( pro_a );
System. out. println ( pub_a );
}
}

139
The class MyPack1_A2 also belongs to mypack1 package and is a subclass of
MyPack1_A1 class which is in the package mypack1. In MyPack1_A2 we can
access member variables a, pro_a and pub_a of class MyPack1_A1. We can not
access pri_a of MyPack1_A1 into MyPack1_A2. Hence if we compile above code it
gives three error shown as a comment in the code. That is because we can not
access private member of a class out side the class. We can access default member
because both class are in the same package. We can access protected members
because the second class is a subclass of first class.
//MyPack1_B
package mypack1;
class MyPack1_B {
MyPack1_B() {
MyPack1_A1 x = new MyPack1_A1( 1, 2, 3, 4);
System. out. println (" non subclass but same package class ");
System. out. println ("a = " + x.a);
System. out. println ("pri_a = " + x.pri_a); // error1
System. out. println ("pro_a "+ x.pro_a); //error2
System. out. println ("pub_a = " + x.pub_a);
}
}
The above class MyPack1_B also belongs to package mypack1. This class is not
subclass of any class of the package mypack1. The MyPack1_B class creates an
instance of MyPack1_A1 and tries to access all members of the class MyPack1_A1
using its object. Here, we can access only default and public members because
default members can be accessed within classes of the same package and public
members can be accessed everywhere. We can not access private outside the
class. And hence class MyPack1_B is not subclass of MyPack1_A, we can not
access protected members. Hence we got two error while compilation of above
code.
Now we are creating package mypack2 and two classes in it one is subclass of a
class of mypack1 and the other is non subclass.
package mypack2;
class MyPack2_A1 extends MyPack1_A1 {

140
MyPack2_A1() {
System. out. println ("derived class of mypack1 package constructor
called");
System. out. println ("a = " + a); //error 1
System. out. println ("pri_a = " + pri_a); //error 2
System. out. println ("pro_a = " + pro_a);
System. out. println ("pub_a = " + pub_a);
}
}
The above class MyPack2_A1 we can not access Private and default members of
MyPack1_A1. This is because private members can access within a class only and
default members can accessed within package only. Here MyPack2_A2 is not in the
same package. Hence we got error 1 and error 2 while compiling above code. We
can access protected and public members of a class MyPack1_A1 because
MyPack2_A1 is a subclass of it.
//MyPack2_ B
package mypack2;
class MyPack2_B {
MyPack2_B() {
mypack1.MyPack1_A1 co = new mypack1.MyPack1_A1 ();
System. out. println ("independent class of the other package constructor");
System. out. println ("a ,= " + co.a); //error1
System. out. println ("pri_a = " + co.pri_a); //error 2
System. out. println ("pro_a = " + co.pro_a); //error 3
System. out. println ("pub_a = " + co.pub_a);
}
}
The above class MyPack2_B belongs to package mypack2. In the constructor of this
class an instance of MyPack1_A1 is created. Using the instance of MyPack1_A1 we
tries to access all member variables of the class. We can only access public
members of a class which belongs to outside package and not a parent class of our
class. Hence we got error 1 , error 2 and error 3, as we try to access default, private
and protected member of the class respectively.

141
1.6 IMPORTING PACKAGE
In C/C++ to use library function we must include the header file congaing that
library function in our program. Similarly in java to use the classes and their
members we should import the package and class in our program. Once a package
is created with all its member classes, we can use those classes in our java program
by import statement. The syntax of import statement is given below,
import package_name.class_name;
OR
Import package_name.sub_package.class_name;
We can use the class class_name of package package_name or
package_name.sub_package in our program using above import statement in our
program.
For example,
import mypack1.MyPack1_A1;
allow us to use MyPack1_A1 class in our program. If we want to use all classes of a
package we can use following,
import mypack1.*;
For importing package, the package folder must be set as a classpath OR the jar file
for that package must be created and path of that jar file must be added in classpath.
Different ways of using package
We may use class of a package using following ways,
class MyClass { mypack1.MyPack1_A1 x = new mypack1.MyPack1_A1() //fully qualified name .... } OR import mypack1.*;

142
class MyClass { MyPack1_A1 x=new MyPack1_A1(); ..... } OR import mypack1.Mypack1_A1; class MyClass { MyPack1_A1 x=new MyPack1_A1(); ..... } Static import
In java static import allows us to use static members of class directly (without
using class name). It reduce the coding when we need to access static members
more frequently.
For example,
import static java.lang.Math.*;
import static java.lang.System.*;
class ExStIm
{
public static void main String args [] )
{
out.println(“ Hello “);
out.println(“ 2 power 4 is “ + pow ( 2, 4 ));
}
}
Name Collision
While developing java application sometimes same class name needs to be
used for different classes created for different purpose. The package allows you to
create different class with same name but in different packages.
We can create class with name A in packages ABC and ACD both. To use such
class, we have to use package_name.class_name.
For example,
ABC.A // refer to class A of ABC package

143
ACD.A // refer to class A of ACD package
Example of package and import,
// Apple.java package fruit; public class Apple { int id; String color; String shape; public Apple() { id = 0; color = ""; shape = ""; } public Apple(int i, String c, String s) { id = i; color = c; shape = s; } public void printApple() { System. out. println (" ID : " + id); System. out. println (" Color : " + color); System. out. println (" Shape : " + shape); } } // Grape.java package fruit; public class Grape { int id; String color; int size; public Grape () { id = 0; color = ""; size = 0; } public Grape (int i, String c, int s) { id = i; color = c; size = s;

144
} public void printGrape() { System. out. println (" ID : " + id); System. out. println (" Color : " + color); System. out. println (" Size : " + size); } } // Banana.java package fruit; public class Banana { int id; String color; String unit; public Banana () { id = 0; color = ""; unit = ""; } public Banana (int i, String c, String u) { id = i; color = c; unit = u; } public void printBanana() { System. out. println (" ID : " + id); System. out. println (" Color : " + color); System. out. println (" Unit : " + unit); } }

145
Figure-54 Compiling java files
Figure-55 Setting class path
//ExPack.java import fruit.Apple; import fruit.Grape; import fruit.Banana; public class ExPack { public static void main ( String args [] ) { Apple a = new Apple (1, "red", "round" ); Grape g = new Grape ( 2, "green", 55 ); Banana b = new Banana ( 3, "yellow", "dozon" ); a. printApple (); g. printGrape (); b. printBanana (); } }

146
Figure-56 Output of program
1.7 BUILT IN PACKAGES
Built in packages are the readily available packages in java which can directly
be used while programming using java. They have a readily available classes and
interfaces. They are also called APIs (Application programming interfaces ) or
Library packages.
For example,
java.lang
it is by default imported in all java programs. It contains Object class, all
wrapper classes, Math class, String class, StringBuffer class etc.
java.io
It contains all classes related to Input Output. Using these classes our java
program can interact with IO Devices. Some of the classes /interfaces are,
InputStream, Reader, Writer, PrintWriter, BufferedReader etc.
java.util
it is also called collection framework. It has various classes which can be used to
improve performance of java program. Some of the classes /interfaces are Scanner,
ArrayList, Vector, LinkedList etc.
java.applet
This package has various classes which helps us to implement applet program in
java. Some of the classes /interfaces are Applet, Graphics, etc.

147
java.net
It has various network programming related classes. Using these classes we can
implement java programs on remote machine which can interact with each other.
Some of the classes /interfaces are Socket, DatagramSocket, InetAddress, URL etc.
java.sql
This package supports a java program to interact with DBMS software. Our
java program can send data to database and can access database using these
classes. Some of the classes /interfaces are Connection, Driver, DriverManager,
ResultSet etc.
Example,
import java.util.Vector;
import java.util.Scanner;
import static java.lang.Math.*;
public class ExBPack
{
public static void main ( String args[] )
{
Vector v = new Vector ( 20 );
Scanner sc = new Scanner ( System.in );
System. out. println (" Enter number : ");
int x = sc.nextInt();
v. add ( x );
v. add ( "hello" );
System. out. println ( v );
System. out. println ( " 2 power 5 is " + pow(2,5) );
}
}
Figure-57 Output of program

148
1.8 LET US SUM UP Package : They are the container of java classes and interfaces related to same
functionality. A package can be created using package keyword at the beginning of
the java program.
Classpath: It is an environment variable which specifies the location of class files
which are used by java program. We can view value of this variable using echo
command and modify its value using set command.
Import: It is used to import the package and classes/ interfaces of the packages
which we are using in our program. This classes /interfaces are readily available in
package folder or jar file.
Static import: Using static import, we can import the classes whose static member
or method can be used directly (without class name) in our program.
Access protection: By creating default, private, public and protected member
variables and methods, we can restrict their access outside the class definition and
or package.
Built-in package: they are the readily available class /interface libraries which can
directly be used in java program by importing them when required.
1.9 CHECK YOUR PROGRESS True-False with reason.
1. Packages are collection of methods.
2. We can create a sub package in package.
3. Package creates a directory for storing class files.
4. Import keyword is used to create a package.
5. We can declare package anywhere in our program.
6. Jar file is a compressed source code java files.
7. Import static is used to call static method of class without class name.
8. We can create class with same name in two different packages.
9. Built in packages are the readily available class which one can directly use
by importing them.

149
10. Package can provide protection to some members of the class.
Match A and B.
A B
1)package a)environment variable
2)import b)key word for creating package
3)import static c)key word for importing class of package
4)class path d)compressed collection of class files
5)jar file e)use to access static member without class name
Answer the following.
1. Which keyword is used to declare package?
2. Which option with javac can be used to automatically create a package
folder?
3. Write a command used to create a jar file.
4. What is class path ? how can we print value of class path?
5. What is the application of static import?
MCQ.
1. Which of these keywords is used to define packages in Java?
a) pkg
b) Pkg
c) package
d) Package
2. Which of this access specifies can be used for a class so that its members can be
accessed by a different class in the same package?
a) Public
b) Protected
c) No Modifier
d) All of the mentioned
3. Which of these access specifiers can be used for a class so that its members can
be accessed by a different class in the different package?
a) Public
b) Protected
c) Private
d) No Modifie
4. Which of the following is the correct way of importing an entire package ‘pkg’?

150
a) import pkg.
b) Import pkg.
c) import pkg.*
d) Import pkg.*
5. What is the output of this program?
package pkg;
class display { int x; void show() { if (x > 1) System.out.print(x + " "); } } class packages { public static void main(String args[]) { display[] arr = new display[3]; for(int i = 0;i < 3; i++) arr[i] = new display(); arr[0].x = 0; arr[1].x = 1; arr[2].x = 2; for (int i = 0; i < 3; ++i) arr[i].show(); } }
Note : packages.class file is in directory pkg;
a) 0
b) 1
c) 2
d) 0 1 2
6. Which of the following is an incorrect statement about packages?
a) Package defines a namespace in which classes are stored
b) A package can contain other package within it
c) Java uses file system directories to store packages
d) A package can be renamed without renaming the directory in which the classes
7. A package is container of _____
a) Methods b) Objects
151
c) Classes d) Variables
8. If a variable is declared as private , then it can be used in _______
a) Any class of any package
b) Any class of same package
c) Only in the same class
d) Only subclass in that package
9. which package is imported implicitly?
a) java.applet
b) java.util
c) java.lang
d) java.io
10. Math class is in ………package.
a) java.io
b) java.lang
c) java.util
d) java.applet
11. Syntax of pow()method is…….
a) double pow(double a, double b)
b) double pow(int a, int b)
c) int pow(int a, int b)
d) double pow(int a)
12. Write a output of following:
class MathEx
{ public static void main(String args[]) { double a = 123.34; double b = 234.56; System. out. println (“ a =” + Math.ceil(a)); System. out. println (“ b =” + Math.floor(b)); } }
a) a=123 b=234
b) a=124 b=235
c) a=124 b=234
d) a=123 b=235
13. Write a output of following
Class MathTest
{ public static void main(string arg[] { double a = 123.456; System. out. println ( Math.rint(a) ); } }
a) 123.46 b) 123

152
c) 124 d) 123.0
14. The data type wrapper classes are in……….package
a) java.lang
b) java.io
c) java.util
d) java.applet
15. syntax of getTime() method is …………..
a) date getTime()
b) void getTime(date d)
c) long getTime()
d) long getTime(date d)
16. Find errors if any otherwise write output:
class Ex
{
Public static void main(String args[])
{
Date d = new date();
System. out. println (“ date is :” + d);
}
}
a) it will print the whole current date and time
b) it will print the current date
c) error:date class and constructor not found
d) error:can not print object d
17. The random class is in ……..package
a) java.io
b) java.util
c) java.lang
d) java.applet
18. The…….class creates a dynamic array
a) vector
b) calendar
c) random
d) object
19. To add element in vector ,…….method is used
a) add item()
b) insertitem()
c) addelement()
d) insertelement
20. To know the size of a vector ……..method is used

153
a) length()
b) size()
c) capacity()
d) getsize()
21. Which of the following is/are true about packages in Java?
a) Every class is part of some package.
b) All classes in a file are part of the same package.
c) If no package is specified, the classes in the file go into a special unnamed
package
d) If no package is specified, a new package is created with folder name of class and
the class is put in this package.
a) Only a, b and c
b) Only a, b and d
c) Only d
d) Only a and c
22. Which of the following is/are advantages of packages?
(a) Packages avoid name clashes
(b) Classes, even though they are visible outside their package, can have fields
visible to packages only
(c) We can have hidden classes that are used by the packages, but not visible
outside.
(d) All of the above
23. Predict the output of following Java program import static java.lang.System.*; class StaticImportDemo { public static void main(String args[]) { out.println(" hello "); } } (a) Compiler Error
(b) Runtime Error
(c) hello
(d) None of the above
24. Predict the output of following program
/* Hello.java */
package a; public class Hello { public void doIt()

154
{ printMessage(); } void printMessage() { System. out. println (" Hello "); } } /* World.java */ package b; import a.Hello; public class World { private static class GFG extends Hello { void printMessage() { System. out. println ("World"); } } public static void main(String[] args) { GFG gfg = new GFG(); gfg.doIt(); } } (a) Compiler Error
(b) Runtime Error
(c) Hello
(d) None of the above
25. / / Hello.java package a; public class Hello { void printMessage() { System. out. println ("Hello"); } } // World.java package b; import a.Hello; public class World extends Hello { void printMessage() { System. out. println ("World"); } public static void main(String[] args) {

155
Hello gfg = new World(); gfg.printMessage(); } } (a) Compiler Error
(b) Runtime Error
(c) Hello
(d) World
26. In java string is ______
a) Array of characters
b) An object of String class
c) a single character
d) Both A and B
27. Which method is used to find the position of a particular substring from a string?
a) substring()
b) getChars()
c) charAt()
d) indexOf()
28. The syntax of charAt() method is _____
a) int charAt(int no)
b) int charAt(char ch)
c) char charAt(int no)
d) char charAt(char no)
29. Which of the following is a string comparision method ?
a). startsWith()
b).endsWith()
c). substring()
d). reqionMatches()
30. The ___ class creates a fixed length string.
a) String
b) StringBuffer
c) Character
d) All of above
31. Which method is used to specify the minimum capacity of the StingBuffer object?
a) capcity()
b) setCapacity()
c) ensurureCapacity()
d) setLength()
32. The syntax of delete() method is ____
a) StringBuffer delete(char ch)
b) StringBuffer delete(char ch,int startIndex)
c) StringBuffer delete(int startIndex,int endIndex)
d) StringBuffer delete(char ch1,char ch2)
33. Which method is used to convert a string in uppercase?
156
a) uppercase()
b) toUpperCase()
c) changeCase()
d) capitalize()
34. Write output of following:
class str
{ public static void main(String args[]) { StringBuffer s = new StringBuffer( “ABCDE” ); s.setChatAt ( 3, ’X’ ); System. out. println ( s ); } }
a) ABCXDE
b) ABCXE
c) ABXDE
d) ABXCDE
35. syntax of replace() of string class is ____________
a) String replace(char ch1, char ch2)
b) void replace(char ch1, char ch2)
c) String replace(char ch1, int i)
d) void replace(char ch1, int i)
36.Wrapper classes are found in _____ package
a) java.lang
b) java.util
c) java.io
d) java.net
1.10 CHECK YOUR PROGRESS: POSSIBLE ANSWERS
True-False with reason
1. False. Package is a collection of classes
2. True.
3. True
4. False. Import is used to include the class/classes of a package which
we want to use in our program.
5. False. Package must be declared at the beginning of the program
6. False. Jar file is a compressed class files.
7. True.
8. True.

157
9. True
10. True
Match A and B.
A B
1)package a)environment variable
2)import b)key word for creating package
3)import static c)key word for importing class of package
4)class path d)compressed collection of class files
5)jar file e)use to access static member without class name
Answer : 1) - b , 2) - c, 3) – e, 4) – a, 5) – d Answer the following.
1. “import” keyword is used to declare package.
2. “-d” option is used with javac to automatically create a package folder.
3. Command used to create a jar file:
jar cvf a1.jar pkg1
Here a1.jar is name of the file created
pkg1 is package/folder name which contains the class files
4. Classpath stores the location of class files or path of jar file which has
classes. To print class path “echo %CLASSPATH%” command is used on
command prompt.
5. Static importis used to access static member without class name.
MCQ
1) c 2)c 3) a 4) c 5) c 6) d 7) c 8) c 9) b 10) b
11) a 12)c 13) b 14) a 15) c 16) a 17) b 18) a 19) c 20) b
21) a 22)d 23) c 24) a 25) d 26) b 27) d 28) c 29) d 30) a

158
31) a 32)c
33) b 34) b
35) a 36) a
1.11 FURTHER READING 1) “Java 2: The Complete Reference” by Herbert Schildt, McGraw Hill
Publications.
2) “Effective Java” by Joshua Bloch, Pearson Education.
3) Java package tutorial with example - Java tutorial and examples
http://java.candidjava.com/tutorial/Java-package-tutorial-with-example.htm
4) Java 101: Packages organize classes and interfaces | JavaWorld
https://www.javaworld.com/.../core-java-packages-organize-classes-and-
interfaces.htm
5) How to Create PACKAGE in Java: Learn with Example Program.
6) https://www.guru99.com/java-packages.html.
1.12 ASSIGNMENTS
1) Create a package name Vehicle. In this package create classes named
bicycle, motor cycle, car, bus and truck with appropriate attributes and
methods in them. Compile the java files and create the classes in package
Vehicle. Now prepare jar file containing this package. Put this jar file in class
path. Create a java program outside this package which is using this package
by importing it. Also create object of each class and call methods in main
method. Use appropriate access modifier while creating classes.
2) Create a package name forest. Create a sub package named animals in it. In
animal sub package create classes for tiger, lion, bear and fox with
appropriate attributes and methods in them. Modify the class path so that one
can use the package forest (without creating jar file ). Now create java
program with main method which import this package and demonstrate use of
this package in it. Use appropriate access modifier while creating classes.

159
Unit 2: Collection Framework
Unit Structure
2.1 Learning Objectives
2.2 Introduction
2.3 Why Collection Framework?
2.4 Hierarchy in collection framework
2.5 Collection interface
2.6 Set interface
2.7 List interface
2.8 Queue interface
2.9 Deque interface
2.10 Iterator interface
2.11 Implementation of List
2.12 Implementation of Queue
2.13 Implementation of Set
2.14 Let us sum up
2.15 Check your Progress
2.16 Check your Progress: Possible Answers
2.17 Further Reading
2.18 Assignments
2

160
2.1 LEARNING OBJECTIVE After studying this unit student should be able to:
Understand need of Collection framework in java.
Understand the hierarchy of classes and interfaces of Collection framework.
Study and understand the functionalities provided by various class and
interfaces of collection framework.
Study the example of utilization of various classes of collection framework like
ArrayList, LinkedList, Stack, Vector, PriorityQueue, HashSet, TreeSet etc.
2.2 INTRODUCTION
Java collection is a collection of various classes which can handle data and
perform various operations like searching, sorting, accessing and deleting data. Java
has a list of classes and interfaces which handles group of objects as a single unit.
This is also called collection framework. The collection framework has a Collection
interface and Map interface as a root of all collection classes and interfaces. They
are available in java.uti package. To use classes od collection framework we need to
import java.util package in our program.
As discussed earlier a java collection framework provides an architecture
using which we can store and manipulate a group of object as a single unit. In
collection framework java has implementation of classes, interface and algorithms.
Interfaces are the abstract data types which allows collection to operate
independently. Classes are the implementation of collection interfaces. They
represents the data structures which a programmer can be use to improve
performance. Algorithms are the ways using which the data can be search, sort or
manipulated efficiently.
The java collection framework provides a ready made implementation of
various data structures as well as the algorithm implementation for those data
structure using which we can manipulate the data.

161
2.3 WHY COLLECTION FRAMEWORK?
In earlier days when collection framework was not introduced the standard
way of managing group of java objects as a single unit were Arrays, Vectors and
HashTable. These classes have no common interface. Using these data structure it
will be difficult for programmers to implement programs, as each data structure has
different method or syntax for manipulating member objects. Hence it will be difficult
for programmers to write a common algorithm for all this classes. The other limitation
was about the Vector class. As the methods of Vector class are declared final we
can not extend Vector class to implement other similar data structure.
Hence java developers decided to deal with this problem and introduced the
Collection Framework in JDK 1.2.
The Vector and HashTable classes were modified in collection frame work as
per the new requirements.
The followings are the advantages of using collection framework.
Set of common functions implemented for all classes like ArrayList, Vector,
LinkedList etc.
Programmer is free from implementation of data structure. The efficient
implementation of data structure is readily available which programmer can
directly use.
Hence the data structures and algorithm are efficiently implemented the
performance of program can be improved.
2.4 Hierarchy in collection framework
The Below igure 58 shows the various interfaces and classes of collection
framework and relationship among them. In this diagram the grey colour boxes are
the interfaces and white colour boxes represents classes.
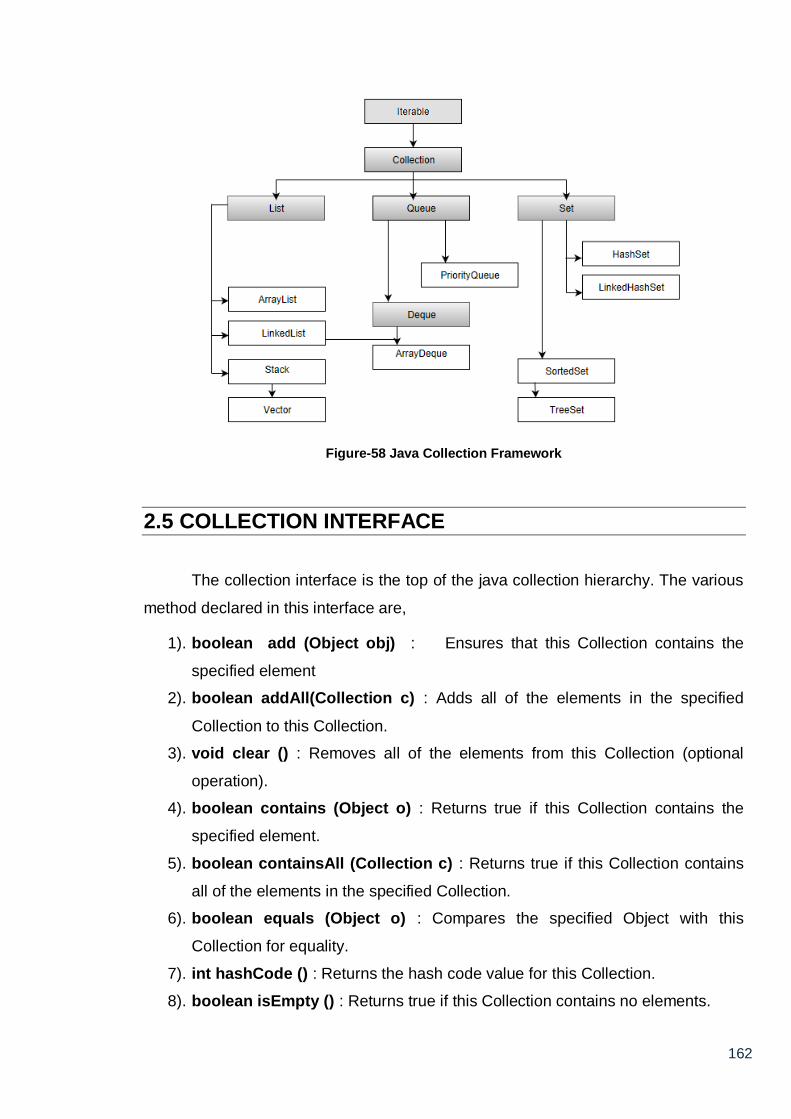
162
Figure-58 Java Collection Framework
2.5 COLLECTION INTERFACE
The collection interface is the top of the java collection hierarchy. The various
method declared in this interface are,
1). boolean add (Object obj) : Ensures that this Collection contains the
specified element
2). boolean addAll(Collection c) : Adds all of the elements in the specified
Collection to this Collection.
3). void clear () : Removes all of the elements from this Collection (optional
operation).
4). boolean contains (Object o) : Returns true if this Collection contains the
specified element.
5). boolean containsAll (Collection c) : Returns true if this Collection contains
all of the elements in the specified Collection.
6). boolean equals (Object o) : Compares the specified Object with this
Collection for equality.
7). int hashCode () : Returns the hash code value for this Collection.
8). boolean isEmpty () : Returns true if this Collection contains no elements.

163
9). Iterator iterator() : Returns an Iterator over the elements in this Collection.
10). boolean remove (Object o) : Removes a single instance of the specified
element from this Collection, if it is present (optional operation).
11). boolean removeAll (Collection c) : Removes from this Collection all of its
elements that are contained in the specified Collection (optional operation).
12). boolean retainAll (Collection c) : Retains only the elements in this
Collection that are contained in the specified Collection (optional operation).
13). int size () : Returns the number of elements in this Collection.
14). Object [ ] toArray () : Returns an array containing all of the elements in this
Collection.
15). Object [ ] toArray (Object[] a) : Returns an array containing all of the
elements in this Collection, whose runtime type is that of the specified array.
2.6 SET INTERFACE
It extends the Collection interface and contains a unique elements i.e. it can
not store duplicate objects. It is an unordered collection of the objects. Set is
implemented by HashSet, LinkedHashSet or TreeSet classes. The methods
declared in Set interface are,
1). int size(): to get the number of elements in the Set.
2). boolean isEmpty(): to check if Set is empty or not.
3). boolean contains(Object o): Returns true if this Set contains the specified
element.
4). Iterator iterator(): Returns an iterator over the elements in this set. The
elements are returned in no particular order.
5). Object[] toArray(): Returns an array containing all of the elements in this set.
If this set makes any guarantees as to what order its elements are returned by
its iterator, this method must return the elements in the same order.
6). boolean add(E e): Adds the specified element to this set if it is not already
present (optional operation).
7). boolean remove(Object o): Removes the specified element from this set if it
is present (optional operation).

164
8). boolean removeAll(Collection c): Removes from this set all of its elements
that are contained in the specified collection (optional operation).
9). boolean retainAll(Collection c): Retains only the elements in this set that
are contained in the specified collection (optional operation).
10). void clear(): Removes all the elements from the set.
11). Iterator iterator(): Returns an iterator over the elements in this set.
2.7 LIST INTERFACE
The Java.util.List extends the Collection interface. It stores ordered collection
of objects. The duplicate values can be stored in list. The List preserves the insertion
order and hence allows positional access and insertion of elements. List Interface is
implemented as ArrayList, LinkedList, Vector and Stack classes.
The followings are the methods declared in List interface.
1). void add(int index,Object O): This method adds given element at specified
index.
2). boolean addAll(int index, Collection c): This method adds all elements from
specified collection to list. First element gets inserted at given index. If there is
already an element at that position, that element and other subsequent
elements(if any) are shifted to the right by increasing their index.
3). Object remove(int index): This method removes an element from the
specified index. It shifts subsequent elements(if any) to left and decreases
their indexes by 1.
4). Object get(int index): This method returns element at the specified index.
5). Object set(int index, Object new): This method replaces element at given
index with new element. This function returns the element which was just
replaced by new element.
6). int indexOf(Object o): This method returns first occurrence of given element
or -1 if element is not present in list.
7). int lastIndexOf(Object o): This method returns the last occurrence of given
element or -1 if element is not present in list.

165
8). List subList(int fromIndex,int toIndex):This method returns List view of
specified List between fromIndex(inclusive) and toIndex(exclusive).
2.8 QUEUE INTERFACE
The Queue interface is available in java.util package and extends the
Collection interface. The queue collection is used to hold the elements about to be
processed and provides various operations like the insertion, removal etc. It is an
ordered list of objects with its use limited to insert elements at the end of the list and
deleting elements from the start of list i.e. it follows the FIFO or the First-In-First-Out
principle. Being an interface the queue needs a concrete class for the declaration
and the most common classes are the PriorityQueue and LinkedList in Java.It is to
be noted that both the implementations are not thread safe. PriorityBlockingQueue is
one alternative implementation if thread safe implementation is needed.
The function of Queue interface are,
1). add(): This method is used to add elements at the tail of queue. More
specifically, at the last of linkedlist if it is used, or according to the priority in
case of priority queue implementation.
2). peek() : This method is used to view the head of queue without removing it. It
returns Null if the queue is empty.
3). element():This method is similar to peek(). It throws
NoSuchElementException when the queue is empty.
4). remove(): This method removes and returns the head of the queue. It throws
NoSuchElementException when the queue is impty.
5). poll(): This method removes and returns the head of the queue. It returns null
if the queue is empty.
6). size(): This method return the no. of elements in the queue.
2.9 DEQUE INTERFACE
The java.util.Deque interface is a subtype of the java.util.Queue interface. The
Deque is related to the double-ended queue that supports addition or removal of
elements from either end of the data structure, it can be used as a queue (first-in-

166
first-out/FIFO) or as a stack (last-in-first-out/LIFO). These are faster than Stack and
LinkedList.
The following are the methods of Qeque interface,
1). add(element): Adds an element to the tail.
2). addFirst(element): Adds an element to the head.
3). addLast(element): Adds an element to the tail.
4). offer(element): Adds an element to the tail and returns a boolean to explain if
the insertion was successful.
5). offerFirst(element): Adds an element to the head and returns a boolean to
explain if the insertion was successful.
6). offerLast(element): Adds an element to the tail and returns a boolean to
explain if the insertion was successful.
7). iterator(): Returna an iterator for this deque.
8). descendingIterator(): Returns an iterator that has the reverse order for this
deque.
9). push(element): Adds an element to the head.
10). pop(element): Removes an element from the head and returns it.
11). removeFirst(): Removes the element at the head.
12). removeLast(): Removes the element at the tail.
13). poll(): Retrieves and removes the head of the queue represented by this
deque (in other words, the first element of this deque), or returns null if this
deque is empty.
14). pollFirst(): Retrieves and removes the first element of this deque, or returns
null if this deque is empty.
15). pollLast(): Retrieves and removes the last element of this deque, or returns
null if this deque is empty.
16). peek(): Retrieves, but does not remove, the head of the queue represented
by this deque (in other words, the first element of this deque), or returns null
if this deque is empty.
17). peekFirst(): Retrieves, but does not remove, the first element of this deque,
or returns null if this deque is empty.
18). peekLast(): Retrieves, but does not remove, the last element of this deque,
or returns null if this deque is empty.

167
2.10 ITERATOR INTERFACE
Iterator is an interface that iterates the elements. It is used to traverse the list
and modify the elements. Iterator interface has three methods which are mentioned
below:
1). public boolean hasNext(): This method returns true if the iterator has more
elements.
2). public object next() : It returns the element and moves the cursor pointer to
the next element.
3). public void remove(): This method removes the last elements returned by
the iterator.
2.11 IMPLEMENTATION OF LIST
The List interface is further implemented into the following classes:
1. ArrayList
2. LinkedList
3. Vectors
ArrayList
ArrayList is the implementation of List Interface where the elements can be
dynamically added or removed from the list. The size of the list can be increased
dynamically if the elements are added more than the initial size.
ArrayList obj = new ArrayList ();
Some of the methods in ArrayList are listed below:
1). boolean add(Collection c) : Appends the specified element to the end of a
list.
2). void add(int index, Object element): Inserts the specified element at the
specified position.
3). void clear() : Removes all the elements from this list.
4). int lastIndexOf(Object o) : Return the index in this list of the last occurrence
of the specified element, or -1 if the list does not contain this element.
5). Object clone() : Return a shallow copy of an ArrayList.
6). Object[] toArray() : Returns an array containing all the elements in the list.

168
7). void trimToSize() : Trims the capacity of this ArrayList instance to be the
list’s current size.
Example,
import java.util.*;
class ExAList
{
public static void main(String args[])
{
ArrayList al = new ArrayList();
al.add("Hello");
al.add("World");
Iterator itr = al.iterator();
while(itr.hasNext())
{ System. out. println (itr.next()); }
}
}
Figure-59 Output of program
LinkedList
LinkedList is a sequence of links which contains items. Each link contains a
connection to another link.
Syntax: Linkedlist object = new Linkedlist();
Java LinkedList class uses two types of Linked list to store the elements:
Singly Linked List
Doubly Linked List
Some of the methods in the LinkedList are listed below:
1). boolean add( Object o) : It is used to append the specified element to the
end of the vector.
2). boolean contains(Object o) : Returns true if this list contains the specified
element.
3). void add (int index, Object element) : Inserts the element at the specified
element in the vector.

169
4). void addFirst(Object o) : It is used to insert the given element at the
beginning.
5). void addLast(Object o) : It is used to append the given element to the end.
6). int size() : It is used to return the number of elements in a list
7). boolean remove(Object o) : Removes the first occurrence of the specified
element from this list.
8). int indexOf(Object element) : Returns the index of the first occurrence of the
specified element in this list, or -1.
9). int lastIndexOf(Object element) : Returns the index of the last occurrence of
the specified element in this list, or -1.
Example,
import java.util.*;
public class ExLnList
{
public static void main(String args[])
{
LinkedList<String> al = new LinkedList<String>();
al.add("Aryu");
al.add("Hello");
al.add("how are you ?");
Iterator<String> itr = al.iterator();
while(itr.hasNext()){
System. out. println (itr.next());
}
}
}
Figure-60 Output of program
Vectors
Vectors are similar to arrays, where the elements of the vector object can be
accessed via an index into the vector. Vector implements a dynamic array. Also, the

170
vector is not limited to a specific size, it can shrink or grow automatically whenever
required. It is similar to ArrayList, but with two differences : Vector is synchronized
and Vector contains many legacy methods that are not part of the collections
framework.
We can create a Vector using following constructor.
1). Vector (): Creates a default vector of initial capacity is 10.
2). Vector (int size): Creates a vector whose initial capacity is specified by
size.
3). Vector (int size, int incr ): Creates a vector whose initial capacity is
specified by size and increment is specified by incr. It specifies the number
of elements to allocate each time that a vector is resized upward.
4). Vector (Collection c): Creates a vector that contains the elements of
collection c.
The followings are some of the methods of the Vector class,
1). boolean add(Object o) : Appends the specified element to the end of the
list.
2). void clear() : Removes all of the elements from this list.
3). void add(int index, Object element) : Inserts the specified element at the
specified position.
4). boolean remove(Object o) : Removes the first occurrence of the specified
element from this list.
5). boolean contains(Object element) : Returns true if this list contains the
specified element.
6). int indexOfObject (Object element) : Returns the index of the first
occurrence of the specified element in the list, or -1.
7). int size() : Returns the number of elements in this list.
8). int lastIndexOf (Object o) : Return the index of the last occurrence of the
specified element in the list, or -1 if the list does not contain any element.
import java.util.*; class ExVector { public static void main(String[] arg) {

171
Vector v = new Vector(); v.add(0, 1); v.add(1, 2); v.add(2, "Hello"); v.add(3, "World"); v.add(4, 3); System. out. println ("Vector is: " + v); v.clear(); System. out. println ("after clearing: " + v); } }
Figure-61 Output of program
Stack
A Stack class models and implements Stack data structure. The class is
based on the principle of last-in-first-out. In addition to the basic push and pop
operations, the class provides three more functions of empty, search and peek. The
Stack class extends Vector class with the five stack functions. The Stack class can
also be referred to as the subclass of Vector.
The followings are the methods in Stack class.
1). Object push(Object element) : Pushes an element on the top of the stack.
2). Object pop() : Removes and returns the top element of the stack. An
‘EmptyStackException’ exception is thrown if we call pop() when the invoking
stack is empty.
3). Object peek() : Returns the element on the top of the stack, but does not
remove it.
4). boolean empty() : It returns true if nothing is on the top of the stack. Else,
returns false.
5). int search(Object element) : It determines whether an object exists in the
stack. If the element is found, it returns the position of the element from the
top of the stack. Else, it returns -1.

172
Example,
import java.util.Stack;
public class ExStack {
public static void main(String[] args) {
Stack<String> stk = new Stack<>();
stk.push("one");
stk.push("two");
stk.push("three");
stk.push("four");
System. out. println ("Stack => " + stk);
System. out. println ();
String tp = stk.pop();
System. out. println ("Stack.pop() => " + tp);
System. out. println ("Current Stack => " + stk);
System. out. println ();
tp = stk.peek();
System. out. println ("Stack.peek() => " + tp);
System. out. println ("Current Stack => " + stk);
}
}
Figure-62 Output of program
2.12 IMPLEMENTATION OF QUEUE

173
A PriorityQueue implements Queue interface. A PriorityQueue is used when
the objects are supposed to be processed based on the priority. It is known that a
queue follows First-In-First-Out algorithm, but sometimes the elements of the queue
are needed to be processed according to the priority, that’s when the PriorityQueue
comes into play. The PriorityQueue is based on the priority heap. The elements of
the priority queue are ordered according to the natural ordering, or by a Comparator
provided at queue construction time, depending on which constructor are used.
Followings are some of the methods of PriorityQueue class,
1). boolean add(E element): This method inserts the specified element into this
priority queue.
2). public remove(): This method removes a single instance of the specified
element from this queue, if it is present
3). public poll(): This method retrieves and removes the head of this queue, or
returns null if this queue is empty.
4). public peek(): This method retrieves, but does not remove, the head of this
queue, or returns null if this queue is empty.
5). Iterator iterator(): Returns an iterator over the elements in this queue.
6). boolean contains(Object o): This method returns true if this queue contains
the specified element
7). void clear(): This method is used to remove all of the contents of the priority
queue.
8). boolean offer(E e): This method is used to insert a specific element into the
priority queue.
9). int size(): The method is used to return the number of elements present in the
set.
10). toArray(): This method is used to return an array containing all of the
elements in this queue.
11). Comparator comparator(): The method is used to return the comparator
that can be used to order the elements of the queue.
Example,
import java.util.*;

174
class ExQueue {
public static void main(String args[]){
PriorityQueue<String> queue=new PriorityQueue<String>();
queue.add("Hello");
queue.add("World");
queue.add("Aryu");
System. out. println ("head:"+queue.element());
System. out. println ("head:"+queue.peek());
System. out. println ("iterating the queue elements:");
Iterator itr=queue.iterator();
while(itr.hasNext()){
System. out. println (itr.next());
}
queue.remove();
queue.poll();
System. out. println ("after removing two elements:");
Iterator<String> itr2=queue.iterator();
while(itr2.hasNext()){
System. out. println (itr2.next());
}
}
}
Figure-63 Output of program
2.13 IMPLEMENTATION OF SET

175
Set has its implementation in various classes such as HashSet, TreeSetand
LinkedHashSet. HashSet stores elements in random order whereas LinkedHashSet
stores elements according to insertion order and TreeHashSet stores according to
natural ordering.
HashSet
Java HashSet class creates a collection that uses a hash table for storage.
Hashset only contain unique elements and it inherits the AbstractSet class and
implements Set interface. Also, it uses a mechanism hashing to store the elements.
Following are some of the methods of HashSet class:
1). boolean add (Object o) : Adds the specified element to this set if it is not
already present.
2). boolean contains (Object o) : Returns true if the set contains the specified
element.
3). void clear () : Removes all the elements from the set.
4). boolean isEmpty() : Returns true if the set contains no elements.
5). boolean remove(Object o) : Remove the specified element from the set.
6). Object clone() : Returns a shallow copy of the HashSet instance: the
elements themselves are not cloned.
7). Iterator iterator() : Returns an iterator over the elements in this set.
8). int size() : Return the number of elements in the set.
Example,
import java.util.*;
class ExHSet
{
public static void main ( String args [] )
{
HashSet <String> al = new HashSet ();
al.add( "Hello" );
al.add( "World" );
al.add( "Aryu" );
Iterator <String> itr = al.iterator ();
while ( itr.hasNext () )

176
{
System. out. println ( itr.next() );
}
}
}
Figure-64 Output of program
LinkedHashset
Java LinkedHashSet class is a Hash table and Linked list implementation of
the set interface. It contains only unique elements like HashSet. Linked HashSet also
provides all optional set operations and maintains insertion order.
1). public boolean add(Object o) :Adds an object to a LinkedHashSet if already
not present in HashSet.
2). public boolean remove(Object o) : Removes an object from LinkedHashSet
if found in HashSet.
3). public boolean contains(Object o) : Returns true if object found else return
false
4). public boolean isEmpty() : Returns true if LinkedHashSet is empty else
return false
5). public int size() : Returns number of elements in the LinkedHashSet
Example,
import java.util.*;
public class LHSet
{
public static void main ( String args[] )
{
LinkedHashSet <String> al = new LinkedHashSet();
al.add ( "Hello" );

177
al.add ( "World" );
al.add ( "Aryu" );
Iterator <String> itr = al.iterator ();
While ( itr.hasNext() )
{
System. out. println ( itr.next() );
}
}
}
Figure-65 Output of program
TreeSet
TreeSet class implements the Set interface that uses a tree for storage. The
objects of this class are stored in the ascending order. Also, it inherits AbstractSet
class and implements NavigableSet interface. It contains only unique elements like
HashSet. In TreeSet class, access and retrieval time are faster.
The followings are some of the methods of TreeSet class.
1). boolean addAll(Collection c) : Add all the elements in the specified
collection to this set.
2). boolean contains(Object o) : Returns true if the set contains the specified
element.
3). boolean isEmpty() : Returns true if this set contains no elements.
4). boolean remove(Object o) : Remove the specified element from the set.
5). void add(Object o) : Add the specified element to the set.
6). void clear() : Removes all the elements from the set.
7). Object clone() : Return a shallow copy of this TreeSet instance.
8). Object first() : Return the first element currently in the sorted set.
9). Object last() : Return the last element currently in the sorted set.

178
10). int size() : Return the number of elements in the set.Let us understand
these.
Example,
import java.util.*;
class ExTreeSet
{
public static void main( String args[] )
{
TreeSet <String> al = new TreeSet <String> ();
al.add ( "Hello" );
al.add ( "World" );
al.add ( "Aryu" );
Iterator <String> itr = al.iterator();
While ( itr.hasNext() )
{
System. out. println ( itr.next ( ) );
}
}
}
Figure-66 Output of program
2.14 LET US SUM UP Collection: It is a parent interface of all classes of collection framework.It declares
the methods that every collection will have.
Iterator : Iterator interface provides the facility of iterating the elements in a forward
direction only.

179
List: List interface is the child interface of Collection interface. It inhibits a list type
data structure in which we can store the ordered collection of objects. It can have
duplicate values.
ArrayList: The ArrayList class implements the List interface. It uses a dynamic array
to store the duplicate element of different data types. The ArrayList class maintains
the insertion order and is non-synchronized. The elements stored in the ArrayList
class can be randomly accessed.
LinkedList: LinkedList implements the Collection interface. It uses a doubly linked
list internally to store the elements. It can store the duplicate elements. It maintains
the insertion order and is not synchronized.
Vector: Vector uses a dynamic array to store the data elements. It is similar to
ArrayList. It is synchronized and contains many methods that are not the part of
Collection framework.
Stack: The stack is the subclass of Vector. It implements the last-in-first-out data
structure, i.e., Stack. The stack contains all of the methods of Vector class and also
provides its methods like boolean push(), boolean peek(), boolean push(object o),
which defines its properties.
Queue: Queue interface maintains the first-in-first-out order. It can be defined as an
ordered list that is used to hold the elements which are about to be processed.
PriorityQueue: The PriorityQueue class implements the Queue interface. It holds
the elements or objects which are to be processed by their priorities. PriorityQueue
does not allow null values to be stored in the queue
Set: Set Interface in Java is present in java.util package. It extends the Collection
interface. It represents the unordered set of elements which doesn't allow us to store
the duplicate items.
HashSet: HashSet class implements Set Interface. It represents the collection that
uses a hash table for storage. Hashing is used to store the elements in the HashSet.
It contains unique items.

180
LinkedHashSet: It represents the LinkedList implementation of Set Interface. It
extends the HashSet class and implements Set interface. Like HashSet, It also
contains unique elements. It maintains the insertion order and permits null elements.
TreeSet: Java TreeSet class implements the Set interface that uses a tree for
storage. TreeSet also contains unique elements. However, the access and retrieval
time of TreeSet is quite fast. The elements in TreeSet stored in ascending order
2.15 CHECK YOUR PROGRESS MCQ
1) Which of these interface handle sequences?
a) Set
b) List
c) Comparator
d) Collection
2) Which of these interface declares core method that all collections will have?
a) set
b) EventListner
c) Comparator
d) Collection
3) Which of this interface must contain a unique element?
a) Set
b) List
c) Array
d) Collection
4) What is the output of this program?
import java.util.*;
class Collection_Algos
{
public static void main(String args[])
{
LinkedList list = new LinkedList();
list.add(new Integer(2));
list.add(new Integer(8));
list.add(new Integer(5));
list.add(new Integer(1));
Iterator i = list.iterator();

181
Collections.reverse(list);
Collections.sort(list);
while(i.hasNext())
System.out.print(i.next() + " ");
}
}
a) 2 8 5 1
b) 1 5 8 2
c) 1 2 5 8
d) 2 1 8 5
5) What is the output of this program?
import java.util.*;
class Collection_Algos
{
public static void main(String args[])
{
LinkedList list = new LinkedList();
list.add(new Integer(2));
list.add(new Integer(8));
list.add(new Integer(5));
list.add(new Integer(1));
Iterator i = list.iterator();
Collections.reverse(list);
Collections.shuffle(list);
while(i.hasNext())
System.out.print(i.next() + " ");
}
}
a) 2 8 5 1
b) 1 5 8 2
c) 1 2 5 8
d) Any random order
6) which method is used to insert an element into a stack object?
a)insert()
b)push()
c)pop()
d)add()
7) which method is used to know the element add the top of the stack?

182
a)pop()
b)top()
c)peek()
d)search()
8) To delete the top element of the stack …….method is used?
a)delete()
b)pop()
c)remove()
d)peep()
9) To insert a key-value pair in a hashtable ………method is used?
a)insert()
b) put()
c) add()
d ) push()
10) To find the value of an element by it’s key…….method is used?
a) get()
b) getvalue()
c) pop()
d) value()
2.16 CHECK YOUR PROGRESS:POSSIBLE ANSWERS MCQ
1) b 2) d 3) a 4) c
5) d 6) b 7) b 8) b
9) c 10) a
2.17 FURTHER READING
1) Java Collections Framework Tutorials - BeginnersBook.com
https://beginnersbook.com/java-collections-tutorials/
2) Java Collections Framework | Collections in Java With Examples
https://www.edureka.co/blog/java-collections/
3) “Java 2: The Complete Reference” by Herbert Schildt, McGraw Hill
Publications.
4) “Effective Java” by Joshua Bloch, Pearson Education.
2.18 ASSIGNMENTS 1) Using list perform following operation on it in java program. (use ArrayList and
LinkedList )

183
1. Creating a new list
2. Basic operations
3. Iterating over a list
4. Searching for an element in a list
5. Sorting a list
6. Copying one list into another
7. Shuffling elements in a list
8. Reversing elements in a list
9. Extracting a portion of a list
10. Converting between Lists and arrays
11. List to Stream
12. Concurrent lists.
2) Write a java program to evaluate arithmetic operation using stack.
3) Implement a java program to show various operation of queue.
4) Implement singly linked list and its operations in java program.

184
Unit 3: Introduction of Exception
Unit Structure
3.1 Learning Objectives
3.2 Introduction
3.3 Error
3.4 Hierarchy of Exception classes
3.5 Types of Exceptions
3.6 Uncaught Exception
3.7 Handling Exception
3.8 try with multiple catch
3.9 Nested try...catch...finally block
3.10 Let us sum up
3.11 Check your Progress
3.12 Check your Progress: Possible Answers
3.13 Further Reading
3.14 Assignments
3

185
3.1 LEARNING OBJECTIVE After studying this unit student should be able to:
Study various types of errors while programming.
Understand need of Error handling in java.
Study various mechanisms to handle error and exceptions.
Understand the types of exception
Use exception handling mechanism using try ... catch, try with multiple catch
and nested catch.
3.2 INTRODUCTION An exception is an unwanted or unexpected event occurs during the
execution of the program. Exception occurs at run time which disturbs the flow of
execution program instructions. The java program terminates abnormally due to
exception. It is not recommended therefore these exceptions are to be handled in
our program. These exceptions are caused by error in data input, by programmer
error, and by physical resources that have failed during execution of program.
3.3 ERROR
Error is unexpected event occur which stops program from compiling or
executing. The programmer should know that there are very less chances that a
program will run perfectly in first attempt. Though programmer has did nice designing
and proper care has been taken while coding we can never predict the execution of
program error free. The programmer must perform systematic effort to detect and
rectify the errors present in the program. For this effort all programmer should know
what types of error may present in the program.
3.3.1 TYPES OF ERRORS IN PROGRAMMING
The error can be classified into four categories as listed below.
1. syntax errors
2. logical errors
3. run-time errors

186
4. latent errors
Syntax Errors
Each programming language has a rules to write a program. The violation of
these rules and poor understanding of the programming language results in syntax
errors. The syntax errors are detected by the compiler. If program has any syntax
error compilation of program fails and it lists the syntax error with line number where
syntax error is occurred.
For example,
public class ExErr {
public static void main ( String args[] ) { int a=10 int b=20 System. out. println ( a + b ); }
}
In above program line 5 and 6 of the program doesn’t have semicolon at the end
hence the compiler will show us errors.
Figure-67 Output of program
Run-time Errors
These error are not detected by compiler. They are the errors that occur
during the execution of the program. For example, dividing by zero error, insufficient
memory for dynamic memory allocation, referencing an out-of-range array element
etc. A program with these kinds of errors will run but produce erroneous results or
may cause abnormal termination of program. Detection and removal of a run-time
error is a very difficult task.

187
public class ExErr {
public static void main ( String args[] ) throws Exception { int a[] = { 10, 23, 85, 52 }; System. out. println ( a[10] ); }
}
Figure-68 Output of program
Logical Errors
These errors are related to the logic of the program. Logical errors are also
not detected by compiler and cause incorrect results. These errors occur due to
incorrect translation of algorithm into the program, poor understanding of the
problem and a lack of clarity of hierarchy of operators. Logic errors occur when there
is a design flaw in your program. Common examples are:
Multiplying when you should be dividing
Adding when you should be subtracting
Opening and using data from the wrong file
Displaying the wrong message
Latent Errors
Latent Errors are the ‘hidden’ errors that occur only when a particular set of
data is used. Such errors can be detected only by using all possible combinations of
data.
For example,
import java.util.Scanner; public class ExErr {
public static void main ( String args[] ) { int a[] = { 10, 23, 85, 52 }; System. out. println (" Enter Index : "); Scanner sc = new Scanner ( System.in );

188
int i = sc.nextInt(); System. out. println ( a[i] ); }
}
Figure-69 Output of program
An error occurs only when we input value of i more than 4.
3.4 HIERARCHY OF EXCEPTION AND ERROR CLASS
Figure-70 Hierarchy of exception class and error class
All exception and errors types are sub classes of class Throwable, which is
base class of the hierarchy. The class Exception is a subclass of Throwable class.
This class is used for exceptional conditions that user programs should catch. Mainly
Throwable
Error Exception
StackOverflowError
VirtualMachineError
OutOfMemoryError
IOException
SQLException
ClassNotFoundException
RuntimeException
ArithmeticException
NumberFormatException
IndexOutOfBoundException
NullPointerException

189
they are used to handle runtime error, logical errors and latent errors. The
NullPointerException is an example of such an exception which is a subclass of
Exception class. The class Error is also derived from Throwable class which is used
by the Java virtual machine (JVM) to indicate errors. StackOverflowError is an
example of such an error class which is derived from the Error class.
3.5 TYPES OF EXCEPTIONS
There are mainly two types of exceptions: checked and unchecked. An error
is considered as the unchecked exception.
1) Checked Exception
All the classes which extend the Throwable class except RuntimeException
and Error are known as checked exceptions for example, IOException,
SQLException etc. Checked exceptions are checked and raised at compile-time. The
check exceptions are forced to be checked and handled using try…catch block or
declare it in function header using throws keyword in java program.
import java.io.File; import java.io.FileReader; public class ExErr { public static void main(String args[]) { File file = new File ( “E://file.txt" ); FileReader fr = new FileReader ( file ); } }
Figure-71 Output of program
The Compile time error as we have not handled check exception
FileNotFoundException in our program. The error can be solved using following
code,
import java.io.File; import java.io.FileReader;

190
public class ExErr { public static void main(String args[]) throws Exception {
File file = new File("E://file.txt"); FileReader fr = new FileReader(file); } }
Figure-72 Output of program
2) Unchecked Exception
The classes which inherit RuntimeException are known as unchecked
exceptions. For example ArithmeticException, NumberFormatException,
NullPointerException, ArrayIndexOutOfBoundsException etc. The unchecked
exceptions are not checked at compile-time, but they are checked at runtime. These
exceptions handle the unrecoverable programming errors.
For example,
import java.util.Scanner; public class ExErr { public static void main ( String args[] ) { String x = "abc "; String s= null; String c = x + s.length(); System. out. println ( c ); } }
Figure-73 Output of program
3.6 UNCAUGHT EXCEPTION
Java provides a strong built in exception handling mechanism. It has a list of
exception classes derived from Exception class. The exception is raised when any
error occurred which further throws errors in form of appropriate Exception class

191
object. The main issue of this mechanism is that it terminates the program execution
from the line where error found. The program code after that error will not be
executed. For example, in following code the program will compiled successfully.
When we execute the program it will ask for value of a and b. Here a and b should
be integer value only. If we enter integer value for a and b, the program executes
successfully and output will print summation of them. However when we enter
character value for either a or b, at that point of time the run time error is raised and
the object of InputMismatchExcpetion is thrown which prints an error message and
terminate program execution.
import java.util.Scanner; public class ExErr { public static void main(String args[]) throws Exception { int a; int b; Scanner sc = new Scanner ( System.in ); System. out. println ( " a = "); a = sc.nextInt(); System. out. println ( " b = "); b = sc.nextInt(); System. out. println ( " a + b = " + ( a + b )); } }
Figure-74 Output of program
3.7 HANDLING EXCEPTION
The JVM automatically handle the unchecked Exception if we have not
handled the in java program. This will print a system generated error message along
with Exception class name. If we want to handle exception in our own way by

192
printing our own error message, we can do that by using exception handling
mechanism in java program.
The keywords try, catch and finally are used to handle exception in any java
program. The try block can be used with either catch block or finally block. The
syntax of using them in program is given below,
try {
// program logic
} catch ( Exception_Class obj ) {
// custom error message
// this block executes only when error occurred in program logic of the try block
} finally {
// the code in finally will always be executed
}
We can not use try block without either catch or finally. It will give compilation error if
we use try block only.
Example,
import java.util.Scanner; public class ExErr1 { public static void main(String args[]) throws Exception { int a = 0; int b = 0; try { Scanner sc = new Scanner ( System.in ); System. out. println ( " a = "); a = sc.nextInt(); System. out. println ( " b = "); b = sc.nextInt(); } } }
Figure-75 Output of program
The following example shows use of try block with catch block, finally block and with
both catch and finally block.

193
Example 1 (try block with catch block)
import java.util.Scanner; import java.util.InputMismatchException; public class ExErr1 { public static void main(String args[]) throws Exception { int a = 0; int b = 0; try { Scanner sc = new Scanner ( System.in ); System. out. println ( " a = "); a = sc.nextInt(); System. out. println ( " b = "); b = sc.nextInt(); System. out. println ( " a + b = " + ( a + b )); } catch (InputMismatchException e ) { System. out. println ( "Error occured as the value entered is a character "); } } }
Figure-76 Output of program
The code which may raise an exception must be put in try block. When an
error occurred during execution of program the try block throws an exception which
will be caught in catch block. In catch block we can write a code to handle exception.
In above example, we have printed a user message when exception is raised.
Example 2 (try block with finally block)
import java.util.Scanner; import java.util.InputMismatchException; public class ExErr1 {

194
public static void main(String args[]) throws Exception { int a = 0; int b = 0; try { Scanner sc = new Scanner ( System.in ); System. out. println ( " a = "); a = sc.nextInt(); System. out. println ( " b = "); b = sc.nextInt(); } finally { System. out. println ( " a + b = " + ( a + b )); } } }
Figure-77 Output of program
In above example we have put code which may raise exception in try block.
During program execution as we entered character for integer input an exception is
raised at that statement of program. As we have not written catch block the
exception will be handle by JVM, which prints an error message. After printing error
message program will not be terminated. It executes the finally block which prints
sum of a and b.
Example 3 (try block with both catch and finally block)
import java.util.Scanner; import java.util.InputMismatchException; public class ExErr {

195
public static void main(String args[]) throws Exception { int a = 0; int b = 0; try { Scanner sc = new Scanner ( System.in ); System. out. println ( " a = "); a = sc.nextInt(); System. out. println ( " b = "); b = sc.nextInt(); } catch (InputMismatchException e ) { System. out. println ( "Error occured as the value entered is a character "); } finally { System. out. println ( " a + b = " + ( a + b )); } } }
Figure-78 Output of program
The code which may have possibility of error can be put in try block and when
error occurred in try block the appropriate exception object will be thrown. This
thrown object will be catch in catch block of the program (Here in above example as
e object). We can handle exception in catch block by writing our own code segment.
Here in above example we have printed our own error message. The finally block
contains the code which must be executed in any way. If exception raised due to
error, the program control will move to catch and then finally block. If exception is not
raised, after executing try block program control moves to the finally block.

196
3.8 TRY WITH MULTIPLE CATCH
When in a try block there is only one possible error, we may handle that error
by writing catch block with appropriate exception. However it may possible that our
try block may raise more than one exception during execution of different code
statement. To handle such situation java allow us to write multiple catch block for
single try block. Each catch block will handle the appropriate exception.
For example,
import java.util.Scanner; import java.util.InputMismatchException; public class ExErr { public static void main(String args[]) throws Exception { int a[] = { 3, 4, 5, 6, 7, 8}; int b = 0, i=0; try { Scanner sc = new Scanner ( System.in ); System. out. println ( " index = "); i = sc.nextInt(); System. out. println ( " a[i] = " + a[i]); System. out. println ( " b = "); b = sc.nextInt(); System. out. println ( " b = " + b); } catch (InputMismatchException e ) { System. out. println ( "Error occured as the value entered is a character "); } catch (ArrayIndexOutOfBoundsException e ) { System. out. println ( "Error occured as the value of i is >=6 "); } } }

197
Figure-79 Output of program
In above example, the line 8 in main method may raise
ArrayIndexOutOfBoundsException if the value of entered i is > = 6. The line 11 of
main method will raise InputMismatchException if the entered value for b is non
integer. To handle these two exceptions of try block we have written two catch
blocks, one for handling each exception.
3.9 NESTED TRY...CATCH...FINALLY BLOCK
Like loops and if...else statement, try ... catch...finally block can also be
nested. We can write a try...catch...finally block inside the try...catch... finally block.
We can use this concept in our program when within try block we may have some
program statements which causes an error and the other program statements cause
the other error and we want to handle both errors independently. When we use
nested try...catch block the inner block will be executed first.
For example,
import java.util.Scanner; import java.util.InputMismatchException; public class ExErr {

198
public static void main(String args[]) throws Exception { int a[] = { 3, 4, 5, 6, 7, 8}; int b = 0, i=0; try { Scanner sc = new Scanner ( System.in ); System. out. println ( " index = "); i = sc.nextInt(); System. out. println ( " a[i] = " + a[i]); try{ System. out. println ( " b = "); b = sc.nextInt(); System. out. println ( " b = " + b); } catch (InputMismatchException e ) { System. out. println ( "Error occured as the value entered is a character "); } } catch (ArrayIndexOutOfBoundsException e ) { System. out. println ( "Error occured as the value of i is >=6 "); } } }
Figure-80 Output of program
3.10 LET US SUM UP Error : Error is something unexpected in your program which stop execution of the
program.

199
Syntax Error : They are the design time error which is due to mistake done by
programmer. They are detected at compile time.
Logical Error : these errors occur due to mistake in program logic. These errors
occur when the output of the program is not as per the programmer expectation.
Runtime Error : They are not detected by compiler. They occur at runtime due to
unexpected input or failure. Java handles run time error using exception.
Exception : Java handles the run time error using exception handling mechanism.
Checked Exception : The checked exception are the exception classes which are
derived from Exception class. Checked exception is raised at compile time. These
exceptions must be handled in program.
Unchecked Exception : These exceptions are raised at run time. All the exception
classes derived from RuntimeException class are of unchecked type.
Uncaught Exception : The JVM will automatically handle the exception raised at
run time (unchecked exception) . For handling checked exception programmer has
to use try ... catch ... finally blocks or throws keyword.
Exception handling using try ... catch ... finally: The code which may have
possibility of error can be put in try block and when error occurred in try block the
appropriate exception object will be thrown. This thrown object will be catch in catch
block of the program. The finally block always runs by the program. We can not use
try block without catch or finally block.
Try with multiple catch : With a single try block we can write multiple catch block in
our java program. One catch block for each Exception we want to handle.
Nested try ... catch ... finally : It is also possible to write try ... catch ... finally block
within a try ... catch ... finally. It is called nested try ... catch ... finally.
3.11 CHECK YOUR PROGRESS True-False with reason
1. We can not handle errors in java program.

200
2. Syntax error will be caught at run time.
3. Runtime error will be caught by compiler.
4. Compiler can detect syntax error only.
5. Try can be used either with catch or finally block.
6. We can not write more than one catch block with try block.
7. Finally block will be run even though the exception is raised.
8. Nested try … catch is not supported in java.
9. Checked exception must be handled by programmer in java program.
10. Uncheck exception must be handled by programmer in java program.
Match A and B.
A B
1)Exception a)unexpected event
2)Error b) try … catch within try … catch
3)Checked Exception c)must be handled by programmer
4)Unchecked Exception d)handled by JVM
5)Nested try … catch e)error which can be handle at run time
Compare the following:
1. Error and Exception
2. Checked Exception and Unchecked Exception
3. Catch block and finally block
4. Syntax error and runtime error
MCQ
1. Exception is a class/interface/abstract class/other?
a. Class
b. Interface
c. Abstract class
d. Other
2. Exception and Error are direct subclasses of?
a. BaseException
b. Throwable
c. Object
d. RuntimeException
3. Which of these are java.lang.Error in exception handling in java

201
a. VirtualMachineError
b. IOError
c. AssertionError
d. ThreadDeath
e. All
4. What type of Exceptions can be ignored at compile time?
a. Runtime
b. Checked
c. Both
d. None
5. What will be output of following program –
public class ExceptionTest {
public static void main ( String args[] ) { System. out. println ( “ method return -> “ + m() ); } static String m( ) { try { int i = 10 / 0; } catch ( ArithmeticException e ) { return “catch”; } finally { return “finally”; } } }
a. runtime exception
b. method return -> finally
c. method return -> catch
d. compile timeError
6. Which of the following are the most common run-time errors in Java
programming?
i) Missing semicolons
ii) Dividing an integer by zero
iii) Converting invalid string to number
iv) Bad reference of objects
a) i and ii only
b) ii and iii only
c) iii and iv only
d) i and iv only
7. Which of the following are the most common compile time errors in Java
programming?
i) Missing semicolons
ii) Use of undeclared variables

202
iii) Attempting to use a negative size for an array
iv) Bad reference of objects
a) i, ii and iii only
b) ii, iii and iv only
c) i, ii and iv only
d) All i, ii, iii and iv
8. The unexpected situations that may occur during program execution are
i) Running out of memory
ii) Resource allocation errors
iii) Inability to find a file
iv) Problems in network
a) i, ii and iii only
b) ii, iii and iv only
c) i, ii and iv only
d) All i, ii, iii and iv
9. The class at the top of the exception classes hierarchy is called
……………………
a) throwable
b) catchable
c) hierarchical
d) ArrayIndexOutofBounds
10. ………………… exception is thrown when an exceptional arithmetic condition
has occurred.
a) Numerical
b) Arithmetic
c) Mathematical
d) All of the above
11 …………………….. exception is thrown when an attempt is made to access
an array element beyond the index of the array.
a) Throwable
b) Restricted
c) Security
d) ArrayIndexOutofBounds
12. You can implement exception-handling in your program by using which of the
following keywords.
i) Try ii) NestTry iii) Catch iv) Finally
a) i, ii and iii only
b) ii, iii and iv only
c) i, iii and iv only
d) All i, ii, iii and iv

203
13. When a ……………………. block is defined, this is guaranteed to execute,
regardless of whether or not in exception is thrown.
a) throw
b) catch
c) finally
d) try
14. Every try statement should be followed by at least one catch statement;
otherwise …………………. will occur.
a) no execution
b) null
c) zero
d) compilation error
15. If an exception occurs within the …………………….. block, the appropriate
exception-handler that is associated with the try block handles the exception.
a) throw
b) catch
c) finally
d) try
16 Exception classes are available in the ……………………package.
a) java.lang
b) java.awt
c) java.io
d) java.applet
17 Consider the following code snippet:
……………….
……………….
try {
int x = 0;
int y = 50 / x;
System. out. println (“Division by zero”);
}
catch(ArithmeticException e) {
System. out. println (“catch block”);
}
………………
………………
What will be the output?
a) Error.
b) Division by zero
c) Catch block
d) Division by zero Catch block

204
18 When an exception in a try block is generated, the Java treats the multiple
………………. statements like cases in switch statement.
a) throw
b) catch
c) finally
d) try
19. The …………………. statement can be used to handle an exception that is
not caught by any of the previous catch statement.
a) throw
b) catch
c) finally
d) try
20. What will be the output of the program?
public class Foo
{ public static void main(String[] args) { try { return; } finally { System. out. println ( "Finally" ); } } }
a. Finally
b. Compilation fails.
c. The code runs with no output.
d. An exception is thrown at
runtime.
21 What will be the output of the program?
try
{ int x = 0; int y = 5 / x; } catch (Exception e) { System. out. println ("Exception"); } catch (ArithmeticException ae) {

205
System. out. println (" Arithmetic Exception"); } System. out. println ("finished");
a) finished
b) Exception
c) Compilation fails.
d) Arithmetic Exception
22. What will be the output of the program?
public class X
{ public static void main(String [] args) { try { badMethod(); System.out.print("A"); } catch (Exception ex) { System.out.print("B"); } finally { System.out.print("C"); } System.out.print("D"); } public static void badMethod() {} }
a) AC
b) BC
c) ACD
d) ABCD
23 What will be the output of the program?
public class X
{ public static void main(String [] args) { try { badMethod(); /* Line 7 */ System.out.print("A"); } catch (Exception ex) /* Line 10 */ { System.out.print("B"); /* Line 12 */

206
} finally /* Line 14 */ { System.out.print("C"); /* Line 16 */ } System.out.print("D"); /* Line 18 */ } public static void badMethod() { throw new RuntimeException(); } }
a) AB
b) BC
c) ABC
d) BCD
24 What will be the output of the program?
public class MyProgram
{ public static void main( String args[] ) { try { System.out.print( "Hello world " ); } finally { System. out. println ( "Finally executing " ); } } } a) Nothing. The program will not compile because no exceptions are specified.
b) Nothing. The program will not compile because no catch clauses are specified.
c) Hello world.
d) Hello world Finally executing
25. Types of exceptions in Java programming are
a) Checked exception
b) unchecked exception
c) Both A & B
d) None
26. What is the output of the following program?
public class Test

207
{ private void m1() { m2(); System.out.printf("1"); } private void m2() { m3(); System.out.printf("2"); } private void m3() { System.out.printf("3"); try { int sum = 4/0; System.out.printf("4"); } catch(ArithmeticException e) { System.out.printf("5"); } System.out.printf("7"); } public static void main(String[] args) { Test obj = new Test(); obj.m1(); } }
a) 35721
b) 354721
c) 3521
d) 35
27. What is the output of the following program?
public class Test
{ public static void main(String[] args) { try { System.out.printf("1"); int data = 5 / 0; } catch(ArithmeticException e) { System.out.printf("2"); System.exit(0);

208
} finally { System.out.printf("3"); } System.out.printf("4"); } }
a) 12
b) 1234
c) 124
d) 123
3.12 CHECK YOUR PROGRESS: POSSIBLE ANSWERS
True-False with reason
1. False. We can handle errors using try … catch block.
2. False. At compile time.
3. False. By interpreter
4. True
5. True.
6. False. We can write on try with multiple catch blocks.
7. True
8. False. Nested try … catch can be used in java.
9. True
10. False. It will be handled at rum time by JVM
Match A and B.
A B
1)Exception a)unexpected event
2)Error b) try … catch within try … catch
3)Checked Exception c)must be handled by programmer
4)Unchecked Exception d)handled by JVM
5)Nested try … catch e)error which can be handle at run time
Answer :
1) – e, 2) – a, 3) – c, 4) – d, 5) – b

209
Compare the following:
1. Error v/s Exception
Error Exception
Error is something unexpected in your
program which stop execution of the
program.
Exception is means using which Java
handles the run time errors.
Error can be syntax error, logical
errors, run-time errors or latent errors
Exception can Checked Exception or
Unchecked Exception
Examples are StackOverflowError,
VirtualMachineError,
OutofMemoryError etc.
Examples, are IOException,
ClassNotFoundException etc.
2. Checked Exception v/s Unchecked Exception
Checked Exception Unchecked Exception
All the classes which extend
theThrowable class except
RuntimeException and Error are
known as checked exceptions
The classes which inherit
RuntimeException are known as
unchecked exceptions.
The checked exceptions are checked
at compile time.
The unchecked exceptions are
checked at runtime.
They are not derived from
RuntimeException class.
They are derived from
RuntimeException class.
Examples are IOException,
SQLException etc.OutofMemoryError
etc.
Examples, are IOException,
ClassNotFoundException etc.
3. Catch block v/s finally block
Catch block Finally block
This block is compulsory to use with
try block.
This block is optional.

210
We can write the code to handle the
exception in catch block
We can write the code which we want
to execute in any case; with or
without error in this block
We can write multiple catch block with
one try block
You can only have one finally block
per try/catch block
4. Syntax error v/s runtime error
Syntax error Runtime error
It is a grammatical error while writing
program.
It is the error in the logic of program.
It is indented at compile time It is identified at runtime
This error must be remove from the
program to compile it.
Java handles this error using
Exception.
MCQ
1) a 2) b 3) e 4) c 5) c 6)b 7) c 8) d 9) a
10) b 11) d 12) a 13) c 14) d 15) d 16) a 17) c 18) b
19) c 20) c 21) b 22) c 23) b 24) d 25) d 26)d 27) a
3.13 FURTHER READING
1) “Java 2: The Complete Reference” by Herbert Schildt, McGraw Hill
Publications.
2) “Effective Java” by Joshua Bloch, Pearson Education
3) Exception Handling in Core Java | Core Java Tutorial | Studytonight
https://www.studytonight.com/java/exception-handling.php
4) Exception Handling in Java | Java Exceptions - javatpoint

211
https://www.javatpoint.com/exception-handling-in-java
5) Exception handling in java with examples - BeginnersBook.com
https://beginnersbook.com/2013/04/java-exception-handling/
3.14 ASSIGNMENTS 1) Write a java program to find solution of quadratic equation. Take care of divide by
zero error and other arithmetic exceptions.
2) Write a program to get value of radius through keyboard and calculate area of
circle. Take care of InputMismatchException.
3) Write a program to create an array of 10 integers. Get value of those 10 integers
using console. Now ask for an index of array through keyboard then divide the
array into two from that index. Take care of array index out of bound exception.
Also handle InputMismatchException.

212
Unit 4: Exception classes
Unit Structure
4.1 Learning Objectives
4.2 throw keyword
4.3 Built in Exception classes
4.4 Use defined Exception class
4.5 throws keyword
4.6 Throwable class
4.7 Chained Exception
4.8 Let us sum up
4.9 Check your Progress
4.10 Check your Progress: Possible Answers
4.11 Further Reading
4.12 Assignments
4

213
4.1 LEARNING OBJECTIVE After studying this unit student should be able to:
Understand the use of throw keyword in exception handling.
Study and understand the various built-in exception classes and their usage in
java program.
Learn how to create user defined exception class and use it in java program.
Understand the throws keyword and its use in program.
Study the Throwable class.
4.2 THROW KEYWORD In Java exception handling mechanism uses the throw keyword to explicitly
raise an exception from a function or a block of code. It can also be used to raise
user defined exception.
Syntax:
throw obj;
Here the object must be of Throwable type or subclass of Throwable. The flow of
execution of the program stops immediately after the throw statement is executed
and the nearest enclosing try block is checked to see if it has a catch statement that
matches the type of exception. If it finds a match, controlled is transferred to that
statement otherwise next enclosing try block is checked and so on. If no matching
catch is found then the default exception handler will halt the program.
For example,
Example1,
class ThrowExcep { static void thr_fun() { try { throw new ArithmeticException ("demo"); } catch( ArithmeticException e) {

214
System. out. println ( "Caught inside thr_fun()."); throw e; } } public static void main(String args[]) { try { thr_fun(); } catch( ArithmeticException e) { System. out. println ("Caught in main function."); } } }
Figure-81 Output of program
As you can see in above program the try block doesn’t have any program
logic which may raise an error/exception. We have used throw keyword which
explicitly throws an object of ArithmeticException, which will be caught in catch
block.
Example 2, import java.util.Scanner; import java.util.InputMismatchException; public class ExErr { public static void main(String args[]) throws Exception { int a[] = { 3, 4, 5, 6, 7, 8}; int i; try { Scanner sc = new Scanner ( System.in ); System. out. println ( " index = "); i = sc.nextInt(); if ( i >= 6) { ArrayIndexOutOfBoundsException ex = new ArrayIndexOutOfBoundsException(); Throw ex; }

215
else System. out. println ( " a[i] = " + a[i]); } catch (ArrayIndexOutOfBoundsException e ) { System. out. println ( "Error occured as the value of i is >=6 "); } } }
Figure-82 Output of program
4.3 BUILT IN EXCEPTION CLASSES
In java library (java.lang package ), many built-in unchecked exception
classes are available. Most common classes are the subclass of RuntimeEception
class. These classes are automatically handling the runtime errors while executing
java program.
The following is the list of Java Unchecked Exception classes derived from
RuntimeException.
1). ArithmeticException: Arithmetic error, such as divide-by-zero.
2). ArrayIndexOutOfBoundsException : Array index is out-of-bounds.
3). ArrayStoreException : Assignment to an array element of an incompatible type.
4). ClassCastException : Invalid cast.
5). IllegalArgumentException : Illegal argument used to invoke a method.
6). IllegalMonitorStateException :Illegal monitor operation, such as waiting on an
unlocked thread.
7). IllegalStateException : Environment or application is in incorrect state.
8). IllegalThreadStateException : Requested operation not compatible with the
current thread state.
9). IndexOutOfBoundsException : Some type of index is out-of-bounds.
10). NegativeArraySizeException : Array created with a negative size.

216
11). NullPointerException : Invalid use of a null reference.
12). NumberFormatException : Invalid conversion of a string to a numeric
format.
13). SecurityException : Attempt to violate security.
14). StringIndexOutOfBounds : Attempt to index outside the bounds of a
string.
15). UnsupportedOperationException : An unsupported operation was
encountered.
There are also many built-in checked Exception classes readily available for
handling various errors in various packages. The following is the list of such
exception classes.
1). IOException : This class is available in java.io package. It handles the IO
operation related runtime errors.
2). FileNotFoundException : This class is available in java.io package. It is used to
handle the runtime error when we try to access a file which is not exists.
3). ParseException : This class is available in java.text package. For example, this
exception raise when you are trying to parse a String to a Date Object and the
string is not containing date format.
4). ClassNotFoundException : This class is available in java.lang package. It is a
runtime exception that is thrown when an application tries to load a class at
runtime using the Class.forName() or loadClass() or findSystemClass() methods
,and the class with specified name are not found in the classpath.
5). CloneNotSupportedException : This class is available in java.lang package.
The java.lang.Cloneable interface must be implemented by the class whose
object clone we want to create. If we don't implement Cloneable interface, clone()
method generates CloneNotSupportedException. (refer last example of 3.12
block 1)
6). InstantiationException : This class is available in java.lang package. When we
try to instantiate the abstract class or interface using the newInstance() method of
Class class, then this exception will be thrown.
7). InterruptedException : This class is available in java.lang package. The
InterruptedException is thrown when a thread is waiting or sleeping and another

217
thread interrupts it using the interrupt method in class Thread . ( The thread will
be discussed in detail in block 3).
8). NoSuchMethodException : This class is available in java.lang package. This
exception occur when we are trying to run our java program which does not have
main method in it.
9). NoSuchFieldException : This class is available in java.lang package. This
exception is used to send a signals that the class doesn't have a field of a
specified name.
10). SQLException : This class is available in java.sql package. This exception is
raised when our program tries to interact with dbms software and due to some
error not getting response.
11). SocketException : This class is available in java.net package. This exception
occurs when our program is performing network programming using socket.
12). RemoteException : This class is available in java.rmi package. This
exception occurs when we are calling remote method in our program and any
error encounter.
4.3.1 EXAMPLES OF BUILT-IN EXCEPTION
ArithmeticException
class ExException {
public static void main(String args[])
{
try {
int a = 30;
int b = 0;
int c = a / b;
System. out. println ( "Result = " + c);
}
catch (ArithmeticException e) {
System. out. println ( "Divide by zero error" );
}
}
}

218
Figure-83 Output of program
ArrayIndexOutOfBoundsException
class ExException {
public static void main(String args[])
{
try {
int a[ ] = { 1, 2, 3, 4, 5 } ;
a[6] = 9;
}
catch (ArrayIndexOutOfBoundsException e) {
System. out. println ("Index of array is more than 5");
}
}
}
Figure-84 Output of program
ClassNotFoundException
class ABC {
}
class XYZ {
}
class ExException {
public static void main(String[] args)
{
try{
Object o = Class.forName(args[0]).newInstance();
System. out. println ("Class created for" + o.getClass().getName());

219
}
catch (Exception e)
{ System. out. println ( "Class " + args[0] + " not found "); }
}
}
Figure-85 Output of program
FileNotFoundException
import java.io.File;
import java.io.FileNotFoundException;
import java.io.FileReader;
class File_notFound_Demo {
public static void main(String args[])
{
try {
File file = new File("E:// file.txt");
FileReader fr = new FileReader(file);
}
catch (FileNotFoundException e) {
System. out. println ("File does not exist");
}
}
}
Figure-86 Output of program
IOException
import java.io.*;

220
class ExException {
public static void main(String args[])
{ FileInputStream f = null;
f = new FileInputStream("abc.txt");
int i;
while ((i = f.read()) != -1) {
System.out.print((char)i);
}
f.close();
}
}
Figure-87 Output of program
InterruptedException
class ExException {
public static void main(String args[])
{
Thread t = new Thread();
t.sleep(10000);
}
}
Figure-88 Output of program
NullPointerException
class ExException {

221
public static void main(String args[])
{
try {
String a = null;
System. out. println (a.charAt(0));
}
catch (NullPointerException e) {
System. out. println ("NullPointerException..");
}
}
}
Figure-89 Output of program
NumberFormatException
class ExException {
public static void main(String args[])
{
try {
int num = Integer.parseInt("hello");
System. out. println (num);
}
catch (NumberFormatException e) {
System. out. println ("Number format exception");
}
}
}
Figure-90 Output of program
StringIndexOutOfBoundsException
class ExException {

222
public static void main(String args[])
{
try {
String a = "Hello this is aryu";
char c = a.charAt(24);
System. out. println (c);
}
catch (StringIndexOutOfBoundsException e) {
System. out. println ("StringIndexOutOfBoundsException");
}
}
}
Figure-91 Output of program
ClassCastException
class ExException {
public static void main(String[] args)
{
String s = new String("Hello");
Object obj = (Object) s;
Object o1 = new Object();
String s1 = (String) o1;
}
}
Figure-92 Output of program
4.4 USER DEFINED EXCEPTION CLASS

223
In java, we can create our own exception class by creating a class which
extends Exception class.
The following example shows us the syntax of writing a custom exception
class. In this example, the NegativeException class is created which extends an
Exception class. We just have to write a constructor for initialization and toString
function to print our own message. Here the negative exception is raised when
entered value is negative. For this we have to check the entered value and throw an
object of NegativeException if the value is negative. Similarly we can user defined
exception class for checking our own condition for input.
import java.util.Scanner; class NegativeException extends Exception { private int x; NegativeException(int a) { x=a; } public String toString() { return "NegativeException[" + x +"] : value is less than zero"; } }
public class UDException { public static void main ( String args[]) { int a; Scanner sc = new Scanner ( System.in ); try { System. out. println ( "Enter a: "); a = sc.nextInt(); if( a < 0 ) throw (new NegativeException(2) ); else System. out. println ( " a = " + a ); } catch (Exception e) { System. out. println (e); } } }

224
Figure-93 Output of program
4.5 THROWS KEYWORD
If you do not handle the checked exception using a try catch block, compiler
will give error message. Each and every program statement in java program is
written in a method. Almost every method in the java library or even user defined
may throw an exception or two. Handling all the exceptions using the try and catch
block could be cumbersome and complex for coder.
Hence java provides an option, wherein whenever your code in the method
definition may raise exception, you can declare that method with throws keyword
followed by the exception or exceptions separated by comma. In this case we can
omit writing code in try and catch block.
For example,
Example 1, class ExException { public static void main(String[] args) throws ClassCasteException { String s = new String("Hello"); Object obj = (Object) s; Object o1 = new Object(); String s1 = (String) o1; } } Example 2, import java.io.File; import java.io.FileNotFoundException; import java.io.FileReader; class File_notFound_Demo {

225
public static void main(String args[]) throws FileNotFoundException { File file = new File("E:// file.txt"); FileReader fr = new FileReader(file); } } Example 3, public class UDException { public static void main ( String args[]) throws NegativeException, InputMismatchException { int a; Scanner sc = new Scanner ( System.in ); System. out. println( "Enter a: "); a = sc.nextInt(); if( a < 0 ) throw (new NegativeException(2) ); else System. out. println ( " a = " + a ); } }
4.6 THROWABLE CLASS
The java.lang.Throwable class is the super class of all errors and exceptions
classes in the Java language. The objects which are the instances of this class are
thrown by the Java Virtual Machine or can be thrown by the Java throw statement.
The Throwable class extends the Object class and implements Serializable interface.
The following are some of the methods of Throwable class.
1). Throwable fillInStackTrace() : This method fills in the execution stack trace.
2). Throwable getCause() : This method returns the cause of this throwable or null
if the cause is nonexistent or unknown.
3). String getLocalizedMessage() : This method creates a localized description of
this throwable.
4). String getMessage() : This method returns the detail message string of this
throwable.
5). StackTraceElement[] getStackTrace() : This method provides programmatic
access to the stack trace information printed by printStackTrace().

226
6). Throwable initCause(Throwable cause) : This method initializes the cause of
this throwable to the specified value.
7). void printStackTrace() : This method prints this throwable and its backtrace to
the standard error stream.
8). void printStackTrace(PrintStream s) : This method prints this throwable and its
backtrace to the specified print stream.
9). void printStackTrace(PrintWriter s) : This method prints this throwable and its
backtrace to the specified print writer.
10). void setStackTrace(StackTraceElement[] stackTrace) : This method sets
the stack trace elements that will be returned by getStackTrace() and printed by
printStackTrace() and related methods.
11). String toString() : This method returns a short description of this Throwable.
4.7 CHAINED EXCEPTION
The chained exception allows you to link an exception with other exception.
The former exception is the cause of later exception. For example, in a program we
are getting numerator and denominator from a file. While reading a denominator
number from a file, due to IOException if we get zero value, it we may get
ArithmeticException. Thus the cause of ArithmeticException is the IOException. If we
want to inform programmer about this, chain exception concept is used.
For example,
import java.io.*; public class LinkedException { static void raiseLinkedException() { ArithmeticException e = new ArithmeticException( " top most exception "); e.initCause( new IOException( " cause " )); throw e; } public static void main ( String args[] ) { try { raiseLinkedException(); } catch ( ArithmeticException ex) { System. out. println ( " caught : " + ex ); System. out. println ( " cause : " + ex.getCause() ); } }

227
}
Figure-94 Output of program
4.8 LET US SUM UP throw keyword :. This keyword is used to throw an exception class object even if
the error is not occurred.
Built in exception class : The java libraries have various readymade exception
class available which can be used to handle different errors occurred during
programming in java.
User defined exception class: If built in exception class can not be used for some
programmer defined validation check user can create custom exception class.
throws keyword: They can be used in place of try and catch block. It can be used
with method declaration along with exception name.
Throwable class : it is a parent class of all exception and error classes.
Chained Exception : It is a concept in java using which we can create a chain of
exceptions. In this chain the upper exception is raised because of lower exception in
the chain.
4.9 CHECK YOUR PROGRESS
True-False with reason
1. Throw and throws keyword can be used for the same purpose.
2. Throwable is an interface.
3. The exception must be handled using try … catch block
4. We can handle exception without using try and catch.
5. Throw keyword explicitly raise an exception error.
Match A and B.

228
A B
1)Throw a)it is custom exception class
2)Throws b)this keyword is used to throw exception
3)Throwable c)it is exception class available in java library
4)User define Exception d)it is an option of try and catch
5)Built in Exception e)it is a parent of all exception class
Answer the following:
1. Which keyword is used to raise an exception?
2. Compare throw and throws.
3. Compare built in exception and user define exception
MCQ
1. Consider the following try…….. catch block class TryCatch { public static void main(String args[ ]) { try { double x = 0.0; throw ( new Exception(“Thrown”) ); return; } catch(Exception e) { System. out. println (“Exception caught”); return; } finally { System. out. println (“finally”); } } }
What will be the output.
a) Exception caught
b) Exception caught finally
c) finally
d) Thrown
2. In below java program, which exception will occur?
public static void main(String[] args) {

229
FileReader file = new FileReader("test.txt"); }
a) NullPointerException at compile time
b) NullPointerException at run time
c) FileNotFoundException at compiler time
d) FileNotFoundException at runtime
3. which answer most closely indicates the behavior of the program?
public class MyProgram
{ public static void throwit() { throw new RuntimeException(); } public static void main(String args[]) { try { System. out. println ("Hello world "); throwit(); System. out. println ("Done with try block "); } finally { System. out. println ("Finally executing "); } } }
a) The program will not compile.
b) The program will print Hello world, then will print that a RuntimeException has
occurred, then will print Done with try block, and then will print Finally
executing.
c) The program will print Hello world, then will print that a RuntimeException has
occurred, and then will print Finally executing.
d) The program will print Hello world, then will print Finally executing, then will
print that a RuntimeException has occurred.
4. What will be the output of the program?
public class RTExcept
{

230
public static void throwit () { System.out.print("throwit "); throw new RuntimeException(); } public static void main(String [] args) { try { System.out.print("hello "); throwit(); } catch (Exception re ) { System.out.print("caught "); } finally { System.out.print("finally "); } System. out. println ("after "); } }
a) hello throwit caught
b) Compilation fails
c) hello throwit RuntimeException caught after
d) hello throwit caught finally after
5. What will be the output of the program?
class Exc0 extends Exception { }
class Exc1 extends Exc0 { } public class Test { public static void main(String args[]) { try { throw new Exc1(); } catch (Exc0 e0) { System. out. println ("Ex0 caught"); } catch (Exception e) { System. out. println ("exception caught"); }

231
} }
a) Ex0 caught
b) exception caught
c) Compilation fails because of an error at line 2.
d) Compilation fails because of an error at line 9.
6. What is the output of following Java program
class Main {
public static void main(String args[]) { try { throw 10; } catch(int e) { System. out. println ("Got the Exception " + e); } } }
a) Got the Exception 10
b) Got the Exception 0
c) Compiler Error
7. What is the output of following Java program
class Test extends Exception { }
class Main { public static void main(String args[]) { try { throw new Test(); } catch(Test t) { System. out. println ("Got the Test Exception"); } finally { System. out. println ("Inside finally block "); } } }
a) Got the Test Exception Inside finally block
b) Got the Test Exception
c) Inside finally block
d) Compiler Error
8. What is the output of following Java program

232
class Base extends Exception {}
class Derived extends Base {} public class Main { public static void main(String args[]) { // some other stuff try { // Some monitored code throw new Derived(); } catch(Base b) { System. out. println ("Caught base class exception"); } catch(Derived d) { System. out. println ("Caught derived class exception"); } } }
a) Caught base class exception
b) Caught derived class exception
c) Compiler Error because derived is not throwable
d) Compiler Error because base class exception is caught before derived class
9. What is the output of following Java program
class Test
{ public static void main (String[] args) { try { int a = 0; System. out. println ("a = " + a); int b = 20 / a; System. out. println ("b = " + b); } catch(ArithmeticException e) { System. out. println ("Divide by zero error"); } finally { System. out. println ("inside the finally block"); } } }

233
a) Compile error
b) Divide by zero error
c) a = 0
Divide by zero error
inside the finally block
d) a = 0
e) inside the finally block
10. What is the output of following Java program
class Test
{ public static void main(String[] args) { try { int a[]= {1, 2, 3, 4}; for (int i = 1; i <= 4; i++) { System. out. println ("a[" + i + "]=" + a[i] + "\n"); } } catch (Exception e) { System. out. println ("error = " + e); } catch (ArrayIndexOutOfBoundsException e) { System. out. println ("ArrayIndexOutOfBoundsException"); } } }
a) Compiler error
b) Run time error
c) ArrayIndexOutOfBoundsException
d) Error Code is printed
e) Array is printed
11. Given the following piece of code:
class SalaryCalculationException extends Exception{}
class Person{ public void calculateSalary() throws SalaryCalculationException{

234
//... throw new SalaryCalculationException(); //... } } class Company{ public void paySalaries(){ new Person().calculateSalary(); } }
Which of the following statements is correct?
1. This code will compile without any problems.
2. This code will compile if in method paySalaries() we return a boolean in stead of
void.
3. This code will compile if we add a try-catch block in paySalaries().
4. This code will compile if we add throws SalaryCalculationException in the
signature of method paySalaries().
a) 1 and 4
b) 2 and 3
c) 2 and 4
d) 3 and 4
12. What will be the output of the following piece of code:
class Person{
public void talk() {} } public class Test{ public static void main(String args[]){ Person p = null; try{ p.talk(); } catch(NullPointerException e){ System.out.print("There is a NullPointerException. "); } catch(Exception e){ System.out.print("There is an Exception. "); } System.out.print("Everything went fine. "); } }
a) There is a NullPointerException. Everything went fine.
b) There is a NullPointerException.
c) There is a NullPointerException. There is an Exception.

235
d) This code will not compile, because in Java there are no pointers.
13. What will be the result if NullPointerException occurs at line 2?
try{
//some code goes here } catch(NullPointerException ne){ System.out.print("1 "); } catch(RuntimeException re){ System.out.print("2 "); } finally{ System.out.print("3"); }
a) 1 b) 3
c) 2 3 d) 1 3
14. What is the output of following Java program
public class Test{ public static void main(String args[]){ try{ String arr[] = new String[10]; arr = null; arr[0] = "one"; System.out.print(arr[0]); }catch(Exception ex){ System.out.print("exception"); }catch(NullPointerException nex){ System.out.print("null pointer exception"); } } } a) "one" is printed.
b) "exception" is printed.
c) "null pointer exception" is printed.
d) Compilation fails saying NullPointerException has already been caught.
15. Given the code. What is the result when this program is executed?
public class Test{
static int x[]; static{ x[0] = 1;

236
} public static void main(String args[]){ } }
a) ArrayIndexOutOfBoundsException is thrown
b) ExceptionInInitializerError is thrown
c) IllegalStateException is thrown
d) StackOverflowException is thrown
4.10 CHECK YOUR PROGRESS: POSSIBLE ANSWERS
True-False with reason
1. False. Throw keyword is used to raise exception programmatically while
throws used with method declaration declaring that this method might
raised an exception.
2. False. Throwable is a class.
3. False. The checked exception must be handled using try … catch block
4. True
5. True
Match A and B.
A B
1)Throw a)it is custom exception class
2)Throws b)this keyword is used to throw exception
3)Throwable c)it is exception class available in java library
4)User define Exception d)it is an option of try and catch
5)Built in Exception e)it is a parent of all exception class
Answer:
1) – b, 2) – d, 3) – e, 4) – a, 5) - c
Answer the following:
1. “throw” keyword is used to raise an exception.
2. throw v/s throws

237
throw throws
It is used to raise exception
explicitly
It is used with method which
may raise exception
It is used with user defined
exception class
It is an option for try and catch
3. Built in exception v/sUser define exception
Built in exception User define exception
They are the readily available
classes used to handle runtime
errors
They are the class created by
user which extends Exception
class and raised by user on
specific condition.
They are raised when runtime
error.
They must be raised by user
using throw keyword
MCQ
1) b 2)c 3) d 4) d 5) a
6) c 7) a 8) d 9) c 10) a
11) d 12)a 13)d 14) d 15) b
4.11 FURTHER READING
1) Java - User Defined Exceptions | Learn JAVA Online | Fresh2Refresh ...
https://fresh2refresh.com › Java Tutorial
2) User defined Exception subclass in Java Exception Handling | Core ...
https://www.studytonight.com/java/create-your-own-exception.php
3) “Java 2: The Complete Reference” by Herbert Schildt, McGraw Hill
Publications.
4) “Effective Java” by Joshua Bloch, Pearson Education
4.12 ASSIGNMENTS

238
1) Create a class name account with attributes like account number, name, type of
account, balance etc. and methods like get account information, print account
details, deposit and withdraw. Create an exception class which raised when
account balance is below 2000 while withdrawal. Also raise exception when
negative amount is sent to deposit function. Create a class with main method to
demonstrate the function of account class and exception classes.
2) Create a class name student which stores information like roll number, name,
phone number, address, course etc. Write a function which accepts an object of
student to add a new student in existing list of student. While adding check for roll
number. The roll number should be in 3 digit. Implement this check usinf user
define exception class.
239
Block-3
MultiThreaded Programming

240
Unit 1: Multithreaded Programming-I
Unit Structure
1.1 Learning Objectives
1.2 Outcomes
1.3 Introduction
1.4 Multithreading: An Introduction and Advantages
1.5 The Main Thread
1.6 Java Thread Model
1.7 Thread states and life cycle
1.8 The Thread class and Runnable interface
1.9 Thread creation
1.10 Thread Priorities
1.11 Let us sum up
1.12 Check your Progress: Possible Answers
1

241
1.1 LEARNING OBJECTIVE
Understand purpose of multitasking and multithreading
Describe java’s multithreading model
1.2 OUTCOMES
After learning the contents of this chapter, the reader must be able to :
Describe the concept of multithreading
Explain the Java thread model
Create and use threads in program
Describe how to set the thread priorities
1.3 INTRODUCTION
Multitasking – performing multiple tasks/jobs simultaneously/concurrently.
There are two types of concurrency- Real and Apparent. Personal Computer has
only a single CPU; so, you might have a question, how it can execute more than one
task at the same time? With single microprocessor systems, only a single task can
run at a time. But multitasking system increase the utilization of CPU. The CPU
quickly switches back and forth between several tasks to create an illusion that the
tasks are performing/ executing at the same time. For example, a user/system can
request the operating system to execute program P1, P2 and P3 by having it spawn
a separate process for each program and scheduled it independently. These
programs can run in a concurrent manner, depending upon the multiprocessing
(multiprogramming) features supported by the operating system. A process is
memory image/context of a program that is created when the program is executed.
In single-processor systems support apparent concurrency only. Real concurrency is
not supported by it. Apparent concurrency is the characteristic exhibited when
multiple tasks execute. There are two types of multitasking –
1. Process based multitasking and
2. Thread based multitasking.

242
A thread is single sequence of execution that can run independently in an
application. Uses of thread in programs are good in terms of resource utilization of
the system on which application(s) is running. There are several advantages of
thread based multitasking, so Java programming language support thread based
multitasking.
This unit covers the very important concept of multithreading in programming.
Multithreading differs from multiprocessing. Multithreaded programming is very
useful in network and Internet applications development. In this unit you will learn
what is multithreading, how thread works, how to write programs in Java using
multithreading. Also, in this unit will be explained about thread-properties,
synchronization, and interthread communication.
1.4 MULTITHREADING: AN INTRODUCTION AND ADVANTAGES
A multithreaded program contains two or more parts that can run
simultaneously. Each such part of a program is called a thread, and each thread
defines a separate path of execution. Thus, multithreading is a specialized form of
multitasking. This means that multiples threads are simultaneously execute multiple
sequences of instructions. Each instruction sequence has its own unique flow of
control that is independent of all others. These independently executed instruction
sequences are known as threads. Threads allow multiple activities to proceed
concurrently in the same program. . For example, a text editor can edit text at the
same time that it is auto save a document, as long as these two actions are being
performed by two separate threads. But remember, threads are not complete
processes in themselves.
The Java Virtual Machine supports multithreaded programming, which allows
you to write programs that execute many tasks simultaneously. The Java run-time
provides simple solution for multithread synchronization that enables you to
construct smoothly running interactive systems. Java’s easy-to-use approach to
multithreading allows you to think about the specific behavior of your program, not
the multitasking subsystem.

243
Advantages of Multithreading
The advantages of multithreading are:
1. Concurrency can be used within a process to implement multiple instances of
simultaneous task.
2. Multitasking threads require less overhead than multitasking processes.
Processes are heavyweight tasks that require their own separate address
spaces. Threads, on the other hand, are lightweight. They share the same
address space and cooperatively share the same heavyweight process.
3. Multithreading requires less processing overhead than multiprocessing
because concurrent threads are able to share common resources more
efficiently.
4. Multithreading enables programmers to write very efficient programs that
make maximum use of the CPU.
5. Inter-thread communication is less expensive.
1.5 THE MAIN THREAD
When you execute a java program, usually a single non-daemon thread
begins running immediately. This is called the “main” thread of your program,
because it is the one that is executed when your program begins. The main thread is
very important for two reasons:
1. It is the thread from which other “child” threads will be spawned. And,
2. It must be the last thread to finish execution because it performs various
cleanup and shutdown actions.
The main thread is created automatically when your program is started. The
main thread of Java programs is accessed and controlled through methods of
Thread class.
You can get a reference of current running thread by calling currentThread( )
method of the Thread class, which is a static method.

244
The signature of the method is:
public static Thread currentThread();
By using this method, you obtain a reference to the thread in which this
method is called. Once you have a reference to the thread, you can control it.
For example, the following code segment obtain a reference of the main thread and
get the name of the main thread is by calling getName () and rename it
“MyMainThread” using method setName(String).
// Program-1
class ThreadDemo {
public static void main(String [] args){
Thread t = Thread.currentThread();
System.out.println("Current thread name is: " + t.getName());
t.setName("MyMainThread");
System.out.println("New name is: " + t.getName());
}
}
Output:
Current thread name is: main
New name is: MyMainThread
In java every thread has a name for identification purposes. More than one
thread may have the same name. If a name is not specified when a thread is
created, a new name is generated for it.
Check Your Progress 1
1) How does multithreading achieved on a computer with a single CPU?
2) Name two ways to create a thread
3) Make suitable change in “Program-1” and find out a priority of the main thread
as well as the name of thread group in which the main thread belong.
4) How would you re-start a dead Thread?
5) State the advantages of multithreading.

245
6) Write an application that executes two threads. One thread which is display
‘A’ every 1000 milliseconds, and the another display ‘B’ every 3000
milliseconds. Create the first thread by implementing Runnable interface and
the second one by extending Thread class.
1.6 THE JAVA THREAD MODEL
The Java run-time environment depends on threads for many things, and all
the class libraries are designed with multithreading in mind. For that, Java uses
threads to enable the entire environment to be asynchronous. This helps to you to
write very efficient programs that make maximum use of the CPU, because idle time
can be kept to a minimum and preventing the waste of CPU cycles.
1.7 THREAD STATES AND LIFE CYCLE
Thread pass through several stages during its life cycle. A thread can be running. It
can be ready to run as soon as it gets CPU time. A running thread can be blocked
when waiting for a resource. At any time, a thread can be terminated, which halts its
execution immediately. Once terminated, a thread cannot be resumed.
Figure-95 Thread States
Ready to run
Blocked/ Waiting/ Timed Waiting
Start()
New
Sleep done, I/O complete, lock available, notify
Dead
Sleep, block on I/O, wait for lock, wait
run() method exits
Running

246
The thread exists as an object; threads have several well-defined states in
addition to the dead states. These states are:
New Thread
When a new thread (thread object) is created, it is in the new state. The
thread has not yet started to run when thread is in this state. When a thread in the
new state, it’s code is yet to be run and hasn’t started to execute.
Runnable State
A thread that is ready to run is moved to runnable state. In this state, a thread
might actually be running or it might be ready run at any instant of time. It is the
responsibility of the thread scheduler to give the thread, time to run. A multi-threaded
program allocates a fixed amount of time to each individual thread. Each and every
thread runs for a short while and then pauses and relinquishes the CPU to another
thread, so that other threads can get a chance to run. When this happens, all such
threads that are ready to run, waiting for the CPU and the currently running thread
lies in runnable state.
Running State
Threads are born to run, and a thread is said to be in the running state when it is
actually executing means thread gets CPU. It may leave this state for a number of
reasons.
Blocked/Waiting/Timed Waiting state
When a thread is temporarily inactive, then it’s in one of the following states:
Blocked
Waiting
Timed Waiting
For example, when a thread is waiting for I/O to complete, it lies in the
blocked state. It’s the responsibility of the thread scheduler to reactivate and
schedule a blocked/waiting thread. A thread in this state cannot continue its
execution any further until it is moved to runnable state. Any thread in these states
do not consume any CPU cycle.

247
A thread is in the blocked state when it tries to access a protected section of
code that is currently locked by some other thread. When the protected section is
unlocked, the schedule picks one of the threads which is blocked for that section and
moves it to the runnable state. A thread is in the waiting state when it waits for
another thread on a condition. When this condition is fulfilled, the scheduler is
notified and the waiting thread is moved to runnable state.
If a currently running thread is moved to blocked/waiting state, another thread
in the runnable state is scheduled by the thread scheduler to run. It is the
responsibility of thread scheduler to determine which thread to run.
A thread lies in timed waiting/temporality sleep state when it calls a method
with a time out parameter. A thread lies in this state until the timeout is completed or
until a notification is received. For example, when a thread calls sleep or a
conditional wait, it is moved to time waiting state.
Dead State
A thread terminates because of either of the following reasons:
The exit method of class Runtime has been called and the security manager
has permitted the exit operation to take place.
All threads that are not daemon threads have died, either by returning from
the call to the run method or by throwing an exception that propagate beyond
the run method.
A thread that lies in this state does no longer consume any cycles of CPU.
After a thread reaches the dead state, then it is not possible to restart it.
1.8 THE THREAD CLASS AND RUNNABLE INTERFACE
Java’s multithreading organization is built upon the Thread class, its methods,
and its companion interface, Runnable. Thread encapsulates a thread of execution.
To create a new thread, your program will either extend Thread or implement the
Runnable interface. The Thread class defines several methods that help manage
threads. Some of that will be used in this chapter are follows:

248
Constructors of Thread class
Thread()
Thread(Runnable target)
Thread (Runnable target, String name)
Thread(String name)
Thread(ThreadGroup group, Runnable target)
Thread(ThreadGroup group, Runnable target, String name)
Thread(ThreadGroup group, Runnable target, String name, long stackSize)
Thread(ThreadGroup group, String name)
Methods of Thread class
Methods Description
public static Thread
currentThread()
Returns a reference to the currently executing
thread object.
public String getName() Obtain a thread’s name
public int getPriority() Obtain a thread’s priority
public boolean isAlive() Determine if a thread is still running
public void join() Wait for a thread to terminate
public void run() Entry point for the thread and execution of it
begins.
public void sleep() Suspend a thread for a period of time
public void start() Start a thread by calling its run method.
public void setName(String name) Change name of the thread
public void setPriority(int priority) Changes the priority of thread
public static void yield() Used to pause temporarily to currently
executing thread object and allow other
threads to execute.

249
public static int activeCount() Returns the number of active threads in the
current thread's thread group.
Table-9 Methods of Thread cladd
The Thread class defines three int static constants that are used to specify the
priority of a thread. These are MAX_PRIORITY, MIN_PRIORITY, and
NORM_PRIORITY. They represent the maximum, minimum and normal thread
priorities.
1.9 THREAD CREATION
Java has built support to create a thread by instantiating an object of type
Thread. Java lets you create a thread one of two ways:
1. By extending the Thread class.
2. By implementing the Runnable interface.
Thread class in the java.lang package allows you to create and manage
threads. The thread class provides the capability to create thread objects, each with
its own separate flow of control. The signature of the class is:
public class java.lang.Thread extends java.lang.Object implements
java.lang.Runnable
Extending Thread class
In the first approach, you create a child of the java.lang.Thread class and
override the run( ) method.
class EvenThread extends Thread{
public void run(){
//Logic for the thread
}
}

250
Here the class EvenThread extends Thread. The logic for the thread is written
in run() method. The complexity of run() method may be simple or complex is
depending on what would you like to performed in you thread.
The program can create an object of the thread by
EvenThread et = new EvenThread(); // Instantiates the EvenThread class
When you create an instance of child of Thread class, you invoke start( ) method to
cause the thread to execute. The start( ) method is inherited from the Thread class. It
register the thread with scheduler and invokes the run( ) method. Your logic for the
thread is implemented in the run() method.
Et.start(); // invokes the start() method of that object to start execution of thread.
Now let us see the program given below for creating threads by inheriting the Thread
class. The program prints even numbers after every one second interval.
// Program-2
class EvenThread extends Thread {
EvenThread(String name){
super(name);}
public void run(){
for(int i=1; i<11; i++){
if(i%2==0)
System.out.println(this.getName() + " :" + i);
try{
Thread.sleep(1000);
} catch (InterruptedException e) {
System.out.println (" Thread is Interrupted");
}
}
}
}
class ThreadDemoOne{
public static void main(String [] args){
EvenThread et1 = new EvenThread("Thread 1 : ");

251
et1.start();
EvenThread et2 = new EvenThread("Thread 2 : ");
et2.start();
while(et1.isAlive() || et2.isAlive()){}
}
}
Output :
Thread 1 : 2
Thread 2 : 2
Thread 1 : 4
Thread 2 : 4
Thread 2 : 6
Thread 1 : 6
Thread 2 : 8
Thread 1 : 8
Thread 2 : 10
Thread 1 : 10
Above output shows how two threads execute in sequence, displaying
information on the console. The program creates two threads of execution, et1, and
et2. The threads display even numbers from 1 to 10, by interval of 1 second.
Implementing Runnable
There is another way to create thread. Declare a class that implements
java.lang.Runnable interface. The Runnable interface contain on one method, that is
public void run(). The run ( ) provides entry point into your thread.
class EvenRunnable implements Runnable{
public void run(){
//Logic for the thread
}
}
The program can start an instance of the thread by using following code:
EvenRunnable et = new EvenRunnable ();

252
Thread t = new Thread(et);
t.start();
The first statement creates an object of EvenRunnable class. The second statement
creates an object of thread class. A reference of EvenRunnble object is provided as
argument to the constructor. The last statement starts the thread.
Now let us see the program given below for creating threads by implementing
Runnable.
// Program-3
class EvenRunnable implements Runnable {
String name=””;
EvenRunnable (String name){
this.name = name;
}
public void run(){
for(int i=1; i<11; i++){
if(i%2==0)
System.out.println(Thread.currentThread().getName() + " :" + i);
try{
Thread.sleep(1000);
} catch (InterruptedException e) {
System.out.println (" Thread is interrupted");
}
}
}
}
class ThreadDemoTwo{
public static void main(String [] args){
EvenThread et1 = new EvenThread("Thread 1 : ");
Thread t1 = new Thread(et1);
t1.start();
EvenThread et2 = new EvenThread("Thread 2 : ");
Thread t2 = new Thread(et2);
t2.start();

253
while(t1.isAlive() || t2.isAlive()){}
}
}
Output:
Thread 1 : 2
Thread 2 : 2
Thread 1 : 4
Thread 2 : 4
Thread 2 : 6
Thread 1 : 6
Thread 2 : 8
Thread 1 : 8
Thread 2 : 10
Thread 1 : 10
This program is similar to previous program and also gives same output. The
advantage of using the Runnable interface is that your class does not need to extend
the thread class. This is a very helpful feature when you create multithreaded
program in that your class already extending for some other class. The only
disadvantage of this approach is that you have to do some more work to create and
execute your own threads.
Choosing an Approach
At this point, you might be questioning why Java has two ways to create child
threads, and which approach is better.
Extending Thread class allows you to modify other overridable methods of
the Thread class, if should you wish to do so. Extending Thread class will not give
you an option to extend any other class. But if you implement Runnable interface you
could extend other classes in your class. Advantages of implementing Runnable are
1. You have freedom to extend any other class
2. You can implement more interfaces
3. You can use you Runnable implementation in thread pools

254
1.10 THREAD PRIORITIES
In java every thread has a priority. Threads with higher priority are executed in
preference to threads with lower priority. When code running in some thread creates
a new Thread object, the new thread has its priority initially set equal to the priority of
the creating thread. Thread priority is an integer value that specifies the relative
priority of one thread to another. A thread can voluntarily relinquish control. Threads
relinquish control by explicitly yielding, sleeping, or blocking on pending Input/ Output
operations. In this scenario, all other threads are examined, and the highest- priority
thread that is ready to run gets the chance to use the CPU.
A higher-priority thread can preempt a low priority thread. In this case, a
lower-priority thread that does not yield the processor is forcibly pre-empted. In
cases where two threads with the same priority are competing for CPU cycles, the
situation is handled differently by different operating systems.
Java thread class has defined three constants NORM_PRIORITY,
MIN_PRIORITY and MAX_PRIORITY. Any thread priority lies between
MIN_PRIORITY and MAX_PRIORITY. The value of NORM_PRIORITY is 5,
MIN_PRIORITY is 1 and MAX_PRIORITY is 10.
// Program-5
class ThreadPriorityDemo
{
public static void main (String [] args)
{
try
{
Thread t1 = new Thread("Thread1");
Thread t2 = new Thread("Thread2");
System.out.println ("Before any change in default priority :");
System.out.println("The Priority of "+ t1.getName() +" is "+ t1.getPriority());
System.out.println("The Priority of "+ t1.getName() +" is "+ t2.getPriority());
//change in priority

255
t1.setPriority(7);
t2.setPriority(8);
System.out.println ("After changing in Priority :");
System.out.println("The Priority of "+ t1.getName() +" is "+ t1.getPriority());
System.out.println("The Priority of "+t1.getName() +" is "+ t2.getPriority());
} catch (Exception e) {
System.out.println("main thread interrupted");
}
}
}
Output:
Before any change in default priority :
The Priority of Thread1 is 5
The Priority of Thread1 is 5
After changing in priority :
The Priority of Thread1 is 7
The Priority of Thread1 is 8
Check Your Progress 2
1) How can we create a Thread in Java?
2) How can we pause the execution of a Thread for specific time?
3) What do you understand about Thread Priority?
1.11 LET US SUM UP
This chapter described the functioning of multithreading in Java. Also you have
learned what the main thread, its purpose and when it is created in a Java program.
Various states of threads are described in this chapter. This chapter also explained
how threads are created using Thread class and Runnable interface. It explained
how thread priority is used to determine which thread is to execute next.

256
1.12 CHECK YOUR PROGRESS: POSSIBLE ANSWERS
Check Your Progress 1
1) In single CPU system, the process/thread scheduler allocates executions
time to multiple processes/threads. By quickly switching between
executing processes/threads, it creates the illusion that tasks executes
simultaneously.
2)
1. By extending the Thread class
2. By implementing the Runnable interface.
3) class ThreadDemo {
public static void main(String [] args){
Thread t = Thread.currentThread();
System.out.println("Current thread name is: " + t.getName());
System.out.println("The priority of main thread is " + t.getPriority());
t.setName("MyMainThread");
System.out.println("New name is: " + t.getName());
System.out.println("The name of thread group is " +
t.getThreadGroup().getName());
}
}
Output:
Current thread name is: main
New name is: MyMainThread
4) You cannot re-start a dead Thread. Once a Thread has run, and is dead, it
is a class like another. You can access the data of the instance and call
methods on the Thread class. You can call the run() method of the dead-
Thread. But it is not anymore as a Thread. It will not be scheduled
anymore by the Thread Scheduler.
5)

257
1) Make optimal use of CPU.
2) Improves performance of an application.
3) Threads share the same address space so it saves the memory.
4) Context switching between threads is usually less expensive than
between processes.
5) Cost of communication between threads is relatively low
6) Provide concurrent execution of multiple instances of different task or
services.
6)
class AThread implements Runnable {
Thread t=null;
AThread()
{
t = new Thread(this);
t.start();
}
public void run(){
while(true){
try{
Thread.sleep(1000);
System.out.println("A");
} catch (InterruptedException e) {
System.out.println (" Thread is Interrupted");
}
}
}
}
class BThread extends Thread {
public void run(){
while(true){
try{
Thread.sleep(3000);
System.out.println("B");

258
} catch (InterruptedException e) {
System.out.println (" Thread is Interrupted");
}
}
}
}
class ThreadDemo{
public static void main(String [] args){
AThread a = new AThread();
BThread b = new BThread();
b.start();
try{
a.join();
b.join();
} catch (InterruptedException e) {}
}
}
Check Your Progress 2
1) There are two ways to create Thread in Java –
a. By implementing Runnable interface and then creating a Thread
object from it
b. By extending the Thread Class.
2) We can use sleep() method of Thread class to pause the execution of
Thread for certain time.
3) In Java, every thread has a priority, usually higher priority thread gets
precedence in execution but it depends on Thread Scheduler
implementation that is OS dependent. We can specify the priority of thread
but it doesn’t guarantee that higher priority thread will get executed before
lower priority thread.

259
Unit 2: Multithreaded Programming-II
Unit Structure
2.1 Learning Objectives
2.2 Outcomes
2.3 Introduction
2.4 Synchronization
2.5 Deadlock
2.6 Inter-thread Communication
2.7 Suspending, Resuming, and Stopping Threads e
2.8 Let us sum up
2.9 Check your Progress: Possible Answers
2.1 LEARNING OBJECTIVE
2

260
To explain concurrency issues in multithreading and its solutions
To understand inter thread communication
2.2 OUTCOMES
After learning the contents of this chapter, the reader must be able to :
Understand the importance of concurrency
Use the concept of synchronization in programming, and
Use inter-thread communication in programs.
2.3 INTRODUCTION
Due to multiple threaded in a program, an asynchronous behavior introduces
in your program. Therefore, synchronization is necessary when a program needs.
When two or more threads need access to a shared resource, they need
some way to ensure that the resource will be used by only one thread at a time. The
process by which this is achieved is called synchronization. For example, in a
banking system, you would not want one thread to credit some amount to user
account balance while another thread is trying to debit some amount from same
account balance; in such situations, you need some way to ensure that they don’t
conflict with each other.
2.4 SYNCHRONIZATION
Synchronization provides a simple monitor facility that can be used to provide
mutual-exclusion between Java threads.
Java implements an elegant model of interprocess synchronization: “The
monitor” (also called a semaphore). The monitor is a control mechanism. You can
assume that the monitor is a very small box that can allow only one thread to stay in
it. Once a thread enters a monitor, all other threads must wait until that thread exits
the monitor. In this way, a monitor can be used to protect a shared asset from being
manipulated by more than one thread at a time.

261
Synchronized keyword in Java is used to provide mutually exclusive access
to a shared resource with multiple threads in Java. Synchronization in
Javaguarantees that no two threads can execute a synchronized method which
requires the same lock simultaneously or concurrently.
The synchronization is mainly used to
1. To prevent thread interference.
2. To prevent consistency problem.
You can synchronize your code in either of two ways. Both involve the use of the
synchronizedkeyword, and both are examined here.
There are two ways to synchronized your code
1. using synchronized methods
2. synchronized statements
2.4.1 Using synchronized methods
When you divide your program into separate threads, you need to define how
they will communicate with each other. Synchronized methods are used to
coordinate access to objects that are shared among multiple threads. These
methods are declared with the synchronized keyword. Only one synchronized
method at a time can be invoked for an object at a given point of time. When a
synchronized method is invoked for a given object, it acquires the monitor for that
object. In this case no other synchronized method may be invoked for that object
until the monitor is released. This keeps synchronized methods in multiple threads
without any conflict with each other.
To understand the need for synchronization, let’s begin with a simple example
that does not use it—but should. The following program has three simple classes.
The first one, MultiplicationTable, has a single method named printMulTable( ). The
printMulTable ( ) method takes an int parameter. This method print multiplication
value. It calls Thread.sleep(250), which pauses the current thread for 250
millisecond. The constructor of the next class, MThread, takes a reference to an
instance of the MultiplicationTable class and an int, which are stored in t and n
respectively. The constructor also creates a new thread that will call this object’s

262
run( ) method. The thread is started immediately. The run( ) method of MThread calls
the printMulTable ( ) method on the t instance of MultiplicationTable, passing in the n
int. Finally, the synchronized class starts by creating a single instance of
MultiplicationTable, and two instances of MThread, each with a unique int value. The
same instance of MultiplicationTable is passed to each MThread.
// Program-6
//example of java synchronized method
class MultiplicationTable{
void printMulTable(int n){ //nonsynchronized method
for(int i=1;i<=5;i++){
System.out.println(n*i);
try{
Thread.sleep(250);
}catch(Exception e){System.out.println(e);}
}
}
}
class MThread extends Thread{
MultiplicationTable t;
int n;
MThread(MultiplicationTable t, int n ){
this.t=t;
this.n=n;
}
public void run(){
t.printMulTable(n);
}
}
public class ThreadSynchronizationDemo{
public static void main(String args[]){

263
MultiplicationTable obj = new MultiplicationTable();//only one object
MThread t1=new MThread(obj, 5);
MThread t2=new MThread(obj, 100);
t1.start();
t2.start();
}
}
Output:
5
100
10
200
15
300
20
400
25
500
As you can see, by calling sleep( ), the printMulTable( ) method allows
execution to switch to another thread. This results in the mixed-up output of the two
threads. In this program, nothing exists to stop two threads from calling the same
method, on the same object, at the same time. This is known as a race condition,
because the two threads are racing each other to complete the method. This
example used sleep( ) to make the effects repeatable and obvious. In most
situations, a race condition is more subtle and less predictable, because you can’t be
sure when the context switch will occur. This can cause a program to run right one
time and wrong the next.
To fix the preceding program, you must serialize access to printMulTable ( ).
That is, you must restrict its access to only one thread at a time. To do this, you

264
simply need to precede printMulTable ( )’s definition with the keyword
synchronized, as shown here:
synchronized void printMulTable(int n){ //synchronized method
for(int i=1;i<=5;i++){
System.out.println(n*i);
try{
Thread.sleep(250);
}catch(Exception e){System.out.println(e);}
}
}
This prevents other threads from entering printMulTable ( ) while another thread is
using it. After synchronized has been added to printMulTable ( ), the output of the
program is as follows:
Output:
5
10
15
20
25
100
200
300
400
500
In such type of situation you should use the synchronized keyword to prevent the
state from race conditions.
2.4.2 The synchronized Statement/block
An effective and easy way of synchronization is to create synchronized
methods within classes. But it will not work in all cases, for example, if you want to
synchronize access to objects of a class that was not designed for multithreaded
programming or the class does not use synchronized methods. Further, this class

265
was not created by you, but by a third party and you do not have access to the
source code. In such situation, the synchronized statement block is a solution.
Synchronized statement block are similar to synchronized methods. It is used to
acquire a lock on an object before performing an action.
The syntax of Synchronized statement block:
Synchronized (obj) {
// statement block
}
Here, obj is the object to be locked. If you desire to protect instance data, you should
lock against that object. If you desire to protect class data, you should lock the
appropriate Class object.
public void run() {
synchronized (t) {
t.printMulTable(n);
}
}
2.5 DEADLOCK
Deadlock in java is a part of multithreading/multitasking. Deadlock can occur
in a situation when two or more threads wait indefinitely for each other to relinquish
locks. In simple words, a thread is waiting for an object lock, that is acquired by
another thread and second thread is waiting for an object lock that is acquired by first
thread. Since, both threads are waiting for each other to release the lock, the
condition is called deadlock. Deadlock situations can also arise that involve more
than two threads.

266
Figure-96 Deadlock Scenario
Thread-1 has resource-B and is requesting Resource-A
Thread-2 has resource-A and is requesting Resource-B
How to avoid deadlock
The solution to any problem lies in identifying the cause of the problem. There
many different situations and solution of the deadlock state. In above situation, it is
the pattern of accessing the resources A and B, is main issue. So, to resolve it, we
will simply re-order the statements where the code is accessing shared resources.
2.6 INTER-THREAD COMMUNICATION
In previous section you learn about how deadlock can occur if a thread obtain
a lock and does not relinquish it. Now, in this section you will see that how threads
can cooperate with each other, a thread can temporarily release a lock so the
threads can get opportunity to execute a synchronized method or statement block.
The lock can be acquired then after.
To avoid wastage of precious time of CPU, or to avoid polling, Java includes
an interthread communication mechanism via the wait( ), notify( ), and notifyAll( )
methods. These methods are implemented as final methods in Object class, so all
classes have them. These three methods can be called only from within a
synchronized method or statement block.
The Object class contains three final methods that allow threads to
communicate with each other. These methods are declared as:
public final void wait( ) throws Interrupted Exception
public final void wait(long milisec) throws Interrupted Exception
public final void wait(long milisec, int nanosec) throws Interrupted Exception

267
public final void notify( )
public final void notifyAll( )
wait( ) methodtells the calling thread to give up the monitor and go
to sleep until some other thread enters the same monitor and calls
notify( ) or notifyAll().
notify( ) method wakes up a single thread that is waiting on this
object’s monitor.
notifyAll( ) method wakes up all threads that are waiting on this
object’s monitor, the highest priority Thread will be run first.
Let us see the following program written to control access of resource using
wait() and notify () methods.
// Program-7
class WaitNotify implements Runnable {
WaitNotify () {
Thread th = new Thread (this); th.start();
} synchronized void notifyThat () {
System.out.println ("Notify the threads waiting"); this.notify();
} synchronized public void run() { try {
System.out.println("Thead is waiting...."); this.wait ();
} catch (InterruptedException e){}
System.out.println ("Waiting thread notified"); }
} Class RunWaitNotify {
public static void main (String args[]) {
WaitNotify wait_not = new WaitNotify();

268
Thread.yield (); wait_not.notifyThat();
} } Output:
Thead is waiting....
Notify the threads waiting
Waiting thread notified
2.7 SUSPENDING, RESUMING, AND STOPPING THREADS
Prior to Java 2 the suspend( ), resume( ), and stop( ) methods defined by
Thread seem to be a perfectly reasonable and convenient approach to managing the
execution of threads, they must not be used for new Java programs.
Java 2 onward these methods were deprecated. Here’s why. The suspend( )
method of the Thread class is deprecated in Java 2. This was done because
suspend( ) can sometimes cause serious system failures. Assume that a thread has
obtained locks on critical data structures. If that thread is suspended at that point,
those locks are not relinquished. Other threads that may be waiting for those
resources can be deadlocked.
The resume( ) method is also deprecated. It does not cause problems, but
cannot be used without the suspend( ) method as its counterpart. The stop( ) method
of the Thread class, too, is deprecated in Java 2. This was done because the similar
to suspend() method.
The task of suspend(), resume() and stop() methods is accomplished by
forming a flag variable that indicates the execution state of the thread. As long as
this flag is set to “running,” the run( ) method must continue to let the thread execute.
If this variable is set to “suspend,” the thread must pause. If it is set to “stop,” the
thread must terminate. Of course, a variety of ways exist in which to write such code,
but the central theme will be the same for all programs.

269
Check Your Progress 1
1) Which is more preferred – Synchronized method or synchronized block?
2) What is deadlock?
3) How does thread communicate with each other?
2.8 LET US SUM UP
This chapter explains various issue and solutions in concurrency. This chapter
explains concept of synchronization, creating synchronous methods and inter thread
communication. It is also explained how object locks are used to control access to
shared resources. It is also explain deadlock.
2.9 CHECK YOUR PROGRESS: POSSIBLE ANSWERS
Check Your Progress 1
1) Synchronized block is more preferred way because it doesn’t lock the
Object, synchronized methods lock the Object and if there are multiple
synchronization blocks in the class, even though they are not related, it will
stop them from execution and put them in wait state to get the lock on
Object.
2) Deadlock is a situation when two or more threads wait indefinitely for each
other to relinquish locks.
3) When threads want to share resources, communication between Threads
is important to coordinate their activity. Object class contains wait(),
notify() and notifyAll() methods allows threads to communicate.

270
Block-4
AWT and Event Handling

271
Unit 1: AWT Controls
Unit Structure
1.1 Learning Objectives
1.2 Outcomes
1.3 Introduction
1.4 AWT Controls
1.5 Let us sum up
1.6 Check your Progress: Possible Answers 1.7 Further Reading 1.8 Assignments
1.1 LEARNING OBJECTIVE
1

272
The objective of this unit is to make the students,
To learn, understand various AWT Component and container hierarchy
To learn, understand various container class and its methods
To learn, understand and define various AWT components / controls and its
methods
1.2 OUTCOMES
After learning the contents of this chapter, the students will be able to:
Use container as per their requirement for GUI designing
Use different AWT controls and its various methods in programs;
1.3 INTRODUCTION
Abstract Window Toolkit (AWT) is a application program interfaces (API’s) to
create graphical user interface (GUI).
Figure-97 AWT Class Hierarchy
GUI contains objects like buttons, label, textField, scrollbars that can be
added to containers like frames, panels and applets. AWT API is part of the Java

273
Foundation Classes (JFC), a GUI class library. The AWT is contained in Java.awt
package.
The Container is a component as it extends Component class. It inherits all
the methods of Component class. Components can be added to the component i.e
container.
As we can see in the above class hierarchy, Container is the super class of all the
Java containers. The class signature is as follows:
public class Container extends Component
Controls are placed on the GUI by adding them to a container. A container is
also a component. We can create and add these controls to the container without
knowing anything about creating containers. Throughout this unit we will use Frame
as a container for all of our controls. To add a control to a container, we need to:
1. First, create an object of the control
2. Second, after creating the control, add the control to the container.
The general form of add( ) method is:
add(Component compt)
compt is an instance of the control that we want to add. Once a control is added, it
will automatically be visible whenever its parent container is displayed.
Sometimes, we need to remove a control from the container then, remove( )
method helps us to do. This method is defined by Container class.
void remove(Component compt)
compt is the control we want to remove. We can remove all the controls from the
container by calling removeAll( ) method.
1.4 AWT COMPONENTS
Now, we will learn about the basic User Interface components (controls) like
labels, buttons, check boxes, choice menus, text fields etc.
1.4.1 FRAME

274
The AWT Frame is a top-level window which is used to hold other child
components in it. Components such as a button, checkbox, radio button, menu, list,
table etc. A Frame can have a Title Window with Minimize, Maximize and Close
buttons. The default layout of the AWT Frame is BorderLayout. So, if we add
components to a Frame without calling it's setLayout() method, these controls are
automatically added to the center region using BorderLayout manager.
Constructor:
public Frame(): This constructor allows us to create a Frame window without name.
public Frame(String name): This constructor allows us to create a Frame window
with a specified name.
Method:
public void add(Component compt): This method adds the component compt, to
the container Frame.
public void setLayout(LayoutManager object): This method allows to set the layout of
the components in a container, Frame.
public void remove(Component compt): This method allows to remove a component,
compt, from the container Frame.
public void setSize(int widthPixel, int heightPixel): This method allows to set the
size of the Frame in terms of pixels.
1.4.2 BUTTON
Buttons are used to fire events in a GUI application. The Button class is used
to create buttons. The default layout for a container is flow layout. To create a button
we will use one of the following constructors:
Button(): This constructor allows to create a button with no text label.
Button(String): This constructor allows to create a button with the given string as
label.
When a button is pressed or clicked, an ActionEvent is fired and leads to
implementation of the ActionListener interface.

275
Note: The Layout Manager helps to organize controls on the container. It is
discussed in next unit.
Example:
import java.awt.*;
public class buttonTest extends Frame
{
Button first, second, third;
buttonTest(String str)
{
super(str);
setLayout(new FlowLayout());
first = new Button("BAOU");
second = new Button("MCA");
third = new Button("GVP");
add(first);
add(second);
add(third);
}
public static void main(String arg[])
{
Frame frm=new buttonTest("AWT Button");
frm.setSize(250,250);
frm.setVisible(true);
}
}
Output:
Figure-98 Output of program

276
1.4.3 LABEL
Labels can be created using the Label class. Labels are basically used to
caption the components on a given interface. Label cannot be modified directly by
the user. To create a Label we will use one of the following constructors:
Label( ): This constructor allows to create a label with its string aligned to the left.
Label(String): This constructor allows to create a label initialized with the specified
string, and aligned to the left.
Label(String, int): This constructor allows to create a label with specified text and
alignment. Alignment may be Label.Right, Label.Left and Label.Center.
getText( ) and setText() method is used to retrieve the label text and set the text of
the label respectively.
Example:
import java.awt.*;
public class labelTest extends Frame
{
labelTest(String str) {
super(str);
setLayout(new FlowLayout());
Label one = new Label("BAOU");
Label two = new Label("MCA");
Label three = new Label("GVP");
// add labels to Frame
add(one);
add(two);
add(three);
}
public static void main(String arg[]){
Frame frm=new labelTest("AWT Label");
frm.setSize(250,200);
frm.setVisible(true);
}
}

277
Output:
Figure-99 Output of program
The output from the LabelTest program shows that the labels are arranged as we
have added to the container.
1.4.4 CHECKBOX
Check Boxes are the controls allowing the user to select multiple selections
from the given choice. For example, if a user wants to specify hobbies then
CheckBox is the best control to use. It can be either “Checked” or “UnChecked”.
Check boxes are created using the Checkbox class. To create a check box
we can use one of the following constructors:
Checkbox():This constructor allows to create an unlabeled checkbox that is not
checked.
Checkbox(String): This constructor allows to create an unchecked checkbox with the
given label as its string.
We can use the setState(boolean) method to set the status of the Checkbox.
We can specify a true as argument for checked checkboxes and false for unchecked
checkboxes. To get the current state of a check box, we can call boolean getState( )
method.
When a check box is selected or deselected, an ItemEvent is fired and leads
to implementation of the ItemListener interface.
Example:
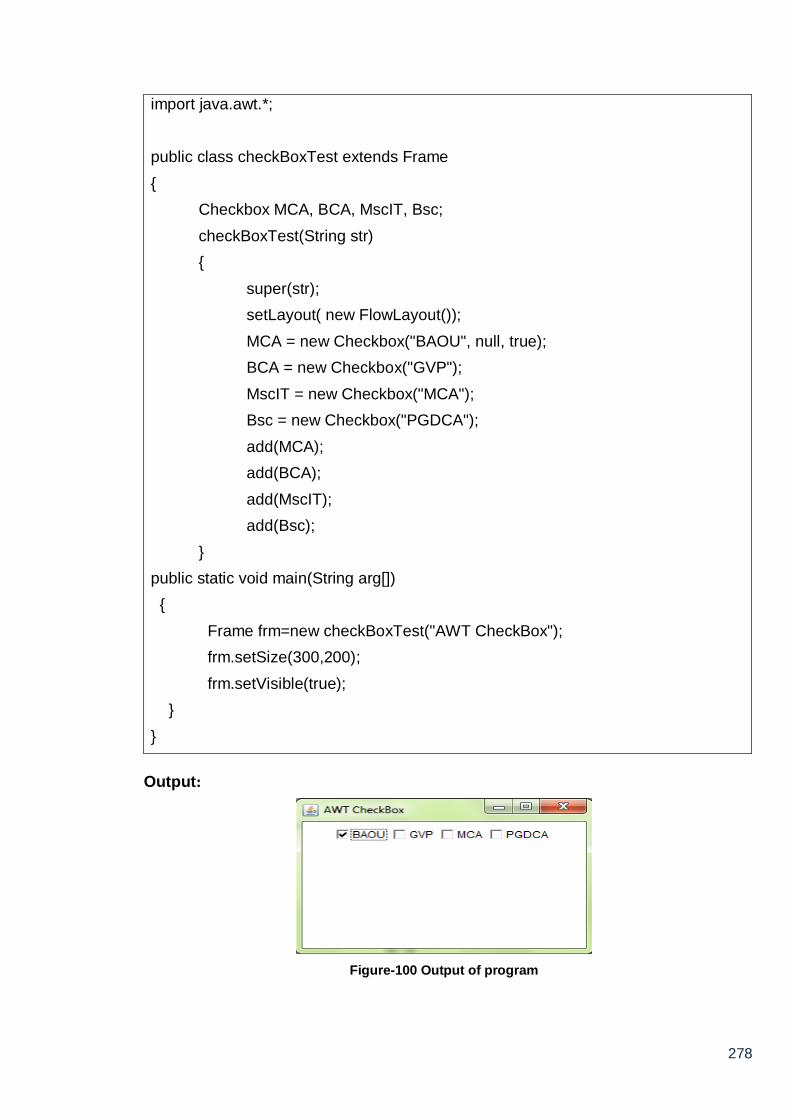
278
import java.awt.*;
public class checkBoxTest extends Frame
{
Checkbox MCA, BCA, MscIT, Bsc;
checkBoxTest(String str)
{
super(str);
setLayout( new FlowLayout());
MCA = new Checkbox("BAOU", null, true);
BCA = new Checkbox("GVP");
MscIT = new Checkbox("MCA");
Bsc = new Checkbox("PGDCA");
add(MCA);
add(BCA);
add(MscIT);
add(Bsc);
}
public static void main(String arg[])
{
Frame frm=new checkBoxTest("AWT CheckBox");
frm.setSize(300,200);
frm.setVisible(true);
}
}
Output:
Figure-100 Output of program

279
As we can see in the above output window that the first BAOU checkbox displayed
checked while others are unchecked.
1.4.5 CHECKBOXGROUP
CheckboxGroup is also known as a radio button or exclusive check boxes.
Check Boxes group allows the user to select single choice from the given choice. For
example, if a user wants to specify gender (Male / Female) then CheckboxGroup is
the best choice. It can be either “Checked” or “UnChecked”.
We can create CheckboxGroup object as follows:
CheckboxGroup cbg = new CheckboxGroup ();
To create radio button, we have to use this object as an extra argument to the
Checkbox constructor. For example,
Checkbox (String, CheckboxGroup, Boolean): It will allow us to create a checkbox
with the given string that belongs to the CheckboxGroup specified in the second
argument. If the last argument is true then the radio button will be checked and false
otherwise.
We can determine currently selected check box in a group by calling
getSelectedCheckbox( ) method as follows:.
Checkbox getSelectedCheckbox( )
We can set a check box by calling setSelectedCheckbox( ) method as follows:
void setSelectedCheckbox(Checkbox cb)
Here, cb is the check box that we want to be selected and at the same time
previously selected check box will be turned off.
Example:
import java.awt.*;
public class ChBoxGroup extends Frame
{
Checkbox mca, mba, mbbs, msc;
CheckboxGroup cbg;
ChBoxGroup(String str)
{

280
super(str);
setLayout(new FlowLayout());
cbg = new CheckboxGroup();
mca = new Checkbox("MCA", cbg, false);
mba = new Checkbox("MBA", cbg, false);
mbbs= new Checkbox("MBBS", cbg, true);
msc = new Checkbox("MSc", cbg, false);
add(mca);
add(mba);
add(mbbs);
add(msc);
}
public static void main(String arg[])
{
Frame frm=new ChBoxGroup("AWT CheckboxGroup");
frm.setSize(300,200);
frm.setVisible(true);
}
}
Output:
Figure-101 Output of program
The output generated by the ChBoxGroup is shown above. Note that the check
boxes are now displayed in circular shape.
Check Your Progress 1

281
1) What do you mean by Container?
……………………………………………………………………………………
……………………………………………………………………………………
2) Write the name of Components Subclasses which Support Painting?
……………………………………………………………………………………
……………………………………………………………………………………
3) What is the difference between Exclusive Checkbox and non Exclusive
Checkbox?
……………………………………………………………………………………
……………………………………………………………………………………
1.4.6 CHOICE
Choice control is created from the Choice class. This component enables a
single item to be selected from a drop-down list. We can create a choice control to
hold the list, as shown below:
Choice city = new Choice():
Items are added to the Choice control by using addItem(String) method. The
following code adds three items to the city choice control.
city.addItem(“Ahmedbad”);
city.addItem(“Vadodara”);
city.addItem(“Surat”);
After adding the items to the Choice, it is added to the container like any other
control using the add() method. The following example shows a Frame that contains
a list of subjects in a MSc IT course.
To get the item currently selected, we may call either getSelectedItem() or
getSelectedIndex() methods as shown here:
String getSelectedItem( )
int getSelectedIndex( )

282
The getSelectedItem() method will return a string containing the name of the item.
While getSelectedIndex( ) will return the index of the item. The first item will be at
index 0. By default, the selected item will be the first item. To get the number of
items in the list we can call getItemCount() method. We can get the name
associated with the item at the specified index by calling getItem( ) method as shown
here:
String getItem(int index)
When a choice is selected, an ItemEvent is generated and leads to implementation
of the ItemListener interface.
Example:
import java.awt.*;
public class choiceTest extends Frame
{
Choice master, bachelor;
choiceTest(String str)
{
super(str);
setLayout(new FlowLayout());
master = new Choice();
bachelor = new Choice();
master.add("MCA");
master.add("MBA");
master.add("MBBS");
master.add("MSc");
bachelor.add("BCA");
bachelor.add("BBA");
bachelor.add("BSc");
add(master);
add(bachelor);
}
public static void main(String arg[])
{
Frame frm=new choiceTest("AWT Choice");

283
frm.setSize(300,200);
frm.setVisible(true);
}
}
Output:
Figure-102 Output of program
The output generated by the above program shows two choice control named
Master and Bachelor.
1.4.7 TEXTFIELD
TextField is a subclass of TextComponent class. This control allows user to
provide textual data through GUI. AWT provides two classes to accept the user
input, i.e TextField and TextArea. The TextField allows a single line of text to be
entered and does not have scrollbars. TextField control allows us to enter the text
and edit the text. To create a text field one of the following constructors are used:
TextField(): This constructor allows to create an empty TextField with no specified
width.
TextField(String): This constructor allows to create a text field initialized with the
given string.
TextField(String, int): This constructor allows to create a text field with specified text
and specified width.
For example, the following line creates a text field 25 characters wide with the
specified string:

284
TextField txtName = new TextField (“BAOU”, 15);
add(txtName);
To get the string contained in the text field, call getText() method. To set the text, call
setText( ) method as follows:
String getText( )
void setText(String str)
setEditable(boolean ed): If ed is true, the text field may be modified. If it is false, the
text cannot be modified.
Boolean isEditable(): This method returns true if the text in text filed may be changed
and false otherwise.
Example:
import java.awt.*;
public class txtFieldTest extends Frame
{
TextField txtname, txtpass;
txtFieldTest(String str)
{
super(str);
setLayout(new FlowLayout());
Label name = new Label("Name: ", Label.RIGHT);
Label pass = new Label("Password: ", Label.RIGHT);
txtname = new TextField(12);
txtpass = new TextField(8);
txtpass.setEchoChar('*');
add(name);
add(txtname);
add(pass);
add(txtpass);
}
public static void main(String arg[])
{
Frame frm=new txtFieldTest("AWT TextField");

285
frm.setSize(250,200);
frm.setVisible(true);
}
}
Output:
Figure-103 Output of program
1.4.8 TextArea
The TextArea control allows us to enter more than one line of text. TextArea
control have horizontal and vertical scrollbars to scroll through the text. We can use
one of the following constructors to create a text area:
TextArea(): creates an empty text area with unspecified width and height.
TextArea(int, int): creates an empty text area with indicated number of lines and
specified width in characters.
TextArea(String): This constructor allows to create a text area with the specified
string.
TextArea(String, int, int): This constructor allows to create a text area containing the
specified text and specified number of lines and width in the characters.
TextArea is a subclass of TextComponent so it inherits the getText(), setText(),
getSelectedText(), select(), isEditable() and setEditable() methods.
TextArea class supports two more methods as follows:

286
insertText(String, int): It is used to insert specified strings at the character index
specified by the second argument.
replaceText(String, int, int): It is used to replace text between given integer position
specified by second and third argument with the specified string.
void append(String str): This append( ) method appends the string specified by str at
the end of the current text.
Example:
import java.awt.*;
public class txtAreaTest extends Frame
{
txtAreaTest(String str)
{
super(str);
setLayout(new FlowLayout());
String val ="Baba Saheb Ambedkar Open University and Gujarat Vidyapith";
TextArea text = new TextArea(val, 10, 30);
add(text);
}
public static void main(String arg[])
{
Frame frm=new txtAreaTest("AWT TextArea");
frm.setSize(250,200);
frm.setVisible(true);
}
}
Output:

287
Figure-104 Output of program
In the above output we can see that scrollbar allows us to scroll through the textarea.
1.4.9 SCROLL BAR
Scroll bar controls are used to select values between a specified minimum
and maximum. Scroll bars may be horizontal or vertical. The current value of the
scroll bar relative to its minimum and maximum values will be specified by the slider
box. The slider box can be dragged by the user to a new position. Scroll bar controls
are encapsulated by the Scrollbar class. Scrollbar constructors are:
Scrollbar( ) : This will allow us to create a vertical scroll bar.
Scrollbar(int style)
Scrollbar(int style, int initialValue, int thumbSize, int minVal, int maxVal)
The second and third constructor will allow us to provide the orientation of the
scroll bar. The style may be Scrollbar.VERTICAL or Scrollbar.HORIZONTAL. The
initial value of the scroll bar will be specified by initialValue. The number of units
represented by the height of the thumb is specified by thumbSize. The minimum and
maximum values for the scroll bar are specified by minVal and maxVal.
If we construct a scroll bar by one of the first two constructors, then we need
to provide its parameters by using setValues( ) method as shown here:
void setValues(int initialValue, int thumbSize, int min, int max)

288
To get the current value of the scroll bar we can call getValue() method. It will
return the current setting. To set the current value we can call setValue() method as
follows:
int getValue( )
void setValue(int newValue)
We can also get the minimum and maximum values by getMinimum( ) and
getMaximum( ) methods as shown here:
int getMinimum( ) and int getMaximum( )
They return the requested quantity. To handle scroll bar events, we need to
implement the AdjustmentListener interface.
Example:
import java.awt.*;
class scrollBarTest extends Frame
{
scrollBarTest(String str)
{
super(str);
setLayout(new FlowLayout());
//Horizontal Scrollbar with min value 0,max value 200,initial value 50 and visible amount 10
Label Horzlbl =new Label("Horizontal Scrollbar");
Scrollbar hzsb = new Scrollbar(Scrollbar.HORIZONTAL,50,10,0,200);
//Vertical Scrollbar with min value 0,max value 255,initial value 10 and visible amount 5
Label vertlbl =new Label("Vertical Scrollbar");
Scrollbar vtsb = new Scrollbar(Scrollbar.VERTICAL,30,15,0,255);
add(Horzlbl);
add(hzsb);
add(vertlbl);
add(vtsb);
}
public static void main(String arg[])
{

289
Frame frm=new scrollBarTest("AWT Scrollbar");
frm.setSize(250,200);
frm.setVisible(true);
}
}
Output:
Figure-105 Output of program
1.4.10 LISTS
The List class provides us a compact, multiple-choice and scrolling selection
list. A List control allows us to show any number of choices in the visible window
compare to a choice object, which shows only the single selected item in the menu.
It also allows multiple selections. List constructors are:
List( ): This constructor allows us to create a List control that will allow only one item
to be selected at any one time.
List(int numRows): In this constructor, the value of numRows specifies the number of
items from the list will always be visible
List(int numRows, boolean multiSelect): In this constructor, if multiSelect is true, then
the user can select two or more items at a time. If it is false, then only one item can
be selected.
To add a selection to the list we have to call add( ) method as follows:
void add(String name)
void add(String name, int index)

290
In both the forms, name is the name of the item added to the list. The first
constructor will add items to the end of the list. The second constructor will add the
item at the index specified by index.
The getSelectedItem( ) method will return a string containing the name of the
item selected. In case of more item is selected or no selection has been made then
null will be returned. getSelectedIndex( ) method will return the index of the item
selected. In case of more item is selected or no selection has been made then –1 will
be returned.
We must use either getSelectedItems() or getSelectedIndexes( ) methods for
lists allowing multiple selection as shown here:
String[ ] getSelectedItems()
int[ ] getSelectedIndexes( )
To get the number of items in the list, call getItemCount( ) method as shown here:
int getItemCount( )
We can obtain the name associated with the item at the specified index by calling
getItem( ) method.
String getItem(int index)
To handle the list events, we need to implement the ActionListener interface.
When a List item is double-clicked, an ActionEvent object is generated. When an
item is selected or deselected with a single click, an ItemEvent object is generated.
Following example shows one multiple choice and the other single choice:
Example:
import java.awt.*;
public class ListTest extends Frame
{
List master, bachelor;
ListTest(String str)
{
super(str);
setLayout(new FlowLayout());

291
master = new List(13, true);
bachelor = new List(13, false);
master.add("MCA");
master.add("MBA");
master.add("MBBS");
master.add("MSc");
bachelor.add("BCA");
bachelor.add("BBA");
bachelor.add("BSc");
bachelor.select(1);
//add lists to Frame
add(master);
add(bachelor);
}
public static void main(String arg[])
{
Frame frm=new ListTest("AWT List");
frm.setSize(1300,200);
frm.setVisible(true);
}
}
Output:
Figure-106 Output of program
As we can see in the output that in second list first index value is selected.
1.4.11 MENU

292
Menus are mostly used in Windows that contains a list of menu items. When
we click on the MenuItem it generates ActionEvent and is handled by ActionListener.
AWT Menu and MenuItem are not components as they are not subclasses of
java.awt.Component class. They are derived from MenuComponent class. Creation
of Menu requires lot of classes like MenuBar, Menu and MenuItem and one is
required to be added to the other. The following image depicts Menu hierarchy.
Figure-107 Hierarchy of menu
MenuComponent class is the super most class of all the menu classes same
as Component is the super most class for all component classes like Button, choice,
Frame etc. MenuBar will hold the menus and Menu will hold menu items. Menus will
be placed on menu bar. The following steps will be executed to create AWT Menu.
1. Create menu bar
2. Add (set) menu bar to the frame
3. Create menus
4. Add created menus to menu bar
5. Create menu items
6. Add created menu items to menus
7. At last, if required then handle events
Example:
import java.awt.*;
import java.lang.*;
import java.util.*;
public class menuTest extends Frame
{

293
MenuBar mbar;
Menu file, help;
MenuItem op, os, pr, sa, mc;
Label msg = new Label("Select an option from menu");
menuTest(String str)
{
super(str);
setLayout(new BorderLayout());
add("Center", msg);
mbar = new MenuBar();
mbar.add(file = new Menu("File"));
mbar.add(help = new Menu("Help"));
mbar.setHelpMenu(help);
file.add(op = new MenuItem("Open"));
file.add(os = new MenuItem("Save"));
file.addSeparator();
file.add(pr = new MenuItem("Print"));
help.add(sa = new MenuItem("Save As"));
help.add(mc = new MenuItem("close"));
setMenuBar(mbar);
}
public static void main(String arg[])
{
Frame frm=new menuTest("MenuBar");
frm.setSize(200,200);
frm.setVisible(true);
}
}
Output:

294
Figure-108 Output of program
1.4.12 CANVAS
The Canvas control is a blank rectangular shape where the application allows
us to draw. It inherits the Component class. Canvas is a class from java.awt package
on which a user can draw some shapes or display images. A button click or a
keyboard key press on the canvas can fire events and these events can be
transferred into drawings. The class signature of canvas is as follows:
public class Canvas extends Component implements Accessible
Drawing Oval on Canvas
In the following simple canvas code, a canvas is created and a oval is drawn on it.
Example:
import java.awt.*;
public class canvasDraw extends Frame
{
public canvasDraw(String str)
{
super(str);
CanvasTest ct = new CanvasTest();
ct.setSize(125, 100);
ct.setBackground(Color.cyan);
add(ct, "North");
setSize(300, 200);
setVisible(true);

295
}
public static void main(String args[])
{
new canvasDraw("AWT Canvas");
}
}
class CanvasTest extends Canvas
{
public void paint(Graphics g)
{
g.setColor(Color.blue);
g.fillRect(65, 5, 1135, 65);
}
}
Output:
Figure-109 Output of program
In the above program, our class extends the java.awt.Canvas class. Here,
CanvasTest extends Canvas. The main class is canvasDraw extends Frame.
CanvasTest object is created and added to the frame on North side. Canvas is
colored cyan just for identification. The object of Canvas is tied to a frame to draw
painting. On the canvas, rectangle object is filled with blue color.
1.4.13 PANEL

296
Panel class is the simple container class. A panel class provides an area in
which an application can contain any other component including other panels. The
signature of Panel class is as follows:
public class Panel extends Container
The default layout manager for a panel class is the FlowLayout layout
manager and can be changed as per the requirement of the layout. Being the
subclass of both Component and Container class, a panel is both a component and
a container. As a component it can be added to another container and as a container
it can be added with components. It is also known as a child window so it does not
have a border.
In the following program, three buttons are added to the north (top) of the
frame and three buttons to the south (bottom) of the frame. Without panels, this
arrangement is not possible with mere layout managers.
Example:
import java.awt.*;
public class PanelTest extends Frame
{
public PanelTest(String str)
{
super(str);
setLayout(new BorderLayout());
Panel p1 = new Panel();
Panel p2 = new Panel();
p1.setBackground(Color.cyan);
p2.setLayout(new GridLayout(1, 3, 20, 0));
Button b1 = new Button("BAOU");
Button b2 = new Button("GVP");
Button b3 = new Button("MCA");
Button b13 = new Button("BCA");
Button b5 = new Button("MBA");

297
Button b6 = new Button("BBA");
p1.add(b1);
p1.add(b2);
p1.add(b3);
p2.add(b13);
p2.add(b5);
p2.add(b6);
add(p1, "North");
add(p2, "South");
}
public static void main(String args[])
{
Frame fm=new PanelTest("AWT Panel");
fm.setSize(300, 200);
fm.setVisible(true);
}
}
Output:
Figure-110 Output of program
Check Your Progress 2
1) What is the difference between Choice and List?

298
……………………………………………………………………………………
……………………………………………………………………………………
2) What is Canvas?
……………………………………………………………………………………
……………………………………………………………………………………
3) What is Panel?
……………………………………………………………………………………
……………………………………………………………………………………
4) What is the difference between text field and text area?
……………………………………………………………………………………
……………………………………………………………………………………
5) How to change the state of a button from enable to disable after click?
……………………………………………………………………………………
……………………………………………………………………………………
6) What is the difference between a Choice and a List?
……………………………………………………………………………………
……………………………………………………………………………………
1.5 LET US SUM UP
At last, AWT is the bunch of component and containers allowing users for
different options to set on their GUI. These components can be created by
instantiating their class and making them visualize on the container like Frame,
window or Panel. Component will be like buttons, choice, text fields etc. Once these
controls are added to the GUI user can interact with them through Event handling.
Event Handling is covered in the next sections.
1.6 CHECK YOUR PROGRESS: POSSIBLE ANSWERS Check Your Progress 1

299
1. Container contains and organizes other components through the use of layout
managers. A container can be a Frame or Applet or Dialog box etc.
2. The Canvas, Frame, Panel and Applet classes support painting
3. Exclusive Checkbox: Only one among a group of items can be selected at a time.
If an item from the group is selected, the checkbox currently checked is
deselected and the new selection will be highlighted. The exclusive Checkboxes
are also known as Radio buttons.
Non Exclusive: These checkboxes are not grouped together and each one can
be selected along with the other.
Check Your Progress 2
1. A choice is displayed in a compact form. It requires user to pull it down to check
the list of available choices and only one item may be selected from a choice.A
list may be displayed in such a way that several list items will be visible and it
supports the selection of one or more list items.
2. It is a simple drawing surface. It is used for painting images or to perform other
graphical operations.
3. For a greater flexibility on the organization of components, panels are widely
used with layout managers. Controls are added to panel and panel in turn can be
added to a container. A panel can work like a container and a component. As
container, control will be added to it and as a control, panel will be added to a
frame or applet.
4. TextField and TextArea are used to get or display text from the user. The
difference is text field displays the message in single line of text only but of varied
length while text area is used to display multiple lines of text.
5. When a user clicks a button an action event is fired which will be listened by
implementing ActionListener interface and actionPerformed(ActionEvent ae)
method. Then we have to call button.setEnable(false) method to disable this
button.
6. A Choice is displayed in a compact form that requires us to pull it down to check
the list of available choices. At a time only one item can be selected from a
Choice. A List will be displayed in such a way that several list items are visible. A
List supports the multiple selections from List items.

300
1.7 FURTHER READING
1) Java: The Complete Reference by Schildt Herbert. Ninth Edition
2) Let us Java by Yashavant Kanetkar. 3rd Edition
3) Head First Java: A Brain-Friendly Guide, Kindle Edition by Kathy Sierra, Bert
Bates. 2nd
4) Edition
5) https://fresh2refresh.com/java-tutorial/
6) https://www.studytonight.com/java/
1.8 ASSIGNMENTS
1) Define AWT. List various component and containers of AWT.
2) Why AWT Components are known as heavy weight components?
3) What is the difference between Panel and Frame?
4) Discuss any three methods of Checkbox and TextField class.
5) Write a program to design personal information form with the help of AWT
controls.

301
Unit 2: Event Delegation Model
Unit Structure
2.1 Learning Objectives
2.2 Outcomes
2.3 Introduction
2.4 Event Delegation Model
2.5 Types of Events
2.6 Adapter Classes
2.7 Let us sum up
2.8 Check your Progress: Possible Answers 2.9 Further Reading 2.10 Assignments
2.1 LEARNING OBJECTIVE
2

302
The objective of this unit is to make the students,
To learn, understand Event
To learn, understand Event Source and Event Handlers
To learn, understand and define different Event and Listeners for various
kinds of Events
To learn, understand adapter classes and their importance
2.2 OUTCOMES
After learning the contents of this chapter, the students will be able to:
Define different events
Write event source and event handlers to handle the events
Adapter classes when they are in need of few methods instead of
all methods of handlers
2.3 INTRODUCTION
Java provides the platform to develop interactive GUI application using the
AWT and Event classes. This unit discusses various event classes for handling
various events like button click, checkbox selection etc. We can define an event as
the change in the state of an object when something changes within a graphical user
interface. If a user check or uncheck redio button, clicks on a button, or write
characters into a text field etc. then an event trigger and creates the relevant event
object. This mechanism is a part of Java's Event Delegation Model
2.4 EVENT DELEGATION MODEL
The Event Delegation Model is based on the concept of source and listener. A
source triggers an event and sends it to one or more registered listeners. On
receiving the event notification, listener processes the event and returns it. The
important feature is that the source has a list of registered listeners which will be
informed as and when event take place. Only the registered listeners will actually

303
receive the notification when a specific event is generated. Generally the event
Handling is a three step process:
a. Create controls which can generate events (Event Generators).
b. Build objects that can handle events (Event Handlers).
c. Register event handlers with event generators.
2.4.1 EVENT GENERATORS
It is an object that is responsible to generate a particular kind of event. An
event is generated when the internal state of an object is changed. A source may
trigger more than one kind of event. Every source must register a list of listeners that
are interested to receive the notifications when an event is generated. Event source
has methods to add or remove listeners.
To register (add) a listener the signature of method is:
public void addNameListener(NameListener eventlistener)
To unregister (remove) a listener the signature of method is:
public void removeNameListener(NameListener eventlistener)
where,
Name is the name of the event and eventlistener is a reference to the event listener.
2.4.2 EVENT LISTENER
An event listener is an object which receives notification when an event is
triggered. As already said only registered listeners will receive notifications from the
event sources about specific kinds of events. The event listener is responsible to
receive these notifications and process them. Technically these listeners are
interfaces having various abstract methods for event handling. These interfaces
needs to be implemented in the class where the object or source will trigger the
event.
For example, consider an action event represented by the class ActionEvent,
which is triggered when a user clicks a button or the item of a list. At the user's
interaction, an ActionEvent object related to the relevant action is created. This

304
object will contain both the event source and the specific action taken by the user.
This event object is then passed to the related ActionListener object's method:
void actionPerformed(ActionEvent e)
This method will be executed and returns the appropriate response to the user.
2.4.3 REGISTRATION OF LISTENER FOR EVENTS
As we know, we have implemented the interface and set up the methods
which will listen for these events and trigger the functionality accordingly. To perform
this, we have to use an event listener. To use an event listener the
addActionListener() method will be used on the component that will listen for these
events - the button.
button.addWindowListener(this);
2.5 TYPES OF EVENTS
There are various types of events that can happen in a Java program. They are,
Event Class /
Type
Generated
when
Listener Interface Methods to implement
Action event Button is
pressed
ActionListener actionPerformed()
Adjustment
event
Scroll bar is
manipulated
AdjustmentListener adjustmentValueChang
ed()
Component
event
A control is
hidden,
moved,
resized, or
shown
ComponentListener componentHidden(),
componentMoved(),
componentResized(),
componentShown()
Container
event
A control is
added or
removed
from a
ContainerListener componentAdded(),
componentRemoved()

305
container
Focus event A control
gains or
loses focus
FocusListener focusGained(),
focusLost()
Item event An item is
selected or
deselected
ItemListener itemStateChanged()
Key event A key is
pressed,
released or
typed
KeyListener keyPressed(), keyRelea
sed(),
keyTyped()
Mouse event Mouse is
clicked,
pressed or
released.
Mouse
pointer
enters,
leaves a
component
MouseListener mouseClicked(),
mouseEntered(),
mouseExited(),
mousePressed(),
mouseReleased()
Mouse event Mouse is
dragged or
moved
MouseMotionListen
er
mouseDragged(),
mouseMoved()
Text event Text value is
changed
TextListener textValueChanged()
Window event A window is
activated,
closed,
deactivated,
deiconfied,
WindowListener windowActivated(),
windowClosed(),
windowClosing(),
windowDeactivated(),

306
opened or
quit
windowDeiconified(),
windowIconified(),
windowOpened()
Table-10: Event classes and their methods
Each interface has their own methods to use to execute some code when
certain events occur. For example, the ActionListener interface has a
actionPerformed method that can be used to execute some code when a button is
clicked. When we implement an interface, we have to define all of it’s abstract
methods in the program.
Let's check a simple example that will have window events.
import java.awt.*;
import java.awt.event.*;
public class winEvents extends Frame implements WindowListener{
}
Now we need to implement the methods of the WindowListener interface to specify
what happens during window events.
//Window event methods
public void windowClosing(WindowEvent we)
{ System.out.println(“The frame is closing”); }
public void windowClosed(WindowEvent we)
{ System.out.println(“The frame is closed”); }
public void windowDeactivated(WindowEvent we)
{ System.out.println(“The frame is deactivated”); }
Example:
In the below program, a frame utilizes all the window event methods. See how the
program displays different messages as we perform different actions such as
minimize and maximize on the frame.

307
import java.awt.*;
import java.awt.event.*;
public class WinEvents extends Frame implements WindowListener
{
public WinEvents(String str){
super(str);
addWindowListener(this);
}
public static void main(String[] args){
Frame fm = new WinEvents("WindowEvent_Example");
fm.setSize(250, 250);
fm.setVisible(true);
}
public void windowClosing(WindowEvent we){
System.out.println("The window is closing.....");
((Window)we.getSource()).dispose();
}
public void windowClosed(WindowEvent we){
System.out.println("The window has been closed!");
System.exit(0);
}
public void windowActivated(WindowEvent we){
System.out.println("The window has been activated");
}
public void windowDeactivated(WindowEvent we){
System.out.println("The window has been deactivated");
}
public void windowDeiconified(WindowEvent we){
System.out.println("The window has been restored from a minimized state");
}
public void windowIconified(WindowEvent we){
System.out.println("The window has been minimized");
}
public void windowOpened(WindowEvent we){
System.out.println("The window is now visible");

308
}
}
Output: When we perform different operation on window following output will be
displayed.
Figure-111: Output of program
After discussing all the window event methods, let us check the key events. The
following program depicts the use of KeyListener to handle different key events.
import java.awt.BorderLayout;
import java.awt.event.KeyEvent;
import java.awt.event.KeyListener;
import java.awt.Frame;
import java.awt.TextField;
import java.awt.TextArea;
import java.awt.Label;
public class keyListenerTest extends Frame implements KeyListener
{
TextArea text;
TextField txtF;
Label l1;
keyListenerTest(String str)
{
super(str);
setLayout(null);
l1=new Label("Enter Key:");
l1.setBounds(50,50,100,30);
txtF= new TextField();

309
text = new TextArea();
txtF.addKeyListener(this);
txtF.setBounds(160,50,100,30);
text.setBounds(20,100,300,300);
add(l1);
add(txtF);
add(text);
}
public void keyPressed(KeyEvent ke)
{
text.append("Key is Pressed\n");
}
public void keyReleased(KeyEvent ke)
{
text.append("Key is Released\n");
}
public void keyTyped(KeyEvent ke)
{
text.append("Key is Typed\n");
}
public static void main(String args[])
{
Frame frame = new keyListenerTest("KeyListener");
frame.setSize(350,1400);
frame.setVisible(true);
}
}
Output:

310
Figure-112: Output of program
Check Your Progress 1
1) Define Event. Which Interface is extended by all awt Event Listener?
……………………………………………………………………………………
……………………………………………………………………………………
2) Write a code to register actionListener for button event.
……………………………………………………………………………………
……………………………………………………………………………………
3) Differentiate between mouseListener and mouseMotionListener.
……………………………………………………………………………………
……………………………………………………………………………………
2.6 ADAPTER CLASSES
We have seen that handler class need to implement interface therefore it has
to provide implementation of all the methods of that interface. Suppose, an interface
has 10 methods, then hander class has to provide implementation of all these 10
methods. Even if the requirement is for one method, class has to provide empty
implementation of the remaining 9 methods with null bodies. This becomes a
irritating job for a programmer.
Adapter classes are classes that implement all of the methods in their
corresponding interfaces with null bodies. If the programmer needs one of the

311
methods of particular interface then he / she can extend an adapter class and
override its methods. They belongs to java.awt.event package.
There is an adapter class for listener interfaces having more than one event
handling methods. For example, for WindowListener there is a WindowAdapter class
and for MouseMotionListener there is a MouseMotionAdapter class and many more.
Adapter classes provide definitions for all the methods (empty bodies) of their
corresponding Listener interface. It means that WindowAdapter class implements
WindowListener interface and provide the definition of all methods inside that
Listener interface. Consider the following example of WindowAdapter and its
corresponding WindowListener interface:
public interface WindowListener{
public void windowOpened ( WindowEvent e )
public void windowIconified ( WindowEvent e )
public void windowDeiconified ( WindowEvent e )
public void windowClosed ( WindowEvent e )
public void windowActivated ( WindowEvent e )
public void windowDeactivated ( WindowEvent e )
}
public class WindowAdapter implements WindowListener {
public void windowOpened ( WindowEvent e ) {}
public void windowIconified ( WindowEvent e ) {}
public void windowDeiconified ( WindowEvent e ) {}
public void windowClosed ( WindowEvent e ) {}
public void windowActivated ( WindowEvent e ) {}
public void windowDeactivated ( WindowEvent e ) {}
}
Now in the below class WinEvents, if we extend the above handler class then
due to inheritance, all the methods of the adapter class will be available inside
handler class as adapter classes has already provided implementation with empty
bodies. So, we only need to override and provide implementation of method of our
interest.
public class WinEvents extends WindowAdapter{...}

312
Example: Following program demonstrates the use of WindowAdapter class.
import java.awt.*;
import java.awt.event.*;
public class adapterTest extends Frame
{
Label lblTest;
adapterTest(String str)
{
super(str);
setLayout(new FlowLayout(FlowLayout.LEFT));
lblTest = new Label();
add(lblTest);
addMouseListener(new MyAdapter(lblTest));
}
public static void main(String str[])
{
Frame at=new adapterTest("AdapterClass");
at.setSize(250,250);
at.setVisible(true);
}
}
class MyAdapter extends MouseAdapter
{
Label lblTest;
MyAdapter(Label lbl)
{
lblTest = lbl;
}
public void mouseClicked(MouseEvent me)
{
lblTest.setText("Mouse is Clicked");
}
}
Output:

313
Figure-113: Output of program
Check Your Progress 2
1) What is the use of WindowListener?
……………………………………………………………………………………
……………………………………………………………………………………
2) What is the use of the Window class?
……………………………………………………………………………………
……………………………………………………………………………………
3) Why do we use adapter class? List all adapter classes of java AWT.
……………………………………………………………………………………
……………………………………………………………………………………
The following example handles action event along with item event when a
user clicks a button, check a checkbox or changes a value from choice.
Example:

314
import java.awt.*;
import java.awt.event.*;
public class AwtControl extends Frame
implements ActionListener, ItemListener
{
Button button;
Checkbox mca;
Choice city;
TextField TxtF,TxtF1,TxtF2;
AwtControl(String str)
{
super(str);
setLayout(new FlowLayout());
button = new Button("BAOU");
mca = new Checkbox("MCA");
city = new Choice();
TxtF = new TextField(50);
TxtF1 = new TextField(50);
TxtF2 = new TextField(50);
button.addActionListener(this);
mca.addItemListener(this);
city.addItemListener(this);
city.addItem("Ahmedabad");
city.addItem("Sadra");
city.addItem("Randheja");
add(button);
add(mca);
add(city);
add(TxtF); add(TxtF1);add(TxtF2);
}
public void actionPerformed(ActionEvent e)
{
String action = e.getActionCommand();

315
if(action.equals("BAOU"))
{
TxtF.setText("BAOU is in Ahmedabad");
}
}
public void itemStateChanged(ItemEvent e)
{
if (e.getSource() == mca)
{
TxtF1.setText("MCA at Gujarat Vidyapith: " + mca.getState() + ".");
}
else if (e.getSource() == city)
{
TxtF2.setText(city.getSelectedItem() + " is selected.");
}
}
public static void main(String arg[])
{
Frame frame = new AwtControl("AWT Event");
frame.setSize(1400,200);
frame.setVisible(true);
}
}
Output:
Figure-114: Output of program
2.7 LET US SUM UP

316
Throughout the unit, we saw that AWT provides various event classes and
listener interfaces to fire and handle events triggered through user interaction. We
have seen that how ActionEvent class helps to handle the event triggered by button
like controls. Same way, in the unit we have discussed various other Event classes
and their respective listener for event handling. At last, we have discussed Adapter
class to relieve the programmer from writing all the listener methods.
2.8 CHECK YOUR PROGRESS: POSSIBLE ANSWERS Check Your Progress 1
1. Event is an act which indicates the changes in the status of an Object. The
java.util.EventListener interface is extended by all the AWT event listeners.
2.
public class handler implements ActionListener
{
handler()
{
Button jb;
jb=new Button("Click");
// Registering Event listener with object.
jb.addActionListener(this);
}
public void actionPerformed(ActionEvent ae)
{
System.out.println("Button Clicked");
}
}

317
3. MouseListener handles event when mouse is Released, Clicked, Exited,
Entered or pressed while MouseMotionListener handles event when mouse is
Dragged or Moved.
Check Your Progress 2
1. WindowListener interface is implemented to handle the tasks like Opening a
window, Closing a window, Iconifying a window, Deiconifying a window,
Activating a window, Deactivating a window and Maximizing the window.
2. The window class can be used to create a plain, open window without a
border or menu. Sometimes, the window class can also be used to display
introduction or welcome screens.
3. The main benefit of adapter class is that we can override any one or two
methods we wants instead of all methods of an interface. But with the listener,
we must have to override all the abstract methods. For example, to minimize
the window, all the 7 abstract methods of WindowListener should be
overridden atleast with empty bodies. But if we use WindowAdapter class
then we need to implement method windowIconified().
Different adapter classes are WindowAdapter, MouseAdapter,
MouseMotionAdapter and KeyAdapter.
2.9 FURTHER READING
7) Java: The Complete Reference by Schildt Herbert. Ninth Edition
8) Let Us Java by Yashavant Kanetkar. 3rd Edition
9) Core Java Volume I — Fundamentals by Cay S. HorstMann, Gary Cornell, 9th
Edition
10) https://www.javatpoint.com/
2.10 ASSIGNMENTS
6) Discuss Event delegation model with diagram in detail.
7) Explain different methods of KeyListener with its signature.
8) Write a program to implement a single key event with the help of adapter
classes.

318
Unit 3: Graphics Class
Unit Structure
3.1 Learning Objectives
3.2 Outcomes
3.3 Introduction
3.4 Graphics Class
3.5 Layout Manager
3.6 Let us sum up
3.7 Check your Progress: Possible Answers 3.8 Further Reading 3.9 Assignments
3

319
3.1 LEARNING OBJECTIVE
The objective of this unit is to make the students,
To learn, understand and define graphics class and its methods
To learn, understand and define the Font class and its methods
To learn, understand and define the Color class and its methods
To learn, understand the arrangement of AWT controls on the container
To learn, understand different Layout and its parameters
3.2 OUTCOMES
After learning the contents of this chapter, the students will be able to:
Use Graphics class and its various methods
Use Font class and its various methods in programs
Use Color class and its various methods in programs
Write a graphical application using graphics, font and color class
Use Layout Manager to arrange AWT components on the containers
3.3 INTRODUCTION
Java provides the platform to develop graphics based application using the
Graphics class. This unit dicusses various java functionalities for painting shapes like
rectangle, polygon etc. The unit covers the use of color and fonts. It also
demonstrates the filling of object once it is drawn on the container. It also discusses
various font family, its style to display the content on the container. It is essential to
learn to beautify the components placed on the container area using Font and Color
class. Withour the proper arrangement of control on the containers the GUI of the
application looks jagged. So, it becomes very important for the programmer to
arrangement the controls on the containers. Here, the Layout Manager comes. This
unit also discusses different layout techniques to arrange components on the
containers. It also covers various techniques to arrange the control manually using
setBounds method.

320
3.4 GRAPHICS CLASS
In the AWT package, the Graphics class provides the foundation for all
graphics operations. At one end the graphics context provides the information about
drawing operations like the background and foreground colors, font and the location
and dimensions of the region of a component. At the other end, the Graphics class
provides methods for drawing simple shapes, text, and images at the destination.
To draw any object a program requires a valid graphics context in the form of
instance of the Graphics class. Graphics class is an abstract base class, it cannot be
instantiated. An instance is created by a component and handed over to the program
as an argument to a component's update() and paint() methods. The
update() and paint() method should be redefined to perform the desired graphics
operations. There are various methods used for drawing different component on the
containser. Thay are discussed below.
repaint() Method
The repaint() method requests for a component to be repainted. This method
has various forms as shown below:
1. public void repaint();
2. public void repaint(long tm) ; // Specify a period of time in milliseconds
Once a period of time is provided, the painting operation will occur before the time
elapses.
3. public void repaint(int x, int y, int w, int h);
We can also provide that only a portion of a component be repainted. It is
useful when the paint operation is time-consuming, and only a portion of the display
needs to be repainted.
4. public void repaint(long tm, int x, int y, int w, int h);
public void update(Graphics g)
The update() method is called in turn to a repaint() request. This method
takes an instance of the Graphics class as an argument. The scope of graphics
instance is valid only within the context of the update() method and the methods it

321
calls. The default implementation of the Component class will erase the background
and calls the paint() method.
public void paint(Graphics g)
The paint() method is called from an update() method, and is responsible for
drawing the graphics. It takes an instance of the Graphics class as an argument.
void drawLine(int xStart, int yStart, int xStop, int yStop)
It draws a straight line, a single pixel wide, between the specified start and end
points. The line will be drawn in the current foreground color. This methods works
when invoked on a valid Graphics instance and used only within the scope of a
component's update() and paint() methods.
Retangle
Rectangle object can be drawn in different ways like,
1. void drawRect(int x, int y, int width, int height)
2. void fillRect(int x, int y, int width, int height)
3. void drawRoundRect(int x, int y, int width, int height, int arcwidth, int
archeight)
4. void fillRoundRect(int x, int y, int width, int height, int arcwidth, int archeight)
5. void draw3DRect(int x, int y, int width, int height, boolean raised)
6. void fill3DRect(int x, int y, int width, int height, boolean raised)
All the method requires, the x and y coordinates as parameters to start the
rectangle, and the width and height of the rectangle. The width and height must be
positive values. Rectangles can be drawn in three different styles: plain, with
rounded corners, and with a three-dimensional effect (rarely seen).
The RoundRect methods require an arc width and arc height to control the
rounding of the corners. The 3 dimensional methods require an additional parameter
that indicates whether or not the rectangle should be raised. These all method works
when invoked on a valid Graphics instance and used only within the scope of a
component's update() and paint() methods.
Ovals and Arcs

322
Ovals and Arc object can be drawn in different ways like,
1. void drawOval(int x, int y, int width, int height)
2. void fillOval(int x, int y, int width, int height)
3. void drawArc(int x, int y, int width, int height, int startAngle, int arcAngle)
4. void fillArc(int x, int y, int width, int height, int startAngle, int arcAngle)
Each of this method requires, the x and y coordinates of the center of the oval
or arc, and the width and height of the oval or arc. The width and height must be
positive values. The arc methods require a start angle and an arc angle, to specify
the beginning of the arc and the size of the arc in degrees.
This methods works when invoked on a valid Graphics instance and used
only within the scope of a component's update() and paint() methods.
Polygons
Polygon object can be drawn in different ways like,
1. void drawPolygon(int xPoints[], int yPoints[], int nPoints)
2. void drawPolygon(Polygon p)
3. void fillPolygon(int xPoints[], int yPoints[], int nPoints)
4. void fillPolygon(Polygon p)
Polygons object drawn from a sequence of line segments. Each of this
method requires, the coordinates of the endpoints of the line segments that will make
the polygon. These endpoints can be specified by first, the two parallel arrays of
integers, one representing the x coordinates and the other representing the y
coordinates; second is, using an instance of the Polygon class. The Polygon class
provides the method addPoint(), which allows a polygon to be organized point by
point. These methods works when invoked on a valid Graphics instance and used
only within the scope of a component's update() and paint() methods.
3.4.1 COLOR CLASS

323
The java.awt.Color class provides 13 standard colors as constants. They are:
RED, GREEN, BLUE, MAGENTA, CYAN, YELLOW, BLACK, WHITE, GRAY,
DARK_GRAY, LIGHT_GRAY, ORANGE and PINK. Colors are created from red,
green and blue components of RGB values. The range of RGB will be from 0 to 255
or floating point values from 0.0 to 1.0. We can use the toString() method to print the
RGB values of these color (e.g., System.out.println(Color.RED)):
Methods
To implement color in objects or text, two Color methods getColor() and
setColor() are used. Method getColor() returns a Color object and setColor() method
used to sets the current drawing color.
Now check below program to learn how these methods can be used.
Example:
import java.awt.Frame;
import java.awt.Panel;
import java.awt.Graphics;
import java.awt.Polygon;
import java.awt.Color;
public class PictureDraw extends Panel
{
public void paint(Graphics g)
{
//Print a String message
g.drawString("Welcome to BAOU", 20, 20);
//draw a Line
g.drawLine(0, 0, 100, 70);
//draw a Oval
g.drawOval(100, 100, 100, 100);
//draw a rectangle
g.drawRect(80, 80, 125, 125);
//draw a Polygon
int x[] = {35, 155, 35, 155, 35};
int y[] = {35, 35, 155, 155, 35};
g.drawPolygon(x,y,5); //points = 5;

324
g.setColor(Color.orange);
Polygon pg = new Polygon();
pg.addPoint(220, 30);
pg.addPoint(300, 35);
pg.addPoint(320, 95);
pg.addPoint(275, 70);
pg.addPoint(210, 100);
pg.addPoint(180, 50);
g.drawPolygon(pg);
g.fillPolygon(pg);
}
public static void main(String[] args)
{
Frame f= new Frame("Graphics Control");
f.add(new PictureDraw());
f.setSize(600, 1500);
f.setVisible(true);
f.setResizable(false);
}
}
Output:
Figure-115: Output of program
Check Your Progress 1

325
1) Write all state information that Graphics object encapsulates.
……………………………………………………………………………………
……………………………………………………………………………………
2) Write two important roles of Graphics class.
……………………………………………………………………………………
……………………………………………………………………………………
3) How does a Color class create color?
……………………………………………………………………………………
……………………………………………………………………………………
4) State the relationship between the Canvas and Graphics class.
……………………………………………………………………………………
……………………………………………………………………………………
3.4.2 FONT CLASS
The java.awt.Font class represents a method of specifying and using fonts.
That font will be used to render the texts. The Font class constructor is used to
construct a font object using the font's name, style (PLAIN, BOLD, ITALIC, or BOLD
+ ITALIC) and font size. In java, fonts are named in a platform independent fashion
and then mapped to local fonts that are supported by the underlying operating
system. The getName() method is used to return the logical Java font name of a
particular font and the getFamily() method is used to return the operating system-
specific name of the font. In java the standard font names are Courier, Helvetica,
TimesRoman etc. There are 3 logical font names. Java will select a font name in the
system that matches the general feature of the logical font.
I. Serif: This is often used for blocks of text (example, Times).
II. Sansserif: This is often used for titles (example, Arial or Helvetica).
III. Monospaced: This is often used for computer text (example, Courier).
The logical font family names are “Dialog”, “DialogInput”, “Monospaced”,
“Serif”, or “SansSerif” and Physical font names are actual font libraries such as
326
“Arial”, “Times New Roman” in the system. There is logical font names, standard on
all platforms and are mapped to actual fonts on a particular platform.
Constructor:
public Font(String fontName, int fontStyle, int fontSize);
where, fontName represents Font Family name
fontStyle represents Font.PLAIN, Font.BOLD, Font.ITALIC or Font.BOLD or
Font.ITALIC
fontSize represents the point size of the font (in pt) (1 inch has 72 pt).
The setFont() method to set the current font for the Graphics context g for rendering
texts.
For example,
g.drawString(“Welcome to BAOU”, 15, 25); // in default font
Font fontTest = new Font(Font.SANS_SERIF, Font.ITALIC, 15);
g.setFont(fontTest);
g.drawString(“Gujarat Vidyapith”, 10, 50); // in fontTest
We can use GraphicsEnvironment’s getAvailableFontFamilyNames() method to list
all the font family names; and getAllFonts() method to construct all Font instances
(font size of 1 pt).
For example,
GraphicsEnvironment fontEnv = GraphicsEnvironment.getLocalGraphicsEnvironment();
String[] fontList = fontEnv.getAvailableFontFamilyNames();
for (int i = 0; i < fontList.length; i++)
{
System.out.println(fontList [i]);
}
// Construct all Font instance (with font size of 1)

327
Font[] fontList = fontEnv.getAllFonts();
for (int i = 0; i < fontList.length; i++)
{
System.out.print(fontList [i].getFontName() + " : ");
System.out.print(fontList [i].getFamily() + " : ");
System.out.print(fontList [i].getName());
}
Example:
Now check below program to learn how Font class and its method can be used.
import java.awt.Font;
import java.awt.Frame;
import java.awt.Panel;
import java.awt.Graphics;
public class FontClass extends Panel
{
public void paint(Graphics g)
{
Font f = new Font("Arial", Font.PLAIN, 18);
Font fb = new Font("TimesRoman", Font.BOLD, 18);
Font fi = new Font("Serif", Font.ITALIC, 18);
Font fbi = new Font("Monospaced", Font.BOLD + Font.ITALIC, 18);
g.setFont(f);
g.setFont(fb);
g.drawString("Welcome to BAOU, Ahmedabad", 10, 50);
g.setFont(fi);
g.drawString("This is Dept. of Computer Science", 10, 75);
g.setFont(fbi);
g.drawString("This is Gujarat Vidyapith, Ahmedabad", 10, 100);
}
public static void main(String s[])
{
Frame f= new Frame("Font Usage");

328
f.add(new FontClass());
f.setVisible(true);
f.setSize(1550,200);
}
}
Output:
Figure-116: Output of program
Check Your Progress 2
1) How many ways can user display Font style?
……………………………………………………………………………………
……………………………………………………………………………………
2) What is the difference between paint() and repaint() methods?
……………………………………………………………………………………
……………………………………………………………………………………
3) Discuss different Font class methods.
……………………………………………………………………………………
……………………………………………………………………………………
4) Differentiate the Font and FontMetrics classes.
……………………………………………………………………………………
……………………………………………………………………………………
3.5 LAYOUT MANAGER

329
It is possible to position and size the GUI component by hard coding but also
challenging and therefore not advised. So, it is advised to use layout manager as it is
easier to adjust and rework positions, sizes and the overall look-and-feel of the
container. Use of layout managers facilitates a top-level or base container to have its
own layout while other containers on top of it have their own layout which is
completely independent. Whenever we add any components to a container, the final
configuration of size and positioning is ultimately decided by the layout manager of
the underlying container. Therefore, anytime a container is resized, its layout
manager has to position each of the components within it. JPanel and content
panes are the containers base of the GUI application structure and belong to
FlowLayout and BorderLayout classes. It is recommended to set layout manager of
the container.
LayoutManager is an interface. It is implemented by all the classes of layout
managers. The following class represents the layout managers from java.awt
package.
1. BorderLayout
2. FlowLayout
3. GridLayout
4. CardLayout
5. GridBagLayout
3.5.1 BORDERLAYOUT
The BorderLayout helps to arrange the components in north, south, east, west
and center regions. This is the default layout for frame or window. The BorderLayout
has five constants for each region. They are public static final int NORTH, SOUTH,
EAST, WEST, CENTER.
Constructors:

330
1. BorderLayout(): This allows us to create a border layout without gaps between
the components.
2. JBorderLayout(int hgap, int vgap): This allows us to create a border layout
with the given horizontal and vertical gaps between the components.
Note: In this unit, we have used Frame as the main container in all programs.
Example: The following program depicts the use of BorderLayout.
import java.awt.*;
public class BorderLout extends Frame
{
BorderLout(String title)
{
super(title);
Button b1=new Button("BAOU");;
Button b2=new Button("GVP");;
Button b3=new Button("DCS");;
Button b15=new Button("BCA");;
Button b5=new Button("MCA");;
add(b1,BorderLayout.NORTH);
add(b2,BorderLayout.SOUTH);
add(b3,BorderLayout.EAST);
add(b15,BorderLayout.WEST);
add(b5,BorderLayout.CENTER);
}
public static void main(String[] args)
{
Frame bly=new BorderLout("Border");
bly.setSize(300,300);
bly.setVisible(true);
}
}
Output:

331
Figure-117: Output of program
3.5.2 FLOWLAYOUT
The FlowLayout is used to arrange the components in a line. As we keeps
adding components, it arranges them one after another from left to right in a flow.
This layout is the default layout of applet or panel.
Constants of FlowLayout:
There are total five constants used in FlowLayout. They are public static final int
LEFT, RIGHT, CENTER, LEADING and TRAILING.
Constructors:
1. FlowLayout(): It allows us to create a flowlayout with centered alignment and
a default 5 unit horizontal and vertical gap.
2. FlowLayout(int align): It allows us to create creates a flowlayout with the
specified alignment and a default 5 unit horizontal and vertical gap.
3. FlowLayout(int align, int hgap, int vgap): It allows us to create a flowlayout
with the specified alignment and horizontal and vertical gap.
Example: The following program depicts the use of FlowLayout.

332
import java.awt.*;
public class FlowLout extends Frame
{
FlowLout(String title)
{
super(title);
Button b1=new Button("BAOU");
Button b2=new Button("GVP");
Button b3=new Button("DCA");
Button b15=new Button("MCA");
Button b5=new Button("BCA");
add(b1);add(b2);add(b3);add(b15);add(b5);
//setting flow layout of right alignment
setLayout(new FlowLayout(FlowLayout.RIGHT));
}
public static void main(String[] args) {
Frame fly=new FlowLout("Flow");
fly.setSize(250,200);
fly.setVisible(true);
}
}
Output:
Figure-118: Output of program

333
3.5.3 GRIDLAYOUT
The GridLayout helps us to arrange the components in rectangular grid. Only
one component will be displayed in each rectangle.
Constructors:
1. GridLayout(): This constructor allows us to create a gridlayout with one
column per component in a row.
2. GridLayout(int rows, int columns): This constructor allows us to create a
gridlayout with the specified rows and columns but without the gaps between
the components.
3. GridLayout(int rows, int columns, int hgap, int vgap): This constructor allows
us to create a gridlayout with the specified rows, columns, horizontal gap and
vertical gap.
Example: The following program depicts the use of GridLayout.
import java.awt.*;
public class GridLout extends Frame
{
GridLout(String title){
super(title);
Button ba=new Button("A");
Button bb=new Button("B");
Button bc=new Button("C");
Button bd=new Button("D");
Button be=new Button("E");
Button bf=new Button("F");
Button bg=new Button("G");
Button bh=new Button("H");
Button bi=new Button("I");
add(ba);add(bb);add(bc);add(bd);add(be);
add(bf);add(bg);add(bh);add(bi);
//setting gridlayout of 3 rows and 3 columns

334
setLayout(new GridLayout(3,3));
}
public static void main(String[] args) {
Frame fyl=new GridLout("Grid");
fyl.setSize(300,300);
fyl.setVisible(true);
}
}
Output:
Figure-119: Output of program
3.5.4 CARDLAYOUT
The CardLayout class manages the components in such a manner that only
one component is visible at a time. It treats each component as a card that is why it
is known as CardLayout. There are various methods like next, first, previous, last
and show to flip from one card to another card.
Constructors:
1. CardLayout(): This constructor allows us to create a cardlayout with zero
horizontal and vertical gap.
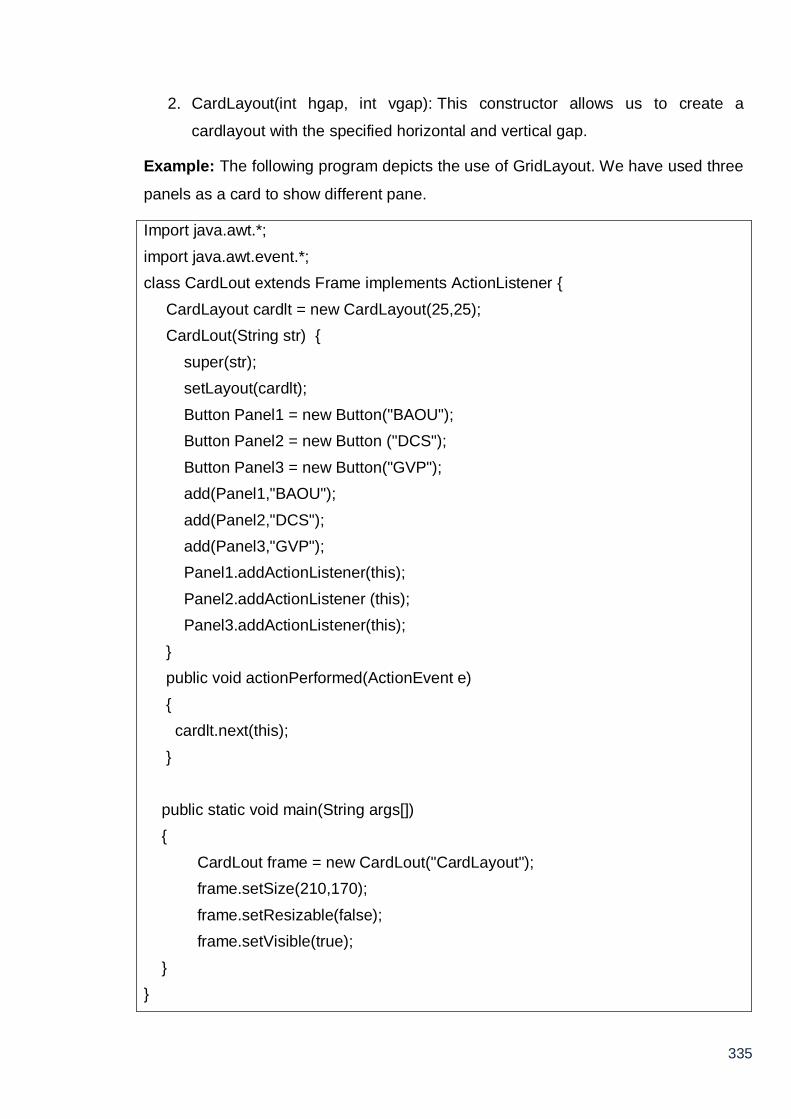
335
2. CardLayout(int hgap, int vgap): This constructor allows us to create a
cardlayout with the specified horizontal and vertical gap.
Example: The following program depicts the use of GridLayout. We have used three
panels as a card to show different pane.
Import java.awt.*;
import java.awt.event.*;
class CardLout extends Frame implements ActionListener {
CardLayout cardlt = new CardLayout(25,25);
CardLout(String str) {
super(str);
setLayout(cardlt);
Button Panel1 = new Button("BAOU");
Button Panel2 = new Button ("DCS");
Button Panel3 = new Button("GVP");
add(Panel1,"BAOU");
add(Panel2,"DCS");
add(Panel3,"GVP");
Panel1.addActionListener(this);
Panel2.addActionListener (this);
Panel3.addActionListener(this);
}
public void actionPerformed(ActionEvent e)
{
cardlt.next(this);
}
public static void main(String args[])
{
CardLout frame = new CardLout("CardLayout");
frame.setSize(210,170);
frame.setResizable(false);
frame.setVisible(true);
}
}
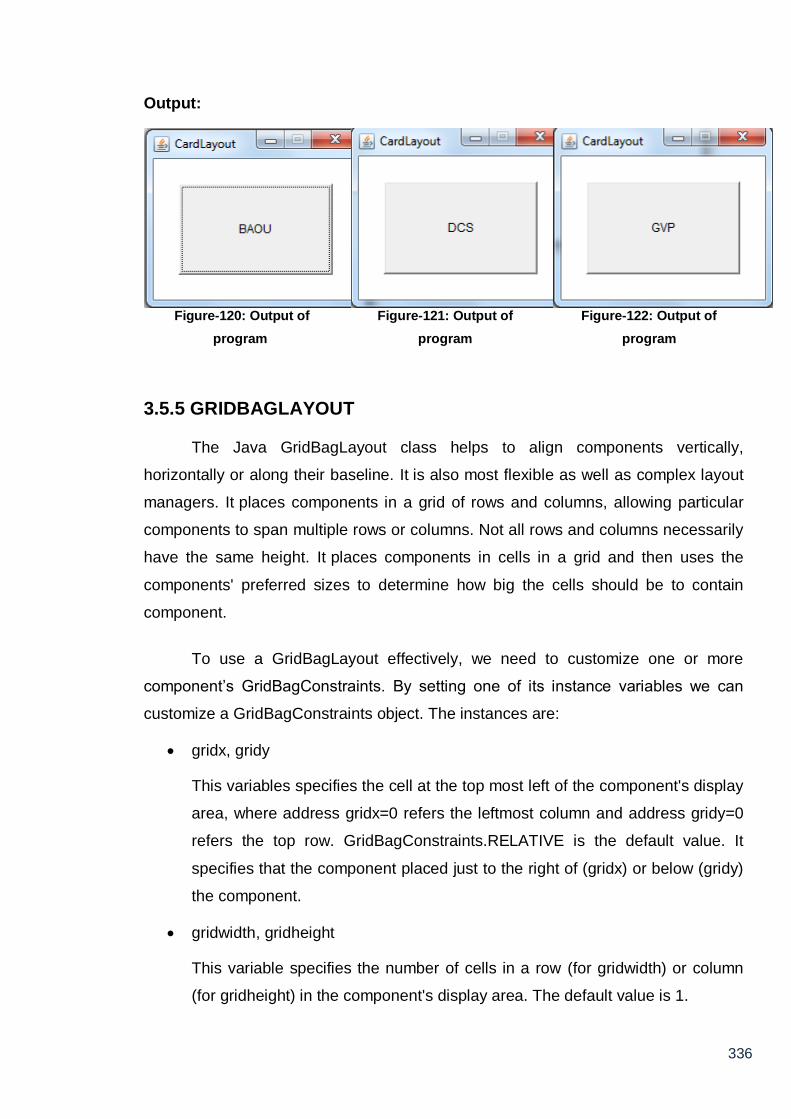
336
Output:
Figure-120: Output of
program
Figure-121: Output of
program
Figure-122: Output of
program
3.5.5 GRIDBAGLAYOUT
The Java GridBagLayout class helps to align components vertically,
horizontally or along their baseline. It is also most flexible as well as complex layout
managers. It places components in a grid of rows and columns, allowing particular
components to span multiple rows or columns. Not all rows and columns necessarily
have the same height. It places components in cells in a grid and then uses the
components' preferred sizes to determine how big the cells should be to contain
component.
To use a GridBagLayout effectively, we need to customize one or more
component’s GridBagConstraints. By setting one of its instance variables we can
customize a GridBagConstraints object. The instances are:
gridx, gridy
This variables specifies the cell at the top most left of the component's display
area, where address gridx=0 refers the leftmost column and address gridy=0
refers the top row. GridBagConstraints.RELATIVE is the default value. It
specifies that the component placed just to the right of (gridx) or below (gridy)
the component.
gridwidth, gridheight
This variable specifies the number of cells in a row (for gridwidth) or column
(for gridheight) in the component's display area. The default value is 1.

337
fill
This variable is used when the component's display area is larger than the
component's requested size to decide whether to resize the component. We
can pass NONE (default), HORIZONTAL (will not change its height),
VERTICAL (will not change its width) and BOTH (component fill its display
area entirely) with GridBagConstrain as valid values of fill.
ipadx, ipady
This variable specifies the internal padding. The width of the component will
be its minimum width plus ipadx*2 pixels (as the padding applies to both sides
of the component). Similarly, the height of the component will be its minimum
height plus ipady*2 pixels.
insets
This variable specifies the external padding of the component. It will be the
minimum amount of space between the component and the edges of its
display area.
anchor
This variable is helps us when the component is smaller than its display area
to decide where to place the component. We can pass CENTER (the default),
NORTH, NORTHEAST, EAST, SOUTHEAST, SOUTH, SOUTHWEST, WEST
and NORTHWEST as valid values.
weightx, weighty
This variable is used to determine how to distribute space when we want to
specify resizing behaviour or change of dimension.
Example: Below example uses GridBagConstraints instance for all the components
the GridBagLayout manages. In real-life, it is recommended that you do not reuse
GridBagConstraints. In the example, just before each component is added to the
container, the code sets the appropriate instance variables in the
GridBagConstraints object. Then after it adds the component to its container,
passing the GridBagConstraints object as the second argument to the add method.

338
import java.awt.*;
import java.awt.GridBagConstraints;
import java.awt.GridBagLayout;
public class gridBagLout extends Frame
{
Button first, second,third,forth,fifth,sixth;
public static void main(String[] args)
{
Frame gbl = new gridBagLout(“GridBag Layout”);
gbl.setSize(300, 300);
gbl.setVisible(true);
}
public gridBagLout(String str)
{
super(str);
first=new Button("BAOU");
second=new Button("DCS");
third=new Button("MCA");
forth=new Button("GVP");
fifth=new Button("Ahmedabad");
sixth=new Button("Gujarat");
GridBagConstraints gbc = new GridBagConstraints();
GridBagLayout layout = new GridBagLayout();
setLayout(layout);
gbc.fill = GridBagConstraints.HORIZONTAL;
gbc.gridx = 0;
gbc.gridy = 0;
add(first, gbc);
gbc.gridx = 1;
gbc.gridy = 0;
add(second, gbc);
gbc.fill = GridBagConstraints.HORIZONTAL;

339
gbc.ipady = 30;
gbc.gridx = 0;
gbc.gridy = 1;
add(third, gbc);
gbc.gridx = 1;
gbc.gridy = 1;
add(forth, gbc);
gbc.gridx = 0;
gbc.gridy = 2;
gbc.fill = GridBagConstraints.HORIZONTAL;
gbc.gridwidth = 2; //Merge two columns
add(fifth, gbc);
gbc.gridx = 0;
gbc.gridy = 3;
gbc.gridwidth = 2; //Merge two columns
add(sixth, gbc);
}
}
Output:
Figure-123: Output of program
setBounds() method

340
setBounds() method of awt.component class is used to set the size and
position of component. When we need to change the size and position of component
then we can use this method
Syntax:
public void setBounds(int x, int y, int width, int height)
This parameter puts the upper left corner at location (x, y), where x is the
number of pixels from the left of the screen and y is the number from the top of the
screen.
Example:
import java.awt.*;
public class Setbound extends Frame
{
Label name;
TextField user;
Button login;
Setbound(String str)
{
super(str);
setLayout(null);
name=new Label("User_Name:");
user=new TextField(10);
login=new Button("Login");
name.setBounds(50, 50, 75, 30 );
add(name);
user.setBounds(130, 50, 180,30 );
add(user);
login.setBounds(100, 90, 60, 30 );
add(login);
}
public static void main(String[] args)
{
Frame sb=new Setbound("SetBound");

341
sb.setSize(350,150);
sb.setVisible(true);
}
}
Output:
Figure-124: Output of program
Check Your Progress 3
1) What is the function of a LayoutManager in Java?
……………………………………………………………………………………
……………………………………………………………………………………
2) Why do you want to use a null layout manager?
……………………………………………………………………………………
……………………………………………………………………………………
3) Which method will cause a Frame to be displayed?
……………………………………………………………………………………
……………………………………………………………………………………
4) Write the advantages of layout manager over traditional windowing systems.
……………………………………………………………………………………
……………………………………………………………………………………
5) How the elements of a CardLayout are organized?

342
……………………………………………………………………………………
……………………………………………………………………………………
6) What is the difference between GridLayout and GridBagLayout?
……………………………………………………………………………………
……………………………………………………………………………………
3.6 LET US SUM UP
In this unit we have learned the basics of how to paint, including how to use
the graphics primitives to draw basic shapes, how to use fonts and font metrics to
draw text, and how to use Color objects to change the color of what we are drawing
on the container. Graphics, Color and Font classes are the foundation in painting
that enables user to do animation inside a container and to work with images. Layout
Manager plays a crucial role for arranging components as per the user requirement
for designing attractive and user friendly GUI.
3.7 CHECK YOUR PROGRESS: POSSIBLE ANSWERS Check Your Progress 1
1. State information of Graphics class includes he Component object on which
to draw, translation origin for rendering and clipping coordinates, current clip,
current color, current font, current logical pixel operation function, current
XOR alternation color.
2. First task is of the graphics context. The graphics context is information that
will affect drawing operations. This includes the background and foreground
colors, the font and the location and dimensions of the clipping rectangle. It
even includes information about the screen or image. Second role is that,
Graphics class provides methods for drawing simple geometric shapes, text
and images to the graphics destination. All output to the graphics destination
occurs via an invocation of various methods methods.
3. The Color class creates color by using the RGBA values. RGBA stands for
RED, GREEN, BLUE, ALPHA. The value for individual components RGBA

343
ranges from 0 to 255 or 0.0 to 0.1. The value of alpha determines the opacity
of the color, where 0 or 0.0 represents fully transparent and 255 or 1.0
represents opaque.
4. A Canvas object enables user to access to a Graphics object via its paint()
method.
Check Your Progress 2
1. There are four styles for displaying fonts in Java. They are plain, bold, italic
and bold italic. Three class constants are used to represent font styles:
a. public static final int BOLD: This constant represents a boldface font.
b. public static final int ITALIC: This constant represents an italic font.
c. public static final int PLAIN: This constant represents a plain or normal
font.
2. Paint is called for the first time when the container is loaded. Every Java
Component implements paint(Graphics), which is responsible for painting that
component in the Graphics context passed as the parameter. When we
extend a Component and want to display it differently than its superclass, we
have to override public void paint(Graphics) .
Whereas repaint method is called everytime the container is refreshed.
The repaint() method is sent to a Component when it needs to be repainted.
For example, a window is moved or resized or unhidden. It also happens
when a webpage contains an image and the pixels of the image are arriving
slowly. The action of repaint() is to spawn a new Thread, which
schedules update(Graphics) in 100 milliseconds. If another repaint() happens
before the 100 milliseconds time, the previous update() is cancelled and a
new one is scheduled.
3. Various method of Font class is described in following table.

344
Method
Name
Object Description
getFont() Graphics It will return the current font object as
previously set by setFont()
getName() Font It will return the name of the font as a
string
getSize() Font It will return the current font size (an
integer)
getStyle() Font It will return the current style of the font
(styles are integer constants: 0 is
plain, 1 is bold, 2 is italic, 3 is bold
italic)
isPlain() Font It will return true or false if the font's
style is plain
isBold() Font It will return true or false if the font's
style is bold
isItalic() Font It will return true or false if the font's
style is italic
Table-11: Methods of Font Class
4. The FontMetrics class is used to define implementation-specific properties
such as ascent and descent, of a Font object.
Check Your Progress 3
1. A LayoutManager implements some policy for arranging components added to
a container. It sets the sizes and positions of the components. Different layout
managers have different rules for arranging components. The standard layout
manager classes are BorderLayout, GridLayout etc.
2. If the layout manager for a container is set to null, then the programmer has
to set the sizes and positions of all the components in the container. This

345
gives the programmer more flexibility over the layout. For simple layouts that
does not change size in a container, the setBounds() method of each
component will be called when it is added to the container. When the
container can change size, then the sizes and positions should be
recomputed whenever a change in size occurs. This task is performed by a
layout manager automatically, and due to this it is good to use a layout
manager for a container that can change size.
3. show() and setVisible() method
4. Java uses layout managers to layout components in a consistent manner
across all windowing platforms. Java's layout managers are not bind to
absolute sizing and positioning, they can accomodate platform-specific
differences among windowing systems.
5. The elements of a CardLayout are stacked, one upon other like a deck of
cards.
6. In Grid layout the size of each grid remains constant while in GridbagLayout
grid size can be varied.
3.8 FURTHER READING
11) Core Java Programming-A Practical Approach by Tushar B. Kute
12) Java: The Complete Reference by Schildt Herbert. Ninth Edition
13) Head First Java: A Brain-Friendly Guide, Kindle Edition by Kathy Sierra, Bert
Bates. 2nd Edition
14) Java: A Beginner’s Guide by Schildt Herbert Sixth Edition
15) Core Java Volume I — Fundamentals by Cay S. HorstMann, Gary Cornell, 9th
Edition
16) https://www.codemiles.com/java-examples/fonts-in-java-t2831.html
17) https://courses.cs.washington.edu/courses/cse3151/98au/java/jdk1.2beta15/d
ocs/api/java/awt/Font.html
18) https://www.leepoint.net/GUI-appearance/fonts/10font.html
3.9 ASSIGNMENTS

346
9) Define Graphics. Explain the importance of Graphics class in java.
10) Differentiate paint(), repaint() and update() method.
11) Explain Font class with proper example to demonstrate the use of font family.
12) How do we can set and get color in java application? Explain through
example.
13) What is Layout Manager? Explain different types of layout managers.

347
Unit 4: I/O Files in Java
Unit Structure
4.1 Learning Objectives
4.2 Outcomes
4.3 Introduction
4.4 Concepts of Streams
4.5 Difference between CharacterStreams and ByteStreams
4.6 CharacterStreams
4.7 ByteStreams
4.8 Other Classes
4.9 Let us sum up
4.10 Check your Progress: Possible Answers 4.11 Further Reading 4.12 Assignments
4

348
4.1 LEARNING OBJECTIVE
After learning this unit, students,will be able to:
Define streams
Describe the use of character streams
Describe the use of byte streams
Describe RandomAccessFile, StreamTokenizer
Access File
4.2 OUTCOMES
After learning the contents of this chapter, the students will be able to:
Define Streams
Differentiate byte stream and character stream
Implement buffered based input and output operation apart from other
important stream classes like object input and output, data input and output,
piped input and output etc.
Implement File handling operation to read and write content from and to the
file.
Perform random read and write operation on the file
4.3 INTRODUCTION
Java I/O stands for Java Input / Output and is contained in java.io package.
This package has an Input Stream and Output Stream classes. Input Stream classes
are used for reading the stream, byte stream and array of byte stream. This can be
used for memory allocation. The Output Stream classes are used for writing byte and
array of bytes.
In this chapter, we are going to dicuss and learn the use of streams that can
handle all kinds of data including primitive values to advanced objects.

349
4.4 CONCEPTS OF STREAM
Streams are the sequence of data or information. The other streams help in
adding capabilities, like the ability to read a whole chunk of data at once for
performance reasons (BufferedInputStream) or converting data from one kind of
character set to Java's native unicode (Reader), or where the data is coming from
(FileInputStream, SocketInputStream and ByteArrayInputStream, etc.).
Some input-output stream initialized automatically by the JVM and these
streams are available in System class. These strems are,
1. System.out: it is a standard output stream. It refers to the default output device,
i.e. console.
2. System.in: It is a standard input stream. It refers the default input device, i.e.
keyboard.
3. System.err: It is a standard error stream. It refers to the default output device,
i.e. console.
Two types of streams are there, Input Streams and Output Streams.
Input Streams: It is used to read the data from different input devices like
keyboard, file, network etc.
Output Streams: It is used to write the data to different output devices like
monitor, file, network etc.
Based on data, streams are divided in two types:
1. Byte Stream: Byte stream performs input and output on 8-bit bytes. Byte
stream classes are used to read or write byte data. InputStream is used to
read and Output Stream is used to write byte data. InputStream and Output
Stream class are abstract classes and they are the super classes of all the
input byte streams and output byte streams.
2. Character Stream: Character stream is used to read and write data in 16 bit
Unicode characters. These classes are used for reading or writing character
data. Reader and Writer are abstract classes.

350
Exceptions Handling during I/O in Java
Exception is an abnormal condition and it must be avoided. In java IO almost
all input or output method throws an exception. Therefore, it is required to enclose
I/O operation in the try and catch block. All the I/O exceptions are derived from
IOException class. Generally you can catch IOException a super class, which will
catch all the derived class exceptions. For some exceptions thrown by I/O which are
not in super class, we have to take extra care to catch them while wrting IO
programs.
4.5 DIFFERENCE BETWEEN CHARACTERSTREAMS AND BYTESTREAMS
By definition:
Character Stream performs input and output operations of 16-bit Unicode while Byte
Stream performs input and output of 8-bit bytes.
By use:
Character stream is used to read character either from Socket or text file. Byte
streams should only be used for the primitive I/O.
By datatype:
Character oriented streams can read only string type or character type while byte
oriented streams are not tied to any datatype. Data of any datatype can be read in
byte stream (except string).
By access:
Character oriented stream reads character by character while Byte oriented stream
reads byte by byte.
By encoding:
Character oriented streams use character encoding scheme (UNICODE) while byte
oriented do not use any encoding scheme.

351
By associated classes:
Character oriented streams are reader and writer streams while Byte oriented
streams are data streams i.e. Data input stream and Data output stream.
Check Your Progress 1
1) Divide the classes in Low level vs High Level to read / write data from files.
……………………………………………………………………………………
……………………………………………………………………………………
2) Define Stream, Readers / Writers and Buffer.
……………………………………………………………………………………
……………………………………………………………………………………
3) Differentiate Byte Stream and Character Stream.
……………………………………………………………………………………
……………………………………………………………………………………
4.6 CHARACTER STREAMS
Character Stream contains classes that are used to read characters from the
source file and write characters to destination file. The following table depicts
different classes for Character Streams.
Stream class Description
Reader This class is an abstract class that define character stream
input.
Writer This class is an abstract class that define character stream
output.
BufferedReader
This class handles buffered input stream.
- LineNumberReader is extends BufferedReader
BufferedWriter This class handles buffered output stream.

352
FileReader
This class handles input stream that reads from file. It
extends InputStreamReader
FileWriter
This class handles output stream that writes to file. It extends
OutputStreamWriter
InputStreamReader
This class handles input stream that translate byte to
character
OutputStreamWriter
This class handles output stream that translate character to
byte.
PrintWriter
This class handles output Stream that contain print() and
println() method.
FilterReader This class is used to perform filtering operation
on reader stream. It is an abstract class.
- PushBackReader class extends FilterReader
FilterWriter This class is an abstract class used to write filtered character
streams.
CharArrayReader This class is consists of two words: CharArray and Reader. It
is used to read character array as a reader (stream). It
extends Reader class.
CharArrayWriter This class is used to write common data to multiple files. This
class extends Writer class.
PipedReader This class is used to read the contents of a pipe as a stream
of characters. It is used generally to read text.
PipedWriter This class is used to write data to a pipe as a stream of
characters. It is used generally for writing text.
StringReader This class is a character stream with string as a source. It
accepts an input string and changes it into character stream.
It extends Reader class.

353
StringWriter This class is a character stream that collects output from
string buffer, which can be used to construct a string. The
StringWriter class extends the Writer class.
Table-12 Classes for Character Streams
There are two types of Character Stream classes: Reader and Writer classes.
1. Reader Classes:
These classes are subclasses of an abstract class Reader and they are used to
read characters from a source like file, memory or console. Being abstract class
we can't create its object but we can use its subclasses for reading characters
from the input stream.
2. Writer Classes:
These classes are subclasses of an abstract class Writer and they used to write
characters to a destination like file, memory or console. Being abstract class we
can't create its object but we can use its subclasses for writing characters to the
output stream.
The main methods for reading from and writing to character streams found in reader
and writer classes and their child classes are given below:
int read()
int read(char cbuff[ ])
int read(char cbuff[ ], int offset, int length)
int write(int ch)
int write(char cbuff[ ])
int write(char cbuff[ ], int offset, int length)
4.6.1 Inputstreamreader Class And Outputstreamwriter
InputStreamReader class is wrapped around an inputstream to read data in
the form of characters from it, so InputStreamReader class acts as
a converter of bytes to characters.
Constructor:
InputStreamReader (InputStream inst)

354
This constructor creates an InputStreamReader object wrapped around an
InputStream to read data from it in the form of characters.
Example:
FileInputStream fis = new FileInputStream("D://Test.txt");
InputStreamReader isread = new InputStreamReader(fis);
Here, In this example we have wrapped an InputStream i.e. FileInputStream, inside
InputStreamReader. FileInputStream class reads data from a file Test.txt as bytes
and then this data is converted to characters, when it is read using
InputStreamReader class.
OutputStreamWriter
OutputStreamWriter class is a subclass of Writer class. Using
OutputStreamWriter class allows us to convert a character, character arrays or a
String to bytes before it is written to an output stream. OutputStreamWriter class
works as a converter of characters to bytes.
Constructor:
OutputStreamWriter (OutputStream outstr)
This constructor creates an OutputStreamWriter object wrapped around an
OutputStream to write data to this OutputStream in the form of bytes.
Example-:
char data[ ] ={‘B’, ‘A’, ‘O’, ‘U’};
FileOutputStream fostm = new FileOutputStream(“D://Test.txt”);
OutputStreamWriter oswt = new OutputStreamWriter (fostm);
Here, FileOutputStream object is wrapped inside the OutputStreamWriter. Only
bytes can be written through FileOutputStream. OutputStreamWriter class will first
convert the characters in a character array data, to bytes before writing them to a file
Test.txt using FileOutputStream.
Now, we will try to understand read and write operation with help of programs.

355
// Program to write a String and character array using OutputStreamWriter and
reading back the same file using InputStreamReader.
import java.io.*;
public class Outstreamwriter
{
public static void main(String[ ] arg)
{
String str=" BAOU";
char[] arrdata= {'V','I','D','Y','A','P','I','T','H'};
try
{
FileOutputStream fos= new FileOutputStream("Test1.txt");
OutputStreamWriter osw= new OutputStreamWriter(fos);
// writing each character of character array using for-each loop
for(char ch : arrdata)
{
osw.write(ch);
}
//writing a String
osw.write(str);
osw.flush();
osw.close();
}
catch(IOException e)
{
System.out.println(e);
}
try
{
FileInputStream fis= new FileInputStream("Test1.txt");
InputStreamReader isr= new InputStreamReader(fis);
int data;

356
while( (data=isr.read())!=-1)
{
System.out.print((char)data);
}
}
catch(IOException e)
{
System.out.println(e);
}
}
}
This program will create a file named Test1.txt, writes a character array first
and then string in to it. After that, the same file is read by using InputStreamReader.
The out put of the program is shown below.
Output:
VIDYAPITH BAOU
4.6.2 BufferedReader and BufferedWriter
BufferedReader and BufferedWriter class in java are classified as buffered I/O
streams. Buffered input stream reads text from a memory area i.e. buffer and buffered
output stream writes data to a buffer. For unbuffered Input and Output stream, every
read or write request is handled directly by the underlying Operating System. This
makes a program less efficient as every request involves disk access, network activity
etc. So, it is adviced to use buffered I/O streams as opposed to Scanner and
PrintWriter classes. The buffer size may be specified. If not specified then the default
size will be used.
BufferedReader and BufferedWriter achieve greater efficiency through the use
of buffers. A data buffer is generally a temporarily a region in memory. BufferedWriter
doesn’t write on a file directly, rather, it stores data in a buffer and writes it onto the
file when you want it to execute a flush operation. Flushing tells the BufferedWriter to
write everything onto the output file. Use of a buffer is what makes
both BufferedReader and BufferedWriter fast and efficient.

357
BufferedReader Constructors
1. BufferedReader (Reader rd)
This constructor allows to create a buffering input stream that uses a default
size for input buffered.
2. BufferedReader (Reader rd, int size)
This constructor allows to create a buffering input stream that uses a
specified size for input buffered.
Example:
FileReader readfile = new FileReader(“Test.txt”);
BufferedReader bufread = new BufferedReader(readfile);
Above example will buffer the input from the specified file. Without buffering, each call
to read() or readLine() method could cause bytes to be read from the file, converted
into characters, and then returned. This can be very inefficient.
A BufferedWriter writes text to a character-output stream, while buffering
characters to provide for the efficient writing of single characters, strings and arrays.
Unlike byte stream (convert data into bytes), bufferwriter writes the strings, arrays or
character data directly to a file.
Constructors:
1. BufferedWriter(Writer wout):
This allows us to create a buffered character-output stream that uses a
default sized output buffer with specified Writer object.
2. BufferedWriter(Writer wout, int sz):
This allows us to create a buffered character-output stream that uses an
output buffer of specified size with specified Writer object.
// Program to writes a data in a file using BufferedWriter and reads the content back
from the same file using BufferedReader.
import java.io.BufferedReader;
import java.io.BufferedWriter;
import java.io.File;
import java.io.FileReader;

358
import java.io.FileWriter;
import java.io.IOException;
public class buferReadWriter
{
public static void main(String[] args)
{
File buffile = new File("buff.txt");
/*Writing file using BufferedWriter*/
FileWriter filewrite = null;
BufferedWriter buffwrite =null;
try {
filewrite=new FileWriter(buffile);
buffwrite =new BufferedWriter(filewrite);
buffwrite.write("Babasaheb Ambedkar Open University \n");
buffwrite.write("Gujarat Vidyapith \n");
buffwrite.write("Dept. of Computer Science");
buffwrite.flush();
} catch (IOException ioe)
{
System.out.println(ioe);
}
finally {
try {
if(filewrite!=null){
filewrite.close();
}
if(buffwrite!=null){
buffwrite.close();
}
} catch (IOException ioe) {
System.out.println(ioe);
}
}

359
/*Reading file using BufferedReader*/
FileReader fileread=null;
BufferedReader buffRead=null;
try {
fileread =new FileReader(buffile);
buffRead=new BufferedReader(fileread);
String data=null;
while((data=buffRead.readLine())!=null){
System.out.println(data);
}
} catch (IOException ioe) {
System.out.println(ioe);
}finally {
try {
if(fileread!=null){
fileread.close();
}
if(buffRead!=null){
buffRead.close();
}
} catch (IOException ioe)
{
System.out.println(ioe);
}
}
}
}
This program creates a file named buff.txt, writes a few data in to it. After that, the
same file is read by using BufferedReader. The out put of the program is shown
below.
Output:
Babasaheb Ambedkar Open University

360
Gujarat Vidyapith
Dept. of Computer Science
4.6.3 PipedWriter and PipedReader
PipedWriter and PipedReader classes are connected to each other to create
a communication link called pipe. PipedWriter and PipedReader class works on
character output and input stream. PipedWriter is the Sending end while
PipedReader is the receiving end. If pipe is broken, IOException will be thrown. The
pipe reader and pipe writer are connected with each other but both are processed by
two different threads.
PipedReader Constructor:
1. PipedReader()
This constructor allows us to create the piped reader object.
2. PipedReader(int pSize)
This constructor allows us to create the piped reader object with specified size
of buffer or pipe.
3. PipedReader(PipedWriter src, int pSize)
This constructor allows us to create the piped reader object with specified size
of buffer or pipe with the specified connection to piped writer instance.
PipedWriter Constructor:
1. PipedWriter()
This constructor allows us to create the piped writer object and not connected
with piped reader.
2. PipedWriter(PipedReader pread)
This constructor allows us to create the piped writer object which is connected
to the specified piped reader instance.
import java.util.*;
import java.io.*;
public class PipeThreadRdWtr

361
{
public static void main(String[] args) throws Exception
{
PipedWriter owner = new PipedWriter();
PipedReader user = new PipedReader(owner);
DigitOwner dit = new DigitOwner(owner);
DigitUser du = new DigitUser(user);
dit.start();
du.start();
}
}
class DigitOwner extends Thread
{
BufferedWriter bw;
public DigitOwner(Writer w)
{
this.bw = new BufferedWriter(w);
}
// thread continually generates random votes
public void run() {
try {
Random r = new Random();
while (true) {
String vote = "" + Math.abs((r.nextInt() % 10));
bw.write(vote);
bw.newLine();
bw.flush();
sleep(20);
}
}
catch(IOException e) {

362
System.err.println(e);
}
catch(InterruptedException e) {
System.err.println(e);
}
}
}
class DigitUser extends Thread
{
BufferedReader br;
int[] votes = new int[10];
public DigitUser(Reader r) {
br = new BufferedReader(r);
}
public void run() {
try {
String data;
int count = 0;
while ((data = br.readLine()) != null) {
int member = Integer.parseInt(data);
votes[member]++;
count++;
if (count % 100 == 0)
{
for (int i=0; i<votes.length; i++)
{
System.out.println("Member ->" + i + ": " + votes[i]);
}
System.out.println("****");
}
}
}
catch(IOException e) {
System.err.println(e);

363
}
}
}
In this example, one thread takes off the behavior of scores for 10 members by
generating random numbers between 0 to 10. Another thread keeps track of the total
votes per members. The output of the program is shown below.
Output:
Figure-125: Output of program
Check Your Progress 2
1) Define Filter Stream.
……………………………………………………………………………………
……………………………………………………………………………………
2) Write a code to append the new content to the end of a file using PrintWriter.
……………………………………………………………………………………
……………………………………………………………………………………
3) What is the functionality of SequenceInputStream?
……………………………………………………………………………………
……………………………………………………………………………………
4.7 BYTE STREAMS

364
There are various important classes’ falls under the umbrella of Byte Streams.
Stream class Description
InputStream This class is an abstract class that describe stream
input. This is a super class of all InputStream class.
OutputStream This class is an abstract class that describe stream
output. This is a super class of all OutputStream class.
FileInputStream This class is used for Input stream that reads from a file.
FileOutputStream This class is used for Output stream that write to a file.
FilterInputStream This class contains different sub classes
as BufferedInputStream, DataInputStream,
LineNumberInputStream and PushBackInputStream for
providing additional functionality.
FilterOutputStream This class provides different sub classes such
as BufferedOutputStream and DataOutputStream and
PrintStream to provide additional functionality.
SequenceInputStream This class is used to read data from multiple streams. It
allows us to reads data sequentially (one by one).
ByteArrayInputStream This class is cosnsists of two words: ByteArray and
InputStream. it can be used to read byte array as input
stream.It contains an internal buffer which is used
to read byte array as stream. The data is read from a
byte array.
ByteArrayOutputStream This class is used to write common data into multiple
files. The data is written into a byte array and it will be
written to multiple streams lateron. It contains a copy of
data and forwards it to multiple streams.
ObjectInputStream This class is used to read the primitive data type and
Java object from an input stream.

365
ObjectOutputStram This class is used to store the primitive data type and
Java object to an output stream. Those objects whose
class implements java.io.Serializable interface are
written to stream.
PipedInputStream Both classes can be used to read and write data
simultaneously. Both streams are connected with each
other using the connect() method of the
PipedOutputStream class.
PipedOutputStream
StringBufferInputStream This class helps in creating an Input Stream where, one
can read bytes from the string. We can only read lower 8
bits of each character present in the string. This class
has been deprecated.
PrintStream This class is used for Output Stream that contain print()
and println() method
Table-13 Classes for Byte Streams
ByteStream contains classes that are used to read bytes from the source file
and write bytes to destination file. There are two types of Byte Stream classes: Input
and Output stream classes.
Byte Streams can be used for all types of files except Strings or text files.
4.7.1 FileInputStream and FileOutputStream
FileInputStream class is used to read the data from file. It is used for reading
streams of raw byte. The FileInputStream class establishes the connection with the
disk file.
Constructors:
1. FileInputStream(File bytefile)
This constructor allows us to create a FileInputStream object to read a file
specified by the File object.
Example:

366
File bytefile= new File(“D:\\Test.txt”);
FileInputStream fis= new FileInputStream(bytefile);
2. FileInputStream(String filepath)
This constructor allows us to create a FileInputStream to read a file which is
accessed by the path specified in the argument of this constructor.
Example:
FileInputStream fis= new FileInputStream(“D:\\Test.txt”);
Both the above constructors have created a FileInputStream object to create an
input stream to read a file called “Test.txt” which is located in the D drive.
FileOutputStream class is used for writing the data to a File.
Constructor:
1. FileOutputStream(File bytefile)
This constructor allows us to create a FileInputStream object to read a file
specified by the File object.
Example:
File bytefile = new File(“D:\\Test.txt”);
FileInputStream fis= new FileInputStream(bytefile);
2. FileOutputStream(String filepath)
This constructor allows us to create a FileOutputStream to write to a file which
is accessed by the path specified in the argument of this constructor.
Example:
FileOutputStream fis= new FileOutputStream(“D:\\Test.txt”);
Both the above constructors have created a FileInputStream object to create
an input stream to read a file called “Test.txt” which is located in the D drive.
//Program to write to and read from the file
import java.io.*;
class fileInoutStream{
public static void main(String args[])

367
{
FileInputStream fin;
BufferedReader br = null;
try
{
//Writing in to file
FileOutputStream fout=new FileOutputStream("foutest.txt");
fout.write(50);
fout.write('V');
fout.write('D');
fout.close();
//Reading from the file
fin=new FileInputStream("foutest.txt");
BufferedInputStream bin=new BufferedInputStream(fin);
int i;
while((i=bin.read())!=-1)
{
System.out.print((char)i);
}
bin.close();
fin.close();
}
catch(Exception ex)
{
System.out.println(ex);
}
}
}
In the above program first we are writing the character / byte in to the file
through FileOutputStream. After that we reads the same file by wrapping the
FileinputStream in BufferedInputStream and displays the content.
Output:
2VD

368
4.7.2 DataInputStream and DataOutputStream
InputStream classes always reads data in the form of bytes but
DataInputStream class is used to read data in the form of primitive data types such
as char, int, float, double, Boolean, short from an input stream. This class is a filter
class used to wrap any input stream to read primitive data types out of it. It is a
subclass of FilterInputStream class which in turn is a subclass of InputStream class.
Constructor:
DataInputStream(InputStream dis)
This constructor takes an InputStream object dis as its argument to read data
out of this input stream.
Example:
FileInputStream disfis=new FileInputStream(“D://Test.txt”);
DataInputStream disread =new DataInputStream(disfis);
In the above code, we have created a DataInputStream object to read primitive data
types out of a file D:\\Test.txt, pointed by FileInputStream object disfis.
OutputStream classes write data only in terms of bytes but
DataOutputStream class allows us to write data of primitive types such as char, int,
float, double, boolean, short to an output stream. This class is a filter class which is
used to wrap any output stream, to write primitive data to it.
Constructor:
DataOutputStream(OutputStream disout)
This constructor takes an OutputStream object disout in the parameters to
write data to this output stream.
Example:
FileOutputStream disfos=new FileOutputStream(“D:\\Test.txt”);
DataOutputStream doswrite =new DataOutputStream(disfos);
In the above code, we have created a DataInputStream object to write data to a file
D:\\Test.txt, pointed by FileOutputStream object reference disfos.

369
import java.io.*;
public class DataInOut {
public static void main(String[] args) throws IOException {
//Writing to the file
FileOutputStream datafile = new FileOutputStream("dataout.txt");
DataOutputStream data = new DataOutputStream(datafile);
data.write(50);
data.write('V');
data.write('L');
data.write('D');
data.flush();
data.close();
//Reading from the file
InputStream inputdata = new FileInputStream("dataout.txt");
DataInputStream datainst = new DataInputStream(inputdata);
int count = inputdata.available();
byte[] arydata = new byte[count];
datainst.read(arydata);
for (byte vd : arydata)
{
char ch = (char) vd;
System.out.print("->"+ch);
}
}
}
In the above program first we are writing the character / byte in to the file
through DataOutputStream. After that we reads the same file by wrapping the
FileinputStream in DataInputStream and displays the content.
Output:
->2->V->L->D
4.8 OTHER CLASSES

370
There are various other classes apart from discussed above. They are,
4.8.1 RANDOMACCESSFILE
Java allows us to access the contents of a file in random order i.e. data items
can be read and written in any fashion. This is especially very important and helpful in
direct access applications like banking systems, airline reservation systems,
Automatic Teller Machine (ATM) etc. Random access files are similar to arrays,
where each data is accessed directly by its index number. In Java,
java.io.RandomAccessFile class enables us to perform random access file input and
output operations as opposed to sequential file I/O offered by ByteStream and
CharacterStream classes.
Constructor:
public RandomAccessFile(String fileName, String mode) throws IOException
This constructor allows us to create a random access file stream to read from,
and optionally to write to, a file with the specified file name. The mode argument must
either be equal to “r” or “rw”, stating either to open the file for read or for both read
and write.
When a data file is opened for random read and write access, an internal file
pointer will be set at the beginning of the file. When we read or write data to the file,
the file pointer will move forward to the next data item. For example, when reading an
int data using readlnt(), 16 bytes are read from the file and the file pointer moves 16
bytes forward from the previous file pointer position. Similarly, when reading a double
data using readDouble (), 8 byte are read from the file pointer and the file pointer
moves 8 bytes forward from the previous file pointer position.
4.8.2 STREAMTOKENIZER
The StreamTokenizer class is used to break an object of type Reader into
tokens based on different identifiers, numbers, quoted strings and various comment
styles. The next token will be obtained from the Reader by calling nextToken()
method. It will return the type of token. StreamTokenizer class defines four int
constants: TT EOF, TT EOL, TT NUMBER and TT WORD.
Apart from these constant there are three instance variables named nval, sval
and ttype. The nval hold the values of numbers, sval hold the value of any words

371
(string) and the ttype is a public int that has just been read by the nextToken( )
method.
If the token will be a word or string, ttype equals TT WORD. If the token will be a
number, ttype equals TT NUMBER. If the token will be a single character, ttype
contains its value. When an end of line condition has been encountered, ttype will
equal TT EOL. When the end of the stream has been encountered, ttype will equal
TT EOF.
Constructor:
The constructor for java.io.StreamTokenizer which works on an InputStream
has been deprecated in favor of the constructor that works on a Reader. We can still
tokenize an InputStream by converting it to a Reader:
Reader rd = new BufferedReader(new InputStreamReader(insr));
StreamTokenizer strtoken = new StreamTokenizer(rd);
Method StreamTokenizer(InputStream) is deprecated and the Alternative method is
StreamTokenizer(Reader).
4.8.3 FILE
Java.io package also provides a File class that provide support for creating
and manipulation of files. Means, the File class does not specify how information is
retrieved from or stored in files rather it describes the properties of a file itself. A File
Object is used to obtain or manipulate the data associated with a disk file. It will
provide the permission, directory path and so on.
Constructor:
1. File(File superstr, String substr)
This constructor allows us to create a new File instance from a superstr
pathname and a substr pathname string.
2. File(String path)
This constructor allows us to create a new File instance by converting the
given path string into an abstract pathname.
3. File(String superstr, String substr)

372
This constructor allows us to create a new File instance from a superstr path
string and a substr path string.
4. File(URI uripath)
This constructor allows us to create a new File instance by converting the
given file URI into an abstract pathname.
File class defines many methods. For example, getName() method returns the name
of the file, getPath() method returns the path of the file, getParent( ) method returns
the name of the parent directory, exists() method returns true if the file exists and
false if it does not. isFile() method returns true if invoked on a file and false if invoked
on a directory. The mkdir( ) method allows us to create a directory, returns true on
success and false on failure. The createNewFile() method allows us to create a
new empty file, return true on success and false on failure. It is written in a try-catch
block. This is must because the createNewFile( ) method throws an IO exception, if
the file cannot be created because of the entire path does not exist. If we fail to catch
the exception, program will not compile.
import java.io.File;
import java.io.*;
public class Filehandling {
public static void main(String[] args) {
File f1 = new File("D:\\College\\BAOU\\BAOU\\Writing Book\\Program\\Book\\
Test.txt");
System.out.println("Folder Name is : "+f1.getName());
System.out.println("Full Path is : "+f1.getPath());
System.out.println("Parent of file : "+f1.getParent());
System.out.println("Book Folder is : "+f1.exists());
System.out.println("Book is a File : "+f1.isFile());
System.out.println("Test.txt is writeable : "+f1.canWrite());
System.out.println("Test.txt is readable : "+f1.canRead());
System.out.println("Test.txt size in Bytes : "+f1.length());
System.out.println("Absolute Location is : "+f1.toString());

373
System.out.println("Test.txt is Hidden file : "+f1.isHidden());
//Creating a new Directory
File f2 = new File("D:\\College\\BAOU\\BAOU\\Writing Book\\Program\\newDir");
if(f2.mkdir())
{
System.out.println("Directory Created : Success");
}else
{
System.out.println("Directory Created : Unsuccess");
}
//New file creation
File f3 = new File("D:\\College\\BAOU\\BAOU\\Writing Book\\Program\\
new.txt");
try{
if(f3.createNewFile())
{
System.out.println("File Created : Success");
}else
{
System.out.println("File Created : Unsuccess");
}
}catch (IOException io){}
}
}
Above example shows the basic function related to File handling using File class.
The output of the above program is as shown below:
Output:
Folder Name is : Test.txt
Full Path is : D:\College\BAOU\BAOU\Writing Book\Program\Book\Test.txt
Parent of file : D:\College\BAOU\BAOU\Writing Book\Program\Book
Book Folder is : true

374
Book is a File : true
Test.txt is writeable : true
Test.txt is readable : true
Test.txt size in Bytes : 816
Absolute Location is : D:\College\BAOU\BAOU\Writing Book\Program\Book\Test.txt
Test.txt is Hidden file : false
Directory Created : Unsuccess
File Created : Unsuccess
4.8.4 READING DATA FROM CONSOLE
There are three different techniques to read the input values from Java Console.
They are:
1. Using Java Bufferedreader Class
2. Scanner Class in Java
3. Console Class in Java
We have already discussed the use of BufferedReader class in Character
Stream classes. So, now we will discuss the remaining two.
Scanner Class
This is easy and widely used technique to take input. The primary reason for
the Scanner class is to parse primitive types and strings utilizing general
expressions.
import java.util.*;
public class studentInput{
public static void main(String []args){
String Stuname;
int Stuage;
float Stuheight;
//creating object of Scanner class

375
Scanner input = new Scanner(System.in);
System.out.print("Enter student name: ");
Stuname = input.next();
System.out.print("Enter student age: ");
Stuage = input.nextInt();
System.out.print("Enter student height: ");
Stuheight = input.nextFloat();
System.out.println("Name: " + Stuname + ", Age: "+ Stuage + ", height: "+ Stuheight);
}
}
Output:
Enter student name: Vinod
Enter student age: 35
Enter student height: 6
Name: Vinod, Age: 35, height: 6.0
Console Class in Java
The java.io.Console class provides convenient methods for reading input and
writing output to the standard input (keyboard) and output streams (display) in
command-line (console) programs. The following program depicts the use of
Console class to read input data from the user and print output:
import java.io.*;
import java.util.*;
public class ConsoleReadWrite {
public static void main(String[] args) throws IOException {
Console console = System.console();
if (console == null) {
System.out.println("Console is not supported");
System.exit(1);
}
String Stuname = console.readLine("What's the student name? ");
String Stuage = console.readLine("How old are the student is? ");

376
String Stucity = console.readLine("Where do the student lives? ");
//console.format("%s, a %s year-old student is living in %s", Stuname, Stuage, Stucity);
console.printf("%s, a %s year-old student is living in %s", Stuname, Stuage, Stucity);
}
}
console.printf () and console.format () prints the same results with applied formats.
Output:
What's the student name? Ved
How old are the student is? 10
Where do the student lives? Gandhinagar
Ved, a 10 year-old student is living in Gandhinagar
Check Your Progress 3
1)Write a code of ObjectInputStream and ObjectOutputStream classes to
demonstrate the working of java IO on objects.
……………………………………………………………………………………
……………………………………………………………………………………
2) Write a code to read byte array from a file using RandomAccessFile.
……………………………………………………………………………………
……………………………………………………………………………………
3) Differentiate various console based input options of Java.
……………………………………………………………………………………
……………………………………………………………………………………
4.9 LET US SUM UP

377
I/O in Java is based on streams. A stream represents a flow of data or a
channel of communication. The package java.io contains streams-binary, character
and object to handle fundamental input and output operations in Java. The I/O
classes can be grouped as follows: All input related process is performed through
subclasses of InputStream and all output related process is performed through
subclasses of OutputStream. In this unit we have discussed various streams
combined together to perform the added functionality of standard input and stream
input. In this we have also discussed the operations of reading from a file and writing
to a file. We have also discussed the classes which performs input – output through
Pipes.
4.10 CHECK YOUR PROGRESS: POSSIBLE ANSWERS Check Your Progress 1
1. We can divide the classes into two groups. They are,
Low level: In this group FileInputStream, FileOutputStream, FileReader,
FileWriter covered
High level: In this group BufferedInputStream, BufferedReader,
ObjectInputStream and their accompanying output classes are covered.
2.
Streams: It deals with one byte at a time. It is good for binary data.
Readers/Writers: it deals with one character at a time. It is good for text data.
Buffered: It deals with many bytes/characters at a time. It is used always.
3. Byte streams are suggested for normal input and output.
Character streams are suggested exclusively for character data.
Basically, all data consist of bits grouped into 8-bit bytes. So, logically all
streams could be called “byte streams”. Whenever the streams which are
intended for bytes and represent characters are known as “character streams”
and rest are called “byte streams”.
Check Your Progress 2

378
1.
Filter streams are used to manipulate data reading from an underlying stream.
The read method in a readable filter stream reads input from the underlying
stream, filters it, and then forward on the filtered data to the caller. The write
method in a writable filter stream, filters the data and then writes the data to the
underlying stream.
2.
import java.io.*;
public class FileAppend
{
public static void main(String[] args)
{
try {
PrintWriter pout = new PrintWriter(new BufferedWriter(new
FileWriter("fAppnd.txt", true))); //the true will append the new content
pout.println("Welcome to BAOU, Ahmedabad.");
pout.close();
} catch (IOException ex) {
System.out.println(ex);
} } }
3.
This class is very useful to copy multiple source files into one destination file
with very less code.
Check Your Progress 3
1.
String str = "Gujarat";

379
byte[] byt = {'V', 'i', 'd', 'y', 'a', 'p', 'i', 't', 'h'};
try {
// create a new file with an ObjectOutputStream
FileOutputStream out = new FileOutputStream("test.txt");
ObjectOutputStream oout = new ObjectOutputStream(out);
// write something in the file
oout.writeObject(str);
oout.writeObject(byt);
oout.flush();
// create an ObjectInputStream for the file we created before
ObjectInputStream ois = new ObjectInputStream(new FileInputStream("test.txt"));
// read and print an object and cast it as string
System.out.println("" + (String) ois.readObject());
// read and print an object and cast it as string
byte[] read = (byte[]) ois.readObject();
String str1 = new String(read);
System.out.println("" + str1);
2.
RandomAccessFile ramacc = new RandomAccessFile("Test.txt", "r");
ramacc.seek(1);
byte[] byt = new byte[5];

380
ramacc.read(byt);
ramacc.close();
System.out.println(new String(byt));
3.
I.Using Buffered Reader Class
II. Using Scanner Class
III. Using Console Class
4.11 FURTHER READING
19) Core Java for Beginners: 1 (X-Team) by Sharanam Shah, Vaishali Shah 1st
edition
20) Java Programming for Beginners by Mark Lassoff
21) Core Java Programming-A Practical Approach by Tushar B. Kute
22) Java: The Complete Reference by Schildt Herbert. Ninth Edition
23) https://www.decodejava.com/
24) https://www.javatpoint.com/
4.12 ASSIGNMENTS
14) Define Stream. Explain BufferedInputStream and BufferedOutputStream with
example.
15) Discuss the different filter classes of IO streams.
16) Explain StringTokenizer class with proper example.
17) What is Console IO? Explain Scanner class with proper example.
18) Define Random access. State its benefit with respect to file access.

Website : www.baou.edu.in | Email : [email protected]
BAOUBAOUBAOUEduca�onEduca�onEduca�onfor Allfor Allfor All
_________________________________BAOUEduca�onfor All
___________