NXP Demo Experience User Guide
34
NXP Demo Experience User Guide NXP Semiconductors Document identifier: DEXPUG User Guide Rev. 0, 24 June 2022
-
Upload
khangminh22 -
Category
Documents
-
view
4 -
download
0
Transcript of NXP Demo Experience User Guide

NXP Demo Experience User Guide
NXP Semiconductors Document identifier: DEXPUGUser Guide Rev. 0, 24 June 2022

ContentsChapter 1 Introduction........................................................................................... 4
1.1 Installing the NXP Demo Experience........................................................................................ 4
Chapter 2 Demo launcher......................................................................................5
Chapter 3 Included demos.....................................................................................73.1 Machine learning demos........................................................................................................... 7
3.1.1 NNStreamer demos.................................................................................................................... 73.1.1.1 Object classification....................................................................................................................... 83.1.1.2 Object detection............................................................................................................................. 83.1.1.3 Pose detection............................................................................................................................... 93.1.1.4 Brand detection............................................................................................................................10
3.1.2 pyeIQ demos.............................................................................................................................113.1.2.1 Object classification..................................................................................................................... 113.1.2.2 Object detection........................................................................................................................... 123.1.2.3 Mask detection.............................................................................................................................133.1.2.4 OpenCV demos........................................................................................................................... 14
3.1.2.4.1 Face recognition .......................................................................................................... 143.2 Multimedia demos................................................................................................................... 18
3.2.1 GStreamer demos.....................................................................................................................183.2.1.1 Video test demo........................................................................................................................... 183.2.1.2 Camera using the VPU................................................................................................................ 193.2.1.3 Multi-camera preview...................................................................................................................19
3.2.2 Image Signal Processor (ISP) demos....................................................................................... 203.2.2.1 ISP control demo......................................................................................................................... 203.2.2.2 Video dump demo........................................................................................................................21
3.2.3 Audio......................................................................................................................................... 233.2.3.1 Audio record.................................................................................................................................233.2.3.2 Audio play.................................................................................................................................... 23
3.3 GPU.........................................................................................................................................233.3.1 OpenVG 2D...............................................................................................................................23
3.3.1.1 Tiger G2D.................................................................................................................................... 233.3.2 GLES2.......................................................................................................................................24
3.3.2.1 Vivante launcher.......................................................................................................................... 243.3.2.2 Cover flow.................................................................................................................................... 243.3.2.3 Vivante tutorial............................................................................................................................. 243.3.2.4 Bloom...........................................................................................................................................253.3.2.5 Blur...............................................................................................................................................253.3.2.6 Eight layer blend.......................................................................................................................... 263.3.2.7 Fractal shader.............................................................................................................................. 263.3.2.8 Line builder 101........................................................................................................................... 273.3.2.9 Model loader................................................................................................................................ 273.3.2.10 S03 transform............................................................................................................................ 283.3.2.11 S04 projection............................................................................................................................ 283.3.2.12 S06 texturing..............................................................................................................................293.3.2.13 Mapping..................................................................................................................................... 293.3.2.14 Mapping refraction..................................................................................................................... 30
NXP Semiconductors
NXP Demo Experience User Guide, Rev. 0, 24 June 2022User Guide 2 / 34

Chapter 4 Revision history ..................................................................................31Legal information..................................................................................................................................................................................... 32
NXP SemiconductorsContents
NXP Demo Experience User Guide, Rev. 0, 24 June 2022User Guide 3 / 34

Chapter 1IntroductionThe NXP Demo Experience is a user-friendly interface that allows you to launch preselected demonstrations that are included in the Linux board support package (BSP) that NXP provides.
The NXP Demo Experience is for the ones who are interested in showcasing various features and capabilities of the SoCs provided by NXP. The demos included in this application are meant to be easy to run for users of all skill levels, making complex use cases assessable to anyone. Users need some knowledge when it comes to setting up equipment on evaluation kits (EVKs), such as changing device tree blob (DTB) files.
This user guide is intended for end users of the NXP Demo Experience. This document covers how to run the NXP Demo Experience while also covering the demos that are included and how to operate them.
To use this software, users need at a minimum:
• A supported NXP evaluation kit (EVK)
• A display output
• A connected mouse
Some demos require more than the minimum required equipment. See the Included demos chapter to find the required materials for each demo.
NOTE
1.1 Installing the NXP Demo ExperienceThe NXP Demo Experience comes preinstalled on NXP-provided demo Linux images. These images can be found here. Alternatively, a user can build the demo images which include the NXP demo experience by following the i.MX Yocto Project User’s Guide. In both cases, the “imx-image-full” image must be used.
NXP Semiconductors
NXP Demo Experience User Guide, Rev. 0, 24 June 2022User Guide 4 / 34

Chapter 2Demo launcherOn boards where the NXP Demo Experience is available, an NXP Logo will be displayed on the top left-hand corner of the screen. Users can start the demo launcher by clicking this logo.
Figure 1. NXP Demo Experience logo
After opening the program, users can launch demos using the following options shown in Figure 2 below:
1. To filter the list, select the icon on the left to expand the filter menu. From this menu, a category or subcategory that filters the demos displayed in the launcher can be selected.
2. A scrollable list of all the demos that are supported on that EVK appears in this area with any filters selected applied. Clicking a demo in the launcher brings up information about the demo.
3. This area displays the demo’s name, categories, and description.
4. Clicking Launch Demo launches the currently selected demo. A demo then can be force-quit by clicking the Stop current demo button in the launcher (appears once a demo is started).
NXP Semiconductors
NXP Demo Experience User Guide, Rev. 0, 24 June 2022User Guide 5 / 34

Figure 2. NXP Demo Experience
Only one demo can be launched at a time.
NOTE
NXP SemiconductorsDemo launcher
NXP Demo Experience User Guide, Rev. 0, 24 June 2022User Guide 6 / 34

Chapter 3Included demosThe following chapter describes the available demos that can be launched from the NXP Demo Experience’s demo launcher. To see the available demos for a specific Linux version and board, refer to the Demo Experience's release notes.
If the Demo is covering up the demo launcher window or another window that is needed, drag the necessary windows, including video output windows, with the mouse.
NOTE
3.1 Machine learning demosThe following demos show machine learning use cases that are possible with the hardware included on-chip.
3.1.1 NNStreamer demosNNStreamer is a set of GStreamer components that enable machine learning in video pipelines. The included demos use NNStreamer to create video outputs that overlay inference information onto the video.
Figure 3. NNStreamer launcher
All NNStreamer demos have identical user interfaces. When these demos launch, users are presented with a control panel, see Figure 3.
1. This button can be used to quit the demo and stop video playback.
2. Various options can be set before a demo is run:
• Source: Select the camera to use or to use the example video provided (requires Internet connection, not available in “Brand Detection” demo)
• Backend: Select whether to use the NPU (if available) or CPU for inferences
• Height: Select the input height of the video if using a camera
• Width: Select the input width of the video if using a camera
NXP Semiconductors
NXP Demo Experience User Guide, Rev. 0, 24 June 2022User Guide 7 / 34

• Label Color: Select the color of the overlay labels
3. Clicking the Run button locks the current settings and starts the camera feed and inferencing.
4. While the video plays, statistics about the current speed of the video feed and inferencing will be displayed here. Video refresh represents the speed of the video inferencing pipeline and inference time is a representation of the time it takes to do one inference.
If the NPU is selected, the first time a demo is run the NPU does a process called “warming up” where it must convert the model file into something it can read. While this result is cached to speed up future runs, this process can take a while.
NOTE
3.1.1.1 Object classification
Required materials: mouse, display output, camera (for camera options), and an Internet connection (for example video option).
It launches a GStreamer pipeline that gets a video feed from a camera or video file and runs a classification inference on the video frames as they come in. This demo uses a pretrained quantized MobileNet V1 TFLite model that is trained on objects included in the ImageNet Large Scale Visual Recognition Challenge 2012 (ILSVRC2012) object set. The result of the inference is then displayed within the video frame.
Figure 4. NNStreamer output classification example
When the demo starts, video overlay of the following information is shown:
1. The label with the highest probability of being in the image.
2. Frames per second (FPS) of the video inferencing pipeline and inferences per second (IPS) based on the time it takes to do one inference are included in the bottom left corner.
3.1.1.2 Object detection
Required materials: mouse, display output, camera (for camera options), and an Internet connection (for example video option).
NXP SemiconductorsIncluded demos
NXP Demo Experience User Guide, Rev. 0, 24 June 2022User Guide 8 / 34

It launches a GStreamer pipeline that gets a video feed from a camera or video file and runs a detection inference on the video frames as they come in. This demo uses a pretrained quantized MobileNet Single Shot Detection (SSD) V2 TFLite model that is trained on objects included in the COCO object dataset. The result of the inference is then displayed within the video frame.
Figure 5. NNStreamer object detection example
When the demo starts, video overlay of the following information is shown:
1. Detected objects have boxes drawn around them and their label displayed near the top left corner
2. Frames per second (FPS) of the video inferencing pipeline and inferences per second (IPS) based on the time it takes to do one inference are included in the bottom left corner.
3.1.1.3 Pose detection
Required materials: mouse, display output, camera (for camera options), and an Internet connection.
It launches a GStreamer pipeline that gets a video feed from a camera or video file and runs a pose detection inference on the video frames as they come in. This demo uses a pretrained quantized PoseNet ResNet-50 TFLite model that is trained on 17 body points. When the video starts, the detected pose is overlaid onto the incoming video feed.
NXP SemiconductorsIncluded demos
NXP Demo Experience User Guide, Rev. 0, 24 June 2022User Guide 9 / 34

Figure 6. NNStreamer pose detection example
3.1.1.4 Brand detection
Required materials: mouse, display output, camera, and an Internet connection.
It launches a GStreamer pipeline that gets a video feed from a camera and runs a brand detection inference on the video frames as they come in. This demo uses a pretrained quantized Popular Products V1 TFLite model that is trained on 100,000 US products. The result of the inference is then displayed within the video frame.
Figure 7. NNStreamer brand detection example
NXP SemiconductorsIncluded demos
NXP Demo Experience User Guide, Rev. 0, 24 June 2022User Guide 10 / 34

When the demo starts, video overlay of the following information is shown:
1. The label with the highest probability of being in the image.
2. Frames per second (FPS) of the video inferencing pipeline and inferences per second (IPS) based on the time it takes to do one inference are included in the bottom left corner.
3.1.2 pyeIQ demospyeIQ is a suite of demos that demonstrate machine learning use cases in various applications. Most applications are written in Python, which is why the suite is given the name “py-eIQ”. Instead of analyzing a video stream, these demos run inferences on photographs.
All demos will run a launcher before running the demos. It ensures that pyeIQ is installed and sets up the demo.
Figure 8. pyeIQ launcher
These demos require pyeIQ version 3.0.1. If another version is installed, uninstall pyeIQ before running the demos below.
NOTE
3.1.2.1 Object classification
Required materials: mouse, display output, and an Internet connection.
This installs pyeIQ if not installed and runs an object classification inference on an image. This demo uses a quantized MobileNet V1 model trained on objects included in the ILSVRC2012 object set.
NXP SemiconductorsIncluded demos
NXP Demo Experience User Guide, Rev. 0, 24 June 2022User Guide 11 / 34

Figure 9. pyeIQ object classification example
3.1.2.2 Object detection
Required materials: mouse, display output, and an Internet connection.
This installs pyeIQ if not installed and runs an object detection inference on an image. This demo uses a quantized MobileNet Single Shot Detection (SSD) V1 TFLite model trained on the COCO object set.
NXP SemiconductorsIncluded demos
NXP Demo Experience User Guide, Rev. 0, 24 June 2022User Guide 12 / 34

Figure 10. pyeIQ object detection example
3.1.2.3 Mask detection
Required materials: mouse, display output, and an Internet connection.
This installs pyeIQ if not installed and runs a mask detection inference on an image. This demo uses a model trained to detect if a user is wearing a mask or not.
NXP SemiconductorsIncluded demos
NXP Demo Experience User Guide, Rev. 0, 24 June 2022User Guide 13 / 34

Figure 11. pyeIQ mask detection example
3.1.2.4 OpenCV demos
The following demos use the OpenCV library to display video frames with inference data displayed on them. This library works best when combined with computer vision use cases, as it is what the “CV” in “OpenCV” stands for.
3.1.2.4.1 Face recognition
Required materials: mouse, display output, camera, and an internet connection.
In this demo, users can register and recognize faces in a video feed. The demo first uses a quantized TFLite SSD MobileNet V2 model to detect the faces that are in the video frame. With those faces, it then crops those faces and uses a quantized TFLite FaceNet model to create face embeddings that can be used to compare against faces saved previously.
NXP SemiconductorsIncluded demos
NXP Demo Experience User Guide, Rev. 0, 24 June 2022User Guide 14 / 34

Figure 12. Face recognition options select
When the demo starts, a new window is displayed that allows the user to set Face recognition options:
1. This button can be used to quit the demo.
2. These options allow certain aspects of demos to be changed:
• Source: Select the camera to use or to use the example video provided (requires internet connection, not available in “Brand Detection” demo)
• Backend: Select whether to use the NPU (if available) or CPU for inferences
3. This button will confirm the settings and start the demo.
4. This area will display status updates while the demo is starting.
When the Run button is pressed, the demo will first download the required model from the internet and then “warm-up” the NPU. This “warm-up” time can take a couple of minutes the first time the demo is run. In future runs, the “warm-up” time will take significantly less time.
NXP SemiconductorsIncluded demos
NXP Demo Experience User Guide, Rev. 0, 24 June 2022User Guide 15 / 34

Figure 13. Face recognition demo
When the demo is ready to begin, the following windows will open.
1. A camera view with inference information layered over the frame.
2. A control panel
Figure 14. Face recognition camera view
NXP SemiconductorsIncluded demos
NXP Demo Experience User Guide, Rev. 0, 24 June 2022User Guide 16 / 34
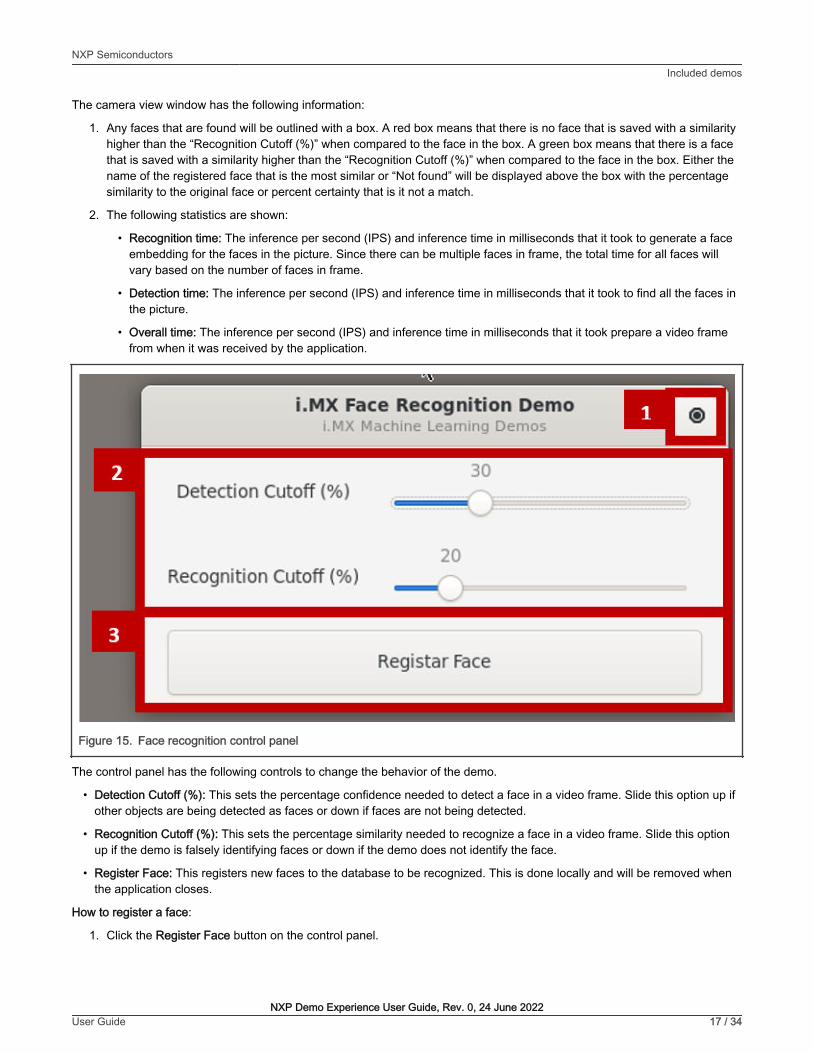
The camera view window has the following information:
1. Any faces that are found will be outlined with a box. A red box means that there is no face that is saved with a similarity higher than the “Recognition Cutoff (%)” when compared to the face in the box. A green box means that there is a face that is saved with a similarity higher than the “Recognition Cutoff (%)” when compared to the face in the box. Either the name of the registered face that is the most similar or “Not found” will be displayed above the box with the percentage similarity to the original face or percent certainty that is it not a match.
2. The following statistics are shown:
• Recognition time: The inference per second (IPS) and inference time in milliseconds that it took to generate a face embedding for the faces in the picture. Since there can be multiple faces in frame, the total time for all faces will vary based on the number of faces in frame.
• Detection time: The inference per second (IPS) and inference time in milliseconds that it took to find all the faces in the picture.
• Overall time: The inference per second (IPS) and inference time in milliseconds that it took prepare a video frame from when it was received by the application.
Figure 15. Face recognition control panel
The control panel has the following controls to change the behavior of the demo.
• Detection Cutoff (%): This sets the percentage confidence needed to detect a face in a video frame. Slide this option up if other objects are being detected as faces or down if faces are not being detected.
• Recognition Cutoff (%): This sets the percentage similarity needed to recognize a face in a video frame. Slide this option up if the demo is falsely identifying faces or down if the demo does not identify the face.
• Register Face: This registers new faces to the database to be recognized. This is done locally and will be removed when the application closes.
How to register a face:
1. Click the Register Face button on the control panel.
NXP SemiconductorsIncluded demos
NXP Demo Experience User Guide, Rev. 0, 24 June 2022User Guide 17 / 34

2. A countdown from 5 seconds will start. At the end of the countdown, the application will save the current frame and detect any faces in frame.
3. For all faces in frame, a window prompt will appear (see below). Type the name of the face that appears in the blue box in the camera view. When done, click “Register Face”. If a face should not be registered, click “Skip Face”.
Face not always being recognized? Registering the same face multiple times helps increase the data pool the database has to pull from.
NOTE
Figure 16. Face recognition register face
3.2 Multimedia demosThis demo package has multimedia demos related to GStreamer, Image Signal Processing (ISP), and audio.
3.2.1 GStreamer demosGStreamer is a flexible tool that allows users to quickly build and deploy video pipelines. Below are demos that show examples of GStreamer.
3.2.1.1 Video test demo
Required materials: mouse, display output, and a camera (optional).
This demo allows the user to test display outputs and cameras connected to the camera. When launched, users see the GUI shown in Figure 17 where they can launch GStreamer pipelines.
The GStreamer windows do not have toolbars that allow users to close and move the window. To move windows, click anywhere in the video output area and drag the window to the correct area on the screen. The GStreamer windows are closed when the demo quits.
NOTE
It launches a GStreamer pipeline that plays a test source on the screen.
NXP SemiconductorsIncluded demos
NXP Demo Experience User Guide, Rev. 0, 24 June 2022User Guide 18 / 34

Figure 17. Video test demo
The following options are available to users while running the demo.
1. This button quits the demo and closes all GStreamer windows that are running at the current time.
2. These options allow users to control what the video output will look like:
• Source: Allows users to either pick a test source or a camera source to be shown in the output.
• Resolution: Allows users to change the video resolution of the output video.
• Scale to output: Allows users to scale the video up to fill the entire screen. For example, if “720x480” is selected as the resolution and the display is “1920x1080”, the video output would first be captured at or scaled down to keep the same format for consistency: "720x480" and then scaled up to keep same format for consistency: "1920x1080".
3. This button starts a video pipeline with the settings that the user has selected.
The current application only allows cameras to be used for a single video stream at a time.
NOTE
3.2.1.2 Camera using the VPU
Required materials: mouse, display output, and camera.
It launches a GStreamer pipeline that encodes a video feed from a camera, then decodes and displays the decoded video on the screen. The encode and decode is done using the on-chip VPU.
3.2.1.3 Multi-camera preview
Required materials: mouse, display output, OV5640 camera, and Basler camera.
Supported cameras:
• Basler camera (<EVKNAME>-evk-basler-ov5640.dtb)
NXP SemiconductorsIncluded demos
NXP Demo Experience User Guide, Rev. 0, 24 June 2022User Guide 19 / 34

It launches a GStreamer pipeline that displays two camera feeds simultaneously on the screen.
3.2.2 Image Signal Processor (ISP) demosSome SoCs have built-in ISPs that allow on-chip image control similar to the one in a DSLR camera. The demos below show ways to use this powerful tool.
3.2.2.1 ISP control demo
Required materials: mouse, display output, and a supported camera.
It launches a GStreamer pipeline that displays the current video output and a window that allows users to change and manipulate the video feed using API calls to the ISP.
Supported cameras:
• Basler camera (<EVKNAME>-evk-basler.dtb)
Figure 18. ISP control demo example
The following options can currently be changed through the UI:
• Black level subtraction (red, green.r, green.b, blue)
• Dewarp
— Dewarp on/off
— Change dewarp mode
— Vertical and horizontal flip
• FPS limiting
• White balance
— Auto white balance on/off
— White balance control (red, green.r, green.b, blue)
• Color processing
NXP SemiconductorsIncluded demos
NXP Demo Experience User Guide, Rev. 0, 24 June 2022User Guide 20 / 34

— Color processing on/off
— Color processing control (brightness, contrast, saturation, and hue)
• Demosaicing
— Demosaicing on/off
— Threshold control
• Gamma Control
— Gamma on/off
— Gamma mode (logarithmic or equidistant)
• Filtering
— Filter on/off
— Filter control (denoise and sharpness)
Figure 19. ISP control demo control panel
The ISP can be controlled using the control panel that appears after the video is started.
1. This button can be used to quit the demo and stop video playback.
2. This button shows a log of the API calls used when changes are made from the control panel.
3. This dropdown allows the user to swap between different sections of the control panel.
4. This area includes the settings and options for the current section. Changes to these settings change the video feed playing in the background and then revert when the demo is exited.
3.2.2.2 Video dump demo
Required materials: mouse, display output, external drive, and supported camera.
Supported cameras:
• Basler camera (<EVKNAME>-evk-basler.dtb)
NXP SemiconductorsIncluded demos
NXP Demo Experience User Guide, Rev. 0, 24 June 2022User Guide 21 / 34

Figure 20. Video Dump example
It allows users to dump raw camera frame data onto a connected drive. This demo allows you to set some settings before starting the frame dump process:
1. This button can be used to quit the demo.
2. This area selects the camera to use and loads it into the application. Select the camera to use from the Camera dropdown and click Load Camera to load the camera. It gets the supported modes and tests if the camera can be run with this demo. Once the camera is loaded in, the other options in this window unlock. If the camera cannot be loaded, an error popup occurs.
3. Here users can set the settings about the frames that get saved onto the drive:
• Mode: Select the mode the camera is in. It typically changes the height, width, FPS, or other camera features like HDR.
• Format: Select the format the raw frame data is saved in. The options are RAW12, RAW10, RAW8, NV16, NV12, and YUYV.
All formats may not be supported for all cameras.
NOTE
• Postprocessing: Allows to set modifications to the image if supported. “Crop” crops a frame while “scale” scales the frame to the selected size.
NXP SemiconductorsIncluded demos
NXP Demo Experience User Guide, Rev. 0, 24 June 2022User Guide 22 / 34

• Width: Shows the width of the selected mode. If postprocessing is enabled, allows users to change the width of an image.
• Height: Shows the height of the selected mode. If postprocessing is enabled, allows users to change the height of an image.
• FPS: The frames per second of a selected mode. It is not how quickly frames will be dumped into a storage.
• Save to... (it missed one): Allows the user to pick a save location for the raw frame data.
4. This button starts the process of getting raw frame data and dumping it to the selected save location. Clicking this button again after the process is started causes the program to stop dumping frames and saves the data.
5. The status bar indicator shows updates on what is happening currently with the demo.
Raw image data are large files that cannot be interpreted by most image viewers. It is not meant to be a way to save processed images onto a drive.
NOTE
Do not disconnect the drive early! Disconnecting the drive early may result in the data saved onto the drive becoming corrupted.
WARNING
3.2.3 AudioA few audio demos have also been included to test audio equipment. These tests have no graphical output.
3.2.3.1 Audio record
Required materials: mouse, display, and microphone.
This test records an audio file from the headphone input with a 10-second duration.
3.2.3.2 Audio play
Required materials: mouse, display, and headphones.
This test plays the audio file recorded on the 'Audio Record' test.
This demo will only work if 'Audio Record' is run first.
NOTE
3.3 GPUSeveral demos that show off the power of an on-chip GPU are included in this section.
3.3.1 OpenVG 2DOpenVG 2D is a cross-platform API that provides low-level hardware acceleration for vector graphics. The following demos use this library to perform their various actions.
3.3.1.1 Tiger G2D
Required materials: mouse and display output.
This demo shows a vector image being rotated and scaled using OpenVG.
NXP SemiconductorsIncluded demos
NXP Demo Experience User Guide, Rev. 0, 24 June 2022User Guide 23 / 34

Figure 21. Tiger G2D example
3.3.2 GLES2OpenGL Embedded Systems is a set of APIs for rendering 2D and 3D graphics using an onboard GPU. The following demos use this library to display various graphics.
3.3.2.1 Vivante launcher
Required materials: mouse and display output.
It shows an example of a launcher menu that would be used in an infotainment system.
Figure 22. Vivante launcher example
3.3.2.2 Cover flow
Required materials: mouse and display output.
It shows an example of a movie selection screen that would be used in an infotainment system.
3.3.2.3 Vivante tutorial
Required materials: mouse and display output.
It shows an example of a complex shape generated using the GPU.
NXP SemiconductorsIncluded demos
NXP Demo Experience User Guide, Rev. 0, 24 June 2022User Guide 24 / 34

Figure 23. Vivante tutorial example
3.3.2.4 Bloom
Required materials: mouse and display output.
An example of how to create a bloom effect. The idea is not to create the most accurate bloom, but something that is fairly fast to render. Instead of increasing the kernel size to get a good blur, we do a fairly fast approximation by downscaling the original image to multiple smaller render targets. We then blur them using a relatively small kernel, and then finally rescale the result to the original size.
Figure 24. Bloom example
3.3.2.5 Blur
Required materials: mouse and display output.
It uses the two-pass linear technique and further reduces the bandwidth requirement by downscaling the 'source image' to 1/4 its size (1/2w x 1/2h) before applying the blur and then upscaling the blurred image to provide the final image. It works well for large kernel sizes and relatively high sigma's, but the downscaling produces visible artifacts with low sigma's.
NXP SemiconductorsIncluded demos
NXP Demo Experience User Guide, Rev. 0, 24 June 2022User Guide 25 / 34

Figure 25. Blur example
3.3.2.6 Eight layer blend
Required materials: mouse and display output.
Creates a simple parallax scrolling effect by blending eight 32-bit per pixel 1080p layers on top of each other. It is not the most optimal way to do it as it uses eight passes, but it does provide a good example of the worst-case bandwidth use for the operation. The demo was created to compare GLES to the G2D eight blend functionality.
Figure 26. Eight-layer blend example
3.3.2.7 Fractal shader
Required materials: mouse and display output.
Can render both the Julia and Mandelbrot set using a fragment shader. This demo is used to demonstrate GPU shader performance by using up roughly 515 instructions to render each fragment while generating the Julia set. It uses no textures, has no overdraw, and has a minimal bandwidth requirement.
NXP SemiconductorsIncluded demos
NXP Demo Experience User Guide, Rev. 0, 24 June 2022User Guide 26 / 34

Figure 27. Fractal shader example
3.3.2.8 Line builder 101
Required materials: mouse and display output.
It is a simple example of dynamic line rendering using the LineBuilder helper class. The line builder has 'Add' methods for most FslBase Math classes like BoundingBox, BoundingSphere, BoundingFrustrum, Ray.
Figure 28. Line builder 101 example
3.3.2.9 Model loader
Required materials: mouse and display output.
Demonstrates how to use the FslSceneImporter and Assimp to load a scene and render it using OpenGLES2. The model is rendered using a simple per-pixel directional light shader.
NXP SemiconductorsIncluded demos
NXP Demo Experience User Guide, Rev. 0, 24 June 2022User Guide 27 / 34

Figure 29. Model loader example
3.3.2.10 S03 transform
Required materials: mouse and display output.
Renders an animated vertex-colored triangle. It shows how to modify the model matrix to rotate a triangle and how to utilize demoTime and deltaTime to do frame rate independent animation.
Figure 30. S03 transform example
3.3.2.11 S04 projection
Required materials: mouse and display output.
This demo shows how to build a perspective projection matrix and render two simple 3D models using frame rate independent animation.
NXP SemiconductorsIncluded demos
NXP Demo Experience User Guide, Rev. 0, 24 June 2022User Guide 28 / 34

Figure 31. S04 projection example
3.3.2.12 S06 texturing
Required materials: mouse and display output.
This example shows how to use the Texture class to use a texture in a cube. It also shows you how to use the ContentManager service to load a 'png' file from the Content directory into a bitmap utility class which is then used to create an OpenGL ES texture.
Figure 32. S06 texturing example
3.3.2.13 Mapping
Required materials: mouse and display output.
This sample shows how to use a cubemap texture to simulate a reflective material. It also shows you how to use the ContentManager service to load a *.dds file from the Content directory into a Texture utility class which is then used to create an OpenGL ES cubemap texture.
NXP SemiconductorsIncluded demos
NXP Demo Experience User Guide, Rev. 0, 24 June 2022User Guide 29 / 34

Figure 33. Mapping example
3.3.2.14 Mapping refraction
Required materials: mouse and display output.
This sample is a variation from “Mapping”. As in the previous example, a cubemap texture is used, but this time instead of simulating a reflective material, a refractive material is simulated. It also shows you how to use the ContentManager service to load a *.dds file from the Content directory into a Texture utility class which is then used to create an OpenGL ES cubemap texture.
Figure 34. Mapping refraction example
NXP SemiconductorsIncluded demos
NXP Demo Experience User Guide, Rev. 0, 24 June 2022User Guide 30 / 34

Chapter 4Revision historyTable 1. Revision history
Revision Date Changes
0 24 June 2022 Initial release
NXP Semiconductors
NXP Demo Experience User Guide, Rev. 0, 24 June 2022User Guide 31 / 34

Legal informationDefinitionsDraft — A draft status on a document indicates that the content is still under internal review and subject to formal approval, which may result in modifications or additions. NXP Semiconductors does not give any representations or warranties as to the accuracy or completeness of information included in a draft version of a document and shall have no liability for the consequences of use of such information.
DisclaimersLimited warranty and liability — Information in this document is believed to be accurate and reliable. However, NXP Semiconductors does not give any representations or warranties, expressed or implied, as to the accuracy or completeness of such information and shall have no liability for the consequences of use of such information. NXP Semiconductors takes no responsibility for the content in this document if provided by an information source outside of NXP Semiconductors.
In no event shall NXP Semiconductors be liable for any indirect, incidental, punitive, special or consequential damages (including - without limitation - lost profits, lost savings, business interruption, costs related to the removal or replacement of any products or rework charges) whether or not such damages are based on tort (including negligence), warranty, breach of contract or any other legal theory.
Notwithstanding any damages that customer might incur for any reason whatsoever, NXP Semiconductors’ aggregate and cumulative liability towards customer for the products described herein shall be limited in accordance with the Terms and conditions of commercial sale of NXP Semiconductors.
Right to make changes — NXP Semiconductors reserves the right to make changes to information published in this document, including without limitation specifications and product descriptions, at any time and without notice. This document supersedes and replaces all information supplied prior to the publication hereof.
Suitability for use — NXP Semiconductors products are not designed, authorized or warranted to be suitable for use in life support, life-critical or safety-critical systems or equipment, nor in applications where failure or malfunction of an NXP Semiconductors product can reasonably be expected to result in personal injury, death or severe property or environmental damage. NXP Semiconductors and its suppliers accept no liability for inclusion and/or use of NXP Semiconductors products in such equipment or applications and therefore such inclusion and/or use is at the customer’s own risk.
Applications — Applications that are described herein for any of these products are for illustrative purposes only. NXP Semiconductors makes no representation or warranty that such applications will be suitable for the specified use without further testing or modification.
Customers are responsible for the design and operation of their applications and products using NXP Semiconductors products, and NXP Semiconductors accepts no liability for any assistance with applications or customer product design. It is customer’s sole responsibility to determine whether the NXP Semiconductors product is suitable and fit for the customer’s applications and products planned, as well as for the planned application and use of customer’s third party customer(s). Customers should provide appropriate design and operating safeguards to minimize the risks associated with their applications and products.
NXP Semiconductors does not accept any liability related to any default, damage, costs or problem which is based on any weakness or default in the customer’s applications or products, or the application or use by customer’s third party customer(s). Customer is responsible for doing all necessary testing for the customer’s applications and products using NXP Semiconductors products in order to avoid a default of the applications and the products or of the application or use by customer’s third party customer(s). NXP does not accept any liability in this respect.
Terms and conditions of commercial sale — NXP Semiconductors products are sold subject to the general terms and conditions of commercial sale, as published at http://www.nxp.com/profile/terms, unless otherwise agreed in a valid written individual agreement. In case an individual agreement is concluded only the terms and conditions of the respective agreement shall apply. NXP Semiconductors hereby expressly objects to applying the customer’s general terms and conditions with regard to the purchase of NXP Semiconductors products by customer.
Export control — This document as well as the item(s) described herein may be subject to export control regulations. Export might require a prior authorization from competent authorities.
NXP SemiconductorsLegal information
NXP Demo Experience User Guide, Rev. 0, 24 June 2022User Guide 32 / 34

Suitability for use in non-automotive qualified products — Unless this data sheet expressly states that this specific NXP Semiconductors product is automotive qualified, the product is not suitable for automotive use. It is neither qualified nor tested in accordance with automotive testing or application requirements. NXP Semiconductors accepts no liability for inclusion and/or use of non-automotive qualified products in automotive equipment or applications.
In the event that customer uses the product for design-in and use in automotive applications to automotive specifications and standards, customer (a) shall use the product without NXP Semiconductors’ warranty of the product for such automotive applications, use and specifications, and (b) whenever customer uses the product for automotive applications beyond NXP Semiconductors’ specifications such use shall be solely at customer’s own risk, and (c) customer fully indemnifies NXP Semiconductors for any liability, damages or failed product claims resulting from customer design and use of the product for automotive applications beyond NXP Semiconductors’ standard warranty and NXP Semiconductors’ product specifications.
Translations — A non-English (translated) version of a document, including the legal information in that document, is for reference only. The English version shall prevail in case of any discrepancy between the translated and English versions.
Security — Customer understands that all NXP products may be subject to unidentified vulnerabilities or may support established security standards or specifications with known limitations. Customer is responsible for the design and operation of its applications and products throughout their lifecycles to reduce the effect of these vulnerabilities on customer’s applications and products. Customer’s responsibility also extends to other open and/or proprietary technologies supported by NXP products for use in customer’s applications. NXP accepts no liability for any vulnerability. Customer should regularly check security updates from NXP and follow up appropriately.
Customer shall select products with security features that best meet rules, regulations, and standards of the intended application and make the ultimate design decisions regarding its products and is solely responsible for compliance with all legal, regulatory, and security related requirements concerning its products, regardless of any information or support that may be provided by NXP.
NXP has a Product Security Incident Response Team (PSIRT) (reachable at [email protected]) that manages the investigation, reporting, and solution release to security vulnerabilities of NXP products.
TrademarksNotice: All referenced brands, product names, service names, and trademarks are the property of their respective owners.
NXP — wordmark and logo are trademarks of NXP B.V.
AMBA, Arm, Arm7, Arm7TDMI, Arm9, Arm11, Artisan, big.LITTLE, Cordio, CoreLink, CoreSight, Cortex, DesignStart, DynamIQ, Jazelle, Keil, Mali, Mbed, Mbed Enabled, NEON, POP, RealView, SecurCore, Socrates, Thumb, TrustZone, ULINK, ULINK2, ULINK-ME, ULINK-PLUS, ULINKpro, μVision, Versatile — are trademarks or registered trademarks of Arm Limited (or its subsidiaries) in the US and/or elsewhere. The related technology may be protected by any or all of patents, copyrights, designs and trade secrets. All rights reserved.
Airfast — is a trademark of NXP B.V.
Bluetooth — the Bluetooth wordmark and logos are registered trademarks owned by Bluetooth SIG, Inc. and any use of such marks by NXP Semiconductors is under license.
Cadence — the Cadence logo, and the other Cadence marks found at www.cadence.com/go/trademarks are trademarks or registered trademarks of Cadence Design Systems, Inc. All rights reserved worldwide.
CodeWarrior — is a trademark of NXP B.V.
ColdFire — is a trademark of NXP B.V.
ColdFire+ — is a trademark of NXP B.V.
EdgeLock — is a trademark of NXP B.V.
EdgeScale — is a trademark of NXP B.V.
EdgeVerse — is a trademark of NXP B.V.
elQ — is a trademark of NXP B.V.
FeliCa — is a trademark of Sony Corporation.
Freescale — is a trademark of NXP B.V.
HITAG — is a trademark of NXP B.V.
ICODE and I-CODE — are trademarks of NXP B.V.
Immersiv3D — is a trademark of NXP B.V.
I2C-bus — logo is a trademark of NXP B.V.
Kinetis — is a trademark of NXP B.V.
Layerscape — is a trademark of NXP B.V.
Mantis — is a trademark of NXP B.V.
MIFARE — is a trademark of NXP B.V.
NTAG — is a trademark of NXP B.V.
Processor Expert — is a trademark of NXP B.V.
QorIQ — is a trademark of NXP B.V.
SafeAssure — is a trademark of NXP B.V.
SafeAssure — logo is a trademark of NXP B.V.
Synopsys — Portions Copyright © 2021 Synopsys, Inc. Used with permission. All rights reserved.
Tower — is a trademark of NXP B.V.
UCODE — is a trademark of NXP B.V.
VortiQa — is a trademark of NXP B.V.
NXP SemiconductorsLegal information
NXP Demo Experience User Guide, Rev. 0, 24 June 2022User Guide 33 / 34

Please be aware that important notices concerning this document and the product(s) described herein, have been included in section 'Legal information'.
© NXP B.V. 2022. All rights reserved.
For more information, please visit: http://www.nxp.comFor sales office addresses, please send an email to: [email protected]
Date of release: 24 June 2022Document identifier: DEXPUG