notes.pdf - Sharpening Made Easy
15
Sharpening Equipment List Basic equipment for starting a knife sharpening business: Belt Sander Paper Wheels with buffer For better results: Tormek Wet Grinder F. Dick RS-150 Sharpener When the business grows, add: Twice-As-Sharp Scissor Sharpener F. Dick RS-75 SERR Serrated Knife Sharpener I sell the equipment in Bold with discounts to my students. Additional Items you will need Sign and/or banner Logo shirt or cap Boxes for Customer's Knives Knife Sheaths Clamp-on light for indoor use Paper Towels Vise Hammers, brass and steel Felt Tip Marking Pens Pouch or Apron with Change Business Cards Handout cards Receipts (price list) Band Aids Tormek Accessories Knife Jig Large Knife Jig Scissor Jig Grading Stone Diamond Truing Tool Comment [S1]: This is the lowest cost setup. Comment [S2]: About $230 Comment [S3]: About $150 Comment [S4]: $800 with Hand Tool Kit Comment [S5]: About $900 Comment [S6]: About $400 Comment [S7]: $610 Comment [S8]: I use drawer dividers made by InterDesign Comment [S9]: Source later Comment [S10]: Used more as an anvil. I use a 3” drill press vise. Harbor Freight $9 Comment [S11]: Brass for straightening knives w/o leaving a mark, steel for tightening rivets in cheap scissors. Comment [S12]: To mark bevels Comment [S13]: With a label make a great giveaway. Comment [S14]: I carry all these just in case.
-
Upload
khangminh22 -
Category
Documents
-
view
5 -
download
0
Transcript of notes.pdf - Sharpening Made Easy

Sharpening Equipment List Basic equipment for starting a knife sharpening business:
Belt Sander Paper Wheels with buffer
For better results:
Tormek Wet Grinder F. Dick RS-150 Sharpener
When the business grows, add: Twice-As-Sharp Scissor Sharpener F. Dick RS-75 SERR Serrated Knife Sharpener
I sell the equipment in Bold with discounts to my students. Additional Items you will need
Sign and/or banner Logo shirt or cap
Boxes for Customer's Knives Knife Sheaths Clamp-on light for indoor use Paper Towels Vise Hammers, brass and steel Felt Tip Marking Pens Pouch or Apron with Change Business Cards Handout cards Receipts (price list) Band Aids
Tormek Accessories
Knife Jig Large Knife Jig Scissor Jig Grading Stone Diamond Truing Tool
Comment [S1]: This is the lowest cost setup.
Comment [S2]: About $230
Comment [S3]: About $150
Comment [S4]: $800 with Hand Tool Kit
Comment [S5]: About $900
Comment [S6]: About $400
Comment [S7]: $610
Comment [S8]: I use drawer dividers made by InterDesign
Comment [S9]: Source later
Comment [S10]: Used more as an anvil. I use a 3” drill press vise. Harbor Freight $9
Comment [S11]: Brass for straightening knives w/o leaving a mark, steel for tightening rivets in cheap scissors.
Comment [S12]: To mark bevels
Comment [S13]: With a label make a great giveaway.
Comment [S14]: I carry all these just in case.

Sharpening Equipment List cont. Small Tools (carried in GateMouth Tool Bag or toolbox)
Spyderco Triangle SharpMaker Small Diamond Hones Butcher Steel, Ceramic or Diamond Steel Penetrating Oil 3 In 1 Oil Scissor lube Pocket knife lube Wrenches Screwdrivers, One with a Thinned Blade Phillips Screwdrivers Pliers Putty Knife Paint thinner or other solvent
Comment [S15]: Useful for serrated knives, and also for use the fishhook groove for pointed tools, awls and ice picks, darts, etc.
Comment [S16]: For deburring pruning shears.
Comment [S17]: I use a butcher steel to demonstrate how it is used but point out that today’s knives are hard so I recommend a ceramic steel.
Comment [S18]: Penetrating oil to free up garden tools that have been left outdoors, 3in1 to lube garden tools.
Comment [S19]: Scissor and knife lubes should not be oily. These two lubes leave a dry wax film
Comment [S20]: Two of each, because every bolt has a nut.
Comment [S21]: I carry vise grip, needle nose, wire cutter and general pliers
Comment [S22]: General cleanup on garden tools. Also to remove the plastic part of tape on scissors before using solvent on the adhesive.
Comment [S23]: I like paint thinner or mineral spirits to remove the wax left by the paper wheels. Goof Off will remove magic marker. GooGone is oily and perfumed.

RustEraser Scissor tools: screw pliers, pink scissor hone and lubricant Wax and Polishing Compound for Paper Wheels
If operating outdoors
2' X 4' Folding Tables Table Covers Portable Bench if using paper wheel buffer or other high speed grinders Canopy with side curtains Extension Cord with Ground Fault Interrupter (GFI)
Items to sell: Knives, scissors, sharpeners, ceramic steels Other equipment you might consider:
F. Dick SM-111 Knife Sharpener EdgePro Professional Manual Sharpener http://www.edgeproinc.com Low Speed belt sharpeners Sharp Machine http://www.thesharpshoponline.com/ AMK Tactical knife sharpener
http://www.amktactical.com/ House of Blades belt sharpening system
http://www.houseofblades.com/
Comment [S24]: A miracle tool. A block of rubber with abrasive throughout, they will clean up many tools. Sources later
Comment [S25]: The screw in scissors is deliberately very tight and requires this tool to adjust it w/o stripping the head.
Comment [S26]: This fine hone is the ONLY thing you can use on the inside of scissors, and then it is only used flat on the blade.
Comment [S27]: I sell only sharpeners with ceramic rods so the customer cannot harm his knives. Tungsten Carbide sharpeners can damage knives.
Comment [S28]: For a high volume, repeat business like knife rental or food processing.
Comment [S29]: Some enthusiasts will pay a premium for manual sharpening

Suppliers: Knife Sheaths
Safety Products – printed, $18 to $27 per 100 www.knifesleeves.com 800-289-8779
Business Cards www.vistaprint.com Lee Valley Tools www.leevalley.com Woodcraft www.woodcraft.com Viel Tools www.vieltools.com, 800-915-2601 Wolff Industries - http://www.wolffind.com/ Scissors and Scissor tools, scissor lube, pink scissor hone Full line wholesalers:
Blue Ridge Knives - http://www.blueridgeknives.com/ 1-800-635-2583 Moteng - http://moteng.com/ 1-800-367-5900 Matthews Cutlery - http://www.matthewscutlery.com/ 1-800-251-0123 Kroll International – http://www.krollcorp.com 1-800-359-6912
Harbor Freight –http://harborfreight.com/ Smoky Mountain Knife Works - http://www.eknifeworks.com Rust Erasers - http://www.widgetsupply.com/
http://www.theruststore.com/ Sharpening belts - http://tinyurl.com/sharpeningbelts
http://tinyurl.com/trizactbelts NEWSLETTERS
On The Edge newsletter www.otenewsletter.com Sharpeners Report www.sharpeners-report.com
WWW SHARPENING GROUPS
http://groups.yahoo.com/group/sharpeningmadeeasy http://groups.yahoo.com/group/sharpeningschool
http://groups.yahoo.com/group/tormekusers http://groups.yahoo.com/group/HowToSharpen http://groups.yahoo.com/group/sharpening http://groups.yahoo.com/group/SharpNet (Professional sharpeners) http://groups.yahoo.com/group/SharpNet-Knives
Comment [S30]: These 3 woodworking companies are great sources for sharpening equipment and information
Comment [S31]: Remember you get a 10% discount on their sharpeners from SME.
Comment [S32]: Any of these will serve you, I currently use Moteng.
Comment [S33]: Low cost Chinese made tools. I use their buffer with paper wheels.
Comment [S34]: My source for ceramic steels
Comment [S35]: Mostly salon shears
Comment [S36]: Very broad, from industrial to shears, saws to clipper blades

Handout Card – First Generation, printed on ¼ sheet of cardstock. Steve Bottorff Knife and Scissor Sharpening Garden and Lawn Tools, Too. 1777 S. Belvoir Blvd. S. Euclid, OH 44121 216-382-1777 Now Offering Quality Kitchen Knives At Discounted Prices: F. Dick EuroCut Restaurant knives Wusthof/Trident Commercial knives Wusthof/Trident Classic Knives 2008 FARMER’S MARKET SCHEDULE: Shaker Square: First and Last Sat. May – Nov 1 Lakewood: Wednesday 12 – 5 June to Oct 1 Heather’s Heat: 2nd Thursday 3 – 6 Mar – Dec Chagrin Cook: 3rd Thursday 3 – 6 Mar – Dec Coit Road Market: 2nd Wednesdays 10 – 1 Back
My prices assume blades in normal condition with no chips. An extra charge may be made for very blunt blades or edges with chips. Repair Prices: An additional charge will be made for severely damaged edges, broken tips, or blades that have worn out of shape. Repair work that cannot be completed at the market can be done in my shop, usually within 2 business days. Our Sharpening Methods: Our goal is to restore your blades while removing no more metal than necessary. We sharpen with a water-cooled grinder to protect temper, then hone with fine abrasives. We wipe off the abrasives, but recommend that you WASH YOUR KNIVES BEFORE YOU USE THEM. CAUTION: Your knives and tools will be very sharp, often sharper than new. Please handle and use them carefully - sharp tools are inherently dangerous. We are not responsible for cuts or injuries you may receive with your newly sharpened knives and tools.
Comment [S37]: Contact Info
Comment [S38]: What I sell.
Comment [S39]: Schedule. The best business practice is to be at markets every week. A regular schedule is next best.
Comment [S40]: Legal boilerplate.

Handout Card – Next generation, printed on ½ sheet
Steve Bottorff Knife and Scissor Sharpening
Garden and Lawn Tools By appointment
1777 S. Belvoir Blvd. S. Euclid, OH 44121
216-382-1777
Serving Chagrin Cook Third Thursday every month.
Our next appearance
June 18
SAMPLE PRICES
Knives $ 4.00 to $ 7.00
Cleavers $ 7.00
Scissors $ 5.00 to $ 8.00
Pruning Clippers $ 5.00
Loppers & Grass Shears $ 6.00
Hedge Trimmers: $ 8.00
Serrated and Asian knives, Add $ 1.00
Repairs $ 1.00 to $ 5.00
Comment [S41]: Contact
Comment [S42]: Location specific schedule
Comment [S43]: Sample prices
Comment [S44]: I have also printed this info on postcards from VistaPrint.
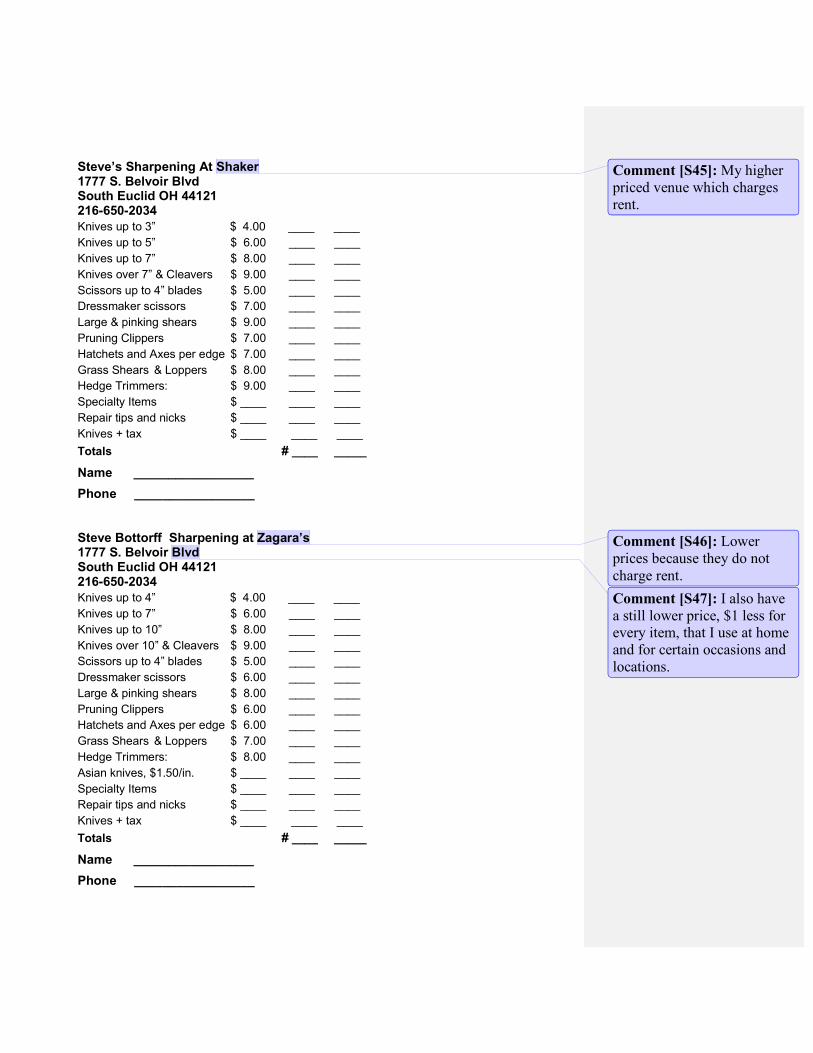
Steve’s Sharpening At Shaker 1777 S. Belvoir Blvd South Euclid OH 44121 216-650-2034 Knives up to 3” $ 4.00 ____ ____
Knives up to 5” $ 6.00 ____ ____
Knives up to 7” $ 8.00 ____ ____
Knives over 7” & Cleavers $ 9.00 ____ ____
Scissors up to 4” blades $ 5.00 ____ ____
Dressmaker scissors $ 7.00 ____ ____
Large & pinking shears $ 9.00 ____ ____
Pruning Clippers $ 7.00 ____ ____
Hatchets and Axes per edge $ 7.00 ____ ____
Grass Shears & Loppers $ 8.00 ____ ____
Hedge Trimmers: $ 9.00 ____ ____
Specialty Items $ ____ ____ ____
Repair tips and nicks $ ____ ____ ____
Knives + tax $ ____ ____ ____
Totals # ____ _____
Name _________________
Phone _________________ Steve Bottorff Sharpening at Zagara’s 1777 S. Belvoir Blvd South Euclid OH 44121 216-650-2034 Knives up to 4” $ 4.00 ____ ____
Knives up to 7” $ 6.00 ____ ____
Knives up to 10” $ 8.00 ____ ____
Knives over 10” & Cleavers $ 9.00 ____ ____
Scissors up to 4” blades $ 5.00 ____ ____
Dressmaker scissors $ 6.00 ____ ____
Large & pinking shears $ 8.00 ____ ____
Pruning Clippers $ 6.00 ____ ____
Hatchets and Axes per edge $ 6.00 ____ ____
Grass Shears & Loppers $ 7.00 ____ ____
Hedge Trimmers: $ 8.00 ____ ____
Asian knives, $1.50/in. $ ____ ____ ____
Specialty Items $ ____ ____ ____
Repair tips and nicks $ ____ ____ ____
Knives + tax $ ____ ____ ____
Totals # ____ _____
Name _________________
Phone _________________
Comment [S45]: My higher priced venue which charges rent.
Comment [S46]: Lower prices because they do not charge rent.
Comment [S47]: I also have a still lower price, $1 less for every item, that I use at home and for certain occasions and locations.

REPAIR AND CUSTOM PRICES
Pocket knives $3.00 for first blade
Plus $1 each additional blade
Non-kitchen knives $3 plus $1 per inch
Re-serrating $2.00 per inch*
Bolster reduction $2.00 – $4.00
Broken tip $2.00 – $4.00
Restore blade shape $2.00 – $4.00
Excessively blunt $2.00 per inch
Asian double bevel Add $2 to sharpening price
Asian single bevel $3.00 per inch*
Food processor blade $6.00*
Mandoline $6.00*
Paper Cutter $2.00 per inch*
Chisels and planes $4.00 to $8*
Cuticle scissors $3.00
Salon Shears $24.00*
Ceramic Knives $3.00 per inch*
* Items have to come to my shop
We do not sharpen nippers or clipper blades.
Comment [S48]: I keep this list in a notebook.

COMMON KNIFE DEFECTS
Comment [S49]: Every knife, stamped or forged, should have a continuous curve from heel to tip or bolster to tip. Broken tips and high bolsters are usually not as extreme as shown and can be corrected free or for $1 or 2, but big repairs should pay for your time.
Comment [S50]: Wet grinding is preferred for the edge but dry grinding can be used for the bolster and to correct the blade shape if done blunt, 90 deg to blade

100 Customers Who Use Scissors and Shears
Alteration shops Apron Makers Auto Upholsterer Automotive Dealers Automotive Detailers Automotive Plants Awning Makers Banner Makers Barbers Beauticians Beauty Salons Bedding Makers Blouse Makers Boat Cover Makers Bridal Apparel Makers Bridal Shops Canvas Products Carpet Installers Carpet Makers Clothing Designers Coat Makers Convertible Tops Costume Makers Craft Designers Craft Shops Curtain Makers Cushion Makers Dress Makers Dry Cleaners Dyeing & Finishers Embroidery Shops Fabric Makers Fabric Stores Farmers
Fashion Designers Fiber Makers Film Makers Flag Makers Flooring Installers Floral Shops Formal Wear Makers Fur Makers Furniture Makers Furriers Garment Workers Glove Makers Government Offices Greenhouses Hand Knitting Harness Shops Hosiery Makers Infant Wear Makers Interior Designers Intimate Apparel Mfg. Knitted Fabric Mfg. Knitwear Makers Lace Makers Laundries Leather Workers Linen Services Luggage Manufactures Manicurists Mattress Makers Medical Equipment Millinery Stores Nail shops Necktie Makers Needlework
Offices Office Supply Stores Paper Products Mfg. Parachute Makers Pet Groomers Quilt Shops Rope & Twine Mfg. Rubber Companies RV Makers Sail Makers Schools Seafood Processors Seat Belt Makers Seat Covers Sewing Shops Shoe Repair Shops Silk Makers Sportswear Makers Stores Tag & Label Makers Tailor Shops Tent Makers Textile Makers Toy Makers Truck Cover Makers Tubing and Hose Mfg. Undergarment Makers Uniform Makers Upholsterers Upholstery Makers Wallcoverings Makers Wallpaper Stores Weavers Window Coverings
Comment [S51]: The following several pages contain material about scissors that is not included in the current edition of my book. They are covered the second day of class.

SCISSOR SHARPENING To understand scissor sharpening you have to think of a pair of scissors as a machine whose purpose is to make one cutting edge ride exactly on the other edge. They cut with a shearing action and can cut things like cloth and hair that a knife does not cut well. The first thing we want to do is make sure the edges will meet. The scissors should open and close smoothly. Look at the inside of each blade. You should see a shiny line right along the edge. This is called the ride line. If it is badly damaged, worn away or ground away by an amateur sharpener, the scissors may not be sharpenable. Any work on the inside surface must be done with factory precision and should be avoided until you have the proper equipment and training. Bad sharpening on the inside surface can render scissors useless - just two sharp edges passing by each other with no shearing action. Do not touch the inside surfaces until you know what you are doing. Next, do the scissors open 90 degrees? If they do not open over 90 degrees they need to be taken apart for sharpening. Most scissors are sharpened with a bevel. (The exception is convex salon shears for cutting hair.) You can see this bevel when the scissors are closed. We grind only this bevel, not the inside. Some scissors, like children's safety scissors or pinking shears, will be ground square. Scissor angles are measured from square, which is called 0 degrees. Paper cutting and older cast scissors will be ground at between 5 and 15 degrees, leaving an acute angle at the edge. Grinding the other way and leaving an obtuse edge, called a negative angle, is bad. You may see this on low quality scissors or after poor sharpening jobs. In newer scissors this angle increases up to 25 - 35 degrees or so, but some scissors are deceptive. Always look carefully for the steepest cutting bevel and duplicate it. The highest angle found in household scissors will be 40 or 45 degrees. This is found on the finger blade of knife edge dressmaking shears, although the thumb blade may be at a lower angle, usually 15 degrees. For standard scissors with both blades the same, grind the bevel until it is right up to the ride line and a slight burr is developed on the inside of the edge. Sharpen both blades, then before you close the scissors, push the blades apart and carefully close them without letting the blades touch. Now pinch the blades together and open the scissors. Repeat a few times. This will move the burr outside the ride and burnish the ride line of the scissors so they operate properly and the blades will not cut into each other. An alternative method is to run a VERY fine hone (like the Wolff pink hone) absolutely flat on the inside surfaces. For knife edge scissors sharpen the thumb blade first, then the finger blade. Remove the burr as described above. Put the finger blade back in your equipment at the same angle and polish the finger blade or knife edge. This sharper edge will cut with less effort. The resulting burr will be small and can be cut off by cutting a piece of paper towel once or twice. The second cut should be much smoother. Scissor blades have a slight curve or bow to them to provide tension when cutting near the tips. This tension is adjusted by tightening or loosening the pivot screw. For most scissors a good adjustment is so they close freely for half of the blade length, but have tension in the final half. This can vary from 1/3 to 2/3. Cheap scissors have a rivet instead of a screw. This type

may not be worth sharpening. The rivet can be carefully peened to tighten them. Be careful with this type not to peen the rivet too much, it is difficult to loosen once you have peened it. Test your newly sharpened scissors by cutting the following materials, arranged by degree of difficulty: 1. paper 2. Paper towel 3. Wet paper towel 4. Wet facial tissue (Kleenex) 5. Plastic grocery bag material, very close to silk 6. Silk 7. Latex or nitrile gloves 8. Surgical or silicon rubber Household scissors should be at least a 5. dressmaker shears at least 6. Another test is to see how many layers of cloth the scissors will cut. This is a combined test of sharpness, alignment and strength.
SHARPENING PINKING SHEARS
1. NEVER touch the inside area. It is lapped to meet the other blade and any metal removed will cause a gap between the blades. Examine the inside area, you will see a color change at the where the lapping ends. You cannot sharpen below it or the shear is ruined. 2. Sharpen the bevel like regular scissors. 3. Maintain the original angle, a few degrees positive, NEVER NEGATIVE. 4. Grind until the tips are needle sharp and have no glints of light. 5. Cut off the burr on a paper towel. 6. Test on blouse silk or a plastic grocery bag. 7. Adjust the tension only as a last resort. Try a 1/4 turn in either direction to see if it improves the cut. The tension mechanism is to keep the blades parallel and does not work like it does on regular shears. Remember, 20 to 25% of new pinking shears do not cut well out of the box, and your chances of improving them are slight.

SHARPENING GARDEN TOOLS
The most common garden tool to sharpen is the hand pruner. There are three basic types:
1. Scissor type, both blades the same. Sharpen as scissors 2. Bypass pruners. One sharp blade and a hook blade that holds the stem. These need to be
taken apart to sharpen. Remove burr with a fine diamond hone 3. Anvil pruners. Some of these cannot be taken apart and have to be sharpened by hand
with diamond hones or with the belt sander as described on that page. Loppers are just larger versions of pruners with long handles and come in all three styles. Some can be opened 90 degrees but the compound type always has to be taken apart. Charge accordingly. Hedge trimmers are large scissors. The simple ones can be opened 90 degrees and sharpened like scissors. The compound type need to be taken apart. Grass shears are also large scissors but the blades are spring loaded and they never open 90 degrees. A worthwhile trick is to separate the blades and see if they can by crossed past each other for sharpening. If not, they have to come apart, or try the belt sander method carefully. Hatchets and axes can be sharpened on the Tormek but are best sharpened on the slack portion of a belt sander to give a strong convex edge. Shovels and hoes are sometimes brought in for sharpening. The earth digging tools with rounded ends are sharpened on the inside. An exception is the spade which is sharpened on the outside. The scooping shovels with flat ends are sharpened on the outside. If they are used on a floor or sidewalk, etc., they are basically self sharpening.

BELT SANDERS
There are several good uses for a belt sander even if you do not it to sharpen knives: This description is for a Viel Tools S5 sander/grinder but can be adapted to any belt sander. 1. Reduce the bolster of a chef’s knife that has been sharpened in a pull through sharpener and developed a swale or low spot. Lay the sander down so the belt is horizontal and moving away from you. Hold the blade across the belt just as if you were sharpening, but only grind the bolster. You can improve the appearance by rocking the blade from about 20 to about 50 degrees, and by using the short slack belt section between the platen and the idler wheel. Grind until the bolster is no longer higher than the edge. I also tilt the handle down so the bolster is lower nearer the handle. If the sander finish is not okay it can be corrected with a coarser or finer Rust Eraser. 2. Reshape a chopping knife with a swale or low spot so it racks against the cutting board. (Santoku, unbolstered chef’s knife or bolstered chefs knife after the above operation) See Knife Defects page Lay sander horizontal as above. Hold the blade parallel to the belt, spine up, edge down. Rock the cutting edge on a belt until the swale is gone. This requires a platen as long as the blade. Of course you dull the edge in the process, but you CANNOT create negative curvature against a flat platen. If you hold the blade about 45 deg. to either side for the last two passes you start the re-sharpening process. 3. Grind a strong convex edge on a chopping tool. (Axe or camp knife) Lay sander horizontal as above, edge across the belt. Sharpen the edge on the short slack section between the platen and the idler wheel. Angle will control how far up the side of the blade you sharpen. Position closer to the platen for stronger edges (axes) and a little further back for a sharper edge (knives) 4. Garden tools that do not open 90 degrees (anvil pruners and grass shears). Set the sander up so the long slack section opposite the platen is up and turning away from you. Bring the belt between the blades (or blade and anvil) at the sharpening angle. Try it first with the sander off to see how it fits and if you can move it the full length of the blade. This is a safe operation if the blade and the anvil form a V with a flat bottom (pruner) and dangerous if the blades form a V with a sharp bottom (grass shears). The sharp V will pinch the belt, shred it ($5 gone) and possibly throw the tool. If anyone asks, I do not recommend this. Do as I say and not as I do. Be careful and WEAR YOUR SAFETY GLASSES!

Serrating A Knife Blade With the Twice As Sharp It is generally useless to do anything more than sharpen the tips of the serrations of cheap serrated knives. A quality bread knife or other serrated knife can usually be brought back to life with a Spyderco SharpMaker or an F. Dick machine with the serrating wheels installed. When the knife is too worn for these methods it is necessary to re-grind the serrations. It is possible to re-serrate a bread knife or other quality serrated knife using a Twice As Sharp scissor sharpener and a modified Industrial Honing Wheel. A video of this method is available from Wolff Industries. Ask for the 2003 Richmond Seminar video.
1. Install the honing wheel on the left side of the TAS 2. Shape the wheel to match the contour of the desired serration.
a. For a bread knife with about 4 serrations per inch the contour will be about ½” radius or 1” diameter.
b. For a tomato knife with 8 serrations per inch, the radius should be about ¼” or ½” diameter; a semicircle on this ½” wide wheel.
c. Shaping will go faster with a diamond T bar dresser. If the surface turns out to be too rough, follow up with the Wolff dressing stick.
3. Burnish the contoured wheel with a carbon steel tool such as a wrench to eliminate fibers. 4. Clamp the knife blade in the TAS clamp with the back side toward you and set the clamp
for maximum or 60 degrees. Insert the clamp in the TAS arm with SHARPN up. Now the shape and angle of the serrations are controlled by the TAS, all that remains is to follow the old serrations and grind each one to the same depth.
5. Carefully guide the blade into each serration, grinding each serration to the same depth.
a. If the serrations are so worn that they are hard to see from the back, mark each serration before grinding.
b. Work within an inch or two of the clamp, then re-clamp. An 8” blade should be done in 2 or 3 clampings.
6. Deburr with your normal method, such as a buffing wheel or Spyderco Triangle
SharpMaker. 7. An alternative method is to swing the blade 45 degrees to the left and use the corner of
the standard grinding wheel. As is, or with a slight rounding, it is useful for some steak knives. A little more rounding and it will fit the 8 serrations per inch knives like tomato and sausage knives. Finally, you can round off the left half, leaving the right half flat, and serrate up to 4 per inch, but it will take some moving around to shape the serrations. Caution, the regular wheel is made for heavier scissor blades and will cut very fast in a thinner knife blade.
Comment [S52]: a.The really dedicated may want to get diamond or CBN wheels made. I get mine from Continental Diamond Tool cdtusa.net