Network Interface Shell Installation and User Guide - Nokia ...
44
NETWORK INTERFACE SHELL NISH INSTALLATION AND USER GUIDE RELEASE 21.2.R1 3HE 17157 AAAA TQZZA 01 Issue 01 February 2021 © 2021 Nokia. Use subject to Terms available at: www.nokia.com.
-
Upload
khangminh22 -
Category
Documents
-
view
0 -
download
0
Transcript of Network Interface Shell Installation and User Guide - Nokia ...
NETWORK INTERFACE SHELL
NISH INSTALLATION AND USER GUIDERELEASE 21.2.R13HE 17157 AAAA TQZZA 01Issue 01February 2021
© 2021 Nokia.Use subject to Terms available at: www.nokia.com.
Nokia is committed to diversity and inclusion. We are continuously reviewing our customerdocumentation and consulting with standards bodies to ensure that terminology is inclusive andaligned with the industry. Our future customer documentation will be updated accordingly.
This document includes Nokia proprietary and confidential information, which may not be distributedor disclosed to any third parties without the prior written consent of Nokia.
This document is intended for use by Nokia’s customers (“You”/”Your”) in connection with a productpurchased or licensed from any company within Nokia Group of Companies. You agree to notifyNokia of any errors you may find in this document; however, should you elect to use this documentfor any purpose(s) for which it is not intended, You understand and warrant that any determinationsYou may make or actions You may take will be based upon Your independent judgment andanalysis of the content of this document.
Nokia reserves the right to make changes to this document without notice.
No part of this document may be copied, reproduced, modified or transmitted.
NO WARRANTY OF ANY KIND, EITHER EXPRESS OR IMPLIED, INCLUDING BUT NOTLIMITED TO ANY WARRANTY OF AVAILABILITY, ACCURACY, RELIABILITY, TITLE, NON-INFRINGEMENT, MERCHANTABILITY OR FITNESS FOR A PARTICULAR PURPOSE, IS MADEIN RELATION TO THE CONTENT OF THIS DOCUMENT. IN NO EVENT WILL NOKIA BE LIABLEFOR ANY DAMAGES, INCLUDING BUT NOT LIMITED TO SPECIAL, DIRECT, INDIRECT,INCIDENTAL OR CONSEQUENTIAL OR ANY LOSSES, SUCH AS BUT NOT LIMITED TO LOSSOF PROFIT, REVENUE, BUSINESS INTERRUPTION, BUSINESS OPPORTUNITY OR DATATHAT MAY ARISE FROM THE USE OF THIS DOCUMENT OR THE INFORMATION IN IT, EVENIN THE CASE OF ERRORS IN OR OMISSIONS FROM THIS DOCUMENT OR ITS CONTENT.
Copyright and trademark: Nokia is a registered trademark of Nokia Corporation. Other productnames mentioned in this document may be trademarks of their respective owners.
© 2021 Nokia.
NISH INSTALLATION AND USERGUIDE RELEASE 21.2.R1
Table of Contents
Table of Contents1 Getting started...........................................................................................................................................5
1.1 About this guide..................................................................................................................................51.2 Audience..............................................................................................................................................51.3 Related technical publications............................................................................................................ 5
2 Network interface shell.............................................................................................................................72.1 NISH overview.................................................................................................................................... 72.2 NISH components...............................................................................................................................82.3 Accessing the Linux man pages........................................................................................................ 82.4 MD-CLI features support.................................................................................................................... 9
3 NISH client................................................................................................................................................103.1 NISH client overview.........................................................................................................................10
3.1.1 SR OS node management.......................................................................................................103.1.2 MD-CLI navigation in NISH client............................................................................................ 113.1.3 NISH Help and assistance....................................................................................................... 113.1.4 Linux direct access using NISH MD-CLI hybrid shell.............................................................. 113.1.5 SR OS node configuration using NISH MD-CLI...................................................................... 123.1.6 Obtaining the SR OS node operational state using NISH MD-CLI.......................................... 13
3.2 NISH client installation......................................................................................................................133.2.1 Installation process................................................................................................................... 133.2.2 Installing the NISH client..........................................................................................................13
3.3 NISH client operation modes............................................................................................................143.3.1 Using the NISH client in 1:1 direct mode.................................................................................153.3.2 Using the NISH client in 1:n static mode.................................................................................173.3.3 Using the NISH client in 1:n manager mode........................................................................... 20
3.4 Command options.............................................................................................................................213.5 Authentication credentials................................................................................................................. 223.6 Device labels.....................................................................................................................................223.7 Connections file.................................................................................................................................233.8 Local schema file..............................................................................................................................243.9 NISH rc files......................................................................................................................................263.10 Multi-node operations......................................................................................................................28
3.10.1 Multi-node configuration modes............................................................................................. 283.10.2 Configuration load operation.................................................................................................. 283.10.3 Multi-node commit operation.................................................................................................. 29
3HE 17157 AAAA TQZZA 01 © 2021 Nokia.Use subject to Terms available at: www.nokia.com.
3
3.11 Device name conflict resolution...................................................................................................... 303.12 Troubleshooting NISH client issues................................................................................................31
4 NISH manager..........................................................................................................................................324.1 Overview............................................................................................................................................324.2 Installing the NISH manager.............................................................................................................334.3 Execution options..............................................................................................................................34
4.3.1 Interactive process....................................................................................................................344.3.2 Linux service.............................................................................................................................35
4.4 Command options.............................................................................................................................374.5 Backup file........................................................................................................................................ 384.6 NISH manager logging..................................................................................................................... 38
4.6.1 Setting the verbosity level for the log file.................................................................................384.7 NISH manager configuration files.....................................................................................................38
5 Configuring NISH security..................................................................................................................... 41
Table of Contents
4 © 2021 Nokia. Use subject to Terms available at: www.nokia.com.
NISH INSTALLATION AND USER GUIDE RELEASE 21.2.R1
3HE 17157 AAAA TQZZA 01
NISH INSTALLATION AND USERGUIDE RELEASE 21.2.R1
Getting started
1 Getting started
1.1 About this guideThis guide describes how to install and use the Network Interface Shell (NISH), which includes the NISHclient and manager service.
NISH is a solution for Linux platforms that provides users with a flexible way to manage multiple SR OSnodes running different SR OS versions, from the same Model-Driven Command Line Interface (MD-CLI)shell.
Topics described in this guide include:
• overview of the NISH solution• NISH client installation and usage• NISH manager service installation and usage
The following products currently support the use of the NISH features and commands described in thisguide:
• 7750 Service Router• Virtualized Service Router
Note:
• NISH requires a valid SR OS license for any compatible product.• Configuration outputs shown in this guide are examples only and actual displays may differ
depending on the user configuration.• This guide covers content for the release specified on the title page of the guide, and may also
contain content to be released in later maintenance loads. See the applicable software releasenotes for information about features supported in each load of the release software.
1.2 AudienceThis guide is intended for network administrators who are responsible for installing, provisioning, and usingNISH for SR OS node management via MD-CLI.
It is assumed that the network administrators have an understanding of the following topics:
• x86 hardware architecture• Linux system installation, configuration, and administration methods• networking principles and configurations
3HE 17157 AAAA TQZZA 01 © 2021 Nokia.Use subject to Terms available at: www.nokia.com.
5
SPACER TEXT
NISH INSTALLATION AND USERGUIDE RELEASE 21.2.R1
Getting started
1.3 Related technical publicationsAfter the installation process is completed, see the guides listed on the 7450 ESS, 7750 SR, 7950XRS, and VSR Documentation Suite Overview for information about the software configuration and CLIcommands to use to configure the SR OS features and services. The documentation suite overview card isavailable from the Nokia Online Documentation Center.
3HE 17157 AAAA TQZZA 01 © 2021 Nokia.Use subject to Terms available at: www.nokia.com.
6
SPACER TEXT
NISH INSTALLATION AND USERGUIDE RELEASE 21.2.R1
Network interface shell
2 Network interface shellThe Network Interface Shell (NISH) solution for Linux platforms provides remote control of SR OS MD-CLI and supports management of multiple SR OS nodes running different SR OS versions from the sameMD-CLI shell. NISH provides similar functionality to operating MD-CLI directly on a node; however, theexperience is not identical.
2.1 NISH overviewModern network node architectures are moving toward disaggregated solutions for specific applications,such as the following examples:
• Control and User Plane Separation (CUPS) deployments• Microservices operating as multiple, interconnected applications able to scale through independent
addition and removal, run different software versions, and support rolling upgrades
The SR OS Broadband Network Gateway (BNG) CUPS feature is an example of a CUPS deploymentarchitecture with multiple SR OS network nodes (both physical and virtual) operating as a cluster ofindependent nodes. By acting as one unit, the BNG CUPS cluster supports flexible and scalable BNGdeployment.
For this type of CUPS deployment, the Network Interface Shell (NISH) solution for Linux platforms providesefficient remote control of the SR OS MD-CLI, by enabling management of multiple nodes that are runningdifferent versions of SR OS from the same MD-CLI shell.
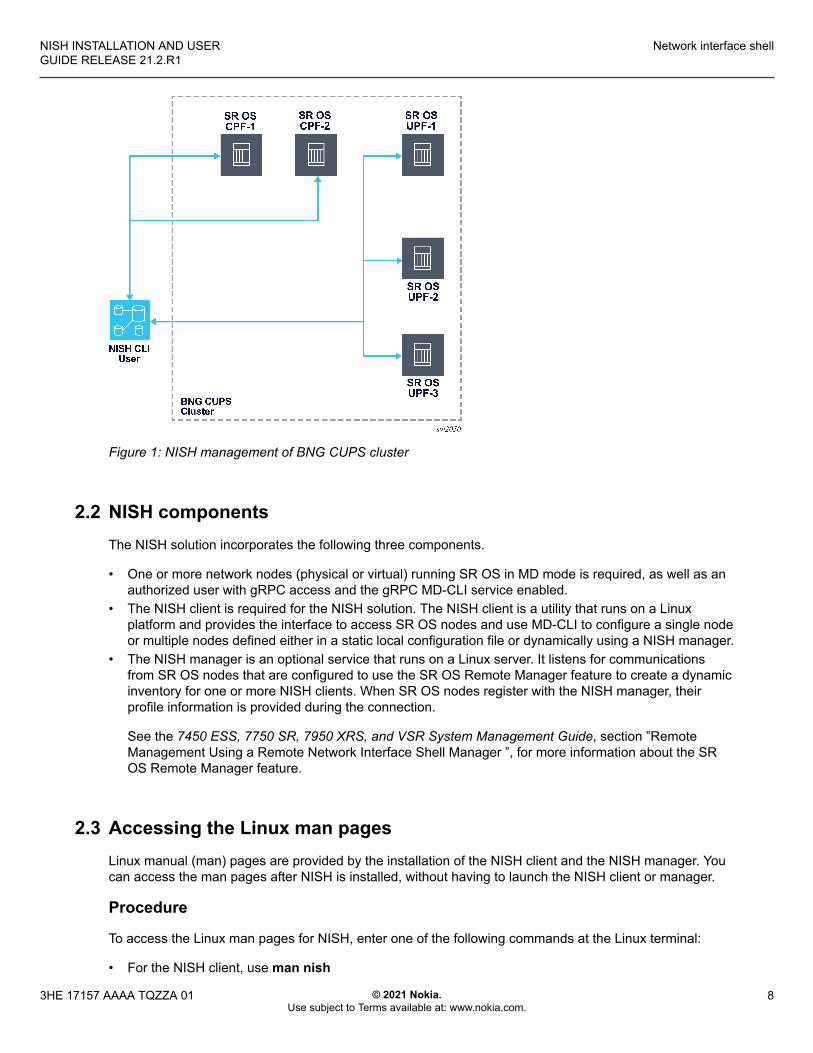
Figure 1: NISH management of BNG CUPS cluster shows the NISH CLI management of a BNG CUPSdeployment with two Control Plane function (CPF) nodes and three User Plane function (UPF) nodes.
3HE 17157 AAAA TQZZA 01 © 2021 Nokia.Use subject to Terms available at: www.nokia.com.
7
SPACER TEXT
NISH INSTALLATION AND USERGUIDE RELEASE 21.2.R1
Network interface shell
Figure 1: NISH management of BNG CUPS cluster
2.2 NISH componentsThe NISH solution incorporates the following three components.
• One or more network nodes (physical or virtual) running SR OS in MD mode is required, as well as anauthorized user with gRPC access and the gRPC MD-CLI service enabled.
• The NISH client is required for the NISH solution. The NISH client is a utility that runs on a Linuxplatform and provides the interface to access SR OS nodes and use MD-CLI to configure a single nodeor multiple nodes defined either in a static local configuration file or dynamically using a NISH manager.
• The NISH manager is an optional service that runs on a Linux server. It listens for communicationsfrom SR OS nodes that are configured to use the SR OS Remote Manager feature to create a dynamicinventory for one or more NISH clients. When SR OS nodes register with the NISH manager, theirprofile information is provided during the connection.
See the 7450 ESS, 7750 SR, 7950 XRS, and VSR System Management Guide, section ‟RemoteManagement Using a Remote Network Interface Shell Manager ”, for more information about the SROS Remote Manager feature.
2.3 Accessing the Linux man pagesLinux manual (man) pages are provided by the installation of the NISH client and the NISH manager. Youcan access the man pages after NISH is installed, without having to launch the NISH client or manager.
Procedure
To access the Linux man pages for NISH, enter one of the following commands at the Linux terminal:
• For the NISH client, use man nish
3HE 17157 AAAA TQZZA 01 © 2021 Nokia.Use subject to Terms available at: www.nokia.com.
8
SPACER TEXT
NISH INSTALLATION AND USERGUIDE RELEASE 21.2.R1
Network interface shell
• For the NISH manager, use man nish-manager
2.4 MD-CLI features supportThe NISH solution for Linux platforms provides remote control of SR OS MD-CLI and supportsmanagement of multiple SR OS nodes running different SR OS versions from the same MD-CLI shell. Thefunctionality that the NISH platform provides is similar to operating MD-CLI directly on a node; however, theexperience is not identical.
The following are some of the MD-CLI features that NISH does not support:
• MD-CLI show, clear, tools, and debug commands• MD-CLI logging• switching to the classic CLI• XML and JSON output formatting• BOF• SSH• Telnet
3HE 17157 AAAA TQZZA 01 © 2021 Nokia.Use subject to Terms available at: www.nokia.com.
9
SPACER TEXT
NISH INSTALLATION AND USERGUIDE RELEASE 21.2.R1
NISH client
3 NISH clientThis chapter provides information about the NISH client features and functionality, and procedures forinstalling and using NISH to manage multiple SR OS nodes using remote MD-CLI shells.
3.1 NISH client overviewThis section describes some of the main features of the NISH client, including the interface for managingmultiple SR OS nodes, navigation options, help and assistance options, direct access to Linux, SR OSnode configuration, and operational state management.
3.1.1 SR OS node management
The NISH client provides an MD-CLI interface to multiple SR OS nodes. The NISH client uses the model-driven networking capabilities built into SR OS to identify the software version and obtain the MD-CLIschema for each SR OS node. This allows the NISH MD-CLI to generate the correct CLI tree that can benavigated within each SR OS node context. It also ensures that each node context is specific to its ownsoftware version.
The NISH client also allows the operator to issue Linux commands on the local machine, without leavingthe MD-CLI shell. This capability provides increased productivity during extended management activities.
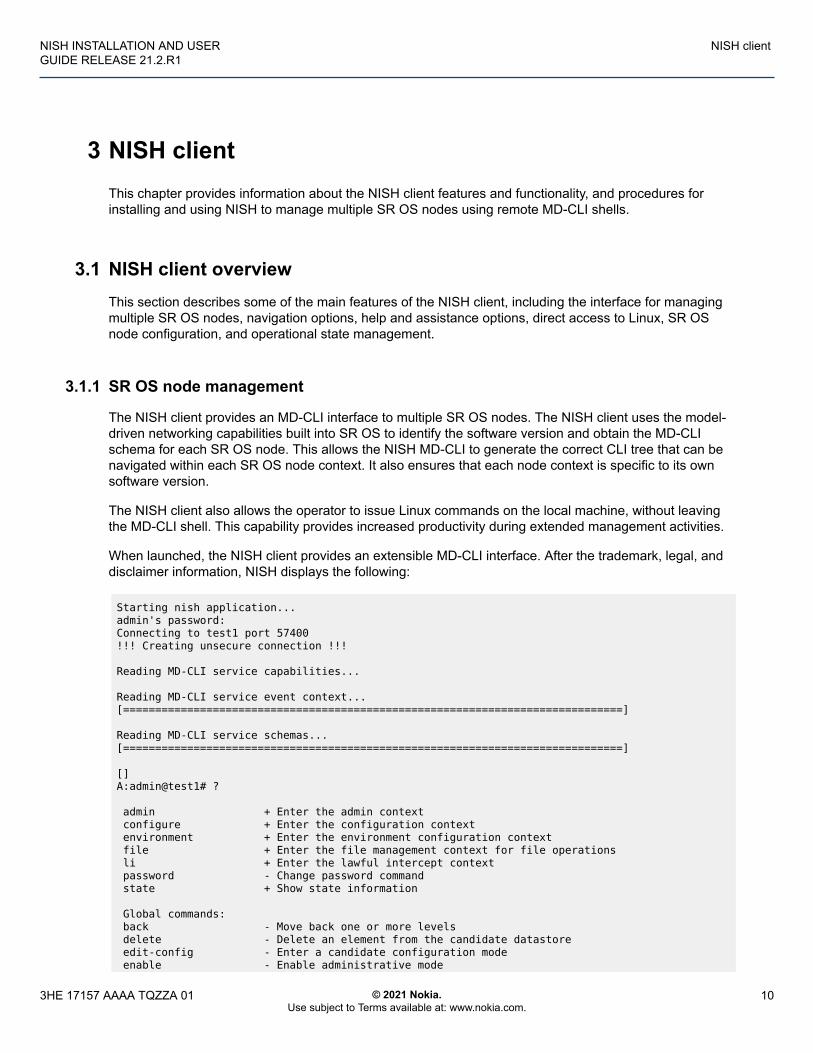
When launched, the NISH client provides an extensible MD-CLI interface. After the trademark, legal, anddisclaimer information, NISH displays the following:
Starting nish application...admin's password:Connecting to test1 port 57400!!! Creating unsecure connection !!! Reading MD-CLI service capabilities... Reading MD-CLI service event context...[==============================================================================] Reading MD-CLI service schemas...[==============================================================================] []A:admin@test1# ? admin + Enter the admin context configure + Enter the configuration context environment + Enter the environment configuration context file + Enter the file management context for file operations li + Enter the lawful intercept context password - Change password command state + Show state information Global commands: back - Move back one or more levels delete - Delete an element from the candidate datastore edit-config - Enter a candidate configuration mode enable - Enable administrative mode
3HE 17157 AAAA TQZZA 01 © 2021 Nokia.Use subject to Terms available at: www.nokia.com.
10
SPACER TEXT
NISH INSTALLATION AND USERGUIDE RELEASE 21.2.R1
NISH client
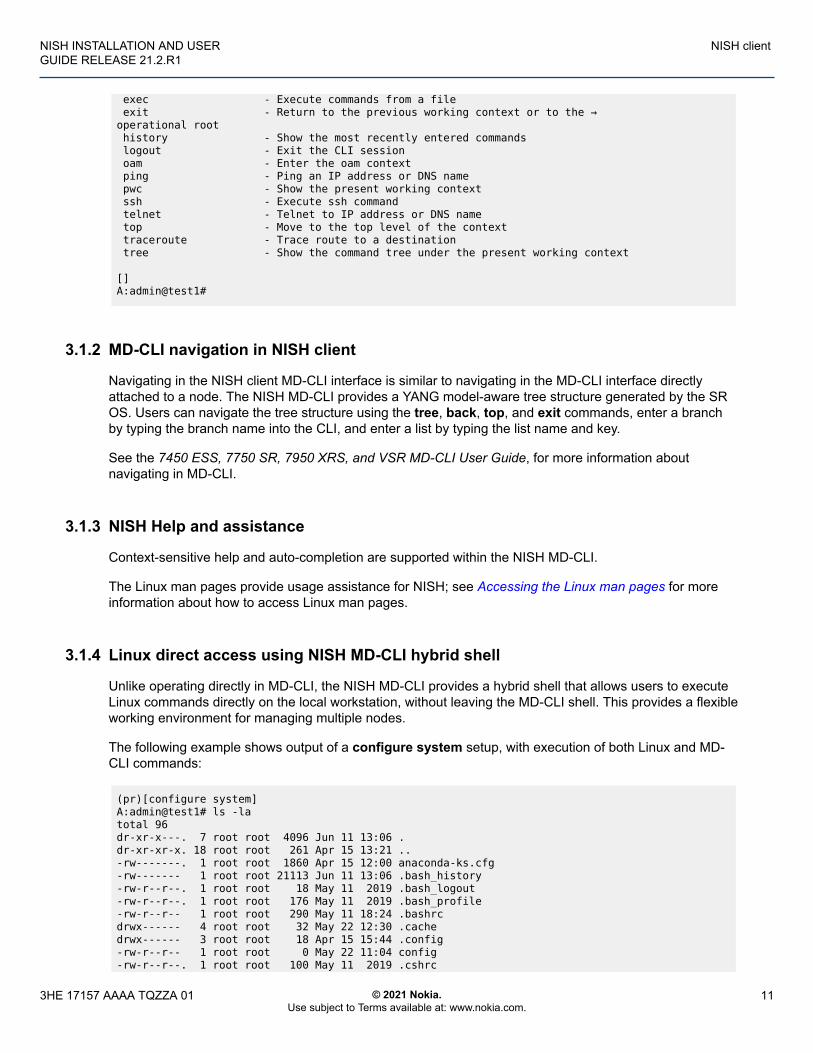
exec - Execute commands from a file exit - Return to the previous working context or to the → operational root history - Show the most recently entered commands logout - Exit the CLI session oam - Enter the oam context ping - Ping an IP address or DNS name pwc - Show the present working context ssh - Execute ssh command telnet - Telnet to IP address or DNS name top - Move to the top level of the context traceroute - Trace route to a destination tree - Show the command tree under the present working context
[]A:admin@test1#
3.1.2 MD-CLI navigation in NISH client
Navigating in the NISH client MD-CLI interface is similar to navigating in the MD-CLI interface directlyattached to a node. The NISH MD-CLI provides a YANG model-aware tree structure generated by the SROS. Users can navigate the tree structure using the tree, back, top, and exit commands, enter a branchby typing the branch name into the CLI, and enter a list by typing the list name and key.
See the 7450 ESS, 7750 SR, 7950 XRS, and VSR MD-CLI User Guide, for more information aboutnavigating in MD-CLI.
3.1.3 NISH Help and assistance
Context-sensitive help and auto-completion are supported within the NISH MD-CLI.
The Linux man pages provide usage assistance for NISH; see Accessing the Linux man pages for moreinformation about how to access Linux man pages.
3.1.4 Linux direct access using NISH MD-CLI hybrid shell
Unlike operating directly in MD-CLI, the NISH MD-CLI provides a hybrid shell that allows users to executeLinux commands directly on the local workstation, without leaving the MD-CLI shell. This provides a flexibleworking environment for managing multiple nodes.
The following example shows output of a configure system setup, with execution of both Linux and MD-CLI commands:
(pr)[configure system]A:admin@test1# ls -latotal 96dr-xr-x---. 7 root root 4096 Jun 11 13:06 .dr-xr-xr-x. 18 root root 261 Apr 15 13:21 ..-rw-------. 1 root root 1860 Apr 15 12:00 anaconda-ks.cfg-rw------- 1 root root 21113 Jun 11 13:06 .bash_history-rw-r--r--. 1 root root 18 May 11 2019 .bash_logout-rw-r--r--. 1 root root 176 May 11 2019 .bash_profile-rw-r--r-- 1 root root 290 May 11 18:24 .bashrcdrwx------ 4 root root 32 May 22 12:30 .cachedrwx------ 3 root root 18 Apr 15 15:44 .config-rw-r--r-- 1 root root 0 May 22 11:04 config-rw-r--r--. 1 root root 100 May 11 2019 .cshrc
3HE 17157 AAAA TQZZA 01 © 2021 Nokia.Use subject to Terms available at: www.nokia.com.
11
SPACER TEXT
NISH INSTALLATION AND USERGUIDE RELEASE 21.2.R1
NISH client
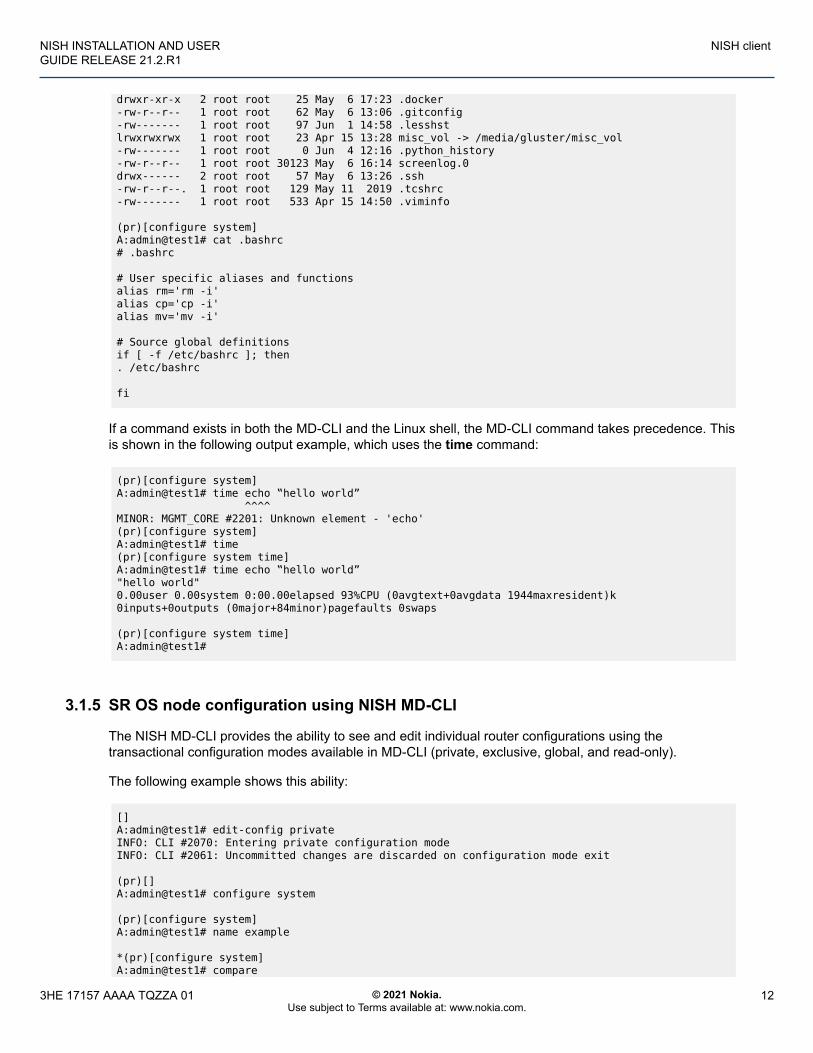
drwxr-xr-x 2 root root 25 May 6 17:23 .docker-rw-r--r-- 1 root root 62 May 6 13:06 .gitconfig-rw------- 1 root root 97 Jun 1 14:58 .lesshstlrwxrwxrwx 1 root root 23 Apr 15 13:28 misc_vol -> /media/gluster/misc_vol-rw------- 1 root root 0 Jun 4 12:16 .python_history-rw-r--r-- 1 root root 30123 May 6 16:14 screenlog.0drwx------ 2 root root 57 May 6 13:26 .ssh-rw-r--r--. 1 root root 129 May 11 2019 .tcshrc-rw------- 1 root root 533 Apr 15 14:50 .viminfo
(pr)[configure system]A:admin@test1# cat .bashrc# .bashrc
# User specific aliases and functionsalias rm='rm -i'alias cp='cp -i'alias mv='mv -i'
# Source global definitionsif [ -f /etc/bashrc ]; then. /etc/bashrc
fi
If a command exists in both the MD-CLI and the Linux shell, the MD-CLI command takes precedence. Thisis shown in the following output example, which uses the time command:
(pr)[configure system]A:admin@test1# time echo ‟hello world” ^^^^MINOR: MGMT_CORE #2201: Unknown element - 'echo'(pr)[configure system]A:admin@test1# time (pr)[configure system time]A:admin@test1# time echo ‟hello world” "hello world"0.00user 0.00system 0:00.00elapsed 93%CPU (0avgtext+0avgdata 1944maxresident)k0inputs+0outputs (0major+84minor)pagefaults 0swaps
(pr)[configure system time]A:admin@test1#
3.1.5 SR OS node configuration using NISH MD-CLI
The NISH MD-CLI provides the ability to see and edit individual router configurations using thetransactional configuration modes available in MD-CLI (private, exclusive, global, and read-only).
The following example shows this ability:
[]A:admin@test1# edit-config privateINFO: CLI #2070: Entering private configuration modeINFO: CLI #2061: Uncommitted changes are discarded on configuration mode exit
(pr)[]A:admin@test1# configure system
(pr)[configure system]A:admin@test1# name example
*(pr)[configure system]A:admin@test1# compare
3HE 17157 AAAA TQZZA 01 © 2021 Nokia.Use subject to Terms available at: www.nokia.com.
12
SPACER TEXT
NISH INSTALLATION AND USERGUIDE RELEASE 21.2.R1
NISH client
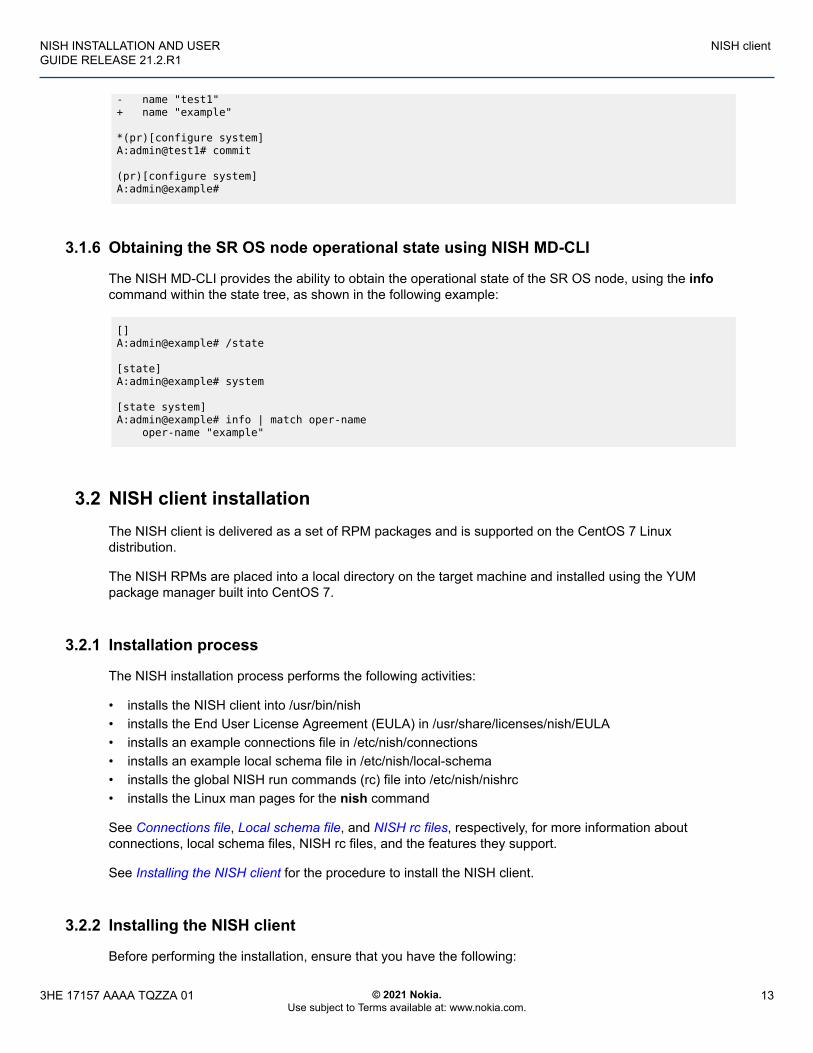
- name "test1"+ name "example"
*(pr)[configure system]A:admin@test1# commit
(pr)[configure system]A:admin@example#
3.1.6 Obtaining the SR OS node operational state using NISH MD-CLI
The NISH MD-CLI provides the ability to obtain the operational state of the SR OS node, using the infocommand within the state tree, as shown in the following example:
[]A:admin@example# /state
[state]A:admin@example# system
[state system]A:admin@example# info | match oper-name oper-name "example"
3.2 NISH client installationThe NISH client is delivered as a set of RPM packages and is supported on the CentOS 7 Linuxdistribution.
The NISH RPMs are placed into a local directory on the target machine and installed using the YUMpackage manager built into CentOS 7.
3.2.1 Installation process
The NISH installation process performs the following activities:
• installs the NISH client into /usr/bin/nish• installs the End User License Agreement (EULA) in /usr/share/licenses/nish/EULA• installs an example connections file in /etc/nish/connections• installs an example local schema file in /etc/nish/local-schema• installs the global NISH run commands (rc) file into /etc/nish/nishrc• installs the Linux man pages for the nish command
See Connections file, Local schema file, and NISH rc files, respectively, for more information aboutconnections, local schema files, NISH rc files, and the features they support.
See Installing the NISH client for the procedure to install the NISH client.
3.2.2 Installing the NISH client
Before performing the installation, ensure that you have the following:
3HE 17157 AAAA TQZZA 01 © 2021 Nokia.Use subject to Terms available at: www.nokia.com.
13
SPACER TEXT
NISH INSTALLATION AND USERGUIDE RELEASE 21.2.R1
NISH client
• RPMs downloaded from the Nokia support portal• CentOS 7• Linux administrative user access rights
To install the NISH client, perform the following steps:
Procedure
1. Put the NISH client RPM packages in a local directory on the target machine.
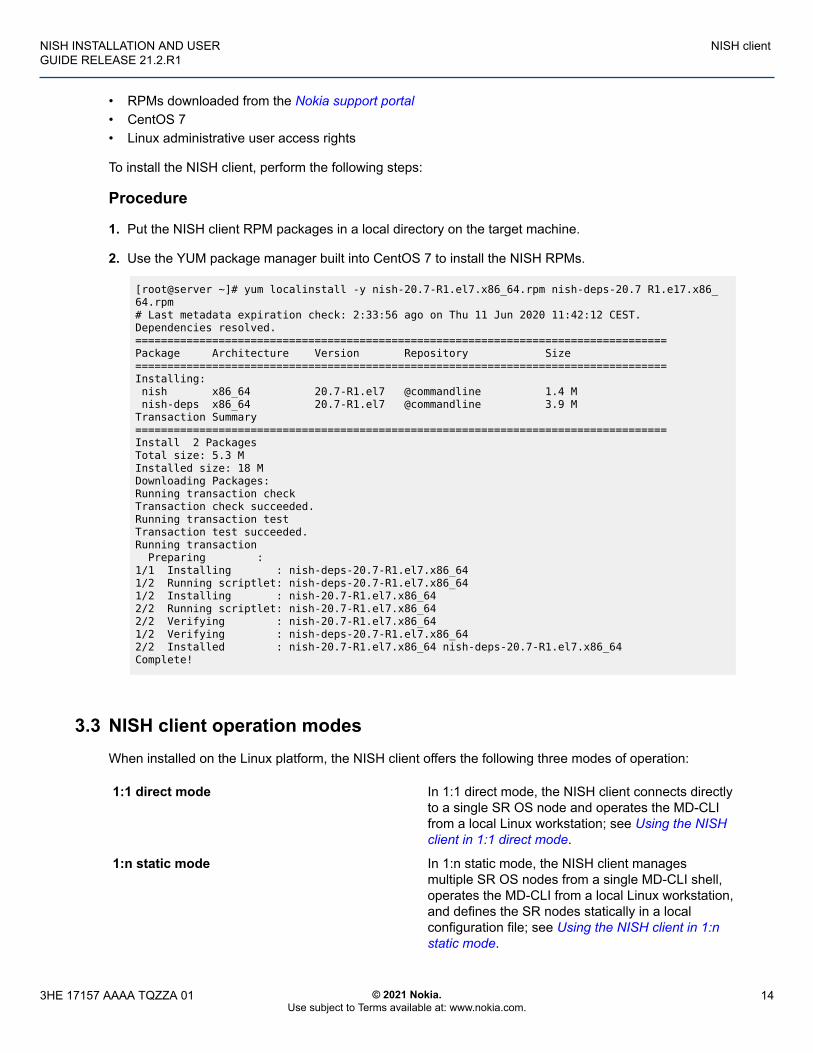
2. Use the YUM package manager built into CentOS 7 to install the NISH RPMs.
[root@server ~]# yum localinstall -y nish-20.7-R1.el7.x86_64.rpm nish-deps-20.7 R1.e17.x86_64.rpm # Last metadata expiration check: 2:33:56 ago on Thu 11 Jun 2020 11:42:12 CEST.Dependencies resolved.===================================================================================Package Architecture Version Repository Size===================================================================================Installing: nish x86_64 20.7-R1.el7 @commandline 1.4 M nish-deps x86_64 20.7-R1.el7 @commandline 3.9 MTransaction Summary===================================================================================Install 2 PackagesTotal size: 5.3 MInstalled size: 18 MDownloading Packages:Running transaction checkTransaction check succeeded.Running transaction testTransaction test succeeded.Running transaction Preparing :1/1 Installing : nish-deps-20.7-R1.el7.x86_641/2 Running scriptlet: nish-deps-20.7-R1.el7.x86_641/2 Installing : nish-20.7-R1.el7.x86_642/2 Running scriptlet: nish-20.7-R1.el7.x86_642/2 Verifying : nish-20.7-R1.el7.x86_641/2 Verifying : nish-deps-20.7-R1.el7.x86_642/2 Installed : nish-20.7-R1.el7.x86_64 nish-deps-20.7-R1.el7.x86_64Complete!
3.3 NISH client operation modesWhen installed on the Linux platform, the NISH client offers the following three modes of operation:
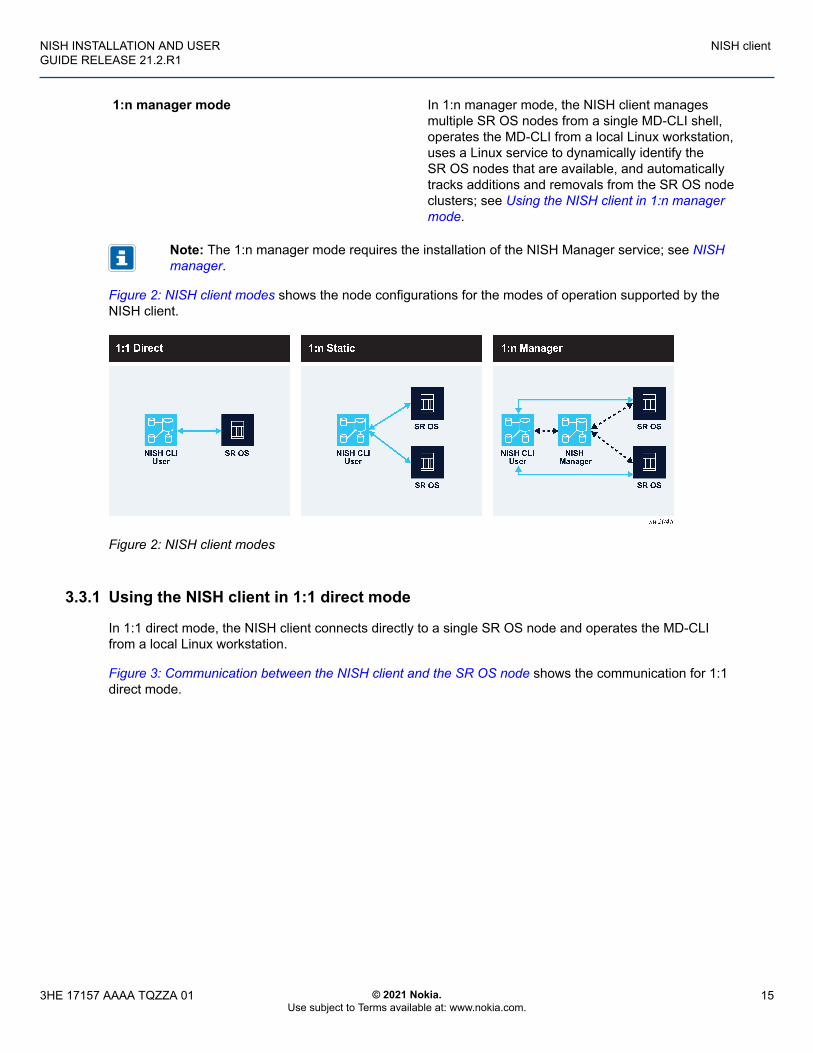
1:1 direct mode In 1:1 direct mode, the NISH client connects directlyto a single SR OS node and operates the MD-CLIfrom a local Linux workstation; see Using the NISHclient in 1:1 direct mode.
1:n static mode In 1:n static mode, the NISH client managesmultiple SR OS nodes from a single MD-CLI shell,operates the MD-CLI from a local Linux workstation,and defines the SR nodes statically in a localconfiguration file; see Using the NISH client in 1:nstatic mode.
3HE 17157 AAAA TQZZA 01 © 2021 Nokia.Use subject to Terms available at: www.nokia.com.
14
SPACER TEXT
NISH INSTALLATION AND USERGUIDE RELEASE 21.2.R1
NISH client
1:n manager mode In 1:n manager mode, the NISH client managesmultiple SR OS nodes from a single MD-CLI shell,operates the MD-CLI from a local Linux workstation,uses a Linux service to dynamically identify theSR OS nodes that are available, and automaticallytracks additions and removals from the SR OS nodeclusters; see Using the NISH client in 1:n managermode.
Note: The 1:n manager mode requires the installation of the NISH Manager service; see NISHmanager.
Figure 2: NISH client modes shows the node configurations for the modes of operation supported by theNISH client.
Figure 2: NISH client modes
3.3.1 Using the NISH client in 1:1 direct mode
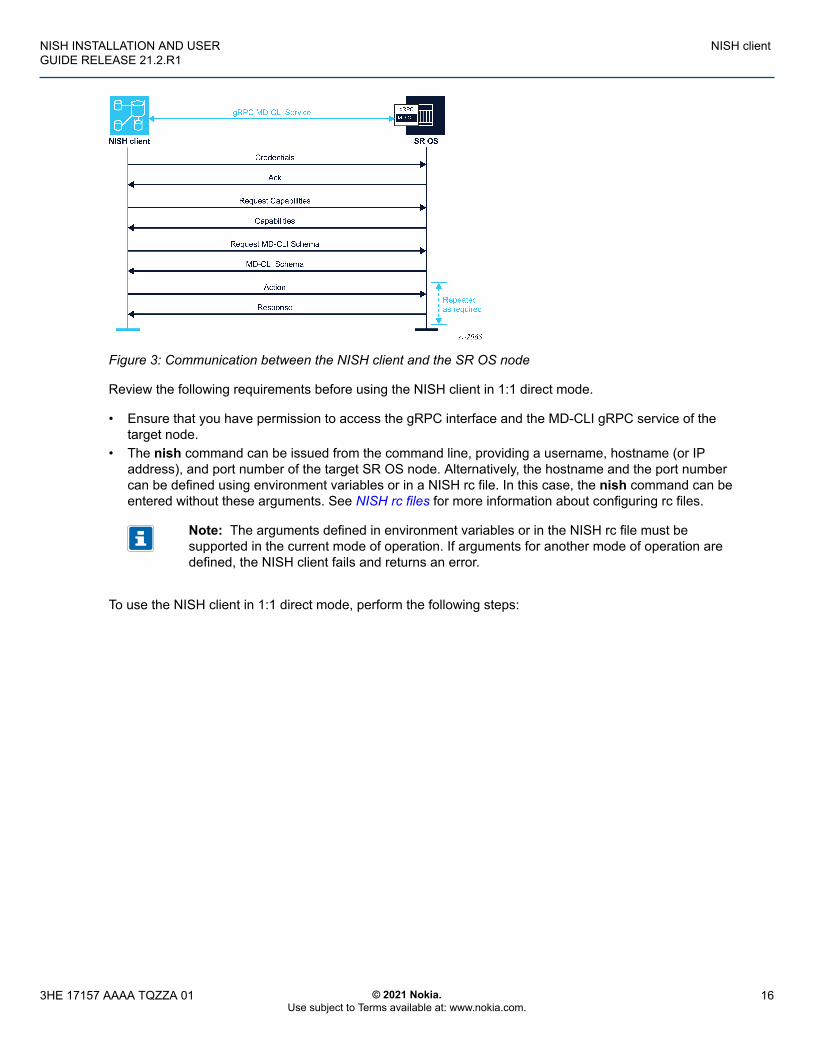
In 1:1 direct mode, the NISH client connects directly to a single SR OS node and operates the MD-CLIfrom a local Linux workstation.
Figure 3: Communication between the NISH client and the SR OS node shows the communication for 1:1direct mode.
3HE 17157 AAAA TQZZA 01 © 2021 Nokia.Use subject to Terms available at: www.nokia.com.
15
SPACER TEXT
NISH INSTALLATION AND USERGUIDE RELEASE 21.2.R1
NISH client
Figure 3: Communication between the NISH client and the SR OS node
Review the following requirements before using the NISH client in 1:1 direct mode.
• Ensure that you have permission to access the gRPC interface and the MD-CLI gRPC service of thetarget node.
• The nish command can be issued from the command line, providing a username, hostname (or IPaddress), and port number of the target SR OS node. Alternatively, the hostname and the port numbercan be defined using environment variables or in a NISH rc file. In this case, the nish command can beentered without these arguments. See NISH rc files for more information about configuring rc files.
Note: The arguments defined in environment variables or in the NISH rc file must besupported in the current mode of operation. If arguments for another mode of operation aredefined, the NISH client fails and returns an error.
To use the NISH client in 1:1 direct mode, perform the following steps:
3HE 17157 AAAA TQZZA 01 © 2021 Nokia.Use subject to Terms available at: www.nokia.com.
16
SPACER TEXT
NISH INSTALLATION AND USERGUIDE RELEASE 21.2.R1
NISH client
Procedure
1. Execute the nish command from the command line, providing a username, hostname (or IP address),and port number of the target SR OS node.
nish [OPTIONS] [-l user] [-p port-number] [user]@hostname
You can specify the user with the -l flag or --login-name option, together with the hostname in theformat user@hostname, or in the $NISH_USER environment variable. If you do not specify a user withany of these options, the default $USER environment variable is used.
The port number defines the target node TCP port. If it is not set, the default port 57400 is used. Tospecify a non-default port number use the -p flag or --port option.
The hostname defines the target SR OS node. FQDN, hostname, IPv4 address, or IPv6 addressformats are accepted. See Command options, for information about other command options.
Example:
[root@server ~]# nish admin@test1
In this example:
• The name of the SR OS node user who has the required permissions is admin.• The hostname of the node is test1.• 57400 is the default port and does not need to be specified explicitly.
Note: If the user, target host, and target port are defined in environment variables or in aNISH rc file, and no other options are needed, the nish command can be used without thesearguments.
2. Enter the password for the SR OS node when prompted.
3.3.2 Using the NISH client in 1:n static mode
Review the following requirements before using the NISH client in 1:n static mode.
• A connections file is required. The connections file contains the details of the SR OS nodes thatare available for direct connections. The connections file may list multiple SR OS nodes. For moreinformation, see Connections file.
Note: The presence of a node in the connections file does not guarantee that the referencednode is online and available to receive NISH connections.
• The referenced node must be configured correctly with gRPC, a user with gRPC access, and the gRPCMD-CLI service.
• The correct TLS-enabled connectivity is recommended.
See the 7450 ESS, 7750 SR, 7950 XRS, and VSR documentation for more information.
To use the NISH client in 1:n static mode, perform the following steps:
3HE 17157 AAAA TQZZA 01 © 2021 Nokia.Use subject to Terms available at: www.nokia.com.
17
SPACER TEXT
NISH INSTALLATION AND USERGUIDE RELEASE 21.2.R1
NISH client
Procedure
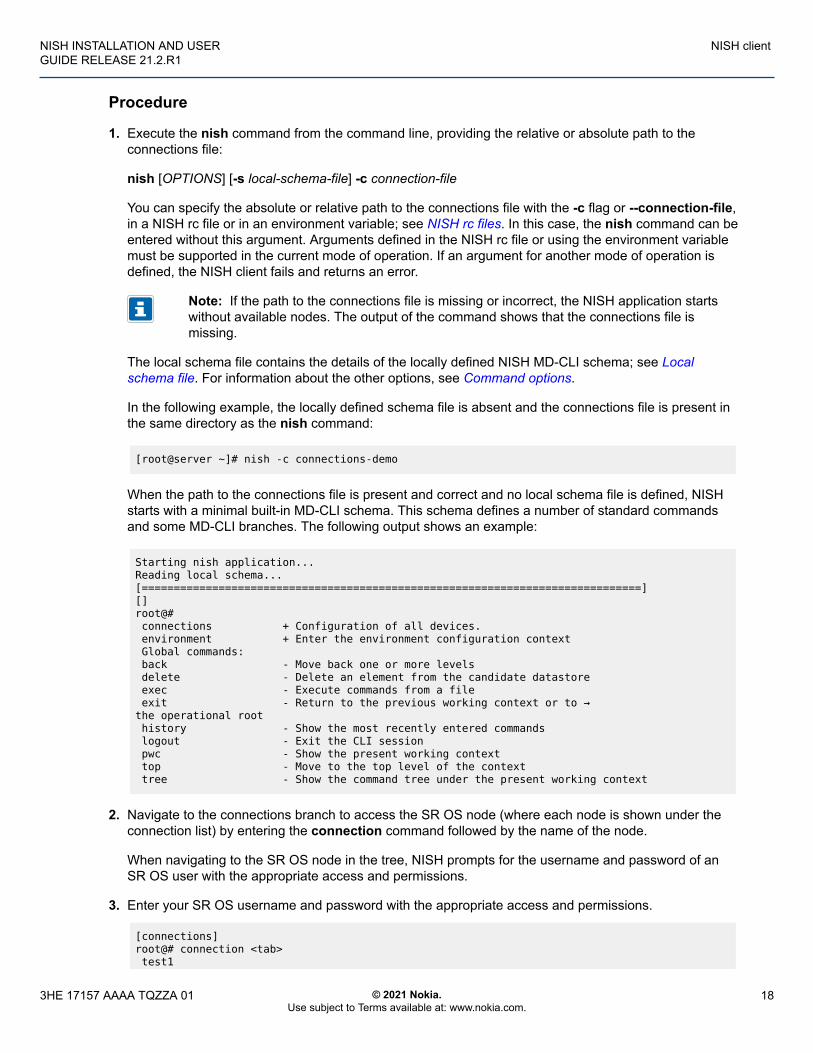
1. Execute the nish command from the command line, providing the relative or absolute path to theconnections file:
nish [OPTIONS] [-s local-schema-file] -c connection-file
You can specify the absolute or relative path to the connections file with the -c flag or --connection-file,in a NISH rc file or in an environment variable; see NISH rc files. In this case, the nish command can beentered without this argument. Arguments defined in the NISH rc file or using the environment variablemust be supported in the current mode of operation. If an argument for another mode of operation isdefined, the NISH client fails and returns an error.
Note: If the path to the connections file is missing or incorrect, the NISH application startswithout available nodes. The output of the command shows that the connections file ismissing.
The local schema file contains the details of the locally defined NISH MD-CLI schema; see Localschema file. For information about the other options, see Command options.
In the following example, the locally defined schema file is absent and the connections file is present inthe same directory as the nish command:
[root@server ~]# nish -c connections-demo
When the path to the connections file is present and correct and no local schema file is defined, NISHstarts with a minimal built-in MD-CLI schema. This schema defines a number of standard commandsand some MD-CLI branches. The following output shows an example:
Starting nish application...Reading local schema...[==============================================================================][]root@# connections + Configuration of all devices. environment + Enter the environment configuration context Global commands: back - Move back one or more levels delete - Delete an element from the candidate datastore exec - Execute commands from a file exit - Return to the previous working context or to →the operational root history - Show the most recently entered commands logout - Exit the CLI session pwc - Show the present working context top - Move to the top level of the context tree - Show the command tree under the present working context
2. Navigate to the connections branch to access the SR OS node (where each node is shown under theconnection list) by entering the connection command followed by the name of the node.
When navigating to the SR OS node in the tree, NISH prompts for the username and password of anSR OS user with the appropriate access and permissions.
3. Enter your SR OS username and password with the appropriate access and permissions.
[connections]root@# connection <tab> test1
3HE 17157 AAAA TQZZA 01 © 2021 Nokia.Use subject to Terms available at: www.nokia.com.
18
SPACER TEXT
NISH INSTALLATION AND USERGUIDE RELEASE 21.2.R1
NISH client
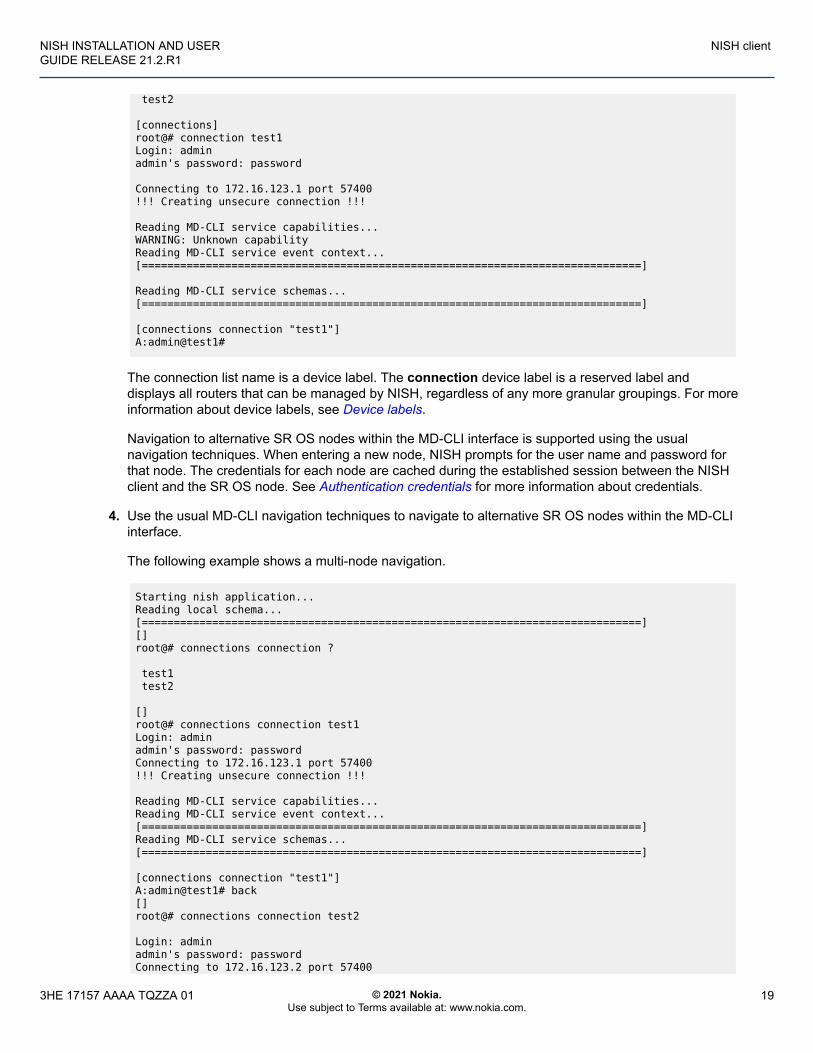
test2
[connections]root@# connection test1Login: adminadmin's password: password
Connecting to 172.16.123.1 port 57400!!! Creating unsecure connection !!!
Reading MD-CLI service capabilities...WARNING: Unknown capabilityReading MD-CLI service event context...[==============================================================================]
Reading MD-CLI service schemas...[==============================================================================]
[connections connection "test1"]A:admin@test1#
The connection list name is a device label. The connection device label is a reserved label anddisplays all routers that can be managed by NISH, regardless of any more granular groupings. For moreinformation about device labels, see Device labels.
Navigation to alternative SR OS nodes within the MD-CLI interface is supported using the usualnavigation techniques. When entering a new node, NISH prompts for the user name and password forthat node. The credentials for each node are cached during the established session between the NISHclient and the SR OS node. See Authentication credentials for more information about credentials.
4. Use the usual MD-CLI navigation techniques to navigate to alternative SR OS nodes within the MD-CLIinterface.
The following example shows a multi-node navigation.
Starting nish application...Reading local schema...[==============================================================================][]root@# connections connection ?
test1 test2
[]root@# connections connection test1Login: adminadmin's password: passwordConnecting to 172.16.123.1 port 57400!!! Creating unsecure connection !!!
Reading MD-CLI service capabilities...Reading MD-CLI service event context...[==============================================================================]Reading MD-CLI service schemas...[==============================================================================]
[connections connection "test1"]A:admin@test1# back[]root@# connections connection test2
Login: adminadmin's password: passwordConnecting to 172.16.123.2 port 57400
3HE 17157 AAAA TQZZA 01 © 2021 Nokia.Use subject to Terms available at: www.nokia.com.
19
SPACER TEXT
NISH INSTALLATION AND USERGUIDE RELEASE 21.2.R1
NISH client
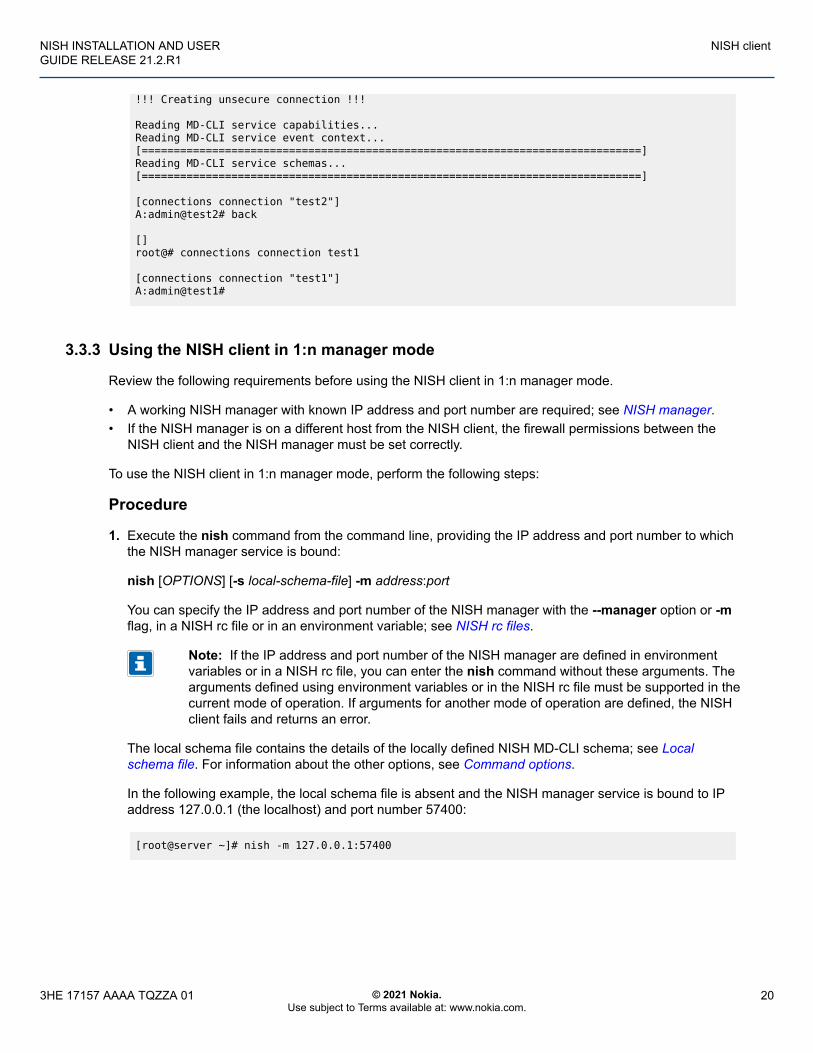
!!! Creating unsecure connection !!!
Reading MD-CLI service capabilities...Reading MD-CLI service event context...[==============================================================================]Reading MD-CLI service schemas...[==============================================================================]
[connections connection "test2"]A:admin@test2# back
[]root@# connections connection test1
[connections connection "test1"]A:admin@test1#
3.3.3 Using the NISH client in 1:n manager mode
Review the following requirements before using the NISH client in 1:n manager mode.
• A working NISH manager with known IP address and port number are required; see NISH manager.• If the NISH manager is on a different host from the NISH client, the firewall permissions between the
NISH client and the NISH manager must be set correctly.
To use the NISH client in 1:n manager mode, perform the following steps:
Procedure
1. Execute the nish command from the command line, providing the IP address and port number to whichthe NISH manager service is bound:
nish [OPTIONS] [-s local-schema-file] -m address:port
You can specify the IP address and port number of the NISH manager with the --manager option or -mflag, in a NISH rc file or in an environment variable; see NISH rc files.
Note: If the IP address and port number of the NISH manager are defined in environmentvariables or in a NISH rc file, you can enter the nish command without these arguments. Thearguments defined using environment variables or in the NISH rc file must be supported in thecurrent mode of operation. If arguments for another mode of operation are defined, the NISHclient fails and returns an error.
The local schema file contains the details of the locally defined NISH MD-CLI schema; see Localschema file. For information about the other options, see Command options.
In the following example, the local schema file is absent and the NISH manager service is bound to IPaddress 127.0.0.1 (the localhost) and port number 57400:
[root@server ~]# nish -m 127.0.0.1:57400
3HE 17157 AAAA TQZZA 01 © 2021 Nokia.Use subject to Terms available at: www.nokia.com.
20
SPACER TEXT
NISH INSTALLATION AND USERGUIDE RELEASE 21.2.R1
NISH client
2. Navigate and operate in NISH manager mode using the same methods used in NISH static mode.
The navigation and operation of NISH in manager mode is the same as in static mode. The NISH clientmakes direct connections to the nodes and you traverse into them within the NISH MD-CLI; see Usingthe NISH client in 1:n static mode.
When the NISH client starts in manager mode, it makes a gRPC connection to the NISH managerservice and obtains the inventory of nodes. The NISH manager uses an ON_CHANGE gRPC streamingmethod to ensure the inventory of nodes is continually updated.
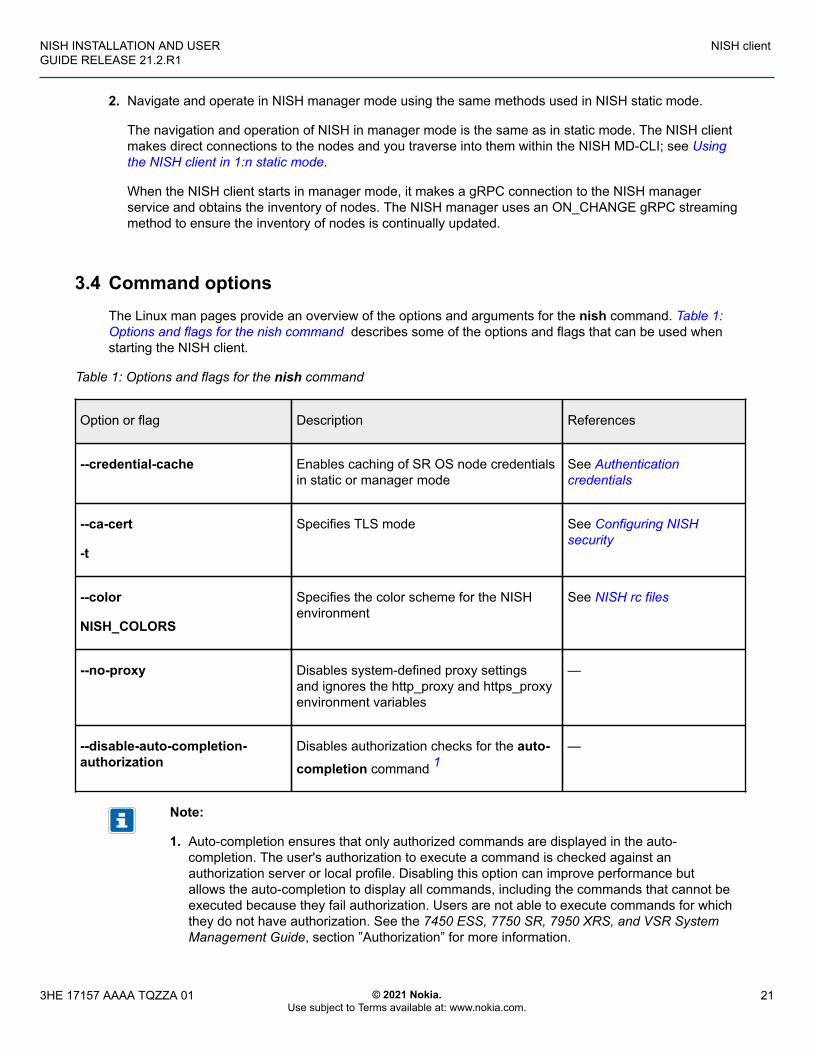
3.4 Command optionsThe Linux man pages provide an overview of the options and arguments for the nish command. Table 1:Options and flags for the nish command describes some of the options and flags that can be used whenstarting the NISH client.
Table 1: Options and flags for the nish command
Option or flag Description References
--credential-cache Enables caching of SR OS node credentialsin static or manager mode
See Authenticationcredentials
--ca-cert
-t
Specifies TLS mode See Configuring NISHsecurity
--color
NISH_COLORS
Specifies the color scheme for the NISHenvironment
See NISH rc files
--no-proxy Disables system-defined proxy settingsand ignores the http_proxy and https_proxyenvironment variables
—
--disable-auto-completion-authorization
Disables authorization checks for the auto-completion command 1
—
Note:
1. Auto-completion ensures that only authorized commands are displayed in the auto-completion. The user's authorization to execute a command is checked against anauthorization server or local profile. Disabling this option can improve performance butallows the auto-completion to display all commands, including the commands that cannot beexecuted because they fail authorization. Users are not able to execute commands for whichthey do not have authorization. See the 7450 ESS, 7750 SR, 7950 XRS, and VSR SystemManagement Guide, section ‟Authorization” for more information.
3HE 17157 AAAA TQZZA 01 © 2021 Nokia.Use subject to Terms available at: www.nokia.com.
21
SPACER TEXT
NISH INSTALLATION AND USERGUIDE RELEASE 21.2.R1
NISH client
3.5 Authentication credentialsBy default, the NISH client prompts for user credentials when connecting to each SR OS node. The usercredentials are cached for the duration of the NISH client session with the node.
It is common in SR OS node cluster deployments for a user’s credentials to be the same over all devices.This is either because a centralized provisioning and management system configures the user manually onall devices, or because an external system such as TACACS or RADIUS manages the user.
The NISH client can streamline such environments by caching a single username and passwordcombination and automatically authenticating against each node as the user navigates into them, withoutfurther prompting.
To enable this feature, start the NISH client with the --credential-cache option.
When the NISH client starts with this feature enabled, it prompts immediately for the username andpassword combination, and caches this information until it closes.
When the credentials are cached and a user connects to a specific node, the NISH client attempts toauthenticate using the global cached password. If this password is incorrect, the user is prompted to re-enter the password. If the authentication is successful, the password is cached for the duration of the NISHclient session for that node only. This process is repeated each time the user connects to another node.
Credential caching can also be enabled in the NISH rc file; see Table 2: NISH rc file variables. If credentialcaching is enabled within the NISH rc file but is not needed for a specific session, you can disable it usingthe --no-credential-cache option.
Note: Both the NISH client static and manager modes support caching of credentials.
3.6 Device labelsUsing device labels, an operator can group SR OS nodes within the NISH MD-CLI schema. A device labelis a string value chosen by the operator to reference a group of SR OS nodes.
The connection device label is present by default and contains all SR OS nodes.
Groups are not predefined. The operator has the freedom to group nodes in the best way for theorganization. The following are examples of SR OS node groupings:
• In a BNG CUPS deployment, the operator groups the user plane nodes with the UPF device label andthe control plane nodes with the CPF device label.
• In a multi-platform deployment, the operator groups the SR OS nodes running on physical 7750 SRrouters with the Physical device label and the VSR nodes with the Virtual device label.
Note: Device labels can only contain letters and integers. Special characters are not supported.
The operator defines the device labels in a local schema file. The NISH schema in the NISH MD-CLI usesthe device labels in the local schema file to group SR OS nodes; see Local schema file.
In the NISH client static mode, the operator applies the device labels defined in the local schema file to thenodes in the connections file; see Connections file.
3HE 17157 AAAA TQZZA 01 © 2021 Nokia.Use subject to Terms available at: www.nokia.com.
22
SPACER TEXT

NISH INSTALLATION AND USERGUIDE RELEASE 21.2.R1
NISH client
In the NISH client manager mode, the operator applies the device labels defined in the local schema fileto the nodes, using the SR OS Remote Manager feature. For more information about the configuration ofremote management on an SR OS device, see the 7450 ESS, 7750 SR, 7950 XRS, and VSR Classic CLICommand Reference Guide, section ‟gRPC MD-CLI”.
When the device labels are defined in the local schema file and applied to the SR OS nodes, the NISHMD-CLI shows the SR OS nodes in the branch that matches the device label, as shown in the followingexample:
• test1 is configured with the device label UPF• test2 is configured with the device label CPF
[]root@# connections <tab> connection UPF CPF[]root@# connections UPF <tab> <ip> test1[]root@# connections CPF <tab> <ip> test2[]root@# connections connection <tab> <ip> test1 test2
Note: A device can have only one user-defined device label and has by default the system-defined connection device label.
If the operator applies to an SR OS node a device label that is not defined in the local schemafile, the node appears only under the connection device label. Only device labels defined in thelocal schema file are visible in the NISH MD-CLI.
If the operator defines a device label in the local schema file and does not apply it to a node, thedevice label appears in the NISH MD-CLI without any member nodes.
3.7 Connections fileA NISH client operating in static mode uses a connections file. The connections file is a text file thatcontains the details of the SR OS nodes that are available within the NISH MD-CLI.
There are no requirements for the filename.
The following are required for the connection file.
• The NISH client must have access to the file location.• The Linux user running the NISH client must have read permissions for the file.
The connections file defines a registration for each SR OS node. Each registration has the following fields:
id The id field is the identifier string, which is usuallythe system name.
3HE 17157 AAAA TQZZA 01 © 2021 Nokia.Use subject to Terms available at: www.nokia.com.
23
SPACER TEXT
NISH INSTALLATION AND USERGUIDE RELEASE 21.2.R1
NISH client
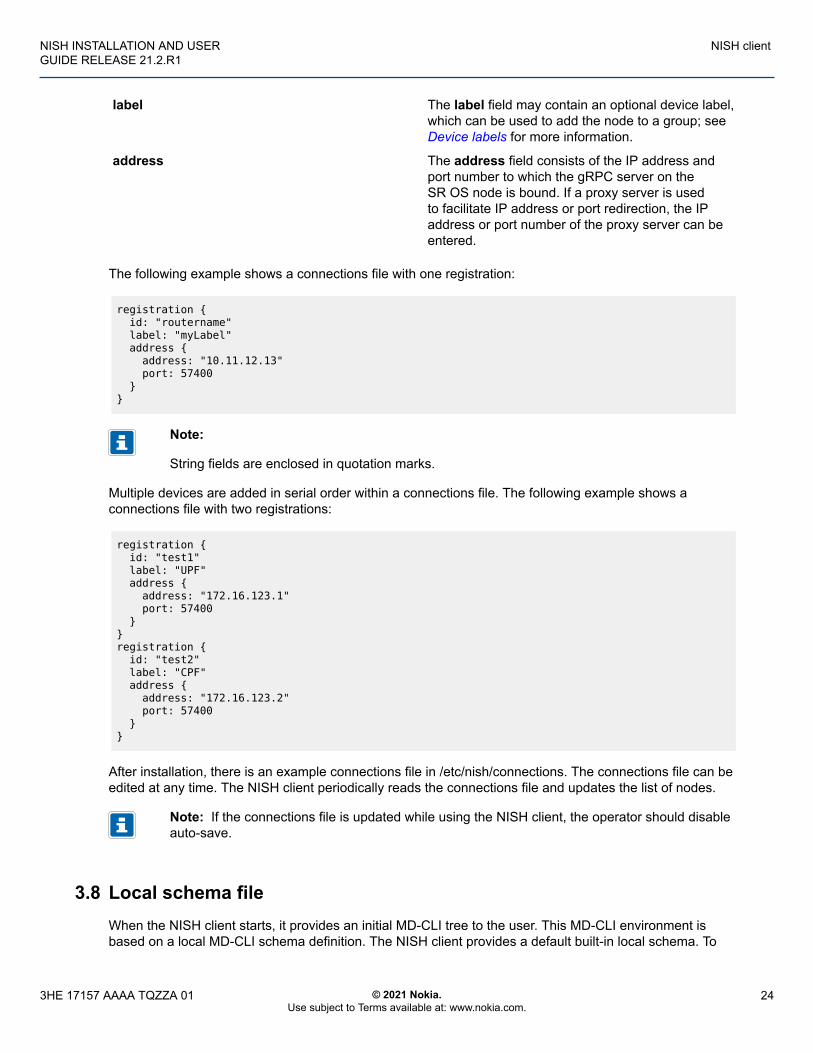
label The label field may contain an optional device label,which can be used to add the node to a group; seeDevice labels for more information.
address The address field consists of the IP address andport number to which the gRPC server on theSR OS node is bound. If a proxy server is usedto facilitate IP address or port redirection, the IPaddress or port number of the proxy server can beentered.
The following example shows a connections file with one registration:
registration { id: "routername" label: "myLabel" address { address: "10.11.12.13" port: 57400 }}
Note:
String fields are enclosed in quotation marks.
Multiple devices are added in serial order within a connections file. The following example shows aconnections file with two registrations:
registration { id: "test1" label: "UPF" address { address: "172.16.123.1" port: 57400 }}registration { id: "test2" label: "CPF" address { address: "172.16.123.2" port: 57400 }}
After installation, there is an example connections file in /etc/nish/connections. The connections file can beedited at any time. The NISH client periodically reads the connections file and updates the list of nodes.
Note: If the connections file is updated while using the NISH client, the operator should disableauto-save.
3.8 Local schema fileWhen the NISH client starts, it provides an initial MD-CLI tree to the user. This MD-CLI environment isbased on a local MD-CLI schema definition. The NISH client provides a default built-in local schema. To
3HE 17157 AAAA TQZZA 01 © 2021 Nokia.Use subject to Terms available at: www.nokia.com.
24
SPACER TEXT
NISH INSTALLATION AND USERGUIDE RELEASE 21.2.R1
NISH client
enable user extensibility in the MD-CLI environment, the operator can create a locally defined MD-CLIschema file.
The local schema file is a text file that contains the details of the locally defined NISH MD-CLI schemaextensibility definitions. It can be used in static and manager mode. There are no requirements for thefilename.
The following are the requirements for the local schema file:
• The NISH client requires access to the file location.• The Linux user running the NISH client requires read permissions for the file.
Note: It is not mandatory for the local schema to be the same for all users of the NISH clientin static or manager modes. This allows administrators and users to define customized MD-CLI schemas for their own purposes.
To use a local schema file, start the NISH client with the --local-schema-file option or --s flag followedby the relative or absolute path to the local schema file, or define the path to the local schema file in anenvironment variable or a NISH rc file. See NISH rc files.
The local schema file defines a structure called a schema that contains one or more schema branches thatcan be linked hierarchically. The schema branches are either local or remote.
Local schema Local schemas define branches in the NISH MD-CLI tree that operate locally on the Linux host;these are currently not supported.
Remote schema Remote schemas define branches in the NISH MD-CLI tree that connect to SR OS nodes.
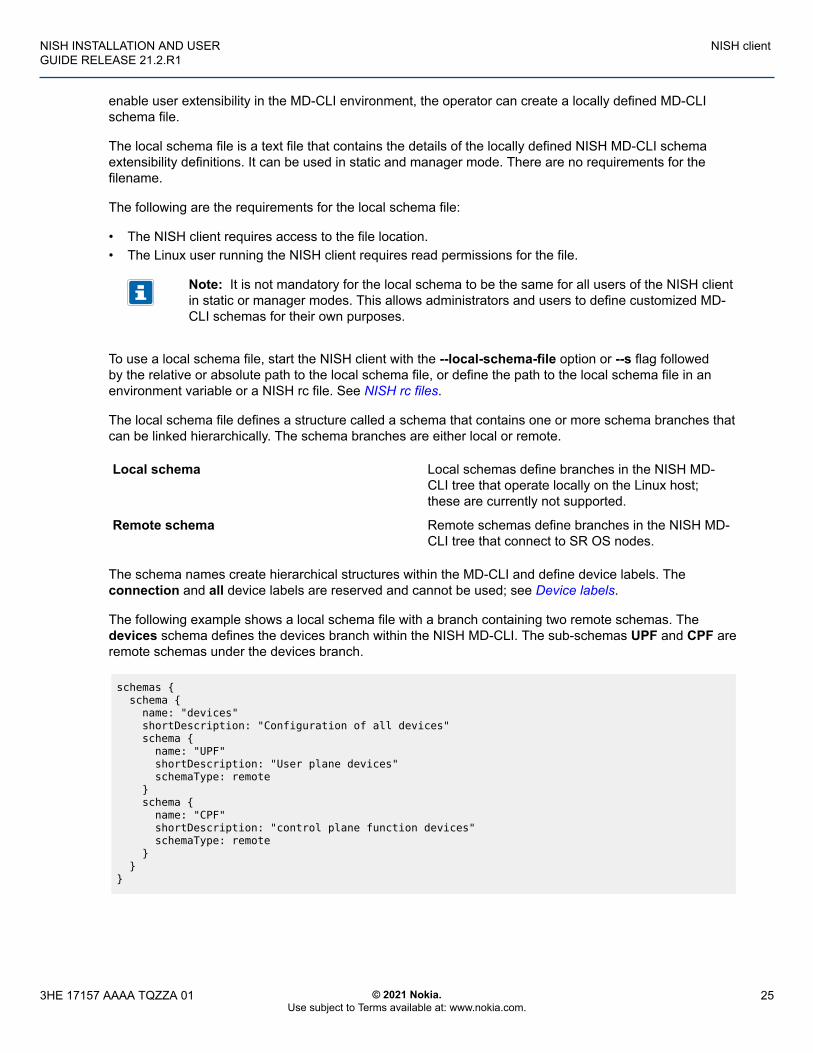
The schema names create hierarchical structures within the MD-CLI and define device labels. Theconnection and all device labels are reserved and cannot be used; see Device labels.
The following example shows a local schema file with a branch containing two remote schemas. Thedevices schema defines the devices branch within the NISH MD-CLI. The sub-schemas UPF and CPF areremote schemas under the devices branch.
schemas { schema { name: "devices" shortDescription: "Configuration of all devices" schema { name: "UPF" shortDescription: "User plane devices" schemaType: remote } schema { name: "CPF" shortDescription: "control plane function devices" schemaType: remote } }}
3HE 17157 AAAA TQZZA 01 © 2021 Nokia.Use subject to Terms available at: www.nokia.com.
25
SPACER TEXT
NISH INSTALLATION AND USERGUIDE RELEASE 21.2.R1
NISH client
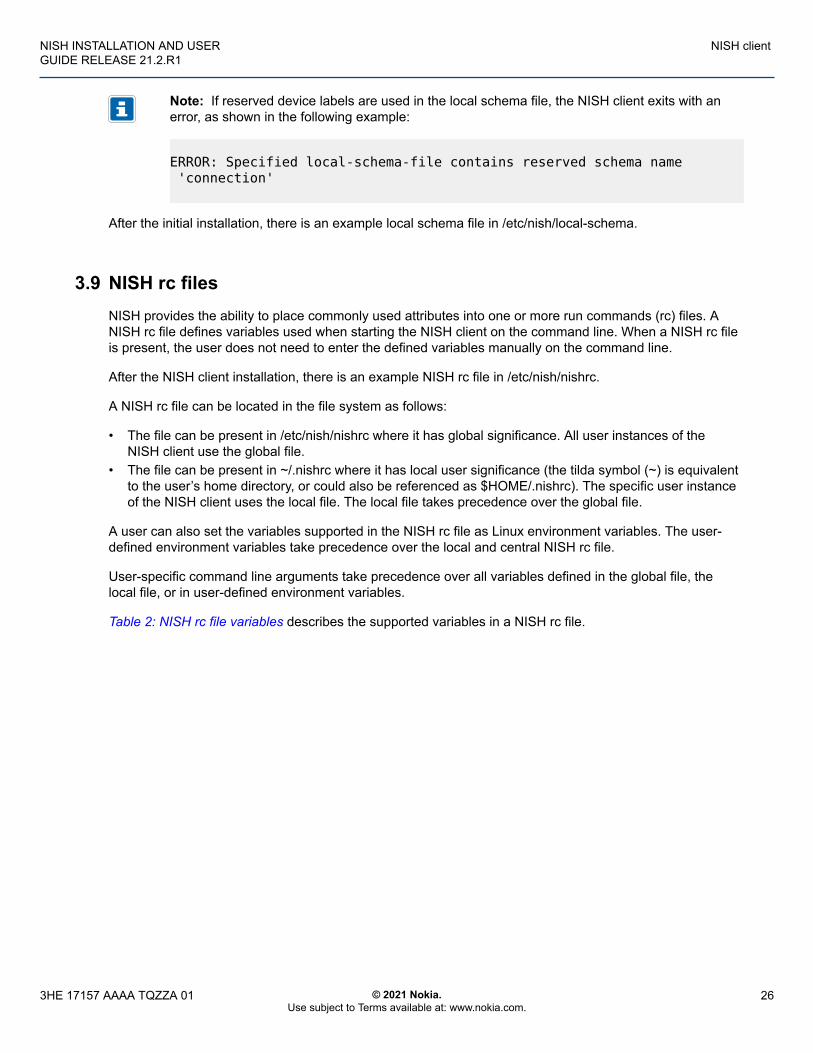
Note: If reserved device labels are used in the local schema file, the NISH client exits with anerror, as shown in the following example:
ERROR: Specified local-schema-file contains reserved schema name 'connection'
After the initial installation, there is an example local schema file in /etc/nish/local-schema.
3.9 NISH rc filesNISH provides the ability to place commonly used attributes into one or more run commands (rc) files. ANISH rc file defines variables used when starting the NISH client on the command line. When a NISH rc fileis present, the user does not need to enter the defined variables manually on the command line.
After the NISH client installation, there is an example NISH rc file in /etc/nish/nishrc.
A NISH rc file can be located in the file system as follows:
• The file can be present in /etc/nish/nishrc where it has global significance. All user instances of theNISH client use the global file.
• The file can be present in ~/.nishrc where it has local user significance (the tilda symbol (~) is equivalentto the user’s home directory, or could also be referenced as $HOME/.nishrc). The specific user instanceof the NISH client uses the local file. The local file takes precedence over the global file.
A user can also set the variables supported in the NISH rc file as Linux environment variables. The user-defined environment variables take precedence over the local and central NISH rc file.
User-specific command line arguments take precedence over all variables defined in the global file, thelocal file, or in user-defined environment variables.
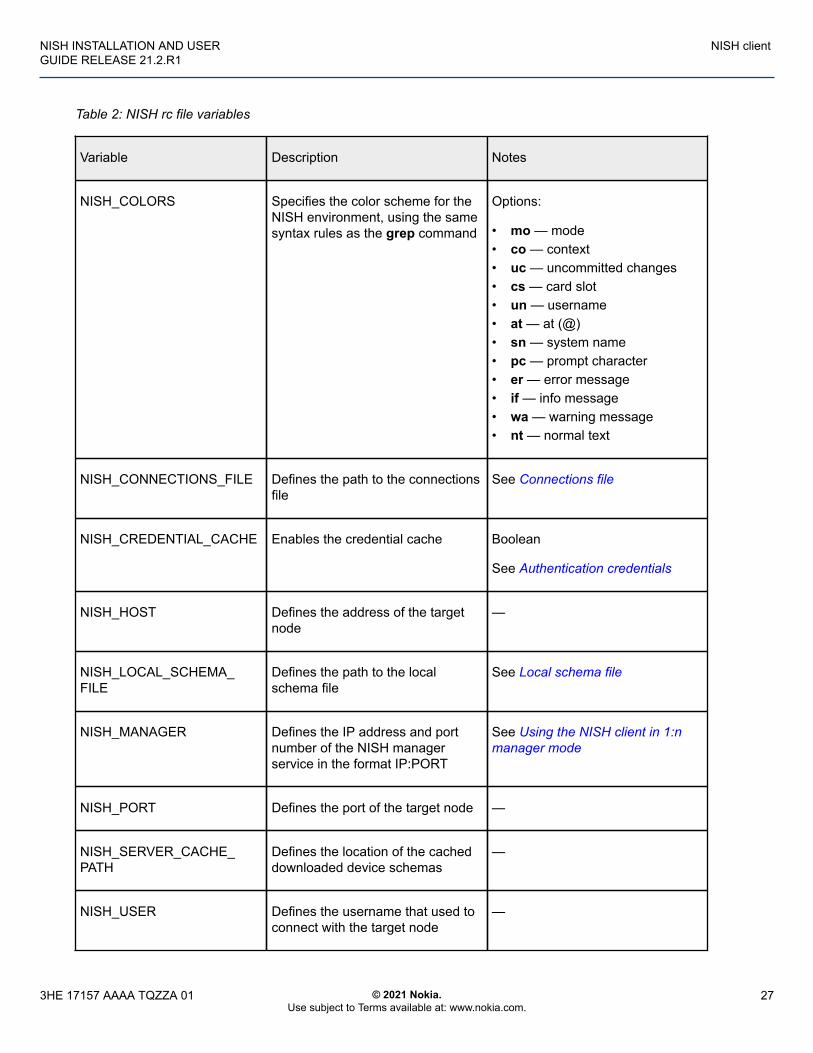
Table 2: NISH rc file variables describes the supported variables in a NISH rc file.
3HE 17157 AAAA TQZZA 01 © 2021 Nokia.Use subject to Terms available at: www.nokia.com.
26
SPACER TEXT
NISH INSTALLATION AND USERGUIDE RELEASE 21.2.R1
NISH client
Table 2: NISH rc file variables
Variable Description Notes
NISH_COLORS Specifies the color scheme for theNISH environment, using the samesyntax rules as the grep command
Options:
• mo — mode• co — context• uc — uncommitted changes• cs — card slot• un — username• at — at (@)• sn — system name• pc — prompt character• er — error message• if — info message• wa — warning message• nt — normal text
NISH_CONNECTIONS_FILE Defines the path to the connectionsfile
See Connections file
NISH_CREDENTIAL_CACHE Enables the credential cache Boolean
See Authentication credentials
NISH_HOST Defines the address of the targetnode
—
NISH_LOCAL_SCHEMA_FILE
Defines the path to the localschema file
See Local schema file
NISH_MANAGER Defines the IP address and portnumber of the NISH managerservice in the format IP:PORT
See Using the NISH client in 1:nmanager mode
NISH_PORT Defines the port of the target node —
NISH_SERVER_CACHE_PATH
Defines the location of the cacheddownloaded device schemas
—
NISH_USER Defines the username that used toconnect with the target node
—
3HE 17157 AAAA TQZZA 01 © 2021 Nokia.Use subject to Terms available at: www.nokia.com.
27
SPACER TEXT

NISH INSTALLATION AND USERGUIDE RELEASE 21.2.R1
NISH client
3.10 Multi-node operationsThe NISH client provides the ability to manage multiple nodes from a single MD-CLI shell.
When operating in 1:n manager or 1:n static mode, the NISH client generates a pseudo-node named ‟all”within the connection device-label (/connections connection ‟all” in the MD-CLI path). The operator cannavigate to this pseudo-node in the same way as to a single node within the NISH client. The pseudo-nodeaddresses supported commands to all nodes that the NISH client knows about.
In 1:n manager or 1:n static mode, the NISH client also generates a pseudo-node named ‟all” in eachdevice-label context it is aware of. By navigating into the pseudo-node within a specific device-label, thesupported commands are addressed to all the nodes with that specific device-label that the NISH clientknows about.
3.10.1 Multi-node configuration modes
The exclusive candidate configuration mode is the only supported candidate configuration mode for NISHclient multi-node operation.
To access the exclusive candidate configuration mode, use the explicit edit-config exclusive command orthe implicit configure exclusive command.
When the operator tries to access the exclusive candidate configuration mode within a multi-node context,the NISH client attempts the following actions:
1. connects to each SR OS node prompting for authentication credentials, if required2. obtains an exclusive lock on all the nodes
A warning is displayed for every node for which the NISH client cannot obtain an exclusive lock. Theoperator can optionally continue the configuration activities with the remaining nodes or exit fromconfiguration mode.
A list of the nodes for which the NISH client has successfully obtained an exclusive candidate configurationlock is stored in memory, and the MD-CLI configuration commands are executed against this set of nodes.
Note: The list of nodes is created to ensure that operators have full knowledge of the set ofnodes they are addressing with the configuration changes.
Any node that is added, removed, renamed, or re-labeled using the NISH connections file or fromthe NISH manager while the exclusive lock remains in force, is ignored until the operator returnsto the operational mode.
When the operator is presented with the exclusive configuration mode, the prompt changes. When theoperator leaves the exclusive configuration mode, all candidate configurations on all nodes are discarded.
3.10.2 Configuration load operation
The NISH client provides the ability to provision a template-based configuration on multiple SR OS nodeswith a specific device-label grouping. This operation is completed using the MD-CLI load command.
When using the load command within NISH for multi-node configuration, the merge and full-replaceoptions are supported. The referenced configuration file supplied to the load command must be accessible
3HE 17157 AAAA TQZZA 01 © 2021 Nokia.Use subject to Terms available at: www.nokia.com.
28
SPACER TEXT
NISH INSTALLATION AND USERGUIDE RELEASE 21.2.R1
NISH client
from each individual SR OS node within the addressed set of nodes, unless it is prefixed with the URLprefix nish://. When nish:// is used, the relative or absolute path or filename that follows nish:// is treated aslocal to the NISH client.
Note: The MD-CLI load command is the only supported method for multi-node configurationfrom the NISH client.
The load command within a multi-device context (MDC) is atomic, that is, it succeeds on alladdressed SR OS nodes or no SR OS nodes.
See the 7450 ESS, 7750 SR, 7950 XRS, and VSR MD-CLI Command Reference Guide for moreinformation about the load command.
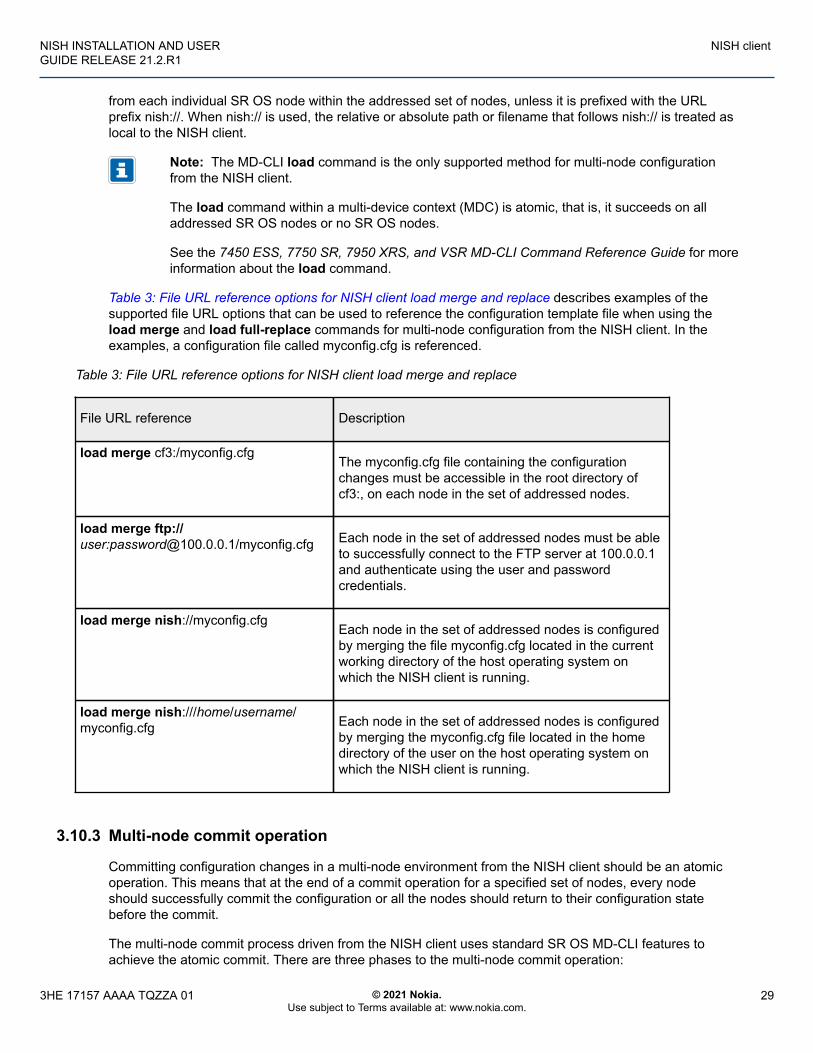
Table 3: File URL reference options for NISH client load merge and replace describes examples of thesupported file URL options that can be used to reference the configuration template file when using theload merge and load full-replace commands for multi-node configuration from the NISH client. In theexamples, a configuration file called myconfig.cfg is referenced.
Table 3: File URL reference options for NISH client load merge and replace
File URL reference Description
load merge cf3:/myconfig.cfgThe myconfig.cfg file containing the configurationchanges must be accessible in the root directory ofcf3:, on each node in the set of addressed nodes.
load merge ftp://user:[email protected]/myconfig.cfg Each node in the set of addressed nodes must be able
to successfully connect to the FTP server at 100.0.0.1and authenticate using the user and passwordcredentials.
load merge nish://myconfig.cfgEach node in the set of addressed nodes is configuredby merging the file myconfig.cfg located in the currentworking directory of the host operating system onwhich the NISH client is running.
load merge nish:///home/username/myconfig.cfg Each node in the set of addressed nodes is configured
by merging the myconfig.cfg file located in the homedirectory of the user on the host operating system onwhich the NISH client is running.
3.10.3 Multi-node commit operation
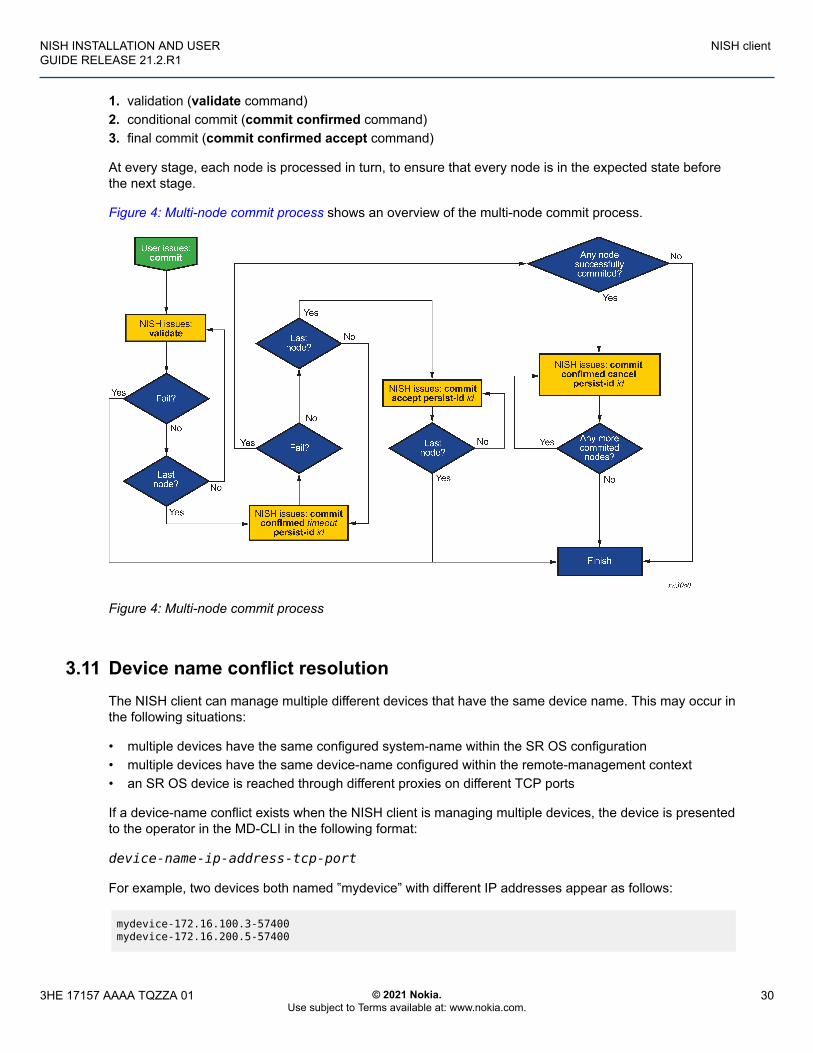
Committing configuration changes in a multi-node environment from the NISH client should be an atomicoperation. This means that at the end of a commit operation for a specified set of nodes, every nodeshould successfully commit the configuration or all the nodes should return to their configuration statebefore the commit.
The multi-node commit process driven from the NISH client uses standard SR OS MD-CLI features toachieve the atomic commit. There are three phases to the multi-node commit operation:
3HE 17157 AAAA TQZZA 01 © 2021 Nokia.Use subject to Terms available at: www.nokia.com.
29
SPACER TEXT
NISH INSTALLATION AND USERGUIDE RELEASE 21.2.R1
NISH client
1. validation (validate command)2. conditional commit (commit confirmed command)3. final commit (commit confirmed accept command)
At every stage, each node is processed in turn, to ensure that every node is in the expected state beforethe next stage.
Figure 4: Multi-node commit process shows an overview of the multi-node commit process.
Figure 4: Multi-node commit process
3.11 Device name conflict resolutionThe NISH client can manage multiple different devices that have the same device name. This may occur inthe following situations:
• multiple devices have the same configured system-name within the SR OS configuration• multiple devices have the same device-name configured within the remote-management context• an SR OS device is reached through different proxies on different TCP ports
If a device-name conflict exists when the NISH client is managing multiple devices, the device is presentedto the operator in the MD-CLI in the following format:
device-name-ip-address-tcp-port
For example, two devices both named ‟mydevice” with different IP addresses appear as follows:
mydevice-172.16.100.3-57400 mydevice-172.16.200.5-57400
3HE 17157 AAAA TQZZA 01 © 2021 Nokia.Use subject to Terms available at: www.nokia.com.
30
SPACER TEXT
NISH INSTALLATION AND USERGUIDE RELEASE 21.2.R1
NISH client
Note: Any device with the device name or system name ‟all” is always presented in the formatdevice-name-ip-address-tcp-port.
3.12 Troubleshooting NISH client issuesWhen providing troubleshooting assistance, the Nokia support organization may request further informationto diagnose issues that occur with the NISH client. This information is contained in a technical support(tech-support) file that the operator can generate and send to the Nokia technical support team.
To generate a tech-support file for NISH client issues, use the nish admin tech-support filenamecommand.
The mandatory filename attribute describes the relative or absolute path to a file on the local file systemwhere the NISH client is running. The resulting encrypted file contains troubleshooting information aboutthe NISH client. It does not provide information about the routers to which the operator is connected.
3HE 17157 AAAA TQZZA 01 © 2021 Nokia.Use subject to Terms available at: www.nokia.com.
31
SPACER TEXT
NISH INSTALLATION AND USERGUIDE RELEASE 21.2.R1
NISH manager
4 NISH manager
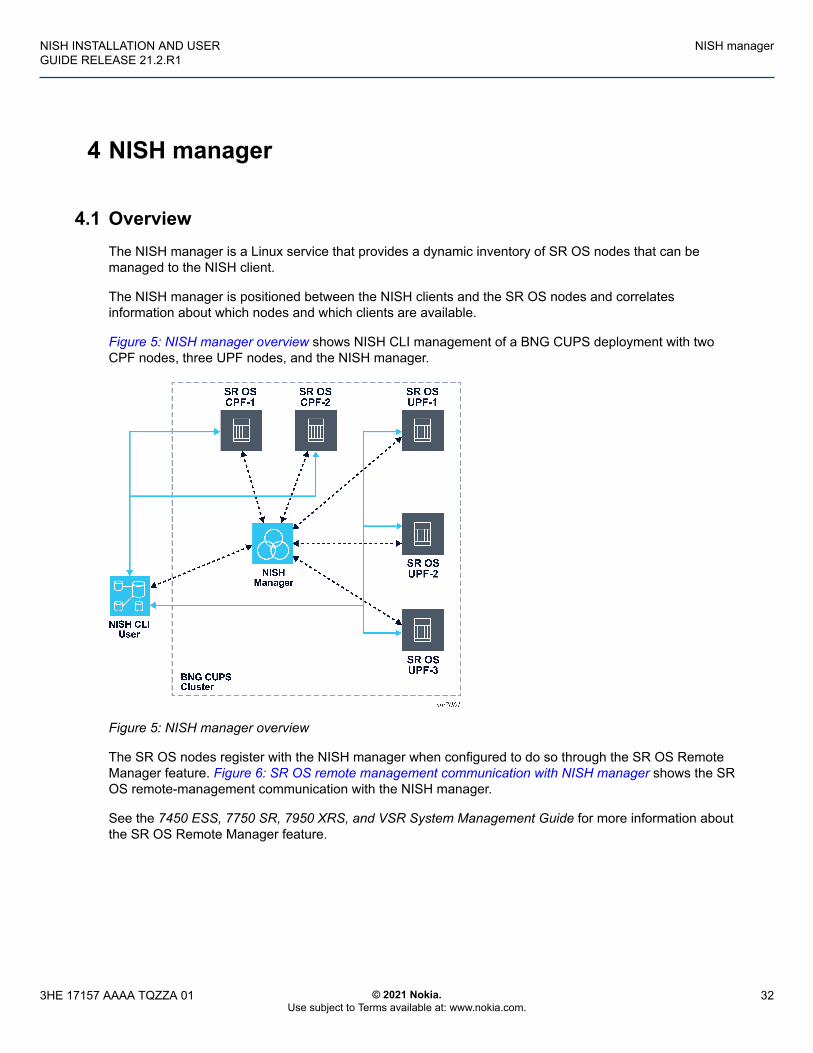
4.1 OverviewThe NISH manager is a Linux service that provides a dynamic inventory of SR OS nodes that can bemanaged to the NISH client.
The NISH manager is positioned between the NISH clients and the SR OS nodes and correlatesinformation about which nodes and which clients are available.
Figure 5: NISH manager overview shows NISH CLI management of a BNG CUPS deployment with twoCPF nodes, three UPF nodes, and the NISH manager.
Figure 5: NISH manager overview
The SR OS nodes register with the NISH manager when configured to do so through the SR OS RemoteManager feature. Figure 6: SR OS remote management communication with NISH manager shows the SROS remote-management communication with the NISH manager.
See the 7450 ESS, 7750 SR, 7950 XRS, and VSR System Management Guide for more information aboutthe SR OS Remote Manager feature.
3HE 17157 AAAA TQZZA 01 © 2021 Nokia.Use subject to Terms available at: www.nokia.com.
32
SPACER TEXT

NISH INSTALLATION AND USERGUIDE RELEASE 21.2.R1
NISH manager
Figure 6: SR OS remote management communication with NISH manager
When a NISH client is started in manager mode, it registers with the NISH manager. The NISH managerprovides the details of the available SR OS nodes to the NISH client, including the names, device labels,and IP address and port information.
Figure 7: NISH client communication with NISH manager shows the NISH client communication with theNISH manager.
Figure 7: NISH client communication with NISH manager
The NISH manager runs as a standalone application in the foreground or background of the Linux shellor as a systemd service on the CentOS 7Linux distribution. Using user-specified IP address and portcombinations, the NISH manager listens for connections from a NISH client and SR OS nodes that areconfigured with the SR OS Remote Manager. By default, the NISH manager listens on all available IPinterfaces and on the default gRPC port (57400).
The NISH manager does not make any outbound connections to the SR OS nodes or to the NISH client,although it does respond to both.
4.2 Installing the NISH managerThe NISH manager is delivered as a set of RPM packages and is supported on the CentOS 7 Linuxdistribution.
The installation process installs the following:
• the NISH manager in /usr/bin/nish-manager• nish-manager as a systemd service• the End User License Agreement (EULA) in /usr/share/licenses/nish-manager/EULA• the Linux man pages for nish-manager
3HE 17157 AAAA TQZZA 01 © 2021 Nokia.Use subject to Terms available at: www.nokia.com.
33
SPACER TEXT
NISH INSTALLATION AND USERGUIDE RELEASE 21.2.R1
NISH manager
• a log rotation schedule in /etc/logrotate.d/nish-manager• a CentOS firewalld definition in /usr/lib/firewalld/services/nish-manager.xml• an example configuration file in /etc/nish-manager/nish-manager.conf
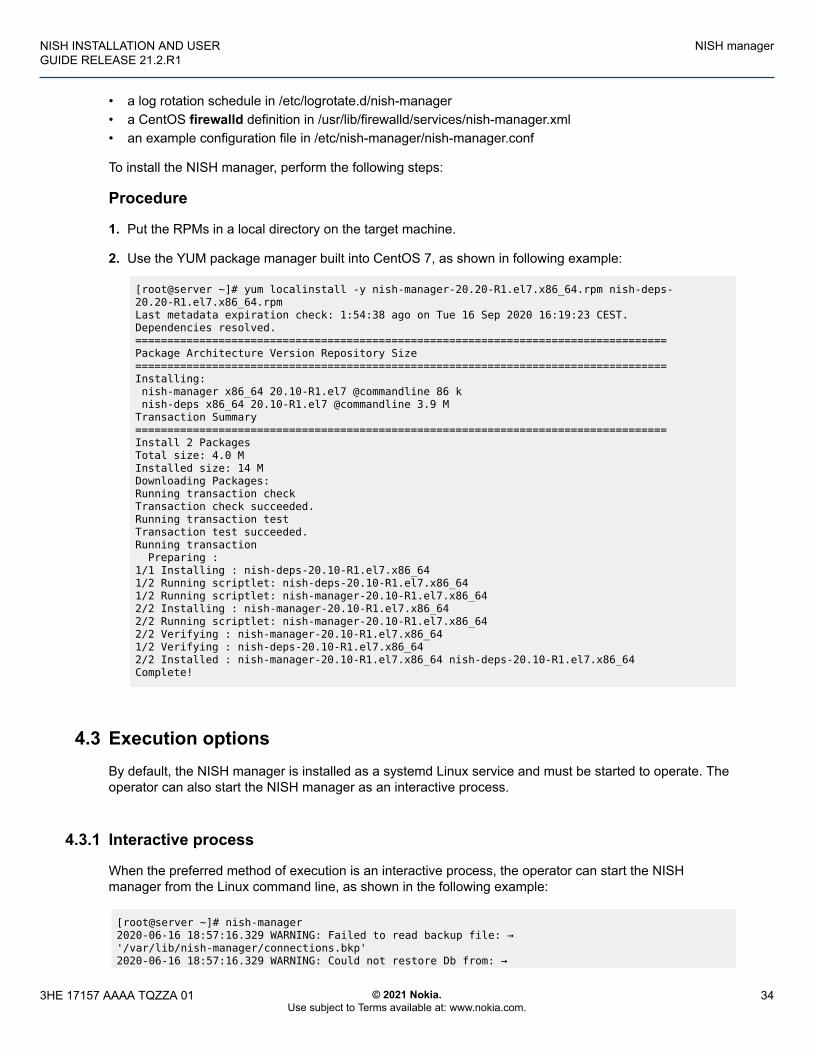
To install the NISH manager, perform the following steps:
Procedure
1. Put the RPMs in a local directory on the target machine.
2. Use the YUM package manager built into CentOS 7, as shown in following example:
[root@server ~]# yum localinstall -y nish-manager-20.20-R1.el7.x86_64.rpm nish-deps-20.20-R1.el7.x86_64.rpm Last metadata expiration check: 1:54:38 ago on Tue 16 Sep 2020 16:19:23 CEST. Dependencies resolved. =================================================================================== Package Architecture Version Repository Size ===================================================================================Installing: nish-manager x86_64 20.10-R1.el7 @commandline 86 k nish-deps x86_64 20.10-R1.el7 @commandline 3.9 MTransaction Summary =================================================================================== Install 2 Packages Total size: 4.0 M Installed size: 14 M Downloading Packages: Running transaction check Transaction check succeeded. Running transaction test Transaction test succeeded. Running transaction Preparing : 1/1 Installing : nish-deps-20.10-R1.el7.x86_64 1/2 Running scriptlet: nish-deps-20.10-R1.el7.x86_64 1/2 Running scriptlet: nish-manager-20.10-R1.el7.x86_64 2/2 Installing : nish-manager-20.10-R1.el7.x86_64 2/2 Running scriptlet: nish-manager-20.10-R1.el7.x86_64 2/2 Verifying : nish-manager-20.10-R1.el7.x86_64 1/2 Verifying : nish-deps-20.10-R1.el7.x86_64 2/2 Installed : nish-manager-20.10-R1.el7.x86_64 nish-deps-20.10-R1.el7.x86_64Complete!
4.3 Execution optionsBy default, the NISH manager is installed as a systemd Linux service and must be started to operate. Theoperator can also start the NISH manager as an interactive process.
4.3.1 Interactive process
When the preferred method of execution is an interactive process, the operator can start the NISHmanager from the Linux command line, as shown in the following example:
[root@server ~]# nish-manager2020-06-16 18:57:16.329 WARNING: Failed to read backup file: →'/var/lib/nish-manager/connections.bkp'2020-06-16 18:57:16.329 WARNING: Could not restore Db from: →
3HE 17157 AAAA TQZZA 01 © 2021 Nokia.Use subject to Terms available at: www.nokia.com.
34
SPACER TEXT
NISH INSTALLATION AND USERGUIDE RELEASE 21.2.R1
NISH manager
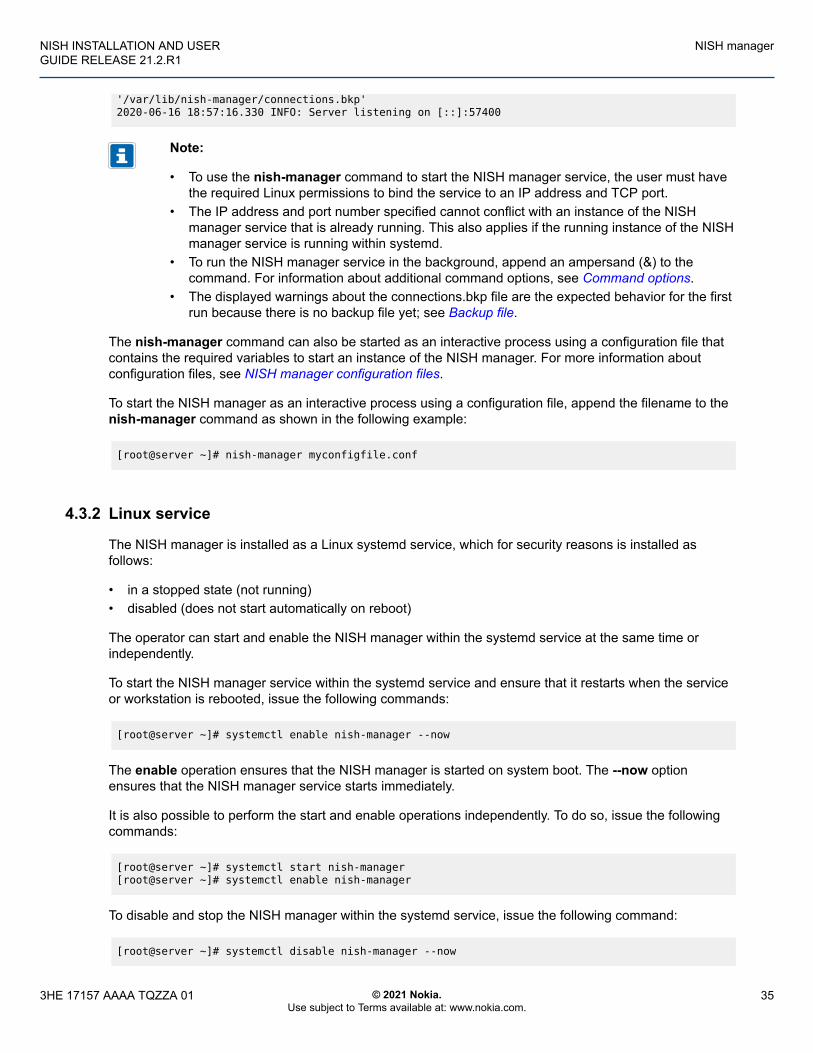
'/var/lib/nish-manager/connections.bkp'2020-06-16 18:57:16.330 INFO: Server listening on [::]:57400
Note:
• To use the nish-manager command to start the NISH manager service, the user must havethe required Linux permissions to bind the service to an IP address and TCP port.
• The IP address and port number specified cannot conflict with an instance of the NISHmanager service that is already running. This also applies if the running instance of the NISHmanager service is running within systemd.
• To run the NISH manager service in the background, append an ampersand (&) to thecommand. For information about additional command options, see Command options.
• The displayed warnings about the connections.bkp file are the expected behavior for the firstrun because there is no backup file yet; see Backup file.
The nish-manager command can also be started as an interactive process using a configuration file thatcontains the required variables to start an instance of the NISH manager. For more information aboutconfiguration files, see NISH manager configuration files.
To start the NISH manager as an interactive process using a configuration file, append the filename to thenish-manager command as shown in the following example:
[root@server ~]# nish-manager myconfigfile.conf
4.3.2 Linux service
The NISH manager is installed as a Linux systemd service, which for security reasons is installed asfollows:
• in a stopped state (not running)• disabled (does not start automatically on reboot)
The operator can start and enable the NISH manager within the systemd service at the same time orindependently.
To start the NISH manager service within the systemd service and ensure that it restarts when the serviceor workstation is rebooted, issue the following commands:
[root@server ~]# systemctl enable nish-manager --now
The enable operation ensures that the NISH manager is started on system boot. The --now optionensures that the NISH manager service starts immediately.
It is also possible to perform the start and enable operations independently. To do so, issue the followingcommands:
[root@server ~]# systemctl start nish-manager[root@server ~]# systemctl enable nish-manager
To disable and stop the NISH manager within the systemd service, issue the following command:
[root@server ~]# systemctl disable nish-manager --now
3HE 17157 AAAA TQZZA 01 © 2021 Nokia.Use subject to Terms available at: www.nokia.com.
35
SPACER TEXT
NISH INSTALLATION AND USERGUIDE RELEASE 21.2.R1
NISH manager
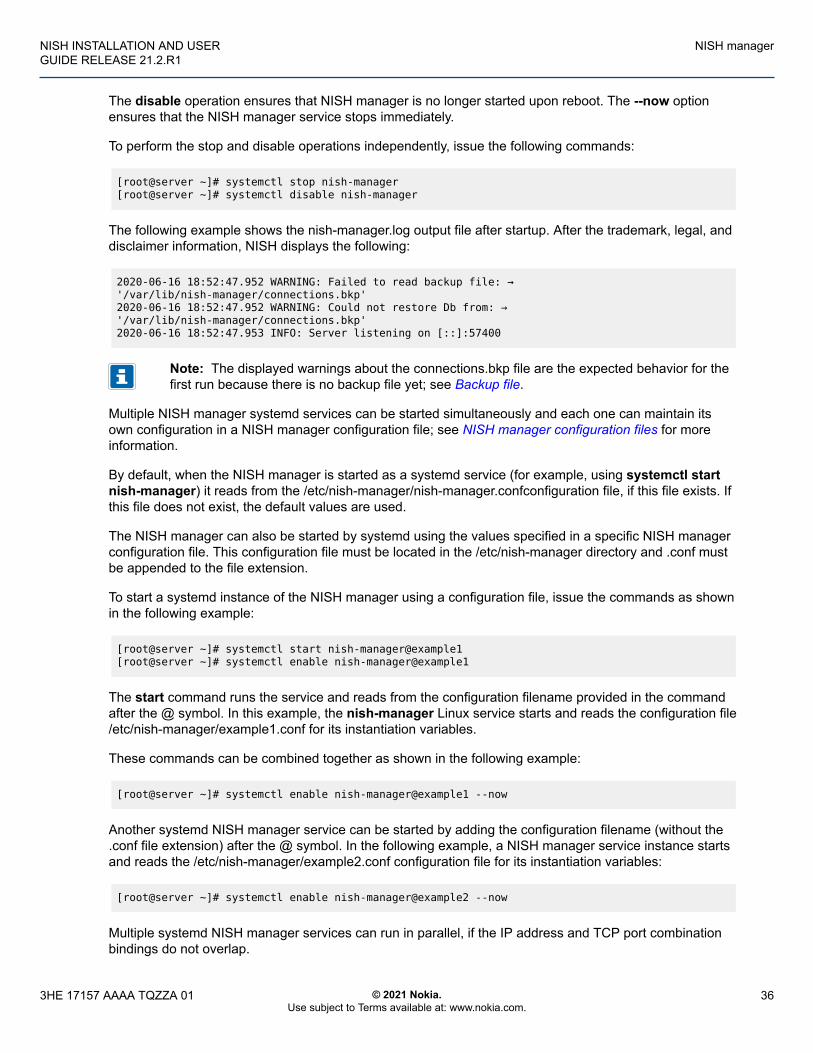
The disable operation ensures that NISH manager is no longer started upon reboot. The --now optionensures that the NISH manager service stops immediately.
To perform the stop and disable operations independently, issue the following commands:
[root@server ~]# systemctl stop nish-manager[root@server ~]# systemctl disable nish-manager
The following example shows the nish-manager.log output file after startup. After the trademark, legal, anddisclaimer information, NISH displays the following:
2020-06-16 18:52:47.952 WARNING: Failed to read backup file: →'/var/lib/nish-manager/connections.bkp'2020-06-16 18:52:47.952 WARNING: Could not restore Db from: →'/var/lib/nish-manager/connections.bkp'2020-06-16 18:52:47.953 INFO: Server listening on [::]:57400
Note: The displayed warnings about the connections.bkp file are the expected behavior for thefirst run because there is no backup file yet; see Backup file.
Multiple NISH manager systemd services can be started simultaneously and each one can maintain itsown configuration in a NISH manager configuration file; see NISH manager configuration files for moreinformation.
By default, when the NISH manager is started as a systemd service (for example, using systemctl startnish-manager) it reads from the /etc/nish-manager/nish-manager.confconfiguration file, if this file exists. Ifthis file does not exist, the default values are used.
The NISH manager can also be started by systemd using the values specified in a specific NISH managerconfiguration file. This configuration file must be located in the /etc/nish-manager directory and .conf mustbe appended to the file extension.
To start a systemd instance of the NISH manager using a configuration file, issue the commands as shownin the following example:
[root@server ~]# systemctl start nish-manager@example1[root@server ~]# systemctl enable nish-manager@example1
The start command runs the service and reads from the configuration filename provided in the commandafter the @ symbol. In this example, the nish-manager Linux service starts and reads the configuration file/etc/nish-manager/example1.conf for its instantiation variables.
These commands can be combined together as shown in the following example:
[root@server ~]# systemctl enable nish-manager@example1 --now
Another systemd NISH manager service can be started by adding the configuration filename (without the.conf file extension) after the @ symbol. In the following example, a NISH manager service instance startsand reads the /etc/nish-manager/example2.conf configuration file for its instantiation variables:
[root@server ~]# systemctl enable nish-manager@example2 --now
Multiple systemd NISH manager services can run in parallel, if the IP address and TCP port combinationbindings do not overlap.
3HE 17157 AAAA TQZZA 01 © 2021 Nokia.Use subject to Terms available at: www.nokia.com.
36
SPACER TEXT
NISH INSTALLATION AND USERGUIDE RELEASE 21.2.R1
NISH manager
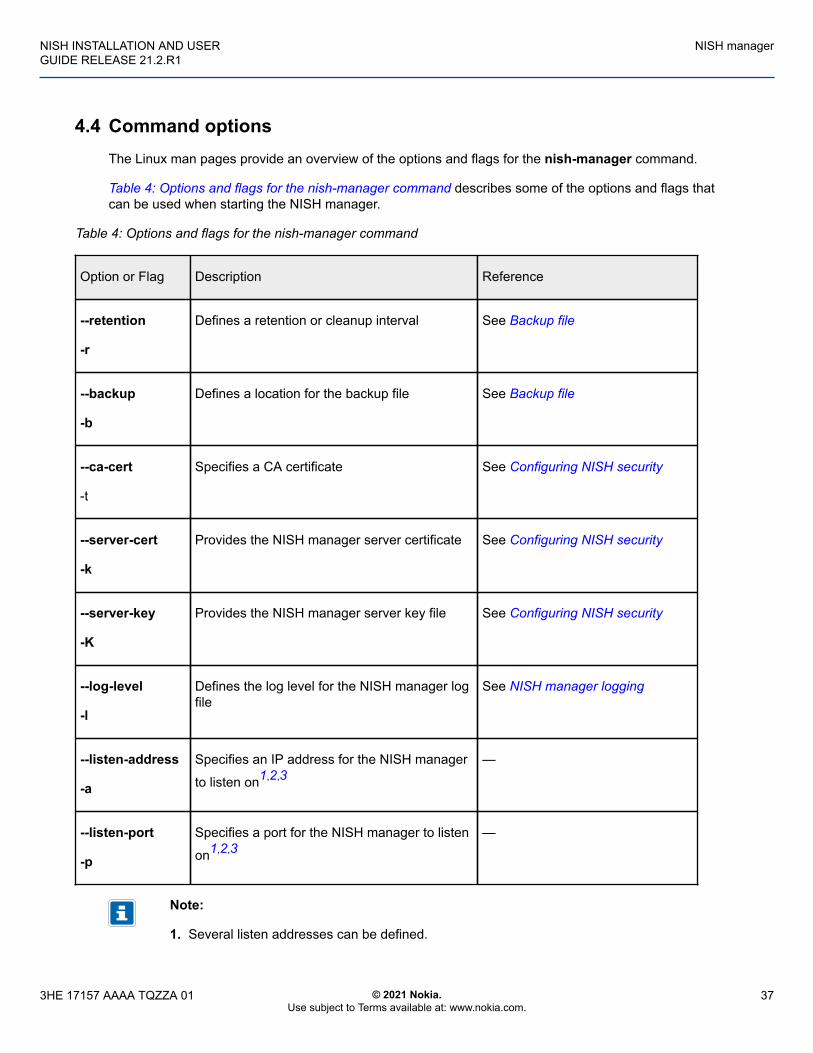
4.4 Command optionsThe Linux man pages provide an overview of the options and flags for the nish-manager command.
Table 4: Options and flags for the nish-manager command describes some of the options and flags thatcan be used when starting the NISH manager.
Table 4: Options and flags for the nish-manager command
Option or Flag Description Reference
--retention
-r
Defines a retention or cleanup interval See Backup file
--backup
-b
Defines a location for the backup file See Backup file
--ca-cert
-t
Specifies a CA certificate See Configuring NISH security
--server-cert
-k
Provides the NISH manager server certificate See Configuring NISH security
--server-key
-K
Provides the NISH manager server key file See Configuring NISH security
--log-level
-l
Defines the log level for the NISH manager logfile
See NISH manager logging
--listen-address
-a
Specifies an IP address for the NISH manager
to listen on1,2,3—
--listen-port
-p
Specifies a port for the NISH manager to listen
on1,2,3—
Note:
1. Several listen addresses can be defined.
3HE 17157 AAAA TQZZA 01 © 2021 Nokia.Use subject to Terms available at: www.nokia.com.
37
SPACER TEXT
NISH INSTALLATION AND USERGUIDE RELEASE 21.2.R1
NISH manager
2. If the operator omits the address and port for the NISH manager to listen on, the NISHmanager listens by default on all IP interfaces available and on the default gRPC port (57400.)
3. Multiple instances of the NISH manager can run on a single server or workstation, if the IPaddress and port combinations of the instances do not clash.
4.5 Backup fileThe NISH manager retains state information in a backup file. It writes the state information to the backupfile for every change in the node connections.
To set the retention or cleanup time for connection registrations, use the -r flag or --retention optionfollowed by a value in minutes. The NISH manager discards connections that have a timestamp older thanthe retention period (default is 60 minutes).
To set the location of the backup file, use the -b flag or --backup option followed by the absolute or relativepath to the backup file. When the flag is present without a path, no backup file is created. When the flag isabsent, the backup file is in the default location: /var/lib/nish-manager/connections.bkp.
When the NISH manager starts, it checks whether it was previously run. If a backup file is present, theNISH manager loads the previous state into its dynamic inventory.
4.6 NISH manager loggingWhen running a systemd service, the NISH manager writes logs continually into a plain text logfile locatedat /var/log/nish-manager/nish-manager.log on the local file system.
When running as a standalone program, the NISH manager writes logs continually to STDOUT.
4.6.1 Setting the verbosity level for the log file
The following are the allowed values for the verbosity level settings:
• e (error)• w (warning)• i (info)• d (debug)
To set the verbosity level:
Procedure
Enter the nish-manager command with the -l flag or --log-level option and the verbosity level setting.
nish-manager -l w
3HE 17157 AAAA TQZZA 01 © 2021 Nokia.Use subject to Terms available at: www.nokia.com.
38
SPACER TEXT

NISH INSTALLATION AND USERGUIDE RELEASE 21.2.R1
NISH manager
4.7 NISH manager configuration filesThe NISH manager provides the ability to place commonly used attributes into a configuration file that isprovided when the NISH manager starts. The configuration file can be used when executing the NISHmanager as an interactive process or as a Linux service.
Note: When a configuration file is provided, the user does not need to manually provide anyvariables on the command line. However, if variables are provided on the command line, theyoverwrite the variables provided in the configuration file.
After the NISH manager installation is completed, an example (and default) configuration file can be foundin /etc/nish-manager/nish-manager.conf.
When executing the nish-manager command as a systemd service or as an interactive service, theconfiguration file must be placed in the /etc/nish-manager directory. This is the only location that the systemchecks for the file.
Table 5: Supported variables in NISH manager configuration file describes the options that are supported ina NISH manager configuration file.
Table 5: Supported variables in NISH manager configuration file
Variable Description Multiple optionsper file
NISH_MANAGER_RETENTION Time that an SR OS node or NISH clientconnection is retained as a valid node withinthe NISH manager without an update message,before it is expunged from the NISH manager
No
NISH_MANAGER_LISTEN_ ADDRESS
IPv4 or IPv6 address to which the NISH managerbinds; if multiple addresses are required, multipleNISH_ MANAGER_LISTEN_ADDRESS linesmust be provided, with one address per line
Default is "::", which indicates to bind to all IPv4and IPv6 addresses present on the system
Yes
NISH_MANAGER_LISTEN_ PORT
TCP port to which the NISH manager binds;if multiple ports are required, multiple NISH_MANAGER_ LISTEN_PORT lines must beprovided with one port per line
Default 57400 is used unless a NISH_ MANAGER_ LISTEN_PORT line is supplied
Yes
3HE 17157 AAAA TQZZA 01 © 2021 Nokia.Use subject to Terms available at: www.nokia.com.
39
SPACER TEXT
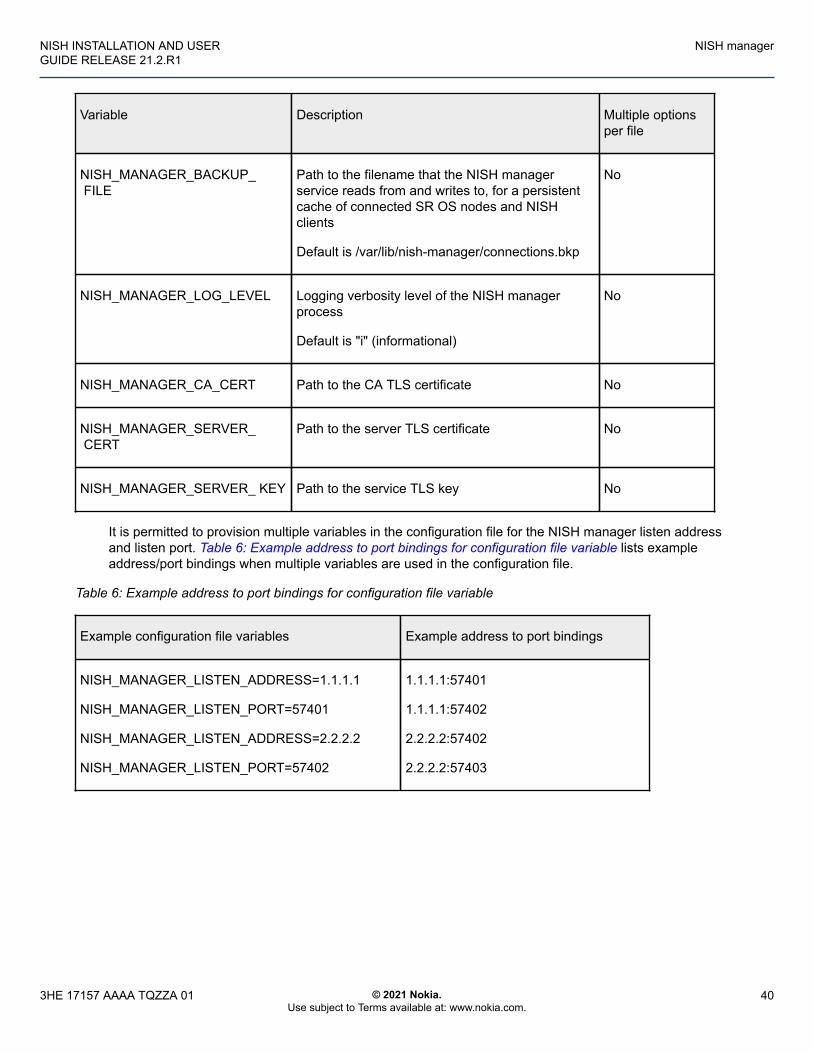
NISH INSTALLATION AND USERGUIDE RELEASE 21.2.R1
NISH manager
Variable Description Multiple optionsper file
NISH_MANAGER_BACKUP_ FILE
Path to the filename that the NISH managerservice reads from and writes to, for a persistentcache of connected SR OS nodes and NISHclients
Default is /var/lib/nish-manager/connections.bkp
No
NISH_MANAGER_LOG_LEVEL Logging verbosity level of the NISH managerprocess
Default is "i" (informational)
No
NISH_MANAGER_CA_CERT Path to the CA TLS certificate No
NISH_MANAGER_SERVER_ CERT
Path to the server TLS certificate No
NISH_MANAGER_SERVER_ KEY Path to the service TLS key No
It is permitted to provision multiple variables in the configuration file for the NISH manager listen addressand listen port. Table 6: Example address to port bindings for configuration file variable lists exampleaddress/port bindings when multiple variables are used in the configuration file.
Table 6: Example address to port bindings for configuration file variable
Example configuration file variables Example address to port bindings
NISH_MANAGER_LISTEN_ADDRESS=1.1.1.1
NISH_MANAGER_LISTEN_PORT=57401
NISH_MANAGER_LISTEN_ADDRESS=2.2.2.2
NISH_MANAGER_LISTEN_PORT=57402
1.1.1.1:57401
1.1.1.1:57402
2.2.2.2:57402
2.2.2.2:57403
3HE 17157 AAAA TQZZA 01 © 2021 Nokia.Use subject to Terms available at: www.nokia.com.
40
SPACER TEXT
NISH INSTALLATION AND USERGUIDE RELEASE 21.2.R1
Configuring NISH security
5 Configuring NISH securityThis chapter provides an example of a NISH security configuration. The NISH client and the NISHmanager use gRPC, which operates over the HTTP2 transport and can make use of TLS encryption. Thedefault gRPC TCP port is 57400.
To use TLS, the following certificates and keys are required:
• Certificate Authority (CA) certificate• Node certificate that contains all DNS names and IP addresses present on the nodes that are used to
manage the device• Node certificate key• NISH manager certificate that contains all DNS names and IP addresses to which all NISH manager
processes are bound• NISH manager certificate key
Note: The use of TLS is strongly recommended for all operational deployments. In labenvironments, the NISH client and NISH managers can operate without TLS.
All certificates must be signed by the provided Certificate Authority.
To start the NISH client in TLS mode, add the -t flag or --ca-cert option followed by the relative or absolutepath to the CA certificate file; for example, cacert.pem.
Note: A single CA certificate is supported.
To start the NISH manager in TLS mode, add the following flags or options:
• -k or --server-cert, followed by the relative or absolute path to the NISH manager certificate file; forexample, nish_manager_cert.pem
• -K or --server-key, followed by the relative or absolute path to the NISH manager certificate key file; forexample, nish_manager_key.pem
• -t or --ca-cert, followed by the relative or absolute path to the CA certificate file; for example,cacert.pem
The certificates must be copied in the SR OS nodes to successfully establish a secured connection.
Note: See the 7450 ESS, 7750 SR, 7950 XRS, and VSR System Management Guide for moreinformation about TLS and certificates.
The following procedure is an example of how to install the certificates for use with the NISH client andthe NISH manager. The example commands in the procedure assume the following filenames for thecertificates:
• node_cert.pem for the node certificate• node_key.pem for the node certificate key• cacert.pem for the CA certificate
Note: When installing certificates, operators must use commands appropriate for their encryptionenvironment.
3HE 17157 AAAA TQZZA 01 © 2021 Nokia.Use subject to Terms available at: www.nokia.com.
41
SPACER TEXT

NISH INSTALLATION AND USERGUIDE RELEASE 21.2.R1
Configuring NISH security
The following are example steps for NISH security configuration:
Procedure
1. Copy the SR OS node certificate, the node certificate key, and the CA certificate to the SR OS node.
2. Import the certificates into the SR OS certificate manager:
//admin certificate import type cert input cf3:/node_cert.pem # output node.cert format pem//admin certificate import type key input cf3:/node_key.pem # output node.key format pem//admin certificate import type cert input cf3:/cacert.pem # output cacert.pem format pem
Note: The // denotes that these SR OS commands are executed in the classic CLIenvironment.
3. Configure the certificate profile:
/configure system security tls cert-profile "grpc_cert_profile" admin-state enable/configure system security tls cert-profile "grpc_cert_profile" entry 1# certificate-file "node.cert"/configure system security tls cert-profile "grpc_cert_profile" entry 1 # key-file "node.key"
4. Configure the TLS cipher list:
/configure system security tls server-cipher-list "all" { }/configure system security tls server-cipher-list "all" cipher 1 name # tls-rsa-with3des-ede-cbc-sha/configure system security tls server-cipher-list "all" cipher 2 name# tls-rsa-with-aes128-cbc-sha/configure system security tls server-cipher-list "all" cipher 3 name # tls-rsa-with-aes128-cbc-sha256/configure system security tls server-cipher-list "all" cipher 4 name# tls-rsa-with-aes256-cbc-sha/configure system security tls server-cipher-list "all" cipher 5 name # tls-rsa-with-aes256-cbc-sha256
5. Configure the TLS server profile:
/configure system security tls server-tls-profile "grpc_tls_profile" # admin-state enable/configure system security tls server-tls-profile "grpc_tls_profile" # cert-profile "grpc_cert_profile"/configure system security tls server-tls-profile "grpc_tls_profile" # cipher-list "all"
6. Configure the client certificate:
/configure system security pki ca-profile "ca" admin-state enable/configure system security pki ca-profile "ca" cert-file "cacert.pem"/configure system security pki ca-profile "ca" revocation-check crl-optional/configure system security tls trust-anchor-profile "grpc_ca" { }/configure system security tls trust-anchor-profile "grpc_ca" { trust-anchor "ca"}
3HE 17157 AAAA TQZZA 01 © 2021 Nokia.Use subject to Terms available at: www.nokia.com.
42
SPACER TEXT

NISH INSTALLATION AND USERGUIDE RELEASE 21.2.R1
Configuring NISH security
7. Configure the client cipher list:
/configure system security tls client-cipher-list "all" { }/configure system security tls client-cipher-list "all" cipher 1 name # tls-rsa-with3des-ede-cbc-sha/configure system security tls client-cipher-list "all" cipher 2 name # tls-rsa-with-aes128-cbc-sha/configure system security tls client-cipher-list "all" cipher 3 name # tls-rsa-with-aes128-cbc-sha256/configure system security tls client-cipher-list "all" cipher 4 name # tls-rsa-with-aes256-cbc-sha/configure system security tls client-cipher-list "all" cipher 5 name # tls-rsa-with-aes256-cbc-sha256
8. Configure the client TLS profile:
/configure system security tls client-tls-profile "grpc_tls_client_profile" →admin-state enable/configure system security tls client-tls-profile "grpc_tls_client_profile" →cipher-list "all"/configure system security tls client-tls-profile "grpc_tls_client_profile" →trust-anchor-profile "grpc_ca"
9. Enable TLS protection for gRPC:
/configure system grpc tls-server-profile "grpc_tls_profile"
10. Enable TLS protection for the Remote Manager service (or per manager):
/configure system management-interface remote-management client-tls-profile # "grpc_tls_client_profile"
3HE 17157 AAAA TQZZA 01 © 2021 Nokia.Use subject to Terms available at: www.nokia.com.
43
SPACER TEXT
Customer Document and Product Support
Customer DocumentationCustomer Documentation Welcome Page
Technical SupportProduct Support Portal
Documentation FeedbackCustomer Documentation Feedback