NetIQ AppManager ResponseTime for Web Management Guide
234
Management Guide NetIQ ® AppManager ® ResponseTime for Web December 2018
-
Upload
khangminh22 -
Category
Documents
-
view
0 -
download
0
Transcript of NetIQ AppManager ResponseTime for Web Management Guide

Management GuideNetIQ® AppManager® ResponseTime for
Web
December 2018

Legal Notice
For information about NetIQ legal notices, disclaimers, warranties, export and other use restrictions, U.S. Government restricted rights, patent policy, and FIPS compliance, see https://www.netiq.com/company/legal/.
© 2018 NetIQ Corporation. All Rights Reserved.
For information about NetIQ trademarks, see https://www.netiq.com/company/legal/. All third-party trademarks are the property of their respective owners.

Contents
About this Book and the Library 7About NetIQ Corporation 9
1 Introducing AppManager ResponseTime for Web 11
1.1 Why Measure Response Time? . . . . . . . . . . . . . . . . . . . . . . . . . . . . . . . . . . . . . . . . . . . . . . . . . . . . . 111.2 The AppManager ResponseTime Modules . . . . . . . . . . . . . . . . . . . . . . . . . . . . . . . . . . . . . . . . . . . . 111.3 How AppManager ResponseTime for Web Works . . . . . . . . . . . . . . . . . . . . . . . . . . . . . . . . . . . . . . . 121.4 Components of AppManager ResponseTime for Web. . . . . . . . . . . . . . . . . . . . . . . . . . . . . . . . . . . . 14
2 Installing AppManager ResponseTime for Web 17
2.1 System Requirements . . . . . . . . . . . . . . . . . . . . . . . . . . . . . . . . . . . . . . . . . . . . . . . . . . . . . . . . . . . . 172.2 Turning off User Account Control for Windows Server 2008 and Windows Vista . . . . . . . . . . . . . . . 182.3 Upgrade Considerations . . . . . . . . . . . . . . . . . . . . . . . . . . . . . . . . . . . . . . . . . . . . . . . . . . . . . . . . . . 192.4 Determining Where to Install . . . . . . . . . . . . . . . . . . . . . . . . . . . . . . . . . . . . . . . . . . . . . . . . . . . . . . . 202.5 Permissions for Running Knowledge Scripts . . . . . . . . . . . . . . . . . . . . . . . . . . . . . . . . . . . . . . . . . . . 212.6 Installing the Module . . . . . . . . . . . . . . . . . . . . . . . . . . . . . . . . . . . . . . . . . . . . . . . . . . . . . . . . . . . . . 212.7 Deploying the Module with Control Center. . . . . . . . . . . . . . . . . . . . . . . . . . . . . . . . . . . . . . . . . . . . . 232.8 Silently Installing the Module . . . . . . . . . . . . . . . . . . . . . . . . . . . . . . . . . . . . . . . . . . . . . . . . . . . . . . . 232.9 Discovering Web-RT Resources . . . . . . . . . . . . . . . . . . . . . . . . . . . . . . . . . . . . . . . . . . . . . . . . . . . . 24
3 Understanding Web Recorder 27
3.1 How Web Recorder Can Help . . . . . . . . . . . . . . . . . . . . . . . . . . . . . . . . . . . . . . . . . . . . . . . . . . . . . . 273.2 Overview of Web Recorder . . . . . . . . . . . . . . . . . . . . . . . . . . . . . . . . . . . . . . . . . . . . . . . . . . . . . . . . 283.3 Web Recorder Components. . . . . . . . . . . . . . . . . . . . . . . . . . . . . . . . . . . . . . . . . . . . . . . . . . . . . . . . 293.4 Running a WebTransaction Knowledge Script . . . . . . . . . . . . . . . . . . . . . . . . . . . . . . . . . . . . . . . . . . 293.5 Running Multiple WebTransaction Knowledge Scripts on a Managed Client. . . . . . . . . . . . . . . . . . . 30
4 Recording with Web Recorder 33
4.1 Recording a Browsing Session . . . . . . . . . . . . . . . . . . . . . . . . . . . . . . . . . . . . . . . . . . . . . . . . . . . . . 334.2 Working with Session Cookies . . . . . . . . . . . . . . . . . . . . . . . . . . . . . . . . . . . . . . . . . . . . . . . . . . . . . . 344.3 Browser Window Features . . . . . . . . . . . . . . . . . . . . . . . . . . . . . . . . . . . . . . . . . . . . . . . . . . . . . . . . . 34
5 Editing Recorded Scripts 37
5.1 About the Script Editor . . . . . . . . . . . . . . . . . . . . . . . . . . . . . . . . . . . . . . . . . . . . . . . . . . . . . . . . . . . . 375.2 Script Editor Markers . . . . . . . . . . . . . . . . . . . . . . . . . . . . . . . . . . . . . . . . . . . . . . . . . . . . . . . . . . . . . 375.3 Using the Script Editor: an Example . . . . . . . . . . . . . . . . . . . . . . . . . . . . . . . . . . . . . . . . . . . . . . . . . 385.4 Step Types . . . . . . . . . . . . . . . . . . . . . . . . . . . . . . . . . . . . . . . . . . . . . . . . . . . . . . . . . . . . . . . . . . . . . 395.5 Manually Adding a Click Step. . . . . . . . . . . . . . . . . . . . . . . . . . . . . . . . . . . . . . . . . . . . . . . . . . . . . . . 465.6 Step Identifiers . . . . . . . . . . . . . . . . . . . . . . . . . . . . . . . . . . . . . . . . . . . . . . . . . . . . . . . . . . . . . . . . . . 465.7 Window Retrieval . . . . . . . . . . . . . . . . . . . . . . . . . . . . . . . . . . . . . . . . . . . . . . . . . . . . . . . . . . . . . . . . 465.8 Frame Retrieval . . . . . . . . . . . . . . . . . . . . . . . . . . . . . . . . . . . . . . . . . . . . . . . . . . . . . . . . . . . . . . . . . 495.9 Form Retrieval . . . . . . . . . . . . . . . . . . . . . . . . . . . . . . . . . . . . . . . . . . . . . . . . . . . . . . . . . . . . . . . . . . 495.10 Object Retrieval . . . . . . . . . . . . . . . . . . . . . . . . . . . . . . . . . . . . . . . . . . . . . . . . . . . . . . . . . . . . . . . . . 50
Contents 3

4 Con
5.11 Search and Advanced Search Steps . . . . . . . . . . . . . . . . . . . . . . . . . . . . . . . . . . . . . . . . . . . . . . . . . 515.12 Adding a Submit Form Step . . . . . . . . . . . . . . . . . . . . . . . . . . . . . . . . . . . . . . . . . . . . . . . . . . . . . . . . 545.13 Wildcard Editing . . . . . . . . . . . . . . . . . . . . . . . . . . . . . . . . . . . . . . . . . . . . . . . . . . . . . . . . . . . . . . . . . 555.14 Defining Custom Attributes. . . . . . . . . . . . . . . . . . . . . . . . . . . . . . . . . . . . . . . . . . . . . . . . . . . . . . . . . 565.15 Failure Event Notes . . . . . . . . . . . . . . . . . . . . . . . . . . . . . . . . . . . . . . . . . . . . . . . . . . . . . . . . . . . . . . 585.16 Checking in the Knowledge Script . . . . . . . . . . . . . . . . . . . . . . . . . . . . . . . . . . . . . . . . . . . . . . . . . . . 58
6 Web Recorder Playback 61
6.1 About Playback in Web Recorder . . . . . . . . . . . . . . . . . . . . . . . . . . . . . . . . . . . . . . . . . . . . . . . . . . . 616.2 Playback Features . . . . . . . . . . . . . . . . . . . . . . . . . . . . . . . . . . . . . . . . . . . . . . . . . . . . . . . . . . . . . . . 626.3 Playing Back and Verifying a Recording . . . . . . . . . . . . . . . . . . . . . . . . . . . . . . . . . . . . . . . . . . . . . . 626.4 Running WebTransaction Knowledge Scripts . . . . . . . . . . . . . . . . . . . . . . . . . . . . . . . . . . . . . . . . . . 636.5 Running Multiple WebTransaction Jobs on a Single Computer . . . . . . . . . . . . . . . . . . . . . . . . . . . . . 636.6 Customizing Navigate Errors Playback Behavior. . . . . . . . . . . . . . . . . . . . . . . . . . . . . . . . . . . . . . . . 666.7 Managed Client Security . . . . . . . . . . . . . . . . . . . . . . . . . . . . . . . . . . . . . . . . . . . . . . . . . . . . . . . . . . 706.8 Optimizing Your Environment for Accurate Response-Time Testing . . . . . . . . . . . . . . . . . . . . . . . . . 71
7 Web Recorder Analytical Tools 73
7.1 The HTML Structure View . . . . . . . . . . . . . . . . . . . . . . . . . . . . . . . . . . . . . . . . . . . . . . . . . . . . . . . . . 737.2 Object Properties . . . . . . . . . . . . . . . . . . . . . . . . . . . . . . . . . . . . . . . . . . . . . . . . . . . . . . . . . . . . . . . . 777.3 The Session Transcript View . . . . . . . . . . . . . . . . . . . . . . . . . . . . . . . . . . . . . . . . . . . . . . . . . . . . . . . 77
8 Fine-Tuning Scripts for Playback 83
8.1 Web Recorder Options. . . . . . . . . . . . . . . . . . . . . . . . . . . . . . . . . . . . . . . . . . . . . . . . . . . . . . . . . . . . 838.2 The Timers Tab. . . . . . . . . . . . . . . . . . . . . . . . . . . . . . . . . . . . . . . . . . . . . . . . . . . . . . . . . . . . . . . . . . 838.3 The Recording Tab . . . . . . . . . . . . . . . . . . . . . . . . . . . . . . . . . . . . . . . . . . . . . . . . . . . . . . . . . . . . . . . 858.4 The Session Transcript Tab . . . . . . . . . . . . . . . . . . . . . . . . . . . . . . . . . . . . . . . . . . . . . . . . . . . . . . . . 858.5 The Knowledge Script Tab . . . . . . . . . . . . . . . . . . . . . . . . . . . . . . . . . . . . . . . . . . . . . . . . . . . . . . . . . 878.6 Step-Identifying Variables. . . . . . . . . . . . . . . . . . . . . . . . . . . . . . . . . . . . . . . . . . . . . . . . . . . . . . . . . . 898.7 The Recorder Tab. . . . . . . . . . . . . . . . . . . . . . . . . . . . . . . . . . . . . . . . . . . . . . . . . . . . . . . . . . . . . . . . 908.8 How Response Time Is Measured . . . . . . . . . . . . . . . . . . . . . . . . . . . . . . . . . . . . . . . . . . . . . . . . . . . 918.9 Delay Steps, Timers, and Playback Speed . . . . . . . . . . . . . . . . . . . . . . . . . . . . . . . . . . . . . . . . . . . . 92
9 Playback and WebTransaction Results 93
9.1 Playback Results . . . . . . . . . . . . . . . . . . . . . . . . . . . . . . . . . . . . . . . . . . . . . . . . . . . . . . . . . . . . . . . . 939.2 Response-Time Messages. . . . . . . . . . . . . . . . . . . . . . . . . . . . . . . . . . . . . . . . . . . . . . . . . . . . . . . . . 959.3 How Search Step Timings Are Handled . . . . . . . . . . . . . . . . . . . . . . . . . . . . . . . . . . . . . . . . . . . . . . . 959.4 WebTransaction Data Points . . . . . . . . . . . . . . . . . . . . . . . . . . . . . . . . . . . . . . . . . . . . . . . . . . . . . . . 969.5 Events and Event Details . . . . . . . . . . . . . . . . . . . . . . . . . . . . . . . . . . . . . . . . . . . . . . . . . . . . . . . . . . 989.6 Browser Snapshots . . . . . . . . . . . . . . . . . . . . . . . . . . . . . . . . . . . . . . . . . . . . . . . . . . . . . . . . . . . . . . 99
10 Troubleshooting Web Recorder Playback 101
10.1 Web Recorder Error Codes . . . . . . . . . . . . . . . . . . . . . . . . . . . . . . . . . . . . . . . . . . . . . . . . . . . . . . . 10110.2 Knowledge Script Error: The Web-RT Managed Object Requires that a User Be Logged in . . . . . 10410.3 Knowledge Script Error: The Knowledge Script Requires AppManager ResponseTime for
Web Version n.n.n.n or Higher to Run Properly . . . . . . . . . . . . . . . . . . . . . . . . . . . . . . . . . . . . . . . . . . . . 104
10.4 Knowledge Script Error: ConfigJob Failed Unexpectedly. . . . . . . . . . . . . . . . . . . . . . . . . . . . . . . . . 10410.5 Knowledge Script Error: The Web-RT Managed Object Is Not Installed . . . . . . . . . . . . . . . . . . . . . 105
tents

10.6 Script Error: Unable to Get Any Information About the Nature of the Error . . . . . . . . . . . . . . . . . . . 10510.7 Script Error: Object Loading Error on Line N . . . . . . . . . . . . . . . . . . . . . . . . . . . . . . . . . . . . . . . . . 10510.8 Playback Error: Unable to Locate the Specified Browser Window. . . . . . . . . . . . . . . . . . . . . . . . . . 10510.9 Playback Error: Not Enough Information to Locate the Browser Window . . . . . . . . . . . . . . . . . . . . 10610.10 Playback Error: The Actual Popup Window Is Not the One Expected . . . . . . . . . . . . . . . . . . . . . . . 10710.11 Playback Error: There Is No Popup Window at this Time . . . . . . . . . . . . . . . . . . . . . . . . . . . . . . . . 10710.12 Playback Error: Unable to Locate the Window. . . . . . . . . . . . . . . . . . . . . . . . . . . . . . . . . . . . . . . . . 10810.13 Playback Error: Unable to Locate the Specified Object . . . . . . . . . . . . . . . . . . . . . . . . . . . . . . . . . . 10810.14 Playback Error: “Retrieve Object” Parameter Is Missing . . . . . . . . . . . . . . . . . . . . . . . . . . . . . . . . . 11010.15 Playback Error: Unable to Locate the Specified Frame . . . . . . . . . . . . . . . . . . . . . . . . . . . . . . . . . . 11010.16 Playback Error: Unable to Locate the Specified Form . . . . . . . . . . . . . . . . . . . . . . . . . . . . . . . . . . . 11110.17 Playback Error: An Unknown Dialog Box Showed Up and Was Unexpected . . . . . . . . . . . . . . . . . 11210.18 Playback Error: Unable to Get the WinClick Mutex . . . . . . . . . . . . . . . . . . . . . . . . . . . . . . . . . . . . . 11310.19 Playback Error: Unable to Create the WinClick Mutex. . . . . . . . . . . . . . . . . . . . . . . . . . . . . . . . . . . 11310.20 Playback Error: The Web Page Is Empty. There May Be a Problem with the Web Server . . . . . . . 11410.21 Playback Error: Unable to Create Main Window . . . . . . . . . . . . . . . . . . . . . . . . . . . . . . . . . . . . . . . 11410.22 Playback Error: The Job Was Aborted Because It Was Using Internet Explorer Resources for
Too Long . . . . . . . . . . . . . . . . . . . . . . . . . . . . . . . . . . . . . . . . . . . . . . . . . . . . . . . . . . . . . . . . . . . . . 11410.23 Playback Error: The Job Was Aborted. Unable to Create New Thread . . . . . . . . . . . . . . . . . . . . . . 11410.24 Playback Error: The Job Was Aborted Because It Failed to Obtain Internet Explorer
Resources Before Timing Out . . . . . . . . . . . . . . . . . . . . . . . . . . . . . . . . . . . . . . . . . . . . . . . . . . . . . 11510.25 Playback Error: The Job Was Aborted. Unable to Create Semaphore. The System May Be
Out of Resources . . . . . . . . . . . . . . . . . . . . . . . . . . . . . . . . . . . . . . . . . . . . . . . . . . . . . . . . . . . . . . . 11510.26 Playback Error: Unable to Allocate _pWebManager Object. May Not Be Registered . . . . . . . . . . . 11610.27 Playback Error: The SCRIPT Property Is Not Set or Empty. . . . . . . . . . . . . . . . . . . . . . . . . . . . . . . 11610.28 Playback Error: Unable to Validate the Script Version . . . . . . . . . . . . . . . . . . . . . . . . . . . . . . . . . . . 11610.29 Playback Error: This Knowledge Script Was Recorded with NetIQ Web Recorder Vx . . . . . . . . . . 11610.30 Playback Error: An Error Occurred in Microsoft Internet Explorer . . . . . . . . . . . . . . . . . . . . . . . . . . 11710.31 Playback Error: AppManager ResponseTime for Web Cannot Take Control of the Desktop. . . . . . 11710.32 Playback Error: Search Failed, Text Not Found . . . . . . . . . . . . . . . . . . . . . . . . . . . . . . . . . . . . . . . . 11710.33 Playback Error: Advanced Search Step Failed, Object Not Found . . . . . . . . . . . . . . . . . . . . . . . . . 11810.34 Playback Error: Text Search Field Is Empty . . . . . . . . . . . . . . . . . . . . . . . . . . . . . . . . . . . . . . . . . . . 11910.35 Playback Error: Search Failed, Text Found . . . . . . . . . . . . . . . . . . . . . . . . . . . . . . . . . . . . . . . . . . . 11910.36 Playback Error: Advanced Search Failed, Object Found . . . . . . . . . . . . . . . . . . . . . . . . . . . . . . . . . 11910.37 Domain Integrity Violation . . . . . . . . . . . . . . . . . . . . . . . . . . . . . . . . . . . . . . . . . . . . . . . . . . . . . . . . 11910.38 Difficulty Determining Source of Step Failure. . . . . . . . . . . . . . . . . . . . . . . . . . . . . . . . . . . . . . . . . . 12010.39 Difficulties Recording Dialog Boxes, ActiveX, Objects, and Embeds . . . . . . . . . . . . . . . . . . . . . . . . 12010.40 Problems Recording HTML Steps . . . . . . . . . . . . . . . . . . . . . . . . . . . . . . . . . . . . . . . . . . . . . . . . . . 12110.41 Known Limitations . . . . . . . . . . . . . . . . . . . . . . . . . . . . . . . . . . . . . . . . . . . . . . . . . . . . . . . . . . . . . . 121
11 Using URL Check Recorder 123
11.1 Getting Started . . . . . . . . . . . . . . . . . . . . . . . . . . . . . . . . . . . . . . . . . . . . . . . . . . . . . . . . . . . . . . . . . 12311.2 Recorder Options . . . . . . . . . . . . . . . . . . . . . . . . . . . . . . . . . . . . . . . . . . . . . . . . . . . . . . . . . . . . . . . 12411.3 Script Options Tab . . . . . . . . . . . . . . . . . . . . . . . . . . . . . . . . . . . . . . . . . . . . . . . . . . . . . . . . . . . . . . 12511.4 Script Options. . . . . . . . . . . . . . . . . . . . . . . . . . . . . . . . . . . . . . . . . . . . . . . . . . . . . . . . . . . . . . . . . . 12611.5 URLs Tab . . . . . . . . . . . . . . . . . . . . . . . . . . . . . . . . . . . . . . . . . . . . . . . . . . . . . . . . . . . . . . . . . . . . . 12711.6 Checking in a URLCheck Knowledge Script . . . . . . . . . . . . . . . . . . . . . . . . . . . . . . . . . . . . . . . . . . 13111.7 URL Properties. . . . . . . . . . . . . . . . . . . . . . . . . . . . . . . . . . . . . . . . . . . . . . . . . . . . . . . . . . . . . . . . . 13211.8 Default URL Properties . . . . . . . . . . . . . . . . . . . . . . . . . . . . . . . . . . . . . . . . . . . . . . . . . . . . . . . . . . 137
Contents 5
6 Con
12 URLCheck Results 143
12.1 Script Options and Results. . . . . . . . . . . . . . . . . . . . . . . . . . . . . . . . . . . . . . . . . . . . . . . . . . . . . . . . 14312.2 URL Verification Summary . . . . . . . . . . . . . . . . . . . . . . . . . . . . . . . . . . . . . . . . . . . . . . . . . . . . . . . . 14412.3 URL Redirection . . . . . . . . . . . . . . . . . . . . . . . . . . . . . . . . . . . . . . . . . . . . . . . . . . . . . . . . . . . . . . . . 14412.4 URLCheck Events . . . . . . . . . . . . . . . . . . . . . . . . . . . . . . . . . . . . . . . . . . . . . . . . . . . . . . . . . . . . . . 14512.5 Individual and Overall Events. . . . . . . . . . . . . . . . . . . . . . . . . . . . . . . . . . . . . . . . . . . . . . . . . . . . . . 14612.6 Data Details in Events and Data Points . . . . . . . . . . . . . . . . . . . . . . . . . . . . . . . . . . . . . . . . . . . . . . 14712.7 Knowledge Script Options . . . . . . . . . . . . . . . . . . . . . . . . . . . . . . . . . . . . . . . . . . . . . . . . . . . . . . . . 14812.8 Status Codes . . . . . . . . . . . . . . . . . . . . . . . . . . . . . . . . . . . . . . . . . . . . . . . . . . . . . . . . . . . . . . . . . . 153
13 Web-RT Knowledge Scripts 163
13.1 AppManager ResponseTime for Web Version Compatibility . . . . . . . . . . . . . . . . . . . . . . . . . . . . . . 16413.2 CheckURL . . . . . . . . . . . . . . . . . . . . . . . . . . . . . . . . . . . . . . . . . . . . . . . . . . . . . . . . . . . . . . . . . . . . 16713.3 FTP. . . . . . . . . . . . . . . . . . . . . . . . . . . . . . . . . . . . . . . . . . . . . . . . . . . . . . . . . . . . . . . . . . . . . . . . . . 17813.4 NNTPConnect . . . . . . . . . . . . . . . . . . . . . . . . . . . . . . . . . . . . . . . . . . . . . . . . . . . . . . . . . . . . . . . . . 18113.5 ReceiveInternetMail . . . . . . . . . . . . . . . . . . . . . . . . . . . . . . . . . . . . . . . . . . . . . . . . . . . . . . . . . . . . . 18313.6 Report_Web-RT_Mail. . . . . . . . . . . . . . . . . . . . . . . . . . . . . . . . . . . . . . . . . . . . . . . . . . . . . . . . . . . . 18613.7 Report_Web-RT_Steps . . . . . . . . . . . . . . . . . . . . . . . . . . . . . . . . . . . . . . . . . . . . . . . . . . . . . . . . . . 18813.8 Report_Web-RT_URLCheck . . . . . . . . . . . . . . . . . . . . . . . . . . . . . . . . . . . . . . . . . . . . . . . . . . . . . . 19013.9 Report_Web-RT_Web . . . . . . . . . . . . . . . . . . . . . . . . . . . . . . . . . . . . . . . . . . . . . . . . . . . . . . . . . . . 19213.10 SendAndReceiveInternetMail. . . . . . . . . . . . . . . . . . . . . . . . . . . . . . . . . . . . . . . . . . . . . . . . . . . . . . 19413.11 SendInternetMail . . . . . . . . . . . . . . . . . . . . . . . . . . . . . . . . . . . . . . . . . . . . . . . . . . . . . . . . . . . . . . . 19813.12 SMTPConnect . . . . . . . . . . . . . . . . . . . . . . . . . . . . . . . . . . . . . . . . . . . . . . . . . . . . . . . . . . . . . . . . . 20113.13 TakeDesktopOwnership . . . . . . . . . . . . . . . . . . . . . . . . . . . . . . . . . . . . . . . . . . . . . . . . . . . . . . . . . . 20313.14 URLCheck . . . . . . . . . . . . . . . . . . . . . . . . . . . . . . . . . . . . . . . . . . . . . . . . . . . . . . . . . . . . . . . . . . . . 20413.15 WebTransaction . . . . . . . . . . . . . . . . . . . . . . . . . . . . . . . . . . . . . . . . . . . . . . . . . . . . . . . . . . . . . . . . 207
14 Troubleshooting AppManager ResponseTime for Web 213
14.1 Result Differences between URLCheck and WebTransaction Knowledge Scripts . . . . . . . . . . . . . 21314.2 Problems with Installation . . . . . . . . . . . . . . . . . . . . . . . . . . . . . . . . . . . . . . . . . . . . . . . . . . . . . . . . 21414.3 Problems with URL Check Recorder . . . . . . . . . . . . . . . . . . . . . . . . . . . . . . . . . . . . . . . . . . . . . . . . 21514.4 Problems with Discovery . . . . . . . . . . . . . . . . . . . . . . . . . . . . . . . . . . . . . . . . . . . . . . . . . . . . . . . . . 21714.5 Problems Running Knowledge Scripts . . . . . . . . . . . . . . . . . . . . . . . . . . . . . . . . . . . . . . . . . . . . . . . 22114.6 Problems Running Internet Mail Knowledge Scripts . . . . . . . . . . . . . . . . . . . . . . . . . . . . . . . . . . . . 22614.7 Compatibility Issues with Windows 10 . . . . . . . . . . . . . . . . . . . . . . . . . . . . . . . . . . . . . . . . . . . . . . . 232
tents

About this Book and the Library
The NetIQ AppManager product (AppManager) is a comprehensive solution for managing, diagnosing, and analyzing performance, availability, and health for a broad spectrum of operating environments, applications, services, and server hardware.
AppManager provides system administrators with a central, easy-to-use console to view critical server and application resources across the enterprise. With AppManager, administrative staff can monitor computer and application resources, check for potential problems, initiate responsive actions, automate routine tasks, and gather performance data for real-time and historical reporting and analysis.
Intended AudienceThis guide provides information for individuals responsible for installing an AppManager module and monitoring specific applications with AppManager.
Other Information in the LibraryThe library provides the following information resources:
Installation Guide for AppManager
Provides complete information about AppManager pre-installation requirements and step-by-step installation procedures for all AppManager components.
User Guide for AppManager Control Center
Provides complete information about managing groups of computers, including running jobs, responding to events, creating reports, and working with Control Center. A separate guide is available for the AppManager Operator Console.
Administrator Guide for AppManager
Provides information about maintaining an AppManager management site, managing security, using scripts to handle AppManager tasks, and leveraging advanced configuration options.
Upgrade and Migration Guide for AppManager
Provides complete information about how to upgrade from a previous version of AppManager.
Management guides
Provide information about installing and monitoring specific applications with AppManager.
Help
Provides context-sensitive information and step-by-step guidance for common tasks, as well as definitions for each field on each window.
The AppManager library is available in Adobe Acrobat (PDF) format from the AppManager Documentation page of the NetIQ Web site.
About this Book and the Library 7

8 About this Book and the Library

About NetIQ Corporation
We are a global, enterprise software company, with a focus on the three persistent challenges in your environment: Change, complexity and risk—and how we can help you control them.
Our ViewpointAdapting to change and managing complexity and risk are nothing new
In fact, of all the challenges you face, these are perhaps the most prominent variables that deny you the control you need to securely measure, monitor, and manage your physical, virtual, and cloud computing environments.
Enabling critical business services, better and faster
We believe that providing as much control as possible to IT organizations is the only way to enable timelier and cost effective delivery of services. Persistent pressures like change and complexity will only continue to increase as organizations continue to change and the technologies needed to manage them become inherently more complex.
Our PhilosophySelling intelligent solutions, not just software
In order to provide reliable control, we first make sure we understand the real-world scenarios in which IT organizations like yours operate — day in and day out. That's the only way we can develop practical, intelligent IT solutions that successfully yield proven, measurable results. And that's so much more rewarding than simply selling software.
Driving your success is our passion
We place your success at the heart of how we do business. From product inception to deployment, we understand that you need IT solutions that work well and integrate seamlessly with your existing investments; you need ongoing support and training post-deployment; and you need someone that is truly easy to work with — for a change. Ultimately, when you succeed, we all succeed.
Our Solutions Identity & Access Governance
Access Management
Security Management
Systems & Application Management
Workload Management
Service Management
About NetIQ Corporation 9

Contacting Sales SupportFor questions about products, pricing, and capabilities, contact your local partner. If you cannot contact your partner, contact our Sales Support team.
Contacting Technical SupportFor specific product issues, contact our Technical Support team.
Contacting Documentation SupportOur goal is to provide documentation that meets your needs. If you have suggestions for improvements, click Add Comment at the bottom of any page in the HTML versions of the documentation posted at www.netiq.com/documentation. You can also email [email protected]. We value your input and look forward to hearing from you.
Contacting the Online User CommunityQmunity, the NetIQ online community, is a collaborative network connecting you to your peers and NetIQ experts. By providing more immediate information, useful links to helpful resources, and access to NetIQ experts, Qmunity helps ensure you are mastering the knowledge you need to realize the full potential of IT investments upon which you rely. For more information, visit http://community.netiq.com.
Worldwide: www.netiq.com/about_netiq/officelocations.asp
United States and Canada: 1-888-323-6768
Email: [email protected]
Web Site: www.netiq.com
Worldwide: www.netiq.com/support/contactinfo.asp
North and South America: 1-713-418-5555
Europe, Middle East, and Africa: +353 (0) 91-782 677
Email: [email protected]
Web Site: www.netiq.com/support
10 About NetIQ Corporation
1 1Introducing AppManager ResponseTime for Web
AppManager ResponseTime for Web helps you monitor your organization’s Web infrastructure to ensure availability and performance of critical sites and services. The Web-RT Knowledge Scripts included with AppManager ResponseTime for Web can identify problems a visitor may encounter when accessing a Web site. These Knowledge Scripts monitor the availability and response time of individual Web links, pages, and transactions, as well as the health of services such as SMTP, POP, and FTP.
AppManager ResponseTime for Web tracks Web site performance over the course of a day, a week, or a year, showing you when performance peaks and dips are occurring and their severity. AppManager ResponseTime for Web can determine whether users are able to download not only a particular page but all the objects on the page and can complete transactions.
Knowledge Scripts help you find the periods of the day or week when a Web site slows down or becomes unavailable because of server or network overload, or because the Web server itself accesses another overtaxed server or database.
This chapter provides a brief introduction to AppManager ResponseTime for Web and an overview of important concepts and terminology.
1.1 Why Measure Response Time?Response time is perhaps the best metric for reporting on the performance of your IT infrastructure. Response time is the metric that is most often experienced by and comprehensible to end users, those for whom the infrastructure must perform as well as it possibly can.
Along with measuring response time, the AppManager ResponseTime modules also measure availability, another key metric that really matters to end users.
With the AppManager ResponseTime modules, you can measure or test the response time and availability of key servers, along with that of the network itself, for different geographies and applications, gathering the information you need for both managing and reporting on network performance.
1.2 The AppManager ResponseTime ModulesThe AppManager ResponseTime modules were designed to measure the response time and availability of a client/server transaction from the client perspective. In that sense, AppManager ResponseTime modules are different from other AppManager modules, which run on the server to measure and monitor server activities.
Therefore, ResponseTime modules are normally installed only on client computers and not on the application servers themselves.
Introducing AppManager ResponseTime for Web 11

The following modules make up the AppManager ResponseTime family:
1.3 How AppManager ResponseTime for Web WorksThe strategy that the AppManager ResponseTime modules deploy for measuring network and server response time and availability is based on synthetic network transactions.
Whenever you run a job using one of the ResponseTime Knowledge Scripts, an agent performs a transaction involving the real application server you want to test. Transactions performed for response-time testing are automated in the sense that no actual user is involved. The AppManager ResponseTime modules perform transactions to monitor performance and availability.
The ResponseTime modules monitor system performance at the application layer. So you not only find out how well the system is performing, you also find out how well Web or NNTP server transactions are performing.
Module Name Knowledge Script Category Name
What Is Monitored
AppManager ResponseTime for Microsoft Active Directory
AD-RT Microsoft Active Directory and DNS transactions
AppManager ResponseTime for Microsoft Exchange
Exchange-RT Microsoft Outlook transactions
AppManager ResponseTime for Networks
Networks-RT Simulated transactions for many popular applications to measure network performance
AppManager ResponseTime for Oracle Database
Oracle-RT ODBC and ADO Transactions to Oracle Servers
AppManager ResponseTime for Microsoft SQL Server
SQL-RT ODBC and ADO transactions to Microsoft SQL Server
AppManager ResponseTime for Web
Web-RT Web, Internet Mail, and News (NNTP) transactions
This module allows you to record a Web-browsing session and “play back” automated transactions to measure response time.
AppManager ResponseTime for Windows
Windows-RT Windows transactions
This module allows you to record and “play back” automated transactions from any 32-bit or 64-bit Windows or Citrix client.
12 Introducing AppManager ResponseTime for Web

1.3.1 ResponseTime Module Architecture
Most AppManager ResponseTime modules have two parts:
A shared managed object component, QCMA.dll, installed in NetIQ\AppManager\bin. The managed object handles tasks associated with starting the ResponseTime engine process used by most ResponseTime modules.
NOTE: This component requires the netiqmc agent process to run as Local System, which allows the agent to start the engine processes as different users. For more information, see Section 2.5, “Permissions for Running Knowledge Scripts,” on page 21.
A ResponseTime engine process that handles the transaction. Module-specific engines are installed in %CommonProgramFiles%\Netiq\ResponseTime.
These engine processes run under the user account you specify in the Knowledge Script.
Depending on the application transaction to be simulated by the Knowledge Script job, the ResponseTime engine may need to impersonate a user or log on to the application server. When necessary, the ResponseTime engine uses the values you supply for the Run As parameters in a Knowledge Script to impersonate a logged-in user and instantiate the application.
1.3.2 Response-Time Test Results
The results you get from response-time testing with one of the Web-RT Knowledge Scripts are extremely accurate because the client, network, or server is running a transaction that acts just like a real transaction from the monitored server or client, and AppManager is timing that transaction. Client-server emulation also lets you test your system the way end-users use it every day and see the same results and performance that end-users are seeing.
When a response-time transaction runs, the agent measures the time taken to complete the transaction. This value is then returned as the Response Time data point. For most ResponseTime Knowledge Scripts, you have the option to collect two types of data points:
Availability: Web-RT always creates the Availability data point if the transaction is initialized and starts, meaning that the ResponseTime engine process is started. If the transaction completes without error, Web-RT creates a data point of 1 or 100, depending on the data stream format. Otherwise, the data point is 0.
If initialization errors prevents the ResponseTime engine from starting, Web-RT does not create the Availability data point. Instead, Web-RT generates a Transaction Initialization Error event.
Response Time: Web-RT creates the Response Time data point if the transaction completes successfully. The value of the data point is the total number of seconds it took to run the transaction.
In addition, some Web-RT Knowledge Scripts offer an option to collect up to five additional Response Time Breakdown data streams. These data streams are individual data points for the different parts of the Knowledge Script transaction that are timed. For more information, see Chapter 13, “Web-RT Knowledge Scripts,” on page 163.
Introducing AppManager ResponseTime for Web 13

1.4 Components of AppManager ResponseTime for WebThe Web Recorder and URL Check Recorder extensions to AppManager ResponseTime for Web let you create and customize Knowledge Scripts to focus on specific aspects of Web site performance. These Knowledge Scripts can also collect data to help you track the performance of Web sites and services over time, for example, during peak usage periods.
1.4.1 Web Recorder
Web Recorder helps you sit in a user’s seat and see a Web site through the user’s eyes. To do that, Web Recorder relies on Microsoft Internet Explorer to create a real browser session.
The Knowledge Scripts you create with Web Recorder (WebRecorder.exe) are based on recorded sessions that begin with accessing an actual URL on the World Wide Web and performing a transaction. During Playback, the WebTransaction Knowledge Scripts you recorded run on a client computer and measure results for response time and availability.
For more information, see Section 4.1, “Recording a Browsing Session,” on page 33.
1.4.2 URL Check Recorder
Unlike Web Recorder, URL Check Recorder (LWWCONFIG.exe) does not attempt to recreate a user’s experience accessing a Web site. Instead, it is designed to access a Web server the way an application or another Web server would. It does not use Internet Explorer, but instead makes use of WinINET or WinHTTP API calls.
A URLCheck Knowledge Script you create with URL Check Recorder simply reads the base document downloaded upon accessing a URL. From the base document, it can perform various checks and measurements that depend on the various Knowledge Script options you selected when you created the URLCheck Knowledge Script in URL Check Recorder.
A URLCheck Knowledge Script can list links and objects, download objects, and validate links and objects, as well as perform searches for links, objects, or strings. URLCheck Knowledge Scripts can measure the following values:
Basic page availability as a percentage
Connection time: the time taken to connect to the site
Download time: the time taken to download an entire page
For more information, see Section 11.1, “Getting Started,” on page 123.
1.4.3 Comparison of AppManager ResponseTime for Web Extensions
The following table summarizes other differences between the Web Recorder and URL Check Recorder:
Features Web Recorder URL Check Recorder
Knowledge Scripts generated Web-RT_WebTransaction Web-RT_URLCheck
14 Introducing AppManager ResponseTime for Web

1.4.4 Web-RT Managed Object
The final component of AppManager ResponseTime for Web, the Web-RT managed object, is installed on the computers where the Web-RT Knowledge Scripts will run, known as managed clients. When you install the Web-RT managed object, you also install the two recording extensions, Web Recorder and URL Check Recorder.
The managed object can be installed on a computer behind your organization’s firewall to monitor a Web site over the Intranet, or outside the firewall, to monitor a Web site from outside the organization over the Internet. Behind the firewall, a Web-RT managed client ensures that a Web site is serving pages and content correctly. Outside a firewall, a Web-RT managed client verifies that a user can access the Web site through the firewall. You may want to monitor a Web site in both modes to ensure that a Web site is serving content correctly, and to verify that your firewall, ISP, or other Internet connection is providing the expected level of service.
Depending on where you place managed clients, you can use the Web-RT Knowledge Scripts to monitor external Web sites, or you can use them to monitor your company’s Intranet to ensure that critical applications, such as Web-based supply-chain, Sales, or Human Resources applications, are always available. Web-RT managed objects deployed on computers on the Intranet can help you to
Data streams collected Response time: The time taken by Internet Explorer to download Web site components.
Download time: The time taken by a requesting application to download Web site components.
Connection time: The time taken by a requesting application to connect to a Web page and download the first byte of data from it.
Mechanism used for Web page rendering
Internet Explorer WinHTTP (using MSHTML)
What is timed Download time is measured as the time from when Web Recorder receives a BeginDownload signal from Internet Explorer to when Web Recorder receives a DownloadComplete signal from Internet Explorer.
Download time is measured as the time taken to download the page and all objects (timed separately), using MSHTML to locate all objects to download.
Connection time is measured as the time taken to establish a connection to the page and download a single byte of data.
What it can handle ActiveX, Java, scripting languages, Internet Explorer popup dialog boxes, Windows Authentication, Secure Sockets Layer authentication protocol, proxy servers.
Windows Authentication, Secure Sockets Layer authentication protocol, proxy servers
Availability defined as The recorded transaction completes without errors.
A connection to the page is successfully made.
Significance of caching? Caching is important. If Internet Explorer is set to cache page content, pages are rendered much more quickly. This may not represent a typical user’s experience with a Web page.
None
Features Web Recorder URL Check Recorder
Introducing AppManager ResponseTime for Web 15

distinguish Internet connectivity problems from Web server or internal network failures, eliminating costly guesswork and lengthy troubleshooting of Web site failures. For more information, see Section 2.4, “Determining Where to Install,” on page 20.
16 Introducing AppManager ResponseTime for Web

2 2Installing AppManager ResponseTime for Web
This chapter provides installation instructions and describes system requirements and what is included with AppManager ResponseTime for Web.
This chapter assumes you have AppManager installed. For more information about installing AppManager or about AppManager system requirements, see the Installation Guide for AppManager on the AppManager Documentation page.
If you are upgrading from a previous version, read Section 2.3, “Upgrade Considerations,” on page 19 before you proceed.
2.1 System RequirementsFor the latest information about supported software versions and the availability of module updates, visit the AppManager Supported Products page. Unless noted otherwise, this module supports all updates, hotfixes, and service packs for the releases listed below.
AppManager ResponseTime for Web version has the following requirements:
Software/Hardware Version
NetIQ AppManager installed on the AppManager repository (QDB) computers, on the Web Recorder computers you want to monitor (agents), on all console computers, and on any computer where you want to run Web Recorder or URL Check Recorder
8.0.3, 8.2, 9.1, 9.2, 9.5, or later
One of the following AppManager agents are required:
AppManager agent 7.0.4 with hotfix 72616 or later
AppManager agent 8.0.3, 8.2, 9.1, 9.2, 9.5, or later
Microsoft Windows operating system on the agent computers
One of the following:
Windows Server 2016
Windows 10 (64-bit)
Windows Server 2012 R2
Windows Server 2012
Windows 8 (32-bit and 64-bit)
Windows Server 2008 R2
Windows Server 2008 (32-bit and 64-bit)
Windows 7 (32-bit and 64-bit)
Windows Vista (32-bit and 64-bit)
Windows Server 2003 R2 (32-bit and 64-bit)
Windows XP Professional with Service Pack 3 (32-bit and 64-bit)
Microsoft Internet Explorer installed on the console and agent computers
8.0, 9.0, 10.0 or later
Installing AppManager ResponseTime for Web 17

AppManager ResponseTime for Web also has the following requirements:
Any agent computer where you plan to run WebTransaction Knowledge Scripts created using the Web Recorder requires a logged-in user.
You cannot run the Knowledge Scripts through a Terminal Services session unless you use the /console command line parameter. For more information about command line parameters, see the Remote Desktop Connection documentation.
If you encounter problems using this module with a later version of your application, contact NetIQ Technical Support.
NOTE: If you want TLS 1.2 support and are running AppManager 9.1 or 9.2, then you are required to perform some additional steps. To know about the steps, see the article.
2.2 Turning off User Account Control for Windows Server 2008 and Windows VistaBefore installing AppManager ResponseTime for Web on a computer running Windows Server 2008 or Windows Vista, disable the User Account Control (UAC) feature. If you do not disable UAC, the module will not install. In addition, the module will not have access to the registry, nor will the module have disk access to create log files or take snapshots.
To turn off User Account Control:
1 Log onto the computer as a member of the local Administrators group.
2 Navigate to the Control Panel and double-click User Accounts.
3 Select Turn User Account Control on or off. If UAC is currently configured in Admin Approval Mode, the User Account Control message is displayed. Click Continue.
4 Deselect Use User Account Control (UAC) to help protect your computer.
5 Click OK.
6 Click Restart Now to restart Windows and finish turning off User Account Control.
Microsoft Edge installed on the console and agent computers
20.10240.16384.0
Microsoft .NET Framework on the WebRecorder computer
3.5 Service Pack 1 or later
Microsoft SQL Server Native Client 11.0
(for TLS 1.2 support)
11.3.6538.0 or later
NOTE: The SQL Server Native client can be installed from this Microsoft download link.
Software/Hardware Version
18 Installing AppManager ResponseTime for Web

2.3 Upgrade ConsiderationsBefore upgrading AppManager ResponseTime for Web, consider the following:
AppManager ResponseTime for Web does not support the use of the AMAdmin_UpgradeJobs Knowledge Script to upgrade existing jobs. Create new jobs to replace the old jobs.
AppManager ResponseTime for Web does not support running some backlevel Web-RT Knowledge Scripts from versions earlier than 6.4. This includes the FTP, NNTPConnect, SMTPConnect, and the three InternetMail Knowledge Scripts. The backlevel Knowledge Scripts fail with an error message stating, “This Knowledge Script is no longer supported.”
Therefore, you should create new Knowledge Script jobs with the latest version of the Knowledge Scripts.
WebTransaction Knowledge Scripts generated by Web Recorder version 6.2 or later continue to run.
You can upgrade WebTransaction Knowledge Scripts version 6.2 or later to the current version by opening and saving them in the latest version of Web Recorder. We strongly recommend that you upgrade these Knowledge Scripts to take advantage of new features.
You cannot upgrade versions of WebTransaction Knowledge Scripts earlier than 6.2. Use the new Web Recorder to create new WebTransaction Knowledge Scripts. Running a mix of old and new WebTransaction Knowledge Scripts is not recommended.
URLCheck Knowledge Scripts generated by URLCheck Recorder version 2.2 or later continue to run. Version 2.2 was released with AppManager version 6.0.
You can upgrade version 2.2 or later URLCheck Knowledge Scripts to the current version by opening and saving them in the latest version of URL Check Recorder.
Upgraded Knowledge Scripts do not work on backlevel versions of the module. Therefore, you should upgrade all of your managed clients before you upgrade any Knowledge Scripts. Upgrade the agents before upgrading your repository.
Installation on the repository saves a copy of the shipped AppManager ResponseTime for Web Knowledge Scripts in the AppManager\Backup directory. If you want to keep them, copy them to another location because subsequent installations delete all files in the AppManager\Backup directory. Knowledge Scripts created using Web Recorder or URL Check Recorder are not automatically backed up.
Once you install the new Knowledge Scripts on the repository and clients, re-run the Discovery_Web-RT Knowledge Script.
Stop all running Web-RT jobs before upgrading your agents. Because AppManager ResponseTime for Web runs out-of process from the agent netiqmc service, ensure that all ResponseTime processes associated with running jobs are also stopped. If not, those processes may not get installed or registered as part of the upgrade installation. The installer does not have permission to stop those processes.
The Web-RT processes affected include the following:
QWEBA6.EXE
QWEBAEx4.EXE
WEBSM.EXE
WEBEXSM.EXE
When you upgrade the module on a computer where the only AppManager component is the Operator Console, the upgrade does not install URL Check Recorder and Web Recorder. If you had old versions of URL Check Recorder and Web Recorder, the installer does not overwrite or
Installing AppManager ResponseTime for Web 19

uninstall those versions during the upgrade. URL Check Recorder and Web Recorder require the AppManager agent. This change was implemented in AppManager ResponseTime for Web version 6.3.
To install or upgrade the extensions, first run the AppManager setup program on the selected computer and install the agent. Then run the latest AppManager ResponseTime for Web setup program.
The Discovery_Web-RT Knowledge Script fails to run on backlevel modules, and it generates the following event:
Back-level version. This is a back-level version of NetIQ AppManager ResponseTime for Web. Install the latest version of the software.
Web-RT or WebServices Knowledge Scripts jobs from AppManager version 5.0.1 fail once you upgrade the Web-RT module. In addition, if you run a newer version of the Discovery_Web-RT Knowledge Script, those jobs are no longer visible in the Jobs pane. All of the resource objects have changed in recent versions of AppManager ResponseTime for Web.
If you have multiple AppManager ResponseTime modules installed on a single computer and you upgrade one of them, you can no longer run Knowledge Scripts earlier than version 6.4. ResponseTime modules share certain files. Therefore, when you upgrade one ResponseTime module, you must upgrade all of them on a given computer.
2.4 Determining Where to InstallYou can install AppManager ResponseTime for Web on an agent computer outside a firewall on the Internet. Agents on the Internet can also measure the bandwidth or service levels provided by an ISP.
URL Check Recorder and Web Recorder are automatically installed on all agents when you install the module, so install an agent and the Web-RT module on any computer where you want to run Web Recorder or URL Check Recorder.
You can also install the AppManager ResponseTime for Web module and Web Recorder and URL Check Recorder extensions on a computer where the AppManager Control Center or Operator Console are installed. The AppManager ResponseTime for Web module is integrated with the Control Center and Operator Console, which enables you to modify existing Knowledge Scripts without Web Recorder or URL Check Recorder, using either of the user interfaces.
If agents are distributed geographically and topologically, by network backbone, on the Internet, the Web-RT modules installed on these agents can help you determine whether problems are related to the geographic location of the user, or whether the problem is related to the user’s ISP or Internet connection. Installing modules on servers using connections of different types and speeds, such as DSL or various types of modems, can help you determine how accessible the site is from a range of client connections. For example, you might want to verify an adequate URL loading time for the slowest connection speed that you expect site visitors to use. You also might want to compile a statistically averaged view of a Web site response time from multiple, distributed agents.
When Web-RT modules are installed on agents behind a firewall, the agents send data and events back to the management server, which forwards the data to the repository. The management server can be located behind the firewall, or outside the firewall.
20 Installing AppManager ResponseTime for Web

2.5 Permissions for Running Knowledge ScriptsAppManager ResponseTime for Web requires the NetIQ AppManager Client Resource Monitor process, netiqmc, to run as Local System on the agent computer.
Most AppManager ResponseTime applications run out-of-process from the agent. The separate process for the module runs as the user account specified in each Knowledge Script. The agent must have permission to start a new process as any user account specified in a Knowledge Script parameter. Therefore, the agent must run with Local System authority.
When you install AppManager ResponseTime for Web on computers with existing AppManager agents, update any agents that are not running as Local System. Even though the requirement to run with this authority only applies to the netiqmc agent service, consider updating both agent services so that the services run with the same authority. If you do not update these services to run as Local System, the Discovery_Web-RT Knowledge Script fails.
NOTE: By default, AppManager agent installation installs the agent services to run as Local System.
To update the agent services:
1 Opening the Administrative Tools folder in the Control Panel and doub le-click Services.
2 Right-click the NetIQ AppManager Client Communication Manager (netiqccm) service in the list of services, and select Properties.
3 On the Logon tab, select Local System account.
4 Click OK.
5 Repeat steps 2 through 4 for the NetIQ AppManager Client Resource Monitor (netiqmc) service.
6 Restart both services.
2.6 Installing the ModuleRun the module installer only once on any computer. The module installer automatically identifies and updates all relevant AppManager components on a computer.
NOTE: On all the console computers, close the console before you run the module installer. If you do not close the console, the module installation might fail.
Access the AM70-Web-RT-7.x.x.0.msi module installer from the AM70_Web-RT_7.x.x.0 self-extracting installation package on the AppManager Module Upgrades & Trials page.
For Windows environments where User Account Control (UAC) is enabled, install the module using an account with administrative privileges. Use one of the following methods:
Log in to the server using the account named Administrator. Then run AM70-Web-RT-7.x.x.0.msi from a command prompt or by double-clicking it.
Log in to the server as a user with administrative privileges and run AM70-Web-RT-7.x.x.0.msi as an administrator from a command prompt. To open a command-prompt window at the administrative level, right-click a command-prompt icon or a Windows menu item and select Run as administrator.
You can install the Knowledge Scripts into local or remote AppManager repositories (QDBs). Install these components only once per QDB.
Installing AppManager ResponseTime for Web 21

The module installer now installs Knowledge Scripts for each module directly into the QDB instead of installing the scripts in the \AppManager\qdb\kp folder as in previous releases of AppManager.
You can install the module manually, or you can use Control Center to deploy the module on a remote computer where an agent is installed. For more information, see Section 2.7, “Deploying the Module with Control Center,” on page 23. However, if you do use Control Center to deploy the module, Control Center only installs the agent components of the module. The module installer installs the QDB and console components as well as the agent components on the agent computer.
NOTE: If you are installing the module on a computer running Windows Server 2008 or Windows Vista, turn off User Account Control. For more information, see Section 2.2, “Turning off User Account Control for Windows Server 2008 and Windows Vista,” on page 18.
To install the module manually:
1 Double-click the module installer .msi file.
2 Accept the license agreement.
3 Review the results of the pre-installation check. You can expect one of the following three scenarios:
No AppManager agent is present: In this scenario, the pre-installation check fails, and the installer does not install agent components.
An AppManager agent is present, but some other prerequisite fails: In this scenario, the default is to not install agent components because of one or more missing prerequisites. However, you can override the default by selecting Install agent component locally. A missing application server for this particular module often causes this scenario. For example, installing the AppManager for Microsoft SharePoint module requires the presence of a Microsoft SharePoint server on the selected computer.
All prerequisites are met: In this scenario, the installer installs the agent components.
4 To install the Knowledge Scripts into the QDB:
4a Select Install Knowledge Scripts to install the repository components, including the Knowledge Scripts, object types, and SQL stored procedures.
4b Specify the SQL Server name of the server hosting the QDB, as well as the case-sensitive QDB name.
5 (Conditional) If you use Control Center 7.x, run the module installer for each QDB attached to Control Center.
6 (Conditional) If you use Control Center 8.x or later, run the module installer only for the primary QDB. Control Center automatically replicates this module to secondary QDBs.
7 Run the module installer on all console computers to install the Help and to be able to edit Web Recorder or URL Check Recorder parameters.
8 Run the module installer on each management server computer.
9 Run the module installer on each client computer you want to monitor and on each computer on which you want to install the Web Recorder console and the URL Check Recorder console.
10 If you have not already discovered Web resources, run the Discovery_Web-RT Knowledge Script on all agent computers where you installed the module. For more information, see Section 2.9, “Discovering Web-RT Resources,” on page 24.
11 If you are upgrading the module, upgrade URLCheck and WebTransaction Knowledge Scripts. For more information, see Section 2.3, “Upgrade Considerations,” on page 19.
After the installation has completed, the Web-RT_Install.log file, located in the \NetIQ\Temp\NetIQ_Debug\<ServerName> folder, lists any problems that occurred.
22 Installing AppManager ResponseTime for Web

2.7 Deploying the Module with Control CenterYou can use Control Center to deploy the module on a remote computer where an agent is installed. This topic briefly describes the steps involved in deploying a module and provides instructions for checking in the module installation package. For more information, see the Control Center User Guide for AppManager, which is available on the AppManager Documentation page.
2.7.1 Deployment Overview
This section describes the tasks required to deploy the module on an agent computer.
To deploy the module on an agent computer:
1 Verify the default deployment credentials.
2 Check in an installation package. For more information, see Section 2.7.2, “Checking In the Installation Package,” on page 23.
3 Configure an e-mail address to receive notification of a deployment.
4 Create a deployment rule or modify an out-of-the-box deployment rule.
5 Approve the deployment task.
6 View the results.
2.7.2 Checking In the Installation Package
You must check in the installation package, AM70-Web-RT-x.x.x.0.xml, before you can deploy the module on an agent computer.
To check in a module installation package:
1 Log on to Control Center using an account that is a member of a user group with deployment permissions.
2 Navigate to the Deployment tab (for AppManager 8.x or later) or Administration tab (for AppManager 7.x).
3 In the Deployment folder, select Packages.
4 On the Tasks pane, click Check in Deployment Packages (for AppManager 8.x or later) or Check in Packages (for AppManager 7.x).
5 Navigate to the folder where you saved AM70-Web-RT-x.x.x.0.xml and select the file.
6 Click Open. The Deployment Package Check in Status dialog box displays the status of the package check in.
7 To get the updates provided in this release, upgrade any running Knowledge Script jobs. For more information, see Section 2.3, “Upgrade Considerations,” on page 19.
2.8 Silently Installing the ModuleTo silently (without user intervention) install a module using the default settings, run the following command from the folder in which you saved the module installer:
msiexec.exe /i "AM70-Web-RT-7.x.x.0.msi" /qn
where x.x is the actual version number of the module installer.
Installing AppManager ResponseTime for Web 23

To get the updates provided in this release, upgrade any running Knowledge Script jobs. For more information, see Section 2.3, “Upgrade Considerations,” on page 19.
To create a log file that describes the operations of the module installer, add the following flag to the command noted above:
/L* "AM70-Web-RT-7.x.x.0.msi.log"
The log file is created in the folder in which you saved the module installer.
NOTE: To perform a silent install on an AppManager agent running Windows Server 2008 R2 or Windows Server 2012, open a command prompt at the administrative level and select Run as administrator before you run the silent install command listed above.
To silently install the module on a remote AppManager repository, you can use Windows authentication or SQL authentication.
Windows authentication:
AM70-Web-RT-7.x.x.0.msi /qn MO_B_QDBINSTALL=1 MO_B_MOINSTALL=0 MO_B_SQLSVR_WINAUTH=1 MO_SQLSVR_NAME=SQLServerName MO_QDBNAME=AM-RepositoryName
SQL authentication:
AM70-Web-RT-7.x.x.0.msi /qn MO_B_QDBINSTALL=1 MO_B_MOINSTALL=0 MO_B_SQLSVR_WINAUTH=0 MO_SQLSVR_USER=SQLLogin MO_SQLSVR_PWD=SQLLoginPassword MO_SQLSVR_NAME=SQLServerName MO_QDBNAME=AM-RepositoryName
2.9 Discovering Web-RT ResourcesUse the Discovery_Web-RT Knowledge Script to discover the NetIQ AppManager for Web-RT managed object that monitors Web sites, services, Web transactions, and related protocols.
2.9.1 Resource Objects
Windows XP or later
2.9.2 Default Schedule
The default interval is Run once.
2.9.3 Setting Parameter Values
Set the Values tab parameters as needed:
Description How to Set It
Raise event if discovery succeeds?
This Knowledge Script always raises an event when the job fails for any reason. In addition, you can select the Yes check box to raise an event when the job succeeds. By default, an event is not raised.
Event severity when discovery succeeds
Set the event severity level, from 1 to 40, to reflect the importance when the discovery is successful. The default is 25.
24 Installing AppManager ResponseTime for Web

Event severity when discovery fails
Set the event severity level, from 1 to 40, to reflect the importance when the discovery fails. The default is 5.
Event severity when discovery partially succeeds
Set the event severity level, from 1 to 40, to reflect the importance when the discovery is partially successful. This type of failure usually occurs when the target computer does not have all the prerequisites installed. Default is 10.
Description How to Set It
Installing AppManager ResponseTime for Web 25

26 Installing AppManager ResponseTime for Web

3 3Understanding Web Recorder
The Web Recorder extension to AppManager ResponseTime for Web lets you create custom Web-RT Knowledge Scripts to verify that customers using a Web site are able to complete transactions in a timely manner. The Knowledge Scripts you create using Web Recorder fall into the WebTransaction subcategory of the Web-RT Knowledge Scripts by default and run as part of AppManager ResponseTime for Web.
Web Recorder has its own Help that explains how to leverage its many features and create WebTransaction Knowledge Scripts. The following section provides an introduction to Web Recorder and helps you understand how it works within the framework of AppManager ResponseTime for Web.
3.1 How Web Recorder Can HelpYou can record and run WebTransaction Knowledge Scripts with AppManager ResponseTime for Web to monitor the performance of web transactions in any situation or environment. The following example illustrates the benefits. Your Web site sells music CDs. You could use Web Recorder to record a user connecting to the site, viewing pages in the product catalog, adding items to a shopping cart, verifying credit card information, and completing a purchase.
Based on the recording of that transaction, you can generate Knowledge Scripts for Playback and monitoring of portions of the transaction or the entire transaction. A Knowledge Script may monitor just the time it takes to make the initial connection to the site, or the time it takes to move from the site’s home page to the catalog of titles. A second Knowledge Script can monitor every step of the transaction.
The Knowledge Scripts saved from a transaction you recorded with Web Recorder monitor the selected transaction from the client side, not from the server hosting the Web site, providing a realistic view of a customer’s experience on your Web site.
These Knowledge Scripts can monitor a Web site according to any schedule you choose. For example, you can run a Knowledge Script job that monitors the entire transaction, from first accessing the site to submitting an order, every 15 minutes. This interval ensures that the site is available throughout the day and that customers can always complete transactions. Anytime one of the steps fails, an event is raised. Each event contains a table summarizing the steps in the transaction and noting which step failed, along with any error message the customer would have seen.
In addition, you can set response time thresholds for individual pages on your Web site. With thresholds, an event is raised if individual pages on the site take too long to load. You can also select a line of text on a Web page and add logic to the Knowledge Script to attempt to find that exact text during Knowledge Script Playback.
Understanding Web Recorder 27

3.2 Overview of Web RecorderWeb Recorder records a set of user interactions with a Web site. The output from Web Recorder is a standard Knowledge Script that can be checked in to the AppManager repository. In addition, these Knowledge Scripts can be reopened either in the Operator Console or Control Center or directly in Web Recorder and edited to ensure that they run successfully. That is, that the Knowledge Scripts “play back” the interactions on the managed client computer.
Web Recorder has two major components, the Script Editor and the browser window, which adds some enhancements to Microsoft Internet Explorer. When recording, you type a URL into the browser and then follow all the links necessary to complete a transaction. Web Recorder makes a record of each step in the transaction and lets you save this record as a WebTransaction Knowledge Script.
The following graphic contains the Script Editor interface, where a previously recorded Web-browsing session displays as a series of steps that can be edited:
You can run the WebTransaction Knowledge Scripts you create on a managed client computer, executing the exact steps that were recorded to collect and return response-time and availability information.
NOTE: To run WebTransaction Knowledge Scripts on the managed client, you must log in using a valid user account. In addition, you cannot play back WebTransaction Knowledge Scripts through a Terminal Services session unless you use the /admin command line parameter (for more recent versions of Windows), or the /console command line parameter (for older versions of Windows). For more information about command line parameters, see the Remote Desktop Connection documentation.
Once saved, a WebTransaction Knowledge Script can execute the transaction at regular intervals, letting you monitor the availability of the site, the integrity of internal and external links, and the speed with which pages are loaded throughout the day. WebTransaction Knowledge Scripts can raise events and collect data for AppManager reports. You can set time thresholds for an entire recorded transaction or for individual steps in the transaction, and raise events if those thresholds are crossed.
The WebTransaction Knowledge Scripts collect data for each of the Web page transitions recorded, presented as steps during Knowledge Script Playback, and returns the total processing time for the transaction, which is the total number of seconds it takes to complete all steps monitored by the
28 Understanding Web Recorder

Knowledge Script. The collected data from each step, which can be charted in the Graph pane or Chart Console or compiled in reports, creates an ongoing representation of site performance. The total processing time indicates how often you should run the Knowledge Script.
For more information, see Section 4.1, “Recording a Browsing Session,” on page 33.
3.3 Web Recorder ComponentsWeb Recorder consists of five windows or views:
The Script Editor, which serves as the main Web Recorder window.
The browser window, which is an Internet Explorer browser window with Web Recorder enhancements.
The HTML Structure view, which analyzes the HTML architecture of a selected Web page, providing information about how the browser parses it.
The Object Properties view, which analyzes the defined attributes of an object selected from the HTML Structure view.
The Session Transcript view, which shows a high-level transcript of Internet Explorer’s interactions with a selected Web site during a recorded browsing session.
Only the Script Editor window is open by default when you start Web Recorder. You can access other windows and views from the menus in the Script Editor.
The first time you run it, Web Recorder modifies four registry keys on the client computer to ensure that the version of Internet Explorer is reported correctly for Web Transaction jobs. These keys are under HKEY_LOCAL_MACHINE\SOFTWARE\Microsoft\Windows\CurrentVersion\Internet Settings\5.0\User Agent.
The modifications to the registry keys include:
(Default) is set to the version of Mozilla on the computer.
Compatible is set to compatible.
Platform is set to the version of Windows on the computer.
Version is set to the version of Internet Explorer on the computer.
3.4 Running a WebTransaction Knowledge ScriptThe Web-RT Knowledge Scripts can run on computers where the Web-RT module and an agent is installed. Web-RT Knowledge Scripts in the WebTransaction subcategory were generated with Web Recorder. A WebTransaction Knowledge Script generally follows the same conventions as other Knowledge Scripts, but instead of running a job, it “plays back” a recorded Web transaction and times it.
NOTE: The computer where you want to play back a WebTransaction Knowledge Script must have a logged-in user and a valid Internet Explorer profile. You cannot log in using a Terminal Services session unless you use the /admin command line parameter (for more recent versions of Windows), or the /console command line parameter (for older versions of Windows). For more information about command line parameters, see the Remote Desktop Connection documentation.
Understanding Web Recorder 29

To run a Knowledge Script generated by Web Recorder:
1 Run the Knowledge Script onto the computers you want to use to initiate the Web transaction. You might want to use computers in different geographical locations to test performance of the site using a variety of connections.
NOTE: To monitor a Web site from a number of different locations using the same Knowledge Script, the login settings for that site must allow multiple logins by the user specified in your Knowledge Script.
2 On the Schedule tab, set a schedule for how often and when you want to run the Knowledge Script. The schedule interval should be based on the Overall Processing Time, which you can see in the Web Recorder Playback Results report after Knowledge Script Playback, and on the number of WebTransaction Knowledge Script jobs running on the same computer. For more information, see Chapter 6, “Web Recorder Playback,” on page 61.
3 On the Values tab, set event, data collection and threshold parameters. If you want to monitor the response time for specific steps in a transaction, you needed to select the individual step to monitor before saving the recorded transaction as a Knowledge Script.
4 On the Action tab, set any actions you want to take in response to threshold crossings or step failures.
5 Click OK.
3.5 Running Multiple WebTransaction Knowledge Scripts on a Managed ClientUnlike other Knowledge Scripts, WebTransaction Knowledge Scripts must have control of the desktop on the managed client in order to run. In addition, WebTransaction Knowledge Scripts require extra resources from the managed client. Although you can run multiple WebTransaction Knowledge Scripts on the same computer at the same time and can also run them alongside other AppManager Knowledge Scripts, WebTransaction Knowledge Scripts are subject to certain limitations to decrease loads.
3.5.1 Running WebTransaction and Win-RT Knowledge Scripts on the Same Computer
You can install AppManager ResponseTime for Windows and AppManager ResponseTime for Web and run the Web-RT and Win-RT Knowledge Scripts on the same computers. However, you cannot run Win-RT Knowledge Scripts and WebTransaction Knowledge Scripts simultaneously. Both types of Knowledge Script must control the desktop to run on the managed object, and only one module can take ownership of the desktop at any given time.
NOTE: Only Web-RT Knowledge Scripts generated by Web Recorder are affected by this conflict. Other Web-RT Knowledge Scripts, including URLCheck Knowledge Scripts generated by the URL Check Recorder extension, do not require ownership of the desktop and can be run simultaneously with Win-RT Knowledge Scripts.
Desktop ownership is governed by a shared registry value, Desktop, which is located under the HKEY_LOCAL_MACHINE\SOFTWARE\NetIQ\Response Time registry key. The module name listed as the value for this key, Web-RT or Win-RT, determines which Knowledge Scripts can be run.
30 Understanding Web Recorder

When you run a Web-RT_WebTransaction or Win-RT Knowledge Script on a managed client, it checks whether the “Desktop” registry value already exists, and performs the following actions:
If the value does not exist or is blank, the Knowledge Script attempts to create and/or update the Desktop value with the associated module name. If the value is created or updated successfully, the Knowledge Script runs normally. If the Knowledge Script fails to create or update the Desktop value, an error event is raised, and the Knowledge Script stops running.
If the Desktop value already exists and is set to the Knowledge Script’s associated module name, the Knowledge Script runs normally.
If the registry value already exists and is set to any value other than the Knowledge Script’s associated module name, an error event is raised, and the Knowledge Script stops running.
Both AppManager ResponseTime for Windows and ResponseTime for Web include a Knowledge Script used to take ownership of the desktop. Once the Desktop registry value has been set, this Knowledge Script can be run to overwrite any existing value and force control of the desktop to be granted to the associated module.
With ResponseTime for Windows, this Knowledge Script is called Win-RT_TakeDesktopOwnership. For ResponseTime for Web, use the Web-RT_TakeDesktopOwnership Knowledge Script.
3.5.2 Resolving WebTransaction Timeout and Limit Issues
The following sections address issues with WebTransaction timeout and limit events and errors.
Setting the WebTransaction Limit
The Web-RT module limits the number of parallel transactions at one time to 5 to help avoid resource problems with Internet Explorer. This value is set at run time. For each WebTransaction job, an associated QWEBA6.exe process is spawned. It runs out-of-process from the AppManager agent netiqmc process. When a QWEBA6.exe process starts, it checks to see if a token is available to run. The number of tokens available is defined by the value of the WebTransaction62Limit registry key, which defaults to 5.
Key: HKLM\Software\netiq\Response Time Value: WebTransaction62Limit
If a token is not available for a job, the transaction is added to the queue and starts the queue timer, whose limit is defined in the Knowledge Script.
NOTE: The value can be 1-5, inclusive. All other values are ignored and the default of 5 substituted. To change this value, all jobs must be stopped, and no active QWEBA6.exe processes can be running for the change to take affect.
Resolving Queue Timeout Errors
If the Queue Timeout expires, the transaction does not run, a “Queue Timeout” event is raised, and the transaction is moved to the end of the queue. The “Queue Timeout” event reads as follows:
The job was aborted because it failed to obtain Internet Explorer resources before timing out.
Understanding Web Recorder 31

To avoid this problem:
Increase the Queue Timeout value. Open the Knowledge Script Properties dialog box in the AppManager Operator Console to change the value for this parameter.
Increase the job’s execution interval by changing its schedule in the Knowledge Script Properties dialog box.
Reduce the number of WebTransaction jobs on the client computer.
Resolving Job Timeout Errors
When a token comes available, the transaction runs and a job timeout timer is started. If the transaction takes longer than the Job Timeout, as defined in the Knowledge Script, the Web Recorder stops the transaction and raises a “Job Timeout” event:
The job was aborted because it had been using Internet Explorer resources for too long.
The job may have timed out for one of the following reasons:
The Web server stopped responding.
The Job Timeout value is too low.
To avoid problems with job timeouts, take one or more of the following steps:
Make sure the Web server is available.
Increase the Job Timeout value. Open the Knowledge Script Properties dialog box in the AppManager Operator Console to change the value of this parameter.
If you receive a Job Timeout event, you may see in the results that the Total Processing Time is a few milliseconds off. In general, the Total Processing Time is a guideline for determining an appropriate Job Timeout value: the Job Timeout value should be slightly greater than the Total Processing Time. However, in the case of job timeouts, you may see that the Job Timeout value is slightly less than the Total Processing Time.
For more information, see Section 3.4, “Running a WebTransaction Knowledge Script,” on page 29.
32 Understanding Web Recorder

4 4Recording with Web Recorder
When you start Web Recorder, the main window is the first one you see. The main window functions as a Script Editor if a Knowledge Script file is open, and it also lets you open and save Web Recorder files and Knowledge Scripts, control Recording and Playback sessions, configure Web Recorder and Knowledge Script options, open a new browser window, and display the Session Transcript view.
Once you have completed a Recording session, Web Recorder lets you open and save recorded Knowledge Scripts in the .QML Knowledge Script file format.
4.1 Recording a Browsing SessionThe Web Recorder main window includes an empty table and a toolbar with buttons to start and stop recording, play back the recorded browsing session, and save a Knowledge Script based on the recorded steps.
The first step in the transaction is limited to entering an address in the address field. After this required navigation to the page, subsequent navigation steps can involve either clicking or entering information on the page itself, or even entering another address in the address field.
You do not need any special permissions to record a browsing session using Web Recorder. However, if you want to save a transcript or a screen capture, make sure that you have permission to write to the Administrator\Local Settings\Temp directory in which Web Recorder saves files of that type.
To record a browsing session:
1 Log on to the agent computer on which you want to record the browsing session and run the corresponding Knowledge Script.
2 Start Web Recorder from the AppManager Operator Console by clicking Extensions > Web Recorder.
3 On the Tools menu, click Record.
4 On the Browser menu, click New Browser Window.
5 In the Address field, type the URL of the Web site you want to visit. Press Enter to begin the navigation.
TIP: Watch the Script Editor pane during Recording to see how each interaction with the selected Web site appears. For more information, see “About the Script Editor” on page 37.
6 Click one or more links and perform some actions, such as entering text in a text field.
NOTE: On a real Web site, if you perform an action such as clicking a link labeled Purchase, you may end up buying something every time you run the Knowledge Script based on this transaction. To validate an entire transaction of this type without making a purchase each time, arrange with the Web site administrator not to process orders from the user specified in the Knowledge Script.
7 Click Stop in the main Web Recorder window to end the Recording session.
Recording with Web Recorder 33

NOTE: Web Recorder does not capture actions using hot keys such as Alt+G, even though hot keys may be enabled on some Web sites. Instead of using hot keys to perform an action on a Web site, click the corresponding button, link, or menu item.
4.2 Working with Session CookiesAs you record a transaction, the Web server you are accessing might send your computer a session cookie, a cookie that in most cases is used to keep track of the pages that a user has visited during a browser session to allow the Web server to serve up custom information to that user. A session cookie is also called a transient cookie, one that is only stored in temporary memory and erased when the user closes the Web browser.
Session cookies can create some inconveniences as you edit a Web Recorder Knowledge Script. Once session information is stored in the cookie on your computer, you cannot play back any part of the Knowledge Script more than once without using a new browser window.
The Web Recorder Recycle Recorder option lets you reset the browser session, erasing or resetting the session cookie, and proceed with Playback. The Recycle Recorder option restarts Web Recorder and Internet Explorer while preserving any parts of a Knowledge Script that you have already recorded.
To clear a session cookie:
1 On the Tools menu, click Recycle Recorder.
2 Wait for Web Recorder to restart itself and restore the Knowledge Script you were working on.
3 Continue working on the Knowledge Script.
The session cookie is cleared, and you can play back any part of the Knowledge Script.
4.3 Browser Window FeaturesTo begin a browsing session, launch an instance of Internet Explorer by clicking Browser > New Browser Window in the main Web Recorder menu.
The Web Recorder browser window implements Microsoft Internet Explorer and resembles it closely. It makes use of typical Internet Explorer features, such as the address bar and the standard toolbars and Internet Explorer settings. However, it also adds some features of its own, taking advantage of some advanced Internet Explorer options to help you understand how a particular Web page works. These features include the following:
The status bar
Browser analytical tools
Browser context menus
34 Recording with Web Recorder

4.3.1 The Status Bar
The Status bar is similar to the Internet Explorer status bar. The left side of the Status bar displays the Browser status. The Progress bar in the center is driven by Internet Explorer and displays the progress as the browser downloads and renders a page.
The “Processing…” part of the Status bar is enabled while the WEB event handlers are not hooked, and the browser is frozen so that you cannot interact with the window at times when doing so would interfere with Recording. Typically when there is a BeforeNavigate or a Download Complete timeout, Session Transcript tracing is enabled and the “Processing…” indication stops.
The security level is shown in the right corner of the Status bar. This value is driven by the SetSecurLockIcon Internet Explorer event. Possible values are:
Unsecure
Mixed
Unknown
40 bits
56 bits
Fortezza
128 bits
You can launch as many browser windows as you like. Each window is assigned a number in the upper left corner to indicate that it is a potential Web Recorder recording session.
When Internet Explorer requests a new window, it retrieves the format of the requested window from the Web server. So if an application wants to display a new advertising window without the address bar, the Web Recorder framework can provide such a window. But Web Recorder adds the ability to resize a window that is locked, as well as display the address bar, the toolbar, and the Status bar, even if those objects have been hidden by a Web application. Full control of the window is always available.
4.3.2 Browser Analytical Tools
You do not have to record every browsing session. To take advantage of certain Web Recorder browser features, such as the security status, or analytical tools, such as the HTML Structure view or Object Properties, just click Browser > New Browser Window at any point. For more information, see Chapter 7, “Web Recorder Analytical Tools,” on page 73.
4.3.3 Browser Context Menus
The context menus you can access by right-clicking within the Web Recorder browser window are different from those you get when you right-click in an Internet Explorer window you did not launch from Web Recorder.
The following menu items are available:
Open in New Window: Opens the linked page in a new browser window.
Object Properties: Provides high-level information about the selected object on the page. For more information, see “Object Properties” on page 77.
Retrieve Object on HTML Structure: Highlights the object in the HTML Structure view. The HTML Structure view has a similar feature to help you locate an item on the page. For more information, see “The HTML Structure View” on page 73.
Recording with Web Recorder 35

While you are recording a transaction, the browser context menu has three additional items:
Add Click Step: Adds a Click step to the Knowledge Script to simulate the user’s mouse-click action. This additional step is only necessary when the Click step cannot be recorded the usual way. For more information, see “Manually Adding a Click Step” on page 46.
Add Search Step: Adds a step to the Knowledge Script that performs a text search on the Web page during Playback. For more information, see “Search and Advanced Search Steps” on page 51.
Add Advanced Search Step: Adds a step to the Knowledge Script that performs a search for the object that was selected when you right-clicked to open the context menu. For more information, see “Search and Advanced Search Steps” on page 51.
36 Recording with Web Recorder

5 5Editing Recorded Scripts
The Script Editor helps you optimize Knowledge Scripts for use with AppManager ResponseTime for Web.
5.1 About the Script EditorWhen you click Record and open a browser window, Web Recorder creates a transcript of everything you do in the browser window until you click Stop. The Script Editor allows you to edit and save recorded browsing sessions as Knowledge Scripts in .QML format. You can reopen saved Knowledge Script files later for further editing. You can also use Web Recorder to check Knowledge Script files into the AppManager repository to start running jobs.
To help you understand how the browser interacted with the pages and objects you accessed, the Script Editor organizes the transcript into steps, blocks of related information, presented in the order in which they occurred.
Once you have stopped recording a browsing session, use the Script Editor to analyze your recording and make any necessary customizations. The recorded session is shown in a table, with each row representing a step in the transactions you performed. Each step has been assigned a marker and a Step index, starting with 1. These numbers provide an alternative means of identifying an item to be retrieved during Knowledge Script Playback.
Expand each step to see parameters that can be edited. A pencil marker next to any parameter indicates that you can double-click it to see and select from the available options.
5.2 Script Editor MarkersScript Editor markers indicate the status of each step and provide further information about each step and indicate your options for editing each step:
Marker Description
Navigation marker. Indicates that the action taken during the step causes the browser to refresh and may include a response time measurement at Playback. You can manually add a Navigation marker to specific types of steps. For more information, see “How Response Time Is Measured” on page 91.
Edit marker. Indicates a Knowledge Script parameter or object attribute that you can edit in some fashion. Double-click the text next to the marker to edit the parameter or attribute.
Restricted Edit marker. Indicates that a default value is still assigned, but that the value of the attribute can be edited.
Restricted Edit marker. Indicates that the value of the attribute has been edited from the default. The original value can be restored.
Processing marker. During Playback, indicates that a step is being processed by the browser.
Editing Recorded Scripts 37

5.3 Using the Script Editor: an ExampleTo illustrate how the Script Editor works, consider the following example. You need to monitor the response time of a Web site that sells music CDs, the Plenty o’ CDs Music Emporium at PlentyoCDsMusicEmporium.com.
The Plenty o’ CDs Web site offers a clickable image link to a sale item that changes daily. You want to create a WebTransaction Knowledge Script to test that link every day. However, the image file is always given a filename that corresponds to the CD that is on sale. On Playback, you need to make sure that the Knowledge Script does not fail as soon as it encounters the new filename of the object it is supposed to download.
To create a Knowledge Script to test this site, record the transaction and then return to the Script Editor window. Look for the Click step where you accessed the Daily Sale Item link. The Script Editor offers you several choices for identifying an object to be downloaded.
Consider the following illustration:
The Knowledge Script is going to use the text in the ALT tags, “Featured Daily Sale Item,” to identify the object it is supposed to download during testing. The green checkmark next to the ALT attribute indicates that the ALT tag text is used. That text should work because although the image file for the Daily Sale Item is different, the ALT text never changes.
If the ALT tag text changes each day, you would need to customize the browsing session transcript in the Script Editor to ensure that the Knowledge Script ran properly. For example, if the image used for the Daily Sale Item link is always saved with the same filename, but the ALT tags are updated to identify the specific image.
In the Playback Processing column, this marker indicates that a step completed successfully.
Next to a step parameter, this marker indicates that it is used during Playback as an identifier.
In the Playback Processing column, this marker indicates that a step failed to complete successfully.
Next to a step parameter, this marker indicates that it is not used during Playback as an identifier.
Marker Description
38 Editing Recorded Scripts

Then edit the Knowledge Script so that the ALT tags are not used to identify the object to be retrieved by the Knowledge Script. To configure the step, click the green checkmark next to the ALT attribute, which changes it to a red X:
The red X indicates that the ALT attribute is not used to determine which object is supposed to be retrieved when the Click command is issued. Instead, the SRC attribute, with the static filename and path, is used.
5.4 Step TypesWhen shown in the Script Editor, a recorded browsing session is organized into a sequentially numbered series of steps. Each step is given a step name and step description, which are placed in separate columns
If a step description is available, you can double-click to edit it.
All steps are based on two types of events:
Web events: actions performed on base HTML objects, such as a clicked link, typing in data on a Form element, or navigating to a new browser window.
Window events: actions performed on window objects generated by pop-up dialog boxes, such as Windows Authentication, JavaScript, or VBScript, plugins such as Flash, or Java.
For actions related to a browser window, as opposed to a window object, the step description is the title of the browser window. By default, the title of the browser window is the text found in the <TITLE> tags of the HTML page shown when the window was accessed.
For actions related to an HTML object, the Script Editor displays any information that makes sense. It looks for object attributes such as display text, a NAME attribute, an ALT attribute, inner text, or a VALUE or SRC attribute.
For actions related to a window object, the Script Editor Step description is composed of the first level of the window hierarchy:
Action: Window Name ::Window Name:Class Name: ID
Here is an example:
Click: WebBrowser - 2::(null):Internet Explorer_ Server:0::(null):MacromediaFlashPlayerActiveX:0
Following the step name and description, the step parameters are shown. Any step parameters that can be edited are assigned an Edit marker.
For all editable fields, the maximum string length is 1024 characters. Most steps also provide a fully customizable Failure Event Note parameter. For more information, see “Failure Event Notes” on page 58.
Editing Recorded Scripts 39

All steps correspond to an action that a user can take in an Internet Explorer browser window. The following table lists the Script Editor step categories and identifies the user action to which the categories correspond:
Step Name User Action Available Parameters
New Browser on User Request
Launching a new Internet Explorer browser window from the Script Editor.
None.
NOTE: This is the only type of step that does not support “Failure Event Notes” on page 58.
Open in New Window
Right-clicking a link and selecting “Open in New Window” or clicking a link whose target is a new browser window.
Description: By default, the URL of the link. Can be modified.
URL: The value passed to the browser during Playback. Can be modified.
Close Browser on User Request
Closing the browser window by clicking the System Close button, by selecting Close from the File menu, or by typing Alt+F4.
Description: By default, the window title. Can be modified.
Window: See “Window Retrieval” on page 46.
NOTE: Users may also close a browser window by clicking an HTML object that triggers a JavaScript method that closes the browser, for example. That type of action creates a Click step, not a Close Browser step.
Resize Resizing the browser window by clicking and dragging or minimizing by clicking Minimize.
Description: By default, the window title. Can be modified.
Window: See “Window Retrieval” on page 46.
Size: CX = window width; CY=window height. Maximum value for either coordinate is 4096.
Go Back Clicking the Back button, or clicking Go To > Back on the View menu.
Description: By default, the window title. Can be modified.
Window: See “Window Retrieval” on page 46.
Go Forward Clicking the Forward button, or clicking Go To > Forward on the View menu.
Description: By default, the window title. Can be modified.
Window: See “Window Retrieval” on page 46.
Navigate Entering a URL into the browser address field.
Description: By default, the window title. Can be modified.
URL: The value passed to the browser during Playback. Can be modified.
40 Editing Recorded Scripts

Click: HTML object Clicking on any one of the following objects:
link (with A tag or JavaScript)
button (such as Submit)
radio button (but not a check box)
anywhere in the browser window
Can also be added manually, during Recording. For more information, see “Manually Adding a Click Step” on page 46.
Description: By default, any string found in the object clicked. Options include display text, a NAME, ID, TITLE, ALT, TYPE, VALUE, SRC, OnClick, or HREF attribute, or any inner text. Can be modified.
Window: See “Window Retrieval” on page 46.
Frame: See “Frame Retrieval” on page 49.
Form: See “Form Retrieval” on page 49.
Object: See “Object Retrieval” on page 50.
NOTE: This step only receives a Navigation marker if it triggered a Refresh of the page.
Click: Window object Clicking on any one of the following objects:
dialog box control
APPLET
EMBED
OBJECT
Can also be added manually, during Recording. For more information, see “Manually Adding a Click Step” on page 46.
NOTE: The Click: Window object category includes Windows authentication, Internet Explorer security prompts, ActiveX or Java applets.
Window: See “Plugin or Dialog Box Window Retrieval” on page 47.
Description: By default, either the title of the lowest control or the entire control string. Can be modified.
X and Y: Coordinates showing where the mouse pointer was located on the page when the click occurred. These coordinates are used to precisely recreate the click on the control during Playback. Maximum value is 4096.
Move Cursor: Used to physically move the cursor over the X,Y coordinates. May be required for some ActiveX controls.
Step Name User Action Available Parameters
Editing Recorded Scripts 41

Text Change: HTML Object
Modifying the content of a TEXTAREA or TEXT INPUT element, or a password.
Description: By default, any string found in the object modified. Options include display text, a NAME, ALT, VALUE, or SRC attribute, which are checked in that order, or any inner text. Can be modified.
Window: See “Window Retrieval” on page 46.
Frame: See “Frame Retrieval” on page 49.
Form: See “Form Retrieval” on page 49.
Object: See “Object Retrieval” on page 50.
Value: By default, the value the user entered during Recording. This parameter can be modified in the Script Editor. Encrypted text, such as a password, is shown in the Value field as asterisks (*).
Text Change: Window Object
Modifying the content of a text field of a dialog box.
Description: By default, either the title of the lowest control or the entire control string. Can be modified.
Value: By default, the value the user entered during Recording. This parameter can be modified in the Script Editor. Encrypted text, such as a password, is shown in the Value field as asterisks (*).
Window: See “Window Retrieval” on page 46.
Check: HTML Object Altering the state of a check box by checking it or clearing it.
Description: By default, any string found in the object clicked. Options include display text, a NAME, ALT, VALUE, or SRC attribute, which are checked in that order, or any inner text. Can be modified.
Window: See “Window Retrieval” on page 46.
Frame: See “Frame Retrieval” on page 49.
Form: See “Form Retrieval” on page 49.
Object: See “Object Retrieval” on page 50.
Value: By default, the value the user changed during Recording. This parameter can be modified in the Script Editor.
Step Name User Action Available Parameters
42 Editing Recorded Scripts

Check: Window Object
Altering the state of a check box by checking it or clearing it.
Description: By default, either the title of the lowest control or the entire control string. Can be modified.
Value: By default, the value selected during Recording. Can be modified.
Window: See “Window Retrieval” on page 46.
Select: HTML Object Altering the state of a list box or combo box.
Description: By default, any string found in the object clicked. Options include display text, a NAME, ALT, VALUE, or SRC attribute, which are checked in that order, or any inner text. Can be modified.
Value: By default, the value selected during Recording. Can be modified or can use the Wildcard character * to replace the value selected during recording. You can use the wildcard search feature only if you have selected Yes in the Use Wildcard Search field.
Use Wildcard Search: Select Yes to use the wildcard search feature otherwise, No. The default is No. For more information, see “More about Wildcard Matching” on page 55.
Window: See “Window Retrieval” on page 46.
Frame: See “Frame Retrieval” on page 49.
Form: See “Form Retrieval” on page 49.
Object: See “Object Retrieval” on page 50.
NOTE: The Value parameter is a list that includes all possible values of the list or combo box.
If the action was a multi-selection, all possible values are shown as check boxes.
Select: Window Object
Altering the state of a list box or combo box.
Description: By default, either the title of the lowest control or the entire control string. Can be modified.
Value: By default, the value selected during Recording. Can be modified.
Window: See “Window Retrieval” on page 46.
Delay None. You must manually insert this step after Recording has completed. For more information, see “Delay Steps, Timers, and Playback Speed” on page 92.
Value: The time to delay in seconds (1-300 sec).
Step Name User Action Available Parameters
Editing Recorded Scripts 43

Search None. You must manually insert this step during Recording. For more information, see “Search and Advanced Search Steps” on page 51.
Description: Can be modified. Set by default to the string to search for.
Case-Sensitive: Enables or disables case sensitivity in the text search.
Search: Can be set to Entire Page, which searches for selected text on the entire Web page, or Specified Frame, which searches within the selected frame only.
Loop until located: Continues to search for the specified string until it is found or until the timeout is exceeded.
Timeout: Ends the search loop after a specified number of seconds. Default is 1 second.
Include time in response time: Adds the time taken to locate the string to the overall response time.
If search item is...Then fail and...: Determines what occurs if the search step fails. You define what constitutes “failure”: whether failure means that the string was found or whether it means that it was not found. Set to one of following actions if the step fails: Event and Abort, where Playback stops with an error message, Continue, where Playback continues to the next step, or Event and Continue, where Playback continues to the next step with an error message.
Window: See “Window Retrieval” on page 46.
Frame: See “Frame Retrieval” on page 49.
Step Name User Action Available Parameters
44 Editing Recorded Scripts
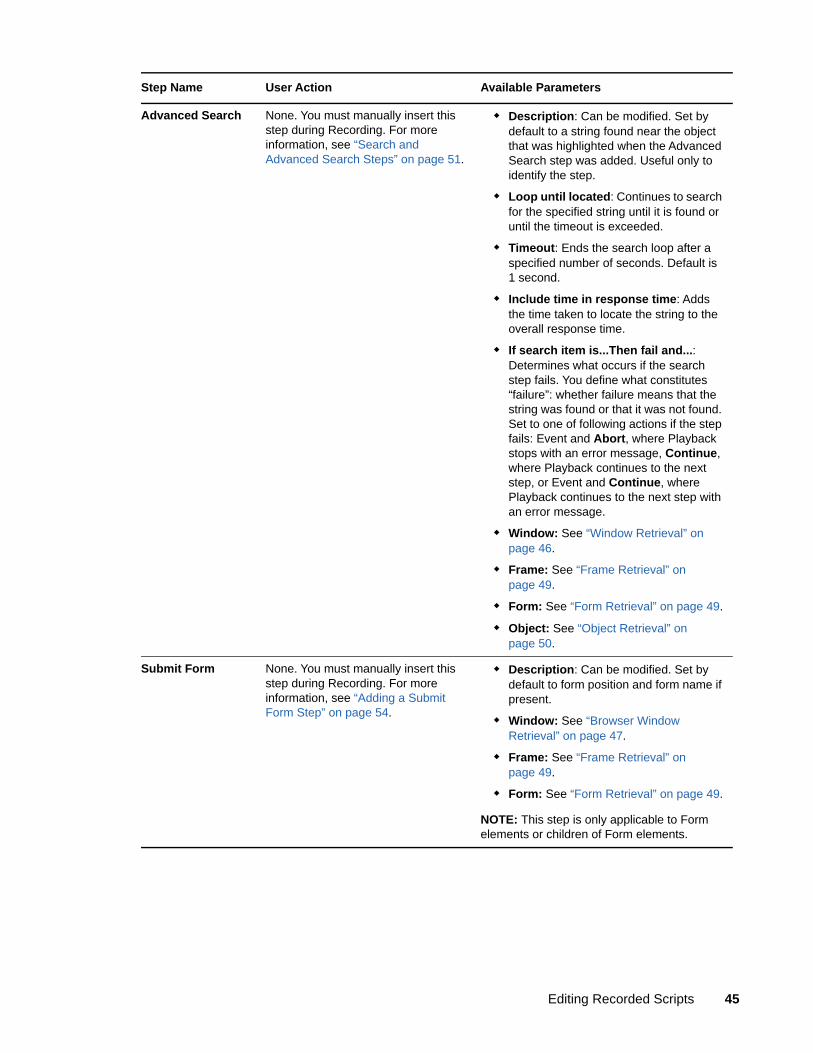
Advanced Search None. You must manually insert this step during Recording. For more information, see “Search and Advanced Search Steps” on page 51.
Description: Can be modified. Set by default to a string found near the object that was highlighted when the Advanced Search step was added. Useful only to identify the step.
Loop until located: Continues to search for the specified string until it is found or until the timeout is exceeded.
Timeout: Ends the search loop after a specified number of seconds. Default is 1 second.
Include time in response time: Adds the time taken to locate the string to the overall response time.
If search item is...Then fail and...: Determines what occurs if the search step fails. You define what constitutes “failure”: whether failure means that the string was found or that it was not found. Set to one of following actions if the step fails: Event and Abort, where Playback stops with an error message, Continue, where Playback continues to the next step, or Event and Continue, where Playback continues to the next step with an error message.
Window: See “Window Retrieval” on page 46.
Frame: See “Frame Retrieval” on page 49.
Form: See “Form Retrieval” on page 49.
Object: See “Object Retrieval” on page 50.
Submit Form None. You must manually insert this step during Recording. For more information, see “Adding a Submit Form Step” on page 54.
Description: Can be modified. Set by default to form position and form name if present.
Window: See “Browser Window Retrieval” on page 47.
Frame: See “Frame Retrieval” on page 49.
Form: See “Form Retrieval” on page 49.
NOTE: This step is only applicable to Form elements or children of Form elements.
Step Name User Action Available Parameters
Editing Recorded Scripts 45

5.5 Manually Adding a Click StepIn a few rare cases, a Click step cannot be generated during a Recording session. For example, on a Web page that implements many different JavaScript methods, a Click step often cannot be generated the usual way. In addition, if you are recording a Web page that uses the OnMouseMove JavaScript method, the browser might not be able to detect the action, which means that the Click step is not generated by Web Recorder.
Web Recorder lets you manually add a Click step to any Knowledge Script, but you can only add it during a Recording session.
To add a Click step to a Knowledge Script:
1 Start the Recording session by clicking Record and then clicking New Browser.
2 In the browser window, enter a URL in the Address field.
3 Perform any actions you like. When you have reached the place in the transaction where you want to add the Click step, right-click and select Add Click Step.
Although in most cases a step is only designated as such when some browser activity occurs, in the case of a manually added Click step, no actual activity is necessary.
5.6 Step IdentifiersWhen a recording session is complete, the steps shown in the Script Editor are further identified with step identifiers. All recorded transaction step identifiers fall into one of four categories:
Window Retrieval
Frame Retrieval
Form Retrieval
Object Retrieval
Other steps shown in the Script Editor window were not recorded, but were added later. For more information about steps you can add, see the following topics:
“Delay Steps, Timers, and Playback Speed” on page 92
“Search and Advanced Search Steps” on page 51
5.7 Window RetrievalThe Window retrieval step identifier indicates steps that involve an action in a specific browser window, including accessing HTML files, nested windows, and all browser-related actions, such as closing, minimizing, or resizing the browser. Window steps contain window sub-objects and parameters that differ depending on whether the user actions involve HTML objects or plugins.
46 Editing Recorded Scripts

5.7.1 Browser Window Retrieval
The Window retrieval step identifier for HTML pages and objects contains three child parameters:
ID: A sequential number assigned to each browser window accessed within a single step.
Title: The title of the Web page as set by the page itself. It is usually found within the document <HEAD> tags. This parameter can be edited, and a wildcard value (*) may be substituted.
Retrieve using: The attribute that should be used to identify the browser window. Web Recorder can use either the ID or the window title to determine whether the correct window has been loaded during Playback. Double-click the Retrieve using parameter to change the default, ID.
5.7.2 Plugin or Dialog Box Window Retrieval
Within the Window retrieval step identifier, sub-objects related to plugins or dialog boxes may be shown. These window objects are broken out into their classes and shown as children of the retrieved browser window object. The child objects are retrieved from the actions of Java and ActiveX embedded objects on a Web page and are associated with a Click step that includes APPLET, EMBED and OBJECT HTML tags. The window objects can also be a window dialog control, such as Windows authentication or Internet Explorer security prompts. In the case of Click steps, they are preceded by a statement of the X and Y coordinates of the mouse pointer’s position in the window when the action was recorded. Here is an example:
For more information, see “Customizing Window Retrieval” on page 48.
As you can see from the previous image, the Window step identifier indicates the title and class of the applet, embedded object, or dialog box. Unlike the HTML retrieval step identifier, the relationships among the related controls or classes and the top-level window are indicated in a hierarchy of child windows under the main Window retrieval step identifier.
These window sub-objects may have the following child parameters:
ID: An internal control identifier for window dialog boxes.
Title: The title of the window or control as set by the window or control itself.
Editing Recorded Scripts 47

Class: The class of the window; for example, the class of the applet that was accessed by the Knowledge Script shown previously was named “Microsoft VM for Java Host Window Class.”
Position: Sequential position of that control relative to other identical windows (title, class, and ID) that may be confused with one another.
5.7.3 Customizing Window Retrieval
Click steps offer two types of parameters you can edit:
X and Y coordinates. Altering these coordinates may help Web Recorder locate a window object on the page.
Here is what to do:
Access the Session Transcript. In the Script Editor window, right-click the window object where the failure is occurring and select Play up to this step. When Playback pauses at the selected step, watch the Session Transcript view as you move the mouse over the page. You can see which X and Y coordinates actually correspond to the object.
You can also right-click the step and select Highlight on Web Browser. The Web Recorder Browser highlights the window object for the step in a red square for 3 seconds. If the object cannot be found, the Web Recorder Browser displays an error message saying “Element not found.”
The Move cursor option. This option is appropriate for certain types of Web sites, particularly those that involve Flash or ActiveX elements that require the actual situation of the mouse over the X,Y location, as with MouseOver commands, for the click action to work.
The following image provides an illustration.
Enabling this option means that the Knowledge Script moves the mouse to match the X and Y coordinates shown in the step parameters before it performs the click action. If the computer is locked, or if another user is moving the mouse, the Playback continues, but a subsequent step is likely to fail.
For Click steps, if you have checked the box labeled Move cursor and then played the Knowledge Script back, a failure may indicate that you tried to play the Knowledge Script back while you were moving the mouse. In such a case, you should try the Playback again without touching the mouse. If Playback fails on a managed client, make sure the desktop computer is not locked.
NOTE: Enabling the Move Cursor option means that you cannot run WebTransaction Knowledge Scripts in silent mode on the managed client.
48 Editing Recorded Scripts
5.8 Frame RetrievalThis step identifier indicates steps involving an action on an HTML object contained within a frame. During Playback, this step is used to retrieve both Frame and IFrame objects.
The Frame step identifier may contain three child attributes:
Ordinal: Sequential numbers representing each frame’s position within the Web page. Because frames can be nested within one another, the ordinal number may be a sequence of relative positions.
Name: The Name attribute of the frame. The Name attribute is not required, so this attribute is not available for all Frame steps. This parameter can be edited, and a wildcard value (*) may be substituted.
Retrieve using: The attribute that should be used to identify the frame. Web Recorder can use either the ordinal sequence number or the frame name to determine whether the correct frame has been loaded during Playback. Double-click the Retrieve using parameter to change the default, Ordinal.
Web Recorder offers a tool to help you understand how frames are organized and identified within a given Web page. In any browser window you have launched from Web Recorder, select HTML Structure from the View menu to see the HTML Structure. Then right-click the HTML Structure view and select Frames and Forms only to see the frame structure. For more information, see “The HTML Structure View” on page 73.
You can also highlight the frame for a particular step by right-clicking the step and selecting Play up to this step. After the Web Recorder plays back the browsing session and pauses at the selected step, right-click the step and select Highlight on Web Browser. The Web Recorder Browser highlights the frame for the step in a red square for 3 seconds. If the frame cannot be found, the Web Recorder Browser displays an error message saying “Element not found.”
5.9 Form RetrievalThis step identifier indicates steps involving an action on an HTML object contained within a form.
The Form step identifier may contain three child attributes:
Position: Sequential numbers representing each form’s position within the Web page.
Name: The Name attribute of the form. The Name attribute is not required, so this attribute is not available for all Form steps. This parameter can be edited, and a wildcard value (*) may be substituted.
Retrieve using: The attribute that should be used to identify the frame. Web Recorder can use either the ordinal sequence number or the frame name to determine whether the correct frame has been loaded during Playback. Double-click the Retrieve using parameter to change the default, Position.
Web Recorder offers a tool to help you understand how forms are identified within a given Web page. In any browser window you have launched from Web Recorder, select HTML Structure from the View menu to see the HTML Structure. Then right-click the HTML Structure view and select Frames and Forms only to see the forms. For more information, see “The HTML Structure View” on page 73.
Editing Recorded Scripts 49

You can also highlight the form for a particular step by right-clicking the step and selecting Play up to this step. After the Web Recorder plays back the browsing session and pauses at the selected step, right-click the step and select Highlight on Web Browser. The Web Recorder Browser highlights the form for the step in a red square for three seconds. If the form cannot be found, the Web Recorder Browser displays an error message saying “Element not found.”
5.10 Object RetrievalThis step identifier indicates steps involving an action on a specific HTML object, such as a page or an image (IMG).
The Retrieve Object step identifier contains one child that in turn may contain multiple child parameters, including:
Display Text: The visible text associated with the object.
NAME: The object’s NAME attribute, if any is available.
ID: The object’s ID attribute, if available.
TITLE: The object’s TITLE attribute, if available.
ALT: The object’s ALT attribute, if available.
TYPE: The object’s TYPE attribute, if available.
VALUE: The VALUE attribute of the object, if available.
SRC: The filename and path information supplied in the object’s source (SRC) tags. Disabled by default if other attributes are available.
HREF: The URL of the object. Disabled by default if other attributes are available.
ONCLICK: An ONCLICK event handler for a JavaScript, if available.
The NAME, ID, TITLE, ALT, TYPE, VALUE, SRC, HREF, and OnClick parameters are attributes for HTML tags.
Web Recorder can use any kind of attribute to retrieve an object. Attributes are selected for you by default, but you can select another attribute to use. For more information, see “Using the Script Editor: an Example” on page 38. You can even define custom attributes and use those to identify an object for retrieval during Playback. For more information, see “Defining Custom Attributes” on page 56.
Because attributes alone may not be enough to make an object unique, the object is also seen in its context, with as many as four levels of parent elements, up to an anchor <A> element, and all child elements.
You can highlight a particular object in the Web Browser by right-clicking the object step and selecting Play up to this step. After the Web Recorder plays back the browsing session and pauses at the selected step, right-click the step and select Highlight on Web Browser. The Web Recorder Browser highlights the object for the step in a red square for three seconds. If the object cannot be found, the Web Recorder Browser displays an error message saying “Element not found.”
50 Editing Recorded Scripts

5.11 Search and Advanced Search StepsIf you want your WebTransaction Knowledge Script to perform some extra validation on the pages it retrieves during Playback, you have two options:
Search for a text string on the page.
Search for an object in its particular context on the page.
To perform a search validation, manually add a Search or Advanced Search step in one of the following ways:
Add a Search step during Recording using Add Search on the context menu in the Web browser window. For more information, see “Adding a Search Step During Recording” on page 51.
Add an Advanced Search step during Recording using Add Advanced Search on the context menu in the Web browser window.
Add a Search step after Recording using Insert Search Step in the Web Recorder Script Editor window. For more information, see “Adding a Search Step After Recording” on page 52.
5.11.1 Adding a Search Step During Recording
This Search step is used to validate text content on a Web page or one of the frames.
NOTE: The Add Search Step menu item is not enabled if you right-click over an EMBED object.
To add a Search step to a Knowledge Script during recording:
1 Start a Recording session by clicking Tools > Record in the menu and then clicking Browser > New Browser Window in the menu and navigate to the Web site you plan to record.
2 Navigate to the Web page you want to search.
3 If you see the text you want to search for on the page, you can highlight the text on the Web page if desired.
4 Right-click on the Web page and select Add Search Step.
5 If you did not highlight text in the Web page, return to the Web Recorder Knowledge Script, double-click the Search step you just added, and change the existing [not specified] to the desired search text.
6 Complete the Recording session.
You can return to the Script Editor window and find where the Search step has been added. Double-click to change any parameters that can be edited, if desired. Here is what the new Search step looks like:
Editing Recorded Scripts 51
With the addition of the Search step, Web Recorder performs extra validation on the Web page during Playback. The line of text reading “Submit” was selected when the step shown previously was added. If this text string is not found during Playback, the Knowledge Script is set to Event and Abort by default, meaning it stops Playback and returns an error message. You can also select either Event and Continue or just Continue for the Handling of the search failure condition parameter, so that the Knowledge Script does not abort if the step fails. Instead, the Playback continues, either with or without an error message as indicated. Web Recorder Playback Results report indicates that the step failed in all cases.
5.11.2 Adding a Search Step After Recording
Adding a search after recording requires a partial playback up to the step before the insertion point, to allow Web Recorder to collect the complete context from all open Web browser windows. You can perform the Playback manually or Web Recorder can run the Playback for you. This Search step can be used to validate text content on an entire Web page only.
To add a Search step to a Knowledge Script after recording:
1 Complete a Recording session.
2 In the Script Editor window, right-click the step above which you want to insert the search step, and select Insert Search Step. If you have not already run a partial Playback down to this step, Web Recorder now starts a Playback from the beginning down to this step.
3 If the Select Browser window displays, which occurs when more than one Web browser window is open, select the browser window you want to search and click OK.
4 Double-click the Search step you just added, and change the existing [not specified] to the desired search text.
5 Complete other edits and save the Knowledge Script if desired.
5.11.3 Search Options
The Web Recorder Script Editor offers several additional options within the Search step. These additional parameters let you reduce or expand the contextual markers that help Web Recorder determine whether the correct page has been loaded. Available options include the following:
Case-sensitivity in the search. By default, any search is not case-sensitive. That is, the uppercase or lowercase status of the characters in the search string is ignored. You can change this condition to perform a case-sensitive search.
Search scope. Click to enable a list where you can select a scope for the search, either the entire Web page or just the selected frame.
Loop until located. By default, Web Recorder makes one attempt to locate the selected search string during Playback. If you enable the Loop until located parameter, it keeps searching until the string is found or the timeout is exceeded.
In a situation where the item you want to search for may not be available until the page is refreshed by the Web Server, it is a good idea to enable this parameter. This option often eliminates the need to add a Delay step to the Knowledge Script. It is ideally suited for steps that require a lot of processing of an unpredictable duration on the Web server, such as a database query that eventually returns a specific result.
Timeout. To avoid having the Search step continue to search for a string for an excessive amount of time, you can set a timeout for the Loop until located parameter. Web Recorder then continues to search for the specified string until the string is found or until the timeout is exceeded, whichever comes first. Possible values are 0-300 seconds.
52 Editing Recorded Scripts

Include time in response time. Most discrete Knowledge Script steps receive a Navigate marker indicating that they are timed. With Search steps, however, the timing is discarded if the item is never found. This parameter adds a further capability: if disabled, the step response time is marked as “N/A”, and the response timing taken for this Search step is not included in the overall response time. If enabled, the response time is reported as “0.00” if the item is found immediately, or as any valid amount of time if success requires more than one search cycle.
Finally, if the item is not found, the response time is reported as “None.” For more information, see “Response-Time Messages” on page 95.
Search failure condition: Found or Not Found. You can set a search condition that constitutes failure. The Search or Advanced search step can be created to locate a string or object that you are hoping Web site visitors see, or to locate a string or object that you hope they do not see. For example, you might create a Search step to search for a text string indicating failure and set the Search failure condition to Found. If the search locates that string, the Search step fails.
Handling of the failure condition. You can instruct Playback to abort or continue based on the Search failure condition you set.
If search item is: Found [or Not Found], Then fail and: Event and Abort [or Continue or Event and Continue]
If your Search failure condition is met, you have the option of aborting the Playback and raising an alert, using Event and Abort, or of continuing on to the next step. If you want to continue, you can choose whether to report an error message, using either Continue or Event and Continue.The result details include the Search Criteria and Search Results.
The Knowledge Script behavior you select here applies only to the Search step and not to the entire Knowledge Script. Regardless of the action you choose after failure, the Search step always fails individually if the specified string is never located.
For more information, see “Step Types” on page 39.
5.11.4 Advanced Search Steps
The Advanced Search feature validates an HTML element in its context. The context of the object must be the same during Playback as it was during Recording for Playback to succeed. It uses the same mechanism used in object retrieval processing for HTML steps to validate selected objects. Advanced Search steps are useful for validating complex objects, such as an anchor containing an image, display text, and popup text.
Once an Advanced Search step has been added, a set of object retrieval parameters determines the context in which the object of the search is located. If the object is on the page but within a different context, for example, if some of the attributes describing the formatting or positioning of the object have changed, it is not found. Just as with most of the retrieval parameters, such as those that apply to the Window, Frame, and Form step categories, context attributes can be enabled or disabled for purposes of the search, and most can also be edited.
NOTE: The Add Advanced Search Step menu item only appears if a valid object is highlighted and if no text is highlighted.
To add an Advanced Search step to a Knowledge Script:
1 Start a Recording session by clicking Tools > Record in the menu and then clicking Browser > New Browser Window in the menu and navigate to the Web site you plan to record.
2 Highlight an object on the page where you want to perform extra validation. Make sure no text is highlighted.
Editing Recorded Scripts 53

3 Right-click, and select Add Advanced Search Step.
4 Complete the Recording session.
Return to the Script Editor window and find where the Advanced Search step has been added. Double-click to change any parameters that can be edited, if desired. Here is what the new Advanced Search step looks like in the Script Editor window:
In the previous image, the context required for the Advanced Search to find a matching object does not include a URL. The search succeeds only when all the contextual details from the Recording session that are enabled for matching actually match at Playback. As you can see in the image, the option to Event and Abort Knowledge Script Playback is selected for the Handling of the Search failure condition parameter. If you want to continue instead of aborting the Playback, you can choose Event and Continue or just Continue, depending on whether you want an error message.
5.12 Adding a Submit Form StepIf the user changes text fields in a Web page form and presses Enter, the form entries are submitted, but there is no action to record for the Submit button click. Occasionally a Web page form does not include a Submit button, and the user must submit in this way. When this occurs, Web Recorder automatically adds a Submit Form step to the Knowledge Script. For more information, see “Step Types” on page 39.
In some cases, Web Recorder cannot record submission of a form in a way that can be reliably played back. To address this issue, Web Recorder allows you to manually add a Submit Form step during recording, from a Web page form to any Knowledge Script.
To add a Submit Form step to a Knowledge Script:
1 Start the Recording session by clicking Record and then clicking Browser > New Browser Window in the menu.
2 Perform actions as desired and navigate to the Web page where you want to add the Submit Form step.
3 Fill out the form.
4 Right-click on the form, and select Add Submit Form Step from the menu.
5 Complete the Recording session.
54 Editing Recorded Scripts

Although in most cases a step is only designated as such when some browser activity occurs, in the case of a manually added Click step, no actual activity is necessary.
5.13 Wildcard EditingDepending on Web site architecture and Web server behavior, a page or object on a page may have a dynamic identity. Object names or URLs may receive suffixes with, for example, a server name or a connection ID. Dynamic elements cannot be played back by default: Web Recorder records the browsing session with the dynamic information but during Playback, it cannot retrieve the items because they have been assigned new identifiers.
5.13.1 Wildcard Matching
For cases where page and object identities are not static, the Script Editor supports wildcard matching. To use this feature, you need to take several steps, beginning with some testing.
To use a wildcard identifier for an object attribute, a window title, or a frame or form name:
1 Use the Web Recorder Web browser feature with the Session Transcript window open so that you can fully understand how the objects on the page are being identified by the Web server.
2 Record a Knowledge Script from a browsing session on that page.
3 In the Script Editor, navigate to one of the objects whose identity is dynamically assigned and click to expand its attributes.
4 Double-click the dynamic object or page attribute. An editable field appears.
NOTE: This step makes an attribute temporarily writable. If you change your mind later, you can always revert to the original value by right-clicking the attribute and selecting Restore original value from the menu.
5 Edit the attribute to add a wildcard (*) character.
6 After performing the preceding steps for any page objects that are subject to change during future browsing sessions on this Web site, try to play the Knowledge Script back by clicking Tools > Play and look for any failures.
5.13.2 More about Wildcard Matching
Here is how wildcard matching works in Web Recorder:
Whenever an editable field in a Knowledge Script step is used to retrieve a window, a frame, a form, or an attribute and is preceded by an Edit marker, you can use one or many asterisks (*) in the value to instruct Web Recorder to look further than a literal string to identify an object. Wildcards used in any other kind of field have no effect, and they cannot be used in a Search step, which does not support wildcard matching.
When used in wildcard matching, an asterisk may mean anything or nothing at all. For example, :Flo*od: matches with “Flood” as well as “FloAnyKindofTextod”.
Following are some examples of wildcard matching:
Example Description
* Matches the very first string found, with any content.
Editing Recorded Scripts 55

5.14 Defining Custom AttributesIn some cases, the only way to make a Web page element unique is to define a new, unique attribute and use it during Recording and Playback to identify and retrieve that particular object.
For example, a series of identical objects might be called up in sequence, at different points in a transaction.
5.14.1 Creating Object Attributes
To know whether the transaction had truly completed successfully, you would need to know exactly which object was successfully retrieved during Playback. In such a case, you could alter the HTML coding on the page to assign unique attributes to the identical objects. Then you could add those attributes to Web Recorder and instruct Playback to use them during object retrieval. Here is how to do it.
To create a unique object attribute:
1 First, determine which attribute you want to create. Click Browser > New browser window and navigate to the page you are testing.
2 In the browser window, select the object or page element that Web Recorder is having difficulty retrieving, right-click, and select Object Properties.
*string Matches any string that terminates with “string”.
String* Matches any string that begins with “String” (case-sensitive).
*str*sd Matches any string with text before and after the characters “str” and that terminates with “sd”.
Ads*fasdf* Matches any string that begins with “Ads” (case-sensitive) and also contains text before and after the characters “fasdf”.
**asdf*asdf* Multiple asterisks next to each other are treated as one.
Example Description
56 Editing Recorded Scripts
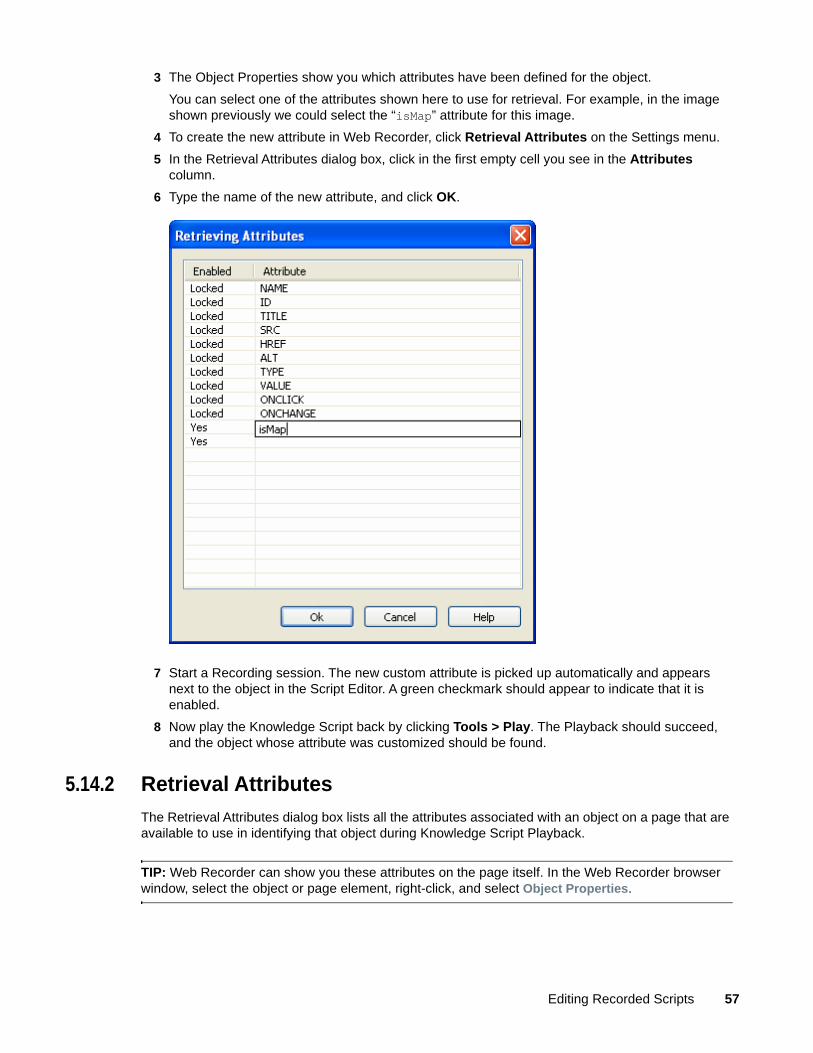
3 The Object Properties show you which attributes have been defined for the object.
You can select one of the attributes shown here to use for retrieval. For example, in the image shown previously we could select the “isMap” attribute for this image.
4 To create the new attribute in Web Recorder, click Retrieval Attributes on the Settings menu.
5 In the Retrieval Attributes dialog box, click in the first empty cell you see in the Attributes column.
6 Type the name of the new attribute, and click OK.
7 Start a Recording session. The new custom attribute is picked up automatically and appears next to the object in the Script Editor. A green checkmark should appear to indicate that it is enabled.
8 Now play the Knowledge Script back by clicking Tools > Play. The Playback should succeed, and the object whose attribute was customized should be found.
5.14.2 Retrieval Attributes
The Retrieval Attributes dialog box lists all the attributes associated with an object on a page that are available to use in identifying that object during Knowledge Script Playback.
TIP: Web Recorder can show you these attributes on the page itself. In the Web Recorder browser window, select the object or page element, right-click, and select Object Properties.
Editing Recorded Scripts 57

The Enabled column in the Retrieval Attributes dialog box indicates an attribute is “Locked” if it is read-only, which means that it cannot be enabled or disabled, modified, or removed from the list. Attributes that are not read-only are custom attributes, which you can create, delete, and modify. These custom attributes are always marked with a “Yes” or “No” in the Enabled column, indicating whether they are being used to identify an object.
5.15 Failure Event NotesThe Web Recorder Script Editor supports custom notes that accompany failure events associated with a particular Knowledge Script step. You might, for example, want to leave a note for yourself or for another AppManager operator explaining why a particular step might fail.
Any step that supports failure event notes includes the Failure Event Note parameter with an Edit marker. To add a failure event note, you double-click the parameter to see an empty field, where you can type your note:
Your failure event note then appears in Playback results and in the Event Details, as in the following graphic:
5.16 Checking in the Knowledge ScriptOnce you have finished recording your Knowledge Script, you can either the Script Editor to fine-tune it by editing some of the parameters, or you can check it into the repository and start running jobs with it.
NOTE: Once you have saved a Knowledge Script as a .qml file, you can always reopen a Knowledge Script later to fine-tune it in the Script Editor, even if you have already checked it in.
To check a Knowledge Script into the repository:
1 On the File menu, click Check-In.
2 The Knowledge Script Check-In dialog box asks for information about the Knowledge Script and for repository security information.
58 Editing Recorded Scripts

3 By default, the Knowledge Script is assigned the same name as the Knowledge Script filename. The default Knowledge Script folder, Web-RT, adds the prefix Web-RT_ to the Knowledge Script name. With that prefix, the checked-in Knowledge Script appears in the same folder as the other AppManager ResponseTime for Web Knowledge Scripts. Make any desired changes to the defaults.
4 Select Overwrite existing Knowledge Script if you are checking in an edited version of an existing Knowledge Script.
5 Fill in the Connection Information parameters to designate the repository where the Knowledge Script is checked in and to grant Web Recorder write access to it.
By default, SQL Server authentication is used. To use Windows authentication, check the Use Windows authentication check box. Specify the full path to the server where the repository is kept. Specify the name of the repository in the Server field.
For SQL Server authentication, supply the user Login name and Password.
6 If desired, edit the Long Script description field to change the text that is displayed in the Knowledge Script Properties dialog box for this Knowledge Script. You can also edit the Short Script description field to change the text that is displayed in the Knowledge Script pane of the AppManager Control Center console.
7 Click OK to check in the Knowledge Script.
Editing Recorded Scripts 59

60 Editing Recorded Scripts

6 6Web Recorder Playback
When you finish recording a transaction on a Web site, you should play the recorded transaction back in Web Recorder to verify it. During Web Recorder Playback, you can test the Knowledge Script, see preliminary response-time measurements, and analyze the interactions between the Web browser and the Web site being tested.
You can also save the recording as a WebTransaction Knowledge Script, check it into the AppManager repository, and run it on a managed client. This type of Playback allows you to set response-time thresholds and to collect data for response time and availability.
Several Playback features can help you verify your Knowledge Scripts. This chapter discusses these features, as well as some factors you must take into consideration before running your Knowledge Scripts on a managed client.
6.1 About Playback in Web RecorderThe Web Recorder Playback feature provides a preview of how a WebTransaction Knowledge Script runs once it is deployed on a Web-RT managed client. It is your chance to tweak any parameters that make it more difficult for the Knowledge Script to run to completion and provide a full set of response-time data.
Playback features have evolved from the requests of users, including beta testers, who wanted to be able to edit and verify Knowledge Scripts quickly and accurately. These features include options to see a replay of the entire transaction or just a portion of it, to slow down or speed up the replay, to delete part of a transaction, and to jump immediately back to Recording mode to replace deleted steps.
Playback on the managed client may not exactly resemble Playback in the Script Editor, but only because the following factors might come into play:
Internet Explorer settings on the managed client. When the Knowledge Script runs, it uses the security settings for Internet Explorer on the managed client. These settings should, therefore, either match those of the browser where Recording takes place or be carefully selected to create the desired response-time testing environment. For more information, see “Internet Explorer Settings” on page 71.
Any plugins installed on the managed client. Some Web sites require you to install a plugin to support versions of ActiveX or Java. An example of such a plugin is a Flash or Shockwave media player. With plugins, it is a good idea to plan for worst-case scenarios, in which the user of a Web site that requires such a player does not have it installed and does not want to install something new, even if it appears safe. Again, record the Knowledge Script and play it back on computers that have the same plugins installed.
Actual changes to dynamic content on the Web site that was recorded. The Script Editor feature provides many options for ensuring that even with dynamic content, the Knowledge Script can still run successfully.
Network factors that are beyond your control. For example, a Knowledge Script might fail because a slow-responding database might prevent a transaction from completing. These factors are precisely what you want to test with your WebTransaction Knowledge Scripts.
Web Recorder Playback 61

6.2 Playback FeaturesOnce you have recorded a browsing session with Web Recorder, the Playback feature lets you watch a replay of the recorded session and debug it if necessary. Several options allow you to find and analyze just the segment of the session that you want to see:
Adjust the Playback speed. Slow down the Playback if you need to get a closer look at the recorded session, or speed it up if you just want to check the Web Recorder Playback Results report for possible failures. The Playback speed you set affects Playback by adding delays between each step. For more information, see “Adjusting the Playback Speed” on page 92.
Play the recording up to a selected step. Open the Knowledge Script file and select a step in the Script Editor window. Right-click and select Play up to this step from the menu.
Play the Knowledge Script back gradually. Open the Knowledge Script file, and click Step on the Tools menu. Step Playback simply goes step by step through the recorded transaction. Playback stops after each step.
Delete all the steps after a certain point in the recorded Knowledge Script. Then record new steps from that point if you like. Open the Knowledge Script file, and highlight a step. Right-click and select Record from this step from the menu. You are warned that all the steps that follow the highlighted step are deleted. Playback then plays back the Knowledge Script up to the selected point. As soon as the last remaining step is reached, Web Recorder enters Recording mode so that you can return to the browser and record a new set of steps.
After you have isolated the place in the Knowledge Script that is not performing as expected, open the Session Transcript or HTML Structure view to get a closer look. For more information, see Chapter 7, “Web Recorder Analytical Tools,” on page 73.
6.3 Playing Back and Verifying a RecordingBe sure to play the transaction back before you save it. AppManager ResponseTime for Web is in some cases stricter than Internet Explorer, and Playback lets you detect cases where the recorded transaction does not exactly duplicate what you did.
To play back a recorded browsing session, first make sure you have stopped the recording by clicking Stop. Click Play to replay the transaction or click Step to replay the transaction one step at a time.
Watch the Playback to visually verify that the browsing session was recorded correctly. Make sure all objects were loaded properly and that all Knowledge Scripts were completed. You can slow down Playback by selecting a different speed; click Tools > Playback Speed.
Any problems during Playback appear with “failure” markers, which are displayed as red Xs, in the Step Processing column of the Script Editor.
A step can fail for many reasons. Before you scrap the whole recording and start over, read Chapter 8, “Fine-Tuning Scripts for Playback,” on page 83, which explains how to ensure Playback success.
You can also troubleshoot steps using the Web Browser. If a step fails, right-click the failed step and select Play up to this step. After the Web Recorder plays back the browsing session and pauses at the failed step, right-click the step and select Highlight on Web Browser.
The Web Recorder Browser highlights the HTML element for the step in a red square for 3 seconds. Right-click the highlighted object and select Object Properties to examine its attributes. If the object still cannot be found, the Web Recorder Browser displays an error message saying “Element not found.”
62 Web Recorder Playback

6.4 Running WebTransaction Knowledge ScriptsThe Web-RT Knowledge Scripts run on computers where the Web-RT module is installed. A WebTransaction Knowledge Script generally follows the same conventions as other Knowledge Scripts, but instead of running a job, it “plays back” a recorded Web transaction and times it.
To run a Knowledge Script generated by Web Recorder:
1 Run the Knowledge Script onto the computers you want to use to initiate the Web transaction. You might want to use computers in different geographical locations to test performance of the site using a variety of connections.
NOTE: To monitor a Web site from a number of different locations using the same Knowledge Script, the login settings for that site must allow multiple logins by the user specified in your Knowledge Script.
2 On the Schedule tab, set a schedule for how often and when you want to run the Knowledge Script.
The schedule interval should be based on the Overall Processing Time, which you can see in the Web Recorder Playback Results report after Knowledge Script Playback, and on the number of WebTransaction Knowledge Script jobs running on the same computer. For more information, see “Running Multiple WebTransaction Jobs on a Single Computer” on page 63.
3 On the Values tab, set event, data collection and threshold parameters. If you want to monitor the response time for specific steps in a transaction, you need to select the individual steps to monitor before saving the recorded transaction as a Knowledge Script.
4 On the Action tab, set any actions you want to take in response to threshold crossings or step failures.
5 Click OK.
6.5 Running Multiple WebTransaction Jobs on a Single ComputerIf you are planning to run multiple WebTransaction Knowledge Script jobs on a single managed client, you should read the white paper titled “Best Practices for Estimating Scalability of Web ResponseTime Agents,” which is included in the Web-download package and on the AppManager CD-ROM, before proceeding. That paper offers guidelines based on our own rigorous testing with multiple jobs.
As a rule of thumb, bear in mind that you have a finite time budget for the number of jobs and the schedule for these jobs. You should take several factors into consideration when determining this budget. If you do not, your results may include gaps in data points due to job overruns, job timeouts, or queue timeouts.
The following factors should influence the number of simultaneous WebTransaction jobs that run on any managed client:
The Processing Time for the transaction
The WebTransaction limit
The number of data points to be generated
The volume of results from events and data points
Web Recorder Playback 63

The schedule for a WebTransaction Knowledge Script should be based on the Processing Time measured for that transaction. This information is returned as part of the results. For more information, see “Playback Results” on page 93. It is never a good idea to run jobs on a schedule that is equal to the Processing Time of the job, for example, every 90 seconds for a job that takes 90 seconds. A time buffer must be added to the total Processing Time to handle cases where the transaction may run longer due to variations caused by the Web server, network connectivity, and client computer.
One rule of thumb is that the time buffer should be equal to the response time or 30 seconds, whichever is greater. In other words, if the Knowledge Script takes 90 seconds to execute and returns a response time value of 45 seconds, provide for the situation where the response time is doubled and extend the schedule by at least 45 seconds. Remember that the Processing Time is affected by the Playback Speed and the timers you set, and changing those at run time changes the Processing Time.
By default, the WebTransaction module limits the number of parallel transactions running at one time to 5 to avoid resource problems associated with Internet Explorer. For more information, see “WebTransaction Limit” on page 65.
6.5.1 Calculating the Total Number of Simultaneous Jobs
Knowing that you are limited to five parallel jobs, and that each take a certain amount of processing time, which determines the schedule, you can calculate the total number of jobs you can run on a single managed client computer based on the number of data points you would want to generate per job.
For example, assume you want to generate a minimum of four data points per hour for each WebTransaction job. Also assume that on average, each job has a Processing Time of 105 seconds, and a Response Time of 35 seconds. Based on those metrics, you would want these jobs to run on a schedule of no less than three-minute intervals (105 secs. + 35 secs. = 140 secs., rounded up to a three-minute interval).
To get four data points per hour, the job would need to run at least every 15 minutes.
If the jobs run at three-minute schedules, we could run five jobs during the 15-minute interval (15 min. / 3 min. = 5 jobs).
Because Web Recorder limits parallel transactions to five, you could only run a maximum of 25 jobs on that single client: 5 time slices * 5 parallel transactions. In addition, you would need to create staggered Knowledge Script schedules so that the 25 jobs would not all start at the exact same time. Otherwise, jobs would be forced to wait in the queue before they could run, resulting in gaps in the data or queue timeouts.
The last factor you should also consider is the overhead as the AppManager agent returns results for these 25 jobs. Each WebTransaction job can return events and multiple data points for each step, including events and data for Overall Availability, Response Time, and Processing Time. You should determine what type of data you want to collect, and limit the other data to reduce agent overhead, as well as the amount of data stored in the AppManager repository. The WebTransaction job uses CPU time to return the results, which could reduce the amount of CPU available for other running jobs.
For example, if your WebTransaction Knowledge Script job included 15 steps and you enabled all the Raise event if...? and Collect data for...? parameters, you could get 17 events and 32 data points generated for each job, broken out as follows:
15 Step Response Time threshold exceeded events
15 Step Response Time data points
15 Step Response Time Availability data points
64 Web Recorder Playback

1 Overall Response Time threshold exceeded event
1 Overall Response Time data point
1 Overall Processing Time threshold exceeded event
1 Overall Processing Time data point
1 Overall Availability data point
Multiply that by 25 jobs, and you can see that excessive amounts of data could be generated.
NOTE: When running a mix of new WebTransaction Knowledge Script jobs with jobs run by older versions of WebTransaction Knowledge Scripts, you should reduce the WebTransaction62Limit registry key value to 3. In addition, you should factor in all the WebTransaction jobs when determining your time budget because both types of WebTransaction jobs compete for Internet Explorer resources. Ultimately, we would strongly recommend that you re-record old WebTransaction Knowledge Scripts using the new version of Web Recorder because the overall framework and technology for Playback have been significantly improved.
6.5.2 WebTransaction Limit
The Web-RT module limits the number of parallel transactions at one time to 5 to help avoid resource problems with Internet Explorer. This value is set at run time. For each WebTransaction job, an associated QWEBA6.exe process is spawned. It runs out-of-process from the AppManager agent netiqmc process. When a QWEBA6.exe process starts, it checks to see if a token is available to run. The number of tokens available is defined by the value of the WebTransaction62Limit registry key, which defaults to 5.
Key: HKLM\Software\netiq\Response Time Value: WebTransaction62LimitIf a token is not available for a job, the transaction is added to the queue and starts the queue timer, whose limit is defined in the Knowledge Script.
NOTE: The value can be 1-5. All other values are ignored and the default of 5 substituted. To change this value, all jobs must be stopped, and no active QWEBA6.exe processes can be running for the change to take effect.
Earlier versions of Web Recorder used a similar key: WebTransactionLimit.
If the Queue Timeout expires, the transaction does not run, a “Queue Timeout” event is raised, and the transaction is moved to the end of the queue. The “Queue Timeout” event reads as follows:
Error 0x803C0106: The job was aborted because it failed to obtain Internet Explorer resources before timing out.
To avoid this problem, take the one or more of the following steps:
Increase the Queue Timeout value. Open the Knowledge Script Properties dialog box in the AppManager Operator Console to change the value for this parameter.
Increase the job’s execution interval by changing its schedule in the Knowledge Script Properties dialog box.
Reduce the number of WebTransaction jobs on the client computer.
Web Recorder Playback 65

When a token comes available, the transaction runs and a job timeout timer is started. If the transaction takes longer than the Job Timeout, as defined in the Knowledge Script, the Web Recorder stops the transaction and raises a “Job Timeout” event:
Error 0x803C0104: The job was aborted because it had been using Internet Explorer resources for too long.
The job may have timed out for one of the following reasons:
The Web server stopped responding.
The Job Timeout value is too low.
To avoid problems with job timeouts, take one or more of the following steps:
Make sure the Web server is available.
Increase the Job Timeout value. Open the Knowledge Script Properties dialog box in the AppManager Operator Console to change the value of this parameter.
If you receive a Job Timeout event, you may see in the results that the Total Processing Time is a few milliseconds off. In general, the Total Processing Time is a guideline for determining an appropriate Job Timeout value: the Job Timeout value should be slightly greater than the Total Processing Time. However, in the case of job timeouts, you may see that the Job Timeout value is slightly less than the Total Processing Time.
6.6 Customizing Navigate Errors Playback BehaviorThe Web server or Internet Explorer sometimes encounters problem situations while “navigating” to a page and generates HTTP or Internet Explorer errors. These errors are usually valid and indicate that a problem exists and the contents of the page cannot be displayed. In this case, you expect the playback to fail. Sometimes the error may indicate a problem with the Web server or browser, but the page content is fully available. In this case, you may want to ignore or log the event, and then proceed with the playback.
Web Recorder Navigate Errors allows you to select a specific outcome based on the specific navigate error. You can choose from a list of standard outcomes for each error code in a list of common navigate errors. You can also add error codes to the list.
6.6.1 Navigate Errors Dialog Box
The Navigate Errors dialog box contains two tabs, each containing a Navigate Error table, and two buttons to reset table values.
Current Web Recorder File: Specifies the navigate errors configuration of the new or existing file that is currently open.
User Defaults: Specifies the navigate errors configuration applied to new files. This configuration is also applied to files recorded with a previous version of the Web Recorder. Web Recorder version 7.1 and later applies the default configuration when opening old files.
Apply Web Recorder Defaults: Resets all predefined values of the visible table to their original values.
Apply User Defaults: Applies all default values to the actual file. You can only use this option when the Current Web Recorder File tab is selected.
66 Web Recorder Playback

When you change values on the Current Web Recorder File table, and click OK, Web Recorder applies the changes to the currently open file and adds an asterick on the window title to indicate the document has been modified.
6.6.2 Navigate Errors Table
The Navigate Errors table specifies the outcome for a list of navigation errors.
Status Code: Specifies the number of the HTTP or Internet Explorer status or error codes.
Status Description: Specifies the description to display in the information table of an event or data point.
Outcome: Specifies the action to take when the corresponding navigate error occurs.
The tables on the Current Web Recorder File and User Defaults tabs initially contain the same predefined code, description and outcome values. You can customize the two tables differently, for use with the current file and as defaults for new files. For each predefined entry, you cannot change the status codes, but you can modify the Status Description and Outcome values. You can also insert custom entries using a status code not included in the predefined list. The tables behave according to the following rules:
Predefined entries can be customized, but cannot be deleted from the list.
Predefined entries can be individually reset to the original value using the Apply Web Recorder Default command on the context menu. All predefined entries can be reset to the original value in one single action by clicking Apply Web Recorder Defaults.
Custom entries can be inserted at the bottom of the list. All custom entries can be individually removed later using the Delete item command on the context menu.
Entries cannot be sorted. All predefined values remain at the top of the list and all custom values at the bottom.
6.6.3 Status Code Column
The status code column contains specific ranges of decimal and hexadecimal field values. You can edit the codes in custom entries only. Predefined entries contain read-only codes. All valid HTTP status codes are predefined. The status code column adheres to the following rules:
0-399: Invalid HTTP status codes. Even though values in the range 100-399 are valid success or redirection codes, Internet Explorer does not expose them to Web Recorder. You cannot insert these error codes in the table.
400-505: Valid predefined HTTP status codes visible to Web Recorder.
0x800C0002L-0x800C0300L: Valid predefined Internet Explorer codes.
0x803CFFFF: Custom Web Recorder error code generated when an invalid status code, usually a zero, is received.
All positive values greater or equal to 400 are valid. The Web browser may or may not be able to catch all values in this range.
All positive values are represented in decimal format.
All negative values are displayed in hexadecimal format, for example, 0x800C02FE. You can only type hexadecimal characters (0123456789abcdef) when inserting or modifying a status code in the table. When the focus moves away from the modified status code field, the value is automatically reformatted. For example, the entered code -2146696450 is transformed to 0x800C02FE.
Web Recorder Playback 67

6.6.4 Status Description Column
If necessary, you can modify the descriptions included with predefined status codes. The description is displayed in the data point and event information tables if the Web Server does not supply a description for the status code.
6.6.5 Outcome Column
The Outcome column fulfills the purpose of the Navigate Errors dialog by allowing the user to specify what happens when a specific navigate error occurs. You can choose from a list of six actions:
Event and Fail: Default value for all status codes. This action specifies that the step fails, and the Knowledge Script aborts and generates an event Step [x] failed: Navigate error.
Event and continue: This action specifies that the step does not fail and the Knowledge Script does not abort, but does generate a low-severity event Step [x] Navigate Error.
Continue: This action specifies that the navigate error is ignored and the Knowledge Script continues. The navigate error is described in an information table of the data point.
6.6.6 Customizing a Predefined Navigate Error
Web Recorder allows you to customize the descriptions and outcomes for predefined errors.
To customize a predefined navigate error:
1 In the AppManager Operator Console, on the Extensions menu, click Web Recorder.
2 On the Settings menu, click Navigate Errors.
3 Select Current Web Recorder File or User Defaults for the errors table you want to customize.
4 In the table, locate the status code you want to customize.
5 Click the existing Status Description and type to modify the description.
6 Click the existing Outcome and select an outcome from the list.
7 Click OK.
6.6.7 Adding a Custom Navigate Error
Web Recorder allows you to add error codes to the navigate errors tables that are not already present. You can add these custom navigate errors to both tables, for Current Web Recorder File and for User Defaults.
To add a custom navigate error:
1 From the AppManager Operator Console Extensions menu, click Web Recorder.
2 On the Settings menu, click Navigate Errors.
3 Select Current Web Recorder File or User Defaults for the errors table you want to customize.
4 Scroll to the empty row at the bottom of the table.
5 Click the blank Status Code field and type the error code you want to add.
6 Click the blank Status Description field and type the corresponding description.
7 To change the outcome from the default value, click the Outcome field and select an outcome from the list.
8 Click OK.
68 Web Recorder Playback

6.6.8 Deleting a Custom Navigate Error
You can delete a custom error code that you have added to Current Web Recorder File or User Defaults navigate errors tables. You cannot remove predefined errors.
To delete a custom navigate error:
1 From the AppManager Operator Console Extensions menu, click Web Recorder.
2 On the Settings menu, click Navigate Errors.
3 Select Current Web Recorder File or User Defaults for the errors table you want to modify.
4 Locate the custom error you want to delete from the table.
5 Right-click the custom error and select Delete item.
6 Click Yes on the confirmation window to delete the indicated custom error number.
7 Click OK.
6.6.9 Restoring a Default Value
Web Recorder provides a way to restore an original default value for a predefined error in the Current Web Recorder File or User Defaults table.
To restore a default navigate error value:
1 From the AppManager Operator Console Extensions menu, click Web Recorder.
2 On the Settings menu, click Navigate Errors.
3 Select Current Web Recorder File or User Defaults for the errors table you want to restore.
4 Locate the predefined value you want to restore.
5 Right-click the value and select Apply Web Recorder Default.
6 Click OK.
6.6.10 Restoring All Default Values
Web Recorder provides a way to restore all the original default values for predefined errors in Current Web Recorder File or User Defaults tables.
To restore all the default navigate error values:
1 From the AppManager Operator Console Extensions menu, click Web Recorder.
2 On the Settings menu, click Navigate Errors.
3 Select Current Web Recorder File or User Defaults for the errors table you want to restore.
4 Click Apply Web Recorder Defaults.
5 Click Yes on the confirmation window to restore original values to all values in predefined errors.
6 Click OK.
Web Recorder Playback 69

6.6.11 Applying Default Values to the Current Knowledge Script
Web Recorder provides a way to apply all default values to Current Web Recorder File, the currently open Knowledge Script. Choosing this option restores both predefined and custom error values to the defaults, and also creates any custom default errors that do not already exist in Current Web Recorder File. Custom errors in Current Web Recorder File that are not in the User Defaults table remain unchanged.
To apply the current defaults to the current Knowledge Script:
1 From the AppManager Operator Console Extensions menu, click Web Recorder.
2 On the Settings menu, click Navigate Errors.
3 Select Current Web Recorder File.
4 Click Apply User Defaults.
5 Click Yes on the confirmation window to apply all current default values to the open Knowledge Script.
6 Click OK.
6.7 Managed Client SecurityWhen running a job using a Knowledge Script generated by Web Recorder, the computer where the Knowledge Script runs and where you have installed the Web-RT managed object must have a logged-in user. You can lock the computer to prevent access to it, but a user must be logged on.
In addition, the user who is logged on must have a valid Internet Explorer profile. That is, the user must have started Internet Explorer and gone through the initial connection wizard that prompts for connection settings. Without the successful completion of the setup wizard, AppManager ResponseTime for Web is not able to reach the Internet to test your Knowledge Scripts. This limitation arises because Internet Explorer is not designed to run without a user.
To provide additional security, you can configure the screensaver on the managed client computer to start up after one minute and set a password. Go to Control Panel > Display > Screen Saver > Password Protected.
NOTE: In the case of a power outage or other reboot, the computer can be set up to automatically log in as a specific user. For more information, see Microsoft Knowledge Base articles How to turn on automatic logon in Windows XP and How to enable automatic logon in Windows.
Because each Knowledge Script job executes in the guise of the person currently logged in to the Playback computer, any cookies associated with that user are used during Knowledge Script execution unless the “Use existing persistent cookies” Knowledge Script parameter is disabled. For more information, see “Optimizing Your Environment for Accurate Response-Time Testing” on page 71.
If the Knowledge Script uses the Mouse Move option, which directs the mouse to click on a specific X,Y coordinate on the screen, the managed client cannot be locked during Playback. For more information, see “Customizing Window Retrieval” on page 48. If the computer is locked, any steps using the Mouse Move option likely appear to complete successfully, but subsequent transaction steps fail because the elements they needed were missing.
70 Web Recorder Playback
6.8 Optimizing Your Environment for Accurate Response-Time TestingTo ensure that the Web-RT Knowledge Scripts measure response times as accurately as possible, you may want to perform some optimizations in your Recording and Playback environments. In some cases, you merely need to recognize the effects of such optimizations in the final measurements. The following topics provide some tips for preparing your environment and understanding what exactly is reflected in the download times you see.
6.8.1 Hardware, Plugins, and Java
Your goal in using Web Recorder may be to find out whether a visitor to a particular Web site is likely to have a pleasant or frustrating experience interacting with it. The Knowledge Scripts you create using Web Recorder help you do that by personifying a user. When played back on a Web-RT managed client, these Knowledge Scripts use Internet Explorer to send out a series of typical user requests, timing the site’s responses to them and alerting you when failures occur.
Bear in mind, therefore, that the managed client, where Knowledge Script Playback occurs, needs to be almost an exact match of the computer where you recorded the Knowledge Script. The operating system, RAM, and processors should be similar. For example, an older Pentium III computer loads pages more slowly than a newer, faster computer. Installed applications, particularly plugins, should be identical. If a site requires a plugin for ActiveX or Flash, make sure it is installed on both computers. Otherwise, at Playback the Knowledge Script skips the step where a popup asks the user if he or she wants to install the required plugin, and the remaining steps likely fail because objects are missing.
If the Web pages being tested use Java, make sure the Recording and Playback computers have the same version of Java, either Sun or Microsoft. The two versions are different, and Playback fails if there is a mismatch.
6.8.2 Internet Explorer Settings
The copy of Internet Explorer installed on the managed client controls the settings that the Knowledge Script must use when a recorded transaction is played back. What type of Internet Explorer user do you want your Knowledge Scripts to portray? Users who are new to a site do not yet have an identifying cookie on their computer, or any cached content from the site to help it load faster. Security-minded users may have changed some default Internet Explorer security settings.
Here are some settings you should consider when setting up the managed client computer to run WebTransaction Knowledge Scripts. Although Internet Explorer also has other settings that can affect Playback, all of the following settings can be checked or changed by clicking Tools > Internet Options > Advanced and scrolling to the Security section or the Browsing section:
Internet Explorer Setting Default Setting Effect on Playback if Enabled
Empty Temporary Internet Files folder when browser is closed
Disabled User appears to be a first-time site visitor, with no cookies and no cached site content. Images load more slowly, for example, and authentication is required, if applicable.
Warn about invalid site certificates
Enabled If the monitored Web site serves up a security certificate containing an invalid URL, the user receives a popup warning.
Web Recorder Playback 71
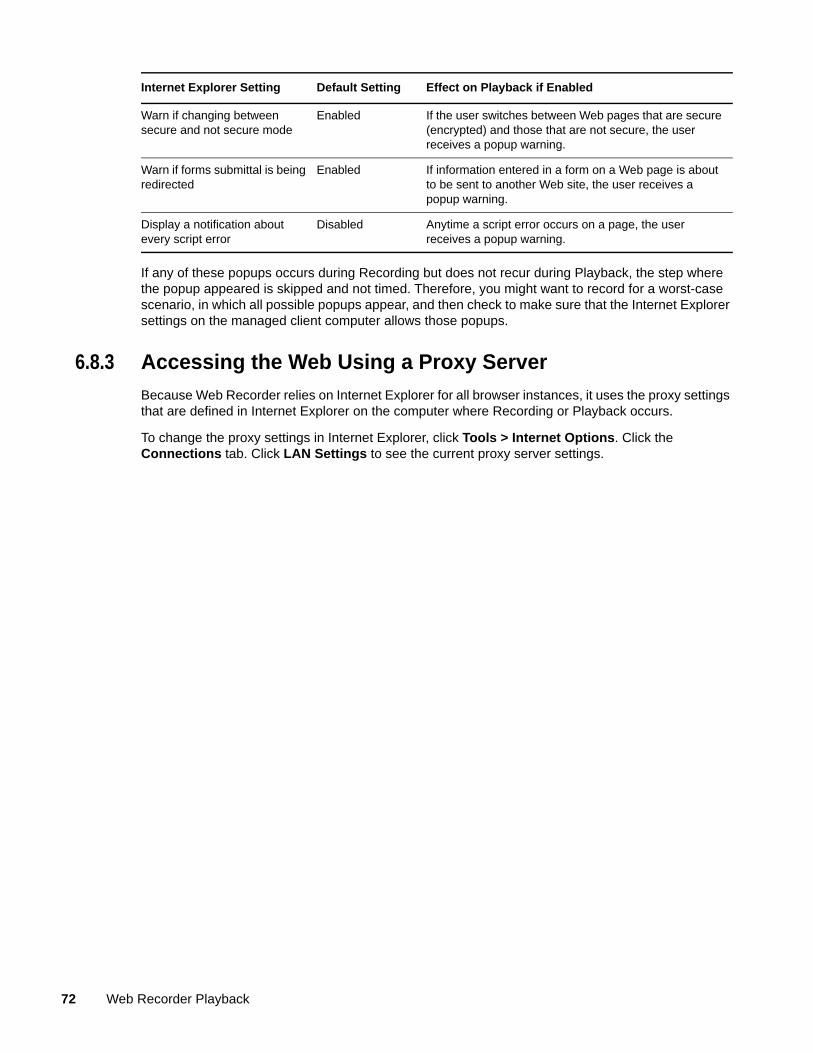
If any of these popups occurs during Recording but does not recur during Playback, the step where the popup appeared is skipped and not timed. Therefore, you might want to record for a worst-case scenario, in which all possible popups appear, and then check to make sure that the Internet Explorer settings on the managed client computer allows those popups.
6.8.3 Accessing the Web Using a Proxy Server
Because Web Recorder relies on Internet Explorer for all browser instances, it uses the proxy settings that are defined in Internet Explorer on the computer where Recording or Playback occurs.
To change the proxy settings in Internet Explorer, click Tools > Internet Options. Click the Connections tab. Click LAN Settings to see the current proxy server settings.
Warn if changing between secure and not secure mode
Enabled If the user switches between Web pages that are secure (encrypted) and those that are not secure, the user receives a popup warning.
Warn if forms submittal is being redirected
Enabled If information entered in a form on a Web page is about to be sent to another Web site, the user receives a popup warning.
Display a notification about every script error
Disabled Anytime a script error occurs on a page, the user receives a popup warning.
Internet Explorer Setting Default Setting Effect on Playback if Enabled
72 Web Recorder Playback

7 7Web Recorder Analytical Tools
Web Recorder offers three tools to help you analyze Web pages and understand how the browser interacts with them. With the knowledge you gain from using the HTML Structure view, the Object Properties browser enhancement, and the Session Transcript view, you can troubleshoot Web pages whose performance is poor or customize recorded Knowledge Scripts to conduct high-level testing of Web site components.
7.1 The HTML Structure ViewThe HTML Structure view is a Web Recorder addition to each Internet Explorer window you launch from the main Web Recorder window. Access it by opening a new browser window and clicking HTML Structure on the View menu. This view adds some functionality and usability to the familiar View Source capability in Internet Explorer.
Context menus are available to help you navigate the HTML Structure view, which can grow to a large size and be very complex. From a Web Recorder browser window, you can right-click over a page object and see a context menu that includes the menu item Retrieve Object on HTML Structure. Select this menu item to launch the HTML Structure view with that object highlighted in the tree.
In addition, you can view the properties of an individual object on a Web page by selecting the object, right-clicking, and selecting Object Properties from the context menu. Properties that are retrieved include the object’s tag name, such as A or IMG, its source or display text, its location, URL, class, and coordinates.
In cases where multiple objects are beneath the cursor, the context menu helps you select a single object and view options for it. For example, if you right-click over an AREA element, that element may be contained by a MAP that may be hosted by a picture. The context menu presents the possible objects to retrieve as separate entities and gives you access to the same options for all objects.
Web Recorder Analytical Tools 73

7.1.1 Understanding the HTML Structure View
The HTML Structure view is useful for debugging a Web page or an interaction problem between Web Recorder and a Web site. It provides a searchable, readable interface between you and Microsoft Internet Explorer, whose tracing output can be very dense. The HTML Structure view was designed to create a snapshot of a Web page from the perspective of Internet Explorer.
The Highlight on Web Browser menu item on the context menu shown previously helps you find an individual element in the tree by highlighting it for you on the Web page. The element shows up on the page surrounded by a red box.
You have the option to view the entire HTML page architecture or just a “Frames and Forms” tree. To limit the amount of information shown in the HTML Structure tree and show only the hierarchy of frames and forms in the page, select Frames and Forms only from the context menu in the HTML Structure view. The status bar displays the text Frames and Forms only, to indicate this state.
Click Display BODY from BASE on the context menu to control where the BODY Web page element is shown in the tree. A BASE is a reference URL provided to resolve all relative REF and SRC paths on the page. The base declaration, when present, is located within the HEAD tags; for example:
<HEAD> <BASE href="http://www.barre.fr/fou/intro.html"> </HEAD>
If a base declaration exists, the Web Recorder engine completely duplicates the BODY of the HTML page under the BASE structure in the tree. The option to View BODY from BASE lets you organize the BODY information under the BASE structure in the tree.
Retrieve an object from the HTML Structure view by highlighting it in the associated browser window or highlight an object on the in the HTML Structure tree and see it become highlighted in the browser window.
74 Web Recorder Analytical Tools
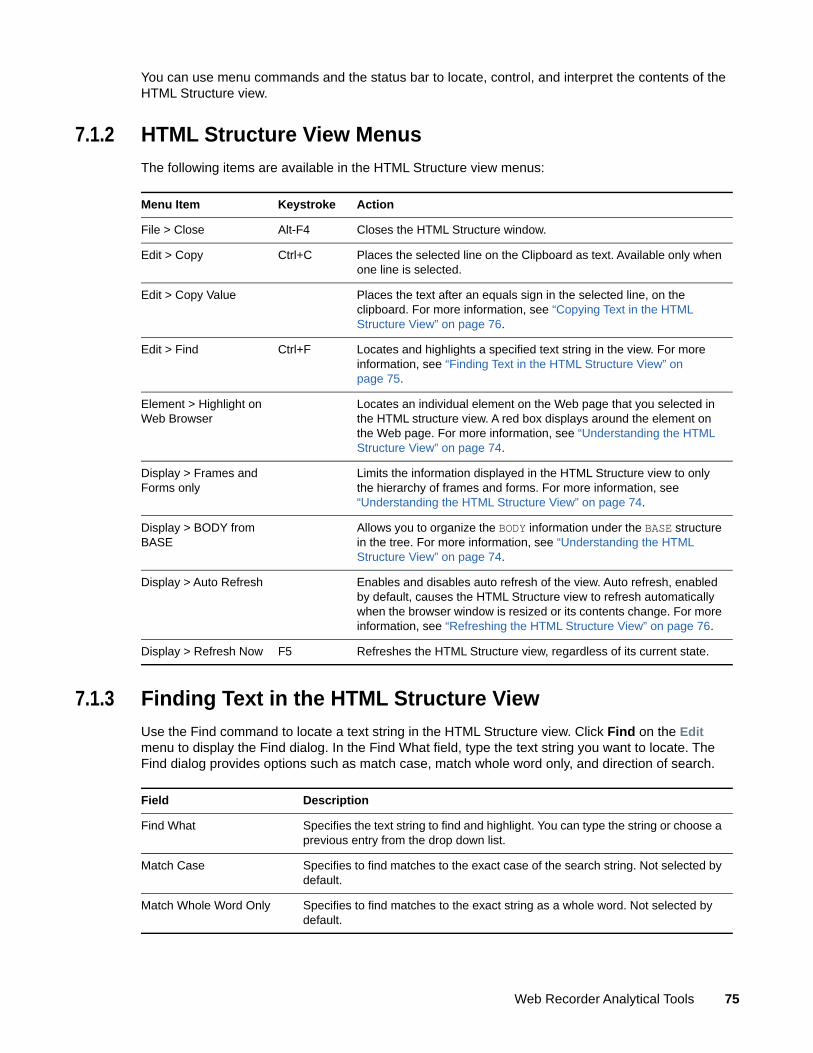
You can use menu commands and the status bar to locate, control, and interpret the contents of the HTML Structure view.
7.1.2 HTML Structure View Menus
The following items are available in the HTML Structure view menus:
7.1.3 Finding Text in the HTML Structure View
Use the Find command to locate a text string in the HTML Structure view. Click Find on the Edit menu to display the Find dialog. In the Find What field, type the text string you want to locate. The Find dialog provides options such as match case, match whole word only, and direction of search.
Menu Item Keystroke Action
File > Close Alt-F4 Closes the HTML Structure window.
Edit > Copy Ctrl+C Places the selected line on the Clipboard as text. Available only when one line is selected.
Edit > Copy Value Places the text after an equals sign in the selected line, on the clipboard. For more information, see “Copying Text in the HTML Structure View” on page 76.
Edit > Find Ctrl+F Locates and highlights a specified text string in the view. For more information, see “Finding Text in the HTML Structure View” on page 75.
Element > Highlight on Web Browser
Locates an individual element on the Web page that you selected in the HTML structure view. A red box displays around the element on the Web page. For more information, see “Understanding the HTML Structure View” on page 74.
Display > Frames and Forms only
Limits the information displayed in the HTML Structure view to only the hierarchy of frames and forms. For more information, see “Understanding the HTML Structure View” on page 74.
Display > BODY from BASE
Allows you to organize the BODY information under the BASE structure in the tree. For more information, see “Understanding the HTML Structure View” on page 74.
Display > Auto Refresh Enables and disables auto refresh of the view. Auto refresh, enabled by default, causes the HTML Structure view to refresh automatically when the browser window is resized or its contents change. For more information, see “Refreshing the HTML Structure View” on page 76.
Display > Refresh Now F5 Refreshes the HTML Structure view, regardless of its current state.
Field Description
Find What Specifies the text string to find and highlight. You can type the string or choose a previous entry from the drop down list.
Match Case Specifies to find matches to the exact case of the search string. Not selected by default.
Match Whole Word Only Specifies to find matches to the exact string as a whole word. Not selected by default.
Web Recorder Analytical Tools 75

7.1.4 Copying Text in the HTML Structure View
The HTML Structure view provides two commands for copying text to the clipboard.
Use the Copy command to copy a line of text from the view to the clipboard. Click a line in the view and then click Copy on the Edit menu.
Use the Copy Value command to copy the text after an equal sign from the view to the clipboard. Click a line that contains an equal sign such as Display Text = "Sign In" in the view and then click Copy Value on the Edit menu. If text is quoted, only the text between the quotes is copied to the clipboard.
7.1.5 Refreshing the HTML Structure View
The HTML Structure view provides two commands for controlling the refresh of the view. By default, the view automatically refreshes when the browser window is resized or its contents change.
Use the Auto Refresh command to enable or disable auto refresh of the view. Auto refresh, enabled by default, causes the HTML Structure view to refresh automatically when the browser window is resized or its contents change. To disable auto refresh, click Auto Refresh on the Display menu to remove the check mark. If the web page contents change while auto refresh is disabled, the status bar displays the text Content Changed.
NOTE: If the Web page contents change while auto refresh is disabled, the Highlight in Web Browser command is disabled. To enable the Highlight in Web Browser command, re-enable Auto Refresh or manually refresh using Refresh Now.
Use the Refresh Now command to refresh the HTML Structure view on demand. To refresh the view immediately, click Refresh Now on the Display menu.
7.1.6 HTML Structure View Status Bar
The status bar at the bottom of the HTML Structure window provides real time information about the view and selected elements in the view.
The following information is available in the HTML Structure view status bar:
Direction Specifies the direction of the search in the view as either Up or Down. Down is selected by default.
Information Description
Position The x and y coordinates of a selected visible element. This area of the status bar is empty if the selected element is not visible in the Web page.
Dimension The x and y coordinates of a selected visible element. This area of the status bar is empty if the selected element is not visible in the Web page.
Frames and Forms only Indicates if only Frames and Forms are being displayed. If this area of the status bar is empty, all HTML for the Web page is currently displayed.
76 Web Recorder Analytical Tools

7.2 Object PropertiesThe Object Properties view is available from the browser context menu when you right-click an object. It is a convenient way to get a quick view of a particular object when you do not need to see the entire page architecture.
The Object Properties view is useful for viewing the details of an element separated from its context, or for selecting object attributes to be used in identifying and retrieving an object during Playback. For example, when editing or troubleshooting a recorded Knowledge Script, you may need to enable the ALT attribute of an IMG object instead of its SRC attribute. The Object Properties view helps you compare object attributes taken directly from a Web page with the attributes shown in a recorded Knowledge Script.
7.3 The Session Transcript ViewThe Session Transcript view displays all events associated with a particular browser window. The resulting information, called a session transcript, contains both Web events and window events. This view can help you understand the flow of data between your Web browser and the Web server and is an important debugging tool when you have problems with Recording or Playback of a Knowledge Script you have created.
To see a session transcript being created while you perform actions on a Web page, launch a new browser window from the Script Editor. From the browser, return to the Script Editor and click Session Transcript on the View menu. Then return to the browser, go to a Web page, and perform some actions. They are shown as browser events in the Session Transcript window.
You can control the level of detail shown in the Session Transcript view. Click Settings > Options, and then click the Session Transcript tab in the Web Recorder Options dialog box. For more information, see “The Session Transcript Tab” on page 85.
Even when the Session Transcript view is not visible, transcription is occurring. Try opening the view after navigating for awhile to see what happens during your browsing session.
NOTE: You can also enable the session transcript to be saved during Playback on a managed client computer. See the topic for the WebTransaction Knowledge Script in the Knowledge Script Reference chapter of the AppManager ResponseTime for Web Management Guide.
Every line that appears in a transcript shown in the Session Transcript view represents an action, or event. Events are sorted hierarchically.
You can see two types of events in your session transcript:
Web events: Actions performed on base HTML objects, such as a clicked link, typing in data on a Form element, or navigating to a new browser window.
Window events: Actions performed on windows generated by pop-up dialog boxes, such as Windows Authentication, JavaScript or VBScript, plugins such as Flash, or Java.
In addition, you can see labels denoting when each step starts and stops, as well as when Recording and Playback begin and end.
Content changed Indicates that the Web page contents have changed and the HTML Structure view is not synchronized. You may want to refresh the view. If this area of the status bar is empty, the HTML Structure view and the Web page are synchronized.
Web Recorder Analytical Tools 77

7.3.1 Web Events in the Session Transcript View
To distinguish Web events from window events, Web events are shown in the Session Transcript view with a preceding number to indicate the browser window in which they occurred.
The format of a Web event is as follows:
Browser Window - Action - Element on Frame
Here is an example:
1 - Click - FONT "L-2000" on Frame "main" (3)
This example shows that a user Click action was performed on a FONT element, on Frame (3) in Window 1. Browser windows are numbered according to the order in which they were launched from the Web Recorder Main window. We discuss another example of a session transcript in the following section.
Example 1: Input of Data into a Form
Here is a Web page that contains check boxes and a form that can be submitted:
78 Web Recorder Analytical Tools

The user checked the check boxes labeled One and Two, entered “Typing in some text” in the Text field of a form, and then clicked the Submit button. The session transcript, with the Core level of tracing detail enabled using the Session Transcript Detail Level parameter in the Options dialog box, shows a user Click action on a check box (checkbox1):
1 - MouseDown - Left Button - INPUT on Form "Check" (2) Name = "checkbox1" Type = "checkbox" Value = "on" checked = false1 - MouseUp - Left Button - INPUT on Form "Check" (2) Name = "checkbox1" Type = "checkbox" Value = "on" checked = false1 - Click - INPUT on Form "Check" (2) Name = "checkbox1" Type = "checkbox" Value = "on" checked = false
Then the transcript shows the user entering data and submitting the form:
1 - MouseDown - Left Button - INPUT on Form "Check" (2) Type = "submit" Value = "submit"1 - Text Changed - TEXTAREA "Typing in some text" on Form "Check" (2) Name = "textareacomments" Type = "textarea" Value = "Typing in some text"1 - MouseUp - Left Button - INPUT on Form "Check" (2) Type = "submit" Value = "submit"1 - Click - INPUT on Form "Check" (2) Type = "submit" Value = "submit"
7.3.2 Window Events in the Session Transcript View
A window event occurs anytime the computer must allocate a window, as when an authentication dialog box or Java applet is displayed. Since windows can be nested infinitely inside one another, the window hierarchy is delimited by a double colon (::) for readability in the Session Transcript view.
The format of a window event is as follows:
Action - Window Name* ::Window Name:Class Name: ID [::Window Name:Class Name: ID[::Window Name:Class Name: ID…]]
NOTE: The first-level Window Name can be the Web browser or a popup dialog box.
Example 2: Windows Authentication Dialog Box
In the following example, the user is prompted for Windows Authentication credentials to login to a page.
The session transcript shows the dialog that appears:
New Popup "Enter Network Password" Dialog
Web Recorder Analytical Tools 79

Next, it shows the mouse movement over the dialog box:
MouseMove (2,3) - Enter Network Password::&Save this password in your password list:Button:1024MouseMove (68,19) - Enter Network Password::Cancel:Button:2
Next, it shows the text that was entered and the field in which it was entered:
Text changed = "test" - Enter Network Password::(null):Edit:1218Click - Enter Network Password::OK:Button:1Password changed - Enter Network Password::(null):Edit:1219
Finally, the transcript shows the closure of the dialog box:
Close Popup - Enter Network Password
Example 3: Java Applet
In this example, the session transcript is for a Web page that has embedded Java code.
When the mouse is moved over the Java applet that is defined in the HTML with a set of <OBJECT> tags, and when the user clicks on the Java applet, the session transcript shows the following:
1 - MouseOver - OBJECTMouseMove (115,129) - WebBrowser - 1::(null):Internet Explorer_Server:0::(null):Microsoft VM For Java(TM) Host Window Class:0::(null):MSAWT_Comp_Class:0Click (115,129) - WebBrowser - 1::(null):Internet Explorer_Server:0::(null):Microsoft VM For Java(TM) Host Window Class:0::(null):MSAWT_Comp_Class:0MouseMove (115,129) - WebBrowser - 1::(null):Internet Explorer_Server:0::(null):Microsoft VM For Java(TM) Host Window Class:0::(null):MSAWT_Comp_Class:0MouseMove (115,129) - WebBrowser - 1::(null):Internet Explorer_Server:0::(null):Microsoft VM For Java(TM) Host Window Class:0::(null):MSAWT_Comp_Class:0Click (115,129) - WebBrowser - 1::(null):Internet Explorer_Server:0::(null):Microsoft VM For Java(TM) Host Window Class:0::(null):MSAWT_Comp_Class:0MouseMove (115,129) - WebBrowser - 1::(null):Internet Explorer_Server:0::(null):Microsoft VM For Java(TM) Host Window Class:0::(null):MSAWT_Comp_Class
The previous examples show only a few of the many different types of information you can see in the Session Transcript view. Remember that the information you see depends on the Session Detail Level you selected in the Options dialog box. For more information, see “The Session Transcript Tab” on page 85 and “Window Retrieval” on page 46.
80 Web Recorder Analytical Tools

7.3.3 Playback in the Session Transcript View
When we play back the Knowledge Script used to generate our Example 2, which required the user to enter Windows Authentication information into a popup dialog box, here is what we see. We had the Session Transcript Detail Level set to Interaction for this example:
Init PlaybackPlay Step: 1 - New Browser on User Request1 - New Browser Window, requested by the userStep 1 Complete: Success1 - Auto Sizing Window (768,500)Play Step: 2 - Navigate1 - Navigate: http://raldtest6-185:300New Popup "Enter Network Password" DialogStep 2 Complete: SuccessPlay Step: 3 - Text ChangeStep 3 Complete: SuccessText changed = "test" - Enter Network Password::(null):Edit:1218Play Step: 4 - Text ChangeStep 4 Complete: SuccessPlay Step: 5 - ClickClose Popup - Enter Network PasswordClick - Enter Network Password::OK:Button:1Step 5 Complete: SuccessPlay Step: 6 - SearchStep 6 Complete: SuccessStop Playback
If we change the Session Transcript Detail Level to Core and enable the Use timestamps? option, we can see the flows from the Web server (Download Begin to Download Complete signals, in boldface text), which are used to calculate the Response Time measurements for each step. The response-time measurements are also shown in boldface text below:
16:23:03 656 Init Playback16:23:03 676 Play Step: 1 - New Browser on User Request16:23:04 177 1 - New Browser Window, requested by the user16:23:04 307 Step 1 Complete: Success16:23:04 327 1 - Auto Sizing Window (768,530)16:23:07 342 Play Step: 2 - Navigate16:23:07 372 1 - Navigate: http://raldtest6-185/web-rt16:23:07 382 1 - BeforeNavigate2 - http://raldtest6-185/web-rt16:23:07 382 1 - DownloadBegin16:23:07 923 1 - DownloadComplete: 0.541 Seconds, Step 216:23:07 933 1 - DownloadBegin16:23:07 973 1 - NavigateComplete2: http://raldtest6-185/web-rt/16:23:08 063 1 - DownloadComplete: 0.130 Seconds, Step 216:23:08 143 1 - DocumentComplete (Final) - http://raldtest6-185/web-rt/16:23:08 153 Step 2 Complete: Success16:23:11 227 Play Step: 3 - Click16:23:11 267 Step 3 Complete: Success16:23:14 352 Play Step: 4 - Click16:23:14 422 1 - BeforeNavigate2 - http://raldtest6-185:300/16:23:14 432 1 - BeforeUnload16:23:14 432 1 - BeforeUnload16:23:14 442 1 - DownloadBegin16:23:14 812 New Popup "Connect to raldtest6-185" Dialog16:23:14 812 Step 4 Complete: Success16:23:17 897 Play Step: 5 - Text Change
Web Recorder Analytical Tools 81

16:23:17 937 Step 5 Complete: Success16:23:20 230 Text changed = "test" - Connect to raldtest6-185::(null):SysCredential:1002::(null):ComboBoxEx32:1003::(null):ComboBox:1003::(null):Edit:100316:23:21 001 Play Step: 6 - Text Change16:23:21 041 Step 6 Complete: Success16:23:24 156 Play Step: 7 - Click16:23:24 376 Close Popup - Connect to raldtest6-18516:23:24 376 Click - Connect to raldtest6-185::OK:Button:116:23:24 436 1 - NavigateComplete2: http://raldtest6-185:300/16:23:24 446 1 - DownloadComplete: 10.005 Seconds, Step 416:23:24 496 1 - DocumentComplete (Final) - http://raldtest6-185:300/16:23:24 496 Step 7 Complete: Success16:23:24 516 Stop Playback
Compare the preceding text to the Results shown in the Results pane:
1 - New Browser on User Request: OkResponse Time: N/A2 - Navigate: http://raldtest6-185/web-rt OkResponse Time: 0.671 Seconds3 - Click: Manage Accounts OkResponse Time: N/A4 - Click: Log into account OkResponse Time: 10.005 Seconds5 - Text Change: Username OkResponse Time: N/A6 - Text Change: password OkResponse Time: N/A7 - Click: OK OkResponse Time: N/ATotal Response Time: 10.676 SecondsTotal Processing Time: 20.920 Seconds
The response-time measurement for Step 4 is shown in boldface in the previous text. It is also possible for a step to consist of multiple pairs of Download Begin/Download Complete signals, in which case the timings for each pair are added together to make up the response time for that step.
Also note that the time difference between the first line in the transcript,
16:23:03 656 Init Playback
and the last line,
16:23:24 516 Stop Playback
is the Total Processing Time, with rounding.
82 Web Recorder Analytical Tools

8 8Fine-Tuning Scripts for Playback
Web Recorder offers many opportunities to customize Knowledge Scripts based on their behavior during Playback. The goal is to mimic the recorded browsing session, even if the page being recorded is quite dynamic.
8.1 Web Recorder OptionsThe Options dialog box, which is accessed from the Settings menu in the main window, lets you set recording parameters as well as some options related to the Session Transcript view. Sometimes changes to settings in the Options dialog box are necessary to determine when a recorded transaction step is considered a complete entity, for example. You might try changing some of the options on the following tabs to see how they affect Knowledge Script Playback.
8.2 The Timers TabThe Timers tab in the Options dialog box lets you set timeouts that are used to determine when a recording session pauses or proceeds. These timeouts are a means of continuing the recording mechanism and ending a step, even when Web Recorder has not received the proper signals from Internet Explorer that a rendering operation has completed. By contrast, you can add delays between steps, after a step is considered complete, by changing the Playback speed or by adding a Delay step. For more information, see “Delay Steps, Timers, and Playback Speed” on page 92.
Fine-Tuning Scripts for Playback 83

During a normal interaction with a Web site, Internet Explorer signals when a page has been completely downloaded. However, certain user interactions with Internet Explorer may not send the proper signal to Web Recorder that a transaction has been completed. For example, on a page with several JavaScript components, the browser often skips the signals that indicate an operation has completed.
If completion signals are lacking, the timeout parameters on the Timers tab let you force Recording to continue after a certain number of seconds have elapsed. You can set any of three timeouts:
Consider document complete N seconds after page change (5-300 seconds).
Default is 20 seconds.
Consider document complete N seconds after Download Complete signal received (1-30 seconds).
Default is 10 seconds.
These first two timers are useful in two different situations:
The Web page is very slow, or there are very large objects to load; however, the objects that you want to click on are available very early in the download.
The Document complete and Download complete signals never occur; the browser does not send them. This is a common problem on pages with a lot of streaming objects, such as movies or audio files, or with scripting languages.
If either of these first two timers expires before it receives a “Document Complete” signal, Web Recorder assumes that the page has completed its download and is fully rendered so that the transaction can proceed to the next step. You can tell a timer has expired if you see a line reading “Force hooking” in the Session Transcript view during Playback.
If the timers you set are too short and expire before receiving the Document Complete signal, the page displayed in the Web Recorder browser window may not be fully rendered during Playback, meaning that some objects are not displayed or are not available. If this occurs, you should increase these timers.
Delay after document complete (0-10 seconds).
Default is 1 second.
This final timer option exists because Internet Explorer can sometimes send several “final” Document Complete signals. In such a case, Web Recorder considers the step to be complete at the first Document Complete signal, before all objects are actually rendered. This option means that Web Recorder waits for up to 10 seconds after it has determined that the step is complete before it moves on to the next step.
If you observe a problem during Playback, that problem will probably occur again until the page is radically changed, or until you adjust a Knowledge Script setting. When the Playback problem is related to a single page on a Web site, inserting a Delay step is the best solution. For more information, see “Adding a Delay Step” on page 92. When the problem seems to be related to the whole Web site, setting the Delay after document complete option may be the best solution.
84 Fine-Tuning Scripts for Playback

8.3 The Recording TabClick the Recording tab in the Web Recorder Options dialog box to determine how certain actions on a Web page are included in the recorded Knowledge Script.
Ignore actions on the BODY element. Set this parameter to No if you want to include a click action on the BODY of a Web page or the use of the scroll bar as a BODY step in the Knowledge Script. The default setting for this parameter is Yes, which sets Web Recorder to ignore click actions on the BODY element and use of the scroll bar.
Record left button click using. Set this parameter to control how left mouse button actions that the user performs on the page are recorded in your Knowledge Script. This parameter is provided because some mouse actions are not easily detected by Web Recorder if they are implemented as part of a JavaScript method. In previous versions of Web Recorder, the Recorder function looked for OnMouseDown or OnMouseUp browser signals and recorded them as left-mouse button actions rather than looking for OnClick signals because the OnClick signal is more often implemented in JavaScript. However, in some cases, OnMouseDown and OnMouseUp signals are themselves implemented in a JavaScript method, and the OnClick signal may be available. If one of the signals is implemented in JavaScript, you can use the other signal. To set this parameter, select one of the following options:
OnMouseDown/OnMouseUp
OnClick
OnMouseDown
OnMouseUp
The default is OnMouseDown/OnMouseUp. Whatever you select here determines which type of signal the recorder uses to detect a left-mouse button action, as well as the behavior of the corresponding Ignore signals parameter on “The Session Transcript Tab” on page 85.
If a step is still not being recorded as expected after you try both of these Recording options, you may need to manually add a Click step to the Knowledge Script. For more information, see “Manually Adding a Click Step” on page 46.
8.4 The Session Transcript TabClick the Session Transcript tab in the Web Recorder Options dialog box to control how much information is gathered for session transcripts, which you can view in the Session transcript view. A session transcript is a high-level transcript of a browsing session showing how Internet Explorer interacted with a Web server to download and display a Web page. For more information, see “The Session Transcript View” on page 77.
In the Session Transcript Detail Level list, you can set the depth of the browser tracing that creates the transcript. The tracing depth can affect transcript readability. Each level of tracing provides all the features of the previous level plus a deeper level of browser information:
Interaction: Minimal tracing to understand user interactions with the page or browser. Displays all events related to Web objects, such as clicks and mouse movement events, as well as the opening of a new browser window, internal handlers such as Go Home and Navigate, and window and popup events. Usually this level of tracing, combined with the other Session Transcript options, is sufficient to understand the actions on a given Web page.
Fine-Tuning Scripts for Playback 85

Core: All Interaction-level information, plus internal information to help you understand how Internet Explorer handles the page. Traces all HTML document events related to navigation, downloading, and rendering, events that trigger a refresh of the display, as well as “hooking” and “unhooking” WEB event handlers. Includes the times associated with the Download Complete browser events that make up the response time for a transaction step.
Properties: All Core-level information, plus some extra information about Core traced items and Internet Explorer properties changes that are not visible to the user of a Web page.
Cosmetic: All Properties-level information, plus all HTML document events and property changes that are controlled by the Web page and related to the visual appearance of the Web browser itself. For example, when the status bar is hidden by a script on a Web page, it is traced here. When it is manually hidden by the user, it is not traced.
The other parameters on the Session Transcript tab let you select the types of user interactions with a Web page that is not included in the Session Transcript view. Following are brief descriptions of each parameter:
Parameter Description Default Setting
Ignore MouseOver signals on HTML objects
Set to Yes to exclude onMouseOver browser signals, when the user moves the mouse over HTML objects on the page.
No
Ignore MouseMove signals on ActiveX controls, embeds, and applets
Set to Yes to exclude onMousemove browser signals, when the user moves the mouse over ActiveX controls, embedded objects, or applets on the page.
No
Ignore MouseDown signals Set to Yes to exclude onMouseDown browser signals, when the user clicks on an element but does not complete the clicking action before moving the mouse.
No
Ignore signals:
... OnClick
... OnMouseDown
... OnMouseUp
Set to Yes to exclude the type of browser signal you have selected for left-mouse button actions:
onClick browser signals, when the user clicks on an element on the page
onMouseDown browser signals, when the user clicks on an element but does not complete the clicking action before moving the mouse
onMouseUp browser signals, when the user releases the mouse button over an element without completing a clicking action
This parameter is controlled by the Record left button click using Web Recorder option. For more information, see “The Recording Tab” on page 85.
Yes
Ignore GetFocus (HTML) and SetFocus (window) signals
Set to Yes to exclude GetFocus browser signals, when a Web page or page element receives focus.
Yes
Ignore Leaving signals Set to Yes to exclude onMouseLeave signals, when the user moves the mouse to another window, leaving the Web page.
Yes
Use timestamps Set to Yes to add timestamps to the transcript. The timestamps indicate when the signal or action occurred.
No
86 Fine-Tuning Scripts for Playback
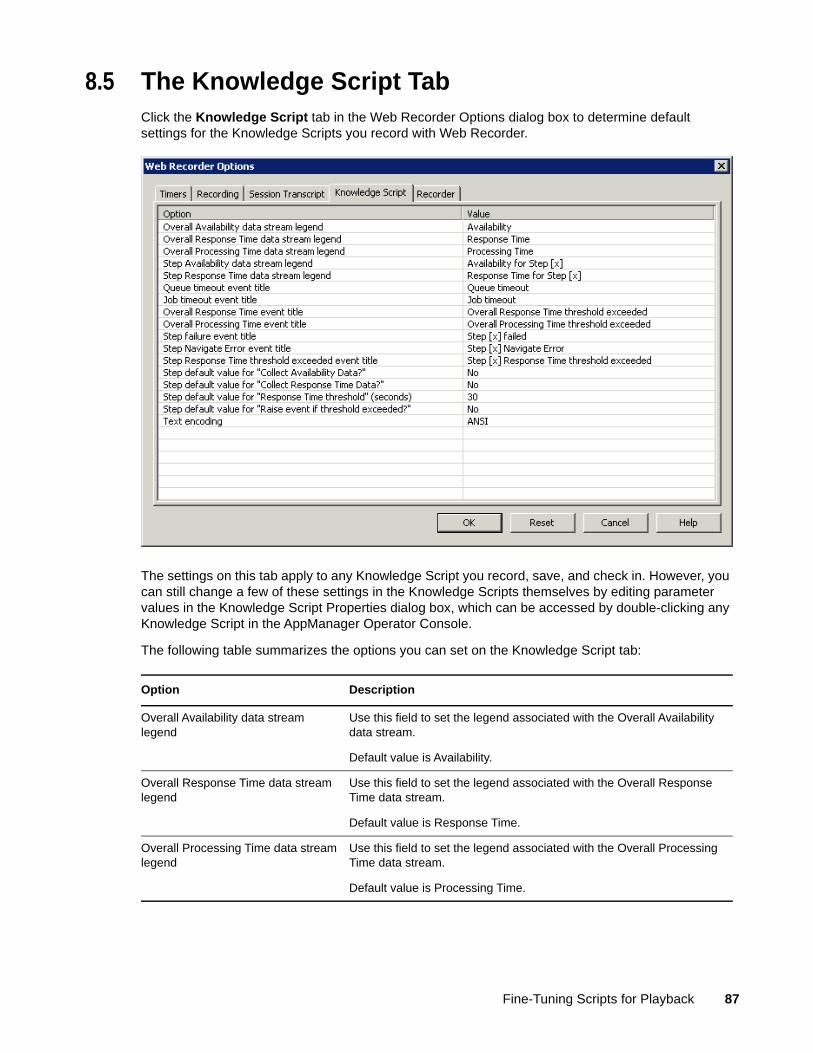
8.5 The Knowledge Script TabClick the Knowledge Script tab in the Web Recorder Options dialog box to determine default settings for the Knowledge Scripts you record with Web Recorder.
The settings on this tab apply to any Knowledge Script you record, save, and check in. However, you can still change a few of these settings in the Knowledge Scripts themselves by editing parameter values in the Knowledge Script Properties dialog box, which can be accessed by double-clicking any Knowledge Script in the AppManager Operator Console.
The following table summarizes the options you can set on the Knowledge Script tab:
Option Description
Overall Availability data stream legend
Use this field to set the legend associated with the Overall Availability data stream.
Default value is Availability.
Overall Response Time data stream legend
Use this field to set the legend associated with the Overall Response Time data stream.
Default value is Response Time.
Overall Processing Time data stream legend
Use this field to set the legend associated with the Overall Processing Time data stream.
Default value is Processing Time.
Fine-Tuning Scripts for Playback 87

Step Availability data stream legend Use this field to set the legend for data streams associated with the Availability of individual steps. This field accepts [x], [n], and [d] as predefined variables. For more information, see “Step-Identifying Variables” on page 89.
Default value is Availability for Step [x], where [x] substitutes the Step index number.
Step Response Time data stream legend
Use this field to set the legend for data streams associated with the Response Time of individual steps. This field accepts [x], [n], and [d] as predefined variables. For more information, see “Step-Identifying Variables” on page 89.
Default value is Response Time for Step [x], where [x] substitutes the Step index number.
Queue timeout event title Use this field to set the title of an event that indicates the queue timeout value was exceeded.
You can set the queue timeout value in the Timers folder of the Knowledge Script Properties dialog box.
Default value is Queue timeout.
Job timeout event title Use this field to set the title of an event that indicates the job timeout value was exceeded.
You can set the job timeout value in the Timers folder of the Knowledge Script Properties dialog box.
Default value is Job timeout.
Overall Response Time event title Use this field to set the title of an event that indicates the overall response time for the entire transaction exceeded your Overall Response Time threshold.
Default value is Overall Response Time threshold exceeded.
Overall Processing Time event title Use this field to set the title of an event that indicates the overall processing time for the entire transaction exceeded your Overall Processing Time threshold.
Default value is Overall Processing Time threshold exceeded.
Step failure event title Use this field to set the title for events associated with the failure of individual steps. This field accepts [x], [n], and [d] as predefined variables. For more information, see “Step-Identifying Variables” on page 89.
Default value is Step [x] failed, where [x] substitutes the Step index number.
Step Navigate Error event title Use this field to set the title for events indicating navigate errors from individual steps. This field accepts [x], [n], and [d] as predefined variables. For more information, see “Step-Identifying Variables” on page 89.
Default value is Step [x] Navigate Error, where [x] substitutes the Step index number.
Option Description
88 Fine-Tuning Scripts for Playback

8.6 Step-Identifying VariablesThe Knowledge Script tab includes options that let you enter unique names to identify data streams and events. For any data stream legend or event message title related to a recorded transaction step, you can insert predefined variables that correlate with step identifiers assigned by the Script Editor. The variables you can select are the following:
[x]: inserts the step index number
[n]: inserts the step name
[d]: inserts the step description
NOTE: Your options are not limited to changing the default [x] to [n] or [d]; you can also add one of these variables.
Step Response Time threshold exceeded event title
Use this field to set the title for events raised when the response time of an individual step exceeds the threshold you set for that step. This field accepts [x], [n], and [d] as predefined variables. For more information, see “Step-Identifying Variables” on page 89.
You can also globally set the threshold for all individual step response times. See the Step default value for “Response Time threshold” (seconds) option, below.
Default value is Step [x] Response Time threshold exceeded, where [x] substitutes the Step index number.
Step default value for “Collect Availability Data?”
Use this field to set the option whether to collect data on step Availability for individual transaction steps.
Default is No.
Step default value for “Collect Response Time Data?”
Use this field to set the option whether to collect data on step Response Time for individual transaction steps.
Default is No.
Step default value for “Response Time threshold (seconds)”
Use this field to set the response time threshold for all individual steps. Enter a value from 0 to 1200 seconds (inclusive).
Default is 30 seconds.
Step default value for “Event if threshold exceeded?”
Use this field to set the option whether to raise an event if any step exceeds its response time threshold.
You can set this threshold value globally by entering a value for the Step default value for “Response Time threshold” (seconds) option.
Default is No.
Text encoding Use this list to select the type of coding to use for the Knowledge Script .qml file that is created.
The options are ANSI and UTF-8.
The default is ANSI. Most AppManager components are expecting Knowledge Script files to be in ANSI format.
Option Description
Fine-Tuning Scripts for Playback 89

For example, the default setting for the Step Availability data stream legend Web Recorder option is Availability for Step [x]. For Step 13 in a recorded transaction, the resulting data stream legend would be Availability for step 13.
Now assume you set the same option to Availability for step [x]: [n]
For Step 13, if the step type was Click, the resulting data stream legend would be Availability for step 13: Click.
Finally, assume you set the same option to Availability for step [x] [n]: [d].
For Step 13, if the step type was Click with a description of “Logout”, the result would be Availability for step 13 Click: Logout
Here is what it would look like in the AppManager Operator Console:
8.7 The Recorder TabWeb Recorder can generate detailed and summarized playback results, such as response time and status, store the results in an HTML document, and display them in a Web browser window. You can specify where to save the results file and whether to create a unique results file or reuse the default file on each playback. The results filename includes the base name of the .QML file being played, a date-time string if needed, and a .htm suffix.
Click the Recorder tab in the Web Recorder Options dialog box to specify whether and how to generate playback results.
Generate Playback results. Set this parameter to Yes if you want to generate Web Recorder playback results. The default setting for this parameter is Yes. For more information, see “Playback Results” on page 93.
Overwrite Playback results. Disabling this option may create many HTML files, depending on how often you verify URLs.
Set this parameter to Yes if you want to overwrite any existing playback results each time you run a playback. Web Recorder reuses the same HTML file for every playback. The filename is the same as the name of the Knowledge Script (.qml) file with a .htm extension.
Set this parameter to No if you do not want to overwrite playback results. Web Recorder creates a unique HTML file for each playback by adding a date-time in the form _YYYMMDD HH:MM:SS to the filename. The default setting for this parameter is Yes.
NOTE: Disabling this option may create many HTML files, depending on how often you play back in Web Recorder.
Playback results path. Set this parameter to the destination directory path for the playback results HTML file. The default setting for this parameter is %TEMP%, indicating the user’s temporary directory. Click OK to validate the path. If the specified playback results path does not exist, Web Recorder prompts you to create it.
90 Fine-Tuning Scripts for Playback

8.8 How Response Time Is MeasuredWeb Recorder distinguishes between browser transactions that can be timed and those that cannot. More specifically, during a Recording session, Web Recorder waits for activity to take place in the Web browser before it creates a new step in the Script Editor.
If any activity occurs, a corresponding step is generated and given a Navigation marker to designate that this step is timed during Playback.
If no activity occurs, a step is generated but is not given a Navigation Marker. Such a step is not timed.
This is the case with most window steps because very few of them actually trigger a download action related to the Web page. It is also the case with actions on a Web page that do not cause the page to transition, such as entering data into a form field. For more information, see “Step Types” on page 39.
When a Navigation marker is not assigned to a window step during Recording, you can add a Navigation marker so that the step is timed during Playback. You can only add a Navigation marker to a Click window step or a Click or Select HTML step.
Here is how steps are handled for purposes of timing during Playback:
For any step that has a Navigation marker in the Script Editor, Web Recorder waits until it receives the final DocumentComplete signal from the browser to consider the step to be complete.
The response time is the sum of the measured times between pairs of DownloadBegin and DownloadComplete browser signals.
In the Session Transcript View, the actual measured time is indicated next to the appropriate DownloadComplete signal.
Most steps that have a Navigation marker receive a response timing in the results. However, it is possible for such a step to have no measured response time. For more information, see “Playback Results” on page 93.
To add a Navigation marker to a step so that Web Recorder times that step:
1 In the Script Editor window, right-click the step.
NOTE: You can only add a Navigation marker to a Click window step or a Click or Select HTML step.
2 Select Navigation Marker from the menu.
3 Play the Knowledge Script back again to make sure the step is timed.
If you change your mind, return to the step in the Script Editor, right-click, and select Navigation Marker again.
For more information, see “The Session Transcript View” on page 77.
Fine-Tuning Scripts for Playback 91

8.9 Delay Steps, Timers, and Playback SpeedIn some cases, the expected signals from Internet Explorer that a rendering operation has completed are never received. For example, the final DocumentComplete signal may be received for one browser window, but the action may have spawned a new window, which has rendering times associated with it; or perhaps the network connectivity is slow between the agent and the Web browser, and you need to add a delay between each step to give the Playback a chance to catch up.
You have a number of options for tuning Playback to handle different scenarios:
You can add a uniform amount of delay between each transaction step. You can do this by adjusting the Playback speed. For more information, see “Adjusting the Playback Speed” on page 92.
You can add a fixed amount of delay after a particular transaction step by adding a Delay step to the Knowledge Script. For more information, see “Adding a Delay Step” on page 92.
You can define the amount of time the Web Recorder waits before it assumes the rendering operation has completed, even if the final DocumentComplete signal is never received. For more information, see “The Timers Tab” on page 83.
You can add a uniform delay after the final DocumentComplete signal, but before Step Complete to ensure that there are not any additional final DocumentComplete signals from other browser windows. For more information, see “The Timers Tab” on page 83.
NOTE: These delays do not affect the response times that are measured. They only affect the processing time, the time taken to execute the Knowledge Script job.
8.9.1 Adjusting the Playback Speed
In some cases, you might want to slow down the entire Playback and add a uniform amount of delay to each step in the transaction.
To adjust the speed of Playback, click Playback Speed on the Tools menu. Choose one of three Playback speed settings:
Once you have changed the Playback speed setting, it appears as a parameter in the Knowledge Script.
8.9.2 Adding a Delay Step
To add a fixed delay after a single step in the transaction, select the step where you want to add a pause during Playback. Right-click, and select Insert Delay Step from the menu. The Delay step is inserted before the selected step.
A Delay step has only one parameter, the delay time. Double-click the inserted Delay step to change the delay time, which can be a value between 0 and 300 seconds.
Speed setting Delay in seconds
Fast 1 second
Medium 3 seconds
Slow 5 seconds
92 Fine-Tuning Scripts for Playback

9 9Playback and WebTransaction Results
When you play back a recorded Web browsing session in Web Recorder, preliminary results are displayed in a Web Recorder Playback Results report. When you run a Knowledge Script created using Web Recorder on a managed client, the same results appear in the data details of the Response Time data point. If a Playback failure occurs, failure results appear in the Event Details. You can view these more comprehensive results by drilling down into the event and data details in the AppManager Operator Console after you run a WebTransaction Knowledge Script.
You can also instruct the Knowledge Script to capture a snapshot of the browser window when certain Playback errors occur. The image usually reveals what caused the failure.
9.1 Playback ResultsWhen you play back a recorded transaction in Web Recorder, you can generate and view a summary of results data. The Web Recorder Playback Results report displays in your Web browser and provides response time and status data for each step and the totals.
Playback and WebTransaction Results 93

Each step in the recorded transaction, as displayed in the Web Recorder Playback Results report, includes the following information in tabular form:
Overall Response Time and Overall Processing Time are provided at the bottom of the results table. The Overall Processing Time is the time taken to play back the entire recorded transaction. The Overall Response Time is the sum of the response times of all individual steps.
The Playback Results report also provides information on any errors encountered and the relevant step.
The Playback Results report includes the following information for tracking purposes:
Source: The name of the original Knowledge Script file, with .qml extension.
Generated: Date and time of the playback session.
Recorder version: The version of Web Recorder that ran the play back.
Computer name: Name of the computer where the playback ran.
For more information, see Section 10.1, “Web Recorder Error Codes,” on page 101.
Column Meaning
<number> The step number, in the order played back.
Action The action taken in the step.
Description A description of the web page or element affected by the step.
Response Time (sec) The response time for the step in seconds.
The response time for each step is the sum of all time values between the DownloadBegin and DownloadComplete signals that Internet Explorer issues. Delays introduced by any Delay steps or other delays you added, such as a slower Playback speed, are not included in the Total Response Time but are included in the Total Processing Time.
Not all steps are timed. Only steps that trigger a refresh of the page are timed. They are designated with a Navigation marker.
Status The status or results for a step can be any of the following:
Succeeded The step completed successfully.
Failed The step failed. With this, as with any failure, additional lines follow with the error codes for the failure. For more information, see Section 10.1, “Web Recorder Error Codes,” on page 101.
Failed And Continue On Search and Advanced Search steps, you have the option to abort or continue with the transaction in the event of Playback failure. If you select either Continue or Event and Continue, the step result is Failed and Continue if the search fails. Window steps always continue, so this error may occur if a dialog box that appeared during Recording does not appear at Playback.
Failed And Abort. You have the option on Search and Advanced Search steps to abort or continue with the transaction in the event of Playback failure. If you select the option Failed and Abort, the step result is Failed and Continue if the search fails.
94 Playback and WebTransaction Results

9.2 Response-Time MessagesIn addition to a response-time value, the results show one of the following messages:
9.3 How Search Step Timings Are HandledThe Search and Advanced Search steps, by default, do not have any time associated with them, and the results are marked as “N/A”. If you enable the Loop until located parameter, you then have the option to include the search time in the Total Response Time by enabling the Include time in the response time parameter. The Search or Advanced Search step is marked with the Navigation marker if enabled.
You can also add Navigation markers to certain types of steps. For more information, see Section 8.8, “How Response Time Is Measured,” on page 91.
The following rules also apply to timings in Search and Advanced Search steps:
1 The time is included for the step if the step succeeds. If the search succeeds right away, the time registered is “0.00,” or no delay.
2 If the search does not succeed, no time is associated with the step, and it appears as “None” in the results.
3 If downloads from the Web server occur while the search is proceeding but the search does not succeed, the download times are added to the previous step in the Knowledge Script.
A Web server might refresh the Web page once or even a few times while information is being retrieved from a database, for example, and the information being retrieved might be the very information you want to search for. The Knowledge Script takes a timing of each page refresh because any refresh appears to be a page that is being downloaded.
Message Meaning Cause
Response Time: N/A The step was not timed. The step was not marked for timing. It did not receive a Script Editor Navigation marker. No download action is expected for this step, based on what was recorded.
Response Time: None The step was timed, but no response time was measured.
This happens when a download action occurred during Recording, but it does not always occur during Playback. This is a common situation, and it always concerns a very small amount of time, for example, 0.020 seconds.
Response Time: N The step was timed, and the value supplied indicates the number of seconds it took to complete.
Playback and WebTransaction Results 95

9.4 WebTransaction Data PointsWhen a WebTransaction Knowledge Script job runs successfully, it can generate Availability, Processing Time, and Response Time data points. The Overall Availability and Overall Response Time data points provide additional data details. The Overall Response Time data point contains details representing results in a format similar to the Web Recorder Playback Results report:
The response times that were measured for each transaction step are shown next to the response-time threshold you had configured when you ran the job. Anytime a measured response time exceeds a threshold, it is shown in red:
96 Playback and WebTransaction Results

When a step fails and the job aborts, it generates a Step Failure event and no Overall Response Time data point. In such a case, the Overall Availability data point is 0. Any error messages are also shown in the data details, following the table with the results:
If the corresponding Knowledge Script parameters are enabled, Availability and Response Time data points can also be generated for each individual step in the Web transaction. Unlike the Overall Availability and Overall Response Time data points, however, these data points do not include data details.
NOTE: NetIQ Corporation recommends that you not enable data collection for every individual step to avoid filling up your repository. Any given WebTransaction Knowledge Script job could potentially generate multiple data points for each job.
Playback and WebTransaction Results 97
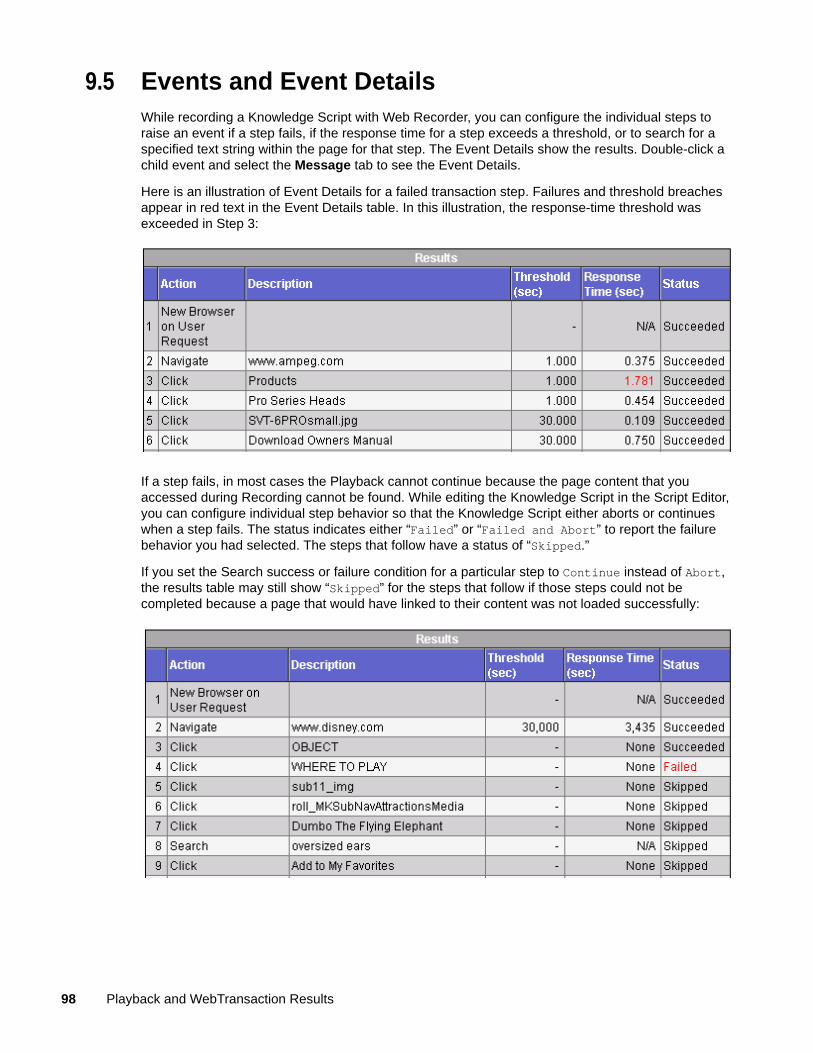
9.5 Events and Event DetailsWhile recording a Knowledge Script with Web Recorder, you can configure the individual steps to raise an event if a step fails, if the response time for a step exceeds a threshold, or to search for a specified text string within the page for that step. The Event Details show the results. Double-click a child event and select the Message tab to see the Event Details.
Here is an illustration of Event Details for a failed transaction step. Failures and threshold breaches appear in red text in the Event Details table. In this illustration, the response-time threshold was exceeded in Step 3:
If a step fails, in most cases the Playback cannot continue because the page content that you accessed during Recording cannot be found. While editing the Knowledge Script in the Script Editor, you can configure individual step behavior so that the Knowledge Script either aborts or continues when a step fails. The status indicates either “Failed” or “Failed and Abort” to report the failure behavior you had selected. The steps that follow have a status of “Skipped.”
If you set the Search success or failure condition for a particular step to Continue instead of Abort, the results table may still show “Skipped” for the steps that follow if those steps could not be completed because a page that would have linked to their content was not loaded successfully:
98 Playback and WebTransaction Results

Scroll to the bottom of the Event Details dialog box to see any failure event notes you may have added for an individual step. You can use these notes to provide the AppManager operator with more information about a step failure. For more information, see Section 5.15, “Failure Event Notes,” on page 58.
9.6 Browser SnapshotsTo give yourself plenty of time to analyze a Playback failure, you can enable one of the snapshot parameters in the WebTransaction Knowledge Script. If you suspect that a Knowledge Script failure was caused by an intermittent problem, or if the failure remains unexplained after some analysis with other Web Recorder tools, the snapshot feature might be your best option.
The General folder of the WebTransaction Knowledge Script parameters on the Values Property tab contains four snapshot parameters:
Capture browser snapshot when object not found?
Capture HTML snapshot when object not found?
Capture browser snapshot on Navigate Errors?
Capture HTML snapshot on Navigate Errors?
The following image shows where they can be found:
Selecting the Yes check box next to either of the “object not found” parameters instructs Web Recorder to save an image of the browser window if a step fails because an object in that step is not found. The snapshot feature is available for the following Knowledge Script step types:
Click: HTML object
Text Change: HTML Object
Check: HTML Object
Select: HTML Object
Search and Advanced Search
Selecting the Yes check box next to either of the “on Navigate Errors” parameters instructs Web Recorder to save an image of the browser window if it encounters any navigate error, regardless of the outcome.
Playback and WebTransaction Results 99

Enabling a Capture browser snapshot parameter takes a screen and saves it in JPEG (.jpg) format anytime a step fails. The image file is saved to your C:\Program Files\NetIQ\temp\netiq_debug\[ComputerName] directory. The filename assigned to the image file begins with the string “WebTransaction” and the job ID number, and it includes the time and date that the capture was taken.
Enabling a Capture HTML snapshot parameter works in a similar way to capture and save a version of the browser window in HTML format. However, be aware of some limitations on the HTML output. To create the HTML output, Web Recorder retrieves and then dumps the raw HTML coding of the main frame into a file. Therefore, the .htm screen capture does not display correctly in your browser when the captured page includes objects such as bitmaps or plugins. Such items cannot be captured.
Access the snapshot to analyze the HTML coding of the page where the object could not be found or the navigate error occurred during Playback. You can also inspect the screen capture image to find out whether an unexpected popup interfered with the Playback.
100 Playback and WebTransaction Results
10 10Troubleshooting Web Recorder Playback
Some failures during Playback are quite common and are easily remedied. Particularly if you are testing a very complicated Web site, differences arise between the site that is accessed during Playback and the one that was accessed during Recording. Some of the most basic differences are discussed in “Using the Script Editor: an Example” on page 38, as when an image file receives a different filename each time it is updated on the site.
Changes on the Web server or network outages may also cause sporadic step failures, which typically indicate that one of the following has occurred:
Part of the infrastructure supporting a multi-tiered Web application, such as a backend database, is down.
Playback is taking place on a different Web server than was accessed during Recording; a load balancer may be active, for example.
Network connectivity between the client used for Playback and the Web server could be affecting the transaction, slowing it down, for example.
In this chapter, we discuss common Playback failures and possible solutions. Consult the tables in the following sections to find out more information about a specific error you might have run across.
10.1 Web Recorder Error CodesWhen a step fails, you can see one of the Web Recorder error codes. The following tables provide a brief description of each code, along with a link to the section that contains more information.
10.1.1 Playback Errors
The Web Recorder Playback engine generates following error codes for Playback failures. For example, when an object or frame that was downloaded during the Recording session cannot be found when the Knowledge Script replays the transaction.
NOTE: Anytime a Playback error occurs only sporadically, it is usually an indication of a problem on the Web server, or it means that too many transactions are running on the client simultaneously.
Troubleshooting Web Recorder Playback 101

10.1.2 Navigation Errors
The following error codes correspond to navigation failures, as, for example, when the browser sends up an error message in response to a server timeout or error, to a failure to gain access to a resource, or to a dropped connection. They indicate a problem with the connection to the Web server. Error codes 1xx-5xx are documented in HTTP Status Codes in the online Help for URL Check Recorder.
Some Navigate errors cause step failures. Errors with code numbers 1xx-3xx do not cause step failures, nor do 403 and 404. Instead, these errors are noted in the data details. The following errors do generate step failures:
Error Code Description
0x800C0002 URL string is not valid.
0x800C0003 No session found.
0x800C0004 Unable to connect to server.
0x800C0005 Requested resource was not found.
0x800C0006 Requested object was not found.
0x800C0007 Requested data is not available.
0x800C0008 Failure occurred during download.
0x800C0009 Requested navigation requires authentication.
0x800C000A Required media not available or not valid.
0x800C000B Connection timed out.
0x800C000C Request is invalid.
0x800C000D Protocol is not recognized.
0x800C000E Navigation request has encountered a security issue.
0x800C000F Unable to load data from the server.
0x800C0010 Unable to create an instance of the object.
0x800C0014 Attempt to redirect the navigation failed.
0x800C0015 Navigation redirected to a directory.
0x800C0016 Unable to lock request with the server.
0x800C0017 Reissue request with extended binding.
0x800C0018 Binding is terminated.
0x800C0100 Permission to download is declined.
0x800C0200 Result is dispatched.
0x800C0300 Cannot replace a protected System File Protection (SFP) file.
0x803CFFFF Unknown error.
102 Troubleshooting Web Recorder Playback

10.1.3 Script Errors
The following error codes correspond to script failures, as, for example, when a script running on the Web site being accessed during Web Recorder Playback encounters an error in VBScript or JavaScript. These errors do not cause step failures:
10.1.4 Knowledge Script Errors
The following error codes correspond to Knowledge Script failures, as when validation between the Knowledge Script and the managed object fails, most often due to a version mismatch.
Error Code Description
Script Error: Unable to Get Any Information About the Nature of the Error
Unable to get any information about the nature of the error.
Script Error: Object Loading Error on Line N
Object loading error on line %d.
Error Code Description
Knowledge Script Error: The Web-RT Managed Object Requires that a User Be Logged in
The Web-RT managed object requires that a user be logged in to the computer in order to run Knowledge Script jobs. A Terminal Services session is not a valid user unless you use the /console command line parameter.
Knowledge Script Error: The Knowledge Script Requires AppManager ResponseTime for Web Version n.n.n.n or Higher to Run Properly
The Knowledge Script requires a later version of the Web-RT managed object to run properly.
Knowledge Script Error: ConfigJob Failed Unexpectedly
The Knowledge Script failed because the script file itself has been modified or corrupted.
Knowledge Script Error: The Web-RT Managed Object Is Not Installed
The Web-RT managed object is not installed.
Troubleshooting Web Recorder Playback 103

10.2 Knowledge Script Error: The Web-RT Managed Object Requires that a User Be Logged in The full text of this error message is as follows: “The Web-RT managed object requires that a user be logged in to the computer in order to run Knowledge Script jobs. A Terminal Services session is not a valid user. Log in to the computer using a valid username and password, then run the job again.”
A valid user account must be logged into the managed client before you can run a WebTransaction Knowledge Script on that computer. That is because WebTransaction Knowledge Scripts use Internet Explorer. WebTransaction Knowledge Scripts cannot play back on the managed object if a Terminal Services session is substituting for a logged-in user, unless you use the /admin command line parameter (for more recent versions of Windows), or the /console command line parameter (for older versions of Windows). For more information about command line parameters, see the Remote Desktop Connection documentation.
For more information, see “Managed Client Security” on page 70.
10.3 Knowledge Script Error: The Knowledge Script Requires AppManager ResponseTime for Web Version n.n.n.n or Higher to Run ProperlyWhenever a major enhancement is made to Web Recorder, the Knowledge Scripts it produces become more sophisticated. They therefore require the same level of functionality in the module in order to run. In this case, the Knowledge Script failed because you tried to run it on a backlevel version of the module.
To resolve this problem, upgrade the module on the client where you tried to run the Knowledge Script. Run the AppManager installation program on that computer and select AppManager ResponseTime for Web.
10.4 Knowledge Script Error: ConfigJob Failed UnexpectedlyThe full text of this error is as follows: “ConfigJob failed unexpectedly. The Knowledge Script may have been modified manually.” It indicates that the Knowledge Script failed because the Knowledge Script file itself (in .qml format) has been modified or corrupted.
To resolve this problem, take one of the following steps:
Re-open the Knowledge Script with the latest version of Web Recorder, re-save it and check it back in. This action refreshes the Knowledge Script, and it may run properly on the agent.
Record the Knowledge Script again.
104 Troubleshooting Web Recorder Playback
10.5 Knowledge Script Error: The Web-RT Managed Object Is Not InstalledThe Web-RT managed object was previously discovered on the managed client computer, but has since been uninstalled or has become corrupted. When you tried to run a Knowledge Script on this computer, it failed to find the managed object.
To resolve this problem, re-install AppManager ResponseTime for Web on the managed client computer.
10.6 Script Error: Unable to Get Any Information About the Nature of the ErrorThis message indicates that a VBScript or JavaScript error occurred on a Web page accessed by the Knowledge Script during Playback. You can see this specific error when Internet Explorer is not able to recover from a VBScript or JavaScript error. This error does not generate a step failure.
The best way to resolve this problem is to fix the VBScript or JavaScript on the Web page indicated in the error details.
10.7 Script Error: Object Loading Error on Line N This message indicates that a VBScript or JavaScript error occurred on a Web page accessed by the Knowledge Script during Playback. You can see this specific error when Internet Explorer has been able to recover from a VBScript or JavaScript error. This error does not generate a step failure.
The best way to resolve this problem is to fix the VBScript or JavaScript on the Web page indicated in the error details.
10.8 Playback Error: Unable to Locate the Specified Browser WindowThis error message may appear alone or in conjunction with one of the other error codes as a secondary error message.
This Knowledge Script failure occurred when trying to locate a browser window. The window that Playback attempted to retrieve did not match the window that was recorded and cannot be identified. One likely cause is that the page title or its ID has changed, perhaps because of an advertisement popup.
Troubleshooting Web Recorder Playback 105

The failure can probably be resolved if you try one or all of the following approaches:
1 Select a different attribute to identify the window to be retrieved during Playback processing.
In the Script Editor window, find the step that failed. You may want to replay the Knowledge Script up to that step by clicking to highlight that step, then right-clicking and selecting Play up to this step from the menu. Then you can use the Step menu item to replay one step at a time as you look for problems.
Now expand the objects in the tree. The Web Recorder Playback Results report should have listed the attribute of the window that could not be retrieved. Find that window and see which attributes are available.
If the window’s TITLE attribute changes often, perhaps the window’s ID attribute remains constant. The ID attribute is assigned to the window by Web Recorder in sequential order, based on when it was accessed during a single step. It is a good idea to use the ID attribute if the page has a dynamic title.
Click the window’s unchanging attribute to change its Script Editor marker to a green checkmark. The checkmark indicates that this is the attribute that Web Recorder uses to identify the window during Playback. Once a window element closely matching the checked attribute is retrieved, Web Recorder assumes that the window has been successfully retrieved.
2 Slow down the Playback. The Web Recorder Knowledge Script may be moving on to a subsequent step before the failed step has actually completed. Click Playback Speed on the Tools menu, and choose one of the Playback speed settings. For more information, see “Delay Steps, Timers, and Playback Speed” on page 92.
3 Add a Delay step just before the failed step. Delay steps cause Web Recorder to pause before moving on to the next step in the recorded transaction. Sometimes a delay is needed to give the page and all its objects enough time to be fully rendered in the browser. Keep in mind that most step failures occur because a previous step did not render an element that was retrieved in a subsequent step during Recording. For more information, see “Delay Steps, Timers, and Playback Speed” on page 92.
4 Re-record the Knowledge Script. This is the best solution if the page has changed since it was recorded.
10.9 Playback Error: Not Enough Information to Locate the Browser WindowThis Knowledge Script failure occurred when Web Recorder was trying to play the Knowledge Script back and found that no valid identifiers for the browser window were supplied. Specifically, both the Window ID and Window Title attributes were invalid.
This error indicates a problem with the Knowledge Script file itself. Someone may have modified it manually. You should re-record the Knowledge Script if you see this error message.
106 Troubleshooting Web Recorder Playback

10.10 Playback Error: The Actual Popup Window Is Not the One ExpectedThis Knowledge Script failure occurred when Web Recorder was trying to retrieve a window object, such as a dialog box, ActiveX element, or a Java applet. The window that the Web Recorder Playback engine found to play back into was not the window it expected. At Playback, a new authentication window may have appeared that was not required at the time of recording. Perhaps a certificate that needed acceptance popped up, or a prompt to download and install an ActiveX control.
The page itself may have changed. You probably need to re-record the Knowledge Script.
Or, depending on what the new popup is, you may be able to manually fix the problem by changing or fixing the configuration of the computer where the Playback occurred. For example, you could change Internet Explorer security settings to accept all certificates. For more information, see “Optimizing Your Environment for Accurate Response-Time Testing” on page 71.
10.11 Playback Error: There Is No Popup Window at this TimeThis step failure occurs when a window object, such as an authentication dialog box, was accessed during Recording but did not need to come up again during Playback, after authentication had been achieved for that browser session. That step may not have failed, and you may have noticed that Playback continued, skipping to the next non-window-related step, such as a click on a link. A subsequent step fails, however, if it relies on content accessed via the missing dialog box.
This type of failure often occurs because the Web site itself has changed since you recorded it. If you think that is what happened, just record the Knowledge Script again.
In some cases, failures may occur because the Recording and Playback environments do not match exactly. For example, Internet Explorer settings on the local computer control which warning dialog boxes are shown. For more information, see “Optimizing Your Environment for Accurate Response-Time Testing” on page 71. If the environments do not match, try adjusting the Internet Explorer settings discussed in that topic and then re-recording the Knowledge Script.
A final reason why this error may have occurred is that the Web Recorder Playback engine received a “Document complete” signal before the page was fully rendered.
For more information about the Internet Explorer signals that Web Recorder uses to determine when a new step should be created, see “The Timers Tab” on page 83. Try increasing the timer that determines when Web Recorder considers a step complete and moves on to the next step. Click Settings > Options, then click the Timers tab. Increase the value of the Delay after document complete timer. You then need to re-record the Knowledge Script with the new setting.
In addition, you can try adding a Delay step just before the failed step. Delay steps cause Web Recorder to pause before moving on to the next step in the recorded transaction. Sometimes a delay is needed to give the page and all its objects enough time to be fully rendered in the browser. Keep in mind that most step failures occur because a previous step did not render an element that was retrieved in a subsequent step during Recording. If that is what happened, you could either add a Delay step or simply slow down the Playback to give each page enough time to be fully rendered. For more information, see “Delay Steps, Timers, and Playback Speed” on page 92.
Troubleshooting Web Recorder Playback 107
10.12 Playback Error: Unable to Locate the WindowThis error message may appear alone or in conjunction with one of the other error codes as a secondary error message.
The Knowledge Script failure occurred when trying to retrieve a window object, such as a dialog box, ActiveX element, or a Java applet.
Playback failed when the window that it attempted to retrieve did not match the window that was recorded. The page itself may have changed since it was recorded, in which case, you need to re-record the Knowledge Script.
In some situations, the Recording and Playback environments may not have matched exactly. For example, Internet Explorer settings on the local computer control which warning dialog boxes are shown. Similarly, this error may indicate that the dialog box appeared to be very different during Playback because it was being accessed on a computer using a different operating system. For more information, see “Optimizing Your Environment for Accurate Response-Time Testing” on page 71. If the environments do not match, try adjusting Internet Explorer settings or running the Knowledge Script on a computer with the same operating system that was used for Recording.
An additional reason why this error may have occurred is that the Web Recorder Playback engine received a “Document complete” signal before the page was fully rendered.
For more information about the Internet Explorer signals that Web Recorder uses to determine when a new step should be created, see “The Timers Tab” on page 83. Try increasing the timer that determines when Web Recorder considers a step complete and moves on to the next step. Click Settings > Options, then click the Timers tab. Increase the value of the Delay after document complete timer. You then need to re-record the Knowledge Script with the new setting.
In addition, you can also try adding a Delay step just before the failed step. Delay steps cause Web Recorder to pause before moving on to the next step in the recorded transaction. Sometimes a delay is needed to give the page and all its objects enough time to be fully rendered in the browser. Keep in mind that most step failures occur because a previous step did not render an element that was retrieved in a subsequent step during Recording. If that is what happened, you could either add a Delay step or simply slow down the Playback to give each page enough time to be fully rendered. For more information, see “Delay Steps, Timers, and Playback Speed” on page 92.
10.13 Playback Error: Unable to Locate the Specified ObjectThis message, which indicates that a step failed during Playback, means that a Knowledge Script failure occurred when trying to locate an object on a Web page. The page where Playback attempted to locate the object did not match the page that was selected during Recording.
If this error occurs infrequently, it usually means that there was a problem on the Web server. Often, this type of problem occurs when a multi-tiered application is involved. The Web server may be running, but a backend database or another server supporting the application may be down.
Another possible cause of this error is excessive competition for CPU resources on the managed client, which can cause slowdowns in the loading of Web pages.
The failure can probably be resolved if you try one or all of the following approaches:
1 Select a different object attribute to identify the object to be retrieved during Playback processing.
108 Troubleshooting Web Recorder Playback

In the Script Editor window, find the step that failed. You may want to replay the Knowledge Script up to that step by clicking to highlight that step, then right-clicking and selecting Play up to this step from the menu. Then you can use the Step menu item to replay one step at a time as you look for problems.
Now expand the object attributes in the Script Editor tree. The Web Recorder Playback Results report should have listed the attribute of the object that could not be retrieved. Find that object and see which attributes are available.
If you cannot find the object, right-click the step that failed and select Highlight on Web Browser. If the object exists, the Web Recorder Browser highlights the object in a red square for 3 seconds. Right-click the highlighted object and select Object Properties to examine its attributes. If the object still cannot be found, the Web Recorder Browser displays an error message saying “Element not found.”
Use the HTML Structure view to analyze the object on the page. In the browser window, right-click the object and select Retrieve Object on HTML Structure to see how the object was coded in HTML.
If the object is a placeholder for a link that changes often, perhaps the object’s ALT attribute remains constant. If not, perhaps the object has another attribute that remains constant, such as its NAME attribute. Click the unchanging attribute to change its Script Editor marker to a green checkmark. The checkmark indicates that this is the attribute that Web Recorder uses to identify the object during Playback. Once an object closely matching the checked attribute is retrieved from the page listed in the step, Web Recorder assumes that the object has been successfully retrieved.
Finally, if an object has no attribute that remains the same for very long, Web Recorder can try to retrieve the object based on other parameters within the step, such as the URL and display text. In such a case, you can disable all the object attributes, replacing them with red Xs. Web Recorder tries to retrieve the object based on contextual attributes.
2 This error may have occurred because the Web Recorder Playback engine received a “Document complete” signal before the page was fully rendered.
For more information about the Internet Explorer signals that Web Recorder uses to determine when a new step should be created, see “The Timers Tab” on page 83. Try increasing the timer that determines when Web Recorder considers a step complete and moves on to the next step. Click Settings > Options, then click the Timers tab. Increase the value of the Delay after document complete timer. You then need to re-record the Knowledge Script with the new setting.
3 Try adding a Delay step just before the failed step. Delay steps cause Web Recorder to pause before moving on to the next step in the recorded transaction. Sometimes a delay is needed to give the page and all its objects enough time to be fully rendered in the browser. Keep in mind that most step failures occur because a previous step did not render an element that was retrieved in a subsequent step during Recording. If that is what happened, you could add a Delay step to give each page enough time to be fully rendered. For more information, see “Delay Steps, Timers, and Playback Speed” on page 92.
4 Slow down the Playback. The Web Recorder Knowledge Script may be moving on to a subsequent step before the failed step has actually completed. Click Playback Speed on the Tools menu, and choose one of the Playback speed settings. For more information, see “Delay Steps, Timers, and Playback Speed” on page 92.
5 Add a Search step just after the step that failed. A Search or Advanced Search step allows you to validate the page based on the presence of a string or object. For more information, see “Search and Advanced Search Steps” on page 51.
Troubleshooting Web Recorder Playback 109

10.14 Playback Error: “Retrieve Object” Parameter Is MissingThis message, which indicates that a step failed during Playback, means that a Knowledge Script failure occurred when trying to retrieve an object on a Web page.
The most likely reason why this error occurred is that someone manually modified a saved Knowledge Script file. If you suspect that is the case, re-record the Knowledge Script.
10.15 Playback Error: Unable to Locate the Specified FrameThis message, which indicates that a step failed during Playback, means that a Knowledge Script failure occurred when trying to locate a frame on a Web page. The page where Playback attempted to locate and, presumably, perform some action on the frame did not match the page that was selected during Recording. The name of the frame or its ordinal may have changed. On some Web sites, some frames are sometimes present and sometimes not.
If this error occurs infrequently, it usually means that there was a problem on the Web server. Often, this type of problem occurs when a multi-tiered application is involved. The Web server may be running, but a backend database or another server supporting the application may be down.
Another possible cause of this error is excessive competition for CPU resources on the managed client, which can cause slowdowns in the loading of Web pages.
The failure can probably be resolved if you try one or all of the following approaches:
1 Select a different attribute to identify the frame to be retrieved during Playback processing.
In the Script Editor window, find the step that failed. You may want to replay the Knowledge Script up to that step by clicking to highlight that step, then right-clicking and selecting Play up to this step from the menu. Then you can use the Step menu item to replay one step at a time as you look for problems.
If you cannot find the frame, right-click the step that failed and select Highlight on Web Browser. If the frame exists, the Web Recorder Browser highlights the frame in a red square for 3 seconds. Right-click the highlighted frame and select Object Properties to examine its attributes. If the frame still cannot be found, the Web Recorder Browser displays an error message saying “Element not found.”
Once you find the frame, expand the objects in the Script Editor tree. The Web Recorder Playback Results report should have listed the attribute of the frame that could not be retrieved. Find that frame in the tree and see which attributes are available.
If the frame’s NAME attribute changes often, perhaps the frame’s Ordinal attribute remains constant. The Ordinal attribute is assigned to the frame by Web Recorder in sequential order, based on its position within the Web page structure.
Use the HTML Structure view to analyze the page. The frame may be nested within other frames, and the Ordinal attribute may be based on a series of relative frame positions. In the browser window, click HTML Structure on the View menu. Right-click within the HTML Structure view and select Frames and Forms Only to see the frame structure.
Click the frame’s unchanging attribute to change its Script Editor marker to a green checkmark. The checkmark indicates that this is the attribute that Web Recorder uses to identify the frame during Playback. Once a frame element closely matching the checked attribute is retrieved from the page listed in the step, Web Recorder assumes that the frame has been successfully retrieved.
110 Troubleshooting Web Recorder Playback

2 Slow down the Playback. The Web Recorder Knowledge Script may be moving on to a subsequent step before the failed step has actually completed. Click Playback Speed on the Tools menu, and choose one of the Playback speed settings. For more information, see “Delay Steps, Timers, and Playback Speed” on page 92.
3 Add a Delay step just before the failed step. Delay steps cause Web Recorder to pause before moving on to the next step in the recorded transaction. Sometimes a delay is needed to give the page and all its objects enough time to be fully rendered in the browser. Keep in mind that most step failures occur because a previous step did not render an element that was retrieved in a subsequent step during Recording. For more information, see “Delay Steps, Timers, and Playback Speed” on page 92.
4 Re-record the Knowledge Script to capture the current state of the page and its frames.
10.16 Playback Error: Unable to Locate the Specified FormThis message, which indicates that a step failed during Playback, means that a Knowledge Script failure occurred when trying to locate a form on a Web page. The page where Playback attempted to locate and, presumably, perform some action on the form did not match the page that was recorded. The name of the form or its position may have changed. On some Web sites, some forms are sometimes present and sometimes not.
If this error occurs infrequently, it usually means that there was a problem on the Web server. Often, this type of problem occurs when a multi-tiered application is involved. The Web server may be running, but a backend database or another server supporting the application may be down.
Another possible cause of this error is excessive competition for CPU resources on the managed client, which can cause slowdowns in the loading of Web pages.
The failure can probably be resolved if you try one or all of the following approaches:
1 The form itself may have changed, or its position on the page has changed. Select a different attribute to identify the form to be retrieved during Playback processing.
In the Script Editor window, find the step that failed. You may want to replay the Knowledge Script up to that step by clicking to highlight that step, then right-clicking and selecting Play up to this step from the menu. Then you can use the Step menu item to replay one step at a time as you look for problems.
If you cannot find the form, right-click the step that failed and select Highlight on Web Browser. If the form exists, the Web Recorder Browser highlights the form in a red square for 3 seconds. Right-click the highlighted form and select Object Properties to examine its attributes. If the form still cannot be found, the Web Recorder Browser displays an error message saying “Element not found.”
Once you find the form, expand the objects in the Script Editor tree. The Web Recorder Playback Results report should have listed the attribute of the form that could not be retrieved. Find that form and see which attributes are available.
If the form’s NAME attribute changes often, perhaps the form’s Position attribute remains constant. The Position attribute is assigned to forms by Web Recorder in sequential order, based on their position on the Web page. Use the HTML Structure view to analyze the page. Right-click over the form in the browser window and select Retrieve Object on HTML Structure to find its position.
Troubleshooting Web Recorder Playback 111

Click the form’s unchanging attribute to change its Script Editor marker to a green checkmark. The checkmark indicates that this is the attribute that Web Recorder uses to identify the form during Playback. Once a form element closely matching the checked attribute is retrieved from the page listed in the step, Web Recorder assumes that the form has been successfully retrieved.
2 Slow down the Playback. The Web Recorder Knowledge Script may be moving on to a subsequent step before the failed step has actually completed. Click Playback Speed on the Tools menu, and choose one of the Playback speed settings. For more information, see “Delay Steps, Timers, and Playback Speed” on page 92.
3 Add a Delay step just before the failed step. Delay steps cause Web Recorder to pause before moving on to the next step in the recorded transaction. Sometimes a delay is needed to give the page and all its objects enough time to be fully rendered in the browser. Keep in mind that most step failures occur because a previous step did not render an element that was retrieved in a subsequent step during Recording. For more information, see “Delay Steps, Timers, and Playback Speed” on page 92.
4 The page may have changed since it was recorded. If you suspect that is the case, re-record the Knowledge Script to capture the current state of the page and its forms.
10.17 Playback Error: An Unknown Dialog Box Showed Up and Was UnexpectedThis message, which indicates that a step failed during Playback, means that a Knowledge Script failure occurred when an unexpected popup dialog box appeared during Playback. The popup, which may have been an authentication dialog box or a prompt of some sort, was not recorded.
This Knowledge Script failure may have occurred because of differences between the configuration of the computer where the Knowledge Script was recorded and the computer where Playback occurred. For example, the Playback computer may not have a copy of a plugin installed, and if the plugin was required to display part of the Web site, such as a Flash media presentation, the popup may have prompted the user to install it. For more information, see “Hardware, Plugins, and Java” on page 71 and “Internet Explorer Settings” on page 71.
In addition, a dialog box from a previous step may not have closed before the next step began during Playback. This sometimes occurs when multiple transactions are running at the same time.
1 Slow down the Playback. Click Playback Speed on the Tools menu, and choose one of the Playback speed settings. For more information, see “Delay Steps, Timers, and Playback Speed” on page 92.
2 Add a Delay step just before the failed step. Delay steps cause Web Recorder to pause before moving on to the next step in the recorded transaction. Sometimes a delay is needed to give the page and all its objects enough time to be fully rendered in the browser. Keep in mind that most step failures occur because a previous step did not render an element that was retrieved in a subsequent step during Recording. For more information, see “Delay Steps, Timers, and Playback Speed” on page 92.
112 Troubleshooting Web Recorder Playback

10.18 Playback Error: Unable to Get the WinClick MutexA mutex, the name of which stands for mutually exclusive, allows multiple program threads to share a resource, such as file access, via a locking mechanism. When a program is started, a mutex is created with a unique name. Then any thread that uses the resource first locks the mutex to prevent other threads from using that resource. The mutex unlocks when the resource is no longer needed.
In Web Recorder, anytime a window Click step uses the Move Cursor option, when the click is recreated, the relevant window is made active, and the cursor is set to the X,Y position specified in the step. For more information, see “Customizing Window Retrieval” on page 48. The mutex means that no other Knowledge Script jobs are able to do the same thing. Any other job that attempts to control that window or the cursor waits until the mutex is available. However, it only waits 20 seconds and then times out with this error.
To resolve this problem, do one of the following:
Make sure that any WebTransaction Knowledge Script jobs that involve a window Click step using the Move Cursor option are not running simultaneously. Modify their schedules if necessary.
Reduce the number of WebTransaction jobs that can run simultaneously on the managed client. To do that, edit the WebTransaction62Limit registry key. For more information, see “WebTransaction Limit” on page 65.
Or, if this problem recurs frequently and restarting did not help to alleviate it, contact NetIQ Technical Support.
10.19 Playback Error: Unable to Create the WinClick MutexA mutex, the name of which stands for mutually exclusive, allows multiple program threads to share a resource, such as file access, via a locking mechanism. When a program is started, a mutex is supposed to be created with a unique name. Then any thread that uses the resource first locks the mutex to prevent other threads from using that resource. The mutex unlocks when the resource is no longer needed.
In Web Recorder, anytime a window Click step uses the Move Cursor option, when the click is recreated, the relevant window is made active, and the cursor is set to the X,Y position specified in the step. For more information, see “Customizing Window Retrieval” on page 48. The mutex means that no other Knowledge Script jobs are able to do the same thing. Any other job that attempts to control that window or the cursor waits until the mutex is available. However, it only waits 20 seconds and then times out with this error.
To resolve this problem, do one of the following:
Open the Windows Task Manager (Ctrl+Alt+Delete). On the Processes tab, look for a process that is using an extremely large amount of resources and stop or restart it. If this problem recurs, use the Task Manager to monitor the affected computer for processes that are using excessive amounts of USER objects, handles, or GDI objects. Terminate any processes that use thousands of them.
Restart the computer where the Playback failure occurred.
Or, if this problem recurs frequently and restarting did not help to alleviate it, contact NetIQ Technical Support.
Troubleshooting Web Recorder Playback 113

10.20 Playback Error: The Web Page Is Empty. There May Be a Problem with the Web ServerThis message indicates a problem with the Web server hosting the page that was accessed during Playback. This error may occur when the Web server is rebooting and some of the services have not yet been started.
10.21 Playback Error: Unable to Create Main WindowThis message indicates that a system resource error occurred during Playback.
A window is a finite system resource. In this case, the system may be too busy, or an application may have created too many windows.
To resolve this problem, do one of the following:
Open the Windows Task Manager (Ctrl+Alt+Delete). On the Processes tab, look for a process that is using an extremely large amount of resources and stop or restart it. If this problem recurs, use the Task Manager to monitor the affected computer for processes that are using excessive amounts of USER objects, handles, or GDI objects. Terminate any processes that use thousands of them.
Restart the computer where the Playback failure occurred.
Or, if this problem recurs frequently and restarting did not help to alleviate it, contact NetIQ Technical Support.
10.22 Playback Error: The Job Was Aborted Because It Was Using Internet Explorer Resources for Too LongThis error indicates that the Knowledge Script job timed out before completing. The Web server may have stopped responding, or else the Job Timeout value is too low. You therefore need to do one of the following:
Check the Web server to make sure it is available.
Increase the Job Timeout value. For more information, see “WebTransaction Limit” on page 65.
For more information, see “Running Multiple WebTransaction Jobs on a Single Computer” on page 63.
10.23 Playback Error: The Job Was Aborted. Unable to Create New ThreadThis error indicates that the Knowledge Script job failed. The message indicates that a system resource error occurred during Playback.
A thread is a finite system resource. In this case, the system may be too busy, or an application may have created too many threads.
114 Troubleshooting Web Recorder Playback

To resolve this problem, do one of the following:
Open the Windows Task Manager (Ctrl+Alt+Delete). On the Processes tab, look for a process that is using an extremely large amount of resources and stop or restart it. If this problem recurs, use the Task Manager to monitor the affected computer for processes that are using excessive amounts of USER objects, handles, or GDI objects. Terminate any processes that use thousands of them.
Restart the computer where the Playback failure occurred.
Or, if this problem recurs frequently and restarting did not help to alleviate it, contact NetIQ Technical Support.
10.24 Playback Error: The Job Was Aborted Because It Failed to Obtain Internet Explorer Resources Before Timing OutThis error indicates that the Knowledge Script transaction queue timed out before the job could complete. Most likely, you have created too many simultaneous WebTransaction jobs that are trying to run on the same managed client, or else the jobs are running on a schedule interval that is too short; that is, the jobs are running too frequently. Some jobs are timing out before previous jobs have completed and relinquished the necessary Internet Explorer resources.
To alleviate this problem, take one of the following steps:
Increase the Queue Timeout Knowledge Script parameter. For more information, see “WebTransaction Limit” on page 65.
Increase the schedule interval for the WebTransaction Knowledge Script jobs you are trying to run so that the jobs run less frequently.
Make sure that any Knowledge Script jobs that use the Move Cursor option in a window Click step are not running in the same time frame. Modify their schedules if necessary.
Reduce the number of simultaneous WebTransaction Knowledge Script jobs that are allowed on the managed client. To do that, edit the WebTransaction62Limit registry key. For more information, see “WebTransaction Limit” on page 65.
10.25 Playback Error: The Job Was Aborted. Unable to Create Semaphore. The System May Be Out of ResourcesThis error indicates that the Knowledge Script job failed due to a lack of available resources on the managed client computer. Another application may have caused a memory leak.
A semaphore is a finite system resource. In this case, the system may be too busy, or an application may have created too many semaphores.
To resolve this problem, do one of the following:
Open the Windows Task Manager (Ctrl+Alt+Delete). On the Processes tab, look for a process that is using an extremely large amount of resources and stop or restart it. If this problem recurs, use the Task Manager to monitor the affected computer for processes that are using excessive amounts of USER objects, handles, or GDI objects. Terminate any processes that use thousands of them.
Troubleshooting Web Recorder Playback 115

Restart the computer where the Playback failure occurred.
Or, if this problem recurs frequently and restarting did not help to alleviate it, contact NetIQ Technical Support.
10.26 Playback Error: Unable to Allocate _pWebManager Object. May Not Be RegisteredThis error, which indicates that the Knowledge Script job failed, may have been caused by an installation error.
You may need to uninstall and then reinstall AppManager ResponseTime for Web. A necessary file has been removed or corrupted.
10.27 Playback Error: The SCRIPT Property Is Not Set or EmptyThis error indicates that the Knowledge Script job failed. The Knowledge Script file may have been modified or corrupted. Try reopening the Knowledge Script in Web Recorder, re-saving it, and checking it back into the repository. Web Recorder may be able to fix the problem that way.
If this does not resolve the problem, record the Knowledge Script again.
10.28 Playback Error: Unable to Validate the Script VersionThe full text of this error is “Unable to validate the script version. Knowledge Script may be corrupted. Record a new Knowledge Script.”
Someone may have edited the Knowledge Script, rendering it invalid.
Try recording the Knowledge Script again.
10.29 Playback Error: This Knowledge Script Was Recorded with NetIQ Web Recorder VxThe full text of this error message is “This Knowledge Script was recorded with NetIQ Web Recorder® Vx.x.x.x, and this managed object supports only Knowledge Scripts recorded using NetIQ Web Recorder Vy.y.y.y or higher. Reopen the Knowledge Script in the newer version of Web Recorder and save it, or record a new Knowledge Script using NetIQ Web Recorder® Vy.y.y.y or higher.”
You upgraded the Web-RT module when you installed the newest version of AppManager ResponseTime for Web, but then you tried to run a WebTransaction Knowledge Script that you recorded with an older version of Web Recorder.
Try opening the Knowledge Script and saving it in the newer version of Web Recorder that was installed along with the newer version of AppManager ResponseTime for Web. You can also record a new Knowledge Script using the newer version of Web Recorder.
116 Troubleshooting Web Recorder Playback

10.30 Playback Error: An Error Occurred in Microsoft Internet ExplorerAn error occurred in the Microsoft Internet Explorer browser. Web Recorder could not detect the source of the problem. It may have been a problem with the Web page, a problem with the connection to the server, or an irrecoverable VBScript, JavaScript, or .NET exception that caused Internet Explorer to crash.
This error does not necessarily indicate a problem with the Web server or even with Web Recorder if it shows up only once in a long series of data points. But if it comes often and is easily repeatable, NetIQ Corporation recommends that you try recording a different browser session for your Knowledge Script.
10.31 Playback Error: AppManager ResponseTime for Web Cannot Take Control of the DesktopThe WebTransaction Knowledge Script you attempted to run cannot run at this time.
This error means that the desktop on the managed client is dedicated to another AppManager application module, most likely AppManager ResponseTime for Windows. While the other module has control of the desktop, WebTransaction Knowledge Scripts cannot run because they need to use the desktop for Playback. Only one application that uses the desktop can run on a single computer at a time.
To reset desktop control to ResponseTime for Web, run the Web-RT_TakeDesktopOwnership Knowledge Script.
10.32 Playback Error: Search Failed, Text Not FoundThis message indicates that a Search step that you added to the Knowledge Script failed to validate during Playback.
The Search step uses the Internet Explorer Find function to attempt to retrieve a line of text on a Web page. If the text cannot be found, a failure is generated if the Search failure condition is set to Not Found. For more information, see “Search Options” on page 52.
The object could not be located for one of several possible reasons:
The page has changed, and the text string is no longer there.
If you think this is the case, you should record the Knowledge Script again.
A previous step failed to load properly, and as a result, the page where the Knowledge Script attempted to perform the search was not the same page that was recorded.
Try adding a Delay step just before the failed step. Delay steps cause Web Recorder to pause before moving on to the next step in the recorded transaction. Sometimes a delay is needed to give the page and all its objects enough time to be fully rendered in the browser. Keep in mind that most step failures occur because a previous step did not render an element that was retrieved in a subsequent step during Recording. For more information, see “Delay Steps, Timers, and Playback Speed” on page 92.
The Web Recorder Playback engine received a “Document complete” signal before the page was fully rendered.
Troubleshooting Web Recorder Playback 117

For more information about the Internet Explorer signals that Web Recorder uses to determine when a new step should be created, see “The Timers Tab” on page 83. You might want to increase the timer that determines when Web Recorder considers a step complete and moves on to the next step. Click Settings > Options, then click the Timers tab. Increase the value of the Delay after document complete timer. You then need to re-record the Knowledge Script with the new setting.
The search string may be on the page, but you may be performing a case-sensitive search. Edit the Search step in the Script Editor so that the Case-sensitive attribute is disabled.
For more information, see “Search and Advanced Search Steps” on page 51.
10.33 Playback Error: Advanced Search Step Failed, Object Not FoundThis message indicates that an Advanced Search step that you added to the Knowledge Script failed to validate during Playback.
The Advanced Search step attempts to retrieve a selected object on a Web page. If the object cannot be found, a failure is generated only if the Search failure condition is set to Not Found. For more information, see “Search Options” on page 52.
The object could not be located for one of several possible reasons:
The page has changed, and the object is no longer there. If you think this is the case, you should record the Knowledge Script again.
A previous step failed to load properly, and as a result, the page where the Knowledge Script attempted to perform the advanced search was not the same page that was recorded.
Try adding a Delay step just before the failed step. Delay steps cause Web Recorder to pause before moving on to the next step in the recorded transaction. Sometimes a delay is needed to give the page and all its objects enough time to be fully rendered in the browser. Keep in mind that most step failures occur because a previous step did not render an element that was retrieved in a subsequent step during Recording. For more information, see “Delay Steps, Timers, and Playback Speed” on page 92.
The Web Recorder Playback engine received a “Document complete” signal before the page was fully rendered.
For more information about the Internet Explorer signals that Web Recorder uses to determine when a new step should be created, see “The Timers Tab” on page 83. You might want to increase the timer that determines when Web Recorder considers a step complete and moves on to the next step. Click Settings > Options, then click the Timers tab. Increase the value of the Delay after document complete timer. You then need to re-record the Knowledge Script with the new setting.
The object is on the page, but the Advanced Search step is attempting to retrieve it using an attribute that has changed. Edit that step in the Script Editor so that a different attribute is enabled for retrieval.
For the Advanced Search to find a match on a page, it only looks for those attributes that are enabled under the Object parameters in the Script Editor window. Expand the Advanced Search step where the Playback failure occurred, and expand its parameters. Enabled attributes have a green checkmark symbol and can be edited if clicked. Make sure the correct attributes are selected, and run the Playback again.
For more information, see “Search and Advanced Search Steps” on page 51.
118 Troubleshooting Web Recorder Playback

10.34 Playback Error: Text Search Field Is EmptyYou added a Search step, but the search string was empty. The Search step looks for a text string on a selected Web page. You may have edited the Knowledge Script to remove the search string by mistake.
The text search string in the Knowledge Script is an editable parameter in the Script Editor. In Web Recorder, expand the step where the failure occurred and add an appropriate text string for the Search parameter.
10.35 Playback Error: Search Failed, Text FoundThis message indicates that a Search step that you added to the Knowledge Script failed during Playback. Although the text string to search for was found on the page, you set the Search failure condition to Found, meaning fail if the text is found.
The Search step attempts to retrieve a selected text string on a Web page. For more information, see “Search Options” on page 52.
10.36 Playback Error: Advanced Search Failed, Object FoundThis message indicates that an Advanced search step that you added to the Knowledge Script failed during Playback. Although the object to search for was found on the page, you had set the Search failure condition to Found, meaning fail if the text is found. The Advanced Search step attempts to retrieve a selected object on a Web page.
For more information, see “Search Options” on page 52 and “Advanced Search Steps” on page 53.
10.37 Domain Integrity ViolationDuring Recording, you may see a popup warning stating that a “domain integrity violation” has occurred. This warning indicates that you clicked on an object that is in a different network domain from the base page.
Although the warning states that “Internet Explorer does not allow cross-domain data access,” the action that prompted this warning was probably legal in Internet Explorer. The browser was probably just attempting to navigate to the object. Web Recorder, however, requires the ability to read objects during Recording so that the steps can be mimicked during Playback. The warning specifies that this object cannot be included in the Knowledge Script because it could not be retrieved during Playback.
The ability to read an object located in another domain is prohibited by the Windows Dynamic HTML (DHTML) object model, which enforces restrictions to protect user privacy and data integrity. These restrictions apply to windows, dialog boxes, frameSets, frames, and iframes. The warning you received specifies that “the action has been canceled,” which means that the action of clicking on the object located in another domain has not been included in the Knowledge Script that is being recorded.
For more information about this warning, see the following Web site:
http://msdn2.microsoft.com/en-us/library/ms533028.aspx
Troubleshooting Web Recorder Playback 119

10.38 Difficulty Determining Source of Step FailureIn a few cases, an unexpected Playback failure whose cause is difficult to determine might occur. After you have consulted the section titled “Playback Error: Unable to Locate the Specified Object” on page 108 for some tuning suggestions, try checking the steps leading up to the failed step. You need to find out whether the failed step is trying to retrieve something that was not there because of unexpected behavior during a previous step.
For example, if a link in a previous step has unexpectedly changed, the page where the failure is occurring might actually be a different page altogether than the one that was recorded. In addition, one page may be loading so slowly that a link that was clicked during Recording is not coming up until the Knowledge Script has moved on to another step. In such a case, you might try adding Delay steps.
As described in “Playback Features” on page 62, use Step Playback to go back through the Playback one step at a time and ensure that each step in turn completes successfully.
You can also try adding another step after the step that fails. For example, you could add a Search step to validate that the previous step completes successfully. It is possible that the failing step involves a window object, or an ActiveX control, something that does not allow for validation. A new step involving a click on an HTML object, such as a link, allows for validation and may, therefore, provide more guidance as to the source of the failure.
10.39 Difficulties Recording Dialog Boxes, ActiveX, Objects, and EmbedsTo record and play back Web transactions in a way that represents a real user’s experience, Web Recorder makes as few undercover modifications as possible to a Web browser’s actual interactions with Web applications. For example, while previous versions of Web Recorder supported undercover authentication, Web Recorder now uses the authentication dialog box that is shown during Recording instead. It can also record and play back some user actions on popup dialog boxes, ActiveX controls, certain objects, and embeds.
Dialog boxes, ActiveX controls, and some objects and embeds are known to the Web Recorder as windows, as opposed to HTML elements. However, the types of user actions that Web Recorder handles at this time are still limited and specific to each type of window control recorded:
Text boxes and passwords: text changes can be recorded and played back.
List boxes: both text changes and selection changes can be recorded and played back.
Combo boxes: both text changes and selection changes can be recorded and played back. Sometimes, a single change may generate both a text change and a Select step. This will likely be improved in a future release of AppManager ResponseTime for Web.
Buttons: Click actions are supported. Click actions are also supported on some unknown controls.
ActiveX, objects, and embeds: Click actions are supported, but only when they have a dedicated window.
120 Troubleshooting Web Recorder Playback

10.40 Problems Recording HTML StepsWhen an HTML element implements a JavaScript method, such as OnMouseMove, by default, the browser might not be able to detect the action, in which case, the Click step is not generated by Web Recorder. This is because the OnMouseDown method usually prevents all subsequent handling of the OnMouseDown signal.
This problem can be avoided by setting the window.event.cancelBubble property to false in the implementation of the method. The default setting is true.
Since OnClick is more commonly implemented than OnMouseDown, Web Recorder uses OnMouseDown to detect a click and generate a Click step
function OnMouseDown() { window.event.cancelBubble = false; }
The workaround for a case like this is to manually add a Click step to the Knowledge Script during Recording. For more information, see “Manually Adding a Click Step” on page 46.
10.41 Known LimitationsThere are some limitations on Web Recorder handling of dialog boxes and ActiveX windows:
ListView and TreeView items are not supported.
Only one dialog box can be handled at a time.
ActiveX controls generate only Click actions in the recorded Knowledge Script. A complex ActiveX control that provides input fields, sliders, or any custom controls requiring direct manipulation are not supported at present. The same restriction applies to embeds and objects.
Any ActiveX controls, embeds, or objects that do not have a dedicated window are not supported. To determine whether such a control or object is associated with its own window, look at the object or control in the HTML Structure view. Anything shown in the hierarchy as being below the Properties object of the Browser Window object is either an ActiveX control, an object, or an embed with a dedicated window. See the following graphic for an example:
Any ActiveX objects that run on a separate process, such as Adobe Acrobat Reader, are not supported and are not recorded.
Some users have found that they cannot add a Search step to a Knowledge Script if they are using Windows 2003. Our testing has found only the following limitations: if you are running on Windows XP or Windows 2003 through a Terminal Services session, you must apply either
Troubleshooting Web Recorder Playback 121

Windows XP Service Pack 2 or Windows 2003 Service Pack 1 for the Search Step function to work in Web Recorder. The Advanced Search step works fine on both operating systems without the referenced service packs.
If a recorded Web site uses a JavaScript event like onblur to manipulate or hide text entered in a textbox or form, Web Recorder Playback will not invoke the event. Because of this, Web Recorder Playback may fail.
122 Troubleshooting Web Recorder Playback

11 11Using URL Check Recorder
This section provides guidance for using URL Check Recorder with the AppManager ResponseTime for Web module.
The following topics are discussed:
“Getting Started” on page 123
“Recorder Options” on page 124
“Script Options Tab” on page 125
“URLs Tab” on page 127
“Checking in a URLCheck Knowledge Script” on page 131
“URL Properties” on page 132
“Default URL Properties” on page 137
You launch URL Check Recorder from the Extensions menu in the AppManager Operator Console or from the Tasks pane in the Control Center Console.
The Knowledge Scripts the URL Check Recorder generates fall into the URLCheck subcategory of Web-RT Knowledge Scripts. These Knowledge Scripts validate one or more URLs for availability and performance.
To check performance, they can validate links and objects on a page, and also search for specific text, links, or objects. The Check Link function can quickly verify the availability of hundreds of URLs.
The output from the URL Check Recorder is in the standard Knowledge Script format (.QML), which you can reopen in URL Check Recorder for easy updates.
Results from the URLCheck subcategory of Web-RT Knowledge Scripts are included in the data details for events and the Percent Available data point. Options such as Validate all links and Validate all objects can return many results, as can Knowledge Scripts that include hundreds of URLs. Therefore, by default, only Failure information is included in events, and no data details are included with the Percent Available data point.
NOTE: If you change the defaults and choose not to limit the data details, you can quickly fill up your repository, which can impact results collection for your entire AppManager system.
11.1 Getting StartedYou do not need any special permissions to use URL Check Recorder.
To launch URL Check Recorder:
1 (Conditional) If you are using the Operator Console, select URL Check Recorder from the Extensions menu.
2 (Conditional) If you are using Control Center, click Knowledge Scripts in TreeView and then click Launch > URL Check Recorder in the Tasks pane.
3 Click the URLs tab.
Using URL Check Recorder 123
4 Click to enable the Link table cell, and then type a URL into the Link field.
5 Press Enter.
6 Continue entering URLs in the other cells in that column, as needed.
7 Right-click any URL and select Verify to test it. A link verification is run using any options you selected on the Script Options tab.
8 If you want to save your work and check it into the repository as a Knowledge Script, click Save As, then Check In on the File menu.
11.2 Recorder OptionsThe Recorder Options dialog box allows you to set general preferences that determine how URL Check Recorder processes the URLs you type in the URLs tab. Those options are saved in the Windows Registry under: HKEY_LOCAL_MACHINE\SOFTWARE\NetIQ\Response Time\URL Check Recorder.
Access the Recorder Options dialog box by clicking Recorder Options on the Settings menu.
Automatically verify new URLs: When this option is selected, as soon as a new URL is entered or when a URL is modified, it is automatically verified in the background. An icon indicating the results from the verification appears next to that URL on the URLs tab.
Verification timeout: Specifies the time after which the attempt to verify the URL should end.
Default prefix (Scheme): HTTP or HTTPS. The default prefix is automatically added at the beginning of a URL if no prefix is specified.
Generate URL Verification Summary: Allows you to generate and display a summary report after URL verification is performed. By default, it is disabled. For more information, see “URL Verification Summary” on page 144.
Overwrite URL Verification Summary: If enabled, the URL Verification Summary filename is reused, always overwriting the previous Summary file if one exists. By default, the filename of the URL Verification Summary file is the same as the name of the Knowledge Script (.qml) file with a .htm extension.
If set to No, the document name is used, with the date and time appended in the following format: “_YYYYMMDD HH:MM:SS.htm”. This creates a unique document each time verification is run. By default, this option is set to Yes.
NOTE: Disabling this option may create many HTML files, depending on how often you verify URLs.
124 Using URL Check Recorder
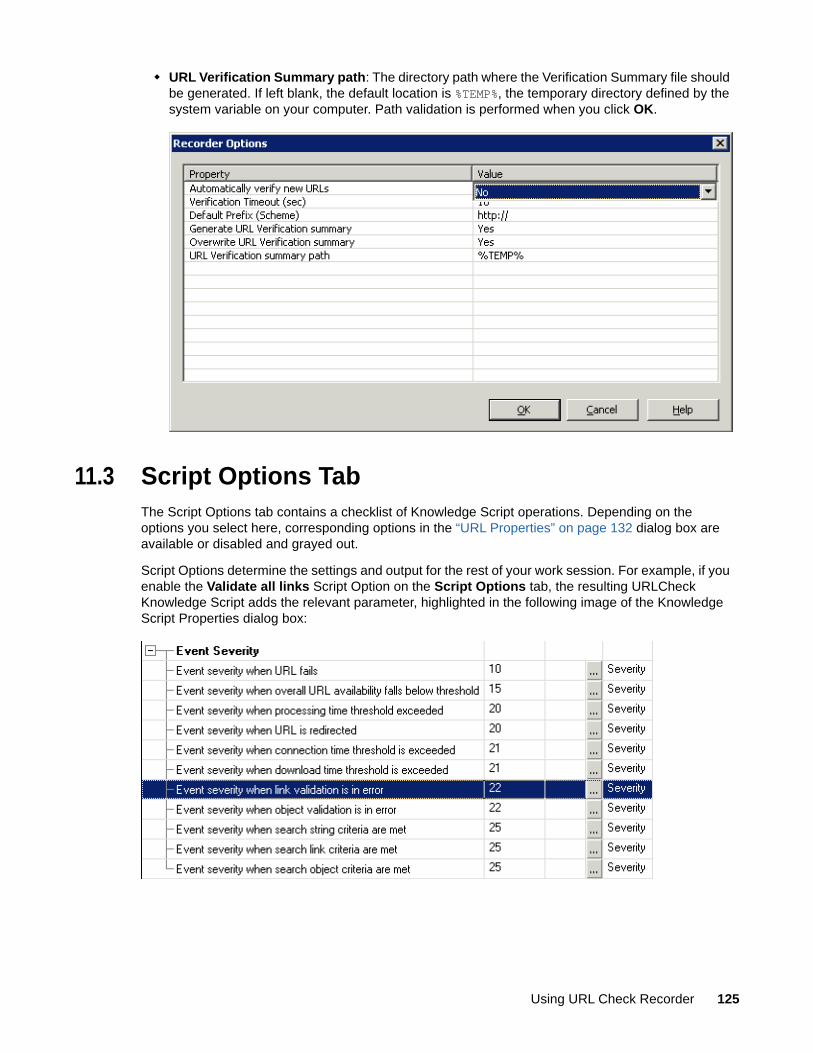
URL Verification Summary path: The directory path where the Verification Summary file should be generated. If left blank, the default location is %TEMP%, the temporary directory defined by the system variable on your computer. Path validation is performed when you click OK.
11.3 Script Options TabThe Script Options tab contains a checklist of Knowledge Script operations. Depending on the options you select here, corresponding options in the “URL Properties” on page 132 dialog box are available or disabled and grayed out.
Script Options determine the settings and output for the rest of your work session. For example, if you enable the Validate all links Script Option on the Script Options tab, the resulting URLCheck Knowledge Script adds the relevant parameter, highlighted in the following image of the Knowledge Script Properties dialog box:
Using URL Check Recorder 125
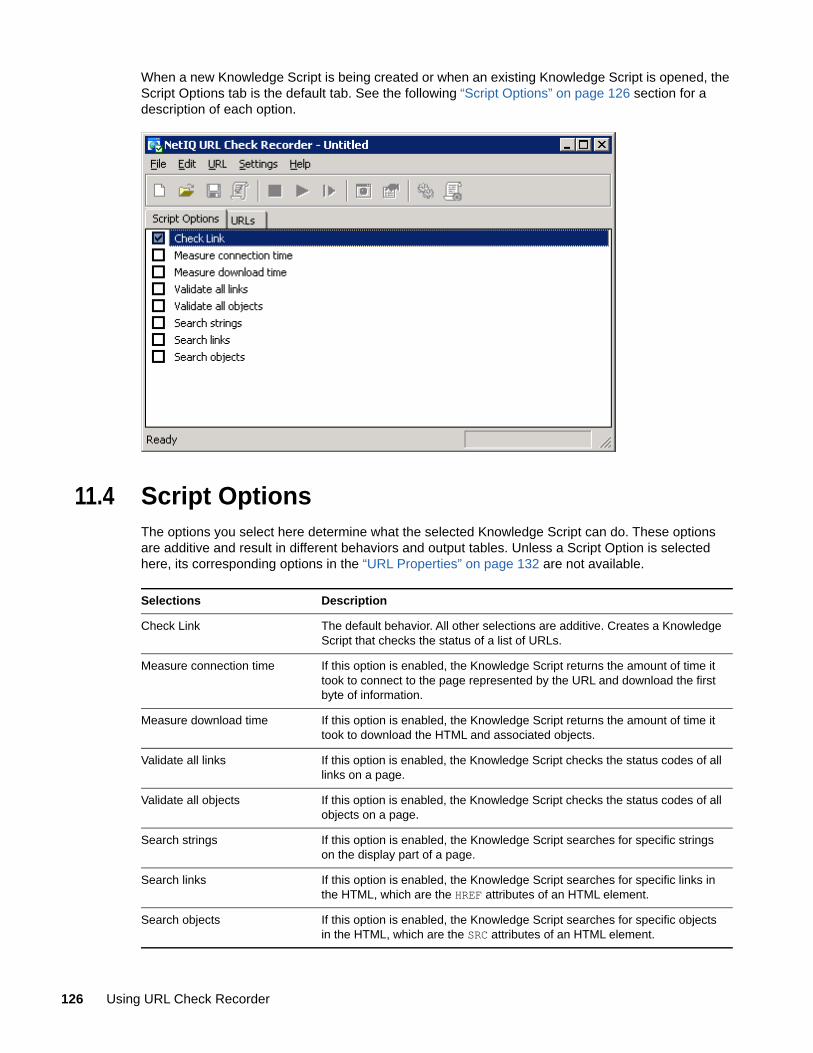
When a new Knowledge Script is being created or when an existing Knowledge Script is opened, the Script Options tab is the default tab. See the following “Script Options” on page 126 section for a description of each option.
11.4 Script OptionsThe options you select here determine what the selected Knowledge Script can do. These options are additive and result in different behaviors and output tables. Unless a Script Option is selected here, its corresponding options in the “URL Properties” on page 132 are not available.
Selections Description
Check Link The default behavior. All other selections are additive. Creates a Knowledge Script that checks the status of a list of URLs.
Measure connection time If this option is enabled, the Knowledge Script returns the amount of time it took to connect to the page represented by the URL and download the first byte of information.
Measure download time If this option is enabled, the Knowledge Script returns the amount of time it took to download the HTML and associated objects.
Validate all links If this option is enabled, the Knowledge Script checks the status codes of all links on a page.
Validate all objects If this option is enabled, the Knowledge Script checks the status codes of all objects on a page.
Search strings If this option is enabled, the Knowledge Script searches for specific strings on the display part of a page.
Search links If this option is enabled, the Knowledge Script searches for specific links in the HTML, which are the HREF attributes of an HTML element.
Search objects If this option is enabled, the Knowledge Script searches for specific objects in the HTML, which are the SRC attributes of an HTML element.
126 Using URL Check Recorder

TIP: You can navigate the options using the arrow keys, and check or clear an option by pressing the Space bar. The Check link option is always checked and cannot be cleared.
11.5 URLs TabThe URLs tab is the heart of URL Check Recorder. The URLs tab lets you navigate and edit the URLs on a table.
Enter URLs, and information about each URL, in the table cells. Using the information you entered, URL Check Recorder automatically attempts to verify each link if the verification option is selected in the Preferences dialog box. For more information, see “Edit Menu” on page 130. Verification attempts to connect to the URL using the properties selected on the “General Tab” on page 132.
The verification process runs in the background and uses a separate thread, which means you can continue adding or editing URLs while others are being verified. However, during link verification, a “Delete” operation is not allowed on that particular link.
The Line column shows the line number for output reference.
The Status and Status Description columns show the results of a URL verification. The Status column shows either HTTP status codes (2xx-5xx), WinHTTP error messages (12xxx), or Windows Sockets error codes (11xxxx) returned when URL Check Recorder attempts to verify the URL.
The Status Description column explains the meaning of the status code. This explanation comes from the Web server, or from the desktop if the server cannot be reached. For more information, see “Status Codes” on page 153.
Click Properties on the URL menu to configure properties for a URL, including properties that determine when events are raised, proxy user IDs and passwords to use, download time thresholds, and strings to search for in the HTML code. For more information, see “URL Properties” on page 132. You can cut, copy and paste, or drag and drop URLs in the list. You can copy URL properties from one URL to any selection of URLs by clicking Paste Properties on the Edit menu. For more information, see “Paste Properties Dialog Box” on page 131.
11.5.1 Adding a URL
You can manually enter URL information in the URLs tab, drag and drop a URL from a Web browser into a Link field, or use the Windows Clipboard to paste in a URL. The default description of the link should automatically appear in the Description field. For more information, see “The Explore Menu Item” on page 129. If a description or a link does not fit completely in a table cell, it is available as a tooltip.
You are not required to enter “HTTP” or “HTTPS” when defining the paths of new URLs. URL Check Recorder accepts either of these prefixes, but when no prefix is specified, the default prefix is automatically added. The default prefix is defined in the Preferences dialog box. For more information, see “Edit Menu” on page 130.
NOTE: You can only enter URLs that use HTTP:// or HTTPS://. URLs that start with FTP://, FILE://, MAILTO://, GOPHER://, MMS://, for example, are not supported.
Using URL Check Recorder 127

11.5.2 Importing Multiple URLs
You can also import a list of URLs to verify from a text file. To batch import a list of URLs, click Settings > Import Format. In order to import from a text file, you must specify the format of the URLs listed in the file.
You can select a predefined format from the drop-down list or create a custom format using the following substitution variables:
[d]: Specifies the location of the description of a URL in the import format.
[l]: Specifies the location of the link of a URL in the import format.
[nl]: Specifies the location of a linebreak in the import format.
URL Check Recorder does not verify that the specified format is correct. If the format does not match the format of the URLs being imported, the URLs are displayed incorrectly in the URLs tab.
You must include a delimiter between the description ([d]) and the URL ([l]). A valid delimiter is a line break ([nl]), a comma, or a semicolon. A space is not a valid delimiter.
For example, using the default import format of [l], a corresponding import file would be formatted as follows:
www.mywebsite.comwww.bigcompany.com
Changing the import format to [l];[d], a corresponding import file would be formatted as follows:
www.mywebsite.com;My Web Site home pagewww.bigcompany.com;Big Company home page
NOTE: URL Check Recorder automatically appends all imported URLs to the Knowledge Script file (.QML) you currently have open. If you want to import URLs to a separate Knowledge Script file, save the open file and then click File > New to create a new Knowledge Script before importing.
After specifying the import format, click OK, then click File > Import. Select the text file you want to import and click Open. URL Check Recorder displays the imported URLs in the URLs tab.
11.5.3 Verifying a URL
URL verification is essentially a quick validity check. To perform a verification of a URL, URL Check Recorder connects to the URL and returns the HTTP status code.
By default, all URLs are verified as soon as they are added to the URLs table. You can disable automatic verification by clicking Settings > Recorder Options and then selecting No for the Automatically verify new URLs parameter.
You can also exclude an individual URL from verification by highlighting the entire table row containing the URL, right-clicking and selecting Exclude from the menu. The Exclude icon appears. In addition, a note stating when the URL was excluded is added to the Note Tab for this URL.
Manually verify a URL that is already in the URLs table by clicking Verify on the URL menu.
During URL verification, the Processing icon is displayed. A green checkmark appears once the URL has been successfully verified. A red X indicates a failed verification.
128 Using URL Check Recorder

The Padlock icon indicates that authentication is required. To verify a link that requires authentication, configure the username and password on the General Tab of the URL Properties dialog box before verifying.
11.5.4 The Find Feature
A single URLCheck Knowledge Script can contain multiple URLs. When a Knowledge Script is really large, it can be difficult to find particular URL in the URLs table. The Find feature helps you search for a string in the URLs table.
To use the Find feature, you must first open the URLCheck Knowledge Script in URL Check Recorder. From the URLs tab, click Find on the Edit menu. Enter a string to search for in the table and click Find. The Find feature searches for the string in both the Description and Link columns.
When a string is found, the table scrolls to reveal the URL and highlights it. If the string you entered is not found, you see a message stating that the end of the table has been reached.
11.5.5 Tips for Working with URLs in the URLs Table
There are several options for navigating within the URLs table:
Navigate between rows with the Up and Down arrow keys. Description and Link columns contain editable cells.
Navigate between empty Description and Link cells using Left and Right arrow keys.
Navigate from left to right within the table using the Tab key. When the last right cell is reached, pressing Tab moves the selection point to the following row, and selects the first cell on the left.
Enter information by typing directly in a cell. After the content of a cell has been modified, using the Up and Down arrows as well as the Tab key saves the content and moves the selection point to another cell.
Once you begin typing, the Left and Right arrows navigate between characters, not between rows.
11.5.6 The Explore Menu Item
The Explore menu item opens a selected URL with Internet Explorer. On the URLs tab, click in the cell containing the URL. Then click Explore on the URL menu.
The Explore menu item also opens a browser you can use to find the URL you want to verify and quickly paste it into URL Check Recorder. Enable this menu item by typing a URL into the Link field. Then in the browser window that opens, navigate to the Web site you want to test. In the Address field of the browser, place the mouse pointer over the Internet Explorer icon. Then click and drag the URL to the URL Check Recorder window. Drop the URL into the Link column.
When you drop a URL into the table, URL Check Recorder appends a new row, pastes the URL, and automatically inserts any description it can find for that URL. This is a useful way to find and add complex URLs by browsing the Web with Internet Explorer. When a new URL is dropped into the table, the table scrolls to the new entry and displays its configuration information.
The URLs table also allows you to drag and drop URL shortcuts from your Desktop or from any link within an Internet Explorer Web page. It supports standard Cut, Copy/Paste, Delete, and Insert functions. For more information, see “Edit Menu” on page 130.
Using URL Check Recorder 129

11.5.7 Edit Menu
The following items are available in the URL Check Recorder Edit menu:
11.5.8 URL Menu
The following items are available in the URL Check Recorder URL menu:
Menu Item Keystroke Action
Cut Ctrl+X Removes the selected item and places it on the Clipboard with all its properties. Available only when one item is selected.
Copy Ctrl+C Places the selected item on the Clipboard with all its properties. Available only when one item is selected.
Paste Ctrl+V If a complete URL is on the Clipboard, pastes the URL, the label, and all properties onto all selected URLs.
If a URL shortcut has been stored in the Clipboard from the Desktop or Internet Explorer, pastes the URL and its label into the row.
If only text is available and a cell is in edit mode, copies the text into the selected cell.
Unavailable if there is nothing on the Clipboard.
Paste Properties Ctrl+P If a URL from this list is on the Clipboard, lets you select the set of properties to paste into the selected URL.
Unavailable if no URL from this list is on the Clipboard, or if nothing is selected. For more information, see “Paste Properties Dialog Box” on page 131.
Delete Del Deletes the current selection. Available only when one or more items are selected.
Find Ctrl+F3 Searches for a specified string in the URLs table.
Find Next F3 Searches for the next instance of a specified string in the URLs table.
Menu Item Keystroke Action
Explore F5 Renders the URL using Microsoft Internet Explorer.
Verify Shift+F5 Verifies the connectivity of the selected item. This item is available only when a URL is selected from the URL list.
Verify All Ctrl+F5 Verifies connectivity of all URLs.
Exclude Shift+Space Excludes a URL from verification.
Insert Ins If a URL is selected, moves the selected item and all items below it down, and inserts a new URL in its place. If no URL is selected, appends a new one at the end of the list.
Stop Verify Break Stops a verification. This item is available only when a verification is in process.
Properties… Ctrl+Enter Displays the URL Properties dialog box for the selected URL. This item is available when at least one URL is selected. For more information, see “URL Properties” on page 132.
130 Using URL Check Recorder

11.5.9 Paste Properties Dialog Box
The Paste Properties feature lets you propagate the URL Properties that you have selected in the URL Properties dialog box from one URL to one or more other URLs.
The Paste Properties dialog box is enabled when a complete URL item is on the Clipboard and some URL properties on the various tabs of the URLs dialog box are selected. To enable this feature, you must select the entire line of any URL that you intend to copy to the Clipboard, as well as the entire line where you intend to Paste it.
The Paste Properties checklist exposes the possible values to paste. The elements listed may or may not be shown, depending on the selections set in the Script Options dialog box. For more information about the available properties, see “URL Properties” on page 132.
11.5.10 URL Check Recorder Limitations
URL Check Recorder supports a maximum of 999 URLs per Knowledge Script file.
Only URLs that use HTTP:// or HTTPS:// are supported. URLs that start with FTP://, FILE://, MAILTO://, GOPHER://, MMS://, etc. are not supported.
Link descriptions that include “/” characters do not copy the description correctly when you attempt to drag the URL and drop it on the table. The description that appears includes only those words following the “/”, and the “/” character is changed to a “-” character. As a workaround, you can manually retype the description or change the “/” to another character.
11.6 Checking in a URLCheck Knowledge ScriptThe Knowledge Script Check-In dialog box lets you check saved Knowledge Scripts in to the AppManager repository you specify. These URLCheck Knowledge Scripts are added to the Web-RT tab in the Knowledge Script pane by default. Access the Knowledge Script Check-In dialog box by clicking Check-In on the File menu.
Specify the Knowledge Script name, the name of the AppManager repository (QDB) server, and the name of the repository. Then select the authentication mode to use. You have the option to use either Windows or SQL authentication to access the repository.
Using URL Check Recorder 131
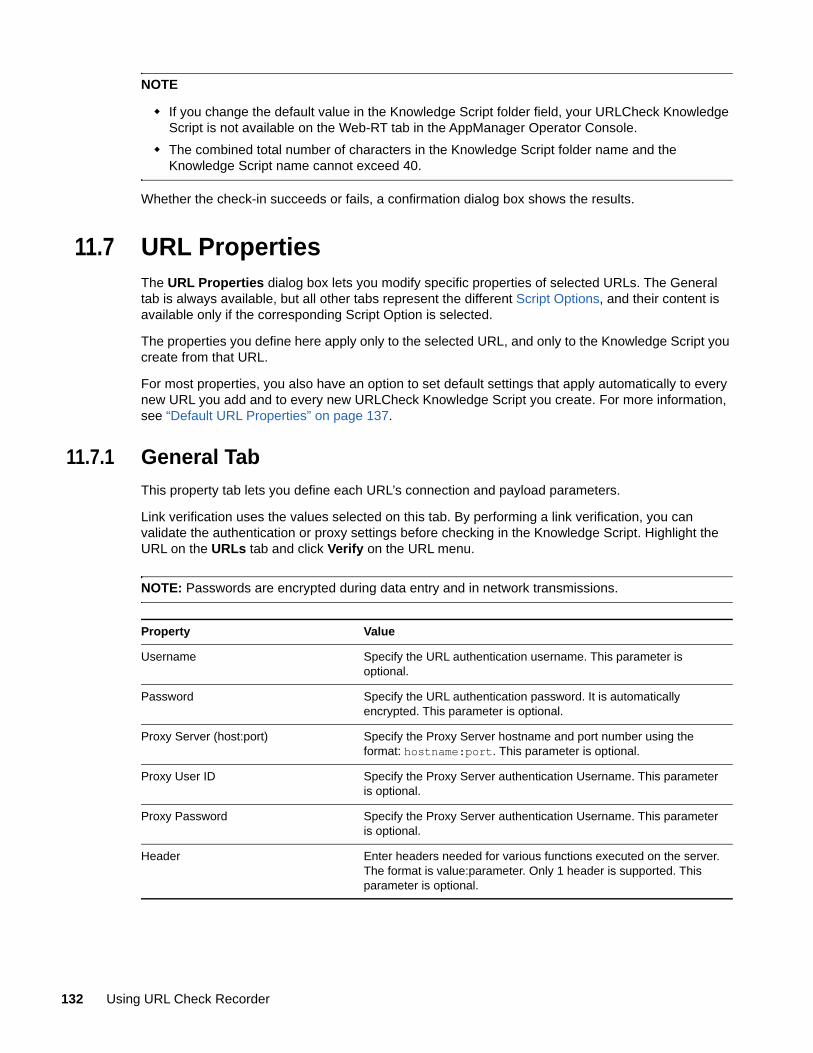
NOTE
If you change the default value in the Knowledge Script folder field, your URLCheck Knowledge Script is not available on the Web-RT tab in the AppManager Operator Console.
The combined total number of characters in the Knowledge Script folder name and the Knowledge Script name cannot exceed 40.
Whether the check-in succeeds or fails, a confirmation dialog box shows the results.
11.7 URL PropertiesThe URL Properties dialog box lets you modify specific properties of selected URLs. The General tab is always available, but all other tabs represent the different Script Options, and their content is available only if the corresponding Script Option is selected.
The properties you define here apply only to the selected URL, and only to the Knowledge Script you create from that URL.
For most properties, you also have an option to set default settings that apply automatically to every new URL you add and to every new URLCheck Knowledge Script you create. For more information, see “Default URL Properties” on page 137.
11.7.1 General Tab
This property tab lets you define each URL’s connection and payload parameters.
Link verification uses the values selected on this tab. By performing a link verification, you can validate the authentication or proxy settings before checking in the Knowledge Script. Highlight the URL on the URLs tab and click Verify on the URL menu.
NOTE: Passwords are encrypted during data entry and in network transmissions.
Property Value
Username Specify the URL authentication username. This parameter is optional.
Password Specify the URL authentication password. It is automatically encrypted. This parameter is optional.
Proxy Server (host:port) Specify the Proxy Server hostname and port number using the format: hostname:port. This parameter is optional.
Proxy User ID Specify the Proxy Server authentication Username. This parameter is optional.
Proxy Password Specify the Proxy Server authentication Username. This parameter is optional.
Header Enter headers needed for various functions executed on the server. The format is value:parameter. Only 1 header is supported. This parameter is optional.
132 Using URL Check Recorder
11.7.2 Availability Tab
This property tab lets you define each URL’s connection availability parameters. You can set the Knowledge Script to raise an event by when a URL is unavailable or to collect data on an individual URL.
11.7.3 Measure Connection Time Tab
This property tab lets you define a threshold for the amount of time it takes to connect to the Web page represented by a URL and download the first byte of information from it.
The “Measure connection time” properties are only enabled if the corresponding Script Options are selected.
Post Data Enter any additional data that is needed by the receiving page to properly process the request. This is the data following the "?" in an HTTP Get function. It is in the form of name/value pairs. The format is value1=parameter&value2=parameter2
This parameter is optional.
Uses header with redirections Select Yes to enable the passing of header information when this URL is redirected.The default is No.
Uses Post Data with redirections Select Yes to enable the passing of post data information when this URL is redirected. The default is No.
Property Value
Collect individual URL availability Set to Yes to collect data on the availability of individual URLs. Default is No. Results are reflected in any graphs and on the Graph Data tab.
Raise event on failure Set to Yes to raise an event when either the Internet connection or the loading of the base page fails. Default is Yes.
Availability = 0 if Validation in error or Search event criteria is met
Set to Yes to change Availability to 0 if the URL cannot be validated or if a specific text string is not found. Default is No.
Raise event on redirection Set to Yes to raise an event when a checked URL redirects to another URL or URLs. Default is No.
Number of duplicate redirections before considered looping
Specify the number of times a URL can be redirected to the same location before AppManager raises an event for looping. The default is 1 time.
Notes
If you set the value to 0, the first duplicate redirection generates a 499 failure. The URL appears once on the detail table.
You can set this value per URL and can modify the value from a running job.
If you keep receiving 499 failures, try increasing this value by 1 and running the job again.
Property Value
Using URL Check Recorder 133
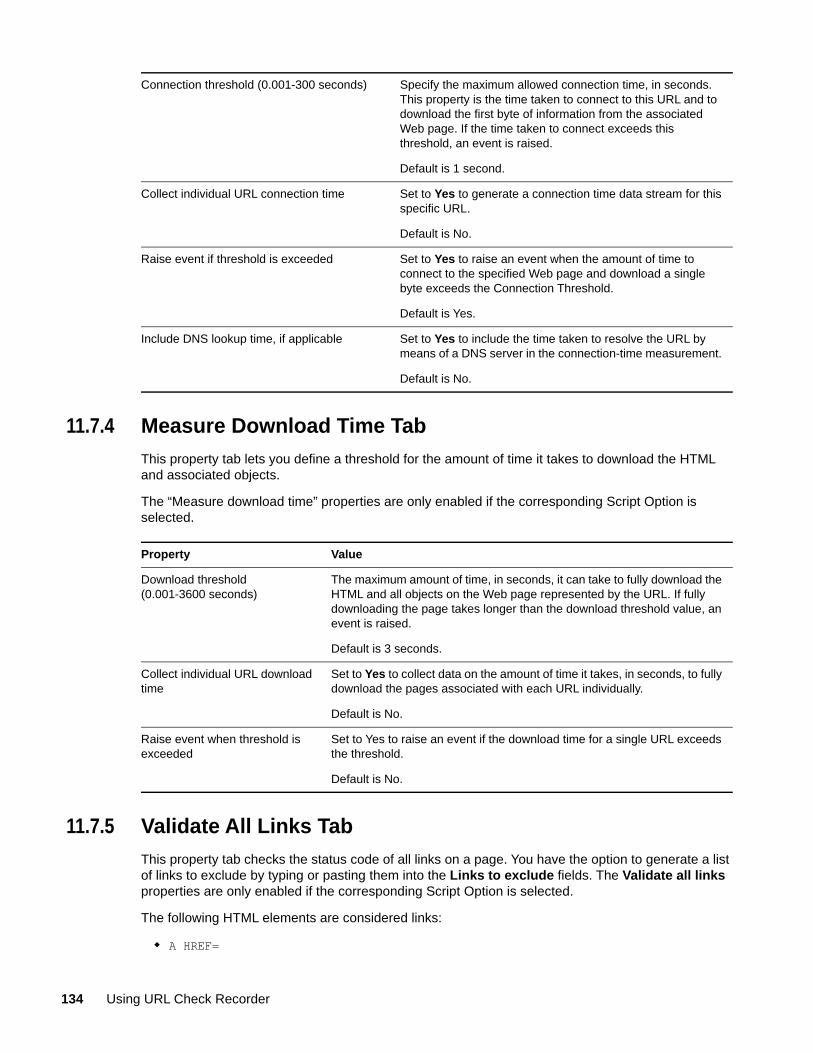
11.7.4 Measure Download Time Tab
This property tab lets you define a threshold for the amount of time it takes to download the HTML and associated objects.
The “Measure download time” properties are only enabled if the corresponding Script Option is selected.
11.7.5 Validate All Links Tab
This property tab checks the status code of all links on a page. You have the option to generate a list of links to exclude by typing or pasting them into the Links to exclude fields. The Validate all links properties are only enabled if the corresponding Script Option is selected.
The following HTML elements are considered links:
A HREF=
Connection threshold (0.001-300 seconds) Specify the maximum allowed connection time, in seconds. This property is the time taken to connect to this URL and to download the first byte of information from the associated Web page. If the time taken to connect exceeds this threshold, an event is raised.
Default is 1 second.
Collect individual URL connection time Set to Yes to generate a connection time data stream for this specific URL.
Default is No.
Raise event if threshold is exceeded Set to Yes to raise an event when the amount of time to connect to the specified Web page and download a single byte exceeds the Connection Threshold.
Default is Yes.
Include DNS lookup time, if applicable Set to Yes to include the time taken to resolve the URL by means of a DNS server in the connection-time measurement.
Default is No.
Property Value
Download threshold (0.001-3600 seconds)
The maximum amount of time, in seconds, it can take to fully download the HTML and all objects on the Web page represented by the URL. If fully downloading the page takes longer than the download threshold value, an event is raised.
Default is 3 seconds.
Collect individual URL download time
Set to Yes to collect data on the amount of time it takes, in seconds, to fully download the pages associated with each URL individually.
Default is No.
Raise event when threshold is exceeded
Set to Yes to raise an event if the download time for a single URL exceeds the threshold.
Default is No.
134 Using URL Check Recorder

LINK HREF=
AREA HREF=
FRAME SRC=
IFRAME SRC=
NOTE: Bookmarks are ignored during link validation. For example, the link <a href=mypage.htm#anchor1>click here</a> is treated as <a href=mypage.htm>click here</a>. If you try to validate any other links to mypage.htm in this example, including other bookmarks to that page, they are counted multiple times.
Only URLs that use HTTP:// or HTTPS:// are validated. URLs that start with FTP://, FILE://, MAILTO://, GOPHER://, MMS://, for example, are not supported.
11.7.6 Validate All Objects Tab
This property tab checks the status code of all objects on a page. The Validate all objects properties are only enabled if the corresponding Script Option is selected.
The following HTML elements are considered objects:
IMG SRC=
EMBED SRC=
BGSOUND SRC=
INPUT TYPE=IMAGE SRC=
SCRIPT SRC=
APPLET CODE= or CODEBASE=
Property Value
Raise event if any link validation is in error Set to Yes to raise an event if any one of the links checked by this Knowledge Script is in error. The event details list all links and their status.
Links are considered to be in error when they return HTTP status codes in the 400s or 500s, WinHTTP error codes (12xxxx), or Windows Sockets error codes (11xxxx).
Default is Yes.
For more information, see “Status Codes” on page 153.
Links to exclude A list of links to exclude from the validation. You can drag and drop or type up to 100 links in these fields.
Property Value
Raise event if any object validation in error
Links are considered to be in error when they return HTTP status codes in the 400s or 500s, WinHTTP error codes (12xxxx), or Windows Sockets error codes (11xxxx). Enable this property to raise an event if the link is in error. Events are enabled by default.
For more information, see “Status Codes” on page 153.
Using URL Check Recorder 135

11.7.7 Search Strings Tab
This property tab searches for specific strings on the display part of the page. The Search Strings properties are only enabled if the corresponding Script Option is selected. You can enter multiple strings and specify whether they are case-sensitive, but wildcard searches are not supported.
An event is raised if any of the strings are found or not found.
NOTE: The values in text boxes and select elements, such as VALUE= elements, are not found in text searches.
11.7.8 Search Links Tab
This property tab searches for specific links in the HTML. The following HTML elements are considered links:
A HREF=
LINK HREF=
AREA HREF=
FRAME SRC=
IFRAME SRC=
NOTE: Any relative paths that you enter, such as ../../tarheels.htm, probably are not found in the search. That is because all links are resolved to valid paths when searching commences.
The Search Links properties are only enabled if the corresponding Script Option is selected. You have the option to generate a list of links by typing them in or by using the copy/paste or drag-and-drop functions. Wildcard searches are not supported.
NOTE: Bookmarks are ignored during a search. For example, the link <a href=mypage.htm#anchor1>click here</a> is treated as <a href=mypage.htm>click here</a>.
11.7.9 Search Objects Tab
This property tab searches for specified objects in the HTML. The following HTML elements are considered objects:
IMG SRC=
EMBED SRC=
BGSOUND SRC=
INPUT TYPE=
IMAGE SRC=
SCRIPT SRC=
APPLET CODE= or CODEBASE=
136 Using URL Check Recorder
The Search objects properties are only enabled if the corresponding Script Option is selected. You can type in an object path directly, but the list does not support drag-and-drop. When you drag an object from Internet Explorer, it drags only the binary content of the object and not the path, so it is not possible to drag and drop a GIF reference, for example. The Objects table only supports a text reference drop. Wildcard searches are not supported.
11.7.10 Note Tab
This property tab lets you add explanatory text to a URL. The text you enter here does not appear in the Knowledge Script itself. However, each time the Knowledge Script is opened in URL Check Recorder, the text is available on this tab when the URL is highlighted and the URL Properties dialog box is accessed.
By default, the text on this tab reflects whether a particular URL has been included or excluded for purposes of verification. For more information, see “URLs Tab” on page 127.
11.8 Default URL PropertiesThe Default URL Properties dialog box lets you set specific properties of the URLs you import into URL Check Recorder. The properties you define apply to every URL you import, and also to every Knowledge Script you create using those URLs.
The properties available on the tabs described in the following sections are identical to those that are available in the URL Properties dialog box. However, when you enable or configure a URL property in the URL Properties dialog box, the setting applies only to a selected URL.
In addition, the URL default properties are not dependent on Script Options. More specifically, while the properties in the URL Properties dialog box are available only if the corresponding Script Options are selected, the corresponding URL default properties are always available.
To set a default property for your URLs, click the URLs tab. Then click Settings > Default URL Properties.
11.8.1 General Default Settings
This default property tab lets you define connection and payload parameters required for network security. These settings apply to each new URL you add to a Knowledge Script.
Link verification uses the values selected on this tab. By performing a link verification, you can validate the authentication or proxy settings before checking in the Knowledge Script. Highlight the URL on the URLs tab and click Verify on the URL menu.
NOTE: Passwords are encrypted during data entry and in network transmissions.
Property Value
Raise event if any object is: Specify whether to raise an event when the specified objects are all "Found" or "Not Found". The default is “Not Found”.
Objects Objects to search for. Specify a maximum of 100 objects.
Using URL Check Recorder 137

11.8.2 Default Availability Settings
This default Properties tab lets you define the default connection availability parameters for all URLs added to a Knowledge Script. You can set the Knowledge Script to raise an event by default when a URL is unavailable or to collect data on an individual URL by default.
11.8.3 Defaults for Measure Connection Time
This default property tab lets you define a default threshold for the amount of time it takes to connect to the Web page represented by a URL and download the first byte of information from it. You can also set the default Knowledge Script behavior for data collection, events, and the handling of DNS lookup time in the response-time measurement.
Property Value
Collect individual URL availability
Set to Yes to collect data on the availability of individual URLs. Default is No. Results are reflected in any graphs and on the Graph Data tab.
Raise event on failure Set to Yes to raise an event when either the Internet connection or the loading of the base page fails. Default is Yes.
Availability = 0 if Validation in error or Search event criteria is met
Set to Yes to change Availability to 0 if the URL cannot be validated or if a specific text string is not found.
Raise event on redirection Set to Yes to raise an event when a checked URL redirects to another URL or URLs.
Number of duplicate redirections before considered looping
Specify the number of times a URL can be redirected to the same location before AppManager raises an event for looping. The default is 1 time.
Notes
If you set the value to 0, the first duplicate redirection generates a 499 failure. The URL appears once on the detail table.
You can set this value per URL and can modify the value from a running job.
If you keep receiving 499 failures, try increasing this value by 1 and running the job again.
Property Value
Connection threshold (0.001-300 seconds)
Specify the maximum allowed connection time, in seconds. This property is the time taken to connect to a URL and to download the first byte of information from the associated Web page. If the time taken to connect exceeds this threshold, an event is raised.
Default is 1 second.
Collect individual URL connection time Set to Yes to generate a connection time data stream for each URL.
Default is No.
Raise event if threshold is exceeded Set to Yes to raise an event when the amount of time to connect to the specified Web page and download a single byte exceeds the Connection Threshold.
Default is Yes.
138 Using URL Check Recorder

11.8.4 Defaults for Measure Download Time
This property tab lets you define a default threshold for the amount of time it takes to download the HTML and associated objects. You can also specify whether to collect the download times of each page associated with this URL separately. These settings appear in every URLCheck Knowledge Script that you create in the future.
11.8.5 Defaults for Validate All Links
This default property tab enables or disables events raised when a URLCheck Knowledge Script checks the status codes of the links on a page.
The following HTML elements are considered links:
A HREF=
LINK HREF=
AREA HREF=
FRAME SRC=
IFRAME SRC=
Include DNS lookup time, if applicable Set to Yes to include the time taken to resolve the URL by means of a DNS server in the connection-time measurement.
Default is No.
Property Value
Download threshold (0.001-3600 seconds)
The maximum amount of time, in seconds, it can take to fully download the HTML and all objects on the Web page represented by the URL. If fully downloading the page takes longer than the download threshold value, an event is raised.
Default is 3 seconds.
Collect individual URL download time?
Set to Yes to collect data on the amount of time it takes, in seconds, to fully download the pages associated with each URL individually.
Default is No.
Raise event if threshold is exceeded?
Set to Yes to raise an event if the download time for a single URL exceeds the threshold.
Default is No.
Using URL Check Recorder 139

For more information, see “Validate All Links Tab” on page 134.
11.8.6 Defaults for Validate All Objects
This default property tab enables or disables events raised when a URLCheck Knowledge Script checks the status codes of the objects on a page.
The Validate All Objects default property sets the condition for an event. When the URLCheck job runs, it attempts to validate each object you specified on the Validate All Objects Tab of the URL Properties dialog box.
The following HTML elements are considered objects:
IMG SRC=
EMBED SRC=
BGSOUND SRC=
INPUT TYPE=IMAGE SRC=
SCRIPT SRC=
APPLET CODE= or CODEBASE=
By default, events are enabled.
Property Value
Raise event if any link validation is in error?
Select Yes or No to determine whether the Knowledge Script should raise an event if any one of the links it checks fails to validate.
Link validation failures are defined as links that return HTTP status codes in the 400s or 500s, WinHTTP error codes (12xxxx), or Windows Sockets error codes (11xxxx).
The default is Yes.
For more information, see “Status Codes” on page 153.
Property Value
Raise event if any object validation in error
Select Yes or No to determine whether the Knowledge Script should raise an event anytime an object fails to validate.
Object validation failures are defined as objects that return HTTP status codes in the 400s or 500s, WinHTTP error codes (12xxxx), or Windows Sockets error codes (11xxxx).
Events are enabled by default.
For more information, see “Status Codes” on page 153.
140 Using URL Check Recorder

11.8.7 Defaults for Search Strings
This default property tab enables or disables events raised when a URLCheck Knowledge Script searches for specific strings on the visible portion of a selected Web page.
The Search Strings default property sets the condition for an event. When the URLCheck job runs, it performs a search for a string you specified on the Search Strings Tab of the URL Properties dialog box. An event is raised if any string is found or not found by a URLCheck Knowledge Script.
11.8.8 Defaults for Search Links
This default property tab enables or disables events raised anytime a link is found or not found by a URLCheck Knowledge Script.
The following HTML elements are considered links:
A HREF=
LINK HREF=
AREA HREF=
FRAME SRC=
IFRAME SRC=
For more information, see “Search Links Tab” on page 136.
11.8.9 Defaults for Search Objects
This default property tab enables or disables events associated with specific objects in the HTML.
URL Check Recorder can be instructed to search for a list of objects on a particular Web page. An event can be raised anytime an object is found or not found by a URLCheck Knowledge Script.
The following HTML elements are considered objects:
IMG SRC=
EMBED SRC=
BGSOUND SRC=
Property Value
Raise event if any string is: Specify whether to raise an event when a string meets a selected condition. For any individual URL, you can set the Search Strings URL Property, which instructs URL Check Recorder to search for a particular string on the page.
The default is “Not Found”.
Property Value
Raise event if any link is: Specify whether to raise an event when a link meets a selected condition.
For any individual URL, you can set the Search Links URL Property, which instructs URL Check Recorder to search for a specific link on the page. Events can be raised anytime a link is found or not found.
The default is “Not Found”.
Using URL Check Recorder 141

INPUT TYPE=
IMAGE SRC=
SCRIPT SRC=
APPLET CODE= or CODEBASE=
For more information, see “Search Objects Tab” on page 136.
11.8.10 Default Note
This property tab does not have an applicable default setting and is therefore disabled. Refer to the topic explaining the Note Tab of the URL Properties dialog box for information about the Note property.
Property Value
Raise event if any object is:
Specify whether to raise an event when the specified objects are all "Found" or "Not Found". The default is “Not Found”.
Search Object Objects to search for. Specify a maximum of 100 objects.
142 Using URL Check Recorder
12 12URLCheck Results
URLCheck Knowledge Scripts raise events and collect data based on how you create them.
URL Check Recorder provides plenty of options to determine how a URLCheck Knowledge Script behaves. The parameters to raise events and collect data are present in a given URLCheck Knowledge Script based on how you configured Script Options on the Script Options Tab. You can then enable event and data-collection options for each URL that is being checked by a Knowledge Script via the URL Properties tabs.
In addition to the great variety of status codes and error messages you might see when you run a URLCheck Knowledge Script, the data and event details you can view in the AppManager Operator Console can be quite complex.
12.1 Script Options and ResultsThe Script Options you set on the URL Check Recorder Script Options tab determine what work the Knowledge Script performs when it runs and what data is collected. For example, if you selected the Measure connection time Script Option, the Knowledge Script job returns results if a connection to the Web server is successfully made.
When you select one or more of the Script Options to Measure download time, Validate all links, Validate all objects, or any of the Search options (strings, links or objects), additional processing occurs when the Knowledge Script runs. More specifically, the actual HTML page is rendered. The result of the rendering is noted in the event: the Rendering column indicates Success or Failure, or N/A if the URL failed verification or was redirected.
URLs that show a failure for “Rendering” do not have results for Measure download time, Validate all links, Validate all objects, or any search that was performed. Pages that fail to render may indicate a problem with the Web server.
If the page is successfully rendered, results are returned for the selected Script Options:
For Measure download time, results include the time taken to download the main page and all objects on that page, including objects in secondary frames.
For Validate all links and Validate all objects, the details returned include a listing of all links and/or objects on the page, the number of times each was found, and their corresponding status codes. This option can take the longest time to run.
WARNING: These results can be very copious if the page being validated has many links or objects, and they can consume a lot of room in the repository. We therefore recommend that you use either “Failure” or “None” as the setting for the Details to be saved with the Percent Available data point Knowledge Script parameter.
For the options to Search strings, Search links, and Search objects, the details returned list the search criteria that were set and the number of times each item was found. Data details also note whether the search criteria, either Found or Not Found, were met. If the search criteria were met, a red flag appears.
URLCheck Results 143

NOTE: When a Web page is rendered, this action does not include executing any scripting code that may be in the page. Therefore, if links, text, or objects are displayed by means of such code, they are not included in the validation or search, or in the Measure download time value.
12.2 URL Verification SummaryAnytime you verify a new URL or set of URLs, you have the option to generate a URL Verification Summary report. This report is disabled by default, but once enabled, it appears in your Web browser and summarizes the findings of the verification.
For the most part, the Verification Summary provides the same information as is shown on the URL Check Recorder URLs tab, but it adds the following information for tracking purposes:
Source: The name of the original Knowledge Script file, with .qml extension.
Generated: Date and time that the verification was performed.
Recorder version: The version of URL Check Recorder that ran the verification.
Computer name: Name of the computer where the verification ran.
To generate URL Verification Summary reports, you must first enable them in the Recorder Options dialog box. Then you simply run a URL verification.
To generate a URL Verification Summary report:
1 Open a URLCheck Knowledge Script in URL Check Recorder.
2 On the Script Options tab, select Check Link.
3 On the Settings menu, select Recorder Options. Select Generate URL Verification summary.
4 On the URLs tab, ensure at least one URL is enabled for verification. Excluded URLs are marked with the Exclude icon, a yellow minus sign.
5 On the URL menu, select Verify All. As soon as verification has completed, you see the URL Verification Summary in your browser window.
12.3 URL RedirectionYou can verify redirected URLs using URL Check Recorder directly or by using the URLCheck and CheckURL Knowledge Scripts. If you attempt to verify a Web page that has moved, URL Check Recorder or the Knowledge Script follows the redirection to the next page in the sequence. If that Web page also redirects users to a further URL, URL Check Recorder or the Knowledge Script continues through the sequence until it reaches the last valid URL.
If one or more redirected URLs are found, information on the URLs and all redirections are displayed, including the redirected URL addresses, status code, and status description, even if there are multiple redirections from the initial URL.
To gather redirection data on a single URL, open URL Check Recorder and enter the URL description and link. Enable URL Verification summary generation in the Recorder Options. Click URL > Verify All in the menu. The URL Verification summary displays information on all redirections URL Check Recorder was able to follow.
You can also view data for individual URLs by checking the Knowledge Script into the Control Center or Operator Console and running the URLCheck Knowledge Script as a job. Redirection data are displayed in the individual event details.
144 URLCheck Results

To view redirection data on verified URLs as a whole, check the Knowledge Script into the Control Center or Operator Console. Select the Knowledge Script, right-click, and select Properties. On the Values tab, expand Overall Availability and set Collect data (%)? to Yes. Set the Details to be saved with Overall URL Availability data point to All. Run the Knowledge Script as a job. Redirection data are displayed in the Percent Available Below Threshold event details and the Overall Availability data point details.
The following graphic is an example of how redirection data is displayed in the Overall Availability data point details:
NOTE: If redirection is delayed, it is not counted by the URLCheck Knowledge Script. In order to follow a redirection, a redirection status code must be sent back from the Web server at the first request.
12.4 URLCheck EventsWhen a URLCheck job runs, it raises events to indicate individual URL failures as well as “overall” events. If a URL fails, for example, and if you are running with the default Availability threshold of 100%, you see a URL Percent Available Below Threshold event.
The title of each event can be set in the Knowledge Script Options dialog box in URL Check Recorder. Event severities, on the other hand, are set using the Event Severity parameters in the Knowledge Script itself.
Depending on what Script Options were selected and which URL Properties were set, several different events may be raised by a single Knowledge Script. Here is an illustration of a set of URLs we used to create a URLCheck Knowledge Script:
URLCheck Results 145

The Event Detail message includes summary tables with results for all URL Properties that were enabled. Items in red indicate failures or event conditions that were met. Here is a portion of the Event Details associated with the URLs shown previously:
This overall event, URL Percent Available Below Threshold, reports that the attempt to connect to two URLs failed.
12.5 Individual and Overall EventsDepending on which URL Properties you set for each URL, you see events raised when individual URLs are not available or exceed connection or download thresholds. From many customers’ requests, only Percent Availability events and data points contain overall information. All other events are individual URL-related events. For each URL, a URLCheck or CheckURL job may raise a number of individual events.
The following events associated with individual URLs can be enabled or disabled via the URL Properties dialog box in URL Check Recorder:
URL Failed - Not Available
URL Connection Time exceeds threshold
URL Download Time exceeds threshold
Failure to validate links or objects. The Validate all links and Validate all events Script Options must be enabled to see these events. If these options are enabled and an attempted validation fails, an event is raised by default.
Failure to find text, links, or objects. The Search strings, Search links, and Search objects Script Options must be enabled to see these events. If these options are enabled and an attempt to find an item fails, an event is raised by default.
These individual events contain tables similar to the one shown in URLCheck Events, but the information included in those tables only applies to a single URL. Here is an example:
146 URLCheck Results

In this example, the connection time for a URL exceeded the threshold that was set in the URL Properties dialog box. Note that the “Percent Available” table does not appear in this event; it only applies to overall events.
12.6 Data Details in Events and Data PointsWhen you run a URLCheck Knowledge Script on a managed client, complete results may appear in the events and in the data details of the Percent Available data point. These data details can be configured so as to limit the amount of data stored in the repository. Options such as Validate all links and Validate all objects can return a great many results, as can Knowledge Scripts that include dozens of URLs. Therefore, by default, only Failure information is included in the events, and no data is included with the data point.
NOTE: By not limiting the data details, you can quickly fill up your repository, which can impact results collection for your entire AppManager system.
Data-collection options can be changed in the Knowledge Script via the following parameters:
Returning to the example cited in URLCheck Events, we recreated the event using a setting of “Failure” for the Details to be saved with Percent Available data point parameter. The data details in the Percent Available data point would only include the following:
Property Value
Details to be included in events Set to Failure to collect details only on failure events, or All to collect details for all results. The default is Failure.
Details to be saved with Percent Available data point
Set to Failure, Success, All, or None:
Failure: Only includes details for failure events or matched event criteria.
Success: Only includes successful results.
All: Includes details for all results.
None: Includes no data details.
The default is None.
URLCheck Results 147
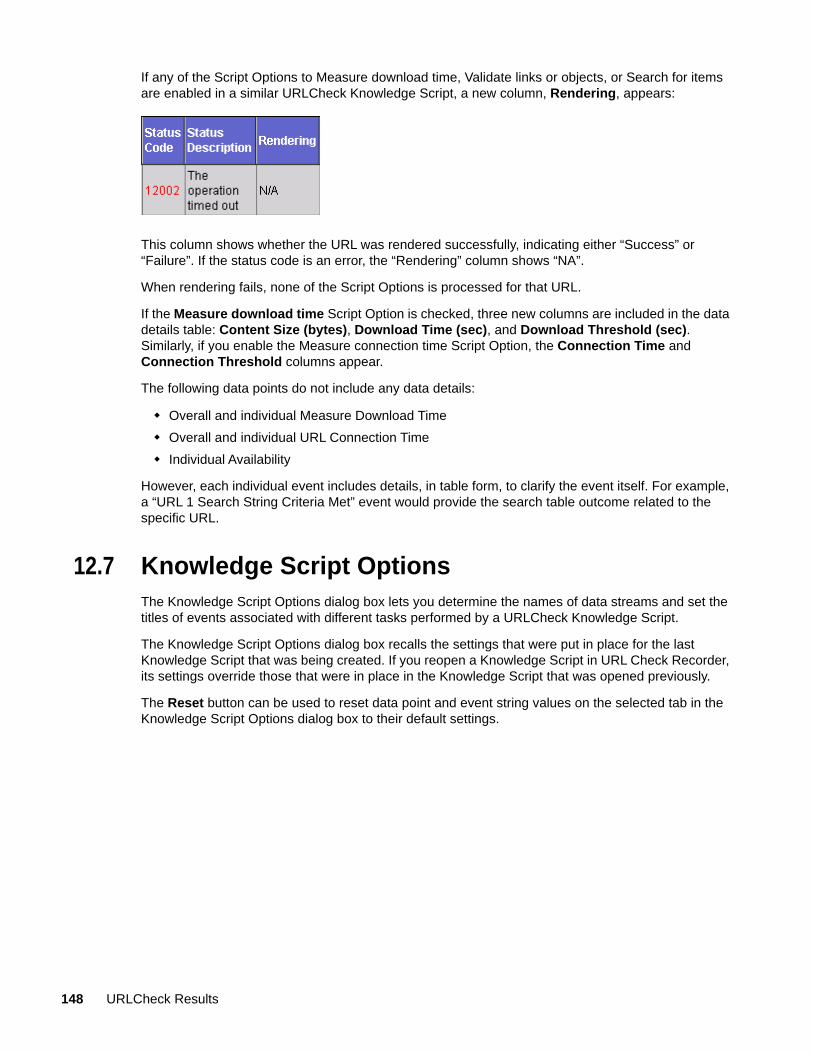
If any of the Script Options to Measure download time, Validate links or objects, or Search for items are enabled in a similar URLCheck Knowledge Script, a new column, Rendering, appears:
This column shows whether the URL was rendered successfully, indicating either “Success” or “Failure”. If the status code is an error, the “Rendering” column shows “NA”.
When rendering fails, none of the Script Options is processed for that URL.
If the Measure download time Script Option is checked, three new columns are included in the data details table: Content Size (bytes), Download Time (sec), and Download Threshold (sec). Similarly, if you enable the Measure connection time Script Option, the Connection Time and Connection Threshold columns appear.
The following data points do not include any data details:
Overall and individual Measure Download Time
Overall and individual URL Connection Time
Individual Availability
However, each individual event includes details, in table form, to clarify the event itself. For example, a “URL 1 Search String Criteria Met” event would provide the search table outcome related to the specific URL.
12.7 Knowledge Script OptionsThe Knowledge Script Options dialog box lets you determine the names of data streams and set the titles of events associated with different tasks performed by a URLCheck Knowledge Script.
The Knowledge Script Options dialog box recalls the settings that were put in place for the last Knowledge Script that was being created. If you reopen a Knowledge Script in URL Check Recorder, its settings override those that were in place in the Knowledge Script that was opened previously.
The Reset button can be used to reset data point and event string values on the selected tab in the Knowledge Script Options dialog box to their default settings.
148 URLCheck Results

12.7.1 Availability Knowledge Script Options
This tab contains options for assigning titles to events and data streams associated with the Availability Script Options on the Availability Tab. The associated data streams and events measure URL availability and alert you if a URL produces a failure status code.
Property Value
Overall Availability data stream legend
A legend for the data stream that measures “overall” URL availability, that is, a rollup of availability as a percentage of all URLs checked by this Knowledge Script.
Default is “Percent Available”.
URL Availability data stream legend A legend for the data stream that measures the availability status of a single URL. This field accepts the following substitution variables:
[x] -- Substitute the URL index. The index corresponds to the number assigned to the URL in the Line column of the URLs table.
[d] -- Substitute the URL description. The description corresponds to the value you entered in the Description column of the URLs table.
[L] -- Substitute the URL address being measured.
Default is “Availability for URL [x]: [d]”. The URL variable [L] is not included by default, but you can add the variable anywhere within the legend string.
NOTE: As a best practice, use URL index variables for Knowledge Scripts that monitor multiple URLs. The variables ensure event and data stream legends for each monitored URL are unique. If you remove URL indexes, it is recommended that you do so only for Knowledge Scripts that monitor a single URL.
Overall Availability below threshold event title
A title for the event raised when the percentage of available URLs, based on all URLs checked by a particular Knowledge Script, falls below the Minimum overall URL availability threshold you set.
Default is “Percent Available below Threshold.”
URLCheck Results 149

12.7.2 Measure Processing Time Knowledge Script Options
This tab contains options for assigning titles to events and data streams associated with the Measure Processing Time Script Option. The associated data streams and events measure the time it takes to process all operations on all URLs of the Knowledge Script.
URL Availability failure event title A title for the event raised when an individual URL returns a status code associated with link failure. For more information, see “Status Codes” on page 153.
This field accepts the following substitution variables:
[x] -- Substitute the URL index. The index corresponds to the number assigned to the URL in the Line column of the URLs table.
[d] -- Substitute the URL description. The description corresponds to the value you entered in the Description column of the URLs table.
[L] -- Substitute the URL address being measured.
Default is “URL [x] Failed: [d].” The URL variable [L] is not included by default, but you can add the variable anywhere within the legend string.
NOTE: As a best practice, use URL index variables for Knowledge Scripts that monitor multiple URLs. The variables ensure event and data stream legends for each monitored URL are unique. If you remove URL indexes, it is recommended that you do so only for Knowledge Scripts that monitor a single URL.
Redirection event title A title for the event raised when an individual URL redirects to one or more subsequent URLs.
This field accepts the following substitution variables:
[x] -- Substitute the URL index. The index corresponds to the number assigned to the URL in the Line column of the URLs table.
[d] -- Substitute the URL description. The description corresponds to the value you entered in the Description column of the URLs table.
Default is “URL [x] Redirected: [d].”
Property Value
Property Value
Processing Time data stream legend A legend for the data stream that measures the time it takes to process all URLs checked by this Knowledge Script.
Default is “Processing Time”.
Processing Time threshold exceeded event title
A title for the event raised when the processing time for the URLs checked by this Knowledge Script exceeds the value you set for the Threshold -- Maximum overall processing time parameter.
Default is “Processing Time Threshold exceeded”.
150 URLCheck Results

12.7.3 Measure Connection Time Knowledge Script Options
This tab contains options for assigning titles to events and data streams associated with the Script Option on the Measure Connection Time Tab. The associated data streams and events measure the time it takes for the Knowledge Script to connect to the URL and download the first byte of information, and alert you if a connection time threshold is exceeded.
12.7.4 Measure Download Time Knowledge Script Options
This tab contains options for assigning titles to events and data streams associated with the Measure Download Time Tab Script Option. The relevant data streams and events measure the time it takes for the Knowledge Script to download the HTML and associated objects, and alert you if the download time threshold is exceeded.
Property Value
Total of Connection Times data stream legend
A legend for the data stream that totals the connection times: the time it takes to connect to all the URLs checked by this Knowledge Script and download a single byte of information from each.
Default is “Total of Connection Times”.
URL Connection Time data stream legend
A legend for the data stream that measures the time it takes to connect to an individual URL and download a single byte of information from it. This field accepts the following substitution variables:
[x] -- Substitute the URL index. The index corresponds to the number assigned to the URL in the Line column of the URLs table.
[d] -- Substitute the URL description. The description corresponds to the value you entered in the Description column of the URLs table.
Default is “Connection Time for URL [x]: [d]”.
NOTE: As a best practice, use URL index variables for Knowledge Scripts that monitor multiple URLs. The variables ensure event and data stream legends for each monitored URL are unique. If you remove URL indexes, it is recommended that you do so only for Knowledge Scripts that monitor a single URL.
URL Connection Time threshold exceeded event title
A title for the event raised when the connection time for a single URL exceeds the value you set for the URL connection timeout parameter. This field accepts the following substitution variables:
[x] -- Substitute the URL index. The index corresponds to the number assigned to the URL in the Line column of the URLs table.
[d] -- Substitute the URL description. The description corresponds to the value you entered in the Description column of the URLs table.
Default is “URL [x] Connection Time threshold exceeded: [d]”.
Property Value
URLCheck Results 151

12.7.5 Validate All Links Knowledge Script Option
This tab contains options for assigning a title to the event associated with the Validate All Links Tab Script Option. The associated event alerts you if a link fails to validate.
12.7.6 Validate All Objects Knowledge Script Option
This tab contains options for assigning a title to the event associated with the Validate All Objects Tab Script Option. The associated event alerts you if an object fails to validate.
Total of Download Times data stream legend
A legend for the data stream that totals the download times: the time it takes to fully download all the Web pages checked by this Knowledge Script, including the HTML and all objects.
Default is “Total of Download Times”.
URL Download Time data stream legend
A legend for the data stream that measures the time it takes to fully download an individual Web page, including the HTML and all objects. This field accepts the following substitution variables:
[x] -- Substitute the URL index. The index corresponds to the number assigned to the URL in the Line column of the URLs table.
[d] -- Substitute the URL description. The description corresponds to the value you entered in the Description column of the URLs table.
Default is “Download Time for URL [x]: [d]”.
NOTE: As a best practice, use URL index variables for Knowledge Scripts that monitor multiple URLs. The variables ensure event and data stream legends for each monitored URL are unique. If you remove URL indexes, it is recommended that you do so only for Knowledge Scripts that monitor a single URL.
URL Download Time threshold exceeded event title
A title for the event raised when the download time for a single URL exceeds the value you set for the URL download timeout parameter. This field accepts the following substitution variables:
[x] -- Substitute the URL index. The index corresponds to the number assigned to the URL in the Line column of the URLs table.
[d] -- Substitute the URL description. The description corresponds to the value you entered in the Description column of the URLs table.
Default is “URL [x] Download Time threshold exceeded: [d]”.
Property Value
Validate link failure event title A title for the event raised when a link fails to validate.
Default is “Validate Link Failure”.
Property Value
Validate Objects failure event title A title for the event raised when a link fails to validate.
Default is Validate Object Failure.
152 URLCheck Results

12.7.7 Search Strings Knowledge Script Option
This tab contains options for assigning a title to the event associated with the Search Strings Tab Script Option. The associated event alerts you if a matching string was found on a page.
12.7.8 Search Links Knowledge Script Option
This tab contains options for assigning a title to the failure event associated with the Search Links Tab Script Option. The associated event alerts you if a matching link was not found on a page.
12.7.9 Search Objects Knowledge Script Option
This tab contains options for assigning a title to the failure event associated with the Search Objects Tab Script Option. The associated event alerts you if a matching object was not found on a page.
12.8 Status CodesThree types of codes may be returned to indicate the status of the operation.
12.8.1 HTTP Status Codes
HTTP status codes are as follows. For more information about HTTP Status codes, see http://msdn2.microsoft.com/en-us/library/Aa384325.aspx.
Property Value
Search Strings event title A title for the event raised when any specified search string’s values are met.
Default is “Search String Criteria Met”.
Property Value
Search Links event title The title of the event raised when the specified links are all found.
The default is “Search Link Criteria Met”.
Property Value
Search Objects event title The title of the event raised when the specified objects are all met.
The default is “Search Object Criteria Met”.
Code Description
100--Continue The request can be continued.
101--Switching Protocols The server has switched protocols in an upgrade header.
200--OK The request completed successfully.
201--Created The request has been fulfilled and resulted in the creation of a new resource.
URLCheck Results 153

202--Accepted The request has been accepted for processing, but the processing has not been completed.
203--Non-Authoritative or Partial Information
The returned meta information in the entity-header is not the definitive set available from the origin server.
204--No Content The server has fulfilled the request, but there is no new information to send back.
205--Reset Content The request has been completed, and the client program should reset the document view that caused the request to be sent to allow the user to easily initiate another input action.
206--Partial Content The server has fulfilled the partial GET request for the resource.
300--Ambiguous The server couldn't decide what to return.
301--Moved Permanently The requested resource has been assigned to a new permanent URI (Uniform Resource Identifier), and any future references to this resource should be done using one of the returned URIs.
302--Redirect The requested resource resides temporarily under a different URI (Uniform Resource Identifier).
303--Redirect Method The response to the request can be found under a different URI (Uniform Resource Identifier) and should be retrieved using a GET HTTP verb on that resource.
304--Not Modified The requested resource has not been modified.
305--Use Proxy The requested resource must be accessed through the proxy given by the location field.
307--Temporary Redirect The redirected request keeps the same HTTP verb. HTTP/1.1 behavior.
400--Bad Request The request could not be processed by the server due to invalid syntax.
401--Unauthorized The requested resource requires user authentication.
402--Payment Required Not currently implemented in the HTTP protocol.
403--Forbidden The server understood the request, but is refusing to fulfill it.
404--Not Found The server has not found anything matching the requested URI.
405--Bad Method The HTTP verb used is not allowed.
406--Not Acceptable No responses acceptable to the client were found.
407--Authentication Required Proxy authentication required.
408--Request Timeout The server timed out waiting for the request.
409--Conflict The request could not be completed due to a conflict with the current state of the resource. The user should resubmit with more information.
410--Gone The requested resource is no longer available at the server, and no forwarding address is known.
411--Length Required The server refuses to accept the request without a defined content length.
412--Precondition Failed The precondition given in one or more of the request header fields evaluated to false when it was tested on the server.
413--Request too Large The server is refusing to process a request because the request entity is larger than the server is willing or able to process.
154 URLCheck Results

12.8.2 WinInet and WinHTTP Error Codes
WinINet error codes are as follows. For more information about WinINet error codes, see http://msdn2.microsoft.com/en-us/library/Aa233093.aspx.
414--URI too Long The server is refusing to service the request because the request URI (Uniform Resource Identifier) is longer than the server is willing to interpret.
415--Unsupported Media The server is refusing to service the request because the entity of the request is in a format not supported by the requested resource for the requested method.
449--Retry with The request should be retried after doing the appropriate action.
500--Server Error The server encountered an unexpected condition that prevented it from fulfilling the request.
501--Not Supported The server does not support the functionality required to fulfill the request.
502--Bad Gateway The server, while acting as a gateway or proxy, received an invalid response from the upstream server it accessed in attempting to fulfill the request.
503--Service Unavailable The service is temporarily overloaded.
504--Gateway Timeout The request was timed out waiting for a gateway.
505--Version not Supported The server does not support, or refuses to support, the HTTP protocol version that was used in the request message.
Code Description
12001 ERROR_INTERNET_OUT_OF_HANDLES
No more handles could be generated at this time.
12002 ERROR_INTERNET_TIMEOUT
The request has timed out.
12003 ERROR_INTERNET_EXTENDED_ERROR
An extended error was returned from the server. This is typically a string or buffer containing a verbose error message. Call InternetGetLastResponseInfo to retrieve the error text.
12004 ERROR_INTERNET_INTERNAL_ERROR
An internal error has occurred.
12005 ERROR_INTERNET_INVALID_URL
The URL is invalid.
12006 ERROR_INTERNET_UNRECOGNIZED_SCHEME
The URL scheme could not be recognized or is not supported.
12007 ERROR_INTERNET_NAME_NOT_RESOLVED
The server name could not be resolved.
12008 ERROR_INTERNET_PROTOCOL_NOT_FOUND
The requested protocol could not be located.
URLCheck Results 155

12009 ERROR_INTERNET_INVALID_OPTION
A request to InternetQueryOption or InternetSetOption specified an invalid option value.
12010 ERROR_INTERNET_BAD_OPTION_LENGTH
The length of an option supplied to InternetQueryOption or InternetSetOption is incorrect for the type of option specified.
12011 ERROR_INTERNET_OPTION_NOT_SETTABLE
The request option cannot be set, only queried.
12012 12012 ERROR_INTERNET_SHUTDOWN
The Win32 Internet function support is being shut down or unloaded.
12013 ERROR_INTERNET_INCORRECT_USER_NAME
The request to connect and log on to an FTP server could not be completed because the supplied user name is incorrect.
12014 ERROR_INTERNET_INCORRECT_PASSWORD
The request to connect and log on to an FTP server could not be completed because the supplied password is incorrect.
12015 ERROR_INTERNET_LOGIN_FAILURE
The request to connect to and log on to an FTP server failed.
12016 ERROR_INTERNET_INVALID_OPERATION
The requested operation is invalid.
12017 ERROR_INTERNET_OPERATION_CANCELLED
The operation was canceled, usually because the handle on which the request was operating was closed before the operation completed.
12018 ERROR_INTERNET_INCORRECT_HANDLE_TYPE
The type of handle supplied is incorrect for this operation.
12019 ERROR_INTERNET_INCORRECT_HANDLE_STATE
The requested operation cannot be carried out because the handle supplied is not in the correct state.
12020 ERROR_INTERNET_NOT_PROXY_REQUEST
The request cannot be made via a proxy.
12021 ERROR_INTERNET_REGISTRY_VALUE_NOT_FOUND
A required registry value could not be located.
12022 ERROR_INTERNET_BAD_REGISTRY_PARAMETER
A required registry value was located but is an incorrect type or has an invalid value.
12023 ERROR_INTERNET_NO_DIRECT_ACCESS
Direct network access cannot be made at this time.
12024 ERROR_INTERNET_NO_CONTEXT
An asynchronous request could not be made because a zero context value was supplied.
156 URLCheck Results
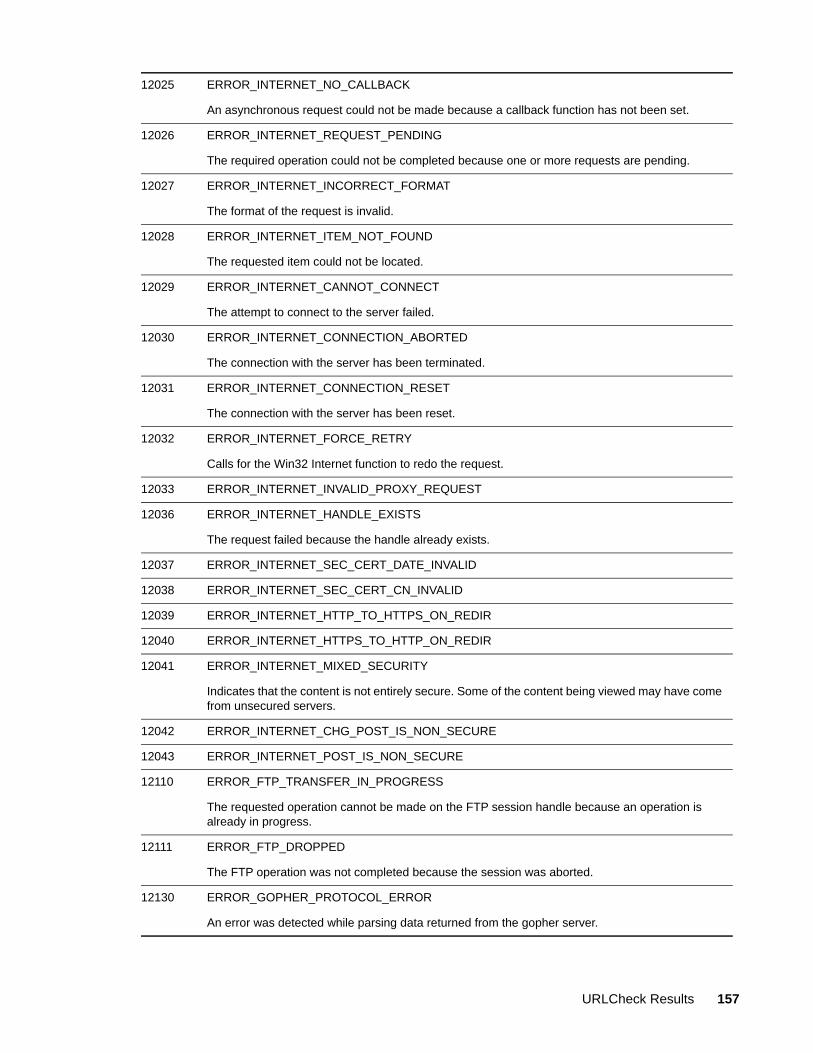
12025 ERROR_INTERNET_NO_CALLBACK
An asynchronous request could not be made because a callback function has not been set.
12026 ERROR_INTERNET_REQUEST_PENDING
The required operation could not be completed because one or more requests are pending.
12027 ERROR_INTERNET_INCORRECT_FORMAT
The format of the request is invalid.
12028 ERROR_INTERNET_ITEM_NOT_FOUND
The requested item could not be located.
12029 ERROR_INTERNET_CANNOT_CONNECT
The attempt to connect to the server failed.
12030 ERROR_INTERNET_CONNECTION_ABORTED
The connection with the server has been terminated.
12031 ERROR_INTERNET_CONNECTION_RESET
The connection with the server has been reset.
12032 ERROR_INTERNET_FORCE_RETRY
Calls for the Win32 Internet function to redo the request.
12033 ERROR_INTERNET_INVALID_PROXY_REQUEST
12036 ERROR_INTERNET_HANDLE_EXISTS
The request failed because the handle already exists.
12037 ERROR_INTERNET_SEC_CERT_DATE_INVALID
12038 ERROR_INTERNET_SEC_CERT_CN_INVALID
12039 ERROR_INTERNET_HTTP_TO_HTTPS_ON_REDIR
12040 ERROR_INTERNET_HTTPS_TO_HTTP_ON_REDIR
12041 ERROR_INTERNET_MIXED_SECURITY
Indicates that the content is not entirely secure. Some of the content being viewed may have come from unsecured servers.
12042 ERROR_INTERNET_CHG_POST_IS_NON_SECURE
12043 ERROR_INTERNET_POST_IS_NON_SECURE
12110 ERROR_FTP_TRANSFER_IN_PROGRESS
The requested operation cannot be made on the FTP session handle because an operation is already in progress.
12111 ERROR_FTP_DROPPED
The FTP operation was not completed because the session was aborted.
12130 ERROR_GOPHER_PROTOCOL_ERROR
An error was detected while parsing data returned from the gopher server.
URLCheck Results 157
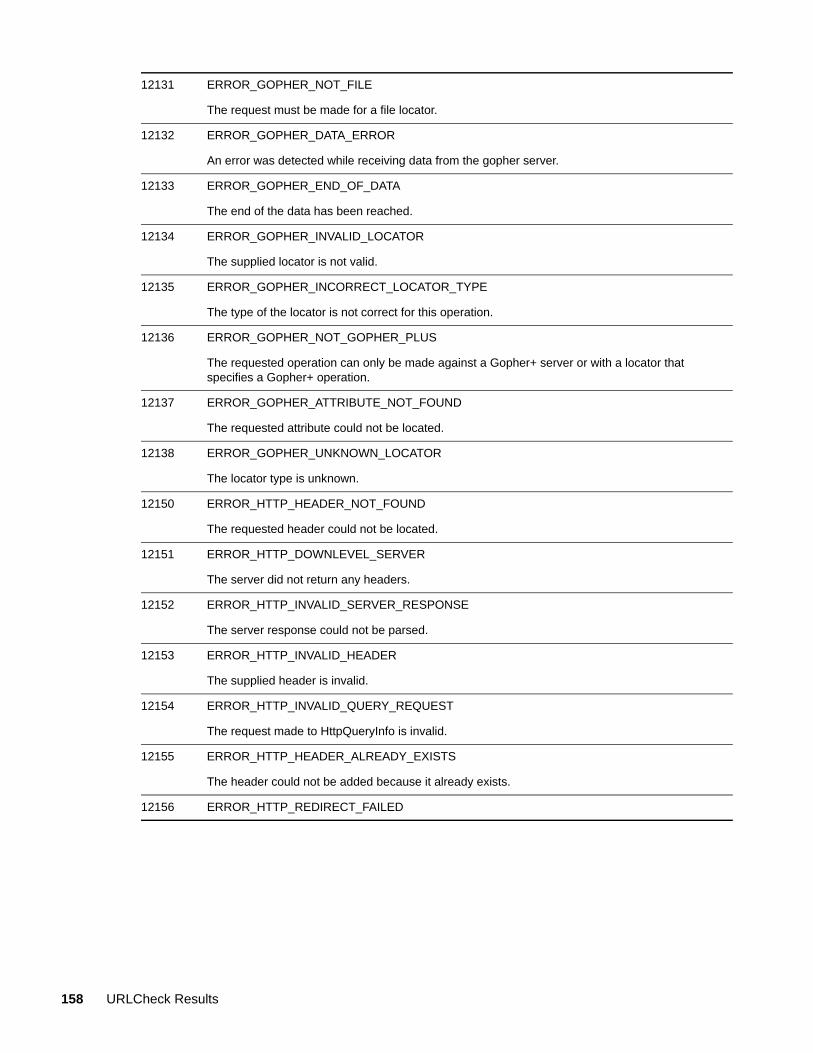
12131 ERROR_GOPHER_NOT_FILE
The request must be made for a file locator.
12132 ERROR_GOPHER_DATA_ERROR
An error was detected while receiving data from the gopher server.
12133 ERROR_GOPHER_END_OF_DATA
The end of the data has been reached.
12134 ERROR_GOPHER_INVALID_LOCATOR
The supplied locator is not valid.
12135 ERROR_GOPHER_INCORRECT_LOCATOR_TYPE
The type of the locator is not correct for this operation.
12136 ERROR_GOPHER_NOT_GOPHER_PLUS
The requested operation can only be made against a Gopher+ server or with a locator that specifies a Gopher+ operation.
12137 ERROR_GOPHER_ATTRIBUTE_NOT_FOUND
The requested attribute could not be located.
12138 ERROR_GOPHER_UNKNOWN_LOCATOR
The locator type is unknown.
12150 ERROR_HTTP_HEADER_NOT_FOUND
The requested header could not be located.
12151 ERROR_HTTP_DOWNLEVEL_SERVER
The server did not return any headers.
12152 ERROR_HTTP_INVALID_SERVER_RESPONSE
The server response could not be parsed.
12153 ERROR_HTTP_INVALID_HEADER
The supplied header is invalid.
12154 ERROR_HTTP_INVALID_QUERY_REQUEST
The request made to HttpQueryInfo is invalid.
12155 ERROR_HTTP_HEADER_ALREADY_EXISTS
The header could not be added because it already exists.
12156 ERROR_HTTP_REDIRECT_FAILED
158 URLCheck Results

WinHTTP error codes are as follows. For more information about WinHTTP error messages, see http://msdn2.microsoft.com/en-us/library/Aa383770.aspx.
Code Description
12044 ERROR_WINHTTP_CLIENT_AUTH_CERT_NEEDED
The server requests client authentication.
12045 ERROR_WINHTTP_SECURE_INVALID_CA
Indicates that a certificate chain was processed but terminated in a root certificate that is not trusted by the trust provider.
12057 ERROR_WINHTTP_SECURE_CERT_REV_FAILED
Indicates that revocation could not be checked because the revocation server was offline.
12157 ERROR_WINHTTP_SECURE_CHANNEL_ERROR
Indicates that an error occurred having to do with a secure channel.
12166 ERROR_WINHTTP_BAD_AUTO_PROXY_SCRIPT
An error occurred executing the script code in the Proxy Auto-Configuration (PAC) file.
12167 ERROR_WINHTTP_UNABLE_TO_DOWNLOAD_SCRIPT
The PAC file could not be downloaded. For example, the server referenced by the PAC URL may not have been reachable, or the server returned a 404 NOT FOUND response.
12169 ERROR_WINHTTP_SECURE_INVALID_CERT
Indicates that a certificate is invalid.
12170 ERROR_WINHTTP_SECURE_CERT_REVOKED
Indicates that a certificate has been revoked.
12179 ERROR_WINHTTP_SECURE_CERT_WRONG_USAGE
Indicates that a certificate is not valid for the requested usage.
12181 ERROR_WINHTTP_HEADER_COUNT_EXCEEDED
A larger number of headers were present in a response than WinHTTP could receive.
12182 ERROR_WINHTTP_HEADER_SIZE_OVERFLOW
The size of headers received exceeds the limit for the request handle.
12183 ERROR_WINHTTP_CHUNKED_ENCODING_HEADER_SIZE_ OVERFLOW
An overflow condition is encountered in the course of parsing chunked encoding.
12184 ERROR_WINHTTP_RESPONSE_DRAIN_OVERFLOW
Returned when an incoming response exceeds an internal WinHTTP size limit.
URLCheck Results 159

12.8.3 Windows Sockets Error Codes
Following are error codes generated by Windows Sockets (WinSock 2), which is used to make the initial connection to the Web server. These errors normally indicate a problem connecting to the Web server. For more information about Windows Sockets error codes, see http://msdn2.microsoft.com/en-us/library/ms740668.aspx.
12185 ERROR_WINHTTP_PROXY_AUTH_REQUIRED
Returned on Windows Server 2003 family if an HTTP status code of 407 is returned, which indicates that proxy authentication is required. This error was added to handle the case where the client is trying to establish an SSL connection to a target server via a proxy server, but the proxy server requires authentication.
This error is not returned on Windows XP SP1 and Windows 2000 SP3, which leaves the client unaware that the SSL connection failed. In this case, a subsequent call fails with an INCORRECT_HANDLE_STATE error.
Code Description
Code Description
WSAEINTR--10004 Interrupted function call.
WSAEACCES--10013 Permission denied.
WSAEFAULT--10014 Bad address.
WSAEINVAL--10022 Invalid argument.
WSAEMFILE--10024 Too many open files.
WSAEWOULDBLOCK--10035 Resource temporarily unavailable.
WSAEINPROGRESS--10036 Operation now in progress.
WSAEALREADY--10037 Operation already in progress.
WSAENOTSOCK--10038 Socket operation on nonsocket.
WSAEDESTADDRREQ--10039 Destination address required.
WSAEMSGSIZE--10040 Message too long.
WSAEPROTOTYPE--10041 Protocol wrong type for socket.
WSAENOPROTOOPT--10042 Bad protocol option.
WSAEPROTONOSUPPORT--10043 Protocol not supported.
WSAESOCKTNOSUPPORT--10044 Socket type not supported.
WSAEOPNOTSUPP--10045 Operation not supported.
WSAEPFNOSUPPORT--10046 Protocol family not supported.
WSAEAFNOSUPPORT--10047 Address family not supported by protocol family.
WSAEADDRINUSE--10048 Address already in use.
WSAEADDRNOTAVAIL--10049 Cannot assign requested address.
WSAENETDOWN--10050 Network is down.
160 URLCheck Results

WSAENETUNREACH--10051 Network is unreachable.
WSAENETRESET--10052 Network dropped connection on reset.
WSAECONNABORTED--10053 Software caused connection abort.
WSAECONNRESET--10054 Connection reset by peer.
WSAENOBUFS--10055 No buffer space available.
WSAEISCONN--10056 Socket is already connected.
WSAENOTCONN--10057 Socket is not connected.
WSAESHUTDOWN--10058 Cannot send after socket shutdown.
WSAETIMEDOUT--10060 Connection timed out.
WSAECONNREFUSED--10061 Connection refused.
WSAEHOSTDOWN--10064 Host is down.
WSAEHOSTUNREACH--10065 No route to host.
WSAEPROCLIM--10067 Too many processes.
WSASYSNOTREADY--10091 Network subsystem is unavailable.
WSAVERNOTSUPPORTED--10092 Winsock.dll version out of range.
WSANOTINITIALISED--10093 Successful WSAStartup not yet performed.
WSAEDISCON--10101 Graceful shutdown in progress.
WSATYPE_NOT_FOUND--10109 Class type not found.
WSAHOST_NOT_FOUND--11001 Host not found.
WSATRY_AGAIN--11002 Nonauthoritative host not found.
WSANO_RECOVERY--11003 This is a nonrecoverable error.
WSANO_DATA--11004 Valid name, no data record of requested type.
URLCheck Results 161

162 URLCheck Results

13 13Web-RT Knowledge Scripts
The Web-RT category provides the following Knowledge Scripts for monitoring Web sites using AppManager ResponseTime for Web.
If you choose to collect data, each Knowledge Script generates the following data streams:
Availability. The availability data point is always one of the following values:
1 or 100 = the test was successful
0 = the test was not successful
The Availability data point is an indication of whether the response-time test succeeded or failed. If, for example, a connection to the server was established but the test message could not be sent, the Availability data point is 0, which indicates not available or not successful.
Response time. You have two options for collecting response-time data:
Overall response time. The information returned by this data stream is also saved with the data point, and can be viewed by double-clicking the data point in the Graph Pane or Chart Console.
Response-time Breakdown. If enabled as separate parameters, you can also collect up to 5 response-time breakdown data streams. These data streams are individual data points for the different parts of the Knowledge Script transaction that are timed.
From the Knowledge Script view of the Control Center Console, you can access more information about any Knowledge Script by selecting it and pressing F1. In the Operator Console, click any Knowledge Script in the Knowledge Script pane and press F1.
Knowledge Script What It Does
CheckURL Monitors availability and performance of a single URL, including validating and searching for text, links, and objects. This Knowledge Script is generated from the URL Check Recorder extension.
FTP Monitors the availability of an FTP site, and verifies that a specified file can be downloaded from the site.
NNTPConnect Monitors the availability of an NNTP server.
ReceiveInternetMail Monitors availability and response time to receive an Internet mail message using the POP3 protocol.
Report_Web-RT_Mail Generates a report of response time and availability for the Web-RT InternetMail Knowledge Scripts.
Report_Web-RT_Steps Generates a report of response time and availability for the steps in WebTransaction Knowledge Scripts.
Report_Web-RT_URLCheck Generates a report of percent availability for URL Check Recorder Knowledge Scripts.
Report_Web-RT_Web Generates a report of response time and availability for the WebTransaction Knowledge Scripts.
Web-RT Knowledge Scripts 163

13.1 AppManager ResponseTime for Web Version CompatibilityKnowledge Scripts from versions of AppManager ResponseTime for Web earlier than version 6.4 are not supported. New Knowledge Scripts that you create with AppManager ResponseTime for Web 7.x are not backward-compatible and cannot run on older modules.
When you upgrade your version of AppManager ResponseTime for Web, also upgrade all of your managed clients so that they are all at the same level. You must re-record or recreate any Knowledge Scripts you created with versions of Web Recorder older than 2.2 after you install the newer version. You must upgrade all other backlevel Knowledge Scripts. You can do this by opening them in the new recorder, saving them, and checking them back in. Backlevel Knowledge Scripts are not supported unless you upgrade them.
The following table provides a more detailed explanation of version compatibility:
SendAndReceiveInternetMail Monitors availability and the response time taken to send and receive an Internet mail message using POP3 and SMTP protocols.
SendInternetMail Monitors availability and the response time taken to send an Internet mail message using the SMTP protocol.
SMTPConnect Monitors the availability of an SMTP server.
TakeDesktopOwnership Reassigns control of the desktop on the managed client to AppManager ResponseTime for Web.
URLCheck Monitors availability and performance of URLs, including validating and searching for text, links, and objects. This Knowledge Script is generated from the URL Check Recorder extension.
WebTransaction Monitors availability and response time for Web transactions. This Knowledge Script is generated from the Web Recorder extension.
Knowledge Script What It Does
Versions of AppManager ResponseTime for Web and Extensions
Description and Compatibility
ResponseTime for Web 1.2
(shipped with AppManager v5.0.1)
Knowledge Scripts from AppManager for WebServices (WebServices Knowledge Script category) were still supported.
ResponseTime for Web 2.0
(Web-download package)
URL Check Recorder extension replaces WebServices Knowledge Scripts.
WebServices and WebTransaction Knowledge Scripts were still supported.
ResponseTime for Web 2.1
(Web-download package)
URL Check Recorder added support for WinHTTP.
WebServices and WebTransaction Knowledge Scripts still supported.
164 Web-RT Knowledge Scripts

ResponseTime for Web 2.2
(Web-download package; shipped with AppManager 6.0)
Major upgrade of Web Recorder.
WebTransaction Knowledge Scripts not backward-compatible.
WebServices and older WebTransaction Knowledge Scripts no longer supported.
ResponseTime for Web 6.2
(Web-download package, and shipped as an additional installation for AppManager 6.0.2)
Major upgrade of Web Recorder.
New WebTransaction Knowledge Scripts not backward-compatible.
Older Knowledge Scripts (v2.2 and later) continue to run.
Minor upgrade of URL Check Recorder.
New URLCheck Knowledge Scripts not backward-compatible.
Older Knowledge Scripts (v2.2 and later) continue to run.
ResponseTime for Web 6.3
(Web-download package)
Minor upgrade of Web Recorder.
New WebTransaction Knowledge Scripts not backward-compatible.
Older Knowledge Scripts (v2.2 and later) continue to run.
Major upgrade of URL Check Recorder.
New URLCheck Knowledge Scripts not backward-compatible.
Older Knowledge Scripts (v2.2 and later) continue to run.
Versions of AppManager ResponseTime for Web and Extensions
Description and Compatibility
Web-RT Knowledge Scripts 165

ResponseTime for Web 6.4
(Web-download package)
Upgrade of all Knowledge Scripts.
FTP, InternetMail, NNTPConnect, and SMTPConnect Knowledge Scripts not backward-compatible.
Older Knowledge Scripts (v2.2 and later) continue to run.
Major upgrade of Web Recorder.
New WebTransaction Knowledge Scripts not backward-compatible.
Older Knowledge Scripts (v6.2 and later) continue to run.
WebTransaction Knowledge Scripts v2.2 and earlier must be re-recorded.
Major upgrade of URL Check Recorder.
New URLCheck Knowledge Scripts not backward-compatible.
Older Knowledge Scripts (v2.2 and later) continue to run.
ResponseTime for Web 7.0
(Shipped with AppManager version 7.0)
Upgrade of all Knowledge Scripts.
FTP, InternetMail, NNTPConnect, and SMTPConnect Knowledge Scripts not backward-compatible in general.
Older Knowledge Scripts (v6.2 and earlier) are no longer supported.
Minor upgrade of Web Recorder.
New WebTransaction Knowledge Scripts not backward-compatible in general.
Older Knowledge Scripts (v6.2 and earlier) are no longer supported.
All backlevel WebTransaction Knowledge Scripts (v6.2 and earlier) must be upgraded or re-recorded.
Minor upgrade of URL Check Recorder.
New URLCheck Knowledge Scripts not backward-compatible.
Older Knowledge Scripts (v6.2 and earlier) are no longer supported.
All backlevel URLCheck Knowledge Scripts (v6.2 and earlier) must be upgraded or re-recorded.
Versions of AppManager ResponseTime for Web and Extensions
Description and Compatibility
166 Web-RT Knowledge Scripts

13.2 CheckURLUse this Knowledge Script to monitor the availability and performance of a single URL, including measuring connection and download time and validating and searching for text, links, and objects.
The CheckURL Knowledge Script cannot be edited using the URL Check Recorder. This Knowledge Script monitors a single URL, and you can view or modify all available parameter options in the Knowledge Script Values tab, using either the Control Center or Operator Console. To create a custom Knowledge Script that can monitor multiple URLs, use the URL Check Recorder to create a URLCheck Knowledge Script.
NOTE: You cannot use the Report_Web-RT_URLCheck Knowledge Script to generate reports out of data from the CheckURL Knowledge Script. To report on data from the CheckURL Knowledge Script, use the default reports provided with AppManager. For more information about running default reports, see the Control Center User Guide for AppManager.
13.2.1 Resource Object
CheckURL
13.2.2 Default Schedule
The default interval for these Knowledge Scripts is Every hour.
ResponseTime for Web 7.1
(Web-download package)
Upgrade of all Knowledge Scripts.
FTP, InternetMail, NNTPConnect, and SMTPConnect Knowledge Scripts not backward-compatible in general.
Older Knowledge Scripts (v6.2 and earlier) are no longer supported.
Major upgrade of Web Recorder.
New WebTransaction Knowledge Scripts not backward-compatible in general.
Older Knowledge Scripts (v6.2 and earlier) are no longer supported.
All backlevel WebTransaction Knowledge Scripts (v6.2 and earlier) must be upgraded or re-recorded.
Major upgrade of URL Check Recorder.
New URLCheck Knowledge Script not backward-compatible.
Older Knowledge Scripts (v6.2 and earlier) are no longer supported.
All backlevel URLCheck Knowledge Scripts (v6.2 and earlier) must be upgraded or re-recorded.
Versions of AppManager ResponseTime for Web and Extensions
Description and Compatibility
Web-RT Knowledge Scripts 167

13.2.3 Setting Parameter Values
Set the following parameters as needed.
Description How to Set It
URL Specify the URL you want to verify.
Description Specify the logical description or label of the checked URL.
Logical Target Specify the identifier to use to enable retrieval of data streams by AppManager Analysis Center v2.0 and higher.
By default, either the Label or the Link text for the URL.
General
Username Specify the URL authentication username.
Password Specify the URL authentication password. It is automatically encrypted.
Proxy
Proxy Server (host:port) Specify the name of the proxy server computer and port to use, if necessary in your environment, using this format: host:port.
User ID Specify a proxy server username if required. Specify the proxy server username using the format: username or domain\username.
Password Specify the proxy server authentication password, if necessary.
Header Enter a header needed for a function executed on the server. Specify the header using the format: value:parameter. AppManager only supports one header.
Post Data Enter any additional data that the receiving page needs to properly process the request, as in an HTTP Get function. Specify the post data using the format: value1=parameter&value2=parameter2.
This parameter is optional.
Allow auto-redirects? Select the Yes check box to allow the checked URL to auto-redirect. By default, redirects are allowed.
By default, when checking the status of a URL that is redirected, both the original URL and all subsequently redirected URLs are verified, and status is returned for all URLs. This option can be disabled by disabling this parameter.
Uses header with redirections? Select Yes to enable the passing of the header information when this URL is redirected.The default is unselected.
Uses post data with redirections? Select Yes to enable the passing of post data information when this URL is redirected. The default is unselected.
Raise event on redirection? Select the Yes check box to raise an event when the checked URL redirects to one or more subsequent URLs. By default, events are raised.
168 Web-RT Knowledge Scripts

Number of duplicate redirections before considered looping
Specify the number of times a URL can be redirected to the same location before AppManager raises an event for looping. The default is 1 time.
Notes
If you set the value to 0, the first duplicate redirection generates a 499 failure. The URL appears once on the detail table.
You can set this value per URL and can modify the value from a running job.
If you keep receiving 499 failures, try increasing this value by 1 and running the job again.
Event severity when URL is redirected
Set the event severity level, from 1 to 40, to indicate the importance of the event raised when the checked URL redirects to one or more subsequent URLs. The default severity level is 20 (yellow event indicator).
Redirect event title A title for the event raised when the checked URL redirects to one or more subsequent URLs. This field accepts the following substitution variables:
[l] -- Substitute the URL address being measured. The URL corresponds to the value you entered in the URL parameter.
[d] -- Substitute the URL description. The description corresponds to the value you entered in the Description parameter.
Default is “URL [l] Redirected: [d].”
Details to be included in events Set to Failure or All.
Failure -- only includes details for failure events or matched event criteria
All -- includes details for all results
Default is Failure.
Availability
Collect data? Select the Yes check box to collect data on the availability of the URL. By default, data is collected.
Details to be saved with data point Set to Failure, Success, All, or None.
Failure -- Only includes details for failure events or matched event criteria.
Success -- Only includes successful results.
All -- Includes details for all results.
None -- Includes no data details.
Default is None.
Data stream format Select the data stream format for the Availability data stream.
Previous versions of AppManager ResponseTime for Web used a 0 ("not available") or 1 ("available") format to indicate availability. You now have the option to use a 0 ("not available") or 100 ("available") format.
The default value is 0-100.
Description How to Set It
Web-RT Knowledge Scripts 169

Data stream legend A legend for the data stream that measures the availability status of the URL. This field accepts the following substitution variables:
[l] -- Substitute the URL address being measured. The URL corresponds to the value you entered in the URL parameter.
[d] -- Substitute the URL description. The description corresponds to the value you entered in the Description parameter.
Default is “Availability for URL [d]”. The URL variable [l] is not included by default, but you can add the variable anywhere within the legend string.
NOTE: As a best practice, use URL index variables for Knowledge Scripts that monitor multiple URLs. The variables ensure event and data stream legends for each monitored URL are unique. If you remove URL indexes, it is recommended that you do so only for Knowledge Scripts that monitor a single URL.
Raise event on failure Select the Yes check box to raise an event when either the Internet connection or the loading of the base page fails. By default, an event is raised.
Event severity when URL fails Set the event severity level, from 1 to 40, to indicate the importance of the event raised when a check of the URL fails. Default is 10 (red event indicator).
Failure event title A title for the event raised when the checked URL returns a status code associated with link failure. For more information, see Section 13.2.4, “Status Code and Status Description,” on page 177.
This field accepts the following substitution variables:
[l] -- Substitute the URL address being measured. The URL corresponds to the value you entered in the URL parameter.
[d] -- Substitute the URL description. The description corresponds to the value you entered in the Description parameter.
Default is “URL [d] Failed”. The URL variable [l] is not included by default, but you can add the variable anywhere within the legend string.
NOTE: As a best practice, use URL index variables for Knowledge Scripts that monitor multiple URLs. The variables ensure event and data stream legends for each monitored URL are unique. If you remove URL indexes, it is recommended that you do so only for Knowledge Scripts that monitor a single URL.
Availability = 0 if Validation in error or Search Criteria met
Set to Yes to change Availability to 0 if the URL cannot be validated or if a specific text string is not found.
Measure Processing Time
Collect data? Select the Yes check box to collect data on the processing time taken for this Knowledge Script to run. By default, data is not collected.
Description How to Set It
170 Web-RT Knowledge Scripts

Data stream legend A legend for the data stream that measures the processing time for the URL. This field accepts the following substitution variables:
[l] -- Substitute the URL address being measured. The URL corresponds to the value you entered in the URL parameter.
[d] -- Substitute the URL description. The description corresponds to the value you entered in the Description parameter.
Default is “Processing Time for URL [d]”. The URL variable [l] is not included by default, but you can add the variable anywhere within the legend string.
NOTE: As a best practice, use URL index variables for Knowledge Scripts that monitor multiple URLs. The variables ensure event and data stream legends for each monitored URL are unique. If you remove URL indexes, it is recommended that you do so only for Knowledge Scripts that monitor a single URL.
Threshold -- Maximum processing time
Set the maximum time allowed to perform all operations, including generating data and events, before an event is raised. The default is 180 seconds.
Raise event if threshold exceeded? Select the Yes check box to raise events if the overall time to process the job exceeds the threshold. By default, events are not raised.
Event severity when processing time threshold exceeded
Set the event severity level, from 1 to 40, to indicate the importance of the event when the overall processing time threshold is exceeded. The default severity level is 20 (blue event indicator).
Processing Time Event title A title for the event raised when the processing time for the checked URL exceeds the value you set for the Threshold -- Maximum overall processing time parameter. This field accepts the following substitution variables:
[l] -- Substitute the URL address being measured. The URL corresponds to the value you entered in the URL parameter.
[d] -- Substitute the URL description. The description corresponds to the value you entered in the Description parameter.
Default is “Processing Time Threshold exceeded for URL [d]”. The URL variable [l] is not included by default, but you can add the variable anywhere within the legend string.
NOTE: As a best practice, use URL index variables for Knowledge Scripts that monitor multiple URLs. The variables ensure event and data stream legends for each monitored URL are unique. If you remove URL indexes, it is recommended that you do so only for Knowledge Scripts that monitor a single URL.
Measure Connection Time Select the Yes check box to enable connection time measurement. By default, measurement is not enabled.
Collect data? Select the Yes check box to collect data on the amount of time it took to connect to the page represented by the URL and download the first byte of information. By default, data is not collected.
Description How to Set It
Web-RT Knowledge Scripts 171

Include DNS Lookup time (if applicable)?
Set to Yes to include the time taken to resolve the URL by means of a DNS server in the connection-time measurement.
Default is No.
Data stream legend A legend for the data stream that totals the connection times: the time it takes to connect to the URL and download a single byte of information. This field accepts the following substitution variables:
[l] -- Substitute the URL address being measured. The URL corresponds to the value you entered in the URL parameter.
[d] -- Substitute the URL description. The description corresponds to the value you entered in the Description parameter.
Default is “Connection Time for URL [d]”. The URL variable [l] is not included by default, but you can add the variable anywhere within the legend string.
Threshold -- Maximum connection time
Specify the maximum allowed connection time, in milliseconds. This parameter is the time taken to connect to the checked URL and to download the first byte of information from the associated Web page. If the time taken to connect exceeds this threshold, an event is raised.
Default is 1000 milliseconds.
Raise event if threshold exceeded? Set to Yes to raise an event when the amount of time to connect to the specified Web page and download a single byte exceeds the Connection Threshold.
Default is Yes.
Event severity when connection time threshold is exceeded
Set the event severity level for the Measure connection time threshold from 1 to 40 to indicate the importance of the event raised when the URL download threshold is exceeded. Default severity level is 21 (blue event indicator).
Connection Time Event title A title for the event raised when the connection time for the URL exceeds the value you set for the URL connection timeout parameter. This field accepts the following substitution variables:
[l] -- Substitute the URL address being measured. The URL corresponds to the value you entered in the URL parameter.
[d] -- Substitute the URL description. The description corresponds to the value you entered in the Description column of the URLs table.
Default is “URL [d] Connection Time threshold exceeded”. The URL variable [l] is not included by default, but you can add the variable anywhere within the legend string.
NOTE: As a best practice, use URL index variables for Knowledge Scripts that monitor multiple URLs. The variables ensure event and data stream legends for each monitored URL are unique. If you remove URL indexes, it is recommended that you do so only for Knowledge Scripts that monitor a single URL.
Description How to Set It
172 Web-RT Knowledge Scripts
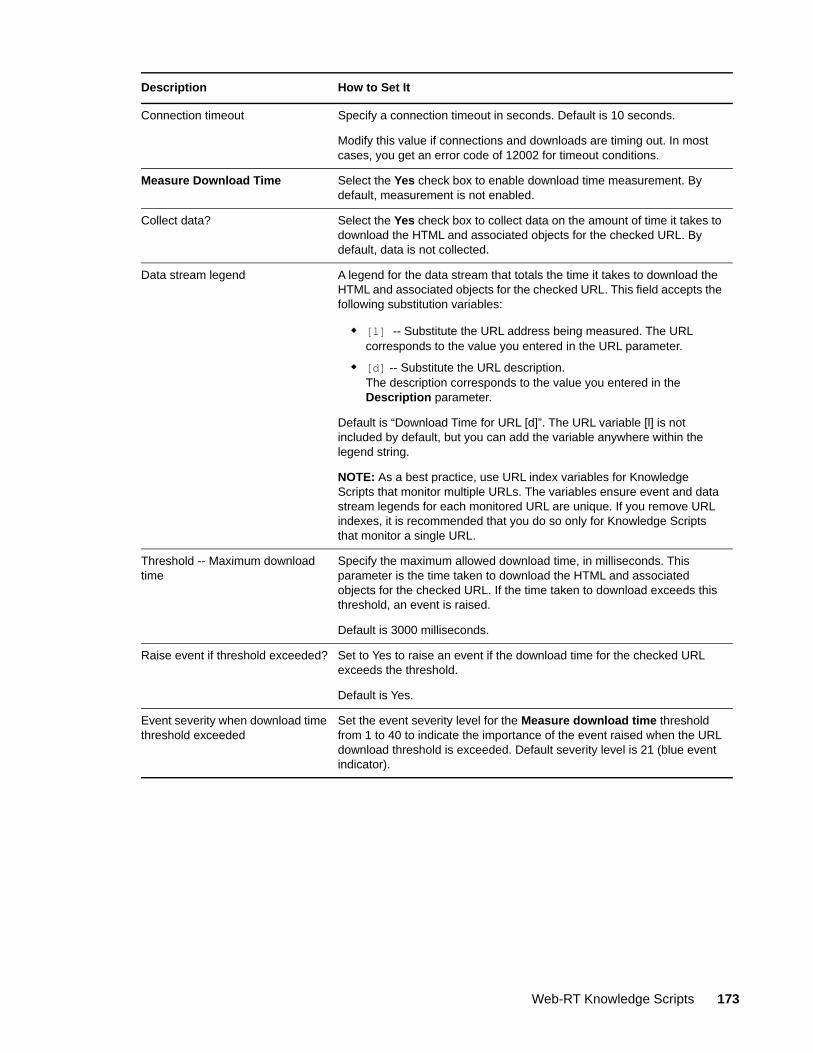
Connection timeout Specify a connection timeout in seconds. Default is 10 seconds.
Modify this value if connections and downloads are timing out. In most cases, you get an error code of 12002 for timeout conditions.
Measure Download Time Select the Yes check box to enable download time measurement. By default, measurement is not enabled.
Collect data? Select the Yes check box to collect data on the amount of time it takes to download the HTML and associated objects for the checked URL. By default, data is not collected.
Data stream legend A legend for the data stream that totals the time it takes to download the HTML and associated objects for the checked URL. This field accepts the following substitution variables:
[l] -- Substitute the URL address being measured. The URL corresponds to the value you entered in the URL parameter.
[d] -- Substitute the URL description. The description corresponds to the value you entered in the Description parameter.
Default is “Download Time for URL [d]”. The URL variable [l] is not included by default, but you can add the variable anywhere within the legend string.
NOTE: As a best practice, use URL index variables for Knowledge Scripts that monitor multiple URLs. The variables ensure event and data stream legends for each monitored URL are unique. If you remove URL indexes, it is recommended that you do so only for Knowledge Scripts that monitor a single URL.
Threshold -- Maximum download time
Specify the maximum allowed download time, in milliseconds. This parameter is the time taken to download the HTML and associated objects for the checked URL. If the time taken to download exceeds this threshold, an event is raised.
Default is 3000 milliseconds.
Raise event if threshold exceeded? Set to Yes to raise an event if the download time for the checked URL exceeds the threshold.
Default is Yes.
Event severity when download time threshold exceeded
Set the event severity level for the Measure download time threshold from 1 to 40 to indicate the importance of the event raised when the URL download threshold is exceeded. Default severity level is 21 (blue event indicator).
Description How to Set It
Web-RT Knowledge Scripts 173
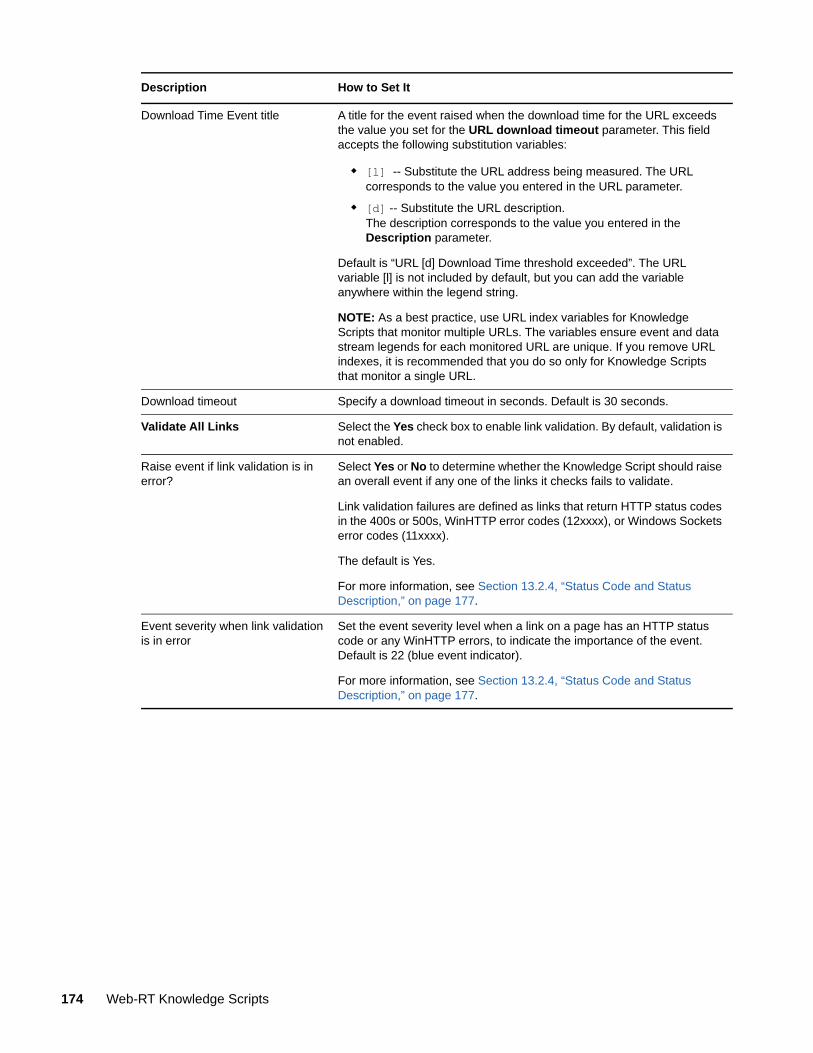
Download Time Event title A title for the event raised when the download time for the URL exceeds the value you set for the URL download timeout parameter. This field accepts the following substitution variables:
[l] -- Substitute the URL address being measured. The URL corresponds to the value you entered in the URL parameter.
[d] -- Substitute the URL description. The description corresponds to the value you entered in the Description parameter.
Default is “URL [d] Download Time threshold exceeded”. The URL variable [l] is not included by default, but you can add the variable anywhere within the legend string.
NOTE: As a best practice, use URL index variables for Knowledge Scripts that monitor multiple URLs. The variables ensure event and data stream legends for each monitored URL are unique. If you remove URL indexes, it is recommended that you do so only for Knowledge Scripts that monitor a single URL.
Download timeout Specify a download timeout in seconds. Default is 30 seconds.
Validate All Links Select the Yes check box to enable link validation. By default, validation is not enabled.
Raise event if link validation is in error?
Select Yes or No to determine whether the Knowledge Script should raise an overall event if any one of the links it checks fails to validate.
Link validation failures are defined as links that return HTTP status codes in the 400s or 500s, WinHTTP error codes (12xxxx), or Windows Sockets error codes (11xxxx).
The default is Yes.
For more information, see Section 13.2.4, “Status Code and Status Description,” on page 177.
Event severity when link validation is in error
Set the event severity level when a link on a page has an HTTP status code or any WinHTTP errors, to indicate the importance of the event. Default is 22 (blue event indicator).
For more information, see Section 13.2.4, “Status Code and Status Description,” on page 177.
Description How to Set It
174 Web-RT Knowledge Scripts

Validate Links Event title A title for the event raised when a link fails to validate. This field accepts the following substitution variables:
[l] -- Substitute the URL address being measured. The URL corresponds to the value you entered in the URL parameter.
[d] -- Substitute the URL description. The description corresponds to the value you entered in the Description parameter.
Default is “URL [d] Validate Link Failure”. The URL variable [l] is not included by default, but you can add the variable anywhere within the legend string.
NOTE: As a best practice, use URL index variables for Knowledge Scripts that monitor multiple URLs. The variables ensure event and data stream legends for each monitored URL are unique. If you remove URL indexes, it is recommended that you do so only for Knowledge Scripts that monitor a single URL.
Validate All Objects Use these parameters to determine whether to collect data and raise events on object validation.
Select the Yes check box to enable object validation. By default, validation is not enabled.
Raise event if object validation is in error?
Select Yes or No to determine whether the Knowledge Script should raise an overall event any time an object fails to validate.
Object validation failures are defined as objects that return HTTP status codes in the 400s or 500s, WinHTTP error codes (12xxxx), or Windows Sockets error codes (11xxxx).
The default is Yes.
For more information, see Section 13.2.4, “Status Code and Status Description,” on page 177.
Event severity when object validation is in error
Set the event severity level when an object on a page has an HTTP status code or any WinHTTP errors, to indicate the importance of the event. Default is 22 (blue event indicator).
For more information, see Section 13.2.4, “Status Code and Status Description,” on page 177.
Validate Objects Event title A title for the event raised when a link fails to validate. This field accepts the following substitution variables:
[l] -- Substitute the URL address being measured. The URL corresponds to the value you entered in the URL parameter.
[d] -- Substitute the URL description. The description corresponds to the value you entered in the Description parameter.
Default is “URL [d] Validate Object Failure.” The URL variable [l] is not included by default, but you can add the variable anywhere within the legend string.
Search String Select the Yes check box to enable string searching. By default, string searching is not enabled.
Description How to Set It
Web-RT Knowledge Scripts 175

String to search Specify string for search. Specify only 1 string.
Case Sensitive? If enabled, the search is case-sensitive.
Raise event if string is Specify whether to raise an overall event when a string meets a selected condition. You can set the Search Strings URL Property for the checked URL, which instructs URL Check Recorder to search for a particular string on the page.
The default is “Not Found”.
Event severity when search string criteria are met
Set the event severity level when a string is Found or Not Found, from 1 to 40, to indicate the importance of the event. Default is 25 (blue event indicator).
Search String Event title A title for the event raised when any specified search string value is met. This field accepts the following substitution variables:
[l] -- Substitute the URL address being measured. The URL corresponds to the value you entered in the URL parameter.
[d] -- Substitute the URL description. The description corresponds to the value you entered in the Description parameter.
Default is “URL [d] Search String Criteria Met”. The URL variable [l] is not included by default, but you can add the variable anywhere within the legend string.
Search Link Select the Yes check box to enable link searching. By default, link searching is not enabled.
Link to search Specify link for search. Specify only 1 link.
Raise event if link is Specify whether to generate an event when the specified links are all "Found" or "Not Found". The default is “Not Found”.
Event severity when search link criteria are met
Set the event severity level when a link is Found or Not Found, from 1 to 40, to indicate the importance of the event. Default is 25 (blue event indicator).
Search Link Event title The title of the event raised when the specified search link value is met. This field accepts the following substitution variables:
[l] -- Substitute the URL address being measured. The URL corresponds to the value you entered in the URL parameter.
[d] -- Substitute the URL description. The description corresponds to the value you entered in the Description parameter.
The default is “URL [d] Search Link Criteria Met”. The URL variable [l] is not included by default, but you can add the variable anywhere within the legend string.
NOTE: As a best practice, use URL index variables for Knowledge Scripts that monitor multiple URLs. The variables ensure event and data stream legends for each monitored URL are unique. If you remove URL indexes, it is recommended that you do so only for Knowledge Scripts that monitor a single URL.
Description How to Set It
176 Web-RT Knowledge Scripts
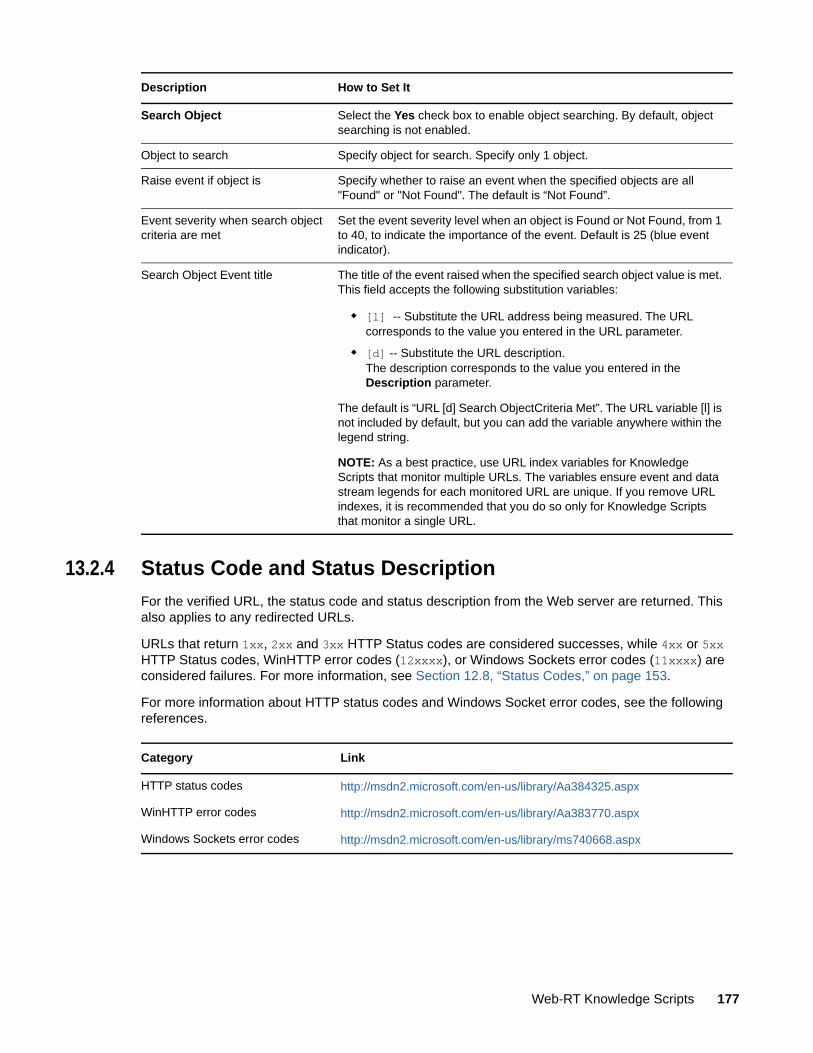
13.2.4 Status Code and Status Description
For the verified URL, the status code and status description from the Web server are returned. This also applies to any redirected URLs.
URLs that return 1xx, 2xx and 3xx HTTP Status codes are considered successes, while 4xx or 5xx HTTP Status codes, WinHTTP error codes (12xxxx), or Windows Sockets error codes (11xxxx) are considered failures. For more information, see Section 12.8, “Status Codes,” on page 153.
For more information about HTTP status codes and Windows Socket error codes, see the following references.
Search Object Select the Yes check box to enable object searching. By default, object searching is not enabled.
Object to search Specify object for search. Specify only 1 object.
Raise event if object is Specify whether to raise an event when the specified objects are all "Found" or "Not Found". The default is “Not Found”.
Event severity when search object criteria are met
Set the event severity level when an object is Found or Not Found, from 1 to 40, to indicate the importance of the event. Default is 25 (blue event indicator).
Search Object Event title The title of the event raised when the specified search object value is met. This field accepts the following substitution variables:
[l] -- Substitute the URL address being measured. The URL corresponds to the value you entered in the URL parameter.
[d] -- Substitute the URL description. The description corresponds to the value you entered in the Description parameter.
The default is “URL [d] Search ObjectCriteria Met”. The URL variable [l] is not included by default, but you can add the variable anywhere within the legend string.
NOTE: As a best practice, use URL index variables for Knowledge Scripts that monitor multiple URLs. The variables ensure event and data stream legends for each monitored URL are unique. If you remove URL indexes, it is recommended that you do so only for Knowledge Scripts that monitor a single URL.
Description How to Set It
Category Link
HTTP status codes http://msdn2.microsoft.com/en-us/library/Aa384325.aspx
WinHTTP error codes http://msdn2.microsoft.com/en-us/library/Aa383770.aspx
Windows Sockets error codes http://msdn2.microsoft.com/en-us/library/ms740668.aspx
Web-RT Knowledge Scripts 177

13.3 FTPUse this Knowledge Script to check the availability of an FTP site, and verify that a file can be downloaded from the site. In addition, you can use this Knowledge Script to compare the contents of a file downloaded from the FTP site with a file on a local computer.
This Knowledge Script raises an event if any of the following conditions occur:
The specified FTP site does not respond to the FTP connection request.
A specified FTP file cannot be downloaded from the site.
The local file cannot be located.
The contents of a downloaded FTP file are different from the contents of a specified local file.
If you choose to compare the contents of a downloaded file with the contents of a local file, the Knowledge Script downloads the entire file from the FTP site in both binary and ASCII formats and compares both formats against the local file. An event raised if differences are found between the files after the second comparison. The downloaded file is saved in memory and is never placed on disk. The size of the file to download must be 20 MB or fewer.
The FTP Knowledge Script supports the use of different port numbers, Passive FTP (PASV) for use through a firewall, and connections through a proxy server.
You can select where some of the possible events are displayed in the Operator Console TreeView or Control Center Console Server view. This event proxying feature is useful in Control Center Service Map views. It is not supported for jobs that are started in the Operator Web Console. See the description of the Event on parameter in the following table.
If you choose to collect data, a data stream for availability is generated, with one of the following values:
1 or 100 = the FTP server responded to the connection request, or
0 = the FTP server did not respond.
As discussed previously, this Knowledge Script potentially performs as many as four discrete actions. If any one of the following actions fails, the entire ResponseTime transaction fails, and the Availability data point is 0:
Connection to the FTP server
File download
Opening local file
Comparing downloaded file to local file
13.3.1 Resource Object
FTP
13.3.2 Default Schedule
The default interval for this Knowledge Script is Every 15 minutes.
178 Web-RT Knowledge Scripts
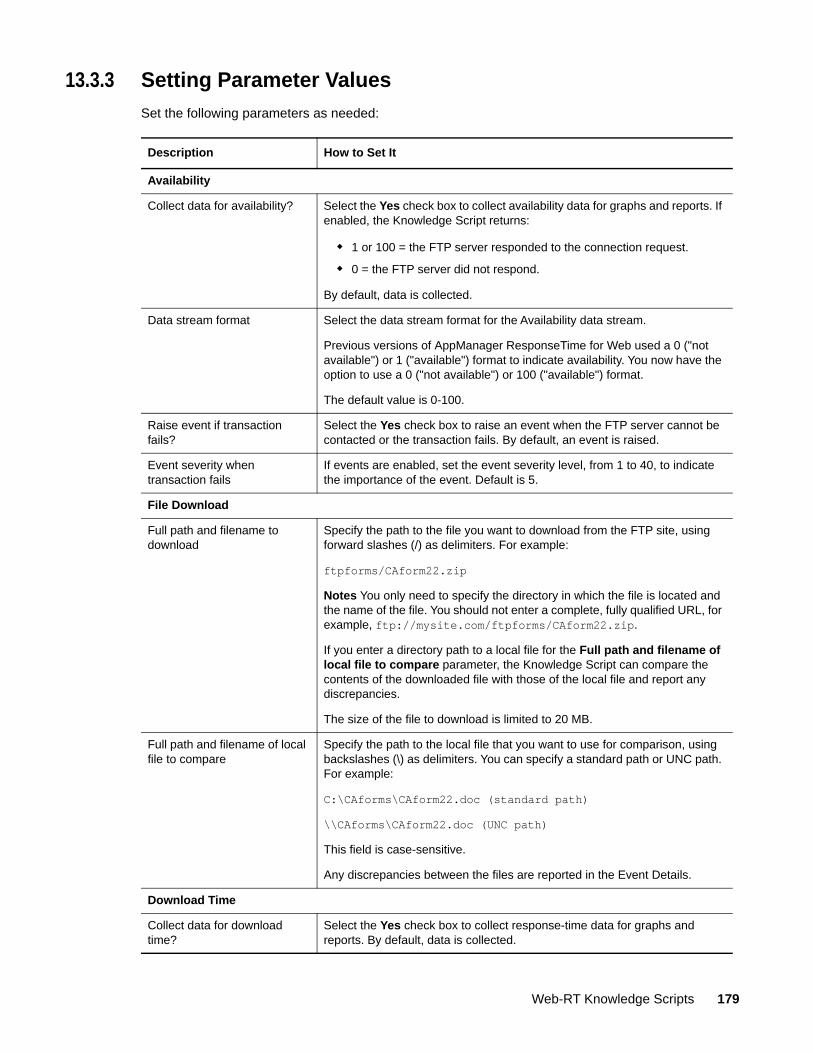
13.3.3 Setting Parameter Values
Set the following parameters as needed:
Description How to Set It
Availability
Collect data for availability? Select the Yes check box to collect availability data for graphs and reports. If enabled, the Knowledge Script returns:
1 or 100 = the FTP server responded to the connection request.
0 = the FTP server did not respond.
By default, data is collected.
Data stream format Select the data stream format for the Availability data stream.
Previous versions of AppManager ResponseTime for Web used a 0 ("not available") or 1 ("available") format to indicate availability. You now have the option to use a 0 ("not available") or 100 ("available") format.
The default value is 0-100.
Raise event if transaction fails?
Select the Yes check box to raise an event when the FTP server cannot be contacted or the transaction fails. By default, an event is raised.
Event severity when transaction fails
If events are enabled, set the event severity level, from 1 to 40, to indicate the importance of the event. Default is 5.
File Download
Full path and filename to download
Specify the path to the file you want to download from the FTP site, using forward slashes (/) as delimiters. For example:
ftpforms/CAform22.zip
Notes You only need to specify the directory in which the file is located and the name of the file. You should not enter a complete, fully qualified URL, for example, ftp://mysite.com/ftpforms/CAform22.zip.
If you enter a directory path to a local file for the Full path and filename of local file to compare parameter, the Knowledge Script can compare the contents of the downloaded file with those of the local file and report any discrepancies.
The size of the file to download is limited to 20 MB.
Full path and filename of local file to compare
Specify the path to the local file that you want to use for comparison, using backslashes (\) as delimiters. You can specify a standard path or UNC path. For example:
C:\CAforms\CAform22.doc (standard path)
\\CAforms\CAform22.doc (UNC path)
This field is case-sensitive.
Any discrepancies between the files are reported in the Event Details.
Download Time
Collect data for download time?
Select the Yes check box to collect response-time data for graphs and reports. By default, data is collected.
Web-RT Knowledge Scripts 179
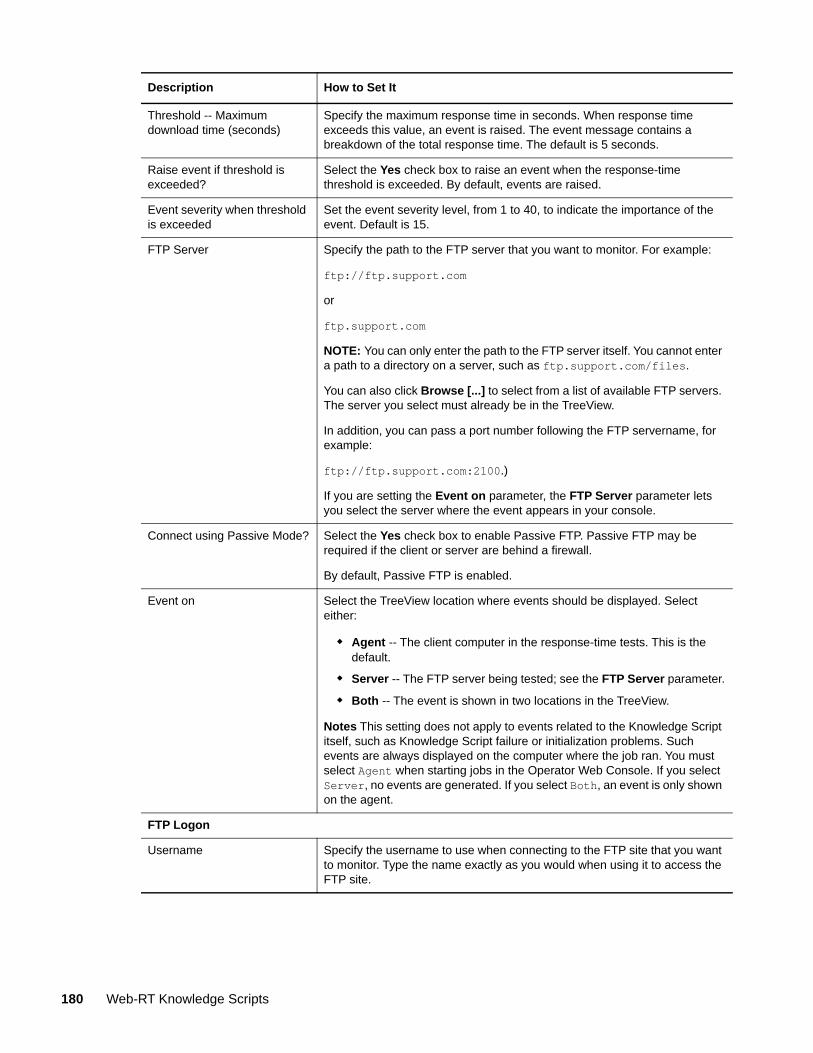
Threshold -- Maximum download time (seconds)
Specify the maximum response time in seconds. When response time exceeds this value, an event is raised. The event message contains a breakdown of the total response time. The default is 5 seconds.
Raise event if threshold is exceeded?
Select the Yes check box to raise an event when the response-time threshold is exceeded. By default, events are raised.
Event severity when threshold is exceeded
Set the event severity level, from 1 to 40, to indicate the importance of the event. Default is 15.
FTP Server Specify the path to the FTP server that you want to monitor. For example:
ftp://ftp.support.com
or
ftp.support.com
NOTE: You can only enter the path to the FTP server itself. You cannot enter a path to a directory on a server, such as ftp.support.com/files.
You can also click Browse [...] to select from a list of available FTP servers. The server you select must already be in the TreeView.
In addition, you can pass a port number following the FTP servername, for example:
ftp://ftp.support.com:2100.)
If you are setting the Event on parameter, the FTP Server parameter lets you select the server where the event appears in your console.
Connect using Passive Mode? Select the Yes check box to enable Passive FTP. Passive FTP may be required if the client or server are behind a firewall.
By default, Passive FTP is enabled.
Event on Select the TreeView location where events should be displayed. Select either:
Agent -- The client computer in the response-time tests. This is the default.
Server -- The FTP server being tested; see the FTP Server parameter.
Both -- The event is shown in two locations in the TreeView.
Notes This setting does not apply to events related to the Knowledge Script itself, such as Knowledge Script failure or initialization problems. Such events are always displayed on the computer where the job ran. You must select Agent when starting jobs in the Operator Web Console. If you select Server, no events are generated. If you select Both, an event is only shown on the agent.
FTP Logon
Username Specify the username to use when connecting to the FTP site that you want to monitor. Type the name exactly as you would when using it to access the FTP site.
Description How to Set It
180 Web-RT Knowledge Scripts

13.4 NNTPConnectUse this Knowledge Script to monitor the availability of an NNTP server. When the specified NNTP server does not respond to a connection request to the NNTP port (port 119), an event is raised.
You can select where some of the possible events are displayed in the Operator Console TreeView or Control Center Console Server view. This event proxying feature is useful in Control Center Service Map views. It is not supported for jobs that are started in the Operator Web Console. See the description of the Event on parameter in the following table.
If you choose to collect data, a data stream for Availability is generated, with one of the following values:
1 or 100 = the NNTP server responded to the connection request, or
0 = the NNTP server did not respond.
The Availability data point is an indication of whether the test succeeded or failed. If a connection to the NNTP server cannot be established, the Availability data point is 0, which indicates not available or not successful.
13.4.1 Resource Object
News (NNTP) server.
13.4.2 Default Schedule
The default interval for this Knowledge Script is Every 15 minutes.
Password Specify the password to use when connecting to the FTP site that you want to monitor. Type the password exactly as you would when using it to access the FTP site.
NOTE: Password entries are limited to a maximum of 32 characters.
Proxy Settings
Server name Specify the name of the proxy server computer and port to use, if necessary in your environment, using this format: proxyserver:port
NOTE: When using a proxy server, this script cannot determine the size of the remote file in advance. If the file size exceeds 20 MB, the FTP file transfer may time out.
Username Specify a proxy server username if required. Specify the proxy server username using the format: username or domain\username.
Password Specify a proxy server password if required.
Description How to Set It
Web-RT Knowledge Scripts 181

13.4.3 Setting Parameter Values
Set the following parameters as needed:
Description How to Set It
Availability
Collect data for availability? Select the Yes check box to collect availability data for graphs and reports. If enabled, the Knowledge Script returns:
1 or 100 = the NNTP server responded to the connection request.
0 = the NNTP server did not respond.
By default, data is collected.
Data stream format Select the data stream format for the Availability data stream.
Previous versions of AppManager ResponseTime for Web used a 0 ("not available") or 1 ("available") format to indicate availability. You now have the option to use a 0 ("not available") or 100 ("available") format.
The default value is 0-100.
Raise event if connection fails? Select the Yes check box to raise events. By default, events are raised.
Event severity when connection fails
Set the event severity level, from 1 to 40, to indicate the importance of the event. Default is 5 (red event indicator).
NNTP Server Specify the name of the NNTP server that you want to monitor. For example, msnews.microsoft.com
You can also click Browse [...] to select from a list of available NNTP servers. The server you select must already be in the TreeView.
In addition, you can pass a port number following the NNTP servername. For example, msnews.microsoft.com:563.
If you are setting the Event on parameter, the NNTP Server parameter lets you select the server where the event appears in your console.
Event on Select the TreeView location where events should be displayed. Select either:
Agent -- The client computer in the response-time tests. This is the default.
Server -- The NNTP server being tested; see the NNTP Server parameter.
Both -- The event is shown in two locations in the TreeView.
Notes This setting does not apply to events related to the Knowledge Script itself, such as Knowledge Script failure or initialization problems. Such events are always displayed on the computer where the job ran. You must select Agent when starting jobs in the Operator Web Console. If you select Server, no events are generated. If you select Both, an event is only shown on the agent.
182 Web-RT Knowledge Scripts

13.5 ReceiveInternetMailUse this Knowledge Script to monitor the availability and the response time taken to receive an Internet mail message using POP3 protocol.
You can run this script as “Interactive User.” This setting requires a user to be physically logged into the computer for the test to run. You might want to do this in environments where a firewall is preventing access to an Active Directory domain controller, or where the test computer is part of a workgroup and not part of a domain. With this feature, the user is not validated, so the test can proceed despite the lack of access to the domain. To run as interactive user, type “Interactive User” for the Run As Username parameter, and leave the Password and Domain parameters blank.
13.5.1 Collecting Data
If you choose to collect data, this Knowledge Script generates the following data streams:
Response time
Overall response time. The information returned by this data stream is also saved with the data point, and can be viewed by double-clicking the data point in the Graph Pane or Chart Console.
Response-time Breakdown. If enabled as separate parameters, up to 2 response-time breakdown data streams. These are individual data points for the different parts of the Knowledge Script transaction that are timed. For more information, see Section 13.5.4, “Setting Parameter Values,” on page 184.
Availability: Returns one of the following values:
1 or 100 = the transaction was successful
0 = the transaction was not successful
The Availability data point is an indication of whether the test succeeded or failed. If, for example, a connection to the POP3 mail server was established but the message was never received, the Availability data point is 0, which indicates not available or not successful.
An event is raised whenever one of the following occurs:
A threshold that you have specified as an event parameter is exceeded.
The Web-RT InternetMail engine cannot be initialized. An initialization error is generated, but an Availability or Response Time data stream is not generated.
The transaction does not complete successfully. A transaction error is generated. Only an Availability data stream is generated, with a value of 0.
You can select where some of the possible events are displayed in the Operator Console TreeView or Control Center Console Server view. This event proxying feature is useful in Control Center Service Map views. It is not supported for jobs that are started in the Operator Web Console. See the description of the Event on parameter in the following table.
13.5.2 Resource Object
Internet Mail
Web-RT Knowledge Scripts 183

13.5.3 Default Schedule
The default interval for this Knowledge Script is Every 15 minutes.
13.5.4 Setting Parameter Values
Set the following parameters as needed
Description How to Set It
Availability
Collect data for availability? Select the Yes check box to collect availability data for graphs and reports. If enabled, the Knowledge Script returns:
1 or 100 = the Internet mail server responded to the connection request.
0 = the Internet mail server did not respond.
By default, data is collected.
Data stream format Select the data stream format for the Availability data stream.
Previous versions of AppManager ResponseTime for Web used a 0 ("not available") or 1 ("available") format to indicate availability. You now have the option to use a 0 ("not available") or 100 ("available") format.
The default value is 0-100.
Raise event if transaction fails?
Select the Yes check box to raise events. By default, events are raised.
Event severity when transaction fails
Set the event severity level, from 1 to 40, to indicate the importance of the event. Default is 5 (red event indicator).
Response Time
Collect data for response time?
Select the Yes check box to collect data for graphs and reports. By default, data is collected.
Threshold -- Maximum response time (seconds)
Specify the maximum response time in seconds. When response time exceeds this value, an event is raised. The event message contains a breakdown of the total response time. The default is 15 seconds.
Raise event if threshold is exceeded?
Select the Yes check box to raise an event when the threshold is exceeded. By default, events are raised.
Event severity when threshold is exceeded
Set the event severity level, from 1 to 40, to indicate the importance of the event. Default is 15 (yellow event indicator). If you disable Response Time events, this value is ignored.
Response Time Breakdown
Collect data for connecting to POP3 server?
Select the Yes check box to collect a separate response-time data stream for the time taken to connect to the POP3 server. By default, separate response-time data streams are not collected.
Collect data for receiving message?
Select the Yes check box to collect a separate response-time data stream for the time taken to receive the test Internet Mail message. By default, separate response-time data streams are not collected.
POP3 Server Settings
184 Web-RT Knowledge Scripts

Server name Specify the name of the POP3 server, or click Browse [...] to select from a list of available servers. The server you select must already be in the TreeView.
If you are setting the Event on parameter, the Target computer parameter lets you select the server where the event appears in your console.
Server port number Specify the port number of the POP3 server. Default is 110.
Username Specify the POP3 username of the client on which the Knowledge Script is to run.
Password Specify the POP3 password for the associated POP3 user name.
Leave message on server? Select the Yes check box to leave the message on the POP3 server. Clear the box to delete the message from the server. By default, messages are left on the server.
Event on Select the TreeView location where events should be displayed. Select either:
Agent -- The client computer in the response-time tests. This is the default.
Server -- The mail server being tested; see the Server name parameter.
Both -- The event is shown in two locations in the TreeView.
Notes This setting does not apply to events related to the Knowledge Script itself, such as Knowledge Script failure or initialization problems. Such events are always displayed on the computer where the job ran.
You must select Agent when starting jobs in the Operator Web Console. If you select Server, no events are generated. If you select Both, an event is only shown on the agent.
Run As
Username Specify the user ID associated with a specific user who has the required permissions to run this application.
Leave the Password and Domain parameters blank if you specify “Interactive User”.
Password Specify the password associated with this user that is required to log on to the network and run the application.
Domain Specify the domain name of the domain you are logging onto. Required.
Administrators group on managed client
Specify the name of the Administrators Group on the managed client. Typically, this name is “Administrators”, except on some foreign-language operating systems. Default is “Administrators”.
Timeouts
Job timeout Set the timeout value, from 1 to 900 seconds, to determine the maximum time allowed to process a job before it's aborted.
When an Web-RT Knowledge Script job runs, a job timer is started. If the transaction takes longer than the Job timeout, the transaction is stopped and a “Job Timeout" event is raised.
The default is 120 seconds.
Description How to Set It
Web-RT Knowledge Scripts 185

13.6 Report_Web-RT_MailUse this Knowledge Script to generate a report detailing availability and response time for the following Web-RT Knowledge Scripts:
ReceiveInternetMail
SendAndReceiveInternetMail
SendInternetMail
This report contains two graphs and tables identifying availability and overall response time for a particular Knowledge Script.
13.6.1 Resource Object
Web-RT
13.6.2 Default Schedule
The default schedule is Run once.
13.6.3 Setting Parameter Values
Set the following parameters as needed:
Queue timeout Set the timeout value, from 1 to 1200 seconds, to determine how long a job can wait for resources before it's aborted.
Multiple simultaneous Web-RT Knowledge Script jobs must wait for a token to run. If no token is available for a job you're trying to run, the job is added to the queue and starts a queue timer. When the Queue Timeout for a job expires, the job does not run, a "Queue Timeout" event is raised, and the job is moved to the end of the queue.
The default is 300 seconds.
Connection timeout Set the connection timeout value to determine how long a job can wait for a connection to the POP3 and SMTP servers before the job is aborted.
The default is 30 seconds.
Description How to Set It
Description How to Set It
Data source
Knowledge Script for report Select the Knowledge Script to report on. Click Browse [...] to show the Select a Knowledge Script dialog box. Highlight a Web-RT Knowledge Script from the Knowledge Script Name list and click Finish to select it.
186 Web-RT Knowledge Scripts

Web-RT client(s) Select the Web-RT clients. Click Browse [...] to show the Select View(s) and a filter dialog box. From the View(s) list, select up to 25 views.
Your subsequent selections are limited to computers or server groups that are visible in the selected views.
Select one of the Filters options:
View: Includes all computers in the views you selected.
Computer: Select from individual computers in the views you selected.
Server Group: Select from server groups in the views you selected. Selecting a server group includes all computers in that group.
Mail Server or “All” Type the name of the Mail Server, or type “All” to designate all computers as Mail Servers.
The default is “All”.
Select time range In the Select Date/Time Range dialog box, set specific start and end report information dates, good for historical or ad hoc reports, or a sliding range, the default, that sets the time range of data to include in the report. This option is useful for reports running on a regular schedule and is the default.
Select peak weekday(s) Click Browse [...] to see the Select Peak Weekday(s) dialog box. Press Shift and click on days to select a contiguous range of days, or Ctrl+Click to select non-contiguous days.
Aggregation by Select the time unit by which to aggregate data. The default is Hour. Works in conjunction with the next field, Aggregation interval, which determines the number of units for one interval of data aggregation.
Aggregation interval Select the interval units in which to aggregate data. The default is 1. For example, if you aggregate by the Hour and select 1 here, data is aggregated once every hour.
Report settings
Include parameter card? Select the Yes check box to include a table in the report that lists parameter settings for the report Knowledge Script. By default, the table is included.
Include Availability detail table?
Specify whether to display the Availability detail table as part of the report. By default, the table is included.
Include Availability chart? Specify whether to display the Availability chart as part of the report. By default, the chart is included.
Threshold on Availability chart
Enter an integer for the availability, as a percent (%), to use as a threshold on the chart. Default is 0, or no threshold is displayed.
Include ResponseTime detail table?
Specify whether to display the ResponseTime detail table as part of the report. By default, the table is included.
Include ResponseTime chart?
Specify whether to display the ResponseTime chart as part of the report. By default, the chart is included.
Units for ResponseTime report
Select the response time unit, either the default, milliseconds, or seconds.
Threshold on Response Time chart (selected units)
Specify the time in the units specified in the previous parameters to use for the threshold indicator on the chart, or use the default of 0.0, for no threshold indicator is used.
Description How to Set It
Web-RT Knowledge Scripts 187

13.7 Report_Web-RT_StepsUse this Report Knowledge Script to generate a report detailing response time for the transaction steps in WebTransaction Knowledge Scripts created with the Web Recorder extension.
To create this report, enable data collection for individual steps in the selected WebTransaction Knowledge Script. You can also set the Step default value for “Collect Response Time Data?” parameter to Yes to enable data collection for all steps on a global basis. Click Settings > Options and then click the Knowledge Script tab in Web Recorder to enable this parameter.
NOTE: This Knowledge Script only works with WebTransaction Knowledge Scripts that use the default step legends.
13.7.1 Resource Object
Web-RT
13.7.2 Default Schedule
The default schedule is Run once.
Select chart style Options in the Chart Settings dialog box set the appearance of the chart. The same parameters are used in both the availability and Response Time charts, if both are produced. Default is Ribbon.
Select output folder In the Specify report folder/filename dialog box, enter an output filename and fill in the remote folder fields.
Add job ID to output folder name?
Specify whether to add a job ID to the output folder name.
Index-Report Title In the Report Properties dialog box, configure report title settings.
Add time stamp to title Specify whether to add a timestamp to the report title.
Event notification
Generate event on success?
Specify whether an event is raised when a report is generated. By default, events are raised.
Severity level for report success
Set the severity level for a successful report. Default is 35 (magenta event indicator).
Severity level for report with no data
Set the severity level for a report with no data. Default is 25 (blue event indicator).
Severity level for report failure
Set the severity level for a report with no data. Default is 5 (red event indicator).
Description How to Set It
188 Web-RT Knowledge Scripts

13.7.3 Setting Parameter Values
Set the following parameters as needed:
Description How to Set It
Data source
Web Transaction Script Select the Knowledge Script to report on. Click Browse [...] to show the Select a Knowledge Script dialog box. Highlight a Web Transaction Knowledge Script from the Knowledge Script Name list and click Finish to select it.
Web-RT client(s) Select the Web-RT clients. Click Browse [...] to show the Select View(s) and a filter dialog box. From the View(s) list, select from one to twenty-five views.
Your subsequent selections are limited to computers or server groups that are visible in the selected views.
Select one of the Filters options:
View: Includes all computers in the views you selected.
Computer: Select from individual computers in the views you selected.
Server Group: Select from server groups in the views you selected. Selecting a server group includes all computers in that group.
Select time range In the Select Date/Time Range dialog box, set specific start and end report information dates, good for historical or ad hoc reports, or a sliding range, the default, that sets the time range of data to include in the report. This option is useful for reports running on a regular schedule and is the default.
Select peak weekday(s) Click Browse [...] to see the Select Peak Weekday(s) dialog box. Press Shift and click on days to select a contiguous range of days, or Ctrl+Click to select non-contiguous days.
Aggregation by Select the time unit by which to aggregate data. Default is Hour. This works in conjunction with the next field, Aggregation interval, which determines the number of units for one interval of data aggregation.
Aggregation interval Select the interval units in which to aggregate data. Default is 1. For example, if you aggregate by the Hour and select 1 here, data is aggregated once every hour.
Report settings
Include parameter card? Select the Yes check box to include a table in the report that lists parameter settings for the report Knowledge Script. By default, the table is included.
Include ResponseTime detail table?
Specify whether to display the ResponseTime detail table as part of the report. By default, the table is included.
Include ResponseTime chart?
Specify whether to display the ResponseTime chart as part of the report. By default, the chart is included.
Units for ResponseTime report
Select the response time unit, either the default, msec, or sec.
Threshold on ResponseTime chart (selected units)
Specify the time in the units specified in the previous parameters to use for the threshold indicator on the chart. The default is 0.0, or no threshold indicator.
Web-RT Knowledge Scripts 189

13.8 Report_Web-RT_URLCheckUse this Report Knowledge Script to generate a report of availability as a percentage for the URLCheck Knowledge Script.
This report shows overall availability for all URLs checked by a particular Knowledge Script.
NOTE: This Knowledge Script only works with URLCheck Knowledge Scripts that use the default legend names. In addition, this Knowledge Script does not work with the CheckURL Knowledge Script. To report on data from the CheckURL Knowledge Script, use the default reports provided with AppManager. For more information about running default reports, see the Control Center User Guide for AppManager.
Set the following parameters as needed:
Select chart style Options in the Chart Settings dialog box set the appearance of the chart. The same parameters are used in both the availability and ResponseTime charts, if both are produced. Default is Bar_Stacked.
Select output folder In the Specify Report Folder/Filename dialog box, enter an output filename and fill in the remote folder fields. Default is Web-RT_Steps_(Script Name)
Add job ID to output folder name?
Specify whether to add a job ID to the output folder name.
Index-Report Title In the Report Properties dialog box, configure report title settings. Default is Web-RT_Steps:(Script Name)
Add time stamp to title Specify whether to add a timestamp to the report title. By default, no timestamp is added.
Event notification
Generate event on success?
Specify whether an event is raised when a report is generated. By default, events are raised.
Severity level for report success
Set the severity level for a successful report. Default is 35 (magenta event indicator).
Severity level for report with no data
Set the severity level for a report with no data. Default is 25 (blue event indicator).
Severity level for report failure
Set the severity level for a report with no data. Default is 5 (red event indicator).
Description How to Set It
Description How to Set It
Data source
URL Check Script Select the Knowledge Script to report on. Click Browse [...] to show the Select a Knowledge Script dialog box. Highlight a Web Transaction Knowledge Script from the Knowledge Script Name list and click Finish to select it.
Web Client(s) Enter a specific client computer, or type All to report on all client computers.
190 Web-RT Knowledge Scripts

Select time range In the Select Date/Time Range dialog box, set specific start and end report information dates, good for historical or ad hoc reports, or a sliding range, the default, that sets the time range of data to include in the report. This option is useful for reports running on a regular schedule and is the default.
Select peak weekday(s) Click Browse [...] to see the Select Peak Weekday(s) dialog box. Press Shift and click on days to select a contiguous range of days, or Ctrl+Click to select non-contiguous days.
Aggregation by Select the time unit by which to aggregate data. Default is Hour. This works in conjunction with the next field, Aggregation interval, which determines the number of units for one interval of data aggregation.
Aggregation interval Select the interval units in which to aggregate data. Default is 1. For example, if you aggregate by the Hour and select 1 here, data is aggregated once every hour.
Report settings
Include parameter card? Select the Yes check box to include a table in the report that lists parameter settings for the report Knowledge Script. By default, the table is included.
Include Percent Available detail table?
Specify whether to display the Percent Available detail table as part of the report. By default, the table is included.
Include Percent Available chart? Specify whether to display the Percent Available chart as part of the report. By default, the chart is included.
Threshold on Percent Available chart (selected units)
Enter an integer for the availability, as a percent (%), to use as a threshold on the chart. Default is 0, or no threshold is displayed.
Select chart style Options in the Chart Settings dialog box set the appearance of the chart. The same parameters are used in both the availability and ResponseTime charts, if both are produced. Default is Ribbon.
Select output folder In the Specify report folder/filename dialog box, enter an output filename and fill in the remote folder fields. The default is Web-RT_ Script Name>.
Add job ID to output folder name?
Specify whether to add a job ID to the output folder name.
Index-Report Title In the Report Properties dialog box, configure report title settings. Default is Web-RT_URLCheck:(Script Name).
Add time stamp to title Specify whether to add a time stamp to the report title. By default, no timestamp is added.
Event notification
Generate event on success? Specify whether an event is raised when a report is generated. By default, events are raised.
Severity level for report success Set the severity level for a successful report. Default is 35 (magenta event indicator).
Severity level for report with no data
Set the severity level for a report with no data. Default is 25 (blue event indicator).
Severity level for report failure Set the severity level for a report with no data. Default is 5 (red event indicator).
Description How to Set It
Web-RT Knowledge Scripts 191

13.9 Report_Web-RT_WebUse this Report Knowledge Script to generate a report detailing availability and response time for the WebTransaction Knowledge Scripts created with the Web Recorder extension.
This contains two graphs and tables with Availability and overall Response Time for a particular Knowledge Script. For more information, see Section 4.1, “Recording a Browsing Session,” on page 33.
NOTE: This Knowledge Script only works with WebTransaction Knowledge Scripts that use the default legend names.
13.9.1 Resource Object
Web-RT
13.9.2 Default Schedule
The default schedule is Run once.
13.9.3 Setting Parameter Values
Set the following parameters as needed:
Description How to Set It
Data source
WebTransaction Script Select the Knowledge Script to report on. Click Browse [...] to show the Select a Knowledge Script dialog box. Highlight a WebTransaction Knowledge Script from the Knowledge Script Name list and click Finish to select it.
Web-RT client(s) Select the Web-RT clients. Click Browse [...] to show the Select View(s) and a Filter dialog box. From the View(s) list, select from 1 to 25 views.
Your subsequent selections are limited to computers or server groups that are visible in the selected views.
Select one of the Filters options:
View: Includes all computers in the views you selected.
Computer: Select from individual computers in the views you selected.
Server Group: Select from server groups in the views you selected. Selecting a server group includes all computers in that group.
Select time range In the Select Date/Time Range dialog box, click Browse [...] to set specific start and end report information dates, good for historical or ad hoc reports, or a sliding range, the default, that sets the time range of data to include in the report. This option is useful for reports running on a regular schedule and is the default.
Select peak weekday(s) Click Browse [...] to see the Select Peak Weekday(s) dialog box. Press Shift and click on days to select a contiguous range of days, or Ctrl+Click to select non-contiguous days.
192 Web-RT Knowledge Scripts

Aggregation by Select the time unit by which to aggregate data. The default is Hour. This works in conjunction with the next field, Aggregation interval, which determines the number of units for one interval of data aggregation.
Aggregation interval Select the interval units in which to aggregate data. The default is 1. For example, if you aggregate by the Hour and select 1 here, data is aggregated once every hour.
Report settings
Include parameter card? Select the Yes check box to include a table in the report that lists parameter settings for the report Knowledge Script. By default, the table is included.
Include Availability detail table?
Specify whether to display the Availability detail table as part of the report. By default, the table is included.
Include Availability chart? Specify whether to display the Availability chart as part of the report. By default, the chart is included.
Threshold on Availability chart
Enter an integer for the availability, as a percent (%), to use as a threshold on the chart. Default is 0, or no threshold is displayed.
Include Response Time detail table?
Specify whether to display the Response Time detail table as part of the report. By default, the table is included.
Include Response Time chart?
Specify whether to display the Response Time chart as part of the report. By default, the chart is included.
Units for Response Time report
Select the response time unit, either the default, msec, or sec.
Threshold on Response Time chart (selected units)
Specify the time for the threshold in units specified in the previous parameters, or use the default of 0.0. Zero suppresses the threshold indicator in the chart.
Select chart style Options in the Chart Settings dialog box set the appearance of the chart. The same parameters are used in both the availability and Response Time charts, if both are produced. Default is Ribbon.
Select output folder In the Specify report folder/filename dialog box, enter an output filename and fill in the remote folder fields.
Add job ID to output folder name?
Specify whether to add a job ID to the output folder name.
Index-Report Title In the Report Properties dialog box, configure report title settings.
Add time stamp to title? Specify whether to add a timestamp to the report title.
Event notification
Generate event on success?
Specify whether an event is raised when a report is generated. By default, events are raised.
Severity level for report success
Set the severity level for a successful report. Default is 35 (magenta event indicator).
Severity level for report with no data
Set the severity level for a report with no data. Default is 25 (blue event indicator).
Severity level for report failure
Set the severity level for a report with no data. Default is 5 (red event indicator).
Description How to Set It
Web-RT Knowledge Scripts 193

13.10 SendAndReceiveInternetMailUse this Knowledge Script to monitor the response time taken to send and receive an Internet mail message using the POP3 and SMTP protocols.
You can run this script as “Interactive User.” This setting requires a user to be physically logged into the computer for the test to run. You might want to do this in environments where a firewall is preventing access to an Active Directory domain controller, or where the test computer is part of a workgroup and not part of a domain. With this feature, the user is not validated, so the test can proceed despite the lack of access to the domain. To run as interactive user, type “Interactive User” for the Run As Username parameter, and leave the Password and Domain parameters blank.
13.10.1 Collecting Data
If you choose to collect data, this Knowledge Script generates the following data streams:
Response time
Overall response time. The information returned by this data stream is also saved with the data point, and can be viewed by double-clicking the data point in the Graph Pane or Chart Console.
Response-time Breakdown. If enabled as separate parameters, up to 5 response-time breakdown data streams. These data streams are individual data points for the different parts of the Knowledge Script transaction that are timed. For more information, see Section 13.10.4, “Setting Parameter Values,” on page 195.
Availability: Returns one of the following values:
1 or 100 = the transaction was successful
0 = the transaction was not successful
The Availability data point is an indication of whether the test succeeded or failed. If, for example, a connection to the POP3 mail server was established but the message was never sent, the Availability data point is 0, which indicates not available or not successful.
An event is raised whenever one of the following occurs:
A threshold that you have specified as an event parameter is exceeded.
The Web-RT InternetMail engine cannot be initialized. An initialization error is generated, but an Availability or Response Time data stream is not generated.
The transaction does not complete successfully. A transaction error is generated. Only an Availability data stream is generated, with a value of 0.
You can select where some of the possible events are displayed in the Operator Console TreeView or Control Center Console Server view. This event proxying feature is useful in Control Center Service Map views. It is not supported for jobs that are started in the Operator Web Console. See the description of the Event on parameter in the following table.
13.10.2 Resource Object
Internet Mail
194 Web-RT Knowledge Scripts
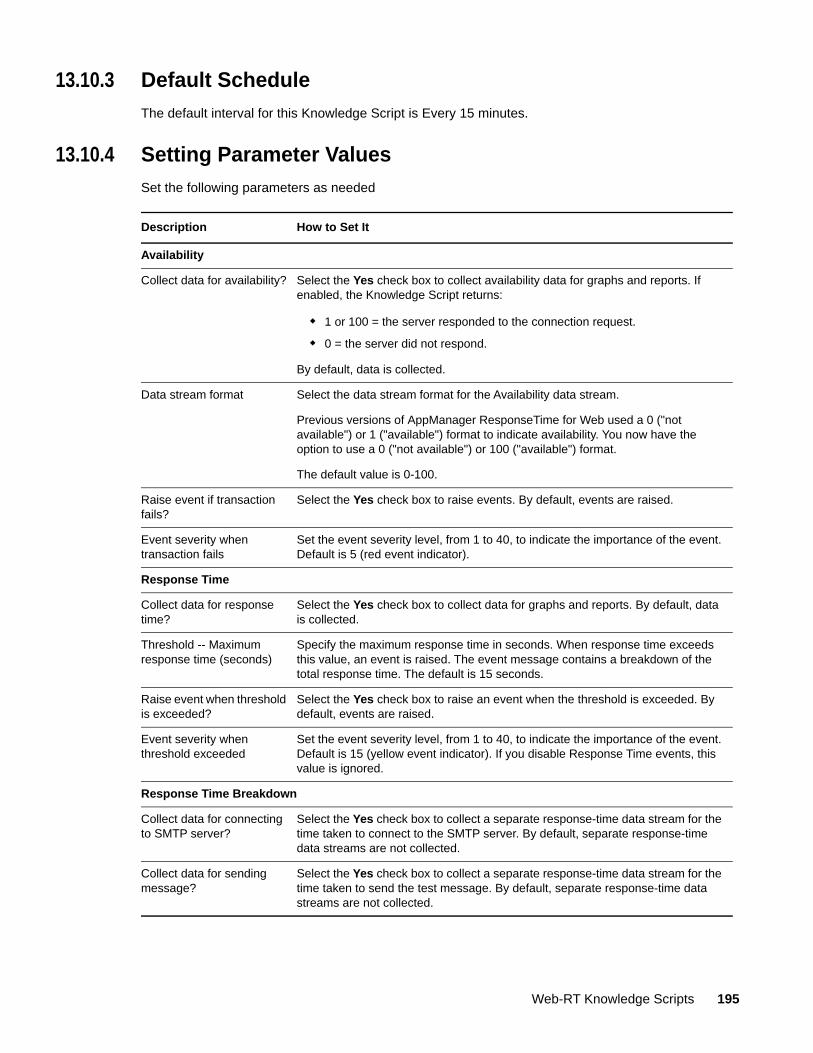
13.10.3 Default Schedule
The default interval for this Knowledge Script is Every 15 minutes.
13.10.4 Setting Parameter Values
Set the following parameters as needed
Description How to Set It
Availability
Collect data for availability? Select the Yes check box to collect availability data for graphs and reports. If enabled, the Knowledge Script returns:
1 or 100 = the server responded to the connection request.
0 = the server did not respond.
By default, data is collected.
Data stream format Select the data stream format for the Availability data stream.
Previous versions of AppManager ResponseTime for Web used a 0 ("not available") or 1 ("available") format to indicate availability. You now have the option to use a 0 ("not available") or 100 ("available") format.
The default value is 0-100.
Raise event if transaction fails?
Select the Yes check box to raise events. By default, events are raised.
Event severity when transaction fails
Set the event severity level, from 1 to 40, to indicate the importance of the event. Default is 5 (red event indicator).
Response Time
Collect data for response time?
Select the Yes check box to collect data for graphs and reports. By default, data is collected.
Threshold -- Maximum response time (seconds)
Specify the maximum response time in seconds. When response time exceeds this value, an event is raised. The event message contains a breakdown of the total response time. The default is 15 seconds.
Raise event when threshold is exceeded?
Select the Yes check box to raise an event when the threshold is exceeded. By default, events are raised.
Event severity when threshold exceeded
Set the event severity level, from 1 to 40, to indicate the importance of the event. Default is 15 (yellow event indicator). If you disable Response Time events, this value is ignored.
Response Time Breakdown
Collect data for connecting to SMTP server?
Select the Yes check box to collect a separate response-time data stream for the time taken to connect to the SMTP server. By default, separate response-time data streams are not collected.
Collect data for sending message?
Select the Yes check box to collect a separate response-time data stream for the time taken to send the test message. By default, separate response-time data streams are not collected.
Web-RT Knowledge Scripts 195

Collect data for connecting to POP3 server?
Select the Yes check box to collect a separate response-time data stream for the time taken to connect to the POP3 server. By default, separate response-time data streams are not collected.
Collect data for scanning incoming mail for message?
Select the Yes check box to collect a separate response-time data stream for the time taken to check the mailbox for the test message. By default, separate response-time data streams are not collected.
Collect data for receiving message?
Select the Yes check box to collect a separate response-time data stream for the time taken to receive the test message. By default, separate response-time data streams are not collected.
SMTP Server Settings
Server name Specify the name of the SMTP server, or click Browse [...] to select from a list of available servers. The server you select must already be in the TreeView.
If you are setting the Event on parameter, the Server name parameter lets you select the server where the event appears in your console.
Server port number Specify the port number of the SMTP server. Default is 25.
Server requires authentication?
Select the Yes check box if the SMTP server needs authentication. The default is Yes.
You can specify to use the same POP3 server settings if the sender and the receiver’s credentials are the same. If they are different, you can specify the credentials specific to SMTP server in the Sender’s Details section.
Sender’s Details
Use same settings as POP3 server
If the credentials of the sender and the receiver is the same, select the Yes check box to use the same credentials specified for POP3 server. The default is Yes. If this is not selected, then the other three parameters within this section are mandatory.
Username Specify the SMTP username of the client where you are running this Knowledge Script.
Password Specify the SMTP password for the associated SMTP user name.
Email address Specify the email address of the client where you are running this Knowledge Script job.
POP3 Server Settings
Server name Specify the name of the POP3 server, or click Browse [...] to select from a list of available servers. The server you select must already be in the TreeView.
If you are setting the Event on parameter, the Server name parameter lets you select the server where the event appears in your console.
Server port number Specify the port number of the POP3 server. Default is 110.
Username Specify the POP3 username of the client where you are running this Knowledge Script.
Password Specify the POP3 password for the associated POP3 user name.
Email address Specify the email address of the client where you are running this Knowledge Script job.
Description How to Set It
196 Web-RT Knowledge Scripts

Message size Specify the number of bytes to include as text in the message body. Default is 1000.
Leave message on server? Select the Yes check box to leave the message on the POP3 server. Clear the box to delete the message from the server. By default, messages are left on server.
Event on Select the TreeView location where events should be displayed. Select either:
Agent -- The client computer in the response-time tests. This is the default.
Server -- The mail server being tested; see the Server name parameter for the POP3 or SMTP server.
Both -- The event is shown in two locations in the TreeView.
Notes This setting does not apply to events related to the Knowledge Script itself, such as Knowledge Script failure or initialization problems. Such events are always displayed on the computer where the job ran.
You must select Agent when starting jobs in the Operator Web Console. If you select Server, no events are generated. If you select Both, an event is only shown on the agent.
Run As
Username Specify the user ID associated with a specific user who has the required permissions to run this application.
Leave the Password and Domain parameters blank if you specify “Interactive User”.
Password Specify the password associated with this user that is required to log on to the network and run the application.
Domain Specify the domain name of the domain you are logging onto.
Administrators group on managed client
Specify the name of the Administrators Group on the managed object. Typically, this name is “Administrators”, except on some foreign-language operating systems. The default is “Administrators”.
Timeouts
Job timeout Set the timeout value, from 1 to 900 seconds, to determine the maximum time allowed to process a job before it's aborted.
When an Web-RT Knowledge Script job runs, a job timer is started. If the transaction takes longer than the Job timeout, the transaction is stopped and a “Job Timeout" event is raised.
The default is 120 seconds.
Queue timeout Set the timeout value, from 1 to 1200 seconds, to determine how long a job can wait for resources before it's aborted.
Multiple simultaneous Web-RT Knowledge Script jobs must wait for a token to run. If no token is available for a job you're trying to run, the job is added to the queue and starts a queue timer. When the Queue Timeout for a job expires, the job does not run, a "Queue Timeout" event is raised, and the job is moved to the end of the queue.
The default is 300 seconds.
Description How to Set It
Web-RT Knowledge Scripts 197

13.11 SendInternetMailUse this Knowledge Script to monitor the response time taken to send an Internet mail message using the SMTP protocol.
You can run this script as “Interactive User.” This setting requires a user to be physically logged into the computer for the test to run. You might want to do this in environments where a firewall is preventing access to an Active Directory domain controller, or where the test computer is part of a workgroup and not part of a domain. With this feature, the user is not validated, so the test can proceed despite the lack of access to the domain. To run as interactive user, type “Interactive User” for the Run As Username parameter, and leave the Password and Domain parameters blank.
13.11.1 Collecting Data
If you choose to collect data, this Knowledge Script generates the following data streams:
Response time
Overall response time. The information returned by this data stream is also saved with the data point, and can be viewed by double-clicking the data point in the Graph Pane or Chart Console.
Response-time Breakdown. If enabled as separate parameters, up to 2 response-time breakdown data streams. These data streams are individual data points for the different parts of the Knowledge Script transaction that are timed. For more information, see Section 13.11.4, “Setting Parameter Values,” on page 199.
Availability: Returns one of the following values:
1 or 100 = the transaction was successful
0 = the transaction was not successful
The Availability data point is an indication of whether the test succeeded or failed. If, for example, a connection to the POP3 mail server was established but the message was never sent, the Availability data point is 0, which indicates not available or not successful.
An event is raised whenever one of the following occurs:
A threshold that you have specified as an event parameter is exceeded.
The Web-RT InternetMail engine cannot be initialized. An initialization error is generated, but an Availability or Response Time data stream is not generated.
The transaction does not complete successfully. A transaction error is generated. Only an Availability data stream is generated, with a value of 0.
You can select where some of the possible events are displayed in the Operator Console TreeView or Control Center Console Server view. This event proxying feature is useful in Control Center Service Map views. It is not supported for jobs that are started in the Operator Web Console. See the description of the Event on parameter in the following table.
Connection timeout Set the connection timeout value to determine how long a job can wait for a connection to the POP3 and SMTP servers before the job is aborted.
The default is 30 seconds.
Description How to Set It
198 Web-RT Knowledge Scripts

13.11.2 Resource Object
Internet Mail
13.11.3 Default Schedule
The default interval for this Knowledge Script is Every 15 minutes.
13.11.4 Setting Parameter Values
Set the following parameters as needed
Description How to Set It
Availability
Collect data for availability? Select the Yes check box to collect availability data for graphs and reports. If enabled, the Knowledge Script returns:
1 or 100 = the server responded to the connection request.
0 = the server did not respond.
By default, data is collected.
Data stream format Select the data stream format for the Availability data stream.
Previous versions of AppManager ResponseTime for Web used a 0 ("not available") or 1 ("available") format to indicate availability. You now have the option to use a 0 ("not available") or 100 ("available") format.
The default value is 0-100.
Raise event if transaction fails?
Select the Yes check box to raise events. By default, events are raised.
Event severity when transaction fails
Set the event severity level, from 1 to 40, to indicate the importance of the event. Default is 5 (red event indicator).
Response Time
Collect data for response time?
Select the Yes check box to collect data for graphs and reports. By default, data is collected.
Threshold -- Maximum response time (seconds)
Specify the maximum response time in seconds. When response time exceeds this value, an event is raised. The event message contains a breakdown of the total response time. The default is 15 seconds.
Raise event when threshold is exceeded?
Select the Yes check box to raise an event when the threshold is exceeded. By default, events are raised.
Event severity when threshold is exceeded
Set the event severity level, from 1 to 40, to indicate the importance of the event. Default is 15 (yellow event indicator). If you disable Response Time events, this value is ignored.
Response Time Breakdown
Collect data for connecting to SMTP server?
Select the Yes check box to collect a separate response-time data stream for the time taken to connect to the SMTP server. By default, separate response-time data streams are not collected.
Web-RT Knowledge Scripts 199

Collect data for sending message?
Select the Yes check box to collect a separate response-time data stream for the time taken to send the test message. By default, separate response-time data streams are not collected.
SMTP Server Settings
Server name Specify the name of the SMTP server, or click Browse [...] to select from a list of available servers. The server you select must already be in the TreeView.
If you are setting the Event on parameter, the Server name parameter lets you select the server where the event appears in your console.
Server port number Specify the port number of the SMTP server. Default is 25.
Server requires authentication?
Select the Yes check box if the SMTP server needs authentication. The default is Yes.
Sender’s Details
Username Specify the SMTP username of the client where you are running this Knowledge Script.
Password Specify the SMTP password for the associated SMTP user name.
Email address Specify the email address of the client (SMTP) where you are running this Knowledge Script job.
Email address Specify the email address of the client (POP3) where you are running this Knowledge Script.
Message size Specify the number of bytes to include as text in the message body. Default is 1000.
Event on Select the TreeView location where events should be displayed. Select either:
Agent -- The client computer in the response-time tests. This is the default.
Server -- The mail server being tested; see the Server name parameter.
Both -- The event is shown in two locations in the TreeView.
Notes This setting does not apply to events related to the Knowledge Script itself, such as Knowledge Script failure or initialization problems. Such events are always displayed on the computer where the job ran.
You must select Agent when starting jobs in the Operator Web Console. If you select Server, no events are generated. If you select Both, an event is only shown on the agent.
Run As
Username Specify the user ID associated with a specific user who has the required permissions to run this application.
Leave the Password and Domain parameters blank if you specify “Interactive User”.
Password Specify the password associated with this user that is required to log on to the network and run the application.
Domain Specify the domain name of the domain you are logging onto.
Description How to Set It
200 Web-RT Knowledge Scripts

13.12 SMTPConnectUse this Knowledge Script to monitor the availability of an SMTP server. When the specified SMTP server does not respond to a connection to the SMTP port (port 25), an event is raised.
You can select where some of the possible events are displayed in the Operator Console TreeView or Control Center Console Server view. This event proxying feature is useful in Control Center Service Map views. It is not supported for jobs that are started in the Operator Web Console. See the description of the Event on parameter in the following table.
If you choose to collect data, a data stream for Availability is generated, with one of the following values:
1 or 100 = the SMTP server responded to the connection request, or
0 = the SMTP server did not respond.
The Availability data point is an indication of whether the test succeeded or failed. If a connection to the SMTP server cannot be established, the Availability data point is 0, which indicates not available or not successful.
13.12.1 Resource Object
SMTP
Administrators group on managed client
Specify the name of the Administrators Group on the managed object. Typically, this name is “Administrators”, except on some foreign-language operating systems. The default is “Administrators”.
Timeouts
Job timeout Set the timeout value, from 1 to 900 seconds, to determine the maximum time allowed to process a job before it's aborted.
When an Web-RT Knowledge Script job runs, a job timer is started. If the transaction takes longer than the Job timeout, the transaction is stopped and a “Job Timeout" event is raised.
The default is 120 seconds.
Queue timeout Set the timeout value, from 1 to 1200 seconds, to determine how long a job can wait for resources before it's aborted.
Multiple simultaneous Web-RT Knowledge Script jobs must wait for a token to run. If no token is available for a job you're trying to run, the job is added to the queue and starts a queue timer. When the Queue Timeout for a job expires, the job does not run, a "Queue Timeout" event is raised, and the job is moved to the end of the queue.
The default is 300 seconds.
Connection timeout Set the connection timeout value to determine how long a job can wait for a connection to the POP3 and SMTP servers before the job is aborted.
The default is 30 seconds.
Description How to Set It
Web-RT Knowledge Scripts 201

13.12.2 Default Schedule
The default interval for this Knowledge Script is Every 15 minutes.
13.12.3 Setting Parameter Values
Set the following parameters as needed:
Description How to Set It
Availability
Collect data for availability?
Select the Yes check box to collect availability data for graphs and reports. If enabled, the Knowledge Script returns:
1 or 100 = the SMTP server responded to the connection request.
0 = the SMTP server did not respond.
By default, data is collected.
Data stream format Select the data stream format for the Availability data stream.
Previous versions of AppManager ResponseTime for Web used a 0 ("not available") or 1 ("available") format to indicate availability. You now have the option to use a 0 ("not available") or 100 ("available") format.
The default value is 0-100.
Raise event if connection fails?
Select the Yes check box to raise events. By default, events are raised.
Event severity when connection fails
Set the event severity level, from 1 to 40, to indicate the importance of the event. Default is 5 (red event indicator).
SMTP Server Specify the name of the SMTP server that you want to test. For example, gazelle.netiq.com. You can also click Browse [...] to select from a list of available servers. The server you select must already be in the TreeView.
If you are setting the Event on parameter, the SMTP Server parameter lets you select the server where the event appears in your console.
You can also pass a port number following the SMTP servername. For example, you can enter gazelle.netiq.com:2500.
Event on Select the TreeView location where events should be displayed. Select either:
Agent -- The client computer in the response-time tests. This is the default.
Server -- The mail server being tested; see the SMTP Server parameter.
Both -- The event is shown in two locations in the TreeView.
Notes This setting does not apply to events related to the Knowledge Script itself, such as Knowledge Script failure or initialization problems. Such events are always displayed on the computer where the job ran.
You must select Agent when starting jobs in the Operator Web Console. If you select Server, no events are generated. If you select Both, an event is only shown on the agent.
202 Web-RT Knowledge Scripts

13.13 TakeDesktopOwnershipUse this Knowledge Script to reassign control of the desktop on the managed client computer when another module is controlling it.
NOTE: You only need to run this Knowledge Script if you are also using AppManager ResponseTime for Windows and you want to run Web-RT_WebTransaction Knowledge Scripts and Win-RT Knowledge Scripts on the same managed client.
Both Win-RT and Web-RT_WebTransaction Knowledge Scripts must have control of the desktop in order to run or play back. However, only one software application can control the desktop at any point. When a WebTransaction Knowledge Script runs, it checks for the value of the “Desktop” registry key on the managed client. If that value assigns control of the desktop to another software application, the Knowledge Script fails and displays a Playback error.
Use this Knowledge Script to overwrite any existing value for the “Desktop” registry key, located under HKEY_LOCAL_MACHINE\SOFTWARE\NetIQ\Response Time, and force control of the desktop to be granted to AppManager ResponseTime for Web.
13.13.1 Resource Object
Web-RT
13.13.2 Default Schedule
The default interval for this Knowledge Script is Run once.
13.13.3 Setting Parameter Values
Set the following parameters as needed:
Description How to Set It
General Settings
Job Failure Notification
Event severity when take desktop ownership fails?
Specify a severity level for the event raised when an error prevents the Knowledge Script from setting the registry value indicating that AppManager ResponseTime for Web has ownership of the desktop. Default is 5 (red event indicator).
Raise event if take desktop ownership successful?
Check the box to raise an event when the Knowledge Script updates the registry value indicating that AppManager ResponseTime for Web has ownership of the desktop.
By default, events are not raised.
Event severity when take desktop ownership successful?
Specify a severity level for the event raised when the Knowledge Script updates the registry value indicating that AppManager ResponseTime for Web has ownership of the desktop. Default is 35 (magenta event indicator).
Web-RT Knowledge Scripts 203

13.14 URLCheckUse this Knowledge Script to monitor the availability and performance of URLs, including validating and searching for text, links, and objects. This Knowledge Script is generated by the URL Check Recorder extension.
The URL Properties configured in URL Check Recorder are distinct settings and cannot be edited in the Knowledge Script itself. The Knowledge Script parameters, which for the most part are determined by URL Check Recorder settings when the Knowledge Script was created, let you further configure or change Knowledge Script execution and results collection. You can make an additional set of customizations by editing the Knowledge Script Options, which let you determine the titles of events and data streams. To change these options or the URL Properties, you can check out the Knowledge Script, reopen it in URL Check Recorder, edit it, save it, and check it back in.
Knowledge Scripts created using the URL Check Recorder are different from the provided CheckURL Knowledge Script. The CheckURL Knowledge Script monitors a single URL and can only be modified using the Control Center or Operator Console. For more information, see CheckURL.
NOTE: Context-sensitive Help is not available for URLCheck Knowledge Scripts. To access Help for URLCheck Knowledge Scripts, launch the Help for AppManager. In the Table of Contents pane of the Help window, click Knowledge Script Reference, then Web-RT Knowledge Scripts. Scroll through the table shown in the right pane and click URLCheck to view Help for these Knowledge Scripts.
13.14.1 Resource Object
URL Check
13.14.2 Default Schedule
The default interval for these Knowledge Scripts is Every hour.
13.14.3 Setting Parameter Values
Set the following parameters as needed. This table includes all available parameters. Depending on how you configure URLCheck options for a particular Knowledge Script, some parameters may not be available.
Description How to Set It
General
Allow auto-redirects? Select the Yes check box to allow auto-redirects of URLs. By default, redirects are allowed.
Details to be included in events Set to Failure to collect details only on failure events, or All to collect for all results. Default is Failure.
Logical Target Specify the identifier to use to enable retrieval of data streams by AppManager Analysis Center v2.0 and higher.
By default, either the Label or the Link text for the first URL.
Overall Availability
204 Web-RT Knowledge Scripts
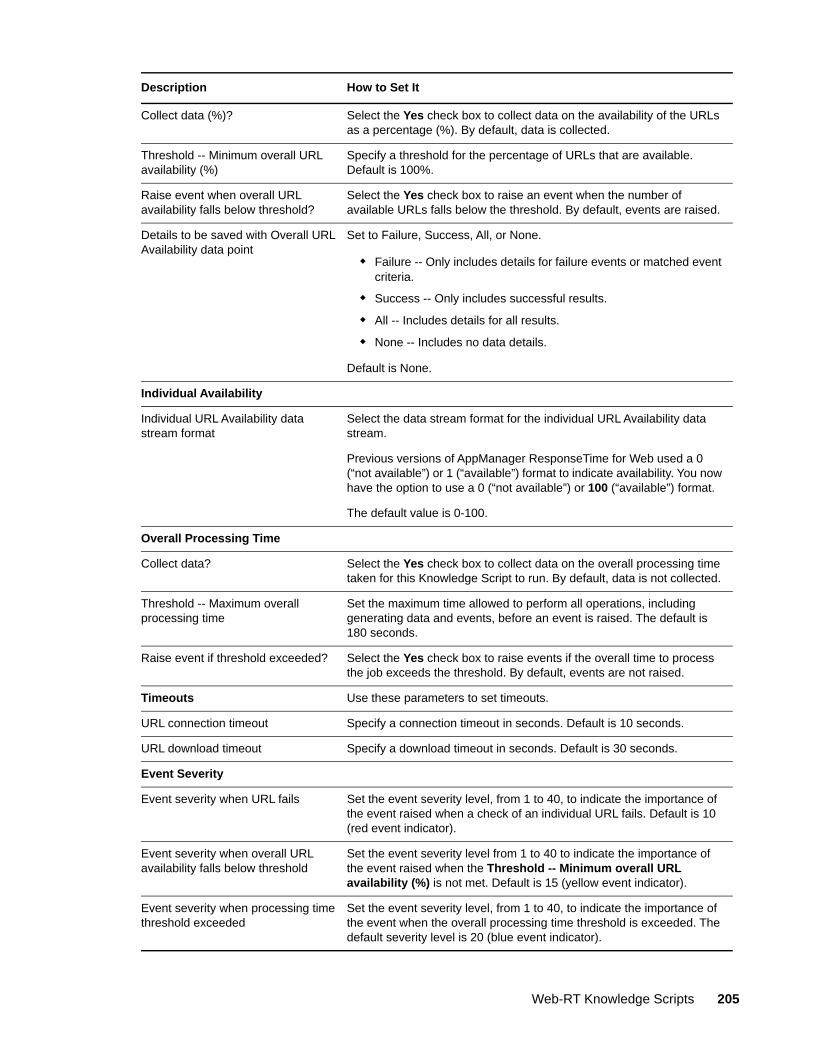
Collect data (%)? Select the Yes check box to collect data on the availability of the URLs as a percentage (%). By default, data is collected.
Threshold -- Minimum overall URL availability (%)
Specify a threshold for the percentage of URLs that are available. Default is 100%.
Raise event when overall URL availability falls below threshold?
Select the Yes check box to raise an event when the number of available URLs falls below the threshold. By default, events are raised.
Details to be saved with Overall URL Availability data point
Set to Failure, Success, All, or None.
Failure -- Only includes details for failure events or matched event criteria.
Success -- Only includes successful results.
All -- Includes details for all results.
None -- Includes no data details.
Default is None.
Individual Availability
Individual URL Availability data stream format
Select the data stream format for the individual URL Availability data stream.
Previous versions of AppManager ResponseTime for Web used a 0 (“not available”) or 1 (“available”) format to indicate availability. You now have the option to use a 0 (“not available”) or 100 (“available”) format.
The default value is 0-100.
Overall Processing Time
Collect data? Select the Yes check box to collect data on the overall processing time taken for this Knowledge Script to run. By default, data is not collected.
Threshold -- Maximum overall processing time
Set the maximum time allowed to perform all operations, including generating data and events, before an event is raised. The default is 180 seconds.
Raise event if threshold exceeded? Select the Yes check box to raise events if the overall time to process the job exceeds the threshold. By default, events are not raised.
Timeouts Use these parameters to set timeouts.
URL connection timeout Specify a connection timeout in seconds. Default is 10 seconds.
URL download timeout Specify a download timeout in seconds. Default is 30 seconds.
Event Severity
Event severity when URL fails Set the event severity level, from 1 to 40, to indicate the importance of the event raised when a check of an individual URL fails. Default is 10 (red event indicator).
Event severity when overall URL availability falls below threshold
Set the event severity level from 1 to 40 to indicate the importance of the event raised when the Threshold -- Minimum overall URL availability (%) is not met. Default is 15 (yellow event indicator).
Event severity when processing time threshold exceeded
Set the event severity level, from 1 to 40, to indicate the importance of the event when the overall processing time threshold is exceeded. The default severity level is 20 (blue event indicator).
Description How to Set It
Web-RT Knowledge Scripts 205
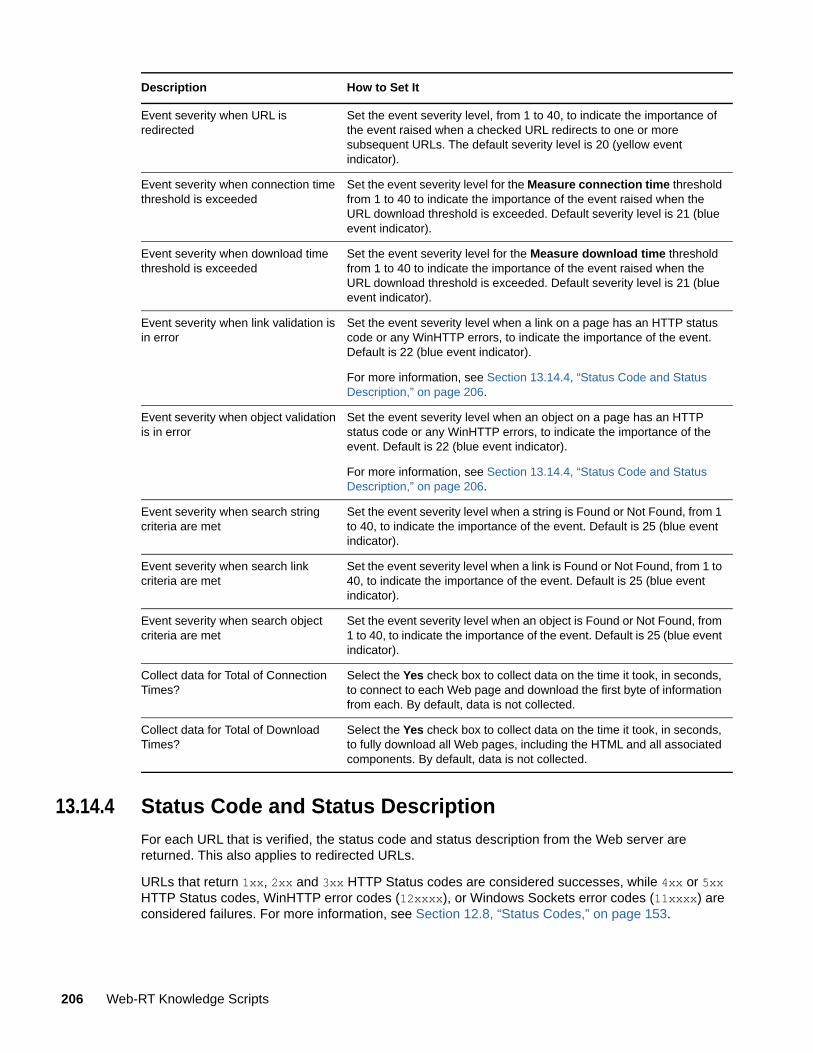
13.14.4 Status Code and Status Description
For each URL that is verified, the status code and status description from the Web server are returned. This also applies to redirected URLs.
URLs that return 1xx, 2xx and 3xx HTTP Status codes are considered successes, while 4xx or 5xx HTTP Status codes, WinHTTP error codes (12xxxx), or Windows Sockets error codes (11xxxx) are considered failures. For more information, see Section 12.8, “Status Codes,” on page 153.
Event severity when URL is redirected
Set the event severity level, from 1 to 40, to indicate the importance of the event raised when a checked URL redirects to one or more subsequent URLs. The default severity level is 20 (yellow event indicator).
Event severity when connection time threshold is exceeded
Set the event severity level for the Measure connection time threshold from 1 to 40 to indicate the importance of the event raised when the URL download threshold is exceeded. Default severity level is 21 (blue event indicator).
Event severity when download time threshold is exceeded
Set the event severity level for the Measure download time threshold from 1 to 40 to indicate the importance of the event raised when the URL download threshold is exceeded. Default severity level is 21 (blue event indicator).
Event severity when link validation is in error
Set the event severity level when a link on a page has an HTTP status code or any WinHTTP errors, to indicate the importance of the event. Default is 22 (blue event indicator).
For more information, see Section 13.14.4, “Status Code and Status Description,” on page 206.
Event severity when object validation is in error
Set the event severity level when an object on a page has an HTTP status code or any WinHTTP errors, to indicate the importance of the event. Default is 22 (blue event indicator).
For more information, see Section 13.14.4, “Status Code and Status Description,” on page 206.
Event severity when search string criteria are met
Set the event severity level when a string is Found or Not Found, from 1 to 40, to indicate the importance of the event. Default is 25 (blue event indicator).
Event severity when search link criteria are met
Set the event severity level when a link is Found or Not Found, from 1 to 40, to indicate the importance of the event. Default is 25 (blue event indicator).
Event severity when search object criteria are met
Set the event severity level when an object is Found or Not Found, from 1 to 40, to indicate the importance of the event. Default is 25 (blue event indicator).
Collect data for Total of Connection Times?
Select the Yes check box to collect data on the time it took, in seconds, to connect to each Web page and download the first byte of information from each. By default, data is not collected.
Collect data for Total of Download Times?
Select the Yes check box to collect data on the time it took, in seconds, to fully download all Web pages, including the HTML and all associated components. By default, data is not collected.
Description How to Set It
206 Web-RT Knowledge Scripts

For more information about HTTP status codes and Windows Socket error codes, see the following references.
13.14.5 Redirects
By default, when checking the status of a URL that is redirected, both the original URL and all subsequently redirected URLs are verified, and status is returned for all URLs. This option can be disabled by disabling the Allow Auto-Redirects? parameter.
13.14.6 Timeouts
The URL connection timeout and URL download timeouts can be modified if connections and downloads are timing out. In most cases, you get an error code of 12002 for timeout conditions. For more information, see Section 14.3, “Problems with URL Check Recorder,” on page 215.
13.15 WebTransactionThe Web Recorder extension lets you record a typical set of user transactions on a Web site and save this information as an AppManager Knowledge Script. When you check in the new Knowledge Script, it is added to the Web-RT category by default.
You can then run the Knowledge Script on any computer that has the Web-RT module installed. The generated Knowledge Script allows you to monitor the availability and response time required to complete the entire transaction, as well as the individual steps within the transaction.
You can select where some of the possible events are displayed in the Operator Console TreeView or Control Center Console Server view. This event proxying feature is useful in Control Center Service Map views. It is not supported for jobs that are started in the Operator Web Console. See the description of the Event on parameter in the following table.
Each WebTransaction Knowledge Script contains all information you entered while performing and recording the transaction. Any information that is encrypted during the recorded browsing session is also encrypted in the resulting Knowledge Script.
NOTE: When you generate WebTransaction Knowledge Scripts with Web Recorder, you rename them in order to save the contents of each transaction. However, this means that the context-sensitive Help no longer works from the renamed Knowledge Scripts. To access Help for WebTransaction Knowledge Scripts, launch the Help for AppManager. In the left pane of the Help window, click Knowledge Script Reference in the Table of Contents, then click Web-RT Knowledge Scripts to see the table of Knowledge Script types.
13.15.1 Resource Object
Web Transaction
Category Link
HTTP status codes http://msdn2.microsoft.com/en-us/library/Aa384325.aspx
WinHTTP error codes http://msdn2.microsoft.com/en-us/library/Aa383770.aspx
Windows Sockets error codes http://msdn2.microsoft.com/en-us/library/ms740668.aspx
Web-RT Knowledge Scripts 207

13.15.2 Default Schedule
The default interval for this Knowledge Script type is Every 15 minutes.
13.15.3 Setting Parameter Values
Set the following parameters as needed:
Description How to Set It
General
Run in silent mode? Select the Yes check box to instruct the Knowledge Script to play back without displaying anything on the computer screen.
NOTE: Silent mode is not available if the Knowledge Script contains any steps that have the MouseMove option enabled.
By default, silent mode is enabled.
Execution speed Set to Slow, Medium, or Fast to determine how fast the Knowledge Script plays back on the managed client. This parameter is controlled by means of the Playback Speed function in Web Recorder.
By default, the execution speed is set to Medium.
Refer to the Web Recorder online Help for the values.
Logical Target Enter an identifier to use to enable retrieval of all data streams in AppManager Analysis Center v2.0 and higher.
By default, this field is set with information from the first Navigate step. It may be, for example, the URL of the page accessed.
Target Computer Enter an identifier to use to enable retrieval of all data streams in AppManager Analysis Center v2.0 and higher.
Select the name of the target Web server for the transaction from the list of monitored Web servers.
If you are setting the Event on parameter, the Target Computer parameter lets you select the server where the event appears in your console.
This field may be left blank, which is the default setting.
Log Session Transcript? Select the Yes check box to create a log file containing the session transcript of the Knowledge Script Playback. If enabled, saves the log file in the ..\NetIQ\AppManager\temp\netiq_debug\[computername] directory. The log filename is Web-RT[JobNumber]Transcript.log.
By default, no log is created.
NOTE: This option should only be enabled to aid in the debugging of problems.
208 Web-RT Knowledge Scripts

Event on Select the TreeView location where events should be displayed. Select either:
Agent -- The client computer in the response-time tests. This is the default.
Server -- The Web server being tested; see the Target Computer parameter.
Both -- The event is shown in two locations in the TreeView.
Notes This setting does not apply to events related to the Knowledge Script itself, such as Knowledge Script failure or initialization problems. Such events are always displayed on the computer where the job ran.
You must select Agent when starting jobs in the Operator Web Console. If you select Server, no events are generated. If you select Both, an event is only shown on the agent.
Capture browser snapshot when object not found?
Select the Yes check box to instruct Web Recorder to take a screen capture of the browser window if the step fails because an object is not found.
Enable this parameter to take a screen capture in JPEG (.jpg) format. The image file is saved to ..\NetIQ\temp\netiq_debug\[ComputerName]. The filename begins with “WebTransaction” and the job ID number, and it includes the time and date.
Tip To ensure that the screen capture shows the entire page, re-record the transaction. While recording, click Maximize in the browser window. When you return to the Web Recorder window, a Resize Browser step is available. Set the coordinates as needed to make the browser window as large as possible.
See the following parameter for another snapshot option.
Capture HTML snapshot when object not found?
Select the Yes check box to instruct Web Recorder to take a snapshot of the browser window if the step fails because an object is not found.
Enable this parameter to take a screen capture in HTML (.htm) format. The HTML file is saved to ..\NetIQ\temp\netiq_debug\[ComputerName]. The filename begins with “WebTransaction” and the job ID number, and it includes the time and date.
See the previous parameter for another snapshot option.
Capture browser snapshot on Navigate Errors?
Select the Yes check box to instruct Web Recorder to take a screen capture of the browser window if the step fails because of a Navigate Error.
Enable this parameter to take a screen capture in JPEG (.jpg) format. The image file is saved to ..\NetIQ\temp\netiq_debug\[ComputerName]. The filename begins with “WebTransaction” and the job ID number, and it includes the time and date.
Tip To ensure that the screen capture shows the entire page, re-record the transaction. While recording, click Maximize in the browser window. When you return to the Web Recorder window, a Resize Browser step is available. Set the coordinates as needed to make the browser window as large as possible.
See the following parameter for another snapshot option.
Description How to Set It
Web-RT Knowledge Scripts 209
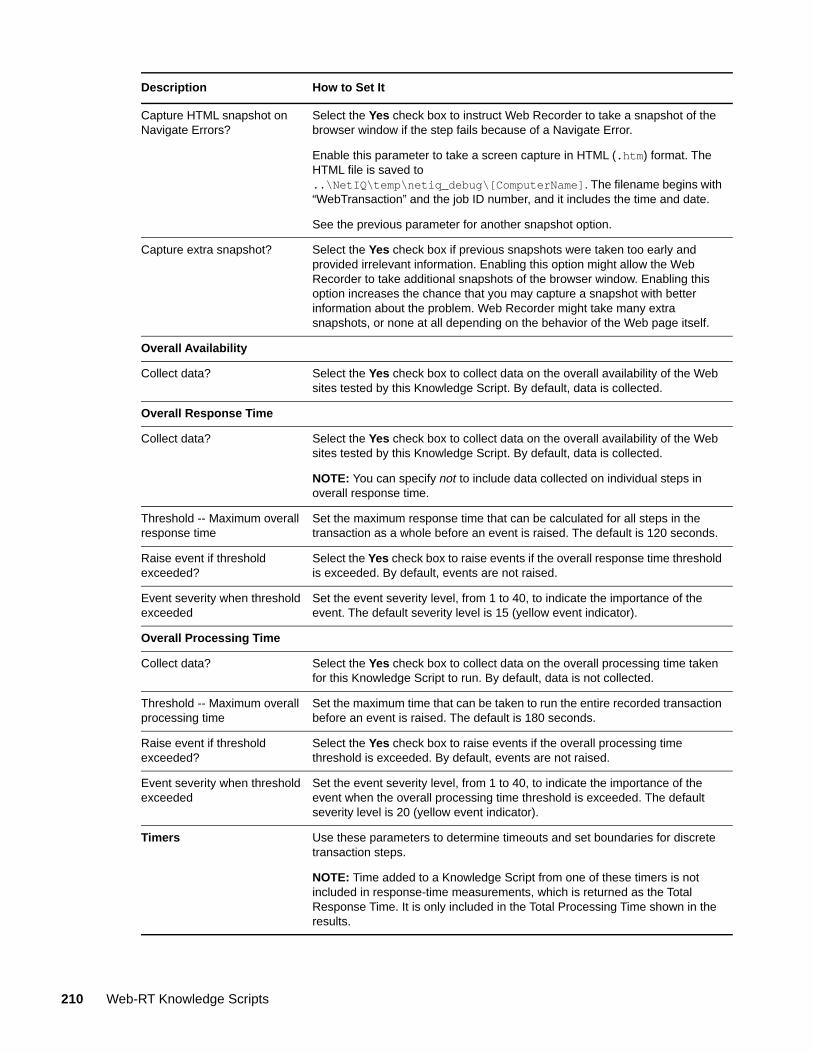
Capture HTML snapshot on Navigate Errors?
Select the Yes check box to instruct Web Recorder to take a snapshot of the browser window if the step fails because of a Navigate Error.
Enable this parameter to take a screen capture in HTML (.htm) format. The HTML file is saved to ..\NetIQ\temp\netiq_debug\[ComputerName]. The filename begins with “WebTransaction” and the job ID number, and it includes the time and date.
See the previous parameter for another snapshot option.
Capture extra snapshot? Select the Yes check box if previous snapshots were taken too early and provided irrelevant information. Enabling this option might allow the Web Recorder to take additional snapshots of the browser window. Enabling this option increases the chance that you may capture a snapshot with better information about the problem. Web Recorder might take many extra snapshots, or none at all depending on the behavior of the Web page itself.
Overall Availability
Collect data? Select the Yes check box to collect data on the overall availability of the Web sites tested by this Knowledge Script. By default, data is collected.
Overall Response Time
Collect data? Select the Yes check box to collect data on the overall availability of the Web sites tested by this Knowledge Script. By default, data is collected.
NOTE: You can specify not to include data collected on individual steps in overall response time.
Threshold -- Maximum overall response time
Set the maximum response time that can be calculated for all steps in the transaction as a whole before an event is raised. The default is 120 seconds.
Raise event if threshold exceeded?
Select the Yes check box to raise events if the overall response time threshold is exceeded. By default, events are not raised.
Event severity when threshold exceeded
Set the event severity level, from 1 to 40, to indicate the importance of the event. The default severity level is 15 (yellow event indicator).
Overall Processing Time
Collect data? Select the Yes check box to collect data on the overall processing time taken for this Knowledge Script to run. By default, data is not collected.
Threshold -- Maximum overall processing time
Set the maximum time that can be taken to run the entire recorded transaction before an event is raised. The default is 180 seconds.
Raise event if threshold exceeded?
Select the Yes check box to raise events if the overall processing time threshold is exceeded. By default, events are not raised.
Event severity when threshold exceeded
Set the event severity level, from 1 to 40, to indicate the importance of the event when the overall processing time threshold is exceeded. The default severity level is 20 (yellow event indicator).
Timers Use these parameters to determine timeouts and set boundaries for discrete transaction steps.
NOTE: Time added to a Knowledge Script from one of these timers is not included in response-time measurements, which is returned as the Total Response Time. It is only included in the Total Processing Time shown in the results.
Description How to Set It
210 Web-RT Knowledge Scripts

Queue timeout Set the timeout value, from 1 to 60 minutes, to determine how long a job can wait for resources before it is aborted.
Multiple simultaneous WebTransaction Knowledge Script jobs must wait for a token to run because they all depend on Internet Explorer. If no token is available for a job you are trying to run, the transaction is added to the queue and starts a queue timer. When the queue timeout for a job expires, the transaction does not run, a “Queue Timeout” event is raised, and the transaction is moved to the end of the queue.
The default is 5 minutes.
Job timeout Set the timeout value, from 1 60 minutes, to determine the maximum time allowed to process a job before it is aborted.
When a WebTransaction Knowledge Script job runs, a job timer is started. If the transaction takes longer than the job timeout, the transaction is stopped and a “Job Timeout” event is raised. This avoids allowing any job to use Internet Explorer resources for too long.
The default is 5 minutes.
NOTE: The Total Processing Time shown in the results after Playback is a guideline for determining an appropriate job timeout value: the job timeout value should be slightly greater than the maximum Total Processing Time.
Consider document complete N seconds after page change
Set the value, from 1 to 30 seconds, to determine how long Web Recorder should wait after a Web page transition event to consider the page download complete.
This timer lets Web Recorder complete a transaction step even if it never receives the Document Complete signal from Internet Explorer to indicate that the page has been fully loaded.
The default is 20 seconds.
Consider document complete N seconds after Download Complete
Set the value, from 5 to 300 seconds, to determine how long Web Recorder should wait after receiving a Download Complete signal from Internet Explorer to consider the page to be completely loaded.
This timer lets Web Recorder complete a transaction step even if it never receives the proper signal from Internet Explorer to indicate that the new page has been fully loaded.
The default is 10 seconds.
Delay after document complete
Set the value, from 0 to 10 seconds, to determine whether and how long Web Recorder should pause before moving on to a new step.
Internet Explorer can sometimes send several “final” Document Complete signals. Web Recorder may therefore consider the step to be complete at the first Document Complete signal, before all objects are actually rendered. This option means that Web Recorder waits for up to 10 seconds after it has determined that the step is complete before it moves on to the next step, giving all objects a further opportunity to be retrieved.
The default is 1 second.
Global Step Options
Description How to Set It
Web-RT Knowledge Scripts 211

Event severity when threshold exceeded
Set the event severity level, from 1 to 40, to indicate the importance of the event when the response time for any individual step exceeds its threshold. The default severity level is 16 (yellow event indicator).
Event severity when step fails Set the event severity level, from 1 to 40, to indicate the importance of the event when any individual step fails. The default severity level is 10 (red event indicator).
Event severity on Navigate Error
Set the event severity level, from 1 to 40, to indicate the importance of the event when any individual step fails because of a Navigate Error. The default severity level is 18 (yellow event indicator).
Step [n] [x] [d] Use the parameters in the individual step folders to set options for data collection, to define threshold values, and to enable events.
Each step is identified by its step index number (variable n), its step type (variable x), and a step description (variable d). For more information, see Section 8.6, “Step-Identifying Variables,” on page 89.
Collect data for availability? Select the Yes check box to collect data on the availability of the Web page accessed by this step. By default, data is not collected, but this value depends on what you have set in the Knowledge Script tab of the Web Recorder Options.
Collect data for response time?
Select the Yes check box to collect data on the response time taken to load the Web page accessed by this step. By default, data is not collected, but this value depends on what you have set in the Knowledge Script tab of the Web Recorder Options.
Included in Overall Response Time?
Select the Yes check box to include collected data in the Overall Response Time. By default, data is included.
NOTE: Ensure you include the collected data from at least one step, or your overall response time is zero.
Threshold -- Maximum response time
Set the maximum time that can be taken to complete this transaction step before an event is raised. The default is 30 seconds. This value depends on what you have set in the Knowledge Script tab of the Web Recorder Options.
Raise event if threshold is exceeded?
Select the Yes check box to raise events if the response time threshold is exceeded. By default, events are enabled.
The event severity that you set in the Global Step Options folder applies to this event.
Description How to Set It
212 Web-RT Knowledge Scripts

14 14Troubleshooting AppManager ResponseTime for Web
This chapter describes how to troubleshoot AppManager ResponseTime for Web. For questions or problems related to Web Recorder or Playback of a WebTransaction Knowledge Script, see Chapter 10, “Troubleshooting Web Recorder Playback,” on page 101.
14.1 Result Differences between URLCheck and WebTransaction Knowledge ScriptsUsing Web-RT Knowledge Scripts to monitor Web pages provides information on data size and response time. If you compare results from a WebTransaction and URLCheck Knowledge Script monitoring the same Web site, you might notice significant differences. Our testing on some live Web sites yielded some surprising results, which prompted us to take a closer look at the sources of the pages to understand what was going on. We concluded that because the World Wide Web is a chaotic place, where coding standards are lax or nonexistent, it is important to be aware of the content of a Web page before questioning AppManager ResponseTime for Web results. We explain further in the following sections.
14.1.1 Browser Overhead
First of all, consider that Web Recorder runs in Microsoft Internet Explorer. As a result, and because it also handles dynamic content, it involves some overhead as compared with URL Check Recorder, which does not depend on Internet Explorer. So even when the size of a download is consistent, when it is performed by both technologies, the time reported by a URLCheck Knowledge Script is usually shorter.
14.1.2 Static Content
“Static” Web site content refers to all the links and objects on a Web page that do not frequently change. For example, HTML pages that are not updated constantly, or that always look the same, with no animation or cycling advertisements, are probably mostly static. In this case, results from URLCheck and WebTransaction Knowledge Scripts are similar in size and close in time.
14.1.3 Dynamic Content
Dynamic Web site content can include JavaScript, ActiveX, or applets that trigger data flow between the client computer and the Web server. A good example is a Macromedia Flash object. On some automobile manufacturers’ Web sites, when a Web page download is officially completed, data may continue to flow forever between the server and the client until the browser is closed, or until the user moves to another page. In a case like this, a URLCheck Knowledge Script may calculate 10 Kb of data size, which corresponds to the size of the original ASP or HTML document that was downloaded. A WebTransaction Knowledge Script, on the other hand, may calculate 400 Kb for the same page, while an HTTP protocol analyzer may report 300 Kb originally and another 500 Kb per minute on an ongoing basis.
Troubleshooting AppManager ResponseTime for Web 213
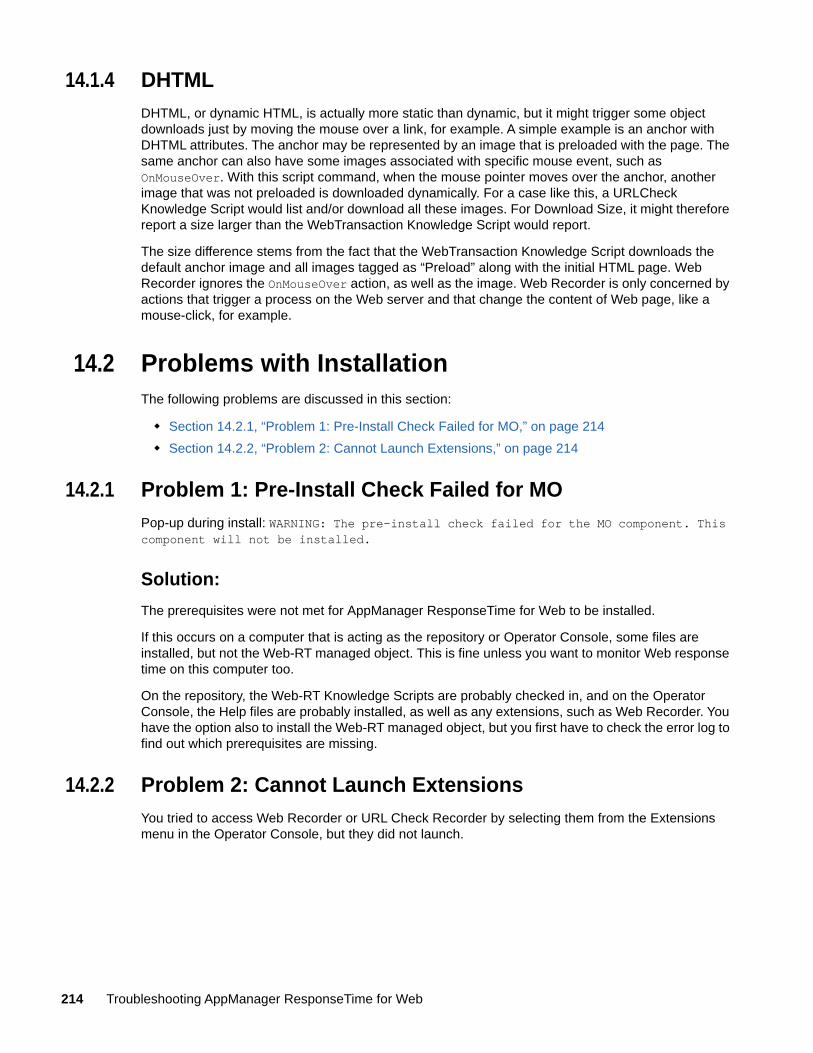
14.1.4 DHTML
DHTML, or dynamic HTML, is actually more static than dynamic, but it might trigger some object downloads just by moving the mouse over a link, for example. A simple example is an anchor with DHTML attributes. The anchor may be represented by an image that is preloaded with the page. The same anchor can also have some images associated with specific mouse event, such as OnMouseOver. With this script command, when the mouse pointer moves over the anchor, another image that was not preloaded is downloaded dynamically. For a case like this, a URLCheck Knowledge Script would list and/or download all these images. For Download Size, it might therefore report a size larger than the WebTransaction Knowledge Script would report.
The size difference stems from the fact that the WebTransaction Knowledge Script downloads the default anchor image and all images tagged as “Preload” along with the initial HTML page. Web Recorder ignores the OnMouseOver action, as well as the image. Web Recorder is only concerned by actions that trigger a process on the Web server and that change the content of Web page, like a mouse-click, for example.
14.2 Problems with InstallationThe following problems are discussed in this section:
Section 14.2.1, “Problem 1: Pre-Install Check Failed for MO,” on page 214
Section 14.2.2, “Problem 2: Cannot Launch Extensions,” on page 214
14.2.1 Problem 1: Pre-Install Check Failed for MO
Pop-up during install: WARNING: The pre-install check failed for the MO component. This component will not be installed.
Solution:
The prerequisites were not met for AppManager ResponseTime for Web to be installed.
If this occurs on a computer that is acting as the repository or Operator Console, some files are installed, but not the Web-RT managed object. This is fine unless you want to monitor Web response time on this computer too.
On the repository, the Web-RT Knowledge Scripts are probably checked in, and on the Operator Console, the Help files are probably installed, as well as any extensions, such as Web Recorder. You have the option also to install the Web-RT managed object, but you first have to check the error log to find out which prerequisites are missing.
14.2.2 Problem 2: Cannot Launch Extensions
You tried to access Web Recorder or URL Check Recorder by selecting them from the Extensions menu in the Operator Console, but they did not launch.
214 Troubleshooting AppManager ResponseTime for Web

Solution:
You probably did not succeed in installing the extensions on the Operator Console computer because an AppManager agent is required to install them. This requirement is part of a feature of the installation package, which automatically tries to install the extensions on all managed clients. A failure to install them is not necessarily reported as such if the rest of the installation succeeded.
14.3 Problems with URL Check RecorderThe following problems are discussed in this section:
Section 14.3.1, “Problem 1: Connection Timeouts,” on page 215
Section 14.3.2, “Problem 2: Errors Dragging and Dropping Links onto URLs Tab,” on page 215
Section 14.3.3, “Problem 3: Explore Option Loses Web Site,” on page 216
Section 14.3.4, “Problem 4: Internet Resources Unavailable,” on page 216
Section 14.3.5, “Problem 5: No Data Stream for Measure Download Time,” on page 216
14.3.1 Problem 1: Connection Timeouts
Error codes in events and data point summary tables indicate connection timeouts. For more information, see Section 12.8, “Status Codes,” on page 153.
If you see any of the following HTML status codes in the events or in the data point summary table, here is what you can do:
14.3.2 Problem 2: Errors Dragging and Dropping Links onto URLs Tab
If you find that links that you drag from a Web page to the URLs tab in URL Check Recorder are not being assigned the correct descriptions in the Description field, it may be due to a problem with Internet Explorer. Internet Explorer does not handle “/” characters correctly, to cite one example.
Status Code Description Possible Solution
11001 Connection timeout: Host not found.
Increase the connection timeout:
In the generated Knowledge Script, click Timeout > URL Connection Timeout.
12002 The request has timed out. Increase the timeout by taking one of the following steps:
In URL Check Recorder, click Tools > Recorder Options. Change the value for Verification Timeout, or
In the generated Knowledge Script, click the Properties tab. Find the URL Download Timeout parameter in the Timeouts folder.
12029 A connection to the server could not be established
Verify that the proxy server and port settings are correct on the General tab in URL Check Recorder.
Troubleshooting AppManager ResponseTime for Web 215

Solution:
Try dragging and dropping the link to the Desktop instead of to the URLs tab. If the link is rendered the same on the Desktop as it is in URL Check Recorder, Internet Explorer is not handling the Copy operation correctly. The workaround is to manually type in corrections to the Link or Description.
14.3.3 Problem 3: Explore Option Loses Web Site
“Invoking the Explore menu item causes me to lose my place in the browser.”
Solution:
As you work with URL Check Recorder, you may browse to a Web site and minimize the browser window while adjusting some URL properties in the URL Check Recorder GUI. If you then click Explore on the URL menu, the same browser window displays the default Web site selected for the browser on the local computer.
To configure Internet Explorer to open with a new instance each time you click Explore on the URL menu, open Internet Explorer. Click Tools > Internet Options. On the Advanced Tab, clear the option to “Reuse windows for launching shortcuts.”
14.3.4 Problem 4: Internet Resources Unavailable
You received an event message stating, “Internet resources unavailable.”
The full message reads, “Unable to process the job at this time due to contention for Internet resources. Increase the time interval between job iterations for this job.”
Reason
You may see this message when running several large URLCheck jobs or a significant number of URLCheck jobs with similar or exact time intervals to a single Web-RT managed object. Because each of these jobs is in contention to make WinHTTP calls, at times a particular job is unable to obtain the resources necessary to make these calls. In such a case, the job returns the “Internet resources unavailable” event message.
Solution:
Upon receiving this message, simply increase the time interval between the job iterations for the jobs that receive the “Internet Resource Unavailable” event message.
14.3.5 Problem 5: No Data Stream for Measure Download Time
When you ran a URLCheck Knowledge Script, the individual data stream for Measure Download Time did not appear on the Graph Data tab in the AppManager Operator Console. You may also not be receiving a data point at each run interval for a specified URL even though you selected that option when you created the Knowledge Script in URL Check Recorder.
216 Troubleshooting AppManager ResponseTime for Web

Solution:
If a specified URL receives an error status code during a run interval and cannot be rendered, no Measure Download Time data is collected. Therefore, an individual data stream for Measure Download Time is not created for that interval.
In cases where no individual data stream for Measure Download Time appears for a specified URL, check to see whether the URL received an error status code at each run interval. An error would explain why no individual data stream for Measure Download Time appears.
In cases where the individual data stream for Measure Download Time exists, but at a specific run interval no data point is received, check to see whether the URL received an error status code for that specific interval. An error would explain why no data point was created for the Individual Measure Download time data stream.
14.4 Problems with DiscoveryThe following problems are discussed in this section:
Section 14.4.1, “Problem 1: Client Resource Monitor Service Must Run as Local System,” on page 217
Section 14.4.2, “Problem 2: Web-RT Is Not Installed; ActiveX Component Cannot Create Object,” on page 218
Section 14.4.3, “Problem 3: Web-RT Not Installed,” on page 218
Section 14.4.4, “Problem 4: Class Not Registered,” on page 218
Section 14.4.5, “Problem 5: The Parameter Is Incorrect,” on page 219
Section 14.4.6, “Problem 6: Web-RT Managed Object Cannot Load Dependent Object,” on page 219
Section 14.4.7, “Problem 7: Unable to Validate Web-RT,” on page 219
Section 14.4.8, “Problem 8: Access is Denied,” on page 220
Section 14.4.9, “Problem 9: Class Member Is Invalid,” on page 220
Section 14.4.10, “Problem 10: Backlevel Version,” on page 220
14.4.1 Problem 1: Client Resource Monitor Service Must Run as Local System
Discovery failed with the following message:
The "NetIQ AppManager Client Resource Monitor" service (netiqmc.exe) user account is currently set as “xxxx”. It must run as “Local System" account in order to use this ResponseTime module.
Troubleshooting AppManager ResponseTime for Web 217

Solution
Most ResponseTime jobs cannot run unless the AppManager Windows agent (netiqmc) is set to run as Local System. In this case, the agent is running under another account.
Most AppManager ResponseTime applications run out-of-process from the AppManager agent. The separate process for the managed object is run as the user ID specified in each Knowledge Script. The agent must have the authority to start a new process as any user ID specified in a Knowledge Script parameter. Therefore, the agent must run with Local System authority.
You must update the agent so that it runs as Local System. For more information, see Section 2.5, “Permissions for Running Knowledge Scripts,” on page 21.
14.4.2 Problem 2: Web-RT Is Not Installed; ActiveX Component Cannot Create Object
These errors are returned from running discovery:
The Web-RT managed object returned Web-RT is not supported.
or:
The Web-RT managed object is not installed or not registered. ActiveX component can't create object.
Solution:
The Web-RT managed object is not installed on the computer. Make sure that the system requirements are met, and try installing it again.
14.4.3 Problem 3: Web-RT Not Installed
Discovery failed with the following message:
Web-RT is not installed.
Solution:
AppManager ResponseTime for Web is not installed. Make sure that the prerequisites were met, and
try installing again.
14.4.4 Problem 4: Class Not Registered
Discovery failed with the following message:
Web-RT cannot work properly. Class not registered.
218 Troubleshooting AppManager ResponseTime for Web

Solution:
Some AppManager ResponseTime for Web shared components are installed, but the module itself is not installed, or else some backlevel components are still installed. The managed object probably was not upgraded when you installed a newer version of AppManager ResponseTime for Web. If this is not the case, the Discovery Knowledge Script itself needs to be upgraded.
Make sure that the prerequisites were met, and try installing the new version of AppManager ResponseTime for Web again. Follow the instructions in the Installation chapter to ensure that the new Web-RT managed object and new Knowledge Scripts are installed.
14.4.5 Problem 5: The Parameter Is Incorrect
Discovery failed with the following message:
Web-RT cannot work properly. The parameter is incorrect.
Solution:
The NetIQmc service is running as a specific user on the computer, and a different user is logged on to the computer. Change NetIQmc to run as Local System, which is a requirement for Web-RT managed objects. For more information, see Section 2.5, “Permissions for Running Knowledge Scripts,” on page 21.
14.4.6 Problem 6: Web-RT Managed Object Cannot Load Dependent Object
Discovery generated the following error:
The Web-RT managed object returned cannot load dependent object: "qweba4.dll". Web-RT is not supported.
Solution:
The older WebServices agent is installed on the computer, but not the Web-RT managed object. Install the latest version of the Web-RT module on the computer if you want to use AppManager ResponseTime for Web. For more information, see Chapter 2, “Installing AppManager ResponseTime for Web,” on page 17.
14.4.7 Problem 7: Unable to Validate Web-RT
Discovery generated the following error:
Unable to validate Web-RT. Please be sure there is a user logged on to the computer. A Terminal Services session is not a valid, logged-on user.
Solution:
AppManager ResponseTime for Web requires a user to be logged on to the computer for any WebTransaction Knowledge Scripts to run. A Terminal Services login is not valid unless you use the /console command line parameter. For more information about command line parameters, see the
Remote Desktop Connection documentation.
Troubleshooting AppManager ResponseTime for Web 219

14.4.8 Problem 8: Access is Denied
Discovery failed with the following error message:
Web-RT cannot work properly. Access is denied.
Solution:
The NetIQmc service is running as a specific user on the computer, and a different user is logged on to the computer.
Change NetIQMC to run as Local System, which is a requirement for Web-RT managed objects. For more information, see Section 2.5, “Permissions for Running Knowledge Scripts,” on page 21.
14.4.9 Problem 9: Class Member Is Invalid
Discovery failed with one of the following messages:
The Web-RT managed object returned the "Class = WebEngine.ActiveWebEngine" member is invalid or the ResponseTime module is not installed properly.
or
Cannot load dependent object: 'qweba4.dll'. WEB-RT is not supported.
Solution:
Make sure that AppManager ResponseTime for Web is installed properly and also make sure a user is logged on to the computer. AppManager ResponseTime for Web requires that a user be logged onto the computer to successfully run.
To verify installation, look at the Web-RT_Install.log in the \netiq\temp\ directory.
14.4.10 Problem 10: Backlevel Version
Discovery failed with the following message:
Back-level version. This is a back-level version of NetIQ AppManager ResponseTime for Web. Please install the latest version of the software.
Solution:
You tried to run the Discovery Knowledge Script from the newest version of AppManager ResponseTime for Web on a computer where an older version of the Web-RT module is installed.
Upgrade the module by running the installation program for the new version of AppManager on that computer. Then run the Discovery Knowledge Script again.
220 Troubleshooting AppManager ResponseTime for Web

14.5 Problems Running Knowledge ScriptsFor more information about troubleshooting any issues you encounter when running WebTransaction Knowledge Scripts or playing them back in Web Recorder, see Chapter 10, “Troubleshooting Web Recorder Playback,” on page 101.
The following problems are discussed in this section:
Section 14.5.1, “Problem 1: Client Resource Monitor Service User Account,” on page 221
Section 14.5.2, “Problem 2: Unable to Validate Local Group Member,” on page 221
Section 14.5.3, “Problem 3: Unable to Validate Domain User,” on page 222
Section 14.5.4, “Problem 4: Managed Object Failed to Execute Transaction,” on page 222
Section 14.5.5, “Problem 5: Managed Object Not Installed/Registered,” on page 222
Section 14.5.6, “Problem 6: Job Timeout -- Resources Unavailable,” on page 223
Section 14.5.7, “Problem 7: Managed Object Not Upgraded,” on page 223
Section 14.5.8, “Problem 8: Older URLCheck Knowledge Script,” on page 223
Section 14.5.9, “Problem 9: Unsupported Script Version,” on page 224
Section 14.5.10, “Problem 10: Backlevel Version,” on page 224
Section 14.5.11, “Problem 11: Web-RT Cannot Be Initialized,” on page 224
Section 14.5.12, “Problem 12: ConfigJob Method Failed,” on page 225
Section 14.5.13, “Problem 13: Unable to Create Files for Debugging,” on page 225
Section 14.5.14, “Problem 14: User not logged in to the agent while running jobs,” on page 225
14.5.1 Problem 1: Client Resource Monitor Service User Account
The Web-RT managed object’s RunTransaction method returned the following message:
The 'NetIQ AppManager Client Resource Monitor' service (netiqmc.exe) user account is currently set as ‘xyz’. It must run as ‘Local System’ account in order to use this ResponseTime module.
Solution:
You must set the “NetIQ AppManager Client Resource Monitor” service (netiqmc.exe) to run as Local System. This is required for most AppManager ResponseTime applications. For more information, see Section 2.5, “Permissions for Running Knowledge Scripts,” on page 21. Once you have changed the login settings for netiqmc.exe, try to run the job again.
14.5.2 Problem 2: Unable to Validate Local Group Member
You received the following error message:
Unable to validate the local group member. Problems with operating system.
NOTE: It is normal to see this error during network maintenance.
Troubleshooting AppManager ResponseTime for Web 221

Solution:
The operating system cannot provide information about a local group at the moment. This may occur during network outage or system maintenance. Wait a few minutes, and try again.
If the problem persists, contact your network administrator.
14.5.3 Problem 3: Unable to Validate Domain User
You received the following error message:
Unable to validate Domain User. Problems contacting the domain controller while validating domain name and user account.
NOTE: It is normal to see this error during network maintenance.
Solution:
This error may occur once in a while during network outage or system maintenance. It may also occur if the domain controller is shut down or reboots during an AppManager ResponseTime for Web operation.
If the problem persists, contact your network administrator.
14.5.4 Problem 4: Managed Object Failed to Execute Transaction
When you tried to run a Knowledge Script job, you got an event that read as follows:
The Managed Object failed to execute the transaction.
The Error Details read,
The Managed Object failed to execute the transaction because a thread could not be allocated to service the request.
Solution:
This event indicates that the Web-RT managed object failed to execute the transaction recorded in the Knowledge Script. The thread allocation problem mentioned here occurred because this WebTransaction Knowledge Script is an old version that is no longer supported. It was recorded with an older version of Web Recorder, and you have now upgraded to a newer version of AppManager ResponseTime for Web.
Record the transaction again using the latest version of Web Recorder. Then try running the job again.
14.5.5 Problem 5: Managed Object Not Installed/Registered
When you tried to run a Knowledge Script job, you got an event that read as follows:
The Web-RT managed object is not installed or not registered.
The error details read, “429: ActiveX component cannot create object”.
222 Troubleshooting AppManager ResponseTime for Web

Solution:
You saw this error because you were trying to run the job with a Knowledge Script recorded with a new version of Web Recorder on a client computer where an older version of the Web-RT module is installed. Try installing the latest version of the module for AppManager ResponseTime for Web on that computer and then try running the job again.
14.5.6 Problem 6: Job Timeout -- Resources Unavailable
When you tried to run a WebTransaction Knowledge Script job, you received an event that read as follows:
Job timeout -- resources unavailable.
Solution:
You saw this error because the job timeout value for a WebTransaction Knowledge Script was too low, which means that a response from the Web server did not come before the job timeout expired. For more information, see Section 3.5.2, “Resolving WebTransaction Timeout and Limit Issues,” on page 31.
14.5.7 Problem 7: Managed Object Not Upgraded
When you tried to run a WebTransaction Knowledge Script job, you got an event that read as follows:
Knowledge Script Error: The Knowledge Script requires ResponseTime for Web version 6.2.113.0 or higher to run properly.
Solution:
You tried to run a Knowledge Script you created with the newest version of Web Recorder on a computer with a backlevel version of the module software. You need to install the newest version of the Web-RT module on that computer. You can do that by running the AppManager installation program again on the computer where you want to upgrade the module.
14.5.8 Problem 8: Older URLCheck Knowledge Script
When you tried to run a URLCheck Knowledge Script job, you got an event that read as follows:
Please use a Knowledge Script generated by NetIQ URL Check Recorder version 4.6.2810.0 or later.
Solution:
In most cases, URLCheck Knowledge Scripts that were created with older versions of URL Check Recorder run fine on computers where you have upgraded the Web_RT module. However, between versions 1.2 and 2.0 of AppManager ResponseTime for Web, substantial changes were made to the URLCheck Knowledge Scripts. The Knowledge Script you are trying to run is no longer supported.
Recreate the Knowledge Script using the newest version of URL Check Recorder, re-save it, and check it back into the repository.
Troubleshooting AppManager ResponseTime for Web 223

14.5.9 Problem 9: Unsupported Script Version
When you tried to run a URLCheck Knowledge Script job, you got an event that read as follows:
Unsupported script version.
The detailed error message stated,
Please use a Knowledge Script generated by NetIQ URL Check Recorder version 4.6.2810.0 or later.
Solution:
In most cases, URLCheck Knowledge Scripts that were created with older versions of URL Check Recorder run fine on computers where you have upgraded the Web_RT module. However, the Knowledge Script you are trying to run, while created with an older version of URL Check Recorder than the version that is currently included with AppManager, is from a newer version of AppManager than the module. It is not supported by that version of the module.
Upgrade the Web-RT module by running the AppManager installation program again on the managed client. You should also recreate the Knowledge Script using the newest version of URL Check Recorder, re-save it, and check it back into the repository.
14.5.10 Problem 10: Backlevel Version
The WebTransaction Knowledge Script failed with the following message:
Back-level version. This is a back-level version of NetIQ AppManager ResponseTime for Web. Please install the latest version of the software.
Solution:
You tried to run a WebTransaction Knowledge Script created with the newest version of AppManager ResponseTime for Web on a computer where an older version of the Web-RT module is installed.
Upgrade the module by running the installation program for the new version of AppManager on that computer. Then run the Knowledge Script again.
14.5.11 Problem 11: Web-RT Cannot Be Initialized
The Knowledge Script job failed, with the following event and error message:
Event: Transaction Initialization ErrorEvent Details:Knowledge Script Error: Web-RT cannot be initialized Error Code: 0x80070057Error Message: Invalid Argument. ObjectType is not valid.
224 Troubleshooting AppManager ResponseTime for Web

Solution:
This error occurs when you drop a newer version of the FTP, NNTPConnect, or SMTPConnect Knowledge Script on an older module.
You have installed some components from the most recent version of AppManager ResponseTime for Web, but you have not upgraded all your computers. You need to upgrade the module on the computer where the Knowledge Script was running to the most recent version.
14.5.12 Problem 12: ConfigJob Method Failed
The Knowledge Script job failed, with the following error message:
The Knowledge Script's ConfigJob method failedKnowledge Script Error: ConfigJob failed unexpectedly. The Knowledge Script may have been modified manually.Error Message: The remote server machine does not exist or is unavailable.The error code you see associated with this failure is one of the following: 0x1CE, 0x800706BE, or 0x800706BF.
Solution:
You will probably see this error if you are running many simultaneous Web-RT Knowledge Script jobs. However, the real problem is not the number of jobs you are running. If you see this error, you need to upgrade your AppManager agents to one of the following levels:
AppManager v5.0.1 with Service Pack 2 and the patch named AM501CE0089.
AppManager v6.0.2 or later.
14.5.13 Problem 13: Unable to Create Files for Debugging
AppManager ResponseTime for Web and its two recording extensions offer several options to help you investigate problems, including trace files, session transcripts, and screen captures.
If you find that these files are not being created on a given computer, verify that the logged-in user on the managed client is an Administrator or has the authority to create files under the \NetIQ\temp directory.
For more information, see Section 3.2, “Overview of Web Recorder,” on page 28.
14.5.14 Problem 14: User not logged in to the agent while running jobs
When you run jobs on an agent, which is a virtual machine running on the Windows operating system later than Windows Vista, and then you disconnect the remote desktop connection to the agent machine, you get the No logged in user event.
Solution:
You need to run the WebRT-ReturnSessionToConsole.bat file available in the \AppManager\bin\ path to disconnect the remote desktop connection to the agent machine. Running the batch file closes the remote desktop connection and return to the desktop session.
Troubleshooting AppManager ResponseTime for Web 225

14.6 Problems Running Internet Mail Knowledge ScriptsThe topics in this section explain the error messages you might see when running any of the following Knowledge Scripts, which all use the AppManager ResponseTime for Web InternetMail engine:
ReceiveInternetMail
SendAndReceiveInternetMail
SendInternetMail
The Internet Mail Knowledge Scripts may return three types of error events:
POP3 Errors
SMTP Errors
WinSock Errors
The following table provides general guidance for each type of error message:
Type of Error Examples Steps to Take
POP3 Server error
POP3 Error: Unable to create the socket
POP3 Error: Unable to resolve server name.
POP3 Error: Unable to connect to the server name.
POP3 Error: Unable read from socket.
POP3 Error: POP3 Server closed connection unexpectedly.
POP3 Error: Problem with POP3 connection.
POP3 Error: There is a problem with the POP3 Username/password
POP3 Error: Problem with POP3 disconnection.
POP3 Error: Problem deleting the email.
POP3 Error: Problem resetting the POP3 connection.
POP3 Error: Problem getting POP3 server status.
POP3 Error: Problem reminding POP3 server of connection.
POP3 Error: Problem listing emails on POP3 server.
POP3 Error: Problem downloading file from POP3 server.
Most POP3 server errors are caused by configuration or network issues.
The event details provide more information about job failures. In the Event Properties dialog box, click the Message tab. Scroll down to check the Job progress and Transaction Configuration sections.
You may have typed the POP3 server name or the Run As Username or Password parameters incorrectly in the Knowledge Script itself.
Your DNS server settings may also be improperly configured on the network, or on the computer that is running the job. Check the DNS server, and check the DNS settings for the TCP/IP connection on the managed client.
Make sure the POP3 server is running, and that it is reachable by the managed client.
226 Troubleshooting AppManager ResponseTime for Web
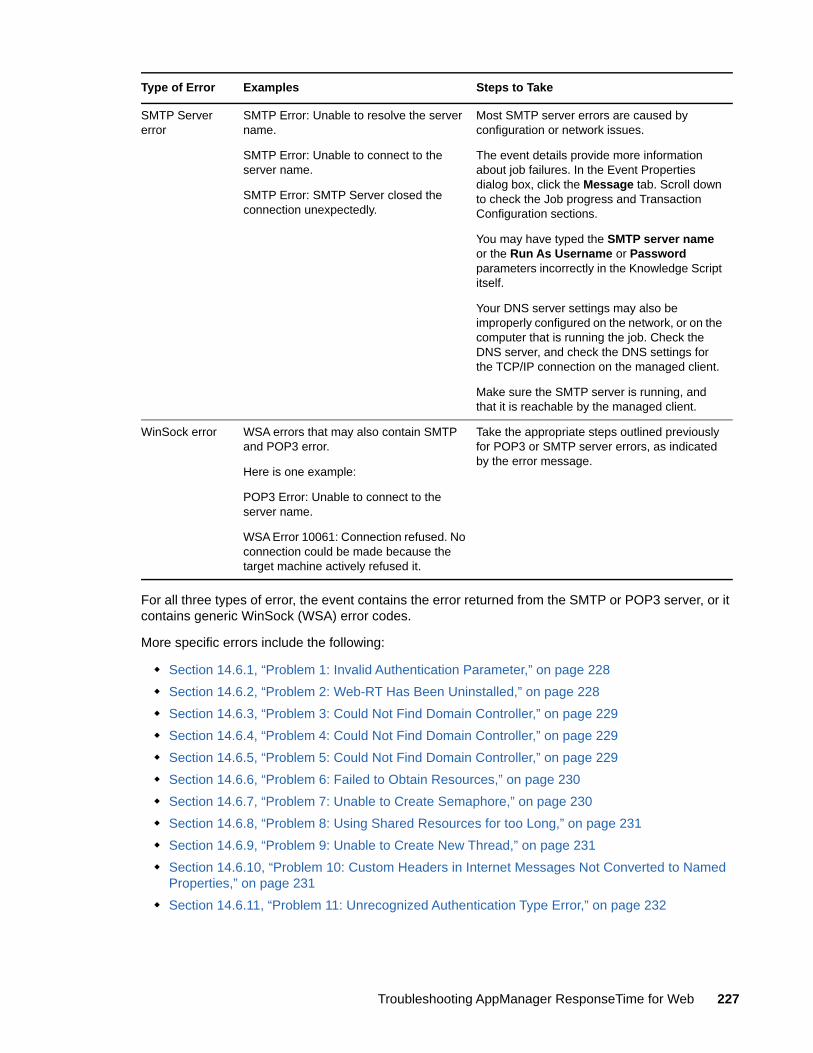
For all three types of error, the event contains the error returned from the SMTP or POP3 server, or it contains generic WinSock (WSA) error codes.
More specific errors include the following:
Section 14.6.1, “Problem 1: Invalid Authentication Parameter,” on page 228
Section 14.6.2, “Problem 2: Web-RT Has Been Uninstalled,” on page 228
Section 14.6.3, “Problem 3: Could Not Find Domain Controller,” on page 229
Section 14.6.4, “Problem 4: Could Not Find Domain Controller,” on page 229
Section 14.6.5, “Problem 5: Could Not Find Domain Controller,” on page 229
Section 14.6.6, “Problem 6: Failed to Obtain Resources,” on page 230
Section 14.6.7, “Problem 7: Unable to Create Semaphore,” on page 230
Section 14.6.8, “Problem 8: Using Shared Resources for too Long,” on page 231
Section 14.6.9, “Problem 9: Unable to Create New Thread,” on page 231
Section 14.6.10, “Problem 10: Custom Headers in Internet Messages Not Converted to Named Properties,” on page 231
Section 14.6.11, “Problem 11: Unrecognized Authentication Type Error,” on page 232
SMTP Server error
SMTP Error: Unable to resolve the server name.
SMTP Error: Unable to connect to the server name.
SMTP Error: SMTP Server closed the connection unexpectedly.
Most SMTP server errors are caused by configuration or network issues.
The event details provide more information about job failures. In the Event Properties dialog box, click the Message tab. Scroll down to check the Job progress and Transaction Configuration sections.
You may have typed the SMTP server name or the Run As Username or Password parameters incorrectly in the Knowledge Script itself.
Your DNS server settings may also be improperly configured on the network, or on the computer that is running the job. Check the DNS server, and check the DNS settings for the TCP/IP connection on the managed client.
Make sure the SMTP server is running, and that it is reachable by the managed client.
WinSock error WSA errors that may also contain SMTP and POP3 error.
Here is one example:
POP3 Error: Unable to connect to the server name.
WSA Error 10061: Connection refused. No connection could be made because the target machine actively refused it.
Take the appropriate steps outlined previously for POP3 or SMTP server errors, as indicated by the error message.
Type of Error Examples Steps to Take
Troubleshooting AppManager ResponseTime for Web 227
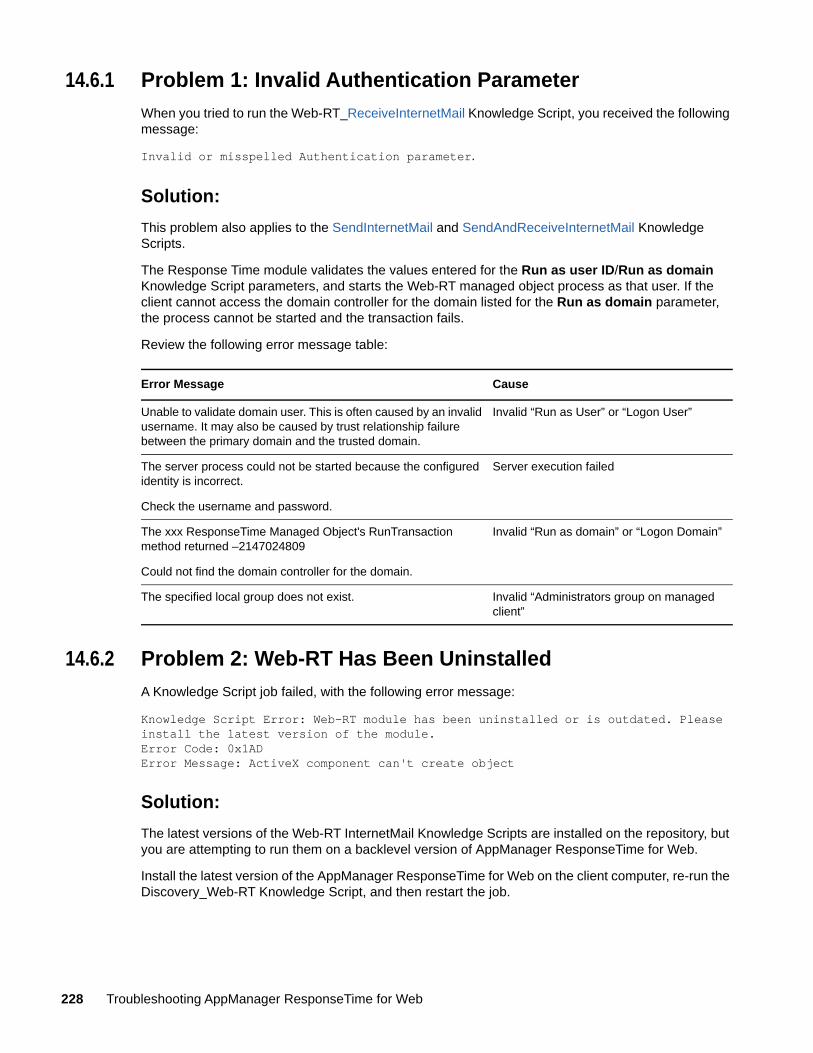
14.6.1 Problem 1: Invalid Authentication Parameter
When you tried to run the Web-RT_ReceiveInternetMail Knowledge Script, you received the following message:
Invalid or misspelled Authentication parameter.
Solution:
This problem also applies to the SendInternetMail and SendAndReceiveInternetMail Knowledge Scripts.
The Response Time module validates the values entered for the Run as user ID/Run as domain Knowledge Script parameters, and starts the Web-RT managed object process as that user. If the client cannot access the domain controller for the domain listed for the Run as domain parameter, the process cannot be started and the transaction fails.
Review the following error message table:
14.6.2 Problem 2: Web-RT Has Been Uninstalled
A Knowledge Script job failed, with the following error message:
Knowledge Script Error: Web-RT module has been uninstalled or is outdated. Please install the latest version of the module.Error Code: 0x1ADError Message: ActiveX component can't create object
Solution:
The latest versions of the Web-RT InternetMail Knowledge Scripts are installed on the repository, but you are attempting to run them on a backlevel version of AppManager ResponseTime for Web.
Install the latest version of the AppManager ResponseTime for Web on the client computer, re-run the Discovery_Web-RT Knowledge Script, and then restart the job.
Error Message Cause
Unable to validate domain user. This is often caused by an invalid username. It may also be caused by trust relationship failure between the primary domain and the trusted domain.
Invalid “Run as User” or “Logon User”
The server process could not be started because the configured identity is incorrect.
Check the username and password.
Server execution failed
The xxx ResponseTime Managed Object's RunTransaction method returned –2147024809
Could not find the domain controller for the domain.
Invalid “Run as domain” or “Logon Domain”
The specified local group does not exist. Invalid “Administrators group on managed client”
228 Troubleshooting AppManager ResponseTime for Web

14.6.3 Problem 3: Could Not Find Domain Controller
The Web-RT managed object’s RunTransaction method returned the following message:
Could not find the domain controller for the domain.
Solution:
One potential cause of this problem is that the value entered for the Run as domain parameter is misspelled or does not exist.
The Web-RT managed objects validate the Run as user ID/Run as domain parameters, and start the Web-RT managed object process as that user. If the client cannot access the domain controller for the domain listed for the Run as domain parameter, the process cannot be started and the transaction fails.
Make sure the value you entered for Run as domain is valid and is typed properly. Verify that the domain controller is active and there are no networking problems between the client and the domain controller. If the problem persists, contact the domain administrator.
14.6.4 Problem 4: Could Not Find Domain Controller
The Web-RT managed object’s RunTransaction method returned the following message:
Could not find the domain controller for the domain.
Solution:
One potential cause of this problem is that the value entered for the Run as domain parameter is misspelled or does not exist.
The Web-RT managed objects validate the Run as user ID/Run as domain parameters, and start the Web-RT managed object process as that user. If the client cannot access the domain controller for the domain listed for the Run as domain parameter, the process cannot be started and the transaction fails.
Make sure the value you entered for Run as domain is valid and is typed properly. Verify that the domain controller is active and there are no networking problems between the client and the domain controller. If the problem persists, contact the domain administrator.
14.6.5 Problem 5: Could Not Find Domain Controller
The Web-RT managed object’s RunTransaction method returned the following message:
Could not find the domain controller for the domain.
Solution:
One potential cause of this problem is that the value entered for the Run as domain parameter is misspelled or does not exist.
The Web-RT managed objects validate the Run as user ID/Run as domain parameters, and start the Web-RT managed object process as that user. If the client cannot access the domain controller for the domain listed for the Run as domain parameter, the process cannot be started and the transaction fails.
Troubleshooting AppManager ResponseTime for Web 229

Make sure the value you entered for Run as domain is valid and is typed properly. Verify that the domain controller is active and there are no networking problems between the client and the domain controller. If the problem persists, contact the domain administrator.
14.6.6 Problem 6: Failed to Obtain Resources
The Knowledge Script job failed, with the following error message:
Error: The job was aborted because it failed to obtain shared resources before timing out
Solution:
This error indicates that the Knowledge Script transaction queue timed out before the job could complete. Most likely, you have created too many simultaneous Knowledge Script jobs that are trying to run on the same managed client, or else the jobs are running on a schedule interval that is too short; that is, the jobs are running too frequently. Some jobs are timing out before previous jobs have completed and relinquished the necessary application resources.
To alleviate this problem, take one of the following steps:
Increase the Queue Timeout Knowledge Script parameter. For more information, see Section 13.15, “WebTransaction,” on page 207.
Increase the schedule interval for the Knowledge Script jobs you are trying to run so that the jobs run less frequently.
14.6.7 Problem 7: Unable to Create Semaphore
The Knowledge Script job failed, with the following error message:
Error: The job was aborted. Unable to create Semaphore. The system may be out of resources
This error indicates that the Knowledge Script job failed due to a lack of available resources on the managed client computer. Another application may have caused a memory leak.
A semaphore is a finite system resource. In this case, the system may be too busy, or an application may have created too many semaphores.
Solution:
To resolve this problem, do one of the following:
Open the Windows Task Manager (Ctrl+Alt+Delete). On the Processes tab, look for a process that is using an extremely large amount of resources and stop or restart it. If this problem recurs, use the Task Manager to monitor the affected computer for processes that are using excessive amounts of USER objects, handles, or GDI objects. Terminate any processes that use thousands of them.
Restart the computer where the failure occurred.
Or, if this problem recurs frequently and restarting did not help to alleviate it, contact NetIQ Technical Support.
230 Troubleshooting AppManager ResponseTime for Web

14.6.8 Problem 8: Using Shared Resources for too Long
The Knowledge Script job failed, with the following error message:
Error: The job was aborted because it was using shared resources for too long.
This error indicates that the Knowledge Script job timed out before completing. The POP3 or SMTP server may have stopped responding, or else the Job Timeout value is too low. you therefore need to do one of the following:
Check the Internet mail server to make sure it is available.
Increase the Job Timeout value. For more information, see Section 13.15, “WebTransaction,” on page 207.
14.6.9 Problem 9: Unable to Create New Thread
The Knowledge Script job failed, with the following error message:
Error: The job was aborted. Unable to create new thread.
This error indicates that the Knowledge Script job failed. This message indicates that a system resource error occurred as the job ran.
A thread is a finite system resource. In this case, the system may be too busy, or an application may have created too many threads.
Solution:
To resolve this problem, do one of the following:
Open the Windows Task Manager (Ctrl+Alt+Delete). On the Processes tab, look for a process that is using an extremely large amount of resources and stop or restart it. If this problem recurs, use the Task Manager to monitor the affected computer for processes that are using excessive amounts of USER objects, handles, or GDI objects. Terminate any processes that use thousands of them.
Restart the computer where the job failure occurred.
Or, if this problem recurs frequently and restarting did not help to alleviate it, contact NetIQ Technical Support.
14.6.10 Problem 10: Custom Headers in Internet Messages Not Converted to Named Properties
The SendAndReceiveInternetMail Knowledge Script does not convert custom headers on Microsoft Exchange Server 2007 SP1 rollups 8 and 9. As a result, the POP step of the SendAndReceiveInternetMail script will not be able to locate the Internet message due to the more restrictive handling of custom Internet mail headers by Exchange 2007 SP1 rollups 8 and 9.
Solution:
1 Install Microsoft Exchange Server 2007 Service Pack 2 or later.
2 After installation, run the following command from the Exchange Command Shell:
Set-TransportConfig -HeaderPromotionModeSetting "MayCreate"
Troubleshooting AppManager ResponseTime for Web 231

This configuration to the hub-transport setting allows Web-RT to promote the custom header a named property in the email message.
NOTE: In Exchange 2007 SP2, custom headers must begin with an "X." For example, NTIQ-Message-id header should be X-NTIQ-Message-Id when Web-RT creates the mail item.
For more information, see the following Microsoft TechNet article: blogs.technet.com/b/stuartp/archive/2009/12/08/new-feature-in-exchange-server-2007-sp2-headerpromotionmodesettings.aspx
14.6.11 Problem 11: Unrecognized Authentication Type Error
When running the ReceiveInternetMail, SendAndReceiveInternetMail, or SendInternetMail scripts, Microsoft Exchange Server might respond to an SMTP attempt with an error message like the following example:
AUTH LOGIN
504 5.7.4 Unrecognized authentication type
Exchange can only offer the basic authentication that is needed by the Web-RT after starting transport level security (TLS). However, Web-RT does not recognize the SMTP TLS extensions. As a result, you need to enable basic authorization in Exchange before you can run the Web-RT InternetMail scripts in your environment.
Solution:
Enable basic authorization in Exchange by modifying the Offer Basic authentication only after starting TLS on the client Receive Connector in Exchange. This configuration should eliminate the AUTH LOGIN error events in Exchange
NOTE: The AUTH LOGIN error event does not prevent the Internet mail from being sent.
14.7 Compatibility Issues with Windows 10The following compatibility issues are discussed in this section:
Section 14.7.1, “Issue 1: Web Recorder stops unexpectedly in Windows 10,” on page 232
Section 14.7.2, “Issue 2: Web Recorder and URL Check Recorder fail to generate summary report in Windows 10,” on page 233
14.7.1 Issue 1: Web Recorder stops unexpectedly in Windows 10
When you run Web Recorder in Windows 10, Web Recorder stops unexpectedly because of a compatibility issue with the Microsoft Edge browser.
Solution:
1. Open WebRecorder Properties.
2. Click Compatibility.
232 Troubleshooting AppManager ResponseTime for Web

3. In Compatibility mode, select Run this program in compatibility mode for: > Windows 8.
4. Click Apply, then click OK.
14.7.2 Issue 2: Web Recorder and URL Check Recorder fail to generate summary report in Windows 10
When you run Web Recorder and URL Check Recorder in Windows 10 to validate the web transactions and the URLs, the summary reports do not generate.
Solution:
1. Press Windows + R to open the Run window.
2. In the Open box, type inetcpl.cpl and click OK to view Internet Options.
3. Click Advanced > Reset > OK.
4. Press Windows + R to open the Run window.
5. In the Open box, type regedit to open Registry Editor.
6. Go to HKEY_LOCAL_MACHINE SOFTWARE\MICROSOFT\WINDOWS\CurrentVersion\Policies\SYSTEM\UIPI.
7. Double-click the Default file and type 0x00000001(1) in Value data.
8. Close Registry Editor.
Troubleshooting AppManager ResponseTime for Web 233

234 Troubleshooting AppManager ResponseTime for Web