NERA network pages Table of Contents
30
1 Guidelines Version 10.7.2015 NERA network pages Table of Contents NERA network pages ........................................................................................................................ 1 Presentation of the new NERA network pages ................................................................. 1 Log in................................................................................................................................................... 3 Add news on the main page ...................................................................................................... 5 Publish news including an attachment on the main page.......................................... 12 Delete news on the main page ............................................................................................... 16 Edit existing webpages (“About”, “Members” and “Contact”) .................................. 17 Create a new webpage............................................................................................................... 19 Delete a webpage ......................................................................................................................... 23 Change the picture on the main page.................................................................................. 26 Presentation of the new NERA network pages 1. Main page where news can be published
-
Upload
khangminh22 -
Category
Documents
-
view
3 -
download
0
Transcript of NERA network pages Table of Contents

1
Guidelines Version 10.7.2015
NERA network pages
Table of Contents NERA network pages ........................................................................................................................ 1 Presentation of the new NERA network pages ................................................................. 1 Log in ................................................................................................................................................... 3 Add news on the main page ...................................................................................................... 5 Publish news including an attachment on the main page .......................................... 12 Delete news on the main page ............................................................................................... 16 Edit existing webpages (“About”, “Members” and “Contact”) .................................. 17 Create a new webpage ............................................................................................................... 19 Delete a webpage ......................................................................................................................... 23 Change the picture on the main page .................................................................................. 26
Presentation of the new NERA network pages
1. Main page where news can be published
2
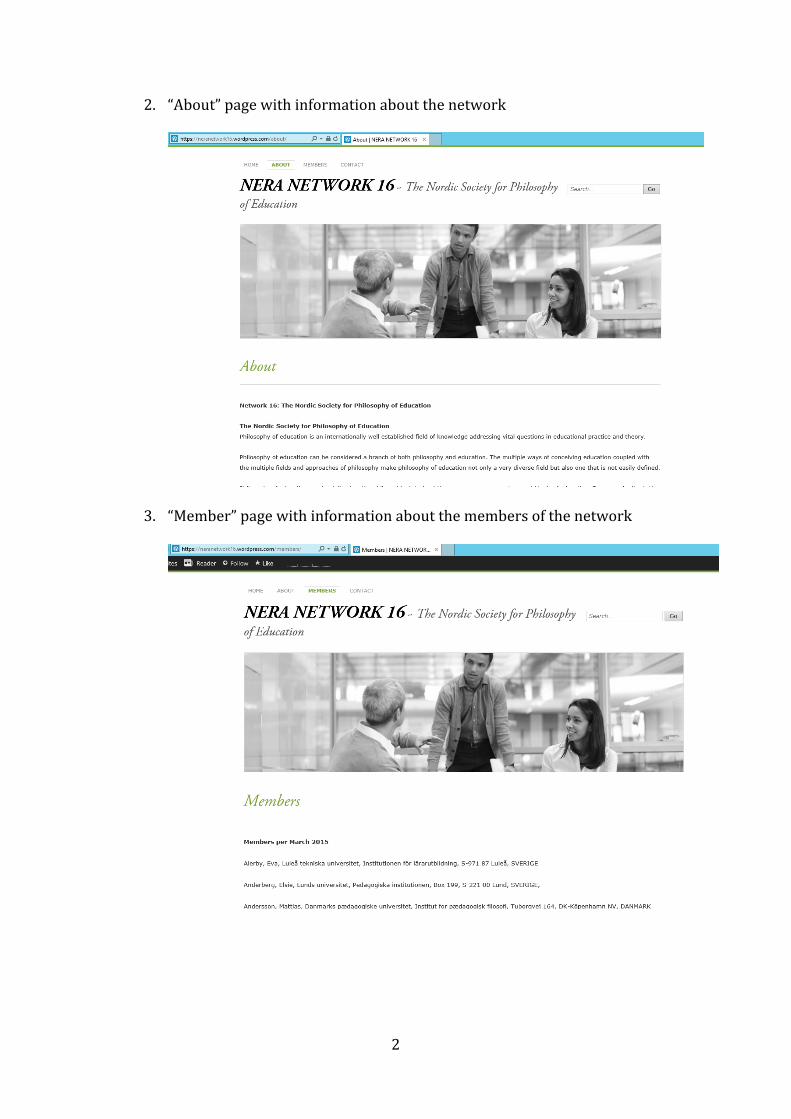
2. “About” page with information about the network
3. “Member” page with information about the members of the network

3
4. “Contact” page with information about how to get in touch with the network/ network convenor
Log in
1. To log in to your network page go to the network page
4
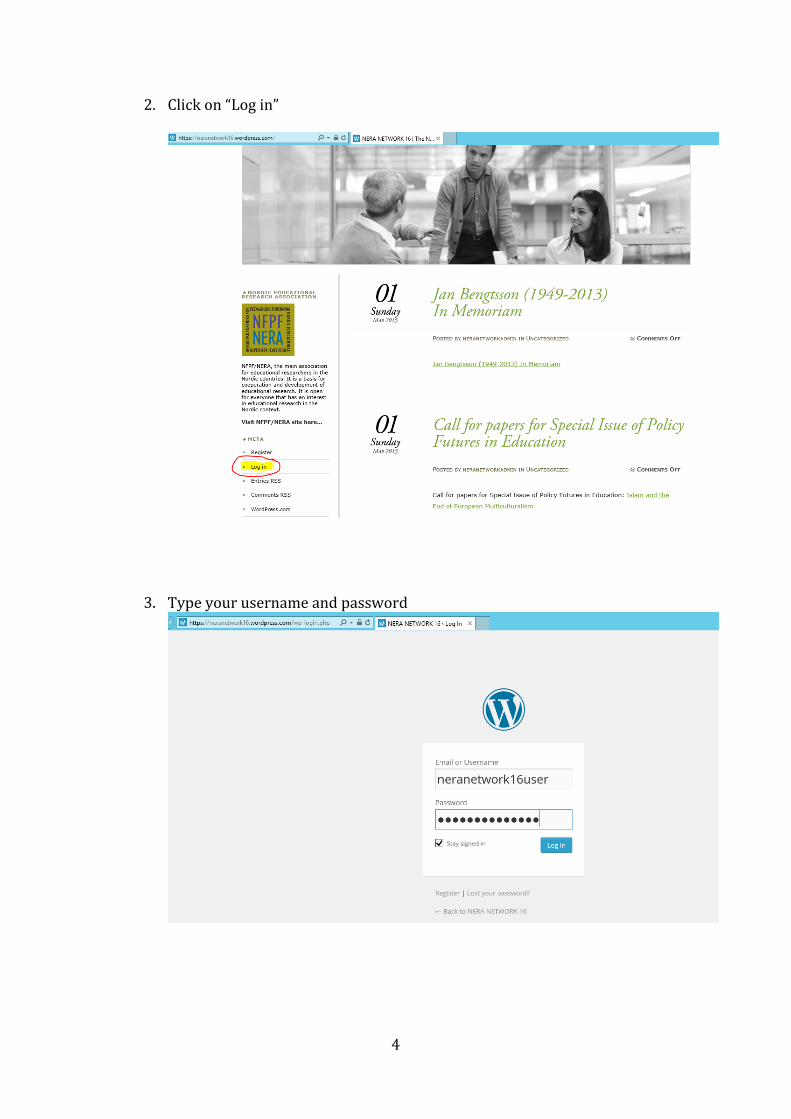
2. Click on “Log in”
3. Type your username and password

5
4. The page you get access to after log in looks like this (Dashboard):
Add news on the main page
1. Log in to your network page (see description above) OR if you already are logged in go to your network page. You will now see a black task bar on top:

6
2. Go with your mouse on “My Sites” (DO NOT CLICK) on top of the left page and a menu will be opened:
3. Click on “WP admin”
7
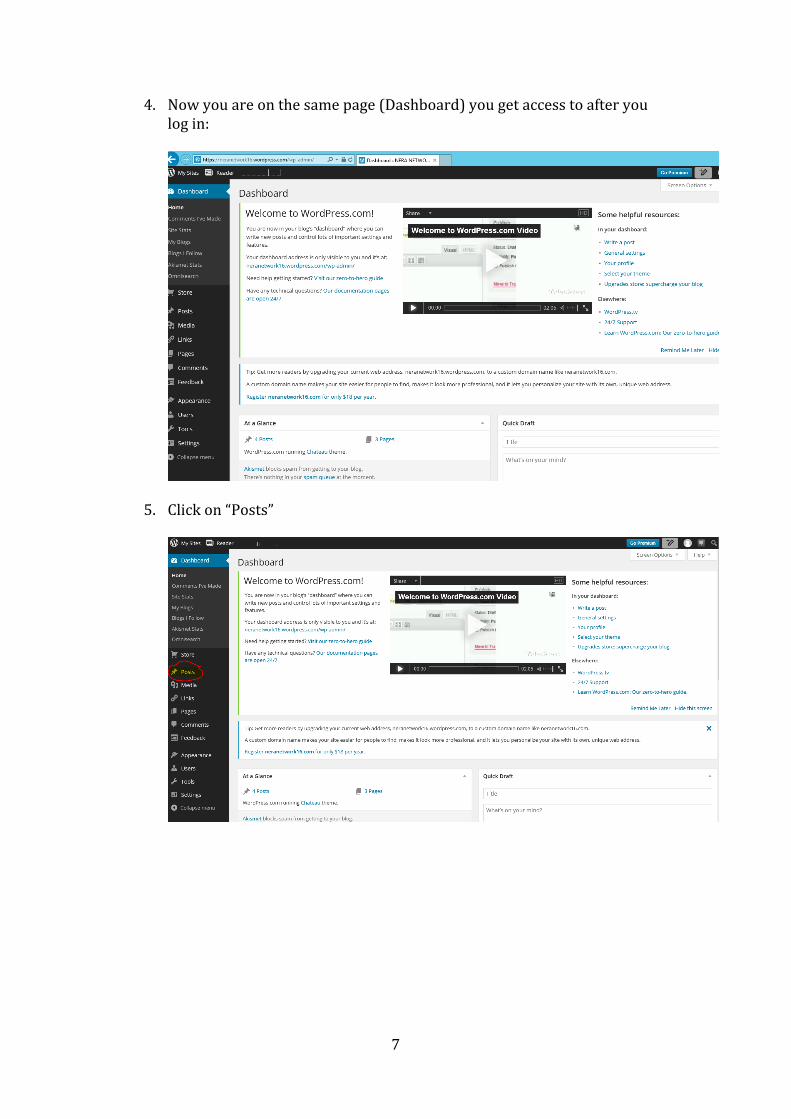
4. Now you are on the same page (Dashboard) you get access to after you log in:
5. Click on “Posts”
8
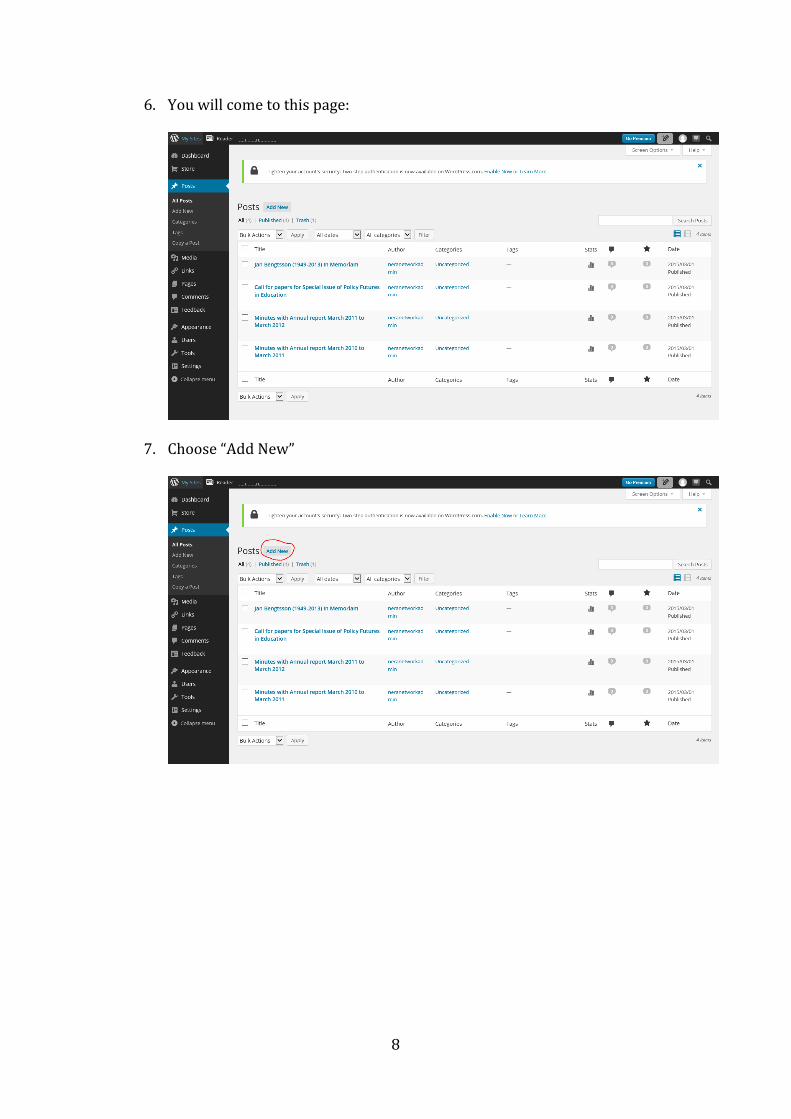
6. You will come to this page:
7. Choose “Add New”

9
8. Write the “news”
9. Click “Publish” to publish the news
10
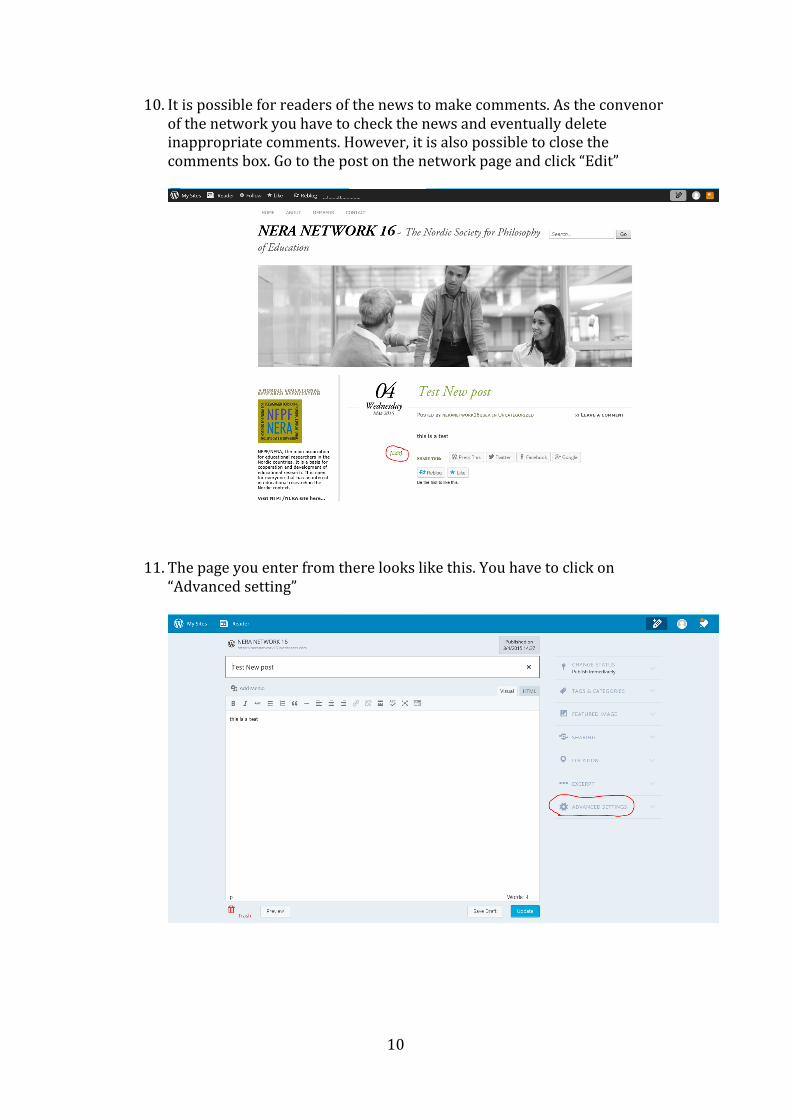
10. It is possible for readers of the news to make comments. As the convenor of the network you have to check the news and eventually delete inappropriate comments. However, it is also possible to close the comments box. Go to the post on the network page and click “Edit”
11. The page you enter from there looks like this. You have to click on
“Advanced setting”

11
12. You then uncheck the boxes “Allow comments” and “Allow pingbacks & trackbacks”
13. You can also edit the post on this page. When you are finished with editing the post you click on “Update”
12
Publish news including an attachment on the main page
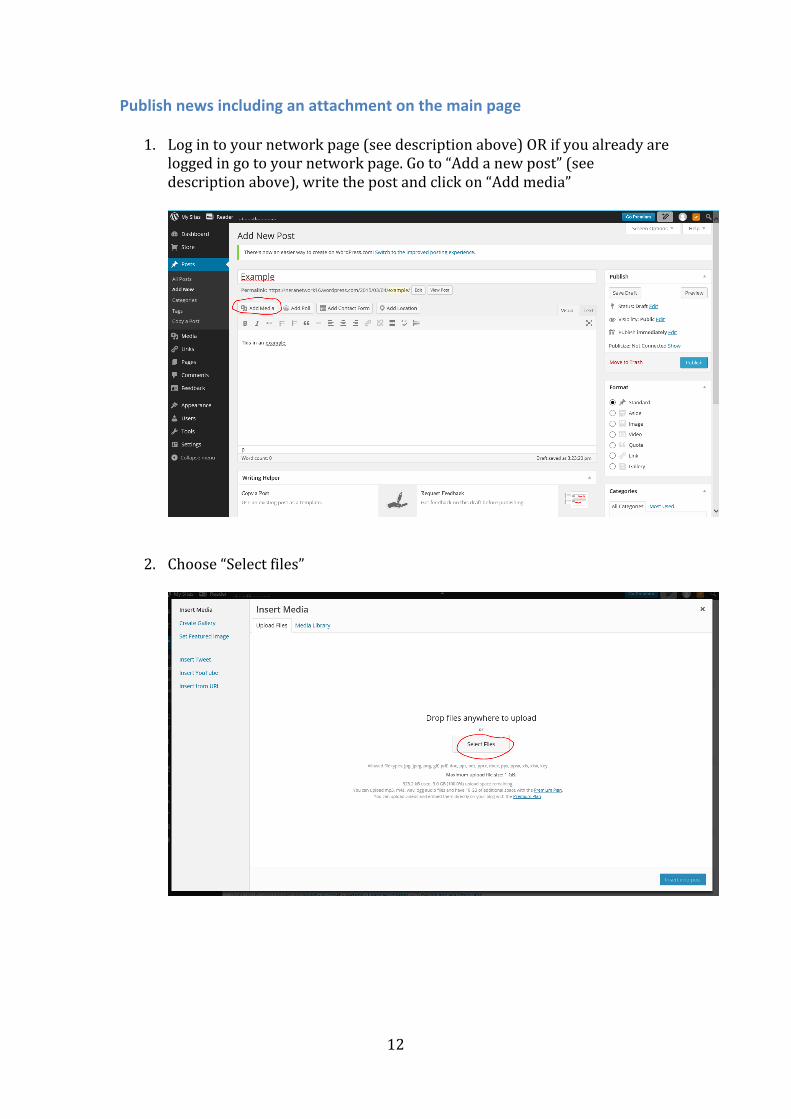
1. Log in to your network page (see description above) OR if you already are logged in go to your network page. Go to “Add a new post” (see description above), write the post and click on “Add media”
2. Choose “Select files”

13
3. Select the file you want to upload and click “open”. I recommend publishing all files as PDF documents.
4. The file is uploaded and you get access to the url of the document to be published. Mark the url and copy it. Then close the window through clicking on the “x” on top right.
14
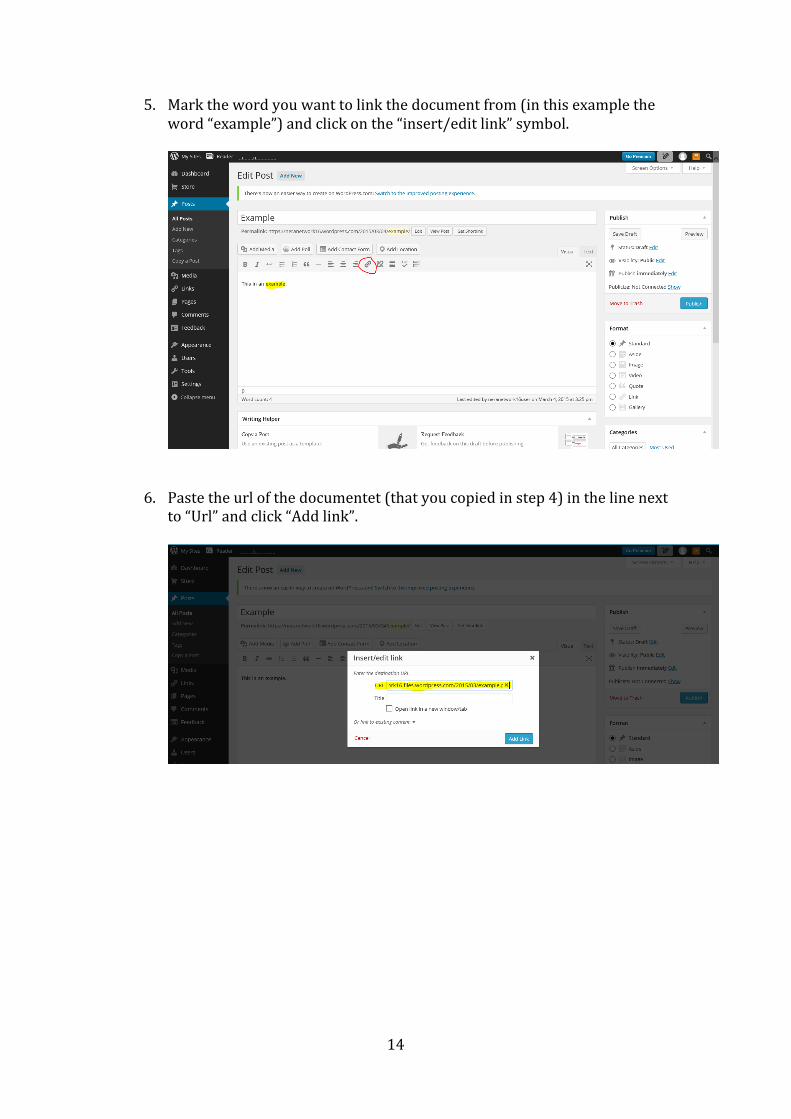
5. Mark the word you want to link the document from (in this example the word “example”) and click on the “insert/edit link” symbol.
6. Paste the url of the documentet (that you copied in step 4) in the line next to “Url” and click “Add link”.
15
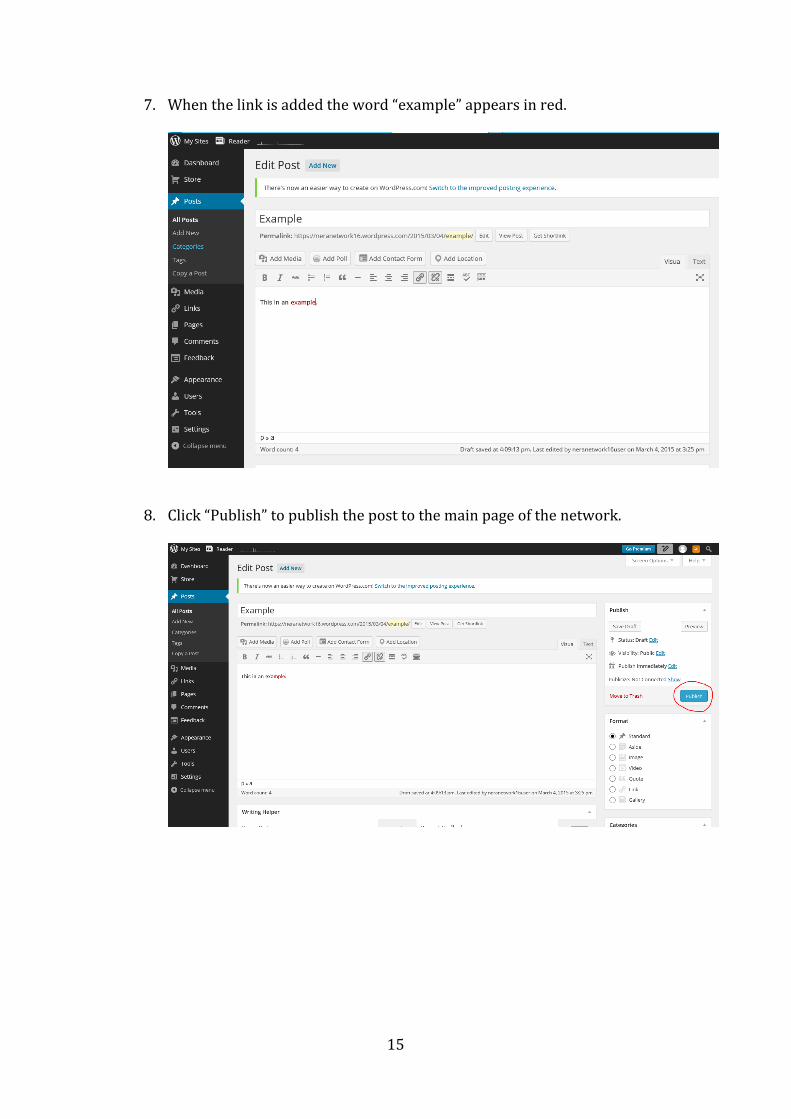
7. When the link is added the word “example” appears in red.
8. Click “Publish” to publish the post to the main page of the network.
16
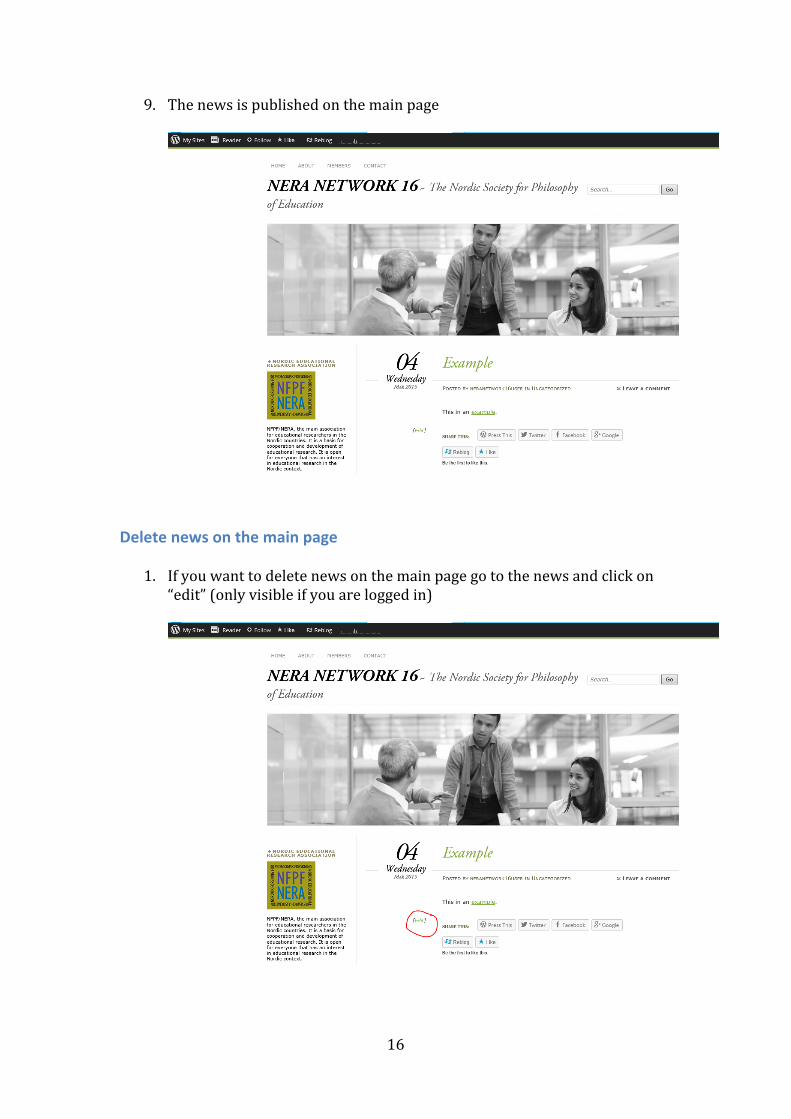
9. The news is published on the main page
Delete news on the main page
1. If you want to delete news on the main page go to the news and click on “edit” (only visible if you are logged in)
17
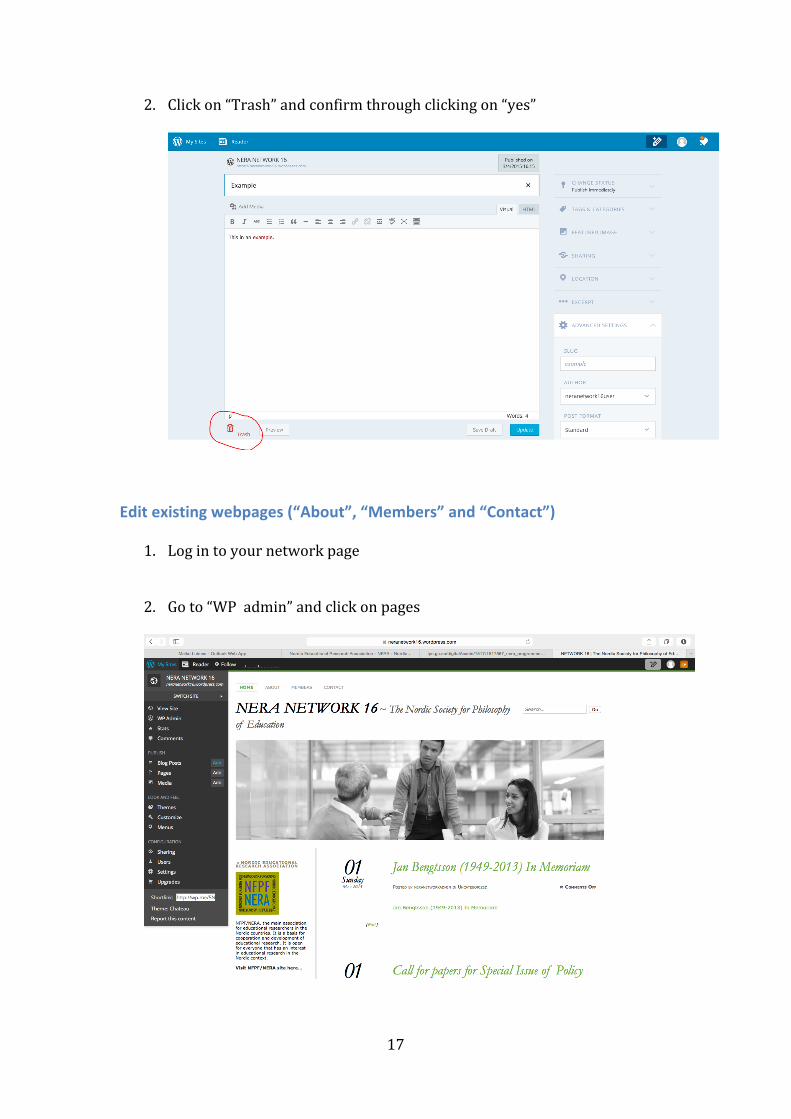
2. Click on “Trash” and confirm through clicking on “yes”
Edit existing webpages (“About”, “Members” and “Contact”)
1. Log in to your network page
2. Go to “WP admin” and click on pages
18
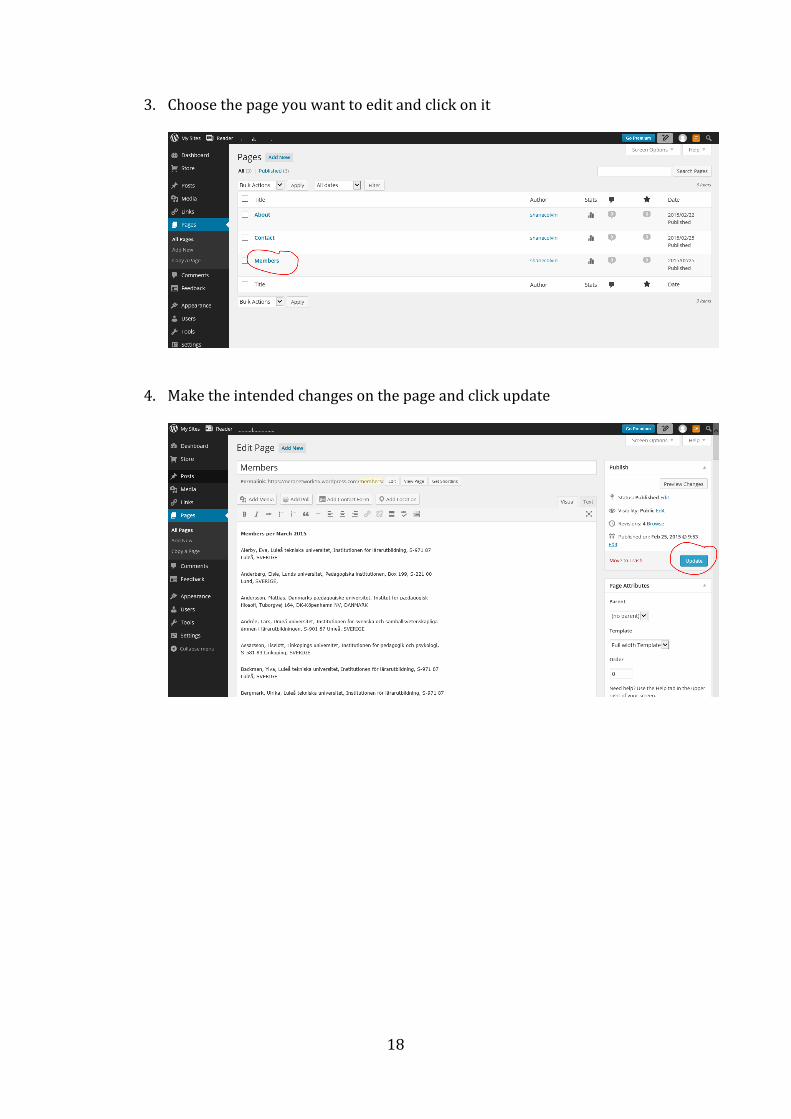
3. Choose the page you want to edit and click on it
4. Make the intended changes on the page and click update

19
Create a new webpage
1. Log in to your network page (see description above) OR if you already are logged in go to your network page (Dashboard). Go to “Pages” and click on “Add new”.
2. Choose a title for your webpage and write the content you want to publish.
20
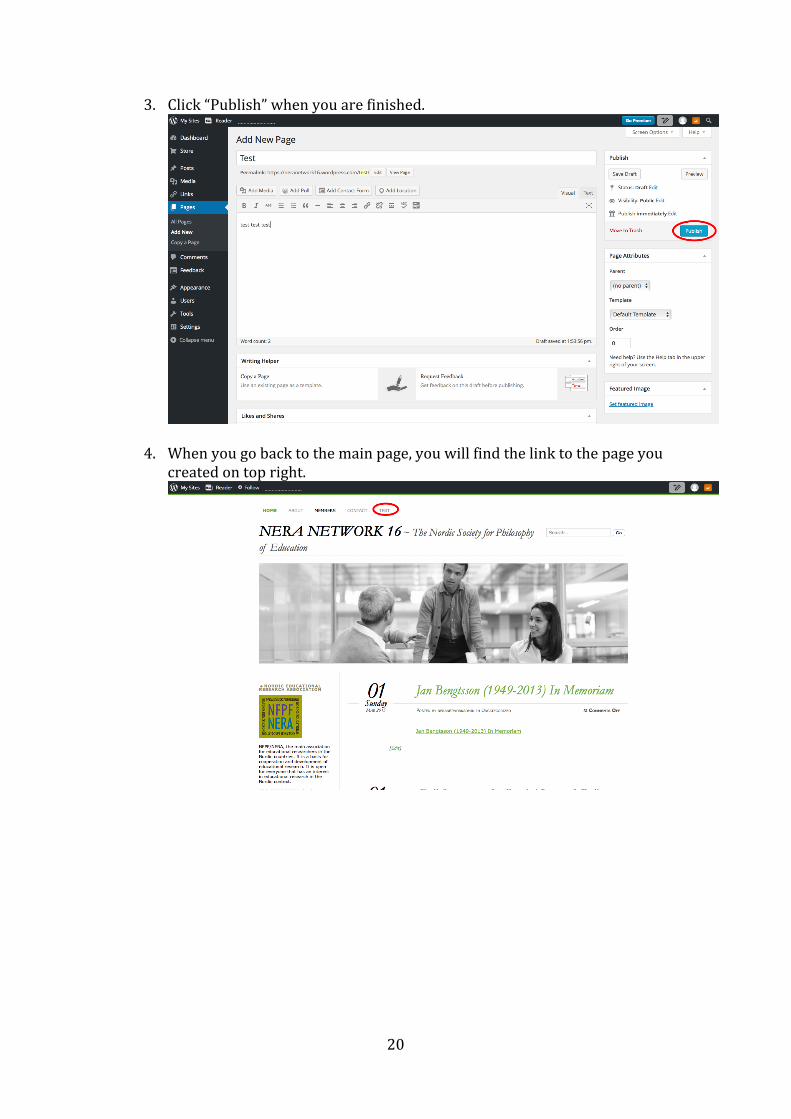
3. Click “Publish” when you are finished.
4. When you go back to the main page, you will find the link to the page you created on top right.

21
5. In case you want to move the link, go back to the page you get access to after you log in (Dashboard). Go to “Appearance” and click on “Menus”.
6. The webpage called “test” is placed below, which means it appears on the far right of the menu on top of the webpage (as you already have seen under 4).

22
7. Use the “drag and drop” function to change the order of the menu and place the new webpage where you want it to appear. Click on “Save Menu” when you are finished.
8. Go back to your main page and you will see that the link to the new webpage now is placed between the link to “Members” and “Contact”.

23
Delete a webpage
1. Log in to your network page (see description above) OR if you already are logged in go to your network page (Dashboard). Click on “Pages” and on the webpage you want to delete, in this case “Test”.
2. Click on “Move to trash”

24
3. Go back to the page you get access to after you log in (Dashboard), go to “Appearance” and click on “Menus”.
4. You get back to the menu of links on top of the webpage. Now you have to delete the link to the page “Test” that you just deleted. Click on the little arrow.
25
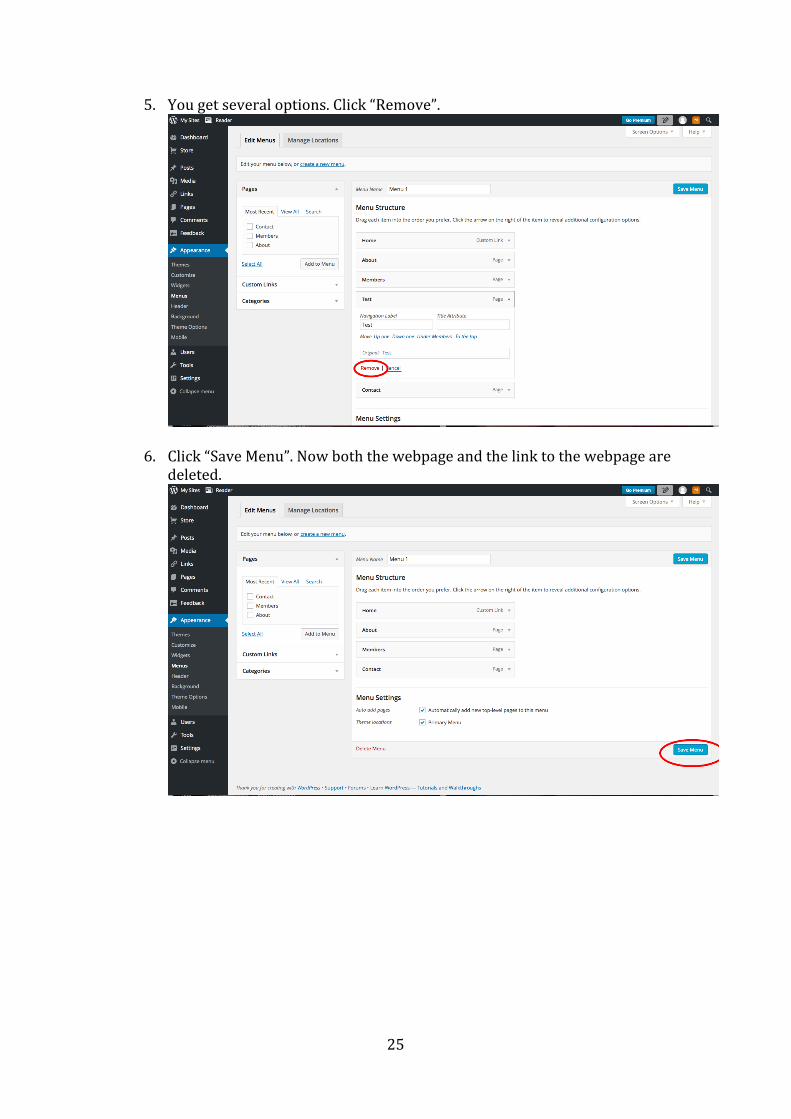
5. You get several options. Click “Remove”.
6. Click “Save Menu”. Now both the webpage and the link to the webpage are deleted.
26
Change the picture on the main page
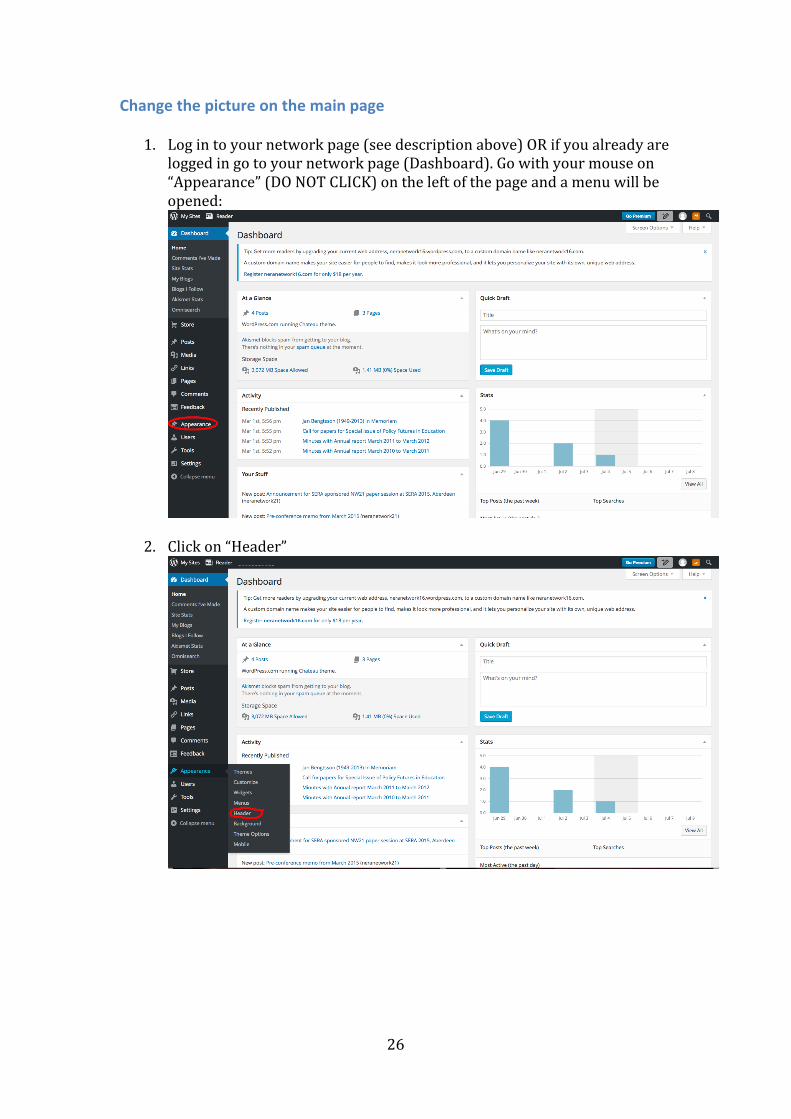
1. Log in to your network page (see description above) OR if you already are logged in go to your network page (Dashboard). Go with your mouse on “Appearance” (DO NOT CLICK) on the left of the page and a menu will be opened:
2. Click on “Header”

27
3. Click on “Header Image”
4. Click on “Add new image”
28
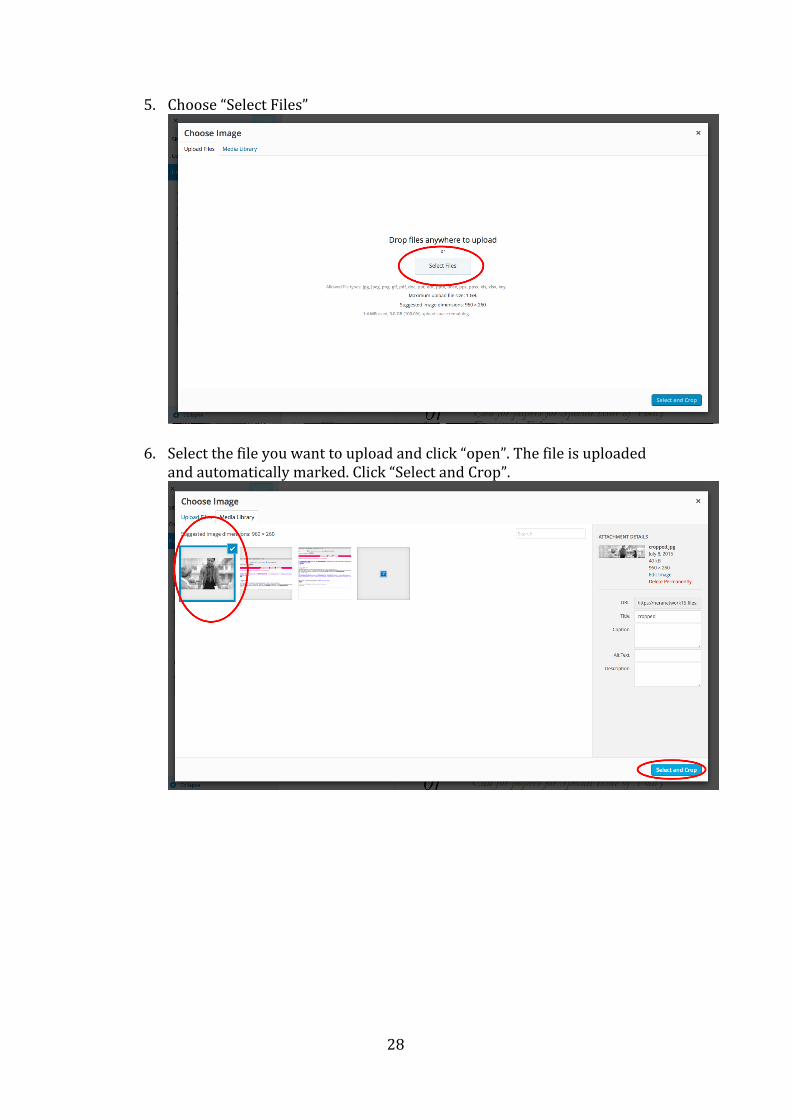
5. Choose “Select Files”
6. Select the file you want to upload and click “open”. The file is uploaded and automatically marked. Click “Select and Crop”.
29
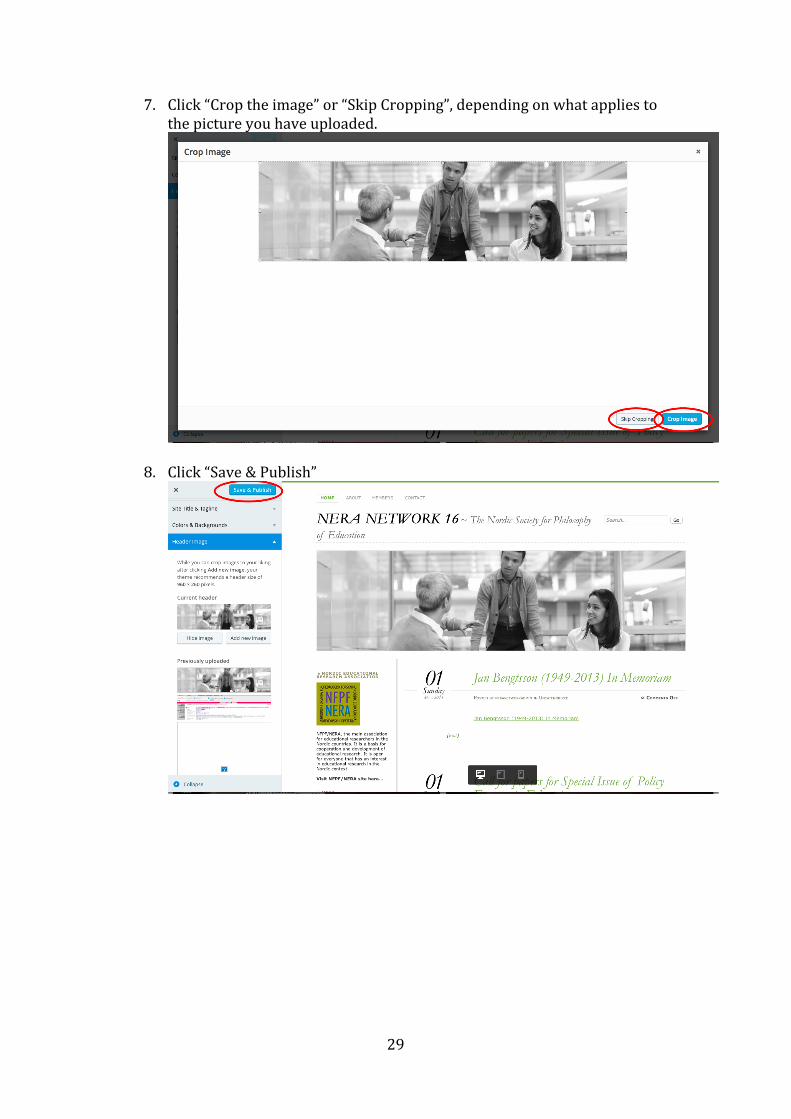
7. Click “Crop the image” or “Skip Cropping”, depending on what applies to the picture you have uploaded.
8. Click “Save & Publish”

30
9. The picture has been saved when you see that it says “Saved”
In case of questions and/or problems with editing the NERA network pages you can send me an e-‐mail [email protected] Maike Luimes