National Industrial Security Program Enterprise Mission Assurance ...
7
National Industrial Security Program Authorization Office Version 1.0 23 June 2021 National Industrial Security Program Enterprise Mission Assurance Support Service Account Request Instructions
-
Upload
khangminh22 -
Category
Documents
-
view
7 -
download
0
Transcript of National Industrial Security Program Enterprise Mission Assurance ...

ADD CLASSIFICATION HERE
National Industrial Security Program Authorization Office Version 1.0 23 June 2021
National Industrial Security
Program Enterprise Mission
Assurance Support Service Account
Request Instructions

TABLE OF CONTENTS
ACCESSING NISP ENTERPRISE MISSION ASSURANCE SUPPORT SERVICE ................................................... 1
NEW USER REGISTRATION ........................................................................................................................... 2
PENDING EMASS ACCOUNT NOTIFICATION ................................................................................................ 4
RE-SEND VERIFICATION EMAIL .................................................................................................................... 4
UPDATE EMAIL & ORGANIZATION .............................................................................................................. 5

1
ACCESSING NISP ENTERPRISE MISSION ASSURANCE SUPPORT SERVICE To request access to the NISP Enterprise Mission Assurance Support Service (eMASS) instance, Industry must complete the following:
1. DISA eMASS Computer Based Training (CBT);
2. DISA Cyber Awareness Challenge (CAC) Training;
3. DCSA (pre-populated) DD Form 2875, System Authorization Access Request (SAAR);
4. Submit all artifacts (above) to DCSA NISP Authorization Office (NAO)eMASS mailbox: [email protected]
Note: Detailed instructions, training links, and required forms are located at the NISP eMASS Information and Resource Center.
Once the prerequisite forms have been submitted to the DCSA NISP Authorization Office (NAO) eMASS mailbox, Industry must access the NISP eMASS link to register a user profile: https://nisp.emass.apps.mil.
The eMASS Site Agreement screen is displayed upon PKI authentication. The eMASS Site Agreement message provides the user a warning message that they are accessing a U.S. Government (USG)
Information System (IS). Click [Access eMASS] to acknowledge the statement and to access eMASS.

2
NEW USER REGISTRATION New users registering with a certificate for the first time must select [New User Registration].
Users must search for their Commercial and Government Entity (CAGE) Code under the Organization dropdown menu. If the CAGE Code is not found, Industry must contact the DCSA NAO eMASS Mailbox at
[email protected] and request a CAGE Code container be created.

3
Click [Next Step] to move to the next stage of New User Registration. Industry must complete all required fields (identified with a red asterisk) on the New eMASS Account Registration screen. Email Notification Preferences to the right of the New User Registration screen allows users to configure which type/how often eMASS will send notifications.
• Enabling “System Authorization Termination Date Approaching” will send users a notification 120,
90, 60, and 30 days prior to their System’s Authorization Termination Date.
• Enabling “POA&M Item Scheduled Completion Date Approaching” will send users a notification 120,
90, 60, and 30 days prior to their System’s POA&M Items’ Schedule Completion Date.
• “System Update Summary” will send users notifications surrounding POA&M Item, Artifact, and
Security Control Compliance Status updates in their Systems.
• “System Authorization Granted” will send users a notification when Systems they are assigned to
receive an Authorization Decision by the Authorizing Official (AO).
• “Critical Security Control Compliance Update” will send users a notification when a “Red” or “Yellow”
Criticality Security Control’s Compliance Status changes from Compliant to Non-Compliant.
• “Action Queue Summary” provides a daily summary of prioritized actions to take against Security
Controls based on ingested asset scan results per assigned Systems.
• The “Workload Email Frequency” field at the bottom of the Email Notification Preferences section
allows a user to set the frequency (“Never,” “Every 24 hours,” “Every 48 hours,” “Weekly”) of
Workload Task summary emails. The Workload Task summary email displays every Workload Task
that a user has received during the indicated time frame. The “Immediate Workload Email” field
allows users to indicate (“Yes” or “No”) if they want to receive Workload Task emails immediately
upon receiving a task within a System. Once the form is complete, click [Submit].

4
PENDING EMASS ACCOUNT NOTIFICATION After clicking [Submit], a confirmation message appears and eMASS sends the user a verification email. A user can verify their email address by navigating to the email verification link. While pending verification, the user has the optional ability to resend the verification email as well as adjust the entered email address and/or selected Home Organization.
Upon receiving the automatically generated verification email, a use should click the verification link embedded within the email body of verify the pending account request. After verification by the user, the Organization’s System Administrators will receive a Workload Task alerting them of a pending user account request. Once the System Administrators have approved the eMASS account, the user will receive an email notification notifying that the eMASS account has been activated. Contact an eMASS System Administrator for any additional instructions.
RE-SEND VERIFICATION EMAIL To re-send the verification email that was sent after completing new user registration click [Resend email verification].
5
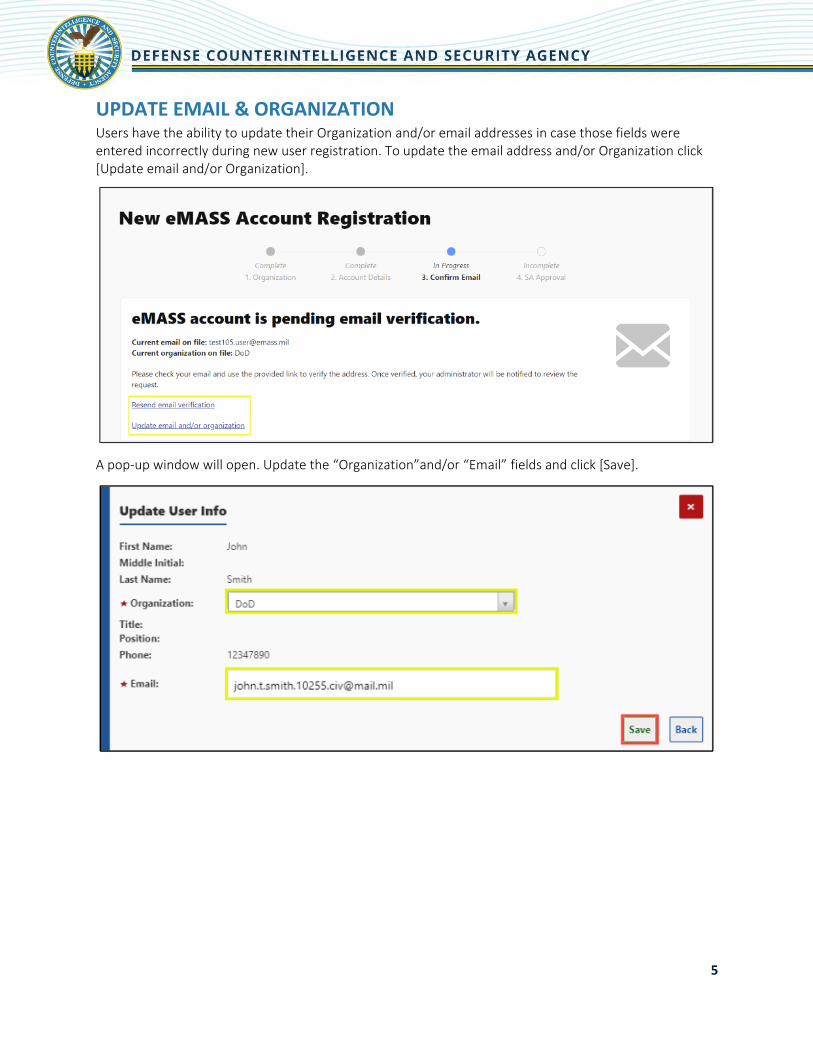
UPDATE EMAIL & ORGANIZATION Users have the ability to update their Organization and/or email addresses in case those fields were entered incorrectly during new user registration. To update the email address and/or Organization click [Update email and/or Organization].
A pop-up window will open. Update the “Organization”and/or “Email” fields and click [Save].