MyQ Recharge Terminal Guide
26
MyQ Recharge Terminal Guide for Administrators REVISION 3 MyQ Recharge Terminal 7.3.0.6+ MyQ Server 7.2+ January 2020 Copyright © 2006-2019 MyQ spol. s r.o. All Rights Reserved
-
Upload
khangminh22 -
Category
Documents
-
view
2 -
download
0
Transcript of MyQ Recharge Terminal Guide

MyQ Recharge Terminal Guidefor Administrators
REVISION 3
MyQRecharge Terminal 7.3.0.6+MyQ Server 7.2+January 2020
Copyright © 2006-2019 MyQ spol. s r.o.All Rights Reserved

-
MyQ Recharge Terminal Guide i
Table Of Content
1. About 1
1.1. About this manual 1
1.2. About the MyQ Recharge Terminal 1
1.2.1. Safety notes 2
1.2.2. Server requirements 3
1.2.3. Operating conditions 3
1.2.4. Power input 3
1.3. Changes to previous version 3
2. Setup 4
2.1. Starting the MyQ Recharge Terminal 4
2.2. Login to the MyQ Recharge Terminal 5
2.3. Configuration of the MyQ Recharge Terminal 5
2.3.1. Server 6
2.3.2. Log in 6
2.3.3. User 7
2.3.4. Devices 8
2.3.5. Receipt 9
2.3.6. Management 10
2.3.7. Log 11
2.3.8. About 12
2.4. Configuration on the MyQWeb Interface 12
3. Administration 15
3.1. Remote desktop connection 15

-
ii MyQ Recharge Terminal Guide
3.2. Restart of the application 15
3.3. Update of the application 15
3.4. Shutting down the nanoPC 21
4. Business Contact 22

1. About - 1.1. About this manual
MyQ Recharge Terminal Guide 1
1. About
1.1. About this manual
NOTICE: Pictures in this manual are illustrative. The real appearance of the MyQRecharge Terminal may differ in details and color.
This document guides the administrator through the setup and administration of theMyQ Recharge Terminal. The first part of the manual shows how to initialize andconfigure the MyQ Recharge Terminal. The second part describes the administration ofthe terminal, such as the restart and update of the application.
1.2. About the MyQ Recharge Terminal
The MyQ Recharge Terminal is a device designed as an extension of the MyQ creditaccounting. The device provides MyQ users with the option to view and increase theircredit balance.
In the basic version, the MyQ Recharge Terminal is equipped with a 19-inch full-colourtouch display and a nanoPC. The MyQ Recharge Terminal can be equipped with thefollowing optional hardware:
l card readerl coin detector witha self-locking coin bag
l bill readerl card dispenserl receipt printer

1. About - 1.2. About the MyQ Recharge Terminal
2 MyQ Recharge Terminal Guide
1.2.1. Safety notes
WARNING: Do not place the MyQ Recharge Terminal in a dusty environment ornear to water and heat sources.
WARNING: Do not expose the MyQ Recharge Terminal to rain. Do not allow anyliquids inside the MyQ Recharge Terminal.
WARNING: Install and use the MyQ Recharge Terminal only in places that meetthe environmental criteria mentioned in the section "Operating conditions" onthe facing page.
WARNING: Connect the MyQ Recharge Terminal to power source according tothe section "Power input" on the facing page. Keep the safety regulations andstandards.
WARNING: To prevent overheating, make sure that there is sufficient spacearound the MyQ Recharge Terminal for venting. Do not cover the ventingopenings of the MyQ Recharge Terminal.
WARNING: Do not insert any objects into openings of the MyQ RechargeTerminal. Risk of damage to installed devices, shock hazard, fire or failure of theMyQ Recharge Terminal.
WARNING: Do not place any objects on the MyQ Recharge Terminal.

1. About - 1.3. Changes to previous version
MyQ Recharge Terminal Guide 3
1.2.2. Server requirements
l MyQ server 7.2 and higherl MyQ server with a BusinessPro license.l The Credit feature must be enabled on the MyQ server.l Recharge terminal must be enabled as a payment provider on the MyQ server.
1.2.3. Operating conditions
Temperature 5 to 35 degrees CRelative humidity 30 to 80 percent
1.2.4. Power input
Voltage 230 V AC/ 50 HzArc fault detection device 10A/1N/C/003
1.3. Changes to previous version
Compared to the previous version the following changes have been made:
Place in document Change"User" on page 7 Section updated

2. Setup - 2.1. Starting the MyQ Recharge Terminal
MyQ Recharge Terminal Guide 4
2. SetupThis chapter provides the reader with information about the initialization, login andconfiguration of the MyQ Recharge Terminal.
2.1. Starting the MyQ Recharge Terminal
NOTICE: Before starting the MyQ Recharge Terminal, make sure that the powercord and the net cable are connected.
To start the MyQ Recharge Terminal, do the following:
1. Unlock and open the door of the MyQ Recharge Terminal.
FIGURE 2.1. Opening theMyQRecharge Terminal
2. Turn on the nanoPC using the "On" button .
FIGURE 2.2. Turning the nanoPC on

2. Setup - 2.2. Login to the MyQ Recharge Terminal
5 MyQ Recharge Terminal Guide
3. Close and lock the door of the MyQ Recharge Terminal, and then wait for thesystem to initialize.
2.2. Login to the MyQ Recharge Terminal
To be able to configure the MyQ Recharging Terminal, you have to enter theAdministrator mode.
To enter the Administrator mode, tap the MyQ logo at the top of the screen. Enter theadministrator's PIN (1087 by default — it can be changed on the "Management" onpage 10 tab), and then tap Log in. Alternatively, you can first enter the administrator'sPIN on the login screen, and then tap the MyQ logo.
The administration screen opens.
FIGURE 2.3. Entering Administrator mode
2.3. Configuration of the MyQ Recharge Terminal
On the tabs of the screen in the Administrator mode, you can configure the MyQRecharge Terminal. You can switch between the tabs using the menu at the upper-leftside of the screen.
Once you are finished with the settings, tap Log out to leave the Administrator mode.
FIGURE 2.4. Leaving the Administrator mode
The tabs are described in the following sections.
2. Setup - 2.3. Configuration of the MyQ Recharge Terminal
MyQ Recharge Terminal Guide 6
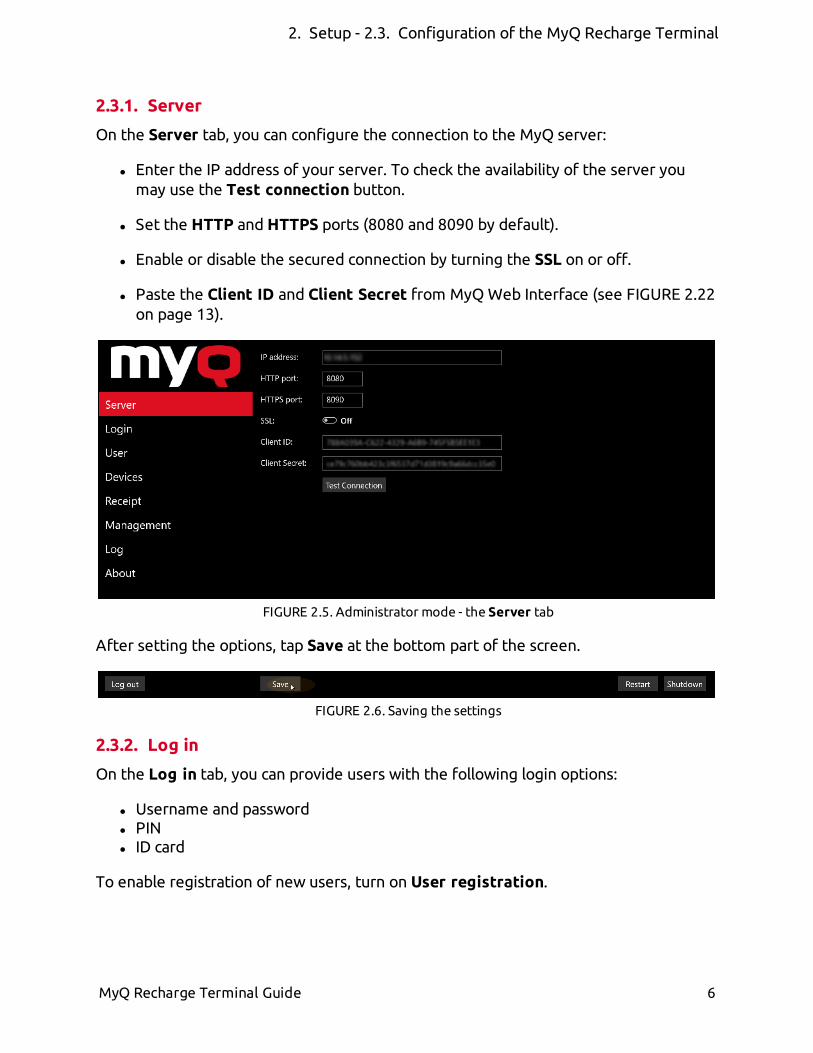
2.3.1. Server
On the Server tab, you can configure the connection to the MyQ server:
l Enter the IP address of your server. To check the availability of the server youmay use the Test connection button.
l Set the HTTP and HTTPS ports (8080 and 8090 by default).
l Enable or disable the secured connection by turning the SSL on or off.
l Paste the Client ID and Client Secret from MyQWeb Interface (see FIGURE 2.22on page 13).
FIGURE 2.5. Administrator mode - the Server tab
After setting the options, tap Save at the bottom part of the screen.
FIGURE 2.6. Saving the settings
2.3.2. Log in
On the Log in tab, you can provide users with the following login options:
l Username and passwordl PINl ID card
To enable registration of new users, turn on User registration.

2. Setup - 2.3. Configuration of the MyQ Recharge Terminal
7 MyQ Recharge Terminal Guide
NOTICE: To be able to register new users, credit accounting must be enabled forall users in MyQ.
FIGURE 2.7. Administrator mode - the Log in tab
After setting the options, tap Save at the bottom part of the screen.
FIGURE 2.8. Saving the settings
2.3.3. User
On the User tab, you can perform the following actions related to the user session:
l Set the minimum credit required to dispense an ID card.l Set the inactivity logout time.l Set the system language of the MyQ Recharge Terminal.l Enable or disable the possibility to register an ID card in user sessions by turningthe Allow user to register their card on or off.
l Enter the information about supported coins and bank notes, that will bedisplayed during the user sessions.
2. Setup - 2.3. Configuration of the MyQ Recharge Terminal
MyQ Recharge Terminal Guide 8
FIGURE 2.9. Administrator mode - theUser tab
After setting the options, tap Save at the bottom part of the screen.
FIGURE 2.10. Saving the settings
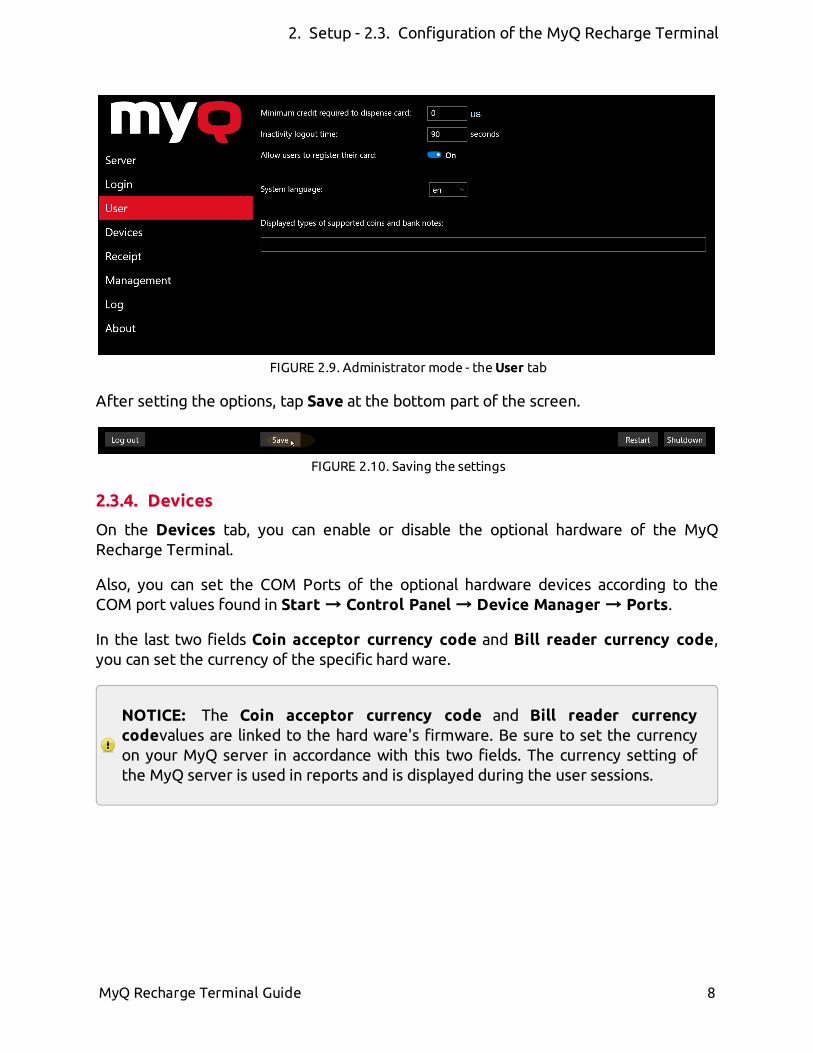
2.3.4. Devices
On the Devices tab, you can enable or disable the optional hardware of the MyQRecharge Terminal.
Also, you can set the COM Ports of the optional hardware devices according to theCOM port values found in Start → Control Panel → Device Manager → Ports.
In the last two fields Coin acceptor currency code and Bill reader currency code,you can set the currency of the specific hard ware.
NOTICE: The Coin acceptor currency code and Bill reader currencycodevalues are linked to the hard ware's firmware. Be sure to set the currencyon your MyQ server in accordance with this two fields. The currency setting ofthe MyQ server is used in reports and is displayed during the user sessions.

2. Setup - 2.3. Configuration of the MyQ Recharge Terminal
9 MyQ Recharge Terminal Guide
FIGURE 2.11. Administrator mode - Devices tab
After setting the options, tap Save at the bottom part of the screen.
FIGURE 2.12. Saving the settings
2.3.5. Receipt
On the Receipt tab, you can configure the data displayed on the receipt, such as thecompany name, address, etc.
Also, you can change the company logo printed on the receipt. To do so, tap Selectlogo, select the file with new logo in the browser, and then click Open. If you want torestore the default MyQ logo, tap Reset logo.
FIGURE 2.13. Administrator mode - theReceipt tab
2. Setup - 2.3. Configuration of the MyQ Recharge Terminal
MyQ Recharge Terminal Guide 10
After setting the options, tap Save at the bottom part of the screen.
FIGURE 2.14. Saving the settings
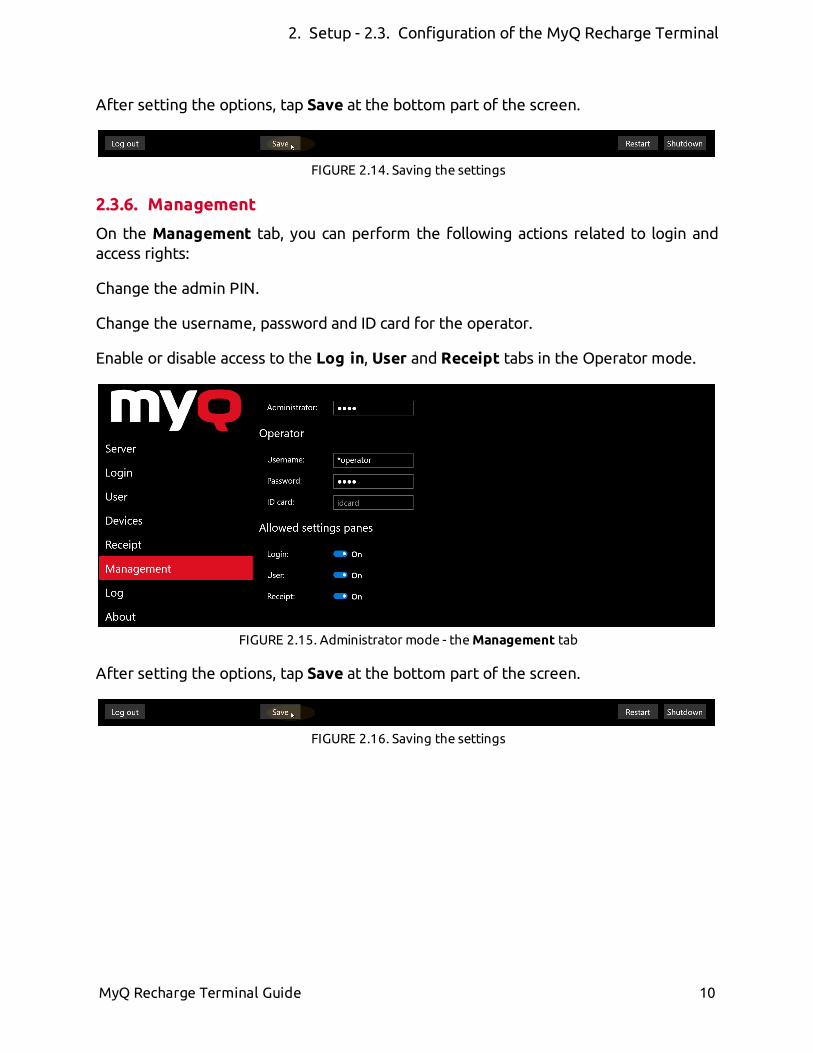
2.3.6. Management
On the Management tab, you can perform the following actions related to login andaccess rights:
Change the admin PIN.
Change the username, password and ID card for the operator.
Enable or disable access to the Log in, User and Receipt tabs in the Operator mode.
FIGURE 2.15. Administrator mode - theManagement tab
After setting the options, tap Save at the bottom part of the screen.
FIGURE 2.16. Saving the settings

2. Setup - 2.3. Configuration of the MyQ Recharge Terminal
11 MyQ Recharge Terminal Guide
2.3.7. Log
On the Log tab, you can see the log of events on the MyQ Recharge Terminal. At thetop of the tab, you can change the date and select one of the filters to show onlyspecific kind of events.
FIGURE 2.17. Administrator mode - the Log tab
To show a more detailed log, you may turn the Log debug info on.
FIGURE 2.18. The Log debug info setting
You can find the logs on the local drive of the nanoPC.
To log in to the nanoPC, you can use the Remote Desktop application in MicrosoftWindows (see "Remote desktop connection" on page 15). Alternatively, you can connecta keyboard to the nanoPC, and then press Ctrl+Alt+Delete . In both cases, theusername for the login is "Admin" and the password is "Admin00".
Once you are logged in to the nanoPC, you can find the logs under the following path:C:\Users\Recharge Terminal\AppData\Local\Packages\RechargeTerminal_0gx9rkgqv5gz0\LocalCache\Recharge Terminal
The text log can be found under the following paths:
for versions older than 6.0.3.27:C:\Program Files (x86)\MyQ Recharge Terminal 6.0\Service\log
for version 6.0.3.27 and newer:C:\Program Files (x86)\MyQ\MyQ Recharge Terminal 6.0\service\log

2. Setup - 2.4. Configuration on the MyQWeb Interface
MyQ Recharge Terminal Guide 12
2.3.8. About
On the About tab, you can overview the general information about the MyQ RechargeTerminal.
Also, you change or reset the logo graphic displayed on the MyQ Recharge Terminal. Tochange the logo, tap Select log, then select your image in the browser, and finally tapOpen. If you want to restore the default MyQ logo, tap Reset logo.
FIGURE 2.19. Administrator mode - theAbout tab
After setting the options, tap Save at the bottom part of the screen.
FIGURE 2.20. Saving the settings
2.4. Configuration on the MyQ Web Interface
This section describes the necessary configuration on the MyQ Web Interface. Toprovide users the possibility to recharge their credit via the MyQ Recharge Terminal,you have to add the terminal to the list of external systems and enable it as a paymentprovider.
To add the MyQ Recharge Terminal to the list of external systems, do the following:
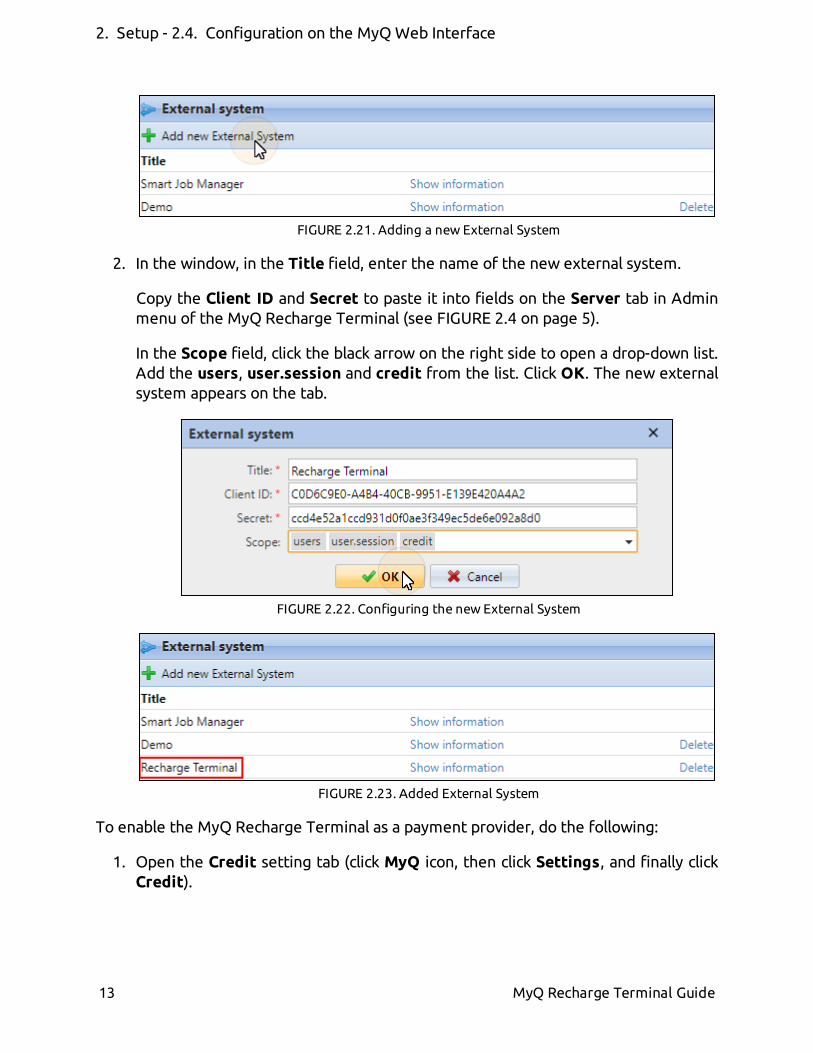
1. Open the External Systems settings tab (click the MyQ icon, then click Settings,and finally click External Systems ). Click Add new External System . TheExternal system window appears.
2. Setup - 2.4. Configuration on the MyQWeb Interface
13 MyQ Recharge Terminal Guide
FIGURE 2.21. Adding a new External System
2. In the window, in the Title field, enter the name of the new external system.
Copy the Client ID and Secret to paste it into fields on the Server tab in Adminmenu of the MyQ Recharge Terminal (see FIGURE 2.4 on page 5).
In the Scope field, click the black arrow on the right side to open a drop-down list.Add the users, user.session and credit from the list. Click OK. The new externalsystem appears on the tab.
FIGURE 2.22. Configuring the new External System
FIGURE 2.23. Added External System
To enable the MyQ Recharge Terminal as a payment provider, do the following:
1. Open the Credit setting tab (click MyQ icon, then click Settings, and finally clickCredit).

2. Setup - 2.4. Configuration on the MyQWeb Interface
MyQ Recharge Terminal Guide 14
2. On the tab, under Payment providers, select Recharge terminal, and then clickEnabled. Alternatively you can right-click Recharge terminal and select Enabledon the pop-up menu.
FIGURE 2.24. Enabling the credit for theMyQ Recharge Terminal

3. Administration - 3.1. Remote desktop connection
MyQ Recharge Terminal Guide 15
3. AdministrationThis chapter describes management of the MyQ Recharge Terminal. The followingsections provide the information about the remote connection, restart and update ofthe application.
3.1. Remote desktop connection
As the MyQ Recharge Terminal is based on the Microsoft Windows operation system,you may access and manage the settings via Remote Desktop.
Turn on the terminal, wait for the application to initialize, and then connect via RemoteDesktop.
3.2. Restart of the application
To restart the MyQ Recharge Terminal, log in as the administrator or the operator, andthen tap Restart in the lower-left corner of the screen.
FIGURE 3.1. Restarting theMyQRecharge Terminal
3.3. Update of the application
To update the MyQ Recharge Terminal application, you have to log in to the nanoPC asthe administrator. To do so, connect a keyboard to the nanoPC, then pressCtrl+Alt+Del, and finally enter the username (Admin) and password (Admin00).
Once you are in Microsoft Windows, you have to change configuration of the RechargeTerminal account, so that it does not start in the kiosk mode. To do so, follow the stepsbelow.
1. Go to Family & other people tab (Start → Settings → Accounts), and then tapSet up assigned access. The Set up assigned access tab opens.

3. Administration - 3.3. Update of the application
16 MyQ Recharge Terminal Guide
FIGURE 3.2. The Family & other people tab

3. Administration - 3.3. Update of the application
MyQ Recharge Terminal Guide 17
2. On the tab, under Choose which app this account can access, tap RechargeTerminal. The Choose an app window opens.
FIGURE 3.3. The Set up assigned access tab

3. Administration - 3.3. Update of the application
18 MyQ Recharge Terminal Guide
3. In the window, tap Don't start an app when the account is signed in. TheRecharge Terminal app disappears from the Set up assigned access tab.
FIGURE 3.4. TheChoose an appwindow
FIGURE 3.5. The Set up assigned access tab

3. Administration - 3.3. Update of the application
MyQ Recharge Terminal Guide 19
4. Open Task Manager, go to Users tab, then select the Recharge Terminal user,and finally tap Sign out.
FIGURE 3.6. Signing out the Recharge Terminal user
5. Now you can log out from the Admin account and log in to the RechargeTerminal account.
6. On this account, update the MyQ Recharge Terminal by installing the new versionof the application (To do this, just run the MyQ Recharge Terminal installationfile.)
INFO: No settings are changed and all data is kept after the update sothere is no need for further configuration.
After the installation, log out of the Recharge Terminal account, and then log in to theAdmin account. Now you have to change configuration of the MyQ Recharge Terminal,so that it starts in the kiosk mode again. To do so, follow the steps below.
1. Go to Family & other people tab (Start → Settings → Accounts), and then tapSet up assigned access. The Set up assigned access tab opens.

3. Administration - 3.3. Update of the application
20 MyQ Recharge Terminal Guide
2. On the tab, under Choose which app this account can access, tap Choose anapp. The Choose an app window opens.
FIGURE 3.7. The Set up assigned access tab
3. In the window, tap Recharge Terminal. The Recharge Terminal app appears onthe Set up assigned access tab again.
FIGURE 3.8. TheChoose an appwindow
4. Restart the nanoPC. The MyQ Recharge Terminal will start in the kiosk mode.

3. Administration - 3.4. Shutting down the nanoPC
MyQ Recharge Terminal Guide 21
3.4. Shutting down the nanoPC
If there is a need to turn off the MyQ Recharge Terminal, shut down the nanoPC first.To do so, you can use Remote Desktop connection or connect a keyboard to the PC anddirectly log in to the system.
Shutting down the nanoPC via Remote Desktop
l Connect to the nanoPC via Remote Desktop application.
l Log in as the administrator. The username is "Admin" and the password is"Admin00".
l Shut down the PC (Start → Power → Shut down).
Shutting down the nanoPC using keyboard
l Unlock and open the front door of the MyQ Recharge Terminal.
l Connect a keyboard to the PC.
l Press Ctrl+Alt+Delete to log in to the system as the administrator. Theusername is "Admin" and the password is "Admin00".
l Shut down the PC (Start → Power → Shut down).
4. Business Contact -
MyQ Recharge Terminal Guide 22
4. Business Contact
MyQ® Manufacturer MyQ® spol. s r.o.
Harfa Office Park, Ceskomoravska 2420/15, 190 93 Prague 9,Czech Republic
MyQ® Company is registered in the Companies register at the Municipal Court inPrague, division C, no. 29842
Business information www.myq-solution.com
Technical support [email protected]
Notice MANUFACTURER WILL NOT BE LIABLE FOR ANY LOSS OR DAMAGECAUSED BY INSTALLATION OR OPERATION OF THE SOFTWAREAND HARDWARE PARTS OF THE MyQ® PRINTING SOLUTION.
This manual, its content, design and structure are protected bycopyright. Copying or other reproduction of all or part of thisguide, or any copyrightable subject matter without the priorwritten consent of MyQ® Company is prohibited and can bepunishable.
MyQ® is not responsible for information content of this manual,particularly regarding its integrity, currency and commercialoccupancy. All the material published here is exclusively ofinformative character.
This manual is subject to change without notification. MyQ®Company is not obliged to make these changes periodically norannounce them, and is not responsible for currently publishedinformation to be compatible with the latest version of the MyQ®printing solution.
Trademarks MyQ® including its logos is registered trademark of MyQ®company. Microsoft Windows, Windows NT and Windows Serverare registered trademarks of Microsoft Corporation. All otherbrand and product names might be registered trademarks ortrademarks of their respective companies.
Any use of trademarks of MyQ® including its logos without theprior written consent of MyQ® Company is prohibited. Thetrademark and product name is protected by MyQ® Companyand/or its local affiliates.