MS Word 2010: An Introduction
35
MS Word 2010 An Introduction
-
Upload
khangminh22 -
Category
Documents
-
view
2 -
download
0
Transcript of MS Word 2010: An Introduction

MS Word 2010
An Introduction

MS Word 2010: An Introduction
MS Word 2010: An Introduction Page i Office of Information Technology September 2013
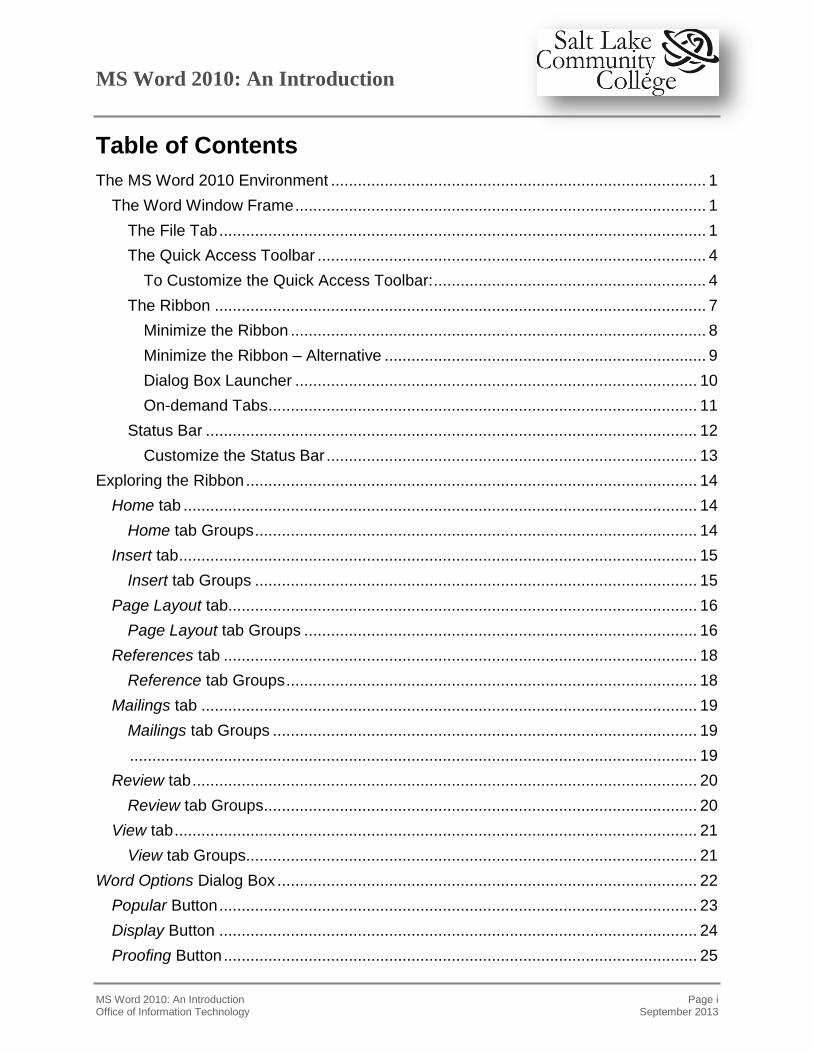
Table of Contents
The MS Word 2010 Environment .................................................................................... 1
The Word Window Frame ............................................................................................ 1
The File Tab ............................................................................................................. 1
The Quick Access Toolbar ....................................................................................... 4
To Customize the Quick Access Toolbar: ............................................................. 4
The Ribbon .............................................................................................................. 7
Minimize the Ribbon ............................................................................................. 8
Minimize the Ribbon – Alternative ........................................................................ 9
Dialog Box Launcher .......................................................................................... 10
On-demand Tabs ................................................................................................ 11
Status Bar .............................................................................................................. 12
Customize the Status Bar ................................................................................... 13
Exploring the Ribbon ..................................................................................................... 14
Home tab ................................................................................................................... 14
Home tab Groups ................................................................................................... 14
Insert tab .................................................................................................................... 15
Insert tab Groups ................................................................................................... 15
Page Layout tab......................................................................................................... 16
Page Layout tab Groups ........................................................................................ 16
References tab .......................................................................................................... 18
Reference tab Groups ............................................................................................ 18
Mailings tab ............................................................................................................... 19
Mailings tab Groups ............................................................................................... 19
............................................................................................................................... 19
Review tab ................................................................................................................. 20
Review tab Groups ................................................................................................. 20
View tab ..................................................................................................................... 21
View tab Groups ..................................................................................................... 21
Word Options Dialog Box .............................................................................................. 22
Popular Button ........................................................................................................... 23
Display Button ........................................................................................................... 24
Proofing Button .......................................................................................................... 25

MS Word 2010: An Introduction
MS Word 2010: An Introduction Page ii Office of Information Technology September 2013
Save Button ............................................................................................................... 26
Advanced Button ....................................................................................................... 27
Customize Button ...................................................................................................... 28
Appendix A: Other Resources ...................................................................................... 29
Microsoft Interactive Guide ........................................................................................ 29
Download the Interactive Guide ............................................................................. 29
To open the Interactive Guide ................................................................................ 30
To use the Interactive Guide .................................................................................. 30

MS Word 2010: An Introduction
MS Word 2010: An Introduction Page 1 Office of Information Technology September 2013
The MS Word 2010 Environment
The Word Window Frame
The Word 2010 Window Frame, also known as the User Interface, provides the user with all the tools needed to create professional documents. Within this window frame the user can create new documents, edit existing documents, and save them in a digital format. The following screen shot shows the major components within the Word Window Frame.
The File Tab
The File Tab displays options that apply to the document as a whole. It also displays a list of the recently opened documents. In addition, it displays an Options button and an Exit button.
File Tab Quick Access Toolbar
Ribbon
Status Bar

MS Word 2010: An Introduction
MS Word 2010: An Introduction Page 2 Office of Information Technology September 2013
Clicking on the File Tab opens the File Menu.
File Menu Options and their Description
Option Description
Saves the document in the .docx format by default. If the document was not previously saved, the Save As dialog box opens.
Saves the document in the .docx format by default. Allows saving the document in other formats, such as earlier versions of Word or PDF.
Opens the Open dialog box allowing navigation to existing documents.
Closes the current document but the Word application remains open.
Displays Properties information about the current document. Also provides document tools for Protecting, Sharing, and Versioning.
Opens the Recent Documents and Recent Places table. Choose a document to open or select a folder to find a document.
Opens Available Templates where you can choose an exisitng template to start from or double click on Blank document to open a new blank document.

MS Word 2010: An Introduction
MS Word 2010: An Introduction Page 3 Office of Information Technology September 2013
The Print and Print Preview dialog box. Here you can choose a printer, change printer settings, and set number of copies. It also displays a Print Preview of your document.
Save and Send provides options for sharing the document with others and changing the File Type.
Save & Send
Send Using Email: When you select this a new email message opens with the document attached. Add recipients and a message to send the documentto them.
Save to Web: You can save the document to your Windows Live Account to share with others.
Save to SharePoint: Save the document to a SharePoint site to collaborate with others on this document.
Publish as Blog Post: Save the document to a blog site to share with others.
File Types
Change File Type: You can save the File Type of the document from a list of types on the right.
Create PDF/XPS Document: You can convert the document to a PDF file or a XPS file. (XPS is a Micrsoft file type similar to Adobe’s PDF type.)
Proivides two sections; Support – which is the online Help feature, Getting Started which is a series of video tutorials for using Word, and Contact Us which provides means of asking questions
Tools for Working With Office – which provides a button to open Word Options and a link to check for Word Updates. Note: At SLCC updates are provided by the IT department and occur automatically.

MS Word 2010: An Introduction
MS Word 2010: An Introduction Page 4 Office of Information Technology September 2013
Opens the Word Options dialog box. This provides customization options for Word so you can set it to your preferences.
To learn more see Word Options Dialog Box.
Clicking this buttom closes all open documents and the Word application
The Quick Access Toolbar
The Quick Access Toolbar provides quick access to Word commands. By default it is in the top left corner above the Ribbon and contains three buttons; Save, Undo and Redo. The Quick Access Toolbar can be customized with additional tool buttons. It also can be positioned below the Ribbon.
To Customize the Quick Access Toolbar:
Click the Options button (see above) to open the Word Options dialog box.
Click the Quick Access Toolbar button on the left side of the dialog box.
The Customize the Quick Access Toolbar window opens. This window contains two sections, the Commands section and the Quick Access Toolbar section.
See figure below.

MS Word 2010: An Introduction
MS Word 2010: An Introduction Page 5 Office of Information Technology September 2013
Customize the Quick Access Toolbar
Using this dialog box you can add or remove command button from the Quick Access Toolbar. You can also change the order of the commands and separate them with a vertical bar called the Separator.
1. Choose commands from: Field.
Field is set to Popular Commands by default. Click the menu button to display a list of other command locations. All Commands can be displayed as well as commands for each of the tabs in the Ribbon.
2. Commands Location Pane. This pane displays the commands for the location selected in the Choose commands from: field.

MS Word 2010: An Introduction
MS Word 2010: An Introduction Page 6 Office of Information Technology September 2013
3. Customize Quick Access Toolbar: Field
Select from this field’s dropdown if the changes are:
For All Documents (default)
For <Current open document> only.
4. Quick Access Toolbar Pane This pane displays a list of the commands on the Quick Access Toolbar and their display order.
5. Add >> and <<Remove Buttons
Select a command in the left pane then click Add>>. The command is added to the list of Quick Access commands in the right pane.
Select a command in the right pane and click Remove The command is removed from the list of Quick Access commands in the right pane.
6. Move Up and Down Buttons. Select a command in the right pane and move its position in the list up or down.
7. Show Quick Access Toolbar below the Ribbon Check Box.
Checking this box will cause the Quick Access Toolbar to display below the Ribbon.
8. OK button When fininshed, click OK to save your changes and exit the dialog box..
Note: Displaying the Quick Access Toolbar below the Ribbon can give Word 2010 a Word 2003 look and feel. (See #7 above.)

MS Word 2010: An Introduction
MS Word 2010: An Introduction Page 7 Office of Information Technology September 2013
The Ribbon
The Ribbon runs across the top of the program window and replaces the menu bar and tool bar. It consists of Tabs, Groups, and Commands.
Three components of the Ribbon:
1. Tabs The Ribbon has seven Tabs across the top.
1. Home 2. Insert 3. Page Layout 4. References 5. Mailings 6. Review 7. View
Each Tab represents a related activity area.
2. Groups Each Tab has several Groups that contain related commands or functions.
3. Commands Each Group contains Commands represented by a button, a box to enter information, or a menu.

MS Word 2010: An Introduction
MS Word 2010: An Introduction Page 8 Office of Information Technology September 2013
Minimize the Ribbon
The Ribbon can be minimized so only the tabs show. This provides more workspace for a document. To minimize the Ribbon:
Right click anywhere along the row of Tabs.
From the menu that opens, select Minimize the Ribbon.
The Ribbon is minimized so only the Tabs show. Clicking on a Tab opens the Ribbon over the open document.
Note: Displaying the Quick Access Toolbar below the Minimized Ribbon can give Word 2010 the look and feel of Word 2003 and earlier versions.

MS Word 2010: An Introduction
MS Word 2010: An Introduction Page 9 Office of Information Technology September 2013
Minimize the Ribbon – Alternative
Minimize the Ribbon Minimizing the Ribbon can provide more workspace. Single click on a tab to display the ribbon or minimize it again.
Note: The Ribbon shrinks and grows as the Word window is resized. To maximize the number of Command tool buttons displayed, make the Word window as wide as possible.
Single Click a Tab to display the Ribbon.
Double Click a Tab again to restore the Ribbon
Double Click a Tab to minimize Ribbon

MS Word 2010: An Introduction
MS Word 2010: An Introduction Page 10 Office of Information Technology September 2013
Dialog Box Launcher
Not all related commands can be shown in the Group. In such cases, the Group has a
small diagonal arrow in the bottom right corner. This is called the Dialog Box Launcher. Many dialog boxes are the same as in previous versions of Word.
Dialog Box Launcher Clicking the Dialog Box Launcher opens a dialog box or a task pane. Many of these are recognizable from previous versions of Word.
Click Dialog Box Launcher
Font Dialog Box Appears

MS Word 2010: An Introduction
MS Word 2010: An Introduction Page 11 Office of Information Technology September 2013
On-demand Tabs
On-demand tabs appear above the Ribbon only when an object on the document is selected, for example, when selecting a picture within a table. In this example, a Picture Tools tab and a Table Tools tab appear.
1. Picture selected When a picture is selected, the Picture Tools Tab appears above the ribbon.
2. Picture Tools sub-tab, Format The Picture Tools tab appears with a Sub-tab called Format. The Format Tab provides picture formatting cammands.
3. Format tab Groups The Format tab Groups contain related commands for formatting the picture.
4. Table Tools tab appears Because in this example the selected picture is within a table, the Table Tools tab also appears. It has two sub-tabs for Designing and changing the Layout of the table.
Note: On-demand tabs appear for other activity areas, such as drawing, diagrams,
and charts.
1
2 4
3

MS Word 2010: An Introduction
MS Word 2010: An Introduction Page 12 Office of Information Technology September 2013
Status Bar
The Office Button, Quick Access Toolbar, Ribbon, and the Document Area all
reside in the MS Office Frame. At the bottom of the frame is the Status Bar which
contains several features not to be overlooked.
1. Page number of Total Pages Displays the current page’s number out of total number of pages. Click to open the Find and Replace dialog box.
2. Words: Displays the number of words in the Document. Click to open the Word Count dialog box.
3. Proofing Errors Indicator. Green checkmark indicates no proofing errors. Red checkmark indicates errors found. Click to run Spelling and Grammar check.
4. Macro Record Indicator Displays Macro recording status:
Indicates Macro not recording. Click to begin recording a Macro.
5. Document View Modes Provides selection of 5 view modes:
Print Layout
Full Screen Reading
Web Layout
Outline
Draft
6. Zoom Level Indicates view size relative to actual size. Click to open the Zoom dialog box.
7. Zoom Slide Drag the slider to the right to zoom in. Drag the
slider to the left to zoom out or click the + or –
buttons.
6
7 5
3 1
4 2

MS Word 2010: An Introduction
MS Word 2010: An Introduction Page 13 Office of Information Technology September 2013
Customize the Status Bar
The Status Bar can be personalized to meet individual user’s needs. To customize the Status Bar, do the following:
Right click anywhere on the Status Bar.
A view pane opens that contains feature options for the Status Bar. Select or deselect a feature by clicking to the left of the name. A check mark appears when a feature is selected. The feature will be added or removed from the Status Bar as soon as it is selected or deselected.

MS Word 2010: An Introduction
MS Word 2010: An Introduction Page 14 Office of Information Technology September 2013
Exploring the Ribbon
Usually, there are several commands required to perform a particular task. The Word 2010 Ribbon takes these task-related commands and puts them in a single location called a Group. The Group provides single click accessibility to related commands, such as Formatting commands. Some Groups also have a Dialog Box Launcher which provides access to even more features.
Note: The Ribbon shrinks and grows as the Word window is resized. To maximize the number of Command tool buttons displayed in a Group, make the Word window as wide as possible.
Home tab
The Home tab contains the most commonly used commands to start working with a document. This tab contains formatting and editing commands.
Home tab Groups
Clipboard Provides Cut, Copy, and Paste commands and Format Painter. Click to open the Clipboard task pane.
Font Provides Commands for selecting and formatting fonts. Click to open the Font dialog box.
Paragraph Provides commands for formatting paragraphs. Click to open the Paragraph dialog box.
Styles Provides commands for selecting a paragraph style. Click to open the Styles task pane.
Editing Click on the Editing button to access Find, Replace and Select options.

MS Word 2010: An Introduction
MS Word 2010: An Introduction Page 15 Office of Information Technology September 2013
Insert tab
The Insert tab contains groups that enable quick insertion of objects such as Pages, Tables, Charts, and Pictures.
Insert tab Groups
Pages Insert a Cover Page, Blank Page, or a Page Break. Click the small arrow next to Cover Page to select from a list of pre-formatted Cover Pages.
Tables Clicking the Table button provides the following options:
Create a table up to 10 columns by 8 rows
Insert Table opens the Insert Table dialog box
Draw Table changes mouse pointer to pencil to draw a table
Convert Text to Table converts selected text to a table
Excel Spreadsheet inserts a blank Excel table
Quick Tables opens the Built In dialog box
Illustrations Insert a Picture, Clip Art, Shapes, SmartArt (opens the Choose a SmartArt Graphic dialog box), or a Chart.
Links Clicking the Links button provides the following options:
Insert a Hyperlink to another part of the document or to an outside document or application.
Insert a Bookmark to assign a name to a location in the document. A hyperlink can be created to that Bookmark name.
Insert a Cross-reference by referring to an item or page in the document. Inserted Cross-references are updated automatically as document changes.

MS Word 2010: An Introduction
MS Word 2010: An Introduction Page 16 Office of Information Technology September 2013
Header & Footer Provides options for creating and editing Headers and Footers:
Clicking Header provides options for working with the Header
Clicking Footer provides options for working with the Footer
Clicking Page Number provides options for inserting and editing Page Numbers
Text Insert a Text Box in the document. Also provides options for inserting:
Quick Parts
Word Art
Drop Cap
Signature Line (Microsoft Digital Siganture)
Date and Time
Objects
Symbol Insert a Symbol or a mathematical Equation.
Page Layout tab
The Page Layout tab contains groups that customize the pages in a document. It also provides commands for the placement of text and graphics in the document.
Page Layout tab Groups
Themes Click the Themes button to select pre-built themes for the document. Use the Theme Colors, Fonts, and Effects buttons to create custom themes for a document.

MS Word 2010: An Introduction
MS Word 2010: An Introduction Page 17 Office of Information Technology September 2013
Page Setup This group provides commands to change the features of the document page(s):
Margins - Select built in margins or create custom Margins
Orientation – Choose Portrait or Landscape document
Size – Select from pre-set paper sizes or create a custom Size
Columns - Select from pre-set columns or create custom Columns
Insert Page and Column Breaks- Select from different Page or Section Breaks
Line Numbers – Insert and control Line Numbers
Hyphenation – Turn off and on
Click to open the Page Setup dialog box.
Page Background
This group provides 3 features for changing the look of the document page:
Watermark – Choose a Watermark or create a custom Watermark
Page Color – For the page background, choose a Theme color, a Standard color, or Create a color
Page Borders – This button opens the Borders and Shading dialog box
Paragraph Provides Fields for changing Paragraph Indent and Spacing above and below the paragraph. Click to open the Paragraph dialog box.
Arrange Organize, align, group, or rotate objects:
Position – Provides multiple options for aligning an object in reference to text
Bring to Front – If multiple objects overlap, desired object brought to Front
Send to Back - If multiple objects overlap, desired object sent to Back
Text Wrapping – Select how text wraps around an object
Align – Align the edges of multiple selected objects
Group – Group multiple objects together so they can be treated as a single object
Rotate – Rotate or Flip the selected object

MS Word 2010: An Introduction
MS Word 2010: An Introduction Page 18 Office of Information Technology September 2013
References tab
The References tab contains groups that provide commands to insert references into a document.
Reference tab Groups
Table of Contents
Provides commands for:
Adding a Table of Contents to a document
Adding a paragraph’s text to a Table of contents
Updating the Table of Contents after changes to the document
Footnotes Provides command for:
Inserting a Footnote
Inserting and Endnote
Navigating to the Next Footnote in a document
Show Notes by scrolling through the document Click to open the Footnote and Endnote dialog box.
Citations and Bibliography
Insert Citations, Manage Sources, select the Bibliography Style, and insert a Bibliography in a document.
Captions Click the Insert Captions button to open the Captions dialog box. Also provides commands for Inserting a Table of Figures in a document, updating the Table of Figures, and creating Cross References.
Index Click the Mark Entry button to insert the selected text into the document’s Table of Authorities. Also provides commands for Inserting an Index and Updating the Index.
Table of Authorities
Click the Mark Citation button to insert the selected text into the document’s Index. Also provides commands for Inserting a Table of Authorities and Updating the Table of Authorities.

MS Word 2010: An Introduction
MS Word 2010: An Introduction Page 19 Office of Information Technology September 2013
Mailings tab
The Mailings tab contains groups that are used to create and run a mail merge, preview results, and create addressed envelopes or mailing labels.
Mailings tab Groups
Create Provides commands for creating addressed envelopes or mailing labels. Clicking either button opens the Envelopes and Labels dialog box.
Start Mail Merge
Provides commands for choosing and editing recipients and starting the mail merge.
Write and Insert Fields
Provides commands for setting up the mail merge in a document.
Preview Results
Before the mail merge is run, use these commands for previewing results.
Finish & Merge
Click the Finish and Merge button to run the mail merge and access editing commands.

MS Word 2010: An Introduction
MS Word 2010: An Introduction Page 20 Office of Information Technology September 2013
Review tab
The Review tab provides commands for reviewing and editing the contents of a document by a single person or a group of people.
Review tab Groups
Proofing Check, modify, and enhance the text in a document with features such as Spelling and Grammar Check, Research, and Thesaurus.
Comments Provides the ability to insert Comments about selected text. Also provides editing and navigation tools for posted Comments.
Tracking Provides Tracking Changes in a document. Also the format in which changes are displayed and the way they are viewed can be set. The Reviewing Pane can be opened as a separate window.
Changes Allows the author of a document to navigate through the changes and accept or reject them.
Compare Allows different versions of the original document to be viewed side-by-side or as a single merged document.
Protect Provides the author of a shared document the ability to set restrictions on access and editing privelages.

MS Word 2010: An Introduction
MS Word 2010: An Introduction Page 21 Office of Information Technology September 2013
View tab
The View tab provides commands to switch between different document views, show or hides features, and view multiple documents at the same time
View tab Groups
Document Views
Provides 5 document viewing options: 1. Print Layout 2. Full Screen Reading 3. Web Layout 4. Outline 5. Draft
Note: Document View tool buttons are also located in the Windows Frame, bottom right corner.
Show/Hide Click a check box to show or hide document editing tools.
Zoom Provides Zoom controls to zoom in or out on a document.
Window Use these commands when multiple document windows are open at once. Commands arrange open windows in several ways.
Macros Click this button to open:
The Macros dialog box.
The Record Macro dialog box.

MS Word 2010: An Introduction
MS Word 2010: An Introduction Page 22 Office of Information Technology September 2013
Word Options Dialog Box
The Word Options Dialog Box contains option commands that allow customization and personalization of the Word environment. By personalizing the Word environment only those needed options are displayed which optimizes work flow.
To access the Word Options Dialog Box:
1. Click on the Word Office Button to display the Office Menu.
2. Then click the Word Options button at the bottom of the Office Menu window.
Word Options Dialog Box
Clicking one of the Word Option Buttons opens that button’s Options Pane.
Following is an explanation of some of the buttons and their features.
1
2
Word Option Buttons
Options Pane

MS Word 2010: An Introduction
MS Word 2010: An Introduction Page 23 Office of Information Technology September 2013
Popular Button
Use this button to change some of the most popular options in Word.
Show Mini Toolbar on Selection
Turns on and off the Mini Toolbar:
Show Developer Tab in the Ribbon
Adds the Developer Tab to the ribbon. This tab is required for creating Macros.
Color Scheme Use this to choose a color scheme for the Word environment.
Screen Tip style: Hovering the mouse pointer over a button on the Ribbon diplays a Screen Tip. These tips give the name and descrition of the the button. Using the drop down, you can: 1. Show the description in the tip. 2. Turn off the description in the tip. 3. Turn of the screen tips entirely.
Personalize your copy of Microsoft Office
Here, users insert their username, initials and select a language.

MS Word 2010: An Introduction
MS Word 2010: An Introduction Page 24 Office of Information Technology September 2013
Display Button
Use this button to change how a document is displayed on the screen and when printed.
Page display options Sets how a document is displayed on the screen.
Always show these formatting marks on the screen
Choose the formatting marks displayed when hidden formatting marks are turned on. Or, all marks can be selected.
Printing options Sets preferences for the way documents are printed.

MS Word 2010: An Introduction
MS Word 2010: An Introduction Page 25 Office of Information Technology September 2013
Proofing Button
Use these options to change auto correction and formatting settings.
Auto Correct options Click the AutoCorrect Options button to open the AutoCorrect dialog box. Use this to cutomize the auto correction features.
When correcting spelling in Microsoft Office programs
Provides auto correction of spelling options for all Microsoft Office applications. Click on the Cutom Dictionaries… button to create custom dictionaries.
When correcting spelling and grammar in Word
Provides spelling and grammar checking options for Word documents. Click the Settings… button to set grammar checking options. Click the Recheck Document button to reset the grammar and spelling check.
Exceptions for: Set spelling and grammar checking exceptions for the current document or all new Word documents.

MS Word 2010: An Introduction
MS Word 2010: An Introduction Page 26 Office of Information Technology September 2013
Save Button
Use the Save tab to choose how documents are saved and the default file save location.
Save Documents Set the default file save format and a default file location. Set how often Word auto saves the document (AutoRecover) and the location of the AutoRecover file.
Offline editing options for document management server files
This provides options for setting where checked-out files are saved.
Preserve fidelity when sharing this document
Provides options for embedding fonts in a file.

MS Word 2010: An Introduction
MS Word 2010: An Introduction Page 27 Office of Information Technology September 2013
Advanced Button
Use this tab to access many more, advanced options for customizing Word.

MS Word 2010: An Introduction
MS Word 2010: An Introduction Page 28 Office of Information Technology September 2013
Customize Button
Use this tab to customize the Quick Access Toolbar and Keyboard Shortcuts.
How to use this feature is discussed on page 3, To Customize the Quick Access
Toolbar:

MS Word 2010: An Introduction
MS Word 2010: An Introduction Page 29 Office of Information Technology September 2013
Appendix A: Other Resources
Microsoft Interactive Guide
The MS Interactive Guide provides a quick way to find a Word feature or command in the 2007 version by using an interactive Word 2003 version.
Download the Interactive Guide
1. Copy and paste the following address to your browser’s address field: http://www.microsoft.com/downloads/details.aspx?FamilyId=9044790B-4E24-4277-B714-66D7B18D0AA1&displaylang=en
2. On the page that opens, click the Download button.

MS Word 2010: An Introduction
MS Word 2010: An Introduction Page 30 Office of Information Technology September 2013
To open the Interactive Guide
Once the download is complete an icon for opening the Interactive Guide is installed on the computer desktop.
Double click the icon to open the Interactive Guide.
To use the Interactive Guide
To learn the location of a command in the 2007 version, in the Interactive Guide hover the mouse pointer over a Menu bar item or a Toolbar Button.
A pane opens describing where the feature or command is found in the 2007 version.
Click the Menu bar item or Toolbar Button for an animated demonstration of its location in the 2007 version.