Mobile Connection User's Guide - Drivers & Downloads ...
106
Mobile Connection User's Guide Version 2.90 2018.6.14 KONICA MINOLTA, INC.
-
Upload
khangminh22 -
Category
Documents
-
view
0 -
download
0
Transcript of Mobile Connection User's Guide - Drivers & Downloads ...

Mobile Connection User's Guide
Version 2.90
2018.6.14
KONICA MINOLTA, INC.

2
Introduction This guide provides information to help the customer, who is using a Konica Minolta bizhub series device, connect a mobile terminal such as a smartphone to the bizhub series device. It presents information on how to select various mobile connection function solutions supplied by Konica Minolta, the functional outline of each solution, and the setting methods for users in charge of the customer's information system or general affairs.

3
Contents Introduction ································································································ 2
1. What is Mobile Connection? ··································································· 8 1.1. Mobile Solutions Supplied by Konica Minolta ........................................................... 8
2. Overview of Konica Minolta Mobile Solutions ·············································· 9 2.1. General outline of mobile solutions ........................................................................... 9 2.2. AirPrint ..................................................................................................................... 11
2.2.1. Overview ................................................................................................... 11 2.2.2. Specifications ........................................................................................... 11
2.3. Mopria ..................................................................................................................... 12 2.3.1. Overview .................................................................................................. 12 2.3.2. Specifications .......................................................................................... 12
2.4. Konica Minolta Print Service ................................................................................... 13 2.4.1. Overview .................................................................................................. 13 2.4.2. Specifications .......................................................................................... 13
2.5. Google Cloud Print .................................................................................................. 14 2.5.1. Overview .................................................................................................. 14 2.5.2. Specifications .......................................................................................... 14
2.6. Basic Functions of Konica Minolta Mobile Print (KMMP) ....................................... 15 2.6.1. Overview .................................................................................................. 15 2.6.2. Specifications .......................................................................................... 15 2.6.3. Secure Print function ............................................................................... 16
2.7. Konica Minolta Mobile Print Quick Setting Function (Pairing Function) ................. 17 2.7.1. Overview .................................................................................................. 17 2.7.2. Registration using the QR code .............................................................. 17 2.7.3. Registration using NFC (Mobile touch area on MFP panel) .................... 18 2.7.4. Registration using NFC (NFC tag) .......................................................... 18 2.7.5. Registration using Bluetooth LE .............................................................. 19
2.8. Mobile Terminal Authentication Device Function of Konica Minolta Mobile Print ... 20 2.8.1. Overview .................................................................................................. 20 2.8.2. Authentication using the card authentication unit .................................... 20 2.8.3. Authentication using NFC ........................................................................ 20 2.8.4. Authentication using Bluetooth LE .......................................................... 21
2.9. bizhub Remote Access ........................................................................................... 22 2.9.1. Overview .................................................................................................. 22 2.9.2. Specifications .......................................................................................... 22
3. Environment Presettings by Administrator ················································ 23 3.1. To Use each Solution .............................................................................................. 23
3.1.1. Step (1) Select the required wireless infrastructure environment. .......... 23 3.1.2. Step (2) Configure MFP settings by the administrator. ........................... 24
4
3.1.3. Step (3) Configure presettings by the user to use the application. ......... 24 3.2. AirPrint .................................................................................................................... 25
3.2.1. Preparation .............................................................................................. 25 3.2.2. Cautions .................................................................................................. 27
3.3. Mopria ..................................................................................................................... 28 3.3.1. Preparation .............................................................................................. 28 3.3.2. Cautions .................................................................................................. 28
3.4. Konica Minolta Print Service ................................................................................... 29 3.4.1. Preparation .............................................................................................. 29 3.4.2. Cautions .................................................................................................. 29
3.5. Google Cloud Print .................................................................................................. 30 3.5.1. Preparation: Models using Google Cloud Print Setup ............................. 30 3.5.2. Cautions: Models using Google Cloud Print Setup ................................. 34 3.5.3. Preparation: Models not using Google Cloud Print Setup ...................... 34
3.6. Konica Minolta Mobile Print Basic Functions .......................................................... 36 3.6.1. Preparation: Print function ....................................................................... 36 3.6.2. Preparation: Scan function ...................................................................... 37 3.6.3. Preparation: Secure Print function .......................................................... 37 3.6.4. Preparation: ID & Print function ............................................................... 37
3.7. ID & Print (PageScope My Print Manager Port) ..................................................... 42 3.7.1. Preparation .............................................................................................. 42 3.7.2. Cautions .................................................................................................. 42
3.8. Konica Minolta Mobile Print Quick Setting Function (Pairing Function) ................. 43 3.8.1. Preparation: Registration using the QR code .......................................... 43 3.8.2. Cautions: Registration using the QR code .............................................. 43 3.8.3. Preparation: Registration using NFC (NFC tag) ...................................... 43 3.8.4. Cautions: Registration using NFC (NFC tag) .......................................... 43 3.8.5. Preparation: Registration using NFC ....................................................... 43 3.8.6. Cautions: Registration using NFC ........................................................... 44 3.8.7. Preparation: Registration using Bluetooth LE ......................................... 44 3.8.8. Cautions: Registration using Bluetooth LE .............................................. 44
3.9. Mobile Terminal Authentication Device Function of Konica Minolta Mobile Print ... 45 3.9.1. Preparation: Authentication using card authentication unit ..................... 45 3.9.2. Cautions: Authentication using card authentication unit.......................... 46 3.9.3. Preparation: Authentication using NFC ................................................... 46 3.9.4. Cautions: Authentication using NFC........................................................ 46 3.9.5. Preparation: Authentication using Bluetooth LE ...................................... 46 3.9.6. Cautions: Authentication using Bluetooth LE .......................................... 47
3.10. bizhub Remote Access ...................................................................................... 48 3.10.1. Preparation .............................................................................................. 48 3.10.2. Cautions .................................................................................................. 49

5
4. Mobile Terminal Presettings by User and Basic Operations ·························· 51 4.1. AirPrint .................................................................................................................... 51
4.1.1. Wireless LAN settings for mobile terminal .............................................. 51 4.1.2. Preparation .............................................................................................. 51 4.1.3. Basic operations ...................................................................................... 51 4.1.4. Cautions .................................................................................................. 51
4.2. Mopria ..................................................................................................................... 52 4.2.1. Wireless LAN settings for mobile terminal .............................................. 52 4.2.2. Preparation .............................................................................................. 52 4.2.3. Basic operations ...................................................................................... 52 4.2.4. Cautions .................................................................................................. 52
4.3. Konica Minolta Print Service ................................................................................... 53 4.3.1. Wireless LAN settings for mobile terminal .............................................. 53 4.3.2. Preparation .............................................................................................. 53 4.3.3. Basic operations ...................................................................................... 53 4.3.4. Cautions .................................................................................................. 53
4.4. Google Cloud Print .................................................................................................. 54 4.4.1. Wireless LAN settings for mobile terminal .............................................. 54 4.4.2. Preparation .............................................................................................. 54 4.4.3. Basic operations ...................................................................................... 54 4.4.4. Cautions .................................................................................................. 56
4.5. Basic Functions of Konica Minolta Mobile Print (KMMP) ....................................... 57 4.5.1. Wireless LAN settings for mobile terminal .............................................. 57 4.5.2. Preparation .............................................................................................. 57 4.5.3. Basic operations for printing .................................................................... 59 4.5.4. Cautions on printing................................................................................. 60 4.5.5. Basic operations for scanning ................................................................. 60 4.5.6. Cautions on scanning .............................................................................. 61 4.5.7. Basic operations for Secure Print function .............................................. 62 4.5.8. Cautions on Secure Print function ........................................................... 62 4.5.9. Basic operations for ID & Print function .................................................. 63 4.5.10. Cautions on ID & Print function ............................................................... 63
4.6. Konica Minolta Mobile Print (KMMP) Quick Setting Function (Pairing Function) ... 64 4.6.1. Mobile terminal settings ........................................................................... 64 4.6.2. Preparation: Registration using the QR code .......................................... 64 4.6.3. Basic operations: Registration using the QR code .................................. 64 4.6.4. Cautions: Registration using the QR code .............................................. 65 4.6.5. Preparation: Registration using NFC (NFC tag) ...................................... 65 4.6.6. Basic operations: Registration using NFC (NFC tag) .............................. 65 4.6.7. Cautions: Registration using NFC (NFC tag) .......................................... 65 4.6.8. Preparation: Registration using NFC ....................................................... 65 4.6.9. Basic operations: Registration using NFC .............................................. 66

6
4.6.10. Cautions: Registration using NFC ........................................................... 66 4.6.11. Preparation: Registration using Bluetooth LE ......................................... 66 4.6.12. Basic operations: Registration using Bluetooth LE ................................. 66 4.6.13. Cautions: Registration using Bluetooth LE .............................................. 66
4.7. Presetting the Mobile Terminal Authentication Device Function of Konica Minolta Mobile Print (KMMP) ......................................................................................................... 67
4.7.1. Preparation: Authentication using card authentication unit ..................... 67 4.7.2. Basic operations: Authentication using the card authentication unit ....... 67 4.7.3. Cautions: Authentication using card authentication unit.......................... 67 4.7.4. Preparation: Authentication using NFC ................................................... 68 4.7.5. Preparation: Authentication using NFC ................................................... 68 4.7.6. Cautions: Authentication using NFC........................................................ 68 4.7.7. Preparation: Authentication using Bluetooth LE ...................................... 68 4.7.8. Basic operations: Authentication using Bluetooth LE .............................. 69 4.7.9. Cautions: Authentication using Bluetooth LE .......................................... 69
4.8. ID & Print (PageScope My Print Manager Port) ..................................................... 70 4.8.1. Preparation .............................................................................................. 70 4.8.2. Basic operations ...................................................................................... 73 4.8.3. Cautions .................................................................................................. 76
4.9. bizhub Remote Access ........................................................................................... 78 4.9.1. Wireless LAN settings for mobile terminal .............................................. 78 4.9.2. Preparation .............................................................................................. 78 4.9.3. Basic operations ...................................................................................... 78 4.9.4. Cautions .................................................................................................. 83
4.10. Configuring Wireless LAN Settings for Mobile Terminal .................................... 85 4.10.1. Mobile settings ......................................................................................... 85
5. Wireless LAN Connection ···································································· 86 5.1. Overview of Wireless LAN Connection ................................................................... 86 5.2. Wireless LAN Connection Specifications................................................................ 87
5.2.1. Secondary mode (Wireless only) ............................................................ 87 5.2.2. Secondary mode (Wired + Wireless) ...................................................... 87 5.2.3. Primary mode (AP mode/Simple AP Mode) ............................................ 88 5.2.4. Primary mode (Wi-Fi Direct) .................................................................... 88
5.3. MFP Wireless LAN Settings: Secondary Mode (Wireless Only) ............................ 89 5.3.1. Preparation .............................................................................................. 89 5.3.2. Cautions .................................................................................................. 90
5.4. MFP Wireless LAN Settings: Secondary Mode (Wired + Wireless) ....................... 91 5.4.1. Preparation .............................................................................................. 91 5.4.2. Cautions .................................................................................................. 92
5.5. MFP Wireless LAN Settings: Primary Mode (AP Mode/Simple AP Mode) ............. 93 5.5.1. Preparation .............................................................................................. 93 5.5.2. Cautions .................................................................................................. 97

7
5.6. MFP Wireless LAN Settings: Wi-Fi Direct ............................................................... 98 5.6.1. Preparation .............................................................................................. 98 5.6.2. Cautions ................................................................................................ 101
Appendix ································································································ 102 1. KMBS WIRELESS SPECIFICATION MATRIX ..................................................... 102

8
1. What is Mobile Connection?
1.1. Mobile Solutions Supplied by Konica Minolta
Konica Minolta provides various solutions involving a mobile terminal connected to an MFP or printer. This guide provides specifics about these solutions and the items required to use them.
This guide introduces the following Konica Minolta mobile solutions. Which types of mobile terminals are supported? Smartphones and tablet terminals the user owns
• iPhones and iPads with iOS installed • Various terminals with Android OS installed (Galaxy series, Nexus series, etc.) • Various terminals with Windows 10 Mobile and Windows 10 Mobile Enterprise
installed
What is possible? Printing and scanning to suit various office environments
• Printing and scanning via the intranet environment • Printing and scanning in different network environments such as a location
outside the office or a business trip destination • Authentication printing upon identifying a user
Which technologies are supported? Supports the latest mobile technologies
• AirPrint • Google Cloud Print • Mopria • Android Printing Framework • Wi-Fi • NFC • Bluetooth LE • bizhub Remote Access

9
2. Overview of Konica Minolta Mobile Solutions 2.1. General outline of mobile solutions
Mobile solution list Supported operating
system Available operation
iOS Android Windows
10 Mobile,
Windows
10 Mobile
Enterprise
Printing
via the
intranet
Printing via
different
networks such
as a location
outside the
office
Authentication
printing upon
identifying a
user
Scanning
via the
intranet
Others
AirPrint ○ × × ○ × × ○ -
Mopria × ○ × ○ × × × -
Cloud Print
○ ○ × ○ ○ × × -
Konica
Minolta
Print Service
× ○ × ○ × × × -
Konica
Minolta
Mobile Print
○ ○ ○ ○ × ○ ○ My Print Manager
connection, and NFC
connection functions
Bluetooth LE
connection function
bizhub
Remote
Access
○ ○ × × × × ○ NFC connection
function
AirPrint Mopria Google Cloud Print
<Office>
Print Scan
Print from outside the office Return to the
office and print
Remote bizhub RemoteAccess
KonicaMinolta Print Service
KonicaMinolta Mobile Print

10
Wireless technologies compatible with mobile solutions Wi-Fi Wi-Fi Direct G3/LTE NFC Bluetooth LE AirPrint ○ (*1) × × × ×
Mopria ○ × (*4) × × × Google Cloud Print ○ × (*4) ○ × × Konica Minolta Print Service
○ × (*4) × × ×
Konica Minolta Mobile Print
○ ○ × ○ (*2, *3) ○ (*5)
bizhub Remote Access ○ × (*4) × ○ (*2) ○ (*5) *1 AirPrint is only available when the MFP and mobile terminal are in the same segment (IP
subnet). *2 To use the quick setting (pairing) function, the MFP must support the NFC function. *3 To use a mobile terminal as an NFC authentication device, the optional AU-201S is required
on the MFP side. Also, the mobile terminal must be compatible with NFC (HCE mode). *4 Available for connection if it is set to legacy mode. *5 To use this function, the Bluetooth option is required on the MFP side.

11
2.2. AirPrint 2.2.1. Overview
AirPrint is the iOS standard print function. To use this function, you do not need to install the dedicated application or driver, so you can make prints with simple operation through the application. This function is also compatible with OS X.
2.2.2. Specifications
Terminal Supported operating system: iOS 4.2 or later, OS X 10.7 or later
Software requirement None.
Protocol Bonjour/mDNS, IPP(SSL/TLS) * To use AirPrint, the MFP and mobile terminal must be included in the same segment (IP subnet). For information on the customer's network configuration, check with the system administrator.
Konica Minolta
Apple products AirPrint-
compatible device
Search for compatible device
Other manufacturers' devices

12
2.3. Mopria 2.3.1. Overview
Mopria allows you to make prints with simple operation through the application by installing the plug-in in your Android terminal.
2.3.2. Specifications
Terminal Supported operating system: Android 4.4 or later
Software requirement Mopria Print Service 1.1 or later
Protocol Bonjour/mDNS, IPP
Konica Minolta
Android terminal
Mopria Print Service-
compatible device
Search for compatible device
Other manufacturers' devices

13
2.4. Konica Minolta Print Service
2.4.1. Overview Konica Minolta Print Service (KMPS) is the print plug-in that is installed in Android 4.4 or later. This function allows you to make prints on the MFP using an Android smartphone or tablet.
2.4.2. Specifications
Terminal Supported operating system: Android 4.4 or later
Software requirement Konica Minolta Print Service
Protocol None.
Android terminal

14
2.5. Google Cloud Print 2.5.1. Overview
Google Cloud Print is a service that enables printing data from a compatible MFP via the Internet. It is capable of: • making prints using the compatible application without requiring a printer driver; • making prints via the cloud by sending print jobs from outside of the office; • making prints through an iOS or Android OS smartphone or tablet terminal and a
Windows or Mac OS PC; • making prints by directly sending data from a local network to the MFP without
going through the cloud; and • sharing an MFP registered in Google Cloud between users.
2.5.2. Specifications
Terminal Terminal compatible with Google Chrome
Software requirement
Google Cloud Print™ Setup This is not required for some models.
Option requirement Refer to Appendix "List of Supported Models".
Protocol XMPP, mDNS, HTTP (SSL/TLS)

15
2.6. Basic Functions of Konica Minolta Mobile Print (KMMP)
2.6.1. Overview Konica Minolta Mobile Print (KMMP) has a function that prints documents in a mobile terminal or on the online storage via Wi-Fi or E-mails (including attachment files) that are being viewed using Konica Minolta Mobile Print (KMMP), through an MFP. In addition to the normal printing, it supports the secure print function that prints important documents securely. Furthermore, it supports scanning from an MFP to a mobile terminal. Windows KMMP does not support functions to: • print a document in online storage • browse and print Web pages • print an E-mail, including attached files • perform Secure Print and ID & Print • link with PSES My Print Manager. • My Documents function and SMB storage function
2.6.2. Specifications
Terminal
Supported operating system Android 4.4/5.0/5.1/6.0/7.0/7.1/8.0 iOS 10.0/10.1/10.2/10.3/11.0/11.1/11.2 Windows 10 Mobile, Windows 10 Mobile Enterprise
Software requirement
Konica Minolta Mobile Print for Android, Konica Minolta Mobile Print for iPhone/iPad, Konica Minolta Mobile Print for Windows

16
Printable formats
- JPEG/PNG/BMP/GIF - PDF 1.4/1.5/1.6/1.7 - Compact PDF, Encrypted PDF - TIFF - XPS - DOCX/XLSX/PPTX * The format may vary depending on the MFP to be used.
Protocol TCP, UDP, Bonjour, HTTP/HTTPS
2.6.3. Secure Print function ID & Print function The ID & Print function saves print data in the ID & Print User Box on this machine in an environment where user authentication is employed. Because the data is not printed within a short time period, this function prevents printed materials from being lost or left unattended. Since you need to be authenticated in this machine to print the data saved in the box, this function is suitable for safely printing highly confidential documents. When you are successfully authenticated, the print data of the login user is automatically printed. This enhances security and ensures smooth operation.
Secure Print Secure Print is a function that saves print data in the MFP User Box (Secure Document User Box) by setting the ID and password to the print data using the mobile terminal with KMMP installed. Because the data is not printed within a short time period, this function prevents printed materials from being lost or left unattended. In contrast to the ID & Print function, this function requires a user to enter the ID and password specified for each document; therefore, this function is particularly suitable for safely printing highly confidential documents.

17
2.7. Konica Minolta Mobile Print Quick Setting Function (Pairing Function)
2.7.1. Overview This function simplifies users' wireless LAN settings, MFP registration operations, and print settings (NFC tag only) using Konica Minolta Mobile Print (KMMP). Using this function substantially reduces the user's burden, and also provides an effect to reduce inquiries by mistake. KMMP has the following three methods to simplify settings. * This function is not supported in Windows KMMP.
1) Setting simplification using the QR code This method is available on a mobile terminal with the camera function. Reading the QR code simplifies setting steps such as wireless LAN connection settings and MFP registration operations on a mobile terminal.
2) Setting simplification using NFC
This method is available on a mobile terminal with the NFC function enabled. The setting procedure can be simplified by reading information using the NFC function. A mobile terminal can read two types of information items: "NFC tag" and "NFC". • Information registered in the "NFC tag" can be read by moving the mobile
terminal close to a tag seal that is sold separately. You can write information such as network connection settings and print settings (Color Setting, Copies, Simplex/Duplex, and Combination) onto a tag seal using "NFC Tag Writer".
• Information registered in "NFC" can be read by moving the mobile terminal close to the mobile touch area of the MFP. To register information in "NFC", use the MFP control panel. You can register information such as network connection settings and whether user authentication settings are configured on the MFP. Information registered in "NFC" is updated each time the MFP is turned off and on.
• Only supported in the Android version.
3) Setting simplification using Bluetooth LE This method is available on a mobile terminal with the Bluetooth function. Reading Bluetooth chip information simplifies steps for wireless LAN connection settings on a mobile terminal. • Only supported in the iOS version.
2.7.2. Registration using the QR code
Overview The MFP can be searched and registered by reading the QR code displayed on the MFP panel or the QR code created in the QR code creation website on the mobile terminal. Using this function allows you to easily search for and register the target MFP even if the networks used by the mobile terminal and MFP are different.
Specifications
Terminal
Supported operating system Android 4.4/5.0/5.1/6.0/7.0/7.1/8.0 iOS 10.0/10.1/10.2/10.3/11.0/11.1/11.2 - The camera function is installed.
Software requirement
Konica Minolta Mobile Print for Android version 1.0 or later, Konica Minolta Mobile Print for iPhone/iPad version 1.0 or later - Readable formats

18
QR code displayed on the MFP panel QR code created on the Konica Minolta QR code creation website (Other QR codes are not read.)
The QR code can be created on the website shown below. http://www.pagescope.com/cqr2/
2.7.3. Registration using NFC (Mobile touch area on MFP panel)
Overview The MFP can be searched and registered by reading MFP information from the mobile touch area on the MFP panel. Using this function allows you to easily search for and register the target MFP even if the networks used by the mobile terminal and MFP are different.
Specifications
Software requirement Konica Minolta Mobile Print for Android version 1.0 or later
Terminal Terminal (Android 4.0 or later) that has the following function - The NFC function must be installed on the mobile terminal.
Protocol ISO/IEC 14443
2.7.4. Registration using NFC (NFC tag) The MFP can be searched and registered by reading NFC tag information to which MFP information is written using the NFC Tag Writer application. Using this function allows you to easily search for and register the target MFP even if the networks used by the mobile terminal and MFP are different.
Software requirement
Konica Minolta Mobile Print for Android version 1.0 or later NFC Tag Writer
Terminal Terminal (Android 4.0 or later) that has the following function - NFC function
Create a QR code on the MFP
Create a QR code in the QR code creation website
QR code

19
Required equipment
- NFC tag Recommended product: SMARTRAC
Protocol ISO/IEC 14443
2.7.5. Registration using Bluetooth LE
Overview The MFP can be searched and registered by reading MFP information from the Bluetooth chip in the MFP. Using this function allows you to easily search for and register the target MFP even if the networks used by the mobile terminal and MFP are different. Specifications
Software requirement Konica Minolta Mobile Print for iPhone/iPad version 1.0 or later
Terminal iOS 9.0 or later
Protocol Bluetooth LE

20
2.8. Mobile Terminal Authentication Device Function of Konica Minolta Mobile Print
2.8.1. Overview
With Konica Minolta Mobile Print, you can use your mobile terminal to perform authentication when operating the MFP. This function, which uses the NFC or Bluetooth LE function of the mobile terminal, is only available on a mobile terminal that has the NFC or Bluetooth LE function. * This function is not supported in Windows KMMP.
1) Authentication using the card authentication unit MFP authentication is performed by placing the Android terminal on the card authentication unit installed on the MFP.
2) Authentication using NFC MFP authentication is performed by placing the Android terminal on the mobile touch area on the MFP panel.
3) Authentication using Bluetooth LE MFP authentication is performed by tapping the [Printer Panel Login] button on the Konica Minolta Mobile Print home page in front of the MFP panel.
2.8.2. Authentication using the card authentication unit
Specifications
Software requirement Konica Minolta Mobile Print for Android version 1.0 or later
Terminal Terminal (Android 4.4 or later) that has the following functions - The NFC function must be installed on the mobile terminal. - HCE (Host Card Emulation) function
Option requirement The card authentication unit (AU-201S) is required on the MFP side.
Protocol ISO/IEC 14443
2.8.3. Authentication using NFC Specifications
Software requirement Konica Minolta Mobile Print for Android version 1.0 or later
Terminal Terminal (Android 4.0 or later) that has the following function - NFC function
Protocol ISO/IEC 14443

21
2.8.4. Authentication using Bluetooth LE Specifications
Software requirement Konica Minolta Mobile Print for iPhone/iPad version 1.0 or later
Terminal iOS 9.0 or later
Protocol Bluetooth LE

22
2.9. bizhub Remote Access
2.9.1. Overview
1. Panel Link This function displays the control panel screen of the MFP connected to the network on the screen of the mobile terminal, enabling MFP remote control operations. (Some keys are not displayed on the MFP control panel, but they can be operated by tapping the pullout key displayed at the bottom of the screen.) Panel Link scan This function sends image data scanned on the MFP to the mobile terminal while Panel Link is active, and saves it on the mobile storage or Google drive. The PDF and compact PDF can be set as the file types at the time of scanning. Furthermore, the OCR function can be set to scanned data in compact PDF format.
2. Keyboard Link
This function allows you to enter characters on the MFP control panel screen using IME (Input Method Editor) of the mobile terminal. You can select whether to insert or overwrite the text, which is entered using a mobile terminal, into or at the cursor position on the control panel screen. (Note: When using Keyboard Link, be sure to move to the front of the MFP, then check that no one else is using the MFP.)
3. Address Link
This function allows you to select a destination to send images or documents scanned on the MFP from the address book of the mobile terminal. (Note: When using Address Link, be sure to move to the front of the MFP, then check that no one else is using the MFP.) There are restrictions on mobile terminals and supported models. For details, refer to Appendix "bizhub Remote Access Function Support List".
2.9.2. Specifications
Software requirement
bizhub Remote Access for Android bizhub Remote Access for iPhone/iPad
Terminal Supported operating system Android 4.4/5.0/5.1/6.0/7.0/7.1/8.0 iOS 10.0/10.1/10.2/10.3/11.0
Protocol TCP, UDP, Bonjour, ISO/IEC 14443, HTTP/HTTPS

23
3. Environment Presettings by Administrator 3.1. To Use each Solution
The wireless infrastructure environment settings and wireless LAN setting for each terminal are required to use each solution of the mobile connection function. On the assumption that the required application is already determined in Chapter 1, follow the below steps to carry out installation.
(1) Select the required wireless infrastructure environment. (2) Configure MFP settings by the administrator. (3) Configure presettings by the user to use the application. (4) Actually use the application.
3.1.1. Step (1) Select the required wireless infrastructure environment.
Some wireless infrastructures can be selected for each Konica Minolta mobile connection solution. The following describes the details.
Mobile functions and available infrastructure environments Wi-Fi Wi-Fi Direct G3/LTE NFC Bluetooth LE AirPrint ○ (*1) × × × ×
Mopria ○ × (*4) × × × Google Cloud Print ○ × (*4) ○ × × Konica Minolta Print Service
○ × (*4) × × ×
Konica Minolta Mobile Print
○ ○ × ○ (*2, *3) ○ (*5)
bizhub Remote Access ○ × (*4) × ○ (*2) ○ (*5) *1 AirPrint is only available when the MFP and mobile terminal are in the same segment (IP
subnet). *2 To use the quick setting (pairing) function, the MFP must support the NFC function. *3 To use a mobile terminal as an NFC authentication device, the optional AU-201S is required
on the MFP side. Also, the mobile terminal must be compatible with NFC (HCE mode). *4 Available for connection if it is set to legacy mode. *5 To use this function, the Bluetooth option is required on the MFP side.
To use each solution, one of the settings shown below must be configured in advance.
Wireless infrastructures to be used and pages in which an explanation is provided in this guide No. Wireless infrastructure environment Corresponding chapter in this
guide Remarks
1 The MFP is used as a Wi-Fi client. 5.2.1 Secondary mode (Wireless only)
2 The MFP is used as a Wi-Fi client. 5.2.2 Secondary mode (Wired + Wireless)
3 The MFP is used in Wi-Fi Primary mode (AP mode) or Simple AP mode.
5.2.3 Primary mode (AP mode/Simple AP Mode)
4 Wi-Fi Direct is used. 5.2.4 Wi-Fi Direct
5 The intranet wireless LAN system is used. (Wireless LAN is not used on the MFP.)
- Supported by all mobile solutions.
6 The MFP is used only through the 3G/LTE line without using the wireless LAN
- Supported only by Google Cloud Print.

24
3.1.2. Step (2) Configure MFP settings by the administrator. The MFP presettings by the administrator are required before the application can be used. For details, refer to each application setting method in this chapter. Reference AirPrint/Mopria/Wi-Fi Direct may be invalidated in firmware versions of certain models. In this case, contact our MFP/printer service representative.
3.1.3. Step (3) Configure presettings by the user to use the application.
Preparations are also required in the mobile terminal used as a wireless LAN client. The setting required in the mobile terminal and its method vary depending on the application to be used. For details, refer to Chapter 4 "Mobile Terminal Presettings by User and Basic Operations".

25
3.2. AirPrint 3.2.1. Preparation
MFP settings 1. Configure MFP network settings.
1) When using the wired network:
1. Configure the basic settings for TCP/IP. 2. In the administrator settings, select [Network Settings] - [TCP/IP Settings] -
[Wired Setting], then click [OK]. In [IPv4 Settings], configure the following settings.
Settings Description
[IP Application Method] To manually enter the IP address, select [Manual Input]. To automatically obtain the IP address from the DHCP server, select [Auto Setting].
[IP Address] When you select [Manual Input] in [IP Application Method], enter the fixed IP address.
[Subnet Mask] When you select [Manual Input] in [IP Application Method], enter the subnet mask.
[Default Gateway] When you select [Manual Input] in [IP Application Method], enter the IP address of the default gateway.
2) When using the wireless network:
Refer to Chapter 5 "Wireless LAN Connection".
2. Configure a setting to enable Bonjour. To use AirPrint, [Bonjour Setting] must be set to [ON]. Bonjour, which runs based on TCP/IP, is a technology that enables you to automatically configure the network settings for networked devices and find available services. The device can be searched as a printer that can print data from iPad, iPhone, or iPod touch.
Panel: In the administrator settings, select [Network Settings] - [Bonjour Setting] to configure settings. Web Connection: In the administrator mode, select [Network] - [Bonjour Setting] to configure settings.
Settings Description
[Bonjour Setting] Select [ON] to use Bonjour. [OFF] is specified by default.
[Bonjour Name] Enter a Bonjour name that is to be displayed as the name of connected device (using up to 63 characters).

26
3. Configure settings to use the AirPrint print function.
Panel: In the administrator settings, select [Network Settings] - [AirPrint Setting] - [Print Settings] to configure settings. Web Connection: In the administrator mode, select [Network] - [AirPrint Setting] - [Print Settings] to configure settings.
Settings Description [Print Settings] Select [ON] to print data on the MFP using AirPrint.
[OFF] is specified by default. [Bonjour Name] *1 Enter a Bonjour name that is to be displayed as the name of connected
device (using up to 63 characters). [Bonjour Service
Name] Displays the service name to notify the iOS terminal that AirPrint is available, via the network. * Cannot be changed.
[Location] *1 Enter the place to install the MFP in text (using up to 127 characters). Location information is displayed on the iPhone/iPad/Mac terminal. This is useful for the user to identify the target MFP when there are multiple MFPs.
[Latitude] Enter the latitude of the MFP installation location using the degrees of latitude. (-90.00000 to 90.00000)
[Longitude] Enter the longitude of the MFP installation location using the degrees of longitude. (-180.00000 to 180.00000)
[Altitude] Enter the altitude of the MFP installation location in meters. (-9999 to 9999)
[Timeout] Enter the timeout value for a connection with the iOS terminal in seconds. (5 to 300)
4. Configure settings to use the AirPrint scan transmission function. Panel: In the administrator settings, select [Network Settings] - [AirPrint Setting] - [Scaner Setting] to configure settings. Web Connection: In administrator mode, select [Network] - [AirPrint Setting] - [Scaner Setting] to configure settings.
Settings Description
[Scaner Setting] *2 To issue a scan instruction from AirPrint-compatible Mac, select [ON]. [OFF] is specified by default.
5. Configure settings to use the AirPrint-compatible fax transmission function. *2
To send a fax from Mac via this machine, select [Network Settings] - [AirPrint Setting], and set [Print Settings] to [ON]. Then, select [Fax Settings] - [Function Settings], and set [PC-Fax Permission Setting] to [Allow].

27
*1 On some models, this value can only be specified using Web Connection. *2 On some models, the setting items may be different depending on
firmware versions. For details, refer to the user's guide of the target model. Reference AirPrint communications can be encrypted based on SSL by configuring the SSL setting for the MFP using Web Connection. To establish SSL communications for each AirPrint function, select [Security] - [PKI Settings] - [Enable SSL] in the Web Connection administrator mode, then set [SSL/TLS Enable Mode] to [Administrator Mode and User Mode]. On some models, you need to select [Network Settings] - [IPP Settings] and set [Enable SSL] to "SSL Only". For information on the SSL setting for the MFP, refer to the user's guide of the product. To use AirPrint by establishing a USB connection between this machine and a Mac, select [Network Settings] - [AirPrint Setting], and set [Print Settings] to [ON]. Then, select [Network Settings] - [AirPrint Setting] - [Common Settings], and set [USB Connection] to [ON]. This setting is common to the print and scan functions.
3.2.2. Cautions None.

28
3.3. Mopria 3.3.1. Preparation
MFP settings 1. Configure MFP network settings.
1) When using the wired network:
1. Configure the basic settings for TCP/IP. 2. In the administrator settings, select [Network Settings] - [TCP/IP Settings] -
[Wired Setting], then click [OK]. In [IPv4 Settings], configure the following settings.
Settings Description [IP Application Method] To manually enter the IP address, select [Manual Input].
To automatically obtain the IP address from the DHCP server, select [Auto Setting].
[IP Address] When you select [Manual Input] in [IP Application Method], enter the fixed IP address.
[Subnet Mask] When you select [Manual Input] in [IP Application Method], enter the subnet mask.
[Default Gateway] When you select [Manual Input] in [IP Application Method], enter the IP address of the default gateway.
2) When using the wireless network:
Refer to Chapter 5 "Wireless LAN Connection".
2. Configure a setting to enable Bonjour. To use Mopria, [Bonjour Setting] must be set to [ON]. Bonjour, which runs based on TCP/IP, is a technology that enables you to automatically configure the network settings for networked devices and find available services. The device can be searched as a printer that can print data from Android.
Panel: In the administrator settings, select [Network Settings] - [Bonjour Setting] to configure settings. Web Connection: In the administrator mode, select [Network] - [Bonjour Setting] to configure settings.
Settings Description
[Bonjour] Select [ON] to use Bonjour. [OFF] is specified by default.
[Bonjour Name] Enter a Bonjour name that is to be displayed as the name of connected device (using up to 63 characters).
3.3.2. Cautions
The description above is intended for Android 4.4 / Mopria Print Service 1.2.27. The operation method may be modified due to a change in the operating system or plug-in specifications.

29
3.4. Konica Minolta Print Service
3.4.1. Preparation MFP settings 1. Configure MFP network settings.
1) When using the wired network:
1. Configure the basic settings for TCP/IP. 2. In the administrator settings, select [Network Settings] - [TCP/IP Settings] -
[Wired Setting], then click [OK]. In [IPv4 Settings], configure the following settings.
Settings Description
[IP Application Method] To manually enter the IP address, select [Manual Input]. To automatically obtain the IP address from the DHCP server, select [Auto Setting].
[IP Address] When you select [Manual Input] in [IP Application Method], enter the fixed IP address.
[Subnet Mask] When you select [Manual Input] in [IP Application Method], enter the subnet mask.
[Default Gateway] When you select [Manual Input] in [IP Application Method], enter the IP address of the default gateway.
2) When using the wireless network:
Refer to Chapter 5 "Wireless LAN Connection".
2. Configure the SNMP network setting. In the administrator settings, select [SNMP Setting], then configure the following
settings.
Settings Description [SNMP Setting] Select whether to use SNMP.
Select [ON]. [SNMP V1/V2c(IP)] Select whether to use SNMP V1/V2c (IP).
Select [ON]. [SNMP v1/v2c Settings] Enter the Read Community Name.
[public] is specified by default.
3. Configure the IP filtering setting. In the administrator settings, select [TCP/IP Settings] - [Wired Setting], then configure the following settings.
Settings Description
[Quick IP Filtering] Configure the IP filtering setting. Select [Synchronize IP], [Synchronize Subnet Mask], or [No Filtering].
[IPv4 Filtering (Deny Access)] Specify the IPv4 address to deny an access. Check that the IP address assigned to the Android terminal is not registered.
3.4.2. Cautions
None.

30
3.5. Google Cloud Print 3.5.1. Preparation: Models using Google Cloud Print Setup
Environment requirements 1) Required options
If the options required for the MFP are not installed to use the Google Cloud Print service, the Google Cloud Print service is not available. Reference For information on the required options, software, and HDD free space, refer to 2.5 "Google Cloud Print".
2) Software Google Cloud Print™ Setup is an application to connect the MFP to the Google Cloud Print service. If it is not installed, the Google Cloud Print service is not available.
3) HDD free space To use the Google Cloud Print™ Setup application, the 50MB free space is required in the IWS application installation area. If there is insufficient free space, the application may not run normally.
4) MFP and environment presettings Before using the Google Cloud Print service, check that there are no problems with the following settings. If any setting is different, the application may not run normally.
Checking network settings Check with the network administrator that the following host and port are available.
- www.google.com: 80, 443 - talk.google.com: 5222
Reference To use a proxy server, also check that the proxy server port is opened.
MFP settings 1. To use the Google Cloud Print service, configure the following settings in the Web
Connection administrator mode. Reference These settings can also be configured on the administrator settings screen of the MFP control panel.
Settings Description
IP filtering setting If the IP filtering setting is enabled on the MFP, configure a setting to make the IP address "127.0.0.1" available. 1. Access Web Connection via the PC browser. (http(s)://IP address of the MFP) 2. Log in as the administrator, then select [Network] - [TCP/IP Settings] - [IPv4
Filtering]. 3. If IP Filtering (Permit Access) is enabled, add the IP address "127.0.0.1" to [Set]. 4. If IP Filtering (Deny Access) is enabled, delete the IP address "127.0.0.1" if it is
included in [Set].

31
IWS Settings If the IWS settings on the MFP is disabled, configure a setting to enable the IWS settings. 1. Access Web Connection via the PC browser.
(http(s)://IP address of the MFP) 2. Log in as the administrator, then change to "ON" if the IWS settings is set to
"OFF" in [Network] - [IWS Settings]. 3. If the network connection of the application is set to "Restrict", change to "Allow".
General Settings If the authentication method (ON (MFP) or external server authentication) is specified on the MFP, configure a setting to allow public users.
2. To enable local printing, configure the following settings in Administrator Setting.
Settings Description
Bonjour Setting Enable the Bonjour function of the MFP. 1. Access PageScope Web Connection via the PC browser.
(http(s)://IP address of the MFP) 2. Log in as the administrator, then select [Network] - [Bonjour Setting]. 3. If Bonjour is set to OFF, change to ON.
SSL settings of WebDAV server function
In the WebDAV Server Settings of the MFP, set the SSL settings of the WebDAV server function to "SSL/Non-SSL" or "Non-SSL Only". 1. Access PageScope Web Connection via the PC browser.
(http(s)://IP address of the MFP) 2. Log in as the administrator. If SSL Settings is set to "SSL Only" in [Network] -
[WebDAV Settings] - [WebDAV Server Settings], change to "SSL/Non-SSL" or "Non-SSL Only".
Quick security settings Check the IP filtering setting in the quick security settings of the MFP. 1. Access PageScope Web Connection via the PC browser.
(http(s)://IP address of the MFP) 2. Log in as the administrator, select [Security] - [Quick Security Settings] - [Quick IP
Filtering], then specify the IP address of the terminal for local printing in the available range, or change to "No Filtering".
3. When connecting to an external service via a proxy server, configure the Web
browser of the MFP as shown below. Follow the below steps to configure settings.
1. In the Web browser, select [Menu] - [Settings], then tap [Settings]. 2. Enter the administrator password, then tap [OK]. 3. Tap [Proxy Settings]. 4. Select the [Use a proxy server.] check box, enter the required information,
then tap [OK]. Then, enter "127.0.0.1" in [Domain without proxy server].

32
Registering a device After installing the application, register the device (MFP) in Google Cloud Print. There are the following two setting methods. • Registration via local network • Registration using application
Registration via local network 1. On the PC, launch Google Chrome to access "chrome://devices/". 2. Check that the registered device is displayed.
Reference If you do not log in the Google service, log in to it. If the target device is not displayed, check the setting to enable local printing. If necessary, configure proxy settings.
3. If Google Cloud Print is set to OFF in the Google Cloud Print Setup administrator settings
on the MFP, it fails in the registration of the printer. 4. Click [Register] of the device to be added. 5. The registration confirmation dialog box appears. Press [Register]. 6. The system is placed in the printer addition confirmation wait state.
7. On the MFP side, start the Google Cloud Print Setup application, then tap [Settings]. 8. Enter the administrator password of the MFP, then tap [Login]. 9. Check the login account, then tap [Approve]. 10. Printer addition processing starts in Google Chrome. 11. This may take a while. 12. The device disappears in the new device column, and the added device appears in My
Device. 13. Click [Manage], then check that the device is displayed. Device registration is then
completed.

33
Registration using application
1. If the device is not registered in Google Cloud Print after the application has started, the following window appears. Tap [Setting].
2. Enter the administrator password of the MFP, then tap [Login]. 3. To connect to the external Google Cloud Print via a proxy server, tap [Proxy Settings].
If the proxy settings are not required, tap [Skip] to proceed to step 6.
(Note) Depending on the MFP and version of the application, values that have been specified in 3.5.1 "Preparation - MFP settings - 3." will be set automatically. In that case, steps from (3) to (5) will be skipped so proceed to step (6).
4. Configure the setting to connect to the external Google Cloud Print via a proxy server. Enter the required information, then tap [Save]. If proxy authentication is required, enter the user name and password.
5. Tap [Close]. 6. To register the device, tap the [Register] tab, enter the device name, then tap [Display].
If you have skipped the proxy settings, the Register tab is selected by default. 7. Tap the URL of the authentication destination. 8. Tap [Complete printer registration].
This requires the login to the Google service. When the following window appears, the device registration in Google Cloud Print is completed. Press the menu key of the MFP, then restart the application in [APP].
9. After the application has restarted, tap [Close].

34
10. When the following window appears, the registration on the MFP is completed.
3.5.2. Cautions: Models using Google Cloud Print Setup 1) Restriction on installing the Fiery controller (option)
This application is not available when the Fiery controller is installed on the MFP. To use this function, remove the Fiery controller.
3.5.3. Preparation: Models not using Google Cloud Print Setup Environment requirements 1) MFP and environment presettings
Before using the Google Cloud Print service, check that there are no problems with the following settings. If any setting is different, the application may not run normally.
Checking network settings Check with your network administrator that the following host and port are available.
- www.google.com: 80, 443 - talk.google.com: 5222
Reference To use a proxy server, also check that the proxy server port is opened.
MFP settings When connecting to an external service via a proxy server, configure the following setting. 1. Access the setting page of the embedded web server via the PC browser.
(http(s)://IP address of the MFP) 2. Click [Settings] - [Network/Ports] - [TCP/IP]. 3. Enter the following values in the HTTP/FTP settings.
- HTTP proxy IP address - HTTP standard setting IP port For the setting values above, check with your network administrator.

35
Registering a device Register the device (MFP) in Google Cloud Print. 1. Access the setting page of the embedded web server via the PC browser.
(http(s)://IP address of the MFP)
Reference If a proxy server is used, the Settings page of the MFP may not be displayed normally. To display the Settings page normally, temporarily disable the proxy server.
2. Click [Settings] - [Network/Ports] - [Google Cloud Print].
Reference When the password prompt window is displayed, if you do not know the ID and password, contact your system administrator.
3. Click [Register]. 4. On the Google Sign in page, enter the Google account, then click [Sign in]. 5. In [Printer confirmation], click [Finish printer registration].

36
3.6. Konica Minolta Mobile Print Basic Functions
3.6.1. Preparation: Print function MFP settings 1. Configure MFP network settings.
1) When using the wired network:
1. Configure the basic settings for TCP/IP. 2. In the administrator settings, select [Network Settings] - [TCP/IP Settings] -
[Wired Setting], then click [OK]. In [IPv4 Settings], configure the following settings.
Settings Description
[IP Application Method] To manually enter the IP address, select [Manual Input]. To automatically obtain the IP address from the DHCP server, select [Auto Setting].
[IP Address] When you select [Manual Input] in [IP Application Method], enter the fixed IP address.
[Subnet Mask] When you select [Manual Input] in [IP Application Method], enter the subnet mask.
[Default Gateway] When you select [Manual Input] in [IP Application Method], enter the IP address of the default gateway.
2) When using the wireless network:
Refer to Chapter 5 "Wireless LAN Connection".
2. Configure the SNMP network setting. In the administrator settings, select [SNMP Setting], then configure the following settings.
Settings Description
[SNMP Setting] Select whether to use SNMP. Select [ON].
[SNMP V1/V2c(IP)] Select whether to use SNMP V1/V2c (IP). Select [ON].
[SNMP v1/v2c Settings] Enter the Read Community Name. [public] is specified by default.
3. Configure the IP filtering setting.
In the administrator settings, select [TCP/IP Settings] - [Wired Setting], then configure the following settings.
Settings Description
[Quick IP Filtering] Configure the IP filtering setting. Select [Synchronize IP], [Synchronize Subnet Mask], or [No Filtering].
[IPv4 Filtering (Deny Access)] Specify the IPv4 address to deny an access. Check that the IP address assigned to the Android terminal is not registered.
Cautions None.

37
3.6.2. Preparation: Scan function MFP settings 1. Configure the same settings as for the print function.
Refer to 3.6.1 "Preparation: Print Function".
2. Configure TCP Socket settings. In the administrator settings, select [TCP Socket Settings] - [TCP Socket], then configure the following settings.
Settings Description
[TCP Socket] Specify whether to use TCP Socket. Select [ON].
[Use SSL/TLS] Select whether to use SSL for TCP Socket. [ON] is specified by default.
[Port Number] Enter the TCP Socket port number as required. [59158] is specified by default.
[Port No.(SSL/TLS)] If necessary, enter the SSL communication port number. [59159] is specified by default.
Cautions This function may not run normally on incompatible MFPs. If the high resolution is set to scanned data, it may cause an unstable operation. To secure the stable operation, select the standard resolution of the MFP when scanning data.
3.6.3. Preparation: Secure Print function
MFP settings 1. Configure the same settings as for the print function.
Refer to 3.6.1 "Preparation: Print Function".
3.6.4. Preparation: ID & Print function MFP settings 1. Configure the same settings as for the print function.
Refer to 3.6.1 "Preparation: Print Function".
Reference To use ID & Print, the authentication settings are required on the MFP. For authentication settings, you can specify User Authentication, Account Track, and User Authentication/Account Track (To use ID & Print, the user authentication must be enabled on the MFP. When selecting Account Track, specify it together with User Authentication).
2. Configure user authentication settings on the MFP.
1) When performing MFP authentication: 1. In the administrator settings, select [User Authentication/Account Track] -
[General Settings], then configure the following settings.
Settings Description [User Authentication] Select whether to use user authentication.
As the required authentication unit, select [ON (MFP)], [ON (MFP) + ON (External Server)], or [ON (MFP) + ON (Enhanced Server)].

38
[Public User] Select whether to allow a public user to use the MFP from three types (ON (With Login), ON (Without Login), and Restrict). ON (With Login): Allows a public user to use the MFP. When a public user uses the MFP, press [Public User] on the login screen displayed on the panel to log in. ON (Without Login): Allows a public user to use the MFP without login. [Restrict]: Restricts public users from using the MFP. [Restrict] is specified by default.
2. To register a user, select [User Authentication/Account Track] - [User
Authentication Settings] - [User Registration] in the administrator settings, specify [No.], then click [Edit] to configure the following settings.
Settings Description
[User Name] Enter the user name to log in to the MFP. [Password] or [Re-input Password]
Enter the password to log in to the MFP.
2) When performing external server authentication:
1. In the administrator settings, select [User Authentication/Account Track] - [General Settings], then configure the following settings.
Settings Description
[User Authentication] Select whether to use user authentication. As the required authentication unit, select [ON (External Server)] or [ON (MFP) + ON (External Server)].
• Active Directory, NTLM, LDAP, or NDS over TCP/IP can be specified
as the external server for authentication.
2. To register the external server, select [User Authentication/Account Track] - [External Server Settings] in the administrator settings, select the registration number of the external server, then click [New] or [Edit] to configure the following settings.
Settings Description
Active Directory Configure the setting to use Active Directory for authentication.
[External Server Name] Enter the name of the Active Directory to be used. [External Server Type] Select the external server type.
Select [Active Directory]. [Default Domain Name] Enter the default domain name of the Active Directory to
be used. [Timeout] Change the timeout time to limit a communication with the
Active Directory if necessary. [60] sec. is specified by default.

39
NTLM Configure the setting to use NTLM authentication for authentication.
[External Server Name] Enter the name of the authentication server to be used. [External Server Type] Select the external server type.
Select [NTLM v1] or [NTLM v2]. [Default Domain Name] Enter the default domain name of the authentication
server to be used. [Timeout] Change the timeout time to limit a communication with the
Active Directory if necessary. [60] sec. is specified by default.
LDAP Configure the setting to use LDAP authentication for authentication.
[External Server Name] Enter the name of the LDAP server to be used. [External Server Type] Select the external server type.
Select [LDAP]. [Server Address] Enter the address of the LDAP server to be used.
Case example to enter the host name:
"host.example.com" Case example to enter the IP address:
"192.168.1.1" [Port Number] If necessary, change the LDAP server port number.
[389] is specified by default.
[Search Base] Specify the starting point to search for a user. The range from the entered origin point, including the following tree structure, is searched. Entry example: "cn=users,dc=example,dc=com"
[Timeout] If necessary, change the time-out time to limit a communication with the LDAP server. [60] sec. is specified by default.
[General Settings] Select the authentication method to log in to the LDAP server. [Simple] is specified by default.
[Search Attribute] Enter the search attribute to search for the user account. [uid] is specified by default.
[Search Attributes Authentication]
Enter authentication information to log in to the LDAP server when searching for the user ID. [OFF] is specified by default.
NDS Configure the setting to use NDS authentication for authentication.
[External Server Name] Enter the name of the NDS server to be used. [External Server Type] Select the external server type.
Select [NDS over TCP/IP]. [Default NDS Tree Name] Enter the default NDS tree name. [Default NDS Context Name] Enter the default NDS context name.

40
3) When performing enhanced server authentication: 1. In the administrator settings, select [User Authentication/Account Track] -
[General Settings], then configure the following settings.
Settings Description [User Authentication] Select whether to use user authentication.
As the required authentication unit, select [Enhanced Server Authentication] or [ON (MFP) + ON (Enhanced Server)].
2. To configure the enhanced server authentication, register the user in
PageScope Authentication Manager.
4) For information on a connection with other enhanced servers, contact your dealer.
3. Set Account Track to the MFP.
To manage account track information for authentication, configure account track settings. When Account Track is not performed, this step is not required.
1) In the administrator settings, select [User Authentication/Account Track] -
[General Settings], then configure the following settings.
Settings Description [Account Track] Select whether to use Account Track.
[ON]: Uses Account Track. [OFF]: Does not use Account Track. [OFF] is specified by default.
[Account Track Input Method]
When [ON] is selected in [Account Track], select the account track method.
[Account Name & Password]: Uses the account name and password to perform authentication. [Password Only]: Uses only the password to perform authentication.
[Account Name & Password] is specified by default.
2) To register the account track to be managed, select [User Authentication/Account Track] - [Account Track Settings] in the administrator settings, specify [No.], then click [Edit] to configure the following settings.
Settings Description
[Account Name] Enter the account name to log in to the MFP.
This name is required when [Account Name & Password] is selected in [User Authentication/Account Track] - [General Settings] - [Account Track Input Method].
[Password] or [Re-input Password]
Enter the password to log in to the MFP.

41
4. Set the combination of user authentication and account track to the MFP. To use user authentication and account track together for authentication, configure the combination settings. Otherwise, this step is not required. 1) In the administrator settings, select [User Authentication/Account Track] -
[General Settings], then configure the following settings.
Settings Description [Synchronize User Authentication & Account Track]
When combining user authentication and account track, select whether to synchronize user authentication and account track. [Synchronize]: Select this option when the user and account is in one-to-one relation. It is possible to also log in to the MFP as an account only by logging in as a user. [Do Not Synchronize]: Select this option when the user joins multiple accounts. To log in to the MFP, specify the user name, then specify the account. [Synchronize by User]: Enables the user to select whether to synchronize the user authentication and account authentication. [Synchronize] is specified by default.
Cautions
None.

42
3.7. ID & Print (PageScope My Print Manager Port)
3.7.1. Preparation The use of My Print Manager Port requires the PageScope Enterprise Suite environment that has the PageScope My Print Manager installed. For details on PageScope My Print Manager, contact the server administrator of PageScope Enterprise Suite.
3.7.2. Cautions
None.

43
3.8. Konica Minolta Mobile Print Quick Setting Function (Pairing Function)
3.8.1. Preparation: Registration using the QR code
MFP settings Configure settings to display the QR code. 1. In the administrator settings, select [System Connection] - [Mobile Connection
Settings] - [Simple Connection Setting] to configure the following settings.
Settings Description [QR Code Display Setting]
Select whether to display the QR code on the MFP control panel. Select [ON]. To use [Wireless Connection Setting], also select [ON] for [QR Code Display Setting].
2. In the administrator settings, select [System Connection] - [Mobile Connection
Settings] - [Wireless Connection Setting] to configure the following settings.
Settings Description [Wireless Connection Setting]
Select whether to store information in the QR code for connecting the wireless LAN.
3.8.2. Cautions: Registration using the QR code
In Konica Minolta Mobile Print for iPhone/iPad, if the initial printer search processing fails, and if the QR code information contains the SSID and password of Wi-Fi, you need to install the configuration profile for Wi-Fi connection.
3.8.3. Preparation: Registration using NFC (NFC tag) Create an NFC tag to which MFP information is written using the NFC Tag Writer application.
3.8.4. Cautions: Registration using NFC (NFC tag)
None.
3.8.5. Preparation: Registration using NFC MFP settings
1. Configure NFC settings. In the administrator settings, select [System Connection] - [Mobile Connection Settings] - [Simple Connection Setting] to configure the following settings.
Settings Description [Enable NFC] Select whether to use NFC for pairing with the Android terminal.
Select [ON].

44
2. Configure settings for the NFC launch application. In the administrator settings, select [System Connection] - [Mobile Connection Settings] - [Default NFC Application Setting] to configure the following settings.
Settings Description [Default NFC Application Setting]
Select which application is to be launched when you place the Android terminal on the mobile touch area on the control panel and launch the application via NFC. Select [Konica Minolta Mobile Print for Android].
3. Configure network information.
In the administrator settings, select [System Connection] - [Mobile Connection Settings] - [Wireless Connection Setting] to configure the following settings.
Settings Description
[Wireless Connection Setting]
Select whether to store information for connecting to the wireless LAN in NFC.
3.8.6. Cautions: Registration using NFC
None.
3.8.7. Preparation: Registration using Bluetooth LE MFP settings
1. Configure Bluetooth LE settings. In the administrator settings, select [System Connection] - [Mobile Connection Settings] - [Simple Connection Setting] to configure the following settings.
Settings Description
[Enable Bluetooth LE] Select whether to use Bluetooth LE for pairing with the iOS terminal. Select [ON].
2. Configure network information.
In the administrator settings, select [System Connection] - [Mobile Connection Settings] - [Wireless Connection Setting] to configure the following settings.
Settings Description
[Wireless Connection Setting]
Select whether to store information for connecting to the wireless LAN.
3. Configure settings to display the QR code.
If [Wireless Connection Setting] is enabled in step 2, also enable the QR code display setting. (* This is because it is necessary to read the QR code before installing the Wi-Fi configuration file.) For details on the QR code display setting, refer to 3.8.1 "Preparation: Registration using the QR code".
3.8.8. Cautions: Registration using Bluetooth LE
If the target device is not found using Bluetooth LE, select [Settings] - [Bluetooth LE Setting] - [Field-intensity detection range] in Konica Minolta Mobile Print to adjust the setting to [Wide].

45
3.9. Mobile Terminal Authentication Device Function of Konica Minolta Mobile Print
3.9.1. Preparation: Authentication using card authentication unit
MFP settings 1. Configure the MFP authentication function.
In the administrator settings, select [User Authentication/Account Track] - [General Settings], then configure the following settings.
Settings Description
[User Authentication] Select the authentication method. Select the desired authentication from [ON (MFP)], [External Server Authentication], [Enhanced Server Authentication], [ON (MFP)] + [External Server Authentication], or [ON (MFP)] + [Enhanced Server Authentication].
2. Configure card authentication settings on the MFP. 1) In the administrator settings, select [User Authentication/Account Track] -
[Authentication Device Settings] - [General Settings], then configure the following settings.
Settings Description
[Card Authentication] Configure card authentication settings. [IC Card type setting] Select the type of the required IC card.
Select [NFC(HCE)]. [Operation Settings] Configure authentication operation settings.
Select [Card Authentication].
3. Register the user's authentication information. 1) For ID & PW
1. In the administrator settings, select [User Authentication/Account Track] - [User Authentication Settings] - [User Registration] - [Edit], then configure the following settings.
Settings Description
[User Name] Enter the user name to perform authentication. [Password] Enter the password to be used for authentication.
2. Register authentication information. On the screen shown in step 1, select [Register Authentication Information] - [Edit], place the Android terminal on the authentication unit, then click [OK].
2) For external server authentication (Active Directory)
1. Check the ID card number of the Android terminal. In Konica Minolta Mobile Print, select [Settings] - [NFC Setting] - [Check ID Card Number] to check the ID card number.
2. Register the ID card number in the [Full Name] column of the user settings of the external server.
3. Register the external server in the MFP, then configure [LDAP-IC Card Authentication Setting].

46
3) For PageScope Authentication Manager 1. Register the user in PageScope Authentication Manager. 2. In PageScope Authentication Manager, select [Authentication Device
Settings] - [Card Authentication Settings], then set [Self-Registration Settings] to [Allow].
3. On the login screen of the MFP, enter user information (User Name and Password) (do not log in to the MFP).
4. Place the Android terminal on the authentication unit.
Reference The ID card number can also be registered in the enhanced server using Registration Tool. 1. Connect the authentication unit to the PC. 2. Place the Android terminal on the authentication unit, then create a file. 3. Import the file to the enhanced server.
4) For information on a connection with other enhanced servers, contact your
dealer.
3.9.2. Cautions: Authentication using card authentication unit If the MFP authentication method is changed or the hard disk is formatted, the registered user information is erased.
3.9.3. Preparation: Authentication using NFC MFP settings Configure the MFP authentication function. In the administrator settings, select [User Authentication/Account Track] - [General Settings], then configure the following settings.
Settings Description [Enable NFC] Configure a setting to use NFC.
Select [ON]. [NFC Authentication Setting]
Configure the setting to use the NFC-compatible terminal as an authentication device. Select [ON].
3.9.4. Cautions: Authentication using NFC
None.
3.9.5. Preparation: Authentication using Bluetooth LE MFP settings Enable [Enable Bluetooth LE] in General Settings. In the administrator settings, select [User Authentication/Account Track] - [General Settings], then configure the following settings.
Settings Description [Enable Bluetooth LE] Configure a setting to use Bluetooth LE.
Select [ON]. [Bluetooth LE Authentication Setting]
Configure the setting to use the Bluetooth LE-compatible terminal as an authentication device. Select [ON].

47
3.9.6. Cautions: Authentication using Bluetooth LE • The [Printer Panel Login] button of Konica Minolta Mobile Print can be used from a
location some distance away from the MFP, but try to always tap the button in front of the MFP. Be aware that if you tap the button from a location some distance away from the MFP, the MFP panel enters the login mode and unauthorized users may be able to use the MFP.
• We recommend that you enable [Logout Confirmation Screen Display Setting] in [User/Account Common Setting] of the MFP to perform operations. Enabling this setting displays a confirmation message on the panel for the login user when authentication is performed from a mobile.

48
3.10. bizhub Remote Access
3.10.1. Preparation MFP settings
Common to bizhub Remote Access Select [Administrator Settings] - [Network Settings] - [TCP Socket Settings], then set [TCP Socket] to [ON]. Select [Administrator Settings] - [Network Settings], then set [bizhub Remote Access Setting] to [ON]. When using Keyboard Link: Select [Administrator Settings] - [Network Settings] - [bizhub Remote Access Setting], then set [keyboard Link] to [Allow]. When using Address Link: Select [Administrator Settings] - [Network Settings] - [bizhub Remote Access Setting], then set [Address Link] to [Allow].
When using Panel Link scan: Select [Administrator Settings] - [Network Settings] - [bizhub Remote Access Setting], then set [Panel Link Scan] to [Allow]. Select [Administrator Settings] - [System Settings] - [Custom Display Settings] - [Main Menu Default Settings], then assign [Panel Link Scan] to any key. In [Function Permission] of public user, set [Scan] to an option other than [Restrict]. When setting bizhub Remote Access to an application to be launched preferentially in an NFC-compatible model: Select [Administrator Settings] - [System Connection] - [Mobile Connection Settings], then set [Touch Link Application Settings] to [bizhub Remote Access]. Select [Administrator Settings] - [Network Settings] - [bizhub Remote Access Setting], then select the target mode from [Primary Start Mode]. Select the desired start mode from the following three types. • Panel Link • Keyboard Link • Address Link When limiting the connection with the MFP to the connection using NFC: • Select [Administrator Settings] - [Network Settings] - [bizhub Remote Access
Setting], then set [Keyboard Link] to [Allow]. Select [Allow only NFC], then specify the connection method to be permitted in [Touch Connection Method], you can select whether to set NFC to [Allow] or [Restrict]. Selecting [Allow only NFC] prohibits a connection using the [Send] key of Keyboard Link.
• Select [Administrator Settings] - [Network Settings] - [bizhub Remote Access Setting], then set [Address Link] to [Allow]. Select [Allow only NFC], then specify the connection method to be permitted in [Touch Connection Method], you can select whether to set NFC to [Allow] or [Restrict]. Selecting [Allow only NFC] prohibits a connection using the [Send] key of Address Link.

49
When enabling to switch to the MFP control panel while Panel Link is active: Select [Administrator Settings] - [Network Settings] - [bizhub Remote Access Setting], then set [Operation Change Screen] to [ON]. When using a function, which denies a Panel Link connection, while operating the MFP: Select [Administrator Settings] - [Network Settings] - [bizhub Remote Access Setting], then set [Connection Permission Screen] to [ON].
When using the MFP search function: Select [Administrator Settings] - [Network Settings], then set [Bonjour Setting] to [ON]. Select [Administrator Settings] - [Network Settings], then set [SNMP Setting] to [ON]. Specify the same value for [Edit the Road Community Name] in [Administrator Settings] - [Network Settings] - [SNMP Setting] - [SNMP v1/v2c Settings] as well as in [Edit the Road Community Name] of bizhub Remote Access. (In general use, both names are set to "Public".) When limiting the connection with the MFP to the connection using Bluetooth LE: • Select [Administrator Settings] - [Network Settings] - [bizhub Remote Access
Setting], and set [Keyboard Link] to [Allow]. Then, select [Allow only NFC], and specify the connection method to be permitted in [Touch Connection Method], you can select whether to set Bluetooth LE to [Allow] or [Restrict]. Selecting [Allow only NFC] allows a user to only connect MFPs that are compatible with Bluetooth LE.
• Select [Administrator Settings] - [Network Settings] - [bizhub Remote Access Setting], and set [Address Link] to [Allow]. Then, select [Allow only NFC], and specify the connection method to be permitted in [Touch Connection Method], you can select whether to set Bluetooth LE to [Allow] or [Restrict]. Selecting [Allow only NFC] allows a user to only connect MFPs that are compatible with Bluetooth LE.
3.10.2. Cautions Some functions will not be available depending on MFP conditions. General • An attempt is made to connect to a model that is not compatible with each
function.
Panel Link • The accounting unit is used on the MFP. • You log in to the MFP as a specific user. • You log in to the MFP as a specific account track. • You log in to the MFP as public user while you are permitted to log in to the MFP
as a public user. • The MFP is used in Administrator Setting. • The bizhub Remote Access Setting of the MFP is set to [OFF]. • The IP address of the mobile terminal is outside the range of Quick IP filtering
setting.

50
• The MFP is used in Enhanced Security mode. • The MFP is accessed from bizhub Remote Panel. • A connection with bizhub Remote Access is disabled on the MFP.
Panel Link scan • In bizhub Remote Access Setting, Panel Link scan is set to [Restrict]. • In Main Menu Default Settings, [Panel Link Scan] is not assigned to any key. • A user is not logged in as a public user. • Public user's scanning is prohibited. Keyboard Link • The keyboard window is not displayed on the MFP control panel. • The MFP is used in Enhanced Security mode. • The MFP is accessed from bizhub Remote Panel. • The IP address of the mobile terminal is outside the range of Quick IP filtering
setting. • The bizhub Remote Access Setting is set to [OFF]. • In bizhub Remote Access Setting, Keyboard Link is set to [Restrict]. • An attempt is made to send data from an application using the [Send] key while
Keyboard Link in the bizhub Remote Access Setting is set to [Allow Send via Touch Conn. Method only]. (Android terminal)
• An attempt is made to connect to an MFP that is incompatible with Bluetooth LE while Keyboard Link in the bizhub Remote Access Setting is set to [Allow Send via Touch Conn. Method only]. (iOS terminal)
Address Link • The MFP control panel is displaying a screen other than the basic screen of
Scan/Fax mode or the basic screen for sending documents stored in User Boxes. • The address to be sent is set to a format other than "***@***". • The MFP is used in Enhanced Security mode. • The MFP is accessed from bizhub Remote Panel. • The IP address of the mobile terminal is outside the range of Quick IP filtering
setting. • The bizhub Remote Access Setting is set to [OFF]. • In bizhub Remote Access Setting, Address Link is set to [Restrict]. • An attempt is made to send data from an application using the [Send] key while
Keyboard Link in the bizhub Remote Access Setting is set to [Allow Send via Touch Conn. Method only]. (Android terminal)
• An attempt is made to connect to an MFP that is incompatible with Bluetooth LE while Address Link in the bizhub Remote Access Setting is set to [Allow Send via Touch Conn. Method only]. (iOS terminal)
• E-mail transmission is disabled.

51
4. Mobile Terminal Presettings by User and Basic Operations To use various mobile connection solutions, settings are required on the mobile terminal. The settings required for each mobile terminal vary depending on solutions. Select the required solution, then configure mobile terminal settings. 4.1. AirPrint 4.1.1. Wireless LAN settings for mobile terminal
For information on the wireless LAN settings for mobile terminal, refer to 4.10 "Configuring Wireless LAN Settings for Mobile Terminal".
4.1.2. Preparation
None.
4.1.3. Basic operations
iOS settings / Execution procedure
1. Start the application to display the contents to be printed. 2. Tap the action button of the application, then select "Print". The "Printer Options"
dialog box appears. Tap "Select Printer", then select MFP from the printer list. *1 3. In the "Printer Options" dialog box, specify the number of printed sheets, paper size,
range, and 2-sided printing. *2 4. Tap "Print" to start printing.
*1 The application must be compatible with AirPrint. *2 The available print settings vary depending on applications.
OS X settings / Execution procedure
The following shows the execution procedure in OS X 10.10.
1. Start the application to display the contents to be printed. 2. Select [Print] from the [File] menu. 3. Select [Print] - [Local Printer], then select the target printer. 4. Specify print settings such as the number of copies or paper size. 5. Press [Print].
4.1.4. Cautions
None.

52
4.2. Mopria 4.2.1. Wireless LAN settings for mobile terminal
For information on the wireless LAN settings for mobile terminal, refer to 4.9 "Configuring Wireless LAN Settings for Mobile Terminal".
4.2.2. Preparation 1. Installing the plug-in: Start the Google Play application, then install the plug-in
"Mopria Print Service". 2. Enabling the print service: Open [Settings] in Android, select [Print] - [Mopria Print
Service], then set the toggle button to [ON]. 4.2.3. Basic operations
1. Start the application to display the contents to be printed. *1 2. Tap the menu button of the application, then select [Print]. The dialog box appears.
Tap [All Printers...], then select the target MFP from the printer list. 3. Selecting [Printer Settings] allows you to specify the paper type or configure 2-sided
printing.* 2 4. Tap [Print] to start printing.
*1 The application must be compatible with Mopria. *2 The available print settings vary depending on applications.
4.2.4. Cautions
None.

53
4.3. Konica Minolta Print Service
4.3.1. Wireless LAN settings for mobile terminal For information on the wireless LAN settings for mobile terminal, refer to 4.9 "Configuring Wireless LAN Settings for Mobile Terminal".
4.3.2. Preparation
Application installation procedure 1. Install Konica Minolta Print Service in the Android terminal. 2. Open the application introduction page of Konica Minolta Print Service using the Play
Store application installed in the Android terminal, then click [Install]. Reference The following search words are available. - KonicaMinolta - PageScopeMobile
Konica Minolta Print Service setting 1. Select [Print] - [Konica Minolta Print Service] in the setting application pre-installed
on the Android terminal, then set the toggle button to [ON].
4.3.3. Basic operations 1. Select a print target.
Start the application compatible with Printing Framework, then select a document or image to be printed.
2. Select [Print] from the menu. In the menu of the application compatible with Printing Framework, select [Print] to open the print setting page.
3. Select the target MFP. Select the target MFP from the list. 1) When the target MFP is not found in the list:
Selecting [All Printers] automatically searches for peripheral MFPs. Then, select the target MFP from the list of searched MFPs.
4. Start printing. Configure print settings on the print setting page, then click the [Print] button.
4.3.4. Cautions This service does not run on an application that is not compatible with Android Printing Framework. The typical applications compatible with Android Printing Framework are as follows.
- Chrome - Gallery - Gmail - Quickoffice

54
4.4. Google Cloud Print 4.4.1. Wireless LAN settings for mobile terminal
For information on the wireless LAN settings for mobile terminal, refer to 4.9 "Configuring Wireless LAN Settings for Mobile Terminal".
4.4.2. Preparation
None.
4.4.3. Basic operations Print
You can print documents saved on Google Cloud. Furthermore, driverless printing is possible even if the terminal is in a local network that cannot be connected to Google Cloud.
Reference • Device registration must be completed in advance. • The screenshot below shows reference information for Google Chrome on the PC.
Printing via Cloud
You can access the device via Cloud to make prints. The following example shows how to upload a file to Cloud for printing.
1. Access Google Cloud Print management page (https://www.google.com/cloudprint/) from
the terminal, then log in. 2. Logging in displays the cloud print information registered with the account. 3. In [PRINT], select [Upload file to print].
4. Select a file. 5. After this, select a device to execute printing. 6. After configuring the required print settings, click [Print] to execute printing. Local printing Driverless printing is possible on Google Chrome even if the terminal is in a local network that cannot be connected to Google Cloud. Note: Models that do not use Google Cloud Print Setup do not support Google Cloud Print local printing.

55
1. Start Google Chrome from the PC to open the page to be printed. If necessary, you can drag and drop a PDF file to Google Chrome to print it.
2. Open the print page, then click [Change] on the destination. (This step is not required when the target device is already selected in the destination.) To display the print page on Google Chrome, press the Ctrl+P keys (⌘+P keys for Mac). Otherwise, this page is also displayed by clicking Print (P) in the menu of Google Chrome. For details, refer to the Google support page.
3. Select the target device from the local destination.
4. After configuring the required print settings, click [Print] to execute printing. Printer sharing
The printers registered in Google Cloud can be shared between users who have the Google account.

56
1. Access Google Cloud Print management page (https://www.google.com/cloudprint/) from the terminal, then log in.
2. Click [Printer] in the menu on the left pane. 3. Select the printer to be shared. 4. Click [Sharing]. 5. In the dialog box that opens, enter the E-mail address and Google group of the other user
who shares the printer. 6. Click [Sharing]. A notification E-mail is sent to the other user who shares the printer.
Reference To disable printer sharing, follow the steps above to open the [Sharing] dialog box of the printer, then edit the user list.
4.4.4. Cautions
1) The layout of the document to be printed may differ from that of the printed document depending on the Google Cloud Print specifications. On the printer selection page, select [Save in Google Drive], then check the output result of the saved PDF document.
2) For information on Google Cloud Print (usage method, troubleshooting, etc.), refer to the
Google support page.
https://support.google.com/cloudprint/?rd=1
3) The encrypted PDF files cannot be printed.

57
4.5. Basic Functions of Konica Minolta Mobile Print (KMMP)
4.5.1. Wireless LAN settings for mobile terminal For information on the wireless LAN settings for mobile terminal, refer to 4.9 "Configuring Wireless LAN Settings for Mobile Terminal".
4.5.2. Preparation
Application installation procedure 1. Install KMMP from Store application on the terminal.
Reference
The following search words are available. - KonicaMinolta - Konica Minolta Mobile Print
* Steps 2 and 3 are not required in Windows KMMP.
2. Configure the application to be used when clicking the Print button. 3. In KMMP, select [Settings] - [Connection App Settings], then set [Click the Print
button to use the following application] to [OFF].
Manual KMMP settings 1. Search for the printer to be used.
Launch KMMP, then click [Select Printer]. On the printer selection page, search for the target MFP using one of the following methods. In Windows KMMP, the printer selection screen is displayed at start-up.
Method Description
Click [Auto]. Automatically searches for peripheral MFPs. The terminal and MFP must be in the same network and in the same subnet.
Click [Manual]. Specify the IP address or DNS name to search for the MFP. The terminal and MFP must be in the same network. When you specify the DNS name to search for the MFP while no DNS server settings are made on the MFP, the Android/iOS/ Windows 10 Mobile/Windows 10 Mobile Enterprise terminal and MFP must be in the same network and in the same subnet. DNS settings can be viewed by selecting [TCP/IP Settings] - [Wired Setting] - [DNS Server Settings (IPv4)] in the administrator settings.
2. Register the target MFP in KMMP.
The searched MFP is displayed on the page. Click the target MFP, then register it. Before registration, a dialog box appears to enter MFP authentication information. Enter the appropriate authentication information.

58
In iOS and Windows KMMP, click the target MFP, then click [Register]. Then, the dialog box is not displayed for authentication information to be entered before registering the MFP. Reference You can view the list of registered MFPs on the printer selection page. The MFP selected by the radio button on the page is an MFP to be ordinarily used. In iOS and Windows KMMP, the MFP to be ordinarily used is indicated using blue characters.
If user authentication is enabled on the MFP, enter authentication information at the time of registration. When authentication settings are configured for the target MFP, enter authentication information in the dialog box that is displayed at the time of registration. The contents displayed in the dialog box vary depending on the configured authentication settings.
(1) When user authentication is enabled:
If ID & PW is selected in the authentication settings of the MFP, configure the following settings.
Settings Description
[Authentication Setting] Select an authentication setting.
Select the desired authentication from [ON (MFP)], [External Server Authentication], [Enhanced Server Authentication], [ON (MFP) + ON (External Server)], or [ON (MFP) + ON (Enhanced Server)].
An authentication setting cannot be selected if it is not configured on the MFP.
[Public User Login] Select whether to register the MFP as a public user.
[ON]: Registers the MFP as a public user. [OFF]: Does not register the MFP as a public user.
This setting is displayed when [Public User Access] is set to [ON (With Login)] or [ON (Without Login)] in the authentication settings of the MFP.
Selecting [ON] executes jobs as a public user when printing or scanning data using the MFP that is registered.
[User Name] Enter the user name to log in to the MFP.
This setting is displayed when [User Authentication] is set to [Authenticate] in the authentication settings of the MFP. This setting is not available when [Public User Access] is set to [ON].
[Password] Enter the password to log in to the MFP.
[Password] is displayed paired with [User Name]. [Select Servers] Select the server type of the target external server.
This setting is required when [User Authentication] is set to [External Server Authentication] or [ON (MFP) + ON (External Server)] in the authentication settings of the MFP.

59
If Enhanced Server Authentication is selected, user information registered in PageScope Authentication Manager is displayed.
(2) When account track is enabled: If ID & PW is selected in the authentication settings of the MFP, configure the following settings.
Settings Description
[Account Name] Enter the account name to log in to the MFP. This setting is displayed when [Account Track] is set to [ON] in the authentication settings of the MFP. This item is not displayed when [Account Track Input Method] is set to [Password Only].
[Password] Enter the password to log in to the MFP. [Password] is displayed paired with [Account Name].
(3) When user authentication and account track are enabled together:
If [Synchronize User Authentication & Account Track] is set to [Synchronize] on the MFP, the same contents as for user authentication settings are displayed in the dialog box.
If [Do Not Synchronize] is set, the account track settings are displayed in addition to the user authentication settings.
4.5.3. Basic operations for printing 1. Select a document to be printed.
1. When printing a document in the terminal:
(1) Select [My Documents] on the KMMP home page. * 1 (2) Tap the required document. The preview screen is displayed. (3) Tap the [OK] button. The print preview screen is displayed. (4) Tap the Print button. *1 In Windows KMMP, select a document using another application, display the
[Sharing] menu, then tap KMMP to display the Print Settings page.
2. When printing a document on the online storage: (1) Select [Online Storage] on the KMMP home page, then specify a document
to be printed. Reference • For information on the operation procedure, refer to "When printing a document in
the terminal".
3. When printing the Web page that is currently displayed: (1) Select [Web] on the KMMP home page to display the Web page. (2) Tap the Print button on the screen.

60
4. When printing an E-mail that is currently displayed: (1) Select [E-mail] on the KMMP home page to display the E-mail. (2) Tap the Print icon on the page. For the Android terminal, place the terminal
on the mobile touch area.
Operation Description Tap the [Print] icon. The Print Settings page opens.
If the displayed E-mail has attachment files, a dialog box appears. Select the print target from [Print Text], [Print Attachment], or [Print Text and Attachment].
Place the Android terminal on the mobile touch area.
The confirmation dialog box appears to check whether to start printing. When [Yes] is selected in the dialog box, printing starts (this step is the same as tapping [Print] in [2. Start printing]). If the displayed E-mail has attachment files, a dialog box appears. Select the print target from [Print Text], [Print Attachment], or [Print Text and Attachment]. Then, a confirmation dialog box appears to check whether to start printing.
2. Start printing.
Configure print settings on the Print Settings page, then tap [Print]. If you place the Android terminal on the mobile touch area on the Print Settings page, printing starts automatically. Reference If the MFP registered in the NFC tag is different from the MFP used ordinarily, a dialog box appears to prompt you to use the MFP registered in the NFC tag, and printing does not start automatically. When printing is started using NFC, print settings are made as specified by the KMMP default or registered in the favorite setting. When print settings are written in the NFC tag, they are used preferentially.
4.5.4. Cautions on printing
None.
4.5.5. Basic operations for scanning Load an original to be scanned on the MFP, then follow the below steps to scan data. 1. When starting scanning on the Scan Settings page:
(1) Select [Scan] on the KMMP home page to display the Scan Settings page. (2) After the page appears, select [Scan] to start scanning.
Reference • If you place the Android terminal on the mobile touch area on the Scan Settings
page, scanning starts automatically. • However, if the MFP registered in the NFC tag is different from the MFP used
ordinarily, a dialog box appears to prompt you to use the MFP registered in the NFC tag, and scanning does not start automatically.

61
• When scanning is completed, the scan result window appears. Tap [Save], [Sharing], or [Deny].
Settings Description
[Save] Saves the scan result. Selecting [Save] displays the dialog box to configure the following settings. [Destination]: Select the folder to save the scan result in. If necessary, you can specify the online storage as the destination. [File Name]: Enter the name of the file to save the scan result in. Tapping [OK] in the dialog box saves the scan result in the folder that is specified as the destination.
[Sharing] Opens the scan result using an application other than KMMP. [Deny] Discards the scan result, and displays the Scan Settings page.
Reference • Scan settings are made as specified by the KMMP default or registered in the
Favorite setting. • The scan result is saved in the folder you are accessing.
4.5.6. Cautions on scanning
• This function may not run normally on incompatible MFPs. • If the high resolution is set to scanned data, it may cause an unstable operation.
To secure the stable operation, select the standard resolution of the MFP when scanning data.

62
4.5.7. Basic operations for Secure Print function 1. Select a document to be printed.
Reference For information on how to select a document, refer to 4.5.3 "Basic Operations for Printing".
2. If you tap [Output Method] on the Print Settings page, the Output Method dialog box appears. Configure the following settings.
Settings Description
[Output Method] Select Secure Print. The available output method varies depending on the MFP to be used.
[ID] Enter the security ID. You cannot specify null characters for ID. For information on the available characters and the maximum number of characters, refer to the user's manual of your MFP.
[Password] Enter the password. For information on the available characters and the maximum number of characters, refer to the user's manual of your MFP.
To make prints using the NFC-based authentication print function on the Android terminal, you need to register the print settings, in which "Secure Print" is selected on the Print Settings page, in the Favorite setting. When such print settings are registered, you can touch the terminal on the mobile touch area to carry out "Secure Print" while a print target remains selected.
4.5.8. Cautions on Secure Print function None.

63
4.5.9. Basic operations for ID & Print function 1. Select a document to be printed.
Reference For information on how to select a document, refer to 4.5.3 "Basic Operations for Printing".
2. If you tap [Output Method] on the Print Settings page, the Output Method dialog box appears. Configure the following settings.
Settings Description [Output Method] Select ID & Print.
The available output method varies depending on the MFP to be used.
To make prints using the NFC-based authentication print function on the Android terminal, you need to register the print settings, in which "ID & Print" is selected on the Print Settings page, in the Favorite setting. When such print settings are registered, you can touch the terminal on the mobile touch area to carry out "ID & Print" while a print target remains selected.
4.5.10. Cautions on ID & Print function
• This function may not run normally on incompatible MFPs. • Under the following conditions, you need to log in to the MFP on its panel at least
once before using KMMP. - Both user authentication and account track are enabled in the MFP
authentication settings, and the synchronization is set to them. - When a user is registered in the MFP, any account track is not assigned to
the user.

64
4.6. Konica Minolta Mobile Print (KMMP) Quick Setting Function (Pairing Function)
4.6.1. Mobile terminal settings
For information on the wireless LAN settings for mobile terminal, refer to 4.9 "Configuring Wireless LAN Settings for Mobile Terminal".
4.6.2. Preparation: Registration using the QR code
Application installation procedure 1. Perform the same procedure as for KMMP preparation.
Refer to 4.5.2 "Preparation".
4.6.3. Basic operations: Registration using the QR code Setting by reading the QR code
1. Launch KMMP, then tap [Select Printer] - [Search] - [QR Code]. 2. Then, display the QR code on the MFP control panel.
When the displayed QR code is read to the terminal, the MFP written in the QR code is searched.
Reference • The MFP is searched in the order of Wired IP - Wired DNS - Wireless IP - Wireless
DNS, which as included in QR code information. When searching is completed by reading the QR code, the searched MFP is displayed.
• If wireless connection information is not written in the QR code, the Android terminal must be registered in the same network as for the MFP.
• When the MFP does not exist in the network currently connected to the terminal while wireless connection information is written in the QR code, the network is switched to another one automatically to continue to search for the MFP. (If the terminal and MFP are not found in the same network after switching the network, the MFP cannot be detected.)
3. Register the target MFP in KMMP.
The searched MFP is displayed on the page. Tap the target MFP, then register it. Before registration, a dialog box appears to enter MFP authentication information. Enter the authentication information registered on the MFP. Reference You can view the list of registered MFPs on the printer selection page. The MFP selected by the radio button on the page is an MFP to be ordinarily used.

65
QR code information read by KMMP Item Display example
IP Address (Wired) Example: 192.168.0.10 Host Name (Wired) Example: KMBIZHUB Printer Name Example: bizhub in 2nd floor, East MAC Address Example: 83:2A:2A:A8:D4:DC Connection Mode Wired, Primary Mode, Secondary Mode IP Address (Wireless) Example: 192.168.0.10 Host Name (Wireless) Example: KMBIZHUB SSID Example: KonicaMinolta-WirelessLAN Password Example: password
Authentication/Encryption Algorithm
No Authentication WEP WPA-PSK(AES) WPA2-PSK(AES) 802.1X WPA-EAP(AES) WPA2-EAP(AES)
4.6.4. Cautions: Registration using the QR code You can use only the QR code that is displayed on the MFP panel or the QR code that is created using http://www.pagescope.com/cqr2/.
4.6.5. Preparation: Registration using NFC (NFC tag)
1. Install KMMP. Refer to the application installation procedure shown in 4.5.2 "Preparation".
2. Tap [Settings] - [NFC Setting]. Check that [NFC Function] is set to [ON].
4.6.6. Basic operations: Registration using NFC (NFC tag) NFC-based settings
1. Unlock the Android terminal. 2. Touch the NFC tag with the Android terminal. 3. Register the target MFP in Konica Minolta Mobile Print.
The searched MFP is displayed on the page. Tap the target MFP, then register it. When user authentication is enabled on the MFP, a dialog box appears to enter MFP authentication information. Enter the authentication information registered on the MFP.
4.6.7. Cautions: Registration using NFC (NFC tag)
You can use only the NFC tag to which MFP information is written using the NFC Tag Writer application.
4.6.8. Preparation: Registration using NFC 1. Configure Wi-Fi connection settings and NFC function settings for the Android
terminal. Refer to 4.7.4 "Preparation: Authentication Using NFC".
2. Install KMMP. Refer to the application installation procedure shown in 4.5.2 "Preparation".
3. Configure KMMP settings. Refer to 4.7.4 "Preparation: Authentication Using NFC".

66
4.6.9. Basic operations: Registration using NFC Refer to 4.7.5 "Basic Operations: Authentication Using NFC".
4.6.10. Cautions: Registration using NFC None.
4.6.11. Preparation: Registration using Bluetooth LE 1. Enable the Bluetooth setting on iOS. 2. Install KMMP.
Refer to the application installation procedure shown in 4.5.2 "Preparation".
4.6.12. Basic operations: Registration using Bluetooth LE 1. Launch KMMP. 2. Select [Home] - [Select Printer] - [Add Printer] to display the printer addition page. 3. On the printer addition page, tap the [Bluetooth LE] button. 4. Follow the on-screen instructions to complete the registration procedure.
4.6.13. Cautions: Registration using Bluetooth LE • If the target device is not found using Bluetooth LE, select [Settings] - [Bluetooth
LE Setting] - [Field-intensity detection range] in Konica Minolta Mobile Print to adjust the setting to [Wide].
• Other devices compatible with Bluetooth LE may be detected depending on the radio wave environment. Select the device to be registered from the displayed device name and IP address.

67
4.7. Presetting the Mobile Terminal Authentication Device Function of Konica Minolta Mobile Print (KMMP)
4.7.1. Preparation: Authentication using card authentication unit
1. Configure NFC function settings for the Android terminal. In the setting application that is preinstalled in the Android terminal, open [Wi-Fi and Network] to configure the following settings. (Any item name may differ depending on your Android terminal.)
Settings Description
Wi-Fi Select whether to enable the Wi-Fi function of the Android terminal. Select [ON].
Other NFC Select whether to enable the NFC function of the Android terminal.
Select [ON].
2. Install KMMP. 3. Configure KMMP settings.
(1) In KMMP, select [Settings] - [NFC Setting] to configure the following settings.
Settings Description [Card Authentication] Select whether to log in to the MFP using the IC card.
Select [ON].
4. It is necessary to register card information (ID information particular to the terminal) for each user registered on the MFP. However, configuring the following setting helps you reduce the administrator's load. • When using PageScope Authentication Manager, enable the self-registration
function. • When using ID & PW, select [Administrator Settings] - [System Settings] -
[Restrict User Access] - [Restrict Access to Job Settings] - [Biometric/IC Card Info. Registration] to permit IC card registration with user privileges.
4.7.2. Basic operations: Authentication using the card authentication unit
1. Unlock the Android terminal. 2. Place the Android terminal on the card authentication unit.
4.7.3. Cautions: Authentication using card authentication unit
• The NFC reading position varies depending on the Android terminal to be used. • If the Android terminal is locked or placed in the screen-off state, you cannot log in
to the MFP panel even if you place the Android terminal on the card authentication unit.

68
4.7.4. Preparation: Authentication using NFC 1. Configure Wi-Fi connection settings and NFC function settings for the Android
terminal. In the setting application that is preinstalled on the Android terminal, open [WIRELESS & NETWORKS] to configure the following settings. (Any item name may differ depending on your Android terminal.)
Settings Description
Wi-Fi Select whether to enable the Wi-Fi function of the Android terminal. Select [ON].
Other NFC Select whether to enable the NFC function of the Android terminal.
Select [ON].
2. Install KMMP. Perform the same procedure as for KMMP preparation. Refer to 4.5.2 "Preparation".
3. Configure KMMP settings.
In KMMP, select [Settings] - [NFC Setting] to configure the following settings. Settings Description
[NFC Authentication] Select whether to enable the NFC authentication of KMMP. Select [ON].
4.7.5. Preparation: Authentication using NFC
1. Unlock the Android terminal. 2. Open the Android home screen or KMMP home page on the Android terminal. 3. Place the Android terminal on the mobile touch area on the MFP panel.
If you touch a device that is not registered on KMMP, the screen used to enter device information or authentication information is displayed. Enter the required information. If you select the [Use this setting for the next registration] check box in the [Default authentication settings] at the bottom of the screen, you do not need to enter information from the next time when using an MFP you can log in to using the same authentication information.
4.7.6. Cautions: Authentication using NFC • The NFC reading position varies depending on the Android terminal to be used. • If the Android terminal is locked or placed in the screen-off state, you cannot log in
to the MFP panel even if you place the Android terminal on the mobile touch area on the MFP panel.
• When the authentication mode or authentication information is changed on the MFP or authentication server side, long-tap the target device in the device list of KMMP, then tap the Edit button on the upper right to open the edit screen, then enter authentication information.
4.7.7. Preparation: Authentication using Bluetooth LE 1. Launch KMMP, then register the MFP using Bluetooth LE. Refer to 4.6.12 "Basic
Operations: Registration using Bluetooth LE". 2. Select [Home] - [Select Printer] to select the target MFP, then configure
authentication information.
69
4.7.8. Basic operations: Authentication using Bluetooth LE 1. Tap the [Printer Panel Login] button on the KMMP home page in front of the MFP. 2. The detected MFPs are displayed in list view. Tap the MFP you want to log in to;
panel authentication is released.
4.7.9. Cautions: Authentication using Bluetooth LE The [Printer Panel Login] button can be used from a location some distance away from the MFP, but try to always tap the button in front of the MFP. Be aware that if you tap the button from a location some distance away from the MFP, the MFP panel enters the login mode and unauthorized users may be able to use the MFP.

70
4.8. ID & Print (PageScope My Print Manager Port)
4.8.1. Preparation 1. In Konica Minolta Mobile Print (KMMP), select [Settings] - [Connection App
Settings] - [Default Connection App], then specify My Print Manager Port. (In a case to connect KMMP and My Print Manager)
2. In [Register Server Information] of My Print Manager Port, enter My Print Manager
server information. The entry items are as follows.
Settings Description Server Address Enter the IP address of the server.
Default (Server Address) Default: Entry rules IP Address (IPv4) • Number of characters: 7 to 15 • Character type: Number between 0 and 255, including period (.) The changed value is held. If the IP address for IPv4 is partially omitted, "0" is embedded automatically. Example: 192.168..1 → 192.168.0.1 192.168.. → 192.168.0.0 ... → 0.0.0.0 If the setting is applied without a value being entered, the following error message appears.
Port Number Enter the port number of the server. Default (PortNumber) Default: 50020 Entry rules • Numeric value: 0 to 65535 • Character type: Number The changed value is held. If the setting is applied without a value being entered, the following error message appears.
The IP address is invalid. [OK]
The port number is invalid. [OK]

71
User Name Enter the user name. Default (User Name) Default: - Entry rules • Number of characters: 64 single-byte or 32 double-byte characters • Character type: Single-byte character, Double-byte character, Number The changed value is held.
Password Enter the password. Default (Password) Default: - Entry rules - Number of characters: 64 single-byte characters - Character type: Single-byte character, Number The changed value is held.

72
Connection Test Executes a connection test. If no IP address is specified, the following message appears. If no port number is specified, the following message appears. If no user name is specified, the following message appears. If timeout has occurred, the following message appears. * 40 seconds is specified by the default timeout. If login fails, the following message appears. If the connection test fails, the following message appears. If the connection test succeeds, the following message appears. If a communication with the server is disconnected, the following message appears. * If a communication protocol error is returned while a communication with the server is running normally, a message from the server is displayed preferentially when there is a message sent from the server. The language to display messages transferred from the server is set to suit the locale settings of the iOS terminal. If the language defined in the locale settings is not supported in the server, English is used to display the message.
The port number is invalid. [OK]
The IP address is invalid. [OK]
Timeout has occurred. [OK]
Connection test has succeeded. [OK]
Login has failed. [OK]
Connection has failed. [OK]
A communication with the server has been disconnected. [OK]
Connection has failed. [OK]

73
4.8.2. Basic operations The following three methods are available to launch My Print Manager Port. Print a file that is transferred when "My Print Manager" is selected as the external application connection destination from KMMP or a file that is transferred when "Open in the following method" is selected from another application. In My Print Manager Port (iOS), only print data is held by one transaction, which is transferred by the external application connection or OpenIn connection. If a new print job is transferred while the previous print data remains, the previous print data is discarded, and new print data is held. 1) Launching only by application
Print settings can be changed. If no print file is transferred from another application (My Print Manager holds no print data), printing cannot be carried out. Print data is held when:
1. the target file is opened by this application after "Open in the following method" is selected in the external application; or
2. this application is launched by URL Scheme while the target file remains set in the clipboard from KMMP.
2) Launching by KMMP external application connection
You can collectively change and print the print settings for multiple files transferred from KMMP. After printing, the screen automatically transitions to the KMMP page of the calling source. However, if all print jobs are canceled, the screen does not transition to the calling source automatically.
3) Launching by OpenIn connection - My Print Manager (iOS) only
You can change and print the print settings for files that are transferred from another application by OpenIn connection.
Print settings
Settings Description Copies Specify the number of copies.
Default: 1 Entry rules • Numeric value: 1 to 9999 • Number of characters: 1 to 4 • Character type: Number The changed value is held.
Print Type Specify the print type. Default: 1-Sided Tapping this item shifts to the print type page. Setting items • 1-Sided • 2-Sided The changed value is held.

74
Sort Specifies sort. Default: OFF Setting items • ON • OFF The changed value is held.
Offset Specifies offset. Default: OFF Setting items • ON • OFF The changed value is held.
Punch Specifies punch. Default: OFF Setting items • ON • OFF The changed value is held.
Staple Specifies staple. Default: OFF Tapping this item changes the page to the staple selection page. Setting items • OFF • Left Corner • Right Corner • 2 points (Left) • 2 points (Top) The changed value is held.
Select Color Specifies color selection. Default: Gray Scale Tapping this item changes the page to the color selection page. Setting items • Full Color • Gray Scale The changed value is held.

75
Paper Tray Specifies the paper tray. Default: Auto Tapping this item changes the page to the paper tray page. Setting items • Auto • Tray 1 • Tray 2 • Tray 3 • Tray 4 • Tray 5 • LCT The changed value is held.
Combination Specifies combination. Default: OFF Tapping this item changes the page to the combination page. When combination is selected, specify the combination direction and border. Setting items (Combination) • OFF • 2 in 1 • 4 in 1 • 6 in 1 • 9 in 1 • 16 in 1 Setting items (Combination direction) • Transverse direction from Upper-Left • Longitudinal direction from Upper-Left • Transverse direction from Upper-Right • Longitudinal direction from Upper-Right * When "2 in 1" is selected, the displayed item is not changed, but the setting value enclosed in parentheses ( ) is applied actually. Setting items (Border) • ON • OFF The changed value is held.
Specify Page (Print range)
Specify the print starting page and print ending page (ON/OFF) (default: OFF).

76
Begin Page Printing (Print range)
Displayed when Specify Page is set to ON. Specify the print starting page. (1 to 9999) (Default 1) * If the value you entered falls below the minimum value: It is changed to the minimum value. (Example: 0 -> 1) * If the value you entered exceeds the maximum value: It is changed to the maximum value. (Example: 10000 -> 9999) * If this item is blank, it is changed to "Required". When the focus moves, the value is automatically changed to "Minimum". * If the focus moves while the specified value is greater than the print ending page, the print ending page is automatically changed to "Maximum". The changed value is held.
To (Print range)
Displayed when Specify Page is set to ON. Specify the print ending page. (1 to 9999) (Default 1) * If the value you entered falls below the minimum value: It is changed to the minimum value. (Example: 0 -> 1) * If the value you entered exceeds the maximum value: It is changed to the maximum value. (Example: 10000 -> 9999) * If this item is blank, it is changed to "Required". When the focus moves, the value is automatically changed to "Maximum". * If the focus moves while the specified value is less than the print ending page, the print starting page is automatically changed to "Minimum". The changed value is held.
4.8.3. Cautions
1. Handling RBP (Rules Based Printing) If you receive a response, which requires a rule application from the server, when executing print processing, display the rule application confirmation page, then check whether to apply rules to the user. The following items are displayed on the rule application confirmation page.
Item Description File Name Displays the name of the file to apply rules to. Server Message Displays the message*1 that is transferred from the server.
If no message is transferred from the server, no information is displayed. App Display Message 1
Fixed message displayed by the application. Message: "Pressing Cancel cancels printing."

77
Display Time Limit*2
The application manages the lapse time based on the time limit transferred from the server, and updates the remaining seconds. Message: "Printing is automatically canceled with [n] seconds to go." * Data is updated by the part equivalent to [n] seconds. If the user does not tap the Continue button or Cancel button within the time limit, the screen transitions to the Print Settings page to cancel print processing, and the following message is displayed. If print data remains after the user has confirmed the message, the next instance of print data processing is performed continuously.
Display Rule List Displays the processing contents*1 for each rule transferred from the server and the default application state (ON). The user can switch the application state (ON or OFF) of each rule as required.
App Display Message 2
Fixed message displayed by the application. Message: "* Execution cannot be canceled in some cases. The dimmed item cannot be canceled."
Cancel button*2 Cancels the currently executed print processing after transitioned to the Print Settings page. If print data remains after print processing has been canceled, the next print processing is performed continuously. When print cancel processing has been performed normally by tapping the Cancel button, a dedicated message is not displayed.
Continue button*2 Continues print processing based on the user-specified rules after the screen has transitioned to the Print Settings page. If print data remains after print processing, the next print processing is performed continuously. When print processing has been performed normally by tapping the Continue button, a dedicated message is not displayed. The print processing completion message is only displayed when there is at least one print job for which print data sending was ended when all print processing was completed.
*1 The language to display messages and processing execution information for each
rule, which are transferred from the server, is set to suit the locale settings of the iOS terminal. If the language defined in the locale settings is not supported in the server, English is used to display the message.
*2 While the rule application confirmation window is displayed until cancel processing is
performed by tapping the Cancel or Continue button or because the limit time lapsed, the MFP does not automatically shift to the sleep mode.

78
4.9. bizhub Remote Access 4.9.1. Wireless LAN settings for mobile terminal
For information on the wireless LAN settings for mobile terminal, refer to 4.10 "Configuring Wireless LAN Settings for Mobile Terminal".
4.9.2. Preparation
Application installation procedure Install bizhub Remote Access on the terminal. Reference
The following search words are available. - KonicaMinolta - bizhub - bizhub Remote Access
4.9.3. Basic operations
Panel Link Connecting with the MFP
1. Select [Panel Link] on the top page of bizhub Remote Access. 2. Tap the entry field of [IP Address] to directly enter the IP address of the MFP, or
tap [MFP Select] to carry out an automatic search. Otherwise, select the IP address of the target MFP from the history.
3. Tap the [Connect] key to connect to the MFP.
Remote-controlling the MFP After a connection with the MFP has been successfully made, you can operate the screen in the same way as for the MFP control panel. If you want to use keys that are not displayed on the MFP control panel while Panel Link is active, you can tap the pullout key displayed at the bottom of the screen to operate such keys.
Disconnecting the terminal from the MFP
Press the Home key or Back key.
Queuing If the connected MFP is already connected to another mobile terminal using Panel Link, the queue screen appears. The queue screen appears on the mobile terminal that is connected later. With the mobile terminal connected, wait until the previous user finishes using the MFP.
Entering characters using the keyboard (IME) of the mobile terminal while Panel Link is active 1. After the screen has transitioned to the text input screen while Panel Link is
active, press the IME key that is displayed on the lower right section of the text input screen.
2. The IME you are using usually is displayed on the Panel Link screen. Enter the text.

79
3. After entering the text, press the IME key displayed on the upper right of the screen to return to the text input screen of the MFP.
* If [Utility] - [User Settings] - [System Settings] - [bizhub Remote Access Setting] -
[IME Auto Display Setting] is set to "ON" while Panel Link is active, IME of the mobile terminal is automatically launched when the screen transitions to the text input screen while Panel Link is active.
Switching to the MFP control panel while Panel Link is active
1. Press any hardware key on the MFP control panel. 2. On the mobile terminal with Panel Link active and the MFP control panel, a
confirmation message appears to check whether to allow operation switchover. Wait for operations in the Panel Link side.
3. If operation switchover is permitted on the mobile terminal side with Panel Link active, or if no operation is performed for the specified time period, operation switchover is carried out.
Denying a Panel Link request while operating the MFP control panel
If the MFP receives a Panel Link connection request while a user is operating the MFP control panel, a confirmation dialog box appears to check whether to permit Panel Link on the MFP control panel. Select Continue.
Changing the information sound or incoming alarm sound while Panel Link is active On the MFP control panel displayed while Panel Link is active, select [Home] - [Accessibility] - [Sound Setting] to specify the desired sound.
Panel Link scan
Specifying the storage location 1. Tap the setting key on the top page of bizhub Remote Access. 2. Tap [MOBILE STORAGE DESTINATION SETTING] or [GOOGLE DRIVE
USAGE SETTING]. (An iOS terminal only supports [GOOGLE DRIVE USAGE SETTING].)
3. Directly enter the path of the storage location, or select the desired folder from the folder selection window. When saving data in the Google drive or using the OCR function, enter the user name of the Google drive, then configure OCR language settings.
Scanning the original and saving scanned data on the mobile storage or Google drive
1. Connect the terminal to the MFP using Panel Link, then display the MFP screen on the mobile terminal.
2. Operate the MFP screen displayed on the mobile terminal, then log in as a public user.
3. Operate the MFP screen displayed on the mobile terminal to display the Utility screen.
4. On the Utility screen, tap the [Panel Link Scan. 5. Select the mobile storage or Google drive from the storage location. 6. Load the original to be scanned into the MFP. 7. Operate the MFP screen displayed on the mobile terminal, configure scan
settings, then tap the Start key. 8. This starts scanning of the original. Wait until processing is completed while
Panel Link remains connected. 9. When the display returns to the Panel Link scan setting screen, then disconnect
Panel Link.
80
Note: If Panel Link is disconnected before the saving process is completed, it will
cause a saving failure. Keyboard Link
Sending the text you entered via the mobile terminal to the MFP Manual sending 1. Select [Keyboard Link] on the top page of bizhub Remote Access. 2. Enter the text in the text input area using the keyboard (IME) of the mobile
terminal, then enter the IP address of the target MFP. 3. Specify Input Mode.
When inserting text into the cursor position on the control panel screen, select [Insert]. When overwriting text you have already entered on the control panel screen, select [Overwrite].
4. Display the keyboard screen on the MFP control panel, then press the [Send] of bizhub Remote Access. Then, the contents of the text input area are input into the text input area on the MFP side.
Note: When using Keyboard Link, be sure to move to the front of the MFP, then
check that no one else is using the MFP. If you enable the Keyboard Link sending confirmation display in Security Settings, a confirmation dialog box is displayed before you send data.
Note: When the Keyboard Link connection method is restricted on the MFP, it is not
possible to send data using a connection method that is not permitted on the MFP.
NFC touch for sending
1. Select [Keyboard Link] on the top page of bizhub Remote Access. 2. Enter the text in the text input area using the keyboard (IME) of the mobile
terminal. 3. Specify Input Mode.
When inserting text into the cursor position on the control panel screen, select [Insert]. When overwriting text you have already entered on the control panel screen, select [Overwrite].
4. Display the keyboard screen on the MFP control panel, then touch the mobile touch area of the MFP with the mobile terminal. Then, the contents of the text input area are input into the text input area on the MFP side.
Address Link Setting the E-mail address registered in the address book of the mobile terminal to an MFP destination 1. Select [Address Link] on the top page of bizhub Remote Access. 2. Select a destination from the address book of the mobile terminal, then enter the IP
address of the target MFP. 3. On the MFP control panel, open the main screen of "Scan/Fax" or the Send screen of
"User Box", then press the [Send] of bizhub Remote Access. The selected destination is then input into the destination on the MFP side.

81
Note: When using Address Link, be sure to move to the front of the MFP, then check that no one else is using the MFP. If you enable the Keyboard Link sending confirmation display in Security Settings, a confirmation dialog box is displayed before you send data.
Note: When the Address Link connection method is restricted on the MFP, it is not
possible to send data using a connection method that is not permitted on the MFP.
NFC touch for sending 1. Select [Address Link] on the top page of bizhub Remote Access. 2. Select a destination from the address book of the mobile terminal, then enter the
IP address of the target MFP. 3. On the MFP control panel, open the main screen of "Scan/Fax" or the Send
screen of "User Box", then place the mobile terminal on the mobile touch area of the MFP. The selected destination is then input into the destination on the MFP side.
Priority start by NFC touch If you touch the mobile touch area on the MFP control panel with the mobile terminal while bizhub Remote Access is inactive, bizhub Remote Access is automatically launched in the specified mode on the MFP side.
Note 1: bizhub Remote Access must be installed on the mobile terminal in advance. Note 2: NFC must be enabled in the mobile terminal side in advance. Note 3: The primary start mode must be set on the MFP side in advance. For details,
refer to 3.10.1 "Preparation". Specifying the MFP to be connected in each mode Manually entering the IP address of the MFP
Tap the entry field of [IP Address], then directly enter the IP address of the MFP to be connected.
Selecting the target MFP from the list
Tap [MFP Select] to carry out an automatic search or select the MFP you want to connect to from the history.
Note 1: When [MFP Select] is dimmed, set [MFP Search/History Function] to [ON] in
the setting of the main screen. Note 2: When [MFP Search/History Function] is set to [ON], check that the IP address
of the destination MFP is correct before establishing a connection. Note 3: You can tap [Edit] on the [History] screen to change the displayed MFP name.
Automatically obtaining the IP address of the MFP using NFC
Touch the mobile touch area of the MFP with the mobile terminal.
Security Settings To configure security settings, tap the Setting key on the top page of the application.
MFP search/history function • Enable
Allows you to select an MFP using [MFP Select]. Also, selecting this option holds the address specified in [IP Address] even after the mobile terminal is disconnected from the MFP.

82
• Disable Prohibits a user from selecting an MFP using [MFP Select]. Also, selecting this option clears the address specified in [IP Address] each time the mobile terminal is disconnected.
Keyboard Link sending confirmation display • Enable
Displays a confirmation dialog box when sending data using Keyboard Link. • Disable
Does not display a confirmation dialog box when sending data using Keyboard Link.
Address Link sending confirmation display • Enable
Displays a confirmation dialog box when sending data using Address Link. • Disable
Does not display a confirmation dialog box when sending data using Address Link.

83
4.9.4. Cautions Panel Link Usage conditions
Refer to 3.10.1 "Preparation" and 3.10.2 "Cautions". Operations at disconnection and operation switchover
The MFP panel is reset when operation switchover succeeds. You will be logged out if you are logged in.
Queuing
Up to three mobile terminals can be queued, including a mobile terminal with Panel Link active. The fourth and subsequent mobile terminals cannot be connected. If the currently queued mobile terminal is disconnected from the MFP, queuing is canceled. Note: Queuing is canceled when: • you log in to the MFP as a specific user • you log in to the MFP as a specific account track • you log in to the MFP as a public user • you switch the MFP to the administrator settings • the MFP shifts to the power save mode • the authentication setting of the MFP is changed to ON • the terminal is connected to the MFP using bizhub Remote Panel • the accounting unit of the MFP is enabled • the MFP is switched to the Enhanced Security mode • the IWS setting of the MFP is enabled • you access the User Box with the MFP password • you access the Web browser on the MFP • you access OpenAPI on the MFP • you attempted to switch to the MFP control panel
Operations at disconnection and operation switchover The MFP panel is reset when operation switchover succeeds. You will be logged out if you are logged in.
Panel Link scan Usage conditions
Refer to 3.10.1 "Preparation" and 3.10.2 "Cautions". Keyboard Link Usage conditions
Refer to 3.10.1 "Preparation" and 3.10.2 "Cautions". Sending the entered text • Characters that are prohibited for entry on the MFP side cannot be entered. If a
prohibited character is sent, it is ignored.

84
Address Link Usage conditions
Refer to 3.10.1 "Preparation" and 3.10.2 "Cautions". Addresses that can be sent
Only E-mail addresses can be sent to the MFP. If you attempt to send an address other than an E-mail address, a sending error occurs.

85
4.10. Configuring Wireless LAN Settings for Mobile Terminal
4.10.1. Mobile settings Secondary mode (Wireless, Wired + Wireless) 1) Configure Wi-Fi settings for the mobile terminal.
The settings for using the wireless function vary depending on your model. For information on the settings, refer to the user's guide of your model.
2) In the Wi-Fi item, select the target network (SSID).
For the password required for Wi-Fi connection, check with your network administrator.
Primary mode (AP mode/Simple AP Mode) 1) Configure Wi-Fi settings for the mobile terminal.
The settings for using the wireless function vary depending on your model. For information on the settings, refer to the user's guide of your model.
2) In the Wi-Fi item of the terminal settings, select the network that has the SSID name
specified for the MFP. Wi-Fi connection requires the password specified on the MFP.
Primary mode (Wi-Fi Direct) 1) Configure Wi-Fi settings for the mobile terminal.
The settings for using the wireless function vary depending on your model. For information on the settings, refer to the user's guide of your model.
2) Select the SSID name.
There are the following two cases to select the SSID name.
• In Android terminal compatible with Wi-Fi Direct Select Wi-Fi Direct from the Wi-Fi item in the terminal settings. The Wi-Fi Direct item varies depending on your model. For information on how to select Wi-Fi Direct, refer to the user's guide of your model. When the SSID of the device to be connected is selected, a connection is established.
• In Android terminal and iOS, Windows 10 Mobile, or Windows 10 Mobile
Enterprise terminal incompatible with Wi-Fi Direct In the Wi-Fi item of the terminal settings, select the network that has the virtual SSID name displayed in the MFP settings. (The virtual SSID name varies by turning the device off and on.) Wi-Fi connection requires the password specified on the MFP.
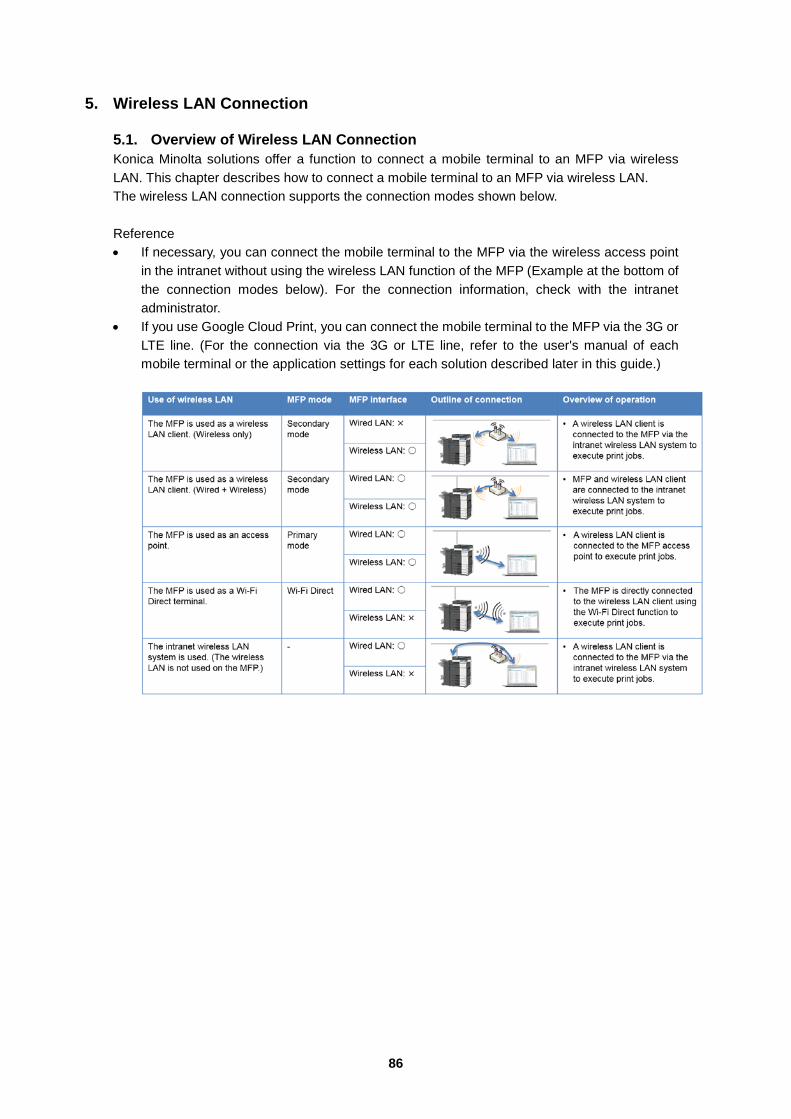
86
5. Wireless LAN Connection
5.1. Overview of Wireless LAN Connection Konica Minolta solutions offer a function to connect a mobile terminal to an MFP via wireless LAN. This chapter describes how to connect a mobile terminal to an MFP via wireless LAN. The wireless LAN connection supports the connection modes shown below. Reference • If necessary, you can connect the mobile terminal to the MFP via the wireless access point
in the intranet without using the wireless LAN function of the MFP (Example at the bottom of the connection modes below). For the connection information, check with the intranet administrator.
• If you use Google Cloud Print, you can connect the mobile terminal to the MFP via the 3G or LTE line. (For the connection via the 3G or LTE line, refer to the user's manual of each mobile terminal or the application settings for each solution described later in this guide.)

87
5.2. Wireless LAN Connection Specifications
5.2.1. Secondary mode (Wireless only) Main Unit Note: The supported specifications vary depending on the options. For details, refer to the specifications of the options. 1) The following wireless LAN standard is supported. • IEEE802.11b/g/n 2.4GHz • IEEE802.11a/n/ac 5GHz
2) The following authentication encryption algorithm is supported. A3 device WPA/WPA2 Personal - WPA-PSK(AES)(CCMP)
- WPA2-PSK(AES)(CCMP) WPA/WPA2 Enterprise * Supported only in EAP-TLS/TTLS and PEAP.
- WPA-EAP(AES)(CCMP) - WPA2-EAP(AES)(CCMP)
Others - Open - 802.1X * Supported only in EAP-TLS/TTLS and PEAP. - WEP
A4 device WPA/WPA2 Personal - WPA-PSK AES(CCMP)
- WPA2-PSK AES(CCMP) WPA/WPA2 Enterprise * Supported only in EAP-TLS/TTLS and PEAP.
- WPA-EAP AES(CCMP) - WPA2-EAP AES(CCMP)
Others - Open - 802.1X * Supported only in EAP-TLS/TTLS and PEAP. - WEP
Supported mobile terminal
The target mobile terminal must provide the wireless LAN function.
5.2.2. Secondary mode (Wired + Wireless) Main Unit Note: The supported specifications vary depending on the options. For details, refer to the specifications of the options. 1) The following wireless LAN standard is supported. • Same as for the secondary mode (wireless only).
2) The following authentication encryption algorithm is supported.
A3 device
WPA/WPA2 Personal - WPA-PSK(AES)(CCMP) - WPA2-PSK(AES)(CCMP)

88
Others - Open - WEP
A4 device • The connection method of the secondary mode (wired + wireless) is not supported.
Supported mobile terminal
The target mobile terminal must provide the wireless LAN function.
5.2.3. Primary mode (AP mode/Simple AP Mode) Main Unit Note: The supported specifications vary depending on the options. For details, refer to the specifications of the options. 1) The following wireless LAN standard is supported. • IEEE802.11b/g/n 2.4GHz • IEEE802.11a/n/ac 5GHz
2) The following authentication encryption algorithm is supported. WPA/WPA2 Personal - WPA-PSK(AES)(CCMP)
- WPA2-PSK(AES)(CCMP) Others - Open
- WEP
Supported mobile terminal The target mobile terminal must provide the wireless LAN function.
5.2.4. Primary mode (Wi-Fi Direct) Main Unit Note: The supported specifications vary depending on the options. For details, refer to the specifications of the options. 1) The following wireless LAN standard is supported. • IEEE802.11b/g/n 2.4GHz • IEEE802.11a/n/ac 5GHz
2) The following authentication encryption algorithm is supported. WPA/WPA2 Personal - WPA-PSK(AES) (CCMP)
- WPA2-PSK(AES) (CCMP) Others - Open
Supported mobile terminal The target mobile terminal must provide the wireless LAN function. However, the terminal (Android 4.4 or later) compatible with Wi-Fi Direct can be easily connected to the MFP. For details, refer to 4.9 "Configuring Wireless LAN Settings for Mobile Terminal".

89
5.3. MFP Wireless LAN Settings: Secondary Mode (Wireless Only)
5.3.1. Preparation Checking the supported models and required options For information on supported models, contact the dealer you purchased the product from. MFP settings 1) A3 device
1. Configure the network interface. In the administrator settings, select [Network Settings] - [Network I/F Configuration], then select [Wireless Only]. Configure a setting to operate the MFP as a wireless LAN adapter and connect to your access point.
2. In the administrator settings, select [Network Settings] - [Wireless Network Setting] - [Easy Setting (WPS)] or [Manual Setting], then specify the setting method.
Settings Description [Easy Setting (WPS)] Select this option to automatically obtain information required for a connection
from the access point. The access point must support the WPS function.
[Manual Setting] Select this option to directly enter all the setting items such as SSID and the encryption scheme that are required for a connection.
3. Configure the following settings depending on the [Easy Setting (WPS)] or
[Manual Setting] setting. When [Easy Setting (WPS)] is selected:
Settings Description [Push Button Method] Select [Push Button Method], then click [Start Operation] to try a connection
with an access point. If you press the WPS setting button at the access point, settings such as SSID and security required for a connection are configured automatically. For some access points that use the WPS push-button method, the connection may fail. If this occurs, wait approximately 30 seconds after pressing the button on the access point before connecting the MFP.
[PIN Method] To display the PIN code, select [PIN Method], then click [OK]. If you enter the displayed PIN code at the access point, settings such as SSID and security required for a connection are configured automatically. This function requires a computer that runs on the Windows 7 operating system or later.
When [Manual Setting] is selected:
Settings Description [Access point list] Click this to automatically search for an access point around the MFP. Select
an access point to be connected to the MFP from the displayed list. [SSID] Enter the SSID of the access point to be connected to the MFP (using up to
32 bytes). [Authentication/Encryption Algorithm]
Select the algorithm to be used for authentication or encryption. [No Authentication/Encryption] is specified by default.

90
[WEP key] When [WEP] is selected in [Authentication/Encryption Algorithm], specify [Key Input Method] and [WEP key]. To specify multiple WEP keys, select the required WEP keys in [Key Selection].
[Passphrase Method] When an algorithm other than [WEP] is selected in [Authentication/Encryption Algorithm], select the passphrase input method.
[Passphrase] When an algorithm other than [WEP] is selected in [Authentication/Encryption Algorithm], enter the passphrase. To change the passphrase, select the [Change Passphrase] check box.
[40 to 20 MHz Auto Switch]
Select [ON] to try a high-speed communication using 40MHz. [OFF] is specified by default.
2) A4 device
1. Configure the network interface. In the administrator settings, select [Network Settings] - [Extended Network Setting] - [Network Interface Configuration], then select [Wireless (Secondary Mode)] to configure the following settings. Configure a setting to operate the MFP as a wireless LAN adapter and connect to your access point.
Settings Description
[Easy Setting (WPS)] Configure a setting to automatically obtain connection information from an access point. The access point must support the WPS function. • [Push Button Method]: Select [Push Button Method], and tap [Start
Operation] to try a connection with an access point. If you press the WPS setting button at the access point, settings such as SSID and security required for a connection are configured automatically.
• [PIN Method]: Select [PIN Method], and tap [Start Operation] to display the PIN code. If you enter the displayed PIN code at the access point, settings such as SSID and security required for a connection are configured automatically.
[Manual Setting] Configure a setting for the authentication or encryption algorithm. • [SSID]: Enter the SSID of the wireless LAN access point connected to the
MFP (using up to 32 characters). • [Access point list]: Displays a list of wireless LAN access points that are
detected. • [Authentication/Encryption Algorithm]: Select the algorithm used for
authentication or encryption. [Select Algorithm]: Select the algorithm to be used for authentication or
encryption. [WEP Key Setting]: Configure a WEP key setting when [WEP] is selected in
[Select Algorithm]. [Key Input Method]: Select the method to enter a WEP key. [Use key settings]: Enter a WEP key. When multiple WEP keys are
registered, select the desired key. [Passphrase Setting]: Set the passphrase when an algorithm other than
[WEP] or [802.1X] is selected in [Select Algorithm]. [Key Input Method]: Select the method to enter a passphrase. [Passphrase]: Enter the passphrase. • [40 to 20 MHz Auto Switch]: Select [ON] to try a high-speed communication
with 40MHz. [OFF] is specified by default. [Connection Status] Allows you to check the access point connected to the MFP, the radio field
intensity of the access point, and the current communication speed.
5.3.2. Cautions
None.

91
5.4. MFP Wireless LAN Settings: Secondary Mode (Wired + Wireless)
5.4.1. Preparation Checking the supported models and required options For information on supported models, contact the dealer you purchased the product from. MFP settings 1) A3 device
1. In the administrator settings, select [Network Settings] - [Network I/F Configuration], then select [Wired + Wireless (Secondary Mode)].
2. Configure the basic settings for TCP/IP. Configure settings to connect the MFP to the wireless network using TCP/IP. In the administrator settings, select [Network Settings] - [TCP/IP Settings] - [Wireless Setting], then click [OK] to configure the following settings.
Settings Description
[IPv4 Settings] Configure an IPv4 setting when connecting the MFP to the wireless network using IPv4.
[IP Address] When you select [Manual Input] in [IP Application Method], enter the fixed IP address that is assigned to the MFP.
[Subnet Mask] When you select [Manual Input] in [IP Application Method], enter the subnet mask.
[IPv6 Settings] Configure an IPv6 setting when connecting the MFP to the wireless network using IPv6.
[IPv6 Link-Local Address]
Displays the link-local address. The link-local address is automatically specified from the MAC address of the MFP.
3. Configure a setting to operate the MFP as a wireless LAN adapter and connect
to your access point. In the administrator settings, select [Network Settings] - [Wireless Network Setting] - [Easy Setting (WPS)] or [Manual Setting], then specify the setting method.
Settings Description
[Easy Setting (WPS)] Select this option to automatically obtain information required for a connection from the access point. The access point must support the WPS function.
[Manual Setting] Select this option to directly enter all the setting items such as SSID and the encryption scheme that are required for a connection.
4. Configure the following settings depending on the [Easy Setting (WPS)] or
[Manual Setting] setting.

92
When [Easy Setting (WPS)] is selected: Settings Description
[Push Button Method] Select [Push Button Method], then click [Start Operation] to try a connection with an access point. If you press the WPS setting button at the access point, settings such as SSID and security required for a connection are configured automatically. For some access points that use the WPS push-button method, the connection may fail. If this occurs, wait approximately 30 seconds after pressing the button on the access point before connecting the MFP.
[PIN Method] To display the PIN code, select [PIN Method], then click [OK]. If you enter the displayed PIN code at the access point, settings such as SSID and security required for a connection are configured automatically. This function requires a computer that runs on the Windows 7 operating system or later.
When [Manual Setting] is selected:
Settings Description [Access point list] Click this to automatically search for an access point around the MFP. Select
an access point to be connected to the MFP from the displayed list. [SSID] Enter the SSID of the access point to be connected to the MFP (using up to
32 bytes). [Authentication/Encryption Algorithm]
Select the algorithm to be used for authentication or encryption. [No Authentication/Encryption] is specified by default.
[WEP key] When [WEP] is selected in [Authentication/Encryption Algorithm], specify [Key Input Method] and [WEP key]. To specify multiple WEP keys, select the required WEP keys in [Key Selection].
[Passphrase Method] When an algorithm other than [WEP] is selected in [Authentication/Encryption Algorithm], select the passphrase input method.
[Passphrase] When an algorithm other than [WEP] is selected in [Authentication/Encryption Algorithm], enter the passphrase. To change the passphrase, select the [Change Passphrase] check box.
[40 to 20 MHz Auto Switch]
Select [ON] to try a high-speed communication using 40MHz. [OFF] is specified by default.
2) A4 device
The A4 device does not support the connection method of the secondary mode (wired + wireless).
5.4.2. Cautions • The wireless LAN network is independent of the wired LAN network.
You cannot connect from the wired LAN network to the wireless LAN network and from the wireless LAN network to the wired LAN network. Specify the address of a segment that is different from the wired LAN.

93
5.5. MFP Wireless LAN Settings: Primary Mode (AP Mode/Simple AP Mode)
5.5.1. Preparation Checking the supported models and required options For information on supported models, contact the dealer you purchased the product from.
MFP settings 1) A3 device
1. Configure the network interface. In the administrator settings, select [Network Settings] - [Network I/F Configuration], then select [Wired + Wireless (Primary Mode)] or [Wired + Wireless (Simple AP Mode)].
2. Configure the basic settings for TCP/IP. Configure settings to connect the MFP to the wireless network using TCP/IP. In the administrator settings, select [Network Settings] - [TCP/IP Settings] - [Wireless Setting], then click [OK] to configure the following settings.
Settings Description
[IPv4 Settings] Configure an IPv4 setting when connecting the MFP to the wireless network using IPv4.
[IP Address] Enter the fixed IP address that is assigned to the MFP. [Subnet Mask] Enter a subnet mask.
[IPv6 Settings] Configure an IPv6 setting when connecting the MFP to the wireless network using IPv6.
[IPv6 Link-Local Address]
Displays the link-local address. The link-local address is automatically specified from the MAC address of the MFP.
3. Configure a setting to operate the MFP as a wireless LAN access point.
Configure a setting to use the MFP as a wireless LAN access point. In the administrator settings, select [Network Settings] - [Wireless Network Setting], then configure the following settings.
Settings Description
AP mode: [AP Mode Setting] - [SSID] Simple AP mode: [Simple AP Mode Setting] - [SSID]
Enter the SSID to use the MFP as a wireless LAN access point (using up to 32 bytes).
AP mode: [AP Mode Setting] - [Authentication/ Encryption Algorithm] Simple AP mode: [Simple AP Mode Setting] - [Authentication/Encryption Algorithm]
Select the algorithm to be used for authentication or encryption. [No Authentication/Encryption] is specified by default. For Simple AP mode, the algorithm is fixed to “WPA2-PSK(AES)”.
[AP Mode Setting] - [WEP key]
When [WEP] is selected in [Authentication/Encryption Algorithm], specify [Key Input Method] and [WEP key]. To specify multiple WEP keys, select the required WEP keys in [Key Selection]. For Simple AP mode, this cannot be set.

94
AP mode: [AP Mode Setting] - [Passphrase] Simple AP mode: [Passphrase]
When an algorithm other than [WEP] is selected in [Authentication/Encryption Algorithm], specify the passphrase. [Passphrase Input Method]: Select the method to enter the passphrase. [Passphrase]: Enter the passphrase. To change the passphrase, select the [Change Passphrase] check box. [Passphrase Auto Update]: Select [ON] to automatically update the passphrase. Also, enter the interval to update the passphrase. For Simple AP mode, the automatic update is fixed to [ON] and the update interval is fixed to [1440].
[AP Mode Setting] - [40 to 20 MHz Auto Switch]
Select [ON] to try a high-speed communication using 40MHz. [OFF] is specified by default. For Simple AP mode, this cannot be set.
[Wireless Channel] Select a wireless channel to be used by the access point. Selecting [Auto] searches for a channel that is not being used for other access points, and automatically assigns it to the access point. [Auto] is specified by default.
[ANY Connection] Select whether to allow ANY connection. If [Restrict] is selected, the SSID cannot be detected automatically as an access point in the wireless LAN adapter side. [Allow] is specified by default. ANY connection is not supported for Simple AP mode.
[MAC Address Filtering] Restricts wireless LAN adapters that can be connected to the access point using the MAC address. Enter the MAC addresses of wireless LAN adapters that can be connected to the access point. MAC addresses of up to 16 devices can be registered. Mac address filtering is not supported for Simple AP mode.
[DHCP Server Settings] Configure a setting to use the DHCP server function. [Enable Settings]: Select whether to enable the DHCP server function. [Disable] is specified by default. [IPv4 lease address]: Specify the range of IPv4 addresses to be leased from the DHCP server when enabling the DHCP server function. [Subnet Mask]: Specify the subnet mask of the IPv4 address to be leased from the DHCP server when enabling the DHCP server function. [Lease period]: Specify the lease period of the IPv4 address to be leased from the DHCP server when enabling the DHCP server function.
[No.of Concurrent Devices Allowed]
Enter the number of devices that can be connected simultaneously to the access point. For Primary mode, [5] devices is specified by default. For Simple AP mode, [4] devices is specified by default.
[Signal Strength Setting] Select the radio field intensity of the access point from three levels (Low, Middle, and High). [High] is specified by default. For Simple AP mode, this cannot be set.
[Display Connected Devices]
Displays a list of names and MAC addresses of wireless LAN adapters that are connected to the access point.

95
2) A4 device 1. Configure the network interface.
For AP mode, select [Network Settings] - [Extended Network Setting] - [Network Interface Configuration] in the administrator settings, then select [Wireless (Primary Mode)]. For Simple AP mode, select [Network Settings] - [Network I/F Configuration] in the administrator settings, then select [Wireless (Simple AP Mode)].
2. Configure the basic settings for TCP/IP. Configure settings to connect the MFP to the wireless network using TCP/IP. For AP mode, select [Network Settings] - [Extended Network Setting] - [AP Mode Setting] - [TCP/IP Settings] in the administrator settings, then configure the following settings. For Simple AP mode, select [Network Settings] - [TCP/IP Settings] - [Wireless Setting] in the administrator settings, then click [OK] to configure the following settings.
Settings Description
[IPv4 Settings] Configure an IPv4 setting when connecting the MFP to the wireless network using IPv4.
[IP Address] Enter the fixed IP address that is assigned to the MFP. [Subnet Mask] Enter the subnet mask.
[IPv6 Settings] Configure an IPv6 setting when connecting the MFP to the wireless network using IPv6.
[Link-Local Address] Displays the link-local address. The link-local address is automatically specified from the MAC address of the MFP.
3. Configure a setting to operate the MFP as a wireless LAN access point.
Configure a setting to use the MFP as a wireless LAN access point. For AP mode, select [Network Settings] - [Extended Network Setting] - [AP Mode Setting] in the administrator settings, then configure the following settings. For Simple AP mode, select [Network Settings] - [Wireless Network Setting] in the administrator settings, then configure the following settings.
Settings Description
AP mode: [SSID] Simple AP mode: [Simple AP Mode Setting] - [SSID]
Enter the SSID to use the MFP as a wireless LAN access point (using up to 32 bytes).
AP mode: [Authentication/ Encryption Algorithm] Simple AP mode: [Simple AP Mode Setting] - [Authentication/Encryption Algorithm]
Select the algorithm to be used for authentication or encryption. [No Authentication/Encryption] is specified by default. For Simple AP mode, the algorithm is fixed to “WPA2-PSK(AES)”.
[WEP key] When [WEP] is selected in [Authentication/Encryption Algorithm], specify [Key Input Method] and [WEP key]. To specify multiple WEP keys, select the required WEP keys in [Key Selection]. For Simple AP mode, this cannot be set.

96
[Passphrase] When an algorithm other than [WEP] is selected in [Authentication/Encryption Algorithm], specify the passphrase. [Passphrase Input Method]: Select the method to enter the passphrase. [Passphrase]: Enter the passphrase. To change the passphrase, select the [Change Passphrase] check box. [Passphrase Auto Update]: Select [ON] to automatically update the passphrase. Also, enter the interval to update the passphrase. For Simple AP mode, the automatic update is fixed to [ON] and the update interval is fixed to [1440].
[40 to 20 MHz Auto Switch]
Select [ON] to try a high-speed communication using 40MHz. [OFF] is specified by default. For Simple AP mode, this cannot be set.
[Wireless Channel] Select a wireless channel to be used by the access point. Selecting [Auto] searches for a channel that is not being used for other access points, and automatically assigns it to the access point. [Auto] is specified by default.
[ANY Connection] Select whether to allow ANY connection. If [Restrict] is selected, the SSID cannot be detected automatically as an access point in the wireless LAN adapter side. [Allow] is specified by default. ANY connection is not supported for Simple AP mode.
[MAC Address Filtering] Restricts wireless LAN adapters that can be connected to the access point using the MAC address. Enter the MAC addresses of wireless LAN adapters that can be connected to the access point. MAC addresses of up to 16 devices can be registered. Mac address filtering is not supported for Simple AP mode.
[DHCP Server Settings] Configure a setting to use the DHCP server function. [Enable Settings]: Select whether to enable the DHCP server function. [Disable] is specified by default. [IPv4 lease address]: Specify the range of IPv4 addresses to be leased from the DHCP server when enabling the DHCP server function. [Subnet Mask]: Specify the subnet mask of the IPv4 address to be leased from the DHCP server when enabling the DHCP server function. [Lease period]: Specify the lease period of the IPv4 address to be leased from the DHCP server when enabling the DHCP server function.
[No.of Concurrent Devices Allowed]
Enter the number of devices that can be connected simultaneously to the access point. For Primary mode, [5] devices is specified by default. For Simple AP mode, [4] devices is specified by default.
[Signal Strength Setting] Select the radio field intensity of the access point from three levels (Low, Middle, and High). [High] is specified by default. For Simple AP mode, this cannot be set.
[Display Connected Devices]
Displays a list of names and MAC addresses of wireless LAN adapters that are connected to the access point.

97
Reference The latest firmware of the A4 device has the following functions advanced. • Extension of the maximum number of connectable devices in [Number of Simultaneous
Devices Allowed] The number of wireless LAN adapters, which can be connected simultaneously in the wireless AP mode, is limited to only one in the previous version, but expanded in this version to five devices for Primary mode and four devices for Simple AP mode.
• Addition of [Signal Strength Setting] The radio wave transmission output adjustment function is added. This function allows you to check the wireless output level of the current AP mode and, if necessary, change a setting to adjust the output level.
• Extension of the number of devices that can be registered in [MAC Address Filtering]. In the MAC address filtering setting, the maximum number of devices that can be registered is extended from "5" to "16".
5.5.2. Cautions
1) Up to five devices can be connected simultaneously for AP mode and up to four devices can be connected simultaneously for Simple AP mode. • When five devices are already connected in AP mode, the sixth device and subsequent
devices cannot be connected. When four devices are already connected in Simple AP mode, the fifth device and subsequent devices cannot be connected. To connect another mobile terminal, disconnect the currently connected terminal in advance.
• If the iOS terminal that is connected to the MFP once is included in the wireless area, it may be automatically connected to the MFP by an operation in the iOS terminal. For this reason, the number of simultaneously connectable devices reaches the maximum, and it may cause a hard-to-connect situation. When there are many iOS terminals around the MFP in view of the MFP installation layout, we recommend that you set [Signal Strength Setting] to [Low].
2) The wireless LAN network is independent of the wired LAN network.
You cannot connect from the wired LAN network to the wireless LAN network and from the wireless LAN network to the wired LAN network.

98
5.6. MFP Wireless LAN Settings: Wi-Fi Direct
5.6.1. Preparation Checking the supported models and required options For information on supported models, contact the dealer you purchased the product from.
MFP settings 1) A3 device
1. Configure the network interface. In the administrator settings, select [Network Settings] - [Network I/F Configuration], then select [Wired + Wireless (Wi-Fi Direct)].
2. Configure the basic settings for TCP/IP. Configure settings to connect the MFP to the wireless network using TCP/IP. In the administrator settings, select [Network Settings] - [TCP/IP Settings] - [Wireless Setting], then click [OK]. In [TCP/IP Setting (Wireless Setting)], configure the following settings.
Settings Description
[IPv4 Settings] Configure an IPv4 setting when connecting the MFP to the wireless network using IPv4.
[IP Address] Enter the fixed IP address that is assigned to the MFP. [Subnet Mask] Enter a subnet mask. [IPv6 Settings] Configure an IPv6 setting when connecting the MFP to the wireless network
using IPv6. [Link-Local
Address] Displays the link-local address. The link-local address is automatically specified from the MAC address of the MFP.
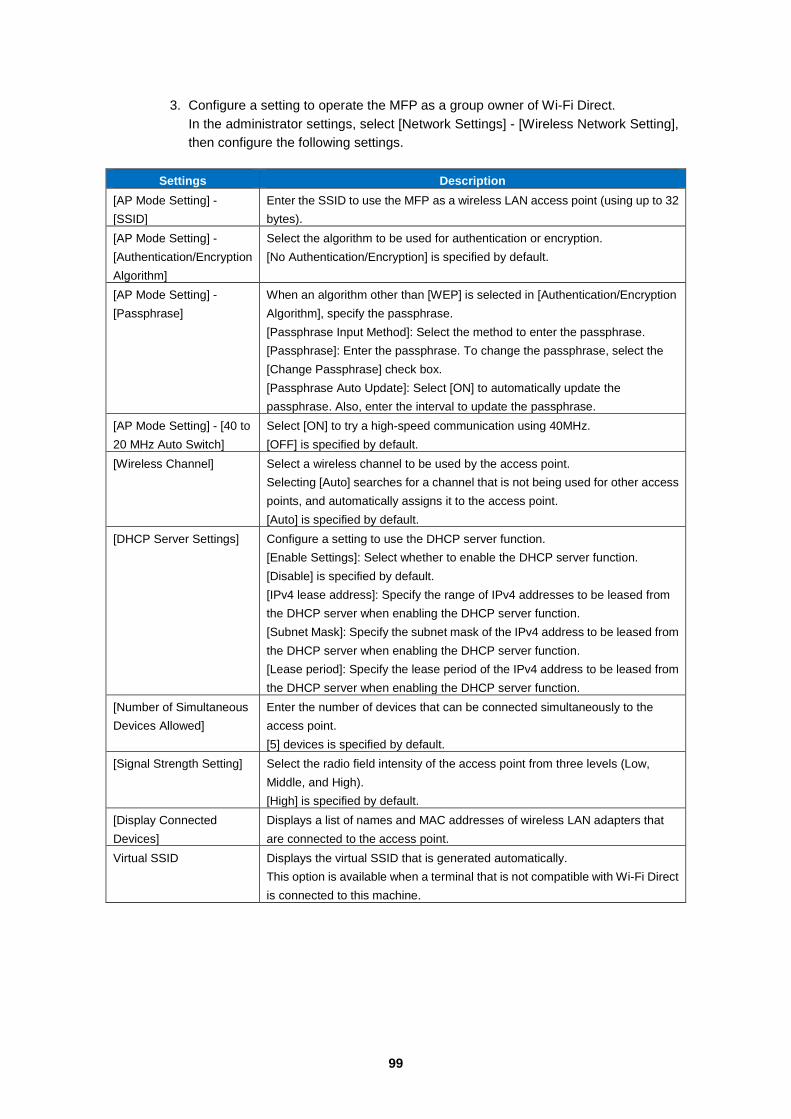
99
3. Configure a setting to operate the MFP as a group owner of Wi-Fi Direct. In the administrator settings, select [Network Settings] - [Wireless Network Setting], then configure the following settings.
Settings Description
[AP Mode Setting] - [SSID]
Enter the SSID to use the MFP as a wireless LAN access point (using up to 32 bytes).
[AP Mode Setting] - [Authentication/Encryption Algorithm]
Select the algorithm to be used for authentication or encryption. [No Authentication/Encryption] is specified by default.
[AP Mode Setting] - [Passphrase]
When an algorithm other than [WEP] is selected in [Authentication/Encryption Algorithm], specify the passphrase. [Passphrase Input Method]: Select the method to enter the passphrase. [Passphrase]: Enter the passphrase. To change the passphrase, select the [Change Passphrase] check box. [Passphrase Auto Update]: Select [ON] to automatically update the passphrase. Also, enter the interval to update the passphrase.
[AP Mode Setting] - [40 to 20 MHz Auto Switch]
Select [ON] to try a high-speed communication using 40MHz. [OFF] is specified by default.
[Wireless Channel] Select a wireless channel to be used by the access point. Selecting [Auto] searches for a channel that is not being used for other access points, and automatically assigns it to the access point. [Auto] is specified by default.
[DHCP Server Settings] Configure a setting to use the DHCP server function. [Enable Settings]: Select whether to enable the DHCP server function. [Disable] is specified by default. [IPv4 lease address]: Specify the range of IPv4 addresses to be leased from the DHCP server when enabling the DHCP server function. [Subnet Mask]: Specify the subnet mask of the IPv4 address to be leased from the DHCP server when enabling the DHCP server function. [Lease period]: Specify the lease period of the IPv4 address to be leased from the DHCP server when enabling the DHCP server function.
[Number of Simultaneous Devices Allowed]
Enter the number of devices that can be connected simultaneously to the access point. [5] devices is specified by default.
[Signal Strength Setting] Select the radio field intensity of the access point from three levels (Low, Middle, and High). [High] is specified by default.
[Display Connected Devices]
Displays a list of names and MAC addresses of wireless LAN adapters that are connected to the access point.
Virtual SSID Displays the virtual SSID that is generated automatically. This option is available when a terminal that is not compatible with Wi-Fi Direct is connected to this machine.
100
2) A4 device 1. Configure the network interface.
In the administrator settings, select [Network] - [Extended Network Setting] - [Network Interface Configuration], then select [Wireless (Wi-Fi Direct)].
2. Configure a setting to operate the MFP as a group owner of Wi-Fi Direct. Configure a setting to use the MFP as a wireless LAN access point. In the administrator settings, select [Network] - [Extended Network Setting] - [Wi-Fi Direct Setting], then configure the following settings.
Settings Description
[SSID] Enter the SSID of the MFP (using up to 32 bytes). When [Wireless (Wi-Fi Direct)] is selected in [Network I/F Configuration], the SSID for Wi-Fi Direct connection is used. The SSID specified here is displayed on the Wi-Fi Direct (setting) screen of the terminal compatible with Wi-Fi Direct. If you cannot connect to the MFP by specifying the SSID on the Wi-Fi Direct (setting) screen, specify [Virtual SSID] on the Wi-Fi (setting) screen to make a connection.
[Authentication/Encryption Algorithm]
Configure a setting for the authentication or encryption algorithm. • [Select Algorithm]: Select the algorithm to be used for authentication or
encryption. [No Authentication/Encryption] is specified by default. • [Passphrase Setting]: Specify the passphrase.
[Key Input Method]: Select the method to enter a passphrase. [Passphrase]: Enter the passphrase. [Passphrase Auto Update]: Specify whether to automatically update the passphrase. [Yes] is specified by default. [Update interval]: Specify the interval to update the passphrase. [60 min.] is specified by default.
[40 to 20 MHz Auto Switch]
Select [ON] to try a high-speed communication using 40MHz. [OFF] is specified by default.
[Wireless Channel] Select a wireless channel to be used by the access point. Selecting [Auto] searches for a channel that is not being used for other access points, and automatically assigns it to the access point. [Auto] is specified by default.
[DHCP Server Settings] Configure a setting to use the DHCP server function. • [Enable Settings]: Select whether to enable the DHCP server function.
[Enable] is specified by default. • [IPv4 lease address]: When [Enable] is selected in [Enable Settings], specify
the range of the IPv4 addresses that are leased by the DHCP server. • [Subnet Mask]: When [Enable] is selected in [Enable Settings], enter the
subnet mask. • [Lease period]: When [Enable] is selected in [Enable Settings], specify the
lease period. [4294967295] sec. is specified by default. [Number of Simultaneous Devices Allowed]
Enter the number of devices that can be connected simultaneously to the access point. [5] devices is specified by default.
[Signal Strength Setting] Select the radio field intensity of the access point from three levels (Low, Middle, and High). [High] is specified by default.

101
[Display Connected Devices]
Displays a list of names and MAC addresses of wireless LAN adapters that are connected to the access point.
[Virtual SSID] This option is available when a terminal that is not compatible with Wi-Fi Direct is connected to the MFP. The virtual SSID is displayed on the Wi-Fi (setting) screen of a terminal not compatible with Wi-Fi Direct. The virtual SSID is displayed with "DIRECT-XXXXXX" ("XXXXXX" indicates a combination of the random alphanumeric characters and the specified value of [SSID]).
[TCP/IP Settings] - [IPv4 Settings]
Configure an IPv4 setting when connecting the MFP to the wireless network using IPv4. • [IP Address]: Enter the fixed IP address that is assigned to the MFP. • [Subnet Mask]: Enter the subnet mask.
[TCP/IP Settings] - [IPv6 Settings]
Configure an IPv6 setting when connecting the MFP to the wireless network using IPv6. • [Link-Local Address]: Displays the link-local address. The link-local address
is automatically specified from the MAC address of the MFP.
Reference The latest firmware of the A4 device has the following functions advanced. • Extension of the maximum number of connectable devices in [Number of Simultaneous
Devices Allowed] The number of wireless LAN adapters, which can be connected simultaneously in the wireless AP mode, is limited to only one in the previous version, but extended to five devices in this version.
• Addition of [Signal Strength Setting] The radio wave transmission output adjustment function is added. This function allows you to check the wireless output level of the current AP mode and, if necessary, change a setting to adjust the output level.
• Extension of the number of devices that can be registered in [MAC Address Filtering]. In the MAC address filtering setting, the maximum number of devices that can be registered is extended from "5" to "16".
5.6.2. Cautions
1) The number of devices able to be simultaneously connected is limited (for details, refer to the specifications of the options).
• Once the maximum number of devices able to be connected has been reached, no more devices can be connected. To connect another mobile terminal, disconnect the currently connected terminal in advance.
• If the iOS terminal that is connected to the MFP once is included in the wireless area, it may be automatically connected to the MFP by an operation in the iOS terminal. For this reason, the number of simultaneously connectable devices reaches the maximum, and it may cause a hard-to-connect situation. When there are many iOS terminals around the MFP in view of the MFP installation layout, we recommend that you set [Signal Strength Setting] to [Low].
2) The wireless LAN network is independent of the wired LAN network.
You cannot connect from the wired LAN network to the wireless LAN network and from the wireless LAN network to the wired LAN network. Specify the address of a segment that is different from the wired LAN.

102
3) When using Wi-Fi Direct, you need to assign the address using DHCP in many cases. Check that [DHCP Server Settings] is set to "Enable" and that the lease IPv4 address range is specified.
Appendix
1. KMBS WIRELESS SPECIFICATION MATRIX
Reference • This list is based on the latest version of product firmware. (As of September 22, 2017). • For information on how to obtain the latest version, contact the dealer you purchased the
product from.
UK-208 Wireless Kit
UK-212 Wireless Kit
NC-P01 Wireless Network Interface
NC-P02 Wireless Network Interface
NC-P03 Wireless Network Interface
Compatible
Engines
C554e
C454e
C364e
C284e
C224e
554e
454e
364e
284e
224e
958
PRO 958
808
758
558
458
368
308
367
287
227
C658
C558
C458
C287
C227
C368
C308
C258
3300P
4000P
4700P
3301P
4020 C3850
C3350
C3850FS
C3110
C3100P
4750
4050
3320
Support Band 2.4GHz 2.4GHz 2.4GHz 2.4GHz 2.4GHz
IEEE Standard 802.11b/g/n 802.11b/g/n 802.11b/g/n 802.11b/g/n 802.11b/g/n
Support
Functions
Secondary mode
Primary mode
Wi-Fi Direct
Secondary mode
Primary mode
Wi-Fi Direct
Secondary mode
Wi-Fi Direct
Secondary mode
Wi-Fi Direct
Secondary mode
Primary mode
(*1)
Wi-Fi Direct

103
Security WPA2-Enterprise
WPA2-Personal
WPA-Enterprise
WPA-Personal
WEP
(64/128bit)
EAP-TLS
EAP-TTLS/MSC
HAPv2
PEAPv0/EAP-M
SCHAPv2
WPA2-Enterprise
WPA2-Personal
WPA-Enterprise
WPA-Personal
WEP
(64/128bit)
EAP-TLS
EAP-TTLS/MSC
HAPv2
PEAPv0/EAP-M
SCHAPv2
WPA2-Enterprise
WPA2-Personal
WPA-Enterprise
WPA-Personal
WEP
(64/128bit)
EAP-TLS
EAP-TTLS/MSC
HAPv2
PEAPv0/EAP-M
SCHAPv2
WPA2-Enterprise
WPA2-Personal
WPA-Enterprise
WPA-Personal
WEP
(64/128bit)
EAP-TLS
EAP-TTLS/MSC
HAPv2
PEAPv0/EAP-M
SCHAPv2
WPA2-Enterprise
WPA2-Personal
WPA-Enterprise
WPA-Personal
WEP
(64/128bit)
EAP-TLS
EAP-TTLS/MSC
HAPv2
PEAPv0/EAP-M
SCHAPv2
Encrypt
-Wireless
WPA/WPA2
AES CCMP
WPA/WPA2
AES CCMP
WPA/WPA2
AES CCMP
WPA/WPA2
AES CCMP
WPA/WPA2
AES CCMP
Channel
Frequency Band
ACS, 1-13
20/40MHz
(802.11n HT)
ACS, 1-13
20/40MHz
(802.11n HT)
ACS, 1-13
20/40MHz
(802.11n HT)
ACS, 1-13
20/40MHz
(802.11n HT)
ACS, 1-13
20/40MHz
(802.11n HT)
Max Association
Rate
150Mbps
(11n)
150Mbps
(11n)
150Mbps
(11n)
150Mbps
(11n)
150Mbps
(11n)
Max Streams 1x1 1x1 1x1 1x1 1x1
Max Number of
Client
(AP-Mode)
5
5 -
-
5 (*1)
Certifications Wi-Fi Certified
Wi-Fi Direct
WMM-Power
Save
Wi-Fi Protected
Setup
Wi-Fi Certified
Wi-Fi Direct
WMM-Power
Save
Wi-Fi Protected
Setup
Wi-Fi Certified
Wi-Fi Direct
WMM-Power
Save
Wi-Fi Protected
Setup
Wi-Fi Certified
Wi-Fi Direct
WMM-Power
Save
Wi-Fi Protected
Setup
Wi-Fi Certified
Wi-Fi Direct
WMM-Power
Save
Wi-Fi Protected
Setup
TX Power
adjustment
Hi (17dBm)
Middle (14dBm)
Low (10dBm)
Hi (17dBm)
Middle (14dBm)
Low (10dBm)
Hi (17dBm)
Middle (14dBm)
Low (10dBm)
Hi (17dBm)
Middle (14dBm)
Low (10dBm)
Hi (17dBm)
Middle (14dBm)
Low (10dBm)
Protected
Management
Frame
○ ○ ○ ○ ○
Wi-Fi Protected
Setup
○
(*2)
○
(*2)
○
(*2)
○
(*2)
○
(*2)
WMM PowerSave ○ ○ ○ ○ ○ Max Number of
Client (MAC
Address Filter)
16 16 - - 16 (*3)

104
UK-215 Wireless Kit (*5)
UK-216 Wireless Kit
Compatible
Engines
958
PRO 958
808
758
367
287
227
558
458
368
308
C658
C558
C458
C287
C227
C368
C308
C258
C266
C226
C3851FS
C3851
C3351
Support Band 2.4GHz, 5GHz 2.4GHz, 5GHz
IEEE Standard 802.11a/b/g/n/ac 802.11a/b/g/n/ac
Support
Functions
Secondary mode
Primary mode
(Simple AP
mode)
Wi-Fi Direct
Secondary mode
Primary mode
(Simple AP
mode)
Wi-Fi Direct
Security WPA2-Enterprise
WPA2-Personal
WPA-Enterprise
WPA-Personal
WEP
(64/128bit)
EAP-TLS
EAP-TTLS/MSC
HAPv2
PEAPv0/EAP-M
SCHAPv2
WPA2-Enterprise
WPA2-Personal
WPA-Enterprise
WPA-Personal
WEP
(64/128bit)
EAP-TLS
EAP-TTLS/MSC
HAPv2
PEAPv0/EAP-M
SCHAPv2
Encrypt
-Wireless
WPA/WPA2
AES CCMP
WPA/WPA2
AES CCMP

105
Channel
Frequency Band
ACS, 1-13,
26-165 (*4)
20/40MHz
(802.11n HT)
40/80MHz
(802.11ac HT)
ACS, 1-13,
26-165 (*4)
20/40MHz
(802.11n HT)
40/80MHz
(802.11ac HT)
Max Association
Rate
300Mbps (11n)
866.7Mbps
(11ac)
300Mbps (11n)
866.7Mbps
(11ac)
Max Streams 1x1 1x1
Max Number of
Client
(AP-Mode)
4 4
Certifications Wi-Fi Certified
Wi-Fi Direct
WMM-Power
Save
Wi-Fi Protected
Setup
Wi-Fi Certified
Wi-Fi Direct
WMM-Power
Save
Wi-Fi Protected
Setup
TX Power
adjustment
- -
Protected
Management
Frame
○ ○
Wi-Fi Protected
Setup
○
(*2)
○
(*2)
WMM PowerSave ○ ○ Max Number of
Client (MAC
Address Filter)
- -
(*1) 3320 is not supported Primary mode (AP-Mode). (*2) Only the WPS-enrollee(Station-Mode) is supported. (*3) 3320 is not supported. (*4) The channels that can be used vary depending on the area. (*5) To use, the function version must be upgraded to 3.2.