Minnesota Trapper Education Manual
76
Revised 7/2012 Minnesota Trapper Education Manual Brought to you by: The Minnesota Trappers Association and Minnesota Department of Natural Resources Division of Wildlife ~ Safety ~ Animal Welfare ~ Responsibility ~ ~ Ethics ~ Furbearer Conservation ~
-
Upload
khangminh22 -
Category
Documents
-
view
2 -
download
0
Transcript of Minnesota Trapper Education Manual

Revised 7/2012 PAGE
Minnesota Trapper Education Manual
Brought to you by:
The Minnesota Trappers Association
and
Minnesota Department of Natural Resources
Division of Wildlife
~ Safety ~ Animal Welfare ~ Responsibility ~
~ Ethics ~ Furbearer Conservation ~

Revised 7/2012 PAGE 2
This manual is intended to improve your
knowledge of Minnesota’s furbearers and to provide the
basic information needed to trap them in a responsible
manner. In the manual is a discussion of basic
techniques and how to avoid many of the most common
trapping mistakes. Trapping is not for everyone and
persons who trap, or who are considering trapping, must
accept the responsibilities that come with it. The
manual will not make an “expert” out of anyone – and is
not intended to. Expertise in trapping comes only with
years of experience and long hours of thoughtful
observation and study. This manual will provide an
introduction to the biology and management of
Minnesota furbearers, and to the basics of using that
resource responsibly and safely. It is not intended to
encourage or discourage anyone who might want to trap.
Unfortunately, much of the opposition to trapping
today is the result of an unknowing public and
irresponsible acts by a few trappers. Although there are
some who will oppose trapping no matter how it is
conducted, there is no excuse for the avoidable abuses
resulting from lack of knowledge by inexperienced and
irresponsible trappers, which serve to inflame public
opinion against all trappers.
As fur prices increased in the 1970s and early
1980s, so did the number of inexperienced trappers. In
1978, concerned members of the Minnesota Trappers
Association (MTA) in cooperation with the Department
of Natural Resources (DNR) began a statewide program
of voluntary trapper education. That program
recognized that many inexperienced trappers were
sincerely interested in trapping responsibly, but they
lacked any available source of direct information.
This manual is intended for use in conjunction with
the MTA/DNR education program. In addition to
classroom sessions, the program includes equipment
demonstrations and practical field experience under the
supervision of qualified instructors. Although this
manual can be used alone as a reference or a self-
instruction book, it will be of most value when used in
combination with the education course.
PREFACE
Individuals who study this manual and successfully
complete the education course will:
1) Have a greater knowledge and appreciation of
natural environments and their associated
wildlife;
2) Be aware of the history and heritage of trapping
and the fur trade;
3) Have a basic understanding of the biology and
management of Minnesota furbearers;
4) Be familiar with trapping and wildlife
regulations and their purpose;
5) Know how to behave ethically in the outdoors;
6) Understand how to properly prepare, maintain
and use trapping equipment;
7) Know the basics of trapping Minnesota
furbearers responsibly and effectively;
8) Understand how to properly prepare, care for,
and use or market, fur pelts to realize the
greatest benefit with the least resource waste;
and
9) Understand the basics of outdoors safety and
survival.
These are ambitious goals. We cannot stress
enough that this manual and the education course are
only a beginning. You are encouraged to check with
your instructor for sources of additional information and
to seek guidance from instructors or other experienced
trappers at every opportunity. Above all, you will learn
by doing. Take the time to analyze the reasons for your
successes and failures and always attempt to improve on
your methods. No two trappers do everything the same;
they each develop a system that works for them. The
purpose of this manual is to get you started on the right
track in this learning experience.
OBJECTIVES

Revised 7/2012 PAGE 3
In addition to providing a
colorful glimpse of the heritage
associated with trapping in
Minnesota, this brief history of the
fur trade also provides a valuable
lesson in the importance of
conservation principles when dealing
with renewable natural resources.
Trapping and the fur trade were
the most important influences in the
early exploration and settlement of
Minnesota. Although the first
explorers came seeking a “northwest
passage” to the Orient and it’s gold
and spices, they found wealth of
another kind – fur. Although
lumber, minerals, agriculture and
industry would later assume the
major economic importance in what
is now Minnesota, it was fur that
lured the first explorers and traders
into the wilderness.
In the 1600s as fur resources in
eastern North America were
becoming depleted, the explorer-
traders advanced westward through
the Great Lakes, and northward up
the Mississippi River. This first
white men known to travel into what
is now Minnesota were the French
fur traders Pierre Radisson and Sieur
de Groselliers who came from
Quebec in 1655 to explore and trade.
When they returned to Montreal,
they told of the riches in fur to be
found in the Minnesota country.
Early French trappers and
traders followed the explorers and at
first were independents, not working
for any company. They were known
as courier de bois, or “bush rangers,”
and would spend their winters in
Minnesota and Wisconsin trapping
and trading with the Indians. In the
spring, they returned to the Indian
village of Mackinac, on the narrow
strait between Lakes Huron and
Michigan, where they traded their
furs for needed supplies and trade
goods.
By 1700, with the establishment
of French trading posts in
Minnesota, the importance of the
independent couriers de bois faded
as fur company employees traded
directly with the Indians. The
voyageurs, or “travelers,” were
French Canadians employed by the
fur companies to transport furs out of
the wilderness and to transport
supplies and trade goods back to the
trading posts. These men were
known for their stamina and
endurance as they paddled and
portaged their heavy canoes through
the wilderness.
In 1731, Sieur de la Verendrye
arrived at the Grand Portage (at the
northeastern tip of Minnesota) and
traveled the canoe route up the
Pigeon River, across the border lakes
(now the boundary between
Minnesota and Ontario), and through
Lake of the Woods to build Fort St.
Charles on the Northwest Angle.
Verendrye has been called the
founder of the fur trade in northern
M i n n e s o t a , M a n i t o b a a n d
Saskatchewan. The posts he
established extended the fur trade
north and west to the Saskatchewan
and Missouri Rivers.
HISTORY OF TRAPPING AND THE FUR
TRADE IN MINNESOTA
This 1827 engraving of the American Fur Company’s post at Fond du Lac is reproduced by permission of the
Minnesota Historical Society

Revised 7/2012 PAGE 4
By the mid-1700s competition
between the French and British fur
companies was intense. The British
gained control over the fur trade
when France lost the French and
Indian War to Great Britain in 1763.
Although Montreal (Northwest Fur
Company) and Hudson Bay
(Hudson’s Bay Company) were the
centers of the fur trade at that time,
Grand Portage was an important
trade center. In the spring, smaller
canoes loaded with furs from the
northwest outposts in northern
M i n n e s o t a , M a n i t o b a a n d
Saskatchewan (and later Alberta),
traveled southeast through the border
lakes.
At the same time larger freighter
canoes loaded with trade goods and
supplies from Montreal headed up
the St. Lawrence and Ottawa Rivers
to North Bay and then across the
tops of Lakes Huron and Superior.
They met at Grand Portage. The
traders and voyagers celebrated for a
few days, exchanged their cargoes,
and then made the return trips. Time
was very important because these
return trips had to be completed prior
to freeze-up in the fall.
Although most of what is now
Minnesota became part of the United
States after the Revolutionary War,
the British continued trading here
until after the War of 1812. The
American Fur Company was
founded by John Jacob Astor in 1811
and it began trading in Minnesota.
In 1816, Congress passed an Act
prohibiting foreigners from engaging
in fur trade in the United States,
giving the American Fur Company a
monopoly on the Minnesota fur
trade.
Fort Snelling was built at the
confluence of the Mississippi and the
Minnesota Rivers in 1819, partially
to protect the fur trade. At that time,
the town of Mendota, just across the
river from the Fort, was the major
fur-trading center in Minnesota.
By 1820, there were already
signs that the beaver population in
Minnesota was being seriously
depleted. Although disease, forest
fires and even wolverines were
blamed for the decline, there is little
doubt that the unregulated harvest
spurred by intense competition
between companies, was primarily
responsible. The heyday of the fur
trade in Minnesota was near an end,
and trappers and traders began
concentrating their efforts in the
West, where some areas of the
Rocky Mountains still contained
abundant beaver populations.
By 1842, the era of the
“mountain man” ended when the fur
trade collapsed with the demise of
the American Fur Company. Silk
hats had become the fashion,
replacing those made from beaver
felt. By this time beaver populations
had been greatly depleted throughout
most of their range in the United
States.
Although we most often think of
trapping and steel traps in connection
with the fur trade era, a variety of
methods were used. Steel traps had
been invented in 15th or 16th century
Europe, and they were used in the
17th and 18th century North America
fur trade. But these traps were
expensive and in limited supply.
The early trappers and the Indians
used any means at their disposal to
capture beaver and other furbearers.
These included shooting, netting,
spearing, snaring, deadfalls, using
dogs and even draining of ponds and
the destruction of dens and lodges.
It was not until 1823, near the end of
the fur trade era, that Sewell
Newhouse perfected the making of
steel traps with interchangeable parts
– thus making mass manufacture
possible.
It would be easy to blame the
demise of beaver and other species
of fur bearers on simple greed, but
the intense competition, the lack of a
conservation ethic and the lack of
regulations all contributed. Some
efforts were made to curb the
decline, but they were too little and
too late. In the Mid 1820s, Hudson’s
Bay Company officials convinced
the Indians in the Rainy Lake area to
protect the beaver, but Indians from
another region came in and took the
beaver from the “resting lodges.”
The effect of this competitive and
unregulated taking was made even
worse because the beaver fur was
used primarily for the making of felt,
and there was little concern about
taking prime pelts. Beaver were thus
trapped year around.
In the latter half of the 19th
century habitat changes caused by
logging, uncontro lled f i res ,
agricultural development and
drainage along with continued
trapping and hunting by the new
settlers, further contributed to the
decline of some furbearer species.
The first organized attempts at
furbearer management in Minnesota
date back to 1867, when the state
legislature closed the mink, muskrat
and otter seasons from May through
mid-November. In later years,
seasons were closed entirely for a
number of species. In 1931, the
M i n n e s o t a d e p a r t m e n t o f
Conservation was formed (now the
Department of Natural Resources) to
manage the state’s natural resources.
Furbearer harvests are now
managed through regulations and
habitat is protected and managed for
furbearers and many other wildlife
species. Populations of most
Minnesota furbearers have recovered
dramatically since the turn of the
century, and no species is being
threatened by over-harvest.
Minnesota trappers and hunters
today take an annual harvest of
furbearers, which is probably as high
or higher than the average take
during the fur trade era. The
difference is that modern harvests
are managed on a sustained-yield
basis, which can be continued
indefinitely, provided the habitat
b a s e

Revised 7/2012 PAGE 5
There are a number of reasons
why people trap. For some it is
mainly for money or out of a need to
reduce wildlife damage, but for most
trappers it is primarily for other less
tangible reasons. Several recent
studies, done in various parts of the
country, have consistently shown
that most trappers rate values such as
nature enjoyment, challenge and
recreation above economic gain as
reasons why they trap. Some of the
motivations behind why people
trapped are discussed in more detail
below.
Economics. Although monetary
return is important to most trappers,
those individuals who begin trapping
because they think it will be an easy
way to make a “fast buck” soon find
out otherwise. If the average trapper
took his annual earnings, subtracted
the costs of traps, equipment and
transportation, and then divided the
remainder by the number of hours
spent obtaining permission, scouting,
preparing equipment, setting and
checking traps and handling and
selling the fur; he would realize just
how low his hourly earnings really
are. But for most, that doesn’t
matter. The attraction of trapping
goes far beyond the dollars earned.
Challenge and Recreation.
Trappers, of necessity, must learn the
requirements and habits of the
animals they seek in great detail. A
recent national survey found that
trappers were among the most
knowledgeable groups about
wildlife, and were also among the
most concerned for the preservation
of wildlife habitats.
Not only does trapping require
detailed knowledge of animals, but it
also involves long hours, physical
labor and the need to be out every
day, no matter what the weather. A
typical day on the trapline, even for
“part-timers,” begins before daylight
with trap checking and resetting, and
does not end until well after dark
when all furs have been properly
taken care of and equipment is
prepared for another day. Successful
trapping is far more difficult than
many people realize. Fox trappers,
for example, typically average only
about one fox per 100 trap nights (a
trap night is one trap set for one
night). It sounds like hard work and
it is; yet to those who understand and
appreciate trapping, nothing is more
satisfying. If you lack the
motivation and perseverance to do
the work involved, day after day,
regardless of the weather, then you
should consider taking another
activity that requires less discipline.
Aesthetics and Heritage. Some
of the motivations for trapping are
difficult to express, but are an
immeasurable part of the experience.
For some trappers, it is the
knowledge that they are practicing a
skill, which dates back to the time of
their forefathers. For others, it is
seeing the changing moods of nature
– experiencing frosty sunrises and
glorious sunsets far removed from
the rush of everyday life. There is
also a feeling of satisfaction and
accomplishment that comes from
being able to identify animal sign at
a glance, and to interpret what is
seen with a fair degree of accuracy.
Damage Control. Some people
trap not so much because they want
to as because they have to.
Landowners and livestock producers
often fall into this category.
Although there are some methods of
preventing or reducing wildlife
damage that do not involve removal
of animals, the fact remains that the
only practical solution to many
problems is removing the animals
that are causing it. Trapping remains
the single most versatile and
effective tool for removing many
types of problem animals.
Responsibility. No matter what
your motivation for wanting to trap,
we want to stress that you should
never set a single trap unless you are
willing to learn how and where to set
it correctly and unless you are
willing to check it promptly and
regularly as required by law. There
is no room in the ranks of trappers
for those who are unwilling to accept
that responsibility, or who are
unwilling to respect and study the
animals they seek.
MOTIVATIONS

Revised 7/2012 PAGE 6
Many people view trapping and
the use of fur as controversial issues.
Much of this controversy stems from
misinformation and
misunderstanding on both sides. As
trappers, we know that our sport is a
legitimate use of a natural renewable
resource, but we often have trouble
putting this in terms that nontrappers
can understand or appreciate.
Few of us are accomplished public
speakers or trained in public
relations. Nevertheless, we
communicate a message about our
sport and about ourselves every time
we mention that we’re trappers.
Demonstrating ethics and
responsibility while trapping sends
many positive messages that
nontrappers understand and
appreciate more than any
explanation. These values are
understood universally and don’t
require extra time or special training.
Yet they tell people that we’re proud
to be trappers, we care about our
sport and we care about the resource
we’re using.
Maintain Good Landowner
Relations
Obtaining permission to trap is
more than the law. It’s an
opportunity to earn respect by
respecting landowners and their
property. Be polite and presentable
while asking for permission. If it’s
granted, take time to make sure you
know where the property lines are so
that neighbors’ rights are upheld as
well.
Ask the landowner or tenant if
they’ve noticed damage or other
problems caused by furbearers.
Chances are that if you’re taking
time to ask permission from a
particular landowner, the property
has good habitat and high furbearer
populations. Asking about damage
will help to reinforce the point that
trapping provides a service by
reducing furbearer populations and
the problems they can cause. By the
same token, don’t promise more than
you can deliver.
As always, practice common
sense and courtesy by leaving gates
the way you found them, walking or
using a four-wheeler when fields and
field roads are too wet to drive, and
avoiding sets that might result in non
-target catches.
Many trappers send a short thank-
you note to landowners and tenants.
A holiday greeting card can mean a
lot as well. Offering to help with a
chore or dropping off a pheasant or
some venison will do more than
words can express.
Respect Other Outdoor
Enthusiasts
Autumn and winter are a popular
time for many outdoor activities like
hunting, hiking, bird watching and
cross country skiing. Taking the
time to find out which activities are
likely to take place on an area you’re
trapping is the first step in avoiding
any misunderstandings between you,
the landowner and others sharing his
property.
Most activities are compatible
with trapping and don’t require
further thought. If an area receives
allot of hunting pressure, you can
time your use of a property to avoid
peak times that hunters tend to
choose like opening weekends and
holidays. If this isn’t practical, use
the most selective traps and trapping
techniques to reduce the chances of a
non-target catch. Doing so will
improve your skills, image and
satisfaction.
Keep Familiar with Improvements
in Trapping Equipment and
Techniques
Nearly all trappers have looked
for better ways to do the same job.
While this usually involves years of
refinement and a realization that
simple methods often work best, new
developments in equipment and
methods often have a place in
specific applications or even broader
use.
Body-gripping traps like
Conibears are a good example.
Many trappers considered them
“gadgets” when they were first made
available. Today they form the
backbone of the muskrat and beaver
trapping industry.
Improving efficiency, selectivity
and humaneness isn’t a new idea for
the trapping industry. Many time-
honored techniques addressed thess
concerns about trapping. However,
research and development are
occurring at a faster pace today and
require more effort to keep abreast of
state-of-the-art developments in
equipment and methods.
Keeping up-to-date with new
developments is easier today than it
was in the past. Some sources are:
trapper magazines and newsletters,
ETHICS AND RESPONSIBILITY
Key ingredients for trappers who care about their sport
“You are your brother’s keeper.
Your actions reflect either credit or
discredit on the thousands of others
who run traplines in Minnesota and
across the nation.”

Revised 7/2012 PAGE 7
presentations at trapping
conventions, instructional books and
videos, and contact with other
trappers at fur sales and conventions.
Appreciate Perceptions of
Nontrappers
Trappers who act responsibly and
ethically don’t have anything to hide.
However, they need to appreciate the
fact that most people know little or
nothing about trapping.
Differences in backgrounds,
cultures and experience can cause
misinterpretation of your words,
deeds and actions. Keep this in mind
when communicating with
nontrappers. Put yourself in their
place if you want an honest
evaluation of how you’re portraying
your sport. Make an effort to
communicate on their level. Above
all, remember that high standards of
ethics and responsibility form a
message that can’t be mistaken.
Respect the Resource
Ethical trappers respect the
resource they use. Part of this
involves making the most of your
catch. Follow proper pelt handling
procedures and take pride in your
work at all times. Look for
secondary markets for carcasses,
castor and other by-products for baits
and lures when possible. If not,
dispose of them properly.
Wildlife laws are designed to
conserve our fur resources while
allowing for responsible use.
Become familiar with and obey all
regulations. Report violations to a
Conservation Officer. Violators are
stealing from trappers and
nontrappers alike, as well as giving
the sport a bad name.
Conclusion
You may be the only trapper that
many people will ever know. Leave
them with a gold impression by
upholding high standards of ethics
and responsibility in your words,
deeds and actions. Be proud to be a
trapper and a good representative for
others who enjoy the sport.
Maintain Good Landowner
Relations
Respect Other Outdoor
Enthusiasts
Keep Familiar with
Improvements in Trapping
Equipment and Techniques
Respect the Resource
Identify and record all trap
locations accurately
Pick up all traps as soon as
you are finished trapping
Cooperate with wildlife
management agencies
Some methods for improving
efficiency, selectivity and
humaneness
Use pan tension devices to avoid
non-target catches
Use extra swivels and center-
mounted chains to hold more
animals and reduce the chance of
injuries
U s e m o d e r n p o s i t i o n i n g
techniques at dirt hole sets to
increase selectivity
Use short trap chains for most land
sets, especially those targeted for
fox and coyote
Use guarded or “stop-loss” traps
for muskrats in shallow water or
dry land sets
Use dispatching methods that are
quick and humane
Use trap sizes that are appropriate
for the target species – pad catches
are desirable for fox, coyote,
raccoon and many other animals
because they cause fewer injuries
Use baits and lures that attract
target species but not other
animals
Use cage, box or species-specific
traps near barns, outbuildings and
other locations where domestic
animals may be present
Use common sense in choosing set
l o c a t i o n s t h a t m a x i m i z e
opportunities to catch target
s p e c i e s a n d m i n i m i z e
opportunities to catch other
animals
Use secure methods of attaching
traps – tailor methods to hold the
largest species you may catch
Use traps with padded or
laminated jaws where the risk of
non-target catches is high
Use discretion when setting body-
gripping traps
Use time to your advantage – don’t
set more traps than you can handle
Use early morning trap checks to
reduce the time an animal is held,
reduce its chances of escape and
avoid theft of traps and animals.
“Always play the game fairly.
Your sense of accomplishment and
pride in your success will be all
the greater”
“Trapping’s rewards are great,
not only in the harvest of fur, but
in the very special satisfaction
gained from time spent afield.
Accept your share with gratitude
and don’t waste a precious gift”

Revised 7/2012 PAGE 8
Furbearing mammals, like all
other species of animals, are
dependent on having adequate food,
water, shelter and living space if they
are to survive. These basic life
needs are commonly referred to as
habitat. Any given amount of
habitat will only support a certain
number of animals. The number of
animals that the habitat is capable of
supporting on a year-around basis is
called carrying capacity.
The carrying capacity depends
on the quantity, quality and
arrangement of habitat factors, as
well as on the amount of crowding
that the animal will tolerate. The
ability of the habitat to support
animals varies with the seasons, and
reaches a low in late winter in
Minnesota. At that time, lack of
adequate food, shelter or other
resources can become a limiting
factor, which sets the upper limit on
the number of animals that can
survive. For example, a marsh may
have enough of everything to support
1,000 muskrats in the summer and
fall, but in the winter there may be
only enough food or deep enough
water for 200. That means that the
year-around capacity is 200 and that
the remaining 800 will die or
possibly disperse (move out).
However, even most of the
dispersers will ultimately die.
Carrying capacity can be
compared to the volume of a bucket.
When the bucket (habitat) has been
filled, adding more to it simply
wastes what is added. That is why
most stocking programs fail. As the
seasons progress and food and
shelter become more limiting, the
population is forced into a smaller
and smaller habitat “bucket.” Since
this smaller bucket cannot support as
many animals, the excess must die,
one way or another, or attempt to
move and find unfilled “buckets.”
The only way to bring about a long-
term increase in the population is to
increase the size of the bucket
(improve the quantity or quality of
habitat).
Because the chances of survival
in the wild are uncertain, nature has
provided most species of animals
with the ability to produce far more
young than are needed to maintain
the population. This is nature’s way
of assuring that enough animals
survive to replenish the breeding
population and to disperse into
available habitats. A portion of this
excess, called the harvestable
surplus, is the amount that can be
taken by people, without reducing
the breeding population. This is
possible because the trapping or
hunting mortality (deaths) replaces
or compensates for some of the
natural mortality that would
otherwise occur.
This harvestable surplus can be
compared to the interest from a
s a v i n g s a c c o u n t . T h e
“interest” (harvestable surplus) can
be used each year without reducing
t h e “ p r i n c i p a l ” ( b r e e d i n g
population). By adjusting the
number of animals removed (for
example, by seasons or limits) the
population can be allowed to
increase, decrease or remain stable.
Use of the surplus provides
recreation, income, products, food
and employment, without depleting
the population. The population
remains to provide ecological,
aesthetic and recreational values, and
to produce the next year’s surplus.
S o m e t i m e s t h e b e s t
management plan requires that a
population be held below its carrying
capacity, for example to prevent
excessive wildlife damage. Also,
management attempts to maintain
levels above the carrying capacity of
the habitat are invitations to
environmental problems, disease and
resource waste. Wildlife cannot be
stockpiled.
Some species of furbearers can
be safely harvested at a higher rate
than others. It is nearly impossible
to over-trap a prolific furbearer like
the muskrat, which breeds at a young
age and has multiple, large litters
annually. Muskrat populations
typically experience a 70 to 90
percent turnover, whether they are
harvested or not. Normally, up to 70
percent of the muskrats present in
the fall can be harvested without a
detrimental population effect.
Practically speaking, except on small
areas of restricted habitat, this 70
percent level is difficult to achieve
and over-trapping very seldom
occurs. On the other hand, for an
animal like the fisher which does not
reproduce until two years of age and
which has only one small litter per
year, a harvest rate of about 20
percent might be the maximum that
could be safely allowed. Wildlife
managers must take into account not
only the biology and population
dynamics of the species, but also the
amount of harvest pressure and how
vulnerable the species is to being
caught. Fur prices, trapping and
hunting license sales, accessibility of
the habitat, and effectiveness of the
harvest methods must all be
considered when managing some
furbearer species.
FURBEARER MANAGEMENT PRINCIPLES
Revised 7/2012 PAGE 9
The Department of Natural
Resources manages Minnesota’s
furbearer resources for the benefit of
the citizens of the state. The
Depar tment recognizes tha t
furbearers have a variety of
ecological, recreational, economic
and aesthetic values, and that those
values can be positive or negative.
Also, since values are determined by
people, not nature, the same animal
can have a wide range of values
depending on the time, the place, and
who is being affected by it.
The goal of management is to
maintain a productive harmony
between people and furbearer
resources for present and future
generations of Minnesotans. This
goal is accomplished by maintaining
habitats and controlling harvest so
that harvestable surpluses can be
utilized, consistent with habitat
disease, wildlife damage, and the
desires and tolerances of people.
In order to responsibly manage
furbearers, the Department monitors
furbearer populations and harvests,
sets regulations, maintains habitats,
and enforces laws related to
furbearers.
Seasons. Seasons are based
first of all on their population
impacts. No season, which would be
detrimental to the survival of a
species in the state, is permitted.
Once that biological requirement is
met, further decisions are based
primarily on the concerns of people
who use, value or are affected by the
resource. Recreational opportunity,
fur primeness, damage problems,
landowner concerns, non-harvest
values, disease problems and all
other factors enter into these
decisions, and opportunities for
public input are provided.
Surveys. Harvest and fur price
surveys are conducted for all species
of furbearers in Minnesota. In
addition, relative changes in
population densities are monitored
by scent-post surveys for land
carnivores and by aerial surveys for
beaver. For species, which are
highly sensitive, exact figures are
determined through pelt registration.
For those species, carcasses are also
collected from trappers and
information on sex ratios, ages and
productivity is used to “model” their
populations with the aid of a
computer. A number of special
surveys are also conducted each year
to evaluate particular areas of
concern.
Habitat. Although furbearers
are often not the highest priority in
many habitat management programs,
the fact remains that furbearing
animals are primary beneficiaries of
many of these practices. This is
particularly true of wetland areas,
which are prime habitat for muskrat,
mink, beaver, raccoons, foxes and
other furbearers. In fact, furbearers
often do so well on these areas that
conflicts develop with management
for other species such as waterfowl.
Forest management practices also
influence furbearer populations, with
some species favoring early
successional stages and others
favoring later stages.
Enforcement. Minnesota
Conservation Officers enforce the
laws relating to furbearers in all 87
counties of the state. Of course they
have many more duties in addition to
the furbearer regulations, but they
are always interested in and
concerned about situations where
violations are occurring. It is
important, however, for trappers to
police their own ranks and to help
enforcement officers by reporting
violators. People who take
furbearers illegally are stealing from
the honest citizens of the state.
Conservation and Trapline
Management. Furbearer regulations
are established for the entire state, or
for large regions of the state,
depending o n the sp ec ie s .
Conditions vary within such large
areas and it is up to the trapper to
practice conservation on his own
trapline and to attempt to take only a
portion of the surplus. This sounds
simple, but is actually quite
complicated because in many areas a
number of trappers and hunters are
competing for the same resource on
the same area. Fortunately, trapping
and hunting tend to be self-limiting
for many species. The time and
effort required to take these animals
exceeds the benefit long before they
are reduced to critically low levels.
For other species which are not so
resilient, regulations have to be
correspondingly more restrictive.
On areas where trappers have
exclusive or near-exclusive trapping
privileges, individual trapline
management is much more feasible.
On these areas the trapper can
manage not only the harvest, but in
many cases the habitat as well. By
doing so he can be assured of having
a relatively high-sustained harvest
year after year.
FURBEARER MANAGEMENT IN
MINNESOTA

Revised 7/2012 PAGE 10
Minnesota is blessed with a rich
and diverse furbearer resource.
Because of Minnesota’s geographic
position, the state has furbearers
representative of both northern and
southern climates, and of prairies
(and agricultural areas) and forests.
Minnesota’s furbearer resource
has a variety of positive values to
trappers, hunters, landowners,
campers, photographers and other
outdoor users. Over the years, the
economic value of the fur resource to
Minnesota trappers and hunters has
been from $3 million to $20 million
annually. The other values are more
difficult to measure. There is no
doubt that the presence of beaver,
otter, wolves and other animals adds
immeasurably to the aesthetic value
of outdoor experiences for many
people.
Furbearers also sometimes have
negative values such as predation on
livestock by foxes or coyotes;
destruction of sweet corn by
raccoons; and flooding of roads,
fields or forests by beaver. Although
the positive values of furbearing
mammals far exceed their more
detrimental aspects, the damage that
they cause costs hundreds of
thousands of dollars annually in
Minnesota. Trapping is the single
most effective, safe and important
tool for resolving these situations.
Because the people who most benefit
economically from furbearers –
trappers and hunters – are not often
the ones bearing the burden of the
costs – livestock producers and
farmers – it is in the best interest of
trappers and hunters to provide
assistance with wildlife damage
problems whenever possible.
In addition to the values that
people place on furbearers, all
wildlife species have a function in
nature. The ecological influences of
these animals vary, and whether their
influence is “beneficial” or
“detrimental” depends solely on the
perspectives of people, and not all
people agree. Nearly everyone does
agree, however, that all species of
native wildlife do have a place in the
Minnesota wildlife community. We
all have a responsibility to wisely
manage those species so that they
can be perpetuated.
MINNESOTA’S FURBEARER RESOURCE
OPOSSUM
(Didelphis virginiana)
Description:
An adult opossum is about the
size of a large house cat, and
resembles a cream to gray colored
rat with a pointed snout and a long,
naked tail. The gray color is from
the white guard hairs over black-
tipped under-fur. The ears and tail
are naked, and the ears are black at
the base and lighter at the tips. The
female has a fur-lined pouch on the
belly, similar to that of a kangaroo.
The tail is prehensile and can be used
to grasp branches or other objects.
Biology: The opossum is the only North
American marsupial, and breeds in
early spring. After a gestation period
(length of pregnancy) of only 13
days, the partially developed young
are born and crawl up the belly to
teats in their mother’s pouch, where
they attach and remain for about two
months. About nine young survive
and by three months of age they can
leave the pouch for short periods of
time. Some will ride on the female’s
back by clinging to her fur, while
others remain in the pouch. The
young become independent at about
four months of age.
Opossums have a loosely
defined territory. Some confine their
movements to 40 acres while others
travel constantly. They are primarily
nocturnal (active at night), and spend
the day in a hollow tree, hollow log,
brush pile, squirrel’s nest or other
dry safe place. Opossums will eat
almost anything, including carrion,
insects, fruit, small mammals, birds
(including poultry), and many other
items. They are often attracted to
roadsides where they feed on road-
killed animals, including other
opossums. Having a relatively small
brain, dominated by the olfactory
(smell) regions, they are easily
attracted by sweet or foul odors.
Habitat: Opossum are found primarily in
the woodlots of southern Minnesota.
The susceptibility of their ears, nose
and tail to frostbite apparently limits
them from spreading farther north.
Virtually all-adult opossums in
Minnesota will have evidence of
frostbite on their ears and tails.
Areas of mixed woodland, brushland
and cropland are good opossum
habitat.
Sign: Opossum tracks are distinctive
especially the widely angled “big
toe” of the hind foot. Opossum
droppings though, are not distinctive
and vary according to the type of
food eaten.

Revised 7/2012 PAGE 11
OPOSSUM. Continued
Trapping Tactics:
Sets: Cubby, Livetrap
Traps or trapping systems: Small or
medium doublespring body-gripping
traps (#120, #220 or equivalent) in
cubby or slotted box, livetraps 9” x
9” x 30” or larger.
Lures and baits: Almost any strong-
smelling food lure or bait will attract
opossums, including tainted meat,
fruit or fish.
MUSKRAT
(Ondrata zibethica)
Description: The muskrat is a rodent closely
related to the field mouse, and
resembles it except for size.
Muskrats weigh from one to three
pounds, are dark brown in color, and
have a long, naked tail, which is
flattened vertically. The muskrat’s
small front feet are used for holding
vegetation, and its large hind feet are
used in swimming. The hind feet are
unwebbed but the toes are fringed
with closely spaced stiff hairs, which
help to propel it through the water.
The muskrat swims with its head,
rump and tail exposed above the
surface of the water.
Biology: Muskrats are very prolific and
may breed from April to September.
A female usually has two or three
litters per year, averaging six to eight
young per litter. The gestation
period is about 30 days and the first
litters are born in May, about one
month after ice-out. Young
muskrats are on their own in three to
four weeks, and then usually
establish territories 10 to 60 yards
from their mother’s den. Sometimes
they travel several miles to find
suitable habitat that is not occupied
by another muskrat. Except in rare
instances, young muskrats do not
reach reproductive maturity until the
spring following their birth.
Muskrats construct a den either
in the bank or in a lodge, which they
build in the water. When the den is
on land, the muskrat may dig several
chambers, with the burrow entrance
below the water level. In periods of
low water, it digs a tunnel or trench
to provide access from the den to
deep water. The lodge is built from
mud and aquatic plants such as
cattail or bulrush, and is usually two
or three feet high and four to six feet
across. There is normally one dry
nest chamber dug out near the center
of the house with two underwater
entrances or “plunge holes.”
Sometimes several nest chambers
will be constructed in a single large
lodge. The greatest lodge-building
activity is in late summer and fall. In
forested areas, muskrats do not
normally build their own lodge, but
construct a den in the side of an
active beaver lodge. This den is a
separate chamber from the one used
by the beaver.
Fe ed i n g p l a t fo r ms ma y
resemble small lodges, but actually
are loose rafts of vegetation where
muskrats can crawl out of the water
and feed. In winter, muskrats often
construct “push-ups,” which are
hollow frozen shells of submergent
vegetation constructed over a hole in
the ice. These have no connection
with the bottom substrate and are
usually constructed near the lodges.
During the fall, there is some
overland movement of muskrats,
primarily due to the drying up of
shallow ponds, which forces the
muskrats to look for larger wetlands,
which still contain water. The large-
scale movement in the spring, just
after ice-out, is related to the onset of
breeding activity. At this time,
muskrats establish territories, which
they defend by fighting off other
muskrats. Fighting may also occur if
food is scarce or population levels
are very high. But, for most of the
year, there is little fighting and a
number of muskrats share the same
den.
Muskrats occupy a small area,
ranging only 100 to 200 feet from
their den. They are creatures of
habit and use the same trails, feeding
platforms and toilet stations over and
over . They are pr imari ly
vegetarians, eating the roots, shoots,
stems, leaves, tubers and bulbs of
aquatic plants, and other plants near
the water’s edge. Cattails probably
rank first as a food item in
Minnesota. The muskrat’s diet may
also be supplemented with clams,
snails, crayfish, fish, frogs and even

Revised 7/2012 PAGE 12
MUSKRAT. Continued
the carcasses of other muskrats,
especially in winter or when
vegetation is scarce. In forested
areas, muskrats will eat the bark of
pencil-sized twigs obtained from
beaver food caches in winter.
Habitat: Muskrats are almost entirely
aquatic and are found in marshes,
streams, lakes, ditches and ponds –
wherever there is enough food and
water to support them. Areas with
extensive stands of cattail are
preferred, although bulrush, sedge,
arrowhead and wild rice stands bay
be used to a lesser degree. The water
must be deep enough not to freeze to
the bottom (usually at least 2 to 3
feet).
Sign: Muskrat sign is, of course, most
often found near water. In marshes,
the presence of muskrats is usually
indicated by the occurrence of
scattered dome-shaped lodges. In
some areas, where muskrats
primarily use bank dens, the burrows
are not obvious and it is necessary to
look for other signs of their presence.
Evidence of feeding such as pieces
of plants floating in the water and the
presence of runs and channels
through vegetation are indications of
muskrat activity. The small “hand-
like” prints of the front feet and the
more elongated hind feet, both with
long toes, are also fairly distinctive.
The small brown pellet-like
droppings are about one-half inch
long and often found in feeding areas
and on logs or rocks protruding from
the water.
Trapping Tactics:
Sets: Feedbed, Trail, Bank
Hole, Channel or Runway, Floating
Recommended traps or
trapping systems: Conibear #110 or
#120 (or equivalent), #1 ½ foothold
(standard) or #1 or # 1 ½ guarded
(“stop-loss”) in shallow water or
heavy vegetation areas.
Lures and baits: Usually not
necessary for muskrats. Apple
slices, carrots or corn are effective
baits.
Comments: Muskrat traps
should be staked in deep water and
the heavier more durable #1 ½
foothold used to make the set. The
weight of this trap is sufficient to
drown a muskrat so no slide wire and
lock is necessary in deep water. If
the vegetation is such that a trapped
muskrat may become entangles, or if
the water is shallow, the guarded
type or body-gripping traps should
be used
Muskrats construct a variety of structures. “Push-ups” are made
only after freeze up. Bank dens are used extensively in spring and
summer or, in some areas, year-around. Houses are built in the fall
and are used from then until spring, with less use in summer.

Revised 7/2012 PAGE 13
BEAVER
(Castor canadensis)
Description:
The beaver is the largest rodent
found in North America, with adults
commonly weighing 40 to 50 pounds
and rarely reaching 70 or 80 pounds
or more. It is highly adapted for
aquatic life having large, webbed
hind feet, and nostrils and ears
constructed with valves to keep
water out when the animal
submerges. The second claw on
each hind foot is split lengthwise and
is used like a comb for grooming and
to coat the fur with oil from its large
oil glands. The fur varies from pale
brown to almost black, is very dense
and, when groomed with oil, will not
soak through for several hours. The
tail is very large, scaled and
horizontally flattened, resembling a
paddle. Beaver swim by propelling
themselves with their hind feet while
holding their front feet folded back
against their body, and with only
their head exposed above the surface
of the water.
Biology:
Beaver usually live as a family
group. The colony usually consists
of the adult pair and their young of
the year (kits), plus the young of the
previous year (yearlings). Breeding
occurs in the den in late January or
February, and an average of five kits
are born in May or June after a
gestation period of 110 days.
Normally only one female per
colony gives birth, although there
have been a few instances where two
adult females captured under the ice
in the same pond were observed to
be pregnant. In the spring, before
the young are born, the two-year-old
beaver are normally forced from the
colony to disperse and establish their
own colony. It is these “travelers”
that can be captured quite easily
using scent mound sets in the early
spring along larger streams. The
movement continues into early
summer. Some older beaver,
referred to as “bachelors,” live alone
and do not have a dam.
Beaver are one of the few
animals capable of manipulating
their environment. They build dams
on streams and small flowages to
create a pond with a stable water
level. The dam is constructed of
sticks and mud, mixed with a few
rocks if available. The upstream or
pond, side is smoothly plastered with
mud. Contrary to popular belief, the
beaver does not use its tail as a
trowel to apply mud to the dam. It
serves primarily as a support while
cutting trees and as a rudder while
swimming. All members of the
family, except kits, help keep the
dam in repair. A lodge, or house,
varying in size from 6 to 40 feet in
diameter depending on the number
of beaver in the colony, is built of
sticks, tree limbs and mud, and
contains a nest chamber, which has
its entrance under water. Burrows
are often dug into the banks of the
pond and used as resting areas.
When suitable banks are present,
such as on large rivers or drainage
ditches, beaver will not build a
lodge, but will construct a bank den
instead. The entrance to the den is
under water and the tunnel leading to
it may be 12 to 15 feet long.
In the spring and summer, beaver
feed mainly on small twigs and
aquatic plants such as a water lily,
cattail roots, sedges and on corn
stalks or other terrestrial plants found
near the water’s edge. Beginning in
late August, tree and brush cutting
activity increases dramatically, and a
food pile, or cache, is constructed
near the lodge by anchoring
branches, shrubs and small trees in
the bottom of the pond. This activity
peaks at the time of leaf fall. This
cache, which usually consists of
aspen, alder, willow, and birch,
provides the green bark which serves
as the late fall and winter food
supply.
Beaver are very territorial and
force away any beaver, which does
not belong to the colony. The adults
mark their territory by creating scent
mounds, or “mud pies,” on the bank
or dam and depositing their scent, or
castor, on these mounds.
Beaver can be found along any
body of water that is deep enough for
construction of a lodge or bank den,
or any water flowage that can be
dammed to create suitable water
conditions. Because of their
tendency to dam narrow flowages,
they often create problems and cause
considerable damage by blocking
road culverts, drainage ditches or
Revised 7/2012 PAGE 14
BEAVER, Continued
streams flowing through pastures.
When they dam the outlet of certain
lakes, the lake levels may be
increased 1 ½ to 2 feet causing
flooding of docks, boat houses, the
killing of trees adjacent to shore, and
the killing of wild rice beds.
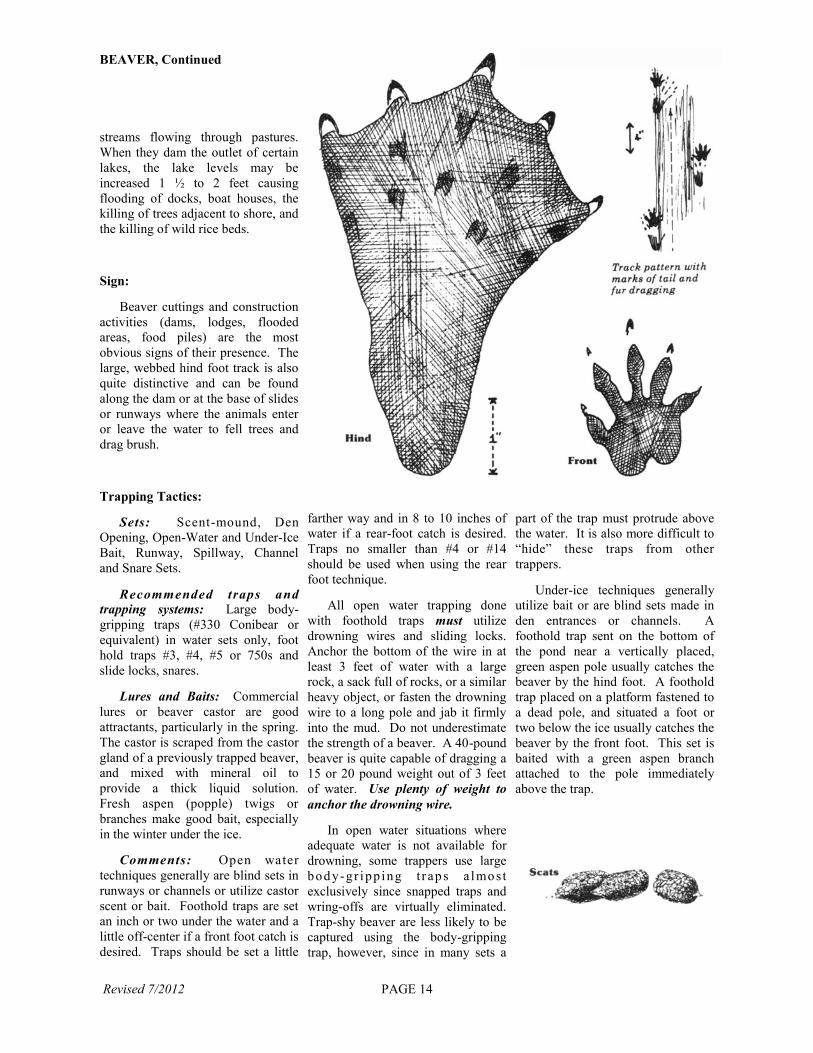
Sign:
Beaver cuttings and construction
activities (dams, lodges, flooded
areas, food piles) are the most
obvious signs of their presence. The
large, webbed hind foot track is also
quite distinctive and can be found
along the dam or at the base of slides
or runways where the animals enter
or leave the water to fell trees and
drag brush.
Trapping Tactics:
Sets: Scent-mound, Den
Opening, Open-Water and Under-Ice
Bait, Runway, Spillway, Channel
and Snare Sets.
Recommended traps and
trapping systems: Large body-
gripping traps (#330 Conibear or
equivalent) in water sets only, foot
hold traps #3, #4, #5 or 750s and
slide locks, snares.
Lures and Baits: Commercial
lures or beaver castor are good
attractants, particularly in the spring.
The castor is scraped from the castor
gland of a previously trapped beaver,
and mixed with mineral oil to
provide a thick liquid solution.
Fresh aspen (popple) twigs or
branches make good bait, especially
in the winter under the ice.
Comments: Open water
techniques generally are blind sets in
runways or channels or utilize castor
scent or bait. Foothold traps are set
an inch or two under the water and a
little off-center if a front foot catch is
desired. Traps should be set a little
farther way and in 8 to 10 inches of
water if a rear-foot catch is desired.
Traps no smaller than #4 or #14
should be used when using the rear
foot technique.
All open water trapping done
with foothold traps must utilize
drowning wires and sliding locks.
Anchor the bottom of the wire in at
least 3 feet of water with a large
rock, a sack full of rocks, or a similar
heavy object, or fasten the drowning
wire to a long pole and jab it firmly
into the mud. Do not underestimate
the strength of a beaver. A 40-pound
beaver is quite capable of dragging a
15 or 20 pound weight out of 3 feet
of water. Use plenty of weight to
anchor the drowning wire.
In open water situations where
adequate water is not available for
drowning, some trappers use large
bod y-gr ipp ing t r ap s a lmo st
exclusively since snapped traps and
wring-offs are virtually eliminated.
Trap-shy beaver are less likely to be
captured using the body-gripping
trap, however, since in many sets a
part of the trap must protrude above
the water. It is also more difficult to
“hide” these traps from other
trappers.
Under-ice techniques generally
utilize bait or are blind sets made in
den entrances or channels. A
foothold trap sent on the bottom of
the pond near a vertically placed,
green aspen pole usually catches the
beaver by the hind foot. A foothold
trap placed on a platform fastened to
a dead pole, and situated a foot or
two below the ice usually catches the
beaver by the front foot. This set is
baited with a green aspen branch
attached to the pole immediately
above the trap.

Revised 7/2012 PAGE 15
RACCOON
(Procyan lotor)
Description: Raccoon are well-known for
their distinctive black mask and
ringed bushy tail. Their coat has a
grizzled appearance, with overall
color ranging from gray to chocolate
brown. The average adult weighs 15
to 25 pounds, with occasional large
animals reaching as much as 35
pounds.
Biology: Raccoon breed from February 20
April with a gestation period of
about nine weeks. An average of
two to six young are born in a
hollow tree, log or other protected
den. The young remain with the
female until fall and may den with
her through the winter. Normally, a
raccoon may range one or two miles
from its main den.
Raccoon are
most active at
night and are
n a t u r a l
explorers with
a curiosity that
can be used to
the trapper’s
advantage.
Raccoo ns
go into partial
hibernation in
winter, either
alone or in
groups, but
they become active during warm
spells and thaws. They are
omnivorous and eat a wide variety of
foods. During late summer and fall,
they eat large quantities of fruits,
grains and acorns. They are efficient
predators, feeding upon nesting
birds, eggs, fish, frogs, crayfish and
insects.
Habitat: Raccoons are highly adaptable
animals and are found over most of
the U.S. and southern Canada. They
are often found along streams, lake
shores, and marshes, but they also
live in upland areas. Although they
are good swimmers, they usually
stay in shallow water. Raccoons are
common in suburban areas and
around farms.
Sign: The raccoon has a very
distinctive and easily identifiable
track. Often, only the front of the
rear foot pad and the long, slender
toes will show and the heel will not
be visible except in soft mud, sand or
snow. The scats are cylindrical and
usually have little or no taper. The
droppings may occasionally be
found on limbs, logs or stumps.
Trapping Tactics:
Sets: Pocket, Obstruction,
Spring Run, Cubby, Raccoon Box,
Dirt Hole, Slanted Pole, and Cage
Trap sets
Recommended traps or trapping
systems: Doublespring body
gripping sizes #120 or #220
Conibear (or equivalent) in cubbies
or raccoon boxes; foothold sizes #1
½ guarded (“stop-loss”), #1 ½
coilspring, #11 longspring, or #2
longspring with a large movable drag
(like a tree limb) or a slide lock and
drowning wire; cage or box traps at
least 10” x 12” x 32”.
Lures and baits: Raccoons are
attracted to a wide variety of
commercial and homemade lures and
baits including fish, chicken, anise
oil, fish oil, honey, apples and
pastries.

Revised 7/2012 PAGE 16
RED FOX
(Vulpes vulpes)
Description:
Red fox have a thick pelage that
varies from shades of red to sandy
gold, with a lighter belly and black
feet. The backsides of the ears are
black. The animal has a white throat
and chin, and a large, bushy white-
tipped tail (at least a white-tipped
hairs can nearly always be found).
Variations in color include black (all
black except for a white-tipped tail),
silver (black with white-tipped guard
hairs, giving the overall appearance
of silver), and cross (normal red with
a darker patch running along the
back and across the shoulders
forming a “cross”). These genetic
variations may appear in the same
litter. The Samson fox is genetically
inferior, and represents the partial or
total loss of the guard hairs. The
average red fox weighs 8 to 10
pounds.
Biology: Red fox reproduce in their first
year. Breeding occurs in late
January or early February, and the
gestation period is 53 days. An
average of five pups are born in late
March or early April, often in a
renovated den of another animal
such as a woodchuck or badger. The
pups stay with the adults until early
fall, when dispersal begins. This
“fall shuffle” is used to advantage by
trappers who catch many of these
dispersers. This dispersal period
usually begins in October and it may
continue through most of the winter.
Some foxes never disperse, and
others disperse later in the winter or
as adults.
The red fox, like most predators,
is an opportunist, which is quick to
take advantage of any food available.
Small mammals such as mice,
rabbits and ground squirrels
comprise the bulk of the red fox’s
diet. A fox will often cache uneaten
food under litter or bury it is a hole
to be eaten later.
Red fox tend to be solitary
animals and always hunt alone.
They do not normally use a den
except when raising their young.
During winter, a red fox will curl up
on the snow using its tail to cover its
nose and feet.
The red fox is primarily
crepuscular being most active at
dawn and dusk. Foxes have an
average home range varying from
one- to four-square miles.
Habitat: The red fox is extremely
adaptable and thrives under a variety
of conditions. It is common
throughout Minnesota and is
abundant in both the forest and
farmland zones. Red fox often hunt
in grassy fields or along fence lines
where small mammals are abundant.
They day may be spent curled up on
a hillside with good visibility to
observe potential danger. Fox avoid
areas with established coyote
populations, although some will be
found in areas between coyote home
ranges.
Sign: Red fox tracks are usually more
or less in a straight line and the hind
foot is narrower and more pointed
than the larger front foot. The heel
pad is narrow and particularly in
winter, little of the heel pad will
show through the thick hair, which
covers the foot. Red fox scats are
variable and are similar to those of
the other canids, although noticeably
smaller than most coyote scats.
Trapping Tactics:
Sets: Dirt-hole, Scent-post, Flat set,
Trail set (snow)
Recommended traps or trapping
systems: Foothold #1 ½, # 1 ¾ or #2
with short chains (if staked) and
good swivels at the trap and at or
near the stake. If drags or grapples
are used for fastening, extension
chains of at least 3 to 4 feet should
be attached. Snares are effective, in
zones where legal.
Lutes and baits: Commercial lures,
fox urine, tainted meat baits, and, in
winter, skunk musk are all effective
attractants for fox.

Revised 7/2012 PAGE 17
GRAY FOX (Urocyon cinereoargenteus)
Description:
The gray fox is slightly smaller
than the red fox, weighing an
average of 6 to 8 pounds. Its pelage
has a coarser texture than a red fox,
and is colored by alternate bands of
black and white on the guard hairs.
There is reddish brown fur on the
underparts of the body. The bushy
tail is gray with a ridge of coarse,
black hair along the top and on the
tip.
Biology:
Gray fox breed in late January
or early February, with a gestation
period of about 63 days. Three or
four pups are born in April in a den
similar to that of a red fox. The
young disperse in late summer and
fall, but travel shorter distances than
do young red foxes.
Although the gray fox has a diet
similar to that of a red fox, it eats
more plant material. Unlike the red
fox, it readily climbs trees when
pursued. The gray fox is shy and
seldom seen and usually is most
active at night. During the day it
rests in dense thickets. The home
range of the gray fox is smaller than
that of the red fox.
Sign:
The gray fox is smaller and
rounder than that of the red fox and,
except for the claw marks, might be
mistaken for that of a bobcat. Scats
are similar to those of the red fox.
Habitat: Gray fox primarily inhabit
deciduous forest areas of central and
extreme southeastern Minnesota,
although they occasionally may be
found in almost any area of the state.
They prefer more dense, brushy
cover than do red fox, and avoid
both open and northern forest areas.
Gray fox and red fox are rather
intolerant of one another, but since
their specific habitat preferences
often separate them spatially, they
often occupy the same general areas.
There are no records of the two
species crossbreeding.
Trapping Tactics: The same tactics used for red
fox will work for grays, the only
difference being that the sets must be
in or near woody cover, which is the
gray’s preferred habitat.

Revised 7/2012 PAGE 18
TIMBER WOLF
(Canis lupus)
Description:
The timber (gray) wolf is the
largest member of the dog family;
two to three times the size of the
coyote. Most of Minnesota’s wolves
are gray in color, but black, cream,
and reddish individuals also occur.
Male wolves weigh about 80 pounds
(about 10 pounds heavier than
females). Wolves of 100 pounds or
more occur rarely, and are
considered very large.
Biology:
The wolf pack is a family group
consisting of a pair of breeding
adults and their young of one or
more years. Only one female in a
pack breeds each year, generally in
February. After a nine-week
gestation, an average of six pups are
born in an underground den, which is
often used for denning for several
years. In early summer, the pups are
moved to open areas or “rendezvous
sites,” where the pack congregates.
By fall, pups are large enough to
hunt with the pack. Young wolves
may leave the pack when they
become sexually mature in their
second winter. They then attempt to
find a mate, and may form a pack in
an area not yet used by other packs.
Individual packs defend
territories of 20 to 200 square miles
(usually not more than one wolf per
10 square miles), and the members
of the pack usually restrict their
hunting and feeding activities to that
area. Most wolf packs in Minnesota
contain about five individuals,
although as many as a dozen may
rarely be present.
In Minnesota, wolves eat a
variety of large and small animals,
but white-tailed deer make up about
80 percent of their diet. Beaver are
often taken in the spring and
summer, while deer, and a few
moose, are taken more frequently in
winter. In areas of mixed farms and
forest, domestic livestock are
sometime preyed upon.
Habitat:
Wolves prefer the large,
extensive forest areas of northern
Minnesota. Their densities occur
in the forested portions of the
northern part of the state where deer
population densities are high and
human population densities are low.
Although the wolf population
expanded in range and numbers from
the late 1970’s to late 1990’s, it has
been relatively stable at about 3,000
wolves with no significant change in
distribution. It appears that wolves in
Minnesota have occupied the most
suitable areas of the state and
population numbers will fluctuate
with changes in deer densities, as is
the case in northern counties where
wolves have been well established
for decades.
Signs:
Wolf tracks are similar to those
of a large dog and are more than
twice the size of the average coyote
track. The droppings are similar to
those of coyotes, but generally larger
( ≥ 1 i n c h i n d i a m e t e r ) .
Trapping Tactics:
The timber wolf is a protected
wild animal in Minnesota and
defined as small game under the
Minnesota Game and Fish laws.
Trapping seasons are a recent
development for wolves in the state
although prior to federal protection
under the Endangered Species Act,
trapping occurred without regulation.
Foothold traps using flat sets and dirt
hole sets with bait or lures along
travel routes are effective strategies
for catching wolves. After freeze up
conditions and throughout winter,
snares set near bait can be effective,
but caution must be used to avoid
non-target animals such as white-
tailed deer and moose.

Revised 7/2012 PAGE 19
COYOTE
(Canis latrans)
Description: The coyote, sometimes known as
the “brush wolf,” resembles a small,
lean German shepherd. Its gray fur
is long, coarse and heavy. Typically,
its underparts are light gray to white,
with the remaining hairs broadly
banded with black. Its tail is bushy
and disproportionately large. The
coyote’s ears are long and erect and
it carries its tail low when running.
Adult coyotes average 25 to 30
pounds in weight, but adult males
may rarely weigh up to 44 pounds.
Biology: Coyotes breed in late January
and February, with a gestation period
of 63 days. An average of 5 to 7
pups are born in April or early May
in a den, dug in loose soil or
enlarged from one dug by another
animal. The pups stay with the
adults until autumn or mid-winter,
when they disperse to find their own
home territory.
Deer (most often in the form of
carrion), snowshoe hare and mice are
the coyote’s favorite food. But
coyotes are very opportunistic and
will eat whatever food is available,
such as fruits or berries in late
summer, and occasionally sheep or
poultry.
Coyotes tend to be solitary
animals or live in small family
groups. They are most active during
evening and before dawn and
normally move two to three miles a
night. Adult males have large
territories (15-25 square miles) in
which they travel, but adult females
occupy areas of six- to ten-square
miles.
Sign: Coyote tracks are oval in shape
and the toenail marks, when present,
tend to hook inwards. They can
usually be distinguished from dog
tracks, which are rounder and have
deeper nail marks pointed outwards.
Like all members of the dog family,
the coyote’s front foot is larger than
the hind foot. Coyote scats are quite
variable but are usually large,
strongly tapering and contain much
hair, bone or seeds.
Habitat: In Minnesota, coyotes usually
live in transitional lands, which are a
combination of farm land and forest,
but they can survive will in open
prairie or dense forest. Coyotes
prefer to hunt in grassy fields or
along the edges of fields for mice,
and spend the daytime in forested
areas. They are rare in areas
occupied by gray (timber) wolves
because the gray wolves will not
tolerate their presence.
Trapping Tactics:
Sets: Dirt-hole, Scent post, Flat
set, Trail set (snow)
Recommended traps or trapping
systems: Foothold traps sizes #1 ¾,
#3, #3N, #4 with short chains (if
staked) and with good swivels at the
trap and at the stake or in the middle
of the chain. If drags or grapples are
used, 3 to 4 foot or longer extension
chains should be added. Snares are
effective where legal.
Lures and baits: Commercial
lures, coyote urine, tainted meat
baits, gland lures and skunk essence
are good for attracting coyotes.

Revised 7/2012 PAGE 20
WEASELS
LONG-TAILED
(Mustela frenata)
SHORT-TAILED (Mustela erminea)
Description: Weasels are relatively small,
long bodied animals with short legs.
Three species occur in Minnesota
(long-tailed, short-tailed, and least),
but only the long-tailed and short-
tailed weasels are of value in the fur
trade. Although both species may be
found throughout the state, the long-
tailed is most common in the
southern half, while the short-tailed
is most common in the northern two-
thirds of the state. Long-tailed
weasels are about 18 inches long
including a 6-inch tail. The smaller
short-tailed weasels are about 13
inches overall, with a 3- or 4-inch
tail. Most of the year, weasels are
dark brown with a white throat and
belly, but in late fall they turn
completely white except for a black-
tipped tail. These white pelts are
known as “ermine” in the fur trade.
Biology: Weasels mate during the
summer, but, as with many members
of the weasel family, they exhibit
delayed implantation, and the young
embryos do not begin developing
until late winter or early spring,
several months after breeding occurs.
Litters of four to eight young are
born in April or May. Weasel dens
are lined with the fur of mice they
have killed and are found in rock
piles, old buildings, burrows, and
hollow logs or stumps.
Weasels mainly prey on small
mammals up to the size of rabbits,
but some birds are taken. Like the
closely related mink and fisher,
weasels are efficient killers. Their
sharp canine teeth pierce the skulls
of their prey. Where prey is
abundant, weasels may kill more
than they can eat, caching excess
prey items. Weasels eat their entire
prey and do not suck the blood as
many people believe. However,
when surplus killing occurs many of
their prey may only show wounds in
the head or throat with no signs of
feeding.
Habitat: Weasels prefer brushy areas
mixed with tall grass, such as brushy
fence rows, willow swamps, beaver
flowages, or recent cutover areas.
They may occasionally occupy more
open country, especially around
wood piles, barns or old buildings.
Sign:
Weasel tracks are usually paired
and the tracks will be spaced about a
foot apart. In deep snow the spacing
will often be irregular alternating
long and short, and sometimes
weasels will travel under the snow
for short distances. Scats are long,
slender and dark brown or black in
color.
Trapping Tactics:
Sets: Cubbies or “weasel
boxes”
Recomm ended t rap s o r
trapping systems: The #110 or #120
conibear or similar sized body-
griping traps set inside cubbies or
boxes work well for weasels,
especially if equipped with a treadle
type trigger. A #1 ½ longspring trap
can also be set as a killing trap for
weasel in the opening of a small
cubby or a tin can if one jaw is
propped in a vertical position.
Lures and baits: Weasels are
attracted by fresh, bloody baits such
as chicken or rabbit heads, the fresh
meat of a muskrat or beaver, and by
dead mice. Weasel musk is an
excellent trapping lure that can be
used for other animals as well. Mink
musk is also a good weasel lure.

Revised 7/2012 PAGE 21
MINK
(Mustela vison)
Description: Wild mink are dark brown
to black, and usually have a white
spot under the chin. Adult males
weigh about 3 pounds, and females
less than 2 pounds. Like most other
members of the weasel family, mink
have small round ears, a pointed
nose, a long neck and body and short
legs.
Biology: Mink breed in February, but
because of delayed implantation, the
fertilized egg does not attach to the
uterine wall and begin developing
until the weather is favorable to the
litter’s survival later in the spring.
After a 31-day gestation, five or six
young are born in dens made in
debris piles, hollow logs, abandoned
muskrat houses, or burrows. The
female and young remain together
until late summer when the young
begin to disperse. The female
remains close to her dens and hunts a
territory she can cover in two or
three days. The male’s home range
is much larger, and a particular area
may be covered once every week or
two. Males are very territorial and
will not tolerate other male mink in
their area, particularly during the
breeding season. They may even kill
young mink in the den.
Mink eat muskrats, fish, frogs,
salamanders, snakes, waterfowl and
eggs, and also prey on small
mammals such as mice and rabbits.
They are efficient hunters and
frequently cache surplus food in their
dens. Mink are mainly nocturnal,
but frequently move about during the
day. They are almost equally at
home on land or in the water. While
hunting, they inspect every hole,
brush pile, hollow log or any food
producing cover along their route of
travel. They are creatures of habit,
and visit the same places on each trip
through an area.
Mink have well-developed scent,
or musk, glands, and can release a
strong odor, similar to the odor of a
skunk, when alarmed or injured.
They also discharge their scent to
mark territory boundaries and during
courtship displays.
Habitat: Mink are shoreline dwellers and
so are most often found near streams,
ditches, lakes, marshes or swamps.
While hunting or dispersing, they
may travel considerable distances
from those wetlands.
Sign: Mink generally leave paired
tracks at 12- to 23-inch intervals,
although they may also assume an
open gait with all four feet separated.
Mink occasionally toboggan on
snow or dive under it for short
distances. In soft mud, they leave a
distinct round cat-like track with five
toes and toenail marks. Mink scats
are longer than those of weasels and
are usually dark and long.
Trapping Tactics:
Sets: Obstruction (blind) set,
Spring set, Pocket set, Channel set
Recommended traps or trapping
systems: Number 120 or similar
double spring body-gripping trap (do
not use a #110 or other single spring
body-gripping trap for mink in non-
drowning sets because they are not
strong enough to kill mink
effectively), foothold traps with
drowning slide lock (#11 double
longspring, #1 or #1 ½ coilspring, #
1 ½ jump or longspring).
Lures and baits: Commercial
lures, fish oil, and fresh muskrat or
fish bait are effective for tracking
mink.

Revised 7/2012 PAGE 22
BADGER
(Taxidea taxus)
Description:
The badger is a member of the
weasel family and is a medium-sized
heavy bodied animal. Adult females
average about 17 pounds and adult
males average 24 pounds. Badgers
have a wide flattened body, short
powerful legs and a short bushy tail.
They are adapted for digging, having
large front feet with massive claws
over an inch long. They are
Minneso ta ’s mo s t fo ssor ia l
(burrowing) furbearer. The fur on
the upper parts is grizzled gray and
black with a slight yellowish tinge.
The underparts and the short tail are
yellowish. A white stripe runs from
the nose to the crown of the head and
tapers off on the neck or back. The
badger has white cheeks and an
elongated black spot in front of each
ear. The feet are black.
Biology: Badger breed in August or
September. After a delay of about
five months, implantation of the
embryos occurs. Following a five-
to six-week development period, an
average of three young are born
sometime from March to June in a
den 2 to 6 feet below ground. The
young stay with the female until fall,
when they disperse.
The badger catches prey such as
ground squirrels, pocket gophers and
mice by digging them out of their
dens. The badger digs a burrow,
uses it for a time, and them moves on
and digs another one. These
burrows, and the accompanying
mounds of dirt, are quite often a
problem in hayfields and pastures,
but if they are located
along fence rows or
field edges, they are
valuable because many
of them are used as dens
by other animals such as
rabbits and fox.
Badgers are
active mainly at night,
spending the daytime
underground. Body fat
is stored during late
summer, which serves
as an energy reserve for the coming
winter. Badgers do not hibernate,
but they do spend most of the winter
sleeping under ground, occasionally
coming out on an especially warm
day.
Although they do not spray like a
skunk, badgers will release a strong,
musk odor from a pair of anal scent
glands when disturbed.
Badgers live throughout most of
Minnesota, preferring open prairie
and pasture land where burrowing
rodents are common. They also will
live in mixed forest-farmland areas,
but are rare in areas with extensive
rocky or boggy soils.
Sign: The most obvious indication that
badger are present is the occurrence
of tunnels, dug in open areas and
fields, with a large mound of dirt in
front of them. Often the badgers will
excavate several shallow tunnels at
the same site when digging out a
gopher, and these series of tunnels
and mounds of dirt may cover an
area the size of a car. Badger tracks
are sometimes mistaken for coyote
tracks, but can be distinguished by
the five toes, and the claw marks of
the front feet, which are well in front
of the toe marks. Badgers normally
cover their droppings or leave them
underground.
Trapping Tactics:
Sets: Burrow Entrance Set, Dirt-
hole Bait Set, Scent-post Set
Recommended traps or trapping
systems: #220 conibear or similar
size body-gripping trap inside
burrow entrance; #1.75 or larger
foothold with long chain fastened to
a long stake or a drag/grapple.
Lures and baits: Most baits and
lures used for fox and coyote will
also attract badger.
Comments: Avoid setting in
inactive burrows – these are
frequently used by rabbits, skunks
and other animals. Avoid short
chains or short stakes because the
badger may dig out the stake and
escape.

Revised 7/2012 PAGE 23
RIVER OTTER (Lutra Canadensis)
Description: Otter are large semi-aquatic
members of the weasel family that
weigh up to 24 pounds. They have a
long cylindrical body with short fur,
short ears, and a thick tail, which
tapers gradually to the tip. The fur is
a rich, glossy brown to black along
the back, and pale brown or gray on
the belly, on the throat and around
the mouth. The otter’s strong,
streamlined body and webbed feet
make it an agile swimmer.
Biology: Adult otter may mate for life.
After mating in late spring or early
summer, an average of two or three
young are born the following spring
in April or May, following a period
of delayed implantation. The den
may be an abandoned beaver lodge,
bank hole or hollow log. The young
stay with the parents until next
spring.
Otter are very adept at catching
small fish and minnows, with rough
fish comprising most of the otter’s
diet. Crayfish, frogs, turtles,
muskrats, and small reptiles are also
eaten. Otter regurgitate fish bones
and scales at “toilet” areas spaced
along their routes of travel. Often,
these toilet areas occur at beaver
dams.
Otter have large territories,
which cover many miles of shoreline
or stream course. They also travel
overland from one water body or
stream to another. Their territories
are marked on twisted tufts of grass
with scent secreted from their anal
glands.
Sign: Otter sign in snow is often
distinctive, with otter alternately
running and sliding leaving a “dot-
dash” pattern. The tracks are
generally paired, but may be
separated at slow gaits. Otter sign
along streams and shorelines is often
concentrated at “hauling out” places
where matted and twisted grass and
droppings will be found. Otter sign
is also often concentrated on beaver
lodges and dams.
Habitat: Otter can inhabit nearly any
wetland area, primarily rivers, small
streams, lakes, and beaver ponds.
They prefer remote areas away from
frequent human disturbance.
Trapping Tactics:
Sets: Slide and Trail Set (water),
Channel Set, Toilet Set
Recommended traps or trapping
systems: Number 220 or 330
conibear (or equivalent) traps or
foothold Some trappers use fresh
beaver meat or fresh whole fish as a
bait for otter.
Lures and baits: Lure if used at
all, is used sparingly with otter musk
being best. Beaver Castor will also
work. Some trappers use fresh
beaver meat or fresh whole fish as
bait for otter.
Comments: Otter are strong, wary
and trap shy. Traps should be placed
in the water and concealed. Channel
or beaver “run” sets result in many
accidentally caught otter, especially
runs on beaver dams, and should be
avoided during closed otter seasons
(especially in spring). Otters are
ful ly protected in southern
Minnesota.

Revised 7/2012 PAGE 24
STRIPED SKUNK
(Mephitis mephitis)
Description: A member of the weasel family,
the striped skunk is black with a
white stripe on is forehead, a white
patch on top of its head, and two
white stripes that begin at the neck
and extend back toward the hip
region. The length of these stripes is
quite variable. The large, bushy tail
is mainly black, but is mixed with
white to varying degrees. Skunks
are wide-bodied, with a relatively
small head. Most striped skunks
weigh 4 to 10 pounds.
The spotted skunk, or “civet cat,”
is smaller and shaped much more
like a weasel than the striped skunk,
with normal weights being 1 to 3
pounds. It is black with a white spot
on its forehead and interrupted white
stripes over its back and sides. The
bushy tail has considerable white,
especially at the tip.
Biology: Mating occurs in late February or
March and, after a gestation period
of about 63 days, an average of six
young skunks are born in May. Both
species of skunk are well known for
t h e i r o d o r i f e r o u s d e f e n s e
mechanisms. They can spray an
attacker up to 15 feet away, four to
six consecutive times, with a bitter,
stinging yellow fluid (mist). Striped
skunks can be observed wandering
about at any time of the day, but tend
to be most active at night, while the
spotted skunk is almost totally
nocturnal. Both species are
omnivorous and prefer mice, insects
and their larvae, fruits and berries,
carrion, frogs and eggs. They are
effective predators on the eggs and
young of ground nesting birds.
Spotted skunks are less common and
more secretive than striped skunks,
often living undiscovered on farms,
while the striped skunk very rarely
climbs trees, the spotted skunk
commonly climbs trees in search of
food and to escape enemies. Spotted
skunks den and rest in dark places
such as ground burrows or under old
buildings.
In early winter, skunks den up
and become inactive, but they do not
actually hibernate. Mid-winter warm
spells bring them out for hunting
forays. Several skunks (sometimes
eight to 10) often occupy the same
den in winter, especially the females.
Males den up later in the winter than
the females, and normally den by
themselves. In more southern
locations, spotted skunks sometimes
remain active throughout the year.
Habitat: Although the striped skunks can
be found statewide, they are most
abundant in semi-open country with
a mixture of small woodlots, brush
patches, pastures, cropland, fence
rows, brush piles, old buildings and
farm yards. Spotted skunks prefer
similar habitat, but are found only in
the southern half of the state. Loss
of native prairie and changing
farming practices may be primarily
responsible for the decline in spotted
skunks, which are now rare in
Minnesota.
Although commonly thought of in
association with prairies, spotted
skunks actually are closely
assoc iated wi th agr icul ture,
particularly small farms. Spotted
skunks are usually found around old
buildings and grain storage facilities
infested with mice and rats. Spotted
skunks spread northward from the
southern plains following the coming
of farming to the Midwest prairies.
They were first reported from
Minnesota in 1892 and reached
northern Minnesota by 1933.
Spotted skunk populations in
Minnesota peaked in the 1940s, and
then declined drastically. At the
same time, spotted skink numbers
were decreasing all over the
Midwest. No one knows for sure
why. Increasing farm size and
efficiency, along with a decrease in
on-farm grain storage were probably
at least partially responsible. The
suddenness of the decline at about
the time DDT was coming into
widespread use suggests that
persistent pesticides may have also
been involved, particularly since
insects are spotted skunks’ primary
source of food in summer.
For whatever reason, spotted
skunks are now rare in Minnesota.
Although several Midwestern states
have closed the season on these
animals, such closures have
apparently had no effect on spotted
skunk numbers.

Revised 7/2012 PAGE 25

Revised 7/2012 PAGE 26
MARTEN
(Martes americana)
Description: The marten is a tree climbing
member of the weasel family, about
the size of a mink. The fur is an
ungrizzled red to yellow brown,
somewhat darker on the back, and
becoming blackish on the tail. The
head and face are light tan and there
is usually a light orangish spot on the
chest. Adult males average 2 to 3
pounds and females average 1 ½ to 2
pounds.
Biology: Marten breed in mid-summer
(July—August). After a period of
delayed implantation and about one
month of pregnancy, three or four
young are born from March to May.
A tree den is preferred.
Marten are primarily nocturnal
and solitary hunters. They are active
both on the ground and in trees.
When traveling on the ground, they
seldom actually touch the ground,
but hop from one fallen log to
another. They are opportunistic
feeders, and prey on a variety of
small to medium-sized mammals,
such as mice (voles), chipmunks,
squirrels and snowshoe hares. In
summer they also eat berries, insects
and birds. In the winter, marten
nesting sites are always below the
snow surface, but in summer they
may use the crowns of conifers,
hollow logs, brush
piles or burrows.
Habitat: In Minnesota,
marten are found in the
forest of the extreme
northeastern parts of
the state. They prefer
large areas of mature
to over-mature upland
conifer and northern
hard wood fores t ,
especially where large
amounts of fallen
timber are present.
Sign: Marten tracks may be confused
with those of a large mink or smaller
fisher. The walking stride of marten
is usually 6 to 9 inches, but the
paired tracks of bounding marten
may be from 1 to 4 feet apart.
Marten scats are about the same size
as mink and similar in shape to
weasel and mink. In summer,
berries and fruit may be present in
marten scats, but generally not in
those of mink.
Trapping Tactics:
Sets: Cubbies, Leaning Pole sets
Recommended traps or trapping
systems: Livetraps, Number 120 or
similar sized body-gripping traps,
foothold #1 ½, snares.
Lures and baits: Commercial lures,
skunk essence and beaver castor are
attractive to marten. Fresh bait such
as beaver can also be used
effectively. Marten are easily
trapped. In areas where marten are
common, livetraps can be used
effectively to set for high value
males. Care should be taken not to
place out too many sets where
restrictive limits are in effect because
overlimits can be taken easily. If
these animals are captured and
cannot be released, they should be
salvaged and turned in to the state
after first contacting a Conservation
Officer and receiving permission to
possess and transport them.

Revised 7/2012 PAGE 27
FISHER
(Martes pennanti)
Description: The fisher is a member of the
weasel family, resembling a very
large mink. It weighs as much as a
red fox, but has much shorter legs.
The males weigh between 10 and 14
pounds, which is about twice the size
of females. The fur of a fisher is a
grizzled dark brown and approaches
blackish on the rump and tail. On
large males, the entire head,
shoulders, and the back of the neck
are yellowish in appearance because
the guard hairs in these areas are
light tan with dark brown tips. Many
fisher have white spots on the chest
at the base of each front leg.
Although smaller, female fisher are
usually darker and more uniform in
color than the males, and their fur is
more valuable.
Biology: Fisher breed in March or April,
with adult females breeding shortly
after giving birth. The fertilized
eggs exhibit delayed implantation
and do not start developing until
January or February of the following
year. One to five young fisher are
born in April in a hollow tree, log, or
rock cavity. The young leave the
female in early fall to find their own
home territory.
Fisher are extremely agile and
active predators. Excellent tree
climbers, they can outclimb marten
and red squirrels. They prey upon
snowshoe hare, mice, squirrels,
porcupine, and also feed upon
carrion, particularly that of deer.
Although they have a reputation for
preying on porcupines, snowshoe
hares and other small mammals are
much more important in their diet in
Minnesota. Fisher will also eat
insects and berries.
Fisher range over 7 to 10 square
miles, traveling at anytime of day or
night. Males have larger ranges than
females. Individual animals
frequently use well-defined hunting
trails. When feeding on a
large food items such as a
deer carcass, fisher
may confine their activities
to the immediate vicinity of
the food source for a period
of several days. Fisher are
solitary, except during the
breeding season and when
young are with the females.
The fisher gives off a foul
musk odor when disturbed.
Habitat: Fisher prefer larger areas
of continuous forest,
particularly older timber stands.
They are adaptable and can live in a
variety of forest types, but they avoid
open areas. They prefer the edges of
conifer stands when these are
adjacent to stands of deciduous trees.
Hollow trees, rock crevices, slash
piles, abandoned beaver lodges in
dry ponds, and old porcupine dens
are preferred denning sites.
Signs: Tracks of small fisher may be
confused with those of large marten.
Both resemble the offset pattern of a
mink. The walking stride of fisher is
about 13 inches for males and about
9 inches for females. When jumping
or bounding fisher generally average
over 24 inches per jump and they
may lope with all four feet separated
or bound with front and hind feet
nearly superimposed. The droppings
are similar to those of marten, but
larger. Like marten, they may
contain the remains of berries or
fruits in the summer. Sometimes
fisher scats will contain porcupine
quills.
Trapping Tactics:
Sets: Cubbies, Leaning Pole sets
Recommended traps or trapping
systems: Number 220 or similar
sized body-gripping traps, foothold
#1 ½, # 1 ¾ or #2 snares.
Lures and baits: Commercial
lures, skunk essence and beaver
essence are attractive to fisher.
Fresh bait such as beaver can also be
used effectively.

Revised 7/2012 PAGE 28
BOBCAT
(Felis rufus)
Description: An adult bobcat stands about 20
to 30 inches at the shoulder and
weighs 15 to 40 pounds. Short black
tufts, up to an inch long, are found
on the eartips. Extending from the
ears to the chin is a white, black and
gray ruff. The bobcat’s fur is light
fawn to rust brown in summer, and
generally gray in winter. The bobcat
is named for its 6-inch “bobtail.”
The tip of the bobcat’s tail is black
above and white below.
Biology:
Bobcats breed primarily in
February and March, although they
can breed anytime between January
and June. They have a gestation
period of about 50 days and most
young are born in May. Two to four
kittens are born in an abandoned den
of another animal, a windfall with
tangled roots or branches, or even
under the foundation of a vacated
building. The young stay with the
female until some time during
winter, when they disperse to find
their own territories.
Bobcats are very secretive, and
are active mainly at night. They
have large home ranges, often
exceeding 8- to 10-square miles.
Bobcats normally hunt alone while
crossing and recrossing their
territories. Their main foods are
snowshoe hare, deer, mice, small
birds and porcupine. Bobcats
occasionally kill deer as fawns in
summer and as adults in winter by
compressing the windpipe. They are
opportunists but are almost entirely
carnivorous and they do not like
rotten or tainted food. When food is
plentiful, bobcats may gorge
themselves and then not feed again
for days.
Habitat: Bobcats prefer heavy brush areas
in and around large lowland conifer
stands, such as cedar, black spruce,
or tamarack. These areas are also
inhabited by their main prey, the
snowshoe hare.
Sign: The bobcat track is rounder than
that of a coyote or a fox with no claw
marks. Also, if a clear track can be
located, bobcats have three distinct
lobes on the rear edge of the foot
pad. Scats are similar to those of
coyotes, but tend to be more
segmented and less tapering. Often
times the scats are partially or
wholly covered with grass or leaves
and scratch marks are visible around
them.
Trapping Tactics: Sets: Cubby, Dirt-hole
Recommended traps or trapping
systems: #1 ¾ - #3 foothold traps,
#220 conibear or equivalent body-
gripping trap.
Lures and baits: Commercial
gland lures and baits are available or
lures can be made using beaver
castor, skunk essence, oil of catnip
vor fish oil.
Comments: Bobcats are more
dependent on their sense of sight and
less dependent on smell than canines
such as fox or coyote. Therefore,
sets for bobcat can be made more
effective by giving them some visual
appeal in addition to the lure or bait.
This is usually done by hanging a
“flag” such as a bird wing, a strip of
fur, or a feather near the set (but not
directly over the trap).

Revised 7/2012 PAGE 29
TYPES OF TRAPS
Traps are constructed in different
designs and sizes to hold varying
sizes and species of furbearers.
Traps can be divided into three
general categories: 1) those that
hold the animal by the foot or leg
(foothold): 2) those that hold the
animal by the body and are usually
intended to kill the animal (body-
gripping or conibear type); 3) those
that enclose the animal (box or cage
type).
Table 1 lists appropriate trap
sizes for various species. Although a
variety of traps may work for various
species, certain sizes and styles of
traps have advantages for different
situations. Recommended traps are
listed under trapping strategies in the
species sections.
Foothold Traps
Each trap size is indicated by a
number. Sizes may vary according
to the manufacturer, but in most
cases the smaller the number the
smaller the trap.
Long spring traps are generally
less expensive and heavier than other
types of foothold traps. Where easy
concealment is not a problem and the
extra weight might be an asset (as in
drowning sets for muskrat or beaver
trapping), long-spring traps may be
the best choice.
Guarded (“stop loss”) traps are
available in several styles. They
employ an additional spring-loaded
bail that prevents a muskrat or mink
from escaping. Guards are almost
essential if foothold traps are used
for muskrats in shallow water or
heavy vegetation. Many muskrat
trappers use these types of traps
almost exclusively. Although
slightly more expensive than
unguarded traps, these traps will
quickly pay for themselves in extra
muskrat, mink and raccoon held and
are highly recommended.
Under-spring or “jump” traps are
more compact and therefore easier to
conceal than are long-spring traps.
While they are a little more difficult
to set than long-spring traps, jump
traps are a bit faster and frequently
stronger for a given size. They are
also a little lighter to carry. Some
manufacturers produce double as
well as single under-spring traps.
Coil-spring traps are the fastest
of the foot hold traps. Available in
sizes 1 through 4 from a variety of
manufacturers, coil springs are often
used in trapping predators. They
have all the advantage of under-
spring traps with the addition of
increased speed.
Modified Foothold Traps
Trap modifications increase the
efficiency of foot-hold traps, and
reduce trap-related injur ies.
Unfortunately, some of these
mo d i f i c a t io n s a r e no t ye t
commercially available, and must be
made by the trapper. Contact the
Minnesota Trappers Association for
information on the latest trap
modification techniques.
Offset Jaws
O f f s e t j a w t r a p s a r e
manufactured so that a slight gap
remains between the jaws when
closed. This modification is
designed to reduce trap injuries by
increasing clamping forces and
stabilizing the foot in the trap.
Padded Jaws
Recently, a padded jaw trap has
become available commercially and
it may offer potential for more safely
trapping wary land animals in areas
where the chance of catching non-
target animals is unavoidably high.
Although the idea of padding traps is
not new, these traps utilize new
materials and designs, which have
proven very effective in preliminary
tests.
Laminate Jaws
By laminating steel rods to the
TOOLS OF THE TRADE

Revised 7/2012 PAGE 30
trap jaws, the surface area of the jaw
is increased. This more broadly
distributes the holding forces of the
jaws, and tends to stabilize the foot
in the trap resulting in reduced
injuries and increased capture rates.
Center Swivels
By relocating swivels to the
center of the trap, the holding power
is increased, resulting in fewer pull-
outs.
Body-Gripping Traps
Body-gripping traps are the
result of many years of research and
design efforts. These traps are
designed to catch the animal around
the neck or the chest. When
properly set, these traps usually kill
the trapped animal quickly through a
combination of striking and
clamping forces. In an ideal
situation, the animal will approach
and enter the trap in such a way that
it will be struck at the base of the
skill, resulting in almost instant
unconsciousness and rapid death. If
a chest hold occurs, the animal may
be killed by heart stoppage or
suffocation, with death again coming
quite rapidly. Catches on other parts
of the body may cause death very
slowly or may not kill at all. In
order to be most effective, body-
gripping traps must be set with
careful attention to trigger placement
and animal approach. Suggested
trigger placements are shown in the
accompanying illustration.
These traps are very popular with
water trappers, and quite useful in
so me k ind s o f l and se t s :
CAUTION: Body-gripping traps
are not adaptable to all types of
furbearers, such as canines, or to a
full range of sets. Canines
instinctively avoid entering body-
gripping traps and these traps may
be dangerous when set on land.
Minnesota regulations prohibit the
setting of certain large body-gripping
traps on land.
Cage Traps
Cage or box traps of various
descriptions may be useful in
trapping some species where the
potential of taking domestic animals
is high. Like the body-gripping
traps, however, their use is rather
limited, especially for wary species.
Their cost, size and visibility are also
disadvantages to their use on trap
lines.
Snares
Snares are a simplified type of
body-snaring device designed to
capture an animal around the neck or
body. Snares consist of wire cable
with sliding locks, which may be
either “locking” or “non-locking.”
Depending on the set, the lock type
and the animal caught, snares either
kill or hold the animal alive.
There are restrictions on snaring
in Minnesota and snares are not
recommended for inexperienced
trappers. Anyone planning to use
snares should seek advice and
training from someone experienced
with their use.

Revised 7/2012 PAGE 31
Trappers are innovative and
modifications to existing
commercially produced traps to
make them more efficient and
species selective while at the
same time treating the animal
respectfully is an ongoing
process.
T h e i n t r o d u c t i o n o f
completely new trap designs to
the market is another example of
this continuing evolution.
One of the most innovative
developments in the trapping
arena over the past ten years has
been the introduction of
commercially produced “dog
proof” raccoon traps. All basic
designs currently available
consist of a small opening in a
steel tube or box that is baited
inside. The raccoon either pushes
or pulls a firing mechanism
inside the opening while
attempting to steal the bait which
causes the entrance hole to be
suddenly restricted, holding the
animal’s foot.
Various swiveling designs
and gripping surfaces allow the
trapped raccoon to be treated
respectfully. This highly selective
trap design has revolutionized
raccoon trapping in many parts of
the United States and due to their
extreme selectivity these traps
may be set in areas where a
traditional foothold set or
bodygripper may not be a wise or
ethical choice particularly in
areas where domestic animals
may occasionally wander.
Because these traps are set
completely exposed above
ground, many of the common
frustrations associated with
traditional traps are eliminated
such as freezing into the ground
inoperable, misfires and the
possibility of non target catches.
Due to the unique firing
mechanism, generally only
animals with the ability to grasp
and item with their paws are
taken with this type of trap which
severely restricts the species of
animals that can be consistently
taken in these traps.
Although these traps are
commonly referred to as
“raccoon traps” other animals
may be caught in them
occasionally. Regular trap
tending requirements as required
by law should always be
observed. Striped skunks seem to
be the most common secondary
by catch although grey foxes are
occasionally taken in rare
circumstances as well.
According to a production
Minnesota raccoon trapper who
has used these traps extensively
over the past several years:
The newest Innovation in
foot hold traps is the “dog proof
“or “DP” raccoon trap. These
traps are designed to catch
raccoon and severely reduce the
chances of ever catching a
domestic dog. The trap is
basically a tube that you place
b a i t i n t o a n d a s t h e
raccoon reaches into the tube to
get at the bait, it trips a
trigger and is caught. These traps
are not buried in the ground but
set vertically above ground
surface held in place by the “foot
peg” incorporated at the bottom
of the trap. These traps must also
be staked down as the “foot peg”
simply holds the trap in the “set
position.” These traps are
versatile and can be set on
raccoon trails, in and around old
or abandoned buildings, in close
proximity to live stock and near
or in the water with the trap
Specialized Traps - Dog Proof Traps
Duffers
Duke DP
Grizz Getters

Revised 7/2012 PAGE 32
opening above the waterline.
They can be either staked solid
for live holding sets or rigged for
drowning dispatch.
I have found ground fish to
be good bait. I put enough bait in
the tube so that bait is just below
the trigger and freeze the trigger
down into the bait. I think the bait
should taste good to the raccoon
because the trigger likely won’t
be activated the first time the
raccoon reaches into the trap to
investigate. If it doesn’t like the
taste, it may not continue to work
the set any further resulting in a
miss. No bait or lure should
be placed on the ground or
around the trap in my opinion as
I want the animal to focus strictly
on the bait contained inside the
trap.
Unfortunately, the DP
although a fine trap isn’t perfect
and will occasionally catch
feral cats in some situations, so
caution should be exercised when
setting near homes and farms.
Bait selection in these areas
appears to be the key to avoiding
problems. I have found the use of
sweet baits such as jams or jellies
as opposed to fish baits in these
areas to be an effective way to
still consistently take raccoons
while substantially reducing the
chances of taking a feral
cat .Avoid fat based baits such as
peanut butter however. Although
peanut butter is “sweet” and
attractive to raccoons fat based
baits may also attract cats as
well.
DP traps work very well on
raccoon trails in road right-of-
ways. The same trails that are
routinely set with medium sized
body grippers can be set with
DP’s without the same concerns
associated with bodygrippers.
An additional advantage to
using this type of trap is the fact
that many landowners will give
you permission to trap raccoons
on their property when using
DP’s despite the fact that they
have denied access to other
trappers in the past. Because of
the selective nature of these
traps, landowners feel more
confident giving trappers access
to their land without being
concerned with Fido getting
accidently caught .
Although I have used only a
single brand of DP, I’m confident
that other brands on the market
will give the trapper similar
positive results. JB
Coon Cuff
Coon Dagger
Alcatraz

Revised 7/2012 PAGE 33
TRAP TYPES
FOOT HOLD BODY GRIPPING BOX TRAP
Furbearer Jaw Spread Size Jaw Spread Size
Length, Width &
Height
Muskrat 4-5 1, 1 ½ 4 1/2 – 6 110 19 x 6 x 6
Mink 4-5 1, 1 1/2, 11 4 1/2 – 6 110, 120, 160 * * *
Beaver 5 1/2 - 7 ½ 3, 4, 5 7 – 12 280, 330 * * *
Otter 5 1/2 - 7 ½ 3, 4 7 - 12 280, 330 * * *
Opossum 5 1 1/2, 11 6 - 7 160, 220 ** 20 x 7 x 7
Skunk 5 1 1/2, 11 6 - 7 160, 220 ** 20 x 7 x 7
Raccoon 5 1 1/2, 11 6 - 7 160, 220 ** 32 x 10 x 10
Gray Fox 5 - 5 ½ 1 1/2, 2 * * * * * *
Red Fox 5 - 5 ½ 1 1/2, 2 * * * * * *
Coyote 5 1/2 – 6 1 3/4, 2, 3 * * * * * *
Weasel 3 1/2 – 4 0, 1, 1 ½ 4 1/2 110 16 x 5 x 5
Fisher 4 1/2 - 5 1/2 1 1/2, 2 6 - 7 160, 200 ** 32 x 10 x 10
Bobcat 5 1/2 – 6 2, 3 7 220 ** * * *
Badger 5 1/2 – 6 2, 3 7 220 ** * * *
All Measurements given in inches
* Dimensions given are minimum sizes for single door traps - double door box traps should be longer than the lengths listed
* * USE ONLY WITH EXTREME CAUTION - when setting on land to avoid catching and killing non-target animals.
* * * Trap types without dimensions for a particular species are either ineffective or not normally recommended for that species.
TABLE 1. Approximate trap sizes for the various Minnesota furbearers.
Before setting traps, a trapper
must acquire some basic trapping
tools. Determining what tools are
needed is a matter of personal
preference, terrain, weather and the
type of trapping to be done. Some
equipment is a necessity for any type
of trapping while other tools are very
specialized.
Trap Tags
Minnesota regulations require
that all traps and snares be tagged or
indelibly marked with the trapper’s
name and address, or driver’s license
or DNR number. Tags made from
aluminum, copper or brass are best
as they do not rust. Tags can be
purchased commercially for little
cost and are usually much better
quality and less work than
homemade tags.
Pack Basket
A trapper needs something in
which to carry all equipment needed.
Most trappers use a pack basket
rather than a canvas pack because
the basket is less likely to hold
odors, more rigid and more
convenient to use. A 5-gallon plastic
pail also works well for carrying
equipment. Lure and bait are usually
carried in a separate pouch or in a
trapper’s coat pocket.
Wire
Wire and/or cable has many uses
on the trap line. Wire can be used to
repair chains, make drowning sets, or
attach traps to stakes. It is also used
to hold traps, baits, or even cubby
pens in place.
Many trappers prefer a dark
flexible wire for these purposes.
S t r o n g 1 6 - g a u g e w i r e i s
recommended for muskrat and 10-
gauge wire or cable for larger
furbearers. Heavy lap-links or S-
hooks are recommended for
fastening fox and coyote traps.
CAUTION: Beware of kinks or
nicks because they will weaken the
wire. Do not twist wire tightly with
pliers. It is best to leave extra length
and twist it with your hands, then
trim the excess. Wire twisted with
pliers can break when an animal is in
the trap. Do not use wire to extend
trap chains – use chain or cable.
Pliers
Pliers are useful for cutting wire
and adjusting traps. They should
have a good cutting edge.
Hatchet
Every trapper encounters the
need for a hatchet or small hand axe
on the trap line. Stakes must be
driven, and ice sometimes must be
chopped in making or checking sets.
A good hatchet should be kept with
your trapping gear. Learn how to
sharpen it and use it safely. Hatchets
should be kept in a stout leather
sheath.
BASIC TRAPPING EQUIPMENT

Revised 7/2012 PAGE 34
Digging Tools
Many sets require digging.
Many trappers use a special trapping
trowel that resembles a garden
trowel with a long wooden handle.
Other tools such as a mattock,
mason’s hammer, a heavy spoon or
hatchet can also be used, but a
trapping trowel is a good investment.
LAND TRAPPING EQUIPMENT
Dirt Sifter
A dirt sifter is simply a mesh-
bottomed box. Most trappers make
their own using a wood frame about
8” x 10” x 3” and tacking in a
bottom of one-fourth inch hardware
cloth or “hailscreen.” A sifter is
extremely useful in dirt or snow
trapping. Sifting the covering
material helps to prevent stones or
twigs from jamming the trap and
lends a natural appearance to the set.
Kneeling Pad
Some trappers use a square of
cloth, rubber or plastic as an odor
barrier and something to put the dirt
on when making sets for animals
such as fox and coyote. Others make
these sets from a squatting position,
letting only their clean rubber
footwear touch the ground.
Gloves
Many trappers prefer to use
gloves while making dry-land sets,
although they are not essential.
Cloth or rubberized gloves may be
used, but all gloves should be kept
clean and odor free. No bait, lure or
other odors should be permitted on
the gloves.
Pan Covers
Pan covers are used by many
trappers to prevent dirt or other
materials from getting under the pan
of the trap, and preventing it from
going off. Pan covers can be made
from fiberglass, latex and window-
screen.
Stakes or Drags
Soil conditions, terrain and cover
type dictate to the experienced
trapper whether a stake or drag
should be used. Staking traps has
the advantage of holding the animal
at the set where the trapper can
locate it. Metal stakes are preferred
to wood because they are more
durable. A one-half inch concrete
reinforcing rod with a five-eighths
inch nut welded on top makes an
excellent stake. The length of the
stake needed varies with the texture
of the soil in which they are used.
Drags or grapples are used where
it is not practical or possible to drive
trap stakes, or where the trapper
desires the trapped animal to move a
short distance away from the set.
The best drag is a metal grapple
hook that has two prongs for easy
concealment. Green saplings, fence
posts and rocks also can be used for
d r a g s i n s o me s i t u a t i o n s .
CAUTION: Drags should only be
used by experienced trappers or
under the supervision of someone
experienced in their use.
Caution: Check Minnesota Hunting
a nd Trap p ing Reg ula t io ns
Handbook regarding the use of
drags as they are not at this time
legal to use statewide.
Catchpole
Many trappers carry a catch-
pole, a pole or length of tubing
with a rope or cable noose. This
highly recommended tool can be
used to control a trapped animal
so it may be released or dis-
patched more safely and easily.
A catchpole can be made by
running a loop of cable through a
three to four foot piece of rigid
aluminum pipe or conduit. At-
taching one end of the cable to
the pipe makes use easier. Com-
mercial catchpoles are available
which allow the noose to be tight-
ened without slipping.

Revised 7/2012 PAGE 35
Rubber Gloves and Rubber
Footwear
Short rubber gloves or shoulder
length gauntlets, and hip boots or
chest waders are essential to keep the
wetland trapper dry. Being wet and
cold takes the fun out of trapping and
can be dangerous. (See safety
section on hypothermia.)
Although not required by law
outside the boating requirements
currently in place, the use of PDF's
(personal floatation devices) while
water t rapping i s s trongly
encouraged.
Drowning Devices
Drowning devices are simple one
-way slide locks designed for use
when trapping water animals,
especially beaver and otter. When a
water animal becomes caught in a
trap it normally dives for deep water.
Drowning devices are strung on a
wire and permit the animal to go into
deep water, but not return.
Staff
Many water trappers use a
walking staff to help them navigate
muddy shorelines. It can be used as
a probe for finding muskrat runs.
With a hook on one end, it is also a
good device for retrieving traps in
deep water. Use of a trap hook is
much safer than reaching under
water or ice to try to feel for a
missing trap because of the risk of
being accidentally caught.
Stakes or Drags
Wooden stakes are usually
preferred to metal stakes for water
trapping because they are often
readily accessible along shorelines.
Stakes should be at least an inch in
diameter with a “Y” at the top or a
downward pointing branch to stop
the trap chain from passing over the
stake. Such stakes should be driven
below the surface of the water, out of
sight of casual observers.
In beaver country, stakes should
be pre-cut and dried. Green stakes
will often be gnawed off by beaver.
Drags used in water sets are
usually heavy objects, pieces of
brick, iron or a rock. Drags should
be used when the soil is too rocky or
too loose to hold a stake. Drags are
also used where a raccoon catch is
likely because raccoons are very
powerful and may pull out a stake in
soft mud or pull out of a solidly
staked trap.
Ice Chisel
This tool is almost indispensable
for setting traps under thick ice. An
axe or hatchet may work under thin
ice conditions, but an ice chisel is
best for thick ice.
WATER TRAPPING EQUIPMENT

Revised 7/2012 PAGE 36
Baits
Baits are foods, which are
attractive to the target animal. Baits
may be fresh or tainted, or solid or
liquid. Baits help hold the animal at
a set and “work” it (explore),
increasing the probability of the
animal being caught.
Baits, scents and lures can be
used alone or in combination.
Beginning trappers would be wise to
use commercial lures until they
develop their own. A new bait or
lure should be used only on a few
sets until it has been proven
successful. Only experience and
experimentation will tell which lures
will be effective in which situations.
Odors or lures and baits should
be kept off the traps themselves and
the soil covering the traps. Lure
contaminated traps or soil may cause
some furbearers, like fox or coyotes,
to dig the traps out.
Before setting traps, the trapper
must be ready to care for the pelts.
A good skinning knife, set of honing
stones, gambrel, tail stripper, tail
splitter, fleshing beam or board,
fleshing tool, and an assortment of
fur drying frames (stretchers) are
needed. Well-handled furs bring
significantly higher prices than
poorly handled ones.
Skinning Knife
A sharp knife is needed if the
catch is to be skinned properly. For
making the initial cuts, slitting tails,
and working on smaller furbearers, a
skinning knife should have a slender
pointed blade. A somewhat broader,
rounded blade is useful in most
skinning situations. Most trappers
prefer a rather high quality knife
with those two blade styles.
Shinning knives should be kept
sharp.
Honing Stones
Frequent touch up honing of a
knife makes the skinning job go
much more smoothly. An
investment in a good knife should be
matched with an investment in good
sharpening stones. A relatively soft
stone will cut the steel quickly to the
desired angle; hard stones smooth
the edge. A good trapper learns the
proper use of both the knife and
honing stones.
Gambrel
The gambrel is a device used to
hang an animal by its hind legs while
it is being skinned. The two hooks
are usually inserted just above the
ankle between the leg bone and the
large Achilles tendon.
LURES, SCENTS AND BAITS
Bait, scents and lures are used as attractants or fear removers
at sets.
Lures
There are three basic categories of lures. Gland lures are
made from anal or other glands of the target animal. These lures
may be effective because the odor may suggest that another
animal of its species has been at a location and marked it, or
because of sexual attraction. Food lures are liquid or semi-liquid
concoctions of substances, which appeal to an animal’s hunger.
Curiosity lures can be any type of unusual scent designed to
interest the animal and cause it to investigate further. Curiosity
lures can be things like skunk essence, beaver castor or even
cheap perfume.
Scents
Scents are generally the urine of the target animal and appeal
to the animal’s habit of marking its territory or serve as a fear
remover.
FUR HANDLING

Revised 7/2012 PAGE 37
Fleshing Beam
A fleshing beam or fleshing
board makes the fleshing task much
quicker, safer for the fur, and easier
for the trapper. Some trappers prefer
a narrow rounded beam with a
tapered point. Others prefer a flat
board with a tapered point. Either
tool works well. A fleshing beam
can be made by tapering and
smoothing a debarked piece of slab
wood. A narrow beam about two or
three inches wide works well for
mink, weasel, and other small pelts.
A wider beam up to eight inches
makes a better surface for fleshing
larger pelts such as raccoon, fox and
opossum. Some trappers use a
smooth, wooden drying frame for a
fleshing board.
Fleshing Tools
There are many types of fleshing
tools. Draw shaves, hog scrapers,
and table knives have all been used.
Some American Indians still use
hardwood wedges for fleshing pelts.
Many trappers buy their fleshing
tools from supply houses. Others
make their own from old knives,
draw shaves, or even sheet metal
stock.
Whatever type of fleshing tool is
used, take care so that excess flesh
and fat is removed from the pelt
ithout damaging the hide. Cuts
affect pelt value as must as sloppy
fleshing. Learn to use fleshing tools
efficiently and properly.
Fur Drying Frames
After the pelt has been removed
and fleshed, it is ready to be dried.
All furs except beaver and badger
are skinned and dried cased. The
pelts are air dried while shape is
maintained by a fur drying frame.
Commercial wire frames are
excellent, but some trappers still
prefer either solid or adjustable wood
drying frames. Remember to fit the
frame to the fur rather than to stretch
the fur to fit the frame. Bear in mind
that the pelt dimensions desired by
the fur market may change
occasionally. Further information is
presented in the fur handling section
of this manual.

Revised 7/2012 PAGE 38
When taken care of properly,
your traps and other equipment can
provide years of trouble free use.
Inspection All traps and other equipment
(including new traps) should be
inspected each year before use.
Check for bent or broken parts, weak
springs and damaged or broken
chains on all traps. Parts are
available for most traps and any
weak or damaged traps should be
repaired. All sharp edges and burs
should be filed smooth, especially on
the inside edges of the jaws. Trap
pans should be adjusted so that they
are level when set.
Preparation All equipment used in land
trapping should be clean and free of
foreign odors. New traps should
have a coating of oil which should be
removed before use by washing with
a mild, odorless detergent, by
allowing the traps to soak overnight
in a saltwater and vinegar solution,
or by boiling in clean water and
pouring or skimming off the grease.
New traps will take dye better if a
light coating of rust is allowed to
form on them. On the other hand,
excess rust should be removed from
used, badly rusted traps with a steel
brush or buffing wheel. Before
dyeing or waxing, a small piece of
wood, wire or the trap ring should be
placed between the jaws to hold
them slightly open.
Dyeing Dyeing slows rusting of traps,
makes them easier to conceal, and
remo ves undesi rab le odors .
Commercially available logwood
chips, powder or crystals are
probably the quickest and easiest
substance to use, but traps can also
be dyed in a solution of black walnut
hulls, alder bark, sumac berries or
maple bark. The solution should be
brought to a boil in a large kettle,
pan or bucket, which is firmly
supported above a fire or stove.
Traps should be tied together with
wire by the chains in groups of six to
make handling easier. The traps
should then be submerged in the
water, with enough of the wire
hanging over the side of the kettle to
retrieve the traps. The traps should
simmer in this solution until they are
an even black in color (usually about
45 minutes). Other metal equipment
(stakes, drags, etc.) can be treated in
this way.
A new method of treating traps,
which has proven to be effective, and
which requires only infrequent touch
-ups, involves spraying clean traps
with a penetrating, cold-galvanizing
compound.
Waxing Traps can be waxed to prevent
further rusting and to improve their
action and speed. This is especially
important for traps used for land sets.
Commercial trap wax or a mixture of
paraffin and a small amount of
beeswax can be used. Some trappers
add a pea-sized piece of pine or
spruce resin to the wax mixture to
help conceal unnatural odors.
To wax dyed traps, submerge
them in clean boiling water. Melt
the wax on top of the water and
when the traps are hot, pull them up
through the melted wax and hang
them to cool and dry. Some trappers
coat traps with a thin wax film by
placing hot traps directly into a very
hot, pure wax solution. However,
this technique is not recommended
for beginning trappers because the
hot wax is extremely flammable and
it can also cause severe burns if it
splashes.
Never wax conibear-type traps because it makes them dangerously
sensitive and they may spring
unexpectedly while they are being
set.
Storage After degreasing, dyeing, and
waxing, the traps should be hung in a
clean, well-aired area away from
foreign odors. An ideal location is
an open building such as a
woodshed, away from the house.
Every effort should be made to
prevent contamination of the clean
traps with lure, bait, human scent,
gasoline, oil, smoke or blood. It is a
good idea to wear gloves when
handling clean traps. Never apply
lubricating oil or grease to a trap.
Metal or wooden cage traps
should be kept as clean as possible
and should be stored in open air.
Wooden traps are more effective if
allowed to weather before use.
EQUIPMENT PREPARATION

Revised 7/2012 PAGE 39
Since humans first began to take
prey with traps, a large body of
experience has been gained by
trappers. A number of standard sets
have emerged from that experience,
and many are described in the
following pages. Some experienced
trappers would not want to be
limited to just these standard sets,
but nearly every trapper used some
of them. Modifications of the sets
are used to fit the situation
encountered at a given time and
place. New trappers should study
these sets and practice making them
before the season arrives.
Trap site selection is extremely
important. A poorly constructed but
well-placed set will often take more
fur than a well constructed but
poorly placed set. In fact, many
trappers feel that trap placement is
80 to 90 percent of successful
trapping. Learning the best sites for
traps requires time, sign reading
ability, and plenty of pre-season
scouting.
TRAP FASTENING Trap fastening is probably the
most overlooked, yet one of the most
important, aspects of trapping.
Nothing causes more frustration to
the trapper, or more problems for the
animal and the trapper’s image than
to have an animal escape with a trap
on its foot. Trappers should always
“overstake” their traps and use good
swivels and fasteners (use a larger
stake than seems necessary). Most
commercially available traps do not
have adequate swivels for trapping
predators. You can purchase good
replacement swivels or make your
own. For land trapping, lap-links or
S-hooks are much better than wire
for fastening traps to stakes. Wire, if
used, should be of 12 gauge or
larger, should be doubled, and
should not be twisted tight with
pliers, which can weaken the wire
and cause a break later. Enough
wire should be used so that it can be
twisted by hand, and a wire cutter
used to trim the excess.
Stakes, when used, should be
made of strong material and be long
enough to hold solid in whatever
type of soil conditions are present.
Always test a stake after driving it by
pulling hard upwards. If it gives, use
a larger stake or “cross-stake” it (see
illustration). Cross-staking is very
effective in sandy or loose soils,
which will not hold a regular stake.
Various types of drags or
grapples can be used by the
knowledgeable trapper for fastening
traps, but their use by inexperienced
trappers is discouraged. Use of
grapples and drags depends on the
type of terrain and vegetation, soil
conditions, and the type of animal
being trapped. Also, some trailing
ability is needed to find captured
animals.
Feedbed Set Muskrats create feedbeds, which
actually are piles of food cuttings.
These piles of clippings or cuttings
can be easily distinguished from
muskrat lodges because the feedbed
is not piled much above the surface
of the water. Muskrats are caught at
these feedpiles by foothold traps set
in 1 to 2 inches of water in front of
the pile. The trap should be attached
to a drowning wire or a heavy (#1 ½)
trap should be staked in deep water.
If the water is less than 1 foot deep, a
guarded foothold trap should be
used.
STANDARD SETS

Revised 7/2012 PAGE 40
Many new trappers start by
trapping semi-aquatic furbearers,
particularly muskrat and mink.
Though less aquatic, raccoon will
also be taken in water sets. The
selection of sets present here is
useful for those species as well as for
beaver and otter. As noted earlier,
body-gripping traps of suitable size
or drowning sets should be used
whenever possible for water
trapping. When trapping muskrat
and mink where the water is not deep
enough to ensure drowning the
catch, and body-gripping traps are
not usable, guarded traps should be
used.
For muskrat and mink, drowning
sets need not be elaborate. Stake
traps in deep water (12 to 18 inches)
or use a sliding wire or cable to let
the animal reach deep water.
Make sure the trap is firmly
anchored since many raccoon are
taken in muskrat sets. Beaver and
otter require the use of a sliding lock
on a strong wire of cable. Sliding
locks can be made using angle iron.
Commercial drowning locks and
cables are also available.
Float Set Muskrat and some other aquatic
animals tend to climb up on floating
logs or other surface objects. The
trapper can take advantage of that
behavior by using existing floating
logs or by building a small floatation
platform and concealing traps where
the animal will trigger them. Several
designs are illustrated. When such
sets are used in one foot or more of
water, the weight of the trap will
drown the muskrat. The trapper can
avoid catching ducks by placing a
crossed pair of branch hoops about
6”over the float as illustrated. Float
sets are particularly effective where
water levels fluctuate markedly.
Channel Set Most semi-aquatic
furbearers follow well-
defined trails under water.
Since the animal commonly
goes through restricted
spaces, body-gripping traps
of adequate sizes are ideal
for trapping these channels.
Where the channel is too
large for the trap, it may be
fenced or otherwise
constricted using brush and
similar natural materials.
The trap is usually more
effective if it is placed at
the bottom of the channel.
Mink will be taken
occasionally in channel sets
for muskrat. Beaver are
effectively trapped in their
channels, and otter may be
caught in those sets as well
WATER SETS
Channel Set (beaver and otter)
Channel Set (muskrat and mink)
Float Sets

Revised 7/2012 PAGE 41
Bank Hole Set Muskrats dig bank dens along
streams, rivers, ponds and lakes.
These dens may look like small
underwater woodchuck burrows.
Foothold traps can be used to capture
muskrat at bank den entrances, but
body-gripping traps are usually
easier to use at the set location. No
bait or lure is needed.
Trail Sets Many water animals travel the
same trail each time they pass over a
given spot. Blind sets in these trails
are often very productive. They are
also selective if properly placed.
Muskrats can be taken by concealing
a foothold trap underwater where
their trails are evident. The trap
should be placed so that the animal’s
foot comes between rather than over
the jaws as it approaches. Muskrat
lure can be placed above the trap to
enhance the set, but it is not
necessary. Be sure to follow the
precautions for drowning the animal,
or use a guarded trap if deep water is
not available, or use a small body-
gripping trap.
Beaver and otter can be taken at
trails using a strong foothold trap
carefully concealed in 3 to 4 inches
of water at the base of the trail. The
use of a sliding lock and drowning
wire is essential for beaver and otter
trapping.
Spring Run Set Spring runs or small streams
entering larger bodies of water are
essentially natural channels. They
are attractive to muskrat, mink, otter
and raccoon. Foothold traps of
appropriate size and a drowning wire
should be used. In some cases,
appropriate sized body-gripping
traps also may be used effectively.
Where the spring run is small and
shallow, raccoon will frequently
move along or across them at the
edge of the larger body of water.
Therefore, a wise trapper must make
sure such sets are secure for raccoon
as well as the smaller mink and
muskrat.
Underwater Ice Beaver Bait Set Many beaver are trapped under
the ice by using fresh bait such as
aspen or poplar. As illustrated,
either foothold traps or body-
gripping traps may be used. A hole
is chopped into the ice near where
the beaver lives or feeds. Then a
trap and bait are fastened on a dry
pole, which is pushed deep into the
mud and anchored above the ice to a
cross pole which cannot be pulled
through the hole in the ice. If the
trap used is a foothold trap, it should
be secured
to the lower
portion of
the pole in
s u c h a
manner as
to prevent
the beaver
f r o m
reaching the
hole in the
ice. This
prevents the
beaver from
getting air and thus ensures
drowning.
Pocket Set The pocket set will take mink,
muskrat, and a raccoon quite
effectively. An upward sloping hole
with its base a couple inches below
the waterline is dug into the stream
bank so that the back of the hole is
above the water. For mink and
muskrat the hole should be about 6
inches in diameter and 12 inches
deep. Pockets for raccoon can be
made as much as twice that size, but
it is unnecessary. Use either a body-
gripping trap of appropriate size or a
foothold trap with a drowning wire
or a heavy drag. The pocket is
baited with a fish or a honey-based
bait and an appropriate lure. In areas
where free-ranging dogs may occur,
the trapper should avoid meat baits
and raccoon gland lures. Locating
the set under low handing cover, like
branches or exposed tree roots, and
keeping the trap well inside the
pocket are also helpful in keeping
dogs out of these sets. Muskrat
musk and beaver castor are excellent
lures for pocket sets.

Revised 7/2012 PAGE 42
Obstruction Set Another type of trail set makes
use of the habits of the furbearer
upon encountering an obstruction.
Raccoon and mink tend to enter the
water at the same place each time
they encounter an obstruction on the
bank, often forming a visible trail.
Water sets at those points can be
quite productive. The traps should
be well bedded and may be covered
with water-soaked leaves or mud. A
drowning set should be used. No
bait or lure is needed.
Spillway Set
Beaver, muskrat and otter often
use the same path or spillway to
cross a beaver dam. Traps can be set
in such path spillways. Foothold
traps should be set as described for
trail sets. If body-gripping traps are
used, they must be set in the water
(generally below the dam in the
spillway).
Scent Mound Set Beaver make mud mounds and
mark them with castor, much like
fox and coyote mark prominent
objects with urine. A well-concealed
trap in 3 to 4 inches of water with a
sliding lock drowner at either a
natural or artificial scent mound will
account for some Beaver in open
water trapping particularly in the
spring.
Otter Toilet Set
Otter create and regularly use
certain spots for toilets. These spots
are generally near the water and
contain numerous piles of otter
droppings. A foothold trap can be
set in 3 to 4 inches of water where
the otter leaves the water to visit the
toilet and should be properly
attached to a drowning wire and one-
way slider.
LAND SETS
Precautions – Traps at Land Sets Body-gripping traps can be used
in some land sets with the proper
precautions. These precautions for
not capturing domestic animals are
necessary because a body-gripping
trap normally kills its catch.
Therefore the use of body-gripping
traps on land is generally
discouraged for beginners. Use of
large body-gripping traps on land is
illegal in Minnesota. The two sets
that involve body-gripping traps in
trees tend to reduce the possibility of
capturing domestic animals (except
cats) if these sets are made as
illustrated.
Trail sets and log crossing sets
are often recommended by trapping
manuals for use in land trapping.
Such sets can be selective if used by
an experienced trapper, but their use
requires both extreme caution and
long experience. For these reasons,
we do not recommend using these
sets for trapping land furbearers.
Cubby Sets Much like the bank cubbies and
pocket sets mentioned under “Water
Sets,” cubbies can be used
effectively for land species that will
enter a closed space. They work
well for weasel, skunk, raccoon,
opossum, fisher, marten, mink and
even bobcat. They are not effective
for fox or coyote. Cubbies are pens
or boxes that prevent the animal
from approaching the bait or lure
from any side except that guarded by

Revised 7/2012 PAGE 43
the trap. Hollow logs or trees,
stumps and drain tiles are natural
cubbies. A trapper may construct
others of sticks, logs, bark or rocks.
Boxes with one end removed, or
with holes cut in them are also types
of cubby sets.
Some types of cubby sets can be
made using body-gripping traps if
there is no danger of catching non-
target animals. Where that danger is
present, foothold traps are a much
better choice. When used, they
should be entirely inside the cubby
entrance, and they should be of an
appropriate size for the species being
taken.
Raccoon Boxes Another type of cubby can be
used effectively for raccoons. An
open ended wooden box about 9” x
9” with its opening guarded by a
medium sized body gripping trap is
placed vertically on a tree no more
than 6’ above the ground. The trap
can be held in place by staples, light
wire, or sticks. (Be sure not to
anchor both jaws!) Baits of fish,
beaver castor, or honey with anise
can be used. This set can take
domestic cats so it should not be
used where there is danger of
catching them. Be sure the box is
securely fastened to a tree.
Weasel Box Set
A small wooden box with holes
cut in the ends is an excellent weasel
cubby. The holes should be about 2
½ to 3 inches in diameter. The box
can be baited with grain (to attract
mice), bloody bait, weasel scent, or a
combination of those baits. Small
body gripping or solidly staked
underspring traps in sizes 0 and 1
with a very light pan action are
appropriate. A large flat rock placed
on top of the box will prevent other
animals from getting into the set.
Box Traps
Box traps are self-contained
cubbies, thus they can be used
effectively for the animals that will
enter an enclosed space. In many
cases, carefully covering the box trap
will make the set more effective, and
also may help in hiding it from
thieves. In most instances, the bait
should be placed behind the treadle
or trigger, with just a few
“appetizers” near the front opening
and just inside the door. Single door
traps may work better than those
with double doors, particularly for
raccoon and fisher.

Revised 7/2012 PAGE 44
Dirt-Hole Sets The dirt-hole set is an extremely
good producer for nearly all
predatory furbearers. Making the
dirt-hole set for fox and coyote is the
most demanding construction, and
the instructions below are written for
that type of set. Site-selection is all-
important. The set should be made
in a relatively open spot where
visibility is good on all sides.
Naturally, fox activity should be
evident in the area.
After selecting the site, all
necessary equipment should be made
ready, and the trapper should go
directly to that spot. The bait hole
should be dug with a clump of
weeds, a rock, a small stump, or
some similar backstop. It should be
about 2 ½ to 4 inches in diameter, 6
to 8 inches deep, sloping back about
60° under the backstop. All dirt
removed should be placed in the
sifter. In areas where free-ranging
dogs may be present, the trap should
be set as near the lip of the hole as
possible. Some trappers offset the
trap slightly to the right or left of
center to assure a front foot catch.

Revised 7/2012 PAGE 45
Next a triangle of sod about 8 to 10
inches on each side is removed in
front of the hole. The point of the
triangle should touch the hole, giving
it the appearance of a fox-dug cache.
Dirt is removed from the triangle
until the trap bed is sufficient for the
trap to sit below the surface.
The trap is staked so that
the stake and chain will be directly
under it. Only about 8 inches of
chain should be used. After the
stake is driven, pull hard on the
chain. If the stake moves, the trap is
inadequately anchored. Either add
an additional stake or move the set to
a location where the stake will hold
adequately. Cover the stake and
excess chain with a smooth layer of
earth and bed the trap carefully. The
trap should not rock or shift position.
In wet or freezing weather the trap
should be bedded in dry sand, anthill
dirt, or a trapping antifreeze may be
used. Antifreezes, which are used,
include salt, calcium chloride or
commercial products. When using
salt or calcium chloride, traps should
be heavily waxed to prevent rusting.
After adding the pan cover
(if used), the trapper can cover the
trap with sifted soil. The pan cover
can be a piece of clean cloth, a
plastic “baggie,” nylon window
screen, or crumpled waxed paper.
The pan cover should go over the
pan of the trap and under the jaws.
The soil should be level, and the trap
should be buried no more than one-
half inch below the surface. The trap
pan should be as close to the front of
the bait hole as possible.
100
For coyote and bobcat, the set is
made a bit larger with larger traps
and with the trap set farther back
from the hole. When trapping
strictly for raccoon, raccoon lure
may be used and fox urine is
unnecessary. Skunk and opossum
may also be caught in these sets.
Mink and fisher are sometimes taken
at dirt-hole sets.
Scent Post Set Like domestic dogs, coyote and
fox urinate on prominent objects
along their lines of travel. Trappers
can take advantage of that habit to
catch these furbearers. Raccoon,
skunk and opossum also many
investigate post sets for fox. A small
prominent object, like a protruding
stone, grass tuft, or stick, serves as
the post. A liberal amount of fox
urine and a few drops of gland lure
are placed on it. The trap is carefully
bedded and concealed a few inches
away from the post, so that the
animal will step on it while
urinating. Traps should be covered
and staked as with the dirt-hole set.
Scent posts can be natural, but most
often are made by the trapper in open
areas with objects taken from near
the set.

Revised 7/2012 PAGE 46
Slanted-Pole or Running Pole set A second “dog-proof” set for
raccoon, fisher and gray fox is the
slanted-pole set. A leaning pole is
baited at the top with suitable bait.
The trap is placed lower on the pole,
but at least 5 feet above the ground.
Medium body-gripping traps can be
stapled (the jaw nearest the bait) to
the pole. The trigger should be set
on top and to the side to permit the
animal to enter the trap to the
shoulder before springing it. This
also prevents small mammals such as
squirrels from springing the trap. A
pan type trigger (as illustrated) is
commercially available, and very
useful in this set. The traps should
be carefully screened or concealed in
all cases, and the trapper should be
sure the animal will be suspended
above the ground and away from the
tree. This set will catch cats, so the
trapper must use it with caution
where they may be found.
Fish, beaver meat, and raccoon
meat are good baits. The bait should
be screened with conifer branches or
leaves so that it is not visible from
above. Suitable lures may be used as
well. Fish oil dribbled along the
pole or the tree trunk will help lead
the animal up it.
Spring-Hole Set The spring hole set is effective
for raccoon and fox. It takes
advantage of the habit of the fox to
avoid wet feet. A site with
permanent water (preferably a non-
freezing spring), several inches deep
and 3 feet or more wide is selected.
A large piece of moss-covered rock
or sod is placed about 12 inches out
from the bank. A second, smaller
rock or sod, fitted to the inside of the
trap jaws, is placed about half way
from the bank edge to the bait sod.
The trap and drag should be
concealed below the surface, but the
“stepping stone” should be above the
water and stable on the pan. The
trap should be adjusted so that the
pan is level and rather stiff in action.
Bait and lure placed on the bait sod
should be carefully hidden to prevent
birds from stealing the bait or getting
into the set. Spring-hole sets work
best in late fall and winter in most
areas.
Flat Set The flat set is quite similar to the
dirt-hole and scent post sets. No bait
hole or post is used, but the set is
lured and liberally sprayed with fox
urine. The flat set is an excellent
choice where fox are acting shy of
dirt-hole sets.

Revised 7/2012 PAGE 47
In Minnesota, all non-drowning
sets must be checked at least once
each day. Since most furbearers are
primarily nocturnal (active at night)
the responsible trapper checks his
trapline as early in the day as
possible. This practice minimizes
the amount of time that animals are
held alive in the traps. It also
reduced the chances of trapped
animals escaping or being stolen.
Trappers who must attend school
or work should try to quickly check
all of their sets in the morning and
remove their catch. After school or
work, the trapline can be revisited,
traps reset, and other sets rechecked.
Before ever setting a trap, the
trapper should have the necessary
knowledge and equipment to
properly handle any capture animal.
If trapping with foothold traps on
land, the trapper should have the
proper equipment for killing target
animals, and a catchpole (or
something similar) for releasing non-
target animals.
When checking traps, the trapper
should always approach as close as
necessary to determine that nothing
has been captured and that the set is
not disturbed. When trapping wary
furbearers such as fox, coyote or
mink, try to keep disturbance near
the set to a minimum.
Checking traps regularly is one
of the most important requirements
of responsible trapping. If you
cannot check it regularly at the
proper time, do not set it.
KILLING TRAPPED ANIMALS Whenever possible, drowning or
killing sets should be used for
animals such as beaver, mink,
muskrat, raccoon, skunk, opossum
and weasel. Kill-type sets are not
recommended for the larger land
furbearers because they can be
hazardous to people and domestic
animals and they are generally
ineffective. For these reasons, large
kill-type traps are prohibited for land
sets in Minnesota.
Animals trapped in foothold traps in
upland areas should be shot in the
chest of head with a .22 caliber rifle
or pistol.
Always be careful that the bullet
does not strike the ground, a rock or
the trap and ricochet, and be sure of
the background before shooting.
Skunks should never be shot in the
head because of the increased
possibility of contacting or
spreading rabies virus, which maybe
concentrated in brain tissue.
Young trappers who do not have
a firearms safety certificate should
restrict their trapping to water sets
and small upland carnivores, which
can be captured in small kill-type
traps, or they should trap only in the
accompaniment of an adult.
Older, more experienced trappers
can kill trapped animals by stunning
them with a hard, sharp blow with a
heavy hardwood or metal tool, which
r e n d e r s t h e m i m me d i a t e l y
unconscious. Once the animal is
unconscious, death is assured by
compressing the chest near the heart.
This method is not recommended for
trappers who lack the strength or
experience to do it properly.
Furbearers held in box traps can
be shot or drown by submersing the
trap in water or gassed with an
engine exhaust after covering the
trap.
RELEASING NON-TARGET
CATCHES If there is a high chance of
catching a non-target animal in an
area, the set should be moved, if
possible, or a cage trap or a selective
set using foothold traps should be
made. Do not use kill-type traps in
areas where a non-target animal is
likely to be caught, unless it is used
in a way that prevents a non-target
animal from entering it. With body-
gripping traps, unlike foothold or
cage traps, you lose the option of
releasing the animal. The key to
minimizing injury with a foothold
trap is to use the proper size, fasten it
properly, and check it frequently,
preferably in early morning.
To safely remove a dog or other
animal from a trap alive and unhurt
and with the least risk of injury to
yourself, it is best to use a cable slip-
noose device on a rigid handle,
referred to as a catchpole or “hog
choker.” The best types have a
locking device, which allows the
noose to be locked at any size. With
patience, the noose can be slipped
over the animal’s head and then
tightened. It should not be tightened
to the point that it causes the animal
to stop breathing.
Once this has been done, the
animal can easily be kept immobile
by standing or kneeling on the
handle of the noose. With the
animal’s head pinned to the ground,
it is unable or unwilling to do much
struggling and the trap can be
removed from its foot. Depending
so mewhat o n the an imal ’s
disposition, some care should be
taken in releasing the noose once it
has been taken out of the trap. It
should be kept at arm’s length when
the noose is loosened and watched
carefully to make certain it does not
try to bite.
If you capture a dog and you
know who owns it, you should go
and explain to them that you
accidentally trapped their dog, rather
than simply releasing it and letting
the owners find out for themselves.
If traps are tended regularly each
day, seldom is there ever permanent
injury to the dog’s foot except in
very cold weather.
In an emergency you can remove
an animal from a trap without a
catchpole by placing a blanket over
its head to calm it, but this method is
not always effective or easy.
Some trappers carry a 3-foot
square piece of plywood in their
vehicles with a 2-inch by 12-inch
notch cut vertically into one side of
it. They then place the plywood on
edge with the animal’s leg extending
through the notch in the board. The
animal and its teeth are then on one
side of the board, and it foot and the
trap are on the other side. The
trapper can then remove the trap
from the animal’s foot without being
bitten.
TRAP CHECKING

Revised 7/2012 PAGE 48
Proper fur handling is very important.
I t can bring much personal
satisfaction from doing a job well and
it can also result in a better price from
the furbuyer. Fur handling starts at
the trap site.
If trapped in water, the furbearer
should be rinsed clean of any mud or
vegetation. Next, attempt to remove
as much excess water as possible.
Muskrat can be held by the head and
shaken to remove much of the water.
Furbearers can be stroked with your
hand from the head to the tail to
squeeze out water, or rolled in dry
snow to clean and soak up excess
water. In cold weather, do not lay a
wet animal on ice or any metal
surface because the guard hairs will
freeze to the surface and the pelt may
be damaged when the animal is
picked up. If animals are carried in a
vehicle, they can be placed on a
newspaper. If the animal’s fur is still
wet, it should be hung up by the head
or forelegs in a cool place to finish
drying. Be sure not to hang too long
since the pelt may spoil in warm
weather. All pelts must be dry before
being placed on a drying frame.
If the furbearer is trapped on land,
brush or comb it to remove any burrs
or dirt before skinning. The trapper
should be cautious of parasites such
as fleas, ticks, and mites that may be
on the animal’s fur (especially land
furbearers). If fleas or ticks are a
problem, the animals can be placed in
a plastic garbage bag and dusted with
flea powder when they are removed
from the trap.
It is advisable for trappers to
wear plastic gloves when skinning. Furbearers should be skinned as soon
as possible after they are killed. The
skin is easier to remove when the
animal is fresh and damage to the pelt
is less likely.
There are two recognized ways of
skinning animals called “cased” and
“open.” All furbearers except beaver
and badger are prepared cased.
Cased furs are removed from the
animal by slitting the fur across from
one hind foot pad to the other and
pulling it down over the animal’s
head they way we take off a pullover
sweater. Open pelts are prepared by
skinning down the belly and tacking
the pelt out flat. Animals with furred
tails have the tail split on the
underside and left on the pelt.
Hairless tails, like those of muskrat,
beaver and opossum are removed at
the hair line.
CASED FURS
Muskrat The muskrat is a good example to
describe the procedures on skinning
cased furs. The first step is to cut the
pelt around the tail and all four feet at
the fur line. Next, the pelt is cut from
the heel of each hind foot to the anus.
By pulling the pelt and cutting
connective tissue where necessary,
the pelt is peeled down from the hind
legs and the tail. Aside from the
initial cuts around the feet and tail
and down the hind legs, the muskrat
pelt can be removed from the body
without using the knife. Cuts will be
required to remove the pelt at the ears
and eyes.
If desired the carcass can be hung
by the hind legs, using a gambrel at a
convenient height. The pelt is pulled
down the carcass as far as it will go,
exposing the base of the forelegs.
Pass a finger between the foreleg and
the pelt; then using a push and pull
motion, strip the skin from each leg.
When both forelegs are free, pull
the pelt down the carcass, past the
neck to the base of the ears. The head
of the carcass should be partially
exposed. Locate the cartilage that
attaches the ears to the skill and cut as
close as possible to the skull. Pulling
the pelt lower should reveal the
connective tissue around the eyes.
The tissue should cut close to the
skull using a sharp knife. If done
properly, no fur should be left on the
carcass around the ears and eyes. The
pelt is pulled down again, finally
exposing the loose flesh around the
lips. The pelt is freed from the
carcass by cutting around the lips and
through the nose cartilage. The pelt
is ready to be fleshed, “stretched” and
dried, or it can be frozen fur side out
in a plastic bag. Do not roll up pelts
before freezing. Heavy pelts are
extremely good insulators and rolled
pelts may begin to spoil and warm in
the center before the cold can
penetrate, particularly if several pelts
are placed next to each other.
Raccoon Another good example of
skinning a cased fur is the raccoon.
The first step in skinning a raccoon is
to cut the pelt around the “ankles”
and “wrists” where the long fur ends.
Next, the pelt is cut from the heel of
each hind foot to the anus and around
the anus. Finally, a cut is made from
the anus straight down the tail about 4
inches. Start peeling the pelt down
the hind legs by pulling the pelt and
by cutting connective tissue where
necessary. After the pelt is removed
from the hind legs, the carcass can be
hung at a convenient height by it hind
feet. Peel the pelt off the carcass
around the anus. If the raccoon is a
male, reproductive organs will be
connected to the pelt. These are cut
off as close to the pelt as possible.
Now peel the pelt from around the
base of the tail exposing a couple
inches of the tailbone. Clamp a tail
stripper around the tail bone with one
hand and hold the base of the tail with
the your other hand and attempt to
pull the tail bone out of the tail by
pulling the tail stripper (see drawing).
If the tailbone does not pull out,
extend the cut several more inches
toward the tip of the tail. Free more
of the tail bone from the pelt by
cutting the connective tissue and then
try to pull the tailbone out as
described before. Once the tailbone
is pulled, extend the cut on the tail
SKINNING AND FUR HANDLING

Revised 7/2012 PAGE 49
straight to the tip. A tail-slitting
guide may be helpful, but is usually
unnecessary if a sharp night is used.
The pelt should now be pulled
down the carcass as far as it will go
exposing the forelegs. Further expose
the foreleg by cutting the connective
tissue. Wrap fingers from both of
your hands around the raccoon’s
foreleg and support it while pushing
the pelt down. Keep pushing until
the raccoon’s forefoot passes through
the pelt and the pelt is free. Repeat
this process with the other foreleg.
As with the muskrat, the ears,
eyes, nose and lips should be cut free
without leaving any fur on the
carcass. The pelt is now ready to be
fleshed or placed fur side out in a
plastic bag to be frozen.
Fleshing Cased Furs Fleshing is the act of removing
the fat and muscle from the skin.
Before the pelt is ready to be fleshed
its fur should be dry and free of any
mud or burrs. Pelts with a lot of fat,
such as raccoon, skunk or opossum
pelts, should be allowed to hang fur
side in and cool until the fat stiffens
or hardens. If the pelt is frozen, it
should be removed from the plastic
bag and thawed completely but
slowly (don’t leave it next to a stove
or heater).
The fleshing job is made easier by
using a fleshing beam or fleshing
board (see diagram). The trapper
should try to match the shape of the
beam or board with the type of
fleshing tool used. One-handed
scrapers, hog scrapers and two-
handed scrapers with a straight blade
work well on the flatter beams and
boards. A two-handed scraper with a
curved blade works well on a rounder
beam or board. Regardless of the
equipment used, care should be taken
not to apply too much pressure on the
pelt. This could cut the hide or the
roots of the fur and lower the value of
the pelt.
To start fleshing, the pelt is
slipped over the fleshing beam or
board with the fur side in. If the
animal has a tail that is left on the
pelt, the tail is usually fleshed first. It
is important that all the fat be cleaned
from the tail because if any is left on
it may spoil or get into the fur.
Many trappers like to flesh a
narrow strip around the bottom of the
pelt after fleshing the tail. Next, start
at the head and flesh a strip down the
length of the pelt. The pelt is turned
or rotated on the beam or board so
that the trapper can flesh another strip
alongside the first strip. The pelt is
turned until all of it has been fleshed.
A sharp knife can be used to trim
around the lips, eyes and ears.
Forelegs should also be checked for
fat and fleshed if necessary. A clean
dry rag, feedbag or a paper towel can
be used to soak up extra grease or
loose fat. Some furbearers, especially
red fox and weasel, will only have a
small amount of flesh or fat on the
pelt and it will only be necessary to
scrape where the trapper sees flesh or
fat.
Wire Stretchers Cased furs are always arranged on
stretchers in such a way that the
forelegs and belly will be centered on
one side of the stretcher and the eyes,
ears and back will be centered on the
other side. Place the pelt fur side in
on the stretcher, centered as
described, and pull the pelt down the
stretcher until snug. Wire stretchers
usually have two or more arms that
move up and down the stretcher.
These arms are attached (pronged)
into the edge of the hide in the center
of the stretcher. Muskrat pelts are
attached at the tail and belly portions
of the pelt each on a separate arm.
All other cased pelts have the tail
portion of the pelt attached to one
arm and the two hind legs attached to
the other arm. The arms are pulled
toward the bottom of the stretcher
until snug. The pelt is then wiped
clean and is ready to dry. The fur
side of the pelt must be completely
dry before it is placed on a wire
stretcher, or the stretcher may rust
and damage the pelt.
Completed
Raccoon Pelt

Revised 7/2012 PAGE 50
Wooden Stretchers Place the pelt on the board fur side
in and center as shown on page 48.
The pelt should be placed
smoothly and evenly on a board with
the tail well cleaned and opened. Pull
snug but do not overstretch, as this
will cause the fur to look thin. It
should be fastened to the board with a
few tacks or pushpins around the skirt
and a few along the edge of the tail.
Cut off the lower lip or use one tack to
hold it in place. Let the skin of the
front legs stick out free from the pelt,
but trim them so that they do not hang
down against the pelt. Do not fold the
front legs together nor turn them back
inside the pelt as either way can cause
rot and hair slip. The back legs of the
pelt can be fastened with one or two
tacks.
With the one piece drying board, a
belly board is necessary. The belly
board is 5/16” x 5/16” x 30” and
sloped or tapered from one end to the
other so it can be removed after the
pelt is dry. Place the smallest end
between the drying board and the pelt
on the belly side and push it ahead
until the belly board goes up to the
head of the pelt. With an adjustable
wooden drying board, no belly board
is necessary. Again wipe clean. The
pelt is now ready for drying.
After the pelt has been boarded, it
should be hung to dry in a place away
from the stove, sunlight or strong, hot
winds. If it is dried too fast the leather
will be ruined. A temperature of 55°
to 60° F. (13° to 15° C.) is about right.
Pelts of foxes, cats, fisher and coyote
are only partially dried then turned fur
side out, as described later, to finish
drying.
The pelts will dry in 24 hours to
one week, depending on the amount of
air movement passing through the
drying place. They should be wiped
with a dry, clean rag occasionally to
take of sweat and any fat that might
work out of the leather. When the
pelts have been on the drying board
long enough to dry, they should be
taken off and hung by the nose until
the head and legs are full dry before
selling. Cased pelts should not be
folded, but should be packed flat, one
on top of the other. Folding makes a
crease and takes away some of the
good appearance.
Note:
The tails of the following ani-
mals should have the tail bone re-
moved and then split open to the tip
and dried.
Mink* Red Fox Fisher
Otter* Gray Fox Bobcat
Skunk* Coyote Badger
Raccoon* Weasel
Spread the tails of these animals
open and nail, tack or pin open
until dry. Use plenty of nails
or pins to be sure the edges are
even. This will give it a better
appearance. Many trappers and
buyers prefer to tack open the
tails of all the animals above.
Mink: Market Fur In
The following step-by-step
procedure illustrates an alternate
method of handing a “cased” fur. Fasten a small steel trap firmly to
a solid support. Place the right hind
foot of a mink in the trap and it will be
held solidly, yet remain movable
while the animal is being skinned.
First, cut the front feet off at the top of
the footpad. The next cut is made by
holding the left hind foot of the mink
straight out toward you and making
the cut from foot pad to foot pad along
the back legs just in from of the anus
on the belly side.
Take the right hind foot of the
mink out of the trap and put the left
hind foot of the mink into the trap and
hold the tail out toward you. Cut
down the tail past the anus to meet the
first cut. Now slice down the opposite
side of the anus and the pelt is open
with no fur being wasted and the anus
not cut open to free scent and oil
glands, which would be harmful to the
fur and result in strong odor.
Next work the legs and tail out.
This is done by simply pushing down
with thumb and finger between the
skin and carcass near the base of the
tail on each side and moving outward
toward the foot, separating the pelt
from the carcass in quick, easy
movements. The pelt is pulled down
the hind legs to the foot and cut off to
leave the claws on the carcass.
The bone is then pulled out of the
mink tail. Next the mink is placed
with both hind feet in the trap and the
pelt pulled down over the head as the
front legs are pulled through. Skin
carefully around the head cutting the
ears off close to the skull and using
great care not to cut the eyes and lips.
Otter: Market Fur In The otter is one for the most
difficult furbearers to skin. The otter
has more connective tissue holding its
pelt to the carcass so the pelt must be
cut free more than pulled free. Once
removed, the pelt is placed on the
scraping board and thoroughly cleaned
of all fat, flesh and blood. Though
difficult to scrape, care should be
taken not to use too sharp a knife or
scraper that will expose the hair roots
through the leather. If the otter is not
well cleaned the remaining fat will
quickly burn and discolor the leather
side, thereby reducing its market
value. When well cleaned, place on a
standard drying board, pull tight and
nail into position. The tail should also
be opened and nailed on the board.
Skunk: Market Fur In Skunk should be skinned the same
as raccoon. Most of the trouble from
skunks is their smell, which creates a
problem while skinning and in storage
as well. Also, because of the
possibility of skunks having rabies,
always wear rubber or plastic gloves
when skinning and do not skin
animals that appear sick or are
behaving abnormally.
Hang the skunk by one hind leg
and open the pelt by slitting from one
hind footpad in a straight line past the
anus to the other footpad. Much care
should be taken in skinning around the
anus to the other footpad. Much care
should be taken in skinning around the
anus to prevent cutting it open to
release the scent. Leaving a small
patch of fur around the anus helps
prevent cutting the scent gland ducts.
Split the tail open on the underside
SPECIAL INSTRUCTIONS BY SPECIES – CASED FURS

Revised 7/2012 PAGE 51
and remove the tailbone. Skin as
described for the raccoon or mink. All
flesh and fat should be fleshed from
the leather on a fleshing beam or
board. When fleshed, the entire pelt
can be soaked in vinegar for one-half
hour to remove most of the scent from
both the pelt and your hands. Rinse,
turn the fur out and hang loose by the
nose in an airy place, until the fur side
is dry. When dry, turn fur side in and
place on a standard drying board or
wire stretcher. Fasten with closely
spaced nails around the skirt. Spread
the tail open and nail that way. Use a
belly board. Hang in a cool, dry place
until dry. When dry, remove from the
board and again store in a cool, dry
place.
Gray Fox, Red Fox and Coyote:
Market Fur Out Hang the animal by one hind foot.
Two cuts are made, one from each
hind foot to the anus following the
line where the belly fur and back fur
meet. Then cut from the anus up to
the tail 2 or 3 inches and finally
around both hind feet. The tailbone is
removed as described for raccoon.
Skin out the hind legs and continue to
pull the pelt down over the front legs,
cutting free any connective tissue
while doing so. A little extra pressure
is needed to pull the small neck part
over the head, but when this is done,
the ear cartilage shows, and this
should be cut off close to the skull.
Using great care, cut the eyes, lips and
nose free, and the fur is then free of
the carcass. Check the leather side
closely, and remove all excess flesh
and fat. Do not forget to spread the
tail open and clean it in the same way.
Place the pelt on a standard drying
board or wire frame fur side in. Use a
belly board. Fasten with nails along
the bottom. The neater the job, the
better looking it will be to the buyer.
Allow to dry in a cool, dry place.
When partly dry (not sticky but
flexible) remove from the board and
turn it fur side out, where it should
remain until fully dry. If the pelt gets
too dry to turn fur side out, it can be
resoftened by wrapping in a damp
cloth. Do not try to force an over-dry
pelt inside out or it might tear. When
completely dry, remove it from the
board, and hang it nose up in a cool
dry place. Then brush the fur lightly
or hold it upside down and “snap” it to
give a good appearance.
Weasel: Market Fur In Weasel is very easy to skin. Skin
as described for the mink. Take care
not to pull the pelt too hard or it may
tear.
Weasel pelts dry rapidly, and
should be placed on proper drying
boards as soon as skinning is
completed. Bloodstains should be
removed by light washing with clean
water. When the pelt is on the drying
board fur side in, a tack at each hind
foot and one at the base of the tail will
hold it in place. Excess fat and flesh
should now be carefully removed.
Pelts should remain on the drying
boards until completely dry in order to
prevent wrinkling after being
removed. Wrinkling spoils the
appearance and reduces size and
value. Use a belly board as you do for
mink. This permits easier removal
from the board when dry. Dry away
from heat.
When fully dry, remove the pelt
carefully from the drying board to
prevent tearing. Store pelts in a cool
dry place. Lay flat, or hand on strings
through the eye holes. Do not fold the
pelt because this may cause cracks and
always leads to a poor appearance.
Split open all tails and always remove
the tailbone.
Fisher: Market Fur Out Skin as for raccoon or fox.
Remove all flesh and fat. Be sure to
flesh large male fisher well, as they
have a tendency to get stiff when dry.
The pelt should be placed on
standard drying boards, fur side in.
The tail on fisher should be spread
open, cleaned, then fastened open to
dry. When partly dry, remove from
the drying board and turn fur side out
by starting at the nose. When turned,
return them to the drying board until
fully dried.
Bobcat: Market Fur Out Although the claws are sometimes
left on bobcat pelts, there is no
necessity for this. Unless you have a
special order for claws on be sure to
remove them from the pelt. It is
sometimes a good idea to slit the skin
of the front leg rather than try to pull
the paw through. Bobcat has small
necks and big heads. Much pressure is
necessary to pull the pelt down over
the head, so take your time to prevent
tearing. Cut the ears off next to the
skull, and skin carefully around the
eyes, nose and lips, until the pelt
comes free. Remove all flesh and fat
from the leather. Place on a standard
drying board with the fur side in. Pull
it down and nail around the skirt. Use
a belly board. Spread open the hind
legs and nail them open to dry.
When the leather side of the pelt is
partially dry, remove it from the
drying board and turn fur side out by
starting at the nose and working to the
rump. Return it to the drying board,
nail and then hang in a cool dry place
until it is dry. When dry, remove the
drying boards, brush the fur out
lightly, and hang by the nose in a cool,
dry place until it is marketed.
OPEN FURS
Beaver Beaver are handled “open” and
can be skinned either clean or rough.
Clean skinning take longer, but little
or no fleshing is required. Some
trappers like to rough skin beaver on
the trapline or at home and then flesh
the pelt on a beam.

Revised 7/2012 PAGE 52
The fur should be clean and dry
before skinning. The first step is to
remove the front and hind feet.
Some trappers chop these off with a
hatchet, but with a little practice they
can be removed easily with just a
knife. Some trappers remove the tail
while other leave it attached and use
it as a “handle” while skinning. Lay
the beaver on its back and make a
straight line in the fur from the lower
lip to the base of the beaver’s tail
with the tip of your index finger. Slit
the belly skin along this line, being
careful not to cut into the body
cavity or to damage the castor glands
on either side of the cloacae (anus).
Begin to pull and cut the pelt free
along this midline cut. Beaver are
difficult to skin and knives must be
kept sharp. Work toward the back of
the beaver, one side at a time,
keeping the hide taut to avoid cutting
it. Do not slit the leg area but pull
the hide off over the legs. When the
skin is loose on the underside of the
animal, flip it over and cut the skin
loose from the back up to the head.
Cut carefully around the ears, eyes
and nose to free the pelt from the
carcass.
Fleshing Beaver The skin should be hung in a
cool place to allow the fat to stiffen
or “set.” This will make the fleshing
job easier. Some trappers flesh
beaver by tacking the pelt out tightly
on a board with at least eight nails
and using a knife or flat fleshing tool
to remove fat and flesh from the
outside edges of the pelt toward the
center. Pelts that were skinned very
clean may not require fleshing.
Beaver are most easily fleshed on a
beam with a two-handled fleshing
knife. A nail head sticking out
slightly at the tip of the fleshing
beam will hold the pelt when the
trapper leans his body against it.
Flesh a strip of the pelt down the
midline of the back and another strip
at right angles across the pelt. Each
of the “quarters” can be easily
fleshed. Any holes made while
skinning or fleshing should be sewn
shut with even stitches before the
pelt is nailed to a drying board.
Boarding Beaver
Beaver pelts should be nailed to
heavy plywood, the end of a cable
drum, or on some other flat surface
in a round or wide oval shape. It
helps to have permanently drawn
concentric circles or ovals of various
sizes marked on the board to serve as
a guide when nailing. Be careful not
to overstretch the pelt. Place the
nails according to the accompanying
illustration. When finished, the nails
should be not more than 1 inch apart.
Use nails at least 2 inches long and,
once the pelt is nailed up, pull it
away from the board up onto the
nails so that air can circulate behind
it.
Pelts can also be sewn onto a
hoop frame of metal or wood. The
pelt should be sewn loosely using
stitches one inch apart. Once it has
been attached all the way around, the
stitches can be pulled tight all
around. Some metal hoops are
adjustable and the stitches can be
tightened by increasing the hoop
size. Some trappers hoop beavers
using metal hog rings rather than
heavy thread or cord.
Leg holes should be trimmed and
sewn or nailed closed.
Beaver should be dried in a cool
place away from direct sun. As the
pelt dries, wipe it from time to time
with a clean dry cloth to remove
grease or oil coming out of the
leather. After the pelt is dry, remove
it from the board or frame, brush the
fur, and hang or stack the pelts
leather-to-leather, fur-to-fur.

Revised 7/2012 PAGE 53
Badger Badger is the only other
Minnesota furbearer, which is
sometime dried and stretched
“open.” However, it is easier to
hang badger and initially skin them
“cased,” as described for a raccoon
or fox. They can be fleshed on a
beam, then the belly fur is slit down
the midline from anus to lip, and the
pelt is tacked out in a rectangular
shape. Some buyers prefer badgers
stretched and dried cased in a wire or
wooden frame similar to a raccoon.
It is best to check with your buyer to
see which he prefers before
stretching badger pelts.
Recommended Stretcher Sizes Recommended wooden stretcher
sizes for various furbearers are listed
on page 60. If homemade wooden
stretchers are constructed, the edges
of the boards should be rasped or
sanded round and smooth after
cutting to shape.
CARCASS
UTILIZATION
MEAT
Beaver, muskrat and raccoon can
be used for human consumption.
The meat from these animals is very
good if prepared properly. Animals
that are freshly caught, skinned and
gutted will taste the best. The front
and hind -quarters and back meat are
most commonly utilized, while the
rib cage area is usually discarded.
All meat should be soaked in salt
water overnight before preparing.
All fat should be carefully removed
from raccoon and parboiling further
helps to eliminate fat and the taste it
imparts to the meat. All oil should
be skimmed or poured off after
boiling.
Beaver and muskrat carcasses
can be sold to fur farms as animal
feed or to sled dog trainers.
Carcasses should be gutted and
frozen while being stored.
Most dogs will eat beaver and
muskrat carcasses. These can be
used as excellent supplements to or
substitutes for dog food.
The meat from many furbearers
can also be used as trapping bait.
Muskrat is excellent bait for mink.
Pieces of beaver or muskrat, either
fresh or tainted, work well for
canines and cats. Skunk is a good
fox and coyote bait, especially in
winter, as is bobcat.
High school biology teachers in
your area might want carcasses or
skulls for use as teaching aids in
anatomy or taxonomy classes.
The trapper should attempt to
utilize the full value of every
furbearer.
GLANDS
Many trappers are unaware of the
value of glands of animals that they
trap. Some glands have commercial
value and others are valuable to the
trapper for formulating his own
lures. On beaver, castor glands and
oil sacs, both found in the anal area
are of value and can be removed by
carefully pulling and cutting the
flesh away from the glands. The oil
sacs are light in color and contain a
yellowish, oily fluid. The castor
glands are darker with a veined
appearance. Care should be taken to
keep the pair of castor glands joined
together. Castors are normally dried
before selling, but can be frozen. To
dry, hang them over a rope or wire.
Dry them for one day, turn over, and
dry for two weeks a room
temperature, then freeze until sale.
Beaver castor is used extensively in
the perfume industry as well as by
lure manufacturers.
Members of the weasel family
(mink, weasel, skunk, otter, fisher)
have anal glands, which contain a
powerful musk useful in lure
making. These glands open in the
anal area and are pod-shaped,
containing liquid musk. They can be
cut loose carefully with a minimum
of squeezing and should be kept cool
or frozen until used.
The glands of weasels are
particularly valuable as an attractant
for mink, otter, weasel or canids.
The anal glands and footpads of
canines are often used in lure making
for those species. The glands of
raccoons, opossums, badgers, and
muskrats are less commonly
collected for lure making.
Caution: Glands should be
doubly or triply sealed before
placing in the family freezer, and
even then you do so at your own
risk! Skunk glands can be removed
by the method described above, but
it is easier (and safer) to withdraw
the musk with a syringe and inject it
into a jar that can be tightly sealed
and stored in a cool place (there is no
need to freeze pure skunk essence).

Revised 7/2012 PAGE 54
Instead of selling your pelts you
may wish to keep some for your own
use, either as garments or for
display. This may be especially true
for smaller or lower grade pelts
which may bring little money, but
which would make attractive furs
when tanned.
This section is just a brief
introduction to home tanning using a
non-caustic tanning solution. Many
other tanning methods and solutions
can be used, including acid tans and
s o m e c o m m e r c i a l t a n n i n g
compounds.
Pelts to be tanned should be
salted heavily on the flesh side,
rolled or folded, and placed in a cool
place for several days to allow the
skin to cure. (Note: Never salt a
pelt that you intend to sell as a raw
fur – dry it as described in preceding
sections.)
If the skin has already been
dried, it should be soaked in a
solution of cool clean water
containing ¼ cup of salt, 1 ounce of
borax and 2 ounces of detergent per
gallon. The soaking should continue
only long enough to soften the skin.
A thin skin such as a fox will soften
in one to two hours while a large
beaver may take 8 to 10 hours.
After the hide has been salted
and allowed to cure, all flesh and fat
should be removed by scraping with
a fleshing tool or knife. Particular
attention should be paid to removing
excess flesh around the eyes lips and
ears. The ears should be turned
inside out. Once all fleshing is
completed, wash the skin several
times in lukewarm (not hot) water
containing a mild dishwashing
detergent. All traces of fat and oil
must be washed from the skin.
RACCOON RECIPES
Roast Raccoon Place the dressed raccoon in a
large pot, and cover with water. Pit
one or two pods of red pepper in the
pot and salt the water to taste. Parboil
until tender, then remove and place in
a baking pan. Sprinkle with black
pepper and flour. Add some stock to
the roast as it is being baked. Onion
may be added if desired. Cook until
brown.
Fried Raccoon Cut a young dressed raccoon into
small pieces suitable for frying. Place
the meat in a bowl and cover with
milk. Let it stand for 30 or 40 min-
utes. Remove the milk and roll the
meat in flour, which is well seasoned
with salt and pepper. Fry in deep fat
until brown. For gravy, pour off most
of the fat, leaving just enough to cover
the bottom of the pan. Add three ta-
blespoons of seasoned flour and
brown. Pour about two cups of milk,
used for soaking meat, into browned
flour and cook until thick, stirring
constantly.
MUSKRAT RECIPES
Fried Muskrat Cut muskrat into 6 pieces. Season
with tenderizer salt and pepper and
rub in a little flour. Let this rest for a
minute, then dip each piece in a
beaten egg followed by cornmeal.
Brown on all sides in very hot bacon
fat.
Put browned meat into a heavy
iron or copper pan and continue cook-
ing in a moderate/slow oven for about
an hour.
A cream gravy can be made just
as you would for fried chicken. Pour
off all but about 3 T. of the fat. Add 3
T. flour and cook for about 2 minutes.
Slowly pour in 1 ½ cups of sweet
milk and stir until thickened. Serve
gravy over the muskrat.
Barbecued Muskrat Marinate whole animals in a sauce
made of equal parts hot catsup,
Worcestershire sauce and plain cider
vinegar for at least 24 hours. Cook
over charcoal fire and, using a long
handled brush, paint the meat with the
marinade of 15 minutes throughout
the cooking.
BEAVER RECIPES
Fried Beaver
Remove fat and cut beaver into
pieces. Soak overnight in cold water,
drain. Cook until tender in a pot with
a small amount of water and a piece
of bacon. Season and brown in bacon
or cooking fat. This is recommended
for small beaver only. Wild rice,
grapefruit salad and watercress with
oil and vinegar dressing will top off
the meal.
Atlanta Special Remove fat from the beaver and
cut up. Soak overnight in salt water.
Parboil with 1 bay leaf, 2 medium
onions, and garlic until about half-
cooked. Drain, roll in flour, and
brown in hot fat. Season with salt and
pepper. Bake in covered pan in a
moderate oven until tender. Gravy
can be made from the drippings.
RECIPES
HOME TANNING

Revised 7/2012 PAGE 55
Place the hide in a pickle
solution of 1 pound of salt and ½
pound alum for each 2 gallons of
water. Make enough solution to
completely cover hides. Leave the
hides in solution of two to three days
(muskrats) to two weeks (beaver).
Stir once a day.
Remove hides from pickle
solution, rinse thoroughly in clean
running water, and hang up for an
hour or so to drain. Next, lay the
skin flat on the floor and apply a
solution of one part leather oil (or
Neatsfoot oil) to two parts hot water.
Work oil into the hide with a steel
brush, then fold hide flesh side to
flesh side and leave it overnight. The
next day, wipe excess oil off the skin
with a soapy rag and then hang it up
to dry. Watch closely and stretch
and work the hide when it shows
signs of drying. A good way to
soften hides is to pull them back and
forth over the dull blade of an axe
tightened in a vice. The more the
hide is worked and stretched while
drying, the softer it will be. Take
care with thin hides not to stretch
them too vigorously, as they may
tear.
After drying, the flesh side of the
hide can be rubbed with sandpaper to
get a smooth finish. Hides tanned
for wall hangings need not be
softened and can be nailed on a
board to dry in the shape desired.
They can be attractively displayed by
attaching a felt backing in the shape
of the pelt, but larger, trimmed with
pinking shears or (for beaver) by
lacing them in a willow hoop.
Fur pelts consist of skin
(“leather”), guard hairs and underfur.
The guard hairs are the long glossy
hairs that overlay the shorter, denser
underfur. The guard hairs help to
repel moisture in addition to
protecting the underfur from
damage. The underfur primarily
serves to insulate the skin, especially
in the cold climates. For this reason,
furs from northern areas are
generally higher in quality and of
more value that those from southern
regions.
Fur “primeness” refers to the
degree of development of the
animals winter pelt. All furbearing
animals undergo at least one annual
molt. Summer pelts are thin and flat
and are of little or no value as furs.
In the fall, as the days begin to
shorten, the winter fur grows in.
Although many people think that low
temperatures cause pelts to prime,
the primary process is actually
regulated by photoperiod (day
length). Weather can make some
differences, however. For example a
cloudy, gray fall will cause furs to
prime up more quickly than they
would in a bright, sunny fall because
of the difference in light levels.
Primeness of a pelt is usually
determined by examining the skin or
leather side, although fur length and
quali ty are also important .
Unprimed pelts will be a dark blue or
black color on the skin side – hence
the term “blue pelt.” They will also
be “flat” or lacking in guard hairs or
underfur. Fully prime pelts will be a
creamy white on the skin side,
indicating that the hair follicles are
fully developed. If the hair follicles
are not developed fully enough, the
hair will fall out or “slip” during the
tanning (“dressing”) process.
Some furbearers are at their best
for some uses before the skin is fully
prime. These include raccoon and
fox, which have better color early in
the season, and muskrat and beaver
which, when fully prime in the
leather are past prime in the fur.
Once the fur has completely
grown in, it begins to deteriorate,
either by fading or by damage or loss
of hair. By late winter, most
furbearers begin to show signs of
“rubbing” (guard hair breakage),
“shedding” (loss of guard hairs), or
singeing (curling of guard hairs –
especially in otter and mink).
However, the time of acceptable
primeness varies for different
furbearers, fur value goes down after
primeness much more rapidly than it
goes up. Therefore, furs taken
slightly before full primeness are
much better than those taken after
prime.
In addition to primeness, a
number of other factors influence the
value of pelts. Pelts are graded
(sorted) according to species, region
of origin, size, primeness, color,
texture, density and amount of
damage. Relative value for the
various types of furs is determined
by availability (supply) and by
contemporary fashion (demand).
Because a majority of fur from this
country is exported, value is also
influenced to a large extent by
international economics and the
strength of the U.S. dollar (generally
a strong dollar will result in lower
prices and vice versa).
Some of the things that graders
look for in pelts are discussed briefly
below.
SIZE
Pelts are graded according to
sizes such as small (S), medium (M),
large (L), and extra large (XL).
S i z e s a r e b a s e d o n p e l t
measurements (length and width)
and vary by species and region. For
beaver, the term “blanket” refers to a
stretched and dried pelt measuring
over 65 inches, length and width
combined. Generally, the larger the
pelts the higher its value, but pelt
color and quality are also important.
For example, female fisher are
general smaller than males but
because they tend to have darker,
silkier fur, they are usually more
valuable.
FUR GRADING

Revised 7/2012 PAGE 56
COLOR AND TEXTURE
Color and texture are very
important in determining the value of
some species. For muskrat, beaver,
otter, mink and fisher, the darker and
finer haired pelts are usually
preferred to the lighter coarser types.
In mink and otter, buyers look for an
even change in fur color from the
underfur to the guard hair, without a
distinct band (known as a “clear”
pelt). “Cotton” mink are mink with
white underfur contrasting with the
guard hairs. This condition is very
evident by blowing into the fur and
looking for the white underfur.
Cotton mink usually have very little
value. Red fox occur in several
color phases, with the more cherry
reds being most preferred of the
standard phase and the less common
“cross” and “silver” phases being
high value variations. “Samson” fox
are animals which are partially or
totally lacking guard hairs, but which
are have apparently normal underfur.
This results from a genetic or
hereditary condition and these types
of pelts have little or no commercial
value, although they make an
interesting tanned fur or a warm
garment. Good dark raccoons
without a yellow cast to the fur are
preferred. For bobcats, current
demand is for the lighter more
heavily spotted cats such as those
that come from areas to the south
and west of Minnesota. Also, paler
and softer western and northwestern
type coyotes are preferred over the
darker and coarser eastern types of
coyote such as occur in Minnesota.
FUR DENSITY AND LENGTH Generally, thicker or heavier furs
are used for trimming garments and
the lighter, flatter pelts are used for
coats or jackets. This is especially
true of raccoons, where most
southern raccoons and flatter pelts
are referred to as “coat types.” Most
Minnesota raccoon are classified as
“heavy” or “semi-heavy” and are
used mainly for trim. Badger are
among the most variable furbearers
in terms of pelt quality and value.
Light-colored badger with dense fur
may be quite valuable while darker
badger nearly lacking in underfur are
of little commercial value.
In recent years, there has been a
decided preference in the fur
industry for “long-haired” types of
fur (such as raccoon, fox, coyote) as
opposed to short-haired types
(beaver, otter, muskrats).
GRADES All of the measurements of
quality discussed above, except size,
are used to assign pelts to quality
“grades.” The top grade usually
includes one-fourth to one-third of a
season’s collection and is referred to
as “Ones” (written I) or as “Ones
part Twos” (written I pt. II). These
are the top quality or near perfect
pelts. The “Seconds” (II’s) are
flatter, slightly rubbed, very slightly
damaged, or slightly off-color pelts,
but still fairly average with a solid,
usable amount of fur. Seconds
represent the bottom end of the
quality range that most good
manufacturers would be likely to
use.
Furs below II’s are referred to as
“low-grade” and are used in cheaper
garments and for trim. Thirds (III’s)
are badly rubbed or flat (unprimed)
pelts and fourths (IV’s) are
extremely bad and of very little
value. Damaged and badly damaged
pelts may be put in a separate
category or included in grades III or
IV.

Revised 7/2012 PAGE 57

Revised 7/2012 PAGE 58
All trappers should constantly be
aware of the potential hazards, which
they might face while trapping.
Young trappers should practice the
“buddy system” and should always
try to avoid venturing out on the
trapline alone. Also, it is a good idea
to get into the habit of always letting
some responsible person know
exactly where you are going and
approximately when you expect to
return. All trappers are advised to
take a first-aid course and to carry a
first aid and survival kit with them.
The items needed in this kit would
depend on how remote the trapline
is. Some of the most common
hazards likely to be encountered on
the trapline are discussed briefly
below.
HYPOTHERMIA Hypothermia (exposure) is one
of the most dangerous hazards a
trapper is likely to face. Extremely
cold weather is not required to cause
hypothermia, in fact in wet, windy
weather, hypothermia can occur at
temperatures of 40 to 50° F. or
higher. Hypothermia can occur in
minutes if a victim is immersed in
cold water.
Hypothermia results from loss of
body heat and is characterized by
uncontrollable shivering, difficulty
in speaking and loss of coordination.
If body heat is not restored, death
will result. Hypothermia is
especially dangerous because the
cooling of the body slows mental
processes and leads to irrational
thinking and mistakes in judgment.
Also, the loss of coordination can
result in stumbling, falling and the
loss of the ability to walk. Pulse and
respiration slow and the victim
lapses into unconsciousness and,
unless help is rendered rapidly, dies.
Early signs of hypothermia
should be a warning to the trapper to
seek shelter as quickly as possible.
Build a fire. If possible, remove wet
clothing and get into a warm
sleeping bag or dry clothes. Drink
hot fluids and eat high-energy foods
such as candy or dried fruit. Do not
consume alcohol, as this will lead to
a further slowing of body functions.
If with a partner, share body heat. In
extreme cases of hypothermia, full
recovery of body temperature may
take hours and medical assistance, if
available, may be required to
gradually bring the body temperature
back up to normal.
FROSTBITE Frostbite most commonly occurs
on exposed skin (nose, ears, face) or
the extremities (hands, feet). It
results from freezing of the flesh and
is indicated by whiteness or
blanching of the skin accompanied
by a tingling sensation. Feeling in
the affected area decreases and the
skin will be cold and frosty. The
best treatment is thawing in warm
water (not hot). Do not rub the
affected area. On the trapline, a
bared hand can be held over the face
until the frostbitten areas hurt again.
In extreme cold do not handle metal
objects (such as traps) with your bare
hands or frostbite can result in a very
short period of time.
THIN ICE Many trappers have necessity to
travel on ice, but it should never be
considered entirely safe, even under
the coldest conditions. Ice on lakes
and ponds is generally stronger than
river ice because the currents create
weak spots. Ice near shore is often
weaker because of buckling action
breaking and refreezing it. Springs
in lakes sometimes cause upwelling
of warmer water, which can weaken
ice, and schools of fish such as carp,
may congregate and create thin ice
spots because of the water circulated
by their fins. Ice can be a foot thick
in one spot and only 1 inch thick 10
feet away.
New, clear ice is generally the
strongest. Ice mixed with snow or
slush appears white and is not as
strong as clear ice. “Candle ice”
results from solid ice decomposing
(usually in spring) and forming into
long vertical needles. This ice
makes a hissing sound when walking
on it.
As a general rule, 2 to 4 inches of
clear ice are required for a single
person on foot and 5 to 7 inches are
required for a snowmobile. There is
not general rule for white ice and
personal judgment is required. It is a
good idea to check to see how thick
the clear ice is under the white ice.
Candle (“rotten”) ice appears
black and is not very strong for its
thickness. Usually, candle ice under
2 feet thick is unsafe and good
judgment is needed even on ice
thicker than that. In most cases, this
ice is safer in the early morning if
subfreezing temperatures occurred
the night before causing the vertical
needles of ice to freeze together.
If you break through the ice,
always turn around and attempt to
climb out at the point where you fell
in, since the ice held you to that
point. Even if near shore do not
continue on, but turn back the way
you came. Place you hands and
arms on the unbroken ice and work
forward by kicking your feet. If the
ice breaks, maintain your position
and slide forward again. Once onto
unbroken ice, don’t stand but roll
away to solid ice.
If you are with someone else and
they break through, do not rush to
the edge of the hole to attempt to
rescue them. Throw them a rope or
extend a pole, branch or other object
to them and pull them out.
Once out, get a fire going as
quickly as possible unless shelter is
close at hand. If no shelter is
available build two fires, one on each
side. If traveling on a snowmobile,
carry extra clothing and a sleeping
bag and change out of your wet
clothes. Wool clothing is preferable
to down or synthetics and will
provide some insulation even when
wet.
CUTS Cuts are one of the most
common injuries to trappers. A
supply of bandages, adhesive tape
and gauze dressing will be sufficient
for most minor cuts. Butterfly
bandages can be used to temporarily
pull together a deeper cut that could
require stitches.
One of the worst situations that
can occur is to cut your foot or leg
with an axe. For that reason, it is a
SAFETY AND SURVIVAL

Revised 7/2012 PAGE 59
good idea to use a saw rather than an
axe whenever possible. If a cut is
made through your boot, do not
remove the boot if at all possible
because you will be unable to get it
back on. Push an absorbent dressing
through the cut in the boot, and then
tie something around the boot to
apply pressure to the wound to stop
the bleeding.
Heavy bleeding can usually be
controlled by applying pressure
directly to the wound. If that fails,
pressure may need to be applied to a
pressure point on the body or, as a
last resort, a tourniquet may have to
be applied. A tourniquet cuts off
blood flow and can lead to gangrene
and loss of a limb if not frequently
loosened. Trappers should take a
first aid course or consult a first-aid
book before attempting these
techniques. Elevating an affected
limb will ease blood pressure and
slow bleeding.
GETTING LOST It is easy to get “turned around”
while trapping, especially in an
unfamiliar area or when it is
impossible to see landmarks.
Trappers should always carry a good
compass and an accurate map. Even
in more settled areas, fog, rain or
snow can obliterate familiar
landmarks and cause difficulties for
the trapper without a compass.
If you do become lost and you do
not have a map and compass to help
guide you out, make yourself
comfortable and stay in one place
until you are found. It is a good idea
to carry some sort of survival kit.
GETTING CAUGHT IN A TRAP All trappers face getting their
hands accidentally caught in one of
their own traps while setting or
checking. For foothold traps on
land, this seldom presents a problem,
since the trapper can usually open
the trap by applying pressure to the
springs with his feet.
Never reach through the ice
with your hands to check or attempt
to find a trap. If your arm is through
the ice and your hand is caught in a
trap, you are in serious trouble. Use
a trap hook to recover traps or make
certain that you have cut a hole large
enough to pull the trap up through if
necessary.
If you are caught in a conibear
trap, use a rope with an end loop to
free yourself. Place your foot in the
loop, double the rope through the
holes in the springs, and pull upward
on the free end with your other hand
or by looping it over your back and
holding it in your teeth (ask an
instructor to demonstrate). Practice
this release method before needed
and when setting large body gripping
traps always have a length of rope
with a loop close at hand. Always
use a safety device when setting
these traps.
Although most buyers will buy
pelts “in the round” (whole), it is
generally to the trapper’s advantage
to skin and stretch his own furs, if at
all possible. Improperly cared for
furs, however, can be a beat total
loss, so it is important to seek advice
from someone knowledgeable or to
carefully study the instructions in
this manual.
Well-cared-for-furs give a
trapper the satisfaction of having
done a job well and completely, and
the pay benefits in at least three other
ways: 1) Properly skinned, stretched
and dried pelts are more valuable
than whole animals; 2) The trapper
who handles his own fur can present
a larger “lot” of fur to a buyer, rather
than a few animals at a time, and he
therefore has more bargaining
leverage; and 3) Stretched and dried
furs can be hauled, shipped, or stored
more easily and allow the trapper to
take advantage of the market or
markets promising the highest return.
Whole animals or “green” (wet,
unstretched) pelts must usually be
sold quickly and to a nearby buyer.
Frozen pelts should be thawed
before being sold. Make sure that
they are slowly thawed in a cool
place. A wet hide can spoil in a few
hours if it becomes too warm.
Stretched and dried pelts should
be removed from the stretcher and
stored in a cool, well-aired place
away from direct sunlight until it is
time to sell them. Fur should be
stored and shipped leather-to-leather
or fur-to-fur, never leather to fur.
Most trappers hang the fur in
bundles from rafters or other areas.
Care should be taken to see that mice
cannot get at furs because their
gnawing can do considerable
damage. If the furs are to be stored
for an extended period of time,
regular fur cold storage (32° F.) is
advisable,
There are a number of ways of
selling pelts, and it often pays to
shop around before selling. There
are some of the ways that a trapper
can sell:
1) To a local fur buyer. These
people sometime advertise in
newspapers and usually are known
by most local trappers. An
advantage of this method is
personally dealing with the buyer.
2) A traveling fur buyer. These
buyers usually make periodic visits
to local sporting goods stores or
other shops and they frequently
advertise in newspapers. As above,
the trapper has the advantage of
dealing personally with the buyer.
3) A mail firm. Some fur buying
companies buy pelts through the
mail. These companies usually
advertise in trapping magazines.
FUR MARKETING

Revised 7/2012 PAGE 60
Unfortunately the trapper doesn’t get
to deal with the buyer personally and
the pelts must be packaged and
mailed.
4) Fur buyers at a fur auction.
These auctions are usually listed in
trapping magazines and they may be
run by trappers’ organizations or by
private firms. The trapper does not
get to deal personally with the
buyers, but he canusually set a
minimum bid or can bid on his own
furs. Auctions have the advantage of
competitive bidding, and usually a
small commission fee is charged.
If pelts are to be shipped, pack
them flat, fur-to-fur or skin to skin
(never rolled or folded) in large
burlap bags (sewn shut) or heavy
boxes. Never ship furs in plastic
bags because they can mildew and
spoil. Make certain that all pelts are
completely dry before shipping.
The trapper’s and consignee’s
name and address should be
conspicuously marked on the outside
of the package. The trapper’s name,
address, license number and a list of
the numbers and species of furs
contained in the package should be
enclosed and must be attached to the
outside of the package. The trapper
should also keep a copy of this list
for his records. It is a good idea to
insure these shipments for their
estimated value.
If furs are to be shipped to
another country (Canada, for
example) special regulations apply.
Customs declaration forms are
required for all furs shipped out of
the country, and for some species an
export permit is required. Check the
trapping regulations or contact an
enforcement officer or customs
official before taking or shipping any
furs out of the country or they may
be seized. Many trappers sending
furs to Canadian auctions prefer to
send them through a broker, who has
the necessary permits and handles all
of the paperwork for them.
Because trappers’ activities
routinely bring them into contact
with animals, they should be aware
of diseases and parasites carried by
wild animals and should take
common-sense precautions. Since
doctors may not routinely look for
some types of diseases, which may
be contracted from wildlife, it is the
trapper’s responsibility to inform the
doctor of his outdoor activities is a
puzzling disease should develop.
RABIES The primary wildlife carrier of
rabies in Minnesota is the striped
skunk. Rabies is also occasionally
found in foxes and raccoons, but is
very rare is all other Minnesota
furbearers.
Rabies is a virus that attacks the
nervous system and is usually
transmitted in the saliva of an
infected animal when it bites a non-
infected animal. In addition to bites,
the virus can enter through a cut or
scratch while skinning an infected
animal or by coming into contact
with the eyes, nose or mouth.
Rabies occurs in two forms in
wildlife. In the “furious” form, the
animal becomes irritable and
aggressive, loses it fear and may
attack other animals. In the “dumb”
form, the animal becomes lethargic
and may suffer various forms of
paralysis.
If you are bitten or scratched by
any wild animal, wash the bite area
thoroughly with soap and water and
contact a physician immediately. If
possible, the animal involved should
be captured or killed without damage
to the head and refrigerated (not
frozen). Trappers should avoid
shooting skunks in the head (since
most rabies virus is in the brain) and
should wear rubber gloves while
skinning. A new vaccine against
rabies (Human Diploid Cell Vaccine
– HDCV) is now available which
provides some pre -exposure
protection from rabies without
serious side effects. Trappers who
handle a lot of carnivores may want
to consult with their doctor about
getting this vaccine.
TULAREMIA Tularemia is a bacterial disease
of mammals found primarily in
rabbits, beavers and muskrats in
Minnesota. The disease often results
in white necrotic (dead) spots in the
liver of infected animals. The
disease can be transmitted to humans
through cuts or scratches while
skinning infected animals, from
drinking contaminated water during
water-borne outbreaks, from flea,
tick or insect bites, or rarely, from
eating undercooked meat.
LYME DISEASE This is a relatively new disease
caused by a spirochete (type of
protozoan) transmitted by a small red
and black tick commonly known as
the deer or bear tick (not the tick
commonly found on dogs). The
disease is known to occur in east-
c e n t r a l M i n n e s o t a a n d i s
characterized by circular skin lesions
with possible headaches, nausea or
fever and, in some cases, arthritis in
one or more joints and heart
problems. Most exposures from this
small tick occur from May through
October. Doctors may not routinely
look for this disease so people with
these symptoms who may have been
exposed to tick bites should inform
their doctor of that fact.
PARASITES A number of parasites, primarily
tapeworms, can be contracted from
wild animals if good hygiene is not
practiced. One of the most serious
o f these i s t he tap eworm
echinococcus, the larvae of which
form cysts in the liver and lungs of
humans, deer, moose and livestock.
Microscopic eggs of this tapeworm
may be found in the feces of foxes,
coyotes, wolves or dogs, and human
i n f e c t i o n c a n r e s u l t f r o m
contamination of hands and
accidental ingestion of eggs.
Raccoons are host to a
roundworm, which also sheds
microscopic eggs in raccoon feces.
Their eggs are not infective for about
30 days. They then can become
airborne as dust and inhaled or can
WILDLIFE DISEASE

Revised 7/2012 PAGE 61
be accidentally ingested. People
coming into contact with areas where
raccoons have lived or concentrated
such as in barns, chimneys and attics
or people who have pet raccoons are
most susceptible to infection. The
eggs hatch after ingestion and the
microscopic larval worms migrate
into the nervous system (spinal cord,
brain) or into the eye. Symptoms are
nervous system disorders and severe
infections may result in death.
MANGE Red foxes and coyotes are
commonly afflicted with a parasitic
mite infestation, which causes a
condition known as mange. The
most common type of mange is
sarcoptic mange and it is cause by
microscopic mites that burrow in the
skin and deposit their eggs as they
go. With time, the eggs hatch and
the infestation increases to the point
that the animal’s hair begins to fall
out and the skin becomes thickened,
crusted with scabs and cracked.
Mange is spread from animal to
animal by contact. In Minnesota is
may become epidemic when red
foxes are abundant and result in
widespread die-offs. Mange is
nearly always fatal to red foxes and
coyotes, but is seldom contracted by
gray foxes. Trappers should take
care in handling animals, which have
mange, since it is possible for
humans to experience mild
infections of the mites, which cause
a red itching rash.
TRICHINOSIS Trichinosis is caused by a
nematode (roundworm) parasite,
which produces the disease in man
and many other domestic and wild
animals. Nearly all mammals are
susceptible to infection with this
parasite, which encysts in the muscle
of the host and is then transmitted by
eating the raw or poorly cooked
meat. Infestations are often most
severe in the well-oxygenated active
muscles such as the diaphragm or
eye muscles.
If carnivorous wild animals such
as raccoons, bobcats, bear or
opossums are to be eaten, the meat
should be properly prepared by
cooking, freezing or curing to
destroy the encysted parasites.
Cooking to an internal temperature
of 137° F., or freezing at 5° F. for 20
days, –10° F. for 10 days, or –20° F.
for six days will kill trichinae.
Curing should follow approved
government regulations.
A few simple, common-sense
precautions will greatly reduce the
risks of contracting diseases or
parasites from wild animals: 1)
Wear plastic or rubber gloves when
skinning or handling furbearers or
scats; 2) Wash hands thoroughly
after handling animals; 3) Avoid
an ima l s tha t a re behaving
abnormally or that are obviously
sick; 4) Do not drink directly from
streams or lakes; 5) Cook all wild
game thoroughly; and 6) Inform your
doctor of your wildlife-related
activities if a puzzling illness should
develop.
All earning from trapping should
be reported as regular income for tax
purposes. However, a trapper should
also keep accurate records and
receipts of expenses incurred while
trapping, most of which can be
deducted. Traps and other
equipment, which are purchased only
for trapping can be deducted, either
in a single year (for small purchases)
or can be amortized over several
years (for large purchases). If you
keep a daily log with odometer
readings, mileage can be deducted at
a standard rate per mile. Other
items, such as trapping cabins, can
be deducted only if they are
purchased or built solely for
trapping. Trappers who trap as a
hobby may deduct expenses only up
to the amount of their earnings.
Only trappers who trap as a business
may claim a loss.
Every trapper has both a role and
a stake in the future of trapping.
Each trapper must work to become
as knowledgeable about wildlife and
trapping as possible; must be willing
and able to share that knowledge
with others; and must behave
responsibly at all times.
Today’s society is becoming
more and more dominated by people
who have spent their entire lives in
towns and cities and who have little
p r ac t i c a l u n d e r s t a n d in g o r
appreciation of nature or life and
death processes. Many of them have
an idealized view of the natural
world based on what they have
learned through television or movies.
Some have difficulty accepting the
fact that death is a normal and
essential part of the functioning of
healthy ecosystems, and have an
e v e n mo r e d i f f i c u l t t i me
understanding and accepting death
caused by humans. Some of these
people are totally and strongly
convinced that they are tight and no
amount of information or persuasion
is likely to change their minds. The
majority, however, are basing their
attitudes on the facts and information
they have been exposed to, thus far
and, given more information, they
can come to a more balanced
understanding.
It is essential for trappers to
conduct themselves responsibly and
to help educate others about wildlife
and natural processes. This should
not be done in a loud, arrogant or
condescending way, but quietly and
with sincerity and respect for the
feeling and beliefs of others.
Realistically, you can never expect
to change the minds of people who
are strongly anti-trapping. The best
you can hope for is that they will
respect your position. However, if
you present factual information in an
honest and objective manner, you
can influence people whose attitudes
are not strongly held and who lack
understanding of this complicated
issue.
TAXES AND
THE
TRAPPER
THE FUTURE
OF TRAPPING

Revised 7/2012 PAGE 62
RECOMMENDED STRETCHER SIZES
Length Base Shoulder Neck
MUSKRAT Large 22 7 ½ 6 6
Average 21 7 6 5 ½
Small 20 6 ½ 5 ½ 5
MINK Large males 40 5 3 ¼ 8 ½
Large females 36 4 3 8
OTTER Large 65 8 6 ¾ 15
Average 58 7 ½ 6 13 ½
Small 50 7 5 ½ 12
OPOSSUM Large 38 8 6 10 ½
Average 36 7 ½ 5 ½ 10
Small 32 7 5 9
SKUNK Large 40 8 6 10 ½
Average 38 7 ½ 5 ½ 10
Small 34 7 5 9
RACCOON Large 48 10 7 ½ 12 ½
Average 42 9 6 ½ 12
Small 34 8 5 ½ 11 ½
GRAY & RED FOX Large 56 8 6 11 ½
Average 54 7 5 11
Small 50 6 ½ 4 ½ 10
COYOTE Large 75 13 9 ½ 14
Average 70 12 9 13
Small 65 11 8 12
WEASEL Large 22 3 2 ½ 5 ½
Average 16 2 ½ 1 ¾ 4
Small 12 1 ¾ 1 ¼ 3
BOBCAT Large 70 10 7 12
Average 60 9 6 ½ 11
Small 48 7 5 10
FISHER Large male 50 8 6 10
Large female 48 7 5 9 ½
MARTEN Large male 40 5 3 ¼ 8 ½
Large female 36 4 ½ 3 7 ½
All Measurements In Inches

Revised 7/2012 PAGE 63
LURES
A Lure is anything used to attract or entice an animal to a given location. It appeals to hunger, curiosity,
reproductive urge or a need to defend a territory. It is an object which the animal either sees or smells
Term Definition Why it attracts How it is used
Scent Lures Any lure which attracts or
lures an animal by smell
Most animals have a highly
developed sense of smell
and will hone in on odors
from a distance.
Scents broadcast their effect more
widely than other lures, and also
retain a stronger odor for a longer time
than baits or urine; as a result, they are
often more effective in colder weather
Gland Scents made from the
glands of animals, usually
from the reproductive
tract
The animal is attracted to
this because of sexual
instinct
Normally used alone or with a visual
attractor. A small quantity is generally
on or around the set.
Urine An animal liquid waste
product used to attract or
lure an animal by smell
The animal attracted for
several possible reasons:
sexual instinct, curiosity,
territorial instinct,
communication reasons
Generally used for canine sets.
Sprinkle a small quantity of urine on
or near a scent post or near a bait set.
May be used in combination with any
other lure.
Curiosity Scents made from oils or
blends of oils and glands
The animal is attracted out
of curiosity to investigate an
unusual but appealing odor.
Used to draw the animal into the
vicinity of the set from a distance.
Sprinkle a small amount well away
from the set but in the surrounding
area.
Food Scents made from food
oils or extracts
The animal is attracted due
to hunger or appetite.
Sprinkle a larger quantity on or near
set so animal must pass through trap.
May be used to enhance the odor of
the bait.
Bait Lures A food substance which
attracts or lures an animal
to a given location
The animal is attracted due
to hunger or appetite.
For fresh bait, a food or curiosity scent
may be used to draw in the animal.
All animals can be attracted by the
proper bait.
Fresh Bait Any unspoiled food
substance used as bait
The animal is attracted due
to hunger or appetite.
For box or cubby sets, bait is placed so
the animal must pass through the trap
to reach it.
Tainted Bait Any food substance used
as bait which is partially
spoiled so it gives off a
strong odor
The animal is attracted due
to hunger or appetite.
In some sets, the bait is attached
directly to the trigger (e.g., for semi-
aquatic species). At bait a station, the
trap or snare is placed at some distance
from the bait on trail leading to or
from bait.
Visual Lures An object which attracts
or lures an animal by
sight. The object should
be natural but unusual. It
may flutter in such a way
as to arouse curiosity,
such as a wing or a
feather. It might be a
bleached bone lying on
the ground.
The animal is attracted by
sight to investigate an
unusual object.
Most effective for bobcats and
canines. Place an object near a bait set
but in a location where it can be seen
for some distance (e.g., bleached bone
near a dirt hole set or a wing hung in a
fairly open area to bring the animal
closer to the trap).

Revised 7/2012 PAGE 64
Animal Baits Scents Urine Visual Attracters
Beaver green aspen, willow or
birch
beaver castor or
beaver oil glands
partially peeled sticks
behind trap
Badger
woodchuck, beaver or
other rodent meat,
tainted or fresh)
badger scent gland dirt holes
Muskrat
Carrot, parsnip, apple or
orange peel, cattail or
lily pad root, sweet flag,
bulrush or parts of other
marsh plants
musk glands from
muskrat
anchored, floating raft or
log invites rat to crawl out
of water light from hole in
ice sight of bait
Weasel rabbit, squirrel, beaver weasel scent gland dark hole in box set
Mink fresh fish, fresh muskrat
or beaver meat
fish oil scent, mink
gland scent, beaver
castor scent, muskrat
musk scent
mink urine
dangling wing near box set
(the dark hole in the box
simulates a natural cavity
Otter fresh fish fish oil scent, other
gland scent
whole fish or artificial fish
at trap
Marten squirrel, rabbit, beaver,
raspberry jam
ma r t e n g l a n d s ,
beaver castor
dark hole in the box
simulates a natural cavity
Fisher beaver meat, fish,
fisher gland scent,
beaver castor, anise,
rat musk
attracted to dark holes, box
set dirt holes
Wolverine meat wolverine gland,
beaver castor, fish oil large bait
Fox,
Coyote
beaver meat (tainted or
fresh), entrails, mice,
scraps from game birds
or animals
fish oil, gland lures,
skunk oil
bobcat urine or
urine from animal
you are trapping
attracted to almost any
unusual but natural looking
feature near a trail (e.g., tuft
of grass)
Bobcat fresh meat, such as
rabbit, fish or beaver
anise, catnip scent,
fish oil, beaver castor
and other gland
scents
wing or other object which
twirls in the wind; grass
ball dark enclosed area
(e.g., cubby)
Raccoon beaver meat, fish, sweet
corn, marshmallows fish oil
dark hole in box set wing,
feather or other object
which flutters in the wind

Revised 7/2012 PAGE 65
Speared or Clipped – guard hair or underfur is missing or fur is eaten by mice before the
pelt is prepared.
Tainted – this is hair-slip of guard hair and underfur, and is one of the worst kinds of
damage; it is caused by rotting of the pelt before dressing.
Loose – top hair coming out because of roots exposed in early caught skins or because of
too deep scraping.
Bitten – usually found in beaver and muskrats and caused by late spring trapping but
sometimes may be from poor food or over-population.
Snared – fur rubbed off pelt by snare wire.
Scored – path of bullet of knife through fur leaving long, bald, bloodstained marks.
Badly shot – peppered by shotgun or large rifle. Bad bites are often listed in this class.
Badly sewn – where leg holes and cuts are poorly sewn or where bad damage has caused
much sewing.
Burnt – pelt cracked by fast drying beside a stove or in hot wind or sun. Also caused by
grease left on pelt.
Flat – guard hairs lying flat due to lack of underfur, found mostly in unprimed pelts.
Low – not fully developed guard hair or underfur, generally found in early-unprimed pelts.
Rough – heavy rubbed skins, late caught.
Complete – fully covered with guard hairs, usually found in unprimed pelts.
Immature – skin taken too early with less than usual growth of guard hair and underfur,
generally shows weak guard hair short in development.
Overgrown or Springy – usually found in late caught skins when the underfur begins to fall
out or has already fallen out.
Coarse – pelt hard to the touch, late caught.
Overstretch – stretching the pelt beyond normal size. Thins the leather and give flat weak
appearance.
Understretch – stretching smaller than normal size causing wrinkles and sloppy appearance.
Singed – guard hairs bent or hooked – most common in mink and otter when pelt is affected
by warm weather and bright sunlight. Sometimes caused by excessive handling of the pelt
and by heat drying.
FUR DAMAGE TERMS

Revised 7/2012 PAGE 66
American Fur Company – early fur trading company founded by John Jacob Astor in 1811.
Body gripping trap – a trap, which catches and holds an animal by the body, usually designed to kill the
captured animal.
Blue Pelt – an unprimed pelt which, when dried, is a dark blue or black on the skin side.
Cage Trap – a trap designed to enclose an animal, and usually to hold it alive.
Cache – food stored for use at a later time – for example the food pile of branches made by beaver or a mouse
buried by a fox.
Carnivore – an animal that primarily eats other animals.
Carrying Capacity – a term referring to the number of annuals that a given area of habitat is capable of
supporting.
Courier de bois – early independent French fur trapper and trader.
Cased Pelt – a pelt that has been skinned by cutting across the hind legs and pulling it down over the body.
Castor – an odorous substance produced by paired glands in the beaver widely used in lures and the perfume
industry.
Catchpole – a slip-noose on a rigid handle used to aid in releasing accidental capture or too-small animals.
Clear Pelt – in mink and otter this term indicated an even change in fur color from underfur to guard hairs.
Cotton Mink – a mink pelt where underfur is white.
Delayed Implantation – in animal reproduction refers to the fertilized egg not implanting and beginning
development for some time after mating occurs.
Dispersal – the one-way movement of animals from their place of birth or home range, often coincides with
sexual maturity.
Diurnal – active during the day.
Drowning Device – a one-way slide lock that allows an animal to go to deep water but not return.
Echinococcus – a tapeworm parasite that can form cysts in humans and other animals.
Ecological Succession – the progressive changing types of plants, which occurs over time – for example
following a fire.
Ermine – the white color phase of the weasel.
Ethics – a code of responsible and acceptable behavior.
Fleshing – the act of removing excess fat and meat from a pelt.
Fleshing beam – a large wooden or fiberglass form designed to hold and support the pelt while fleshing.
Foothold trap – a trap designed to catch an animal by the foot or leg and to either hold it alive or drown it.
Foot snare – a trap designed to catch long-legged animals by holding the leg or foot in a wire noose.
Fossorial – an animal adapted for burrowing or digging.
Frostbite – a serious health hazard involving the freezing of skin or other body tissues.
Fur Dressing – the tanning process.
Fur Stretcher – the frame for allowing fur to dry in a standard shape – does not actually stretch the pelt.
Gait – the way that an animal moves its feet when it walks or runs.
Gambrel – a frame or device used for hanging an animal by the hind legs for skinning.
Gestation Period – length of pregnancy.
Grapple – a hook like device attached to the trap, which allows an animal to move from the trap site before
becoming entangled.
Green Pelt – a pelt that has not been stretched or dried
GLOSSARY

Revised 7/2012 PAGE 67
Guarded Trap – a trap with an extra spring device to pin the animal and prevent it from twisting or pulling
free.
Guard Hairs – the long, glossy hairs that overlay and protect the softer, denser underfur.
Habitat – the place where an animal lives, principal components are food, water and shelter.
Hair Follicle – the part of the skin that produces and holds the hair or fur.
Herbivore – an animal that primarily eats plants.
Hibernation – a state of inactivity that some animals enter in winter.
Home Range – the area over which an animal travels in its day-to-day activities.
Hudson’s Bay Company – an early Canadian fur trading company that continues active to this day.
Hypothermia – a serious health risk involving loss of body heat resulting in loss of coordination and
eventually death if corrective measures are not taken.
Lap-link – a metal ring attaching the trap to the stake so that the chain can rotate.
Lyme Disease – a potentially serious disease transmitted by the deer or bear tick.
Nocturnal – active at night.
Northwest Fur Company – one of the major companies in the early Fur Trade era headquartered in Montreal.
Omnivore – an animal that includes both animal and plant materials in its normal diet.
Open Pelt – a pelt skinned by cutting down the midline of the belly.
Opportunist – an animal that takes advantage of the most abundant or easily obtainable food source.
Pan Cover – a piece of canvas, cloth, plastic, window screen or other material placed over the trap pan to
prevent soil from getting under it.
Pelage – the hair or fur of an animal.
Pelt – the hair or fur of an animal plus the skin.
Photoperiod – the length or amount of daylight, helps regulate fur priming, breeding, etc.
Prime Pelt – normally refers to a pelt in which the winter fur is completely grown in and the hair follicles
completely mature.
Rabies – a serious viral disease of warm-blooded animals transmitted primarily in the saliva of infected
animals.
Raw Fur – a pelt that has not been salted or tanned (may be stretched or dried).
S-Hook – a device for attaching the trap chain to the stake to allow the trap to rotate around the stake.
Samson Pelt – a pelt lacking or nearly lacking in guard hairs.
Scats – the droppings or feces of animals.
Scavengers – an animal that feeds primarily on carrion (dead animals) rather than killing its own food.
Swivel – a device placed at either or both ends of the trap chain and sometime in the middle of the chain to
allow the trap to freely move with the animal’s foot and reduce injury caused by twisting.
Tanning – the process of preserving a hide by treating it to make leather.
Territory – the portion of an animal’s home range that is defended against trespass by other individuals of the
same species.
Trap Bed – the hole dug in the ground in which traps are placed.
Trap Hook – a pole with a hook at one end to help find and recover traps from water, can also double as a
wading staff.
Tularemia – a bacterial disease of rabbits and rodents that can be transmitted to humans through cuts or
scratches while skinning infected animals.
Underfur – the soft, dense fibers underlying the guard hairs that provide the primary insulation for the animal.
Verendrye – the primary founder of the northern Minnesota fur trade.
Voyageurs – French Canadians employed by the early fur companies to transport furs and trade goods through
the wilderness primarily by canoe.

Revised 7/2012 PAGE 68
ACKNOWLEDGMENTS
This text was developed using information from a variety of sources. Some of the
information was adapted by permission, from Trapping Furbearers: Student Manual by Dr.
Ronald Howell, Louis Berchelli, Gary Parsons and Mark Brown; published by the New York
State Department of Environmental Conservation.
Drawing on pages 2, 32, 34, 36-40, 43, 45, 46, 48, and 49 are by Michael Stickney of the
New York Department of Conservation. Animal artwork on pages 16, 17, 24, 25, 26, and 27 is
by Dan Metz. Remaining animal illustrations are by Charles Schwartz and are reprinted by
permission from Trapper Education: Primitive Skills Series, by Ken Kelm, Ralph Duren and
Dave Erickson, published by the Missouri Department of Conservation. Cartoons on pages 5
and 33 are by Kent Olson and are reprinted by permission, from Kansas Fur Harvest Manual
by F. Robert Henderson, published by Kansas State University Cooperative Extension Service.
The land set location illustration on page 43 is reprinted from Trapping Iowa Furbearers by
Tom Berkley, published by the Iowa Conservation Commission.
Information for species biology, behavior and distribution came from unpublished DNR
records, various DNR Reports leaflets and from Mammals of Minnesota by Evan Hazard of
Bemidji State University. Information on the history of the fur trade in Minnesota was adapted
from an article entitled Fur Trade 1976. Roots, Minnesota Historical Soc., Vol. 5, No. 1 and
from The Beaver In Minnesota by William H. Longley and John B. Moyle published by the
Minnesota Department of Conservation.
Bill Berg, Jim Breyen, Todd Eberhardt, Nick Gulden, Gary Johnson, Bill Peterson, Terry
Simon, Greg Spaulding, Lloyd Steen and Terry Wolfe of the Minnesota Department of Natural
Resources and Dan Croke, Russ Davis, Robert Gessner, Michael Lance, Keith Larson and Pete
Stupar of the Minnesota Trappers Association reviewed this manual and offered helpful
comments or suggestions. We would also like to thank Paulette Tichenor who typed several
early drafts of this manuscript.
Thanks to the Minnesota Trappers Association for providing the financial support for this
printing.

Revised 7/2012 PAGE 69

Revised 7/2012 PAGE 70

Revised 7/2012 PAGE 71

Revised 7/2012 PAGE 72

Revised 7/2012 PAGE 73

Revised 7/2012 PAGE 74
Coyote cable loops must be 10 inches in diameter and the bottom of the
loop should be 6 inches off the ground.
10”
6”

Revised 7/2012 PAGE 75

Revised 7/2012 PAGE 76