Microsoft 365 Beginners Guide for IT Administrators - Vembu
33
Simplifying Data Protection Gopalakrishnan Manager System Administration Gopal has broad experience in IT Administration and Network expertise streams, Owning a decade and half years of knowledge and hands on experience with Server Management, concepts of Virtualization, Microsoft 365, Microsoft Azure, AWS, Google Workspace, and Zoho ONE platforms. Associated with Vembu Technologies for more than 12 + years. He is a certified VMware Professional (VCP), Cisco Certified Network Associate (CCNA) and an emerging blogger. Microsoft 365 Beginners Guide for IT Administrators Microsoft 365 Beginners Guide for IT-Administrators
-
Upload
khangminh22 -
Category
Documents
-
view
0 -
download
0
Transcript of Microsoft 365 Beginners Guide for IT Administrators - Vembu

Simplifying Data Protection
GopalakrishnanManager System AdministrationGopal has broad experience in IT Administration and Network expertise streams, Owning a
decade and half years of knowledge and hands on experience with Server Management,
concepts of Virtualization, Microsoft 365, Microsoft Azure, AWS, Google Workspace, and
Zoho ONE platforms. Associated with Vembu Technologies for more than 12 + years. He is a
certified VMware Professional (VCP), Cisco Certified Network Associate (CCNA) and an
emerging blogger.
Microsoft 365 Beginners Guide for IT Administrators
Microsoft 365 Beginners Guide for IT-Administrators

Preface
Microsoft a well known tech brand has a lot of portfolios under one roof. Understanding the future they developed an idea to provide all their business related products through the SaaS model on that note they came up with the product Microsoft 365.
The Microsoft 365, formerly known as Office 365, is a Microsoft subscription service that blends and includes the Microsoft Office product line-ups. Launched in the year 2017, the brand was introduced for a superset of Office 365 with Windows 10 Enterprise licences and other cloud-based security and device management products.
This Microsoft 365 includes some subscription plans that allows the use of Microsoft Office software suite until the subscription period; it also includes the cloud-based software-as-a-service products for business environments such as hosted Exchange Server, Skype for Business Server, and SharePoint.
This e-book covers all the basic details on Microsoft 365 and serves its purpose as a guide for most of the IT-admins and System-admins who wishes to learn about Microsoft 365 Business and its editions. Through this ebook the IT-admins will get to know how to create a business trial account, and learn how to avail a subscription and renew the existing subscription.
Are you ready to get started?
e-book

Index :
1. Introduction to Microsoft 365 Business
a. Microsoft Business editions and its supported Apps and services.
2. Creating a new business email trial account
a. Setting up a 30-day free trial account.
b. Quantity and payment details for the trial account
3. Setting up email with a custom domain
4. Setting up a new admin account for the subscription
5. Installing apps and services on Windows devices
6. Migrating emails and files to Microsoft 365
a. Adding a migration batch in Microsoft 365 admin center
b. Supported migration types
7. Setup Self-Service Password Reset (SSPR) in Microsoft 365 Admin Center
a. Enabling self-service password reset SSPR in Microsoft 365 admin center
b. Setting up Authentication methods for users in Azure AD
c. Providing Authentication contact info for a user in Azure AD
8. Create App Protection Policy for Mobile Devices in Microsoft 365
a. What is the Microsoft 365 app protection policy?
b. How does Microsoft 365 app protection protect the app data?
c. User impact & Application impact on applying the app protection policy
d. Creating an app protection policy in Microsoft 365 admin center
e. Manage how users access Office files on their mobile devices
9. Create a New Microsoft 365 Subscription or Renew an Existing Subscription
a. Finding your active subscriptions
b. Purchasing a new service from Microsoft 365 Admin Center
10. Conclusion
e-book

1. Introduction to Microsoft 365 Business
Microsoft 365 Business is a line of subscription services that brings together best-in-class productivity
apps with powerful cloud services, device management, and advanced security in one, connected
experience.
Microsoft 365 Apps for business includes desktop versions of the Office apps such as - Outlook, Word,
Excel, PowerPoint, OneNote (Plus Access and Publisher for PC only), 1 TB of OneDrive cloud storage
per user, 1 license for all Office apps on five mobile devices, five tablets, and five PCs or Macs per user,
automatic updates.
a) Microsoft Business editions and its supported Apps and services
Microsoft 365 Business offers 4 flavors or editions as follows:
❖ Microsoft 365 Business Basic
❖ Microsoft 365 Business Standard
❖ Microsoft 365 Business Premium and
❖ Microsoft 365 Apps for business
Microsoft 365 Business Basic - Word, Excel, PowerPoint, Teams, Outlook, Exchange, OneDrive, and
SharePoint.
Microsoft 365 Business Standard - Word, Excel, PowerPoint, Teams, Outlook, OneDrive, Access (PC
only ), and Publisher ( PC only ).
Microsoft 365 Business Premium - Word, Excel, PowerPoint, Teams, Outlook, OneDrive, Access (PC
only ), Publisher ( PC only ), Intune, and Azure Information Protection.
Microsoft 365 Apps for business - Word, Excel, PowerPoint, Outlook, OneDrive, Access (PC only ), and
Publisher ( PC only ).
e-book

2. Creating a new business email trial account
With this option, an Organization’s administrator will be able to use Microsoft 365 Exchange as the
Organization’s professional, branded email provider. All the Organisation users will have a shared
domain email address. For example, their username, followed by @example.com.
Administrators and other users sign into Microsoft 365 with this new email address. When the
administrator follows this process (add a domain and create new business email accounts), all users will
get access to all the features provided in Microsoft 365 Business Standard.
Here we are setting up the Microsoft 365 Business standard subscription for a custom domain. Before
proceeding with the trial account, the administrator should own a domain and be required to set up
DNS records for the domain to use the mail functionality on the domain.
a) Setting up a 30-day free trial account
Here we are setting up a 30-day free trial account for Microsoft 365 Business standard subscription.
After your 1-month free trial, you will be charged the applicable subscription fee. You may need to put
the Credit card details when required. Users can cancel the subscription at any time to stop future
charges.
First visit the Microsoft 365 product comparison page, where you can find the comparison chart for
each subscription and you can choose the subscription depending on your need. The below screenshot
shows this page, and we are choosing the 30 day trial for the Microsoft 365 Business standard
subscription (as highlighted in red, in the below pic)
URL:https://www.microsoft.com/en-in/microsoft-365/business/compare-all-microsoft-365-business-products#
e-book

On clicking the “Try free for one month” link, a new page will open, asking for your current official
email address. Provide your email address in the box and click Next, as shown in the below image.
If your email address is already associated with Microsoft service, you may choose the link “Create
a new account instead” on the page to continue. On the next screen, the administrator should
provide the details such as First Name, Last Name, Company name, Business contact no, Number
of employee count, Region, etc. Provide those details and click Next. On the next screen, you will
be asked to verify the business contact number by call or text verification method. Choose the text
verification, and click “ Send verification code”. Then enter the OTP and click verify.
e-book

After successful verification, your page redirects to the next page, where you need to provide the
username and domain name. Click save to save your login username. In the next step, provide a password
for the login username. This becomes your Microsoft assigned first global administrator account. The
below screenshot shows these details, click Next to continue.
b) Quantity and payment details for the trial account
Here as an administrator, you should provide the number of licenses ( no of users ) to be added in the
trial period. You can add up to 25 users during the trial period, and after that, you can change the number
of users as per your requirement.
Here we are using one Microsoft 365 Standard license. And then click the “Payment Method” link to
provide the payment details such as credit card number and expiration date etc.
e-book

e-book
Normally your first month is free. You need to add a payment method because the free trial
will be automatically converted to a paid subscription after the trial period. When clicking
save, you'll be taken to the secure website to confirm your identity. To do this, Microsoft will
submit a small purchase amount to your bank, but it will not be charged to your account. After
a while of processing, your credit card will be added successfully.
On the final “Review and confirm” step, you may be required to verify your product is chosen,
the quantity of licenses, your billing address, payment method, and PAN ID ( Providing PAN ID
is mandatory for the Microsoft 365 Business account )
Click save to save the above information provided. Thus all the information provided is saved.
On the final step, click the “ Start Trial” button to finish the setup.
Finally, you will get the confirmation details as shown below with the username and a
confirmation email sent to the registered email in the first step. The below screenshot shows
this detail.
Click “Get Started” to begin the next step.

Thus setting up a Microsoft 365 Business Standard account is completed, and our next step is setting
up an email with a custom domain. When you click the Get Started button, a new page opens in
Microsoft 365 admin center as shown below to set up an email for the custom domain you own.
3. Creating a new business email trial account
Click on the box with the label “ Setup email with a custom domain “. This will open a box to choose a
domain you already own or buy a new domain from the Microsoft registrar.
Since we already own a custom domain, click on the box which says “Use a domain you already own”.
This will open the “setup email” wizard in Microsoft 365 admin center as shown in the below
screenshot. Click “Continue” to add your custom domain.
e-book

Enter the name of the domain you want to configure the email. The domain you add will appear after
the “@” character, at the end of your email address. for example, @ demowebsite.com. The below
screenshot shows this detail
Click Continue to the next step,
This will validate your domain with the registrar and ask you to log in to the domain host to verify that
you are the owner of the domain. Click Verify to start the verification process.
e-book
Next, it will open your domain registrar login page. Once you log in to the domain registrar, you will be
asked to provide the validation code by generating the OTP to the registered email or phone number in
your domain registrar. There it will ask you to click the “Connect” button to ensure you are the owner of
the particular domain you provided in the last stage.
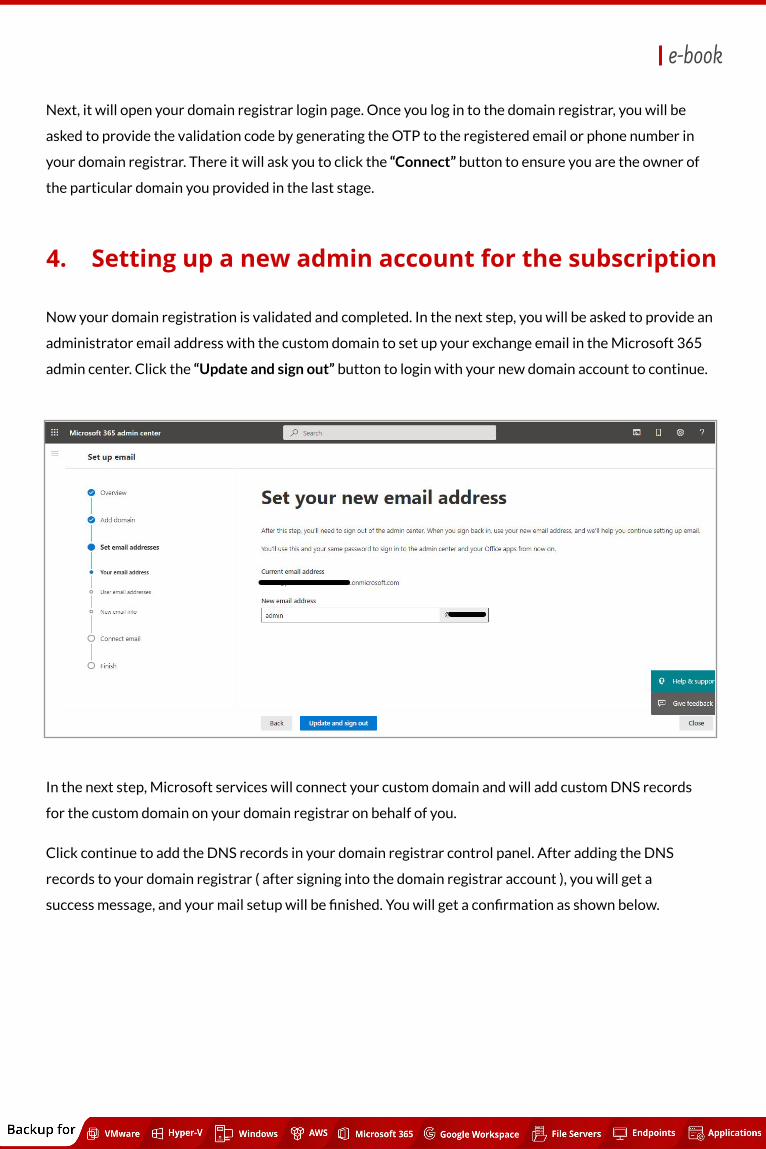
4. Setting up a new admin account for the subscription
Now your domain registration is validated and completed. In the next step, you will be asked to provide an
administrator email address with the custom domain to set up your exchange email in the Microsoft 365
admin center. Click the “Update and sign out” button to login with your new domain account to continue.
In the next step, Microsoft services will connect your custom domain and will add custom DNS records
for the custom domain on your domain registrar on behalf of you.
Click continue to add the DNS records in your domain registrar control panel. After adding the DNS
records to your domain registrar ( after signing into the domain registrar account ), you will get a
success message, and your mail setup will be finished. You will get a confirmation as shown below.
e-book

Click Done to finish the setup process. Now your Microsoft 365 Business subscription is ready, you can
now add the users to Microsoft 365 admin center and start using the Microsoft 365 services.
e-book

5. Installing the latest version of Office apps on Windows Device
Having a Microsoft 365 business plan allows you to install the Office applications on 5 devices. As
a Microsoft 365 business administrator, you can install the Microsoft 365 apps from the Microsoft
365 admin center itself. The below screenshot shows the app launcher page where you can start
the installation process of the Microsoft 365 apps.
First, it is recommended to create user accounts in Microsoft 365 admin center and install the
Microsoft 365 apps on devices after login into the user account. Here we have shown an example
of an administrator account that uses the Microsoft 365 admin center ( Home → Setup ) to install
Microsoft 365 apps
Click the box “Install the latest Office apps” button. This will download the OfficeSetup.exe file and on
executing it, Office 365 apps will get installed on the windows device.
e-book

After checking the system readiness, your system will start to download the Office application as shown
below
And finally, you get the completion message as shown below.
Now the web version of the Office 365 application ( that comes with Microsoft 365 standard
subscription ) is installed, and on clicking the Office icon on the Windows device, you will get a welcome
screen to sign in to your Office 365 account, as shown below.
e-book

On clicking the “Sign in” button, you will be asked to sign in with a Microsoft account. You can use your
business user account which was created in the previous step.
Once done your business account will be remembered by the Windows OS and automatically the
process will sign you in to your apps and websites on the device. This will reduce the number of times
you are asked to login. The below screenshot shows this step.
Click on “OK” to finish the installation, once done you will get a successful account setup
message as a pop-up.
e-book

6. Migrating emails and files to Microsoft 365
Microsoft 365 admin center offers a collection of migration tools to help you migrate your
organization's email, data, and content. Migrated content benefits from Microsoft 365 security and
compliance and lets your team be productive and collaborate on the same platform. There are 7
migration tools to migrate from different sources which hold your emails, data, and contents to
Microsoft 365 viz
❖ EMails - Tool to use to migrate email from your current email server or provider to Exchange
Online .
❖ File Share - Tool to copy your on-premises file shares into OneDrive , SharePoint , and Teams .
❖ Box - Copy your Box users and all their content into OneDrive , SharePoint , and Teams .
❖ Dropbox - Copy your Dropbox users and all their content into OneDrive , SharePoint ,
and Teams .
❖ Egnyte - Copy your Egnyte folders and all their content into OneDrive , SharePoint , and Teams
❖ Google Workspace - Migrate your organization's mail, documents, and data from Google
Workspace to Microsoft 365
❖ Sharepoint Server - Copy your out-of-the-box classic sites and content from SharePoint 2010,
2013, and 2016 into the modern SharePoint experience.
Here we have given an overview for migrating emails and contacts from legacy Exchange servers &
older Exchange online services to Microsoft 365 Exchange. This can be done by creating migration
batches in Microsoft 365 admin center in the Home → Migration section.
a) Adding a migration batch in Microsoft 365 admin center
As an administrator, you can migrate email, calendars, and contacts to Microsoft 365 Exchange Online
by going to the Microsoft 365 Exchange admin center and selecting Add migration batch. A
step-by-step guide will walk you through the process. You'll need to add a batch for each type of email
that you want to bring over.
For example, if you have some mailboxes currently on an Exchange Server , and others that are hosted
in Google Workspace , you can add these as separate migration batches. The below screenshot shows
the main page of the Migration batches on the Exchange admin center. Click “Add migration batch”
(highlighted in red below)
e-book

Once clicked it will open a new wizard, in the Getting started page, provide a unique name for the
migration batch and choose the migration mail path as “Migration to Exchange Online” and click Next to
proceed.
Note: As of now, to migrate a mailbox from Exchange Online, use the classic Exchange admin center, as
that functionality isn't available on the new Exchange admin center. Here we are providing the various
migration types supported by the Exchange admin center as shown in the screenshot below.
b) Supported migration types
Staged migration - This option migrates the contents of mailboxes from an on-premises Exchange to
Exchange Online. You can migrate batches of mailboxes until all mailboxes are migrated to the cloud. This
migration is supported by Exchange Server 2003 and Exchange Server 2007 only.
e-book

Remote move migration - This option migrates the contents of mailboxes from
an on-premises Exchange to Exchange Online. You can migrate batches of
mailboxes until all mailboxes are migrated to the cloud. This migration is supported by
Exchange Server 2010 and later versions.
Cutover migration - This option migrates the contents of mailboxes from an on-premises Exchange to
Exchange Online. You can migrate batches of mailboxes until all mailboxes are migrated to the cloud. This
migration is supported by Exchange Server 2003 and later versions.
Cross tenant migration - This option migrates the contents of mailboxes from one Exchange Online
Organization (tenant) to another Exchange Online Organization (tenant). You can migrate batches of
mailboxes until all desired mailboxes are migrated to the other tenant.
Google Workspace ( Gmail ) migration - This option migrates the contents of mailboxes from a Google
Workspace (Gmail) organization to Exchange Online. You can migrate batches of mailboxes until all
mailboxes are migrated to the cloud.
IMAP migration - This option migrates the contents of user mailboxes from your source email system to
Microsoft 365 or Office 365 if your source email system supports IMAP. You can migrate batches of
mailboxes until all mailboxes are migrated. This migration is supported by Exchange and other email
systems.
e-book

When you add a user account in Microsoft 365 admin center, basic information such as First Name & Last
Name, Display Name, and username should be provided by you. Also, Microsoft automatically enabled
the two options “Automatically create a password” and “Require this user to change their password when
they first sign in”. These two options are very much necessary when creating a new user. Similarly, if the
user forgets the password, as an administrator you should reset the password and share the new
one-time password with the user.
But for a bigger organization, say managing 500 or 1000 accounts, it is useful to change the user’s
password on their own if they want to change or when they forget the password. You are providing the
liberty by allowing them to register for a self-service password reset. To do so the Microsoft 365 admin
center should allow the users to register for a self-service password reset, they'll be asked to provide
contact information such as their email address or phone number the next time they sign in.
To reduce your support costs and help your users be more self-sufficient, you can allow them to register
for a self-service password reset known as SSPR. Here, the users no longer need to contact your
organization's IT support to reset their passwords. Instead, Microsoft will send them a code that they can
use to reset it themselves.
a) Enabling self-service password reset SSPR in Microsoft 365 admin center
Login to Microsoft 365 admin center with your global administrator account. Choose Setup from the left
menu. Under the Sign-in and security section, you can see the name “Let users reset their own
passwords” and the status as “ Not started yet”. This will tell you that you have not yet set up the
self-service registration. The below screen shows this stage shown in red.
7. Setup Self-Service Password Reset (SSPR) in Microsoft 365 Admin-Center
Click the link “ Let users reset their passwords” and it will open a new wizard. Click the Get Started
button. The below screen shows this.
e-book

1. When you select Get started, the Azure portal will open in a new browser tab. Make sure you
save your selections for each setting as you go.
2. In Password reset > Properties, choose All to let everyone reset their passwords or Selected to
choose specific groups
3. In Password reset > Authentication methods, choose how many and which methods people
can use to identify themselves when they reset their passwords. For example, they can use a
mobile authentication app or get a code sent to their mobile phone, office phone, or email.
The Azure Password reset menu blade will be opened and shows no users are selected for a
self-service password reset. Here you need to decide to select all users or particular users.
This designates whether users in this directory can reset their passwords. Choose "Selected" to
restrict password reset to a limited group of users or Choose “All” for all the users in the Azure
Directory.
Here we are choosing all the users to register for a self-service password reset. So we are choosing
the option “All” as shown in the picture below.
And click Save to save the action, and you will get the notification “ Password reset policy saved”. Now
Self service password reset SSPR is enabled for all users.
e-book
b) Setting up Authentication methods for users in Azure AD
Our next step is, how to set up authentication methods if a user wants to do a password reset
self-service. Here we can enable various available methods to use the registered users to reset their
passwords without any IT helpdesk help.
In the same password reset menu blade, choose “Authentication methods” from the left menu in the
Azure AD. Here you can define the number of methods required to reset the password. You can
configure the number of the available authentication methods a user must provide to reset or unlock
their password. This value can be set to either one or two.
Users can, and should, register multiple authentication methods. Again, it's highly recommended that
users register two or more authentication methods so they have more flexibility in case they're unable to
access one method when they need it.
The available authentication methods are:
Email - Reset instructions are initiated through the SSPR portal to email ( primary and secondary email
provided in the Azure AD ), and self-service password reset can be done by the SSPR password reset
workflow.
Mobile phone - Same process as above with Mobile OTP authentication ( Mobile number should be
configured for the user in Azure AD
Office phone - Same process as above with Office Phone no authorization.
The following considerations apply to this authentication contact info:
If the Phone field is populated and the Mobile phone is enabled in the SSPR policy, the user sees that
number on the password reset registration page and during the password reset workflow.
If the Email field is populated and Email is enabled in the SSPR policy, the user sees that email on the
password reset registration page and during the password reset workflow.
Security questions - Settings for security questions for Registering & resetting
Here an administrator can define the number of questions that must be answered by the user for
registering the SSPR. This setting defines the minimum number of security questions a user must select
and answer when registering for a password reset. Usually, the number of questions will be 3 or 4 or 5.
Also, the administrator can define the number of questions that must be answered by the user for
resetting the password. This setting defines the number of randomly-selected security questions a user
must answer when resetting a password.
e-book

Note: The number of questions a user must-have for the registration must be greater than or equal to the
number of questions a user must have to reset a password.
The below screen shows an example of an authentication page on the AAD.
You could also use Mobile app notification as your authentication method. For that, your mobile device
should be registered by downloading Microsoft Authenticator app on your mobile device, and on each
authentication time, you should approve on the mobile device.
e-book

c) Providing Authentication contact info for a user in Azure AD
As an administrator, once you set up the Authentication methods to follow for SSPR, you are good to go
for providing authentication contact info details for the users. User’s authentication methods are the
ways your users sign into Azure AD.
Here, you can set the phone numbers and email addresses that users use to perform multi-factor
authentication and self-service password reset, and reset a user’s password. This can be done by
selecting the individual user’s AAD properties. Click on an individual user in AAD → Click
``Authentication methods” under the “Manage'' section. Click “Add authentication method” ( in the new
authentication method ).
Choose the method either a Phone number or email, provide a valid email ID or phone number, and click
Add. This will allow the user to receive one-time-use codes via email or phone to use for a self-service
password reset. You should also set an alternate email on the individual user’s profile section in the same
user details menu blade. The below screenshot shows an example of the user’s authentication method
menu blade.
Thus, the user has configured his email id and phone number to get the OTP to initiate the SSPR reset
workflow when he wants to change the password without any IT help.
e-book

8. Create App Protection Policy for Mobile Devices in Microsoft 365
a) What is the Microsoft 365 app protection policy?
Microsoft 365 app protection policies are rules that ensure an organization's data remains safe or
contained in a managed app. A policy can be a rule that is enforced when the user attempts to access or
move "corporate" data or a set of actions that are prohibited or monitored when the user is inside the
app.
A managed app is an app that has app protection policies applied to it and can be managed by Intune,
which is part of the Microsoft 365 Business premium edition.
b) How does Microsoft 365 app protection protect the app data?
An Organization employee uses mobile devices for both personal and work tasks. While making sure
your employees can be productive, as an Administrator, you want to prevent data loss, intentional and
unintentional. Also, it is important to protect company data that is accessed from devices that are not
managed by the IT department.
This Microsoft 365 app protection policy helps you protect your company's data with or without
enrolling devices in a device management solution. By implementing app-level policies, an administrator
can restrict access to company resources and keep data within the purview of the IT department.
In this blog, we are providing the steps that are involved in creating an app protection policy in Microsoft
365 admin center. This can be done through Microsoft 365 admin center → Setup Menu. Under device
management, you can see the configuration setup for “Protect data in mobile apps” and you can see the
status as “Not started yet “. Thus you are good to go to start the configuration. The below picture shows
these details in red boxes.
e-book

On clicking the link ( inside the Redbox ) “ Protect data in mobile apps” you will be redirected to
a new wizard shown in the below screenshot, and select the “Get started” button
c) User impact & Application impact on applying the app protection policy
After creating an app protection policy, the next time an assigned user opens one of the affected apps on
a mobile device, the app will restart, notify them that it's now being managed by a policy, and ask them to
set up a PIN to access it. Android users will be asked to install the Company Portal app on their mobile
devices.
As an administrator, when you set up an app protection policy, you will be asked to choose a security
group and work apps where the protection policy is applied to. Administrators can choose to apply the
policies to apps such as Microsoft Office , OneDrive , Skype , and Teams . Policies are applied only when
apps are used in a work context on a mobile device. For example, when a user signs in to an app with a
work account or opens files that are stored in your org's OneDrive for business.
d) Creating an app protection policy in Microsoft 365 admin center
In the following steps, we are providing the details of Android and iOS mobile device settings to define
the policy to protect your organization's data by controlling how it's accessed, shared, and encrypted in
mobile Office apps, even when a personal mobile device is lost or stolen.
In this step, we are configuring two settings for Android and iOS devices, namely :
❖ Protect your organization’s data when mobile devices are lost or stolen
❖ Manage how users access Office files on their mobile devices
And determine who should use the policy you are creating. Either you can choose everyone in the
Organisation or you can choose the users using creating a security group (its members ) in the Azure AD.
e-book
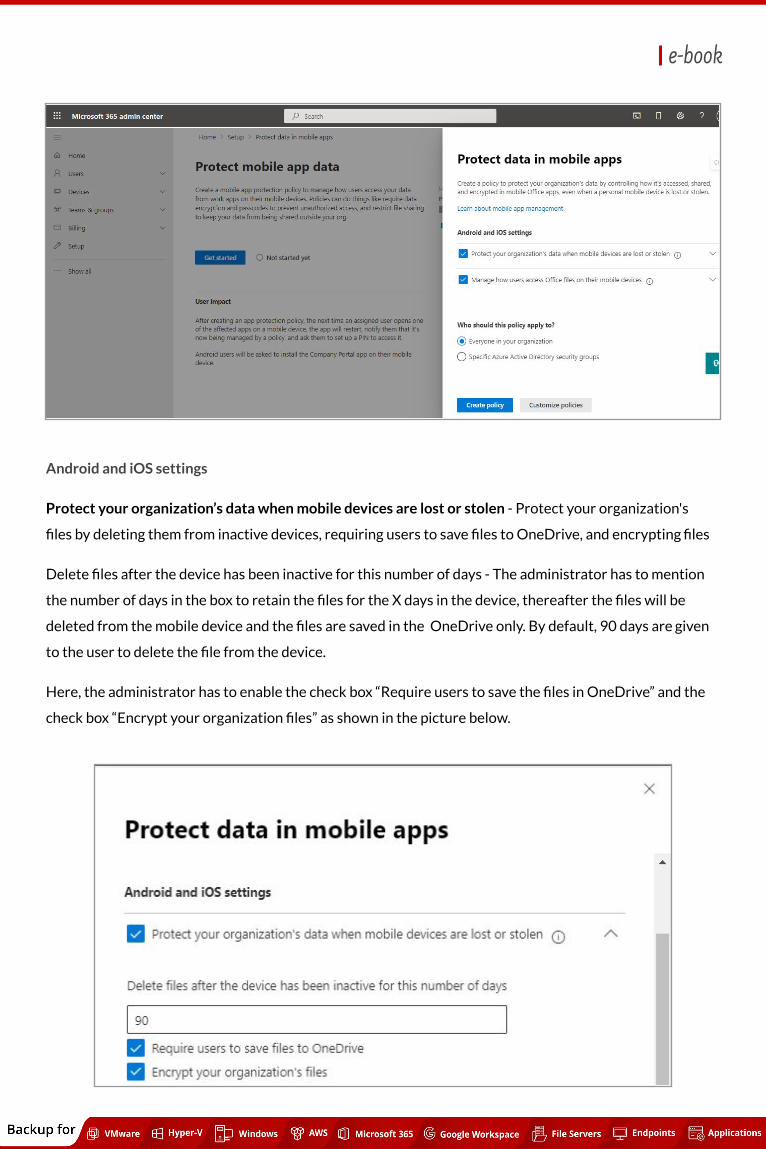
Android and iOS settings
Protect your organization’s data when mobile devices are lost or stolen - Protect your organization's
files by deleting them from inactive devices, requiring users to save files to OneDrive, and encrypting files
Delete files after the device has been inactive for this number of days - The administrator has to mention
the number of days in the box to retain the files for the X days in the device, thereafter the files will be
deleted from the mobile device and the files are saved in the OneDrive only. By default, 90 days are given
to the user to delete the file from the device.
Here, the administrator has to enable the check box “Require users to save the files in OneDrive” and the
check box “Encrypt your organization files” as shown in the picture below.
e-book
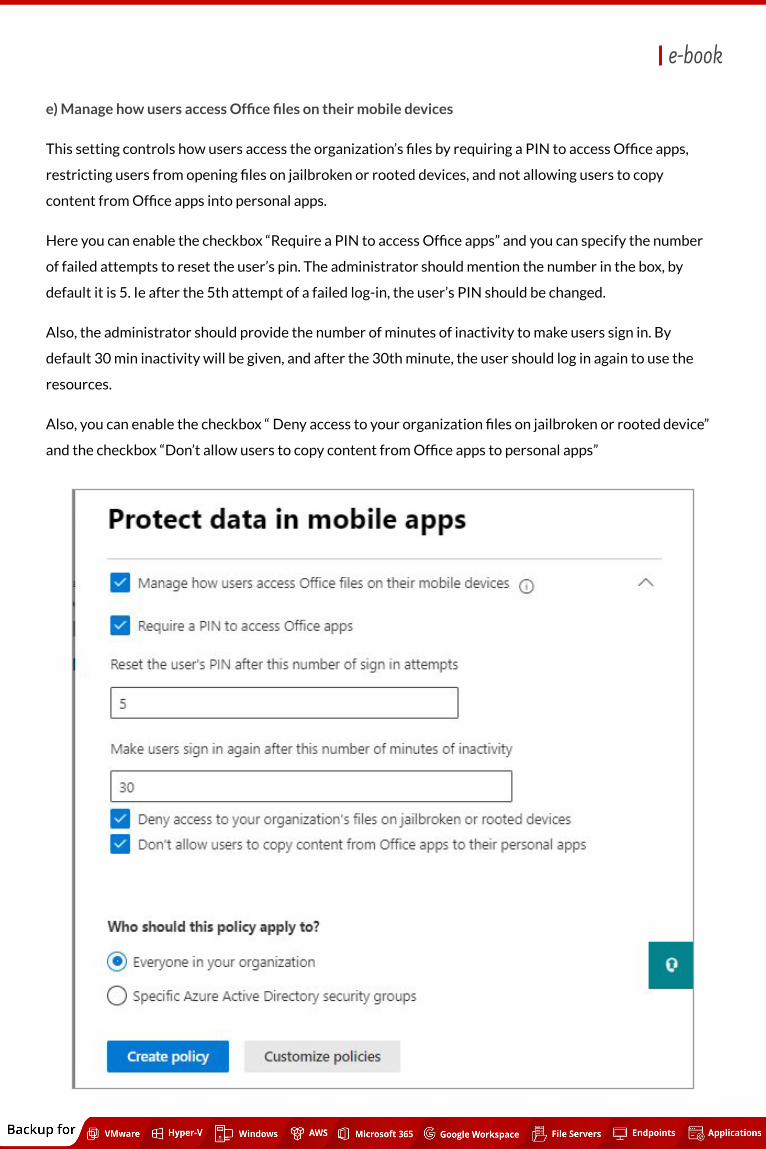
e) Manage how users access Office files on their mobile devices
This setting controls how users access the organization’s files by requiring a PIN to access Office apps,
restricting users from opening files on jailbroken or rooted devices, and not allowing users to copy
content from Office apps into personal apps.
Here you can enable the checkbox “Require a PIN to access Office apps” and you can specify the number
of failed attempts to reset the user’s pin. The administrator should mention the number in the box, by
default it is 5. Ie after the 5th attempt of a failed log-in, the user’s PIN should be changed.
Also, the administrator should provide the number of minutes of inactivity to make users sign in. By
default 30 min inactivity will be given, and after the 30th minute, the user should log in again to use the
resources.
Also, you can enable the checkbox “ Deny access to your organization files on jailbroken or rooted device”
and the checkbox “Don’t allow users to copy content from Office apps to personal apps”
e-book

Who should this policy apply to?
By default, everyone in the organization is selected or can choose the “All Users” security group. If you
want to specify particular users, create a security group and make specific users as members of the
group, and mention that security group in the specified box as shown below.
Click Create a policy to finish the work, you will get a processing prompt for a while and you will get the
message “Data is now protected in mobile apps” and you will find the notification ”The next time a user
opens one of the protected apps on a mobile device, the app will restart and notify them that their device
is now managed by a policy. They will need to set up a PIN to access it”
The below screenshot shows this confirmation.
Now you can verify with the user’s Android or iOS devices for generating a PIN for each device.
e-book

9. Create a New Microsoft 365 Subscription or Renew an Existing Subscription
a) Finding your active subscription
Microsoft offers a convenient way of switching your plans from your existing plan through the Microsoft
365 admin center easily by purchasing a new plan using the “Purchase services'' option. In this section
using the Microsoft 365 admin center, an administrator can find the Organisation’s current plan and can
find the various upgrade options.
Login to Microsoft 365 Admin Center using the Global administrator credentials. Under Billing → Your
products → You can see your Microsoft product with active status
Also, you can find the license details such as available licenses, assigned licenses under Billing → Licences.
This will give a clear picture of the total licenses you have for the active products. The below screenshot
shows you have Microsoft 365 Business Premium license and you are eligible to upgrade to a higher
version
e-book

b) Purchasing a new service from Microsoft 365 Admin Center
Microsoft 365 Admin Center purchase service offers you to buy your required Microsoft 365 plan from the
Microsoft 365 admin center itself. If you already have a subscription and want to use the additional apps &
services and features, you can easily purchase the required plan ( subscription ), and you can reassign the
new subscription license to the existing users, and later you can remove the old subscription license.
Login to Microsoft 365 admin Center using the global administrator account. Under Billing → Purchase
services, you can see all the available products to purchase. You can also view the products by their
category. The below screenshot shows this page.
Here we have given steps for purchasing a new Microsoft 365 E3 subscription in 10 quantities. You may
select the billing frequency per month or per year.
In the “Search all product categories” box type “Microsoft 365 E3” and it will show the results. The below
screenshot shows this result. You can compare all of the three products by clicking the three products
and compare button.
e-book

Also on clicking Details of each product, a new page will appear with the product details,
where you can have the option to buy the product. Here we have chosen the product
Microsoft 365 E3, and click Details to the next step.
Here you can provide the no of licenses to be purchased and the billing frequency ( either monthly or yearly ).
You could also see the “Start free trial” button if you opt for a Microsoft 365 free trial. This Microsoft 365 ree
trial includes 25 licenses for a month. Click the Buy button to proceed. This will go to the Checkout page.
e-book

Conclusion:
Microsoft 365 is a full suite of productivity tools, now bundled together and priced attractively to ensure
that all SMBs can simplify their internal processes, boost their productivity, and protect their valuable
data against cybercriminals.
Microsoft 365 business edition enables a hybrid work environment without compromising security,
efficiency, and speed. It stays connected in real-time across multiple tools and applications.
With Microsoft teams, SMBs can now have a dedicated space for communicating, organizing, and
managing work-related matters on a dedicated instant messaging platform with seamless integrations
with the Microsoft ecosystem.
With Microsoft 365 Business SharePoint, SMBs can do away with physical copies of documents and
store them digitally. With advanced access controls, SMBs can decide the terms of access for multiple
departments with no more than a few clicks.
Using a moderate knowledge of Microsoft 365 & Azure one can set up Microsoft 365 Business accounts
easily and can configure the important security settings in a few steps quickly.
e-book
About BDRSuite
Vembu Technologies is a leading software vendor offering backup and disaster recovery solutions to small, medium, enterprise businesses, and service providers. Vembu's flagship backup and DR software BDRSuite, ensures the business continuity and disaster recovery of small to large scale IT infrastructures having virtual, physical machines, cloud workloads, and SaaS applications at an affordable price. The products under the suite can be deployed flexibly in any location like on-premise, offsite and the public cloud. The centralized monitoring and management user interface also make it very easy to monitor and manage large deployments with minimal effort.
USA & CANADA+1-512-256-8699
UNITED KINGDOM+1-512-256-8699
www.vembu.com
Contact us
Disclaimer
All rights reserved. No part of this publication may be reproduced, distributed, or transmitted in any form or by any means, including photocopying, recording, or other electronic or mechanical methods, without the prior written permission of the publisher. The information is provided by Vembu and while we endeavour to keep the information up to date and correct, we make no representations or warranties of any kind, express or implied, about the completeness, accuracy, reliability, suitability or availability with respect to the document or the information contained on the document for any purpose. Any reliance you place on such information is therefore strictly at your own risk.
e-book