THE WORLD ARCHERY BEGINNERS' AWARDS PROGRAM
45
Page 1 CHAPTER 13: THE WORLD ARCHERY BEGINNERS’ AWARDS PROGRAM 13.1. Introduction: This World Archery Beginners’ Award Program Manual is a guide for beginner archers and their Level 1 archery coaches. 13.1.1. To the Level 1 Archery Coaches: Thank you for promoting archery! This guide will help coaches in properly educating novices in archery and in evaluating their progress. We encourage you to make regular use of the World Archery Level 1 Coaching Manual and/or audio-visual document in your coaching activities. 13.1.2. To the Beginner Archers: Congratulations on taking up Archery! This chapter presents the curriculum of each of the 7 levels of the World Archery Beginners’ Awards Program. It will help you to develop your general shooting skills, knowledge of archery and performance. Your progress will be encouraged and rewarded by the earning of World Archery Beginners’ Award pins. After completion of the Entry level program, you will be encouraged to take part in some World Archery tournaments, through which you can win other World Archery awards specific to each archery discipline. World Archery wishes you a life of enjoyment within the World Archery family. 13.1.3. The World Archery Beginners’ Awards Program at a glance: The World Archery Beginners’ Awards Program has been designed to be implemented in all countries of the world at any time; incorporating Indoor and Outdoor disciplines. Up to seven awards lead the novice: • from a very short shooting distance - 6 to 10 meters, depending on the archer’s age; • to the shortest Indoor distance - 18 meters, but on a bigger target face than the World Archery official one for this distance; • and even further – to 26 meters on an 80 cm target face, which is close to the first World Archery Outdoor distance, 30 meters. This process is not only based on score, since skills, knowledge and know-how are also assessed; hence the main goal of the World Archery Beginners’ Awards Program (BAP) is the archer’s education as a whole. 13.2. Overall presentation 13.2.1. Goals: World Archery has produced this manual to guide beginners in assessing their progress during the long period covering the entry-level program before they compete in official tournaments. 13.2.2. Evaluation principle To earn any of the World Archery Beginners’ Awards, you have to reach a minimum level of: • score; • skill development; • Knowledge and/or know-how. 13.2.2.1. SCORE Your performance is evaluated at reduced shooting distances and number of shots. At each stage, 15 arrows are shot at an 80 cm target face. Note about the shooting distances: Seven shooting distances are on the program. This high number of shooting lines could be a problem in some facilities; for example, with a permanent wall of target. If so, you can modify the requested score of: • 1 hit per meter of change in the shooting distance for the Feather Awards • 3 points per meter of change in the shooting distance for the Arrow Awards Note about the target faces Only a few factors can involve a change of the target faces that if the archer is not accurate enough. Decision factors can be: o Very young archers o Instinctive archers o Disabled archers
-
Upload
khangminh22 -
Category
Documents
-
view
0 -
download
0
Transcript of THE WORLD ARCHERY BEGINNERS' AWARDS PROGRAM

COACHING MANUAL
Page 1
CHAPTER 13: THE WORLD ARCHERY BEGINNERS’ AWARDS PROGRAM
13.1. Introduction:
This World Archery Beginners’ Award Program
Manual is a guide for beginner archers and their
Level 1 archery coaches.
13.1.1. To the Level 1 Archery Coaches:
Thank you for promoting archery!
This guide will help coaches in properly
educating novices in archery and in evaluating
their progress.
We encourage you to make regular use of the
World Archery Level 1 Coaching Manual and/or
audio-visual document in your coaching
activities.
13.1.2. To the Beginner Archers:
Congratulations on taking up Archery!
This chapter presents the curriculum of each of
the 7 levels of the World Archery Beginners’
Awards Program. It will help you to develop your
general shooting skills, knowledge of archery
and performance. Your progress will be
encouraged and rewarded by the earning of
World Archery Beginners’ Award pins.
After completion of the Entry level program, you
will be encouraged to take part in some World
Archery tournaments, through which you can
win other World Archery awards specific to each
archery discipline.
World Archery wishes you a life of enjoyment
within the World Archery family.
13.1.3. The World Archery Beginners’ Awards
Program at a glance:
The World Archery Beginners’ Awards Program
has been designed to be implemented in all
countries of the world at any time; incorporating
Indoor and Outdoor disciplines. Up to seven
awards lead the novice:
• from a very short shooting distance - 6 to 10
meters, depending on the archer’s age;
• to the shortest Indoor distance - 18 meters,
but on a bigger target face than the World
Archery official one for this distance;
• and even further – to 26 meters on an 80 cm
target face, which is close to the first World
Archery Outdoor distance, 30 meters.
This process is not only based on score, since
skills, knowledge and know-how are also
assessed; hence the main goal of the World
Archery Beginners’ Awards Program (BAP) is the
archer’s education as a whole.
13.2. Overall presentation
13.2.1. Goals:
World Archery has produced this manual to guide
beginners in assessing their progress during the
long period covering the entry-level program
before they compete in official tournaments.
13.2.2. Evaluation principle
To earn any of the World Archery Beginners’
Awards, you have to reach a minimum level of:
• score;
• skill development;
• Knowledge and/or know-how.
13.2.2.1. SCORE
Your performance is evaluated at reduced
shooting distances and number of shots. At each
stage, 15 arrows are shot at an 80 cm target
face.
Note about the shooting distances:
Seven shooting distances are on the program.
This high number of shooting lines could be a
problem in some facilities; for example, with a
permanent wall of target. If so, you can modify
the requested score of:
• 1 hit per meter of change in the shooting
distance for the Feather Awards
• 3 points per meter of change in the shooting
distance for the Arrow Awards
Note about the target faces
Only a few factors can involve a change of the
target faces that if the archer is not accurate
enough.
Decision factors can be:
o Very young archers
o Instinctive archers
o Disabled archers
COACHING MANUAL
Page 2
In this case the coach can decide to use the 122
cm target face. This decision is to take with
absolute caution and just in exceptional case.
See the evaluation form for the shooting
distance for each award level.
13.2.2.2. SKILLS DEVELOPMENT
The achievement of a good score is only a
consequence of well-implemented skills, as
described in the World Archery level 1 Coaching
Manual.
Thus, for each development level, some skills are
expected to be acquired. Their assessment is
based on some key elements described in the
World Archery Entry Level 1 Coaching Manual. If
you need help in evaluating these skills, do not
hesitate to consult this reference manual.
To help with your training, collaborating with an
archery coach is also strongly recommended
13.2.2.3. Knowledge and/or know-how
Learning archery is not restricted to learning the
steps of the shooting sequence. The novices
have also to:
• play safe, and know the safety rules;
• know the specific terminology;
• look after their equipment - to brace the bow,
maintain and repair the equipment (i.e.
arrows, string, arrow-rest), etc.;
learn the competition rules.
13.2.3. Delivery of the World Archery Beginners’
Awards
The following organizations are entitled to order
the World Archery Beginners’ Awards from the
World Archery office:
- Member Associations (the National Archery
Federations) in good standing with World
Archery;
- Clubs and Regional Archery Associations, as
long as they can prove their membership in
World Archery Member Association is in good
standing with World Archery.
Note: In some countries, only the National
Archery Federation is entitled to sell
or distribute the World Archery
Beginners’ Awards to its Clubs and
Regional Archery Associations. Please
check with your respective National
Archery Federation, if you are allowed
to directly order the Beginners’
Awards to World Archery.
In most cases, clubs maintain a stock of World
Archery Beginners’ Awards, which they have
ordered either through their National Archery
Federation, or directly from the World Archery
office.
13.2.4. Types of Awards
Two sets of beginners Awards are available:
• One set for the youngest beginners (under
12 years old) and for some disabled novices.
It is up to the coach (or person in charge of
the entry level programme) to decide the
archer’s eligibility to challenge for these
awards. World Archery does not ask for any
proof of age or disability. This group of
awards is entitled “FEATHERS”.
• One set for pre-teens, teenagers and adults:
This group of awards is entitled “ARROWS”.
The awards are pins and can be displayed, on the
quiver for instance.
13.2.5. Recommended examination guidelines
for awards
Develop a schedule of specific sessions for
challenging the World Archery Beginners’ Awards
and require a minimum attendance in entry-level
practice sessions to be eligible to take part in an
evaluation session.
For instance:
Schedule a specific session for challenging the
World Archery Beginners’ Awards every 2
months; open only to those who have attended
at least 7 practice sessions during the two
preceding months.
To challenge for a World Archery Beginners’
Award, those who have attended less than 7
practice sessions will have to wait until the next
specific challenge session and complete at least
7 practice sessions before then.
Beginners who fail some components of the
evaluation may re-challenge these items only,
but they must retrain on all the modules failed
and the reassessment/evaluation cannot be
retaken until the full program is completed.

COACHING MANUAL
Page 3
All novices must start by challenging the Red
Feather or the White Arrow. Starting at any
other level would make it difficult to evaluate the
skills, knowledge and know-how that were
supposed to have been learned previously.

COACHING MANUAL
Page 4
World Archery Feather Awards at a glance.
After the World Archery Gold Feather, I will challenge the World Archery Arrow Awards, starting with the White one at 10 meters
World Archery Arrow Awards at a glance.
When I have achieved the Gold FITA Arrow, I am able to attend some local tournaments shot at short distances
In order to measure my progress, every 2 months* my club organizes, a threefold evaluation through which I can get the
World Archery Red Feather then the Gold Feather
* As an example
With 15 arrows, I have to hitan 80cm target face, scoring 6 or
better, 12 times.
At 6 meters for the WA Red Feather.
At 8 meters for the WA Gold Feather.
I have to answer correctly several questions about the
basic safety rules and I have to know how to take good care of
the equipment, such as retrieving the arrow and bracing
the bow correctly.
My shooting form, from stance to arrow loading, is evaluated.
In order to measure my progress, every 2 months (for instance) my club organizes, a threefold evaluation through which I can get the various World
Archery Arrows. Each of the 5 Arrow awards is from one color of the archery target face.
With 15 arrows (half an Indoor round), I have to score 115 points on an 80cm
target face, at:
10 m for the White World Archery Arrow.
14 m for the Black World Archery Arrow.
18 m for the Blue World Archery Arrow.
(which is an official FITA Indoor distance, but my target face is bigger than the official one. Nevertheless I can shoot
from the same shooting line as the experienced archers).
25 m for the Red World Archery Arrow.
30 m for the Gold World Archery Arrow.
Then I will be ready to shoot 30 meters, the shortest Official Outdoor World
Archery distance.
I have to answer correctly several questions about:
Safety;
Archery terminology /language;
Rough description of the archery disciplines;
I also have to know how to:
Install/assemble the equipment;
Handle the equipment;
Maintain the equipment;
Register to take part in a local tournament.
My shooting form and
sequence are evaluated.

COACHING MANUAL
Page 5
COACHING MANUAL
Page 6
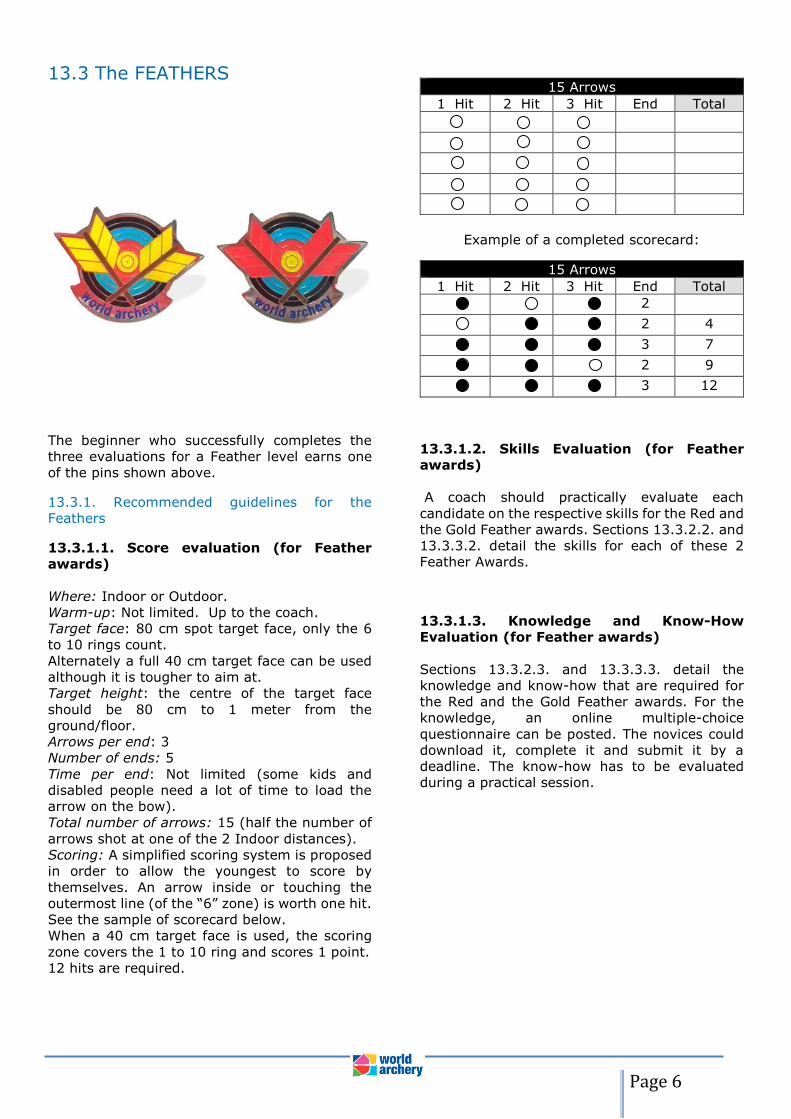
13.3 The FEATHERS
The beginner who successfully completes the
three evaluations for a Feather level earns one
of the pins shown above.
13.3.1. Recommended guidelines for the
Feathers
13.3.1.1. Score evaluation (for Feather
awards)
Where: Indoor or Outdoor.
Warm-up: Not limited. Up to the coach.
Target face: 80 cm spot target face, only the 6
to 10 rings count.
Alternately a full 40 cm target face can be used
although it is tougher to aim at.
Target height: the centre of the target face
should be 80 cm to 1 meter from the
ground/floor.
Arrows per end: 3
Number of ends: 5
Time per end: Not limited (some kids and
disabled people need a lot of time to load the
arrow on the bow).
Total number of arrows: 15 (half the number of
arrows shot at one of the 2 Indoor distances).
Scoring: A simplified scoring system is proposed
in order to allow the youngest to score by
themselves. An arrow inside or touching the
outermost line (of the “6” zone) is worth one hit.
See the sample of scorecard below.
When a 40 cm target face is used, the scoring
zone covers the 1 to 10 ring and scores 1 point.
12 hits are required.
15 Arrows
1 Hit 2 Hit 3 Hit End Total
Example of a completed scorecard:
15 Arrows
1 Hit 2 Hit 3 Hit End Total
2
2 4
3 7
2 9
3 12
13.3.1.2. Skills Evaluation (for Feather
awards)
A coach should practically evaluate each
candidate on the respective skills for the Red and
the Gold Feather awards. Sections 13.3.2.2. and
13.3.3.2. detail the skills for each of these 2
Feather Awards.
13.3.1.3. Knowledge and Know-How
Evaluation (for Feather awards)
Sections 13.3.2.3. and 13.3.3.3. detail the
knowledge and know-how that are required for
the Red and the Gold Feather awards. For the
knowledge, an online multiple-choice
questionnaire can be posted. The novices could
download it, complete it and submit it by a
deadline. The know-how has to be evaluated
during a practical session.
COACHING MANUAL
Page 7
13.3.2. Red Feather
13.3.2.1. Performance:
From a shooting distance of 6 meters, you must
achieve a minimum of 12 hits of 15 arrows shot
in 5 consecutive ends of 3 arrows at either:
• an 80 cm spot target face,
• a full 80 cm target face, only the 6 to 10 rings
count for one hit
• an 40 cm target face, any scoring zone counts
for one hit.
13.3.2.2. Skills
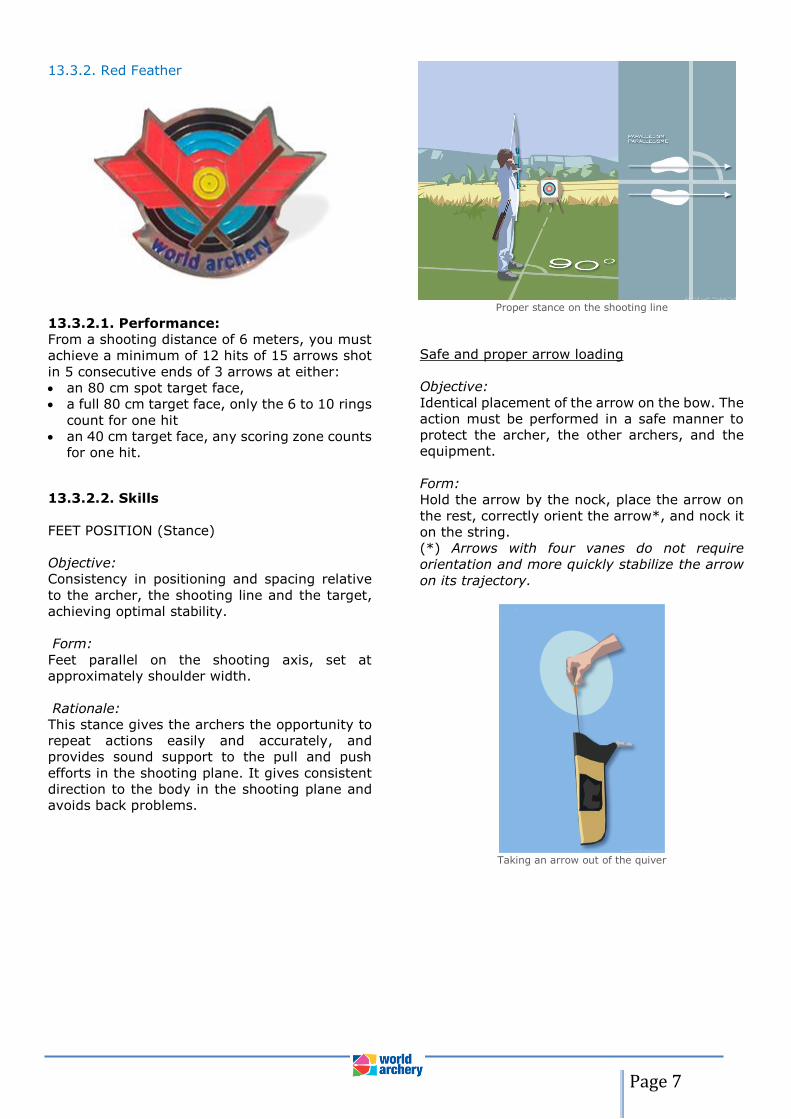
FEET POSITION (Stance)
Objective:
Consistency in positioning and spacing relative
to the archer, the shooting line and the target,
achieving optimal stability.
Form:
Feet parallel on the shooting axis, set at
approximately shoulder width.
Rationale:
This stance gives the archers the opportunity to
repeat actions easily and accurately, and
provides sound support to the pull and push
efforts in the shooting plane. It gives consistent
direction to the body in the shooting plane and
avoids back problems.
Proper stance on the shooting line
Safe and proper arrow loading
Objective:
Identical placement of the arrow on the bow. The
action must be performed in a safe manner to
protect the archer, the other archers, and the
equipment.
Form:
Hold the arrow by the nock, place the arrow on
the rest, correctly orient the arrow*, and nock it
on the string.
(*) Arrows with four vanes do not require
orientation and more quickly stabilize the arrow
on its trajectory.
Taking an arrow out of the quiver
COACHING MANUAL
Page 8
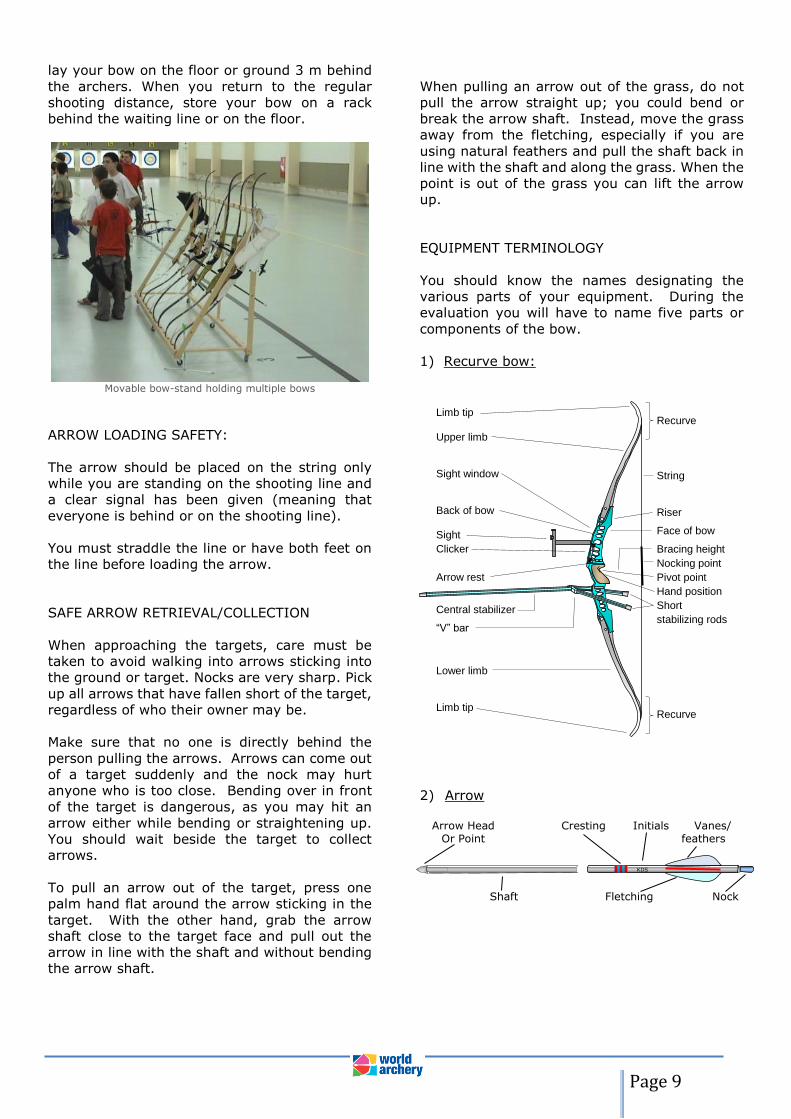
Arrow loading
Rationale:
Taking hold of the arrow in front of the vanes
makes nocking more difficult and risks damaging
the fletching if the hand slips during the nocking
process. A finger must not be used to hold the
shaft on the arrow rest since the rest does not
endure strong vertical pressure and could be
damaged.
Nocking the arrow
Finger pressure damaging the arrow rest
12.3.2.3. Knowledge and/or Know-How
You must know the following subjects:
BOW SAFETY
• Releasing the string from full draw without
an arrow on the string could cause damage
and/or injury.
• After shooting one end put the bow on a bow
stand or rack located in the equipment lane.
• Bow stands located behind the waiting line
are ideal for storing bows when they are not
being used during training sessions.
Equipment stored in the equipment lane
When shooting arrows at a shorter distance than
usual (for a specific drill, for instance), you can
COACHING MANUAL
Page 9
lay your bow on the floor or ground 3 m behind
the archers. When you return to the regular
shooting distance, store your bow on a rack
behind the waiting line or on the floor.
Movable bow-stand holding multiple bows
ARROW LOADING SAFETY:
The arrow should be placed on the string only
while you are standing on the shooting line and
a clear signal has been given (meaning that
everyone is behind or on the shooting line).
You must straddle the line or have both feet on
the line before loading the arrow.
SAFE ARROW RETRIEVAL/COLLECTION
When approaching the targets, care must be
taken to avoid walking into arrows sticking into
the ground or target. Nocks are very sharp. Pick
up all arrows that have fallen short of the target,
regardless of who their owner may be.
Make sure that no one is directly behind the
person pulling the arrows. Arrows can come out
of a target suddenly and the nock may hurt
anyone who is too close. Bending over in front
of the target is dangerous, as you may hit an
arrow either while bending or straightening up.
You should wait beside the target to collect
arrows.
To pull an arrow out of the target, press one
palm hand flat around the arrow sticking in the
target. With the other hand, grab the arrow
shaft close to the target face and pull out the
arrow in line with the shaft and without bending
the arrow shaft.
When pulling an arrow out of the grass, do not
pull the arrow straight up; you could bend or
break the arrow shaft. Instead, move the grass
away from the fletching, especially if you are
using natural feathers and pull the shaft back in
line with the shaft and along the grass. When the
point is out of the grass you can lift the arrow
up.
EQUIPMENT TERMINOLOGY
You should know the names designating the
various parts of your equipment. During the
evaluation you will have to name five parts or
components of the bow.
1) Recurve bow:
2) Arrow
KDS
Arrow Head Or Point
Vanes/ feathers
Cresting Initials
Shaft Fletching Nock
Limb tip Upper limb Sight window Back of bow Sight
Clicker
Arrow rest
Central stabilizer
“V” bar
Lower limb Limb tip
Recurve
String
Riser
Face of bow
Bracing height
Nocking point
Pivot point
Hand position
Short
stabilizing rods
Recurve
COACHING MANUAL
Page 10
VISUAL AND ACOUSTIC SIGNALS
The archer must know the visual an especially
the acoustic signals.
Before the start of the shooting everybody has
to wait behind the waiting line.
The archer can take up the bow and wait for the
two acoustic signals.
Now he can go to the shooting line. After the
next single acoustic signal the shooting can start
and will finish at the latest when the next 2
acoustic signals are to hear.

COACHING MANUAL
Page 11
Evaluation form for Red Feather Candidates
Name of the beginner: Form A
Date: ____ / ____ / 20__ Retake date: ____ / ____ / 20__
PERFORMANCE
Shooting distance
Required minimum score Achieved
*
*Not yet
achieved
Number of hits
(result)
6 meters 12 hits
SKILLS
Key elements (What should be done)
Achieved*
*Not yet achieved
References to the World Archery
Level 1 Coaching Manual.
Warm-up Knowing and executing warm-up exercises named by the coach
#11.1
Feet position Feet either side of the shooting line #6.1.1
(Stance) Feet at shoulder width apart #6.1.1
Line of feet square to the shooting line #6.1.1
Feet parallel #6.1.1
Safe and proper
Implemented with bow vertical #6.2.1
arrow loading No finger pressing the arrow on rest #6.2.1
Arrow properly rotated cock feather away from bow window)
#6.2.1.
KNOWLEDGE
and/or KNOW-HOW
Required knowledge or know-how Achieved
*
*Not yet
achieved
Comments
and/or references
Acoustic signals
Respect the acoustic signals Chapter 13.5;
Visual and
acoustic time
control
Bow safety No dry firing (dry loosing) #2.3
Set the bow in equipment lane after shooting the end
#2.2.2
Arrow loading safety
Load the arrow on the bow only when everyone is behind the shooting line and
the signal is given
#2.2.1 & 2.2.2
To be done only when the feet are set each side of the shooting line
#2.2.2
Safe arrow
retrieval/collection
Walk carefully to target (do not run and
watch your step)
#2.3
Stand to the side of the target (not behind arrows)
#2.2.2
Properly pull the arrow out of the target (or grass)
#2.4
Equipment
terminology
Can name 3 parts or components of
the bow
#9.3.1
TOTAL 18 positive evaluations are required ** Granted ____ not yet granted ___
* Checkmark if the score / skill / knowledge is positively evaluated (Achieved) or not (Not yet achieved).
Write in the TOTAL row of these two columns the accumulated number of checkmarks.
** Just checkmark the final result of this evaluation.
Name and signature of the assessor/evaluator: _______________________________________
COACHING MANUAL
Page 12
13.3.3. Gold Feather
13.3.3.1. Performance
From a shooting distance of 8 meters, you must
achieve a minimum of 12 hits of 15 arrows shot
in 5 ends of 3 arrows at either:
• an 80 cm spot target face,
• a full 80 cm target face, only the 6 to 10 rings
count for one hit
• a 40 cm target face, any scoring zone counts
for one hit a
13.3.3.2. Skills
BODY SETTING
(from before drawing until full draw)
Objective:
Provide an identical, stable foundation that
facilitates a consistent repetition of upper body
actions as well as optimal general balance. It
should also allow the position of the aiming eye
at the same stable spot in the space on each
shot. Imagine the aiming eye as the top of the
“big pyramid” (your coach will instruct you on the
pyramid system – refer to sections 6.5.1.
Complementary Knowledge and 6.10.
Complementary Knowledge for details)
Form:
Most novices are slightly bent over while setting
up the string and bow hands. Moving from a bent
over position to an upright one creates a good
base at the beginning of the execution process
of the shot.
38
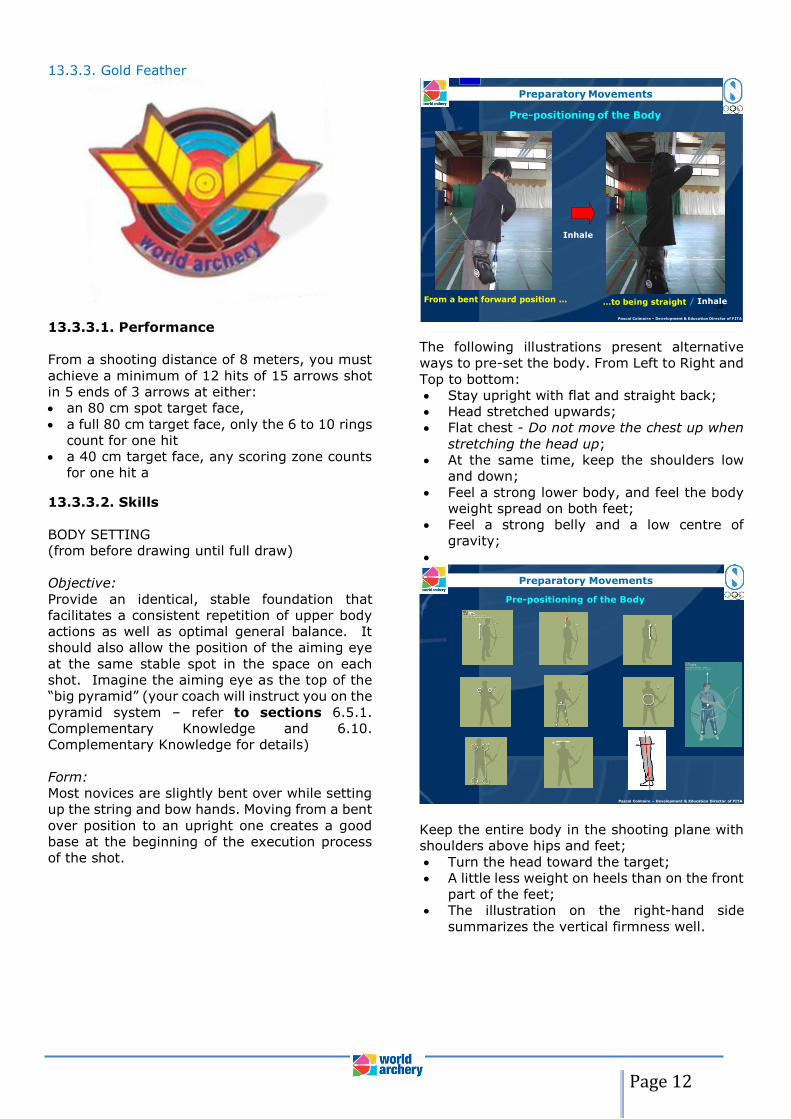
Pre-positioning of the Body
From a bent forward position … …to being straight
Inhale
/ Inhale
Preparatory Movements
Pascal Colmaire – Development & Education Director of FITA
The following illustrations present alternative
ways to pre-set the body. From Left to Right and
Top to bottom:
• Stay upright with flat and straight back;
• Head stretched upwards;
• Flat chest - Do not move the chest up when
stretching the head up;
• At the same time, keep the shoulders low
and down;
• Feel a strong lower body, and feel the body
weight spread on both feet;
• Feel a strong belly and a low centre of
gravity;
•
Pre-positioning of the Body
Preparatory Movements
Pascal Colmaire – Development & Education Director of FITA
Keep the entire body in the shooting plane with
shoulders above hips and feet;
• Turn the head toward the target;
• A little less weight on heels than on the front
part of the feet;
• The illustration on the right-hand side
summarizes the vertical firmness well.
COACHING MANUAL
Page 13
LEGS
Form:
The legs form an upside-down "V" that is
symmetrical around the vertical axis going
through the head. Weight is placed as equally on
both feet as possible.
Rationale:
The body weight is distributed approximately
equally on both legs. Swaying in the vertical
plane is reduced because the body weight is
slightly forward (toward toes).
The string leg participates in the production of
the push while the bow leg contributes to the
pull. The two efforts strengthen your vertical
body axis and generate a downward pressure,
providing a solid foundation for upper body work
and good stability.
Flat chest, powerful belly and body weight equally shared on
both feet
String (right) leg assists the push effort
Bow (left) leg assists the pull effort
THE UPPER BODY
Initially the torso, shoulder, and head are
positioned close to their final position.
Form:
Turn or tilt the pelvis backwards (flattening the
lower back), and stretch the spine up while
keeping the shoulders in the same plane as the
hips. Lower your shoulders and flatten your chest
- you may feel a slight stretching in the trapezius
muscles. Turn your head toward the target
(whilst maintaining the stretching up action)
until your nose is directed toward the target.
Rationale:
Stretching-up your head and spine assures an
erect vertical stance. Tilting your pelvis,
flattening your chest and the lowering your
shoulders lower the centre of gravity, making
your body more stable. Furthermore, it transfers
energy from the upper body to the lower body,
helping you to relax. Shoulders and the head are
close to their final position, thus minimizing
movement during the draw.
BODY SETTING (end of draw)
Objective:
Draw the bow without disturbing the pre-set
position achieved above. In fact, maintain this
body position until after the shot.

COACHING MANUAL
Page 14
Draw made in the shooting plane
The top and bottom body remain well in place during the draw
and end of draw
Form:
A balance between the production of traction and
repulsion (pull and push) forces must be created
and maintained throughout the draw. As
previously noted, these pull and push efforts are
supported by the legs.
Always stay in control, keeping momentum
movements to a minimal or non-existent level.
The drawing motion diminishes in speed as you
near the facial reference, but it does not stop.
The torso remains almost immobile. If there was
no pre-draw, a slight rotation of the chest,
aligning the shoulders with the shooting plane
may occur.
The body is vertical or leans slightly toward the
string leg. The shoulders remain low and the
head remains in place and extended up - it
should not move toward the string during the
draw. The arrow always remains parallel to the
ground and the string moves straight to the face
in the shooting plane.
Rationale:
This form is easy to duplicate because the
foundation stays in place, the movement is
simple, and control is easily preserved. Striving
for symmetry will maintain balance in the shot.
The production of effort is dispersed, which
facilitates achieving symmetry, reduces local
fatigue effects, and minimizes the risk of injury.
The major muscles are used to generate the
effort and full drawing effort is attained as soon
as the draw approaches the face, which
enhances the control of the shot. Because the
beginning of the draw is faster, the archer saves
energy.
13.3.3.3. KNOWLEDGE AND/OR KNOW-
HOW
BOW ASSEMBLY:
You must learn from your coach how to properly
mount the limbs onto and remove them from the
riser (if you use a takedown bow). An assembled
Recurve bow that has not been braced has the
tips of the limbs towards the target (not towards
you) when your hand is properly in the grip. On
some older bows, due to a former World Archery
rule, the internal part (the side facing you when
your hand is properly in the grip) of the top limbs
is blank, while the limb specifications (length and
weight) are written in the internal part of the
bottom limb, as shown on the illustration below.
The technical specifications of the limbs are often written
on the internal part of the bottom limb

COACHING MANUAL
Page 15
BOW BRACING:
Your coach will most likely have your bow strung
before the start of the first two or three practice
sessions. Stringing and unstringing of the bow
is usually taught on the third or fourth session
when the students are a little more familiar with
the equipment. Below we recommend some safe
methods for stringing the bow.
A loop stringer is inexpensive, easy to use and
makes the task of stringing the bow almost
effortless. Like any other stringing methods, it
is necessary to check the string positioning
before taking the bow stringer pressure off the
upper limb tip. Place a small piece of carpet or
rubber on hard and rough ground to prevent
damage to the lower limb tip. A tip protector on
the lower limb would also serve this function and
also help keep the string loop in the proper
location.
Use of a string loop with 2 feet
Use of a string loop with 1 foot
You also can buy a bow stringer like the one
show below from any archery shop. They are a
little tricky to use properly at first, but over time
and with experience they become simple and
reliable tools.
Finally, a wall or pole-mounted bow stringer is
another excellent device for setting the string on
the bow. It is made of 2 pieces of metal cylinder,
wrapped with something to protect the limbs,
and affixed to a wall or pole.
COACHING MANUAL
Page 16
RANGE SAFETY:
Under no circumstances should anyone shoot if
someone is downrange on the field. Arrows may
glance off the targets or depart from their
intended path.
The shooting line should be straight, not
staggered.
When in a group where archers are not shooting
at the same distance, it is safest to have the
targets at the desired distances and all the
archers on the same shooting line.
SAFETY and ETIQUETTE on the SHOOTING LINE:
Only draw your bow back if you are on the
shooting line. Never draw the bow with your bow
hand higher than your drawing hand, and you
should not shoot “cross-court” (toward a target
that is not straight ahead) unless specifically
directed to (for a competition or game, for
instance).
Avoid talking on the line or otherwise distracting
other archers during the shooting of the end.
Leave it to the coach to critique any archer’s
technique, but encouraging remarks are
welcome at any time.
If your bow or arrow falls in front of the shooting
line and you can reach it without leaving the
shooting line, ensure that the archers on either
side of you have their bows down at their sides
before retrieving your equipment. Any arrow
which cannot be retrieved without moving your
feet on the shooting line should only be retrieved
after shooting has stopped.
COACHING MANUAL
Page 17
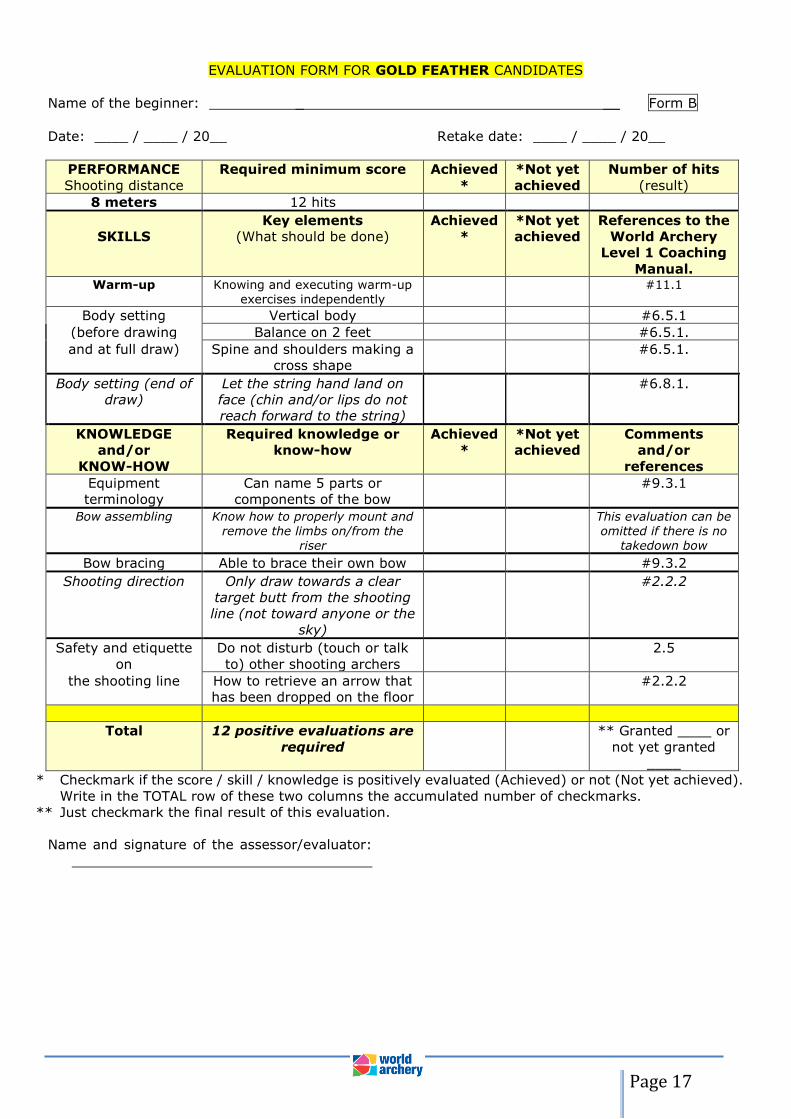
EVALUATION FORM FOR GOLD FEATHER CANDIDATES
Name of the beginner: _ __ Form B
Date: ____ / ____ / 20__ Retake date: ____ / ____ / 20__
PERFORMANCE
Shooting distance
Required minimum score Achieved
*
*Not yet
achieved
Number of hits
(result)
8 meters 12 hits
SKILLS
Key elements
(What should be done)
Achieved
*
*Not yet
achieved
References to the
World Archery
Level 1 Coaching
Manual. Warm-up Knowing and executing warm-up
exercises independently #11.1
Body setting Vertical body #6.5.1
(before drawing Balance on 2 feet #6.5.1.
and at full draw) Spine and shoulders making a
cross shape
#6.5.1.
Body setting (end of
draw)
Let the string hand land on
face (chin and/or lips do not
reach forward to the string)
#6.8.1.
KNOWLEDGE
and/or
KNOW-HOW
Required knowledge or
know-how
Achieved
*
*Not yet
achieved
Comments
and/or
references
Equipment
terminology
Can name 5 parts or
components of the bow
#9.3.1
Bow assembling Know how to properly mount and remove the limbs on/from the
riser
This evaluation can be omitted if there is no
takedown bow
Bow bracing Able to brace their own bow #9.3.2
Shooting direction Only draw towards a clear
target butt from the shooting
line (not toward anyone or the
sky)
#2.2.2
Safety and etiquette
on
Do not disturb (touch or talk
to) other shooting archers
2.5
the shooting line How to retrieve an arrow that
has been dropped on the floor
#2.2.2
Total 12 positive evaluations are
required
** Granted ____ or
not yet granted
____
* Checkmark if the score / skill / knowledge is positively evaluated (Achieved) or not (Not yet achieved).
Write in the TOTAL row of these two columns the accumulated number of checkmarks.
** Just checkmark the final result of this evaluation.
Name and signature of the assessor/evaluator:

COACHING MANUAL
Page 18
13.4. THE ARROWS
The Red and Yellow Arrow FITA awards will be
replaced with WA ones, once they will be out of stock
13.4.1. Recommended evaluation guidelines for
the “Arrows”
13.4.1.1. Score evaluation (for the Arrow
awards)
Where: Indoor or Outdoor.
Warm-up: No more than 4 ends
(recommendation only).
Target face: 80 cm (a full one)
Target height: centre of the target face 1 meter
to 1.3 meter from the ground/floor.
Arrows per end: 3
Number of ends: 5
Time per end: 2 minutes.
Total number of arrows: 15 (half the number of
arrows shot at one of the 2 Indoor distances).
Scoring: As per World Archery Indoor and
Outdoor scoring rules.
13.4.1.2. SKILLS EVALUATION (for the
Arrow awards)
A coach should practically evaluate each
candidate on the respective skills for the various
Arrow Awards. The sections below detail the
skills for each of these five Arrow Awards.
13.4.1.3. KNOWLEDGE and KNOW-HOW
EVALUATION (for the Arrow awards)
The sections below detail the knowledge and
know-how that are required for the five Arrow
Awards. For the knowledge, an online multiple-
choice questionnaire can be posted on the
Internet site of the association the beginners
belong to. The novices could download it,
complete it and submit it by a deadline. The
know-how has to be evaluated during a practical
session.
White arrow candidates:
Depending on your current level, three cases are
possible:
a) You have not earned any Feather awards, but
your coach wishes you to challenge the White
Arrow (suggested for beginners who are 12
years old or older).
For this level, you must learn the “Skills” and
“Knowledge and Know-How” for all three of
the Red Feather, Gold Feather and White
arrow levels.
Your evaluator will use form C1.
b) You only have the Red Feather award
You should complete the Feather awards
program by earning the Gold Feather (this
applies to most of the youngest beginners;
i.e. under 12 years old). Only after getting
the Gold Feather will you be allowed to
challenge the White Arrow.
c) You already have the Gold Feather award.
You are ready to challenge the White Arrow
level. Your evaluator will use form C2.

COACHING MANUAL
Page 19
13.4.2 White Arrow
13.4.2.1. Performance
Shooting distance: 10 meters
Minimum required score: 115 points
13.4.2.2. Skills – Your shooting sequence
should include the following
FEET POSITION:
For candidates having earned no World Archery
Feather awards, see the “Skills” section of the
Red Feather curriculum.
ARROW LOADING:
For candidates having earned no World Archery
Feather awards, see the “Skills” section of the
Red Feather curriculum.
BODY SETTING (before drawing and full draw):
For candidates having earned no World Archery
Feather awards, see the “Skills” section of the
Gold Feather curriculum.
BODY SETTING (end of draw): For candidates
having earned no World Archery Feather awards,
see the “Skills” section of the Gold Feather
curriculum.
RAISING THE BOW:
Objective:
Perform the preliminary movements with as little
unnecessary motion and disruption to initial
positioning as possible. This initial positioning
must allow for an effective draw.
Form:
Synchronized raising of the two hands towards
the target until both hands are level with the
nose.
Throughout the process:
• the bow shoulder must stay as low as
possible;
• the upper body (shoulders, chest and centre
of gravity) stays in its lowest position;
• the arrow must be stay within the shooting
plane as it is moved up;
• the head and spine stay extended;
• the pelvis remains tilted (if this position is
chosen).
Toward the end of the raising:
• both hands are moved up to the same level;
• the arrow is parallel to the ground;
At the end of the raising:
• the arrow is at the nose/eyes level;
• the string shoulder is lower than the arrow
shaft;
• the string wrist is in line with the string
forearm;
• a slight backward inclination of the torso
toward the string foot is acceptable, but a
straight body is recommended.
Rationale:
The simplicity of the movement makes it easy to
repeat. It is a safe starting position for the draw,
even if an arrow is inadvertently released.
Raising the arms in this manner only slightly
changes the body elements already in position,
if at all. The forces exerted on the upper body
facilitate the low positioning of the shoulders.
The body's inclination toward the string foot
counter balances the weight of the bow and
moves the archer's centre of gravity away from
the target (the use of bows with light mass
weight will reduce this inclination).
COACHING MANUAL
Page 20
13.4.2.3. Knowledge and/or Know-how –
You must know the following
BOW SAFETY:
For candidates having earned no World Archery
Feather awards, see the “Knowledge and/or
Know-how” section of the Red Feather
curriculum.
ARROW LOADING SAFETY:
For candidates having earned no World Archery
Feather awards, see the “Knowledge and/or
Know-how” section of the Red Feather
curriculum.
SAFE ARROW RECUPERATION:
For the candidates having earned no World
Archery Feather awards, see the “Knowledge
and/or Know-how” section of the Red Feather
curriculum.
BOW PREPARATION:
For candidates having earned no World Archery
Feather awards, see the “Knowledge and/or
Know-how” section of both the Red Feather and
Gold Feather curricula.
SHOOTING DIRECTION:
For candidates having earned no World Archery
Feather awards, see the “Knowledge and/or
Know-how” section of the Gold Feather
curriculum.
SAFETY AND ETIQUETTE ON THE SHOOTING
LINE: For candidates having earned no World
Archery Feather awards, see the “Knowledge
and/or Know-how” section of the Red Feather
curriculum.
SCORING:
You should be able to identify the arrow’s value.
You should know how to complete a scorecard
for a complete “World Archery BAP round”. The
value that each arrow scores must be entered on
the scorecards in descending order as called out
by the athlete to whom the arrows belong. The
other athletes on that target will check the value
of each arrow called out and in case of
disagreement call the assigned judge who makes
the final decision.
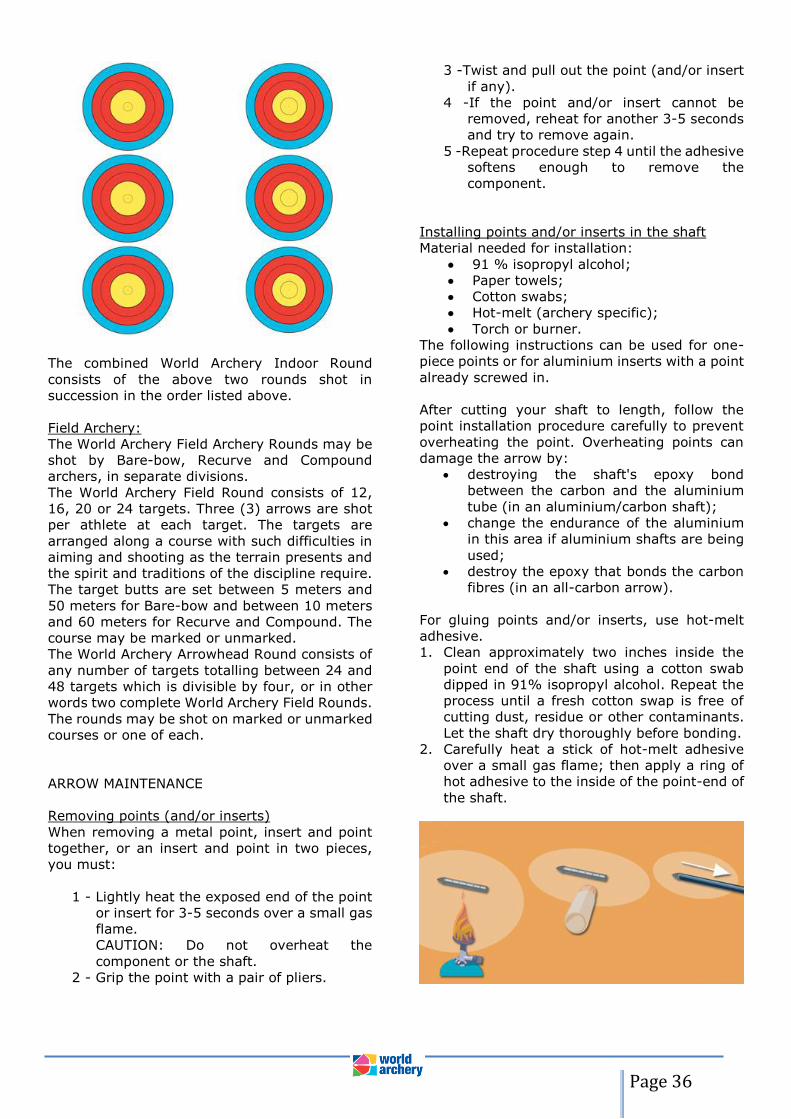
Example of a blank scorecard (for BAP Arrow
round only):
Example of a completed scorecard (for BAP
Arrow round only):
EXECUTING THE WARM-UP ROUTINE:
A detailed description of the warm-up program
for general and archery specific physics can be
found in the chapter 11.1.
A routine for the warm up is important.
Start with general cardio-vascular exercises as
for example:
• light jogging jumping jacks
After this general warm up you will start with
movements for general warm of:
• Torso
• Leg
• Shoulders
A
1, 2, 3, 4, 5, 6, 7, 8, 9, 10
COACHING MANUAL
Page 21
• Wrist and fingers
• Neck
Further you may do some warm-up exercises
with a rubber band.
In the Chapter 11 of the Beginners Award
Program Level 1 you will find a detailed
explanation of possible exercises.
EXPLAIN THE ACOUSTIC SIGNALS
The couple rules for the acoustic signals can be
found in chapter 13.5 of the WA rule book.
Make sure you use the same signal each time
you want the archers to carry out a particular
task, for example 1 whistle to start shooting; 3
whistles to collect the arrows.
EQUIPMENT TERMINOLOGY
You should know the names designating the
various parts of your equipment. During the
evaluation you will have to name five parts or
components of the bow.
3) Recurve bow:
4) Arrow
KDS
Arrow Head Or Point
Vanes/ feathers
Cresting Initials
Shaft Fletchings Nock
Limb tip Upper limb Sight window Back of bow Sight
Clicker
Arrow rest
Central stabilizer
“V” bar
Lower limb Limb tip
Recurve
String
Riser
Face of bow
Bracing height
Nocking point
Pivot point
Hand position
Short
stabilizing rods
Recurve
COACHING MANUAL
Page 22
Evaluation form for White Arrow candidates
having earned no Feather awards.
Page #1 (start /front page)
Name of the beginner: _____ ___ Form C1
Date: ____ / ____ / 20__ Retake date: ____ / ____ / 20__
PERFORMANCE Shooting distance
Required minimum score Achieved *
*Not yet achieved
Total score
10 meters 115 points
SKILLS Key elements (What should be done)
Achieved *
*Not yet achieved
References to the World
Archery Level 1 Coaching
Manual
Warm-up Executing the warm-up routine #11.1
Feet position Feet either side of the shooting line #6.1.1
(Stance) Feet at shoulder width apart #6.1.1
Line of feet square to the shooting line #6.1.1
Feet parallel #6.1.1
Safe and proper
Implemented with bow vertical #6.2.1
arrow loading No finger pressing the arrow on rest #6.2.1
Arrow properly oriented (index fletching away from bow window)
#6.2.1.
Body setting Vertical body #6.5.1
(before drawing Balance equal on both feet #6.5.1. and at full draw) Spine and shoulders making a cross shape #6.5.1.
Raising Synchronized hands #6.6.1
Raise hands while keeping the shoulders down
#6.6.1
Hands at same height and at nose or eye level once raised
#6.6.1.
Arrow parallel to the floor once raised #6.6.1
Body setting (end of draw)
Let the string hand land on face (chin and/or lips do not reach forward to the
string)
#6.8.1.
COACHING MANUAL
Page 23
Evaluation form for White Arrow candidates
having earned no Feather awards.
Page #2 of form C1 (end / Back page)
KNOWLEDGE and/or
KNOW-HOW
Required knowledge or know-how
Achieved *
*Not yet achieved
Comments and/or references
Acoustic signals
Explain the acoustic signals Rule Book: chapter 13.5;
Visual and acoustic time
control
Bow safety No dry firing (dry loosing) #2.3
Place the bow in the equipment lane after end
#2.2.2
Arrow loading
safety
Load the arrow on the bow only
when the Field of play is empty, the shooting signal has been given and
#2.2.1 & 2.2.2
done only when both feet are set, one on each side of the shooting line
#2.2.2
Safe arrow recuperation
Walk carefully to the target (not running and watching his/her step)
#2.3
Stand to the side of the target (not behind arrows)
#2.2.2
Properly pull the arrow out of the target (or grass)
#2.4
Equipment
terminology
Can name 5 parts or components
of the bow
#9.3.1
Bow
preparation
Know how to properly mount and
remove the limbs on/from the riser
This evaluation can be
skipped if no take down bow is available
Can brace his or her bow #9.3.2
Shooting direction
Only draw towards a clear target butt from the shooting line (not
toward anyone or the sky)
#2.2.2
Safety and etiquette on
Not disturbing (touching or talking to) other shooting archers
2.5
the shooting line
Properly retrieve an arrow that dropped on the floor
#2.2.2
Scoring Identify each arrow’s value Chapter 14 Scoring
Complete a scorecard for a complete round
Chapter 14 Scoring
TOTAL 33 positive evaluations are required
** Awarded ____ or Not awarded yet ____
* Checkmark if the score / skill / knowledge is positively evaluated (Achieved) or not (Not yet achieved).
Write in the TOTAL row of these two columns the accumulated number of checkmarks.
** Just checkmark the final result of this evaluation.
COACHING MANUAL
Page 24
Name and signature of the evaluator: __________
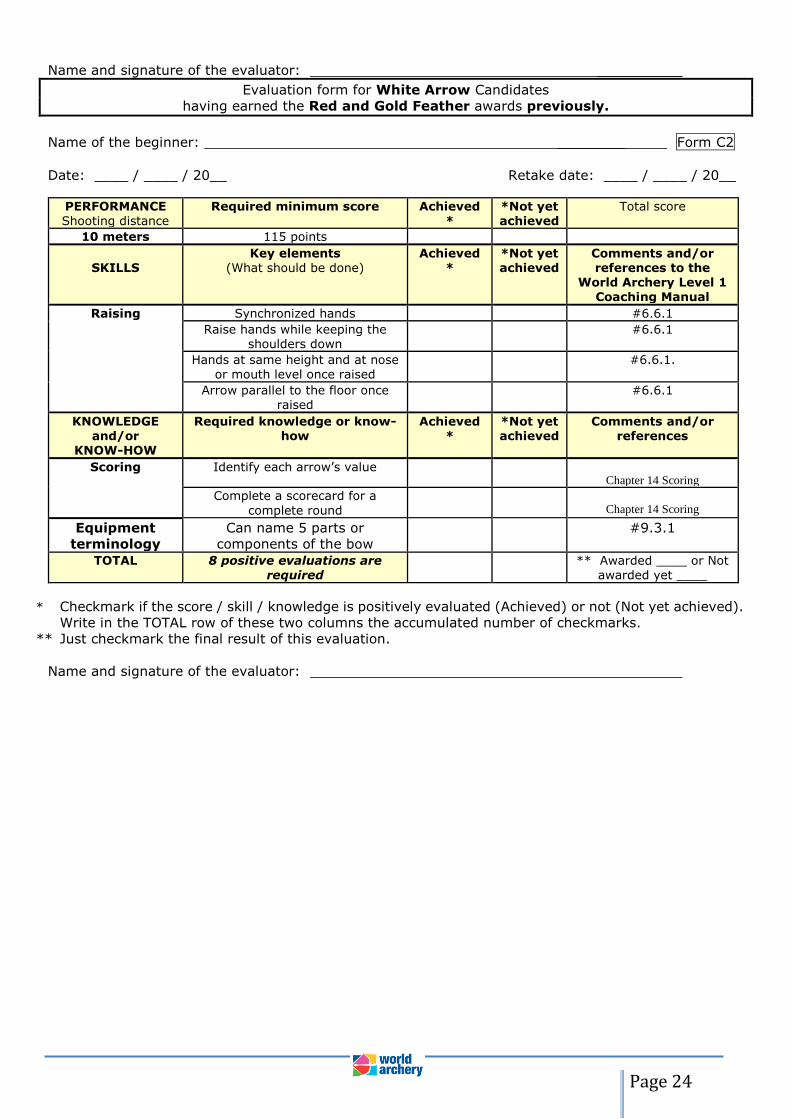
Evaluation form for White Arrow Candidates
having earned the Red and Gold Feather awards previously.
Name of the beginner: ________ Form C2
Date: ____ / ____ / 20__ Retake date: ____ / ____ / 20__
PERFORMANCE Shooting distance
Required minimum score Achieved *
*Not yet achieved
Total score
10 meters 115 points
SKILLS
Key elements (What should be done)
Achieved *
*Not yet achieved
Comments and/or references to the
World Archery Level 1 Coaching Manual
Raising Synchronized hands #6.6.1
Raise hands while keeping the shoulders down
#6.6.1
Hands at same height and at nose or mouth level once raised
#6.6.1.
Arrow parallel to the floor once raised
#6.6.1
KNOWLEDGE and/or
KNOW-HOW
Required knowledge or know-how
Achieved *
*Not yet achieved
Comments and/or references
Scoring Identify each arrow’s value WA Interactive Rulebook
Chapter 14 Scoring
Complete a scorecard for a
complete round
WA Interactive Rulebook
Chapter 14 Scoring
Equipment
terminology
Can name 5 parts or
components of the bow
#9.3.1
TOTAL 8 positive evaluations are required
** Awarded ____ or Not awarded yet ____
* Checkmark if the score / skill / knowledge is positively evaluated (Achieved) or not (Not yet achieved).
Write in the TOTAL row of these two columns the accumulated number of checkmarks.
** Just checkmark the final result of this evaluation.
Name and signature of the evaluator:
COACHING MANUAL
Page 25
13.4.3 Black Arrow
13.4.3.1. Performance:
Shooting distance: 14 meters
Minimum required score: 115 points
13.4.3.2. Skills – Your shooting sequence
should include the following:
DRAW PROCESS: See the “The Upper Body”
section of the “Skills” from the Gold Arrow
curriculum.
FULL DRAW (the hold)
Objective:
Body and equipment stability for effective
aiming. Holding the bow at full draw without
collapsing from the bow's draw weight or mass.
Form:
With the body in an upright position and keeping
the torso still, let the chest and shoulders exert
a steady downward effort while seeking to
spread out the shoulders. Maintain an erect spine
and head. Strike a balance between the push and
pull forces, supported by an equal use of both
legs and an engaged abdominal area. The
constants are:
• the distance between the arrow and the bow
shoulder in the horizontal plane;
• the distance between the chin and bow
shoulder;
• the height difference between the arrow and
the bow shoulder in the vertical plane;
• the height of the shoulders;
• the bow's vertical position;
• The positions of the torso and head.
Rationale:
This form strongly opposes the spring effect of
the bow, which can cause the archer to collapse,
and draws in the chest, facilitating string
displacement. The production of effort is
dispersed, which facilitates achieving symmetry,
reduces local fatigue effects, and minimizes the
risk of injury. Moreover, major muscles are used
in generating the movement and effort and
promote stretching the spine helping the archer
stay erect and vertical. Flattening the chest and
lowering the shoulders lowers the centre of
gravity, making the body more stable. The
combination of the above actions contributes to
maintaining the draw length and helps to keep
the head and the aiming eye at a constant level.
Furthermore, a certain level of muscle tone is
necessary; weak muscles will probably collapse
under the spring effect of the bow.
13.4.3.2. Knowledge and/or Know-how
ARROW SAFETY AND CHECKING
When shot, an arrow may not fully stick into the
target. Instead it may hang loose from the point
of the arrow and lay down along the target face.
If this happens, shooting on that target butt
should cease until the arrow is removed. If
shooting continues at a target with a dangling
arrow, other arrows may hit it causing damage
to either the hanging arrow or the one that
strikes it. The striking arrow may also ricochet
off the hanging arrow.
Arrows should always be straight. Usually small
bends in aluminium arrows do not affect a
beginner's accuracy. Straightness can be
checked by eye, down the shaft, or by spinning
the arrow and noting wobble or vibration. Rolling
the shaft along a table can also be used to check
straightness.
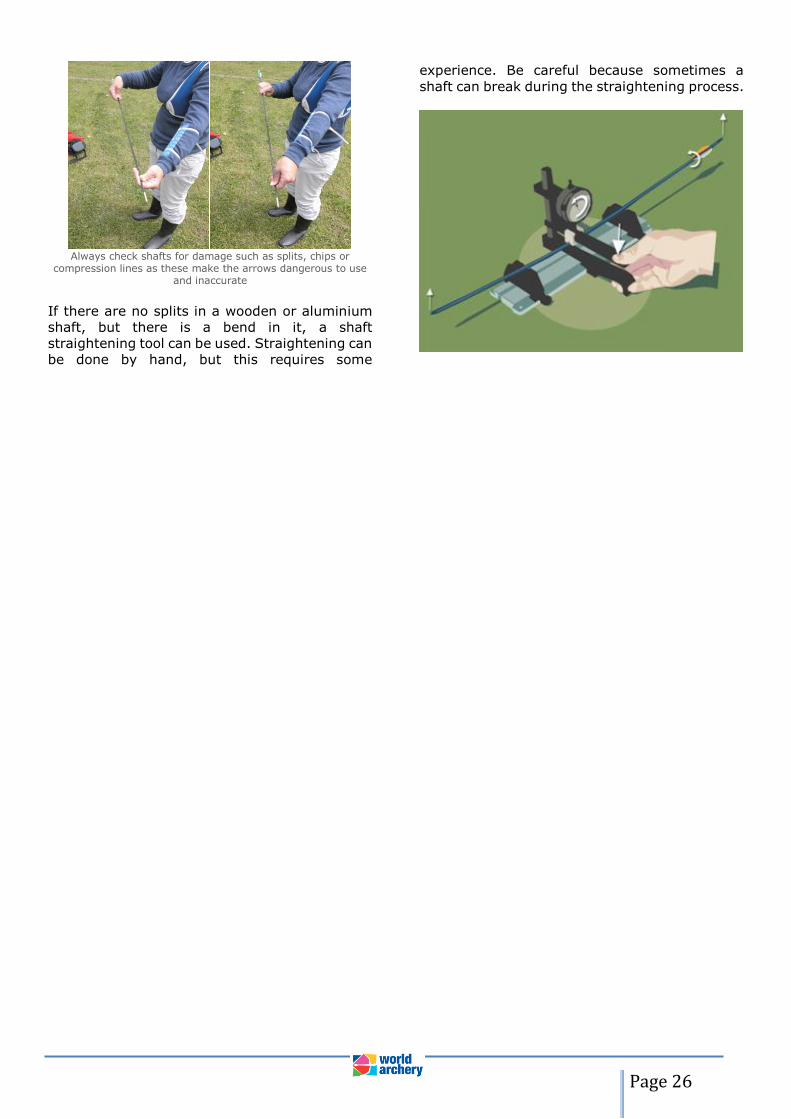
Always check shafts for damage such as splits,
chips or compression lines as these make the
arrows dangerous to use and inaccurate.
COACHING MANUAL
Page 26
Always check shafts for damage such as splits, chips or
compression lines as these make the arrows dangerous to use and inaccurate
If there are no splits in a wooden or aluminium
shaft, but there is a bend in it, a shaft
straightening tool can be used. Straightening can
be done by hand, but this requires some
experience. Be careful because sometimes a
shaft can break during the straightening process.
COACHING MANUAL
Page 27
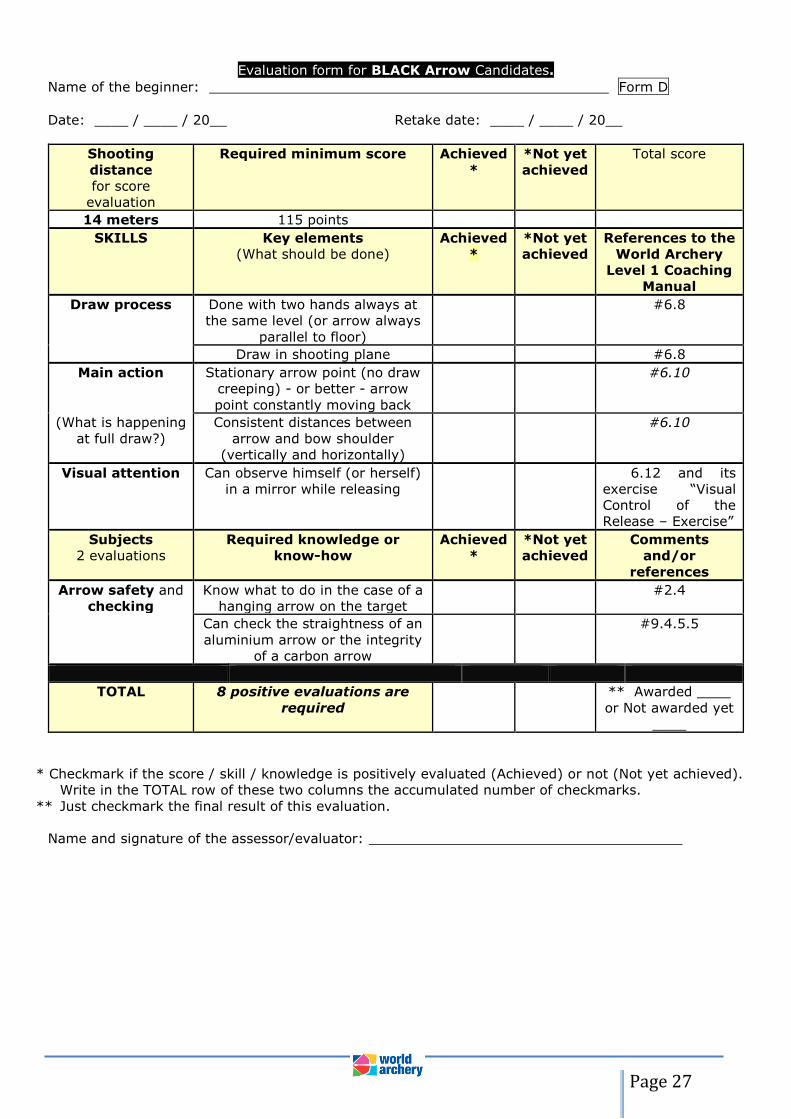
Evaluation form for BLACK Arrow Candidates.
Name of the beginner: Form D
Date: ____ / ____ / 20__ Retake date: ____ / ____ / 20__
Shooting
distance
for score
evaluation
Required minimum score Achieved
*
*Not yet
achieved
Total score
14 meters 115 points
SKILLS Key elements
(What should be done)
Achieved
*
*Not yet
achieved
References to the
World Archery
Level 1 Coaching
Manual
Draw process Done with two hands always at
the same level (or arrow always
parallel to floor)
#6.8
Draw in shooting plane #6.8
Main action
Stationary arrow point (no draw
creeping) - or better - arrow
point constantly moving back
#6.10
(What is happening
at full draw?)
Consistent distances between
arrow and bow shoulder
(vertically and horizontally)
#6.10
Visual attention Can observe himself (or herself)
in a mirror while releasing
6.12 and its
exercise “Visual
Control of the
Release – Exercise”
Subjects
2 evaluations
Required knowledge or
know-how
Achieved
*
*Not yet
achieved
Comments
and/or
references
Arrow safety and
checking
Know what to do in the case of a
hanging arrow on the target
#2.4
Can check the straightness of an
aluminium arrow or the integrity
of a carbon arrow
#9.4.5.5
TOTAL 8 positive evaluations are
required
** Awarded ____
or Not awarded yet
____
* Checkmark if the score / skill / knowledge is positively evaluated (Achieved) or not (Not yet achieved).
Write in the TOTAL row of these two columns the accumulated number of checkmarks.
** Just checkmark the final result of this evaluation.
Name and signature of the assessor/evaluator:
COACHING MANUAL
Page 28
13.4.4 Blue Arrow
13.4.4.1. Performance:
Shooting distance: 18 meters
Minimum required score: 115 points
13.4.4.2. Skills – Your shooting sequence
should include the following:
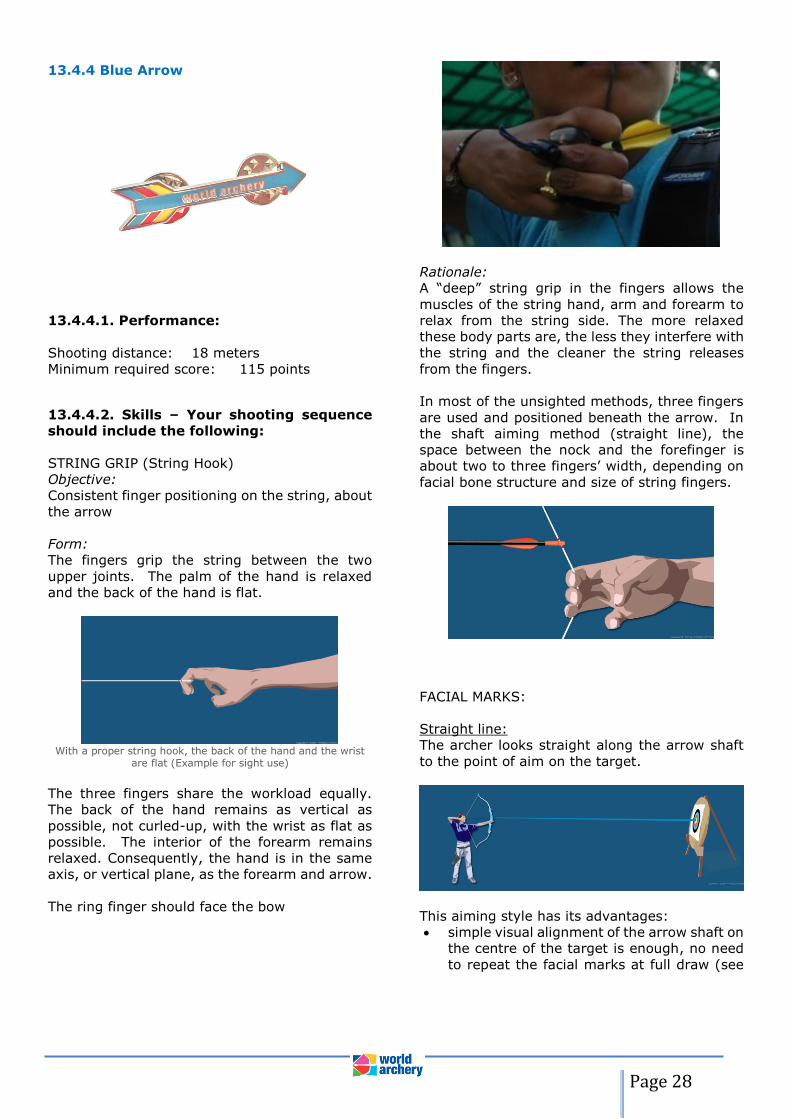
STRING GRIP (String Hook)
Objective:
Consistent finger positioning on the string, about
the arrow
Form:
The fingers grip the string between the two
upper joints. The palm of the hand is relaxed
and the back of the hand is flat.
With a proper string hook, the back of the hand and the wrist
are flat (Example for sight use)
The three fingers share the workload equally.
The back of the hand remains as vertical as
possible, not curled-up, with the wrist as flat as
possible. The interior of the forearm remains
relaxed. Consequently, the hand is in the same
axis, or vertical plane, as the forearm and arrow.
The ring finger should face the bow
Rationale:
A “deep” string grip in the fingers allows the
muscles of the string hand, arm and forearm to
relax from the string side. The more relaxed
these body parts are, the less they interfere with
the string and the cleaner the string releases
from the fingers.
In most of the unsighted methods, three fingers
are used and positioned beneath the arrow. In
the shaft aiming method (straight line), the
space between the nock and the forefinger is
about two to three fingers’ width, depending on
facial bone structure and size of string fingers.
FACIAL MARKS:
Straight line:
The archer looks straight along the arrow shaft
to the point of aim on the target.
This aiming style has its advantages:
• simple visual alignment of the arrow shaft on
the centre of the target is enough, no need
to repeat the facial marks at full draw (see

COACHING MANUAL
Page 29
triangle and quadrilateral methods described
further down in this chapter);
• the aiming eye positioning in reference with
the shooting plane is automatic (hence no
need for string alignment);
• no concern about applying a vertical finger
pressure on the arrow (upward or
downward) with the string fingers.
Triangle:
The aiming style positions the arrow using two
reference points:
• The arrow point, by visual placement on the
target while maintaining a consistent draw
length (because the archer is aiming
“through” the point);
• The arrow nock, through contact of the
string hand on the face.
To ensure the consistent reproduction of the
triangle, the archer has to position the aiming
eye for string alignment.
In the triangle method and following quadrilateral one, the
aiming eye position (for string alignment) is mandatory
Quadrilateral:
This aiming style requires the introduction of a
sight. The arrow is positioned by two reference
points:
• The arrow point, by visual placement of a
sight on the target;
• The arrow nock, through tactile placement of
the string hand on the face.
COACHING MANUAL
Page 30
Furthermore, to ensure consistent repetition of
the quadrilateral method, the archer must
maintain:
• the bow in the vertical plane or consistently
canted the same amount;
• a consistent draw length;
• the position of the aiming eye for string
alignment.
ARROW- STRING FOREARM ALIGNMENT:
Objective:
Determine the body position that requires the
minimum effort for maximal stability at full draw.
Form:
Your string forearm should be as much as
possible in the vertical plane passing through the
arrow.
Rationale:
In terms of required effort, this position is the
most efficient. Furthermore, it allows the
muscles in the string arm, forearm and wrist to
stay relaxed.
The relaxation of these muscles facilitates the
use of the muscles located in the back and
behind the string shoulder.
FEELING ATTENTION:
In order to get a better kinaesthetic perception
(physical feeling) of the skill and, in this case,
the string hand, shoot at a very short distance
(about 3 meters) with your eyes closed and focus
on the feeling of the shot. Shooting at an empty
buttress (nothing to aim at) with your eyes open
also makes it easier to sense physical
perceptions.
13.4.4.3. Knowledge and/or Know-how
BOW KNOWLEDGE:
You should be able to give the overall description
of 3 types of bow.
The following gives a general description of the
Recurve, Compound and Bare-bow.
Recurve:
The only type of bow allowed in Olympic
competitions. Its limbs curve away from the
archer. It is also called Classic Bow.
Compound:
This bow has pulleys and cables to make the
holding weight less than half of the draw weight.
Bare-bow:
This is a recurve bow without a mechanical sight
or stabilizers.
ARROW MAINTENANCE: NOCK REPLACEMENT
1. Remove the remaining part of the broken
nock, if any. For easier removal you can
slightly warm the remaining part of the
nock with a flame or warm water.
2. If desired, you can use a fine sand paper
on the cone of an aluminium shaft. Clean
the area where the new nock will fit with
91 % isopropyl alcohol. For an
Aluminium/Carbon shaft, clean the area
that will receive the new nock, but do not
sand it.
3. Put a drop of glue on the area where the new
nock will fit, as shown below.
4. Press the nock onto the shaft and rotate it to
spread the glue.

COACHING MANUAL
Page 31
5. Orientate the grove of the nock so that it is
square to the index vane, as in the picture
below.
6. Give the glue time to properly set before
shooting the arrow with the new nock.
120 deg.
120 deg.
120 deg.

COACHING MANUAL
Page 32
EVALUATION FORM FOR BLUE ARROW CANDIDATES
Name of the beginner: Form E
Date: ____ / ____ / 20__ Retake date: ____ / ____ / 20__
Shooting
distance
for score
evaluation
Required minimum score Achieved
*
*Not yet
achieved
Total score
18 meters 115 points
SKILLS Key elements
(What should be done)
Achieved
*
*Not yet
achieved
References to the
World Archery
Level 1 Coaching
Manual
String hand Flat back of hand (no knuckles
pointed out)
#6.3.1
3 fingers are used for gripping
the string
#6.3.1
Vertical back of hand #6.3.1
Consistent grip #6.3.1
Facial marks Consistent location #6.9.1
Provide “decent” alignment
between arrow and string
forearm
#6.9.1
Can align the string #6.9.2 - String
Alignment Discovery
Exercise
Feeling
attention
Can shoot with eyes closed #Intro of chapter 6
– Standard Teaching
Process
Subjects
3 evaluations
Required knowledge or know-
how
Achieved
*
*Not yet
achieved
Comments and/or
references
Bow knowledge Can give the overall description
of 3 types of bow
WA Interactive
Rulebook: 22.1.1, 22.2.1
& 22.3.1
Arrow
maintenance
Knows how to replace a nock #9.4.5.1
TOTAL 11 positive evaluations are
required
** Awarded ____ or
Not awarded yet
____
* Checkmark if the score / skill / knowledge is positively evaluated (Achieved) or not (Not yet achieved).
Write in the TOTAL row of these two columns the accumulated number of checkmarks.
** Just checkmark the final result of this evaluation.
Name and signature of the evaluator: _______________________________________
COACHING MANUAL
Page 33
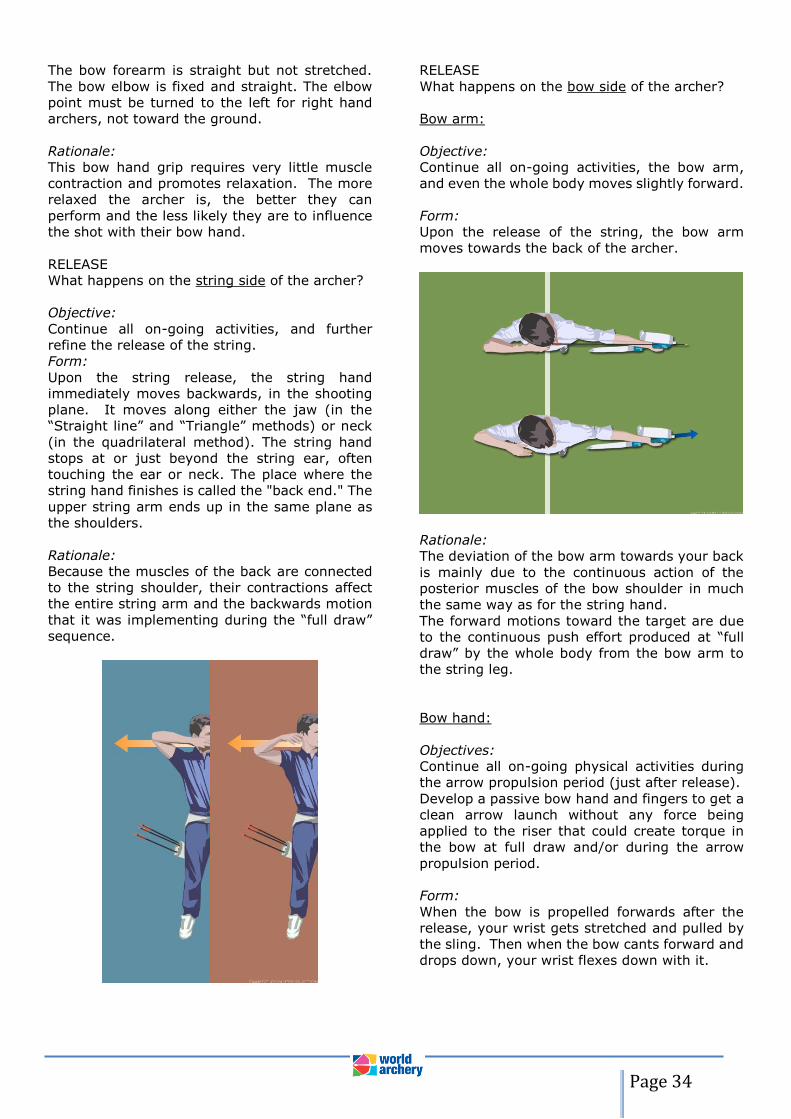
13.4.5 Red Arrow
13.4.5.1. Performance
Shooting distance:
Depending if you shoot in- or outdoor the
shooting distance and the target varies as listed
in the following table.
Distance Target
Indoor 18m 60cm
Outdoor 25 80cm
Minimum required score: 115 points
13.4.5.2. Skills – Your shooting sequence
should include the following:
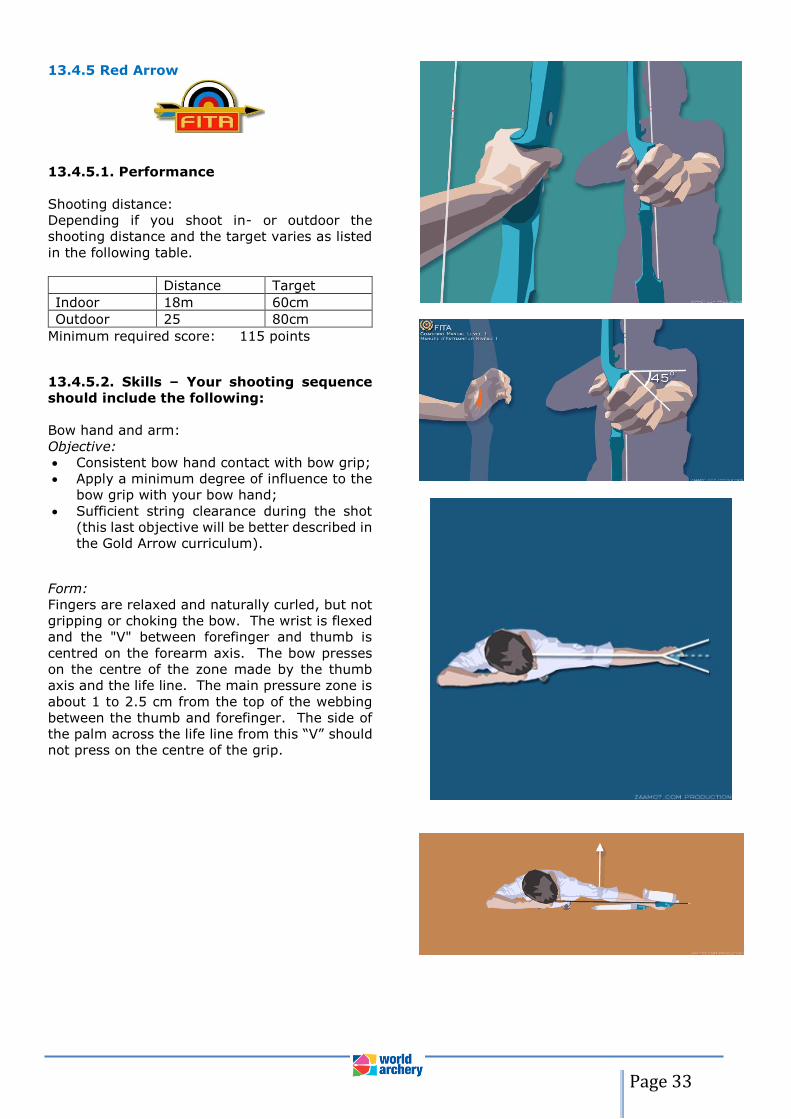
Bow hand and arm:
Objective:
• Consistent bow hand contact with bow grip;
• Apply a minimum degree of influence to the
bow grip with your bow hand;
• Sufficient string clearance during the shot
(this last objective will be better described in
the Gold Arrow curriculum).
Form:
Fingers are relaxed and naturally curled, but not
gripping or choking the bow. The wrist is flexed
and the "V" between forefinger and thumb is
centred on the forearm axis. The bow presses
on the centre of the zone made by the thumb
axis and the life line. The main pressure zone is
about 1 to 2.5 cm from the top of the webbing
between the thumb and forefinger. The side of
the palm across the life line from this “V” should
not press on the centre of the grip.
COACHING MANUAL
Page 34
The bow forearm is straight but not stretched.
The bow elbow is fixed and straight. The elbow
point must be turned to the left for right hand
archers, not toward the ground.
Rationale:
This bow hand grip requires very little muscle
contraction and promotes relaxation. The more
relaxed the archer is, the better they can
perform and the less likely they are to influence
the shot with their bow hand.
RELEASE
What happens on the string side of the archer?
Objective:
Continue all on-going activities, and further
refine the release of the string.
Form:
Upon the string release, the string hand
immediately moves backwards, in the shooting
plane. It moves along either the jaw (in the
“Straight line” and “Triangle” methods) or neck
(in the quadrilateral method). The string hand
stops at or just beyond the string ear, often
touching the ear or neck. The place where the
string hand finishes is called the "back end." The
upper string arm ends up in the same plane as
the shoulders.
Rationale:
Because the muscles of the back are connected
to the string shoulder, their contractions affect
the entire string arm and the backwards motion
that it was implementing during the “full draw”
sequence.
RELEASE
What happens on the bow side of the archer?
Bow arm:
Objective:
Continue all on-going activities, the bow arm,
and even the whole body moves slightly forward.
Form:
Upon the release of the string, the bow arm
moves towards the back of the archer.
Rationale:
The deviation of the bow arm towards your back
is mainly due to the continuous action of the
posterior muscles of the bow shoulder in much
the same way as for the string hand.
The forward motions toward the target are due
to the continuous push effort produced at “full
draw” by the whole body from the bow arm to
the string leg.
Bow hand:
Objectives:
Continue all on-going physical activities during
the arrow propulsion period (just after release).
Develop a passive bow hand and fingers to get a
clean arrow launch without any force being
applied to the riser that could create torque in
the bow at full draw and/or during the arrow
propulsion period.
Form:
When the bow is propelled forwards after the
release, your wrist gets stretched and pulled by
the sling. Then when the bow cants forward and
drops down, your wrist flexes down with it.
COACHING MANUAL
Page 35
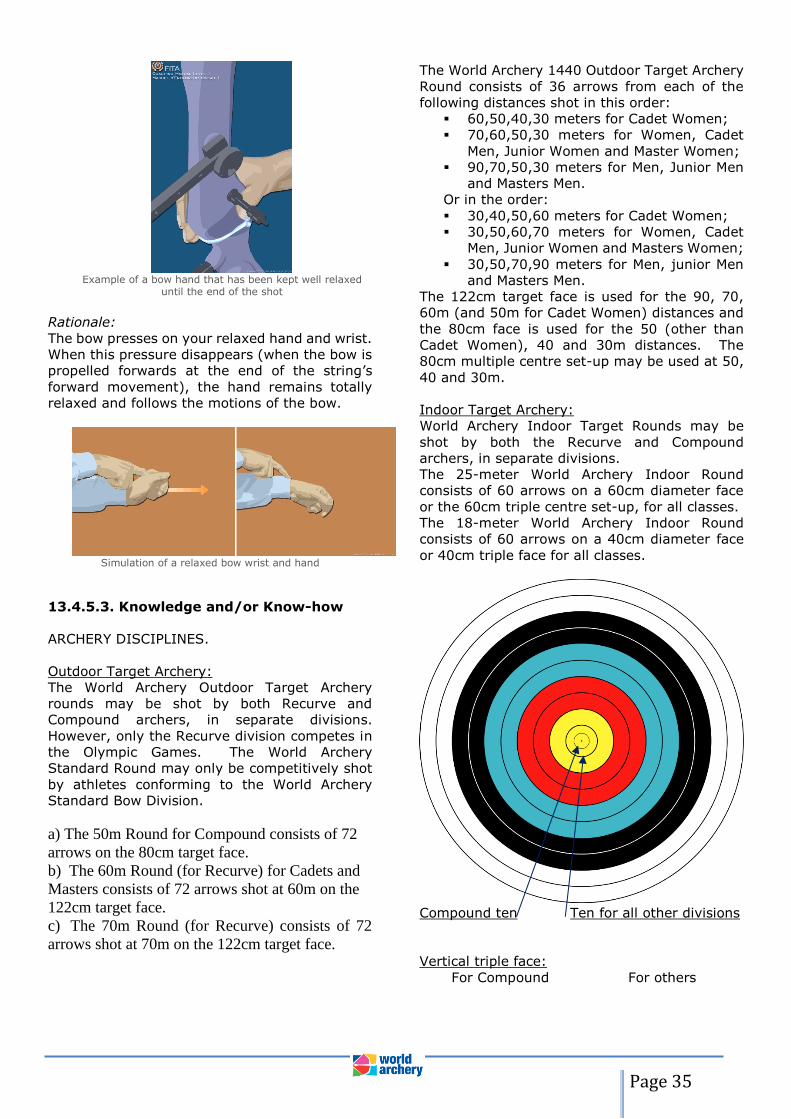
Example of a bow hand that has been kept well relaxed
until the end of the shot
Rationale:
The bow presses on your relaxed hand and wrist.
When this pressure disappears (when the bow is
propelled forwards at the end of the string’s
forward movement), the hand remains totally
relaxed and follows the motions of the bow.
Simulation of a relaxed bow wrist and hand
13.4.5.3. Knowledge and/or Know-how
ARCHERY DISCIPLINES.
Outdoor Target Archery:
The World Archery Outdoor Target Archery
rounds may be shot by both Recurve and
Compound archers, in separate divisions.
However, only the Recurve division competes in
the Olympic Games. The World Archery
Standard Round may only be competitively shot
by athletes conforming to the World Archery
Standard Bow Division.
a) The 50m Round for Compound consists of 72
arrows on the 80cm target face.
b) The 60m Round (for Recurve) for Cadets and
Masters consists of 72 arrows shot at 60m on the
122cm target face.
c) The 70m Round (for Recurve) consists of 72
arrows shot at 70m on the 122cm target face.
The World Archery 1440 Outdoor Target Archery
Round consists of 36 arrows from each of the
following distances shot in this order:
▪ 60,50,40,30 meters for Cadet Women;
▪ 70,60,50,30 meters for Women, Cadet
Men, Junior Women and Master Women;
▪ 90,70,50,30 meters for Men, Junior Men
and Masters Men.
Or in the order:
▪ 30,40,50,60 meters for Cadet Women;
▪ 30,50,60,70 meters for Women, Cadet
Men, Junior Women and Masters Women;
▪ 30,50,70,90 meters for Men, junior Men
and Masters Men.
The 122cm target face is used for the 90, 70,
60m (and 50m for Cadet Women) distances and
the 80cm face is used for the 50 (other than
Cadet Women), 40 and 30m distances. The
80cm multiple centre set-up may be used at 50,
40 and 30m.
Indoor Target Archery:
World Archery Indoor Target Rounds may be
shot by both the Recurve and Compound
archers, in separate divisions.
The 25-meter World Archery Indoor Round
consists of 60 arrows on a 60cm diameter face
or the 60cm triple centre set-up, for all classes.
The 18-meter World Archery Indoor Round
consists of 60 arrows on a 40cm diameter face
or 40cm triple face for all classes.
Compound ten Ten for all other divisions
Vertical triple face:
For Compound For others
COACHING MANUAL
Page 36
The combined World Archery Indoor Round
consists of the above two rounds shot in
succession in the order listed above.
Field Archery:
The World Archery Field Archery Rounds may be
shot by Bare-bow, Recurve and Compound
archers, in separate divisions.
The World Archery Field Round consists of 12,
16, 20 or 24 targets. Three (3) arrows are shot
per athlete at each target. The targets are
arranged along a course with such difficulties in
aiming and shooting as the terrain presents and
the spirit and traditions of the discipline require.
The target butts are set between 5 meters and
50 meters for Bare-bow and between 10 meters
and 60 meters for Recurve and Compound. The
course may be marked or unmarked.
The World Archery Arrowhead Round consists of
any number of targets totalling between 24 and
48 targets which is divisible by four, or in other
words two complete World Archery Field Rounds.
The rounds may be shot on marked or unmarked
courses or one of each.
ARROW MAINTENANCE
Removing points (and/or inserts)
When removing a metal point, insert and point
together, or an insert and point in two pieces,
you must:
1 - Lightly heat the exposed end of the point
or insert for 3-5 seconds over a small gas
flame.
CAUTION: Do not overheat the
component or the shaft.
2 - Grip the point with a pair of pliers.
3 -Twist and pull out the point (and/or insert
if any).
4 -If the point and/or insert cannot be
removed, reheat for another 3-5 seconds
and try to remove again.
5 -Repeat procedure step 4 until the adhesive
softens enough to remove the
component.
Installing points and/or inserts in the shaft
Material needed for installation:
• 91 % isopropyl alcohol;
• Paper towels;
• Cotton swabs;
• Hot-melt (archery specific);
• Torch or burner.
The following instructions can be used for one-
piece points or for aluminium inserts with a point
already screwed in.
After cutting your shaft to length, follow the
point installation procedure carefully to prevent
overheating the point. Overheating points can
damage the arrow by:
• destroying the shaft's epoxy bond
between the carbon and the aluminium
tube (in an aluminium/carbon shaft);
• change the endurance of the aluminium
in this area if aluminium shafts are being
used;
• destroy the epoxy that bonds the carbon
fibres (in an all-carbon arrow).
For gluing points and/or inserts, use hot-melt
adhesive.
1. Clean approximately two inches inside the
point end of the shaft using a cotton swab
dipped in 91% isopropyl alcohol. Repeat the
process until a fresh cotton swap is free of
cutting dust, residue or other contaminants.
Let the shaft dry thoroughly before bonding.
2. Carefully heat a stick of hot-melt adhesive
over a small gas flame; then apply a ring of
hot adhesive to the inside of the point-end of
the shaft.
COACHING MANUAL
Page 37
CAUTION: Do not apply heat directly to the
arrow shaft.
The melting point of hot-melt adhesive is low
enough that the shaft will not be damaged during
installation and high enough to keep the point
securely bonded despite the frictional heating
generated when the arrow penetrates a target
mat. Arrow points can come out in the target mat
if a lower melting temperature hot-melt adhesive
or if not enough is used.
3. Hold the end of the point with your fingers.
(Do not hold with pliers because it is then
possible to overheat the point.) Heat the
insert portion of the point shank or insert
until you feel it getting warm. It should be
just hot enough to melt the adhesive.
CAUTION: Do not overheat the points. If the
point becomes too hot to hold in your fingers, it
is too hot to put in the shaft. Set the point on a
non-combustible surface until cool.
4. Heat the hot-melt adhesive and apply a
generous layer of adhesive to the shank of
the point or insert.
5. While the adhesive is still fluid, push the point
and/or insert into the shaft with rotating
motion until the point flange seats against
the end of the shaft. To assure an even
distribution of glue, rotate the point for two
complete revolutions after it has seated
against the shaft.
NOTE: Do not force a point and/or insert into a
shaft. If it does not seat fully, reheat the point
immediately for 2-3 seconds and try pushing it
in again.
6. Wait for it to cool, then pick the glue ring off
towards the point (away from the shaft). This
has the added benefit of not wasting the
excess glue; simply reheat it and put it on the
end of the glue stick.
CAUTION: Do not apply heat directly to an arrow
shaft of any type because it could destroy the
carbon fibres and/or change the endurance of
the aluminium in this area. Take care to not
overheat the points, because this could also
cause damage in the shaft.
If the head of the shaft is damaged on the point
side, you may be able to use this arrow again, if
its initial length before the “problem” was long
enough. If there is enough shaft to safely do so,
this arrow may be cut down a little to remove the
damaged area. It is advisable to cut all your
arrows down to the new length, for the sake of
consistency.
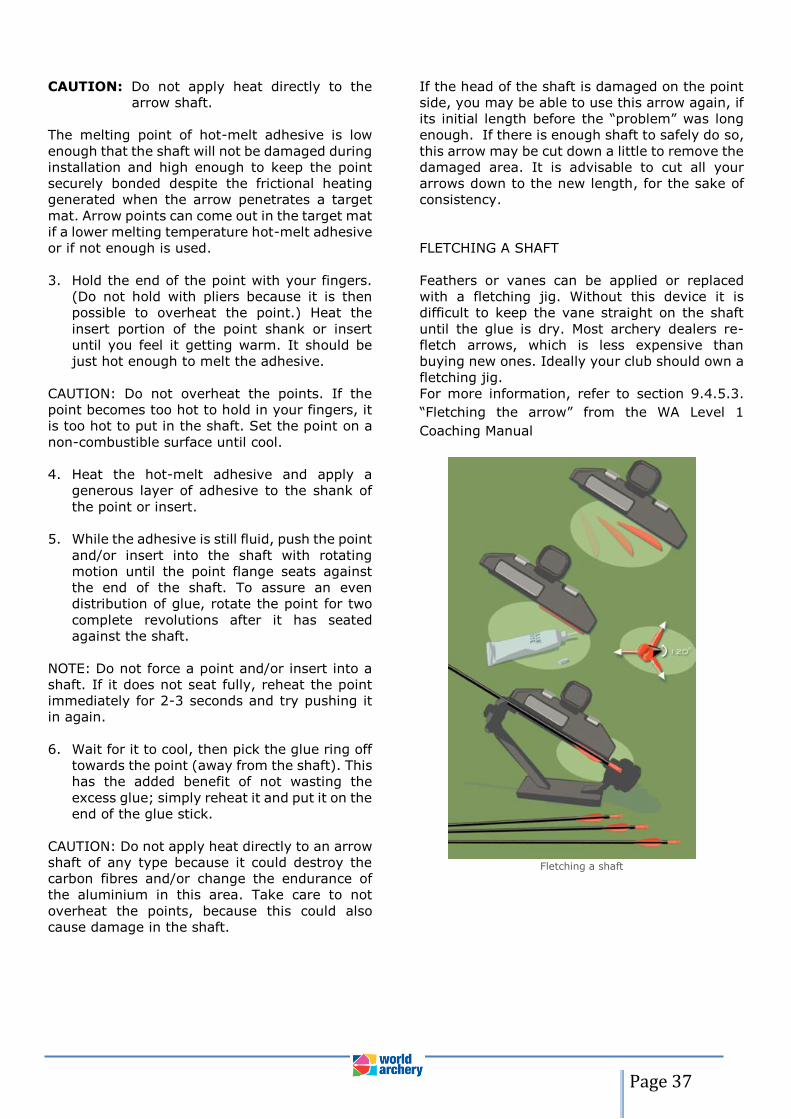
FLETCHING A SHAFT
Feathers or vanes can be applied or replaced
with a fletching jig. Without this device it is
difficult to keep the vane straight on the shaft
until the glue is dry. Most archery dealers re-
fletch arrows, which is less expensive than
buying new ones. Ideally your club should own a
fletching jig.
For more information, refer to section 9.4.5.3.
“Fletching the arrow” from the WA Level 1
Coaching Manual
Fletching a shaft
COACHING MANUAL
Page 38
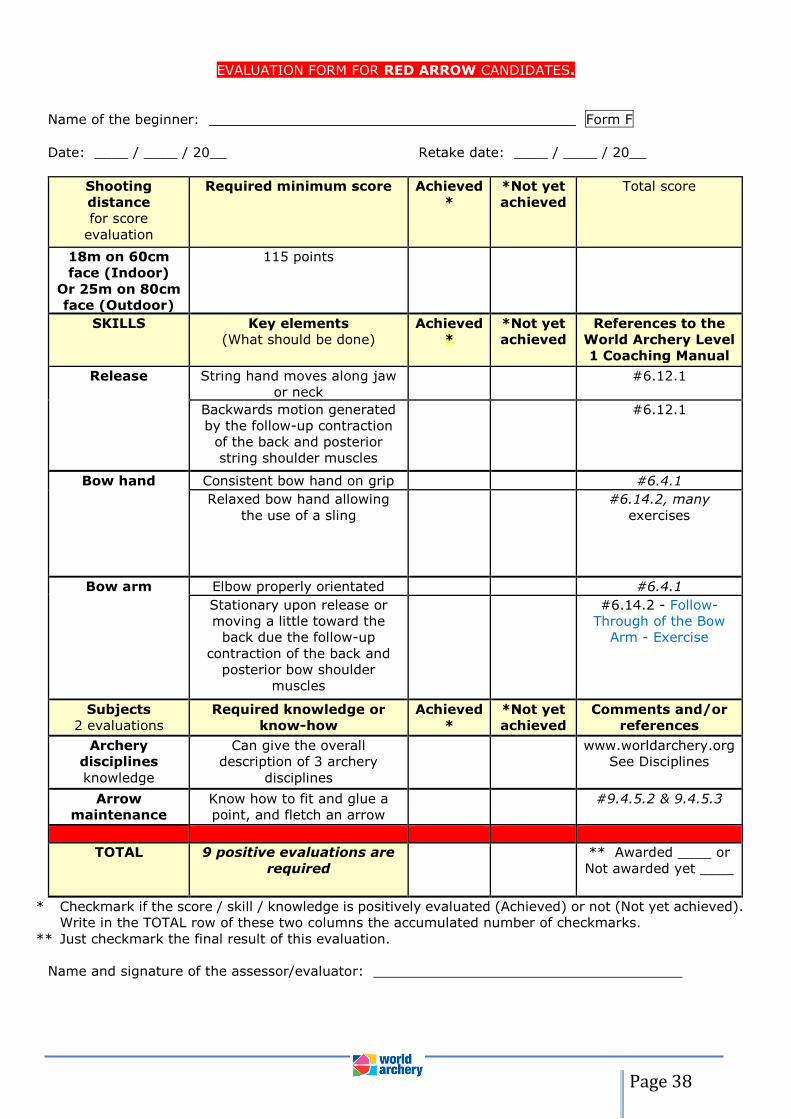
EVALUATION FORM FOR RED ARROW CANDIDATES.
Name of the beginner: Form F
Date: ____ / ____ / 20__ Retake date: ____ / ____ / 20__
Shooting
distance
for score
evaluation
Required minimum score Achieved
*
*Not yet
achieved
Total score
18m on 60cm
face (Indoor)
Or 25m on 80cm
face (Outdoor)
115 points
SKILLS Key elements
(What should be done)
Achieved
*
*Not yet
achieved
References to the
World Archery Level
1 Coaching Manual
Release String hand moves along jaw
or neck
#6.12.1
Backwards motion generated
by the follow-up contraction
of the back and posterior
string shoulder muscles
#6.12.1
Bow hand Consistent bow hand on grip #6.4.1
Relaxed bow hand allowing
the use of a sling
#6.14.2, many
exercises
Bow arm Elbow properly orientated #6.4.1
Stationary upon release or
moving a little toward the
back due the follow-up
contraction of the back and
posterior bow shoulder
muscles
#6.14.2 - Follow-
Through of the Bow
Arm - Exercise
Subjects
2 evaluations
Required knowledge or
know-how
Achieved
*
*Not yet
achieved
Comments and/or
references
Archery
disciplines
knowledge
Can give the overall
description of 3 archery
disciplines
www.worldarchery.org
See Disciplines
Arrow
maintenance
Know how to fit and glue a
point, and fletch an arrow
#9.4.5.2 & 9.4.5.3
TOTAL 9 positive evaluations are
required
** Awarded ____ or
Not awarded yet ____
* Checkmark if the score / skill / knowledge is positively evaluated (Achieved) or not (Not yet achieved).
Write in the TOTAL row of these two columns the accumulated number of checkmarks.
** Just checkmark the final result of this evaluation.
Name and signature of the assessor/evaluator:

COACHING MANUAL
Page 39
COACHING MANUAL
Page 40
13.4.6. Gold Arrow
13.4.6.1. Performance:
Shooting distance:
Depending if you shoot in- or outdoor the
shooting distance and the target varies as listed
in the following table.
Distance Target
Indoor 18m 40cm
Outdoor 30 80cm
Minimum required score: 115 points
13.4.6.2. Skills – your shooting sequence
should include the following:
STRING CLEARANCE
Objective:
Allow a free path of the string during the
propelling of the arrow.
Form:
See the two tests further down in this section.
You will have to successfully pass one of these
tests.
Rationale:
Any string interference during the propelling step
would:
• make the consistent repetition of the push
axis and the propelling intensity difficult;
• reduce the amount of kinetic energy
transmitted to the arrow.
Test at the bow arm:
Make a mark with a pen on one side of a length
of adhesive tape. With no hand on the string,
raise your bow and note where your string is
located on your armguard or forearm. About 1
to 1.5 cm forwards of this spot, affix the marked
piece of adhesive tape, raised about 2 mm in the
middle (like a bridge), with the mark closer to
the string. The bridge of tape should be affixed
vertically across your bow forearm/armguard, or
if you prefer, parallel to the string.
The mark will help identify if the string hits the
tape while it is pushing the arrow or on its way
back after the arrow has left the string.
Shoot one arrow with this adhesive tape in place,
making sure that you do not flatten out the
bridge before the draw. After the shot, look at
the tape and analyse the hit (if any).
If you come to the conclusion that the string
clearance is too poor because the tape is
damaged, ask to your coach to help you improve
it.
Test at the bow side chest:
Either watch yourself in a mirror, or with the help
of an assistant, observe where the string touches
your chest at full draw (if at all). About 1 to 1.5
cm forwards of this spot affix a piece of adhesive
tape that has a bridge shape – 2 mm raised in
the middle. See picture below.
The most critical point is the edge (hem or trim)
of the chest-guard surrounding your bow
shoulder. The bridge of tape should be affixed
parallel to the line of the string at full draw.
Shoot one arrow with this tape in place, making
sure that you do not flatten out the “bridge” part
before the draw. After the shot, look at the tape
to analyse the hit (if any).
If you come to the conclusion that the string
clearance is too poor because the tape is hit, ask
to your coach to help you improve it.

COACHING MANUAL
Page 41
FOLLOW-THROUGH
Objective:
Continue all on-going activities – not only the
physical ones, but also the visual and mental
ones - and further refine the release of the
string.
Form:
The shot must take an observer by surprise; no
tell-tale signs of an impending shot may be seen.
The body, face and gaze remain impassive
before, during, and slightly after the action.
Your face should remain the same, before, during and after the
release
SEQUENCE
Objective:
Repeat with consistency the shooting steps (as
listed below).
Step 1: Feet
Step 2: Nocking
Step 3: Bow Hand

COACHING MANUAL
Page 42
Step 4: String Hand
Step 5: Body Setting
Step 6: Raising
Step 7: Draw
Step 8: Aiming eye positioned and string aligned
Step 9: Aiming

COACHING MANUAL
Page 43
Step 10: Expansion
Step 11: Release
Step 12: Follow through and continued aiming
13.4.6.3. Knowledge and/or Know-how
TOURNAMENT REGISTRATION PROCESS:
You should know the registration process (of
your club) in order to participate in a local
tournament; hence you have to ask your club,
what this process is.
ARROW SETTING:
Affixing arrow rests:
The use of an arrow rest is important as it
reduces the area of contact between the bow and
the arrow, thus creating less friction when the
arrow begins to move upon release. Some arrow
rests are made from wire and others are plastic.
The arrow rest should be glued onto the window
directly above the pivot point of the handle and
should be aligned perpendicular to the string.
There should be a space of at least 15 mm
between the arrow shaft and the window shelf.
Making the nocking point:
The correct height of the nocking point depends
on many things. A suggested starting point is to
have the nocking point locate the bottom of the
nock at about 1 cm higher above the level of the
arrow rest, as measured with a bow square.
This is valid if you start with the straight line
method (recommended). 6 mm above the rest
is enough if the archer uses a string grip where
the arrow is between the fore and middle fingers.
The nock locators may be above and below the
nock.

COACHING MANUAL
Page 44
Nock locators may be added in two ways.
• Manufactured nock-sets are available. Quite
often they are made of metal and are
clamped on the string with special pliers.
• Another method is to use standard heavy
thread with fletching cement to form a small
neat ring around the serving. This knot must
be firm and uniform. Apply another thin coat
of glue over the entire nock locator, and then
leave it to dry.
TYING A THREAD NOCK-SET ONTO THE STRING
Roll one end of the thread around the loop (made of the same
thread) and the string body
Pass the end of the serving thread into the loop, then pull both
ends of the thread
Cut both ends, then add some glue
BRACE HEIGHT
The bracing height of the bow should be within
the individual bow manufacturers’ recommended
tolerances.
If necessary the string can have twists added to
it to increase the bracing height, or conversely,
have some twists removed to lower the bracing
height.
COACHING MANUAL
Page 45
EVALUATION FORM FOR GOLD ARROW CANDIDATES.
Name of the beginner: Form G
Date: ____ / ____ / 20__ Retake date: ____ / ____ / 20__
Shooting
distance
for score
evaluation
Required minimum
score
Achieved *
*Not yet
achieved Total score
18 m on 40
cm face
(Indoor) or
30m on 80cm
face
(Outdoor)
115 points
SKILLS Key elements
(What should be done)
Achieved *
*Not yet achieved
References to
the World
Archery Level 1
Coaching
Manual
String
clearance
Successful string
clearance test (bridge
of tape for instance)
#6.13
Follow-through Impassive face upon
release
#6.14.1
Continued aiming upon
release
#6.14.1
Sequence Repeat the shooting
steps with consistency
# 4.2.2.2
Consistent shooting
time (+/- 10 seconds
per end of 3 arrows)
Use of breathing
#6.15
Subjects
2 evaluations
Required knowledge
or know-how
Achieved *
*Not yet achieved
Comments
and/or
references
Tournament
registration
process
Know the registration
process (of the club) for
a local tournament
Internal process
of the club
Arrow setting Know how to affix an
arrow-rest and make a
nocking point
#11.3.4& 11.4.6
TOTAL 8 positive
evaluations are
required
** Awarded
____ or Not
awarded yet____
* Checkmark if the score / skill / knowledge is positively evaluated (Achieved) or not
(Not yet achieved). Write in the TOTAL row of these two columns the accumulated
number of checkmarks.
** Just checkmark the final result of this evaluation.
Name and signature of the assessor/evaluator: _______________________________