Administrators Guide - OpenNMS
403
Administrators Guide Copyright (c) 2015-2018 The OpenNMS Group, Inc. OpenNMS Horizon 22.0.3, Last updated 2018-08-16 11:24:06 EDT
-
Upload
khangminh22 -
Category
Documents
-
view
0 -
download
0
Transcript of Administrators Guide - OpenNMS

Administrators GuideCopyright (c) 2015-2018 The OpenNMS Group, Inc.
OpenNMS Horizon 22.0.3, Last updated 2018-08-16 11:24:06 EDT

Table of Contents1. Data Choices. . . . . . . . . . . . . . . . . . . . . . . . . . . . . . . . . . . . . . . . . . . . . . . . . . . . . . . . . . . . . . . . . . . . . . . . . . . . . . 1
2. User Management . . . . . . . . . . . . . . . . . . . . . . . . . . . . . . . . . . . . . . . . . . . . . . . . . . . . . . . . . . . . . . . . . . . . . . . . 2
2.1. Users. . . . . . . . . . . . . . . . . . . . . . . . . . . . . . . . . . . . . . . . . . . . . . . . . . . . . . . . . . . . . . . . . . . . . . . . . . . . . . . . . 2
2.2. Security Roles. . . . . . . . . . . . . . . . . . . . . . . . . . . . . . . . . . . . . . . . . . . . . . . . . . . . . . . . . . . . . . . . . . . . . . . . . 3
2.3. Web UI Pre-Authentication . . . . . . . . . . . . . . . . . . . . . . . . . . . . . . . . . . . . . . . . . . . . . . . . . . . . . . . . . . . . 5
2.3.1. Enabling Pre-Authentication . . . . . . . . . . . . . . . . . . . . . . . . . . . . . . . . . . . . . . . . . . . . . . . . . . . . . . . 6
2.3.2. Configuring Pre-Authentication . . . . . . . . . . . . . . . . . . . . . . . . . . . . . . . . . . . . . . . . . . . . . . . . . . . . 6
3. Administrative Webinterface . . . . . . . . . . . . . . . . . . . . . . . . . . . . . . . . . . . . . . . . . . . . . . . . . . . . . . . . . . . . . . 7
3.1. Grafana Dashboard Box . . . . . . . . . . . . . . . . . . . . . . . . . . . . . . . . . . . . . . . . . . . . . . . . . . . . . . . . . . . . . . . 7
3.2. Operator Board . . . . . . . . . . . . . . . . . . . . . . . . . . . . . . . . . . . . . . . . . . . . . . . . . . . . . . . . . . . . . . . . . . . . . . . 8
3.2.1. Configuration . . . . . . . . . . . . . . . . . . . . . . . . . . . . . . . . . . . . . . . . . . . . . . . . . . . . . . . . . . . . . . . . . . . . . 9
3.2.2. Dashlets . . . . . . . . . . . . . . . . . . . . . . . . . . . . . . . . . . . . . . . . . . . . . . . . . . . . . . . . . . . . . . . . . . . . . . . . . 11
3.2.3. Boosting Dashlet . . . . . . . . . . . . . . . . . . . . . . . . . . . . . . . . . . . . . . . . . . . . . . . . . . . . . . . . . . . . . . . . . 15
3.2.4. Criteria Builder . . . . . . . . . . . . . . . . . . . . . . . . . . . . . . . . . . . . . . . . . . . . . . . . . . . . . . . . . . . . . . . . . . 15
3.3. JMX Configuration Generator . . . . . . . . . . . . . . . . . . . . . . . . . . . . . . . . . . . . . . . . . . . . . . . . . . . . . . . . . 16
3.3.1. Web based utility . . . . . . . . . . . . . . . . . . . . . . . . . . . . . . . . . . . . . . . . . . . . . . . . . . . . . . . . . . . . . . . . 16
3.3.2. CLI based utility. . . . . . . . . . . . . . . . . . . . . . . . . . . . . . . . . . . . . . . . . . . . . . . . . . . . . . . . . . . . . . . . . . 20
3.4. Heatmap . . . . . . . . . . . . . . . . . . . . . . . . . . . . . . . . . . . . . . . . . . . . . . . . . . . . . . . . . . . . . . . . . . . . . . . . . . . . 25
3.5. Trend . . . . . . . . . . . . . . . . . . . . . . . . . . . . . . . . . . . . . . . . . . . . . . . . . . . . . . . . . . . . . . . . . . . . . . . . . . . . . . . 27
4. Service Assurance . . . . . . . . . . . . . . . . . . . . . . . . . . . . . . . . . . . . . . . . . . . . . . . . . . . . . . . . . . . . . . . . . . . . . . . 30
4.1. Pollerd Configuration . . . . . . . . . . . . . . . . . . . . . . . . . . . . . . . . . . . . . . . . . . . . . . . . . . . . . . . . . . . . . . . . 30
4.2. Critical Service . . . . . . . . . . . . . . . . . . . . . . . . . . . . . . . . . . . . . . . . . . . . . . . . . . . . . . . . . . . . . . . . . . . . . . 32
4.3. Downtime Model . . . . . . . . . . . . . . . . . . . . . . . . . . . . . . . . . . . . . . . . . . . . . . . . . . . . . . . . . . . . . . . . . . . . 32
4.4. Path Outages . . . . . . . . . . . . . . . . . . . . . . . . . . . . . . . . . . . . . . . . . . . . . . . . . . . . . . . . . . . . . . . . . . . . . . . . 33
4.5. Poller Packages . . . . . . . . . . . . . . . . . . . . . . . . . . . . . . . . . . . . . . . . . . . . . . . . . . . . . . . . . . . . . . . . . . . . . . 34
4.5.1. Response Time Configuration . . . . . . . . . . . . . . . . . . . . . . . . . . . . . . . . . . . . . . . . . . . . . . . . . . . . . 35
4.5.2. Overlapping Services . . . . . . . . . . . . . . . . . . . . . . . . . . . . . . . . . . . . . . . . . . . . . . . . . . . . . . . . . . . . . 36
4.5.3. Test Services on manually . . . . . . . . . . . . . . . . . . . . . . . . . . . . . . . . . . . . . . . . . . . . . . . . . . . . . . . . 38
4.5.4. Test filters on Karaf Shell . . . . . . . . . . . . . . . . . . . . . . . . . . . . . . . . . . . . . . . . . . . . . . . . . . . . . . . . . 40
4.6. Service monitors . . . . . . . . . . . . . . . . . . . . . . . . . . . . . . . . . . . . . . . . . . . . . . . . . . . . . . . . . . . . . . . . . . . . . 41
4.6.1. Common Configuration Parameters . . . . . . . . . . . . . . . . . . . . . . . . . . . . . . . . . . . . . . . . . . . . . . . 41
4.6.2. AvailabilityMonitor . . . . . . . . . . . . . . . . . . . . . . . . . . . . . . . . . . . . . . . . . . . . . . . . . . . . . . . . . . . . . . 42
4.6.3. BgpSessionMonitor. . . . . . . . . . . . . . . . . . . . . . . . . . . . . . . . . . . . . . . . . . . . . . . . . . . . . . . . . . . . . . . 43
4.6.4. BSFMonitor. . . . . . . . . . . . . . . . . . . . . . . . . . . . . . . . . . . . . . . . . . . . . . . . . . . . . . . . . . . . . . . . . . . . . . 46
4.6.5. CiscoIpSlaMonitor. . . . . . . . . . . . . . . . . . . . . . . . . . . . . . . . . . . . . . . . . . . . . . . . . . . . . . . . . . . . . . . . 53
4.6.6. CiscoPingMibMonitor . . . . . . . . . . . . . . . . . . . . . . . . . . . . . . . . . . . . . . . . . . . . . . . . . . . . . . . . . . . . 55
4.6.7. CitrixMonitor . . . . . . . . . . . . . . . . . . . . . . . . . . . . . . . . . . . . . . . . . . . . . . . . . . . . . . . . . . . . . . . . . . . . 60
4.6.8. DhcpMonitor . . . . . . . . . . . . . . . . . . . . . . . . . . . . . . . . . . . . . . . . . . . . . . . . . . . . . . . . . . . . . . . . . . . . 61

4.6.9. DiskUsageMonitor. . . . . . . . . . . . . . . . . . . . . . . . . . . . . . . . . . . . . . . . . . . . . . . . . . . . . . . . . . . . . . . . 65
4.6.10. DnsMonitor . . . . . . . . . . . . . . . . . . . . . . . . . . . . . . . . . . . . . . . . . . . . . . . . . . . . . . . . . . . . . . . . . . . . 67
4.6.11. DNSResolutionMonitor . . . . . . . . . . . . . . . . . . . . . . . . . . . . . . . . . . . . . . . . . . . . . . . . . . . . . . . . . . 69
4.6.12. FtpMonitor . . . . . . . . . . . . . . . . . . . . . . . . . . . . . . . . . . . . . . . . . . . . . . . . . . . . . . . . . . . . . . . . . . . . . 72
4.6.13. HostResourceSwRunMonitor. . . . . . . . . . . . . . . . . . . . . . . . . . . . . . . . . . . . . . . . . . . . . . . . . . . . . 74
4.6.14. HttpMonitor . . . . . . . . . . . . . . . . . . . . . . . . . . . . . . . . . . . . . . . . . . . . . . . . . . . . . . . . . . . . . . . . . . . . 75
4.6.15. HttpPostMonitor . . . . . . . . . . . . . . . . . . . . . . . . . . . . . . . . . . . . . . . . . . . . . . . . . . . . . . . . . . . . . . . . 79
4.6.16. HttpsMonitor . . . . . . . . . . . . . . . . . . . . . . . . . . . . . . . . . . . . . . . . . . . . . . . . . . . . . . . . . . . . . . . . . . . 81
4.6.17. IcmpMonitor . . . . . . . . . . . . . . . . . . . . . . . . . . . . . . . . . . . . . . . . . . . . . . . . . . . . . . . . . . . . . . . . . . . 81
4.6.18. ImapMonitor . . . . . . . . . . . . . . . . . . . . . . . . . . . . . . . . . . . . . . . . . . . . . . . . . . . . . . . . . . . . . . . . . . . 83
4.6.19. ImapsMonitor . . . . . . . . . . . . . . . . . . . . . . . . . . . . . . . . . . . . . . . . . . . . . . . . . . . . . . . . . . . . . . . . . . 84
4.6.20. JCifsMonitor . . . . . . . . . . . . . . . . . . . . . . . . . . . . . . . . . . . . . . . . . . . . . . . . . . . . . . . . . . . . . . . . . . . . 85
4.6.21. JDBCMonitor . . . . . . . . . . . . . . . . . . . . . . . . . . . . . . . . . . . . . . . . . . . . . . . . . . . . . . . . . . . . . . . . . . . 87
4.6.22. JDBCStoredProcedureMonitor. . . . . . . . . . . . . . . . . . . . . . . . . . . . . . . . . . . . . . . . . . . . . . . . . . . . 88
4.6.23. JDBCQueryMonitor. . . . . . . . . . . . . . . . . . . . . . . . . . . . . . . . . . . . . . . . . . . . . . . . . . . . . . . . . . . . . . 90
4.6.24. JmxMonitor . . . . . . . . . . . . . . . . . . . . . . . . . . . . . . . . . . . . . . . . . . . . . . . . . . . . . . . . . . . . . . . . . . . . 92
4.6.25. JolokiaBeanMonitor . . . . . . . . . . . . . . . . . . . . . . . . . . . . . . . . . . . . . . . . . . . . . . . . . . . . . . . . . . . . . 94
4.6.26. LdapMonitor . . . . . . . . . . . . . . . . . . . . . . . . . . . . . . . . . . . . . . . . . . . . . . . . . . . . . . . . . . . . . . . . . . . 96
4.6.27. LdapsMonitor . . . . . . . . . . . . . . . . . . . . . . . . . . . . . . . . . . . . . . . . . . . . . . . . . . . . . . . . . . . . . . . . . . 97
4.6.28. MemcachedMonitor . . . . . . . . . . . . . . . . . . . . . . . . . . . . . . . . . . . . . . . . . . . . . . . . . . . . . . . . . . . . . 98
4.6.29. NetScalerGroupHealthMonitor . . . . . . . . . . . . . . . . . . . . . . . . . . . . . . . . . . . . . . . . . . . . . . . . . . . 99
4.6.30. NrpeMonitor . . . . . . . . . . . . . . . . . . . . . . . . . . . . . . . . . . . . . . . . . . . . . . . . . . . . . . . . . . . . . . . . . . 101
4.6.31. NtpMonitor. . . . . . . . . . . . . . . . . . . . . . . . . . . . . . . . . . . . . . . . . . . . . . . . . . . . . . . . . . . . . . . . . . . . 102
4.6.32. OmsaStorageMonitor. . . . . . . . . . . . . . . . . . . . . . . . . . . . . . . . . . . . . . . . . . . . . . . . . . . . . . . . . . . 103
4.6.33. OpenManageChassisMonitor. . . . . . . . . . . . . . . . . . . . . . . . . . . . . . . . . . . . . . . . . . . . . . . . . . . . 105
4.6.34. PageSequenceMonitor. . . . . . . . . . . . . . . . . . . . . . . . . . . . . . . . . . . . . . . . . . . . . . . . . . . . . . . . . . 106
4.6.35. PercMonitor . . . . . . . . . . . . . . . . . . . . . . . . . . . . . . . . . . . . . . . . . . . . . . . . . . . . . . . . . . . . . . . . . . . 115
4.6.36. Pop3Monitor . . . . . . . . . . . . . . . . . . . . . . . . . . . . . . . . . . . . . . . . . . . . . . . . . . . . . . . . . . . . . . . . . . 116
4.6.37. PrTableMonitor. . . . . . . . . . . . . . . . . . . . . . . . . . . . . . . . . . . . . . . . . . . . . . . . . . . . . . . . . . . . . . . . 117
4.6.38. RadiusAuthMonitor . . . . . . . . . . . . . . . . . . . . . . . . . . . . . . . . . . . . . . . . . . . . . . . . . . . . . . . . . . . . 118
4.6.39. SmbMonitor . . . . . . . . . . . . . . . . . . . . . . . . . . . . . . . . . . . . . . . . . . . . . . . . . . . . . . . . . . . . . . . . . . . 120
4.6.40. SnmpMonitor. . . . . . . . . . . . . . . . . . . . . . . . . . . . . . . . . . . . . . . . . . . . . . . . . . . . . . . . . . . . . . . . . . 121
4.6.41. SshMonitor . . . . . . . . . . . . . . . . . . . . . . . . . . . . . . . . . . . . . . . . . . . . . . . . . . . . . . . . . . . . . . . . . . . . 129
4.6.42. SSLCertMonitor. . . . . . . . . . . . . . . . . . . . . . . . . . . . . . . . . . . . . . . . . . . . . . . . . . . . . . . . . . . . . . . . 130
4.6.43. StrafePingMonitor . . . . . . . . . . . . . . . . . . . . . . . . . . . . . . . . . . . . . . . . . . . . . . . . . . . . . . . . . . . . . 132
4.6.44. TcpMonitor. . . . . . . . . . . . . . . . . . . . . . . . . . . . . . . . . . . . . . . . . . . . . . . . . . . . . . . . . . . . . . . . . . . . 135
4.6.45. SystemExecuteMonitor . . . . . . . . . . . . . . . . . . . . . . . . . . . . . . . . . . . . . . . . . . . . . . . . . . . . . . . . . 136
4.6.46. VmwareCimMonitor . . . . . . . . . . . . . . . . . . . . . . . . . . . . . . . . . . . . . . . . . . . . . . . . . . . . . . . . . . . 138
4.6.47. VmwareMonitor . . . . . . . . . . . . . . . . . . . . . . . . . . . . . . . . . . . . . . . . . . . . . . . . . . . . . . . . . . . . . . . 139
4.6.48. Win32ServiceMonitor . . . . . . . . . . . . . . . . . . . . . . . . . . . . . . . . . . . . . . . . . . . . . . . . . . . . . . . . . . 140
4.6.49. WsManMonitor . . . . . . . . . . . . . . . . . . . . . . . . . . . . . . . . . . . . . . . . . . . . . . . . . . . . . . . . . . . . . . . . 142

4.6.50. XmpMonitor. . . . . . . . . . . . . . . . . . . . . . . . . . . . . . . . . . . . . . . . . . . . . . . . . . . . . . . . . . . . . . . . . . . 143
5. Performance Management . . . . . . . . . . . . . . . . . . . . . . . . . . . . . . . . . . . . . . . . . . . . . . . . . . . . . . . . . . . . . . 145
5.1. Collectd Configuration . . . . . . . . . . . . . . . . . . . . . . . . . . . . . . . . . . . . . . . . . . . . . . . . . . . . . . . . . . . . . . 145
5.1.1. Resource Types . . . . . . . . . . . . . . . . . . . . . . . . . . . . . . . . . . . . . . . . . . . . . . . . . . . . . . . . . . . . . . . . . 146
5.2. Collection Packages . . . . . . . . . . . . . . . . . . . . . . . . . . . . . . . . . . . . . . . . . . . . . . . . . . . . . . . . . . . . . . . . . 150
5.2.1. Service Configurations . . . . . . . . . . . . . . . . . . . . . . . . . . . . . . . . . . . . . . . . . . . . . . . . . . . . . . . . . . 150
5.3. Collectors . . . . . . . . . . . . . . . . . . . . . . . . . . . . . . . . . . . . . . . . . . . . . . . . . . . . . . . . . . . . . . . . . . . . . . . . . . 151
5.3.1. JmxCollector. . . . . . . . . . . . . . . . . . . . . . . . . . . . . . . . . . . . . . . . . . . . . . . . . . . . . . . . . . . . . . . . . . . . 151
5.3.2. SnmpCollector . . . . . . . . . . . . . . . . . . . . . . . . . . . . . . . . . . . . . . . . . . . . . . . . . . . . . . . . . . . . . . . . . . 155
5.3.3. HttpCollector . . . . . . . . . . . . . . . . . . . . . . . . . . . . . . . . . . . . . . . . . . . . . . . . . . . . . . . . . . . . . . . . . . . 156
5.3.4. JdbcCollector . . . . . . . . . . . . . . . . . . . . . . . . . . . . . . . . . . . . . . . . . . . . . . . . . . . . . . . . . . . . . . . . . . . 158
5.3.5. JmxCollector. . . . . . . . . . . . . . . . . . . . . . . . . . . . . . . . . . . . . . . . . . . . . . . . . . . . . . . . . . . . . . . . . . . . 160
5.3.6. NSClientCollector . . . . . . . . . . . . . . . . . . . . . . . . . . . . . . . . . . . . . . . . . . . . . . . . . . . . . . . . . . . . . . . 164
5.3.7. TcaCollector . . . . . . . . . . . . . . . . . . . . . . . . . . . . . . . . . . . . . . . . . . . . . . . . . . . . . . . . . . . . . . . . . . . . 164
5.3.8. VmwareCimCollector. . . . . . . . . . . . . . . . . . . . . . . . . . . . . . . . . . . . . . . . . . . . . . . . . . . . . . . . . . . . 165
5.3.9. VmwareCollector . . . . . . . . . . . . . . . . . . . . . . . . . . . . . . . . . . . . . . . . . . . . . . . . . . . . . . . . . . . . . . . 165
5.3.10. WmiCollector. . . . . . . . . . . . . . . . . . . . . . . . . . . . . . . . . . . . . . . . . . . . . . . . . . . . . . . . . . . . . . . . . . 166
5.3.11. WsManCollector . . . . . . . . . . . . . . . . . . . . . . . . . . . . . . . . . . . . . . . . . . . . . . . . . . . . . . . . . . . . . . . 166
5.3.12. XmlCollector . . . . . . . . . . . . . . . . . . . . . . . . . . . . . . . . . . . . . . . . . . . . . . . . . . . . . . . . . . . . . . . . . . 172
5.3.13. XmpCollector . . . . . . . . . . . . . . . . . . . . . . . . . . . . . . . . . . . . . . . . . . . . . . . . . . . . . . . . . . . . . . . . . . 174
5.4. Shell Commands . . . . . . . . . . . . . . . . . . . . . . . . . . . . . . . . . . . . . . . . . . . . . . . . . . . . . . . . . . . . . . . . . . . . 175
5.4.1. Ad-hoc collection. . . . . . . . . . . . . . . . . . . . . . . . . . . . . . . . . . . . . . . . . . . . . . . . . . . . . . . . . . . . . . . . 175
5.4.2. Interpreting the output . . . . . . . . . . . . . . . . . . . . . . . . . . . . . . . . . . . . . . . . . . . . . . . . . . . . . . . . . . 176
5.4.3. Stress Testing . . . . . . . . . . . . . . . . . . . . . . . . . . . . . . . . . . . . . . . . . . . . . . . . . . . . . . . . . . . . . . . . . . . 176
5.4.4. Interpreting the output . . . . . . . . . . . . . . . . . . . . . . . . . . . . . . . . . . . . . . . . . . . . . . . . . . . . . . . . . . 177
6. Events . . . . . . . . . . . . . . . . . . . . . . . . . . . . . . . . . . . . . . . . . . . . . . . . . . . . . . . . . . . . . . . . . . . . . . . . . . . . . . . . . 178
6.1. Anatomy of an Event . . . . . . . . . . . . . . . . . . . . . . . . . . . . . . . . . . . . . . . . . . . . . . . . . . . . . . . . . . . . . . . . 178
6.2. Sources of Events . . . . . . . . . . . . . . . . . . . . . . . . . . . . . . . . . . . . . . . . . . . . . . . . . . . . . . . . . . . . . . . . . . . 178
6.2.1. SNMP Traps . . . . . . . . . . . . . . . . . . . . . . . . . . . . . . . . . . . . . . . . . . . . . . . . . . . . . . . . . . . . . . . . . . . . 179
6.2.2. Syslog Messages. . . . . . . . . . . . . . . . . . . . . . . . . . . . . . . . . . . . . . . . . . . . . . . . . . . . . . . . . . . . . . . . . 179
6.2.3. ReST . . . . . . . . . . . . . . . . . . . . . . . . . . . . . . . . . . . . . . . . . . . . . . . . . . . . . . . . . . . . . . . . . . . . . . . . . . . 181
6.2.4. XML-TCP . . . . . . . . . . . . . . . . . . . . . . . . . . . . . . . . . . . . . . . . . . . . . . . . . . . . . . . . . . . . . . . . . . . . . . . 181
6.2.5. Receiving IBM Tivoli Event Integration Facility Events . . . . . . . . . . . . . . . . . . . . . . . . . . . . . 181
6.2.6. TL1 Autonomous Messages . . . . . . . . . . . . . . . . . . . . . . . . . . . . . . . . . . . . . . . . . . . . . . . . . . . . . . 182
6.3. The Event Bus . . . . . . . . . . . . . . . . . . . . . . . . . . . . . . . . . . . . . . . . . . . . . . . . . . . . . . . . . . . . . . . . . . . . . . 182
6.3.1. Associate an Event to a given node . . . . . . . . . . . . . . . . . . . . . . . . . . . . . . . . . . . . . . . . . . . . . . . 182
6.4. Event Configuration. . . . . . . . . . . . . . . . . . . . . . . . . . . . . . . . . . . . . . . . . . . . . . . . . . . . . . . . . . . . . . . . . 183
6.4.1. The eventd-configuration.xml file . . . . . . . . . . . . . . . . . . . . . . . . . . . . . . . . . . . . . . . . . . . . . . . . 183
6.4.2. The eventconf.xml file and its tributaries . . . . . . . . . . . . . . . . . . . . . . . . . . . . . . . . . . . . . . . . . 183
6.4.3. Reloading the event configuration . . . . . . . . . . . . . . . . . . . . . . . . . . . . . . . . . . . . . . . . . . . . . . . . 187
6.5. Debugging . . . . . . . . . . . . . . . . . . . . . . . . . . . . . . . . . . . . . . . . . . . . . . . . . . . . . . . . . . . . . . . . . . . . . . . . . 187

7. Alarms. . . . . . . . . . . . . . . . . . . . . . . . . . . . . . . . . . . . . . . . . . . . . . . . . . . . . . . . . . . . . . . . . . . . . . . . . . . . . . . . . 188
7.1. Alarm Sounds . . . . . . . . . . . . . . . . . . . . . . . . . . . . . . . . . . . . . . . . . . . . . . . . . . . . . . . . . . . . . . . . . . . . . . 188
7.2. Flashing Unacknowledged Alarms. . . . . . . . . . . . . . . . . . . . . . . . . . . . . . . . . . . . . . . . . . . . . . . . . . . . 188
7.3. Configuring Alarm Sounds and Flashing . . . . . . . . . . . . . . . . . . . . . . . . . . . . . . . . . . . . . . . . . . . . . . 189
8. Notifications . . . . . . . . . . . . . . . . . . . . . . . . . . . . . . . . . . . . . . . . . . . . . . . . . . . . . . . . . . . . . . . . . . . . . . . . . . . 190
8.1. Introduction. . . . . . . . . . . . . . . . . . . . . . . . . . . . . . . . . . . . . . . . . . . . . . . . . . . . . . . . . . . . . . . . . . . . . . . . 190
8.2. Getting Started . . . . . . . . . . . . . . . . . . . . . . . . . . . . . . . . . . . . . . . . . . . . . . . . . . . . . . . . . . . . . . . . . . . . . 190
8.2.1. Enabling Notifications . . . . . . . . . . . . . . . . . . . . . . . . . . . . . . . . . . . . . . . . . . . . . . . . . . . . . . . . . . . 190
8.2.2. Configuring Destination Paths. . . . . . . . . . . . . . . . . . . . . . . . . . . . . . . . . . . . . . . . . . . . . . . . . . . . 190
8.2.3. Configuring Event Notifications . . . . . . . . . . . . . . . . . . . . . . . . . . . . . . . . . . . . . . . . . . . . . . . . . . 191
8.3. Concepts . . . . . . . . . . . . . . . . . . . . . . . . . . . . . . . . . . . . . . . . . . . . . . . . . . . . . . . . . . . . . . . . . . . . . . . . . . . 191
8.3.1. Events and UEIs. . . . . . . . . . . . . . . . . . . . . . . . . . . . . . . . . . . . . . . . . . . . . . . . . . . . . . . . . . . . . . . . . 191
8.3.2. Users, Groups, and On-Call Roles . . . . . . . . . . . . . . . . . . . . . . . . . . . . . . . . . . . . . . . . . . . . . . . . . 191
8.3.3. Duty Schedules . . . . . . . . . . . . . . . . . . . . . . . . . . . . . . . . . . . . . . . . . . . . . . . . . . . . . . . . . . . . . . . . . 193
8.3.4. Destination Paths . . . . . . . . . . . . . . . . . . . . . . . . . . . . . . . . . . . . . . . . . . . . . . . . . . . . . . . . . . . . . . . 193
8.3.5. Notification Commands. . . . . . . . . . . . . . . . . . . . . . . . . . . . . . . . . . . . . . . . . . . . . . . . . . . . . . . . . . 194
8.4. Bonus Notification Methods . . . . . . . . . . . . . . . . . . . . . . . . . . . . . . . . . . . . . . . . . . . . . . . . . . . . . . . . . 195
8.4.1. Mattermost . . . . . . . . . . . . . . . . . . . . . . . . . . . . . . . . . . . . . . . . . . . . . . . . . . . . . . . . . . . . . . . . . . . . . 195
8.4.2. Slack Notifications . . . . . . . . . . . . . . . . . . . . . . . . . . . . . . . . . . . . . . . . . . . . . . . . . . . . . . . . . . . . . . 196
9. Provisioning . . . . . . . . . . . . . . . . . . . . . . . . . . . . . . . . . . . . . . . . . . . . . . . . . . . . . . . . . . . . . . . . . . . . . . . . . . . 198
9.1. Introduction. . . . . . . . . . . . . . . . . . . . . . . . . . . . . . . . . . . . . . . . . . . . . . . . . . . . . . . . . . . . . . . . . . . . . . . . 198
9.2. Concepts . . . . . . . . . . . . . . . . . . . . . . . . . . . . . . . . . . . . . . . . . . . . . . . . . . . . . . . . . . . . . . . . . . . . . . . . . . . 198
9.2.1. Terminology. . . . . . . . . . . . . . . . . . . . . . . . . . . . . . . . . . . . . . . . . . . . . . . . . . . . . . . . . . . . . . . . . . . . 199
9.2.2. Addressing Scalability . . . . . . . . . . . . . . . . . . . . . . . . . . . . . . . . . . . . . . . . . . . . . . . . . . . . . . . . . . . 200
9.3. Getting Started . . . . . . . . . . . . . . . . . . . . . . . . . . . . . . . . . . . . . . . . . . . . . . . . . . . . . . . . . . . . . . . . . . . . . 203
9.3.1. Provisioning the SNMP Configuration. . . . . . . . . . . . . . . . . . . . . . . . . . . . . . . . . . . . . . . . . . . . . 203
9.3.2. Automatic Discovery . . . . . . . . . . . . . . . . . . . . . . . . . . . . . . . . . . . . . . . . . . . . . . . . . . . . . . . . . . . . 205
9.3.3. Enhanced Directed Discovery . . . . . . . . . . . . . . . . . . . . . . . . . . . . . . . . . . . . . . . . . . . . . . . . . . . . 206
9.4. Import Handlers . . . . . . . . . . . . . . . . . . . . . . . . . . . . . . . . . . . . . . . . . . . . . . . . . . . . . . . . . . . . . . . . . . . . 208
9.4.1. Generic Handler . . . . . . . . . . . . . . . . . . . . . . . . . . . . . . . . . . . . . . . . . . . . . . . . . . . . . . . . . . . . . . . . 208
9.4.2. File Handler . . . . . . . . . . . . . . . . . . . . . . . . . . . . . . . . . . . . . . . . . . . . . . . . . . . . . . . . . . . . . . . . . . . . 209
9.4.3. HTTP Handler . . . . . . . . . . . . . . . . . . . . . . . . . . . . . . . . . . . . . . . . . . . . . . . . . . . . . . . . . . . . . . . . . . 209
9.4.4. DNS Handler . . . . . . . . . . . . . . . . . . . . . . . . . . . . . . . . . . . . . . . . . . . . . . . . . . . . . . . . . . . . . . . . . . . 209
9.5. Provisioning Examples . . . . . . . . . . . . . . . . . . . . . . . . . . . . . . . . . . . . . . . . . . . . . . . . . . . . . . . . . . . . . . 211
9.5.1. Basic Provisioning . . . . . . . . . . . . . . . . . . . . . . . . . . . . . . . . . . . . . . . . . . . . . . . . . . . . . . . . . . . . . . 211
9.5.2. Advanced Provisioning Example . . . . . . . . . . . . . . . . . . . . . . . . . . . . . . . . . . . . . . . . . . . . . . . . . 217
9.6. Adapters . . . . . . . . . . . . . . . . . . . . . . . . . . . . . . . . . . . . . . . . . . . . . . . . . . . . . . . . . . . . . . . . . . . . . . . . . . . 227
9.6.1. DDNS Adapter . . . . . . . . . . . . . . . . . . . . . . . . . . . . . . . . . . . . . . . . . . . . . . . . . . . . . . . . . . . . . . . . . . 228
9.6.2. RANCID Adapter . . . . . . . . . . . . . . . . . . . . . . . . . . . . . . . . . . . . . . . . . . . . . . . . . . . . . . . . . . . . . . . . 228
9.7. Integrating with Provisiond. . . . . . . . . . . . . . . . . . . . . . . . . . . . . . . . . . . . . . . . . . . . . . . . . . . . . . . . . . 228
9.7.1. Provisioning Groups of Nodes . . . . . . . . . . . . . . . . . . . . . . . . . . . . . . . . . . . . . . . . . . . . . . . . . . . . 228

9.7.2. Example . . . . . . . . . . . . . . . . . . . . . . . . . . . . . . . . . . . . . . . . . . . . . . . . . . . . . . . . . . . . . . . . . . . . . . . 228
9.8. Provisioning Single Nodes (Quick Add Node) . . . . . . . . . . . . . . . . . . . . . . . . . . . . . . . . . . . . . . . . . . 230
9.9. Fine Grained Provisioning Using provision.pl . . . . . . . . . . . . . . . . . . . . . . . . . . . . . . . . . . . . . . . . . . 231
9.9.1. Create a new requisition. . . . . . . . . . . . . . . . . . . . . . . . . . . . . . . . . . . . . . . . . . . . . . . . . . . . . . . . . 231
9.10. Yet Other API Examples . . . . . . . . . . . . . . . . . . . . . . . . . . . . . . . . . . . . . . . . . . . . . . . . . . . . . . . . . . . . 233
9.11. Service Detectors . . . . . . . . . . . . . . . . . . . . . . . . . . . . . . . . . . . . . . . . . . . . . . . . . . . . . . . . . . . . . . . . . . 233
9.11.1. SNMP Detector. . . . . . . . . . . . . . . . . . . . . . . . . . . . . . . . . . . . . . . . . . . . . . . . . . . . . . . . . . . . . . . . . 233
9.11.2. WS-Man Detector . . . . . . . . . . . . . . . . . . . . . . . . . . . . . . . . . . . . . . . . . . . . . . . . . . . . . . . . . . . . . . 235
10. Business Service Monitoring. . . . . . . . . . . . . . . . . . . . . . . . . . . . . . . . . . . . . . . . . . . . . . . . . . . . . . . . . . . . 238
10.1. Business Service Definition . . . . . . . . . . . . . . . . . . . . . . . . . . . . . . . . . . . . . . . . . . . . . . . . . . . . . . . . . 238
10.2. Edges . . . . . . . . . . . . . . . . . . . . . . . . . . . . . . . . . . . . . . . . . . . . . . . . . . . . . . . . . . . . . . . . . . . . . . . . . . . . . 239
10.2.1. Child Services . . . . . . . . . . . . . . . . . . . . . . . . . . . . . . . . . . . . . . . . . . . . . . . . . . . . . . . . . . . . . . . . . 240
10.2.2. IP Services . . . . . . . . . . . . . . . . . . . . . . . . . . . . . . . . . . . . . . . . . . . . . . . . . . . . . . . . . . . . . . . . . . . . 240
10.2.3. Custom Reduction Key. . . . . . . . . . . . . . . . . . . . . . . . . . . . . . . . . . . . . . . . . . . . . . . . . . . . . . . . . . 241
10.3. Map Functions . . . . . . . . . . . . . . . . . . . . . . . . . . . . . . . . . . . . . . . . . . . . . . . . . . . . . . . . . . . . . . . . . . . . 241
10.4. Reduce Functions . . . . . . . . . . . . . . . . . . . . . . . . . . . . . . . . . . . . . . . . . . . . . . . . . . . . . . . . . . . . . . . . . . 241
10.5. Business Service Daemon. . . . . . . . . . . . . . . . . . . . . . . . . . . . . . . . . . . . . . . . . . . . . . . . . . . . . . . . . . . 243
11. Topology Map . . . . . . . . . . . . . . . . . . . . . . . . . . . . . . . . . . . . . . . . . . . . . . . . . . . . . . . . . . . . . . . . . . . . . . . . . 245
11.1. Properties. . . . . . . . . . . . . . . . . . . . . . . . . . . . . . . . . . . . . . . . . . . . . . . . . . . . . . . . . . . . . . . . . . . . . . . . . 245
11.2. Icons . . . . . . . . . . . . . . . . . . . . . . . . . . . . . . . . . . . . . . . . . . . . . . . . . . . . . . . . . . . . . . . . . . . . . . . . . . . . . 245
11.2.1. Icon resolution . . . . . . . . . . . . . . . . . . . . . . . . . . . . . . . . . . . . . . . . . . . . . . . . . . . . . . . . . . . . . . . . 246
11.2.2. Change existing icon mappings. . . . . . . . . . . . . . . . . . . . . . . . . . . . . . . . . . . . . . . . . . . . . . . . . . 247
11.2.3. Add new icons . . . . . . . . . . . . . . . . . . . . . . . . . . . . . . . . . . . . . . . . . . . . . . . . . . . . . . . . . . . . . . . . . 247
12. Asset Topology Provider. . . . . . . . . . . . . . . . . . . . . . . . . . . . . . . . . . . . . . . . . . . . . . . . . . . . . . . . . . . . . . . . 249
12.1. Overview . . . . . . . . . . . . . . . . . . . . . . . . . . . . . . . . . . . . . . . . . . . . . . . . . . . . . . . . . . . . . . . . . . . . . . . . . 249
12.2. Asset layers . . . . . . . . . . . . . . . . . . . . . . . . . . . . . . . . . . . . . . . . . . . . . . . . . . . . . . . . . . . . . . . . . . . . . . . 252
12.3. Node filtering . . . . . . . . . . . . . . . . . . . . . . . . . . . . . . . . . . . . . . . . . . . . . . . . . . . . . . . . . . . . . . . . . . . . . 252
12.4. Configuration . . . . . . . . . . . . . . . . . . . . . . . . . . . . . . . . . . . . . . . . . . . . . . . . . . . . . . . . . . . . . . . . . . . . . 254
12.5. Creating Asset Based Topologies From Karaf Consol . . . . . . . . . . . . . . . . . . . . . . . . . . . . . . . . . . 255
12.6. Creating Asset Based Topologies Using OpenNMS Horizon events . . . . . . . . . . . . . . . . . . . . . . 256
12.7. Viewing the topology. . . . . . . . . . . . . . . . . . . . . . . . . . . . . . . . . . . . . . . . . . . . . . . . . . . . . . . . . . . . . . . 257
12.8. Additional notes . . . . . . . . . . . . . . . . . . . . . . . . . . . . . . . . . . . . . . . . . . . . . . . . . . . . . . . . . . . . . . . . . . . 258
13. Database Reports . . . . . . . . . . . . . . . . . . . . . . . . . . . . . . . . . . . . . . . . . . . . . . . . . . . . . . . . . . . . . . . . . . . . . . 259
13.1. Overview . . . . . . . . . . . . . . . . . . . . . . . . . . . . . . . . . . . . . . . . . . . . . . . . . . . . . . . . . . . . . . . . . . . . . . . . . 259
13.2. Modify existing reports. . . . . . . . . . . . . . . . . . . . . . . . . . . . . . . . . . . . . . . . . . . . . . . . . . . . . . . . . . . . . 259
13.3. Add a custom report . . . . . . . . . . . . . . . . . . . . . . . . . . . . . . . . . . . . . . . . . . . . . . . . . . . . . . . . . . . . . . . 260
13.4. Usage of Jaspersoft Studio . . . . . . . . . . . . . . . . . . . . . . . . . . . . . . . . . . . . . . . . . . . . . . . . . . . . . . . . . . 260
13.4.1. Connect to the OpenNMS Horizon Database . . . . . . . . . . . . . . . . . . . . . . . . . . . . . . . . . . . . . . 261
13.4.2. Use Measurements Datasource and Helpers . . . . . . . . . . . . . . . . . . . . . . . . . . . . . . . . . . . . . . 261
13.5. Accessing Performance Data . . . . . . . . . . . . . . . . . . . . . . . . . . . . . . . . . . . . . . . . . . . . . . . . . . . . . . . . 262
13.5.1. Fields . . . . . . . . . . . . . . . . . . . . . . . . . . . . . . . . . . . . . . . . . . . . . . . . . . . . . . . . . . . . . . . . . . . . . . . . . 263

13.5.2. Parameters . . . . . . . . . . . . . . . . . . . . . . . . . . . . . . . . . . . . . . . . . . . . . . . . . . . . . . . . . . . . . . . . . . . . 263
13.6. Helper methods . . . . . . . . . . . . . . . . . . . . . . . . . . . . . . . . . . . . . . . . . . . . . . . . . . . . . . . . . . . . . . . . . . . 264
13.6.1. Usage of the node source descriptor . . . . . . . . . . . . . . . . . . . . . . . . . . . . . . . . . . . . . . . . . . . . . 265
13.6.2. Usage of the interface descriptor . . . . . . . . . . . . . . . . . . . . . . . . . . . . . . . . . . . . . . . . . . . . . . . . 266
13.6.3. Use HTTPS . . . . . . . . . . . . . . . . . . . . . . . . . . . . . . . . . . . . . . . . . . . . . . . . . . . . . . . . . . . . . . . . . . . . 267
13.7. Limitations. . . . . . . . . . . . . . . . . . . . . . . . . . . . . . . . . . . . . . . . . . . . . . . . . . . . . . . . . . . . . . . . . . . . . . . . 267
14. Enhanced Linkd . . . . . . . . . . . . . . . . . . . . . . . . . . . . . . . . . . . . . . . . . . . . . . . . . . . . . . . . . . . . . . . . . . . . . . . 268
14.1. Enlinkd Daemon. . . . . . . . . . . . . . . . . . . . . . . . . . . . . . . . . . . . . . . . . . . . . . . . . . . . . . . . . . . . . . . . . . . 268
14.2. Layer 2 Link Discovery . . . . . . . . . . . . . . . . . . . . . . . . . . . . . . . . . . . . . . . . . . . . . . . . . . . . . . . . . . . . . 269
14.2.1. LLDP Discovery. . . . . . . . . . . . . . . . . . . . . . . . . . . . . . . . . . . . . . . . . . . . . . . . . . . . . . . . . . . . . . . . 270
14.2.2. CDP Discovery . . . . . . . . . . . . . . . . . . . . . . . . . . . . . . . . . . . . . . . . . . . . . . . . . . . . . . . . . . . . . . . . . 273
14.2.3. Transparent Bridge Discovery . . . . . . . . . . . . . . . . . . . . . . . . . . . . . . . . . . . . . . . . . . . . . . . . . . 276
14.3. Layer 3 Link Discovery . . . . . . . . . . . . . . . . . . . . . . . . . . . . . . . . . . . . . . . . . . . . . . . . . . . . . . . . . . . . . 281
14.3.1. OSPF Discovery . . . . . . . . . . . . . . . . . . . . . . . . . . . . . . . . . . . . . . . . . . . . . . . . . . . . . . . . . . . . . . . . 282
14.3.2. IS-IS Discovery. . . . . . . . . . . . . . . . . . . . . . . . . . . . . . . . . . . . . . . . . . . . . . . . . . . . . . . . . . . . . . . . . 283
15. Operation . . . . . . . . . . . . . . . . . . . . . . . . . . . . . . . . . . . . . . . . . . . . . . . . . . . . . . . . . . . . . . . . . . . . . . . . . . . . . 286
15.1. HTTPS / SSL . . . . . . . . . . . . . . . . . . . . . . . . . . . . . . . . . . . . . . . . . . . . . . . . . . . . . . . . . . . . . . . . . . . . . . . 286
15.1.1. Standalone HTTPS with Jetty . . . . . . . . . . . . . . . . . . . . . . . . . . . . . . . . . . . . . . . . . . . . . . . . . . . . 286
15.1.2. OpenNMS Horizon as HTTPS client . . . . . . . . . . . . . . . . . . . . . . . . . . . . . . . . . . . . . . . . . . . . . . 286
15.1.3. Differences between Java Trust Store and Java Key Store . . . . . . . . . . . . . . . . . . . . . . . . . . 288
15.1.4. Debugging / Properties . . . . . . . . . . . . . . . . . . . . . . . . . . . . . . . . . . . . . . . . . . . . . . . . . . . . . . . . . 288
15.2. Request Logging . . . . . . . . . . . . . . . . . . . . . . . . . . . . . . . . . . . . . . . . . . . . . . . . . . . . . . . . . . . . . . . . . . . 289
15.3. Geocoder Service . . . . . . . . . . . . . . . . . . . . . . . . . . . . . . . . . . . . . . . . . . . . . . . . . . . . . . . . . . . . . . . . . . 290
15.4. resourcecli: simple resource management tool . . . . . . . . . . . . . . . . . . . . . . . . . . . . . . . . . . . . . . . 290
15.4.1. Usage . . . . . . . . . . . . . . . . . . . . . . . . . . . . . . . . . . . . . . . . . . . . . . . . . . . . . . . . . . . . . . . . . . . . . . . . . 290
15.4.2. Sub-command: list . . . . . . . . . . . . . . . . . . . . . . . . . . . . . . . . . . . . . . . . . . . . . . . . . . . . . . . . . . . . . 291
15.4.3. Sub-command: show . . . . . . . . . . . . . . . . . . . . . . . . . . . . . . . . . . . . . . . . . . . . . . . . . . . . . . . . . . . 292
15.4.4. Sub-command: delete . . . . . . . . . . . . . . . . . . . . . . . . . . . . . . . . . . . . . . . . . . . . . . . . . . . . . . . . . . 292
15.5. newts-repository-converter: Rrd/Jrb to Newts migration utility . . . . . . . . . . . . . . . . . . . . . . . . 293
15.5.1. Migration . . . . . . . . . . . . . . . . . . . . . . . . . . . . . . . . . . . . . . . . . . . . . . . . . . . . . . . . . . . . . . . . . . . . . 293
15.5.2. Usage . . . . . . . . . . . . . . . . . . . . . . . . . . . . . . . . . . . . . . . . . . . . . . . . . . . . . . . . . . . . . . . . . . . . . . . . . 294
15.5.3. Example 1: convert Rrd-based data with storeByGroup enabled. . . . . . . . . . . . . . . . . . . . 295
15.5.4. Example 2: convert JRobin-based data with storeByGroup disabled . . . . . . . . . . . . . . . . 295
15.6. Newts. . . . . . . . . . . . . . . . . . . . . . . . . . . . . . . . . . . . . . . . . . . . . . . . . . . . . . . . . . . . . . . . . . . . . . . . . . . . . 295
15.6.1. Configuration. . . . . . . . . . . . . . . . . . . . . . . . . . . . . . . . . . . . . . . . . . . . . . . . . . . . . . . . . . . . . . . . . . 295
15.6.2. Cassandra Monitoring . . . . . . . . . . . . . . . . . . . . . . . . . . . . . . . . . . . . . . . . . . . . . . . . . . . . . . . . . . 298
15.6.3. Newts Monitoring. . . . . . . . . . . . . . . . . . . . . . . . . . . . . . . . . . . . . . . . . . . . . . . . . . . . . . . . . . . . . . 302
15.7. Daemon Configuration Files . . . . . . . . . . . . . . . . . . . . . . . . . . . . . . . . . . . . . . . . . . . . . . . . . . . . . . . . 304
15.7.1. Eventd . . . . . . . . . . . . . . . . . . . . . . . . . . . . . . . . . . . . . . . . . . . . . . . . . . . . . . . . . . . . . . . . . . . . . . . . 304
15.7.2. Notifd. . . . . . . . . . . . . . . . . . . . . . . . . . . . . . . . . . . . . . . . . . . . . . . . . . . . . . . . . . . . . . . . . . . . . . . . . 305
15.7.3. Pollerd . . . . . . . . . . . . . . . . . . . . . . . . . . . . . . . . . . . . . . . . . . . . . . . . . . . . . . . . . . . . . . . . . . . . . . . . 305

16. System Properties . . . . . . . . . . . . . . . . . . . . . . . . . . . . . . . . . . . . . . . . . . . . . . . . . . . . . . . . . . . . . . . . . . . . . 307
17. Ticketing. . . . . . . . . . . . . . . . . . . . . . . . . . . . . . . . . . . . . . . . . . . . . . . . . . . . . . . . . . . . . . . . . . . . . . . . . . . . . . 308
17.1. JIRA Ticketing Plugin. . . . . . . . . . . . . . . . . . . . . . . . . . . . . . . . . . . . . . . . . . . . . . . . . . . . . . . . . . . . . . . 308
17.1.1. Setup . . . . . . . . . . . . . . . . . . . . . . . . . . . . . . . . . . . . . . . . . . . . . . . . . . . . . . . . . . . . . . . . . . . . . . . . . 308
17.1.2. Jira Commands . . . . . . . . . . . . . . . . . . . . . . . . . . . . . . . . . . . . . . . . . . . . . . . . . . . . . . . . . . . . . . . . 309
17.1.3. Custom fields . . . . . . . . . . . . . . . . . . . . . . . . . . . . . . . . . . . . . . . . . . . . . . . . . . . . . . . . . . . . . . . . . . 310
17.1.4. Troubleshooting . . . . . . . . . . . . . . . . . . . . . . . . . . . . . . . . . . . . . . . . . . . . . . . . . . . . . . . . . . . . . . . 314
17.2. Remedy Ticketing Plugin . . . . . . . . . . . . . . . . . . . . . . . . . . . . . . . . . . . . . . . . . . . . . . . . . . . . . . . . . . . 314
17.2.1. Remedy Product Overview. . . . . . . . . . . . . . . . . . . . . . . . . . . . . . . . . . . . . . . . . . . . . . . . . . . . . . 314
17.2.2. Supported Remedy Product Versions . . . . . . . . . . . . . . . . . . . . . . . . . . . . . . . . . . . . . . . . . . . . 314
17.2.3. Setup . . . . . . . . . . . . . . . . . . . . . . . . . . . . . . . . . . . . . . . . . . . . . . . . . . . . . . . . . . . . . . . . . . . . . . . . . 314
17.3. TSRM Ticketing Plugin . . . . . . . . . . . . . . . . . . . . . . . . . . . . . . . . . . . . . . . . . . . . . . . . . . . . . . . . . . . . . 317
17.3.1. Setup . . . . . . . . . . . . . . . . . . . . . . . . . . . . . . . . . . . . . . . . . . . . . . . . . . . . . . . . . . . . . . . . . . . . . . . . . 317
17.3.2. Mapping OpenNMS Ticket with TSRM Incident . . . . . . . . . . . . . . . . . . . . . . . . . . . . . . . . . . . 317
18. Enabling RMI . . . . . . . . . . . . . . . . . . . . . . . . . . . . . . . . . . . . . . . . . . . . . . . . . . . . . . . . . . . . . . . . . . . . . . . . . 319
18.1. Enabling RMI. . . . . . . . . . . . . . . . . . . . . . . . . . . . . . . . . . . . . . . . . . . . . . . . . . . . . . . . . . . . . . . . . . . . . . 319
18.2. Enabling SSL . . . . . . . . . . . . . . . . . . . . . . . . . . . . . . . . . . . . . . . . . . . . . . . . . . . . . . . . . . . . . . . . . . . . . . 320
18.3. Connecting to RMI over SSL. . . . . . . . . . . . . . . . . . . . . . . . . . . . . . . . . . . . . . . . . . . . . . . . . . . . . . . . . 320
19. Minion . . . . . . . . . . . . . . . . . . . . . . . . . . . . . . . . . . . . . . . . . . . . . . . . . . . . . . . . . . . . . . . . . . . . . . . . . . . . . . . 322
19.1. Using Kafka . . . . . . . . . . . . . . . . . . . . . . . . . . . . . . . . . . . . . . . . . . . . . . . . . . . . . . . . . . . . . . . . . . . . . . . 322
19.1.1. Consumer Configuration . . . . . . . . . . . . . . . . . . . . . . . . . . . . . . . . . . . . . . . . . . . . . . . . . . . . . . . 322
19.1.2. Producer Configuration . . . . . . . . . . . . . . . . . . . . . . . . . . . . . . . . . . . . . . . . . . . . . . . . . . . . . . . . 322
19.2. Using AWS SQS . . . . . . . . . . . . . . . . . . . . . . . . . . . . . . . . . . . . . . . . . . . . . . . . . . . . . . . . . . . . . . . . . . . . 323
19.2.1. OpenNMS Horizon Configuration . . . . . . . . . . . . . . . . . . . . . . . . . . . . . . . . . . . . . . . . . . . . . . . . 323
19.2.2. Minion Configuration . . . . . . . . . . . . . . . . . . . . . . . . . . . . . . . . . . . . . . . . . . . . . . . . . . . . . . . . . . 324
19.2.3. SQS Configuration Settings. . . . . . . . . . . . . . . . . . . . . . . . . . . . . . . . . . . . . . . . . . . . . . . . . . . . . . 325
19.2.4. Managing Multiple Environments . . . . . . . . . . . . . . . . . . . . . . . . . . . . . . . . . . . . . . . . . . . . . . . 327
19.2.5. AWS Credentials . . . . . . . . . . . . . . . . . . . . . . . . . . . . . . . . . . . . . . . . . . . . . . . . . . . . . . . . . . . . . . . 327
19.2.6. Limitations . . . . . . . . . . . . . . . . . . . . . . . . . . . . . . . . . . . . . . . . . . . . . . . . . . . . . . . . . . . . . . . . . . . . 328
20. Plugin Manager . . . . . . . . . . . . . . . . . . . . . . . . . . . . . . . . . . . . . . . . . . . . . . . . . . . . . . . . . . . . . . . . . . . . . . . 329
20.1. Plugin Manager UI panel . . . . . . . . . . . . . . . . . . . . . . . . . . . . . . . . . . . . . . . . . . . . . . . . . . . . . . . . . . . 329
20.2. Setting Karaf Instance Data . . . . . . . . . . . . . . . . . . . . . . . . . . . . . . . . . . . . . . . . . . . . . . . . . . . . . . . . . 331
20.3. Manually adding a managed Karaf instance. . . . . . . . . . . . . . . . . . . . . . . . . . . . . . . . . . . . . . . . . . 333
20.4. Installed Plugins . . . . . . . . . . . . . . . . . . . . . . . . . . . . . . . . . . . . . . . . . . . . . . . . . . . . . . . . . . . . . . . . . . . 334
20.5. Available Plugins Server . . . . . . . . . . . . . . . . . . . . . . . . . . . . . . . . . . . . . . . . . . . . . . . . . . . . . . . . . . . 336
20.6. Installing Available Plugins . . . . . . . . . . . . . . . . . . . . . . . . . . . . . . . . . . . . . . . . . . . . . . . . . . . . . . . . . 337
20.7. Plugins Manifest . . . . . . . . . . . . . . . . . . . . . . . . . . . . . . . . . . . . . . . . . . . . . . . . . . . . . . . . . . . . . . . . . . . 338
20.8. Installed Licences Panel . . . . . . . . . . . . . . . . . . . . . . . . . . . . . . . . . . . . . . . . . . . . . . . . . . . . . . . . . . . . 339
20.9. Adding a New Licence. . . . . . . . . . . . . . . . . . . . . . . . . . . . . . . . . . . . . . . . . . . . . . . . . . . . . . . . . . . . . . 340
20.10. Installing Internal Plugins . . . . . . . . . . . . . . . . . . . . . . . . . . . . . . . . . . . . . . . . . . . . . . . . . . . . . . . . . 341
21. Internal Plugins . . . . . . . . . . . . . . . . . . . . . . . . . . . . . . . . . . . . . . . . . . . . . . . . . . . . . . . . . . . . . . . . . . . . . . . 343

21.1. Internal Plugins supplied with OpenNMS Horizon . . . . . . . . . . . . . . . . . . . . . . . . . . . . . . . . . . . . 343
21.2. Installing Plugins with the Karaf Consol . . . . . . . . . . . . . . . . . . . . . . . . . . . . . . . . . . . . . . . . . . . . . 343
21.3. Alarm Change Notifier Plugin . . . . . . . . . . . . . . . . . . . . . . . . . . . . . . . . . . . . . . . . . . . . . . . . . . . . . . . 343
21.4. Elasticsearch ReST plugin . . . . . . . . . . . . . . . . . . . . . . . . . . . . . . . . . . . . . . . . . . . . . . . . . . . . . . . . . . 345
22. Special Cases and Workarounds . . . . . . . . . . . . . . . . . . . . . . . . . . . . . . . . . . . . . . . . . . . . . . . . . . . . . . . . 346
22.1. Overriding SNMP Client Behavior . . . . . . . . . . . . . . . . . . . . . . . . . . . . . . . . . . . . . . . . . . . . . . . . . . . 346
23. IFTTT Integration. . . . . . . . . . . . . . . . . . . . . . . . . . . . . . . . . . . . . . . . . . . . . . . . . . . . . . . . . . . . . . . . . . . . . . 348
23.1. IFTTT Configuration . . . . . . . . . . . . . . . . . . . . . . . . . . . . . . . . . . . . . . . . . . . . . . . . . . . . . . . . . . . . . . . 348
23.2. OpenNMS Configuration . . . . . . . . . . . . . . . . . . . . . . . . . . . . . . . . . . . . . . . . . . . . . . . . . . . . . . . . . . . 351
23.3. Example . . . . . . . . . . . . . . . . . . . . . . . . . . . . . . . . . . . . . . . . . . . . . . . . . . . . . . . . . . . . . . . . . . . . . . . . . . 351
24. Telemetry Daemon . . . . . . . . . . . . . . . . . . . . . . . . . . . . . . . . . . . . . . . . . . . . . . . . . . . . . . . . . . . . . . . . . . . . 353
24.1. What is a Listener . . . . . . . . . . . . . . . . . . . . . . . . . . . . . . . . . . . . . . . . . . . . . . . . . . . . . . . . . . . . . . . . . 353
24.2. What is an Adapter . . . . . . . . . . . . . . . . . . . . . . . . . . . . . . . . . . . . . . . . . . . . . . . . . . . . . . . . . . . . . . . . 353
24.3. What are Protocols. . . . . . . . . . . . . . . . . . . . . . . . . . . . . . . . . . . . . . . . . . . . . . . . . . . . . . . . . . . . . . . . . 354
24.4. Push Sensor Data through Minion . . . . . . . . . . . . . . . . . . . . . . . . . . . . . . . . . . . . . . . . . . . . . . . . . . . 354
24.5. Protocol Reference. . . . . . . . . . . . . . . . . . . . . . . . . . . . . . . . . . . . . . . . . . . . . . . . . . . . . . . . . . . . . . . . . 354
24.5.1. IPFIX Interface . . . . . . . . . . . . . . . . . . . . . . . . . . . . . . . . . . . . . . . . . . . . . . . . . . . . . . . . . . . . . . . . 354
24.5.2. Junos Telemetry Interface . . . . . . . . . . . . . . . . . . . . . . . . . . . . . . . . . . . . . . . . . . . . . . . . . . . . . . 355
24.5.3. NetFlow v5 Interface . . . . . . . . . . . . . . . . . . . . . . . . . . . . . . . . . . . . . . . . . . . . . . . . . . . . . . . . . . . 356
24.5.4. NetFlow v9 Interface . . . . . . . . . . . . . . . . . . . . . . . . . . . . . . . . . . . . . . . . . . . . . . . . . . . . . . . . . . . 356
24.5.5. Cisco NX-OS Telemetry . . . . . . . . . . . . . . . . . . . . . . . . . . . . . . . . . . . . . . . . . . . . . . . . . . . . . . . . . 357
24.5.6. sFlow Interface . . . . . . . . . . . . . . . . . . . . . . . . . . . . . . . . . . . . . . . . . . . . . . . . . . . . . . . . . . . . . . . . 359
24.6. Listener Reference . . . . . . . . . . . . . . . . . . . . . . . . . . . . . . . . . . . . . . . . . . . . . . . . . . . . . . . . . . . . . . . . . 359
24.6.1. UDP Listener . . . . . . . . . . . . . . . . . . . . . . . . . . . . . . . . . . . . . . . . . . . . . . . . . . . . . . . . . . . . . . . . . . 359
24.6.2. Netflow v9 UDP Listener. . . . . . . . . . . . . . . . . . . . . . . . . . . . . . . . . . . . . . . . . . . . . . . . . . . . . . . . 359
24.6.3. IPFIX UDP Listener. . . . . . . . . . . . . . . . . . . . . . . . . . . . . . . . . . . . . . . . . . . . . . . . . . . . . . . . . . . . . 360
24.6.4. IPFIX TCP Listener . . . . . . . . . . . . . . . . . . . . . . . . . . . . . . . . . . . . . . . . . . . . . . . . . . . . . . . . . . . . . 360
24.6.5. sFlow UDP Listener . . . . . . . . . . . . . . . . . . . . . . . . . . . . . . . . . . . . . . . . . . . . . . . . . . . . . . . . . . . . 361
25. Elasticsearch Integration . . . . . . . . . . . . . . . . . . . . . . . . . . . . . . . . . . . . . . . . . . . . . . . . . . . . . . . . . . . . . . . 362
25.1. Configuration . . . . . . . . . . . . . . . . . . . . . . . . . . . . . . . . . . . . . . . . . . . . . . . . . . . . . . . . . . . . . . . . . . . . . 362
25.2. Credentials . . . . . . . . . . . . . . . . . . . . . . . . . . . . . . . . . . . . . . . . . . . . . . . . . . . . . . . . . . . . . . . . . . . . . . . . 363
25.3. Features . . . . . . . . . . . . . . . . . . . . . . . . . . . . . . . . . . . . . . . . . . . . . . . . . . . . . . . . . . . . . . . . . . . . . . . . . . 364
25.3.1. Version Matrix . . . . . . . . . . . . . . . . . . . . . . . . . . . . . . . . . . . . . . . . . . . . . . . . . . . . . . . . . . . . . . . . 364
25.3.2. Alarm and Event Forwarder . . . . . . . . . . . . . . . . . . . . . . . . . . . . . . . . . . . . . . . . . . . . . . . . . . . . 364
25.3.3. Flow Support . . . . . . . . . . . . . . . . . . . . . . . . . . . . . . . . . . . . . . . . . . . . . . . . . . . . . . . . . . . . . . . . . . 381
26. Flow Support. . . . . . . . . . . . . . . . . . . . . . . . . . . . . . . . . . . . . . . . . . . . . . . . . . . . . . . . . . . . . . . . . . . . . . . . . . 382
26.1. Introduction. . . . . . . . . . . . . . . . . . . . . . . . . . . . . . . . . . . . . . . . . . . . . . . . . . . . . . . . . . . . . . . . . . . . . . . 382
26.1.1. How it works . . . . . . . . . . . . . . . . . . . . . . . . . . . . . . . . . . . . . . . . . . . . . . . . . . . . . . . . . . . . . . . . . . 382
26.2. Setup . . . . . . . . . . . . . . . . . . . . . . . . . . . . . . . . . . . . . . . . . . . . . . . . . . . . . . . . . . . . . . . . . . . . . . . . . . . . . 382
26.2.1. Configuration Elasticsearch persistence. . . . . . . . . . . . . . . . . . . . . . . . . . . . . . . . . . . . . . . . . . 382
26.2.2. Enabling a protocol . . . . . . . . . . . . . . . . . . . . . . . . . . . . . . . . . . . . . . . . . . . . . . . . . . . . . . . . . . . . 383

26.2.3. Linking to OpenNMS Helm in the Web UI . . . . . . . . . . . . . . . . . . . . . . . . . . . . . . . . . . . . . . . . 383
26.2.4. Node cache configuration (Optional). . . . . . . . . . . . . . . . . . . . . . . . . . . . . . . . . . . . . . . . . . . . . 385
26.2.5. Classification Exporter Filter cache configuration (Optional). . . . . . . . . . . . . . . . . . . . . . . 385
26.3. Classification Engine . . . . . . . . . . . . . . . . . . . . . . . . . . . . . . . . . . . . . . . . . . . . . . . . . . . . . . . . . . . . . . . 385
26.3.1. Rule definition. . . . . . . . . . . . . . . . . . . . . . . . . . . . . . . . . . . . . . . . . . . . . . . . . . . . . . . . . . . . . . . . . 386
26.3.2. Rule Priority. . . . . . . . . . . . . . . . . . . . . . . . . . . . . . . . . . . . . . . . . . . . . . . . . . . . . . . . . . . . . . . . . . . 386
26.3.3. Verification . . . . . . . . . . . . . . . . . . . . . . . . . . . . . . . . . . . . . . . . . . . . . . . . . . . . . . . . . . . . . . . . . . . 387
26.3.4. Example . . . . . . . . . . . . . . . . . . . . . . . . . . . . . . . . . . . . . . . . . . . . . . . . . . . . . . . . . . . . . . . . . . . . . . 387
27. Kafka Producer. . . . . . . . . . . . . . . . . . . . . . . . . . . . . . . . . . . . . . . . . . . . . . . . . . . . . . . . . . . . . . . . . . . . . . . . 389
27.1. Overview . . . . . . . . . . . . . . . . . . . . . . . . . . . . . . . . . . . . . . . . . . . . . . . . . . . . . . . . . . . . . . . . . . . . . . . . . 389
27.1.1. Events . . . . . . . . . . . . . . . . . . . . . . . . . . . . . . . . . . . . . . . . . . . . . . . . . . . . . . . . . . . . . . . . . . . . . . . . 389
27.1.2. Alarms . . . . . . . . . . . . . . . . . . . . . . . . . . . . . . . . . . . . . . . . . . . . . . . . . . . . . . . . . . . . . . . . . . . . . . . . 389
27.1.3. Nodes . . . . . . . . . . . . . . . . . . . . . . . . . . . . . . . . . . . . . . . . . . . . . . . . . . . . . . . . . . . . . . . . . . . . . . . . . 389
27.2. Enabling the Kafka Producer . . . . . . . . . . . . . . . . . . . . . . . . . . . . . . . . . . . . . . . . . . . . . . . . . . . . . . . 390
27.3. Configuring the Kafka Producer. . . . . . . . . . . . . . . . . . . . . . . . . . . . . . . . . . . . . . . . . . . . . . . . . . . . . 390
27.3.1. Configuring Filtering . . . . . . . . . . . . . . . . . . . . . . . . . . . . . . . . . . . . . . . . . . . . . . . . . . . . . . . . . . . 391
27.3.2. Configuring Topic Names . . . . . . . . . . . . . . . . . . . . . . . . . . . . . . . . . . . . . . . . . . . . . . . . . . . . . . . 392
27.4. Shell Commands . . . . . . . . . . . . . . . . . . . . . . . . . . . . . . . . . . . . . . . . . . . . . . . . . . . . . . . . . . . . . . . . . . . 392
27.4.1. kafka-producer:list-alarms. . . . . . . . . . . . . . . . . . . . . . . . . . . . . . . . . . . . . . . . . . . . . . . . . . . . . . 392
27.4.2. kafka-producer:sync-alarms . . . . . . . . . . . . . . . . . . . . . . . . . . . . . . . . . . . . . . . . . . . . . . . . . . . . 392
27.4.3. kafka-producer:evaluate-filter . . . . . . . . . . . . . . . . . . . . . . . . . . . . . . . . . . . . . . . . . . . . . . . . . . 393

Chapter 1. Data ChoicesThe Data Choices module collects and publishes anonymous usage statistics tohttps://stats.opennms.org.
When a user with the Admin role logs into the system for the first time, they will be prompted as towhether or not they want to opt-in to publish these statistics. Statistics will only be published oncean Administrator has opted-in.
Usage statistics can later be disabled by accessing the 'Data Choices' link in the 'Admin' menu.
When enabled, the following anonymous statistics will be collected and publish on system startupand every 24 hours after:
• System ID (a randomly generated UUID)
• OpenNMS Horizon Release
• OpenNMS Horizon Version
• OS Architecture
• OS Name
• OS Version
1. Number of Alarms in the alarms table
2. Number of Events in the events table
3. Number of IP Interfaces in the ipinterface table
4. Number of Nodes in the node table
5. Number of Nodes, grouped by System OID
1

Chapter 2. User ManagementUsers are entities with login accounts in the OpenNMS Horizon system. Ideally each usercorresponds to a person. An OpenNMS Horizon User represents an actor which may be grantedpermissions in the system by associating Security Roles. OpenNMS Horizon stores by default Userinformation and credentials in a local embedded file based storage. Credentials and user details,e.g. contact information, descriptions or Security Roles can be managed through the Admin Sectionin the Web User Interface.
Beside local Users, external LDAP service and SSO can be configured, but are not scope in thissection. The following paragraphs describe how to manage the embedded User and Security Rolesin OpenNMS Horizon.
2.1. UsersManaging Users is done through the Web User Interface and requires to login as a User withadministrative permissions. By default the admin user is used to initially create and modify Users.The User, Password and other detail descriptions are persisted in users.xml file. It is not required torestart OpenNMS Horizon when User attributes are changed.
In case administrative tasks should be delegated to an User the Security Role named ROLE_ADMINcan be assigned.
Don’t delete the admin and rtc user. The RTC user is used for the communication ofthe Real-Time Console on the start page to calculate the node and serviceavailability.
Change the default admin password to a secure password.
How to set a new password for any user
1. Login as a User with administrative permissions
2. Choose Configure OpenNMS from the user specific main navigation which is named as yourlogin user name
3. Choose Configure Users, Groups and On-Call roles and select Configure Users
4. Click the Modify icon next to an existing User and select Reset Password
5. Set a new Password, Confirm Password and click OK
6. Click Finish to persist and apply the changes
How users can change their own password
1. Login with user name and old password
2. Choose Change Password from the user specific main navigation which is named as your loginuser name
3. Select Change Password
4. Identify yourself with the old password and set the new password and confirm
2

5. Click Submit
6. Logout and login with your new password
How to create or modify user
1. Login as a User with administrative permissions
2. Choose Configure OpenNMS from the user specific main navigation which is named as yourlogin user name
3. Choose Configure Users, Groups and On-Call roles and select Configure Users
4. Use Add new user and type in a login name as User ID and a Password with confirmation orclick Modify next to an existing User
5. Optional: Fill in detailed User Information to provide more context information around the newuser in the system
6. Optional: Assign Security Roles to give or remove permissions in the system
7. Optional: Provide Notification Information which are used in Notification targets to sendmessages to the User
8. Optional: Set a schedule when a User should receive Notifications
9. Click Finish to persist and apply the changes
By default a new User has the Security Role similar to ROLE_USER assigned.Acknowledgment and working with Alarms and Notifications is possible. TheConfigure OpenNMS administration menu is not available.
How to delete existing user
1. Login as a User with administrative permissions
2. Choose Configure OpenNMS from the user specific main navigation which is named as yourlogin user name
3. Choose Configure Users, Groups and On-Call roles and select Configure Users
4. Use the trash bin icon next to the User to delete
5. Confirm delete request with OK
2.2. Security RolesA Security Roles is a set of permissions and can be assigned to an User. They regulate access to theWeb User Interface and the ReST API to exchange monitoring and inventory information. In case ofa distributed installation, the Minion or Remote Poller instances interact with OpenNMS Horizonand require specific permissions which are defined in the Security Roles ROLE_MINION andROLE_REMOTING. The following Security Roles are available:
Table 1. Functions and existing system roles in OpenNMS Horizon
3
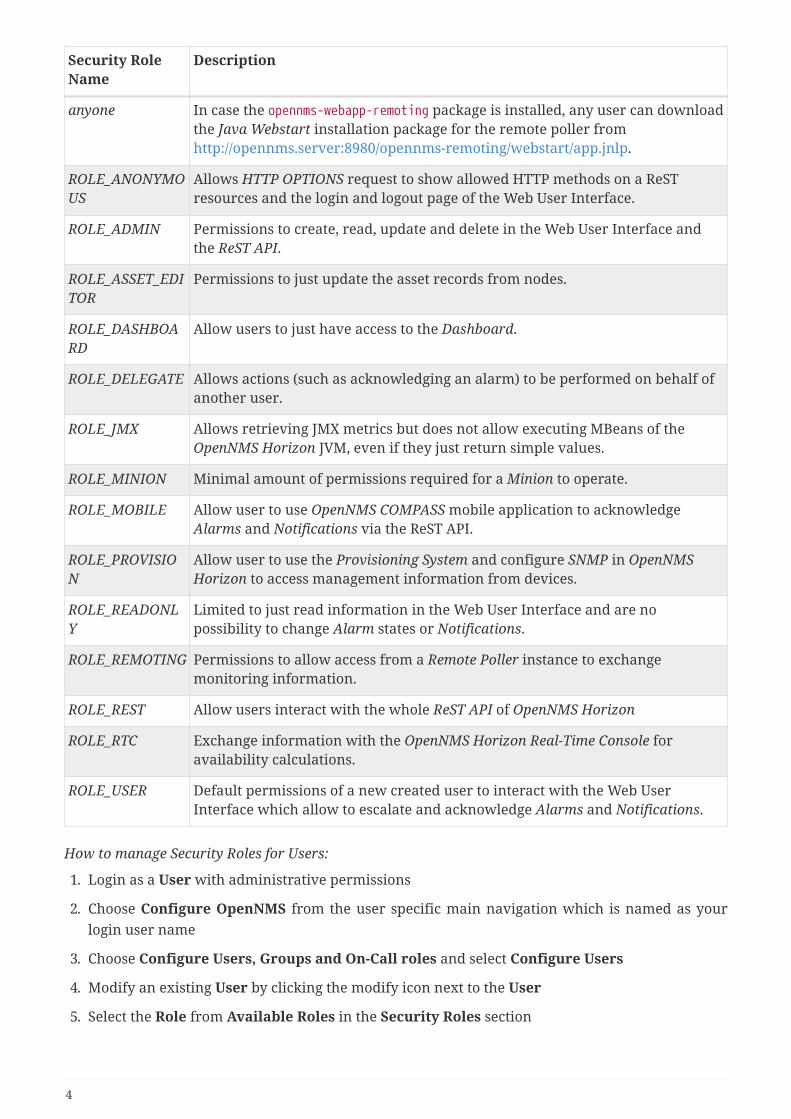
Security RoleName
Description
anyone In case the opennms-webapp-remoting package is installed, any user can downloadthe Java Webstart installation package for the remote poller fromhttp://opennms.server:8980/opennms-remoting/webstart/app.jnlp.
ROLE_ANONYMOUS
Allows HTTP OPTIONS request to show allowed HTTP methods on a ReSTresources and the login and logout page of the Web User Interface.
ROLE_ADMIN Permissions to create, read, update and delete in the Web User Interface andthe ReST API.
ROLE_ASSET_EDITOR
Permissions to just update the asset records from nodes.
ROLE_DASHBOARD
Allow users to just have access to the Dashboard.
ROLE_DELEGATE Allows actions (such as acknowledging an alarm) to be performed on behalf ofanother user.
ROLE_JMX Allows retrieving JMX metrics but does not allow executing MBeans of theOpenNMS Horizon JVM, even if they just return simple values.
ROLE_MINION Minimal amount of permissions required for a Minion to operate.
ROLE_MOBILE Allow user to use OpenNMS COMPASS mobile application to acknowledgeAlarms and Notifications via the ReST API.
ROLE_PROVISION
Allow user to use the Provisioning System and configure SNMP in OpenNMSHorizon to access management information from devices.
ROLE_READONLY
Limited to just read information in the Web User Interface and are nopossibility to change Alarm states or Notifications.
ROLE_REMOTING Permissions to allow access from a Remote Poller instance to exchangemonitoring information.
ROLE_REST Allow users interact with the whole ReST API of OpenNMS Horizon
ROLE_RTC Exchange information with the OpenNMS Horizon Real-Time Console foravailability calculations.
ROLE_USER Default permissions of a new created user to interact with the Web UserInterface which allow to escalate and acknowledge Alarms and Notifications.
How to manage Security Roles for Users:
1. Login as a User with administrative permissions
2. Choose Configure OpenNMS from the user specific main navigation which is named as yourlogin user name
3. Choose Configure Users, Groups and On-Call roles and select Configure Users
4. Modify an existing User by clicking the modify icon next to the User
5. Select the Role from Available Roles in the Security Roles section
4
6. Use Add and Remove to assign or remove the Security Role from the User
7. Click Finish to persist and apply the Changes
8. Logout and Login to apply the new Security Role settings
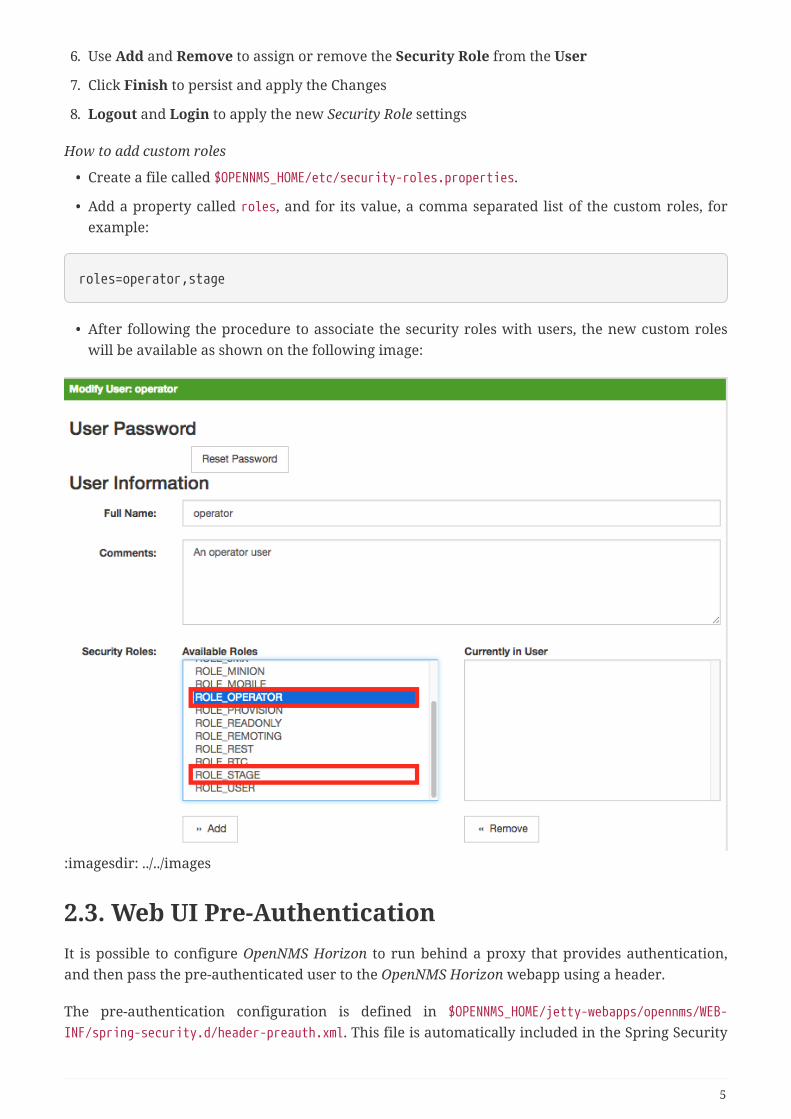
How to add custom roles
• Create a file called $OPENNMS_HOME/etc/security-roles.properties.
• Add a property called roles, and for its value, a comma separated list of the custom roles, forexample:
roles=operator,stage
• After following the procedure to associate the security roles with users, the new custom roleswill be available as shown on the following image:
:imagesdir: ../../images
2.3. Web UI Pre-AuthenticationIt is possible to configure OpenNMS Horizon to run behind a proxy that provides authentication,and then pass the pre-authenticated user to the OpenNMS Horizon webapp using a header.
The pre-authentication configuration is defined in $OPENNMS_HOME/jetty-webapps/opennms/WEB-
INF/spring-security.d/header-preauth.xml. This file is automatically included in the Spring Security
5

context, but is not enabled by default.
DO NOT configure OpenNMS Horizon in this manner unless you are certain theweb UI is only accessible to the proxy and not to end-users. Otherwise, maliciousattackers can craft queries that include the pre-authentication header and get fullcontrol of the web UI and ReST APIs.
2.3.1. Enabling Pre-Authentication
Edit the header-preauth.xml file, and set the enabled property:
<beans:property name="enabled" value="true" />
2.3.2. Configuring Pre-Authentication
There are a number of other properties that can be set to change the behavior of the pre-authentication plugin.
Property Description Default
enabled Whether the pre-authenticationplugin is active.
false
failOnError If true, disallow login if theheader is not set or the userdoes not exist. If false, fallthrough to other mechanisms(basic auth, form login, etc.)
false
userHeader The HTTP header that willspecify the user to authenticateas.
X-Remote-User
credentialsHeader A comma-separated list ofadditional credentials (roles)the user should have.
6

Chapter 3. Administrative Webinterface
3.1. Grafana Dashboard BoxGrafana provides an API key which gives access for 3rd party application like OpenNMS Horizon.The Grafana Dashboard Box on the start page shows dashboards related to OpenNMS Horizon. Tofilter relevant dashboards, you can use a tag for dashboards and make them accessible. If no tag isprovided all dashboards from Grafana will be shown.
The feature is by default deactivated and is configured through opennms.properties. Please note thatthis feature works with the Grafana API v2.5.0.
Quick access to Grafana dashboards from the OpenNMS Horizon start page
Table 2. Grafana Dashboard configuration properties
Name Type Description Default
org.opennms.grafanaBox.show
Boolean
This setting controls whether a grafana box showing theavailable dashboards is placed on the landing page. Thetwo valid options for this are true or false.
false
org.opennms.grafanaBox.hostname
String
If the box is enabled you also need to specify hostname ofthe Grafana server
localhost
org.opennms.grafanaBox.port
Integer
The port of the Grafana server ReST API 3000
org.opennms.grafanaBox.basePath
String
The Grafana base path to be used
org.opennms.grafanaBox.apiKey
String
The API key is needed for the ReST calls to work
7

Name Type Description Default
org.opennms.grafanaBox.tag
String
When a tag is specified only dashboards with this giventag will be displayed. When no tag is given all dashboardswill be displayed
org.opennms.grafanaBox.protocol
String
The protocol for the ReST call can also be specified http
org.opennms.grafanaBox.connectionTimeout
Integer
Timeout in milliseconds for getting information from theGrafana server
500
org.opennms.grafanaBox.soTimeout
Integer
Socket timeout 500
org.opennms.grafanaBox.dashboardLimit
Integer
Maximum number of entries to be displayed (0 forunlimited)
0
If you have Grafana behind a proxy it is important theorg.opennms.grafanaBox.hostname is reachable. This host name is used to generatelinks to the Grafana dashboards.
The process to generate an Grafana API Key can be found in the HTTP API documentation. Copy theAPI Key to opennms.properties as org.opennms.grafanaBox.apiKey.
3.2. Operator BoardIn a network operation center (NOC) the Ops Board can be used to visualize monitoringinformation. The monitoring information for various use-cases are arranged in configurableDashlets. To address different user groups it is possible to create multiple Ops Boards.
There are two visualisation components to display Dashlets:
• Ops Panel: Shows multiple Dashlets on one screen, e.g. on a NOC operators workstation
• Ops Board: Shows one Dashlet at a time in rotation, e.g. for a screen wall in a NOC
8

Figure 1. Concept of Dashlets displayed in Ops Panel
Figure 2. Concept to show Dashlets in rotation on the Ops Board
3.2.1. Configuration
To create and configure Ops Boards administration permissions are required. The configurationsection is in admin area of OpenNMS Horizon and named Ops Board Config Web Ui.
9

Figure 3. Navigation to the Ops Board configuration
Create or modify Ops Boards is described in the following screenshot.
Figure 4. Adding a Dashlet to an existing Ops Board
1. Create a new Ops Board to organize and arrange different Dashlets
2. The name to identify the Ops Board
3. Add a Dashlet to show OpenNMS Horizon monitoring information
10

4. Show a preview of the whole Ops Board
5. List of available Dashlets
6. Priority for this Dashlet in Ops Board rotation, lower priority means it will be displayed moreoften
7. Duration in seconds for this Dashlet in the Ops Board rotation
8. Change Priority if the Dashlet is in alert state, this is optional and maybe not available in allDashlets
9. Change Duration if the Dashlet is in alert state, it is optional and maybe not available in allDashlets
10. Configuration properties for this Dashlet
11. Remove this Dashlet from the Ops Board
12. Order Dashlets for the rotation on the Ops Board and the tile view in the Ops Panel
13. Show a preview for the whole Ops Board
The configured Ops Board can be used by navigating in the main menu to Dashboard → Ops Board.
Figure 5. Navigation to use the Ops Board
3.2.2. Dashlets
Visualization of information is implemented in Dashlets. The different Dashlets are described inthis section with all available configuration parameter.
To allow filter information the Dashlet can be configured with a generic Criteria Builder.
Alarm Details
This Alarm-Details Dashlet shows a table with alarms and some detailed information.
11

Table 3. Information of the alarms
Field Description
Alarm ID OpenNMS Horizon ID for the alarm
Severity Alarm severity (Cleared, Indeterminate, Normal, Warning, Minor, Major, Critical)
Node label Node label of the node where the alarm occurred
Alarm count Alarm count based on reduction key for deduplication
Last Event Time Last time the alarm occurred
Log Message Reason and detailed log message of the alarm
The Alarm Details Dashlet can be configured with the following parameters.
Boost support Boosted Severity
Configuration Criteria Builder
Alarms
This Alarms Dashlet shows a table with a short alarm description.
Table 4. Information of the alarm
Field Description
Time Absolute time since the alarm appeared
Node label Node label of the node where the alarm occurred
UEI OpenNMS Horizon Unique Event Identifier for this alarm
The Alarms Dashlet can be configured with the following parameters.
Boost support Boosted Severity
Configuration Criteria Builder
Charts
This Dashlet displays an existing Chart.
Boost support false
Chart Name of the existing chart to display
Maximize Width Rescale the image to fill display width
Maximize Height Rescale the image to fill display height
12

Grafana
This Dashlet shows a Grafana Dashboard for a given time range. The Grafana Dashboard Boxconfiguration defined in the opennms.properties file is used to access the Grafana instance.
Boost support false
title Title of the Grafana dashboard to be displayed
uri URI to the Grafana Dashboard to be displayed
from Start of time range
to End of time range
Image
This Dashlet displays an image by a given URL.
Boost support false
imageUrl URL with the location of the image to show in this Dashlet
maximizeHeight Rescale the image to fill display width
maximizeWidth Rescale the image to fill display height
KSC
This Dashlet shows an existing KSC report. The view is exact the same as the KSC report is buildregarding order, columns and time spans.
Boost support false
KSC-Report Name of the KSC report to show in this Dashlet
Map
This Dashlet displays the geographical map.
Boostsupport
false
search Predefined search for a subset of nodes shown in the geographical map in thisDashlet
RRD
This Dashlet shows one or multiple RRD graphs. It is possible to arrange and order the RRD graphsin multiple columns and rows. All RRD graphs are normalized with a given width and height.
Boost support false
Columns Number of columns within the Dashlet
13

Rows Number of rows with the Dashlet
KSC Report Import RRD graphs from an existing KSC report and re-arrange them.
Graph Width Generic width for all RRD graphs in this Dashlet
Graph Height Generic height for all RRD graphs in this Dashlet
Timeframe value Number of the given Timeframe type
Timeframe type Minute, Hour, Day, Week, Month and Year for all RRD graphs
RTC
This Dashlet shows the configured SLA categories from the OpenNMS Horizon start page.
Boost support false
- -
Summary
This Dashlet shows a trend of incoming alarms in given time frame.
Boost support Boosted Severity
timeslot Time slot in seconds to evaluate the trend for alarms by severity and UEI.
Surveillance
This Dashlet shows a given Surveillance View.
Boost support false
viewName Name of the configured Surveillance View
Topology
This Dashlet shows a Topology Map. The Topology Map can be configured with the followingparameter.
Boost support false
focusNodes Which node(s) is in focus for the topology
provider Which topology should be displayed, e.g. Linkd, VMware
szl Set the zoom level for the topology
URL
This Dashlet shows the content of a web page or other web application, e.g. other monitoringsystems by a given URL.
14

Boost support false
password Optional password if a basic authentication is required
url URL to the web application or web page
username Optional username if a basic authentication is required
3.2.3. Boosting Dashlet
The behavior to boost a Dashlet describes the behavior of a Dashlet showing critical monitoringinformation. It can raise the priority in the Ops Board rotation to indicate a problem. This behaviorcan be configured with the configuration parameter Boost Priority and Boost Duration. These toconfiguration parameter effect the behavior on the Ops Board in rotation.
• Boost Priority: Absolute priority of the Dashlet with critical monitoring information.
• Boost Duration: Absolute duration in seconds of the Dashlet with critical monitoringinformation.
3.2.4. Criteria Builder
The Criteria Builder is a generic component to filter information of a Dashlet. Some Dashlets use thiscomponent to filter the shown information on a Dashlet for certain use case. It is possible tocombine multiple Criteria to display just a subset of information in a given Dashlet.
Table 5. Generic Criteria Builder configuration possibilities
Restriction
Property Value1
Value2
Description
Asc - - - ascending order
Desc - - - descending order
Between databaseattribute
String String Subset of data between value 1 and value 2
Contains databaseattribute
String - Select all data which contains a given text string in a givendatabase attribute
Distinct databaseattribute
- - Select a single instance
Eq databaseattribute
String - Select data where attribute equals (==) a given text string
Ge databaseattribute
String - Select data where attribute is greater equals than (>=) agiven text value
Gt databaseattribute
String - Select data where attribute is greater than (>) a given textvalue
Ilike databaseattribute
String - unknown
15

Restriction
Property Value1
Value2
Description
In databaseattribute
String - unknown
Iplike databaseattribute
String - Select data where attribute matches an given IPLIKEexpression
IsNull databaseattribute
- - Select data where attribute is null
IsNotNull
databaseattribute
- - Select data where attribute is not null
IsNotNull
databaseattribute
- - Select data where attribute is not null
Le databaseattribute
String - Select data where attribute is less equals than (⇐) a giventext value
Lt databaseattribute
String - Select data where attribute is less than (<) a given textvalue
Le databaseattribute
String - Select data where attribute is less equals than (⇐) a giventext value
Like databaseattribute
String - Select data where attribute is like a given text valuesimilar to SQL like
Limit - Integer
- Limit the result set by a given number
Ne databaseattribute
String - Select data where attribute is not equals (!=) a given textvalue
Not databaseattribute
String - unknown difference between Ne
OrderBy databaseattribute
- - Order the result set by a given attribute
3.3. JMX Configuration GeneratorOpenNMS Horizon implements the JMX protocol to collect long term performance data for Javaapplications. There are a huge variety of metrics available and administrators have to select whichinformation should be collected. The JMX Configuration Generator Tools is build to help generatingvalid complex JMX data collection configuration and RRD graph definitions for OpenNMS Horizon.
This tool is available as CLI and a web based version.
3.3.1. Web based utility
Complex JMX data collection configurations can be generated from a web based tool. It collects allavailable MBean Attributes or Composite Data Attributes from a JMX enabled Java application.
16

The workflow of the tool is:
1. Connect with JMX or JMXMP against a MBean Server provided of a Java application
2. Retrieve all MBean and Composite Data from the application
3. Select specific MBeans and Composite Data objects which should be collected by OpenNMSHorizon
4. Generate JMX Collectd configuration file and RRD graph definitions for OpenNMS Horizon asdownloadable archive
The following connection settings are supported:
• Ability to connect to MBean Server with RMI based JMX
• Authentication credentials for JMX connection
• Optional: JMXMP connection
The web based configuration tool can be used in the OpenNMS Horizon Web Application inadministration section Admin → JMX Configuration Generator.
Configure JMX Connection
At the beginning the connection to an MBean Server of a Java application has to be configured.
Figure 6. JMX connection configuration window
• Service name: The name of the service to bind the JMX data collection for Collectd
• Host: IP address or FQDN connecting to the MBean Server to load MBeans and Composite Datainto the generation tool
• Port: Port to connect to the MBean Server
• Authentication: Enable / Disable authentication for JMX connection with username and
17

password
• Skip non-number values: Skip attributes with non-number values
• JMXMP: Enable / Disable JMX Messaging Protocol instead of using JMX over RMI
By clicking the arrow ( > ) the MBeans and Composite Data will be retrieved with the givenconnection settings. The data is loaded into the MBeans Configuration screen which allows to selectmetrics for the data collection configuration.
Select MBeans and Composite
The MBeans Configuration section is used to assign the MBean and Composite Data attributes to RRDdomain specific data types and data source names.
Figure 7. Select MBeans or Composite Data for OpenNMS Horizon data collection
The left sidebar shows the tree with the JMX Domain, MBeans and Composite Data hierarchyretrieved from the MBean Server. To select or deselect all attributes use Mouse right click →select/deselect.
The right panel shows the MBean Attributes with the RRD specific mapping and allows to select ordeselect specific MBean Attriubtes or Composite Data Attributes for the data collectionconfiguration.
18
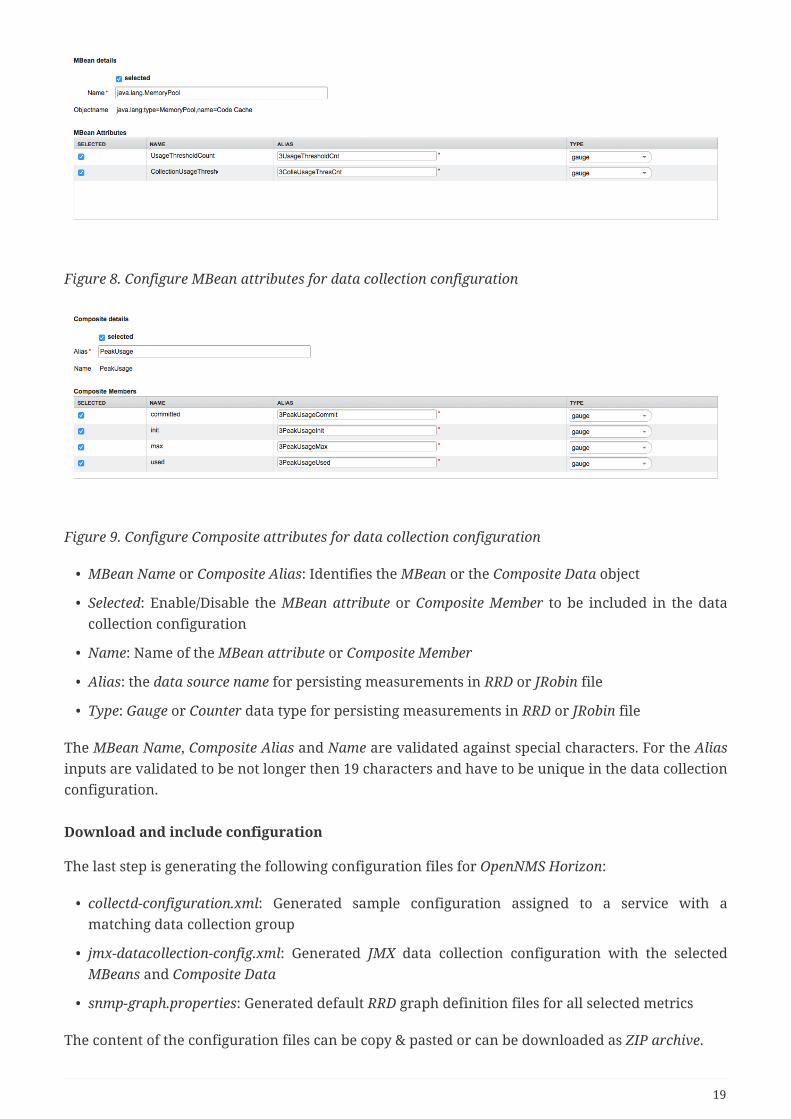
Figure 8. Configure MBean attributes for data collection configuration
Figure 9. Configure Composite attributes for data collection configuration
• MBean Name or Composite Alias: Identifies the MBean or the Composite Data object
• Selected: Enable/Disable the MBean attribute or Composite Member to be included in the datacollection configuration
• Name: Name of the MBean attribute or Composite Member
• Alias: the data source name for persisting measurements in RRD or JRobin file
• Type: Gauge or Counter data type for persisting measurements in RRD or JRobin file
The MBean Name, Composite Alias and Name are validated against special characters. For the Aliasinputs are validated to be not longer then 19 characters and have to be unique in the data collectionconfiguration.
Download and include configuration
The last step is generating the following configuration files for OpenNMS Horizon:
• collectd-configuration.xml: Generated sample configuration assigned to a service with amatching data collection group
• jmx-datacollection-config.xml: Generated JMX data collection configuration with the selectedMBeans and Composite Data
• snmp-graph.properties: Generated default RRD graph definition files for all selected metrics
The content of the configuration files can be copy & pasted or can be downloaded as ZIP archive.
19

If the content of the configuration file exceeds 2,500 lines, the files can only bedownloaded as ZIP archive.
3.3.2. CLI based utility
The command line (CLI) based tool is not installed by default. It is available as Debian and RPMpackage in the official repositories.
Installation
RHEL based installation with Yum
yum install opennms-jmx-config-generator
Debian based installation with apt
apt-get install opennms-jmx-config-generator
Installation from source
It is required to have the Java 8 Development Kit with Apache Maven installed. The mvn binary has tobe in the path environment. After cloning the repository you have to enter the source folder andcompile an executable JAR.
cd opennms/features/jmx-config-generatormvn package
Inside the newly created target folder a file named jmxconfiggenerator-<VERSION>-onejar.jar ispresent. This file can be invoked by:
java -jar target/jmxconfiggenerator-22.0.3-onejar.jar
Usage
After installing the the JMX Config Generator the tool’s wrapper script is located in the$OPENNMS_HOME/bin directory.
$ cd /path/to/opennms/bin$ ./jmx-config-generator
When invoked without parameters the usage and help information is printed.
The JMX Config Generator uses sub-commands for the different configuration generation tasks.Each of these sub-commands provide different options and parameters. The command line toolaccepts the following sub-commands.
20

Sub-command
Description
query Queries a MBean Server for certain MBeans and attributes.
generate-conf
Generates a valid jmx-datacollection-config.xml file.
generate-graph
Generates a RRD graph definition file with matching graph definitions for a givenjmx-datacollection-config.xml.
The following global options are available in each of the sub-commands of the tool:
Option/Argument
Description Default
-h (--help) Show help and usage information. false
-v (--verbose) Enables verbose mode for debugging purposes. false
Sub-command: query
This sub-command is used to query a MBean Server for it’s available MBean objects. The followingexample queries the server myserver with the credentials myusername/mypassword on port 7199 forMBean objects in the java.lang domain.
./jmx-config-generator query --host myserver --username myusername --passwordmypassword --port 7199 "java.lang:*"java.lang:type=ClassLoading description: Information on the management interface of the MBean class name: sun.management.ClassLoadingImpl attributes: (5/5) TotalLoadedClassCount id: java.lang:type=ClassLoading:TotalLoadedClassCount description: TotalLoadedClassCount type: long isReadable: true isWritable: false isIs: false LoadedClassCount id: java.lang:type=ClassLoading:LoadedClassCount description: LoadedClassCount type: int isReadable: true isWritable: false isIs: false
<output omitted>
The following command line options are available for the query sub-command.
21

Option/Argument Description Default
<filter criteria> A filter criteria to query the MBean Server for. The format is<objectname>[:attribute name]. The <objectname> accepts the defaultJMX object name pattern to identify the MBeans to be retrieved. If nullall domains are shown. If no key properties are specified, the domain’sMBeans are retrieved. To execute for certain attributes, you have toadd :<attribute name>. The <attribute name> accepts regularexpressions. When multiple <filter criteria> are provided they areOR concatenated.
-
--host <host> Hostname or IP address of the remote JMX host. -
--ids-only Only show the ids of the attributes. false
--ignore <filtercriteria>
Set <filter criteria> to ignore while running. -
--include-values Include attribute values. false
--jmxmp Use JMXMP and not JMX over RMI. false
--password<password>
Password for JMX authentication. -
--port <port> Port of JMX service. -
--show-domains Only lists the available domains. true
--show-empty Includes MBeans, even if they do not have attributes. Either due to the<filter criteria> or while there are none.
false
--url <url> Custom connection URL<hostname>:<port>service:jmx:<protocol>:<sap>service:jmx:remoting-jmx://<hostname>:<port>
-
--username<username>
Username for JMX authentication. -
-h (--help) Show help and usage information. false
-v (--verbose) Enables verbose mode for debugging purposes. false
Sub-command: generate-conf
This sub-command can be used to generate a valid jmx-datacollection-config.xml for a given set ofMBean objects queried from a MBean Server.
The following example generate a configuration file myconfig.xml for MBean objects in the java.langdomain of the server myserver on port 7199 with the credentials myusername/mypassword. You have todefine either an URL or a hostname and port to connect to a JMX server.
jmx-config-generator generate-conf --host myserver --username myusername --passwordmypassword --port 7199 "java.lang:*" --output myconfig.xmlDictionary entries loaded: '18'
22

The following options are available for the generate-conf sub-command.
Option/Argument
Description Default
<attribute id> A list of attribute Ids to be included for the generation of theconfiguration file.
-
--dictionary<file>
Path to a dictionary file for replacing attribute names and part ofMBean attributes. The file should have for each line a replacement, e.g.Auxillary:Auxil.
-
--host <host> Hostname or IP address of JMX host. -
--jmxmp Use JMXMP and not JMX over RMI. false
--output <file> Output filename to write generated jmx-datacollection-config.xml. -
--password<password>
Password for JMX authentication. -
--port <port> Port of JMX service -
--print-dictionary
Prints the used dictionary to STDOUT. May be used with --dictionary false
--service<value>
The Service Name used as JMX data collection name. anyservice
--skipDefaultVM Skip default JavaVM Beans. false
--skipNonNumber Skip attributes with non-number values false
--url <url> Custom connection URL<hostname>:<port>service:jmx:<protocol>:<sap>service:jmx:remoting-jmx://<hostname>:<port>
-
--username<username>
Username for JMX authentication -
-h (--help) Show help and usage information. false
-v (--verbose) Enables verbose mode for debugging purposes. false
The option --skipDefaultVM offers the ability to ignore the MBeans provided asstandard by the JVM and just create configurations for the MBeans provided by theJava Application itself. This is particularly useful if an optimized configuration forthe JVM already exists. If the --skipDefaultVM option is not set the generatedconfiguration will include the MBeans of the JVM and the MBeans of the JavaApplication.
Check the file and see if there are alias names with more than 19 characters. Thiserrors are marked with NAME_CRASH_AS_19_CHAR_VALUE
23

Sub-command: generate-graph
This sub-command generates a RRD graph definition file for a given configuration file. Thefollowing example generates a graph definition file mygraph.properties using the configuration infile myconfig.xml.
./jmx-config-generator generate-graph --input myconfig.xml --output mygraph.propertiesreports=java.lang.ClassLoading.MBeanReport, \java.lang.ClassLoading.0TotalLoadeClassCnt.AttributeReport, \java.lang.ClassLoading.0LoadedClassCnt.AttributeReport, \java.lang.ClassLoading.0UnloadedClassCnt.AttributeReport, \java.lang.Compilation.MBeanReport, \<output omitted>
The following options are available for this sub-command.
Option/Argument Description Default
--input <jmx-datacollection.xml>
Configuration file to use as input to generate the graph propertiesfile
-
--output <file> Output filename for the generated graph properties file. -
--print-template Prints the default template. false
--template <file> Template file using Apache Velocity template engine to be used togenerate the graph properties.
-
-h (--help) Show help and usage information. false
-v (--verbose) Enables verbose mode for debugging purposes. false
Graph Templates
The JMX Config Generator uses a template file to generate the graphs. It is possible to use a user-defined template. The option --template followed by a file lets the JMX Config Generator use theexternal template file as base for the graph generation. The following example illustrates how acustom template mytemplate.vm is used to generate the graph definition file mygraph.properties usingthe configuration in file myconfig.xml.
./jmx-config-generator generate-graph --input myconfig.xml --output mygraph.properties--template mytemplate.vm
The template file has to be an Apache Velocity template. The following sample represents thetemplate that is used by default:
24

reports=#foreach( $report in $reportsList )$report.id#if( $foreach.hasNext ), \#end#end
#foreach( $report in $reportsBody )
#[[###########################################]]##[[##]]# $report.id#[[###########################################]]#report.$report.id.name=$report.namereport.$report.id.columns=$report.graphResourcesreport.$report.id.type=interfaceSnmpreport.$report.id.command=--title="$report.title" \ --vertical-label="$report.verticalLabel" \#foreach($graph in $report.graphs ) DEF:$graph.id=rrd$foreach.count:$graph.resourceName:AVERAGE \ AREA:$graph.id#$graph.coloreB \ LINE2:$graph.id#$graph.coloreA:"$graph.description" \ GPRINT:$graph.id:AVERAGE:" Avg \\: %8.2lf %s" \ GPRINT:$graph.id:MIN:" Min \\: %8.2lf %s" \ GPRINT:$graph.id:MAX:" Max \\: %8.2lf %s\\n" \#end
#end
The JMX Config Generator generates different types of graphs from the jmx-datacollection-config.xml. The different types are listed below:
Type Description
AttributeReport For each attribute of any MBean a graph will be generated. Compositeattributes will be ignored.
MbeanReport For each MBean a combined graph with all attributes of the MBeans isgenerated. Composite attributes will be ignored.
CompositeReport For each composite attribute of every MBean a graph is generated.
CompositeAttributeReport
For each composite member of every MBean a combined graph with allcomposite attributes is generated.
3.4. HeatmapThe Heatmap can be either be used to display unacknowledged alarms or to display ongoingoutages of nodes. Each of this visualizations can be applied on categories, foreign sources orservices of nodes. The sizing of an entity is calculated by counting the services inside the entity.Thus, a node with fewer services will appear in a smaller box than a node with more services.
The feature is by default deactivated and is configured through opennms.properties.
25

Heatmap visualizations of alarms
Table 6. Heatmap dashboard configuration properties
Name Type Description Default
org.opennms.heatmap.defaultMode
String
There exist two options for using the heatmap: alarmsand outages. This option configures which aredisplayed per default.
alarms
org.opennms.heatmap.defaultHeatmap
String
This option defines which Heatmap is displayed bydefault. Valid options are categories, foreignSourcesand monitoredServices.
categories
org.opennms.heatmap.categoryFilter
String
The following option is used to filter for categories tobe displayed in the Heatmap. This option uses the Javaregular expression syntax. The default is .* so allcategories will be displayed.
.*
org.opennms.heatmap.foreignSourceFilter
String
The following option is used to filter for foreignsources to be displayed in the Heatmap. This optionuses the Java regular expression syntax. The default is.* so all foreign sources will be displayed.
.*
org.opennms.heatmap.serviceFilter
String
The following option is used to filter for services to bedisplayed in the Heatmap. This option uses the Javaregular expression syntax. The default is .* so allservices will be displayed.
.*
org.opennms.heatmap.onlyUnacknowledged
Boolean
This option configures whether only unacknowledgedalarms will be taken into account when generatingthe alarm-based version of the Heatmap.
false
org.opennms.web.console.centerUrl
String
You can also place the Heatmap on the landing pageby setting this option to /heatmap/heatmap-box.jsp.
/surveillance-box.jsp
You can use negative lookahead expressions for excluding categories you wish notto be displayed in the heatmap, e.g. by using an expression like ^(?!XY).* you canfilter out entities with names starting with XY.
26

3.5. TrendThe Trend feature allows to display small inline charts of database-based statistics. These chart areaccessible in the Status menu of the OpenNMS' web application. Furthermore it is also possible toconfigure these charts to be displayed on the OpenNMS' landing page. To achieve this alter theorg.opennms.web.console.centerUrl property to also include the entry /trend/trend-box.htm.
Trend chart structure
These charts can be configured and defined in the trend-configuration.xml file in your OpenNMS'etc directory. The following sample defines a Trend chart for displaying nodes with ongoingoutages.
27

Sample Trend chart XML definition for displaying nodes with outages
<trend-definition name="nodes"> <title>Nodes</title> ① <subtitle>w/ Outages</subtitle> ② <visible>true</visible> ③ <icon>glyphicon-fire</icon> ④ <trend-attributes> ⑤ <trend-attribute key="sparkWidth" value="100%"/> <trend-attribute key="sparkHeight" value="35"/> <trend-attribute key="sparkChartRangeMin" value="0"/> <trend-attribute key="sparkLineColor" value="white"/> <trend-attribute key="sparkLineWidth" value="1.5"/> <trend-attribute key="sparkFillColor" value="#88BB55"/> <trend-attribute key="sparkSpotColor" value="white"/> <trend-attribute key="sparkMinSpotColor" value="white"/> <trend-attribute key="sparkMaxSpotColor" value="white"/> <trend-attribute key="sparkSpotRadius" value="3"/> <trend-attribute key="sparkHighlightSpotColor" value="white"/> <trend-attribute key="sparkHighlightLineColor" value="white"/> </trend-attributes> <descriptionLink>outage/list.htm?outtype=current</descriptionLink> ⑥ <description>$intValue[23] NODES WITH OUTAGE(S)</description> ⑦ <query> ⑧ <![CDATA[ select ( select count(distinct nodeid) from outages o, events e where e.eventid = o.svclosteventid and iflostservice < E and (ifregainedservice is null or ifregainedservice > E) ) from ( select now() - interval '1 hour' * (O + 1) AS S, now() - interval '1 hour' * O as E from generate_series(0, 23) as O ) I order by S; ]]> </query> </trend-definition>
① title of the Trend chart, see below for supported variable substitutions
② subtitle of the Trend chart, see below for supported variable substitutions
③ defines whether the chart is visible by default
28

④ icon for the chart, see Glyphicons for viable options
⑤ options for inline chart, see jQuery Sparklines for viable options
⑥ the description link
⑦ the description text, see below for supported variable substitutions
⑧ the SQL statement for querying the chart’s values
Don’t forget to limit the SQL query’s return values!
It is possible to use values or aggregated values in the title, subtitle and description fields. Thefollowing table describes the available variable substitutions.
Table 7. Variables usable in definition’s title, subtitle and description fields
Name Type Description
$intMax Integer integer maximum value
$doubleMax Double maximum value
$intMin Integer integer minimum value
$doubleMin Double minimum value
$intAvg Integer integer average value
$doubleAvg Double average value
$intSum Integer integer sum of values
$doubleSum Double sum of value
$intValue[] Integer array of integer result values for the given SQL query
$doubleValue[] Double array of result values for the given SQL query
$intValueChange[] Integer array of integer value changes for the given SQL query
$doubleValueChange[] Double array of value changes for the given SQL query
$intLastValue Integer last integer value
$doubleLastValue Double last value
$intLastValueChange Integer last integer value change
$doubleLastValueChange Double last value change
You can also display a single graph in your JSP files by including the file /trend/single-trend-box.jsp and specifying the name parameter.
Sample JSP snippet to include a single Trend chart with name 'example'
<jsp:include page="/trend/single-trend-box.jsp" flush="false"> <jsp:param name="name" value="example"/></jsp:include>
29

Chapter 4. Service AssuranceIn OpenNMS Horizon the daemon to measures service availability and latency is done by Pollerd. Torun these tests Service Monitors are scheduled and run in parallel in a Thread Pool. The behavior ofPollerd uses the following files for configuration and logging. Functionalities and general conceptsare described in the User Documentation of OpenNMS. This section describes how to configurePollerd for service assurance with all available Service Monitors coming with OpenNMS.
4.1. Pollerd ConfigurationTable 8. Configuration and log files related to Pollerd.
File Description
$OPENNMS_HOME/etc/poller-configuration.xml
Configuration file for monitors and global daemonconfiguration
$OPENNMS_HOME/logs/poller.log Log file for all monitors and the global Pollerd
$OPENNMS_HOME/etc/response-graph.properties
RRD graph definitions for service response timemeasurements
$OPENNMS_HOME/etc/events/opennms.events.xml
Event definitions for Pollerd, i.e. nodeLostService,interfaceDown or nodeDown
To change the behavior for service monitoring, the poller-configuration.xml can be modified. Theconfiguration file is structured in the following parts:
• Global daemon config: Define the size of the used Thread Pool to run Service Monitors in parallel.Define and configure the Critical Service for Node Event Correlation.
• Polling packages: Package to allow grouping of configuration parameters for Service Monitors.
• Downtime Model: Configure the behavior of Pollerd to run tests in case of an Outage is detected.
• Monitor service association: Based on the name of the service, the implementation forapplication or network management protocols are assigned.
Global configuration parameters for Pollerd
<poller-configuration threads="30" ① pathOutageEnabled="false" ② serviceUnresponsiveEnabled="false"> ③
① Size of the Thread Pool to run Service Monitors in parallel
② Enable or Disable Path Outage functionality based on a Critical Node in a network path
③ In case of unresponsive service services a serviceUnresponsive event is generated and not anoutage. It prevents to apply the Downtime Model to retest the service after 30 seconds andprevents false alarms.
Configuration changes are applied by restarting OpenNMS and Pollerd. It is also possible to send anEvent to Pollerd reloading the configuration. An Event can be sent on the CLI or the Web User
30

Interface.
Send configuration reload event on CLI
cd $OPENNMS_HOME/bin./send-event.pl uei.opennms.org/internal/reloadDaemonConfig --parm 'daemonNamePollerd'
Figure 10. Send configuration reload event with the Web User Interface
31

If you define new services in poller-configuration.xml a service restart ofOpenNMS is necessary.
4.2. Critical ServiceThe Critical Service is used to correlate outages from Services to a nodeDown or interfaceDownevent. It is a global configuration of Pollerd defined in poller-configuration.xml. The OpenNMSdefault configuration enables this behavior.
Critical Service Configuration in Pollerd
<poller-configuration threads="30" pathOutageEnabled="false" serviceUnresponsiveEnabled="false">
<node-outage status="on" ① pollAllIfNoCriticalServiceDefined="true"> ② <critical-service name="ICMP" /> ③ </node-outage>
① Enable Node Outage correlation based on a Critical Service
② Optional: In case of nodes without a Critical Service this option controls the behavior. If set totrue then all services will be polled. If set to false then the first service in the package that existson the node will be polled until service is restored, and then polling will resume for all services.
③ Define Critical Service for Node Outage correlation
4.3. Downtime ModelBy default the monitoring interval for a service is 5 minutes. To detect also short services outages,caused for example by automatic network rerouting, the downtime model can be used. On adetected service outage, the interval is reduced to 30 seconds for 5 minutes. If the service comesback within 5 minutes, a shorter outage is documented and the impact on service availability canbe less than 5 minutes. This behavior is called Downtime Model and is configurable.
Figure 11. Downtime model with resolved and ongoing outage
32

In figure Outages and Downtime Model there are two outages. The first outage shows a shortoutage which was detected as up after 90 seconds. The second outage is not resolved now and themonitor has not detected an available service and was not available in the first 5 minutes (10 times30 second polling). The scheduler changed the polling interval back to 5 minutes.
Example default configuration of the Downtime Model
<downtime interval="30000" begin="0" end="300000" /><!-- 30s, 0, 5m -->①<downtime interval="300000" begin="300000" end="43200000" /><!-- 5m, 5m, 12h -->②<downtime interval="600000" begin="43200000" end="432000000" /><!-- 10m, 12h, 5d -->③<downtime interval="3600000" begin="432000000" /><!-- 1h, 5d -->④
① from 0 seconds after an outage is detected until 5 minutes the polling interval will be set to 30seconds
② after 5 minutes of an ongoing outage until 12 hours the polling interval will be set to 5 minutes
③ after 12 hours of an ongoing outage until 5 days the polling interval will be set to 10 minutes
④ after 5 days of an ongoing outage the service will polled only once a hour
4.4. Path OutagesTo reduce the amount of alarms and notifications a Path Outage can be configured. Thisfunctionality is used to suppress Notifications based on the node depending on each other in thenetwork path. The dependency is modeled in the Node Provisioning in Path Outage.
By default the Path Outage feature is disabled and has to be enabled in thepollerd-configuration.xml.
It requires the following information:
• Parent Foreign Source: The Foreign Source where the parent node is defined.
• Parent Foreign ID: The Foreign ID of the parent Node where this node depends on.
• The IP Interface selected as Primary is used as Critical IP
Additionally it is possible to define generic rules for Path Outages. For example there is a whole IPSubnet behind a Router and this Router is the Critical Path to this IP Subnet.
The configuration can be made in Admin → Configure Notifications → Configure Path Outages. Itrequires to specify a Critical IP of the Router and allows to specify the IP Subnet by defining aRule/Filter. They are specified in Rules/Filters in the OpenNMS Wiki. In this case, the Router with allNodes on the IP Subnet are down, but only one Notification is sent. All other Node Downnotifications are suppressed matching the Rule/Filter defined in the Path Outage.
33
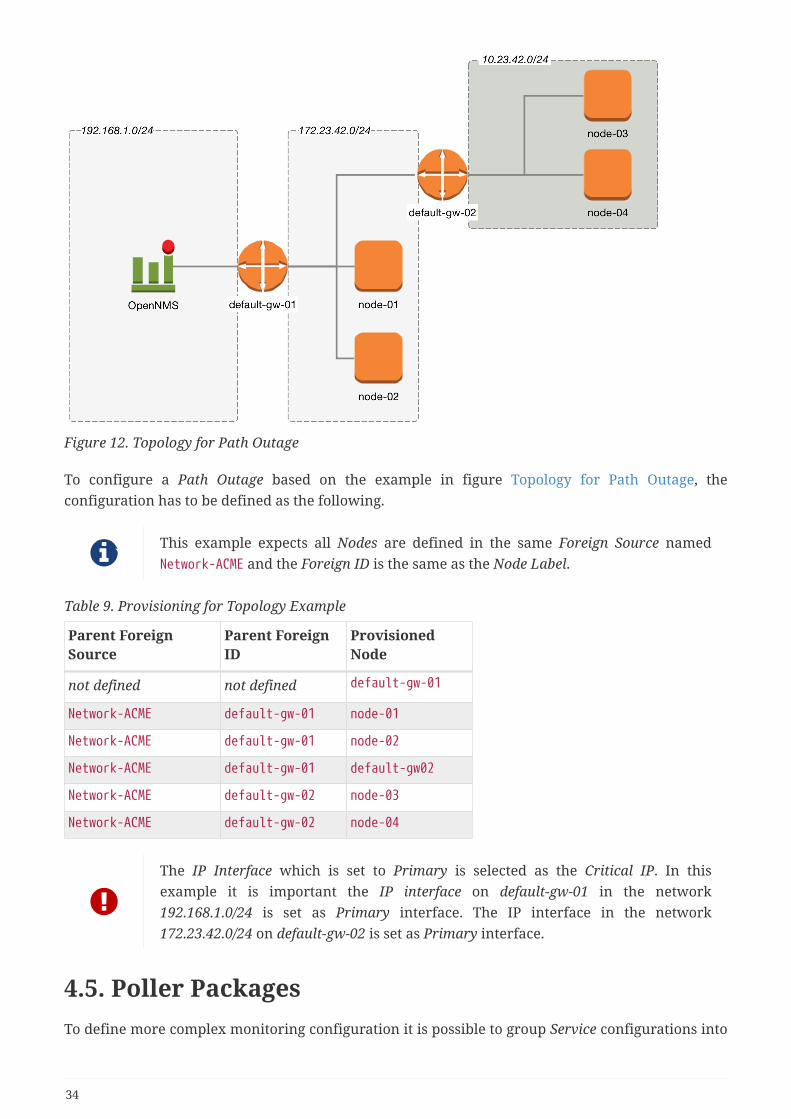
Figure 12. Topology for Path Outage
To configure a Path Outage based on the example in figure Topology for Path Outage, theconfiguration has to be defined as the following.
This example expects all Nodes are defined in the same Foreign Source namedNetwork-ACME and the Foreign ID is the same as the Node Label.
Table 9. Provisioning for Topology Example
Parent ForeignSource
Parent ForeignID
ProvisionedNode
not defined not defined default-gw-01
Network-ACME default-gw-01 node-01
Network-ACME default-gw-01 node-02
Network-ACME default-gw-01 default-gw02
Network-ACME default-gw-02 node-03
Network-ACME default-gw-02 node-04
The IP Interface which is set to Primary is selected as the Critical IP. In thisexample it is important the IP interface on default-gw-01 in the network192.168.1.0/24 is set as Primary interface. The IP interface in the network172.23.42.0/24 on default-gw-02 is set as Primary interface.
4.5. Poller PackagesTo define more complex monitoring configuration it is possible to group Service configurations into
34

Polling Packages. They allow to assign to Nodes different Service Configurations. To assign a PollingPackage to nodes the Rules/Filters syntax can be used. Each Polling Package can have its ownDowntime Model configuration.
Multiple packages can be configured, and an interface can exist in more than one package. Thisgives great flexibility to how the service levels will be determined for a given device.
Polling package assigned to Nodes with Rules and Filters
<package name="example1">① <filter>IPADDR != '0.0.0.0'</filter>② <include-range begin="1.1.1.1" end="254.254.254.254" />③ <include-range begin="::1" end="ffff:ffff:ffff:ffff:ffff:ffff:ffff:ffff" />③
① Unique name of the polling package.
② Filter can be based on IP address, categories or asset attributes of Nodes based on Rules/Filters.The filter is evaluated first and is required. This package is used for all IP Interfaces which don’thave 0.0.0.0 as an assigned IP address and is required.
③ Allow to specify if the configuration of Services is applied on a range of IP Interfaces (IPv4 orIPv6).
Instead of the include-range it is possible to add one or more specific IP-Interfaces with:
Defining a specific IP Interfaces
<specific>192.168.1.59</specific>
It is also possible to exclude IP Interfaces with:
Exclude IP Interfaces
<exclude-range begin="192.168.0.100" end="192.168.0.104"/>
4.5.1. Response Time Configuration
The definition of Polling Packages allows to configure similar services with different pollingintervals. All the response time measurements are persisted in RRD Files and require a definition.Each Polling Package contains a RRD definition
35

RRD configuration for Polling Package example1
<package name="example1"> <filter>IPADDR != '0.0.0.0'</filter> <include-range begin="1.1.1.1" end="254.254.254.254" /> <include-range begin="::1" end="ffff:ffff:ffff:ffff:ffff:ffff:ffff:ffff" /> <rrd step="300">① <rra>RRA:AVERAGE:0.5:1:2016</rra>② <rra>RRA:AVERAGE:0.5:12:1488</rra>③ <rra>RRA:AVERAGE:0.5:288:366</rra>④ <rra>RRA:MAX:0.5:288:366</rra>⑤ <rra>RRA:MIN:0.5:288:366</rra>⑥</rrd>
① Polling interval for all services in this Polling Package is reflected in the step of size 300 seconds.All services in this package have to polled in 5 min interval, otherwise response timemeasurements are not correct persisted.
② 1 step size is persisted 2016 times: 1 * 5 min * 2016 = 7 d, 5 min accuracy for 7 d.
③ 12 steps average persisted 1488 times: 12 * 5 min * 1488 = 62 d, aggregated to 60 min for 62 d.
④ 288 steps average persisted 366 times: 288 * 5 min * 366 = 366 d, aggregated to 24 h for 366 d.
⑤ 288 steps maximum from 24 h persisted for 366 d.
⑥ 288 steps minimum from 24 h persisted for 366 d.
The RRD configuration and the service polling interval has to be aligned. In othercases the persisted response time data is not correct displayed in the response timegraph.
If the polling interval is changed afterwards, existing RRD files needs to berecreated with the new definitions.
4.5.2. Overlapping Services
With the possibility of specifying multiple Polling Packages it is possible to use the same Service likeICMP multiple times. The order how Polling Packages in the poller-configuration.xml are defined isimportant when IP Interfaces match multiple Polling Packages with the same Service configuration.
The following example shows which configuration is applied for a specific service:
36

Overwriting
<package name="less-specific"> <filter>IPADDR != '0.0.0.0'</filter> <include-range begin="1.1.1.1" end="254.254.254.254" /> <include-range begin="::1" end="ffff:ffff:ffff:ffff:ffff:ffff:ffff:ffff" /> <rrd step="300">① <rra>RRA:AVERAGE:0.5:1:2016</rra> <rra>RRA:AVERAGE:0.5:12:1488</rra> <rra>RRA:AVERAGE:0.5:288:366</rra> <rra>RRA:MAX:0.5:288:366</rra> <rra>RRA:MIN:0.5:288:366</rra> </rrd> <service name="ICMP" interval="300000" user-defined="false" status="on">② <parameter key="retry" value="5" />③ <parameter key="timeout" value="10000" />④ <parameter key="rrd-repository" value="/var/lib/opennms/rrd/response" /> <parameter key="rrd-base-name" value="icmp" /> <parameter key="ds-name" value="icmp" /> </service> <downtime interval="30000" begin="0" end="300000" /> <downtime interval="300000" begin="300000" end="43200000" /> <downtime interval="600000" begin="43200000" end="432000000" /></package>
<package name="more-specific"> <filter>IPADDR != '0.0.0.0'</filter> <include-range begin="192.168.1.1" end="192.168.1.254" /> <include-range begin="2600::1" end="2600:::ffff" /> <rrd step="30">① <rra>RRA:AVERAGE:0.5:1:20160</rra> <rra>RRA:AVERAGE:0.5:12:14880</rra> <rra>RRA:AVERAGE:0.5:288:3660</rra> <rra>RRA:MAX:0.5:288:3660</rra> <rra>RRA:MIN:0.5:288:3660</rra> </rrd> <service name="ICMP" interval="30000" user-defined="false" status="on">② <parameter key="retry" value="2" />③ <parameter key="timeout" value="3000" />④ <parameter key="rrd-repository" value="/var/lib/opennms/rrd/response" /> <parameter key="rrd-base-name" value="icmp" /> <parameter key="ds-name" value="icmp" /> </service> <downtime interval="10000" begin="0" end="300000" /> <downtime interval="300000" begin="300000" end="43200000" /> <downtime interval="600000" begin="43200000" end="432000000" /></package>
① Polling interval in the packages are 300 seconds and 30 seconds
② Different polling interval for the service ICMP
37

③ Different retry settings for the service ICMP
④ Different timeout settings for the service ICMP
The last Polling Package on the service will be applied. This can be used to define a less specificcatch all filter for a default configuration. A more specific Polling Package can be used to overwritethe default setting. In the example above all IP Interfaces in 192.168.1/24 or 2600:/64 will bemonitored with ICMP with different polling, retry and timeout settings.
Which Polling Packages are applied to the IP Interface and Service can be found in the Web UserInterface. The IP Interface and Service page show which Polling Package and Service configuration isapplied for this specific service.
Figure 13. Polling Package applied to IP interface and Service
4.5.3. Test Services on manually
For troubleshooting it is possible to run a test via the Karaf Shell:
ssh -p 8101 admin@localhost
Once in the shell, you can print show the commands help as follows:
38

opennms> poller:test --helpDESCRIPTION poller:test
Execute a poller test from the command line using current settings frompoller-configuration.xml
SYNTAX poller:test [options]
OPTIONS -s, --service Service name -p, --param Service parameter ~ key=value -i, --ipaddress IP Address to test -P, --package Poller Package -c, --class Monitor Class --help Display this help message
The following example runs the ICMP monitor on a specific IP Interface.
Run ICMP monitor configuration defined in specific Polling Package
opennms> poller:test -i 10.23.42.1 -s ICMP -P example1
The output is verbose which allows debugging of Monitor configurations. Important output linesare shown as the following:
Important output testing a service on the CLI
Checking service ICMP on IP 10.23.42.1 ①Package: example1 ②Monitor: org.opennms.netmgt.poller.monitors.IcmpMonitor ③Parameter ds-name : icmp ④Parameter rrd-base-name : icmp ④Parameter rrd-repository : /var/lib/opennms/rrd/response ④Parameter retry : 2 ⑤Parameter timeout : 3000 ⑤
Available ? true (status Up[1])
① Service and IP Interface to run the test
② Applied Service configuration from Polling Package for this test
39

③ Service Monitor used for this test
④ RRD configuration for response time measurement
⑤ Retry and timeout settings for this test
4.5.4. Test filters on Karaf Shell
Filters are ubiquitous in opennms configurations with <filter> syntax. This karaf shell can be usedto verify filters. For more info, refer to Filters.
ssh -p 8101 admin@localhost
Once in the shell, print command help as follows
opennms> filters:filter --helpDESCRIPTION filters:filter Enumerates nodes/interfaces that match a give filterSYNTAX filters:filter filterRuleARGUMENTS filterRule A filter Rule
For ex: Run a filter rule that match a location
filters:filter "location='MINION'"
Output is displayed as follows
nodeId=2 nodeLabel=00000000-0000-0000-0000-000000ddba11 location=MINION IpAddresses: 127.0.0.1
Another ex: Run a filter that match a node location and for a given IP Address range. Refer toIPLIKE for more info on using IPLIKE syntax.
filters:filter "location='Default' & (IPADDR IPLIKE 172.*.*.*)"
Output is displayed as follows
40

nodeId=3 nodeLabel=label1 location=Default IpAddresses: 172.10.154.1 172.20.12.12 172.20.2.14 172.01.134.1 172.20.11.15 172.40.12.18
nodeId=5 nodeLabel=label2 location=Default IpAddresses: 172.17.0.111
nodeId=6 nodeLabel=label3 location=Default IpAddresses: 172.20.12.22 172.17.0.123
Node info displayed will have nodeId, nodeLabel, location and optional fileds likeforeignId, foreignSource, categories when they exist.
4.6. Service monitorsTo support several specific applications and management agents, Pollerd executes Service Monitors.This section describes all available built-in Service Monitors which are available and can beconfigured to allow complex monitoring. For information how these can be extended, seeDevelopment Guide of the OpenNMS documentation.
4.6.1. Common Configuration Parameters
Application or Device specific Monitors are based on a generic API which provide commonconfiguration parameters. These minimal configuration parameters are available in all Monitorsand describe the behavior for timeouts, retries, etc.
Table 10. Common implemented configuration parameters
Parameter Description Required
Defaultvalue
retry Number of attempts to test a Service to be up or down. optional 3
timeout Timeout for the isReachable method, in milliseconds. optional 3000
invert-status Invert the up/down behavior of the monitor optional false
In case the Monitor is using the SNMP Protocol the default configuration fortimeout and retry are used from the SNMP Configuration (snmp-config.xml).
41

Minion Configuration Parameters
When nodes are configured with a non-default location, the associated Service Monitors areexecuted on a Minion configured with that same location. If there are many Minions at a givenlocation, the Service Monitor may be executed on any of the Minions that are currently available.Users can choose to execute a Service Monitor on a specific Minion, by specifying the System ID ofthe Minion. This mechanism is used for monitoring the Minions individually.
The following parameters can be used to override this behavior and control where the ServiceMonitors are executed.
Table 11. Minion configuration parameters
Parameter Description Required
Default value
location Specify the location at which the ServiceMonitor should be executed.
optional
(The location of theassociated node)
system-id Specify the System ID on which the ServiceMonitor should be executed
optional
(None)
use-foreign-id-as-system-id
Use the foreign id of the associated node asthe System ID
optional
false
When specifying a System ID the location should also be set to the correspondinglocation for that system.
4.6.2. AvailabilityMonitor
This monitor tests reachability of a node by using the isReachable method of the InetAddress javaclass. The service is considered available if isReachable returns true. See Oracle’s documentationfor more details.
This monitor is deprecated in favour of the IcmpMonitor monitor. You should onlyuse this monitor on remote pollers running on unusual configurations (See belowfor more details).
Monitor facts
Class Name org.opennms.netmgt.poller.monitors.AvailabilityMonitor
Remote Enabled true
Configuration and Usage
This monitor implements the Common Configuration Parameters.
Examples
42
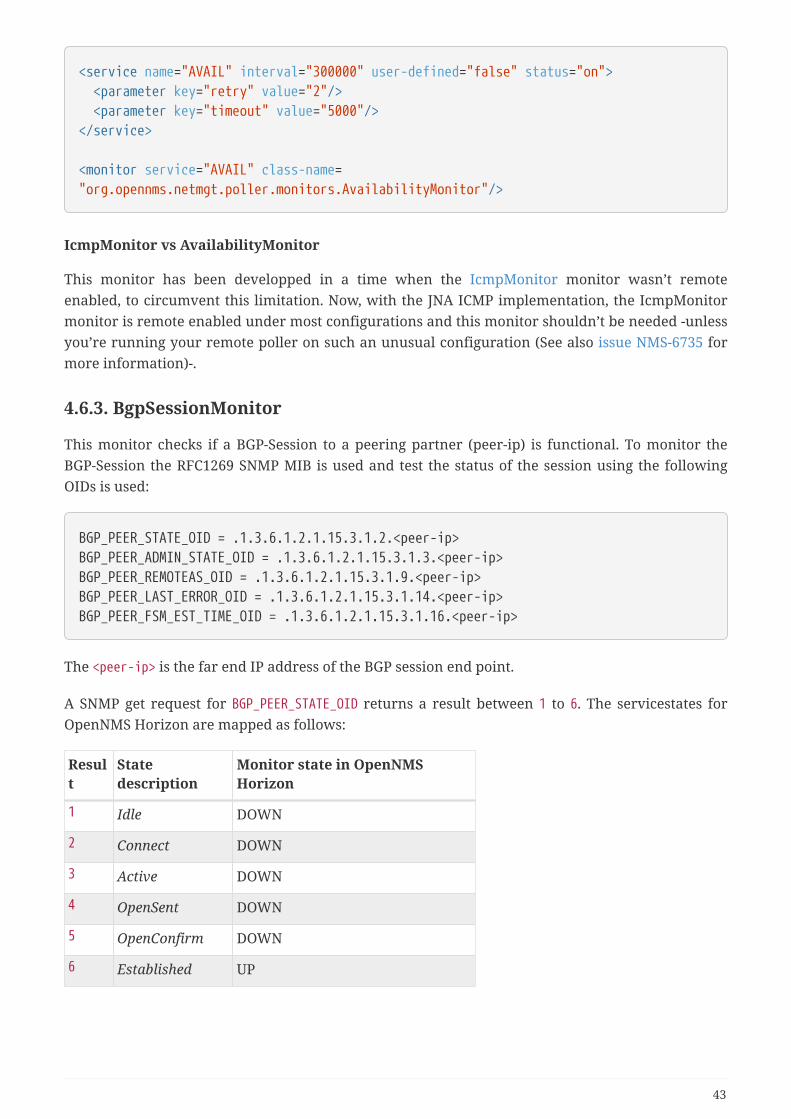
<service name="AVAIL" interval="300000" user-defined="false" status="on"> <parameter key="retry" value="2"/> <parameter key="timeout" value="5000"/></service>
<monitor service="AVAIL" class-name="org.opennms.netmgt.poller.monitors.AvailabilityMonitor"/>
IcmpMonitor vs AvailabilityMonitor
This monitor has been developped in a time when the IcmpMonitor monitor wasn’t remoteenabled, to circumvent this limitation. Now, with the JNA ICMP implementation, the IcmpMonitormonitor is remote enabled under most configurations and this monitor shouldn’t be needed -unlessyou’re running your remote poller on such an unusual configuration (See also issue NMS-6735 formore information)-.
4.6.3. BgpSessionMonitor
This monitor checks if a BGP-Session to a peering partner (peer-ip) is functional. To monitor theBGP-Session the RFC1269 SNMP MIB is used and test the status of the session using the followingOIDs is used:
BGP_PEER_STATE_OID = .1.3.6.1.2.1.15.3.1.2.<peer-ip>BGP_PEER_ADMIN_STATE_OID = .1.3.6.1.2.1.15.3.1.3.<peer-ip>BGP_PEER_REMOTEAS_OID = .1.3.6.1.2.1.15.3.1.9.<peer-ip>BGP_PEER_LAST_ERROR_OID = .1.3.6.1.2.1.15.3.1.14.<peer-ip>BGP_PEER_FSM_EST_TIME_OID = .1.3.6.1.2.1.15.3.1.16.<peer-ip>
The <peer-ip> is the far end IP address of the BGP session end point.
A SNMP get request for BGP_PEER_STATE_OID returns a result between 1 to 6. The servicestates forOpenNMS Horizon are mapped as follows:
Result
Statedescription
Monitor state in OpenNMSHorizon
1 Idle DOWN
2 Connect DOWN
3 Active DOWN
4 OpenSent DOWN
5 OpenConfirm DOWN
6 Established UP
43

Monitor facts
Class Name org.opennms.netmgt.poller.monitors.BgpSessionMonitor
Remote Enabled false
To define the mapping I used the description from RFC1771 BGP Finite State Machine.
Configuration and Usage
Parameter
Description Required
Defaultvalue
bgpPeerIp IP address of the far end BGP peer session required -
This monitor implements the Common Configuration Parameters.
Examples
To monitor the session state Established it is necessary to add a service to your poller configurationin '$OPENNMS_HOME/etc/poller-configuration.xml', for example:
<!-- Example configuration poller-configuration.xml --><service name="BGP-Peer-99.99.99.99-AS65423" interval="300000" user-defined="false" status="on"> <parameter key="retry" value="2" /> <parameter key="timeout" value="3000" /> <parameter key="port" value="161" /> <parameter key="bgpPeerIp" value="99.99.99.99" /></service>
<monitor service="BGP-Peer-99.99.99.99-AS65423" class-name="org.opennms.netmgt.poller.monitors.BgpSessionMonitor" />
Error code mapping
The BGP_PEER_LAST_ERROR_OID gives an error in HEX-code. To make it human readable acodemapping table is implemented:
Errorcode
Error Message
0100 Message Header Error
0101 Message Header Error - Connection Not Synchronized
0102 Message Header Error - Bad Message Length
0103 Message Header Error - Bad Message Type
0200 OPEN Message Error
44

Errorcode
Error Message
0201 OPEN Message Error - Unsupported Version Number
0202 OPEN Message Error - Bad Peer AS
0203 OPEN Message Error - Bad BGP Identifier
0204 OPEN Message Error - Unsupported Optional Parameter
0205 OPEN Message Error (deprecated)
0206 OPEN Message Error - Unacceptable Hold Time
0300 UPDATE Message Error
0301 UPDATE Message Error - Malformed Attribute List
0302 UPDATE Message Error - Unrecognized Well-known Attribute
0303 UPDATE Message Error - Missing Well-known Attribute
0304 UPDATE Message Error - Attribute Flags Error
0305 UPDATE Message Error - Attribute Length Error
0306 UPDATE Message Error - Invalid ORIGIN Attribute
0307 UPDATE Message Error (deprecated)
0308 UPDATE Message Error - Invalid NEXT_HOP Attribute
0309 UPDATE Message Error - Optional Attribute Error
030A UPDATE Message Error - Invalid Network Field
030B UPDATE Message Error - Malformed AS_PATH
0400 Hold Timer Expired
0500 Finite State Machine Error
0600 Cease
0601 Cease - Maximum Number of Prefixes Reached
0602 Cease - Administrative Shutdown
0603 Cease - Peer De-configured
0604 Cease - Administrative Reset
0605 Cease - Connection Rejected
0606 Cease - Other Configuration Change
0607 Cease - Connection Collision Resolution
0608 Cease - Out of Resources
Instead of HEX-Code the error message will be displayed in the service down logmessage. To givesome additional informations the logmessage contains also
45

BGP-Peer AdminstateBGP-Peer Remote ASBGP-Peer established time in seconds
Debugging
If you have problems to detect or monitor the BGP Session you can use the following command tofigure out where the problem come from.
snmpwalk -v 2c -c <myCommunity> <myRouter2Monitor> .1.3.6.1.2.1.15.3.1.2.99.99.99.99
Replace 99.99.99.99 with your BGP-Peer IP. The result should be an Integer between 1 and 6.
4.6.4. BSFMonitor
This monitor runs a Bean Scripting Framework BSF compatible script to determine the status of aservice. Users can write scripts to perform highly custom service checks. This monitor is notoptimised for scale. It’s intended for a small number of custom checks or prototyping of monitors.
BSFMonitor vs SystemExecuteMonitor
The BSFMonitor avoids the overhead of fork(2) that is used by the SystemExecuteMonitor.BSFMonitor also grants access to a selection of OpenNMS Horizon internal methods and classes thatcan be used in the script.
Monitor facts
Class Name org.opennms.netmgt.poller.monitors.BSFMonitor
Remote Enabled false
Configuration and Usage
Table 12. Monitor specific parameters for the BSFMonitor
Parameter
Description Required
Default value
file-name Path to the script file. required
-
bsf-engine
The BSF Engine to run the script in different languageslikeBean Shell: bsh.util.BeanShellBSFEngineGroovy: org.codehaus.groovy.bsf.GroovyEngine Jython: org.apache.bsf.engines.jython.JythonEngine
required
-
run-type one of eval or exec optional
eval
46

Parameter
Description Required
Default value
lang-class
The BSF language class, like groovy or beanshell. optional
file-name extension isinterpreted by default
file-extensions
comma-separated list optional
-
This monitor implements the Common Configuration Parameters.
Table 13. Beans which can be used in the script
Variable
Type Description
map Map<String, Object> The map contains all various parameters passed to the monitorfrom the service definition it the poller-configuration.xml file.
ip_addr String The IP address that is currently being polled.
node_id int The Node ID of the node the ip_addr belongs to.
node_label
String The Node Label of the node the ip_addr and service belongs to.
svc_name
String The name of the service that is being polled.
bsf_monitor
BSFMonitor The instance of the BSFMonitor object calling the script. Usefulfor logging via its log(String sev, String fmt, Object... args) method.
results HashMap<String,String>
The script is expected to put its results into this object. The statusindication should be set into the entry with key status. If thestatus is not OK, a key reason should contain a description of theproblem.
times LinkedHashMap<String, Number>
The script is expected to put one or more response times into thisobject.
Additionally every parameter added to the service definition in poller-configuration.xml isavailable as a String object in the script. The key attribute of the parameter represents the name ofthe String object and the value attribute represents the value of the String object.
Please keep in mind, that these parameters are also accessible via the map bean.
Avoid non-character names for parameters to avoid problems in the scriptlanguages.
Response Codes
The script has to provide a status code that represents the status of the associated service. Thefollowing status codes are defined:
Table 14. Status codes
47
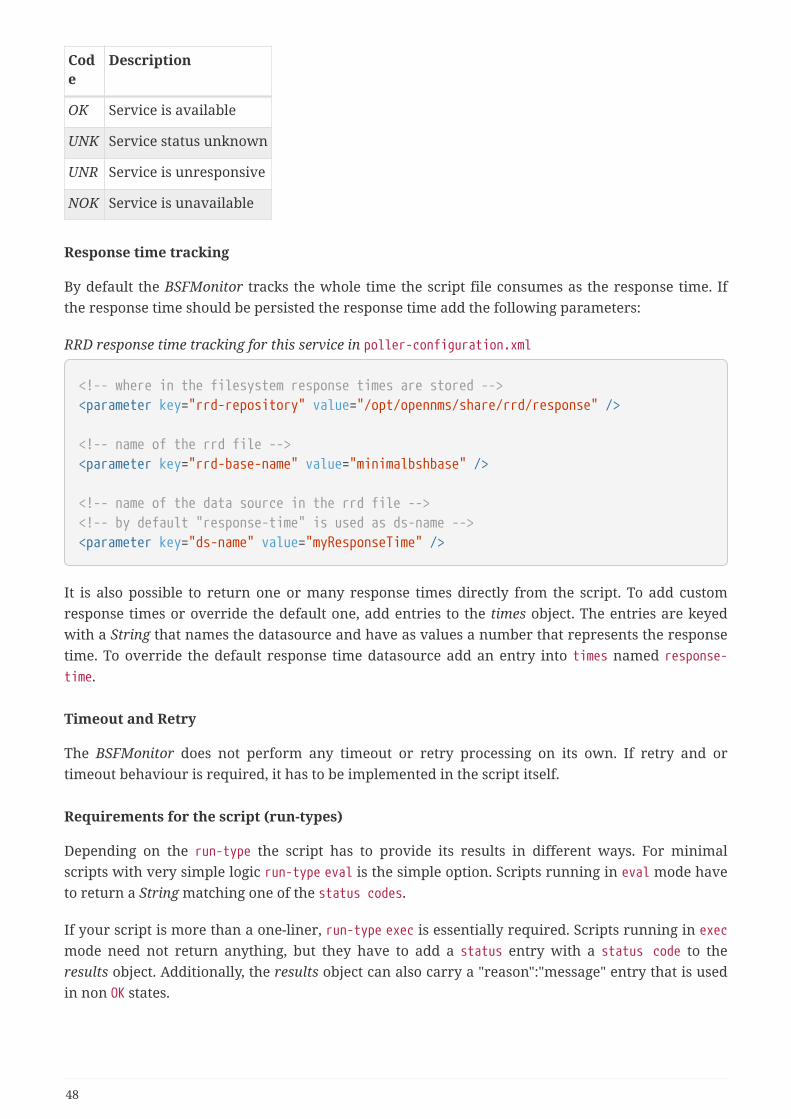
Code
Description
OK Service is available
UNK Service status unknown
UNR Service is unresponsive
NOK Service is unavailable
Response time tracking
By default the BSFMonitor tracks the whole time the script file consumes as the response time. Ifthe response time should be persisted the response time add the following parameters:
RRD response time tracking for this service in poller-configuration.xml
<!-- where in the filesystem response times are stored --><parameter key="rrd-repository" value="/opt/opennms/share/rrd/response" />
<!-- name of the rrd file --><parameter key="rrd-base-name" value="minimalbshbase" />
<!-- name of the data source in the rrd file --><!-- by default "response-time" is used as ds-name --><parameter key="ds-name" value="myResponseTime" />
It is also possible to return one or many response times directly from the script. To add customresponse times or override the default one, add entries to the times object. The entries are keyedwith a String that names the datasource and have as values a number that represents the responsetime. To override the default response time datasource add an entry into times named response-time.
Timeout and Retry
The BSFMonitor does not perform any timeout or retry processing on its own. If retry and ortimeout behaviour is required, it has to be implemented in the script itself.
Requirements for the script (run-types)
Depending on the run-type the script has to provide its results in different ways. For minimalscripts with very simple logic run-type eval is the simple option. Scripts running in eval mode haveto return a String matching one of the status codes.
If your script is more than a one-liner, run-type exec is essentially required. Scripts running in execmode need not return anything, but they have to add a status entry with a status code to theresults object. Additionally, the results object can also carry a "reason":"message" entry that is usedin non OK states.
48

Commonly used language settings
The BSF supports many languages, the following table provides the required setup for commonlyused languages.
Table 15. BSF language setups
Language
lang-class
bsf-engine required library
BeanShell beanshell bsh.util.BeanShellBSFEngine supported by default
Groovy groovy org.codehaus.groovy.bsf.GroovyEngine groovy-all-[version].jar
Jython jython org.apache.bsf.engines.jython.JythonEngine jython-[version].jar
Example Bean Shell
BeanShell example poller-configuration.xml
<service name="MinimalBeanShell" interval="300000" user-defined="true" status="on"> <parameter key="file-name" value="/tmp/MinimalBeanShell.bsh"/> <parameter key="bsf-engine" value="bsh.util.BeanShellBSFEngine"/></service>
<monitor service="MinimalBeanShell" class-name="org.opennms.netmgt.poller.monitors.BSFMonitor" />
BeanShell example MinimalBeanShell.bsh script file
bsf_monitor.log("ERROR", "Starting MinimalBeanShell.bsf", null);File testFile = new File("/tmp/TestFile");if (testFile.exists()) return "OK"; else results.put("reason", "file does not exist"); return "NOK";
Example Groovy
To use the Groovy language an additional library is required. Copy a compatible groovy-all.jar intoto opennms/lib folder and restart OpenNMS Horizon. That makes Groovy available for theBSFMonitor.
49

Groovy example poller-configuration.xml with default run-type set to eval
<service name="MinimalGroovy" interval="300000" user-defined="true" status="on"> <parameter key="file-name" value="/tmp/MinimalGroovy.groovy"/> <parameter key="bsf-engine" value="org.codehaus.groovy.bsf.GroovyEngine"/></service>
<monitor service="MinimalGroovy" class-name="org.opennms.netmgt.poller.monitors.BSFMonitor" />
Groovy example MinimalGroovy.groovy script file for run-type eval
bsf_monitor.log("ERROR", "Starting MinimalGroovy.groovy", null);File testFile = new File("/tmp/TestFile");if (testFile.exists()) return "OK"; else results.put("reason", "file does not exist"); return "NOK";
Groovy example poller-configuration.xml with run-type set to exec
<service name="MinimalGroovy" interval="300000" user-defined="true" status="on"> <parameter key="file-name" value="/tmp/MinimalGroovy.groovy"/> <parameter key="bsf-engine" value="org.codehaus.groovy.bsf.GroovyEngine"/> <parameter key="run-type" value="exec"/></service>
<monitor service="MinimalGroovy" class-name="org.opennms.netmgt.poller.monitors.BSFMonitor" />
Groovy example MinimalGroovy.groovy script file for run-type set to exec
bsf_monitor.log("ERROR", "Starting MinimalGroovy", null);def testFile = new File("/tmp/TestFile");if (testFile.exists()) results.put("status", "OK") else results.put("reason", "file does not exist"); results.put("status", "NOK");
Example Jython
To use the Jython (Java implementation of Python) language an additional library is required. Copya compatible jython-x.y.z.jar into the opennms/lib folder and restart OpenNMS Horizon. Thatmakes Jython available for the BSFMonitor.
50

Jython example poller-configuration.xml with run-type exec
<service name="MinimalJython" interval="300000" user-defined="true" status="on"> <parameter key="file-name" value="/tmp/MinimalJython.py"/> <parameter key="bsf-engine" value="org.apache.bsf.engines.jython.JythonEngine"/> <parameter key="run-type" value="exec"/></service>
<monitor service="MinimalJython" class-name="org.opennms.netmgt.poller.monitors.BSFMonitor" />
Jython example MinimalJython.py script file for run-type set to exec
from java.io import File
bsf_monitor.log("ERROR", "Starting MinimalJython.py", None);if (File("/tmp/TestFile").exists()): results.put("status", "OK")else: results.put("reason", "file does not exist") results.put("status", "NOK")
We have to use run-type exec here because Jython chokes on the import keyword ineval mode.
As profit that this is really Python, notice the substitution of Python’s None valuefor Java’s null in the log call.
Advanced examples
The following example references all beans that are exposed to the script, including a customparameter.
51
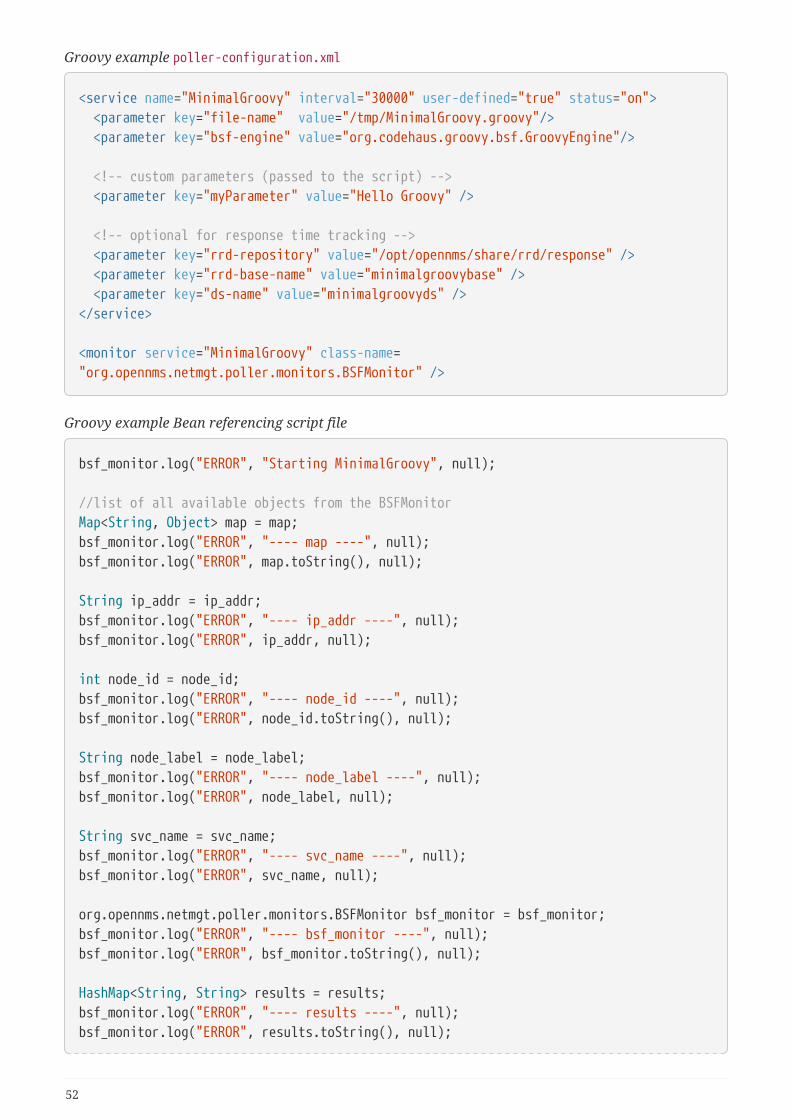
Groovy example poller-configuration.xml
<service name="MinimalGroovy" interval="30000" user-defined="true" status="on"> <parameter key="file-name" value="/tmp/MinimalGroovy.groovy"/> <parameter key="bsf-engine" value="org.codehaus.groovy.bsf.GroovyEngine"/>
<!-- custom parameters (passed to the script) --> <parameter key="myParameter" value="Hello Groovy" />
<!-- optional for response time tracking --> <parameter key="rrd-repository" value="/opt/opennms/share/rrd/response" /> <parameter key="rrd-base-name" value="minimalgroovybase" /> <parameter key="ds-name" value="minimalgroovyds" /></service>
<monitor service="MinimalGroovy" class-name="org.opennms.netmgt.poller.monitors.BSFMonitor" />
Groovy example Bean referencing script file
bsf_monitor.log("ERROR", "Starting MinimalGroovy", null);
//list of all available objects from the BSFMonitorMap<String, Object> map = map;bsf_monitor.log("ERROR", "---- map ----", null);bsf_monitor.log("ERROR", map.toString(), null);
String ip_addr = ip_addr;bsf_monitor.log("ERROR", "---- ip_addr ----", null);bsf_monitor.log("ERROR", ip_addr, null);
int node_id = node_id;bsf_monitor.log("ERROR", "---- node_id ----", null);bsf_monitor.log("ERROR", node_id.toString(), null);
String node_label = node_label;bsf_monitor.log("ERROR", "---- node_label ----", null);bsf_monitor.log("ERROR", node_label, null);
String svc_name = svc_name;bsf_monitor.log("ERROR", "---- svc_name ----", null);bsf_monitor.log("ERROR", svc_name, null);
org.opennms.netmgt.poller.monitors.BSFMonitor bsf_monitor = bsf_monitor;bsf_monitor.log("ERROR", "---- bsf_monitor ----", null);bsf_monitor.log("ERROR", bsf_monitor.toString(), null);
HashMap<String, String> results = results;bsf_monitor.log("ERROR", "---- results ----", null);bsf_monitor.log("ERROR", results.toString(), null);
52

LinkedHashMap<String, Number> times = times;bsf_monitor.log("ERROR", "---- times ----", null);bsf_monitor.log("ERROR", times.toString(), null);
// reading a parameter from the service definitionString myParameter = myParameter;bsf_monitor.log("ERROR", "---- myParameter ----", null);bsf_monitor.log("ERROR", myParameter, null);
// minimal exampledef testFile = new File("/tmp/TestFile");if (testFile.exists()) bsf_monitor.log("ERROR", "Done MinimalGroovy ---- OK ----", null); return "OK"; else
results.put("reason", "file does not exist"); bsf_monitor.log("ERROR", "Done MinimalGroovy ---- NOK ----", null); return "NOK";
4.6.5. CiscoIpSlaMonitor
This monitor can be used to monitor IP SLA configurations on your Cisco devices. This monitorsupports the following SNMP OIDS from CISCO-RTT-MON-MIB:
RTT_ADMIN_TAG_OID = .1.3.6.1.4.1.9.9.42.1.2.1.1.3RTT_OPER_STATE_OID = .1.3.6.1.4.1.9.9.42.1.2.9.1.10RTT_LATEST_OPERSENSE_OID = .1.3.6.1.4.1.9.9.42.1.2.10.1.2RTT_ADMIN_THRESH_OID = .1.3.6.1.4.1.9.9.42.1.2.1.1.5RTT_ADMIN_TYPE_OID = .1.3.6.1.4.1.9.9.42.1.2.1.1.4RTT_LATEST_OID = .1.3.6.1.4.1.9.9.42.1.2.10.1.1
The monitor can be run in two scenarios. The first one tests the RTT_LATEST_OPERSENSE which isa sense code for the completion status of the latest RTT operation. If the RTT_LATEST_OPERSENSEreturns ok(1) the service is marked as up.
The second scenario is to monitor the configured threshold in the IP SLA config. If theRTT_LATEST_OPERSENSE returns with overThreshold(3) the service is marked down.
Monitor facts
Class Name org.opennms.netmgt.poller.monitors.CiscoIpSlaMonitor
Remote Enabled false
53

Configuration and Usage
Table 16. Monitor-specific parameters for the CiscoIpSlaMonitor
Parameter Description Required
Defaultvalue
admin-tag The tag attribute from your IP SLA configuration you want tomonitor.
required
-
ignore-thresh
Boolean indicates if just the status or configured thresholdshould be monitored.
required
``
This monitor implements the Common Configuration Parameters.
Example for HTTP and ICMP echo reply
In this example we configure an IP SLA entry to monitor Google’s website with HTTP GET from theCisco device. We use 8.8.8.8 as our DNS resolver. In our example our SLA says we should reachGoogle’s website within 200ms. To advise co-workers that this monitor entry is used for monitoring,I set the owner to OpenNMS. The tag is used to identify the entry later in the SNMP table formonitoring.
Cisco device configuration for IP SLA instance for HTTP GET
ip sla monitor 1 type http operation get url http://www.google.de name-server 8.8.8.8 timeout 3000 threshold 200 owner OpenNMS tag Google Websiteip sla monitor schedule 3 life forever start-time now
In the second example we configure a IP SLA to test if the IP address from www.opennms.org isreachable with ICMP from the perspective of the Cisco device. Like the example above we have athreshold and a timeout.
Cisco device configuration for IP SLA instance for ICMP monitoring.
ip sla 1 icmp-echo 64.146.64.212 timeout 3000 threshold 150 owner OpenNMS tag OpenNMS Hostip sla schedule 1 life forever start-time now
It´s not possible to reconfigure an IP SLA entry. If you want to change parameters,you have to delete the whole configuration and reconfigure it with your newparameters. Backup your Cisco configuration manually or take a look at RANCID.
54

To monitor both of the entries the configuration in poller-configuration.xml requires two servicedefinition entries:
<service name="IP-SLA-WEB-Google" interval="300000" user-defined="false" status="on"> <parameter key="retry" value="2" /> <parameter key="timeout" value="3000" /> <parameter key="admin-tag" value="Google Website" /> <parameter key="ignore-thresh" value="false" />①</service><service name="IP-SLA-PING-OpenNMS" interval="300000" user-defined="false" status="on"> <parameter key="retry" value="2" /> <parameter key="timeout" value="3000" /> <parameter key="admin-tag" value="OpenNMS Host" /> <parameter key="ignore-thresh" value="true" />②</service>
<monitor service="IP-SLA-WEB-Google" class-name="org.opennms.netmgt.poller.monitors.CiscoIpSlaMonitor" /><monitor service="IP-SLA-PING-OpenNMS" class-name="org.opennms.netmgt.poller.monitors.CiscoIpSlaMonitor" />
① Service is up if the IP SLA state is ok(1)
② Service is down if the IP SLA state is overThreshold(3)
4.6.6. CiscoPingMibMonitor
This poller monitor’s purpose is to create conceptual rows (entries) in the ciscoPingTable on CiscoIOS devices that support the CISCO-PING-MIB. These entries direct the remote IOS device to ping anIPv4 or IPv6 address with a configurable set of parameters. After the IOS device has completed therequested ping operations, the poller monitor queries the IOS device to determine the results. If theresults indicate success according to the configured parameters in the service configuration, thenthe monitored service is reported as available and the results are available for optional time-series(RRD) storage. If the results indicate failure, the monitored service is reported unavailable with adescriptive reason code. If something goes wrong during the setup of the entry or the subsequentquerying of its status, the monitored service is reported to be in an unknown state.
Unlike most poller monitors, the CiscoPingMibMonitor does not interpret thetimeout and retries parameters to determine when a poll attempt has timed out orwhether it should be attempted again. The packet-count and packet-timeoutparameters instead service this purpose from the perspective of the remote IOSdevice.
55

Supported MIB OIDs from CISCO_PING_MIB
ciscoPingEntry 1.3.6.1.4.1.9.9.16.1.1.1 ciscoPingSerialNumber 1.3.6.1.4.1.9.9.16.1.1.1.1 ciscoPingProtocol 1.3.6.1.4.1.9.9.16.1.1.1.2 ciscoPingAddress 1.3.6.1.4.1.9.9.16.1.1.1.3 ciscoPingPacketCount 1.3.6.1.4.1.9.9.16.1.1.1.4 ciscoPingPacketSize 1.3.6.1.4.1.9.9.16.1.1.1.5 ciscoPingPacketTimeout 1.3.6.1.4.1.9.9.16.1.1.1.6 ciscoPingDelay 1.3.6.1.4.1.9.9.16.1.1.1.7 ciscoPingTrapOnCompletion 1.3.6.1.4.1.9.9.16.1.1.1.8 ciscoPingSentPackets 1.3.6.1.4.1.9.9.16.1.1.1.9 ciscoPingReceivedPackets 1.3.6.1.4.1.9.9.16.1.1.1.10 ciscoPingMinRtt 1.3.6.1.4.1.9.9.16.1.1.1.11 ciscoPingAvgRtt 1.3.6.1.4.1.9.9.16.1.1.1.12 ciscoPingMaxRtt 1.3.6.1.4.1.9.9.16.1.1.1.13 ciscoPingCompleted 1.3.6.1.4.1.9.9.16.1.1.1.14 ciscoPingEntryOwner 1.3.6.1.4.1.9.9.16.1.1.1.15 ciscoPingEntryStatus 1.3.6.1.4.1.9.9.16.1.1.1.16 ciscoPingVrfName 1.3.6.1.4.1.9.9.16.1.1.1.17
Prerequisites
• One or more Cisco devices running an IOS image of recent vintage; any 12.2 or later image isprobably fine. Even very low-end devices appear to support the CISCO-PING-MIB.
• The IOS devices that will perform the remote pings must be configured with an SNMP writecommunity string whose source address access-list includes the address of the OpenNMSHorizon server and whose MIB view (if any) includes the OID of the ciscoPingTable.
• The corresponding SNMP write community string must be specified in the write-communityattribute of either the top-level <snmp-config> element of snmp-config.xml or a <definition> childelement that applies to the SNMP-primary interface of the IOS device(s) that will perform theremote pings.
Scalability concerns
This monitor spends a fair amount of time sleeping while it waits for the remote IOS device tocomplete the requested ping operations. The monitor is pessimistic in calculating the delay betweencreation of the ciscoPingTable entry and its first attempt to retrieve the results of that entry’s pingoperations — it will always wait at least (packet-count * (packet-timeout + packet-delay))milliseconds before even checking whether the remote pings have completed. It’s therefore proneto hogging poller threads if used with large values for the packet-count, packet-timeout, and/orpacket-delay parameters. Keep these values as small as practical to avoid tying up poller threadsunnecessarily.
This monitor always uses the current time in whole seconds since the UNIX epoch as the instanceidentifier of the ciscoPingTable entries that it creates. The object that holds this identifier is a signed32-bit integer type, precluding a finer resolution. It’s probably a good idea to mix in the least-significant byte of the millisecond-accurate time as a substitute for that of the whole-second-
56

accurate value to avoid collisions. IOS seems to clean up entries in this table within a manner ofminutes after their ping operations have completed.
Monitor facts
Class Name org.opennms.netmgt.poller.monitors.CiscoPingMibMonitor
Remote Enabled false
Configuration and Usage
Table 17. Monitor specific parameters for the CiscoPingMibMonitor
Parameter Description Required
Default value
version SNMP protocol version (1, 2c, or 3) to use foroperations performed by this service monitor. Donot use with out a very good reason to do so.
optional
from snmp-config.xml
packet-count Number of ping packets that the remote IOSdevice should send.
optional
5
packet-size Size, in bytes, of each ping packet that the remoteIOS device should send.
optional
100
packet-timeout Timeout, in milliseconds, of each ping packet sentby the remote IOS device.
optional
2000
packet-delay Delay, in milliseconds, between ping packets sentby the remote IOS device.
optional
0
entry-owner String value to set as the value ofciscoPingEntryOwner of entries created for thisservice.
optional
OpenNMSCiscoPingMibMonitor
vrf-name String value to set as the VRF (VLAN) name inwhose context the remote IOS device shouldperform the pings for this service.
optional
empty String
proxy-node-id Numeric database identifier of the node whoseprimary SNMP interface should be used as theproxy for this service. If specified along with therelated proxy-node-foreign-source, proxy-node-foreign-id, and/or proxy-ip-addr, this parameterwill be the effective one.
optional
-
proxy-node-foreign-sourceproxy-node-foreign-id
foreign-source name and foreign-ID of the nodewhose primary SNMP interface should be used asthe "proxy" for this service. These twoparameters are corequisites. If they appear alongwith the related proxy-ip-addr, these parameterswill be the effective ones.
optional
-
57

Parameter Description Required
Default value
proxy-ip-addr IP address of the interface that should be used asthe proxy for this service. Effective only if none ofproxy-node-id, proxy-node-foreign-source, norproxy-node-foreign-id appears alongside thisparameter. A value of $ipaddr will besubstituted with the IP address of the interface onwhich the monitored service appears.
optional
-
target-ip-addr IP address that the remote IOS device shouldping. A value of $ipaddr will be substituted withthe IP address of the interface on which themonitored service appears.
optional
-
success-percent A whole-number percentage of pings that mustsucceed (from the perspective of the remote IOSdevice) in order for this service to be consideredavailable. As an example, if packet-count is left atits default value of 5 but you wish the service tobe considered available even if only one of thosefive pings is successful, then set this parameter’svalue to 20.
optional
100
rrd-repository Base directory of an RRD repository in which tostore this service monitor’s response-timesamples
optional
-
ds-name Name of the RRD datasource (DS) name in whichto store this service monitor’s response-timesamples; rrd-base-name Base name of the RRDfile (minus the .rrd or .jrb file extension) withinthe specified rrd-repository path in which thisservice monitor’s response-time samples will bepersisted
optional
-
This monitor implements the Common Configuration Parameters.
This is optional just if you can use variables in the configuration.
Table 18. Variables which can be used in the configuration
Variable
Description
$ipaddr
This value will be substituted with the IP address of the interface on which themonitored service appears.
Example: Ping the same non-routable address from all routers of customer Foo
A service provider’s client, Foo Corporation, has network service at multiple locations. At each Foolocation, a point-of-sale system is statically configured at IPv4 address 192.168.255.1. Foo wants tobe notified any time a point-of-sale system becomes unreachable. Using an OpenNMS Horizon
58

remote location monitor is not feasible. All of Foo Corporation’s CPE routers must be Cisco IOSdevices in order to achieve full coverage in this scenario.
One approach to this requirement is to configure all of Foo Corporation’s premise routers to be inthe surveillance categories Customer_Foo, CPE, and Routers, and to use a filter to create a pollerpackage that applies only to those routers. We will use the special value $ipaddr for the proxy-ip-addr parameter so that the remote pings will be provisioned on each Foo CPE router. Since we wanteach Foo CPE router to ping the same IP address 192.168.255.1, we statically list that value for thetarget-ip-addr address.
<package name="ciscoping-foo-pos"> <filter>catincCustomer_Foo & catincCPE & catincRouters & nodeSysOID LIKE'.1.3.6.1.4.1.9.%'</filter> <include-range begin="0.0.0.0" end="254.254.254.254" /> <rrd step="300"> <rra>RRA:AVERAGE:0.5:1:2016</rra> <rra>RRA:AVERAGE:0.5:12:1488</rra> <rra>RRA:AVERAGE:0.5:288:366</rra> <rra>RRA:MAX:0.5:288:366</rra> <rra>RRA:MIN:0.5:288:366</rra> </rrd> <service name="FooPOS" interval="300000" user-defined="false" status="on"> <parameter key="rrd-repository" value="/opt/opennms/share/rrd/response" /> <parameter key="rrd-base-name" value="ciscoping" /> <parameter key="ds-name" value="ciscoping" /> <parameter key="proxy-ip-addr" value="$ipaddr" /> <parameter key="target-ip-addr" value="192.168.255.1" /> </service> <downtime interval="30000" begin="0" end="300000" /><!-- 30s, 0, 5m --> <downtime interval="300000" begin="300000" end="43200000" /><!-- 5m, 5m, 12h --> <downtime interval="600000" begin="43200000" end="432000000" /><!-- 10m, 12h, 5d --> <downtime begin="432000000" delete="true" /><!-- anything after 5 days delete --></package>
<monitor service="FooPOS" class-name="org.opennms.netmgt.poller.monitors.CiscoPingMibMonitor" />
Example: Ping from a single IOS device routable address of each router of customer Bar
A service provider’s client, Bar Limited, has network service at multiple locations. While OpenNMSHorizon' world-class service assurance is generally sufficient, Bar also wants to be notified any timea premise router at one of their locations unreachable from the perspective of an IOS device inBar’s main data center. Some or all of the Bar Limited CPE routers may be non-Cisco devices in thisscenario.
To meet this requirement, our approach is to configure Bar Limited’s premise routers to be in thesurveillance categories Customer_Bar, CPE, and Routers, and to use a filter to create a pollerpackage that applies only to those routers. This time, though, we will use the special value $ipaddrnot in the proxy-ip-addr parameter but in the target-ip-addr parameter so that the remote pings
59

will be performed for each Bar CPE router. Since we want the same IOS device 20.11.5.11 to pingthe CPE routers, we statically list that value for the proxy-ip-addr address. Example poller-configuration.xml additions
<package name="ciscoping-bar-cpe"> <filter>catincCustomer_Bar & catincCPE & catincRouters</filter> <include-range begin="0.0.0.0" end="254.254.254.254" /> <rrd step="300"> <rra>RRA:AVERAGE:0.5:1:2016</rra> <rra>RRA:AVERAGE:0.5:12:1488</rra> <rra>RRA:AVERAGE:0.5:288:366</rra> <rra>RRA:MAX:0.5:288:366</rra> <rra>RRA:MIN:0.5:288:366</rra> </rrd> <service name="BarCentral" interval="300000" user-defined="false" status="on"> <parameter key="rrd-repository" value="/opt/opennms/share/rrd/response" /> <parameter key="rrd-base-name" value="ciscoping" /> <parameter key="ds-name" value="ciscoping" /> <parameter key="proxy-ip-addr" value="20.11.5.11" /> <parameter key="target-ip-addr" value="$ipaddr" /> </service> <downtime interval="30000" begin="0" end="300000" /><!-- 30s, 0, 5m --> <downtime interval="300000" begin="300000" end="43200000" /><!-- 5m, 5m, 12h --> <downtime interval="600000" begin="43200000" end="432000000" /><!-- 10m, 12h, 5d --> <downtime begin="432000000" delete="true" /><!-- anything after 5 days delete --></package>
<monitor service="BarCentral" class-name="org.opennms.netmgt.poller.monitors.CiscoPingMibMonitor" />
4.6.7. CitrixMonitor
This monitor is used to test if a Citrix® Server or XenApp Server® is providing the IndependentComputing Architecture (ICA) protocol on TCP 1494. The monitor opens a TCP socket and tests thegreeting banner returns with ICA, otherwise the service is unavailable.
Monitor facts
Class Name org.opennms.netmgt.poller.monitors.CitrixMonitor
Remote Enabled true
Configuration and Usage
Table 19. Monitor specific parameters for the CitrixMonitor
Parameter
Description Required
Defaultvalue
port TCP port where the ICA protocol is listening. optional 1494
60
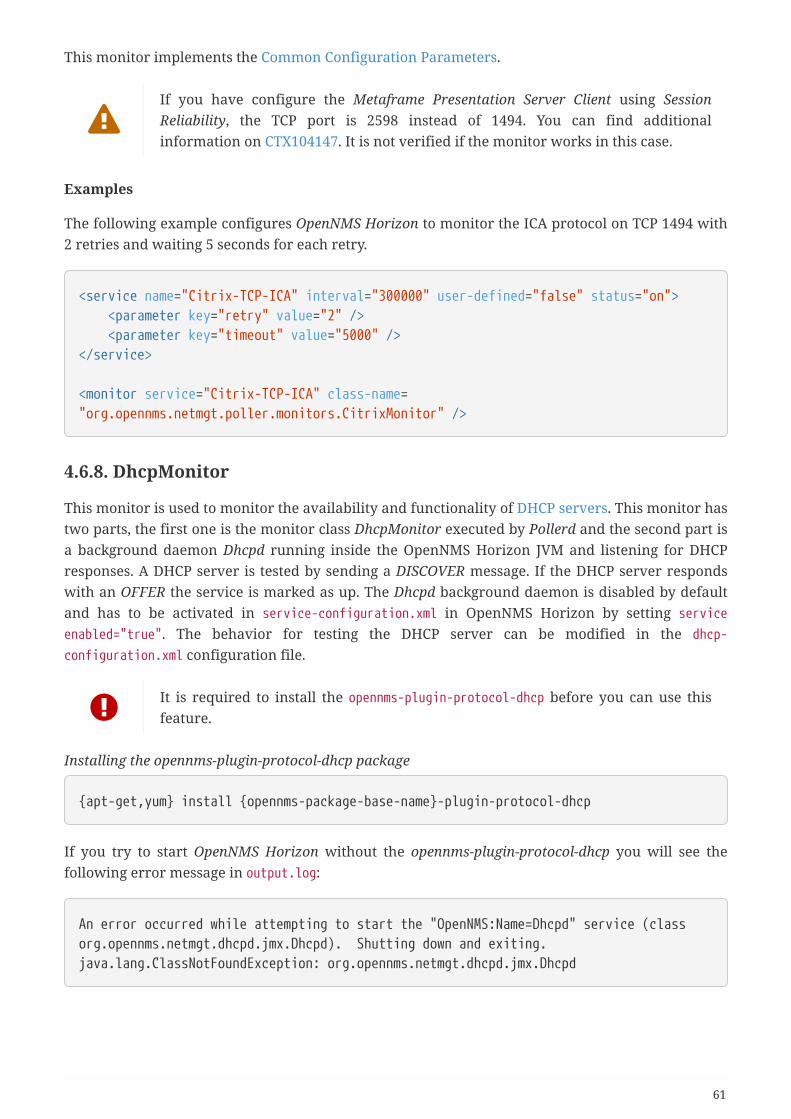
This monitor implements the Common Configuration Parameters.
If you have configure the Metaframe Presentation Server Client using SessionReliability, the TCP port is 2598 instead of 1494. You can find additionalinformation on CTX104147. It is not verified if the monitor works in this case.
Examples
The following example configures OpenNMS Horizon to monitor the ICA protocol on TCP 1494 with2 retries and waiting 5 seconds for each retry.
<service name="Citrix-TCP-ICA" interval="300000" user-defined="false" status="on"> <parameter key="retry" value="2" /> <parameter key="timeout" value="5000" /></service>
<monitor service="Citrix-TCP-ICA" class-name="org.opennms.netmgt.poller.monitors.CitrixMonitor" />
4.6.8. DhcpMonitor
This monitor is used to monitor the availability and functionality of DHCP servers. This monitor hastwo parts, the first one is the monitor class DhcpMonitor executed by Pollerd and the second part isa background daemon Dhcpd running inside the OpenNMS Horizon JVM and listening for DHCPresponses. A DHCP server is tested by sending a DISCOVER message. If the DHCP server respondswith an OFFER the service is marked as up. The Dhcpd background daemon is disabled by defaultand has to be activated in service-configuration.xml in OpenNMS Horizon by setting serviceenabled="true". The behavior for testing the DHCP server can be modified in the dhcp-
configuration.xml configuration file.
It is required to install the opennms-plugin-protocol-dhcp before you can use thisfeature.
Installing the opennms-plugin-protocol-dhcp package
apt-get,yum install opennms-package-base-name-plugin-protocol-dhcp
If you try to start OpenNMS Horizon without the opennms-plugin-protocol-dhcp you will see thefollowing error message in output.log:
An error occurred while attempting to start the "OpenNMS:Name=Dhcpd" service (classorg.opennms.netmgt.dhcpd.jmx.Dhcpd). Shutting down and exiting.java.lang.ClassNotFoundException: org.opennms.netmgt.dhcpd.jmx.Dhcpd
61

Make sure no DHCP client is running on the OpenNMS Horizon server and usingport UDP/68. If UDP/68 is already in use, you will find an error message in themanager.log. You can test if a process is listening on udp/68 with sudo ss -lnpusport = :68.
Monitor facts
Class Name org.opennms.protocols.dhcp.monitor.DhcpMonitor
Remote Enabled false
Table 20. Service monitor parameters configured in poller-configuration.xml
Parameter
Description Required
Default value
retry Number of retries before the service is marked as down optional
0
rrd-repository
The location to write RRD data. Generally, you will notwant to change this from default
optional
$OPENNMS_HOME/share/rrd/response
rrd-base-name
The name of the RRD file to write (minus the extension,.rrd or .jrb)
optional
dhcp
ds-name This is the name as reference for this particular datasource in the RRD file
optional
dhcp
This monitor implements the Common Configuration Parameters.
Dhcpd configuration
Table 21. Dhcpd parameters in dhcp-configuration.xml.
Parameter Description Required
Defaultvalue
port Defines the port your dhcp server is using required
5818
macAddress The MAC address which OpenNMS Horizon uses for a dhcprequest
required
00:06:0D:BE:9C:B2
myIpAddress This parameter will usually be set to the IP address of theOpenNMS Horizon server, which puts the DHCP poller in relaymode as opposed to broadcast mode. In relay mode, the DHCPserver being polled will unicast its responses directly back to theIP address specified by myIpAddress rather than broadcasting itsresponses. This allows DHCP servers to be polled even thoughthey are not on the same subnet as the OpenNMS Horizonserver, and without the aid of an external relay. Usage:myIpAddress="10.11.12.13" or myIpAddress="broadcast"
required
broadcast
62

extendedMode
When extendedMode is false, the DHCP poller will send aDISCOVER and expect an OFFER in return. When extendedModeis true, the DHCP poller will first send a DISCOVER. If no validresponse is received it will send an INFORM. If no valid responseis received it will then send a REQUEST. OFFER, ACK, and NAKare all considered valid responses in extendedMode. Usage:extendedMode="true" or extendedMode="false"
required
false
requestIpAddress
This parameter only applies to REQUEST queries sent to theDHCP server when extendedMode is true. If an IP address isspecified, that IP address will be requested in the query. IftargetHost is specified, the DHCP server’s own IP address will berequested. Since a well-managed server will probably notrespond to a request for its own IP, this parameter can also beset to targetSubnet. This is similar to targetHost except the DHCPserver’s IP address is incremented or decremented by 1 toobtain an ip address that is on the same subnet. (The resultingaddress will not be on the same subnet if the DHCP server’ssubnet is a /32 or /31. Otherwise, the algorithm used should bereliable.) Usage: requestIpAddress="10.77.88.99" orrequestIpAddress="targetHost" orrequestIpAddress="targetSubnet"
required
false
Figure 14. Visualization of DHCP message flow in broadcast mode
63

Figure 15. Visualization of DHCP message flow in relay mode
Example testing DHCP server in the same subnet
Example configuration how to configure the monitor in the poller-configuration.xml. The monitorwill try to send in maximum 3 DISCOVER messages and waits 3 seconds for the DHCP server OFFERmessage.
Step 1: Configure a DHCP service in poller-configuration.xml
<service name="DHCP" interval="300000" user-defined="false" status="on"> <parameter key="retry" value="2" /> <parameter key="timeout" value="3000" /> <parameter key="rrd-repository" value="/opt/opennms/share/rrd/response" /> <parameter key="rrd-base-name" value="dhcp" /> <parameter key="ds-name" value="dhcp" /></service>
<monitor service="DHCP" class-name="org.opennms.protocols.dhcp.monitor.DhcpMonitor"/>
Step 2: Enable the OpenNMS Horizon Dhcpd daemon in service-configuration.xml
<service enabled="true"> <name>OpenNMS:Name=Dhcpd</name> <class-name>org.opennms.netmgt.dhcpd.jmx.Dhcpd</class-name> <invoke method="start" pass="1" at="start"/> <invoke method="status" pass="0" at="status"/> <invoke method="stop" pass="0" at="stop"/></service>
64

Step 3: Configure Dhcpd to test a DHCP server in the same subnet as the OpenNMS Horizon server.
<DhcpdConfiguration port="5818" macAddress="00:06:0D:BE:9C:B2" myIpAddress="broadcast extendedMode="false" requestIpAddress="127.0.0.1"></DhcpdConfiguration>
Example testing DHCP server in a different subnet in extended mode
You can use the same monitor in poller-configuration.xml as in the example above.
Configure Dhcpd to test DHCP server in a different subnet. The OFFER from the DHCP server is sent tomyIpAddress.
<DhcpdConfiguration port="5818" macAddress="00:06:0D:BE:9C:B2" myIpAddress="10.4.1.234" extendedMode="true" requestIpAddress="targetSubnet"></DhcpdConfiguration>
If in extendedMode, the time required to complete the poll for an unresponsive nodeis increased by a factor of 3. Thus it is a good idea to limit the number of retries toa small number.
4.6.9. DiskUsageMonitor
The DiskUsageMonitor monitor can be used to test the amount of free space available on certainstorages of a node. The monitor gets information about the available free storage spaces availableby inspecting the hrStorageTable of the HOST-RESOURCES-MIB. A storage’s description (as found inthe corresponding hrStorageDescr object) must match the criteria specified by the disk and match-type parameters to be monitored. A storage’s available free space is calculated using thecorresponding hrStorageSize and hrStorageUsed objects.
The hrStorageUsed doesn’t account for filesystem reserved blocks (i.e. for thesuper-user), so DiskUsageMonitor will report the service as unavailable only whenthe amount of free disk space is actually lower than free minus the percentage ofreserved filesystem blocks.
This monitor uses SNMP to accomplish its work. Therefore systems against which it is to be usedmust have an SNMP agent supporting the HOST-RESOURCES-MIB installed and configured. Mostmodern SNMP agents, including most distributions of the Net-SNMP agent and the SNMP servicethat ships with Microsoft Windows, support this MIB. Out-of-box support for HOST-RESOURCES-MIBamong commercial Unix operating systems may be somewhat spotty.
65

Monitor facts
Class Name org.opennms.netmgt.poller.monitors.DiskUsageMonitor
Remote Enabled false, relies on SNMP configuration.
Configuration and Usage
Table 22. Monitor specific parameters for the DiskUsageMonitor
Parameter
Description Required
Default value
disk A pattern that a storage’s description (hrStorageDescr) mustmatch to be taken into account.
required
-
free The minimum amount of free space that storages matching thecriteria must have available. This parameter is evaluated as apercent of the storage’s reported maximum capacity.
optional
15
match-type
The way how the pattern specified by the disk parameter must becompared to storages description Must be one of the followingsymbolic operators:endswith : The disk parameter’s value is evaluated as a string thatstorages' description must end with;exact : The disk parameter’s value is evaluated as a string thatstorages" description must exactly match;regex : The disk parameter’s value is evaluated as a regularexpression that storages' description must match;startswith : The disk parameter’s value is evaluated as a stringthat storages' description must start with.Note: Comparisons are case-sensitive
optional
exact
port Destination port where the SNMP requests shall be sent. optional
from snmp-config.xml
retries Deprecated. Same as retry. Parameter retry takes precedencewhen both are set.
optional
from snmp-config.xml
This monitor implements the Common Configuration Parameters.
Examples
66

<!-- Make sure there's at least 5% of free space available on storages ending with"/home" --><service name="DiskUsage-home" interval="300000" user-defined="false" status="on"> <parameter key="timeout" value="3000" /> <parameter key="retry" value="2" /> <parameter key="disk" value="/home" /> <parameter key="match-type" value="endsWith" /> <parameter key="free" value="5" /></service><monitor service="DiskUsage-home" class-name="org.opennms.netmgt.poller.monitors.DiskUsageMonitor" />
DiskUsageMonitor vs thresholds
Storages' available free space can also be monitored using thresholds if you are already collectingthese data.
4.6.10. DnsMonitor
This monitor is build to test the availability of the DNS service on remote IP interfaces. The monitortests the service availability by sending a DNS query for A resource record types against the DNSserver to test.
The monitor is marked as up if the DNS Server is able to send a valid response to the monitor. Formultiple records it is possible to test if the number of responses are within a given boundary.
The monitor can be simulated with the command line tool host:
67

~ % host -v -t a www.google.com 8.8.8.8Trying "www.google.com"Using domain server:Name: 8.8.8.8Address: 8.8.8.8#53Aliases:
;; ->>HEADER<<- opcode: QUERY, status: NOERROR, id: 9324;; flags: qr rd ra; QUERY: 1, ANSWER: 5, AUTHORITY: 0, ADDITIONAL: 0
;; QUESTION SECTION:;www.google.com. IN A
;; ANSWER SECTION:www.google.com. 283 IN A 74.125.232.17www.google.com. 283 IN A 74.125.232.20www.google.com. 283 IN A 74.125.232.19www.google.com. 283 IN A 74.125.232.16www.google.com. 283 IN A 74.125.232.18
Received 112 bytes from 8.8.8.8#53 in 41 ms
TIP: This monitor is intended for testing the availability of a DNS service. If you want to monitor theDNS resolution of some of your nodes from a client’s perspective, please use theDNSResolutionMonitor.
Monitor facts
Class Name org.opennms.netmgt.poller.monitors.DnsMonitor
Remote Enabled true
Configuration and Usage
Table 23. Monitor specific parameters for the DnsMonitor
Parameter Description Required
Defaultvalue
retry Number of retries before the service is marked as down optional
0
timeout Time in milliseconds to wait for the A Record response from theserver
optional
5000
port UDP Port for the DNS server optional
53
lookup DNS A Record for lookup test optional
localhost
68

Parameter Description Required
Defaultvalue
fatal-response-codes
A comma-separated list of numeric DNS response codes that willbe considered fatal if present in the server’s response. Defaultvalue is 2 corresponds to Server Failed. A list of codes and theirmeanings is found in RFC 2929
optional
2
min-answers Minmal number of records in the DNS server respone for thegiven lookup
optional
-
max-answers Maximal number of records in the DNS server respone for thegiven lookup
optional
-
This monitor implements the Common Configuration Parameters.
Examples
The given examples shows how to monitor if the IP interface from a given DNS server resolves aDNS request. This service should be bound to a DNS server which should be able to give a valid DNSrespone for DNS request www.google.com. The service is up if the DNS server gives between 1 and10 A record responses.
Example configuration monitoring DNS request for a given server for www.google.com
<service name="DNS-www.google.com" interval="300000" user-defined="false" status="on"> <parameter key="lookup" value="www.google.com" /> <parameter key="fatal-response-code" value="2" /> <parameter key="min-answers" value="1" /> <parameter key="max-answers" value="10" /></service>
<monitor service="DNS-www.google.com" class-name="org.opennms.netmgt.poller.monitors.DnsMonitor" />
4.6.11. DNSResolutionMonitor
The DNS resolution monitor, tests if the node label of an OpenNMS Horizon node can be resolved.This monitor uses the name resolver configuration from the poller configuration or from theoperating system where OpenNMS Horizon is running on. It can be used to test a client behavior fora given host name. For example: Create a node with the node label www.google.com and an IPinterface. Assigning the DNS resolution monitor on the IP interface will test if www.google.com canbe resolved using the DNS configuration defined by the poller. The response from the A recordlookup can be any address, it is not verified with the IP address on the OpenNMS Horizon IPinterface where the monitor is assigned to.
Monitor facts
Class Name org.opennms.netmgt.poller.monitors.DNSResolutionMonitor
69

Remote Enabled true
Configuration and Usage
Table 24. Monitor specific parameters for the DNSResolutionMonitor
Parameter
Description Required
Default value
resolution-type
Type of record for the node label test.Allowed valuesv4 for A records,v6 for AAAA record,both A and AAAA record must be available,either A or AAAA record must be available.
optional
either
record-types
Alternate DNS record types to search for.The comma separated list can contain A,AAAA, CNAME, NS, MX, PTR, SOA,SRV, or TXT.
optional
``
lookup Alternate DNS record to lookup optional
The node label.
nameserver
The DNS server to query for the records.The string can be in the form of hostname,hostname:port, or [ipv6address]:port.
optional
Use name server from hostsystem running OpenNMSHorizon
This monitor implements the Common Configuration Parameters.
Examples
The following example shows the possibilities monitoring IPv4 and/or IPv6 for the serviceconfiguration:
<!-- Assigned service test if the node label is resolved for an A record --><service name="DNS-Resolution-v4" interval="300000" user-defined="false" status="on"> <parameter key="retry" value="2"/> <parameter key="timeout" value="2000"/> <parameter key="resolution-type" value="v4"/> <parameter key="rrd-repository" value="/opt/opennms/share/rrd/response"/> <parameter key="rrd-base-name" value="dns-res-v4"/> <parameter key="ds-name" value="dns-res-v4"/></service>
<!-- Assigned service test if www.google.com is resolved for an A record --><service name="DNS-Resolution-v4-lookup" interval="300000" user-defined="false"status="on"> <parameter key="retry" value="2"/> <parameter key="timeout" value="2000"/> <parameter key="resolution-type" value="v4"/> <parameter key="lookup" value="www.google.com"/>
70

</service>
<!-- Assigned service test if the node label is resolved for an AAAA record using aspecific DNS server --><service name="DNS-Resolution-v6" interval="300000" user-defined="false" status="on"> <parameter key="retry" value="2"/> <parameter key="timeout" value="2000"/> <parameter key="resolution-type" value="v6"/> <parameter key="rrd-repository" value="/opt/opennms/share/rrd/response"/> <parameter key="rrd-base-name" value="dns-res-v6"/> <parameter key="ds-name" value="dns-res-v6"/> <parameter key="nameserver" value="8.8.8.8"/></service>
<!-- Assigned service test if the node label is resolved for an AAAA record AND Arecord --><service name="DNS-Resolution-v4-and-v6" interval="300000" user-defined="false"status="on"> <parameter key="retry" value="2"/> <parameter key="timeout" value="2000"/> <parameter key="resolution-type" value="both"/> <parameter key="rrd-repository" value="/opt/opennms/share/rrd/response"/> <parameter key="rrd-base-name" value="dns-res-both"/> <parameter key="ds-name" value="dns-res-both"/></service>
<!-- Assigned service test if the node label is resolved for an AAAA record OR Arecord --><service name="DNS-Resolution-v4-or-v6" interval="300000" user-defined="false" status="on"> <parameter key="retry" value="2"/> <parameter key="timeout" value="2000"/> <parameter key="resolution-type" value="either"/> <parameter key="rrd-repository" value="/opt/opennms/share/rrd/response"/> <parameter key="rrd-base-name" value="dns-res-either"/> <parameter key="ds-name" value="dns-res-either"/></service>
<!-- Assigned service test if the node label is resolved for an CNAME record AND MXrecord --><service name="DNS-Resolution-CNAME-and-MX" interval="300000" user-defined="false"status="on"> <parameter key="retry" value="2"/> <parameter key="timeout" value="2000"/> <parameter key="record-types" value="CNAME,MX"/> <parameter key="lookup" value="www.google.comm"/> <parameter key="rrd-repository" value="/opt/opennms/share/rrd/response"/> <parameter key="rrd-base-name" value="dns-res-cname-mx"/> <parameter key="ds-name" value="dns-res-cname-mx"/></service>
71

<monitor service="DNS-Resolution-v4" class-name="org.opennms.netmgt.poller.monitors.DNSResolutionMonitor" /><monitor service="DNS-Resolution-v4-lookup" class-name="org.opennms.netmgt.poller.monitors.DNSResolutionMonitor" /><monitor service="DNS-Resolution-v6" class-name="org.opennms.netmgt.poller.monitors.DNSResolutionMonitor" /><monitor service="DNS-Resolution-v4-and-v6" class-name="org.opennms.netmgt.poller.monitors.DNSResolutionMonitor" /><monitor service="DNS-Resolution-v4-or-v6" class-name="org.opennms.netmgt.poller.monitors.DNSResolutionMonitor" /><monitor service="DNS-Resolution-CNAME-and-MX" class-name="org.opennms.netmgt.poller.monitors.DNSResolutionMonitor" />
To have response time graphs for the name resolution you have to configure RRD graphs for thegiven ds-names (dns-res-v4, dns-res-v6, dns-res-both, dns-res-either, dns-res-cname-mx) in'$OPENNMS_HOME/etc/response-graph.properties'.
DNSResolutionMonitor vs DnsMonitor
The DNSResolutionMonitor is used to measure the availability and record outages of a nameresolution from client perspective. The service is mainly used for websites or similar publicavailable resources. It can be used in combination with the Page Sequence Monitor to give a hint ifa website isn’t available for DNS reasons.
The DnsMonitor on the other hand is a test against a specific DNS server. In OpenNMS Horizon theDNS server is the node and the DnsMonitor will send a lookup request for a given A record to theDNS server IP address. The service goes down if the DNS server doesn’t have a valid A record in hiszone database or as some other issues resolving A records.
4.6.12. FtpMonitor
The FtpMonitor is able to validate ftp connection dial-up processes. The monitor can test ftp serveron multiple ports and specific login data.
The service using the FtpMonitor is up if the FTP server responds with return codes between 200and 299. For special cases the service is also marked as up for 425 and 530.
Monitor facts
Class Name org.opennms.netmgt.poller.monitors.FtpMonitor
Remote Enabled true
Configuration and Usage
Table 25. Monitor specific parameters for the FtpMonitor.
72

Parameter
Description Required
Defaultvalue
retry Number of attempts to get a valid FTP response/response-text optional
0
port A list of TCP ports to which connection shall be tried. optional
20,21
password
This parameter is meant to be used together with the user parameterto perform basic authentication. This parameter specify to passwordto be used. The user and password parameters are ignored when thebasic-authentication parameter is defined.
optional
emptystring
userid This parameter is meant to be used together with the passwordparameter to perform basic authentication. This parameter specify touser ID to be used. The userid and password parameters are ignoredwhen the basic-authentication parameter is defined.
optional
-
This monitor implements the Common Configuration Parameters.
Examples
Some example configuration how to configure the monitor in the 'poller-configuration.xml'
<service name="FTP" interval="300000" user-defined="false" status="on"> <parameter key="retry" value="1"/> <parameter key="timeout" value="3000"/> <parameter key="port" value="21"/> <parameter key="userid" value=""/> <parameter key="password" value=""/></service>
<service name="FTP-Customer" interval="300000" user-defined="false" status="on"> <parameter key="retry" value="1"/> <parameter key="timeout" value="3000"/> <parameter key="port" value="21"/> <parameter key="userid" value="Customer"/> <parameter key="password" value="MySecretPassword"/></service>
<monitor service="FTP" class-name="org.opennms.netmgt.poller.monitors.FtpMonitor"/><monitor service="FTP-Customer" class-name="org.opennms.netmgt.poller.monitors.FtpMonitor"/>
Hint
Comment from FtpMonitor source
Also want to accept the following ERROR message generated by some FTP servers following a QUITcommand without a previous successful login: "530 QUIT : User not logged in. Please login with
73
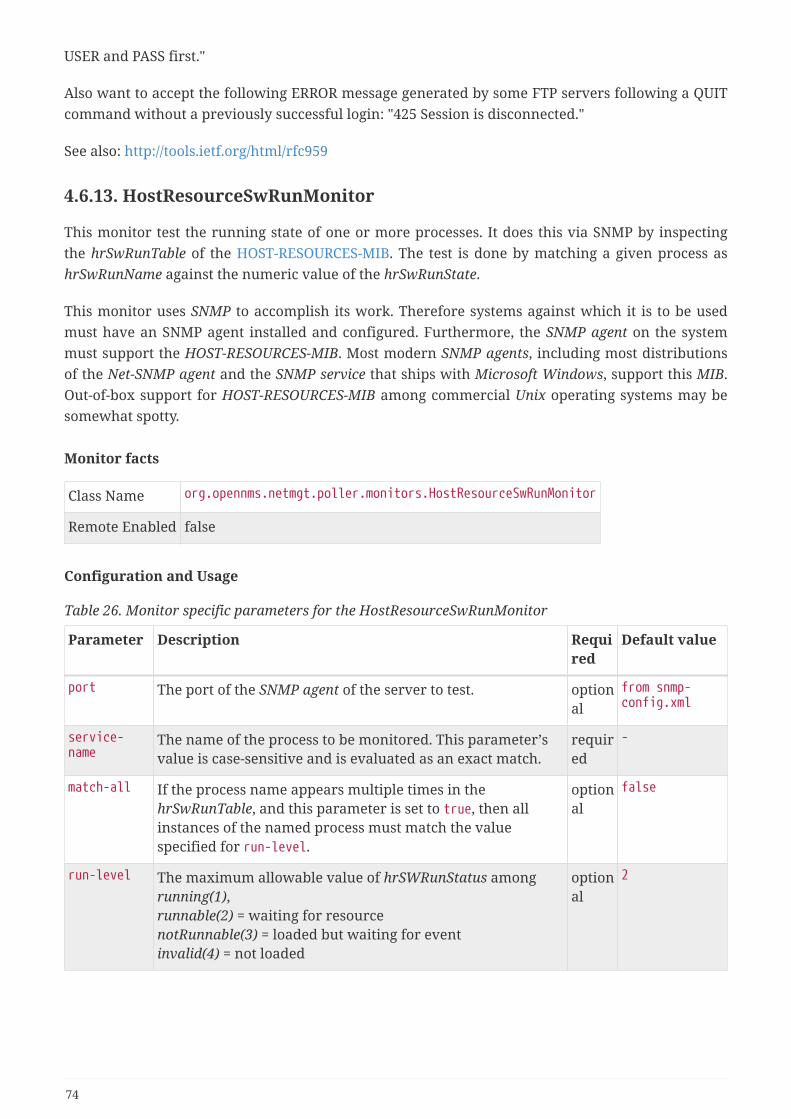
USER and PASS first."
Also want to accept the following ERROR message generated by some FTP servers following a QUITcommand without a previously successful login: "425 Session is disconnected."
See also: http://tools.ietf.org/html/rfc959
4.6.13. HostResourceSwRunMonitor
This monitor test the running state of one or more processes. It does this via SNMP by inspectingthe hrSwRunTable of the HOST-RESOURCES-MIB. The test is done by matching a given process ashrSwRunName against the numeric value of the hrSwRunState.
This monitor uses SNMP to accomplish its work. Therefore systems against which it is to be usedmust have an SNMP agent installed and configured. Furthermore, the SNMP agent on the systemmust support the HOST-RESOURCES-MIB. Most modern SNMP agents, including most distributionsof the Net-SNMP agent and the SNMP service that ships with Microsoft Windows, support this MIB.Out-of-box support for HOST-RESOURCES-MIB among commercial Unix operating systems may besomewhat spotty.
Monitor facts
Class Name org.opennms.netmgt.poller.monitors.HostResourceSwRunMonitor
Remote Enabled false
Configuration and Usage
Table 26. Monitor specific parameters for the HostResourceSwRunMonitor
Parameter Description Required
Default value
port The port of the SNMP agent of the server to test. optional
from snmp-config.xml
service-name
The name of the process to be monitored. This parameter’svalue is case-sensitive and is evaluated as an exact match.
required
-
match-all If the process name appears multiple times in thehrSwRunTable, and this parameter is set to true, then allinstances of the named process must match the valuespecified for run-level.
optional
false
run-level The maximum allowable value of hrSWRunStatus amongrunning(1),runnable(2) = waiting for resourcenotRunnable(3) = loaded but waiting for eventinvalid(4) = not loaded
optional
2
74

Parameter Description Required
Default value
service-name-oid
The numeric object identifier (OID) from which processnames are queried. Defaults to hrSwRunName and shouldnever be changed under normal circumstances. That said,changing it to hrSwRunParameters (.1.3.6.1.2.1.25.4.2.1.5)is often helpful when dealing with processes running underJava Virtual Machines which all have the same process namejava.
optional
.1.3.6.1.2.1.25.4.2.1.2
service-status-oid
The numeric object identifier (OID) from which run status isqueried. Defaults to hrSwRunStatus and should never bechanged under normal circumstances.
optional
.1.3.6.1.2.1.25.4.2.1.7
This monitor implements the Common Configuration Parameters.
Examples
The following example shows how to monitor the process called httpd running on a server usingthis monitor. The configuration in poller-configuration.xml has to be defined as the following:
<service name="Process-httpd" interval="300000" user-defined="false" status="on"> <parameter key="retry" value="3"/> <parameter key="timeout" value="3000"/> <parameter key="service-name" value="httpd"/>① <parameter key="run-level" value="3"/>② <parameter key="match-all" value="true"/>③</service>
<monitor service="Process-httpd" class-name="org.opennms.netmgt.poller.monitors.HostResourceSwRunMonitor"/>
① Name of the process on the system
② Test the state if the process is in a valid state, i.e. have a run-level no higher than notRunnable(3)
③ If the httpd process runs multiple times the test is done for each instance of the process.
4.6.14. HttpMonitor
The HTTP monitor tests the response of an HTTP server on a specific HTTP 'GET' command. Duringthe poll, an attempt is made to connect on the specified port(s). The monitor can test web server onmultiple ports. By default the a test is made against port 80, 8080 and 8888. If the connectionrequest is successful, an HTTP 'GET' command is sent to the interface. The response is parsed and areturn code extracted and verified.
Monitor facts
Class Name org.opennms.netmgt.poller.monitors.HttpMonitor
75

Remote Enabled true
Configuration and Usage
Table 27. Monitor specific parameters for the HttpMonitor
Parameter
Description Required
Default value
basic-authentication
Authentication credentials to performbasic authentication.Credentials should comply to RFC1945section 11.1, without the Base64encoding part. That’s: be a string madeof the concatenation of:1- the user ID;2- a colon;3- the password.basic-authentication takes precedenceover the user and password parameters.
optional
-
header[0-9]+
Additional headers to be sent along withthe request.Example of valid parameter’s names areheader0, header1 and header180. header isnot a valid parameter name.
optional
-
host-name Specify the Host header’s value. optional
-
nodelabel-host-name
If the host-name parameter isn’t set andthe resolve-ip parameter is set to false,then OpenNMS Horizon will use thenode’s label to set the Host header’svalue if this parameter is set to true.Otherwise, OpenNMS Horizon will fallback using the node interface’s IPaddress as Host header value.
optional
false
password This parameter is meant to be usedtogether with the user parameter toperform basicauthentication. This parameter specifyto password to be used. The user andpasswordparameters are ignored when the basic-authentication parameter is defined.
optional
empty string
port A list of TCP ports to which connectionshall be tried.
optional
80,8080,8888
retry Number of attempts to get a valid HTTPresponse/response-text
optional
0
76

Parameter
Description Required
Default value
resolve-ip
If the host-name parameter isn’t set andthis parameter is set to true, OpenNMSHorizon will use DNS to resolve thenode interface’s IP address, and use theresult to set the Host header’s value.When set to false and the host-nameparameter isn’t set, OpenNMS Horizonwill try to use the nodelabel-host-nameparameter to set the Host header’svalue.
optional
false
response A comma-separated list of acceptableHTTP response code ranges. Example:200-202,299
optional
If the url parameter is set to /, thedefaultvalue for this parameter is 100-499,otherwise it’s 100-399.
response-text
Text to look for in the response body.This will be matched against every line,and it will be considered a success at thefirst match. If there is a ~ at thebeginning of the parameter, the rest ofthe string will be used as a regularexpression pattern match, otherwise thematch will be a substring match. Theregular expression match is anchored atthe beginning and end of the line, so youwill likely need to put a .* on both sidesof your pattern unless you are going tobe matching on the entire line.
optional
-
url URL to be retrieved via the HTTP 'GET'command
optional
/
user This parameter is meant to be usedtogether with the password parameter toperform basic authentication. Thisparameter specify to user ID to be used.The user and password parameters areignored when the basic-authenticationparameter is defined.
optional
-
user-agent
Allows you to set the User-Agent HTTPheader (see also RFC2616 section 14.43).
optional
OpenNMS HttpMonitor
verbose When set to true, full communicationbetween client and the webserver willbe logged (with a log level of DEBUG).
optional
-
This monitor implements the Common Configuration Parameters.
77

Examples
<!-- Test HTTP service on port 80 only --><service name="HTTP" interval="300000" user-defined="false" status="on"> <parameter key="retry" value="2"/> <parameter key="timeout" value="3000"/> <parameter key="port" value="80"/> <parameter key="url" value="/"/></service>
<!-- Test for virtual host opennms.com running --><service name="OpenNMSdotCom" interval="300000" user-defined="false" status="on"> <parameter key="retry" value="1"/> <parameter key="timeout" value="3000"/> <parameter key="port" value="80"/> <parameter key="host-name" value="opennms.com"/> <parameter key="url" value="/solutions"/> <parameter key="response" value="200-202,299"/> <parameter key="response-text" value="~.*[Cc]onsulting.*"/></service>
<!-- Test for instance of OpenNMS 1.2.9 running --><service name="OpenNMS-129" interval="300000" user-defined="false" status="on"> <parameter key="retry" value="1"/> <parameter key="timeout" value="3000"/> <parameter key="port" value="8080"/> <parameter key="url" value="/opennms/event/list"/> <parameter key="basic-authentication" value="admin:admin"/> <parameter key="response" value="200"/></service>
<monitor service="HTTP" class-name="org.opennms.netmgt.poller.monitors.HttpMonitor" /><monitor service="OpenNMSdotCom" class-name="org.opennms.netmgt.poller.monitors.HttpMonitor" /><monitor service="OpenNMS-129" class-name="org.opennms.netmgt.poller.monitors.HttpMonitor" />
Testing filtering proxies with HttpMonitor
In case a filtering proxy server is set up to allow retrieval of some URLs but deny others, theHttpMonitor can be used to verify this behavior.
As an example a proxy server is running on TCP port 3128, and serves http://www.opennms.org/ butnever http://www.myspace.com/. To test this behaviour, the HttpMonitor can be configured as thefollowing:
78

<service name="HTTP-Allow-opennms.org" interval="300000" user-defined="false" status="on"> <parameter key="retry" value="1"/> <parameter key="timeout" value="3000"/> <parameter key="port" value="3128"/> <parameter key="url" value="http://www.opennms.org/"/> <parameter key="response" value="200-399"/></service>
<service name="HTTP-Block-myspace.com" interval="300000" user-defined="false" status="on"> <parameter key="retry" value="1"/> <parameter key="timeout" value="3000"/> <parameter key="port" value="3128"/> <parameter key="url" value="http://www.myspace.com/"/> <parameter key="response" value="400-599"/></service>
<monitor service="HTTP-Allow-opennms.org" class-name="org.opennms.netmgt.poller.monitors.HttpMonitor"/><monitor service="HTTP-Block-myspace.com" class-name="org.opennms.netmgt.poller.monitors.HttpMonitor"/>
4.6.15. HttpPostMonitor
If it is required to HTTP POST any arbitrary content to a remote URI, the HttpPostMonitor can beused. A use case is to HTTP POST to a SOAP endpoint.
Monitor facts
Class Name org.opennms.netmgt.poller.monitors.HttpPostMonitor
Remote Enabled false
Configuration and Usage
Table 28. Monitor specific parameters for the HttpPostMonitor
Parameter
Description Required
Defaultvalue
payload The body of the POST, for example properly escaped XML. required
-
auth-password
The password to use for HTTP BASIC auth. optional
-
auth-username
The username to use for HTTP BASIC auth. optional
-
79

Parameter
Description Required
Defaultvalue
banner A string that is matched against the response of the HTTP POST. Ifthe output contains the banner, the service is determined as up.Specify a regex by starting with ~.
optional
-
charset Set the character set for the POST. optional
UTF-8
mimetype Set the mimetype for the POST. optional
text/xml
port The port for the web server where the POST is send to. optional
80
scheme The connection scheme to use. optional
http
usesslfilter
Enables or disables the SSL ceritificate validation. true - false optional
false
uri The uri to use during the POST. optional
/
This monitor implements the Common Configuration Parameters.
Examples
The following example would create a POST that contains the payload Word.
<service name="MyServlet" interval="300000" user-defined="false" status="on"> <parameter key="banner" value="Hello"/> <parameter key="port" value="8080"/> <parameter key="uri" value="/MyServlet"> <parameter key="payload" value="World"/> <parameter key="retry" value="1"/> <parameter key="timeout" value="30000"/></service><monitor service="MyServlet" class-name="org.opennms.netmgt.poller.monitors.HttpPostMonitor"/>
The resulting POST looks like this:
POST /MyServlet HTTP/1.1Content-Type: text/xml; charset=utf-8Host: <ip_addr_of_interface>:8080Connection: Keep-Alive
World
80

4.6.16. HttpsMonitor
The HTTPS monitor tests the response of an SSL-enabled HTTP server. The HTTPS monitor is anSSL-enabled extension of the HTTP monitor with a default TCP port value of 443. All HttpMonitorparameters apply, so please refer to HttpMonitor’s documentation for more information.
Monitor facts
Class Name org.opennms.netmgt.poller.monitors.HttpsMonitor
Remote Enabled true
Configuration and Usage
Table 29. Monitor specific parameters for the HttpsMonitor
Parameter
Description Required
Defaultvalue
port A list of TCP ports to which connection shall be tried. optional 443
Examples
<!-- Test HTTPS service on port 8443 --><service name="HTTPS" interval="300000" user-defined="false" status="on"> <parameter key="retry" value="2"/> <parameter key="timeout" value="3000"/> <parameter key="port" value="8443"/> <parameter key="url" value="/"/></service>
<monitor service="HTTPS" class-name="org.opennms.netmgt.poller.monitors.HttpsMonitor"/>
4.6.17. IcmpMonitor
The ICMP monitor tests for ICMP service availability by sending echo request ICMP messages. Theservice is considered available when the node sends back an echo reply ICMP message within thespecified amount of time.
Monitor facts
Class Name org.opennms.netmgt.poller.monitors.IcmpMonitor
Remote Enabled true with some restrictions (see below)
Configuration and Usage
Table 30. Monitor specific parameters for the IcmpMonitor
81
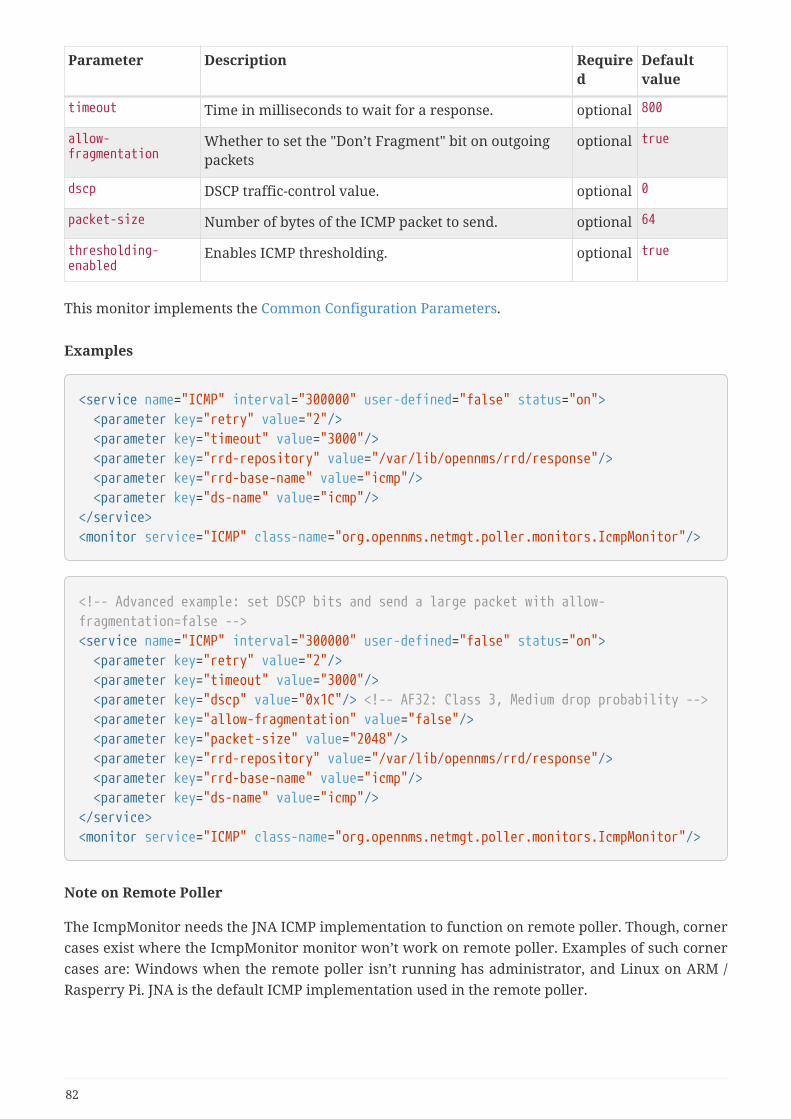
Parameter Description Required
Defaultvalue
timeout Time in milliseconds to wait for a response. optional 800
allow-fragmentation
Whether to set the "Don’t Fragment" bit on outgoingpackets
optional true
dscp DSCP traffic-control value. optional 0
packet-size Number of bytes of the ICMP packet to send. optional 64
thresholding-enabled
Enables ICMP thresholding. optional true
This monitor implements the Common Configuration Parameters.
Examples
<service name="ICMP" interval="300000" user-defined="false" status="on"> <parameter key="retry" value="2"/> <parameter key="timeout" value="3000"/> <parameter key="rrd-repository" value="/var/lib/opennms/rrd/response"/> <parameter key="rrd-base-name" value="icmp"/> <parameter key="ds-name" value="icmp"/></service><monitor service="ICMP" class-name="org.opennms.netmgt.poller.monitors.IcmpMonitor"/>
<!-- Advanced example: set DSCP bits and send a large packet with allow-fragmentation=false --><service name="ICMP" interval="300000" user-defined="false" status="on"> <parameter key="retry" value="2"/> <parameter key="timeout" value="3000"/> <parameter key="dscp" value="0x1C"/> <!-- AF32: Class 3, Medium drop probability --> <parameter key="allow-fragmentation" value="false"/> <parameter key="packet-size" value="2048"/> <parameter key="rrd-repository" value="/var/lib/opennms/rrd/response"/> <parameter key="rrd-base-name" value="icmp"/> <parameter key="ds-name" value="icmp"/></service><monitor service="ICMP" class-name="org.opennms.netmgt.poller.monitors.IcmpMonitor"/>
Note on Remote Poller
The IcmpMonitor needs the JNA ICMP implementation to function on remote poller. Though, cornercases exist where the IcmpMonitor monitor won’t work on remote poller. Examples of such cornercases are: Windows when the remote poller isn’t running has administrator, and Linux on ARM /Rasperry Pi. JNA is the default ICMP implementation used in the remote poller.
82

4.6.18. ImapMonitor
This monitor checks if an IMAP server is functional. The test is done by initializing a very simpleIMAP conversation. The ImapMonitor establishes a TCP connection, sends a logout command andtest the IMAP server responses.
The behavior can be simulated with telnet:
telnet mail.myserver.de 143Trying 62.108.41.197...Connected to mail.myserver.de.Escape character is '^]'.* OK [CAPABILITY IMAP4rev1 LITERAL+ SASL-IR LOGIN-REFERRALS ID ENABLE IDLE STARTTLSLOGINDISABLED] Dovecot ready. ①ONMSPOLLER LOGOUT ②* BYE Logging out ③ONMSPOLLER OK Logout completed.Connection closed by foreign host.
① Test IMAP server banner, it has to start * OK to be up
② Sending a ONMSPOLLER LOGOUT
③ Test server responds with, it has to start with * BYE to be up
If one of the tests in the sample above fails the service is marked down.
Monitor facts
Class Name org.opennms.netmgt.poller.monitors.ImapMonitor
Remote Enabled false
Configuration and Usage
Table 31. Monitor specific parameters for the ImapMonitor
Parameter
Description Required
Defaultvalue
retry Number of attempts to get a valid IMAP response optional 0
port The port of the IMAP server. optional 143
This monitor implements the Common Configuration Parameters.
Examples
Some example configuration how to configure the monitor in the poller-configuration.xml
83

<!-- Test IMAP service on port 143 only --><service name="IMAP" interval="300000" user-defined="false" status="on"> <parameter key="retry" value="1"/> <parameter key="port" value="143"/> <parameter key="timeout" value="3000"/></service>
<monitor service="IMAP" class-name="org.opennms.netmgt.poller.monitors.ImapMonitor" />
4.6.19. ImapsMonitor
The IMAPS monitor tests the response of an SSL-enabled IMAP server. The IMAPS monitor is an SSL-enabled extension of the IMAP monitor with a default TCP port value of 993. All ImapMonitorparameters apply, so please refer to ImapMonitor’s documentation for more information.
Monitor facts
Class Name org.opennms.netmgt.poller.monitors.ImapsMonitor
Remote Enabled true
Configuration and Usage
Table 32. Monitor specific parameters for the ImapsMonitor
Parameter
Description Required
Defaultvalue
port The destination port where connections shall be attempted. optional 993
This monitor implements the Common Configuration Parameters.
Examples
<!-- IMAPS service at OpenNMS.org is on port 9993 --><service name="IMAPS" interval="300000" user-defined="false" status="on"> <parameter key="port" value="9993"/> <parameter key="version" value="3"/> <parameter key="retry" value="2"/> <parameter key="timeout" value="3000"/> <parameter key="rrd-repository" value="/var/lib/opennms/rrd/response"/> <parameter key="rrd-base-name" value="imaps"/> <parameter key="ds-name" value="imaps"/></service>
<monitor service="IMAPS" class-name="org.opennms.netmgt.poller.monitors.ImapsMonitor"/>
84

4.6.20. JCifsMonitor
This monitor allows to test a file sharing service based on the CIFS/SMB protocol.
This monitor is not installed by default. You have to install opennmms-plugin-protocol-cifs from your OpenNMS Horizon installation repository.
With the JCIFS monitor you have different possibilities to test the availability of the JCIFS service:
With the JCifsMonitor it is possible to run tests for the following use cases:
• share is available in the network
• a given file exists in the share
• a given folder exists in the share
• a given folder should contain at least one (1) file
• a given folder folder should contain no (0) files
• by testing on files and folders, you can use a regular expression to ignore specific file and foldernames from the test
A network resource in SMB like a file or folder is addressed as a UNC Path.
\\server\share\folder\file.txt
The Java implementation jCIFS, which implements the CIFS/SMB network protocol, uses SMB URLsto access the network resource. The same resource as in our example would look like this as anSMB URL:
smb://workgroup;user:password@server/share/folder/file.txt
The JCifsMonitor can not test:
• file contains specific content
• a specific number of files in a folder, for example folder should contain exactly / more or lessthan x files
• Age or modification time stamps of files or folders
• Permissions or other attributes of files or folders
Monitor facts
Class Name org.opennms.netmgt.poller.monitors.JCifsMonitor
Remote Enabled false
85

Configuration and Usage
Table 33. Monitor specific parameters for the JCifsMonitor
Parameter Description Required
Defaultvalue
retry Number of retries before the service is marked as down. optional
0
domain Windows domain where the user is located. You don’t have to usethe domain parameter if you use local user accounts.
optional
emptyString
username Username to access the resource over a network optional
emptyString
password Password for the user optional
emptyString
path Path to the resource you want to test required
emptyString
mode The test mode which has the following optionspath_exist: Service is up if the resource is accessiblepath_not_exist: Service is up if the resource is not accessiblefolder_empty: Service is up if the folder is empty (0 files)folder_not_empty: Service is up if the folder has at least one file
optional
path_exist
smbHost Override the IP address of the SMB url to check shares ondifferent file servers.
optional
emptyString
folderIgnoreFiles
Ignore specific files in folder with regular expression. Thisparameter will just be applied on folder_empty andfolder_not_empty, otherwise it will be ignored.
optional
-
This monitor implements the Common Configuration Parameters.
It makes little sense to have retries higher than 1. It is a waste of resources duringthe monitoring.
Please consider, if you are accessing shares with Mac OSX you have some sideeffects with the hidden file '.DS_Store.' It could give you false positives inmonitoring, you can use then the folderIgnoreFiles parameter.
Example test existence of a file
This example shows how to configure the JCifsMonitor to test if a file share is available over anetwork. For this example we have access to a share for error logs and we want to get an outage ifwe have any error log files in our folder. The share is named log. The service should go back tonormal if the error log file is deleted and the folder is empty.
86

JCifsMonitor configuration to test that a shared folder is empty
<service name="CIFS-ErrorLog" interval="30000" user-defined="true" status="on"> <parameter key="retry" value="1" /> <parameter key="timeout" value="3000" /> <parameter key="domain" value="contoso" />① <parameter key="username" value="MonitoringUser" />② <parameter key="password" value="MonitoringPassword" />③ <parameter key="path" value="/fileshare/log/" />④ <parameter key="mode" value="folder_empty" />⑤</service>
<monitor service="CIFS-ErrorLog" class-name="org.opennms.netmgt.poller.monitors.JCifsMonitor" />
① Name of the SMB or Microsoft Windows Domain
② User for accessing the share
③ Password for accessing the share
④ Path to the folder inside of the share as part of the SMB URL
⑤ Mode is set to folder_empty
4.6.21. JDBCMonitor
The JDBCMonitor checks that it is able to connect to a database and checks if it is able to get thedatabase catalog from that database management system (DBMS). It is based on the JDBCtechnology to connect and communicate with the database.
Monitor facts
Class Name org.opennms.netmgt.poller.monitors.JDBCMonitor
Remote Enabled true
Configuration and Usage
Table 34. Monitor specific parameters for the JDBCMonitor
Parameter
Description Required
Default value
driver JDBC driver class to use required
org.postgresql.Driver
url JDBC Url to connect to. required
jdbc:postgresql://:OPENNMS_JDBC_HOSTNAME/opennms
user Database user required
postgres
87

Parameter
Description Required
Default value
password
Database password required
empty string
retries How many retries should be performedbefore failing the test
optional
0
The OPENNMS_JDBC_HOSTNAME is replaced in the url parameter with the IP orresolved hostname of the interface the monitored service is assigned to.
This monitor implements the Common Configuration Parameters.
Provide the database driver
The JDBCMonitor is based on JDBC and requires a JDBC driver to communicate with any database.Due to the fact that OpenNMS Horizon itself uses a PostgreSQL database, the PostgreSQL JDBCdriver is available out of the box. For all other database systems a compatible JDBC driver has to beprovided to OpenNMS Horizon as a jar-file. To provide a JDBC driver place the driver-jar in theopennms/lib folder of your OpenNMS Horizon. To use the JDBCMonitor from a remote poller, thedriver-jar has to be provided to the Remote Poller too. This may be tricky or impossible when usingthe Java Webstart Remote Poller, because of code signing requirements.
Examples
The following example checks if the PostgreSQL database used by OpenNMS Horizon is available.
<service name="OpenNMS-DBMS" interval="30000" user-defined="true" status="on"> <parameter key="driver" value="org.postgresql.Driver"/> <parameter key="url" value="jdbc:postgresql://OPENNMS_JDBC_HOSTNAME:5432/opennms"/> <parameter key="user" value="opennms"/> <parameter key="password" value="opennms"/></service>
<monitor service="OpenNMS-DBMS" class-name="org.opennms.netmgt.poller.monitors.JDBCMonitor" />
4.6.22. JDBCStoredProcedureMonitor
The JDBCStoredProcedureMonitor checks the result of a stored procedure in a remote database. Theresult of the stored procedure has to be a boolean value (representing true or false). The serviceassociated with this monitor is marked as up if the stored procedure returns true and it is markedas down in all other cases. It is based on the JDBC technology to connect and communicate with thedatabase.
Monitor facts
88

Class Name org.opennms.netmgt.poller.monitors.JDBCStoredProcedureMonitor
Remote Enabled false
Configuration and Usage
Table 35. Monitor specific parameters for the JDBCStoredProcedureMonitor
Parameter Description Required
Default value
driver JDBC driver class to use required
org.postgresql.Driver
url JDBC Url to connect to. required
jdbc:postgresql://:OPENNMS_JDBC_HOSTNAME/opennms
user Database user required
postgres
password Database password required
empty string
retries How many retries should be performedbefore failing the test
optional
0
stored-procedure
Name of the database stored procedure tocall
required
-
schema Name of the database schema in whichthe stored procedure is
optional
test
The OPENNMS_JDBC_HOSTNAME is replaced in the url parameter with the IP orresolved hostname of the interface the monitored service is assigned to.
This monitor implements the Common Configuration Parameters.
Provide the database driver
The JDBCStoredProcedureMonitor is based on JDBC and requires a JDBC driver to communicate withany database. Due to the fact that OpenNMS Horizon itself uses a PostgreSQL database, thePostgreSQL JDBC driver is available out of the box. For all other database systems a compatibleJDBC driver has to be provided to OpenNMS Horizon as a jar-file. To provide a JDBC driver place thedriver-jar in the opennms/lib folder of your OpenNMS Horizon. To use theJDBCStoredProcedureMonitor from a remote poller, the driver-jar has to be provided to the RemotePoller too. This may be tricky or impossible when using the Java Webstart Remote Poller, because ofcode signing requirements.
Examples
The following example checks a stored procedure added to the PostgreSQL database used byOpenNMS Horizon. The stored procedure returns true as long as less than 250000 events are in theevents table of OpenNMS Horizon.
89

Stored procedure which is used in the monitor
CREATE OR REPLACE FUNCTION eventlimit_sp() RETURNS boolean AS$BODY$DECLAREnum_events integer;BEGIN SELECT COUNT(*) into num_events from events; RETURN num_events > 250000;END;$BODY$LANGUAGE plpgsql VOLATILE NOT LEAKPROOFCOST 100;
<service name="OpenNMS-DB-SP-Event-Limit" interval="300000" user-defined="true"status="on"> <parameter key="driver" value="org.postgresql.Driver"/> <parameter key="url" value="jdbc:postgresql://OPENNMS_JDBC_HOSTNAME:5432/opennms"/> <parameter key="user" value="opennms"/> <parameter key="password" value="opennms"/> <parameter key="stored-procedure" value="eventlimit_sp"/> <parameter key="schema" value="public"/></service>
<monitor service="OpenNMS-DB-SP-Event-Limit" class-name="org.opennms.netmgt.poller.monitors.JDBCStoredProcedureMonitor"/>
4.6.23. JDBCQueryMonitor
The JDBCQueryMonitor runs an SQL query against a database and is able to verify the result of thequery. A read-only connection is used to run the SQL query, so the data in the database is notaltered. It is based on the JDBC technology to connect and communicate with the database.
Monitor facts
Class Name org.opennms.netmgt.poller.monitors.JDBCQueryMonitor
Remote Enabled false
Configuration and Usage
Table 36. Monitor specific parameters for the JDBCQueryMonitor
Parameter
Description Required
Default value
driver JDBC driver class to use required
org.postgresql.Driver
url JDBC URL to connect to. required
jdbc:postgresql://:OPENNMS_JDBC_HOSTNAME/opennms
90

Parameter
Description Required
Default value
user Database user required
postgres
password
Database password required
empty string
query The SQL query to run required
-
action What evaluation action to perform required
row_count
column The result column to evaluate against required
-
operator
Operator to use for the evaluation required
>=
operand
The operand to compare against the SQL query result required
depends on the action
message
The message to use if the service is down. Bothoperands and the operator are added to the messagetoo.
optional
generic message dependingon the action
retries
How many retries should be performed before failingthe test
optional
0
The OPENNMS_JDBC_HOSTNAME is replaced in the url parameter with the IP orresolved hostname of the interface the monitored service is assigned to.
This monitor implements the Common Configuration Parameters.
Table 37. Available action parameters and their default operand
Parameter Description Defaultoperand
row_count The number of returned rows is compared, not a value of theresulting rows
1
compare_string
Strings are always checked for equality with the operand -
compare_int An integer from a column of the first result row is compared 1
Table 38. Available operand parameters
Parameter
XML entity to use in XMLconfigs
= =
< <
91
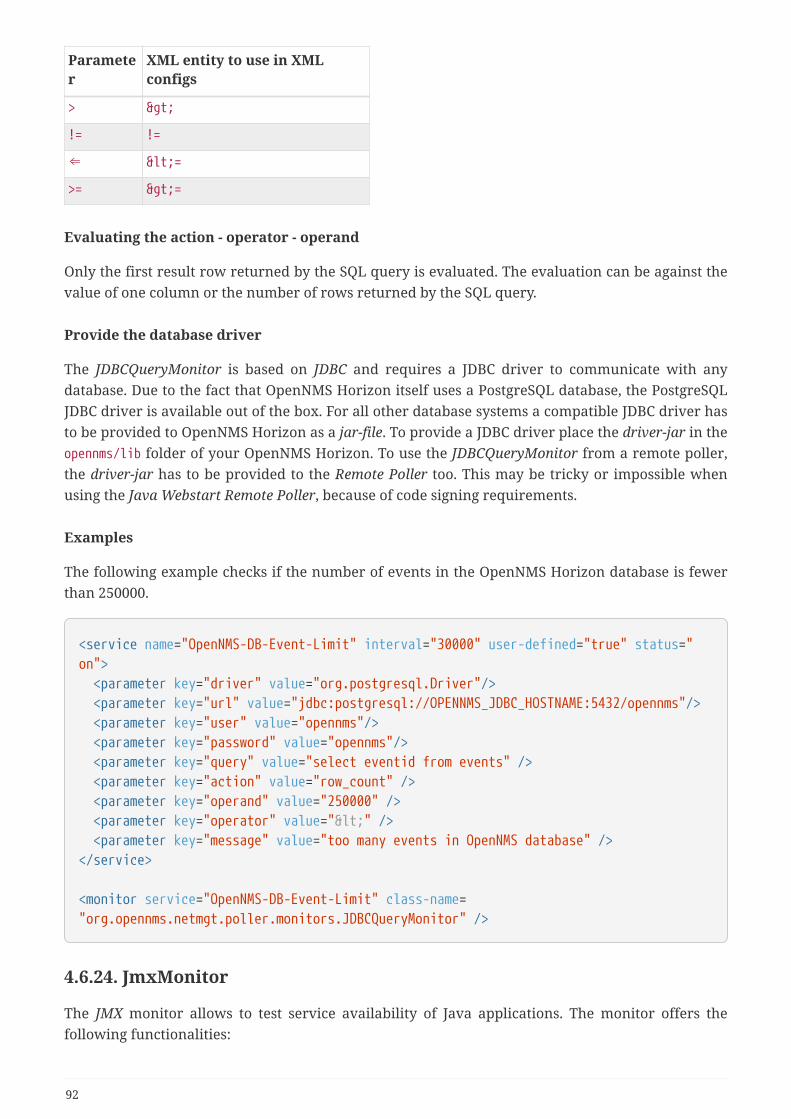
Parameter
XML entity to use in XMLconfigs
> >
!= !=
⇐ <=
>= >=
Evaluating the action - operator - operand
Only the first result row returned by the SQL query is evaluated. The evaluation can be against thevalue of one column or the number of rows returned by the SQL query.
Provide the database driver
The JDBCQueryMonitor is based on JDBC and requires a JDBC driver to communicate with anydatabase. Due to the fact that OpenNMS Horizon itself uses a PostgreSQL database, the PostgreSQLJDBC driver is available out of the box. For all other database systems a compatible JDBC driver hasto be provided to OpenNMS Horizon as a jar-file. To provide a JDBC driver place the driver-jar in theopennms/lib folder of your OpenNMS Horizon. To use the JDBCQueryMonitor from a remote poller,the driver-jar has to be provided to the Remote Poller too. This may be tricky or impossible whenusing the Java Webstart Remote Poller, because of code signing requirements.
Examples
The following example checks if the number of events in the OpenNMS Horizon database is fewerthan 250000.
<service name="OpenNMS-DB-Event-Limit" interval="30000" user-defined="true" status="on"> <parameter key="driver" value="org.postgresql.Driver"/> <parameter key="url" value="jdbc:postgresql://OPENNMS_JDBC_HOSTNAME:5432/opennms"/> <parameter key="user" value="opennms"/> <parameter key="password" value="opennms"/> <parameter key="query" value="select eventid from events" /> <parameter key="action" value="row_count" /> <parameter key="operand" value="250000" /> <parameter key="operator" value="<" /> <parameter key="message" value="too many events in OpenNMS database" /></service>
<monitor service="OpenNMS-DB-Event-Limit" class-name="org.opennms.netmgt.poller.monitors.JDBCQueryMonitor" />
4.6.24. JmxMonitor
The JMX monitor allows to test service availability of Java applications. The monitor offers thefollowing functionalities:
92

• test the application’s connectivity via JMX
• existence of management beans
• test the status of a single or multiple management beans and evaluate their value
Monitor facts
Class Name org.opennms.netmgt.poller.monitors.Jsr160Monitor
Remote Enabled true
Configuration and Usage
Table 39. Monitor specific parameters for the JmxMonitor
Parameter Description Required
Default value
retry Number of attempts to get a response optional
3
timeout Time in milliseconds to wait for a response optional
?
port Destination port where the JMX requests shall be sent optional
from jmx-config.xml
factory
Set this to PASSWORD-CLEAR if credentials are required optional
STANDARD
protocol
Protocol used in the JMX connection string optional
rmi
urlPath
Path used in JMX connection string optional
/jmxrmi
rmiServerPort
RMI port optional
45444
remoteJMX
Use an alternative JMX URL scheme optional
false
beans.<variable>
Defines a mbeans objectname to access. The ´<variable>´name is arbitrary.
optional
-
tests.<variable>
Tests a mbeans attribute value. The ´<variable>´ name isarbitrary.
optional
-
Examples
93

Test if a JMX connection can be established
<service name="JMX-Connection-Test" interval="300000" user-defined="false" status="on"> <parameter key="retry" value="3"/> <parameter key="timeout" value="3000"/> <parameter key="port" value="18980"/></service><monitor service="JMX-Connection-Test" class-name="org.opennms.netmgt.poller.monitors.JmxMonitor"/>
Test a specific management bean for a value
<service name="JMX-BeanValue-Test" interval="300000" user-defined="false" status="on"> <parameter key="retry" value="3"/> <parameter key="timeout" value="3000"/> <parameter key="port" value="18980"/> <parameter key="beans.connected" value="org.opennms.workflow:name=client.onms.connected"/> <parameter key="tests.isConnected" value="connected.get("Value") ==true"/></service><monitor service="JMX-BeanValue-Test" class-name="org.opennms.netmgt.poller.monitors.Jsr160Monitor"/>
Reserved XML characters like >, <, " need to be escaped.
4.6.25. JolokiaBeanMonitor
The JolokiaBeanMonitor is a JMX monitor specialized for the use with the Jolokia framework. If it isrequired to execute a method via JMX or poll an attribute via JMX, the JolokiaBeanMonitor can beused. It requires a fully installed and configured Jolokia agent to be deployed in the JVM container.If required it allows attribute names, paths, and method parameters to be provided additionalarguments to the call. To determine the status of the service the JolokiaBeanMonitor relies on theoutput to be matched against a banner. If the banner is part of the output the status is interpretedas up. If the banner is not available in the output the status is determined as down. Bannermatching supports regular expression and substring match.
Monitor facts
Class Name org.opennms.netmgt.poller.monitors.JolokiaBeanMonitor
Remote Enabled false
Configuration and Usage
Table 40. Monitor specific parameters for the JolokiaBeanMonitor
94

Parameter
Description Required Defaultvalue
beanname
The bean name to query against. required -
attrname
The name of the JMX attribute to scrape. optional (attrname ormethodname must be set)
-
attrpath
The attribute path. optional -
auth-username
The username to use for HTTP BASIC auth. optional -
auth-password
The password to use for HTTP BASIC auth. optional -
banner A string that is match against the output of thesystem-call. If the output contains the banner, theservice is determined as up. Specify a regex bystarting with ~.
optional -
input1 Method input optional -
input2 Method input optional -
methodname
The name of the bean method to execute, output willbe compared to banner.
optional (attrname ormethodname must be set)
-
port The port of the jolokia agent. optional 8080
url The jolokia agent url. Defaults to"http://<ipaddr>:<port>/jolokia"
optional -
This monitor implements the Common Configuration Parameters.
Table 41. Variables which can be used in the configuration
Variable Description
$ipaddr IP-address of the interface the service is bound to.
$port Port the service it bound to.
Examples
Some example configuration how to configure the monitor in the poller-configuration.xml
<parameter key="url" value="http://$ipaddr:$port/jolokia"/><parameter key="url" value="https://$ipaddr:$port/jolokia"/>
AttrName vs MethodName
The JolokiaBeanMonitor has two modes of operation. It can either scrape an attribute from a bean,
95

or execute a method and compare output to a banner. The method execute is useful when yourapplication has it’s own test methods that you would like to trigger via OpenNMS Horizon.
The args to execute a test method called "superTest" that take in a string as input would look likethis:
<parameter key="beanname" value="MyBean" /><parameter key="methodname" value="superTest" /><parameter key="input1" value="someString"/>
The args to scrape an attribute from the same bean would look like this:
<parameter key="beanname" value="MyBean" /><parameter key="attrname" value="upTime" />
4.6.26. LdapMonitor
The LDAP monitor tests for LDAP service availability. The LDAP monitor first tries to establish a TCPconnection on the specified port. Then, if it succeeds, it will attempt to establish an LDAPconnection and do a simple search. If the search returns a result within the specified timeout andattempts, the service will be considered available. The scope of the LDAP search is limited to theimmediate subordinates of the base object. The LDAP search is anonymous by default. The LDAPmonitor makes use of the com.novell.ldap.LDAPConnection class.
Monitor facts
Class Name org.opennms.netmgt.poller.monitors.LdapMonitor
Remote Enabled true
Configuration and Usage
Table 42. Monitor specific parameters for the LdapMonitor
Parameter
Description Required
Defaultvalue
dn The distinguished name to use if authenticated search is needed. optional
-
password The password to use if authenticated search is needed. optional
-
port The destination port where connection shall be attempted. optional
389
retry Number of attempts to get a search result. optional
1
96

Parameter
Description Required
Defaultvalue
searchbase
The base distinguished name to search from. optional
base
searchfilter
The LDAP search’s filter. optional
(objectclass=*)
version The version of the LDAP protocol to use, specified as an integer.Note: Only LDAPv3 is supported at the moment.
optional
3
This monitor implements the Common Configuration Parameters.
Examples
<--! OpenNMS.org --><service name="LDAP" interval="300000" user-defined="false" status="on"> <parameter key="port" value="389"/> <parameter key="version" value="3"/> <parameter key="searchbase" value="dc=opennms,dc=org"/> <parameter key="searchfilter" value="uid=ulf"/> <parameter key="retry" value="2"/> <parameter key="timeout" value="3000"/> <parameter key="rrd-repository" value="/var/lib/opennms/rrd/response"/> <parameter key="rrd-base-name" value="ldap"/> <parameter key="ds-name" value="ldap"/></service><monitor service="LDAP" class-name="org.opennms.netmgt.poller.monitors.LdapMonitor"/>
4.6.27. LdapsMonitor
The LDAPS monitor tests the response of an SSL-enabled LDAP server. The LDAPS monitor is anSSL-enabled extension of the LDAP monitor with a default TCP port value of 636. All LdapMonitorparameters apply, so please refer to LdapMonitor’s documentation for more information.
Monitor facts
Class Name org.opennms.netmgt.poller.monitors.LdapsMonitor
Remote Enabled true
Configuration and Usage
Table 43. Monitor specific parameters for the LdapsMonitor
Parameter
Description Required
Defaultvalue
port The destination port where connections shall be attempted. optional 636
97

This monitor implements the Common Configuration Parameters.
Examples
<!-- LDAPS service at OpenNMS.org is on port 6636 --><service name="LDAPS" interval="300000" user-defined="false" status="on"> <parameter key="port" value="6636"/> <parameter key="version" value="3"/> <parameter key="searchbase" value="dc=opennms,dc=org"/> <parameter key="searchfilter" value="uid=ulf"/> <parameter key="retry" value="2"/> <parameter key="timeout" value="3000"/> <parameter key="rrd-repository" value="/var/lib/opennms/rrd/response"/> <parameter key="rrd-base-name" value="ldaps"/> <parameter key="ds-name" value="ldaps"/></service>
<monitor service="LDAPS" class-name="org.opennms.netmgt.poller.monitors.LdapsMonitor"/>
4.6.28. MemcachedMonitor
This monitor allows to monitor Memcached, a distributed memory object caching system. Tomonitor the service availability the monitor tests if the Memcached statistics can be requested. Thestatistics are processed and stored in RRD files. The following metrics are collected:
Table 44. Collected metrics using the MemcachedMonitor
Metric Description
uptime Seconds the Memcached server has been running since last restart.
rusageuser User time seconds for the server process.
rusagesystem System time seconds for the server process.
curritems Number of items in this servers cache.
totalitems Number of items stored on this server.
bytes Number of bytes currently used for caching items.
limitmaxbytes Maximum configured cache size.
currconnections Number of open connections to this Memcached.
totalconnections Number of successful connect attempts to this server since start.
connectionstructure Number of internal connection handles currently held by the server.
cmdget Number of GET commands received since server startup.
cmdset Number of SET commands received since server startup.
gethits Number of successful GET commands (cache hits) since startup.
98

Metric Description
getmisses Number of failed GET requests, because nothing was cached.
evictions Number of objects removed from the cache to free up memory.
bytesread Number of bytes received from the network.
byteswritten Number of bytes send to the network.
threads Number of threads used by this server.
Monitor facts
Class Name org.opennms.netmgt.poller.monitors.MemcachedMonitor
Remote Enabled true
Configuration and Usage
Table 45. Monitor specific parameters for the MemcachedMonitor
Parameter
Description Required
Defaultvalue
retry Number of attempts to establish the Memcached connnection. optional 0
port TCP port connecting to Memcached. optional 11211
This monitor implements the Common Configuration Parameters.
Examples
The following example shows a configuration in the poller-configuration.xml.
<service name="Memcached" interval="300000" user-defined="false" status="on"> <parameter key="port" value="11211" /> <parameter key="retry" value="2" /> <parameter key="timeout" value="3000" /> <parameter key="rrd-repository" value="/opt/opennms/share/rrd/response" /> <parameter key="ds-name" value="memcached" /> <parameter key="rrd-base-name" value="memcached" /></service>
<monitor service="Memcached" class-name="org.opennms.netmgt.poller.monitors.MemcachedMonitor" />
4.6.29. NetScalerGroupHealthMonitor
This monitor is designed for Citrix® NetScaler® loadbalancing checks. It checks if more than xpercent of the servers assigned to a specific group on a loadbalanced service are active. Therequired data is gathered via SNMP from the NetScaler®. The status of the servers is determined by
99
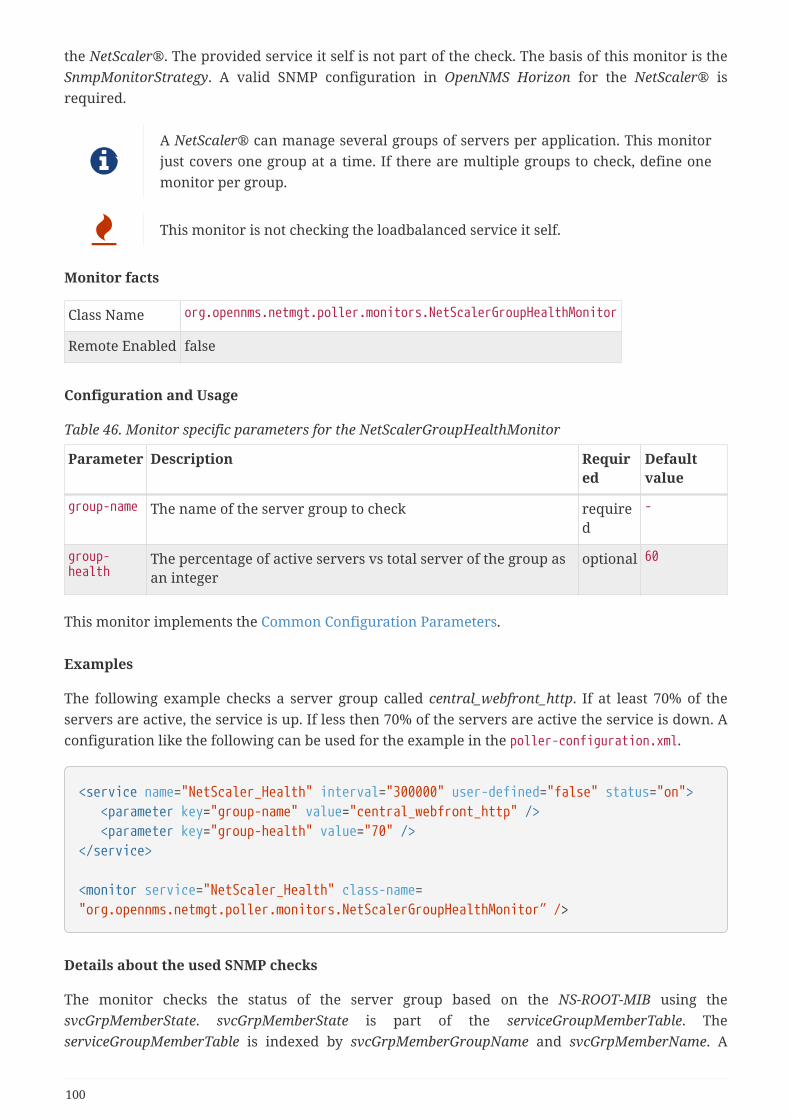
the NetScaler®. The provided service it self is not part of the check. The basis of this monitor is theSnmpMonitorStrategy. A valid SNMP configuration in OpenNMS Horizon for the NetScaler® isrequired.
A NetScaler® can manage several groups of servers per application. This monitorjust covers one group at a time. If there are multiple groups to check, define onemonitor per group.
This monitor is not checking the loadbalanced service it self.
Monitor facts
Class Name org.opennms.netmgt.poller.monitors.NetScalerGroupHealthMonitor
Remote Enabled false
Configuration and Usage
Table 46. Monitor specific parameters for the NetScalerGroupHealthMonitor
Parameter Description Required
Defaultvalue
group-name The name of the server group to check required
-
group-health
The percentage of active servers vs total server of the group asan integer
optional 60
This monitor implements the Common Configuration Parameters.
Examples
The following example checks a server group called central_webfront_http. If at least 70% of theservers are active, the service is up. If less then 70% of the servers are active the service is down. Aconfiguration like the following can be used for the example in the poller-configuration.xml.
<service name="NetScaler_Health" interval="300000" user-defined="false" status="on"> <parameter key="group-name" value="central_webfront_http" /> <parameter key="group-health" value="70" /></service>
<monitor service="NetScaler_Health" class-name="org.opennms.netmgt.poller.monitors.NetScalerGroupHealthMonitor” />
Details about the used SNMP checks
The monitor checks the status of the server group based on the NS-ROOT-MIB using thesvcGrpMemberState. svcGrpMemberState is part of the serviceGroupMemberTable. TheserviceGroupMemberTable is indexed by svcGrpMemberGroupName and svcGrpMemberName. A
100

initial lookup for the group-name is performed. Based on the lookup the serviceGroupMemberTable iswalked with the numeric representation of the server group. The monitor interprets just the serverstatus code 7-up as active server. Other status codes like 2-unknown or 3-busy are counted for totalamount of servers.
4.6.30. NrpeMonitor
This monitor allows to test plugins and checks running on the Nagios Remote Plugin Executor(NRPE) framework. The monitor allows to test the status output of any available check commandexecuted by NRPE. Between OpenNMS Horizon and Nagios are some conceptional differences. InOpenNMS Horizon a service can only be available or not available and the response time for theservice is measured. Nagios on the other hand combines service availability, performance datacollection and thresholding in one check command. For this reason a Nagios check command canhave more states then OK and CRITICAL. Using the NrpeMonitor marks all check command resultsother than OK as down. The full output of the check command output message is passed into theservice down event in OpenNMS Horizon.
NRPE configuration on the server is required and the check command has to beconfigured, e.g. command[check_apt]=/usr/lib/nagios/plugins/check_apt
OpenNMS Horizon executes every NRPE check in a Java thread without fork() aprocess and it is more resource friendly. Nevertheless it is possible to run NRPEplugins which combine a lot of external programs like sed, awk or cut. Be aware,each command end up in forking additional processes.
Monitor facts
Class Name org.opennms.netmgt.poller.monitors.NrpeMonitor
Remote Enabled false
Configuration and Usage
Table 47. Monitor specific parameters for the NrpeMonitor
Parameter
Description Required
Defaultvalue
retry Number of retries before the service is marked as down. optional
0
command The check_name of the command configured as`command[check_name]="/path/to/plugin/check-script"
required
empty
port Port to access NRPE on the remote server. optional
5666
padding Padding for sending the command to the NRPE agent. optional
2
101

Parameter
Description Required
Defaultvalue
usessl Enable encryption of network communication. NRPE uses SSL withanonymous DH and the following cipher suiteTLS_DH_anon_WITH_AES_128_CBC_SHA
optional
true
This monitor implements the Common Configuration Parameters.
Example: Using check_apt with NRPE
This examples shows how to configure the NrpeMonitor running the check_apt command on aconfigured NRPE.
Configuration of the NRPE check command on the agent in 'nrpe.cfg'
command[check_apt]=/usr/lib/nagios/plugins/check_apt
Configuration to test the NRPE plugin with the NrpeMonitor
<service name="NRPE-Check-APT" interval="300000" user-defined="false" status="on"> <parameter key="retry" value="3" /> <parameter key="timeout" value="3000" /> <parameter key="port" value="5666" /> <parameter key="command" value="check_apt" /> <parameter key="padding" value="2" /></service>
<monitor service="NRPE-Check-APT" class-name="org.opennms.netmgt.poller.monitors.NrpeMonitor" />
4.6.31. NtpMonitor
The NTP monitor tests for NTP service availability. During the poll an NTP request query packet isgenerated. If a response is received, it is parsed and validated. If the response is a valid NTPresponse, the service is considered available.
Monitor facts
Class Name org.opennms.netmgt.poller.monitors.NtpMonitor
Remote Enabled true
Configuration and Usage
Table 48. Monitor specific parameters for the NtpMonitor
102

Parameter
Description Required
Defaultvalue
port The destination port where the NTP request shall be sent. optional 123
retry Number of attempts to get a response. optional 0
timeout Time in milliseconds to wait for a response. optional 5000
This monitor implements the Common Configuration Parameters.
Examples
<--! Fast NTP server --><service name="NTP" interval="300000" user-defined="false" status="on"> <parameter key="retry" value="2"/> <parameter key="timeout" value="1000"/> <parameter key="rrd-repository" value="/var/lib/opennms/rrd/response"/> <parameter key="rrd-base-name" value="ntp"/> <parameter key="ds-name" value="ntp"/></service><monitor service="NTP" class-name="org.opennms.netmgt.poller.monitors.NtpMonitor"/>
4.6.32. OmsaStorageMonitor
With OmsaStorageMonitor you are able to monitor your Dell OpenManaged servers RAID arraystatus. The following OIDs from the STORAGEMANAGEMENT-MIB are supported by this monitor:
virtualDiskRollUpStatus .1.3.6.1.4.1.674.10893.1.20.140.1.1.19arrayDiskLogicalConnectionVirtualDiskNumber .1.3.6.1.4.1.674.10893.1.20.140.3.1.5arrayDiskNexusID .1.3.6.1.4.1.674.10893.1.20.130.4.1.26arrayDiskLogicalConnectionArrayDiskNumber .1.3.6.1.4.1.674.10893.1.20.140.3.1.3arrayDiskState .1.3.6.1.4.1.674.10893.1.20.130.4.1.4
To test the status of the disk array the virtualDiskRollUpStatus is used. If the result of thevirtualDiskRollUpStatus is not 3 the monitors is marked as down.
Table 49. Possible result of virtual disk rollup status
Result
Statedescription
Monitor state in OpenNMSHorizon
1 other DOWN
2 unknown DOWN
3 ok UP
4 non-critical DOWN
5 critical DOWN
103

Result
Statedescription
Monitor state in OpenNMSHorizon
6 non-recoverable DOWN
You’ll need to know the maximum number of possible logical disks you have inyour environment. For example: If you have 3 RAID arrays, you need for eachlogical disk array a service poller.
To give more detailed information in case of an disk array error, the monitor tries to identify theproblem using the other OIDs. This values are used to enrich the error reason in the service downevent. The disk array state is resolved to a human readable value by the following status table.
Table 50. Possible array disk state errors
Value
Status
1 Ready
2 Failed
3 Online
4 Offline
6 Degraded
7 Recovering
11 Removed
15 Resynching
24 Rebuilding
25 noMedia
26 Formating
28 Running Diagnostics
35 Initializing
Monitor facts
Class Name org.opennms.netmgt.poller.monitors.OmsaStorageMonitor
Remote Enabled false
Configuration and Usage
Table 51. Monitor specific parameters for the OmsaStorageMonitor
104

Parameter Description Required
Default value
virtualDiskNumber The disk index of your RAID array optional 1
port The TCP port OpenManage is listening optional from snmp-config.xml
This monitor implements the Common Configuration Parameters.
Examples
Some example configuration how to configure the monitor in the poller-configuration.xml. TheRAID array monitor for your first array is configured with virtualDiskNumber = 1 and can look likethis:
<service name="OMSA-Disk-Array-1" interval="300000" user-defined="false" status="on"> <parameter key="retry" value="3"/> <parameter key="timeout" value="6000"/> <parameter key="virtualDiskNumber" value="1"/></service>
<monitor service="OMSA-Disk-Array-1" class-name="org.opennms.netmgt.poller.monitors.OmsaStorageMonitor"/>
If there is more than one RAID array to monitor you need an additional configuration. In this casevirtualDiskNumber = 2.
<service name="OMSA-Disk-Array-2" interval="300000" user-defined="false" status="on"> <parameter key="retry" value="3"/> <parameter key="timeout" value="6000"/> <parameter key="virtualDiskNumber" value="2"/></service>
<monitor service="OMSA-Disk-Array-2" class-name="org.opennms.netmgt.poller.monitors.OmsaStorageMonitor"/>
4.6.33. OpenManageChassisMonitor
The OpenManageChassis monitor tests the status of a Dell chassis by querying its SNMP agent. Themonitor polls the value of the node’s SNMP OID .1.3.6.1.4.1.674.10892.1.300.10.1.4.1 (MIB-Dell-10892::chassisStatus). If the value is OK (3), the service is considered available.
As this monitor uses SNMP, the queried nodes must have proper SNMP configuration in snmp-config.xml.
Monitor facts
Class Name org.opennms.netmgt.poller.monitors.OpenManageChassisMonitor
105

Remote Enabled false
Configuration and Usage
Table 52. Monitor specific parameters for the OpenManageChassisMonitor
Parameter
Description Required
Default value
port The port to which connection shall be tried. optional from snmp-config.xml
This monitor implements the Common Configuration Parameters.
Examples
<!-- Overriding default SNMP config --><service name="OMA-Chassis" interval="300000" user-defined="false" status="on"> <parameter key="retry" value="3"/> <parameter key="timeout" value="5000"/></service>
<monitor service="OMA-Chassis" class-name="org.opennms.netmgt.poller.monitors.OpenManageChassisMonitor" />
Dell MIBs
Dell MIBs can be found here. Download the DCMIB<version>.zip or DCMIB<version>.exe filecorresponding to the version of your OpenManage agents. The latest one should be good enough forall previous version though.
4.6.34. PageSequenceMonitor
The PageSequenceMonitor (PSM) allows OpenNMS to monitor web applications. This monitor hasseveral configuration options regarding IPv4, IPv6 and how to deal with name resolution. To addflexibility, the node label and IP address can be passed as variable into the monitor. This allowsrunning the monitor with node dependent configuration. Beyond testing a web application with asingle URL it can also test a path through a web application. A test path through an web applicationcan look like this:
1. login to a certain web application
2. Execute an action while being logged in
3. Log off
The service is considered as up if all this is working ok. If there’s an error somewhere, yourapplication will need attention and the service changes the state to down.
106
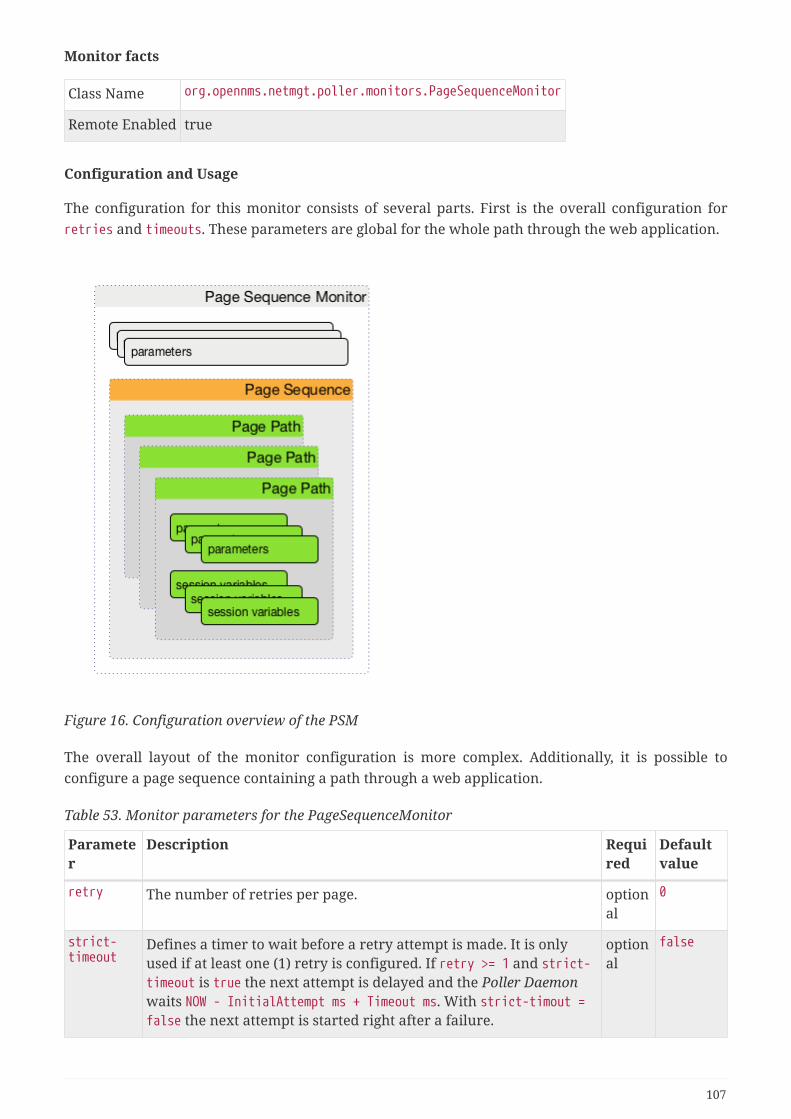
Monitor facts
Class Name org.opennms.netmgt.poller.monitors.PageSequenceMonitor
Remote Enabled true
Configuration and Usage
The configuration for this monitor consists of several parts. First is the overall configuration forretries and timeouts. These parameters are global for the whole path through the web application.
Figure 16. Configuration overview of the PSM
The overall layout of the monitor configuration is more complex. Additionally, it is possible toconfigure a page sequence containing a path through a web application.
Table 53. Monitor parameters for the PageSequenceMonitor
Parameter
Description Required
Defaultvalue
retry The number of retries per page. optional
0
strict-timeout
Defines a timer to wait before a retry attempt is made. It is onlyused if at least one (1) retry is configured. If retry >= 1 and strict-timeout is true the next attempt is delayed and the Poller Daemonwaits NOW - InitialAttempt ms + Timeout ms. With strict-timout =false the next attempt is started right after a failure.
optional
false
107

Parameter
Description Required
Defaultvalue
page-sequence
Definition of the page-sequence to execute, see table with PageSequence Parameter
required
-
sequence-retry
The retry parameter for the entire page sequence. optional
0
This monitor implements the Common Configuration Parameters.
Table 54. Page Sequence Parameter
Parameter Description Required
Default
name The name of the page-sequence. (Is thisrelevant/used?)
optional
-
method HTTP method for example GET or POST - -
http-version HTTP protocol version number, 0.9, 1.0 or 1.1 optional
HTTP/1.1
user-agent Set the user agent field in HTTP header toidentify the OpenNMS monitor
optional
OpenNMS PageSequenceMonitor(Service name: "$SERVICENAME")
virtual-host Set the virtual host field in HTTP header. Incase of an HTTPS request, this is also thevirtual domain to send as part of the TLSnegotiation, known as server name indication(SNI) (See: RFC3546 section 3.1)
- -
path The relative URL to call in the request. required
-
scheme Define the URL scheme as http or https optional
http
user-info Set user info field in the HTTP header - -
host Set host field in HTTP header optional
IP interface address of theservice
requireIPv6 Communication requires a connection to anIPv6 address. (true or false)
- -
requireIPv4 Communication requires a connection to anIPv4 address. (true or false)
- -
disable-ssl-verification
Enable or disable SSL certificate verificationfor HTTPS tests. Please use this optioncarefully, for self-signed certificates import theCA certificate in the JVM and don’t just disableit.
optional
false
108

Parameter Description Required
Default
port Port of the web server connecting to optional
80
query ?? - -
failureMatch Text to look for in the response body. This is aRegular Expression matched against everyline, and it will be considered a failure at thefirst match and sets the service with thismonitor Down.
- -
failureMessage
The failure message is used to construct thereason code. $n values may be used to pullinformation from matching groups in thefailureMatch regular expression.
- -
successMatch Text to look for in the response body. This is aRegular Expression matched against everyline, and it will be considered a success at thefirst match and sets the service with thismonitor Up.
optional
-
locationMatch
The relative URL which must be loaded for therequest to be considered successful.
optional
-
response-range
Range for allowed HTTP error codes from theresponse.
- -
session-variable
Assign the value of a regex match group to asession variable with a user-defined name.The match group is identified by number andmust be zero or greater.
- -
response-range
A comma-separated list of acceptable HTTPresponse code ranges (200-202,299).
optional
100-399
If you set requireIPv4 and requireIPv6 false, the host IP for connection will beresolved from system name resolver and the associated IP address from the IPinterface is ignored.
Table 55. Variables which can be passed in the configuration
Variable Description
$nodelabel Nodelabel of the node the monitor is associated to.
Session variables
It is possible to assign strings from a retrieved page to variables that can be used in pageparameters later in the same sequence. First, specify one or more capturing groups in thesuccessMatch expression (see Java Class Pattern for more information on regular expressions inJava). The captured values can then be assigned to variable names by using the session-variable
109

parameter, and used in a later page load.
Per-page response times
It is possible to collect response times for individual pages in a sequence. To use this functionality, ads-name attribute must be added to each page whose load time should be tracked. The response timefor each page will be stored in the same RRD file specified for the service via the rrd-base-nameparameter under the specified datasource name.
You will need to delete existing RRD files and let them be recreated with the newlist of datasources when you add a ds-name attribute to a page in a sequence that isalready storing response time data.
Examples
The following example shows how to monitor the OpenNMS web application using severalmechanisms. It first does an HTTP GET of $ipaddr/opennms (following redirects as a browserwould) and then checks to ensure that the resulting page has the phrase Password on it. Next, a loginis attempted using HTTP POST to the relative URL for submitting form data (usually, the URL whichthe form action points to). The parameters (j_username and j_password) indicate the form’s data andvalues to be submitted. After getting the resulting page, first the expression specified in the page’sfailureMatch attribute is verified, which when found anywhere on the page indicates that the pagehas failed. If the failureMatch expression is not found in the resulting page, then the expressionspecified in the page’s successMatch attribute is checked to ensure it matches the resulting page. Ifthe successMatch expression is not found on the page, then the page fails. If the monitor was able tosuccessfully login, then the next page is processed. In the example, the monitor navigates to theEvent page, to ensure that the text Event Queries is found on the page. Finally, the monitor calls theURL of the logout page to close the session. By using the locationMatch parameter, it is verified thatthe logout was successful and a redirect was triggered.
Each page is checked to ensure its HTTP response code fits into the response-range,before the failureMatch, successMatch, and locationMatch expressions areevaluated.
110

Configuration to test the login to the OpenNMS Web application
<service name="OpenNMS-Web-Login" interval="30000" user-defined="true" status="on"> <parameter key="retry" value="1"/> <parameter key="timeout" value="5000"/> <parameter key="rrd-repository" value="/opt/opennms/share/rrd/response"/> <parameter key="ds-name" value="opennmslogin"/> <parameter key="page-sequence"> <page-sequence> <page path="/opennms/login.jsp" port="8980" successMatch="Password" /> <page path="/opennms/j_spring_security_check" port="8980" method="POST"> <parameter key="j_username" value="admin"/> <parameter key="j_password" value="admin"/> </page> <page path="/opennms/index.jsp" port="8980" successMatch="Log Out" /> <page path="/opennms/event/index" port="8980" successMatch="Event Queries" /> <page path="/opennms/j_spring_security_logout" port="8980" method="POST" response-range="300-399" locationMatch="/opennms" /> </page-sequence> </parameter></service>
<monitor service="OpenNMS-Web-Login" class-name="org.opennms.netmgt.poller.monitors.PageSequenceMonitor"/>
111

Test with mixing HTTP and HTTPS in a page sequence
<service name="OpenNMS-Web-Login" interval="30000" user-defined="true" status="on"> <parameter key="retry" value="1"/> <parameter key="timeout" value="5000"/> <parameter key="rrd-repository" value="/opt/opennms/share/rrd/response"/> <parameter key="ds-name" value="opennmslogin"/> <parameter key="page-sequence"> <page-sequence> <page scheme="http" host="ecomm.example.com" port="80" path="/ecomm/jsp/Login.jsp" virtual-host="ecomm.example.com" successMatch="eComm Login" timeout="10000" http-version="1.1"/> <page scheme="https" method="POST" host="ecomm.example.com" port="443" path="/ecomm/controller" virtual-host="ecomm.example.com" successMatch="requesttab_select.gif" failureMessage="Login failed: $1" timeout="10000" http-version="1.1"> <parameter key="action_name" value="XbtnLogin"/> <parameter key="session_timeout" value=""/> <parameter key="userid" value="EXAMPLE"/> <parameter key="password" value="econ"/> </page> <page scheme="http" host="ecomm.example.com" port="80" path="/econsult/controller" virtual-host="ecomm.example.com" successMatch="You have successfully logged out of eComm" timeout="10000" http-version="1.1"> <parameter key="action_name" value="XbtnLogout"/> </page> </page-sequence> </parameter></service>
<monitor service="OpenNMS-Web-Login" class-name="org.opennms.netmgt.poller.monitors.PageSequenceMonitor"/>
112

Test login with dynamic credentials using session variables
<service name="OpenNMS-Web-Login" interval="30000" user-defined="true" status="on"> <parameter key="retry" value="1"/> <parameter key="timeout" value="5000"/> <parameter key="rrd-repository" value="/opt/opennms/share/rrd/response"/> <parameter key="ds-name" value="opennmslogin"/> <parameter key="page-sequence"> <page-sequence name="opennms-login-seq-dynamic-credentials"> <page path="/opennms" port="80" virtual-host="demo.opennms.org" successMatch="(?s)User:.*<strong>(.*?)</strong>.*?Password:.*?<strong>(.*?)</strong>"> <session-variable name="username" match-group="1" /> <session-variable name="password" match-group="2" /> </page> <page path="/opennms/j_acegi_security_check" port="80" virtual-host="demo.opennms.org" method="POST" failureMatch="(?s)Your log-in attempt failed.*Reason: ([^<]*)" failureMessage="Login Failed: $1" successMatch="Log out">" <parameter key="j_username" value="$username" /> <parameter key="j_password" value="$password" /> </page> <page path="/opennms/event/index.jsp" port="80" virtual-host="demo.opennms.org" successMatch="Event Queries" /> <page path="/opennms/j_acegi_logout" port="80" virtual-host="demo.opennms.org" successMatch="logged off" /> </page-sequence> </parameter></service>
<monitor service="OpenNMS-Web-Login" class-name="org.opennms.netmgt.poller.monitors.PageSequenceMonitor"/>
113

Log in to demo.opennms.org without knowing username and password
<service name="OpenNMS-Demo-Login" interval="300000" user-defined="true" status="on"> <parameter key="page-sequence"> <page-sequence> <page path="/opennms" port="80" virtual-host="demo.opennms.org" successMatch="(?s)User:.*<strong>(.*?)</strong>.*?Password:.*?<strong>(.*?)</strong>"> <session-variable name="username" match-group="1" /> <session-variable name="password" match-group="2" /> </page> <page path="/opennms/j_acegi_security_check" port="80" virtual-host="demo.opennms.org" method="POST" successMatch="Log out">" <parameter key="j_username" value="$username" /> <parameter key="j_password" value="$password" /> </page> <page path="/opennms/j_acegi_logout" port="80" virtual-host="demo.opennms.org" successMatch="logged off" /> </page-sequence> </parameter></service>
<monitor service="OpenNMS-Demo-Login" class-name="org.opennms.netmgt.poller.monitors.PageSequenceMonitor"/>
114

Example with per-page response times
<service name="OpenNMS-Login" interval="300000" user-defined="false" status="on"> <parameter key="rrd-repository" value="/opt/opennms/share/rrd/response"/> <parameter key="rrd-base-name" value="opennmslogin"/> <parameter key="ds-name" value="overall"/> <parameter key="page-sequence"> <page-sequence> <page path="/opennms/acegilogin.jsp" port="8980" ds-name="login-page"/> <page path="/opennms/event/index.jsp" port="8980" ds-name="event-page"/> </page-sequence> </parameter></service>
<monitor service="OpenNMS-Login" class-name="org.opennms.netmgt.poller.monitors.PageSequenceMonitor"/>
4.6.35. PercMonitor
This monitor tests the status of a PERC RAID array.
The monitor first polls the RAID-Adapter-MIB::logicaldriveTable (1.3.6.1.4.1.3582.1.1.2) to retrievethe status of the RAID array you want to monitor. If the value of the status object of thecorresponding logicaldriveEntry is not 2, the array is degraded and the monitor further polls theRAID-Adapter-MIB::physicaldriveTable (1.3.6.1.4.1.3582.1.1.3) to detect the failed drive(s).
This monitor requires the outdated persnmpd software to be installed on thepolled nodes. Please prefer using OmsaStorageMonitor monitor where possible.
Monitor facts
Class Name org.opennms.netmgt.poller.monitors.PercMonitor
Remote Enabled false (relies on SNMP configuration)
Configuration and Usage
Table 56. Monitor specific parameters for the PercMonitor
Parameter
Description Required
Default value
array The RAID array you want to monitor. optional 0.0
port The UDP port to connect to optional from snmp-config.xml
This monitor implements the Common Configuration Parameters.
115

Examples
<!-- Monitor 1st RAID arrays using configuration from snmp-config.xml --><service name="PERC" interval="300000" user-defined="false" status="on" />
<monitor service="PERC" class-name="org.opennms.netmgt.poller.monitors.PercMonitor" />
4.6.36. Pop3Monitor
The POP3 monitor tests for POP3 service availability on a node. The monitor first tries to establish aTCP connection on the specified port. If a connection is established, a service banner should havebeen received. The monitor makes sure the service banner is a valid POP3 banner (ie: starts with+OK). If the banner is valid, the monitor sends a QUIT POP3 command and makes sure the serviceanswers with a valid response (ie: a response that starts with +OK). The service is consideredavailable if the service’s answer to the QUIT command is valid.
The behaviour can be simulated with telnet:
$ telnet mail.opennms.org 110Trying 192.168.0.100Connected to mail.opennms.org.Escape character is '^]'.+OK <[email protected]>quit+OKConnection closed by foreign host.
Monitor facts
Class Name org.opennms.netmgt.poller.monitors.Pop3Monitor
Remote Enabled true
Configuration and Usage
Table 57. Monitor specific parameters for the Pop3Monitor
Parameter Description Required
Defaultvalue
port TCP port to connect to. optional
110
retry Number of attempts to find the service available. optional
0
strict-timeout
If set to true, makes sure that at least timeout milliseconds areelapsed between attempts.
optional
false
This monitor implements the Common Configuration Parameters.
116

Examples
<service name="POP3" interval="300000" user-defined="false" status="on"> <parameter key="retry" value="2"/> <parameter key="timeout" value="3000"/> <parameter key="rrd-repository" value="/var/lib/opennms/rrd/response"/> <parameter key="rrd-base-name" value="pop3"/> <parameter key="ds-name" value="pop3"/></service><monitor service="POP3" class-name="org.opennms.netmgt.poller.monitors.Pop3Monitor"/>
4.6.37. PrTableMonitor
The PrTableMonitor monitor tests the prTable of a Net-SNMP agent.
prTable definition
A table containing information on running programs/daemons configuredfor monitoring in the snmpd.conf file of the agent. Processes violating thenumber of running processes required by the agent’s configuration file areflagged with numerical and textual errors.
— UCD-SNMP-MIB
The monitor looks up the prErrorFlag entries of this table. If the value of a prErrorFlag entry in thistable is set to "1" the service is considered unavailable.
prErrorFlag definition
An Error flag to indicate trouble with a process. It goes to 1 if there is anerror, 0 if no error.
— UCD-SNMP-MIB
Monitor facts
Class Name org.opennms.netmgt.poller.monitors.PrTableMonitor
Remote Enabled false
Configuration and Usage
Table 58. Monitor specific parameters for the PrTableMonitor
Parameter
Description Required
Default value
port The port to which connection shall be tried. optional
from snmp-config.xml
117

Parameter
Description Required
Default value
retries Deprecated. Same as retry. Parameter retry takesprecedence if both are set.
optional
from snmp-config.xml
This monitor implements the Common Configuration Parameters.
Examples
<!-- Overriding default SNMP config --><service name="Process-Table" interval="300000" user-defined="false" status="on"> <parameter key="retry" value="3"/> <parameter key="timeout" value="5000"/></service>
<monitor service="Process-Table" class-name="org.opennms.netmgt.poller.monitors.PrTableMonitor" />
UCD-SNMP-MIB
The UCD-SNMP-MIB may be found here.
4.6.38. RadiusAuthMonitor
This monitor allows to test the functionality of the RADIUS authentication system. The availabilityis tested by sending an AUTH packet to the RADIUS server. If a valid ACCEPT response is received,the RADIUS service is up and considered as available.
To use this monitor it is required to install the RADIUS protocol for OpenNMSHorizon.
apt-get,yum install opennms-package-base-name-plugin-protocol-radius
The test is similar to test the behavior of a RADIUS server by evaluating the result with thecommand line tool radtest.
root@vagrant:~# radtest "John Doe" hello 127.0.0.1 1812 radiuspasswordSending Access-Request of id 49 to 127.0.0.1 port 1812 User-Name = "John Doe" User-Password = "hello" NAS-IP-Address = 127.0.0.1 NAS-Port = 1812 Message-Authenticator = 0x00000000000000000000000000000000rad_recv: Access-Accept packet from host 127.0.0.1 port 1812, id=49, length=37 ① Reply-Message = "Hello, John Doe"
118

① The Access-Accept message which is evaluated by the monitor.
Monitor facts
Class Name org.opennms.protocols.radius.monitor.RadiusAuthMonitor
Remote Enabled false
Configuration and Usage
Table 59. Monitor specific parameters for the RadiusAuthMonitor
Parameter
Description Required
Defaultvalue
timeout Time in milliseconds to wait for the RADIUS service. optional
5000
retry This is a placeholder for the second optional monitor parameterdescription.
optional
0
authport RADIUS authentication port. optional
1812
acctport RADIUS accounting port. optional
1813
user Username to test the authentication optional
OpenNMS
password Password to test the authentication optional
OpenNMS
secret The RADIUS shared secret used for communication between theclient/NAS and the RADIUS server.
optional
secret
authtype RADIUS authentication type. The following authentication types aresupported: chap, pap, mschapv1, mschapv2, eapmd5, eapmschapv2, eapttls
optional
pap
nasid The Network Access Server identifier originating the Access-Request.
optional
opennms
inner-protocol
When using EAP-TTLS authentication, this property indicates thetunnelled authentication type. Only pap is currently supported.
optional
pap
inner-user Username for the tunnelled pap authentication when using EAP-TTLS.
optional
Inner-OpenNMS
This monitor implements the Common Configuration Parameters.
Examples
Example configuration how to configure the monitor in the poller-configuration.xml.
119

<service name="Radius-Authentication" interval="300000" user-defined="false" status="on"> <parameter key="retry" value="3" /> <parameter key="timeout" value="3000" /> <parameter key="user" value="John Doe" /> <parameter key="password" value="hello" /> <parameter key="secret" value="radiuspassword" /> <parameter key="rrd-repository" value="/var/lib/opennms/rrd/response" /> <parameter key="ds-name" value="radiusauth" /></service>
<monitor service="Radius-Authentication" class-name="org.opennms.protocols.radius.monitor.RadiusAuthMonitor" />
4.6.39. SmbMonitor
This monitor is used to test the NetBIOS over TCP/IP name resolution in Microsoft Windowsenvironments. The monitor tries to retrieve a NetBIOS name for the IP address of the interface.Name services for NetBIOS in Microsoft Windows are provided on port 137/UDP or 137/TCP.
The service uses the IP address of the interface, where the monitor is assigned to. The service is upif for the given IP address a NetBIOS name is registered and can be resolved.
For troubleshooting see the usage of the Microsoft Windows command line tool nbtstat or on Linuxnmblookup.
Microsoft deprecated the usage of NetBIOS. Since Windows Server 2000 DNS isused as the default name resolution.
Monitor facts
Class Name org.opennms.netmgt.poller.monitors.SmbMonitor
Remote Enabled false
Configuration and Usage
Table 60. Monitor specific parameters for the SmbMonitor
Parameter Description Required
Defaultvalue
do-node-status
Try to get the NetBIOS node status type for the givenaddress
optional true
This monitor implements the Common Configuration Parameters.
120

Examples
Some example configuration how to configure the monitor in the poller-configuration.xml.
<service name="SMB" interval="300000" user-defined="false" status="on"> <parameter key="retry" value="1"/> <parameter key="timeout" value="3000"/></service>
<monitor service="SMB" class-name="org.opennms.netmgt.poller.monitors.SmbMonitor"/>
4.6.40. SnmpMonitor
The SNMP monitor gives a generic possibility to monitor states and results from SNMP agents. Thismonitor has two basic operation modes:
• Test the response value of one specific OID (scalar object identifier);
• Test multiple values in a whole table.
To decide which mode should be used, the walk and match-all parameters are used.
See the Operating mode selection'' and Monitor specific parameters for the SnmpMonitor'' tablesbelow for more information about these operation modes.
Table 61. Operating mode selection
walk match-all
Operating mode
true true tabular, all values must match
false tabular, any value must match
count specifies that the value of at least minimum and at most maximum objectsencountered in
false
true scalar
false scalar
count tabular, between minimum and maximum values must match
This monitor can’t be used on the OpenNMS Horizon Remote Poller. It is currentlynot possible for the Remote Poller to have access to the SNMP configuration of acentral OpenNMS Horizon.
Monitor facts
Class Name org.opennms.netmgt.poller.monitors.SnmpMonitor
Remote Enabled false
121

When the monitor is configured to persist the response time, it will count the total amount of timespent until a successful response is obtained, including the retries. It won’t store the time spentduring the last successful attempt.
Configuration and Usage
Table 62. Monitor specific parameters for the SnmpMonitor
Parameter
Description Required
Default value
hex Specifies that the value monitored should becompared against its hexadecimal representation.Useful when the monitored value is a stringcontaining non-printable characters.
optional
false
match-all Can be set to:count: specifies that the value of at least minimumand at most maximum objects encountered in thewalk must match the criteria specified by operand andoperator.true and walk is set to true: specifies that the value ofevery object encountered in the walk must match thecriteria specified by the operand and operatorparameters.false and walk is set to true: specifies that the value ofany object encountered in the walk must match thecriteria specified by the operand and operatorparameters.
optional
true
maximum Valid only when match-all is set to count, otherwiseignored. Should be used in conjunction with theminimum parameter. Specifies that the value of at mostmaximum objects encountered in the walk must meetthe criteria specified by the operand and operatorparameters.
optional
0
minimum Valid only when match-all is set to count, otherwiseignored. Should be used in conjunction with themaximum parameter. Specifies that the value of at leastminimum objects encountered in the walk must meetthe criteria specified by the operand and operatorparameters.
optional
0
oid The object identifier of the MIB object to monitor. Ifno other parameters are present, the monitor assertsthat the agent’s response for this object must includea valid value (as opposed to an error, no-such-name,or end-of-view condition) that is non-null.
optional
.1.3.6.1.2.1.1.2.0(SNMPv2-MIB::SysObjectID)
operand The value to be compared against the observed valueof the monitored object. Note: Comparison willalways succeed if either the operand or operatorparameter isn’t set and the monitored value is non-null.
optional
-
122

Parameter
Description Required
Default value
operator The operator to be used for comparing the monitoredobject against the operand parameter. Must be one ofthe following symbolic operators:< (<): Less than. Both operand and observed objectvalue must be numeric.> (>): Greater than. Both operand and observedobject value must be numeric.<= (⇐): Less than or equal to. Both operand andobserved object value must be numeric.>= (>=): Greater than or equal to. Both operand andobserved object value must be numeric.=: Equal to. Applied in numeric context if bothoperand and observed object value are numeric,otherwise in string context as a case-sensitive exactmatch.!=: Not equal to. Applied in numeric context if bothoperand and observed object value are numeric,otherwise in string context as a case-sensitive exactmatch.~: Regular expression match. Always applied in stringcontext.Note: Comparison will always succeed if either theoperand or operator parameter isn’t set and themonitored value is non-null. Keep in mind that youneed to escape all < and > characters as XML entities(< and > respectively)
optional
-
port Destination port where the SNMP requests shall besent.
optional
from snmp-config.xml
reason-template
A user-provided template used for the monitor’sreason code if the service is unvailable. Defaults to areasonable value if unset. See below for anexplanation of the possible template parameters.
optional
depends on operationmode
retries Deprecated Same as retry. Parameter retry takesprecedence if both are set.
optional
from snmp-config.xml
walk false: Sets the monitor to poll for a scalar objectunless if the match-all parameter is set to count, inwhich case the match-all parameter takes precedence.true: Sets the monitor to poll for a tabular objectwhere the match-all parameter defines how thetabular object’s values must match the criteriadefined by the operator and operand parameters. Seealso the match-all, minimum, and maximum parameters.
optional
false
This monitor implements the Common Configuration Parameters.
Table 63. Variables which can be used in the reason-template parameter
123
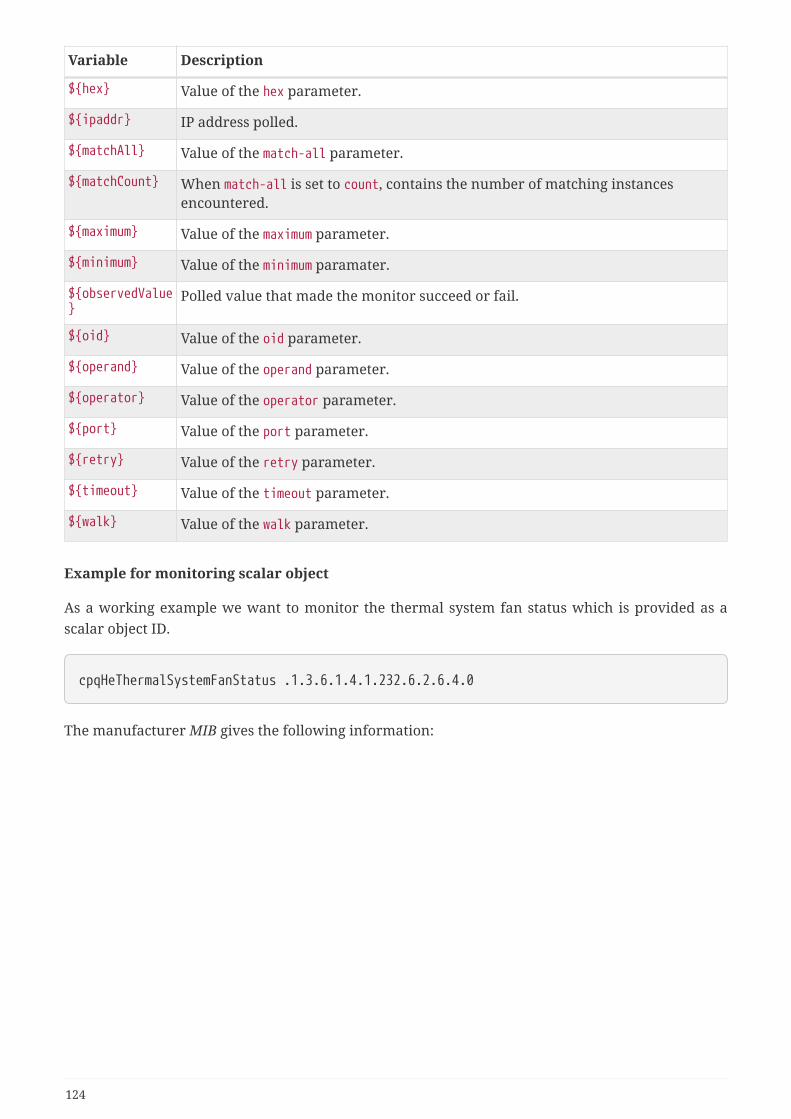
Variable Description
$hex Value of the hex parameter.
$ipaddr IP address polled.
$matchAll Value of the match-all parameter.
$matchCount When match-all is set to count, contains the number of matching instancesencountered.
$maximum Value of the maximum parameter.
$minimum Value of the minimum paramater.
$observedValue
Polled value that made the monitor succeed or fail.
$oid Value of the oid parameter.
$operand Value of the operand parameter.
$operator Value of the operator parameter.
$port Value of the port parameter.
$retry Value of the retry parameter.
$timeout Value of the timeout parameter.
$walk Value of the walk parameter.
Example for monitoring scalar object
As a working example we want to monitor the thermal system fan status which is provided as ascalar object ID.
cpqHeThermalSystemFanStatus .1.3.6.1.4.1.232.6.2.6.4.0
The manufacturer MIB gives the following information:
124

Description of the cpqHeThermalSystemFanStatus from CPQHLTH-MIB
SYNTAX INTEGER other (1), ok (2), degraded (3), failed (4)ACCESS read-onlyDESCRIPTION"The status of the fan(s) in the system.
This value will be one of the following:other(1)Fan status detection is not supported by this system or driver.
ok(2)All fans are operating properly.
degraded(3)A non-required fan is not operating properly.
failed(4)A required fan is not operating properly.
If the cpqHeThermalDegradedAction is set to shutdown(3) thesystem will be shutdown if the failed(4) condition occurs."
The SnmpMonitor is configured to test if the fan status returns ok(2). If so, the service is marked asup. Any other value indicates a problem with the thermal fan status and marks the service down.
Example SnmpMonitor as HP InsightManager fan monitor in poller-configuration.xml
<service name="HP-Insight-Fan-System" interval="300000" user-defined="false" status="on"> <parameter key="oid" value=".1.3.6.1.4.1.232.6.2.6.4.0"/>① <parameter key="operator" value="="/>② <parameter key="operand" value="2"/>③ <parameter key="reason-template" value="System fan status is not ok. The stateshould be ok($operand) the observed value is $observedValue. Please check your HPInsight Manager. Syntax: other(1), ok(2), degraded(3), failed(4)"/>④</service>
<monitor service="HP-Insight-Fan-System" class-name="org.opennms.netmgt.poller.monitors.SnmpMonitor" />
① Scalar object ID to test
② Operator for testing the response value
③ Integer 2 as operand for the test
125

④ Encode MIB status in the reason code to give more detailed information if the service goes down
Example test SNMP table with all matching values
The second mode shows how to monitor values of a whole SNMP table. As a practical use case thestatus of a set of physical drives is monitored. This example configuration shows the statusmonitoring from the CPQIDA-MIB.
We use as a scalar object id the physical drive status given by the following tabular OID:
cpqDaPhyDrvStatus .1.3.6.1.4.1.232.3.2.5.1.1.6
Description of the cpqDaPhyDrvStatus object id from CPQIDA-MIB
SYNTAX INTEGER other (1), ok (2), failed (3), predictiveFailure (4)ACCESS read-onlyDESCRIPTIONPhysical Drive Status.This shows the status of the physical drive.The following values are valid for the physical drive status:
other (1) Indicates that the instrument agent does not recognize the drive. You may need to upgrade your instrument agent and/or driver software.
ok (2) Indicates the drive is functioning properly.
failed (3) Indicates that the drive is no longer operating and should be replaced.
predictiveFailure(4) Indicates that the drive has a predictive failure error and should be replaced.
The configuration in our monitor will test all physical drives for status ok(2).
126

Example SnmpMonitor as HP Insight physical drive monitor in poller-configuration.xml
<service name="HP-Insight-Drive-Physical" interval="300000" user-defined="false"status="on"> <parameter key="oid" value=".1.3.6.1.4.1.232.3.2.5.1.1.6"/>① <parameter key="walk" value="true"/>② <parameter key="operator" value="="/>③ <parameter key="operand" value="2"/>④ <parameter key="match-all" value="true"/>⑤ <parameter key="reason-template" value="One or more physical drives are not ok.The state should be ok($operand) the observed value is $observedValue. Pleasecheck your HP Insight Manager. Syntax: other(1), ok(2), failed(3),predictiveFailure(4), erasing(5), eraseDone(6), eraseQueued(7)"/>⑥</service>
<monitor service="HP-Insight-Drive-Physical" class-name="org.opennms.netmgt.poller.monitors.SnmpMonitor" />
① OID for SNMP table with all physical drive states
② Enable walk mode to test every entry in the table against the test criteria
③ Test operator for integer
④ Integer 2 as operand for the test
⑤ Test in walk mode has to be passed for every entry in the table
⑥ Encode MIB status in the reason code to give more detailed information if the service goes down
Example test SNMP table with all matching values
This example shows how to use the SnmpMonitor to test if the number of static routes are within agiven boundary. The service is marked as up if at least 3 and at maxium 10 static routes are set on anetwork device. This status can be monitored by polling the table ipRouteProto from the RFC1213-MIB2.
ipRouteProto 1.3.6.1.2.1.4.21.1.9
The MIB description gives us the following information:
127

SYNTAX INTEGER other(1), local(2), netmgmt(3), icmp(4), egp(5), ggp(6), hello(7), rip(8), is-is(9), es-is(10), ciscoIgrp(11), bbnSpfIgp(12), ospf(13), bgp(14)ACCESS read-onlyDESCRIPTION"The routing mechanism via which this route was learned.Inclusion of values for gateway routing protocols is notintended to imply that hosts should support those protocols."
To monitor only local routes, the test should be applied only on entries in the ipRouteProto tablewith value 2. The number of entries in the whole ipRouteProto table has to be counted and theboundaries on the number has to be applied.
Example SnmpMonitor used to test if the number of local static route entries are between 3 or 10.
<service name="All-Static-Routes" interval="300000" user-defined="false" status="on"> <parameter key="oid" value=".1.3.6.1.2.1.4.21.1.9" />① <parameter key="walk" value="true" />② <parameter key="operator" value="=" />③ <parameter key="operand" value="2" />④ <parameter key="match-all" value="count" />⑤ <parameter key="minimum" value="3" />⑥ <parameter key="maximum" value="10" />⑦</service>
<monitor service="All-Static-Routes" class-name="org.opennms.netmgt.poller.monitors.SnmpMonitor" />
① OID for SNMP table ipRouteProto
② Enable walk mode to test every entry in the table against the test criteria
③ Test operator for integer
④ Integer 2 as operand for testing local route entries
⑤ Test in walk mode has is set to count to get the number of entries in the table regarding operatorand operand
128

⑥ Lower count boundary set to 3
⑦ High count boundary is set to 10
4.6.41. SshMonitor
The SshMonitor tests the availability of a SSH service. During the poll an attempt is made to connecton the specified port. If the connection request is successful, then the service is considered up.Optionaly, the banner line generated by the service may be parsed and compared against a patternbefore the service is considered up.
Monitor facts
Class Name org.opennms.netmgt.poller.monitors.SshMonitor
Remote Enabled true
Configuration and Usage
Table 64. Monitor specific parameters for the SshMonitor
Parameter
Description Required
Default value
banner Regular expression to be matched against the service’s banner. optional
-
client-banner
The client banner that OpenNMS Horizon will use to identifyitself on the service.
optional
SSH-1.99-OpenNMS_1.5
match Regular expression to be matched against the service’s banner.Deprecated, please use the banner parameter instead.Note that this parameter takes precedence over the bannerparameter, though.
optional
-
port TCP port to which SSH connection shall be tried. optional
22
retry Number of attempts to establish the SSH connnection. optional
0
This monitor implements the Common Configuration Parameters.
Examples
129

<service name="SSH" interval="300000" user-defined="false" status="on"> <parameter key="retry" value="1"/> <parameter key="banner" value="SSH"/> <parameter key="client-banner" value="OpenNMS poller"/> <parameter key="timeout" value="5000"/> <parameter key="rrd-repository" value="/var/lib/opennms/rrd/response"/> <parameter key="rrd-base-name" value="ssh"/> <parameter key="ds-name" value="ssh"/></service><monitor service="SSH" class-name="org.opennms.netmgt.poller.monitors.SshMonitor"/>
4.6.42. SSLCertMonitor
This monitor is used to test if a SSL certificate presented by a remote network server are valid. Acertificate is invalid if its initial time is prior to the current time, or if the current time is prior to 7days (configurable) before the expiration time. The monitor only supports SSL on the socket anddoes not support a higher level protocol above it.
You can simulate the behavior by running a command like this:
echo | openssl s_client -connect <site>:<port> 2>/dev/null | openssl x509 -noout-dates
The output shows you the time range a certificate is valid:
notBefore=Dec 24 14:11:34 2013 GMTnotAfter=Dec 25 10:37:40 2014 GMT
You can configure a threshold in days applied on the notAfter date.
Monitor facts
Class Name org.opennms.netmgt.poller.monitors.SSLCertMonitor
Remote Enabled true
Configuration and Usage
Table 65. Monitor specific parameters for the SSLCertMonitor
Parameter
Description Required
Defaultvalue
port TCP port for the service with SSL certificate. required
-1
retry Number of attempts to get the certificate state optional
0
130

Parameter
Description Required
Defaultvalue
days Number of days before the certificate expires that we mark theservice as failed.
optional
7
server-name
This is the DNS hostname to send as part of the TLS negotiation,known as server name indication (SNI) (See: RFC3546 section 3.1)
optional
-
This monitor implements the Common Configuration Parameters.
Table 66. Variables which can be passed in the configuration for server-name
Variable Description
$ipaddr The node’s IP-Address
$nodeid The node ID
$nodelabel Label of the node the monitor is associated to.
$svcname The service name
The monitor has no support for communicating on other protocol layers above theSSL session layer. It is not able to send a Host header for HTTPS, or issue aSTARTTLS command for IMAP, POP3, SMTP, FTP, XMPP, LDAP, or NNTP.
Examples
The following example shows how to monitor SSL certificates on services like IMAPS, SMTPS andHTTPS. If the certificates expire within 30 days the service goes down and indicates this issue in thereason of the monitor. In this example the monitoring interval is reduced to test the certificateevery 2 hours (7,200,000 ms). Configuration in poller-configuration.xml is as the following:
131

<service name="SSL-Cert-IMAPS-993" interval="7200000" user-defined="false" status="on"> <parameter key="retry" value="2"/> <parameter key="timeout" value="2000"/> <parameter key="port" value="993"/> <parameter key="days" value="30"/></service><service name="SSL-Cert-SMTPS-465" interval="7200000" user-defined="false" status="on"> <parameter key="retry" value="2"/> <parameter key="timeout" value="2000"/> <parameter key="port" value="465"/> <parameter key="days" value="30"/></service><service name="SSL-Cert-HTTPS-443" interval="7200000" user-defined="false" status="on"> <parameter key="retry" value="2"/> <parameter key="timeout" value="3000"/> <parameter key="port" value="443"/> <parameter key="days" value="30"/> <parameter key="server-name" value="$nodelabel.example.com"/></service>
<monitor service="SSL-Cert-IMAPS-993" class-name="org.opennms.netmgt.poller.monitors.SSLCertMonitor" /><monitor service="SSL-Cert-SMTPS-465" class-name="org.opennms.netmgt.poller.monitors.SSLCertMonitor" /><monitor service="SSL-Cert-HTTPS-443" class-name="org.opennms.netmgt.poller.monitors.SSLCertMonitor" />
4.6.43. StrafePingMonitor
This monitor is used to monitor packet delay variation to a specific endpoint using ICMP. The mainuse case is to monitor a WAN end point and visualize packet loss and ICMP packet round trip timedeviation. The StrafePingMonitor performs multiple ICMP echo requests (ping) and stores theresponse-time of each as well as the packet loss, in a RRD file. Credit is due to Tobias Oetiker, as thisgraphing feature is an adaptation of the SmokePing tool that he developed.
132

Figure 17. Visualization of a graph from the StrafePingMonitor
Monitor facts
Class Name org.opennms.netmgt.poller.monitors.StrafePingMonitor
Remote Enabled false
Configuration and Usage
Monitor specific parameters for the StrafePingMonitor
Parameter Description Required
Default value
timeout Time in milliseconds to wait before assuming that apacket has not responded
optional
800
retry The number of retries to attempt when a packet failsto respond in the given timeout
optional
2
ping-count The number of pings to attempt each interval required
20
failure-ping-count
The number of pings that need to fail for the serviceto be considered down
required
20
allow-fragmentation
Whether to set the "Don’t Fragment" bit on outgoingpackets
optional
true
dscp DSCP traffic-control value. optional
0
packet-size Number of bytes of the ICMP packet to send. optional
64
wait-interval
Time in milliseconds to wait between each ICMP echo-request packet
required
50
133

Parameter Description Required
Default value
rrd-repository
The location to write RRD data. Generally, you will notwant to change this from default
required
$OPENNMS_HOME/share/rrd/response
rrd-base-name
The name of the RRD file to write (minus theextension, .rrd or .jrb)
required
strafeping
This monitor implements the Common Configuration Parameters.
Examples
The StrafePingMonitor is typically used on WAN connections and not activated for every ICMPenabled device in your network. Further this monitor is much I/O heavier than just a simple RRDgraph with a single ICMP response time measurement. By default you can find a separate pollerpackage in the 'poller-configuration.xml' called strafer. Configure the include-range or a filter toenable monitoring for devices with the service StrafePing.
Don’t forget to assign the service StrafePing on the IP interface to be activated.
The following example enables the monitoring for the service StrafePing on IP interfaces in therange 10.0.0.1 until 10.0.0.20. Additionally the Nodes have to be in a surveillance category namedLatency.
134
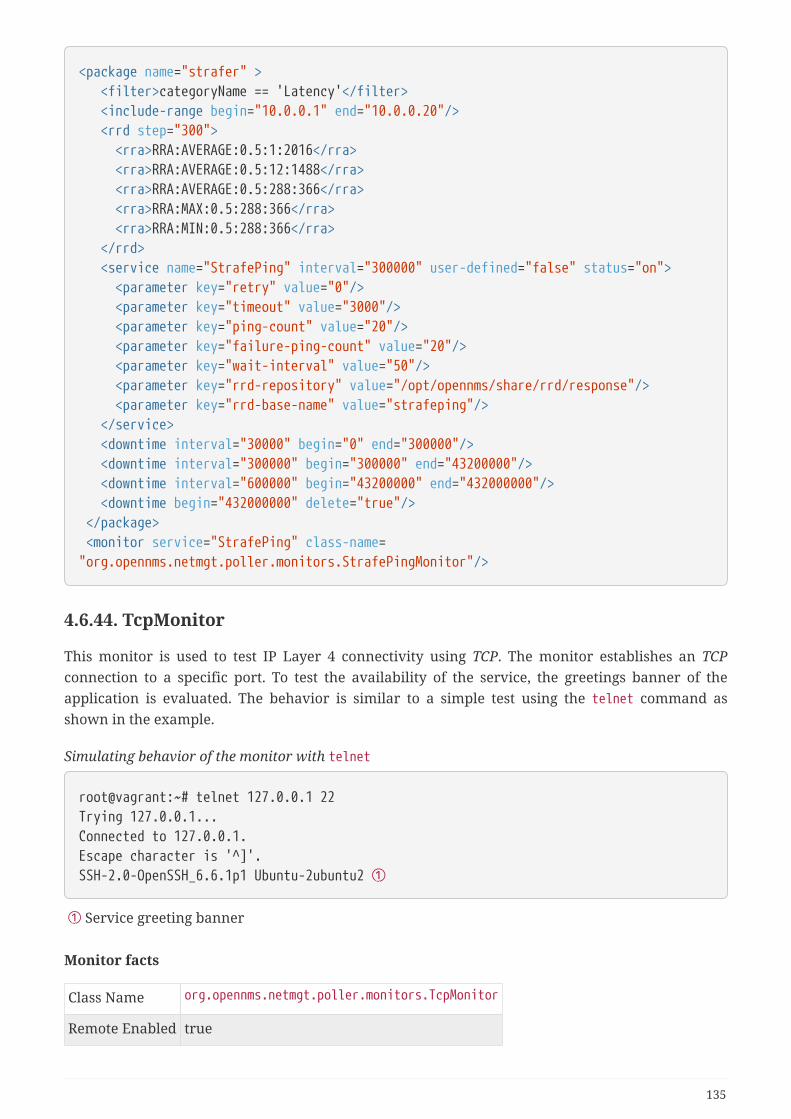
<package name="strafer" > <filter>categoryName == 'Latency'</filter> <include-range begin="10.0.0.1" end="10.0.0.20"/> <rrd step="300"> <rra>RRA:AVERAGE:0.5:1:2016</rra> <rra>RRA:AVERAGE:0.5:12:1488</rra> <rra>RRA:AVERAGE:0.5:288:366</rra> <rra>RRA:MAX:0.5:288:366</rra> <rra>RRA:MIN:0.5:288:366</rra> </rrd> <service name="StrafePing" interval="300000" user-defined="false" status="on"> <parameter key="retry" value="0"/> <parameter key="timeout" value="3000"/> <parameter key="ping-count" value="20"/> <parameter key="failure-ping-count" value="20"/> <parameter key="wait-interval" value="50"/> <parameter key="rrd-repository" value="/opt/opennms/share/rrd/response"/> <parameter key="rrd-base-name" value="strafeping"/> </service> <downtime interval="30000" begin="0" end="300000"/> <downtime interval="300000" begin="300000" end="43200000"/> <downtime interval="600000" begin="43200000" end="432000000"/> <downtime begin="432000000" delete="true"/> </package> <monitor service="StrafePing" class-name="org.opennms.netmgt.poller.monitors.StrafePingMonitor"/>
4.6.44. TcpMonitor
This monitor is used to test IP Layer 4 connectivity using TCP. The monitor establishes an TCPconnection to a specific port. To test the availability of the service, the greetings banner of theapplication is evaluated. The behavior is similar to a simple test using the telnet command asshown in the example.
Simulating behavior of the monitor with telnet
root@vagrant:~# telnet 127.0.0.1 22Trying 127.0.0.1...Connected to 127.0.0.1.Escape character is '^]'.SSH-2.0-OpenSSH_6.6.1p1 Ubuntu-2ubuntu2 ①
① Service greeting banner
Monitor facts
Class Name org.opennms.netmgt.poller.monitors.TcpMonitor
Remote Enabled true
135

Configuration and Usage
Table 67. Monitor specific parameters for the TcpMonitor
Parameter
Description Required
Defaultvalue
port TCP port of the application. required
-1
retry Number of retries before the service is marked as down. optional
0
banner Evaluation of the service connection banner with regular expression.By default any banner result is valid.
optional
*
This monitor implements the Common Configuration Parameters.
Examples
This example shows to test if the ICA service is available on TCP port 1494. The test evaluates theconnection banner starting with ICA.
<service name="TCP-Citrix-ICA" interval="300000" user-defined="false" status="on"> <parameter key="retry" value="0" /> <parameter key="banner" value="ICA" /> <parameter key="port" value="1494" /> <parameter key="timeout" value="3000" /> <parameter key="rrd-repository" value="/var/lib/opennms/rrd/response" /> <parameter key="rrd-base-name" value="tcpCitrixIca" /> <parameter key="ds-name" value="tcpCitrixIca" /></service>
<monitor service="TCP-Citrix-ICA" class-name="org.opennms.netmgt.poller.monitors.TcpMonitor" />
4.6.45. SystemExecuteMonitor
If it is required to execute a system call or run a script to determine a service status, theSystemExecuteMonitor can be used. It is calling a script or system command, if required it providesadditional arguments to the call. To determine the status of the service the SystemExecuteMonitorcan rely on 0 or a non-0 exit code of system call. As an alternative, the output of the system call canbe matched against a banner. If the banner is part of the output the status is interpreted as up. Ifthe banner is not available in the output the status is determined as down.
Monitor facts
Class Name org.opennms.netmgt.poller.monitors.SystemExecuteMonitor
Remote Enabled true
136

Configuration and Usage
Table 68. Monitor specific parameters for the SystemExecuteMonitor
Parameter
Description Required
Defaultvalue
script The system-call to execute. required
-
args The arguments to hand over to the system-call. It supports variablereplacement, see below.
optional
-
banner A string that is match against the output of the system-call. If theoutput contains the banner, the service is determined as UP.
optional
-
The parameter args supports variable replacement for the following set of variables.
This monitor implements the Common Configuration Parameters.
Table 69. Variables which can be used in the configuration
Variable Description
$timeout Timeout in milliseconds, based on config of the service.
$timeoutsec Timeout in seconds, based on config of the service.
$retry Amount of retries based on config of the service.
$svcname Service name based on the config of the service.
$ipaddr IP-address of the interface the service is bound to.
$nodeid Nodeid of the node the monitor is associated to.
$nodelabel Nodelabel of the node the monitor is associated to.
Examples
<parameter key="args" value="-i $ipaddr -t $timeout"/><parameter key="args" value="http://$nodelabel/$svcname/static"/>
SystemExecuteMonitor vs GpMonitor
The SystemExecuteMonitor is the successor of the GpMonitor. The main differences are:
• Variable replacement for the parameter args
• There are no fixed arguments handed to the system-call
• The SystemExecuteMonitor supports RemotePoller deployment
To migrate services from the GpMonitor to the SystemExecuteMonitor it is required to alter theparameter args. To match the arguments called hoption for the hostAddress and toption for thetimeoutInSeconds. The args string that matches the GpMonitor call looks like this:
137

<parameter key="args" value="--hostname $ipaddr --timeout $timeoutsec" />
To migrate the GpMonitor parameters hoption and toption just replace the --hostname and --timeoutdirectly in the args key.
4.6.46. VmwareCimMonitor
This monitor is part of the VMware integration provided in Provisiond. The monitor is specializedto test the health status provided from all Host System (host) sensor data.
This monitor is only executed if the host is in power state on.
This monitor requires to import hosts with Provisiond and the VMware import.OpenNMS Horizon requires network access to VMware vCenter and the hosts. Toget the sensor data the credentials from vmware-config.xml for the responsiblevCenter is used. The following asset fields are filled from Provisiond and isprovided by VMware import feature: VMware Management Server, VMwareManaged Entity Type and the foreignId which contains an internal VMware vCenterIdentifier.
The global health status is evaluated by testing all available host sensors and evaluating the state ofeach sensor. A sensor state could be represented as the following:
• Unknown(0)
• OK(5)
• Degraded/Warning(10)
• Minor failure(15)
• Major failure(20)
• Critical failure(25)
• Non-recoverable error(30)
The service is up if all sensors have the status OK(5). If any sensor gives another status then OK(5)the service is marked as down. The monitor error reason contains a list of all sensors which notreturned status OK(5).
In case of using Distributed Power Management the standBy state forces a servicedown. The health status is gathrered with a direct connection to the host and instand by this connection is unavailable and the service is down. To deal with standby states, the configuration ignoreStandBy can be used. In case of a stand by state,the service is considered as up.
state can be changed see the ignoreStandBy configuration parameter.
138

Monitor facts
Class Name org.opennms.netmgt.poller.monitors.VmwareCimMonitor
Remote Enabled false
Configuration and Usage
Table 70. Monitor specific parameters for the VmwareCimMonitor
Parameter Description Required
Defaultvalue
retry Number of retries before the service is marked as down. optional 0
ignoreStandBy Treat power state standBy as up. optional false
This monitor implements the Common Configuration Parameters.
Examples
Some example configuration how to configure the monitor in the poller-configuration.xml.
<service name="VMwareCim-HostSystem" interval="300000" user-defined="false" status="on"> <parameter key="retry" value="2"/> <parameter key="timeout" value="3000"/></service>
<monitor service="VMwareCim-HostSystem" class-name="org.opennms.netmgt.poller.monitors.VmwareCimMonitor"/>
4.6.47. VmwareMonitor
This monitor is part of the VMware integration provided in Provisiond and test the power state of avirtual machine (VM) or a host system (host). If the power state of a VM or host is poweredOn theservice is up. The state off the service on the VM or Host is marked as down. By default standBy isalso considered as down. In case of using Distributed Power Management the standBy state can bechanged see the ignoreStandBy configuration parameter.
The information for the status of a virtual machine is collected from theresponsible VMware vCenter using the credentials from the vmware-config.xml. Itis also required to get specific asset fields assigned to an imported virtual machineand host system. The following asset fields are required, which are populated bythe VMware integration in Provisiond: VMware Management Server, VMwareManaged Entity Type and the foreignId which contains an internal VMware vCenterIdentifier.
139
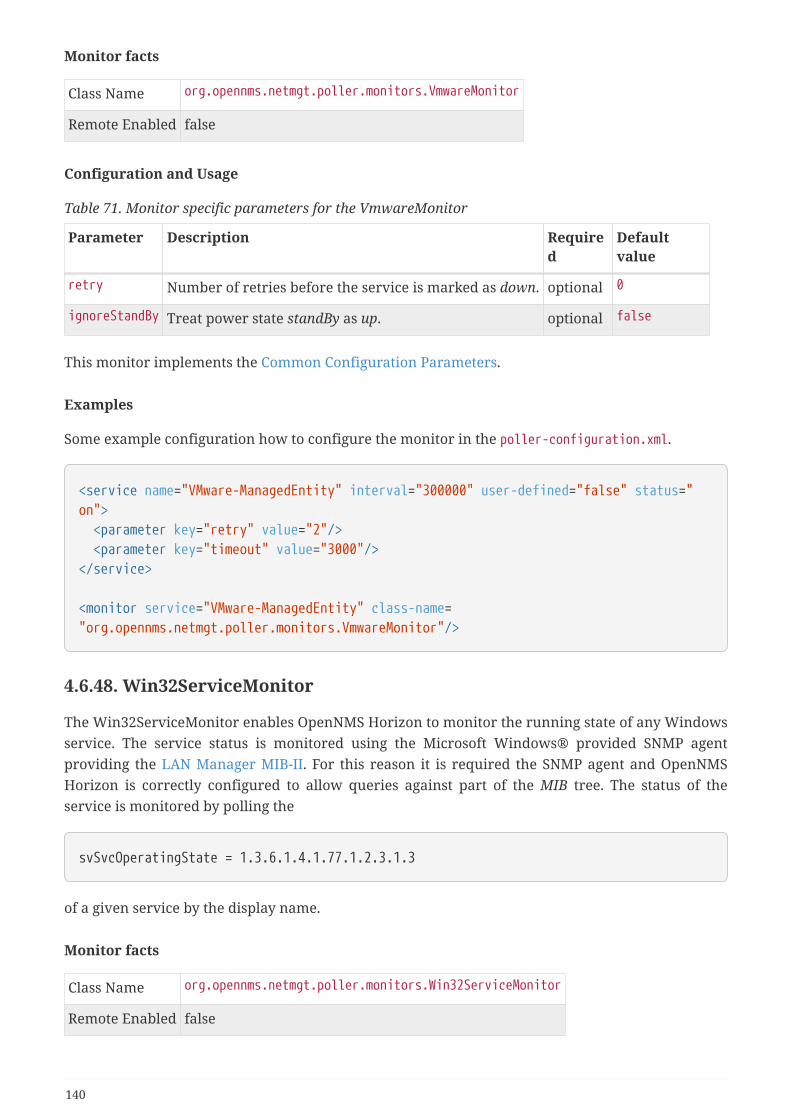
Monitor facts
Class Name org.opennms.netmgt.poller.monitors.VmwareMonitor
Remote Enabled false
Configuration and Usage
Table 71. Monitor specific parameters for the VmwareMonitor
Parameter Description Required
Defaultvalue
retry Number of retries before the service is marked as down. optional 0
ignoreStandBy Treat power state standBy as up. optional false
This monitor implements the Common Configuration Parameters.
Examples
Some example configuration how to configure the monitor in the poller-configuration.xml.
<service name="VMware-ManagedEntity" interval="300000" user-defined="false" status="on"> <parameter key="retry" value="2"/> <parameter key="timeout" value="3000"/></service>
<monitor service="VMware-ManagedEntity" class-name="org.opennms.netmgt.poller.monitors.VmwareMonitor"/>
4.6.48. Win32ServiceMonitor
The Win32ServiceMonitor enables OpenNMS Horizon to monitor the running state of any Windowsservice. The service status is monitored using the Microsoft Windows® provided SNMP agentproviding the LAN Manager MIB-II. For this reason it is required the SNMP agent and OpenNMSHorizon is correctly configured to allow queries against part of the MIB tree. The status of theservice is monitored by polling the
svSvcOperatingState = 1.3.6.1.4.1.77.1.2.3.1.3
of a given service by the display name.
Monitor facts
Class Name org.opennms.netmgt.poller.monitors.Win32ServiceMonitor
Remote Enabled false
140
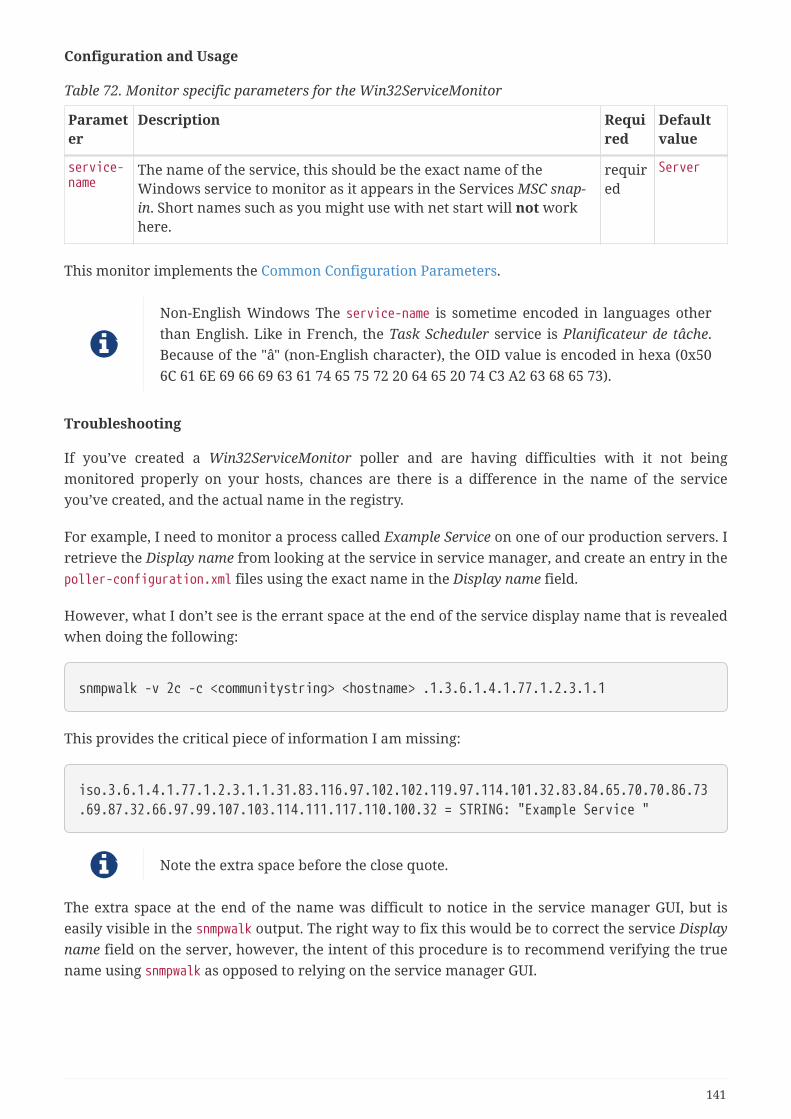
Configuration and Usage
Table 72. Monitor specific parameters for the Win32ServiceMonitor
Parameter
Description Required
Defaultvalue
service-name
The name of the service, this should be the exact name of theWindows service to monitor as it appears in the Services MSC snap-in. Short names such as you might use with net start will not workhere.
required
Server
This monitor implements the Common Configuration Parameters.
Non-English Windows The service-name is sometime encoded in languages otherthan English. Like in French, the Task Scheduler service is Planificateur de tâche.Because of the "â" (non-English character), the OID value is encoded in hexa (0x506C 61 6E 69 66 69 63 61 74 65 75 72 20 64 65 20 74 C3 A2 63 68 65 73).
Troubleshooting
If you’ve created a Win32ServiceMonitor poller and are having difficulties with it not beingmonitored properly on your hosts, chances are there is a difference in the name of the serviceyou’ve created, and the actual name in the registry.
For example, I need to monitor a process called Example Service on one of our production servers. Iretrieve the Display name from looking at the service in service manager, and create an entry in thepoller-configuration.xml files using the exact name in the Display name field.
However, what I don’t see is the errant space at the end of the service display name that is revealedwhen doing the following:
snmpwalk -v 2c -c <communitystring> <hostname> .1.3.6.1.4.1.77.1.2.3.1.1
This provides the critical piece of information I am missing:
iso.3.6.1.4.1.77.1.2.3.1.1.31.83.116.97.102.102.119.97.114.101.32.83.84.65.70.70.86.73.69.87.32.66.97.99.107.103.114.111.117.110.100.32 = STRING: "Example Service "
Note the extra space before the close quote.
The extra space at the end of the name was difficult to notice in the service manager GUI, but iseasily visible in the snmpwalk output. The right way to fix this would be to correct the service Displayname field on the server, however, the intent of this procedure is to recommend verifying the truename using snmpwalk as opposed to relying on the service manager GUI.
141

Examples
Monitoring the service running state of the Task Scheduler on an English local Microsoft Windows®Server requires at minimum the following entry in the poller-configuration.xml.
<service name="Windows-Task-Scheduler" interval="300000" user-defined="false" status="on"> <parameter key="service-name" value="Task Scheduler"/></service>
<monitor service="Windows-Task-Scheduler" class-name="org.opennms.netmgt.poller.monitors.Win32ServiceMonitor"/>
4.6.49. WsManMonitor
This monitor can be used to issue a WS-Man Get command and validate the results using a SPELexpression.
Monitor facts
Class Name org.opennms.netmgt.poller.monitors.WsManMonitor
Remote Enabled false
Configuration and Usage
Table 73. Monitor specific parameters for the WsManMonitor
Parameter Description Required
Defaultvalue
resource-uri
Resource URI required
-
rule SPEL expression applied against the result of the Get required
-
selector. Used to filter the result set. All selectors must prefixed withselector.
optional (None)
This monitor implements the Common Configuration Parameters.
Examples
The following monitor will issue a Get against the configured resource and verify that the correctservice tag is returned:
142

<service name="WsMan-ServiceTag-Check" interval="300000" user-defined="false" status="on"> <parameter key="resource-uri" value="http://schemas.dell.com/wbem/wscim/1/cim-schema/2/root/dcim/DCIM_ComputerSystem"/> <parameter key="selector.CreationClassName" value="DCIM_ComputerSystem"/> <parameter key="selector.Name" value="srv:system"/> <parameter key="rule" value="#IdentifyingDescriptions matches '.*ServiceTag' and#OtherIdentifyingInfo matches 'C7BBBP1'"/></service>
<monitor service="WsMan-ServiceTag-Check" class-name="org.opennms.netmgt.poller.monitors.WsManMonitor/>
4.6.50. XmpMonitor
The XMP monitor tests for XMP service/agent availability by establishing an XMP session andquerying the target agent’s sysObjectID variable contained in the Core MIB. The service isconsidered available when the session attempt succeeds and the agent returns its sysObjectIDwithout error.
Monitor facts
Class Name org.opennms.netmgt.poller.monitors.XmpMonitor
Remote Enabled false
Configuration and Usage
These parameters can be set in the XMP service entry in collectd-configuration.xml and willoverride settings from xmp-config.xml. Also, don’t forget to add an entry in response-graph.properties so that response values will be graphed.
Table 74. Monitor specific parameters for the XmpMonitor
Parameter
Description Required
Defaultvalue
timeout Time in milliseconds to wait for a successful session. optional 5000
authenUser The authenUser parameter for use with the XMP session. optional xmpUser
port TCP port to connect to for XMP session establishment optional 5270
mib Name of MIB to query optional core
object Name of MIB object to query optional sysObjectID
This monitor implements the Common Configuration Parameters.
143

Examples
Adding entry in collectd-configuration.xml
<service name="XMP" interval="300000" user-defined="false" status="on"> <parameter key="timeout" value="3000"/> <parameter key="rrd-repository" value="/opt/opennms/share/rrd/response"/> <parameter key="rrd-base-name" value="xmp"/> <parameter key="ds-name" value="xmp"/></service><monitor service="XMP" class-name="org.opennms.netmgt.poller.monitors.XmpMonitor"/>
Add entry in response-graph.properties
reports=icmp, \xmp, \ . . . .
report.xmp.name=XMPreport.xmp.columns=xmpreport.xmp.type=responseTimereport.xmp.command=--title="XMP Response Time" \ --vertical-label="Seconds" \ DEF:rtMills=rrd1:xmp:AVERAGE \ DEF:minRtMills=rrd1:xmp:MIN \ DEF:maxRtMills=rrd1:xmp:MAX \ CDEF:rt=rtMills,1000,/ \ CDEF:minRt=minRtMills,1000,/ \ CDEF:maxRt=maxRtMills,1000,/ \ LINE1:rt#0000ff:"Response Time" \ GPRINT:rt:AVERAGE:" Avg \\: %8.2lf %s" \ GPRINT:rt:MIN:"Min \\: %8.2lf %s" \ GPRINT:rt:MAX:"Max \\: %8.2lf %s\\n"
144

Chapter 5. Performance ManagementIn OpenNMS Horizon collection of performance data is done by the Collectd daemon. ManagementAgents and protocols to access performance data is implemented in Collectors. These Collectors arescheduled and run in parallel in a global defined Thread Pool in Collectd.
This section describes how to configure Collectd for performance data collection with all availableCollectors coming with OpenNMS Horizon.
5.1. Collectd ConfigurationTable 75. Configuration and log files related to Collectd
File Description
$OPENNMS_HOME/etc/collectd-configuration.xml
Configuration file for global Collectd daemon and Collectorsconfiguration
$OPENNMS_HOME/logs/collectd.log
Log file for all Collectors and the global Collectd daemon
$OPENNMS_HOME/etc/snmp-graph.properties
RRD graph definitions to render performance data measurementsin the Web UI
$OPENNMS_HOME/etc/snmp-graph.properties.d
Directory with RRD graph definitions for devices and applicationsto render performance data measurements in the Web UI
$OPENNMS_HOME/etc/events/opennms.events.xml
Event definitions for Collectd, i.e. dataCollectionSucceeded, anddataCollectionFailed
$OPENNMS_HOME/etc/resource-types.d
Directory to store generic resource type definitions.
To change the behavior for performance data collection, the collectd-configuration.xml file can bemodified. The configuration file is structured in the following parts:
• Global daemon config: Define the size of the used Thread Pool to run Collectors in parallel.
• Collection packages: Packages to allow the grouping of configuration parameters for Collectors.
• Collection service association: Based on the name of the collection service, the implementationfor application or network management protocols are assigned.
145
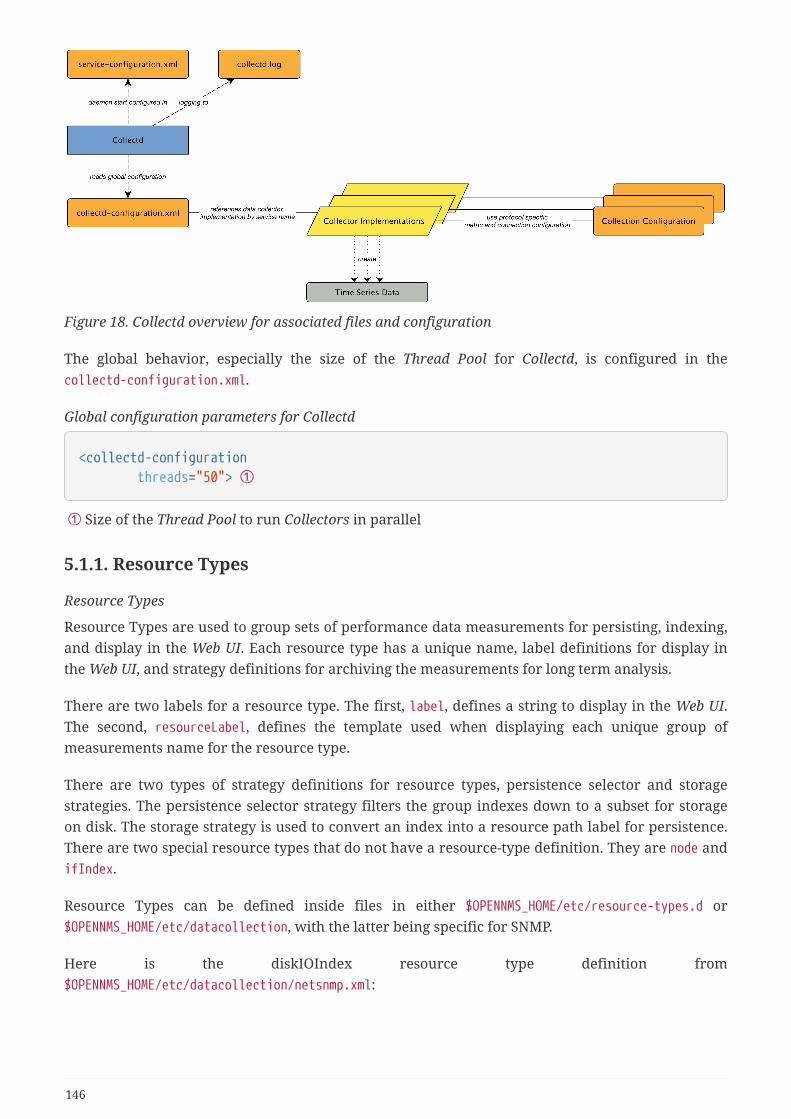
Figure 18. Collectd overview for associated files and configuration
The global behavior, especially the size of the Thread Pool for Collectd, is configured in thecollectd-configuration.xml.
Global configuration parameters for Collectd
<collectd-configuration threads="50"> ①
① Size of the Thread Pool to run Collectors in parallel
5.1.1. Resource Types
Resource Types
Resource Types are used to group sets of performance data measurements for persisting, indexing,and display in the Web UI. Each resource type has a unique name, label definitions for display inthe Web UI, and strategy definitions for archiving the measurements for long term analysis.
There are two labels for a resource type. The first, label, defines a string to display in the Web UI.The second, resourceLabel, defines the template used when displaying each unique group ofmeasurements name for the resource type.
There are two types of strategy definitions for resource types, persistence selector and storagestrategies. The persistence selector strategy filters the group indexes down to a subset for storageon disk. The storage strategy is used to convert an index into a resource path label for persistence.There are two special resource types that do not have a resource-type definition. They are node andifIndex.
Resource Types can be defined inside files in either $OPENNMS_HOME/etc/resource-types.d or$OPENNMS_HOME/etc/datacollection, with the latter being specific for SNMP.
Here is the diskIOIndex resource type definition from$OPENNMS_HOME/etc/datacollection/netsnmp.xml:
146
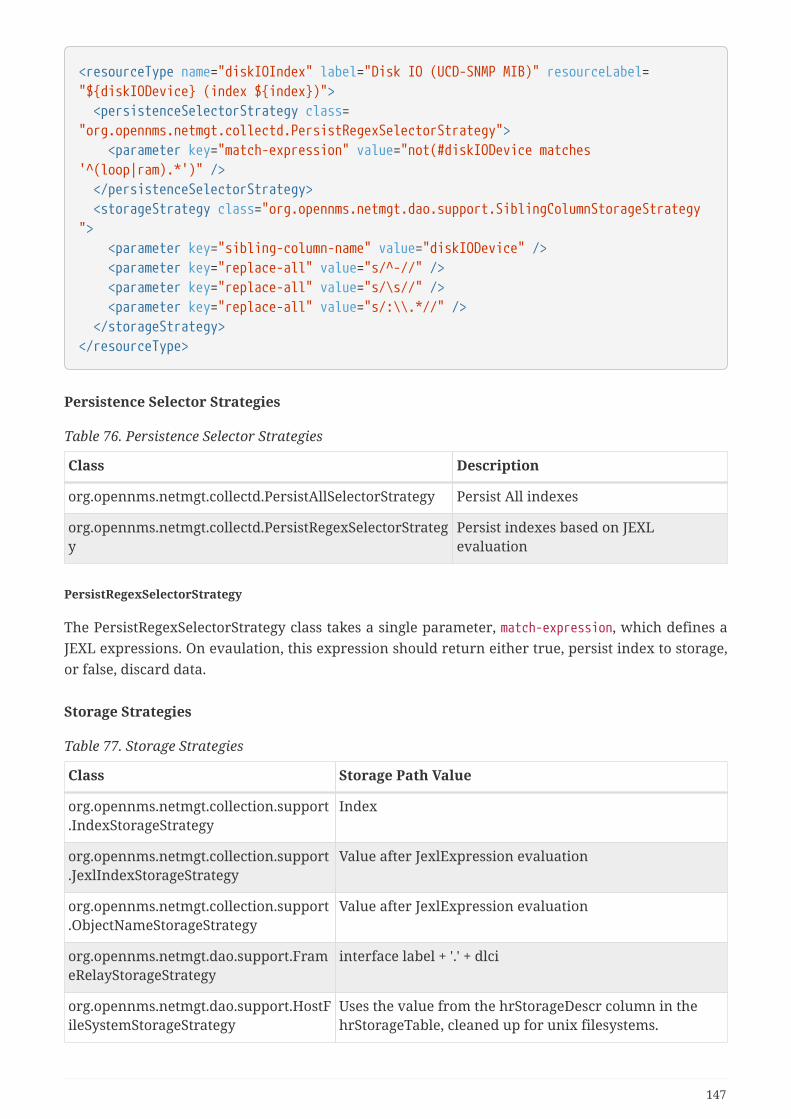
<resourceType name="diskIOIndex" label="Disk IO (UCD-SNMP MIB)" resourceLabel="$diskIODevice (index $index)"> <persistenceSelectorStrategy class="org.opennms.netmgt.collectd.PersistRegexSelectorStrategy"> <parameter key="match-expression" value="not(#diskIODevice matches'^(loop|ram).*')" /> </persistenceSelectorStrategy> <storageStrategy class="org.opennms.netmgt.dao.support.SiblingColumnStorageStrategy"> <parameter key="sibling-column-name" value="diskIODevice" /> <parameter key="replace-all" value="s/^-//" /> <parameter key="replace-all" value="s/\s//" /> <parameter key="replace-all" value="s/:\\.*//" /> </storageStrategy></resourceType>
Persistence Selector Strategies
Table 76. Persistence Selector Strategies
Class Description
org.opennms.netmgt.collectd.PersistAllSelectorStrategy Persist All indexes
org.opennms.netmgt.collectd.PersistRegexSelectorStrategy
Persist indexes based on JEXLevaluation
PersistRegexSelectorStrategy
The PersistRegexSelectorStrategy class takes a single parameter, match-expression, which defines aJEXL expressions. On evaulation, this expression should return either true, persist index to storage,or false, discard data.
Storage Strategies
Table 77. Storage Strategies
Class Storage Path Value
org.opennms.netmgt.collection.support.IndexStorageStrategy
Index
org.opennms.netmgt.collection.support.JexlIndexStorageStrategy
Value after JexlExpression evaluation
org.opennms.netmgt.collection.support.ObjectNameStorageStrategy
Value after JexlExpression evaluation
org.opennms.netmgt.dao.support.FrameRelayStorageStrategy
interface label + '.' + dlci
org.opennms.netmgt.dao.support.HostFileSystemStorageStrategy
Uses the value from the hrStorageDescr column in thehrStorageTable, cleaned up for unix filesystems.
147

Class Storage Path Value
org.opennms.netmgt.dao.support.SiblingColumnStorageStrategy
Uses the value from an SNMP lookup of OID in sibling-column-name parameter, cleaned up for unix filesystems.
org.opennms.protocols.xml.collector.XmlStorageStrategy
Index, but cleaned up for unix filesystems.
IndexStorageStrategy
The IndexStorageStrategy takes no parameters.
JexlIndexStorageStrategy
The JexlIndexStorageStrategy takes two parameters, index-format which is required, and clean-output which is optional.
Parameter Description
index-format The JexlExpression to evaluate
clean-output Boolean to indicate whether the index value is cleaned up.
If the index value will be cleaned up, then it will have all whitespace, colons, forward and backslashes, and vertical bars replaced with underscores. All equal signs are removed.
This class can be extended to create custom storage strategies by overriding the updateContextmethod to set additional key/value pairs to use in your index-format template.
public class ExampleStorageStrategy extends JexlIndexStorageStrategy
private static final Logger LOG = LoggerFactory.getLogger(ExampleStorageStrategy.class); public ExampleStorageStrategy() super();
@Override public void updateContext(JexlContext context, CollectionResource resource) context.set("Example", resource.getInstance());
ObjectNameStorageStrategy
The ObjectNameStorageStrategy extends the JexlIndexStorageStrategy, so its requirements are thesame. Extra key/values pairs are added to the JexlContext which can then be used in the index-format template. The original index string is converted to an ObjectName and can be referenced as$ObjectName. The domain from the ObjectName can be referenced as $domain. All key propertiesfrom the ObjectName can also be referenced by $key.
148

This storage strategy is meant to be used with JMX MBean datacollections where multiple MBeanscan return the same set of attributes. As of OpenNMS Horizon 20, this is only supported using aHTTP to JMX proxy and using the XmlCollector as the JmxCollector does not yet support indexedgroups.
Given an MBean like java.lang:type=MemoryPool,name=Survivor Space, and a storage strategy likethis:
<storageStrategy class="org.opennms.netmgt.collection.support.ObjectNameStorageStragegy"> <parameter key="index-format" value="$domain_$type_$name" /> <parameter key="clean-output" value="true" /></storageStrategy>
Then the index value would be java_lang_MemoryPool_Survivor_Space.
FrameRelayStorageStrategy
The FrameRelayStorageStrategy takes no parameters.
HostFileSystemStorageStrategy
The HostFileSystemStorageStrategy takes no parameters. This class is marked as deprecated, andcan be replaced with:
<storageStrategy class="org.opennms.netmgt.dao.support.SiblingColumnStorageStrategy"> <parameter key="sibling-column-name" value="hrStorageDescr" /> <parameter key="replace-first" value="s/^-$/_root_fs/" /> <parameter key="replace-all" value="s/^-//" /> <parameter key="replace-all" value="s/\\s//" /> <parameter key="replace-all" value="s/:\\\\.*//" /></storageStrategy>
SiblingColumnStorageStrategy
Parameter Description
sibling-column-name Alternate string value to use for index
replace-first Regex Pattern, replaces only the first match
replace-all Regex Pattern, replaces all matches
Values for replace-first, and replace-all must match the pattern s/regex/replacement/ or an errorwill be thrown.
XmlStorageStrategy
This XmlStorageStrategy takes no parameters. The index value will have all whitespace, colons,forward and back slashes, and vertical bars replaced with underscores. All equal signs are
149

removed.
5.2. Collection PackagesTo define more complex collection configuration it is possible to group Service configurations whichprovide performance metrics into Collection Packages. They allow to assign to Nodes differentService Configurations to differentiate collection of performance metrics and connection settings. Toassign a Collection Package to nodes the Rules/Filters syntax can be used.
Multiple packages can be configured, and an interface can exist in more than one package. Thisgives great flexibility how the service levels will be determined for a given device. The order howCollection Packages are defined is important when IP Interfaces match multiple Collection Packageswith the same Service configuration. The last Collection Package on the service will be applied. Thiscan be used to define a less specific catch all filter for a default configuration. A more specificCollection Package can be used to overwrite the default setting.
Collection Package Attributes
<package name="package1">① <filter>IPADDR != '0.0.0.0'</filter>② <include-range begin="1.1.1.1" end="254.254.254.254"/>③ <include-range begin="::1" end="ffff:ffff:ffff:ffff:ffff:ffff:ffff:ffff"/>④
① Unique name of the collection package.
② Apply this package to all IP interfaces with a configured IPv4 address (not equal 0.0.0.0)
③ Evaluate IPv4 rule to collect for all IPv4 interfaces in the given range
④ Evaluate IPv6 rule to collect for all IPv6 interfaces in the given range
5.2.1. Service Configurations
Service Configurations define what Collector to use and which performance metrics needs to becollected. Service Configurations contains common Service Attributes as well as Collector specificparameters.
Service Configuration Attributes
<service name="SNMP"① interval="300000"② user-defined="false"③ status="on">④ <parameter key="collection" value="default"/>⑤ <parameter key="thresholding-enabled" value="true"/>⑥</service>
<collector service="SNMP" class-name="org.opennms.netmgt.collectd.SnmpCollector"/>⑦
① Service Configuration name which is mapped to a specific Collector implementation.
150

② The interval at which the service is to be collected. (in milliseconds).
③ Marker to say if service is user defined, used specifically for UI purposes.
④ Service is collected only if on.
⑤ Assign performance data collection metric groups named default.
⑥ Enable threshold evaluation for metrics provided by this service.
⑦ Run the SnmpCollector implementation for the service named SNMP
Figure 19. Configuration overview for data collection with Collectd
5.3. Collectors
5.3.1. JmxCollector
The JmxCollector is used to collect performance data via JMX. Attributes are extracted from theavailable MBeans.
Collector Facts
Class Name org.opennms.netmgt.collectd.Jsr160Collector
Package core
Supported on Minion Yes
151

Collector Parameters
Table 78. Collector specific parameters for the Jsr160Collector
Parameter Description Required
Default value
collection The name of the JMX Collection to use required
(none)
thresholding-enabled
Whether collected performance data shall be testedagainst thresholds
optional
true
retry Number of retries optional
3
friendlyName
Name of the path in which the metrics should bestored
optional
Value of the port, or'jsr160' if no port is set.
factory The password strategy to use. Supported values are:STANDARD (for authentication), PASSWORD_CLEAR (same asSTANDARD) and SASL (if secure connection is required)
optional
STANDARD
url The connection url, e.g.service:jmx:rmi:localhost:18980. The ip address canbe substituted. Use $ipaddr in that case, e.g.:service:jmx:rmi:$ipaddr:18980
optional
(none)
username The username if authentication is required. optional
(none)
password The password if authentication is required. optional
(none)
port Deprecated. JMX port. optional
1099
protocol Deprecated. Protocol used in the JMX connectionstring.
optional
rmi
urlPath Deprecated. Path used in JMX connection string. optional
/jmxrmi
rmiServerPort
Deprecated. RMI port. optional
45444
remoteJMX Deprecated. Use an alternative JMX URL scheme. optional
false
The parameters port, protocol, urlPath, rmiServerPort and remoteJMX aredeprecated and should be replaced with the url parameter. If url is not defined thecollector falls back to Legacy Mode and the deprecated parameters are usedinstead to build the connection url.
If a service requires different configuration it can be overwritten with an entry in$OPENNMS_HOME/etc/jmx-config.xml.
152

JMX Collection Configuration
JMX Collections are defined in the etc/jmx-datacollection-config.xml and etc/jmx-datacollection-config.d/.
Here is a snippet providing a collection definition named opennms-poller:
<jmx-collection name="opennms-poller"> <rrd step="300"> <rra>RRA:AVERAGE:0.5:1:2016</rra> <rra>RRA:AVERAGE:0.5:12:1488</rra> <rra>RRA:AVERAGE:0.5:288:366</rra> <rra>RRA:MAX:0.5:288:366</rra> <rra>RRA:MIN:0.5:288:366</rra> </rrd> <mbeans> <mbean name="OpenNMS Pollerd" objectname="OpenNMS:Name=Pollerd"> <attrib name="NumPolls" alias="ONMSPollCount" type="counter"/> </mbean> </mbeans></jmx-collection>
Once added to etc/jmx-datacollection-config.xml you can test it using the collect commandavailable in the Karaf Shell:
collection:collect org.opennms.netmgt.collectd.Jsr160Collector 127.0.0.1collection=opennms-poller port=18980
Generic Resource Type
In order to support wildcard (*) in objectname, JMX collector supports generic resource types. Twochanges needed to jmx configuration for this to work.
• Create a custom resource type in etc/resource-types.d/ for ex: there is already a definition injmx-resource.xml which defines a custom resource for kafka lag
<resource-types> <resourceType name="kafkaLag" label="Kafka Lag" resourceLabel="$index"> <persistenceSelectorStrategy class="org.opennms.netmgt.collection.support.PersistAllSelectorStrategy"/> <storageStrategy class="org.opennms.netmgt.dao.support.SiblingColumnStorageStrategy"> <parameter key="sibling-column-name" value="name" /> </storageStrategy> </resourceType></resource-types>
153

• Match the resourceType name as resource-type in mbean definition
<mbean name="org.opennms.core.ipc.sink.kafka.heartbeat" resource-type="kafkaLag"objectname="org.opennms.core.ipc.sink.kafka:name=OpenNMS.Sink.*.Lag"> <attrib name="Value" alias="Lag" type="gauge"/></mbean>
Resource definition
JMX objectname is the full name of Mbean in form of ( domain:key=value, key=value, ..). Wildcard(*) can exist anywhere in the objectname.
Depending on wildcard definition, use SiblingColumnStorageStrategy to extract resource label. Ifwildcard exists in the value ( usual case), use corresponding key as the sibling-column-nameparameter. for ex: org.apache.activemq:BrokerName=*,Type=Queue,Destination=com.mycompany.myqueue
Here BrokerName can be defined as parameter for SiblingColumnStorageStrategy
<parameter key="sibling-column-name" value="BrokerName" />
The extracted BrokerNames from the wildcard will be the resource folders in the form ofnodeId/resourceTypeName/resource-label
Wildcard may exist in domain as well, for ex: org.apache.*:BrokerName=trap, Type=Queue. Thendomain can be defined as the sibling-column-name parameter.
<parameter key="sibling-column-name" value="domain" />
The objectname itself can be used as resource label, simply use IndexStorageStrategy asstorageStrategy in resource-type definition.
3rd Party JMX Services
Some java applications provide their own JMX implementation and require certain libraries to bepresent on the classpath, e.g. the java application server Wildfly. In order to successfully collectdata the following steps may be required:
• Place the jmx client lib to the $OPENNMS_HOME/lib folder (e.g. jboss-cli-client.jar)
• Configure the JMX-Collector accordingly (see below)
• Configure the collection accordingly (see above)
154

Example
<service name="JMX-WILDFLY" interval="300000" user-defined="false" status="on"> <parameter key="url" value="service:jmx:http-remoting-jmx://$ipaddr:9990"/> <parameter key="retry" value="2"/> <parameter key="timeout" value="3000"/> <parameter key="factory" value="PASSWORD-CLEAR"/> <parameter key="username" value="admin"/> <parameter key="password" value="admin"/> <parameter key="rrd-base-name" value="java"/> <parameter key="collection" value="jsr160"/> <parameter key="thresholding-enabled" value="true"/> <parameter key="ds-name" value="jmx-wildfly"/> <parameter key="friendly-name" value="jmx-wildfly"/></service><collector service="JMX-WILDFLY" class-name="org.opennms.netmgt.collectd.Jsr160Collector"/>
5.3.2. SnmpCollector
The SnmpCollector is used to collect performance data through the SNMP protocol. Access to theSNMP Agent is configured through the SNMP configuration in the Web User Interface.
Collector Facts
Class Name org.opennms.netmgt.collectd.SnmpCollector
Package core
Supported on Minion Yes (via the SNMP proxy)
Collector Parameters
Table 79. Collector specific parameters for the SnmpCollector
Parameter Description Required
Default value
collection The name of the SNMP Collection to use. required
default
thresholding-enabled
Whether collected performance data shall be testedagainst thresholds.
optional
true
timeout Timeout in milliseconds to wait for SNMP responses. optional
SNMPconfiguration
SNMP Collection Configuration
SNMP Collection are defined in the etc/datacollection-config.xml and etc/datacollection.d/*.xmlfiles.
155

<?xml version="1.0"?><datacollection-config rrd-repository="/var/lib/opennms/rrd/snmp/">① <snmp-collection name="default"② snmpStorageFlag="select">③ <rrd step="300">④ <rra>RRA:AVERAGE:0.5:1:2016</rra> <rra>RRA:AVERAGE:0.5:12:1488</rra> <rra>RRA:AVERAGE:0.5:288:366</rra> <rra>RRA:MAX:0.5:288:366</rra> <rra>RRA:MIN:0.5:288:366</rra> </rrd>
<include-collection dataCollectionGroup="MIB2"/>⑤ <include-collection dataCollectionGroup="3Com"/> ... <include-collection dataCollectionGroup="VMware-Cim"/> </snmp-collection></datacollection-config>
① Directory where to persist RRD files on the file system, ignored if NewTS is used as time seriesstorage.
② Name of the SNMP data collection referenced in the Collection Package in collectd-
configuration.xml.
③ Configure SNMP MIB-II interface metric collection behavior: all means collect metrics from allinterfaces, primary only from interface provisioned as primary interface, select only frommanualy selected interfaces from the Web UI.
④ RRD archive configuration for this set of performance metrics, ignored when NewTS is used astime series storage.
⑤ Include device or application specific performance metric OIDS to collect.
Figure 20. Configuration overview for SNMP data collection
5.3.3. HttpCollector
The HttpCollector is used to collect performance data via HTTP and HTTPS. Attributes are extractedfrom the HTTP responses using a regular expression.
156

Collector Facts
Class Name org.opennms.netmgt.collectd.HttpCollector
Package core
Supported on Minion Yes
Collector Parameters
Table 80. Collector specific parameters for the HttpCollector
Parameter Description Required
Defaultvalue
collection The name of the HTTP Collection to use. required
(none)
thresholding-enabled
Whether collected performance data shall be testedagainst thresholds.
optional
true
port Override the default port in the all of the URIs optional
80
timeout Connection and socket timeout in milliseconds optional
3000
retry Number of retries optional
2
HTTP Collection Configuration
HTTP Collections are defined in the etc/http-datacollection-config.xml.
Here is a snippet providing a collection definition named opennms-copyright:
157

<http-collection name="opennms-copyright"> <rrd step="300"> <rra>RRA:AVERAGE:0.5:1:2016</rra> <rra>RRA:AVERAGE:0.5:12:1488</rra> <rra>RRA:AVERAGE:0.5:288:366</rra> <rra>RRA:MAX:0.5:288:366</rra> <rra>RRA:MIN:0.5:288:366</rra> </rrd> <uris> <uri name="login-page"> <url path="/opennms/login.jsp" matches=".*2002\-([0-9]+).*" response-range="100-399" dotall="true" > </url> <attributes> <attrib alias="copyrightYear" match-group="1" type="gauge"/> </attributes> </uri> </uris></http-collection>
Once added to etc/http-datacollection-config.xml you can test it using the collect commandavailable in the Karaf Shell:
collection:collect org.opennms.netmgt.collectd.HttpCollector 127.0.0.1collection=opennms-copyright port=8980
5.3.4. JdbcCollector
The JdbcCollector is used to collect performance data via JDBC drivers. Attributes are retrievedusing SQL queries.
Collector Facts
Class Name org.opennms.netmgt.collectd.JdbcCollector
Package core
Supported on Minion Yes (see limitations)
Limitations on Minion
When running on Minion the data sources in opennms-datasources.xml cannot be referenced.Instead, the JDBC connection settings need be set using the service parameters instead.
Also, the JDBC driver must be properly loaded in the Minion container. By default, only the JDBCdriver for PostgreSQL is available.
158

Collector Parameters
Table 81. Collector specific parameters for the JdbcCollector
Parameter
Description Required
Default value
collection
The name of the JDBC Collection to use required
(empty)
data-source
Use an existing datasource defined inopennms-datasources.xml
optional
NO_DATASOURCE_FOUND
driver Driver class name optional
org.postgresql.Driver
url JDBC URL optional
jdbc:postgresql://:OPENNMS_JDBC_HOSTNAME/opennms
user JDBC username optional
postgres
password JDBC password optional
(empty string)
JDBC Collection Configuration
JDBC Collections are defined in the etc/jdbc-datacollection-config.xml.
Here is a snippet providing a collection definition named opennms-stats:
<jdbc-collection name="opennms-stats"> <rrd step="300"> <rra>RRA:AVERAGE:0.5:1:2016</rra> <rra>RRA:AVERAGE:0.5:12:1488</rra> <rra>RRA:AVERAGE:0.5:288:366</rra> <rra>RRA:MAX:0.5:288:366</rra> <rra>RRA:MIN:0.5:288:366</rra> </rrd> <queries> <query name="opennmsQuery" ifType="ignore"> <statement data-source="opennms"> <queryString>select count(*) as event_count from events;</queryString> </statement> <columns> <column name="event_count" data-source-name="event_count" alias="event_count"type="GAUGE"/> </columns> </query> </queries></jdbc-collection>
Once added to etc/jdbc-datacollection-config.xml you can test it using the collect command
159

available in the Karaf Shell:
collection:collect org.opennms.netmgt.collectd.JdbcCollector 127.0.0.1collection=opennms-stats data-source=opennms
To test this same collection on Minion you must specify the JDBC settings as service attributes, forexample:
collection:collect -l MINION org.opennms.netmgt.collectd.JdbcCollector 127.0.0.1collection=opennms-stats driver=org.postgresql.Driverurl=jdbc:postgresql://localhost:5432/opennms user=opennms password=opennms
5.3.5. JmxCollector
The JmxCollector is used to collect performance data via JMX. Attributes are extracted from theavailable MBeans.
Collector Facts
Class Name org.opennms.netmgt.collectd.Jsr160Collector
Package core
Supported on Minion Yes
Collector Parameters
Table 82. Collector specific parameters for the Jsr160Collector
Parameter Description Required
Default value
collection The name of the JMX Collection to use required
(none)
thresholding-enabled
Whether collected performance data shall be testedagainst thresholds
optional
true
retry Number of retries optional
3
friendlyName
Name of the path in which the metrics should bestored
optional
Value of the port, or'jsr160' if no port is set.
factory The password strategy to use. Supported values are:STANDARD (for authentication), PASSWORD_CLEAR (same asSTANDARD) and SASL (if secure connection is required)
optional
STANDARD
url The connection url, e.g.service:jmx:rmi:localhost:18980. The ip address canbe substituted. Use $ipaddr in that case, e.g.:service:jmx:rmi:$ipaddr:18980
optional
(none)
160

Parameter Description Required
Default value
username The username if authentication is required. optional
(none)
password The password if authentication is required. optional
(none)
port Deprecated. JMX port. optional
1099
protocol Deprecated. Protocol used in the JMX connectionstring.
optional
rmi
urlPath Deprecated. Path used in JMX connection string. optional
/jmxrmi
rmiServerPort
Deprecated. RMI port. optional
45444
remoteJMX Deprecated. Use an alternative JMX URL scheme. optional
false
The parameters port, protocol, urlPath, rmiServerPort and remoteJMX aredeprecated and should be replaced with the url parameter. If url is not defined thecollector falls back to Legacy Mode and the deprecated parameters are usedinstead to build the connection url.
If a service requires different configuration it can be overwritten with an entry in$OPENNMS_HOME/etc/jmx-config.xml.
JMX Collection Configuration
JMX Collections are defined in the etc/jmx-datacollection-config.xml and etc/jmx-datacollection-config.d/.
Here is a snippet providing a collection definition named opennms-poller:
161

<jmx-collection name="opennms-poller"> <rrd step="300"> <rra>RRA:AVERAGE:0.5:1:2016</rra> <rra>RRA:AVERAGE:0.5:12:1488</rra> <rra>RRA:AVERAGE:0.5:288:366</rra> <rra>RRA:MAX:0.5:288:366</rra> <rra>RRA:MIN:0.5:288:366</rra> </rrd> <mbeans> <mbean name="OpenNMS Pollerd" objectname="OpenNMS:Name=Pollerd"> <attrib name="NumPolls" alias="ONMSPollCount" type="counter"/> </mbean> </mbeans></jmx-collection>
Once added to etc/jmx-datacollection-config.xml you can test it using the collect commandavailable in the Karaf Shell:
collection:collect org.opennms.netmgt.collectd.Jsr160Collector 127.0.0.1collection=opennms-poller port=18980
Generic Resource Type
In order to support wildcard (*) in objectname, JMX collector supports generic resource types. Twochanges needed to jmx configuration for this to work.
• Create a custom resource type in etc/resource-types.d/ for ex: there is already a definition injmx-resource.xml which defines a custom resource for kafka lag
<resource-types> <resourceType name="kafkaLag" label="Kafka Lag" resourceLabel="$index"> <persistenceSelectorStrategy class="org.opennms.netmgt.collection.support.PersistAllSelectorStrategy"/> <storageStrategy class="org.opennms.netmgt.dao.support.SiblingColumnStorageStrategy"> <parameter key="sibling-column-name" value="name" /> </storageStrategy> </resourceType></resource-types>
• Match the resourceType name as resource-type in mbean definition
162

<mbean name="org.opennms.core.ipc.sink.kafka.heartbeat" resource-type="kafkaLag"objectname="org.opennms.core.ipc.sink.kafka:name=OpenNMS.Sink.*.Lag"> <attrib name="Value" alias="Lag" type="gauge"/></mbean>
Resource definition
JMX objectname is the full name of Mbean in form of ( domain:key=value, key=value, ..). Wildcard(*) can exist anywhere in the objectname.
Depending on wildcard definition, use SiblingColumnStorageStrategy to extract resource label. Ifwildcard exists in the value ( usual case), use corresponding key as the sibling-column-nameparameter. for ex: org.apache.activemq:BrokerName=*,Type=Queue,Destination=com.mycompany.myqueue
Here BrokerName can be defined as parameter for SiblingColumnStorageStrategy
<parameter key="sibling-column-name" value="BrokerName" />
The extracted BrokerNames from the wildcard will be the resource folders in the form ofnodeId/resourceTypeName/resource-label
Wildcard may exist in domain as well, for ex: org.apache.*:BrokerName=trap, Type=Queue. Thendomain can be defined as the sibling-column-name parameter.
<parameter key="sibling-column-name" value="domain" />
The objectname itself can be used as resource label, simply use IndexStorageStrategy asstorageStrategy in resource-type definition.
3rd Party JMX Services
Some java applications provide their own JMX implementation and require certain libraries to bepresent on the classpath, e.g. the java application server Wildfly. In order to successfully collectdata the following steps may be required:
• Place the jmx client lib to the $OPENNMS_HOME/lib folder (e.g. jboss-cli-client.jar)
• Configure the JMX-Collector accordingly (see below)
• Configure the collection accordingly (see above)
163

Example
<service name="JMX-WILDFLY" interval="300000" user-defined="false" status="on"> <parameter key="url" value="service:jmx:http-remoting-jmx://$ipaddr:9990"/> <parameter key="retry" value="2"/> <parameter key="timeout" value="3000"/> <parameter key="factory" value="PASSWORD-CLEAR"/> <parameter key="username" value="admin"/> <parameter key="password" value="admin"/> <parameter key="rrd-base-name" value="java"/> <parameter key="collection" value="jsr160"/> <parameter key="thresholding-enabled" value="true"/> <parameter key="ds-name" value="jmx-wildfly"/> <parameter key="friendly-name" value="jmx-wildfly"/></service><collector service="JMX-WILDFLY" class-name="org.opennms.netmgt.collectd.Jsr160Collector"/>
5.3.6. NSClientCollector
The NSClientCollector is used to collect performance data over HTTP from NSClient++.
Collector Facts
Class Name org.opennms.protocols.nsclient.collector.NSClientCollector
Package opennms-plugin-protocol-nsclient
Supported on Minion Yes
Collector Parameters
Table 83. Collector specific parameters for the NSClientCollector
Parameter
Description Required
Defaultvalue
collection The name of the NSClient Collection to use optional default
5.3.7. TcaCollector
The TcaCollector is used to collect special SNMP data from Juniper TCA Devices.
Collector Facts
Class Name org.opennms.netmgt.collectd.tca.TcaCollector
Package opennms-plugin-collector-juniper-tca
Supported on Minion Yes
164

Collector Parameters
Table 84. Collector specific parameters for the TcaCollector
Parameter
Description Required
Defaultvalue
collection The name of the TCA Collection to use required
5.3.8. VmwareCimCollector
The VmwareCimCollector collects ESXi host and sensor metrics from vCenter.
Collector Facts
Class Name org.opennms.netmgt.collectd.VmwareCimCollector
Package core
Supported on Minion Yes
Collector Parameters
Table 85. Collector specific parameters for the VmwareCimCollector
Parameter
Description Required
Defaultvalue
collection The name of the VMWare CIM Collection to use required
timeout Connection timeout in milliseconds optional
5.3.9. VmwareCollector
The VmwareCollector collects peformance metrics for managed entities from vCenter.
Collector Facts
Class Name org.opennms.netmgt.collectd.VmwareCollector
Package core
Supported on Minion Yes
Collector Parameters
Table 86. Collector specific parameters for the VmwareCollector
Parameter
Description Required
Defaultvalue
collection The name of the VMWare Collection to use required
timeout Connection timeout in milliseconds optional
165

5.3.10. WmiCollector
The WmiCollector collects peformance metrics from Windows systems using Windows ManagementInstrumentation (WMI).
Collector Facts
Class Name org.opennms.netmgt.collectd.WmiCollector
Package core
Supported on Minion Yes
Collector Parameters
Table 87. Collector specific parameters for the WmiCollector
Parameter
Description Required
Defaultvalue
collection The name of the WMI Collection to use required
5.3.11. WsManCollector
The WsManCollector collects peformance metrics using the Web Services-Management (WS-Management) protocol.
Web Services-Management (WS-Management) is a DMTF open standard defining a SOAP-basedprotocol for the management of servers, devices, applications and various Web services. WindowsRemote Management (WinRM) is the Microsoft implementation of WS-Management Protocol.
Collector Facts
Class Name org.opennms.netmgt.collectd.WsManCollector
Package core
Supported on Minion Yes
Collector Parameters
Table 88. Collector specific parameters for the WsManCollector
Parameter
Description Required
Defaultvalue
collection The name of the WS-Man Collection to use required
WS-Management Setup
Before setting up OpenNMS Horizon to communicate with a WS-Management agent, you shouldconfirm that it is properly configured and reachable from the OpenNMS Horizon system. If youneed help enabling the WS-Management agent, consult the documentation from the manufacturer.
166

Here are some link resources that could help:
• Installation and Configuration for Windows Remote Management
• Troubleshooting WinRM connection and authentication
We suggest using the Openwsman command line client for validating authentication andconnectivity. Packages are available for most distributions under wsmancli.
For example:
wsman identify -h localhost -P 5985 -u wsman -p secret
Once validated, add the agent specific details to the OpenNMS Horizon configuration, defined in thenext section.
Troubleshooting and Commands
For troubleshooting there is a set of commands you can use in Powershell verified on MicrosoftWindows Server 2012.
Enable WinRM in PowerShell
Enable-PSRemoting
Setup Firewall for WinRM over HTTP
netsh advfirewall firewall add rule name="WinRM-HTTP" dir=in localport=5985protocol=TCP action=allow
Setup Firewall for WinRM over HTTPS
netsh advfirewall firewall add rule name="WinRM-HTTPS" dir=in localport=5986protocol=TCP action=allow
Test WinRM on local Windows Server
winrm id
Show WinRM configuration on Windows Server
winrm get winrm/config
Show listener for configuration on Windows Server
winrm e winrm/config/listener
167

Test connectivity from a Linux system
nc -z -w1 <windows-server-ip-or-host> 5985;echo $?
Use BasicAuthentication just with WinRM over HTTPS with verifiable certificatesin production environment.
Enable BasicAuthentication
winrm set winrm/config/client/auth '@Basic="true"'winrm set winrm/config/service/auth '@Basic="true"'winrm set winrm/config/service '@AllowUnencrypted="true"'
WS-Management Agent Configuration
The agent specific configuration details are maintained in etc/wsman-config.xml. This file has asimilar structure as etc/snmp-config.xml, which the reader may already be familiar with.
This file is consulted when a connection to a WS-Man Agent is made. If the IP address of the agent ismatched by the range, specific or ip-match elements of a definition, then the attributes on thatdefinition are used to connect to the agent. Otherwise, the attributes on the outer wsman-configdefinition are used.
This etc/wsman-config.xml files is automatically reloaded when modified.
Here is an example with several definitions:
<?xml version="1.0"?><wsman-config retry="3" timeout="1500" ssl="true" strict-ssl="false" path="/wsman"> <definition ssl="true" strict-ssl="false" path="/wsman" username="root" password="calvin" product-vendor="Dell" product-version="iDRAC 6"> <range begin="192.168.1.1" end="192.168.1.10"/> </definition> <definition ssl="false" port="5985" path="/wsman" username="Administrator"password="P@ssword"> <ip-match>172.23.1-4.1-255</ip-match> <specific>172.23.1.105</specific> </definition></wsman-config>
Table 89. Collector configuration attributes
Attribute Description Default
timeout HTTP Connection and response timeout in milliseconds. HTTP clientdefault
retry Number of retries on connection failure. 0
168

Attribute Description Default
username Username for basic authentication. none
password Password used for basic authentication. none
port HTTP/S port Default forprotocol
max-elements
Maximum number of elements to retrieve in a single request. no limit
ssl Enable SSL False
strict-ssl Enforce SSL certificate verification. True
path Path in the URL to the WS-Management service. /
product-vendor
Used to overwrite the detected product vendor. none
product-version
Used to overwrite the detected product version. none
gss-auth Enables GSS authentication. When enabled a reverse lookup isperformed on the target IP address in order to determine thecanonical host name.
False
If you try to connect against Microsoft Windows Server make sure to set specificports for WinRM connections. By default Microsoft Windows Server uses portTCP/5985 for plain text and port TCP/5986 for SSL connections.
WS-Management Collection Configuration
Configuration for the WS-Management collector is stored in etc/wsman-datacollection-config.xmland etc/wsman-datacollection.d/*.xml.
The contents of these files are automatically merged and reloaded when changed.The default WS-Management collection looks as follows:
169

<?xml version="1.0"?><wsman-datacollection-config rrd-repository="$install.share.dir/rrd/snmp/"> <collection name="default"> <rrd step="300"> <rra>RRA:AVERAGE:0.5:1:2016</rra> <rra>RRA:AVERAGE:0.5:12:1488</rra> <rra>RRA:AVERAGE:0.5:288:366</rra> <rra>RRA:MAX:0.5:288:366</rra> <rra>RRA:MIN:0.5:288:366</rra> </rrd>
<!-- Include all of the available system definitions --> <include-all-system-definitions/> </collection></wsman-datacollection-config>
The magic happens with the <include-all-system-definitions/> element which automaticallyincludes all of the system definitions into the collection group.
If required, you can include a specific system-definition with <include-system-definition>sys-def-name</include-system-definition>.
System definitions and related groups can be defined in the root etc/wsman-datacollection-config.xml file, but it is preferred that be added to a device specific configuration files in etc/wsman-datacollection-config.d/*.xml.
Avoid modifying any of the distribution configuration files and create new ones tostore you specific details instead.
Here is an example configuration file for a Dell iDRAC:
170

<?xml version="1.0"?><wsman-datacollection-config> <group name="drac-system" resource-uri="http://schemas.dell.com/wbem/wscim/1/cim-schema/2/root/dcim/DCIM_ComputerSystem" resource-type="node"> <attrib name="OtherIdentifyingInfo" index-of="#IdentifyingDescriptions matches'.*ServiceTag'" alias="serviceTag" type="String"/> </group>
<group name="drac-power-supply" resource-uri="http://schemas.dmtf.org/wbem/wscim/1/*" dialect="http://schemas.microsoft.com/wbem/wsman/1/WQL" filter="selectInputVoltage,InstanceID,PrimaryStatus,SerialNumber,TotalOutputPower fromDCIM_PowerSupplyView where DetailedState != 'Absent'" resource-type="dracPowerSupplyIndex"> <attrib name="InputVoltage" alias="inputVoltage" type="Gauge"/> <attrib name="InstanceID" alias="instanceId" type="String"/> <attrib name="PrimaryStatus" alias="primaryStatus" type="Gauge"/> <attrib name="SerialNumber" alias="serialNumber" type="String"/> <attrib name="TotalOutputPower" alias="totalOutputPower" type="Gauge"/> </group>
<system-definition name="Dell iDRAC (All Version)"> <rule>#productVendor matches '^Dell.*' and #productVersion matches'.*iDRAC.*'</rule> <include-group>drac-system</include-group> <include-group>drac-power-supply</include-group> </system-definition></wsman-datacollection-config>
System Definitions
Rules in the system definition are written using SpEL expressions.
The expression has access to the following variables in it`s evaluation context:
Name Type
(root) org.opennms.netmgt.model.OnmsNode
agent org.opennms.netmgt.collection.api.CollectionAgent
productVendor java.lang.String
productVersion java.lang.String
If a particular agent is matched by any of the rules, then the collector will attempt to collect thereferenced groups from the agent.
171

Group Definitions
Groups are retrieved by issuing an Enumerate command against a particular Resource URI andparsing the results. The Enumerate commands can include an optional filter in order to filter therecords and attributes that are returned.
When configuring a filter, you must also specify the dialect.
The resource type used by the group must of be of type node or a generic resource type. Interfacelevel resources are not supported.
When using a generic resource type, the IndexStorageStrategy cannot be used since records have noimplicit index. Instead, you must use an alternative such as the SiblingColumnStorageStrategy.
If a record includes a multi-valued key, you can collect the value at a specific index with an index-ofexpression. This is best demonstrated with an example. Let`s assume we wanted to collect theServiceTag from the following record:
<IdentifyingDescriptions>CIM:GUID</IdentifyingDescriptions><IdentifyingDescriptions>CIM:Tag</IdentifyingDescriptions><IdentifyingDescriptions>DCIM:ServiceTag</IdentifyingDescriptions><OtherIdentifyingInfo>45454C4C-3700-104A-8052-C3C01BB25031</OtherIdentifyingInfo><OtherIdentifyingInfo>mainsystemchassis</OtherIdentifyingInfo><OtherIdentifyingInfo>C8BBBP1</OtherIdentifyingInfo>
Specifying, the attribute name OtherIdentifyingInfo would not be sufficient, since there aremultiple values for that key. Instead, we want to retrieve the value for the OtherIdentifyingInfo keyat the same index where IdentifyingDescriptions is set to DCIM:ServiceTag.
This can be achieved using the following attribute definition:
<attrib name="OtherIdentifyingInfo" index-of="#IdentifyingDescriptions matches'.*ServiceTag'" alias="serviceTag" type="String"/>
5.3.12. XmlCollector
The XmlCollector is used to collect and extract metrics from a XML and JSON documents.
Collector Facts
Class Name org.opennms.protocols.xml.collector.XmlCollector
Package core
Supported on Minion Yes (see limitations)
Limitations on Minion
The following handlers are not currently supported on Minion:
172

• DefaultJsonCollectionHandler
• Sftp3gppXmlCollectionHandler
• Sftp3gppVTDXmlCollectionHandler
Collector Parameters
Table 90. Collector specific parameters for the XmlCollector
Parameter
Description Required
Default value
collection The name of the XMLCollection to use
required
-
handler-class
Class used to perform thecollection
optional
org.opennms.protocols.xml.collector.DefaultXmlCollectionHandler
The available handlers include:
• org.opennms.protocols.xml.collector.DefaultXmlCollectionHandler
• org.opennms.protocols.xml.collector.Sftp3gppXmlCollectionHandler
• org.opennms.protocols.xml.vtdxml.DefaultVTDXmlCollectionHandler
• org.opennms.protocols.xml.vtdxml.Sftp3gppVTDXmlCollectionHandler
• org.opennms.protocols.json.collector.DefaultJsonCollectionHandler
• org.opennms.protocols.http.collector.HttpCollectionHandler
XML Collection Configuration
XML Collections are defined in the etc/xml-datacollection-config.xml and etc/xml-datacollection/.
Here is a snippet providing a collection definition named xml-opennms-nodes:
<xml-collection name="xml-opennms-nodes"> <rrd step="300"> <rra>RRA:AVERAGE:0.5:1:2016</rra> <rra>RRA:AVERAGE:0.5:12:1488</rra> <rra>RRA:AVERAGE:0.5:288:366</rra> <rra>RRA:MAX:0.5:288:366</rra> <rra>RRA:MIN:0.5:288:366</rra> </rrd> <xml-source url="http://admin:admin@ipaddr:8980/opennms/rest/nodes"> <import-groups>xml-datacollection/opennms-nodes.xml</import-groups> </xml-source></xml-collection
The referenced opennms-nodes.xml file contains:
173

<xml-groups> <xml-group name="nodes" resource-type="node" resource-xpath="/nodes"> <xml-object name="totalCount" type="GAUGE" xpath="@totalCount"/> </xml-group></xml-groups>
With the configuration in place, you can test it using the collect command available in the KarafShell:
collection:collect -n 1 org.opennms.protocols.xml.collector.XmlCollector 127.0.0.1collection=xml-opennms-nodes
Caveats
The org.opennms.protocols.json.collector.DefaultJsonCollectionHandler requires the fetcheddocument to be single element of type object to make xpath query work. If the root element is anarray, it will be wrapped in an object whereas the original array is accessible as /elements.
5.3.13. XmpCollector
The XmpCollector collects peformance metrics via the X/Open Management Protocol API (XMP)protocol.
Collector Facts
Class Name org.opennms.netmgt.protocols.xmp.collector.XmpCollector
Package opennms-plugin-protocol-xmp
Supported on Minion No
Collector Parameters
Table 91. Collector specific parameters for the XmpCollector
Parameter
Description Required
Defaultvalue
collection The name of the XMP Collection to use required
port The TCP port on which the agent communicates required
authenUser The username used for authenticating to the agent optional (none)
timeout The timeout used when communicating with the agent optional 3000
retry The number of retries permitted when timeout expires optional 0
174

5.4. Shell CommandsA number of Karaf Shell commands are made available to help administer and diagnose issuesrelated to performance data collection.
To use the commands, log into the Karaf Shell on your system using:
ssh -p 8101 admin@localhost
The Karaf shell uses the same credential as the web interface. Users must beassociated with the ADMIN role to access the shell.
In order to keep the session open while executing long-running tasks without anyuser input add -o ServerAliveInterval=10 to your ssh command.
5.4.1. Ad-hoc collection
The collection:collect Karaf Shell command can be used to trigger and perform a collection on anyof the available collectors.
The results of the collection (also referred to as the "collection set") will be displayed in the consoleafter a successful collection. The resulting collection set will not be persisted, nor will anythresholding be applied.
List all of the available collectors:
collection:list-collectors
Invoke the SnmpCollector against interface 127.0.0.1 on NODES:n1.
collection:collect -n NODES:n1 org.opennms.netmgt.collectd.SnmpCollector 127.0.0.1
Invoke the SnmpCollector against interface 127.0.0.1 on NODES:n1 via the MINION location.
collection:collect -l MINION -n NODES:n1 org.opennms.netmgt.collectd.SnmpCollector127.0.0.1
Setting the location on the command line will override the node’s location.
If you see errors caused by RequestTimedOutException`s when invoking a collectorat a remote location, consider increasing the time to live. By default,
`collectd will use the service interval as the time to live.
Invoke the JdbcCollector against 127.0.0.1 while specifying some of the collector parameters.
175

collection:collect org.opennms.netmgt.collectd.JdbcCollector 127.0.0.1collection=PostgreSQL driver=org.postgresql.Driverurl=jdbc:postgresql://OPENNMS_JDBC_HOSTNAME/postgres user=postgres
Some collectors, such as the JdbcCollector, can be invoked without specifying anode.
Persist a collection :
collection:collect -l MINION -n NODES=n1 -p org.opennms.netmgt.collectd.SnmpCollector127.0.0.1
-p/--persist option will persist collection set there by introducing an extradatapoint other than data collected during already configured collection interval.
A complete list of options is available using:
collection:collect --help
5.4.2. Interpreting the output
After a successful collection, the collection set will be displayed in the following format:
resource a group 1 attribute attribute group 2 attributeresource b group 1 attribute...
The description of the resources, groups and attribute may differ between collectors. This output isindependent of the persistence strategy that is being used.
5.4.3. Stress Testing
The metrics:stress Karaf Shell command can be used to simulate load on the active persistencestrategy, whether it be RRDtool, JRobin, or Newts.
The tool works by generating collection sets, similar to those built when performing data collection,and sending these to the active persistence layer. By using the active persistence layer, we ensure
176

that we use the same write path which is used by the actual data collection services.
Generate samples for 10 nodes every 15 seconds and printing the statistic report every 30 seconds:
metrics:stress -n 10 -i 15 -r 30
While active, the command will continue to generate and persist collection sets. During this timeyou can monitor the system I/O and other relevant statistics.
When your done, use CTRL+C to stop the stress tool.
A complete list of options is available using:
metrics:stress --help
5.4.4. Interpreting the output
The statistics output by the tool can be be interpreted as follows:
numeric-attributes-generated
The number of numeric attributes that were sent to the persistence layer. We have no guaranteeas to whether or not these were actually persisted.
string-attributes-generated
The number of string attributes that were sent to the persistence layer. We have no guarantee asto whether or not these were actually persisted.
batches
The count is used to indicate how many batches of collection sets (one at every interval) weresent to the persistence layer. The timers show how much time was spent generating the batch,and sending the batch to the persistence layer.
177

Chapter 6. EventsEvents are central to the operation of the OpenNMS Horizon platform, so it’s critical to have a firmgrasp of this topic.
Whenever something in OpenNMS Horizon appears to work by magic, it’sprobably events working behind the curtain.
6.1. Anatomy of an EventEvents are structured historical records of things that happen in OpenNMS Horizon and the nodes,interfaces, and services it manages. Every event has a number of fixed fields and zero or moreparameters.
Mandatory Fields
UEI (Universal Event Identifier)
A string uniquely identifying the event’s type. UEIs are typically formatted in the style of a URI,but the only requirement is that they start with the string uei..
Event Label
A short, static label summarizing the gist of all instances of this event.
Description
A long-form description describing all instances of this event.
Log Message
A long-form log message describing this event, optionally including expansions of fields andparameters so that the value is tailored to the event at hand.
Severity
A severity for this event type. Possible values range from Cleared to Critical.
Event ID
A numeric identifier used to look up a specific event in the OpenNMS Horizon system.
Notable Optional Fields
Operator Instruction
A set of instructions for an operator to respond appropriately to an event of this type.
Alarm Data
If this field is provided for an event, OpenNMS Horizon will create, update, or clear alarms forevents of that type according to the alarm-data specifics.
6.2. Sources of EventsEvents may originate within OpenNMS Horizon itself or from outside.
178

Internally-generated events can be the result of the platform’s monitoring and managementfunctions (e.g. a monitored node becoming totally unavailable results in an event with the UEIuei.opennms.org/nodes/nodeDown) or they may act as inputs or outputs of housekeeping processes.
The following subsections summarize the mechanisms by which externally-created events canarrive.
6.2.1. SNMP Traps
If SNMP-capable devices in the network are configured to send traps to OpenNMS Horizon, thesetraps are transformed into events according to pre-configured rules. The Trapd service daemon,which enables OpenNMS Horizon to receive SNMP traps, is enabled by default.
Disabling the Trapd service daemon will render OpenNMS Horizon incapable ofreceiving SNMP traps.
Event definitions are included with OpenNMS Horizon for traps from many vendors' equipment.
6.2.2. Syslog Messages
Syslog messages sent over the network to OpenNMS Horizon can be transformed into eventsaccording to pre-configured rules.
The Syslogd service daemon, which enables OpenNMS Horizon to receive syslogmessages over the network, must be enabled for this functionality to work. Thisservice daemon is disabled by default.
Parsers
Different parsers can be used to convert the syslog message fields into OpenNMS Horizon eventfields.
Parser Description
org.opennms.netmgt.syslogd.CustomSyslogParser
Default parser that uses a regex statement to parse thesyslog header.
org.opennms.netmgt.syslogd.RadixTreeSyslogParser
Parser that uses an internal list of grok-style statements toparse the syslog header.
org.opennms.netmgt.syslogd.SyslogNGParser
Parser that strictly parses messages in the default pattern ofsyslog-ng.
org.opennms.netmgt.syslogd.Rfc5424SyslogParser
Parser that strictly parses the RFC 5424 format for syslogmessages.
RadixTreeSyslogParser
The RadixTreeSyslogParser normally uses a set of internally-defined patterns to parse multiplesyslog message formats. If you wish to customize the set of patterns, you can put a new set ofpatterns into a syslog-grok-patterns.txt in the etc directory for OpenNMS Horizon.
179
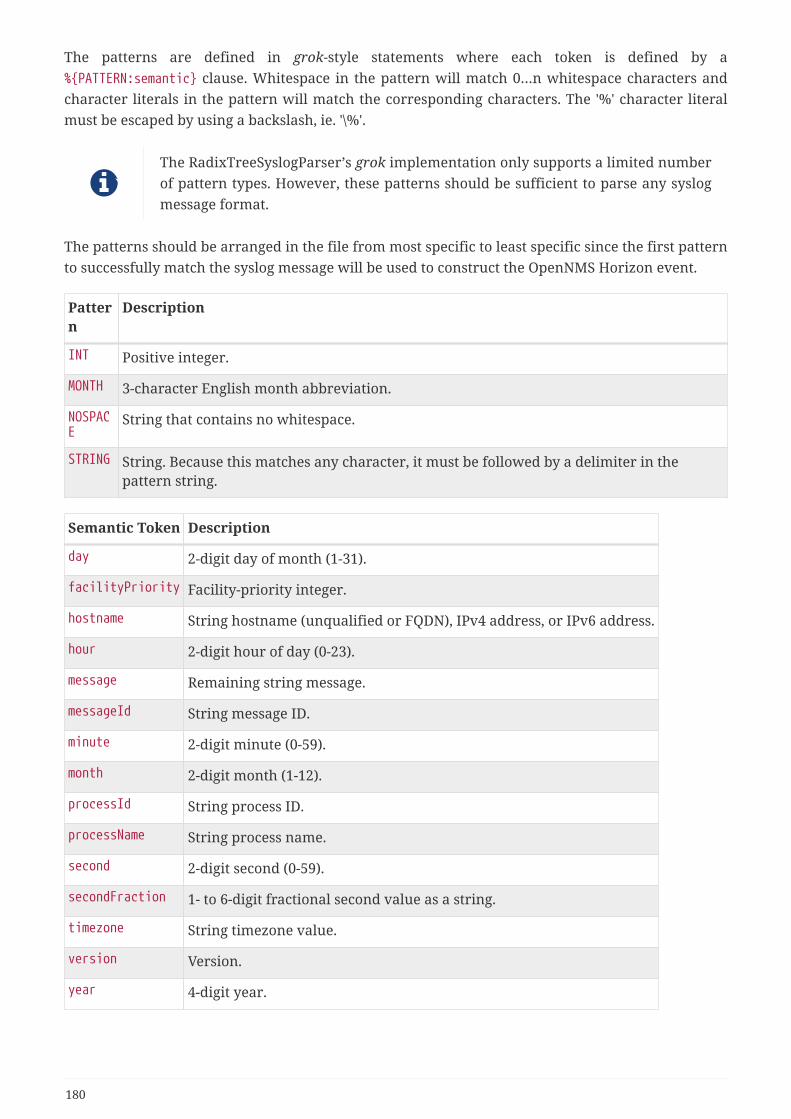
The patterns are defined in grok-style statements where each token is defined by a%PATTERN:semantic clause. Whitespace in the pattern will match 0…n whitespace characters andcharacter literals in the pattern will match the corresponding characters. The '%' character literalmust be escaped by using a backslash, ie. '\%'.
The RadixTreeSyslogParser’s grok implementation only supports a limited numberof pattern types. However, these patterns should be sufficient to parse any syslogmessage format.
The patterns should be arranged in the file from most specific to least specific since the first patternto successfully match the syslog message will be used to construct the OpenNMS Horizon event.
Pattern
Description
INT Positive integer.
MONTH 3-character English month abbreviation.
NOSPACE
String that contains no whitespace.
STRING String. Because this matches any character, it must be followed by a delimiter in thepattern string.
Semantic Token Description
day 2-digit day of month (1-31).
facilityPriority Facility-priority integer.
hostname String hostname (unqualified or FQDN), IPv4 address, or IPv6 address.
hour 2-digit hour of day (0-23).
message Remaining string message.
messageId String message ID.
minute 2-digit minute (0-59).
month 2-digit month (1-12).
processId String process ID.
processName String process name.
second 2-digit second (0-59).
secondFraction 1- to 6-digit fractional second value as a string.
timezone String timezone value.
version Version.
year 4-digit year.
180

6.2.3. ReST
Posting an event in XML format to the appropriate endpoint in the OpenNMS Horizon ReST API willcause the creation of a corresponding event, just as with the XML-TCP interface.
6.2.4. XML-TCP
Any application or script can create custom events in OpenNMS Horizon by sending properly-formatted XML data over a TCP socket.
6.2.5. Receiving IBM Tivoli Event Integration Facility Events
OpenNMS can be configured to receive Events sent using the Tivoli Event Integration Facility. TheseEIF events are translated into OpenNMS events using preconfigured rules. The resulting UEI areanchored in the uei.opennms.org/vendor/IBM/EIF/ namespace, with the name of the EIF event classappended.
A sample event configuration for the OMEGAMON_BASE class is included with OpenNMS.
Configuring the EIF Adapter
Once OpenNMS is started and the Karaf shell is accessible, you can install the EIF Adapter featureand configure it to listen on a specific interface and port.
By default the EIF Adapter is configured to listen on TCP port 1828 on all interfaces.
OSGi login, installation, and configuration of the EIF Adapter
[root@localhost /root]# $ ssh -p 8101 [email protected]> feature:install eif-adapteropennms> config:edit org.opennms.features.eifadapteropennms> config:property-set interface 0.0.0.0opennms> config:property-set port 1828opennms> config:update
You can check the routes status with the camel:* commands and/or inspect the log with log:tail forany obvious errors. The feature has a debug level logging that can be used to debug operations.
Documentation on using the OSGi console embedded in OpenNMS and the relatedcamel commands.
Features installed through the Karaf shell persist only as long as the$OPENNMS_HOME/data directory remains intact. To enable the feature morepermanently, add it to the featuresBoot list in$OPENNMS_HOME/etc/org.apache.karaf.features.cfg.
You should now be able to configure your EIF forwarders to send to this destination, and their
181

events will be translated into OpenNMS Events and written to the event bus.
Troubleshooting
If events are not reaching OpenNMS, check whether the event source (EIF Forwarder) is correctlyconfigured. Check your event destination configuration. In particular review the HOSTNAME and PORTparameters. Also check that your situations are configured to forward to that EIF destination.
If those appear to be correct verify that the EIF Forwarder can communicate with OpenNMS overthe configured port (default 1828).
Review the OSGi log with log:tail or the camel:* commands.
6.2.6. TL1 Autonomous Messages
Autonomous messages can be retrieved from certain TL1-enabled equipment and transformed intoevents.
The Tl1d service daemon, which enables OpenNMS Horizon to receive TL1autonomous messages, must be enabled for this functionality to work. This servicedaemon is disabled by default.
6.3. The Event BusAt the heart of OpenNMS Horizon lies an event bus. Any OpenNMS Horizon component can publishevents to the bus, and any component can subscribe to receive events of interest that have beenpublished on the bus. This publish-subscribe model enables components to use events as amechanism to send messages to each other. For example, the provisioning subsystem of OpenNMSHorizon publishes a node-added event whenever a new node is added to the system. Othersubsystems with an interest in new nodes subscribe to the node-added event and automaticallyreceive these events, so they know to start monitoring and managing the new node if theirconfiguration dictates. The publisher and subscriber components do not need to have anyknowledge of each other, allowing for a clean division of labor and lessening the programmingburden to add entirely new OpenNMS Horizon subsystems or modify the behavior of existing ones.
6.3.1. Associate an Event to a given node
There are 2 ways to associate an existing node to a given event prior sending it to the Event Bus:
• Set the nodeId of the node in question to the event.
• For requisitioned nodes, set the _foreignSource and _foreignId as parameters to the event.Then, any incoming event without a nodeId and these 2 parameters will trigger a lookup on theDB; if a node is found, the nodeId attribute will be dynamically set into the event, regardlesswhich method has been used to send it to the Event Bus. :imagesdir: ../../images
182

6.4. Event ConfigurationThe back-end configuration surrounding events is broken into two areas: the configuration ofEventd itself, and the configuration of all types of events known to OpenNMS Horizon.
6.4.1. The eventd-configuration.xml file
The overall behavior of Eventd is configured in the file OPENNMS_HOME/etc/eventd-configuration.xml.This file does not need to be changed in most installations. The configurable items include:
TCPAddress
The IP address to which the Eventd XML/TCP listener will bind. Defaults to 127.0.0.1.
TCPPort
The TCP port number on TCPAddress to which the Eventd XML/TCP listener will bind. Defaults to5817.
UDPAddress
The IP address to which the Eventd XML/UDP listener will bind. Defaults to 127.0.0.1.
UDPPort
The UDP port number on TCPAddress to which the Eventd XML/UDP listener will bind. Defaults to5817.
receivers
The number of threads allocated to service the event intake work done by Eventd.
queueLength
The maximum number of events that may be queued for processing. Additional events will bedropped. Defaults to unlimited.
getNextEventID
An SQL query statement used to retrieve the ID of the next new event. Changing this setting isnot recommended.
socketSoTimeoutRequired
Whether to set a timeout value on the Eventd receiver socket.
socketSoTimeoutPeriod
The socket timeout, in milliseconds, to set if socketSoTimeoutRequired is set to yes.
logEventSummaries
Whether to log a simple (terse) summary of every event at level INFO. Useful whentroubleshooting event processing on busy systems where DEBUG logging is not practical.
6.4.2. The eventconf.xml file and its tributaries
The set of known events is configured in OPENNMS_HOME/etc/eventconf.xml. This file opens with a
183

<global> element, whose <security> child element defines which event fields may not beoverridden in the body of an event submitted via any Eventd listener. This mechanism stops amailicious actor from, for instance, sending an event whose operator-action field amounts to aphishing attack.
After the <global> element, this file consists of a series of <event-file> elements. The content ofeach <event-file> element specifies the path of a tributary file whose contents will be read andincorporated into the event configuration. These paths are resolved relative to the OPENNMS_HOME/etcdirectory; absolute paths are not allowed.
Each tributary file contains a top-level <events> element with one or more <event> child elements.Consider the following event definition:
<event> <uei>uei.opennms.org/nodes/nodeLostService</uei> <event-label>OpenNMS-defined node event: nodeLostService</event-label> <descr><p>A %service% outage was identified on interface %interface% because of the following condition: %parm[eventReason]%.</p> <p> A new Outage record has been created and service level availability calculations will be impacted until this outage is resolved.</p></descr> <logmsg dest="logndisplay"> %service% outage identified on interface %interface%. </logmsg> <severity>Minor</severity> <alarm-data reduction-key="%uei%:%dpname%:%nodeid%:%interface%:%service%" alarm-type="1" auto-clean="false"/> </event>
Every event definition has this same basic structure. See Anatomy of an Event for a discussion ofthe structural elements.
A word about severities
When setting severities of events, it’s important to consider each event in the context of yourinfrastructure as a whole. Events whose severity is critical at the zoomed-in level of a single devicemay not merit a Critical severity in the zoomed-out view of your entire enterprise. Since an eventwith Critical severity can never have its alarms escalated, this severity level should usually bereserved for events that unequivocally indicate a truly critical impact to the business. Rock legendNigel Tufnel offered some wisdom on the subject.
Replacement tokens
Various tokens can be included in the description, log message, operator instruction and automaticactions for each event. These tokens will be replaced by values from the current event when thetext for the event is constructed. Not all events will have values for all tokens, and some referspecifically to information available only in events derived from SNMP traps.
%eventid%
184
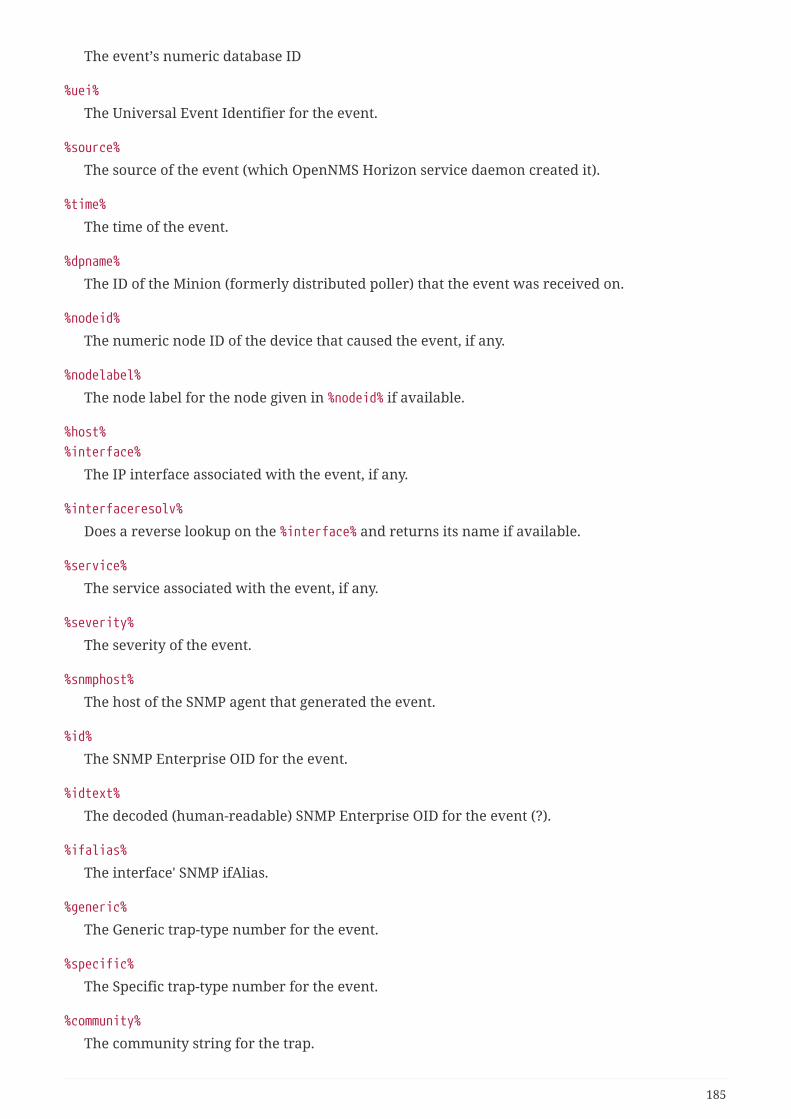
The event’s numeric database ID
%uei%
The Universal Event Identifier for the event.
%source%
The source of the event (which OpenNMS Horizon service daemon created it).
%time%
The time of the event.
%dpname%
The ID of the Minion (formerly distributed poller) that the event was received on.
%nodeid%
The numeric node ID of the device that caused the event, if any.
%nodelabel%
The node label for the node given in %nodeid% if available.
%host%
%interface%
The IP interface associated with the event, if any.
%interfaceresolv%
Does a reverse lookup on the %interface% and returns its name if available.
%service%
The service associated with the event, if any.
%severity%
The severity of the event.
%snmphost%
The host of the SNMP agent that generated the event.
%id%
The SNMP Enterprise OID for the event.
%idtext%
The decoded (human-readable) SNMP Enterprise OID for the event (?).
%ifalias%
The interface' SNMP ifAlias.
%generic%
The Generic trap-type number for the event.
%specific%
The Specific trap-type number for the event.
%community%
The community string for the trap.
185

%version%
The SNMP version of the trap.
%snmp%
The SNMP information associated with the event.
%operinstruct%
The operator instructions for the event.
%mouseovertext%
The mouse over text for the event.
Parameter tokens
Many events carry additional information in parameters (see Anatomy of an Event). Theseparameters may start life as SNMP trap variable bindings, or varbinds for short. You can accessevent parameters using the parm replacement token, which takes several forms:
%parm[all]%
Space-separated list of all parameter values in the form parmName1="parmValue1"
parmName2="parmValue2" and so on.
%parm[values-all]%
Space-separated list of all parameter values (without their names) associated with the event.
%parm[names-all]%
Space-separated list of all parameter names (without their values) associated with the event.
%parm[<name>]%
Will return the value of the parameter named <name> if it exists.
%parm[##]%
Will return the total number of parameters as an integer.
%parm[#<num>]%
Will return the value of parameter number <num> (one-indexed).
%parm[name-#<num>]%
Will return the name of parameter number <num> (one-indexed).
The structure of the eventconf.xml tributary files
The ordering of event definitions is very important, as an incoming event is matched against themin order. It is possible and often useful to have several event definitions which could match variantforms of a given event, for example based on the values of SNMP trap variable bindings.
The tributary files included via the <event-file> tag have been broken up by vendor. WhenOpenNMS Horizon starts, each tributary file is loaded in order. The ordering of events inside eachtributary file is also preserved.
The tributary files listed at the very end of eventconf.xml contain catch-all event definitions. Whenslotting your own event definitions, take care not to place them below these catch-all files;otherwise your definitions will be effectively unreachable.
186

A few tips
• To save memory and shorten startup times, you may wish to remove event definition files thatyou know you do not need.
• If you need to customize some events in one of the default tributary files, you may wish to makea copy of the file containing only the customized events, and slot the copy above the original;this practice will make it easier to maintain your customizations in case the default file changesin a future release of OpenNMS Horizon.
6.4.3. Reloading the event configuration
After making manual changes to OPENNMS_HOME/etc/eventconf.xml or any of its tributary files, youcan trigger a reload of the event configuration by issuing the following command on the OpenNMSHorizon server:
OPENNMS_HOME/bin/send-event.pl uei.opennms.org/internal/reloadDaemonConfig -p'daemonName Eventd'
6.5. DebuggingWhen debugging events, it may be helpful to lower the minimum severity at which Eventd will logfrom the default level of WARN. To change this setting, edit OPENNMS_HOME/etc/log4j2.xml and locatethe following line:
<KeyValuePair key="eventd" value="WARN" />
Changes to log42.xml will be take effect within 60 seconds with no extra action needed. At levelDEBUG, Eventd will log a verbose description of every event it handles toOPENNMS_HOME/logs/eventd.log. On busy systems, this setting may create so much noise as to beimpractical. In these cases, you can get terse event summaries by setting Eventd to log at level INFOand setting logEventSummaries="yes" in OPENNMS_HOME/etc/eventd-configuration.xml. Note thatchanges to eventd-configuration.xml require a full restart of OpenNMS Horizon.
187

Chapter 7. Alarms
7.1. Alarm SoundsOften users want an audible indication of a change in alarm state. The OpenNMS Horizon alarm listpage has the optional ability to generate a sound either on each new alarm or (more annoyingly) oneach change to an alarm event count on the page.
The figure Alarm Sounds View shows the alarm list page when alarms sounds are enabled.
Alarm Sounds View
By default the alarm sound feature is disabled. System Administrators must activate the soundfeature and also set the default sound setting for all users. However users can modify the defaultsound setting for the duration of their logged-in session using a drop down menu with the followingoptions:
• Sound off: no sounds generated by the page.
• Sound on new alarm: sounds generated for every new alarm on the page.
• Sound on new alarm count: sounds generated for every increase in alarm event count foralarms on the page.
7.2. Flashing Unacknowledged AlarmsBy default OpenNMS Horizon displays the alarm list page with acknowledged and unacknowledgedalarms listed in separate search tabs. In a number of operational environments it is useful to see allof the alarms on the same page with unacknowledged alarms flashing to indicate that they haven’tyet been noticed by one of the team. This allows everyone to see at a glance the real time status ofall alarms and which alarms still need attention.
The figure Alarm Sounds View also shows the alarm list page when flashing unacknowledgedalarms are enabled. Alarms which are unacknowledged flash steadily. Alarms which have beenacknowledged do not flash and also have a small tick beside the selection check box. All alarms canbe selected to be escalated, cleared, acknowledged and unacknowledged.
188

7.3. Configuring Alarm Sounds and FlashingBy default OpenNMS Horizon does not enable alarm sounds or flashing alarms. The default settingsare included in opennms.properties. However rather than editing the default opennms.propertiesfile, the system administrator should enable these features by creating a new file inopennms.properties.d and applying the following settings;
$OPENNMS_HOME/etc/opennms.properties.d/alarm.listpage.properties
Configuration properties related to Alarm sound and flashing visualization
# ###### Alarm List Page Options ####### Several options are available to change the default behaviour of the Alarm ListPage.# <opennms url>/opennms/alarm/list.htm## The alarm list page has the ability to generate a sound either on each new alarm# or (more annoyingly) on each change to an alarm event count on the page.## Turn on the sound feature. Set true and Alarm List Pages can generate sounds in theweb browser.opennms.alarmlist.sound.enable=true## Set the default setting for how the Alarm List Pages generates sounds. The defaultsetting can be# modified by users for the duration of their logged-in session using a drop down menu.# off = no sounds generated by the page.# newalarm = sounds generated for every new alarm in the page# newalarmcount = sounds generated for every increase in alarm event count foralarms on the page#opennms.alarmlist.sound.status=off
# By default the alarm list page displays acknowledged and unacknowledged alarms inseparate search tabs# Some users have asked to be able to see both on the same page. This option allowsthe alarm list page# to display acknowledged and unacknowledged alarms on the same list butunacknowledged alarms# flash until they are acknowledged.#opennms.alarmlist.unackflash=true
The sound played is determined by the contents of the following file $OPENNMS_HOME/jetty-webapps/opennms/sounds/alert.wav
If you want to change the sound, create a new wav file with your desired sound, name it alert.wavand replace the default file in the same directory.
189

Chapter 8. Notifications
8.1. IntroductionOpenNMS Horizon uses notifications to make users aware of an event. Common notificationmethods are email and paging, but notification mechanisms also exist for:
• Arbitrary HTTP GET and POST operations
• Arbitrary external commands
• Asterisk call origination
• IRCcat Internet Relay Chat bot
• SNMP Traps
• Slack, Mattermost, and other API-compatible team chat platforms
• Twitter, GNU Social, and other API-compatible microblog services
• User-provided scripts in any JSR-223 compatible language
• XMPP
The notification daemon Notifd creates and sends notifications according to configured rules whenselected events occur in OpenNMS Horizon.
8.2. Getting StartedThe status of notifications is indicated by an icon at the top right of the web UI’s navigation bar.OpenNMS Horizon installs with notifications globally disabled by default.
8.2.1. Enabling Notifications
To enable notifications in OpenNMS Horizon, log in to the web UI as a user with administratorprivileges. Hover over the user icon and click the Configure OpenNMS link. The controls for globalnotification status appear in the top-level configuration menu as Notification Status. Click the Onradio button and then the Update button. Notifications are now globally enabled.
The web workflow above is functionally equivalent to editing the notifd-
configuration.xml file and setting status="on" in the top-level notifd-configurationelement. This configuration file change is picked up on the fly with no need torestart or send an event.
8.2.2. Configuring Destination Paths
To configure notification destination paths in OpenNMS Horizon, navigate to Configure OpenNMSand, in the Event Management section, choose Configure Notifications. In the resulting dialog chooseConfigure Destination Paths.
190

The destination paths configuration is stored in the destinationPaths.xml file.Changes to this file are picked up on the fly with no need to restart or send anevent.
8.2.3. Configuring Event Notifications
To configure notifications for individual events in OpenNMS Horizon, navigate to ConfigureOpenNMS and, in the Event Management section, choose _Configure Notifications. Then chooseConfigure Event Notifications.
The event notification configuration is stored in the notifications.xml file.Changes to this file are picked up on the fly with no need to restart or send anevent.
8.3. ConceptsNotifications are how OpenNMS Horizon informs users about an event that happened in thenetwork, without the users having to log in and look at the UI. The core concepts required tounderstand notifications are:
• Events and UEIs
• Users, Groups, and On-Call Roles
• Duty Schedules
• Destination Paths
• Notification Commands
These concepts fit together to form an Event Notification Definition. Also related, but presently onlyloosely coupled to notifications, are Alarms and Acknowledgments.
8.3.1. Events and UEIs
As discussed in the chapter on Events, events are central to the operation of OpenNMS Horizon.Almost everything that happens in the system is the result of, or the cause of, one or more events;Every notification is triggered by exactly one event. A good understanding of events is thereforeessential to a working knowledge of notifications.
Every event has a UEI (Uniform Event Identifier), a string uniquely identifying the event’s type.UEIs are typically formatted in the style of a URI, but the only requirement is that they start withthe string uei.. Most notifications are triggered by an exact UEI match (though they may also betriggered with partial UEI matches using regular expression syntax).
8.3.2. Users, Groups, and On-Call Roles
Users are entities with login accounts in the OpenNMS Horizon system. Ideally each usercorresponds to a person. They are used to control access to the web UI, but also carry contactinformation (e-mail addresses, phone numbers, etc.) for the people they represent. A user may
191

receive a notification either individually or as part of a Group or On-Call Role. Each user has severaltechnology-specific contact fields, which must be filled if the user is to receive notifications by theassociated method.
Groups are lists of users. In large systems with many users it is helpful to organize them intoGroups. A group may receive a notification, which is often a more convenient way to operate thanon individual user. Groups allow to assign a set of users to On Call Roles to build more complexnotification workflows.
How to create or modify membership of Users in a Group
1. Login as a User with administrative permissions
2. Choose Configure OpenNMS from the user specific main navigation which is named as yourlogin user name
3. Choose Configure Users, Groups and On-Call roles and select Configure Groups
4. Create a new Group with Add new group or modify an existing Group by clicking the Modifyicon next to the Group
5. Select User from Available Users and use the >> to add them to the Currently in Group orselect the users in the Currently in Group list and use << to remove them from the list.
6. Click Finish to persist and apply the changes
The order of the Users in the group is relevant and is used as the order forNotifications when this group is used as Target in a Destination Path.
How to delete a Group
1. Login as a User with administrative permissions
2. Choose Configure OpenNMS from the user specific main navigation which is named as yourlogin user name
3. Choose Configure Users, Groups and On-Call roles and select Configure Groups
4. Use the trash bin icon next to the Group to delete
5. Confirm delete request with OK
On-Call Roles are an overlay on top of groups, designed to enable OpenNMS Horizon to target theappropriate user or users according to a calendar configuration. A common use case is to haveSystem Engineers in On-Call rotations with a given schedule. The On-Call Roles allow to assign apredefined Duty Schedule to an existing Group with Users. For each On-Call Role a User is assignedas a Supervisor to be responsible for the group of people in this On-Call Role.
How to assign a Group to an On-Call Role
1. Login as a User with administrative permissions
2. Choose Configure OpenNMS from the user specific main navigation which is named as yourlogin user name
3. Choose Configure Users, Groups and On-Call roles and select Configure On-Call Roles
4. Use Add New On-Call Role and set a Name for this On-Call Role, assign an existing Group and
192

give a meaningful description
5. Click Save to persist
6. Define a Duty Schedule in the calendar for the given date by click on the Plus (+) icon of the dayand provide a notification time for a specific User from the associated Group
7. Click Save to persist the Schedule
8. Click Done to apply the changes
8.3.3. Duty Schedules
Every User and Group may have a Duty Schedule, which specifies that user’s (or group’s) weeklyschedule for receiving notifications. If a notification should be delivered to an individual user, butthat user is not on duty at the time, the notification will never be delivered to that user. In the caseof notifications targeting a user via a group, the logic differs slightly. If the group is on duty at thetime the notification is created, then all users who are also on duty will be notified. If the group ison duty, but no member user is currently on duty, then the notification will be queued and sent tothe next user who comes on duty. If the group is off duty at the time the notification is created, thenthe notification will never be sent.
8.3.4. Destination Paths
A Destination Path is a named, reusable set of rules for sending notifications. Every destination pathhas an initial step and zero or more escalation steps.
Each step in a destination path has an associated delay which defaults to zero seconds. The initialstep’s delay is called the initial delay, while an escalation step’s delay is simply called its delay.
Each step has one or more targets. A target may be a user, a group, an on-call role, or a one-off e-mail address.
While it may be tempting to use one-off e-mail addresses any time an individualuser is to be targeted, it’s a good idea to reserve one-off e-mail addresses forspecial cases. If a user changes her e-mail address, for instance, you’ll need toupdate in every destination path where it appears. The use of one-off e-mailaddresses is meant for situations where a vendor or other external entity isassisting with troubleshooting in the short term.
When a step targets one or more groups, a delay may also be specified for each group. The defaultis zero seconds, in which case all group members are notified simultaneously. If a longer delay isset, the group members will be notified in alphabetical order of their usernames.
Avoid using the same name for a group and a user. The destination pathconfiguration does not distinguish between users and groups at the step level, sothe behavior is undefined if you have both a user and a group named admin. It isfor this reason that the default administrators group is called Admin (with a capitalA) — case matters.
Within a step, each target is associated with one or more notification commands. If multiple
193

commands are selected, they will execute simultaneously.
Each step also has an auto-notify switch, which may be set to off, on, or auto. This switch specifiesthe logic used when deciding whether or not to send a notice for an auto-acknowledged notificationto a target that was not on duty at the time the notification was first created. If off, notices willnever be sent to such a target; if on, they will always be sent; if auto, the system employs heuristicsaimed at "doing the right thing".
8.3.5. Notification Commands
A Notification Command is a named, reusable execution profile for a Java class or external programcommand used to convey notices to targets. The following notification commands are included inthe default configuration:
callHomePhone, callMobilePhone, and callWorkPhone
Ring one of the phone numbers configured in the user’s contact information. All three areimplemented using the in-process Asterisk notification strategy, and differ only in which contactfield is used.
ircCat
Conveys a notice to an instance of the IRCcat Internet Relay Chat bot. Implemented by the in-process IRCcat notification strategy.
javaEmail and javaPagerEmail
By far the most commonly used commands, these deliver a notice to a user’s email or pagerEmailcontact field value. By configuring a user’s pagerEmail contact field value to target an email-to-SMS gateway, SMS notifications are trivially easy to configure. Both are implemented using thein-process JavaMail notification strategy.
microblogDM, microblogReply, and microblogUpdate
Sends a notice to a user as a direct message, at a user via an at-reply, or to everybody as anupdate via a microblog service with a Twitter v1-compatible API. Each command is implementedwith a separate, in-process notification strategy.
numericPage and textPage
Sends a notice to a user’s numeric or alphanumeric pager. Implemented as an externalcommand using the qpage utility.
xmppGroupMessage and xmppMessage
Sends a message to an XMPP group or user. Implemented with the in-process XMPP notificationstrategy.
Notification commands are customizable and extensible by editing the notificationCommands.xmlfile.
194

Use external binary notification commands sparingly to avoid fork-bombing yourOpenNMS Horizon system. Originally, all notification commands were external.Today only the numericPage and textPage commands use external programs to dotheir work.
8.4. Bonus Notification MethodsA handful of newer notification methods are included in OpenNMS Horizon but currently requiremanual steps to activate.
8.4.1. Mattermost
If your organization uses the Mattermost team communications platform, you can configureOpenNMS Horizon to send notices to any Mattermost channel via an incoming webhook. You mustconfigure an incoming webhook in your Mattermost team and do a bit of manual configuration toyour OpenNMS Horizon instance.
First, add the following bit of XML to the notificationCommands.xml configuration file (nocustomization should be needed):
<command binary="false"> <name>mattermost</name> <execute>org.opennms.netmgt.notifd.MattermostNotificationStrategy</execute> <comment>class for sending messages to a Mattermost team channel fornotifications</comment> <argument streamed="false"> <switch>-subject</switch> </argument> <argument streamed="false"> <switch>-tm</switch> </argument></command>
Then create a new file called mattermost.properties in the opennms.properties.d directory with thefollowing contents (customizing values as appropriate):
org.opennms.netmgt.notifd.mattermost.webhookURL=https://mattermost.example.com/hooks/bf980352b5f7232efe721dbf0626bee1
Restart OpenNMS so that the mattermost.properties file will be loaded. Your new mattermostnotification command is now available for use in a destination path.
Additional Options
The following table lists optional properties that you may use in mattermost.properties to customizeyour Mattermost notifications.
195

To improve the layout, the property names have been shortened to their finalcomponent; you must prepend org.opennms.netmgt.notifd.mattermost. when usingthem.
Table 92. Additional available parameters for the Mattermost notification strategy
Parameter
Description Required
Defaultvalue
Example
channel
Specify a channel or private group other thanthe one targeted by the webhook
optional
Webhookdefault
NetOps
username
The username to associate with the notificationposts
optional
None OpenNMS_Bot
iconEmoji
An emoji sequence to use as the icon for thenotification posts
optional
No icon :metal:
iconURL
The URL of an image to use as the icon for thenotification posts
optional
No icon https://example.org/assets/icon.png
Some of the optional configuration parameters are incompatible with someversions of Mattermost. For instance, the channel option is known not to work withMattermost 3.7.0.
For more information on incoming webhooks in Mattermost, see Mattermost Integration Guide.
8.4.2. Slack Notifications
If your organization uses the Slack team communications platform, you can configure OpenNMSHorizon to send notices to any Slack channel via an incoming webhook. You must configure anincoming webhook in your Slack team and do a bit of manual configuration to your OpenNMSHorizon instance.
First, add the following bit of XML to the notificationCommands.xml configuration file (nocustomization should be needed):
<command binary="false"> <name>slack</name> <execute>org.opennms.netmgt.notifd.SlackNotificationStrategy</execute> <comment>class for sending messages to a Slack team channel fornotifications</comment> <argument streamed="false"> <switch>-subject</switch> </argument> <argument streamed="false"> <switch>-tm</switch> </argument></command>
196

Then create a new file called slack.properties in the opennms.properties.d directory with thefollowing contents (customizing values as appropriate):
org.opennms.netmgt.notifd.slack.webhookURL=https://hooks.slack.com/services/AEJ7IIYAI/XOOTH3EOD/c3fc4a662c8e07fe072aeeec
Restart OpenNMS so that the slack.properties file will be loaded. Your new slack notificationcommand is now available for use in a destination path.
Additional Options
The following table lists optional properties that you may use in slack.properties to customize yourSlack notifications.
To improve the layout, the property names have been shortened to their finalcomponent; you must prepend org.opennms.netmgt.notifd.slack. when usingthem.
Table 93. Additional parameters for the Slack notification strategy
Parameter
Description Required
Defaultvalue
Example
channel
Specify a channel or private group other thanthe one targeted by the webhook
optional
Webhookdefault
NetOps
username
The username to associate with the notificationposts
optional
None OpenNMS_Bot
iconEmoji
An emoji sequence to use as the icon for thenotification posts
optional
No icon :metal:
iconURL
The URL of an image to use as the icon for thenotification posts
optional
No icon https://example.org/assets/icon.png
For more information on incoming webhooks in Slack, see Slack API.
197

Chapter 9. Provisioning
9.1. IntroductionThe introduction of OpenNMS version 1.8 empowers enterprises and services providers like neverbefore with a new service daemon for maintaining the managed entity inventory in OpenNMS. Thisnew daemon, Provisiond, unifies all previous entity control mechanisms available in 1.6 (Capsd andthe Importer), into a new and improved, massively parallel, policy based provisioning system.System integrators should note, Provisiond comes complete with a RESTFul Web Service API for easyintegration with external systems such as CRM or external inventory systems as well as an adapterAPI for interfacing with other management systems such as configuration management.
OpenNMS 1.0, introduced almost a decade ago now, provided a capabilities scanning daemon,Capsd, as the mechanism for provisioning managed entities. Capsd, deprecated with the release of1.8.0, provided a rich automatic provisioning mechanism that simply required an IP address to seedits algorithm for creating and maintaining the managed entities (nodes, interfaces, and IP basedservices). Version 1.2 added and XML-RPC API as a more controlled (directed) strategy forprovisioning services that was mainly used by non telco based service providers (i.e. managedhosting companies). Version 1.6 followed this up with yet another and more advanced mechanismcalled the Importer service daemon. The Importer provided large service providers with the abilityto strictly control the OpenNMS entity provisioning with an XML based API for completely definingand controlling the entities where no discovery and service scanning scanning was feasible.
The Importer service improved OpenNMS' scalability for maintaining managed entity databases byan order of magnitude. This daemon, while very simple in concept and yet extremely powerful andflexible provisioning improvement, has blazed the trail for Provisiond. The Importer service hasbeen in production for 3 years in service provider networks maintaining entity counts of more than50,000 node level entities on a single instances of OpenNMS. It is a rock solid provisioning tool.
Provisiond begins a new era of managed entity provisioning in OpenNMS.
9.2. ConceptsProvisioning is a term that is familiar to service providers (a.k.a. operators, a.k.a. telephonecompanies) and OSS systems but not so much in the non OSS enterprises.
Provisiond receives "requests" for adding managed entities via 2 basic mechanisms, the OpenNMSHorizon traditional "New Suspect" event, typically via the Discovery daemon, and the importrequisition (XML definition of node entities) typically via the Provisioning Groups UI. If you arefamiliar with all previous releases of OpenNMS, you will recognize the New Suspect Event basedDiscovery to be what was previously the Capsd component of the auto discovery behavior. You willalso recognize the import requisition to be of the Model Importer component of OpenNMS.Provisiond now unifies these two separate components into a massively parallel advanced policybased provisioning service.
198

9.2.1. Terminology
The following terms are used with respect to the OpenNMS Horizon provisioning system and areessential for understanding the material presented in this guide.
Entity
Entities are managed objects in OpenNMS Horizon such as Nodes, IP interfaces, SNMP Interfaces,and Services.
Foreign Source and Foreign ID
The Importer service from 1.6 introduced the idea of foreign sources and foreign IDs. The ForeignSource uniquely identifies a provisioning source and is still a basic attribute of importing nodeentities into OpenNMS Horizon. The concept is to provide an external (foreign) system with a wayto uniquely identify itself and any node entities that it is requesting (via a requisition) to beprovisioned into OpenNMS Horizon.
The Foreign ID is the unique node ID maintained in foreign system and the foreign source uniquelyidentifies the external system in OpenNMS Horizon.
OpenNMS Horizon uses the combination of the foreign source and foreign ID become the uniqueforeign key when synchronizing the set of nodes from each source with the nodes in the OpenNMSHorizon DB. This way the foreign system doesn’t have to keep track of the OpenNMS Horizon nodeIDs that are assigned when a node is first created. This is how Provisiond can decided if a nodeentity from an import requisition is new, has been changed, or needs to be deleted.
Foreign Source Definition
Additionally, the foreign source has been extended to also contain specifications for how entitiesshould be discovered and managed on the nodes from each foreign source. The name of the foreignsource has become pervasive within the provisioning system and is used to simply some of thecomplexities by weaving this name into:
• the name of the provisioning group in the Web-UI
• the name of the file containing the persisted requisition (as well as the pending requisition if itis in this state)
• the foreign-source attribute value inside the requisition (obviously, but, this is pointed out toindicate that the file name doesn’t necessarily have to equal the value of this attribute but ishighly recommended as an OpenNMS Horizon best practice)
• the building attribute of the node defined in the requisition (this value is called “site” in theWeb-UI and is assigned to the building column of the node’s asset record by Provisiond and isthe default value used in the Site Status View feature)
Import Requisition
Import requisition is the terminology OpenNMS Horizon uses to represent the set of nodes,specified in XML, to be provisioned from a foreign source into OpenNMS Horizon. The requisitionschema (XSD) can be found at the following location. http://xmlns.opennms.org/xsd/config/model-
199

import
Auto Discovery
Auto discovery is the term used by OpenNMS Horizon to characterize the automatic provisioning ofnodes entities. Currently, OpenNMS Horizon uses an ICMP ping sweep to find IP address on thenetwork. For the IPs that respond and that are not currently in the DB, OpenNMS Horizon generatesa new suspect event. When this event is received by Provisiond, it creates a node and it begins anode scan based on the default foreign source definition.
Directed Discovery
Provisiond takes over for the Model Importer found in version 1.6 which implemented a unique,first of its kind, controlled mechanism for specifying managed entities directly into OpenNMSHorizon from one or more data sources. These data sources often were in the form of an in-houseddeveloped inventory or stand-alone provisioning system or even a set of element managementsystems. Using this mechanism, OpenNMS Horizon is directed to add, update, or delete a nodeentity exactly as defined by the external source. No discovery process is used for finding moreinterfaces or services.
Enhanced Directed Discovery
Directed discovery is enhanced with the capability to scan nodes that have been directed nodes forentities (interfaces.
Policy Based Discovery
The phrase, Policy based Directed Discovery, is a term that represents the latest step in OpenNMSHorizon provisioning evolution and best describes the new provisioning architecture now inOpenNMS Horizon for maintaining its inventory of managed entities. This term describes thecontrol that is given over the Provisioning system to OpenNMS Horizon users for managing thebehavior of the NMS with respect to the new entities that are being discovered. Current behaviorsinclude persistence, data collection, service monitoring, and categorization policies.
9.2.2. Addressing Scalability
The explosive growth and density of the IT systems being deployed today to support not traditionalIP services is impacting management systems like never before and is demanding from themtremendous amounts of scalability. The scalability of a management system is defined by itscapacity for maintaining large numbers of managing entities coupled with its efficiency ofmanaging the entities.
Today, It is not uncommon for OpenNMS Horizon deployments to find node entities with tens ofthousands of physical interfaces being reported by SNMP agents due to virtualization (virtual hosts,interfaces, as well as networks). An NMS must be capable of using the full capacity every resourceof its computing platform (hardware and OS) as effectively as possible in order to manage theseenvironments. The days of writing scripts or single threaded applications will just no longer be ableto do the work required an NMS when dealing with the scalability challenges facing systems andsystems administrators working in this domain.
200

Parallelization and Non-Blocking I/O
Squeezing out every ounce of power from a management system’s platform (hardware and OS) isabsolutely required to complete all the work of a fully functional NMS such as OpenNMS Horizon.Fortunately, the hardware and CPU architecture of a modern computing platform provides multipleCPUs with multiple cores having instruction sets that include support for atomic operations. Whilethese very powerful resources are being provided by commodity systems, it makes the complexityof developing applications to use them vs. not using them, orders of magnitude more complex.However, because of scalability demands of our complex IT environments, multi-threaded NMSapplications are now essential and this has fully exposed the complex issues of concurrency insoftware development.
OpenNMS Horizon has stepped up to this challenge with its new concurrency strategy. This strategyis based on a technique that combines the efficiency of parallel (asynchronous) operations(traditionally used by most effectively by single threaded applications) with the power of a fullycurrent, non-blocking, multi-threaded design. The non-blocking component of this newconcurrency strategy added greater complexity but OpenNMS Horizon gained orders of magnitudein increased scalability.
Java Runtimes, based on the Sun JVM, have provided implementations forprocessor based atomic operations and is the basis for OpenNMS Horizon’ non-blocking concurrency algorithms.
Provisioning Policies
Just because you can, doesn’t mean you should! Because the massively parallel operations beingcreated for Provisiond allows tremendous numbers of nodes, interfaces, and services to be veryrapidly discovered and persisted, doesn’t mean it should. A policy API was created for Provisiondthat allows implementations to be developed that can be applied to control the behavior ofProvisiond. The 1.8 release includes a set of flexible provisioning policies that control thepersistence of entities and their attributes constrain monitoring behavior.
When nodes are imported or re-scanned, there is, potentially, a set of zero or more provisioningpolicies that are applied. The policies are defined in the foreign source’s definition. The policies foran auto-discovered node or nodes from provisioning groups that don’t have a foreign sourcedefinition, are the policies defined in the default foreign source definition.
The Default Foreign Source Definition
Contained in the libraries of the Provisioning service is the "template" or default foreign source.The template stored in the library is used until the OpenNMS Horizon admin user alters the defaultfrom the Provisioning Groups WebUI. Upon edit, this template is exported to the OpenNMS Horizonetc/ directory with the file name: default-foreign-source.xml.
201

<?xml version="1.0" encoding="UTF-8" standalone="yes"?><foreign-source date-stamp="2009-10-16T18:04:12.844-05:00" name="default" xmlns="http://xmlns.opennms.org/[http://xmlns.opennms.org/xsd/config/foreign-source"> <scan-interval>1d</scan-interval> <detectors> <detector class="org.opennms.netmgt.provision.detector.datagram.DnsDetector"name="DNS"/> <detector class="org.opennms.netmgt.provision.detector.simple.FtpDetector" name="FTP"/> <detector class="org.opennms.netmgt.provision.detector.simple.HttpDetector"name="HTTP"/> <detector class="org.opennms.netmgt.provision.detector.simple.HttpsDetector"name="HTTPS"/> <detector class="org.opennms.netmgt.provision.detector.icmp.IcmpDetector" name="ICMP"/> <detector class="org.opennms.netmgt.provision.detector.simple.ImapDetector"name="IMAP"/> <detector class="org.opennms.netmgt.provision.detector.simple.LdapDetector"name="LDAP"/> <detector class="org.opennms.netmgt.provision.detector.simple.NrpeDetector"name="NRPE"/> <detector class="org.opennms.netmgt.provision.detector.simple.Pop3Detector"name="POP3"/> <detector class="org.opennms.netmgt.provision.detector.radius.RadiusAuthDetector" name="Radius"/> <detector class="org.opennms.netmgt.provision.detector.simple.SmtpDetector"name="SMTP"/> <detector class="org.opennms.netmgt.provision.detector.snmp.SnmpDetector" name="SNMP"/> <detector class="org.opennms.netmgt.provision.detector.ssh.SshDetector" name="SSH"/> </detectors> <policies/></foreign-source>
Automatic Rescanning
The default foreign source defines a scan-interval of 1d, which will cause all nodes in therequisition to be scanned daily. You may set the scan interval using any combination of thefollowing signifiers:
• w: Weeks
• d: Days
• h: Hours
• m: Minutes
• s: Seconds
202

• ms: Milliseconds
For example, to rescan every 6 days and 53 minutes, you would set the scan-interval to 6d 53m.
Don’t forget, for the new scan interval to take effect, you will need to import the requisition onemore time so that the foreign source becomes active.
Disabling Rescan
For a large number of devices, you may want to set the scan-interval to 0 to disable automaticrescan altogether. OpenNMS Horizon will not attempt to rescan the nodes in the requisition unlessyou trigger a manual (forced) rescan through the web UI or Provisioning ReST API.
9.3. Getting StartedAn NMS is of no use until it is setup for monitoring and entities are added to the system. OpenNMSHorizon installs with a base configuration with a configuration that is sufficient get service levelmonitoring and performance management quickly up and running. As soon as managed entitiesare provisioned, the base configuration will automatically begin monitoring and reporting.
Generally speaking, there are two methods of provisioning in OpenNMS Horizon: Auto Discoveryand Directed Discovery. We’ll start with Auto Discovery, but first, we should quickly review theconfiguration of SNMP so that newly discovered devices can be immediately scanned for entities aswell as have reporting and thresholding available.
9.3.1. Provisioning the SNMP Configuration
OpenNMS Horizon requires SNMP configuration to be properly setup for your network in order toproperly understand Network and Node topology as well as to automatically enable performancedata collection. Network topology is updated as nodes (a.k.a. devices or hosts) are provisioned.Navigate to the Admin/Configure SNMP Community Names by IP address as shown below.
Configuring SNMP community names
203

Provisiond includes an option to add community information in the Single Nodeprovisioning interface. This, is equivalent of entering a single IP address in thescreen with the convenience of setting the community string at the same time anode is provisioned. See the Quick Node Add feature below for more details aboutthis capability.
This screen sets up SNMP within OpenNMS Horizon for agents listening on IP addresses 10.1.1.1through 10.254.254.254. These settings are optimized into the snmp-configuration.xml file.Optimization means that the minimal configuration possible will be written. Any IP addressesalready configured that are eclipsed by this range will be removed. Here is the resultingconfiguration.
Sample snmp-config.xml
<?xml version="1.0" encoding="UTF-8"?>
<snmp-configxmlns="http://xmlns.opennms.org/xsd/config/snmp[http://xmlns.opennms.org/xsd/config/snmp]"port="161" retry="3" timeout="800" read-community="public"
version="v1" max-vars-per-pdu="10">
<definition retry="1" timeout="2000"
read-community="public" version="v2c">
<specific>10.12.23.32</specific>
</definition>
</snmp-config>
However, If an IP address is then configured that is within the range, the range will be split into twoseparate ranges and a specific entry will be added. For example, if a configuration was addedthrough the same UI for the IP: 10.12.23.32 having the community name public, then the resultingconfiguration will be:
204

<?xml version="1.0" encoding="UTF-8"?><snmp-config xmlns="http://xmlns.opennms.org/xsd/config/snmp" port="161" retry="3" timeout="800" read-community="public" version="v1" max-vars-per-pdu="10">
<definition retry="1" timeout="2000" read-community="YrusoNoz" version="v2c"> <range begin="10.1.1.1" end="10.12.23.31"/> <range begin="10.12.23.33" end="10.254.254.254"/> </definition>
<definition retry="1" timeout="2000" read-community="public" version="v2c"> <specific>10.12.23.32</specific> </definition></snmp-config>
the bold IP addresses show where the range was split and the specific withcommunity name "public" was added.
Now, with SNMP configuration provisioned for our 10 networks, we are ready to begin addingnodes. Our first example will be to automatically discover and add all managed entities (nodes, IPinterfaces, SNMP Interfaces, and Monitored IP based Services). We will then give an example ofhow to be more directed and deliberate about your discovery by using Provisioning Groups.
Automatically discovered entities are analyzed, persisted to the relational data store, and thenmanaged based on the policies defined in the default foreign source definition. This is very similarto the way that entities were previously handled by the (now obsolete) Capsd daemon but withfiner grained sense of control.
9.3.2. Automatic Discovery
Currently in OpenNMS Horizon, the ICMP is used to automatically provision node entities intoOpenNMS Horizon. This functionality has been in OpenNMS since is 1.0 release, however, in 1.8, afew of the use cases have been updated with Provisiond’s replacement of Capsd.
Separation of Concerns
Version 1.8 Provisiond separates what was called Capsd scanning in to 3 distinct phases: entityscanning, service detection, and node merging. These phases are now managed separately byProvisiond. Immediately following the import of a node entity, tasks are created for scanning anode to discover the node entity’s interfaces (SNMP and IP). As interfaces are found, they arepersisted and tasks are scheduled for service detection of each IP interface.
For auto discovered nodes, a node merging phase is scheduled; Nodes that have been directlyprovisioned will not be included in the node merging process. Merging will only occur when 2
205

automatically discovered nodes appear to be the same node.
the use case and redesign of node merging is still an outstanding issue with the1.8.0 release
9.3.3. Enhanced Directed Discovery
This new form of provisioning first appears in OpenNMS with version 1.8 and the new Provisiondservice. It combines the benefits of the Importer’s strictly controlled methodology of directedprovisioning (from version 1.6) with OpenNMS’ robustly flexible auto discovery. Enhanced Directeddiscovery begins with an enhanced version of the same import requisition used in directedprovisioning and completes with a policy influenced persistence phase that sorts though the detailsof all the entities and services found during the entity and service scanning phase.
If you are planning to use this form of provisioning, it important to understand the conceptualdetails of how Provisiond manages entities it is directed to provision. This knowledge will enableadministrators and systems integrators to better plan, implement, and resolve any issues involvedwith this provisioning strategy.
Understanding the Process
There are 3 phases involved with directing entities to be discovered: import, node scan, and servicescan. The import phase also has sub phases: marshal, audit, limited SNMP scan, and re-parent.
Marshal and Audit Phases
It is important to understand that the nodes requisitioned from each foreign source are managed asa complete set. Nodes defined in a requisition from the foreign source CRM and CMDB, for example,will be managed separately from each other even if they should contain exactly the same nodedefinitions. To OpenNMS Horizon, these are individual entities and they are managed as a set.
Requisitions are referenced via a URL. Currently, the URL can be specified as one of the followingprotocols: FILE, HTTP, HTTPS, and DNS. Each protocol has a protocol handler that is used to streamthe XML from a foreign source, i.e. http://inv.corp.org/import.cgi?customer=acme orfile:/opt/opennms/etc/imports/acme.xml. The DNS protocol is a special handler developed forProvisioning sets of nodes as a foreign-source from a corporate DNS server. See DNS ProtocolHandler for details.
Upon the import request (either on schedule or on demand via an Event) the requisition ismarshaled into Java objects for processing. The nodes defined in the requisition represent whatOpenNMS Horizon should have as the current set of managed entities from that foreign source. Theaudit phase determines for each node defined (or not defined) in the requisition which are to beprocessed as an Add, Update, or Delete operation during the Import Phase. This determination ismade by comparing the set foreign IDs of each node in the requisition set with the set of foreign IDsof currently managed entities in OpenNMS Horizon.
The intersection of the IDs from each set will become the Update operations, the extra set of foreignIDs that are in the requisition become the Add operations, and the extra set of foreign IDs from themanaged entities become the Delete operations. This implies that the foreign IDs from each foreign
206

source must be unique.
Naturally, the first time an import request is processed from a foreign source there will be zero (0)node entities from the set of nodes currently being managed and each node defined in therequisition will become an Add Operation. If a requisition is processed with zero (0) nodedefinitions, all the currently managed nodes from that foreign source will become Deleteoperations (all the nodes, interfaces, outages, alarms, etc. will be removed from OpenNMS Horizon).
When nodes are provisioned using the Provisioning Groups Web-UI, the requisitions are stored onthe local file system and the file protocol handler is used to reference the requisition. EachProvisioning Group is a separate foreign source and unique foreign IDs are generated by the Web-UI. An MSP might use Provisioning Groups to define the set of nodes to be managed by customername where each customer’s set of nodes are maintained in a separate Provisioning Group.
Import Phase
The import phase begins when Provisiond receives a request to import a requisition from a URL.The first step in this phase is to load the requisition and marshal all the node entities defined in therequisition into Java objects.
If any syntactical or XML structural problems occur in the requisition, the entire import isabandoned and no import operations are completed.
Once the requisition is marshaled, the requisition nodes are audited against the persisted nodeentities. The set of requisitioned nodes are compared with a subset of persisted nodes and thissubset is generated from a database query using the foreign source defined in the requisition. Theaudit generates one of three operations for each requisition node: insert, update, delete based oneach requisitioned node’s foreign ID. Delete operations are created for any nodes that are not in therequisition but are in the DB subset, update operations are created for requisition nodes that matcha persisted node from the subset (the intersection), and insert operations are created from theremaining requisition nodes (nodes in the requisition that are not in the DB subset).
If a requisition node has an interface defined as the Primary SNMP interface, then during theupdate and insert operations the node will be scanned for minimal SNMP attribute information.This scan find the required node and SNMP interface details required for complete SNMP supportof the node and only the IP interfaces defined in the requisition.
this not the same as Provisiond SNMP discovery scan phases: node scan andinterface scan.
Node Scan Phase
Where directed discovery leaves off and enhanced directed discovery begins is that after all theoperations have completed, directed discovery is finished and enhanced directed discovery takesoff. The requisitioned nodes are scheduled for node scans where details about the node arediscovered and interfaces that were not directly provisioned are also discovered. All physical(SNMP) and logical (IP) interfaces are discovered and persisted based on any Provisioning Policiesthat may have been defined for the foreign source associated with the import requisition.
207

Service Scan (detection) Phase
Additionally, the new Provisiond enhanced directed discovery mechanism follows interfacediscovery with service detection on each IP interface entity. This is very similar to the Capsd pluginscanning found in all former releases of OpenNMS except that the foreign source definition is usedto define what services should be detected on these interfaces found for nodes in the importrequisition.
9.4. Import HandlersThe new Provisioning service in OpenNMS Horizon is continuously improving and adapting to theneeds of the community.
One of the most recent enhancements to the system is built upon the very flexible and extensibleAPI of referencing an import requisition’s location via a URL. Most commonly, these URLs are fileson the file system (i.e. file:/opt/opennms/etc/imports/<my-provisioning-group.xml>) as requisitionscreated by the Provisioning Groups UI. However, these same requisitions for adding, updating, anddeleting nodes (based on the original model importer) can also come from URLs. For example arequisition can be retrieving the using HTTP protocol: http://myinventory.server.org/nodes.cgi
In addition to the standard protocols supported by Java, we provide a series of custom URLhandlers to help retrieve requisitions from external sources.
9.4.1. Generic Handler
The generic handler is made available using URLs of the form: requisition://type?param=1;param=2
Using these URLs various type handlers can be invoked, both locally and via a Minion.
In addition to the type specific parameters, the following parameters are supported:
Table 94. General parameters
Parameter
Description Required
Defaultvalue
location The name of location at which the handler should be run optional
Default
ttl The maximum number of miliseconds to wait for the handlerwhen ran remotely
optional
20000
See the relevant sections bellow for additional details on the support types.
The provision:show-import command available via the Karaf Shell can be used to show the results ofan import (without persisting or triggering the import):
provision:show-import -l MINION http url=http://127.0.0.1:8000/req.xml
208

9.4.2. File Handler
Examples:
Simple
file:///path/to/my/requisition.xml
Using the generic handler
requisition://file?path=/path/to/my/requisition.xml;location=MINION
9.4.3. HTTP Handler
Examples:
Simple
http://myinventory.server.org/nodes.cgi
Using the generic handler
requisition://http?url=http%3A%2F%2Fmyinventory.server.org%2Fnodes.cgi
When using the generic handler, the URL should be "URL encoded".
9.4.4. DNS Handler
The DNS handler requests a Zone Transfer (AXFR) request from a DNS server. The A records arerecorded and used to build an import requisition. This is handy for organizations that use DNS(possibly coupled with an IP management tool) as the data base of record for nodes in the network.So, rather than ping sweeping the network or entering the nodes manually into OpenNMS HorizonProvisioning UI, nodes can be managed via 1 or more DNS servers.
The format of the URL for this new protocol handler is: dns://<host>[:port]/<zone>[/<foreign-source>/][?expression=<regex>]
DNS Import Examples:
Simple
dns://my-dns-server/myzone.com
This URL will import all A records from the host my-dns-server on port 53 (default port) from zone"myzone.com" and since the foreign source (a.k.a. the provisioning group) is not specified it willdefault to the specified zone.
209

Using a Regular Expression Filter
dns://my-dns-server/myzone.com/portland/?expression=^por-.*
This URL will import all nodes from the same server and zone but will only manage the nodes inthe zone matching the regular expression ^port-.* and will and they will be assigned a uniqueforeign source (provisioning group) for managing these nodes as a subset of nodes from within thespecified zone.
If your expression requires URL encoding (for example you need to use a ? in the expression) itmust be properly encoded.
dns://my-dns-server/myzone.com/portland/?expression=^por[0-9]%3F
DNS Setup
Currently, the DNS server requires to be setup to allow a zone transfer from the OpenNMS Horizonserver. It is recommended that a secondary DNS server is running on OpenNMS Horizon and thatthe OpenNMS Horizon server be allowed to request a zone transfer. A quick way to test if zonetransfers are working is:
dig -t AXFR @<dnsServer> <zone>
Configuration
The configuration of the Provisoning system has moved from a properties file (model-importer.properties) to an XML based configuration container. The configuration is now extensibleto allow the definition of 0 or more import requisitions each with their own cron based schedulefor automatic importing from various sources (intended for integration with external URL such ashttp and this new dns protocol handler.
A default configuration is provided in the OpenNMS Horizon etc/ directory and is called:provisiond-configuration.xml. This default configuration has an example for scheduling an importfrom a DNS server running on the localhost requesting nodes from the zone, localhost and will beimported once per day at the stroke of midnight. Not very practical but is a good example.
210

<?xml version="1.0" encoding="UTF-8"?> <provisiond-configuration xmlns:xsi="http://www.w3.org/2001/XMLSchema-instance"xsi:schemaLocation="http://xmlns.opennms.org/xsd/config/provisiond-configuration" foreign-source-dir="/opt/opennms/etc/foreign-sources" requistion-dir="/opt/opennms/etc/imports" importThreads="8" scanThreads="10" rescanThreads="10" writeThreads="8" >
<!--http://www.quartz-scheduler.org/documentation/quartz-1.x/tutorials/crontrigger Field Name Allowed Values Allowed Special Characters Seconds 0-59 , - * / Minutes 0-59 , - * / Hours 0-23 , - * / Day-of-month1-31, - * ? / L W C Month1-12 or JAN-DEC, - * / Day-of-Week1-7 or SUN-SAT, - * ? / L C # Year (Opt)empty, 1970-2099, - * / -->
<requisition-def import-name="localhost" import-url-resource="dns://localhost/localhost">
<cron-schedule>0 0 0 * * ? *</cron-schedule> <!-- daily, at midnight --> </requisition-def></provisiond-configuration>
Configuration Reload
Like many of the daemon configuration in the 1.7 branch, the configurations are reloadablewithout having to restart OpenNMS Horizon, using the reloadDaemonConfig uei:
/opt/opennms/bin/send-event.pluei.opennms.org/internal/reloadDaemonConfig --parm 'daemonName Provisiond'
This means that you don’t have to restart OpenNMS Horizon every time you update theconfiguration.
9.5. Provisioning ExamplesHere are a few practical examples of enhanced directed discovery to help with your understandingof this feature.
9.5.1. Basic Provisioning
This example adds three nodes and requires no OpenNMS Horizon configuration other thanspecifying the node entities to be provisioned and managed in OpenNMS Horizon.
Defining the Nodes via the Web-UI
Using the Provisioning Groups Web-UI, three nodes are created given a single IP address. Navigate
211

to the Admin Menu and click Provisioning Groups Menu from the list of Admin options and createthe group Bronze.
Creating a new Provisioning Group
Clicking the Add New Group button will create the group and will redisplay the page including thisnew group among the list of any group(s) that have already been created.
At this point, the XML structure for holding the new provisioning group (a.k.a. animport requisition) has been persisted to the '$OPENNMS_ETC/imports/pending'directory.
Clicking the Edit link will bring you to the screen where you can begin the process of defining nodeentities that will be imported into OpenNMS Horizon. Click the Add Node button will begin the nodeentity creation process fill in the node label and click the Save button.
Creating a new Node definition in the Provisioning Group
At this point, the provisioning group contains the basic structure of a node entity but it is notcomplete until the interface(s) and interface service(s) have been defined. After having clicked theSave button, as we did above presents, in the Web-UI, the options Add Interface, Add Node Category,and Add Node Asset. Click the Add Interface link to add an interface entity to the node.
Adding an Interface to the node definition
212

Enter the IP address for this interface entity, a description, and specify the Primary attribute as P(Primary), S (Secondary), N (Not collected), or C (Collected) and click the save button. Now the nodeentity has an interface for which services can be defined for which the Web-UI now presents theAdd Service link. Add two services (ICMP, SNMP) via this link.
A complete node definition with all required elements defined.
Now the node entity definition contains all the required elements necessary for importing thisrequisition into OpenNMS Horizon. At this point, all the interfaces that are required for the nodeshould be added. For example, NAT interfaces should be specified there are services that theyprovide because they will not be discovered during the Scan Phase.
Two more node definitions will be added for the benefit of this example.
The completed requisition for the example Bronze Provisioning Group
This set of nodes represents an import requisition for the Bronze provisioning group. As thisrequisition is being edited via the WebUI, changes are being persisted into the OpenNMS Horizonconfiguration directory '$OPENNMS_etc/imports/' pending as an XML file having the namebronze.xml.
The name of the XML file containing the import requisition is the same as theprovisioning group name. Therefore naming your provisioning group without theuse of spaces makes them easier to manage on the file system.
Click the Done button to return to the Provisioning Groups list screen. The details of the “Bronze”
213

group now indicates that there are 3 nodes in the requisition and that there are no nodes in the DBfrom this group (a.k.a. foreign source). Additionally, you can see that time the requisition was lastmodified and the time it last imported are given (the time stamps are stored as attributes inside therequisition and are not the file system time stamps). These details are indicative of how well the DBrepresents what is in the requisition.
You can tell that this is a pending requisition for 2 reasons: 1) there are 3 nodesdefined and 0 nodes in the DB, 2) the requisition has been modified since the lastimport (in this case never).
Import the Nodes
In this example, you see that there are 3 nodes in the pending requisition and 0 in the DB. Click theImport button to submit the requisition to the provisioning system (what actually happens is thatthe Web-UI sends an event to the Provisioner telling it to begin the Import Phase for this group).
Do not refresh this page to check the values of these details. To refresh the detailsto verify the import, click the Provisioning Groups bread crumb item.
You should be able to immediately verify the importation of this provisioning group because theimport happens very quickly. Provisiond has several threads ready for processing the importoperations of the nodes defined in this requisition.
A few SNMP packets are sent and received to get the SNMP details of the node and the interfacesdefined in the requisition. Upon receipt of these packets (or not) each node is inserted as a DBtransaction.
The nodes are now added to OpenNMS Horizon and are under management.
214

Following the import of a node with thousands of interfaces, you will be able to refresh theInterface table browser on the Node page and see that interfaces and services are being discoveredand added in the background. This is the discovery component of directed discovery.
Adding a Node
To direct that another node be added from a foreign source (in this example the BronzeProvisioning Group) simply add a new node definition and re-import. It is important to rememberthat all the node definitions will be re-imported and the existing managed nodes will be updated, ifnecessary.
Changing a Node
To direct changes to an existing node, simply add, change, or delete elements or attributes of thenode definition and re- import. This is a great feature of having directed specific elements of a nodein the requisition because that attributes will simply be changed. For example, to change the IPaddress of the Primary SNMP interface for the node, barbrady.opennms.org, just change therequisition and re-import.
Each element in the Web-UI has an associated Edit icon Click this icon to change the IP address forbarbrady.opennms.org, click save, and then Click the Done button.
Changing the IP address of barbrady.opennms.org from 10.1.1.2 to 192.168.1.1
The Web-UI will return you to the Provisioning Groups screen where you will see that there are thetime stamp showing that the requisition’s last modification is more recent that the last import time.
The Provisioning Group must be re-imported
This provides an indication that the group must be re-imported for the changes made to the
215

requisition to take effect. The IP Interface will be simply updated and all the required events(messages) will be sent to communicate this change within OpenNMS Horizon.
The IP interface for barbrady.opennms.org is immediately updated
Deleting a Node
Barbrady has not been behaving, as one might expect, so it is time to remove him from the system.Edit the provisioning group, click the delete button next to the node barbrady.opennms.org, click theDone button.
Bronze Provisioning Group definition indicates a node has been removed and requires an import todelete the node entity from the OpenNMS Horizon system
Click the Import button for the Bronze group and the Barbrady node and its interfaces, services,and any other related data will be immediately deleted from the OpenNMS Horizon system. All therequired Events (messages) will be sent by Provisiond to provide indication to the OpenNMSHorizon system that the node Barbrady has been deleted.
Barbrady has been deleted
Deleting all the Nodes
There is a convenient way to delete all the nodes that have been provided from a specific foreignsource. From the main Admin/Provisioning Groups screen in the Web-UI, click the Delete Nodesbutton. This button deletes all the nodes defined in the Bronze requisition. It is very important tonote that once this is done, it cannot be undone! Well it can’t be undone from the Web-UI and canonly be undone if you’ve been good about keeping a backup copy of your '$OPENMS_ETC/' directory
216

tree. If you’ve made a mistake, before you re-import the requisition, restore the Bronze.xmlrequisition from your backup copy to the '$OPENNMS_ETC/imports' directory.
All node definitions have been removed from the Bronze requisition. The Web-UI indicates an import isnow required to remove them from OpenNMS Horizon.
Clicking the Import button will cause the Audit Phase of Provisiond to determine that all the nodesfrom the Bronze group (foreign source) should be deleted from the DB and will create Deleteoperations. At this point, if you are satisfied that the nodes have been deleted and that you will nolonger require nodes to be defined in this Group, you will see that the Delete Nodes button has nowchanged to the Delete Group button. The Delete Group button is displayed when there are no nodesentities from that group (foreign source) in OpenNMS Horizon.
When no node entities from the group exist in OpenNMS Horizon, then the Delete Group button isdisplayed.
9.5.2. Advanced Provisioning Example
In the previous example, we provisioned 3 nodes and let Provisiond complete all of its importphases using a default foreign source definition. Each Provisioning Group can have a separateforeign source definition that controls:
• The rescan interval
• The services to be detected
• The policies to be applied
This example will demonstrate how to create a foreign source definition and how it is used tocontrol the behavior of Provisiond when importing a Provisioning Group/foreign source requisition.
First let’s simply provision the node and let the default foreign source definition apply.
The node definition used for the Advanced Provisioning Example
217

Following the import, All the IP and SNMP interfaces, in addition to the interface specified in therequisition, have been discovered and added to the node entity. The default foreign sourcedefinition has no polices for controlling which interfaces that are discovered either get persisted ormanaged by OpenNMS Horizon.
Logical and Physical interface and Service entities directed and discovered by Provisiond.
218

219

Service Detection
As IP interfaces are found during the node scan process, service detection tasks are scheduled foreach IP interface. The service detections defined in the foreign source determines which servicesare to be detected and how (i.e. the values of the parameters that parameters control how theservice is detected, port, timeout, etc.).
Applying a New Foreign Source Definition
This example node has been provisioned using the Default foreign source definition. By navigatingto the Provisioning Groups screen in the OpenNMS Horizon Web-UI and clicking the Edit ForeignSource link of a group, you can create a new foreign source definition that defines service detectionand policies. The policies determine entity persistence and/or set attributes on the discoveredentities that control OpenNMS Horizon management behaviors.
When creating a new foreign source definition, the default definition is used as a template.
220

In this UI, new Detectors can be added, changed, and removed. For this example, we will removedetection of all services accept ICMP and DNS, change the timeout of ICMP detection, and a newService detection for OpenNMS Horizon Web-UI.
Custom foreign source definition created for NMS Provisioning Group (foreign source).
Click the Done button and re-import the NMS Provisioning Group. During this and any subsequentre-imports or re- scans, the OpenNMS Horizon detector will be active, and the detectors that havebeen removed will no longer test for the related services for the interfaces on nodes managed inthe provisioning group (requisition), however, the currently detected services will not be removed.There are 2 ways to delete the previously detected services:
1. Delete the node in the provisioning group, re-import, define it again, and finally re-import again
2. Use the ReST API to delete unwanted services. Use this command to remove each unwantedservice from each interface, iteratively:
curl -X DELETE -H "Content-Type: application/xml" -u admin:adminhttp://localhost:8980/opennms/rest/nodes/6/ipinterfaces/172.16.1.1/services/DNS
221

There is a sneaky way to do #1. Edit the provisioning group and just change theforeign ID. That will make Provisiond think that a node was deleted and a newnode was added in the same requisition! Use this hint with caution and an fullunderstanding of the impact of deleting an existing node.
Provisioning with Policies
The Policy API in Provisiond allow you to control the persistence of discovered IP and SNMPInterface entities and Node Categories during the Scan phase.
Matching IP Interface Policy
The Matching IP Interface policy controls whether discovered interfaces are to be persisted and ifthey are to be persisted, whether or not they will be forced to be Managed or Unmanaged.
Continuing with this example Provisioning Group, we are going to define a few policies that:
a. Prevent discovered 10 network addresses from being persisted
b. Force 192.168 network addresses to be unmanaged
From the foreign source definition screen, click the Add Policy button and the definition of a newpolicy will begin with a field for naming the policy and a drop down list of the currently installedpolicies. Name the policy no10s, make sure that the Match IP Interface policy is specified in the classlist and click the Save button. This action will automatically add all the parameters required for thepolicy.
The two required parameters for this policy are action and matchBehavior.
The action parameter can be set to DO_NOT_PERSIST, Manage, or UnManage.
Creating a policy to prevent persistence of 10 network IP interfaces.
The DO_NOT_PERSIST action does just what it indicates, it prevents discovered IP interface entitiesfrom being added to OpenNMS Horizon when the matchBehavior is satisfied. The Manage andUnManage values for this action allow the IP interface entity to be persisted by control whether ornot that interface should be managed by OpenNMS Horizon.
The matchBehavior action is a boolean control that determines how the optional parameters willbe evaluated. Setting this parameter’s value to ALL_PARAMETERS causes Provisiond to evaluateeach optional parameter with boolean AND logic and the value ANY_PARAMETERS will cause ORlogic to be applied.
Now we will add one of the optional parameters to filter the 10 network addresses. The Matching IPInterface policy supports two additional parameters, hostName and ipAddress. Click the AddParameter link and choose ipAddress as the key. The value for either of the optional parameters canbe an exact or regular expression match. As in most configurations in OpenNMS Horizon where
222

regular expression matching can be optionally applied, prefix the value with the ~ character.
Example Matching IP Interface Policy to not Persist 10 Network addresses
Any subsequent scan of the node or re-imports of NMS provisioning group will force this policy tobe applied. IP Interface entities that already exist that match this policy will not be deleted. Existinginterfaces can be deleted by recreating the node in the Provisioning Groups screen (simply changethe foreign ID and re-import the group) or by using the ReST API:
curl -X DELETE -H "Content-Type: application/xml" -u admin:adminhttp://localhost:8980/opennms/rest/nodes/6/ipinterfaces/10.1.1.1
The next step in this example is to define a policy that sets discovered 192.168 network addresses tobe unmanaged (not managed) in OpenNMS Horizon. Again, click the Add Policy button and let’s callthis policy noMgt192168s. Again, choose the Mach IP Interface policy and this time set the action toUNMANAGE.
Policy to not manage IP interfaces from 192.168 networks
The UNMANAGE behavior will be applied to existing interfaces.
Matching SNMP Interface Policy
Like the Matching IP Interface Policy, this policy controls the whether discovered SNMP interfaceentities are to be persisted and whether or not OpenNMS Horizon should collect performancemetrics from the SNMP agent for Interface’s index (MIB2 IfIndex).
In this example, we are going to create a policy that doesn’t persist interfaces that are AAL5 overATM or type 49 (ifType). Following the same steps as when creating an IP Management Policy, editthe foreign source definition and create a new policy. Let’s call it: noAAL5s. We’ll use Match SNMPInterface class for each policy and add a parameter with ifType as the key and 49 as the value.
Matching SNMP Interface Policy example for Persistence and Data Collection
223

At the appropriate time during the scanning phase, Provisiond will evaluate thepolicies in the foreign source definition and take appropriate action. If during thepolicy evaluation process any policy matches for a “DO_NOT_PERSIST” action, nofurther policy evaluations will happen for that particular entity (IP Interface,SNMP Interface).
Node Categorization Policy
With this policy, nodes entities will automatically be assigned categories. The policy is defined inthe same manner as the IP and SNMP interface polices. Click the Add Policy button and give thepolicy name, cisco and choose the Set Node Category class. Edit the required category key and setthe value to Cisco. Add a policy parameter and choose the sysObjectId key with a value~^\.1\.3\.6\.1\.4\.1\.9\..*.
Example: Node Category setting policy
New Import Capabilities
Several new XML entities have been added to the import requisition since the introduction of theOpenNMS Importer service in version 1.6. So, in addition to provisioning the basic node, interface,service, and node categories, you can now also provision asset data.
Provisiond Configuration
The configuration of the Provisioning system has moved from a properties file (model-importer.properties) to an XML based configuration container. The configuration is now extensibleto allow the definition of 0 or more import requisitions each with their own Cron based schedulefor automatic importing from various sources (intended for integration with external URL such asHTTP and this new DNS protocol handler.
224

A default configuration is provided in the OpenNMS Horizon etc/ directory and is called:provisiond-configuration.xml. This default configuration has an example for scheduling an importfrom a DNS server running on the localhost requesting nodes from the zone, localhost and will beimported once per day at the stroke of midnight. Not very practical but is a good example.
<?xml version="1.0" encoding="UTF-8"?> <provisiond-configuration xmlns:xsi="http://www.w3.org/2001/XMLSchema-instance"xsi:schemaLocation="http://xmlns.opennms.org/xsd/config/provisiond-configuration" foreign-source-dir="/opt/opennms/etc/foreign-sources" requistion-dir="/opt/opennms/etc/imports" importThreads="8" scanThreads="10" rescanThreads="10" writeThreads="8" > <!-- http://www.quartz-scheduler.org/documentation/quartz-1.x/tutorials/crontrigger[http://www.quartz-scheduler.org/documentation/quartz-1.x/tutorials/crontrigger] Field Name Allowed Values Allowed Special Characters Seconds 0-59 , - * / Minutes 0-59 , - * / Hours 0-23 , - * / Day-of-month1-31, - * ? / L W C Month1-12 or JAN-DEC, - * / Day-of-Week1-7 or SUN-SAT, - * ? / L C # Year (Opt)empty, 1970-2099, - * / -->
<requisition-def import-name="NMS" import-url-resource="file://opt/opennms/etc/imports/NMS.xml"> <cron-schedule>0 0 0 * * ? *</cron-schedule> <!-- daily, at midnight --> </requisition-def></provisiond-configuration>
Configuration Reload
Like many of the daemon configurations in the 1.7 branch, Provisiond’s configuration is re-loadablewithout having to restart OpenNMS. Use the reloadDaemonConfig uei:
/opt/opennms/bin/send-event.pl uei.opennms.org/internal/reloadDaemonConfig --parm'daemonName Provisiond'
This means that you don’t have to restart OpenNMS Horizon every time you update theconfiguration!
Provisioning Asset Data
The Provisioning Groups Web-UI had been updated to expose the ability to add Node Asset data inan import requisition. Click the Add Node Asset link and you can select from a drop down list all thepossible node asset attributes that can be defined.
225

After an import, you can navigate to the Node Page and click the Asset Info link and see the assetdata that was just provided in the requisition.
External Requisition Sources
Because Provisiond takes a URL as the location service for import requisitions, OpenNMS Horizoncan be easily extended to support sources in addition to the native URL handling provided by Java:file://, http://, and https://. When you configure Provisiond to import requisitions on a schedule youspecify using a URL Resource. For requisitions created by the Provisioning Groups WebUI, you canspecify a file based URL.
<need further documentation>
Provisioning Nodes from DNS
The new Provisioning service in OpenNMS Horizon is continuously improving and adapting to theneeds of the community. One of the most recent enhancements to the system is built upon the veryflexible and extensible API of referencing an import requisition’s location via a URL. Mostcommmonly, these URLs are files on the file system (i.e. file:/opt/opennms/etc/imports/<my-provisioning-group.xml>) as requisitions created by the Provisioning Groups UI. However, thesesame requistions for adding, updating, and deleting nodes (based on the original model importer)can also come from URLs specifying the HTTP protocol: http://myinventory.server.org/nodes.cgi)
Now, using Java’s extensible protocol handling specification, a new protocol handler was created sothat a URL can be specified for requesting a Zone Transfer (AXFR) request from a DNS server. The A
226

records are recorded and used to build an import requisition. This is handy for organizations thatuse DNS (possibly coupled with an IP management tool) as the data base of record for nodes in thenetwork. So, rather than ping sweeping the network or entering the nodes manually into OpenNMSHorizon Provisioning UI, nodes can be managed via 1 or more DNS servers. The format of the URLfor this new protocol handler is:
dns://<host>[:port]/<zone>[/<foreign-source>/][?expression=<regex>]
Simple Example
dns://my-dns-server/myzone.com
This will import all A records from the host my-dns-server on port 53 (default port) from zonemyzone.com and since the foreign source (a.k.a. the provisioning group) is not specified it willdefault to the specified zone.
Using a Regular Expression Filter
You can also specify a subset of the A records from the zone transfer using a regular expression:
dns://my-dns-server/myzone.com/portland/?expression=^por-.*
This will import all nodes from the same server and zone but will only manage the nodes in thezone matching the regular expression ^port-.* and will and they will be assigned a unique foreignsource (provisioning group) for managing these nodes as a subset of nodes from within thespecified zone.
URL Encoding
If your expression requires URL encoding (for example you need to use a ? in the expression) itmust be properly encoded.
dns://my-dns-server/myzone.com/portland/?expression=^por[0-9]%3F
DNS Setup
Currently, the DNS server requires to be setup to allow a zone transfer from the OpenNMS Horizonserver. It is recommended that a secondary DNS server is running on OpenNMS Horizon and thatthe OpenNMS Horizon server be allowed to request a zone transfer. A quick way to test if zonetransfers are working is:
dig -t AXFR @<dn5Server> <zone>
9.6. AdaptersThe OpenNMS Horizon Provisiond API also supports Provisioning Adapters (plugins) for integration
227

with external systems during the provisioning Import phase. When node entities are added,updated, deleted, or receive a configuration management change event, OpenNMS Horizon will callthe adapter for the provisioning activities with integrated systems.
Currently, OpenNMS Horizon supports the following adapters:
9.6.1. DDNS Adapter
The Opposite end of Provisiond integration from the DNS Requisition Import, is the DDNS adapter.This adapter uses the dynamic DNS protocol to update a DNS system as nodes are provisioned intoOpenNMS Horizon. To configure this adapter, edit the opennms.properties file and set theimporter.adapter.dns.server property:
importer.adapter.dns.server=192.168.1.1
9.6.2. RANCID Adapter
Integration has been integrated with RANCID though this new API.
<More documentation needed>
Maps (soon to be moved to Mapd) <documentation required>
WiMax-Link (soon to be moved to Linkd) <documentation required>
9.7. Integrating with ProvisiondThe ReST API should be used for integration from other provisioning systems with OpenNMSHorizon. The ReST API provides an interface for defining foreign sources and requisitions.
9.7.1. Provisioning Groups of Nodes
Just as with the WebUI, groups of nodes can be managed via the ReST API from an external system.The steps are:
1. Create a Foreign Source (if not using the default) for the group
2. Update the SNMP configuration for each node in the group
3. Create/Update the group of nodes
9.7.2. Example
Step 1 - Create a Foreign Source
If policies for this group of nodes are going to be specified differently than the default policy, then aforeign source should be created for the group. Using the ReST API, a foreign source can beprovided. Here is an example:
228

The XML can be imbedded in the curl command option -d or be referenced from afile if the @ prefix is used with the file name as in this case.
The XML file: customer-a.foreign-source.xml:
<?xml version="1.0" encoding="UTF-8" standalone="yes"?><foreign-source date-stamp="2009-10-12T17:26:11.616-04:00" name="customer-a" xmlns="http://xmlns.opennms.org/xsd/config/foreign-source"> <scan-interval>1d</scan-interval> <detectors> <detector class="org.opennms.netmgt.provision.detector.icmp.IcmpDetector"name="ICMP"/> <detector class="org.opennms.netmgt.provision.detector.snmp.SnmpDetector"name="SNMP"/> </detectors> <policies> <policy class="org.opennms.netmgt.provision.persist.policies.MatchingIpInterfacePolicy" name="no-192-168"> <parameter value="UNMANAGE" key="action"/> <parameter value="ALL_PARAMETERS" key="matchBehavior"/> <parameter value="~^192\.168\..*" key="ipAddress"/> </policy> </policies></foreign-source>
Here is an example curl command used to create the foreign source with the above foreign sourcespecification above:
curl -v -u admin:admin -X POST -H 'Content-type: application/xml' -d '@customer-a.foreign-source.xml' http://localhost:8980/opennms/rest/foreignSources
Now that you’ve created the foreign source, it needs to be deployed by Provisiond. Here an theexample using the curl command to deploy the foreign source:
curl -v -u admin:adminhttp://localhost:8980/opennms/rest/foreignSources/pending/customer-a/deploy -X PUT
The current API doesn’t strictly follow the ReST design guidelines and will beupdated in a later release.
Step 2 - Update the SNMP configuration
The implementation only supports a PUT request because it is an implied "Update" of theconfiguration since it requires an IP address and all IPs have a default configuration. This request isis passed to the SNMP configuration factory in OpenNMS Horizon for optimization of the
229

configuration store snmp-config.xml. This example changes the community string for the IP address10.1.1.1 to yRuSonoZ.
Community string is the only required element
curl -v -X PUT -H "Content-Type: application/xml" -H "Accept: application/xml" -d<snmp-info><community>yRuSonoZ</community><port>161</port><retries>1</retries><timeout>2000</timeout><version>v2c</version></snmp-info>" -u admin:adminhttp://localhost:8980/opennms/rest/snmpConfig/10.1.1.1
Step 3 - Create/Update the Requisition
This example adds 2 nodes to the Provisioning Group, customer-a. Note that the foreign-sourceattribute typically has a 1 to 1 relationship to the name of the Provisioning Group requisition. Thereis a direct relationship between the foreign- source attribute in the requisition and the foreignsource policy specification. Also, typically, the name of the provisioning group will also be the same.In the following example, the ReST API will automatically create a provisioning group based on thevalue foreign-source attribute specified in the XML requisition.
curl -X POST -H "Content-Type: application/xml" -d "<?xml version="1.0" encoding="UTF-8"?><model-import xmlns="http://xmlns.opennms.org/xsd/config/model-import" date-stamp="2009-03-07T17:56:53.123-05:00" last-import="2009-03-07T17:56:53.117-05:00"foreign-source="customer-a"><node node-label="p-brane" foreign-id="1" ><interface ip-addr="10.0.1.3" descr="en1" status="1" snmp-primary="P"><monitored-service service-name="ICMP"/><monitored-service service-name="SNMP"/></interface><categoryname="Production"/><category name="Routers"/></node><node node-label="m-brane"foreign-id="1" ><interface ip-addr="10.0.1.4" descr="en1" status="1" snmp-primary="P"><monitored-service service-name="ICMP"/><monitored-service service-name="SNMP"/></interface><category name="Production"/><categoryname="Routers"/></node></model-import>" -u admin:adminhttp://localhost:8980/opennms/rest/requisitions
A provisioning group file called etc/imports/customer-a.xml will be found on the OpenNMS Horizonsystem following the successful completion of this curl command and will also be visible via theWebUI.
Add, Update, Delete operations are handled via the ReST API in the same manneras described in detailed specification.
9.8. Provisioning Single Nodes (Quick Add Node)Adding a Node to a Current Requisition
Often, it is requested that a single node add/update be completed for an already definedprovisioning group. There is a ReST API for the Add Node implementation found in the OpenNMSHorizon Web-UI. For this to work, the provisioning group must already exist in the system even if
230

there are no nodes defined in the group.
1. Create a foreign source (if required)
2. Specify SNMP configuration
3. Provide a single node with the following specification
9.9. Fine Grained Provisioning Using provision.plprovision.pl provides an example command-line interface to the provisioning-related OpenNMSHorizon REST API endpoints.
The script has many options but the first 3 optional parameters are described here:
You can use --help to the script to see all the available options.
--username (default: admin)--password (default: admin)--url (default: http://localhost:8980/opennms/rest)
9.9.1. Create a new requisition
provision.pl provides easy access to the requisition REST service using the requisition option:
$OPENNMS_HOME/bin/provision.pl requisition customer1
This command will create a new, empty (containing no nodes) requisition in OpenNMS Horizon.
The new requisition starts life in the pending state. This allows you to iteratively build therequisition and then later actually import the nodes in the requisition into OpenNMS Horizon. Thishandles all adds/changes/deletes at once. So, you could be making changes all day and then at nighteither have a schedule in OpenNMS Horizon that imports the group automatically or you can senda command through the REST service from an outside system to have the pending requisitionimported/reimported.
You can get a list of all existing requisitions with the list option of the provision.pl script:
$OPENNMS_HOME/bin/provision.pl list
Create a new Node
$OPENNMS_HOME/bin/provision.pl node add customer1 1 node-a
This command creates a node element in the requisition customer1 called node-a using the script’snode option. The node’s foreign-ID is 1 but it can be any alphanumeric value as long as it is unique
231
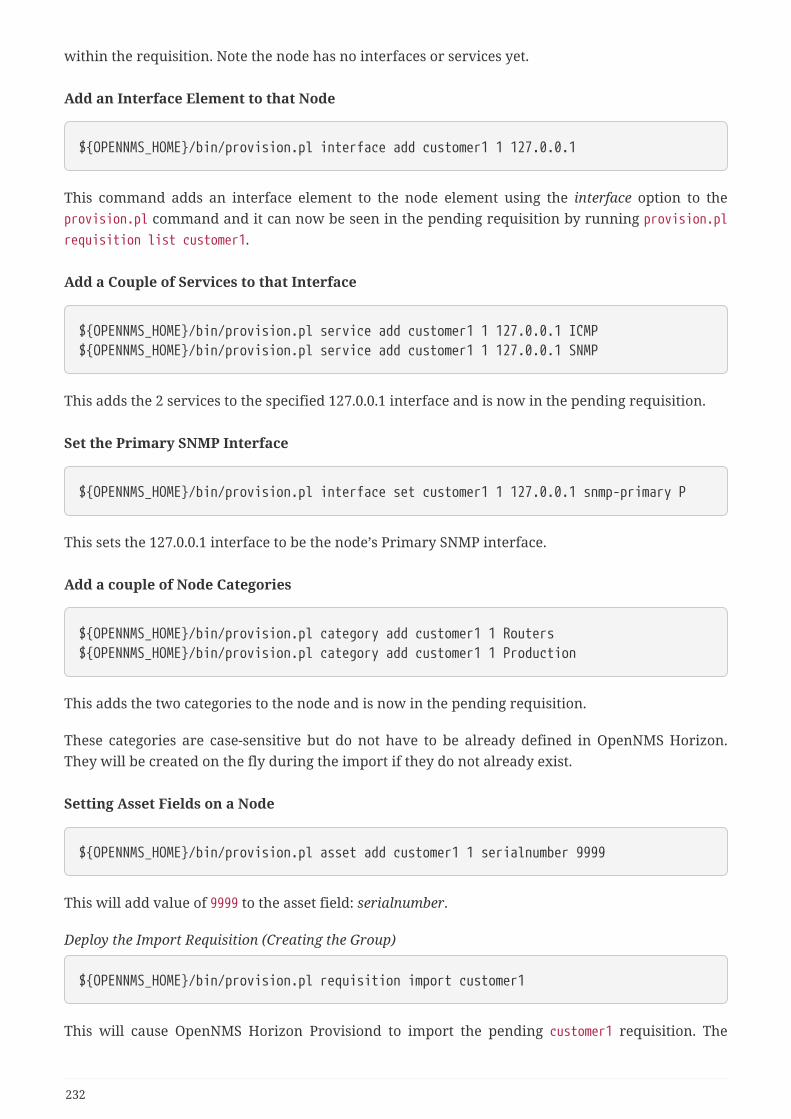
within the requisition. Note the node has no interfaces or services yet.
Add an Interface Element to that Node
$OPENNMS_HOME/bin/provision.pl interface add customer1 1 127.0.0.1
This command adds an interface element to the node element using the interface option to theprovision.pl command and it can now be seen in the pending requisition by running provision.plrequisition list customer1.
Add a Couple of Services to that Interface
$OPENNMS_HOME/bin/provision.pl service add customer1 1 127.0.0.1 ICMP$OPENNMS_HOME/bin/provision.pl service add customer1 1 127.0.0.1 SNMP
This adds the 2 services to the specified 127.0.0.1 interface and is now in the pending requisition.
Set the Primary SNMP Interface
$OPENNMS_HOME/bin/provision.pl interface set customer1 1 127.0.0.1 snmp-primary P
This sets the 127.0.0.1 interface to be the node’s Primary SNMP interface.
Add a couple of Node Categories
$OPENNMS_HOME/bin/provision.pl category add customer1 1 Routers$OPENNMS_HOME/bin/provision.pl category add customer1 1 Production
This adds the two categories to the node and is now in the pending requisition.
These categories are case-sensitive but do not have to be already defined in OpenNMS Horizon.They will be created on the fly during the import if they do not already exist.
Setting Asset Fields on a Node
$OPENNMS_HOME/bin/provision.pl asset add customer1 1 serialnumber 9999
This will add value of 9999 to the asset field: serialnumber.
Deploy the Import Requisition (Creating the Group)
$OPENNMS_HOME/bin/provision.pl requisition import customer1
This will cause OpenNMS Horizon Provisiond to import the pending customer1 requisition. The
232

formerly pending requisition will move into the deployed state inside OpenNMS Horizon.
Deleting a Node from a Requisition
Very much the same as the add, except that a single delete command and a re-import is required.What happens is that the audit phase is run by Provisiond and it will be determined that a node hasbeen removed from the requisition and the node will be deleted from the DB and all services willstop activities related to it.
$OPENNMS_HOME/bin/provision.pl node delete customer1 1 node-a$OPENNMS_HOME/bin/provision.pl requisition import customer1
This completes the life cycle of managing a node element, iteratively, in a import requisition.
9.10. Yet Other API ExamplesList the Nodes in a Provisioning Group
The provision.pl script doesn’t supply this feature but you can get it via the REST API. Here is anexample using curl:
#!/bin/bashREQ=$1curl -X GET -H "Content-Type: application/xml" -u admin:adminhttp://localhost:8980/opennms/rest/requisitions/$REQ 2>/dev/null | xmllint --format -
9.11. Service Detectors
9.11.1. SNMP Detector
This detector is used to find and assigns services based on SNMP. The detector binds a service witha given Service Name when a particular SNMP OID as scalar or table matches a given criteria.
Detector facts
Implementation org.opennms.netmgt.provision.detector.snmp.SnmpDetector
Configuration and Usage
Table 95. Parameters for the SNMP detector
Parameter
Description Required
Defaultvalue
oid SNMP OID for scalar or table to detect the service. required
.1.3.6.1.2.1
.1.2.0
retry Number of retries to detect the service. optional
agent config
233

Parameter
Description Required
Defaultvalue
timeout Timeout in milliseconds to wait for a response from the SNMPagent.
optional
agent config
vbvalue expected return value to detect the service; if not specified theservice is detected if the SNMP OID returned any kind of validvalue. The vbvalue is evaluated as Java Regular Expression.
optional
-
hex Set true if the data is from type HEX-String. optional
false
isTable Set true if detector should evaluate SNMP tables. optional
false
matchType
Set match type to evaluate the expected value in the SNMP table.EXIST: the expected vbalue is ignored, service detected if the giventable under OID existALL: all values in the table must match against expected vbalue todetect serviceANY: at least one value in the table must match against expectedvbalue to detect serviceNONE: None of the values should match against expected value todetect service
optional
EXIST
Example for SNMP scalar value
We have Dell server farm and want to monitor the global server status provided by theOpenManage Server Administrator. Global status is provided by a scalar OID.1.3.6.1.4.1.674.10892.1.200.10.1.2.1. The service should be automatically detected if the serversupports this OID.
For provisioning we have a requisition named Server which contains all server of our data center.A Detector with the name Dell-OMSA-Global-State for this requisition is created with the followingparameter:
Table 96. Parameters for the SNMP detector
Parameter
Value
Name Dell-OMSA-Global-State
oid .1.3.6.1.4.1.674.10892.1.200.10.1.2.1
When the requisition Server is synchronized the service Dell-OMSA-Global-State will be detected incase they support the given SNMP OID.
Example using SNMP tables
We have a HP server farm and want to monitor the status of logical drives over SNMP providedfrom HP Insight Manager. The status for logical drives is provided in a SNMP Table under.1.3.6.1.4.1.232.3.2.3.1.1.4. The service should be automatically assigned to all servers exposing
234

the given SNMP OID.
For provisioning we have a requisition named Server which contains all server of our data center.A Detector with the name HP-Insight-Drive-Logical for this requisition is created with the followingparameter:
Table 97. Parameters for the SNMP detector
Parameter
Value
Name HP-Insight-Drive-Logical
oid .1.3.6.1.4.1.232.3.2.3.1.1.4
isTable true
When the requisition Server is synchronized the service HP-Insight-Drive-Logical will be detected incase they support the given SNMP OID table.
9.11.2. WS-Man Detector
The WS-Management detector attempts to connect to the agent defined in wsman-config.xml andissues an Identify command. If the Identify command is successful, the service is marked asdetected and the product details returned by the command are optionally stored in the asset fields(see details bellow.)
Detector facts
Implementation org.opennms.netmgt.provision.detector.wsman.WsManDetector
Configuration and Usage
Table 98. Parameters for the <DETECTOR-NAME-HERE>
Parameter
Description Required
Defaultvalue
updateAssets
Stores the product vendor and product version in the vendor andmodelNumber asset fields
false true
Examples
If a valid response to the Identify command is received, the product vendor and product versionare stored in the vendor and modelNumber fields of the associated node`s assets table.
For example, a Windows Server 2008 machine returns:
Product Vendor Microsoft Corporation
Product Version OS: 6.1.7601 SP: 1.0 Stack: 2.0
If these assets field are being used for another purpose, this behavior can be disabled by settings
235

the updateAssets parameters to false in the detector configuration of the appropriate foreignsource.
Some agents may respond to the Identify command with generic identities such asOpenwsman 2.0.0. These values can be overridden by specifying the product-vendorand product-version attributes in wsman-config.xml.
Example detector configuration:
<detector name="WS-Man" class="org.opennms.netmgt.provision.detector.wsman.WsManDetector"> <parameter key="updateAssets" value="true"/></detector>
The response is logged as DEBUG information in provisiond.log and looks like the following:
ID: 3Response-Code: 200309Encoding: UTF-8Content-Type: application/soap+xml;charset=UTF-8Headers: Content-Length=[787], content-type=[application/soap+xml;charset=UTF-8],Date=[Mon, 08 Feb 2016 14:21:20 GMT], Server=[Microsoft-HTTPAPI/2.0]Payload:<s:Envelope xmlns:s="http://www.w3.org/2003/05/soap-envelope" xml:lang="en-US"> <s:Header/> <s:Body> <wsmid:IdentifyResponse xmlns:wsmid="http://schemas.dmtf.org/wbem/wsman/identity/1/wsmanidentity.xsd"> <wsmid:ProtocolVersion>http://schemas.dmtf.org/wbem/wsman/1/wsman.xsd</wsmid:ProtocolVersion> <wsmid:ProductVendor>Microsoft Corporation</wsmid:ProductVendor>① <wsmid:ProductVersion>OS: 6.2.9200 SP: 0.0 Stack: 3.0</wsmid:ProductVersion>② <wsmid:SecurityProfiles> <wsmid:SecurityProfileName>http://schemas.dmtf.org/wbem/wsman/1/wsman/secprofile/http/basic</wsmid:SecurityProfileName> <wsmid:SecurityProfileName>http://schemas.dmtf.org/wbem/wsman/1/wsman/secprofile/http/spnego-kerberos</wsmid:SecurityProfileName> </wsmid:SecurityProfiles> </wsmid:IdentifyResponse> </s:Body></s:Envelope>
① ProductVendor: Stored to the asset field vendor
② ProductVersion: Stored in the asset field modelNumber
236

The information of the asset fields are used in the System Definition Rule to decidewhich performance metrics will be gathered from Collectd.
237

Chapter 10. Business Service MonitoringThis section describes how to model and configure Business Services (BS) and orchestrate them in ahierarchy. The concepts and usage of the section Business Service Monitoring from the User Guide ispresumed.
Business Service Monitoring (BSM) includes the following components:
• Business Service Monitoring Daemon (BSMD): Maintains and drives the state of all BS
• Business Service Editor: Web application which allows you to create, update or delete BS
• Topology View for Business Services: Visual representation of the Business Service Hierarchy as acomponent of the Topology User Interface.
• BSM ReST API: ReST based API to create, read, update or delete BS
10.1. Business Service DefinitionThe status of Service Monitors and any kind of Alarm can be used to drive the Operational Status ofa BS. A BS is defined with the following components:
• Business Service Name: A unique name used to identify the BS
• Edges: A set of elements on which this BS relies which can include other BS, or Reduction Keys.
• Reduce Function: Function used to aggregate the Operational Status from all the Edges. Specificfunctions may take additional parameters.
• Attributes: Optional key/value pairs that can be used to tag or enrich the Busines Service withadditional information.
Each Business Service can contain a list of optional key/value attributes. These can be used toidentify or tag the BS, and may be reference in other workflows. These attributes do not affect thedependencies or the status calculation of the BS.
Attributes can be used to filter BS in Ops Board dashlets.
The Business Service Editor is used to manage and model the Business Services and their hierarchy.It is required to have administrative permissions and is available in "Login Name → ConfigureOpenNMS → Manage Business Services" in the Service Monitoring section.
Managing Business Services with the Business Service Editor
238

① Create a new Business Service definition
② Collapse tree view for all Business Services in the view
③ Expand tree view for all Business Services in the view
④ Reload all Business Services in the view with current Business Services from the system
⑤ Reload the Business Service Monitoring Daemon to use the Business Service definition asconfigured
⑥ Business Service dependency hierarchy as tree view
⑦ Show the current Business Service with dependencies in the Topology UI
⑧ Edit and delete existing Business Service defintions
As shown in figure Managing Business Services with the Business Service Editor the BusinessServices can be created or changed. The hierarchy is created by assigning an existing BusinessService as Child Service.
10.2. EdgesEdges map the Alarm status monitoring with OpenNMS
The following types can be used:
• Child Service: A reference to an existing Business Service on which to depend
• IP Service: A convenient way to refer to the alarms that can be generated by a monitored IPService. This will automatically provided edges for the nodeLostService, interfaceDown andnodeDown reductions keys of the specified service.
• Reduction Key: A resolved Reduction Key used to refer to a specific Alarm, e.g. generated by aSNMP Trap or Threshold violation
239
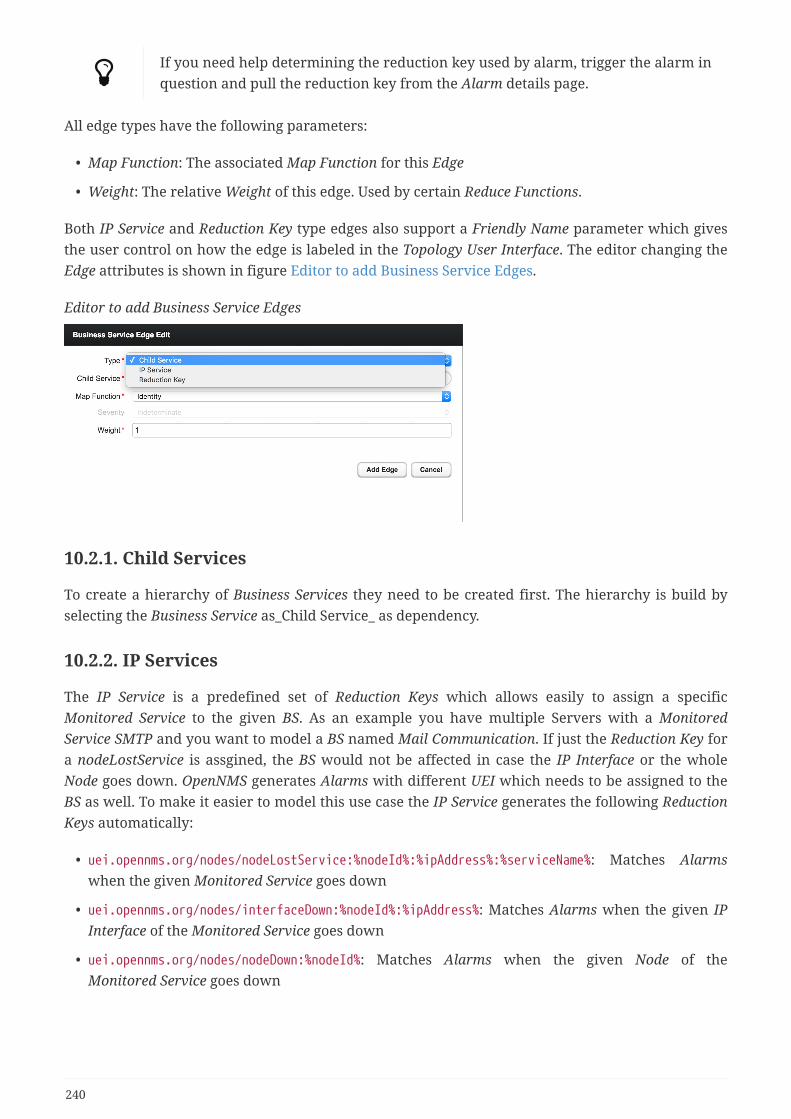
If you need help determining the reduction key used by alarm, trigger the alarm inquestion and pull the reduction key from the Alarm details page.
All edge types have the following parameters:
• Map Function: The associated Map Function for this Edge
• Weight: The relative Weight of this edge. Used by certain Reduce Functions.
Both IP Service and Reduction Key type edges also support a Friendly Name parameter which givesthe user control on how the edge is labeled in the Topology User Interface. The editor changing theEdge attributes is shown in figure Editor to add Business Service Edges.
Editor to add Business Service Edges
10.2.1. Child Services
To create a hierarchy of Business Services they need to be created first. The hierarchy is build byselecting the Business Service as_Child Service_ as dependency.
10.2.2. IP Services
The IP Service is a predefined set of Reduction Keys which allows easily to assign a specificMonitored Service to the given BS. As an example you have multiple Servers with a MonitoredService SMTP and you want to model a BS named Mail Communication. If just the Reduction Key fora nodeLostService is assgined, the BS would not be affected in case the IP Interface or the wholeNode goes down. OpenNMS generates Alarms with different UEI which needs to be assigned to theBS as well. To make it easier to model this use case the IP Service generates the following ReductionKeys automatically:
• uei.opennms.org/nodes/nodeLostService:%nodeId%:%ipAddress%:%serviceName%: Matches Alarmswhen the given Monitored Service goes down
• uei.opennms.org/nodes/interfaceDown:%nodeId%:%ipAddress%: Matches Alarms when the given IPInterface of the Monitored Service goes down
• uei.opennms.org/nodes/nodeDown:%nodeId%: Matches Alarms when the given Node of theMonitored Service goes down
240

10.2.3. Custom Reduction Key
The Reduction Key edge is used to refer to specific instance of alarms. When an alarm with thegiven Reduction Key is present, the alarms' severity will be used to calculate the Operational Statusof the BS. To give a better explanation a Friendly Name can be set and is used in the Business ServiceView. The format of the Reduction Key is build by a set of attributes as a key separated by : andenclosed in %, i.e (%attribute%:%attribute%).
Example of a Reduction Key for a specific nodeLostService
%uei.opennms.org/nodes/nodeLostService%:%nodeId%:%ipAddress%:%serviceName%
10.3. Map FunctionsThe Map Functions define how the Severity of the edge will be used in the Reduce Function of theparent when calculating the Operational Status.
The available Map Functions are:
Table 99. Calculation of the Operational Status with Map Functions
Name Description
Identity Use the same Severity as Operational Status of the BS
Increase Increase the Severity by one level and use it as Operational Status of the BS
Decrease Decrease the Severity by one level and use it as Operational Status of the BS
SetTo Set the Operational Status to a constant Severity value
Ignore The input of the Edge is ignored for Operational Status calculation
10.4. Reduce FunctionsA Reduce Function is used to aggregate the Operational Status for the BS. The Alarm Severity fromthe Edges are used as input for the Reduce Function. For this operation the following ReduceFunctions are available:
Table 100. Status calculation Reduce Functions
Name Description
Highest Severity Uses the value of the highest severity, Weight is ignored.
Threshold Uses the highest severity found more often than the given threshold, e.g. 0.26can also be seen as 26%, which means at least 2 of 4 Alarms need to be raisedto change the BS.
Highest SeverityAbove
Uses the highest severity greater than the given threshold severity.
241
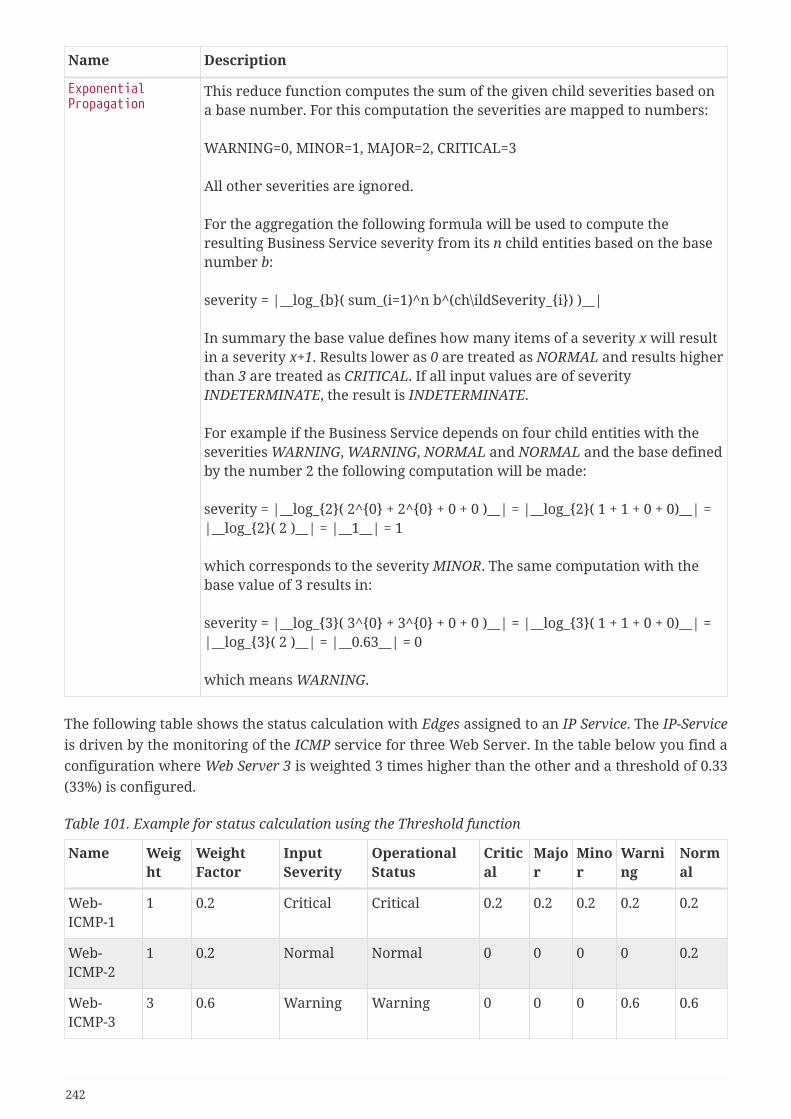
Name Description
ExponentialPropagation
This reduce function computes the sum of the given child severities based ona base number. For this computation the severities are mapped to numbers:
WARNING=0, MINOR=1, MAJOR=2, CRITICAL=3
All other severities are ignored.
For the aggregation the following formula will be used to compute theresulting Business Service severity from its n child entities based on the basenumber b:
severity = |__log_b( sum_(i=1)^n b^(ch\ildSeverity_i) )__|
In summary the base value defines how many items of a severity x will resultin a severity x+1. Results lower as 0 are treated as NORMAL and results higherthan 3 are treated as CRITICAL. If all input values are of severityINDETERMINATE, the result is INDETERMINATE.
For example if the Business Service depends on four child entities with theseverities WARNING, WARNING, NORMAL and NORMAL and the base definedby the number 2 the following computation will be made:
severity = |__log_2( 2^0 + 2^0 + 0 + 0 )__| = |__log_2( 1 + 1 + 0 + 0)__| =|__log_2( 2 )__| = |__1__| = 1
which corresponds to the severity MINOR. The same computation with thebase value of 3 results in:
severity = |__log_3( 3^0 + 3^0 + 0 + 0 )__| = |__log_3( 1 + 1 + 0 + 0)__| =|__log_3( 2 )__| = |__0.63__| = 0
which means WARNING.
The following table shows the status calculation with Edges assigned to an IP Service. The IP-Serviceis driven by the monitoring of the ICMP service for three Web Server. In the table below you find aconfiguration where Web Server 3 is weighted 3 times higher than the other and a threshold of 0.33(33%) is configured.
Table 101. Example for status calculation using the Threshold function
Name Weight
WeightFactor
InputSeverity
OperationalStatus
Critical
Major
Minor
Warning
Normal
Web-ICMP-1
1 0.2 Critical Critical 0.2 0.2 0.2 0.2 0.2
Web-ICMP-2
1 0.2 Normal Normal 0 0 0 0 0.2
Web-ICMP-3
3 0.6 Warning Warning 0 0 0 0.6 0.6
242

Name Weight
WeightFactor
InputSeverity
OperationalStatus
Critical
Major
Minor
Warning
Normal
Total 1.0 0.2 0.2 0.2 0.8 1
Percentage
100% 20% 20% 20% 80% 100%
The Operational Status Severity is evaluated from left to right, the first value higher then theconfigured Threshold is used. In this case the Operational Status is set to Warning because the firstthreshold which exceeds 33% is Warning with 80%.
10.5. Business Service DaemonThe calculation of the Operational Status of the BS is driven by the Business Service MonitoringDaemon (bsmd). The daemon is responsible for tracking the operational status of all BS and forsending events in case of operational status changes.
In order to calculate the Operational Status the reduction key associated with a Business Service isused. The reduction key is obtained from an alarm generated by OpenNMS Horizon. This means thatthe alarm’s reduction key of a defined Business Service must not change afterwards. Otherwise bsmdis not able to calculate the Operational Status correctly. This also applies for removing the alarmdata from events associated to Business Services In addition the child type "IP Service" from theBusiness Service Configuration Page requires the following events with the default reduction keysbeing defined: * uei.opennms.org/nodes/nodeLostService * uei.opennms.org/nodes/nodeDown *uei.opennms.org/nodes/interfaceDown
Every time the configuration of a Business Service is changed a reload of the daemon’sconfiguration is required. This includes changes like the name of the Business Service or itsattributes as well as changes regarding the Reduction Keys, contained Business Services or IPServices. The bsmd configuration can be reloaded with the following mechanisms:
• Click the Reload Daemon button in the Business Service Editor
• Send the reloadDaemonConfig event using send-event.pl or use the WebUI in Manually Send anEvent with parameter daemonName bsmd
• Use the ReST API to perform a POST request to /opennms/api/v2/business-services/daemon/reload
If the reload of the configuration is done an event of typeuei.opennms.org/internal/reloadDaemonConfigSuccessful is fired.
Example reloading bsmd configuration from CLI
$OPENNMS_HOME/bin/send-event.pl -p 'daemonName bsmd'uei.opennms.org/internal/reloadDaemonConfig
243

Example reloading bsmd configuration through ReST POST
curl -X POST -u admin:admin -v http://localhost:8980/opennms/api/v2/business-services/daemon/reload
244

Chapter 11. Topology MapThis section describes how to configure the Topology Map.
11.1. PropertiesThe Topology Map supports the following properties, which can be influenced by changing the fileetc/org.opennms.features.topology.app.cfg:
Property Type Default Description
showHeader Boolean
true Defines if the OpenNMS Horizon header is shown.
autoRefresh.enabled
Boolean
false If enabled, auto refresh is enabled by default.
autoRefresh.interval
Integer
60 Defines the auto refresh interval in seconds.
hiddenCategoryPrefix
String
emptyString
A String which allows hiding categories. For example a value ofserver will hide all categories starting with server. Be aware, thatthis setting is case-sensistive, so Servers will be shown. Theresolution is only enabled if no longitude/latitude information isavailable.
11.2. IconsEach Vertex on the Topology Map is represented by an icon. The default icon is configured in theicon mapping file: $OPENNMS_HOME/etc/org.opennms.features.topology.app.icons.<topology-
namespace>.cfg. If an icon mapping file does not exist for a Topology Provider, the provider does notsupport customization.
List of available icon mapping files (may not be complete)
org.opennms.features.topology.app.icons.default.cfg ①org.opennms.features.topology.app.icons.application.cfg ②org.opennms.features.topology.app.icons.bsm.cfg ③org.opennms.features.topology.app.icons.linkd.cfg ④org.opennms.features.topology.app.icons.vmware.cfg ⑤
① Default icon mapping
② Icon mapping for the Application Topology Provider
③ Icon mapping for the Business Services Topology Provider
④ Icon mapping for the Linkd Topology Provider
⑤ Icon mapping for the Vmware Topology Provider
Each File contains a mapping in form of <icon key> = <icon id>.
245

Icon key
A Topology Provider dependent string which maps to an icon id. An icon key consists of one tomultiple segments. Each segment must contain only numbers or characters. If multiple segmentsexist they must be separated by ., e.g. my.custom.key. Any existing default icon keys are notconfigurable and should not be changed.
Icon id
The icon id is a unique icon identifier to reference an icon within one of the available SVG iconslocated in $OPENNMS_HOME/jetty-webapps/opennms/svg. For more details see Add new icons.
Icon key and icon id specification using BNF
icon key ::= segment["."segment]*segment ::= text+ [( "-" | "_" | ":" ) text]*text ::== (char | number)+char ::== A | B | ... | Z | a | b | ... | znumber ::= 0 | 1 | 2 | 3 | 4 | 5 | 6 | 7 | 8 | 9icon id ::= segment
Example icon mapping file
# Business Service Topologybsm.business-service = business_service ①bsm.ip-service = IP_service ②bsm.reduction-key = reduction_key ③
① Icon definition for Business Services
② Icon definition for IP Services
③ Icon definition for Reduction Keys
11.2.1. Icon resolution
The icon of a vertex is resolved as follows:
• If a vertex id to icon id mapping is defined, the icon referenced by the icon id is used
• If a mapping for the icon key determined by the Topology Provider for the vertex is defined, theicon referenced by the icon id is used
If no mapping exists and the icon key has more than one segments, reduce the icon key bythe last segment and try resolving that icon key
• If no mapping is defined, the fallback icon key default is used.
The following example icon mapping is defined for the Linkd Topology Provider to illustrate thisbehaviour.
linkd.system.snmp.1.3.6.1.4.1.9.1.485 = server1linkd.system.snmp.1.3.6 = server2
246
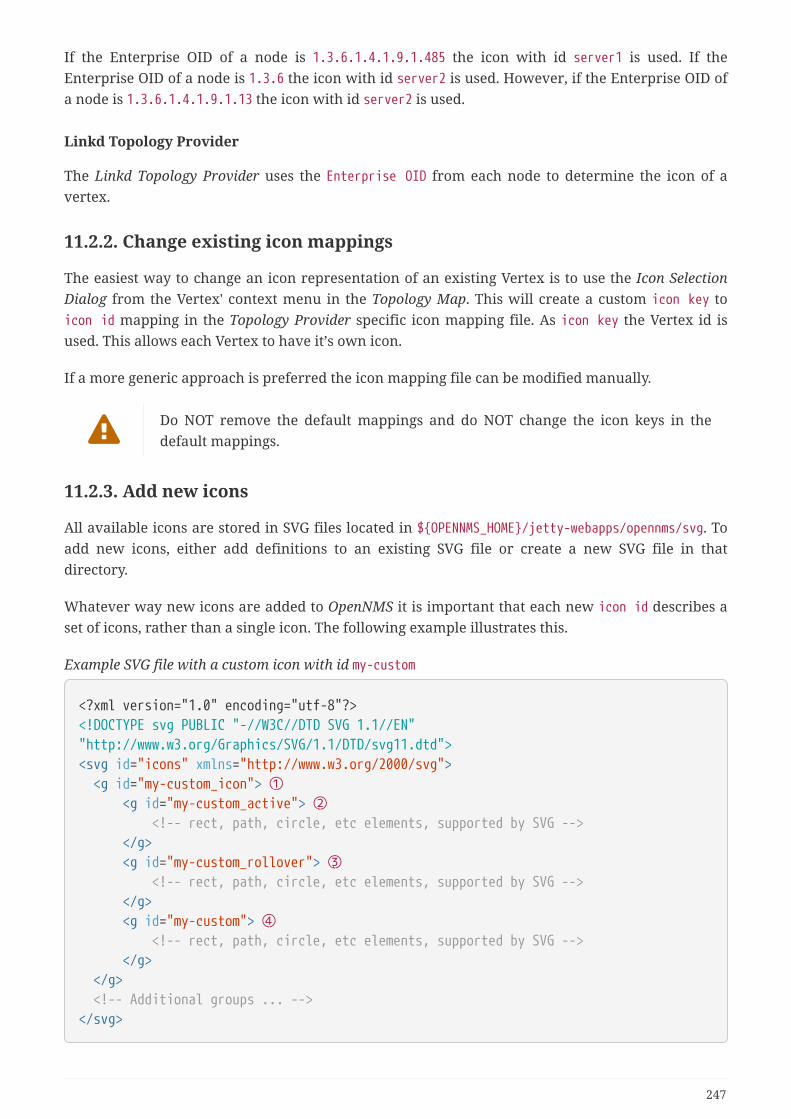
If the Enterprise OID of a node is 1.3.6.1.4.1.9.1.485 the icon with id server1 is used. If theEnterprise OID of a node is 1.3.6 the icon with id server2 is used. However, if the Enterprise OID ofa node is 1.3.6.1.4.1.9.1.13 the icon with id server2 is used.
Linkd Topology Provider
The Linkd Topology Provider uses the Enterprise OID from each node to determine the icon of avertex.
11.2.2. Change existing icon mappings
The easiest way to change an icon representation of an existing Vertex is to use the Icon SelectionDialog from the Vertex' context menu in the Topology Map. This will create a custom icon key toicon id mapping in the Topology Provider specific icon mapping file. As icon key the Vertex id isused. This allows each Vertex to have it’s own icon.
If a more generic approach is preferred the icon mapping file can be modified manually.
Do NOT remove the default mappings and do NOT change the icon keys in thedefault mappings.
11.2.3. Add new icons
All available icons are stored in SVG files located in $OPENNMS_HOME/jetty-webapps/opennms/svg. Toadd new icons, either add definitions to an existing SVG file or create a new SVG file in thatdirectory.
Whatever way new icons are added to OpenNMS it is important that each new icon id describes aset of icons, rather than a single icon. The following example illustrates this.
Example SVG file with a custom icon with id my-custom
<?xml version="1.0" encoding="utf-8"?><!DOCTYPE svg PUBLIC "-//W3C//DTD SVG 1.1//EN""http://www.w3.org/Graphics/SVG/1.1/DTD/svg11.dtd"><svg id="icons" xmlns="http://www.w3.org/2000/svg"> <g id="my-custom_icon"> ① <g id="my-custom_active"> ② <!-- rect, path, circle, etc elements, supported by SVG --> </g> <g id="my-custom_rollover"> ③ <!-- rect, path, circle, etc elements, supported by SVG --> </g> <g id="my-custom"> ④ <!-- rect, path, circle, etc elements, supported by SVG --> </g> </g> <!-- Additional groups ... --></svg>
247

① Each icon must be in a SVG group with the id <icon id>_icon. Each SVG <icon id>_icon groupmust contain three sub groups with the ids: <icon id>_active, <icon id>_rollover and <icon id>.
② The icon to use when the Vertex is selected.
③ The icon to use when the Vertex is moused over.
④ The icon to use when the Vertex is not selected or not moused over (just visible).
It is important that each icon id is unique overall SVG files. This means therecannot be another my-custom icon id in any other SVG file.
If the new icons should be selectable from the Topology Map’s Icon Selection Dialog an entry withthe new icon id must be added to the file$OPENNMS_HOME/etc/org.opennms.features.topology.app.icons.properties.
Snippet of org.opennms.features.topology.app.icons.list
access_gateway ①accesspointcloudfileserverlinux_file_serveropennms_serverprinterrouterworkgroup_switchmy-custom ②
① Already existing icon ids
② New icon id
The order of the entries in org.opennms.features.topology.app.icons.list
determine the order in the Icon Selection Dialog in the Topology Map.
248

Chapter 12. Asset Topology Provider
12.1. OverviewOpenNMS Horizon has introduced the ability for users to define arbitrarily complex layeredtopologies using GraphML (see http://graphml.graphdrawing.org/). The details of how OpenNMSHorizon interprets GraphML are given in the GraphML section of the OpenNMS Horizon developersguide. The ability to display complex layered topologies is a great feature but creating a usableGraphML topology for a large network can be a complex task for a user.
The Asset Topology Provider avoids the need for users to work directly with GraphML by directlygenerating a layered GraphML topology based upon node parameters and the contents of the NodeAsset table. The Asset Topology Provider greatly simplifies the task for many use cases by allowingusers to define fields in the Node Asset table which will enable nodes to be positioned correctly in acomplex topology. This allows a physical and logical ordering of nodes which makes it easier forusers to represent and navigate their infrastructure.
The structure of the generated topology is determined by the assetLayers configuration constantwhich can be set by a user. To illustrate how this works, we will consider the followingconfiguration:
assetLayers=asset-region,asset-building
The OpenNMS Horizon Asset table is parsed to generate nested layers in the order of the commaseparated keys in the assetLayers property. Each layer is a graph which is named after the key.Graph nodes in each layer reference related Graph nodes in the underlying layer. The lowest layercontains Graph nodes which are directly linked to monitored OpenNMS Horizon nodes which haveentries in the Asset table.
The following diagram shows the structure of a topology generated by the above assetLayersproperty
249

In this example the region asset fields for node 1,2,3,4 are set to north. All of these nodes are in thesame north region. The building asset fields for Node 1 and Node 2 are set to 21 (both nodes are in
250

building 21) while the building asset fields for Node 3 and Node 4 are set to 22 (both nodes are inbuilding 22).
The Asset Topology Provider generates four linked graphs for this configuration. The layer 0 graphis called asset-region, the layer 1 graph is called asset-building and the layer 2 graph is callednodes.
Conceptually we can see that the topology is rendered as concentric sets. The Asset TopologyProvider first searches all of the nodes with regions defined and creates a new level 0 graph noderepresenting each region found. The Asset Topology Provider then searches within each region tofind the building entries and creates a corresponding level 1 graph node for each building namefound. Finally the Asset Topology Provider creates layer 2 nodes corresponding to each OpenNMSHorizon monitored node and places each in the correct building.
If however OpenNMS Horizon monitored nodes are found which have either the region or buildingasset fields empty they cannot be placed correctly in this topology. These nodes as shown in thediagram as unallocated nodes. Finally, only building and region nodes are generated which can belinked to OpenNMS Horizon nodes in the topology. The Asset Topology Provider does not generatespurious graph nodes in upper layers which are not directly and completely referenced byOpenNMS Horizon nodes in the lowest layer.
Example screenshots of a topology containing regions, buildings, racks and nodes are shown below
251

12.2. Asset layersThe entries for assetLayers can be any node or asset entry from the following list (defined in classNodeParamLabels). Keys beginning with node- come from the node table. Keys beginning withparent- come from the node table entry of the designated parent node (If defined). Keys beginningwith asset- come from the corresponding asset table entry for the given node (If defined).
node-nodelabel node-nodeid node-foreignsource node-foreignid node-nodesysname
node-nodesyslocation
node-operatingsystem
node-categories
parent-nodelabel parent-nodeid parent-foreignsource
parent-foreignid
asset-address1 asset-address2 asset-city asset-zip asset-state
asset-latitude asset-longitude asset-region asset-division asset-department
asset-building asset-floor asset-room asset-rack asset-slot
asset-port asset-circuitid asset-category asset-displaycategory asset-notifycategory
asset-pollercategory
asset-thresholdcategory
asset-managedobjecttype
asset-managedobjectinstance
asset-manufacturer
asset-vendor asset-modelnumber
asset-description asset-operatingsystem asset-country
This allows arbitrary topologies to be generated including physical fields (room, rack etc.) andlogical fields such as asset node categories. Please note you should not put any spaces in the commaseparated assetLayers list. If the assetLayers property is defined as empty then a single graph layerwill be generated containing all opennms nodes.
12.3. Node filteringIn many cases it is desirable to control which nodes are included or excluded from a topology. For
252

instance it is useful to be able to generate customised topologies for specific customers whichinclude only regions/buildings etc relevant to their filtered node set. To this end it is possible todefine a node filter which chooses which nodes are included in a generated topology.
Filters are defined using the same asset table keys which are available for the assetLayers field.
Operation
Definition Example
OR key1=value1,value2 alternativelykey1=value1;key1=value2
asset-region=north,south
AND key1=val1;key2=val2 asset-region=north;asset-building=23
NOT key1=!val1 asset-building=!23
Thus the following configuration means include only nodes with region north or south but excludeall nodes with building 23.
filter=asset-region=north,south;asset-building=!23
The filters are designed to treat all selected text key entries as comma separated values (csv). Thisallows OpenNMS node-categories which are many to many entries to be dealt with as a commaseparated list of values; routers,servers,web etc. Thus we can select based on multiple separatenode categories. The following configuration means show routers and servers on all buildingsexcept building 23.
filter=node-categories=routers,servers;asset-building=!23
The filters treat all asset table entries as comma separated variables (csv). This also means that, forinstance asset-displaycategory could also contain several values separated by commas. e.g.customer1,customer2,customer3 etc.
You should make sure asset addresses and other free format asset text fields do notcontain commas if you want an exact match on the whole field
Regular expressions are also allowed. Regular expressions start with the ~ character. You can alsonegate a regular expression by preceding it with !~.
The following example will match against regions 'Stuttgart' and 'Isengard' and any building namewhich ends in 4
filter=asset-region=~.*gar(t|d);asset-building=~.*4
253

12.4. ConfigurationThe Asset Topology Provider persists both the asset topology graph definitions and the generatedGraphML graphs. The persisted definitions mean that is is possible to regenerate graphs if the assettable is changed without reentering the configuration.
The Asset Topology Provider persists GraphML graphs along side any other GraphML graphs in thedirectory;
<opennms home>/etc/graphml
Please note that if you are using ReST or any other means to generate other GraphML graphs, youshould ensure that the providerIds and labels are distinct from those used by the Asset TopologyProvider
The asset graph definitions for the Asset Topology Provider are persisted to the following xmlconfiguration file:
<opennms home>/etc/org.opennms.features.topology.plugins.topo.asset.xml
Normally you should not edit this file directly but use the karaf consol or events to define newgraphs.
The config file will contain each of the graph definitions as properties in the form
<?xml version="1.0" encoding="UTF-8" standalone="yes"?><configs> <config> <label>Asset Topology Provider</label> <breadcrumb-strategy>SHORTEST_PATH_TO_ROOT</breadcrumb-strategy> <provider-id>asset</provider-id> <preferred-layout>Grid Layout</preferred-layout> <filters> <filter>asset-region=South</filter> </filters> <layers> <layer>asset-region</layer> <layer>asset-building</layer> <layer>asset-rack</layer> </layers> </config></configs>
The individual definition parameters are described in the following table
254

Parameter Description
providerId The unique name of the provider - used as handle to install and remove thetopology
label The name which shows up on the topology menu (must be unique)
assetLayers List of asset layers (in order). See separate description.
filters List of filters to be applied. Filters determine which nodes are included in graph.See separate description.
preferredLayout Preferred layout of the nodes in generated graphs.
breadcrumbStrategy
Breadcrumb strategy used to display breadcrumbs above each graph
12.5. Creating Asset Based Topologies From KarafConsolThe OpenNMS Horizon Karaf Consol can be used to control topology generation. To login use adminpassword.
ssh admin@localhost -p 8101
The following commands are available
255

Command Description Options
asset-topology:create
Creates Asset Topology. (The default settings are used if aparticular setting is not included in thecommand)
-l, --label : Asset Topology label (shows intopology menu) (Default: asset)
-i, --providerId : Unique providerId ofasset topology (Default: 'Asset TopologyProvider')
-f, --filter : Optional node filter (Default:empty filter i.e. allow all nodes)
-a, --assetLayers : Comma separated list ofasset layers (Default: asset-region,asset-building,asset-rack)
-p, --preferredLayout : Preferred Layout(Default: 'Grid Layout')
-b, --breadcrumbStrategy : Bread CrumbStrategy (Default:SHORTEST_PATH_TO_ROOT)
If you simply type asset-topology:create adefault topology with providerId assetwill be created.
asset-topology:remove
Removes Asset Topology. -i, --providerId : Unique providerId ofasset topology (Default: asset)
asset-topology:list
Lists all Asset Topologies installed. all : display detailed view including--uriParams string
asset-topology:regenerate
Regenerates the graphs for the givenAsset Topology definition.
-i, --providerId : Unique providerId ofasset topology to regenerate (Default:asset)
asset-topology:regenerateall
Best Effort regeneration of all assettopologies. (If one graph fails, thecommand will try to complete the rest ofthe definitions definition)
12.6. Creating Asset Based Topologies Using OpenNMSHorizon eventsThe Asset Topology Provider listens for events which trigger the generation and installation orremoval of topologies. The Asset Topology Provider events are defined in the file
256
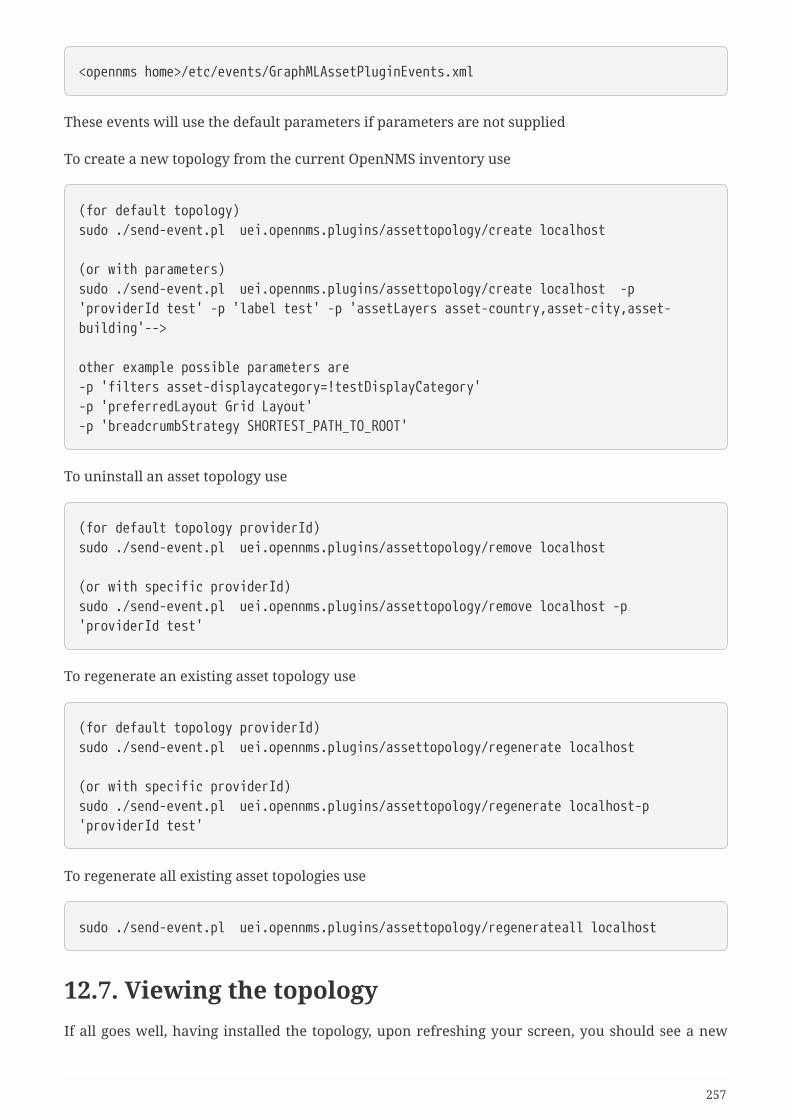
<opennms home>/etc/events/GraphMLAssetPluginEvents.xml
These events will use the default parameters if parameters are not supplied
To create a new topology from the current OpenNMS inventory use
(for default topology)sudo ./send-event.pl uei.opennms.plugins/assettopology/create localhost
(or with parameters)sudo ./send-event.pl uei.opennms.plugins/assettopology/create localhost -p'providerId test' -p 'label test' -p 'assetLayers asset-country,asset-city,asset-building'-->
other example possible parameters are-p 'filters asset-displaycategory=!testDisplayCategory'-p 'preferredLayout Grid Layout'-p 'breadcrumbStrategy SHORTEST_PATH_TO_ROOT'
To uninstall an asset topology use
(for default topology providerId)sudo ./send-event.pl uei.opennms.plugins/assettopology/remove localhost
(or with specific providerId)sudo ./send-event.pl uei.opennms.plugins/assettopology/remove localhost -p'providerId test'
To regenerate an existing asset topology use
(for default topology providerId)sudo ./send-event.pl uei.opennms.plugins/assettopology/regenerate localhost
(or with specific providerId)sudo ./send-event.pl uei.opennms.plugins/assettopology/regenerate localhost-p'providerId test'
To regenerate all existing asset topologies use
sudo ./send-event.pl uei.opennms.plugins/assettopology/regenerateall localhost
12.7. Viewing the topologyIf all goes well, having installed the topology, upon refreshing your screen, you should see a new
257

topology display option in the OpenNMS Horizon topology page. The displayed name of thistopology is given by the label field
The label field need not be the same as the providerId which is used by the ReST api for theinstallation or removal of a topology. However the label field must be unique across all installedtopologies.
It is possible to have several topologies installed which have been generated using differentconfigurations. You simply need to ensure that the providerId and label field used for eachinstallation command is different.
12.8. Additional notesPlease note you MUST first uninstall an OpenNMS Horizon graphml topology before installing a newone. You will also have to log out and log back into the UI in order to see the new topology file. Ifyou uninstall a topology while viewing it, the UI will throw an error and you will also have to logout and back in to see the remaining topologies.
258

Chapter 13. Database ReportsReporting on information from the OpenNMS Horizon monitoring system is important forstrategical or operational decisions. Database Reports give access to the embedded JasperReportsengine and allows to create and customize report templates. These reports can be executed ondemand or on a pre-defined schedule within OpenNMS Horizon.
Originally Database Reports were introduced to create reports working on datastored in the OpenNMS Horizon database only. This is no longer mandatory, alsoperformance data can be used. Theoretically the reports do not necessarily need tobe OpenNMS Horizon related.
The OpenNMS Horizon Report Engine allows the creation of various kinds ofreports and also supports distributed report repositories. At the moment thesefeatures are not covered by this documentation. Only reports using JasperReportsare described here.
13.1. OverviewThe OpenNMS Horizon Report Engine uses the JasperReport library to create reports in variousoutput formats. Each report template must be a *.jrxml file. The OpenNMS Horizon Report Enginepasses a JDBC Connection to the OpenNMS Horizon Database to each report on execution.
Table 102. feature overview
Supported Output Formats PDF, CSV
JasperReport Version 6.3.0
For more details on how JasperReports works, please have a look at the official documentation ofJaspersoft Studio.
13.2. Modify existing reportsAll default reports of OpenNMS Horizon are located in $OPENNMS_HOME/etc/report-templates. Each.jrxml file located there can be modified and the changes are applied the next time a report iscreated by OpenNMS Horizon.
When a subreport has been modified OpenNMS Horizon will detect a change based on the report’slastModified time and will recompile the report. A compiled version of the report is represented bya .jasper file with the same name as the .jrxml file. Subreports are located in$OPENNMS_HOME/etc/report-templates/subreports.
If unsure, simply delete all .jasper files and OpenNMS Horizon will automaticallycompile the subreports if needed.
259

13.3. Add a custom reportTo add a new JasperReport report to the Local OpenNMS Horizon Report Repository, the followingsteps are required.
At first a new entry in the file $OPENNMS_HOME/etc/database-reports.xml must be created.
<report id="MyReport" ① display-name="My Report" ② online="true" ③ report-service="jasperReportService" ④ description="This is an example description. It shows up in the web ui when creatingan online report" ⑤/>
① A unique identifier.
② The name of the report. Is shown when using the web ui.
③ Defines if this report can be executed on demand, otherwise only scheduling is possible.
④ The report service implementation to use. In most cases this is jasperReportService.
⑤ A description of the report. Is shown when using the web ui.
In addition a new entry in the file $OPENNMS_HOME/etc/jasper-reports.xml must be created.
<report id="MyReport" ① template="My-Report.jrxml" ② engine="jdbc" ③/>
① The identifier defined in the previous step. This identifier must exist in$OPENNMS_HOME/etc/database-reports.xml.
② The name of the template. The template must be located in $OPENNMS_HOME/etc/report-templates.
③ The engine to use. It is either jdbc or null.
13.4. Usage of Jaspersoft StudioWhen developing new reports it is recommended to use the Jaspersoft Studio application. It can bedownloaded here.
We recommend always to use the same Jaspersoft Studio version as theJasperReport library OpenNMS Horizon uses. Currently OpenNMS Horizon usesversion 6.3.0.
260

13.4.1. Connect to the OpenNMS Horizon Database
In order to actually create SQL statements against the OpenNMS Horizon database a database DataAdapter must be created. The official Jaspersoft Studio documentation and wiki covers this aspect.
13.4.2. Use Measurements Datasource and Helpers
To use the Measurements API it is required to add the Measurements Datasource library to the buildpath of JasperStudio. This is achieved with right click in the Project Explorer and select ConfigureBuildpath.
1. Switch to the Libraries tab.
2. Click Add External JARs and select the opennms-jasperstudio-extension-22.0.3-jar-with-
dependencies.jar file located in $OPENNMS_HOME/contrib/jasperstudio-extension.
3. Close the file selection dialog.
1. Close the dialog.
2. The Measurements Datasource and Helpers should now be available.
261
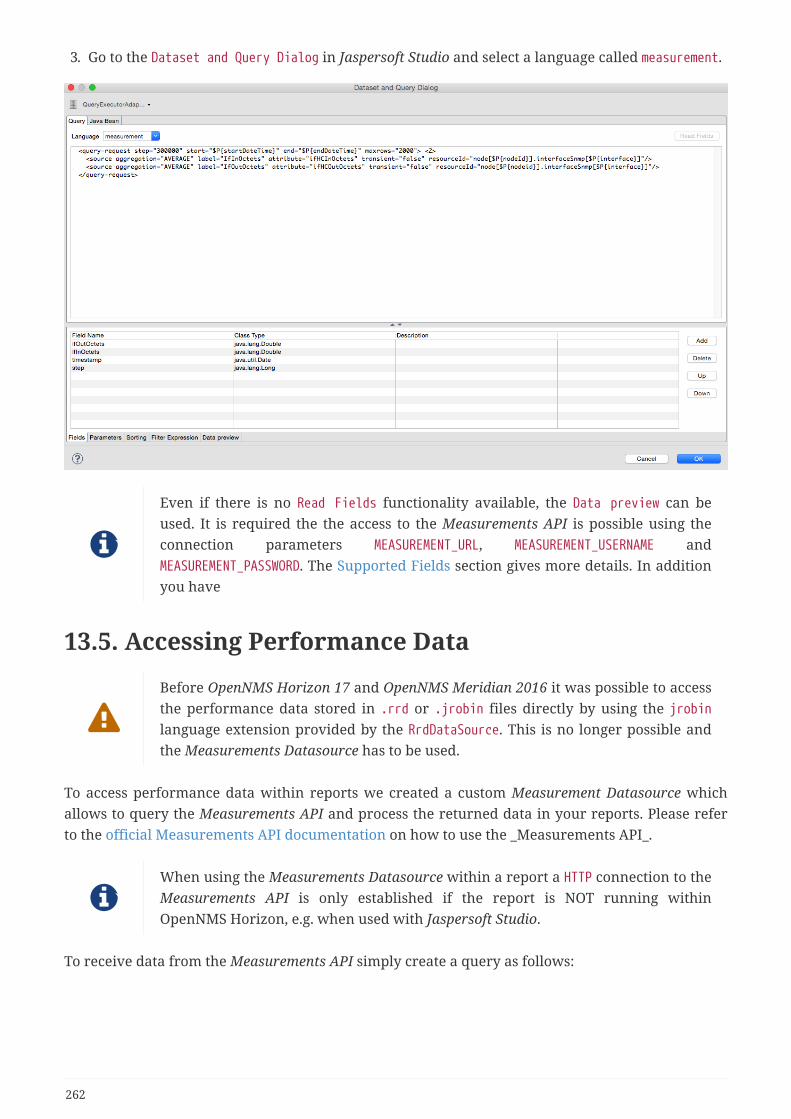
3. Go to the Dataset and Query Dialog in Jaspersoft Studio and select a language called measurement.
Even if there is no Read Fields functionality available, the Data preview can beused. It is required the the access to the Measurements API is possible using theconnection parameters MEASUREMENT_URL, MEASUREMENT_USERNAME andMEASUREMENT_PASSWORD. The Supported Fields section gives more details. In additionyou have
13.5. Accessing Performance Data
Before OpenNMS Horizon 17 and OpenNMS Meridian 2016 it was possible to accessthe performance data stored in .rrd or .jrobin files directly by using the jrobinlanguage extension provided by the RrdDataSource. This is no longer possible andthe Measurements Datasource has to be used.
To access performance data within reports we created a custom Measurement Datasource whichallows to query the Measurements API and process the returned data in your reports. Please referto the official Measurements API documentation on how to use the _Measurements API_.
When using the Measurements Datasource within a report a HTTP connection to theMeasurements API is only established if the report is NOT running withinOpenNMS Horizon, e.g. when used with Jaspersoft Studio.
To receive data from the Measurements API simply create a query as follows:
262

Sample queryString to receive data from the Measurements API
<query-request step="300000" start="$PstartDateTime" end="$PendDateTime" maxrows="2000"> ① <source aggregation="AVERAGE" label="IfInOctets" attribute="ifHCInOctets" transient="false" resourceId="node[$PnodeId].interfaceSnmp[$Pinterface]"/> <source aggregation="AVERAGE" label="IfOutOctets" attribute="ifHCOutOctets"transient="false" resourceId="node[$Pnodeid].interfaceSnmp[$Pinterface]"/></query-request>
① The query language. In our case measurement, but JasperReports supports a lot out of the box,such as sql, xpath, etc.
13.5.1. Fields
Each datasource should return a number of fields, which then can be used in the report. TheMeasurement Datasource supports the following fields:
Field name Field type Field description
<label> java.lang.Double Each Source defined astransient=false can be used asa field. The name of the field isthe label, e.g. IfInOctets
timestamp java.util.Date The timestamp of the sample.
step java.lang.Long The Step size of the Response.Returns the same value for allrows.
start java.lang.Long The Start timestamp inmilliseconds of the Resopnse.Returns the same value for allrows.
end java.lang.Long The End timestamp inmilliseconds of the Response.Returns the same value for allrows.
For more details about the Response, please refer to the official Measurement API documentation.
13.5.2. Parameters
In addition to the queryString the following JasperReports parameters are supported.
Parameter name Required Description
MEASUREMENT_URL yes The URL of the MeasurementsAPI, e.g. http://localhost:8980/opennms/rest/measurements
263

Parameter name Required Description
MEASUREMENT_USERNAME no If authentication is required,specify the username, e.g. admin
MEASUREMENT_PASSWORD no If authentication is required,specify the password, e.g. admin
13.6. Helper methodsThere are a couple of helper methods to help creating reports in OpenNMS Horizon.
These helpers come along with the Measurement Datasource.
Table 103. supported helper methods
Helper class Helper Method Description
org.opennms.netmgt.jasper.helper.MeasurementsHelper
getNodeOrNodeSourceDescriptor(nodeId, foreignSource,foreignId)
Generates a node sourcedescriptor according to theinput paramters. Eithernode[nodeId] ornodeSource[foreignSource:foreignId] is returned.nodeSource[foreignSource:foreignId] is only returned ifforeignSource and foreignId isnot empty and not null.Otherwise always node[nodeId]is returned.
nodeId : String, the id of thenodeforeignSource: String, theforeign source of the node, maybe nullforeignId: String, the foreign idof the node, may be null.
For more details checkoutUsage of the node sourcedescriptor.
264

Helper class Helper Method Description
org.opennms.netmgt.jasper.helper.MeasurementsHelper
getInterfaceDescriptor(snmpifname, snmpifdescr, snmphysaddr)
Returns the interfacedescriptor of a given interface,e.g. en0-005e607e9e00. The inputparamaters are prioritized. If asnmpifdescr is specified, it isused instead of the snmpifname.It a snmpifdescr is defined, itwill be appended to snmpifname/snmpifdescr.
snmpifname: String, the interfacename of the interface, e.g. en0.May be null.snmpifdescr: String, thedescription of the interface, e.g.en0. May be null.snmphyaddr: String, the macaddress of the interface, e.g.005e607e9e00. May be null.As each input parameter maybe null, not all of them can benull at the same time. At leastone input parameter has to bedefined.
For more details checkoutUsage of the interfacedescriptor.
13.6.1. Usage of the node source descriptor
A node is addressed by a node source descriptor. The node source descriptor references the nodeeither via the foreign source and foreign id or by the node id.
If store by foreign source is enabled only addressing the node via foreign source and foreign id ispossible.
In order to make report creation easier, there is a helper method to create the node source
descriptor.
For more information about store by foreign source, please have a look at ourWiki.
The following example shows the usage of that helper.
265

jrxml report snippet to visualize the use of the node source descriptor.
<parameter name="nodeResourceDescriptor" class="java.lang.String" isForPrompting="false"> <defaultValueExpression><![CDATA[org.opennms.netmgt.jasper.helper.MeasurementsHelper.getNodeOrNodeSourceDescriptor(String.valueOf($Pnodeid), $Pforeignsource, $Pforeignid)]]></defaultValueExpression></parameter><queryString language="Measurement"> <![CDATA[<query-request step="300000" start="$PstartDateTime"end="$PendDateTime" maxrows="2000"><source aggregation="AVERAGE" label="IfInOctets" attribute="ifHCInOctets"transient="false" resourceId="$PnodeResourceDescriptor.interfaceSnmp[en0-005e607e9e00]"/><source aggregation="AVERAGE" label="IfOutOctets" attribute="ifHCOutOctets"transient="false" resourceId="$PnodeResourceDescriptor.interfaceSnmp[en0-005e607e9e00]"/></query-request>]]>
Depending on the input parameters you either get a node resource descriptor or a foreignsource/foreign id resource descriptor.
13.6.2. Usage of the interface descriptor
An interfaceSnmp is addressed with the exact interface descriptor. To allow easy access to theinterface descriptor a helper tool is provided. The following example shows the usage of thathelper.
jrxml report snippet to visualize the use of the interface descriptor
<parameter name="interface" class="java.lang.String" isForPrompting="false"> <parameterDescription><![CDATA[]]></parameterDescription> <defaultValueExpression><![CDATA[org.opennms.netmgt.jasper.helper.MeasurementsHelper.getInterfaceDescriptor($Psnmpifname, $Psnmpifdescr, $Psnmpphysaddr)]]></defaultValueExpression></parameter><queryString language="Measurement"> <![CDATA[<query-request step="300000" start="$PstartDateTime"end="$PendDateTime" maxrows="2000"><source aggregation="AVERAGE" label="IfInOctets" attribute="ifHCInOctets"transient="false" resourceId="node[$PnodeId].interfaceSnmp[$Pinterface]"/><source aggregation="AVERAGE" label="IfOutOctets" attribute="ifHCOutOctets"transient="false" resourceId="node[$PnodeId].interfaceSnmp[$Pinterface]"/></query-request>]]>
To get the appropriate interface descriptor depends on the input parameter.
266

13.6.3. Use HTTPS
To establish a secure connection to the Measurements API the public certificate of the runningOpenNMS Horizon must be imported to the Java Trust Store. In Addition OpenNMS Horizon must beconfigured to use that Java Trust Store. Please follow the instructions in this chapter to setup theJava Trust Store correctly.
In addition please also set the property org.opennms.netmgt.jasper.measurement.ssl.enable in$OPENNMS_HOME\etc\opennms.properties to true to ensure that only secure connections areestablished.
If org.opennms.netmgt.jasper.measurement.ssl.enable is set to false an accidentallyinsecure connection can be established to the Measurements API location. A SSLsecured connection can be established even iforg.opennms.netmgt.jasper.measurement.ssl.enable is set to false.
13.7. Limitations• Only a JDBC Datasource to the OpenNMS Horizon Database connection can be passed to a report,
or no datasource at all. One does not have to use the datasource, though.
267

Chapter 14. Enhanced LinkdEnhanced Linkd (Enlinkd) has been designed to discover connections between nodes using datagenerated by various link discovery protocols and accessible via SNMP. Enlinkd gathers this data ona regular interval and creates a snapshot of a device’s neighbors from its perspective. Theconnections discovered by Enlinkd are called Links. The term Link, within the context of Enlinkd, isnot synonymous with the term "link" when used with respect to the network OSI Layer 2 domain,whereby a link only indicates a Layer 2 connection. A Link in context of Enlinkd is a more abstractconcept and is used to describe any connection between two OpenNMS Horizon Nodes. These Linksare discovered based on information provided by an agent’s understanding of connections at theOSI Layer 2, Layer 3, or other OSI layers.
The following sections describe the Enlinkd daemon and its configuration. Additionally, thesupported Link discovery implementations will be described as well as a list of the SNMP MIBs thatthe SNMP agents must expose in order for EnLinkd to gather Links between Nodes. FYI: Detailedinformation about a node’s connections (discovered Links) and supporting link data can be seen onthe Node detail page within the OpenNMS Horizon Web-UI.
14.1. Enlinkd DaemonEssentially Enlinkd asks each device the following question: "What is the network topology fromyour point of view". From this point of view this will only provide local topology discovery features.It does not attempt to discover global topology or to do any correlation with the data coming fromother nodes.
For large environments the behavior of Enlinkd can be configured. During the Link discoveryprocess informational and error output is logged to a global log file.
Table 104. Global log and configuration files for Enlinkd
File Location Description
enlinkd-configuration.xml $OPENNMS_HOME/etc Global configuration for the daemon process
enlinkd.log $OPENNMS_HOME/logs Global Enlinkd log file
log4j2.xml $OPENNMS_HOME/etc Configuration file to set the log level for Enlinkd
268

Configuration file for Enlinkd
<?xml version="1.0" encoding="ISO-8859-1"?><enlinkd-configuration threads="5" initial_sleep_time="60000" rescan_interval="86400000" use-cdp-discovery="true" use-bridge-discovery="true" use-lldp-discovery="true" use-ospf-discovery="true" use-isis-discovery="true" />
Table 105. Descriptione for global configuration parameter
Attribute Type Default
Description
threads Integer
5 Number of parallel threads used to discover the topology.
initial_sleep_time
Integer
60000 Time in milliseconds to wait for discovering the topology afterOpenNMS Horizon is started.
rescan_interval Integer
86400000
Interval to rediscover and update the topology in milliseconds.
use-cdp-discovery
Boolean
true Enable or disable topology discovery based on CDP information.
use-bridge-discovery
Boolean
true Enable or disable algorithm to discover the topology based on theBridge MIB information.
use-lldp-discovery
Boolean
true Enable or disable topology discovery based on LLDP information.
use-ospf-discovery
Boolean
true Enable or disable topology discovery based on OSPF information.
use-isis-discovery
Boolean
true Enable or disable topology discovery based on IS-IS information.
If multiple protocols are enabled, the links will be discovered for each enableddiscovery protocol. The topology WebUI will visualize Links for each discoveryprotocol. For example if you start CDP and LLDP discovery, the WebUI willvisualize a CDP Link and an LLDP Link.
14.2. Layer 2 Link DiscoveryEnlinkd is able to discover Layer 2 network links based on the following protocols:
• Link Layer Discovery Protocol (LLDP)
269
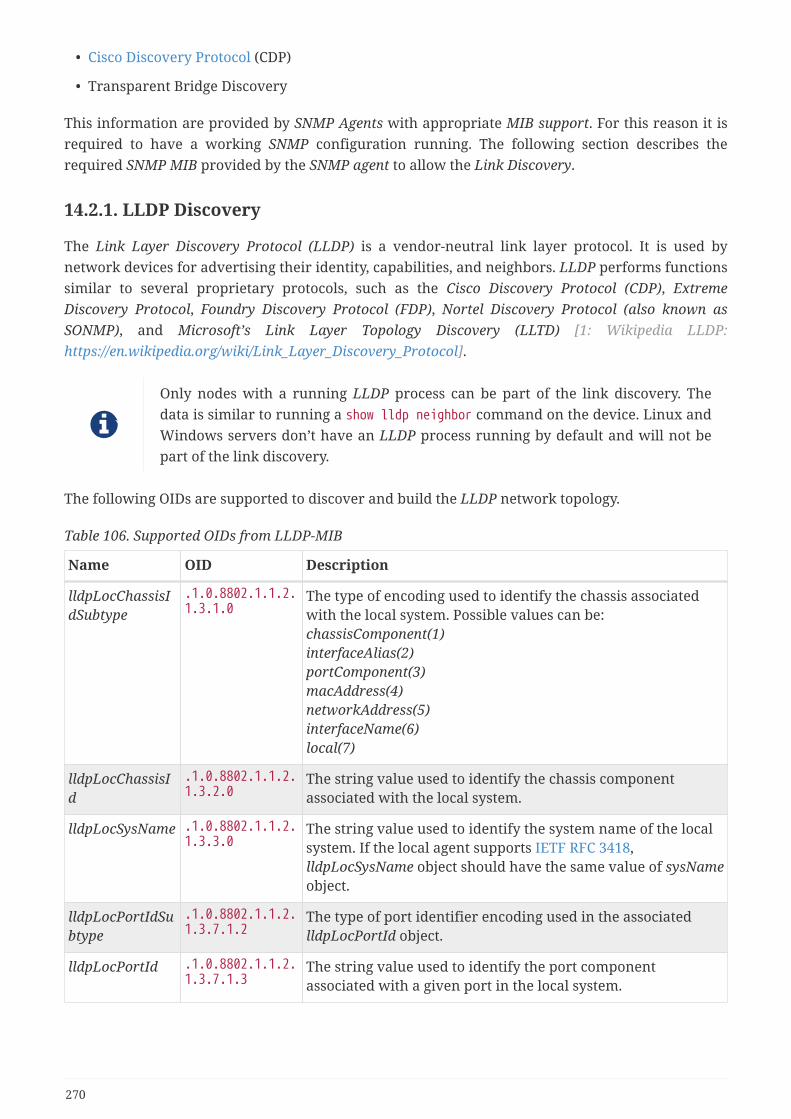
• Cisco Discovery Protocol (CDP)
• Transparent Bridge Discovery
This information are provided by SNMP Agents with appropriate MIB support. For this reason it isrequired to have a working SNMP configuration running. The following section describes therequired SNMP MIB provided by the SNMP agent to allow the Link Discovery.
14.2.1. LLDP Discovery
The Link Layer Discovery Protocol (LLDP) is a vendor-neutral link layer protocol. It is used bynetwork devices for advertising their identity, capabilities, and neighbors. LLDP performs functionssimilar to several proprietary protocols, such as the Cisco Discovery Protocol (CDP), ExtremeDiscovery Protocol, Foundry Discovery Protocol (FDP), Nortel Discovery Protocol (also known asSONMP), and Microsoft’s Link Layer Topology Discovery (LLTD) [1: Wikipedia LLDP:https://en.wikipedia.org/wiki/Link_Layer_Discovery_Protocol].
Only nodes with a running LLDP process can be part of the link discovery. Thedata is similar to running a show lldp neighbor command on the device. Linux andWindows servers don’t have an LLDP process running by default and will not bepart of the link discovery.
The following OIDs are supported to discover and build the LLDP network topology.
Table 106. Supported OIDs from LLDP-MIB
Name OID Description
lldpLocChassisIdSubtype
.1.0.8802.1.1.2.1.3.1.0
The type of encoding used to identify the chassis associatedwith the local system. Possible values can be:chassisComponent(1)interfaceAlias(2)portComponent(3)macAddress(4)networkAddress(5)interfaceName(6)local(7)
lldpLocChassisId
.1.0.8802.1.1.2.1.3.2.0
The string value used to identify the chassis componentassociated with the local system.
lldpLocSysName .1.0.8802.1.1.2.1.3.3.0
The string value used to identify the system name of the localsystem. If the local agent supports IETF RFC 3418,lldpLocSysName object should have the same value of sysNameobject.
lldpLocPortIdSubtype
.1.0.8802.1.1.2.1.3.7.1.2
The type of port identifier encoding used in the associatedlldpLocPortId object.
lldpLocPortId .1.0.8802.1.1.2.1.3.7.1.3
The string value used to identify the port componentassociated with a given port in the local system.
270

Name OID Description
lldpLocPortDesc .1.0.8802.1.1.2.1.3.7.1.4
The string value used to identify the 802 LAN station’s portdescription associated with the local system. If the local agentsupports IETF RFC 2863, lldpLocPortDesc object should havethe same value of ifDescr object.
lldpRemChassisIdSubtype
.1.0.8802.1.1.2.1.4.1.1.4
The type of encoding used to identify the chassis associatedwith the local system. Possible values can be:chassisComponent(1)interfaceAlias(2)portComponent(3)macAddress(4)networkAddress(5)interfaceName(6)local(7)
lldpRemChassisId
.1.0.8802.1.1.2.1.4.1.1.5
The string value used to identify the chassis componentassociated with the remote system.
271

Name OID Description
lldpRemPortIdSubtype
.1.0.8802.1.1.2.1.4.1.1.6
The type of port identifier encoding used in the associatedlldpRemPortId object.
interfaceAlias(1)the octet string identifies a particular instance of the ifAliasobject (defined in IETF RFC 2863). If the particular ifAliasobject does not contain any values, another port identifier typeshould be used.
portComponent(2)the octet string identifies a particular instance of theentPhysicalAlias object (defined in IETF RFC 2737) for a port orbackplane component.
macAddress(3)this string identifies a particular unicast source address(encoded in network byte order and IEEE 802.3 canonical bitorder) associated with the port (IEEE Std 802-2001).
networkAddress(4)this string identifies a network address associated with theport. The first octet contains the IANA AddressFamilyNumbersenumeration value for the specific address type, and octets 2through N contain the networkAddress address value innetwork byte order.
interfaceName(5)the octet string identifies a particular instance of the ifNameobject (defined in IETF RFC 2863). If the particular ifNameobject does not contain any values, another port identifier typeshould be used.
agentCircuitId(6)this string identifies a agent-local identifier of the circuit(defined in RFC 3046)
local(7)this string identifies a locally assigned port ID.
lldpRemPortId .1.0.8802.1.1.2.1.4.1.1.7
The string value used to identify the port componentassociated with the remote system.
lldpRemPortDesc
.1.0.8802.1.1.2.1.4.1.1.8
The string value used to identify the description of the givenport associated with the remote system.
lldpRemSysName
.1.0.8802.1.1.2.1.4.1.1.9
The string value used to identify the system name of theremote system.
Generic information about the LLDP process can be found in the LLDP Information box on the NodeDetail Page of the device. Information gathered from these OIDs will be stored in the followingdatabase table:
272

Figure 21. Database tables related to LLDP discovery
14.2.2. CDP Discovery
The Cisco Discovery Protocol (CDP) is a proprietary link layer protocol from Cisco. It is used bynetwork devices to advertise identity, capabilities and neighbors. CDP performs functions similar toseveral proprietary protocols, such as the Link Layer Discovery Protocol (LLDP), Extreme DiscoveryProtocol, Foundry Discovery Protocol (FDP), Nortel Discovery Protocol (also known as SONMP), andMicrosoft’s Link Layer Topology Discovery (LLTD). The CDP discovery uses information provided bythe CISCO-CDP-MIB and CISCO-VTP-MIB.
Only nodes with a running CDP process can be part of the link discovery. The datais similar to running a show cdp neighbor command on the IOS CLI of the device.Linux and Windows servers don’t have a CDP process running by default and willnot be part of the link discovery.
The following OIDs are supported to discover and build the CDP network topology.
Table 107. Supported OIDS from the IF-MIB
Name
OID Description
ifDescr
.1.3.6.1.2.1.2.2.1.2
A textual string containing information about the interface. This stringshould include the name of the manufacturer, the product name and theversion of the interface hardware/software.
Table 108. Supported OIDS from the CISCO-CDP-MIB to discover links
Name OID Description
cdpInterfaceName
.1.3.6.1.4.1.9.9.23.1.1.1.1.6
The name of the local interface as advertised by CDP in thePort-ID TLV.
273

Name OID Description
cdpCacheEntry .1.3.6.1.4.1.9.9.23.1.2.1.1
An entry (conceptual row) in the cdpCacheTable, containingthe information received via CDP on one interface from onedevice. Entries appear when a CDP advertisement isreceived from a neighbor device. Entries disappear whenCDP is disabled on the interface, or globally.
cdpCacheAddressType
.1.3.6.1.4.1.9.9.23.1.2.1.1.3
An indication of the type of address contained in thecorresponding instance of cdpCacheAddress.
cdpCacheAddress
.1.3.6.1.4.1.9.9.23.1.2.1.1.4
The (first) network-layer address of the device’s SNMP-agentas reported in the Address TLV of the most recently receivedCDP message. For example, if the corresponding instance ofcacheAddressType had the value ip(1), then this objectwould be an IP-address.
cdpCacheVersion
.1.3.6.1.4.1.9.9.23.1.2.1.1.5
The Version string as reported in the most recent CDPmessage. The zero-length string indicates no Version field(TLV) was reported in the most recent CDP message.
cdpCacheDeviceId
.1.3.6.1.4.1.9.9.23.1.2.1.1.6
The Device-ID string as reported in the most recent CDPmessage. The zero-length string indicates no Device-ID field(TLV) was reported in the most recent CDP message.
cdpCacheDevicePort
.1.3.6.1.4.1.9.9.23.1.2.1.1.7
The Port-ID string as reported in the most recent CDPmessage. This will typically be the value of the ifName object(e.g., Ethernet0). The zero-length string indicates no Port-IDfield (TLV) was reported in the most recent CDP message.
cdpCachePlatform
.1.3.6.1.4.1.9.9.23.1.2.1.1.8
The Device’s Hardware Platform as reported in the mostrecent CDP message. The zero-length string indicates that noPlatform field (TLV) was reported in the most recent CDPmessage.
cdpGlobalRun .1.3.6.1.4.1.9.9.23.1.3.1.0
An indication of whether the Cisco Discovery Protocol iscurrently running. Entries in cdpCacheTable are deletedwhen CDP is disabled.
cdpGlobalDeviceId
.1.3.6.1.4.1.9.9.23.1.3.4.0
The device ID advertised by this device. The format of thisdevice id is characterized by the value ofcdpGlobalDeviceIdFormat object.
274

Name OID Description
cdpGlobalDeviceIdFormat
.1.3.6.1.4.1.9.9.23.1.3.7.0
An indication of the format of Device-Id contained in thecorresponding instance of cdpGlobalDeviceId. User can onlyspecify the formats that the device is capable of as denotedin cdpGlobalDeviceIdFormatCpb object.serialNumber(1): indicates that the value ofcdpGlobalDeviceId object is in the form of an ASCII stringcontain the device serial number.macAddress(2): indicates that the value ofcdpGlobalDeviceId object is in the form of Layer 2 MACaddress.other(3): indicates that the value of cdpGlobalDeviceIdobject is in the form of a platform specific ASCII stringcontain info that identifies the device. For example: ASCIIstring contains serialNumber appended/prepened withsystem name.
Table 109. Supported OIDS from the CISCO-VTP-MIB.
vtpVersion .1.3.6.1.4.1.9.9.46.1.1.1.0
The version of VTP in use on the local system. A device willreport its version capability and not any particular versionin use on the device. If the device does not support VTP, theversion is none(3).
ciscoVtpVlanState
.1.3.6.1.4.1.9.9.46
.1.3.1.1.2The state of this VLAN. The state mtuTooBigForDevice indicatesthat this device cannot participate in this VLAN because theVLAN’s MTU is larger than the device can support.The state mtuTooBigForTrunk indicates that while this VLAN’sMTU is supported by this device, it is too large for one or moreof the device’s trunk ports.operational(1), suspended(2), mtuTooBigForDevice(3),mtuTooBigForTrunk(4)
ciscoVtpVlanType
.1.3.6.1.4.1.9.9.46
.1.3.1.1.3The type of this VLAN.ethernet(1), fddi(2), tokenRing(3), fddiNet(4), trNet(5),deprecated(6)
ciscoVtpVlanName
.1.3.6.1.4.1.9.9.46
.1.3.1.1.4The name of this VLAN. This name is used as the ELAN-namefor an ATM LAN-Emulation segment of this VLAN.
Generic information about the CDP process can be found in the CDP Information box on the NodeDetail Page of the device. Information gathered from these OIDs will be stored in the followingdatabase table:
275

Figure 22. Database tables related to CDP discovery
14.2.3. Transparent Bridge Discovery
Discovering Layer 2 network links using the Bridge Forwarding table requires a special algorithm.To discover Links an algorithm based on a scientific paper with the title Topology Discovery forLarge Ethernet Networks is implemented. The gathered information is used to classify Links inmacLink and bridgeLink. A macLink represents a Link between a workstation or server identifiedby a mac address. A bridgeLink is a connection between backbone ports.
Transparent bridging is not loop free so if you have loops you have to enable the spanning treeprotocol that will detect loops and again will put some ports in a blocking state to avoid loops. To getlinks it is necessary to perform some calculations that let us define the Links. The following MIBSmust be supported by the SNMP agent to allow Transparent Bridge Discovery.
Table 110. Supported MIBS from the Cisco-VTP MIB
Name OID Description
vtpVersion
.1.3.6.1.4.1.9.9.46
.1.1.1.0The version of VTP in use on the local system. A device will report itsversion capability and not any particular version in use on thedevice. If the device does not support VTP, the version is none(3).
Table 111. Supported OIDs from the IP-MIB
Name OID Description
ipNetToMediaIfIndex
.1.3.6.1.2.1.4
.22.1.1The interface on which this entry’s equivalence is effective. Thelayer-2 interface identified by a particular value of this index isthe same interface as identified by the same value of ifIndex.
ipNetToMediaPhysAddress
.1.3.6.1.2.1.4
.22.1.2The media-dependent physical address.
ipNetToMediaNetAddress
.1.3.6.1.2.1.4
.22.1.3The IpAddress corresponding to the media-dependent physicaladdress.
276

ipNetToMediaType
.1.3.6.1.2.1.4
.22.1.4The type of mapping. Setting this object to the value invalid(2)has the effect of invalidating the corresponding entry in theipNetToMediaTable. That is, it effectively dissasociates theinterface identified with said entry from the mapping identifiedwith said entry. It is an implementation-specific matter as towhether the agent removes an invalidated entry from the table.Accordingly, management stations must be prepared to receivetabular information from agents that corresponds to entries notcurrently in use. Proper interpretation of such entries requiresexamination of the relevant ipNetToMediaType object.
Table 112. Supported OIDS from the BRIDGE-MIB
Name OID Description
dot1dBaseBridgeAddress
.1.3.6.1.2.1.17
.1.1.0The MAC address used by this bridge when it must bereferred to in a unique fashion. It is recommended that thisbe the numerically smallest MAC address of all ports thatbelong to this bridge. However it is only required to beunique. When concatenated with dot1dStpPriority a uniqueBridgeIdentifier is formed which is used in the Spanning TreeProtocol.
dot1dBaseNumPorts
.1.3.6.1.2.1.17
.1.2.0The number of ports controlled by this bridging entity.
dot1dBaseType .1.3.6.1.2.1.17.1.3.0
Indicates what type of bridging this bridge can perform. If abridge is actually performing a certain type of bridging thiswill be indicated by entries in the port table for the giventype.
dot1dBasePort .1.3.6.1.2.1.17.1.4.1.1
The port number of the port for which this entry containsbridge management information.
dot1dPortIfIndex .1.3.6.1.2.1.17.1.4.1.2
The value of the instance of the ifIndex object, defined inMIB-II, for the interface corresponding to this port.
dot1dStpProtocolSpecification
.1.3.6.1.2.1.17
.2.1.0An indication of what version of the Spanning Tree Protocolis being run. The value decLb100(2) indicates the DECLANbridge 100 Spanning Tree protocol. IEEE 802.1dimplementations will return ieee8021d(3). If future versionsof the IEEE Spanning Tree Protocol are released that areincompatible with the current version a new value will bedefined.
dot1dStpPriority .1.3.6.1.2.1.17.2.2
The value of the writeable portion of the Bridge ID, i.e., thefirst two octets of the (8 octet long) Bridge ID. The other (last)6 octets of the Bridge ID are given by the value ofdot1dBaseBridgeAddress.
dot1dStpDesignatedRoot
.1.3.6.1.2.1.17
.2.5The bridge identifier of the root of the spanning tree asdetermined by the Spanning Tree Protocol as executed by thisnode. This value is used as the Root Identifier parameter inall configuration Bridge PDUs originated by this node.
277

dot1dStpRootCost .1.3.6.1.2.1.17.2.6
The cost of the path to the root as seen from this bridge.
dot1dStpRootPort .1.3.6.1.2.1.17.2.7
The port number of the port which offers the lowest costpath from this bridge to the root bridge.
dot1dStpPort .1.3.6.1.2.1.17.2.15.1.1
The port number of the port for which this entry containsSpanning Tree Protocol management information.
dot1dStpPortPriority
.1.3.6.1.2.1.17
.2.15.1.2The value of the priority field which is contained in the first(in network byte order) octet of the (2 octet long) Port ID. Theother octet of the Port ID is given by the value ofdot1dStpPort.
dot1dStpPortState .1.3.6.1.2.1.17.2.15.1.3
The port’s current state as defined by application of theSpanning Tree Protocol. This state controls what action a porttakes on reception of a frame. If the bridge has detected aport that is malfunctioning it will place that port into thebroken(6) state. For ports which are disabled (seedot1dStpPortEnable), this object will have a value ofdisabled(1).
dot1dStpPortEnable
.1.3.6.1.2.1.17
.2.15.1.4The enabled/disabled status of the port.
dot1dStpPortPathCost
.1.3.6.1.2.1.17
.2.15.1.5The contribution of this port to the path cost of pathstowards the spanning tree root which include this port.802.1D-1990 recommends that the default value of thisparameter be in inverse proportion to the speed of theattached LAN.
dot1dStpPortDesignatedRoot
.1.3.6.1.2.1.17
.2.15.1.6The unique Bridge Identifier of the Bridge recorded as theRoot in the Configuration BPDUs transmitted by theDesignated Bridge for the segment to which the port isattached.
dot1dStpPortDesignatedCost
.1.3.6.1.2.1.17
.2.15.1.7The path cost of the Designated Port of the segmentconnected to this port. This value is compared to the RootPath Cost field in received bridge PDUs.
dot1dStpPortDesignatedBridge
.1.3.6.1.2.1.17
.2.15.1.8The Bridge Identifier of the bridge which this port considersto be the Designated Bridge for this port’s segment.
dot1dStpPortDesignatedPort
.1.3.6.1.2.1.17
.2.15.1.9The Port Identifier of the port on the Designated Bridge forthis port’s segment.
dot1dTpFdbAddress
.1.3.6.1.2.1.17
.4.3.1.1A unicast MAC address for which the bridge has forwardingand/or filtering information.
278

dot1dTpFdbPort .1.3.6.1.2.1.17.4.3.1.2
Either the value '0', or the port number of the port on whicha frame having a source address equal to the value of thecorresponding instance of dot1dTpFdbAddress has been seen.A value of '0' indicates that the port number has not beenlearned but that the bridge does have someforwarding/filtering information about this address (e.g. inthe dot1dStaticTable). Implementors are encouraged toassign the port value to this object whenever it is learnedeven for addresses for which the corresponding value ofdot1dTpFdbStatus is not learned(3).
dot1dTpFdbStatus .1.3.6.1.2.1.17.4.3.1.3
The status of this entry. The meanings of the values are:other(1): none of the following. This would include the casewhere some other MIB object (not the correspondinginstance of dot1dTpFdbPort, nor an entry in thedot1dStaticTable) is being used to determine if and howframes addressed to the value of the corresponding instanceof dot1dTpFdbAddress are being forwarded.invalid(2): this entry is not longer valid (e.g., it was learnedbut has since aged-out), but has not yet been flushed fromthe table.learned(3): the value of the corresponding instance ofdot1dTpFdbPort was learned, and is being used.self(4): the value of the corresponding instance ofdot1dTpFdbAddress represents one of the bridge’s addresses.The corresponding instance of dot1dTpFdbPort indicateswhich of the bridge’s ports has this address.mgmt(5): the value of the corresponding instance ofdot1dTpFdbAddress is also the value of an existing instanceof dot1dStaticAddress.
Table 113. Supported OIDS from the Q-BRIDGE-MIB
Name OID Description
dot1qTpFdbPort
.1.3.6.1.2.1.17.7.1.2.2.1.2
Either the value 0, or the port number of the port on which aframe having a source address equal to the value of thecorresponding instance of dot1qTpFdbAddress has been seen. Avalue of 0 indicates that the port number has not been learnedbut that the device does have some forwarding/filteringinformation about this address (e.g., in thedot1qStaticUnicastTable). Implementors are encouraged to assignthe port value to this object whenever it is learned, even foraddresses for which the corresponding value ofdot1qTpFdbStatus is not learned(3).
279

dot1qTpFdbStatus
.1.3.6.1.2.1.17.7.1.2.2.1.3
The status of this entry. The meanings of the values are:other(1): none of the following. This may include the case wheresome other MIB object (not the corresponding instance ofdot1qTpFdbPort, nor an entry in the dot1qStaticUnicastTable) isbeing used to determine if and how frames addressed to thevalue of the corresponding instance of dot1qTpFdbAddress arebeing forwarded.invalid(2): this entry is no longer valid (e.g., it was learned buthas since aged out), but has not yet been flushed from the table.learned(3): the value of the corresponding instance ofdot1qTpFdbPort was learned and is being used.self(4): the value of the corresponding instance ofdot1qTpFdbAddress represents one of the device’s addresses. Thecorresponding instance of dot1qTpFdbPort indicates which of thedevice’s ports has this address.mgmt(5): the value of the corresponding instance ofdot1qTpFdbAddress is also the value of an existing instance ofdot1qStaticAddress.
Generic information about the bridge link discovery process can be found in the Bridge Informationbox on the Node Detail Page of the device. Information gathered from this OID will be stored in thefollowing database table:
280

Figure 23. Database tables related to transparent bridge discovery
14.3. Layer 3 Link DiscoveryWith Enlinkd it is possible to get Links based on network routing applications. The following routingdaemons can be used to provide a discovery of links based Layer 3 information:
• Open Shortest Path First (OSPF)
• Intermediate System to Intermediate System (IS-IS)
This information is provided by SNMP Agents with appropriate MIB support. For this reason it isrequired to have a working SNMP configuration running. The link data discovered from Enlinkd isprovided in the Topology User Interface and on the detail page of a node.
281

14.3.1. OSPF Discovery
The relevant MIBs for OSPF topology are OSPF-MIB and OSPF-TRAP-MIB. In these MIBs are definedthe relevant objects used to find OSPF links, specifically:
• The Router ID which, in OSPF, has the same format as an IP address
• But identifies the router independent of its IP address.
Also all the interfaces are identified by their IP addresses. The OSPF links come from the SNMPospfNbrTable defined in OSPF-MIB and this table is in practice persisted in the ospfLink table:
Table 114. Supported OIDs from OSPF-MIB
Name OID Description
ospfRouterId .1.3.6.1.2.1.14.1.1.0
A 32-bit integer uniquely identifying the router in theAutonomous System. By convention, to ensure uniqueness, thisshould default to the value of one of the router’s IP interfaceaddresses. This object is persistent and when written the entityshould save the change to non-volatile storage.
ospfAdminStat .1.3.6.1.2.1.14.1.2.0
The administrative status of OSPF in the router. The valueenabled denotes that the OSPF Process is active on at least oneinterface; disabled disables it on all interfaces. This object ispersistent and when written the entity should save the changeto non-volatile storage.
ospfVersionNumber
.1.3.6.1.2.1.14.1.3.0
The current version number of the OSPF protocol is 2.
ospfAreaBdrRtrStatus
.1.3.6.1.2.1.14.1.4.0
A flag to note whether this router is an Area Border Router.
ospfAreaASBdrRtrStatus
.1.3.6.1.2.1.14.1.5.0
A flag to note whether this router is configured as anAutonomous System Border Router. This object is persistent andwhen written the entity should save the change to non-volatilestorage.
ospfIfIpAddress .1.3.6.1.2.1.14.7.1.1
The IP address of this OSPF interface.
ospfAddressLessIf
.1.3.6.1.2.1.14.7.1.2
For the purpose of easing the instancing of addressed andaddressless interfaces; this variable takes the value 0 oninterfaces with IP addresses and the corresponding value ofifIndex for interfaces having no IP address.
ospfNbrIpAddr .1.3.6.1.2.1.14.10.1.1
The IP address this neighbor is using in its IP source address.Note that, on addressless links, this will not be 0.0.0.0 but theaddress of another of the neighbor’s interfaces.
ospfNbrAddressLessIndex
.1.3.6.1.2.1.14.10.1.2
On an interface having an IP address, zero. On addresslessinterfaces, the corresponding value of ifIndex in the InternetStandard MIB. On row creation, this can be derived from theinstance.
282

Name OID Description
ospfNbrRtrId .1.3.6.1.2.1.14.10.1.3
A 32-bit integer (represented as a type IpAddress) uniquelyidentifying the neighboring router in the Autonomous System.
Table 115. Supported OIDs from IP-MIB
Name OID Description
ipAdEntIfIndex
.1.3.6.1.2.1.4.20.1.2
The index value which uniquely identifies the interface to whichthis entry is applicable. The interface identified by a particular valueof this index is the same interface as identified by the same value ofthe IF-MIB’s ifIndex.
ipAdEntNetMask
.1.3.6.1.2.1.4.20.1.3
The subnet mask associated with the IPv4 address of this entry. Thevalue of the mask is an IPv4 address with all the network bits set to 1and all the hosts bits set to 0.
Generic information about the OSPF link discovery process can be found in the OSPF Informationbox on the Node Detail Page of the device. Information gathered from these OIDs will be stored inthe following database table:
Figure 24. Database tables related to OSPF discovery
14.3.2. IS-IS Discovery
IS-IS Links are found in the isisISAdjTable that is defined in ISIS-MIB (mib-rfc4444.txt). In this tableis found the information needed to find the Adjacency Intermediate System. The information aboutIS-IS is stored into two tables: isisElement and isisLink. isisElement contains the ISISSysID, a uniqueidentifier of the "Intermediate System" (the name for the Router in ISO protocols). Each entry in thisSNMP MIB table represents a unidirectional link from the Intermediate System that is queried to theAdjacent Intermediate Systems running IS-IS and "peering" with the source router. If two routers IS-A and IS-B support ISIS-MIB, then EnLinkd will create two link entries in OpenNMS Horizon: onefrom IS-A to IS-B (from the adjtable of IS-A) the complementary link back from IS-B to IS-A (from the
283

adjTable of _IS-B). IS-IS links are represented in the ISIS-MIB as follows:
Table 116. Supported OIDs from ISIS-MIB
Name OID Description
isisSysID .1.3.6.1.2.1.138.1.1.1.3.0
The ID for this Intermediate System. This value is appendedto each of the area addresses to form the Network EntityTitles. The derivation of a value for this object isimplementation specific. Some implementations mayautomatically assign values and not permit an SNMP write,while others may require the value to be set manually.Configured values must survive an agent reboot.
isisSysAdminState
.1.3.6.1.2.1.138
.1.1.1.8.0The administrative state of this Intermediate System. Settingthis object to the value on when its current value is offenables the Intermediate System. Configured values mustsurvive an agent reboot.
isisSysObject .1.3.6.1.2.1.138.1.1.1
isisSysObject
isisCircIfIndex .1.3.6.1.2.1.138.1.3.2.1.2
The value of ifIndex for the interface to which this circuitcorresponds. This object cannot be modified after creation.
isisCircAdminState
.1.3.6.1.2.1.138
.1.3.2.1.3The administrative state of the circuit.
isisISAdjState .1.3.6.1.2.1.138.1.6.1.1.2
The state of the adjacency.
isisISAdjNeighSNPAAddress
.1.3.6.1.2.1.138
.1.6.1.1.4The SNPA address of the neighboring system.
isisISAdjNeighSysType
.1.3.6.1.2.1.138
.1.6.1.1.5The type of the neighboring system.
isisISAdjNeighSysID
.1.3.6.1.2.1.138
.1.6.1.1.6The system ID of the neighboring Intermediate System.
isisISAdjNbrExtendedCircID
.1.3.6.1.2.1.138
.1.6.1.1.7The 4-byte Extended Circuit ID learned from the Neighborduring 3-way handshake, or 0.
Generic information about the IS-IS link discovery process can be found in the IS-IS Informationbox on the Node Detail Page of the device. Information gathered from this OIDs will be stored in thefollowing database table:
284

Figure 25. Database tables related to IS-IS discovery
285

Chapter 15. Operation
15.1. HTTPS / SSLThis chapter covers the possibilities to configure OpenNMS Horizon to protect web sessions withHTTPS and also explains how to configure OpenNMS Horizon to establish secure connections.
In order to use HTTPS the Java command line tool keytool is used. It isautomatically shipped with each JRE installation. More details about the keytoolcan be found at the official documentation.
15.1.1. Standalone HTTPS with Jetty
To configure OpenNMS Horizon to protect web sessions with HTTPS please refer to the officialOpenNMS Horizon Wiki article Standalone HTTPS with Jetty.
15.1.2. OpenNMS Horizon as HTTPS client
To establish secure HTTPS connections within Java one has to setup a so called Java Trust Store.
The Java Trust Store contains all certificates a Java application should trust when makingconnections as a client to a server.
Setup Java Trust Store
To setup the Java Trust Store the following command can be issued.
If you do not have a Java Trust Store setup yet, it is created automatically.
Import a certificate to the Java Trust Store
keytool \ -import \ ① -v \ ② -trustcacerts \ ③ -alias localhost \ ④ -file localhost.cert \ ⑤ -keystore /$OPENNMS_HOME/etc/trust-store.jks ⑥
① Define to import a certificate or a certificate chain
② Use verbose output
③ Define to trust certificates from cacerts
④ The alias for the certificate to import, e.g. the common name
⑤ The certificate to import
⑥ The location of the Java Trust Store
286

If you create a new Java Trust Store you are asked for a password to protect the Java Trust Store. Ifyou update an already existing Java Trust Store please enter the password you chose when creatingthe Java Trust Store initially.
Download existing public certificate
To Download an existing public certificate the following command can be issued.
Download an existing public certificate
openssl \ s_client \ ① -showcerts \ ② -connect localhost:443 \ ③ -servername localhost \ ④ < /dev/null \ ⑤ > localhost.cert ⑥
① Use SSL/TLS client functionality of openssl.
② Show all certificates in the chain
③ PORT:HOST to connect to, e.g. localhost:443
④ This is optional, but if you are serving multiple certificates under one single ip address you maydefine a server name, otherwise the ip of localhost:PORT certificate is returned which may notmatch the requested server name (mail.domain.com, opennms.domain.com, dns.domain.com)
⑤ No input
⑥ Where to store the certificate.
Configure OpenNMS Horizon to use the defined Java Trust Store
To setup OpenNMS Horizon to use the defined Java Trust Store the accordingjavax.net.ssl.trustStore* properties have to be set. Open $OPENNMS_HOME/etc/opennms.propertiesand add the properties javax.net.ssl.trustStore and javax.net.ssl.trustStorePassword as shownbelow.
$OPENNMS_HOME/etc/opennms.properties snippet to define a Java Trust Store
javax.net.ssl.trustStore=/$OPENNMS_HOME/etc/trust-store.jks ①javax.net.ssl.trustStorePassword=change-me ②
① The location of the Java Trust Store
② The password of the Java Trust Store
For more details on the Java build-in SSL System properties have a look at chapter Debugging /Properties.
Each time you modify the Java Trust Store you have to restart OpenNMS Horizon tohave the changes take effect.
287

15.1.3. Differences between Java Trust Store and Java Key Store
The Java Trust Store is used to determine whether a remote connection should be trusted or not,e.g. whether a remote party is who it claims to be (client use case).
The Java Key Store is used to decide which authentication credentials should be sent to the remotehost for authentication during SSL handshake (server use case).
For more details, please check the JSSE Reference Guide.
15.1.4. Debugging / Properties
If you encounter issues while using HTTPS it might be useful to enable debugging or use one of thebuild-in Java System Properties to configure the proper use of SSL.
Table 117. Java build-in System Properties (Source)
System Property Name Description
javax.net.ssl.keyStore Location of the Java keystore file containing anapplication process’s own certificate and privatekey. On Windows, the specified pathname mustuse forward slashes, /, in place of backslashes, \.
javax.net.ssl.keyStorePassword Password to access the private key from thekeystore file specified by javax.net.ssl.keyStore.This password is used twice: to unlock thekeystore file (store password) and to decrypt theprivate key stored in the keystore (keypassword). In other words, the JSSE frameworkrequires these passwords to be identical.
javax.net.ssl.keyStoreType (Optional) For Java keystore file format, thisproperty has the value jks (or JKS). You do notnormally specify this property, because itsdefault value is already jks.
javax.net.ssl.trustStore Location of the Java keystore file containing thecollection of CA certificates trusted by thisapplication process (trust store). On Windows,the specified pathname must use forwardslashes, /, in place of backslashes, \. If a truststore location is not specified using thisproperty, the Sun JSSE implementation searchesfor and uses a keystore file in the followinglocations (in order):$JAVA_HOME/lib/security/jssecacerts and$JAVA_HOME/lib/security/cacerts
javax.net.ssl.trustStorePassword Password to unlock the keystore file (storepassword) specified byjavax.net.ssl.trustStore.
288

System Property Name Description
javax.net.ssl.trustStoreType (Optional) For Java keystore file format, thisproperty has the value jks (or JKS). You do notnormally specify this property, because itsdefault value is already jks.
javax.net.debug To switch on logging for the SSL/TLS layer, setthis property to ssl. More details about possiblevalues can be found here.
15.2. Request LoggingHTTP requests logs for Jetty can be enabled by uncommenting the following snippet inetc/jetty.xml:
<!-- NCSA Request Logging <Item> <New id="RequestLog" class="org.eclipse.jetty.server.handler.RequestLogHandler"> <Set name="requestLog"> <New id="RequestLogImpl" class="org.eclipse.jetty.server.NCSARequestLog"> <Arg>logs/jetty-requests-yyyy_mm_dd.log</Arg> <Set name="retainDays">90</Set> <Set name="append">true</Set> <Set name="extended">true</Set> <Set name="logTimeZone">US/Central</Set> </New> </Set> </New> </Item>-->
If you do not have a jetty.xml in the etc directory, you can start by copying theexample from etc/examples/jetty.xml.
If you would like the include the usernames associated with the requests in the log file, you mustalso uncomment the following snippet in jetty-webapps/opennms/WEB-INF/web.xml:
<!-- Enable this filter mapping when using NCSA request logging<filter-mapping> <filter-name>jettyUserIdentityFilter</filter-name> <url-pattern>/*</url-pattern></filter-mapping>-->
After restarting OpenNMS Horizon, requests logs of the following form should be available inlogs/jetty-requests-*.log:
289

127.0.0.1 - - [02/Jun/2017:09:16:38 -0500] "GET / HTTP/1.1" 302 0 "-" "Mozilla/5.0(X11; Fedora; Linux x86_64) AppleWebKit/537.36 (KHTML, like Gecko) Chrome/58.0.3029.110 Safari/537.36"127.0.0.1 - anonymousUser [02/Jun/2017:09:16:39 -0500] "GET /opennms/ HTTP/1.1" 302 0"-" "Mozilla/5.0 (X11; Fedora; Linux x86_64) AppleWebKit/537.36 (KHTML, like Gecko)Chrome/58.0.3029.110 Safari/537.36"127.0.0.1 - admin [02/Jun/2017:09:16:46 -0500] "POST/opennms/rest/datachoices?action=enable HTTP/1.1" 200 0"http://127.0.0.1:8980/opennms/index.jsp" "Mozilla/5.0 (X11; Fedora; Linux x86_64)AppleWebKit/537.36 (KHTML, like Gecko) Chrome/58.0.3029.110 Safari/537.36"127.0.0.1 - rtc [02/Jun/2017:09:16:45 -0500] "POST/opennms/rtc/post/DNS+and+DHCP+Servers HTTP/1.1" 200 35 "-" "Java/1.8.0_121"
15.3. Geocoder ServiceThe Geocoder Service is used to resolve geolocation information within OpenNMS Horizon. Bydefault The Google Map API is used to resolve the geolocation information, if available. In order toconfigure the Google Map API the following properties inetc/org.opennms.features.geocoder.google.cfg are supported:
Property
Type Default Description
clientId
String
emptystring
The Google Map API Client ID. This is required if you exceed the freeGoogle Map API usage. Please refer to the official documentation formore information.
clientKey
String
emptystring
The Google Map API API Key. This is required if you exceed the freeGoogle Map API usage. Please refer to the official documentation formore information.
timeout Integer
500 The connection timeout in milliseconds the Geocoder tries to resolve asingle geolocation.
15.4. resourcecli: simple resource management toolSometimes a user want to list or manually delete collected data (resources) of an OpenNMS Horizoninstance. When using RRDTool- or JRobin-based storage this can easily be achieved by traversingthe share/rrd directory and its subdirectories. The several .rrd or .jrb files can be listed or deletedfor individual nodes. When Newts-based storage is used the data is stored and indexed remotely ona Cassandra cluster. In this case the cluster must be queried for available resources. For thedeletion of resources the data and all generated indexes must be gathered and removed. Theresourcecli tool simplifies this process and works with Newts-based storage as well as with RRDTooland JRobin files.
15.4.1. Usage
The utility is installed by default and its wrapper script is located in the $OPENNMS_HOME/bin
290

directory.
$ cd /path/to/opennms/bin$ ./resourcecli
When invoked without parameters the usage and help information is printed.
The resourcecli tool uses sub-commands for the different tasks. Each of these sub-commandsprovide different options and parameters. The command line tool accepts the following sub-commands.
Sub-command
Description
list Queries an OpenNMS Horizon server for available resources.
show Displays details for a given resource.
delete Deletes a given resource and all of its child resources.
The following global options are available in each of the sub-commands of the tool:
Option/Argument
Description Default
--help Displays help and exit false
--username VALUE Username for connecting to OpenNMS Horizon admin
--password VALUE Password for connecting to OpenNMS Horizon admin
--url VALUE URL of the OpenNMS Horizon instance to connectto
http://localhost:8980/opennms
15.4.2. Sub-command: list
This sub-command is used to query an OpenNMS Horizon instance for its available resources. Thefollowing example queries the local OpenNMS Horizon instance with the credentials admin/secret.
291

$ ./resourcecli --username admin --password secret listnode[72] node[72].nodeSnmp[] node[72].responseTime[192.168.0.2]node[70] node[70].nodeSnmp[] node[70].interfaceSnmp[bridge0] node[70].interfaceSnmp[bridge1] node[70].interfaceSnmp[vlan0-002500fe1bf3] node[70].responseTime[50.16.15.18] node[70].responseTime[192.168.0.1]
<output omitted>
15.4.3. Sub-command: show
This sub-command can be used to show details for a given resource. The following example displaydetails for the resource identified by resourceId node[70].
$ ./resourcecli --username admin --password secret show node\[70\]ID: node[70]Name: 70Label: MyRouterType: NodeLink: element/node.jsp?node=70Parent ID: nullChildren: node[70].nodeSnmp[] node[70].interfaceSnmp[bridge0] node[70].interfaceSnmp[bridge1] node[70].interfaceSnmp[vlan0-002500fe1bf3] node[70].responseTime[50.16.15.18] node[70].responseTime[192.168.0.1]Attributes: External: Graphs: Strings:
The following options are available for the show sub-command.
Option/Argument
Description Default
<resource> The resourceId of the resource to display. -
15.4.4. Sub-command: delete
This sub-command can be used to delete a given resource and its child resources. The following
292

example deletes the resource identified by resourceId node[70]. When successful, this commanddoes not generate any output.
$ ./resourcecli --username admin --password secret delete node\[70\]$
The following options are available for the delete sub-command.
Option/Argument
Description Default
<resource> The resourceId of the resource to be deleted. -
15.5. newts-repository-converter: Rrd/Jrb to Newtsmigration utilityThis utility can be used to migrate existing RRDTool- or JRobin-based data to a Newts cluster. Thiswill be achieved by traversing the share/rrd directory and its subdirectories, reading the data andproperties files and persisting this data to Newts.
15.5.1. Migration
The following suggestions try to minimize the data collection gap that occur when reconfiguringOpenNMS Horizon for a different storage strategy. First, we determine the parameters needed formigration of the existing data. After that, we reconfigure OpenNMS Horizon to persists all newcollected data to Newts storage. Finally, the Rrd- or JRobin-based data will be converted andpersisted to Newts using the newts-repository-converter utility.
Prerequisites
• Working OpenNMS Horizon installation with RRDTool- or JRobin-based storage strategyconfigured.
• Installed and working Newts cluster reachable by the OpenNMS Horizon instance.
Migration plan
1. Check and write down the values for the following options in your opennms.properties file. Youwill need these information later to invoke the newts-repository-converter utility.
a. File etc/opennms.properties:
Check for the entry org.opennms.rrd.storeByGroup whether storeByGroup is enabled.
Check for the entry rrd.base.dir for the location where Rrd or Jrb files are stored.
Check for the entry rrd.binary for the location of the RRDTool binary.
b. File etc/rrd-configuration.properties:
Check for the entry org.opennms.rrd.strategyClass whether JRobinRrdStrategy (JRobin) orJniRrdStrategy / MultithreadedJniRrdStrategy (RRDTool) is used.
293
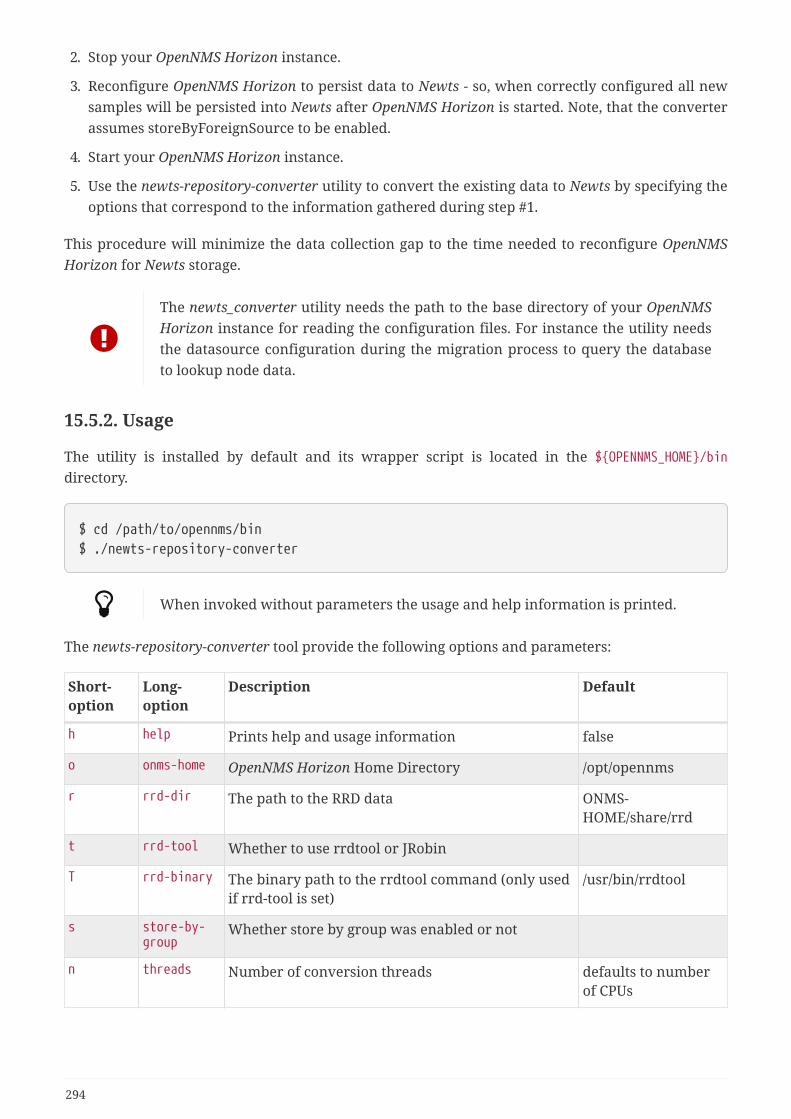
2. Stop your OpenNMS Horizon instance.
3. Reconfigure OpenNMS Horizon to persist data to Newts - so, when correctly configured all newsamples will be persisted into Newts after OpenNMS Horizon is started. Note, that the converterassumes storeByForeignSource to be enabled.
4. Start your OpenNMS Horizon instance.
5. Use the newts-repository-converter utility to convert the existing data to Newts by specifying theoptions that correspond to the information gathered during step #1.
This procedure will minimize the data collection gap to the time needed to reconfigure OpenNMSHorizon for Newts storage.
The newts_converter utility needs the path to the base directory of your OpenNMSHorizon instance for reading the configuration files. For instance the utility needsthe datasource configuration during the migration process to query the databaseto lookup node data.
15.5.2. Usage
The utility is installed by default and its wrapper script is located in the $OPENNMS_HOME/bindirectory.
$ cd /path/to/opennms/bin$ ./newts-repository-converter
When invoked without parameters the usage and help information is printed.
The newts-repository-converter tool provide the following options and parameters:
Short-option
Long-option
Description Default
h help Prints help and usage information false
o onms-home OpenNMS Horizon Home Directory /opt/opennms
r rrd-dir The path to the RRD data ONMS-HOME/share/rrd
t rrd-tool Whether to use rrdtool or JRobin
T rrd-binary The binary path to the rrdtool command (only usedif rrd-tool is set)
/usr/bin/rrdtool
s store-by-group
Whether store by group was enabled or not
n threads Number of conversion threads defaults to numberof CPUs
294

15.5.3. Example 1: convert Rrd-based data with storeByGroup enabled
The following example shows how to convert RRDTool-based data that was stored withstoreByGroup enabled. The OpenNMS Horizon home is /opt/opennms, the data directory is/opt/opennms/share/rrd and the RRDTool binary located at /usr/local/bin/rrdtool. This programcall will use 16 concurrent threads to convert the Rrd files.
$ ./newts-repository-converter -t true -s true -T /usr/local/bin/rrdtool -n 16<output omitted>
15.5.4. Example 2: convert JRobin-based data with storeByGroup disabled
The following example shows how to convert JRobin-based data located in the directory/mnt/opennms/rrd that was collected with storeByGroup disabled. This program call will use 8concurrent threads to convert the Jrb files.
$ ./newts-repository-converter -t false -s false -r /mnt/opennms/rrd -n 8<output omitted>
15.6. NewtsThis section describes how to configure OpenNMS Horizon to use Newts and how to use OpenNMSHorizon to monitor your Cassandra cluster.
15.6.1. Configuration
Enabling Newts
OpenNMS Horizon can be configured to use Newts by setting the following property in in$OPENNMS_HOME/etc/opennms.properties:
org.opennms.timeseries.strategy=newts
It is also highly recommended that resources stored in Newts are referenced by their foreign sourceand foreign ID, as opposed to their database ID. To this end, the following property should also beset in the same file:
org.opennms.rrd.storeByForeignSource=true
With these set, OpenNMS Horizon will begin persisting metrics using the Newts engine whenrestarted.
Additional configuration options are presented in the next section.
295
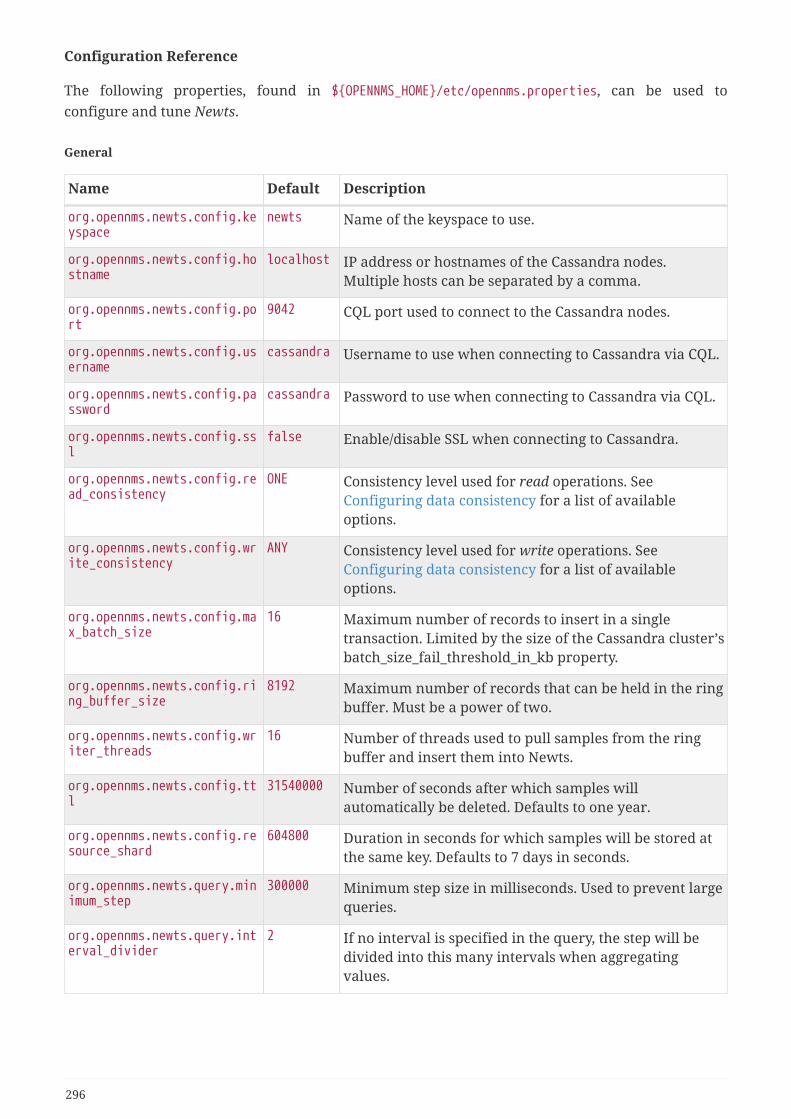
Configuration Reference
The following properties, found in $OPENNMS_HOME/etc/opennms.properties, can be used toconfigure and tune Newts.
General
Name Default Description
org.opennms.newts.config.keyspace
newts Name of the keyspace to use.
org.opennms.newts.config.hostname
localhost IP address or hostnames of the Cassandra nodes.Multiple hosts can be separated by a comma.
org.opennms.newts.config.port
9042 CQL port used to connect to the Cassandra nodes.
org.opennms.newts.config.username
cassandra Username to use when connecting to Cassandra via CQL.
org.opennms.newts.config.password
cassandra Password to use when connecting to Cassandra via CQL.
org.opennms.newts.config.ssl
false Enable/disable SSL when connecting to Cassandra.
org.opennms.newts.config.read_consistency
ONE Consistency level used for read operations. SeeConfiguring data consistency for a list of availableoptions.
org.opennms.newts.config.write_consistency
ANY Consistency level used for write operations. SeeConfiguring data consistency for a list of availableoptions.
org.opennms.newts.config.max_batch_size
16 Maximum number of records to insert in a singletransaction. Limited by the size of the Cassandra cluster’sbatch_size_fail_threshold_in_kb property.
org.opennms.newts.config.ring_buffer_size
8192 Maximum number of records that can be held in the ringbuffer. Must be a power of two.
org.opennms.newts.config.writer_threads
16 Number of threads used to pull samples from the ringbuffer and insert them into Newts.
org.opennms.newts.config.ttl
31540000 Number of seconds after which samples willautomatically be deleted. Defaults to one year.
org.opennms.newts.config.resource_shard
604800 Duration in seconds for which samples will be stored atthe same key. Defaults to 7 days in seconds.
org.opennms.newts.query.minimum_step
300000 Minimum step size in milliseconds. Used to prevent largequeries.
org.opennms.newts.query.interval_divider
2 If no interval is specified in the query, the step will bedivided into this many intervals when aggregatingvalues.
296
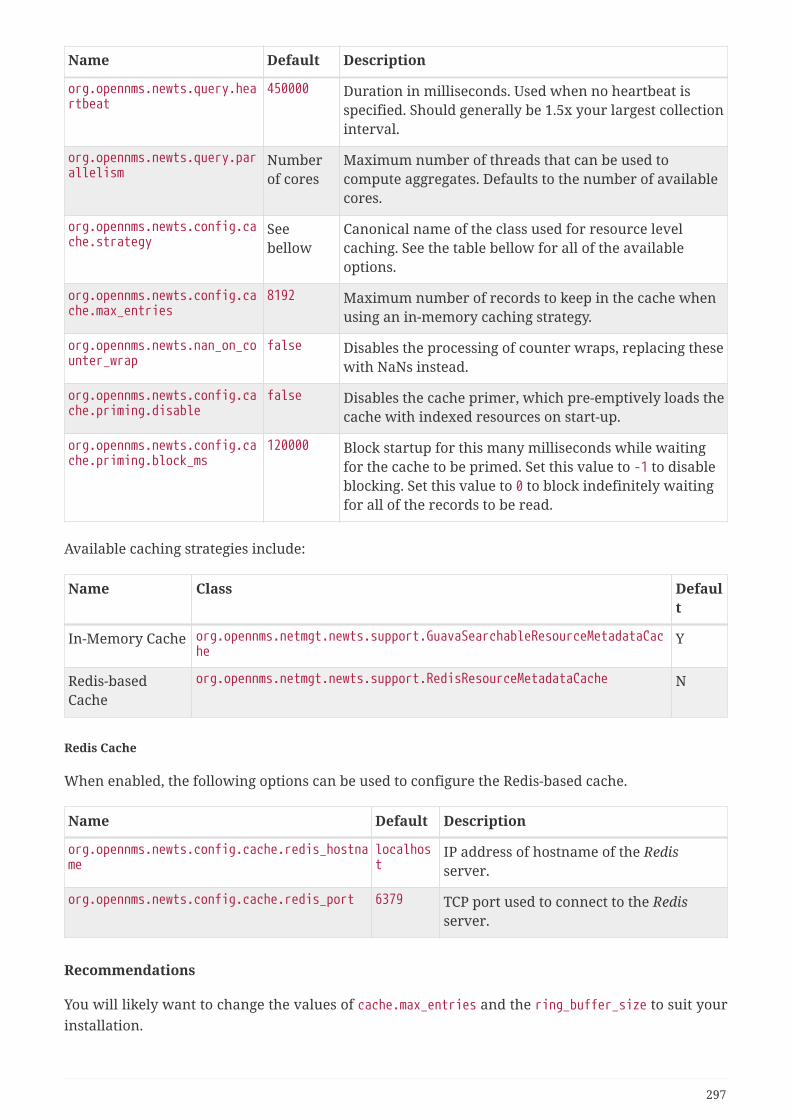
Name Default Description
org.opennms.newts.query.heartbeat
450000 Duration in milliseconds. Used when no heartbeat isspecified. Should generally be 1.5x your largest collectioninterval.
org.opennms.newts.query.parallelism
Numberof cores
Maximum number of threads that can be used tocompute aggregates. Defaults to the number of availablecores.
org.opennms.newts.config.cache.strategy
Seebellow
Canonical name of the class used for resource levelcaching. See the table bellow for all of the availableoptions.
org.opennms.newts.config.cache.max_entries
8192 Maximum number of records to keep in the cache whenusing an in-memory caching strategy.
org.opennms.newts.nan_on_counter_wrap
false Disables the processing of counter wraps, replacing thesewith NaNs instead.
org.opennms.newts.config.cache.priming.disable
false Disables the cache primer, which pre-emptively loads thecache with indexed resources on start-up.
org.opennms.newts.config.cache.priming.block_ms
120000 Block startup for this many milliseconds while waitingfor the cache to be primed. Set this value to -1 to disableblocking. Set this value to 0 to block indefinitely waitingfor all of the records to be read.
Available caching strategies include:
Name Class Default
In-Memory Cache org.opennms.netmgt.newts.support.GuavaSearchableResourceMetadataCache
Y
Redis-basedCache
org.opennms.netmgt.newts.support.RedisResourceMetadataCache N
Redis Cache
When enabled, the following options can be used to configure the Redis-based cache.
Name Default Description
org.opennms.newts.config.cache.redis_hostname
localhost
IP address of hostname of the Redisserver.
org.opennms.newts.config.cache.redis_port 6379 TCP port used to connect to the Redisserver.
Recommendations
You will likely want to change the values of cache.max_entries and the ring_buffer_size to suit yourinstallation.
297

Meta-data related to resources are cached in order to avoid writing redundant records inCassandra. If you are collecting data from a large number of resources, you should increase thecache.max_entries to reflect the number of resources you are collecting from, with a suitable buffer.
The samples gathered by the collectors are temporarily stored in a ring buffer before they arepersisted to Cassandra using Newts. The value of the ring_buffer_size should be increased if youexpect large peaks of collectors returning at once or latency in persisting these to Cassandra.However, note that the memory used by the ring buffer is reserved, and larger values may requirean increased heap size.
Cache priming is used to help reduce the number of records that need to be indexed after restartingOpenNMS Horizon. This works by rebuilding the cache using the index data that has already beenpersisted in Cassandra. If you continue to see large spikes of index related inserts after rebootingyou may want to consider increasing the amount of time spent priming the cache.
15.6.2. Cassandra Monitoring
This section describes some of the metrics OpenNMS Horizon collects from a Cassandra cluster.
JMX must be enabled on the Cassandra nodes and made accessible from_OpenNMS Horizon in order to collect these metrics. See Enabling JMXauthentication for details.
The data collection is bound to the agent IP interface with the service name JMX-Cassandra. The JMXCollector is used to retrieve the MBean entities from theCassandra node.
Client Connections
The number of active client connections from org.apache.cassandra.metrics.Client are collected:
Name Description
connectedNativeClients Metrics for connected native clients
connectedThriftClients Metrics for connected thrift clients
Compaction Bytes
The following compaction manager metrics from org.apache.cassandra.metrics.Compaction arecollected:
Name Description
BytesCompacted Number of bytes compacted since node started
Compaction Tasks
The following compaction manager metrics from org.apache.cassandra.metrics.Compaction arecollected:
298
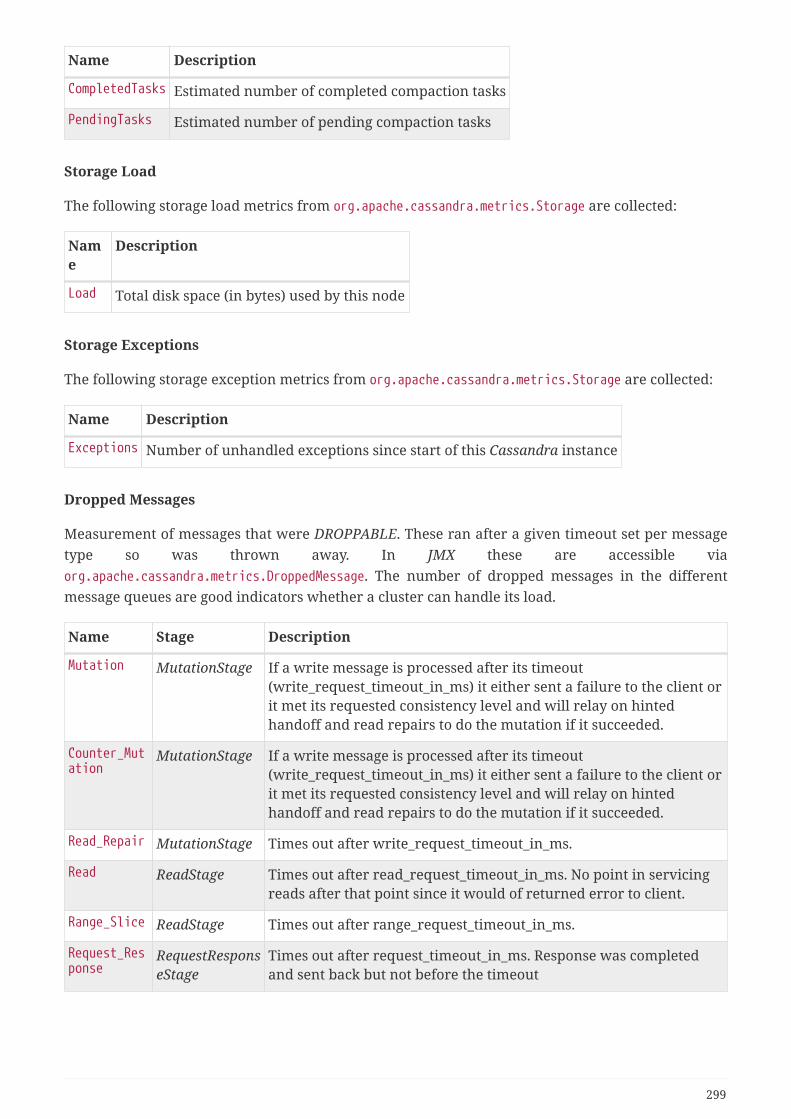
Name Description
CompletedTasks Estimated number of completed compaction tasks
PendingTasks Estimated number of pending compaction tasks
Storage Load
The following storage load metrics from org.apache.cassandra.metrics.Storage are collected:
Name
Description
Load Total disk space (in bytes) used by this node
Storage Exceptions
The following storage exception metrics from org.apache.cassandra.metrics.Storage are collected:
Name Description
Exceptions Number of unhandled exceptions since start of this Cassandra instance
Dropped Messages
Measurement of messages that were DROPPABLE. These ran after a given timeout set per messagetype so was thrown away. In JMX these are accessible viaorg.apache.cassandra.metrics.DroppedMessage. The number of dropped messages in the differentmessage queues are good indicators whether a cluster can handle its load.
Name Stage Description
Mutation MutationStage If a write message is processed after its timeout(write_request_timeout_in_ms) it either sent a failure to the client orit met its requested consistency level and will relay on hintedhandoff and read repairs to do the mutation if it succeeded.
Counter_Mutation
MutationStage If a write message is processed after its timeout(write_request_timeout_in_ms) it either sent a failure to the client orit met its requested consistency level and will relay on hintedhandoff and read repairs to do the mutation if it succeeded.
Read_Repair MutationStage Times out after write_request_timeout_in_ms.
Read ReadStage Times out after read_request_timeout_in_ms. No point in servicingreads after that point since it would of returned error to client.
Range_Slice ReadStage Times out after range_request_timeout_in_ms.
Request_Response
RequestResponseStage
Times out after request_timeout_in_ms. Response was completedand sent back but not before the timeout
299

Thread pools
Apache Cassandra is based on a so called Staged Event Driven Architecture (SEDA). This seperatesdifferent operations in stages and these stages are loosely coupled using a messaging service. Eachof these components use queues and thread pools to group and execute their tasks. Thedocumentation for Cassandra Thread pool monitoring is originated from Pythian Guide toCassandra Thread Pools.
Table 118. Collected metrics for Thread Pools
Name Description
ActiveTasks Tasks that are currently running
CompletedTasks Tasks that have been completed
CurrentlyBlockedTasks Tasks that have been blocked due to a full queue
PendingTasks Tasks queued for execution
Memtable FlushWriter
Sort and write memtables to disk from org.apache.cassandra.metrics.ThreadPools. A vast majority oftime this backing up is from over running disk capability. The sorting can cause issues as wellhowever. In the case of sorting being a problem, it is usually accompanied with high load but asmall amount of actual flushes (seen in cfstats). Can be from huge rows with large column names,i.e. something inserting many large values into a CQL collection. If overrunning disk capabilities, itis recommended to add nodes or tune the configuration.
Alerts: pending > 15 || blocked > 0
Memtable Post Flusher
Operations after flushing the memtable. Discard commit log files that have had all data in them insstables. Flushing non-cf backed secondary indexes.
Alerts: pending > 15 || blocked > 0
Anti Entropy Stage
Repairing consistency. Handle repair messages like merkle tree transfer (from Validationcompaction) and streaming.
Alerts: pending > 15 || blocked > 0
Gossip Stage
Post 2.0.3 there should no longer be issue with pending tasks. Instead monitor logs for a message:
Gossip stage has pending tasks; skipping status check ...
300

Before that change, in particular older versions of 1.2, with a lot of nodes (100+) while using vnodescan cause a lot of CPU intensive work that caused the stage to get behind. Been known to of beencaused with out of sync schemas. Check NTP working correctly and attempt nodetool
resetlocalschema or the more drastic deleting of system column family folder.
Alerts: pending > 15 || blocked > 0
Migration Stage
Making schema changes
Alerts: pending > 15 || blocked > 0
MiscStage
Snapshotting, replicating data after node remove completed.
Alerts: pending > 15 || blocked > 0
Mutation Stage
Performing a local including:
• insert/updates
• Schema merges
• commit log replays
• hints in progress
Similar to ReadStage, an increase in pending tasks here can be caused by disk issues, over loading asystem, or poor tuning. If messages are backed up in this stage, you can add nodes, tune hardwareand configuration, or update the data model and use case.
Alerts: pending > 15 || blocked > 0
Read Stage
Performing a local read. Also includes deserializing data from row cache. If there are pendingvalues this can cause increased read latency. This can spike due to disk problems, poor tuning, orover loading your cluster. In many cases (not disk failure) this is resolved by adding nodes ortuning the system.
Alerts: pending > 15 || blocked > 0
Request Response Stage
When a response to a request is received this is the stage used to execute any callbacks that werecreated with the original request.
301

Alerts: pending > 15 || blocked > 0
Read Repair Stage
Performing read repairs. Chance of them occurring is configurable per column family withread_repair_chance. More likely to back up if using CL.ONE (and to lesser possibly other non-CL.ALLqueries) for reads and using multiple data centers. It will then be kicked off asynchronously outsideof the queries feedback loop. Note that this is not very likely to be a problem since does not happenon all queries and is fast providing good connectivity between replicas. The repair being droppablealso means that after write_request_timeout_in_ms it will be thrown away which further mitigatesthis. If pending grows attempt to lower the rate for high read CFs.
Alerts: pending > 15 || blocked > 0
JVM Metrics
Some key metrics from the running Java virtual machine are also collected:
java.lang:type=Memory
The memory system of the Java virtual machine. This includes heap and non-heap memory
java.lang:type=GarbageCollector,name=ConcurrentMarkSweep
Metrics for the garbage collection process of the Java virtual machine
If you use Apache Cassandra for running Newts you can also enable additionalmetrics for the Newts keyspace.
15.6.3. Newts Monitoring
This section describes the metrics OpenNMS Horizon collects for monitoring the Newts keyspacefrom org.apache.cassandra.metrics.Keyspace on an Cassandra node.
JMX must be enabled on the Cassandra nodes and made accessible from_OpenNMS Horizon in order to collect these metrics. See Enabling JMXauthentication for details.
The data collection is bound to the agent IP interface with the service name JMX-Cassandra-Newts.The JMXCollector is used to retrieve the MBean entities from the Cassandra node.
All Memory Table Data Size
Name Description
AllMemtablesLiveDataSize
Total amount of live data stored in the memtables (2i and pending flushmemtables included) that resides off-heap, excluding any data structureoverhead
AllMemtablesOffHeapDataSize
Total amount of data stored in the memtables (2i and pending flushmemtables included) that resides off-heap.
302

Name Description
AllMemtablesOnHeapDataSize
Total amount of data stored in the memtables (2i and pending flushmemtables included) that resides on-heap.
Memtable Switch Count
Name Description
MemtableSwitchCount Number of times flush has resulted in the memtable being switched out.
Memtable Columns Count
Name Description
MemtableColumnsCount Total number of columns present in the memtable.
Memory Table Data Size
Name Description
MemtableLiveDataSize
Total amount of live data stored in the memtable, excluding any datastructure overhead
MemtableOffHeapDataSize
Total amount of data stored in the memtable that resides off-heap, includingcolumn related overhead and partitions overwritten.
MemtableOnHeapDataSize
Total amount of data stored in the memtable that resides on-heap, includingcolumn related overhead and partitions overwritten.
Read and Write Latency
Name Description
ReadTotalLatency Local read metrics.
WriteTotalLatency Local write metrics.
Range Latency
Name Description
RangeLatency 99th Percentile Local range slice metrics 99th percentile.
Latency
Name Description
CasCommitTotalLatency
CasPrepareTotalLatency
CasProposeTotalLatency
303

Bloom Filter Disk Space
Name Description
BloomFilterDiskSpaceUsed Disk space used by bloom filter
Bloom Filter Off Heap Memory
Name Description
BloomFilterOffHeapMemoryUsed Off heap memory used by bloom filter
Newts Memory Used
Name Description
CompressionMetadataOffHeapMemoryUsed Off heap memory used by compression meta data
IndexSummaryOffHeapMemoryUsed Off heap memory used by index summary
Pending
Name Description
PendingCompactions Estimate of number of pending compactions for this column family
PendingFlushes Estimated number of tasks pending for this column family
Disk Space
Name Description
TotalDiskSpaceUsed
Total disk space used by SSTables belonging to this column family includingobsolete ones waiting to be garbage collected.
LiveDiskSpaceUsed
Disk space used by SSTables belonging to this column family
15.7. Daemon Configuration FilesConfiguration changes require a restart of OpenNMS and some daemons are able to reloadconfiguration changes triggered by a daemon reload event. This section gives an overview about alldaemons and the related configuration files and which can be reloaded without restartingOpenNMS.
15.7.1. Eventd
Internal DaemonName
Reload Event
Eventd uei.opennms.org/internal/reloadDaemonConfig -p 'daemonName Eventd'
304

Table 119. Eventd configuration file overview
File RestartRequired
ReloadEvent
Description
eventd-configuration.xml
yes no Configure generic behavior of Eventd, i.e. TCP and UDP portnumbers with IP addresses to listen for Events and sockettimeouts.
eventconf.xml no yes Main configuration file for Eventd.
events/* no yes Out-of-the-box, all files in this folder are included viainclude directives in eventconf.xml.
15.7.2. Notifd
Internal DaemonName
Reload Event
Notifd uei.opennms.org/internal/reloadDaemonConfig -p 'daemonName Notifd'
Table 120. Notifd configuration file overview
File RestartRequired
ReloadEvent
Description
notifd-configuration.xml
no yes Describes auto-acknowledge prefix, e.g. prefix"RESOLVED: " for nodeUp/nodeDown events.
notificationCommands.xml
no no Configuration for notification media, e.g. scripts,XMPP or HTTP Post, immediately applied.
notifications.xml no no Event notification definitions and changes areimmediately applied.
destinationPaths.xml no no Contains paths for notification targets, e.g. JavaMail,XMPP or external scripts.
users.xml no no Contain pager and address information fornotification destination paths.
groups.xml no no Groups can be used as target for notifications.
javamail-configuration.properties
no no Configuration to send notification mails via specificmail servers.
15.7.3. Pollerd
Internal DaemonName
Reload Event
Pollerd uei.opennms.org/internal/reloadDaemonConfig -p 'daemonName Pollerd'
Table 121. Pollerd configuration file overview
305

File RestartRequired
ReloadEvent
Description
poller-configuration.xml
yes yes Restart is required in case new monitors are created orremoved. Reload Event loads changed configurationparameters of existing monitors.
response-graph.properties
no no Graph definition for response time graphs from monitors
poll-outages.xml
no yes Can be reloaded withuei.opennms.org/internal/schedOutagesChanged
306

Chapter 16. System PropertiesThe global behavior of OpenNMS is configured with Property files. Configuration can have alsoeffect on the Java Virtual Machine underneath OpenNMS. Changes in these property files require arestart of OpenNMS. The configuration files can be found in $OPENNMS_HOME/etc.
The priority for Java system properties is as follows:
1. Those set via the Java command line i.e. in opennms.conf via ADDITIONAL_MANAGER_OPTIONS
2. opennms.properties.d/*.properties
3. opennms.properties
4. libraries.properties
5. rrd-configuration.properties
6. bootstrap.properties
Property files in opennms.properties.d/ are sorted alphabetically.
To avoid conflicts with customized configurations, all custom properties can beadded to one or more files in $OPENNMS_HOME/etc/opennms.properties.d/. It isrecommended to avoid modification of OpenNMS properties from the defaultinstallation. Create dedicated files with your customized properties inopennms.properties.d/.
307

Chapter 17. TicketingThe ticketing integration allows OpenNMS Horizon to create trouble tickets in external systems.Tickets can be created and updated in response to new and/or resolved alarms.
To activate the ticketing integration, the following properties in$OPENNMS_HOME/etc/opennms.properties must be set accordingly:
Property Default Description
opennms.ticketer.plugin NullTicketerPlugin
The plugin implementation to use. Each ticketerintegration should define which value to set. TheNullTicketerPlugin does nothing when attempting tocreate/update/delete tickets.
opennms.alarmTroubleTicketEnabled
false Defines if the integration is enabled. If enabled variouslinks to control the issue state is shown on the alarmdetails page.
opennms.alarmTroubleTicketLinkTemplate
$id A template to generate a link to the issue, e.g.http://issues.opennms.org/browse/$id
17.1. JIRA Ticketing PluginThe JIRA Ticketing Plugin is used to create JIRA Issues in response to OpenNMS Horizon alarms.
17.1.1. Setup
First, you’ll need to install the opennms-plugin-ticketer-jira package for your system. The JIRAticketing plugin and it’s dependencies are not part of the core packages.
Now, in order to enable the plugin start by setting following property in$OPENNMS_HOME/etc/opennms.properties:
opennms.ticketer.plugin=org.opennms.netmgt.ticketd.OSGiBasedTicketerPlugin
Configure the plugin options by setting the following properties in$OPENNMS_HOME/etc/jira.properties:
Name Description
jira.host JIRA Server Url
jira.username Username
jira.password Password
jira.project The key of the project to use. Use jira:list-projects command to determinethe project key.
308
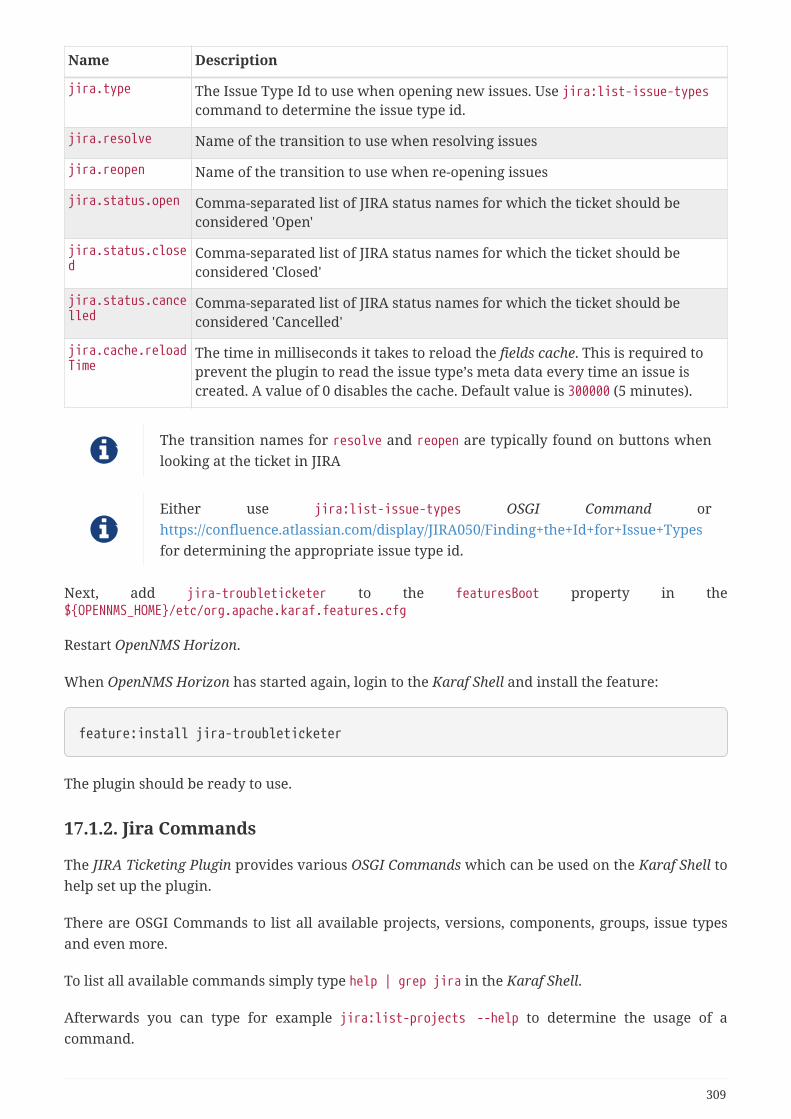
Name Description
jira.type The Issue Type Id to use when opening new issues. Use jira:list-issue-typescommand to determine the issue type id.
jira.resolve Name of the transition to use when resolving issues
jira.reopen Name of the transition to use when re-opening issues
jira.status.open Comma-separated list of JIRA status names for which the ticket should beconsidered 'Open'
jira.status.closed
Comma-separated list of JIRA status names for which the ticket should beconsidered 'Closed'
jira.status.cancelled
Comma-separated list of JIRA status names for which the ticket should beconsidered 'Cancelled'
jira.cache.reloadTime
The time in milliseconds it takes to reload the fields cache. This is required toprevent the plugin to read the issue type’s meta data every time an issue iscreated. A value of 0 disables the cache. Default value is 300000 (5 minutes).
The transition names for resolve and reopen are typically found on buttons whenlooking at the ticket in JIRA
Either use jira:list-issue-types OSGI Command orhttps://confluence.atlassian.com/display/JIRA050/Finding+the+Id+for+Issue+Typesfor determining the appropriate issue type id.
Next, add jira-troubleticketer to the featuresBoot property in the$OPENNMS_HOME/etc/org.apache.karaf.features.cfg
Restart OpenNMS Horizon.
When OpenNMS Horizon has started again, login to the Karaf Shell and install the feature:
feature:install jira-troubleticketer
The plugin should be ready to use.
17.1.2. Jira Commands
The JIRA Ticketing Plugin provides various OSGI Commands which can be used on the Karaf Shell tohelp set up the plugin.
There are OSGI Commands to list all available projects, versions, components, groups, issue typesand even more.
To list all available commands simply type help | grep jira in the Karaf Shell.
Afterwards you can type for example jira:list-projects --help to determine the usage of acommand.
309

17.1.3. Custom fields
The OpenNMS Horizon Ticketer model is limited to the most common fields provided by all ticketingsystems.
Besides the common fields creator, create date, description or subject, ticket system proprietaryfields usually need to be set.
In some cases, even additional - so called - custom fields are defined.
In order to set these fields, the JIRA Ticketing Plugin provides the possibility to define those in theOpenNMS Ticket attributes which can be overwritten with the Usage of Drools.
To enable the Drools Ticketing integration, the following property in$OPENNMS_HOME/etc/opennms.properties must be set:
opennms.ticketer.servicelayer=org.opennms.netmgt.ticketd.DroolsTicketerServiceLayer
In addition the property in $OPENNMS_HOME/etc/drools-ticketer.properties must point to a drools-ticketer-rules.drl file:
drools-ticketer.rules-file=$OPENNMS_HOME/etc/drools-ticketer-rules.drl
Finally a Drools Rule file named drools-ticketer-rules.drl must be placed in $OPENNMS_HOME/etc.
The following drools example snippet defines attributes to set custom fields:
// Set ticket defaultsrule "TicketDefaults"salience 100 when $alarm : OnmsAlarm() then ticket.setSummary($alarm.logMsg); ticket.setDetails($alarm.description); ticket.addAttribute("customfield_10111", "custom-value"); ticket.addAttribute("customfield_10112", "my-location"); ticket.addAttribute("customfield_10113", "some classification");end
Fields must be referenced by their id. To identify the id of a field, the jira:list-fields commandcan be used. By default only custom fields are shown. The -s options allows to show all fields. Thismay be necessary if JIRA default values need to be set as well, e.g. the Component, the Reporter, theAsignee, etc. Even the project key or issue type can be defined differently than originally in thejira.properties.
The OpenNMS Ticketer Attribute model only allows to set a String value. However the JIRA model is
310

slightly different. Therefore each String value must be converted to a JIRA field type. The followingtable describes valid values for an OpenNMS attribute.
Type Description
any Any string.
date Any date in the format of YYYY-MM-DD.
datetime Any datetime in ISO 8601 format: YYYY-MM-DDThh:mm:ss.sTZD.
group The name of the group.
user The name of the user.
project The key of the project (e.g. NMS)
version The name of the version. To list all available versions, use jira:list-versions.
string Any string.
option The name of the option.
issuetype The name of the issuetpye, e.g. Bug. To list all issue types, use jira:list-issue-types.
priority The name of the priority, e.g. Major. To list all priorites, use jira:list-priorities.
option-with-child
Either the name of the option, or a comma separated list (e.g. parent,child).
number Any valid number (e.g. 1000)
array If the type is array the value must be of the containing type. E.g. to set a customfield which defines multiple groups, the value jira-users,jira-administrators ismapped properly. The same is valid for versions: 18.0.3,19.0.0.
As described above the values are usually identified by their name instead of their id (projects areidentified by their key). This is easier to read, but may break the mapping code, if for example thename of a component changes in the future. To change the mapping from name (or key) to id anentry in jira.properties must be made:
jira.attributes.customfield_10113.resolution=id
To learn more about the Jira REST API please consult the following pages:
• https://developer.atlassian.com/jiradev/jira-apis/jira-rest-apis/jira-rest-api-tutorials/jira-rest-api-example-create-issue#JIRARESTAPIExample-CreateIssue-MultiSelect
• https://docs.atlassian.com/jira/REST/cloud/
The following jira (custom) fields have been tested with jira version 6.3.15:
• Checkboxes
• Date Picker
311

• Date Time Picker
• Group Picker (multiple groups)
• Group Picker (single group)
• Labels
• Number Field
• Project Picker (single project)
• Radio Buttons
• Select List (cascading)
• Select List (multiple choices)
• Select List (single choice)
• Text Field (multi-line)
• Text Field (read only)
• Text Field (single line)
• URL Field
• User Picker (multiple user)
• User Picker (single user)
• Version Picker (multiple versions)
• Version Picker (single version)
All other field types are mapped as is and therefore may not work.
Examples
The following output is the result of the command jira:list-fields -h http://localhost:8080 -uadmin -p testtest -k DUM -i Bug -s and lists all available fields for project with key DUM and issuetype Bug:
312

Name Id Custom TypeAffects Version/s versions false arrayAssignee assignee false userAttachment attachment false arrayComponent/s components false array ①Description description false stringEnvironment environment false stringEpic Link customfield_10002 true anyFix Version/s fixVersions false array ②Issue Type issuetype false issuetype ③Labels labels false arrayLinked Issues issuelinks false arrayPriority priority false priority ④Project project false project ⑤Reporter reporter false userSprint customfield_10001 true arraySummary summary false stringcustom checkbox customfield_10100 true array ⑥custom datepicker customfield_10101 true date
① Defined Components are core, service, web
② Defined versions are 1.0.0 and 1.0.1
③ Defined issue types are Bug and Task
④ Defined priorities are Major and Minor
⑤ Defined projects are NMS and HZN
⑥ Defined options are yes, no and sometimes
The following snipped shows how to set the various custom fields:
ticket.addAttribute("components", "core,web"); ①ticket.addAttribute("assignee", "ulf"); ②ticket.addAttribute("fixVersions", "1.0.1"); ③ticket.addAttribte("issueType", "Task"); ④ticket.addAttribute("priority", "Minor"); ⑤ticket.addAttribute("project", "HZN"); ⑥ticket.addAttribute("summary", "Custom Summary"); ⑦ticket.addAttribute("customfield_10100", "yes,no"); ⑧ticket.addAttribute("customfield_10101", "2016-12-06"); ⑨
① Sets the components of the created issue to core and web.
② Sets the Asignee of the issue to the user with login ulf.
③ Sets the fix version of the issue to 1.0.1
④ Sets the issue type to Task, overwriting the value of jira.type.
⑤ Sets the priority of the created issue to Minor.
⑥ Sets the project to HZN, overwriting the value of jira.project.
313

⑦ Sets the summary to Custom Summary, overwriting any previous summary.
⑧ Checks the checkboxes yes and no.
⑨ Sets the value to 2016-12-06.
17.1.4. Troubleshooting
When troubleshooting, consult the following log files:
• $OPENNMS_HOME/data/log/karaf.log
• $OPENNMS_HOME/logs/trouble-ticketer.log
You can also try the jira:verify OSGI Command to help identifying problems in your configuration.
17.2. Remedy Ticketing PluginThe Remedy Ticketing Plugin is used to create requests in the BMC Remedy ARS Help Desk Modulein response to OpenNMS Horizon alarms.
17.2.1. Remedy Product Overview
It’s important to be specific when discussing Remedy, because BMC Remedy is a suite of products.The OpenNMS Horizon Remedy Ticketing Plugin requires the core Remedy ARS and the Help DeskModule. The Help Desk Module contains a Help Desk Interface Web Service, which serves as theendpoint for creating, updating, and fetching tickets.
The Help Desk Interface (HDI) Web Service requires extensive configuration for its basic operation,and may need additional customization to interoperate with the OpenNMS Horizon RemedyTicketing Plugin. Contact your Remedy administrator for help with required configuration tasks.
17.2.2. Supported Remedy Product Versions
Currently supported Remedy product versions are listed below:
Product Version
Remedy ARS 7.6.04 Service Pack 2
Help Desk Module 7.6.04 Service Pack 1
HDI Web Service Same as Help Desk Module
17.2.3. Setup
The Remedy Ticketing Plugin and its dependencies are part of the OpenNMS Horizon core packages.
Start by enabling the plugin and the ticket controls in the OpenNMS Horizon web interface, bysetting the following properties in $OPENNMS_HOME/etc/opennms.properties:
314

opennms.ticketer.plugin=org.opennms.netmgt.ticketer.remedy.RemedyTicketerPluginopennms.alarmTroubleTicketEnabled = true
In the same file, set the property opennms.alarmTroubleTicketLinkTemplate to a value appropriate forconstructing a link to tickets in the Remedy web interface. A sample value is provided but must becustomized for your site; the token $id will be replaced with the Remedy ticket ID when the linkis rendered.
Now configure the plugin itself by setting the following properties in$OPENNMS_HOME/etc/remedy.properties:
Name Required
Description
remedy.username required
Username for authenticating to Remedy
remedy.password required
Password for authenticating to Remedy
remedy.authentication optional
Authentication style to use
remedy.locale optional
Locale for text when creating and updating tickets
remedy.timezone optional
Timezone for interaction with Remedy
remedy.endpoint required
The endpoint URL of the HPD web service
remedy.portname required
The Port name of the HPD web service
remedy.createendpoint required
The endpoint location of the Create-HPD web service
remedy.createportname required
The Port name of the Create-HPD web service
remedy.targetgroups optional
Colon-separated list of Remedy groups to which createdtickets may be assigned (group below refers to values fromthis list)
remedy.assignedgroup.group
optional
Assigned group for the target group group
remedy.assignedsupportcompany.group
optional
Assigned support company for the target group group
remedy.assignedsupportorganization.group
optional
Assigned support organization for the target group group
315

Name Required
Description
remedy.assignedgroup required
Default group to assign the ticket in case the ticket itself lacksinformation about a target assigned group
remedy.firstname required
First name for ticket creation and updating. Must exist inRemedy.
remedy.lastname required
Last name for ticket creation and updating. Must exist inRemedy.
remedy.serviceCI required
A valid Remedy Service CI for ticket creation
remedy.serviceCIReconID required
A valid Remedy Service CI Reconciliation ID for ticket creation
remedy.assignedsupportcompany
required
A valid default assigned support company for ticket creation
remedy.assignedsupportorganization
required
A valid default assigned support organization for ticketcreation
remedy.categorizationtier1 required
A valid categorization tier (primary) for ticket creation
remedy.categorizationtier2 required
A valid categorization tier (secondary) for ticket creation
remedy.categorizationtier3 required
A valid categorization tier (tertiary) for ticket creation
remedy.serviceType required
A valid service type for ticket creation
remedy.reportedSource required
A valid Reported Source for ticket creation
remedy.impact required
A valid value for Impact, used in ticket creation
remedy.urgency required
A valid value for Urgency, used in ticket creation
remedy.reason.reopen required
The reason code set in Remedy when the ticket is reopened inOpenNMS Horizon
remedy.resolution required
The reason code set in Remedy when the ticket is closed inOpenNMS Horizon
remedy.reason.cancelled required
The reason code set in Remedy when the ticket is cancelled inOpenNMS Horizon
The values for many of the required properties are site-specific; contact yourRemedy administrator for assistance.
Restart OpenNMS Horizon.
316

The plugin should be ready to use. When troubleshooting, consult the following log files:
• $OPENNMS_HOME/logs/trouble-ticketer.log
17.3. TSRM Ticketing PluginThe TSRM Ticketing Plugin is used to create TSRM incidents in response to OpenNMS Horizonalarms.
17.3.1. Setup
In order to enable the plugin start by setting following property in$OPENNMS_HOME/etc/opennms.properties:
opennms.ticketer.plugin=org.opennms.netmgt.ticketd.OSGiBasedTicketerPlugin
Configure the plugin options by setting the following properties in$OPENNMS_HOME/etc/tsrm.properties:
Name Description
tsrm.url TSRM Endpoint URL
tsrm.ssl.strict Strict SSL Check (true/false)
tsrm.status.open TSRM status for open ticket
tsrm.status.close TSRM status for close ticket
Next, add tsrm-troubleticketer to the featuresBoot property in the$OPENNMS_HOME/etc/org.apache.karaf.features.cfg
Restart OpenNMS.
When OpenNMS has started again, login to the Karaf Shell and install the feature:
feature:install tsrm-troubleticketer
The plugin should be ready to use. When troubleshooting, consult the following log files:
• $OPENNMS_HOME/data/log/karaf.log
• $OPENNMS_HOME/logs/trouble-ticketer.log
17.3.2. Mapping OpenNMS Ticket with TSRM Incident
Following tables shows mapping between OpenNMS ticket and TSRM Incident
317
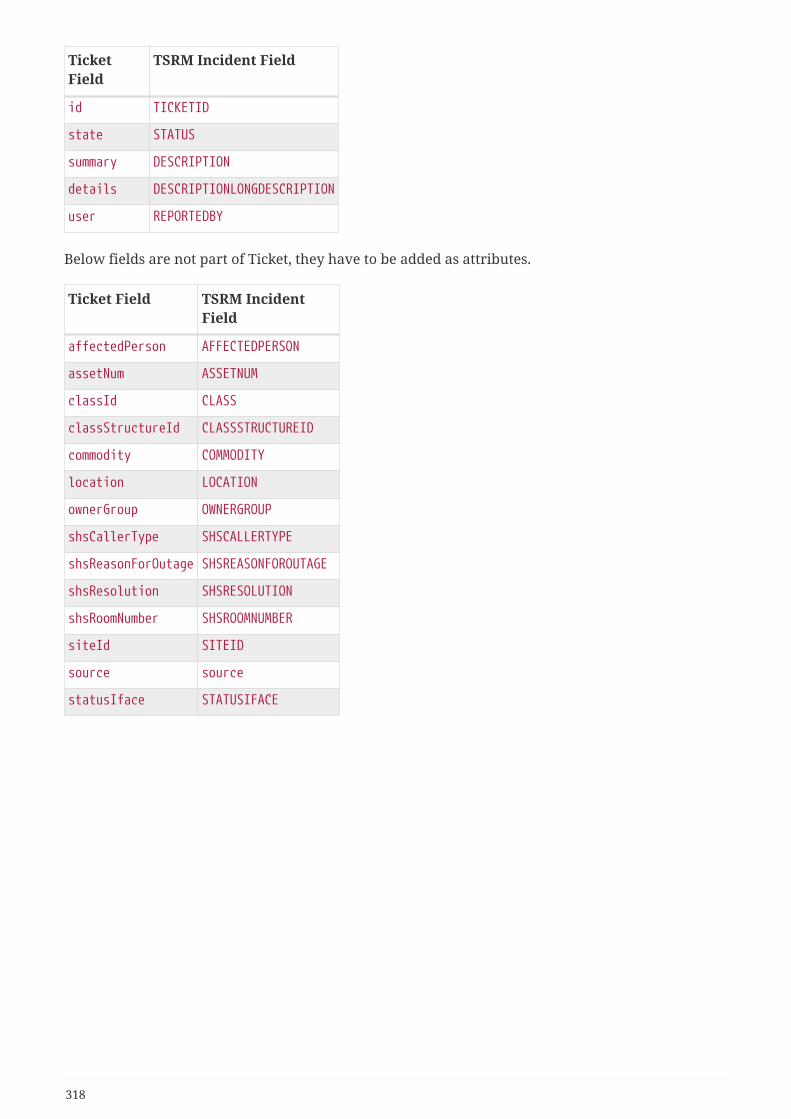
TicketField
TSRM Incident Field
id TICKETID
state STATUS
summary DESCRIPTION
details DESCRIPTIONLONGDESCRIPTION
user REPORTEDBY
Below fields are not part of Ticket, they have to be added as attributes.
Ticket Field TSRM IncidentField
affectedPerson AFFECTEDPERSON
assetNum ASSETNUM
classId CLASS
classStructureId CLASSSTRUCTUREID
commodity COMMODITY
location LOCATION
ownerGroup OWNERGROUP
shsCallerType SHSCALLERTYPE
shsReasonForOutage SHSREASONFOROUTAGE
shsResolution SHSRESOLUTION
shsRoomNumber SHSROOMNUMBER
siteId SITEID
source source
statusIface STATUSIFACE
318

Chapter 18. Enabling RMIBy default, the RMI port in the OpenNMS Horizon server is disabled, for security reasons. If youwish to enable it so you can access OpenNMS Horizon through jconsole, remote-manage OpenNMSHorizon, or use the remote poller over RMI, you will have to add some settings to the defaultOpenNMS Horizon install.
18.1. Enabling RMITo enable the RMI port in OpenNMS Horizon, you will have to add the following to the$OPENNMS_HOME/etc/opennms.conf file. If you do not have an opennms.conf file, you can create it.
# Configure remote JMXADDITIONAL_MANAGER_OPTIONS="$ADDITIONAL_MANAGER_OPTIONS-Dcom.sun.management.jmxremote.port=18980"ADDITIONAL_MANAGER_OPTIONS="$ADDITIONAL_MANAGER_OPTIONS-Dcom.sun.management.jmxremote.local.only=false"ADDITIONAL_MANAGER_OPTIONS="$ADDITIONAL_MANAGER_OPTIONS-Dcom.sun.management.jmxremote.authenticate=true"ADDITIONAL_MANAGER_OPTIONS="$ADDITIONAL_MANAGER_OPTIONS-Dcom.sun.management.jmxremote.ssl=false"
# Listen on all interfacesADDITIONAL_MANAGER_OPTIONS="$ADDITIONAL_MANAGER_OPTIONS-Dopennms.poller.server.serverHost=0.0.0.0"# Accept remote RMI connections on this interfaceADDITIONAL_MANAGER_OPTIONS="$ADDITIONAL_MANAGER_OPTIONS-Djava.rmi.server.hostname=<your-server-ip-address>"
This tells OpenNMS Horizon to listen for RMI on port 18980, and to listen on all interfaces.(Originally, RMI was only used for the Remote Poller, so despite the porperty name mentioning the"opennms poller server" it applies to RMI as a whole.) Note that you must include the-Djava.rmi.server.hostname= option or OpenNMS Horizon will accept connections on the RMI port,but not be able to complete a valid connection.
Authentication will only be allowed for users that are in the admin role (i.e. ROLE_ADMIN), or the jmxrole (i.e. ROLE_JMX). To make a user an admin, be sure to add only the ROLE_ADMIN role to the user inusers.xml. To add the jmx role to the user, add the ROLE_JMX role to the user in users.xml, and also theROLE_USER role if is required to provide access to the WebUI.
Make sure $OPENNMS_HOME/etc/jmxremote.access has the appropriate settings:
admin readwritejmx readonly
The possible types of access are:
319
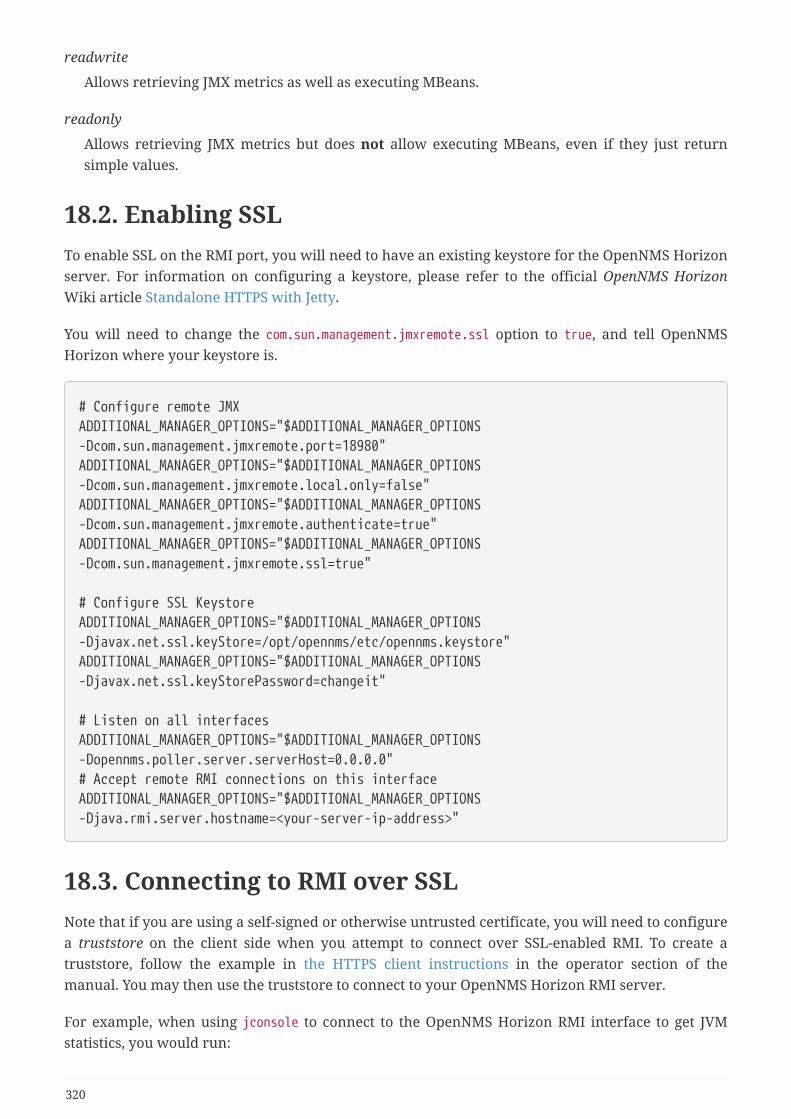
readwrite
Allows retrieving JMX metrics as well as executing MBeans.
readonly
Allows retrieving JMX metrics but does not allow executing MBeans, even if they just returnsimple values.
18.2. Enabling SSLTo enable SSL on the RMI port, you will need to have an existing keystore for the OpenNMS Horizonserver. For information on configuring a keystore, please refer to the official OpenNMS HorizonWiki article Standalone HTTPS with Jetty.
You will need to change the com.sun.management.jmxremote.ssl option to true, and tell OpenNMSHorizon where your keystore is.
# Configure remote JMXADDITIONAL_MANAGER_OPTIONS="$ADDITIONAL_MANAGER_OPTIONS-Dcom.sun.management.jmxremote.port=18980"ADDITIONAL_MANAGER_OPTIONS="$ADDITIONAL_MANAGER_OPTIONS-Dcom.sun.management.jmxremote.local.only=false"ADDITIONAL_MANAGER_OPTIONS="$ADDITIONAL_MANAGER_OPTIONS-Dcom.sun.management.jmxremote.authenticate=true"ADDITIONAL_MANAGER_OPTIONS="$ADDITIONAL_MANAGER_OPTIONS-Dcom.sun.management.jmxremote.ssl=true"
# Configure SSL KeystoreADDITIONAL_MANAGER_OPTIONS="$ADDITIONAL_MANAGER_OPTIONS-Djavax.net.ssl.keyStore=/opt/opennms/etc/opennms.keystore"ADDITIONAL_MANAGER_OPTIONS="$ADDITIONAL_MANAGER_OPTIONS-Djavax.net.ssl.keyStorePassword=changeit"
# Listen on all interfacesADDITIONAL_MANAGER_OPTIONS="$ADDITIONAL_MANAGER_OPTIONS-Dopennms.poller.server.serverHost=0.0.0.0"# Accept remote RMI connections on this interfaceADDITIONAL_MANAGER_OPTIONS="$ADDITIONAL_MANAGER_OPTIONS-Djava.rmi.server.hostname=<your-server-ip-address>"
18.3. Connecting to RMI over SSLNote that if you are using a self-signed or otherwise untrusted certificate, you will need to configurea truststore on the client side when you attempt to connect over SSL-enabled RMI. To create atruststore, follow the example in the HTTPS client instructions in the operator section of themanual. You may then use the truststore to connect to your OpenNMS Horizon RMI server.
For example, when using jconsole to connect to the OpenNMS Horizon RMI interface to get JVMstatistics, you would run:
320

jconsole -J-Djavax.net.ssl.trustStore=/path/to/opennms.truststore -J-Djavax.net.ssl.trustStorePassword=changeit
321

Chapter 19. Minion
19.1. Using KafkaBy default, OpenNMS Horizon uses the embedded ActiveMQ broker to communicate with Minions.This broker is used for both issuing remote procedure calls (RPCs, ie. ping this host) and fortransporting unsolicited messages such as SNMP traps and syslog messages.
Apache Kafka can be used as an alternative to ActiveMQ for transporting the unsolicited messages.
Kafka cannot currently be used for handling RPC messages. This means thatActiveMQ is still required even when Kafka support is enabled.
Kafka must be enabled on both OpenNMS Horizon and Minion to function.
The Kafka server must be compatible with Kafka client version 1.0.1.
19.1.1. Consumer Configuration
Enable and configure the Kafka consumer on OpenNMS Horizon by using the following commands.The initialSleepTime property will ensure that messages are not consumed from Kafka until theOpenNMS Horizon system has fully initialized.
echo 'org.opennms.core.ipc.sink.initialSleepTime=60000' >"$OPENNMS_HOME/etc/opennms.properties.d/sink-initial-sleep-time.properties"echo 'org.opennms.core.ipc.sink.strategy=kafkaorg.opennms.core.ipc.sink.kafka.bootstrap.servers=127.0.0.1:9092' >"$OPENNMS_HOME/etc/opennms.properties.d/kafka.properties"
Restart OpenNMS Horizon to apply the changes.
Additional Kafka consumer options can be set by defining additional system properties prefixedwith org.opennms.core.ipc.sink.kafka. For example, you can customize the group ID usingorg.opennms.core.ipc.sink.kafka.group.id=MyOpenNMS.
A list of all the available options can be found here in New Consumer Configs.
19.1.2. Producer Configuration
Enable the Kafka producer on Minion using:
echo '!opennms-core-ipc-sink-camelopennms-core-ipc-sink-kafka' > "$MINION_HOME/etc/featuresBoot.d/kafka.boot"
The snippet above prevents the opennms-core-ipc-sink-camel feature from startingwhen Minion is started, and loads the opennms-core-ipc-sink-kafka feature instead.
322
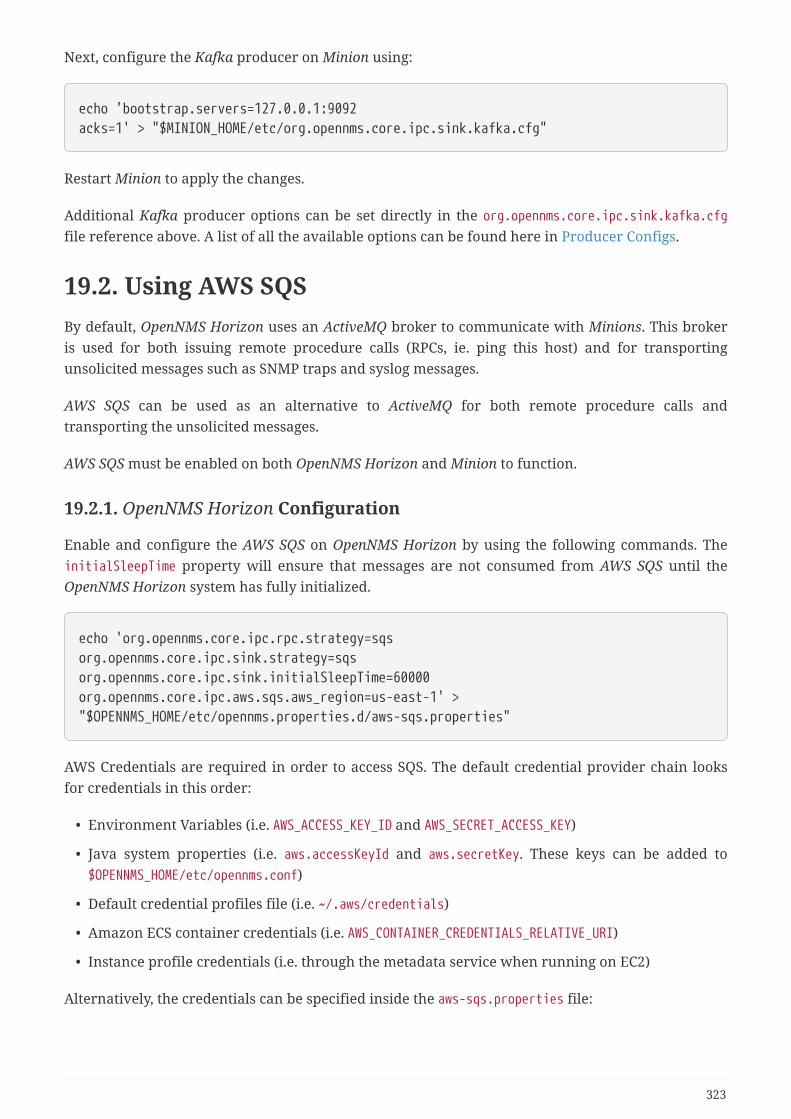
Next, configure the Kafka producer on Minion using:
echo 'bootstrap.servers=127.0.0.1:9092acks=1' > "$MINION_HOME/etc/org.opennms.core.ipc.sink.kafka.cfg"
Restart Minion to apply the changes.
Additional Kafka producer options can be set directly in the org.opennms.core.ipc.sink.kafka.cfgfile reference above. A list of all the available options can be found here in Producer Configs.
19.2. Using AWS SQSBy default, OpenNMS Horizon uses an ActiveMQ broker to communicate with Minions. This brokeris used for both issuing remote procedure calls (RPCs, ie. ping this host) and for transportingunsolicited messages such as SNMP traps and syslog messages.
AWS SQS can be used as an alternative to ActiveMQ for both remote procedure calls andtransporting the unsolicited messages.
AWS SQS must be enabled on both OpenNMS Horizon and Minion to function.
19.2.1. OpenNMS Horizon Configuration
Enable and configure the AWS SQS on OpenNMS Horizon by using the following commands. TheinitialSleepTime property will ensure that messages are not consumed from AWS SQS until theOpenNMS Horizon system has fully initialized.
echo 'org.opennms.core.ipc.rpc.strategy=sqsorg.opennms.core.ipc.sink.strategy=sqsorg.opennms.core.ipc.sink.initialSleepTime=60000org.opennms.core.ipc.aws.sqs.aws_region=us-east-1' >"$OPENNMS_HOME/etc/opennms.properties.d/aws-sqs.properties"
AWS Credentials are required in order to access SQS. The default credential provider chain looksfor credentials in this order:
• Environment Variables (i.e. AWS_ACCESS_KEY_ID and AWS_SECRET_ACCESS_KEY)
• Java system properties (i.e. aws.accessKeyId and aws.secretKey. These keys can be added to$OPENNMS_HOME/etc/opennms.conf)
• Default credential profiles file (i.e. ~/.aws/credentials)
• Amazon ECS container credentials (i.e. AWS_CONTAINER_CREDENTIALS_RELATIVE_URI)
• Instance profile credentials (i.e. through the metadata service when running on EC2)
Alternatively, the credentials can be specified inside the aws-sqs.properties file:
323

echo 'org.opennms.core.ipc.aws.sqs.aws_access_key_id=XXXXXXXXXXXorg.opennms.core.ipc.aws.sqs.aws_secret_access_key=XXXXXXXXXXX' >>"$OPENNMS_HOME/etc/opennms.properties.d/aws-sqs.properties"
When running OpenNMS inside AWS, it is possible to use the default provider chain with an IAMRole to avoid hard coding the AWS Credentials on a configuration file. The following shows anexample of the role that should be associated with the EC2 instance on which OpenNMS is going torun:
If you require consistent ordering of the messages, you should use FIFO queues instead of Standardqueues. You can enable FIFO queues by adding the following parameter to the aws-sqs.propertiesfile referenced above:
org.opennms.core.ipc.aws.sqs.sink.FifoQueue=true
Restart OpenNMS Horizon to apply the changes.
19.2.2. Minion Configuration
Enable the AWS SQS on Minion using:
echo '!minion-jms!opennms-core-ipc-rpc-jms!opennms-core-ipc-sink-camelopennms-core-ipc-rpc-aws-sqsopennms-core-ipc-sink-aws-sqs' > "$MINION_HOME/etc/featuresBoot.d/aws-sqs.boot"
324

The snippet above prevents the default JMS related features from starting andloads the SQS related features instead.
Next, configure AWS SQS on Minion using:
echo 'aws_region=us-east-1aws_access_key_id=XXXXXXXXXXXaws_secret_access_key=XXXXXXXXXXX' >"$MINION_HOME/etc/org.opennms.core.ipc.aws.sqs.cfg"
The AWS credentials are required. If they are not specified on the configuration file, the defaultcredentials provider chain (explained above) will be used instead.
If you require consistent ordering to the messages, you should use FIFO queues instead of Standardqueues. You can enable FIFO queues by adding the following parameter to theorg.opennms.core.ipc.aws.sqs.cfg file referenced above:
sink.FifoQueue=true
Restart Minion to apply the changes.
AWS credentials are required when the Minion is not running inside a VPC.
The Minion SQS settings must match what OpenNMS currently has. This isparticularly critical for the FifoQueue setting.
19.2.3. SQS Configuration Settings
From the Amazon SQS Documentation, the following tables list parameters which can be added toeither Minion (via MINION_HOME/etc/org.opennms.core.ipc.aws.sqs.cfg) or OpenNMS Horizon (viaOPENNMS_HOME/etc/opennms.properties.d/aws-sqs.properties), along with the correct syntax for eachenvironment.
Sink Settings
Queues used for reception of unsolicited messages (e.g. SNMP traps, syslog messages) areconfigured by setting properties with sink prepended to the SQS parameter name:
Parameter Notes OpenNMS Horizon Minion
DelaySeconds Default: 0 seconds org.opennms.core.ipc.aws.sqs.sink.DelaySeconds
sink.DelaySeconds
MaximumMessageSize Default: 262144 bytes org.opennms.core.ipc.aws.sqs.sink.MaximumMessageSize
sink.MaximumMessageSize
325

Parameter Notes OpenNMS Horizon Minion
MessageRetentionPeriod Default: 1209600seconds
org.opennms.core.ipc.aws.sqs.sink.MessageRetentionPeriod
sink.MessageRetentionPeriod
ReceiveMessageWaitTimeSeconds
Default: 10 seconds (forOpenNMS)
org.opennms.core.ipc.aws.sqs.sink.ReceiveMessageWaitTimeSeconds
sink.ReceiveMessageWaitTimeSeconds
VisibilityTimeout Default: 30 seconds org.opennms.core.ipc.aws.sqs.sink.VisibilityTimeout
sink.VisibilityTimeout
Policy - org.opennms.core.ipc.aws.sqs.sink.Policy
sink.Policy
RedrivePolicy - org.opennms.core.ipc.aws.sqs.sink.RedrivePolicy
sink.RedrivePolicy
KmsMasterKeyId - org.opennms.core.ipc.aws.sqs.sink.KmsMasterKeyId
sink.KmsMasterKeyId
KmsDataKeyReusePeriodSeconds
- org.opennms.core.ipc.aws.sqs.sink.KmsDataKeyReusePeriodSeconds
sink.KmsDataKeyReusePeriodSeconds
FifoQueue Default: false org.opennms.core.ipc.aws.sqs.sink.FifoQueue
sink.FifoQueue
ContentBasedDeduplication
Valid only whensink.FifoQueue is true
org.opennms.core.ipc.aws.sqs.sink.ContentBasedDeduplication
sink.ContentBasedDeduplication
RPC Settings
Queues used for provisioning, service polling, data collection, and other concerns apart fromunsolicited message reception are configured by setting properties with rpc prepended to the SQSparameter name:
Parameter Notes OpenNMS Horizon Minion
DelaySeconds Default: 0 seconds org.opennms.core.ipc.aws.sqs.rpc.DelaySeconds
rpc.DelaySeconds
MaximumMessageSize Default: 262144 bytes org.opennms.core.ipc.aws.sqs.rpc.MaximumMessageSize
rpc.MaximumMessageSize
MessageRetentionPeriod Default: 1209600seconds
org.opennms.core.ipc.aws.sqs.rpc.MessageRetentionPeriod
rpc.MessageRetentionPeriod
ReceiveMessageWaitTimeSeconds
Default: 10 seconds (forOpenNMS)
org.opennms.core.ipc.aws.sqs.rpc.ReceiveMessageWaitTimeSeconds
rpc.ReceiveMessageWaitTimeSeconds
VisibilityTimeout Default: 30 seconds org.opennms.core.ipc.aws.sqs.rpc.VisibilityTimeout
rpc.VisibilityTimeout
326

Parameter Notes OpenNMS Horizon Minion
Policy - org.opennms.core.ipc.aws.sqs.rpc.Policy
rpc.Policy
RedrivePolicy - org.opennms.core.ipc.aws.sqs.rpc.RedrivePolicy
rpc.RedrivePolicy
KmsMasterKeyId - org.opennms.core.ipc.aws.sqs.rpc.KmsMasterKeyId
rpc.KmsMasterKeyId
KmsDataKeyReusePeriodSeconds
- org.opennms.core.ipc.aws.sqs.rpc.KmsDataKeyReusePeriodSeconds
rpc.KmsDataKeyReusePeriodSeconds
FifoQueue Default: false org.opennms.core.ipc.aws.sqs.rpc.FifoQueue
rpc.FifoQueue
ContentBasedDeduplication
Valid only whenrpc.FifoQueue is true
org.opennms.core.ipc.aws.sqs.rpc.ContentBasedDeduplication
rpc.ContentBasedDeduplication
When FIFO queues are not required, there is no need to add FifoQueue=false to theconfiguration files, as this is the default behavior.
19.2.4. Managing Multiple Environments
In order to support multiple OpenNMS Horizon environments in a single AWS region, theaws_queue_name_prefix property can be used to prefix the queue names.
For example, if we set this property to be "PROD", the queue names will resemble PROD-OpenNMS-Sink-Heartbeat, instead of OpenNMS-Sink-Heartbeat.
This property must be properly configured at OpenNMS Horizon and Minion side.
19.2.5. AWS Credentials
The credentials (a.k.a. the Access Key ID and the Secret Access Key) are required in both sides,OpenNMS and Minion.
In order to create credentials just for accessing SQS resources, follow this procedure:
• From the AWS Console, choose the appropriate region.
• Open the IAM Dashboard and click on "Add user".
• Choose a name for the user, for example opennms-minion.
• Check only Programmatic access for the Access type.
• On the permissions, click on Attach existing policies directly.
• On the search bar, write SQS, and then check on AmazonSQSFullAccess.
• Click on Create User
327
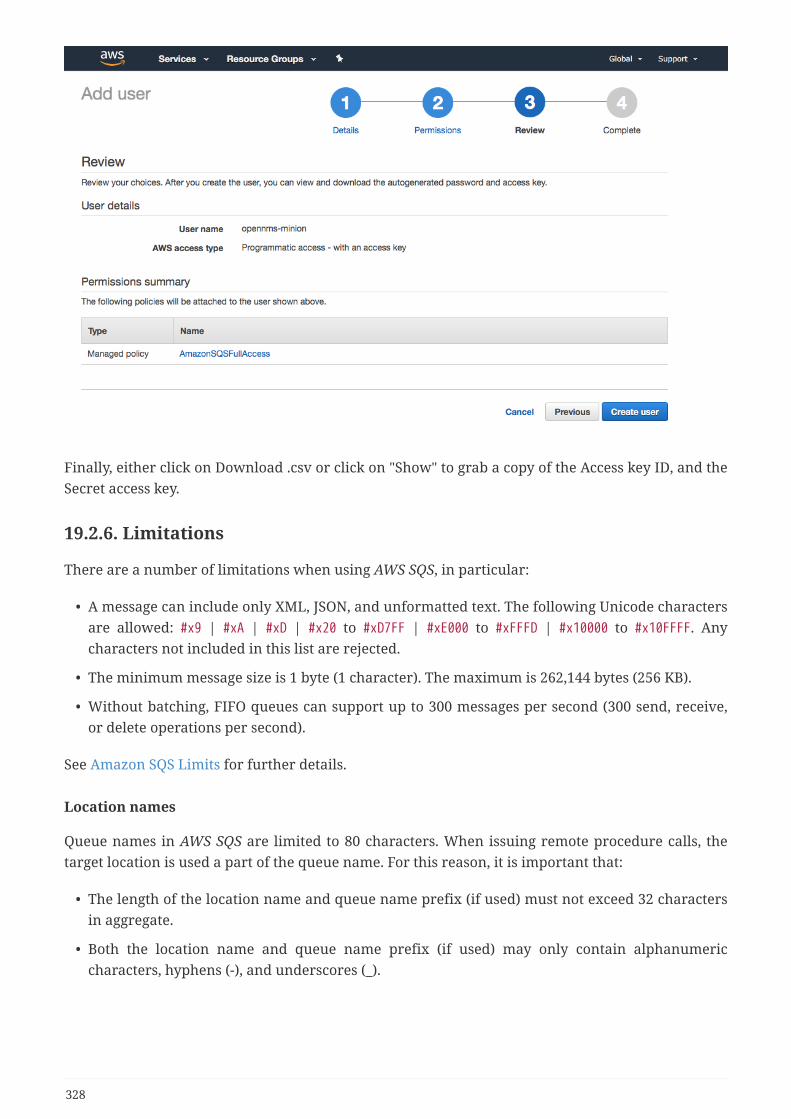
Finally, either click on Download .csv or click on "Show" to grab a copy of the Access key ID, and theSecret access key.
19.2.6. Limitations
There are a number of limitations when using AWS SQS, in particular:
• A message can include only XML, JSON, and unformatted text. The following Unicode charactersare allowed: #x9 | #xA | #xD | #x20 to #xD7FF | #xE000 to #xFFFD | #x10000 to #x10FFFF. Anycharacters not included in this list are rejected.
• The minimum message size is 1 byte (1 character). The maximum is 262,144 bytes (256 KB).
• Without batching, FIFO queues can support up to 300 messages per second (300 send, receive,or delete operations per second).
See Amazon SQS Limits for further details.
Location names
Queue names in AWS SQS are limited to 80 characters. When issuing remote procedure calls, thetarget location is used a part of the queue name. For this reason, it is important that:
• The length of the location name and queue name prefix (if used) must not exceed 32 charactersin aggregate.
• Both the location name and queue name prefix (if used) may only contain alphanumericcharacters, hyphens (-), and underscores (_).
328

Chapter 20. Plugin ManagerWith the introduction of Karaf as an OSGi application container, OpenNMS Horizon now has theability to install or upgrade features on top of a running instance of OpenNMS Horizon. In addition,the new distributed OSGi architecture allows an OpenNMS Horizon system to be deployed asmultiple software modules each running in their own Karaf instance.
The OpenNMS Horizon Plugin Manager_ provides a unified interface for managing the lifecycle ofoptional OSGi plugins installed in OpenNMS Horizon or in any Karaf instances which it manages.This need not be limited to Karaf instances running OpenNMS Horizon but can also be used todeploy modules to Karaf instances running user applications.
In addition to managing the installation of OSGi features, the Plugin Manager also allows theinstallation of licence keys which can be used to enable features for a particular instance ofOpenNMS Horizon. Although the OpenNMS Horizon platform remains open source, this provides amechanism for third parties developing features on top of the OpenNMS Horizon platform tomanage access to their software.
The Plugin Manager also provides a mechanism for a separate 'app-store' or Available PluginsServer to be used to deliver these new features and / or licences into a particular OpenNMS Horizoninstance. It is also possible to deliver software without access to the internet using the traditionalKaraf Kar/RPM deployment model. (Kar files are a form of zip file containing bundles and featuresdefinitions which can be deployed in the Karaf /deploy directory). These can be placed in the/deploy directory directly or installed there using an RPM). In this case a number of features can bedelivered together in a single software package but each only enabled at run time using the PluginManager.
OpenNMS Horizon plugins are standard Karaf features with additional metadata which describesthe feature and the licence (if any) required. A plugin requiring a licence will not start if a validlicence string is not also installed.
Note that Karaf's features mechanism has not been modified in any way. The Plugin Managersimply provides a user front end and additional metadata for features. Plugin features can beinstalled from the internal features repository, remote maven repositories or Kar files placed in thedeploy directory depending on how the Karaf configuration is set up. The standard OpenNMSHorizon configuration has no remote maven access enabled for Karaf and external features mustbe locally provisioned as a Kar or an RPM before being enabled with the Plugin Manager.
This guide describes how to deploy and manage plugins using the Plugin Manager. A separateplugin developer’s guide is provided for those wishing to write their own plugins.
20.1. Plugin Manager UI panelThe Plugin Manager is accessed as an entry in the Additional Tools panel of the OpenNMS HorizonAdmin Gui.
329

The Plugin Manager administration page is split into six main areas as illustrated below.
1. Top Left is the Karaf Instance data panel which lists the Karaf instances known to the PluginManager. When a Karaf instance is selected, the data on the rest of the page refers to theselected instance.
2. Bottom Left is the Available Plugins Server Panel which is used to set the address and passwordsto access the Available Plugins Server and / or the list of locally available plugins provided by aKar or RPM.
3. Top Right, just below the main OpenNMS Horizon menu bar are links to three diagnostic pageswhich can help test the ReST interface to remote Karaf Instances.
4. Middle Right is a messages panel which reports the status of any operations. If an operationfails, the full error message can be viewed by pressing the error message button.
5. Bottom Right is a tabbed panel which reflects the status of the plugins and licences installed inthe Karaf instance selected by the Karaf Instance data panel.
330

20.2. Setting Karaf Instance DataThe Karaf instances known to the Plugin Manager are listed in the Karaf Instance data panel.Localhost refers to the local OpenNMS Horizon server and is always an option in the panel. TheKaraf instance data is persisted locally and should be refreshed from remote sources using thereload Karaf instance data button before changes are made.
Please note that the Localhost configuration in the Plugin Manager by default usesadmin for both the username and the password. This will not work in a productionOpenNMS where you have changed the admin user password. You should edit theLocalhost configuration using the edit instance list button to match your localconfiguration)
Each Karaf instance must have a unique system id which is used to update its configuration andalso to validate its licences. The system id it must be unique and included a checksum. A newrandom system id can be generated for a Karaf instance using a button on the panel.
In most situations the remote Karaf instance can be accessed from the OpenNMS Horizon Plugin
331

Manager. However in many cases, the remote Karaf will be behind a firewall in which case it mustinitiate the communications to request its configuration and supply an update on its status.
The Remote is Accessible field tells the Plugin Manager which mode of operation is in use.
Remote request of configuration is not yet fully implemented and will becompleted in a future release.
Table 122. Karaf Instance Fields
Field Name Description
Instance Name host Name of the Karaf instance
Karaf URL URL used to access the Karaf Plugin ManagerReST API
Current Instance System ID The system ID currently installed in the Karafsystem
Manifest System ID The system ID to be provisioned in the Karafsystem
Remote is Accessible If ticked 'true', the Plugin Manager will try andcontact the remote Karaf instance using the URL.If not ticked (i.e. false), the remote Karafinstance must request its configuration.
Allow Status Update from Remote Allow the remote Karaf instance to request anupdate to its remote configuration from thelocally held manifest and at the same time toupdate its status.
332
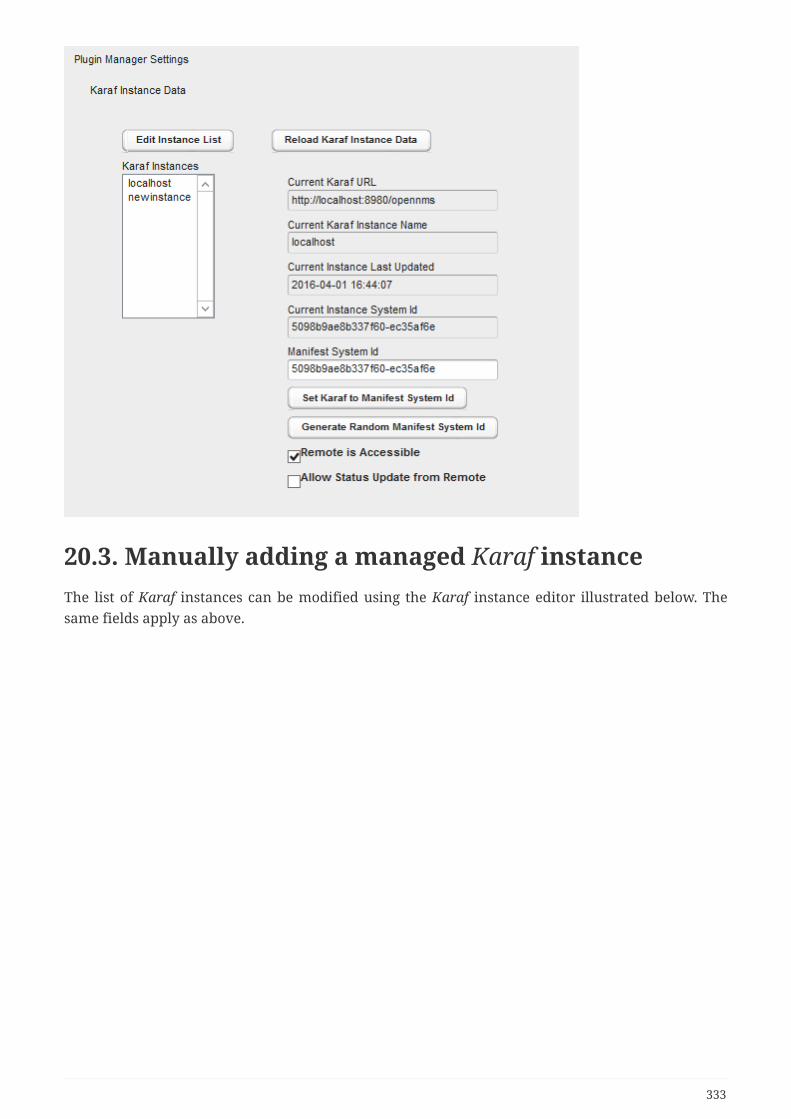
20.3. Manually adding a managed Karaf instanceThe list of Karaf instances can be modified using the Karaf instance editor illustrated below. Thesame fields apply as above.
333

20.4. Installed PluginsUnder plugin settings, the Installed Plugins tab lists which plugins are currently installed in theKaraf instance selected in the Karaf instance data panel. System Plugins cannot be uninstalledthrough the UI. (The Plugin Manager is itself a system plugin). Non-system plugins can bereinstalled or removed from the system. Each plugin has metadata associated with it which is usedto identify and describe the plugin.
Table 123. Plugin Metadata Fields
Plugin Metadata Description
Product ID The unique key used to identify the name andversion of the feature. (Same as Karaf FeatureName/Version)
334

Plugin Metadata Description
Licence Key Required If true (ticked), this plugin needs a licence key tostart
Licence Validated If a licence key is required, a green text labelwill indicate if the licence has been installed andvalidated. Otherwise a red text label willindicate an invalid licence
System Plugin If true (ticked) this is a system plugin and cannotbe removed.
Packaging Descriptor This describes the packaging mechanism bywhich the feature was delivered. This will referto a Kar if the feature was manually installed asa Kar/RPM on the host server.
Feature Repository URL The URL identifying the feature repository(Same as Karaf Feature Repository URL)
Product Description A textual description of the functionalityprovided by the plugin.
Product URL A URL to point to the plugin’s documentation /web site
licence Type A description of the licence applied to the plugin(May be GPL if the plugin is not subject to anELUA)
Organisation The organisation issuing the plugin and/orlicence.
335

The installed plugins tab shows the data retrieved the last time the Reload KarafInstance data button was pressed. (This allow us to maintain a record of offlineKaraf instances). However it also means that the localhost data may not be up todate with the local Karaf instance. You should always reload to get the accuratepicture of what is currently installed.
20.5. Available Plugins ServerThe Plugin Manager obtains a list of available plugins from the Available Plugin’s server.
Available Plugin’s server can be part of an externally hosted plugin shopping cart or it can simply be
336

a url serving the internal list of available plugins as described in the section on Internal Plugins.
In order for externally downloaded plugins to be installed, the Available Plugin’s server must have arelated maven repository from which Karaf can download the feature. By default feature downloadis not enabled in OpenNMS Horizon. To enable Karaf external feature download, the address of themaven repository should be entered in the org.ops4j.pax.url.mvn.cfg file in the OpenNMS Horizon/etc directory.
Alternatively the Plugin Manager can list the available plugins which have been installed on thelocal machine as bundled Plugin Kar’s (using the Karaf Kar deploy mechanism) along with anyinternal plugins bundled with OpenNMS Horizon. In this case, the Plugin Server URL should bepointed at http:\\localhost:8980\opennms.
The admin username and passwords are used to access the Available Plugins Server. If a shoppingcart is provided for obtaining licences, the URL of the shopping cart should be filled in.
20.6. Installing Available PluginsThe Available Plugins panel list the plugins which are available and listed by the Available Pluginsserver. These can be directly installed into the selected Karaf instance or can be posted to amanifest for later installation. If a plugin is installed, the system will try and start it. However if acorresponding licence is required and not installed, the features will be loaded but not started. Youmust restart the feature if you later install a licence key.
337

20.7. Plugins ManifestThe Plugins Manifest for a given Karaf instance lists the target plugins which the Karaf instanceshould install when it next contacts the licence manager. If the Plugin Manager can communicatewith the remote server, then a manifest can be selected for installation. A manual manifest entrycan also be created for a feature. This can be used to install features which are not listed in theAvailable Features list.
338

20.8. Installed Licences PanelEach licence has a licence ID which is the Karaf feature ID of the feature to which the licence refers.Many licences can be installed on a system but only one licence string is allowed per feature ID.
Licence Strings are used to validate that a particular feature can be run on a given Karaf instance.The Plugin Manager will not allow a feature to run if it’s licence cannot be validated using a privatekey encoded in the feature bundle.
Licences are associated with specific Product ID’s and specific Karaf instances. Several Karafinstances can be listed in a licence allowing a feature to run on more than one system using the
339

same licence. When a licence is installed, the licence metadata is decoded and displayed.
A licence may be installed before or after its associated feature is installed. If alicence is installed after the feature the feature must be restarted before thelicence will be read.
20.9. Adding a New LicenceNew licences are added using the add licence panel. Licences are obtained from the App Storewhere they can be generated by a user for a given set of system id’s.
340

A licence must be copied (cut and paste) from the app store into the add licence panel. The Validatelicence button should be used to check the licence has been installed correctly. Please note that thisjust checks the integrity of the licence string. A licence is only authenticated once it is installed andthe corresponding feature bundle checks it on start-up.
20.10. Installing Internal PluginsOpenNMS Horizon is packaged with an internal repository of plugins which are shipped with theOpenNMS Horizon distribution. These plugins can be installed in the local OpenNMS Horizon Karafinstance and activated by a user using the Plugin Manager in the same way it could be used todownload and install external plugins.
341

The internal-plugin-descriptor feature maintains a list of internal plugins which are packaged withOpenNMS Horizon. This list of internal plugins can be accessed by the Plugin Manager by setting theAvailable Plugins Server to point to the local OpenNMS Horizon instance. To do this set PluginServer URL to the address of the local OpenNMS Horizon (i.e. http:\\localhost:8980\opennms) and setthe Plugin Server Username and Plugin Server Password to match the OpenNMS Horizon ReST oradmin username and password.
Clicking Reload available plugins will then add the list of available internal plugins to the AvailablePlugins Tab where they can be installed and started by the user as described previously.
The internal plugins included with this OpenNMS Horizon release are documented in the nextsection.
342

Chapter 21. Internal Plugins
21.1. Internal Plugins supplied with OpenNMS HorizonOpenNMS Horizon includes a number of plugins which can be installed by the Plugin Manager UI ordirectly from the Karaf consol. Plugins are simply Karaf features which have additional metadatadescribing the Plugin and possibly defining that the Plugin also needs a licence installed to run.
Once installed, the plugins will always start when OpenNMS is restarted. If the plugins appear notto be working properly, you should check the /data/log/karaf.log file for problems.
Each internal plugin supplied with OpenNMS Horizon is described in its own section below.
21.2. Installing Plugins with the Karaf ConsolThe easiest way to install a plugin is to use the Plugin Manager UI described in the Plugin Managersection. However plugins can also be installed using the Karaf consol. To use the Karaf consol, youneed to open the karaf command prompt using
ssh -p 8101 admin@localhost(or ssh -o UserKnownHostsFile=/dev/null -o StrictHostKeyChecking=no if no hostchecking is wanted)
To install or remove a feature in Karaf use
karaf@root> feature:install <feature name>karaf@root> feature:uninstall <feature name>
You can see which plugins are installed using
karaf@root> product-reg:list
21.3. Alarm Change Notifier PluginThe Alarm Change Notifier Plugin generates new OpenNMS events corresponding to changes inalarms The new events are defined in the <opennmshome>/etc/events/AlarmChangeNotifierEvents.xml file
These events contain a json copy of the database table before changes in %parm[oldalarmvalues]%and after changes in %parm[newalarmvalues]%. (New Alarm events do not contain%parm[oldalarmvalues] and Alarm Deleted events do not contain %parm[newalarmvalues]%)
%parm[alarmid]% contains the alarmid of the alarm which has changed
343

The generated event itself references copies of the nodeid, interface and service contained in theoriginal alarm. This way the alarm change events are associated with the original source of thealarm.
Alarm change events have a severity of normal since they only reflect changes to the alarm.
Events from the alarm-change-notifier are also used by the opennms-es-rest plugin to send alarmhistory to Elasticsearch
The table below lists the parameters included with each type of Alarm Change Event. Parametersare listed in the %parm[xxx]% format which is used to reference them inAlarmChangeNotifierEvents.xml
To simplify searching and visualisation, specific parameter values are also added for each alarmchange event type. These additional values are described in the table below.
AlarmChangeEvent Type
UEI Additional Parameters
New AlarmCreated
uei.opennms.org/plugin/AlarmChangeNotificationEvent/NewAlarmCreated
%parm[alarmid]%%parm[newalarmvalues]%
AlarmSeverityChanged
uei.opennms.org/plugin/AlarmChangeNotificationEvent/AlarmSeverityChanged
%parm[alarmid]% %parm[oldalarmvalues]%%parm[newalarmvalues]%%parm[severity]% %parm[oldseverity]%
AlarmCleared
uei.opennms.org/plugin/AlarmChangeNotificationEvent/AlarmCleared
%parm[alarmid]% %parm[oldalarmvalues]%%parm[newalarmvalues]%
AlarmDeleted
uei.opennms.org/plugin/AlarmChangeNotificationEvent/AlarmDeleted
%parm[alarmid]% %parm[oldalarmvalues]%
AlarmChanged
uei.opennms.org/plugin/AlarmChangeNotificationEvent/AlarmChanged
%parm[alarmid]% %parm[oldalarmvalues]%%parm[newalarmvalues]%
AlarmAcknowledged
uei.opennms.org/plugin/AlarmChangeNotificationEvent/AlarmAcknowledged
%parm[alarmid]% %parm[oldalarmvalues]%%parm[newalarmvalues]%%parm[alarmid]% %parm[alarmacktime]%%parm[alarmackuser]%
AlarmUnAcknowledged
uei.opennms.org/plugin/AlarmChangeNotificationEvent/AlarmUnAcknowledged
%parm[alarmid]% %parm[oldalarmvalues]%%parm[newalarmvalues]%
AlarmSuppressed
uei.opennms.org/plugin/AlarmChangeNotificationEvent/AlarmSuppressed
%parm[alarmid]% %parm[oldalarmvalues]%%parm[newalarmvalues]%%parm[suppressedtime]%%parm[suppresseduntil]%%parm[suppresseduser]%
AlarmUnSuppressed
uei.opennms.org/plugin/AlarmChangeNotificationEvent/AlarmUnSuppressed
%parm[alarmid]% %parm[oldalarmvalues]%%parm[newalarmvalues]%
344

AlarmChangeEvent Type
UEI Additional Parameters
TroubleTicketStateChange
uei.opennms.org/plugin/AlarmChangeNotificationEvent/TroubleTicketStateChange
%parm[alarmid]% %parm[oldalarmvalues]%%parm[newalarmvalues]%%parm[tticketid]% %parm[tticketstate]%
Sticky MemoAdded
uei.opennms.org/plugin/AlarmChangeNotificationEvent/StickyMemoAdded
%parm[alarmid]% %parm[oldalarmvalues]%%parm[newalarmvalues]%%parm[stickymemo]%
Sticky MemoUpdate
uei.opennms.org/plugin/AlarmChangeNotificationEvent/StickyMemoUpdate
%parm[alarmid]% %parm[oldalarmvalues]%%parm[newalarmvalues]%%parm[oldalarmvalues]%%parm[stickymemo]% %parm[author]%%parm[body]% %parm[memovalues]%
JournalMemoUpdate
uei.opennms.org/plugin/AlarmChangeNotificationEvent/JournalMemoUpdate
%parm[alarmid]%%parm[newalarmvalues]%%parm[oldalarmvalues]% %parm[author]%%parm[body]% %parm[reductionkey]%%parm[memovalues]%
21.4. Elasticsearch ReST pluginThe Elasticsearch ReST plugin has been renamed to Event & Alarm Forwarder and since the releaseof version 22.0.0 is no longer a plugin. Refer to Flow Support for the documentation.
345

Chapter 22. Special Cases and Workarounds
22.1. Overriding SNMP Client BehaviorBy default, the SNMP subsystem in OpenNMS Horizon does not treat any RFC 3416 error-status asfatal. Instead, it will attempt to continue the request, if possible. However, only a subset of errorswill cause OpenNMS Horizon’s SNMP client to attempt retries. The default SNMP error-statushandling behavior is as follows:
Table 124. Default SNMP Error Status Behavior
error-status Fatal?
Retry?
noError(0) false false
tooBig(1) false true
noSuchName(2) false true
badValue(3) false false
readOnly(4) false false
genErr(5) false true
noAccess(6) false true
wrongType(7) false false
wrongLength(8) false false
wrongEncoding(9) false false
wrongValue(10) false false
noCreation(11) false false
inconsistentValue(12) false false
resourceUnavailable(13) false false
commitFailed(14) false false
undoFailed(15) false false
authorizationError(16) false true
notWritable(17) false false
inconsistentName(18) false false
You can override this behavior by setting a property inside $OPENNMS_HOME/etc/opennms.propertiesin the form:
org.opennms.netmgt.snmp.errorStatus.[statusCode].[type]
For example, to make authorizationError(16) abort and not retry, you would set:
346

org.opennms.netmgt.snmp.errorStatus.16.fatal=trueorg.opennms.netmgt.snmp.errorStatus.16.retry=false
347

Chapter 23. IFTTT IntegrationThe free web-based service IFTTT allows to combine web applications using simple conditionalinstructions. Each supported service has several triggers that can be used to trigger actions of otherservices. This allows for example to change brightness and color of a smart bulb, send messages ordate to IoT devices.
The OpenNMS Horizon integration makes uses of the so-called "Webhooks" service, that allows totrigger actions when a specific web-request was received. The basic operation is as follows:OpenNMS Horizon polls for alarms with associated nodes and matches a given category filter. Forthe resulting alarm set the maximum severity and total count is computed. If one of these valueschanged compared to the last poll one or more events specified for the computed maximumseverity will be sent to IFTTT.
23.1. IFTTT ConfigurationIn order to use the IFTTT integration in OpenNMS Horizon you need an IFTTT account. With thisaccount you are able to create so-called applets that combine a trigger with an action. In our casewe use the "Webhooks" service as the trigger and define the event name OpenNMS. After this step youcan combine this trigger with any of the possible supported services and their actions.
Webhooks service trigger definition
348

In your account service settings for the "Webhooks" service you find your key in the given serviceURL. In the following example this key is X71dfUZsH4Wkl6cjsLjdV.
Webhooks service settings
349

On the side of OpenNMS Horizon you need a configuration that defines which event names to sendon an alarm count or severity change. The configuration file ifttt-config.xml contains so calledtrigger packages.
The operation is as follows: OpenNMS Horizon retrieves all alarms that have a node associated.Each trigger package defines whether only acknowledged alarms should be taken into account. Itthen computes the maximum severity and alarm count for each trigger package’s category filter.After that it triggers all events defined in the corresponding trigger sets for the computedmaximum severity. The category filter accepts Java regular expressions. Using an empty categoryfilter will use all unacknowledged alarms with an associated node.
Each trigger inside a trigger set defines the event name to be triggered and three additional values.These values can be used to set additional attributes for the corresponding IFTTT applet action. Thefollowing trigger sets can be defined:
Name Execution
ON on start of the IFTTT alarm polling daemon to switch on a device
OFF on stop of the IFTTT alarm polling daemon to switch off a device
NORMAL if severity is NORMAL
WARNING if severity is WARNING
350

Name Execution
MINOR if severity is MINOR
MAJOR if severity is MAJOR
CRITICAL if severity is CRITICAL
There are also ON and OFF available for the trigger set definition. The ON event will be sent when thepolling daemon is started and the OFF when it is stopped. These events can be used to poweringup/down and initializing devices.
23.2. OpenNMS ConfigurationIFTTT alarm polling will be enabled by setting the attribute enabled to true in the ifttt-config.xmlfile. It is also possible to configure the polling interval. The following trigger package defined thetrigger sets which itself define a sequence of events to be triggered at IFTTT. Each trigger definesthe eventName and an additional delay. This allows to defer the execution of the next trigger in atrigger set.
23.3. ExampleThe following example shows the configuration file for a WiFi light bulb controlled via IFTTT. Thedefined applets use value1 for setting the color and value2 for setting the brightness. The third valuedemonstrate the use of placeholders. For the severity-based trigger sets the following placeholderscan be used in the three value fields: %os%/%oldSeverity for old severity, %ns%/%newSeverity% for newseverity, %oc%/%oldCount for old alarm count and %nc%/``%newCount% for new alarm count. This isuseful for sending messages or operating LED displays via IFTTT.
<ifttt-config enabled="true" key="X71dfUZsH4Wkl6cjsLjdV" pollInterval="30"> <trigger-package categoryFilter="Routers|Switches" onlyUnacknowledged="true"> <trigger-set name="ON"> <trigger eventName="on" delay="0"> <value1></value1> <value2></value2> <value3></value3> </trigger> </trigger-set>
<trigger-set name="OFF"> <trigger eventName="off" delay="0"> <value1></value1> <value2></value2> <value3></value3> </trigger> </trigger-set>
<trigger-set name="NORMAL"> <trigger eventName="OpenNMS" delay="0">
351

<value1>#336600</value1> <value2>0.40</value2> <value3>%os%,%ns%,%oc%,%nc%</value3> </trigger> </trigger-set>
<trigger-set name="WARNING"> <trigger eventName="OpenNMS" delay="0"> <value1>#FFCC00</value1> <value2>0.50</value2> <value3>%os%,%ns%,%oc%,%nc%</value3> </trigger> </trigger-set>
<trigger-set name="MINOR"> <trigger eventName="OpenNMS" delay="0"> <value1>#FF9900</value1> <value2>0.60</value2> <value3>%os%,%ns%,%oc%,%nc%</value3> </trigger> </trigger-set>
<trigger-set name="MAJOR"> <trigger eventName="OpenNMS" delay="0"> <value1>#CC3300</value1> <value2>0.70</value2> <value3>%os%,%ns%,%oc%,%nc%</value3> </trigger> </trigger-set>
<trigger-set name="CRITICAL"> <trigger eventName="OpenNMS" delay="0"> <value1>#FF0000</value1> <value2>0.80</value2> <value3>%os%,%ns%,%oc%,%nc%</value3> </trigger> </trigger-set> <trigger-package></ifttt-config>
352

Chapter 24. Telemetry DaemonThe telemetry daemon (telemetryd) provides an extensible framework that can be used to handlesensor data pushed to OpenNMS Horizon. The extensible framework is used to implement supportfor a variety of applications which use different protocols to transfer metrics. In telemetryd anoperator can define a series of protocols, each of which has at least one Listener, and at least oneAdapter.
Figure 26. Generic component overview of protocol implementations in Telemetryd
The Listener and Adapter together with it’s configuration build a Protocol for an application.
24.1. What is a ListenerA Listener is responsible for receiving sensor data from some external source. For example, thismay include listening for packets from an UDP socket, retrieving messages from an MQTT topic,etc… It is possible to configure multiple Listeners.
24.2. What is an AdapterAn Adapter is responsible for processing the byte streams dispatched by the Listeners. For example,this may include decoding a specific JSON format, persisting metrics and/or generating events.
The framework does not make any assumption about the data about being received or processed,leaving this up to the Listener and Adapter implementation.
In case you have multiple Adapters, the execution order is the same as defined inthe telemetryd-configuration.xml.
353

24.3. What are ProtocolsA Protocol is composed with at least one Listener and at least one Adapter and their configuration.With a Protocol it is possible to process sensor data from Juniper Telemetry Interface (JTI) or Netflowv5.
24.4. Push Sensor Data through MinionListeners may run on either OpenNMS Horizon or Minion, whereas adapters run exclusively onOpenNMS Horizon. If a listener is running on Minion, the received messages will be automaticallydispatched to the associated adapter(s) running in OpenNMS Horizon.
Figure 27. Running Listener on a Minion forwarding packets using the messaging system
24.5. Protocol Reference
24.5.1. IPFIX Interface
The IP Flow Information Export (IPFIX) protocol is a vendor neutral standard standard fortransmitting Traffic Flow information. See Flow Support for details on flow support in OpenNMSHorizon.
IPFIX Adapter
The IPFIX adapter is used to handle IPFIX payloads generated by either of the UDP or TCP basedIPFIX listeners. Flows are decoded from the messages into the canonical flow format and arepublished to the flow repository
Facts
Class Name org.opennms.netmgt.telemetry.adapters.netflow.ipfix.IpfixAdapter
Parameters
This adapter does not currently have any configurable parameters.
354

24.5.2. Junos Telemetry Interface
The Junos Telemetry Interface (JTI) allows to push operational statistics asynchronously to OpenNMSHorizon. OpenNMS Horizon sends a request to stream periodic updates once to the device. Data isgenerated as Google protocol buffers (gpb) structured messages over UDP. Detailed informationabout JTI can be found in Juniper Documentation.
To enable support for Junos Telemetry Interface (JTI), edit $OPENNMS_HOME/etc/telemetryd-
configuration.xml set enabled=true for JTI protocol.
Enable JTI protocol in telemetryd-configuration.xml
<protocol name="JTI" description="Junos Telemetry Interface (JTI)" enabled="true">
Apply the changes without restarting by sending a reloadDaemonConfig event in the CLI or theWebUI:
Send a reloadDaemonConfig event through CLI
$OPENNMS_HOMEbin/send-event.pl -p 'daemonName Telemetryd'uei.opennms.org/internal/reloadDaemonConfig
By default, this will open a UDP socket bound to 0.0.0.0:50000 to which JTI messages can beforwarded.
Configure JTI Listener on a Minion
To enable and configure an UDP Listener for JTI on Minion, connect to the Karaf Console and set thefollowing properties:
$ ssh -p 8201 [email protected]@minion()> config:edit org.opennms.features.telemetry.listeners-udp-50000admin@minion()> config:property-set name JTIadmin@minion()> config:property-set class-nameorg.opennms.netmgt.telemetry.listeners.udp.UdpListeneradmin@minion()> config:property-set listener.port 50000admin@minion()> config:update
The protocol must also be enabled on OpenNMS Horizon for the messages to beprocessed.
JTI Adapter
The JTI adapter is used to handle Junos Telemetry Interface payloads. Messages are decoded usingthe published protobuf specifications and forwarded to a JSR-223 compatible script (i.e. Beanshellor Groovy) for further processing. Using the script extension you can extract the desired metricsfrom the JTI messages and persist the results as time series data.
355

Facts
Class Name org.opennms.netmgt.telemetry.adapters.jti.JtiGpbAdapter
Parameters
Table 125. Adapter specific parameters for the JtiGpbAdapter
Parameter
Description Required
Defaultvalue
script Full path to the script used to handle the JTI messages required (none)
Scripting
The script will be invoked for every JTI message that is received and succesfully decoded.
The following globals will be passed to the script:
Table 126. Globals passed to the script
Parameter
Description Type
agent The agent (node) against which the metricswill be associated
org.opennms.netmgt.collection.api.CollectionAgent
builder Builder in which the resources and metricsshould be added
org.opennms.netmgt.collection.support.builder.CollectionSetBuilder
msg Decoded JTI message from which themetrics should be extracted
org.opennms.netmgt.telemetry.adapters.jti.proto.TelemetryTop
24.5.3. NetFlow v5 Interface
See Flow Support for details on flow support in OpenNMS Horizon.
NetFlow v5 Adapter
The NetFlow v5 adapter is used to handle NetFlow v5 payloads.
Facts
Class Name org.opennms.netmgt.telemetry.adapters.netflow.Netflow5Adapter
Parameters
This adapter does not currently have any configurable parameters.
24.5.4. NetFlow v9 Interface
See Flow Support for details on flow support in OpenNMS Horizon.
356

Netflow v9 Adapter
The Netflow v9 adapter is used to handle Netflow v9 payloads generated by the Netflov9 UDPlistener. Flows are decoded from the messages into the canonical flow format and are published tothe flow repository
Facts
Class Name org.opennms.netmgt.telemetry.adapters.netflow.v9.Netflow9Adapter
Parameters
This adapter does not currently have any configurable parameters.
24.5.5. Cisco NX-OS Telemetry
The Cisco NX-OS Telemetry allows to push operational statistics asynchronously to OpenNMSHorizon. OpenNMS Horizon sends a request to stream periodic updates once to the device. Data isgenerated as Google protocol buffers (gpb) structured messages over UDP. Detailed informationabout NX-OS can be found in NXOS Documentation.
To enable support for NX-OS Telemetry, edit $OPENNMS_HOME/etc/telemetryd-configuration.xml setenabled=true for NXOS protocol.
Enable NX-OS protocol in telemetryd-configuration.xml
<protocol name="NXOS" description="Cisco NX-OS Telemetry" enabled="true">
Apply the changes without restarting by sending a reloadDaemonConfig event in the CLI or theWebUI:
Send a reloadDaemonConfig event through CLI
$OPENNMS_HOMEbin/send-event.pl -p 'daemonName Telemetryd'uei.opennms.org/internal/reloadDaemonConfig
By default, this will open a UDP socket bound to 0.0.0.0:50001 to which NXOS messages can beforwarded.
Configure NX-OS Listener on a Minion
To enable and configure an UDP Listener for NX-OS on Minion, connect to the Karaf Console and setthe following properties:
357

$ ssh -p 8201 [email protected]@minion()> config:edit org.opennms.features.telemetry.listeners-udp-50000admin@minion()> config:property-set name NXOSadmin@minion()> config:property-set class-nameorg.opennms.netmgt.telemetry.listeners.udp.UdpListeneradmin@minion()> config:property-set listener.port 50001admin@minion()> config:update
The protocol must also be enabled on OpenNMS Horizon for the messages to beprocessed.
Cisco NX-OS Adapter
The NX-OS adapter is used to handle Cisco NX-OS Telemetry payloads. Messages are decoded usingthe published protobuf (proto3) specifications and forwarded to a JSR-223 compatible script (i.e.Beanshell or Groovy) for further processing. Using the script extension you can extract the desiredmetrics from the NX-OS messages and persist the results as time series data.
Facts
Class Name org.opennms.netmgt.telemetry.adapters.nxos.NxosGpbAdapter
Parameters
Table 127. Adapter specific parameters for the NxosGpbAdapter
Parameter
Description Required
Defaultvalue
script Full path to the script used to handle the NXOS messages required (none)
Scripting
The script will be invoked for every NX-OS message that is received and succesfully decoded.
The following globals will be passed to the script:
Table 128. Globals passed to the script
Parameter
Description Type
agent The agent (node) against which the metricswill be associated
org.opennms.netmgt.collection.api.CollectionAgent
builder Builder in which the resources and metricsshould be added
org.opennms.netmgt.collection.support.builder.CollectionSetBuilder
msg Decoded NX-OS message from which themetrics should be extracted
org.opennms.netmgt.telemetry.adapters.nxos.proto.TelemetryBis
358

24.5.6. sFlow Interface
See Flow Support for details on flow support in OpenNMS Horizon.
sFlow Adapter
The sFlow adapter is used to handle sFlow payloads generated by the sFlow listener. Flows aredecoded from the messages into the canonical flow format and are published to the flow repository.
Facts
Class Name org.opennms.netmgt.telemetry.adapters.netflow.sflow.SFlowAdapter
Parameters
This adapter does not currently have any configurable parameters.
24.6. Listener Reference
24.6.1. UDP Listener
The UDP listener can be used to open a simple UDP socket and build messages from the receivedpackets.
Facts
Class Name org.opennms.netmgt.telemetry.listeners.udp.UdpListener
Supported on Minion Yes
Parameters
Table 129. Listener specific parameters for the UdpListener
Parameter Description Required
Defaultvalue
host IP address on which to bind the UDP port optional 0.0.0.0
port UDP port number on which to listen optional 50000
maxPacketSize
Maximum packet size in bytes (anything greater will betruncated)
optional 8096
24.6.2. Netflow v9 UDP Listener
This UDP based listener can be used to open a UDP socket to deal with incoming Netflow v9 packets.
Facts
Class Name org.opennms.netmgt.telemetry.listeners.flow.netflow9.UdpListener
359

Supported on Minion Yes
Parameters
Table 130. Listener specific parameters for the Netflow v9 UDP listener
Parameter Description Required
Default value
host IP address on which to bind the UDP socket optional
0.0.0.0
port UDP port number on which to listen optional
4738
maxPacketSize Maximum packet size in bytes (anything greater will betruncated)
optional
8096
templateTimeout
Number of milliseconds after which templates timeout optional
1800000 (30minutes)
24.6.3. IPFIX UDP Listener
This UDP based listener can be used to open a UDP socket to deal with incoming IPFIX packets.
Facts
Class Name org.opennms.netmgt.telemetry.listeners.flow.ipfix.UdpListener
Supported on Minion Yes
Parameters
Table 131. Listener specific parameters for the IPFIX UDP listener
Parameter Description Required
Default value
host IP address on which to bind the UDP socket optional
0.0.0.0
port UDP port number on which to listen optional
4738
maxPacketSize Maximum packet size in bytes (anything greater will betruncated)
optional
8096
templateTimeout
Number of milliseconds after which templates timeout optional
1800000 (30minutes)
24.6.4. IPFIX TCP Listener
This TCP based listener can be used to open a TCP socket to deal with IPFIX sessions.
360

Facts
Class Name org.opennms.netmgt.telemetry.listeners.flow.ipfix.TcpListener
Supported on Minion Yes
Parameters
Table 132. Listener specific parameters for the IPFIX TCP listener
Parameter
Description Required
Defaultvalue
host IP address on which to bind the TCP socket optional 0.0.0.0
port TCP port number on which to listen optional 4739
24.6.5. sFlow UDP Listener
This UDP based listener can be used to open a UDP socket to deal with incoming sFlow packets.
Facts
Class Name org.opennms.netmgt.telemetry.listeners.sflow.Listener
Supported on Minion Yes
Parameters
Table 133. Listener specific parameters for the sFlow UDP listener
Parameter Description Required
Defaultvalue
host IP address on which to bind the UDP socket optional 0.0.0.0
port UDP port number on which to listen optional 6343
maxPacketSize
Maximum packet size in bytes (anything greater will betruncated)
optional 8096
361

Chapter 25. Elasticsearch IntegrationOpenNMS Horizon persists/forwards certain data to Elasticsearch.
The following chapters describe the configuration possibilities as well as the available features.
Internally all Elasticsearch integrations use the Jest library to access the Elasticsearch ReSTinterface.
25.1. ConfigurationThe configuration is feature dependant and therefore must take place in the feature configurationfile in $OPENNMS_HOME/etc/org.opennms.features.flows.persistence.elastic.cfg.
The following properties can be set:
Property Description Required
default
elasticUrl URL(s) to Elasticsearch nodes. Can either pointdirectly to ReST API or seed nodes. The format is:<host>:<port>. Comma separate multiple values.
required
http://localhost:9200
elasticIndexStrategy
Index strategy for data, allowed values yearly,monthly, daily, hourly
optional
daily
globalElasticUser Username to use for all nodes, when X-PackSecurity is configured.
optional
-
globalElasticPassword
Password to use for all nodes, when X-Pack Securityis configured.
optional
-
defaultMaxTotalConnectionPerRoute
Sets the default max connections per route. If anegative value is given, the value is ignored.
optional
<availableprocessors> * 2
maxTotalConnection
Sets the default max total connections. If a negativevalue is given, the value is ignored.
optional
<max connectionsper route> * 3
nodeDiscovery Enable/Disable node discovery. Valid values aretrue|false.
optional
false
nodeDiscoveryFrequency
Defines the frequency in seconds in which thenodes are re-discovered. Must be set, ifdiscovery=true
optional
-
proxy Allows defining a HTTP proxy. Only accepts validURLs.
optional
-
retries Defines how many times an operation is retriedbefore considered failed.
optional
0
retryCooldown Defines the cooldown in ms to wait before retrying.Value of 0 means no cooldown. Value must be >= 0.
optional
500
362

Property Description Required
default
connTimeout Defines the connection timeout in ms. optional
5000
readTimeout Defines the read timeout in ms. optional
30000
bulkRetryCount Defines the number of retries performed before abulk operation is considered as failed. When bulkoperations fail, only the failed items are retried.
optional
5
settings.index.number_of_shards
The number of primary shards that an index shouldhave. Refer to Elasticsearch Reference → IndexModules for more details.
optional
-
settings.index.number_of_replicas
The number of replicas each primary shard has.Refer to Elasticsearch Reference → Index Modulesfor more details.
optional
-
settings.index.refresh_interval
How often to perform a refresh operation, whichmakes recent changes to the index visible to search.Refer to Elasticsearch Reference → Index Modulesfor more details.
optional
-
settings.index.routing_partition_size
The number of shards a custom routing valuce cango to. Refer to Elasticsearch Reference → IndexModules for more details.
optional
-
If a configuration management tool is used, the properties file can be created andis used as startup configuration
If credentials are provided preemptive auth is used for all defined Elasticsearchnodes.
Configuration Example to access Elasticsearch
elasticUrl=http://elastic:9200elasticIndexStrategy=dailyelasticGlobalUser=elasticelasticGlobalPassword=changeme
25.2. CredentialsIt is possible to define credentials for each Elasticsearch node individually. Credentials for eachnode must be stored in $OPENNMS_HOME/etc/elastic-credentials.xml.
363

Custom credentials
<?xml version="1.0" encoding="UTF-8" standalone="yes"?><elastic-credentials> <credentials url="http://localhost:9200" username="ulf" password="ulf" /> <credentials url="https://10.10.0.1:9333" username="ulf" password="flu" /></elastic-credentials>
Credentials are globally defined and will be used by each feature.
25.3. Features
25.3.1. Version Matrix
Not all features are enabled by default and may require a certain version of Elasticsearch.Therefore the following table provides a version overview.
Name Supported ElasticVersion
Enabled by default Feature
Event and AlarmForwarder
>= 5.0 no opennms-es-rest
Flow Support >= 6.2.4 yes opennms-flows
25.3.2. Alarm and Event Forwarder
The Alarm and Event Forwarder (formerly known as the Elasticsearch ReST plugin) forwards eventsand alarms to Elasticsearch. In combination with the alarm Alarm Change Notifier Plugin it alsoforwards alarm change events.
The events and alarms in Elasticsearch can then be used for indexing, long time archival, plottingwith Grafana and browsing with Kibana.
This feature uses the Elasticsearch ReST interface and can interact with cloud-hosted Elasticsearch instances.
If you use Kibana, make sure you are using the version that is compatible withyour version of Elasticsearch.
Configuration
The configuration is held in$OPENNMS_HOME/etc/org.opennms.plugin.elasticsearch.rest.forwarder.cfg. Please refer to sectionConfiguring Elasticsearch in order to configure Elasticsearch connection settings.
Besides the general Elasticsearch connection settings, the following properties are supported toconfigure the Alarm and Event Forwarder:
364
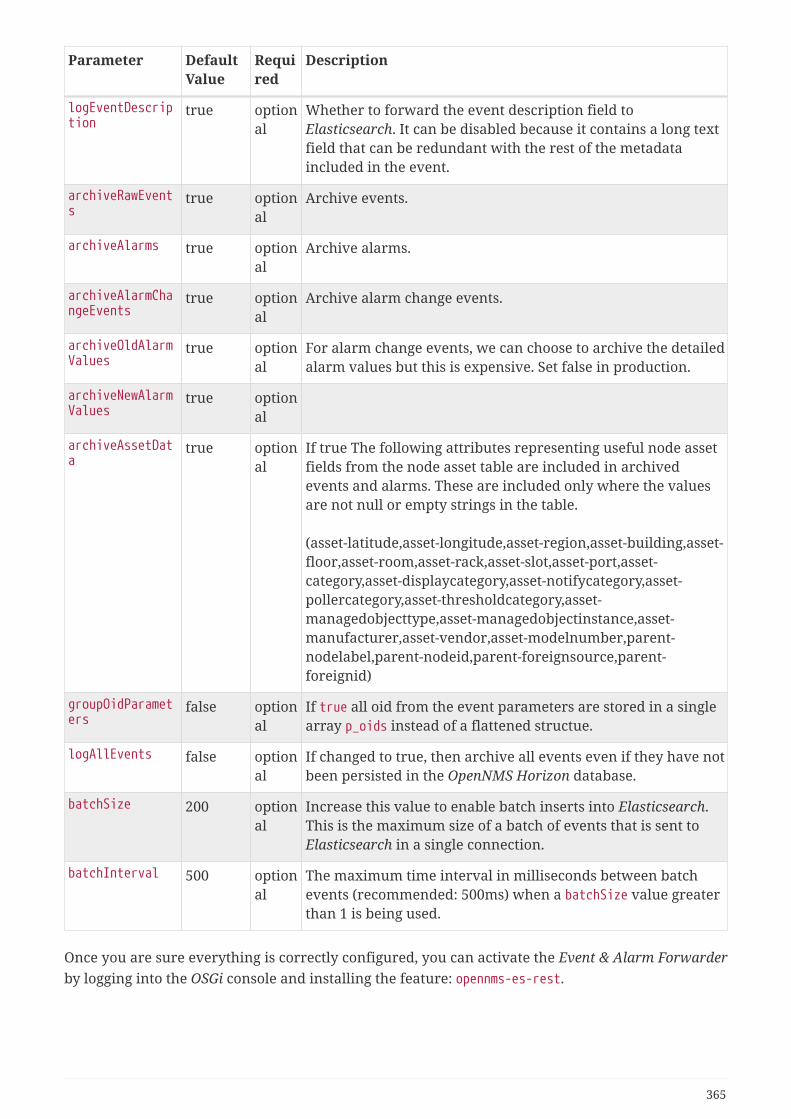
Parameter DefaultValue
Required
Description
logEventDescription
true optional
Whether to forward the event description field toElasticsearch. It can be disabled because it contains a long textfield that can be redundant with the rest of the metadataincluded in the event.
archiveRawEvents
true optional
Archive events.
archiveAlarms true optional
Archive alarms.
archiveAlarmChangeEvents
true optional
Archive alarm change events.
archiveOldAlarmValues
true optional
For alarm change events, we can choose to archive the detailedalarm values but this is expensive. Set false in production.
archiveNewAlarmValues
true optional
archiveAssetData
true optional
If true The following attributes representing useful node assetfields from the node asset table are included in archivedevents and alarms. These are included only where the valuesare not null or empty strings in the table.
(asset-latitude,asset-longitude,asset-region,asset-building,asset-floor,asset-room,asset-rack,asset-slot,asset-port,asset-category,asset-displaycategory,asset-notifycategory,asset-pollercategory,asset-thresholdcategory,asset-managedobjecttype,asset-managedobjectinstance,asset-manufacturer,asset-vendor,asset-modelnumber,parent-nodelabel,parent-nodeid,parent-foreignsource,parent-foreignid)
groupOidParameters
false optional
If true all oid from the event parameters are stored in a singlearray p_oids instead of a flattened structue.
logAllEvents false optional
If changed to true, then archive all events even if they have notbeen persisted in the OpenNMS Horizon database.
batchSize 200 optional
Increase this value to enable batch inserts into Elasticsearch.This is the maximum size of a batch of events that is sent toElasticsearch in a single connection.
batchInterval 500 optional
The maximum time interval in milliseconds between batchevents (recommended: 500ms) when a batchSize value greaterthan 1 is being used.
Once you are sure everything is correctly configured, you can activate the Event & Alarm Forwarderby logging into the OSGi console and installing the feature: opennms-es-rest.
365

OSGi login and installation of the Elasticsearch forwarder
ssh admin@localhost -p 8101feature:install opennms-es-rest
Loading Historical Events
It is possible to load historical OpenNMS Horizon events into Elasticsearch from the OpenNMSHorizon database using a karaf console command. The command uses the OpenNMS Horizon EventsReST interface to retrieve a set number of historical events and forward them to Elasticsearch.Because we are using the ReST interface it is also possible to contact a remote OpenNMS Horizonand download its events into Elasticsearch by using the correct remote URL and credentials.
The following example sends historic events to Elasticsearch using the karaf console:
# open karaf command prompt using# ssh -p 8101 admin@localhostkaraf> elasticsearch:send-historic-events --username admin --password admin --urlhttp://localhost:8980 --limit 10 --offset 0
For more details, consolidate the --help option of the command.
Index Definitions
Three indices are created; one for alarms, one for alarm change events and one for raw events.Alarms and alarm change events are only saved if the Alarm Change Notifier Plugin plugin is alsoinstalled to generate alarm change events from the OpenNMS Horizon alarms table. The indexnames are of the form (assuming an index strategy of monthly): opennms-<name>-<index-strategy>/type/id
For example
a) Alarms
opennms-alarms-2017-01/alarmdata/1823
b) Alarm Change Events
opennms-events-alarmchange-2017-01/eventdata/11549
c) Raw OpenNMS Horizon events (not including alarm change events)
opennms-events-raw-2017-01/eventdata/11549
366

Viewing events using Kibana Sense
Kibana Sense is a Kibana app which allows you to run queries directly against Elasticsearch.(https://www.elastic.co/guide/en/sense/current/installing.html)
If you install Kibana Sense you can use the following commands to view the alarms and events sentto Elasticsearch You should review the Elasticsearch ReST API documentation to understand howsearches are specified. (See https://www.elastic.co/guide/en/elasticsearch/reference/current/search.html)
Example searches to use in Kibana Sense (you can copy the whole contents of this panel into KibanaSense as a set of examples)
367

# Search all the alarms indexes
GET /opennms-alarms-*/_search
# Get all of the alarms indexes
GET /opennms-alarms-*/
# Get a specific alarm id from the 2017.01 index
GET opennms-alarms-2017-01/alarmdata/1823
# Delete all alarm indexes
DELETE /opennms-alarms-*/
# Search all the events indexes
GET /opennms-events-*/_search
# Search all the raw events indexes
GET /opennms-events-raw*/_search
# Delete all the events indexes
DELETE /opennms-events-*/
# Get all the raw events indexes
GET /opennms-events-raw*/
# Get all the alarmchange event indexes
GET /opennms-events-alarmchange-*/
# Search all the alarm change event indexes
GET opennms-events-alarmchange-*/_search
# Get a specific alarm change event
GET opennms-events-alarmchange-2016-08/eventdata/11549
Mapping of Alarms and Events to Elasticsearch
Overview of index mapping
In OpenNMS Horizon, Alarm and Event table entries contain references to associated node, asset,service and journal message tables. In Elasticsearch, we must flatten these entries into a single
368

index entry for each insertion. Thus each index entry contains more context information thanwould be found in the actual OpenNMS Horizon event or alarm. This context information includesthe associated node and asset table information which was current when (but may have changedsince) the event was archived.
In the Table of Index Mappings below we have example alarm and event JSON entries retrievedusing a sense command. The table helps illustrate how OpenNMS Horizon saves data inElasticsearch.
Internal Elasticsearch fields always begin with an underscore character. The internal fields id,_index and _type are combined to give the unique identifier for an entry as described aboveunder Index Definitions. All of the fields under _source represent the stored alarm or event
(_Elasticsearch documentation refers to source entries as indexed documents). The ID of eachevent is included in the _source id field and also duplicated in the internal _id.
Events in the OpenNMS Horizon events table (i.e. those corresponding to logs or traps) are copieddirectly to the opennms-events-raw- indexes. In OpenNMS Horizon alarms and events can containparameters which are key-value pairs referencing additional data stored when the event or alarm iscreated. In Elasticsearch these parameters are always stored in separate fields in the index withnames beginning with p_
Alarm change events created by the Alarm Change Notifier Plugin have an identical format to rawevents but are only copied to the opennms-events-alarmchange- indexes. These alarm change eventsare also used to change the state of alarms in the opennms-alarms- indexes. Thus alarm entries in theopennms-alarms- indexes reflect the current state of alarms as notified by OpenNMS Horizon throughalarm change events.
The parameters included with each type of Alarm Change Event are listed in the Alarm ChangeNotifier Plugin section. Each parameter in the index will have a p_ prefix (ie. %parm[newalarmvalues]%becomes p_newalarmvalues).
Alarms and Events have severity fields defined as integers (long) and also correspondingseverity_text fields which give the text equivalent (Critical, Major, Minor, Normal, Cleared).
Additional Alarm Fields
The id of each alarm is included in the _source alarmid field and also duplicated in the internal _idreference for the alarms index. Alarm Change Events reference their associated alarm using thep_alarmid parameter. To make it easier to search for alarm change events associated with the samealarm, alarms also have a _source p_alarmid parameter which matches alarmid. Thus we should beable to search for an alarm in the opennms-alarms index and find its complete lifecycle from alarmraise to deletion in the opennms-events-alarmchange index.
The alarms index is enriched with additional data to allow the alarm entries to be used in SLAcalculations.
Additional AlarmFields
description
alarmackduration Calculated time in milliseconds from first event which created the alarm tothe latest alarm acknowledgement.
369

Additional AlarmFields
description
alarmclearduration
Calculated time in milliseconds from first event which created the alarm tothe latest alarm clear.
initialseverity The final state of any given alarm in an alarm index should be cleared anddeleted. Therefore we also include an initial severity.
initialseverity_text The initial severity as a text field.
Table of Index Mapping
The following table describes the mapping of simple OpenNMS Horizon events to the Raw EventsIndex and the mapping of Alarm Change Events to the Alarm Change Events index and to theAlarms index. Note that fields that begin with an underscore (_) are internal to Elasticsearch.
Alarm Index Fields Event Index Fields (Alarmchange and raw events)
Description
Example Alarm JSON AlarmField
EventField
Example Event JSON Type
Description
"_index": "opennms-alarms-2017.03",
"_index":
"_index":
"_index": "opennms-events-alarmchange-2017.03",
string
_index is the index inwhich this alarm orevent is stored.
"_type": "alarmdata", "_type": "_type":
"_type": "eventdata", string
_type either alarmdata oreventdata
"_id": "31", "_id": "_id": "_id": "1110", string
_id field matches theevent or alarm ID, ifpresent.
"_score": 1, "_score":
"_score":
"_score": 1, long
Internal Elasticsearchranking of the searchresult.
"_source": "_source":
"_source":
"_source": string
_source contains the dataof the index entry.
"@timestamp": "2017-03-03T12:44:21.210Z",
"@timestamp":
"@timestamp":
"@timestamp": "2017-03-02T15:20:56.861Z",
date
For Alarms, @timestamp isalarm creation timebased on the first eventtime. For Events,@timestamp is event timefrom event.getTime().
"dom": "3", "dom": "dom":
"dom": "2", long
Day of month from@timestamp.
370

Alarm Index Fields Event Index Fields (Alarmchange and raw events)
Description
"dow": "6", "dow": "dow": "dow": "5", long
Day of week from@timestamp.
"hour": "12", "hour": "hour":
"hour": "15", long
Hour of day from@timestamp.
"eventdescr":
"eventdescr": "<p>Alarm<ahref=\"/opennms/alarm/detail.htm?id=30\">30</a>Cleared<p>…",
string
Event description.
"eventseverity":
"eventseverity": "3", long
Event severity.
Alarm Change Events:
All events have severitynormal.
"eventseverity_text":
"eventseverity_text":"Normal",
string
Text representation ofseverity value.
"eventsource":
"eventsource":"AlarmChangeNotifier",
string
OpenNMS event source.
Alarm Change Events:
All events have the eventsourceAlarmChangeNotifier.
"eventuei":
"eventuei":"uei.opennms.org/plugin/AlarmChangeNotificationEvent/AlarmCleared",
string
OpenNMS universalevent identifier (UEI) ofthe event.
"id": "id": "1110", string
Event ID.
"interface":
"interface": "127.0.0.1", string
IP address of the event.
"ipaddr":
"ipaddr": "/127.0.0.1", string
IP address of the event.
371

Alarm Index Fields Event Index Fields (Alarmchange and raw events)
Description
"logmsg":
"logmsg": "<p>Alarm <ahref=\"/opennms/alarm/detail.htm?id=30\">30</a>Cleared<p>",
string
Log message of theevent.
Alarm Change Events:
Log messages contain alink to the alarm.
"logmsgdest":
"logmsgdest":"logndisplay",
string
Log Destination of theEvent.
372
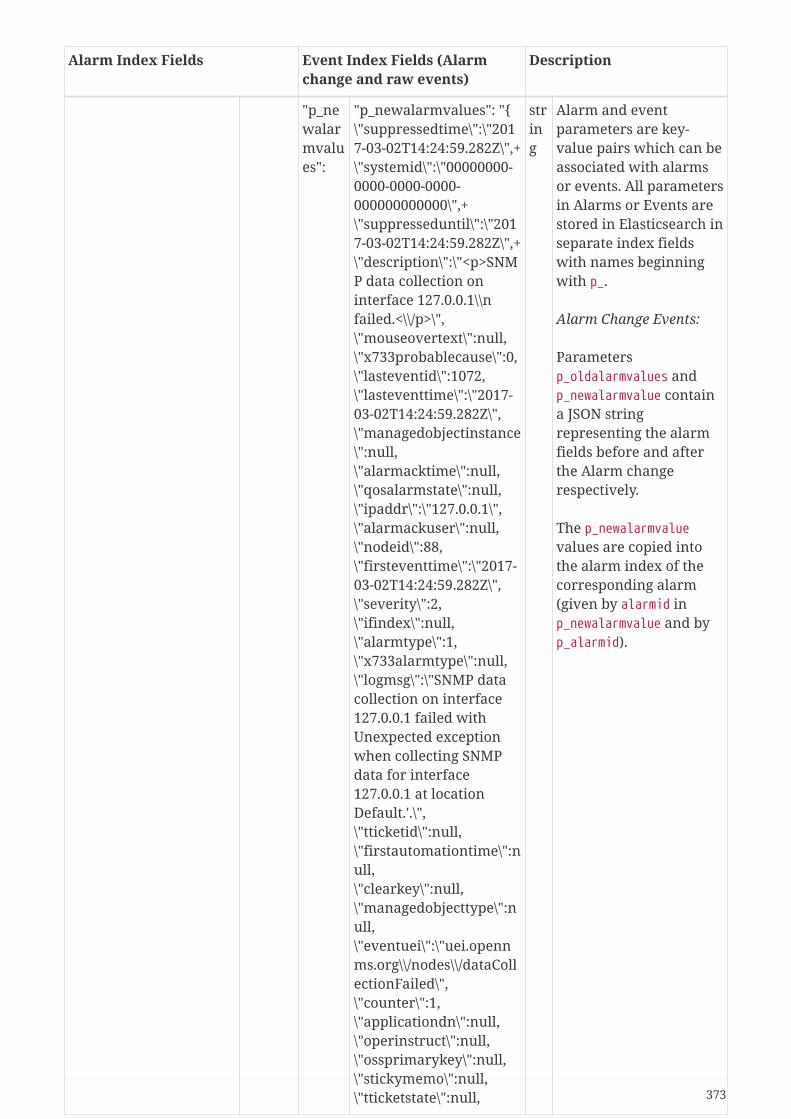
Alarm Index Fields Event Index Fields (Alarmchange and raw events)
Description
"p_newalarmvalues":
"p_newalarmvalues": "\"suppressedtime\":\"2017-03-02T14:24:59.282Z\",+\"systemid\":\"00000000-0000-0000-0000-000000000000\",+\"suppresseduntil\":\"2017-03-02T14:24:59.282Z\",+\"description\":\"<p>SNMP data collection oninterface 127.0.0.1\\nfailed.<\\/p>\",\"mouseovertext\":null,\"x733probablecause\":0,\"lasteventid\":1072,\"lasteventtime\":\"2017-03-02T14:24:59.282Z\",\"managedobjectinstance\":null,\"alarmacktime\":null,\"qosalarmstate\":null,\"ipaddr\":\"127.0.0.1\",\"alarmackuser\":null,\"nodeid\":88,\"firsteventtime\":\"2017-03-02T14:24:59.282Z\",\"severity\":2,\"ifindex\":null,\"alarmtype\":1,\"x733alarmtype\":null,\"logmsg\":\"SNMP datacollection on interface127.0.0.1 failed withUnexpected exceptionwhen collecting SNMPdata for interface127.0.0.1 at locationDefault.'.\", \"tticketid\":null,\"firstautomationtime\":null,\"clearkey\":null,\"managedobjecttype\":null,\"eventuei\":\"uei.opennms.org\\/nodes\\/dataCollectionFailed\",\"counter\":1,\"applicationdn\":null,\"operinstruct\":null,\"ossprimarykey\":null,\"stickymemo\":null,\"tticketstate\":null,
string
Alarm and eventparameters are key-value pairs which can beassociated with alarmsor events. All parametersin Alarms or Events arestored in Elasticsearch inseparate index fieldswith names beginningwith p_.
Alarm Change Events:
Parametersp_oldalarmvalues andp_newalarmvalue containa JSON stringrepresenting the alarmfields before and afterthe Alarm changerespectively.
The p_newalarmvaluevalues are copied intothe alarm index of thecorresponding alarm(given by alarmid inp_newalarmvalue and byp_alarmid).
373

Alarm Index Fields Event Index Fields (Alarmchange and raw events)
Description
"p_oldalarmvalues":
"p_oldalarmvalues": " ….",
string
See p_newalarmvalues.
"p_oldseverity":
"p_oldseverity": "5", long
Alarm Change Events:
Contains the old severityof the alarm before thisalarm change event.
"alarmackduration":"2132249",
"alarmackduration":
long
Time in millisecondsfrom first event whichcreated the alarm to thelatest alarmacknowledgement.
"alarmacktime": "2017-03-03T13:19:53.351Z",
"alarmacktime":
"p_alarmacktime":
"p_alarmacktime": "2017-03-03T13:19:53.351Z",
date
AlarmChangeNotificationEvent/AlarmAcknowledged Events:
Time that the alarm wasacknowledged.
"alarmackuser": "admin", "alarmackuser":
"p_alarmackuser"
"p_alarmackuser":"admin",
AlarmChangeNotificationEvent/AlarmAcknowledged Events:
Name of the user whoacknowledged the alarm.
"alarmclearduration":"2175014"
"alarmclearduration":
long
Time in millisecondsfrom first event whichcreated the alarm to thelatest alarm clear.
"alarmcleartime": "2017-03-03T13:20:36.224Z",
"alarmcleartime":
"p_alarmcleartime":
"p_alarmcleartime":"2017-03-03T13:20:36.224Z",
date
AlarmChangeNotificationEvent/AlarmClear Events:
Time that the alarm wascleared.
"alarmid": "31", "alarmid":
"p_alarmid":
"p_alarmid": "30", string
Alarm Change Events:
The alarm ID of thealarm that has changed.
"alarmtype": "1", "alarmtype":
"p_alarmtype":
"p_alarmtype": "1", string
Alarm Change Events:
Corresponds to thealarm’s type.
374

Alarm Index Fields Event Index Fields (Alarmchange and raw events)
Description
"applicationdn": null, "applicationdn":
string
"asset-category":"Power",
"asset-category":
"asset-category":
"asset-category":"Power",
string
All asset_ entriescorrespond to fields inthe Asset Table of thenode referenced in theevent. These fields areonly present if populatedin the asset table.
"asset-building": "55", "asset-building":
"asset-building":
"asset-building": "55", string
"asset-room": "F201", "asset-room":
"asset-room":
"asset-room": "F201", string
"asset-floor": "Gnd", "asset-floor":
"asset-floor":
"asset-floor": "Gnd", string
"asset-rack": "2101", "asset-rack":
"asset-rack":
"asset-rack": "2101", string
"categories": "", "categories":
"categories":
"categories": "", string
categories correspondsto node categories table.This is a comma-separated list ofcategories associatedwith this node ID. Thisfield is indexed soseparate values can besearched.
"clearkey": null, "clearkey":
string
"counter": "1", "counter":
string
"description": "<p>SNMPdata collection oninterface 127.0.0.1\nfailed.</p>",
"description":
string
375

Alarm Index Fields Event Index Fields (Alarmchange and raw events)
Description
"eventuei":"uei.opennms.org/nodes/dataCollectionFailed",
"eventuei":
"p_eventuei":
"p_eventuei":"uei.opennms.org/nodes/dataCollectionFailed",
string
Alarm Change Events:
Corresponds to thealarm’s event UEI.
"firstautomationtime":null,
"firstautomationtime":
date
"firsteventtime": "2017-03-03T12:44:21.210Z",
"firsteventtime":
date
"foreignid":"1488375237814",
"foreignid":
"foreignid":
"foreignid":"1488375237814",
string
Foreign ID of the nodeassociated with thealarm or event.
"foreignsource":"LocalTest",
"foreignsource":
"foreignsource":
"foreignsource":"LocalTest",
string
Foreign source of thenode associated withalarm or event.
"ifindex": null, "ifindex":
string
"ipaddr": "127.0.0.1", "ipaddr":
string
"lastautomationtime":null,
"lastautomationtime":
"lasteventid": "1112", "lasteventid":
string
"lasteventtime": "2017-03-03T12:44:21.210Z",
"lasteventtime":
"logmsg": "SNMP datacollection on interface127.0.0.1 failed with'Unexpected exceptionwhen collecting SNMPdata for interface127.0.0.1 at locationDefault.'.",
"logmsg":
"p_logmsg":
"p_logmsg": "SNMP datacollection on interface127.0.0.1 failed with'Unexpected exceptionwhen collecting SNMPdata for interface127.0.0.1 at locationDefault.'.",
string
376

Alarm Index Fields Event Index Fields (Alarmchange and raw events)
Description
"managedobjectinstance": null,
"managedobjectinstance":
string
"managedobjecttype":null,
"managedobjecttype":
string
"mouseovertext": null, "mouseovertext":
string
"nodeid": "88", "nodeid":
"nodeid":
"nodeid": "88", string
Node ID of the nodeassociated with thealarm or event.
"nodelabel": "localhost", "nodelabel":
"nodelabel":
"nodelabel": "localhost", string
Node label of the nodeassociated with thealarm or event.
"nodesyslocation":"Unknown (edit/etc/snmp/snmpd.conf)",
"nodesyslocation":
"nodesyslocation":
"nodesyslocation":"Unknown (edit/etc/snmp/snmpd.conf)",
string
SNMP syslocation of thenode associated with thealarm or event.
"nodesysname":"localhost.localdomain",
"nodesysname":
"nodesysname":
"nodesysname":"localhost.localdomain",
string
SNMP sysname of thenode associated with thealarm or event.
"operatingsystem": null, "operatingsystem":
string
"operinstruct": null, "operinstruct":
string
"ossprimarykey": null, "ossprimarykey":
string
377

Alarm Index Fields Event Index Fields (Alarmchange and raw events)
Description
"p_alarmid": "31", "p_alarmid":
string
The Elasticsearch alarmsindex has a fieldp_alarmid whichcorresponds to thealarmid of the alarm andalso the p_alarmid field inAlarm Change Events.This allows Alarm andAlarm Change Eventindexes to be easilysearched together for allAlarm Change Eventscorresponding to analarm.
"p_reason": "Unexpectedexception whencollecting SNMP data forinterface 127.0.0.1 atlocation Default.",
"p_reason":
string
All parameters in Alarmsor Events are stored inElasticsearch in separateindex fields with namesbeginning with p_.p_reason is an exampleparameter injected bytheuei.opennms.org/nodes/dataCollectionFailed eventin OpenNMS.
"qosalarmstate": null, "qosalarmstate":
string
"reductionkey":"uei.opennms.org/nodes/dataCollectionFailed::88",
"reductionkey":
"p_reductionkey":
"p_reductionkey":"uei.opennms.org/nodes/dataCollectionFailed::88",
string
Alarm Change Events:
Corresponds to alarmreductionkey.
"serviceid": "5", "serviceid":
"p_serviceid":
"p_serviceid": "5" string
Alarm Change Events:
Corresponds to thealarm’s service ID.
"severity": "2", "severity":
"p_alarmseverity":
"p_alarmseverity": "2", string
Alarm Change Events:
Corresponds to thealarm’s severity.
"severity_text":"Cleared",
"severity_text":
string
378

Alarm Index Fields Event Index Fields (Alarmchange and raw events)
Description
"stickymemo": null, "stickymemo":
"p_stickymemo"
"p_stickymemo": null, string
AlarmChangeNotificationEvent/StickyMemoAddedEvents:
Content of current stickymemo for the alarm.
AlarmChangeNotificationEvent/StickyMemoUpdateEvents:
These events haveparameters:
• p_author: author ofstickymemo
• p_body: content ofsticky memo
AlarmChangeNotificationEvent/JournalMemoUpdate Events:
These events haveparameters:
• p_author: user whoauthored the memo
• p_body: content of thememo
• p_reductionkey:reduction keyassociated withmemo (correspondsto alarm reductionkey)
Note that journal memosdo not have an entry inthe alarm index but areonly referenced byreduction key.
379

Alarm Index Fields Event Index Fields (Alarmchange and raw events)
Description
"suppressedtime": "2017-03-03T12:44:21.210Z",
"suppressedtime":
"p_suppressedtime":
"p_suppressedtime":"2017-03-02T14:24:59.282Z",
date
AlarmChangeNotificationEvent/AlarmSuppressedEvents:
Corresponds to thealarm’s suppressed time.
"suppresseduntil": "2017-03-03T12:44:21.210Z",
"suppresseduntil":
"p_suppresseduntil":
"p_suppresseduntil":"2017-03-02T14:24:59.282Z",
date
AlarmChangeNotificationEvent/AlarmSuppressedEvents:
Corresponds to thealarm’s suppressed untiltime.
"suppresseduser": null, "suppresseduser":
"p_suppresseduser":
"p_suppresseduser": null, string
AlarmChangeNotificationEvent/AlarmSuppressedEvents:
Corresponds to thealarm’s suppressed user.
"systemid": "00000000-0000-0000-0000-000000000000",
"systemid":
"p_systemid":
"p_systemid": "00000000-0000-0000-0000-000000000000",
string
Alarm Change Events:
Corresponds to thealarm’s system ID.
"tticketid": null, "p_tticketid":
"p_tticketid":
"p_tticketid": null, string
AlarmChangeNotificationEvent/TroubleTicketStateChange Events:
Corresponds to thealarm’s trouble ticket ID.
"tticketstate": null, "p_tticketstate":
"p_tticketstate":
"p_tticketstate": null, string
AlarmChangeNotificationEvent/TroubleTicketStateChange Events:
Corresponds to thealarm’s trouble ticketstate.
"x733alarmtype": null, "x733alarmtype":
string
"x733probablecause":"0",
"x733probablecause":
string
380

25.3.3. Flow Support
Flow Support is described in detail here.
When persisting flows into Elasticsearch, every flow is represented by a single document.
The following table describes a subset of the fields in the flow document:
Field Description
@timestamp Timestamp in milliseconds at which the flow was sent by the exporter.
location Monitoring location at which the flow was received. This will be Default unlessyou are using Minion.
netflow.bytes Number of bytes transferred in the flow.
netflow.last_switched
Timestamp in milliseconds at which the last packet of the flow wastransferred.
netflow.direction ingress or egress
netflow.first_switched
Timestamp in milliseconds at which the first packet of the flow wastransferred.
netflow.last_switched
Timestamp in milliseconds at which the last packet of the flow wastransferred.
netflow.input_snmp
SNMP interface index on which packets related to this flow were received.
netflow.output_snmp
SNMP interface index on which packets related to this flow were forwarded.
381

Chapter 26. Flow Support
26.1. IntroductionOpenNMS Horizon supports receiving, decoding and persisting flow information sent via Netflowv5, Netflow v9, IPFIX and sFlow. While flows offer a great breadth of information, the current focusof the support in OpenNMS Horizon is aimed at:
• Network diagnostic: Being able to view the top protocols and top talkers within the context of aparticular network interface.
• Forensic analysis: Persisting the flows for long term storage.
26.1.1. How it works
At a high level:
• telemetryd is used to receive and decode flows on both OpenNMS Horizon and Minion.
• The telemetryd adapters convert the flows to a canonical flow model and dispatch these to theflow repository.
• The flow repository enriches the flows and persists them to Elasticsearch:
Flows are tagged with an application name via the Classification Engine.
Metadata related to associated nodes such as ids and categories are also added to the flows.
• The REST API supports generating both summaries and time series data from the flows stored inthe flow repository.
• OpenNMS Helm is used to visualize the flow data using the flow datasource that interfaces withthe OpenNMS Horizon REST API.
26.2. SetupHere we assume that you already have:
• An Elasticsearch cluster setup with the elasticsearch-drift-plugin installed on everyElasticsearch node.
• An instance of Grafana OpenNMS Helm v2.0.0 or greater installed.
26.2.1. Configuration Elasticsearch persistence
From a Karaf shell on your OpenNMS Horizon instance, start by configuring the flow persistence touse your Elasticsearch cluster:
382

$ ssh -p 8101 [email protected]@opennms()> config:edit org.opennms.features.flows.persistence.elasticadmin@opennms()> config:property-set elasticUrl http://elastic:9200admin@opennms()> config:update
This configuration is stored in$OPENNMS_HOME/etc/org.opennms.features.flows.persistence.elastic.cfg. SeeGeneral Elasticsearch Configuration for a complete set of options.
26.2.2. Enabling a protocol
Next, enable one or more of the protocols you would like to handle in$OPENNMS_HOME/etc/telemetryd-configuration.xml.
In this example we enable the NetFlow v5 protocol, but the same process can berepeated for any of the other flow related protocols.
Enable NetFlow v5 in telemetryd-configuration.xml
<protocol name="Netflow-5" description="Listener for Netflow 5 UDP packets" enabled="true"> <listener name="Netflow-5-UDP-8877" class-name="org.opennms.netmgt.telemetry.listeners.udp.UdpListener"> <parameter key="port" value="8877"/> </listener>
<adapter name="Netflow-5-Parser" class-name="org.opennms.netmgt.telemetry.adapters.netflow.Netflow5Adapter"> </adapter> </protocol>
Apply the changes without restarting by sending a reloadDaemonConfig event via the CLI:
Send a reloadDaemonConfig event through CLI
$OPENNMS_HOMEbin/send-event.pl -p 'daemonName Telemetryd'uei.opennms.org/internal/reloadDaemonConfig
This will open a UDP socket bound to 0.0.0.0:8877 to which NetFlow v5 messages can be forwarded.
26.2.3. Linking to OpenNMS Helm in the Web UI
In order to access flow related graphs from the OpenNMS Horizon web interface, you mustconfigure a link to your instance of OpenNMS Helm.
383
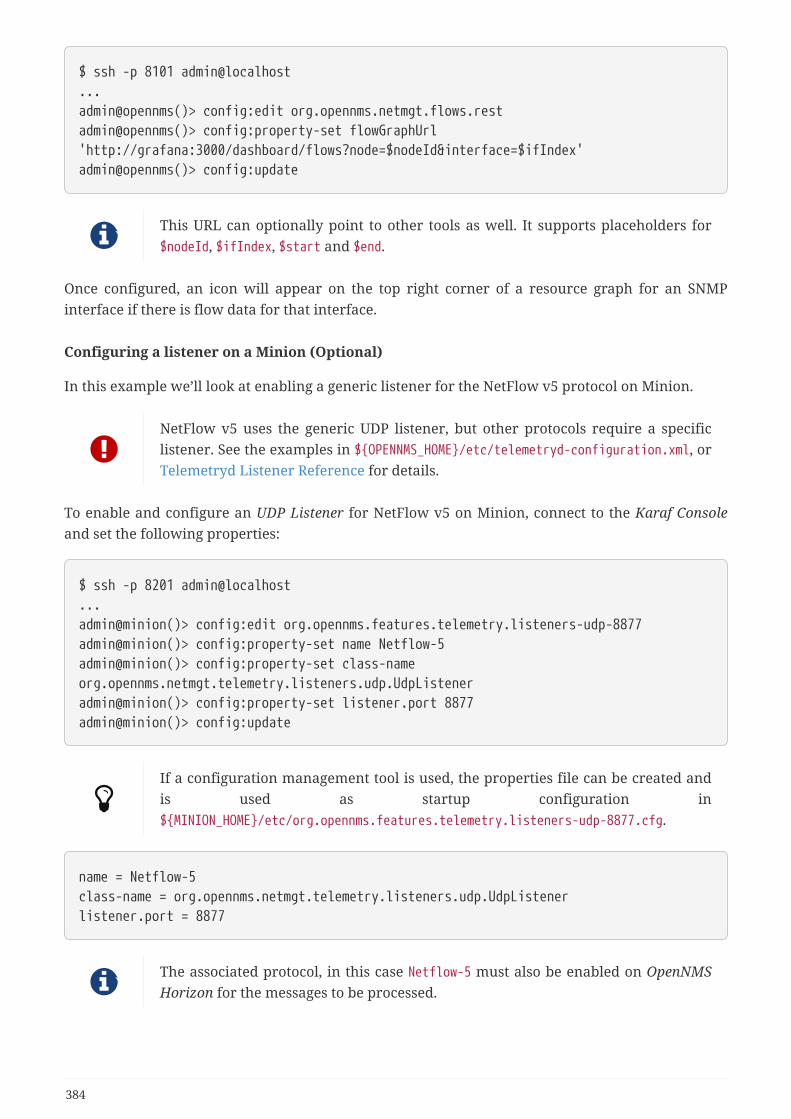
$ ssh -p 8101 [email protected]@opennms()> config:edit org.opennms.netmgt.flows.restadmin@opennms()> config:property-set flowGraphUrl'http://grafana:3000/dashboard/flows?node=$nodeId&interface=$ifIndex'admin@opennms()> config:update
This URL can optionally point to other tools as well. It supports placeholders for$nodeId, $ifIndex, $start and $end.
Once configured, an icon will appear on the top right corner of a resource graph for an SNMPinterface if there is flow data for that interface.
Configuring a listener on a Minion (Optional)
In this example we’ll look at enabling a generic listener for the NetFlow v5 protocol on Minion.
NetFlow v5 uses the generic UDP listener, but other protocols require a specificlistener. See the examples in $OPENNMS_HOME/etc/telemetryd-configuration.xml, orTelemetryd Listener Reference for details.
To enable and configure an UDP Listener for NetFlow v5 on Minion, connect to the Karaf Consoleand set the following properties:
$ ssh -p 8201 [email protected]@minion()> config:edit org.opennms.features.telemetry.listeners-udp-8877admin@minion()> config:property-set name Netflow-5admin@minion()> config:property-set class-nameorg.opennms.netmgt.telemetry.listeners.udp.UdpListeneradmin@minion()> config:property-set listener.port 8877admin@minion()> config:update
If a configuration management tool is used, the properties file can be created andis used as startup configuration in$MINION_HOME/etc/org.opennms.features.telemetry.listeners-udp-8877.cfg.
name = Netflow-5class-name = org.opennms.netmgt.telemetry.listeners.udp.UdpListenerlistener.port = 8877
The associated protocol, in this case Netflow-5 must also be enabled on OpenNMSHorizon for the messages to be processed.
384

26.2.4. Node cache configuration (Optional)
By default each Flow Document is - if known by OpenNMS Horizon - enriched with nodeinformation. To reduce the number of queries to the database, the data is cached.
The following cache properties are available to be set in$OPENNMS_HOME/etc/org.opennms.features.flows.persistence.elastic.cfg:
Property Description Required
default
nodeCache.maximumSize
The maximum size of the cache false 1000
nodeCache.expireAfterWrite
Number of seconds until an entry in the node cache is evicted.Set to 0 to disable eviction.
false 300
nodeCache.recordStats
Defines if cache statistics are exposed via JMX. Set to false todisable statistic recording.
false true
26.2.5. Classification Exporter Filter cache configuration (Optional)
A rule in the Classification Engine may define an exporterFilter. In order to resolve if the filtercriteria matches the address of an exporter a database query is executed. A cache can beconfigured to cache the result to improve performance.
The following cache properties are available to be set in$OPENNMS_HOME/etc/org.opennms.features.flows.classification.cfg:
Property Description Required
default
cache.classificationFilter.enabled
Enables or disables the cache. false false
cache.classificationFilter.maxSize
The maximum size of the cache false 5000
cache.classificationFilter.expireAfterRead
Number of seconds until an entry in the node cache isevicted. Set to 0 to disable eviction. The timer is resetevery time an entry is read.
false 300
nodeCache.recordStats Defines if cache statistics are exposed via JMX. Set to falseto disable statistic recording.
false true
26.3. Classification EngineThe Classification Engine applies a set of user- and/or system-defined rules to each flow to classify it.This allows users to group flows by applications, e.g. if all flows to port 80 are marked as http.
In order to classify a flow, a rule must be defined. A rule defines at least a name, which the flow isclassified with, and additional parameters which must match for a successful classification.
385

26.3.1. Rule definition
A rule has the following fields:
Name Mandatory Description
name mandatory The name the flow is classifiedwith, e.g. http
dstPort optional The dstPort of the flow mustmatch this port. May be a rangeor list of ports, e.g. 80,8080,8980,or 8000-9000.
dstAddress optional The dstAddress of the flow mustmatch this address. May containwildcards.
srcPort optional The srcPort of the flow mustmatch this port. See dstPort formore details.
srcAddress optional The srcAddress of the flow mustmatch this address. SeedstAddress for more details.
exporterFilter optional The exporter of the flow mustmatch this criteria. It supportsall capabilities of the OpenNMSHorizon Filters API.
protocol optional The ip protocol of the flow mustmatch this criteria.
Even if all fields (besides name) are optional, at least one of them must be defined to be considered avalid rule. A list of pre-defined rules already exist. The pre-defined rules are inspired by the IANAService Name and Transport Protocol Port Number Registry. New rules can be defined using theClassification UI which can be found in the Admin Menu: Admin → Configure OpenNMS →Manage Flow Classification
26.3.2. Rule Priority
User-defined rules always have a higher priority than the pre-defined rules. For example, if theuser defines a new rule, http with a dstPort of 8980 that rule has a higher priority than the pre-defined rule www-alt.
The priorities are as follows:
Field Priority
srcAddress +9
dstAddress +9
srcPort +3
386

Field Priority
dstPort +3
protocol +1
exporterFilter +1
The priority is added for each field which is defined according to the table above. This means a rulewith a srcAddress or dstAddress has a priority of at least 9 and is always higher than a rule with asrcPort or dstPort, etc.
The calculation of the priority is implemented here.
At the moment it is not possible to manually define a priority. This may beimplemented at a later time. See issue HZN-1265.
26.3.3. Verification
With a more complex set of rules it is not always easy to verify if everything is configured correctly.To make things a bit easier, the Classification UI allows to test/verify a classification. To do so, pleasenavigate to the Classification UI: Admin → Configure OpenNMS → Manage Flow Classificationand select the Test Classification action in the top right. This allows to simulate a flow being send tothe Classification Engine with certain fields.
26.3.4. Example
Let’s assume the following rules are defined:
name srcAddress srcPort dstAddress dstPort protocol exporterFilter
OpenNMS 10.0.0.1 8980 tcp,udp
http 80,8980,8080,9000
udp,tcp
https 443
Exporters categoryName =='Exporters'
The following flows are send to OpenNMS Horizon and with the rules defined above classifiedaccordingly.
387

Flow Classification
protocol: tcp,
srcAddress: 10.0.0.5, srcPort: 60123,
dstAddress: 54.246.188.65, dstPort: 80,
exporterAddress: 10.0.0.55
http
protocol: tcp,
srcAddress: 10.0.0.5, srcPort: 60123,
dstAddress: 54.246.188.65, dstPort: 443,
exporterAddress: 10.0.0.55
https
protocol: tcp,
srcAddress: 10.0.0.5, srcPort: 60123,
dstAddress: 10.0.0.1, dstPort: 8980,
exporterAddress: 10.0.0.55
OpenNMS
388

Chapter 27. Kafka Producer
27.1. OverviewThe Kafka Producer feature allows events, alarms and nodes from OpenNMS Horizon to beforwarded to Kafka.
These objects are stored in different topics and the payloads are encoded using Google ProtocolBuffers (GPB). See opennms-kafka-producer.proto in the corresponding source distribution for themodel definitions.
27.1.1. Events
The Kafka Producer listens for all events on the event bus and forwards these to a Kafka topic. Therecords are keyed by event UEI and contain a GPB encoded model of the event.
By default, all events are forwarded to a topic named events.
The name of the topic used can be configured, and an optional filtering expression can be set tohelp control which events are sent to the topic.
27.1.2. Alarms
The Kafka Producer listens for changes made to the current set of alarms and forwards theresulting alarms to a Kafka topic. The records are keyed by alarm reduction key and contain a GPBencoded model of the alarm. When an alarm is deleted, a null value is sent with the correspondingreduction key. Publishing records in this fashion allows the topic to be used as a KTable. The KafkaProducer will also perform periodic synchronization tasks to ensure that the contents of the Kafkatopic reflect the current state of alarms in the OpenNMS Horizon database.
By default, all alarms (and subsequent updates) are forwarded to a topic named alarms.
The name of the topic used can be configured, and an optional filtering expression can be set tohelp control which alarms are sent to the topic.
27.1.3. Nodes
If an event or alarm being forwarded reference a node, then the corresponding node is alsoforwarded. The records are keyed by "node criteria" (see bellow) and contain a GPB encoded modelof the alarm. A caching mechanism is in place to help avoid forwarding nodes that have beensuccessfully forwarded, and have not changed since.
The name of the topic used can be configured.
The node topic is not intended to include all of the nodes in the system, it onlyincludes records for nodes that relate to events or alarms that have beenforwarded.
389
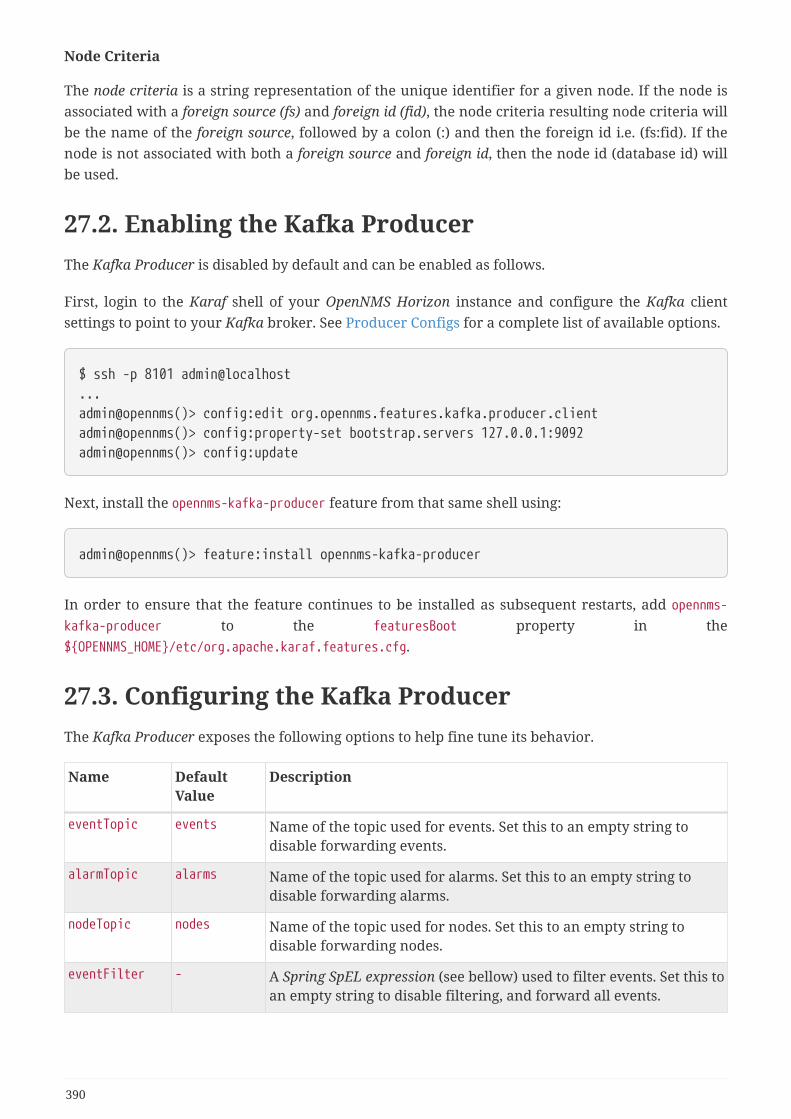
Node Criteria
The node criteria is a string representation of the unique identifier for a given node. If the node isassociated with a foreign source (fs) and foreign id (fid), the node criteria resulting node criteria willbe the name of the foreign source, followed by a colon (:) and then the foreign id i.e. (fs:fid). If thenode is not associated with both a foreign source and foreign id, then the node id (database id) willbe used.
27.2. Enabling the Kafka ProducerThe Kafka Producer is disabled by default and can be enabled as follows.
First, login to the Karaf shell of your OpenNMS Horizon instance and configure the Kafka clientsettings to point to your Kafka broker. See Producer Configs for a complete list of available options.
$ ssh -p 8101 [email protected]@opennms()> config:edit org.opennms.features.kafka.producer.clientadmin@opennms()> config:property-set bootstrap.servers 127.0.0.1:9092admin@opennms()> config:update
Next, install the opennms-kafka-producer feature from that same shell using:
admin@opennms()> feature:install opennms-kafka-producer
In order to ensure that the feature continues to be installed as subsequent restarts, add opennms-kafka-producer to the featuresBoot property in the$OPENNMS_HOME/etc/org.apache.karaf.features.cfg.
27.3. Configuring the Kafka ProducerThe Kafka Producer exposes the following options to help fine tune its behavior.
Name DefaultValue
Description
eventTopic events Name of the topic used for events. Set this to an empty string todisable forwarding events.
alarmTopic alarms Name of the topic used for alarms. Set this to an empty string todisable forwarding alarms.
nodeTopic nodes Name of the topic used for nodes. Set this to an empty string todisable forwarding nodes.
eventFilter - A Spring SpEL expression (see bellow) used to filter events. Set this toan empty string to disable filtering, and forward all events.
390

Name DefaultValue
Description
alarmFilter - A Spring SpEL expression (see bellow) used to filter alarms. Set thisto an empty string to disable filtering, and forward all alarms.
nodeRefreshTimeoutMs
300000 (5minutes)
Number of milliseconds to wait before looking up a node in thedatabase again. Decrease this value to improve accuracy at the costof additional database look ups.
alarmSyncIntervalMs
300000 (5minutes)
Number of milliseconds at which the contents of the alarm topic willbe synchronized with the local database. Decrease this to improveaccuracy at the cost of additional database look ups. Set this value to0 to disable alarm synchronization.
27.3.1. Configuring Filtering
Filtering can be used to selectively forward events and/or alarms to the Kafka topics.
Filtering is performed using a Spring SpEL expression which is evaluated against each object todetermine if it should be forwarded. The expression must return a boolean value i.e. true or false.
Enabling Event Filtering
To enable event filtering, set the value of the eventFilter property to a valid SpEL expression.
$ ssh -p 8101 [email protected]@opennms()> config:edit org.opennms.features.kafka.produceradmin@opennms()> config:property-set eventFilter'getUei().equals("uei.opennms.org/internal/discovery/newSuspect")'admin@opennms()> config:update
In the example above, the filter is configured such that only events with the given UEI areforwarded. Consult the source code of the org.opennms.netmgt.xml.event.OnmsEvent class in yourdistribution for a complete list of available properties.
Enabling Alarm Filtering
To enable alarm filtering, set the value of the alarmFilter property to a valid SpEL expression.
$ ssh -p 8101 [email protected]@opennms()> config:edit org.opennms.features.kafka.produceradmin@opennms()> config:property-set alarmFilter 'getTTicketId() != null'admin@opennms()> config:update
In the example above, the filter is configured such that only alarms that are associated with a ticketid are forwarded. Consult the source code of the org.opennms.netmgt.model.OnmsAlarm class in your
391

distribution for a complete list of available properties.
27.3.2. Configuring Topic Names
By default three topics are created i.e. events, alarms, nodes. To change these, you can use:
$ ssh -p 8101 [email protected]@opennms()> config:edit org.opennms.features.kafka.produceradmin@opennms()> config:property-set eventTopic ""admin@opennms()> config:property-set nodeTopic "opennms-nodes"admin@opennms()> config:update
In the example above, we disable event forwarding by setting an empty topic name and change thenode topic name to opennms-nodes.
27.4. Shell CommandsThe Kafka Producer also provides a series of shell commands to help administering and debuggingthe service.
27.4.1. kafka-producer:list-alarms
The list-alarms command can be used to enumerate the reduction keys and show the associatedevent labels for the alarms that are present in the topic. This command leverages functionality usedby the alarm synchronization process, and as a result this must be enabled in for this command tofunction.
$ ssh -p 8101 [email protected]@opennms> kafka-producer:list-alarmsuei.opennms.org/alarms/trigger:n33:0.0.0.0:HTTPS_POOLs Alarm: Generic Trigger
27.4.2. kafka-producer:sync-alarms
The sync-alarms command can be used to manually trigger the alarm synchronization process.
392

$ ssh -p 8101 [email protected]@opennms> kafka-producer:sync-alarmsPerforming synchronization of alarms from the database with those in the ktable.Executed 1 updates in 47ms.
Number of reduction keys in ktable: 4Number of reduction keys in the db: 4 (4 alarms total)Reduction keys added to the ktable: (None)Reduction keys deleted from the ktable: (None)Reduction keys updated in the ktable: uei.opennms.org/nodes/nodeLostService::1:127.0.0.1:Minion-RPC
27.4.3. kafka-producer:evaluate-filter
The evaluate-filter command can be used to test arbitrary SpEL filtering expressions againstalarms or events.
Evaluating filters against alarms
To test a filter against an alarm, specify the database id of the alarm and the expression to test:
admin@opennms> kafka-producer:evaluate-filter --alarm-id 57"getReductionKey().contains('n33')"SPEL Expression: getReductionKey().contains('n33')Alarm with ID 57 has reduction key:uei.opennms.org/alarms/trigger:n33:0.0.0.0:HTTPS_POOLsResult: true
Evaluating filters against events
To test a filter against an event, specify the UEI of the event and the expression to test:
admin@opennms> kafka-producer:evaluate-filter --event-ueiuei.opennms.org/alarms/trigger "getUei().contains('alarm')"SPEL Expression: getUei().contains('alarm')Event has UEI: uei.opennms.org/alarms/triggerResult: true
In this case, a new event will be created with the given UEI, and the filter will be evaluated againstthis new event object. At this time, existing events cannot be referenced by this tool, so thisfunctionality only serves to help make sure the expressions are syntactically valid.
393