oracle-audit-vault-and-database-firewall-administrators-guide ...
718
Oracle® Audit Vault and Database Firewall Administrator's Guide Release 20 E93408-16 March 2022
-
Upload
khangminh22 -
Category
Documents
-
view
0 -
download
0
Transcript of oracle-audit-vault-and-database-firewall-administrators-guide ...

Oracle® Audit Vault and DatabaseFirewallAdministrator's Guide
Release 20E93408-16March 2022

Oracle Audit Vault and Database Firewall Administrator's Guide, Release 20
E93408-16
Copyright © 2012, 2022, Oracle and/or its affiliates.
Primary Authors: Karthik Shetty, Rajesh Tammana, Mahesh Rao , Ravi Kumar, Sachin Deshmanya, AshokSwaminathan, Angeline Dhanarani, Manish Chandra
Contributors: Jean-Francois Verrier, Vipin Samar, Sarma Namuduri, Lok Sheung, Kaviarasi G, ShrikrishnaMudrale, Soumya Vinod, Hitali Sheth, Sourav Basu, Sumanth Vishwaraj, Paul Laws, Nikhita P, Rinchu S,Shobhit Mishra, Venkataharikrishna Nimmaraju, Marek Dulko, Paul Hackett, William Howard-Jones, RaviSharma, Vijay Medi, Tom Taylor, Nithin Gomez, Sunil Channapatna Ravindrachar
This software and related documentation are provided under a license agreement containing restrictions onuse and disclosure and are protected by intellectual property laws. Except as expressly permitted in yourlicense agreement or allowed by law, you may not use, copy, reproduce, translate, broadcast, modify, license,transmit, distribute, exhibit, perform, publish, or display any part, in any form, or by any means. Reverseengineering, disassembly, or decompilation of this software, unless required by law for interoperability, isprohibited.
The information contained herein is subject to change without notice and is not warranted to be error-free. Ifyou find any errors, please report them to us in writing.
If this is software or related documentation that is delivered to the U.S. Government or anyone licensing it onbehalf of the U.S. Government, then the following notice is applicable:
U.S. GOVERNMENT END USERS: Oracle programs (including any operating system, integrated software,any programs embedded, installed or activated on delivered hardware, and modifications of such programs)and Oracle computer documentation or other Oracle data delivered to or accessed by U.S. Government endusers are "commercial computer software" or "commercial computer software documentation" pursuant to theapplicable Federal Acquisition Regulation and agency-specific supplemental regulations. As such, the use,reproduction, duplication, release, display, disclosure, modification, preparation of derivative works, and/oradaptation of i) Oracle programs (including any operating system, integrated software, any programsembedded, installed or activated on delivered hardware, and modifications of such programs), ii) Oraclecomputer documentation and/or iii) other Oracle data, is subject to the rights and limitations specified in thelicense contained in the applicable contract. The terms governing the U.S. Government’s use of Oracle cloudservices are defined by the applicable contract for such services. No other rights are granted to the U.S.Government.
This software or hardware is developed for general use in a variety of information management applications.It is not developed or intended for use in any inherently dangerous applications, including applications thatmay create a risk of personal injury. If you use this software or hardware in dangerous applications, then youshall be responsible to take all appropriate fail-safe, backup, redundancy, and other measures to ensure itssafe use. Oracle Corporation and its affiliates disclaim any liability for any damages caused by use of thissoftware or hardware in dangerous applications.
Oracle, Java, and MySQL are registered trademarks of Oracle and/or its affiliates. Other names may betrademarks of their respective owners.
Intel and Intel Inside are trademarks or registered trademarks of Intel Corporation. All SPARC trademarks areused under license and are trademarks or registered trademarks of SPARC International, Inc. AMD, Epyc,and the AMD logo are trademarks or registered trademarks of Advanced Micro Devices. UNIX is a registeredtrademark of The Open Group.
This software or hardware and documentation may provide access to or information about content, products,and services from third parties. Oracle Corporation and its affiliates are not responsible for and expresslydisclaim all warranties of any kind with respect to third-party content, products, and services unless otherwiseset forth in an applicable agreement between you and Oracle. Oracle Corporation and its affiliates will not beresponsible for any loss, costs, or damages incurred due to your access to or use of third-party content,products, or services, except as set forth in an applicable agreement between you and Oracle.
Contents
Preface
Audience xxix
Documentation Accessibility xxix
Diversity and Inclusion xxix
Related Documents xxix
Conventions xxix
Translation xxx
Quick Reference for Common Tasks
About this Quick Reference xxxi
Audit Vault Server xxxi
Database Firewall xxxii
Hosts xxxiii
Agent xxxiii
Host Monitor xxxiv
Targets xxxiv
Other Administrator Tasks xxxv
Reference Information xxxv
Part I Getting Started with Oracle Audit Vault and Database Firewall
1 Changes in Oracle Audit Vault and Database Firewall Release 20
2 Introducing Oracle Audit Vault and Database Firewall
2.1 Downloading the Latest Version of This Manual 2-1
2.2 Learning About Oracle Audit Vault and Database Firewall 2-1
2.3 Supported Platforms for Oracle Audit Vault and Database Firewall 2-1
2.4 Oracle Audit Vault and Database Firewall System Features 2-2
2.4.1 About Oracle Audit Vault and Database Firewall 2-2
iii

2.4.2 Security Technical Implementation Guides and Implementation for Oracle AuditVault and Database Firewall 2-2
2.4.3 System Requirements for Oracle Audit Vault and Database Firewall 2-3
2.4.4 Supported Targets for Oracle Audit Vault and Database Firewall 2-3
2.4.5 Oracle Audit Vault and Database Firewall Administrative Features 2-3
2.4.6 Oracle Audit Vault and Database Firewall Auditing Features 2-4
2.4.7 Integrating Oracle Audit Vault and Database Firewall with Oracle Key Vault 2-4
2.5 Separation of Duties 2-4
2.6 Understanding the Administrator's Role 2-5
2.7 Planning Your Oracle Audit Vault and Database Firewall System Configuration 2-6
2.7.1 Guidance for Planning Your Oracle Audit Vault and Database FirewallConfiguration 2-6
2.7.2 Step 1: Plan Your Oracle Audit Vault Server Configuration 2-6
2.7.3 Step 2: Plan Your Oracle Database Firewall Configuration 2-7
2.7.4 Step 3: Plan Your Oracle Audit Vault Agent Deployments 2-7
2.7.5 Step 4: Plan Your Audit Trail Configurations 2-8
2.7.6 Step 5: Plan for High Availability 2-8
2.7.7 Step 6: Plan User Accounts and Access Rights 2-8
2.8 Summary of Configuration Steps 2-9
2.8.1 Configuring Oracle Audit Vault and Database Firewall and Deploying the Agent 2-9
2.8.2 Configuring Oracle Audit Vault and Database Firewall and Deploying OracleDatabase Firewall 2-9
2.9 Using Audit Vault Server Console 2-10
2.9.1 Log in to Audit Vault Server Console 2-10
2.9.2 Log in to Database Firewall Console 2-11
2.9.3 Understanding the Tabs and Menus in Audit Vault Server Console 2-11
2.9.4 Working with Lists of Objects in the UI 2-12
2.10 Using the Audit Vault Command Line Interface 2-13
2.11 Using the Oracle Audit Vault and Oracle Database Firewall Enterprise ManagerPlug-In 2-14
3 General Security Guidelines
3.1 Installing Oracle Audit Vault and Database Firewall Securely to Protect Your Data 3-1
3.1.1 Installing Oracle Audit Vault and Database Firewall Securely 3-1
3.1.2 Protecting Your Data 3-1
3.2 General Security Recommendations 3-2
3.3 External Network Dependencies 3-2
3.4 Considerations for Deploying Network-Based Solutions 3-3
3.4.1 Managing Database Firewall Network Encryption 3-3
3.4.2 Managing Database Firewall Server Side SQL and Context Configurations 3-3
3.4.3 How Oracle AVDF Works with Various Database Access Paths 3-3
iv

3.4.4 Database Firewall Configuration for Oracle Database Target Configured inShared Server Mode 3-4
3.4.5 Additional Client and Listener Behavior Considerations 3-4
3.5 Security Considerations for Special Configurations 3-5
3.5.1 Custom Collector Development 3-5
3.6 About Setting Transport Layer Security Levels 3-6
3.7 Certificates 3-12
3.7.1 Platform Certificates 3-12
4 Configuring Audit Vault Server
4.1 About Configuring Audit Vault Server 4-1
4.2 Changing the UI (Console) Certificate for Audit Vault Server 4-2
4.3 Specifying Initial System Settings and Options on Audit Vault Server (Required) 4-3
4.3.1 Specifying the Server Date, Time, and Keyboard Settings 4-3
4.3.2 Changing the Time Zone 4-7
4.3.3 Specifying Audit Vault Server System Settings 4-7
4.3.3.1 Changing the Audit Vault Server Network Configuration 4-7
4.3.3.2 Changing the Standby Audit Vault Server Network Configuration 4-9
4.3.3.3 Configuring or Changing the Audit Vault Server Services 4-10
4.3.3.4 Changing the Standby Audit Vault Server System Settings 4-11
4.3.3.5 Changing IP Addresses of Active and Registered Agents 4-12
4.3.4 Configuring Audit Vault Server Syslog Destinations 4-13
4.3.5 Configuring Custom Ports on Network Interfaces 4-14
4.4 Configuring the Email Notification Service 4-16
4.4.1 About Email Notifications in Oracle Audit Vault and Database Firewall 4-16
4.4.2 Configuring Email Notification for Oracle Audit Vault and Database Firewall 4-17
4.5 Configuring Archive Locations and Retention Policies 4-18
4.5.1 About Archiving and Retrieving Data in Oracle Audit Vault and DatabaseFirewall 4-18
4.5.2 Defining Archive Locations 4-21
4.5.3 Creating or Deleting Archiving Policies 4-23
4.5.3.1 Creating Archiving and Retention Policies 4-23
4.5.3.2 Deleting Archiving Policies 4-24
4.5.4 Viewing Archived Datafiles 4-24
4.5.5 Running Archive and Retrieval Jobs 4-25
4.6 Managing Archival and Retrieval in High Availability Environments 4-25
4.7 Defining Resilient Pairs for High Availability 4-27
4.8 Registering Database Firewall in Audit Vault Server 4-27
4.9 Testing Audit Vault Server System Operations 4-28
4.10 Configuring Fiber Channel-Based Storage for Audit Vault Server 4-29
4.11 Adding Local Disks to the New ASM Disk Group 4-30
v

4.12 Fiber Channel Based Multipath in Oracle AVDF 4-32
4.13 Adding Network Address Translation IP Addresses to Audit Vault Agent 4-33
5 Configuring Database Firewall
5.1 About Configuring Database Firewall 5-1
5.2 Introduction to Database Firewall Deployment 5-2
5.2.1 Monitoring / Blocking (Proxy) 5-3
5.2.2 Monitoring (Out-of-Band) 5-7
5.2.3 Monitoring (Host Monitor) 5-8
5.3 Specifying the Audit Vault Server Certificate and IP Address 5-9
5.4 Managing the Oracle Database Firewall Network and Services Configuration 5-11
5.4.1 Configuring Network Settings for Oracle Database Firewall 5-11
5.4.2 Configuring Network Services for Oracle Database Firewall 5-12
5.4.3 Configuring SNMPv3 Users in Oracle Audit Vault and Database Firewall 5-13
5.5 Setting the Date and Time in Database Firewall 5-15
5.6 Changing IP Address on a Single Instance of Database Firewall Server 5-16
5.7 Changing the Database Firewall Host Name 5-18
5.8 Configuring Database Firewall and Its Traffic Sources on Your Network 5-18
5.8.1 About Configuring Oracle Database Firewall and Traffic Sources On YourNetwork 5-18
5.8.2 Configuring Traffic Sources 5-19
5.8.3 Configuring Database Firewall As A Traffic Proxy 5-20
5.9 Viewing the Status and Diagnostics Report for Database Firewall 5-20
5.10 Configure and Download the Diagnostics Report File 5-21
5.11 Configuring Encapsulated Remote Switched Port Analyzer with Database Firewall 5-24
6 Registering Hosts and Deploying the Agent
6.1 Registering Hosts on Oracle Audit Vault Server 6-1
6.1.1 About Registering Hosts 6-1
6.1.2 Registering Hosts in the Audit Vault Server 6-2
6.1.3 Changing Host Names 6-4
6.2 Deploying and Activating the Audit Vault Agent on Host Computers 6-5
6.2.1 Audit Vault Agent Requirements 6-5
6.2.2 Audit Vault Agent Machine Java Best Practices 6-6
6.2.3 Validation During Audit Vault Agent Deployment 6-6
6.2.4 About Deploying the Audit Vault Agent 6-7
6.2.5 Steps Required to Deploy and Activate the Audit Vault Agent 6-11
6.2.6 Registering the Host 6-11
6.2.7 Deploying the Audit Vault Agent 6-12
6.2.8 Activating and Starting the Audit Vault Agent 6-13
vi

6.2.9 Configuring Agent Auto Restart Functionality 6-14
6.2.10 Registering and Unregistering the Audit Vault Agent as a Windows Service 6-15
6.2.10.1 About the Audit Vault Agent Windows Service 6-15
6.2.10.2 Registering the Audit Vault Agent as a Windows Service 6-16
6.2.10.3 Unregistering the Audit Vault Agent as a Windows Service 6-17
6.3 Stopping, Starting, and Other Agent Operations 6-17
6.3.1 Stopping and Starting Audit Vault Agent 6-17
6.3.1.1 Stopping and Starting the Agent on Unix Hosts 6-18
6.3.1.2 Stopping and Starting the Agent on Windows Hosts 6-18
6.3.1.3 Autostarting the Agent on Windows Hosts 6-19
6.3.2 Changing the Logging Level for the Audit Vault Agent 6-20
6.3.3 Viewing the Status and Details of Audit Vault Agent 6-20
6.3.4 Deactivating and Removing Audit Vault Agent 6-21
6.4 Updating Oracle Audit Vault Agent 6-22
6.5 Deploying Plug-ins and Registering Plug-in Hosts 6-22
6.5.1 About Plug-ins 6-22
6.5.2 Ensuring that Auditing is Enabled in A Target 6-23
6.5.3 Registering the Plug-in Host in Audit Vault Server 6-23
6.5.4 Deploying and Activating the Plug-in 6-23
6.5.5 Removing Plug-ins 6-25
6.6 Deleting Hosts from Audit Vault Server 6-25
7 Configuring Targets, Audit Trails, and Database Firewall MonitoringPoints
7.1 About Configuring Targets 7-1
7.2 Registering Targets and Creating Groups 7-1
7.2.1 Registering or Removing Targets in Audit Vault Server 7-1
7.2.1.1 About Targets in the Audit Vault Server 7-1
7.2.1.2 Registering Targets 7-2
7.2.1.3 Modifying Targets 7-7
7.2.1.4 Removing Targets 7-8
7.2.2 Creating a Target Group 7-8
7.2.3 Modifying a Target Group 7-9
7.2.4 Controlling Access to Targets and Target Groups 7-10
7.3 Preparing Targets for Audit Data Collection 7-10
7.3.1 Using an NTP Service to Set Time on Targets 7-10
7.3.2 Ensuring that Auditing is Enabled on the Target 7-10
7.3.3 Setting User Account Privileges on Targets 7-11
7.3.4 Scheduling Audit Trail Cleanup 7-12
7.4 Configuring and Managing Audit Trail Collection 7-12
vii
7.4.1 Prerequisites for Adding Audit Trails in Oracle Audit Vault Server 7-12
7.4.2 Adding Audit Trails in Audit Vault Server 7-12
7.4.3 Stopping, Starting, and Autostart of Audit Trails in Oracle Audit Vault Server 7-14
7.4.4 Checking the Status of Trail Collection in Audit Vault Server 7-15
7.4.5 Audit Collection Best Practices 7-18
7.4.6 Handling New Audit Trails with Expired Audit Records 7-18
7.4.7 Deleting an Audit Trail 7-19
7.4.8 Converting Audit Record Formats for Collection 7-19
7.4.8.1 Prerequisites for Converting Oracle Audit Vault Record MySQL Formats 7-19
7.4.8.2 Running the XML Transformation Utility for MySQL Audit Formats 7-20
7.4.8.3 Converting Binary Audit Files to ASCII Format for IBM DB2 7-21
7.4.9 Configuring Audit Trail Collection for Oracle Real Application Clusters 7-24
7.4.10 Configuring Audit Trail Collection for CDBs and PDBs 7-25
7.5 Configuring Database Firewall Monitoring Points 7-27
7.5.1 About Configuring Database Firewall Monitoring Points for Targets 7-27
7.5.2 Creating and Configuring a Database Firewall Monitoring Point 7-28
7.5.3 Modifying a Database Firewall Monitoring Point 7-31
7.5.4 Starting, Stopping, or Deleting Database Firewall Monitoring Points 7-33
7.5.5 Viewing the Status of Database Firewall Monitoring Points 7-33
7.5.6 Finding the Port Number Used by a Database Firewall Monitoring Point 7-34
7.6 Configuring Stored Procedure Auditing (SPA) 7-34
7.7 Configuring Database Firewall for Databases That Use Native Network Encryption 7-35
7.7.1 Step 1: Apply the Specified Patch to the Oracle Database 7-35
7.7.2 Step 2: Run the Oracle Advance Security Integration Script 7-36
7.7.3 Step 3: Provide the Database Firewall Public Key to Oracle Database 7-37
7.7.4 Step 4: Enable Native Network Encrypted Traffic Monitoring for OracleDatabase 7-38
7.8 Configuring Advanced Settings for Database Firewall 7-38
7.8.1 About Native Network Encryption for Oracle Databases 7-38
7.8.2 Monitor Native Network Encrypted Traffic Through Database Firewall forOracle Databases 7-39
7.8.3 Disabling Encrypted Traffic Monitoring for Oracle Databases 7-40
7.8.4 Retrieve Session Information for Non Oracle Databases 7-40
7.8.4.1 Setting Permissions to Retrieve Session Information in Microsoft SQLServer 7-40
7.8.4.2 Setting Permissions to Retrieve Session Information in Sybase SQLAnywhere Database 7-41
7.9 Monitoring TLS Encrypted SQL Traffic 7-42
7.9.1 Using Default Self Signed Certificates Created During Monitoring PointCreation 7-42
7.9.2 Configuring Mutual Authentication for Inbound or Outbound TLSCommunication 7-43
7.9.3 Using External Certificates Signed by Certificate Authority 7-45
viii

7.9.4 Disabling Mutual Authentication for Inbound or Outbound TLS Communication 7-48
7.10 Configuring and Using Database Response Monitoring 7-49
7.10.1 About Database Response Monitoring 7-49
7.10.2 Enabling Database Response Monitoring 7-50
7.11 Securing the Agent and Oracle Database Target Connection 7-51
8 Using Host Monitor
8.1 About Host Monitoring 8-1
8.2 Installing and Enabling Host Monitor 8-1
8.2.1 Host Monitor Requirements 8-2
8.2.2 Validation During Host Monitor Agent Deployment 8-3
8.2.3 Register the Host Machine That Will Run the Host Monitor 8-3
8.2.4 Deploy the Audit Vault Agent and the Host Monitor 8-3
8.2.4.1 Deploying the Agent and Host Monitor on Windows Host Machine 8-4
8.2.4.2 Deploying the Agent and Host Monitor on Unix Host Machine 8-7
8.2.5 Create a Target for the Host Monitored Database 8-8
8.2.6 Create a Monitoring Point for the Host Monitor 8-8
8.2.7 Create a Network Audit Trail 8-10
8.3 Starting, Stopping, and Other Host Monitor Operations 8-12
8.3.1 Starting the Host Monitor 8-12
8.3.2 Stopping the Host Monitor 8-13
8.3.3 Changing the Logging Level for a Host Monitor 8-13
8.3.4 Viewing Host Monitor Status and Details 8-13
8.3.5 Checking the Status of a Host Monitor Audit Trail 8-13
8.3.6 Uninstalling the Host Monitor (Unix Hosts Only) 8-13
8.4 Updating the Host Monitor (Unix Hosts Only) 8-14
8.5 Using Certificate-based Authentication for the Host Monitor 8-14
8.5.1 Requiring a Signed Certificate for Host Monitor Connections to DatabaseFirewall 8-14
8.5.2 Getting a Signed Certificate from Audit Vault Server 8-15
9 High Availability in Oracle AVDF
9.1 About High Availability in Oracle AVDF 9-1
9.2 Managing High Availability in Audit Vault Server 9-1
9.2.1 About High Availability in Audit Vault Servers 9-1
9.2.2 Prerequisites for Configuring High Availability in Audit Vault Servers 9-3
9.2.3 Configure the Designated Standby Audit Vault Server 9-3
9.2.4 Configure the Designated Primary Audit Vault Server 9-4
9.2.5 Checking the High Availability Status of an Audit Vault Server 9-5
9.2.6 Post High Availability Pairing Steps 9-5
ix
9.2.7 Audit Vault Agent Communication with Audit Vault Server in High Availability 9-6
9.2.8 Swapping Roles Between a Primary and Standby Audit Vault Server 9-7
9.2.9 Handling a Failover Scenario 9-7
9.2.10 Unpair Primary and Standby Audit Vault Servers 9-8
9.2.11 Disabling or Enabling Failover of the Audit Vault Server 9-8
9.2.12 Archiving and Retrieving in High Availability 9-9
9.2.13 Backup and Restore of Audit Vault Server in High Availability 9-10
9.3 High Availability for Database Firewall 9-11
9.3.1 High Availability for Database Firewall 9-11
9.3.2 High Availability for Database Firewall in Host Monitor or Out of Band Modes 9-12
9.3.3 Swapping Roles Between Primary and Standby Database Firewalls 9-13
9.3.4 Unpair Primary and Standby Database Firewalls 9-13
9.3.5 Configuring High Availability of Database Firewall Instances With MonitoringPoints 9-14
9.4 High Availability for Database Firewall in Proxy Mode 9-15
9.4.1 Configuring High Availability for Database Firewall in Proxy Mode throughClient Configuration 9-15
9.4.2 Configuring High Availability for Database Firewall in Proxy Mode using DNS 9-17
10
Integration with Third Party SIEM and Log-data Analysis Tools
11
Using Oracle Database Firewall with Oracle RAC
11.1 Configuring a Database Firewall with Oracle RAC for Monitoring and Blocking 11-1
11.1.1 About Configuring Database Firewall with Oracle RAC for Monitoring andBlocking 11-1
11.1.2 Configure A Proxy Using the Audit Vault Server Console 11-1
11.2 Configuring a Database Firewall with Oracle RAC for Monitoring 11-2
12
Oracle Audit Vault and Database Firewall on Oracle Cloud Infrastructure
12.1 About Oracle AVDF on Oracle Cloud Infrastructure 12-1
12.2 Benefits of Provisioning Oracle AVDF on Oracle Cloud Infrastructure 12-1
12.3 Supported Oracle Cloud Infrastructure Virtual Machine Shapes 12-2
12.4 Provisioning Oracle AVDF with the Oracle Cloud Marketplace Image 12-2
12.4.1 Accessing the Oracle AVDF Cloud Marketplace Image 12-3
12.4.2 Creating an Oracle AVDF instance with Oracle Cloud Marketplace Image 12-3
12.4.3 Post Instance Creation Steps 12-5
12.5 Connecting to Oracle AVDF Instance 12-6
12.6 Scaling up Oracle AVDF Instance 12-7
12.7 Changes in Functionality for Oracle AVDF Instances on OCI 12-8
x

12.8 Ports for Communication between Oracle AVDF Components 12-9
12.9 High Availability for Oracle AVDF Instance 12-9
12.10 Deploying Audit Vault Agents 12-10
12.11 Configuring Audit Trail Collection 12-11
12.12 Deploying Database Firewall for Monitoring 12-11
12.13 Monitoring Autonomous Database Services 12-12
12.14 Monitoring DB Systems on OCI 12-13
12.15 Backup and Restore of Oracle AVDF Instances in OCI 12-13
12.16 Archiving and Retrieving Audit Data 12-14
12.17 Starting or Stopping the Oracle AVDF Instance 12-14
12.18 Terminating Oracle AVDF Instance 12-15
13
Oracle Audit Vault And Database Firewall Hybrid Cloud Deployment
13.1 Oracle Audit Vault and Database Firewall Hybrid Cloud Deployment andPrerequisites 13-1
13.2 Opening Ports on Oracle Database Cloud Service 13-3
13.3 Configuring Hybrid Cloud Target Using TCP 13-4
13.3.1 Step 1: Registering On-premises Host on the Audit Vault Server 13-4
13.3.2 Step 2: Installing Audit Vault Agent on Registered On-premises Hosts 13-4
13.3.3 Step 3: Creating User Accounts on Oracle Database Cloud Service TargetInstances 13-5
13.3.4 Step 4: Setting Up or Reviewing Audit Policies on Target Oracle DatabaseCloud Service Instances 13-6
13.3.5 Step 5: Creating Targets on Oracle Audit Vault Server for Oracle DatabaseCloud Service Instances 13-6
13.3.6 Step 6: Starting Audit Trail on Audit Vault Server for Oracle Database CloudService Instances 13-7
13.4 Configuring TCPS Connections for DBCS Instances 13-8
13.4.1 Step 1: Creating Server Wallet and Certificate 13-8
13.4.2 Step 2: Creating Client (Agent) Wallet and Certificate 13-10
13.4.3 Step 3: Exchanging Client (Agent) and Server Certificates 13-13
13.4.4 Step 4: Configuring Server Network 13-16
13.4.5 Step 5: Connecting to DBCS instances in TCPS mode 13-18
13.5 Configuring Hybrid Cloud Target Using TCPS 13-18
13.5.1 Step 1: Registering On-premises Host on Oracle Audit Vault Server 13-18
13.5.2 Step 2: Installing Oracle Audit Vault Agent on Registered On-premises Hostsand Configuring TCPS 13-19
13.5.3 Step 3: Creating User Accounts on Oracle Database Cloud Service TargetInstances 13-19
13.5.4 Step 4: Setting Up or Reviewing Audit Policies on Target Oracle DatabaseCloud Service Instances 13-20
13.5.5 Step 5: Creating Targets on Audit Vault Server for Oracle Database CloudService Instances 13-21
xi
13.5.6 Step 6: Starting Audit Trail on Audit Vault Server for Oracle Database CloudServices Instances 13-22
13.6 Configuring Oracle Database Exadata Express Cloud Service Target Using TCPS 13-22
13.6.1 Step 1: Installing Audit Vault Agent on registered On-premises Hosts andConfiguring TCPS 13-23
13.6.2 Step 2: Creating User Accounts on Oracle Exadata Express Cloud ServiceInstances 13-23
13.6.3 Step 3: Creating Targets on Oracle Audit Vault Server for Oracle ExadataExpress Cloud Service Instances 13-24
13.7 Configuring Oracle Database Exadata Express Cloud Service Target Using TCP 13-24
13.7.1 Step 1: Registering On-premises Hosts on Oracle Audit Vault Server 13-24
13.7.2 Step 2: Installing Audit Vault Agents on Registered On-Premises Hosts 13-24
13.7.3 Step 3: Creating User Accounts on Oracle Exadata Express Cloud TargetInstances 13-24
13.7.4 Step 4: Setting Up or Reviewing Audit Policies on Target Oracle ExadataExpress Cloud Instances 13-25
13.7.5 Step 5: Creating Targets on Oracle Audit Vault Servers for Oracle ExadataExpress Cloud Instances 13-25
13.7.6 Step 6: Starting Audit Trail on Oracle Audit Vault Server for Oracle ExadataExpress Cloud Instances 13-25
13.8 Configuring Autonomous Data Warehouse and Autonomous TransactionProcessing 13-26
13.8.1 Step 1: Install Audit Vault Agent on Registered Host 13-26
13.8.2 Step 2: Create User Accounts on Oracle Cloud Instances 13-26
13.8.3 Step 3: Create Targets on Audit Vault Server for the Cloud Instances 13-27
13.8.4 Step 4: Start Audit Trail on Audit Vault Server for the Autonomous DataWarehouse and Autonomous Transaction Processing Cloud Instances 13-27
Part II General Administration Tasks
14
Managing User Accounts and Access
14.1 About Oracle Audit Vault and Database Firewall Administrative Accounts 14-1
14.2 Security Technical Implementation Guides and Implementation for User Accounts 14-2
14.3 Configuring Administrative Accounts for Oracle Audit Vault Server 14-2
14.3.1 Guidelines for Securing Oracle Audit Vault and Database Firewall UserAccounts 14-2
14.3.2 Creating Administrative Accounts for Audit Vault Server 14-3
14.3.3 Viewing the Status of Administrator User Accounts 14-3
14.3.4 Changing User Account Types for Audit Vault Server 14-3
14.3.5 Unlocking User Accounts 14-4
14.3.6 Deleting Oracle Audit Vault Server Administrator Accounts 14-5
14.4 Configuring sudo Access for Users 14-5
xii
14.4.1 About Configuring sudo Access 14-5
14.4.2 Configuring sudo Access for Users 14-5
14.5 Managing User Access Rights to Targets and Groups 14-6
14.5.1 About Managing User Access Rights 14-7
14.5.2 Controlling Access Rights by User 14-7
14.5.3 Controlling Access Rights by Target or Group 14-7
14.6 Changing User Passwords in Oracle Audit Vault and Database Firewall 14-8
14.6.1 Password Requirements 14-8
14.6.2 Changing the Audit Vault Server Administrator Password 14-9
14.6.2.1 Changing Your Own Password 14-9
14.6.2.2 Changing the Password of Another Administrator 14-9
14.6.2.3 Changing the Expired Password of an Administrator 14-10
14.7 Integrating Oracle Audit Vault and Database Firewall with Microsoft Active Directoryor OpenLDAP 14-11
14.7.1 About Microsoft Active Directory or OpenLDAP Integration 14-11
14.7.2 Configuring an LDAP Server 14-12
14.7.3 Creating New Users 14-12
14.7.4 Log in as an OpenLDAP or Microsoft Active Directory User 14-14
15
Managing the Audit Vault Server and Database Firewalls
15.1 Managing Audit Vault Server Settings, Status, and Maintenance Operations 15-1
15.1.1 Checking Server Status and System Operation 15-1
15.1.2 Managing Diagnostics 15-1
15.1.2.1 About Managing Diagnostics 15-1
15.1.2.2 Running Diagnostics Checks for the Audit Vault Server 15-2
15.1.2.3 Downloading Detailed Diagnostics Reports for Oracle Audit Vault Server 15-3
15.1.2.4 Clearing Diagnostic Logs 15-4
15.1.3 Accessing the Audit Vault Server Certificate and Public Key 15-4
15.1.3.1 Accessing the Server Certificate 15-4
15.1.3.2 Accessing the Server Public Key 15-4
15.1.4 Changing the Keyboard Layout 15-5
15.1.5 Restarting or Powering Off the Audit Vault Server 15-5
15.2 Changing Oracle Audit Vault Server Network and Services Configurations 15-5
15.3 Managing Server Connectors for Email and Syslog 15-6
15.4 Configuring Remote Syslog Over TLS 15-6
15.5 Archiving and Retrieving Audit Data 15-9
15.5.1 Enabling Automatic Archival 15-9
15.5.2 Starting an Archive Job Manually 15-10
15.5.3 Retrieving Oracle Audit Vault and Database Firewall Audit Data 15-10
15.6 Managing Repository Encryption 15-12
15.6.1 About Oracle Audit Vault Server Repository Encryption 15-12
xiii

15.6.2 Rotating the Master Key for Repository Encryption 15-13
15.6.3 Changing the Keystore Password 15-13
15.6.4 Backing Up TDE Wallets 15-14
15.6.5 Data Encryption on Upgraded Instances 15-14
15.7 Backing Up and Restoring the Audit Vault Server 15-18
15.7.1 About the Backup and Restore Utility 15-18
15.7.2 How Much Space Do I Need for Backup Files? 15-20
15.7.3 Backing Up the Audit Vault Server 15-20
15.7.3.1 Step 1: Configure the Backup Utility 15-20
15.7.3.2 Step 2: Back Up Oracle Audit Vault Server 15-24
15.7.3.3 Step 3: Validate the Backup 15-25
15.7.4 Restoring the Audit Vault Server 15-26
15.7.4.1 About Restoring Audit Vault Server 15-26
15.7.4.2 Prerequisites for Restoring Audit Vault Server 15-27
15.7.4.3 Step 1: Configure the Backup Utility on a New Audit Vault Server 15-28
15.7.4.4 Step 2: Restore Audit Vault Server 15-28
15.7.5 Restoring a Backup to a New System with a New or Different IP Address 15-29
15.8 Backing Up and Restoring the Database Firewall 15-30
15.9 Enabling Oracle Database In-Memory for the Audit Vault Server 15-31
15.9.1 About Enabling Oracle Database In-Memory for Oracle Audit Vault Server 15-31
15.9.2 Enabling and Allocating Memory for Oracle Database In-Memory 15-31
15.9.3 Disabling Oracle Database In-Memory 15-32
15.9.4 Monitoring Oracle Database In-Memory Usage 15-32
15.10 Managing Plug-ins 15-33
15.11 Monitoring Server Tablespace Space Usage 15-33
15.12 Monitoring Server Archive Log Disk Space Use 15-33
15.13 Monitoring Server Flash Recovery Area 15-35
15.14 Monitoring Jobs 15-35
15.15 Scheduling Maintenance Jobs 15-36
15.16 Downloading and Using the AVCLI Command Line Interface 15-37
15.16.1 About the AVCLI Command-Line Interface 15-37
15.16.2 Downloading the AVCLI Command Line Utility and Setting JAVA_HOME 15-38
15.16.3 Logging in to AVCLI 15-38
15.16.3.1 About Logging in to AVCLI 15-38
15.16.3.2 Logging in to AVCLI Interactively 15-39
15.16.3.3 Storing or Overwriting Administrative Credentials 15-39
15.16.3.4 Logging in to AVCLI Using Stored Credentials 15-40
15.16.4 Running AVCLI Scripts 15-41
15.16.5 Specifying Log Levels for AVCLI 15-42
15.16.6 Displaying Help and the Version Number of AVCLI 15-42
15.17 Downloading the Oracle Audit Vault and Database Firewall SDK 15-43
xiv

15.18 Managing Database Firewalls 15-43
15.18.1 Changing the Database Firewall Network or Services Configuration 15-43
15.18.2 Viewing Network Traffic in a Database Firewall 15-43
15.18.3 Capturing Network Traffic in Database Firewall 15-44
15.18.4 Restarting or Powering Off Database Firewall 15-44
15.18.5 Removing Database Firewall from Audit Vault Server 15-45
15.18.6 Fetching an Updated Certificate from Database Firewall 15-45
15.18.7 Viewing Diagnostics for Database Firewall 15-46
15.18.8 Resetting Database Firewall 15-46
15.18.9 Restoring Database Firewall Monitoring Points 15-46
16
Configuring a SAN Repository
16.1 About Configuring a SAN Repository 16-1
16.2 Configuring a SAN Server to Communicate with Oracle Audit Vault and DatabaseFirewall 16-1
16.3 Registering or Dropping SAN Servers in the Oracle Audit Vault Server 16-2
16.3.1 Registering a SAN Server 16-3
16.3.2 Dropping a SAN Server 16-3
16.4 Discovering Targets on a SAN Server 16-4
16.4.1 About SAN Targets and Disks 16-4
16.4.2 Discovering Targets on a SAN Server and Making Disks Available 16-4
16.4.3 Logging Out of Targets on SAN Servers 16-4
16.5 Adding or Dropping SAN Disks in the Audit Vault Server Repository 16-5
16.5.1 About Disk Groups in the Oracle Audit Vault Server Repository 16-5
16.5.2 Adding SAN Disks to the Audit Vault Server Repository 16-6
16.5.3 Dropping SAN Disks from the Audit Vault Server Repository 16-6
Part III General Reference
A AVCLI Commands Reference
A.1 About AVCLI Commands A-1
A.2 Agent Host AVCLI Commands A-1
A.2.1 About the Agent Host AVCLI Commands A-1
A.2.2 ACTIVATE HOST A-1
A.2.3 ALTER HOST A-2
A.2.4 DEACTIVATE HOST A-4
A.2.5 DROP HOST A-4
A.2.6 LIST HOST A-6
A.2.7 REGISTER HOST A-6
xv
A.3 Database Firewall AVCLI Commands A-7
A.3.1 About the Database Firewall AVCLI Commands A-7
A.3.2 ALTER FIREWALL A-7
A.3.3 CREATE RESILIENT PAIR A-8
A.3.4 DROP FIREWALL A-9
A.3.5 DROP RESILIENT PAIR A-9
A.3.6 LIST FIREWALL A-10
A.3.7 POWEROFF FIREWALL A-10
A.3.8 REBOOT FIREWALL A-10
A.3.9 REGISTER FIREWALL A-11
A.3.10 SWAP RESILIENT PAIR A-11
A.3.11 SHOW STATUS FOR FIREWALL A-12
A.4 Database Firewall Monitors AVCLI Commands A-12
A.4.1 About Database Firewall Monitors AVCLI Commands A-12
A.4.2 ALTER DATABASE FIREWALL MONITOR A-12
A.4.3 CREATE DATABASE FIREWALL MONITOR A-15
A.4.4 DROP DATABASE FIREWALL MONITOR A-16
A.4.5 LIST DATABASE FIREWALL MONITOR A-17
A.4.6 START DATABASE FIREWALL MONITOR A-17
A.4.7 STOP DATABASE FIREWALL MONITOR A-18
A.5 Target AVCLI Commands A-18
A.5.1 About the Target AVCLI Commands A-19
A.5.2 ALTER SECURED TARGET A-19
A.5.3 DROP SECURED TARGET A-20
A.5.4 LIST ATTRIBUTE FOR SECURED TARGET A-21
A.5.5 LIST METRICS A-21
A.5.6 LIST SECURED TARGET A-22
A.5.7 LIST SECURED TARGET TYPE A-22
A.5.8 REGISTER SECURED TARGET A-22
A.5.9 UPLOAD OR DELETE WALLET FILE A-25
A.6 Target Group AVCLI Commands A-25
A.6.1 ADD TARGET A-26
A.6.2 ALTER TARGET GROUP A-26
A.6.3 CREATE TARGET GROUP A-27
A.6.4 DELETE TARGET A-28
A.6.5 DROP TARGET GROUP A-28
A.6.6 LIST TARGET GROUPS A-29
A.6.7 LIST TARGETS OF TARGET GROUP A-29
A.7 Audit Trail Collection AVCLI Commands A-30
A.7.1 About Oracle Audit Trail AVCLI Commands A-30
A.7.2 DROP TRAIL FOR SECURED TARGET A-30
xvi

A.7.3 LIST TRAIL FOR SECURED TARGET A-32
A.7.4 START COLLECTION FOR SECURED TARGET A-33
A.7.5 Create Audit Trail for a Secured Target A-38
A.7.6 STOP COLLECTION FOR SECURED TARGET A-39
A.8 SMTP Connection AVCLI Commands A-43
A.8.1 About the SMTP Connection AVCLI Commands A-43
A.8.2 ALTER SMTP SERVER A-43
A.8.3 ALTER SMTP SERVER DISABLE A-44
A.8.4 ALTER SMTP SERVER ENABLE A-45
A.8.5 ALTER SMTP SERVER SECURE MODE OFF A-45
A.8.6 ALTER SMTP SERVER SECURE MODE ON A-46
A.8.7 DROP SMTP SERVER A-47
A.8.8 LIST ATTRIBUTE OF SMTP SERVER A-47
A.8.9 REGISTER SMTP SERVER A-48
A.8.10 TEST SMTP SERVER A-49
A.9 Security Management AVCLI Commands A-50
A.9.1 About the Security Management AVCLI Commands A-50
A.9.2 ALTER DATA ENCRYPTION A-50
A.9.3 ALTER USER A-50
A.9.4 GRANT ACCESS A-51
A.9.5 GRANT ADMIN A-52
A.9.6 GRANT AUDITOR A-52
A.9.7 GRANT SUPERADMIN A-53
A.9.8 GRANT SUPERAUDITOR A-53
A.9.9 REVOKE ACCESS A-54
A.9.10 REVOKE ADMIN A-54
A.9.11 REVOKE AUDITOR A-55
A.9.12 REVOKE SUPERADMIN A-55
A.9.13 REVOKE SUPERAUDITOR A-56
A.9.14 SHOW DATA ENCRYPTION STATUS A-56
A.10 SAN Storage AVCLI Commands A-57
A.10.1 About the SAN Storage AVCLI Commands A-57
A.10.2 ALTER DISKGROUP A-57
A.10.3 ALTER SAN SERVER A-57
A.10.4 DROP SAN SERVER A-58
A.10.5 LIST DISK A-59
A.10.6 LIST DISKGROUP A-59
A.10.7 LIST SAN SERVER A-60
A.10.8 LIST TARGET FOR SAN SERVER A-60
A.10.9 REGISTER SAN SERVER A-61
A.10.10 SHOW iSCSI INITIATOR DETAILS FOR SERVER A-61
xvii

A.11 Remote File System AVCLI Commands A-62
A.11.1 About the Remote File System AVCLI Commands A-62
A.11.2 ALTER REMOTE FILESYSTEM A-62
A.11.3 DROP REMOTE FILESYSTEM A-63
A.11.4 LIST EXPORT A-63
A.11.5 LIST REMOTE FILESYSTEM A-64
A.11.6 REGISTER REMOTE FILESYSTEM A-64
A.11.7 SHOW STATUS OF REMOTE FILESYSTEM A-65
A.12 Server Management AVCLI Commands A-65
A.12.1 About the Server Management AVCLI Commands A-65
A.12.2 ALTER SYSTEM SET A-66
A.12.3 DOWNLOAD LOG FILE A-68
A.12.4 SHOW CERTIFICATE A-68
A.13 Collection Plug-In AVCLI Commands A-68
A.13.1 About the Collection Plug-In AVCLI Commands A-68
A.13.2 DEPLOY PLUGIN A-69
A.13.3 LIST PLUGIN FOR SECURED TARGET TYPE A-69
A.13.4 UNDEPLOY PLUGIN A-70
A.14 General Usage AVCLI Commands A-70
A.14.1 About the General Usage AVCLI Commands A-70
A.14.2 CLEAR LOG A-71
A.14.3 CONNECT A-71
A.14.4 HELP A-71
A.14.5 -HELP A-72
A.14.6 QUIT A-73
A.14.7 SHOW USER A-73
A.14.8 STORE CREDENTIALS A-73
A.14.9 -VERSION A-74
A.15 Retention Policy AVCLI Commands A-74
A.15.1 APPLY RETENTION POLICY A-74
A.15.2 CREATE RETENTION POLICY A-75
A.15.3 DELETE RETENTION POLICY A-75
A.15.4 LIST RETENTION POLICIES A-76
A.15.5 SHOW RETENTION POLICY FOR TARGET A-76
A.16 Alert Policy Management AVCLI Commands A-77
A.16.1 DELETE ALERT POLICY A-77
A.16.2 DISABLE ALERT POLICY A-78
A.16.3 ENABLE ALERT POLICY A-78
A.16.4 LIST ALERT POLICIES A-79
A.17 Unified Audit Policy AVCLI Commands A-79
A.17.1 DISABLE UNIFIED AUDIT POLICY A-79
xviii
A.17.2 ENABLE UNIFIED AUDIT POLICY A-80
A.17.3 LIST UNIFIED AUDIT POLICIES A-83
A.18 AVCLI User Commands A-84
A.18.1 About the User AVCLI Commands A-84
A.18.2 ALTER ADMIN A-84
A.18.3 ALTER AUDITOR A-86
A.18.4 CREATE ADMIN A-87
A.18.5 CREATE AUDITOR A-88
A.18.6 DROP ADMIN A-89
A.18.7 DROP AUDITOR A-90
A.18.8 LIST ADMIN A-90
A.18.9 LIST ADMINS A-91
A.18.10 LIST AUDITOR A-91
A.18.11 LIST AUDITORS A-92
B System Configuration Utilities
B.1 CONFIG-ASO B-1
B.2 CONFIG-AVS B-1
B.3 CONFIG-BOND B-2
B.4 CONFIG-CAPTURE B-4
B.5 CONFIG-DIAGNOSTICS B-5
B.6 CONFIG-DNS B-5
B.7 CONFIG-KEYTABLE B-6
B.8 CONFIG-NIC B-7
B.9 CONFIG-NTP B-8
B.10 CONFIG-PROXY B-9
B.11 CONFIG-SNMP B-10
B.12 CONFIG-SSH B-11
B.13 CONFIG-STATUS B-11
B.14 CONFIG-SYSLOG B-12
B.15 CONFIG-TIME B-13
B.16 CONFIG-PKI_IDENTITY B-14
C Plug-In Reference
C.1 About Oracle Audit Vault and Database Firewall Plug-ins C-1
C.2 Plug-ins That are Shipped with Oracle Audit Vault and Database Firewall C-1
C.2.1 About Plug-ins C-1
C.2.2 Oracle Database Plug-in for Oracle Audit Vault and Database Firewall C-4
C.2.3 MySQL Plug-in for Oracle Audit Vault and Database Firewall C-6
xix

C.2.4 Microsoft SQL Server Plug-in for Oracle Audit Vault and Database Firewall C-8
C.2.5 PostgreSQL Plug-in for Oracle Audit Vault and Database Firewall C-9
C.2.6 IBM DB2 Plug-in for Oracle Audit Vault and Database Firewall C-10
C.2.7 Sybase ASE Plug-in for Oracle Audit Vault and Database Firewall C-11
C.2.8 Sybase SQL Anywhere Plug-in for Oracle Audit Vault and Database Firewall C-12
C.2.9 Quick JSON Target Type for Oracle Audit Vault and Database Firewall C-13
C.2.10 Oracle Solaris Plug-in for Oracle Audit Vault and Database Firewall C-15
C.2.11 Linux Plug-in for Oracle Audit Vault and Database Firewall C-15
C.2.12 IBM AIX Plug-in for Oracle Audit Vault and Database Firewall C-17
C.2.13 Microsoft Windows Plug-in for Oracle Audit Vault and Database Firewall C-18
C.2.14 Microsoft Active Directory Plug-in for Oracle Audit Vault and DatabaseFirewall C-19
C.2.15 Oracle ACFS Plug-in for Oracle Audit Vault and Database Firewall C-20
C.2.16 Summary of Data Collected for Each Audit Trail Type C-20
C.3 Scripts for Oracle AVDF Account Privileges on Targets C-23
C.3.1 About Scripts for Setting up Oracle Audit Vault and Database Firewall AccountPrivileges C-23
C.3.2 Oracle Database Setup Scripts C-24
C.3.3 Sybase ASE Setup Scripts for Oracle Audit Vault and Database Firewall C-25
C.3.3.1 About Sybase ASE Setup Scripts C-25
C.3.3.2 Setting Up Audit Data Collection Privileges for Sybase ASE Targets C-26
C.3.3.3 Setting Up Stored Procedure Auditing Privileges for Sybase ASE Targets C-27
C.3.4 Sybase SQL Anywhere Setup Scripts C-27
C.3.5 Microsoft SQL Server Setup Scripts C-28
C.3.5.1 About the SQL Server Setup Script C-28
C.3.5.2 Setting Up Audit Data Collection Privileges for SQL Server Targets C-29
C.3.5.3 Setting Up Stored Procedure Auditing Privileges for SQL Server Targets C-30
C.3.6 IBM DB2 for LUW Setup Scripts C-31
C.3.6.1 About the IBM DB2 for LUW Setup Scripts C-31
C.3.6.2 Setting Up Audit Data Collection Privileges for IBM DB2 for LUW C-32
C.4 Audit Collection Consideration C-32
C.4.1 Additional Information for Audit Collection from Oracle Active Data Guard C-32
C.4.2 Additional Information for Audit Collection from Oracle Data Guard C-35
C.5 Audit Trail Cleanup C-35
C.5.1 Oracle Database Audit Trail Cleanup C-36
C.5.1.1 About Purging the Oracle Database Target Audit Trail C-36
C.5.1.2 Scheduling Automated Purge Jobs C-36
C.5.1.3 Oracle GoldenGate Extract Cleanup C-38
C.5.2 Microsoft SQL Server Audit Trail Cleanup C-38
C.5.3 MySQL Audit Trail Cleanup C-39
C.5.4 IBM DB2 Audit Trail Cleanup C-39
C.6 Procedure Look-Ups: Connect Strings, Collection Attributes, Audit Trail Locations C-40
xx

C.6.1 Target Locations (Connect Strings) C-40
C.6.2 Collection Attributes C-41
C.6.2.1 About Collection Attributes C-41
C.6.2.2 Oracle Database Collection Attributes C-42
C.6.2.3 IBM DB2 for LUW Collection Attribute C-44
C.6.2.4 MySQL Collection Attributes C-44
C.6.2.5 Oracle ACFS Collection Attribute C-45
C.6.3 Audit Trail Locations C-45
D Transaction Log Audit Data Collection Reference
D.1 Introduction to Transaction Log Audit Trail Using Oracle GoldenGate D-1
D.2 Sizing Guidelines D-2
D.3 Deploying Oracle GoldenGate Microservices Architecture D-3
D.4 Installing Oracle GoldenGate on Oracle Database D-3
D.5 Capturing Transaction Log Data from Oracle Database 12.2.0.1 and Later D-4
D.6 Downstream Mining to Capture Transaction Log Data from Oracle Database Prior to12.2.0.1 D-4
D.7 Migrating Transaction Log Audit Trail from Oracle AVDF 12.2 to 20 D-5
D.8 Create User and Grant Relevant Privileges D-6
D.9 Configure Oracle GoldenGate Parameters for Oracle Database D-7
D.10 Create New Credential in GoldenGate Administration Server D-9
D.11 Create a New Integrated Extract in Oracle GoldenGate Administration Server D-10
D.12 Sample Oracle GoldenGate Integrated Extract Parameter Files D-12
D.13 Audit Trail Creation in Audit Vault Console D-14
D.14 Audit Trail Cleanup D-14
D.15 Configure GoldenGate Downstream Mining D-15
E PostgreSQL Audit Data Collection Reference
E.1 Introduction to PostgreSQL Audit Data Collection E-1
E.2 Installing PostgreSQL E-1
E.3 Steps After Installing PostgreSQL E-2
F Ports Used by Oracle Audit Vault and Database Firewall
F.1 Ports for Deploying Database Firewall for Targets F-1
F.2 Ports for Services Provided by Audit Vault Server F-1
F.3 Ports for Services Provided by Database Firewall F-2
F.4 Ports for External Network Access by Audit Vault Server F-3
F.5 Ports for External Network Access by Database Firewall F-4
xxi
F.6 Ports for Internal TCP Communication F-5
G Message Code Dictionary for Oracle Audit Vault and Database Firewall
G.1 Audit Vault Messages G-1
G.2 Database Firewall Messages G-40
H Security Technical Implementation Guides
H.1 About Security Technical Implementation Guides H-1
H.2 Enabling and Disabling STIG Rules on Oracle Audit Vault and Database Firewall H-2
H.2.1 Enabling STIG Rules on Oracle Audit Vault and Database Firewall H-2
H.2.2 Disabling STIG Rules on Oracle Audit Vault and Database Firewall H-3
H.3 Current Implementation of STIG Rules on Oracle Audit Vault and Database Firewall H-3
H.4 Current Implementation of Database STIG Rules H-3
H.5 Additional STIG Rule Notes H-12
H.5.1 DG0008-ORACLE11 STIG Rule H-12
H.5.2 DG0075-ORACLE11 and DO0250-ORACLE11 STIG Rules H-12
H.5.3 DG0116-ORACLE11 STIG Rule H-12
H.6 Current Implementation of Operating System STIG Rules H-13
I Enabling FIPS 140-2 in Oracle AVDF
I.1 About FIPS and Oracle AVDF I-1
I.2 Enabling FIPS 140-2 in Audit Vault Server I-1
I.3 Enabling FIPS 140-2 in Database Firewall I-2
I.4 Enabling FIPS 140-2 for Database Firewall Instances in High Availability I-2
I.5 Verify the Status After Enabling FIPS 140-2 for Database Firewall Instances in HighAvailability I-3
I.6 Enabling FIPS 140-2 for Database Firewall Instances in High Availability Deployed inProxy Mode I-4
J Troubleshooting Oracle Audit Vault and Database Firewall
J.1 Audit Vault Agent or Host Monitor is not Upgraded to the New Release J-1
J.2 Partial or No Traffic Seen for an Oracle Database Monitored by Oracle DatabaseFirewall J-2
J.3 Agent Activation Request Returns 'host is not registered' Error J-3
J.4 Unable to Deploy Agent on the Secondary Audit Vault Server J-4
J.5 Failure While Building a Host Monitor or Collecting Oracle Database Trails J-4
J.6 'java -jar agent.jar' Failed on Windows Machine J-5
J.7 Unable to Install the Agent or Generate the agent.jar File J-5
xxii

J.8 Unable to Un-install the Oracle Audit Vault Agent Windows Service J-6
J.9 Access Denied Error While Installing Agent as a Windows Service J-6
J.10 Unable to Start the Agent Through the Services Applet on the Control Panel J-6
J.11 Error When Starting the Agent J-7
J.12 Error When Running Host Monitor Setup J-8
J.13 Alerts on Oracle Database Targets Are Not Triggered for Extended Periods of Time J-8
J.14 Error When Creating an Audit Policy J-9
J.15 Connection Problems When Using Oracle Database Firewall Monitoring andBlocking J-9
J.16 Audit Trail Does Not Start J-10
J.17 Cannot See Data for Targets J-11
J.18 Problems Pairing Oracle Database Firewall and Oracle Audit Vault Server J-12
J.19 User Names Do Not Appear on Database Firewall Reports J-13
J.20 Alerts Are Not Generated J-13
J.21 Problems Retrieving or Provisioning Audit Settings on Oracle Target J-14
J.22 Operation Failed Message Appears When Attempting to Enable Oracle Audit Vaultand Database Firewall Policies J-15
J.23 Out of Memory Error Message During Restore J-15
J.24 JAVA.IO.IOEXCEPTION Error J-16
J.25 Failed to Start ASM Instance Error J-16
J.26 Internal Capacity Exceeded Messages Seen in the /var/log/messages file J-17
J.27 First Archive Or Retrieve Job After Upgrade J-18
J.28 Audit Vault Agent Installation Fails After HA Pairing Or Separation J-19
J.29 Error in Restoring Files J-20
J.30 DB2 Collector Fails Due to Source Version NULL Errors J-20
J.31 DB2 Collector Fails Due to Database Connection or Permission Issues J-21
J.32 ORA-12660 Error While Registering Target J-21
J.33 Audit Trail Performance Issues Occur After Audit Vault Server Upgrade J-22
J.34 Failures Due to Dropping Users J-22
J.35 Failure of Agent Automatic Upgrades J-23
J.36 Some Services May Not Start After Backup J-23
J.37 Data Overflow Issues in the Oracle Audit Vault UI J-23
J.38 Oracle Audit Vault Agent is Unreachable and the Transaction Log Audit Trail isFrozen in Starting Status J-24
J.39 Scheduled PDF or XLS Reports Result in a Hung State J-24
J.40 Pending Reports Remain in Scheduled Status J-25
J.41 Audit Vault Log Displays a Message to Install WinPcap and OpenSSL J-26
J.42 Host Monitor Agent Fails to Start J-27
J.43 Error OAV-47409 While Managing Archive Locations J-28
J.44 Audit Trail Stopped After Relocating Windows Event Log Files J-28
J.45 Missing or Incomplete Client Information in Oracle Database Firewall Logs J-29
J.46 Network Audit Trail Does Not Start on Unix Platforms J-29
xxiii
J.47 Issues with Retrieving Session Information Through Clients Connecting to MicrosoftSQL Server J-30
J.48 Performance Issues Due to High Memory Usage J-31
J.49 httpd Crash Issue on Database Firewall J-31
J.50 Issue with Retrieval of Return Row Count J-33
J.51 Unable to Log in to the Oracle AVDF Appliance through SSH J-35
J.52 Error When Changing IP Address of Management Interface J-35
J.53 Unable to Configure Microsoft SQL Server XEL Audit Trail After Upgrade J-36
J.54 Transaction Log Audit Trail Stops Due to an Error While Parsing XML FileContaining Emoji J-36
J.55 Unable to Find the FIPS Status for Database Firewall Instance J-37
J.56 Unable to Modify the Database Firewall FIPS Mode Through Audit Vault ServerConsole J-38
J.57 The FIPS Status on Both the Database Firewall Instances is Different J-38
J.58 After Restarting Secondary Audit Vault Server, the Primary Instance Fails toSwitchover J-39
J.59 Incorrect Syntax Near Connectivity Entry in Audit Logs J-39
J.60 Certificate Regenerate Failure Error J-40
J.61 User Entitlement or Audit Policy Job Stuck in Running State J-41
J.62 Audit Trails are Toggling Between COLLECTING and UNREACHABLE Status J-41
J.63 Displaying Job Status Takes Lot of Time in the Audit Vault Server Console J-42
J.64 Microsoft SQL Server Database Audit Trails are in Stopped State After UpgradingJava J-42
J.65 Unable to Delete Database Firewall J-43
J.66 Issue in Language Setting of the Audit Vault Agent J-44
K Multiple Network Interface Cards
K.1 About Multiple Network Interface Cards K-1
K.2 Enabling SSH on a Secondary Network Interface Card K-2
K.3 Enabling Agent Connectivity on a Secondary NIC for Audit Vault Server K-3
K.4 Enabling the Agent for High Availability Connection on a Secondary NIC for AuditVault Server K-4
K.5 Bonding of Network Interface Cards K-5
K.6 Configuring Routing on Secondary Network Interface Cards K-6
L Configuring Quick JSON Target Type to Collect Audit Data fromMongoDB
M Audit Vault Agent Auto Start Configuration
M.1 Configuring Agent Auto Start on Host Machine With OL7 and OL8 M-1
xxiv

M.2 Configuring Agent Auto Start on Host Machine With OL6 M-3
M.3 Configuring Agent Auto Start on Host Machine With Windows x64 M-4
M.4 Configuring Agent Auto Start on Host Machine With Solaris [SPARC/x64] M-5
M.5 Configuring Agent Auto Start on Host Machine With IBM AIX M-7
N Adding User Content To System Configuration Files
O Monitoring Audit Vault Server
O.1 About Auditing Operating System O-1
O.2 About Auditing Audit Vault Server Repository O-1
O.3 Collecting Audit Records to Shadow Audit Vault Server O-4
O.4 Deploying the Audit Vault Agent on the Main Audit Vault Server O-5
O.5 Adding a Trail to Collect Data From Unified Audit Trail on the Main Audit Vault Server O-6
O.5.1 Registering the Main Audit Vault Server as an Oracle Database Target O-6
O.5.2 Configuring Trail to Collect Data from Unified Audit Trail on the Main AuditVault Server O-7
O.6 Adding a Trail to Collect Data from OS Audit Trail on the Main Audit Vault Server O-7
O.6.1 Registering the Main Audit Vault Server as a Linux Target O-8
O.6.2 Configuring a Trail to Collect Data from OS Audit Trail on the Main Audit VaultServer O-8
O.7 Storage Requirement for Main Audit Vault Server O-9
O.8 About Purging Unified Audit Trail on the Main Audit Vault Server O-10
Index
xxv
List of Figures
5-1 Proxy Without Network Separation 5-4
5-2 Proxy Without Network Separation Using a Dedicated NIC for the Proxy Service 5-5
5-3 Proxy With Network Separation 5-6
5-4 Monitoring (Out-of-Band) 5-7
5-5 Monitoring (Host Monitor) 5-9
7-1 Database Response Monitoring 7-49
11-1 Connection Details 11-2
D-1 Transaction Log Collection Process D-2
xxvi
List of Tables
2-1 Oracle Audit Vault and Database Firewall User Accounts 2-5
5-1 Database Firewall Deployment Types 5-2
6-1 Remote Agent or Local Agent 6-8
12-1 Functional Differences Between Oracle AVDF Deployed On-premises and on OCI 12-8
12-2 Platform Support Matrix for Audit Vault Agent and Host Monitor Agent Deployment 12-11
15-1 Components with Variable Logging Levels 15-2
A-1 Host Attributes (key values) A-2
A-2 LOGLEVEL Component Names A-3
A-3 LOGLEVEL Values A-3
A-4 Oracle Database Firewall Attributes A-8
A-5 Target Attributes A-19
A-6 AVCLI Target Group Commands A-25
A-7 System Attributes A-66
A-8 Logging component names and values A-67
A-9 Logging level and values A-67
C-1 Out-of-the-Box Plug-ins and Features Supported in Oracle Audit Vault and Database Firewall C-2
C-2 Oracle Database Plug-in C-4
C-3 MySQL Plug-in C-6
C-4 Old Audit Format C-7
C-5 New Audit Format C-7
C-6 Microsoft SQL Server Plug-in C-8
C-7 PostgreSQL C-10
C-8 IBM DB2 Plug-in C-10
C-9 Sybase ASE Plug-in C-11
C-10 Sybase SQL Anywhere Plug-in C-13
C-11 Quick JSON C-13
C-12 Quick JSON Collection Attributes C-14
C-13 Oracle Solaris Plug-in C-15
C-14 Linux Plug-in C-16
C-15 IBM AIX Plug-in C-17
C-16 Microsoft Windows Plug-in C-19
C-17 Microsoft Active Directory Plug-in C-19
C-18 Oracle ACFS Plug-in C-20
C-19 Summary of Audit Trail Types Supported for Each Target Type C-21
C-20 Target Connect Strings (for Target Location Field) C-40
xxvii

C-21 Collection Attributes for DIRECTORY Audit Trail for Oracle Database C-42
C-22 Collection Attribute for IBM DB2 for LUW Database C-44
C-23 Collection Attributes for MySQL Database C-44
C-24 Collection Attribute for Oracle ACFS C-45
C-25 Supported Trail Locations for Targets C-45
F-1 Ports for Services Provided by Audit Vault Server F-2
F-2 Ports for Services Provided by Database Firewall F-2
F-3 Ports for External Network Access by the Audit Vault Server F-3
F-4 Ports for External Network Access by Database Firewall F-4
F-5 Ports for Internal TCP Communication F-5
H-1 Vulnerability Categories H-3
H-2 Current Implementation of Database STIG Rules H-4
H-3 Accounts and Role Assignments in Audit Vault Server H-13
H-4 Accounts and Role Assignments in Database Firewall H-13
H-5 Operating System STIG Rule Set Reference H-13
H-6 User Action – Definition and Guidelines H-14
H-7 Current Implementation of Operating System STIG Rules H-14
J-1 Server Encryption Types J-22
L-1 Collection attributes and values required for audit collection from MongoDB audit file L-1
O-1 Oracle Predefined Policies Configured for Audit Vault Server O-2
xxviii

Preface
Oracle Audit Vault and Database Firewall Administrator's Guide explains how to configure anAudit Vault and Database Firewall installation.
AudienceThis document is intended for security managers, audit managers, and databaseadministrators (DBAs) who are involved in the configuration of Oracle Audit Vault andDatabase Firewall.
Documentation AccessibilityFor information about Oracle's commitment to accessibility, visit the Oracle AccessibilityProgram website at http://www.oracle.com/pls/topic/lookup?ctx=acc&id=docacc.
Access to Oracle Support
Oracle customers that have purchased support have access to electronic support through MyOracle Support. For information, visit http://www.oracle.com/pls/topic/lookup?ctx=acc&id=infoor visit http://www.oracle.com/pls/topic/lookup?ctx=acc&id=trs if you are hearing impaired.
Diversity and InclusionOracle is fully committed to diversity and inclusion. Oracle respects and values having adiverse workforce that increases thought leadership and innovation. As part of our initiative tobuild a more inclusive culture that positively impacts our employees, customers, andpartners, we are working to remove insensitive terms from our products and documentation.We are also mindful of the necessity to maintain compatibility with our customers' existingtechnologies and the need to ensure continuity of service as Oracle's offerings and industrystandards evolve. Because of these technical constraints, our effort to remove insensitiveterms is ongoing and will take time and external cooperation.
Related DocumentsSee Oracle Audit Vault and Database Firewall 20.1 Books.
ConventionsThe following text conventions are used in this document:
xxix

Convention Meaning
boldface Boldface type indicates graphical user interface elements associatedwith an action, or terms defined in text or the glossary.
italic Italic type indicates book titles, emphasis, or placeholder variables forwhich you supply particular values.
monospace Monospace type indicates commands within a paragraph, URLs, codein examples, text that appears on the screen, or text that you enter.
TranslationThis topic contains translation (or localization) information for Oracle AVDF UserInterface and Documentation.
The Web based User Interface or the Audit Vault Server console is translated andmade available in the following languages. This includes the User Interface, errormessages, and help text.
• French
• German
• Italian
• Japanese
• Korean
• Spanish
• Portuguese - Brazil
• Chinese - Traditional
• Chinese - Simplified
Oracle AVDF Documentation is available in the following languages:
• English
• Japanese
Preface
xxx

Quick Reference for Common Tasks
This section lists some of the common tasks performed using Oracle Audit Vault andDatabase Firewall.
About this Quick ReferenceThis chapter is intended for users who are familiar with Oracle Audit Vault and DatabaseFirewall (Oracle AVDF), and who want to locate step-by-step instructions for common tasks. Ifyou are new to Oracle AVDF, then we recommend that you read the documentation tounderstand the product and plan your configuration.
See Summary of Configuration Steps to understand the workflows for configuring OracleAudit Vault and Database Firewall
Audit Vault ServerSystem Settings
"Specifying the Server Date, Time, and Keyboard Settings"
"Changing the Audit Vault Server Network Configuration"
"Changing the UI (Console) Certificate for Audit Vault Server"
"Configuring or Changing the Audit Vault Server Services"
"Configuring Audit Vault Server Syslog Destinations"
"Configuring Email Notification for Oracle Audit Vault and Database Firewall"
"Testing Audit Vault Server System Operations"
"Data Encryption on Upgraded Instances"
Archiving and Retrieving
"Defining Archive Locations"
"Creating Archiving and Retention Policies"
"Deleting Archiving Policies"
"Starting an Archive Job Manually"
"Retrieving Oracle Audit Vault and Database Firewall Audit Data"
High Availability Configuration of Audit Vault Servers
"Configure the Designated Standby Audit Vault Server"
xxxi

"Configure the Designated Primary Audit Vault Server"
"Checking the High Availability Status of an Audit Vault Server"
"Post High Availability Pairing Steps"
"Disabling or Enabling Failover of the Audit Vault Server"
AVCLI (Command Line Interface)
"Downloading the AVCLI Command Line Utility and Setting JAVA_HOME"
"About Logging in to AVCLI"
"Displaying Help and the Version Number of AVCLI"
"Running AVCLI Scripts"
"Specifying Log Levels for AVCLI"
"AVCLI Commands Reference"
Other Operations
"Backing Up and Restoring the Audit Vault Server"
"Rotating the Master Key for Repository Encryption"
"Changing the Keystore Password"
"Enabling Oracle Database In-Memory for the Audit Vault Server"
"Monitoring Jobs"
"Checking Server Status and System Operation"
"Accessing the Audit Vault Server Certificate and Public Key"
"Restarting or Powering Off the Audit Vault Server"
"Changing the Keyboard Layout"
"Running Diagnostics Checks for the Audit Vault Server"
Database FirewallFirewall System Settings
"Configuring Network Settings for Oracle Database Firewall"
"Configuring Network Services for Oracle Database Firewall"
"Setting the Date and Time in Database Firewall"
"Specifying the Audit Vault Server Certificate and IP Address"
"Viewing the Status and Diagnostics Report for Database Firewall"
Firewall Network Configuration
"Configuring Traffic Sources"
"Configuring Database Firewall As A Traffic Proxy"
Quick Reference for Common Tasks
xxxii
"Viewing Network Traffic in a Database Firewall"
Managing Database Firewalls in the Audit Vault Server
"Registering Database Firewall in Audit Vault Server"
"Restarting or Powering Off Database Firewall"
"Removing Database Firewall from Audit Vault Server"
"Fetching an Updated Certificate from Database Firewall"
High Availability Pairing of Database Firewalls
"High Availability for Database Firewall in Host Monitor or Out of Band Modes"
"Swapping Roles Between Primary and Standby Database Firewalls"
"Unpair Primary and Standby Database Firewalls"
Hosts"Registering Hosts in the Audit Vault Server"
"Changing Host Names"
"Deleting Hosts from Audit Vault Server"
"Deploying Plug-ins and Registering Plug-in Hosts"
"Removing Plug-ins"
AgentAgent Deployment
"Steps Required to Deploy and Activate the Audit Vault Agent"
"Deploying the Audit Vault Agent"
"Activating and Starting the Audit Vault Agent"
"Unregistering the Audit Vault Agent as a Windows Service"
"Stopping and Starting the Agent on Unix Hosts"
"Stopping and Starting the Agent on Windows Hosts"
"Changing the Logging Level for the Audit Vault Agent"
"Deactivating and Removing Audit Vault Agent"
Updating Agent
"Updating Oracle Audit Vault Agent"
Quick Reference for Common Tasks
xxxiii
Host MonitorHost Monitor Installation
"Register the Host Machine That Will Run the Host Monitor"
"Deploy the Audit Vault Agent and the Host Monitor"
"Create a Target for the Host Monitored Database"
"Create a Monitoring Point for the Host Monitor"
Host Monitor Operations
"Starting the Host Monitor"
"Stopping the Host Monitor"
"Changing the Logging Level for a Host Monitor"
"Checking the Status of a Host Monitor Audit Trail"
"Uninstalling the Host Monitor (Unix Hosts Only)"
Updating
"Updating the Host Monitor (Unix Hosts Only)"
Host Monitor Security
"Using Certificate-based Authentication for the Host Monitor"
Targets
Registering and Managing"Registering Targets"
"Removing Targets"
"Creating a Target Group"
"Managing User Access Rights to Targets and Groups"
AuditingPreparing for Auditing
"Preparing Targets for Audit Data Collection"
"Using an NTP Service to Set Time on Targets"
"Ensuring that Auditing is Enabled on the Target"
"Setting User Account Privileges on Targets"
Quick Reference for Common Tasks
xxxiv

"Scheduling Audit Trail Cleanup"
Audit Trails
"Adding Audit Trails in Audit Vault Server"
"Stopping, Starting, and Autostart of Audit Trails in Oracle Audit Vault Server"
"Checking the Status of Trail Collection in Audit Vault Server"
"Deleting an Audit Trail"
"Running the XML Transformation Utility for MySQL Audit Formats"
Monitoring with Database FirewallDatabase Firewall Monitoring Points
"Creating and Configuring a Database Firewall Monitoring Point"
"Modifying a Database Firewall Monitoring Point"
"Starting, Stopping, or Deleting Database Firewall Monitoring Points"
"Viewing the Status of Database Firewall Monitoring Points"
"Finding the Port Number Used by a Database Firewall Monitoring Point"
Native Network Encrypted Traffic Monitoring
"Configuring Advanced Settings for Database Firewall"
"Changing the Database Firewall Host Name"
"Configuring Database Firewall for Databases That Use Native Network Encryption"
"Monitor Native Network Encrypted Traffic Through Database Firewall for Oracle Databases"
"Disabling Encrypted Traffic Monitoring for Oracle Databases"
Other Administrator Tasks"Downloading the Oracle Audit Vault and Database Firewall SDK"
"Monitoring Server Tablespace Space Usage"
"Monitoring Server Archive Log Disk Space Use"
"Monitoring Server Flash Recovery Area"
"Backing Up and Restoring the Audit Vault Server"
Reference InformationPlug-ins
About Plug-ins
Summary of Data Collected for Each Audit Trail Type
Quick Reference for Common Tasks
xxxv

Scripts for Oracle AVDF Account Privileges on Targets
Audit Trail Cleanup
Target Locations (Connect Strings)
Collection Attributes
Audit Trail Locations
Other Reference Information
AVCLI Commands Reference
Transaction Log Audit Data Collection Reference
Ports Used by Oracle Audit Vault and Database Firewall
Troubleshooting Oracle Audit Vault and Database Firewall
Oracle AVDF 20 Cookbook
Cookbook: Oracle Audit Vault and Database Firewall 20 for Beginners
Quick Reference for Common Tasks
xxxvi
Part IGetting Started with Oracle Audit Vault andDatabase Firewall
Learn to configure Oracle Audit Vault and Database Firewall.
Part I describes how to configure a basic Oracle Audit Vault and Database Firewall system.Part I takes you from a new installation through the process of configuring the Oracle AuditVault and Database Firewall components.
This part contains the following chapters:

1Changes in Oracle Audit Vault and DatabaseFirewall Release 20
New features in Oracle AVDF Release 20.7
• New Features in Database Firewall:
– Capability to decrypt TLS traffic and analyze the SQL statements going to OracleDatabase targets. See Monitoring TLS Encrypted SQL Traffic for more information.
– A new Default policy is added to Pre-defined Policies. It logs all login and logoutevents to the database along with DDL or DCL activities. See Creating andConfiguring a Database Firewall Monitoring Point for more information.
– ERSPAN support for Database Firewall deployed in Monitoring (Out of Band)mode. See Configuring Encapsulated Remote Switched Port Analyzer with DatabaseFirewall for more information.
– In case a Linux host machine has multiple network devices, then the Host MonitorAgent can now monitor all those network devices. See Create a Monitoring Point forthe Host Monitor and Create a Network Audit Trail for more information.
• New Features in Audit Vault Server:
– Introducing support for monitoring of Audit Vault Server. See Monitoring Audit VaultServer for more information.
– Improved audit trail status reporting mechanism in the Audit Vault Server console.This feature eliminates incorrect reporting of unreachable trails. See Checking theStatus of Trail Collection in Audit Vault Server and ALTER SYSTEM SET for moreinformation.
– Network and system settings for the standby Audit Vault Server can now beconfigured using the primary Audit Vault Server console. See Changing the StandbyAudit Vault Server Network Configuration and Changing the Standby Audit VaultServer System Settings for more information.
– Ability for super administrator to create and edit a user-defined data retention policyand set it as default. The retention policy can be selected during target registration.See Creating Archiving and Retention Policies and Registering Targets for moreinformation.
• New Features in Audit Vault Agent:
– Introducing Audit Vault Agent auto restart functionality that restarts the Agent in casehost machine is restarted or the Agent goes down for any reason. See ConfiguringAgent Auto Restart Functionality for more information.
– Oracle AVDF can collect unified audit trail data from both primary and standby OracleActive Data Guard databases consistently. With this feature Oracle AVDF can nowcollect audit data generated on the standby database. See Additional Information forAudit Collection from Oracle Active Data Guard for more information.
1-1
New features in Oracle AVDF Release 20.6
• Automated pre-check of Audit Vault Agent on the host machine. See the topics Validation During Audit Vault Agent Deployment and Validation During HostMonitor Agent Deployment for more information.
• Provide historical data of audit trail downtime for better visibility of audit trail status.See Checking the Status of Trail Collection in Audit Vault Server for moreinformation.
• Database Firewall instances with existing monitoring points can now be paired forhigh availability. See Configuring High Availability of Database Firewall InstancesWith Monitoring Points for more information.
• Broaden Oracle AVDF with support for Microsoft SQL Server (Standard Edition)version 2019 for audit collection. See Microsoft SQL Server Plug-in for OracleAudit Vault and Database Firewall for more information.
• Providing flexibility by setting user's preferred time zone in Audit Vault Serverconsole for a specific session. See Changing the Time Zone for more information.
• For installation of Host Monitor on Windows, manual installation of Npcap is nolonger needed. Npcap is automatically installed along with the Agent installation.See Deploying the Agent and Host Monitor on Windows Host Machine for moreinformation.
• A super administrator can view all the archived datafiles. See Viewing ArchivedDatafiles for complete information.
New features in Oracle AVDF Release 20.5
• To improve security posture, introducing Security Technical ImplementationGuidelines (STIG) unified audit policy for provisioning on Oracle Database targets.See ENABLE UNIFIED AUDIT POLICY for more information.
• Broaden Oracle AVDF platform compatibility with support for IBM DB2 DatabasePartitioning Feature (DPF) on Linux and AIX platform for audit collection. See Converting Binary Audit Files to ASCII Format for IBM DB2 for more information.
• For Host Monitoring on Windows, Npcap is automatically downloaded along withthe Agent software (agent.jar) file. See Deploying the Agent and Host Monitoron Windows Host Machine for more information.
New features in Oracle AVDF Release 20.4
• Introducing capability to enable FIPS 140-2 for Audit Vault Server and DatabaseFirewall. See Enabling FIPS 140-2 in Oracle AVDF for more information.
• 2X audit collection rate. See Registering Targets for more information.
• Support for audit collection and network monitoring (using Database Firewall) ofOracle Database 21.
• Support for audit collection from Autonomous Data Warehouse (Dedicated) andAutonomous Transaction Processing (Dedicated).
• Support for audit collection from MongoDB 4.4.
• Enable conditional auditing for Unified Audit policies. See ENABLE UNIFIEDAUDIT POLICY for more information.
Chapter 1
1-2

• Additional user management capability through AVCLI. See AVCLI User Commands formore information.
• Introducing Oracle GoldenGate Extract Cleanup utility to simplify maintenance.
New features in Oracle AVDF Release 20.3
• Support for audit collection and network monitoring (using Database Firewall) of MicrosoftSQL Server (Enterprise Edition) 2019. See Product Compatibility Matrix for completeinformation.
• Support for audit collection from Microsoft SQL Server Extended events. See MicrosoftSQL Server Plug-in for Oracle Audit Vault and Database Firewall for completeinformation.
• Support for Microsoft SQL Server Always On availability group.
• Support for automating retention policy configuration, unified audit policy provisioning,and alert policy management tasks through AVCLI. See Retention Policy AVCLICommands, Unified Audit Policy AVCLI Commands, and Alert Policy Management AVCLICommands for complete information.
• Support for Audit Vault Agent configuration to restart automatically when the hostmachine is restarted. See Audit Vault Agent Auto Start Configuration for completeinformation.
New features in Oracle AVDF Release 20.2
• Audit Vault Agent can be associated with more than one IP address for Audit Vault Servercommunication. See section Registering Hosts on Oracle Audit Vault Server for completeinformation.
• Supporting audit collection, Audit Vault Agent deployment, and Host Monitor deploymenton Microsoft Windows Server (x86-64) version 2019. See Microsoft Windows Plug-in forOracle Audit Vault and Database Firewall for complete information.
• Enhancement in audit collection from CDB_UNIFIED_AUDIT_TRAIL for PDBs. See section Configuring Audit Trail Collection for CDBs and PDBs for complete information.
• Supporting audit records collection from DB2 instance level audit.
New features in Oracle AVDF Release 20.1
• Supports audit data collection from new target types and versions. Unified console forAudit and Firewall management. Registering a target for audit collection and DatabaseFirewall monitoring is now simplified. Refer to the following sections for more information:
– Registering Targets
– Adding Audit Trails in Audit Vault Server
– Plug-ins That are Shipped with Oracle Audit Vault and Database Firewall
• Supports audit collection for more target types and version. See Platform Support formore information.
• Supports automatic archival of audit or log data. See the following sections for completeinformation:
– Enabling Automatic Archival
– Starting an Archive Job Manually
– About Archiving and Retrieving Data in Oracle Audit Vault and Database Firewall
Chapter 1
1-3

– Error OAV-47409 While Managing Archive Locations
• You can now restore a backup to a new system with a new IP address and notretain the old IP address by default:
Restoring a Backup to a New System with a New or Different IP Address
• Supports changing the TCP/TCPS ports used by Audit Vault Server database. See Configuring Custom Ports on Network Interfaces for complete information.
• Supports provisioning of recommended Unified audit policies.
• Supports audit collection from Container Database. See Configuring Audit TrailCollection for CDBs and PDBs for complete information.
• Improved audit collection performance.
• Introduced new command-line interface commands. See Specifying the AuditVault Server Certificate and IP Address and Configuring Network Services forOracle Database Firewall for complete information.
• Secure communication between the syslog clients and servers usingauthentication and encryption. See Configuring Remote Syslog Over TLS.
• Supports user authentication with Microsoft Active Directory and OpenLDAP forusers connecting to Audit Vault Server console. See Integrating Oracle Audit Vaultand Database Firewall with Microsoft Active Directory or OpenLDAP for completeinformation.
• Using Oracle Database Firewall with Oracle RAC is simplified.
• Enhanced DDI to retrieve session information for Oracle Database targets. This isavailable for Oracle Database Firewall in monitoring and blocking, or in monitoringonly mode. See Step 2: Run the Oracle Advance Security Integration Script forcomplete information.
• Supports Bonding of Network Interface Cards for increased throughput.
• Introducing new System Configuration Utilities.
• Supports fiber channel based storage with multipath. See Configuring FiberChannel-Based Storage for Audit Vault Server for complete information.
• Introduced Quick JSON collector to collect audit data from any JSON audit fileincluding MongoDB. See Configuring Quick JSON Target Type to Collect AuditData from MongoDB for complete information.
• Built-in support for PostgreSQL.
Chapter 1
1-4

2Introducing Oracle Audit Vault and DatabaseFirewall
To begin using Oracle Audit Vault and Database Firewall (Oracle AVDF), perform preliminarytasks, such as downloading the latest version of this manual and understanding the basicOracle AVDF concepts.
2.1 Downloading the Latest Version of This ManualLearn how to download the latest documentation for Oracle Audit Vault and DatabaseFirewall.
Download the latest version of this manual from the following website:
https://docs.oracle.com/en/database/oracle/audit-vault-database-firewall/20/sigad/index.html
Find documentation for other Oracle products at the following website:
https://docs.oracle.com
2.2 Learning About Oracle Audit Vault and Database FirewallUnderstanding the basic concepts of Oracle Audit Vault and Database Firewall is key to asuccessful Oracle AVDF deployment.
Oracle recommends that you read Oracle Audit Vault and Database Firewall Concepts Guideto understand the features, components, users, and deployment procedures of Oracle AVDF.
2.3 Supported Platforms for Oracle Audit Vault and DatabaseFirewall
You can run Oracle Audit Vault and Database Firewall on various platforms.
Oracle Audit Vault and Database Firewall (Oracle AVDF) consolidates activity audit data fromOracle and non-Oracle databases, operating systems, and directories. It provides securityand compliance reports through an accurate SQL grammar based engine. Database Firewallmonitors SQL traffic and blocks unauthorized SQL.
See Oracle Audit Vault and Database Firewall Installation Guide for detailed platform supportfor the current release.
2-1
2.4 Oracle Audit Vault and Database Firewall SystemFeatures
Learn about the system features of Oracle Audit Vault and Database Firewall.
Topics
2.4.1 About Oracle Audit Vault and Database FirewallOracle Audit Vault and Database Firewall protects your IT infrastructure by monitoringactivity, blocking intrusion attempts, collecting audit data, and enacting customizablefirewall rules.
Oracle Audit Vault and Database Firewall (Oracle AVDF) secures databases and othercritical components of your IT infrastructure, such as operating systems, in thefollowing ways:
• Provides a database firewall that monitors activity and can block SQL statementson the network based on your firewall policy.
• Collects audit data and presents the data in audit reports.
• Provides dozens of built-in, customizable activity, and compliance reports.
• Enables you to proactively configure alerts and notifications.
This section provides a brief overview of the administrative and auditing features ofOracle AVDF.
Oracle AVDF auditing features are described in detail in Oracle Audit Vault andDatabase Firewall Auditor's Guide.
We strongly recommend that you read Oracle Audit Vault and Database FirewallConcepts Guide for more information on the features, components, users, anddeployment of Oracle AVDF.
2.4.2 Security Technical Implementation Guides and Implementationfor Oracle Audit Vault and Database Firewall
Learn about Oracle Audit Vault and Database Firewall compliance with SecurityTechnical Implementation Guides (STIG) standards.
Oracle Audit Vault and Database Firewall (Oracle AVDF) is compliant with the SecurityTechnical Implementation Guides (STIG) standards.
See Also:
Security Technical Implementation Guides
Chapter 2Oracle Audit Vault and Database Firewall System Features
2-2

2.4.3 System Requirements for Oracle Audit Vault and Database FirewallRead about the Oracle AVDF hardware and software requirements.
For hardware and software requirements, see Oracle Audit Vault and Database FirewallInstallation Guide.
2.4.4 Supported Targets for Oracle Audit Vault and Database FirewallLearn about Oracle Audit Vault and Database Firewall targets.
A target is a database or non-database product that you secure using either the Oracle AuditVault Agent, the Oracle Database Firewall, or both. If the target is a database, then you canmonitor or block its incoming SQL traffic with Oracle Database Firewall. If the target, whetheror not it is a database, is supported by the Oracle Audit Vault Agent, then you can deploy theagent on that target's host computer and collect audit data from the internal audit tables andoperating system audit files.
Oracle Audit Vault and Database Firewall supports various target products out of the box inthe form of built-in plug-ins.
See Also:
• About Plug-ins
• Plug-In Reference for detailed information on each plug-in.
• Table C-1 for supported target products and versions.
• Table C-19 for the data collected and platforms supported for each audit trailtype.
• Oracle Audit Vault and Database Firewall Developer's Guide for information oncreating custom plug-ins to capture audit trails from more target types using theOracle AVDF SDK.
2.4.5 Oracle Audit Vault and Database Firewall Administrative FeaturesYou can use Oracle Audit Vault and Database Firewall administrative features to managetargets and their hosts, firewalls, and other features.
You can use Oracle Audit Vault and Database Firewall administrative features to configureand manage the following:
• Targets
• Database Firewalls
• High Availability
• Third party integrations
• Audit Vault Agent deployment
• Audit trail collection
Chapter 2Oracle Audit Vault and Database Firewall System Features
2-3
• Audit data lifecycle, archiving, and purging
• Microsoft Active Directory or OpenLDAP
2.4.6 Oracle Audit Vault and Database Firewall Auditing FeaturesLearn about Oracle Audit Vault and Database Firewall auditing features.
Oracle Audit Vault and Database Firewall auditing features enable you to configureand manage the following:
• Firewall policies
• Audit policies for Oracle Database
• Reports and report schedules
• Entitlement auditing for Oracle Database
• Stored procedure auditing
• Alerts and e-mail notifications
See Also:
Oracle Audit Vault and Database Firewall Auditor's Guide for detailedinformation about these auditing features
2.4.7 Integrating Oracle Audit Vault and Database Firewall with OracleKey Vault
You can integrate Oracle Audit Vault and Database Firewall with Oracle Key Vault.
Oracle Key Vault events are collected by Oracle Audit Vault and Database Firewall.
See Oracle Key Vault Administrator's Guide for instructions about integrating OracleKey Vault with Oracle Audit Vault and Database Firewall
2.5 Separation of DutiesOracle Audit Vault and Database Firewall offers multiple roles as part of the separationof duties between auditors and administrators.
To provide greater security, the Oracle Audit Vault and Database Firewalladministrator and auditor roles have different user interfaces, and different useraccounts. This separation of interfaces and accounts ensures that there is aseparation of duties between these two roles. In addition to these Oracle Audit Vaultand Database Firewall user accounts, you can also set up user accounts on yourtargets as necessary to access targets for collecting audit data. This is needed by theAudit Vault Agent for connecting to the target and collecting the audit data from theaudit trails. Oracle Audit Vault and Database Firewall provides scripts to set up theseuser accounts on database targets, and guidance for other types of targets.
The following table shows the user accounts in Oracle Audit Vault and DatabaseFirewall.
Chapter 2Separation of Duties
2-4

Table 2-1 Oracle Audit Vault and Database Firewall User Accounts
Account Description
Super Administrator Super administrators configure and maintain the Oracle Audit Vaultand Database Firewall system, including Audit Vault Server settingssuch as network settings, high availability, data retention policies, etc.The super administrator can create other administrators or superadministrators, and has access to all targets. The super administratorcan also grant access to specific targets to other administrators.
Administrator The administrator can perform a subset of the system configurationtasks that a super administrator can, such as registering hosts andtargets, running archive jobs, etc. Administrators can also managetargets for which they have been granted access by a superadministrator.
An administrator cannot create another administrator. This can beperformed by a super administrator only.
Super Auditor The super auditor can create firewall policies, provision audit policiesfor Oracle Database targets, and specify settings for target such aswhether to enable stored procedure auditing. Super auditors alsogenerate reports, and create alerts and notifications. The superauditor can access all targets, create auditor or super auditor users,and grant access to specific targets to those users.
Auditor Auditors can perform all the functions of super auditors, but only forthe targets to which they have access.
Additional accounts are provided for diagnostics and used under the guidance of OracleSupport.
2.6 Understanding the Administrator's RoleOracle AVDF administrators can configure system settings, create connections and targets,deploy agents, configure audit trails, and more.
Oracle AVDF Administrator Tasks
As an Oracle Audit Vault and Database Firewall administrator, your tasks include:
• Configuring the system settings on Audit Vault Server.
• Configuring connections to host computers on which you deployed Audit Vault Agent.This is usually the same computer as your targets.
• Creating targets on Audit Vault Server for each database or operating system that youare monitoring.
• Deploying and activating Audit Vault Agent on target host computers.
• Configuring audit trails for targets that Audit Vault Agent monitors.
• Configuring Database Firewall on your network.
• Creating Database Firewall monitoring points for targets.
• Backing up and archiving audit and configuration data.
• Creating administrative users and managing access (super administrator only).
• Configuring Microsoft Active Directory or OpenLDAP.
Chapter 2Understanding the Administrator's Role
2-5

• Creating high availability for Audit Vault Server.
Administrator Roles in Oracle AVDF
There are two Oracle AVDF administrator roles with different target access levels:
• Super Administrator - This role can create other administrators or superadministrators, has access to all targets, and grants access to specific targets andgroups to an administrator.
• Administrator - Administrators can only see data for targets to which they havebeen granted access by a super administrator.
2.7 Planning Your Oracle Audit Vault and Database FirewallSystem Configuration
Learn about planning your system configuration for Oracle AVDF.
2.7.1 Guidance for Planning Your Oracle Audit Vault and DatabaseFirewall Configuration
Learn about the steps for planning your Oracle Audit Vault and Database Firewallconfiguration.
The steps in this section summarize the planning steps with links to specificinstructions in this user guide.
See Also:
Oracle Audit Vault and Database Firewall Concepts Guide for guidance onplanning deployments of Oracle Audit Vault Server, Oracle Audit Vault Agent,and Oracle Database Firewall.
2.7.2 Step 1: Plan Your Oracle Audit Vault Server ConfigurationPlan your Oracle Audit Vault Server configuration.
In this step, plan whether to configure a resilient pair of servers, whether to change thenetwork configuration settings that were made during the installation, and how toconfigure optional services.
Chapter 2Planning Your Oracle Audit Vault and Database Firewall System Configuration
2-6

See Also:
• Configuring Audit Vault Server for information on the Oracle Audit Vault Serverconfiguration settings.
• High Availability in Oracle AVDF for information about setting up resilient pairsof Oracle Audit Vault Servers.
• Integrating Oracle Audit Vault and Database Firewall with Microsoft ActiveDirectory or OpenLDAP for authenticating users connecting to the Audit VaultServer console.
2.7.3 Step 2: Plan Your Oracle Database Firewall ConfigurationLearn how to plan your Oracle Database Firewall configuration.
If you are using Oracle Database Firewall, then plan how many you need, which targetdatabases they will protect, where to place them in the network, whether they will be formonitoring only or for monitoring and blocking mode, and whether to configure a resilient pairof firewalls. Also plan whether to change the Oracle Database Firewall network configurationthat was specified during installation.
See Also:
• Overview of Oracle Database Firewall Deployment for information on differentdeployment types available.
• Configuring Database Firewall for information about the Oracle DatabaseFirewall configuration settings.
• High Availability in Oracle AVDF for information on setting up resilient pairs offirewalls.
2.7.4 Step 3: Plan Your Oracle Audit Vault Agent DeploymentsPlan your Oracle Audit Vault Agent deployments.
If you are deploying the Oracle Audit Vault Agent(s), then determine the targets for which youwant to collect audit data and identify their host computers. You will register these hosts withOracle Audit Vault and Database Firewall and deploy the Oracle Audit Vault Agent on each ofthem. Then you will register each target in the Oracle Audit Vault Server.
See Also:
• Registering Hosts and Deploying the Agent
• Registering Targets and Creating Groups
Chapter 2Planning Your Oracle Audit Vault and Database Firewall System Configuration
2-7
2.7.5 Step 4: Plan Your Audit Trail ConfigurationsLearn to plan your Audit Trail configurations.
If you are deploying Audit Vault Agent to collect audit data, then you need to configureaudit trails. This section provides guidelines for planning audit trail configurations forthe targets from which you want to extract audit data. The type of audit trail that youselect depends on the target type, and in the case of an Oracle Database target, thetype of auditing that you have enabled in Oracle Database.
To plan the target audit trail configuration:
1. Ensure that auditing is enabled on the target. For Oracle Database targets, findthe type of auditing that Oracle Database uses.
2. Ensure the Audit Vault Agent is installed on a host computer. This is called asAgent machine throughout this document.
3. Determine what type of audit trail to collect.
Table C-19 lists the types of audit trails that can be configured for each target typeand supported platforms.
4. Familiarize yourself with the procedures to register a target and configure an audittrail.
5. If you are collecting audit data from MySQL or IBM DB2 targets, then there areadditional steps you need to take.
See Also:
• Oracle Audit Vault and Database Firewall Auditor's Guide for moreinformation about the target requirements
• Deploying and Activating the Audit Vault Agent on Host Computers
• Registering Targets and Creating Groups
• Configuring and Managing Audit Trail Collection
• Running the XML Transformation Utility for MySQL Audit Formats
2.7.6 Step 5: Plan for High AvailabilityLearn how to plan for high availability.
In this step, consider the high availability options that are outlined in "High Availabilityin Oracle AVDF".
2.7.7 Step 6: Plan User Accounts and Access RightsLearn how to plan your user accounts and their access rights.
As a super administrator, you can create other super administrators andadministrators. Super administrators can see and modify any target. Administratorshave access to the targets that you enable them to access. In this step, determine how
Chapter 2Planning Your Oracle Audit Vault and Database Firewall System Configuration
2-8
many super administrators and administrators you create accounts for, and to which targetsthe administrators will have access.
See Also:
Managing User Accounts and Access
2.8 Summary of Configuration StepsLearn about the Oracle AVDF configuration steps.
With Oracle AVDF, you can deploy Oracle Audit Vault Agent, Oracle Database Firewall, orboth. This section suggests the high-level steps for configuring Oracle AVDF when you are:
2.8.1 Configuring Oracle Audit Vault and Database Firewall and Deployingthe Agent
Learn how to deploy the Oracle Audit Vault and Database Firewall and the Agent.
Use the following procedure to configure Oracle Audit Vault and Database Firewall and todeploy the Agent:
1. Configure the Audit Vault Server. See "Configuring Audit Vault Server".
2. Register the host computers where you will deploy the Audit Vault Agent. Then deployand start the Audit Vault Agent on those hosts. See "Registering Hosts and Deploying theAgent".
3. Create user accounts on your targets for Oracle Audit Vault and Database Firewall. See"Scripts for Oracle AVDF Account Privileges on Targets".
4. Register the targets that you are monitoring with the Agent in the Audit Vault Server,configure data retention policies, and configure audit trails for these targets. See"Configuring Targets, Audit Trails, and Database Firewall Monitoring Points".
After configuring the system as administrator, the Oracle AVDF auditor creates and provisionsaudit policies for Oracle Database targets and generates various reports.
2.8.2 Configuring Oracle Audit Vault and Database Firewall and DeployingOracle Database Firewall
Configure and deploy Oracle Audit Vault and Database Firewall to enable you to createfirewall policies and assign them to the targets.
Complete this procedure to configure and deploy Oracle Audit Vault and Database Firewall.
1. Configure the basic Oracle Database Firewall settings and associate the firewall withOracle Audit Vault Server. Then configure the firewall on your network.
See "Configuring Database Firewall".
2. Configure Oracle Audit Vault Server and associate each Oracle Database Firewall withthe server.
Chapter 2Summary of Configuration Steps
2-9

See "Configuring Audit Vault Server".
3. Register the targets that you are monitoring with Oracle Database Firewall inOracle Audit Vault Server. Then configure the monitoring points for these targets.Optionally, if you want to also monitor the database response to SQL traffic, thenuse the scripts and configuration steps.
See "Configuring Targets, Audit Trails, and Database Firewall Monitoring Points"
After configuring the system as administrator, the Oracle Audit Vault and DatabaseFirewall auditor creates firewall policies and assigns them to the targets. Your role andtasks as an auditor are described in Oracle Audit Vault and Database FirewallAuditor's Guide.
2.9 Using Audit Vault Server ConsoleLearn how to log in and use Audit Vault Server console.
2.9.1 Log in to Audit Vault Server ConsoleLearn how to log in to Audit Vault Server console.
When you first log in after installing Audit Vault Server:
• you must set up a password for root user
• create a super administrator or super auditor
See Also:
Oracle Audit Vault and Database Firewall Installation Guide for informationon post-installation tasks.
To log in to Oracle Audit Vault Server Console:
1. From a browser, enter the following URL:
https://host/where host is the server on which you installed Oracle Audit Vault Server.
For example:
https://192.0.2.1/If a message appears indicating that there is a problem with the Web site securitycertificate, then this could be due to a self-signed certificate. Click the Continue tothis website (or similar) link.
See Also:
Changing the UI (Console) Certificate for Audit Vault Server for moreinformation on providing a new UI Certificate to avoid the certificatemessage in future
Chapter 2Using Audit Vault Server Console
2-10

2. In the Login page, enter your user name and password, and then click Login.
The Dashboard page appears.
Note:
The Audit Vault Server console has a maximum idle time of 30 minutes. Uponlaunching the console, it can be used up to a maximum of 8 hours actively. Thesession times out if the idle time reaches 30 minutes or 8 hours after the initiallaunch.
2.9.2 Log in to Database Firewall ConsoleLearn how to log in to Database Firewall Console.
Starting with Oracle Audit Vault and Database Firewall release 20.1.0.0.0, you can performDatabase Firewall related tasks on the Audit Vault Server console.
1. Log in to Audit Vault Server console.
2. Click the Database Firewalls tab on the main page.
As administrator, use the Database Firewalls tab in the Audit Vault Server console toconfigure the network, services, and system settings for Database Firewall. You can also usethe console to identify the Audit Vault Server that manages each firewall instance, toconfigure network traffic sources, monitor, and block threats to your target databases.
See Also:
Configuring Database Firewall for detailed information on configuring the DatabaseFirewall using the Audit Vault Server console.
2.9.3 Understanding the Tabs and Menus in Audit Vault Server ConsoleAudit Vault Server Console tabs and menus enable you to see statuses for Agents, audittrails, targets, and more.
Oracle Audit Vault Server Console includes the following five tabs:
• Home - Displays a dashboard showing high-level information and status for:
– Agents
– Audit Trails
– Targets
– Disk Space
– Database Firewalls
– CPU Usage
• Targets - Provides menus for registering targets, managing target groups, managingaccess rights, and monitoring audit trails.
Chapter 2Using Audit Vault Server Console
2-11

• Agents - Provides menus for registering, deploying, activating, and managingAudit Vault Agents.
• Database Firewalls - Provides menus for registering Database Firewalls in AuditVault Server, for creating resilient firewall pairs for high availability, managing, andmonitoring.
• Settings - Provides menus for managing security, storage, archiving, users,certificates, password, and system settings. From here, you can also download theAVCLI command line utility.
2.9.4 Working with Lists of Objects in the UILearn how to work with lists of objects in the UI.
In the Oracle Audit Vault Server console, you can view lists of objects such as users,targets, audit trails, monitoring points, and so on. You can filter and customize the listsof objects in the same way as you can filter and customize reports. This sectionprovides a summary of how you can create custom views of lists of objects. For moredetailed information, see the Reports chapter of Oracle Audit Vault and DatabaseFirewall Auditor's Guide.
To filter and control the display of lists of objects in the Oracle Audit Vault Server UI:
1. For any list (or report) in the UI, there is a search box and Actions menu:
2. To find an item in the list, enter the name in the search box.
3. To customize the list, from the Actions menu, select any of the following:
Chapter 2Using Audit Vault Server Console
2-12

• Select Columns: Select the columns to display.
• Filter: Filter the list by column or by row using regular expressions with the availableoperators. Rows provide more control and operators. When done, click Apply.
• Rows Per Page: Select the number of rows to display per page.
• Format: Format the list by selecting from the following options:
– Sort
– Control Break
– Highlight
– Compute
– Aggregate
– Chart
– Group By
Enter the criteria for each option as needed and click Apply.
• Save Report: Save the current view of the list. Enter a name, description, and clickApply.
• Reset: Reset the list to the default view.
• Help: Display the online help.
• Download: Download the list. Select the download format (CSV or HTML) todownload.
2.10 Using the Audit Vault Command Line InterfaceLearn about using the Audit Vault Command Line Interface (AVCLI).
You can download AVCLI and use it as an alternative to Audit Vault Server Console for:
• configuring and managing Oracle Audit Vault and Database Firewall
• creating Database Firewall monitoring points
• managing audit trails
• registering hosts and performing other Agent related tasks
• configuring both database and non database targets for Audit Vault Server
• managing archive locations
See Also:
• Downloading and Using the AVCLI Command Line Interface for information ondownloading and using AVCLI
• AVCLI Commands Reference for details of available commands and syntax
Chapter 2Using the Audit Vault Command Line Interface
2-13

2.11 Using the Oracle Audit Vault and Oracle DatabaseFirewall Enterprise Manager Plug-In
Learn about using the Oracle Audit Vault and Database Firewall Enterprise Managerplug-in.
With Oracle Enterprise Manager Cloud Control you can install the Oracle Audit Vaultand Database Firewall plug-in. Use this plug-in to manage and monitor Oracle AuditVault and Database Firewall through Oracle Enterprise Manager.
You can perform the following tasks:
• View Audit Vault and Database Firewall topologies
• Monitor the availability and performance of Oracle Audit Vault components
• Provision Oracle Audit Vault Agent on targets
• Initialize and integrate Oracle Audit Vault and Database Firewall with targetsincluding Oracle Database, hosts, and audit trails for hosts as well as OracleDatabase.
• Perform discovery of sensitive columns on targets
• Monitor targets
Using Oracle Enterprise Manager Audit Vault and Database Firewall plug-in, thefollowing components can be managed to perform certain operations:
Components Operations Performed
Database Firewall • Restart• Delete• Power Off
Audit Vault Agent • Activate• Deactivate• Delete• Start• Stop
Monitoring Point • Start• Stop• Delete
Audit Trail • Start• Stop• Delete
Target • Delete
Related Topics
• Managing Oracle AVDF in Cloud Control
• Manually Installing the Enterprise Manager Management Agent
Chapter 2Using the Oracle Audit Vault and Oracle Database Firewall Enterprise Manager Plug-In
2-14
3General Security Guidelines
Learn about general security guidelines.
3.1 Installing Oracle Audit Vault and Database Firewall Securelyto Protect Your Data
Learn how to securely install Oracle AVDF to protect your data.
3.1.1 Installing Oracle Audit Vault and Database Firewall SecurelyLearn to securely install Oracle Audit Vault and Database Firewall.
Oracle Audit Vault Server installs in a secure state by default. Therefore, it is important to becareful if you change any of the default settings because your changes may compromise thesecurity of your setup.
See Also:
Oracle Audit Vault and Database Firewall Installation Guide for details of theinstallation.
3.1.2 Protecting Your DataConsider account naming, password use, and other guidelines to better enable Oracle AVDFto protect your data.
Consider following these guidelines to protect your data:
• Account Names and Passwords: Use secure passwords for the Oracle Audit Vault Serverconsole UI, as well as for the root, support, and sys accounts and keep thesepasswords safe.
• Administrator Accounts: Do not share Oracle Audit Vault and Database FirewallAdministrator accounts.
• Strong Password Policies: Encourage users to adopt strong passwords.
• Installed Accounts: Oracle Audit Vault and Database Firewall embeds operating systemand database accounts. Do not add new accounts of this type. Do not unlock the existingaccounts. Doing so may compromise the security of the Oracle Audit Vault and DatabaseFirewall system.
• Secure Archiving: Oracle Audit Vault and Database Firewall sends archive data over thenetwork. Secure both the archive destination and intermediate network infrastructure.
3-1

• Remote Access: The Settings tab of the services page of Oracle Audit VaultServer console controls access to:
– web console
– shell (ssh)
– SNMP
Follow these guidelines when granting remote access:
– Grant access only if you need it for a specific task and then revoke accesswhen that task is completed.
– Restrict access by IP address. Do this immediately after installing the system.
– Grant terminal (shell) access only when doing a patch update or whenrequested to do so by the documentation or by Oracle support.
3.2 General Security RecommendationsLearn about the general security recommendations for Oracle AVDF.
Oracle security recommendations:
• If you are using the Database Firewall to block unwanted traffic, then ensure thatall data flowing from the database clients to the database and back passesthrough the Oracle Database Firewall. This includes both requests and responses.
• Use the appropriate security measures for your site to control access to thecomputer that contains Oracle Audit Vault Server and Database Firewall. Giveaccess only to specific users.
• Ensure that passwords conform to best practice.
• Separate the duties of administrators and auditors by assigning these roles todifferent people.
• Assign Oracle Audit Vault Server user the appropriate administrator, superadministrator, auditor, and super auditor roles.
• By default, the following accounts that are related to Oracle AVDF are locked: theOracle OS user account, Oracle Grid accounts, any Oracle Database Vaultaccounts (for example, users who have been granted the DV_OWNER andDV_ACCTMGR roles). Ensure that these accounts remain locked.
• Avoid sharing passwords between users and login sessions. Add new OperatingSystem users to distinguish access by different people.
3.3 External Network DependenciesEnsure the security of your Oracle AVDF configuration by considering importantexternal network dependencies.
When you add an external network service to Audit Vault Server or Database Firewall,you include these services to the trust model of your deployment.
For example, when you add a DNS server to an appliance, you trust the DNS server toprovide the correct information about the host names that you look up. If someonecompromises the DNS server, then they can control the network endpoints that areaccessed by Audit Vault Server or Database Firewall using the host name.
Chapter 3General Security Recommendations
3-2
There are analogous trust relationships in other services too, for example, NFS or NTP.
For this reason, add network services to Audit Vault Server or Database Firewall only whenthe following are adequately secure:
• the service
• the host server
• the intermediate network
3.4 Considerations for Deploying Network-Based SolutionsLearn about what to consider when deploying network-based solutions.
3.4.1 Managing Database Firewall Network EncryptionLearn about handling Database Firewall network encryption.
You deploy Database Firewall between the database tier and application tier. DatabaseFirewall can decrypt traffic to and from an Oracle Database when you use Oracle NativeNetwork Encryption. For non-Oracle databases, and for Oracle Databases that use TLSnetwork encryption, if SQL traffic between the database tier and application tier is encrypted,then Database Firewall cannot interpret or enforce protection policies on this SQL traffic.
You can use SSL or TLS termination solutions to terminate the SQL traffic just before itreaches Database Firewall.
3.4.2 Managing Database Firewall Server Side SQL and ContextConfigurations
Learn how to manage Database Firewall SQL and context configurations.
Database Firewall policy enforcement relies on capturing and understanding SQL trafficbetween the database client and server. Because Database Firewall only analyzes networktraffic between the application tier and the database server, the firewall cannot examine SQLthat is directly sent from the database server. Some of the types of SQL statements thatDatabase Firewall cannot examine are system provided and user defined SQL that you runfrom stored procedures and callouts. The firewall also cannot examine SQL that you run frombackground jobs, such as those that created by the DBMS_JOB or DBMS_SCHEDULER PL/SQLpackages in Oracle databases, or SQL that is indirectly run from DDLs or other SQLstatements. You can use the Oracle AVDF auditing features to capture these types of SQLstatements.
Database Firewall builds its execution context entirely from the information that it capturesfrom the network traffic. However, enforcement may depend on context information on theserver. Any lack of context affects the resolution of identifiers that you use in databaseobjects.
3.4.3 How Oracle AVDF Works with Various Database Access PathsLearn how Oracle AVDF works with database access paths.
Oracle AVDF works with the following types of database access paths:
Chapter 3Considerations for Deploying Network-Based Solutions
3-3

• Non SQL protocol access: Database platforms support different network protocolsbeyond the database SQL based protocols. For example, Oracle Databasesupports HTTP, FTP, Advanced Queuing, Direct Path, and NFS access to the datain the database. The Database Firewall provides policy enforcement only for SQLbased access to the database. The protocols that Database Firewall understandsare Oracle TTC/Net and Tabular Data Stream (TDS) for Microsoft SQL Server,Sybase ASE, and IBM Distributed Relational Database Architecture (DRDA).
• IPv6 Connections: Oracle AVDF does not support IPv6 deployments.
• Non TCP based Connections: Database Firewall only supports TCP basednetwork connections to database servers. It cannot monitor connections that aremade to database servers using non TCP protocols such as Systems NetworkArchitecture (SNA), Internetwork Packet Exchange/Sequenced Packet Exchange(IPX/SPX).
3.4.4 Database Firewall Configuration for Oracle Database TargetConfigured in Shared Server Mode
Learn about managing Database Firewall shared server configuration.
Shared server architectures enable databases to permit user processes to shareserver processes. A dispatcher process directs multiple incoming network sessionrequests to a common queue, and then redirects these session requests to the nextavailable process of the shared server. By default, Oracle Database creates onedispatcher service for the TCP protocol. In the init.ora file, this setting is controlledby the DISPATCHERS parameter, as follows:
dispatchers="(PROTOCOL=tcp)"In the default configuration, a dynamic port listens to the incoming connection usingthe TCP protocol. With a shared server configuration, many user processes connect toa dispatcher on this dynamic port. If the Database Firewall is not configured to monitorthe connections on this port, then the policy cannot be enforced on these connections.To facilitate the Database Firewall connection configuration, you should explicitlyinclude the port number in the DISPATCHERS parameter. For example:
dispatchers="(PROTOCOL=tcp)(PORT=nnnn)"Choose a value for nnnn, and configure the Database Firewall to protect that address,alongside the usual listener address.
See Also:
• Oracle Database Administrator's Guide for more information aboutmanaging shared servers
• Oracle Database Reference for more information about the DISPATCHERSparameter
3.4.5 Additional Client and Listener Behavior ConsiderationsLearn about additional issues to be aware of with clients and shared listeners.
Chapter 3Considerations for Deploying Network-Based Solutions
3-4
• Client-side context: You can configure Oracle Database Firewall policies to use client-side context information such as client program name, client operating system username,and so on. After the client transmits this information to the database, Oracle DatabaseFirewall captures it from the network. Oracle Database Firewall does not control orenforce the integrity of the client side or network. Consider the integrity of this informationbefore using it to define security policies.
• Multiple databases and services on a shared listener: Oracle Database Firewall supportspolicies based on Oracle Database service names. For non-Oracle databases, OracleDatabase Firewall enforces policies that are based on the IP address and port number. Ina configuration where a single listener endpoint (IP_address:port) is shared amongmultiple databases, Oracle Database Firewall cannot differentiate traffic that is directed toeach individual database.
3.5 Security Considerations for Special ConfigurationsLearn about security considerations for special configurations.
3.5.1 Custom Collector DevelopmentLearn about custom collector development.
Note the following if you develop custom collectors:
• Prevent resource leaks. Ensure that JDBC resources are closed appropriately. Theseresources include the connections, result sets, and statements.
• Prevent data loss. Ensure that your audit data is purged from the target system only afterit has been successfully collected by the custom collector.
• Avoid frequent queries to the target system.
• Ensure that the custom collector does not consume a lot of system resources such asCPU and memory on the target host.
• Avoid logging audit data because the audit records contain sensitive information.
• Grant only the required privileges on the target system to users who have access to theAgent.
• Ensure that only necessary files are added to custom collector .jar file.
• Ensure that your custom collector code collects the audit data from your target systemsecurely.
Note:
The collection framework ensures that audit data is transferred from thecollector to Oracle Audit Vault Server securely.
Chapter 3Security Considerations for Special Configurations
3-5

3.6 About Setting Transport Layer Security LevelsLearn about setting Transport Layer Security (TLS) levels in Oracle AVDF.
This topic describes the different levels of connection encryption deployed on OracleAudit Vault and Database Firewall appliances. Oracle AVDF uses TLS for intercomponent communication.
You can change the TLS levels and cipher suites for the following:
• Connection between Audit Vault Server and the Agent or Host Monitor
• Connection between Host Monitor and Database Firewall
• Connection between Audit Vault Server and Database Firewall
• Audit Vault Server console and the end user browsers
Note:
• Adhere to Host Monitor Requirements.
• If any Agent is using Java 1.6, then upgrade the Java version to 1.8.
Connection Encryption Strength Used On Oracle AVDF Appliances
TLS Level TLS Version Description
Level-4
(Default on newinstallation)
TLSv1.2This level is the strongest, restricting TLS to version1.2 for inter communication between all thecomponents in Oracle Audit Vault and DatabaseFirewall.
Note:It is recommended to use Level-4 for all servicesunless the supported service explicitly requires alower level of TLS.
Level-3TLSv1.2
This level supports everything that Level-4 does.
For Oracle AVDF releases 20.1 to 20.3:
• If any Audit Vault Agent has to be deployed onIBM AIX, then set the TLS level to Level-3 orbelow (refer to row # 5 in the table below).
• Level-3 uses TLS 1.2 or TLS 1.1 for Audit VaultAgent to Audit Vault Server communication. It isthe same for Host Monitor Agent to DatabaseFirewall communication.
Starting Oracle AVDF 20.4, Level-3 uses TLS 1.2for Audit Vault Agent to Audit Vault Servercommunication. It is the same for Host MonitorAgent to Database Firewall communication.
Chapter 3About Setting Transport Layer Security Levels
3-6

TLS Level TLS Version Description
Level-2TLSv1.2
TLSv1.1
This level adds support for legacy and deprecatedciphers.
Note:• While upgrading to Oracle AVDF releases 20.1
to 20.3, the upgrade process does notautomatically set to Level-4 to maintainconnectivity while upgrading a multi appliancedeployment. Upon completion of the upgrade,set to Level-4 unless interoperability with legacysystems is required.
• While upgrading to Oracle AVDF releases 20.4(or later), the upgrade process does notautomatically set to Level-4 in all cases. Afterthe upgrade process is complete (includingAgents), it is strongly advisable to set toLevel-4.
Level-1
(Custom) TLSv1.2This is a customizable cipher set that is configuredwith Level-4 strength by default.
How To Change TLS Levels and Other Tasks
RowNo.
Task Command Detailed Information
1 To check theexisting TLS levelsfor Audit VaultServer andDatabase Firewall.
grep CIPHER_LEVEL /usr/local/dbfw/etc/dbfw.conf
Log in as support user and run thiscommand. Use this command tocheck the actual configuration ofthe Audit Vault Server andDatabase Firewall.
2 To set the TLSlevel and to findmore options.
/usr/local/dbfw/bin/priv/configure-networking --help
Log in as root user and run thiscommand. By default, on a newinstallation the TLS level is set toLevel-4.
On upgrade it is set to Level-2 bydefault. This is appropriate to mostof the situations.
It is possible to change the levelset. Use this command to find theoptions available.
3 To set TLS level forthe Audit VaultSever console.
/usr/local/dbfw/bin/priv/configure-networking --wui-tls-cipher-level [LEVEL]
Log in as root user and run thiscommand. This command sets theTLS level for web browserconnections to the AVS GUI. Thelevels can be set to 1, 2, 3, or4.
Chapter 3About Setting Transport Layer Security Levels
3-7

RowNo.
Task Command Detailed Information
4 To set TLS level forcommunicationbetween AuditVault Server andDatabase Firewall.
/usr/local/dbfw/bin/priv/configure-networking --internal-tls-cipher-level [LEVEL]
Log in as root user and run thiscommand. This command sets thedesired TLS level and restarts theinternal services. The levels canbe set to 1, 2, 3, or 4.
5 To set the TLSlevel for Audit VaultAgent to AuditVault Server, andHost Monitor toDatabase Firewallcommunication.
/usr/local/dbfw/bin/priv/configure-networking --agent-tls-cipher-level [LEVEL]
Log in as root user and run thiscommand. This command sets theTLS level for communicationbetween the Audit Vault Agent toAudit Vault Server, and HostMonitor to Database Firewall. Thelevels can be set to 1, 2, 3, or4.
Note:Perform the following steps toupgrade all Agents to the specifiedTLS levels after executing theconfigure-networkingcommand:
1. Log in to the Audit Vault Serverconsole as root user.
2. Change the directory by usingthe command:
cd /usr/local/dbfw/bin/priv3. Execute the script using thecommand:
./send_agent_update_signal.shThis command must not beexecuted more than once in aperiod of one hour.
Chapter 3About Setting Transport Layer Security Levels
3-8
RowNo.
Task Command Detailed Information
6 To applycustomized cipherset.
For Audit Vault Server console:
• Edit: /usr/local/dbfw/etc/platform-configuration/tls_configuration_custom_group.xmlRun:
/usr/local/dbfw/bin/priv/configure-networking --wui-tls-cipher-level 1
For Audit Vault Agent or HostMonitor Agent:
• Edit: /usr/local/dbfw/etc/platform-configuration/tls_configuration_custom_group_agent.xml
• Run:
/usr/local/dbfw/bin/priv/configure-networking --agent-tls-cipher-level 1
For inter appliance communication:
• Edit: /usr/local/dbfw/etc/platform-configuration/tls_configuration_custom_group_services.xml
• Run:
/usr/local/dbfw/bin/priv/configure-networking --internal-tls-cipher-level 1
By default, on a new installationthe product is set to Level-4. Onupgrade it is set to Level-2. This isappropriate to most of thesituations. It is possible tocustomize. There are prompts andwarning messages during theupgrade process which indicatethat the cipher levels are not set tomaximum security. The cipherlevels are not automaticallychanged during upgrade.
Use this command to apply thecustom defined level from the filecreated. These commands set theTLS level for web browserconnections and restart theinternal services and Audit VaultServer.
Note:After running the command toapply customized cipher set, verifythe error output in the system logfile available at /var/log/messages to confirm that thereare no errors in the file.
Log in as root user to run thecommand to edit the custom levelconfiguration file. Thecustomizable set of cipher suites isdefined in this file. By default, on anew installation the product is setto Level-4. This file can bemodified to further restrict thecipher suite and include ciphersavailable on the product.
7 To display thecomplete list ofavailable ciphersuites.
openssl ciphers -vLog in as support user to run thiscommand. Use this command todisplay the current set of availablecipher suites.
8 To change TLSlevels for inboundconnection fromthe database clientto the DatabaseFirewall monitoringpoint.
See Modifying a Database FirewallMonitoring Point for completeinformation.
Starting with Oracle AVDF release20.7, Database Firewall supportsTLS encrypted SQL traffic. TheTLS levels can be changed in theAdvanced settings of the DatabaseFirewall monitoring point using theAudit Vault Server console.
Chapter 3About Setting Transport Layer Security Levels
3-9
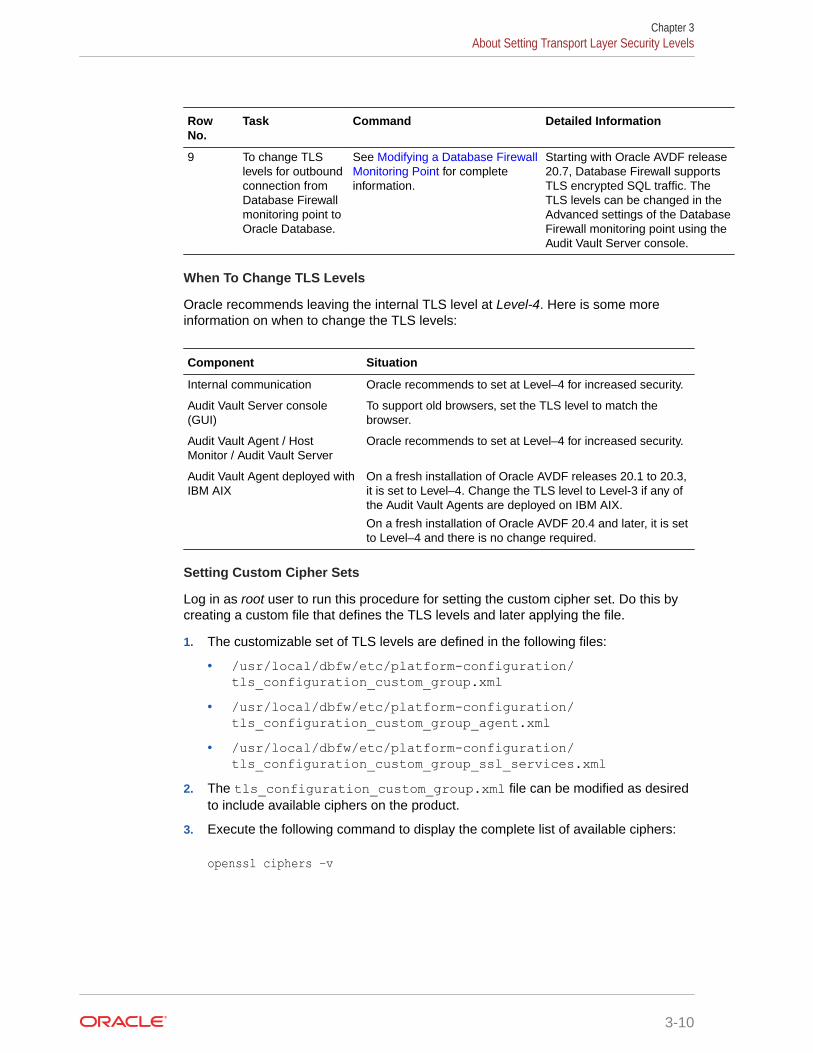
RowNo.
Task Command Detailed Information
9 To change TLSlevels for outboundconnection fromDatabase Firewallmonitoring point toOracle Database.
See Modifying a Database FirewallMonitoring Point for completeinformation.
Starting with Oracle AVDF release20.7, Database Firewall supportsTLS encrypted SQL traffic. TheTLS levels can be changed in theAdvanced settings of the DatabaseFirewall monitoring point using theAudit Vault Server console.
When To Change TLS Levels
Oracle recommends leaving the internal TLS level at Level-4. Here is some moreinformation on when to change the TLS levels:
Component Situation
Internal communication Oracle recommends to set at Level–4 for increased security.
Audit Vault Server console(GUI)
To support old browsers, set the TLS level to match thebrowser.
Audit Vault Agent / HostMonitor / Audit Vault Server
Oracle recommends to set at Level–4 for increased security.
Audit Vault Agent deployed withIBM AIX
On a fresh installation of Oracle AVDF releases 20.1 to 20.3,it is set to Level–4. Change the TLS level to Level-3 if any ofthe Audit Vault Agents are deployed on IBM AIX.
On a fresh installation of Oracle AVDF 20.4 and later, it is setto Level–4 and there is no change required.
Setting Custom Cipher Sets
Log in as root user to run this procedure for setting the custom cipher set. Do this bycreating a custom file that defines the TLS levels and later applying the file.
1. The customizable set of TLS levels are defined in the following files:
• /usr/local/dbfw/etc/platform-configuration/tls_configuration_custom_group.xml
• /usr/local/dbfw/etc/platform-configuration/tls_configuration_custom_group_agent.xml
• /usr/local/dbfw/etc/platform-configuration/tls_configuration_custom_group_ssl_services.xml
2. The tls_configuration_custom_group.xml file can be modified as desiredto include available ciphers on the product.
3. Execute the following command to display the complete list of available ciphers:
openssl ciphers –v
Chapter 3About Setting Transport Layer Security Levels
3-10

4. Open the tls_configuration_custom_group.xml file and verify the format of thefile. The format must be similar to the following:
<?xml version="1.0" encoding='UTF-8' standalone='yes'?>
<tls_configuration_groups xmlns='http://www.oracle.com/avdf'>
<tls_configuration level="1">
<ssl_protocols>
<ssl_protocol>...</ssl_protocol>
</ssl_protocols>
<ssl_cipher_suite>
<ssl_cipher>...</ssl_cipher>
</ssl_cipher_suite>
</tls_configuration>
</tls_configuration_groups>
5. In the customizable tls_configuration_custom_group.xml file, only the followingtags can be added or removed as required:
<ssl_protocol>...</ssl_protocol>
6. Multiple tags can be applied in a sequence as follows:
<ssl_cipher>...</ssl_cipher>
7. The values must be any of the following Apache protocol values:
a. TLSv1.2
b. TLSv1.1
c. TLSv1 (Deprecated)
Chapter 3About Setting Transport Layer Security Levels
3-11

8. Execute the following command to apply the custom set.
/usr/local/dbfw/bin/priv/configure-networking --wui-tls-cipher-level 1 --internal-tls-cipher-level 1 --agent-tls-cipher-level 1
See Also:
Monitoring TLS Encrypted SQL Traffic
3.7 CertificatesLearn about different certificates in Oracle AVDF.
3.7.1 Platform CertificatesLearn all about Oracle AVDF platform certificates.
Oracle AVDF uses platform certificates for internal communication by various services.
Oracle AVDF release 20.6.0.0.0 and later provides the ability to renew platformcertificates for Audit Vault Server and Database Firewall appliances before they expire.If the expiry period is less than 90 days, a warning message (ODF 10729) is displayedin the /var/log/messages file. See the action column against ODF 10729 in thesection Database Firewall Messages for detailed procedure for renewing thecertificates manually.
If the certificates are not renewed manually and if they are about to expire in less than30 days, then the platform certificates are automatically renewed and all the relevantservices are restarted.
Chapter 3Certificates
3-12
4Configuring Audit Vault Server
Learn about configuring Audit Vault Server.
4.1 About Configuring Audit Vault ServerLearn about configuring Audit Vault Server.
This chapter explains how to perform the initial Audit Vault Server configuration.
Note:
Audit Vault Server and Database Firewall are software appliances. You must notmake changes to the Linux operating system through the command line on theseservers unless you are following procedures as described in the official Oracledocumentation or you are working under the guidance of Oracle Support.
The main steps involved in the configuration process are as follows:
1. Perform the initial configuration tasks at the Audit Vault Server. For example, confirmsystem services and network settings, and set the date and time.
2. Configure the Audit Vault Agents.
3. (Optional) Define resilient pairs of servers for high availability.
4. (Optional) Add each Database Firewall at Audit Vault Server.
5. (Optional) Configure Oracle Audit Vault and Database Firewall to work with third partySecurity Information Event Management (SIEM) products that can read from Syslog.
6. (Optional) Configure Microsoft Active Directory or Open LDAP.
7. Check that the system is functioning correctly.
See Also:
• Managing High Availability in Audit Vault Server for more information aboutconfiguring a resilient pair of Audit Vault Servers for high availability. Performthe initial configuration that is described in this chapter for both Audit VaultServers.
• Summary of Configuration Steps to understand the high level workflow forconfiguring Oracle Audit Vault and Database Firewall.
4-1
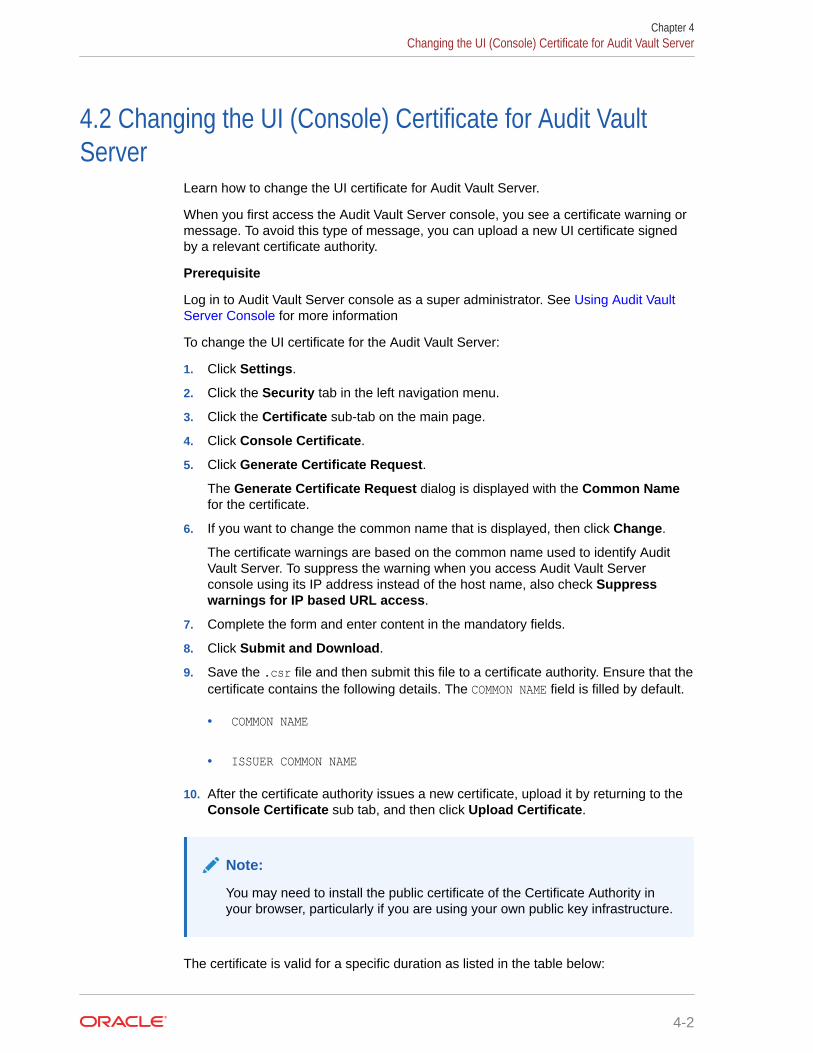
4.2 Changing the UI (Console) Certificate for Audit VaultServer
Learn how to change the UI certificate for Audit Vault Server.
When you first access the Audit Vault Server console, you see a certificate warning ormessage. To avoid this type of message, you can upload a new UI certificate signedby a relevant certificate authority.
Prerequisite
Log in to Audit Vault Server console as a super administrator. See Using Audit VaultServer Console for more information
To change the UI certificate for the Audit Vault Server:
1. Click Settings.
2. Click the Security tab in the left navigation menu.
3. Click the Certificate sub-tab on the main page.
4. Click Console Certificate.
5. Click Generate Certificate Request.
The Generate Certificate Request dialog is displayed with the Common Namefor the certificate.
6. If you want to change the common name that is displayed, then click Change.
The certificate warnings are based on the common name used to identify AuditVault Server. To suppress the warning when you access Audit Vault Serverconsole using its IP address instead of the host name, also check Suppresswarnings for IP based URL access.
7. Complete the form and enter content in the mandatory fields.
8. Click Submit and Download.
9. Save the .csr file and then submit this file to a certificate authority. Ensure that thecertificate contains the following details. The COMMON NAME field is filled by default.
• COMMON NAME
• ISSUER COMMON NAME
10. After the certificate authority issues a new certificate, upload it by returning to theConsole Certificate sub tab, and then click Upload Certificate.
Note:
You may need to install the public certificate of the Certificate Authority inyour browser, particularly if you are using your own public key infrastructure.
The certificate is valid for a specific duration as listed in the table below:
Chapter 4Changing the UI (Console) Certificate for Audit Vault Server
4-2

Oracle AVDF Release Validity Duration
20.1 to 20.3 10 years
20.4 27 months
4.3 Specifying Initial System Settings and Options on Audit VaultServer (Required)
Learn how to specify initial system settings and options on Audit Vault Server.
4.3.1 Specifying the Server Date, Time, and Keyboard SettingsLearn how to specify the Audit Vault Server date, time, and keyboard settings.
Super administrators can change the Audit Vault Server date, time, and keyboard settings. Itis important to ensure that the date and time that you set for Audit Vault Server are correct.This is because events that the server performs are logged with the date and time at whichthey occur according to the server's settings. In addition, archiving occurs at specifiedintervals based on the server's time settings.
About Timestamps
Audit Vault Server stores all data in UTC. Timestamps are displayed as follows:
• If you are accessing data interactively, for example using the Audit Vault Server consoleor AVCLI command line, then all timestamps are in your time zone. In the UI, the timezone is derived from the browser time zone. If you are using AVCLI, then the time zone isderived from the "shell" time zone (usually set by the TZ environment variable).
• If you log in to Audit Vault Server as root or support, then timestamps are displayed inUTC, unless you change the TZ environment variable for that session.
• If you are looking at a PDF or XLS report that is generated by the system, then thetimestamps displayed reflect the Time Zone Offset setting in the Audit Vault ServerManage link (see procedure below).
WARNING:
Do not change the Audit Vault Server database time zone or change the timezone through any configuration files. Doing so causes serious problems in AuditVault Server.
Prerequisite
Log in to Audit Vault Server console as super administrator. See Using Audit Vault ServerConsole for more information.
Set the Server Date, Time, and Keyboard Settings
1. Click Settings tab.
2. Click on the System tab in the left navigation menu.
Chapter 4Specifying Initial System Settings and Options on Audit Vault Server (Required)
4-3

3. In the Configuration tab on the main page:
Click For Oracle AVDF Release
Manage 20.1 and 20.2
System Settings 20.3 and later
4. From the Timezone Offset drop down list, select your local time in relation toCoordinated Universal Time (UTC). Timezone Offset is used in non-interactivescheduled PDF or XLS reports. The time set here is converted to local time and isdisplayed in Event Time field of the report.
For example, -5:00 is five hours behind UTC. You must select the correct setting toensure that the time is set accurately during synchronization.
Note:
To change the time only for the console and to the specific user session,follow the steps in Changing the Time Zone. This functionality isavailable starting with Oracle AVDF release 20.6.
5. From the Keyboard drop down list, select the keyboard setting.
6. In the System Time field, select Set Manually or Use NTP.
Selecting NTP synchronizes time with the average of the time recovered from thetime servers specified in the NTP Server 1/2/3 fields.
7. Select Use NTP, and then select Synchronize Periodically to start using the NTPServer time.
If you do not enable time synchronization in this step, then you can still enter NTPServer information in the steps below and enable NTP synchronization later.
8. Optionally select Synchronize Once After Save, to synchronize the time oncewhen you click Save.
9. In the NTP Server 1, NTP Server 2, and NTP Server 3 sections enter the IPaddresses or names of your preferred time servers.
If you specify a name, then the DNS server that is specified in the Services dialogunder System tab is used for name resolution.
10. Click Test Server to display the time from the server.
Click Apply Server to update the Audit Vault Server time from this NTP server.The update will not take effect until you click Save.
11. Click Save.
Note:
• In case of high availability environment the steps above change the timeonly on the primary Audit Vault Server.
• In case of NTP, specify the IP address of the default gateway and a DNSserver to enable time synchronization.
Chapter 4Specifying Initial System Settings and Options on Audit Vault Server (Required)
4-4
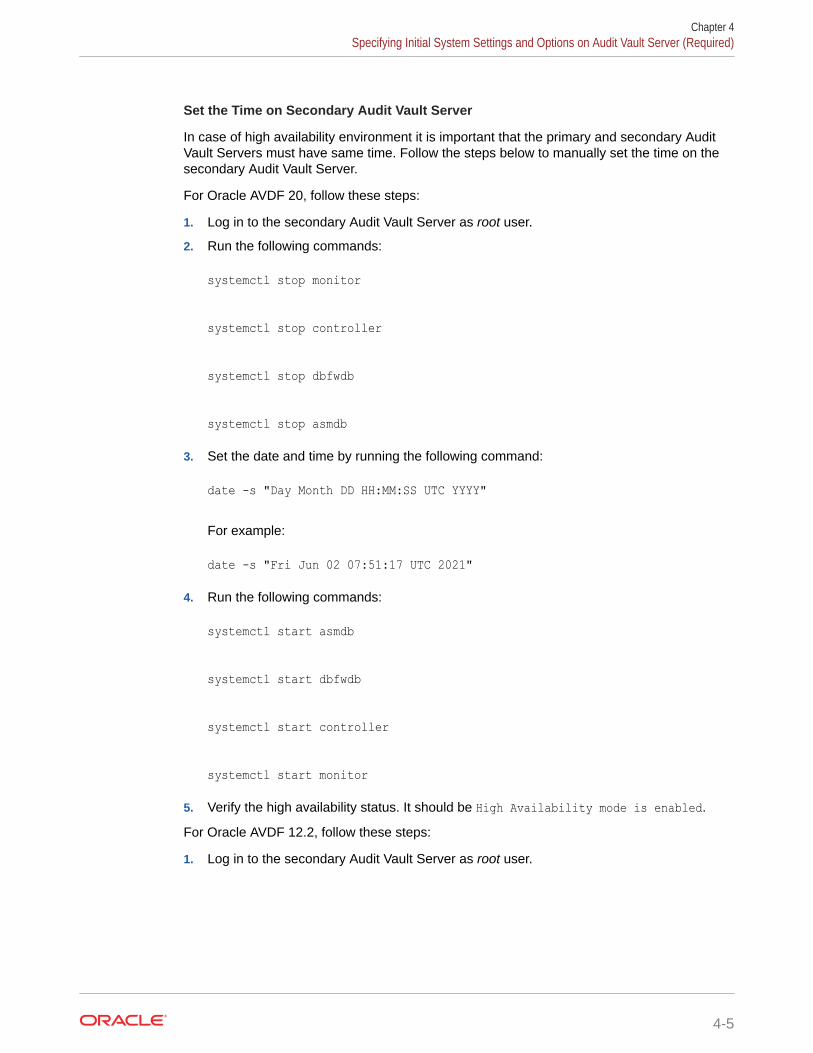
Set the Time on Secondary Audit Vault Server
In case of high availability environment it is important that the primary and secondary AuditVault Servers must have same time. Follow the steps below to manually set the time on thesecondary Audit Vault Server.
For Oracle AVDF 20, follow these steps:
1. Log in to the secondary Audit Vault Server as root user.
2. Run the following commands:
systemctl stop monitor
systemctl stop controller
systemctl stop dbfwdb
systemctl stop asmdb
3. Set the date and time by running the following command:
date -s "Day Month DD HH:MM:SS UTC YYYY"
For example:
date -s "Fri Jun 02 07:51:17 UTC 2021"
4. Run the following commands:
systemctl start asmdb
systemctl start dbfwdb
systemctl start controller
systemctl start monitor
5. Verify the high availability status. It should be High Availability mode is enabled.
For Oracle AVDF 12.2, follow these steps:
1. Log in to the secondary Audit Vault Server as root user.
Chapter 4Specifying Initial System Settings and Options on Audit Vault Server (Required)
4-5
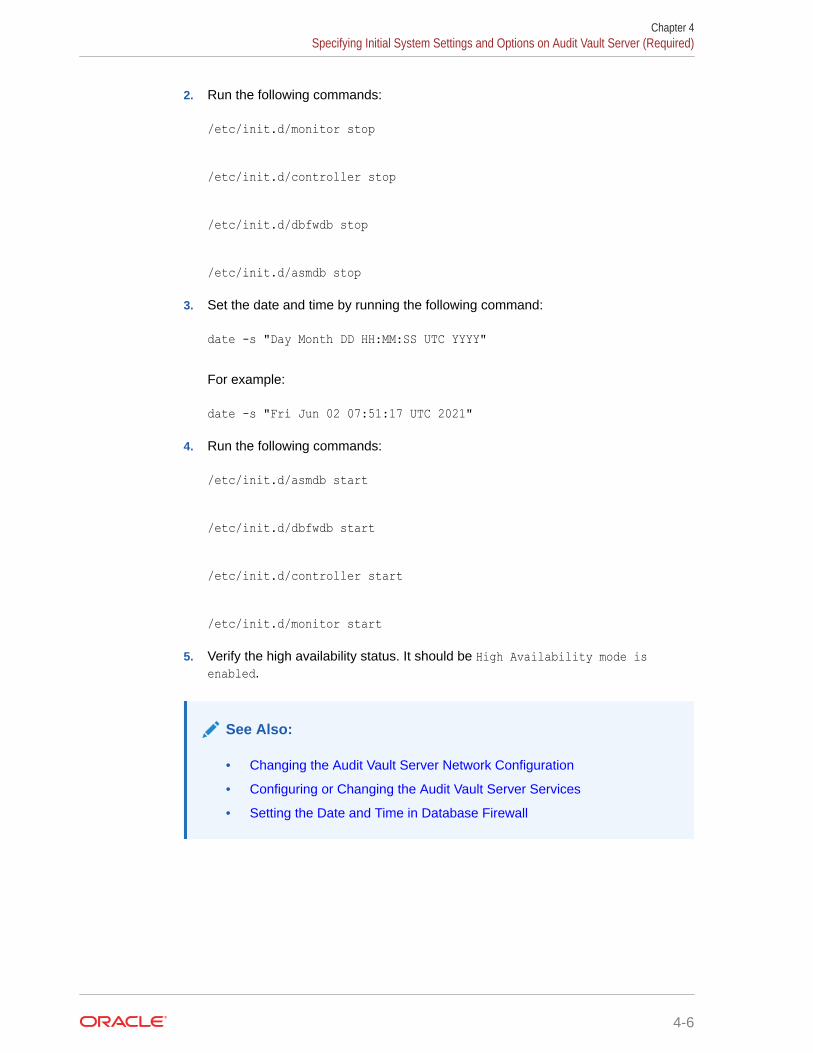
2. Run the following commands:
/etc/init.d/monitor stop
/etc/init.d/controller stop
/etc/init.d/dbfwdb stop
/etc/init.d/asmdb stop
3. Set the date and time by running the following command:
date -s "Day Month DD HH:MM:SS UTC YYYY"
For example:
date -s "Fri Jun 02 07:51:17 UTC 2021"
4. Run the following commands:
/etc/init.d/asmdb start
/etc/init.d/dbfwdb start
/etc/init.d/controller start
/etc/init.d/monitor start
5. Verify the high availability status. It should be High Availability mode isenabled.
See Also:
• Changing the Audit Vault Server Network Configuration
• Configuring or Changing the Audit Vault Server Services
• Setting the Date and Time in Database Firewall
Chapter 4Specifying Initial System Settings and Options on Audit Vault Server (Required)
4-6

4.3.2 Changing the Time ZoneLearn how to change the time zone in the Audit Vault Server console only for the activesession.
The time can be changed in the Audit Vault Server console only for the active session. This islimited only for the console (User Interface). This functionality is available starting with OracleAVDF release 20.6. Follow these steps:
1. Log in to the Audit Vault Server console as administrator or auditor.
2. Click the drop down icon next to the user name in the top right corner. For example,admin or auditor user icon.
3. Click Change Timezone option.
4. In the Change Timezone dialog, select your time zone in relation to CoordinatedUniversal Time (UTC).
5. Click Save.
Note:
• The time zone changed here is applicable only to the user's active session.The timestamps in the Audit Vault server console also reflect the selectedtime zone.
• This time zone changed here is not reflected in the non-interactive (PDF/XLS) reports. To change the time in the reports, follow the steps mentionedin Specifying the Server Date, Time, and Keyboard Settings.
4.3.3 Specifying Audit Vault Server System SettingsLearn about configuring Audit Vault Server system settings.
4.3.3.1 Changing the Audit Vault Server Network ConfigurationLearn how to change the Audit Vault Server network configuration.
Oracle Audit Vault and Database Firewall installer configures the initial network settings forAudit Vault Server during installation. You can change the network settings after installation.
Chapter 4Specifying Initial System Settings and Options on Audit Vault Server (Required)
4-7

Note:
If you change the Audit Vault Server network configuration, then you mustalso do the following:
1. In case the audit trails are not started automatically, then you may haveto start them manually.
2. Reconfigure the resilient pair of Database Firewalls if you previouslyconfigured them.
3. If the IP address of Audit Vault Server is changed, then update thisinformation in Database Firewall.
4. If the IP address of Audit Vault Server is changed, then you have toredeploy the Audit Vault Agents.
To configure the Audit Vault Server network settings:
1. Log in to the Audit Vault Server console as a super administrator.
2. Click Settings tab.
3. Click System tab in the left navigation menu.
4. Under the Configuration sub tab in the main page, click Network Settings.
5. In the Network Settings dialog, edit the following fields as necessary:
• Host Name: The host name must be a fully qualified domain name of AuditVault Server. The host name must start with a letter, can contain maximum of64 characters, and cannot contain spaces.
Note:
– Changing the host name reconfigures the Audit Vault Serverautomatically. After the host name is changed, click Save. Thesystem prompts for confirmation and reconfigures the Audit VaultServer. The Audit Vault Server console is unavailable for aminimum of 10 minutes. After this, the updated host name isvisible in the Network Settings dialog
– In Oracle AVDF releases 20.1 to 20.6, the host name cannot bechanged in a high availability environment. If the host namerequires to be changed, unpair the Audit Vault Servers, changethe host name, and pair them again.
– In Oracle AVDF release 20.7 and later, the host name of theprimary and standby Audit Vault Servers can be changed. Thehost name can be changed using the primary Audit Vault Serverconsole.
• IP Address: The IP address of Audit Vault Server was set during theinstallation of Audit Vault Server. Enter the new IP address if you want tochange the existing one.
Chapter 4Specifying Initial System Settings and Options on Audit Vault Server (Required)
4-8

Note:
If you have a high availability configuration, then the primary and standbyAudit Vault Servers must be unpaired before changing network settings(Host Name, IP Address, Network Mask, and Gateway). After the settings ischanged on the primary or standby Audit Vault Server, pair the two serversagain. Once you complete the pairing process, redeploy the Audit VaultAgents to ensure that they are updated with the new settings for both theprimary and the standby Audit Vault Servers.
• Network Mask: The subnet mask of the Audit Vault Server.
• Gateway: The IP address of the default gateway (for example, to access themanagement interface from another subnet). The default gateway must be on thesame subnet as Audit Vault Server.
• Link properties: Do not change the default setting unless your network has beenconfigured to not use auto negotiation.
6. Click Save.
See Also:
• Ports Used by Oracle Audit Vault and Database Firewall for a list of defaultAudit Vault Server port numbers
• High Availability for Database Firewall to configure a resilient pair ofDatabase Firewalls
• Specifying the Audit Vault Server Certificate and IP Address to update AuditVault Server's IP address in the Database Firewall
4.3.3.2 Changing the Standby Audit Vault Server Network ConfigurationLearn how to change the standby Audit Vault Server network configuration.
Starting with Oracle AVDF release 20.7, the network settings of the standby Audit VaultServer can be configured using the primary Audit Vault Server console.
To configure the standby Audit Vault Server network settings:
1. Log in to the primary Audit Vault Server console as a super administrator.
2. Click Settings tab.
3. Click System tab in the left navigation menu.
4. Under the Configuration sub tab in the main page, click Network Settings.
5. In the Network Settings dialog, the Settings sub tab is selected by default. ClickStandby Server radio button.
6. Edit the Host Name. The host name must be a fully qualified domain name of Audit VaultServer. The host name can contain maximum of 64 characters, and cannot containspaces. The host name of the standby Audit Vault Server cannot be the same as theprimary.
Chapter 4Specifying Initial System Settings and Options on Audit Vault Server (Required)
4-9

7. Click Save.
The following confirmation dialog is displayed:
This operation reconfigures the standby Audit Vault Server. Thisprocess takes at least 10 minutes. Do you want to continue?
8. Click OK.
Note:
During this time, the standby Audit Vault Server is unavailable for aminimum of 10 minutes. An error message is displayed in the NetworkSettings and System Settings dialog on the Audit Vault Server consolefor failing to reach the standby Audit Vault Server.
See Also:
• Ports Used by Oracle Audit Vault and Database Firewall for a list ofdefault Audit Vault Server port numbers
• High Availability for Database Firewall to configure a resilient pair ofDatabase Firewalls
• Specifying the Audit Vault Server Certificate and IP Address toupdate Audit Vault Server's IP address in the Database Firewall
4.3.3.3 Configuring or Changing the Audit Vault Server ServicesLearn how to configure and change the Audit Vault Server sevices.
To configure the Audit Vault Server services:
1. Log in to the Audit Vault Server console as a super administrator.
2. Click Settings tab.
3. Click System tab in the left navigation menu.
4. In the Configuration section on the main page:
Click For Oracle AVDF Release
System Services 20.1 and 20.2
System Settings 20.3 and later
5. Under the DNS tab, turn on the button and enter the IP address in the specificfields. Enter the IP addresses of up to three DNS servers on the network. AuditVault Server uses these IP addresses to resolve host names. Keep the fieldsdisabled if you do not use DNS servers. Enabling these fields could degradesystem performance if you use DNS servers.
Chapter 4Specifying Initial System Settings and Options on Audit Vault Server (Required)
4-10

Note:
The Client Host (host name of the client) value is displayed in the reports onlyif the DNS is configured here.
6. In the dialog, click Web/SSH/SNMP tab.
7. Complete the following fields as necessary:
Caution:
When allowing access to Oracle Audit Vault and Database Firewall you must becareful to take proper precautions to maintain security.
• Web Access: If you want to allow only selected computers to access the Audit VaultServer console, select IP Addresses and enter specific IP addresses in the box,separated by spaces. Using the default value All allows access from any computer inyour site.
• SSH Access: You can specify a list of IP addresses that are allowed to access theAudit Vault Server through SSH, from a remote console by selecting IP Addressesand entering them in this field, separated by spaces. Using the value All allowsaccess from any computer in your site. Using the value Disabled prevents SSHaccess from any computer.
• SNMP Access: You can specify a list of IP addresses that are allowed to access thenetwork configuration of Audit Vault Server through SNMP by selecting IPAddresses. Then enter them in this field, separated by spaces. Selecting All allowsaccess from any computer. If you disable this, it prevents SNMP access. The SNMPcommunity string is gT8@fq+E.
8. Click Save. A message is displayed.
9. Click OK in the confirmation dialog.
See Also:
Protecting Your Data for a list of recommendations and precautions to maintainsecurity
4.3.3.4 Changing the Standby Audit Vault Server System SettingsLearn how to change the system settings for the standby Audit Vault Server.
Starting with Oracle AVDF release 20.7, the system settings of the standby Audit Vault Servercan be changed using the primary Audit Vault Server console.
To configure the standby Audit Vault Server system settings:
1. Log in to the primary Audit Vault Server console as a super administrator.
2. Click Settings tab.
Chapter 4Specifying Initial System Settings and Options on Audit Vault Server (Required)
4-11

3. Click System tab in the left navigation menu.
4. Under the Configuration sub tab in the main page, click System Settings.
5. In the System Settings dialog, the DNS sub tab is selected by default. ClickStandby Server radio button.
6. Enter the IP address in the specific fields. Enter the IP addresses of up to threeDNS servers on the network. Audit Vault Server uses these IP addresses toresolve host names. Keep the fields disabled if you do not use DNS servers.Enabling these fields could degrade system performance if you use DNS servers.
7. In the System Settings dialog, click on the Web/SSH/SNMP tab.
8. Click Standby Server radio button.
9. Complete the Web/SSH/SNMP fields as necessary. The requirements are similarto the primary Audit Vault Server as mentioned in the previous topic.
10. Click Save.
The following confirmation dialog is displayed:
This operation reconfigures the standby Audit Vault Server. Thisprocess takes at least 2 minutes. Do you want to continue?
11. Click OK.
See Also:
Protecting Your Data for a list of recommendations and precautions tomaintain security
4.3.3.5 Changing IP Addresses of Active and Registered AgentsLearn about changing the IP addresses of active and registered Agents.
Use this procedure to change the IP address of a live registered Agents withoutaffecting the functionality of the Audit Vault Agent.
Prerequisites
1. Stop all audit trails managed by the specific Audit Vault Agent. See section Stopping, Starting, and Autostart of Audit Trails in Oracle Audit Vault Server formore information.
2. Stop Audit Vault Agent before changing the IP address of the target server. Seesection Stopping, Starting, and Other Agent Operations for more information tostop the Audit Vault Agent.
To change the IP address of a live registered Agent
1. Change the IP address of the target server.
2. Change the IP address of the previously registered Agent entity of Oracle AuditVault and Database Firewall using the Audit Vault Server console or Audit Vaultcommand-line interface.
Chapter 4Specifying Initial System Settings and Options on Audit Vault Server (Required)
4-12

3. Run the following to start the Audit Vault Agent with the -k option:
agentctl start -k
4. Enter an Activation Key.
5. Start Audit Trails.
See Also:
Changing IP Address on a Single Instance of Database Firewall Server
4.3.4 Configuring Audit Vault Server Syslog DestinationsLearn how to configure Audit Vault Server syslog destinations.
Use the following procedure to configure the types of syslog messages to send from AuditVault Server. The message categories are Debug, Info, or System. You can also forward Alertmessages to the syslog.
Configuring Syslog enables integration with popular SIEM vendors such as Splunk, IBMQRadar, LogRhythm, ArcSight and others.
Prerequisites
• Log in to the Audit Vault Server console as a super administrator. See Using Audit VaultServer Console for more information.
• Ensure that the IP addresses provided for syslog destinations are on a different host thanthe Audit Vault Server.
1. Click the Settings tab.
2. Click on System tab in the left navigation menu.
3. Under the Configuration section, click Connectors.
4. In the Connectors dialog, click on Syslog tab.
5. Complete the fields, as necessary:
• Syslog Destinations (UDP): Use this box if you are using User Datagram Protocol(UDP) to communicate syslog messages from Audit Vault Server. Enter the IPaddress of each machine that is permitted to receive the syslog messages, separatedby spaces.
• Syslog Destinations (TCP): Use this box if you are using Transmission ControlProtocol (TCP) to communicate syslog messages from Audit Vault Server. Enter theIP address and port combinations of each server that is permitted to receive thesyslog messages, separated by spaces.
• Syslog Categories: You can select the types of messages to be sent to Syslog asfollows:
– Alert: Alerts based on alert conditions that an Oracle Audit Vault and DatabaseFirewall auditor specifies.
Chapter 4Specifying Initial System Settings and Options on Audit Vault Server (Required)
4-13

To forward Oracle Audit Vault and Database Firewall alerts to syslog. Inaddition to this setting, the Oracle Audit Vault and Database Firewallauditor must configure alert forwarding.
– Debug: Engineering debug messages (for Oracle support use only).
– Info: General Oracle Audit Vault and Database Firewall messages andproperty changes.
– System: System messages generated by Oracle Audit Vault andDatabase Firewall or other software that has a syslog priority level of atleast INFO.
6. Click Save.
7. Repeat the initial system settings and options set on the second Audit VaultServer, in case of high availability.
See Also:
• Specifying Initial System Settings and Options on Audit Vault Server(Required)
• Oracle Audit Vault and Database Firewall Auditor's Guide fordetailed instructions and information about Oracle Audit Vault andDatabase Firewall syslog alert formats
4.3.5 Configuring Custom Ports on Network InterfacesLearn how to configure custom ports on network interfaces in standalone and highavailability environment.
Oracle Audit Vault and Database Firewall requires TCP and TCPS based external SQLaccess. By default, the TCP and TCPS ports are 1521 and 1522 respectively. User-defined ports are also used for SQL connections. Oracle Audit Vault and DatabaseFirewall supports the configuration of a custom port. As a super admin user you canspecify a custom TCP and TCPS port for SQL communication on Oracle Audit VaultServer. Custom ports can be configured for network interfaces in standalone and highavailability environment. Upon configuring a custom port, SQL communication isenabled and added to the network configuration.
To configure custom ports on a primary network interface:
Note:
The commands in the procedure below must be executed only on theprimary Audit Vault Server in a high availability environment.
1. Log in to the appliance as root user.
2. Switch user to oracle.
3. Use SQL*Plus and connect as super admin user by entering the ID and passwordas follows.
Chapter 4Specifying Initial System Settings and Options on Audit Vault Server (Required)
4-14

<super-admin>/<password>
Note:
• Other users cannot configure custom ports. If this operation is attempted byanother user, then a message is displayed on the SQL*Plus that there areinsufficient privileges for the user.
• Only root users can access error or debug logs.
4. Run the following commands to configure custom ports and related operations:
Operation Command
To configure custom TCP andTCPS ports on the Audit VaultServer.
exec management.server.custom_listener_ports(<tcp_custom_port>, <tcps_custom_port>);
To disable default ports (1521,1522) on the Audit Vault Server.
exec management.server.disable_std_listener_port_access;
Chapter 4Specifying Initial System Settings and Options on Audit Vault Server (Required)
4-15

Note:
• The same ports are configured on the standby Audit Vault Server ina high availability environment.
• Upon configuring a new custom port, ensure all the Audit VaultAgents are updated with the new port. After all the Agents areupdated, ensure the trails continue to run after the Agents areupdated with the new custom ports. The standard ports must bedisabled after this verification. If standard ports are disabled beforethe Agents are updated, then those Agents stop running and need tobe manually updated. This can be done by updating the connectstring in the av/conf/bootstrap.prop file of the Agent homedirectory.
• Oracle Audit Vault and Database Firewall supports more than oneset of custom ports.
• Follow these instructions while performing backup and restoreoperations. If you configured a custom port before performing thebackup operation, then the port should remain as you configured itduring the restore operation.
• Follow these instructions for high availability environment. The TCPSport configured on the standby is same as primary server duringpairing. Else, pairing results in an error.
• Run the command execmanagement.server.enable_std_listener_port_access to rollbackand set ports 1521 and 1522 as the default ports. After the standardports are enabled again, do not disable the custom ports inimmediate succession as this may disrupt the communicationbetween the Audit Vault Agent and the Audit Vault Server. In such anevent, the Audit Vault Agents have to be reinstalled. Before disablingthe custom port and changing back to default ports, ensure the AuditVault Agents are updated and are in RUNNING state. To disablecustom ports, run the command execmanagement.server.disable_custom_listener_port_access.
4.4 Configuring the Email Notification ServiceLearn about configuring the email notification service.
4.4.1 About Email Notifications in Oracle Audit Vault and DatabaseFirewall
Learn about Oracle Audit Vault and Database Firewall email notifications.
An auditor can configure Oracle Audit Vault and Database Firewall to send users emailnotifications when alerts or reports are generated. To do this, you must configure anSMTP server to enable email notifications. The email notifications can be sent in textformat to mobile devices or they can be routed through an SMS gateway.
Chapter 4Configuring the Email Notification Service
4-16

Note:
• You can configure one SMTP (or ESMTP) server for Oracle Audit Vault andDatabase Firewall.
• You can configure Oracle Audit Vault and Database Firewall to work with bothunsecured SMTP servers as well as with secured and authenticated SMTPservers.
See Also:
Oracle Audit Vault and Database Firewall Auditor's Guide for information aboutconfiguring alerts and generating reports.
4.4.2 Configuring Email Notification for Oracle Audit Vault and DatabaseFirewall
Learn how to configure email notification for Oracle Audit Vault and Database Firewall.
Prerequisite
Log in to the Audit Vault Server console as a super administrator. See Using Audit VaultServer Console for more information.
To configure the email notification service:
1. Click the Settings tab.
2. Click the System tab in the left navigation menu.
3. Click Connectors in the Configuration section on the main page.
4. In the Connectors dialog, click on Email tab.
5. Enter the IP address of the SMTP server in SMTP Server Address.
6. In the SMTP Port field, enter the SMTP server port.
7. In the From Name field, enter the user name used as the sender of the email.
8. In the From Address field, enter the sender's address that appears in the emailnotifications.
9. If this SMTP server requires it, then select Require Credentials, then supply aUsername, Password.
10. If this SMTP server requires authentication, then select Require Secure Connection,and then select the authentication protocol (SSL or TLS).
11. Optionally enter the email address and Test the email configuration.
12. Click Save.
Chapter 4Configuring the Email Notification Service
4-17
4.5 Configuring Archive Locations and Retention PoliciesLearn about configuring archive locations and retention policies.
Note:
Remember the following rules while archiving and restoring tablespaces:
• The restore policy must follow the guidelines in this section.
• Check the tablespace that needs to be archived and the correspondingtablespace that needs to be purged as explained in the policy.
• Restoring data into empty tablespaces is not possible. Checkaccordingly.
• In case the tablespace enters the delete period, it is deletedautomatically from Oracle Audit Vault Server.
• Every tablespace is uniquely identified using the name of the month thatit moves offline and the month that it is purged. The tablespaces arecreated automatically based on the policies that you create.
• When the retention policy changes, the new policy is applied to theincoming data in the following month. It does not affect the existingtablespaces which adhere to the old policy.
• You can archive the tablespace when it enters the offline period.
• After restoring the tablespace, it is actually online. After you release thetablespace, it goes offline. You must rearchive the tablespace after it isreleased.
4.5.1 About Archiving and Retrieving Data in Oracle Audit Vault andDatabase Firewall
Learn about archiving and retrieving data in Oracle Audit Vault and Database Firewall.
Data files are archived as part of an information lifecycle strategy. Oracle Audit Vaultand Database Firewall release 20.1.0.0.0 supports automatic archival of a job only forNFS configured locations. When the online period of the data on the tablespaceexpires, it is automatically archived without your intervention. You have a choice toenable automatic archival during a fresh installation of Oracle Audit Vault andDatabase Firewall in release 20.1.0.0.0. Or, you can manually archive jobs with thedesired settings.
When you upgrade to Oracle Audit Vault and Database Firewall release 20.1.0.0.0from an older release, the system continues to use manual archiving. You have toenable automatic archiving of jobs post upgrade.
You can switch between automatic and manual job archiving. If there is a job inprogress during the switch over, then the change occurs after the active job iscompleted. A suitable message is displayed to the user. After you switch to automaticarchiving, all of the existing NFS locations are configured into an automatic archiving
Chapter 4Configuring Archive Locations and Retention Policies
4-18

list. They are listed under Manage Archive Locations. If the space in archive location is fullor inaccessible, then automatic archiving chooses the next archive location from the list. Theautomatic archival functionality runs on a daily basis and archives the data that is availablefor archiving.
Note:
After you enable automatic archiving, manual archiving is disabled. Whenupgrading to a newer version in release 20.1.0.0.0, the system continues to useeither the automatic or the manual archiving that you configured prior to theupgrade.
You must create archiving (or retention) policies and archive locations so that the archiveddata is transferred in accordance with your archiving policies. Oracle recommends that youarchive regularly in accordance with your company's policy.
Automatic archival is supported only on Network File Systems (NFS). Oracle recommendsthat you use NFS to transfer data to an archive location. If you use Secure Copy (SCP) orWindows File Sharing (SMB) to transfer data to an archive location, then your data files arefirst copied to a staging area in Oracle Audit Vault Server. Therefore, you must ensure thatthere is sufficient space in your file system. Otherwise, the data file copying may fail.Transferring large files using SCP or SMB may take a long time.
What is a Retention (or Archiving) Policy?
Retention policies determine how long data is retained in Oracle Audit Vault Server, whendata is available for archiving, and for how long archived data can be retrieved to OracleAudit Vault Server. An administrator creates retention (or archiving) policies and an auditorassigns a specific policy to each target as well as to scheduled reports. The settings that youcan specify in a retention policy are as follows:
• Months Online: The audit data is available in Oracle Audit Vault Server for the number ofmonths online that you specify. During this period, data is available for viewing in reports.When this period elapses, the audit data files are available for archiving, and are nolonger visible for reports. When the administrator archives these data files, the data isphysically removed from Oracle Audit Vault Server.
• Months Archived: The archived audit data can be retrieved to Oracle Audit Vault Serverfor the number of months specified in Months Archived. If you retrieve the data duringthis period, then it will be available again in reports. When the months archived periodexpires, the data can no longer be retrieved to Oracle Audit Vault Server.
Note:
Retention times are based on the event time (time it is generated). If the auditordoes not select a retention policy for a target or scheduled report, Audit Vault Serveruses the default retention policy (12 months for online retention, and 12 months inarchives).
Example
Suppose your retention policy is:
Chapter 4Configuring Archive Locations and Retention Policies
4-19
• Months Online: 2
• Months Archived: 4
With this retention policy, audit data that is generated during the last two months isavailable in Audit Vault Server. Data that is older than two months is available forarchiving, and is no longer visible in reports. Archived data is available to retrieve forfour months. This data is older than two months but newer than six months, and canbe retrieved from the archives to Oracle Audit Vault Server. Data that is older than sixmonths is no longer available.
When new Data Collected is Older than Retention Policy Limits
When you collect audit data for a newly configured target, or from a new audit trail onan existing target, the data collected from that target may be older than the MonthsOnline period. In fact, the data may be even be older than the Months Archived period.
For instance, suppose your retention policy is the same as the above Example. Nowsuppose you begin collecting audit data from a newly configured target. If some of thisdata is over six months old, it is older than the months online period and the monthsarchived period combined. In this case, Oracle Audit Vault and Database Firewallautomatically drops any newly collected audit records that are older than six months.
However, if some of this audit data is older than two months but newer than sixmonths, that is, it falls within the months archived period, then Oracle Audit Vault andDatabase Firewall does one of the following:
• If this is an audit trail for a newly configured target, then Oracle Audit Vault andDatabase Firewall automatically archives that data as the audit trail is collected.
• If this is a new audit trail for an existing target, then Oracle Audit Vault andDatabase Firewall attempts to archive these records automatically as the audit trailis collected. However, you may have to make required data files available duringthis process.
Note:
In case the archive location is not defined, once the months online periodexpires and before the completion of offline period, the audit data for thespecific target is moved offline. The data remains on the Audit Vault Serverand can be retrieved and viewed in the Reports section of the Audit VaultServer console. This is applicable for the default and user defined archivaland retention policy.
See Also:
Handling New Audit Trails with Expired Audit Records for information tomake required data files available
Chapter 4Configuring Archive Locations and Retention Policies
4-20

4.5.2 Defining Archive LocationsLearn about defining archive locations.
You must define one or more locations as destinations for archive files before you can startan archive job. An archiving destination specifies the archive storage locations and othersettings.
Oracle recommends that you use NFS to transfer data to an archive location. If you useSecure Copy (SCP) or Windows File Sharing (SMB) to transfer data to an archive location,then your data files are first copied to a staging area in the Audit Vault Server. Therefore, youmust ensure that there is sufficient space in the file system. Otherwise the data file copyingmay fail. Transferring large files using SCP or SMB may take a long time.
Note:
• The backup functionality does not backup archived files. The data files in thearchive location are not backed up by avbackup because they may be locatedon a remote file system. In case those files are on NFS mount point, then theyare accessible after restoring on a new system with the same mount points thatwere previously configured.
• Oracle AVDF 20.1 and later supports archive and retrieve functionality withNetwork File System (NFS) server which support both versions v3 and v4.
• Only NFS version v3 is not supported for releases 20.3 and prior. It is supportedstarting Oracle AVDF release 20.4.
• If your NFS server supports and permits both v3 and v4 for archive or retrieve,then no action is required.
• In case you have NFS v4 only in your environment for archive or retrieve, thenset the _SHOWMOUNT_DISABLED parameter to TRUE using the following steps:
1. Log in to the Audit Vault Server as root.
2. Switch user to oracle: su oracle3. Start SQL*Plus connection as sqlplus /nolog without the username or
password.
4. In SQL*Plus execute the command: connect <super administrator>5. Enter the password when prompted. Alternatively, execute the command:
connect <super administrator/password>6. Execute the command: exec
avsys.adm.add_config_param('_SHOWMOUNT_DISABLED','TRUE');
Prerequisite
Log in to the Audit Vault Server as an administrator. See Using Audit Vault Server Console formore information.
To create an archive location:
1. Click the Settings tab.
Chapter 4Configuring Archive Locations and Retention Policies
4-21

2. Click Archiving tab in the left navigation menu.
3. Click Manage Archive Locations tab in the main page.
A list of existing archive locations is displayed.
4. Click the Create button, and complete the following fields:
• Transfer Method: The method used to transfer data from Oracle Audit VaultServer to the machine that archives the data:
– Secure Copy (scp): Select if the data is archived by a Linux machine.
– Windows File Sharing (SMB): Select if the data is archived by aWindows machine.
– Network File System (NFS): Select if using a network file share or NAS.
• Location Name: The name of the archiving destination. This name is used toselect the archiving destination when starting an archive.
• Remote Filesystem: If you use the Network File System (NFS) transfermethod, then you can select an existing filesystem, or one will be createdautomatically based on the details of this archive location.
Note:
In a standalone system, you can use the AVCLI utility to register aremote filesystem. This filesystem can be later selected in the AuditVault Server console. This is not possible in a high availabilityenvironment.
The archive locations must be created using the Audit Vault Serverconsole only in a high availability environment by selecting theCreate New Filesystem option.
• Address: The host name or IP address of the NFS server used by the AuditVault Server for archiving. If Windows File Sharing is the transfer method, thenspecify an IP address.
• Export Directory: If you use the Network File System (NFS) transfer method,then enter the export directory of the NFS server. For example, this directorycan be created in the /etc/exports file of the NFS server. Ensure theoracle user (User ID: 503) has appropriate read and write permissions to thisdirectory.
• Path: The path to the archive storage location. Enter a path to a directory (nota file), noting the following for these transfer methods:
– Secure Copy (scp): If there is no leading slash character, the path isrelative to the user's home directory. If there is a leading slash, the path isrelative to the root directory.
– Windows File Sharing (SMB): Enter the sharename, followed by a forwardslash and the name of the folder. For example, /sharename/myfolder
– Network File System (NFS): Enter the path relative to the export directory.For example if the export directory is /export_dir, and the full path to thedirectory you want to designate as an archive location is /export_dir/dir1/dir2, then enter /dir1/dir2 in the Path field. To put archives
Chapter 4Configuring Archive Locations and Retention Policies
4-22
directly in the NFS server's export directory, enter / (forward slash) for the Path.
You can click the Test button to validate the NFS location when done.
• Port: This is the port number that secure copy uses or the Windows fileshare serviceon the machine that archives the data. You can normally use the default port number.
If you selected Windows File Sharing as the Transfer Method, then use port 445.
• Username: The account name on the machine to which the archive data will betransferred.
• Authentication Method: If Secure Copy (scp) is the transfer method, then you canselect Password Authentication and enter the login password. If a Linux machine isused, then you can select Key-based Authentication.
If using Key-based Authentication, then the administrator of the remote machine mustensure that the file that contains the RSA key (~/.ssh/authorized_keys) haspermissions set to 664.
• Password and Confirm Password: If you use Windows file sharing, or if youselected Password as the authentication method, then this is the password to log intothe machine that archives the data.
• Public Key: This field appears if you selected Key-based Authentication. Copy thispublic key and add it to the public keys file on the machine that archives the data. Forexample, add the key in ~/.ssh/authorized_keys.
5. Click Save.
See Also:
• REGISTER REMOTE FILESYSTEM
• Archiving and Retrieving in High Availability
4.5.3 Creating or Deleting Archiving PoliciesLearn about creating and deleting policies.
4.5.3.1 Creating Archiving and Retention PoliciesLearn about creating archiving and retention policies.
After you create a retention policy, an Oracle AVDF auditor can apply the policy to targets.
To create an archiving (retention) policy:
1. Log in to the Audit Vault Server console as an administrator.
2. Click the Settings tab.
3. Click Archiving tab in the left navigation menu.
4. Click Manage Policies tab in the main page, and then click the Create button.
5. Enter a Name for this policy.
6. In the Months Online field, enter the number of months to retain audit data in OracleAudit Vault Server before the data is marked for archiving. The default value is 1.
Chapter 4Configuring Archive Locations and Retention Policies
4-23
For example, if you enter 2, then audit data for targets that use this retention policywill be available for archive jobs after two months online in Audit Vault Server.After the months online period expires, the data is no longer visible in reports.
7. In the Months Archived field, enter the number of months to retain audit data inthe archive location. The default value is 6.
This value determines how long data is available to retrieve to Audit Vault Server,but it does not cause the data to be purged from the archive. For example if youenter 4, data can be retrieved from the archives for a period of four months after ithas been archived.
Starting Oracle AVDF 20.4, when the datafiles that have been archived on theNFS location, enter the purge period they are deleted from the NFS location.
8. Starting with Oracle AVDF release 20.7, the super administrator can create andedit a user-defined policy, and set it as default. Click on the name of the user-defined policy to edit and set it as default.
See Also:
Oracle Audit Vault and Database Firewall Auditor's Guide forinstructions on assigning retention policies
4.5.3.2 Deleting Archiving PoliciesLearn how to delete archiving policies.
You can only delete user-defined archiving policies.
Prerequisite
Log in to Oracle Audit Vault Server console as an administrator. See Using Audit VaultServer Console for more information.
To delete an archiving (retention) policy:
1. Click the Settings tab.
2. Click the Archiving tab in the left navigation menu.
3. Click Manage Policies in the main page.
4. Under User-defined Policy section, select the specific policy to delete.
5. Click Delete button.
4.5.4 Viewing Archived DatafilesLearn how to view archived datafiles.
1. Log in to the Audit Vault Server console as administrator.
2. Click the Settings tab.
3. Click the Archiving tab in the left navigation menu.
This page lists the archived datafiles with the following details:
Chapter 4Configuring Archive Locations and Retention Policies
4-24

Table Field Description
Target Name of the target.
Event Month The specific month in which the eventsoccurred.
Datafiles Name of the datafile.
Online data expiration date Data is online until the specified month.Later it is offline.
Offline data expiration date Data is offline until the specified month.Later it is purged.
Retention Policy Specifies the online and offline duration ofthe data.
Archived Specifies if data is archived externally onSCP, SMB, or NFS locations.
Archive Location If the data is archived externally, then thisfield is enabled. It contains the name of thearchive location. If you hover the mouse onthis field, it displays the type of archivelocation (SCP, SMB, or NFS), IP address ofthe archive location, and the path to thearchive directory.
Note:
• A super administrator can view datafiles pertaining to all targets. Anadministrator can view datafiles only for the targets they have access to.
• This functionality of viewing the archived datafiles is available starting withOracle AVDF release 20.6.
4.5.5 Running Archive and Retrieval JobsLearn how to run archive and retrieval jobs.
See "Archiving and Retrieving Audit Data".
4.6 Managing Archival and Retrieval in High AvailabilityEnvironments
Learn how to manage archival and retrieval in high availability environments.
Chapter 4Managing Archival and Retrieval in High Availability Environments
4-25
Oracle Audit Vault and Database Firewall supports archiving. Prior to release12.2.0.11.0, archiving was configured only on the primary Audit Vault Server and therewas no ability to configure archiving on the standby server. After a failover, archivelocations had to be manually set on the former standby (new primary). Starting withrelease 12.2.0.11.0, you can now configure NFS archive locations on both the primaryand standby Audit Vault Servers, reducing the amount of manual work that needs to beperformed following a failover.
Oracle Audit Vault and Database Firewall release 12.2.0.11.0 and later ensures thatthe primary and secondary Audit Vault Servers have the same number of NFS archivelocations. This is crucial for archiving and file management functionality to workeffectively in a high availability environment.
Note:
• Any user with admin privileges can perform archival and retrieval tasks.
• It is recommended that NFS archive locations for primary and secondaryAudit Vault Servers are on separate NFS servers.
• It is recommended to have these NFS servers within the same DataCenter as the Audit Vault Server. As in the NFS server for primary AuditVault Server should be in the same data center and NFS server forsecondary Audit Vault Server should be in the same data center.
• NFS is a mount point on the Audit Vault Server. If you want to replaceNFS server, then make sure the Audit Vault Server does not access themount point.
Prerequisite
Ensure that all of the Prerequisites for Configuring High Availability in Audit VaultServers are satisfied before configuring high availability.
After you complete the high availability pairing, the NFS locations pertaining to boththe primary and secondary Audit Vault Servers are displayed under Manage ArchiveLocations of the primary Audit Vault Server console. These NFS locations includethose created on both the primary and secondary Audit Vault Servers before and afterconfiguring high availability. The names of these NFS locations have the primarylocation name or the name defined while creating the location once high availability isconfigured. The Audit Vault Server console provides details of the host, exportdirectory, and destination path for both the primary and secondary Audit Vault Servers.
Note:
Oracle Audit Vault and Database Firewall release 20.1.0.0.0 supportsautomatic archival on both primary and secondary Audit Vault Servers. Ifautomatic archival is enabled on the primary Audit Vault Server, it is enabledon the corresponding secondary Audit Vault Server as well. The Audit VaultServer console displays the archive locations of the primary host with theirmapped corresponding secondary locations.
Chapter 4Managing Archival and Retrieval in High Availability Environments
4-26
Upgrade and archiving functionality in high availability environment
Archiving functionality is disabled during the upgrade process only when there are datafilesarchived to the NFS locations. Upon completion of the upgrade process the admin user mustenable the archive functionality to start archiving.
Updating or Deleting NFS locations
The super admin can update or delete the NFS locations after high availability pairing ofprimary and secondary Audit Vault Servers. The NFS locations on both the primary andsecondary Audit Vault Servers can be updated or deleted. In case the datafiles are archived,the location cannot be updated or deleted. The Location Name and the Primary ServerPath or the Secondary Server Path can be updated in case high availability is enabled.
See Also:
• Monitoring Jobs
• Defining Archive Locations
4.7 Defining Resilient Pairs for High AvailabilityLearn how to define resilient pairs for high availability.
You can define resilient pairs of Oracle Audit Vault Servers, Oracle Database Firewalls, orboth.
When you define a resilient pair of Oracle Audit Vault Servers, you must perform all of theconfiguration tasks. These tasks include adding database firewalls to the server andregistering the targets on the primary Oracle Audit Vault Server.
See Also:
High Availability in Oracle AVDF
4.8 Registering Database Firewall in Audit Vault ServerLearn how to register Database Firewall in Audit Vault Server.
Use this procedure to register an Database Firewall in Audit Vault Server.
Prerequisites
• If you are deploying more than one Database Firewall, then you must register eachfirewall in Audit Vault Server to enable communication among the servers. We suggestthat you first configure Database Firewall using the instructions in Configuring DatabaseFirewall.
• You must register Database Firewalls in Audit Vault Server before you can pair them forhigh availability. See High Availability for Database Firewall for more information.
Chapter 4Defining Resilient Pairs for High Availability
4-27

• Provide the Audit Vault Server certificate and IP address to the Database Firewallthat you are registering. See Specifying the Audit Vault Server Certificate and IPAddress.
• Log in to Audit Vault Server as an administrator. See Using Audit Vault ServerConsole for more information.
• The version of the Database Firewall must be 20.1.
To register Database Firewall in Audit Vault Server:
1. If there is a resilient pair of Audit Vault Servers, then log in to the primary server.
2. Click the Database Firewalls tab.
The Firewalls page displays the currently registered firewalls and their statuses.
3. Click Register.
4. Enter a Name for Database Firewall and its IP Address.
5. Click Save.
Note:
• If a message indicates that there is a problem with the certificate,then ensure that the date and time settings are identical on bothDatabase Firewall and Audit Vault Server.
• If the following error message is encountered, then check the AuditVault Server certificate is copied properly to the Database Firewall.Also check the date and time settings are identical on both theDatabase Firewall and Audit Vault Server.
OAV-46981 Unable to connect to Database Firewall with IP
4.9 Testing Audit Vault Server System OperationsLearn about testing Audit Vault Server system operations.
Verify that your system is fully operational before beginning your normal, day-to-dayoperations.
Prerequisite
Log in to Audit Vault Server as an administrator. See Using Audit Vault Server Consolefor more information.
To test your system's operation:
1. Check the date and time settings of Audit Vault Server.
2. Click the Settings tab.
3. Click on the System tab in the left navigation menu.
4. Under Monitoring section in the main page, click Diagnostics.
5. Click the Run Diagnostics button to run a series of diagnostic tests and reviewthe results.
Chapter 4Testing Audit Vault Server System Operations
4-28
These diagnostics include testing:
• Existence and access permissions of configuration files
• File system sanity
• Network configuration
• Status of various processes that are required to run on the system. For example,database server processes, event collection process, Java framework process, HTTPserver process, and so on.
6. You can use the Download Diagnostics button to download the diagnostic results forfurther analysis.
7. You can use the Clear Diagnostic Logs button to clear the current set of diagnostic logson the Audit Vault Server.
8. Click the Home tab, and check the status of Database Firewalls and Targets.
4.10 Configuring Fiber Channel-Based Storage for Audit VaultServer
Learn about configuring fiber channel-based storage for Audit Vault Server.
Audit Vault Server supports fiber channel-based storage. You can configure this storageduring installation by performing this procedure.
To configure fiber channel-based storage for Audit Vault Server:
1. Install Audit Vault Server on the local disk of your server. During installation, Audit VaultServer attempts to use all of the disks in your system. Use the configuration tools for thefiber channel controller such as Fast!UTIL, to ensure that other disks are not accessible.
Note:
• If the other disks are accessible, then they are formatted and erased duringinstallation.
• Audit Vault Server looks for the devices with the names of sd*, xvd*, hd*,cciss*, fio* in /sys/block. The installation succeeds if the fiber channeldisks are exposed as one of these block devices.
• The device xvd* is not supported for multipath.
• The first disk must be a local disk with a minimum of 300 GB availablespace. If the available space is less than 300 GB, then the boot partition isallocated to a SAN fiber channel disk which is not supported. It isrecommended that the sizes of the other disks be greater than that of thefirst disk.
2. If you are using fiber channel-based storage, then perform the following remaining stepsafter your installation has successfully completed to ensure that Oracle AutomaticStorage Management uses the active path. Otherwise, reboot your system to completethe configuration process.
Chapter 4Configuring Fiber Channel-Based Storage for Audit Vault Server
4-29

Note:
Fiber channel-based storage with multipath is supported by Oracle AuditVault and Database Firewall release 20.1 and onwards.
4.11 Adding Local Disks to the New ASM Disk GroupLearn how to add local disks to new ASK disk group in Oracle AVDF.
This topic contains information on adding storage to all three ASM disk groups.However, it may not be necessary to increase the storage for all three. Use yourdiscretion to add storage where it is needed.
Prerequisite
Ensure that any disk added to the Oracle AVDF appliance has no pre-existing LVM,partition, or other device mapper metadata. In case the disks have been usedpreviously, then restore them to a clean state before running this procedure.
To add local disks to new ASK disk group, follow these steps:
1. Connect to the Audit Vault Server through SSH as support user using the followingcommand:
ssh support@<IP address of the Audit Vault Server>
Note:
If the Audit Vault Server is installed on OCI, then refer to Connecting toOracle AVDF Instance.
2. Enter the password of the support user when prompted.
3. Run the following command to view a list of all the available hard disks:
fdisk -l
4. From the list, locate the disk with no partitions defined and with the same size youneed. Ignore any entries referring to /dev/dm-0, etc.
Note:
• Fiber Channel based storage with multipath is supported in OracleAudit Vault and Database Firewall release 20.1 and onwards.
• Fiber Channel based storage is supported by Oracle AVDF. FiberChannel over Ethernet (FCoE) is currently not supported by OracleAVDF.
Here is an example of the multipath device: /dev/mpatha
Chapter 4Adding Local Disks to the New ASM Disk Group
4-30
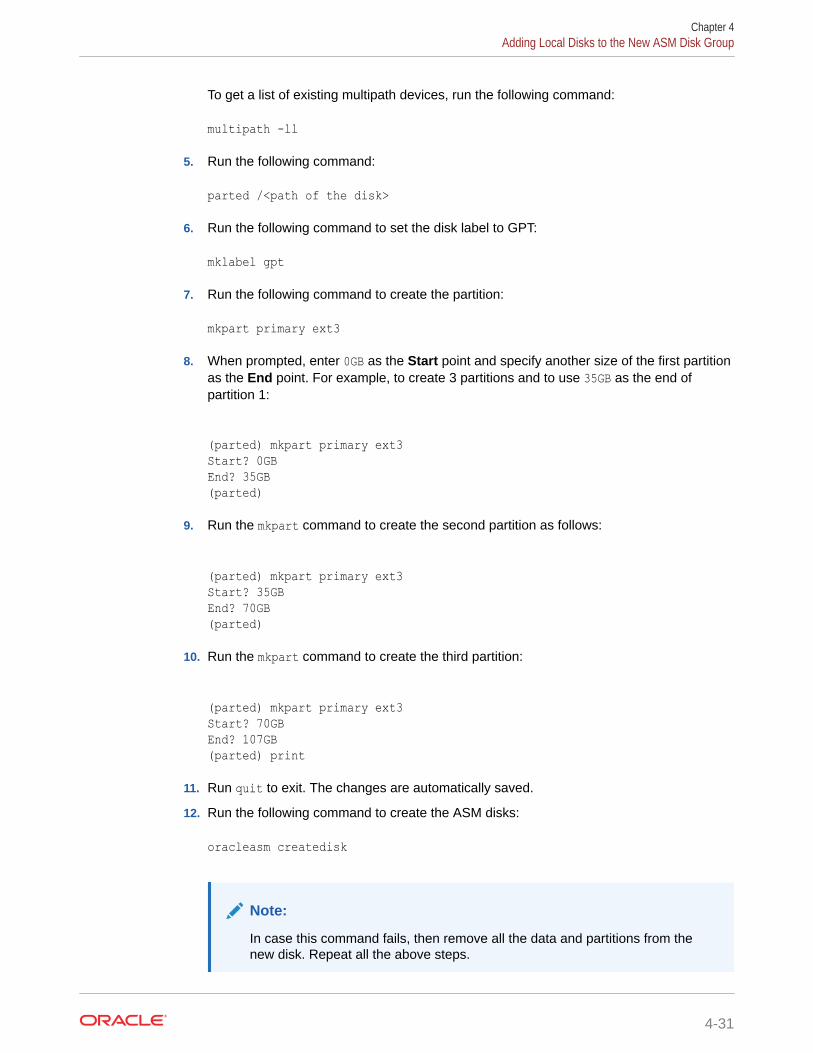
To get a list of existing multipath devices, run the following command:
multipath -ll
5. Run the following command:
parted /<path of the disk>
6. Run the following command to set the disk label to GPT:
mklabel gpt
7. Run the following command to create the partition:
mkpart primary ext3
8. When prompted, enter 0GB as the Start point and specify another size of the first partitionas the End point. For example, to create 3 partitions and to use 35GB as the end ofpartition 1:
(parted) mkpart primary ext3Start? 0GBEnd? 35GB(parted)
9. Run the mkpart command to create the second partition as follows:
(parted) mkpart primary ext3Start? 35GBEnd? 70GB(parted)
10. Run the mkpart command to create the third partition:
(parted) mkpart primary ext3Start? 70GBEnd? 107GB(parted) print
11. Run quit to exit. The changes are automatically saved.
12. Run the following command to create the ASM disks:
oracleasm createdisk
Note:
In case this command fails, then remove all the data and partitions from thenew disk. Repeat all the above steps.
Chapter 4Adding Local Disks to the New ASM Disk Group
4-31
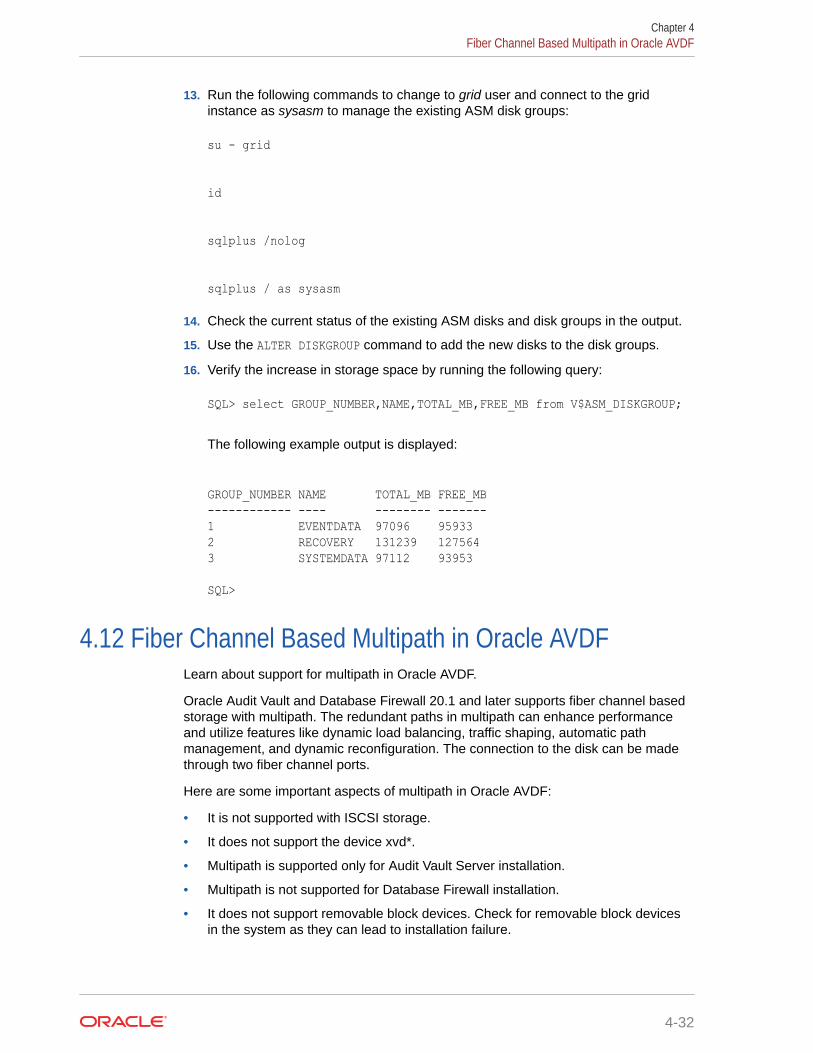
13. Run the following commands to change to grid user and connect to the gridinstance as sysasm to manage the existing ASM disk groups:
su - grid
id
sqlplus /nolog
sqlplus / as sysasm
14. Check the current status of the existing ASM disks and disk groups in the output.
15. Use the ALTER DISKGROUP command to add the new disks to the disk groups.
16. Verify the increase in storage space by running the following query:
SQL> select GROUP_NUMBER,NAME,TOTAL_MB,FREE_MB from V$ASM_DISKGROUP;
The following example output is displayed:
GROUP_NUMBER NAME TOTAL_MB FREE_MB------------ ---- -------- -------1 EVENTDATA 97096 959332 RECOVERY 131239 1275643 SYSTEMDATA 97112 93953 SQL>
4.12 Fiber Channel Based Multipath in Oracle AVDFLearn about support for multipath in Oracle AVDF.
Oracle Audit Vault and Database Firewall 20.1 and later supports fiber channel basedstorage with multipath. The redundant paths in multipath can enhance performanceand utilize features like dynamic load balancing, traffic shaping, automatic pathmanagement, and dynamic reconfiguration. The connection to the disk can be madethrough two fiber channel ports.
Here are some important aspects of multipath in Oracle AVDF:
• It is not supported with ISCSI storage.
• It does not support the device xvd*.
• Multipath is supported only for Audit Vault Server installation.
• Multipath is not supported for Database Firewall installation.
• It does not support removable block devices. Check for removable block devicesin the system as they can lead to installation failure.
Chapter 4Fiber Channel Based Multipath in Oracle AVDF
4-32
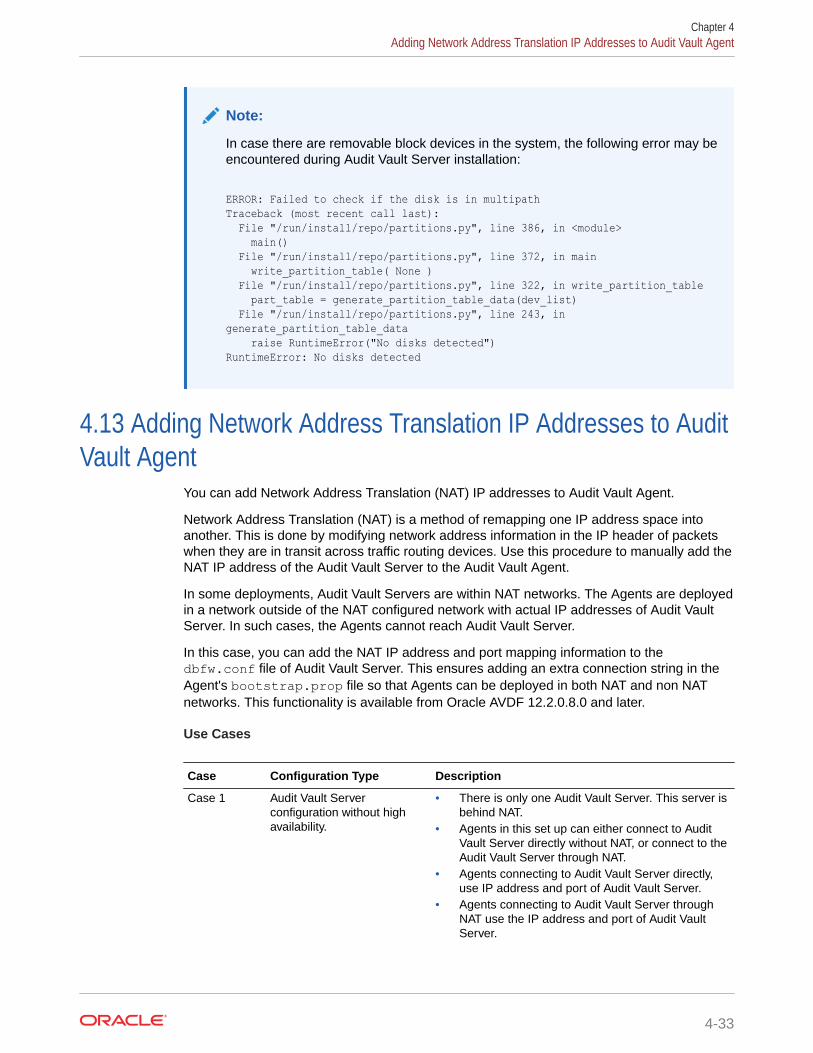
Note:
In case there are removable block devices in the system, the following error may beencountered during Audit Vault Server installation:
ERROR: Failed to check if the disk is in multipathTraceback (most recent call last): File "/run/install/repo/partitions.py", line 386, in <module> main() File "/run/install/repo/partitions.py", line 372, in main write_partition_table( None ) File "/run/install/repo/partitions.py", line 322, in write_partition_table part_table = generate_partition_table_data(dev_list) File "/run/install/repo/partitions.py", line 243, in generate_partition_table_data raise RuntimeError("No disks detected")RuntimeError: No disks detected
4.13 Adding Network Address Translation IP Addresses to AuditVault Agent
You can add Network Address Translation (NAT) IP addresses to Audit Vault Agent.
Network Address Translation (NAT) is a method of remapping one IP address space intoanother. This is done by modifying network address information in the IP header of packetswhen they are in transit across traffic routing devices. Use this procedure to manually add theNAT IP address of the Audit Vault Server to the Audit Vault Agent.
In some deployments, Audit Vault Servers are within NAT networks. The Agents are deployedin a network outside of the NAT configured network with actual IP addresses of Audit VaultServer. In such cases, the Agents cannot reach Audit Vault Server.
In this case, you can add the NAT IP address and port mapping information to thedbfw.conf file of Audit Vault Server. This ensures adding an extra connection string in theAgent's bootstrap.prop file so that Agents can be deployed in both NAT and non NATnetworks. This functionality is available from Oracle AVDF 12.2.0.8.0 and later.
Use Cases
Case Configuration Type Description
Case 1 Audit Vault Serverconfiguration without highavailability.
• There is only one Audit Vault Server. This server isbehind NAT.
• Agents in this set up can either connect to AuditVault Server directly without NAT, or connect to theAudit Vault Server through NAT.
• Agents connecting to Audit Vault Server directly,use IP address and port of Audit Vault Server.
• Agents connecting to Audit Vault Server throughNAT use the IP address and port of Audit VaultServer.
Chapter 4Adding Network Address Translation IP Addresses to Audit Vault Agent
4-33
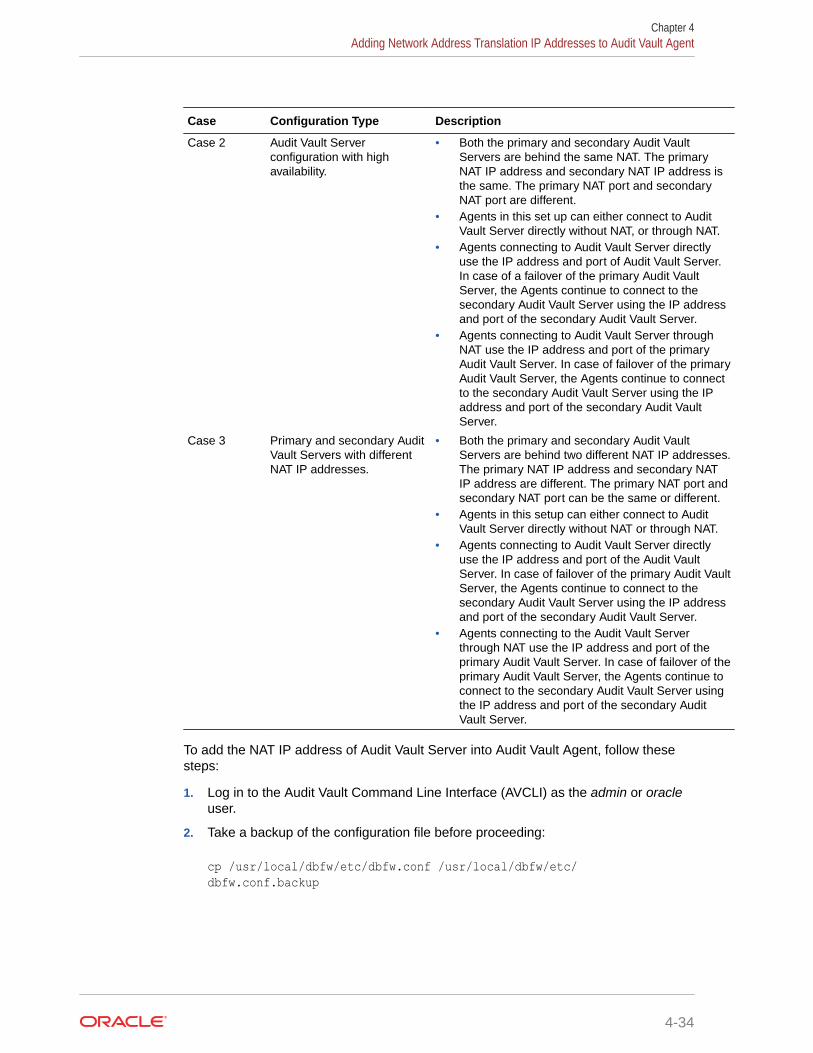
Case Configuration Type Description
Case 2 Audit Vault Serverconfiguration with highavailability.
• Both the primary and secondary Audit VaultServers are behind the same NAT. The primaryNAT IP address and secondary NAT IP address isthe same. The primary NAT port and secondaryNAT port are different.
• Agents in this set up can either connect to AuditVault Server directly without NAT, or through NAT.
• Agents connecting to Audit Vault Server directlyuse the IP address and port of Audit Vault Server.In case of a failover of the primary Audit VaultServer, the Agents continue to connect to thesecondary Audit Vault Server using the IP addressand port of the secondary Audit Vault Server.
• Agents connecting to Audit Vault Server throughNAT use the IP address and port of the primaryAudit Vault Server. In case of failover of the primaryAudit Vault Server, the Agents continue to connectto the secondary Audit Vault Server using the IPaddress and port of the secondary Audit VaultServer.
Case 3 Primary and secondary AuditVault Servers with differentNAT IP addresses.
• Both the primary and secondary Audit VaultServers are behind two different NAT IP addresses.The primary NAT IP address and secondary NATIP address are different. The primary NAT port andsecondary NAT port can be the same or different.
• Agents in this setup can either connect to AuditVault Server directly without NAT or through NAT.
• Agents connecting to Audit Vault Server directlyuse the IP address and port of the Audit VaultServer. In case of failover of the primary Audit VaultServer, the Agents continue to connect to thesecondary Audit Vault Server using the IP addressand port of the secondary Audit Vault Server.
• Agents connecting to the Audit Vault Serverthrough NAT use the IP address and port of theprimary Audit Vault Server. In case of failover of theprimary Audit Vault Server, the Agents continue toconnect to the secondary Audit Vault Server usingthe IP address and port of the secondary AuditVault Server.
To add the NAT IP address of Audit Vault Server into Audit Vault Agent, follow thesesteps:
1. Log in to the Audit Vault Command Line Interface (AVCLI) as the admin or oracleuser.
2. Take a backup of the configuration file before proceeding:
cp /usr/local/dbfw/etc/dbfw.conf /usr/local/dbfw/etc/dbfw.conf.backup
Chapter 4Adding Network Address Translation IP Addresses to Audit Vault Agent
4-34

3. Edit the dbfw.conf file to include the NAT IP address in the Audit Vault Server asfollows:
NAT_PRIMARY_IP_ADDRESS=<xx.yyy.zzz.aaa>NAT_PRIMARY_AGENT_PORT_TLS=<12345>NAT_PRIMARY_AGENT_PORT=<12346>
4. Save the changes.
5. Regenerate the agent by running the following command:
avca configure_bootstrap
After this, all of the Agents downloaded contain one of the strings with the NAT IPaddress. To verify, check the contents of the bootstrap file at /var/lib/oracle/dbfw/av/conf/bootstrap.prop which should be as follows:
SYS.CONNECT_STRING999=(DESCRIPTION=(ENABLE=BROKEN)(ADDRESS=(PROTOCOL=TCP)(HOST=10.240.114.167)(PORT=13031))(CONNECT_DATA=(SERVICE_NAME=DBFWDB.DBFWDB)))SYS.SSL_CONNECT_STRING999=(DESCRIPTION=(ADDRESS=(PROTOCOL=TCPS)(HOST=10.240.114.167)(PORT=13032))(CONNECT_DATA=(SERVICE_NAME=DBFWDB.DBFWDB)(SERVER=DEDICATED))(SECURITY= (SSL_SERVER_CERT_DN="DC=com,CN=avserver,OU=db,O=oracle")))
6. The above case is applicable in Case 1 that is mentioned in the table above. In Case 2and Case 3, Audit Vault Server is in high availability mode. In these cases, you need toconfigure the dbfw.conf file with an additional set of parameters as follows:
NAT_PRIMARY_IP_ADDRESS=<xx.yyy.zzz.aaa>NAT_PRIMARY_AGENT_PORT_TLS=<12345>NAT_PRIMARY_AGENT_PORT=<12346>NAT_SECONDARY_IP_ADDRESS=<xx.yyy.zzz.ccc>NAT_SECONDARY_AGENT_PORT_TLS=<56789>NAT_SECONDARY_AGENT_PORT=<12678>
7. Save the changes.
8. After this, the Agent’s bootstrap.prop file is configured with a high availability connectstring to include the above set of IP addresses and ports. To verify this, check thecontents of the bootstrap file at /var/lib/oracle/dbfw/av/conf/bootstrap.prop which should be as follows:
SYS.CONNECT_STRING999=(DESCRIPTION_LIST=(LOAD_BALANCE=off)(FAILOVER=on)(DESCRIPTION=(ENABLE=BROKEN)(ADDRESS_LIST=(LOAD_BALANCE=on)(ADDRESS=(PROTOCOL=TCP)(HOST=<NAT_PRIMARY_AGENT_PORT>)(PORT=<NAT_PRIMARY_AGENT_PORT>)))
(CONNECT_DATA=(SERVICE_NAME=DBFWDB.DBFWDB)))(DESCRIPTION=(ENABLE=BROKEN)(ADDRESS_LIST=(LOAD_BALANCE=on)(ADDRESS=(PROTOCOL=TCP)(HOST=<NAT_SECONDARY_IP_ADDRESS>)(PORT=NAT_SECONDARY_AGENT_PORT>)))(CONNECT_DATA=(SERVICE_NAME=DBFWDB.DBFWDB))))
SYS.SSL_CONNECT_STRING999=(DESCRIPTION_LIST=(LOAD_BALANCE=off)
Chapter 4Adding Network Address Translation IP Addresses to Audit Vault Agent
4-35

(FAILOVER=on)(DESCRIPTION=(ADDRESS_LIST=(LOAD_BALANCE=on)(ADDRESS=(PROTOCOL=TCPS)(HOST=<NAT_PRIMARY_IP_ADDRESS>)(PORT=<NAT_PRIMARY_AGENT_PORT_TLS>)))(CONNECT_DATA=(SERVICE_NAME=DBFWDB.DBFWDB)(SERVER=DEDICATED))(SECURITY= (SSL_SERVER_CERT_DN="DC=com,CN=avserver,OU=db,O=oracle")))(DESCRIPTION=(ADDRESS_LIST=(LOAD_BALANCE=on)(ADDRESS=(PROTOCOL=TCPS)(HOST=<NAT_SECONDARY_IP_ADDRESS>)(PORT=<NAT_SECONDARY_AGENT_PORT_TLS>)))(CONNECT_DATA=(SERVICE_NAME=DBFWDB.DBFWDB)(SERVER=DEDICATED))(SECURITY=(SSL_SERVER_CERT_DN="DC=com,CN=avserver,OU=db,O=oracle"))))
Chapter 4Adding Network Address Translation IP Addresses to Audit Vault Agent
4-36
5Configuring Database Firewall
Learn about configuring Database Firewall.
You can use Database Firewall to configure traffic sources and proxies.
5.1 About Configuring Database FirewallLearn how to configure Database Firewall.
The way in which you configure the system and firewall settings for each Database Firewalldepends on your overall plan for deploying Oracle Audit Vault and Database Firewall.
When you configure a Firewall instance, you identify the Audit Vault Server that will managethe specific Firewall. Depending on your plan for the overall Oracle Audit Vault and DatabaseFirewall system configuration, you also configure the traffic sources, and determine thedeployment types. The following are the Database Firewall deployment types:
• Monitoring (Out-of-Band)
• Monitoring (Host Monitor)
• Monitoring / Blocking (Proxy)
Note:
• The Audit Vault Server and the Database Firewall server are softwareappliances. You must not make any changes to the Linux operating systemthrough the command line on these servers unless following official Oracledocumentation or under guidance from Oracle Support.
• Database Firewall introduces very minimal latency overhead of less than 100microseconds per SQL statement with 100K transactions per second. This isbased on internal performance tests.
Basic firewall configuration consists of these four steps:
1. Specifying the Audit Vault Server Certificate and IP Address
2. Managing the Oracle Database Firewall Network and Services Configuration
3. Setting the Date and Time in Database Firewall
4. Configuring Database Firewall and Its Traffic Sources on Your Network
After configuring the Database Firewalls, perform the following tasks:
• Configure Database Firewall monitoring points for each database target.
• You can optionally set up resilient pairs of Database Firewalls for a high availabilityenvironment.
5-1

See Also:
• Summary of Configuration Steps to understand the high level workflowfor configuring the Oracle Audit Vault and Database Firewall system.
• Planning Your Oracle Audit Vault and Database Firewall SystemConfiguration for an overview of the planning steps.
• Configuring Database Firewall Monitoring Points
• High Availability in Oracle AVDF to set up resilient pairs of DatabaseFirewalls for a high availability.
5.2 Introduction to Database Firewall DeploymentDepending on your requirements, you can choose from one of three types ofdeployments available for Database Firewall.
Depending on your operational needs you can monitor SQL traffic only, or monitor andblock the SQL traffic reaching the target database. Based on the requirement, you candeploy the Database Firewall in the following modes:
• Monitoring / Blocking (Proxy) - In this deployment mode the Database Firewallcan monitor, alert, block, and substitute SQL statements, based on the definedpolicy.
• Monitoring (Out-of-Band) - In this deployment mode, the Database Firewall canmonitor SQL traffic, but cannot block or substitute SQL statements.
• Monitoring (Host Monitor) - In this deployment mode, the Database Firewall canmonitor SQL traffic, but cannot block or substitute SQL statements.
Table 5-1 Database Firewall Deployment Types
Deployment Type Supported Modes Minimum Number ofNetwork InterfaceCards (NICs)
Operational Notes
Proxy Monitoring /Blocking (Proxy)
3 (for deployment withnetwork separation)
1 (for deploymentwithout networkseparation)
In proxy mode, theDatabase Firewall canboth monitor and blockSQL, as well as optionallysubstitute SQLstatements.
Out-of-Band Monitoring (Out-of-Band)
2 When monitoringdatabase activity in Out-of-Band mode, theDatabase Firewallintercepts the networktraffic, including clientrequests to the databaseand the response from thedatabase.
Host Monitor Monitoring (HostMonitor)
1 Host Monitor is part of theAudit Vault Agent.
Chapter 5Introduction to Database Firewall Deployment
5-2

The same Database Firewall can monitor traffic from multiple Host Monitors, and at the sametime be a proxy for some databases, and out-of-band (span) for other databases.
Note:
• A single network interface card (NIC) is required in the case that client anddatabase are on the same sub-network. There is no network separation.
• Additional NICs are required in the case that client and databases are ondifferent sub-networks.
• In case where there are 3 NICs, the network separation requires you to have amanagement network interface which is usually attached to the default gateway.The first NIC is placed in the client subnet. The second NIC is placed in thedatabase subnet. There is no additional routing set up required in thisconfiguration. All the addresses for clients and databases are local to thenetworks that are accessible to the Database Firewall NICs.
5.2.1 Monitoring / Blocking (Proxy)Learn about how to configure Database Firewall in Monitoring / Blocking (Proxy) mode.
In Monitoring / Blocking (Proxy) mode, the Database Firewall can both monitor and blockSQL, as well as optionally substitute SQL statements. Database Firewall is configured as aproxy, so that all the traffic to the database server is routed through the Database Firewall.
Database clients connect to the Database Firewall proxy that in turn connects to thedatabase server, forwarding all data received from the database client. In all cases, thedatabase server identifies the Database Firewall as the client.
The clients must be reconfigured to connect to the Database Firewall instead of thedatabase. Oracle recommends that you configure the database to reject all connections thatdo not come from the Database Firewall.
Note:
To simplify the modification required for applications to connect to the DatabaseFirewall proxy mode deployments, configure local domain name servers (DNS) toresolve fully qualified domain name (FQDN) of the target database to the IPaddress of the Database Firewall.
You can deploy the Monitoring / Blocking (Proxy) mode in the following ways:
1. Proxy without network separation
2. Proxy without network separation using a dedicated NIC for the proxy service
3. Proxy with network separation
Proxy Without Network Separation
The proxy without network separation has the client and database traffic accessible at allpoints in the network. The Database Firewall management interface is accessible to both the
Chapter 5Introduction to Database Firewall Deployment
5-3
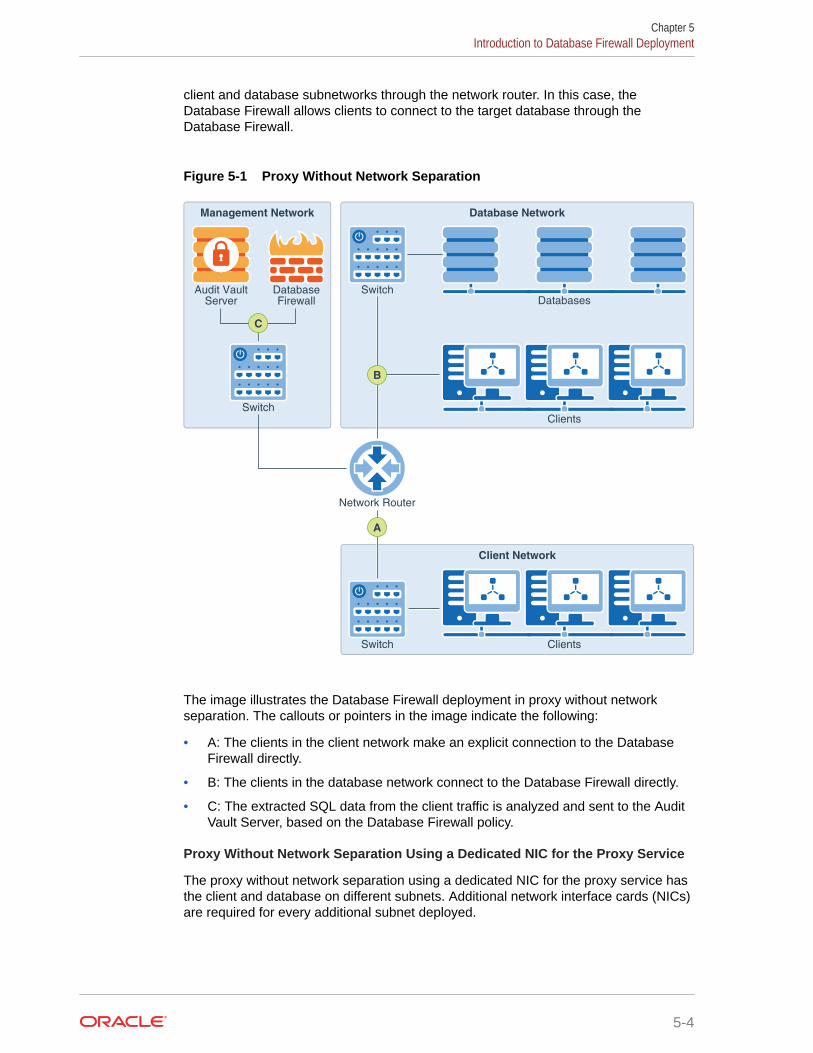
client and database subnetworks through the network router. In this case, theDatabase Firewall allows clients to connect to the target database through theDatabase Firewall.
Figure 5-1 Proxy Without Network Separation
Database Network
Network Router
Management Network
Clients
Databases
Switch
Client Network
ClientsSwitch
Audit Vault
Server
Database
Firewall
C
B
A
Switch
The image illustrates the Database Firewall deployment in proxy without networkseparation. The callouts or pointers in the image indicate the following:
• A: The clients in the client network make an explicit connection to the DatabaseFirewall directly.
• B: The clients in the database network connect to the Database Firewall directly.
• C: The extracted SQL data from the client traffic is analyzed and sent to the AuditVault Server, based on the Database Firewall policy.
Proxy Without Network Separation Using a Dedicated NIC for the Proxy Service
The proxy without network separation using a dedicated NIC for the proxy service hasthe client and database on different subnets. Additional network interface cards (NICs)are required for every additional subnet deployed.
Chapter 5Introduction to Database Firewall Deployment
5-4

Figure 5-2 Proxy Without Network Separation Using a Dedicated NIC for the ProxyService
Database Network
Network Router
Management Network
Clients
Databases
Switch
DBFW TrafficProxy
Client Network
ClientsSwitch
Audit VaultServer
DatabaseFirewall
C D
B
E
A
Switch
The image illustrates the Database Firewall deployment in proxy without network separationusing a dedicated NIC for the proxy service. The callouts or pointers in the image indicate thefollowing:
• A: The clients in the client network connect to the Database Firewall traffic proxy throughthe network router.
• B: The clients in the database network connect to the Database Firewall traffic proxydirectly.
• C: The extracted SQL data from the client traffic is analyzed and sent to the Audit VaultServer, based on the Database Firewall policy.
• D: The traffic is forwarded to the target database by the Database Firewall. The responsefrom the database is returned to the Database Firewall and then forwarded to theoriginator through the network router.
• E: The management network is separate from the client and database networks.
Proxy With Network Separation
The Database Firewall can monitor and block SQL traffic. The Database Firewall canoptionally substitute SQL statements. In cases where database servers are deployedremotely, the Database Firewall can be configured as a proxy so that all the traffic to thedatabase server is routed through the Database Firewall. Database clients connect to theDatabase Firewall proxy, which in turn connects to the database server, and forwards all datareceived from the database client. In all cases the database server identifies the DatabaseFirewall as the client. The clients must be reconfigured to connect to the Database Firewall
Chapter 5Introduction to Database Firewall Deployment
5-5

instead of the database. It is advisable to configure the database to reject allconnections not coming from the Database Firewall.
To simplify the modification required for applications to connect to the DatabaseFirewall deployments through proxy, configure local DNS in a way that the targetFQDN resolves to the IP address of the Database Firewall.
The proxy with network separation has the client and database on different subnetwork. In this mode, the Database Firewall allows clients to connect through theDatabase Firewall. It also allows the clients to connect to the database directly, withouta single point of failure.
Figure 5-3 Proxy With Network Separation
Management Network Database Network
Client Network
Switch
Switch
Switch
Database
Firewall
DBFW
NIC
DBFW NIC
Audit Vault
Server
D
C
A
B
Databases
Clients
Network Router
Clients
The image illustrates Database Firewall deployment in proxy with network separation.The callouts or pointers in the image indicate the following:
• A: The Database Firewall places a network interface card in each network. Theclients must connect directly to the Database Firewall network interface card andshould be prevented from connecting to the database through the network router.The clients connecting to the Database Firewall are connected to the databasethrough the network interface card in the database network.
• B: The Database Firewall directly connects to the databases in the databasenetwork.
• C: The Database Firewall sends the response from the database directly to theclients. These clients connect to the Database Firewall in the client network.
Chapter 5Introduction to Database Firewall Deployment
5-6

• D: The client traffic using the proxy is monitored by the Database Firewall and thenforwarded to the Audit Vault Server. The Database Firewall connects to the databases inthe local network through the network interface card and the switch.
5.2.2 Monitoring (Out-of-Band)Learn about how to configure Database Firewall in the Monitoring (Out-of-Band) mode.
When you configure database activity monitoring in Out-of-Band mode, the Database Firewalllistens to the network traffic, including client requests to the database and the response fromthe database.
The database activity is monitored as per the defined policy. There are several technologiesthat can be used to copy database traffic to the database firewall. These technologies include(but are not limited to) spanning ports, network taps, and using packet replicators.
In this mode, the Database Firewall can monitor and alert on SQL traffic, but cannot block orsubstitute SQL statements.
The Monitoring (Out-of-Band) mode is the simplest deployment mode overall for a non-blocking policy requirement. There is no additional load on the database or the clients. Thereis no latency or single point of failure introduced by the Database Firewall. Oracle AVDFsupports high availability in this deployment mode.
Figure 5-4 Monitoring (Out-of-Band)
Database Network
Network Router
Management Network
Clients
Databases
Switch
DBFW
NIC
Client Network
ClientsSwitch
Audit Vault
Server
Database
Firewall
C B
Switch
A
The image illustrates deployment of the Database Firewall component in Monitoring (Out-of-Band) mode. The callouts in the image indicate the following:
Chapter 5Introduction to Database Firewall Deployment
5-7
• A: The Database Firewall interface is plugged into a span port on the switch.
• B: Database Firewall monitors the SQL traffic received from the switch.
• C: The extracted SQL data from the client traffic is analyzed and sent to the AuditVault Server, based on database firewall policy.
5.2.3 Monitoring (Host Monitor)Learn about how to configure Database Firewall in Monitoring (Host Monitor) mode.
To use Database Firewall in Monitoring (Host Monitor) mode, Audit Vault Agent andHost Monitor Agent are installed on the host machine running the target database. TheHost Monitor Agent captures traffic from the network interface card of the hostmachine running the target database. The captured SQL traffic is then securelyforwarded to the Database Firewall.
Note:
In Oracle AVDF release 20.3 and later, any network interface card (with IPaddress configured) on the Database Firewall can be added to themonitoring point. See section Create a Monitoring Point for the Host Monitor.
Monitoring (Host Monitor) mode is helpful if the network topology preventsdeployment of other Database Firewall modes. Host monitoring is designed forsituations to capture only the relevant traffic when compared to capturing all thenetwork traffic in Monitoring (Out-of-Band) mode. The Monitoring (Host Monitor)mode can monitor SQL traffic using the Host Monitor Agent deployed on the databaseserver in case there are multiple network paths from clients to the database host.
Chapter 5Introduction to Database Firewall Deployment
5-8
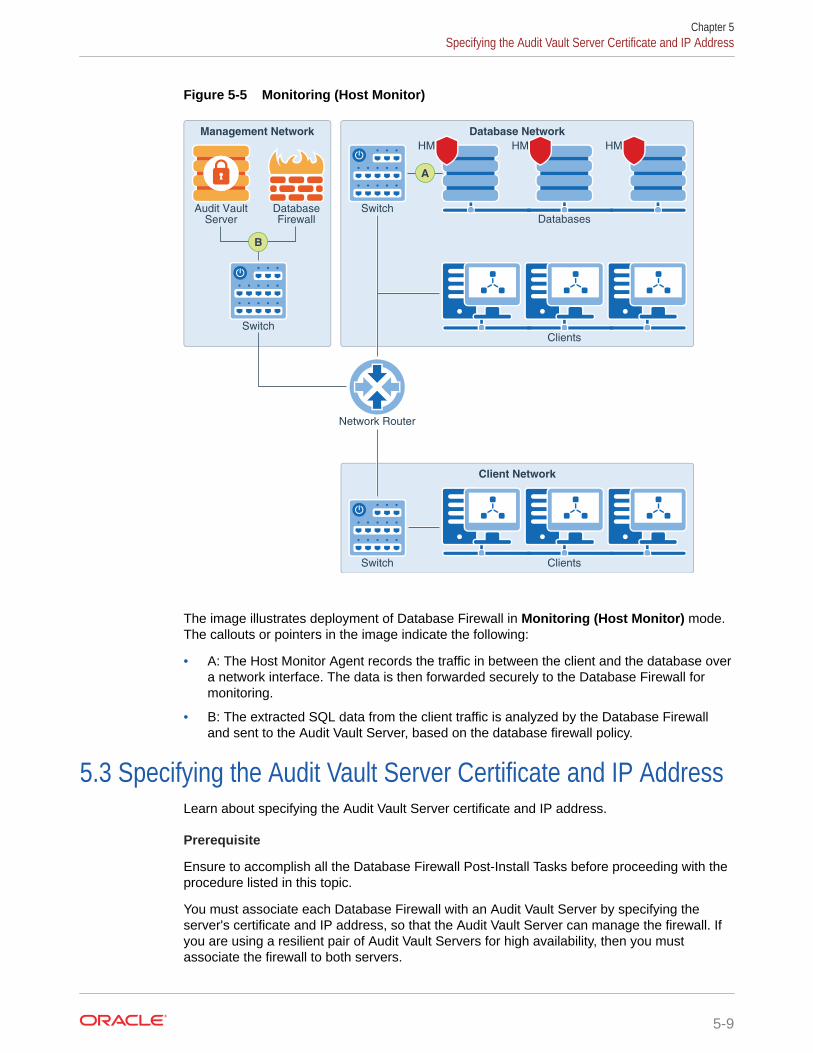
Figure 5-5 Monitoring (Host Monitor)
Database Network
Network Router
Management Network
Clients
Databases
HM HM HM
Switch
Client Network
ClientsSwitch
Audit Vault
Server
Database
Firewall
B
A
Switch
The image illustrates deployment of Database Firewall in Monitoring (Host Monitor) mode.The callouts or pointers in the image indicate the following:
• A: The Host Monitor Agent records the traffic in between the client and the database overa network interface. The data is then forwarded securely to the Database Firewall formonitoring.
• B: The extracted SQL data from the client traffic is analyzed by the Database Firewalland sent to the Audit Vault Server, based on the database firewall policy.
5.3 Specifying the Audit Vault Server Certificate and IP AddressLearn about specifying the Audit Vault Server certificate and IP address.
Prerequisite
Ensure to accomplish all the Database Firewall Post-Install Tasks before proceeding with theprocedure listed in this topic.
You must associate each Database Firewall with an Audit Vault Server by specifying theserver's certificate and IP address, so that the Audit Vault Server can manage the firewall. Ifyou are using a resilient pair of Audit Vault Servers for high availability, then you mustassociate the firewall to both servers.
Chapter 5Specifying the Audit Vault Server Certificate and IP Address
5-9
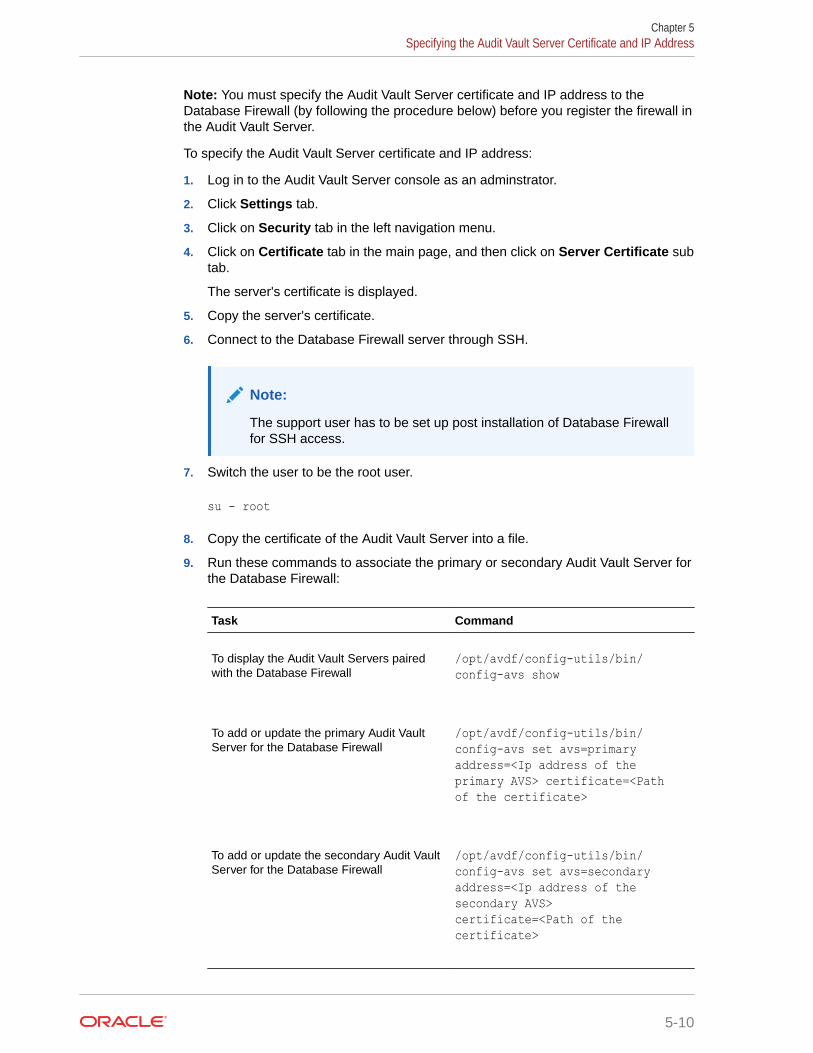
Note: You must specify the Audit Vault Server certificate and IP address to theDatabase Firewall (by following the procedure below) before you register the firewall inthe Audit Vault Server.
To specify the Audit Vault Server certificate and IP address:
1. Log in to the Audit Vault Server console as an adminstrator.
2. Click Settings tab.
3. Click on Security tab in the left navigation menu.
4. Click on Certificate tab in the main page, and then click on Server Certificate subtab.
The server's certificate is displayed.
5. Copy the server's certificate.
6. Connect to the Database Firewall server through SSH.
Note:
The support user has to be set up post installation of Database Firewallfor SSH access.
7. Switch the user to be the root user.
su - root
8. Copy the certificate of the Audit Vault Server into a file.
9. Run these commands to associate the primary or secondary Audit Vault Server forthe Database Firewall:
Task Command
To display the Audit Vault Servers pairedwith the Database Firewall
/opt/avdf/config-utils/bin/config-avs show
To add or update the primary Audit VaultServer for the Database Firewall
/opt/avdf/config-utils/bin/config-avs set avs=primary address=<Ip address of the primary AVS> certificate=<Path of the certificate>
To add or update the secondary Audit VaultServer for the Database Firewall
/opt/avdf/config-utils/bin/config-avs set avs=secondary address=<Ip address of the secondary AVS> certificate=<Path of the certificate>
Chapter 5Specifying the Audit Vault Server Certificate and IP Address
5-10
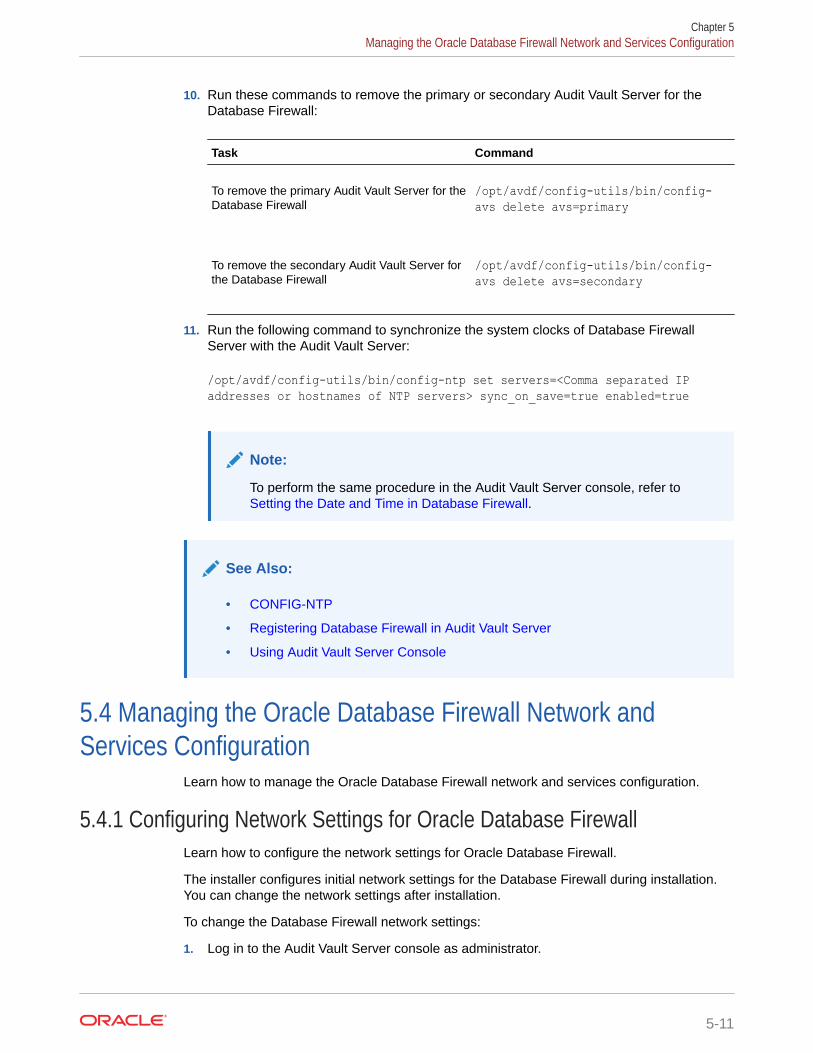
10. Run these commands to remove the primary or secondary Audit Vault Server for theDatabase Firewall:
Task Command
To remove the primary Audit Vault Server for theDatabase Firewall
/opt/avdf/config-utils/bin/config-avs delete avs=primary
To remove the secondary Audit Vault Server forthe Database Firewall
/opt/avdf/config-utils/bin/config-avs delete avs=secondary
11. Run the following command to synchronize the system clocks of Database FirewallServer with the Audit Vault Server:
/opt/avdf/config-utils/bin/config-ntp set servers=<Comma separated IP addresses or hostnames of NTP servers> sync_on_save=true enabled=true
Note:
To perform the same procedure in the Audit Vault Server console, refer to Setting the Date and Time in Database Firewall.
See Also:
• CONFIG-NTP
• Registering Database Firewall in Audit Vault Server
• Using Audit Vault Server Console
5.4 Managing the Oracle Database Firewall Network andServices Configuration
Learn how to manage the Oracle Database Firewall network and services configuration.
5.4.1 Configuring Network Settings for Oracle Database FirewallLearn how to configure the network settings for Oracle Database Firewall.
The installer configures initial network settings for the Database Firewall during installation.You can change the network settings after installation.
To change the Database Firewall network settings:
1. Log in to the Audit Vault Server console as administrator.
Chapter 5Managing the Oracle Database Firewall Network and Services Configuration
5-11
2. Click the Database Firewalls tab.
3. Click the specific Database Firewall instance for which the network settings needsto be configured or changed.
4. Click Network Settings link under the Configuration section in the main page.
5. In the Network Settings dialog, click the specific network interface.
6. In the Network Interface Settings dialog, complete the following fields asnecessary:
• IP Address: The IP address of the network interface. If you want to use adifferent address, then you can change it here. The IP address is static andmust be obtained from the network administrator.
The network interface which has the same IP address as that of DatabaseFirewall is the Management Interface. If the IP address of the ManagementInterface is changed, then the IP address of the Database Firewall is alsochanged. After changing the IP address of the Management Interface, in theNetwork Interface Settings dialog, then change the IP address on theDatabase Firewall details page.
• Network Mask: The subnet mask of the Database Firewall. If you want to usea different network mask, then you can change it here.
• Gateway: The IP address of the default gateway (for example, for internetaccess). The default gateway must be on the same subnet as the host. This isoptional.
7. Click Save.
Note:
The following error may be encountered while changing the IP addressof the Management Interface. This can be ignored and no actionrequired.
Operation failed OAV-46981: Unable to connect to DatabaseFirewall with IP
5.4.2 Configuring Network Services for Oracle Database FirewallLearn about configuring network services for Oracle Database Firewall.
The network services configuration determines how administrators can access OracleDatabase Firewall. See the guidelines to protect data and ensure that you take theappropriate security measures when configuring network services.
To configure network services for a Database Firewall:
1. Click Database Firewalls tab in the Audit Vault Server console.
2. In the left navigation menu, click Database Firewalls.
3. Click on the specific Database Firewall instance.
4. Under Configuration tab, click on System Services.
5. In the System Services dialog, the following options are available:
Chapter 5Managing the Oracle Database Firewall Network and Services Configuration
5-12

• DNS: If you require host names to be translated, then enter the IP address of at leastone DNS server on the network. Turn on the button and enter IP addresses for up tothree DNS servers (DNS Server 1, DNS Server 2, and DNS Server 3). Keep thebutton turned off if there is no DNS server. Otherwise, your system's performancemay be impaired.
If you want to use DNS, then ensure that the servers are reliable. If the DNS serversare unavailable, then many services on the Database Firewall do not work. Forexample, the Database Firewall may pass traffic that it would otherwise block.
• SSH/SNMP: If you want to allow selected computers to have secure shell access tothe Database Firewall, then turn on the button for SSH Access. You can select All toallow unrestricted access or click on IP Addresses and enter their IP addressesseparated by space or comma.
SSH setting can also be configured using command line interface. Use thesecommands for the same.
Task Command
To display the current settingsof SSH
/opt/avdf/config-utils/bin/config-ssh show
To allow unrestricted accessfrom all systems
/opt/avdf/config-utils/bin/config-ssh setaccess=all
To block SSH access from allsystems
/opt/avdf/config-utils/bin/config-ssh setaccess=disabled
To allow a selected computer tohave secure shell access to theDatabase Firewall
/opt/avdf/config-utils/bin/config-ssh setaccess=192.0.2.11
To allow a multiple computersto have secure shell access tothe Database Firewall
/opt/avdf/config-utils/bin/config-ssh setaccess='192.0.2.11 192.0.2.12'
• SNMP Access: If you want to enable access to the network configuration of theDatabase Firewall through SNMP, then turn on the button for SNMP Access. Youcan select All to allow unrestricted access or click on IP Addresses and enter their IPaddresses separated by space or comma.
6. Click Save.
See Also:
Protecting Your Data
5.4.3 Configuring SNMPv3 Users in Oracle Audit Vault and DatabaseFirewall
Learn how to configure SNMPv3 users.
Simple Network Management Protocol version 3 (SNMPv3) is an interoperable, standards-based protocol. SNMPv3 involves User-based Security Model (USM) for message securityand the View-based Access Control Model (VACM) for access control. With USM, messagesexchanged between the SNMP Manager and the SNMP Agent can have data integrity
Chapter 5Managing the Oracle Database Firewall Network and Services Configuration
5-13
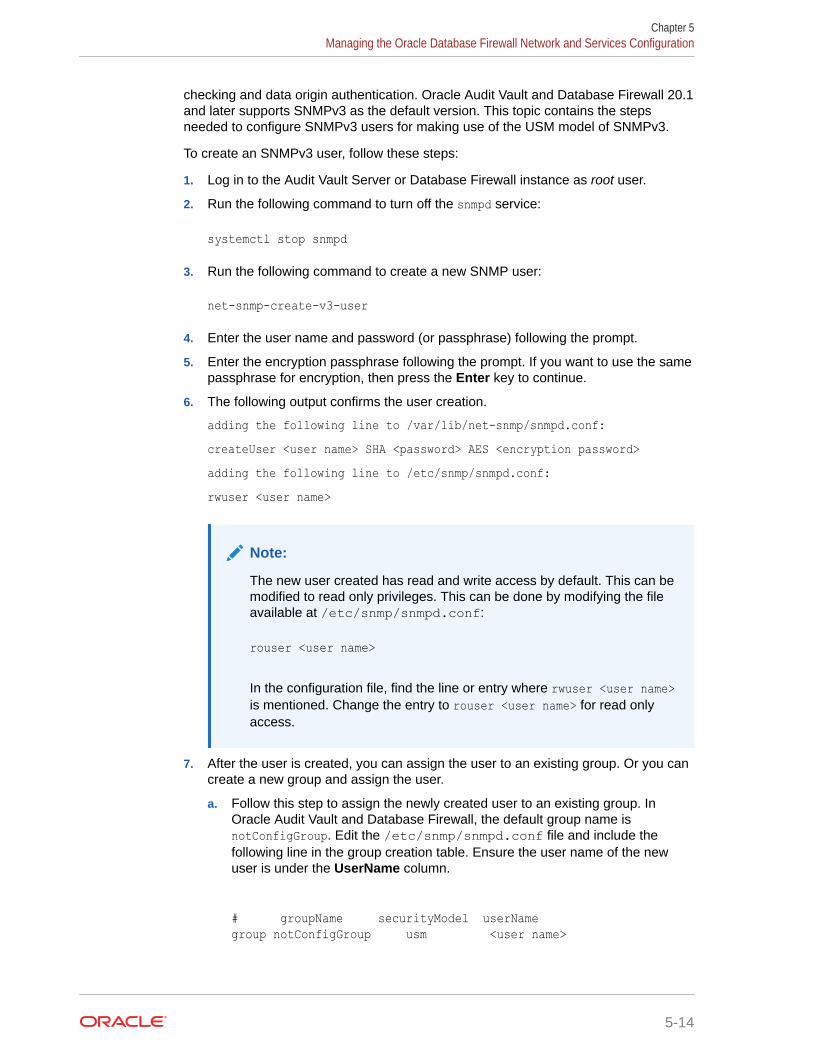
checking and data origin authentication. Oracle Audit Vault and Database Firewall 20.1and later supports SNMPv3 as the default version. This topic contains the stepsneeded to configure SNMPv3 users for making use of the USM model of SNMPv3.
To create an SNMPv3 user, follow these steps:
1. Log in to the Audit Vault Server or Database Firewall instance as root user.
2. Run the following command to turn off the snmpd service:
systemctl stop snmpd
3. Run the following command to create a new SNMP user:
net-snmp-create-v3-user
4. Enter the user name and password (or passphrase) following the prompt.
5. Enter the encryption passphrase following the prompt. If you want to use the samepassphrase for encryption, then press the Enter key to continue.
6. The following output confirms the user creation.
adding the following line to /var/lib/net-snmp/snmpd.conf:createUser <user name> SHA <password> AES <encryption password>adding the following line to /etc/snmp/snmpd.conf:rwuser <user name>
Note:
The new user created has read and write access by default. This can bemodified to read only privileges. This can be done by modifying the fileavailable at /etc/snmp/snmpd.conf:
rouser <user name>
In the configuration file, find the line or entry where rwuser <user name>is mentioned. Change the entry to rouser <user name> for read onlyaccess.
7. After the user is created, you can assign the user to an existing group. Or you cancreate a new group and assign the user.
a. Follow this step to assign the newly created user to an existing group. InOracle Audit Vault and Database Firewall, the default group name isnotConfigGroup. Edit the /etc/snmp/snmpd.conf file and include thefollowing line in the group creation table. Ensure the user name of the newuser is under the UserName column.
# groupName securityModel userNamegroup notConfigGroup usm <user name>
Chapter 5Managing the Oracle Database Firewall Network and Services Configuration
5-14
Example of adding the user to a predefined group:
# groupName securityModel userNamegroup notConfigGroup usm myUser
b. Follow this step to assign the newly created user to a new group.
# groupName securityModel userNamegroup <new group name> usm <user name>
Example of adding the user to a new group:
# groupName securityModel userNamegroup newGroup usm myUser
8. Run the following command to start the snmpd service:
systemctl start snmpd
9. Run the following command to test and confirm that the SNMPv3 user is created andassigned to the group:
Note:
Install the net-snmp-utils package to run the following snmpwalk command. Itis not installed as part of Audit Vault Server or Database Firewall installation bydefault. Other standard SNMP querying tools can also be used.
snmpwalk -v3 -u <user name> -a SHA -A "<authentication password>" -x AES -X "<privacy password>" -l authPriv <IP address of the system> <standard SNMP MIB>
For example:
snmpwalk -v3 -u myUser -a SHA -A "myAuthPassword" -x AES -X "myPrivacyPassword" -l authPriv 192.0.2.24 system
5.5 Setting the Date and Time in Database FirewallLearn how to set the date and time in Database Firewall.
Use this procedure to set the Database Firewall date and time:
1. Log in to the Audit Vault Server console as administrator.
2. Click Database Firewalls tab in the Audit Vault Server console main page.
Chapter 5Setting the Date and Time in Database Firewall
5-15
3. In the left navigation menu, click Database Firewalls.
4. Click on the specific Database Firewall instance.
5. Under Configuration tab, click System Services.
6. Click Date and Time tab.
7. In the System Time field, select the date and time in Coordinated Universal Time(UTC).
8. Optionally you can enable NTP synchronization. You can turn on the buttonagainst NTP Server1 and enter the NTP server address in the field. You can add 1and upto 3 NTP server addresses.
It keeps the time synchronized with the average of the time recovered from thetime servers specified in the NTP Server1, NTP Server2, and NTP Server3 fields,which contain an IP address or a name. If you specify a name, then the DNSserver specified in the DNS tab is used for name resolution.
To enable time synchronization, you also must specify the IP address of thedefault gateway and a DNS server.
WARNING:
In Monitoring / Blocking mode, changing the time causes all monitoringpoints to restart, dropping existing connections to protected databases.This causes a temporary disruption to traffic, and will happen when youchoose to enter the time directly.
9. Click Save.
See Also:
Managing the Oracle Database Firewall Network and ServicesConfiguration to specify the IP address of the default gateway and DNSserver.
5.6 Changing IP Address on a Single Instance of DatabaseFirewall Server
Learn how to change the IP Address on a single instance of Database Firewall Server.
Use this procedure to change the IP address of the Database Firewall Server.
Before you begin
Change the IP address of the Database Firewall Server during a safe period to avoidinterrupting the log collection processing.
To change the IP address of the Database Firewall Server:
1. Log in to the Audit Vault Server console as an administrator.
Chapter 5Changing IP Address on a Single Instance of Database Firewall Server
5-16

2. Click Database Firewalls tab. The Database Firewalls tab in the left navigation menu isselected by default.
3. Click on a specific Database Firewall instance. The details of the Firewall instance aredisplayed on the main page.
Note:
In Oracle AVDF 20.1, the IP address can be changed on the main page. Do notchange the IP address in the IP Address field here. Follow the remaining stepsin this topic.
4. Click Network Settings under the Configuration section.
5. Click the specific network interface, under the column Network Interface Card.
6. In the Network Interface Settings dialog, edit the IP address, Gateway, or the NetworkMask fields as necessary.
7. Click Save and Close buttons to exit the dialog. Do not click on the cross (X) mark in thetop right corner of the dialog.
Note:
In Oracle AVDF 20.1, the following error may be encountered while attemptingto change the IP address of the Management Interface:
Operation failed OAV-46981: Unable to connect to Database Firewallwith IP <ipaddress>Ignore the error and close the window. The IP address is changed successfully.This error is fixed in Oracle AVDF 20.2.
This change is effective immediately on Database Firewall. However, it may take a fewseconds for the network update on the Database Firewall and for the system to settle.
Continue with the remaining steps only if the IP address to be changed belongs to theManagement Interface if your current installation is Oracle AVDF 20.1. These steps arenot required for Oracle AVDF 20.2 and later. The Management Interface IP address is theIP address of the Database Firewall which was used to register the Database Firewall inthe Audit Vault Server console.
8. In the Database Firewall details page, the IP Address of the Database Firewall Server isdisplayed next to the Firewall Name field. Change the IP address.
9. Click Save. The Firewall updated successfully message is displayed on the screen.
10. After the changes are saved, the certificate validation may fail. Click the name of theDatabase Firewall and then click Update Certificate.
11. After the certificate is updated, the Database Firewalls tab is displayed. The DatabaseFirewall Server is online.
12. Change the IP address on the /etc/hosts of the Audit Vault Server appliance to thenew one as root user.
Chapter 5Changing IP Address on a Single Instance of Database Firewall Server
5-17
Note:
Once the Database Firewall Server is back online it begins to download anymonitoring point log data that is not downloaded while it was offline.
See Also:
Changing IP Addresses of Active and Registered Agents
5.7 Changing the Database Firewall Host NameLearn how to change the Database Firewall host name.
To change the Database Firewall host name using the Audit Vault Server console:
1. Log in to the Audit Vault Server console as administrator.
2. Click Database Firewalls tab in the Audit Vault Server console main page. TheDatabase Firewalls tab in the left navigation menu is selected by default.
3. Locate and click the name of the specific Database Firewall instance for which thehost name needs changing. The Firewall Details page is displayed.
4. Change the Host Name in the main page. This is the name of the host machineon which the Database Firewall is installed.
5. Click Save button in the top right corner.
5.8 Configuring Database Firewall and Its Traffic Sources onYour Network
Learn about configuring Oracle Database Firewall and its traffic sources on yournetwork.
Note:
A single proxy port is required for every target. A single proxy port cannotservice multiple target databases. Add more traffic proxy ports as required.
5.8.1 About Configuring Oracle Database Firewall and Traffic SourcesOn Your Network
Learn about configuring Oracle Database Firewall and its traffic sources on thenetwork.
During your planning of the network configuration, you must decide the DatabaseFirewall deployment type. The following are the Database Firewall deployment types:
Chapter 5Changing the Database Firewall Host Name
5-18

• Monitoring (Out-of-Band)
• Monitoring (Host Monitor)
• Monitoring / Blocking (Proxy)
You may also decide to use a firewall as a traffic proxy. The network configuration is impactedby whether the Database Firewall will operate in monitoring only or will include blocking modeas well.
You will use traffic and proxy sources of a Firewall to configure monitoring points for eachtarget database you are monitoring with that firewall.
See Also:
Configuring Database Firewall Monitoring Points
5.8.2 Configuring Traffic SourcesLearn about configuring traffic sources.
Traffic sources specify the IP address and network interface details for the traffic goingthrough a Database Firewall. Traffic sources are automatically configured during theinstallation process, and you can change their configuration details later.
To change the configuration of traffic sources:
1. Click the Targets tab.
2. The Targets tab in the left navigation menu is selected by default.
3. Select the specific target from the list.
4. In the Database Firewall Monitoring section, click the specific target.
The Database Firewall Monitor dialog lists all the details like the current networksettings, proxy ports, and traffic sources (Network Interface Cards) of the specificDatabase Firewall instance.
5. To make changes to the IP address or the network mask, navigate to the DatabaseFirewall tab.
6. Click the specific Database Firewall instance. The details are displayed on the page.
7. Under the Configuration section, click Network Settings.
8. In the Network Settings dialog, click the specific network interface card under theNetwork Interface Card column.
9. In the Network Interface Settings dialog, edit the IP address or Network Mask fieldsas necessary.
10. Click Save.
Chapter 5Configuring Database Firewall and Its Traffic Sources on Your Network
5-19

5.8.3 Configuring Database Firewall As A Traffic ProxyLearn about configuring a Firewall as a traffic proxy.
You can specify multiple ports for a proxy in order to use them for different monitoringpoints. Once you set up the Database Firewall as a traffic proxy, your database clientsconnect to the database using the Database Firewall proxy IP and port.
To configure a traffic proxy:
1. Log in to the Audit Vault Server console as an administrator.
2. Click on Database Firewalls tab. The Database Firewalls tab in the leftnavigation menu is selected by default.
3. Click on the Database Firewall instance that you want to configure as a proxy. Thedetails of the specific Database Firewall is displayed on the main page.
4. In the Configuration section, click on Network Settings.
5. In the Network Settings dialog, click the specific network interface card under theNetwork Interface Card column.
The Network Interface Settings dialog is displayed.
6. Click the Add button under Proxy Ports section.
7. Enter the Name for the port.
8. Enter the Port number.
9. You can specify more than one proxy port by entering another port number andclicking Add.
10. Click Save. The traffic proxy is now available to use in the monitoring point.
See Also:
Configuring Database Firewall Monitoring Points
5.9 Viewing the Status and Diagnostics Report for DatabaseFirewall
Learn how to view Database Firewall status and diagnostics reports.
To view the status or diagnostic reports for Database Firewall:
1. Log in to the Audit Vault Server console.
2. Click the Database Firewalls tab.
3. Click the name of a specific Database Firewall instance for which the diagnosticsneeds to be viewed.
4. In the Diagnostics section on the main page, click Download Diagnostics.
The Download Diagnostics dialog is displayed.
5. Select one of the following buttons on the dialog:
Chapter 5Viewing the Status and Diagnostics Report for Database Firewall
5-20

• Run Diagnostics to run diagnostics.
• Download to download all diagnostics files.
• Delete to clear the diagnostic logs.
5.10 Configure and Download the Diagnostics Report FileLearn about configuring and downloading the diagnostics report file.
This section contains information about enabling, configuring, and modifying the waydiagnostic reports are generated using CLI.
Note:
You need root user privileges to perform these tasks.
The diagnostic report is not enabled by default. You must enable the feature to capture thediagnostic report. Once enabled, you must configure the information that is to be captured inthe diagnostic report. You can customize and package the diagnostics report with flexibility.
The following file contains instructions about how to install, enable, and run the diagnosticutility:
diagnostics-not-enabled.readme
See Also:
This file is generated only if you follow the instructions for downloading thediagnostics report. See Viewing the Status and Diagnostics Report for DatabaseFirewall for more information.
Use the following commands to accomplish certain tasks related to diagnostics.
Command Action
/usr/local/dbfw/bin/priv/dbfw-diagnostics-package.rb
To capture the enabled diagnosticinformation for the appliance. Thelocation of the saved zip file is displayedat the end of the command execution.
Note:This command must be runfrom /usr/local/dbfw/tmp whencollecting diagnostics information.
/usr/local/dbfw/bin/priv/dbfw-diagnostics-package.rb --install
To enable the system to capturediagnostics report.
/usr/local/dbfw/bin/priv/dbfw-diagnostics-package.rb --enable ALL
To enable capturing the completediagnostics report.
/usr/local/dbfw/bin/priv/dbfw-diagnostics-package.rb –enable <Element>
To enable individual elements in thediagnostics report.
Chapter 5Configure and Download the Diagnostics Report File
5-21
The following elements can be included while customizing the diagnostics report:
SYSTEMLOGDATABASEAVS_ARCHIVEDBFW_ARCHIVEPLATFORM_COMMANDSAVS_HA_COMMANDSAVS_COMMANDSDBFW_COMMANDSSOS_REPORT
Note:
SOS_REPORT can be included starting with Oracle AVDF release 20.7.
The content of the diagnostics report is controlled by the file /usr/local/dbfw/etc/dbfw-diagnostics-package.yml. The user can modify this file to include and excludea combination of files in multiple categories. Each section of this file has an option toenable and disable the specific category by setting the value to true or false.
For example, to add an item to one of the log file collections simply add the file path orglob to the list under the :files: element.
:log_files:
:comment: Log files generated by the system runtime, install and upgrade.
:enabled: false
:platform:
- AVS
- DBFW
:files:
- /root/apply.out
- /root/install.log
- /root/install.log.syslog
- /root/install_database_api.log
- /root/migration-stats-*.yml
- /root/once.log
Chapter 5Configure and Download the Diagnostics Report File
5-22

- /root/pre_firstboot_logs/partition-include
- /root/pre_firstboot_logs/partitions_error
- /root/pre_firstboot_logs/syslog
- /var/lib/avdf/system_history.yaml
- /var/log
- /path/to/new/file
- /path/to/new/*glob
To add a new command output to the log, add the command to the correct group:
:all_commands:
:comment: Command output to include in the diagnostics package.
:enabled: false
:platform:
- AVS
- DBFW
:commands:
:cpuinfo:
:enabled: true
:command:
- :cat
- /proc/cpuinfo
:logfile: /proc-cpuinfo.log
:diskuse:
:enabled: true
:command:
- :df
- -kP
:logfile: /disk-usage.log
Chapter 5Configure and Download the Diagnostics Report File
5-23
:new_command
:enabled: true
:command:
- :new_command
- -arg1
- -arg2
:logfile: /new-command.log
Note:
To remove the diagnostic package when it is not in use, run the followingcommand:
/usr/local/dbfw/bin/priv/dbfw-diagnostics-package.rb --remove
5.11 Configuring Encapsulated Remote Switched PortAnalyzer with Database Firewall
Learn how to configure Database Firewall when the SQL traffic is mirrored usingEncapsulated Remote Switched Port Analyzer.
Encapsulated Remote Switched Port Analyzer (ERSPAN) mirrors the traffic from oneor more source ports and delivers the mirrored traffic to one or more destination portson another device.
This functionality enables the Database Firewall to interpret the SQL traffic received.This functionality is available only in Monitoring (Out of Band) deployment mode ofDatabase Firewall.
Configuring ERSPAN with Database Firewall includes the following steps on a highlevel:
1. Configuring the ERSPAN source or the switch.
2. Configuring the Database Firewall.
Configuring the ERSPAN source or the switch includes the following steps:
1. The network device must be configured to span the SQL traffic to the targetdatabases being monitored.
2. Consider the following aspects during ERSPAN configuration:
• Avoid spanning the database response traffic unless it requires to beanalyzed.
• Avoid spanning empty TCP packets. For example, empty ACK packets.
Chapter 5Configuring Encapsulated Remote Switched Port Analyzer with Database Firewall
5-24
3. Ensure the ERSPAN traffic is directed to the appropriate network interface card (NIC)configured on the Database Firewall.
Configuring the Database Firewall for this functionality includes the following steps:
1. Configure the Database Firewall monitoring point only in Monitoring (Out of Band)mode.
2. List all the IP addresses and ports of the SQL traffic expected from the target databases.
Note:
For Oracle Real Application Cluster databases, this is not just the scan IPaddresses. It also includes all the relevant Oracle RAC nodes.
3. Configure the Database Firewall monitoring point. During configuration, select the NIC towhich the ERSPAN traffic is forwarded.
4. The Database Firewall does not process the ERSPAN traffic by default. It has to beenabled on the Database Firewall monitoring points. Follow these steps to enable:
a. Log in to the Database Firewall as support user.
b. Switch to root user.
c. Every Database Firewall monitoring point has a number (N) assigned. Identify thenumber assigned to this Database Firewall monitoring point being configured. Runthe following command: grep <Target_Name> /var/dbfw/va/*/etc/appliance.conf /dev/null
d. It displays output similar to the following: /var/dbfw/va/1/etc/appliance.conf:<Target_Name>="ora-TGT"
e. Identify the target database name and the relevant va number associated with that.The number (N) assigned to the Database Firewall monitoring point is listed next to vain the above path.
f. Enable ERSPAN in the Database Firewall monitoring point by editing the file: /usr/local/dbfw/va/<N>/etc/appliance.conf.
g. In the file, edit the setting: DAM_TRAFFIC_IS_ERSPAN="0" toDAM_TRAFFIC_IS_ERSPAN="1".
h. Save the changes.
i. Restart the Database Firewall processes so that the new configuration comes intoeffect. Run the command to restart: /usr/local/dbfw/bin/dbfwctl restart
5. Verify the ERSPAN traffic received. Access the /var/log/messages file in the DatabaseFirewall. Navigate and locate the string ODF-10524: Encapsulated protocol detected.This string is logged when the ERSPAN traffic is first received.
Chapter 5Configuring Encapsulated Remote Switched Port Analyzer with Database Firewall
5-25

6Registering Hosts and Deploying the Agent
Learn about registering hosts and deploying the agents.
6.1 Registering Hosts on Oracle Audit Vault ServerLearn about registering hosts on Oracle Audit Vault Server.
6.1.1 About Registering HostsLearn how to register hosts.
Register a host computer from where audit data is collected. After registering the host, youcan deploy and activate the Audit Vault Agent on that host. Audit Vault Agent is a componentof Oracle AVDF. It collects audit data from the targets and sends audit data to the Audit VaultServer. A target is a system that you want to monitor and protect. This chapter containsnecessary information for registering hosts using the Audit Vault Server console.
Step Task Reference Topic
1 Check the requirements. Audit Vault Agent Requirements
2 Check the documentation about deploying theAudit Vault Agent.
Deploying and Activating the Audit VaultAgent on Host Computers
3 Register the host machine (Agent machine). Registering Hosts in the Audit Vault Server
4 Download the Audit Vault Agent software from theAudit Vault Server console and deploy the Agent.
Deploying the Audit Vault Agent
5 Activate and start the Audit Vault Agent. Activating and Starting the Audit Vault Agent
6 Register one or more targets from which the auditdata needs to be collected.
Registering or Removing Targets in AuditVault Server
7 Start audit trails using the Audit Vault Serverconsole.
Configuring and Managing Audit TrailCollection
8 Ensure audit trails are running successfully. Checking the Status of Trail Collection inAudit Vault Server
9 Check the audit data collected in the reports. Log in to the Audit Vault Server console asan auditor. Click Reports tab, navigate toActivity Reports, and then click All ActivityReports. Filter the reports or select specificcolumns using the Actions drop downfeature.
10 In case of any error or issue, refer to thetroubleshooting document and known issues.
Troubleshooting Oracle Audit Vault andDatabase Firewall
Known Issues
Check the audit trail history (Starting OracleAVDF release 20.6).
6-1
After registering the hosts on the Audit Vault Server perform the following steps to beable to collect audit records:
1. Download the Audit Vault Agent software from the Audit Vault Server console
2. Deploy the Audit Vault Agent
3. Activate the Audit Vault Agent
4. Register one or more targets from which the audit data needs to be collected
5. Start audit trails using the Audit Vault Server console
See Also:
• Registering Targets
• Configuring and Managing Audit Trail Collection
• Summary of Configuration Steps to understand the high-level workflowfor configuring the Oracle Audit Vault and Database Firewall system.
• Using the Audit Vault Command Line Interface
• Deploying and Activating the Audit Vault Agent on Host Computers
6.1.2 Registering Hosts in the Audit Vault ServerLearn about registering hosts in the Audit Vault Server.
Prerequisite
Check Product Compatibility Matrix for supported cluster/platforms for Agentdeployment and before proceeding with the host registration.
To register a host computer in the Audit Vault Server:
1. Log in to the Audit Vault Server console as an administrator.
2. Click the Agents tab.
3. In the left navigation menu, click Agents tab.
A list of registered Agents is displayed on the page.
4. Click Register.
5. In Name field, enter the name of the Audit Vault Agent. This field is mandatory andmust not contain special characters. The system connects to the host using the IPaddress. The name defined here is a logical name of the Agent and is used fordescriptive identification. You may use the host name as the Agent name for easyidentification.
6. The IP Address field is mandatory.
Enter the IP address of the host computer where the Audit Vault Agent is expectedto run.
Audit Vault Server validates the connections from the Audit Vault Agent using theregistered IP address. In case the host machine contains more than one IPaddress (i.e. the Audit Vault Agent is expected to run on a host with multiple IP
Chapter 6Registering Hosts on Oracle Audit Vault Server
6-2

addresses or network interfaces), all of the IP addresses have to be registered with theAudit Vault Server. Follow these steps:
a. Enter one of the IP addresses or a unique logical IP address.
b. After setting the IP address, set all the physical IP addresses using which the AuditVault Agent is expected to connect to the Audit Vault Server as host attributes. ClickAdd button in the Attributes section.
c. Enter AGENT_PHYSICAL_ADDRESS_XX in the Name field where XX can be any valuebetween 01 and 99.
d. Enter a valid IP address in the corresponding Value field.
7. Click Save.
An Agent Activation Key is automatically generated when you register the host.
Agent Deployment in a High Availability System
Audit Vault Agent may be associated with multiple IP addresses in the following cases:
1. Agent installed on a host with multiple network interface cards
2. Agent installed on a node of high availability cluster
a. Only one Audit Vault Agent installation is necessary for high availability clusterdeployment. The Agent installation is needed only on active node of the cluster.Ensure the Audit Vault Agent installation directory is accessible from all nodes of thecluster.
b. Cluster management software must be configured to start, stop, and monitor theAgent by providing the necessary input. The Agent must be started automatically bythe cluster management software on the active node and stopped automatically onpassive nodes.
Use the following commands in the cluster manager software:
Action Command
To stop the AgentAgent_Home/bin/agentctl stop
To start the AgentAgent_Home/bin/agentctl start
To monitor the AgentAgent_Home/bin/agentctl status
Chapter 6Registering Hosts on Oracle Audit Vault Server
6-3

See Also:
• REGISTER HOST for the command line syntax to register a host.
• Configuring or Changing the Audit Vault Server Services to configureDNS server.
• Using Audit Vault Server Console
6.1.3 Changing Host NamesLearn about changing host name.
To change the name of a registered host:
1. If the Audit Vault Agent is already deployed on that host and the Agent is running,then stop the Agent by executing the command below.
For Linux platform:
Agent_Home/bin/agentctl stop
For Windows platform, if Agent is running as a process:
Agent_Home/bin/agentctl stop
For Windows platform, if Agent is running as a service:
Agent_Home/bin/agentctl stopsvc
2. Log in to the Audit Vault Server console as an administrator. See Using Audit VaultServer Console for more information.
3. Click the Agents tab.
4. In the left navigation menu, click Agents.
A list of registered Agents is displayed on the page.
5. Click the name of the Agent that you want to change.
6. In the dialog, change the Name or the IP Address field, and then click Save.
7. If you have changed either the Agent name or the IP address, and if the Agent hasalready been deployed on that host, then start the Agent by executing the belowcommand. Enter the new activation key when prompted.
For Linux platform:
Agent_Home /bin/agentctl start -k
For Windows platform, if Agent is running as a process:
Agent_Home /bin/agentctl start -k
Chapter 6Registering Hosts on Oracle Audit Vault Server
6-4
For Windows platform, if Agent is running as a service:
Agent_Home /bin/agentctl startsvc -k
6.2 Deploying and Activating the Audit Vault Agent on HostComputers
Learn about how to deploy and activate the Audit Vault Agent on host computers.
6.2.1 Audit Vault Agent RequirementsLearn about the Audit Vault Agent requirements.
Recommended Prerequisites for Installing Audit Vault Agent
1. Ensure to meet the system requirements. See Product Compatibility Matrix.
2. Ensure to meet the following Java requirements:
• Install the supported Java version on the Audit Vault Agent. See Audit Vault Agent:Supported and Tested Java Runtime Environment.
• Apply the latest java patches.
• Point the JAVA_HOME to JRE/JDK directory and set the path before installing theAgent.
3. The host machine on which the Audit Vault Agent is deployed must have at least 512 MBRAM.
4. Apply the latest security patches of OpenSSL libraries available from the OS vendor forthe specific OS version on the host machine.
5. The host machine on which the Audit Vault Agent is deployed must have connectivity tothe Audit Vault Server. In case of high availability set up, it must have connectivity to boththe primary and standby Audit Vault Servers.
6. The Audit Vault Server uses 2 ports (1521 and 1522 by default) for Agent communication.Ensure to configure the ports appropriately for this communication.
7. If NAT (Network Address Translation) is used in the network between Audit Vault Serverand the host machine where agent is deployed, then ensure the IP address of the hostmachine is resolvable from Audit Vault Server.
8. The user must have the required OS permissions to install the Agent. The user must beable to access the audit trail location in case of directory audit trails. See About Deployingthe Audit Vault Agent for the OS permissions required for installing the Agent.
Additional Requirements for Starting Audit Vault Agent as a Service on Windows
Ensure to comply with one of the following prerequisites for Oracle AVDF 20.4 and earlierreleases:
• Install Visual C++ Redistributable for Visual Studio 2012 Update 4 package fromMicrosoft on the Windows host machine. Ensure msvcr110.dll file is available inC:\Windows\System32 directory.
Chapter 6Deploying and Activating the Audit Vault Agent on Host Computers
6-5

• If the msvcr110.dll file is not present, then add it to the <Agent Home>/binand <Agent Home>/bin/mswin-x86-64 directories.
Ensure to comply with one of the following prerequisites for Oracle AVDF 20.6 andlater releases:
• Install Visual C++ Redistributable for Visual Studio 2017 package from Microsofton the Windows host machine. Ensure vcruntime140.dll file is available inC:\Windows\System32 directory.
• If the vcruntime140.dll file is not present, then add it to the <AgentHome>/bin and <Agent Home>/bin/mswin-x86-64 directories.
Note:
There is a known issue in Oracle AVDF 20.5 for starting Audit Vault Agent asa service on Windows. See Error When Starting Audit Vault Agent as aService on Windows in Oracle AVDF 20.5 for complete information. Thisissue is resolved in release Oracle AVDF 20.6 and later.
6.2.2 Audit Vault Agent Machine Java Best PracticesLearn some best practices regarding Java on the Audit Vault Agent machine.
1. Ensure installation of Java and the Java home directory is managed by a trusteduser.
2. If Java is upgraded to a major version or if it is patched with security updates, thenrestart the Audit Vault Agent. This ensures the Audit Vault Agent runs with theupdated Java.
6.2.3 Validation During Audit Vault Agent DeploymentLearn about validations performed by Oracle AVDF when deploying the Audit VaultAgent.
Starting Oracle AVDF release 20.6, some validations are performed when deployingAudit Vault Agent.
The following validations are performed when running the agentctl start command.These requirements are mandatory and have to be complied, without which the AuditVault Agent installation cannot be completed.
• Minimum java version is installed on the host machine as per Audit Vault Agent:Supported and Tested Java Runtime Environment.
• Audit Vault Agent is being installed on the supported operating system version asper Product Compatibility Matrix.
• The Agent machine on which the Audit Vault Agent is being deployed can connectto the Audit Vault Server.
Ensure to comply with the requirements on the Agent machine:
• The Agent machine has a minimum of 512MB available space.
• The Agent machine must be able to connect to the Audit Vault Server.
Chapter 6Deploying and Activating the Audit Vault Agent on Host Computers
6-6

• Sufficient permissions required to install the Audit Vault Agent are available.
6.2.4 About Deploying the Audit Vault AgentLearn about deploying Audit Vault Agent.
To collect audit trails from targets, you must deploy the Audit Vault Agent on a standalonehost computer which is usually the same computer where the target resides. The Audit VaultAgent includes plug-ins for each target type.
For audit trail collection perform the following:
1. Register the host
2. Deploy the Audit Vault Agent
3. Register the target
4. Add audit trails for the targets
To decide on the specific host to deploy the Agent, follow these guidelines.
Trail Type Guideline
TABLE To configure TABLE trail, the Audit Vault Agent can be deployed either on aremote host or on the host machine where the database is running.
DIRECTORY To configure DIRECTORY trail, the Audit Vault Agent can be deployed eitheron the host machine where DIRECTORY path exists, or on a machine fromwhere the DIRECTORY path can be accessed.
TRANSACTION LOG To configure TRANSACTION LOG trail, the Audit Vault Agent can be deployedeither on the host machine where the GoldenGate Integrated Extract pathexists, or on a machine from where it can be accessed.
OS Permission Required for Installing the Agent
Operating System User
Linux/Unix Any user.
Windows Any user for running the Agent from the commandprompt.
admin user for registering as a service.
Chapter 6Deploying and Activating the Audit Vault Agent on Host Computers
6-7

Note:
• Host Monitor on Linux/Unix/AIX/Solaris platforms must be installed asroot user.
• If directory trails are used then Agent installation user should have readpermission on the audit files.
• Host Monitor on Windows platform, must be installed as admin user.
• Ensure that the host machine has OpenSSL 1.0.1 (or later) installed forAudit Vault Agent.
• Agent home directory must be access protected. No other user apartfrom Agent user must have write or execute permission on the Agenthome directory.
• Agent host machine system settings must be access protected to avoidany malicious users from making modification.
• The Audit Vault Agent and the target can be in different time zones.However, the system time of the Agent host machine and the systemtime of the target should be synchronized. The time difference betweenthese two systems (considering time zone conversion) should not beexceed 2 seconds.
Deploying Audit Vault Agent Remotely or Locally
Table 6-1 Remote Agent or Local Agent
TrailType
Audit VaultServerLocation
Agent Type Detailed Information
Directory On-premises Remote Agent
Not installed on thetarget machine
• Audit data is written to the local disk.• The local disk is mounted on the remote Agent machine
as NFS (Network File System).• Remote Agent is not installed on the target machine.• Remote Agent should have access to the mounted NFS.• Audit data read time includes the network latency
involved in accessing NFS.• This deployment can be used when the operating system
of the target machine is not supported for Audit VaultAgent installation.
• This deployment can be used when the target machinedoes not have sufficient memory or CPU resources forthe Audit Vault Agent processes.
• For Oracle Linux operating system, it is recommended touse Kerberos to secure NFS.
• For non Oracle Linux operating systems, follow therespective OS recommendations to secure NFS.
Chapter 6Deploying and Activating the Audit Vault Agent on Host Computers
6-8
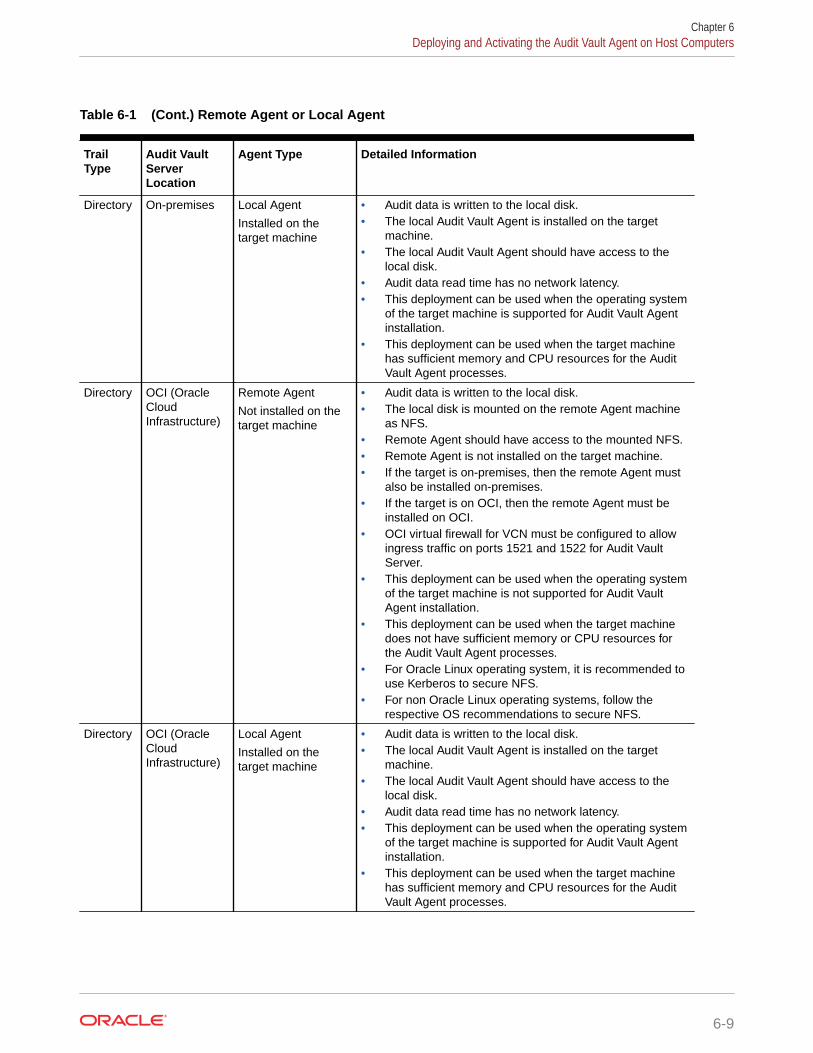
Table 6-1 (Cont.) Remote Agent or Local Agent
TrailType
Audit VaultServerLocation
Agent Type Detailed Information
Directory On-premises Local Agent
Installed on thetarget machine
• Audit data is written to the local disk.• The local Audit Vault Agent is installed on the target
machine.• The local Audit Vault Agent should have access to the
local disk.• Audit data read time has no network latency.• This deployment can be used when the operating system
of the target machine is supported for Audit Vault Agentinstallation.
• This deployment can be used when the target machinehas sufficient memory and CPU resources for the AuditVault Agent processes.
Directory OCI (OracleCloudInfrastructure)
Remote Agent
Not installed on thetarget machine
• Audit data is written to the local disk.• The local disk is mounted on the remote Agent machine
as NFS.• Remote Agent should have access to the mounted NFS.• Remote Agent is not installed on the target machine.• If the target is on-premises, then the remote Agent must
also be installed on-premises.• If the target is on OCI, then the remote Agent must be
installed on OCI.• OCI virtual firewall for VCN must be configured to allow
ingress traffic on ports 1521 and 1522 for Audit VaultServer.
• This deployment can be used when the operating systemof the target machine is not supported for Audit VaultAgent installation.
• This deployment can be used when the target machinedoes not have sufficient memory or CPU resources forthe Audit Vault Agent processes.
• For Oracle Linux operating system, it is recommended touse Kerberos to secure NFS.
• For non Oracle Linux operating systems, follow therespective OS recommendations to secure NFS.
Directory OCI (OracleCloudInfrastructure)
Local Agent
Installed on thetarget machine
• Audit data is written to the local disk.• The local Audit Vault Agent is installed on the target
machine.• The local Audit Vault Agent should have access to the
local disk.• Audit data read time has no network latency.• This deployment can be used when the operating system
of the target machine is supported for Audit Vault Agentinstallation.
• This deployment can be used when the target machinehas sufficient memory and CPU resources for the AuditVault Agent processes.
Chapter 6Deploying and Activating the Audit Vault Agent on Host Computers
6-9

Table 6-1 (Cont.) Remote Agent or Local Agent
TrailType
Audit VaultServerLocation
Agent Type Detailed Information
Table On-premises Remote Agent
Not installed on thetarget machine
• Audit data is written to the table.• Remote Agent is not installed on the target machine.• Remote Agent uses connection string to connect to the
target.• Audit data read time includes the network latency
involved in accessing the audit table.• This deployment can be used when the operating system
of the target machine is not supported for Audit VaultAgent installation.
• This deployment can be used when the target machinedoes not have sufficient memory or CPU resources forthe Audit Vault Agent processes.
Table On-premises Local Agent
Installed on thetarget machine
• Audit data is written to the table.• The local Audit Vault Agent is installed on the target
machine.• The local Audit Vault Agent uses connection string to
connect to the target.• Audit data read time has no network latency.• This deployment can be used when the operating system
of the target machine is supported for Audit Vault Agentinstallation.
• This deployment can be used when the target machinehas sufficient memory and CPU resources for the AuditVault Agent processes.
Table OCI (OracleCloudInfrastructure)
Remote Agent
Not installed on thetarget machine
• Audit data is written to the table.• Remote Agent is not installed on the target machine.• Remote Agent uses connection string to connect to the
target.• If the target is on-premises, then the remote Agent must
also be installed on-premises.• If the target is on OCI, then the remote Agent must also
be installed on OCI.• Audit data read time includes the network latency
involved in accessing the audit table.• OCI virtual firewall for VCN must be configured to allow
ingress traffic on ports 1521 and 1522 for Audit VaultServer.
• This deployment can be used when the operating systemof the target machine is not supported for Audit VaultAgent installation.
• This deployment can be used when the target machinedoes not have sufficient memory or CPU resources forthe Audit Vault Agent processes.
Chapter 6Deploying and Activating the Audit Vault Agent on Host Computers
6-10

Table 6-1 (Cont.) Remote Agent or Local Agent
TrailType
Audit VaultServerLocation
Agent Type Detailed Information
Table OCI (OracleCloudInfrastructure)
Local Agent
Installed on thetarget machine
• Audit data is written to the table.• The local Audit Vault Agent is installed on the target
machine.• The local Audit Vault Agent uses connection string to
connect to the target.• Audit data read time has no network latency.• OCI virtual firewall for VCN must be configured to allow
ingress traffic on ports 1521 and 1522 for Audit VaultServer.
• This deployment can be used when the operating systemof the target machine is supported for Audit Vault Agentinstallation.
• This deployment can be used when the target machinehas sufficient memory and CPU resources for the AuditVault Agent processes.
See Also:
• Registering Hosts on Oracle Audit Vault Server
• Registering Targets and Creating Groups
• Configuring and Managing Audit Trail Collection
• Summary of Configuration Steps to understand the high-level workflow forconfiguring the Oracle Audit Vault and Database Firewall system.
• Adding Audit Trails in Audit Vault Server to configure an audit trail.
6.2.5 Steps Required to Deploy and Activate the Audit Vault AgentLearn about the procedures to deploy and activate Oracle Audit Vault Agent.
Deploying and activating the Audit Vault Agent on a host machine consists of these steps:
1. Registering the Host
2. Deploying the Audit Vault Agent.
3. Activating and Starting the Audit Vault Agent.
6.2.6 Registering the HostLearn about the procedure for registering the host.
To register the host on which you deployed the Audit Vault Agent, follow the procedure in"Registering Hosts on Oracle Audit Vault Server".
Chapter 6Deploying and Activating the Audit Vault Agent on Host Computers
6-11

6.2.7 Deploying the Audit Vault AgentLearn about deploying the Audit Vault Agent.
You must use an OS user account to deploy the Audit Vault Agent. In this step, youcopy the agent.jar file from the Audit Vault Server and deploy this file on the hostmachine.
Note:
Ensure that all security patches from the OS vendor is applied on the hostmachine.
See Also:
The Audit Vault Agent is supported on Unix and Microsoft Windowsplatforms. It requires Java version 1.8 to be installed on the host machine.See Product Compatibility Matrix for Agent platform support details for thecurrent release and for the supported Java versions.
To copy and deploy the Audit Vault Agent to the host computer:
1. Log in to the Audit Vault Server console as an administrator.
2. Click the Agents tab.
3. In the left navigation menu:
For release Action
20.1 and 20.2 Click Agent Software
20.3 and later Click Downloads
A list of downloadable agent software files are displayed on the page.
4. Click the Download button against the platform type, and then save theagent.jar file to a location of your choice.
The download process copies the agent.jar file from the Audit Vault Server.Ensure that you always use this agent.jar file when you deploy the Agent.
5. Using an OS user account, copy the agent.jar file to the target's host machine.
Best Practice:
Do not install the Audit Vault Agent as root user.
Chapter 6Deploying and Activating the Audit Vault Agent on Host Computers
6-12

6. On the host machine, set the JAVA_HOME environment variable to the installationdirectory of the Jdk, and make sure the Java executable corresponds to thisJAVA_HOME setting.
Note:
For a Sybase ASE target, ensure the Audit Vault Agent is installed on acomputer in which SQL*Net can communicate with the Sybase ASE database.
7. On a Microsoft Windows system, start a command prompt with Run as Administrator.
8. In the directory where you placed the agent.jar file, extract it by running:
java -jar agent.jar -d Agent_Home
This creates a directory by the name you enter for Agent_Home, and installs the AuditVault Agent in that directory.
On a Microsoft Windows system, this command automatically registers a MicrosoftWindows service named OracleAVAgent.
Caution:
After deploying the Audit Vault Agent, do not delete the Agent_Home directoryunless directed to do so by Oracle Support. If you are updating an existing AuditVault Agent, then do not delete the existing Agent_Home directory.
6.2.8 Activating and Starting the Audit Vault AgentLearn how to activate and start Oracle Audit Vault Agent.
In this step, you activate the Audit Vault Agent with the Agent Activation Key and start theAgent.
Prerequisites
• Follow and complete the procedure in Registering Hosts on Oracle Audit Vault Server.
• Log in to the Audit Vault Server console as an administrator. See Using Audit VaultServer Console for more information.
To activate and start the agent:
1. Click the Hosts tab.
2. Click the Agents tab.
3. In the left navigation menu, click Agents.
A list of registered hosts are displayed on the page.
4. On this page, make a note of the Agent Activation Key for this host.
5. On the host machine, change directory as follows:
cd Agent_Home/binAgent_Home is the directory created in the step 8 above.
Chapter 6Deploying and Activating the Audit Vault Agent on Host Computers
6-13

6. Run one of the following commands and provide the Agent Activation Key:
agentctl start -k Enter Activation Key:
Enter the activation key when prompted. This key will not be displayed as you typeit.
Note: the -k argument is not needed after the initial agentctl start command.
See Also:
• Registering and Unregistering the Audit Vault Agent as a WindowsService to start or stop the agent Windows service through the WindowsServices applet in the Windows Control Panel, in case the Agent isdeployed on a Microsoft Windows host computer.
• ACTIVATE HOST for the command line syntax to activate the Agent.
6.2.9 Configuring Agent Auto Restart FunctionalityLearn how to configure the Audit Vault Agent auto restart functionality.
Audit Vault Agent collects audit data from the target and sends it to the Audit VaultServer. The Agent must continuously run to carry out this task seamlessly. In somecases where the host machine (Agent machine) is restarted or the Agent goes down,then the Agent may stop running. It needs to be manually restarted so that it cancontinue to collect audit data.
Starting with Oracle AVDF release 20.7, the Audit Vault Agent can be configured torestart automatically. This functionality can be configure by the agent user. Itperiodically monitors the status of the Agent and restarts whenever required.
Note:
In Oracle AVDF releases 20.3 to 20.6, there is an existing functionality whichinvolves configuring a service to restart the Agent. In case you haveconfigured this functionality as mentioned in Audit Vault Agent Auto StartConfiguration, then disable this previously configured functionality beforeproceeding with the below commands.
Run the following commands in the Agent_Home/bin directory to enable or disablethe Agent auto restart functionality:
Task Command
To enable Agent auto restart functionality and to startthe Agent
agentctl startsvc
To enable Agent auto restart functionality, if the Agent isnot activated
agentctl startsvc -k
Chapter 6Deploying and Activating the Audit Vault Agent on Host Computers
6-14
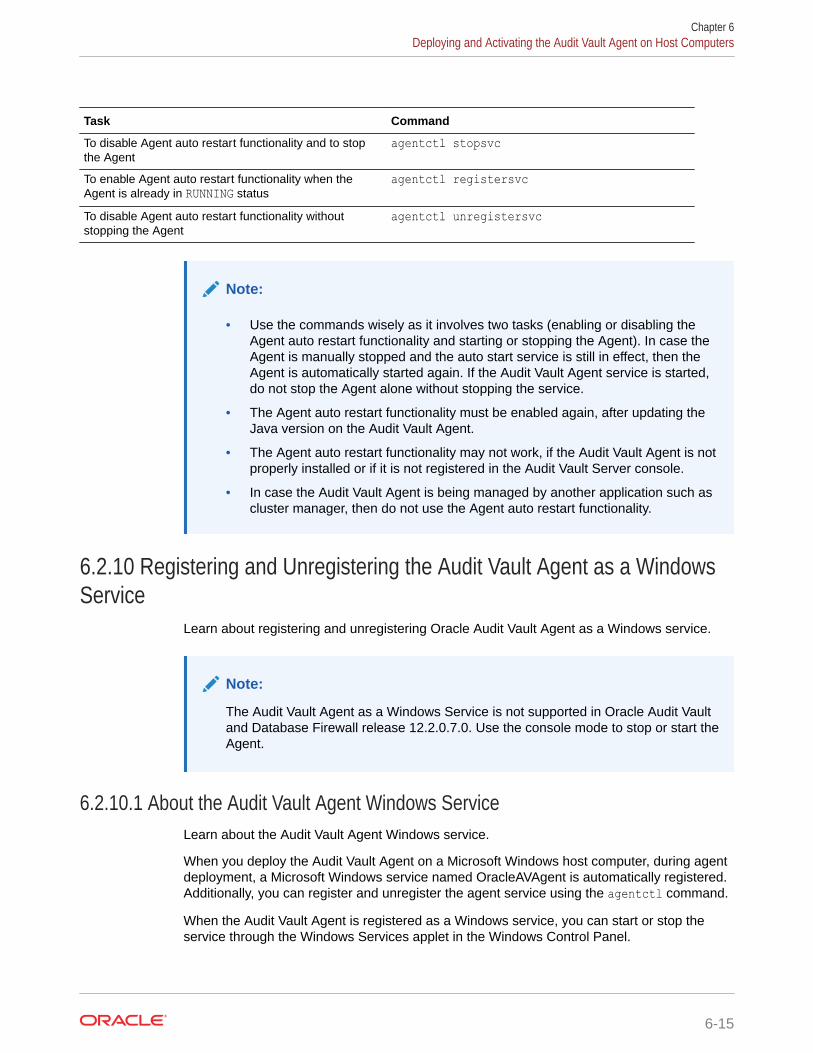
Task Command
To disable Agent auto restart functionality and to stopthe Agent
agentctl stopsvc
To enable Agent auto restart functionality when theAgent is already in RUNNING status
agentctl registersvc
To disable Agent auto restart functionality withoutstopping the Agent
agentctl unregistersvc
Note:
• Use the commands wisely as it involves two tasks (enabling or disabling theAgent auto restart functionality and starting or stopping the Agent). In case theAgent is manually stopped and the auto start service is still in effect, then theAgent is automatically started again. If the Audit Vault Agent service is started,do not stop the Agent alone without stopping the service.
• The Agent auto restart functionality must be enabled again, after updating theJava version on the Audit Vault Agent.
• The Agent auto restart functionality may not work, if the Audit Vault Agent is notproperly installed or if it is not registered in the Audit Vault Server console.
• In case the Audit Vault Agent is being managed by another application such ascluster manager, then do not use the Agent auto restart functionality.
6.2.10 Registering and Unregistering the Audit Vault Agent as a WindowsService
Learn about registering and unregistering Oracle Audit Vault Agent as a Windows service.
Note:
The Audit Vault Agent as a Windows Service is not supported in Oracle Audit Vaultand Database Firewall release 12.2.0.7.0. Use the console mode to stop or start theAgent.
6.2.10.1 About the Audit Vault Agent Windows ServiceLearn about the Audit Vault Agent Windows service.
When you deploy the Audit Vault Agent on a Microsoft Windows host computer, during agentdeployment, a Microsoft Windows service named OracleAVAgent is automatically registered.Additionally, you can register and unregister the agent service using the agentctl command.
When the Audit Vault Agent is registered as a Windows service, you can start or stop theservice through the Windows Services applet in the Windows Control Panel.
Chapter 6Deploying and Activating the Audit Vault Agent on Host Computers
6-15

See Also:
Deploying the Audit Vault Agent
6.2.10.2 Registering the Audit Vault Agent as a Windows ServiceYou can register Audit Vault Agent as a Windows service.
Deploying the Audit Vault Agent on a Windows host automatically registers a Windowsservice named agentctl. Use this procedure to register the Windows service again.
Prerequisite
Ensure to comply with one of the following prerequisites for Oracle AVDF 20.4 andearlier releases:
• Install Visual C++ Redistributable for Visual Studio 2012 Update 4 package fromMicrosoft on the Windows target machine. Ensure msvcr110.dll file is availablein C:\Windows\System32 directory.
• If the msvcr110.dll file is not present, then add it to the <Agent Home>/binand <Agent Home>/bin/mswin-x86-64 directories.
Ensure to comply with one of the following prerequisites for Oracle AVDF 20.6 andlater releases:
• Install Visual C++ Redistributable for Visual Studio 2017 package from Microsofton the Windows target machine. Ensure vcruntime140.dll file is available inC:\Windows\System32 directory.
• If the vcruntime140.dll file is not present, then add it to the <AgentHome>/bin and <Agent Home>/bin/mswin-x86-64 directories.
Note:
There is a known issue in Oracle AVDF 20.5 for starting Audit Vault Agent asa service on Windows. See Error When Starting Audit Vault Agent as aService on Windows in Oracle AVDF 20.5 for complete information. Thisissue is resolved in release Oracle AVDF 20.6 and later.
Registering Audit Vault Agent as a Windows Service
Run the following command on the host machine from the Agent_Home\bindirectory:
agentctl registersvcThis adds the Audit Vault Agent service in the Windows services registry.
Chapter 6Deploying and Activating the Audit Vault Agent on Host Computers
6-16
Note:
• Be sure to set the Audit Vault Agent service to use the credentials of theWindows OS user account that was used to deploy the Agent using the java -jar command. Do this in the service Properties dialogue.
• In the Service Properties dialogue, local user name entries in the This accountfield should be formatted as in the following example: user name jdoe shouldbe entered as .\jdoe. Refer to Microsoft Windows documentation forprocedures to do so.
6.2.10.3 Unregistering the Audit Vault Agent as a Windows ServiceYou can use two methods to unregister the Oracle Audit Vault Agent as a Windows service.
To unregister the Oracle Audit Vault Agent as a Windows Service, use one of the followingmethods:
• Method 1 (Recommended)
On the host machine, run the following command from the Agent_Home\bin directory:
agentctl unregistersvcThis removes the Oracle Audit Vault Agent service from the Windows services registry.
• Method 2
If Method 1 fails, then execute the following from the Windows command prompt (Run asAdministrator):
cmd> sc delete OracleAVAgentYou can verify that the Audit Vault Agent has been deleted by executing the followingquery from the Windows command prompt (Run as Administrator):
cmd> sc queryex OracleAVAgent
6.3 Stopping, Starting, and Other Agent OperationsLearn about starting and stopping the agent and other operations.
6.3.1 Stopping and Starting Audit Vault AgentLearn about stopping and starting Audit Vault Agent.
Topics
Important:
Stop and start the Audit Vault Agent as the same OS user account that you usedduring installation.
Chapter 6Stopping, Starting, and Other Agent Operations
6-17

See Also:
Audit Vault Agent Auto Start Configuration
6.3.1.1 Stopping and Starting the Agent on Unix HostsLearn about stopping and starting the Agent on Unix hosts.
To start the Audit Vault Agent after initial activation, run the following command fromthe Agent_Home/bin directory on the host machine:
agentctl start
To stop the Audit Vault Agent run the following command from the Agent_Home/bindirectory on the host machine:
agentctl stop
Note:
• After the agentctl stop command, execute agentctl status commandto ensure the Agent is in STOPPED state before executing the agentctlstart command again.
• In case the Agent auto start service (Oracle AVDF release 20.7 andonwards) is configured and if the Agent alone is manually stopped, thenthe Agent is automatically started again. See Configuring Agent AutoRestart Functionality for complete information and run the rightcommands.
6.3.1.2 Stopping and Starting the Agent on Windows HostsLearn about stopping and starting the Agent on Microsoft Windows hosts.
The Audit Vault Agent is automatically registered as a Windows service when youdeploy the Agent on a Windows host. We recommend that you run the Agent asWindows service so that it can keep running after the user logs out.
See Also::
Registering and Unregistering the Audit Vault Agent as a Windows Service
To stop or start the Agent Windows service
Use one of the methods below:
Chapter 6Stopping, Starting, and Other Agent Operations
6-18

• In the Windows GUI (Control Panel > Administrative Tools > Services), find the AuditVault Agent service, and then right-click it to select Start or Stop.
• Run one of these commands from the Agent_Home\bin directory on the host machine:
agentctl stopsvc
agentctl startsvc
To check that the Windows service is stopped
Run this command:
cmd> sc queryex OracleAVAgent
You should see the Agent Windows service in a STOPPED state.
To stop or start the Agent in console mode
start /b agentctl stopstart /b agentctl start
To forcibly stop the Agent in console mode
agentctl stop -force
Note:
This is not a recommended option to stop the Agent. Use it only in case the Agentgoes into an unreachable state for a long time and cannot be restarted or stopped.In such a scenario, use this option to forcibly stop and later restart the Agent.
To restart the Agent use the agentctl start command.
6.3.1.3 Autostarting the Agent on Windows HostsLearn about autostarting the agent on Microsoft Windows hosts.
You can configure the agent service to start automatically on a Windows host.
1. Open the Services Management Console.
From the Start menu, select Run, and in the Run dialog box, enter services.msc to startthe Services Management Console.
2. Right-click Oracle Audit Vault Agent and from the menu, select Properties.
3. In the Properties dialog box, set the Startup type setting to Automatic.
4. Click OK.
5. Close the Services Management Console.
Chapter 6Stopping, Starting, and Other Agent Operations
6-19
6.3.2 Changing the Logging Level for the Audit Vault AgentLearn how to change the logging level for Oracle Audit Vault Agent.
The logging level that you set affects the amount of information that Oracle writes tothe log files. You may need to take this into account due to disc space limitations.
Log files are located in the Agent_Home/av/log directory.
The following logging levels are listed in the order of the amount of information writtento log files, where debug provides the most information:
• error - Writes only error messages
• warning - (Default) Writes warning and error messages
• info - Writes informational, warning, and error messages
• debug - Writes detailed messages for debugging purposes
Using the Audit Vault Server Console to Change Logging Levels
To change the logging level for the Audit Vault Agent using the Audit Vault Server UI,see "Clearing Diagnostic Logs".
Using AVCLI to Change the Agent Logging Level
To change the logging level for the Audit Vault Agent using the AVCLI utility:
1. Ensure that you are logged into AVCLI on the Audit Vault Server.
2. Run the ALTER HOST command.
The syntax is as follows:
ALTER HOST host_name SET LOGLEVEL=av.agent:log_level
In this specification:
• host_name: The name of the host where the Audit Vault Agent is deployed.
• log_level: Enter a value of info, warn, debug, or error.
6.3.3 Viewing the Status and Details of Audit Vault AgentLearn about viewing the status and details of Audit Vault Agent.
You can view an Audit Vault Agent's status and details such as activation key, platform,version, location, and other details.
Prerequisite
Log in to the Audit Vault Server console as an administrator. See Using Audit VaultServer Console for more information.
To view the status and details of an Audit Vault Agent:
1. Click the Agents tab.
2. In the left navigation menu, click Agents.
A list of registered Agents is displayed on the page.
Chapter 6Stopping, Starting, and Other Agent Operations
6-20
3. In this list of registered Agents, check the Agent Status, Host Monitor Status, AgentActivation Key, Agent Details, and Host Monitor Details columns for the Agent thatyou are interested in.
4. To see the audit trails for a specific Agent host, click View Audit Trails in the AgentDetails column.
6.3.4 Deactivating and Removing Audit Vault AgentLearn about deactivating and removing Audit Vault Agent.
Use this procedure to deactivate and remove Audit Vault Agent.
See Also:
If you have registered the Audit Vault Agent as a Windows service, see Registeringand Unregistering the Audit Vault Agent as a Windows Service to unregister theservice.
1. Stop all audit trails being collected by the Audit Vault Agent.
a. In the Audit Vault Server console, click the Home tab, then click Audit Trails.
b. In the left navigation menu, click Audit Trails to display a page of the available audittrails.
c. Select the check boxes for each audit trail that you want to stop, and then click Stop.
2. Stop the Audit Vault Agent by running the following command on the host computer:
agentctl stop
3. Deactivate the Audit Vault Agent on the host computer:
a. In the Audit Vault Server console, click the Agents tab, and then in the left navigationmenu, select Agents.
b. Select the check box for each host name that you want to deactivate, and then clickDeactivate.
c. Optionally, drop the host by selecting the check box for it, and then clicking Delete.
d. Delete the Audit Vault Agent home directory on the host computer.
Note:
The Audit Vault Agent deployed on a host is associated with the specific AuditVault Server from where it was downloaded. This Audit Vault Agent collectsaudit data from the configured targets. It sends this data to the specific AuditVault Server. To configure the audit trail collection from the existing targets to adifferent Audit Vault Server, you should deactivate, remove the existing Agent,download the Audit Vault Agent installation file from the new Audit Vault Server,and install it on the target host. This scenario is different from updating theexisting Auditing Vault Agent.
Chapter 6Stopping, Starting, and Other Agent Operations
6-21
6.4 Updating Oracle Audit Vault AgentLearn about updating Oracle Audit Vault Agent.
As of Oracle Audit Vault and Database Firewall 12.1.1 BP2, when you update the AuditVault Server to a future release, the Audit Vault Agent is automatically updated.
If your current release is prior to 12.1.1 BP2, then refer to the README included withupgrade software or patch updates for instructions on how to update the Audit VaultAgent.
As of Oracle Audit Vault and Database Firewall 12.2.0, when you upgrade the AuditVault Server to a later version, or restart the Audit Vault Agent, you no longer need torestart audit trails manually. The audit trails associated with this Audit Vault Agentautomatically restart if you have not explicitly stopped them. If you upgrade the AuditVault Server to 12.2.0 from a prior release, audit trails associated with the updatedAgents will automatically restart if the trails have a single plug-in.
See Also:
Oracle Audit Vault and Database Firewall Installation Guide for informationabout downloading upgrade software.
6.5 Deploying Plug-ins and Registering Plug-in HostsLearn about deploying plug-ins and registering plug-in hosts.
6.5.1 About Plug-insLearn about plug-ins for Audit Vault Server.
Each type of target has a corresponding software plug-in in the Audit Vault Server,which enables the Audit Vault Agent to collect audit data. You can deploy more plug-ins, in addition to those shipped with Oracle Audit Vault and Database Firewall, inorder to collect audit data from more target types.
A plug-in supports only one target type. However, you may deploy more than one plug-in for the same target type if, for example, you acquired each plug-in from a differentdeveloper, or each plug-in supports a specific type of audit trail for the same targettype. You can select the specific plug-in to use when you configure audit trailcollections.
To start collecting audit data from the target type associated with a plug-in, you mustalso add the target in the Audit Vault Server, then configure and manually start audittrail collection.
See Also:
Configuring Targets, Audit Trails, and Database Firewall Monitoring Points
Chapter 6Updating Oracle Audit Vault Agent
6-22

Deploying a plug-in consists of three steps:
1. Ensuring that Auditing is Enabled in A Target
2. Registering the Plug-in Host in Audit Vault Server
3. Deploying and Activating the Plug-in
6.5.2 Ensuring that Auditing is Enabled in A TargetLearn how to ensure that auditing is enabled in a target.
Ensure that auditing has been enabled in the target. See the target's product documentationfor more information.
See Also:
Ensuring that Auditing is Enabled on the Target for information on plug-ins forOracle Database.
6.5.3 Registering the Plug-in Host in Audit Vault ServerLearn about registering a plug-in host in Oracle Audit Vault Server.
To register a host in the Audit Vault Server, see "Registering Hosts in the Audit Vault Server".
6.5.4 Deploying and Activating the Plug-inLearn about deploying and activating a plug-in in Audit Vault Server.
To deploy and activate a plug-in:
1. Log in to the Audit Vault Server console as an administrator.
2. Click the Settings tab.
3. In the left navigation menu, select System.
A status page appears, with pane for Configuration and Monitoring.
4. In the Monitoring pane, click Plug-ins.
The Plug-ins page lists the currently deployed plug-ins:
Chapter 6Deploying Plug-ins and Registering Plug-in Hosts
6-23
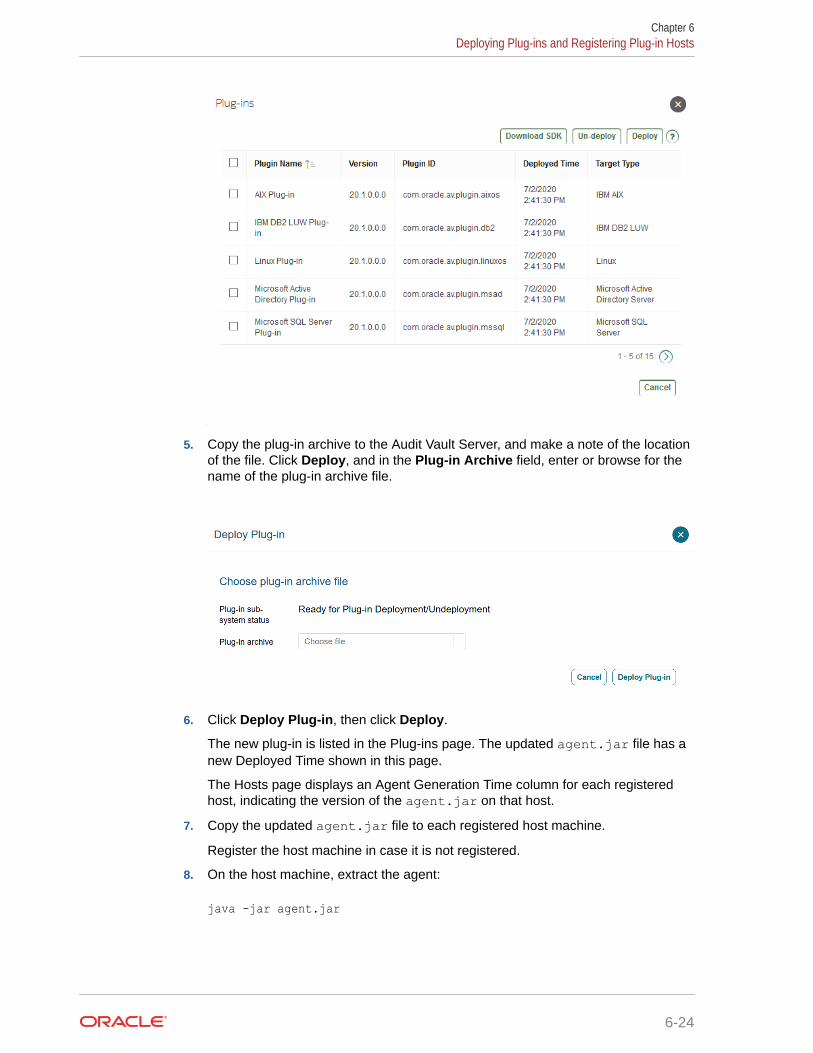
5. Copy the plug-in archive to the Audit Vault Server, and make a note of the locationof the file. Click Deploy, and in the Plug-in Archive field, enter or browse for thename of the plug-in archive file.
6. Click Deploy Plug-in, then click Deploy.
The new plug-in is listed in the Plug-ins page. The updated agent.jar file has anew Deployed Time shown in this page.
The Hosts page displays an Agent Generation Time column for each registeredhost, indicating the version of the agent.jar on that host.
7. Copy the updated agent.jar file to each registered host machine.
Register the host machine in case it is not registered.
8. On the host machine, extract the agent:
java -jar agent.jar
Chapter 6Deploying Plug-ins and Registering Plug-in Hosts
6-24

Note:
Do not download the Agent during the same login session in which the plug-inis deployed, as the agent.jar file is being updated. However, users in othersessions can download the most current version of the agent.jar file after theplug-in deployment process is complete and a new version is available.
See Also:
• Using Audit Vault Server Console
• Registering Hosts in the Audit Vault Server
6.5.5 Removing Plug-insLearn about removing plug-ins.
To remove a plug-in:
1. Log in to the Audit Vault Server console as an administrator.
2. Click the Settings tab.
3. In the left navigation menu, select System.
A status page appears, with pane for Configuration and Monitoring.
4. In the Monitoring pane, click Plug-ins.
5. Select the plug-in that you want, and then click Un-deploy.
See Also:
Using Audit Vault Server Console
6.6 Deleting Hosts from Audit Vault ServerLearn how to delete hosts from Audit Vault Server.
When you delete a host, if you want to register it again to collect audit data, then you mustreinstall the Audit Vault Agent on this host.
To delete hosts:
1. Log in to the Audit Vault Server console as an administrator.
2. Click the Agents tab.
3. In the left navigation menu, click Agents.
A list of registered Agents is displayed on the page.
4. Select the check boxes for the hosts that you want to delete, and then click Delete.
Chapter 6Deleting Hosts from Audit Vault Server
6-25

See Also:
• Working with Lists of Objects in the UI to control the view ofregistered hosts listed.
• Using Audit Vault Server Console
Chapter 6Deleting Hosts from Audit Vault Server
6-26

7Configuring Targets, Audit Trails, andDatabase Firewall Monitoring Points
Learn about configuring targets, audit trails, and Database Firewall monitoring points.
7.1 About Configuring TargetsLearn about configuring targets.
Targets can be supported databases or operating systems that Audit Vault and DatabaseFirewall monitors. You must register all of the targets in the Audit Vault Server, regardless ofwhether you are deploying the Audit Vault Agent, the Database Firewall, or both.
If you want to collect audit trails from your targets, you must configure an audit trail for eachtarget and start collection manually.
If you want to monitor a target with the Database Firewall, you must create a monitoring pointfor that target.
For Oracle Database targets that you monitor with the Database Firewall, you can configureOracle Audit Vault and Database Firewall to monitor the native network encrypted traffic. Todo so, you must run scripts on the target computers to configure the necessary privileges.
If you are using the Database Firewall, you can also monitor the target database's responsesto incoming SQL traffic. The following sections contain the high-level workflow for configuringthe Oracle Audit Vault and Database Firewall system.
See Also:
• Configuring Oracle Audit Vault and Database Firewall and Deploying the Agent
• Configuring Oracle Audit Vault and Database Firewall and Deploying OracleDatabase Firewall
7.2 Registering Targets and Creating GroupsLearn about registering targets and creating groups.
7.2.1 Registering or Removing Targets in Audit Vault ServerLearn about registering and removing targets in Audit Vault Server.
7.2.1.1 About Targets in the Audit Vault ServerLearn about Oracle Audit Vault Server targets.
7-1

Oracle Audit Vault and Database Firewall super administrators can create targets andgrant access to them to other administrators. Administrators can also create targets,but the target that they create are only accessible to that administrator and the superadministrator who created them.
Note:
In the following procedure, if you specify service names and/or SIDs, thenOracle Database Firewall only captures traffic to the service names and/orSIDs listed. In this case, if a database client connects using a differentservice name or SID than those listed, Oracle Database Firewall does notmonitor that traffic. As a best practice to avoid this problem, follow theseguidelines:
• Define the configuration and policies that use Oracle service names for everyservice that runs on a protected Oracle target. This ensures that the configurationenables each policy to be applied to the correct Oracle service name.
• Always define a catch-all target (and associated monitoring point) to process thedatabase traffic that does not match the Oracle service names that were explicitlyconfigured in the previous targets. This new target should have the same IPaddress and TCP port number, but the Oracle service name should be left blank,and should have a "log-all" policy applied. This way, any traffic that the targets withexplicitly defined Oracle service names do not capture is logged and can beexamined. Based on your findings, you then can tighten the configuration andpolicies so all traffic that reaches an Oracle service name is captured in an explicitfashion.
In Oracle Database 12c, if you are not using a multitenant container database (CDB),then register a target for your database as you would for previous versions of OracleDatabase. If you use a CDB, then you must register a target for the CDB, as well aseach pluggable database (PDB).
7.2.1.2 Registering TargetsLearn about registering targets for audit collection and Database Firewall monitoring.
This section explains how to register targets in Oracle Audit Vault Server:
1. Log in to the Audit Vault Server console as an administrator.
2. Click the Targets tab.
The Targets tab in the left navigation is selected by default. The main pagecontains a list of configured targets. You can sort or filter the list of targets.
3. Click Register in the top right corner.
The following page appears:
Chapter 7Registering Targets and Creating Groups
7-2
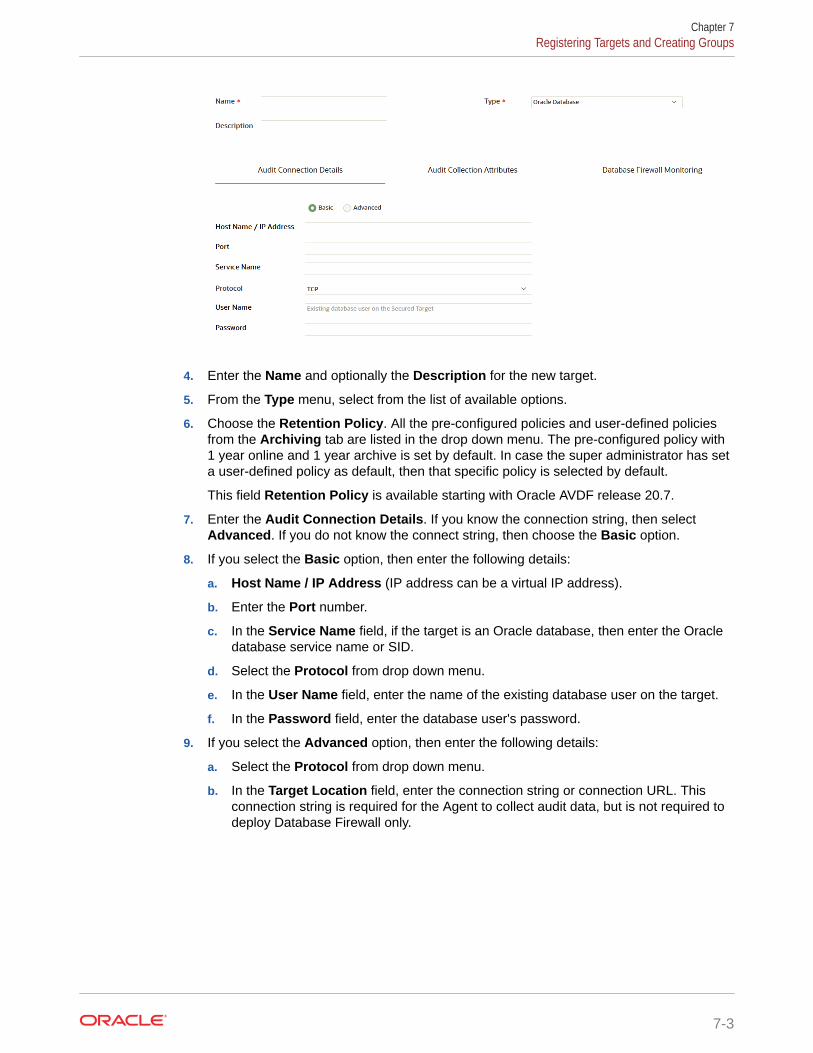
4. Enter the Name and optionally the Description for the new target.
5. From the Type menu, select from the list of available options.
6. Choose the Retention Policy. All the pre-configured policies and user-defined policiesfrom the Archiving tab are listed in the drop down menu. The pre-configured policy with1 year online and 1 year archive is set by default. In case the super administrator has seta user-defined policy as default, then that specific policy is selected by default.
This field Retention Policy is available starting with Oracle AVDF release 20.7.
7. Enter the Audit Connection Details. If you know the connection string, then selectAdvanced. If you do not know the connect string, then choose the Basic option.
8. If you select the Basic option, then enter the following details:
a. Host Name / IP Address (IP address can be a virtual IP address).
b. Enter the Port number.
c. In the Service Name field, if the target is an Oracle database, then enter the Oracledatabase service name or SID.
d. Select the Protocol from drop down menu.
e. In the User Name field, enter the name of the existing database user on the target.
f. In the Password field, enter the database user's password.
9. If you select the Advanced option, then enter the following details:
a. Select the Protocol from drop down menu.
b. In the Target Location field, enter the connection string or connection URL. Thisconnection string is required for the Agent to collect audit data, but is not required todeploy Database Firewall only.
Chapter 7Registering Targets and Creating Groups
7-3

Note:
• For Oracle Database, the string may look like:jdbc:oracle:thin:@//<IP address of the Database serverhost>:<port number>/hrdb
• When you configure an Oracle RAC (Real Application Clusters)as a target for Agent data collection, enter the SCAN host name.Oracle RAC can be secured using Oracle Database Firewall byconfiguring as a target.
• In case the target is Microsoft SQL Server Cluster, a mandatorycollection attribute needs to be set. See section Microsoft SQLServer Plug-in for Oracle Audit Vault and Database Firewall forcomplete information.
c. In the User Name field, optionally enter the name of the existing databaseuser on the target. This user should have access to the audit data generatedby the target.
d. In the Password field, enter the database user's password.
10. Click the Audit Collection Attributes tab.
11. Enter details of the collection attributes in the Name and Value fields. Click theAdd icon to add more entries.
Note:
Collection attributes may be required by the Audit Vault Agent dependingon the target type. Refer to the following table for the mandatorycollection attributes to be entered in the Name fields for different targettypes.
Target Type Mandatory Collection Attributes
Microsoft SQL Server Cluster av.collector.clusterEnabledPostgreSQL av.collector.securedTargetVe
rsionOracle Database for TransactionLog Audit Collection
AV.COLLECTOR.TIMEZONEOFFSETNote: This attribute is a timezoneoffset of Oracle Database.
For PostgreSQL, ensure to enable pgaudit extension. The audit collection isincomplete and operational details are missed out from the reports in case thisextension is not enabled.
12. Optionally use the information here to improve the audit collection rate oreffectively utilize the resources of the Agent and Audit Vault Server.
• Oracle AVDF 20.4 (and later) provides configuration option to improve auditcollection performance. The audit collection rate can be increased by setting
Chapter 7Registering Targets and Creating Groups
7-4
the target attribute av.collfwk.MULTI_THREADED to true. This is applicable to all audittrails belonging to the specific target. This configuration improves the audit collectionrate. However, the resource (CPU and memory) requirement on the Agent machinealso increases. There may be increase in resource utilization on the Audit VaultServer. It is recommended to use this configuration if the target audit recordgeneration rate is between 86 and 172 million records per day (or between 1000 to2000 records per second). This functionality is not applicable to Host Monitor ornetwork trails.
• In Oracle AVDF 20.5 (and later), the Audit Vault Agents automatically choose thebest possible configuration for improving audit collection rate. This dynamic multi-threaded collector functionality effectively utilizes the resources of the Audit VaultServer and Audit Vault Agent.
This functionality is the default behavior and increases the throughput of the audittrail by increasing the number of threads when the target audit generation rate ishigh. It also reduces the number of threads when the target audit generation rate islow. This functionality improves the audit collection rate and can support targetsgenerating records up to 2000 per second or 172 million per day. When the targetaudit generation rate is very high, the resource (CPU and memory) requirement onthe Agent machine is also increased. There may be increase in resource utilizationon the Audit Vault Server.
It is recommended to avoid setting the av.collfwk.MULTI_THREADED attribute andrely on the dynamic multi-threaded collector functionality.
In case high throughput is not required due to Agent machine resource constraints,then use the single threaded collector by setting the target attributeav.collfwk.MULTI_THREADED to false. This is the default behavior prior to OracleAVDF 20.5.
In case high throughput is always required due to audit data generation rate of 86 to172 million records per day, then use the static multi-threaded collector (always usesmaximum threads) by setting the target attribute av.collfwk.MULTI_THREADED totrue.
Note:
This functionality is not applicable to Host Monitor or network trails.
13. Click Save to complete the target registration for audit collection. Continue with theremaining steps to configure the target for Database Firewall monitoring.
14. Click the Database Firewall Monitoring tab.
15. Click Add. The Database Firewall Monitor dialog is displayed.
16. In the Core tab (or Basic tab), select from the list in the Database Firewall field.
17. Select a Mode from the following:
• Monitoring (Out-of-Band) - In this deployment mode, Oracle Database Firewall canmonitor and alert on SQL traffic, but cannot block or substitute SQL statements.
• Monitoring (Host Monitor) - In this deployment mode, Oracle Database Firewall canmonitor and alert on SQL traffic, but cannot block or substitute SQL statements.
• Monitoring / Blocking (Proxy) - In this deployment mode the Database Firewall canblock or substitute SQL statements.
Chapter 7Registering Targets and Creating Groups
7-5

Note:
Ensure you select the right mode in accordance with Firewall policydefined for the target. If the Firewall policy specified contains SQLblocking rules, but you select for monitoring only, SQL statements arenot blocked. Therefore, if you want to block SQL statements according topolicy rules, you should use monitoring and blocking mode.
18. In the Network Interface Card field, select one from the list.
19. Select the Proxy Ports from the list.
Note:
For a RAC instance, select the Network Interface Card and ProxyPorts for Monitoring / Blocking (Proxy) mode. The proxy port is notmandatory for Monitoring only modes.
20. Select the check box against RAC Instance field if the target is Oracle RealApplication Cluster.
21. In the Connection Details section, add one or more targets. You can add ordelete targets from the list. Enter the following information for each availableconnection of the database. Click the Add button to add more targets and enterthe following fields:
• Host Name / IP Address
• Port
• Service Name (Optional, for Oracle Database only)
You can also use an SID in this field. To enter multiple service names and/orSIDs, enter a new line here for each of them, and then click Add.
If you want to enforce different Database Firewall policies for different servicenames or SIDs on the same database, then you must create a separate targetfor each service name or SID.
22. In the Advanced tab, enter the number of Database Firewall Monitor Threads(minimum and default value is 1). This controls the number of traffic handlingthreads in the Database Firewall monitoring point. Use due caution beforemodifying the value.
23. Select the check box for Capture Database Response field. Select Full ErrorMessage check box if required.
24. Select the check box Decrypt With Native Network Encryption Key, for enablingdecryption of traffic if Oracle Database target is configured for Native NetworkEncryption. Fill in the relevant fields as applicable.
25. Click Save at the bottom of the dialog to save the configuration of the monitoringpoint.
26. Click Save at the top right corner of the main page.
Chapter 7Registering Targets and Creating Groups
7-6

Note:
TCPS must be configured for registering Hybrid Cloud Oracle Databases. See Securing the Agent and Oracle Database Target Connection.
See Also:
• Plug-ins That are Shipped with Oracle Audit Vault and Database Firewall
• Collection Attributes to look up requirements for a specific target type.
• Using Oracle Database Firewall with Oracle RAC to configure OracleDatabase Firewall in an Oracle RAC environment.
• Working with Lists of Objects in the UI to sort or filter the list of targets.
• Target Locations (Connect Strings)
• Using Audit Vault Server Console
• Setting User Account Privileges on Targets
7.2.1.3 Modifying TargetsLearn about modifying targets.
To modify a target:
1. Log in to Oracle Audit Vault Server console as an administrator.
2. Click the Targets tab.
The Targets tab in the left navigation menu is selected by default. It lists the configuredtargets to which you have access. You can sort or filter the list of targets.
3. Click the name of the target that you want to modify.
A page showing details about the target appears.
4. Make your changes and then click Save.
Note:
If you change the name of a target, then the new name does not appear in OracleAudit Vault and Database Firewall reports until you restart the Audit Vault Agent.
Chapter 7Registering Targets and Creating Groups
7-7

See Also:
• Registering Targets for description of the fields in the Modify Targetpage.
• Working with Lists of Objects in the UI to sort or filter the list of targets.
• Using Audit Vault Server Console
7.2.1.4 Removing TargetsLearn about removing targets.
If you no longer need to have a target registered with Oracle Audit Vault and DatabaseFirewall, then you can use either the console or the command-line utility to remove thetarget. After you have removed the target, the audit data pertaining to the target stillresides in the data warehouse within its retention period (according to the archivingpolicy).
After you have removed a target, its identity data remains so that there will be a recordof targets that have been dropped. Remove the target only if you no longer want tocollect its data or if it has moved to a new host computer.
To remove a target:
1. Log in to the Audit Vault Server console as an administrator.
2. Click the Targets tab.
3. The Targets tab in the left navigation menu is selected by default. Select thecheck boxes against the targets that you want to remove.
4. Click Delete button in the top right corner of the page.
See Also:
• Creating or Deleting Archiving Policies for information on archiving(retention) policies.
7.2.2 Creating a Target GroupLearn how to create target groups.
As a super administrator you can create target groups to grant other administratorsaccess to targets as a group rather than individually.
1. Log in to the Audit Vault Server console as a super administrator.
2. Click the Targets tab.
3. In the left navigation menu, click Target Groups.
4. Click Create button in the top right corner.
5. In the Create Target Group dialog, do the following:
Chapter 7Registering Targets and Creating Groups
7-8

Release Oracle AVDF 20.1 and 20.2 Release Oracle AVDF 20.3 and later
a. Name field: Enter a name for the targetgroup.
b. Description: Optionally, enter adescription for this target group.
c. Under Members section, select one ormore members by clicking the checkbox against the member name.
d. Click the Add button.
a. Group Name field: Enter a name forthe target group.
b. Description: Optionally, enter adescription for this target group.
c. Under Members section, select one ormore members by moving them fromthe Available column to Selectedcolumn. You can also search for thetargets in the field below the Memberssection using the target name.
d. To remove the targets, select one ormore members and move them back tothe Available column from theSelected column.
6. Click Save.
7.2.3 Modifying a Target GroupYou can modify the contents of a target group or change the target group name anddescription.
1. Log in to the Audit Vault Server console as a super administrator.
2. Click the Targets tab.
3. In the left navigation menu, click Target Groups.
4. Click the name of the target group that you want to modify.
5. In the Modify Target Group dialog, perform any of the following modifications:
Release Oracle AVDF 20.1 and 20.2 Release Oracle AVDF 20.3 and later
a. Change the Name of the target group.
b. Optionally edit the Description.
c. Under the Members section, add orremove members by selecting thecheck box against the member.
d. Click Add or Remove buttonsaccordingly.
a. Change the Group Name.
b. Optionally edit the Description.
c. Under the Members section, add orremove members by moving them inbetween the Available and Selectedcolumns. You can also search for thetargets in the field below the Memberssection using the target name.
6. Click Save.
Chapter 7Registering Targets and Creating Groups
7-9
7.2.4 Controlling Access to Targets and Target GroupsLearn about controlling access to targets and target groups.
Oracle Audit Vault and Database Firewall super administrators can control whichadministrators have access to targets or target groups. You can control access for anindividual user or for an individual target or group.
See Also:
Managing User Access Rights to Targets and Groups
7.3 Preparing Targets for Audit Data CollectionLearn about preparing targets for audit data collection.
7.3.1 Using an NTP Service to Set Time on TargetsLearn how to use NTP Service to configure time settings on targets.
Oracle recommends that you use an It is recommended that you also use a NetworkTime Protocol (NTP) service on both your targets and the Audit Vault server. This willhelp to avoid confusion on timestamps on the alerts raised by the Audit Vault Server.
See Also:
Specifying the Server Date, Time, and Keyboard Settings for instructions onusing an NTP server to set time for the Audit Vault Server.
7.3.2 Ensuring that Auditing is Enabled on the TargetLearn how to enable auditing.
To collect audit data from a target, you must ensure that auditing is enabled on thattarget and, where applicable, note the type of auditing that the target is using. Checkthe product documentation for your target type for details.
To check if auditing is enabled on an Oracle Database target:
1. Log in to the Oracle database as a user with administrative privileges. Forexample:
sqlplus trbokuksaEnter password: passwordConnected.
2. Run the following command:
SHOW PARAMETER AUDIT_TRAIL
Chapter 7Preparing Targets for Audit Data Collection
7-10
NAME TYPE VALUE------------------------------------ ----------- -------audit_trail string DB
3. If the output of the SHOW PARAMETER command is NONE or if it is an auditing value that youwant to change, then you can change the setting as follows.
For example, if you want to change to XML, and if you are using a server parameter file,you would enter the following:
CONNECT SYS/AS SYSDBAEnter password: password
ALTER SYSTEM SET AUDIT_TRAIL=XML SCOPE=SPFILE;System altered.
SHUTDOWNDatabase closed.Database dismounted.ORACLE instance shut down.
STARTUPORACLE instance started.
4. Make a note of the audit trail setting.
You will need this information when you configure the audit trail in Oracle Audit Vault andDatabase Firewall.
7.3.3 Setting User Account Privileges on TargetsLearn about setting account privileges on targets.
Some target types require credentials in order for Oracle Audit Vault and Database Firewall toaccess them. If you plan to collect audit data from a target, perform stored procedure auditing(SPA), entitlements auditing, or monitor native network encrypted traffic for Oracle Database,then you must create a user account on the target with the appropriate privileges to enableOracle Audit Vault and Database Firewall to access the required data.
Setup scripts for database targets: Oracle Audit Vault and Database Firewall provides scriptsto configure user account privileges for database target types.
Non-database targets: You must create a user that has the appropriate privileges to accessthe audit trail required. For example, for a Windows target, this user must have administrativepermissions in order to read the security log.
Note:
Oracle Audit Vault and Database Firewall does not accept user names withquotation marks. For example, "J'Smith" would not be a valid user name for anAudit Vault and Database Firewall user account on targets.
Chapter 7Preparing Targets for Audit Data Collection
7-11

See Also:
Scripts for Oracle AVDF Account Privileges on Targets for information onscripts to configure user account privileges for database target types.
7.3.4 Scheduling Audit Trail CleanupLearn about scheduling audit trail cleanup.
Oracle AVDF supports audit trail cleanup for Oracle Database, Microsoft SQL Server,IBM DB2, and MySQL.
See Also:
Audit Trail Cleanup
7.4 Configuring and Managing Audit Trail CollectionLearn about configuring and managing audit trail collection.
7.4.1 Prerequisites for Adding Audit Trails in Oracle Audit Vault ServerLearn about the prerequisites for adding audit trails in Oracle Audit Vault Server.
Before configuring an audit trail for any target, you must:
• Oracle Golden Gate version 19.1 or later must be installed to configureTransaction Log audit trail on Oracle Database.
• Add the target in the Audit Vault Server. See Registering or Removing Targets inAudit Vault Server for details.
• Register the host machine. This machine is where the Audit Vault Agent isdeployed and the target resides in case of directory trails. See Registering Hostsand Deploying the Agent.
• Deploy and start the Audit Vault Agent on the host machine. See Deploying andActivating the Audit Vault Agent on Host Computers.
• For IBM DB2 targets, ensure that the binary audit file has been converted to ASCIIformat before starting an audit trail.
• For MySQL targets, run the XML transformation utility. See Running the XMLTransformation Utility for MySQL Audit Formats.
7.4.2 Adding Audit Trails in Audit Vault ServerLearn about adding audit trails in Audit Vault Server.
To begin collecting audit data, configure an audit trail for each target in Audit VaultServer and then start the audit trail collection manually.
Chapter 7Configuring and Managing Audit Trail Collection
7-12
Note:
The Audit Vault Agent must be installed on the same host containing the auditdirectory in case of directory trails.
To configure an audit trail for a target:
1. Create a new target.
2. Click the Targets tab. The Targets tab in the left navigation menu is selected by default.
3. Click on the name of the target for which the audit trail needs to be added.
4. Under Audit Data Collection, select Add.The Add Audit Trail dialog appears.
5. Select the value in the Audit Trail Type menu based on the target.
Note:
For complete details on the audit trail types, see Plug-ins That are Shipped withOracle Audit Vault and Database Firewall.
There are different audit trail types available in the drop down list. Select one of thefollowing:
• CUSTOM
• DIRECTORY
• EVENT LOG
• NETWORK
• SYSLOG
This trail type can collect from either syslog or rsyslog files. If both are present, youmust give the exact Trail Location in the following step ahead, if you want to collectaudit data from rsyslog files. See Table C-25 for details.
Note:
Ensure that records generated by rsyslog have the same time zoneinformation as the Audit Vault Agent running on the collection host.
• TABLE
• TRANSACTION LOG
See Table C-19 for details on which types of audit trails can be collected for a specifictarget type.
6. In the Trail Location field, enter the location of the audit trail on the target computer. Thetrail location depends on the type of target.
For example, unified_audit_trail.
Chapter 7Configuring and Managing Audit Trail Collection
7-13

For complete details on the target type and trail location, see Plug-ins That areShipped with Oracle Audit Vault and Database Firewall.
Note:
If you select DIRECTORY or TRANSACTION LOG as Audit Trail Type, thenthe trail location must be a directory mask. See Table C-25 for importantdetails.
7. In the Agent Host field, select the host computer where the Audit Vault Agent isdeployed.
8. The Agent Plug-in field automatically contains the appropriate plug-in name.
9. Click Save.
The audit trail is added to the list on the Audit Trails tab. The collection statusdisplays a red circle initially. This indicates the status of the trail as stopped. Theaudit trail starts automatically shortly after it is added.
See Also:
• Summary of Data Collected for Each Audit Trail Type for descriptions ofdata collected.
• Audit Trail Locations for supported trail locations.
• About Plug-ins
7.4.3 Stopping, Starting, and Autostart of Audit Trails in Oracle AuditVault Server
Lean about stopping, starting, and setting up autostart of audit trails in Oracle AuditVault Server.
An audit trail starts automatically shortly after you add it. To start an audit trail, theAudit Vault Agent must be running on a host computer.
Audit trails that are started will automatically restart if the Audit Vault Agent isrestarted, or updated due to an Audit Vault Server update.
An audit trail can go down at times such as when the target goes down temporarily.With Autostart, the system automatically attempts to restart an audit trail if it goesdown. Autostart is normally enabled unless you have manually stopped the trail. Youcan set parameters on when and how many times the system attempts Autostart usingthe AVCLI utility.
To start or stop audit trail collection for a target:
1. Log in to the Audit Vault Server console as an administrator.
2. Click the Targets tab. The Targets tab in the left navigation menu is selected bydefault.
3. Select the specific target by clicking on the name.
Chapter 7Configuring and Managing Audit Trail Collection
7-14
4. Under the Audit Data Collection section, select the targets that have the audit trails thatyou want to start or stop.
5. Click Stop or Start accordingly.
Note:
• You cannot start an audit trail while the Audit Vault Agent is updating.
• If your environment has a large number of audit files to collect, for exampleone million or more, then the audit trail may take a few minutes to start.
See Also:
• ALTER SYSTEM SET to set parameters on when and how many times thesystem attempts Autostart using the AVCLI utility.
• Deploying and Activating the Audit Vault Agent on Host Computers
• Updating Oracle Audit Vault Agent
• Using Audit Vault Server Console
7.4.4 Checking the Status of Trail Collection in Audit Vault ServerLearn about checking the status trail collection in Audit Vault Server.
To check the status of audit trails:
1. Log in to the Audit Vault Server console as an administrator.
2. Click the Targets tab. The Targets tab in the left navigation menu is selected by default.
3. Click Audit Trails tab in the left navigation menu.
It lists targets that have audit trails configured. Check the Collection Status column. Thestatus can be one of the following:
• Idle - Trail is up and running, no new audit data to collect. In this state, the trail iswaiting for the target to generate new audit data.
• Starting - Collection process is starting.
• Collecting - Trail is currently actively collecting audit data.
• Stopping - Collection process is stopping.
• Stopped - Trail is currently stopped.
• Recovering - Trail is recovering after it has been stopped previously. The trail wasstopped before updating the checkpoint for the records collected. In the recoverystate, the trail reads records starting from the current checkpoint and filter out theduplicate records which were already read. The recovery state can take a whiledepending on the server load.
• Unreachable - A heartbeat timeout has occurred, indicating that a heartbeat messagehas not been received from the trail in the last 30 minutes. This status is temporary
Chapter 7Configuring and Managing Audit Trail Collection
7-15
unless the trail has crashed. The Audit Vault Server checks the status of theaudit trail. It attempts to check the status 5 times (by default) in Oracle AVDFreleases 20.1 to 20.6. In Oracle AVDF release 20.7 and onwards, the AuditVault Server attempts 20 times (by default) to reach the audit trail beforeconcluding it is Unreachable.
• Archive data files are required (link) - If you see this link, it means a new audittrail contains expired audit records that must be archived, and that therequired archive data files are not available.
The Trail Autostart Details column indicates whether autostart is enabled for atrail, and whether there have been attempts to restart a failed audit trail (forexample, if a target goes down temporarily).
Tip: You can sort and filter the audit trail list.
Note:
• To view audit trails status for a specific agent host, click the name of thetrail.
• If an audit trail fails to start, then you can get more information by lookingat the Error Message column.
See Also:
Handling New Audit Trails with Expired Audit Records
Checking Downtime History of the Trail
Audit Vault Server console displays the current status of the trail. Starting Oracle AVDF20.6, the Audit Vault Server console maintains record of the trail downtime. It alsodisplays the reason for the downtime. This information is available in the DowntimeReport. This report contains downtime information of every trail and a cumulativedowntime report of all the trails in the Audit Vault Server. It captures the intervalsduring which the specific trail may have gone down either due to an error, or if it wasmanually stopped through the Audit Vault Server console, or it had changed status toone of the following:
Status Description
STOPPED_ERROR If this status is seen, then the trail has gone down due toan error. In this case there is an additional column ErrorMessage that specifies the reason the trail wasstopped.
UNREACHABLE This status is dynamically calculated and is seen whenthe trail is unable to connect to the Audit Vault Server formore than 30 minutes.
Chapter 7Configuring and Managing Audit Trail Collection
7-16

STOPPED_UNKNOWN If this status is seen, then the trail downtime data hasbeen purged as the trail is down for more than thespecified retention period.
STOPPED The trail has stopped and is not collecting data.
STARTING The trail is about to start with collection.
STOPPING The trail is about to stop collecting data.
COLLECTING The trail is active and collecting data.
IDLE The trail is idle and not collecting data.
RECOVERING The trail is in recovering mode.
Note:
Not all the status information is available in the reports.
To capture downtime report for the trail and to view the history of the trail, follow these steps:
1. Log in to the Audit Vault Server console as an administrator.
2. Click the Targets tab.
3. Click Audit Trails in the left navigation menu.
4. Select the trails for which the downtime report needs to be generated.
5. Click Downtime button. The downtime report for the selected trails is displayed. Use thefilter option, download the report, or click the back button to navigate to the Audit Trailstab.
The downtime of the Audit Vault Agent, the specific time as to when the Agent went down, theduration for which the data has not been captured, and the reason for the Agent going downis also made available in the reports.
Chapter 7Configuring and Managing Audit Trail Collection
7-17
Note:
• This downtime data is available, archived, and purged like any other datamanaged by Oracle AVDF. By default in release 20.6, the downtime datais available for a period of one month and is purged after that.
• The history of trails configured prior to upgrade to Oracle AVDF 20.6 isnot captured or available.
• The report for new trails configured after upgrade to Oracle AVDF 20.6 isavailable.
• Data for the trails configured after upgrade to Oracle AVDF 20.6 isavailable from the time the trail was started.
7.4.5 Audit Collection Best PracticesLearn about best practices for audit collection.
• There may be too many records (more than a million) in a table audit trail. This canslow down audit data collection. This in turn results in reduced throughput of thetable audit trail.
• In case of directory trail, there may be too many files (more than a thousand) witha size of more than 1GB. This can slow down audit data collection. This in turnresults in reduced throughput of the directory trail.
• It is advised to periodically purge the records which have been already read by theaudit trail. For some targets, Audit Vault Agent contains scripts for cleanup. Referto Audit Trail Cleanup for more information. In case of remaining targets where therecords have already been read by the audit trail, it can be manually cleaned up.
7.4.6 Handling New Audit Trails with Expired Audit RecordsLearn about handling new audit trails with expired audit records.
With established audit trail collection, audit data is retained in Oracle Audit VaultServer for the Months Online period of a retention (or archiving) policy. After thisperiod, the data files are made available for archiving. The data is then kept inarchives for the Months Archived period of the retention policy, and is available toretrieve to the Audit Vault Server during that period.
However, when you add a new audit trail to an existing target, the audit data collectedmay contain records that fall into the Months Archived period in the retention policyassigned to this target. That is, the online period for these audit records has expiredand they should be archived according to the retention policy.
In this case, Oracle Audit Vault and Database Firewall attempts to automaticallyarchive these expired records during the new audit trail collection. In some cases, youmay need to make the archive data files available in order for the audit trail tocomplete collection.
When collecting a new audit trail for an existing target, follow these instruction if yousee an Archive data files are required link in the Collection Status of the audit trail.
To make archive data files accessible:
Chapter 7Configuring and Managing Audit Trail Collection
7-18

1. Log in to the Audit Vault Server console as an administrator.
2. Click the Targets tab, and then click Audit Trails.
3. In the Collection Status column, if applicable, click the Archive data files are requiredlink.
The required archive data files are listed.
4. Check that required data files are available in the archive location, and that theconnection to the location is set up correctly.
5. After you make the required data files available, restart this audit trail.
See Also:
• Defining Archive Locations to check the required data files are available in thearchive location and the connection to the location is established.
• About Archiving and Retrieving Data in Oracle Audit Vault and DatabaseFirewall
• Using Audit Vault Server Console
7.4.7 Deleting an Audit TrailLearn how to delete an audit trail.
1. Log in to the Audit Vault Server console as an administrator.
2. Click the Targets tab.
3. In the left navigational menu, click Audit Trails.
4. Select the audit trails that you want to delete and then, if necessary, click Stop to stop theaudit trail.
5. Select the audit trails that you want to delete, and then click Delete.
7.4.8 Converting Audit Record Formats for CollectionYou can use special tools to convert audit record formats so that Audit Vault and DatabaseFirewall can collect these records.
7.4.8.1 Prerequisites for Converting Oracle Audit Vault Record MySQL FormatsLearn about the prerequsites for converting Oracle Audit Vault record MySQL formats.
Before you begin the format conversion process, ensure that you have completed thefollowing tasks.
• Register the MySQL target in the Audit Vault Server. See Registering or RemovingTargets in Audit Vault Server.
• Deploy the Audit Vault Agent on the MySQL host machine. See Deploying the Audit VaultAgent.
Chapter 7Configuring and Managing Audit Trail Collection
7-19
7.4.8.2 Running the XML Transformation Utility for MySQL Audit FormatsLearn how to run the XML transformation utility for MySQL audit formats.
Audit records of some databases are in the format that cannot be read directly byOracle Audit Vault and Database Firewall collectors. Such audit records are firstconverted to a readable format and then collected.
For MySQL targets, Oracle Audit Vault and Database Firewall provides a utility totransform the MySQL XML audit format log file into a required format for audit datacollection. You must run this utility on the MySQL host machine before adding an audittrail.
Note:
This procedure is only applicable for the old audit format. The default auditformat of MySQL 5.5 and 5.6 is old. The default audit format of MySQL 5.7 isnew. The audit format can be changed by modifying the configuration onMySQL Server.
To run the XML Transformation Utility:
1. On the MySQL host computer, go to the directory AGENT_HOME/av/plugins/com.oracle.av.plugin.mysql/bin/
2. Run the following command:
MySQLTransformationUtility.bat inputPath=path_to_log_folder outputPath=path_to_converted_xml agentHome=path_to_AGENT_HOME interval=interval_in_minutes xslPath=XSL_file_path securedTargetName=registered_secured_target_name
This command contains the following variables:
• path_to_log_folder:
– For MySQL version prior to 5.7.21: The path to the MySQL log folderlisted in my.ini
– For MySQL version 5.7.21 and later: The path to the MySQL log folderlisted in my.ini\<audit file name>.*.log
• path_to_converted_xml - The path to the folder where the converted XMLfiles will reside. You will use this path as the Trail Location when creating theaudit trail for this MySQL target in the Audit Vault Server, or when startingaudit trail collection using the AVCLI command line.
• path_to_AGENT_HOME - The path to the installation directory of the Audit VaultAgent
• interval_in_minutes - (Optional) The waiting time, in minutes, between twotransformation operations. If not specified, the default it is 60 minutes. To runthe transformation utility once, specify -ve for this argument.
• XSL_file_path - (Optional) The path to the XSL file to use for thetransformation.
Chapter 7Configuring and Managing Audit Trail Collection
7-20
• registered_secured_target_name - The name of the MySQL target registered in theAudit Vault Server.
Example:
For MySQL version prior to 5.7.21: MySQLTransformationUtility.batinputPath=D:\MySQLLog outputPath=D:\ConvertedXML agentHome=E:\MySQLCollectorinterval=1 securedTargetName=MYSQL_DEVFor MySQL version 5.7.21 and later: MySQLTransformationUtility.batinputPath=D:\MySQLLog\audit.*.log outputPath=D:\ConvertedXMLagentHome=E:\MySQLCollector interval=1 securedTargetName=MYSQL_DEV
7.4.8.3 Converting Binary Audit Files to ASCII Format for IBM DB2Learn about converting binary audit files to ASCII format for IBM DB2.
IBM DB2 creates its audit log files in a binary file format that is separate from the DB2database. For IBM DB2 targets, you must convert the binary file to an ASCII file before eachtime you collect audit data (start an audit trail) for a DB2 database, using the scriptinstructions in this section.
Ideally, schedule the script to run periodically. If the script finds older text files that havealready been collected by the DB2 audit trail, then the script deletes them. It creates a new,timestamped ASCII text file each time you run it. Optionally, you can set the script to purgethe output audit files.
Note:
It is recommended that you extract audit log files for each database and eachinstance in a separate directory. You must configure separate audit trails for eachdatabase and each instance in Oracle AVDF.
1. Identify a user who has privileges to run the db2audit command.
This user will extract the binary files to the text files.
2. This user must have execute privileges to run the conversion script from the OracleAVDF directory. The script name is DB295ExtractionUtil (for Microsoft Windows, this fileis called DB295ExtractionUtil.bat.)
3. This user identified in the initial step, must have read permission forthe $AGENT_HOME/av/atc directory and its contents.
4. In the server where you installed the IBM DB2 database, open a shell as the SYSADM DB2user.
5. Set the following variables:
• AGENT_HOME (this is the Audit Vault Agent installation directory)
• DB2AUDIT_HOME (this directory points to the main directory that contains the db2auditcommand)
6. Ensure that the Oracle AVDF owner of the agent process has read permissions for theaudit text files that will be generated by the extraction utility.
7. Log in as the DB2 user that you identified in IBM DB2 for LUW Setup Scripts.
Chapter 7Configuring and Managing Audit Trail Collection
7-21
8. Run one of the following scripts, depending on the version of DB2 that you haveinstalled:
• For supported DB2 databases:
DB295ExtractionUtil -archivepath archive_path -extractionpath extraction_path -audittrailcleanup yes/no -databasename database_name
In this specification:
– archive_path: This is DB2 archive path configured using the db2auditutility.
– extraction_path: This is the directory where the DB2 extraction utilityplaces the converted ASCII text file. This file is created in either thedb2audit.instance.log.0.YYYYDDMMHHMMSS.out ordb2audit.db.database_name.log.0.20111104015353.out format.
– audittrailcleanup yes/no: Enter yes or no, to enable or disable theaudit trail cleanup. Entering yes deletes the archived IBM DB2 audit filesthat were collected by the Oracle AVDF DB2 audit trail. If you omit thisvalue, then the default is no.
– database_name: (Optional) This is the name, or names separated byspaces, of the database(s) that contain the audit records.
The utility creates a separate ASCII file for each database named in thecommand. If this parameter is omitted, then the utility converts theinstance binary to an ASCII file. This parameter enables you to collectcategories of audit records such as object maintenance (objmaint)records, which capture the creation and dropping of tables.
Important: If you enter more than one database name in this command,be sure to put the ASCII file for each database in a separate directory afteryou run the command.
– audittrailcleanup yes/no: Enter yes or no, to enable or disable theaudit trail cleanup. Entering yes deletes the archived IBM DB2 audit filesthat were collected by the Oracle AVDF DB2 audit trail. If you omit thisvalue, then the default is no.
• Support for IBM DB2 Database Partition Feature
Starting Oracle AVDF 20.5, IBM DB2 Database Partition Feature is supportedon Linux and AIX platforms. This functionality is supported for DB2 version10.5 and later. The Database Partition functionality is not supported onWindows platform.
Specify the following parameters in the DB295ExtractionUtil script:
– databasepartition yes/no: (Optional) Enter yes if current DB2 setup hasDatabase Partition Feature setup, else enter no. If you omit this value,then the default is no.
– nodes: (Optional) This is the name of the node (or multiple nodes)separated by spaces, of the DB2 Database Partition Feature setup.
Chapter 7Configuring and Managing Audit Trail Collection
7-22
Note:
• If the archive path and extraction path are on the shared location, that isaccessible by all the nodes in the Database Partition Feature (DPF) setup,then you can exclude the nodes input parameter. The script generates thearchive data and audit data for all the nodes in the Database PartitionFeature setup, in the shared location.
• If the archive path and extraction path are host machine specific locations,that are accessible only by the nodes on that machine, then it isrecommended to run the script on every machine of the Database PartitionFeature setup. Include the nodes input parameter with only the nodespresent on the specific machine.
For example: Machine 1 has Node 0 and Node 1. Machine 2 has Node 2and Node 3. The script must be run on Machine 1 with parameters -databasepartition yes -nodes 0 1. The script must be run on Machine 2with parameters -databasepartition yes -nodes 2 3.
Example 1: The following command creates an ASCII file for the TOOLSDB database,places the file in the /home/extract_dir directory, and deletes the archive files afteraudit data is collected:
DB295ExtractionUtil -archivepath /home/archive_dir -extractionpath /home/extract_dir -audittrailcleanup yes -databasename TOOLSDB
Example 2: The following command creates an ASCII file for the database instance,places the file in the /home/extract_dir directory, and deletes the archive files afteraudit data is collected:
DB295ExtractionUtil -archivepath /home/archive_dir -extractionpath /home/extract_dir -audittrailcleanup yes
Example 3: The following command creates an ASCII file for all the nodes of thedatabase instance with Database Partition Feature setup, places the file in the /home/extract_dir directory, and deletes the archive files after audit data is collected:
DB295ExtractionUtil -archivepath /home/archive_dir -extractionpath /home/extract_dir -audittrailcleanup yes -databasepartition yes
Example 4: The following command creates an ASCII file for the specified nodes (0, 1,and 2) of the database instance with Database Partition Feature setup, places the file inthe /home/extract_dir directory, and deletes the archive files after audit data iscollected:
DB295ExtractionUtil -archivepath /home/archive_dir -extractionpath /home/extract_dir -audittrailcleanup yes -databasepartition yes -nodes 0 1 2
Chapter 7Configuring and Managing Audit Trail Collection
7-23
Example 5: The following command creates an ASCII file for all the nodes of theTOOLSDB database with Database Partition Feature setup, places the file in the /home/extract_dir directory, and deletes the archive files after audit data iscollected:
DB295ExtractionUtil -archivepath /home/archive_dir -extractionpath /home/extract_dir -audittrailcleanup yes -databasename TOOLSDB -databasepartition yes
Example 6: The following command creates an ASCII file for the specified nodes(0, 1, and 2) of the TOOLSDB database with Database Partition Feature setup,places the file in the /home/extract_dir directory, and deletes the archive filesafter audit data is collected:
DB295ExtractionUtil -archivepath /home/archive_dir -extractionpath /home/extract_dir -audittrailcleanup yes -databasename TOOLSDB -databasepartition yes -nodes 0 1 2
To schedule the script to run automatically, follow these guidelines:
• UNIX: Use the crontab UNIX utility. Provide the same information that you wouldprovide using the parameters described previously when you normally run thescript.
• Microsoft Windows: Use the Windows Scheduler. Provide the archive directorypath (for release 9.5 databases only), extraction path, and target database namein the scheduled task.
7.4.9 Configuring Audit Trail Collection for Oracle Real ApplicationClusters
You can configure audit trail collection for Oracle Real Application Clusters (OracleRAC).
Configure a SCAN listener for the RAC and use the SCAN listener IP as the single IPduring target registration.
To configure Audit Trail collection for Oracle Real Application Clusters (RAC), followthese guidelines.
Audit Trail Type Number of Audit Trails
TABLE To configure table trail audit data collection from Oracle RACenvironment, 1 audit trail is sufficient.
DIRECTORY To configure directory audit data collection from Oracle RACenvironment, separate audit trails are required. The trail location mustbe different directories in the shared storage of the Oracle RACenvironment.
TRANSACTION LOG To configure Transaction Log audit data collection from Oracle RACenvironment, 1 audit trail is sufficient.
Chapter 7Configuring and Managing Audit Trail Collection
7-24

See Also:
Adding Audit Trails in Audit Vault Server to configure an audit trail.
7.4.10 Configuring Audit Trail Collection for CDBs and PDBsLearn about configuring audit trail collection for CDBs and PDBs.
Oracle Database can work as Container Database (CDB) or Pluggable Databases (PDB). APDB is a portable collection of schemas, schema objects, and nonschema objects thatappears to an Oracle Net client as a non-CDB. All Oracle databases before Oracle Database12c are non-CDB.
The PDB and CDB can be registered as targets. Oracle Audit Vault and Database Firewallsupports CDB and PDB level audit collection. To collect audit data from multiple PDBinstances within a CDB, adopt either one of the following approaches:
Approach 1: Create a separate target for each PDB instance and create audit trail for eachPDB target, which collects data from UNIFIED_AUDIT_TRAIL table.
Approach 2: Create one target for the CDB and create audit trail which collects data fromCDB_UNIFIED_AUDIT_TRAIL table.
Note:
• In Oracle AVDF 20 data will be collected from CDB_UNIFIED_AUDIT_TRAIL, onlyif all the PDBs are up and running.
• CDB_UNIFIED_AUDIT_TRAIL provides audit records from all PDB instances in amultitenant environment. The performance of audit collection fromCDB_UNIFIED_AUDIT_TRAIL is lower than audit collection fromUNIFIED_AUDIT_TRAIL of every PDB instance. If the number of audit recordsgenerated per day in CDB_UNIFIED_AUDIT_TRAIL is higher than 8 million, thenconfigure audit collection from UNIFIED_AUDIT_TRAIL of every PDB instance.
To configure Audit Trail collection for CDB or PDB, follow these guidelines:
Chapter 7Configuring and Managing Audit Trail Collection
7-25

Audit Trail Type Guidelines
TABLE • Audit records specific to CDB activities can be collected fromUNIFIED_AUDIT_TRAIL table of the CDB target. Audit recordscorresponding to CDB activities and all PDB activities can becollected from CDB_UNIFIED_AUDIT_TRAIL.
• Every PDB stores it's own audit data in it's ownUNIFIED_AUDIT_TRAIL table which does not contain audit dataof other PDBs. Separate audit trails can be configured for the PDBtarget to collect data corresponding to that specific PDB only.
• For PDB target, collection from CDB_UNIFIED_AUDIT_TRAIL isnot supported.
Note:Audit collection from CDB_UNIFIED_AUDIT_TRAIL is supported inrelease 20.1.0.0.0.
DIRECTORY • Audit from directory trail can be collected for CDB, by providingdirectory trail location as <value of AUDIT_FILE_DEST>(database parameter).
• Audit from directory trail can be collected for each PDB, byproviding directory trail location as <value ofAUDIT_FILE_DEST>/<GUID of the PDB>.
Note:If you are using a multitenant container database (CDB) in OracleDatabase 12c, then for a CDB you must register a target for the CDBas well as for every PDB.
CDB Trail Enhancement in Oracle AVDF 20.2
In Oracle AVDF 20.2.0.0.0 (or 20 RU2), audit data is collected fromCDB_UNIFIED_AUDIT_TRAIL for PDBs that are up and running, even if some of thePDBs are down. When a PDB is down, the data corresponding to the PDB with statusdown is not visible in CDB_UNIFIED_AUDIT_TRAIL. When the PDB which was earlierdown comes up, then the data corresponding to the specific PDB is collected fromCDB_UNIFIED_AUDIT_TRAIL.
If any PDB is down, then the last archive timestamp is not set on theCDB_UNIFIED_AUDIT_TRAIL, even if other PDBs are up and running. Hence thoserecords that have already been read by the audit trail are not purged from theCDB_UNIFIED_AUDIT_TRAIL and this can lead to severe performance degradation of theaudit trail.
If there are any PDBs that are permanently taken down or taken down for few days,then they must be specified in the AV.COLLECTOR.IGNORE_PDB_IF_DOWN_LIST targetattribute. The value of the AV.COLLECTOR.IGNORE_PDB_IF_DOWN_LIST target attribute isa list of PDBs separated by a colon. For example, PDB1:PDB2:PDB5.
If a PDB is down, but is present in the AV.COLLECTOR.IGNORE_PDB_IF_DOWN_LIST, thenthe audit trail ignores the specific PDB if it is down and sets the last archive timestampon the CDB_UNIFIED_AUDIT_TRAIL if all the other PDBs are up and running.
Audit data collection from PDBs which are mentioned in theAV.COLLECTOR.IGNORE_PDB_IF_DOWN_LIST is not completely accurate. Some of theaudit records for these PDBs may be missed. It is also possible that the data is purgedfrom these PDBs, depending on when the last archive timestamp was set.
Chapter 7Configuring and Managing Audit Trail Collection
7-26

If there is a PDB with status down, that was present in theAV.COLLECTOR.IGNORE_PDB_IF_DOWN_LIST, and has to brought up, then first remove it fromAV.COLLECTOR.IGNORE_PDB_IF_DOWN_LIST. Wait for 10 minutes so that the audit trail readsand processes the updated AV.COLLECTOR.IGNORE_PDB_IF_DOWN_LIST attribute. Afterapproximately 10 minutes, bring up the PDB. This ensures that all future records aresuccessfully collected from this PDB without any data loss.
See Also:
Adding Audit Trails in Audit Vault Server to configure an audit trail.
7.5 Configuring Database Firewall Monitoring PointsLearn about configuring Database Firewall monitoring points.
Note:
If you are using Transparent Application Failover (TAF), Fast Application Notification(FAN), or the Oracle Notification Service (ONS), then SQL commands are not sentthrough this channel. There is no need to route them through Oracle DatabaseFirewall. ONS communications bypass the Database Firewall and connect directlyto the ONS listener. ONS communications, including destination host and port, areconfigured in the ons.config properties file located on the ONS server.
7.5.1 About Configuring Database Firewall Monitoring Points for TargetsLearn about configuring Database Firewall monitoring points for the target.
If you are monitoring databases with a Database Firewall, you must configure one monitoringpoint for every target database that you want to monitor with the firewall. The monitoring pointconfiguration allows you to specify:
• Firewall monitoring mode
• Database Firewall used for the monitoring point
• Identify the target database being monitored
• Network traffic sources to the database
Oracle Database Firewall can be deployed in the following modes:
• Monitoring (Out-of-Band) - In this deployment mode, Oracle Database Firewall canmonitor and alert on SQL traffic, but cannot block or substitute SQL statements.
• Monitoring (Host Monitor) - In this deployment mode, Oracle Database Firewall canmonitor and alert on SQL traffic, but cannot block or substitute SQL statements.
• Monitoring / Blocking (Proxy) - In this deployment mode the Database Firewall canmonitor, alert, block, and substitute SQL statements.
Before configuring monitoring points, configure network traffic sources as part of databasefirewall configuration.
Chapter 7Configuring Database Firewall Monitoring Points
7-27

See Also:
Configuring Database Firewall and Its Traffic Sources on Your Network
7.5.2 Creating and Configuring a Database Firewall Monitoring PointLearn about creating and configuring Database Firewall monitoring points.
Configure Database Firewall monitoring points using the Audit Vault Server console. Ifyou have configured a resilient pair of Audit Vault Servers, configure the monitoringpoints on the primary server.
Prerequisites
• The Database Firewall instances must be paired before configuring the monitoringpoints, targets, and policies.
• Ensure that you have configured traffic sources on the Database Firewall you planto use for this monitoring point. See Configuring Database Firewall and Its TrafficSources on Your Network for more information.
1. Log in to the Audit Vault Server console as an administrator.
2. Click the Targets tab.
The Targets tab in the left navigation menu is selected by default.
3. Select and click the target you wish to modify.
4. From the Database Firewall Monitoring section on the main page, click on Add.The Database Firewall Monitor dialog is displayed.
5. In the Basic tab (for 20.3 or later the name of the tab is Core), enter the name forthis Database Firewall instance or select one from the list.
6. Select a Mode from the following:
• Monitoring (Out-of-Band)
• Monitoring (Host Monitor)
• Monitoring / Blocking (Proxy)
7. In the Network Interface Card field, select one from the list. For Monitoring(Host Monitor) mode, see Create a Monitoring Point for the Host Monitor.
8. Select the Proxy Ports from the list for Monitoring / Blocking (Proxy) mode.This field does not apply to other modes of Database Firewall deployment.
9. In the Connection Details section, select one or more targets. You can Add thetargets from the list.
Chapter 7Configuring Database Firewall Monitoring Points
7-28
Note:
• Select the check box against RAC Instance field if the target is Oracle RealApplication Cluster. Select this option for Oracle Databases where themonitoring point is in Monitoring / Blocking (Proxy) mode. ForMonitoring (Out-of-Band) mode, uncheck this box. Enter the IP address ofthe individual RAC node in Target Connections field.
• Select the Network Interface Card and Proxy Ports for Monitoring /Blocking (Proxy) mode. The proxy port is not applicable for monitoringonly modes.
Enter the following information for each network location of the database. Click the Addbutton to configure the following additional details of the target instance:
• Host Name / IP Address
Note:
For Oracle RAC target, if RAC Instance checkbox was enabled, enter theFQDN of the SCAN Listener as the host name.
• Port
• Service Name (Optional, for Oracle Database only). SID can be used in this field. Toenter multiple service names and/or SIDs, enter a new line for each of them, andthen click Add. Multiple entries are allowed for monitoring only mode. ForMonitoring / Blocking (Proxy) mode, only one target detail is allowed. To enforcedifferent Database Firewall policies for different service names or SIDs on the samedatabase, create a separate monitoring point, and register a separate target for eachof the service name or SID.
Note:
Targets are listed here with the policy details. Choose the right deploymentmode as per the requirement. Choose Monitoring / Blocking (Proxy) formonitoring, blocking, and alerting. Choose Monitoring (Out-of-Band) orMonitoring (Host Monitor) modes for monitoring and alerting only.
10. In the Advanced tab, enter the number of Database Firewall Monitor Threads(minimum and default value is 1). This controls the number of traffic handling threads inthe Database Firewall monitoring point. Use due caution before modifying the value.
11. Select the check box for Capture Database Response field. If you check this field, theDatabase Firewall monitors the SQL response from the database. Select Full ErrorMessage check box to capture the database response codes and error codes.
12. Select the check box Decrypt With Native Network Encryption Key, for enablingdecryption of traffic if Oracle Database is using Native Network Encryption. Decrypt withnative network encryption key option also supports retrieval of session information forOracle Database. Fill in the remaining fields as applicable.
Chapter 7Configuring Database Firewall Monitoring Points
7-29

For Oracle RAC target (if RAC Instance checkbox was enabled in the Basic tab(for 20.3 or later the name of the tab is Core)), enter the SCAN Listener IPaddress.
For Oracle standalone database targets, enter the IP address of the databaselistener.
For other database types (non Oracle) the field is Retrieve session informationfrom target DB.
Note:
Ensure the Database Firewall is allowed to make a network connectionto the above mentioned database listener.
13. Click Save at the bottom of the dialog to save the configuration of the monitoringpoint.
The new monitoring point appears in the list and starts automatically.
Note:
Default Database Firewall Policy will be applied for thisDatabase Firewall Monitoring Point. This message is displayed atthe bottom of the dialog.
14. Click Save in the main page.
15. To stop or restart the monitoring point, select it from the Database FirewallMonitoring section and click Stop or Start.
Note:
When you use the Monitoring / Blocking (Proxy) mode, you must configureany external devices that use IP or MAC address spoofing detection rulessuch that they ignore database IP or MAC address changes made by theDatabase Firewall.
See Also:
• High Availability in Oracle AVDF for details on configuring a resilient pairof servers.
• Oracle Audit Vault and Database Firewall Concepts Guide for moreinformation on different modes.
• Configuring Traffic Sources for more information on traffic sources.
• Configuring Database Firewall As A Traffic Proxy
Chapter 7Configuring Database Firewall Monitoring Points
7-30
7.5.3 Modifying a Database Firewall Monitoring PointAfter you create a Database Firewall monitoring point, you can modify the settings, enabledatabase response monitoring, monitor native network encrypted traffic for Oracle Database,and host monitoring.
1. Log in to the Audit Vault Server console as an administrator.
2. Click Targets tab.
The Targets tab in the left navigation menu is selected by default.
3. Select and click on a specific target from the list.
4. From the Database Firewall Monitoring section on the main page, click the name of themonitoring point you want to modify.
5. In the Database Firewall Monitor dialog, you can change some of the settings.
6. Select a different Mode from the following:
• Monitoring (Out-of-Band) - In this deployment mode, Database Firewall can monitorand alert on SQL traffic, but cannot block or substitute SQL statements.
• Monitoring / Blocking (Proxy) - In this deployment mode, the Database Firewallcan block or substitute SQL statements.
• Monitoring (Host Monitor) - In this deployment mode, Database Firewall canmonitor and alert on SQL traffic, but cannot block or substitute SQL statements.
Note:
• For Oracle AVDF 20.2 and earlier, while configuring the Monitoring (HostMonitor) deployment mode, you must select a network interface card thatis not used as a Management Interface.
• For Oracle AVDF release 20.3 and later, while configuring the Monitoring(Host Monitor) deployment mode, you must select a NIC which has an IPaddress configured. This may be the Management Interface. This is theNIC to which the Host Monitor will connect. When you select Monitoring(Host Monitor) as the deployment type, only those network interface cardswhich have IP address configured are displayed in the Network InterfaceCard field.
7. Select a different traffic source in the field Network Interface Card.
8. In the Advanced tab, enter the number of Database Firewall Monitor Threads(minimum value is 1). This controls the number of traffic handling threads in the DatabaseFirewall monitoring point. This value should be left at the default (1) unless there areindications that the Database Firewall is unable to cope with the amount of traffic it isreceiving.
9. Select the check box for Capture Database Response field. If you check this field, theDatabase Firewall monitors the SQL response from the database. Select Full ErrorMessage check box to capture the database response codes and error codes.
10. Select the check box Enable TLS if the database client and server are communicatingover TLS protocol. The Database Firewall acts as a TLS proxy, serves as a TLS server
Chapter 7Configuring Database Firewall Monitoring Points
7-31
for the database client, and acts as a TLS client to the database. The DatabaseFirewall and the Audit Vault Server have access to the decrypted SQL traffic forfurther analysis. If TLS encryption is chosen, the field for Native NetworkEncryption is disabled. This feature is applicable only for Database Firewalldeployed in Monitoring / Blocking (Proxy) mode.
11. Select the appropriate TLS level in the Inbound TLS (client connection) field.Level-4 is selected by default.
12. Select the appropriate TLS level in the Outbound TLS (database connection)field. Level-4 is selected by default.
13. Select the check box.
Check box For Oracle AVDF Release
Decrypt With Network NativeEncryption Key
20.5 and earlier
Decrypt With Native NetworkEncryption Key
20.6 and later
This is for enabling decryption of traffic if Oracle Database is using Native NetworkEncryption. Decrypt with native network encryption key option also supportsretrieval of session information for Oracle Database. Fill in the other fields asapplicable.
For Oracle RAC target (if RAC Instance checkbox was enabled in the Basic tab(for 20.3 or later the name of the tab is Core), enter the SCAN Listener IP address
For Oracle standalone database targets, enter the IP address of the databaselistener.
For other database types (non Oracle) the field is Retrieve session informationfrom target DB.
Note:
Ensure the Database Firewall is allowed to make a network connectionto the above mentioned database listener.
14. Click Save at the bottom of the dialog to save the configuration of the monitoringpoint.
15. Click Save in the main page.
See Also:
• Using Audit Vault Server Console
• Configuring and Using Database Response Monitoring
• Configuring Advanced Settings for Database Firewall
Chapter 7Configuring Database Firewall Monitoring Points
7-32
7.5.4 Starting, Stopping, or Deleting Database Firewall Monitoring PointsLearn about starting, stopping, and deleting Database Firewall monitoring points.
1. Log in to the Audit Vault Server console as an administrator.
2. Click the Targets tab.
3. Click on a specific target. The details of the target are displayed on the main page.
4. Under Database Firewall Monitoring tab, select a specific Database Firewall monitoringpoint.
5. Click one of the following buttons:
• Start - To start the monitoring point
• Stop - To stop the monitoring point
• Delete - To delete the monitoring point
See Also:
Using Audit Vault Server Console
7.5.5 Viewing the Status of Database Firewall Monitoring PointsLearn about viewing Database Firewall monitoring point status.
1. Log in to the Audit Vault Server console as an administrator.
2. Click the Targets tab.
3. Select a specific target. The details of the specific target are displayed on the main page.
4. Under Database Firewall Monitoring section, click on a specific Database Firewallmonitoring point.
A list of monitoring points and their status is displayed. Possible status values are:
• Up - The monitoring point is up and running, and there are no errors.
• Suspended - The user has stopped the monitoring point, and there are no errors.
• Down - The monitoring point is not working, probably due to errors.
• Unreachable - There are communication errors between the Database Firewall andthe Audit Vault Server.
See Also:
Using Audit Vault Server Console
Chapter 7Configuring Database Firewall Monitoring Points
7-33

7.5.6 Finding the Port Number Used by a Database FirewallMonitoring Point
Learn about finding Database Firewall monitoring point port numbers.
1. Log in to the Audit Vault Server console as an administrator.
2. Click the Targets tab.
3. Select a specific target. The details of the specific target are displayed on the mainpage.
4. Under Database Firewall Monitoring section, click on a specific DatabaseFirewall monitoring point.
5. The port number is displayed in the field Proxy Ports.
See Also:
Using Audit Vault Server Console
7.6 Configuring Stored Procedure Auditing (SPA)Learn about configuring stored procedure auditing (SPA).
Stored procedure auditing (SPA) enables Oracle Audit Vault and Database Firewallauditors to audit changes to stored procedures on target databases. Oracle Audit Vaultand Database Firewall connects to the database server at scheduled intervals anddiscovers any changes or additions that have been made to stored procedures.
To enable SPA, you simply configure the user account privileges necessary for OracleAudit Vault and Database Firewall to do stored procedure auditing on a target. OracleAudit Vault and Database Firewall provides scripts for setting up these privileges. Runthe scripts specific to the target type.
An Oracle Audit Vault and Database Firewall auditor can view changes to storedprocedures in reports if the auditor enables Stored Procedure Auditing in the targetconfiguration.
See Also:
• Scripts for Oracle AVDF Account Privileges on Targets
• Supported Targets for Oracle Audit Vault and Database Firewall
• Oracle Audit Vault and Database Firewall Auditor's Guide
Chapter 7Configuring Stored Procedure Auditing (SPA)
7-34

7.7 Configuring Database Firewall for Databases That UseNative Network Encryption
Learn about monitoring native network encrypted traffic for Oracle Database.
You can monitor native network encrypted traffic for Oracle Database to obtain the name ofthe database user, operating system, and client program that originated a SQL statement, ifthis information is not available from the network traffic. This information is then madeavailable in the reports.
Note:
In order to fetch the session information successfully, the target database shouldhave configuration to do a reverse DNS lookup under certain cases where clientmachine is a Windows instance or uses network host names.
To configure monitoring of native network encrypted traffic for Oracle Database, follow thesteps in this section.
7.7.1 Step 1: Apply the Specified Patch to the Oracle DatabaseLearn how to apply the specified patch to Oracle Database.
Note:
This step is not required for Oracle Database versions 11.2.0.4 or later. For allversions prior to 11.2.0.4, apply the patch specified in this section on the OracleDatabase that is using Network Encryption.
To apply the patch:
1. Shut down the Oracle Database.
2. Get the patch identified by the bug number 13051081.
The patch file will be in the format: p13051081_OracleVersion_Platform.zip. Forexample: p13051081_112030_Linux-x86-64.zip
3. Unzip the patch .zip file in a directory, identified here as Patch_Directory.
4. Go to the directory Patch_Directory/13051081.
5. Execute the command:
$ opatch apply6. Start the Oracle Database.
Chapter 7Configuring Database Firewall for Databases That Use Native Network Encryption
7-35
7.7.2 Step 2: Run the Oracle Advance Security Integration ScriptLearn how to run the Oracle Advance Security integration script.
To run the Network Encryption integration script:
1. From the Oracle Audit Vault and Database Firewall utilities file dbfw-utility.zip(downloaded with the software), copy the database directory to a location fromwhich you can connect to the Oracle Database being patched.
2. In this location, go to the database/ddi directory and uncompress one of the twooracle compressed files (both contain the same content), preferably into adirectory called oracle.
This directory now contains the uncompressed file:advanced_security_integration.sql.
3. Execute the following command as a user with privileges to create users and grantprivileges.
sqlplus / as sysdba @advanced_security_integration <param1> <param2><param3>where <param1> is the schema or username
<param2> is the password to be set for the username
<param3> valid values are ASO and SESSION_INFO
ASO retrieves native network encryption key and session information.
SESSION_INFO retrieves session information.
Note:
The third parameter (<param3>) is mandatory. In case it is missed, thesystem prompts with a help message.
In case value of the third parameter (<param3>) is incorrect, the followinghelp message is displayed:
Invalid value is provided for <param3>The valid values are ASO, SESSION_INFO.ASO retrieves oracle native network encryption key and session informationSESSION_INFO retrieves session information
Chapter 7Configuring Database Firewall for Databases That Use Native Network Encryption
7-36
7.7.3 Step 3: Provide the Database Firewall Public Key to Oracle DatabaseLearn how to provide Database Firewall public keys to Oracle Database.
In order to decrypt traffic using native network encrypted traffic for Oracle Database, youmust provide the Database Firewall public key.
To provide the public key to the Oracle Database:
1. Log in to the Audit Vault Server console as administrator.
2. Click Database Firewall tab.
3. Click the specific Database Firewall instance from the list.
4. Click Oracle Native Encryption under Configuration section.
5. Click Copy Key to copy the public key and paste it into a text file. For example,dbfw_public_key.txt.
Each Database Firewall has its own public key. In a case where you have DatabaseFirewall high availability or monitoring point resiliency, when you have more than oneDatabase Firewall monitoring this target, each Database Firewall public key must becopied and appended to the dbfw_public_key.txt file.
Note: For security purposes the dbfw_public_key.txt file must have the same accesspermissions as the sqlnet.ora file on the Oracle Database server.
6. Modify the sqlnet.ora file in the Oracle Database to include the public key and to requirenative network traffic encryption:
a. Put the file you created in the earlier step on the Oracle Database server, preferablyin the same directory as the sqlnet.ora file.
b. Open the sqlnet.ora file and append the following parameters (in this example thepublic key file is dbfw_public_key.txt):
SQLNET.ENCRYPTION_TYPES_SERVER=AES256SQLNET.DBFW_PUBLIC_KEY="/path_to_file/dbfw_public_key.txt"SQLNET.ENCRYPTION_SERVER=REQUIRED
Note:
• If the sqlnet.ora file contains the optional parameterSQLNET.ENCRYPTION_CLIENT, its value must not be REJECTED.Otherwise, an error will occur.
• The parameter SQLNET.ENCRYPTION_SERVER must never have the valueREJECTED.
c. Save and close the sqlnet.ora file.
See Also:
Oracle Database Security Guide for more information on network encryption.
Chapter 7Configuring Database Firewall for Databases That Use Native Network Encryption
7-37
7.7.4 Step 4: Enable Native Network Encrypted Traffic Monitoring forOracle Database
You can enable native network encrypted traffic monitoring for Oracle Database.
Follow the procedure in Monitor Native Network Encrypted Traffic Through DatabaseFirewall for Oracle Databases to complete the configuration for Oracle Databases thatuse network encryption.
7.8 Configuring Advanced Settings for Database FirewallLearn about configuring database connection details under advanced options.
7.8.1 About Native Network Encryption for Oracle DatabasesLearn about using native network encryption for Oracle Databases.
If you are using the Database Firewall to monitor an Oracle Database target that usesnetwork encryption, then you must use native network encryption monitoring in orderto decrypt statements sent to, and responses received from, that database so they canbe analyzed.
Limitations on Decryption of Oracle Database Statements
Configuring Audit Vault and Database Firewall to decrypt traffic with NetworkEncryption has the following limitations:
• There is no statement substitution in Audit Vault and Database Firewall whenNetwork Encryption checksum is used.
• There is no support for Network Encryption RC4 cipher.
• Supported versions of Oracle Database.
• If you are using Oracle Container Databases (CDB), ASO decryption is notavailable for root container databases (CDB$ROOT). It is available only forPluggable Container Databases (PDB). One or more PDBs together are called acontainer database (CDB).
See Also:
Configuring Database Firewall for Databases That Use Native NetworkEncryption
Chapter 7Configuring Advanced Settings for Database Firewall
7-38

7.8.2 Monitor Native Network Encrypted Traffic Through Database Firewallfor Oracle Databases
Learn how to enable monitoring of native network encrypted traffic through Database Firewallfor Oracle Databases.
This functionality enables Database Firewall to monitor native network encrypted traffic forsupported Oracle Database targets.
Note:
Native Network Encrypted traffic monitoring was earlier known as DatabaseInterrogation.
Prerequisite
Log in to the Audit Vault Server console as administrator. See Using Audit Vault ServerConsole for more information.
To enable this functionality for a Database Firewall monitoring point:
1. Click the Targets tab. The Targets tab in the left navigation menu is selected.
2. Click on the specific target. The details of the target are displayed on the main page.
3. Under Database Firewall Monitoring section, select the monitoring point for whichnative network encrypted traffic monitoring needs to be enabled.
4. In the Advanced tab, select the check box Decrypt With Native Network EncryptionKey, for enabling decryption of traffic if Oracle Database is using Native NetworkEncryption. Decrypt with native network encryption key option also supports retrieval ofsession information for Oracle Database. Fill in the remaining fields as applicable.
For Oracle RAC target (if RAC Instance checkbox was enabled in the Basic tab, enterthe SCAN Listener IP address
For Oracle standalone database targets, enter the IP address of the database listener.
Note:
Ensure the Database Firewall is allowed to make a network connection to theabove mentioned database listener.
5. Once the above mentioned field is checked, the following fields are populated. Enter thevalues in the appropriate fields.
• Host Name / IP Address - Enter the host name or the IP address of the targetdatabase. For Oracle standalone Database targets, enter the IP address of thedatabase host machine. For Oracle RAC target, enter the SCAN Listener IP address.
• Port - Enter the port number of the target database.
• Service Name - Enter the service name of the database or database instance.
• User Name - Enter the user name that was set up for this target.
Chapter 7Configuring Advanced Settings for Database Firewall
7-39
• Password - Enter the password for the user name.
6. Click Save.
7.8.3 Disabling Encrypted Traffic Monitoring for Oracle DatabasesLearn about disabling encrypted traffic monitoring for Oracle Databases.
You can temporarily disable encrypted traffic monitoring. Oracle AVDF saves theconfiguration information that you have created for the next time that you want toenable it.
To disable encrypted traffic monitoring:
1. Log in to the Audit Vault Server console as an administrator.
2. Click the Targets tab. The Targets tab in the left navigation menu is selected.
3. Click on the specific target. The details of the target are displayed on the mainpage.
4. Under Database Firewall Monitoring section, select the monitoring point forwhich native network encrypted traffic monitoring needs to be disabled.
Alternatively, navigate to Database Firewalls tab and then click DatabaseFirewall Monitoring tab in the left navigation menu. A list of monitoring points aredisplayed on the page. The list can be sorted or filtered. Select the monitoringpoint for which native network encrypted traffic monitoring needs to be disabled.
5. In the Advanced tab, uncheck the box against Decrypt With Native NetworkEncryption Key for disabling decryption of traffic if Oracle Database is usingNative Network Encryption. Upon deselection the remaining fields disappear.
6. Click Save.
See Also:
Changing the Database Firewall Host Name
7.8.4 Retrieve Session Information for Non Oracle DatabasesLearn how to obtain session information for non Oracle databases.
You can retrieve session information for non Oracle databases like Microsoft SQLServer and Sybase SQL Anywhere database to obtain the name of the database user,operating system, and client program that originated a SQL statement. Enable thisfunctionality only if this information is not available from the network traffic. Thisinformation is then made available in the reports.
While configuring this functionality choose the field Retrieve session informationfrom target DB in the Advanced tab.
7.8.4.1 Setting Permissions to Retrieve Session Information in Microsoft SQLServer
Learn about retrieving session information in Microsoft SQL Server.
Chapter 7Configuring Advanced Settings for Database Firewall
7-40

1. Create a user account for Oracle AVDF for querying session information on the database.This database should be registered as a target in the Audit Vault Server console.
Make a note of the user name and password for this account.
2. Grant the following permissions to the user account you created in the previous step:
• VIEW ANY DEFINITION and VIEW SERVER STATE for SQL Server
• SELECT on the master.dbo.sysdatabases table
3. Enable retrieving session information for the Database Firewall monitoring point that isassociated with this target database, using the credentials created in the earlier step.Ensure the following steps are accurate while registering Microsoft SQL Server as atarget.
• In the User Name field, enter the user name of the user created in the earlier step.
• In the Password field, enter the password of the user.
• In the Host Name / IP Address field, enter the IP address of the SQL Server.
• In the Port field, enter the port of the SQL server listening port.
• In the Database Name field, enter a valid database service name on SQL Server. Incase the database service name is not correct, then SQL server DDI requests fail onthe SQL Server with invalid request error.
See Also:
Monitor Native Network Encrypted Traffic Through Database Firewall for OracleDatabases
7.8.4.2 Setting Permissions to Retrieve Session Information in Sybase SQLAnywhere Database
Learn about retrieving session information in Sybase SQL Anywhere databases.
Note:
Before you can use Sybase SQL Anywhere, you must download and install the SQLAnywhere ODBC driver for Linux.
1. Create a user account Oracle AVDF for querying session information on the database.This database should be registered as a target in the Audit Vault Server console.
Make a note of the user name and password for this account.
2. Grant the following permissions to the user account created in the earlier step:
• CONNECT• SELECT on these system tables:
sys.sysusersys.sysuserauthoritysys.sysremoteuser
Chapter 7Configuring Advanced Settings for Database Firewall
7-41
sys.sysloginmapsys.sysgroup
3. Enable retrieving session information for the Database Firewall monitoring pointthat is associated with this target database, using the credentials created in theearlier step.
See Also:
Monitor Native Network Encrypted Traffic Through Database Firewall forOracle Databases
7.9 Monitoring TLS Encrypted SQL TrafficLearn how to enable monitoring of TLS encrypted SQL traffic between the databaseclients and Oracle Database.
Note:
• This functionality does not support database clients using PKIauthentication.
• This functionality is not supported for Oracle Real Application Cluster(RAC) as a target.
• The Database Firewall acts as a proxy and terminates TLS session fromthe database clients. In all cases, Database Firewall becomes the clientfor the database server.
• Native Network Encryption is disabled in case this functionality isenabled.
7.9.1 Using Default Self Signed Certificates Created During MonitoringPoint Creation
Learn how to use self signed certificates created by default when creating a DatabaseFirewall monitoring point.
Starting with Oracle AVDF release 20.7, Database Firewall supports monitoring of TLSencrypted SQL traffic between the database client and Oracle Database. DatabaseFirewall acts a TLS proxy terminating the session from the database client andcreating a new TLS outbound session to the database server. Different TLS levels canbe set for:
1. Inbound connection from the database client to Database Firewall
2. Outbound connection from Database Firewall to Oracle Database
TLS Level-4 is the strictest and set by default. Mutual authentication is enabled bydefault for both inbound and outbound connections.
Chapter 7Monitoring TLS Encrypted SQL Traffic
7-42
Database Firewall decrypts the network traffic from the database clients, extracts SQL traffic,and acts on the SQL statements based on the configured policies. It creates a new TLSsession to the database server if the traffic needs to be passed on.
Note:
For production instances it is recommended to use third party CA signed certificatesthan self signed certificates as per your organizational policy.
Follow these steps to enable TLS encrypted traffic monitoring capability for a target database:
1. Log in to the Audit Vault Server console as an administrator.
2. Click the Targets tab. The Targets tab in the left navigation menu is selected.
3. Click the specific target. The details of the target are displayed on the main page.
4. Under Database Firewall Monitoring section, click Add to create a new monitoringpoint. The Database Firewall Monitor dialog is displayed.
5. In the Core tab, select the Database Firewall instance from the list.
6. Select Monitoring / Blocking (Proxy) as the deployment mode from the list.
7. Enter the remaining details.
8. In the Advanced tab, select the check the box against Enable TLS Support field. All thenecessary self signed certificates for this monitoring point are created. Mutualauthentication is also enabled by default for inbound and outbound TLS connections.
9. Complete the configuration of mutual authentication for the monitoring point.
See Also:
• Disabling Mutual Authentication for Inbound or Outbound TLSCommunication
• Creating and Configuring a Database Firewall Monitoring Point
• About Setting Transport Layer Security Levels
7.9.2 Configuring Mutual Authentication for Inbound or Outbound TLSCommunication
Learn how to configure mutual authentication for inbound or outbound TLS communicationbetween the database clients and Oracle Database.
You can configure mutual authentication for TLS communication between:
1. Database client to Database Firewall (inbound connection)
2. Database Firewall to Oracle Database (outbound connection)
The configuration file for the Database Firewall monitoring point is /var/dbfw/va/x/etc/appliance.conf. In this case x is the Database Firewall monitoring point identifier. Thedatabase client always authenticates the associated Database Firewall it is connecting to.
Chapter 7Monitoring TLS Encrypted SQL Traffic
7-43

Follow these steps:
1. Log in to the Database Firewall appliance.
2. Switch user to root.
3. Configure the mutual authentication of database client and Database Firewall byfollowing these steps:
a. Import the monitoring point inbound certificate (/usr/local/dbfw/va/xx/pki/in/in.crt) into the key store of the database client as atrusted CA certificate. In this case xx refers to the monitoring point identifier.
For Oracle Database clients, this involves importing the inbound certificate ofthe monitoring point into the client's wallet. Refer to the SQLNET AdministratorGuide for complete information.
For other (non Oracle) database clients, refer to respective databasedocumentation.
b. Copy the database client's trusted CA certificate into the monitoring point'sinbound CA directory /usr/local/dbfw/va/xx/pki/in/ca.
In this case xx refers to the monitoring point identifier. The permissions of theCA certificate for the clients must be 0440:dbfw:dbfw.
4. Configure the mutual authentication of Database Firewall and database server byfollowing these steps:
a. Configure mutual authentication for outbound TLS connection. Copy thetrusted CA certificate of the target database into the corresponding outboundCA directory of the monitoring point /usr/local/dbfw/va/xx/pki/out/ca.
In this case xx refers to monitoring point identifier. The permissions ofdatabase CA certificate must be 0440:dbfw:dbfw.
b. Import the outbound certificate of the monitoring point /usr/local/dbfw/va/xx/pki/out/out.crt into the key store of the target databaseas trusted CA certificate.
For Oracle Database target this involves importing the outbound CA certificateof the monitoring point into wallet of the target database. Refer to the SQLNETAdministrator Guide for complete information.
For other (non Oracle) database clients, refer to respective databasedocumentation.
5. Restart the services. Run the following commands to restart the monitoring pointswhich had changes to the configuration:
systemctl stop monitor
/usr/local/dbfw/bin/dbfwctl stop xx
systemctl start monitor
In this case xx refers to monitoring point identifier.
Chapter 7Monitoring TLS Encrypted SQL Traffic
7-44
6. Test the connections. TLS connection initiated from the database client to the abovemonitoring point should result in a successful connection.
See Also:
• Creating and Configuring a Database Firewall Monitoring Point
• Modifying a Database Firewall Monitoring Point
• About Setting Transport Layer Security Levels
7.9.3 Using External Certificates Signed by Certificate AuthorityLearn how to use certificates signed by an external CA in Database Firewall.
You can use a certificate signed by an external Certification Authority (CA) based on yourorganization policy. Starting with Oracle AVDF release 20.7, Database Firewall supportsexternal CA signed certificates for inbound and outbound TLS connections. DatabaseFirewall provides a utility (config-pki_identity) to generate a CSR (Certificate SigningRequest) which can be signed externally.
Follow these steps to use one pair of externally signed certificates for all Database Firewallmonitoring points:
1. Log in to the Audit Vault Server console as an administrator.
2. Create Database Firewall monitoring points and enable TLS encrypted SQL trafficmonitoring. Select appropriate TLS levels in the Inbound TLS (client connection) andOutbound TLS (database connection) fields as per requirement.
Relevant self signed certificates are created for these Database Firewall monitoringpoints.
3. Connect to the Database Firewall through SSH as support user.
4. Switch user to root.
5. Delete the self signed certificates for above Database Firewall monitoring points usingthe /opt/avdf/config-utils/bin/config-pki_identity utility.
6. Create a CSR (Certificate Signing Request) to be signed externally.
Chapter 7Monitoring TLS Encrypted SQL Traffic
7-45

Note:
Important aspects to be noted while creating a CSR:
• The alt_* values are optional, depending on the certificate usagerequirements.
• The key_path and cert_path directories must exist.
• The value of cert_uid/gid/mode must always be dbfw:dbfw:444.
• The value of key_uid/gid/mode must always beroot:arbitercerts:440.
• Use the add command in /opt/avdf/config-utils/bin/config-pki_identity utility to create a CSR.
For example: To create a CSR (in.csr) for the key (in.key), then usethe following:
/opt/avdf/config-utils/bin/config-pki_identity add \key_path=/usr/local/dbfw/va/in.key \cert_path=/usr/local/dbfw/va/in.csr \cert_uid=dbfw \cert_gid=dbfw \cert_mode=444 \key_uid=root \key_gid=arbitercerts \key_mode=440 \common_name=test.certificate \country=--- \[email protected] \locality=city \organisation=company \organisational_unit=group \state=area \alt_dns=foobar.example.org,foobar2.example.org \[email protected],[email protected] \alt_ip='192.0.2.0,192.0.2.1' \alt_uri=https://<exampleuri.1>,https://<exampleuri.2>
7. Use the example to create a /usr/local/dbfw/va/out.csr.
8. Get both the CSRs signed externally:
a. /usr/local/dbfw/va/in.csrb. /usr/local/dbfw/va/out.csr
9. Copy both the externally signed certificates (in.crt and out.crt) to the /usr/local/dbfw/va directory.
Chapter 7Monitoring TLS Encrypted SQL Traffic
7-46

10. Validate and import both the externally signed certificates using the following examplecommand:
/opt/avdf/config-utils/bin/config-pki_identity set cert_path=/usr/local/dbfw/va/in.crt
11. Create a symbolic link for the in.crt from every Database Firewall monitoring pointinbound directory to /usr/local/dbfw/va/in.crt.
Note:
Add all the trusted certificates that constitute the certificate chain in thecorresponding pki/in/ca path before adding externally signed certificate intopki/in path of a monitoring point.
12. Create a symbolic link for the in.key from every Database Firewall monitoring pointinbound directory to /usr/local/dbfw/va/in.key.
13. Create a symbolic link for the out.crt from every Database Firewall monitoring pointoutbound directory to /usr/local/dbfw/va/out.crt.
Note:
Add all the trusted certificates that constitute the certificate chain in thecorresponding pki/out/ca path before adding externally signed certificateinto pki/out path of a monitoring point.
14. Create a symbolic link for the out.key from every Database Firewall monitoring pointoutbound directory to /usr/local/dbfw/va/out.key.
For example:
ln -s /var/dbfw/va/in.crt /var/dbfw/va/xx/pki/in/in.crt ; ln -s /var/dbfw/va/out.crt /var/dbfw/va/xx/pki/out/out.crt
In this case xx refers to the Database Firewall monitoring point identifier.
15. Configure mutual authentication for the inbound TLS connection. The inbound connectionis the connection from the database client to the Database Firewall.
16. Configure mutual authentication for the outbound TLS connection. The outboundconnection is the connection from the Database Firewall to Oracle Database.
17. Restart all the modified Database Firewall monitoring points.
Chapter 7Monitoring TLS Encrypted SQL Traffic
7-47

See Also:
• CONFIG-PKI_IDENTITY
• Disabling Mutual Authentication for Inbound or Outbound TLSCommunication
• Using Default Self Signed Certificates Created During MonitoringPoint Creation
7.9.4 Disabling Mutual Authentication for Inbound or Outbound TLSCommunication
Learn how to disable mutual authentication for inbound or outbound TLScommunication between the database clients and Oracle Database.
You can disable mutual authentication for TLS communication between:
1. Database client to Database Firewall (inbound connection)
2. Database Firewall to Oracle Database (outbound connection)
Mutual authentication can be optionally disabled for inbound or outbound TLScommunication. The configuration file for the Database Firewall monitoring pointis /var/dbfw/va/x/etc/appliance.conf. In this case x is the Database Firewallmonitoring point identifier. The database client always authenticates the associatedDatabase Firewall it is connecting to.
Follow these steps to disable mutual authentication for inbound TLS communication:
1. Modify the following value in the configuration file /var/dbfw/va/x/etc/appliance.conf:
TLS_CLIENT_AUTH="0"2. Import the Database Firewall monitoring point inbound certificate (/usr/local/
dbfw/va/xx/pki/in/in.crt or /usr/local/dbfw/va/in.crt) into theSQL client's key store as a trusted CA certificate.
Note: For Oracle SQL clients this involves importing the Database Firewallmonitoring point CA certificate into the SQL client's wallet. Refer to the SQLNETAdministrator Guide for complete information. For other (non Oracle) SQL clients,refer to the respective database documentation.
Database Firewall authenticates the database it is connecting to. Follow these steps todisable mutual authentication for outbound TLS communication:
1. Modify the following value in the sqlnet.ora configuration file:
SSL_CLIENT_AUTHENTICATION = FALSE2. Copy the trusted CA certificate of the target database into the corresponding
Database Firewall monitoring point's outbound CA directory (/usr/local/dbfw/va/xx/pki/out/ca).
Chapter 7Monitoring TLS Encrypted SQL Traffic
7-48

See Also:
• Configuring Mutual Authentication for Inbound or Outbound TLSCommunication
• Creating and Configuring a Database Firewall Monitoring Point
• Modifying a Database Firewall Monitoring Point
• About Setting Transport Layer Security Levels
7.10 Configuring and Using Database Response MonitoringLearn about configuring and using database response monitoring.
7.10.1 About Database Response MonitoringLearn about database response monitoring.
Enabling the Database Response Monitoring feature enables Oracle Database Firewall torecord responses that the target database makes to login requests, logout requests and SQLstatements sent from database clients, as shown in Figure 7-1. This feature allows you todetermine whether the database executed logins, logouts and statements successfully, andcan provide useful information for audit and forensic purposes.
Figure 7-1 illustrates the process flow of database response monitoring.
Figure 7-1 Database Response Monitoring
Database
DatabaseClient
Database Responses
Login Requests Logout Requests SQL Statements
Oracle Database Firewall
The Oracle Audit Vault and Database Firewall auditor can view database responses in auditreports.
Database Response Monitoring records database responses for all SQL statements, logins,and logouts that are logged by the Database Firewall policy.
Chapter 7Configuring and Using Database Response Monitoring
7-49

The information recorded includes the response interpreted by Oracle Audit Vault andDatabase Firewall (such as "statement fail"), the detailed status information from thedatabase, and the database response text (which may be displayed in the databaseclient).
Note:
The Event Status value in the reports is displayed only if DatabaseResponse Monitoring is enabled for the respective monitoring point.
7.10.2 Enabling Database Response MonitoringLearn about enabling database response monitoring.
To enable database response monitoring for a target:
1. Log in to the Audit Vault Server console as an administrator.
2. Click the Targets tab. The Targets tab in the left navigation menu is selected.
3. Click on the specific target. The details of the target are displayed on the mainpage.
4. Under Database Firewall Monitoring section, select the monitoring point forwhich native network encrypted traffic monitoring needs to be enabled.
5. In the Database Firewall Monitor dialog, click the Advanced tab.
6. Select the check box against Capture Database Response field.
After this field is checked, the Full error message check box is displayed. If thisfield is checked, any detailed error message text generated by the database islogged along with the error code.
7. Click Save.
See Also:
• Working with Lists of Objects in the UI to sort or filter the monitoringpoints list.
• Using Audit Vault Server Console
• Oracle Audit Vault and Database Firewall Auditor's Guide for moreinformation on configuring Firewall policies.
Chapter 7Configuring and Using Database Response Monitoring
7-50
7.11 Securing the Agent and Oracle Database TargetConnection
Learn how secure the Agent and Oracle Database target connection.
Data security between an Audit Vault Agent and an Oracle Database target is achieved bydefault, through network encryption over TCP connection. Data security can also be achievedby using a TCPS/SSL connection.
If the target has been setup to accept TCPS/SSL connections, then follow these steps toconfigure the Agent:
1. Ensure that in the target's sqlnet.ora file, the following parameters are set:
• SQLNET.ENCRYPTION_SERVER = REQUESTED, REJECTED, or the default, ACCEPTED.
• SQLNET.CRYPTO_CHECKSUM_SERVER = REJECTED or the default, ACCEPTED2. Log in to the Audit Vault Server console as an administrator.
3. Click the Targets tab.
4. In the left navigation menu, select Targets.
5. Select the name of the target that you want to modify.
6. In the target page, do the following:
a. In the Audit Data Collection section, enter the details in Host Name/IP Address,choose TCPS protocol, Server DN, and upload the wallet file.
b. Or alternately, select the Advanced option, choose TCPS protocol, upload the walletfile, and then in the Target Location field, provide the TCPS connection string.
For example:
jdbc:oracle:thin:@(DESCRIPTION=(ADDRESS=(PROTOCOL=TCPS)(HOST=host_ip)(PORT=port_number))(CONNECT_DATA=(SERVICE_NAME=service_name)(SERVER=DEDICATED))(SECURITY= (SSL_SERVER_CERT_DN="dn")))
c. Click Save.
See Also:
• Oracle Database Net Services Reference for more information about theparameters.
• Using Audit Vault Server Console
Chapter 7Securing the Agent and Oracle Database Target Connection
7-51

8Using Host Monitor
Learn how to use Host Monitor.
8.1 About Host MonitoringLearn about Host Monitoring.
Database Firewall can be used to monitor and analyze the SQL traffic to the database.Database Firewall can be configured in the following deployment modes:
• Monitoring / Blocking (Proxy)
• Monitoring (Out-of-Band)
• Monitoring (Host Monitor)
Host Monitor can monitor SQL traffic of multiple databases running on a single Agentmachine. Monitoring (Host Monitor) deployment mode requires a Host Monitor Agent to bedeployed on the Agent machine. The Host Monitor Agent can be configured to capture trafficon ports that the database is listening.
This deployment mode provides the ability to monitor SQL traffic by the Host Monitor Agentthat is deployed on the Agent machine and if there are multiple network paths from the clientsto the Agent machine.
After the Host Monitor Agent is deployed and configured on the Agent machine, it performsthe following actions:
• Captures traffic on ports that the database is listening
• Forwards the traffic securely to Database Firewall
See Also:
• Monitoring (Host Monitor)
• Oracle Audit Vault and Database Firewall Auditor's Guide
8.2 Installing and Enabling Host MonitorLearn about installing and enabling Host Monitor.
Host Monitor can monitor SQL traffic to databases on a database server. Installing andenabling Host Monitor involves:
1. Deploying Host Monitor Agent on all the database servers where the database is running.
2. Register the target.
3. Creating a Database Firewall monitoring point in Monitoring (Host Monitor) mode.
8-1

4. Configuring a NETWORK audit trail for the monitored target.
Note:
• Host Monitor is supported on Linux, Solaris, AIX, and Windowsplatforms, and can monitor any database supported by the DatabaseFirewall. See Table C-1 for supported databases.
• Host Monitor Agent supports link type Solaris IPNET on Oracle SolarisSPARC64 and x86-64.
• Host Monitor Agent supports Ethernet (EN10MB) link type for allsupported platforms.
• Host Monitor does not capture the traffic from Oracle Database'sBequeath connections.
8.2.1 Host Monitor RequirementsLearn about Host Monitor requirements.
Requirements for installing Host Monitor on Windows platform:
1. Ensure Audit Vault Agent is running on the database server.
2. Note and follow Npcap installation details:
• For Oracle AVDF release 20.6 and later, Npcap is automatically installed alongwith the Agent installation. Installing Npcap removes any existing installation ofNpcap or WinPcap from the Windows host machine.
• For Oracle AVDF release 20.5, Npcap is automatically downloaded along withthe Agent software (agent.jar) file. The Npcap installer file is availableunder Agent_Home\hm directory.
• For Oracle AVDF release 20.4 and earlier, install Npcap that is available in theavdf20-utility.zip bundle in Oracle Software Delivery Cloud. It is part ofthe Oracle Audit Vault and Database Firewall installable files. Ensure to installNpcap in WinPcap-API-compatible mode.
3. Install the latest version of OpenSSL (1.1.1g or higher) libraries.
4. Ensure the Windows target machine has the latest update of Visual C++Redistributable for Visual Studio 2015 (MSVCRT.dll (*) or later) package from Microsoft installed.
Requirements for installing Host Monitor on Linux/Unix/AIX/Solaris platforms:
1. Ensure Audit Vault Agent is running on the database server.
2. Ensure the latest version of the following packages from the OS vendor for thespecific OS version are installed on the database server:
• Libcap (for Linux hosts only)
• LibPcap
• OpenSSL
Chapter 8Installing and Enabling Host Monitor
8-2
3. Ensure gmake is installed for AIX database servers. For other Unix database servertypes (Linux/Unix/Solaris), ensure make is installed. This is required for Host Monitor torun successfully.
4. In case network firewall is present, allow communication on port range 2050 - 5200. Thisis required for communication in between the database server and the Database Firewall.
5. Ensure the Input Output Completion Ports (IOCP) is set to available for IBM AIX onPower Systems (64-bit). It is set to defined by default.
6. Check directory permissions. All the directories in the path of the Host Monitor installlocation should have 755 as the permission bits starting from the root directory. This isrequired as the Host Monitor has to be installed in a root owned location.
7. Host Monitor has to be installed by the root user.
General requirement for installing Host Monitor: Open port range 2050 - 5200 on theDatabase Firewall machine for communication.
See Also:
Enabling and Using Host Monitoring for host monitoring instructions andprerequisites.
8.2.2 Validation During Host Monitor Agent DeploymentLearn about validations performed by Oracle AVDF when deploying the Host Monitor Agent.
Starting Oracle AVDF release 20.6, the following validations performed on the Linux/Unix/AIX/Solaris platforms when deploying the Host Monitor Agent. These requirements aremandatory and have to be complied without which the Host Monitor Agent installation cannotbe completed.
• The Host Monitor Agent is being installed as root user.
• If Host Monitor process is already running on the host machine.
• If the Input Output Completion Ports (IOCP) is set to available for IBM AIX on PowerSystems (64-bit).
• If gmake is installed for AIX database servers. For other Unix database server types(Linux/Unix/Solaris), check if make is installed.
• If symlinks of libssl, libcrypto, libnsl libraries are present. In case of Linux checks foradditional symlink libaio is performed.
8.2.3 Register the Host Machine That Will Run the Host MonitorLearn how to register the host machine (or database server) that runs the Host Monitor.
To register a host in the Audit Vault Server, see Registering Hosts on Oracle Audit VaultServer.
8.2.4 Deploy the Audit Vault Agent and the Host MonitorLearn how to deploy the Audit Vault Agent and the Host Monitor.
Chapter 8Installing and Enabling Host Monitor
8-3

8.2.4.1 Deploying the Agent and Host Monitor on Windows Host MachineLearn how to deploy Host Monitor on Windows platform.
Oracle Audit Vault and Database Firewall 20 supports Host Monitoring on Windows.This section contains the necessary details to be followed before upgrading from anolder release in Oracle AVDF 12.2 or for a fresh installation of 20.
Prerequisites
• Audit Vault Agent Requirements
• Host Monitor Requirements
Details for Installing OpenSSL
OpenSSL 1.1.1g or a higher version must be installed on the Windows host machine.
Note:
While installing OpenSSL on Windows machine, you are prompted to choosea location to copy the OpenSSL DLLs as an additional configuration step. Itis recommended that you choose the Windows System Directory option,as this location is added to the Path environment variable on Windowsmachine by default. Else, if you choose the OpenSSL bin directory option,then ensure the location is added to the Path environment variable.
Follow these steps to change environment variables after installing OpenSSL:
1. In the Windows host machine, navigate to Control Panel.
2. Click System, and then click Advanced system settings.
3. In the Advanced tab, click on Environment Variables button.
4. The Environment Variables dialog is displayed. In the System variables box,select Path under the Variable column.
5. Click Edit button. The Edit environment variable dialog is displayed.
6. Add the location of the OpenSSL bin directory at the beginning of the Pathvariable.
7. Click OK to save the changes, and then exit all the dialogs.
Installing Npcap (for Fresh Installation of Host Monitor)
Note:
For Oracle AVDF release 20.6 and later, Npcap is automatically installedalong with the Agent installation. Installing Npcap removes any existinginstallation of Npcap or WinPcap from the Windows host machine. Thefollowing steps are not required for release 20.6 and later.
Chapter 8Installing and Enabling Host Monitor
8-4

Host Monitoring on Windows functionality requires Npcap. Follow these steps to install Npcapfor a fresh installation of Host Monitor in release 20:
1. Log in to Oracle Software Delivery Cloud.
2. Note and follow Npcap manual installation details:
• For Oracle AVDF release 20.5 and later, Npcap is automatically downloaded alongwith the Agent software (agent.jar) file. The Npcap installer file is available underAgent_Home\hm directory.
• For Oracle AVDF release 20.4 and earlier, install Npcap that is available in theavdf20-utility.zip bundle in Oracle Software Delivery Cloud. It is part of theOracle Audit Vault and Database Firewall installable files. Ensure to install Npcap inWinPcap-API-compatible mode.
3. Install Npcap. For Oracle AVDF releases 20.5 and earlier, complete the Npcapinstallation on the Windows host machine. Ensure to install in WinPcap-API-compatiblemode. Installing Npcap in WinPcap API compatible mode removes any existinginstallation of WinPcap from the Windows machine.
Installing Npcap (Upgrade from Oracle AVDF release 20.4 (or earlier) to 20.5 (and later))
Host Monitoring on Windows functionality requires Npcap. Follow these steps to uninstall andreinstall the recent and updated Npcap version:
1. Log in to Oracle Software Delivery Cloud.
2. Reinstall Npcap that is available in the avdf20-utility.zip bundle in OracleSoftware Delivery Cloud. It is part of the Oracle Audit Vault and Database Firewallinstallable files. Ensure to reinstall Npcap in WinPcap-API-compatible mode.
3. Complete the Npcap installation on the Windows host machine. Ensure to install inWinPcap-API-compatible mode. Installing Npcap in WinPcap API compatible moderemoves any existing installation of Npcap or WinPcap from the Windows machine.
Installing Npcap (Upgrade from Oracle AVDF release 12.2 BP9 or BP10 to 20.1 (orlater))
Host Monitoring on Windows functionality requires Npcap. Follow these steps to continueusing Host Monitor on Windows from 12.2.0.9.0 or 12.2.0.10.0, before upgrading to OracleAudit Vault and Database Firewall release 20:
1. Stop the Audit Vault Agent running on the Windows host machine.
2. Log in to 12.2 Audit Vault Server console as administrator.
3. Verify the audit trails and the Audit Vault Agent are in STOPPED state.
4. Log in to My Oracle Support, and download Npcap that is available with Oracle AVDFrelease 20 upgrade files.
5. Complete the Npcap installation on the Windows host machine. Ensure to install inWinPcap-API-compatible mode.
Note:
Installing Npcap in WinPcap API compatible mode removes any existinginstallation of WinPcap from the Windows machine.
Chapter 8Installing and Enabling Host Monitor
8-5

6. Follow verification steps below to ensure Npcap installation is completedsuccessfully.
7. Restart the Audit Vault Agent on the Windows host machine.
8. Start the network trails using the Audit Vault Server console.
9. The Host Monitor is now powered by Npcap during runtime. Verify the network trailcollection.
10. Proceed with the appliance upgrade.
Note:
• Ensure the audit trails and the Audit Vault Agent are in STOPPED state,before installing Npcap. Else, an error may be encountered.
• Do not delete the DLL files as they are created newly by Npcapinstallation.
• On Windows the Host Monitor is installed by the Audit Vault Agent. Thereare no separate Host Monitor installable bundle available for download inthe Audit Vault Server console. There is no separate action required forinstalling Host Monitor on Windows.
Verification of Npcap Installation
Follow these steps after installing or upgrading Npcap:
1. In addition to the Windows System directory, Npcap copies the DLL files to theNpcap sub-directory inside the Windows System directory. Do not remove theDLL files from the Windows System directory.
Note:
Installing Npcap in WinPcap API compatible mode, adds the Npcap DLLfiles to the Windows System directory which is already there in thesystem Path environment variable.
2. Add the Npcap sub directory inside the Windows System directory to the Pathenvironment variable, by following the steps below:
a. Navigate to Control Panel.
b. Click System, and then click Advanced system settings.
c. In the Advanced tab, click on Environment Variables button.
d. The Environment Variables dialog is displayed. In the System variablesbox, select Path under the Variable column.
e. Click Edit button. The Edit environment variable dialog is displayed.
f. Add the location of the Npcap DLL files at the beginning of the Path variable.For example: C:\Windows\System32\Npcap
g. Click OK to save the changes, and then exit all the dialogs.
Chapter 8Installing and Enabling Host Monitor
8-6

3. Confirm the changes in the Path environment variable.
See Also:
• Deploying the Audit Vault Agent
• Registering and Unregistering the Audit Vault Agent as a Windows Service
8.2.4.2 Deploying the Agent and Host Monitor on Unix Host MachineLearn about deploying the Audit Vault Agent and Host Monitor on Unix hosts.
PrerequisiteHost Monitor Requirements
1. Before you install the Host Monitor, ensure you have deployed the Audit Vault Agent.
See Deploying the Audit Vault Agent.
2. Log in as root and identify a root-owned directory on the local hard disk, such as /usr/local, where you will install the Host Monitor.
Note: The entire directory hierarchy must be root-owned. All the directories in thishierarchy must have read and execute permission for other users or groups, but notwrite permission.
3. Log in to the Audit Vault Server console as an administrator.
4. Click the Agents tab.
5. In the left navigation menu:
For release Action
20.1 and 20.2 Click Agent Software
20.3 and later Click Downloads
6. On the page listing the agent software, click the Download button corresponding to yourUnix version, and then save the .zip file to the root-owned directory (on the local harddisk) you identified in Step 2, for example /usr/local.
7. As root user, unzip the Host Monitor file.
This creates a directory named hm. This is your HM_Home directory, which in this exampleis /usr/local/hm.
8. Ensure that the hostmonsetup file (in the hm directory) has execute permission.
9. Run the following command:
HM_Home/hostmonsetup install [agentuser=Agent_Username] [agentgroup=Agent_Group]
• HM_Home - The directory created in Step 7.
• Agent_Username - (Optional) Enter the username of the user who installed the AuditVault Agent (the user who executed the java -jar agent.jar command).
• Agent_Group - (Optional) Enter the group to which the Agent_Username belongs.
Chapter 8Installing and Enabling Host Monitor
8-7
See Also:
Using Audit Vault Server Console
8.2.5 Create a Target for the Host Monitored DatabaseLearn how to create a target for the Host Monitor.
To create a target, see Registering or Removing Targets in Audit Vault Server.
8.2.6 Create a Monitoring Point for the Host MonitorLearn how to create a monitoring point for Host Monitor deployment.
A monitoring point is a logical entity on the Database Firewall host that contains theconfiguration and rules defined for monitoring the traffic received.
1. Log in to the Audit Vault Server console as an administrator.
2. Click the Targets tab.
The Targets tab in the left navigation menu is selected by default.
3. Select and click on a specific target from the list.
4. From the Database Firewall Monitoring section on the main page, click on Add.The Database Firewall Monitor dialog is displayed.
5. In the Basic tab (for 20.3 or later the name of the tab is Core), enter the name forthe Database Firewall instance or select one from the list.
6. Select Monitoring (Host Monitor) as the deployment type from the list. In thismode, the Database Firewall can only monitor the SQL traffic.
7. Choose a Network Interface Card for the Database Firewall host from the list.
Note:
• For Oracle AVDF 20.2 and earlier, it is recommended to select anetwork interface card that is not used as a Management Interface.This segregates the traffic from Host Monitor to the DatabaseFirewall and the traffic from the Database Firewall to Audit VaultServer.
• For Oracle AVDF release 20.3 and later, you must select a networkinterface card which has an IP address configured. All the networkinterface cards which have an IP address configured are displayed inthe Network Interface Card list. It is recommended to select anetwork interface card that is not used as a Management Interface.This segregates the traffic from Host Monitor to the DatabaseFirewall and the traffic from the Database Firewall to Audit VaultServer.
8. In the Connection Details section, select one or more targets for which the trafficneeds to be monitored. You can Add the targets from the list.
Chapter 8Installing and Enabling Host Monitor
8-8
Note:
For Oracle RAC, enter the IP address of the individual RAC node in the TargetConnections field.
Enter the following information for each available connection of the database. Click theAdd button to add more targets and enter the following fields:
• Host Name / IP Address
• Port
• Service Name (Optional, for Oracle Database only). SID can be used in this field. Toenter multiple service names and/or SIDs, enter a new line for each of them, andthen click Add. Multiple entries are allowed for monitoring only mode. To enforcedifferent Database Firewall policies for different service names or SIDs on the samedatabase, create a separate target and a monitoring point for each service name orSID.
Note:
Starting with Oracle AVDF release 20.7, for Linux hosts with multiple networkdevices, add a row for every network device from which the database traffic isexpected to arrive.
9. Click the Advanced tab, enter the number of Database Firewall Monitor Threads(minimum value is 1). This controls the number of traffic handling threads in the DatabaseFirewall monitoring point. The default value is 1. This value can be increased when hightransactions are reported (per second traffic) and packet dropped messages are reportedin the /var/log/messages file. Contact Oracle Support while changing this number.
10. Select the check box for Decrypt With Network Native Encryption Key field only forOracle Database targets. This is for enabling decryption of traffic if the database is usingOracle Native encryption. Decrypt with network native encryption key option alsosupports retrieval of session information for Oracle Database. Complete the remainingfields as applicable.
For Oracle standalone database targets, enter the IP address of the database listener inthe IP Address field.
For other database types (non Oracle) the field is Retrieve session information fromtarget DB. Select this field to retrieve session information such as OS User Name, DBUser Name, client application name, and IP address from the target database.
Note:
Ensure the Database Firewall is allowed to make a network connection to theabove mentioned database.
11. Click Save at the bottom of the dialog to save the configuration of the monitoring point.
The new monitoring point appears in the list and starts automatically.
Chapter 8Installing and Enabling Host Monitor
8-9

Note:
Default Database Firewall Policy will be applied for thisDatabase Firewall Monitoring Point. This message is displayed atthe bottom of the dialog.
12. Click Save in the main page.
13. To stop or restart the monitoring point, select it from the Database FirewallMonitoring section and click Stop or Start.
See Also:
Configuring Database Firewall Monitoring Points
8.2.7 Create a Network Audit TrailLearn how to create network audit trails.
Create an audit trail for each target you are monitoring with a Host Monitor. SpecifyNETWORK for the Audit Trail Type.
Note:
Ensure the collection attribute network_device_name_for_hostmonitor ismandatorily configured for the targets which are monitored by Host Monitor.The name of the network interface card is the attribute value. The networkinterface card receives all the network traffic of the target database.
Linux/AIX/Solaris hosts
Follow these steps to determine the value of thenetwork_device_name_for_hostmonitor collection attribute:
1. Determine the IP address on which the target database is configured to acceptTCP traffic. Make a note of the IP address.
2. Run the following command to list the network device details present in thedatabase server:
ifconfig -a
3. From the output displayed, search for the IP address that was noted in the initialstep. The corresponding name of the network card is the value of the collectionattribute network_device_name_for_hostmonitor.
Consider the example scenario mentioned below. The values in your system maybe different.
a. IP address of the target database: 192.0.2.10b. Output of ifconfig -a:
Chapter 8Installing and Enabling Host Monitor
8-10

eth0: flags=4163<UP,BROADCAST,RUNNING,MULTICAST> mtu 1500inet 192.0.2.10 netmask 255.255.255.255 broadcast 192.0.2.11
c. The device name is eth0.
Note:
Starting with Oracle AVDF release 20.7, in case there are multiple network devicesfrom which the database traffic is expected to arrive, then set the value of theattribute network_device_for_hostmonitor to any.
Windows hosts
Follow these steps to determine the value of the network_device_name_for_hostmonitorcollection attribute:
1. Determine the IP address on which the target database is configured to accept TCPtraffic. Make a note of the IP address.
2. Run the following command to list the network device details present in the databaseserver:
ipconfig /all
Note:
This command displays the physical address, IPv4 Address, and other detailsfor every device.
3. From the output displayed, search for the device which has an IPv4 Address that wasnoted in the initial step. Make a note of the corresponding physical address.
4. Run the following command:
getmac
5. Make a note of the device name against the physical address determined previously.Observe the device name being displayed in the following format:
\Device\Tcpip_{xxxxxxxx-xxxx-xxxx-xxxx-xxxxxxxxxxxx}6. Copy the device name to use as the collection attribute value by replacing Tcpip with
NPF. Hence for a network card with the name \Device\Tcpip_{xxxxxxxx-xxxx-xxxx-xxxx-xxxxxxxxxxxx} the attribute value to be used is \Device\NPF_{xxxxxxxx-xxxx-xxxx-xxxx-xxxxxxxxxxxx}.
Consider the example scenario mentioned below. The values in your system may bedifferent.
a. IP address of the target database: 192.0.2.24b. Output of ipconfig /all:
Ethernet adapter Ethernet 2:Connection-specific DNS Suffix . : foobar.example.com
Chapter 8Installing and Enabling Host Monitor
8-11
Physical Address. . . . . . . . . : 00-00-5E-00-53-12IPv4 Address. . . . . . . . . . . : 192.0.2.24
c. Output of getmac command:
Physical Address Transport Name00-00-5E-00-53-10 \Device\Tcpip_{xxxxxxxx-xxxx-xxxx-xxxx-xxxxxxxxxx10}00-00-5E-00-53-11 \Device\Tcpip_{xxxxxxxx-xxxx-xxxx-xxxx-xxxxxxxxxx11}00-00-5E-00-53-12 \Device\Tcpip_{xxxxxxxx-xxxx-xxxx-xxxx-xxxxxxxxxx12}In this example, the IP address is 192.0.2.24 corresponding to physicaladdress 00-00-5E-00-53-12. Hence, the device name is\Device\Tcpip_{xxxxxxxx-xxxx-xxxx-xxxx-xxxxxxxxxx12}.
Attribute value to be used is \Device\NPF_{xxxxxxxx-xxxx-xxxx-xxxx-xxxxxxxxxx12}.
Note:
This does not involve changing the network device name at a systemlevel.
8.3 Starting, Stopping, and Other Host Monitor OperationsLearn about starting, stopping, and other host monitor operations.
8.3.1 Starting the Host MonitorLearn how to start the host monitor.
Starting the host monitor consists of starting collection for the NETWORK audit trail onthe host you are monitoring.
To start the host monitor from the Audit Vault Server console:
1. Log in to the Audit Vault Server console as an administrator.
2. Start the audit trail(s) you created for host monitoring in Create a Network AuditTrail.
See Also:
• Stopping, Starting, and Autostart of Audit Trails in Oracle Audit VaultServer
• Using Audit Vault Server Console
Chapter 8Starting, Stopping, and Other Host Monitor Operations
8-12

8.3.2 Stopping the Host MonitorLearn how to stop the host monitor.
To stop the host monitor, stop the audit trail you created for the target that is being monitored.See "Stopping, Starting, and Autostart of Audit Trails in Oracle Audit Vault Server".
8.3.3 Changing the Logging Level for a Host MonitorLearn about changing the logging level for host monitors.
See "Changing the Logging Level for the Audit Vault Agent".
8.3.4 Viewing Host Monitor Status and DetailsLearn how to view the host monitor status and details.
You can view whether a host monitor is installed, and information such as its location,version, update time, and other details.
To view host monitor status and details:
1. Log in to the Audit Vault Server console as an auditor.
2. Click the Agents tab.
3. In the left navigation menu, select Agent Hosts.
4. In the page that appears, check the Host Monitor Status and the Host Monitor Detailscolumns for the host you are interested in.
See Also:
Using Audit Vault Server Console
8.3.5 Checking the Status of a Host Monitor Audit TrailLearn how to check the status of a host monitor audit trail.
1. Log in to the Audit Vault Server console as an auditor.
2. Click the Targets tab, and then from the left navigation menu, select Audit Trails.
3. In the status page that appears, in the Audit Trail Type column, search for audit trails oftype NETWORK to find audit trails for host monitors.
8.3.6 Uninstalling the Host Monitor (Unix Hosts Only)Learn about unistalling the host monitor on Unix systems.
This procedure applies to Unix hosts only. There is no install or uninstall for Windows hosts.
To uninstall a host monitor:
1. Log in to the host computer as root.
Chapter 8Starting, Stopping, and Other Host Monitor Operations
8-13

2. From the HM_Home directory (where you installed the host monitor in Step 7) run thefollowing command:
hostmonsetup uninstall
8.4 Updating the Host Monitor (Unix Hosts Only)Learn how to update the host monitor on Unix systems.
When you update the Audit Vault Server to a future release, the host monitor isautomatically updated.
If your current release is prior to 12.1.2, refer to the README included with upgradesoftware or patch updates for instructions on how to update the host monitor.
See Also:
Oracle Audit Vault and Database Firewall Installation Guide for informationon downloading upgrade software.
8.5 Using Certificate-based Authentication for the HostMonitor
Learn to use certificate-based authentication for host monitors.
By default, the Database Firewall allows the host monitor connection based onverifying the host's (originating) IP address.
If you want the additional security of using certificate-based authentication for the hostmonitor, follow these procedures after the host monitor is installed:
8.5.1 Requiring a Signed Certificate for Host Monitor Connections toDatabase Firewall
Learn how to configure the requirement for a signed certificate for Host Monitorconnections to Database Firewall.
To require a signed certificate for Host Monitor connections:
1. Stop the Host Monitor if it is running.
2. At the Database Firewall, log in as root, and run the following commands:
cp /usr/local/dbfw/etc/controller.crt /usr/local/dbfw/etc/fw_ca.crtchown dbfw:dbfw /usr/local/dbfw/etc/fw_ca.crtchmod 400 /usr/local/dbfw/etc/fw_ca.crt
3. Run the following command to restart the Database Firewall traffic processingprocesses:
/usr/local/dbfw/bin/dbfwctl restart
Chapter 8Updating the Host Monitor (Unix Hosts Only)
8-14
Related Topics
• Stopping the Host MonitorLearn how to stop the host monitor.
8.5.2 Getting a Signed Certificate from Audit Vault ServerLearn how to obtain a signed certificate from Audit Vault Server.
Follow this procedure for each host machine that is running Host Monitor. The Host Monitorshould already be installed.
To get a signed certificate from the Audit Vault Server, follow these steps:
1. Log in to the Audit Vault Server as root.
2. Go to the directory /usr/local/dbfw/etc.
3. Run the following two commands:
openssl genrsa -out hmprivkey.perm 2048
openssl req -new -key hmprivkey.perm -out hmcsr.csr -subj "/CN=Hostmonitor_Cert_hostname/"
The hostname is the name of the database server where the Audit Vault Agent isinstalled.
4. To generate one signed certificate, run the following command:
/usr/local/dbfw/bin/generate_casigned_hmcert.sh
The signed certificate file hmcert.crt is generated in the directory /usr/local/dbfw/etc.
5. Copy the following files from the Audit Vault Server to the Agent_Home/hm directory onthe database server where the Audit Vault Agent is installed:
/usr/local/dbfw/etc/hmcert.crt/usr/local/dbfw/etc/hmprivkey.perm
6. (Unix Hosts only) As root, run the following commands:
chown root:root Agent_Home/hm/hmcert.crt Agent_Home/hm/hmprivkey.perm
chmod 400 Agent_Home/hm/hmcert.crt Agent_Home/hm/hmprivkey.perm
7. (Windows Hosts only) Ensure the files hmcert.crt and hmprivkey.perm have Agent userownership and appropriate permissions to prevent unwanted user access.
8. Start the Host Monitor to capture network traffic.
9. Repeat this procedure for every host running Host Monitor.
Chapter 8Using Certificate-based Authentication for the Host Monitor
8-15

Related Topics
• Starting the Host MonitorLearn how to start the host monitor.
Chapter 8Using Certificate-based Authentication for the Host Monitor
8-16

9High Availability in Oracle AVDF
Oracle AVDF supports high availability for Audit Vault Server and Database Firewall.
9.1 About High Availability in Oracle AVDFLearn about high availability in Oracle AVDF.
High availability in Oracle AVDF increases reliability by ensuring continuity in DatabaseActivity Monitoring services like audit data collection, network event data collection, analysis,reporting, etc. High availability requires a pair of Audit Vault Server instances or a pair ofDatabase Firewall instances. One instance works as the primary and another instance worksas the standby.
9.2 Managing High Availability in Audit Vault ServerLearn about configuring, monitoring, or updating high availability of Audit Vault Servers.
9.2.1 About High Availability in Audit Vault ServersLearn about high availability in Audit Vault Servers.
High availability in Audit Vault Server involves two Audit Vault Server instances that arepaired for business continuity. Start with the primary Audit Vault Server and then installanother Audit Vault Server which can be the standby. In this configuration, one Audit VaultServer instance is designated as the primary and the other as the standby. The primary AuditVault Server is the active server that provides the Audit Vault Server functionality. Thestandby is automatically synchronized (audit data and network event data) and has aconsistent copy of the primary.
If the primary Audit Vault Server becomes unavailable because of unplanned outage for aperiod of 10 minutes, the configuration automatically fails over (failover) to the standbyserver. The earlier standby becomes the new primary.
In high availability, configuration data pertaining to target registration, Audit Vault Agentmachine registration, Database Firewall configuration is automatically synchronized with thestandby.
The high availability in Audit Vault Server is internally managed using Oracle Data Guard -Physical standby deployed in maximum protection mode. This ensures highest level of dataprotection without affecting the performance of the primary Audit Vault Server instance.
Best Practice:
Oracle recommends high availability to be configured before deploying Audit VaultAgents and Database Firewalls.
9-1
See Also:
Oracle Data Guard Protection Modes
The Audit Vault Servers in high availability communicate through HTTPS and OracleNet. There are no restrictions on where the Audit Vault Servers are located as long asthey can communicate with each other.
Important Aspects to Consider Before Configuring High Availability
Since existing data on the designated standby Audit Vault Server is purged during highavailability configuration, you must consider these aspects:
• Impact on existing Database Firewalls: All Database Firewalls registered withdesignated standby Audit Vault Server must be registered again after highavailability is configured.
• Impact on existing Audit Vault Agents: There is no impact on the Audit VaultAgents registered on the designated primary Audit Vault Server.
However, all the registered Audit Vault Agents on the designated standby AuditVault Server must be redeployed on the primary after high availabilityconfiguration. See Post High Availability Pairing Steps for more information.
Note:
Post High Availability Pairing Steps
• Impact on existing Audit Trails and Database Firewall monitoring points: Sinceaudit and network event data collected from targets by the designated standbyAudit Vault Server is purged during high availability configuration, you mustreconfigure these audit trails and Database Firewall monitoring points on the AuditVault Server after high availability is configured to ensure these targets continue tobe protected.
Setting up Audit Vault Servers in high availability configuration involves these steps:
1. Have two standalone Audit Vault Servers or install them as required.
Best Practice:
Place the two Audit Vault Servers in two different data centers.
2. Configuring the designated standby Audit Vault Server.
3. Configuring the designated primary Audit Vault Server.
Related Topics
• Specifying the Audit Vault Server Certificate and IP AddressLearn about specifying the Audit Vault Server certificate and IP address.
• Handling a Failover ScenarioLearn how to handle Audit Vault Server failover scenario.
Chapter 9Managing High Availability in Audit Vault Server
9-2

9.2.2 Prerequisites for Configuring High Availability in Audit Vault ServersLearn about the prerequisites to be performed before configuring high availability in AuditVault Servers.
Prerequisites
• The designated primary and standby Audit Vault Servers must have identicalconfiguration so they can stand in for each other. They should have the same:
– Oracle AVDF version
– Total system memory
– Total repository storage size
– Number of NFS archive locations
– Repository encryption status
• System time difference between the two Audit Vault Servers must be less than 60seconds.
Related Topics
• Specifying Initial System Settings and Options on Audit Vault Server (Required)Learn how to specify initial system settings and options on Audit Vault Server.
9.2.3 Configure the Designated Standby Audit Vault ServerLearn how to configure the designated standby Audit Vault Server.
1. Make a note of the IP address of the designated primary Audit Vault Server.
2. Copy the server certificate of the designated primary Audit Vault Server:
a. Log in to primary Audit Vault Server console as super administrator.
b. Click the Settings tab. The Security tab in the left navigation menu is selected bydefault.
c. Now, click the Certificate sub tab in the main page.
d. Click the Server Certificate sub tab.
e. Click the Copy Certificate button.
3. In the left navigation menu of the designated standby Audit Vault Server, perform thesesteps:
a. Select System tab.
b. Click High Availability link under the Configuration section on the main page.
c. In the Configure High Availability dialog, the Current status field indicates thestatus of the current Audit Vault Server which is Standalone.
d. In the Configure this server as field, select the Standby server option.
e. In the expanded Configure High Availability dialog, enter the following settings:
• Primary server IP address: Enter the IP address of the designated primaryAudit Vault Server.
Chapter 9Managing High Availability in Audit Vault Server
9-3

• Primary server certificate: Paste the certificate that you copied from thedesignated primary Audit Vault Server.
f. Click Save. The designated primary Audit Vault Server's IP address andcertificate is now saved on the standby Audit Vault Server, and is now ready tobe paired.
9.2.4 Configure the Designated Primary Audit Vault ServerLearn how to configure the designated primary Audit Vault Server.
1. Make a note of the IP address of the designated standby Audit Vault Server.
2. Copy the server certificate from the designated standby Audit Vault Server:
a. Log in to the designated standby Audit Vault Server console as superadministrator.
b. Click the Settings tab. The Security tab in the left navigation menu isselected by default.
c. Now click the Certificate sub tab in the main page.
d. Click Server Certificate sub tab.
e. Click the Copy Certificate button.
3. Log in to the designated primary Audit Vault Server console as super administratorand perform these steps:
a. In the left navigation menu, select System tab.
b. Click High Availability link under the Configuration section in the main page.
c. In the Configure High Availability dialog, the Current status field indicatesthe status of the current Audit Vault Server which is Standalone.
d. In the Configure this server as field, select the Primary server option.
e. In the expanded Configure High Availability window, enter the followingsettings:
• Standby server IP address: Enter the IP address of the standby AuditVault Server.
• Standby server certificate: Paste the certificate that you copied from thestandby Audit Vault Server.
f. Click Initiate Pairing button at the bottom of the dialog, to initiate highavailability pairing. To get the updated status, refresh the Audit Vault Serverconsole periodically as the process can take at least 15 minutes. This processcan take longer depending on the amount of data in the repository. When thehigh availability pairing is complete, the High Availability Status field in themain page displays the current status.
Chapter 9Managing High Availability in Audit Vault Server
9-4
Note:
• After high availability pairing is successfully completed, perform all theconfiguration tasks on the primary Audit Vault Server only. This includestasks such as downloading the Audit Vault Agent, registering targetsand hosts, adding Database Firewalls and monitoring points. Toperform tasks like setting system time or changing IP address for thestandby Audit Vault Server refer to section Specifying the Server Date,Time, and Keyboard Settings.
• During high availability pairing, the NFS archive locations pertaining tothe primary and standby Audit Vault Servers are mapped. The mappingof these locations is displayed in the primary Audit Vault Server consoleafter high availability pairing is successful.
9.2.5 Checking the High Availability Status of an Audit Vault ServerLearn how to check the high availability status of an Audit Vault Server.
After high availability pairing is successfully completed, the standby Audit Vault Serverconsole is not accessible. Perform all tasks on the primary Audit Vault Server console. If youattempt to access the standby Audit Vault Server console, it redirects to the primary AuditVault Server console.
1. In the Audit Vault Server console, click the Settings tab.
2. In the left navigation menu, select System.
3. Under the Status section, check the High Availability Status field.
The possible values are:
• Standalone - This server is not configured for high availability and is a standaloneinstance.
• Primary - This server is currently the primary Audit Vault Server.
• Disconnected - This primary Audit Vault Server switches to this mode if it detectsthat the standby Audit Vault Server changed its role to standalone or primary. Thisindicates that the high availability pairing is broken. Contact Oracle Support forfurther assistance.
9.2.6 Post High Availability Pairing StepsLearn post high availability pairing steps for Audit Vault Agents and Host Monitor Agents.
Audit Vault Agents and Host Monitor Agents deployed on the designated primary Audit VaultServer, require no further action. The information of Audit Vault Agents is replicated to thestandby Audit Vault Server during high availability pairing.
Audit Vault Agents and Host Monitor Agents deployed on the designated standby Audit VaultServer, will be unable to communicate with the designated primary Audit Vault Server afterhigh availability pairing. To redeploy the Agents on the specific Agent machines, follow thesesteps:
1. Clean up the Agent_Home folder on the Agent machine.
Chapter 9Managing High Availability in Audit Vault Server
9-5
Agent installed on Windows hostmachine
Agent installed on Linux (or otherUnix) machine
a. Run the command agentctl.batunregistersvc from theAgent_Home directory.
b. Remove the contents in theAgent_Home directory on the Agenthost machine.
Remove the contents in theAgent_Home directory on the Agenthost machine.
2. Register the Agent on the Audit Vault Server and activate.
3. Download the agent.jar file from the Audit Vault Server console.
4. Copy the agent.jar file to the Agent_Home directory on the Agent hostmachine.
5. In the Agent_Home directory, run the following command:
java -jar agent.jar
6. Run the following command and provide the Agent activation key when prompted.The key is available on the Audit Vault Server console.
agentctl start -k
Note:
This key is not displayed as you type.
See Also:
Deploying and Activating the Audit Vault Agent on Host Computers
9.2.7 Audit Vault Agent Communication with Audit Vault Server in HighAvailability
Learn how Audit Vault Agent communicates with Audit Vault Server.
Audit Vault Agent software is packaged with the connection details pertaining to AuditVault Server. In case of high availability environment, the Audit Vault Agent software ispackaged with the connection details pertaining to both the primary and standby AuditVault Servers.
Existing Audit Vault Agents on the designated primary Audit Vault Server receive theconnection details of both the primary and standby Audit Vault Servers during highavailability configuration. New Audit Vault Agents that are deployed after highavailability configuration are also packaged with the connection details pertaining toboth the primary and standby Audit Vault Servers.
Chapter 9Managing High Availability in Audit Vault Server
9-6

In the event of Audit Vault Server failover, the Audit Vault Agents reconnect to the newprimary Audit Vault Server (previous standby).
9.2.8 Swapping Roles Between a Primary and Standby Audit Vault ServerLearn how to swap the roles of the primary and standby Audit Vault Servers.
1. Log in to the Audit Vault Server console as a super administrator.
2. Click the Settings tab.
3. In the left navigation menu, select System.
4. In the Configuration section click High Availability link. The Configure HighAvailability dialog is displayed.
5. Click the Switch Roles button.
6. In the confirmation window, click OK.
A message is displayed indicating the progress of the high availability configuration.During this process, which takes at least 10 minutes, the console is unavailable. Click thebrowser refresh button periodically. When the configuration is complete, it will redirect tothe new primary Audit Vault Server.
Related Topics
• Using Audit Vault Server ConsoleLearn how to log in and use Audit Vault Server console.
9.2.9 Handling a Failover ScenarioLearn how to handle Audit Vault Server failover scenario.
In a high availability environment, automatic failover mechanism is enabled by default. It canbe disabled manually through the Audit Vault Server console.
When automatic failover is in effect, the system periodically monitors the availability ofprimary Audit Vault Server. If the primary becomes unavailable for more than 10 minutes,then the failover to the standby Audit Vault Server is automatically triggered. However, if theprimary Audit Vault Server has been gracefully shutdown by the user, then no failover isautomatically triggered. In this case to manually initiate the failover, carefully examine thesituation as required, and run the following command as oracle user on any of the Audit VaultServers:
/usr/local/dbfw/bin/setup_ha.rb --failover
In the event of a failover, the standby Audit Vault Server becomes the new primary. In casethe previous primary comes back within 20 minutes, it will be reinstated as the new standbyand both the systems will be in high availability configuration.
In case the previous primary does not come back within 20 minutes, then it will becomeunusable. The new primary will unpair and become a standalone instance. Perform thefollowing procedure to bring the system back into high availability configuration:
1. Install a new Audit Vault Server for the new designated standby.
2. Follow the configuration steps again, to configure Audit Vault Servers for high availability.See Managing High Availability in Audit Vault Server for more information.
Chapter 9Managing High Availability in Audit Vault Server
9-7
Related Topics
• Specifying Audit Vault Server System SettingsLearn about configuring Audit Vault Server system settings.
9.2.10 Unpair Primary and Standby Audit Vault ServersLearn how to unpair primary and standby Audit Vault Servers in high availabilityenvironment.
1. Log in to the Audit Vault Server console as a super administrator.
2. Click Settings tab.
3. In the left navigation menu, select System.
4. In the Status page, click High Availability link under the Configuration section.
5. To unpair Audit Vault Servers in high availability mode, click Unpair.
After unpairing, the Audit Vault Servers are not synchronized. Make a note of thefollowing details:
• The primary Audit Vault Server goes into Standalone mode and the standbyAudit Vault Server stays in Standby mode. However, there is nocommunication between these two Audit Vault Servers.
• In case you attempt to connect to the standby Audit Vault Server console, itdirects you to the primary Audit Vault Server console which is the Standalone.
• The Audit Vault Agents communicate only with the standalone Audit VaultServer (previous primary).
Note:
• You can continue to perform backup operation on the standalone(previous primary) Audit Vault Server.
• You can restore high availability after unpairing. See Handling aFailover Scenario for complete information.
9.2.11 Disabling or Enabling Failover of the Audit Vault ServerLearn how to enable or disable failover for Audit Vault Servers.
When you configure high availability, the system is configured for automatic failover.However, in some cases, you may want to disable automatic failover. For example,you may need to disconnect the Audit Vault Servers for maintenance or you may be inan environment with unstable network that may cause frequent failover. In thesecases, you may choose to disable automatic failover, and trigger the failover manuallyby following the steps mentioned below.
To enable or disable automatic failover using the Audit Vault Server console:
1. Log in to the primary Audit Vault Server as a super administrator.
2. Click the Settings tab, and then in the left navigation menu, select System tab.
Chapter 9Managing High Availability in Audit Vault Server
9-8

3. Click High Availability link under the Configuration section.
4. Click the Enable Failover or Disable Failover button as needed.
Note:
Alternately, you can execute the following commands to disable or enable thefailover as oracle user:
/usr/local/dbfw/bin/setup_ha.rb --disable_failover
/usr/local/dbfw/bin/setup_ha.rb --enable_failover
9.2.12 Archiving and Retrieving in High AvailabilityLearn about archiving and retrieving audit and network event data in a high availability.
Archive and retrieve functionality in high availability automatically handles the necessarysteps to process the datafiles on both the primary and standby Audit Vault Server instances.In order to archive, you must provide an NFS archive location. An NFS archive location inhigh availability environment contains separate NFS details for primary and standby AuditVault Servers.
In case there is no NFS archive location, then follow these steps to create a new NFS archivelocation:
1. Log in to the Audit Vault Server console as super administrator.
2. Click Settings tab, and then click Archiving tab in the left navigation menu.
3. Click Manage Archive Locations sub tab in the main page.
4. Click Create, to create a new archive location using NFS.
5. Network File System (NFS) option is selected by default. Enter the following details tocreate a new NFS archive location:
Field Description
Location Name The name of the NFS archive location.
Remote Filesystem Select an existing filesystem, or one will becreated automatically based on the detailsof this archive location.
NFS Server for Primary NFS Server IP address or host name formounting the remote filesystem on primaryAudit Vault Server.
NFS Server for Standby NFS Server IP address or host name formounting the remote filesystem on standbyAudit Vault Server.
Chapter 9Managing High Availability in Audit Vault Server
9-9

NFS Export Directory for Primary Export directory on the NFS server forprimary Audit Vault Server.
NFS Export Directory for Standby Export directory on the NFS server forstandby Audit Vault Server.
NFS Server Path for Primary The destination path relative to NFS ExportDirectory for Primary.
NFS Server Path for Standby The destination path relative to NFS ExportDirectory for Standby.
Note:
The combination of NFS server, export directory, and the path specifiedfor primary and standby Audit Vault Servers must be unique.
6. Click Save.
Note:
Each Audit Vault Server instance has its own copy of the datafiles. Whenyou archive or retrieve, the datafiles associated with each instance isautomatically archived to, or retrieved from the associated archivelocation.
Best Practice:
Place the NFS servers for primary and standby Audit Vault Servers inseparate data centers.
9.2.13 Backup and Restore of Audit Vault Server in High AvailabilityLearn about backup and restore of Audit Vault Server in high availability.
In a high availability configuration, you must perform the backup operation on theprimary Audit Vault Server and not on the standby. To recover from a disaster, you canrestore from the backup taken earlier. However, the restored system is notautomatically configured for high availability. You need to once again configure for highavailability after completing the restore from backup.
Chapter 9Managing High Availability in Audit Vault Server
9-10

See Also:
1. Prerequisites for Configuring High Availability in Audit Vault Servers
2. Configure the Designated Standby Audit Vault Server
3. Configure the Designated Primary Audit Vault Server
9.3 High Availability for Database FirewallLearn how to manage, configure, switch roles, and unpair a Database Firewall pair.
9.3.1 High Availability for Database FirewallLearn about high availability in Database Firewall.
High availability in Database Firewall ensures uninterrupted network event monitoring in theevent of network or Database Firewall failure. It also ensures that the corporate securitypolicies for monitoring the database targets is enforced at all times.
High availability for Database Firewall can be accomplished in the following two ways:
1. A pair of Database Firewall instances in Monitoring (Host Monitor) or Monitoring (Outof Band) modes.
2. Multiple Database Firewall instances operating in Monitoring/Blocking (Proxy) mode.
Prerequisite
Ensure to create the Database Firewall instances, register them in the Audit Vault Serverconsole, and configure them for high availability first. Later create monitoring points, registertargets, and define policies for the Database Firewall instances configured for highavailability.
Starting Oracle AVDF 20.6, Database Firewall instances can be paired with existingmonitoring points in Monitoring (Host Monitor) or Monitoring (Out of Band) modes. See Configuring High Availability of Database Firewall Instances With Monitoring Points for moreinformation.
High Availability in Monitoring (Host Monitor) Or Monitoring (Out of Band) Modes
In this configuration:
• High availability (primary and standby) is configured through Audit Vault Server.
• In case of Monitoring (Host Monitor) mode, the Host Monitor Agent is configured tocapture and forward the traffic to the primary and standby Database Firewall instances.
• In case of Monitoring (Out of Band) deployment mode, the network switch is configuredto mirror and forward the traffic to both the primary and standby Database Firewallinstances.
• The configuration of targets, monitoring points, and policies is automatically applied to theprimary and standby Database Firewall instances by Audit Vault Server.
The Audit Vault Server collects network events from the primary or standby Database Firewallinstance. If the Audit Vault Server is unable to contact the primary Database Firewall for a
Chapter 9High Availability for Database Firewall
9-11

specified period of time (default of 10 minutes), then the Audit Vault Server collects thenetwork events from the standby Database Firewall. The Audit Vault Server deletesthe network events from both instances of Database Firewall after storing the data inthe Audit Vault Server repository.
High Availability in Monitoring/Blocking (Proxy) Mode
Database Firewall instances deployed in Monitoring/Blocking (Proxy) mode, can beconfigured for high availability in the following ways:
1. Active (primary) and passive (standby)
2. Active and active
In active and passive configuration:
• Client programs are configured to connect to the primary Database Firewallinstance. If the primary Database Firewall instance is not reachable or is down,then they connect to the standby.
• Audit Vault Server collects the network events from the Database Firewall instance(either active or passive) that receives the traffic.
In active and active configuration:
• Multiple Database Firewall instances can be part of this configuration.
• Client programs can connect to any of the active Database Firewall instances thatare part of this configuration.
• Once a client establishes a session with an active Database Firewall instance, itcommunicates with the same instance throughout the session.
• Audit Vault Server collects the network events from all the active DatabaseFirewall instances that are part of this configuration.
Related Topics
• Configuring Database FirewallLearn about configuring Database Firewall.
• Specifying the Audit Vault Server Certificate and IP AddressLearn about specifying the Audit Vault Server certificate and IP address.
9.3.2 High Availability for Database Firewall in Host Monitor or Out ofBand Modes
Learn how to configure a Database Firewall high availability pair in Host Monitor or Outof Band modes.
Prerequisites
• Register both the Database Firewall instances in the Audit Vault Server console.
• If you have Audit Vault Servers in high availability mode, then you must providethe primary and standby Audit Vault Server's IP address and certificate to eachDatabase Firewall instance during registration.
• For Oracle AVDF release 20.5 and earlier, ensure there are no monitoring pointsconfigured on either of the Database Firewall instances. In case there are anyexisting monitoring points, then they must be deleted.
Chapter 9High Availability for Database Firewall
9-12

• For Oracle AVDF release 20.6 and later, pairing of Database Firewall instances withexisting monitoring points is possible.
1. Log in to the Audit Vault Server console as an administrator.
2. Click Database Firewalls tab.
3. In the left navigation menu, select High Availability.
4. Click Create.
5. In the Create Resilient Pair dialog, select the Database Firewall instances for Primaryand Standby fields from the drop down list.
6. Click Save.
7. Starting Oracle AVDF 20.6, the pairing process of the Database Firewall instances is abackground job. See the Jobs dialog in the Audit Vault Server console to check thestatus of high availability pairing. Locate for the job against the entry Create DBFWresilient pair. After completion of the pairing process, navigate to the DatabaseFirewalls tab and then to High Availability tab in left navigation menu to verify theresilient pair.
9.3.3 Swapping Roles Between Primary and Standby Database FirewallsLearn to swap the roles of primary and standby Database Firewall instances in a highavailability.
1. Log in to the Audit Vault Server console as an administrator.
2. Click the Database Firewalls tab.
3. In the left navigation menu, select High Availability.
4. Select the specific pair for which you want to swap roles.
5. Click the Swap button.
6. In the confirmation dialog, click OK.
9.3.4 Unpair Primary and Standby Database FirewallsLearn to unpair Database Firewall instances in high availability.
1. Log in to the Audit Vault Server console as an administrator.
2. Click the Database Firewalls tab.
3. In the left navigation menu, select High Availability.
4. Select the specific pair of Database Firewalls that you want to unpair.
5. Click the Unpair button.
Note:
For releases Oracle AVDF 20.4 and prior, click Break button.
Chapter 9High Availability for Database Firewall
9-13

9.3.5 Configuring High Availability of Database Firewall Instances WithMonitoring Points
Learn how to configure high availability in Database Firewall instances with monitoringpoints.
Starting with Oracle AVDF release 20.6 if there are monitoring points on thedesignated primary Database Firewall instance or on the standby instance, or on both,they can be paired. The existing monitoring points on the designated primary instanceare replicated on the standby Database Firewall instance after pairing. Likewise, theexisting monitoring points of the designated standby Database Firewall instance arereplicated on the primary instance after pairing. The monitoring points are sharedbetween the resilient pair.
If a target has monitoring points on both the Database Firewall instances, theconfiguration data of the monitoring points is merged. The data on the primaryinstance takes precedence.
Note:
Starting Oracle AVDF 20.6, Database Firewall instances can be paired withexisting monitoring points in Monitoring (Host Monitor) or Monitoring (Outof Band) modes. This is not supported for Database Firewall instancesdeployed in Monitoring/Blocking (Proxy) mode. An error is displayed if anattempt is made to pair Database Firewall instances deployed in Monitoring/Blocking (Proxy) mode with existing monitoring points.
Unable to create resilient pair in Monitoring/Blocking(Proxy)mode.
1. Log in to the Audit Vault Server console as an administrator.
2. Click the Database Firewalls tab.
3. In the left navigation menu, select High Availability.
4. Click Create.
5. In the Create Resilient Pair dialog, select the Database Firewall instances forPrimary and Standby fields from the drop down list.
6. Click Save.
7. If there are monitoring points on the both the Database Firewall instances, thefollowing a confirmation message is displayed:
Pairing will merge settings of both monitoring points. Do you wish tocontinue?
8. Click OK to continue.
9. The following message is displayed:
Request submitted successfully.10. The pairing process of the Database Firewall instances is a background job. See
the Jobs dialog to check the status of high availability pairing. Locate for the job
Chapter 9High Availability for Database Firewall
9-14

against the entry Create DBFW resilient pair. After completion of the pairing process,navigate to the Database Firewalls tab and then to High Availability tab in leftnavigation menu to verify the resilient pair.
9.4 High Availability for Database Firewall in Proxy ModeLearn how to configure Database Firewall instances for high availability Monitoring /Blocking (Proxy) mode.
Oracle AVDF provides an option to set up the high availability configuration for multipleDatabase Firewall instances deployed in Monitoring / Blocking (Proxy) mode. Thesemultiple instances are installed and configured independently.
Prerequisites
• Install and register all Database Firewall instances that will be part of the high availability.
• For each Database Firewall instance:
– The configuration of the monitoring points must be same. For example DatabaseFirewall instances DBFW1 and DBFW2 should have the same number of monitoringpoints and the configuration of these monitoring points should also be the same.
– Deploy the same Database Firewall policy for a specific target. For example, deployDatabase Firewall policy P1 (for target T1) on instances DBFW1 and DBFW2.
High availability configuration in proxy mode can be achieved in the following ways:
• Through Client Configuration for Oracle Databases
• Using DNS for Oracle and Other Database Types
9.4.1 Configuring High Availability for Database Firewall in Proxy Modethrough Client Configuration
Learn how to configure high availability for two or more Database Firewall instances in proxymode using tnsnames.ora for Oracle databases.
OCI (Oracle Call Interface) based clients use tnsnames.ora file to connect to Oracledatabase. The following parameters in this file should be modified as part of thisconfiguration:
1. ADDRESS_LIST2. CONNECT_TIMEOUT3. LOAD_BALANCE
ADDRESS_LIST
Include addresses of all the Database Firewall instances in the ADDRESS_LIST. The clientprograms connect to the first Database Firewall instance. In case of a failed attempt, theclient connects to the next instance in the order.
For example:
dbfw1=(DESCRIPTION=(ADDRESS_LIST=(ADDRESS=(PROTOCOL=TCP)(HOST=192.0.2.1)
Chapter 9High Availability for Database Firewall in Proxy Mode
9-15
(PORT=1111))
(ADDRESS=(PROTOCOL=TCP)(HOST=192.0.2.2)(PORT=2222)))(CONNECT_DATA=(SERVICE_NAME=dbfwdb)))
where:
dbfw1 is referred to as net_service_name.
Host = 192.0.2.1 and Host = 192.0.2.2 are the IP addresses of Database Firewallinstances configured for high availability.
If you are using SQL*Plus client, then use the following command:
sqlplus <username>/<password>@<net_service_name>
The SQL*Plus client attempts to connect to the first Database Firewall instance with IP192.0.2.1. In case the first instance is down or not reachable, then the client attemptsto connect to the second Database Firewall instance with IP address 192.0.2.2.
CONNECT_TIMEOUT
Use CONNECT_TIMEOUT (seconds) parameter to quickly detect if the Database Firewallinstance is down.
For example:
dbfw1=(DESCRIPTION=(CONNECT_TIMEOUT=10)(ADDRESS_LIST=(ADDRESS=(PROTOCOL=TCP)(HOST=192.0.2.1)(PORT=1111))(ADDRESS=(PROTOCOL=TCP)(HOST=192.0.2.2)(PORT=2222)))(CONNECT_DATA=(SERVICE_NAME=dbfwdb)))
The client attempts to connect to the first Database Firewall instance with IP192.0.2.1. In case the first instance is down or not reachable, then the client waits forthe duration (seconds) mentioned in the CONNECT_TIMEOUT parameter. In the aboveexample it is 10 seconds. Next the client attempts to connect to the second DatabaseFirewall instance with IP address 192.0.2.2.
Note:
• By default the value of CONNECT_TIMEOUT is 60 seconds.
• Refer to Oracle Database Net Services Administrator's Guide for moredetails.
LOAD_BALANCE
Use LOAD_BALANCE parameter for client connections to connect to Database Firewallinstances in a random sequence.
Chapter 9High Availability for Database Firewall in Proxy Mode
9-16

For example:
dbfw1=(DESCRIPTION=(ADDRESS_LIST=(LOAD_BALANCE=on)(ADDRESS=(PROTOCOL=TCP)(HOST=192.0.2.1)(PORT=1111))(ADDRESS=(PROTOCOL=TCP)(HOST=192.0.2.2)(PORT=2222)))(CONNECT_DATA=(SERVICE_NAME=dbfwdb)))
Here clients will connect to either 192.0.2.1 or 192.0.2.2 in a random sequence.
Note:
• When set to on, the LOAD_BALANCE parameter instructs clients to progressthrough the list of Database Firewall addresses in a random sequence. Whenset to off, instructs clients to try the addresses sequentially until one succeeds.
• Refer to Oracle Database Net Services Administrator's Guide for more details.
9.4.2 Configuring High Availability for Database Firewall in Proxy Modeusing DNS
Learn how to configure high availability for multiple Database Firewall instances inMonitoring / Blocking (Proxy) mode using DNS for Oracle and other database types.
Prerequisites
1. Install and register Database Firewall instances.
2. For each Database Firewall instance:
• The configuration of the monitoring points must be same. For example DatabaseFirewall instances DBFW1 and DBFW2 should have the same number of monitoringpoints and the configuration of these monitoring points should also be the same.
• Deploy the same Database Firewall policy for a specific target. For example, deployDatabase Firewall policy P1 (for target T1) on instances DBFW1 and DBFW2.
3. Client programs should be able to connect to the configured DNS server.
Setup a fully qualified Domain Name in DNS
1. Create a fully qualified domain name to represent IP addresses of the Database Firewallinstances.
2. Configure the selected DNS server as the name resolution server on the client hosts.
3. Clients should use the fully qualified domain name in the connection string to connect tothe Database Firewall instance.
4. For example, if you are using SQL*Plus, then follow these steps:
a. Start the SQL*Plus connection as sqlplus /nolog without the username orpassword.
b. Run the command: connect <username>/<password>@<fully qualified domainname>:<port/service>
5. DNS can be configured in one of the following ways:
Chapter 9High Availability for Database Firewall in Proxy Mode
9-17

a. Configure DNS to always connect to an ordered list of Database Firewallinstances (for example DBFW1, DBFW2, etc). If a client is not able to connect tothe first instance (DBFW1), then it attempts to connect to the second instance(DBFW2).
b. Configure DNS to use round-robin algorithm for connecting to DatabaseFirewall instances.
Chapter 9High Availability for Database Firewall in Proxy Mode
9-18
10Integration with Third Party SIEM and Log-data Analysis Tools
Oracle Audit Vault and Database Firewall supports integration with third-party SIEM (SecurityInformation and Event Management) and log-data analysis tools.
Oracle Audit Vault and Database Firewall can push alerts to an external system usingSYSLOG. It also allows third party tools to connect directly to the database and extract (pull)data from the event log table using a collector provided by the SIEM.
Integration with any SIEM tool is achieved through one of two methods:
1. Oracle AVDF pushes alerts into the SIEM using SYSLOG. For the push method whereOracle Audit Vault and Database Firewall sends alerts to the SIEM using SYSLOG, see Configuring Audit Vault Server Syslog Destinations for information.
2. Configure SIEM to pull events from the AVSYS.EVENT_LOG table in Oracle AVDF. Usethe SIEM's database table connector to configure this functionality. For the pull method,configure SIEM to view and extract all of the data from the AVSYS.EVENT_LOG tableusing the collector provided by the SIEM. This requires creating a user in Oracle AuditVault and Database Firewall with the auditor role. Ensure that this user has access to thetargets whose data has to be sent to SIEM. This is the database user the SIEM will useto connect to the database. The remaining configuration needs to completed in the SIEM.The Oracle Audit Vault and Database Firewall schema and the specific mapping in theAVSYS.EVENT_LOG table to the SIEM depends on the SIEM. A description of theEVENT_LOG table is available in Appendix Oracle Audit Vault and Database FirewallDatabase Schemas.
See Also:
• START COLLECTION FOR SECURED TARGET
• Oracle Database Plug-in for Oracle Audit Vault and Database Firewall
10-1

11Using Oracle Database Firewallwith Oracle RAC
You can configure Oracle Database Firewall to work with Oracle Real Application Clusters(Oracle RAC) so that it can block and substitute statements or log SQL statements and raisealerts.
11.1 Configuring a Database Firewall with Oracle RAC forMonitoring and Blocking
Learn how to configure a database firewall with Oracle Real Application Clusters (OracleRAC) for monitoring and blocking.
11.1.1 About Configuring Database Firewall with Oracle RAC for Monitoringand Blocking
Oracle Database Firewall has monitoring and blocking features that you can use with OracleRAC.
To use blocking, you must use the Monitoring / Blocking (Proxy) mode.
The Database Firewall when configured in Monitoring / Blocking (Proxy) mode, thefollowing takes place:
1. SQL client connects to Database Firewall.
2. Database Firewall connects to SCAN Listener.
3. SCAN Listener redirects the connection to a RAC node.
4. Database Firewall handles the redirection, makes a outbound connection to the re-directed RAC node.
5. The response from Oracle RAC node is passed to the client.
All components must be in the same subnet. If the client and the SCAN Listener are indifferent subnets, then 2 Network Interface Cards are needed (one in the client subnet andthe other in SCAN Listener subnet). The internal Database Firewall routing must be adjustedif the client, Database Firewall, and database server reside in a different subnet.
11.1.2 Configure A Proxy Using the Audit Vault Server ConsoleYou can use the Oracle Audit Vault Server Console to configura a proxy.
1. Log in to the Audit Vault Server console as administrator.
2. Complete the steps for Configuring Database Firewall As A Traffic Proxy.
11-1

3. Complete the steps for Creating and Configuring a Database Firewall MonitoringPoint. While executing this procedure, ensure to select the check box against RACInstance under Connection Details section.
4. Ensure Network Interface Card and Proxy Ports fields are selected. Uponselecting them, the check box against RAC Instance is enabled.
5. Upon selecting the check box RAC Instance, and adding the SCAN ListenerDomain Name in the Host Name / IP Address field, the following message isdisplayed:
Configure SCAN Listener Domain Name as target. For more details refer:Real Application Clusters Installation Guide.
Figure 11-1 Connection Details
6. Ensure the SCAN Listener Domain Name is entered in the Host Name / IPAddress.
7. Enter the Port number of SCAN Listener.
8. Enter the Service Name or SID (optional).
9. Click Add.
10. Click Save on the dialog.
11. Click Save on the main page. The target is created and shows up under theDatabase Firewall Monitoring sub tab on the main page.
12. Click the newly created RAC target to verify the details.
11.2 Configuring a Database Firewall with Oracle RAC forMonitoring
You can configure an Oracle Database Firewall with Oracle RAC to use HostMonitoring and Out-of-Band deployment modes.
Oracle recommends that you configure Oracle Database Firewall with Oracle RAC inone of the following deployment modes:
• Monitoring (Out-of-Band) - In this deployment mode, Oracle Database Firewallcan monitor and alert on SQL traffic, but cannot block or substitute SQLstatements. Create a monitoring point using IP addresses of all the RAC nodes.Select this option only while creating the monitoring point.
Chapter 11Configuring a Database Firewall with Oracle RAC for Monitoring
11-2
• Monitoring (Host Monitor) - In this deployment mode, Oracle Database Firewall canmonitor and alert on SQL traffic, but cannot block or substitute SQL statements. For thisdeployment mode, install the Host Monitor Agent on each RAC node and create amonitoring point for each RAC node. Select this option only while creating the monitoringpoint.
Note:
Complete the steps for Creating and Configuring a Database Firewall MonitoringPoint. While executing this procedure, ensure to select the deployment mode asmentioned above.
Chapter 11Configuring a Database Firewall with Oracle RAC for Monitoring
11-3

12Oracle Audit Vault and Database Firewall onOracle Cloud Infrastructure
You can deploy Oracle AVDF on Oracle Cloud Infrastructure (OCI).
12.1 About Oracle AVDF on Oracle Cloud InfrastructureLearn about Oracle AVDF on Oracle Cloud Infrastructure (OCI).
Oracle Cloud Infrastructure Marketplace is an online store that offers solutions specifically forcustomers of Oracle Cloud Infrastructure (OCI). Oracle Cloud Marketplace images aretemplates of virtual hard drives that determine the operating system and software to run onan instance. Oracle AVDF instances (Audit Vault Server instance or Database Firewallinstance) can be provisioned on Oracle Cloud Infrastructure's Virtual Machine standardshapes using Oracle AVDF Cloud Marketplace images.
Oracle AVDF Cloud Marketplace images consist of the Audit Vault Server image and theDatabase Firewall image that is used to provision Audit Vault Server and Database Firewallinstances respectively.
See Also:
Oracle Cloud Marketplace
12.2 Benefits of Provisioning Oracle AVDF on Oracle CloudInfrastructure
Learn about the benefits of provisioning Oracle AVDF on Oracle Cloud Infrastructure (OCI).
Quick Provisioning
Oracle AVDF instances can be provisioned within minutes, without the need to procure andmanage hardware.
Ease of Scaling up
Scaling up Oracle AVDF instance to meet increased workload needs, is simple and easy.Ease of scaling up gives you the option to start with a small VM shape and scale up asworkload increases.
12-1

12.3 Supported Oracle Cloud Infrastructure Virtual MachineShapes
List of supported VM standard shapes for deploying Oracle AVDF on Oracle CloudInfrastructure (OCI).
The following Oracle Cloud Infrastructure VM standard shapes are supported forOracle AVDF instances:
• VM.Standard2.1
• VM.Standard2.2
• VM.Standard2.4
• VM.Standard2.8
• VM.Standard2.16
• VM.Standard2.24
• VM.Standard1.2
• VM.Standard1.4
• VM.Standard1.8
• VM.Standard1.16
• VM.Standard.E3.Flex
See Also:
Oracle Cloud Infrastructure compute shapes
12.4 Provisioning Oracle AVDF with the Oracle CloudMarketplace Image
Learn about provisioning Audit Vault Server or Database Firewall with Oracle CloudMarketplace image.
The following are required prior to provisioning Oracle AVDF instances using theOracle Cloud Marketplace image:
1. A VM standard shape with a minimum memory of 8GB.
2. Block storage with a minimum of 220 GB.
3. A Virtual Cloud Network (VCN) in your tenancy.
4. SSH key pair for ssh access to the instance. Oracle AVDF instance accepts thefollowing key types:
• ssh-ed25519• [email protected]
Chapter 12Supported Oracle Cloud Infrastructure Virtual Machine Shapes
12-2
• ecdsa-sha2-nistp384• [email protected]• rsa-sha2-512 key types
Generate an SSH key pair of these types. For example: Run the following command togenerate a public key of ssh-ed25519 type:
sh-keygen -t ed25519
12.4.1 Accessing the Oracle AVDF Cloud Marketplace ImageLearn how to access the Oracle AVDF Cloud Marketplace image.
The Oracle AVDF Cloud Marketplace image is available on the Oracle Cloud Marketplacewebsite. Follow these steps:
1. Go to Oracle Cloud Marketplace.
2. In the Applications search field, enter Oracle Audit Vault and Database Firewall.
3. Click Go.
4. Under the search results, click Oracle Audit Vault and Database Firewall to navigate tothe Oracle AVDF Cloud Marketplace page.
Note:
Access the latest Audit Vault Server 20.x for Audit Vault Server image orDatabase Firewall 20.x for Database Firewall image from Oracle CloudMarketplace website. Other artifacts (or installable files) can be downloadedfrom Oracle Software Delivery Cloud. Refer to About Oracle AVDF InstallableFiles.
12.4.2 Creating an Oracle AVDF instance with Oracle Cloud MarketplaceImage
Learn how to create an Oracle AVDF instance with Oracle Cloud Marketplace image.
Follow these steps:
1. In the Oracle AVDF Cloud Marketplace page, click the Get App button.
2. If you already have an OCI account, select the OCI region, and then click Sign In. Else,click Sign Up to create a new account.
3. In the Get Version menu, select the latest Audit Vault Server 20.x for Audit Vault Serverimage or Database Firewall 20.x for Database Firewall image.
4. In the Compartment menu, select a compartment.
5. Check the I have reviewed the terms and conditions box.
6. Click Launch Instance.
7. The Create Compute Instance page is displayed. Fill in the required details:
Chapter 12Provisioning Oracle AVDF with the Oracle Cloud Marketplace Image
12-3
a. Provide a NAME for the Oracle AVDF instance.
b. Choose the AVAILABILITY DOMAIN.
c. Under Shape, click Change Shape.
d. Choose Virtual Machine as the Instance Type.
e. Select the Shape series.
f. Then click Select Shape. Choose the shape for the instance.
8. In the Configure networking section, select the following fields:
a. VIRTUAL CLOUD NETWORK COMPARTMENT
b. SELECT A VIRTUAL CLOUD NETWORK
c. SUBNET COMPARTMENT
d. SUBNET
9. Check one of the following options for IP address:
• ASSIGN A PUBLIC IP ADDRESS
• DO NOT ASSIGN A PUBLIC IP ADDRESS
Note:
See IP Addresses in your VCN (Virtual Cloud Network) to understandmore about public and private IP addresses in Oracle CloudInfrastructure.
10. In the Add SSH Keys section, provide your ssh public key by selecting Choosepublic key files or Paste public keys. If you select any other option, you will notbe able to connect to the Oracle AVDF instance.
11. Under Boot volume section, specify a custom boot volume size if you want theboot volume to be larger than the default size of 220 GB.
Note:
The custom boot volume size should not exceed 2TB. Refer to Scalingup Oracle AVDF Instance section for more details on expanding storage.
12. Click Advanced Options, and then choose the default options in all the tabs.
13. Click Create to start creating the instance.
14. After the instance state changes to Running in the Oracle Cloud Infrastructureconsole, wait for a few minutes for the underlying services to start up beforeaccessing the instance.
15. Perform the post instance creation steps.
Chapter 12Provisioning Oracle AVDF with the Oracle Cloud Marketplace Image
12-4
Note:
For production workload, follow the sizing guidelines (MOS Doc ID 2223771.1)to calculate shape and storage requirements.
See Also:
Creating an instance in Oracle Cloud Infrastructure
12.4.3 Post Instance Creation StepsPerform one time post instance creation steps.
After the instance creation is completed, you must perform these steps once.
For Audit Vault Server Instance
1. Connect to the instance through SSH using the ssh utility. See section Connecting toOracle AVDF Instance.
2. Change root user password by running the following command. The root password isrequired to troubleshoot the instance using OCI instance console connection.
sudo passwd root
3. Generate a one time passphrase by running the command:
sudo -u oracle /usr/local/dbfw/bin/generate_post_install_passphrase
4. Copy the passphrase that is returned by the above command.
5. Access the Audit Vault Server console by entering https://<IP address of theinstance> as the URL in the browser.
6. Enter the passphrase copied from the earlier step in the Post Install Authenticationpage of the Audit Vault Server console.
7. Fill in the details in the Post Install Configuration page.
8. In the AVS IP for Agent Communication section, specify the public IP of the Audit VaultServer if you are expecting to collect audit data from any target outside of OCI. Seesection Deploying Audit Vault Agents for more details.
Note:
After the post installation step is complete, changing the AVS IP for Agentcommunication is not supported.
9. DNS is automatically set to 169.254.169.254. However, you can specify a different DNSsetting.
Chapter 12Provisioning Oracle AVDF with the Oracle Cloud Marketplace Image
12-5

See Also:
DNS in Your Virtual Cloud Network
10. Click Save.
For Database Firewall Instance
1. Connect to the instance through SSH using the ssh utility. See section Connectingto Oracle AVDF Instance.
2. Change root user password by running the following command. The root passwordis required to troubleshoot the instance using OCI instance console connection.
sudo passwd root
12.5 Connecting to Oracle AVDF InstanceLearn how to access Audit Vault Server and Database Firewall instances on OracleCloud Infrastructure (OCI).
Connecting through SSH
Prerequisite: OCI virtual firewall for your VCN must be configured to allow ingresstraffic on SSH port 22. See OCI Access and Security for complete information.
The public key specified during instance creation is installed on Oracle AVDF instancefor SSH authentication. After the instance creation is completed, connect to theinstance as opc user using the matching private key.
Using the ssh utility, run the following command:
ssh -i <path to private key file> opc@<IP address of Oracle AVDF instance>
See Also:
• Connecting to Oracle Cloud Infrastructure Instance
• Oracle Cloud Infrastructure Access and Security
• IP Addresses in your VCN
Chapter 12Connecting to Oracle AVDF Instance
12-6

Note:
Oracle AVDF instances accept the following public key types:
• ssh-ed25519• [email protected]• ecdsa-sha2-nistp384• [email protected]• rsa-sha2-512
Connecting through Audit Vault Server console
Prerequisite: OCI virtual firewall for your VCN must be configured to allow ingress traffic onport 443. See OCI Access and Security for complete information.
Access the Audit Vault Server console by entering https://<IP address of theAudit Vault Server instance> as the URL in your browser.
12.6 Scaling up Oracle AVDF InstanceLearn to scale up Oracle AVDF instances on OCI.
CPU, memory, network bandwidth, and repository storage of Oracle AVDF instance can bescaled up without recreating the instance. This allows for increased performance to meetgrowing workload needs.
Changing the Shape of Oracle AVDF Instance
CPU, memory, and network bandwidth can be scaled up by changing the shape of theinstance to one of the supported VM standard shapes.
Use the OCI console to edit the shape of the instance. Refer to Using the Console for moredetails.
Note:
Changing a shape to a smaller one than the current shape is not supported. Forexample, changing the shape from VM.Standard2.4 to VM.Standard2.2 is notsupported.
Expanding Repository Storage for Audit Vault Server
Each Audit Vault Server instance has a repository that stores the collected audit and networkevent data. The storage requirements increase as the collection workload grows. To meet thestorage needs, expand the Audit Vault Server repository storage in the following ways:
• During Instance creation: When specifying the boot volume larger than the default forAudit Vault Server instance, the underlying repository storage is automatically expanded.Refer to section Creating an Oracle AVDF instance with Oracle Cloud Marketplace Imageon how to specify custom boot volume size.
Chapter 12Scaling up Oracle AVDF Instance
12-7

• Post instance creation: Follow these steps:
1. Attach additional OCI Block storage to the instance. Follow the steps listed in Attaching the Volume to an Instance.
2. Ensure the disks are visible at the OS level, by running the followingcommand:
lsblk
3. Follow the manual steps listed in MOS note (Doc ID 1923751.1) to completeexpanding repository storage.
Note:
• Ensure the attached OCI Block storage is not shared with any otherinstance as it may lead to data loss.
• SAN storage is not supported.
12.7 Changes in Functionality for Oracle AVDF Instances onOCI
Learn about the changes in functionality of Oracle AVDF deployed on Oracle CloudInfrastructure (OCI).
Table 12-1 Functional Differences Between Oracle AVDF Deployed On-premises and on OCI
Functionality Oracle AVDF instance deployedon-premises
Oracle AVDF instances deployedon OCI
SSH authentication Password based authentication Key based authentication
Network settings (IP address andHost Name)
Network settings can be modifiedusing the Audit Vault Server console.
These settings are read only in theAudit Vault Server console. However,they can be modified from the OCIconsole.
Time synchronization NTP settings can be modified usingthe Audit Vault Server console.
NTP is automatically configuredduring instance creation and the NTPserver settings cannot be changed.
DNS DNS setting can be modified usingthe Audit Vault Server console.
DNS is automatically set to169.254.169.254 during instancecreation. The settings can bechanged on the Audit Vault Serverconsole.
Repository storage expansion SAN Storage OCI Block Storage must be used forstorage expansion.
Archive or backup location NFS OCI File Storage (Recommended)
Chapter 12Changes in Functionality for Oracle AVDF Instances on OCI
12-8

Table 12-1 (Cont.) Functional Differences Between Oracle AVDF Deployed On-premises and onOCI
Functionality Oracle AVDF instance deployedon-premises
Oracle AVDF instances deployedon OCI
Database Firewall deploymentmodes
• Monitoring / Blocking (Proxy)• Monitoring (Host Monitor)• Monitoring (Out-of-Band)
• Monitoring / Blocking (Proxy)• Monitoring (Host Monitor)• Monitoring (Out-of-Band) is not
supported.
Secondary Network Interface Cardson Audit Vault Server
Supported Not supported. (Only the primarynetwork interface card that isassociated with the primary AuditVault Server's private IP address ofthe instance is supported.)
Secondary Network Interface Cardson Database Firewall
Supported Not supported
12.8 Ports for Communication between Oracle AVDFComponents
Learn about different ports used by Oracle AVDF for communication between differentcomponents.
The list of ports used by Oracle AVDF is listed in Ports Used by Oracle Audit Vault andDatabase Firewall.
See Also:
Security Lists in OCI
12.9 High Availability for Oracle AVDF InstanceLearn about high availability for Oracle AVDF instance.
High availability in Oracle AVDF makes the deployment more reliable by ensuring continuityof functionality (for example, audit and network event data collection).
Configuring High Availability in Audit Vault Server
Prerequisite: OCI virtual firewall for your VCN must be configured to allow ingress traffic onport 7443, 1521, and 1522. See OCI Access and Security for complete information.
To configure high availability you need two Audit Vault Server instances. The first instance isthe primary server and the other as the secondary server. The steps to configure highavailability is similar to on-premises deployment. However, private IP addresses of the AuditVault Server instances must be used during high availability configuration.
Chapter 12Ports for Communication between Oracle AVDF Components
12-9

Configuring High Availability in Database Firewall
Configuring high availability for Database Firewall instance is supported only forMonitoring / Blocking (Proxy) mode.
Prerequisite: OCI virtual firewall for your VCN must be configured to allow ingresstraffic on proxy ports for Database Firewall nodes. See OCI Access and Security forcomplete information.
To configure high availability you need two Database Firewall instances. The firstinstance is the primary and the other as the secondary. The steps to configure highavailability is similar to on-premises deployment.
See Also:
High Availability in Oracle AVDF
12.10 Deploying Audit Vault AgentsLearn about deploying Audit Vault Agents.
Audit Vault Agent is a component of Oracle AVDF that you deploy on a machine(usually the same host as the target) to collect audit data from targets.
Prerequisite: OCI virtual firewall for your VCN must be configured to allow ingresstraffic on ports 1521 and 1522 for Audit Vault Server. See OCI Access and Security forcomplete information.
Follow these steps to deploy an Audit Vault Agent:
1. Register the Audit Vault Agent machine on Audit Vault Server. In some cases, youneed to specify AGENT_PHYSICAL_ADDRESS_XX (where XX can be a number from 01to 99) Agent attribute. See Registering Hosts in the Audit Vault Server forcomplete information.
2. Download the Audit Vault Agent software from Audit Vault Server console to theAgent machine.
3. Install the Audit Vault Agent software on the Agent machine.
4. Activate and start the Audit Vault Agent.
See Also:
Registering Hosts and Deploying the Agent
Audit Vault Agent communicates to Audit Vault Server using a JDBC connect stringthat contains the IP address of the Audit Vault Server. The connect string isautomatically generated after post instance creation steps. Specify the IP address thatmust be used in the connect string by filling in the AVS IP for Agent Communicationsection in the Post installation configuration page of the Audit Vault Server console.If an IP address is not specified, the private IP address of the Audit Vault Server isused.
Chapter 12Deploying Audit Vault Agents
12-10
Follow these guidelines for the type of IP address to be specified in the Post installationconfiguration page of the Audit Vault Server:
• If you are expecting to collect audit data from any target outside of OCI, then specify apublic IP address of the Audit Vault Server.
• If you are expecting to collect audit data from targets only in OCI, then specify a privateIP address of the Audit Vault Server.
• If you are expecting to deploy Database Firewall in Monitoring (Host Monitor) mode fortargets only in OCI, then specify the private IP address of the Audit Vault Server.
Table 12-2 Platform Support Matrix for Audit Vault Agent and Host Monitor Agent Deployment
Platform Audit Vault Agent Deployment Host Monitor Agent Deployment
Oracle Linux 64 bit (OCI) Yes Yes
Oracle Linux 64 bit (outside OCI) Yes No
Microsoft Windows Server (x86-64)(OCI)
Yes Yes
Microsoft Windows Server (x86-64)(outside OCI)
Yes No
12.11 Configuring Audit Trail CollectionLearn how to configure audit trails.
The steps to configure audit trails is similar to on-premises deployment.
See Also:
• Deploying Audit Vault Agents
• Configuring and Managing Audit Trail Collection
12.12 Deploying Database Firewall for MonitoringLearn about deploying Database Firewall on Oracle Cloud Infrastructure (OCI).
The following Database Firewall deployment modes are supported on OCI:
• Monitoring / Blocking (Proxy)
• Monitoring (Host Monitor)
Prerequisites:
• For Database Firewall deployed in Monitoring (Host Monitor) mode, the virtual firewall foryour Database Firewall VCN must be configured to allow ingress traffic on ports rangingfrom 2051 to 5100. See OCI Access and Security for complete information.
• For Database Firewall deployed in Monitoring / Blocking (Proxy) mode, the virtual firewallfor your Database Firewall VCN must be configured to open the specific proxy port.
Chapter 12Configuring Audit Trail Collection
12-11

• For Audit Vault Server to collect network event data from Database Firewall, youmust configure virtual firewall of your Database Firewall VCN to allow ingresstraffic on port 1514.
When deploying Database Firewall, consider these points:
• You can use either public or private IP address of the Database Firewall to registerwith the Audit Vault Server.
• When configuring a Database Firewall monitoring point, use the primary VNIC asthe network interface card.
• Use private IP address of the target when enabling native network encrypted trafficmonitoring for Oracle Database.
• When configuring the Database Firewall monitoring point for Oracle RealApplication Clusters (Oracle RAC), use the IP address of the SCAN listener.
See Also:
• Configuring Database Firewall for Databases That Use Native NetworkEncryption
• Configuring Database Firewall
Note:
• Database Firewall monitoring and protection is not supported for targetsoutside OCI.
• For deploying Host Monitor follow the same guidelines mentioned insection Deploying Audit Vault Agents.
12.13 Monitoring Autonomous Database ServicesLearn how to monitor Autonomous Database services with Oracle AVDF on OCI.
Clients connect to Autonomous Database Services using a public or private endpoint.Use the public endpoint when configuring the Autonomous Database Services as atarget in the Audit Vault Server.
Configuring Audit Trail
To configure audit trail for collection, follow the instructions in section Configuring AuditTrail Collection with the following changes:
• You must provide the public endpoint, credentials wallet, user credentials of yourAutonomous database during target registration.
• You must deploy the Audit Vault Agent remotely and ensure access to the publicendpoint.
Chapter 12Monitoring Autonomous Database Services
12-12

Configuring Audit Provisioning and Entitlement Retrieval
For Audit Provisioning and Entitlement Retrieval, the Audit Vault Server connects to theAutonomous Database using the audit connection details you have provided during targetregistration. Therefore, you must ensure the Audit Vault Server can access the publicendpoint of your Autonomous database.
Configuring Database Firewall
Database Firewall monitoring is not supported for Autonomous Database services.
See Also:
Connecting to an Autonomous Database for more information on public or privateendpoint of the Autonomous Database.
12.14 Monitoring DB Systems on OCILearn how to monitor DB Systems with Oracle AVDF on OCI.
OCI DB Systems allow you to configure SSH key based access to the machine hosting thedatabase. You can install the Audit Vault Agent on the DB Systems.
In addition, all SQL connections use native network encryption by default.
Configuring Audit Trail Collection
Refer to the following sections:
• Deploying Audit Vault Agents
• Configuring Audit Trail Collection
Configuring Audit Provisioning and Entitlement Retrieval
For Audit Provisioning and Entitlement Retrieval, the Audit Vault Server connects to the DBSystems on OCI using the audit connection details provided during the target registration.Therefore, you must ensure that Audit Vault Server has JDBC access to your database.
Configuring Database Firewall Monitoring
Refer to section Deploying Database Firewall for Monitoring.
12.15 Backup and Restore of Oracle AVDF Instances in OCILearn about back up and restore functionality for Oracle AVDF instances in OCI.
The purpose of backup and restore is to protect against data loss and to restore the instancefrom a backup taken earlier.
Backup and Restore of Audit Vault Server
The steps to perform backup and restore of Audit Vault Server is similar to on-premisesdeployment with the following changes:
Chapter 12Monitoring DB Systems on OCI
12-13
• Use OCI File Storage when configuring backup location.
• When configuring restore, you must set USE_NEW_IP parameter to Y.
See Also:
Backing Up and Restoring the Audit Vault Server
Backup and Restore of Database Firewall
The Database Firewall does not need to be backed up. As part of Audit Vault Serverbackup, all the existing configuration is backed up. After restoring the Audit VaultServer, the existing configuration to the Database Firewall is restored. Follow the stepsmentioned in section Backing Up and Restoring the Database Firewall to complete therestore process.
12.16 Archiving and Retrieving Audit DataLearn about archiving and retrieving audit data of Oracle AVDF on OCI.
Archiving and retrieving audit data is similar to the on-premises deployment. Use OCIFile Storage when specifying the archive locations.
To comply with corporate guidelines, all enterprises have data retention policies foraudit and network event data. Retention policies define how long the collected data iskept online (so it is visible in reports) and for how long it is to be kept in archive. UsingOracle AVDF, you can set the data retention policies for every target. Data is visible inreports during the online period. For archiving, Oracle AVDF supports both manual andautomatic modes. When manual archiving mode is enabled, as soon as the onlineperiod expires, data is made offline, but stays on Audit Vault Server. It has to bemoved manually to a remote location. If the mode is set to automatic archiving, data isautomatically moved to an NFS configured location, after the online period expires.Oracle AVDF allows switching between manual and automatic archiving modes. ForAudit Vault Server deployed in OCI, use OCI File Storage for configuring NFSlocations.
See Also:
Archiving and Retrieving Audit Data
12.17 Starting or Stopping the Oracle AVDF InstanceLearn how to start or stop the Oracle AVDF instance.
Audit Vault Server console or the OCI console can be used to start or stop theinstances. Instances that are stopped can only be started using the OCI console.
Refer to Stopping and Starting an Instance using OCI console.
From the Audit Vault Server console, you can stop or reboot the Oracle AVDFinstance.
Chapter 12Archiving and Retrieving Audit Data
12-14

To Power Off or Reboot the Audit Vault Server instance
1. Log in to the Audit Vault Server console as a super administrator.
2. Click Settings tab.
3. Click System tab in the left navigation menu.
4. In the main page to the top right corner, click Power Off to stop the instance. ClickReboot to restart the instance.
To Power Off or Reboot the Database Firewall instance
The Database Firewall instance must be registered in the Audit Vault Server console.
1. Log in to the Audit Vault Server console as a super administrator.
2. Click Database Firewalls tab.
3. Select the checkbox against the specific Database Firewall instance.
4. Click Power Off to stop the instance. Click Reboot to restart the instance.
12.18 Terminating Oracle AVDF InstanceLearn about terminating Oracle AVDF instance.
You can terminate the Oracle AVDF instance using the OCI console by following the steps insection Terminating an Instance.
Note:
When the instance is terminated, all audit and network event data is permanentlylost, unless you have taken a backup from which you can restore. Terminatedinstances are temporarily visible in the list of instances with the status Terminated.
Chapter 12Terminating Oracle AVDF Instance
12-15
13Oracle Audit Vault And Database FirewallHybrid Cloud Deployment
To use Oracle Audit Vault and Database Firewall Hybrid Cloud Deployment, you mustperform some preliminary tasks.
13.1 Oracle Audit Vault and Database Firewall Hybrid CloudDeployment and Prerequisites
You can configure Oracle Audit Vault and Database Firewall for hybrid cloud deployments.
Oracle AVDF hybrid cloud deployment models:
1. Audit Vault Server deployed on-premises and the targets are deployed in cloud or on-premises
2. Audit Vault Server deployed on cloud and the targets are deployed in cloud or on-premises
In Oracle Public Cloud deployment model, the Audit Vault Server is either deployed on-premises or in Oracle Cloud. It monitors Oracle Database Cloud Service, Oracle ExadataCloud Service, and on-premises database instances. It uses Audit Vault Agents that cancollect audit data from on-premises or cloud targets. These Agents connect to the targetdatabase and to the Audit Vault Server. Connections to the Audit Vault Server are madethrough JDBC on ports 1521 and 1522. This chapter uses Oracle Public Cloud as anexample.
For non-Oracle clouds, the concepts are similar but the actual execution of configuringnetwork connectivity between Agents and databases differ. There is a wide variety of networkconfigurations, firewalls, and cloud providers, each with their own unique ways of configuringnetwork connectivity. When using the hybrid cloud deployment model for Oracle Databasesrunning in non-Oracle clouds, support is limited to Agent interaction with the database. Due towide variety of network configuration paradigms used by different cloud providers, support fornetwork connectivity issues must remain with the cloud provider.
When using the hybrid cloud deployment model for Oracle Databases running on-premises,the Audit Vault Server is running in Public Cloud. In such cases, the configuration of the on-premises network to enable connectivity between the Agents and Audit Vault Server is theresponsibility of the customer. Oracle AVDF support is limited to the Audit Vault Agent, andnot to the underlying network components involved in allowing the connections.
TCP and TCPS are the two connection options in Oracle Database Cloud Service. Setting upconnections for TCP and TCPS is similar. The difference is the port numbers. The followingare the key characteristics of Oracle Database Cloud Service cloud target configurationsettings:
• TCP connections have encryption enforced by default.
• TCPS connections are configured between Audit Vault Agents and cloud targets.
– On the Audit Vault Server the TCPS option must be set for cloud targets.
13-1
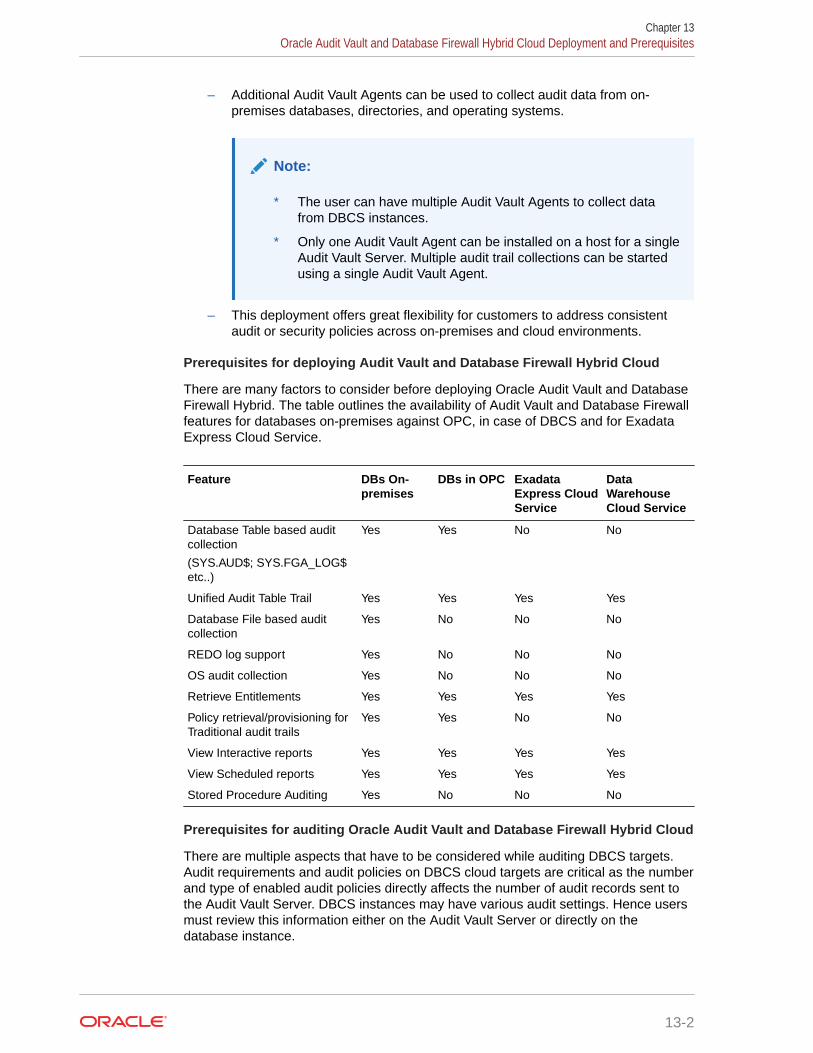
– Additional Audit Vault Agents can be used to collect audit data from on-premises databases, directories, and operating systems.
Note:
* The user can have multiple Audit Vault Agents to collect datafrom DBCS instances.
* Only one Audit Vault Agent can be installed on a host for a singleAudit Vault Server. Multiple audit trail collections can be startedusing a single Audit Vault Agent.
– This deployment offers great flexibility for customers to address consistentaudit or security policies across on-premises and cloud environments.
Prerequisites for deploying Audit Vault and Database Firewall Hybrid Cloud
There are many factors to consider before deploying Oracle Audit Vault and DatabaseFirewall Hybrid. The table outlines the availability of Audit Vault and Database Firewallfeatures for databases on-premises against OPC, in case of DBCS and for ExadataExpress Cloud Service.
Feature DBs On-premises
DBs in OPC ExadataExpress CloudService
DataWarehouseCloud Service
Database Table based auditcollection
(SYS.AUD$; SYS.FGA_LOG$etc..)
Yes Yes No No
Unified Audit Table Trail Yes Yes Yes Yes
Database File based auditcollection
Yes No No No
REDO log support Yes No No No
OS audit collection Yes No No No
Retrieve Entitlements Yes Yes Yes Yes
Policy retrieval/provisioning forTraditional audit trails
Yes Yes No No
View Interactive reports Yes Yes Yes Yes
View Scheduled reports Yes Yes Yes Yes
Stored Procedure Auditing Yes No No No
Prerequisites for auditing Oracle Audit Vault and Database Firewall Hybrid Cloud
There are multiple aspects that have to be considered while auditing DBCS targets.Audit requirements and audit policies on DBCS cloud targets are critical as the numberand type of enabled audit policies directly affects the number of audit records sent tothe Audit Vault Server. DBCS instances may have various audit settings. Hence usersmust review this information either on the Audit Vault Server or directly on thedatabase instance.
Chapter 13Oracle Audit Vault and Database Firewall Hybrid Cloud Deployment and Prerequisites
13-2
Note:
The audit data collection from table based audit trails is only supported. The versionspecific information is listed below:
Release Audit information supported
Oracle Database 11g Release11.2
• Fine Grained Audit• Database Vault Audit• Traditional Audit data stored in sys.AUD$
Oracle Database 12c and later • Unified Audit• Database Vault Audit• Fine Grained Audit• Traditional Audit data stored in sys.AUD$
Note:
The SYS.AUD$ and SYS.FGA_LOG$ tables have an additional column RLS$INFO.The Unified Audit trail table has RLS_INFO column. This column describes rowlevel security policies configured. This is mapped to the extension field in OracleAudit Vault and Database Firewall. In order to populate this column, the user needsto set the AUDIT_TRAIL parameter of the target to DB EXTENDED.
13.2 Opening Ports on Oracle Database Cloud ServiceYou can open ports on Oracle Database Cloud Service.
This procedure is used to open up a specific port. This is one of the pre-requisites beforedeploying Audit Vault and Database Firewall Hybrid Cloud.
To open a port, execute the following procedure:
1. Log in to the DBCS service.
2. Click on the navigation menu that is located next to the Oracle logo on the top.
3. Select Oracle Cloud Infrastructure Compute for Oracle Public Cloud service.
4. In the next screen, click on Network tab that is located at the top of setup port orallowlist.
5. Click the Security Application tab to display the list of available ports.
6. Click Create Security Application and specify the port that must be enabled.
7. Click Security Rules tab, and then click Create Security Rule button.
8. In the Security Application field select the application previously chosen.
9. Enter the remaining fields.
10. Click Create.
Chapter 13Opening Ports on Oracle Database Cloud Service
13-3

13.3 Configuring Hybrid Cloud Target Using TCPYou can configure cloud targets for DBCS instances in TCP mode. The Audit Vaultserver and Audit Vault agent are installed on-premises.
13.3.1 Step 1: Registering On-premises Host on the Audit Vault ServerThis configuration step registers the on-premises host in the Audit Vault server.
In case there is already a registered on-premises host in the Audit Vault serverinstalled on the agent for monitoring Oracle Database Cloud Services instances,bypass this procedure. Otherwise, the steps are similar for all target databases thatare on-premises.
See Also:
Registering Hosts in the Audit Vault Server
13.3.2 Step 2: Installing Audit Vault Agent on Registered On-premisesHosts
This configuration step installs Oracle Audit Vault agents on registered on-premiseshosts.
Note:
If there is already an Audit Vault agent installed on an on-premises host thatis planned for monitoring DBCS instances then ignore this step. In case thereare no agents installed, there are specific requirements for the Audit Vaultagents that monitor DBCS instances. The requirements or features are asfollows:
1. The agent has to run on-premise.
2. A minimum of one agent must be dedicated to monitor only DBCSinstances. There may be multiple agents dedicated to monitor onlyDBCS instances.
3. The agent should not run on the Audit Vault server.
1. Install the Audit Vault agent on the on-premises host.
Chapter 13Configuring Hybrid Cloud Target Using TCP
13-4

See Also:
Deploying and Activating the Audit Vault Agent on Host Computers for detailedsteps on installing on-premises host.
2. Start the Audit Vault agent.
13.3.3 Step 3: Creating User Accounts on Oracle Database Cloud ServiceTarget Instances
This configuration step creates user accounts on Oracle Database Cloud Service targetinstances.
Note:
The connection methodology is different in case on-premises deployment, for TCPconnections.
Prerequisite
• Port 1521 has to be opened on the DBCS instance for TCP connection so that laterSQL*Plus and SQL*Developer can be used. TCP connection is encrypted by default. Itutilizes the native encryption. See Opening Ports on Oracle Database Cloud Service fordetailed steps.
Procedure for installation:
1. Ensure that the connection has been established to the DBCS instances through TCP asuser with SYSDBA administrative privilege.
2. Scripts and respective actions:
Script Action
oracle_AVDF_dbcs_user_setup.sql To setup target user account.
oracle_AVDF_dbcs_drop_db_permissions.sql
To revoke permission from user.
3. Execute the script in order to setup target user account in specific mode:
oracle_AVDF_dbcs_user_setup.sql <username> <mode>Where <username> is the user name of the Hybrid cloud target user.
The <mode> can be one of the following:
Mode Purpose
AUDIT_COLLECTION To collect data from Oracle Cloud instanceTABLE audit trail in Oracle Audit Vault andDatabase Firewall.
Chapter 13Configuring Hybrid Cloud Target Using TCP
13-5

Mode Purpose
AUDIT_SETTING_PROVISIONING To set up privileges for managing the OracleCloud instance audit policy from Oracle AuditVault and Database Firewall.
STORED_PROCEDURE_AUDITING To enable stored procedure auditing for theOracle Cloud instance.
ENTITLEMENT_RETRIEVAL To enable user entitlement retrieval for OracleCloud instance.
ALL To enable all the above mentioned options.
13.3.4 Step 4: Setting Up or Reviewing Audit Policies on Target OracleDatabase Cloud Service Instances
This configuration step explains how to manage audit policies on target OracleDatabase Cloud Service instances.
Check the audit polices that are enabled and change them as needed. For OracleDatabase 11g release 11.2 and Oracle Database 12c instances where the Unifiedaudit is not enabled, it is possible to provision audit policies from the Audit Vault server.If the Unified Trail is enabled on Oracle12c instances, ensure to change the auditpolicies manually on the DBCS instance.
Note:
Ensure to understand the audit settings on the DBCS instances beforestarting the audit data collection process. Currently one Audit Vault agentsupports up to a maximum of 10 cloud target audit trails. The collectionspeed is up to 25 million audit records per target audit trail, per day. Therecommended Audit Vault agent configuration can be found in the OracleAudit Vault and Database Firewall Installation Guide.
Run the DBMS_AUDIT_MGMT package on the DBCS instances for audit clean up, afterthe data is collected by on-premises Audit Vault Server. The Audit Vault Serversupports data retention policies for every target and meets compliance requirements. Itallows configuring different retention policies for on-premises and DBCS instances.
Storage requirements on the Audit Vault Server also must be reviewed to ensureenough storage is available, while adding more on-premises or DBCS instance targetsto the Audit Vault Server.
13.3.5 Step 5: Creating Targets on Oracle Audit Vault Server forOracle Database Cloud Service Instances
This configuration step creates targets on Oracle Audit Vault Servers for OracleDatabase Cloud Service instances.
To connect to the DBCS instance the configuration is the same as for on-premisetargets. The user must define these specific settings on the target configuration page.
1. Log in to Audit Vault console with as an administrator.
Chapter 13Configuring Hybrid Cloud Target Using TCP
13-6

2. Click the Targets tab.
3. Click the Register button on the right.
4. Enter a Name for the target and select from the Type menu.
5. Optionally fill in the Description field.
6. Under the Audit Connection Details sub tab, choose the Advanced option.
7. In the Protocol menu, select TCP.
8. In the Target Location field, enter the following settings:
jdbc:oracle:thin:@//host_ip:port_number/service_name
Alternatively, you can accomplish this uing the Basic option. Enter the details in HostName/IP Address, Port, Service Name fields.
9. Enter the User Name and Password.
10. Click Save to save the configuration changes.
13.3.6 Step 6: Starting Audit Trail on Audit Vault Server for OracleDatabase Cloud Service Instances
This configuration step starts the audit trail on Oracle Audit Vault Server for Oracle DatabaseCloud Service instances.
Use this procedure to start an audit trail on the Audit Vault Server for the DBCS instance.
1. Log in to the Audit Vault console as an administrator.
2. In the Targets tab, select the newly registered target.
3. Under Audit Data Collection section, click Add. The Add Audit Trail dialog isdisplayed.
4. Select Audit Trail Type as TABLE.
Note:
Other trail types are not supported for DBCS target instances.
5. Select the appropriate values in the Trail Location from the drop down menu.
The supported table trails for Oracle DBCS target are:
a. UNIFIED_AUDIT_TRAILb. SYS.AUD$c. SYS.FGA_LOG$d. DVSYS.AUDIT_TRAIL$
6. Select the Agent Host.
7. Click Save to add the audit trail.
Chapter 13Configuring Hybrid Cloud Target Using TCP
13-7

13.4 Configuring TCPS Connections for DBCS InstancesLearn how to configure TCPS connections for DBCS instances.
13.4.1 Step 1: Creating Server Wallet and CertificateThis configuration step shows you how to create server wallets and certificates.
1. Ensure that port 1522 is open on the DBCS instance for TCPS connection. .
See Opening Ports on Oracle Database Cloud Service for detailed information.Later some standard tools such as SQL*Plus and SQL*Developer can be used
2. Create a new auto-login wallet by executing the orapki utility.
mkdir -p <wallet path>orapki wallet create –wallet <wallet path> -auto_login
Note:
This command will prompt you to enter and re-enter a wallet password.
Example:
orapki wallet create –wallet /u01/app/example/demowallet -auto_login3. Create a self-signed certificate and load it into the wallet, by executing the
command:
orapki wallet add –wallet <wallet path> -dn
Note:
This command will prompt you to enter and re-enter a wallet password.
CN=hostname –keysize 1024 -self_signed –validity 365Example:
orapki wallet add –wallet /u01/app/example/demowallet -dnCN=CloudAB2.abcdXY.example.somedomain –keysize 1024 -self_signed –validity 365
4. Check the contents of the wallet by executing the following command:
orapki wallet display -wallet <wallet path>Result:
Displays the self-signed certificate which is both a user and trusted certificate.
Requested Certificates:User Certificates:
Chapter 13Configuring TCPS Connections for DBCS Instances
13-8

Subject: CN=<hostname>Trusted Certificates:Subject: CN=<hostname>
Example:
orapki wallet display –wallet /u01/app/example/demowalletResult:
Oracle PKI Tool : Version 12.1.0.2Copyright (c) 2004, 2014, Oracle and/or its affiliates. All rights reserved.
Requested Certificates:User Certificates:Subject: CN=CloudAB2.abcdXY.example.somedomainTrusted Certificates:Subject: CN=CloudAB2.abcdXY.example.somedomain
5. Export the certificate to the client wallet for future use, by executing the command:
orapki wallet export –wallet <wallet path> -dn CN=hostname
Note:
This command will prompt you to enter and re-enter a wallet password.
-cert <certificate file name>.crtExample:
orapki wallet export –wallet /u01/app/example/demowallet –dnCN=CloudAB2.abcdXY.example.somedomain -cert CloudAB2-certificate.crt
6. Check that the certificate has been exported as expected, by executing the command:
cat <certificate file name>.crtExample:
cat CloudAB2-certificate.crtResult:
-----BEGIN CERTIFICATE-----MIIB0TCCAToCAQAwDQYJKoZIhvcNAQEEBQAwMTEvMC0GA1UEAxMmQ2xvdWRTVDIuZGViZGV2MTkub3JhY2xlY2xvdWQuaW50ZXJuYWwwHhcNMTYwNTExMTEyMDI2WhcNMjYwNTA5MTEyMDI2WjAxMS8wLQYDVQQDEyZDbG91ZFNUMi5kZWJkZXYxOS5vcmFjbGVjbG91ZC5pbnRlcm5hbDCBnzANBgkqhkiG9w0BAQEFAAOBjQAwgYkCgYEAr6fhuQly2t3i8gugLVzgP2kFGVXVOzqbggEIC+Qazb15JuKs0ntkEn9ERGvA0fxHkAkCtIPjCzQD5WYRU9C8AQQOWe7UFHae7PsQX8jsmEtecpr5Wkq3818+26qU3JyiXxxK/rRydwBO526G5Tn5XPsovaw/PYJxF/
Chapter 13Configuring TCPS Connections for DBCS Instances
13-9

fIKMG7fzMCAwEAATANBgkqhkiG9w0BAQQFAAOBgQCufBYJj4wQYriZIfjij4eac/jnO85EifF3L3DU8qCHJxOxRgK97GJzD73TiY20xpzQjWKougX73YKVTp9yusAx/T/qXbpAD9JKyHlKj16wPeeMcS06pmDDXtJ2CYqOUwMIk53cK7mLaAHCbYGGM6btqP4VKYIjP48GrsQ5MOqd0w==-----END CERTIFICATE-----
13.4.2 Step 2: Creating Client (Agent) Wallet and CertificateThis configuration step explains how to create client wallets and certificates.
1. Run the following command to create a new auto-login wallet:
c:\>mkdir -p <client wallet dir>
c:\>orapki wallet create –wallet "<wallet path>" -auto_login
Note:
This command will prompt you to enter and re-enter a wallet password.
Example:
C:\Work\CloudWallet>orapki wallet create –wallet C:\Work\CloudWallet -auto_login
Result:
Oracle PKI Tool : Version 12.1.0.1Copyright (c) 2004, 2012, Oracle and/or its affiliates. All rights reserved.
2. Run the following command to create a self-signed certificate and load it into thewallet:
c:\>orapki wallet add –wallet <client wallet path> -dn
Note:
This command will prompt you to enter and re-enter a wallet password.
CN=%client computer name% –keysize 1024 -self_signed –validity 365
Chapter 13Configuring TCPS Connections for DBCS Instances
13-10

Example:
C:\Work\CloudWallet>orapki wallet add –wallet C:\Work\CloudWallet -dn
CN=machine1.somedomain.com –keysize 1024 -self_signed –validity 365
Result:
Oracle PKI Tool : Version 12.1.0.1Copyright (c) 2004, 2012, Oracle and/or its affiliates. All rights reserved.
3. Check the contents of the wallet by running the command:
orapki wallet display –wallet <client wallet path>
Note:
This command will prompt you to enter and re-enter a wallet password.
Example:
C:\Work\CloudWallet>orapki wallet display –wallet C:\Work\CloudWallet
Result:
Oracle PKI Tool : Version 12.1.0.1Copyright (c) 2004, 2012, Oracle and/or its affiliates. All rights reserved.
Requested Certificates:User Certificates:Subject: CN=machine1.foobar.example.comTrusted Certificates:Subject: OU=Class 3 Public Primary Certification Authority,O=VeriSign\, Inc.,C=USSubject: CN=GTE CyberTrust Global Root,OU=GTE CyberTrust Solutions\, Inc.,O=GTE Corporation,C=USSubject: OU=Class 2 Public Primary Certification Authority,O=VeriSign\, Inc.,C=USSubject: OU=Class 1 Public Primary Certification Authority,O=VeriSign\, Inc.,C=USSubject: CN=machine1.foobar.example.com
4. Run the following command to export the certificate and load it onto the server:
orapki wallet export –wallet <client wallet path> -dn
Chapter 13Configuring TCPS Connections for DBCS Instances
13-11

Note:
This command will prompt you to enter and re-enter a wallet password.
CN=<client computer name> -cert <clent computer name>-certificate.crt
Example:
C:\Work\CloudWallet>orapki wallet export –wallet C:\Work\CloudWallet -dn
CN=machine1.foobar.example.com -cert machine1-certificate.crt
Result:
Oracle PKI Tool : Version 12.1.0.1Copyright (c) 2004, 2012, Oracle and/or its affiliates. All rights reserved.
5. Check the certificate by running the command:
more c:\%computername%-certificate.crt
Example:
C:\Work\CloudWallet>more machine1-certificate.crt
Result:
-----BEGIN CERTIFICATE-----MIIBsTCCARoCAQAwDQYJKoZIhvcNAQEEBQAwITEfMB0GA1UEAxMWZ2JyMzAxMzkudWsub3JhY2xlLmNvbTAeFw0xNjA1MTExMTQzMzFaFw0yNjA1MDkxMTQzMzFaMCExHzAdBgNVBAMTFmdicjMwMTM5LnVrLm9yYWNsZS5jb20wgZ8wDQYJKoZIhvcNAQEBBQADgY0AMIGJAoGBAKH8G8sFS6l0llu+RMfl7Yt+Ppw8J0PfDEDbTGP5wtsrs/22dUCipU9l+vif1VgSPLE2UPJbGM8tQzTC6UYbBtWHe4CshmvDEVlcIMsEFvD7a5Q+P45jqNSEtV9VdbGyxaD6i5Y/Smd+B87FcQQCX54LaI9BJ8SZwmPXgDweADLfAgMBAAEwDQYJKoZIhvcNAQEEBQADgYEAai742jfNYYTKMq2xxRygGJGn1LhpFenHvuHLBvnTup1NnZOBwBi4VxW3CImvwONYcCEFp3E1SRswS5evlfIfruCZ1xQBoUNei3EJ6O3OdKeRRp2E+muXEtfeU+jwUE+SzpnzfpI23Okl2vo8Q7VHrSalxE2KEhAzC1UYX7ZYp1U=-----END CERTIFICATE-----
Chapter 13Configuring TCPS Connections for DBCS Instances
13-12
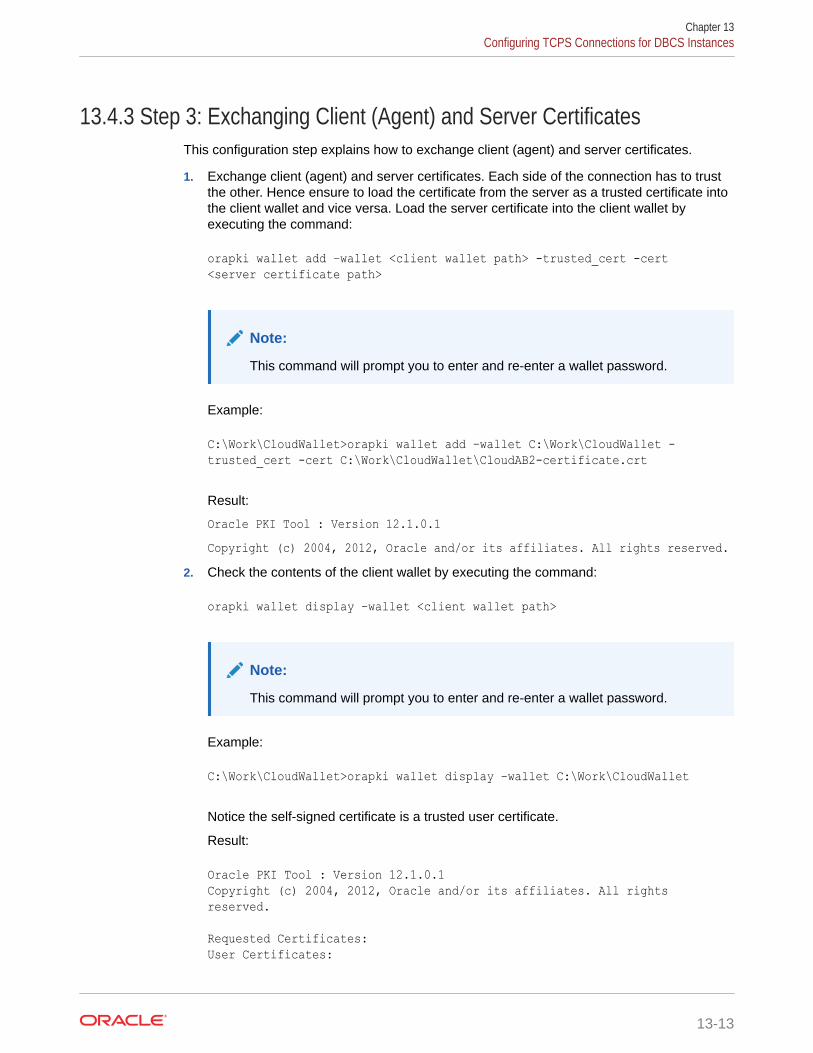
13.4.3 Step 3: Exchanging Client (Agent) and Server CertificatesThis configuration step explains how to exchange client (agent) and server certificates.
1. Exchange client (agent) and server certificates. Each side of the connection has to trustthe other. Hence ensure to load the certificate from the server as a trusted certificate intothe client wallet and vice versa. Load the server certificate into the client wallet byexecuting the command:
orapki wallet add –wallet <client wallet path> -trusted_cert -cert <server certificate path>
Note:
This command will prompt you to enter and re-enter a wallet password.
Example:
C:\Work\CloudWallet>orapki wallet add –wallet C:\Work\CloudWallet -trusted_cert -cert C:\Work\CloudWallet\CloudAB2-certificate.crt
Result:
Oracle PKI Tool : Version 12.1.0.1Copyright (c) 2004, 2012, Oracle and/or its affiliates. All rights reserved.
2. Check the contents of the client wallet by executing the command:
orapki wallet display –wallet <client wallet path>
Note:
This command will prompt you to enter and re-enter a wallet password.
Example:
C:\Work\CloudWallet>orapki wallet display –wallet C:\Work\CloudWallet
Notice the self-signed certificate is a trusted user certificate.
Result:
Oracle PKI Tool : Version 12.1.0.1Copyright (c) 2004, 2012, Oracle and/or its affiliates. All rights reserved.
Requested Certificates:User Certificates:
Chapter 13Configuring TCPS Connections for DBCS Instances
13-13

Subject: CN=machine1.foobar.example.comTrusted Certificates:Subject: OU=Class 1 Public Primary Certification Authority,O=VeriSign\, Inc.,C=USSubject: CN=machine1.foobar.example.comSubject: CN=GTE CyberTrust Global Root,OU=MNO CyberTrust Solutions\, Inc.,O=MNO Corporation,C=USSubject: CN=CloudAB2.abcxy10.example.somedomainSubject: OU=Class 3 Public Primary Certification Authority,O=VeriSign\, Inc.,C=USSubject: OU=Class 2 Public Primary Certification Authority,O=VeriSign\, Inc.,C=US
3. Load the client certificate into server by executing the command:
orapki wallet add –wallet <server wallet path> -trusted_cert -cert <client certificate file>
Note:
This command will prompt you to enter and re-enter a wallet password.
Example:
orapki wallet add –wallet /u01/app/example/demowallet -trusted_cert -cert machine1-certificate.crt
Result:
Oracle PKI Tool : Version 12.1.0.2Copyright (c) 2004, 2014, Oracle and/or its affiliates. All rights reserved.
4. Check the contents of the client wallet by executing the command:
orapki wallet display –wallet <client wallet path>
Note:
This command will prompt you to enter and re-enter a wallet password.
Example:
C:\Work\CloudWallet>orapki wallet display –wallet C:\Work\CloudWallet
The server certificate is now included in the list of trusted certificates.
Chapter 13Configuring TCPS Connections for DBCS Instances
13-14
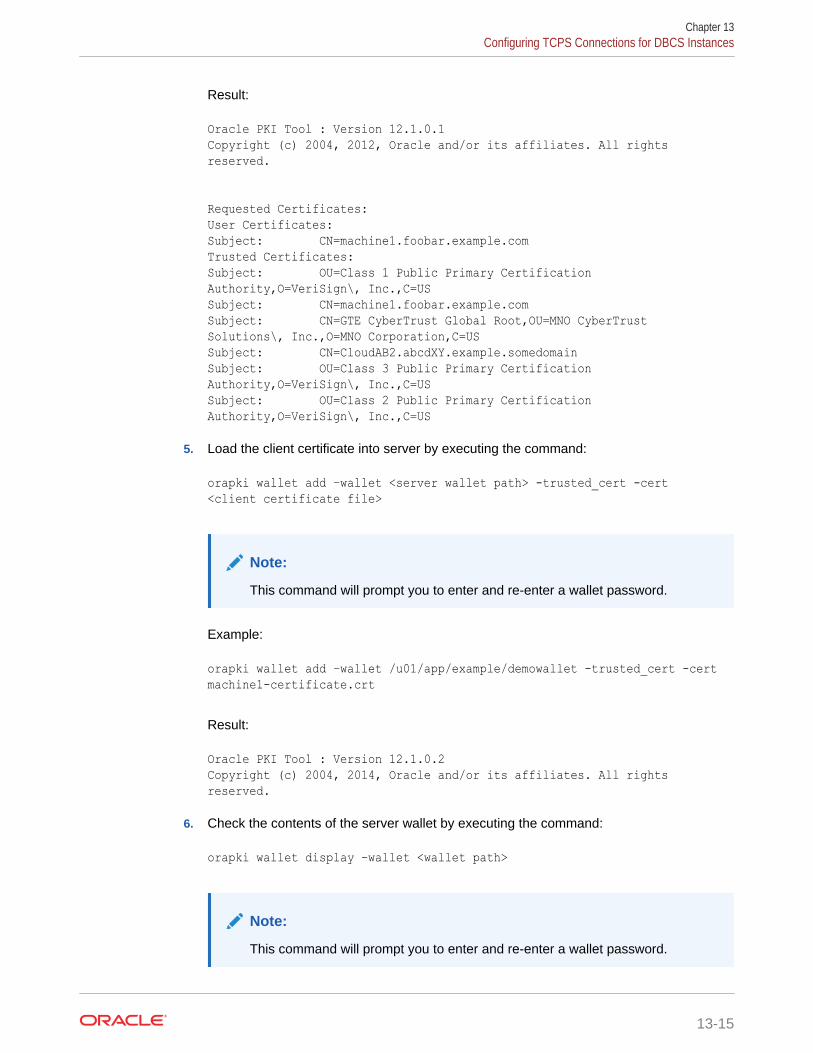
Result:
Oracle PKI Tool : Version 12.1.0.1Copyright (c) 2004, 2012, Oracle and/or its affiliates. All rights reserved.
Requested Certificates:User Certificates:Subject: CN=machine1.foobar.example.comTrusted Certificates:Subject: OU=Class 1 Public Primary Certification Authority,O=VeriSign\, Inc.,C=USSubject: CN=machine1.foobar.example.comSubject: CN=GTE CyberTrust Global Root,OU=MNO CyberTrust Solutions\, Inc.,O=MNO Corporation,C=USSubject: CN=CloudAB2.abcdXY.example.somedomainSubject: OU=Class 3 Public Primary Certification Authority,O=VeriSign\, Inc.,C=USSubject: OU=Class 2 Public Primary Certification Authority,O=VeriSign\, Inc.,C=US
5. Load the client certificate into server by executing the command:
orapki wallet add –wallet <server wallet path> -trusted_cert -cert <client certificate file>
Note:
This command will prompt you to enter and re-enter a wallet password.
Example:
orapki wallet add –wallet /u01/app/example/demowallet -trusted_cert -cert machine1-certificate.crt
Result:
Oracle PKI Tool : Version 12.1.0.2Copyright (c) 2004, 2014, Oracle and/or its affiliates. All rights reserved.
6. Check the contents of the server wallet by executing the command:
orapki wallet display –wallet <wallet path>
Note:
This command will prompt you to enter and re-enter a wallet password.
Chapter 13Configuring TCPS Connections for DBCS Instances
13-15

Example:
orapki wallet display –wallet /u01/app/example/demowallet
Result:
Oracle PKI Tool : Version 12.1.0.2Copyright (c) 2004, 2014, Oracle and/or its affiliates. All rights reserved.
Requested Certificates:User Certificates:Subject: CN=CloudAB2.abcdXY.example.somedomainTrusted Certificates:Subject: CN=CloudAB2.abcdXY.example.somedomainSubject: CN=machine1.foobar.example.com
13.4.4 Step 4: Configuring Server NetworkThis step explains how to configure the server network.
Data security between an Audit Vault Server and an Oracle Database target isachieved by default, through network encryption over TCP connection. Data securitycan also be achieved by using a TCPS/SSL connection.
1. Configure the server network. Add the following entries on the server and intothe $ORACLE_HOME/network/admin/sqlnet.ora file:
orapki wallet add –wallet <client wallet path> -trusted_cert -cert <server certificate path>
Note:
This command will prompt you to enter and re-enter a wallet password.
WALLET_LOCATION = (SOURCE = (METHOD = FILE) (METHOD_DATA = (DIRECTORY = /u01/app/oracle/demowallet) ) ) SQLNET.AUTHENTICATION_SERVICES = (TCPS,TCP,NTS,BEQ)SSL_CLIENT_AUTHENTICATION = TRUE SQLNET.ENCRYPTION_SERVER = ACCEPTED/REQUESTED/REJECTEDSQLNET.CRYPTO_CHECKSUM_SERVER = ACCEPTED/REQUESTED/REJECTED
Chapter 13Configuring TCPS Connections for DBCS Instances
13-16

Note:
a. The server encryption is set to REQUIRED on the DBCS instance and on-premises by default. Set the server encryption to ACCEPTED orREQUESTED or REJECTED.
b. REJECTED is not a recommended option. The following table describesthese options in detail.
Option Description
ACCEPTED The server does not allow bothencrypted and non-encryptedconnections. This is the default value incase the parameter is not set.
REJECTED The server does not allow encryptedtraffic.
REQUESTED The server requests encrypted traffic if itis possible, but accepts non-encryptedtraffic if encryption is not possible.
REQUIRED The server accepts only encryptedtraffic.
2. Configure the listener to accept SSL or TLS encrypted connections. Editthe $ORACLE_HOME/network/admin/listener.ora file. Add the wallet informationand the TCPS entry. Set the values as follows, using the directory location that youspecified for your environment:
SSL_CLIENT_AUTHENTICATION = TRUE
WALLET_LOCATION = (SOURCE = (METHOD = FILE) (METHOD_DATA = (DIRECTORY = /u01/app/oracle/demowallet) ) )
LISTENER = (DESCRIPTION_LIST = (DESCRIPTION = (ADDRESS = (PROTOCOL = TCP)(HOST = <host name>.localdomain)(PORT = 1521)) (ADDRESS = (PROTOCOL = IPC)(KEY = EXTPROC1521)) (ADDRESS = (PROTOCOL = TCPS)(HOST = <host name>.localdomain)(PORT = 1522)) ) )
Chapter 13Configuring TCPS Connections for DBCS Instances
13-17
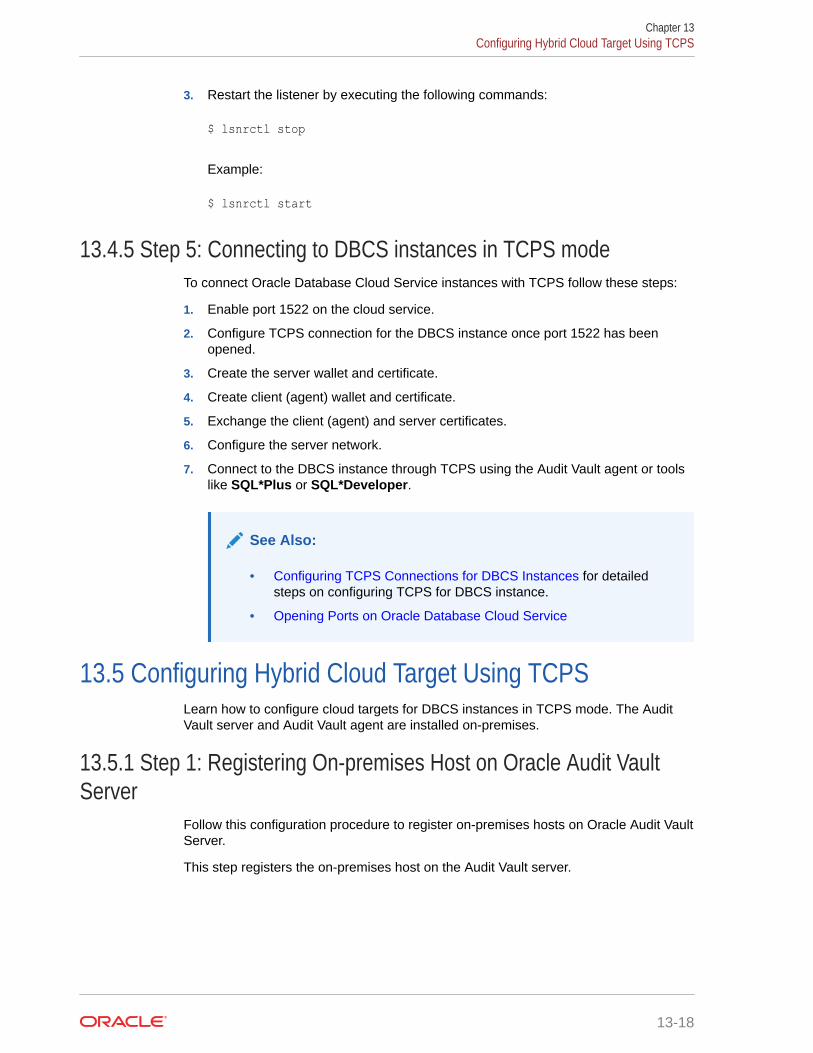
3. Restart the listener by executing the following commands:
$ lsnrctl stop
Example:
$ lsnrctl start
13.4.5 Step 5: Connecting to DBCS instances in TCPS modeTo connect Oracle Database Cloud Service instances with TCPS follow these steps:
1. Enable port 1522 on the cloud service.
2. Configure TCPS connection for the DBCS instance once port 1522 has beenopened.
3. Create the server wallet and certificate.
4. Create client (agent) wallet and certificate.
5. Exchange the client (agent) and server certificates.
6. Configure the server network.
7. Connect to the DBCS instance through TCPS using the Audit Vault agent or toolslike SQL*Plus or SQL*Developer.
See Also:
• Configuring TCPS Connections for DBCS Instances for detailedsteps on configuring TCPS for DBCS instance.
• Opening Ports on Oracle Database Cloud Service
13.5 Configuring Hybrid Cloud Target Using TCPSLearn how to configure cloud targets for DBCS instances in TCPS mode. The AuditVault server and Audit Vault agent are installed on-premises.
13.5.1 Step 1: Registering On-premises Host on Oracle Audit VaultServer
Follow this configuration procedure to register on-premises hosts on Oracle Audit VaultServer.
This step registers the on-premises host on the Audit Vault server.
Chapter 13Configuring Hybrid Cloud Target Using TCPS
13-18

Note:
If there is already a registered on-premises host in the Audit Vault Server installedon the Agent for monitoring DBCS instances, then skip this procedure. Otherwise,the steps are similar for all target databases that are on-premises. See RegisteringHosts in the Audit Vault Server for detailed steps.
13.5.2 Step 2: Installing Oracle Audit Vault Agent on Registered On-premises Hosts and Configuring TCPS
This configuration procedure installs Oracle Audit Vault Agent on registered on-premiseshosts and configures TCPS.
Note:
If there is already an Audit Vault agent installed on an on-premises host that isplanned for monitoring DBCS instances then ignore this step. In case there are noagents installed, there are specific requirements for the Audit Vault agents thatmonitor DBCS instances. The requirements or features are as follows:
1. The agent has to run on-premise.
2. A minimum of one agent must be dedicated to monitor only DBCS instances.There may be multiple agents dedicated to monitor only DBCS instances.
3. The agent should not run on the Audit Vault server.
1. Install the Audit Vault agent on the on-premises host. See Deploying and Activating theAudit Vault Agent on Host Computers for detailed steps on installing on-premises host.
2. Start the Audit Vault agent.
13.5.3 Step 3: Creating User Accounts on Oracle Database Cloud ServiceTarget Instances
This step creates a user account on the Oracle Database Cloud Service instance.
Note:
The connection methodology and scripts utilized are different in case on-premisesdeployment.
Prerequisite
• Port 1522 has to be opened up on the DBCS instance for TCP connection so that laterSQL*Plus and SQL*Developer can be used. TCP connection is encrypted by default. It
Chapter 13Configuring Hybrid Cloud Target Using TCPS
13-19

utilizes the native encryption. See Opening Ports on Oracle Database CloudService for detailed steps.
Procedure:
1. Ensure that the connection has been established to the DBCS instances throughTCPS as user with SYSDBA administrative privilege.
2. Create Server Wallet and certificate.
3. Create Client Wallet and certificate.
4. Exchange Client and Server certificates.
5. Configure Server network.
Note:
See “Configuring TCPS Connections for DBCS Instances” for creatingServer Wallet, Client Wallet, certificates, and exchanging certificates.
6. Once the above steps are complete, the user can now connect to the DBCSinstances in TCPS using the Audit Vault Agent or tools like SQL*Plus andSQL*Developer.
7. Execute the following commands to create audit retrieval user account creationscripts:
a. oracle_AVDF_dbcs_user_setup.sqlb. oracle_AVDF_dbcs_drop_db_permissions.sql
Note:
These scripts are different from those of the on-premises databaseinstances.
13.5.4 Step 4: Setting Up or Reviewing Audit Policies on Target OracleDatabase Cloud Service Instances
Use this procedure to set up and review audit policies on target Oracle DatabaseCloud Service instances.
Check the audit polices that are enabled and change them as needed. For OracleDatabase 11g, Oracle Database 11.2, and Oracle Database 12c release instanceswhere the unified audit is not enabled, you can provision audit policies from the AuditVault Server. If the Unified Trail is enabled on Oracle Database 12c instances, changethe audit policies manually on the DBCS instance.
Chapter 13Configuring Hybrid Cloud Target Using TCPS
13-20

Note:
• Understand the audit settings on the DBCS instances, before starting the auditdata collection process. Currently one Audit Vault Agent supports up to amaximum of 10 cloud target audit trails. The collection speed is up to 25 millionaudit records per target audit trail, in a day. The recommended Audit VaultAgent configuration can be found in the Oracle Audit Vault and DatabaseFirewall Installation Guide.
• Run the DBMS_AUDIT_MGMT package on the DBCS instances for audit cleanup, once the data is collected by the on-premises Audit Vault Server. The AuditVault Server supports data retention policies for every target and meetscompliance requirements. It allows configuring different retention policies for on-premises and DBCS instances.
13.5.5 Step 5: Creating Targets on Audit Vault Server for Oracle DatabaseCloud Service Instances
This configuration step creates target on Oracle Audit Vault Servers for Oracle DatabaseCloud Service instances.
The user must define these specific settings on the target configuration page. Use thefollowing procedure:
1. Log in to Audit Vault console as an administrator.
2. Click Targets tab.
3. Click the Register button on the right.
4. Enter a Name for the target and select from the Type menu.
5. Optionally fill in the Description field.
6. Under the Audit Connection Details sub tab, choose the Advanced option.
7. In the Protocol menu, select TCPS.
8. In the Wallet field, choose the client wallet by navigating to the location of the walletwhere it was previously created.
9. Enter the following TCPS connection string in the Target Location field:
jdbc:oracle:thin:@(DESCRIPTION=(ADDRESS=(PROTOCOL=TCPS)(HOST=<Host IP>)(PORT=<Port Number>))(CONNECT_DATA=(SERVICE_NAME=<service name>)(SERVER=DEDICATED))(SECURITY= (SSL_SERVER_CERT_DN="DN")))
This can also be accomplished in the Basic option. Enter the details in Host Name/IPAddress, Server DN, and the Wallet fields.
10. Enter the User Name and Password.
11. Click Save to save the configuration changes.
Chapter 13Configuring Hybrid Cloud Target Using TCPS
13-21
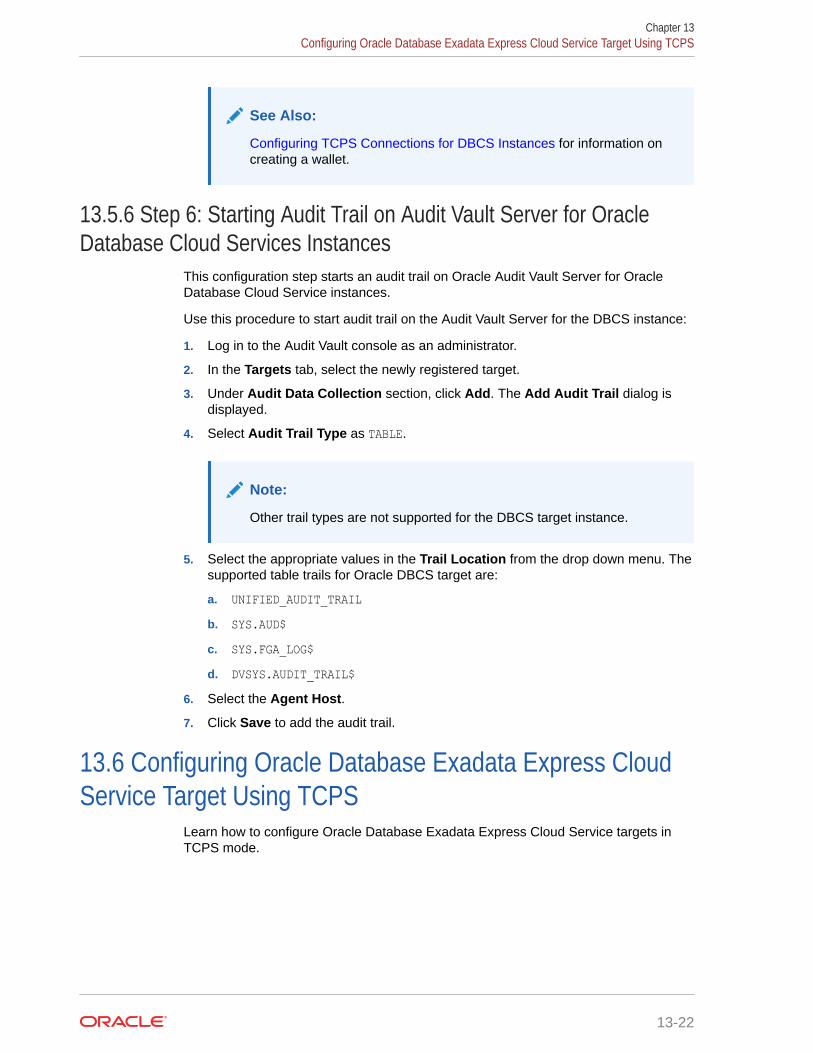
See Also:
Configuring TCPS Connections for DBCS Instances for information oncreating a wallet.
13.5.6 Step 6: Starting Audit Trail on Audit Vault Server for OracleDatabase Cloud Services Instances
This configuration step starts an audit trail on Oracle Audit Vault Server for OracleDatabase Cloud Service instances.
Use this procedure to start audit trail on the Audit Vault Server for the DBCS instance:
1. Log in to the Audit Vault console as an administrator.
2. In the Targets tab, select the newly registered target.
3. Under Audit Data Collection section, click Add. The Add Audit Trail dialog isdisplayed.
4. Select Audit Trail Type as TABLE.
Note:
Other trail types are not supported for the DBCS target instance.
5. Select the appropriate values in the Trail Location from the drop down menu. Thesupported table trails for Oracle DBCS target are:
a. UNIFIED_AUDIT_TRAILb. SYS.AUD$c. SYS.FGA_LOG$d. DVSYS.AUDIT_TRAIL$
6. Select the Agent Host.
7. Click Save to add the audit trail.
13.6 Configuring Oracle Database Exadata Express CloudService Target Using TCPS
Learn how to configure Oracle Database Exadata Express Cloud Service targets inTCPS mode.
Chapter 13Configuring Oracle Database Exadata Express Cloud Service Target Using TCPS
13-22

13.6.1 Step 1: Installing Audit Vault Agent on registered On-premisesHosts and Configuring TCPS
This step installs Oracle Audit Vault Agent on registered on-premises hosts and configuresTCPS.
See Step 2: Installing Oracle Audit Vault Agent on Registered On-premises Hosts andConfiguring TCPS.
Prerequisites
• Ensure the right version of JDK is installed. The supported JDK versions are:
– JDK7u80 or higher
– JDK8u71
– JCE Unlimited Strength Jurisdiction Policy Files with both JDK7 and JDK8. JDK 8 .jarfiles can be downloaded from: http://www.oracle.com/technetwork/java/javase/downloads/jce8-download-2133166.html
13.6.2 Step 2: Creating User Accounts on Oracle Exadata Express CloudService Instances
This configuration step creates user accounts on Oracle Exadata Express Cloud ServiceInstances.
Procedure:
1. Ensure that the connection has been established to the Oracle Database Cloud Serviceinstances through TCPS as user with SYSDBA administrative privilege.
2. Create Server Wallet and certificate.
3. Create Client Wallet and certificate.
4. Exchange Client and Server certificates.
5. Configure Server network.
6. After the above steps are complete, you can now connect to the DBCS instances inTCPS using the Audit Vault Agent or tools like SQL*Plus and SQL*Developer.
7. Run the following commands to create audit retrieval user account scripts:
oracle_AVDF_E1_user_setup.sqloracle_AVDF_E1_drop_db_permissions.sql
See Also:
Configuring TCPS Connections for DBCS Instances for creating Server Wallet,Client Wallet, certificates, and exchanging certificates.
Chapter 13Configuring Oracle Database Exadata Express Cloud Service Target Using TCPS
13-23

13.6.3 Step 3: Creating Targets on Oracle Audit Vault Server forOracle Exadata Express Cloud Service Instances
This configuration step creates targets on Oracle Audit Vault Server for OracleExadata Express Cloud Service instances.
1. Create a target on Oracle Audit Vault Server for the DBCS Instance. See Step 5:Creating Targets on Audit Vault Server for Oracle Database Cloud ServiceInstances.
2. Execute the following command to set mandatory target attribute for SSL version:
av.collector.stconn.oracle.net.ssl_version = 1.2
13.7 Configuring Oracle Database Exadata Express CloudService Target Using TCP
Learn how to configure Exadata Express Cloud Targets in TCP mode. The Audit VaultServer and Audit Vault Agent are installed on-premises.
13.7.1 Step 1: Registering On-premises Hosts on Oracle Audit VaultServer
This configuration step explains how to register on-premises hosts on Oracle AuditVault Server.
See Step 1: Registering On-premises Host on the Audit Vault Server.
13.7.2 Step 2: Installing Audit Vault Agents on Registered On-Premises Hosts
This configuration step installs agents on registered on-premises hosts.
See Step 2: Installing Audit Vault Agent on Registered On-premises Hosts.
13.7.3 Step 3: Creating User Accounts on Oracle Exadata ExpressCloud Target Instances
This configuration step creates user accounts on Oracle Exadata Express Cloudtargets.
1. Log in with SYSDBA administrative privilege and establish a connection to theDBCS instances through TCP.
2. Execute the following commands to create audit retrieval user account scripts:
oracle_AVDF_E1_user_setup.sqloracle_AVDF_E1_drop_db_permissions.sql
Chapter 13Configuring Oracle Database Exadata Express Cloud Service Target Using TCP
13-24

13.7.4 Step 4: Setting Up or Reviewing Audit Policies on Target OracleExadata Express Cloud Instances
This configuration step enables you to set up and review audit policies on target OracleExadata Express Cloud instances.
Note:
This is not supported for Oracle Exadata Express Cloud Service instance.
13.7.5 Step 5: Creating Targets on Oracle Audit Vault Servers for OracleExadata Express Cloud Instances
This configuration step creates targets on Oracle Audit Vault Servers for Oracle ExadataExpress Cloud instances.
See Step 5: Creating Targets on Oracle Audit Vault Server for Oracle Database CloudService Instances.
13.7.6 Step 6: Starting Audit Trail on Oracle Audit Vault Server for OracleExadata Express Cloud Instances
This configuration step starts audit trails on Oracle Audit Vault Server for Oracle ExadataExpress Cloud instances.
Use this procedure to start audit trail on Oracle Audit Vault Server for Oracle ExadataExpress Cloud instances:
1. Log in to the Audit Vault console as an administrator.
2. In the Targets tab, select the newly registered target.
3. Under Audit Data Collection section, click Add. The Add Audit Trail dialog isdisplayed.
4. Select Audit Trail Type as TABLE.
Note:
Other trail types are not supported for the Express Exadata Cloud targetinstance.
5. Select the appropriate values in the Trail Location from the drop-down menu. Thesupported table trails for Oracle Express Exadata Cloud target are:
a. UNIFIED_AUDIT_TRAIL6. Click Save to add the audit trail.
Chapter 13Configuring Oracle Database Exadata Express Cloud Service Target Using TCP
13-25

13.8 Configuring Autonomous Data Warehouse andAutonomous Transaction Processing
Learn how to configure Oracle Database Cloud Service types as targets in TCPSmode for Autonomous Data Warehouse and Autonomous Transaction Processing.
13.8.1 Step 1: Install Audit Vault Agent on Registered HostThis configuration step installs Audit Vault Agents on registered host.
Prerequisites
Ensure the right version of JDK is installed. The supported JDK versions are:
• JDK7u80 or higher
• JDK8u71
• JCE Unlimited Strength Jurisdiction Policy Files with both JDK7 and JDK8. JDK8 .jar files can be downloaded from: http://www.oracle.com/technetwork/java/javase/downloads/jce8-download-2133166.html
Follow these steps:
1. Install the Audit Vault Agent on the host machine. See Deploying and Activatingthe Audit Vault Agent on Host Computers for detailed steps.
2. Start the Audit Vault Agent.
13.8.2 Step 2: Create User Accounts on Oracle Cloud InstancesThis configuration step creates user account on Oracle Cloud instances.
Complete this procedure to create a user account on an Autonomous Data Warehouseor on an Autonomous Transaction Processing Cloud instance:
1. Ensure that the connection has been established to the Autonomous DataWarehouse Cloud instances through TCPS as user with SYSDBA administrativeprivilege.
2. Create a user that is used to collect audit data from the database.
3. Run the script to provide relevant privileges to the user:oracle_AVDF_dbcs_user_setup.sql
See Also:
Configuring TCPS Connections for DBCS Instances
Chapter 13Configuring Autonomous Data Warehouse and Autonomous Transaction Processing
13-26
13.8.3 Step 3: Create Targets on Audit Vault Server for the Cloud InstancesThis configuration step creates a target on Audit Vault Server for the Autonomous DataWarehouse and Autonomous Transaction Processing Cloud instances.
Prerequisites
1. The user must download the client wallet using Oracle Cloud Infrastructure Console. See Download Client Credentials (Wallets) for complete information.
2. Unzip the client wallet. The wallet contains the Single Sign On Wallet file (cwallet.sso).
3. The user can get connection string Using Oracle Cloud Infrastructure Console.
The user must enter these details and specific settings on the target configuration page.Follow the below steps:
1. Log in to Audit Vault Server console as an administrator.
2. Click Targets tab.
3. Click the Register button on the right.
4. Enter a Name for the target and select the Type as Oracle Database.
5. Optionally fill in the Description field.
6. Under the Audit Connection Details sub tab, choose the Advanced option.
7. In the Protocol menu, select TCPS.
8. In the Wallet field, upload the Single Sign On Wallet file (cwallet.sso).
9. Enter the TCPS connection string in the Target Location field:jdbc:oracle:thin:@<Connection string from OCI Console>
10. Enter the User Name and Password.
11. Click Save to save the configuration changes.
13.8.4 Step 4: Start Audit Trail on Audit Vault Server for the AutonomousData Warehouse and Autonomous Transaction Processing CloudInstances
This configuration step starts an audit trail on Audit Vault Server for the Autonomous DataWarehouse and Autonomous Transaction Processing Cloud instances.
Create audit trail using the Audit Vault Server console for the Autonomous Data Warehouseand Autonomous Transaction Processing Cloud instances. See Step 6: Starting Audit Trail onAudit Vault Server for Oracle Database Cloud Services Instances for complete information.
Chapter 13Configuring Autonomous Data Warehouse and Autonomous Transaction Processing
13-27
Part IIGeneral Administration Tasks
Learn about Oracle AVDF general administration tasks.
Part II assumes that you have completed the steps in Part I to configure Oracle Audit Vaultand Database Firewall. This part covers general administrative tasks.

14Managing User Accounts and Access
To manage user accounts and access, you can use both the command line and the AuditVault Server console.
14.1 About Oracle Audit Vault and Database FirewallAdministrative Accounts
Oracle Audit Vault and Database Firewall administrative accounts help you manage useraccess.
When administrators log in to Oracle Audit Vault and Database Firewall, they have accessonly to administrative functions, whereas auditors have access only to the auditing functions.
Oracle Audit Vault and Database Firewall has three types of administrative user accounts:
• Audit Vault Server Super Administrator:
– Manages system-wide settings
– Creates user accounts for super administrators and administrators
– Has access to all targets and target groups
– Grants access to targets or target groups to administrators
• Audit Vault Server Administrator: Has access to specific targets or target groupsgranted by a super administrator. Administrators cannot manage system-wide settings.
After installing Oracle Audit Vault and Database Firewall, a post-installation configurationpage lets you create and specify passwords for one super administrator account and onesuper auditor account for the Audit Vault Server. This super administrator and super auditorcreated during post installation are Audit Vault Server database users. There is at least oneAudit Vault Server database user as super administrator and one as super auditor.
Thereafter, the Audit Vault Server super administrator can create other administrative users,and the super auditor can create other auditor users, for the server.
This chapter describes managing user accounts and passwords for the Oracle Audit Vaultand Database Firewall administrator user interfaces.
See Also:
• Oracle Audit Vault and Database Firewall Installation Guide for information onpost-installation configuration.
• Oracle Audit Vault and Database Firewall Auditor's Guide for information onmanaging auditor accounts.
14-1

14.2 Security Technical Implementation Guides andImplementation for User Accounts
Oracle Audit Vault and Database Firewall follow STIG rules for user accounts.
Oracle Audit Vault and Database Firewall follows the Security TechnicalImplementation Guides (STIG) and implementation rules for user accounts.
• The default Oracle Audit Vault and Database Firewall user accounts must havecustom passwords.
• The number of consecutive failed login attempts is 3.
• When a user exceeds the maximum number of unsuccessful login attempts, theaccount is locked until a super administrator releases it.
• Account lockouts will persist until a super administrator resets the user account.
See Also:
Security Technical Implementation Guides for more information about STIGcompliance
14.3 Configuring Administrative Accounts for Oracle AuditVault Server
Learn how to configure administrative accounts for Oracle Audit Vault Server.
14.3.1 Guidelines for Securing Oracle Audit Vault and DatabaseFirewall User Accounts
Review the guidelines for securing Oracle Audit Vault and Database Firewall useraccounts.
As a best practice, use the installed Oracle Audit Vault and Database Firewall useraccounts only as back-up accounts. Add new user accounts, with unique user namesand passwords, for the users who are responsible for the day-to-day Oracle AuditVault and Database Firewall operations.
Note:
Oracle Audit Vault and Database Firewall does not accept user names withquotation marks. For example, "jsmith" is not a valid user name for anOracle Audit Vault and Database Firewall user account, or an accountcreated on a target for use by Oracle Audit Vault and Database Firewall.
Chapter 14Security Technical Implementation Guides and Implementation for User Accounts
14-2
14.3.2 Creating Administrative Accounts for Audit Vault ServerYou can create Audit Vault Server administrative accounts to manage administration.
Audit Vault Server super administrators can create both super administrator and administratoruser accounts.
1. Log in to the Audit Vault Server console as a super administrator.
2. Click the Settings tab.
The Manage Admins sub tab appears by default, and displays existing users and thetargets or groups to which they have access.
3. Click Add.
4. Enter the Admin Name and Password, and re-type the password in the appropriatefields.
Oracle Audit Vault and Database Firewall does not accept user names with quotationmarks, such as "jsmith".
5. In the Type menu, select Admin or Super Admin.
6. Click Save.
The new user is listed in the Manage Admins sub tab.
See Also:
About Oracle Audit Vault and Database Firewall Administrative Accounts forexplanation on roles.
14.3.3 Viewing the Status of Administrator User AccountsLearn how to view the status of administrator accounts.
As a super administrator, you can view the status of administrator accounts by clicking theSettings tab. The Manage Admins sub tab lists all administrator and super administratoraccounts, with their statuses, password expiry dates, the targets and target groups they haveaccess to, etc.
14.3.4 Changing User Account Types for Audit Vault ServerYou can change Audit Vault Server administrative account type from administrator to superadministrator, or vice versa.
You can change an administrative account type from administrator to super administrator, orvice versa.
Note:
If you change a user's account type from administrator to super administrator, thenthe user will have access to all targets and target groups.
Chapter 14Configuring Administrative Accounts for Oracle Audit Vault Server
14-3
1. Log in to the Audit Vault Server as a super administrator.
2. Click the Settings tab.
The Manage Admins section appears by default. It displays existing users andthe targets or groups to which they have access.
3. Click the name of the user account that you want to change.
4. In the Modify Admin dialog, click the edit icon against the Type field.
5. You can change the type from Admin to Super Admin. If you want to change thetype from Super Admin to Admin.
6. You can also grant or revoke access to any targets or groups as necessary for thisuser.
Release Oracle AVDF 20.1 and 20.2 Release Oracle AVDF 20.3 and later
a. Select the targets or groups towhich you want to grant or revokeaccess.
b. Click Grant or Revoke button.
A green check mark indicatesaccess granted. A red cross mark(X) indicates access revoked.
a. Select the targets or groups towhich you want to grant or revokeaccess. You can also search for thetargets or groups in the field underTargets & Target Groups.
b. Choose the access rights in theAvailable column and move them tothe Selected column, to grantaccess. Choose the access rights inthe Selected column and movethem to the Available column, torevoke access.
7. Click Save.
14.3.5 Unlocking User AccountsThis procedure explains how to unlock user accounts.
An Oracle Audit Vault and Database Firewall administrator account is locked after atleast 3 failed login attempts. A super administrator must unlock user accounts.
1. Log in to the Audit Vault Server console as a super administrator.
2. Click the Settings tab.
The Manage Admin sub tab is selected by default. It displays a list of existingusers.
3. Click the name of the user account you want to unlock.
4. In the dialog, click Unlock.
See Also:
ALTER USER
Chapter 14Configuring Administrative Accounts for Oracle Audit Vault Server
14-4

14.3.6 Deleting Oracle Audit Vault Server Administrator AccountsYou may need to delete Oracle Audit Vault Server Administrator accounts with this procedure.
1. Log in to the Audit Vault Server as a super administrator.
2. Click the Settings tab.
The Manage Admin page appears by default, and displays existing users and the targetsor groups to which they have access.
3. Select the users you want to delete, and then click Delete.
14.4 Configuring sudo Access for UsersLearn about configuring sudo access for users.
14.4.1 About Configuring sudo AccessLearn about configuring sudo access.
The sudo command enables trusted users to have administrative access to systems withouthaving to log in using root user passwords.
When users have sudo access, they can precede an administrative command with sudo, andthen be prompted to enter their password. After authentication is complete, and assumingthat the command is permitted, the command is processed as if it had been run by the rootuser.
14.4.2 Configuring sudo Access for UsersLearn about configuring sudo access for users.
You need root privileges to configure sudo access for users.
1. Log in to the system as the root user.
2. Create a normal user account using the useradd command.
For example, to create a normal user account for the user psmith:
# useradd psmith3. Set a password for the user using the passwd command.
For example:
# passwd psmithChanging password for user psmith.New password: new_passwordRetype new password: new_passwordpasswd: all authentication tokens updated successfully
4. Run the visudo utility to edit the /etc/sudoers file.
# visudo
The sudoers file defines the policies that the sudo command applies.
Chapter 14Configuring sudo Access for Users
14-5

5. Find the lines in the sudoers file that grant access to users in the wheel groupwhen enabled.
## Allows people in group wheel to run all commands# %wheel ALL=(ALL) ALL
6. Remove the comment character (#) at the start of the second line, which beginswith %wheel.
This enables the configuration option.
7. Save your changes and exit the editor.
8. Add the user account that you created earlier to the wheel group usingthe usermod command.
For example:
usermod -aG wheel psmith9. Test that the updated configuration enables the user that you created to run
commands using sudo.
a. Use the su command to switch to the new user account that you created.
# su psmithb. Use the groups command to verify that the user is in the wheel group.
$ groupspsmith wheel
c. Use the sudo command to run the whoami command.
Because this is the first time that you have run a command using sudo fromthis user account, the banner message is displayed. You will be prompted toenter the password for the user account.
$ sudo whoami
The following output should appear:
We trust you have received the usual lecture from the local SystemAdministrator. It usually boils down to these three things: #1) Respect the privacy of others. #2) Think before you type. #3) With great power comes great responsibility.
Enter the password when prompted:
[sudo] password for psmith: passwordroot
The last line of the output is the user name that is returned by the whoamicommand. If sudo access has been configured correctly, then this value isroot.
14.5 Managing User Access Rights to Targets and GroupsLearn about managing users access rights to targets and groups.
Chapter 14Managing User Access Rights to Targets and Groups
14-6

14.5.1 About Managing User Access RightsLearn about managing user access rights.
Super administrators have access to all targets and target groups and can grant access tospecific targets and groups to administrators.
You control access to targets or groups in two ways:
• Modify a target or group to grant or revoke access for one or more users.
• Modify a user account to grant or revoke access to one or more targets or groups.
14.5.2 Controlling Access Rights by UserLearn about controlling access rights by user.
1. Log in to the Audit Vault Server as a super administrator.
2. Click the Settings tab.
Click the Manage Admins sub tab. It displays existing users and the targets or groups towhich they have access.
3. Click the name of the user account you want to modify.
The Modify Admin dialog appears.
4. In the Targets & Target Groups section:
Release Oracle AVDF 20.1 and 20.2 Release Oracle AVDF 20.3 and later
a. Select the access rights to which youwant to grant or revoke access.
b. Click Grant or Revoke button.
A green check mark indicates accessgranted. A red cross mark (X) indicatesaccess revoked.
a. Select the access rights to which youwant to grant or revoke access. Youcan also search for the access rights inthe field under Targets & TargetGroups.
b. Choose the access rights in theAvailable column and move them tothe Selected column, to grant access.Choose the access rights in theSelected column and move them to theAvailable column, to revoke access.
5. Click Save.
14.5.3 Controlling Access Rights by Target or GroupYou can control access rights by targets or groups.
1. Log in to the Audit Vault Server as a super administrator.
2. Click the Settings tab, and then click Security (which should be selected by default).
3. Under Manage Admins sub tab, select the name of the administrator whose targetaccess you want to change.
The Modify Admin window appears.
Chapter 14Managing User Access Rights to Targets and Groups
14-7
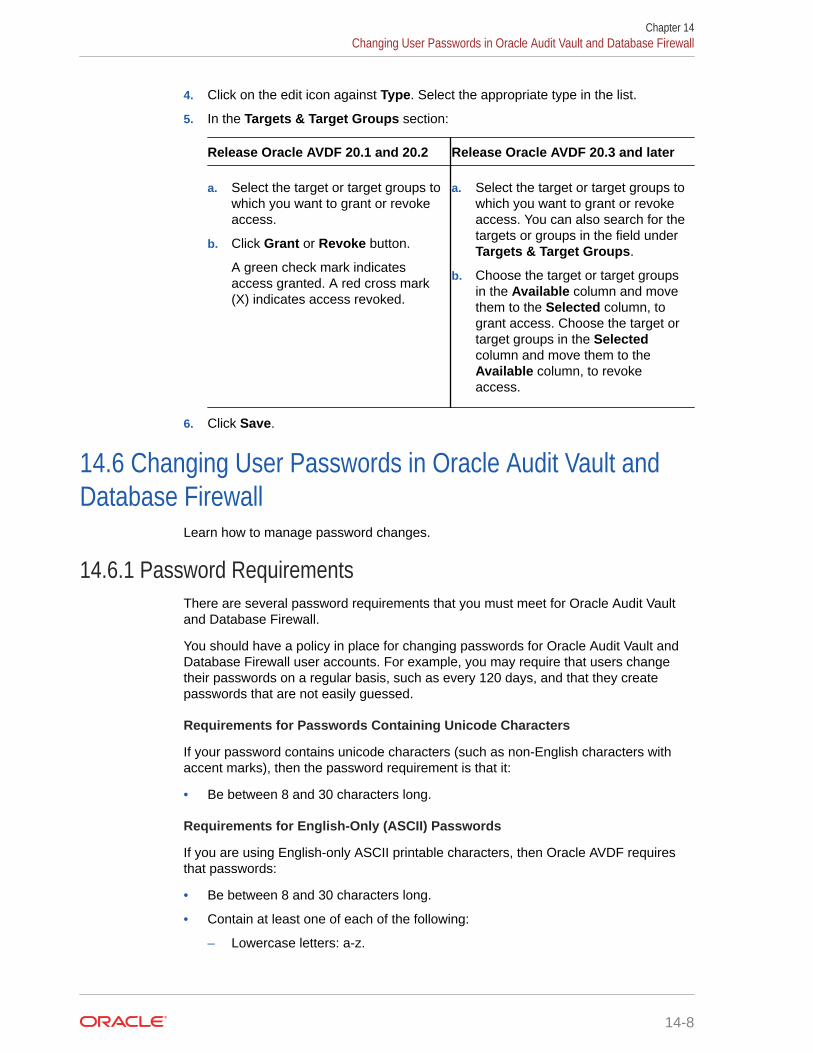
4. Click on the edit icon against Type. Select the appropriate type in the list.
5. In the Targets & Target Groups section:
Release Oracle AVDF 20.1 and 20.2 Release Oracle AVDF 20.3 and later
a. Select the target or target groups towhich you want to grant or revokeaccess.
b. Click Grant or Revoke button.
A green check mark indicatesaccess granted. A red cross mark(X) indicates access revoked.
a. Select the target or target groups towhich you want to grant or revokeaccess. You can also search for thetargets or groups in the field underTargets & Target Groups.
b. Choose the target or target groupsin the Available column and movethem to the Selected column, togrant access. Choose the target ortarget groups in the Selectedcolumn and move them to theAvailable column, to revokeaccess.
6. Click Save.
14.6 Changing User Passwords in Oracle Audit Vault andDatabase Firewall
Learn how to manage password changes.
14.6.1 Password RequirementsThere are several password requirements that you must meet for Oracle Audit Vaultand Database Firewall.
You should have a policy in place for changing passwords for Oracle Audit Vault andDatabase Firewall user accounts. For example, you may require that users changetheir passwords on a regular basis, such as every 120 days, and that they createpasswords that are not easily guessed.
Requirements for Passwords Containing Unicode Characters
If your password contains unicode characters (such as non-English characters withaccent marks), then the password requirement is that it:
• Be between 8 and 30 characters long.
Requirements for English-Only (ASCII) Passwords
If you are using English-only ASCII printable characters, then Oracle AVDF requiresthat passwords:
• Be between 8 and 30 characters long.
• Contain at least one of each of the following:
– Lowercase letters: a-z.
Chapter 14Changing User Passwords in Oracle Audit Vault and Database Firewall
14-8
– Uppercase letters: A-Z.
– Digits: 0-9.
– Punctuation marks: comma (,), period (.), plus sign (+), colon(:), exclamation mark (!),and underscore (_)
• Not contain double quotes ("), back space, or control characters.
In addition, Oracle recommends that passwords:
• Not be the same as the user name.
• Not be an Oracle reserved word.
• Not be an obvious password (such as welcome, account, database, and user).
• Not contain any repeating characters.
14.6.2 Changing the Audit Vault Server Administrator PasswordLearn how to change the password of an administrator.
Administrators can change their own password. A super administrator can also change thepassword of other administrators. If a super administrator changes the password of anotheradministrator, then the password automatically expires immediately after it is changed.
14.6.2.1 Changing Your Own PasswordLearn how to change your own password as an administrator.
1. Log in to the Audit Vault Server as an administrator.
2. In the upper right corner, to the right of your login name, select the menu icon.
3. Select Change Password from this menu.
4. In the Change Password window, enter the following fields:
• Current Password
• New Password
• Re-enter New Password
5. Click Save.
Related Topics
• Password RequirementsThere are several password requirements that you must meet for Oracle Audit Vault andDatabase Firewall.
14.6.2.2 Changing the Password of Another AdministratorLearn how to change the password of another administrator as a super administrator.
A super administrator can change the passwords of other administrators. However, thepassword automatically expires immediately after it is changed by the super administrator.The administrator must follow the instructions in the topic Changing the Expired Password ofan Administrator.
1. Log in to the Audit Vault Server as super administrator.
Chapter 14Changing User Passwords in Oracle Audit Vault and Database Firewall
14-9
2. Click the Settings tab and then if necessary, select Security in the leftnavigational menu.
3. Under Manage Admins, select the name of the administrator whose passwordyou want to change.
4. In the Modify Admin window, click Change Password.
5. In the Change Password window, enter the following fields:
• New Password
• Re-enter New Password
6. Click Save.
Related Topics
• Password RequirementsThere are several password requirements that you must meet for Oracle AuditVault and Database Firewall.
14.6.2.3 Changing the Expired Password of an AdministratorYour password might be expired if a super administrator changes your password, or ifit passes the password expiry date.
In case of Oracle AVDF release 20.4 or earlier, follow these steps:
1. Complete the steps mentioned in MOS note (Doc ID 2117211.1). At the end of theinstructions, if the user is locked, then run the command to unlock the user.
2. Run the following command to change the password:
SQL> alter user <administrator_username> identified by <new_password>;
In case of Oracle AVDF release 20.5 or later, follow these steps:
1. Log in to AVCLI with your user name.
2. AVCLI prompts to enter the password. Enter the expired password.
The following message is displayed:
The password has expired. Enter the new password:3. Enter the new password of your choice. Follow the password requirements.
The following message is displayed:
Re-enter password:4. Re-enter the new password.
5. If the following message is displayed, then you have successfully logged in toAVCLI with the new password, and your account is active again:
Connected to: Oracle Audit Vault Server - Version : 20.x.0.0.0
Chapter 14Changing User Passwords in Oracle Audit Vault and Database Firewall
14-10

Note:
If your attempt to log in fails for 3 times or more, then your account gets locked.You need to unlock your account and retry the above mentioned steps.
Related Topics
• Logging in to AVCLIYou can log in to the Audit Vault command line interface by using different methods.
• Password RequirementsThere are several password requirements that you must meet for Oracle Audit Vault andDatabase Firewall.
• Unlocking User AccountsThis procedure explains how to unlock user accounts.
14.7 Integrating Oracle Audit Vault and Database Firewall withMicrosoft Active Directory or OpenLDAP
You can use Microsoft Active Directory or OpenLDAP to control access to Oracle Audit Vaultand Database Firewall.
14.7.1 About Microsoft Active Directory or OpenLDAP IntegrationLearn about integrating Microsoft Active Directory or OpenLDAP with Audit Vault Server.
You can integrate Microsoft Active Directory or OpenLDAP server to authenticate usersconnecting to the Audit Vault Server console. A user is prompted during log in to select agroup from a list of groups. The user is authorized from the group to which they belong andselect. After the user is authenticated, access is granted based on the Microsoft ActiveDirectory or OpenLDAP groups to which the user belongs and selects.
A super user can assign the roles to the groups on Oracle Audit Vault Database Firewall. Forexample, super administrator, super auditor, administrator, or auditor. Oracle Audit Vault andDatabase Firewall release 20.1 and later supports Microsoft Active Directory and OpenLDAP.
Note:
• While other LDAP servers may work, they are not tested or certified with OracleAudit Vault and Database Firewall release 20.1.
• Oracle AVDF does not support the default local accounts of Microsoft ActiveDirectory (for example administrator). Refer to Microsoft documentation forcomplete information on default local accounts in Active Directory.
• Microsoft Active Directory and OpenLDAP users and groups must belong to thedomain specified in the topic Configuring an LDAP Server.
Chapter 14Integrating Oracle Audit Vault and Database Firewall with Microsoft Active Directory or OpenLDAP
14-11

14.7.2 Configuring an LDAP ServerYou can configure LDAP server to authenticate users using Microsoft Active Directoryor OpenLDAP.
1. Get the SSL certificate to connect to Microsoft Active Directory or OpenLDAP. Thiscan be sourced from Microsoft Active Directory or OpenLDAP administrator. Copythe SSL certificate.
2. Launch the Audit Vault Server console.
3. Log in to the console as super administrator.
4. Click the Settings tab.
5. Click the LDAP Configuration tab in the main page.
6. Click the Add button.
7. Enter the Microsoft Active Directory or OpenLDAP server details. In the LDAPConfiguration dialog, select Active Directory User or LDAP User.
8. Provide a new Name for the LDAP server.
9. Enter the Server Name or the IP address.
10. Enter the Port number for the SSL connection.
11. Enter the Domain Name.
12. Provide the Microsoft Active Directory or OpenLDAP SSL certificate sourcedearlier in the initial step.
13. Enter the wallet password for the SSL certificate. This wallet stores the SSLcertificate you provided for LDAP SSL connection earlier.
14. Enter the LDAP Username (distinguished name) and Password. The user mustbe able to retrieve all groups from OpenLDAP.
15. Click Test Connection to verify the details. Fix any errors encountered andproceed to the next step.
16. Click Save.
Note:
Click Delete to delete the Microsoft Active Directory or OpenLDAPconfiguration. Starting Oracle AVDF 20.4, a dialog appears and promptsfor your confirmation.
14.7.3 Creating New UsersCreate new users for Microsoft Active Directory or OpenLDAP authentication.
1. Log in to the Audit Vault Server console as a super administrator or super auditor.
2. Click on Settings tab.
3. The Manage Admins or Manage Auditors sub tab on the main page is selectedby default.
Chapter 14Integrating Oracle Audit Vault and Database Firewall with Microsoft Active Directory or OpenLDAP
14-12

4. Click on Add button in the top right corner.
5. In the Add Admin (or Add Auditor) dialog select the Authentication type, Audit VaultUser or Active Directory User.
6. For Audit Vault User, enter the details to create a database administrator or auditor.Enter the newly created Admin Name or Auditor Name.
a. Select the Admin Type or Auditor Type.
b. Enter the Password and Re-type Password.
7. For Active Directory User or LDAP User, select the Import Mode.
OpenLDAP or Active Directory users and groups have to exist in the LDAP server beforeyou can create the admin or auditor on the Audit Vault Server for the same.
a. If you have selected import mode as Fetch, then provide an LDAP User Name andPassword. Alternatively, you can register an Microsoft Active Directory orOpenLDAP group in Oracle Audit Vault Database Firewall that corresponds to anexisting group by providing the distinguished name. The LDAP user needs thecorrect access privileges to view all the groups that exist on the LDAP server.
Note:
The user credentials are not stored. Therefore, each time that you choosethe Fetch option, you must enter the credentials.
b. In the Group Name Like field, enter a keyword to search in order to fetch detailsfrom a group that has a similar name. Click Fetch at the bottom of the dialog. Forexample, enter admin keyword to fetch AD or OpenLDAP groups containing adminstring in the group name.
Note:
A user can be added to a group. A group can have administrator or auditorprivileges, but not both. For example, a group with the nameAdminAndAuditor can have administrator privileges assigned. However, thesame group cannot have auditor privileges. In case there is an attempt toadd both the privileges, then it fails. The user SpecialUser can be part ofboth, the Admin group and the Auditor group. This user SpecialUser maychoose to connect with Admin group as administrator, or with Auditor groupas auditor.
c. Select the Domain.
d. Click the Fetch button at the bottom of the dialog. The values in the Group and UserType fields are populated.
e. Select the right Group from the drop down menu.
f. Select the User Type from the drop-down menu, such as, Admin, Super Admin,Auditor, or Super Auditor.
g. If you have selected the import mode as Manual, then enter the Group Name asdistinguished name.
8. Click Save.
Chapter 14Integrating Oracle Audit Vault and Database Firewall with Microsoft Active Directory or OpenLDAP
14-13

14.7.4 Log in as an OpenLDAP or Microsoft Active Directory UserAfter OpenLDAP or Microsoft Active Directory is configured, the user can log in to theAudit Vault Server console.
1. Launch the Audit Vault Server console.
2. Select the appropriate radio button to log in. The following are the availableoptions:
• Microsoft Active Directory User or Audit Vault User
• LDAP User or Audit Vault User
You can log in as Audit Vault User. If you have configured Microsoft ActiveDirectory, then you can log in as Microsoft Active Directory User. If you haveconfigured OpenLDAP, then you can log in as LDAP User.
3. Enter details of the user. For database user, enter the user name and password.For Microsoft Active Directory user, enter the username (sAMAccountName). Enterthe password. Select the domain name from the drop-down.
Note:
You must add the user to the Microsoft Active Directory or OpenLDAPgroup. This group needs to be registered with the Audit Vault Server asdocumented in the previous section.
4. In the following page, select a Group from the drop-down.
5. Click Save to log in and complete the authorization.
Chapter 14Integrating Oracle Audit Vault and Database Firewall with Microsoft Active Directory or OpenLDAP
14-14
15Managing the Audit Vault Serverand Database Firewalls
Learn how to manage day-to-day Audit Vault Server and Database Firewall operations afterthe initial configuration is completed.
15.1 Managing Audit Vault Server Settings, Status, andMaintenance Operations
Learn how to manage the Audit Vault Server settings, status, and maintenance operations.
15.1.1 Checking Server Status and System OperationThis procedure enables you to check the server status and system operation.
1. Log in to the Audit Vault Server as an administrator.
2. Use one of the following methods to find the system status:
• Select the Home tab. The page displays overall system status information (some ofwhich you can drill down into) for Agents, Audit Trails, Targets, Disk Space, DatabaseFirewalls, and CPU Usage.
• Select the Settings tab, and then in the left navigational menu, select System. Thestatus page displays detailed information for areas such as the overall server status,configuration status, and monitoring status.
15.1.2 Managing DiagnosticsYou can generate diagnostic reports to find the source of errors, warnings, and other issuesin Audit Vault and Database Firewall.
15.1.2.1 About Managing DiagnosticsYou can run diagnostic tools to help you debug problems that may arise.
You can adjust the amount of diagnostics information gathered by setting the LOGLEVEL fordifferent server components using the AVCLI ALTER SYSTEM SET command. When youperform the download operation, the process captures the log and trace file information,along with configuration information that is available at that time. Be aware that a change inthe log level only affects those trace or log files that are generated after the change is made.For example, if you encounter a problem after you set the log level to DEBUG, then you mustreproduce the issue before you run the procedure in this section to download the diagnosticreport. Otherwise, the debug or trace is not captured in the report.
Be aware, however, that the DEBUG setting will generate many files, which can affect theperformance of your system. Therefore, only use this setting on a temporary basis, when you
15-1

are trying to diagnose problems. After you find and correct the problem, then set DEBUGto the original setting, such as ERROR.
Logging Levels
The logging levels determine the amount of information to record in the log files. Thefollowing logging levels are listed in the order of amount of information written to logfiles, with Debug providing the most information:
• Error: Reports only critical information. This generates the least amount of logmessages.
• Warning: (Default) Reports warning and error messages (not supported for WebConsole UI).
• Info: Writes informational, warning, and error messages. This level is appropriatefor testing environments but not for production.
• Debug: Writes detailed messages for debugging purposes. This generates themost amount of log messages. Debug logs may contain sensitive informationabout the state of your system. Add the debug log level only when necessary, andremove it once debugging is complete.
System Components
You can set different logging levels for these system components:
Table 15-1 Components with Variable Logging Levels
Agent Alert
Archive and Retrieve Background Server Process
Data Repository Database Firewall
Notification Plug-in Management
Policy Management Report Generation
SAN Storage Transaction Log Trail
Web Console UI (has three logging levels only) N/A
15.1.2.2 Running Diagnostics Checks for the Audit Vault ServerFollow this procedure to run diagnostics checks for Oracle Audit Vault Server.
You can run a diagnostics check for the Audit Vault Server that tracks activities suchas whether necessary files exist, whether the HTTP server is running, whether theOracle listener and other processes are running.
1. Log in to the Audit Vault Server console as a super administrator.
2. Click the Settings tab.
3. In the left navigation menu, click the System tab.
4. Under Monitoring section, click the Diagnostics link. The Diagnostics dialog isdisplayed as follows:
Chapter 15Managing Audit Vault Server Settings, Status, and Maintenance Operations
15-2
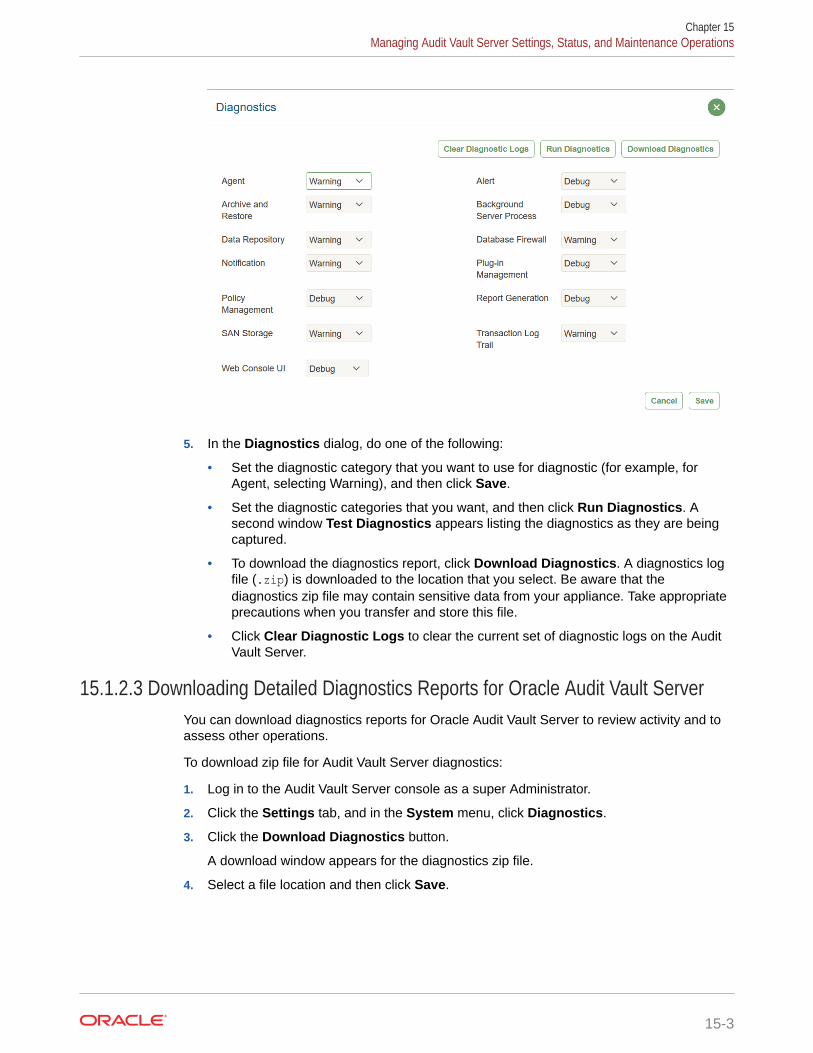
5. In the Diagnostics dialog, do one of the following:
• Set the diagnostic category that you want to use for diagnostic (for example, forAgent, selecting Warning), and then click Save.
• Set the diagnostic categories that you want, and then click Run Diagnostics. Asecond window Test Diagnostics appears listing the diagnostics as they are beingcaptured.
• To download the diagnostics report, click Download Diagnostics. A diagnostics logfile (.zip) is downloaded to the location that you select. Be aware that thediagnostics zip file may contain sensitive data from your appliance. Take appropriateprecautions when you transfer and store this file.
• Click Clear Diagnostic Logs to clear the current set of diagnostic logs on the AuditVault Server.
15.1.2.3 Downloading Detailed Diagnostics Reports for Oracle Audit Vault ServerYou can download diagnostics reports for Oracle Audit Vault Server to review activity and toassess other operations.
To download zip file for Audit Vault Server diagnostics:
1. Log in to the Audit Vault Server console as a super Administrator.
2. Click the Settings tab, and in the System menu, click Diagnostics.
3. Click the Download Diagnostics button.
A download window appears for the diagnostics zip file.
4. Select a file location and then click Save.
Chapter 15Managing Audit Vault Server Settings, Status, and Maintenance Operations
15-3
See Also:
• ALTER SYSTEM SET for details about setting the LOGLEVELparameter.
15.1.2.4 Clearing Diagnostic LogsFollow this process to empty your Oracle Audit Vault and Database Firewall diagnosticlogs.
1. Log in to the Audit Vault Server console as a super administrator.
2. Click the Settings tab.
3. In the left navigation menu, select System.
4. Under Monitoring, click Diagnostics.
5. In the Diagnostics window, click Clear Diagnostic Logs, then in the confirmationwindow, click OK.
15.1.3 Accessing the Audit Vault Server Certificate and Public KeyYou can use the Audit Vault Server console to access the Audit Vault server certificateand public key.
15.1.3.1 Accessing the Server CertificateIf you have deployed Database Firewalls, you must provide the Audit Vault Servercertificate and IP address to each Database Firewall.
1. Log in to the Audit Vault Server console as an administrator.
2. Click the Settings tab.
3. In the left navigation menu, select Security.
4. In the status page, click Certificate.
The server's certificate is displayed. You can copy the certificate and provide it toeach Database Firewall.
5. In the Security menu, click Certificate.
Related Topics
• Specifying the Audit Vault Server Certificate and IP AddressLearn about specifying the Audit Vault Server certificate and IP address.
15.1.3.2 Accessing the Server Public KeyYou can access the Audit Vault Server public key from the Manage Archive Locationsarea.
You must provide the server's public key to another system in order to upload archivefiles from the Audit Vault Server to that system. This public key must be added to theauthorized_keys file for that system. For a typical Linux installation, this file is in the
Chapter 15Managing Audit Vault Server Settings, Status, and Maintenance Operations
15-4

user's home directory under .ssh, and its permissions must be set to 0600, or even 0400.
1. Log in to the Audit Vault Server console as an administrator.
2. Click the Settings tab.
3. In the left navigation menu, select Archiving.
4. In the page that appears, click Manage Archive Locations, and then click Create.
5. In the Create Archive Location window, in the Public Key field, copy this key and past itinto the appropriate file on another system.
15.1.4 Changing the Keyboard LayoutYou can change the keyboard layout for Audit Vault and Database Firewall depending yourgeographic location.
1. Log in to the Audit Vault Server console as a super administrator.
2. Click the Settings tab.
3. In the left navigation menu, select System.
4. In the page that appears, under Configuration, select Manage.
5. In the Manage window, select the keyboard you want from the Keyboard menu.
6. Click Save.
7. In the confirmation dialog box, select OK.
You may be logged out if your selection affects the server's time changes significantly.
15.1.5 Restarting or Powering Off the Audit Vault ServerYou must be a super administrator to restart or power off the Audit Vault Server.
1. Log in to the Audit Vault Server as super administrator.
2. Click the Settings tab.
3. In the left navigation menu, select System.
4. Under Configuration, select Manage.
5. In the Manage window, click Reboot or Power Off.
15.2 Changing Oracle Audit Vault Server Network and ServicesConfigurations
Use this procedure to change Oracle Audit Vault Server network and services configurations.
To set or change the network or services configuration, follow the relevant procedure below:
• "Changing the Audit Vault Server Network Configuration"
• "Configuring or Changing the Audit Vault Server Services"
Chapter 15Changing Oracle Audit Vault Server Network and Services Configurations
15-5

15.3 Managing Server Connectors for Email and SyslogFollow this procedure to manage server connectors for email and syslog.
To set or change connector information, follow the relevant procedure below:
• Configuring the Email Notification Service
• Configuring Audit Vault Server Syslog Destinations
15.4 Configuring Remote Syslog Over TLSUse this procedure to configure remote syslog over TLS.
Syslog provides a convenient mechanism to transfer logs from one device to another.The logs contain sensitive information. Therefore, it is important that you secure thelogs during transfers. Do this by authenticating and encrypting the connection beweenthe client and the server. The remote feature in the syslog supports this functionality.Use this procedure to establish secure communications between the syslog clientsand servers.
Prerequisites
• Ensure that the normal or unencrypted remote syslog functionality works usingTCP.
• Complete the server side configuration. Load the imtcp module and specify thelistener port.
• Complete the client side configuration. Specify the remote machine to which thelogs are sent.
• Upon completion of the server side and client side configuration. Restart thesyslog service.
• Restart the syslog service in case any of the devices were added, modified, oractivated.
• Ensure the logs from the client are listed in the log file of the server. This is aconfirmation and you can proceed to securing the communication channel.
To load the imtcp module and to specify the listener port, modify the /etc/rsyslog.conf file as follows:
# listen for tcp input$ModLoad imtcp# listening on port <port number>$InputTCPServerRun <port number># Remote logs written to /var/log/messages.*.* /var/log/messages
Chapter 15Managing Server Connectors for Email and Syslog
15-6

To specify the destination remote machine to which the logs will be sent, modify the /etc/rsyslog.conf file as follows:
# Forward messages to remotehost:port*.* @@<Ip address of the remote host>:<port number>
Syslog contains modules, protective transport layer, and digital certificates to ensure mutualauthentication. It covers many aspects. The syslog messages are encrypted in transit. Thesyslog sender authenticates to the syslog receiver. The receiver is able to identify and inreturn authenticates to the syslog sender. The receiver performs few checks to validate if it isthe valid recipient of the messages. This kind of mutual authentication and hand shakeprevents any kind of attacks.
The syslog mutual authentication system makes use of CA certificate and peer certificates. Incase there is no signed certificate available, the user can create a self signed certificate usingOpenSSL. The server must have the CA (certificate authority) certificate and it’s own digitalcertificate. These certificates enable SSL operation that provides the necessary crypto keysused to secure the connection.
Syslog makes use of GTLS module as the network stream driver. Syslog has TLS protectedtransport security feature and ensures messages are encrypted. It makes use of digitalcertificates to ensure mutual authentication.
Configuring the server
The server configuration involves specifying the location of the certificates, the GTLS driver tobe used, and starting of the listener. The following example is applicable to Linux basedremote server only. It is different for other platforms. To make any changes to the server'ssyslog configuration, refer to the documentation of the specific syslog server. Modifythe /etc/rsyslog.conf file as follows:
# listen for tcp input$ModLoad imtcp# make gtls driver the default$DefaultNetstreamDriver gtls# certificate files$DefaultNetstreamDriverCAFile /path/to/cacert.pem$DefaultNetstreamDriverCertFile /path/to/servercert.pem$DefaultNetstreamDriverKeyFile /path/to/serverkey.pem# Auth mode and permitted peers$InputTCPServerStreamDriverAuthMode x509/name$InputTCPServerStreamDriverPermittedPeer <permittedHost>$InputTCPServerStreamDriverMode 1 # run driver in TLS-only mode# Listening on port <port number>$InputTCPServerRun <port number># Generic log file watching$WorkDirectory /var/cache/rsyslog# Remote logs*.* /var/log/messages
Chapter 15Configuring Remote Syslog Over TLS
15-7
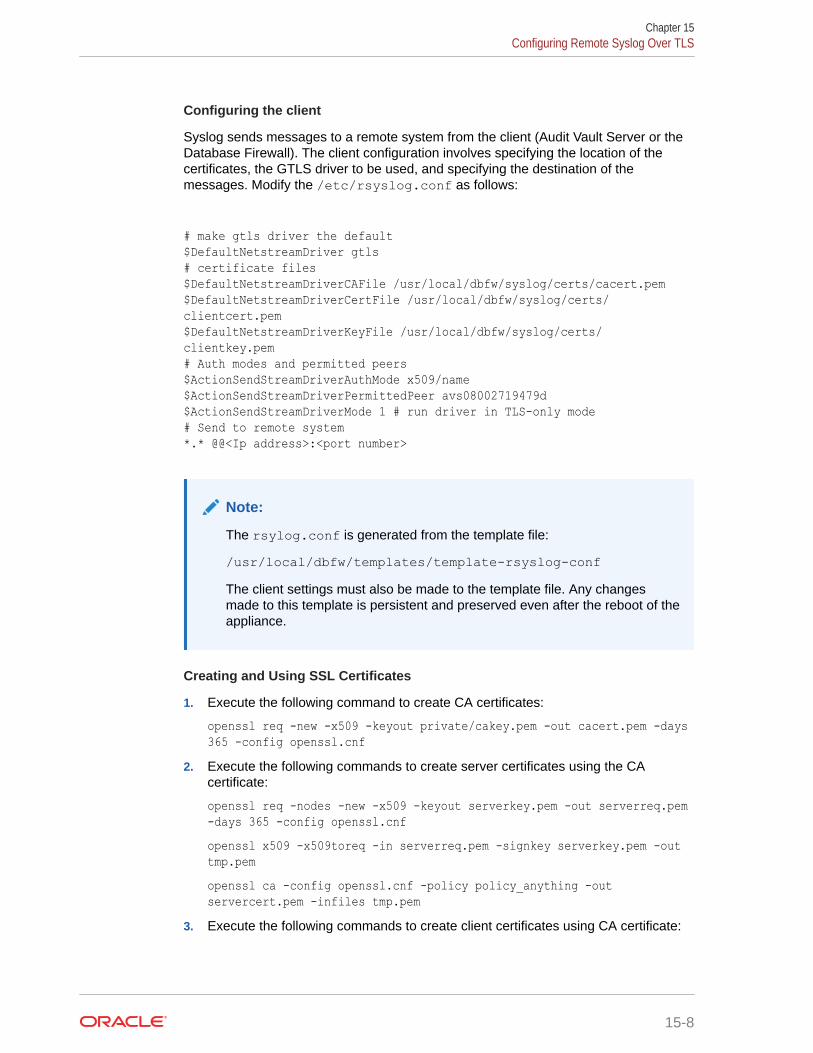
Configuring the client
Syslog sends messages to a remote system from the client (Audit Vault Server or theDatabase Firewall). The client configuration involves specifying the location of thecertificates, the GTLS driver to be used, and specifying the destination of themessages. Modify the /etc/rsyslog.conf as follows:
# make gtls driver the default$DefaultNetstreamDriver gtls# certificate files$DefaultNetstreamDriverCAFile /usr/local/dbfw/syslog/certs/cacert.pem$DefaultNetstreamDriverCertFile /usr/local/dbfw/syslog/certs/clientcert.pem$DefaultNetstreamDriverKeyFile /usr/local/dbfw/syslog/certs/clientkey.pem# Auth modes and permitted peers$ActionSendStreamDriverAuthMode x509/name$ActionSendStreamDriverPermittedPeer avs08002719479d$ActionSendStreamDriverMode 1 # run driver in TLS-only mode# Send to remote system*.* @@<Ip address>:<port number>
Note:
The rsylog.conf is generated from the template file:
/usr/local/dbfw/templates/template-rsyslog-confThe client settings must also be made to the template file. Any changesmade to this template is persistent and preserved even after the reboot of theappliance.
Creating and Using SSL Certificates
1. Execute the following command to create CA certificates:
openssl req -new -x509 -keyout private/cakey.pem -out cacert.pem -days365 -config openssl.cnf
2. Execute the following commands to create server certificates using the CAcertificate:
openssl req -nodes -new -x509 -keyout serverkey.pem -out serverreq.pem-days 365 -config openssl.cnfopenssl x509 -x509toreq -in serverreq.pem -signkey serverkey.pem -outtmp.pemopenssl ca -config openssl.cnf -policy policy_anything -outservercert.pem -infiles tmp.pem
3. Execute the following commands to create client certificates using CA certificate:
Chapter 15Configuring Remote Syslog Over TLS
15-8

openssl req -nodes -new -x509 -keyout clientkey.pem -out clientreq.pem -days365 -config openssl.cnfopenssl x509 -x509toreq -in clientreq.pem -signkey clientkey.pem -outtmp.pemopenssl ca -config openssl.cnf -policy policy_anything -out clientcert.pem -infiles tmp.pem
4. Transfer the following certificates to the specific location on the log server.
cacerts.pem,servercert.pem,serverkey.pem5. Transfer the following certificates to the specific location on the client.
cacerts.pem,clientcert.pem,clientkey.pem
15.5 Archiving and Retrieving Audit DataLearn how to archive and retrieve audit data.
15.5.1 Enabling Automatic ArchivalOracle Audit Vault and Database Firewall 20.1 supports automatic archival to an NFSconfigured location.
When the online period of the data on the tablespace expires, it is automatically archivedwithout user's intervention.
1. Configure a list of NFS archive locations. Ensure that NFS is configured on the AuditVault Server as the archive location.
2. Log in to the Audit Vault Server console as an administrator.
3. Click Settings tab.
4. In the left navigation menu, select Archiving.
5. On the main page, click Data Retention.
6. Click Enable button, against Auto Archive Status.
Related Topics
• About Archiving and Retrieving Data in Oracle Audit Vault and Database FirewallLearn about archiving and retrieving data in Oracle Audit Vault and Database Firewall.
• Defining Archive LocationsLearn about defining archive locations.
• REGISTER REMOTE FILESYSTEMUse the REGISTER REMOTE FILESYSTEM command to register remote file systems withOracle Audit Vault Server.
• ORA-12660 Error While Registering TargetLearn how to resolve the ORA-12660 error.
Chapter 15Archiving and Retrieving Audit Data
15-9

15.5.2 Starting an Archive Job ManuallyTo start an archive job, you must have configured at least one archive location.
Oracle recommends that you use NFS to transfer data to an archive location. If youuse Secure Copy (SCP) or Windows File Sharing (SMB) to transfer data to an archivelocation, then your data files are first copied to a staging area in the Audit Vault Server.Therefore, you must ensure that there is additional space in the file system. Elsecopying the data file may fail. Transferring large files using SCP or SMB may takelong.
You can register a remove file system by using the AVCLI commandREGISTER_REMOTE_FILESYSTEM.
1. Log in to the Audit Vault Server as an administrator.
2. Click Settings tab.
3. In the left navigation menu, select Archiving.
4. In the page that appears, click Data Retention.
5. Under Job Name, enter a name for the archive job.
6. Under Archive Location, select the archive location from the list.
7. From the list, select the files you want to archive.
The files listed are those for which the Months Online period has expiredaccording to the target's retention policy.
8. Click Archive.
Related Topics
• REGISTER REMOTE FILESYSTEMUse the REGISTER REMOTE FILESYSTEM command to register remote file systemswith Oracle Audit Vault Server.
• Monitoring JobsYou can see the status of various jobs that run on the Audit Vault Server, such asreport generation, and user entitlement or audit policy retrieval from targets.
• Defining Archive LocationsLearn about defining archive locations.
• About Archiving and Retrieving Data in Oracle Audit Vault and Database FirewallLearn about archiving and retrieving data in Oracle Audit Vault and DatabaseFirewall.
15.5.3 Retrieving Oracle Audit Vault and Database Firewall Audit DataYou can retrieve data files for a specific target and time range.
The Months Archived value in a targets retention (archiving) policy determines howlong the target's data is available to retrieve to the Audit Vault Server. When theMonths Archived period expires, the data is no longer available to retrieve, however, itcontinues to reside in the archive location.
1. Log in to the Audit Vault Server as an administrator.
2. Click the Settings tab, and from the left navigation menu, click Archiving.
Chapter 15Archiving and Retrieving Audit Data
15-10

3. Select Retrieve sub tab on the main page.
4. Under Retrieve Request, enter the following:
• Target menu: Select the target.
• Start Date field: Enter the start date, optionally using the date icon to select from acalendar. The start and end dates are associated with the event time (the time theevent occurred).
• End Date field: Enter the end date, optionally using the date icon to select from acalendar.
5. Click the Retrieve button.
Note:
• You can check the status of the retrieve job in the Jobs dialog that can beaccessed from the System tab in the left navigation menu.
• When the retrieved data files are available, they are listed in the RetrievedDatafiles section of the Retrieve tab, and the data will be visible in reports.
• Starting Oracle AVDF 20.4, the datafiles archived in NFS locations aredeleted from the location after the retrieve job completes.
6. To purge retrieved files when no longer needed, from the Retrieved Datafiles section.Select the files you want to unload from the system, and then click the Release button.Once the release is successful, the data is not visible in reports.
7. After the retrieved data files are released, they are now eligible to be archived again. Ifthey are not needed anytime soon, then they should be archived to release disk space tothe system.
Chapter 15Archiving and Retrieving Audit Data
15-11
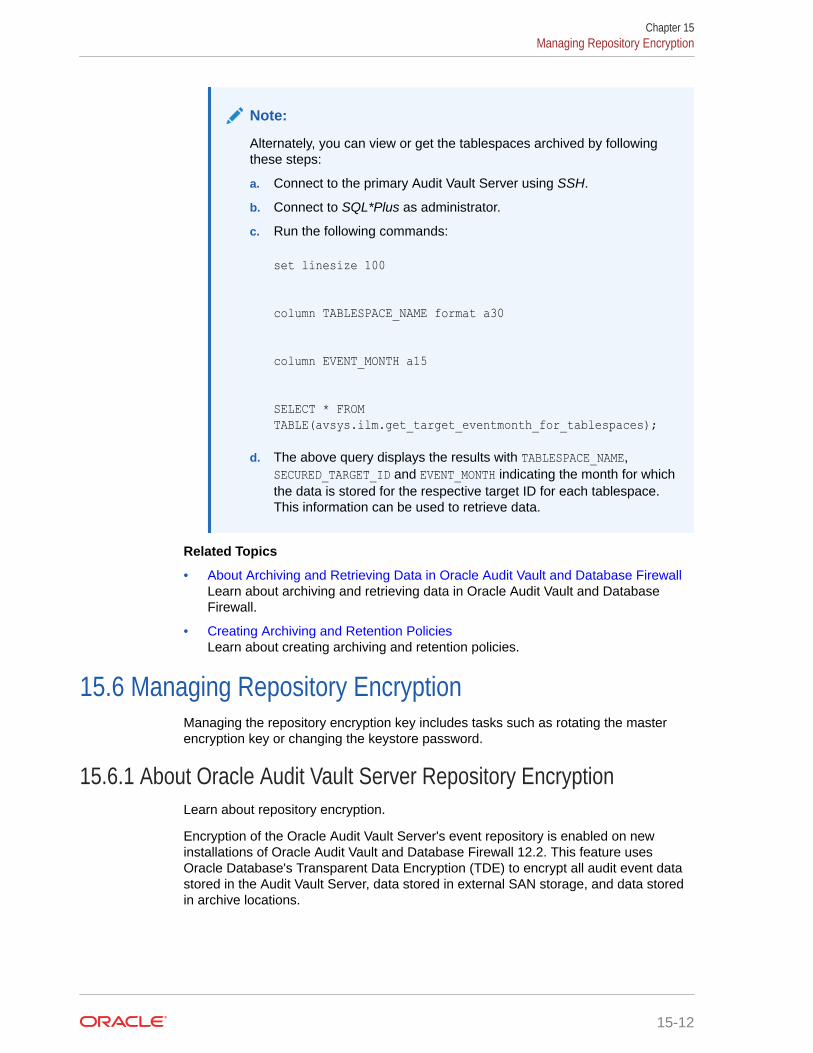
Note:
Alternately, you can view or get the tablespaces archived by followingthese steps:
a. Connect to the primary Audit Vault Server using SSH.
b. Connect to SQL*Plus as administrator.
c. Run the following commands:
set linesize 100
column TABLESPACE_NAME format a30
column EVENT_MONTH a15
SELECT * FROM TABLE(avsys.ilm.get_target_eventmonth_for_tablespaces);
d. The above query displays the results with TABLESPACE_NAME,SECURED_TARGET_ID and EVENT_MONTH indicating the month for whichthe data is stored for the respective target ID for each tablespace.This information can be used to retrieve data.
Related Topics
• About Archiving and Retrieving Data in Oracle Audit Vault and Database FirewallLearn about archiving and retrieving data in Oracle Audit Vault and DatabaseFirewall.
• Creating Archiving and Retention PoliciesLearn about creating archiving and retention policies.
15.6 Managing Repository EncryptionManaging the repository encryption key includes tasks such as rotating the masterencryption key or changing the keystore password.
15.6.1 About Oracle Audit Vault Server Repository EncryptionLearn about repository encryption.
Encryption of the Oracle Audit Vault Server's event repository is enabled on newinstallations of Oracle Audit Vault and Database Firewall 12.2. This feature usesOracle Database's Transparent Data Encryption (TDE) to encrypt all audit event datastored in the Audit Vault Server, data stored in external SAN storage, and data storedin archive locations.
Chapter 15Managing Repository Encryption
15-12
15.6.2 Rotating the Master Key for Repository EncryptionRotating encryption keys adds a layer of security to your encrypted data.
You should rotate the master encryption key for the Audit Vault Server's event repository on aregular basis, according to your organization's guidelines. It is also a good practice to rotatethe encryption key as needed. For example, when a person who had access to your masterkey leaves your organization.
Note:
If you restore the Audit Vault Server from a backup, the restore operation restoresthe system to a point in time. Therefore, restoring the system may reinstate an olderencryption key.
1. Log in to the Audit Vault Server console as a super administrator.
2. Click the Settings tab.
3. In the left navigation menu, select Storage tab.
4. In the page that appears, click Repository Encryption tab.
5. In the Rotate Master Key section, in the Keystore Password field, enter the keystorepassword.
This password is originally set as a required post-installation step.
6. Click the Re-key button.
15.6.3 Changing the Keystore PasswordFor better security, periodically change the keystore password.
The keystore password for repository encryption is originally set as a required post-installation step. It is the same as the Event Repository Encryption password. You only needthis password for restore operations, not backup operations. Thereafter, you can change thispassword in the Audit Vault Server console.
1. Log in to the Audit Vault Server console as a super administrator.
2. Select the Settings tab.
3. In the left navigation menu, select Storage.
4. In the page that appears, click Repository Encryption tab.
5. Under Change Keystore Password section, enter the following:
• Old password
• New password
• Re-enter new password
6. Click Change Password button.
Chapter 15Managing Repository Encryption
15-13

See Also:
Backing Up and Restoring the Audit Vault Server for more information onusing the keystore password to restore the Audit Vault Server frombackup files.
15.6.4 Backing Up TDE WalletsYou can back up TDE wallets to preserve information.
It is important to perform regular backups of Oracle Audit Vault Server, which includethe TDE wallet. However, if you cannot back up Oracle Audit Vault Server, then youshould, at a minimum, do regular backups of the TDE wallet at this location:
/usr/local/dbfw/etc/wallets/dbfwdb_walletOracle Audit Vault and Database Firewall does not provide the ability to back upwallets. You should securely back the wallet up in a remote location.
15.6.5 Data Encryption on Upgraded InstancesLearn about data encryption on upgraded instances in Oracle Audit Vault Server.
Phases of Data Encryption
This topic contains a detailed procedure that can be used to start data encryptionprocess.
WARNING:
Do not run data encryption processes on a newly installed Oracle Audit VaultServer or on a system that has been upgraded from fresh install of releaseOracle Database 12.2.x. With versions of Oracle Database 12.2.0 andabove, all of the new installations have encryption enabled automatically.Thus, all of the table spaces are encrypted by default.
The data encryption process happens in two phases:
1. Enabling Data Encryption:
This phase is automatic and data encryption is enabled while performing an AuditVault Server upgrade. The upgrade process prompts for a keystore password onstandalone and primary systems. Upon successful upgrade, data encryption isautomatically enabled. The newly created table spaces thereafter areautomatically encrypted. However, table spaces created before upgrade continueto be in clear text.
2. Encrypting existing clear text table spaces:
This phase is triggered by the user. To encrypt the existing clear text table spaces,the user must initiate the data encryption process. This process is triggered byrunning the /usr/local/dbfw/bin/avdf_data_encryption.sh script. The detailed
Chapter 15Managing Repository Encryption
15-14
steps for encrypting existing clear text table spaces triggered by the user are available inthis topic.
Before you begin
• The rate of encryption is approximately 20 to 50 seconds to encrypt 1 GiB of data,depending on the hardware profile of the system.
• To begin the process of encrypting the table spaces, the user must execute the /usr/local/dbfw/bin/avdf_data_encryption.sh script as root.
• Ensure to take AVDF backup prior to the encryption process.
• The user must have root operating system user privileges to execute this procedure.Ensure the proper privileges are obtained.
• The encryption process script must be executed on standalone system or on the primaryin a HA set up. Ensure that the standby system is also up and running before running theencryption script. The script may result in an error if the standby system is down. Thescript encrypts table spaces on both the primary and standby system.
• Ensure that the database is up and running prior to executing the encryption process. Toverify the status of the database, log in as root user and execute the command /etc/init.d/dbfwdb status
• The encryption process script stops all the jobs running in the background. Ensure thereis no critical process running that may be impacted.
Note:
Data encryption is not completely enabled on HA system, until the primary issuccessfully upgraded. After a successful upgrade, all clear text table spaces are inone of the following states:
• online
• offline local (offline but the data file resides on the AVS)
• offline remote (offline but the data files reside on the remote archive location)
• online retrieved by user
• online retrieved by a trail
To start Data Encryption process:
1. Log in to the system as root user.
2. Execute the following command to start encryption:
/usr/local/dbfw/bin/avdf_data_encryption.sh start3. The following message is displayed on the screen:
*************************************************************** This script will encrypt all online tablespaces and create ** a background job to encrypt offline tablespaces. ** Encrypting online tablespaces could potentially take long ** time depending on the size of the online data collected. ** Note that during this time *
Chapter 15Managing Repository Encryption
15-15

* - There will be no access to Web UI console. ** - Event collection will be shutdown. ** - AV agents will not be able to connect. ** - AVCLI will not be able to connect. ** ** NOTE: It is recommended to take backup before continuing. ***************************************************************Do you want to continue (Y/N):
4. Type Y to continue with encryption.
5. The following message is displayed:
************************************************************* Do not interrupt this script execution or reboot. ** To stop the script execution use ** 'avdf_data_encryption stop' command. ** Check /root/avdf_data_encryption.log to track progress *************************************************************
Note:
At this point, it is recommended to move the process to background byexecuting Ctrl+z followed by bg. Alternately to keep the session alive,the user can execute the command ssh -o ServerAliveInterval 20
The following messages are displayed on the screen:
Successfully encrypted online table spaces. System is ready for use.Offline table space encryption can be managed on the AVS GUI.
Note:
Contact My Oracle Support with the printed output in the event of afailure.
6. The following message is displayed in the /var/log/avdf_data_encryption.log file:
Encrypting <tbsp name> Tablespace : % done
7. Once the encryption process is successfully completed, another job to encryptoffline table spaces is created and enabled in the background. All the servicesappear online and the following message is displayed:
System is ready for use8. In case the encryption process fails, the /var/log/
avdf_data_encryption.log file displays the following error message.
Chapter 15Managing Repository Encryption
15-16

Failed to encrypt table spaces: Please contact Oracle Support9. Execute the following command to stop encryption:
/usr/local/dbfw/bin/avdf_data_encryption.sh stop
Note:
Ensure to execute the stop command only after you see the following messagein the /var/log/avdf_data_encryption.log:
You may issue stop command to gracefully stop the encrypting process
Note:
Once the stop encryption command is executed, the encryption process exitsonly after encrypting the current table space that is being encrypted. It is alwaysrecommended to run the script again to complete the encryption process.
10. In case the user decides to perform a reboot of the system during the encryption process,it stops at the current table space that encryption last accessed. The user can decide torun the script again to complete the encryption process.
11. In case the dbfwdb service terminates unexpectedly, contact Oracle Support. Theencryption script will not run if this service is down.
12. The encryption process collects all the logs to /var/log/avdf_data_encryption.log file securely.
13. After all online table spaces are encrypted, a background jobENCRYPT_OFFLINE_TBSP is enabled to perform encryption of offline table spaces.This job encrypts all table spaces for those data files that reside locally on the system. Incase the data file is located on the remote location nfs/scp/smb, the data file is copiedto the local system, encrypted, and setup for re archival. The user must manually performthe re archival process to ensure that the data file in the remote location scp/smb isencrypted. The user can navigate to Settings and Repository Encryption page to viewa list of offline table spaces that are not encrypted. If the data file is not available, themessage displayed indicates the same.
14. The process of encrypting offline table spaces can be in one of the following states.
Message Description
NOT YET STARTED The user has not executed the script to encrypt table spaces.
COMPLETED All online and offline table spaces are encrypted. Any new tablespaces created will also be encrypted. This is the final state.
IN PROGRESS The background job is currently encrypting offline table spaces.
USER The background job is waiting for user input. User must visit theRepository Encryption page and take appropriate action.
ERROR There was an error in encrypting one or more table spaces.The user must download the diagnostics and provide that toOracle Support.
Chapter 15Managing Repository Encryption
15-17

Message Description
TRAIL The table space has been retrieved by a trail as it is collectingold data. Wait for the trail to release the table space.
15. In the ERROR state the background job is disabled and hence the user, after fixingthe cause of the error must re-enable the job from the Repository Encryptionpage.
16. In the event of system reboot, power failure, switch over, or fail over the user canexecute the encryption process again.
15.7 Backing Up and Restoring the Audit Vault ServerYou can back up and restore the Audit Vault Server from the Audit Vault Serverconsole.
15.7.1 About the Backup and Restore UtilityThe Oracle Audit Vault Server backup utility backs up all Oracle Audit Vault Serverdata as well as configuration settings.
You can perform full backups as well as incremental backups, which contain only newdata and configuration changes since the previous hot backup. For example, youmight do full backups on Sundays, then do incremental backups on Mondays,Wednesdays, and Fridays.
The backup utility can perform hot or cold backups. A hot backup runs while OracleAudit Vault Server is up and running. A cold backup shuts down Oracle Audit VaultServer before running.
You can store the backup files on the Audit Vault Server, but it is better to store them ina remote location, such as an NFS file system, in case the Audit Vault Servercomputer fails. The location of the backup files should be accessible by the Audit VaultServer.
The restore utility lets you restore the data and configuration to a new Audit VaultServer from backup files. The computer on which you do a restore must have thesame version of Oracle Audit Vault and Database Firewall as the computer from whichyou took the backups.
Chapter 15Backing Up and Restoring the Audit Vault Server
15-18
Note:
• The user must note to have the same path of the backup while performingrestore operation. For example, if the backup directory is /usr/local/backup, then while performing restore operation specify /usr/local/backup, as the backup directory.
• The Database Firewall does not need to be backed up. The Audit Vault Servercan reapply all existing configuration of the monitoring point to the DatabaseFirewall. See Restoring Database Firewall Monitoring Points for moreinformation.
• The backup functionality does not backup archived files. The data files in thearchive location are not backed up by avbackup as they may be located on aremote file system. In case those files are on NFS mount point, then they areaccessible after restoring on a new system with the same mount points setupas before.
• NFS is a mount point on the Audit Vault Server. If you want to replace NFSserver, then make sure the Audit Vault Server does not access the mount point.
• The restore operation takes time to complete. It depends on the amount of databeing restored. In case the restore operation is being performed using SSH orTerminus, the connection may drop if there is no user interaction. Ensure tokeep the SSH or Terminus alive.
How Backup and Restore Operations Work in a High Availability Configuration
If you are using a high availability configuration, then be aware that Oracle Audit Vault andDatabase Firewall performs the backup only on the primary server, not the secondary server.When you perform a restore operation from the high availability primary backup, then the finalrestored system becomes a standalone server, which is not in high availability configuration.
Repository Encryption and Backup Encryption
If you did a full install of Oracle Audit Vault and Database Firewall (as opposed to anupgrade), the stored data in the Audit Vault Server is automatically encrypted using OracleDatabase Transparent Data Encryption (TDE). This feature is not available on upgradedsystems.
If you are restoring from backup files where the system backed up had TDE enabled, you willbe prompted for the TDE keystore password during the restore. You must use the TDEkeystore password that was in place when the backup was taken. Since the TDE keystorepassword may change after a backup, it is important that you keep track of the keystorepassword in place at the time you do each backup.
In addition, you can set encryption on backup files regardless of whether you have the TDEfeature available. In this case, you will need a backup encryption password, which will berequired if you do a restore.
Therefore, you may need to provide up to two passwords when doing a restore.
Chapter 15Backing Up and Restoring the Audit Vault Server
15-19
See Also:
• Managing Repository Encryption for more information on TDE.
• High Availability in Oracle AVDF for information about configuring highavailability for Oracle Audit Vault and Database Firewall.
15.7.2 How Much Space Do I Need for Backup Files?Determine the amount of space you need for backup files.
The amount of space needed for backup files is determined by the size of your OracleAudit Vault Server database. You can obtain an upper estimate of the backup file sizefor the database by running the following SQL query on the Audit Vault Server:
sqlplus systemEnter password: passwordSELECT SUM (BYTES)/1024/1024/1024||' GB' FROM DBA_DATA_FILES1
Note:
• Ensure that the RAM size and Disk size in the new system is equal orgreater than the original system. This ensures that out of memory erroris not encountered while performing the backup and restore task.
• The backup process does not include the SAN configuration. Ensure thenew system has sufficient disk space before performing restore. Formore information on the disk space needed, refer to the info.txt fileavailable in the backup directory.
• The restore system requires at least the same amount of memory anddisk space as the backup system. Otherwise, the restore operation fails.
15.7.3 Backing Up the Audit Vault ServerAfter you back up the Audit Vault Server, you can validate the backup that you created.
15.7.3.1 Step 1: Configure the Backup UtilityYou can perform a cold backup in a high availability environment.
1. If you are using a high availability configuration and want to perform a coldbackup, then do the following:
a. Log in to the Audit Vault Server console as administrator.
b. Select Settings.
c. In the left navigation menu, select System.
1 In this guide, 1 GB represents 2 to the 30th power bytes or in decimal notation 1,073,741,824 bytes.
Chapter 15Backing Up and Restoring the Audit Vault Server
15-20
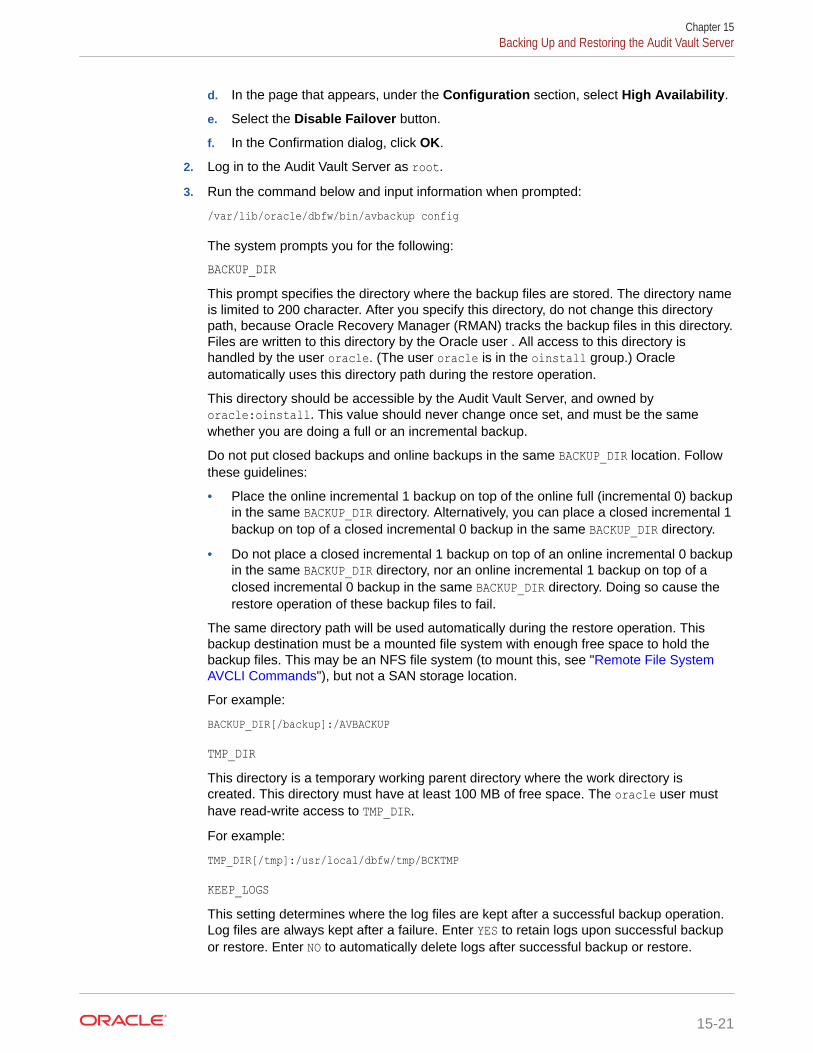
d. In the page that appears, under the Configuration section, select High Availability.
e. Select the Disable Failover button.
f. In the Confirmation dialog, click OK.
2. Log in to the Audit Vault Server as root.
3. Run the command below and input information when prompted:
/var/lib/oracle/dbfw/bin/avbackup config
The system prompts you for the following:
BACKUP_DIRThis prompt specifies the directory where the backup files are stored. The directory nameis limited to 200 character. After you specify this directory, do not change this directorypath, because Oracle Recovery Manager (RMAN) tracks the backup files in this directory.Files are written to this directory by the Oracle user . All access to this directory ishandled by the user oracle. (The user oracle is in the oinstall group.) Oracleautomatically uses this directory path during the restore operation.
This directory should be accessible by the Audit Vault Server, and owned byoracle:oinstall. This value should never change once set, and must be the samewhether you are doing a full or an incremental backup.
Do not put closed backups and online backups in the same BACKUP_DIR location. Followthese guidelines:
• Place the online incremental 1 backup on top of the online full (incremental 0) backupin the same BACKUP_DIR directory. Alternatively, you can place a closed incremental 1backup on top of a closed incremental 0 backup in the same BACKUP_DIR directory.
• Do not place a closed incremental 1 backup on top of an online incremental 0 backupin the same BACKUP_DIR directory, nor an online incremental 1 backup on top of aclosed incremental 0 backup in the same BACKUP_DIR directory. Doing so cause therestore operation of these backup files to fail.
The same directory path will be used automatically during the restore operation. Thisbackup destination must be a mounted file system with enough free space to hold thebackup files. This may be an NFS file system (to mount this, see "Remote File SystemAVCLI Commands"), but not a SAN storage location.
For example:
BACKUP_DIR[/backup]:/AVBACKUP
TMP_DIRThis directory is a temporary working parent directory where the work directory iscreated. This directory must have at least 100 MB of free space. The oracle user musthave read-write access to TMP_DIR.
For example:
TMP_DIR[/tmp]:/usr/local/dbfw/tmp/BCKTMP
KEEP_LOGSThis setting determines where the log files are kept after a successful backup operation.Log files are always kept after a failure. Enter YES to retain logs upon successful backupor restore. Enter NO to automatically delete logs after successful backup or restore.
Chapter 15Backing Up and Restoring the Audit Vault Server
15-21
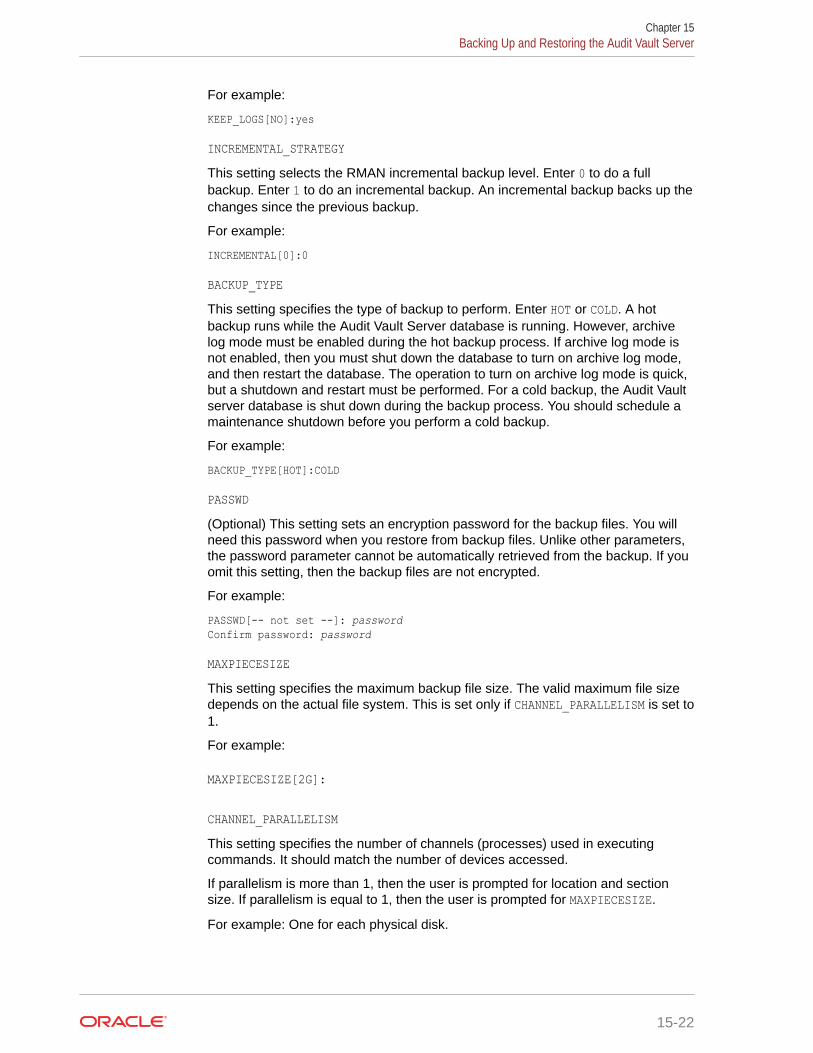
For example:
KEEP_LOGS[NO]:yes
INCREMENTAL_STRATEGYThis setting selects the RMAN incremental backup level. Enter 0 to do a fullbackup. Enter 1 to do an incremental backup. An incremental backup backs up thechanges since the previous backup.
For example:
INCREMENTAL[0]:0
BACKUP_TYPEThis setting specifies the type of backup to perform. Enter HOT or COLD. A hotbackup runs while the Audit Vault Server database is running. However, archivelog mode must be enabled during the hot backup process. If archive log mode isnot enabled, then you must shut down the database to turn on archive log mode,and then restart the database. The operation to turn on archive log mode is quick,but a shutdown and restart must be performed. For a cold backup, the Audit Vaultserver database is shut down during the backup process. You should schedule amaintenance shutdown before you perform a cold backup.
For example:
BACKUP_TYPE[HOT]:COLD
PASSWD(Optional) This setting sets an encryption password for the backup files. You willneed this password when you restore from backup files. Unlike other parameters,the password parameter cannot be automatically retrieved from the backup. If youomit this setting, then the backup files are not encrypted.
For example:
PASSWD[-- not set --]: passwordConfirm password: password
MAXPIECESIZEThis setting specifies the maximum backup file size. The valid maximum file sizedepends on the actual file system. This is set only if CHANNEL_PARALLELISM is set to1.
For example:
MAXPIECESIZE[2G]:
CHANNEL_PARALLELISMThis setting specifies the number of channels (processes) used in executingcommands. It should match the number of devices accessed.
If parallelism is more than 1, then the user is prompted for location and sectionsize. If parallelism is equal to 1, then the user is prompted for MAXPIECESIZE.
For example: One for each physical disk.
Chapter 15Backing Up and Restoring the Audit Vault Server
15-22

If the number of channels is larger than 1, then specify the location for each channel andsection size next.
CHANNEL_PARALLELISM[1]:4
Best Practice:
In case there are multiple physical disks, then it is advised to setCHANNEL_PARALLELISM to an appropriate value according to the number ofphysical disks. To backup large databases, set CHANNEL_PARALLELISM andSECTION_SIZE according to the actual physical disks configured to improve thetime needed to backup the system.
CHANNEL_LOCATIONSpecifies the location for channel. The user can set multiple locations for each channel.All locations can be the same for all channels. The location is the full path for backupfiles. To improve performance, the user must specify different locations on a differentphysical hard disk. The user may specify all locations to the same path.
For example:
CHANNEL_LOCATION_1[]:/disk_1CHANNEL_LOCATION_2[]:/disk_2CHANNEL_LOCATION_3[]:/disk_3CHANNEL_LOCATION_4[]:/disk_4
SECTION_SIZEThe section size is smaller than the largest data file or parallelism and smaller than thesize the physical disk can handle.
For example:
SECTION_SIZE[]:32G
USE_NEW_IPFor restore operation it specifies the new (current) IP address of the restore system,instead of the old IP address from the backup system. The allowed values are Y or N.
USE_NEW_IP[N]:Y
REDUNDANCYThis setting specifies a number that sets how many full backups to keep. When you runthe backup command, backups that are older than this number of backups (as well astheir related incremental backups) are deleted. More redundancy requires more diskspace for the backup, specified in the BACKUP_DIR parameter.
For example:
REDUNDANCY[1]:
Chapter 15Backing Up and Restoring the Audit Vault Server
15-23

After you complete these settings, a summary of your selection is displayed similarto the following:
BACKUP_DIR=/long_backup_directory_name_so_three_times_is_more_than_two_hundred_charsTMP_DIR=/tmpKEEP_LOGS=NOINCREMENTAL=0BACKUP_TYPE=HOTPASSWD=-- not set --CHANNEL_PARALLELISM=3CHANNEL_LOCATION=/long_backup_directory_name_so_three_times_is_more_than_two_hundred_chars /long_backup_directory_name_so_three_times_is_more_than_two_hundred_chars /long_backup_directory_name_so_three_times_is_more_than_two_hundred_charsSECTION_SIZE=500MREDUNDANCY=1USE_NEW_IP=Y
If you changed the archivelog mode during the backup configuration process, afterthe database restarts, then ensure that the Java Framework internal tool is runningon the Audit Vault Server.
For example:
/usr/local/dbfw/bin/javafwk status
If the output is Java framework process is stopped, then restart it as follows:
/usr/local/dbfw/bin/javafwk start
15.7.3.2 Step 2: Back Up Oracle Audit Vault ServerUse this procedure to back up Oracle Audit Vault Server.
This step backs up Oracle Audit Vault Server databases and configurations.
1. If applicable, ensure that you have the backup file encryption password and/orevent repository encryption keystore password.
See Also:
Repository Encryption and Backup Encryption
2. Log in to the Audit Vault Server as root.
3. Run the following command and input information at the prompts:
/var/lib/oracle/dbfw/bin/avbackup backup
Chapter 15Backing Up and Restoring the Audit Vault Server
15-24

When the backup is complete, you should see a number of files in your backup directory,similar to the following:
DBID_1440353975_09Q7EF7L_1_1DBID_1440353975_C-1440353975-20150520-00
Note:
Oracle recommends that you reboot your system in case there is a failure whileperforming a cold backup operation.
15.7.3.3 Step 3: Validate the BackupThis step validates the backup. It performs the validate operation on the last backup that youcreated, regardless the settings of the avbackup config file.
The backup configuration file is release specific. It works only for the same release. It isadvisable to execute the avbackup config command and create a new configuration filebefore performing the backup operation after every upgrade.
1. Log in to the Audit Vault Server as root.
2. Run the following command:
/var/lib/oracle/dbfw/bin/avbackup validate
The backup status is displayed, similar to the following:
Backup Restore exit status: 0
Status 0 = Success. Status 1 = Failure.
3. Check these log files for errors:
/TMP_DIR/av_backup_timestamp/var/lib/oracle/dbfw/av/log/av.backup_restore-pid-0.log/var/lib/oracle/dbfw/av/log/av.backup_restore_error-pid-0.log
If you need help diagnosing errors, contact Oracle Support.
The location of closed backup and online backup must be different. Do not use the sameBACKUP_DIR location. Once you specify this location, it is advisable not to change the directorypath as Oracle Recovery Manager (RMAN) tracks the backup files in this directory.
Chapter 15Backing Up and Restoring the Audit Vault Server
15-25
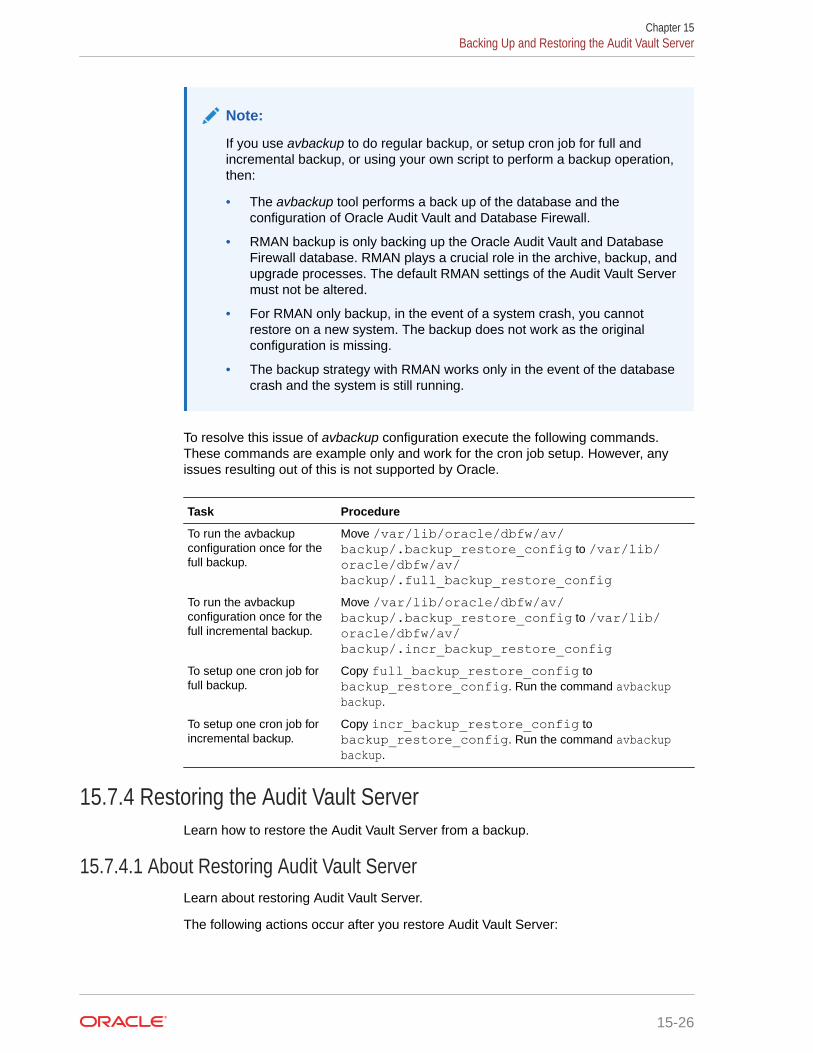
Note:
If you use avbackup to do regular backup, or setup cron job for full andincremental backup, or using your own script to perform a backup operation,then:
• The avbackup tool performs a back up of the database and theconfiguration of Oracle Audit Vault and Database Firewall.
• RMAN backup is only backing up the Oracle Audit Vault and DatabaseFirewall database. RMAN plays a crucial role in the archive, backup, andupgrade processes. The default RMAN settings of the Audit Vault Servermust not be altered.
• For RMAN only backup, in the event of a system crash, you cannotrestore on a new system. The backup does not work as the originalconfiguration is missing.
• The backup strategy with RMAN works only in the event of the databasecrash and the system is still running.
To resolve this issue of avbackup configuration execute the following commands.These commands are example only and work for the cron job setup. However, anyissues resulting out of this is not supported by Oracle.
Task Procedure
To run the avbackupconfiguration once for thefull backup.
Move /var/lib/oracle/dbfw/av/backup/.backup_restore_config to /var/lib/oracle/dbfw/av/backup/.full_backup_restore_config
To run the avbackupconfiguration once for thefull incremental backup.
Move /var/lib/oracle/dbfw/av/backup/.backup_restore_config to /var/lib/oracle/dbfw/av/backup/.incr_backup_restore_config
To setup one cron job forfull backup.
Copy full_backup_restore_config tobackup_restore_config. Run the command avbackupbackup.
To setup one cron job forincremental backup.
Copy incr_backup_restore_config tobackup_restore_config. Run the command avbackupbackup.
15.7.4 Restoring the Audit Vault ServerLearn how to restore the Audit Vault Server from a backup.
15.7.4.1 About Restoring Audit Vault ServerLearn about restoring Audit Vault Server.
The following actions occur after you restore Audit Vault Server:
Chapter 15Backing Up and Restoring the Audit Vault Server
15-26

• All database accounts are replaced by the accounts from the earlier system. After therestore process completes, you can modify these accounts as needed.
• The keystore password is replaced by the keystore password that was used in the earliersystem. After the restore process is complete, you can modify the keystore password asneeded.
• Operating system accounts are not affected by the restore process. Therefore, thepasswords that you set for the root and support accounts remain the same as before therestore.
15.7.4.2 Prerequisites for Restoring Audit Vault ServerExamine the prerequisites for restoring Audit Vault Server.
Before restoring backup files to a new Audit Vault Server:
• Shut down and remove the earlier Audit Vault Server from the subnet on which it resides.This task enables the new Audit Vault Server to be restored on the same subnet as theprevious server.
• Check the FIPS 140-2 status of the Audit Vault Server which was backed up. In case theFIPS 140-2 status was enabled, ensure to enable the same on the system on which youare restoring. The status must be the same.
• Perform full installation of the same release version of Oracle AVDF, including the post-installation tasks, on the system to which you are restoring. See Oracle Audit Vault andDatabase Firewall Installation Guide for instructions.
• Ensure that the new Audit Vault Server is on the same subnet as the Audit Vault Serverfrom which you took the backups.
• Ensure that the new Audit Vault Server has a different IP address than the Audit VaultServer from which you took the backups.
Note:
• After you complete the restore process, the IP address of the new Audit VaultServer is automatically changed to the IP address of the old system. If you wantto restore the system with the IP address of the old system (prior to backup),ensure the new Audit Vault Server is on the same subnet as the Audit VaultServer from which you took the backup. Set the USE_NEW_IP parameter to Nwhile executing the avbackup config command on the restore system. For thiscase, if the original system is still up and running, the restore fails because itcannot switch the IP address which is in use.
• If you plan to restore the system to a new IP, not to the original backed upsystem IP, make sure you set USE_NEW_IP parameter to Y while executing theavbackup config command on the restore system. In this case, you do notneed to restore on the same subnet as the backup system. You may use thisconfiguration when you are restoring on a different data center, which is on adifferent subnet, or restore the backup on a new IP while the backup system isup and running.
Chapter 15Backing Up and Restoring the Audit Vault Server
15-27

15.7.4.3 Step 1: Configure the Backup Utility on a New Audit Vault ServerLearn how to configure the backup utility on a new Audit Vault Server.
To restore the new Audit Vault Server from backup files, configure the backup utility onthe new Audit Vault Server.
Follow the procedure as in "Step 1: Configure the Backup Utility", providing the samevalues for BACKUP_DIR and PASSWD as you did on the backed up system.
15.7.4.4 Step 2: Restore Audit Vault ServerLearn how to restore Audit Vault Server.
To restore the Audit Vault Server:
1. Copy the backup files to your new Audit Vault Server, placing the files in theBACKUP_DIR directory that you specified in "Step 1: Configure the Backup Utility ona New Audit Vault Server".
Make sure the backup files are owned by oracle:oinstall.
2. Log in to Audit Vault Server as root.
3. In case the backup files are in NFS, then ensure the NFS location is mounted onthe system used for restore. The backup directory must be accessible through themount point. Run the following command to manually mount the NFS location priorto performing the restore operation:
/bin/mount -t nfs <NFS server IP>:<NFS export> <mount point of Audit Vault Server>
4. Run the following command:
/var/lib/oracle/dbfw/bin/avbackup restore
5. If you have TDE enabled, then when prompted, then enter the keystore password,using the same value for the keystore password for the original system.
For example:
Enter keystore password:
If TDE is not enabled, then this step is bypassed.
6. When restore is complete, check the following log files for errors:
/TMP_DIR/av_backup_timestamp/var/lib/oracle/dbfw/av/log/av.backup_restore-pid-0.log/var/lib/oracle/dbfw/av/log/av.backup_restore_error-pid-0.log
Common errors and their solutions are as follows:
• No access to BACKUP_DIR: Ensure that the BACKUP_DIR directory is owned byoracle:oinstall.
• Disk full: Ensure that the BACKUP_DIR disk has enough room for the backupfiles.
Chapter 15Backing Up and Restoring the Audit Vault Server
15-28

• Incorrect password: Re-run the avbackup config command to set the passwordcorrectly.
• In addition, a common error is not running the script as root.
• The restore operation takes time to complete. It depends on the amount of databeing restored. In case the restore operation is being performed using SSH orTerminus, the connection may drop if there is no user interaction. Ensure to keep theSSH or Terminus alive.
15.7.5 Restoring a Backup to a New System with a New or Different IPAddress
Learn how to restore a backup to a new system with a new or different IP address.
After performing the restore operation, the system has the same IP address. The user has anoption to keep the new IP address without disrupting the service and functionality of thesystem. If the new IP address is used, the system restores the database and keeps the newIP address. This section contains the necessary steps to be performed after the restoreoperation so that the system or Audit Vault Server does not retain the original IP address bydefault.
Follow these steps after the restore operation when the system has a new IP address:
1. Log in to the Audit Vault Server as root user.
2. Restore the backup on a new Audit Vault Server with a new IP address.
3. Log in to the Agent machine:
a. Update the IP addresses in Agent_Home/av/conf/bootstrap.prop file for AuditVault Agent deployment and in Agent_Home/hm/bootstrap.prop file (for HostMonitor Agent deployment). Replace the old IP addresses with the new IP addressesin bootstrap.prop file.
b. Restart the Agent. It downloads the new agent.jar file from the Audit Vault Server withthe new IP address.
Note:
Execute this operation on all Audit Vault Agents and restart them.
4. Log in to the Audit Vault Server console as admin user.
5. Click Database Firewall tab.
6. In the System menu, click Audit Vault Server.
7. In the Audit Vault Server 1 IP Address field, enter the new IP address of the Audit VaultServer.
Result:
This ensures that new communication between Audit Vault Server and Database Firewallis established.
Chapter 15Backing Up and Restoring the Audit Vault Server
15-29

Note:
If this communication is not established, then Oracle Audit Vault Servercannot access Oracle Database Firewall. It may result in a commonaccess issue error or an incomplete restore operation.
8. Update the IP address on all instances of Database Firewall.
Note:
• Upon completion of restore process on a new IP, the console certificatein the backup system is no longer valid or in use. You must generate anew certificate and upload it.
• The restore operation takes time to complete. It depends on the amountof data being restored. In case the restore operation is being performedusing SSH or Terminus, the connection may drop if there is no userinteraction. Ensure to keep the SSH or Terminus alive.
15.8 Backing Up and Restoring the Database FirewallYou can back up and restore the Database Firewall instance.
The Database Firewall configuration is backed up automatically when the Audit VaultServer backup is taken. This does not require any additional action.
Restoring the Database Firewall Configuration on an Existing Database FirewallInstance
A copy of the Database Firewall configuration is stored on the Audit Vault Server. Ifrequired, it can overwrite the existing settings of the Database Firewall and maintain acopy of the same on the Audit Vault Server.
To restore the Database Firewall configuration from the Audit Vault Server, follow thesesteps:
1. Ensure the Audit Vault Server's certificate is installed on the Database Firewall.See Specifying the Audit Vault Server Certificate and IP Address for moreinformation.
2. Ensure the IP address of the Database Firewall remains the same.
3. Follow the steps mentioned in section Resetting Database Firewall.
Restoring the Database Firewall Configuration on a New Database FirewallInstance
In case the Database Firewall instance has failed, it is possible to restore theDatabase Firewall settings on a newly installed system.
To restore the Database Firewall configuration on a new system, follow these steps:
1. Install the Database Firewall. See Configuring Database Firewall for completeinformation.
Chapter 15Backing Up and Restoring the Database Firewall
15-30

2. Configure the same IP address which was used during the previous configuration.
3. Install the Audit Vault Server's certificate on the Database Firewall. See Specifying theAudit Vault Server Certificate and IP Address for more information.
4. Update the Audit Vault Server with the new Database Firewall's certificate by followingthe instructions mentioned in section Fetching an Updated Certificate from DatabaseFirewall.
5. To restore the Database Firewall configuration, follow the steps mentioned in section Resetting Database Firewall.
15.9 Enabling Oracle Database In-Memory for the Audit VaultServer
After you enable Oracle Database In-Memory, you can monitor it.
15.9.1 About Enabling Oracle Database In-Memory for Oracle Audit VaultServer
You can enable Oracle Database In-Memory for Oracle Audit Vault Server.
You can improve the performance of Oracle Audit Vault and Database Firewall reports anddashboards by enabling Oracle Database In-Memory in Oracle Audit Vault Server. Thisfeature lets you allocate a certain amount of system memory for audit data for a specifiedperiod of time. The audit data residing in-memory then becomes available more quickly foruse in dashboards and reports.
Based on the amount of system memory you allocate for Oracle Database In-Memory, andthe average amount of data collected per day in your environment, Oracle Audit Vault andDatabase Firewall calculates the number of days of audit data that will fit into that allocatedmemory. From this calculation, the system displays the in-memory date range to Oracle AuditVault and Database Firewall auditors, letting them know the time ranges for which they canobtain faster reports. For example, if 1 gigabyte can accommodate 2 days of data, and youhave provided 1 gigabyte of memory for Oracle Database In-Memory, then 2 days of thelatest data will be put in Oracle Database In-Memory. If you provide 2 gigabytes of memory toOracle Database In-Memory, then 4 days of data will go to Oracle Database In-Memory.
Before enabling Oracle Database In-Memory, be sure to estimate the amount of memoryneeded for your current and future targets and Database Firewall monitoring points. You canfind some guidelines for calculating RAM requirements in the Oracle Audit Vault andDatabase Firewall Sizing Advice (MOS Doc ID 2223771.1). This document can be obtainedfrom Oracle Support. After estimating your normal RAM requirements, if you want to use theOracle Database In-Memory feature, estimate how much RAM you want to use for in-memorydatabase and add that to your RAM requirement. If you enable this feature, you must allocateat least 1 GB for Oracle Database In-Memory.
15.9.2 Enabling and Allocating Memory for Oracle Database In-MemoryYou can enable and allocate memory for Oracle Database In-Memory from the Audit VaultServer console.
1. Log in to the Audit Vault Server console as a super administrator.
2. Click the Settings tab.
Chapter 15Enabling Oracle Database In-Memory for the Audit Vault Server
15-31

3. In the left navigation menu, select select System.
4. Under Configuration, select Oracle Database In-Memory.
5. In the Oracle Database In-Memory dialog, select the Enable Oracle DatabaseIn-Memory check box.
The Oracle Database In-Memory window expands to show the total system RAM.
6. If you have sufficient memory on your system, configure the following settings:
• Allocated In-Memory field: Enter (or change) the amount of RAM to allocatein Gigabytes. You must enter a minimum of 1 (default), and up to Maximumavailable for Database In-Memory indicated on this dialog.
• Keep latest data option: Select this option to retain the data that has just beencollected. This setting enables the system to automatically select the mostrecent dates, based on the in-memory size that was configured.
• Select a date range option: Select this option if you want the memory to beavailable for a specific period of time.
7. Click Save.
After you enable or disable Oracle Database In-Memory, the Audit Vault Serverdatabase, Audit Vault Agents, and audit trails shut down for a few minutes, andthen restart automatically.
15.9.3 Disabling Oracle Database In-MemoryYou can disable Oracle Database In-Memory from the Audit Vault Server console.
1. Log in to the Audit Vault Server console as a super administrator.
2. Click the Settings tab.
3. In the left navigation menu, select System.
4. Under Configuration section, select Oracle Database In-Memory.
5. In the Oracle Database In-Memory window, select the Enable Oracle DatabaseIn-Memory check box to clear it. If enabled, the disable option is available in thedialog.
6. Click Save.
After you enable or disable Oracle Database In-Memory, the Audit Vault Serverdatabase, Audit Vault Agents, and audit trails go down for a few minutes, and thenrestart automatically.
15.9.4 Monitoring Oracle Database In-Memory UsageYou can monitor the Oracle Database In-Memory usage from the Audit Vault Serverconsole.
To see in-memory usage in the Audit Vault Server dashboard:
1. Click the Settings tab.
2. In the left navigation menu, select select System.
3. Under Configuration, select Oracle Database In-Memory.
4. The Oracle Database In-Memory dialog contains all the details.
Chapter 15Enabling Oracle Database In-Memory for the Audit Vault Server
15-32

15.10 Managing Plug-insYou can use plug-ins to deploy additional target types in Oracle Audit Vault and DatabaseFirewall environments.
You can deploy additional plug-ins to support more types of targets, or un-deploy plug-ins thatare no longer needed.
See Also:
Deploying Plug-ins and Registering Plug-in Hosts
15.11 Monitoring Server Tablespace Space UsageYou can monitor server table space usage in Oracle Audit Vault Server.
Oracle Audit Vault Server contains the SYSAUX tablespace, which by default has one data file.The SYSAUX tablespace is a locally managed tablespace with automatic segment spacemanagement.
You should monitor the space usage for the SYSAUX tablespace and create additional datafiles for storage as needed.
See Also:
• Oracle Database Administrator's Guide for more information about the ALTERTABLESPACE SQL statement, which you can use to add more storage data files.
• Oracle Database SQL Tuning Guide for information about optimizing atablespace.
15.12 Monitoring Server Archive Log Disk Space UseYou can monitor archive log disk space use to manage your system.
By default, ARCHIVELOG mode is disabled in Oracle Audit Vault Server. The ARCHIVELOG modeonce enabled, copies the filled online redo logs to disk. This enables you to back up thedatabase while it is open and being accessed by users, and to recover the database to anydesired point in time. You should monitor the disk space usage for the redo logs.
To change from No Archive Mode to Archive Mode, follow these steps:
1. Log in as oracle user.
2. Connect to SQL*Plus as sysdba user.
3. Run the command:
SQL> archive log list;
Chapter 15Managing Plug-ins
15-33
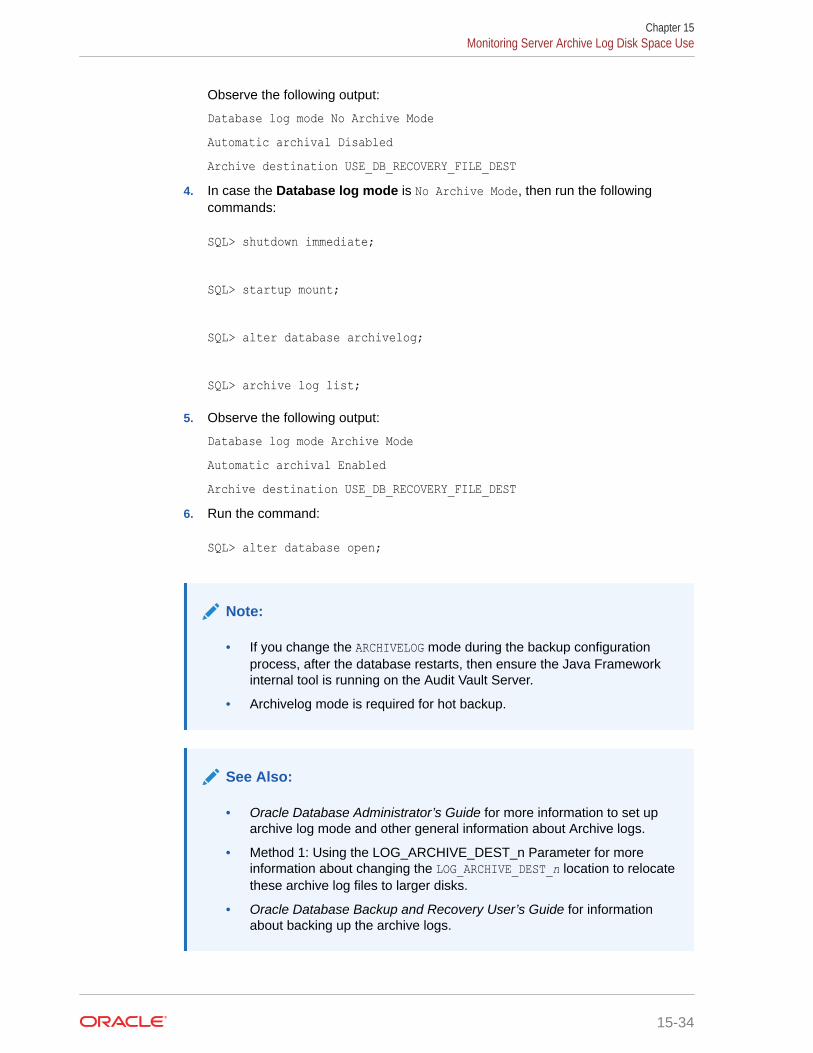
Observe the following output:
Database log mode No Archive ModeAutomatic archival DisabledArchive destination USE_DB_RECOVERY_FILE_DEST
4. In case the Database log mode is No Archive Mode, then run the followingcommands:
SQL> shutdown immediate;
SQL> startup mount;
SQL> alter database archivelog;
SQL> archive log list;
5. Observe the following output:
Database log mode Archive ModeAutomatic archival EnabledArchive destination USE_DB_RECOVERY_FILE_DEST
6. Run the command:
SQL> alter database open;
Note:
• If you change the ARCHIVELOG mode during the backup configurationprocess, after the database restarts, then ensure the Java Frameworkinternal tool is running on the Audit Vault Server.
• Archivelog mode is required for hot backup.
See Also:
• Oracle Database Administrator’s Guide for more information to set uparchive log mode and other general information about Archive logs.
• Method 1: Using the LOG_ARCHIVE_DEST_n Parameter for moreinformation about changing the LOG_ARCHIVE_DEST_n location to relocatethese archive log files to larger disks.
• Oracle Database Backup and Recovery User’s Guide for informationabout backing up the archive logs.
Chapter 15Monitoring Server Archive Log Disk Space Use
15-34
15.13 Monitoring Server Flash Recovery AreaMonitoring server flash recovery area is advisable to ensure you have enough space forbackups.
By default, Oracle Audit Vault Server has the following initialization parameter settings:
• The DB_RECOVERY_FILE_DEST_SIZE initialization parameter is set to 2 GB.
• The DB_RECOVERY_FILE_DEST initialization parameter is set to the default flash recoveryarea, typically the ORACLE_HOME/flash_recovery_area directory.
Ensure that the size of your flash recovery area is large enough to hold a copy of all datafiles, all incremental backups, online redo logs, archived redo logs not yet backed up on tape,control files, and control file auto backups. This space can fill quickly, depending on thenumber of audit trails configured, the scope of the audit record collection being administered,and the backup and archive plans that you have in place.
You can use Oracle Enterprise Manager Database Control to monitor the available space inthe flash recovery area. Monitor the percent space that is usable in the Usable FlashRecovery Area field under the High Availability section on the Home page. Check the alert login the Database Console for messages. When the used space in the flash recovery areareaches 85 percent, a warning message is sent to the alert log. When the used space in theflash recovery area reaches 97 percent, a critical warning message is sent to the alert log.
You can manage space in the flash recovery area by increasing the value of theDB_RECOVERY_FILE_DEST_SIZE initialization parameter to accommodate these files and to setthe DB_RECOVERY_FILE_DEST initialization parameter to a value where more disk space isavailable.
See Also:
• Oracle Database Administrator's Guide
• Oracle Database Backup and Recovery User’s Guide
15.14 Monitoring JobsYou can see the status of various jobs that run on the Audit Vault Server, such as reportgeneration, and user entitlement or audit policy retrieval from targets.
1. Log in to the Audit Vault Server as an administrator.
2. Click the Settings tab.
3. In the left navigation menu, select System.
4. In the Status page, under Monitoring section, click Jobs.
The Jobs window appears, listing all the jobs that have been configured. It shows the jobtype, current status (such as Starting), when last updated, when started, who created thejob, and any messages that may result from the job.
Chapter 15Monitoring Server Flash Recovery Area
15-35

5. To see details for an individual job, click the Job Details icon to the extreme left ofa specific job.
15.15 Scheduling Maintenance JobsOracle AVDF runs some jobs on the Audit Vault Server for proper and effectivefunctioning of the system.
Oracle recommends that you run these jobs during a period when the Audit Vaultserver usage is low, such as night. You can schedule these jobs as per your time zone.
1. Log in to the Audit Vault Server as an administrator.
2. Click Settings tab.
3. Click System tab in the left navigation menu.
4. In the Configuration section:
For Oracle AVDF Release Click
20.1 and 20.2 Manage
20.3 and later Maintenance
5. To schedule a new maintenance job, select Start Time. Enter the time in hoursand minutes for the maintenance job to start at a specific time. The time specifiedhere is the time on the browser.
6. In the Time Out (In hours) field, enter the duration of the maintenance job inhours.
Chapter 15Scheduling Maintenance Jobs
15-36
Note:
In case the job does not complete within the duration specified, it is timed out.
7. In the Repeat Frequency field, select the frequency of the maintenance job to berepeated.
Note:
This field cannot be edited, and by default the value remains Daily. The job runsat the specified start time daily.
8. Click Save.
15.16 Downloading and Using the AVCLI Command LineInterface
You can download the AVCLI command line interface from the Audit Vault Server console.
15.16.1 About the AVCLI Command-Line InterfaceLearn about the AVCLI command-line interface.
As an alternative to using the Oracle Audit Vault Server console (Web) UI, you can use theAVCLI command line interface to manage Oracle Audit Vault and Database Firewall,including registering and configuring targets and their connections to the Audit Vault Server.
You can run AVCLI from the Audit Vault Server, or download the AVCLI utility from the AuditVault Server and install and run the utility on another computer.
The syntax used for AVCLI is similar to SQL*Plus. For example, from within AVCLI, you canuse the CONNECT command to log in as another user. In addition, the AVCLI commands arenot case sensitive. In this manual, the commands are entered in upper case.
Note:
Set the JAVA_HOME environment variable to point to JDK installation directory. OnWindows, add %JAVA_HOME%\bin to the PATH environment variable.
See Also:
AVCLI Commands Reference for details of the available AVCLI commands.
Chapter 15Downloading and Using the AVCLI Command Line Interface
15-37

15.16.2 Downloading the AVCLI Command Line Utility and SettingJAVA_HOME
The AVCLI utility is already installed on the Audit Vault Server. If you want to runAVCLI on a different computer, then you must download it from the Audit Vault Serverconsole and install it on the other computer.
1. Log in to the Audit Vault Server console as an administrator.
2. Click the Settings tab.
3. In the left navigation menu, select Audit Vault CLI.
4. Click the Download AVCLI button. Save the avcli.jar file.
5. Copy the avcli.jar file to the computer from which you want to run AVCLI. Runthe command:
java -jar avcli.jarThe AVCLI utility is installed in the current directory with the necessarypermissions. To install in a different directory, use the command:
java -jar avcli.jar -d directory_name6. Set the JAVA_HOME environment variable to point to the JDK installation directory.
On Windows, add %JAVA_HOME%\bin to the PATH environment variable.
15.16.3 Logging in to AVCLIYou can log in to the Audit Vault command line interface by using different methods.
15.16.3.1 About Logging in to AVCLIYou can log in to AVCLI interactively with or without a user name, and with storedcredentials.
Before users log in, ensure that the JAVA_HOME environment variable in the serverpoints to JDK installation directory. The user who logs in to AVCLI must be granted thegranted the AV_ADMIN role, which you can grant by using the Audit Vault Serverconsole.
The ways to log in are as follows:
• By supplying a user name and password by executing the avcli command
• Without supplying a user name and password, but you will be prompted for thesecredentials after you execute avcli
• By using a stored credential, which is useful for situations in which you must runscripts.
Chapter 15Downloading and Using the AVCLI Command Line Interface
15-38
15.16.3.2 Logging in to AVCLI InteractivelyYou can start AVCLI interactively at the command line with or without a user name.
Except for a few commands where it is optional, all AVCLI commands must end in a semi-colon (;). For simplicity, in this guide we use a semi-colon for all AVCLI commands.
1. Log in to the server where AVCLI is installed as a user who has been granted theAV_ADMIN role.
2. At the command line, use one of the following methods to log in to AVCLI:
• Logging in with a user name: Use the following syntax:
avcli -u usernameEnter password: password
For example:
avcli -u psmithAVCLI : Release 20.1.0.0.0 - Production on timestampCopyright (c) 1996, 2020 Oracle. All Rights Reserved.Enter password for 'psmith': password
Connected to:Oracle Audit Vault Server 20.1.0.0.0
AVCLI> • Logging in without a user name: Use the following syntax:
avcliAVCLI> CONNECT [username];
For example:
avcli
AVCLI : Release 20.1.0.0.0 - Production on timestampCopyright (c) 1996, 2020 Oracle. All Rights Reserved.
AVCLI> CONNECT psmithEnter password: password;Connected.
If you do not enter a user name, then you will be prompted for one.
15.16.3.3 Storing or Overwriting Administrative CredentialsIf you are the AVCLI owner (that is, you installed the AVCLI utility) you can store thecredentials of one Oracle AVDF administrator in the AVCLI wallet.
Thereafter, that administrator can invoke AVCLI without providing credentials, and can alsorun scripts without intervention.
As a prerequisite for an administrator to be able to invoke AVCLI without credentials (non-interactively), the AVCLI owner must store that administrator's credentials. As the AVCLIowner, you can store credentials for only one administrator.
1. As the AVCLI owner, run avcli without connecting to the Audit Vault Server.
For example:
Chapter 15Downloading and Using the AVCLI Command Line Interface
15-39
avcli
AVCLI : Release Release 20.1.0.0.0 - Production on timestampCopyright (c) 1996, 2020 Oracle. All Rights Reserved.
AVCLI>2. Run the command STORE CREDENTIALS and provide the administrator's credentials
when prompted.
For example:
AVCLI> STORE CREDENTIALS;Enter user name: usernameEnter password:passwordRe-enter password:password
Any previously stored credentials will be overwritten. If this administrator'spassword changes, follow this procedure again to store the new credentials.
15.16.3.4 Logging in to AVCLI Using Stored CredentialsTo start AVCLI without having to enter credentials, your credentials must be stored inthe Audit Vault Server.
1. Log in to the server where AVCLI is installed as a user who has been granted theAV_ADMIN role.
2. Use one of the following methods to log in to AVCLI using stored credentials:
• From the shell: In the Audit Vault Server console, enter the followingcommand, which logs you in to AVCLI and connects to the Audit Vault Server:
avcli /@• From within AVCLI: If you have invoked AVCLI from the shell without
credentials (by typing avcli), connect to the Audit Vault Server by entering:
AVCLI> CONNECT /@;
For example:
avcli
AVCLI : Release 20.1.0.0.0 - Production on timestampCopyright (c) 1996, 2020 Oracle. All Rights Reserved.
AVCLI> CONNECT /@;Connected.
Related Topics
• Running AVCLI ScriptsYou can run AVCLI scripts without user intervention or putting credentials insidethe script.
Chapter 15Downloading and Using the AVCLI Command Line Interface
15-40
15.16.4 Running AVCLI ScriptsYou can run AVCLI scripts without user intervention or putting credentials inside the script.
An AVCLI script contains a series of AVCLI commands. You can run an AVCLI script from theshell. Valid AVCLI script names have a .av extension.Here is an example AVCLI script:
#Here is an AVCLI commandstart collection for secured target sample_target1 using host sample_host1 from table SYS.AUD$;#More AVCLI commands#Quit commandquit;
1. Log in to the server where AVCLI is installed as a user who has been granted theAV_ADMIN role.
2. Use the following syntax to run the script:
avcli -u username -f scriptname.av
For example:
avcli -u psmith -f myscript.avAVCLI : Release 20.1.0.0.0 - Production on timestampCopyright (c) 1996, 2020 Oracle. All Rights Reserved.Enter password for 'psmith': password
Connected to:Oracle Audit Vault Server 20.1.0.0.0
AVCLI> the script myscript.av executes
If you have stored administrator credentials, to run an AVCLI script, use the appropriatecommand below:
• avcli /@ -f sample_script1.avThis command uses the stored credentials, connects to the Audit Vault Server, andruns the script.
• avcli -f sample_script2.avYou can use the above command if you include the following command at thebeginning of your script:
connect /@Then the script runs using the stored credentials, and connecting to the Audit VaultServer.
Related Topics
• Logging in to AVCLI Using Stored CredentialsTo start AVCLI without having to enter credentials, your credentials must be stored in theAudit Vault Server.
Chapter 15Downloading and Using the AVCLI Command Line Interface
15-41
15.16.5 Specifying Log Levels for AVCLIWhen you run AVCLI, you can specify log levels to capture different categories ofinformation or errors.
Oracle Audit Vault and Database Firewall writes the logs to the Audit VaultServer $ORACLE_HOME/av/log directory.
• info: Logs informational and error messages
• warning: Logs both warning and error messages
• error: Logs only error messages (default)
• debug: Logs debug, error, warning, and informational messages
To specify a log level, enter the L option. For example, to invoke AVCLI as user psmithwith the log level set to warning:
avcli -l warning -u psmithAVCLI : Release 20.1.0.0.0 - Production on timestampCopyright (c) 1996, 2020 Oracle. All Rights Reserved.Enter password for 'psmith': password
Connected to:Oracle Audit Vault Server 20.1.0.0.0
AVCLI>
To invoke AVCLI using a script and with the debug warning level:
avcli -l debug -f myscript.av
AVCLI : Release 20.1.0.0.0 - Production on timestampCopyright (c) 1996, 2020 Oracle. All Rights Reserved.
AVCLI> Connected.
AVCLI> the script myscript.av executes
Note: You must be connected as a valid user who has been granted the AV_ADMINrole. You can do so using the CONNECT username/password directive.
15.16.6 Displaying Help and the Version Number of AVCLIYou can display help information for various AVCLI commands and find the AVCLIversion number from the command line.
To display the AVCLI help information and version number:
avcli -h
If you only want to find the version number, then use the V argument:
avcli -v
Chapter 15Downloading and Using the AVCLI Command Line Interface
15-42
15.17 Downloading the Oracle Audit Vault and DatabaseFirewall SDK
An SDK is available for developing custom Oracle Audit Vault and Database Firewall plug-ins.
1. Log in to the Audit Vault Server console as an administrator.
2. Click the Settings tab.
3. In the left navigation menu, click System.
4. In the Status page that appears, under Monitoring, click Plug-ins.
5. In the Plug-ins window, do not select any of the plug-ins.
6. Click Download SDK.
7. Select Save File and then specify a location.
Related Topics
• Oracle Audit Vault and Database Firewall Developer's Guide
15.18 Managing Database FirewallsManagement tasks for Database Firewalls include tasks such as changing the network orservices configuration.
15.18.1 Changing the Database Firewall Network or Services ConfigurationLearn how to change the Database Firewall network or services configuration.
See one of the topics below if you need to change a Database Firewall's network, trafficsources, or services configuration:
• "Configuring Network Settings for Oracle Database Firewall"
• "Configuring Network Services for Oracle Database Firewall"
• "Configuring Traffic Sources"
• "Configuring Database Firewall As A Traffic Proxy"
15.18.2 Viewing Network Traffic in a Database FirewallYou can view network traffic for debugging purposes.
1. Log in to the Audit Vault Server console.
2. Select the Database Firewalls tab.
3. In the left navigation menu, select Database Firewalls.
4. Select the specific Database Firewall instance for which the network traffic needs acheck.
5. The details of the Database Firewall instance are displayed on the page. UnderDiagnostics, select Network Traffic Capture.
Chapter 15Downloading the Oracle Audit Vault and Database Firewall SDK
15-43
6. In the Network Traffic Capture dialog, from the Duration (min) menu, set thenumber of minutes you want to capture. Then click the Capture button.
In a moment, a message appears telling you that the network files weresuccessfully captured. The capture appears in the table on this window.
7. Select the check box for the network files that you captured, and then click theDownload button. Then select a location to download the file.
15.18.3 Capturing Network Traffic in Database FirewallLearn how to capture network traffic in Database Firewall.
You can capture traffic to a file (.pcap file type) that you can download and analyze.
To capture network traffic to a file:
1. Log in to the Audit Vault Server console.
2. Select the Database Firewalls tab.
3. In the left navigation menu, select Database Firewalls.
4. Select the specific Database Firewall instance for which the network traffic needsto be captured.
5. The details of the Database Firewall instance are displayed on the page. UnderDiagnostics, select Network Traffic Capture.
6. In the Network Traffic Capture dialog, select the network traffic source in the fieldNetwork Interface.
7. In the Duration (min) menu, set the number of minutes you want to capture. Thenclick the Capture button.
In a moment, a message appears telling you that the network files weresuccessfully captured. The capture appears in the table on this window.
8. Select the specific file, and click Download for the network traffic file you want todownload. Specify the location and download the traffic file in .pcap format.
15.18.4 Restarting or Powering Off Database FirewallUse this procedure to restart or power off Database Firewall.
To restart or power off a Database Firewall:
1. Log in to the Audit Vault Server as an administrator.
2. Click the Database Firewalls tab.
3. Select the specific Database Firewall you want to reboot or power off.
4. Click the Reboot or Power Off button.
See Also:
Using Audit Vault Server Console
Chapter 15Managing Database Firewalls
15-44

15.18.5 Removing Database Firewall from Audit Vault ServerYou can remove Database Firewall from Audit Vault Server.
To remove Database Firewall from Audit Vault Server:
1. Log in to the Audit Vault Server as an administrator.
2. Click the Database Firewalls tab.
3. Select the specific Database Firewall you want to remove.
4. Click the Delete button.
See Also:
Using Audit Vault Server Console
15.18.6 Fetching an Updated Certificate from Database FirewallLearn how to obtain updated certificates from Database Firewall.
You can update the Database Firewall certificate stored in the Audit Vault Server using theAudit Vault Server console. You must update this certificate when you upgrade the DatabaseFirewall to maintain communication between the Database Firewall and the Audit VaultServer.
To update the Database Firewall certificate stored in the Audit Vault Server:
1. After upgrading the Database Firewall, log in to the Audit Vault Server console as anadministrator.
2. Select the Database Firewalls tab.
3. In the left navigation menu, select Database Firewalls tab.
4. Select the specific Database Firewall instance from the list.
5. If the Database Firewall instance is down due to certificate validation error, then theUpdate Certificate button appears on the page. Click this button to update thecertificate.
See Also:
Using Audit Vault Server Console
Chapter 15Managing Database Firewalls
15-45
15.18.7 Viewing Diagnostics for Database Firewall
See Also:
Viewing the Status and Diagnostics Report for Database Firewall for viewingDatabase Firewall diagnostics.
15.18.8 Resetting Database FirewallLearn how to reset the Database Firewall instance.
This block contains information about the Database Firewall settings and the details ofresetting a Database Firewall instance. The Reset Firewall button is available in thepage that contains details of the specific Database Firewall instance. It performs areset of the Firewall ID. The Firewall ID is a unique identification number of theDatabase Firewall. It is derived from the Management Interface card.
Once the reset is performed, it removes the existing monitoring point instances andcreates new ones using the configuration information stored in Audit Vault Server. Themonitoring point instances not listed on the Audit Vault Server are removed once thereset is performed. The captured data which is not processed is also deleted. Thenetwork setting (Management Interface) of the Database Firewall is not altered. Thisoperation restores the network interface card settings other than the ManagementInterface. It also restores the proxy ports information that was stored in the Audit VaultServer.
Note:
• Whenever the Network Interface Card is replaced, the Database FirewallID must be reset.
• The network setting (Management Interface) of the Database Firewall isnot altered. Ensure the Database Firewall network is configuredappropriately before attempting to reset Firewall ID.
The user must reset the Firewall ID in the following scenarios:
1. After replacing the Management Interface card on the Database Firewall.
2. After replacing an existing and configured Database Firewall instance with a newlyinstalled Database Firewall instance.
15.18.9 Restoring Database Firewall Monitoring PointsLearn how to restore Database Firewall monitoring points.
When you restore the Audit Vault Server from a backup, you must restore the status ofthe Database Firewall monitoring points that are registered with the Database Firewall.
Chapter 15Managing Database Firewalls
15-46
See Also:
Resetting Database Firewall for more information.
Chapter 15Managing Database Firewalls
15-47

16Configuring a SAN Repository
Learn how to configure, discover targets, and add and drop disks for an Oracle Audit Vaultand Database Firewall storage area network.
16.1 About Configuring a SAN RepositoryYou can configure an Oracle Audit Vault storage area network (SAN) for event data, systemdata, recovery data, and for high availability.
You can use storage area networks (SANs) to expand your data storage, and manage highavailability.
Types of Data Supported for SANs
You have the option to configure a SAN storage repository for these data types:
• Event Data - Data that is kept online in the Oracle Audit Vault Server for a specifiedduration according to archiving policies. After the online duration expires, this data is thenarchived.
• System Data - Data specific to the Oracle Audit Vault and Database Firewall system
• Recovery - Recovery data for the Oracle Audit Vault Server repository
During the Oracle Audit Vault Server installation process, your server is partitioned to storeEvent, System, and Recovery data in a way that works with the number of disk partitions youhave set up on the server. Optionally, you can register SAN servers and configure yourstorage repository to use additional disks to store this data.
About Configuring a SAN Repository in High Availability Environments
In a high availability environment, you can configure the storage repository on the secondaryOracle Audit Vault Server from the primary Oracle Audit Vault Server, using either the consoleUI or AVCLI commands. The primary and secondary Oracle Audit Vault Servers must notshare (read or write to) the same SAN disks, and you must ensure that the secondary serverhas at least the same amount of space in each disk group as the primary server.
16.2 Configuring a SAN Server to Communicate with OracleAudit Vault and Database Firewall
To configure a storage area network (SAN) for Oracle Audit Vault and Database Firewall,complete this procedure.
Oracle Audit Vault and Database Firewall uses Linux Open-iSCSI to communicate with SANservers. You must ensure that the iSCSI service is enabled on the SAN server you want touse for storing Audit Vault and Database Firewall data, and provide the Audit Vault Server'siSCSI initiator name to your storage administrator to use in configuring the SAN server. TheSAN server must allow iSCSI targets and LUNs (logical unit numbers) to communicate with
16-1
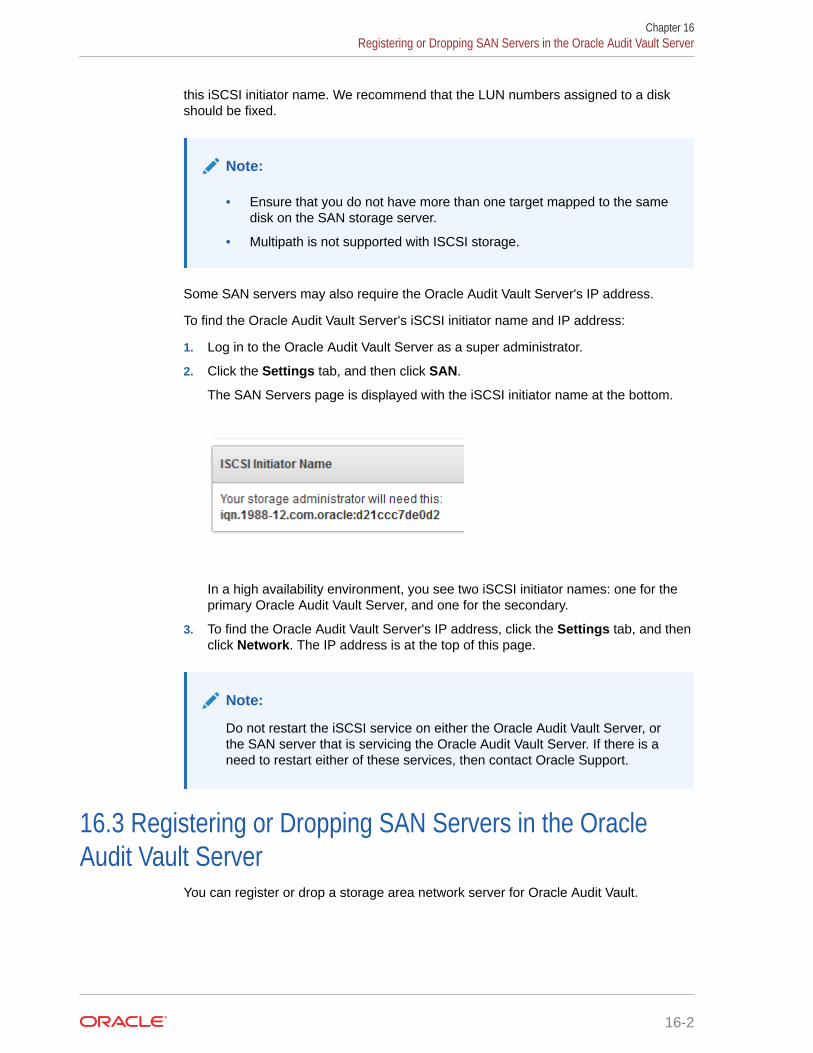
this iSCSI initiator name. We recommend that the LUN numbers assigned to a diskshould be fixed.
Note:
• Ensure that you do not have more than one target mapped to the samedisk on the SAN storage server.
• Multipath is not supported with ISCSI storage.
Some SAN servers may also require the Oracle Audit Vault Server's IP address.
To find the Oracle Audit Vault Server's iSCSI initiator name and IP address:
1. Log in to the Oracle Audit Vault Server as a super administrator.
2. Click the Settings tab, and then click SAN.
The SAN Servers page is displayed with the iSCSI initiator name at the bottom.
In a high availability environment, you see two iSCSI initiator names: one for theprimary Oracle Audit Vault Server, and one for the secondary.
3. To find the Oracle Audit Vault Server's IP address, click the Settings tab, and thenclick Network. The IP address is at the top of this page.
Note:
Do not restart the iSCSI service on either the Oracle Audit Vault Server, orthe SAN server that is servicing the Oracle Audit Vault Server. If there is aneed to restart either of these services, then contact Oracle Support.
16.3 Registering or Dropping SAN Servers in the OracleAudit Vault Server
You can register or drop a storage area network server for Oracle Audit Vault.
Chapter 16Registering or Dropping SAN Servers in the Oracle Audit Vault Server
16-2

16.3.1 Registering a SAN ServerTo register a storage area network (SAN) server to the Oracle Audit Vault server, completethis procedure.
In a high availability environment, you can use this procedure to register a SAN server to theprimary or the secondary Oracle Audit Vault Server. Note that while you can register thesame SAN server to both the primary and secondary Oracle Audit Vault Servers, they mustnot share (read or write to) the same SAN disks.
Note:
Multipath is not supported with ISCSI storage.
To register a SAN server in the Audit Vault Server:
1. If you plan to use Internet Small Computer System Interface (iSCSI) as a target, thenensure that it is not shared with other systems. The iSCSI target must be exclusive to theAudit Vault Server.
2. Log in to the Audit Vault Server as a super administrator.
3. Click the Settings tab, and then click SAN.
4. Click Register, and provide the following information:
• Register to - (High Availability Only) Select the Primary or Secondary Audit VaultServer.
• Storage Name - Name for this SAN server
• IP Address - SAN Server IP address
• Port - SAN Server port
• Method - The data transfer method
• Authentication - If sendTargets is the transfer method, this specifies noauthentication, or CHAP (one way). Using CHAP (one way), the Oracle Audit VaultServer is authenticated by the SAN server.
5. Click Submit.
16.3.2 Dropping a SAN ServerTo drop a storage area network (SAN) server from the Oracle Audit Vault Server, completethis procedure.
You can drop a SAN server if none of its disks are in use for storage in the Oracle Audit VaultServer repository. Otherwise, you must first drop the disks from any disk groups that use thisSAN server.
To drop a SAN server from the Audit Vault Server:
1. Log in to the Oracle Audit Vault Server as a super administrator.
2. Click the Settings tab, and then click SAN.
3. Select the SAN servers that you want to drop, and then click Drop.
Chapter 16Registering or Dropping SAN Servers in the Oracle Audit Vault Server
16-3

Related Topics
• Dropping SAN Disks from the Audit Vault Server RepositoryLearn how to drop a SAN disk from a disk group.
16.4 Discovering Targets on a SAN ServerFind out how to discover and manage storage area network (SAN) targets for OracleAudit Vault and Database Firewall.
16.4.1 About SAN Targets and DisksTo make storage area network disks available to Oracle Audit Vault and DatabaseFirewall, you must discover storage area network servers, and then log in to availabletargets.
After you have registered SAN servers in the Audit Vault Server, to make SAN disksavailable for storing Audit Vault Server data, you must discover and log in to theavailable targets on the SAN server.
When you log in to a target on the SAN server, a number of storage disks are madeavailable to the Audit Vault Server, corresponding to the number of LUNs available onthe SAN server for that target.
16.4.2 Discovering Targets on a SAN Server and Making DisksAvailable
Discover targets on a storage area network (SAN) server that is registered with theAudit Vault Server.
To make SAN server disks available for storing Audit Vault Server data, you must login to a target on the SAN server, and then provide login credentials if required.
To discover targets on a SAN server:
1. Log in to the Audit Vault Server as a super administrator.
2. Click the Settings tab, and then click SAN.
3. Find the SAN server you want, and then click the corresponding Discover link.
A list of targets appears, showing the status of each target.
4. Click Log In to log in to a target on this SAN server and make its disks availablefor storage.
If the SAN server is configured so that the target does not require credentials, thenyou can leave those fields empty and click Log in.
Related Topics
• Registering a SAN ServerTo register a storage area network (SAN) server to the Oracle Audit Vault server,complete this procedure.
16.4.3 Logging Out of Targets on SAN ServersLearn how to log out of SAN server targets.
Chapter 16Discovering Targets on a SAN Server
16-4

You can log out of a target if none of its disks are in use for storing Audit Vault Server data. Ifa disk from a target is in use, then you must first drop the disk and then log out of the target.
To log out of a target on a SAN server:
1. Log in to the Audit Vault Server as a super administrator.
2. Click the Settings tab, and then click SAN.
3. Find the SAN server you want, and then click the corresponding Discover link.
A list of targets appears, showing the status of each target.
4. Find the target you want, and then click the corresponding Log Out link in the Actioncolumn.
If there is a dash character in the Action column for the target, then disks from this targetare in use.
See Also:
Dropping SAN Disks from the Audit Vault Server Repository
16.5 Adding or Dropping SAN Disks in the Audit Vault ServerRepository
Find out about storage area network (SAN) disk groups, and how to add or drop them fromthe Oracle Audit Vault Server repository.
16.5.1 About Disk Groups in the Oracle Audit Vault Server RepositoryYou can add disk groups for the three data types to the repository, and you can make thesedisk groups highly available.
Log in to the Audit Vault Server console as super administrator. Click the Settings tab, andthen click the Storage tab in the left navigation menu. The Repository sub tab can beaccessed from the main page.
Adding Disk Groups to the Repository sub tab
There are three disk groups used for storing Oracle Audit Vault Server data, corresponding tothree data types:
• EVENTDATA
• SYSTEMDATA
• RECOVERY
If desired, you can add disks from a registered SAN server to the EVENTDATA,SYSTEMDATA, and RECOVERY disk groups to increase the storage capacity for those typesof data. Else, these data types are stored in disk partitions on the Audit Vault Server.
Adding SAN disks to these disk groups is optional.
Chapter 16Adding or Dropping SAN Disks in the Audit Vault Server Repository
16-5

In a high availability environment, you must ensure that the secondary server has atleast the same amount of space in each disk group as the primary server.
The Repository sub tab in a High Availability Environment
In a high availability environment, you see the disk groups in the Repository page forthe Primary Oracle Audit Vault Server, followed by the same disk groups for theSecondary Oracle Audit Vault Server. You must ensure that the secondary server hasat least the same amount of space in each disk group as the primary server.
Related Topics
• About Configuring a SAN RepositoryYou can configure an Oracle Audit Vault storage area network (SAN) for eventdata, system data, recovery data, and for high availability.
16.5.2 Adding SAN Disks to the Audit Vault Server RepositoryTo add storage area network (SAN) disks to the Oracle Audit Vault Server repository,use this procedure.
You can add SAN disks that are not already in use to any of the disk groups in therepository.
Note:
Adding an additional disk creates two VG_ROOT volume groups. When youhave two VG_ROOT disks, this results in failure during upgrade. Ensure thatany disk added to the appliance has no pre-existing LVM or other devicemapper metadata.
To add disks to a disk group in the repository:
1. Log in to the Audit Vault Server as a super administrator.
2. Click the Settings tab, and then click Storage tab in the left navigation menu.
3. Click Repository sub tab on the main page.
4. Click the Add Disk button against the specific disk group.
Details for available disks are displayed, including disk capacity and free space.
5. Select the disks that you want to add to this disk group, and then click Use Disk(s)button.
6. Click OK to confirm.
The selected disks are displayed under the specified disk group.
16.5.3 Dropping SAN Disks from the Audit Vault Server RepositoryLearn how to drop a SAN disk from a disk group.
The data on the disk being dropped is relocated to the remaining disks in the diskgroup. Before dropping a disk, the system checks for space on the remaining disks inthe disk group for data to be relocated. If this space check fails, it results in OAV-47330error. You cannot drop the only disk in the disk group.
Chapter 16Adding or Dropping SAN Disks in the Audit Vault Server Repository
16-6

To drop a SAN disk from a disk group in the repository:
1. Log in to the Audit Vault Server console as a super administrator.
2. Click the Settings tab, and then click Storage tab in the left navigation menu.
3. Find the disk you want to drop under one of the disk groups, select the disk, and thenclick Drop Disk button.
4. Click OK to confirm.
Chapter 16Adding or Dropping SAN Disks in the Audit Vault Server Repository
16-7

Part IIIGeneral Reference
These appendixes provide general reference information for administering the Audit Vault andDatabase Firewall system.
AAVCLI Commands Reference
The AVCLI commands enable you to perform tasks such as creating Database Firewallmonitoring points and managing audit trails.
A.1 About AVCLI CommandsLearn about AVCLI commands and their uses.
Use the AVCLI commands to configure host connections from the command line. You must begranted the AV_ADMIN role before you can run these commands. This appendix does not listall of the AVCLI commands, however. It only covers the commands that Oracle Audit Vaultand Database Firewall administrators need to configure target connections.
All AVCLI commands must end in a semi-colon (;).
See Also:
Using the Audit Vault Command Line Interface for general usage information aboutusing the AVCLI command line interface.
Setting the JAVA_HOME Environment Variable
In Oracle Audit Vault Server, you must set the JAVA_HOME environment variable to point to JDKinstallation directory.
A.2 Agent Host AVCLI CommandsThe agent host AVCLI commands enable you to perform agent host-related tasks such asregistering hosts.
A.2.1 About the Agent Host AVCLI CommandsThe AVCLI host commands enable you to configure the host computer on which the AuditVault Agent will reside.
A.2.2 ACTIVATE HOSTLearn how to use the ACTIVATE HOST AVCLI command.
The ACTIVATE HOST command activates the host specified by hostname.
Syntax
ACTIVATE HOST hostname
A-1
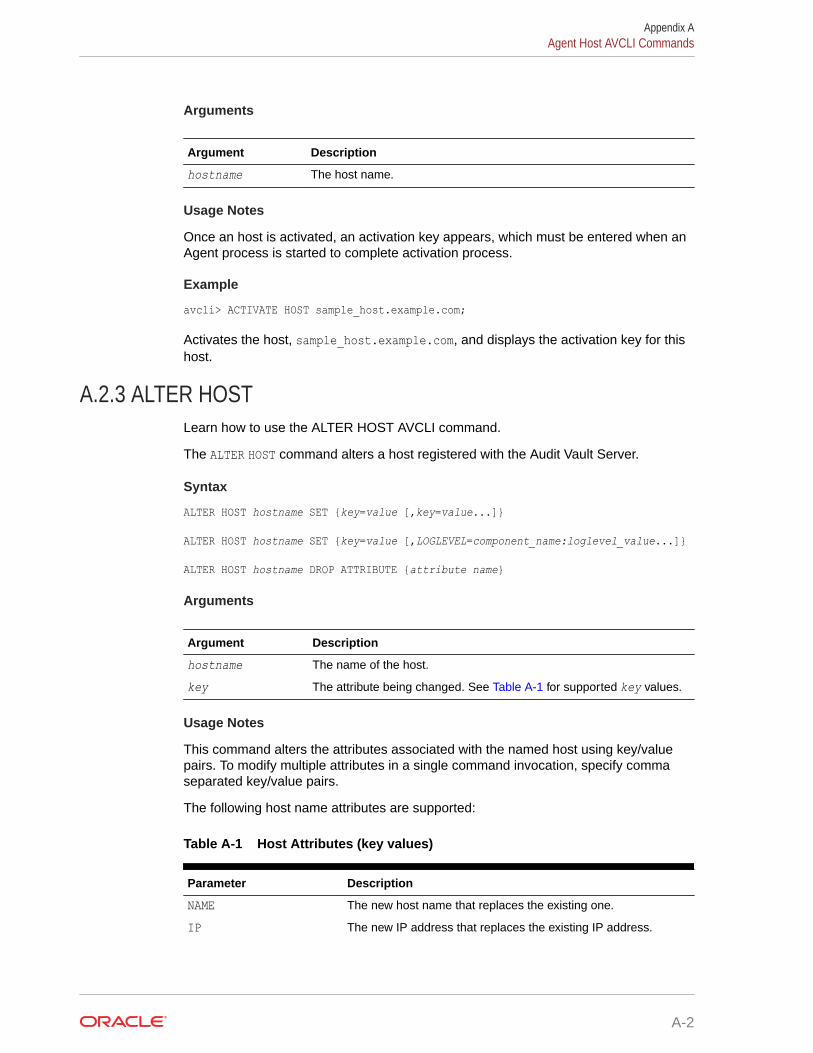
Arguments
Argument Description
hostname The host name.
Usage Notes
Once an host is activated, an activation key appears, which must be entered when anAgent process is started to complete activation process.
Example
avcli> ACTIVATE HOST sample_host.example.com;
Activates the host, sample_host.example.com, and displays the activation key for thishost.
A.2.3 ALTER HOSTLearn how to use the ALTER HOST AVCLI command.
The ALTER HOST command alters a host registered with the Audit Vault Server.
Syntax
ALTER HOST hostname SET {key=value [,key=value...]}
ALTER HOST hostname SET {key=value [,LOGLEVEL=component_name:loglevel_value...]}
ALTER HOST hostname DROP ATTRIBUTE {attribute name}
Arguments
Argument Description
hostname The name of the host.
key The attribute being changed. See Table A-1 for supported key values.
Usage Notes
This command alters the attributes associated with the named host using key/valuepairs. To modify multiple attributes in a single command invocation, specify commaseparated key/value pairs.
The following host name attributes are supported:
Table A-1 Host Attributes (key values)
Parameter Description
NAME The new host name that replaces the existing one.
IP The new IP address that replaces the existing IP address.
Appendix AAgent Host AVCLI Commands
A-2
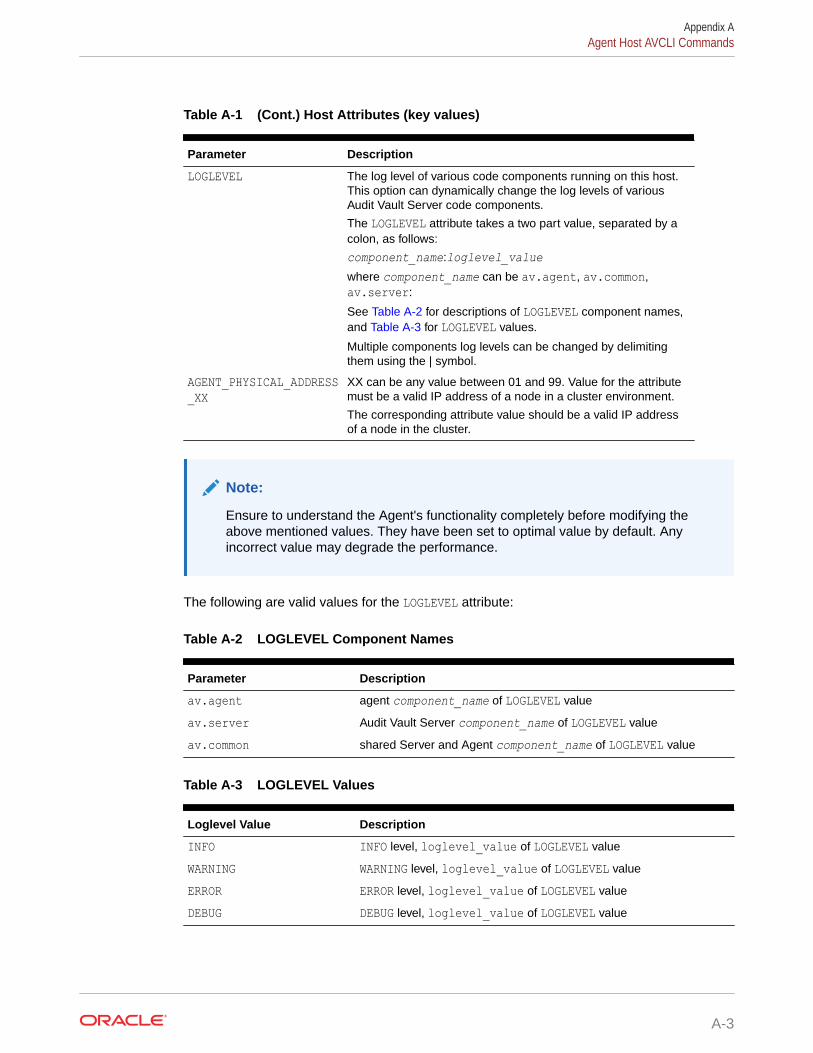
Table A-1 (Cont.) Host Attributes (key values)
Parameter Description
LOGLEVEL The log level of various code components running on this host.This option can dynamically change the log levels of variousAudit Vault Server code components.
The LOGLEVEL attribute takes a two part value, separated by acolon, as follows:
component_name:loglevel_valuewhere component_name can be av.agent, av.common,av.server:
See Table A-2 for descriptions of LOGLEVEL component names,and Table A-3 for LOGLEVEL values.
Multiple components log levels can be changed by delimitingthem using the | symbol.
AGENT_PHYSICAL_ADDRESS_XX
XX can be any value between 01 and 99. Value for the attributemust be a valid IP address of a node in a cluster environment.
The corresponding attribute value should be a valid IP addressof a node in the cluster.
Note:
Ensure to understand the Agent's functionality completely before modifying theabove mentioned values. They have been set to optimal value by default. Anyincorrect value may degrade the performance.
The following are valid values for the LOGLEVEL attribute:
Table A-2 LOGLEVEL Component Names
Parameter Description
av.agent agent component_name of LOGLEVEL value
av.server Audit Vault Server component_name of LOGLEVEL value
av.common shared Server and Agent component_name of LOGLEVEL value
Table A-3 LOGLEVEL Values
Loglevel Value Description
INFO INFO level, loglevel_value of LOGLEVEL value
WARNING WARNING level, loglevel_value of LOGLEVEL value
ERROR ERROR level, loglevel_value of LOGLEVEL value
DEBUG DEBUG level, loglevel_value of LOGLEVEL value
Appendix AAgent Host AVCLI Commands
A-3
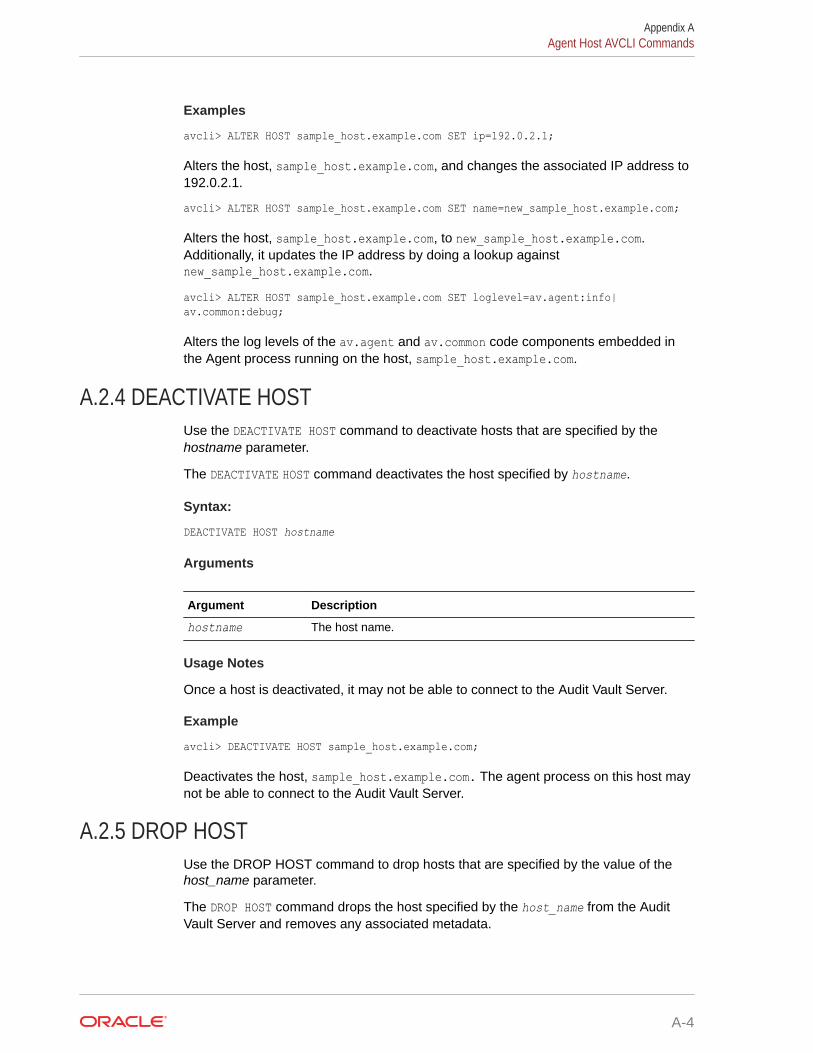
Examples
avcli> ALTER HOST sample_host.example.com SET ip=192.0.2.1;
Alters the host, sample_host.example.com, and changes the associated IP address to192.0.2.1.
avcli> ALTER HOST sample_host.example.com SET name=new_sample_host.example.com;
Alters the host, sample_host.example.com, to new_sample_host.example.com.Additionally, it updates the IP address by doing a lookup againstnew_sample_host.example.com.
avcli> ALTER HOST sample_host.example.com SET loglevel=av.agent:info|av.common:debug;
Alters the log levels of the av.agent and av.common code components embedded inthe Agent process running on the host, sample_host.example.com.
A.2.4 DEACTIVATE HOSTUse the DEACTIVATE HOST command to deactivate hosts that are specified by thehostname parameter.
The DEACTIVATE HOST command deactivates the host specified by hostname.
Syntax:
DEACTIVATE HOST hostname
Arguments
Argument Description
hostname The host name.
Usage Notes
Once a host is deactivated, it may not be able to connect to the Audit Vault Server.
Example
avcli> DEACTIVATE HOST sample_host.example.com;
Deactivates the host, sample_host.example.com. The agent process on this host maynot be able to connect to the Audit Vault Server.
A.2.5 DROP HOSTUse the DROP HOST command to drop hosts that are specified by the value of thehost_name parameter.
The DROP HOST command drops the host specified by the host_name from the AuditVault Server and removes any associated metadata.
Appendix AAgent Host AVCLI Commands
A-4
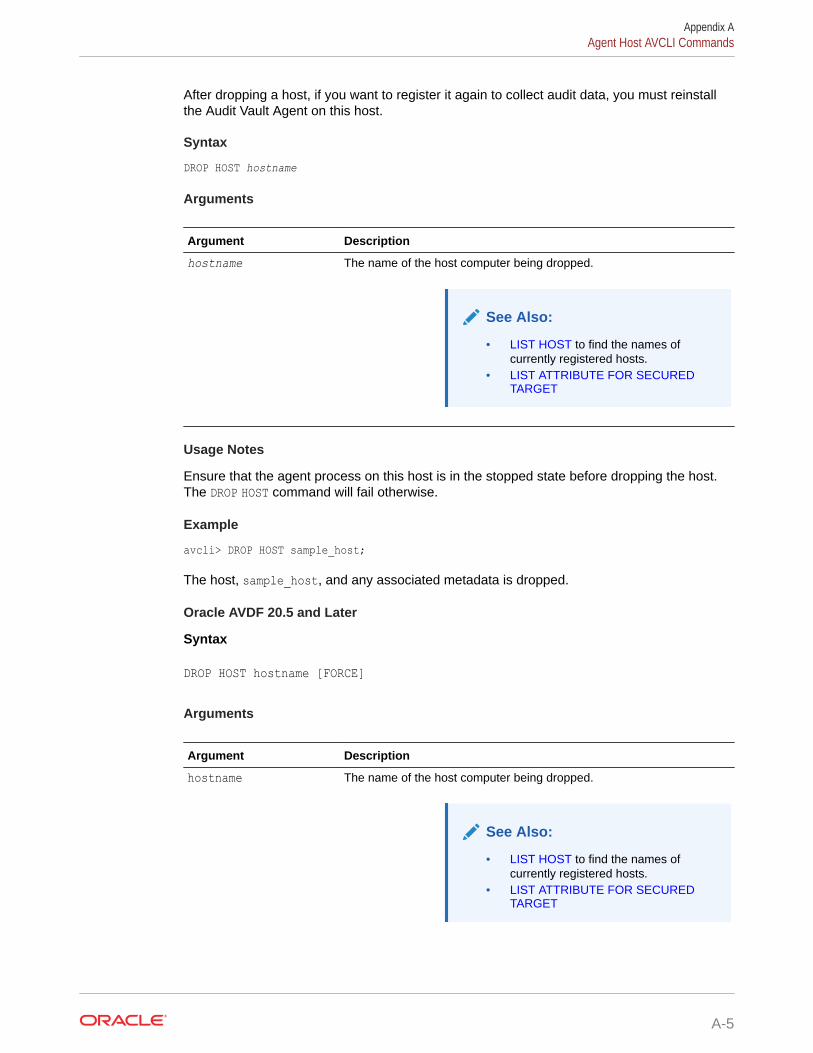
After dropping a host, if you want to register it again to collect audit data, you must reinstallthe Audit Vault Agent on this host.
Syntax
DROP HOST hostname
Arguments
Argument Description
hostname The name of the host computer being dropped.
See Also:
• LIST HOST to find the names ofcurrently registered hosts.
• LIST ATTRIBUTE FOR SECUREDTARGET
Usage Notes
Ensure that the agent process on this host is in the stopped state before dropping the host.The DROP HOST command will fail otherwise.
Example
avcli> DROP HOST sample_host;
The host, sample_host, and any associated metadata is dropped.
Oracle AVDF 20.5 and Later
Syntax
DROP HOST hostname [FORCE]
Arguments
Argument Description
hostname The name of the host computer being dropped.
See Also:
• LIST HOST to find the names ofcurrently registered hosts.
• LIST ATTRIBUTE FOR SECUREDTARGET
Appendix AAgent Host AVCLI Commands
A-5
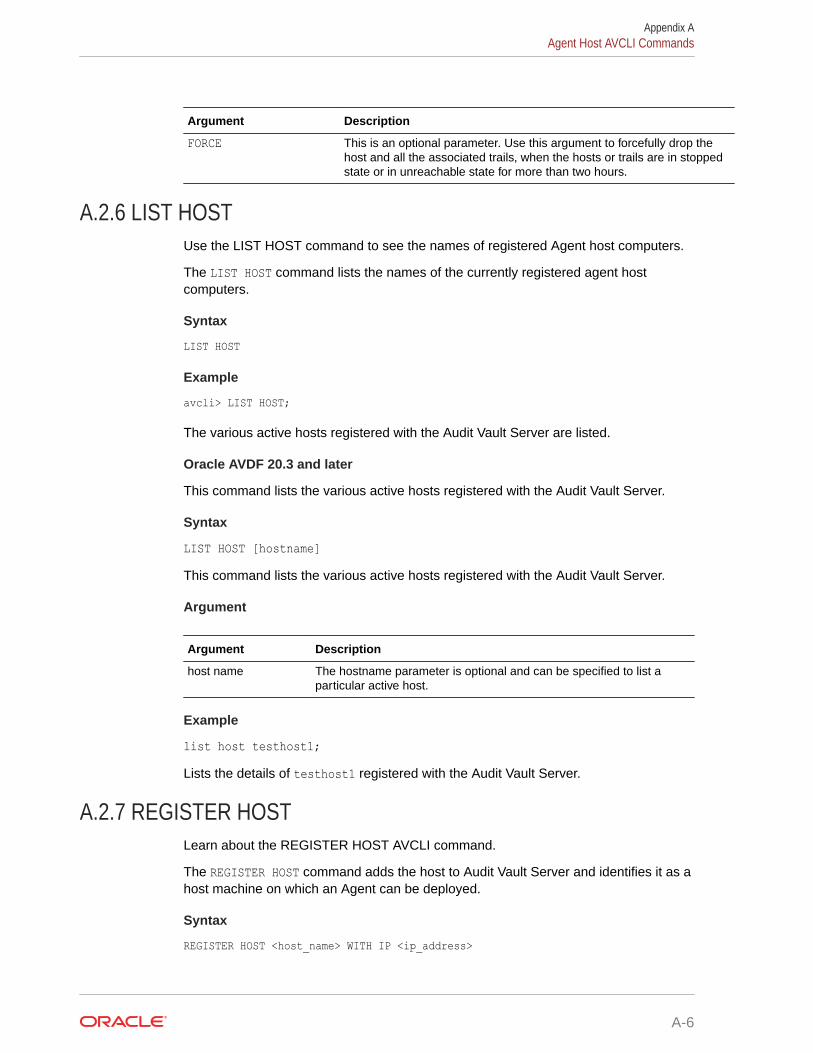
Argument Description
FORCE This is an optional parameter. Use this argument to forcefully drop thehost and all the associated trails, when the hosts or trails are in stoppedstate or in unreachable state for more than two hours.
A.2.6 LIST HOSTUse the LIST HOST command to see the names of registered Agent host computers.
The LIST HOST command lists the names of the currently registered agent hostcomputers.
Syntax
LIST HOST
Example
avcli> LIST HOST;
The various active hosts registered with the Audit Vault Server are listed.
Oracle AVDF 20.3 and later
This command lists the various active hosts registered with the Audit Vault Server.
Syntax
LIST HOST [hostname]This command lists the various active hosts registered with the Audit Vault Server.
Argument
Argument Description
host name The hostname parameter is optional and can be specified to list aparticular active host.
Example
list host testhost1;Lists the details of testhost1 registered with the Audit Vault Server.
A.2.7 REGISTER HOSTLearn about the REGISTER HOST AVCLI command.
The REGISTER HOST command adds the host to Audit Vault Server and identifies it as ahost machine on which an Agent can be deployed.
Syntax
REGISTER HOST <host_name> WITH IP <ip_address>
Appendix AAgent Host AVCLI Commands
A-6

Arguments
Argument Description
host_name The name of the host computer that you want to register.
See Also:
• LIST HOST to find the names ofcurrently registered hosts.
• LIST ATTRIBUTE FOR SECUREDTARGET
ip_address The IP address associated with the host.
Usage Notes
To change the IP address associated with a host, use the ALTER HOST command.
Example
avcli> REGISTER HOST sample_host.example.net with ip 192.0.2.1;
Registers the host machine, sample_host.example.net, and associates it with the IP address192.0.2.1.
A.3 Database Firewall AVCLI CommandsThe AVCLI Database Firewall commands enable you to configure the Database Firewall.
A.3.1 About the Database Firewall AVCLI CommandsThe AVCLI database firewall commands enable you to perform tasks such as registering oraltering a database firewall.
A.3.2 ALTER FIREWALLUse the ALTER FIREWALL command to alter Oracle Database Firewall attributes.
The ALTER FIREWALL command alters the Database Firewall attributes.
Syntax
ALTER FIREWALL firewall_name SET attribute=value [, attribute=value]
Arguments
Argument Description
firewall_name The name of the Database Firewall.
Appendix ADatabase Firewall AVCLI Commands
A-7

Argument Description
attribute The pair (attribute and new value) for the Database Firewall. Separatemultiple pairs by a space on the command line. See Table A-4 for a list ofattributes.
Usage Notes
Table A-4 lists Database Firewall attributes that you can specify for the attribute=valueargument.
Table A-4 Oracle Database Firewall Attributes
Parameter Description
NAME The new name of the Database Firewall.
IP The IP address of the Database Firewall.
Example
avcli> ALTER FIREWALL sample_fw1 SET NAME=sample_newfw1;
Database Firewall name changes from sample_fw1 to sample_newfw1.
avcli> ALTER FIREWALL sample_fw1 SET IP=192.0.2.169;
Database Firewall IP address is set to 192.0.2.169.
A.3.3 CREATE RESILIENT PAIRUse the CREATE RESILIENT PAIR command to create a resilient pair with two OracleDatabase Firewall installations for high availability.
The CREATE RESILIENT PAIR command creates a resilient pair with two DatabaseFirewalls for high availability.
Syntax
CREATE RESILIENT PAIR FOR FIREWALL PRIMARY primary_firewall STANDBY standby_firewall
Arguments
Argument Descriptions
primary_firewall The name of the primary Database Firewall. Only this Firewall cangenerate syslog alerts
standby_firewall The name of the standby Database Firewall.
This argument is available starting Oracle AVDF release 20.6.
Starting Oracle AVDF 20.6, the pairing process of the Database Firewall instances is abackground job. See the Jobs dialog in the Audit Vault Server console to check thestatus of high availability pairing. Locate for the job against the entry Create DBFWresilient pair. After completion of the pairing process, navigate to the Database
Appendix ADatabase Firewall AVCLI Commands
A-8

Firewalls tab and then to High Availability tab in left navigation menu to verify the resilientpair.
Example
avcli> CREATE RESILIENT PAIR FOR FIREWALL PRIMARY sample_fw1 SECONDARY sample_fw2;
A resilient pair is created with primary Database Firewall sample_fw1 and standby DatabaseFirewall sample_fw2.
A.3.4 DROP FIREWALLUse the DROP FIREWALL command to drop a registered Oracle Database Firewall from OracleAudit Vault Server.
The DROP FIREWALL command drops an already registered Database Firewall from the AuditVault Server.
Syntax
DROP FIREWALL firewall_name
Arguments
Argument Descriptions
firewall_name The name of the Database Firewall.
Example
avcli> DROP FIREWALL sample_fw;
The Database Firewall sample_fw is dropped.
A.3.5 DROP RESILIENT PAIRLearn to use the DROP RESILIENT PAIR command to drop a resilient pair that contains thespecified Oracle Database Firewall.
The DROP RESILIENT PAIR command drops the resilient pair that contains the specifiedDatabase Firewall.
Syntax
DROP RESILIENT PAIR HAVING FIREWALL firewall_name
Arguments
Argument Descriptions
firewall_name The name of the Database Firewall.
Example
avcli> DROP RESILIENT PAIR HAVING FIREWALL sample_fw1;
Appendix ADatabase Firewall AVCLI Commands
A-9
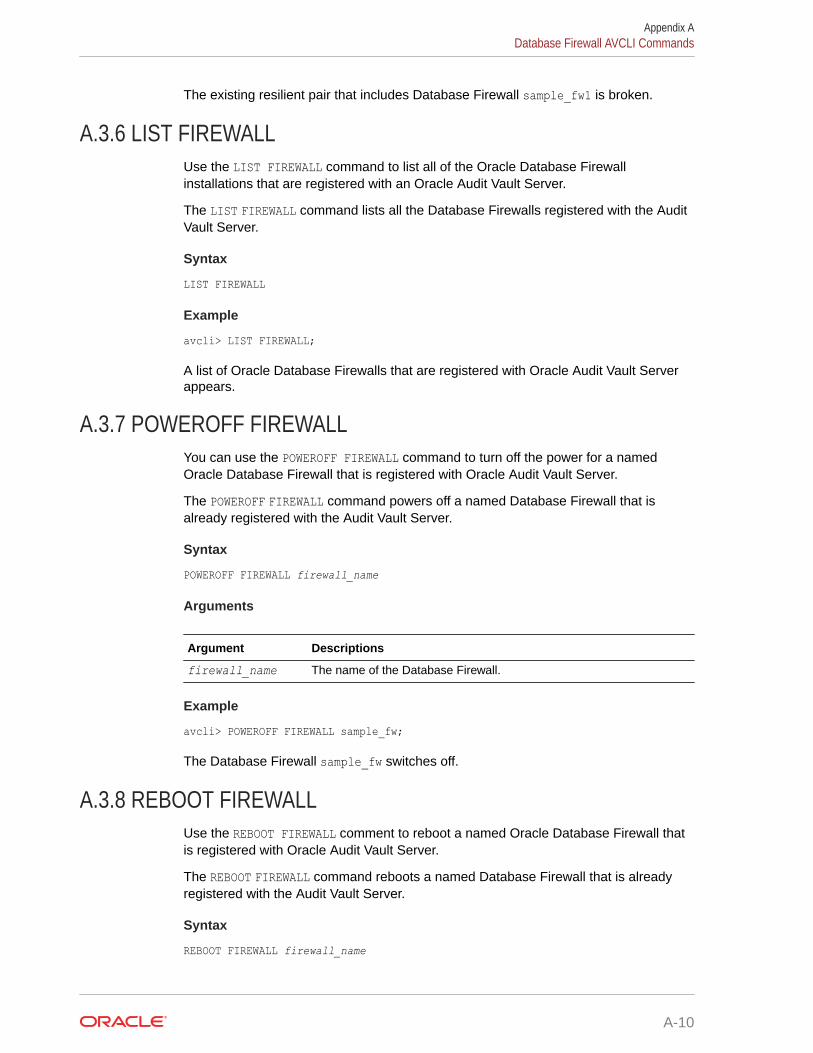
The existing resilient pair that includes Database Firewall sample_fw1 is broken.
A.3.6 LIST FIREWALLUse the LIST FIREWALL command to list all of the Oracle Database Firewallinstallations that are registered with an Oracle Audit Vault Server.
The LIST FIREWALL command lists all the Database Firewalls registered with the AuditVault Server.
Syntax
LIST FIREWALL
Example
avcli> LIST FIREWALL;
A list of Oracle Database Firewalls that are registered with Oracle Audit Vault Serverappears.
A.3.7 POWEROFF FIREWALLYou can use the POWEROFF FIREWALL command to turn off the power for a namedOracle Database Firewall that is registered with Oracle Audit Vault Server.
The POWEROFF FIREWALL command powers off a named Database Firewall that isalready registered with the Audit Vault Server.
Syntax
POWEROFF FIREWALL firewall_name
Arguments
Argument Descriptions
firewall_name The name of the Database Firewall.
Example
avcli> POWEROFF FIREWALL sample_fw;
The Database Firewall sample_fw switches off.
A.3.8 REBOOT FIREWALLUse the REBOOT FIREWALL comment to reboot a named Oracle Database Firewall thatis registered with Oracle Audit Vault Server.
The REBOOT FIREWALL command reboots a named Database Firewall that is alreadyregistered with the Audit Vault Server.
Syntax
REBOOT FIREWALL firewall_name
Appendix ADatabase Firewall AVCLI Commands
A-10

Arguments
Argument Descriptions
firewall_name The name of the Database Firewall.
Example
avcli> REBOOT FIREWALL sample_fw;
The Database Firewall sample_fw reboots.
A.3.9 REGISTER FIREWALLUse the REGISTER FIREWALL command to register an Oracle Database Firewall that has aspecific IP address with Oracle Audit Vault Server.
The REGISTER FIREWALL command registers the Database Firewall that has the specified IPaddress with the Audit Vault Server.
Syntax
REGISTER FIREWALL firewall_name WITH IP ip_address
Arguments
Argument Descriptions
firewall_name The name of the Database Firewall.
ip_address The IP address of the Database Firewall.
Usage Notes
The Database Firewall must be installed at the given IP address location.
To specify a firewall name with a space, enclose the entire string in quotes.
Example
avcli> REGISTER FIREWALL sample_fw WITH IP 192.0.2.14;
Database Firewall sample_fw is installed at IP address 192.0.2.14.
A.3.10 SWAP RESILIENT PAIRLearn how to use the SWAP RESILIENT PAIR command to swap Oracle Database Firewallinstallations that are part of a resilient pair that includes a named Oracle Database Firewall.
The SWAP RESILIENT PAIR command swaps Database Firewalls in a resilient pair that includesthe named Database Firewall.
Syntax
SWAP RESILIENT PAIR HAVING FIREWALL firewall_name
Appendix ADatabase Firewall AVCLI Commands
A-11

Arguments
Argument Descriptions
firewall_name The name of the Database Firewall.
Example
avcli> SWAP RESILIENT PAIR HAVING FIREWALL sample_fw1;
In the existing resilient pair, Database Firewall sample_fw1, the primary firewall isswapped with the secondary firewall, or the reverse.
A.3.11 SHOW STATUS FOR FIREWALLLearn how to use the SHOW STATUS FOR FIREWALL command to show the status for anOracle Database Firewall installation.
The SHOW STATUS command displays the status for a particular Database Firewall.
Syntax
SHOW STATUS FOR FIREWALL firewall_name
Arguments
Argument Descriptions
firewall_name The name of the Database Firewall.
Example
avcli> SHOW STATUS FOR FIREWALL sample_fw1;
The running information for Oracle Database Firewall sample_fw1 appears.
A.4 Database Firewall Monitors AVCLI CommandsThe Database Firewall monitoring points related AVCLI commands enable you toconfigure the Database Firewall.
A.4.1 About Database Firewall Monitors AVCLI CommandsThe Database Firewall monitoring points related AVCLI commands enable you toconfigure the host computer on which the Audit Vault Agent resides.
A.4.2 ALTER DATABASE FIREWALL MONITORUse the ALTER DATABASE FIREWALL MONITOR command to alter monitoring points andtheir attributes.
The ALTER DATABASE FIREWALL MONITOR command alters the monitoring point and therelated attributes.
Appendix ADatabase Firewall Monitors AVCLI Commands
A-12

Syntax
ALTER DATABASE FIREWALL MONITOR FOR TARGET <target name> USING FIREWALL <firewall name> SET <options>
Arguments
Argument Description
firewall name The name of the Database Firewall which is associated with themonitoring point.
target name The name of the target which is associated with the Database Firewallmonitoring point.
options Every option must be in <attribute=value> format.
The following attributes can be included in options:
MODE=Monitoring_Blocking_Proxy /Monitoring_Out_Of_Band / Monitoring_Host_MonitorPRESERVE_CONNECTION=TRUE/FALSENETWORK_INTERFACE_CARD=new_network_interface_cardDATABASE_RESPONSE=TRUE/FALSEFULL_ERROR_MESSAGE=TRUE/FALSEDATABASE_INTERROGATION=TRUE/FALSEDDI_DB_ADDRESS = <database_address>DDI_DB_PORT = <port>DDI_DB_NAME = <database_name>DDI_DB_CREDENTIAL = <credential>ADD_ADDRESS=<ip:port[:service name | SID]>REMOVE_ADDRESS=<ip:port[:service name | SID]>
ADD_ADDRESS The address of the target which needs to be monitored by theDatabase Firewall.
The address needs to be in the following format: ip:port:[service]REMOVE_ADDRESS The address of the target which needs to be removed from being
monitored by the Database Firewall.
NETWORK_INTERFACE_CARD The new network interface card (or traffic source) for the DatabaseFirewall monitoring point.
For Monitoring_Host_Monitor (Oracle AVDF release 20.3 andlater) deployment mode, provide the name of the network interfacecard which has an IP address configured.
MODE The Database Firewall deployment mode. Valid modes are:
• Monitoring (Out-of-Band)• Monitoring (Host Monitor)• Monitoring / Blocking (Proxy)
Appendix ADatabase Firewall Monitors AVCLI Commands
A-13
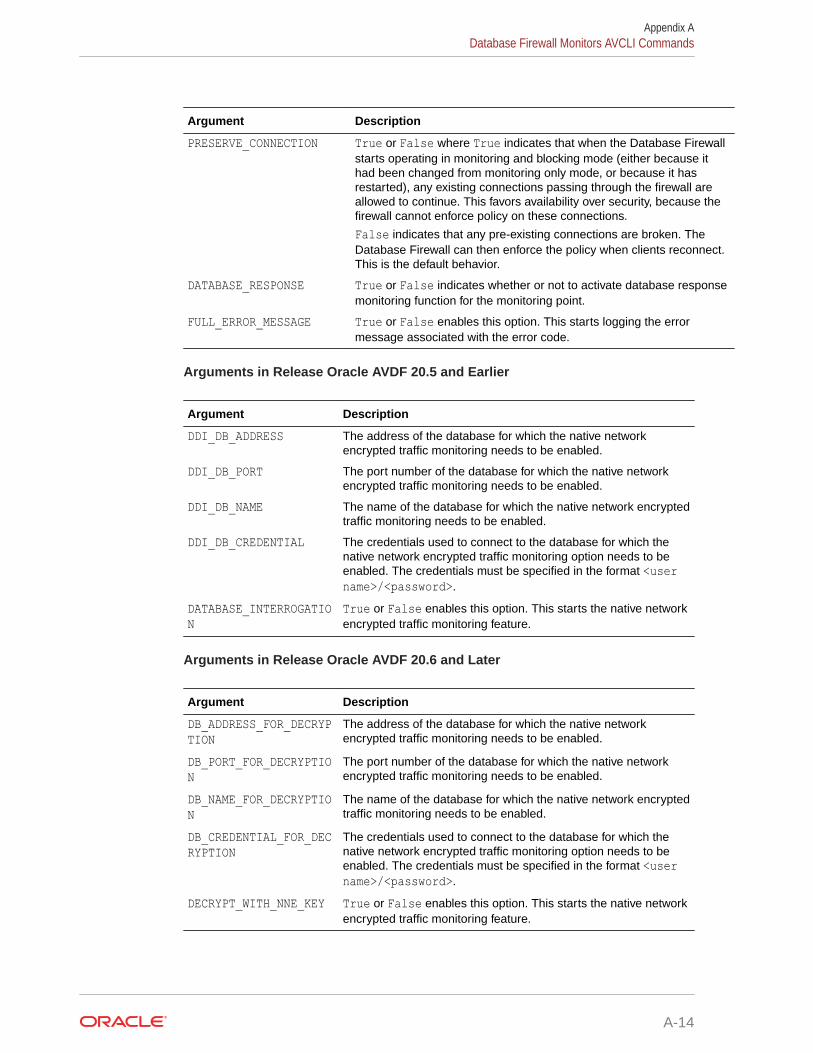
Argument Description
PRESERVE_CONNECTION True or False where True indicates that when the Database Firewallstarts operating in monitoring and blocking mode (either because ithad been changed from monitoring only mode, or because it hasrestarted), any existing connections passing through the firewall areallowed to continue. This favors availability over security, because thefirewall cannot enforce policy on these connections.
False indicates that any pre-existing connections are broken. TheDatabase Firewall can then enforce the policy when clients reconnect.This is the default behavior.
DATABASE_RESPONSE True or False indicates whether or not to activate database responsemonitoring function for the monitoring point.
FULL_ERROR_MESSAGE True or False enables this option. This starts logging the errormessage associated with the error code.
Arguments in Release Oracle AVDF 20.5 and Earlier
Argument Description
DDI_DB_ADDRESS The address of the database for which the native networkencrypted traffic monitoring needs to be enabled.
DDI_DB_PORT The port number of the database for which the native networkencrypted traffic monitoring needs to be enabled.
DDI_DB_NAME The name of the database for which the native network encryptedtraffic monitoring needs to be enabled.
DDI_DB_CREDENTIAL The credentials used to connect to the database for which thenative network encrypted traffic monitoring option needs to beenabled. The credentials must be specified in the format <username>/<password>.
DATABASE_INTERROGATION
True or False enables this option. This starts the native networkencrypted traffic monitoring feature.
Arguments in Release Oracle AVDF 20.6 and Later
Argument Description
DB_ADDRESS_FOR_DECRYPTION
The address of the database for which the native networkencrypted traffic monitoring needs to be enabled.
DB_PORT_FOR_DECRYPTION
The port number of the database for which the native networkencrypted traffic monitoring needs to be enabled.
DB_NAME_FOR_DECRYPTION
The name of the database for which the native network encryptedtraffic monitoring needs to be enabled.
DB_CREDENTIAL_FOR_DECRYPTION
The credentials used to connect to the database for which thenative network encrypted traffic monitoring option needs to beenabled. The credentials must be specified in the format <username>/<password>.
DECRYPT_WITH_NNE_KEY True or False enables this option. This starts the native networkencrypted traffic monitoring feature.
Appendix ADatabase Firewall Monitors AVCLI Commands
A-14
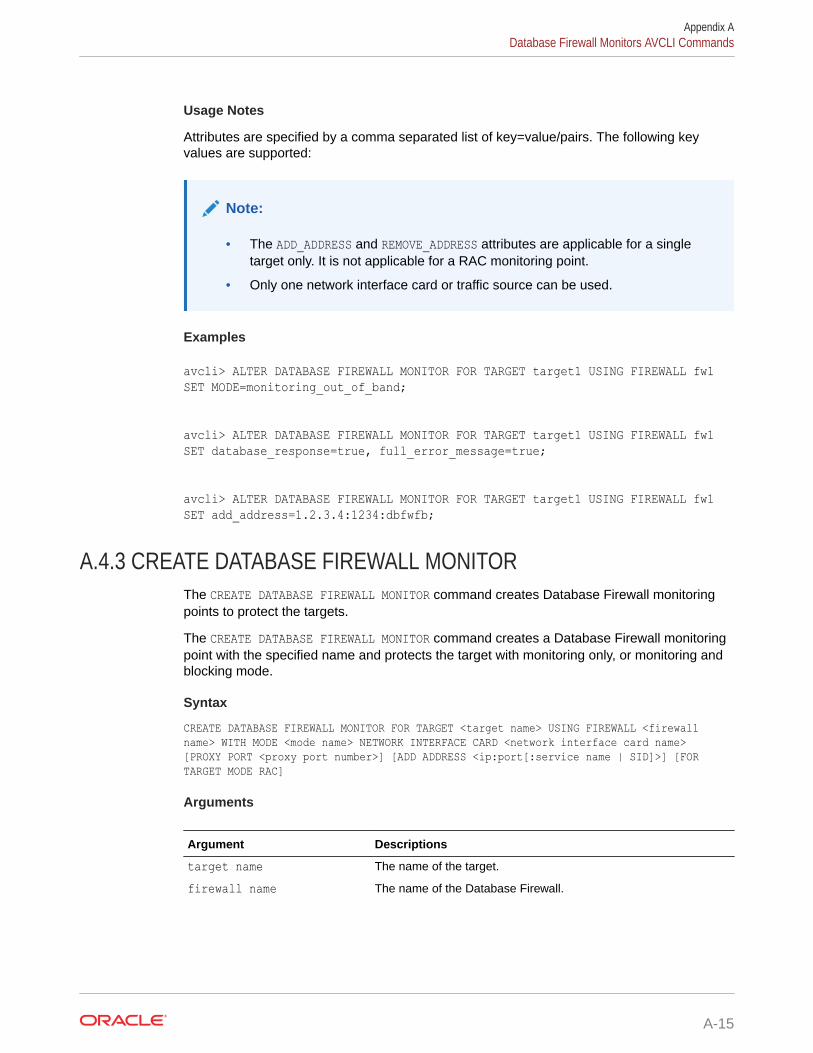
Usage Notes
Attributes are specified by a comma separated list of key=value/pairs. The following keyvalues are supported:
Note:
• The ADD_ADDRESS and REMOVE_ADDRESS attributes are applicable for a singletarget only. It is not applicable for a RAC monitoring point.
• Only one network interface card or traffic source can be used.
Examples
avcli> ALTER DATABASE FIREWALL MONITOR FOR TARGET target1 USING FIREWALL fw1 SET MODE=monitoring_out_of_band;
avcli> ALTER DATABASE FIREWALL MONITOR FOR TARGET target1 USING FIREWALL fw1 SET database_response=true, full_error_message=true;
avcli> ALTER DATABASE FIREWALL MONITOR FOR TARGET target1 USING FIREWALL fw1 SET add_address=1.2.3.4:1234:dbfwfb;
A.4.3 CREATE DATABASE FIREWALL MONITORThe CREATE DATABASE FIREWALL MONITOR command creates Database Firewall monitoringpoints to protect the targets.
The CREATE DATABASE FIREWALL MONITOR command creates a Database Firewall monitoringpoint with the specified name and protects the target with monitoring only, or monitoring andblocking mode.
Syntax
CREATE DATABASE FIREWALL MONITOR FOR TARGET <target name> USING FIREWALL <firewall name> WITH MODE <mode name> NETWORK INTERFACE CARD <network interface card name> [PROXY PORT <proxy port number>] [ADD ADDRESS <ip:port[:service name | SID]>] [FOR TARGET MODE RAC]
Arguments
Argument Descriptions
target name The name of the target.
firewall name The name of the Database Firewall.
Appendix ADatabase Firewall Monitors AVCLI Commands
A-15
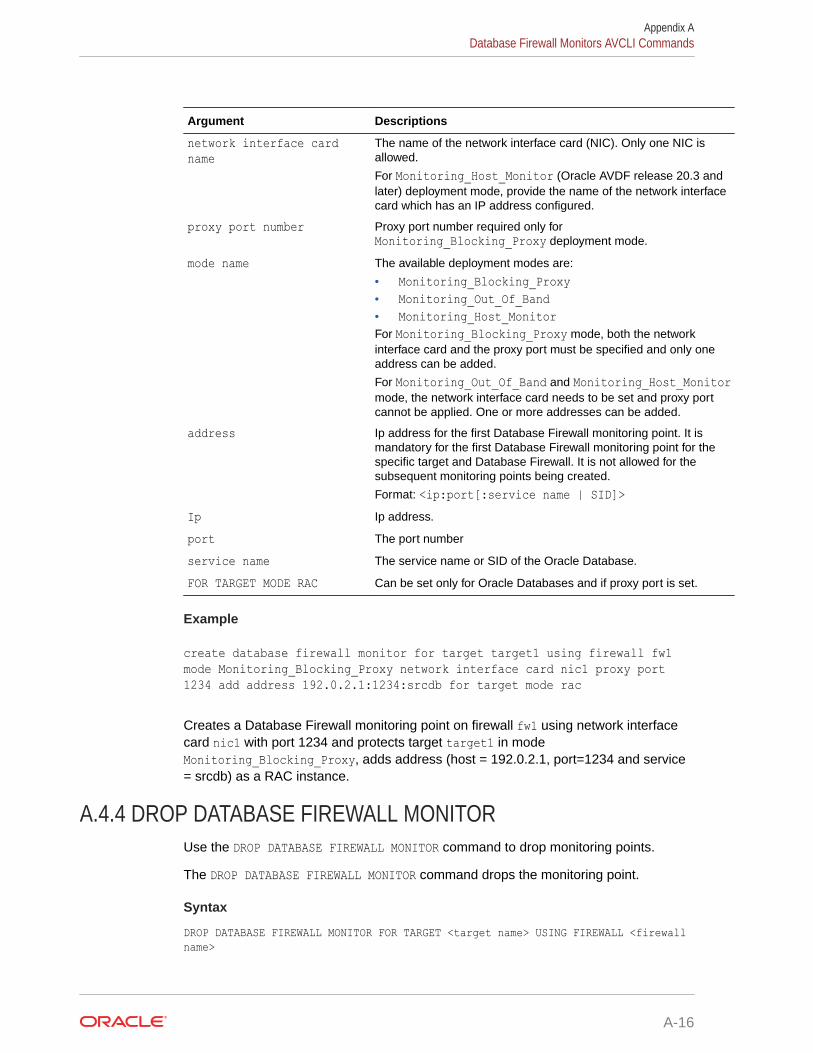
Argument Descriptions
network interface cardname
The name of the network interface card (NIC). Only one NIC isallowed.
For Monitoring_Host_Monitor (Oracle AVDF release 20.3 andlater) deployment mode, provide the name of the network interfacecard which has an IP address configured.
proxy port number Proxy port number required only forMonitoring_Blocking_Proxy deployment mode.
mode name The available deployment modes are:
• Monitoring_Blocking_Proxy• Monitoring_Out_Of_Band• Monitoring_Host_MonitorFor Monitoring_Blocking_Proxy mode, both the networkinterface card and the proxy port must be specified and only oneaddress can be added.
For Monitoring_Out_Of_Band and Monitoring_Host_Monitormode, the network interface card needs to be set and proxy portcannot be applied. One or more addresses can be added.
address Ip address for the first Database Firewall monitoring point. It ismandatory for the first Database Firewall monitoring point for thespecific target and Database Firewall. It is not allowed for thesubsequent monitoring points being created.
Format: <ip:port[:service name | SID]>Ip Ip address.
port The port number
service name The service name or SID of the Oracle Database.
FOR TARGET MODE RAC Can be set only for Oracle Databases and if proxy port is set.
Example
create database firewall monitor for target target1 using firewall fw1 mode Monitoring_Blocking_Proxy network interface card nic1 proxy port 1234 add address 192.0.2.1:1234:srcdb for target mode rac
Creates a Database Firewall monitoring point on firewall fw1 using network interfacecard nic1 with port 1234 and protects target target1 in modeMonitoring_Blocking_Proxy, adds address (host = 192.0.2.1, port=1234 and service= srcdb) as a RAC instance.
A.4.4 DROP DATABASE FIREWALL MONITORUse the DROP DATABASE FIREWALL MONITOR command to drop monitoring points.
The DROP DATABASE FIREWALL MONITOR command drops the monitoring point.
Syntax
DROP DATABASE FIREWALL MONITOR FOR TARGET <target name> USING FIREWALL <firewall name>
Appendix ADatabase Firewall Monitors AVCLI Commands
A-16

Arguments
Argument Descriptions
firewall name The name of the Database Firewall.
target name The name of the target.
Examples
avcli> DROP DATABASE FIREWALL MONITOR FOR TARGET sample_source USING FIREWALL sample_fw;
avcli> DROP DATABASE FIREWALL MONITOR FOR TARGET target1 USING FIREWALL fw1;
The monitoring point is dropped.
A.4.5 LIST DATABASE FIREWALL MONITORUse the LIST DATABASE FIREWALL MONITOR command to list all of the monitoring pointsassociated with either the Database Firewall or the target.
The LIST DATABASE FIREWALL MONITOR command lists the monitoring points associated witheither the Database Firewall or the target.
Syntax
LIST DATABASE FIREWALL MONITOR FOR FIREWALL <firewall_name>
LIST DATABASE FIREWALL MONITOR FOR TARGET <target_name>
Arguments
Argument Descriptions
firewall_name The name of the Database Firewall.
target_name The name of the target.
Example
avcli> LIST DATABASE FIREWALL MONITOR FOR FIREWALL sample_fw;
A list of all the monitoring points associated with the Database Firewall sample_fw appears.
avcli> LIST DATABASE FIREWALL MONITOR FOR TARGET sample_source;
A list all the monitoring points associated with the target sample_source appears.
A.4.6 START DATABASE FIREWALL MONITORLearn how to use the START DATABASE FIREWALL MONITOR command to start a monitoringpoint that was previously suspended.
The START DATABASE FIREWALL MONITOR command starts a monitoring point that waspreviously suspended.
Appendix ADatabase Firewall Monitors AVCLI Commands
A-17

Syntax
START DATABASE FIREWALL MONITOR FOR TARGET <target name> USING FIREWALL <firewall name>
Arguments
Argument Descriptions
firewall name The name of the Database Firewall.
target name The name of the target.
Examples
avcli> START DATABASE FIREWALL MONITOR FOR TARGET sample_source USING FIREWALL sample_fw;
avcli> START DATABASE FIREWALL MONITOR FOR TARGET target1 USING FIREWALL fw1;
The monitoring point is started.
A.4.7 STOP DATABASE FIREWALL MONITORUse the STOP DATABASE FIREWALL MONITOR command to stop monitoring point.
The STOP DATABASE FIREWALL MONITOR command stops the monitoring point of thetarget.
Syntax
STOP DATABASE FIREWALL MONITOR FOR TARGET <target name> USING FIREWALL <firewall name>
Arguments
Argument Descriptions
firewall name The name of the Database Firewall.
target name The name of the target.
Examples
avcli> STOP DATABASE FIREWALL MONITOR FOR TARGET sample_source USING FIREWALL sample_fw;
avcli> STOP DATABASE FIREWALL MONITOR FOR TARGET target1 USING FIREWALL fw1;
The monitoring point is stopped.
A.5 Target AVCLI CommandsThe AVCLI target commands enable you to configure both database and nondatabasetargets for Audit Vault Server.
Appendix ATarget AVCLI Commands
A-18
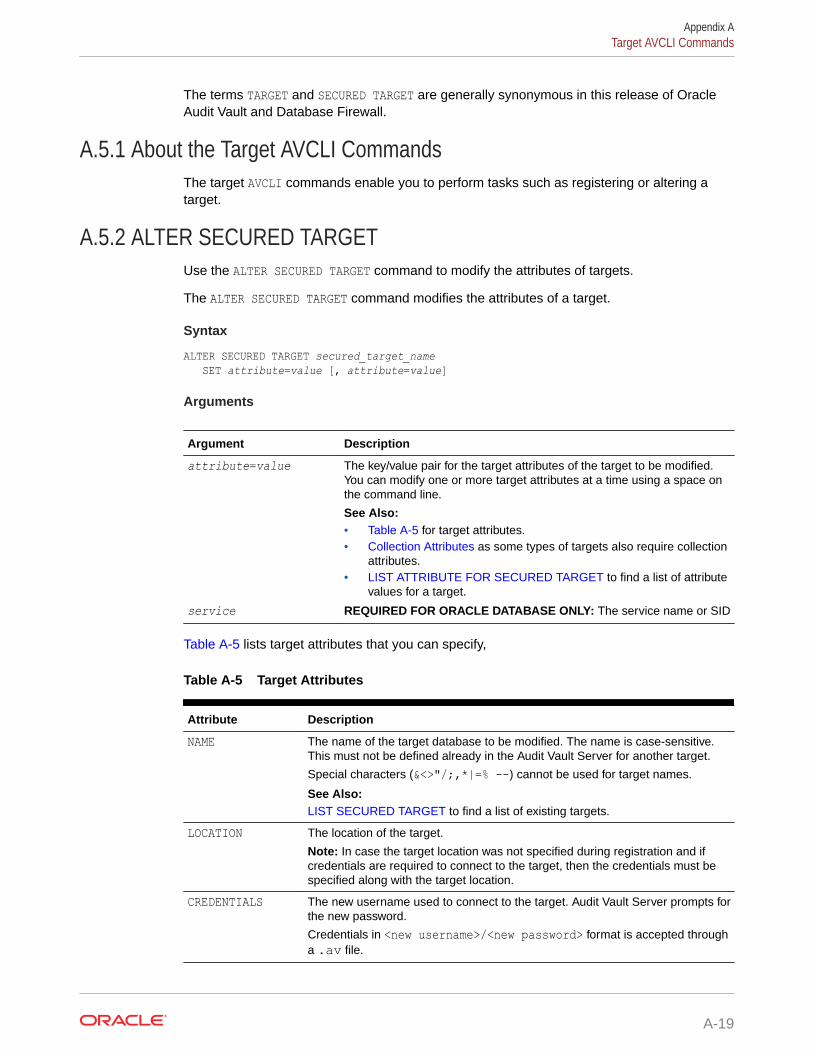
The terms TARGET and SECURED TARGET are generally synonymous in this release of OracleAudit Vault and Database Firewall.
A.5.1 About the Target AVCLI CommandsThe target AVCLI commands enable you to perform tasks such as registering or altering atarget.
A.5.2 ALTER SECURED TARGETUse the ALTER SECURED TARGET command to modify the attributes of targets.
The ALTER SECURED TARGET command modifies the attributes of a target.
Syntax
ALTER SECURED TARGET secured_target_name SET attribute=value [, attribute=value]
Arguments
Argument Description
attribute=value The key/value pair for the target attributes of the target to be modified.You can modify one or more target attributes at a time using a space onthe command line.
See Also:• Table A-5 for target attributes.• Collection Attributes as some types of targets also require collection
attributes.• LIST ATTRIBUTE FOR SECURED TARGET to find a list of attribute
values for a target.
service REQUIRED FOR ORACLE DATABASE ONLY: The service name or SID
Table A-5 lists target attributes that you can specify,
Table A-5 Target Attributes
Attribute Description
NAME The name of the target database to be modified. The name is case-sensitive.This must not be defined already in the Audit Vault Server for another target.
Special characters (&<>"/;,*|=% --) cannot be used for target names.
See Also:LIST SECURED TARGET to find a list of existing targets.
LOCATION The location of the target.
Note: In case the target location was not specified during registration and ifcredentials are required to connect to the target, then the credentials must bespecified along with the target location.
CREDENTIALS The new username used to connect to the target. Audit Vault Server prompts forthe new password.
Credentials in <new username>/<new password> format is accepted througha .av file.
Appendix ATarget AVCLI Commands
A-19

Table A-5 (Cont.) Target Attributes
Attribute Description
DESCRIPTION The description for this target database instance
MAXIMUM_ENFORCEMENT_POINT_THREADS
The maximum number of monitoring point threads for the target. The validrange is between 1 and 16 (inclusive). The default value is 1.
General Usage Examples
avcli> ALTER SECURED TARGET sample_source SET name=sample_source2;
The target name of sample_source changed to sample_source2.
avcli> ALTER SECURED TARGET sample_source SET credentials=scott;
The credentials used to connect to the target, sample_source, are changed.
avcli> ALTER SECURED TARGET sample_source SET description='This is a new description';
Number of monitoring point threads is set for target, sample_source.
avcli> ALTER SECURED TARGET sample_source SET maximum_enforcement_point_threads=14;
The description for the target, sample_source, is changed.
avcli> ALTER SECURED TARGET sample_source set maximum_enforcement_point_threads = 10;
Sets the maximum number of monitoring point threads for target sample_source to 10.
Oracle Example:
avcli> ALTER SECURED TARGET secured target sample_source set location=jdbc:oracle:thin:@//new_sample_host:1521:sample_db;
The location of the target, sample_source, changes.
A.5.3 DROP SECURED TARGETLearn how to use the DROP SECURED TARGET command to remove the registration of aspecified target from Oracle Audit Vault Server.
The DROP SECURED TARGET command removes the registration of the specified targetfrom Audit Vault Server.
Syntax
DROP SECURED TARGET secured_target_name
Appendix ATarget AVCLI Commands
A-20

Arguments
Argument Description
secured_target_name The name of the target. To find all registered targets, see "LISTSECURED TARGET".
Usage Notes
Ensure that all trails associated with this target are in stopped state before dropping thetarget. Otherwise, the DROP SECURED TARGET command fails. See HELP STOP COLLECTION for anexplanation of how to stop active trails.
Dropping a target stops the Audit Vault Server from monitoring it. Any audit data collectedearlier continues to be available in the Audit Vault Server repository.
Examples
avcli> DROP SECURED TARGET sample_source;
Drops the sample_source target.
A.5.4 LIST ATTRIBUTE FOR SECURED TARGETUse the LIST ATTRIBUTE FOR SECURED TARGET command to list the attributes of targets.
The LIST ATTRIBUTE FOR SECURED TARGET command lists the attributes of a given target.
Syntax
LIST ATTRIBUTE FOR SECURED TARGET secured target name;
Arguments
Argument Description
securedtarget name
The name of the target. To find all registered targets, see "LIST SECUREDTARGET".
A.5.5 LIST METRICSUse the LIST METRICS command to list the metrics of a given target, such as various trails.
The LIST METRICS command lists the metrics of a given target, such as various trails.
Syntax
LIST METRICS FOR SECURED TARGET secured_target_name
Arguments
Argument Description
secured_target_name The name of the target
To find all registered targets, see "LIST SECURED TARGET".
Appendix ATarget AVCLI Commands
A-21
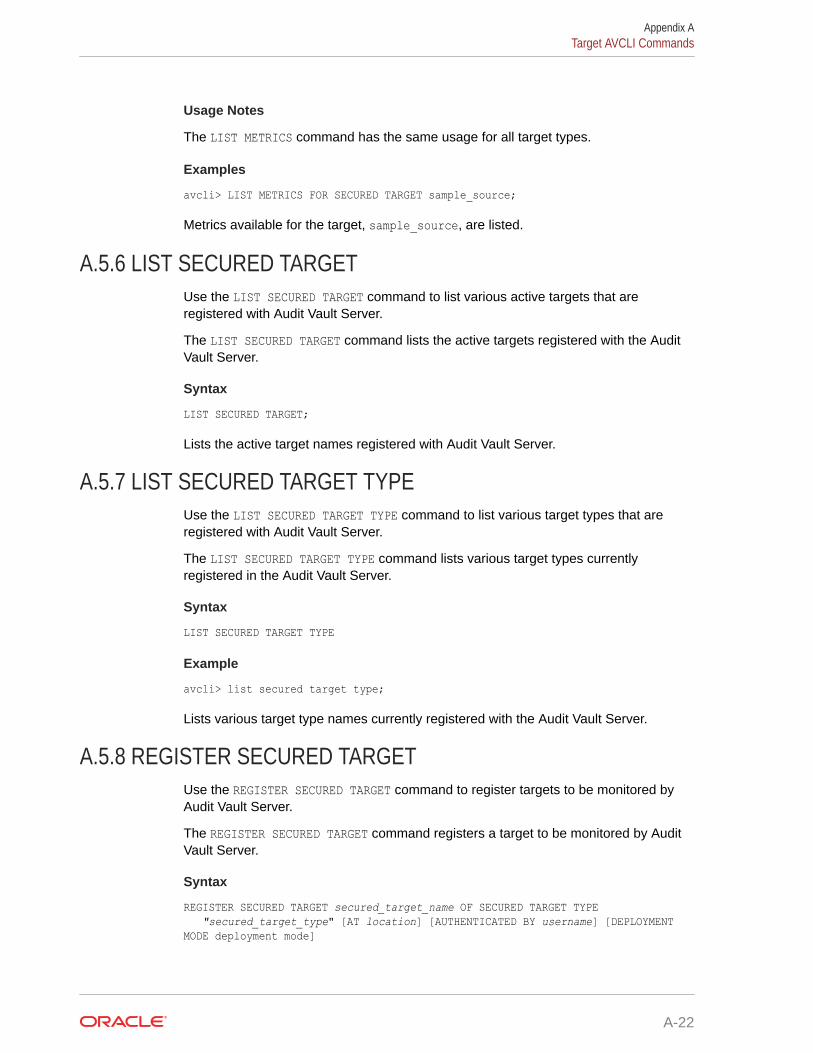
Usage Notes
The LIST METRICS command has the same usage for all target types.
Examples
avcli> LIST METRICS FOR SECURED TARGET sample_source;
Metrics available for the target, sample_source, are listed.
A.5.6 LIST SECURED TARGETUse the LIST SECURED TARGET command to list various active targets that areregistered with Audit Vault Server.
The LIST SECURED TARGET command lists the active targets registered with the AuditVault Server.
Syntax
LIST SECURED TARGET;
Lists the active target names registered with Audit Vault Server.
A.5.7 LIST SECURED TARGET TYPEUse the LIST SECURED TARGET TYPE command to list various target types that areregistered with Audit Vault Server.
The LIST SECURED TARGET TYPE command lists various target types currentlyregistered in the Audit Vault Server.
Syntax
LIST SECURED TARGET TYPE
Example
avcli> list secured target type;
Lists various target type names currently registered with the Audit Vault Server.
A.5.8 REGISTER SECURED TARGETUse the REGISTER SECURED TARGET command to register targets to be monitored byAudit Vault Server.
The REGISTER SECURED TARGET command registers a target to be monitored by AuditVault Server.
Syntax
REGISTER SECURED TARGET secured_target_name OF SECURED TARGET TYPE "secured_target_type" [AT location] [AUTHENTICATED BY username] [DEPLOYMENT MODE deployment mode]
Appendix ATarget AVCLI Commands
A-22

Arguments
Argument Description
secured_target_name Name of target. Must be unique.
Special characters (&<>"/;,*|=% --) cannot be used fortarget names.
secured_target_type A valid target type, for example "Oracle".
See Also:LIST SECURED TARGET TYPE to find a list of supportedtarget types.
location The target database connection information.
See Also:ALTER SECURED TARGET
This is optional. It can be added later.
The location is an opaque string that specifies how to connectto the target, typically a JDBC connect string. The syntax thatyou use depends on the target type. See the database-specificUsage Notes below.
If location is not provided, certain features such as entitlementretrieval, audit settings management, SPA retrieval, and audittrail collection are disabled if applicable to this target type.
user_name Optional. Credentials to connect to the target.
After you enter the username argument, Audit Vault Serverprompts you for the password of the target user account. Fortarget databases, this account must exist on the targetdatabase. Optional.
See the database specific usage notes in the followingsections.
DEPLOYMENT MODE Optional. Deployment mode of target. This argument isavailable starting with release Oracle AVDF 20.7.
For Oracle Database having Active Data Guard with UnifiedAuditing, specify the DEPLOYMENT MODE as ADG. For additionalinformation, refer to Additional Information for Audit Collectionfrom Oracle Active Data Guard.
General Examples
avcli> HELP REGISTER SECURED TARGET;
Displays detailed help for the REGISTER SECURED TARGET command.
Oracle Database Usage Notes and Examples
• Authentication credentials must be specified along with the target location if credentialsare required to connect to the target.
• For the location argument, enter the host name, port number, and service ID (SID),separated by a colon. Use the following syntax:
AT host:port:service• JDBC connect string format for different target types are specified below. For example:
Oracle Database: jdbc:oracle:thin:@//<host>:<port>/<service name | SID>
Appendix ATarget AVCLI Commands
A-23

Sybase ASE and Sybase SQL Anywhere: jdbc:av:sybase://<host>:<port>Microsoft SQL Server: jdbc:av:sqlserver://<host>:<port>IBM DB2 DBARS and IBM DB2 LUW: jdbc:av:db2://<host>:<port>/<databasename>MySQL: jdbc:av:mysql://<host>:<port>/mysql
• If you are unsure of this connection information, then run the lsnrctl statuslistener_name command on the computer where you installed the targetdatabase.
• For the AUTHENTICATED BY command, enter the user name, and Audit Vault Serverprompts you for the password. AUTHENTICATED BY <username>/<password> isaccepted from file input through .av file. This user account must exist in the targetdatabase.
To find this user, query the SESSION_PRIVS and SESSION_ROLES data dictionaryviews.
• For Oracle Database having Active Data Guard with Unified Auditing, specify theDEPLOYMENT MODE as ADG.
Oracle Database Examples
avcli> REGISTER SECURED TARGET sample_source OF SECURED TARGET TYPE "Oracle Database" AT jdbc:oracle:thin:@//anymachinename:1521/example.com AUTHENTICATED BY system DEPLOYMENT MODE ADG;
Registers an Oracle target, sample_source, of target type Oracle Database, reachableusing connect string jdbc:oracle:thin:@//anymachinename: 1521/example.comusing credentials system and deployment mode ADG.
SQL Server Example With DB
avcli > REGISTER SECURED TARGET sample_mssqldb OF SECURED TARGET TYPE"Microsoft SQL Server" AT jdbc:av:sqlserver://hostname:port authenticatedby <user>;
SQL Server Example with Windows Authentication
avcli > REGISTER SECURED TARGET sample_mssqldb OF SECURED TARGET TYPE "Microsoft SQL Server" AT “jdbc:av:sqlserver://<Host Name>:<Port>;authenticationMethod=ntlmjava;domain=<domain name>” authenticated by <windows user>;
IBM DB2 Example
avcli> REGISTER SECURED TARGET sample_db2db OF SECURED TARGET TYPE "IBM DB2 LUW" AT jdbc:av:db2://host:port authenticated by sa;
Registers a DB2 target, sample_db2db, of target type "IBM DB2 LUW", reachable usingconnect string jdbc:av:db2://host:port using credentials authenticated by sa.
Appendix ATarget AVCLI Commands
A-24
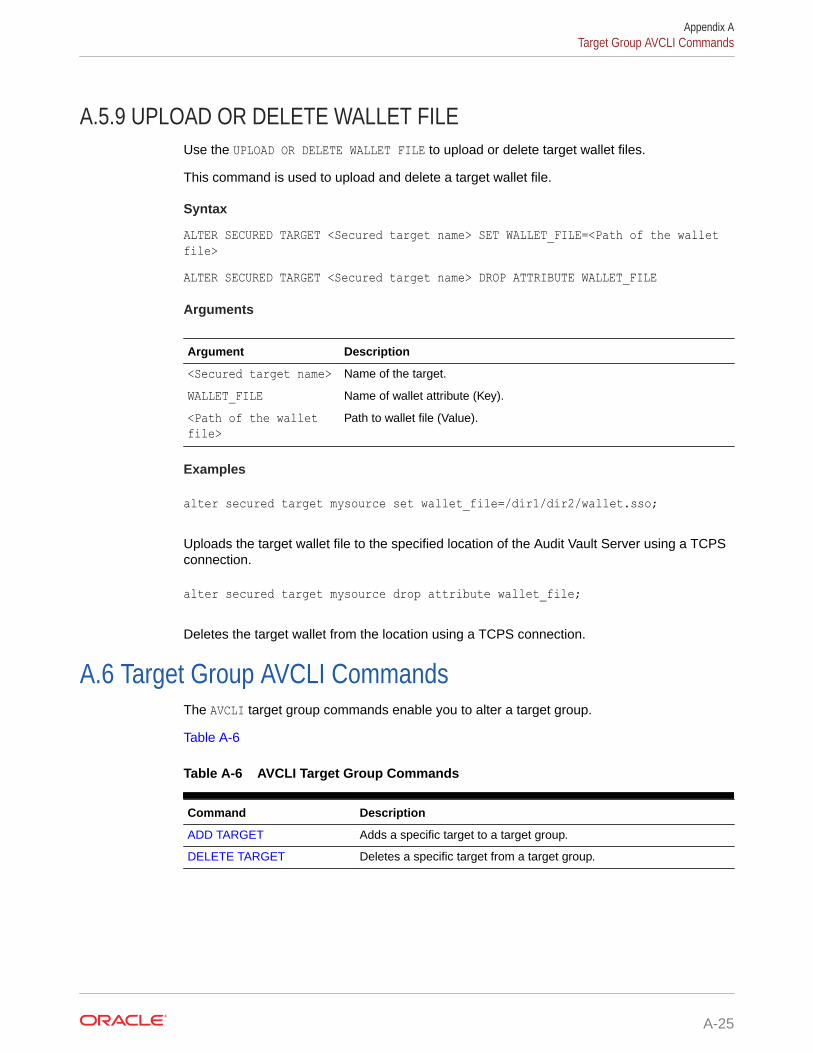
A.5.9 UPLOAD OR DELETE WALLET FILEUse the UPLOAD OR DELETE WALLET FILE to upload or delete target wallet files.
This command is used to upload and delete a target wallet file.
Syntax
ALTER SECURED TARGET <Secured target name> SET WALLET_FILE=<Path of the walletfile>ALTER SECURED TARGET <Secured target name> DROP ATTRIBUTE WALLET_FILE
Arguments
Argument Description
<Secured target name> Name of the target.
WALLET_FILE Name of wallet attribute (Key).
<Path of the walletfile>
Path to wallet file (Value).
Examples
alter secured target mysource set wallet_file=/dir1/dir2/wallet.sso;
Uploads the target wallet file to the specified location of the Audit Vault Server using a TCPSconnection.
alter secured target mysource drop attribute wallet_file;
Deletes the target wallet from the location using a TCPS connection.
A.6 Target Group AVCLI CommandsThe AVCLI target group commands enable you to alter a target group.
Table A-6
Table A-6 AVCLI Target Group Commands
Command Description
ADD TARGET Adds a specific target to a target group.
DELETE TARGET Deletes a specific target from a target group.
Appendix ATarget Group AVCLI Commands
A-25
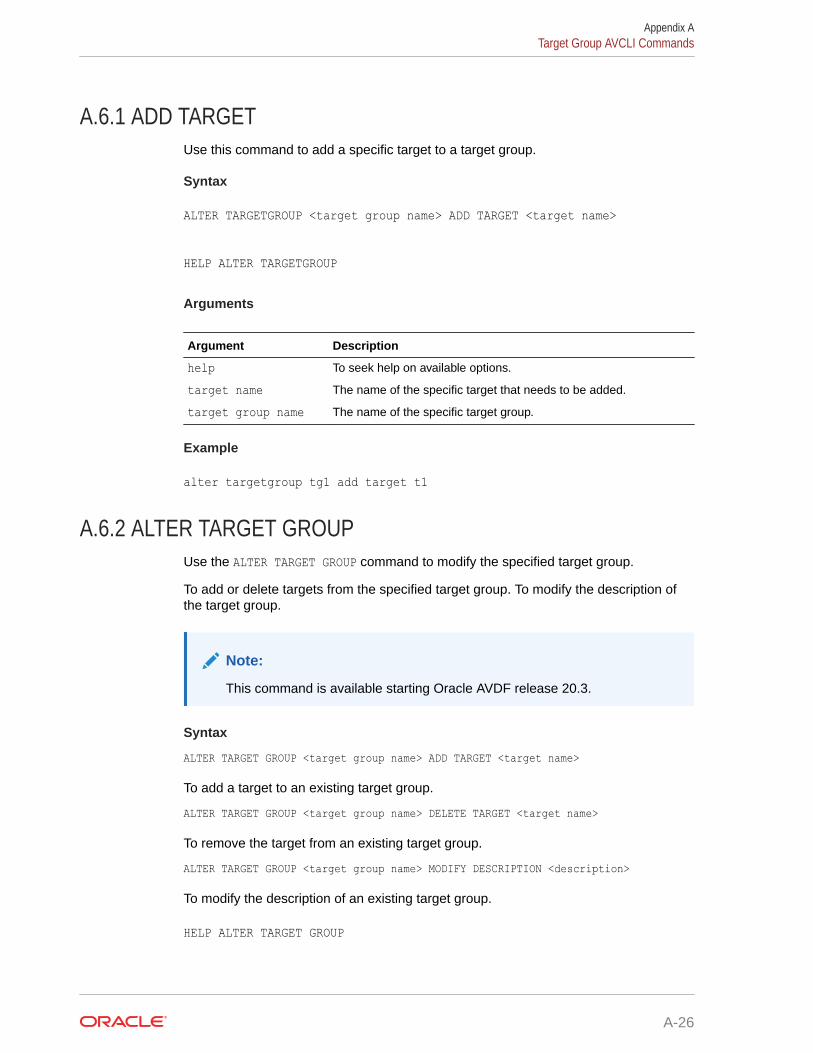
A.6.1 ADD TARGETUse this command to add a specific target to a target group.
Syntax
ALTER TARGETGROUP <target group name> ADD TARGET <target name>
HELP ALTER TARGETGROUP
Arguments
Argument Description
help To seek help on available options.
target name The name of the specific target that needs to be added.
target group name The name of the specific target group.
Example
alter targetgroup tg1 add target t1
A.6.2 ALTER TARGET GROUPUse the ALTER TARGET GROUP command to modify the specified target group.
To add or delete targets from the specified target group. To modify the description ofthe target group.
Note:
This command is available starting Oracle AVDF release 20.3.
Syntax
ALTER TARGET GROUP <target group name> ADD TARGET <target name>
To add a target to an existing target group.
ALTER TARGET GROUP <target group name> DELETE TARGET <target name>
To remove the target from an existing target group.
ALTER TARGET GROUP <target group name> MODIFY DESCRIPTION <description>
To modify the description of an existing target group.
HELP ALTER TARGET GROUP
Appendix ATarget Group AVCLI Commands
A-26
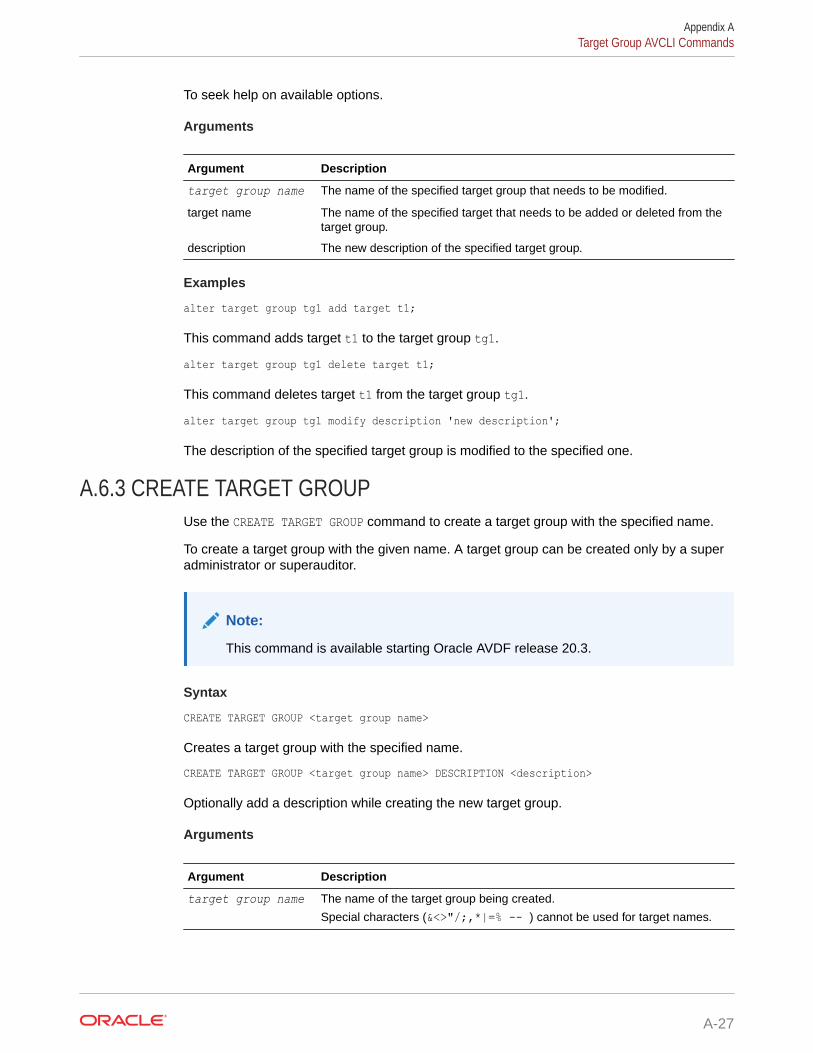
To seek help on available options.
Arguments
Argument Description
target group name The name of the specified target group that needs to be modified.
target name The name of the specified target that needs to be added or deleted from thetarget group.
description The new description of the specified target group.
Examples
alter target group tg1 add target t1;
This command adds target t1 to the target group tg1.
alter target group tg1 delete target t1;
This command deletes target t1 from the target group tg1.
alter target group tg1 modify description 'new description';
The description of the specified target group is modified to the specified one.
A.6.3 CREATE TARGET GROUPUse the CREATE TARGET GROUP command to create a target group with the specified name.
To create a target group with the given name. A target group can be created only by a superadministrator or superauditor.
Note:
This command is available starting Oracle AVDF release 20.3.
Syntax
CREATE TARGET GROUP <target group name>
Creates a target group with the specified name.
CREATE TARGET GROUP <target group name> DESCRIPTION <description>
Optionally add a description while creating the new target group.
Arguments
Argument Description
target group name The name of the target group being created.
Special characters (&<>"/;,*|=% -- ) cannot be used for target names.
Appendix ATarget Group AVCLI Commands
A-27

Examples
CREATE TARGET GROUP test22
A new target group with the name test22 is created.
create target group my_group2 description 'new group for new reports';
Creates a target group my_group2 with description new group for new reports.
A.6.4 DELETE TARGETUse this command to delete a specific target from a target group.
Syntax
ALTER TARGETGROUP <target group name> DELETE TARGET <target name>HELP ALTER TARGETGROUP
Arguments
Argument Description
help To seek help on available options.
target name The name of the specific target that needs to be deleted.
target group name The name of the specific target group.
Example
alter targetgroup tg1 delete target t1
A.6.5 DROP TARGET GROUPUse the DROP TARGET GROUP command to remove the registration of the specifiedtarget group from Audit Vault Server.
To drop the specified target group from Audit Vault Server.
Note:
This command is available starting Oracle AVDF release 20.3.
Syntax
DROP TARGET GROUP <target group name>
Arguments
Argument Description
target group name The name of the specified target group being dropped.
Appendix ATarget Group AVCLI Commands
A-28

Example
DROP TARGET GROUP test22
The target group with the name test22 is dropped.
A.6.6 LIST TARGET GROUPSUse the LIST TARGET GROUPS command to view a list of all target groups for a user.
To view a list of all target groups for a user.
Note:
This command is available starting Oracle AVDF release 20.3.
Syntax
LIST TARGET GROUPS
This command lists all the target groups for the current user.
Example
list target groups;
Lists all the target groups.
A.6.7 LIST TARGETS OF TARGET GROUPUse the LIST TARGETS OF TARGET GROUP command to view a list of active targets in aspecific target group.
To view a list of active targets in a specific target group.
Note:
This command is available starting Oracle AVDF release 20.3.
Syntax
LIST TARGETS OF TARGET GROUP <target group name>
This command lists various active targets in a specific target group. The output contains thename, location, and description for each target.
Arguments
Argument Description
target group name The name of the target group for which the active targets are being listed.
Appendix ATarget Group AVCLI Commands
A-29

Example
list targets of target group tg1;
Lists various active targets of the target group tg1.
A.7 Audit Trail Collection AVCLI CommandsThe audit trail collection AVCLI commands enable you to perform tasks such asstarting and stopping audit trail collections.
A.7.1 About Oracle Audit Trail AVCLI CommandsThe AVCLI target audit trial collection commands enable you to manage the audit trailcollections for the targets.
A.7.2 DROP TRAIL FOR SECURED TARGETUse the DROP TRAIL FOR SECURED TARGET command to drop audit trails.
The DROP TRAIL FOR SECURED TARGET drops a trail that no longer needs to bemonitored.
Note:
An audit trail must be in a STOPPED state in order for it to be dropped. Atrail that has previously collected audit data associated with it cannot bedropped.
Syntax
DROP TRAIL FOR SECURED TARGET secured_target_name USING HOST hostname FROM location [WITH CONNECTION <connection_name>]
Arguments
Argument Description
secured_target_name The name of the target whose audit trail you want todrop.
hostname The name of the host where the target agent resides.
location The location is one of following:
• DIRECTORY directory name / mask• TABLE tablename• SYSLOG DEFAULT | filename / file mask• NETWORK• EVENT LOG eventlog name• TRANSACTION LOG directory name / mask
• CUSTOM name
Appendix AAudit Trail Collection AVCLI Commands
A-30
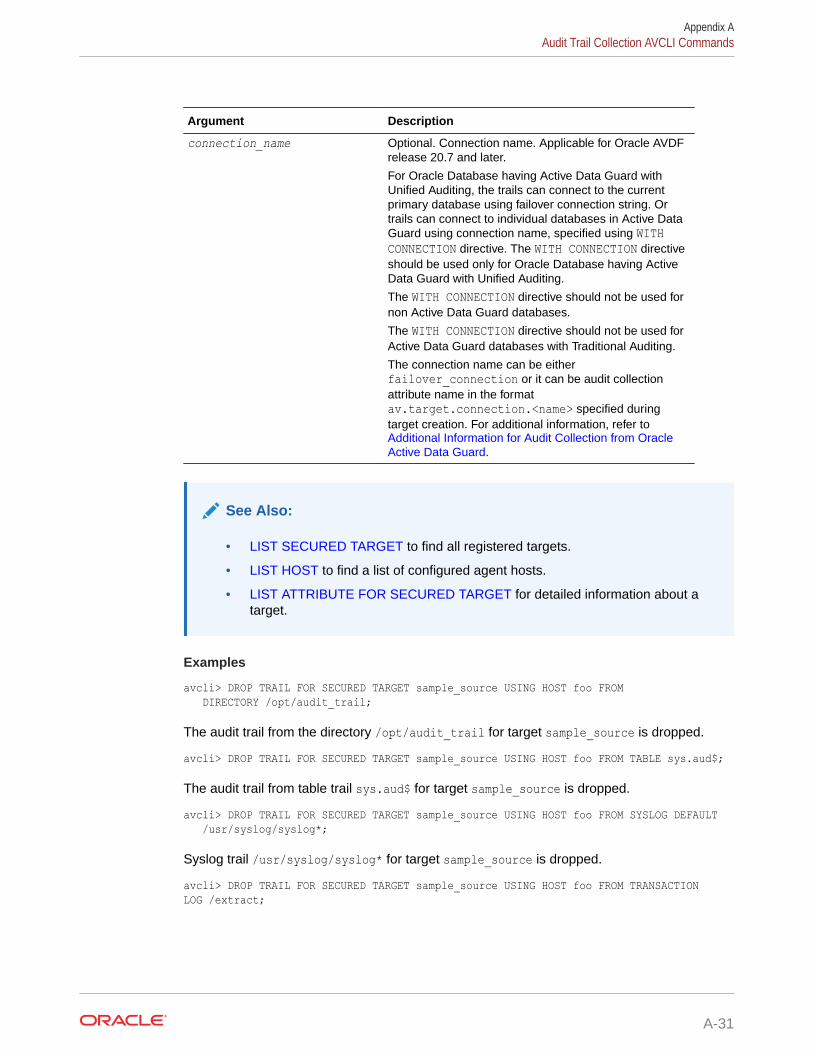
Argument Description
connection_name Optional. Connection name. Applicable for Oracle AVDFrelease 20.7 and later.
For Oracle Database having Active Data Guard withUnified Auditing, the trails can connect to the currentprimary database using failover connection string. Ortrails can connect to individual databases in Active DataGuard using connection name, specified using WITHCONNECTION directive. The WITH CONNECTION directiveshould be used only for Oracle Database having ActiveData Guard with Unified Auditing.
The WITH CONNECTION directive should not be used fornon Active Data Guard databases.
The WITH CONNECTION directive should not be used forActive Data Guard databases with Traditional Auditing.
The connection name can be eitherfailover_connection or it can be audit collectionattribute name in the formatav.target.connection.<name> specified duringtarget creation. For additional information, refer to Additional Information for Audit Collection from OracleActive Data Guard.
See Also:
• LIST SECURED TARGET to find all registered targets.
• LIST HOST to find a list of configured agent hosts.
• LIST ATTRIBUTE FOR SECURED TARGET for detailed information about atarget.
Examples
avcli> DROP TRAIL FOR SECURED TARGET sample_source USING HOST foo FROM DIRECTORY /opt/audit_trail;
The audit trail from the directory /opt/audit_trail for target sample_source is dropped.
avcli> DROP TRAIL FOR SECURED TARGET sample_source USING HOST foo FROM TABLE sys.aud$;
The audit trail from table trail sys.aud$ for target sample_source is dropped.
avcli> DROP TRAIL FOR SECURED TARGET sample_source USING HOST foo FROM SYSLOG DEFAULT /usr/syslog/syslog*;
Syslog trail /usr/syslog/syslog* for target sample_source is dropped.
avcli> DROP TRAIL FOR SECURED TARGET sample_source USING HOST foo FROM TRANSACTION LOG /extract;
Appendix AAudit Trail Collection AVCLI Commands
A-31

The transaction log trail from the directory /extract for target sample_source isdropped.
avcli> DROP TRAIL FOR SECURED TARGET mysource USING HOST foo FROM TABLE unified_audit_trail WITH CONNECTION failover_connection;
Deletes table trail unified_audit_trail for target mysource using failover connectionspecified during target registration. This is applicable only for Oracle Database havingActive Data Guard with Unified Auditing starting with Oracle AVDF release 20.7.
avcli> DROP TRAIL FOR SECURED TARGET mysource USING HOST foo FROM TABLE unified_audit_trail WITH CONNECTION av.target.connection.<name>;
Deletes table trail unified_audit_trail for target mysource using connection name inthe format av.target.connection.<name> specified during target registration. This isapplicable only for Oracle Database having Active Data Guard with Unified Auditingstarting with Oracle AVDF release 20.7.
A.7.3 LIST TRAIL FOR SECURED TARGETUse the LIST TRAIL FOR SECURED TARGET command to list audit trails that have beenstarted with the START COLLECTION command or stopped with the STOP COLLECTIONcommand,
The LIST TRAIL FOR SECURED TARGET command lists the available audit trails thathave been started with the START COLLECTION command or stopped with the STOPCOLLECTION command.
Syntax
LIST TRAIL FOR SECURED TARGET secured_target_name
Arguments
Argument Description
secured_target_name The name of the target.
To find a list of existing targets, see "LIST SECUREDTARGET".
Usage Notes
LIST TRAIL FOR SECURED TARGET does not list audit trails have been created but notyet started or stopped.
Examples
avcli> LIST TRAIL FOR SECURED TARGET sample_source;
The trails available for the target sample_souce are listed.
Appendix AAudit Trail Collection AVCLI Commands
A-32

A.7.4 START COLLECTION FOR SECURED TARGETLearn how to use the START COLLECTION FOR SECURED TARGET command to begin thecollection of specified audit trail data from targets.
The START COLLECTION FOR SECURED TARGET command starts the collection of specified audittrail data from a given target, optionally using the specified collection plug-in.
Note:
In case the audit trail does not already exist, then it is created and started.
Syntax
START COLLECTION FOR SECURED TARGET secured_target_name USING HOST host FROM location [USING PLUGIN plugin id] [WITH CONNECTION <connection_name>]
Arguments
Argument Description
secured_target_name The name of the target whose audit trail collection you wantto begin.
host The name of the host where the target agent resides.
location The location is one of following:
• DIRECTORY directory name / mask• TABLE tablename• SYSLOG DEFAULT | filename / file mask• NETWORK• EVENT LOG eventlog_name• TRANSACTION LOG directory name / mask• CUSTOM name
plugin id The collection plug-in id being used. Required if there is morethan one possible plug-in. Optional if there is only one plug-in.
Appendix AAudit Trail Collection AVCLI Commands
A-33
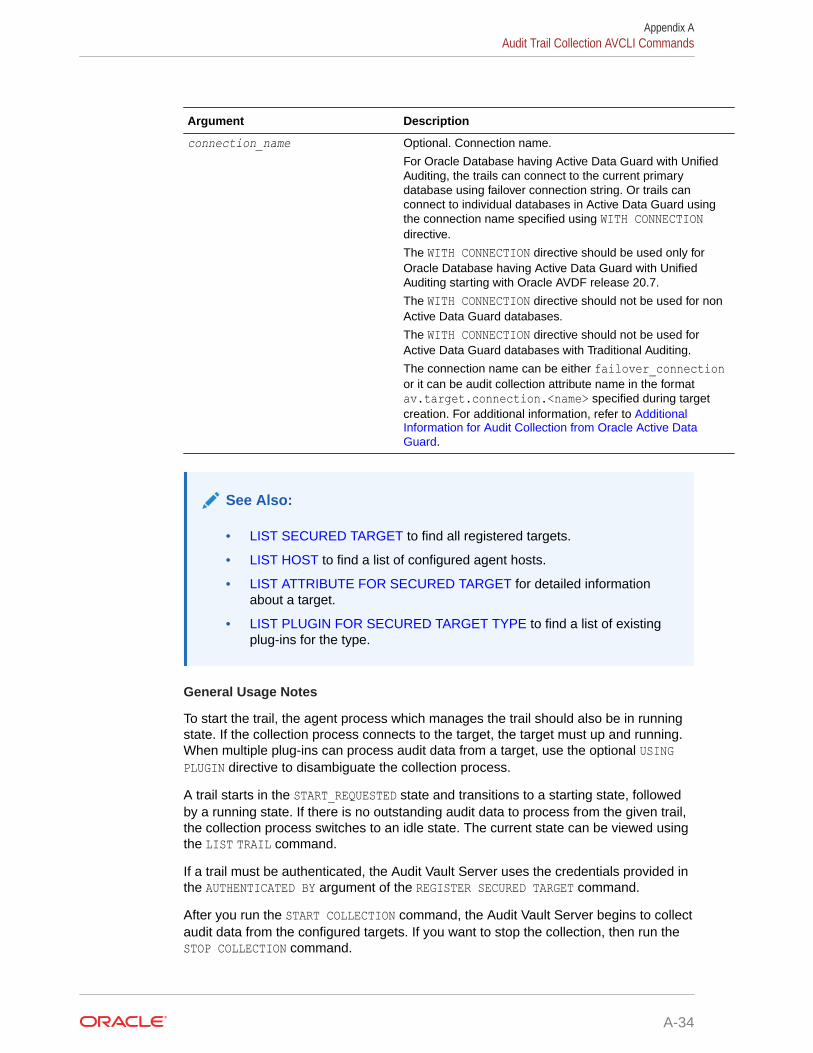
Argument Description
connection_name Optional. Connection name.
For Oracle Database having Active Data Guard with UnifiedAuditing, the trails can connect to the current primarydatabase using failover connection string. Or trails canconnect to individual databases in Active Data Guard usingthe connection name specified using WITH CONNECTIONdirective.
The WITH CONNECTION directive should be used only forOracle Database having Active Data Guard with UnifiedAuditing starting with Oracle AVDF release 20.7.
The WITH CONNECTION directive should not be used for nonActive Data Guard databases.
The WITH CONNECTION directive should not be used forActive Data Guard databases with Traditional Auditing.
The connection name can be either failover_connectionor it can be audit collection attribute name in the formatav.target.connection.<name> specified during targetcreation. For additional information, refer to AdditionalInformation for Audit Collection from Oracle Active DataGuard.
See Also:
• LIST SECURED TARGET to find all registered targets.
• LIST HOST to find a list of configured agent hosts.
• LIST ATTRIBUTE FOR SECURED TARGET for detailed informationabout a target.
• LIST PLUGIN FOR SECURED TARGET TYPE to find a list of existingplug-ins for the type.
General Usage Notes
To start the trail, the agent process which manages the trail should also be in runningstate. If the collection process connects to the target, the target must up and running.When multiple plug-ins can process audit data from a target, use the optional USINGPLUGIN directive to disambiguate the collection process.
A trail starts in the START_REQUESTED state and transitions to a starting state, followedby a running state. If there is no outstanding audit data to process from the given trail,the collection process switches to an idle state. The current state can be viewed usingthe LIST TRAIL command.
If a trail must be authenticated, the Audit Vault Server uses the credentials provided inthe AUTHENTICATED BY argument of the REGISTER SECURED TARGET command.
After you run the START COLLECTION command, the Audit Vault Server begins to collectaudit data from the configured targets. If you want to stop the collection, then run theSTOP COLLECTION command.
Appendix AAudit Trail Collection AVCLI Commands
A-34

See Also:
• REGISTER SECURED TARGET
• STOP COLLECTION FOR SECURED TARGET
Windows Systems Usage Notes
On Windows systems, enter directory and file name locations in either double-quoted stringsor as a nonquoted string using forward slashes. For example:
... FROM DIRECTORY "c:\app\oracle\product\11.1\av";
... FROM DIRECTORY c:/app/oracle/product/11.1/av;
General Examples
avcli> START COLLECTION FOR SECURED TARGET sample_source USING HOST foo FROM directory /opt/audit_trail;
Audit data collection from trail /opt/audit_trail for target sample_source starts.
avcli> START COLLECTION FOR SECURED TARGET sample_source USING HOST foo FROM TABLE sys.aud$;
Audit data collection from table trail sys.aud$ for target sample_source starts.
avcli> START COLLECTION FOR SECURED TARGET sample_source USING HOST foo FROM syslog /usr/syslog/syslog*;
Collecting syslog trail /usr/syslog/syslog* for target sample_source starts.
avcli> START COLLECTION FOR SECURED TARGET sample_source USING HOST foo FROM event log application;
Collecting application event log trail for target sample_source starts.
avcli> START COLLECTION FOR SECURED TARGET sample_source USING HOST foo FROM transaction log /extract;
Audit data collection from trail /extract for target sample_source.
Collecting transaction log data from trail location /extract for target sample_source starts.
avcli> START COLLECTION FOR SECURED TARGET sample_source USING HOST foo FROM TABLE sys.aud$ USING PLUGIN com.sample_plugin;
Audit data collection from table trail sys.aud$ for the target sample_source, using thecom.sample_plugin, plug-in starts.
avcli> START COLLECTION FOR SECURED TARGET mysource USING HOST foo FROM TABLE unified_audit_trail WITH CONNECTION failover_connection;
Starts collecting audit data from table trail unified_audit_trail for target mysource usingfailover connection specified during target registration. This is applicable only for Oracle
Appendix AAudit Trail Collection AVCLI Commands
A-35

Database having Active Data Guard with Unified Auditing starting with Oracle AVDFrelease 20.7.
avcli> START COLLECTION FOR SECURED TARGET mysource USING HOST foo FROM TABLE unified_audit_trail WITH CONNECTION av.target.connection.<name>;
Starts collecting audit data from table trail unified_audit_trail for target mysourceusing connection name in the format av.target.connection.<name> specified duringtarget registration. This is applicable only for Oracle database having Active DataGuard with Unified Auditing starting with Oracle AVDF release 20.7.
Oracle Database Target Usage Notes
Audit Trail Settings
For the operating system type of audit trail, use the following settings:
Type of Audit Trail trail_type Setting audit_trail Setting
Operating system directory DIRECTORY directory_location
Syslog file SYSLOG file_name
Windows event log EVENTLOG N/A
SQL Server Target Usage Notes
Audit Trail Settings
You can write the SQL Server audit trail to the Windows event log, C2 trace files, orserver side trace files. The FROM trail_type audit_trail arguments are as follows:
Type of Audit Trail trail_type Setting audit_trail Setting
Windows event log EVENTLOG N/A
C2 trace file DIRECTORY file_wildcard
Server-side trace files DIRECTORY file_wildcard
SQLAUDIT files DIRECTORY file_wildcard
Appendix AAudit Trail Collection AVCLI Commands
A-36

Best Practice:
The user must have admin privileges to access the security event log collectorsystem. The user has an option to choose the following properties as the maximumevent log size.
Event Log Properties To Accomplish
Overwrite event as needed To delete the oldest event first. It automaticallyclears events.
Do not overwrite events To avoid overwriting of existing events. In this casethe user has to manually clear the event log.
Sybase ASE Target Usage Notes and Examples
For the Sybase ASE audit trail, set the trail_type audit_trail setting to TABLE SYSAUDITS.
Sybase ASE Example
avcli> START COLLECTION FOR SECURED TARGET hr_syb_db USING HOST sybserver FROM TABLE SYSAUDITS;
MySQL Usage Notes
The trail location is the path to the directory where converted XML files are created byrunning the MySQL XML transformation utility.
See Also:
Running the XML Transformation Utility for MySQL Audit Formats
IBM DB2 Usage Notes and Examples
For the IBM DB2 audit trail, set the trail_type audit_trail setting to DIRECTORYdirectory_location.
IBM DB2 Example
avcli> START COLLECTION FOR SECURED TARGET hr_db2_db USING HOST db2serverFROM DIRECTORY "d:\temp\trace";
Oracle Solaris Target Usage Notes
For an Oracle Solaris target, the trail location used in this command must be in the format:
hostname:path_to_trailwhere hostname matches the hostname in the audit log names, which look like this:
timestamp1.timestamp2.hostname
Appendix AAudit Trail Collection AVCLI Commands
A-37

Windows Target Usage Notes
For a Windows target, the event log audit trail type collects data from the WindowsSecurity Event Log. The trail location used in this command must be security.
Best Practice:
The user must have admin privileges to access the security event logcollector system. The user has an option to choose the following propertiesas the maximum event log size.
Event Log Properties To Accomplish
Overwrite event as needed To delete the oldest event first. It automaticallyclears events.
Do not overwrite events To avoid overwriting of existing events. In thiscase the user has to manually clear the eventlog.
Active Directory Target Usage Notes
For Active Directory target, the event log audit trail type collects data from the securityand directory service. The trail location used in this command must be security ordirectory service.
Best Practice:
Event Log Properties WhenMaximum Event Log Size IsReached
To Accomplish
Overwrite event as needed It is recommended to select Overwriteevent as needed (Oldest event first)or Do not overwrite events.
To delete the oldest event first. It automaticallyclears events.
Do not overwrite events To avoid overwriting of existing events. In thiscase the user has to manually clear the eventlog.
A.7.5 Create Audit Trail for a Secured TargetLearn how to create and start an audit trail.
To create a new audit trail, use the command syntax mentioned in STARTCOLLECTION FOR SECURED TARGET. In case the audit trail does not already exist,then it is created and started.
Appendix AAudit Trail Collection AVCLI Commands
A-38

A.7.6 STOP COLLECTION FOR SECURED TARGETUse the STOP COLLECTION FOR SECURED TARGET command to stop audit trail collections.
The STOP COLLECTION FOR SECURED TARGET command stops the audit trail collection.
Syntax
STOP COLLECTION FOR SECURED TARGET secured_target_name USING HOST hostname FROM location [USING PLUGIN plugin_id]] [WITH CONNECTION <connection_name>]
Arguments
Argument Description
secured_target_name The name of the target for the trail collection you want to stop.
hostname The name of the host where the target agent resides.
location The location is one of following:
• DIRECTORY directory name / mask• TABLE tablename• SYSLOGDEFAULT | filename / file mask• NETWORK• EVENT LOG eventlog name• TRANSACTION LOG directory name / mask• CUSTOM name
plugin_id The collection plug-in id being used. Required if there is morethan one possible plug-in. Optional if there is only one plug-in.
connection_name Optional. Connection name.
For Oracle Database having Active Data Guard with UnifiedAuditing, the trails can connect to the current primarydatabase using failover connection string. Or trails canconnect to individual databases in Active Data Guard usingconnection name, specified using WITH CONNECTIONdirective.
The WITH CONNECTION directive should be used only forOracle Database having Active Data Guard with UnifiedAuditing starting with Oracle AVDF release 20.7.
The WITH CONNECTION directive should not be used for nonActive Data Guard databases.
The WITH CONNECTION directive should not be used forActive Data Guard databases with Traditional Auditing.
The connection name can be either failover_connectionor it can be audit collection attribute name in the formatav.target.connection.<name> specified during targetcreation. For additional information, refer to AdditionalInformation for Audit Collection from Oracle Active DataGuard.
Appendix AAudit Trail Collection AVCLI Commands
A-39

See Also:
• LIST SECURED TARGET to find a list of all registered targets.
• LIST HOST to find a list of configured agent hosts.
• LIST ATTRIBUTE FOR SECURED TARGET for detailed informationabout a target.
• LIST PLUGIN FOR SECURED TARGET TYPE to find a list of existingplug-ins for the type.
• LIST TRAIL FOR SECURED TARGET to view the current state of target.
General Usage Notes
Since the command is sent to the trail directly, the agent process does not need to bein running state. When multiple plug-ins process audit data from a target, use theoptional USING PLUGIN directive to disambiguate the process.
A trail will be in a STOP_REQUESTED state when stopped and transitions to a stoppingstate, followed by a stopped state.
Windows Systems Usage Notes
On Windows systems, enter directory and file name locations in either double-quotedstrings or as a nonquoted string using forward slashes. For example:
... FROM DIRECTORY "c:\app\oracle\product\11.1\av";
... FROM DIRECTORY c:/app/oracle/product/11.1/av;
General Examples
avcli> STOP COLLECTION FOR SECURED TARGET sample_source USING HOST sample_host FROM directory /opt/audit_trail;
Audit data collection from trail /opt/audit_trail for target sample_source stops.
avcli> STOP COLLECTION FOR SECURED TARGET sample_source USING HOST sample_host FROM TABLE sys.aud$;
Audit data collection from table trail sys.aud$ for target sample_source stops.
avcli> STOP COLLECTION FOR SECURED TARGET sample_source USING HOST sample_host FROM syslog /usr/syslog/syslog*;
Collecting syslog trail /usr/syslog/syslog* for target sample_source stops.
avcli> STOP COLLECTION FOR SECURED TARGET sample_source USING HOST sample_host FROM event log application;
Collecting application event log trail for target sample_source stops
avcli> STOP COLLECTION FOR SECURED TARGET sample_source USING HOST sample_host FROM transaction log /extract;
Appendix AAudit Trail Collection AVCLI Commands
A-40
Collecting transaction log data from trail location /extract for target sample_source stops
avcli> STOP COLLECTION FOR SECURED TARGET sample_source USING HOST sample_host FROM TABLE sys.aud$ USING PLUGIN com.sample_plugin;
Audit data collection from table sys.aud$ for the target, sample_source, using thecom.sample_plugin, plug-in stops
avcli> STOP COLLECTION FOR SECURED TARGET mysource USING HOST foo FROM TABLE unified_audit_trail WITH CONNECTION failover_connection;
Stops collecting audit data from table trail unified_audit_trail for target mysource usingfailover connection specified during target registration. This is applicable only for OracleDatabase having Active Data Guard with Unified Auditing starting with Oracle AVDF release20.7.
avcli> STOP COLLECTION FOR SECURED TARGET mysource USING HOST foo FROM TABLE unified_audit_trail WITH CONNECTION av.target.connection.<name>;
Stops collecting audit data from table trail unified_audit_trail for target mysource usingconnection name in the format av.target.connection.<name> specified during targetregistration. This is applicable only for Oracle Database having Active Data Guard withUnified Auditing starting with Oracle AVDF release 20.7.
Oracle Database Usage Notes and Examples
Audit Trail Settings
For the operating system type of audit trail, use the following settings:
Oracle Database Examples
Operating system directory example:
avcli> STOP COLLECTION FOR SECURED TARGET hr_sql_db USING HOST hrdb.example.com FROM DIRECTORY $ORACLE_HOME/logs;
Operating system syslog file example:
avcli> STOP COLLECTION FOR SECURED TARGET hr_sql_db USING HOST hrdb.example.com FROM SYSLOG /etc/syslog.conf;
Operating system Windows event log example:
avcli> STOP COLLECTION FOR SECURED TARGET hr_sql_db USING HOST hrdb.example.com FROM EVENTLOG;
Database audit trail example:
avcli> START COLLECTION FOR SECURED TARGET hr_sql_db USING HOST hrdb.example.com FROM TABLE sys.aud$;
TRANSACTION LOG example:
avcli> START COLLECTION FOR SECURED TARGET hr_sql_db USING HOST hrdb.example.com FROM TRANSACTION LOG /extract;
Appendix AAudit Trail Collection AVCLI Commands
A-41
SQL Server Usage Notes and Example
The SQL Server audit trail can be in the Windows event log, C2 trace files, or serverside trace files. The FROM trail_type audit_trail arguments are as follows:
Type of Audit Trail trail_type Setting audit_trail Setting
Windows event log EVENTLOG n/a
C2 trace file C2TRACE file_wildcard
Server-side trace files SERVERSIDETRACE file_wildcard
SQL Server Examples
Windows event log example:
avcli> STOP COLLECTION FOR SECURED TARGET hr_sql_db USING HOST mssqlserver FROM EVENTLOG;
C2 trace example:
avcli> STOP COLLECTION FOR SECURED TARGET hr_sql_db USING HOST mssqlserver FROM DIRECTORY "c:\SQLAuditFile*.trc";
Server-side trace example:
avcli> STOP COLLECTION FOR SECURED TARGET hr_sql_db USING HOST mssqlserver FROM DIRECTORY "c:\SQLAuditFile*.trc";
Sybase ASE Usage Notes and Example
For the Sybase ASE audit trail, set the trail_type audit_trail setting to TABLESYSAUDITS.
Sybase ASE Example
avcli> STOP COLLECTION FOR SECURED TARGET hr_syb_db USING HOST sybserver FROM TABLE SYSAUDITS;
MySQL Usage Notes
The trail location is the path to the directory where converted XML files are createdby running the MySQL XML transformation utility.
See Also:
Running the XML Transformation Utility for MySQL Audit Formats
IBM DB2 Usage Notes and Example
For the IBM DB2 audit trail, set the trail_type audit_trail setting to DIRECTORYdirectory_location.
IBM DB2 Example
Appendix AAudit Trail Collection AVCLI Commands
A-42
avcli> STOP COLLECTION FOR SECURED TARGET hr_db2_db USING HOST db2serverFROM DIRECTORY "d:\temp\trace";
Oracle Solaris Usage Notes
For Oracle Solaris, the trail location must be in the format:
hostname:path_to_trailwhere hostname matches the hostname in the audit log names, which look like this:
timestamp1.timestamp2.hostname
Windows Target Usage Notes
For a Windows target, the event log audit trail type collects data from the Windows SecurityEvent Log. The trail location used in this command must be security.
A.8 SMTP Connection AVCLI CommandsThe AVCLI SMTP commands enable you to manage SMTP email notifications for Audit VaultServer reports and alert.
A.8.1 About the SMTP Connection AVCLI CommandsThe AVCLI SMTP connection commands enable you to perform tasks such as registering andmodifying SMTP connections.
A.8.2 ALTER SMTP SERVERUse the ALTER SMTP SERVER command to modify SMTP server configurations and states.
The ALTER SMTP SERVER command modifies the SMTP server configuration and state.
Syntax
ALTER_SMTP SERVER AT host:[port] | [SENDER ID sender_id]| [SENDER EMAIL sender_email] | [AUTHENTICATED BY username]
Arguments
Argument Description
host:[port] The name, and optionally, the outgoing port number of theSMTP server. The port defaults to 25.
sender_id The user ID of the person responsible for sending the email(that is, the email address that appears after From).
sender_email The email address of the person whose ID you entered for theSENDER ID, in Request For Comments (RFC) 822 format.
Appendix ASMTP Connection AVCLI Commands
A-43

Argument Description
username Optional. The authentication credentials for the recipient user.
If the SMTP server runs in authenticated mode and needs avalid user name to connect to send emails, use theAUTHENTICATED BY clause to specify those credentials. AuditVault Server prompts for the password. AUTHENTICATED BYusername/password is accepted from file input through .avfile.
Usage Notes
• After you complete the SMTP server configuration, it is enabled and ready to use.
• If the SMTP server is a secure server, then run the ALTER SYSTEM SMTP SECUREMODE ON command after you run REGISTER SMTP SERVER.
• To test the configuration, run the TEST SMTP SERVER command.
• If you omit an argument, then Audit Vault Server uses the previously configuredsetting.
See Also:
• ALTER SMTP SERVER SECURE MODE ON
• TEST SMTP SERVER
Example
avcli> ALTER SMTP SERVER AT new_sample_host:465;
The host and port configuration information of the SMTP server is changed.
avcli> ALTER SMTP SERVER SENDER ID new-do-not-reply;
The sender ID configuration information of the SMTP server is changed.
avcli> ALTER SMTP SERVER AT new_sample_host:465 sender id new-do-not-reply;
The host and port as well as the sender ID of the SMTP server is changed.
A.8.3 ALTER SMTP SERVER DISABLEUse the ALTER SMTP SERVER DISABLE COMMAND to disable SMTP server configurations.
The ALTER SMTP SERVER DISABLE command disables the SMTP server configuration.
Syntax
ALTER SMTP SERVER DISABLE
Appendix ASMTP Connection AVCLI Commands
A-44

Usage Notes
• After you disable the configuration, Audit Vault Server preserves the most recentconfiguration. So, when you re-enable the configuration, this configuration is made activeagain.
• To find details about the most recent service configuration, see "LIST ATTRIBUTE OFSMTP SERVER".
• This command may be useful when the SMTP Server is down for system maintenance.
Example
avcli> ALTER SMTP SERVER DISABLE;
SMTP integration is disabled.
Disables the integration between the Audit Vault and SMT Server.
A.8.4 ALTER SMTP SERVER ENABLEUse the ALTER SMTP SERVER ENABLE command to enable SMTP server configurations forservers that you have registered with the REGISTER SMTP SERVER command or that youmodified with the ALTER SMTP SERVER command.
The ALTER SMTP SERVER ENABLE command enables SMTP server configurations for serversregistered with the REGISTER SMTP SERVER command or modified with the ALTER SMTPSERVER command.
Syntax
ALTER SMTP SERVER ENABLE
Usage Notes
• When you enable the configuration, Audit Vault Server uses the configuration that was inplace when you last disabled the SMTP configuration.
• To find details about the most recent service configuration, see "LIST ATTRIBUTE OFSMTP SERVER".
Example
avcli> ALTER SMTP SERVER ENABLE;
SMTP integration is enabled.
Enables the integration between the Audit Vault and SMTP server.
A.8.5 ALTER SMTP SERVER SECURE MODE OFFUse the ALTER SMTP SERVER SECURE MODE OFF command to disable the secure mode insecure SMTP servers.
The ALTER SMTP SERVER SECURE MODE OFF command disables secure mode in an existingsecure SMTP server.
Appendix ASMTP Connection AVCLI Commands
A-45
Syntax
ALTER SMTP SERVER SECURE MODE OFF
Usage Notes
Run this command after you run either the REGISTER SMTP SERVER or ALTERSMTP SERVER command.
Example
avcli> ALTER SMTP SERVER SECURE MODE OFF;
Updated SMTP server configuration to not use secure protocol.
Sets the SMTP Server registered with Oracle Audit Server to non-secure mode.
A.8.6 ALTER SMTP SERVER SECURE MODE ONUse the ALTER SMTP SERVER SECURE MODE ON command to enable SMTP serverconfigurations and specify the secure protocol mode that is in use.
The ALTER SMTP SERVER SECURE MODE ON command enables the SMTP serverconfiguration and specifies the secure protocol mode used.
Syntax
ALTER SMTP SERVER SECURE MODE ON PROTOCOL [SSL | TLS ] [TRUSTSTORE location]
Arguments
Argument Description
PROTOCOL Optional: One of the following types of protocol:
• SSL: Secure Sockets Layer (default)
• TLS: Transport Layer Security
location The path to the truststore file used to validate the servercertificates. Optional.
Usage Notes
Run this command after you run either the REGISTER SMTP SERVER or ALTER SMTPSERVER command.
Only run this command if the SMTP server that you are configuring is a secure server.
See Also:
• REGISTER SMTP SERVER
• ALTER SMTP SERVER
Appendix ASMTP Connection AVCLI Commands
A-46
Examples
avcli> ALTER SMTP SERVER SECURE MODE ON PROTOCOL ssl TRUSTSTORE /sample_tstore;
This command acknowledges that the SMTP Server registered with Oracle Audit Vault Serveris in secure mode, that is, supports SSL or TLS, and uses the file /sample_tstore to validatethe certificate obtained from the SMTP Server during connects.
avcli> ALTER SMTP SERVER SECURE MODE ON PROTOCOL tls TRUSTSTORE /sample_tstore;
This example sets TLS protocol instead of SSL.
A.8.7 DROP SMTP SERVERUse the DROP SMTP SERVER command to unregister the SMTP server that is registered withOracle Audit Vault Server and remove associated configuration metadata.
The DROP SMTP SERVER command unregisters the SMTP Server registered with the AuditVault Server and removes any associated configuration metadata.
Syntax
DROP SMTP SERVER
Example
avcli> DROP SMTP SERVER;
SMTP server unregistered successfully.
The SMTP Server is unregistered and any associated configuration metadata is removed.
A.8.8 LIST ATTRIBUTE OF SMTP SERVERUse the LIST ATTRIBUTE OF SMTP SERVER command to dislay the current SMTPconfiguration details the Oracle Audit Vault Server uses.
The LIST ATTRIBUTE OF SMTP SERVER command displays the current SMTP configurationdetails used by Audit Vault Server.
Syntax
LIST ATTRIBUTE OF SMTP SERVER
Usage Notes
To reconfigure the SMTP service connection, run the ALTER SMTP SERVER ("ALTER SMTPSERVER") command.
Example
avcli> LIST ATTRIBUTE OF SMTP SERVER;
The configuration data/attributes for the SMTP server appear.
Appendix ASMTP Connection AVCLI Commands
A-47

A.8.9 REGISTER SMTP SERVERUse the REGISTER SMTP SERVER command to register SMTP server configurations withAudit Vault Server.
The REGISTER SMTP SERVER command registers the SMTP server configuration withthe Audit Vault Server.
Syntax
REGISTER SMTP SERVER AT host:[port] SENDER ID sender_id SENDER EMAIL sender_email [AUTHENTICATED BY username]
Arguments
Argument Description
host:[port] The name, and optionally, the outgoing port number of theSMTP server. The port defaults to 25, if unspecified.
sender_id The user ID of the person responsible for sending theemail (that is, the email address that appears after From).
sender_email The email address of the person whose ID you entered forthe SENDER ID, in Request For Comments (RFC) 822format.
username Optional. The authentication credentials for the recipientuser.
If the SMTP server runs in authenticated mode and needsa valid username and password to connect to sendemails, use the AUTHENTICATED BY clause to specifythose credentials.
Audit Vault Server prompts for the password.AUTHENTICATED BY username/password is acceptedfrom file input through .av file.
Usage Notes
• Right after you create the SMTP server configuration, it is enabled and ready touse.
• If the SMTP server is a secure server, then run the ALTER SYSTEM SMTP SECUREMODE ON command after you run REGISTER SMTP SERVER.
• To test the configuration, run the TEST SMTP SERVER command.
• This command associates the sender id and sender email with this configurationdata so that all generated emails are sent with this sender id and sender email.
See Also:
• ALTER SMTP SERVER SECURE MODE ON
• TEST SMTP SERVER
Appendix ASMTP Connection AVCLI Commands
A-48
Examples
avcli> REGISTER SMTP SERVER AT sample_mail.example.com sender id "do-not-reply";
For an SMTP server running in non-authentication mode at sample_mail.example.com, allemail is generated and sent from the address: do-not-reply<[email protected]>.
avcli> REGISTER SMTP SERVER AT sample_mail.example.com:455 SENDER ID av-alerts SENDER EMAIL [email protected] AUTHENTICATED BY smtpuser
For an SMTP server running in authentication mode at sample_mail.example.com, port 455;all email is generated and sent from the address: av-alerts<[email protected]>. Thecredentials smtpuser connect to this server to send emails. The password has to be enteredin the next step by following the prompt.
A.8.10 TEST SMTP SERVERUse the TEST SMTP SERVER command to test the SMTP integration with Oracle Audit VaultServer by sending a test email.
The TEST SMTP SERVER command tests SMTP integration with the Audit Vault Server bysending a test email.
Syntax
TEST SMTP SERVER SEND EMAIL TO email_address
Arguments
Argument Description
email_address Recipient of the test email notification
Usage Notes
• If the test fails, then check the configuration by running the LIST ATTRIBUTE OF SMTPSERVER command.
• You can recreate the configuration by running the ALTER_SMTP SERVER command.
• If there are no errors, a test email appears in the mail box of the user specified by the e-mail address argument.
• You can provide a list of comma-separated email addresses to this command.
• A SMTP Server must first be registered with the Audit Vault Server before this commandcan be used.
See Also:
• ALTER SMTP SERVER
• REGISTER SMTP SERVER
• LIST ATTRIBUTE OF SMTP SERVER
Appendix ASMTP Connection AVCLI Commands
A-49

Example
avcli> TEST SMTP SERVER SEND EMAIL TO [email protected];
To test the SMTP integration, a test email is sent to the email address,[email protected].
avcli> TEST SMTP SERVER SEND EMAIL TO [email protected],[email protected];
To test the SMTP integration, a test email is sent to the email address list,[email protected],[email protected].
A.9 Security Management AVCLI CommandsThe AVCLI security management commands enable you to manage variousadministrator and super administrator privileges.
A.9.1 About the Security Management AVCLI CommandsThe security management AVCLI commands enable you to perform tasks such asregistering and modifying SMTP connections.
A.9.2 ALTER DATA ENCRYPTIONUse the ALTER DATA ENCRYPTION command to change Transparent Data Encryption(TDE) configuration to rekey or to reset the repository encryption password.
The ALTER DATA ENCRYPTION command enables super administrators to change theTransparent Data Encryption (TDE) configuration in an Oracle Audit Vault Serverrepository. A super administrator can use this command to rekey the master encryptionkey, or to reset the repository encryption (wallet) password.
Syntax
ALTER DATA ENCRYPTION REKEY
ALTER DATA ENCRYPTION CHANGE WALLET PASSWORD
Examples
avcli> ALTER DATA ENCRYPTION REKEY;
This command rekeys the master encryption key for the Audit Vault Server repository.
avcli> ALTER DATA ENCRYPTION CHANGE WALLET PASSWORD;This commands gives prompts to change the repository encryption (wallet) password.
A.9.3 ALTER USERUse the ALTER USER command to unlock user accounts.
The ALTER USER command unlocks a user account. Only super administrators can runthis command.
Appendix ASecurity Management AVCLI Commands
A-50

Syntax:
ALTER USER username ACCOUNT UNLOCK
Example:
avcli> ALTER USER scott ACCOUNT UNLOCK;
The account for user scott is unlocked.
Note:
To unlock super administrator or super auditor, follow these steps:
1. Connect to the Audit Vault Server as root user.
2. Switch user to dvaccountmgr: su dvaccountmgr3. Run sqlplus /.
4. Run the command: ALTER USER <super administrator/auditor username>ACCOUNT UNLOCK
A.9.4 GRANT ACCESSUse the GRANT ACCESS command to grant access to target names or target group names forspecified users.
The GRANT ACCESS command grants access to a target name or target group name to aspecified user.
Syntax
GRANT ACCESS ON SECURED TARGET secured_target_name TO username
GRANT ACCESS ON SECURED TARGET GROUP secured_target_group name TO username
Arguments
Argument Description
username The specified user.
secured_target_name The name of the target.
secured_target_group_name The name of the target group.
Example
avcli> GRANT ACCESS ON SECURED TARGET sample_source TO scott;
User scott granted access to target sample_source.
avcli> GRANT ACCESS ON SECURED TARGET GROUP hr_db_group TO hr;
User hr granted access to group of targets specified by the group hr_db_group.
Appendix ASecurity Management AVCLI Commands
A-51

A.9.5 GRANT ADMINUse the GRANT ADMIN command to grant administrator privileges to specified users.
The GRANT ADMIN command grants administrator privileges to specified user.
Syntax
GRANT ADMIN TO username
Arguments
Argument Description
username The specified user.
Example
avcli> GRANT ADMIN TO scott;
Administrator privileges granted to user scott.
A.9.6 GRANT AUDITORUse the GRANT AUDITOR command to grant auditor privileges to the specified user.
The GRANT AUDITOR command grants auditor privileges to the specified user.
Note:
This command is available starting Oracle AVDF release 20.4.
Syntax
GRANT AUDITOR TO <username>
Arguments
Argument Description
username The specified user.
Example
avcli> GRANT AUDITOR TO scott;
Auditor privileges granted to user scott.
Appendix ASecurity Management AVCLI Commands
A-52

A.9.7 GRANT SUPERADMINUse the GRANT SUPERADMIN command to grant super administrator privileges to users who arespecified by username.
The GRANT SUPERADMIN command grants super administrator privileges to the user specifiedby username.
Syntax
GRANT SUPERADMIN TO username
Arguments
Argument Description
username The specified user.
Usage Notes
This user automatically receives regular administrator rights as well.
Example
avcli> GRANT SUPERADMIN TO scott;
Super administrator (and administrator) privileges granted to user scott.
A.9.8 GRANT SUPERAUDITORUse the GRANT SUPERAUDITOR command to grant super auditor privileges to a specific user.
The GRANT SUPERAUDITOR command grants super auditor privileges to the specified user.
Note:
This command is available starting Oracle AVDF release 20.4.
Syntax
GRANT SUPERAUDITOR TO <username>
Arguments
Argument Description
username The specified user.
Usage Notes
This user automatically receives regular auditor rights as well.
Appendix ASecurity Management AVCLI Commands
A-53

Example
avcli> GRANT SUPERAUDITOR TO scott;
Super auditor (and auditor) privileges granted to user scott.
A.9.9 REVOKE ACCESSUse the REVOKE ACCESS command to revoke access to targets or target groupnames for specified users.
The REVOKE ACCESS command revokes access to a target or target group name from aspecified user.
Syntax
REVOKE ACCESS ON SECURED TARGET secured_target_name FROM username
REVOKE ACCESS ON SECURED TARGET GROUP secured_target_group_name FROM username
Arguments
Argument Description
username The specified user.
secured_target_name The name of the target.
secured_target_group_name The name of the target group.
Example
avcli> REVOKE ACCESS ON SECURED TARGET sample_source FROM scott;
Access to target sample_source revoked from user scott.
avcli> REVOKE ACCESS ON SECURED TARGET GROUP hr_db_group FROM hr;
Access to a group of targets specified by the group hr_db_group revoked from user hr.
A.9.10 REVOKE ADMINUse the REVOKE ADMIN command to revoke administrator privileges from specifiedusers.
The REVOKE ADMIN command revokes administrator privileges from specified user.
Syntax:
REVOKE ADMIN FROM username
Arguments
Argument Description
username The specified user.
Appendix ASecurity Management AVCLI Commands
A-54
Example:
avcli> REVOKE ADMIN FROM scott;
Administrator privileges revoked from user scott.
A.9.11 REVOKE AUDITORUse the REVOKE AUDITOR command to revoke auditor privileges from specified users.
The REVOKE AUDITOR command revokes auditor privileges from specified user.
Note:
This command is available starting Oracle AVDF release 20.4.
Syntax:
REVOKE AUDITOR FROM <username>
Arguments
Argument Description
username The specified user.
Example
avcli> REVOKE AUDITOR FROM scott;
Auditor privileges revoked from user scott.
A.9.12 REVOKE SUPERADMINUse the REVOKE SUPERADMIN command to revoke super administrator privileges from userswho are specified by username.
The REVOKE SUPERADMIN command revokes super administrator privileges from usersspecified by username.
Syntax:
REVOKE SUPERADMIN FROM username
Arguments
Argument Description
username The specified user.
Usage Notes
The user continues to retain regular administrator rights.
Appendix ASecurity Management AVCLI Commands
A-55
Example:
avcli> REVOKE SUPERADMIN FROM scott;
Super administrator privileges are revoked from user scott.
A.9.13 REVOKE SUPERAUDITORUse the REVOKE SUPERAUDITOR command to revoke super auditor privileges from aspecific user.
The REVOKE SUPERAUDITOR command revokes super auditor privileges from a specificuser.
Note:
This command is available starting Oracle AVDF release 20.4.
Syntax
REVOKE SUPERAUDITOR FROM <username>
Arguments
Argument Description
username The specified user.
Usage Notes
The user continues to retain regular auditor rights.
Example
avcli> REVOKE SUPERAUDITOR FROM scott;
Super auditor privileges are revoked from user scott. User scott continues to be anormal auditor.
A.9.14 SHOW DATA ENCRYPTION STATUSUse the SHOW DATA ENCRYPTION STATUS command to show whether data encryption isenabled for Oracle Audit Vault Server repositories.
The SHOW DATA ENCRYPTION STATUS command shows whether encryption is enabledor disabled. Encryption is automatically enabled on new installations.
Syntax
SHOW DATA ENCRYPTION STATUS
Example
avcli> SHOW DATA ENCRYPTION STATUS;
Appendix ASecurity Management AVCLI Commands
A-56

This command shows the encryption status (enabled or disabled).
A.10 SAN Storage AVCLI CommandsYou can manage SAN servers with SAN storage AVCLI commands.
A.10.1 About the SAN Storage AVCLI CommandsThe AVCLI SAN storage commands enable you to perform tasks such as registering andaltering SAN servers.
A.10.2 ALTER DISKGROUPUse the ALTER DISK GROUP command to alter a diskgroup by adding or dropping disks.
The ALTER DISKGROUP command alters a disk group by adding or dropping disks from thegroup.
Syntax:
ALTER DISKGROUP SYSTEMDATA|EVENTDATA|RECOVERY ADD DISK disk_name [ON SECONDARY]
ALTER DISKGROUP SYSTEMDATA|EVENTDATA|RECOVERY DROP DISK disk_name [ON SECONDARY]
Use the [ON SECONDARY] option in a high availability configuration to apply this command tosecondary Audit Vault Server.
Arguments
Argument Description
disk_name Name of the disk to add or drop. When adding a disk, the disk must beavailable in the system, and not previously added to a disk group. To displayall disks available in the system, use the command "LIST DISK".
Examples:
avcli> ALTER DISKGROUP SYSTEMDATA ADD DISK disk1;
Adds disk1 to the SYSTEMDATA disk group.
avcli> ALTER DISKGROUP RECOVERY DROP DISK disk2;
Drops disk2 from the RECOVERY disk group.
A.10.3 ALTER SAN SERVERUse the ALTER SAN SERVER command to alter SAN servers that are registered with Audit VaultServer by logging into or logging out of a target that is available on the SAN server.
The ALTER SAN SERVER command alters a SAN server registered with the Audit Vault Serverby logging in or logging out of a target available on the SAN server.
Appendix ASAN Storage AVCLI Commands
A-57

Syntax
ALTER SAN SERVER server_name LOGIN target_name ADDRESS address [PORT port][AUTHENTICATED BY username] [ON SECONDARY]
ALTER SAN SERVER server_name LOGOUT target_name ADDRESS address [PORT port][AUTHENTICATED BY username] [ON SECONDARY]
Use the [ON SECONDARY] option in a high availability configuration to apply thiscommand to secondary Audit Vault Server.
Arguments
Argument Description
server_name Name of the SAN server registered with the Audit Vault Server.
target_name Name of the target on the SAN server. To get a list of targets, use thecommand "LIST TARGET FOR SAN SERVER".
address IP address or hostname of the target on the SAN server
port Optional. Default is 3260.
username If needed, credential used to log in to the target.
The user name and password is accepted from file input through .avfile.
Example
avcli> ALTER SAN SERVER testServer1 LOGIN target1 ADDRESS sample_target.example.com AUTHENTICATED BY username1;
Alter the SAN server testServer1 by logging into target1 at addresssample_target.example.com using credentials username1. The default port number3260 will be used.
avcli> ALTER SAN SERVER testServer2 LOGOUT target2 ADDRESS sample_target.example.com;
Alter the SAN server testServer2 by logging out of target2 at addresssample_target.example.com.
A.10.4 DROP SAN SERVERUse the DROP SAN SERVER command to drop SAN servers that are registered withOracle Audit Vault Server.
The DROP SAN SERVER command removes a SAN server registered with the Audit VaultServer.
Syntax:
DROP SAN SERVER server_name [ON SECONDARY]
Appendix ASAN Storage AVCLI Commands
A-58

Use the [ON SECONDARY] option in a high availability configuration to apply this command tosecondary Audit Vault Server.
Arguments
Argument Description
server_name Name of the SAN server registered with the Audit Vault Server.
Example:
avcli> DROP SAN SERVER testServer1;
Removes SAN server testServer1 from the Audit Vault Server.
A.10.5 LIST DISKUse the LIST DISK commant to see details of disks that are available on your system.
The LIST DISK command displays details of all disks available in the system, or disks in aspecific disk group.
Syntax:
LIST DISK [FOR DISKGROUP SYSTEMDATA|EVENTDATA|RECOVERY] [ON SECONDARY]
Use the [ON SECONDARY] option in a high availability configuration to apply this command tosecondary Audit Vault Server.
Examples:
avcli> LIST DISK;
Displays the details of all disks in the system.
avcli> LIST DISK FOR DISKGROUP SYSTEMDATA;
Displays the details of the SYSTEMDATA disk group.
A.10.6 LIST DISKGROUPUse the LIST DISKGROUP command to see the details of all disk groups in your system.
The LIST DISKGROUP command displays details of a disk group in the Audit Vault Server.
Syntax:
LIST DISKGROUP [ON SECONDARY]
Use the [ON SECONDARY] option in a high availability configuration to apply this command tosecondary Audit Vault Server.
Example:
avcli> LIST DISKGROUP;
Appendix ASAN Storage AVCLI Commands
A-59

Displays details for all disk groups in the system, for example, name, total space, andfree space. To see details of disk in a specific disk group, use the command "LISTDISK".
A.10.7 LIST SAN SERVERUse the LIST SAN SERVER command to display the details of SAN servers that areregistered with Oracle Audit Vault Server.
The LIST SAN SERVER command displays details of SAN servers registered withOracle Audit Vault Server.
Syntax:
LIST SAN SERVER [ON SECONDARY]
Use the [ON SECONDARY] option in a high availability configuration to apply thiscommand to secondary Audit Vault Server.
Example:
avcli> LIST SAN SERVER;
Displays details of SAN servers registered in the system, for example, storage name,storage type, etc.
A.10.8 LIST TARGET FOR SAN SERVERUse the LIST TARGET FOR SAN SERVER command to alter SAN servers that areregistered with Oracle Audit Vault Server by logging into or logging out of a target thatis available on the SAN server
The LIST TARGET FOR SAN SERVER command displays details of the targets availableon a specified SAN server.
Syntax:
LIST TARGET FOR SAN SERVER server_name [ON SECONDARY]
Use the [ON SECONDARY] option in a high availability configuration to apply thiscommand to secondary Audit Vault Server.
Arguments
Argument Description
server_name Name of the SAN server registered with the Audit Vault Server.
Example:
avcli> LIST TARGET FOR SAN SERVER testServer1;
Displays the details of targets available on SAN server testServer1.
Appendix ASAN Storage AVCLI Commands
A-60
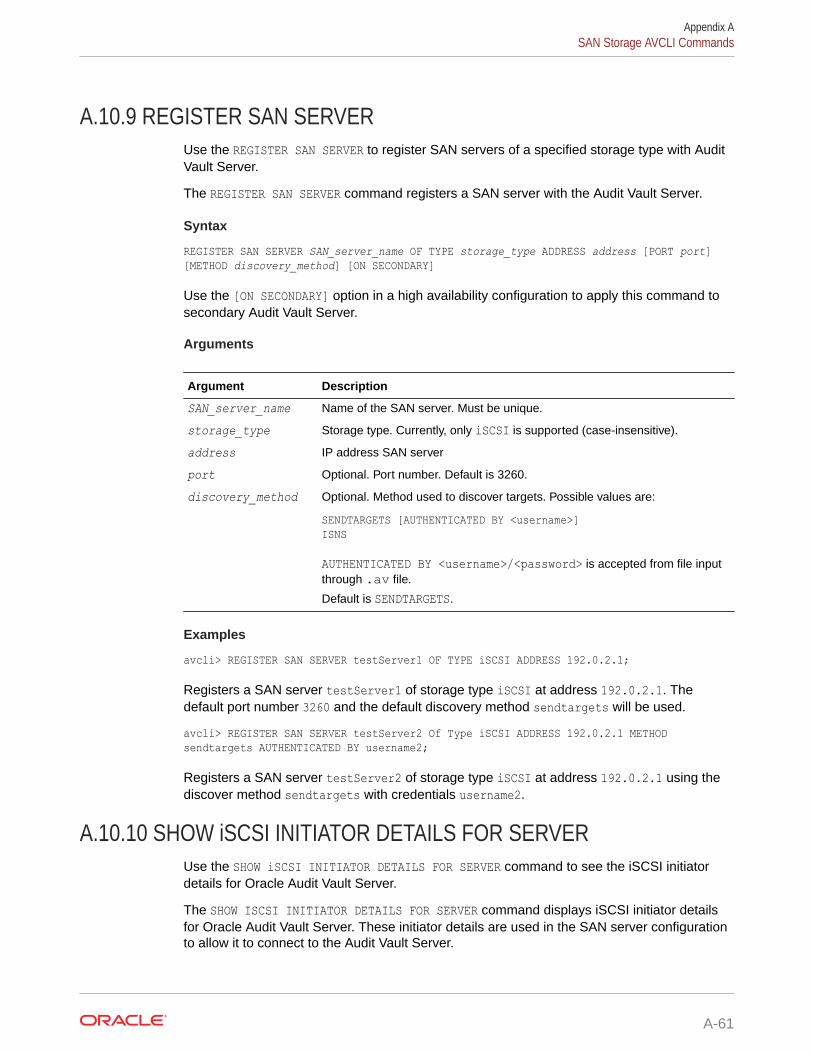
A.10.9 REGISTER SAN SERVERUse the REGISTER SAN SERVER to register SAN servers of a specified storage type with AuditVault Server.
The REGISTER SAN SERVER command registers a SAN server with the Audit Vault Server.
Syntax
REGISTER SAN SERVER SAN_server_name OF TYPE storage_type ADDRESS address [PORT port] [METHOD discovery_method] [ON SECONDARY]
Use the [ON SECONDARY] option in a high availability configuration to apply this command tosecondary Audit Vault Server.
Arguments
Argument Description
SAN_server_name Name of the SAN server. Must be unique.
storage_type Storage type. Currently, only iSCSI is supported (case-insensitive).
address IP address SAN server
port Optional. Port number. Default is 3260.
discovery_method Optional. Method used to discover targets. Possible values are:
SENDTARGETS [AUTHENTICATED BY <username>]ISNS
AUTHENTICATED BY <username>/<password> is accepted from file inputthrough .av file.
Default is SENDTARGETS.
Examples
avcli> REGISTER SAN SERVER testServer1 OF TYPE iSCSI ADDRESS 192.0.2.1;
Registers a SAN server testServer1 of storage type iSCSI at address 192.0.2.1. Thedefault port number 3260 and the default discovery method sendtargets will be used.
avcli> REGISTER SAN SERVER testServer2 Of Type iSCSI ADDRESS 192.0.2.1 METHOD sendtargets AUTHENTICATED BY username2;
Registers a SAN server testServer2 of storage type iSCSI at address 192.0.2.1 using thediscover method sendtargets with credentials username2.
A.10.10 SHOW iSCSI INITIATOR DETAILS FOR SERVERUse the SHOW iSCSI INITIATOR DETAILS FOR SERVER command to see the iSCSI initiatordetails for Oracle Audit Vault Server.
The SHOW ISCSI INITIATOR DETAILS FOR SERVER command displays iSCSI initiator detailsfor Oracle Audit Vault Server. These initiator details are used in the SAN server configurationto allow it to connect to the Audit Vault Server.
Appendix ASAN Storage AVCLI Commands
A-61

Syntax:
SHOW ISCSI INITIATOR DETAILS FOR SERVER [ON SECONDARY]
Use the [ON SECONDARY] option in a high availability configuration to apply thiscommand to secondary Audit Vault Server.
Example:
avcli> SHOW ISCSI INITIATOR DETAILS FOR SERVER;
Displays the iSCSI initiator details for the Audit Vault Server.
A.11 Remote File System AVCLI CommandsUse the remote file system AVCLI commands to mange remote file systems. Thesecommands support registering and managing connections to NFS file systems that areused as archive locations.
A.11.1 About the Remote File System AVCLI CommandsUse the remote file system AVCLI commands to configure remote file systems to workwith Oracle Audit Vault and Database Firewall.
A.11.2 ALTER REMOTE FILESYSTEMUse the ALTER REMOTE FILESYSTEM command to alter remote file systems that areregistered with Oracle Audit Vault Server.
The ALTER REMOTE FILESYSTEM command alters a remote filesystem registered withOracle Audit Vault Server.
Syntax:
ALTER REMOTE FILESYSTEM filesystem_name SET {key=value [,key=value...]}
ALTER REMOTE FILESYSTEM filesystem_name MOUNT
ALTER REMOTE FILESYSTEM filesystem_name UNMOUNT [FORCE]
Arguments
Argument Description
filesystem_name Name of the remote filesystem
key For an NFS remote filesystem, the key NAME is supported.
Examples:
avcli> ALTER REMOTE FILESYSTEM sample_filesystem SET NAME=newfilesystem;
Changes the name of the remote filesystem sample_filesystem to newfilesystem.
avcli> ALTER REMOTE FILESYSTEM sample_filesystem MOUNT;
Appendix ARemote File System AVCLI Commands
A-62
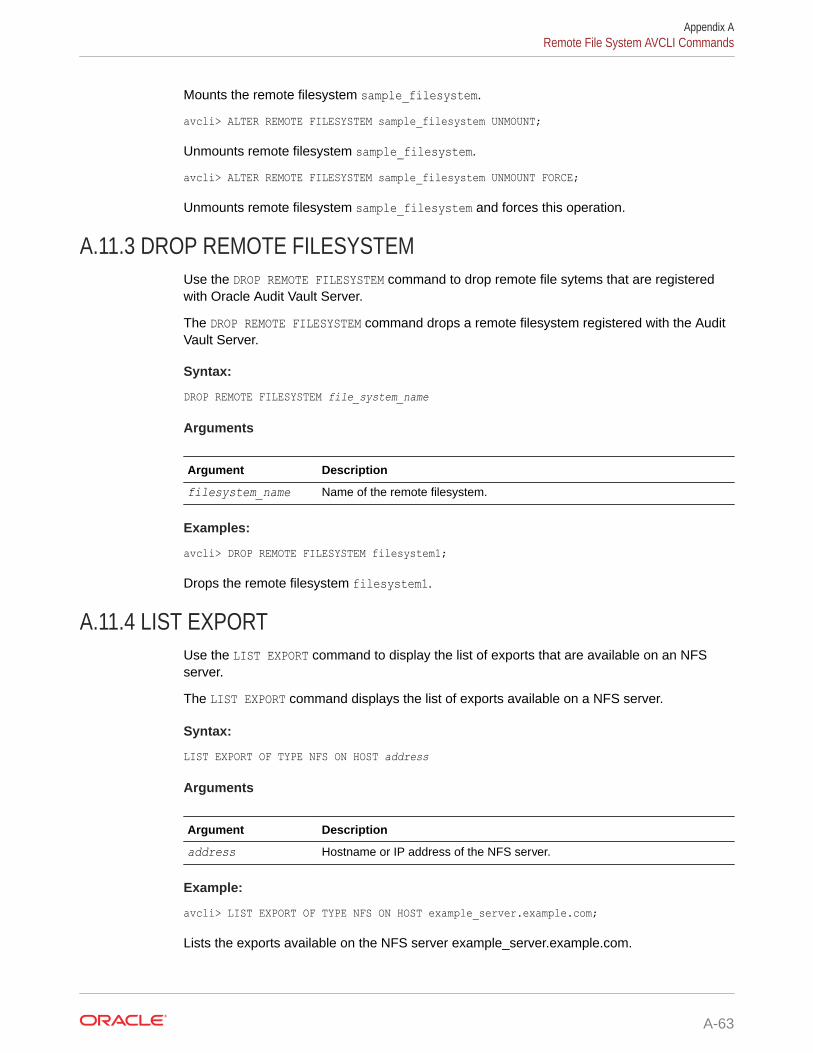
Mounts the remote filesystem sample_filesystem.
avcli> ALTER REMOTE FILESYSTEM sample_filesystem UNMOUNT;
Unmounts remote filesystem sample_filesystem.
avcli> ALTER REMOTE FILESYSTEM sample_filesystem UNMOUNT FORCE;
Unmounts remote filesystem sample_filesystem and forces this operation.
A.11.3 DROP REMOTE FILESYSTEMUse the DROP REMOTE FILESYSTEM command to drop remote file sytems that are registeredwith Oracle Audit Vault Server.
The DROP REMOTE FILESYSTEM command drops a remote filesystem registered with the AuditVault Server.
Syntax:
DROP REMOTE FILESYSTEM file_system_name
Arguments
Argument Description
filesystem_name Name of the remote filesystem.
Examples:
avcli> DROP REMOTE FILESYSTEM filesystem1;
Drops the remote filesystem filesystem1.
A.11.4 LIST EXPORTUse the LIST EXPORT command to display the list of exports that are available on an NFSserver.
The LIST EXPORT command displays the list of exports available on a NFS server.
Syntax:
LIST EXPORT OF TYPE NFS ON HOST address
Arguments
Argument Description
address Hostname or IP address of the NFS server.
Example:
avcli> LIST EXPORT OF TYPE NFS ON HOST example_server.example.com;
Lists the exports available on the NFS server example_server.example.com.
Appendix ARemote File System AVCLI Commands
A-63

A.11.5 LIST REMOTE FILESYSTEMUse the LIST REMOTE FILESYSTEM command to list all of the remote file systems thatare registered with Oracle Audit Vault Server.
The LIST REMOTE FILESYSTEM command lists all of the remote file systems that areregistered with Oracle Audit Vault Server.
Syntax:
LIST REMOTE FILESYSTEM
Example:
avcli> LIST REMOTE FILESYSTEM;
Lists all remote filesystems registered with Oracle Audit Vault Server.
A.11.6 REGISTER REMOTE FILESYSTEMUse the REGISTER REMOTE FILESYSTEM command to register remote file systems withOracle Audit Vault Server.
The REGISTER REMOTE FILESYSTEM command registers a remote filesystem with theAudit Vault Server. This command currently supports registering an NFS filesystem.After registering a remote filesystem, an administrator can select it when specifying anarchive location.
Syntax:
REGISTER REMOTE FILESYSTEM filesystem_name OF TYPE NFS ON HOST NFS_server_address USING EXPORT export [MOUNT]
Arguments
Argument Description
filesystem_name A unique name for the remote filesystem
NFS_server_address Hostname or IP address of the NFS server
export Name of the export directory on the NFS server. This directory mustbe created in etc/exports file of the NFS server.
Note:
1. Log in as Oracle user 503 to register the remote filesystem. Use thesame user name on the NFS Server and the Audit Vault Server.
2. If this is any different, then edit the /etc/passwd/ file in the NFSServer and change the USER ID of Oracle user to 503.
Appendix ARemote File System AVCLI Commands
A-64

Examples:
avcli> REGISTER REMOTE FILESYSTEM sample_Filesystem OF TYPE NFS ON HOST example_host.example.com USING EXPORT /export/home1;
Registers a remote NFS filesystem named sample_Filesystem on the hostexample_host.example.com using the export directory /export/home1. This will mount theregistered remote filesystem.
avcli> REGISTER REMOTE FILESYSTEM sample_Filesystem OF TYPE NFS ON HOST example_host.example.com USING EXPORT /export/home1 MOUNT;
Registers a remote NFS filesystem named sample_Filesystem on the hostexample_host.example.com using the export directory /export/home1. This will also mountthe registered remote filesystem.
A.11.7 SHOW STATUS OF REMOTE FILESYSTEMUse the SHOW STATUS OF REMOTE FILESYSTEM command to show the status of remote filesystems that are registered with Oracle Audit Vault Server.
The SHOW STATUS OF REMOTE FILESYSTEM command shows the status of a specified remotefile system.
Syntax:
SHOW STATUS OF REMOTE FILESYSTEM filesystem_name
Arguments
Argument Description
filesystem_name Name of the remote filesystem
Examples:
avcli> SHOW STATUS OF REMOTE FILESYSTEM filesystem1;
Shows the status of remote filesystem filesystem1.
A.12 Server Management AVCLI CommandsThe server management AVCLI commands enable you to manage the server, such aschecking certificates and downloading log files.
A.12.1 About the Server Management AVCLI CommandsThe AVCLI server management commands manage aspects of Oracle Audit Vault andDatabase Firewall such as altering the system set.
Appendix AServer Management AVCLI Commands
A-65

A.12.2 ALTER SYSTEM SETUse the ALTER SYSTEM SET command to modify system configuration data.
The ALTER SYSTEM command modifies system configuration data.
Syntax:
ALTER SYSTEM SET {attribute=value [,attribute=value...]}
Arguments
Argument Description
attribute System attributes as key/value pairs. See Table A-7.
Usage Notes
Typically, system configuration data affects all components system-wide.
Multiple component log levels can be changed by delimiting them using the | symbol.
Modify system configuration data by altering the attributes associated with the datausing key=value pairs and multiple attributes by specifying comma-separated pairs.
Log files are in the $Oracle_Home/av/log directory in the Audit Vault Server.
The following attributes are supported:
Table A-7 System Attributes
Parameter Description
LOGLEVEL The log level of components running on this host.
The LOGLEVEL attribute takes a two part value, separated by acolon, as follows:
component_name:loglevel_valueSee Table A-8 for component names and log level values.
Multiple components' log levels can be changed by delimitingthem using the | symbol.
SYS.HEARTBEAT_INTERVAL Sets the system heartbeat interval to a numerical value inseconds.
SYS.AUTOSTART_INTERVAL The interval in seconds before the system will try to restart failedaudit trails. Default: 1800
SYS.AUTOSTART_RETRY_COUNT
The number of times the system attempts to start failed audittrails.
Oracle AVDF release 20.1 to 20.6: 5 times (default)
Oracle AVDF release 20.7 and onwards: 20 times (default)
Table A-8 shows valid values for component_name and loglevel_value for theLOGLEVEL attribute:
Appendix AServer Management AVCLI Commands
A-66
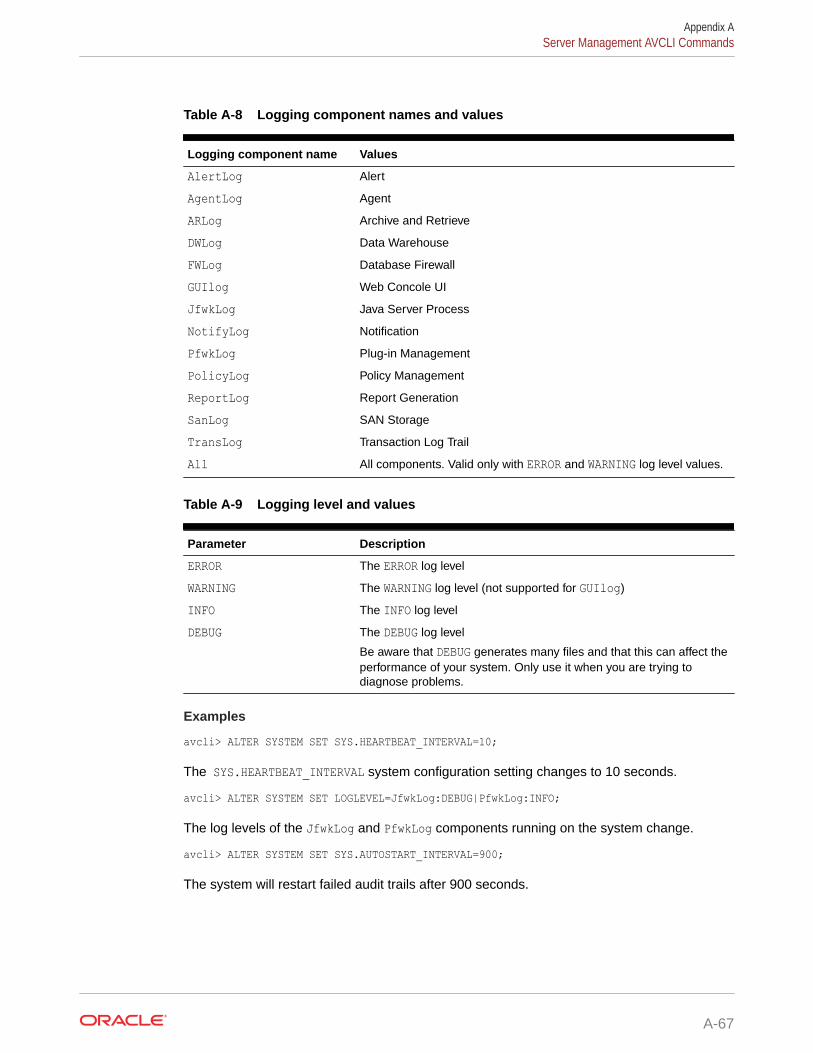
Table A-8 Logging component names and values
Logging component name Values
AlertLog Alert
AgentLog Agent
ARLog Archive and Retrieve
DWLog Data Warehouse
FWLog Database Firewall
GUIlog Web Concole UI
JfwkLog Java Server Process
NotifyLog Notification
PfwkLog Plug-in Management
PolicyLog Policy Management
ReportLog Report Generation
SanLog SAN Storage
TransLog Transaction Log Trail
All All components. Valid only with ERROR and WARNING log level values.
Table A-9 Logging level and values
Parameter Description
ERROR The ERROR log level
WARNING The WARNING log level (not supported for GUIlog)
INFO The INFO log level
DEBUG The DEBUG log level
Be aware that DEBUG generates many files and that this can affect theperformance of your system. Only use it when you are trying todiagnose problems.
Examples
avcli> ALTER SYSTEM SET SYS.HEARTBEAT_INTERVAL=10;
The SYS.HEARTBEAT_INTERVAL system configuration setting changes to 10 seconds.
avcli> ALTER SYSTEM SET LOGLEVEL=JfwkLog:DEBUG|PfwkLog:INFO;
The log levels of the JfwkLog and PfwkLog components running on the system change.
avcli> ALTER SYSTEM SET SYS.AUTOSTART_INTERVAL=900;
The system will restart failed audit trails after 900 seconds.
Appendix AServer Management AVCLI Commands
A-67
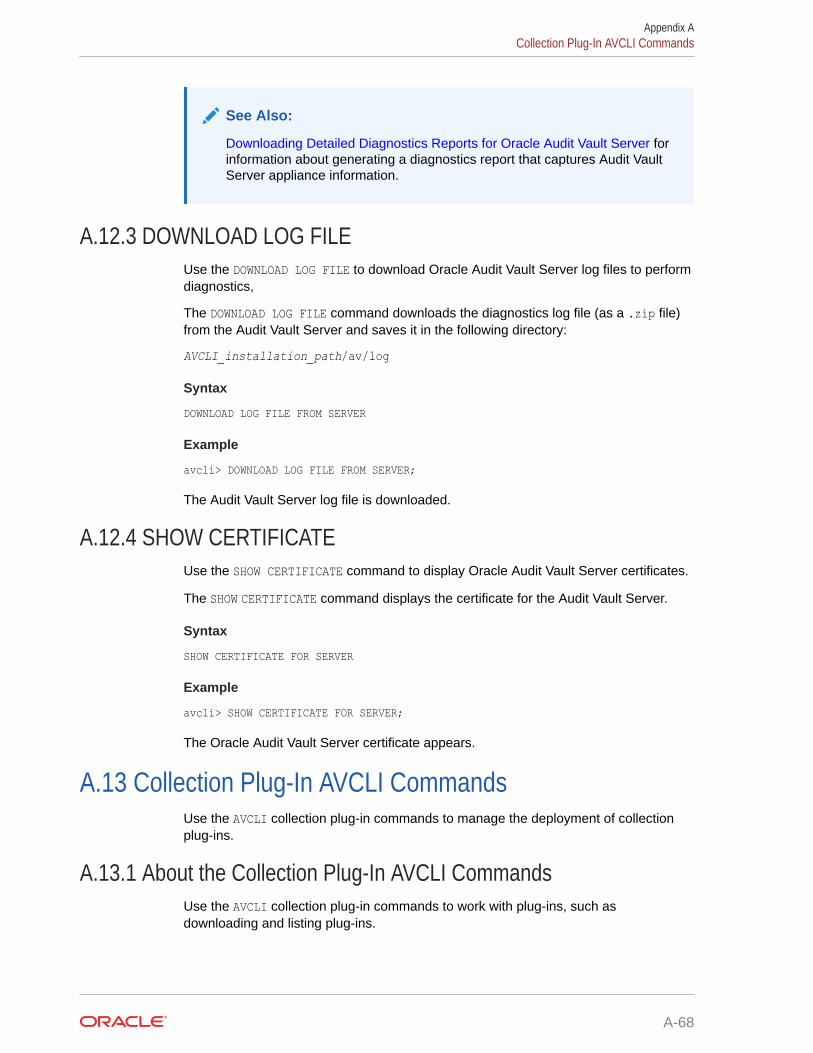
See Also:
Downloading Detailed Diagnostics Reports for Oracle Audit Vault Server forinformation about generating a diagnostics report that captures Audit VaultServer appliance information.
A.12.3 DOWNLOAD LOG FILEUse the DOWNLOAD LOG FILE to download Oracle Audit Vault Server log files to performdiagnostics,
The DOWNLOAD LOG FILE command downloads the diagnostics log file (as a .zip file)from the Audit Vault Server and saves it in the following directory:
AVCLI_installation_path/av/log
Syntax
DOWNLOAD LOG FILE FROM SERVER
Example
avcli> DOWNLOAD LOG FILE FROM SERVER;
The Audit Vault Server log file is downloaded.
A.12.4 SHOW CERTIFICATEUse the SHOW CERTIFICATE command to display Oracle Audit Vault Server certificates.
The SHOW CERTIFICATE command displays the certificate for the Audit Vault Server.
Syntax
SHOW CERTIFICATE FOR SERVER
Example
avcli> SHOW CERTIFICATE FOR SERVER;
The Oracle Audit Vault Server certificate appears.
A.13 Collection Plug-In AVCLI CommandsUse the AVCLI collection plug-in commands to manage the deployment of collectionplug-ins.
A.13.1 About the Collection Plug-In AVCLI CommandsUse the AVCLI collection plug-in commands to work with plug-ins, such asdownloading and listing plug-ins.
Appendix ACollection Plug-In AVCLI Commands
A-68

A.13.2 DEPLOY PLUGINUse the DEPLOY PLUGIN command to deploy plug-ins into Oracle Audit Vault Server homesfrom a given archive file.
The DEPLOY PLUGIN command deploys a plug-in into the Audit Vault Server home from agiven archive file.
Syntax
DEPLOY PLUGIN plugin archive
Arguments
Argument Description
plugin archive The plug-in archive.
Archive files have an .zip extension, specifying custom plug-ins that third-party vendors or partners develop to add functionality to Audit Vault Server.
Usage Notes
No action is required after this command.
The DEPLOY PLUGIN command updates the agent archive with the contents of this plug-in forfuture Agent deployments.
When a newer version of the plug-in is available, use the DEPLOY PLUGIN command to updatethe plug-in artifacts. Multiple plug-ins can support a single target type.
Example
avcli> DEPLOY PLUGIN /opt/avplugins/sample_plugin.zip;
Deploys the plug-in at /opt/avplugins/sample_plugin.zip into the Audit Vault Server andupdates the agent archive by adding the plug-in to its contents.
A.13.3 LIST PLUGIN FOR SECURED TARGET TYPEUse the LIST PLUGIN FOR SECURED TARGET TYPE command to list all of the plug-ins in AuditVault Server installations.
The LIST PLUGIN FOR SECURED TARGET TYPE command lists all the plug-ins that support aparticular target type.
Syntax
LIST PLUGIN FOR SECURED TARGET TYPE secured target type name
Arguments
Argument Description
secured targettype name
The name of the target type
Appendix ACollection Plug-In AVCLI Commands
A-69

Usage Notes
To find a list of available target types, see "LIST SECURED TARGET TYPE".
Examples
avcli> LIST PLUGINS FOR SECURED TARGET TYPE "Oracle Database";
The plug-ins that support the target type "Oracle Database" are listed.
A.13.4 UNDEPLOY PLUGINUse the UNDEPLOY PLUGIN command to undeploy plug-ins from Oracle Audit VaultServer homes.
The UNDEPLOY PLUGIN command deletes a plug-in from an Audit Vault Server home.
Syntax
UNDEPLOY PLUGIN plugin_id
Arguments
Argument Description
plugin_id The ID of the plug-in that you want to undeploy.
Usage Notes
UNDEPLOY PLUGIN attempts to identify dependent plug-ins or packages prior to deletingthe plug-in.
This command undeploys a plug-in specified by the plug-in ID from the Audit VaultServer. It also updates the agent archive removing this plug-in, so that it is notdeployed in future agent deployments.
Examples
avcli> UNDEPLOY PLUGIN com.abc.sample_plugin;
The plug-in, com.abc.sample_plugin, is undeployed from Oracle Audit Vault Serverand the agent archive is updated by removing the plug-in.
A.14 General Usage AVCLI CommandsYou can find general information, such as help, from the general usage AVCLIcommands.
A.14.1 About the General Usage AVCLI CommandsThe AVCLI general usage commands enable you to perform tasks such as connectingto servers or identifying users.
Appendix AGeneral Usage AVCLI Commands
A-70
A.14.2 CLEAR LOGUse the CLEAR LOG command to clear a system's diagnostic logs.
The CLEAR LOG command deletes all log files in the directory $ORACLE_HOME/av/log on theAudit Vault Server.
Syntax
CLEAR LOG
Example
avcli> CLEAR LOG;
A.14.3 CONNECTUse the CONNECT command to connect the current AVCLI user as a different user.
The CONNECT command enables you to connect as a different user in AVCLI.
Syntax
CONNECT [username]
Usage Notes
• If you have logged into to AVCLI without specifying a username and password, then youmust use the CONNECT command to connect as a valid user.
• For additional ways to connect to AVCLI, see "Using the Audit Vault Command LineInterface".
Example 1
avcli> CONNECT psmith;Enter password: password
Connected.
Example 2
avcli> CONNECT;Enter user name: usernameEnter password: password
Connected.
A.14.4 HELPUse the HELP command to list the AVCLI commands with their categories.
The HELP command lists all available AVCLI commands and their categories.
Syntax
HELP
Appendix AGeneral Usage AVCLI Commands
A-71
Example
avcli> HELP;
A.14.5 -HELPUse the -HELP command to display help information for all of the AVCLI utilitycommands.
The -HELP command displays version number and help information about the AVCLIcommands. Run the -HELP command from outside of AVCLI.
Syntax
avcli -havcli -Havcli -helpavcli -HELP
Example
avcli -help: [oracle@slc02vjp ~]$ avcli -help AVCLI : Release 12.2.0.0.0 - Production on Thu Nov 8 00:53:54 UTC 2012 Copyright (c) 1996, 2015 Oracle. All Rights Reserved. Usage 1: avcli -{h|H} | -{v|V} -{h|H} Displays the AVCLI version and the usage help -{v|V} Displays the AVCLI version. Usage 2: avcli [ [<option>] [<logon>] [<start>] ] <option> is: [-{l|L} <log level>] -{l|L} <log level> Sets the log level to the level specified. Supported log levels: INFO, WARNING, ERROR, DEBUG <logon> is: -{u|U} <username> Specifies the database account username for the database connection <start> is: -{f|F} <filename>.<ext> Runs the specified AVCLI script from the local file system (filename.ext). Valid AVCLI script files should have their file extension as '.av' (e.g. sample_script.av)
Appendix AGeneral Usage AVCLI Commands
A-72

A.14.6 QUITUse the QUIT command to exit AVCLI.
The QUIT command exits AVCLI.
Syntax
QUIT
Example
avcli> QUIT;
A.14.7 SHOW USERUse the SHOW USER command to display the currently logged in AVCLI user.
The SHOW USER command displays the currently logged in AVCLI user.
Syntax
SHOW USER
Example
avcli> SHOW USER;
A.14.8 STORE CREDENTIALSUse the STORE CREDENTIALS command to store administrator credentials in AVCLI wallet, orto overwrite previously stored credentials.
The STORE CREDENTIALS command lets you store credentials for one Oracle Audit Vault andDatabase Firewall administrator in the Oracle AVCLI wallet, or update existing credentials inthe wallet.
Syntax
STORE CREDENTIALS [FOR USER username]
Example 1
avcli> STORE CREDENTIALS FOR USER admin1;Enter password: passwordRe-enter password: password
Example 2
avcli> STORE CREDENTIALS;Enter user name: admin1Enter password: passwordRe-enter password: password
Appendix AGeneral Usage AVCLI Commands
A-73

A.14.9 -VERSIONUse the -VERSION command to display the AVCLI version number.
The -VERSION command displays the version number for AVCLI. Run the -VERSIONcommand from outside of AVCLI.
Syntax
avcli -vavcli -Vavcli -versionavcli -VERSION
Example
avcli -v;
AVCLI : Release 12.2.0.0.0 - Production on Tue Apr 26 14:25:31 PDT 2011 Copyright (c) 2014, Oracle. All Rights Reserved.
A.15 Retention Policy AVCLI CommandsYou can find general information on retention policy (or Information LifecycleManagement) related AVCLI commands.
A.15.1 APPLY RETENTION POLICYUse the APPLY RETENTION POLICY command to apply a retention policy to a target.This can be applied only by a super auditor.
To apply a retention policy to a target.
Note:
This command is available starting Oracle AVDF release 20.3.
Syntax
APPLY RETENTION POLICY <policy name> TO TARGET <target name>
This command applies a specific retention policy to a specified target.
Arguments
Argument Description
policy name The name of the policy on which the retention policy needs to beapplied.
target name The name of specified target for which the policy needs to be applied.
Appendix ARetention Policy AVCLI Commands
A-74

Example
apply retention policy test_policy1 to target test_target1;
Applies policy test_policy1 to target test_target1.
A.15.2 CREATE RETENTION POLICYUse the CREATE RETENTION POLICY command to create a retention (or lifecycle) policy. Thiscan be created only by a super administrator.
To create a retention policy.
Note:
This command is available starting Oracle AVDF release 20.3.
Syntax
CREATE RETENTION POLICY <policy name> ONLINE MONTHS <month number> ARCHIVED MONTHS <month number>
This command creates a retention policy with the specified name and specifies the number ofonline months and archived months. A policy name cannot be null, start with reserved name,or be the same as an existing policy name. Only alphanumeric, underscore (_), dollar sign($), and pound sign (#) are allowed for the policy name.
Arguments
Argument Description
policy name The name of the policy to be created.
month number The number of months to be online or to be archived.
The number of months for online, must be between 1 and 9000.
The number of months to be archived, must be between 0 and 9000.
Note: In case the above guidelines for the number of months (online and tobe archived) are not followed, then an error may be observed.
Example
create retention policy test_policy1 online months 2 archived months 3;
Creates a retention policy with the name test_policy1 and sets 2 months online and 3months as the archival period.
A.15.3 DELETE RETENTION POLICYUse the DELETE RETENTION POLICY command to delete a retention policy.
To delete a retention policy.
Appendix ARetention Policy AVCLI Commands
A-75

Note:
This command is available starting Oracle AVDF release 20.3.
Syntax
DELETE RETENTION POLICY <policy name>
This command deletes the specified retention policy.
Arguments
Argument Description
policy name The name of the retention policy to be deleted.
Example
delete retention policy test_policy1;
Deletes test_policy1.
A.15.4 LIST RETENTION POLICIESUse the LIST RETENTION POLICIES command to view all the retention policies.
To view all the retention policies.
Note:
This command is available starting Oracle AVDF release 20.3.
Syntax
LIST RETENTION POLICIES
This command lists all retention policies.
Example
list retention policies;
Lists all the retention policies.
A.15.5 SHOW RETENTION POLICY FOR TARGETUse the SHOW RETENTION POLICY FOR TARGET command to display the currentretention policy defined for the specified target.
To view the lifecycle policy defined for the specified target.
Appendix ARetention Policy AVCLI Commands
A-76

Note:
This command is available starting Oracle AVDF release 20.3.
Syntax
SHOW RETENTION POLICY FOR TARGET <target name>
This command displays the current retention policy for the specified target.
Arguments
Argument Description
target name The name of specified target for which the policy needs to be viewed.
Example
show retention policy for target test_target1;
Displays the current policy for test_target1.
A.16 Alert Policy Management AVCLI CommandsYou can find general information on alert policy management related AVCLI commands.
A.16.1 DELETE ALERT POLICYUse the DELETE ALERT POLICY command to delete an alert policy.
To delete an alert policy.
Note:
This command is available starting Oracle AVDF release 20.3.
Syntax
DELETE ALERT POLICY <alert policy name>
This command deletes the alert policy with the specified name.
Arguments
Argument Description
alert policy name The name of the alert policy to be deleted.
Example
delete alert policy test_alert1;
Appendix AAlert Policy Management AVCLI Commands
A-77
Deletes alert policy with the specified name test_alert1.
A.16.2 DISABLE ALERT POLICYUse the DISABLE ALERT POLICY command to disable an alert policy.
To disable an alert policy.
Note:
This command is available starting Oracle AVDF release 20.3.
Syntax
DISABLE ALERT POLICY <alert policy name>
This command disables the alert policy with the specified name.
Arguments
Argument Description
alert policy name The name of the alert policy to be disabled.
Example
disable alert policy test_alert1;
Disables the alert policy with the name test_alert1.
A.16.3 ENABLE ALERT POLICYUse the ENABLE ALERT POLICY command to enable an alert policy.
To enable an alert policy.
Note:
This command is available starting Oracle AVDF release 20.3.
Syntax
ENABLE ALERT POLICY <alert policy name>
Arguments
Argument Description
alert policy name The name of the alert policy to be enabled.
Appendix AAlert Policy Management AVCLI Commands
A-78
Example
enable alert policy test_alert1;
Enables alert policy with the name test_alert1.
A.16.4 LIST ALERT POLICIESUse the LIST ALERT POLICIES command to list all the active alert policies.
Lists all the active alert policies.
Note:
This command is available starting Oracle AVDF release 20.3.
Syntax
LIST ALERT POLICIES
This command lists all the active alert policies.
Example
list alert policies;
A.17 Unified Audit Policy AVCLI CommandsYou can find general information on unified audit policy related AVCLI commands.
A.17.1 DISABLE UNIFIED AUDIT POLICYUse the DISABLE UNIFIED AUDIT POLICY command to disable a unified audit policy.
To disable a unified audit policy. This command provisions the unified audit policy specifiedon the target and turns it off. The policy name must be specified properly.
Note:
This command is available starting Oracle AVDF release 20.3.
Syntax
DISABLE UNIFIED AUDIT POLICY <policy name> ON TARGET <target name>
Arguments
Argument Description
policy name The name of policy to be disabled.
Appendix AUnified Audit Policy AVCLI Commands
A-79

Argument Description
target name The name of specific target for which the unified audit policies is to bedisabled.
Examples
disable unified audit policy tp1 on target t1;
Disables the policy tp1 on t1.
A.17.2 ENABLE UNIFIED AUDIT POLICYUse the ENABLE UNIFIED AUDIT POLICY command to enable a unified audit policy.
To enable a unified audit policy for a target. This command provisions the unified auditpolicy specified on the target.
Note:
This command is available starting Oracle AVDF release 20.3.
Syntax
ENABLE UNIFIED AUDIT POLICY <policy name> [EXCLUDE USERS <user names>] [LIST OF USERS <user names>] ON TARGET <target name>
This command provisions the unified audit policy with the specified policy name on thespecific target. The policy name must be specified with the actual name.
Arguments
Argument Description
policy name The name of policy to be provisioned or enabled.
user names A list of users separated by comma. This is optional.
target name The name of specific target for which the unified audit policies is to beenabled.
EXCLUDE USERS Optional parameter required for LOGON EVENTS and USERACTIVITY. The list of user names must be separated by comma.
LIST OF USERS Optional parameter required for LOGON EVENTS and USERACTIVITY. The list of user names must be separated by comma.
Examples
enable unified audit policy tp1 on target t1;
Toggles policy tp1 of target t1 to ON.
enable unified audit policy 'User Activity' list of users 'BOB,JOHN' on target t1;
Enables User Activity policy for users BOB and JOHN on target t1.
Appendix AUnified Audit Policy AVCLI Commands
A-80
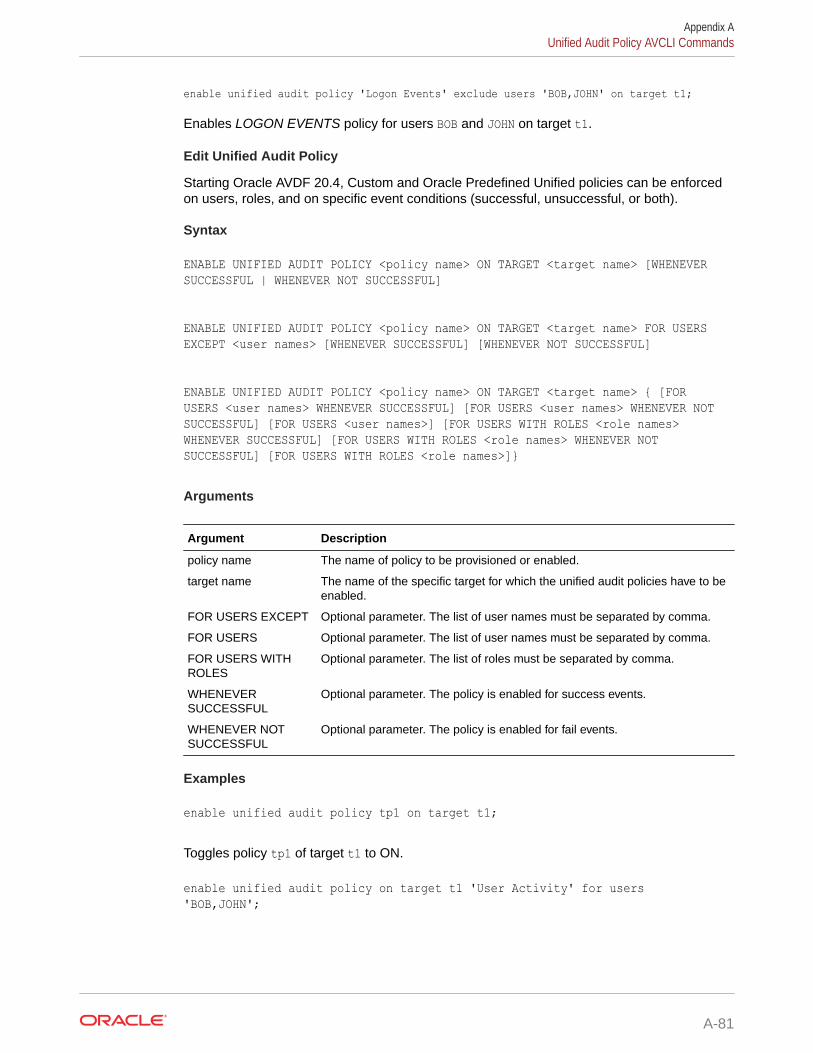
enable unified audit policy 'Logon Events' exclude users 'BOB,JOHN' on target t1;
Enables LOGON EVENTS policy for users BOB and JOHN on target t1.
Edit Unified Audit Policy
Starting Oracle AVDF 20.4, Custom and Oracle Predefined Unified policies can be enforcedon users, roles, and on specific event conditions (successful, unsuccessful, or both).
Syntax
ENABLE UNIFIED AUDIT POLICY <policy name> ON TARGET <target name> [WHENEVER SUCCESSFUL | WHENEVER NOT SUCCESSFUL]
ENABLE UNIFIED AUDIT POLICY <policy name> ON TARGET <target name> FOR USERS EXCEPT <user names> [WHENEVER SUCCESSFUL] [WHENEVER NOT SUCCESSFUL]
ENABLE UNIFIED AUDIT POLICY <policy name> ON TARGET <target name> { [FOR USERS <user names> WHENEVER SUCCESSFUL] [FOR USERS <user names> WHENEVER NOT SUCCESSFUL] [FOR USERS <user names>] [FOR USERS WITH ROLES <role names> WHENEVER SUCCESSFUL] [FOR USERS WITH ROLES <role names> WHENEVER NOT SUCCESSFUL] [FOR USERS WITH ROLES <role names>]}
Arguments
Argument Description
policy name The name of policy to be provisioned or enabled.
target name The name of the specific target for which the unified audit policies have to beenabled.
FOR USERS EXCEPT Optional parameter. The list of user names must be separated by comma.
FOR USERS Optional parameter. The list of user names must be separated by comma.
FOR USERS WITHROLES
Optional parameter. The list of roles must be separated by comma.
WHENEVERSUCCESSFUL
Optional parameter. The policy is enabled for success events.
WHENEVER NOTSUCCESSFUL
Optional parameter. The policy is enabled for fail events.
Examples
enable unified audit policy tp1 on target t1;
Toggles policy tp1 of target t1 to ON.
enable unified audit policy on target t1 'User Activity' for users 'BOB,JOHN';
Appendix AUnified Audit Policy AVCLI Commands
A-81
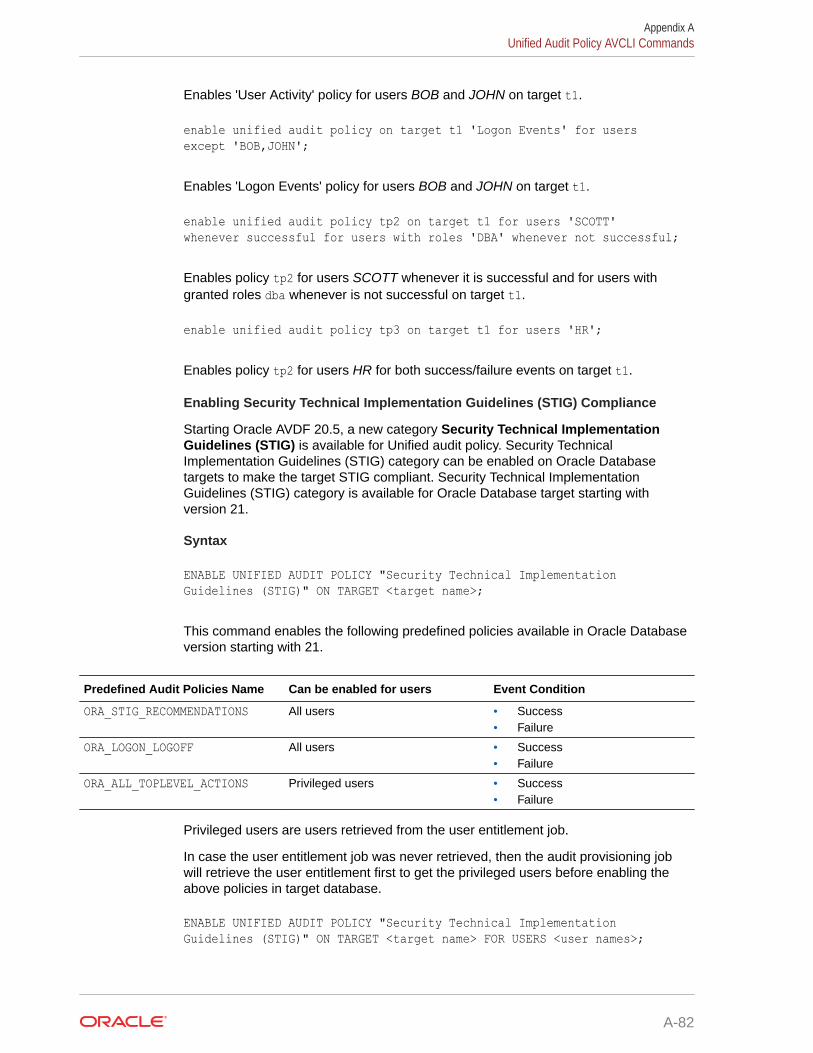
Enables 'User Activity' policy for users BOB and JOHN on target t1.
enable unified audit policy on target t1 'Logon Events' for users except 'BOB,JOHN';
Enables 'Logon Events' policy for users BOB and JOHN on target t1.
enable unified audit policy tp2 on target t1 for users 'SCOTT' whenever successful for users with roles 'DBA' whenever not successful;
Enables policy tp2 for users SCOTT whenever it is successful and for users withgranted roles dba whenever is not successful on target t1.
enable unified audit policy tp3 on target t1 for users 'HR';
Enables policy tp2 for users HR for both success/failure events on target t1.
Enabling Security Technical Implementation Guidelines (STIG) Compliance
Starting Oracle AVDF 20.5, a new category Security Technical ImplementationGuidelines (STIG) is available for Unified audit policy. Security TechnicalImplementation Guidelines (STIG) category can be enabled on Oracle Databasetargets to make the target STIG compliant. Security Technical ImplementationGuidelines (STIG) category is available for Oracle Database target starting withversion 21.
Syntax
ENABLE UNIFIED AUDIT POLICY "Security Technical Implementation Guidelines (STIG)" ON TARGET <target name>;
This command enables the following predefined policies available in Oracle Databaseversion starting with 21.
Predefined Audit Policies Name Can be enabled for users Event Condition
ORA_STIG_RECOMMENDATIONS All users • Success• Failure
ORA_LOGON_LOGOFF All users • Success• Failure
ORA_ALL_TOPLEVEL_ACTIONS Privileged users • Success• Failure
Privileged users are users retrieved from the user entitlement job.
In case the user entitlement job was never retrieved, then the audit provisioning jobwill retrieve the user entitlement first to get the privileged users before enabling theabove policies in target database.
ENABLE UNIFIED AUDIT POLICY "Security Technical Implementation Guidelines (STIG)" ON TARGET <target name> FOR USERS <user names>;
Appendix AUnified Audit Policy AVCLI Commands
A-82

This command enables following Oracle Predefined policies available in Oracle Databaseversion starting with 21:
• ORA_STIG_RECOMMENDATIONS audit policy will be enabled for all users for both successfuland failed events.
• ORA_LOGON_LOGOFF audit policy will be enabled for all users for both successful and failedevents.
• ORA_ALL_TOPLEVEL_ACTIONS will be enabled for users provided in the enable statementfor both successful and failed events.
Arguments
Argument Description
target name The name of the specific target for which the unified audit policies have to beenabled.
FOR USERS Optional parameter. The list of user names must be separated by comma.
A.17.3 LIST UNIFIED AUDIT POLICIESUse the LIST UNIFIED AUDIT POLICIES command to list all the various unified core, oraclepre-defined, custom, and all the unified policies of a specific target.
To view all the various unified core, Oracle pre-defined, custom, and all the unified policies ofa specific target. The output is displayed in the format |Unified Policy Name|Enabled(Yes/No)|.
Note:
This command is available starting Oracle AVDF release 20.3.
Syntax
LIST UNIFIED AUDIT CORE POLICIES FOR TARGET <target name>
This command lists all the core policies for the specified target.
LIST UNIFIED AUDIT ORACLE PREDEFINED POLICIES FOR TARGET <target name>
This command lists all the Oracle pre-defined policies for the specified target.
LIST UNIFIED AUDIT CUSTOM POLICIES FOR TARGET <target name>
This command lists all the custom policies for the specified target.
LIST UNIFIED AUDIT POLICIES FOR TARGET <target name>
This command lists all the unified policies for the specified target.
Appendix AUnified Audit Policy AVCLI Commands
A-83

Arguments
Argument Description
target name The name of specified target for which the unified audit policies need tobe viewed.
Examples
list unified audit policies for target tg1;
Lists all the unified audit policies (for example core, custom, and others) for tg1.
list unified audit oracle predefined policies for target tg1;
Lists all the Oracle pre-defined policies for tg1.
list unified audit custom policies for target tg1;
Lists all the custom policies for tg1.
list unified audit policies for target tg1;
Lists all the unified policies for tg1.
A.18 AVCLI User CommandsYou can run AVCLI user commands to create users, assign roles, reset passwords,and delete users.
A.18.1 About the User AVCLI CommandsThe AVCLI general user commands enable you to perform tasks such as creating anddropping Oracle Audit Vault users.
A.18.2 ALTER ADMINUse the ALTER ADMIN command to reset the password for an admin or superadminuser. Only a superadmin can reset the password for an admin or superadmin user.
The ALTER ADMIN command resets the password of the user with admin role. Asuperadmin can modify the password of the user with admin role.
Syntax
ALTER ADMIN <user name>
Arguments
Argument Description
user name The existing user with admin role who requires a password reset.
Appendix AAVCLI User Commands
A-84
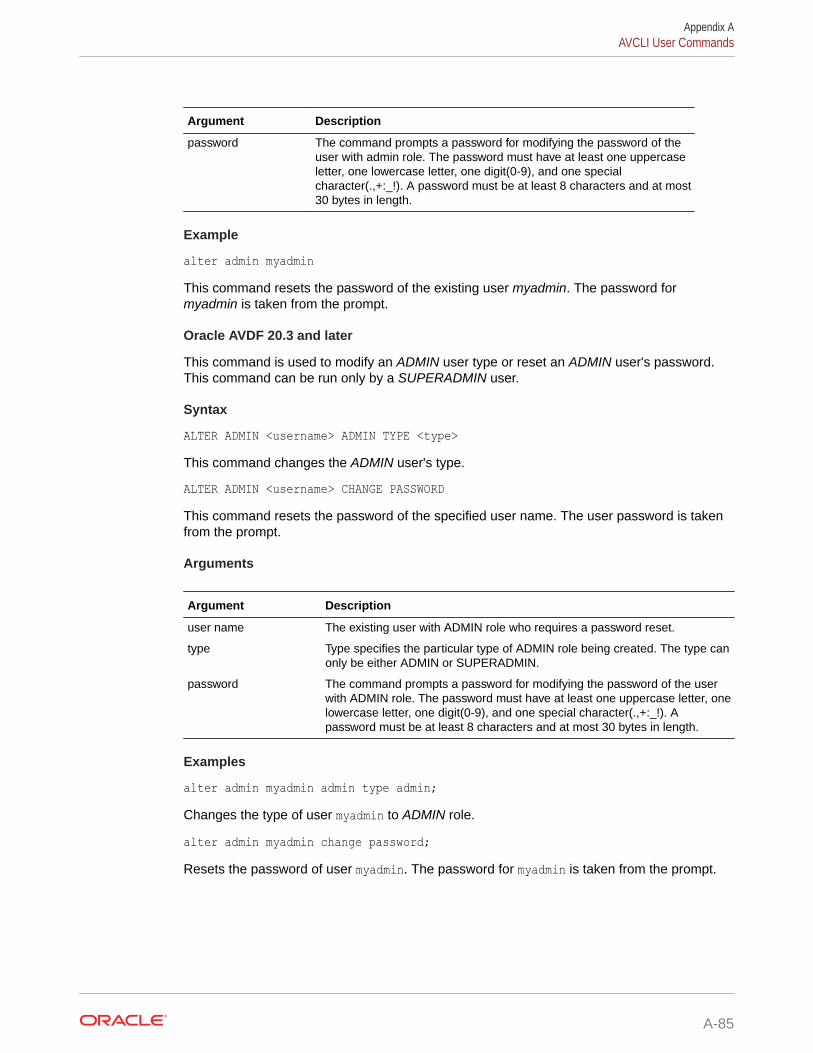
Argument Description
password The command prompts a password for modifying the password of theuser with admin role. The password must have at least one uppercaseletter, one lowercase letter, one digit(0-9), and one specialcharacter(.,+:_!). A password must be at least 8 characters and at most30 bytes in length.
Example
alter admin myadminThis command resets the password of the existing user myadmin. The password formyadmin is taken from the prompt.
Oracle AVDF 20.3 and later
This command is used to modify an ADMIN user type or reset an ADMIN user's password.This command can be run only by a SUPERADMIN user.
Syntax
ALTER ADMIN <username> ADMIN TYPE <type>This command changes the ADMIN user's type.
ALTER ADMIN <username> CHANGE PASSWORDThis command resets the password of the specified user name. The user password is takenfrom the prompt.
Arguments
Argument Description
user name The existing user with ADMIN role who requires a password reset.
type Type specifies the particular type of ADMIN role being created. The type canonly be either ADMIN or SUPERADMIN.
password The command prompts a password for modifying the password of the userwith ADMIN role. The password must have at least one uppercase letter, onelowercase letter, one digit(0-9), and one special character(.,+:_!). Apassword must be at least 8 characters and at most 30 bytes in length.
Examples
alter admin myadmin admin type admin;Changes the type of user myadmin to ADMIN role.
alter admin myadmin change password;Resets the password of user myadmin. The password for myadmin is taken from the prompt.
Appendix AAVCLI User Commands
A-85
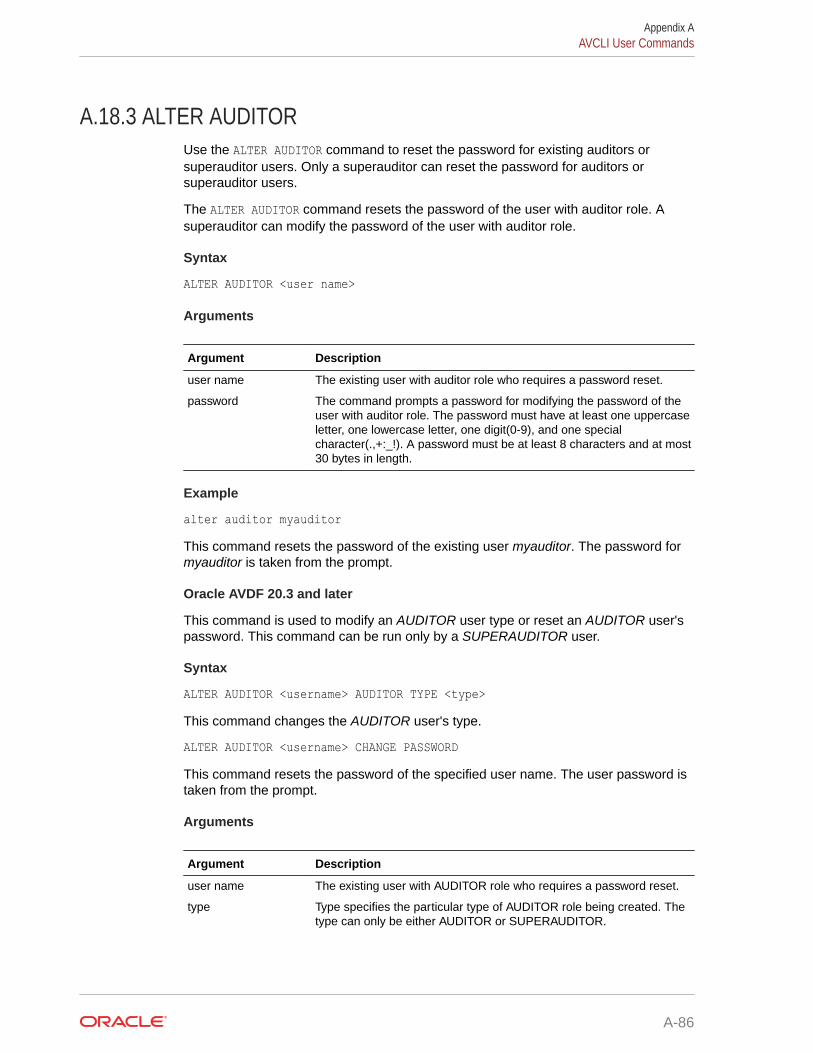
A.18.3 ALTER AUDITORUse the ALTER AUDITOR command to reset the password for existing auditors orsuperauditor users. Only a superauditor can reset the password for auditors orsuperauditor users.
The ALTER AUDITOR command resets the password of the user with auditor role. Asuperauditor can modify the password of the user with auditor role.
Syntax
ALTER AUDITOR <user name>
Arguments
Argument Description
user name The existing user with auditor role who requires a password reset.
password The command prompts a password for modifying the password of theuser with auditor role. The password must have at least one uppercaseletter, one lowercase letter, one digit(0-9), and one specialcharacter(.,+:_!). A password must be at least 8 characters and at most30 bytes in length.
Example
alter auditor myauditorThis command resets the password of the existing user myauditor. The password formyauditor is taken from the prompt.
Oracle AVDF 20.3 and later
This command is used to modify an AUDITOR user type or reset an AUDITOR user'spassword. This command can be run only by a SUPERAUDITOR user.
Syntax
ALTER AUDITOR <username> AUDITOR TYPE <type>This command changes the AUDITOR user's type.
ALTER AUDITOR <username> CHANGE PASSWORDThis command resets the password of the specified user name. The user password istaken from the prompt.
Arguments
Argument Description
user name The existing user with AUDITOR role who requires a password reset.
type Type specifies the particular type of AUDITOR role being created. Thetype can only be either AUDITOR or SUPERAUDITOR.
Appendix AAVCLI User Commands
A-86
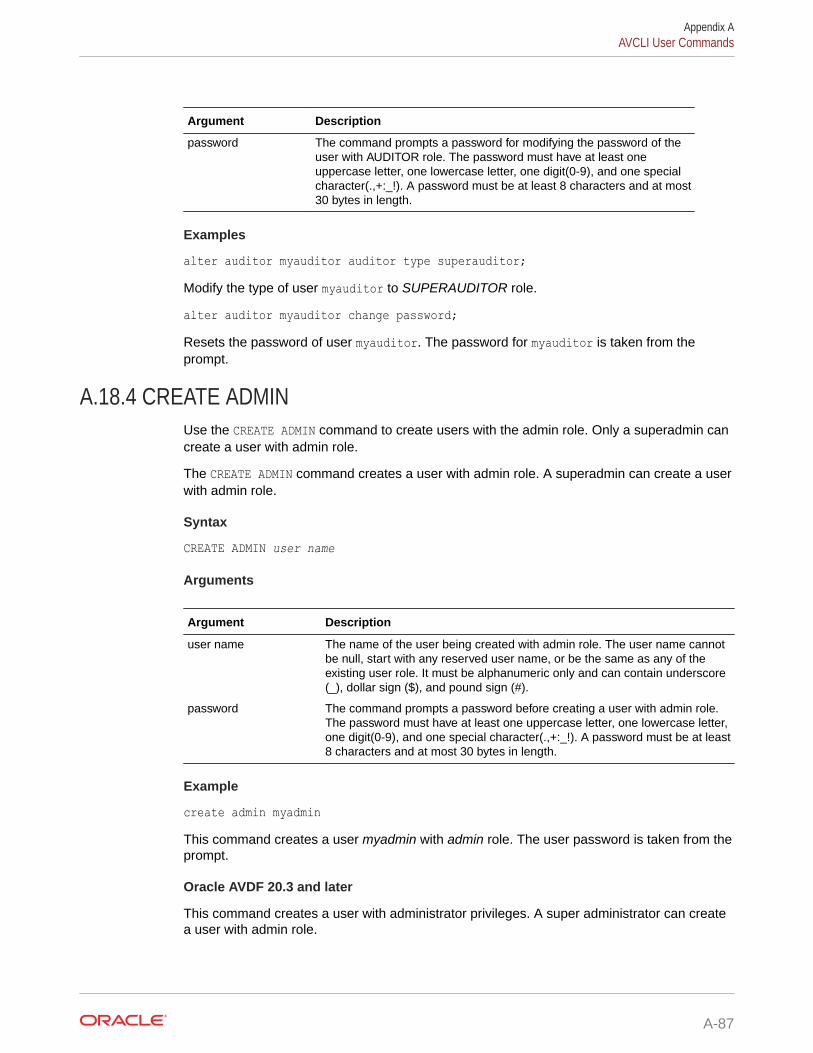
Argument Description
password The command prompts a password for modifying the password of theuser with AUDITOR role. The password must have at least oneuppercase letter, one lowercase letter, one digit(0-9), and one specialcharacter(.,+:_!). A password must be at least 8 characters and at most30 bytes in length.
Examples
alter auditor myauditor auditor type superauditor;Modify the type of user myauditor to SUPERAUDITOR role.
alter auditor myauditor change password;Resets the password of user myauditor. The password for myauditor is taken from theprompt.
A.18.4 CREATE ADMINUse the CREATE ADMIN command to create users with the admin role. Only a superadmin cancreate a user with admin role.
The CREATE ADMIN command creates a user with admin role. A superadmin can create a userwith admin role.
Syntax
CREATE ADMIN user name
Arguments
Argument Description
user name The name of the user being created with admin role. The user name cannotbe null, start with any reserved user name, or be the same as any of theexisting user role. It must be alphanumeric only and can contain underscore(_), dollar sign ($), and pound sign (#).
password The command prompts a password before creating a user with admin role.The password must have at least one uppercase letter, one lowercase letter,one digit(0-9), and one special character(.,+:_!). A password must be at least8 characters and at most 30 bytes in length.
Example
create admin myadminThis command creates a user myadmin with admin role. The user password is taken from theprompt.
Oracle AVDF 20.3 and later
This command creates a user with administrator privileges. A super administrator can createa user with admin role.
Appendix AAVCLI User Commands
A-87
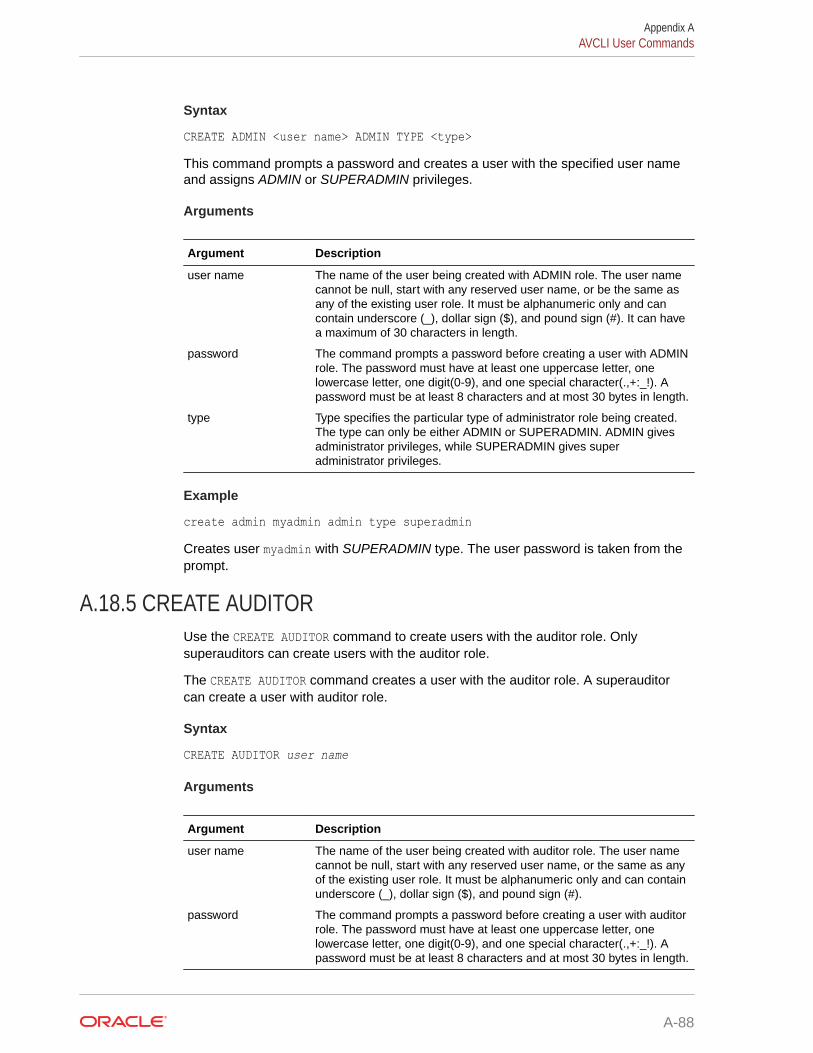
Syntax
CREATE ADMIN <user name> ADMIN TYPE <type>This command prompts a password and creates a user with the specified user nameand assigns ADMIN or SUPERADMIN privileges.
Arguments
Argument Description
user name The name of the user being created with ADMIN role. The user namecannot be null, start with any reserved user name, or be the same asany of the existing user role. It must be alphanumeric only and cancontain underscore (_), dollar sign ($), and pound sign (#). It can havea maximum of 30 characters in length.
password The command prompts a password before creating a user with ADMINrole. The password must have at least one uppercase letter, onelowercase letter, one digit(0-9), and one special character(.,+:_!). Apassword must be at least 8 characters and at most 30 bytes in length.
type Type specifies the particular type of administrator role being created.The type can only be either ADMIN or SUPERADMIN. ADMIN givesadministrator privileges, while SUPERADMIN gives superadministrator privileges.
Example
create admin myadmin admin type superadminCreates user myadmin with SUPERADMIN type. The user password is taken from theprompt.
A.18.5 CREATE AUDITORUse the CREATE AUDITOR command to create users with the auditor role. Onlysuperauditors can create users with the auditor role.
The CREATE AUDITOR command creates a user with the auditor role. A superauditorcan create a user with auditor role.
Syntax
CREATE AUDITOR user name
Arguments
Argument Description
user name The name of the user being created with auditor role. The user namecannot be null, start with any reserved user name, or the same as anyof the existing user role. It must be alphanumeric only and can containunderscore (_), dollar sign ($), and pound sign (#).
password The command prompts a password before creating a user with auditorrole. The password must have at least one uppercase letter, onelowercase letter, one digit(0-9), and one special character(.,+:_!). Apassword must be at least 8 characters and at most 30 bytes in length.
Appendix AAVCLI User Commands
A-88

Example
create auditor myauditorThis command creates a user myauditor with auditor role. The user password is taken fromthe prompt.
Oracle AVDF 20.3 and later
This command creates a user with AUDITOR privileges. A super auditor can create a userwith auditor role.
Syntax
CREATE AUDITOR <username> AUDITOR TYPE <type>This command prompts a password and creates a user with the specified user name andassigns AUDITOR privileges.
Arguments
Argument Description
user name The name of the user being created with auditor role. The user name cannotbe null, start with any reserved user name, or the same as any of theexisting user role. It must be alphanumeric only and can contain underscore(_), dollar sign ($), and pound sign (#). It can have a maximum of 30characters in length.
password The command prompts a password before creating a user with auditor role.The password must have at least one uppercase letter, one lowercase letter,one digit(0-9), and one special character(.,+:_!). A password must be at least8 characters and at most 30 bytes in length.
type Type specifies the particular type of auditor role being created. The type canonly be either AUDITOR or SUPERAUDITOR. AUDITOR gives auditorprivileges, while SUPERAUDITOR gives super auditor privileges.
Example
create auditor myauditor auditor type superauditor;Creates user myauditor with SUPERAUDITOR type. The user password is taken from theprompt.
A.18.6 DROP ADMINUse the DROP ADMIN command to drop or delete admin or superadmin users. Only asuperadmin can drop an admin or superadmin user.
The DROP ADMIN command drops or deletes a user with admin role. A superadmin can drop auser with admin role.
Syntax
DROP ADMIN user name
Appendix AAVCLI User Commands
A-89

Arguments
Argument Description
user name The existing user with admin role who needs to be dropped or deleted.
Example
drop admin myadminThis command drops the existing user myadmin. The command performs a cleanup,expire the password, lock the account, terminate any existing sessions for the user,and drop the user completely from the database.
A.18.7 DROP AUDITORUse the DROP AUDITOR command to drop or delete auditors or superauditor users. Onlysuperauditors can drop an auditor or superauditor user.
The DROP AUDITOR command drops or deletes a user with auditor role. A superauditorcan drop a user with auditor role.
Syntax
DROP AUDITOR user name
Arguments
Argument Description
user name The existing user with auditor role who needs to be dropped ordeleted.
Example
drop auditor myauditorThis command drops the existing user myauditor. The command performs a cleanup,expire the password, lock the account, terminate any existing sessions for the user,and drop the user completely from the database.
A.18.8 LIST ADMINUse the LIST ADMIN command to see administrator privileges for a specific user.
The LIST ADMIN command lists administrator privileges for a specific user.
Note:
This command is available starting Oracle AVDF release 20.4.
Appendix AAVCLI User Commands
A-90
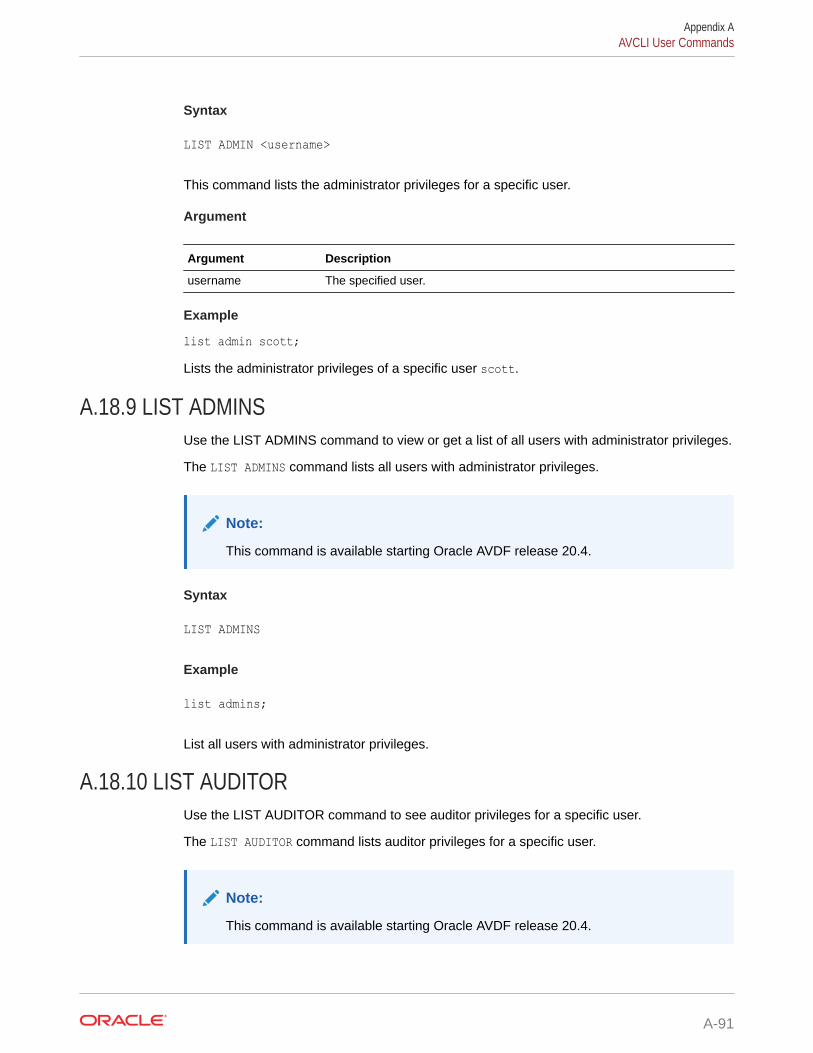
Syntax
LIST ADMIN <username>
This command lists the administrator privileges for a specific user.
Argument
Argument Description
username The specified user.
Example
list admin scott;Lists the administrator privileges of a specific user scott.
A.18.9 LIST ADMINSUse the LIST ADMINS command to view or get a list of all users with administrator privileges.
The LIST ADMINS command lists all users with administrator privileges.
Note:
This command is available starting Oracle AVDF release 20.4.
Syntax
LIST ADMINS
Example
list admins;
List all users with administrator privileges.
A.18.10 LIST AUDITORUse the LIST AUDITOR command to see auditor privileges for a specific user.
The LIST AUDITOR command lists auditor privileges for a specific user.
Note:
This command is available starting Oracle AVDF release 20.4.
Appendix AAVCLI User Commands
A-91

Syntax
LIST AUDITOR <username>
This command lists the auditor privileges for a specific user.
Argument
Argument Description
username The specified user.
Example
list auditor scott;Lists the auditor privileges of a specific user scott.
A.18.11 LIST AUDITORSUse the LIST AUDITORS command to view or get a list of all users with auditorprivileges.
The LIST AUDITORS command lists all users with auditor privileges.
Note:
This command is available starting Oracle AVDF release 20.4.
Syntax
LIST AUDITORS
Example
list auditors;
List all users with auditor privileges.
Appendix AAVCLI User Commands
A-92
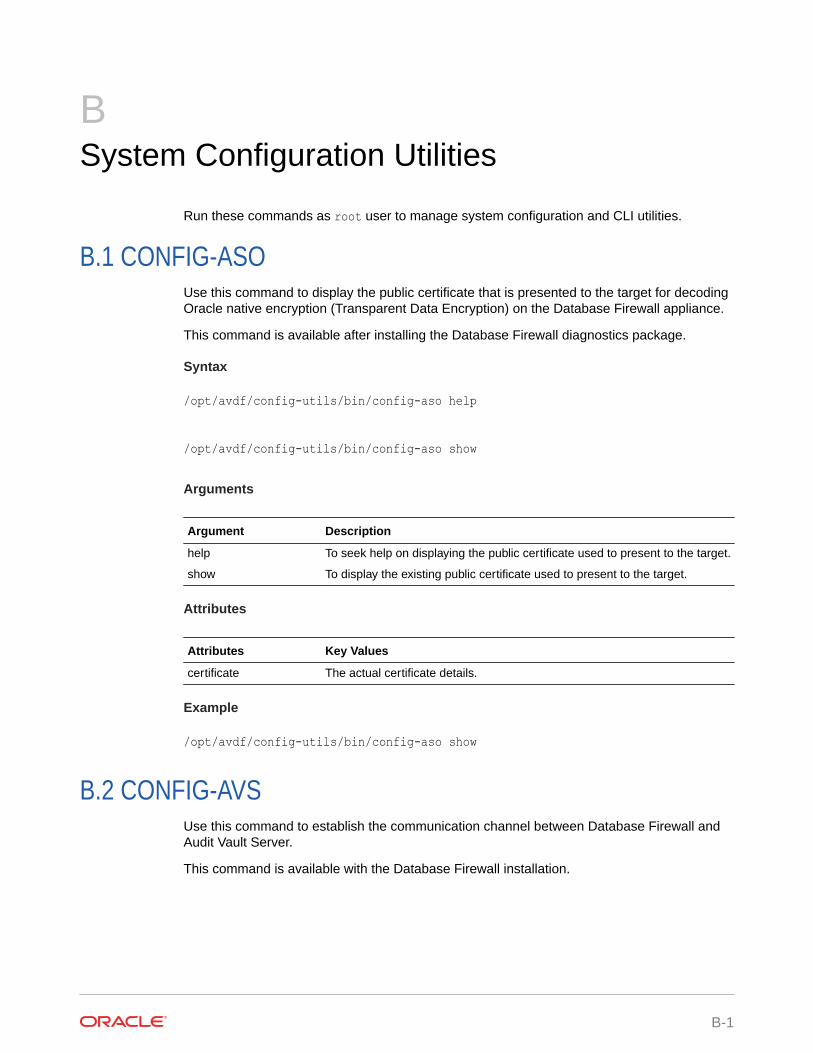
BSystem Configuration Utilities
Run these commands as root user to manage system configuration and CLI utilities.
B.1 CONFIG-ASOUse this command to display the public certificate that is presented to the target for decodingOracle native encryption (Transparent Data Encryption) on the Database Firewall appliance.
This command is available after installing the Database Firewall diagnostics package.
Syntax
/opt/avdf/config-utils/bin/config-aso help
/opt/avdf/config-utils/bin/config-aso show
Arguments
Argument Description
help To seek help on displaying the public certificate used to present to the target.
show To display the existing public certificate used to present to the target.
Attributes
Attributes Key Values
certificate The actual certificate details.
Example
/opt/avdf/config-utils/bin/config-aso show
B.2 CONFIG-AVSUse this command to establish the communication channel between Database Firewall andAudit Vault Server.
This command is available with the Database Firewall installation.
B-1

Syntax
/opt/avdf/config-utils/bin/config-avs help
/opt/avdf/config-utils/bin/config-avs set
/opt/avdf/config-utils/bin/config-avs show
Arguments
Argument Description
help To seek help on establishing the communication channel betweenDatabase Firewall and Audit Vault Server.
show To display the existing communication channel between DatabaseFirewall and Audit Vault Server.
set To modify the communication channel between Database Firewall andAudit Vault Server.
Attributes
Attributes Key Values
address IP address of the Audit Vault Server instance.
avs primarysecondary
certificate The CA certificate of the Audit Vault Server.
Example
/opt/avdf/config-utils/bin/config-avs set avs=primary address=192.0.2.12 certificate=/root/avscert.crt
B.3 CONFIG-BONDUse this command to configure bonding between two Network Interface Cards (NIC).The bonding functionality increases the bandwidth and supports redundancy of thenetwork connections on the appliance.
This command is available with the Database Firewall installation.
Appendix BCONFIG-BOND
B-2

Syntax
/opt/avdf/config-utils/bin/config-bond help
/opt/avdf/config-utils/bin/config-bond add
/opt/avdf/config-utils/bin/config-bond delete
/opt/avdf/config-utils/bin/config-bond set
/opt/avdf/config-utils/bin/config-bond show
Arguments
Argument Description
help To seek help on configuring bonding between two Network Interface Cards.
add To configure bonding between two Network Interface Cards.
delete To delete the existing bonding between two Network Interface Cards.
show To display the existing bonding between two Network Interface Cards.
set To modify the existing bonding functionality between two Network InterfaceCards.
Attributes
Attributes Key Values
description A short description of the network or service this bond provides.
device User defined name of the bonded device.
enabled This attribute confirms if the bonding between two Network Interface Cardsexists. The allowed values are Yes or No.
gateway IP address of the gateway.
ip_address Ip address of the bond.
network_mask The network mask of the device.
slaves The names of the component devices.
Example
/opt/avdf/config-utils/bin/config-bond add device=bond0 slaves=enp0s18,enp0s19 ip_address=192.168.10.10 network_mask=255.255.255.0 gateway=192.168.10.1 enabled=yes
Appendix BCONFIG-BOND
B-3

B.4 CONFIG-CAPTUREUse this command to monitor the network traffic on the Database Firewall and createpacket capture files (PCAP) for Database Firewall configuration.
This command is available with the Database Firewall installation.
Syntax
/opt/avdf/config-utils/bin/config-capture help
/opt/avdf/config-utils/bin/config-capture add
/opt/avdf/config-utils/bin/config-capture delete
/opt/avdf/config-utils/bin/config-capture show
Arguments
Argument Description
help To seek help on configuring traffic capture facility on the DatabaseFirewall appliance.
add To capture traffic using a NIC on the Database Firewall appliance.
delete To delete the results of the traffic captured using a NIC on theDatabase Firewall appliance.
show To display the list of the recorded traffic captured on the DatabaseFirewall appliance.
Attributes
Attributes Key Values
duration The amount of time (in seconds) to capture the traffic.
interface The name of the interface.
size The maximum allowed size (in kilobytes) of the traffic capture file.
Example
/opt/avdf/config-utils/bin/config-capture add interface=enp0s3 duration=300 size=9999
Appendix BCONFIG-CAPTURE
B-4

B.5 CONFIG-DIAGNOSTICSUse this command to run the system diagnostics status which displays current informationabout a range of processes monitored on the appliance.
This command is available after installing the Database Firewall diagnostics package.
Syntax
/opt/avdf/config-utils/bin/config-diagnostics help
/opt/avdf/config-utils/bin/config-diagnostics show
Arguments
Argument Description
help To seek help on system diagnostic processes monitored on the appliance.
show To display the existing system diagnostic capturing process on theappliance.
Example
/opt/avdf/config-utils/bin/config-diagnostics show
B.6 CONFIG-DNSUse this command to get and set the DNS server addresses on the appliance.
This command is available after installing the Audit Vault Server and Database Firewalldiagnostics packages.
Syntax
/opt/avdf/config-utils/bin/config-dns help
/opt/avdf/config-utils/bin/config-dns set
/opt/avdf/config-utils/bin/config-dns show
Arguments
Argument Description
help To seek help on configuring DNS server addresses on the appliance.
set To configure the DNS server address on the appliance.
show To display the existing DNS server configuration on the appliance.
Appendix BCONFIG-DIAGNOSTICS
B-5

Attributes
Attributes Key Values
servers Up to three DNS server IP addresses separated by comma.
Example
/opt/avdf/config-utils/bin/config-dns set servers="192.0.2.1 192.0.2.2 192.0.2.3"
B.7 CONFIG-KEYTABLEUse this command to configure keyboard locale on the appliance.
This command is available after installing the Audit Vault Server and Database Firewalldiagnostics packages.
Syntax
/opt/avdf/config-utils/bin/config-keytable help
/opt/avdf/config-utils/bin/config-keytable set
/opt/avdf/config-utils/bin/config-keytable show
Arguments
Argument Description
help To seek help on configuring keyboard locale on the appliance.
set To configure the keyboard locale on the appliance.
show To display the existing keyboard locale settings on the appliance.
Attributes
Attributes Key Values
layout Any value from /lib/kbd/keymaps/xkb/ and /lib/kbd/keymaps/legacy/
Example
/opt/avdf/config-utils/bin/config-keytable set layout=us
Appendix BCONFIG-KEYTABLE
B-6

B.8 CONFIG-NICUse this command to configure secondary network interfaces on the appliance.
This command is available with the Audit Vault Server and the Database Firewall installation.
Syntax
/opt/avdf/config-utils/bin/config-nic help
/opt/avdf/config-utils/bin/config-nic set
/opt/avdf/config-utils/bin/config-nic show
Note:
This command should be used for debugging purpose only. It is advisable to usethe Audit Vault Server console to perform the NIC configuration.
Arguments
Argument Description
help To seek help on configuring secondary network interfaces on the appliance.
set To configure secondary network interfaces on the appliance.
show To display the current settings of secondary network interfaces on theappliance.
delete To delete a configured secondary network interface on the appliance.
Attributes
Attributes Key Values
description User defined name of the interface.
device Device name of the interface on the appliance.
enabled YesNo
gateway IP address of the gateway.
hostname User defined hostname for all the NICs.
info System level information about the NIC.
ip_address IP address of the secondary NIC.
network_mask The network mask of the NIC.
Appendix BCONFIG-NIC
B-7
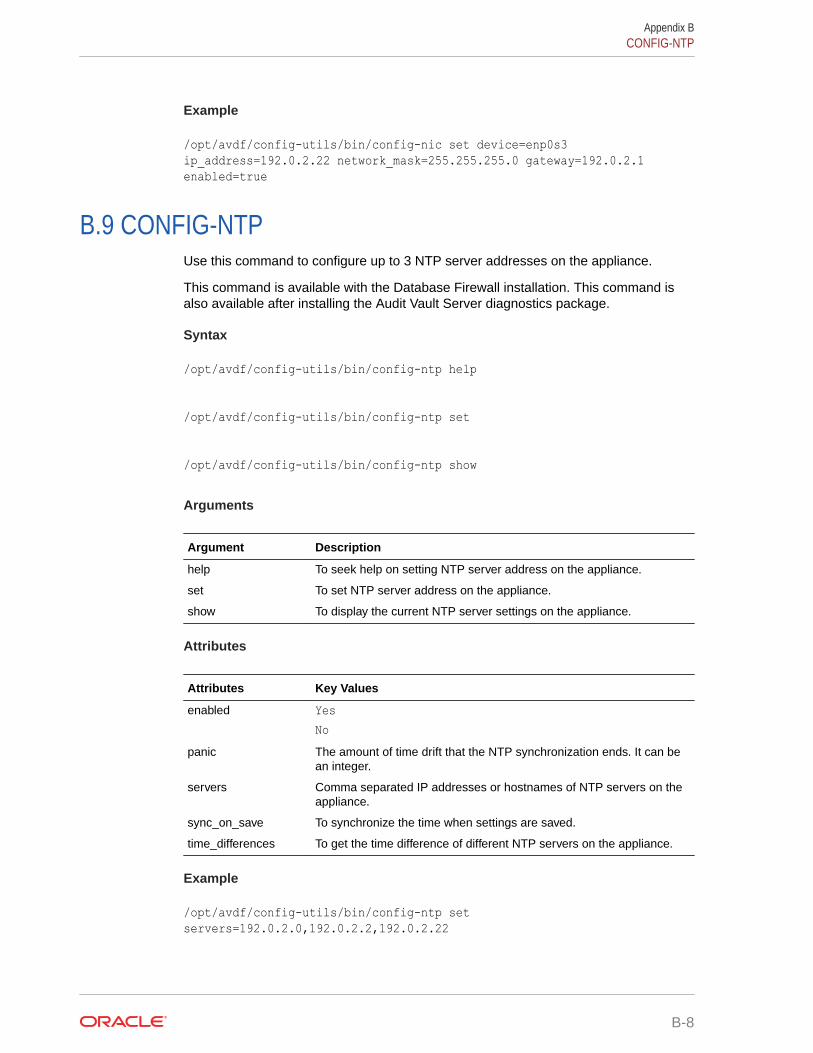
Example
/opt/avdf/config-utils/bin/config-nic set device=enp0s3 ip_address=192.0.2.22 network_mask=255.255.255.0 gateway=192.0.2.1 enabled=true
B.9 CONFIG-NTPUse this command to configure up to 3 NTP server addresses on the appliance.
This command is available with the Database Firewall installation. This command isalso available after installing the Audit Vault Server diagnostics package.
Syntax
/opt/avdf/config-utils/bin/config-ntp help
/opt/avdf/config-utils/bin/config-ntp set
/opt/avdf/config-utils/bin/config-ntp show
Arguments
Argument Description
help To seek help on setting NTP server address on the appliance.
set To set NTP server address on the appliance.
show To display the current NTP server settings on the appliance.
Attributes
Attributes Key Values
enabled YesNo
panic The amount of time drift that the NTP synchronization ends. It can bean integer.
servers Comma separated IP addresses or hostnames of NTP servers on theappliance.
sync_on_save To synchronize the time when settings are saved.
time_differences To get the time difference of different NTP servers on the appliance.
Example
/opt/avdf/config-utils/bin/config-ntp set servers=192.0.2.0,192.0.2.2,192.0.2.22
Appendix BCONFIG-NTP
B-8

B.10 CONFIG-PROXYUse this command to configure traffic proxy ports on the Database Firwewall appliance.
This command is available after installing the Database Firewall diagnostics package.
Syntax
/opt/avdf/config-utils/bin/config-proxy help
/opt/avdf/config-utils/bin/config-proxy add
/opt/avdf/config-utils/bin/config-proxy delete
/opt/avdf/config-utils/bin/config-proxy set
/opt/avdf/config-utils/bin/config-proxy show
Note:
This command should be used for debugging purpose only. It is advisable to usethe Audit Vault Server console to configure proxy ports.
Arguments
Argument Description
add To add a proxy port on the Database Firewall appliance.
delete To delete an existing proxy port on the Database Firewall appliance.
help To seek help on proxy port configuration for the Database Firewall appliance.
set To modify a proxy port on the Database Firewall appliance.
show To display the existing traffic proxy ports on the Database Firewall appliance.
Attributes
Attributes Key Values
description User defined name of the port.
enabled YesNo
id A unique ID has to be set for the proxy port on the Database Firewallappliance.
network_id To set the network interface used for the proxy port on the Database Firewallappliance.
Appendix BCONFIG-PROXY
B-9
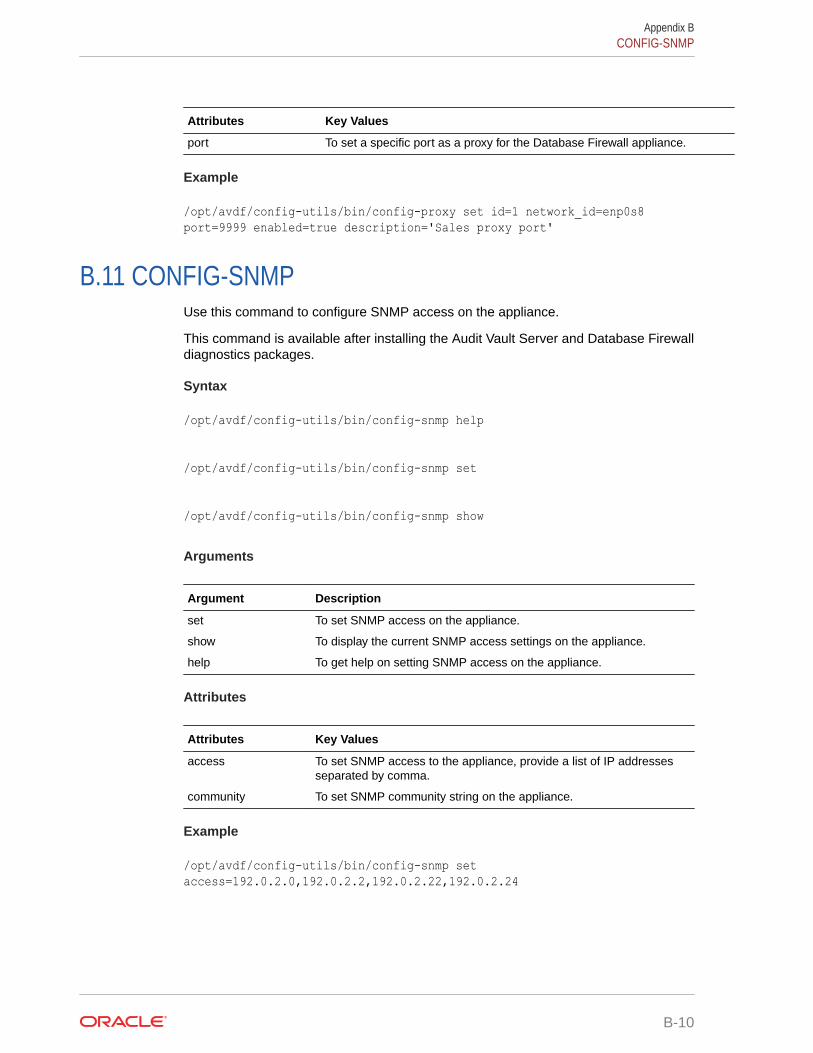
Attributes Key Values
port To set a specific port as a proxy for the Database Firewall appliance.
Example
/opt/avdf/config-utils/bin/config-proxy set id=1 network_id=enp0s8 port=9999 enabled=true description='Sales proxy port'
B.11 CONFIG-SNMPUse this command to configure SNMP access on the appliance.
This command is available after installing the Audit Vault Server and Database Firewalldiagnostics packages.
Syntax
/opt/avdf/config-utils/bin/config-snmp help
/opt/avdf/config-utils/bin/config-snmp set
/opt/avdf/config-utils/bin/config-snmp show
Arguments
Argument Description
set To set SNMP access on the appliance.
show To display the current SNMP access settings on the appliance.
help To get help on setting SNMP access on the appliance.
Attributes
Attributes Key Values
access To set SNMP access to the appliance, provide a list of IP addressesseparated by comma.
community To set SNMP community string on the appliance.
Example
/opt/avdf/config-utils/bin/config-snmp set access=192.0.2.0,192.0.2.2,192.0.2.22,192.0.2.24
Appendix BCONFIG-SNMP
B-10

B.12 CONFIG-SSHUse this command to configure SSH access on the appliance.
This command is available with the Database Firewall installation. This command is alsoavailable after installing the Audit Vault Server diagnostics package.
Syntax
/opt/avdf/config-utils/bin/config-ssh help
/opt/avdf/config-utils/bin/config-ssh set
/opt/avdf/config-utils/bin/config-ssh show
Arguments
Argument Description
set To set SSH access on the appliance.
show To display the current SSH access settings on the appliance.
help To get help on setting SSH access on the appliance.
Attributes
Attributes Key Values
access To set SSH access to the appliance, provide a list of IP addresses separatedby comma.
Example
/opt/avdf/config-utils/bin/config-ssh set access=192.0.2.0,192.0.2.2,192.0.2.22,192.0.2.24
B.13 CONFIG-STATUSUse this command to display the current status of updates on various Database Firewallcomponents.
This command is available after installing the Database Firewall diagnostics package.
Syntax
/opt/avdf/config-utils/bin/config-status show
/opt/avdf/config-utils/bin/config-status help
Appendix BCONFIG-SSH
B-11
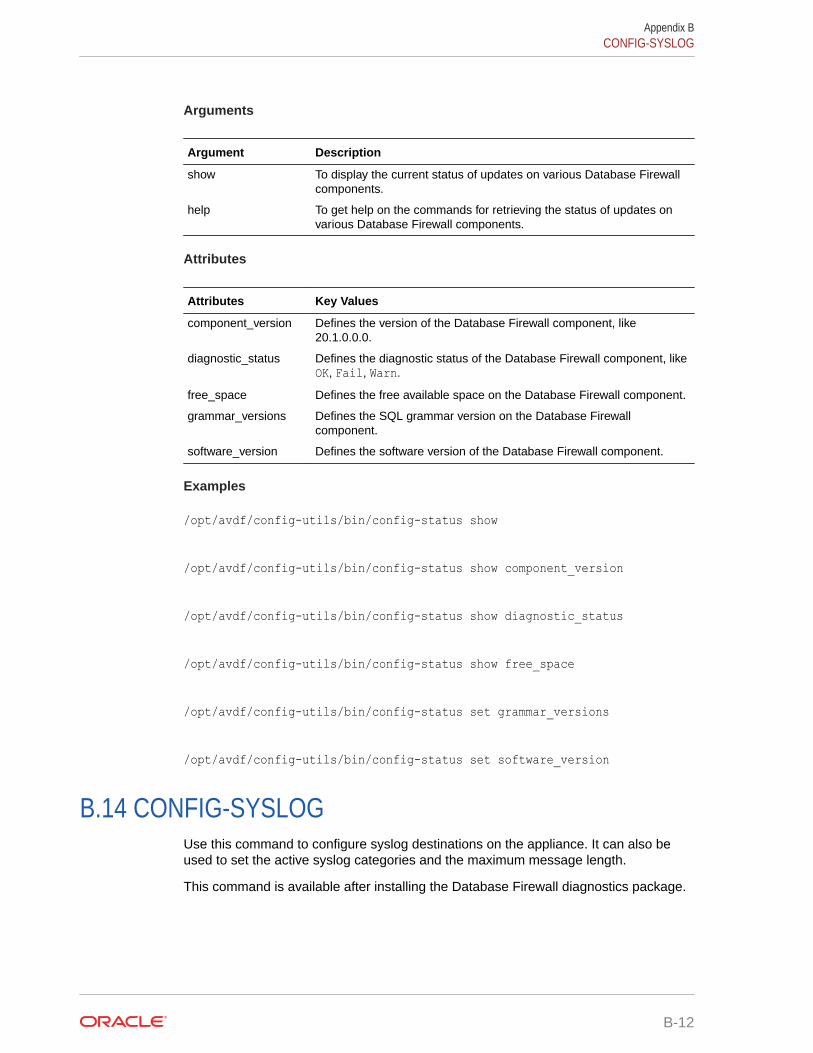
Arguments
Argument Description
show To display the current status of updates on various Database Firewallcomponents.
help To get help on the commands for retrieving the status of updates onvarious Database Firewall components.
Attributes
Attributes Key Values
component_version Defines the version of the Database Firewall component, like20.1.0.0.0.
diagnostic_status Defines the diagnostic status of the Database Firewall component, likeOK, Fail, Warn.
free_space Defines the free available space on the Database Firewall component.
grammar_versions Defines the SQL grammar version on the Database Firewallcomponent.
software_version Defines the software version of the Database Firewall component.
Examples
/opt/avdf/config-utils/bin/config-status show
/opt/avdf/config-utils/bin/config-status show component_version
/opt/avdf/config-utils/bin/config-status show diagnostic_status
/opt/avdf/config-utils/bin/config-status show free_space
/opt/avdf/config-utils/bin/config-status set grammar_versions
/opt/avdf/config-utils/bin/config-status set software_version
B.14 CONFIG-SYSLOGUse this command to configure syslog destinations on the appliance. It can also beused to set the active syslog categories and the maximum message length.
This command is available after installing the Database Firewall diagnostics package.
Appendix BCONFIG-SYSLOG
B-12

Syntax
/opt/avdf/config-utils/bin/config-syslog set
/opt/avdf/config-utils/bin/config-syslog show
/opt/avdf/config-utils/bin/config-syslog help
Arguments
Argument Description
set To set syslog destinations on the appliance.
show To display the current syslog destinations on the appliance.
help To get help of the available commands and supported attributes.
Attributes
Attributes Key Values
categories systemalertsinfodebugheartbeat
max_message_length Defines the maximum length of the syslog messages. It can be any integerbetween 1024 and 1048576.
tcp_destinations The TCP destinations on the appliance includes IP address, or thehostname, and the port number. For example, my.host:1234
udp_destinations The UDP destinations on the appliance includes IP address or thehostname. For example, my.hostThe default port number is 514.
Example
/opt/avdf/config-utils/bin/config-syslog set categories=system,alerts,info,debug,hearbeat max_message_length=2000 tcp_destinations=my.host:1234,second.host:4321 udp_destinations=my.host
B.15 CONFIG-TIMEUse this command to configure the time on the appliance.
This command is available after installing the Audit Vault Server and Database Firewalldiagnostics packages.
Appendix BCONFIG-TIME
B-13

Syntax
/opt/avdf/config-utils/bin/config-time set
/opt/avdf/config-utils/bin/config-time show
/opt/avdf/config-utils/bin/config-time help
Arguments
Argument Description
set To set the time on the appliance.
show To display the current time on the appliance.
help To get help of the available commands and supported attributes.
Attributes
Attribute Key Values
time Define the date and time in ISO8601 format:
yyyy-mm-ddThh:mm:ss
Example
/opt/avdf/config-utils/bin/config-time set time=2020-02-15T14:31:01
B.16 CONFIG-PKI_IDENTITYUse this command to list, add, delete, and validate TLS identities (keys, certificates,Certificate Signing Requests) for Database Firewall.
Note:
This command is available starting with Oracle AVDF 20.7.
Syntax
/opt/avdf/config-utils/bin/config-pki_identity show
/opt/avdf/config-utils/bin/config-pki_identity help
Appendix BCONFIG-PKI_IDENTITY
B-14

Arguments
Argument Description
show To display the list of certificates and Certificate Signing Requests.
add To create a Certificate Signing Request with specified attributes.
set To self sign or import external signed certificates to a specified path.
delete To delete a certificate with the specified common_name.
help To get help of the available commands and supported attributes.
Attributes
Attribute Key Values
common_name Common name of the certificate.
alt_dns
alt_email
alt_ip
alt_uri
common_name
country
locality
organisation
organisational_unit
state
Generic certificate attributes used for creating a CSR (add).
cert_gid
cert_mode
cert_path
cert_uid
File system setting for the generated CSR.
key_gid
key_mode
key_path
key_uid
File system setting for the generated key.
self_sign Argument to self sign the CSR with the local CA.
Appendix BCONFIG-PKI_IDENTITY
B-15
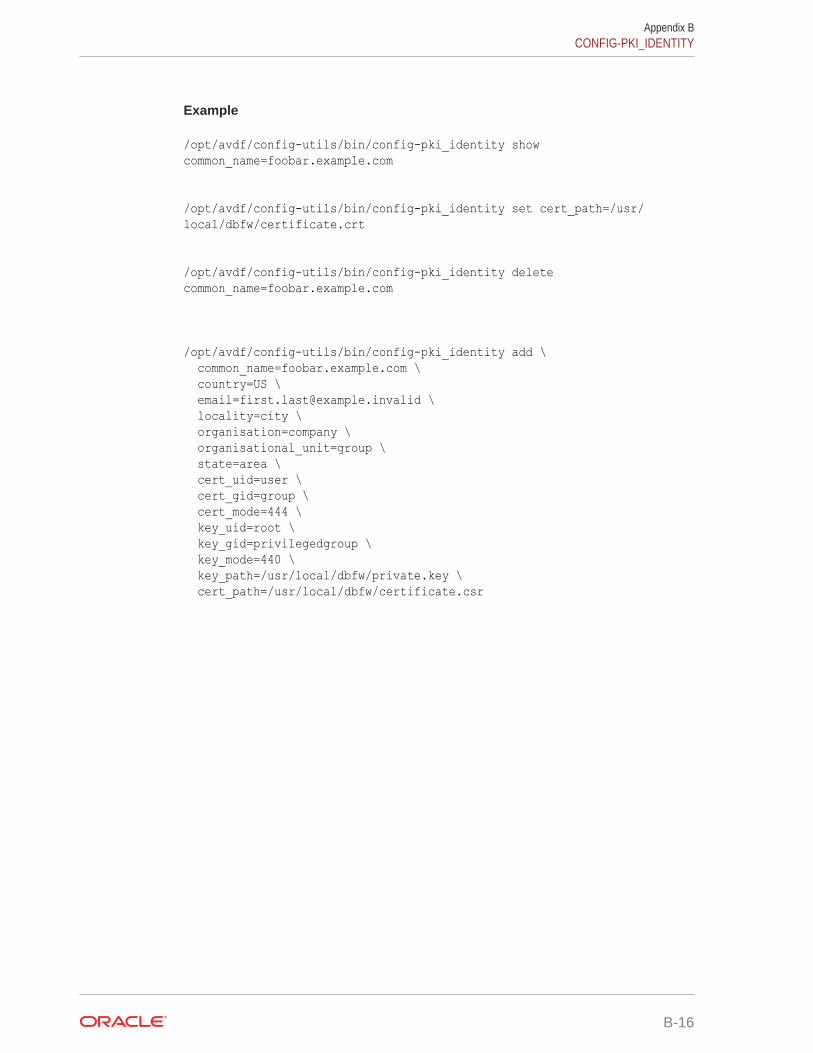
Example
/opt/avdf/config-utils/bin/config-pki_identity show common_name=foobar.example.com
/opt/avdf/config-utils/bin/config-pki_identity set cert_path=/usr/local/dbfw/certificate.crt
/opt/avdf/config-utils/bin/config-pki_identity delete common_name=foobar.example.com
/opt/avdf/config-utils/bin/config-pki_identity add \ common_name=foobar.example.com \ country=US \ [email protected] \ locality=city \ organisation=company \ organisational_unit=group \ state=area \ cert_uid=user \ cert_gid=group \ cert_mode=444 \ key_uid=root \ key_gid=privilegedgroup \ key_mode=440 \ key_path=/usr/local/dbfw/private.key \ cert_path=/usr/local/dbfw/certificate.csr
Appendix BCONFIG-PKI_IDENTITY
B-16

CPlug-In Reference
You can use plug-ins to incorporate additional functionality for your Audit Vault and DatabaseFirewall tasks.
C.1 About Oracle Audit Vault and Database Firewall Plug-insLearn about the plug-ins supported by Oracle Audit Vault and Database Firewall.
Oracle Audit Vault and Database Firewall supports different types of targets by providing aplug-in for each target type. Oracle Audit Vault and Database Firewall ships with a set of plug-ins out-of-the-box. These plug-ins are packaged and deployed with the Audit Vault Server.
You can also develop your own plug-ins, or get new available plug-ins, and add them to yourOracle Audit Vault and Database Firewall installation.
This appendix contains high-level data for each plug-in shipped with Oracle Audit Vault andDatabase Firewall. The appendix also contains look-up information you will need to completethe procedures for registering targets and configuring audit trails. These procedures linkdirectly to the relevant section of this appendix.
See Also:
Deploying Plug-ins and Registering Plug-in Hosts
C.2 Plug-ins That are Shipped with Oracle Audit Vault andDatabase Firewall
Oracle Audit Vault and Database Firewall supports plug-ins for a variety of different platforms,such as Oracle Solaris, Linux, and Microsoft Windows.
C.2.1 About Plug-insOracle Audit Vault and Database Firewall supports plug-ins for many platforms and third-partyproducts.
Oracle Audit Vault and Database Firewall plug-ins support the target versions listed in Table C-1. Click the link for each target to get detailed information.
C-1

Table C-1 Out-of-the-Box Plug-ins and Features Supported in Oracle Audit Vault and DatabaseFirewall
Target Version Audit TrailCollection
Audit PolicyCreation,EntitlementAuditing
StoredProcedureAuditing
AuditTrailCleanup
DatabaseFirewall
HostMonitor
NativeNetworkEncryptedTrafficMonitoring /RetrieveSessionInformation
Oracle DatabasePlug-in for OracleAudit Vault andDatabase Firewall
11.2
Yes Yes (exceptUnified AuditPolicies)
Yes Yes Yes Yes Yes
Oracle DatabasePlug-in for OracleAudit Vault andDatabase Firewall
12c, 18c, 19c
Yes Yes(includingUnified AuditPolicies)
Yes Yes Yes Yes Yes
Microsoft SQLServer Plug-in forOracle Audit Vaultand DatabaseFirewall (Windows)
2012, 2014, 2016,2017
Yes No Yes(Versions2000, 2005,2008, 2008R2)
Yes Yes Yes (onMicrosoftWindows2008 andonwards)
Yes (MicrosoftSQL Server2005, 2008,2008 R2)
(Retrievingsessioninformationonly)
Microsoft SQLServer Plug-in forOracle Audit Vaultand DatabaseFirewall (WindowsClustered)
2012 R2
Yes No Yes(Versions2012 R2)
Yes No No No
Sybase ASE Plug-infor Oracle AuditVault and DatabaseFirewall
15.7, 16
Yes No Yes No Yes Yes No
IBM DB2 Plug-in forOracle Audit Vaultand DatabaseFirewall for LUW
10.5, 11.1, 11.5
Yes No No Yes Yes
Versions9.1 - 10.5
Yes No
MySQL Plug-in forOracle Audit Vaultand DatabaseFirewall
5.6, 5.7, 8.0
Yes No No Yes Yes Yes No
Appendix CPlug-ins That are Shipped with Oracle Audit Vault and Database Firewall
C-2

Table C-1 (Cont.) Out-of-the-Box Plug-ins and Features Supported in Oracle Audit Vault andDatabase Firewall
Target Version Audit TrailCollection
Audit PolicyCreation,EntitlementAuditing
StoredProcedureAuditing
AuditTrailCleanup
DatabaseFirewall
HostMonitor
NativeNetworkEncryptedTrafficMonitoring /RetrieveSessionInformation
Oracle Solaris Plug-in for Oracle AuditVault and DatabaseFirewall
11.x upto 11.4 onx86-64 platforms
Yes No No No No YesVersions 11,11.1, 11.2
No
Oracle Solaris Plug-in for Oracle AuditVault and DatabaseFirewall11.x upto 11.4 onSPARC64 platforms
Yes No No No No YesVersions 11,11.1, 11.2
No
Oracle Linux
6.0 - 6.10
7.0 - 7.3, 7.4, 7.5,7.8
Yes No No No No Yes No
Red Hat EnterpriseLinux
6.8 - 6.10
7.3 - 7.8
Yes No No No No Yes No
IBM AIX Plug-in forOracle Audit Vaultand DatabaseFirewall
7.1 TL5, 7.2 TL2,TL3, TL4 on PowerSystems (64-bit)
Yes No No No No Yes No
Microsoft WindowsPlug-in for OracleAudit Vault andDatabase Firewall
Microsoft WindowsServer 2012, 2012R2, and 2016 onx86-64
Yes No No No No No No
Microsoft ActiveDirectory Plug-in forOracle Audit Vaultand DatabaseFirewall
2012, 2012 R2, and2016 on 64 bit
Yes No No No No No No
Appendix CPlug-ins That are Shipped with Oracle Audit Vault and Database Firewall
C-3
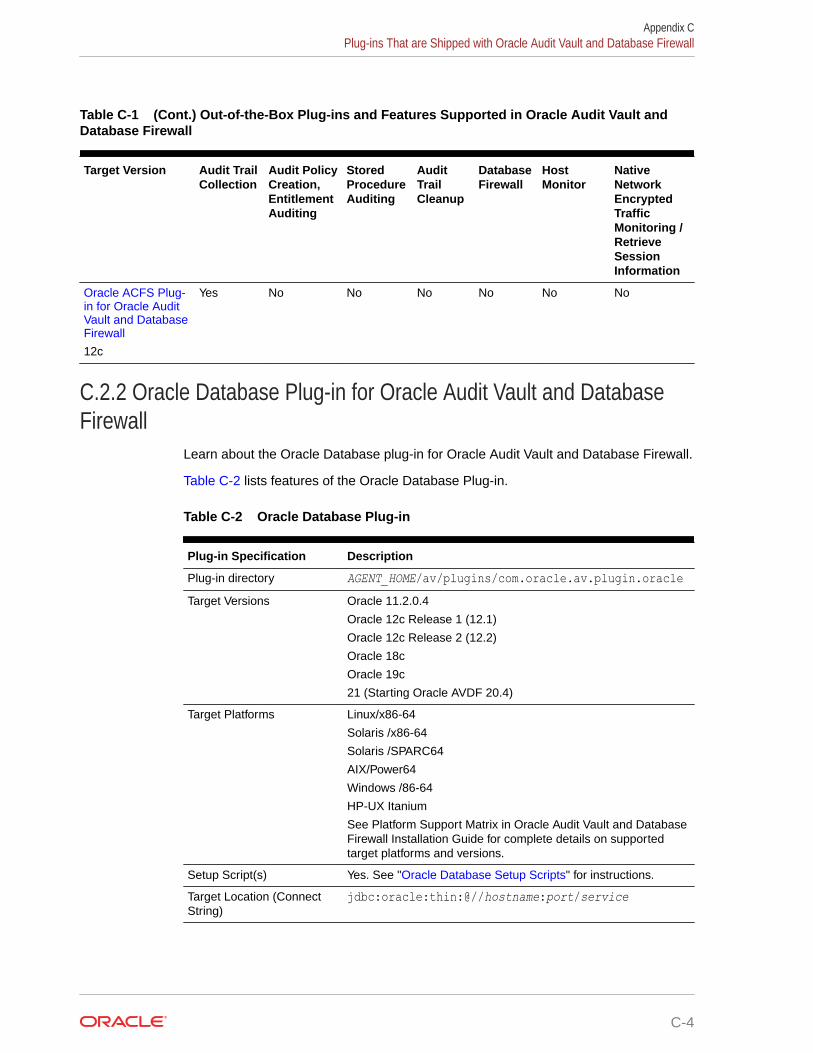
Table C-1 (Cont.) Out-of-the-Box Plug-ins and Features Supported in Oracle Audit Vault andDatabase Firewall
Target Version Audit TrailCollection
Audit PolicyCreation,EntitlementAuditing
StoredProcedureAuditing
AuditTrailCleanup
DatabaseFirewall
HostMonitor
NativeNetworkEncryptedTrafficMonitoring /RetrieveSessionInformation
Oracle ACFS Plug-in for Oracle AuditVault and DatabaseFirewall
12c
Yes No No No No No No
C.2.2 Oracle Database Plug-in for Oracle Audit Vault and DatabaseFirewall
Learn about the Oracle Database plug-in for Oracle Audit Vault and Database Firewall.
Table C-2 lists features of the Oracle Database Plug-in.
Table C-2 Oracle Database Plug-in
Plug-in Specification Description
Plug-in directory AGENT_HOME/av/plugins/com.oracle.av.plugin.oracleTarget Versions Oracle 11.2.0.4
Oracle 12c Release 1 (12.1)
Oracle 12c Release 2 (12.2)
Oracle 18c
Oracle 19c
21 (Starting Oracle AVDF 20.4)
Target Platforms Linux/x86-64
Solaris /x86-64
Solaris /SPARC64
AIX/Power64
Windows /86-64
HP-UX Itanium
See Platform Support Matrix in Oracle Audit Vault and DatabaseFirewall Installation Guide for complete details on supportedtarget platforms and versions.
Setup Script(s) Yes. See "Oracle Database Setup Scripts" for instructions.
Target Location (ConnectString)
jdbc:oracle:thin:@//hostname:port/service
Appendix CPlug-ins That are Shipped with Oracle Audit Vault and Database Firewall
C-4

Table C-2 (Cont.) Oracle Database Plug-in
Plug-in Specification Description
Collection Attributes None.
ORCLCOLL.NLS_LANGUAGE, ORCLCOLL.NLS_TERRITORY andORCLCOLL.NLS_CHARSET: These will be deprecated in thefuture.
ORCLCOLL.NLS_CHARSET attribute is replaced byAV.COLLECTOR.DATABASECHARSET.
See Table C-21 for details.
AV.COLLECTOR.TIMEZONEOFFSETNote: This attribute must be set to timezone offset of OracleDatabase. It is mandatory if Transaction Log audit trail is going tobe configured for the target.
AVDF Audit Trail Types TABLEDIRECTORYTRANSACTION LOGSYSLOG (Linux only)
EVENT LOG (Windows only)
NETWORKSee Table C-19 for descriptions of audit trail types.
Audit Trail Location For TABLE audit trails: SYS.AUD$, SYS.FGA_LOG$,DVSYS.AUDIT_TRAIL$, UNIFIED_AUDIT_TRAIL,CDB_UNIFIED_AUDIT_TRAIL.
For DIRECTORY audit trails: Full path to directory containing AUDor XML files.
For SYSLOG audit trails: Use DEFAULT or the full path to directorycontaining the syslog file.
For EVENT LOG and NETWORK audit trails: no trail locationrequired.
For TRANSACTION LOG: Full path to directory containing GoldenGate Integrated Extract file.
Note:Oracle Audit Vault and Database Firewall queries and collectsrecords from Unified Audit trail which fetches unified auditrecords from operating system spillover audit files. The DatabaseAudit Management manages the clean up of Unified Audit trailand the underlying operating system spillover audit files.
Audit Trail Cleanup Support Yes. See Oracle Database Audit Trail Cleanup for instructions.
OS user running the Agent For Oracle Database Directory Audit Trail: Any user who hasread permission on audit files, i.e oracle user, or user in DBAgroup.
For Table Trail: Any database user (preferably not DBA).
For Transaction Log trail : Any user who has read permission onGolden Gate Integrated Extract XML files.
For any other directory audit trail: Any user who has readpermission on audit files.
Appendix CPlug-ins That are Shipped with Oracle Audit Vault and Database Firewall
C-5
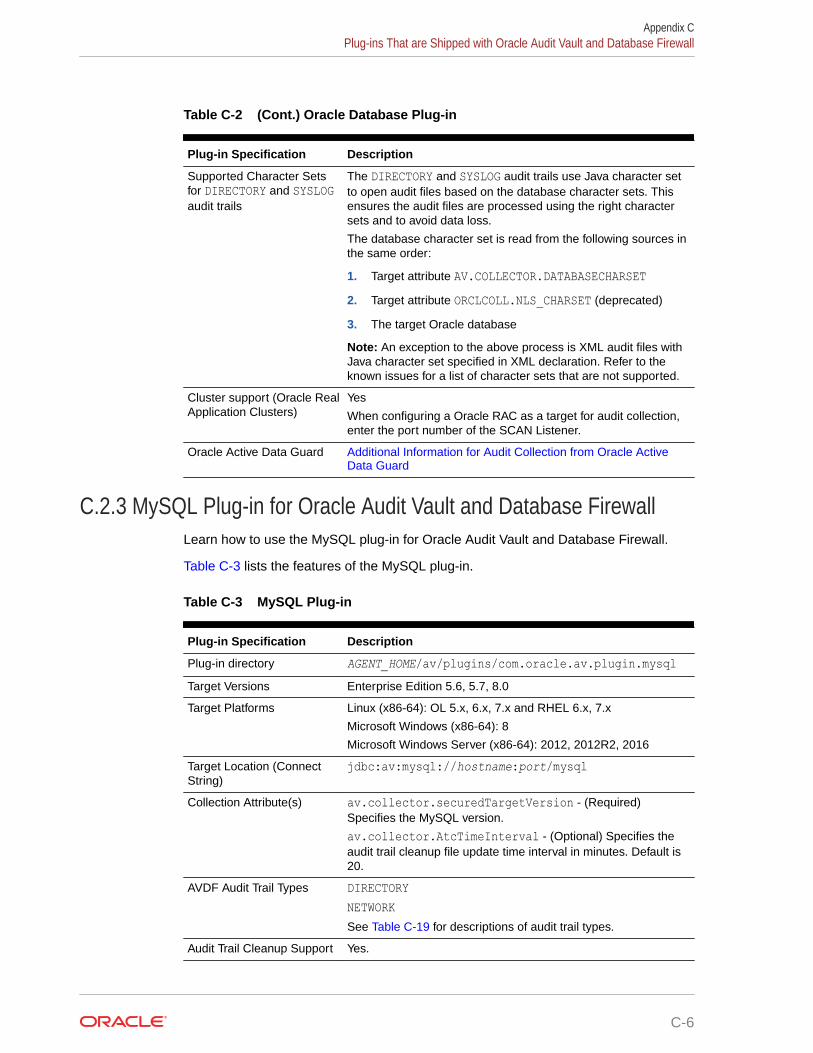
Table C-2 (Cont.) Oracle Database Plug-in
Plug-in Specification Description
Supported Character Setsfor DIRECTORY and SYSLOGaudit trails
The DIRECTORY and SYSLOG audit trails use Java character setto open audit files based on the database character sets. Thisensures the audit files are processed using the right charactersets and to avoid data loss.
The database character set is read from the following sources inthe same order:
1. Target attribute AV.COLLECTOR.DATABASECHARSET2. Target attribute ORCLCOLL.NLS_CHARSET (deprecated)
3. The target Oracle database
Note: An exception to the above process is XML audit files withJava character set specified in XML declaration. Refer to theknown issues for a list of character sets that are not supported.
Cluster support (Oracle RealApplication Clusters)
Yes
When configuring a Oracle RAC as a target for audit collection,enter the port number of the SCAN Listener.
Oracle Active Data Guard Additional Information for Audit Collection from Oracle ActiveData Guard
C.2.3 MySQL Plug-in for Oracle Audit Vault and Database FirewallLearn how to use the MySQL plug-in for Oracle Audit Vault and Database Firewall.
Table C-3 lists the features of the MySQL plug-in.
Table C-3 MySQL Plug-in
Plug-in Specification Description
Plug-in directory AGENT_HOME/av/plugins/com.oracle.av.plugin.mysqlTarget Versions Enterprise Edition 5.6, 5.7, 8.0
Target Platforms Linux (x86-64): OL 5.x, 6.x, 7.x and RHEL 6.x, 7.x
Microsoft Windows (x86-64): 8
Microsoft Windows Server (x86-64): 2012, 2012R2, 2016
Target Location (ConnectString)
jdbc:av:mysql://hostname:port/mysql
Collection Attribute(s) av.collector.securedTargetVersion - (Required)Specifies the MySQL version.
av.collector.AtcTimeInterval - (Optional) Specifies theaudit trail cleanup file update time interval in minutes. Default is20.
AVDF Audit Trail Types DIRECTORYNETWORKSee Table C-19 for descriptions of audit trail types.
Audit Trail Cleanup Support Yes.
Appendix CPlug-ins That are Shipped with Oracle Audit Vault and Database Firewall
C-6

Audit Trail Location
The path to the directory where the converted files are created.
The default audit format for MySQL 5.5 and 5.6 is old. The default audit format for MySQL 5.7is new. The audit format can be changed by modifying the configuration on MySQL Server.
The Audit Trail Location is as follows:
1. For old audit format, the path to the directory is where the converted XML files arecreated when you run the MySQL XML transformation utility.
2. For new audit format, the path to the directory is where the audit.log files are generatedby MySQL Server.
Table C-4 Old Audit Format
Audit Trail Location Value
Input path format before MySQL 5.7.21 <Path of the converted XML location.>For example: \ConvertedXML
Input path format of MySQL 5.7.21 onwards <Path of the converted XML location.>For example: \ConvertedXML
Table C-5 New Audit Format
Audit Trail Location Value
Input path format before MySQL 5.7.21 <Path of the audit.log location.>For example: \MySQLLog
Input path format for MySQL 5.7.21 onwards <Path of the audit log file>/<log filename>.*.logWhere * is the time stamp in YYYYMMDDThhmmss format.
For example: MySQLLog/audit*.log
Note:
• In the old format audit data is collected from converted XML files. In the newformat audit data is collected from both active log and rotated logs.
• Audit collection from MySQL Community Edition is not supported by this plug-inof Oracle AVDF.
Best Practice:
Enable automatic size-based audit log file rotation, by settingaudit_log_rotate_on_size property. See Audit Log File Space Management andName Rotation in MySQL Reference Manual for further details.
Appendix CPlug-ins That are Shipped with Oracle Audit Vault and Database Firewall
C-7

See Also:
• Running the XML Transformation Utility for MySQL Audit Formats
• MySQL Audit Trail Cleanup
C.2.4 Microsoft SQL Server Plug-in for Oracle Audit Vault andDatabase Firewall
Learn about using the Microsoft SQL Server Plug-in for Oracle Audit Vault andDatabase Firewall.
Table C-6 lists the features of the Microsoft SQL Server plug-in.
Table C-6 Microsoft SQL Server Plug-in
Plug-in Specification Description
Plug-in directory AGENT_HOME\av\plugins\com.oracle.av.plugin.mssqlTarget Versions Enterprise Edition 2012, 2014, 2016, 2017, 2019.
Standard Edition 2019 (Starting Oracle AVDF 20.6)
Target Platforms Windows/x86-64
See Platform Support Matrix in Oracle Audit Vault and DatabaseFirewall Installation Guide for complete details on supportedtarget platforms and versions.
Setup Script(s) Yes. "Microsoft SQL Server Setup Scripts" for instructions.
Note: After upgrading to Oracle 20.3 or later, rerun the serversetup script for all targets in order to continue with auditcollection.
Target Location (ConnectString for SQL serverauthentication)
jdbc:av:sqlserver://hostname:port
Target Location (ConnectString for WindowsAuthentication)
jdbc:av:sqlserver://<HostName>:<Port>;authenticationMethod=ntlmjavaUse Windows user credentials along with domain. For example:
<domain name>\<user name > and passwordCollection Attribute(s) None
AVDF Audit Trail Types DIRECTORYEVENT LOGNETWORKSee Table C-19 for descriptions of audit trail types.
Appendix CPlug-ins That are Shipped with Oracle Audit Vault and Database Firewall
C-8

Table C-6 (Cont.) Microsoft SQL Server Plug-in
Plug-in Specification Description
Audit Trail Location forDIRECTORY audit trail
• *.sqlaudit• *.trc (trace)
• *.xel (extended events)
• #C2_DYNAMIC• #TRACE_DYNAMICExamples:
• directory_path\*.sqlaudit• directory_path\prefix*.sqlaudit• directory_path\prefix*.trc• directory_path\*.xel• directory_path\prefix*.xel• #C2_DYNAMIC• #TRACE_DYNAMICNote:• For prefix, you can use any prefix for the .trc, *.xel, or
*.sqlaudit files.
• Support for extended events (*.xel files) is included forDIRECTORY audit trails starting Oracle AVDF release 20.3.
Audit Trail Location forEVENT LOG audit trail
• application• security
Audit Trail Cleanup Support Yes. See "Microsoft SQL Server Audit Trail Cleanup" forinstructions.
Cluster support Yes
Target Platform for Cluster Windows 2012 R2 Enterprise Edition for audit collection
Cluster Collection Attribute Attribute Name: av.collector.clusterEnabledAttribute Value: 1
Support for Always Onavailability group
Yes (Starting with Oracle AVDF release 20.3)
Note:• Register one target in the Audit Vault Server for every MS
SQL server that is part of the Always On availability group.• Oracle AVDF audit report provides a view of audit records
generated by individual MS SQL servers of the availabilitygroup. It is not a consolidated view of audit recordsgenerated by all servers of availability group.
Collection Attributes(Optional)
av.collector.validateConnectionOnBorrowSetting this attribute to False, eliminates unnecessary logging ofrecords or events due to test queries in target database. Thisattribute is available starting Oracle AVDF release 20.6.
C.2.5 PostgreSQL Plug-in for Oracle Audit Vault and Database FirewallLearn about using the PostgreSQL plug-in for Oracle Audit Vault and Database Firewall.
Table C-7 specifies the values or details required for the configuration.
Appendix CPlug-ins That are Shipped with Oracle Audit Vault and Database Firewall
C-9
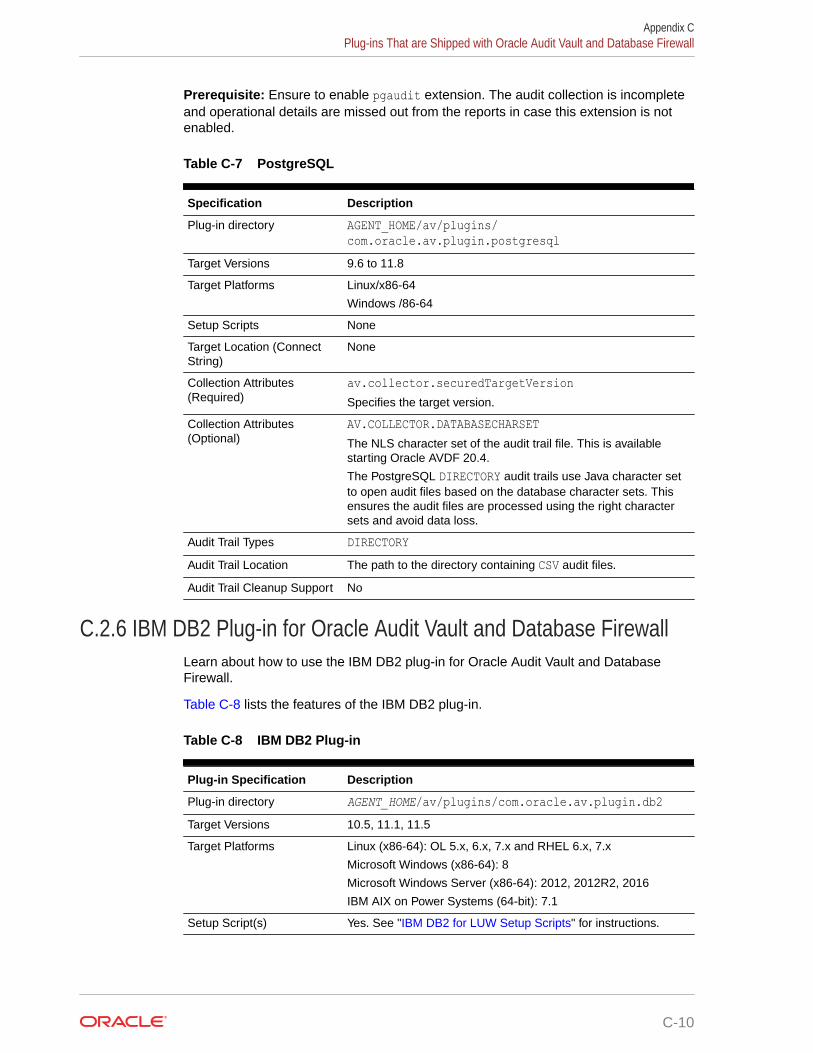
Prerequisite: Ensure to enable pgaudit extension. The audit collection is incompleteand operational details are missed out from the reports in case this extension is notenabled.
Table C-7 PostgreSQL
Specification Description
Plug-in directory AGENT_HOME/av/plugins/com.oracle.av.plugin.postgresql
Target Versions 9.6 to 11.8
Target Platforms Linux/x86-64
Windows /86-64
Setup Scripts None
Target Location (ConnectString)
None
Collection Attributes(Required)
av.collector.securedTargetVersionSpecifies the target version.
Collection Attributes(Optional)
AV.COLLECTOR.DATABASECHARSETThe NLS character set of the audit trail file. This is availablestarting Oracle AVDF 20.4.
The PostgreSQL DIRECTORY audit trails use Java character setto open audit files based on the database character sets. Thisensures the audit files are processed using the right charactersets and avoid data loss.
Audit Trail Types DIRECTORYAudit Trail Location The path to the directory containing CSV audit files.
Audit Trail Cleanup Support No
C.2.6 IBM DB2 Plug-in for Oracle Audit Vault and Database FirewallLearn about how to use the IBM DB2 plug-in for Oracle Audit Vault and DatabaseFirewall.
Table C-8 lists the features of the IBM DB2 plug-in.
Table C-8 IBM DB2 Plug-in
Plug-in Specification Description
Plug-in directory AGENT_HOME/av/plugins/com.oracle.av.plugin.db2Target Versions 10.5, 11.1, 11.5
Target Platforms Linux (x86-64): OL 5.x, 6.x, 7.x and RHEL 6.x, 7.x
Microsoft Windows (x86-64): 8
Microsoft Windows Server (x86-64): 2012, 2012R2, 2016
IBM AIX on Power Systems (64-bit): 7.1
Setup Script(s) Yes. See "IBM DB2 for LUW Setup Scripts" for instructions.
Appendix CPlug-ins That are Shipped with Oracle Audit Vault and Database Firewall
C-10

Table C-8 (Cont.) IBM DB2 Plug-in
Plug-in Specification Description
Target Location (ConnectString)
jdbc:av:db2://hostname:port/dbnameNote:• Connect string is not required for Oracle AVDF release 20.• Connect string is not required for IBM DB2 cluster.
Collection Attribute(s) av.collector.databasename (case sensitive) - (Required)Specifies the IBM DB2 for LUW database name.
AVDF Audit Trail Types DIRECTORYNETWORKSee Table C-19 for descriptions of audit trail types.
Audit Trail Location Path to a directory, for example: d:\temp\traceAudit Trail Cleanup Support Yes
Cluster Support Yes
HADR (High Availability and Disaster Recovery)
Target Platform for Cluster HADR on OL 7.x
DB2 Multiple InstancesSupport
Yes
Multiple Instances Environment
In case of multiple instances environment, create an Audit Vault Agent user and then theAgent group. Install the Agent as the newly created Agent user belonging to the Agent group.Add all the users of the instance to the Agent group and then add the Agent user to theinstance group. This functionality is supported from Oracle AVDF 20.2 (RU2) and later.
Perform the following steps from every instance to extract the audit files:
1. Navigate to the extraction utility location using $AGENT_HOME/av/plugins/com.oracle.av.plugin.db2/bin.
2. Set the environment variables agent_home, db2audit_command, and lslk_cmd.
3. Run the extraction utility using ./DB295ExtractionUtil -archivepath <archive path>-extractionpath <extraction path> -audittrailcleanup <yes/no>.
4. The extracted files are generated in the directory at the instance level.
5. Start the audit trail for every instance as the extraction path is different for each instance.
C.2.7 Sybase ASE Plug-in for Oracle Audit Vault and Database FirewallLearn how to use the Sybase ASE plug-in for Oracle Audit Vault and Database Firewall.
Table C-9 lists the features of the Sybase ASE plug-in.
Table C-9 Sybase ASE Plug-in
Plug-in Specification Description
Plug-in directory AGENT_HOME/av/plugins/com.oracle.av.plugin.sybase
Appendix CPlug-ins That are Shipped with Oracle Audit Vault and Database Firewall
C-11
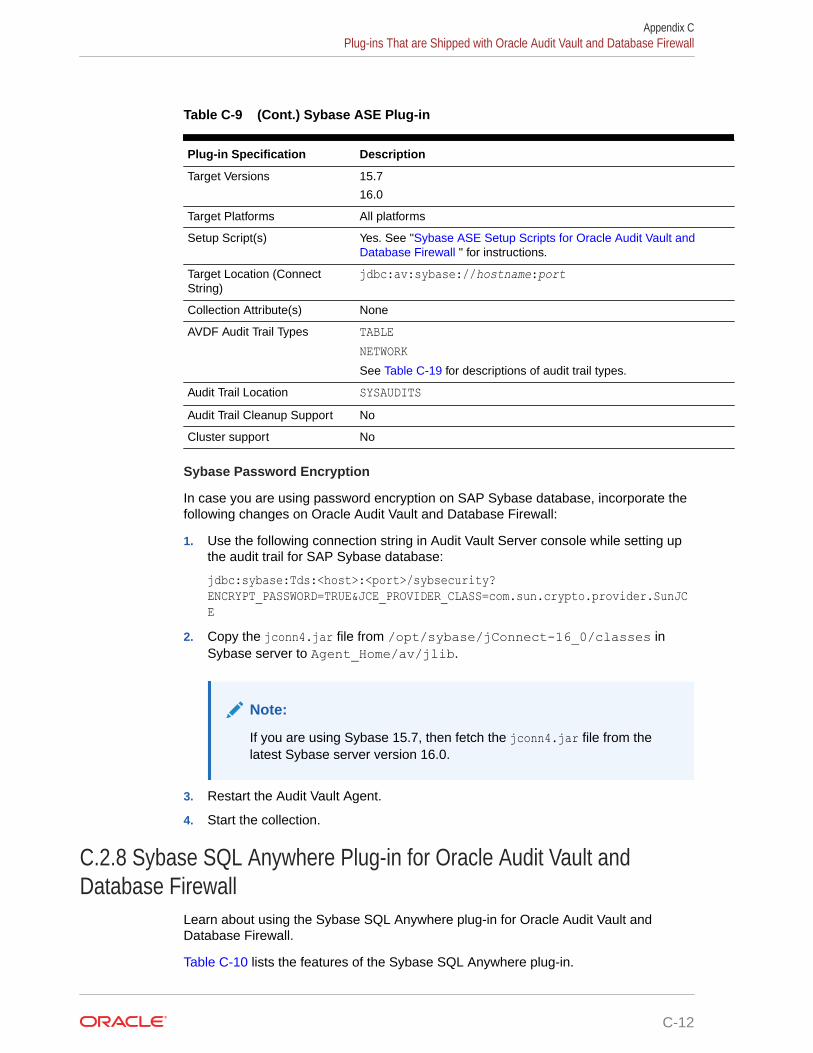
Table C-9 (Cont.) Sybase ASE Plug-in
Plug-in Specification Description
Target Versions 15.7
16.0
Target Platforms All platforms
Setup Script(s) Yes. See "Sybase ASE Setup Scripts for Oracle Audit Vault andDatabase Firewall " for instructions.
Target Location (ConnectString)
jdbc:av:sybase://hostname:port
Collection Attribute(s) None
AVDF Audit Trail Types TABLENETWORKSee Table C-19 for descriptions of audit trail types.
Audit Trail Location SYSAUDITSAudit Trail Cleanup Support No
Cluster support No
Sybase Password Encryption
In case you are using password encryption on SAP Sybase database, incorporate thefollowing changes on Oracle Audit Vault and Database Firewall:
1. Use the following connection string in Audit Vault Server console while setting upthe audit trail for SAP Sybase database:
jdbc:sybase:Tds:<host>:<port>/sybsecurity?ENCRYPT_PASSWORD=TRUE&JCE_PROVIDER_CLASS=com.sun.crypto.provider.SunJCE
2. Copy the jconn4.jar file from /opt/sybase/jConnect-16_0/classes inSybase server to Agent_Home/av/jlib.
Note:
If you are using Sybase 15.7, then fetch the jconn4.jar file from thelatest Sybase server version 16.0.
3. Restart the Audit Vault Agent.
4. Start the collection.
C.2.8 Sybase SQL Anywhere Plug-in for Oracle Audit Vault andDatabase Firewall
Learn about using the Sybase SQL Anywhere plug-in for Oracle Audit Vault andDatabase Firewall.
Table C-10 lists the features of the Sybase SQL Anywhere plug-in.
Appendix CPlug-ins That are Shipped with Oracle Audit Vault and Database Firewall
C-12

Table C-10 Sybase SQL Anywhere Plug-in
Plug-in Specification Description
Plug-in directory AGENT_HOME/av/plugins/com.oracle.av.plugin.sqlanywhereTarget Versions 10.0.1
Target Platforms All platforms
Setup Script(s) Yes. See "Sybase SQL Anywhere Setup Scripts" for instructions.
Target Location (ConnectString)
jdbc:av:sybase://hostname:port
Collection Attributes None
AVDF Audit Trail Types NETWORK (used for host monitoring only)
See Table C-19 for descriptions of audit trail types.
Audit Trail Location Not required
Audit Trail Cleanup Support No
C.2.9 Quick JSON Target Type for Oracle Audit Vault and DatabaseFirewall
Learn how to configure and use the Quick JSON target type for Oracle Audit Vault andDatabase Firewall.
Quick JSON target type can be used to collect audit data from targets that store audit recordsin JSON format, by mapping few collection attributes.
Table C-11 specifies the values or details required for the configuration.
Table C-11 Quick JSON
Specification Description
Plug-in directory AGENT_HOME/av/plugins/com.oracle.av.plugin.quickjsonTarget Platforms Linux/x86-64
Windows /86-64
Setup Scripts None
Target Location (ConnectString)
None
Collection Attributes(Required)
av.collector.securedTargetVersionSpecifies the target version.
Collection Attributes (Optional) AV.COLLECTOR.DATABASECHARSETThe NLS character set of the audit trail file. This is available startingOracle AVDF 20.4.
The Quick JSON DIRECTORY audit trails use Java character set toopen audit files based on the database character sets. This ensuresthe audit files are processed using the right character sets and avoiddata loss.
Audit Trail Types DIRECTORY
Appendix CPlug-ins That are Shipped with Oracle Audit Vault and Database Firewall
C-13

Table C-11 (Cont.) Quick JSON
Specification Description
Audit Trail Location The path to the directory containing JSON audit files.
Audit Trail Cleanup Support No
QuickJSON collector relies on collection attributes to map JSON audit data to OracleAVDF audit record fields. These collection attributes point to data within JSON auditfile using JSON Path expressions. Following table lists the QuickJSON collectionattributes.
Table C-12 Quick JSON Collection Attributes
Quick JSON Collection AttributeName
Description Attribute Value Type
av.collector.qck.starttag Should be set to the first key ofJSON audit record. This is not JSONPath expression. It is the name of therequired key.
Static String
av.collector.qck.eventtime Time when the event occurred. JSON Path Expression
av.collector.qck.username The user of the target who executedthe event.
JSON Path Expression
av.collector.qck.os.username Operating system login name of thetarget user who executed the event.
JSON Path Expression
av.collector.qck.eventname Name of the event as recognized bythe target.
JSON Path Expression
av.collector.qck.commandclass
Class of command issued by thetarget user who executed the event.
JSON Path Expression
av.collector.qck.client.ip IP address of the client host. JSON Path Expression
av.collector.qck.targetobject
Object affected by the event. JSON Path Expression
av.collector.qck.targettype Type of the target object. Forexample: Package, Type, or Table.
JSON Path Expression
av.collector.qck.eventstatus Completion status of the event. JSON Path Expression
av.collector.qck.errorid Error number in case of event failure. JSON Path Expression
av.collector.qck.errormessage
Error message in case of eventfailure.
JSON Path Expression
av.collector.qck.target.entity
Name of target entity. JSON Path Expression
av.collector.qck.target.user Name of target user. JSON Path Expression
av.collector.qck.target.role Name of target role. JSON Path Expression
Appendix CPlug-ins That are Shipped with Oracle Audit Vault and Database Firewall
C-14

Note:
The attributes av.collector.qck.target.entity,av.collector.qck.target.user, and av.collector.qck.target.role are onlyapplicable if Quick JSON target is used to collect audit data from Mongo DB.
See Also:
• Configuring Quick JSON Target Type to Collect Audit Data from MongoDB
• Audit Record Fields for more information on other collection attributes andcorresponding audit record field definitions.
C.2.10 Oracle Solaris Plug-in for Oracle Audit Vault and Database FirewallLearn to use the Oracle Solaris plug-in for Oracle Audit Vault and Database Firewall.
Table C-13 lists the features of the Oracle Solaris plug-in.
Table C-13 Oracle Solaris Plug-in
Plug-in Specification Description
Plug-in directory AGENT_HOME/av/plugins/com.oracle.av.plugin.solarisTarget Versions Versions 11.3 and 11.4 on SPARC64 and x86-64 platforms
Target Platforms Solaris/x86-64
Solaris/SPARC64
Setup Script(s) No
Target Location (ConnectString)
hostname (fully qualified machine name or IP address)
Collection Attribute(s) None
AVDF Audit Trail Types DIRECTORYSee Table C-19 for descriptions of audit trail types.
Audit Trail Location hostname:path_to_trailThe hostname matches the hostname in the audit log names, whichlook like this:
timestamp1.timestamp2.hostnameAudit Trail Cleanup Support No
C.2.11 Linux Plug-in for Oracle Audit Vault and Database FirewallLearn how to benefit from using the Linux plug-in for Oracle Audit Vault and DatabaseFirewall.
Table C-14 lists the features of the Linux plug-in that collects audit data from Oracle Linux(OL) and Red Hat Enterprise Linux (RHEL).
Appendix CPlug-ins That are Shipped with Oracle Audit Vault and Database Firewall
C-15

Table C-14 Linux Plug-in
Plug-in Specification Description
Plug-in directory AGENT_HOME/av/plugins/com.oracle.av.plugin.linuxTarget Versions Oracle Linux (OL)
• OL 5.8 (with auditd package 1.8)
• OL 5.11• OL 6.0 (with auditd package 2.0)
• OL 6.1 - 6.5 (with auditd package 2.2.2)
• OL 6.6 - 6.7 (with auditd package 2.3.7)
• OL 6.8 - 6.9 (with auditd package 2.4.5)
• OL 7.0 (with auditd package 2.3.3)
• OL 7.1 - 7.2 (with auditd package 2.4.1)
• OL 7.3 (with auditd package 2.6.5)
• OL 7.4 - 7.5 (with auditd package 2.7.6)
• OL 7.6 (with auditd 2.8) (Starting Oracle AVDF 20.2)
• OL 7.7 (with auditd 2.8.5) (Starting Oracle AVDF 20.2)
• OL 7.8 (with auditd 2.8) (Starting Oracle AVDF 20.2)
• OL 7.9 (with auditd 2.8) (Starting Oracle AVDF 20.4)
• OL 8 (with auditd 3.0) (Starting Oracle AVDF 20.3)
• OL 8.2 and 8.3 (with auditd 3.0) (Starting Oracle AVDF20.4)
Red Hat Enterprise Linux (RHEL)• RHEL 6.7 (with auditd 2.3.7)
• RHEL 6.8 (with auditd 2.4.5)
• RHEL 6.9 (with auditd 2.4.5)
• RHEL 6.10 (with auditd 2.4.5)
• RHEL 7.0 (with auditd 2.3.3)
• RHEL 7.1 (with auditd 2.4.1)
• RHEL 7.2 (with auditd 2.4.1)
• RHEL 7.3 (with auditd 2.6.5)
• RHEL 7.4 (with auditd 2.7.6)
• RHEL 7.5 (with auditd 2.7.6)
• RHEL 7.6 (with auditd 2.8) (Starting Oracle AVDF 20.2)
• RHEL 7.7 (with auditd 2.8.5) (Starting Oracle AVDF 20.2)
• RHEL 7.8 (with auditd 2.8) (Starting Oracle AVDF 20.2)
• RHEL 7.9 (with auditd 2.8) (Starting Oracle AVDF 20.4)
• RHEL 8 (with auditd 3.0) (Starting Oracle AVDF 20.3)
• RHEL 8.2 and 8.3 (with auditd 3.0) (Starting Oracle AVDF20.4)
Run rpm -q audit to get the audit package version.
Target Platforms Linux/x86-64
Appendix CPlug-ins That are Shipped with Oracle Audit Vault and Database Firewall
C-16

Table C-14 (Cont.) Linux Plug-in
Plug-in Specification Description
Setup Script(s) No. However, the following user/group access rights are neededto start a Linux audit trail:
If the agent process is started with root user, no changes toaccess rights are needed.
If the agent process is started with a user other than root:
1. Assign the group name of the Agent user (the one who willstart the Agent process) to the log_group parameter inthe /etc/audit/auditd.conf file.
2. The Agent user and group must have read and executepermissions on the folder that contains the audit.log file(default folder is /var/log/audit).
3. Restart the Linux audit service after you make the abovechanges.
Target Location (ConnectString)
hostname (fully qualified machine name or IP address)
Collection Attribute(s) None
AVDF Audit Trail Types DIRECTORYSee Table C-19 for descriptions of audit trail types.
Audit Trail Location Default location of audit.log (/var/log/audit/audit*.log)or any custom location configured in the /etc/audit/auditd.conf file
Audit Trail Cleanup Support No
C.2.12 IBM AIX Plug-in for Oracle Audit Vault and Database FirewallLearn about the IBM AIX plug-in for Oracle Audit Vault and Database Firewall.
Table C-15 lists the features of the IBM AIX plug-in.
Table C-15 IBM AIX Plug-in
Plug-in Specification Description
Plug-in directory AGENT_HOME/av/plugins/com.oracle.av.plugin.aixosTarget Versions AIX versions:
• 7.2 TL2 and above• 7.1 TL5
Supported JRE Version 1.8.0_241 (minimum)
Note: JRE version 11 is not supported on AIX platform.
Target Platforms Power Systems (64-bit)
Appendix CPlug-ins That are Shipped with Oracle Audit Vault and Database Firewall
C-17

Table C-15 (Cont.) IBM AIX Plug-in
Plug-in Specification Description
Setup Script(s) No. However, the following user andgroup access rights are needed tostart an AIX audit trail:
If the Agent process is started by the root user, then no changes toaccess rights are needed.
If the Agent process is started with a user other than root, then runthe following commands in the AIX system as root to authorizeanother user:
1. Create a new role and grant it the aix.security.auditauthorization:
mkrole authorizations= (aix.security.audit)(role_name)
2. Alter the Agent user to assign the newly created role:
chuser roles=role_name agent_user_name3. Update the kernel table with the newly created role by running the
command: setkst4. Add the Agent user to the same group as that of the AIX audit
files.
5. Ensure you have set read permission on the /audit directorywhere the audit trail files are located.
6. To start the Agent with the Agent user, log in to the AIX terminalwith agent_user_name and switch to the role created in thisprocedure:
swrole role_name
Target Location (ConnectString)
hostname (fully qualified machine name or IP address)
Collection Attribute(s) None
AVDF Audit Trail Types DIRECTORY
See Table C-19 for descriptions of audit trail types.
Audit Trail Location Default location of trail (/audit/trail) or any custom locationconfigured in the /etc/security/audit/config file
Audit Trail Cleanup Support Yes. The AIX plug-in will create a .atc file at:
AGENT_HOME/av/atc/SecuredTargetName_TrailId.atcThe .atc file contains the following information:
trail_location end_time_of_audit_event_collection
C.2.13 Microsoft Windows Plug-in for Oracle Audit Vault and DatabaseFirewall
Learn about the Microsoft Windows plug-in for Oracle Audit Vault and DatabaseFirewall.
Table C-16 lists the features of the Microsoft Windows plug-in.
Appendix CPlug-ins That are Shipped with Oracle Audit Vault and Database Firewall
C-18

Table C-16 Microsoft Windows Plug-in
Plug-in Specification Description
Plug-in directory AGENT_HOME\av\plugins\com.oracle.av.plugin.winosTarget Versions Microsoft Windows Server 2008, 2008 R2, 2012, 2012 R2, and 2016
2019 in release 20.2 (20 RU2) and later
Target Platforms Windows/x86-64
Setup Script(s) No
Target Location (ConnectString)
hostname (fully qualified machine name or IP address)
Collection Attribute(s) None
AVDF Audit Trail Types EVENT LOGSee Table C-19 for descriptions of audit trail types.
Audit Trail Location security (case-sensitive)
Audit Trail Cleanup Support No
C.2.14 Microsoft Active Directory Plug-in for Oracle Audit Vault andDatabase Firewall
Learn about how to use the Microsoft Active Directory plug-in for Oracle Audit Vault andDatabase Firewall.
Table C-17 lists the features of the Microsoft Active Directory plug-in.
Table C-17 Microsoft Active Directory Plug-in
Plug-in Specification Description
Plug-in directory AGENT_HOME\av\plugins\com.oracle.av.plugin.msadTarget Versions 2008, 2008 R2, 2012, and 2016 on 64 bit
Target Platforms Windows/x86-64
Setup Script(s) No
Target Location (ConnectString)
hostname (fully qualified machine name or IP address)
Collection Attribute(s) None
AVDF Audit Trail Types EVENT LOGSee Table C-19 for descriptions of audit trail types.
Audit Trail Location directory service or security (case-sensitive)
Audit Trail Cleanup Support No
Appendix CPlug-ins That are Shipped with Oracle Audit Vault and Database Firewall
C-19

C.2.15 Oracle ACFS Plug-in for Oracle Audit Vault and DatabaseFirewall
Use the Oracle ACFS plug-in for Oracle Audit Vault and Database Firewall toimplement Oracle ACFS in Oracle AVDF.
Table C-18 lists the features of the Oracle ACFS plug-in.
Table C-18 Oracle ACFS Plug-in
Plug-in Specification Description
Plug-in directory AGENT_HOME/av/plugins/com.oracle.av.plugin.acfsTarget Versions 12c Release 1 (12.1)
Target Platforms Linux/x86-64
Solaris/x86-64
Solaris/SPARC64
Windows 2008, 2008 R2 64-bit
Setup Script(s) No
Target Location (ConnectString)
hostname (fully qualified machine name or IP address)
Collection Attribute(s) av.collector.securedtargetversion - (Required) Specifythe Oracle ACFS version.
AVDF Audit Trail Types DIRECTORYSee Table C-19 for descriptions of audit trail types.
Audit Trail Location The path to the directory containing XML audit files. Forexample, for a file system mounted at $MOUNT_POINT, the audittrail location is:
$MOUNT_POINT/.Security/audit/Audit Trail Cleanup Support No
C.2.16 Summary of Data Collected for Each Audit Trail TypeExplore the summary of the types of data that Oracle AVDF collects for each audit trailtype.
When you configure an audit trail for a target, you select the type of audit trail in theAudit Trail Type field. The audit trail type depends on your target type. Table C-19describes the types of audit trails that can be configured for each target type.
Refer to the product documentation for your target type for details on its auditingfeatures and functionality. Refer to the following documentation for Oracle products:
• Oracle Database 12c Release 1 (12.1): Oracle Database Security Guide
• Oracle Database 11g Release 2 (11.2): Oracle Database Security Guide
• Oracle Solaris 11.1
• Oracle Solaris 10.6
Appendix CPlug-ins That are Shipped with Oracle Audit Vault and Database Firewall
C-20
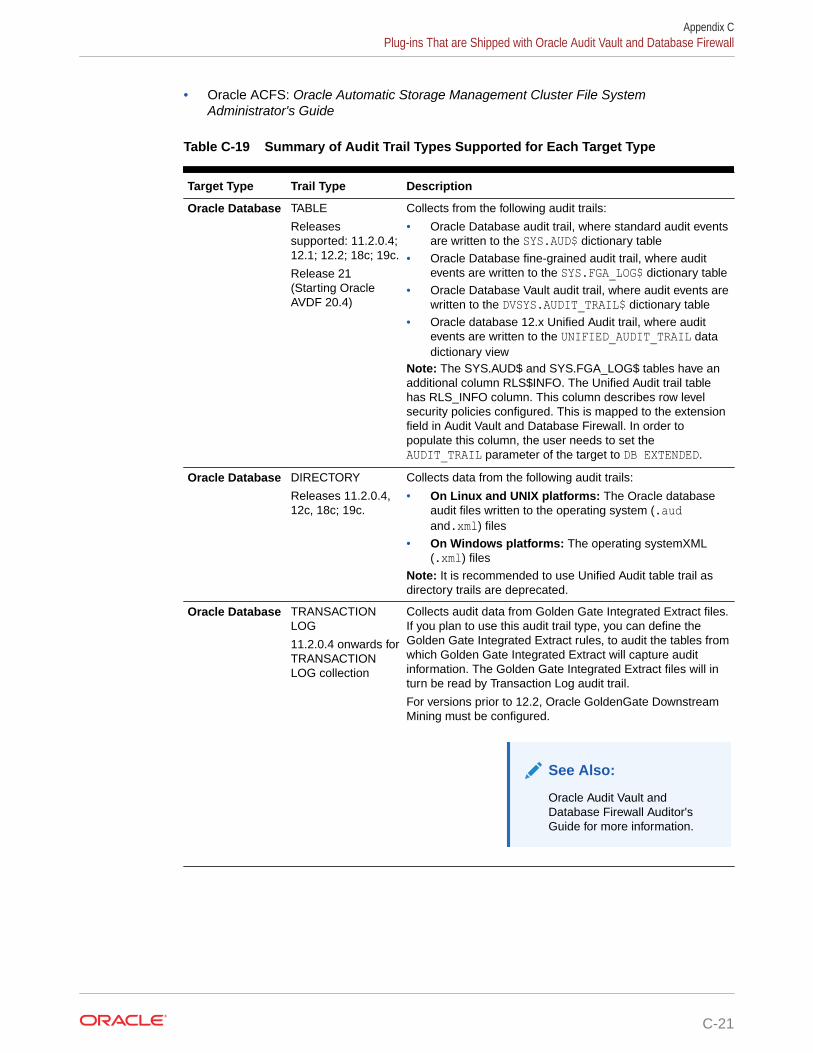
• Oracle ACFS: Oracle Automatic Storage Management Cluster File SystemAdministrator's Guide
Table C-19 Summary of Audit Trail Types Supported for Each Target Type
Target Type Trail Type Description
Oracle Database TABLE
Releasessupported: 11.2.0.4;12.1; 12.2; 18c; 19c.
Release 21(Starting OracleAVDF 20.4)
Collects from the following audit trails:
• Oracle Database audit trail, where standard audit eventsare written to the SYS.AUD$ dictionary table
• Oracle Database fine-grained audit trail, where auditevents are written to the SYS.FGA_LOG$ dictionary table
• Oracle Database Vault audit trail, where audit events arewritten to the DVSYS.AUDIT_TRAIL$ dictionary table
• Oracle database 12.x Unified Audit trail, where auditevents are written to the UNIFIED_AUDIT_TRAIL datadictionary view
Note: The SYS.AUD$ and SYS.FGA_LOG$ tables have anadditional column RLS$INFO. The Unified Audit trail tablehas RLS_INFO column. This column describes row levelsecurity policies configured. This is mapped to the extensionfield in Audit Vault and Database Firewall. In order topopulate this column, the user needs to set theAUDIT_TRAIL parameter of the target to DB EXTENDED.
Oracle Database DIRECTORY
Releases 11.2.0.4,12c, 18c; 19c.
Collects data from the following audit trails:
• On Linux and UNIX platforms: The Oracle databaseaudit files written to the operating system (.audand.xml) files
• On Windows platforms: The operating systemXML(.xml) files
Note: It is recommended to use Unified Audit table trail asdirectory trails are deprecated.
Oracle Database TRANSACTIONLOG
11.2.0.4 onwards forTRANSACTIONLOG collection
Collects audit data from Golden Gate Integrated Extract files.If you plan to use this audit trail type, you can define theGolden Gate Integrated Extract rules, to audit the tables fromwhich Golden Gate Integrated Extract will capture auditinformation. The Golden Gate Integrated Extract files will inturn be read by Transaction Log audit trail.
For versions prior to 12.2, Oracle GoldenGate DownstreamMining must be configured.
See Also:
Oracle Audit Vault andDatabase Firewall Auditor'sGuide for more information.
Appendix CPlug-ins That are Shipped with Oracle Audit Vault and Database Firewall
C-21

Table C-19 (Cont.) Summary of Audit Trail Types Supported for Each Target Type
Target Type Trail Type Description
Oracle Database SYSLOG Collects Oracle audit records from either syslog or rsyslogaudit files on Linux and Unix platforms only.
If the system has both syslog and rsyslog installed, theexact rsyslog audit file location must be specified in orderto collect data from rsyslog files.
The following rsyslog formats are supported:
• RSYSLOG_TraditionalFileFormat (has low-precisiontime stamps)
• RSYSLOG_FileFormat (has high-precision time stampsand time zone information)
Events from both formats appear the same on reports,however with RSYSLOG_FileFormat, theAVSYS.EVENT_LOG table shows EVENT_TIME withmicrosecond precision.
See Also:
Oracle Audit Vault andDatabase Firewall Auditor'sGuide for details on this table,and Audit Vault Server schemadocumentation.
Oracle Database EVENT LOG Collects Oracle audit records from Microsoft Windows EventLog on Windows platforms only
Oracle Database NETWORK Collects network traffic (all database operations using a TCPconnection). Used for host monitor.
Microsoft SQLServer
DIRECTORY Collects audit data from:
• sqlaudit• trace• extended events• C2_DYNAMIC• TRACE_DYNAMIC
Microsoft SQLServer
EVENT LOG Collects audit data from Windows Application and SecurityEvent Logs.
Microsoft SQLServer
NETWORK Collects network traffic (all database operations using a TCPconnection). Used for Host Monitor.
Sybase ASE TABLE Collects audit data from system audit tables (sysaudits_01through sysaudits_08) in the sybsecurity database
Sybase ASE NETWORK Collects network traffic (all database operations using a TCPconnection). Used for host monitor.
Sybase SQLAnywhere
NETWORK (For host monitoring only) Collects network traffic (alldatabase operations using a TCP connection).
Appendix CPlug-ins That are Shipped with Oracle Audit Vault and Database Firewall
C-22

Table C-19 (Cont.) Summary of Audit Trail Types Supported for Each Target Type
Target Type Trail Type Description
IBM DB2 forLUW
DIRECTORY Collects audit data from ASCII text files extracted from thebinary audit log (db2audit.log). These files are located inthe security subdirectory of the DB2 database instance.
IBM DB2 forLUW
NETWORK Collects network traffic (all database operations using a TCPconnection). Used for host monitor.
MySQL DIRECTORY Collects XML-based audit data from a specified location
MySQL NETWORK Collects network traffic (all database operations using a TCPconnection). Used for host monitor.
Oracle Solaris DIRECTORY Collects Solaris Audit records (version 2) generated by theaudit_binfile plug-in of Solaris Audit
Linux DIRECTORY Collects audit data from audit.logWindows OS EVENT LOG Collects audit data from Windows Security Event Log
Microsoft ActiveDirectory
EVENT LOG Collects audit data from Windows Directory Service, andSecurity Event Logs
Oracle ACFS DIRECTORY Collects audit data from ACFS encryption and ACFS securitysources.
Oracle Linux DIRECTORY Collects audit data from audit.log
C.3 Scripts for Oracle AVDF Account Privileges on TargetsOracle Audit Vault and Database Firewall provides scripts for Oracle Database, Sybase,Microsoft, IBM DB2 for LUW, and MySQL plug-ins.
C.3.1 About Scripts for Setting up Oracle Audit Vault and DatabaseFirewall Account Privileges
You can use scripts to set up accounts and privileges for Oracle Audit Vault and DatabaseFirewall.
You must set up a user account with the correct privileges on each target for Oracle AuditVault and Database Firewall to use to perform functions that are related to monitoring andcollecting audit data. Oracle Audit Vault and Database Firewall provides setup scripts for thispurpose so that you can configure your database targets. Depending on the type of target,the scripts set up user privileges that enable Oracle Audit Vault and Database Firewall to dothe following functions:
• Audit data collection
• Audit policy management
• Stored procedure auditing
• User entitlement auditing
• Native Network Encrypted Traffic monitoring
• Audit trail cleanup (for some targets)
Appendix CScripts for Oracle AVDF Account Privileges on Targets
C-23

When you deploy the Audit Vault Agent on a host computer (usually the samecomputer as the target), the setup scripts for creating the user permissions for OracleAudit Vault and Database Firewall are in the following directory (Linux example below):
$AGENT_HOME/av/plugins/com.oracle.av.plugin.secured_target_type/config/
C.3.2 Oracle Database Setup ScriptsLearn about the Oracle Database setup scripts.
The Oracle Audit Vault and Database Firewall setup scripts for an Oracle Databasetarget, oracle_user_setup.sql and oracle_drop_db_permissions.sql, are located inthe following directory (Linux example below):
$AGENT_HOME/av/plugins/com.oracle.av.plugin.oracle/config/These scripts are used to set up or revoke user privileges on Oracle Database in orderfor Oracle Audit Vault and Database Firewall to perform the following functions:
• Audit data collection
• Audit policy management
• Stored procedure auditing (SPA)
• User entitlement auditing
To set up or revoke Oracle Audit Vault and Database Firewall user privileges on anOracle Database target:
1. Create a user account for Oracle Audit Vault and Database Firewall on the OracleDatabase. For example:
SQL> CREATE USER username IDENTIFIED BY password
You will use this username and password when registering this Oracle Databaseas a target in the Audit Vault Server.
2. Connect as user SYS with the SYSDBA privilege. For example:
SQL> CONNECT SYS / AS SYSDBA3. To set up Oracle Audit Vault and Database Firewall user privileges, run the setup
script as follows:
SQL> @oracle_user_setup.sql username mode
• username: Enter the name of the user you created in Step 1.
• mode: Enter one of the following:
– SETUP: To set up privileges for managing the Oracle Database audit policyfrom Oracle Audit Vault and Database Firewall, and for collecting datafrom any audit trail type. For example, use this mode for a TABLE audittrail in Oracle Audit Vault and Database Firewall.
– SPA: To enable stored procedure auditing for this database
– ENTITLEMENT: To enable user entitlement auditing for this database
Appendix CScripts for Oracle AVDF Account Privileges on Targets
C-24
Note:
• For audit collection from CDB, create a user in the CDB and run theoracle_user_setup.sql script for this user.
• For audit collection from individual PDB, first alter the session to switch tothe PDB, create the user on the PDB and then run theoracle_user_setup.sql script for this user.
4. If Database Vault is installed and enabled on the Oracle database, log in as a user whohas been granted the DV_OWNER role do the following:
Grant the Oracle Audit Vault and Database Firewall user the DV_SECANALYST role on thisOracle Database. For example:
SQL> GRANT DV_SECANALYST TO username;
For username, enter the user name you created in Step 1.
The DV_SECANALYST role enables Oracle Audit Vault and Database Firewall to monitor andcollect audit trail data for Oracle Database Vault, and run Oracle Database Vault reports.
5. To revoke Oracle Audit Vault and Database Firewall user privileges, connect to thisdatabase as user SYS with the SYSDBA privilege, and run the following script:
SQL> @oracle_drop_db_permissions.sql username mode
• username - Enter the name of the user you created in Step 1.
• mode - Enter one of the following:
– SETUP: To revoke privileges for managing the Oracle Database audit policy fromOracle Audit Vault and Database Firewall, and for collecting data from any audittrail type.
– SPA: To disable stored procedure auditing for this database
– ENTITLEMENT: To disable user entitlement auditing for this database
See Also::
Configuring Audit Trail Collection for CDBs and PDBs
C.3.3 Sybase ASE Setup Scripts for Oracle Audit Vault and DatabaseFirewall
The Sybase ASE setup scripts configure audit data collection privileges and auditingprivileges for Sybase ASE targets.
C.3.3.1 About Sybase ASE Setup ScriptsLearn about Sybase ASE setup scripts for Oracle Audit Vault and Database Firewall.
Appendix CScripts for Oracle AVDF Account Privileges on Targets
C-25

The following scripts are provided for configuring necessary user privileges for OracleAudit Vault and Database Firewall in a Sybase ASE target:
sybase_auditcoll_user_setup.sqlsybase_auditcoll_drop_db_permissions.sqlsybase_spa_user_setup.sqlsybase_spa_drop_db_permissions.sql
The scripts are located in the following directory (Linux example below):
$AGENT_HOME/av/plugins/com.oracle.av.plugin.sybase/config/These scripts allow Oracle Audit Vault and Database Firewall to perform the followingfunctions for Sybase ASE:
• Audit data collection
• Stored procedure auditing (SPA)
C.3.3.2 Setting Up Audit Data Collection Privileges for Sybase ASE TargetsSet up audit data collection privileges for Sybase ASE targets to enable you to analyzeaudit data.
To set up or revoke audit data collection privileges on a Sybase ASE target:
1. Create a user account for Oracle Audit Vault and Database Firewall in SybaseASE with the user name avdf_sybuser. For example:
sp_addlogin avdf_sybuser, password
You will use the user name av_sybuser and password when registering thisSybase ASE database as a target in the Audit Vault Server.
2. Run the setup sybase_auditcoll_user_setup.sql script as follows:
isql -S server_name -U sa -i sybase_auditcoll_user_setup.sql
• server_name: Only use this argument if the database is remote. Enter thename of the remote server or its IP address. If you are running the scriptlocally, then omit the -S server_name argument.
• sa: Enter the system administrator user name.
3. When prompted for a password, enter the system administrator password.
4. To revoke the Oracle Audit Vault and Database Firewall user privileges, run thesybase_auditcoll_drop_db_permissions.sql script as follows:
isql -S server_name -U sa -i sybase_auditcoll_drop_db_permissions.sql
• server_name: Only use this argument if the database is remote. Enter thename of the remote server or its IP address. If you are running the scriptlocally, then omit the -S server_name argument.
• sa: Enter the system administrator user name.
• When prompted for a password, enter the system administrator password.
Appendix CScripts for Oracle AVDF Account Privileges on Targets
C-26
C.3.3.3 Setting Up Stored Procedure Auditing Privileges for Sybase ASE TargetsYou can configure stored procedure auditing privileges for Sybase ASE Targets.
To set up or revoke stored procedure auditing privileges on a Sybase ASE target:
1. If you have not already done so, then create a user account for Oracle AVDF in SybaseASE with the user name avdf_sybuser. For example:
sp_addlogin avdf_sybuser, password
You will use the user name av_sybuser and password when registering this Sybase ASEdatabase as a target in the Audit Vault Server.
2. Run the sybase_spa_user_setup.sql script as follows:
isql -S server_name -U sa -i sybase_spa_user_setup.sql
• server_name: Only use this argument if the database is remote. Enter the name ofthe remote server or its IP address. If you are running the script locally, then omit the-S server_name argument.
• sa: Enter the system administrator user name.
3. When prompted for a password, enter the system administrator password.
4. To revoke the SPA user privileges, run the sybase_spa_drop_db_permissions.sql scriptas follows:
isql -S server_name -U sa -i sybase_spa_drop_db_permissions.sql
• server_name: Only use this argument if the database is remote. Enter the name ofthe remote server or its IP address. If you are running the script locally, then omit the-S server_name argument.
• sa: Enter the system administrator user name.
• When prompted for a password, enter the system administrator password.
C.3.4 Sybase SQL Anywhere Setup ScriptsLearn how to use the Sybase SQL Anywhere setup scripts.
The Oracle AVDF setup scripts for a Sybase SQL Anywhere target,sqlanywhere_spa_user_setup.sql and sqlanywhere_spa_drop_db_permissions.sql, arelocated in the following directory (Linux example below):
$AGENT_HOME/av/plugins/com.oracle.av.plugin.sqlanywhere/config/These scripts are used to set up or revoke user privileges on the SQL Anywhere database forOracle AVDF to do stored procedure auditing (SPA).
To set up or revoke stored procedure auditing for a SQL Anywhere target:
1. Log in to the database as a user who has privileges to create users and set userpermissions.
2. Run the sqlanywhere_spa_user_setup.sql script as follows:
isql -S server_name -U sa -i sqlanywhere_spa_user_setup.sql -v username="username" password="password"
Appendix CScripts for Oracle AVDF Account Privileges on Targets
C-27

• server_name: Only use this argument if the database is remote. Enter thename of the remote server or its IP address. If you are running the scriptlocally, then omit the -S server_name argument.
• sa: Enter the system administrator user name.
• username: Enter the name of the user you want to create for Oracle AVDF touse for SPA. Enclose this user name in double quotation marks.
• password: Enter a password for the Oracle AVDF SPA user you are creating.Enclose the password in double quotation marks.
After running the script, the user is created with privileges for SPA.
3. When prompted for a password, enter the system administrator password.
4. To revoke these privileges and remove this user from the database, run thesqlanywhere_spa_drop_db_permissions.sql as follows:
isql -S server_name -U sa -i sqlanywhere_spa_drop_db_permissions.sql -v username="username"
• server_name: Only use this argument if the database is remote. Enter thename of the remote server or its IP address. If you are running the scriptlocally, then omit the -S server_name argument.
• sa: Enter the system administrator user name.
• username: Enter the name of the user you want to create for Oracle AVDF touse for SPA. Enclose this user name in double quotation marks.
• When prompted for a password, enter the system administrator password.
C.3.5 Microsoft SQL Server Setup ScriptsThe Microsoft SQL Server setup scripts manage audit data collection and auditingprivileges for Microsoft SQL Server targets.
C.3.5.1 About the SQL Server Setup ScriptUse the SQL Server setup script to set up or revoke user privileges for Oracle AVDF.
The Oracle AVDF setup scripts for a Microsoft SQL Server target,mssql_user_setup.sql and mssql_drop_db_permissions.sql, are located in thefollowing directory:
AGENT_HOME\av\plugins\com.oracle.av.plugin.mssql\config\The scripts set up or revoke user privileges for Oracle AVDF to perform the followingfunctions for SQL Server:
• Audit data collection
• Stored procedure auditing (SPA)
Appendix CScripts for Oracle AVDF Account Privileges on Targets
C-28

C.3.5.2 Setting Up Audit Data Collection Privileges for SQL Server TargetsYou can set up audit data collection privileges for SQL Server targets.
Prerequisites
Assign the following required privileges to run the commands in this topic:
Version and Detail Command
To assign the required privileges inSQL Server 2014 and later dbsa/src/plugin/mssqldb/scripts/
mssql_user_ver12_setup.sql
To revoke the assigned privilegesin SQL Server 2014 and later dbsa/src/plugin/mssqldb/scripts/
mssql_drop_db_permissions_ver12.sql
To assign the required privileges inSQL Server versions prior to 2014 dbsa/src/plugin/mssqldb/scripts/
mssql_user_setup.sql
To revoke the assigned privilegesin SQL Server versions prior to2014
dbsa/src/plugin/mssqldb/scripts/mssql_drop_db_permissions.sql
To set up or revoke Oracle AVDF user privileges for audit data collection:
1. Create a user account for Oracle Audit Vault and Database Firewall in SQL Server or useWindows authenticated user. For example:
exec sp_executesql N'create login username with password = ''password'', check_policy= off'
exec sp_executesql N'create user username for login username'
Use this user name and password when registering this SQL Server database as a targetin the Audit Vault Server.
2. Run the mssql_user_setup.sql script as follows:
For SQL Server authentication:
sqlcmd -S server_name -U sa -i mssql_user_setup.sql -v username="username" mode="AUDIT_COLL" all_databases="NA" database="NA"
For Windows Authentication:
sqlcmd -S localhost -U sa -i mssql_user_setup.sql -v username="[<domainname>\<user name>]" mode="AUDIT_COLL" all_databases="NA" database="NA"• server_name: Only use this argument if the database is remote. Enter the name of
the remote server or its IP address. If you are running the script locally, then omit the-S server_name argument.
Appendix CScripts for Oracle AVDF Account Privileges on Targets
C-29

• sa: Enter the system administrator user name.
• username: Enter the name of the user you created in Step 1.
3. When prompted for a password, enter the system administrator password.
4. To revoke audit data collection privileges run the mssql_drop_db_permissions.sqlscript as follows:
For SQL Server Authentication:
sqlcmd -S server_name -U sa -i mssql_drop_db_permissions.sql -v username="username" mode="AUDIT_COLL" all_databases="NA" database="NA"
For Windows Authentication:
a. sqlcmd -S server_name -U sa -i mssql_drop_db_permissions.sql -vusername="[<domain name>\<user name>]" mode="AUDIT_COLL"all_databases="NA" database="NA"• server_name: Only use this argument if the database is remote. Enter the
name of the remote server or its IP address. If you are running the scriptlocally, then omit the -S server_name argument.
• sa: Enter the system administrator user name.
• username: Enter the name of the user you created in Step 1.
b. When prompted for a password, enter the system administrator password.
C.3.5.3 Setting Up Stored Procedure Auditing Privileges for SQL ServerTargets
You can set up stored procedure auditing privileges for SQL Server targets.
To set up or revoke Oracle AVDF user privileges for stored procedure auditing:
1. If you have not already done so, create a user account for Oracle AVDF in SQLServer. For example:
exec sp_executesql N'create login username with password = ''password'', check_policy= off'
exec sp_executesql N'create user username for login username'
You will use this user name and password when registering this SQL Serverdatabase as a target in the Audit Vault Server.
2. Run the mssql_user_setup.sql script as follows:
sqlcmd -S server_name -U sa -i mssql_user_setup.sql -v username="username" mode="SPA" all_databases="Y/N" database="NA/database_name"
• server_name: Only use this argument if the database is remote. Enter thename of the remote server or its IP address. If you are running the scriptlocally, then omit the -S server_name argument.
• sa: Enter the system administrator user name.
• username: Enter the name of the user you created in Step 1.
Appendix CScripts for Oracle AVDF Account Privileges on Targets
C-30
• Y/N: Enter Y if all databases should be audited for stored procedures. Enter N tospecify one database name in the database parameter.
• NA/database_name: If you entered Y for all_databases, enter NA. If you entered N forall_databases, enter the database name that should be audited for storedprocedures.
3. When prompted for a password, enter the system administrator password.
4. To revoke SPA privileges run the mssql_drop_db_permissions.sql script as follows:
sqlcmd -S server_name -U sa -i mssql_drop_db_permissions.sql -v username="username" mode="SPA" all_databases="Y/N" database="NA/database_name"
• server_name: Only use this argument if the database is remote. Enter the name ofthe remote server or its IP address. If you are running the script locally, then omit the-S server_name argument.
• sa: Enter the system administrator user name.
• sa_password: Enter the system administrator password.
• Y/N: Enter Y if SPA privileges for all databases should be revoked. Enter N to specifyone database name in the database parameter.
• NA/database_name: If you entered Y for all_databases, enter NA. If you entered N forall_databases, enter the database name for which SPA privileges should berevoked.
• When prompted for a password, enter the name of the user you created in Step 1.
C.3.6 IBM DB2 for LUW Setup ScriptsThe IBM DB2 for LUW setup scripts manage privileges for audit data collection and storedprocedure auditing (SPA) privileges for IBM DB2 for LUW targets.
C.3.6.1 About the IBM DB2 for LUW Setup ScriptsLearn how to use the IBM DB2 for LUW setup scripts.
The Oracle Audit Vault and Database Firewall setup scripts for a DB2 target,db2_auditcoll_user_setup.sql and db2_spa_user_setup.sql, are located in the followingdirectory (Linux example below):
$AGENT_HOME/av/plugins/com.oracle.av.plugin.db2/config/
Note:
Connect string is not required from release 12.2.0.11.0 and onwards.
These scripts are used to set up or revoke user privileges on the DB2 database for OracleAVDF to do the following functions:
• Audit data collection
• Stored procedure auditing (SPA)
Appendix CScripts for Oracle AVDF Account Privileges on Targets
C-31

C.3.6.2 Setting Up Audit Data Collection Privileges for IBM DB2 for LUWYou can configure audit data collection privileges for IBM DB2 for LUW to controlaccess to the audit data.
To set up or revoke Oracle AVDF user privileges for audit data collection:
1. Create a new user account in DB2 to be used by Oracle AVDF for audit datacollection.
You will use this user name and password when registering this DB2 database asa target in the Audit Vault Server.
2. In the $AGENT_HOME/av/plugins/com.oracle.av.plugin.db2/config/ directory,locate the db2_auditcoll_user_setup.sql script and open it for editing.
3. In the script, put the user name of the account from Step 1 in the grant statement,then save the modified script.
4. Execute the modified script as follows:
$> db2 -tvf db2_auditcoll_user_setup.sql5. To revoke audit collection privileges:
a. Modify the db2_auditcoll_drop_db_permissions.sql script as in Step 3above.
b. Run the script as follows:
$> db2 -tvf db2_auditcoll_drop_db_permissions.sql
C.4 Audit Collection ConsiderationConsiderations for audit collection on other target types.
C.4.1 Additional Information for Audit Collection from Oracle ActiveData Guard
Learn about additional information required to collect audit data from Oracle ActiveData Guard.
Oracle Active Data Guard is a high availability solution which consists of one primarydatabase and multiple standby databases. This section contains some additionalinformation for configuring different audit trails.
Appendix CAudit Collection Consideration
C-32

Note:
Oracle AVDF release 20.6 and prior:
• When Traditional Auditing is enabled, Oracle AVDF supports audit collectionfrom both the primary and standby databases of Oracle Active Data Guard. ForOracle Active Data Guard target, Traditional Auditing is recommended forOracle AVDF release 20.6 and prior.
• When Unified Auditing is enabled for Oracle Active Dataguard, audit collectionis supported only from the primary database and not from the standbydatabase. The audit data generated in the standby database is not collected.
Oracle AVDF release 20.7 and later: When Unified Auditing is enabled, auditcollection is supported from both the primary and standby databases of OracleActive Data Guard. For Oracle Active Data Guard target, Unified Auditing isrecommended for Oracle AVDF release 20.7 and later.
Traditional Auditing
Follow these steps for collecting audit data from databases in Oracle Active Data Guard withtraditional auditing:
1. Set AUDIT_TRAIL parameter to DB, EXTENDED on all target databases.
2. Create a target in Oracle AVDF with a single connection string that contains theconnection details of all the databases. This ensures that Oracle AVDF trail can readfrom sys.aud$ table of the current primary database even when failover or switchoveroccurs.
3. For the above mentioned target configure Oracle Database table trail in Oracle AVDF toread the records from sys.aud$.
4. Create one target in Oracle AVDF for every database in Oracle Active Data Guard with aconnection string that contains connection details of only the specific database.
5. Configure one directory trail in Oracle AVDF for every target to collect data from *.audlog file for the specific target database in Oracle Active Data Guard.
Unified Auditing (Oracle AVDF 20.6 and Earlier)
Audit data can be collected only from the primary database in Oracle Active Data Guard withunified auditing in releases Oracle AVDF 20.6 and prior. Follow these steps:
1. Create a target in Oracle AVDF with single connection string that contains the connectiondetails of all the databases. This ensures that Oracle AVDF trail can read fromunified_audit_trail table of the primary database even when failover or switchoveroccurs.
2. Create Oracle Database table trail in Oracle AVDF to read the records fromunified_audit_trail of the primary database.
Unified Auditing (Oracle AVDF 20.7 and Later)
Audit data can be collected from both the primary and standby databases in Oracle ActiveData Guard with unified auditing. This is applicable starting with Oracle AVDF release 20.7.Follow these steps:
Appendix CAudit Collection Consideration
C-33
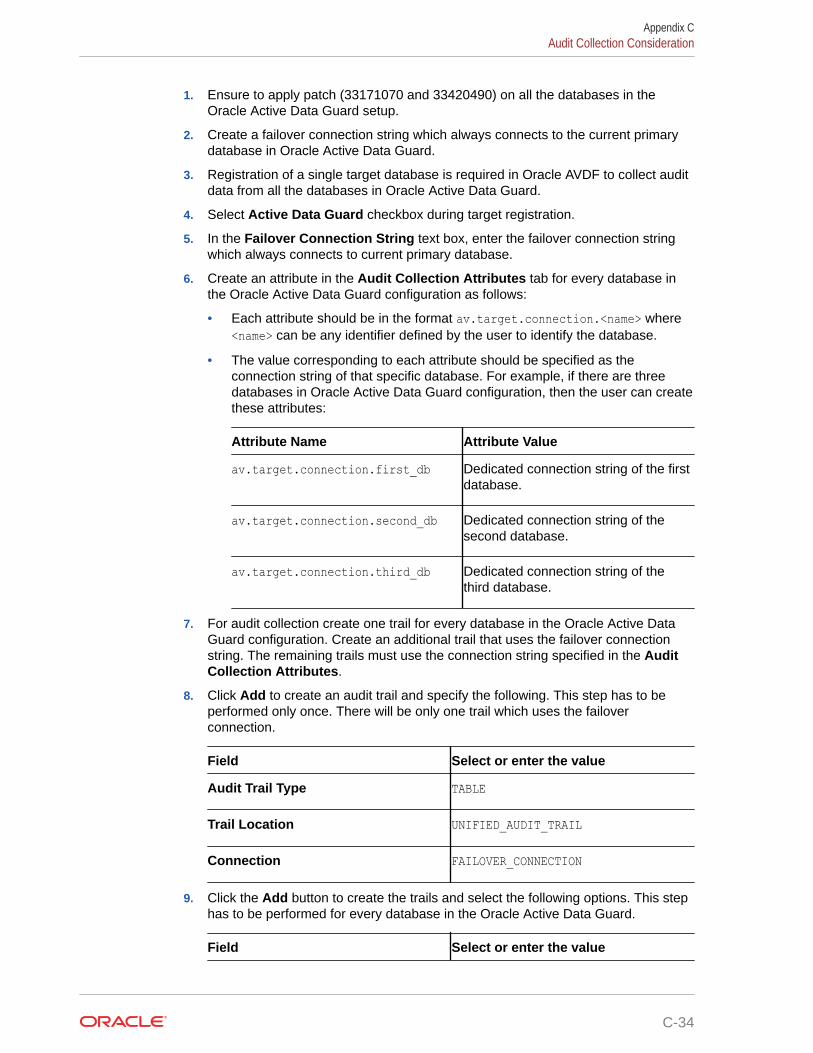
1. Ensure to apply patch (33171070 and 33420490) on all the databases in theOracle Active Data Guard setup.
2. Create a failover connection string which always connects to the current primarydatabase in Oracle Active Data Guard.
3. Registration of a single target database is required in Oracle AVDF to collect auditdata from all the databases in Oracle Active Data Guard.
4. Select Active Data Guard checkbox during target registration.
5. In the Failover Connection String text box, enter the failover connection stringwhich always connects to current primary database.
6. Create an attribute in the Audit Collection Attributes tab for every database inthe Oracle Active Data Guard configuration as follows:
• Each attribute should be in the format av.target.connection.<name> where<name> can be any identifier defined by the user to identify the database.
• The value corresponding to each attribute should be specified as theconnection string of that specific database. For example, if there are threedatabases in Oracle Active Data Guard configuration, then the user can createthese attributes:
Attribute Name Attribute Value
av.target.connection.first_db Dedicated connection string of the firstdatabase.
av.target.connection.second_db Dedicated connection string of thesecond database.
av.target.connection.third_db Dedicated connection string of thethird database.
7. For audit collection create one trail for every database in the Oracle Active DataGuard configuration. Create an additional trail that uses the failover connectionstring. The remaining trails must use the connection string specified in the AuditCollection Attributes.
8. Click Add to create an audit trail and specify the following. This step has to beperformed only once. There will be only one trail which uses the failoverconnection.
Field Select or enter the value
Audit Trail Type TABLE
Trail Location UNIFIED_AUDIT_TRAIL
Connection FAILOVER_CONNECTION
9. Click the Add button to create the trails and select the following options. This stephas to be performed for every database in the Oracle Active Data Guard.
Field Select or enter the value
Appendix CAudit Collection Consideration
C-34

Audit Trail Type TABLE
Trail Location UNIFIED_AUDIT_TRAIL
Connection av.target.connection.<name>
C.4.2 Additional Information for Audit Collection from Oracle Data GuardLearn about additional information required to collect audit data from Oracle Data Guard.
Oracle Data Guard is a high availability solution which consists of one primary database andmultiple standby databases. This section contains some additional information for configuringdifferent audit trails.
Traditional Auditing
Audit data can be collected from the current primary database in Oracle Data Guard withtraditional auditing. Follow these steps:
1. Set AUDIT_TRAIL parameter to DB, EXTENDED, on all target databases.
2. Create a target in Oracle AVDF with a single connection string that contains theconnection details of all the databases. This ensures that Oracle AVDF trail can readfrom sys.aud$ table of the current primary database after failover or switchover occurs.
3. Create Oracle Database table trail in Oracle AVDF to read the records from sys.aud$. ofthe current primary database.
Unified Auditing
Audit data can be collected from the current primary database in Oracle Data Guard withunified auditing. Follow these steps:
1. Create a target in Oracle AVDF with single connection string that contains the connectiondetails of all the databases. This ensures that Oracle AVDF trail can read fromunified_audit_trail table of the current primary database after failover or switchoveroccurs.
2. Create Oracle Database table trail in Oracle AVDF to read the records fromunified_audit_trail of the current primary database.
Note:
Oracle AVDF supports audit collection from the traditional audit trail and unifiedaudit trail for the current primary database only. In case of switchover or failover,audit collection starts on the new primary database, from the point at which thecollection had stopped on the old primary database. Audit collection is notsupported from the standby database.
C.5 Audit Trail CleanupSome Oracle Audit Vault and Database Firewall plug-ins include audit trail cleanup utilities.
Appendix CAudit Trail Cleanup
C-35

C.5.1 Oracle Database Audit Trail CleanupOracle Database provides the ability to purge audit trails both manually and withscheduled jobs.
C.5.1.1 About Purging the Oracle Database Target Audit TrailYou can use the DBMS_AUDIT_MGMT PL/SQL package to purge the database audit trail.
The DBMS_AUDIT_MGMT package lets you perform audit trail cleanup tasks such asscheduling purge jobs, moving the audit trail to a different tablespace, setting archivetimestamps in the audit trail, and so on. You must have the EXECUTE privilege forDBMS_AUDIT_MGMT before you can use it.
Oracle Database 11g release 2 (11.2) or later includes the DBMS_AUDIT_MGMT packageand its associated data dictionary views installed by default. If your target databasedoes not have this package installed, then you can download the package and datadictionary views from My Oracle Support.
Search for Article ID 731908.1.
For details about using the DBMS_AUDIT_MGMT PL/SQL package and views, refer to thefollowing Oracle Database 11g Release 2 (11.2) documentation:
• The section "Purging Audit Trail Records" in Oracle Database Security Guide forconceptual and procedural information
• Oracle Database PL/SQL Packages and Types Reference for referenceinformation about the DBMS_AUDIT_MGMT PL/SQL package
• Oracle Database Reference for information about the DBA_AUDIT_MGMT_* datadictionary views
C.5.1.2 Scheduling Automated Purge JobsSimplify maintenance by scheduling automated jobs to purge unneeded audit data.
Oracle Audit Vault and Database Firewall is integrated with the DBMS_AUDIT_MGMTpackage on an Oracle Database. This integration automates the purging of auditrecords from the UNIFIED_AUDIT_TRAIL, AUD$, and FGA_LOG$ tables, and from theoperating system .aud and .xml files after they have been successfully inserted intothe Audit Vault Server repository.
After the purge is completed, the Audit Vault Agent automatically sets a timestamp onaudit data that has been collected. Therefore, you must set theUSE_LAST_ARCH_TIMESTAMP property to TRUE to ensure that the right set of audit recordsare purged. You do not need to manually set a purge job interval.
To schedule an automated purge job for an Oracle Database target:
1. Log in to SQL*Plus on the target database as a user who has been granted theEXECUTE privilege for the DBMS_AUDIT_MGMT PL/SQL package.
For example:
sqlplus tjonesEnter password: password
Appendix CAudit Trail Cleanup
C-36
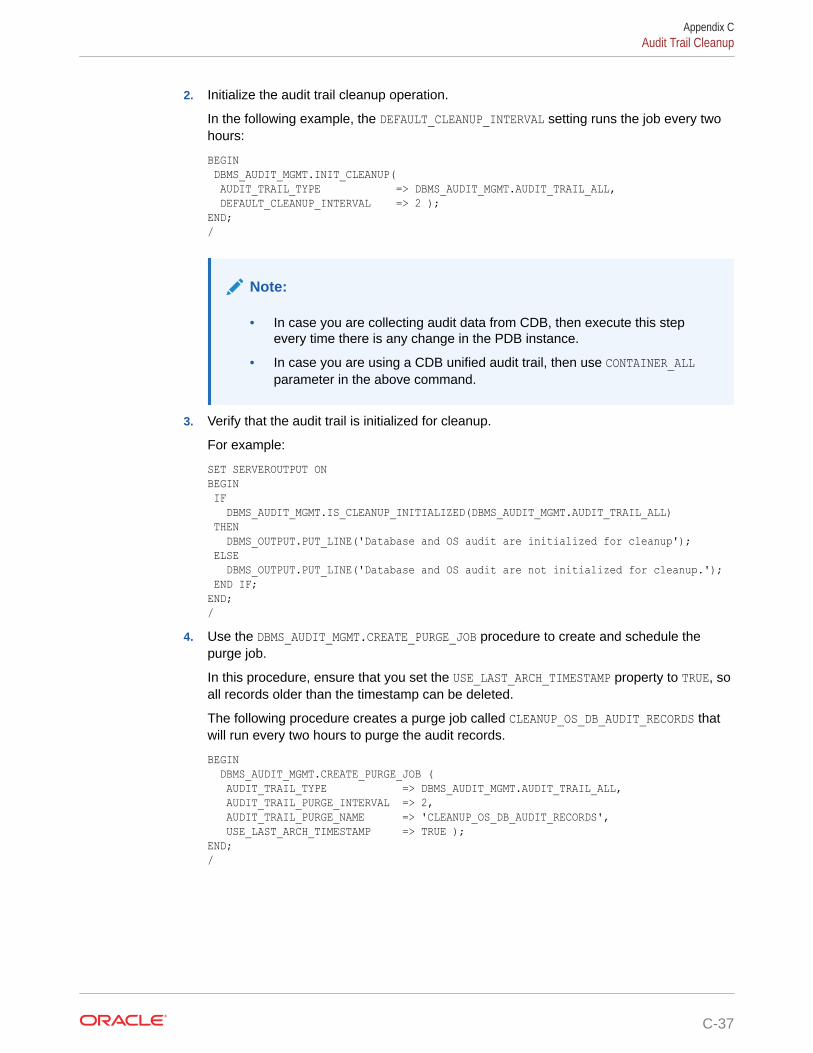
2. Initialize the audit trail cleanup operation.
In the following example, the DEFAULT_CLEANUP_INTERVAL setting runs the job every twohours:
BEGIN DBMS_AUDIT_MGMT.INIT_CLEANUP( AUDIT_TRAIL_TYPE => DBMS_AUDIT_MGMT.AUDIT_TRAIL_ALL, DEFAULT_CLEANUP_INTERVAL => 2 );END;/
Note:
• In case you are collecting audit data from CDB, then execute this stepevery time there is any change in the PDB instance.
• In case you are using a CDB unified audit trail, then use CONTAINER_ALLparameter in the above command.
3. Verify that the audit trail is initialized for cleanup.
For example:
SET SERVEROUTPUT ONBEGIN IF DBMS_AUDIT_MGMT.IS_CLEANUP_INITIALIZED(DBMS_AUDIT_MGMT.AUDIT_TRAIL_ALL) THEN DBMS_OUTPUT.PUT_LINE('Database and OS audit are initialized for cleanup'); ELSE DBMS_OUTPUT.PUT_LINE('Database and OS audit are not initialized for cleanup.'); END IF;END;/
4. Use the DBMS_AUDIT_MGMT.CREATE_PURGE_JOB procedure to create and schedule thepurge job.
In this procedure, ensure that you set the USE_LAST_ARCH_TIMESTAMP property to TRUE, soall records older than the timestamp can be deleted.
The following procedure creates a purge job called CLEANUP_OS_DB_AUDIT_RECORDS thatwill run every two hours to purge the audit records.
BEGIN DBMS_AUDIT_MGMT.CREATE_PURGE_JOB ( AUDIT_TRAIL_TYPE => DBMS_AUDIT_MGMT.AUDIT_TRAIL_ALL, AUDIT_TRAIL_PURGE_INTERVAL => 2, AUDIT_TRAIL_PURGE_NAME => 'CLEANUP_OS_DB_AUDIT_RECORDS', USE_LAST_ARCH_TIMESTAMP => TRUE );END;/
Appendix CAudit Trail Cleanup
C-37

C.5.1.3 Oracle GoldenGate Extract CleanupLearn how to use Oracle GoldenGate extract cleanup and simply maintenance.
Use the Oracle GoldenGate extract cleanup utility to simplify maintenance. This utilityis available starting Oracle AVDF 20.4.
To run the Oracle GoldenGate extract cleanup utility:
1. Navigate to the following directory on the host machine:
AGENT_HOME\av\plugins\com.oracle.av.plugin.oracle\bin2. Run the following command:
OracleGoldenGateExtractCleanupHandler <target name> <Agent deployed location>
The above command has the following variables:
<target name> is the name of the registered target.
<Agent deployed location> is the full path of the directory where the Agent isdeployed.
Note:
Ensure to specify the timezone offset when creating the target, using thetarget attribute av.collector.timezoneoffset. Also ensure the Agentmachine and Oracle Database target are in the same timezone.
C.5.2 Microsoft SQL Server Audit Trail CleanupLearn about cleaning up your Microsoft SQL Server audit trail.
If the SQL Server audit trail has collected data from a trace, extended events, orsqlaudit file and that file is inactive, then you can clean up this file. The SQL Serveraudit trail writes the names of the SQL Server audit text files to a plain text file withthe .atc extension. The .atc file resides in the AGENT_HOME\av\atc directory on thecomputer on which the agent is installed.
To manually clean up files that Oracle AVDF has completed extracting audit recordsfrom:
1. Go to the AGENT_HOME\av\plugins\com.oracle.av.plugin.mssql\bin directory ofthe computer where the Audit Vault Agent is installed.
Ensure that the AGENT_HOME environment variable is correctly set to the directorypath where the agent.jar file is extracted.
2. Run the following utility:
SQLServerCleanupHandler secured_target_name
For example:
SQLServerCleanupHandler mssqldb4
Appendix CAudit Trail Cleanup
C-38

If you do not set the AGENT_HOME environment variable, you can provide the agent homelocation in the command line using the following syntax:
SQLServerCleanupHandler -securedtargetname secured_target_name agent_home_location
For example:
SQLServerCleanupHandler mssqldb4 c:\AV_agent_installation
Important: If the name of the Audit Vault Agent installation directory contains spaces,enclose the name in double quotes, for example "C:\Agent Directory".
To automate the cleanup of SQL Server trace files, you can use the Windows Scheduler.
Note:
If the SQL Server trace definition is redefined or reinitialized, then you must ensurethat the file names of the trace files do not overlap with trace files that were createdearlier.
For example, suppose you start SQL Server with a trace definition in which thetrace files names use the following format:
c:\serversidetraces.trcc:\serversidetraces_1.trcc:\serversidetraces_2.trc...c:\serversidetraces_259.trc
Then you restart the SQL Server with a new trace definition. This new tracedefinition must use a different file name from the current trace files (for example, thecurrent one named c:\serversidetraces.trc). If you do not, then when you purgethe audit trail, the new trace files that have same names as the old ones will bedeleted.
C.5.3 MySQL Audit Trail CleanupUse the MySQL audit trail cleanup utility to simplify maintenance.
To run the MySQL audit trail cleanup utility:
1. On the host machine, go to the directoryAGENT_HOME\av\plugins\com.oracle.av.plugin.mysql\bin
2. Run the following command:
MySQLServerCleanupHandler.bat secured_target_name AGENT_HOME
The above command has the following variables:
• secured_target_name - the name of the MySQL target
• AGENT_HOME - the path to the directory where the Audit Vault Agent is deployed.
C.5.4 IBM DB2 Audit Trail CleanupLearn about using the IBM DB2 scripts to cleanup records.
Appendix CAudit Trail Cleanup
C-39

Refer to Converting Binary Audit Files to ASCII Format for IBM DB2 for informationregarding DB2 records cleanup.
C.6 Procedure Look-Ups: Connect Strings, CollectionAttributes, Audit Trail Locations
Procedure lookups enable you to fine tune and customize audit records generation.
C.6.1 Target Locations (Connect Strings)Use connect strings to register target locations in the Oracle Audit Vault Serverconsole.
When registering a target in the Audit Vault Server console, you enter a connect stringin the Target Location field. Use a connect string format from Table C-20 dependingon the target type.
Note: A connect string is not required for a Database Firewall-only deployment.
Table C-20 Target Connect Strings (for Target Location Field)
Target Type Connect String
Oracle Database jdbc:oracle:thin:@//hostname:port/serviceSybase ASE jdbc:av:sybase://hostname:portSybase SQLAnywhere
jdbc:av:sybase://hostname:port
Microsoft SQL Server(SQL ServerAuthentication)
jdbc:av:sqlserver://hostname:portWhen SSL Encryption is used with MSSQL sever and the servercertificate validation is required. Ensure that agent TLS level is set toLevel 4.
jdbc:av:sqlserver://<MSSQL Host name>:<Portnumber>;encryptionMethod=SSL;validateServerCertificate=true;CryptoProtocolVersion=TLSv1.2;trustStore=<keystore jks path>;trustStorePassword=<keystorepassword>;extendedOptions=enableCipherSuites=SSL_RSA_WITH_RC4_128_MD5,SSL_RSA_WITH_RC4_128_SHAWhen SSL Encryption is used with MSSQL sever and the servercertificate validation is not required.
jdbc:av:sqlserver://<MSSQL Host name>:<Portnumber>;encryptionMethod=SSL;validateServerCertificate=false;CryptoProtocolVersion=TLSv1.2;
Appendix CProcedure Look-Ups: Connect Strings, Collection Attributes, Audit Trail Locations
C-40

Table C-20 (Cont.) Target Connect Strings (for Target Location Field)
Target Type Connect String
Microsoft SQL Server(WindowsAuthentication)
jdbc:av:sqlserver://<HostName>:<Port>;authenticationMethod=ntlmjava(Use Windows user credentials along with domain. Forexample, <domain name>\<user name > and password.)OR
jdbc:av:sqlserver://<HostName>:<Port>;authenticationMethod=ntlmjava;domain=<domain name>Use Windows user credentials without domain. Forexample, <user name > and password.
Oracle Solaris hostname (fully qualified machine name or IP address)
Oracle Linux hostname (fully qualified machine name or IP address)
Microsoft Windows hostname (fully qualified machine name or IP address)
Microsoft ActiveDirectory Server
hostname (fully qualified machine name or IP address)
Oracle ACFS hostname (fully qualified machine name or IP address)
See Also:
Registering or Removing Targets in Audit Vault Server
C.6.2 Collection AttributesOracle Audit Vault and Database Firewall provides collection attributes that are specific to thetarget platform, such as Oracle Database or MySQL.
C.6.2.1 About Collection AttributesSpecify collection attributes when configuring targets.
Some types of targets have optional or required audit trail collection attributes. You canspecify collection attributes when registering or modifying targets in the CollectionAttributes fields.
The following target types do not require collection attributes:
• Microsoft SQL Server
• Sybase ASE
• Oracle Solaris
• Windows
• Linux
• Microsoft Active Directory Server
Appendix CProcedure Look-Ups: Connect Strings, Collection Attributes, Audit Trail Locations
C-41
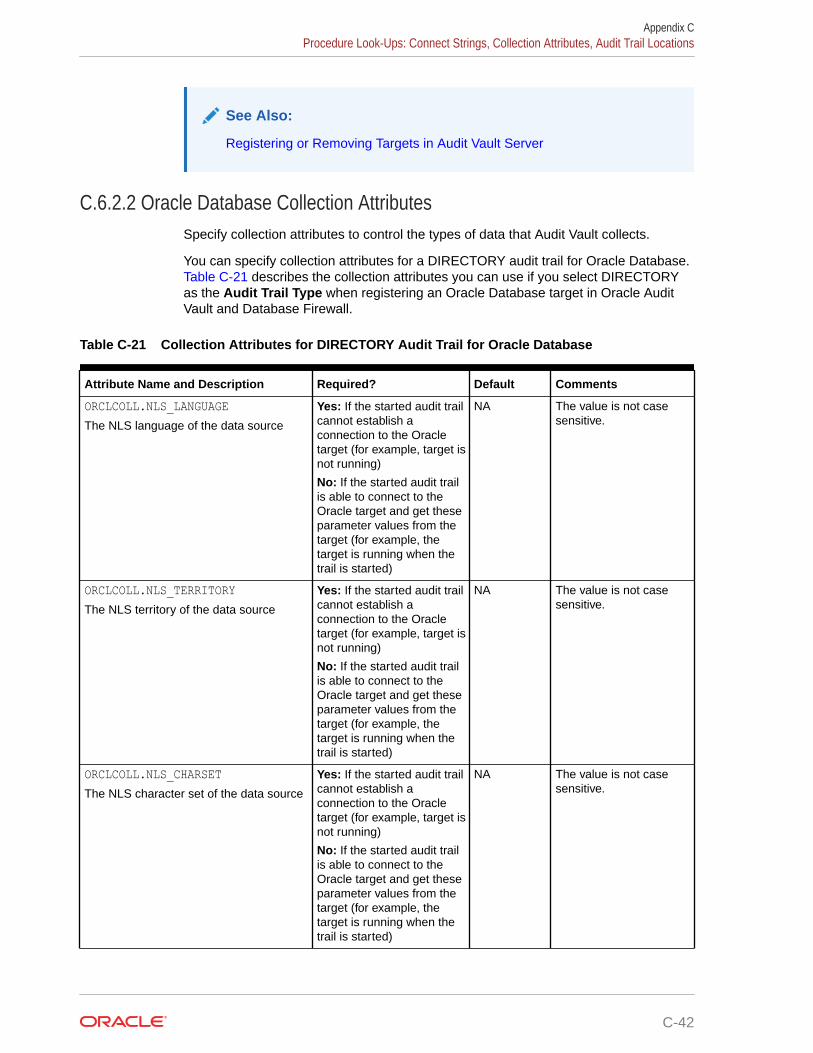
See Also:
Registering or Removing Targets in Audit Vault Server
C.6.2.2 Oracle Database Collection AttributesSpecify collection attributes to control the types of data that Audit Vault collects.
You can specify collection attributes for a DIRECTORY audit trail for Oracle Database. Table C-21 describes the collection attributes you can use if you select DIRECTORYas the Audit Trail Type when registering an Oracle Database target in Oracle AuditVault and Database Firewall.
Table C-21 Collection Attributes for DIRECTORY Audit Trail for Oracle Database
Attribute Name and Description Required? Default Comments
ORCLCOLL.NLS_LANGUAGEThe NLS language of the data source
Yes: If the started audit trailcannot establish aconnection to the Oracletarget (for example, target isnot running)
No: If the started audit trailis able to connect to theOracle target and get theseparameter values from thetarget (for example, thetarget is running when thetrail is started)
NA The value is not casesensitive.
ORCLCOLL.NLS_TERRITORYThe NLS territory of the data source
Yes: If the started audit trailcannot establish aconnection to the Oracletarget (for example, target isnot running)
No: If the started audit trailis able to connect to theOracle target and get theseparameter values from thetarget (for example, thetarget is running when thetrail is started)
NA The value is not casesensitive.
ORCLCOLL.NLS_CHARSETThe NLS character set of the data source
Yes: If the started audit trailcannot establish aconnection to the Oracletarget (for example, target isnot running)
No: If the started audit trailis able to connect to theOracle target and get theseparameter values from thetarget (for example, thetarget is running when thetrail is started)
NA The value is not casesensitive.
Appendix CProcedure Look-Ups: Connect Strings, Collection Attributes, Audit Trail Locations
C-42
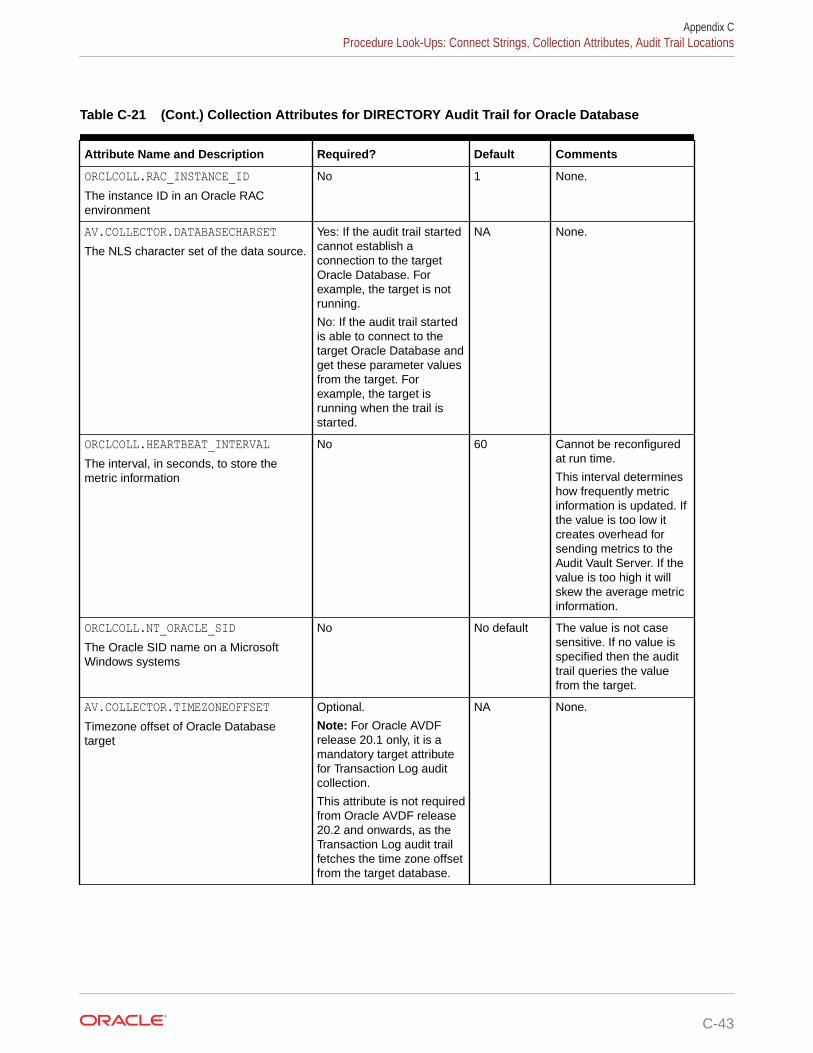
Table C-21 (Cont.) Collection Attributes for DIRECTORY Audit Trail for Oracle Database
Attribute Name and Description Required? Default Comments
ORCLCOLL.RAC_INSTANCE_IDThe instance ID in an Oracle RACenvironment
No 1 None.
AV.COLLECTOR.DATABASECHARSETThe NLS character set of the data source.
Yes: If the audit trail startedcannot establish aconnection to the targetOracle Database. Forexample, the target is notrunning.
No: If the audit trail startedis able to connect to thetarget Oracle Database andget these parameter valuesfrom the target. Forexample, the target isrunning when the trail isstarted.
NA None.
ORCLCOLL.HEARTBEAT_INTERVALThe interval, in seconds, to store themetric information
No 60 Cannot be reconfiguredat run time.
This interval determineshow frequently metricinformation is updated. Ifthe value is too low itcreates overhead forsending metrics to theAudit Vault Server. If thevalue is too high it willskew the average metricinformation.
ORCLCOLL.NT_ORACLE_SIDThe Oracle SID name on a MicrosoftWindows systems
No No default The value is not casesensitive. If no value isspecified then the audittrail queries the valuefrom the target.
AV.COLLECTOR.TIMEZONEOFFSETTimezone offset of Oracle Databasetarget
Optional.
Note: For Oracle AVDFrelease 20.1 only, it is amandatory target attributefor Transaction Log auditcollection.
This attribute is not requiredfrom Oracle AVDF release20.2 and onwards, as theTransaction Log audit trailfetches the time zone offsetfrom the target database.
NA None.
Appendix CProcedure Look-Ups: Connect Strings, Collection Attributes, Audit Trail Locations
C-43
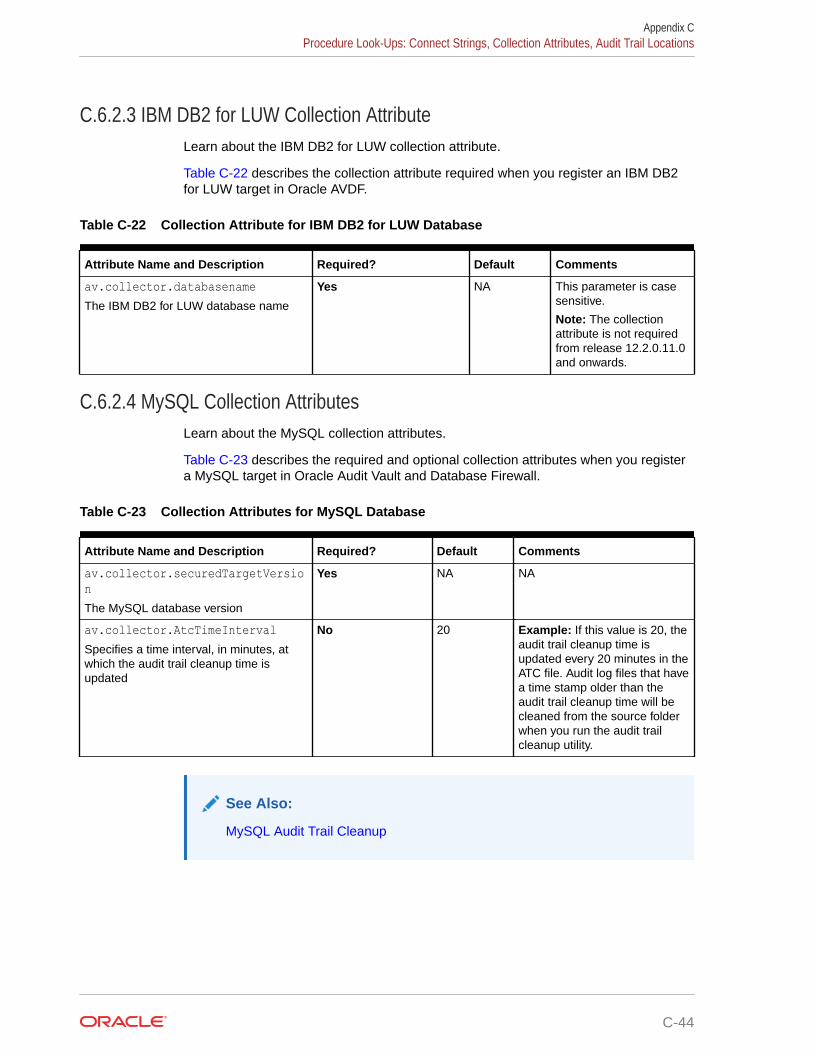
C.6.2.3 IBM DB2 for LUW Collection AttributeLearn about the IBM DB2 for LUW collection attribute.
Table C-22 describes the collection attribute required when you register an IBM DB2for LUW target in Oracle AVDF.
Table C-22 Collection Attribute for IBM DB2 for LUW Database
Attribute Name and Description Required? Default Comments
av.collector.databasenameThe IBM DB2 for LUW database name
Yes NA This parameter is casesensitive.
Note: The collectionattribute is not requiredfrom release 12.2.0.11.0and onwards.
C.6.2.4 MySQL Collection AttributesLearn about the MySQL collection attributes.
Table C-23 describes the required and optional collection attributes when you registera MySQL target in Oracle Audit Vault and Database Firewall.
Table C-23 Collection Attributes for MySQL Database
Attribute Name and Description Required? Default Comments
av.collector.securedTargetVersionThe MySQL database version
Yes NA NA
av.collector.AtcTimeIntervalSpecifies a time interval, in minutes, atwhich the audit trail cleanup time isupdated
No 20 Example: If this value is 20, theaudit trail cleanup time isupdated every 20 minutes in theATC file. Audit log files that havea time stamp older than theaudit trail cleanup time will becleaned from the source folderwhen you run the audit trailcleanup utility.
See Also:
MySQL Audit Trail Cleanup
Appendix CProcedure Look-Ups: Connect Strings, Collection Attributes, Audit Trail Locations
C-44

C.6.2.5 Oracle ACFS Collection AttributeLearn about the Oracle ACFS target collection attribute.
Table C-24 describes the collection attribute required when you register an Oracle ACFStarget in Oracle Audit Vault and Database Firewall.
Table C-24 Collection Attribute for Oracle ACFS
Attribute Name and Description Required? Default Comments
av.collector.securedtargetversionThe version number of Oracle ACFS
Yes NA Five integer valuesseparated by dots, forexample 12.1.0.0.0.
C.6.3 Audit Trail LocationsLearn about the considerations for configuring Oracle Audit Vault audit trail locations.
When you configure an audit trail for a target in the Audit Vault Server, you must specify aTrail Location. The trail location depends on the type of target. Use the format below thatcorresponds to your target type.
Important: Trail locations are case sensitive. To avoid duplicate data collection, werecommend that you provide the entire trail location either in all capital letters or all smallletters.
Note: If you selected DIRECTORY for Audit Trail Type, the Trail Location must be a directorymask.
Table C-25 shows the supported formats for Trail Location.
Table C-25 Supported Trail Locations for Targets
Target Type Trail Type Supported Trail Locations
OracleDatabase
Table SYS.AUD$, SYS.FGA_LOG$, DVSYS.AUDIT_TRAIL$,UNIFIED_AUDIT_TRAIL, CDB_UNIFIED_AUDIT_TRAIL.
OracleDatabase
Directory Full path to directory containing AUD or XML files.
OracleDatabase
syslog Full path to directory containing the syslog or rsyslog file.Include the syslog or rsyslog file prefix in the path. Forexample, if the file names are messages.0, messages.1, andso on, an example path might be:
/scratch/user1/rsyslogbug/dbrecord/messagesYou can also enter Default and the system will search foreither the syslog or rsyslog location. If both are present,entering Default causes the audit trail to collect data from thesyslog files.
OracleDatabase
Event log and Network No trail location required.
OracleDatabase
Transaction Log Full path to directory containing Golden Gate IntegratedExtract XML trail file.
Appendix CProcedure Look-Ups: Connect Strings, Collection Attributes, Audit Trail Locations
C-45

Table C-25 (Cont.) Supported Trail Locations for Targets
Target Type Trail Type Supported Trail Locations
MicrosoftSQL Server
Directory *.sqlaudit files, or *.trc (trace) files.
Examples:
directory_path\*.sqlauditdirectory_path\prefix*.sqlauditdirectory_path\prefix*.trcFor prefix, you can use any prefix for the .trc or*.sqlaudit files.
#C2_DYNAMIC and #TRACE_DYNAMIC are only supported forSQL Server 2000, 2005, 2014, and 2016.
MicrosoftSQL Server
Event log application or security (SQL Server 2008, 2012,2014, and 2016)
IBM DB2 forLUW
Directory Path to a directory, for example: d:\temp\trace
Sybase ASE Table SYSAUDITSPostgreSQL Directory The path to the directory containing CSV audit files.
MySQL Directory The path to the directory where converted XML files arecreated when you run the MySQL XML transformation utility.
Linux Directory Default location of audit.log (/var/log/audit/audit*.log) or any custom location configured in the /etc/audit/auditd.conf file
MicrosoftWindows
Event log security (case-insensitive)
You can use any case combination in the word security.However, once you start collecting a trail using a particularcase case combination, you must use the same combination insubsequent collections, otherwise, a new audit trail will startcollecting records from the start of the security event log.
OracleSolaris
Directory hostname:path_to_trailThe hostname matches the hostname in the audit log names,which look like this:
timestamp1.timestamp2.hostname
AIX Directory /audit/trailOracle ACFS Directory The path to the directory containing XML audit files. For
example, for a file system mounted at $MOUNT_POINT, theaudit trail location is:
$MOUNT_POINT/.Security/audit/
MicrosoftActiveDirectoryServer
Event log directory service or security (case-insensitive)
You can use any case combination in the words directoryservice or security. However, once you start collecting atrail using a particular case combination, you must use thesame combination in subsequent collections, otherwise, a newaudit trail will start collecting records from the start of thesecurity event log.
Appendix CProcedure Look-Ups: Connect Strings, Collection Attributes, Audit Trail Locations
C-46

See Also:
• Adding Audit Trails in Audit Vault Server
• Running the XML Transformation Utility for MySQL Audit Formats
Appendix CProcedure Look-Ups: Connect Strings, Collection Attributes, Audit Trail Locations
C-47
DTransaction Log Audit Data CollectionReference
You can fine-tune audit data collection by setting REDO log parameters for Oracle Databasetargets.
D.1 Introduction to Transaction Log Audit Trail Using OracleGoldenGate
Learn about the recommended collection from REDO logs settings using Oracle GoldenGate.
REDO log files also known as transaction logs are files used by Oracle Database to maintainlogs of all the transactions that have occurred in the database. This chapter contains therecommendations for setting initialization parameters to use the TRANSACTION LOG audittrail type to collect audit data from the REDO logs of Oracle Database target.
These log files allow Oracle Database to recover the changes made to the database in caseof a failure. For example, if a user updates a salary value in a table that contains employeerelated data, a REDO record is generated. It contains the value before this change (old value)and the new changed value. REDO records are used to guarantee ACID (Atomicity,Consistency, Isolation, and Durability) properties over crash or hardware failure. In case of adatabase crash, the system performs redo (re-process) of all the changes on data files thattakes the database data back to the state it was when the last REDO record was written.
REDO log records contain Before and After values for every DML (Data ManipulationLanguage) and DDL (Data Definition Language) operations. Oracle Audit Vault and DatabaseFirewall provides the ability to monitor the changed values from REDO logs using TransactionLog collector.
Transaction Log collector takes advantage of Oracle GoldenGate’s Integrated Extractprocess to move the REDO log data from database to XML files. The extract process isconfigured to run against the source database or it is configured to run on a DownstreamMining database (Oracle only). It captures DML and DDL operations performed on theconfigured objects. The captured operations from transaction logs are transferred toGoldenGate XML trail files. Oracle AVDF's Transaction Log collector, collects transaction logrecords from generated XML files. These logs are forwarded to the Audit Vault Server toshow the before and after values changed in the Data Modification Before-After Valuesreport. The DDL changes are available in the All Activity report. The DML changes areavailable in the Data Modification Before-After Values report.
D-1

Figure D-1 Transaction Log Collection Process
AVDF Transaction
Log Collector
SourceDatabase
TransactionLogs
Before and After Values Report -GUI
XML
XML
GoldenGate Audit VaultServer
See Also:
Oracle Database Setup Scripts for instructions on setting up privileges in theOracle Database for collecting audit data from the REDO logs.
D.2 Sizing GuidelinesLearn and follow the sizing guidelines outlined in this topic.
Prerequisites
Adhere to the system and sizing requirements outlined in System Requirements andOperating System Requirements of Oracle GoldenGate documentation.
General sizing guidelines
1. General recommendation for memory and CPU is to start with 32G memory and 2CPUs per Integrated Extract as it is a multi threaded process and uses largememory when processing large transaction. Depending on the transaction volumeand transaction pattern, scale up the resources appropriately following theguidelines in Oracle GoldenGate documentation.
2. General recommendation for disk space is to start with 2T, and vary based on thevolume of data the Integrated Extract captures from the source databases. Extractuses storage for trail files and temporary disk space for cache files in case there isbig transaction to buffer for processing.
Oracle GoldenGate has a multithreaded process and uses large memory whenprocessing large transactions. Scale up the resources depending on the transactionvolume and transaction pattern. The disk space may vary based on the volume of datathat the Integrated Extract captures from the source databases. Extract uses storagefor trail files and temporary disk space for cache files in case there is big transaction tobuffer for processing.
There are multiple database dictionary views in the computation formulae referred inthe guidelines. They provide information on transaction log size. For example, v$loggives detailed information of each online log. Similarly number of log switches per daycan be estimated from v$log_history/gv$log_history.
Appendix DSizing Guidelines
D-2
Temporary disk space requirements on account of large transactions may fill up cache andspill over to the transaction cached data or temporary files. Configure an archive policy anddefine the retention period of the files, so they can be recycled accordingly.
Maintain enough physical memory to handle large transactions. As per the guidelines, haveat least 32 GB of memory available for Extract to use. For a more accurate estimation, collectthe statistics from the database server history run and check for the size of the biggesttransaction. Oracle GoldenGate provides send <extract> cachemgr, cachestats commandthat displays the statistics of the transaction, that is helpful to determine the base line forestimation.
In general, the sizing, storage, and memory for Oracle GoldenGate Integrated Extractprocess is highly dependent on the transaction volume and transaction pattern. Collect thesestatistics from every single database server to estimate as there is no standard value.
The number of databases that can be supported by a single GoldenGate instance orIntegrated Extract process, depends on the system resources that support multiple extracts.Ensure to configure one extract for every database.
Note:
• Other Disk Space Considerations
• Temporary Disk Requirements
D.3 Deploying Oracle GoldenGate Microservices ArchitectureLearn about restricted license of Oracle GoldenGate.
A restricted use license for Oracle GoldenGate is included with Oracle Audit Vault andDatabase Firewall release 20.1. This license permits you to install Oracle GoldenGate anduse the integrated extract process to capture transactional changes in database systemsmonitored by Oracle AVDF. The extracted data from Oracle GoldenGate is consumed only byOracle AVDF. Deploy Oracle GoldenGate Microservices Architecture on a separate serverother than the server on which Oracle AVDF appliance is deployed. Later configure theIntegrated Extract feature of Oracle GoldenGate. Oracle GoldenGate version 19.1.0.0.4 is theminimum version supported with Oracle Audit Vault and Database Firewall 20.1. To supportpre-12.2 Oracle databases, Downstream Mining needs to be configured. It requiresdeployment of Oracle Enterprise Edition database and has to be licensed separately.
D.4 Installing Oracle GoldenGate on Oracle DatabaseLearn how to install Oracle GoldenGate on Oracle Database.
Download Oracle GoldenGate Microservices Architecture (MA) from the Oracle SoftwareDelivery Cloud.
Appendix DDeploying Oracle GoldenGate Microservices Architecture
D-3

Note:
After installing Oracle GoldenGate, contact Oracle Support to create a MergeLabel Request for applying the patch 32175609 and 32063871. This patchneeds to be applied on Oracle GoldenGate installation.
1. Refer and follow the Installing Oracle GoldenGate Microservices procedure inOracle GoldenGate documentation.
2. After installing Oracle GoldenGate, configure a new instance of GoldenGate byfollowing the steps in Setting Up Secure or Non-Secure Deployments
D.5 Capturing Transaction Log Data from Oracle Database12.2.0.1 and Later
Learn how to capture Transaction Log data from Oracle Database versions 12.2.0.1and later.
Oracle GoldenGate Integrated Extract process is supported only for Oracle Databaseversions 12.2.0.1 and later. In this case Oracle GoldenGate Integrated Extract isconfigured on the source database. To capture Transaction Log data from OracleDatabase 12.2.0.1 or later, run the steps in the following sections and in the sameorder:
1. Create User and Grant Relevant Privileges
2. Configure Oracle GoldenGate Parameters for Oracle Database
3. Create New Credential in GoldenGate Administration Server
4. Create a New Integrated Extract in Oracle GoldenGate Administration Server
D.6 Downstream Mining to Capture Transaction Log Datafrom Oracle Database Prior to 12.2.0.1
Learn how to capture Transaction Log data from Oracle Database versions prior to12.2.0.1.
Oracle GoldenGate Integrated Extract process is supported only for Oracle Databaseversions 12.2.0.1 and later. In this case Oracle GoldenGate Integrated Extract isconfigured on the source database.
For capturing Transaction Log data from Oracle Database versions prior to 12.2.0.1,Downstream Mining must be used. In this case there are 2 databases, the sourcedatabase and the Downstream Mining database. The source database (OracleDatabase prior to 12.2.0.1) is configured to ship the online REDO logs to aDownstream database (Oracle Database version 12.2.0.1 or later). Integrated Extractis then configured on the Downstream database.
Appendix DCapturing Transaction Log Data from Oracle Database 12.2.0.1 and Later
D-4
Note:
• Before configuring Downstream Mining, execute the steps in sections CreateUser and Grant Relevant Privileges and Configure Oracle GoldenGateParameters for Oracle Database on both the source database and theDownstream Mining database.
• Configure Downstream Mining by referring to section Configure GoldenGateDownstream Mining.
D.7 Migrating Transaction Log Audit Trail from Oracle AVDF12.2 to 20
Learn how to migrate transaction log audit trail from Oracle AVDF 12.2 to 20.
Transaction log audit trail data can be migrated from Oracle AVDF 12.2 to 20. Follow thisprocedure before upgrading to Oracle AVDF 20:
1. Install and deploy Oracle GoldenGate.
2. Run the below procedure for every transaction log audit trail in Oracle AVDF 12.2:
a. Ensure Oracle AVDF 12.2 transaction log audit trail is running on the Oracle sourcedatabase. Create Oracle Goldengate integrated extract. If Oracle source database isolder than 12.2.0.1, then configure Downstream Mining and create Integrated Extractfor Downstream Mining database. If Oracle source database is version 12.2.0.1 orlater, then create Integrated Extract for the source database.
b. Configure Integrated Extract XML file for each source database instance in a uniquelocation.
c. Wait for five minutes after creating the Integrated Extract, to ensure it is runningsuccessfully. In case the Integrated Extract fails, then check the logs in the Reportstab and fix the issue.
d. After confirming that the Integrated Extract is running successfully, wait till DDL/DMLstatements run. Ensure that the Integrated Extract file contains XML data in it.
e. Stop the 12.2 transaction log audit trail. Before Oracle AVDF 12.2 transaction logaudit trail is stopped, for a brief duration both the GoldenGate Integrated Extract andOracle AVDF 12.2 transaction log audit trail are running concurrently. Henceduplicate records are observed only for this brief duration. Safely ignore the duplicaterecords observed for this short duration.
f. Ensure these steps run successfully for all the 12.2 transaction log audit trails.
3. If the current version of Oracle AVDF is prior to 12.2.0.9.0, then first upgrade to12.2.0.9.0 and then upgrade to Oracle AVDF 20.
4. After upgrading to Oracle AVDF 20, perform these steps for each target database whichhas transaction log audit trail:
a. Delete the old transaction log audit trail.
b. Create a new transaction log audit trail.
Appendix DMigrating Transaction Log Audit Trail from Oracle AVDF 12.2 to 20
D-5
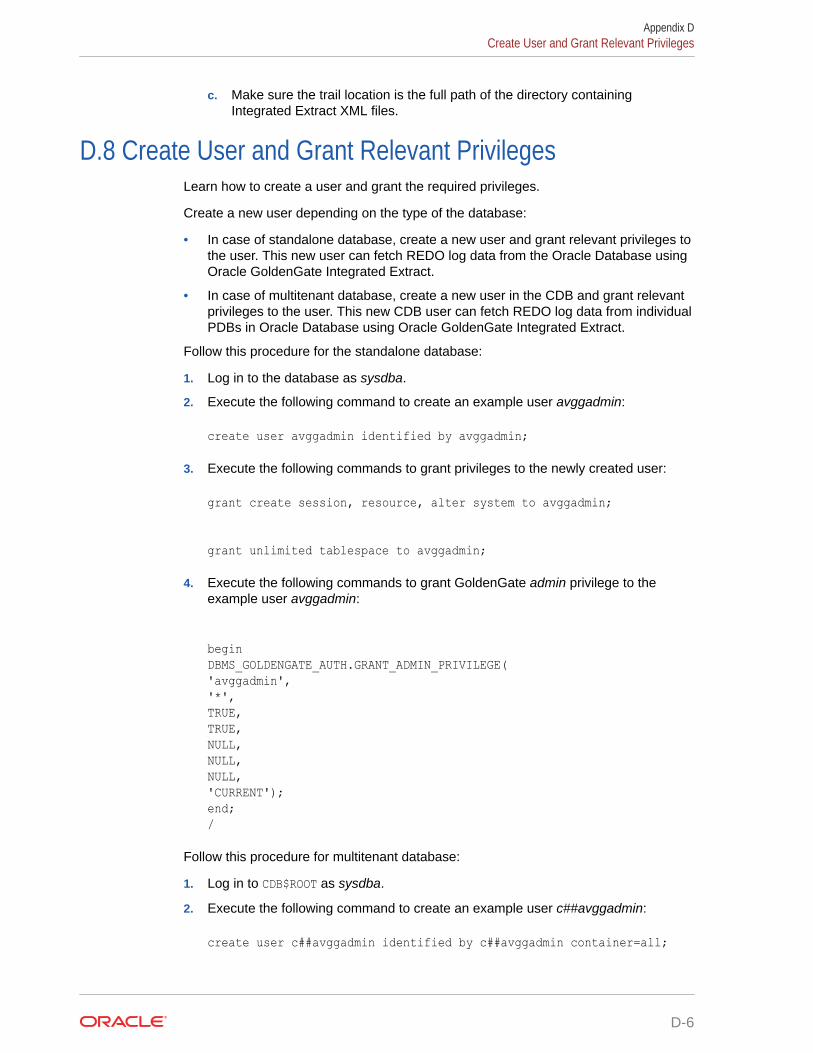
c. Make sure the trail location is the full path of the directory containingIntegrated Extract XML files.
D.8 Create User and Grant Relevant PrivilegesLearn how to create a user and grant the required privileges.
Create a new user depending on the type of the database:
• In case of standalone database, create a new user and grant relevant privileges tothe user. This new user can fetch REDO log data from the Oracle Database usingOracle GoldenGate Integrated Extract.
• In case of multitenant database, create a new user in the CDB and grant relevantprivileges to the user. This new CDB user can fetch REDO log data from individualPDBs in Oracle Database using Oracle GoldenGate Integrated Extract.
Follow this procedure for the standalone database:
1. Log in to the database as sysdba.
2. Execute the following command to create an example user avggadmin:
create user avggadmin identified by avggadmin;
3. Execute the following commands to grant privileges to the newly created user:
grant create session, resource, alter system to avggadmin;
grant unlimited tablespace to avggadmin;
4. Execute the following commands to grant GoldenGate admin privilege to theexample user avggadmin:
beginDBMS_GOLDENGATE_AUTH.GRANT_ADMIN_PRIVILEGE('avggadmin','*',TRUE,TRUE,NULL,NULL,NULL,'CURRENT');end;/
Follow this procedure for multitenant database:
1. Log in to CDB$ROOT as sysdba.
2. Execute the following command to create an example user c##avggadmin:
create user c##avggadmin identified by c##avggadmin container=all;
Appendix DCreate User and Grant Relevant Privileges
D-6
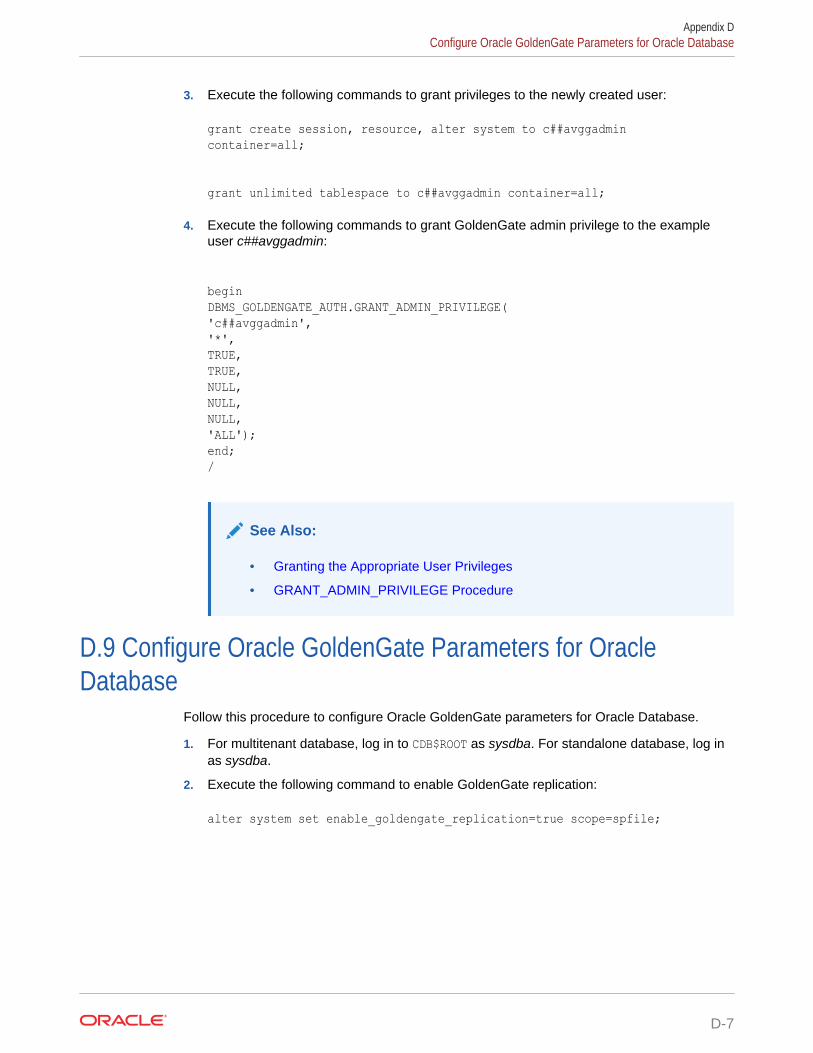
3. Execute the following commands to grant privileges to the newly created user:
grant create session, resource, alter system to c##avggadmin container=all;
grant unlimited tablespace to c##avggadmin container=all;
4. Execute the following commands to grant GoldenGate admin privilege to the exampleuser c##avggadmin:
beginDBMS_GOLDENGATE_AUTH.GRANT_ADMIN_PRIVILEGE('c##avggadmin','*',TRUE,TRUE,NULL,NULL,NULL,'ALL');end;/
See Also:
• Granting the Appropriate User Privileges
• GRANT_ADMIN_PRIVILEGE Procedure
D.9 Configure Oracle GoldenGate Parameters for OracleDatabase
Follow this procedure to configure Oracle GoldenGate parameters for Oracle Database.
1. For multitenant database, log in to CDB$ROOT as sysdba. For standalone database, log inas sysdba.
2. Execute the following command to enable GoldenGate replication:
alter system set enable_goldengate_replication=true scope=spfile;
Appendix DConfigure Oracle GoldenGate Parameters for Oracle Database
D-7

3. Execute the following commands to enable Archive Log:
shutdown immediate
startup mount
alter database archivelog;
alter database open;
alter pluggable database all open /*Applicable only for multitenant database*/;
select name,log_mode from v$database;
4. Enabling Forced Logging is recommended by Oracle GoldenGate. Execute thefollowing command to enable Forced Logging:
alter database force logging;
5. Execute the following commands to enable Supplemental Logging:
alter database add supplemental log data;
select force_logging, supplemental_log_data_min from v$database;
6. Change database compatibility only if the version is prior to 12.2.0.1.0. Executethe following command to see database compatibility:
show parameter compatible;
7. The database compatibility parameter needs to be changed only for the database,on which Integrated Extract will be configured. Execute the following command toset database compatibility to version 12.2.0.1.0 or higher. In case of normalintegrated extract, execute the following command on the source database. Incase of Downstream Mining configuration, execute the following command only onthe Downstream Mining database and not on the source database.
alter system set compatible = '12.2.0.1.0' scope=spfile;
8. Set the appropriate streams_pool_size depending on the number of integratedextracts on the database. Refer to Oracle GoldenGate Performance BestPractices guide for complete information on sizing.
9. Execute the following command to check the current parameter values:
show parameter streams;
Appendix DConfigure Oracle GoldenGate Parameters for Oracle Database
D-8
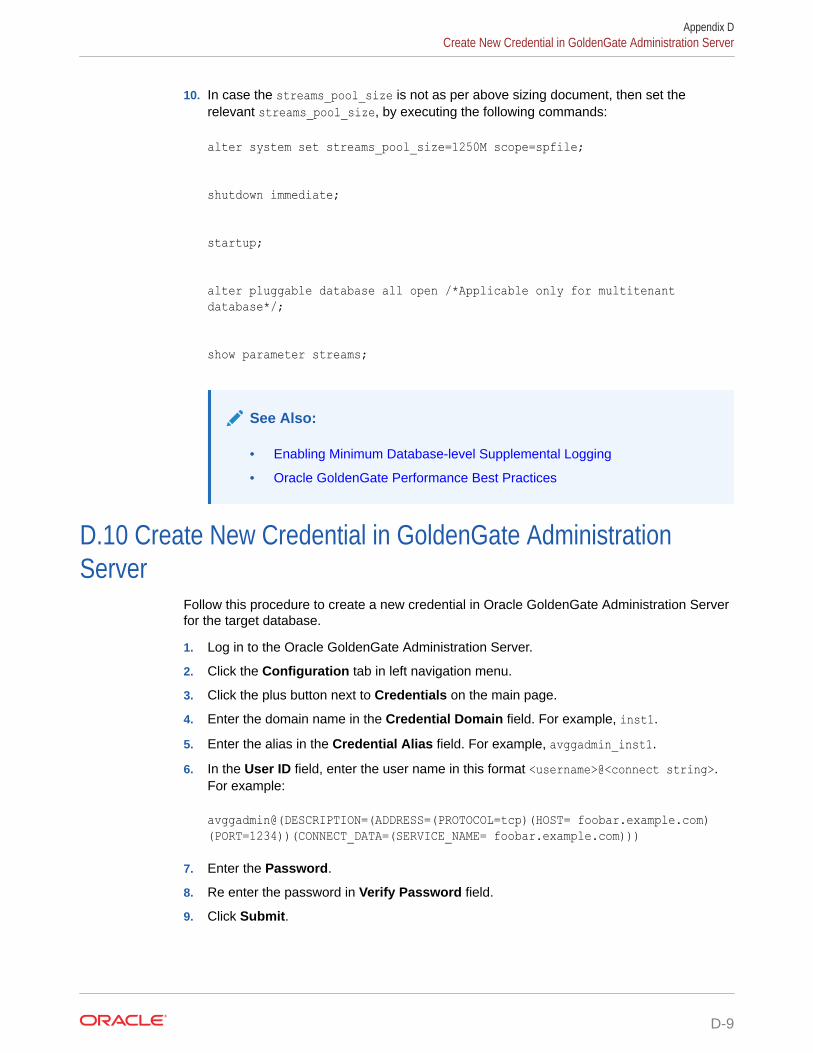
10. In case the streams_pool_size is not as per above sizing document, then set therelevant streams_pool_size, by executing the following commands:
alter system set streams_pool_size=1250M scope=spfile;
shutdown immediate;
startup;
alter pluggable database all open /*Applicable only for multitenant database*/;
show parameter streams;
See Also:
• Enabling Minimum Database-level Supplemental Logging
• Oracle GoldenGate Performance Best Practices
D.10 Create New Credential in GoldenGate AdministrationServer
Follow this procedure to create a new credential in Oracle GoldenGate Administration Serverfor the target database.
1. Log in to the Oracle GoldenGate Administration Server.
2. Click the Configuration tab in left navigation menu.
3. Click the plus button next to Credentials on the main page.
4. Enter the domain name in the Credential Domain field. For example, inst1.
5. Enter the alias in the Credential Alias field. For example, avggadmin_inst1.
6. In the User ID field, enter the user name in this format <username>@<connect string>.For example:
avggadmin@(DESCRIPTION=(ADDRESS=(PROTOCOL=tcp)(HOST= foobar.example.com)(PORT=1234))(CONNECT_DATA=(SERVICE_NAME= foobar.example.com)))
7. Enter the Password.
8. Re enter the password in Verify Password field.
9. Click Submit.
Appendix DCreate New Credential in GoldenGate Administration Server
D-9

10. After creating the credential, click the Log in database icon. There is a pointeravailable for the icon. This ensures that the newly created credential is able toconnect to the target database.
D.11 Create a New Integrated Extract in Oracle GoldenGateAdministration Server
Follow this procedure to create new Integrated Extract in Oracle GoldenGateAdministration Server for the target database.
1. Log in to the Oracle GoldenGate Administration Server.
2. Click the Overview tab in left navigation menu.
3. Click the plus button next to Extract on the main page.
4. In the Add Extract section and Extract Type sub section, select the IntegratedExtract radio button.
5. Click Next.
6. In the Extract Options sub section, enter the Process Name.
7. Optionally, enter the Description.
8. Select Unidirectional in the Intent field.
9. Select the Credential Domain from the drop down.
10. Select the Credential Alias from the drop down.
11. Select Now in the Begin field.
12. Enter a two character trail name in the Trail Name field.
13. Enter the Trail Subdirectory.
Note:
Trail subdirectory can be full path of any directory. This directory mustalready exist on the file system.
14. Enter the Trail Size (in MB).
Note:
In case the record generation rate of GoldenGate is low (less than 50records per second), then it is recommended to set the Trail Size tolower values. For example, 100MB.
15. Select the PDB container in the Register to PDBs field.
16. The maximum size of the XML file can be configured using the Trail Size field.After the XML file reaches this size, rotation happens and integrated extract startswriting into a new XML file.
17. The other fields can be left unchanged as they are optional.
Appendix DCreate a New Integrated Extract in Oracle GoldenGate Administration Server
D-10

18. Click Next.
19. In the Parameter File sub section, enter the below parameters:
extract <extract_name>useridalias <credential_userid_alias> domain <credential_domain>OUTPUTFORMAT XML _AUDIT_VAULTexttrail <sub_directory>/<trail_name>SOURCECATALOG <pdb_name>DDL <ddl options to include or exclude schemas and tables>TABLE <schema>.<table>;
Example parameter file:
extract int_ex_1useridalias tkggadmin_inst1 domain inst1OUTPUTFORMAT XML _AUDIT_VAULTexttrail subdirectory/aaSOURCECATALOG cdb1_pdb1DDL INCLUDE ALLTABLE scott.*;
Note:
• The SOURCECATALOG parameter is applicable only for the multi tenantdatabase and is not required for the standalone database.
• There is space between XML and _AUDIT_VAULT in the OUTPUTFORMATparameter.
• The OUTPUTFORMAT parameter must be mentioned before the exttrailparameter in the parameter file. Else, the XML files are not generated.
• Ensure the TABLE command always ends with a semicolon (;).
• Ensure the sequence of all the parameters are in the exact order asmentioned above.
• The DDL INCLUDE command is used to specify the tables for which DDLchanges need to be captured.
• The TABLE command is used to specify the tables for which DML changesneed to be captured.
• Refer to the following sections in Oracle® GoldenGate Reference forOracle GoldenGate for Windows and UNIX for more information about theDDL, TABLE and TABLEEXCLUDE commands.
20. After entering the values in the Parameter File field, click Create and Run button to startthe integrated extract process.
21. In the Extracts panel, the newly created Integrated Extract is displayed. To view thestatus of the Integrated Extract follow these steps:
Appendix DCreate a New Integrated Extract in Oracle GoldenGate Administration Server
D-11

a. Click Actions drop down next to the Integrated Extract icon.
b. Select Details.
c. Click Report tab to view the diagnostic messages. In case the extract processfails, then the relevant errors are displayed in the report.
See Also:
• DDL
• TABLE | MAP
• TABLEEXCLUDE
D.12 Sample Oracle GoldenGate Integrated ExtractParameter Files
Use sample Oracle GoldenGate Integrated Extract parameter files.
Audit DML and DDL in multiple tables
The following parameter file configures Integrated Extract to capture:
1. DDL operations on all the objects in accounts schema and emp table of scottschema.
2. DML operations on all the tables in accounts schema and emp table of scottschema.
extract <extract_name>useridalias <credential_userid_alias> domain <credential_domain>OUTPUTFORMAT XML _AUDIT_VAULTexttrail <sub_directory>/<trail_name>SOURCECATALOG cdb1_pdb1DDL INCLUDE OBJNAME accounts.* INCLUDE OBJNAME scott.emp;TABLE accounts.*;TABLE scott.emp;
Audit DML and DDL in the schema excluding some tables
The following parameter file configures Integrated Extract to capture:
1. DDL operations on all the objects, except the objects in accounts schema.
2. DML operations on all the tables in scott schema, except emp table in scottschema.
extract <extract_name>useridalias <credential_userid_alias> domain <credential_domain>OUTPUTFORMAT XML _AUDIT_VAULTexttrail <sub_directory>/<trail_name>
Appendix DSample Oracle GoldenGate Integrated Extract Parameter Files
D-12
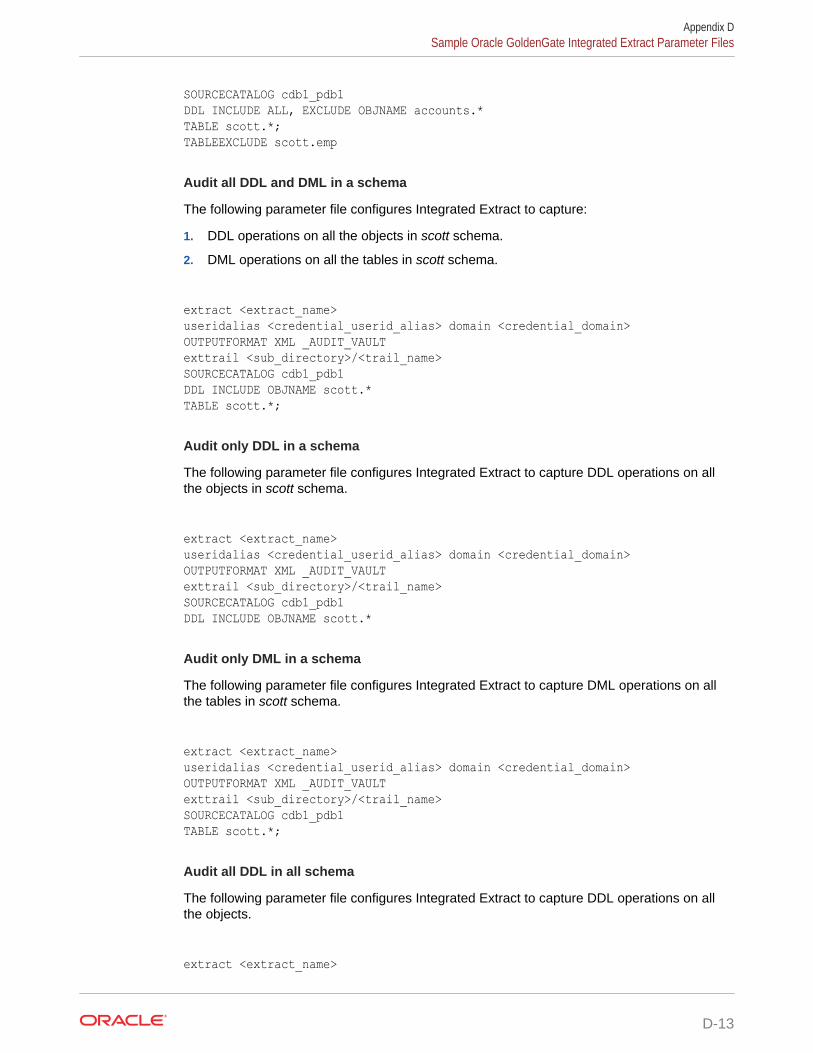
SOURCECATALOG cdb1_pdb1DDL INCLUDE ALL, EXCLUDE OBJNAME accounts.*TABLE scott.*;TABLEEXCLUDE scott.emp
Audit all DDL and DML in a schema
The following parameter file configures Integrated Extract to capture:
1. DDL operations on all the objects in scott schema.
2. DML operations on all the tables in scott schema.
extract <extract_name>useridalias <credential_userid_alias> domain <credential_domain>OUTPUTFORMAT XML _AUDIT_VAULTexttrail <sub_directory>/<trail_name>SOURCECATALOG cdb1_pdb1DDL INCLUDE OBJNAME scott.*TABLE scott.*;
Audit only DDL in a schema
The following parameter file configures Integrated Extract to capture DDL operations on allthe objects in scott schema.
extract <extract_name>useridalias <credential_userid_alias> domain <credential_domain>OUTPUTFORMAT XML _AUDIT_VAULTexttrail <sub_directory>/<trail_name>SOURCECATALOG cdb1_pdb1DDL INCLUDE OBJNAME scott.*
Audit only DML in a schema
The following parameter file configures Integrated Extract to capture DML operations on allthe tables in scott schema.
extract <extract_name>useridalias <credential_userid_alias> domain <credential_domain>OUTPUTFORMAT XML _AUDIT_VAULTexttrail <sub_directory>/<trail_name>SOURCECATALOG cdb1_pdb1TABLE scott.*;
Audit all DDL in all schema
The following parameter file configures Integrated Extract to capture DDL operations on allthe objects.
extract <extract_name>
Appendix DSample Oracle GoldenGate Integrated Extract Parameter Files
D-13

useridalias <credential_userid_alias> domain <credential_domain>OUTPUTFORMAT XML _AUDIT_VAULTexttrail <sub_directory>/<trail_name>SOURCECATALOG cdb1_pdb1DDL INCLUDE ALL
See Also:
Adding Audit Trails in Audit Vault Server for configuring Transaction Logaudit trail in Oracle AVDF.
D.13 Audit Trail Creation in Audit Vault ConsoleLearn how to create a mandatory target attribute before creating audit trail.
Ensure the mandatory target attribute AV.COLLECTOR.TIMEZONEOFFSET is set on theOracle Database target in Audit Vault Server console before audit trail creation. Thisattribute must be set to timezone offset of Oracle Database. For example, +03:00 forpositive offset, -03:00 for negative offset.
Create audit trail by specifying the following details or guidelines:
• Trail Type: TRANSACTION LOG
• Trail Location: Full path of directory containing integrated extract XML files
• Agent should be running on the host machine which has access to the traillocation
• Agent user should have read permission on the trail location
D.14 Audit Trail CleanupLearn how to delete the files that are read by Audit Vault Agent.
Oracle Golden Gate Collector writes the checkpoint information into the Audit TrailCleanup (ATC) file. This file is present in <Agent_Home>/av/atc directory. The ATCfile contains information of the target type, target name, trail type, trail directory, andthe checkpoint timestamp. The ATC file has extension .atc. All the records with eventtimestamp older than the checkpoint timestamp are read by Audit Vault Agent andwritten into the event_log table in Audit Vault Server.
Note:
The timestamp in ATC file is in UTC (Coordinated Universal Time) time zone.
Here is an example ATC file:
securedTargetType=Oracle DatabaseSecuredTargetName=secured_target_oracle_one
Appendix DAudit Trail Creation in Audit Vault Console
D-14

TrailType=TRANSACTION LOGTrailName=/foo/bar/trail_files2020-06-30 07:11:46.0
For Oracle AVDF 20.3 and Earlier
To delete the files that are read by the Audit Vault Agent, create a script which deletes thefiles. These are the files where the last modified timestamp is older than the checkpointtimestamp present in ATC file. This script can be scheduled to run periodically.
For Oracle AVDF 20.4 and Later
To delete the files that are read by the Audit Vault Agent use the Oracle GoldenGate ExtractCleanup utility. This is available starting Oracle AVDF 20.4.
D.15 Configure GoldenGate Downstream MiningLearn how to configure GoldenGate downstream mining.
Oracle GoldenGate Integrated Extract process is supported only for Oracle Databaseversions 12.2.0.1 and later. In this case Oracle GoldenGate Integrated Extract is configuredon the source database. For capturing transaction log data from Oracle Database versionsprior to 12.2.0.1, downstream mining is used. In this case there are 2 databases, the sourcedatabase and the Downstream Mining database. The source database (Oracle Databaseversions prior to 12.2.0.1) is configured to send the online REDO logs to a Downstreamdatabase (Oracle Database version 12.2.0.1 or later). Integrated Extract is then configured onthe Downstream database to generate XML files in _AUDIT_VAULT format.
Prerequisite
Execute the steps in Create User and Grant Relevant Privileges and Configure OracleGoldenGate Parameters for Oracle Database on both the source database and theDownstream Mining database.
Configuring the Password File
1. Execute the follow command on the source database to see database compatibility:
show parameter compatible;
2. If the version of the source database is 12.1.0.2.0, then execute below command:
alter system set compatible = '12.1.0.2.0' scope=spfile;
shutdown immediate
startup
3. Execute the following command and check if the compatibility has changed to 12.1.0.2.0:
show parameter compatible;
Appendix DConfigure GoldenGate Downstream Mining
D-15
4. Execute the following query to find the global_name on both the source databaseand the Downstream Mining database:
select * from global_name;
5. Ensure the source database and the Downstream Mining database do not havethe same global_name.
6. If a source database has a remote login password file, copy it to the appropriatedirectory of the mining database system. The password file must be the same asthe source database and the mining database. If the source database and theDownstream Mining database do not have the same password file, then executethe following commands in the source database and then copy over the sourcepassword file to the Downstream Mining database:
alter system set remote_login_passwordfile = 'shared' scope = spfile;
shutdown immediate
startup
7. In the source database, the password file is $ORACLE_HOME/dbs/orapw<$ORACLE_SID>.
The example source password file is /foo/bar/orapwsource.
8. Execute the following command on the Downstream Mining database to find thedownstream password file:
select file_name from v$passwordfile_info;
The example downstream password file is /foo/bar/orapwdownstream.
9. Execute the following command to take backup of the existing downstreampassword file:
cp /foo/bar/orapwdownstream /foo/bar/orapwdownstream_orig
10. Execute the following command to copy the source password file to downstreampassword file location:
cp /foo/bar/orapwsource /foo/bar/orapwdownstream
Configuring the Source Database
In this example, the database unique name for source database issource_db_unique_name and for the Downstream Mining database isdownstream_db_unique_name.
Execute the following command to find the database unique name:
select db_unique_name from v$database;
Appendix DConfigure GoldenGate Downstream Mining
D-16
Execute the following commands on the source database, to configure the source databaseto transmit redo data to the Downstream Mining database. While setting theLOG_ARCHIVE_DEST_2 parameter, the connection details of the Downstream Mining databaseneeds to be provided.
ALTER SYSTEM SET LOG_ARCHIVE_CONFIG='DG_CONFIG=(source_db_unique_name,downstream_db_unique_name)';
ALTER SYSTEM SET LOG_ARCHIVE_DEST_2='SERVICE="(DESCRIPTION=(ADDRESS=(PROTOCOL=tcp)(HOST=foo.bar.com)(PORT=1234))(CONNECT_DATA=(SERVICE_NAME=foo.bar.com)))" ASYNC OPTIONAL NOREGISTER VALID_FOR=(ONLINE_LOGFILE,PRIMARY_ROLE) DB_UNIQUE_NAME=downstream_db_unique_name';
ALTER SYSTEM SET LOG_ARCHIVE_DEST_STATE_2=ENABLE;
Configuring the Downstream Mining Database
1. Archiving must be enabled in the Downstream Mining database to run Integrated Extractin real time integrated capture mode. Execute the following commands on theDownstream Mining database to archive local redo log files:
ALTER SYSTEM SET LOG_ARCHIVE_DEST_1='LOCATION=/foo/bar/arc_dest/local valid_for=(ONLINE_LOGFILE,PRIMARY_ROLE)';
ALTER SYSTEM SET LOG_ARCHIVE_DEST_STATE_1=ENABLE;
2. Downstream Mining database must be configured to archive the standby redo logs thatreceive redo data from the online redo logs of the source database. The foreign archivedlogs should not be archived in the recovery area of the Downstream Mining database.Execute the following commands on the Downstream Mining database to archive standbyredo logs locally:
ALTER SYSTEM SET LOG_ARCHIVE_CONFIG='DG_CONFIG=(source_db_unique_name,downstream_db_unique_name)';
ALTER SYSTEM SET LOG_ARCHIVE_DEST_2='LOCATION=/foo/bar/arc_dest/standbyredo VALID_FOR=(STANDBY_LOGFILE,PRIMARY_ROLE)';
ALTER SYSTEM SET LOG_ARCHIVE_DEST_STATE_2=ENABLE ;
3. Execute the following command on the source database and make a note of the results:
select group#, thread#, bytes from v$log;
4. Add the standby log file groups to the mining database. The standby log file size must beat least the size of the source log file. The number of standby log file groups must be at
Appendix DConfigure GoldenGate Downstream Mining
D-17

least one more than the number of source online log file groups. This applies toeach instance (thread) in case of Oracle RAC installation. If you have n threads inthe source database, each having m redo log groups, then you should configuren*(m+1) redo log groups in the Downstream Mining database.
For example, let us assume the following is the result of the query select group#,thread#, bytes from v$log;:
GROUP# THREAD# BYTES
1 1 26214400
2 1 26214400
Number of threads ( n ) is 1.
Number of groups per thread ( m ) is 2.
Hence n*(m+1) = 3 redo logs groups are required in the Downstream Miningdatabase, where the size of each log group should be at least 26214400 bytes.
5. For this example, execute the following query on the Downstream Miningdatabase:
ALTER DATABASE ADD STANDBY LOGFILE GROUP 3('/foo/bar/arc_dest/standbyloggroups/slog3a.rdo', '/foo/bar/arc_dest/standbyloggroups/slog3b.rdo') SIZE 500M; ALTER DATABASE ADD STANDBY LOGFILE GROUP 4('/foo/bar/arc_dest/standbyloggroups/slog4a.rdo', '/foo/bar/arc_dest/standbyloggroups/slog4b.rdo') SIZE 500M; ALTER DATABASE ADD STANDBY LOGFILE GROUP 5('/foo/bar/arc_dest/standbyloggroups/slog5a.rdo', '/foo/bar/arc_dest/standbyloggroups/slog5b.rdo') SIZE 500M; SELECT * FROM V$STANDBY_LOG;
Registering Integrated Extract
1. Create credentials for both the source database and the Downstream Miningdatabase on Oracle GoldenGate administration server by following the steps in Create New Credential in GoldenGate Administration Server.
2. Launch the adminclient command line interface:
$GG_HOME/bin/adminclient
3. Execute the command to connect to the GoldenGate Service Manager. If SSL isconfigured, then execute the command:
connect https://<hostname>:<port> as <username> password <password> !
Appendix DConfigure GoldenGate Downstream Mining
D-18
If SSL is not configured, then execute the command:
connect http://<hostname>:<port> as <username> password <password> !
Example command if SSL is configured:
connect https://localhost:1234 as ggadminuser password ggadminpassword !
Example command if SSL is not configured:
connect https://localhost:1234 as ggadminuser password ggadminpassword !
4. Execute the following command to log in to the source database in adminclient:
dblogin useridalias <source db user id> domain <source db domain>
For example:
dblogin useridalias avggadmin_remotesourceinst1 domain remotesourceinst1
5. Execute the following command to log in to the Downstream Mining database inadminclient:
miningdblogin useridalias <downstream db user id> domain <downstream db domain>
For example:
miningdblogin useridalias avggadmin_remotedowninst1 domain remotedowninst1
6. Execute the following commands to add and register the Integratd Extract. Beforeexecuting these steps, manually create the subdirectory, where the Integrated ExtractXML files need to be stored.
ADD EXTRACT <extract name> INTEGRATED TRANLOG BEGIN NOW
REGISTER EXTRACT <extract name> DATABASE
ADD EXTTRAIL <subdirectory>/<trail name>, EXTRACT <extract name>
After executing this command, you may see the message OGG-12029 The file withname '<extract name>.prm' does not exist. Ignore this message.
For example:
ADD EXTRACT ext1 INTEGRATED TRANLOG BEGIN NOWREGISTER EXTRACT ext1 DATABASEADD EXTTRAIL e1/e1, EXTRACT ext1
Appendix DConfigure GoldenGate Downstream Mining
D-19

7. Log in to the Oracle GoldenGate administration server.
8. In the Extracts panel, the newly created Integrated Extract is displayed. To updatethe parameter file of the Integrated Extract follow these steps:
a. Click Actions drop down next to the Integrated Extract icon.
b. Select Details.
c. In the Parameters tab, enter the below parameters:
extract <extract name>useridalias <source db user id> domain <source db domain>TRANLOGOPTIONS MININGUSERALIAS <downstream db user id> domain <downstream db domain>TRANLOGOPTIONS INTEGRATEDPARAMS (downstream_real_time_mine Y)OUTPUTFORMAT XML _AUDIT_VAULTexttrail <subdirectory>/<trail name>DDL INCLUDE ALLTABLE <schema>.<table>;
For example:
extract ext1useridalias avggadmin_remotesourceinst1 domain remotesourceinst1TRANLOGOPTIONS MININGUSERALIAS avggadmin_remotedowninst1 domain remotedowninst1TRANLOGOPTIONS INTEGRATEDPARAMS (downstream_real_time_mine Y)OUTPUTFORMAT XML _AUDIT_VAULTexttrail e1/e1DDL INCLUDE ALLTABLE scott.*;
9. After updating the parameters, click the Apply button.
10. Click Actions drop down next to the Integrated Extract icon.
11. Click Start button to start the Integrated Extract. Wait for 5 minutes for theIntegrated Extract to start successfully and create the background log miningprocess. Log Mining process runs in the background and is not visible to the user.
12. Execute the following commands on the source database to switch the log files onthe source database:
select * from v$log;
alter system switch logfile;
select * from v$log;
13. Wait for 5 minutes after performing the log switch. The Integrated Extract needsfew minutes to start creating the XML files.
Appendix DConfigure GoldenGate Downstream Mining
D-20
Checking the status of Downstream Mining
Execute the following commands on both the source database and the Downstream Miningdatabase:
select * from V$archive_dest_status;
select * from V$archive_dest;
In the row having dest_name column with values LOG_ARCHIVE_DEST_1 andLOG_ARCHIVE_DEST_2, ensure the status column has a value VALID and the gap_statuscolumn has a value NO GAP or null.
If the status column has a value ERROR, then the error column shows the relevant errormessage.
Checking the status of Integrated Extract
1. Log in to the Oracle GoldenGate administration server.
2. View the Extracts panel. The Integrated Extract is displayed.
3. Check the status of the Integrated Extract. Click Actions drop down next to theIntegrated Extract icon.
4. Select Details.
5. Click Report tab to view the diagnostic messages. In case the extract process fails, thenthe relevant errors are displayed in the report.
See Also:
Understand the downstream mining process available in Configuring a DownstreamMining Database and Example Downstream Mining Configuration.
Appendix DConfigure GoldenGate Downstream Mining
D-21
EPostgreSQL Audit Data Collection Reference
Learn how to collect audit data from PostgreSQL.
E.1 Introduction to PostgreSQL Audit Data CollectionLearn how to collect audit data from PostgreSQL.
PostgreSQL is a open source object relational database system that uses and extends theSQL language combined with many features. It safely stores and scales the mostcomplicated data workload. The origin of PostgreSQL dates back to 1986 as part of thePOSTGRES project at the University of California in Berkeley, and has more than 30 years ofactive development on the core platform.
PostgreSQL must be configured to generate audit data in CSV format. The PostgreSQL auditextension (or pgaudit) provides detailed session and object audit logging through thestandard logging facility provided by PostgreSQL.
Installing pgaudit extension on the PostgreSQL database is a must for audit collection. AuditVault Agent supports collection of PostgreSQL audit events only if the pgaudit extension isinstalled and PostgreSQL is configured to generate audit data in CSV format.
E.2 Installing PostgreSQLLearn how to install PostgreSQL.
Refer to the following link to install relevant PostgreSQL version:
https://www.postgresql.org/download/linux/redhat/
1. Log in as user root and run the commands in this procedure.
2. Run the following command to install the repository RPM:
yum install <URL to download the RPM>
Example command to install Postgres 11 on Oracle 6 with x86_64 architecture:
yum install https://download.postgresql.org/pub/repos/yum/reporpms/EL-6-x86_64/pgdg-redhat-repo-latest.noarch.rpm
3. Run the following example command to install PostgreSQL 11 server:
yum install postgresql11-server
E-1

4. Run the following example commands to optionally initialize the PostgreSQL 11database and enable automatic start:
/sbin/service postgresql-11 initdb
/sbin/chkconfig postgresql-11 on
/sbin/service postgresql-11 start
E.3 Steps After Installing PostgreSQLRun post PostgreSQL installation steps.
Update PostgreSQL Super User Password
A default super user postgres is created during PostgreSQL installation. Run thefollowing command to change the password for postgres user:
sudo passwd postgres
Create PostgreSQL Non Super User
Create a new user with necessary permission to create databases, and set thepassword. Run the following command to create the new user:
sudo -u postgres createuser <new user name> -d -P
Create root Permission on PostgreSQL Database
The role root is required for installing pgaudit extension on PostgreSQL database.Perform these steps:
1. Run the following command to log in as user postgres:
sudo -u postgres psql
2. Run the following commands in the postgres command prompt:
create role root superuser;
alter user root with password <new password>;
alter role root with login;
Appendix ESteps After Installing PostgreSQL
E-2

3. Find the PostgreSQL configuration file location by running the following commands, andthen exit the postgres command prompt. Make a note of the configuration file details, asit is updated in the later part of this topic.
show config_file;
exit;
Create a Sample Database
1. Log in using the newly created PostgreSQL non super user.
2. Create a sample database by running the following commands:
createdb <new database name>
3. Log in to the newly created database with the newly created PostgreSQL non super userby running the following command:
psql <new database name>
4. Exit the database prompt by running exit or \q command.
Install the pgaudit Extension on PostgreSQL Database
Refer to the below link for detailed steps to install pgaudit extension:
https://github.com/pgaudit/pgaudit
1. Log in as root user and run the below commands to install PostgreSQL developerlibraries. The commands used in this section are for installing PostgreSQL 11 developerlibraries as example only.
yum install postgresql11-devel
2. Log in as root user. In the PostgreSQL configuration file, update theshared_preload_libraries parameter to include pgaudit, and save the file.
shared_preload_libraries = 'pgaudit'
3. Log in as root user. Restart the PostgreSQL service by running these commands:
/sbin/service postgresql-11 stop
/sbin/service postgresql-11 start
4. Log in as root user and modify the path variable as follows:
export PATH="$PATH:/usr/pgsql-11/bin"
Appendix ESteps After Installing PostgreSQL
E-3

5. Log in as root user and run the following commands to install pgaudit:
git clone https://github.com/pgaudit/pgaudit.git
cd pgaudit
git checkout REL_11_STABLE
make install USE_PGXS=1
make installcheck USE_PGXS=1
Note:
In case the installcheck command throws error 1 of 1 tests failed,then ignore the error message.
Enable pgaudit Audit Logging in PostgreSQL Database
Note:
For complete information on all the PGAUDIT settings, refer to the respectivedocumentation.
1. Log in as postgres user:
sudo -u postgres psql
Appendix ESteps After Installing PostgreSQL
E-4

2. Run the following commands in postgres command prompt, for enabling auditing for thenewly created database:
CREATE EXTENSION pgaudit;
alter database <database name> set pgaudit.log = 'all';
SET pgaudit.log = 'ALL';
SET pgaudit.log_level = 'notice';
SET pgaudit.log_client = ON;
SET pgaudit.log_relation = ON;
SET pgaudit.log_parameter = ON;
SET pgaudit.log_catalog = ON;
alter system set log_connections=on;
alter system set log_disconnections=on;
alter system set log_statement='all';
alter system set pgaudit.log_parameter TO 'on';
SELECT pg_reload_conf();
Update Audit Logging Parameters in PostgreSQL Configuration File
Note:
For complete information on all the PostgresSQL logging related parameters, referto the respective documentation.
Log in as root user. Edit the PostgreSQL configuration file and update below parameters asfollows:
log_destination = 'csvlog'
Appendix ESteps After Installing PostgreSQL
E-5

log_filename = 'postgresql-%Y-%m-%d_%H%M%S.log'log_min_messages = infolog_checkpoints = onlog_connections = onlog_disconnections = onlog_duration = onlog_error_verbosity = verboselog_hostname = onlog_statement = 'all'log_directory = '<full path of directory where log files need to be stored>'log_file_mode = 0640
Log in as root user and restart the PostgreSQL service. The following examplecommands are for PosgreSQL 11:
/sbin/service postgresql-11 stop
/sbin/service postgresql-11 start
Generate Audit Log
1. Log in as the newly created PostgreSQL non super user. Now, log in to the newlycreated database using below command:
psql <database name>
2. Run commands to create tables, insert data into the tables, and query the datafrom the tables.
3. The logs are present in the following location for PostgreSQL 11 (example)installation on Oracle Linux 6.
/var/lib/pgsql/11/data/log/
Appendix ESteps After Installing PostgreSQL
E-6

FPorts Used by Oracle Audit Vault andDatabase Firewall
Oracle Audit Vault and Database Firewall uses specific TCP and UDP ports.
F.1 Ports for Deploying Database Firewall for TargetsYou must configure two classes of ports when deploying Database Firewall for targets.
These following two classes of ports must be open in external network firewalls for thefollowing types of Database Firewall deployments:
• When you configure Database Firewall to protect a target database, traffic directed to thatdatabase must be able to pass through external network firewalls to Database Firewall.The ports required are configured in the target's page in Audit Vault Server.
• You can configure Database Firewall to accept proxy connections which are passed on tothe database. The ports required for proxy connections are configured in the NetworkConfiguration page on Database Firewall.
Note:
It is recommend that you do not change these ports.
See Also:
• Registering or Removing Targets in Audit Vault Server
• Configuring Database Firewall As A Traffic Proxy
F.2 Ports for Services Provided by Audit Vault ServerLearn about the ports for services that are provided by Audit Vault Server.
Table F-1 lists the ports for services that are provided by Audit Vault Server. These servicesare used by external users of the system. Access to most of these ports can be controlledwithin Oracle AVDF. If you use external network firewalls, then these ports must be open toenable connections from the users, or clients, of these services to Audit Vault Server.
F-1
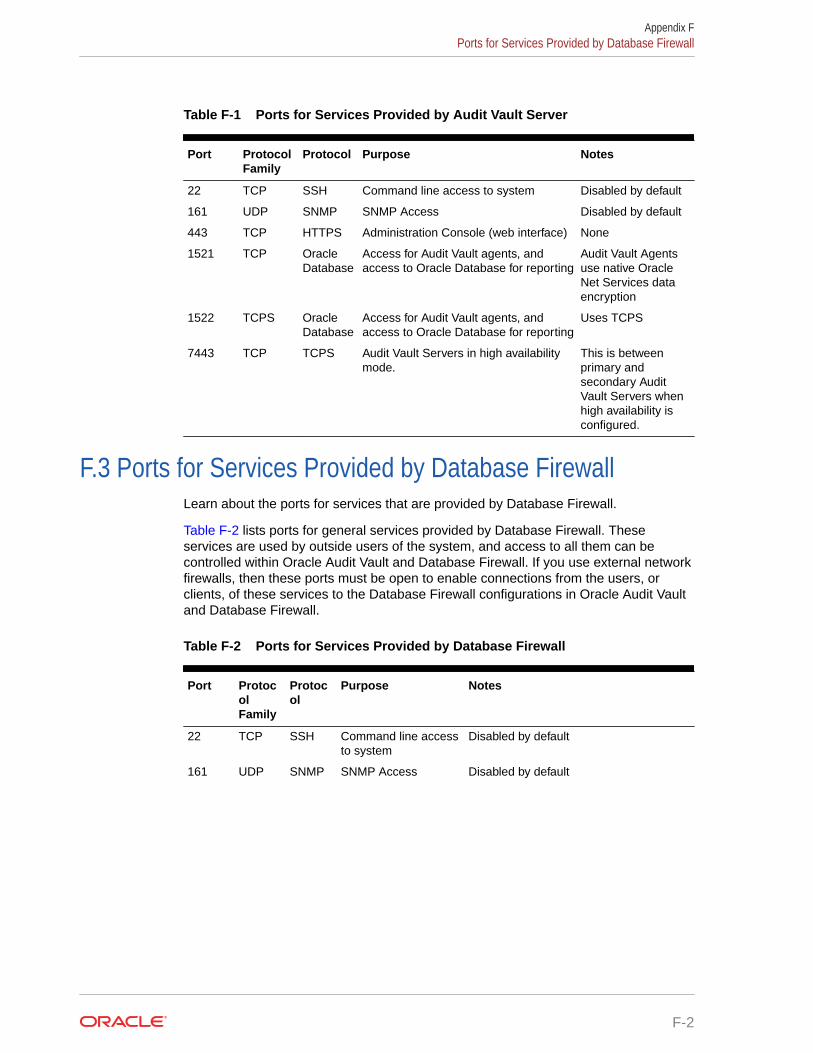
Table F-1 Ports for Services Provided by Audit Vault Server
Port ProtocolFamily
Protocol Purpose Notes
22 TCP SSH Command line access to system Disabled by default
161 UDP SNMP SNMP Access Disabled by default
443 TCP HTTPS Administration Console (web interface) None
1521 TCP OracleDatabase
Access for Audit Vault agents, andaccess to Oracle Database for reporting
Audit Vault Agentsuse native OracleNet Services dataencryption
1522 TCPS OracleDatabase
Access for Audit Vault agents, andaccess to Oracle Database for reporting
Uses TCPS
7443 TCP TCPS Audit Vault Servers in high availabilitymode.
This is betweenprimary andsecondary AuditVault Servers whenhigh availability isconfigured.
F.3 Ports for Services Provided by Database FirewallLearn about the ports for services that are provided by Database Firewall.
Table F-2 lists ports for general services provided by Database Firewall. Theseservices are used by outside users of the system, and access to all them can becontrolled within Oracle Audit Vault and Database Firewall. If you use external networkfirewalls, then these ports must be open to enable connections from the users, orclients, of these services to the Database Firewall configurations in Oracle Audit Vaultand Database Firewall.
Table F-2 Ports for Services Provided by Database Firewall
Port ProtocolFamily
Protocol
Purpose Notes
22 TCP SSH Command line accessto system
Disabled by default
161 UDP SNMP SNMP Access Disabled by default
Appendix FPorts for Services Provided by Database Firewall
F-2

Table F-2 (Cont.) Ports for Services Provided by Database Firewall
Port ProtocolFamily
Protocol
Purpose Notes
2050 -5100
TCP AuditVaultandDatabaseFirewallInternalProtocol
Incoming trafficcaptured from HostMonitor. The HostMonitor forwards thedata securely toDatabase Firewall.
This applies when deployed in HostMonitor mode and ports need not beopen during out-of-band or proxy mode.
For each monitoring point, a unique portis created in the given range. The exactport for each monitoring point can befound at /usr/local/dbfw/va/XX/etc/appliance.conf where XXrepresents the monitoring points createdand have the value of 1, 2, 3…..N.
REMOTE_AGENT_LISTEN_PORT is the keyin appliance.conf file thatrepresents the port Database Firewall islistening for data from Host Monitor.
2050 -5100
TCP Syslog Incoming WAF (F5)violation alerts
The exact port number used by amonitoring point can be found in theAdvanced settings.
See Also:Finding the Port Number Used by aDatabase Firewall Monitoring Point
F.4 Ports for External Network Access by Audit Vault ServerYou must configure the correct external network firewall ports to enable Audit Vault Server toaccess them as a client.
Table F-3 lists ports for external services that Audit Vault Server can use. If you use externalnetwork firewalls, then the correct ports must be open so that Audit Vault Server can usethese services as a client.
Table F-3 Ports for External Network Access by the Audit Vault Server
Port ProtocolFamily
Protocol Purpose Notes
25 TCP SMTP Email delivery None
53 UDP DNS Domain nameservice
None
123 UDP and TCP NTP TimeSynchronization
None
Appendix FPorts for External Network Access by Audit Vault Server
F-3

Table F-3 (Cont.) Ports for External Network Access by the Audit Vault Server
Port ProtocolFamily
Protocol Purpose Notes
514 UDP, orconfigured asTCP
Syslog Syslog alerts For TCP-transport connections tosyslog server(s) the port must beconfigured in the Audit Vault Serverconsole.
See Also:Configuring Audit Vault Server SyslogDestinations
3260 TCP SoftwareiSCSI
SAN servercommunication
This port can be configured on AuditVault Server console when registering aSAN server.
See Also:Registering a SAN Server
Target listenerport.
It is the sameas the portprovided intargetlocation.
OracleDatabase
TCP or TCPS UserEntitlementReporting
StoredProcedureAuditing
Audit PolicyRetrieval
The direct connection between AuditVault Server and the target.
The connection details is provided withthe target location used.
See Also:
About Plug-ins for a complete list of supported target types.
F.5 Ports for External Network Access by Database FirewallLearn about the ports that you must configure for access by Database Firewall.
Table F-4 lists ports for external services that Database Firewall can use. If you useexternal network firewall, then the relevant ports must be open so that DatabaseFirewall can use these services as a client.
Table F-4 Ports for External Network Access by Database Firewall
Port ProtocolFamily
Protocol Purpose Notes
53 UDP DNS Domain nameservice
None
123 UDP andTCP
NTP TimeSynchronization
None
Appendix FPorts for External Network Access by Database Firewall
F-4

Table F-4 (Cont.) Ports for External Network Access by Database Firewall
Port ProtocolFamily
Protocol Purpose Notes
514 UDP, orconfiguredas TCP
Syslog Syslog alerts For TCP-transport connections tosyslog server(s) the port must beconfigured in the Audit VaultServer console.
514 TCP WAF (F5) alerts WAF (F5) alerts The port can be changed fromthe Audit Vault Server console.
See Also:
Configuring Audit Vault Server Syslog Destinations
F.6 Ports for Internal TCP CommunicationLearn about ports for internal TCP communication between Database Firewall and AuditVault Server.
Table F-5 lists ports for services that are used between Database Firewall and Audit VaultServer. If you configure an external network firewall between these systems, then you mustopen the relevant ports.
Table F-5 Ports for Internal TCP Communication
Port ProtocolFamily
Protocol Direction Notes
7443 TCP HTTPS • Database Firewallaccepts connectionsfrom Audit Vault Server
• Database Firewallaccepts connectionsfrom Audit Vault Serverin high availability.
It is the default port for interappliance communication. It appliesto both the Audit Vault Server andthe Database Firewall. It alsohandles traffic log transfer from theDatabase Firewall.
1514 TCP SSL Audit Vault Server acceptsconnections from DatabaseFirewall
Event reporting and monitoring
Appendix FPorts for Internal TCP Communication
F-5
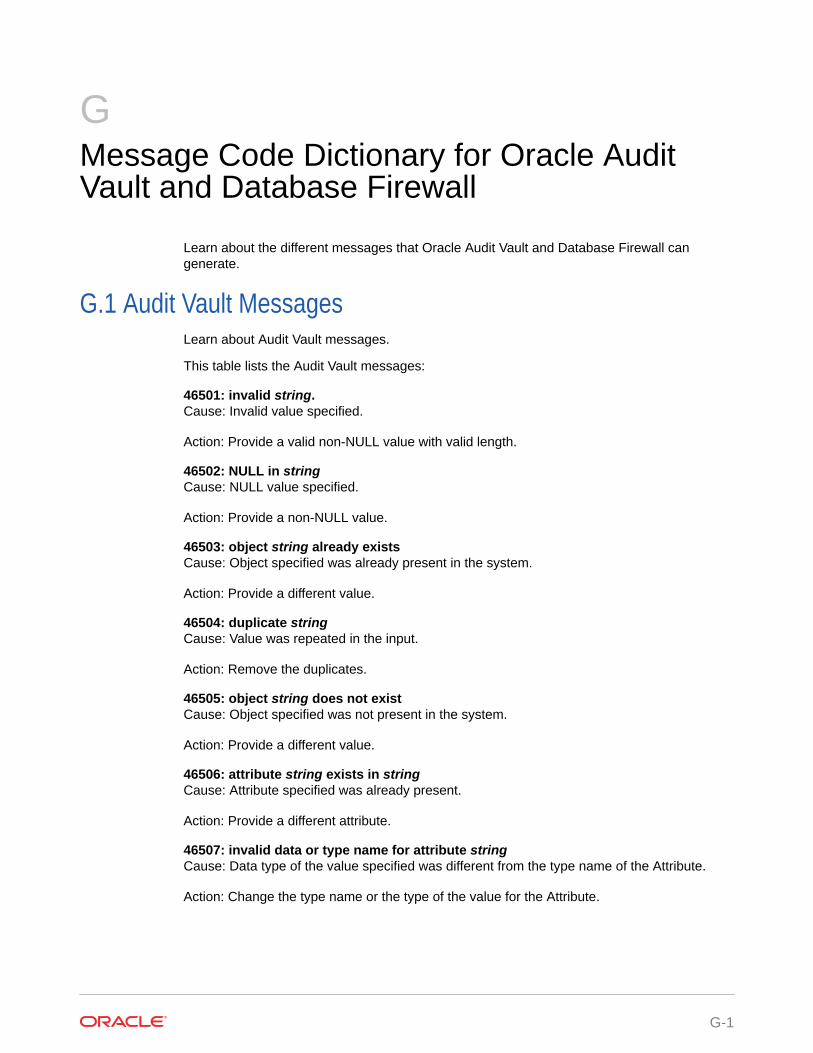
GMessage Code Dictionary for Oracle AuditVault and Database Firewall
Learn about the different messages that Oracle Audit Vault and Database Firewall cangenerate.
G.1 Audit Vault MessagesLearn about Audit Vault messages.
This table lists the Audit Vault messages:
46501: invalid string.Cause: Invalid value specified.
Action: Provide a valid non-NULL value with valid length.
46502: NULL in stringCause: NULL value specified.
Action: Provide a non-NULL value.
46503: object string already existsCause: Object specified was already present in the system.
Action: Provide a different value.
46504: duplicate stringCause: Value was repeated in the input.
Action: Remove the duplicates.
46505: object string does not existCause: Object specified was not present in the system.
Action: Provide a different value.
46506: attribute string exists in stringCause: Attribute specified was already present.
Action: Provide a different attribute.
46507: invalid data or type name for attribute stringCause: Data type of the value specified was different from the type name of the Attribute.
Action: Change the type name or the type of the value for the Attribute.
G-1

46508: too many attributes of type string specifiedCause: Specified number of attributes of this type exceeded the maximum numbersupported.
Action: Specify fewer number of attributes of this type.
46509: offset "string" is incorrectly formattedCause: The specified offset value is not in the format +/-hh:mm
Action: Specify the offset in the correct format +/-hh:mm
46510: specified audit trail can be collected by more than one plugin. pleaseresolve the conflict by explicitly specifying a plugin using the USING PLUGINclauseCause: Multiple plugins are registered that can collect from this audit trail.
Action: Explicitly specify the plugin ID by using the USING PLUGIN clause.
46511: missing plugin for trail at agent on host "string"Cause: Agent at the specified host does not have the plugin to handle the trail.
Action: Deploy the plugin on the server that can handle this trail and deploy the agentwith this plugin on the host.
46512: no agent running on host "string"Cause: Agent at the specified host does not seem to be running.
Action: Start the agent using agentctl start command and re-try the operation.
46513: insufficient privilegesCause: User performed an operation for which they did not have sufficient privileges.
Action: Check privileges for user and re-try the operation.
46514: invalid syntax "string". Run HELP string for help.Cause: User entered an invalid command.
Action: Check syntax and re-try the command with the correct syntax.
46515: invalid host attribute "string". Run HELP string for help.Cause: User attempted to alter an invalid attribute for HOST.
Action: Check syntax and re-try the command with the correct syntax.
46516: audit data is being actively collected from the specified trail "string".cannot drop trail.Cause: User attempted to drop a trail which is currently active.
Action: Stop the trail using STOP COLLECTION command and re-try.
46517: Cannot drop trail of type "string" at "string" for target "string"; audit traildoes not exist.Cause: User attempted to drop a trail which does not exist.
Action: One cannot drop audit trail which does not exist.
Appendix GAudit Vault Messages
G-2
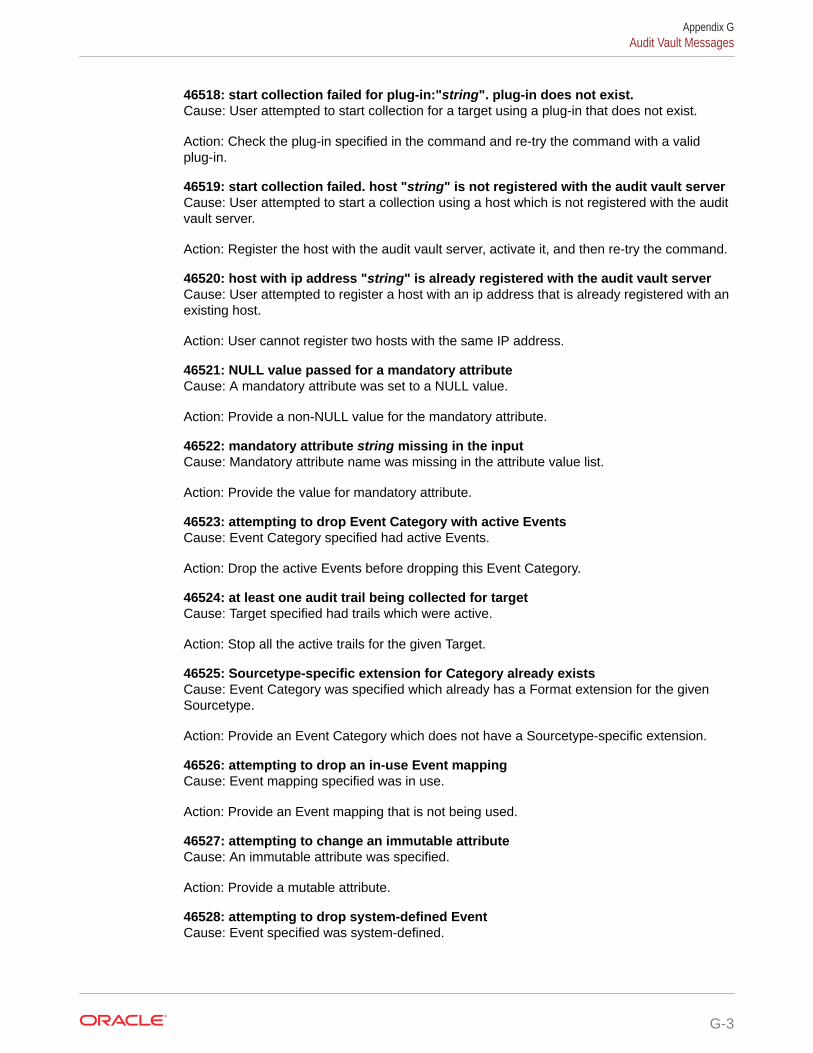
46518: start collection failed for plug-in:"string". plug-in does not exist.Cause: User attempted to start collection for a target using a plug-in that does not exist.
Action: Check the plug-in specified in the command and re-try the command with a validplug-in.
46519: start collection failed. host "string" is not registered with the audit vault serverCause: User attempted to start a collection using a host which is not registered with the auditvault server.
Action: Register the host with the audit vault server, activate it, and then re-try the command.
46520: host with ip address "string" is already registered with the audit vault serverCause: User attempted to register a host with an ip address that is already registered with anexisting host.
Action: User cannot register two hosts with the same IP address.
46521: NULL value passed for a mandatory attributeCause: A mandatory attribute was set to a NULL value.
Action: Provide a non-NULL value for the mandatory attribute.
46522: mandatory attribute string missing in the inputCause: Mandatory attribute name was missing in the attribute value list.
Action: Provide the value for mandatory attribute.
46523: attempting to drop Event Category with active EventsCause: Event Category specified had active Events.
Action: Drop the active Events before dropping this Event Category.
46524: at least one audit trail being collected for targetCause: Target specified had trails which were active.
Action: Stop all the active trails for the given Target.
46525: Sourcetype-specific extension for Category already existsCause: Event Category was specified which already has a Format extension for the givenSourcetype.
Action: Provide an Event Category which does not have a Sourcetype-specific extension.
46526: attempting to drop an in-use Event mappingCause: Event mapping specified was in use.
Action: Provide an Event mapping that is not being used.
46527: attempting to change an immutable attributeCause: An immutable attribute was specified.
Action: Provide a mutable attribute.
46528: attempting to drop system-defined EventCause: Event specified was system-defined.
Appendix GAudit Vault Messages
G-3
Action: Provide a user-defined Event.
46529: attempting to drop Event with active mappingsCause: Event specified had active Event mappings.
Action: Drop the active mappings before dropping this Event.
46530: attempting to drop Sourcetype with active SourcesCause: Sourcetype specified had active Sources.
Action: Drop the active Sources before dropping this Sourcetype.
46531: unsupported Source versionCause: Version specified for the Source was not supported.
Action: Provide a Source version which is equal to or greater than the minimumsupported version for the corresponding Sourcetype.
46532: Attribute 'string' is not set for target 'string'.Cause: The specified attribute was not set for the target.
Action: Set the specified attribute for the target.
46533: Invalid lock type 'string' specified.Cause: An invalid plugin lock type was specified.
Action: Valid plugin lock types are 'DEPLOY' and 'UNDEPLOY'.
46534: Plug-in deployment/undeployment operation already in progress.Cause: A plug-in deployment/undeployment operation is already in progress and acorresponding lock already exists.
Action: Wait for the current operation to end before attempting another plug-indeployment/undeployment operation.
46535: failed to add target address: address 'string' is used by Target 'string'.Cause: The user tried to add a duplicate address for a target.
Action: Check existing address for the target.
46536: firewall cannot be paired with itselfCause: User tries to pair a firewall with itself.
Action: Choose a different firewall and try again.
46537: firewall string is not registered with the Audit Vault ServerCause: User tries to create a resilient pair using a non-existent firewall.
Action: Register the firewall first and then try again.
46538: invalid enforcement point attribute "string". Run HELP string for help.Cause: User attempted to alter an invalid attribute for the enforcement point.
Action: Check syntax and re-try the command with the correct syntax.
46539: Target Name is too long.Cause: Target Name failed length validation checks.
Appendix GAudit Vault Messages
G-4
Action: Provide valid Target Name.
46540: Target Description is too long.Cause: Target Description failed length validation checks.
Action: Provide valid Target Description.
46541: attempting to drop Collector Type with active CollectorsCause: One or more Collectors for this Collector Type were active.
Action: Drop all active Collectors for this Collector Type.
46542: attempting to drop an Agent with active CollectorsCause: One or more Collectors for this Agent were active.
Action: Drop all active Collectors for this Agent.
46543: attempting to drop a Collector before disabling the collectionCause: The collection for the Collector specified was not disabled.
Action: Disable the collection before dropping the Collector.
46544: attempting to drop an Agent before disabling itCause: The Agent specified was not disabled.
Action: Disable the Agent before dropping it.
46545: failed to start collection; trail is already being collected. Audit Trail willcontinue to auto-start.Cause: The user tried to start a trail which had already been started.
Action: Check the status of the trail before starting it.
46546: Failed to drop host; one or more audit trails associated with the host are beingcollected.Cause: User tried to drop a host which has active trails associated with it.
Action: Stop the active trails associated with this host and then try again.
46547: Enabling Target Location requires setting User Name and Password; pleasespecify User Name and Password along with the Target Location.Cause: The user tried to set target location without setting user name and password.
Action: Set user name and password along with the target location.
46548: Failed to generate target location string.Cause: User did not specify the correct components of target location string.
Action: Specify the correct components of target location string and then try again.
46549: No NTP servers are specified.Cause: The user chose to enable NTP synchronization, but did not specify any NTP server.
Action: Specify NTP server and then try again.
Appendix GAudit Vault Messages
G-5

46550: Target Location is required for registering this target.Cause: User tried to register a target without providing target location, which isrequired to connect to the target.
Action: Provide target location and try again.
46551: attempting to change the type of an attribute currently in useCause: Attribute specified was in use.
Action: Provide an attribute that is not being used.
46552: attempting to drop an attribute currently in useCause: Attribute specified was in use.
Action: Provide an attribute that is not being used.
46553: attempting to change the type of an attribute without providing a newdefault valueCause: Current type of the default value did not match with the new type specified.
Action: Provide a new default value for the attribute.
46554: Target Location is too long.Cause: Target Location failed length validation checks.
Action: Provide valid Target Location.
46555: User Name is too long.Cause: User Name failed length validation checks.
Action: Provide valid User Name.
46556: Single and double quotes are not allowed in the User Name.Cause: Illegal characters were supplied in the User Name.
Action: Remove single and double quotes from User Name.
46557: Password must contain at least 8 characters and at most 30 bytes.Cause: Password failed length validation checks.
Action: Provide valid Password.
46558: Target Attribute Name is too long.Cause: Target Attribute Name failed length validation checks.
Action: Provide valid Target Attribute Name.
46559: Target Attribute Value is too long.Cause: Target Attribute Value failed length validation checks.
Action: Provide valid Target Attribute Value.
46560: Setting User Name and Password requires enabling Target Location;please specify Target Location along with User Name and Password.Cause: The user tried to set user name and password without enabling targetlocation.
Appendix GAudit Vault Messages
G-6

Action: Set target location along with user name and password.
46561: no Format defined for the Source Type and CategoryCause: Format for the specified Source Type and Catetory pair was not present in thesystem.
Action: Provide Source Type and Category pair which already has a Format defined.
46562: error in Alert conditionCause: Invalid Alert condition was specified.
Action: Correct the Alert condition.
46563: Attempt to delete alert 'string' failed.Cause: User is trying to drop an alert he does not own.
Action: Ask the owner of the alert to drop it.
46564: Setting alert threshold value to string failed.Cause: An invalid value was specified for the alert threshold.
Action: Provide an alert threshold value in the valid range ( > 1).
46565: Failed to update alert 'string' due to insufficient privileges.Cause: User is trying to update an alert he does not own.
Action: Ask the owner of the alert to update it.
46566: no changes specifiedCause: The user attempted to alter an alert, but no changes were specified.
Action: No action is required.
46567: Cannot modify, or delete built-in alertCause: The user attempted to alter, or delete a built-in alert.
Action: No action is required.
46568: Setting alert duration value to string failed.Cause: An invalid value was specified for the alert duration.
Action: Provide an alert duration value in the valid range ( >= 0).
46569: no agent running on host "string". Audit trail no longer eligible for auto-start.Cause: Agent at the specified host does not seem to be running.
Action: Start the agent using agentctl start command and re-try the operation.
46570: no agent running on host "string". Audit trail is now eligible for auto start andwill auto-start when the agent is started.Cause: Agent at the specified host does not seem to be running.
Action: Start the agent using agentctl start command and re-try the operation.
46571: Agent is running on host "string". Host name or host IP can not be changed.Cause: Agent at the specified host is running.
Appendix GAudit Vault Messages
G-7

Action: Stop the agent and then change host name and IP.
46572: Agent is UNREACHABLE on host "string". Please try after some time.Audit trail no longer eligible for auto-start.Cause: Agent at the specified host is in UNREACHABLE state.
Action: Please check the agent log files for details.
46573: Agent is UNREACHABLE on host "string". Please try after some time.Audit trail is now eligible for auto start.Cause: Agent at the specified host is in UNREACHABLE state.
Action: Please check the agent log files for details.
46581: notification profile "string" already existsCause: Notification Profile already exists.
Action: Please try creating the Notification Profile with another name.
46582: cannot delete notification profile "string" as it is being used in alertdefinitionsCause: Notification Profile is being used in Alert Definitions.
Action: Please try changing the Alert Definition to use a different Notification Profilename before deleting this one.
46583: notification profile "string" does not existCause: Notification Profile does not exist.
Action: Please try specifying a valid Notification Profile name.
46584: "string" is not a well-formed e-mail address listCause: The specified e-mail address list was not well formed.
Action: Please try specifying a well-formed e-mail address list.
46585: notification template "string" already existsCause: Notification Template already exists.
Action: Please try creating the Notification Template with another name.
46586: "string" is not a well-formed e-mail addressCause: The specified e-mail address was not well formed.
Action: Please try specifying a well-formed e-mail address.
46587: remedy string trouble ticket template "string" already existsCause: Trouble Ticket Template already exists.
Action: Please try creating the Template with another name.
46588: string is not one of string valuesCause: The specified value is not in the list of values expected for this entity.
Action: Please try choosing from the list of values.
Appendix GAudit Vault Messages
G-8

46589: Warning level Alert and Critical level Alert cannot be mapped to the sameRemedy Urgency levelCause: Warning Alert and Critical Alert is mapped to the same Remedy Urgency level.
Action: Please try mapping them to different Remedy Urgency levels.
46591: No Enforcement Point configured for the Target.Cause: User tried to start a collection of type network for a target which has no enforcementpoint configured.
Action: Configure an enforcement point for the target and then try again.
46592: firewall with name string and/or IP address string already exists.Cause: User tries to register a firewall which already exists.
Action: Check the name and/or IP of the firewall then try again.
46593: target address does not exist. cannot drop target address.Cause: User tries to drop a target address which does not exist.
Action: Check the target address and then try again.
46594: unable to resolve host stringCause: The user did not provide an IP address when registering a host and the host name isnot resolvable.
Action: Provide a valid IP address or a resolvable host name.
46595: failed to drop host string. agent process may be running and needs to bestopped first before dropping. if you already stopped the agent, please wait for theagent to be fully stopped.Cause: User tries to drop a host on which an agent process is running or the agent has notbeen fully stopped.
Action: Stop the agent process first and then try again.
46596: host string has already been activated.Cause: User tries to activate a host which has already been activated.
Action: Check the current status of the host.
46597: no pending activation request for host string.Cause: Activation request for agent on host was not found.
Action: Request activation for the agent.
46598: stop collection failed for plug-in:"string". plug-in does not exist.Cause: User attempted to stop collection for a target using a plug-in that does not exist.
Action: Check the plug-in specified in the command and re-try the command with a validplug-in.
46599: internal error string string string string stringCause: Internal error occurred in Audit Vault.
Action: Contact Oracle Support Services.
Appendix GAudit Vault Messages
G-9

46601: The authenticated user is not authorized with audit sourceCause: User is not authorized to send audit data on behalf of this audit source.
Action: Connect as the user who is associated with the source. Or grant this userappropriate authorization by changing the source's properties.
46602: Error on audit record insert as RADS partition fullCause: RADS partition table is full.
Action: Purge the RADS partition table through archive.
46603: Error on audit record insert as RADS_INVALID table fullCause: RADS_INVALID table is full.
Action: Need to purge RADS_INVALID table or make its size larger.
46604: Error on insert as Error table fullCause: Error table is full.
Action: Need to purge the error table.
46605: There are more recovery entries than the maximum member can bereturnedCause: There are more recovery entries for this collector.
Action: Need to purge the old entries from the recovery table.
46606: There is no recovery entry for the given nameCause: There was no recovery context matching to the given name.
Action: Need to check if the name was correct or if the recovery context was saved forthis name.
46607: There are more configuration entries than the maximum member can bereturnedCause: There were more configuration entries for this collector.
Action: Need to reduce the configuration entries for this collector.
46608: Failed to drop Target; Stored Procedure Auditing collection is inprogress.Cause: User tried to drop target while SPA job is running.
Action: Wait for SPA job to complete and then try again.
46620: invalid interval string for data warehouse duration; must be positiveCause: Invalid interval was specified for data warehouse duration.
Action: Specify valid interval, the interval should be positive.
46621: invalid start date string for data warehouse operation; must be less thanstringCause: Invalid start date was specified for data warehouse load/purge operation.
Action: Specify valid start date, the start date must be less than current date -warehouse duration.
Appendix GAudit Vault Messages
G-10

46622: invalid number of days string for data warehouse operation; must be greaterthan 0Cause: Invalid number of days was specified for data warehouse load/purge operation.
Action: Specify valid number of days, the number of days must be positive.
46623: cannot execute warehouse operation; another operation is currently runningCause: A warehouse operation was executed while another operation is currently running.
Action: Wait for the operation to complete before reissuing the command.
46624: invalid schedule string for data warehouse refresh scheduleCause: Invalid schedule was specified for data warehouse refresh.
Action: Specify valid non-null schedule.
46625: invalid repeat interval string for data warehouse refresh scheduleCause: Invalid schedule was specified for data warehouse refresh.
Action: Specify valid non-null repeat interval.
46626: invalid number of years string for audit data retention; must be positiveCause: Invalid number of years was specified for audit data retention.
Action: Specify valid number, the number should be positive.
46627: error in aquiring the global lock for target stringCause: Internal error occurred while acquiring the global lock.
Action: Contact Oracle Support Services.
46640: specified source name string was not foundCause: Invalid source name was specified.
Action: Specify a valid source name.
46641: archive does not existCause: Invalid archive id was specified.
Action: Specify valid archive ID.
46642: database audit type invalidCause: Invalid database audit type specified.
Action: Database audit type must be S for standard or F for FGA.
46643: audit frequency invalidCause: Invalid audit frequency specified.
Action: Audit frequency must be A for "by access" or S for "by session".
46644: return type invalidCause: Return type was invalid.
Action: Return type must be S for "success", F for "failure", or B for "both".
Appendix GAudit Vault Messages
G-11

46645: privilege flag invalidCause: Privilege flag is invalid.
Action: The privilege flag must be Y or N.
46646: specified Agent name string was not foundCause: Invalid Agent name was specified.
Action: Specify a valid Agent name.
46647: enforcement point does not existCause: User tried to start/stop/remove an enforcement point which does not exist.
Action: Check if the enforcement point has actually been created and then try again.
46648: Enforcement point is already suspendedCause: User tried to stop an enforcement point which has already been stopped.
Action: User cannot stop an enforcement point which has already been stopped.
46649: Enforcement point is in resume stateCause: User tried to start an enforcement point which has already been started.
Action: User cannot start an enforcement point which has already been started.
46650: At least one Enforcement Point is monitoring the Target string.Cause: User tried to drop a target which an enforcement point is monitoring.
Action: Stop the enforcement point and try again.
46651: Retention Policy string is in use.Cause: Operation failed because Retention Policy is in use.
Action: Delete the assignment of this Retention Policy to Target(s) and try again.
46652: Cannot delete built-in Retention Policies.Cause: Cannot delete built-in Retention Policies.
Action: n/a
46653: Retention Policy Name is too long.Cause: Retention Policy Name failed length validation checks.
Action: Provide valid Retention Policy Name.
46654: Invalid Retention Policy Name.Cause: Retention Policy Name contains illegal characters.
Action: Provide a valid Retention Policy Name.
46655: Invalid Retention Policy Month specified. Online Month must be between0 and 9996. Offline Month must be between 1 and 9996.Cause: Retention Policy Month is invalid.
Action: Provide a valid Retention Policy Month.
Appendix GAudit Vault Messages
G-12
46656: Unable to release tablespace used by audit trails.Cause: There is one or more audit trails writing data into the selected tablespace.
Action: n/a
46657: Datafile associated with tablespace string is inaccessible at this archivelocation string.Cause: The datafile for the tablespace needed by a trail is not accessible.
Action: n/a
46658: Unable to stage datafile string for archiving.Cause: Insufficient space on /var/lib/oracle.
Action: Add space and try again.
46661: Service Name is too long.Cause: Service Name failed length validation checks.
Action: Provide valid Service Name.
46662: Service Name/SID is not supported for Target of type "string".Cause: User entered service name as part of target address for a target which does notsupport service name.
Action: Do not provide service name when providing target address.
46663: Target Address is not supported for Target of type "string".Cause: User tried to add a target address for a target which cannot be monitored by thefirewall.
Action: Users are not allowed to add target address for a target which cannot be monitoredby the firewall.
46671: High Availability is not configured.Cause: Cannot perform operation as system is not configured for HA.
Action: Please configure HA and try again.
46672: unable to stage diagnostic file "string" for downloadCause: File copy operation failed while staging diagnostics file for download.
Action: Check for available disk space on /tmp and see if the diagnostics file exists in /usr/local/dbfw/tmp folder.
46673: IP address 'string' is already in use on the network.Cause: IP address is already in use on the network.
Action: Please specify a different IP address and try again.
46674: Illegal characters were supplied in password. Password must not containcontrol characters, delete character, non-spacebar a space, or double-quote (")characterCause: Illegal characters were supplied in password.
Action: Specify valid characters and try again.
Appendix GAudit Vault Messages
G-13

46675: Current password is incorrect.Cause: The current password supplied for authentication is incorrect.
Action: The user must supply the correct password associated with the account.
46676: User 'string' already exists in the system.Cause: User by that name already exists in the system.
Action: Please specify a different user name and try again.
46677: User name string is invalid. User name cannot be null, or start withreserved user name. Only alphanumeric, underscore (_), dollar sign ($), andpound sign (#) are allowed for user name.Cause: Illegal user name is provided.
Action: Please specify a different user name and try again.
46678: User account string is locked or has expired. Please contact youradministrator.Cause: User account with specified name is locked or has expired.
Action: Contact your administrator.
46679: Password cannot have leading, or trailing space. ASCII only passwordmust have at least one uppercase letter, one lowercase letter, one digit(0-9), andone special character(.,+:_!). Password must be at least 8 characters and atmost 30 bytes in length.Cause: Password does not satisfy the password rule.
Action: Specify valid characters and try again.
46680: User account string is locked. Please contact your administrator.Cause: User account with specified name is locked.
Action: Contact your administrator.
46681: Failed to remove AVS log files. [string]Cause: Files does not exist, or no privilege to access the files.
Action: Make sure directory /var/lib/oracle/dbfw/av/log and log files existand OS user oracle has privilege to access and remove those files.
46682: Failed to set trace level for AVS event 46600Cause: Null value is passed for trace level.
Action: Contact Oracle Support Services.
46683: Old and new passwords should not be the same.Cause: Old and new password are the same.
Action: Specify different passwords and try again.
46684: The password cannot be reused.Cause: Old password is reused.
Action: Specify different new password and try again. User can reuse the passwordafter 365 days if the password has already been changed 1 time.
Appendix GAudit Vault Messages
G-14
46685: Failed to generate diagnostic file for downloadCause: Operation failed while generating diagnostics file for download.
Action: Check information in /var/log/messages and /var/log/debug.
46686: Empty diagnostics file name.Cause: Operation failed while generating diagnostics file without a file name.
Action: Check information in /var/log/messages and /var/log/debug.
46687: Invalid diagnostics file name format: "string" for generation.Cause: Operation failed while generating diagnostics file with invalid file name format.
Action: Check information in /var/log/messages, /var/log/debug, and trace file for "AdminAPI::Diagnostics".
46688: Diagnostics file is missing after generation opertion.Cause: Operation failed while generating diagnostics file for download.
Action: Check information in /var/log/messages and /var/log/debug, and trace file for "AdminAPI::Diagnostics".
46689: Invalid diagnostics file name format: "string" for download.Cause: Operation failed while downloading diagnostics file with invalid file name format.
Action: Check information in /var/log/messages and /var/log/debug, and trace file for "AdminAPI::Diagnostics".
46690: Diagnostics file "string" is missing for downloading.Cause: Operation failed while downloading diagnostics file.
Action: Check information in /var/log/messages, /var/log/debug, and trace file for "AdminAPI::Diagnostics".
46800: normal, successful completionCause: Normal exit.
Action: None
46801: out of memoryCause: The process ran out of memory.
Action: Increase the amount of memory on the system.
46821: generic CSDK error (line number)Cause: There was a generic error in CSDK.
Action: Contact Oracle Support Services.
46822: no collector details for collector stringCause: Collector is not properly set up in AV tables.
Action: Configure collector.
46823: attribute string is not valid for categoryCause: Collector attempted to set invalid attribute.
Appendix GAudit Vault Messages
G-15
Action: Contact collector owner.
46824: type is not valid for attribute stringCause: Collector attempted to set value of wrong type to attribute.
Action: Contact collector owner.
46825: invalid recordCause: Collector attempted to pass invalid record.
Action: Contact collector owner.
46826: invalid parameter string (line number)Cause: Collector attempted to pass invalid parameter.
Action: Contact collector owner.
46827: invalid contextCause: Collector attempted to pass invalid context.
Action: Contact collector owner.
46828: OCI layer error numberCause: OCI layer returned error.
Action: Contact collector owner.
46829: category string unknownCause: Collector attempted to pass category not configured in AV.
Action: Contact collector owner.
46830: null pointer (line number)Cause: Collector attempted to pass null pointer.
Action: Contact collector owner.
46831: invalid source event id (string)Cause: Collector passed source event id not suitable for category.
Action: Contact collector owner.
46832: internal error (line number), additional information numberCause: Internal error occurred in CSDK.
Action: Contact Oracle Support Services.
46833: invalid error recordCause: Collector attempted to pass invalid error record.
Action: Contact collector owner.
46834: missing attribute in error recordCause: One or more attributes of error record is missing.
Action: Contact collector owner.
Appendix GAudit Vault Messages
G-16

46835: duplicate error attributeCause: Collector attempted to set already set attribute.
Action: Contact collector owner.
46836: error record in useCause: Attempt to create a new error record before sending or dropping the previous one.
Action: Contact collector owner.
46837: missing eventid attribute in audit recordCause: Eventid attributes of audit record is missing.
Action: Contact collector owner.
46838: Internal Error: Failed to insert string into string hash tableCause: Core hash table insertion function failed.
Action: Contact collector owner.
46840: no smtp server registeredCause: SMTP server is not registered.
Action: Please register SMTP server using avca register_smtp first.
46841: smtp server already registeredCause: SMTP server is already registered.
Action: Please unregister SMTP server using avca register_smtp -remove first or use avcaalter_smtp to update SMTP parameters.
46842: string command requires the string parameterCause: A required parameter is missing
Action: Please provide all the required parameters for the command.
46843: invalid value "string" specified for parameter stringCause: A parameter was specified an invalid or incorrect value.
Action: Please provide correct values for the indicated parameter.
46844: no value specified for "string" in parameter stringCause: No value was specified for a sub-parameter in a main parameter.
Action: Please provide correct values for the indicated parameter.
46845: input value "string" exceeds maximum allowed length of stringCause: Input value exceeds the maximum allowed length.
Action: Please input a value within the allowed length limits.
46846: input value "string" in parameter string is not a numberCause: Input value for port number must be a numeric value.
Action: Please input a numeric value for the port number.
Appendix GAudit Vault Messages
G-17

46847: input value "string" for parameter string is not a valid email addressCause: Input value does not seem to be a valid email address.
Action: Please input a valid email address of the form user@domain.
46848: smtp server is already in secure mode using protocol "string"Cause: The specified SMTP server configuration is already secure using the protocolspecified.
Action: Please use avca alter_smtp to change the protocol settings.
46849: smtp server is not configured to use a secure protocolCause: The specified SMTP server is not configured to use a secure protocol.
Action: Please use avca secure_smtp to specify a secure SMTP protocol first.
46850: file "string" does not existCause: The specified file does not exist.
Action: Please specify a valid file.
46851: smtp integration is already enabledCause: The SMTP configuration registered with Audit Vault is already in enabledstate.
Action: None
46852: smtp integration is already disabledCause: The SMTP configuration registered with Audit Vault is already in disabledstate.
Action: None
46853: parameters "string" and "string" cannot be specified togetherCause: The user specified two mutually exclusive parameters.
Action: Please provide one of the two parameters.
46854: unsupported remedy version: "string"Cause: The user specified an unsupported Remedy version.
Action: Please specify 6 or 7 for remedy.version.
46855: remedy server already registeredCause: Remedy server is already registered.
Action: Please unregister Remedy server using avca register_remedy -remove first oruse avca alter_remedy to update Remedy parameters.
46856: no remedy server registeredCause: Remedy server is not registered.
Action: Please register Remedy server using avca register_remedy first.
46857: remedy integration is already enabledCause: The Remedy configuration registered with Audit Vault is already in enabledstate.
Appendix GAudit Vault Messages
G-18
Action: None
46858: remedy integration is already disabledCause: The Remedy configuration registered with Audit Vault is already in disabled state.
Action: None
46859: remedy server is already in secure mode using protocol "string"Cause: The specified Remedy server configuration is already secure using the protocolspecified.
Action: None
46860: remedy server is not configured to use a secure protocolCause: The specified Remedy server is not configured to use a secure protocol.
Action: Please use avca secure_remedy to specify a secure Remedy protocol first.
46861: specified ticket id "string" does not exist in the remedy server databaseCause: Specified ticket does not exist in the Remedy Server.
Action: Please provide a ticket ID which exists in the Remedy Server.
46862: Email Template Name is too long.Cause: Email Template Name failed length validation checks.
Action: Provide a valid Email Template Name.
46863: Email Template Description is too long.Cause: Email Template Description failed length validation checks.
Action: Provide a valid Email Template Description.
46864: Email Template Subject is too long.Cause: Email Template Subject failed length validation checks.
Action: Provide a valid Email Template Subject.
46865: Firewall string is offline.Cause: User tried to create an enforcement point using a firewall which is offline.
Action: Bring the firewall online and try again.
46866: An Enforcement Point with the same configuration already exists.Cause: User tried to create two EPs with the same target and firewall.
Action: Two EPs with the same firewall and target are not allowed.
46867: string is not a valid global name.Cause: Global name contains invalid character [()@=].
Action: Correct Audit Vault Server global name.
46868: Alert syslog template name is too long.Cause: Alert syslog template name failed length validation check (255B is the limit).
Action: Provide a valid alert syslog template name.
Appendix GAudit Vault Messages
G-19

46869: Alert syslog template description is too long.Cause: Alert syslog template description failed length validation check (4000B is thelimit).
Action: Provide a valid alert syslog template description.
46870: Alert syslog template "string" already existsCause: Alert syslog template already exists.
Action: Please try creating the alert syslog template with another name.
46871: Dropping the default alert syslog template is not allowed.Cause: User attempts to drop the default alert syslog template.
Action: Users are not supposed to drop the default alert syslog template.
46901: internal error, stringCause: There was a generic internal exception for OS Audit Collector.
Action: Contact Oracle Support Services.
46902: process could not be started, incorrect argumentsCause: Wrong number of arguments or invalid syntax used.
Action: Please verify that all the required arguments are provided. The requiredarguments are Host name, Source name, Collector name and the Command.
46903: process could not be started, operating system errorCause: The process could not be spawned because of an operating system error.
Action: Please consult the log file for detailed operating system error.
46904: collector string already running for source stringCause: Collector specified was already running.
Action: Provide a different collector or source name.
46905: collector string for source string does not existCause: Collector specified was not running.
Action: Provide a different collector or source name.
46906: could not start collector string for source string, reached maximum limitCause: No more collectors could be started for the given source.
Action: None
46907: could not start collector string for source string, configuration errorCause: Some collector parameters were not configured correctly.
Action: Check the configuration parameters added during ADD_COLLECTOR.
46908: could not start collector string for source string, directory access errorfor stringCause: Access to specified directory was denied.
Appendix GAudit Vault Messages
G-20

Action: Verify the path is correct and the collector has read permissions on the specifieddirectory.
46909: could not start collector string for source string, internal error: [string], Errorcode[number]Cause: An internal error occurred while starting the collector.
Action: Contact Oracle Support Services.
46910: error processing collector string for source string, directory access error forstringCause: Access to specified directory was denied.
Action: Verify the path is correct and the collector has read permissions on the specifieddirectory.
46911: error processing collector string for source string, internal error: [string],[number]Cause: An internal error occurred while processing the collector.
Action: Contact Oracle Support Services.
46912: could not stop collector string for source stringCause: An error occurred while closing the collector.
Action: None
46913: error in recovery of collector string for source string: stringCause: An error occurred while accessing the file.
Action: Verify the path is correct and the collector has read permissions on the specifieddirectory.
46914: error in recovery of collector string for source string, internal error: [string],[number]Cause: An internal error occurred while getting recovery information for collector.
Action: Contact Oracle Support Services.
46915: error in parsing of collector string for source string: stringCause: An error occurred while accessing the file.
Action: Verify the path is correct and the collector has read permissions on the specifieddirectory.
46916: error in parsing of collector string for source string, internal error [string],[number]Cause: An internal error occurred while parsing data for collector.
Action: Contact Oracle Support Services.
46917: error processing request, collector not runningCause: OS Audit Collector was not running and a command was issued.
Action: Start the collector using command START.
Appendix GAudit Vault Messages
G-21
46918: could not process the command; invalid commandCause: An invalid value was passed to the command argument.
Action: Please verify that a valid value is passed to command argument. The validvalues are START, STOP and METRIC.
46919: error processing METRIC command; command is not in the requiredformatCause: METRIC command was not in the required METRIC:XYZ format.
Action: Please verify that metric passed is in METRIC:XYZ format where XYZ is thetype of metric (Example:- METRIC:ISALIVE).
46920: could not start collector string for source string, directory or file namestring is too longCause: The name of directory or file was too long.
Action: Verify the length of the path is less than the system-allowed limit.
46921: error processing collector string for source string, directory or file namestring is too longCause: The name of directory or file was too long.
Action: Verify the length of the path is less than the system-allowed limit.
46922: collector string for source string is not able to collect from event log,cannot open or process Windows event log :[string] Error code [number]Cause: Windows event log could not be opened or processed.
Action: Verify event log exists.
46923: OCI error encountered for source database string access, audit trailcleanup support disabled.Cause: An error was encountered while attempting to connect to or execute SQLstatements on the source database.
Action: Verify source database and listener are up and connect information is correct.
46924: Corrupted recovery information detected for collector string for sourcestringCause: Corrupted recovery information detected.
Action: Contact Oracle Support Services.
46925: error in parsing XML file string for collector string and source databasestring : error code numberCause: An internal error occurred while parsing data for collector.
Action: Verify that collector has read permissions on the file and the file is in properXML format. Contact Oracle Support Services for patch set.
46926: error in recovery of XML file string for collector string and sourcedatabase string : error code numberCause: An internal error occurred while parsing data for collector.
Action: Verify that collector has read permissions on the file and the file is in properXML format. Contact Oracle Support Services for patch set.
Appendix GAudit Vault Messages
G-22
46927: Syslog is not configured or error in getting audit files path for syslog forcollector string and source database string.Cause: One of the following occurred. - facility.priority was not valid. - There was nocorresponding path for facility.priority setting. - Source database was only returning facilityand there was no corresponding path for facility.* setting.
Action: Configure syslog auditing to valid facility.priority setting and corresponding valid path.If source database only returning facility then contact Oracle Support Services for patch set.
46928: Collector string for source database string cannot read complete file stringCause: File size is more than 2GB.
Action: File size should be less than 2GB. Please use log rotation to limit the file size to lessthan 2GB.
46941: internal error, on line number in file ZAAC.C, additional information numberCause: There was a generic internal exception for AUD$ Audit Collector.
Action: Contact Oracle Support Services.
46942: invalid AUD Collector contextCause: The AUD Collector context passed to collector was invalid.
Action: Make sure that context passed is the context returned by ZAAC_START.
46943: NULL AUD Collector contextCause: The pointer to AUD Collector context passed to collector was NULL.
Action: Make sure that context passed is the context returned by ZAAC_START.
46944: conversion error in column string for <string>Cause: The VARCHAR retrieved from AUD$ or FGA_LOG$ table could not be converted toub4.
Action: Correct value in source database.
46945: bad recovery recordCause: The recovery record retrieved from Audit Vault was damaged.
Action: None. The record will be corrected automatically.
46946: too many active sessionsCause: The number of active sessions exceeded the specified number in theGV$PARAMETER table.
Action: Contact Oracle Support Services.
46947: CSDK layer errorCause: CSDK layer returned error indication.
Action: Action should be specified in CSDK error report.
46948: already stoppedCause: AUD collector already stopped because of previous fatal error.
Action: Restart collector.
Appendix GAudit Vault Messages
G-23
46949: log levelCause: Specified log level was invalid.
Action: Use legal log level (1,2,3).
46950: log fileCause: An error occurred during the opening of the log file.
Action: Make sure that the log directory exists, and that the directory and log file arewritable.
46951: bad value for AUD collector attributeCause: Specified collector attribute was invalid.
Action: Correct attribute value in Audit Vault table AV$ATTRVALUE.
46952: bad name for AUD collector metricCause: The specified metric name was undefined.
Action: Use a correct metric name.
46953: unsupported versionCause: The specified version of the source database is not supported.
Action: Update to supported version.
46954: recovery context of 10.xCause: Source database (9.x) was incompatible with 10.x recovery context.
Action: Clean up AUD$ and FGA_LOG$ tables and recovery context.
46955: recovery context of 9.xCause: Source database (10.x) was incompatible with 9.x recovery context.
Action: Clean up AUD$ and FGA_LOG$ tables and recovery context.
46956: FGA_LOG$ table of 9.xCause: Source database (10.x) was incompatible with 9.x rows of FGA_LOG$.
Action: Clean up FGA_LOG$ table.
46957: RAC recovery contextCause: Non-RAC source database was incompatible with RAC recovery context.
Action: Clean up AUD$ and FGA_LOG$ tables and recovery context.
46958: Non-RAC recovery contextCause: RAC source database was incompatible with non-RAC recovery context.
Action: Clean up AUD$ and FGA_LOG$ tables and recovery context.
46959: bad authentication informationCause: Incorrect format of authentication information in the columnCOMMENT$TEXT.
Action: Contact Oracle Support Services.
Appendix GAudit Vault Messages
G-24
46960: bad metric requestCause: Unknown metric name (%s) was provided in metric request.
Action: Contact Oracle Support Services.
46961: internal error on line number in file ZAAC.C; additional info |string|Cause: There was a generic internal exception for AUD$ Audit Collector.
Action: Contact Oracle Support Services.
46962: Database Vault audit table is not accessibleCause: Database Vault was not set up properly or the proper role was not granted to userbeing used by the collector.
Action: Set up Database Vault and make sure that DVSYS.AUDIT_TRAIL$ is accessible tothe user being used by the collector.
46963: Some rows may have been missed by Audit Vault or may be duplicatedCause: Collector encountered rows in the SYS.AUD$ or FGA_LOG$ tables with SESSIONID<= 0.
Action: Contact Oracle Support Services.
46964: Connector was not able to reconnect to Source DatabaseCause: Maximum number of attempts to reconnect was exceeded.
Action: Verify connectivity and that that the database is started.
46965: Attribute string is longer than 4000 bytes and was clippedCause: When attribute was converted to UTF8 encoding, it became longer than 4000 bytes.
Action: None. It was clipped automatically after conversion.
46966: Function AV_TRUNCATE_CLOB does not exist in source databaseCause: Latest version of script ZARSSPRIV.SQL was not run.
Action: None. Function created automatically.
46967: Audit Trail Cleanup package is not proper. Audit Trail Cleanup cannot beperformed for source database.Cause: Audit Trail Cleanup package was not proper.
Action: Contact Oracle Support Services.
46979: Firewall string (with IP address string) has the same IP address as the AuditVault ServerCause: User tried to register a firewall which has the same IP address as Audit Vault Server.
Action: Check the name and/or IP of the firewall then try again.
46980: Firewall string part of a resilient pairCause: Operation not permitted when firewall is part of a resilient pair.
Action: Break the resilience and try the operation again.
Appendix GAudit Vault Messages
G-25

46981: Unable to connect to Database Firewall with IP string.Cause: Database Firewall is shutdown or unreachable, Audit Vault Server certificate isinvalid or not yet valid because the date on the Database Firewall is out of sync withthe Audit Vault Server certificate.
Action: Restart the Database Firewall, Copy the correct certificate and ensure that thedate on Database Firewall is in sync with the Audit Vault Server and try again.
46982: Network configuration of the secondary Firewall does not match that ofthe primary Firewall.Cause: You may be trying to perform an operation like adding a resilient pair. Suchoperations require the network configuration on the firewalls to be identical.
Action: Ensure that the network configuration is identical on the firewalls and tryagain.
46983: Bridged interface string is not enabled on Firewall string.Cause: When the mode is in monitoring and blocking mode, bridged interfaces mustbe enabled.
Action: Enable the bridged interface on the Firewall and retry operation.
46984: Firewalls not in the same resilient pair.Cause: Only a resilient pair can be swapped. You cannot swap Firewalls from differentresilient pairs.
Action: Ensure that the Firewalls are part of the same resilient pair and retryoperation.
46985: Unable to create resilient pair because Firewall string has EnforcementPoints configured.Cause: The Firewalls being paired for resilience must not have any EnforcementPoints configured.
Action: Please delete all Enforcement Points and try again.
46986: Firewall at IP address string does not have a valid Audit Vault Servercertificate.Cause: Audit Vault Server certificate is not present on the Firewall, or is invalid.
Action: Please supply server certificate on the Firewall UI.
46987: Firewall Name is too long.Cause: Firewall Name failed length validation checks.
Action: Provide a valid Firewall Name.
46988: Invalid IP address 'string'. IP address must be a valid IPv4 address.Cause: IP address does not confirm to IPv4 standard.
Action: Please specify an IPv4 address and try again.
46990: More than one proxy interface specified.Cause: In monitoring and blocking mode, only one proxy interface must be specified.
Action: Specify one proxy most and retry the operation.
Appendix GAudit Vault Messages
G-26

46991: Invalid monitoring only mode for proxy interface.Cause: Use monitoring and blocking mode when proxy interface is specified.
Action: Specify monitoring only mode.
46992: Enforcement Point mode cannot be in monitoring and blocking mode when theFirewall is in a resilient pair configuration.Cause: Monitoring only mode must be set when Firewall is in a resilient configuration.
Action: Specify monitoring only mode.
46993: Full error message reporting can only be enabled if database responsemonitoring is enabled.Cause: Database response monitoring not enabled.
Action: Please enable database response and try again.
46994: Enforcement Point Name is too long.Cause: Enforcement Point Name failed length validation checks.
Action: Provide a valid Enforcement Point Name.
46995: Target Address cannot be deleted.Cause: There must be at least one address defined when there are active EnforcementPoints.
Action: Add a new Target Address and try again.
46996: Invalid IP addresses list. IP addresses list must be a space-separated list ofvalid IPv4 addresses. For example, '10.240.114.168 10.240.114.169'.Cause: Invalid IP address list specified.
Action: The IP addresses must be valid IPv4 addresses and separated by spaces.
46997: Invalid Port 'string'. Port must be a number between 1 and 65535.Cause: Port Number is not between 1 and 65535.
Action: Specify a value between 1 and 65535 and try again.
46998: Invalid WAF session timeout 'string'. WAF session timeout value is specified inminutes, and must be at least 30 and at most 1440.Cause: WAF session timeout must be at least 30 minutes and no more than a day.
Action: Please specify a valid timeout value and try again.
46999: IP address, port number, service name, and credentials must be specified inorder to decrypt with Native Network Encryption Key.Cause: User tried to decrypt with native network encryption key without specifying IPaddress, port number, service name, or credentials.
Action: Specify IP address, port number, service name, or credentials appropriately and thentry again.
47000: Activation approval for agent on host string failed.Cause: Activation request for agent on host was not found.
Action: Request activation for the agent.
Appendix GAudit Vault Messages
G-27

47001: Agent deactivation for host string failed.Cause: Agent Deactivation failed.
Action: Check if agent on the host is activated.
47002: Agent version string is invalid.Cause: Agent version must be in 'YYYY-MM-DD HH24:MI:SS.FF3 TZHTZM' format
Action: Check the agent version.
47003: Agent on host string is incompatible with Audit Vault Server.Cause: Agent version is not supported by the Audit Vault Server.
Action: Upgrade the agent to the latest version.
47004: Host Monitor is not installed on host 'string'.Cause: Host Monitor is not installed for the Host.
Action: Install Host Monitor at the host
47005: Upgrade of Host Monitor on host 'string' failed.Cause: Host Monitor auto upgrade failed for the Host.
Action: Reinstall Host Monitor at the host
47006: Host Monitor on host 'string' is being upgraded.Cause: Host Monitor auto upgrade is running for the Host.
Action: Try later once upgrade finishes.
47007: Host Monitor is being installed on host 'string'.Cause: Host Monitor installation is running for the Host.
Action: Try later once installation finishes.
47008: Host Monitor is being uninstalled on host 'string'.Cause: Host Monitor uninstallation is running for the Host.
Action: Try after Installing Host Monitor once uninstallation finishes.
47009: Host 'string' is not active.Cause: The host is deactivated.
Action: Activate the host and install Host Monitor on the host.
47010: Host Monitor is not supported for host 'string' (string).Cause: Host Monitor is not supported for the platform type
Action: Contact Oracle Support
47011: Host Monitor needs to be upgraded to a newer version for host 'string'.Cause: Host Monitor version is lower than the version available at the server.
Action: Download new Host Monitor zip from Audit Vault Server and update HostMonitor.
Appendix GAudit Vault Messages
G-28

47012: Host Monitor state is unknown for host 'string'.Cause: Host Monitor state is Unkown.
Action: Download new Host Monitor zip from Audit Vault Server and install Host Monitor.
47101: Invalid job name specified. Job name must be at most 18 chars and must be avalid SQL identifier.Cause: Job name validation failed.
Action: Enter a valid job name.
47102: Repository storage is not upgraded to use ASM.Cause: Repository storage is not upgraded to use ASM.
Action: Upgrade repository storage to ASM and try again.
47103: ARCHIVE diskgroup does not exist.Cause: ARCHIVE diskgroup must exist.
Action: Please create ARCHIVE diskgroup and try again.
47104: Invalid transfer type.Cause: Specified transfer type is not supported.
Action: Please specify a transfer type that is supported and try again.
47105: Invalid authentication method.Cause: Specified authentication method is not supported.
Action: Please specify a valid authentication method and try again.
47106: Archive Location Name is too long.Cause: Archive Location Name failed length validation checks.
Action: Provide valid Archive Location Name.
47107: Invalid Archive Location Name.Cause: Archive Location Name contains illegal characters.
Action: Provide a valid Archive Location Name.
47108: Failed to create Archive Location "string". The name is reserved.Cause: Reserved name cannot be used for Archive Location Names.
Action: Use another name for Archive Location Name.
47109: Failed to modify Archive Location "string". Reserved Archive Locations cannot be modified.Cause: A reserved archive location, once added, cannot be modified.
Action: Do not delete or change reserved archive location.
47110: Failed to create Archive Location "string". Another Archive Location with thesame name exists.Cause: An existing Archive Location Name conflicts with a reserved name.
Action: Delete or rename the existing Archive Location Name and retry operation.
Appendix GAudit Vault Messages
G-29
47111: Cannot drop disk from 'ARCHIVE' diskgroup with archived data.Cause: Archived data is present in the diskgroup.
Action: Add another disk to diskgroup or wait untill the archive period expires.
47112: Cannot drop Archive Location. It is being used to store archived data.Cause: Specified Archive Location is being used to store archive data.
Action: Wait untill the archive period expires.
47113: Tablespace is being encrypted. Please try againCause: Specified tablespace has been encrypted already.
Action: Encrypt again with another tablespace name.
47114: Job is currently running. Re submit after the job finishesCause: Retrieve job for encryption has already been running.
Action: Wait and resubmit.
47201: Operation not permitted. User must be an admin.Cause: The user passed in is not an admin.
Action: Specify an admin and retry the operation.
47202: Operation not permitted. User must be an auditor.Cause: The user passed in is not an auditor.
Action: Specify an auditor and retry the operation.
47203: Operation not permitted. User must be a super admin.Cause: The user passed in is not a super admin.
Action: Specify a super admin and retry the operation.
47204: Operation not permitted. User must be a super auditor.Cause: The user passed in is not a super auditor.
Action: Specify a super auditor and retry the operation.
47205: Operation not permitted on this userCause: This is operation not permitted on this user.
Action: n/a
47206: Operation not permitted. User is neither admin nor auditor.Cause: The user passed in is neither admin nor auditor.
Action: Specify an admin or auditor and retry.
47301: SAN Server with the name 'string' already exists.Cause: Storage names are unique across the system.
Action: Specify a different storage name and try again.
47302: SAN Server with the name 'string' does not exist.Cause: A SAN Server with that name already exists in the system.
Appendix GAudit Vault Messages
G-30

Action: Specify a different storage name and try again.
47303: iSCSI Target already in session.Cause: An attempt was made to log into a target that is already in session.
Action: Specify another target or logout from this target and try again.
47304: iSCSI Target not in session.Cause: An attempt was made to logout from a target that is not in session.
Action: Specify another target or login to this target and try again.
47305: No SAN Server found for IP Address=string, Port=string and Method=string.Cause: No matching SAN Servers were found.
Action: Please register this SAN Server or specify different values
47306: Invalid method string for iSCSI target discovery. Must be 'SENDTARGETS' or'iSNS'.Cause: Discovery method must be 'SENDTARGETS' or 'iSNS'
Action: Specify a valid method and try again.
47307: SAN Server with IP Address=string, Port=string and Method = string alreadyexists.Cause: SAN Server with the specified configuration already exits.
Action: Try with different values for IP Address, Port and Method.
47308: Disk string does not exist.Cause: Disk specified is not an existing disk in the system.
Action: Specify an existing disk and try again.
47309: Disk string not is part of the diskgroup string.Cause: Disk specified is not part of an existing diskgroup.
Action: Specify a disk that is a memeber of a diskgroup and try again.
47310: Disk string cannot be removed. Please try after number minutesCause: ASM rebalance operation is in progress.
Action: Please try again.
47311: Invalid diskgroup string specified.Cause: Diskgroup must be one of 'SYSTEMDATA', 'RECOVERY', 'EVENTDATA' or'ARCHIVE'.
Action: Please try again with a valid diskgroup.
47312: Disk string already member of a diskgroup.Cause: Disk already part of diskgroup
Action: Please try again with a different disk.
47314: SAN Server Name is too long.Cause: SAN Server Name failed length validation checks.
Appendix GAudit Vault Messages
G-31

Action: Provide valid SAN Server Name.
47315: Unable to logout from iSCSI target. Disk string in useCause: The disk is being used by a diskgroup.
Action: Drop the disk from the diskgroup and try again.
47316: Illegal characters were supplied in CHAP secret.Cause: Illegal characters were supplied in CHAP secret.
Action: Specify valid characters and try again.
47317: Illegal characters were supplied in CHAP name.Cause: Illegal characters were supplied in CHAP name.
Action: Specify valid characters and try again.
47318: CHAP secret must contain at least 8 characters and at most 30characters.Cause: CHAP secret failed length validation checks.
Action: Provide valid CHAP secret.
47319: CHAP Name is too long.Cause: CHAP Name failed length validation checks.
Action: Provide valid CHAP Name.
47320: iSCSI Name is too long.Cause: iSCSI Name failed length validation checks.
Action: Provide valid iSCSI Name.
47321: Invalid iSCSI Name.Cause: iSCSI Name does not conform to standards.
Action: Provide a valid iSCSI Name.
47322: Invalid SAN Server Name.Cause: SAN Server contains illegal characters.
Action: Provide a valid SAN Server Name.
47323: Invalid Disk Name.Cause: ASM disk name contains illegal characters.
Action: Provide a valid ASM disk name.
47324: Connection to IP Address = string, Port = string timed out.Cause: Network connection to the specified address timed out.
Action: Please check the address and try again.
47325: Connection to IP Address = string, Port = string refused.Cause: Network connection to the specified address was refused by the remoteserver.
Appendix GAudit Vault Messages
G-32

Action: Please check the address and try again.
47326: Login failed. Invalid CHAP name/secret.Cause: Incorrect CHAP credentials specified.
Action: Please specify correct CHAP credentials and try again.
47327: Specified target is not a discovered target.Cause: Target must be first discovered before performing this operation.
Action: Please discover the target and try this operation again.
47328: Cannot drop SAN Server. Active sessions found.Cause: Active sessions for nodes from this SAN server exist.
Action: Please logout of these sessions and try again.
47329: iSCSI subsystem may have been manually configured. Please delete theconfiguration and try again.Cause: iSCSI subsystem is not configured using AVDF UI or AVCLI.
Action: Please delete the configuration and try again.
47330: Cannot drop disk from string diskgroup. This operation requires number MB offree space in the diskgroupCause: Disgkroup rebalance operation will fail.
Action: Add more disks to the diskgroup and try again.
47331: User requested to stop the encryption process.Cause: User requested to stop the encryption process.
Action: Try again.
47332: Encryption process has not started yet. Execute /usr/local/dbfw/bin/avdf_data_encryption.sh as root and try again.Cause: Encryption process not started yet. Execute /usr/local/dbfw/bin/avdf_data_encryption.sh as root
Action: Try again.
47333: All tablespaces are encrypted.Cause: All tablespaces are encrypted.
Action: n/a
47401: The remote filesystem is busy.Cause: There are open file(s) on the filesystem.
Action: Close file(s) and retry operation; or use force option.
47402: Unable to mount export string from host string.Cause: AVS is not given client access or cannot contact server.
Action: Check server export and add AVS system to allowed client list
Appendix GAudit Vault Messages
G-33

47403: The path string is not a relative path.Cause: Remote location destination path must be a relative path
Action: Provide a relative path without the leading / character
47404: The path string is not an absolute path.Cause: Remote location destination path must be a relative path
Action: Provide a relative path without the leading / character
47405: Remote filesystem mount point still exists.Cause: Remote filesystem was not unmounted before delete operation.
Action: Unmount the remote filesystem (with force option if necessary).
47406: Unexpected character(s) in remote destination path.Cause: Remote destination path contains illegal character(s).
Action: Remove characters that are not letters, numbers, space or _ . : , + !
47407: Filesystem name string is not unique.Cause: A duplicate filesytem name is already in use.
Action: Pick a different filesystem name.
47408: Location name string is not unique.Cause: A duplicate location name is already in use.
Action: Pick a different location name.
47409: Absolute path does not exist on remote filesystemCause: The constructed path is missing or outside of the remote filesystem.
Action: Make sure remote location resolves to a valid directory on the remotefilesystem.
47410: User Oracle cannot write to absolute pathCause: The constructed path's permission does not allow oracle write access.
Action: Change the NFS export permission or directory permission to allow oraclewrite access.
47411: Export string does not exist on remote filesystem.Cause: The user attempts to mount a non-existing export on the remote filesystem.
Action: Make sure the export exists on the remote filesystem.
47481: Unable to load the generated certificate request.Cause: Certificate request could not be loaded.
Action: Once again generate certificate request and try.
47482: Certificate requst is not compatible with server.Cause: Certificate siging request and private key mismatch.
Action: Retry with a valid certificate signing request.
Appendix GAudit Vault Messages
G-34

47483: Common Name(string) of the certificate request does not match with the hostname(string).Cause: Common Name of the certificate request has to be the same as the host name.
Action: Generate certificate request once again.
47484: IP address(string) of the certificate request does not match with the host IPaddress(string).Cause: IP address of the certificate request has to be same as the host.
Action: Generate certificate request once again.
47485: Unable to validate string field of the certificate request.Cause: Validation of the Specified field of certificate request failed.
Action: Generate certificate request once again.
47486: Common Name(string) of the certificate does not match with the hostname(string).Cause: Common Name of the certificate has to be the same as the host name.
Action: Modify the host name to match with Common Name of the certificate and retry.
47487: Certificate is not compatible with server.Cause: Certificate and private key mismatch.
Action: Please upload certificate whose certificate signing request file was generated.
47488: Cannot restore the user uploaded certificate for UI.Cause: The user uploaded certificate is not present.
Action: Please upload a new certificate.
47489: User uploaded certificate is already in use for UI.Cause: The user uploaded certificate is already in use for UI.
Action: No action required.
47490: Certificate restore failed: Certificate is no longer valid.Cause: The earlier uploaded certificate is not valid for UI.
Action: Please upload a new certificate.
47491: UI certificate management operation already in progress.Cause: Another AVS UI certificate management operation is already in progress.
Action: Wait for the current operation to end before attempting another managementoperation.
47492: IP address(string) of the certificate does not match with the host IPaddress(string).Cause: IP address of the certificate has to be same as the host.
Action: Modify the host IP address to match with IP address of the certificate and retry.
47493: The certificate has expired.Cause: End date of certificate is more than system time.
Appendix GAudit Vault Messages
G-35

Action: Try uploading another valid certificate.
47494: string is too long. Maximum allowed length is string.Cause: Length validation check failed.
Action: Provide value with valid length.
47495: Invalid certificate. The certificate can't be null and the size of certificateshould be less than 32KBCause: Certificate is more than 32767 bytes.
Action: Please provide a certificate with 1 to 32767 bytes.
47496: string cannot be a multi-byte character string.Cause: Given string is multi-byte character string.
Action: Please use only ASCII characters.
47497: Issuer certificate of Firewall console with common name(string) is notpart of AVS trusted certification authorities.Cause: Issuer certificate of Firewall console certificate is not imported to AVS oraclewallet
Action: Please import the issuer certificate of Firewall console certificate to AVS oraclewallet
47498: Invalid Certificate. Issuer should use SHA-2 algorithm for signing.Cause: Issuer should use a stronger algorithm for signing the CSR
Action: Please upload a certificate where the issuer have signed it using SHA-2algorithm
47501: Traffic proxy 'string' is in use.Cause: Traffic proxy port is in use by another Enforcement Point.
Action: Please specify a different proxy port and try again.
47502: Enforcement Point with the specified name already exists.Cause: Duplicate Enforcement Point name.
Action: Please specify a different name and try again.
47503: Cannot stop trail of type "string" at "string" for target "string"; audit traildoes not exist.Cause: User attempted to stop a trail which does not exist
Action: One cannot stop audit trail which does not exist
47504: Cannot stop trail of type "string" at "string" for target "string"; audit trailis already stopped. Audit trail no longer eligible for auto-start.Cause: User attempted to stop a trail which is already stopped
Action: User cannot stop an audit trail which is already stopped
47505: Trail auto start invocation failed. Invoker unknown.Cause: Unknown invoker
Appendix GAudit Vault Messages
G-36

Action: Provide valid invoker e.g. 'AGENT' or 'DBJOB'.
47506: Error while setting up redo collector during start trail. Additional Info |string|Cause: Internal Error.
Action: Check additional information to solve the problem or Contact Oracle SupportServices.
47551: Invalid user name string. User name should be between 1 and 30 bytes long.Cause: The user name spcified is 0 byte long, or more than 30 bytes.
Action: Provide a simple SQL name as user name between 1 and 30 bytes long.
47553: User name string is already in use. Please provide a different user name.Cause: The user name already exists in the database.
Action: Provide a different simple SQL name as user name.
47571: Invalid host name string. Host name should be between 1 and 255 bytes long.Cause: Host name is more than 255 byte.
Action: Please provide a host name with 1 to 255 bytes.
47572: Invalid host name string. The first and last characters of a host name cannnotbe dots(.).Cause: There is a leading and/or trailing dot in the host name.
Action: Please remove the leading and/or trailing dot.
47573: Invalid host name string. Host name can only contain the characters a-z, A-Zand dot(.).Cause: Invalid characters in host name.
Action: Please provide a host name with characters from a-z, A-Z, 0-9, and dot(.).
47581: Invalid certificate. Certificate should be between 1 and 2048 bytes long.Cause: Certificate is more than 2048 bytes.
Action: Please provide a certificate with 1 to 2048 bytes.
47582: Certificate has invalid format or contains illegal characters.Cause: Certificate has invalid format or contains illegal characters.
Action: Please provide a valid certificate.
47583: Invalid certificate: string.Cause: Certificate could not be verified.
Action: Please provide a valid certificate.
47584: Unable to load certificateCause: Certificate could not be loaded.
Action: Please provide a valid certificate.
47591: Remote system string is not accessible.Cause: Remote system is not accessible.
Appendix GAudit Vault Messages
G-37
Action: Please check the IP address or hostname.
47596: Failed to get the HA status of the remote AVS.Cause: The HA status could not be verified.
Action: Please check the system log files for details.
47597: The primary and the standby system cannot have the same IP address.Cause: The HA peer IP address is the same as the IP address of the current system.
Action: Please check the provided IP address.
47598: The system cannot use its own certificate.Cause: The HA peer certificate is the same as the certificate of the current system.
Action: Please check the provided certificate.
47599: Data Encryption status is not compatible between primary andsecondary.Cause: When configuration HA, the encryption status must be the same.
Action: Please enable encryption and try again.
47621: The interval in UE retrieval has invalid value.Cause: The interval value for retrieval of UE is invalid.
Action: Please input a valid interval value and submit again.
47622: The first run time in UE retrieval should not be in the past.Cause: The start time for retrieval of UE is in the past.
Action: Please input a future start time and submit again.
47651: The interval in Audit Setting retrieval has invalid value.Cause: The interval value for retrieval of audit setting is invalid.
Action: Please input a valid interval value and submit again.
47652: The first run time in Audit Setting retrieval should not be in the past.Cause: The start time for retrieval of audit setting is in the past.
Action: Please input a future start time and submit again.
47671: The interval in SPA has invalid value.Cause: The interval value for SPA is invalid.
Action: Please input a valid interval value and submit again.
47672: The first run time in SPA should not be in the past.Cause: The start time for SPA is in the past.
Action: Please input a future start time and submit again.
47681: Oracle Database In-Memory is already enabled on the Audit Vault Server.Cause: User is trying to enable Oracle Database In-Memory on an Audit Vault Serverwhere Oracle Database In-Memory is already enabled.
Appendix GAudit Vault Messages
G-38
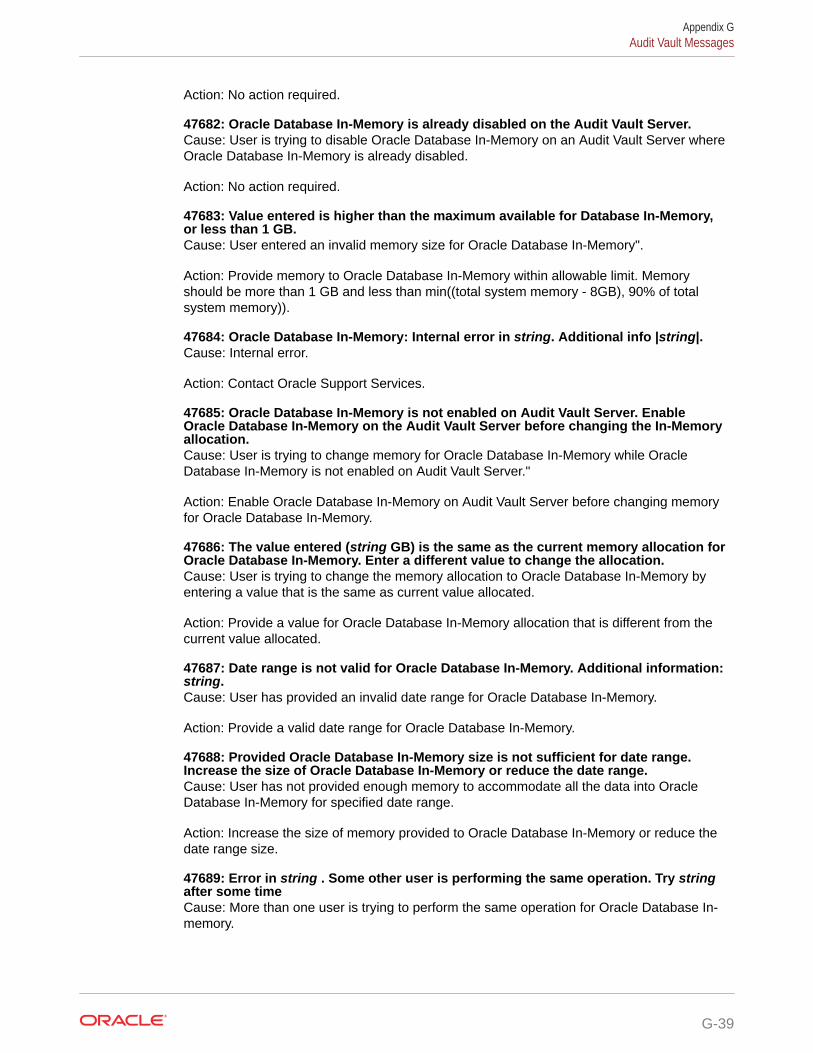
Action: No action required.
47682: Oracle Database In-Memory is already disabled on the Audit Vault Server.Cause: User is trying to disable Oracle Database In-Memory on an Audit Vault Server whereOracle Database In-Memory is already disabled.
Action: No action required.
47683: Value entered is higher than the maximum available for Database In-Memory,or less than 1 GB.Cause: User entered an invalid memory size for Oracle Database In-Memory".
Action: Provide memory to Oracle Database In-Memory within allowable limit. Memoryshould be more than 1 GB and less than min((total system memory - 8GB), 90% of totalsystem memory)).
47684: Oracle Database In-Memory: Internal error in string. Additional info |string|.Cause: Internal error.
Action: Contact Oracle Support Services.
47685: Oracle Database In-Memory is not enabled on Audit Vault Server. EnableOracle Database In-Memory on the Audit Vault Server before changing the In-Memoryallocation.Cause: User is trying to change memory for Oracle Database In-Memory while OracleDatabase In-Memory is not enabled on Audit Vault Server."
Action: Enable Oracle Database In-Memory on Audit Vault Server before changing memoryfor Oracle Database In-Memory.
47686: The value entered (string GB) is the same as the current memory allocation forOracle Database In-Memory. Enter a different value to change the allocation.Cause: User is trying to change the memory allocation to Oracle Database In-Memory byentering a value that is the same as current value allocated.
Action: Provide a value for Oracle Database In-Memory allocation that is different from thecurrent value allocated.
47687: Date range is not valid for Oracle Database In-Memory. Additional information:string.Cause: User has provided an invalid date range for Oracle Database In-Memory.
Action: Provide a valid date range for Oracle Database In-Memory.
47688: Provided Oracle Database In-Memory size is not sufficient for date range.Increase the size of Oracle Database In-Memory or reduce the date range.Cause: User has not provided enough memory to accommodate all the data into OracleDatabase In-Memory for specified date range.
Action: Increase the size of memory provided to Oracle Database In-Memory or reduce thedate range size.
47689: Error in string . Some other user is performing the same operation. Try stringafter some timeCause: More than one user is trying to perform the same operation for Oracle Database In-memory.
Appendix GAudit Vault Messages
G-39

Action: Try to perform the Oracle Database In-memory operations after some time.
47701: Invalid policy name: string ... Policy name should be between 1 and 255bytes long.Cause: Policy name is more than 255 bytes.
Action: Please provide a policy name with 1 to 255 bytes.
47702: Policy name cannot be null or the length is 0.Cause: Policy name is null or the length of the policy name is 0 byte.
Action: Please provide a policy name with 1 to 255 bytes.
47751: The SNMP string is invalid. SNMP string must contain at least 8characters and at most 30 characters, at least one uppercase letter(A-Z), onelowercase letter(a-z), one digit(0-9), and one special character(.,+:_!). SNMPstring must not contain characters outside of a-z, A-Z, 0-9, and . , + : _ !.Cause: SNMP string does not meet the policy.
Action: Please input a valid string and submit again.
47755: Built-in report string cannot be deleted.Cause: User attempted to delete a built-in report.
Action: Built-in reports cannot be deleted.
47756: Report string cannot be deleted as you are not the owner of the report.Cause: User attempted to delete a report uploaded by a different auditor.
Action: Users can only delete reports owned by them.
G.2 Database Firewall MessagesLearn about Database Firewall messages.
This table lists Database Firewall messages. These messages are captured inthe /var/log/messages file.
ODF Code Cause Action
10000 Minimum number for theDBFW message codes
This message should never be seen. Pleasecontact Oracle Support.
10001 Internal error Please contact Oracle Support.
10100 The operation hascompleted successfully
No action required.
10101 Configuration change A configuration change is being applied. Noaction required.
10102 Startup complete The process has completed its initializationand is ready to perform work. No actionrequired.
10103 Engine informational Informational message only. No actionrequired.
10104 ACE informational Informational message only. No actionrequired.
10105 Decoder informational Informational message only. No actionrequired.
Appendix GDatabase Firewall Messages
G-40
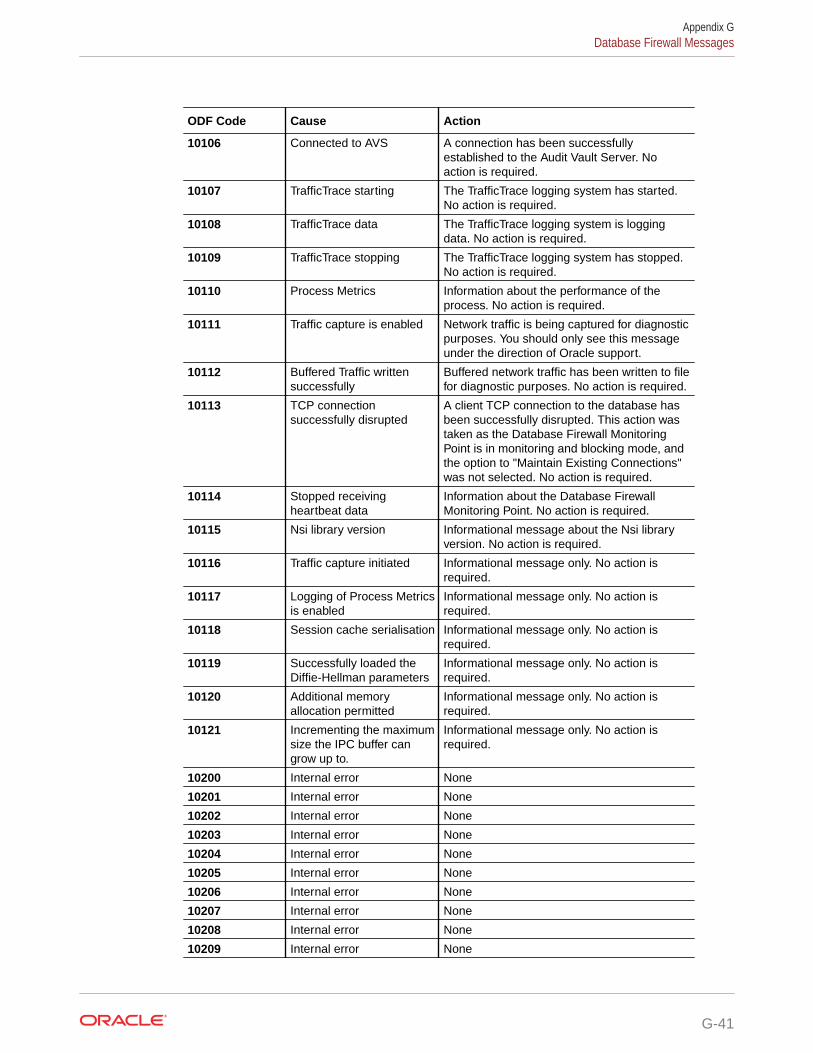
ODF Code Cause Action
10106 Connected to AVS A connection has been successfullyestablished to the Audit Vault Server. Noaction is required.
10107 TrafficTrace starting The TrafficTrace logging system has started.No action is required.
10108 TrafficTrace data The TrafficTrace logging system is loggingdata. No action is required.
10109 TrafficTrace stopping The TrafficTrace logging system has stopped.No action is required.
10110 Process Metrics Information about the performance of theprocess. No action is required.
10111 Traffic capture is enabled Network traffic is being captured for diagnosticpurposes. You should only see this messageunder the direction of Oracle support.
10112 Buffered Traffic writtensuccessfully
Buffered network traffic has been written to filefor diagnostic purposes. No action is required.
10113 TCP connectionsuccessfully disrupted
A client TCP connection to the database hasbeen successfully disrupted. This action wastaken as the Database Firewall MonitoringPoint is in monitoring and blocking mode, andthe option to "Maintain Existing Connections"was not selected. No action is required.
10114 Stopped receivingheartbeat data
Information about the Database FirewallMonitoring Point. No action is required.
10115 Nsi library version Informational message about the Nsi libraryversion. No action is required.
10116 Traffic capture initiated Informational message only. No action isrequired.
10117 Logging of Process Metricsis enabled
Informational message only. No action isrequired.
10118 Session cache serialisation Informational message only. No action isrequired.
10119 Successfully loaded theDiffie-Hellman parameters
Informational message only. No action isrequired.
10120 Additional memoryallocation permitted
Informational message only. No action isrequired.
10121 Incrementing the maximumsize the IPC buffer cangrow up to.
Informational message only. No action isrequired.
10200 Internal error None
10201 Internal error None
10202 Internal error None
10203 Internal error None
10204 Internal error None
10205 Internal error None
10206 Internal error None
10207 Internal error None
10208 Internal error None
10209 Internal error None
Appendix GDatabase Firewall Messages
G-41

ODF Code Cause Action
10210 Internal error None
10211 Internal error None
10300 Host Monitor connected A remote Host Monitor process hasestablished a connection to the DatabaseFirewall. No action required.
10301 Host Monitor disconnected A remote Host Monitor process hasdisconnected from the Database Firewall. Thisis normal behavior if the Host Monitor hasbeen stopped.
10302 Host Monitor notauthorized
A Host Monitor has attempted to connect tothe Database Firewall from an unauthorizedsource. Please investigate the source of thisunexpected connection attempt.
10303 Authentication not enabledfor HostMonitorconnections - No certificateprovided
No certificate has been provided toauthenticate incoming connections fromHostMonitor. Please see the documentationrelated to "Enabling and Using HostMonitoring" for information as to how toresolve this issue.
10400 No ASO records found Check that database has been configured forASO as per the instructions in theAdministrator's Guide.
10401 ASO traffic will not bedecrypted
ASO (encrypted) traffic to the database will notbe decrypted. If you wish this traffic to bedecrypted, follow the instructions in theAdministrator's Guide.
10402 Delayed response to ASOrequest
The response to the ASO request was sodelayed that the request was purged from thequeue before the response was received.Verify that the Target is configured for ASOand is functioning correctly.
10403 ASO is using unsupportedencryption algorithm
ASO processing found the session is usingunsupported encryption algorithm. If theDatabase Firewall Monitoring Point isconfigured in monitoring and blocking mode,the session is terminted. The message isdecoded and SQL statements extracted whenDatabase Firewall is in monitoring only mode.
10500 Unable to connect to AVS A connection could not be established to theAudit Vault Server. This message will be seenin normal operation when the DBFW is firstassociated with the Audit Vault Server. If themessage persists, or is seen under differentcircumstances then check the settings for theDBFW on the Audit Vault Server GUI.
10501 Failed connecting to theTarget
Check the Target configuration. Check theTarget host is running and prepared to acceptconnections.
10502 Failed connecting toremote database
Check the configuration for the remotedatabase in question, and that it is runningand prepared to accept connections.
Appendix GDatabase Firewall Messages
G-42

ODF Code Cause Action
10503 No connection to remotedatabase
Check the connection configuration, and thatthe remote database is running and preparedto accept connections. Note that this may bedue to temporary unavailability of the remotedatabase.
10504 Network device error Check the configuration of the network deviceson the DBFW.
10505 Failed to resolve hostname Check the DNS settings on your Appliance,and that the hostname is specified correctly.
10506 IP packet fragmented An IP packet intercepted with DatabaseFirewall in monitoring only mode was markedas fragmented. Check your networkinfrastructure to determine the cause of thefragmentation.
10507 TCP session re-use A closed TCP session to the database hasbeen re-opened. This could lead to state fromthe previous session being applied to the newsession. No action required.
10508 Detected connection failureto AVS
A notification of message delivery has notbeen received for certain period of time. If themessage persists then check the networkconnection between the Audit Vault Serverand the Database Firewall (including router orfirewall settings).
10509 Failed to find MAC address Failed to find database MAC address. MACaddress substitution will not work. Possiblecauses: database server is down orunreachable through specified traffic source;database server is connected to client port.Connect the database and firewall correctly,then reboot the firewall.
10510 The TCP connection to theAVS has been lost
Please check the network path between theDBFW and the AVS. Note that this problemmay be seen when the AVS is restarted.
10511 IPC CommunicationDisrupted
Please see other messages in log file for moreinformation.
10512 A badly formed TCP URGpacket was received
This problem has been seen in 'Fuzz-Testing'of the DBFW where bad TCP packets aretransmitted. Please verify that the clients usingthe DBFW are behaving correcly.
10513 SSL handshake failed An SSL client has failed to connect to theDBFW due to a failure in the initial handshake.Please examine the additional information inthis message, and confirm that the client iscorrectly configured.
10514 Peer has reset theconnection
The remote peer of this TCP session has resetthe connection. Please ensure that the remotepeer is behaving correctly. Note that althoughresetting a TCP connection is a hard close ofthe TCP session, it does not necessarilyindicate that there is an error in the peer.
Appendix GDatabase Firewall Messages
G-43
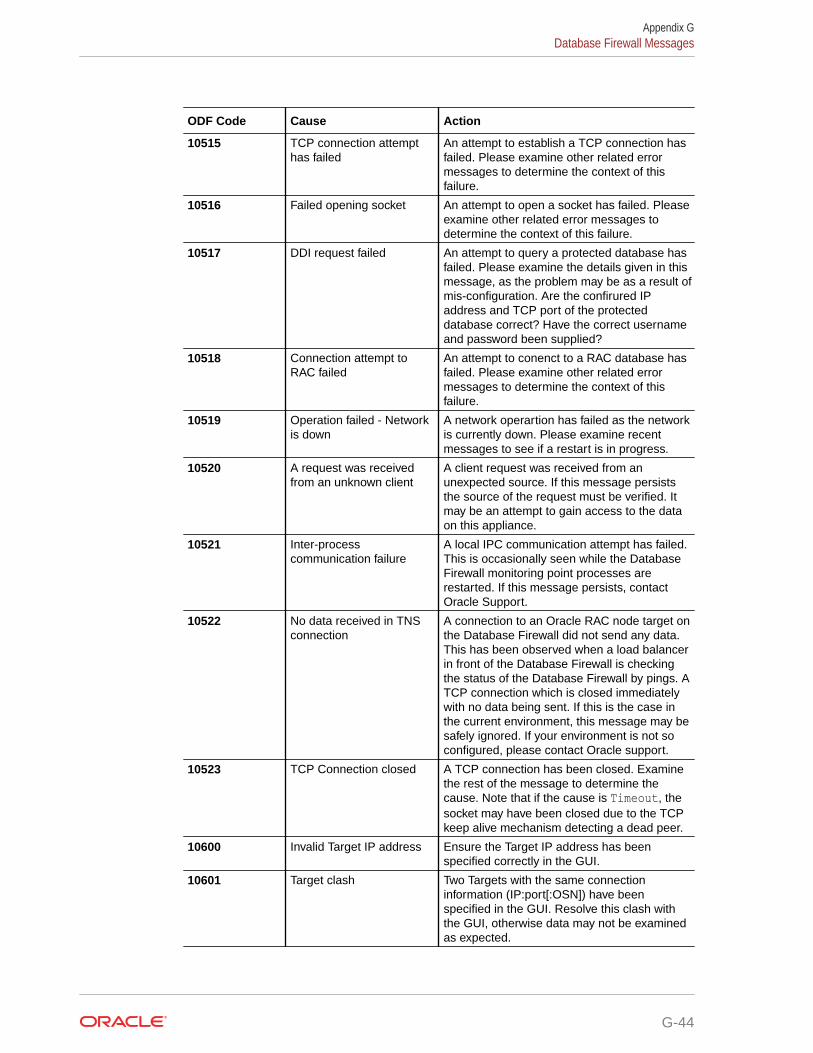
ODF Code Cause Action
10515 TCP connection attempthas failed
An attempt to establish a TCP connection hasfailed. Please examine other related errormessages to determine the context of thisfailure.
10516 Failed opening socket An attempt to open a socket has failed. Pleaseexamine other related error messages todetermine the context of this failure.
10517 DDI request failed An attempt to query a protected database hasfailed. Please examine the details given in thismessage, as the problem may be as a result ofmis-configuration. Are the confirured IPaddress and TCP port of the protecteddatabase correct? Have the correct usernameand password been supplied?
10518 Connection attempt toRAC failed
An attempt to conenct to a RAC database hasfailed. Please examine other related errormessages to determine the context of thisfailure.
10519 Operation failed - Networkis down
A network operartion has failed as the networkis currently down. Please examine recentmessages to see if a restart is in progress.
10520 A request was receivedfrom an unknown client
A client request was received from anunexpected source. If this message persiststhe source of the request must be verified. Itmay be an attempt to gain access to the dataon this appliance.
10521 Inter-processcommunication failure
A local IPC communication attempt has failed.This is occasionally seen while the DatabaseFirewall monitoring point processes arerestarted. If this message persists, contactOracle Support.
10522 No data received in TNSconnection
A connection to an Oracle RAC node target onthe Database Firewall did not send any data.This has been observed when a load balancerin front of the Database Firewall is checkingthe status of the Database Firewall by pings. ATCP connection which is closed immediatelywith no data being sent. If this is the case inthe current environment, this message may besafely ignored. If your environment is not soconfigured, please contact Oracle support.
10523 TCP Connection closed A TCP connection has been closed. Examinethe rest of the message to determine thecause. Note that if the cause is Timeout, thesocket may have been closed due to the TCPkeep alive mechanism detecting a dead peer.
10600 Invalid Target IP address Ensure the Target IP address has beenspecified correctly in the GUI.
10601 Target clash Two Targets with the same connectioninformation (IP:port[:OSN]) have beenspecified in the GUI. Resolve this clash withthe GUI, otherwise data may not be examinedas expected.
Appendix GDatabase Firewall Messages
G-44

ODF Code Cause Action
10602 No MySql database name The name of the MySql database has notbeen provided. Check the relevantconfiguration on the GUI and add thedatabase name.
10603 Reboot now to apply newconfiguration (cannot applyconfiguration to runningsystem)
The system management software failed toapply configuration to the running system. Areboot should apply the new settings. Moreinformation may be available in the debug log.
10604 Cannot generate newconfiguration file.
The system management software failed togenerate the new configuration. Pleasecontact Oracle Support.
10605 Cannot generate newconfiguration, please retrythe operation
The system management software failed togenerate the new configuration. Workaroundgiven.
10606 Internal error, invalidconfiguration
Please contact Oracle Support.
10607 Value of systemconfiguration rmem_maxmay be excessive
The value of the system setting rmem_max isunexpectedly high. On some hardware, it hasbeen observed that this can lead to traffic notbeing intercepted as expected when DatabaseFirewall is in monitoring only mode. Pleaseverify that your system can support this valuesuccessfully.
10608 Invalid argument forcertificate operation
Please check the parameters or files you haveprovided.
10609 Invalid certificate key pair The uploaded certificate was not generatedfrom the correct certificate signing request.
10610 Certificate SigningRequest common namemismatch
The uploaded certificate does not match theoriginal common name. Please verify yoursigning process.
10611 Error processing certificate The uploaded certificate was not valid. Pleasecheck the uploaded certificate.
10612 Proxy-mode DatabaseFirewall Monitoring Pointsclash
More than one Database Firewall MonitoringPoint is configured to use the same proxy port.Please examine the Database FirewallMonitoring Points configured for this DBFWand resolve the conflict.
10613 LVM out of space, addmore storage and try again
There is not enough storage available for therequested LVM operation. Please add morestorage and try again.
10614 No TrafficTrace SQLstatement provided inconfiguration file
Edit the configuration file and add the SQLagainst key TRACE_SQL
10615 Unable to parse the expirytime in configuration file
Edit the configuration file and enter the expirytime against key EXPIRES_AT in the format"yyyy-mm-dd hh:mm:ss". Example:"2015-11-23 12:13:14".
10616 Expiry time has alreadypassed
Edit the configuration file and alter theEXRIRES_AT time as desired
10617 TrafficTrace period set forgreater than the permittedvalue
Edit the configuration file and alter theEXRIRES_AT time as desired
Appendix GDatabase Firewall Messages
G-45
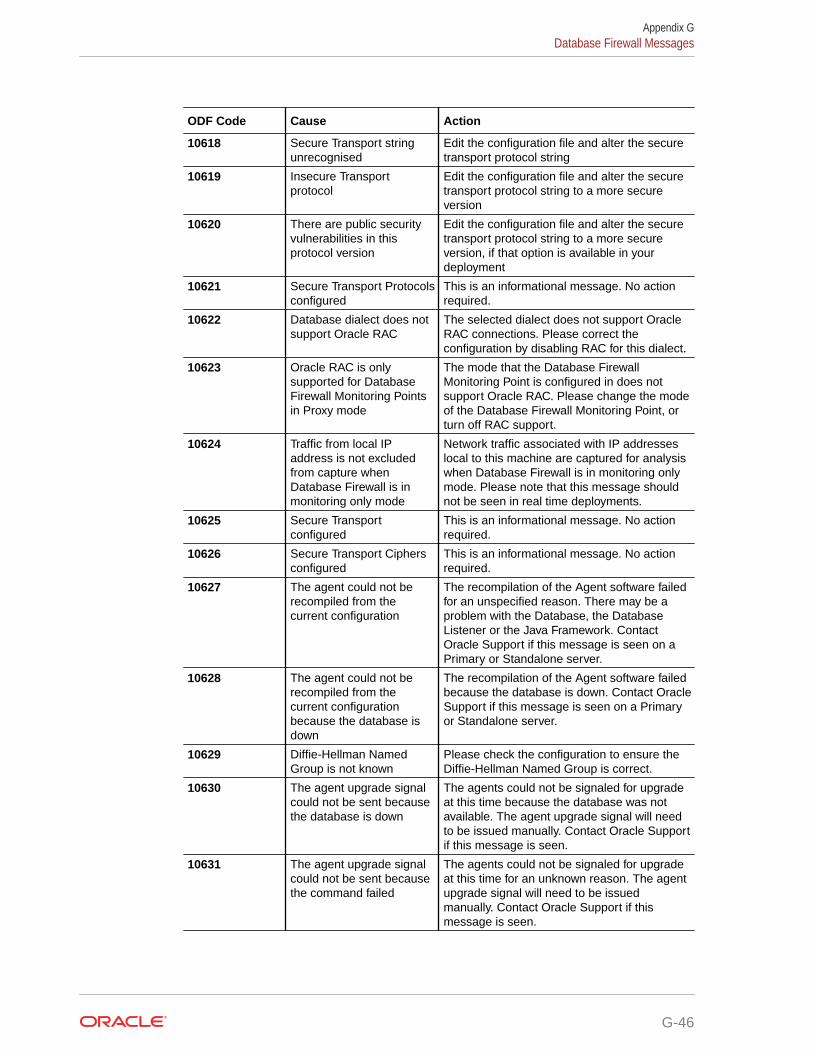
ODF Code Cause Action
10618 Secure Transport stringunrecognised
Edit the configuration file and alter the securetransport protocol string
10619 Insecure Transportprotocol
Edit the configuration file and alter the securetransport protocol string to a more secureversion
10620 There are public securityvulnerabilities in thisprotocol version
Edit the configuration file and alter the securetransport protocol string to a more secureversion, if that option is available in yourdeployment
10621 Secure Transport Protocolsconfigured
This is an informational message. No actionrequired.
10622 Database dialect does notsupport Oracle RAC
The selected dialect does not support OracleRAC connections. Please correct theconfiguration by disabling RAC for this dialect.
10623 Oracle RAC is onlysupported for DatabaseFirewall Monitoring Pointsin Proxy mode
The mode that the Database FirewallMonitoring Point is configured in does notsupport Oracle RAC. Please change the modeof the Database Firewall Monitoring Point, orturn off RAC support.
10624 Traffic from local IPaddress is not excludedfrom capture whenDatabase Firewall is inmonitoring only mode
Network traffic associated with IP addresseslocal to this machine are captured for analysiswhen Database Firewall is in monitoring onlymode. Please note that this message shouldnot be seen in real time deployments.
10625 Secure Transportconfigured
This is an informational message. No actionrequired.
10626 Secure Transport Ciphersconfigured
This is an informational message. No actionrequired.
10627 The agent could not berecompiled from thecurrent configuration
The recompilation of the Agent software failedfor an unspecified reason. There may be aproblem with the Database, the DatabaseListener or the Java Framework. ContactOracle Support if this message is seen on aPrimary or Standalone server.
10628 The agent could not berecompiled from thecurrent configurationbecause the database isdown
The recompilation of the Agent software failedbecause the database is down. Contact OracleSupport if this message is seen on a Primaryor Standalone server.
10629 Diffie-Hellman NamedGroup is not known
Please check the configuration to ensure theDiffie-Hellman Named Group is correct.
10630 The agent upgrade signalcould not be sent becausethe database is down
The agents could not be signaled for upgradeat this time because the database was notavailable. The agent upgrade signal will needto be issued manually. Contact Oracle Supportif this message is seen.
10631 The agent upgrade signalcould not be sent becausethe command failed
The agents could not be signaled for upgradeat this time for an unknown reason. The agentupgrade signal will need to be issuedmanually. Contact Oracle Support if thismessage is seen.
Appendix GDatabase Firewall Messages
G-46

ODF Code Cause Action
10632 The agent upgrade signalcould not be disabled
The agents were signaled for upgrade but thetarget could not be disabled. The agentupgrade signal must be disabled manually.Run 'systemctl agent-signal-upgrade.servicedisable'.
10633 File missing fromCertificate/private key pair
Ensure that both the required certificate andprivate key have been provided.
10634 Device name not found onsystem
The supplied device name could not be foundin the list of devices available on thisappliance. Check the network device listings toensure that all expected devices are present.
10635 Dhclient config file missing The required configuration file could not befound. This may happen during install butshould not happen during general runtimeactivities. If this message persists, contactOracle Support.
10636 NTP query failed Confirm that the configured NTP server(echoed in the message) is correct, and ifrequired check the DNS is configuredcorrectly.
10637 Data for stream notprocessed
Traffic has been observed destined for adatabase that is not configured for processingby this target, and the traffic is ignored. Alteryour configuration so that stream can beprocessed.
10700 Internal cache full Check the status of the Audit Vault Serverassociated with this DBFW, and that the AVServer and DBFW are correctly paired.
10701 Capture capacity exceededfor Database Firewall inmonitoring only mode
Some network packets were not capturedbecause the system was overloaded whenDatabase Firewall is in monitoring only mode.
10702 Capacity exceeded The system is not able to capture all therequested traffic with Database Firewall inmonitoring only mode.
10703 Database Firewall inmonitoring only modecapture capacity no longerexceeded
The system is now capturing all the requestedtraffic again when Database Firewall is inmonitoring only mode. No action required.
10704 Internal capacity exceeded Internal system capacity has been exceededfor the protected database. Please contactOracle Support.
10705 SQL call failed Check that database is running, that theconfigured user has permission to execute thestatement and has access to the requiredresources.
10706 Syslog message too big A message being processed for forwarding tothe Audit Vault Server is too large to send.Please contact Oracle Support.
10707 Data truncation The size of an item of data exceeded a limitand has been truncated.
10708 Failed sendingStartMonitoring commandto Arbiter
Unable to start the Arbiter process. Pleaseexamine the log file for other errors todetermine the cause of this failure.
Appendix GDatabase Firewall Messages
G-47

ODF Code Cause Action
10709 Failed To Start MonitoringProcesses
Please examine the debug log file for othererrors to determine the cause of this failure.
10710 Internal capacity no longerexceeded
The system is now transferring all therequested traffic again when DatabaseFirewall is in monitoring only mode. No actionrequired.
10711 Could not find servicename information inconnection string
The Oracle connection string did not containrecognizable service name information("SERVICE_NAME" or "SID"). This means thatsuch information will not be logged for displayin any reports. If you require this information inreprorts, please alter the client's connectionstring appropriately.
10712 Syslog Fifo Closed Informational message only. No actionrequired.
10713 Failed connecting to thePolicy Server
This message is sometimes seen in heavilyloaded systems during the shutdown or restartof a Database Firewall Monitoring Point. Noaction required, unless this error is seenrepeatedly.
10714 Failure in proxying toOracle RAC database
There was a failure trying to establish aconnection to a protected Oracle RACdatabase. Please examine recent previousmessages to determine the cause of thisfailure.
10715 Failed sending StitcherCount Object
This message is sometimes seen in heavilyloaded systems during the shutdown or restartof a Database Firewall Monitoring Point.Please contact Oracle support if this erroroccurs repeatedly during routine operartion.
10716 Bad response to controlcommand from Arbiter
This message is sometimes seen in heavilyloaded systems during the shutdown or restartof a Database Firewall Monitoring Point.Please contact Oracle support if this erroroccurs repeatedly during routine operartion.
10717 Zero packets processed forDatabase Firewall inmonitoring only mode
This message may be seen with DatabaseFirewall in monitoring only mode when zeropackets are processed in the event loop. Thismessage is informational only, and has noeffect of the performance of the system.
10718 Internal cache full. Possibleslow transfer rate betweenthe Database Firewall andthe AVS
Check the network throughput between theAudit Vault Server associated with thisDatabase Firewall, and that the number ofalerts or syslog messages generated by thisDatabase Firewall does not exceed thenetwork capacity.
10719 Unable to load Sessioninformation from file
We were unable to load the cached Sessioninformation from file. In DAM mode, this maymean that some fields associated with longlived client connections may not be populatedin reports.
10720 Unable to save Sessioninformation to file
This may be seen at startup. If it is seencontinuously, please call Oracle support.
Appendix GDatabase Firewall Messages
G-48

ODF Code Cause Action
10721 Update of the Audit VaultServer connectivity flagintterrupted by a reloadsignal.
Informational message only. No actionrequired.
10722 Failed determining policy This may be seen at startup. If it is seencontinuously, call Oracle support.
10723 Cache at capacity, evictingitems
An internal cache has reached its maximumcapacity, and entries are being evicted. Thismessage should not be seen during normalfunctioning of the system. If this message isseen continuously, call Oracle support.
10724 Potential alert notgenerated as policy not yetdetermined.
Under some circumstances the DatabaseFirwall may want to test if an alert is to beissued for a SQL statement before the policyfor that SQL statement has been determined.This can happen for the initial SQL statementsinvolved in establishing connection to Oracledatabases when the connection is encryptedwith ASO.
10725 Unable to retrieve relevantsession information.
This message may be emitted when thedatabase session we are inquiring about hasalready been terminated, or is for otherreasons not available from the protecteddatabase.
10726 RAC Proxy object present An internal object was unexpectedly still inexistance when it was expected that it shouldhave been released by now. If this message isseen as part of a warning, look for previouslylogged warnings for an explanation. If thismessage is seen as part of an error, contactOracle Support.
10727 Additional memoryallocation denied
Informational message only. No action isrequired.
10728 Items being evicted fromcache
Items are being evicted from internal cache.Examine the rest of the message for fulldetails. If this message is seen continuously,call Oracle Support.
Appendix GDatabase Firewall Messages
G-49

ODF Code Cause Action
10729 Platform certificates mayexpire soon. Refer to therequired action against thespecific ODF codementioned in Oracle AVDFAdministrators Guide.
Perform the following action for uninterruptedOracle AVDF services.
Regenerate the platform certificates on AuditVault Server and Database Firewall byfollowing these steps:
1. Log in to the appliance as support user.
2. Switch to root user using the command:su root
3. Run the following command to regeneratethe certificate: /usr/local/bin/gensslcert create-certs
4. Run the following commands to restartthe services on the Database Firewallappliance:
• systemctl stop httpd• systemctl start httpd• /usr/local/dbfw/bin/dbfwctl
restart• systemctl stop stund• systemctl start stundRun the following commands to restartthe services on the Audit Vault Serverappliance:
• systemctl stop httpd• systemctl start httpd• systemctl stop controller• systemctl start controller• systemctl stop dbfwlistener• systemctl start dbfwlistener
The platform certificates of Audit Vault Serveror Database Firewall appliances are rotated orrenewed for another year.
10800 Generic GUI information Generic informational message. No actionrequired.
10801 Generic GUI warning Generic warning message. No action required.
10900 Invalid user credentials The system does not recognize the accountcredentials (username, password)
10901 Failed to set password The system has failed to set the password.
11000 Migration file result:success
This message is for audit trail and no specificaction is required.
11001 Migration file invocation This message is for audit trail and no specificaction is required.
11002 Migration group invocation This message is for audit trail and no specificaction is required.
11003 Migration stanza invocation This message is for audit trail and no specificaction is required.
11004 Migration stanza result:success
This message is for audit trail and no specificaction is required.
Appendix GDatabase Firewall Messages
G-50

ODF Code Cause Action
11005 Migration group result:success
This message is for audit trail and no specificaction is required.
11006 Migration file result:success
This message is for audit trail and no specificaction is required.
11007 Migration stanza result:skipped
This message is for audit trail and no specificaction is required.
11008 Please confirm you wish tostart upgrade
Please read the following messages, and re-run this utility as follows to beginupgrade: /usr/bin/avdf-upgrade --confirm
11009 Please check beforecontinuing
Power loss during upgrade may cause dataloss. Do not power off during upgrade.
11010 Please check beforecontinuing
This upgrade will erase /root and /images.
11011 Please check beforecontinuing
Please review Note ID 2235931.1 for a currentlist of known issues.
11012 The install or upgrade hascompleted successfully
This message is for audit trail and no specificaction is required.
11013 Last migration: success No further action needed.
11014 Last migration: started The upgrade is in progress or was interrupted.Please wait until the upgrade completes orcontact support.
11015 Last migration: failed Please fix the failure cause. Migration isrerunnable and can be executed again.
11016 Last migration: failed Please review /var/log/messages and /var/log/debug for more information. Perform theactions necessary to get the system to theexpected final state of migration.
11017 Attempt to resume upgradewithout confirmation
Confirm that you have fixed the original errorcause by running the tool again with --confirmoption.
11018 Attempt to resume upgradewithout confirmation
Confirm that you have fixed the original errorcause by running the tool again with --confirmoption. WARNING: resuming upgrade on anunfixed system may further corrupt it.
11019 Attempt to resume upgradewhen not in recovery mode
The system is not in recovery mode. There isnothing to resume.
11030 Migration file result:completed with warnings
Please download the diagnostics package andcontact Oracle support. Please review /var/log/messages and /var/log/debug for moreinformation. To download the diagnosticspackage please follow the instructions fromthe documentation.
11031 Cannot resume upgrade orinstall: migration file doesnot match hash
The migration index does not validate with thegiven hash, so it is not possible to resume theinstall or upgrade. Please generate a newhash if you are using a new migration index.
Appendix GDatabase Firewall Messages
G-51

ODF Code Cause Action
11060 Migration file result: FATALERROR - TERMINATED
Please do not use this system in a productionenvironment. Please download the diagnosticspackage and contact Oracle support. Pleasereview /var/log/messages and /var/log/debugfor more information. To download thediagnostics package please follow theinstructions from the documentation.
11061 Migration group result:failed
Please do not use this system in a productionenvironment. Please download the diagnosticspackage and contact Oracle support. Pleasereview /var/log/messages and /var/log/debugfor more information. To download thediagnostics package please follow theinstructions from the documentation.
11062 Migration stanza result:failed to start because itspreconditions were not met
Please do not use this system in a productionenvironment. Please download the diagnosticspackage and contact Oracle support. Pleasereview /var/log/messages and /var/log/debugfor more information. To download thediagnostics package please follow theinstructions from the documentation.
11063 Migration file result:incomplete
Please download the diagnostics package andcontact Oracle support. Please review /var/log/messages and /var/log/debug for moreinformation. To download the diagnosticspackage please follow the instructions fromthe documentation.
11064 The install or upgrade isincomplete
Please download the diagnostics package andcontact Oracle support. Please review /var/log/messages and /var/log/debug for moreinformation. To download the diagnosticspackage please follow the instructions fromthe documentation.
11065 Failed to executemigrations
Please review /var/log/messages and /var/log/debug for more information.
19999 Maximum number for theDBFW message codes
This message should never be seen. Pleasecontact Oracle Support.
99999 The code for this messageis the maximum permittednumber
This message should never be seen. Pleasecontact Oracle Support.
Appendix GDatabase Firewall Messages
G-52

HSecurity Technical Implementation Guides
Oracle Audit Vault and Database Firewall follows the Security Technical ImplementationGuides (STIG)-based compliance standards.
H.1 About Security Technical Implementation GuidesLearn about Security Technical Implementation Guides.
A Security Technical Implementation Guide (STIG) is a methodology followed by the U.S.Department of Defense (DOD) to reduce the attack surface of computer systems andnetworks, thereby ensuring a lockdown of highly confidential information stored within theDOD network. STIGs provide secure configuration standards for the DOD's InformationAssurance (IA) and IA-enabled devices and systems. STIGs are created by the DefenseInformation Systems Agency (DISA).
For over a decade, Oracle has worked closely with the DOD to develop, publish, andmaintain a growing list of STIGs for a variety of core Oracle products and technologiesincluding:
• Oracle Database
• Oracle Solaris
• Oracle Linux
• Oracle WebLogic
When STIGs are updated, Oracle analyzes the latest recommendations in order to identifynew ways to improve the security of its products by:
• Implementing new and innovative security capabilities that are then added to future STIGupdates
• Delivering functionality to automate the assessment and implementation of STIGrecommendations
After you enable the STIG rules in Oracle Audit Vault and Database Firewall, the settings arepreserved when you perform any upgrades.
Improving "out of the box" security configuration settings based upon STIG recommendations
STIG recommendations
Oracle Audit Vault Server is a highly tuned and tested software appliance. Any additionalsoftware installed on this server can cause unstable behavior. Hence Oracle does notrecommend the installation of any software on Oracle Audit Vault Server. If there arerequirements for virus scan, then utilize external scanners as much as possible.
The following are some cases where external scanners cannot be utilized and an Anti-virus isinstalled on the Audit Vault Server:
• If there is an issue, then Oracle support may request that the user uninstall the Anti-virussoftware to enable troubleshooting.
H-1

• If there are no issues and there is a new Bundle Patch to be applied for OracleAudit Vault and Database Firewall, then Oracle support may request that youuninstall the anti-virus software, apply the patch, and then re-install the anti-virussoftware on Oracle Audit Vault Server. This reduces some of the issues afterapplying the patch.
• If there are no issues but the anti-virus scanner has detected a virus or malware,then you should contact the anti-virus scanner vendor to verify the validity of thefinding.
• If the anti-virus software was not removed in advance and the Bundle Patchupgrade has failed, then Oracle may recommend a fresh installation of OracleAudit Vault and Database Firewall and a consequent Bundle Patch upgrade. Onlyafter this the anti-virus scanner can be re-installed.
• If the customer followed the instructions from Oracle, the anti-virus scanner doesnot uninstall completely, and the Bundle Patch upgrade fails, contact the anti-virusvendor for instructions on how to remove their software completely. Once this iscompleted Oracle Audit Vault and Database Firewall Bundle Patch should beinstalled. If the install fails, then a clean install may be warranted.
See Also:
• Oracle Database STIG
• Oracle Linux STIG
• DISA STIG Home
H.2 Enabling and Disabling STIG Rules on Oracle AuditVault and Database Firewall
You can enable STIG rules on Oracle Audit Vault and Database Firewall by enablingStrict mode.
H.2.1 Enabling STIG Rules on Oracle Audit Vault and DatabaseFirewall
Learn how to enable STIG rules on Oracle Audit Vault and Database Firewall.
To enable strict mode:
1. Log in to the operating system of Oracle Audit Vault Server as the root user.
2. Run the following command as root:
/usr/local/dbfw/bin/stig --enable
Appendix HEnabling and Disabling STIG Rules on Oracle Audit Vault and Database Firewall
H-2

H.2.2 Disabling STIG Rules on Oracle Audit Vault and Database FirewallLearn how to disable STIG Rules on Oracle Audit Vault and Database Firewall.
To disable strict mode:
1. Log in to the operating system of Oracle Audit Vault Server as the root user.
2. Run the following command as root:
/usr/local/dbfw/bin/stig --disable
H.3 Current Implementation of STIG Rules on Oracle Audit Vaultand Database Firewall
Oracle Audit Vault and Database Firewall is security-hardened because the configurationsfollow Security Technical Implementation Guide (STIG) recommendations.
Oracle has developed a security-hardened configuration of Oracle Audit Vault and DatabaseFirewall that supports U.S. Department of Defense Security Technical Implementation Guide(STIG) recommendations.
Table H-1 lists the three vulnerability categories that STIG recommendations.
Table H-1 Vulnerability Categories
Category Description
CAT I Any vulnerability, the exploitation of which will, directly and immediately result in loss ofConfidentiality, Availability, or Integrity.
CAT II Any vulnerability, the exploitation of which has a potential to result in loss ofConfidentiality, Availability, or Integrity.
CAT III Any vulnerability, the existence of which degrades measures to protect against loss ofConfidentiality, Availability, or Integrity.
H.4 Current Implementation of Database STIG RulesLearn about the current implementation of database STIG rules on Oracle Audit Vault andDatabase Firewall.
Table H-2 shows the current implementation of Database STIG rules on Oracle Audit Vaultand Database Firewall.
Appendix HCurrent Implementation of STIG Rules on Oracle Audit Vault and Database Firewall
H-3
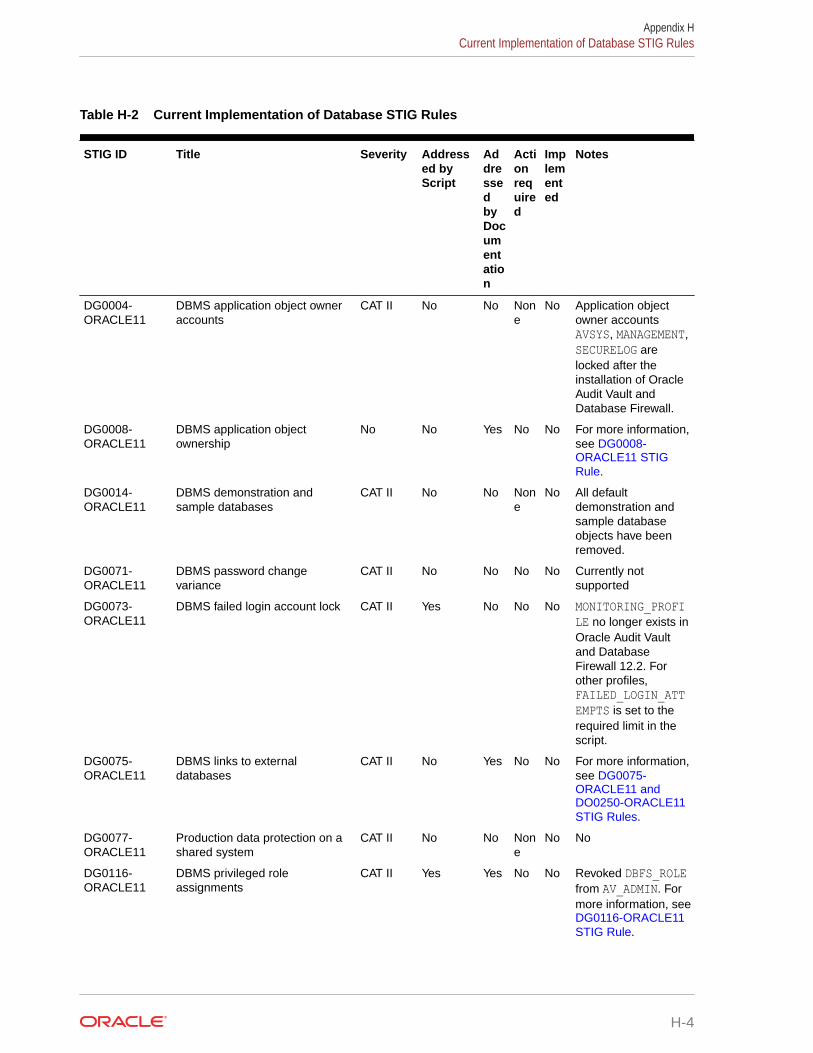
Table H-2 Current Implementation of Database STIG Rules
STIG ID Title Severity Addressed byScript
AddressedbyDocumentation
Actionrequired
Implemented
Notes
DG0004-ORACLE11
DBMS application object owneraccounts
CAT II No No None
No Application objectowner accountsAVSYS, MANAGEMENT,SECURELOG arelocked after theinstallation of OracleAudit Vault andDatabase Firewall.
DG0008-ORACLE11
DBMS application objectownership
No No Yes No No For more information,see DG0008-ORACLE11 STIGRule.
DG0014-ORACLE11
DBMS demonstration andsample databases
CAT II No No None
No All defaultdemonstration andsample databaseobjects have beenremoved.
DG0071-ORACLE11
DBMS password changevariance
CAT II No No No No Currently notsupported
DG0073-ORACLE11
DBMS failed login account lock CAT II Yes No No No MONITORING_PROFILE no longer exists inOracle Audit Vaultand DatabaseFirewall 12.2. Forother profiles,FAILED_LOGIN_ATTEMPTS is set to therequired limit in thescript.
DG0075-ORACLE11
DBMS links to externaldatabases
CAT II No Yes No No For more information,see DG0075-ORACLE11 andDO0250-ORACLE11STIG Rules.
DG0077-ORACLE11
Production data protection on ashared system
CAT II No No None
No No
DG0116-ORACLE11
DBMS privileged roleassignments
CAT II Yes Yes No No Revoked DBFS_ROLEfrom AV_ADMIN. Formore information, see DG0116-ORACLE11STIG Rule.
Appendix HCurrent Implementation of Database STIG Rules
H-4

Table H-2 (Cont.) Current Implementation of Database STIG Rules
STIG ID Title Severity Addressed byScript
AddressedbyDocumentation
Actionrequired
Implemented
Notes
DG0117-ORACLE11
DBMS administrative privilegeassignment
CAT II No No No No Currently notsupported
DG0121-ORACLE11
DBMS application user privilegeassignment
CAT II No No No No Currently notsupported
DG0123-ORACLE11
DBMS Administrative dataaccess
CAT II No No No No Currently notsupported
DG0125-ORACLE11
DBMS account passwordexpiration
CAT II Yes No No No MONITORING_PROFILE no longer exists inOracle Audit Vaultand DatabaseFirewall 12.2. Forother profiles,PASSWORD_LIFE_TIME is set to therequired limit in thescript.
DG0126-ORACLE11
DBMS account password reuse CAT II No No None
No Password reuse isnot allowed on OracleAudit Vault andDatabase Firewall.
DG0128-ORACLE11
DBMS default passwords CAT I Yes No No No AccountOWBSYS_AUDIT nolonger exists inOracle Audit Vaultand DatabaseFirewall 12.2.Accounts such asCTXSYS , AUDSYS,DBSNMP, and ORDSYSare assigned arandom password inthe script.
DG0133-ORACLE11
DBMS Account lock time CAT II Yes No No No No
DG0141-ORACLE11
DBMS access control bypass CAT II Yes No No No Users can use ascript to audit thefollowing events:
DROP ANY SYNONYMDROP ANYINDEXTYPE
Appendix HCurrent Implementation of Database STIG Rules
H-5

Table H-2 (Cont.) Current Implementation of Database STIG Rules
STIG ID Title Severity Addressed byScript
AddressedbyDocumentation
Actionrequired
Implemented
Notes
DG0142-ORACLE11
DBMS Privileged action audit CAT II No No None
No No
DG0192-ORACLE11
DBMS fully-qualified name forremote access
CAT II Yes No No No Currently notsupported
DO0231-ORACLE11
Oracle application object ownertablespaces
CAT II No No No No Currently notsupported
DO0250-ORACLE11
Oracle database link usage CAT II No Yes No No For more information,see DG0075-ORACLE11 andDO0250-ORACLE11STIG Rules.
DO0270-ORACLE11
Oracle redo log file availability CAT II No No No No Currently notsupported
DO0350-ORACLE11
Oracle system privilegeassignment
CAT II No No No No Currently notsupported
DO3475-ORACLE11
Oracle PUBLIC access torestricted packages
CAT II No No No No Currently notsupported
DO3536-ORACLE11
Oracle IDLE_TIME profileparameter
CAT II Yes No No No No
DO3540-ORACLE11
Oracle SQL92_SECURITYparameter
CAT II No No None
No ParameterSQL92_SECURITY isalready set to TRUE.
DO3609-ORACLE11
System privileges granted WITHADMIN OPTION
CAT II No No No No Currently notsupported
DO3610-ORACLE11
Oracle minimum object auditing CAT II No No No No Currently notsupported
DO3689-ORACLE11
Oracle object permissionassignment to PUBLIC
CAT II No No No No Currently notsupported
DO3696-ORACLE11
Oracle RESOURCE_LIMITparameter
CAT II No No No No Currently notsupported
O121-BP-021900
The OracleREMOTE_OS_AUTHENT parametermust be set to FALSE.
CAT I No No No Yes None
O121-BP-022000
The Oracle REMOTE_OS_ROLESparameter must be set to FALSE.
CAT I No No No Yes None
O121-BP-022700
The Oracle Listener must beconfigured to requireadministration authentication.
CAT I No No No Yes None
Appendix HCurrent Implementation of Database STIG Rules
H-6

Table H-2 (Cont.) Current Implementation of Database STIG Rules
STIG ID Title Severity Addressed byScript
AddressedbyDocumentation
Actionrequired
Implemented
Notes
O121-C1-004500
DBA OS accounts must begranted only those host systemprivileges necessary for theadministration of the DBMS.
CAT I No No No Yes In Audit Vault andDatabase Firewall,only Oracle user canconnect to thedatabase asSYSDBA. Oracleuser is granted onlynecessary privileges.
O121-C1-011100
Oracle software must beevaluated and patched againstnewly found vulnerabilities.
CAT I No No No No Apply Audit Vault andDatabase Firewallrelease quarterlybundle patch whichpatches OS, DB, andJava on the AuditVault Server andDatabase Firewall.
O121-C1-015000
DBMS default accounts must beassigned custom passwords.
CAT I Yes No No Yes DVSYS is assignedcustom password inproduct. Other usersare assignedpasswords throughthe STIG script.
O121-C1-015400
The DBMS, when using PKI-based authentication, mustenforce authorized access to thecorresponding private key.
CAT I No No No Yes None
O121-C1-019700
The DBMS must employcryptographic mechanismspreventing the unauthorizeddisclosure of information duringtransmission unless thetransmitted data is otherwiseprotected by alternative physicalmeasures.
CAT I No No No Yes On Audit VaultServer, the followinglist of encryptionalgorithms is set insqlnet.ora:SQLNET.ENCRYPTION_TYPES_SERVER =(AES256,AES192,AES128). Thecommunicationbetween agent andthe Audit Vault Serveris encrypted.
Appendix HCurrent Implementation of Database STIG Rules
H-7

Table H-2 (Cont.) Current Implementation of Database STIG Rules
STIG ID Title Severity Addressed byScript
AddressedbyDocumentation
Actionrequired
Implemented
Notes
O121-N1-015601
Applications must obscurefeedback of authenticationinformation during theauthentication process to protectthe information from possibleexploitation or use byunauthorized individuals.
CAT I No No No Yes All passwords in AuditVault and DatabaseFirewall are eitherstored in OracleWallet or encrypted inthe database. Allpasswords are sentthrough encryptedchannel.
O121-N1-015602
When using command-line toolssuch as Oracle SQL*Plus, whichcan accept a plain-text password,users must use an alternativelogin method that does notexpose the password.
CAT I No No No Cannotcompletelycomply.
Audit Vault andDatabase Firewallhas a command lineinterface AVCLI. Thepassword can betyped clearly withoutany issue. HoweverAVCLI also providesan alternative loginmethod which doesnot expose thepassword as cleartext.
O121-OS-004600
Use of the DBMS softwareinstallation account must berestricted to DBMS softwareinstallation.
CAT I No No No Yes None
O121-BP-021300
Oracle instance names must notcontain Oracle version numbers.
CAT II No No No Yes None
O121-BP-021400
Fixed user and public databaselinks must be authorized for use.
CAT II No SeeNote.
No No See note
O121-BP-022100
The Oracle SQL92_SECURITYparameter must be set to TRUE.
CAT II No No No Yes None
O121-BP-022200
The OracleREMOTE_LOGIN_PASSWORDFILEparameter must be set toEXCLUSIVE or NONE.
CAT II No No No Yes None
O121-BP-022300
System privileges granted usingthe WITH ADMIN OPTION mustnot be granted to unauthorizeduser.
CAT II No No No Yes None
Appendix HCurrent Implementation of Database STIG Rules
H-8
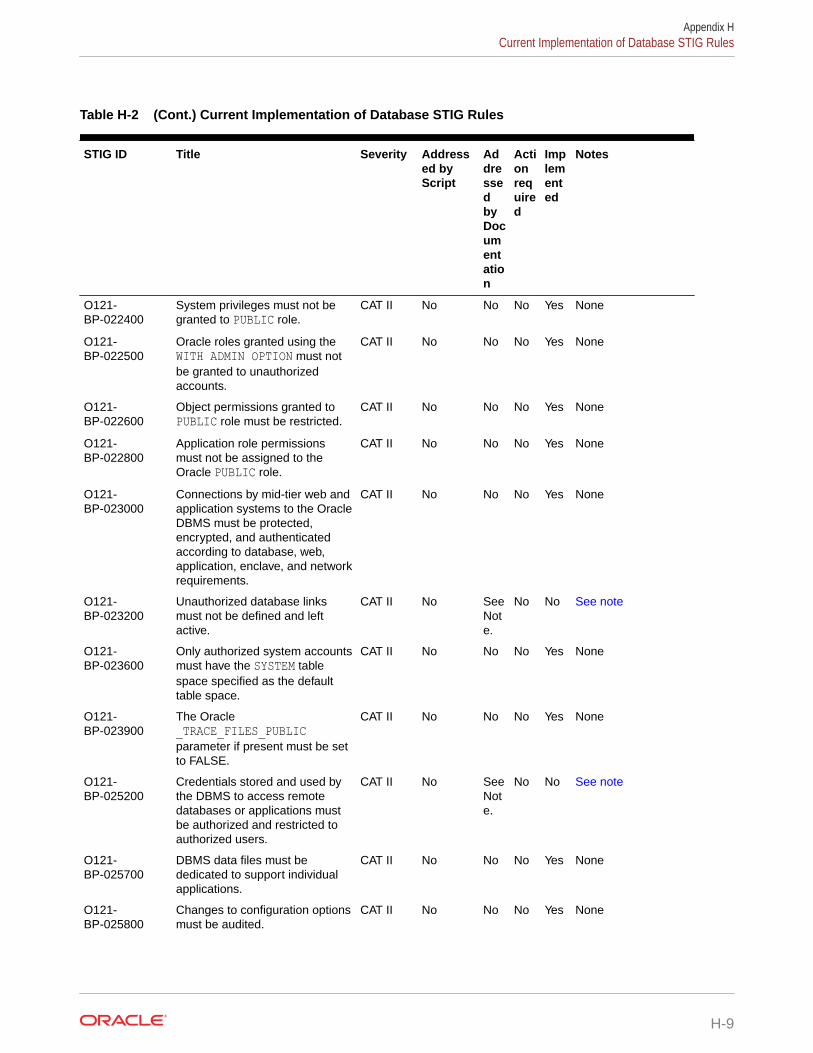
Table H-2 (Cont.) Current Implementation of Database STIG Rules
STIG ID Title Severity Addressed byScript
AddressedbyDocumentation
Actionrequired
Implemented
Notes
O121-BP-022400
System privileges must not begranted to PUBLIC role.
CAT II No No No Yes None
O121-BP-022500
Oracle roles granted using theWITH ADMIN OPTION must notbe granted to unauthorizedaccounts.
CAT II No No No Yes None
O121-BP-022600
Object permissions granted toPUBLIC role must be restricted.
CAT II No No No Yes None
O121-BP-022800
Application role permissionsmust not be assigned to theOracle PUBLIC role.
CAT II No No No Yes None
O121-BP-023000
Connections by mid-tier web andapplication systems to the OracleDBMS must be protected,encrypted, and authenticatedaccording to database, web,application, enclave, and networkrequirements.
CAT II No No No Yes None
O121-BP-023200
Unauthorized database linksmust not be defined and leftactive.
CAT II No SeeNote.
No No See note
O121-BP-023600
Only authorized system accountsmust have the SYSTEM tablespace specified as the defaulttable space.
CAT II No No No Yes None
O121-BP-023900
The Oracle_TRACE_FILES_PUBLICparameter if present must be setto FALSE.
CAT II No No No Yes None
O121-BP-025200
Credentials stored and used bythe DBMS to access remotedatabases or applications mustbe authorized and restricted toauthorized users.
CAT II No SeeNote.
No No See note
O121-BP-025700
DBMS data files must bededicated to support individualapplications.
CAT II No No No Yes None
O121-BP-025800
Changes to configuration optionsmust be audited.
CAT II No No No Yes None
Appendix HCurrent Implementation of Database STIG Rules
H-9
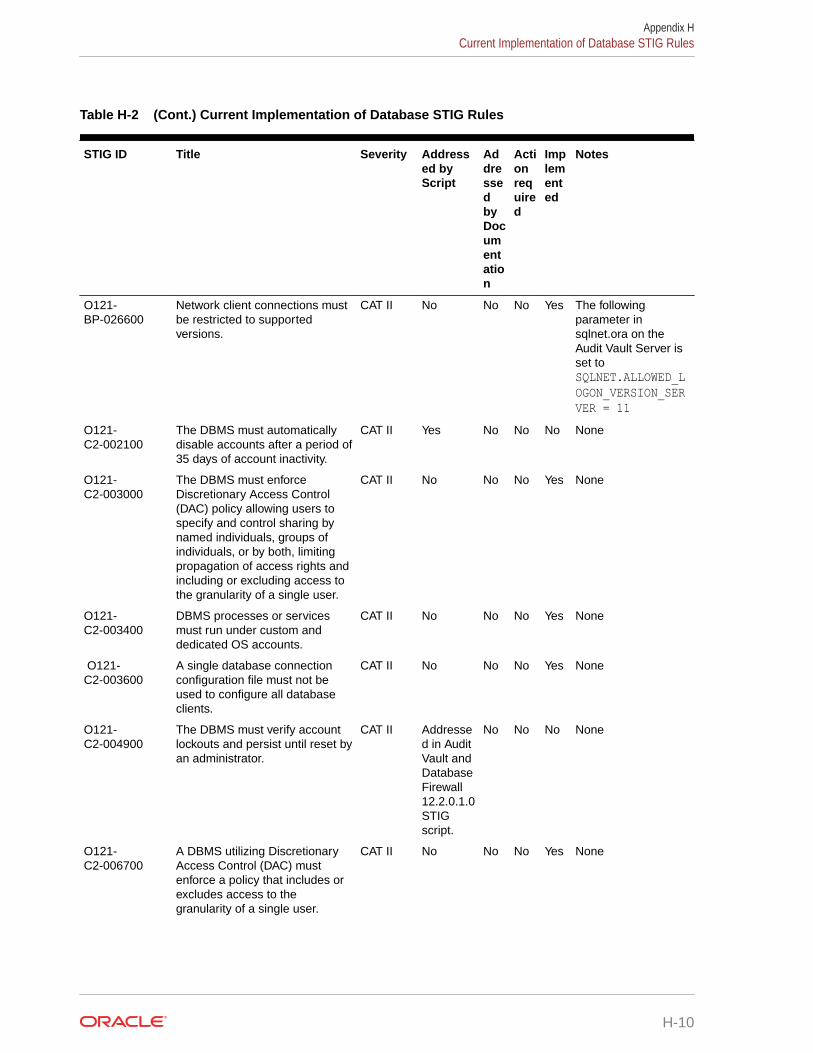
Table H-2 (Cont.) Current Implementation of Database STIG Rules
STIG ID Title Severity Addressed byScript
AddressedbyDocumentation
Actionrequired
Implemented
Notes
O121-BP-026600
Network client connections mustbe restricted to supportedversions.
CAT II No No No Yes The followingparameter insqlnet.ora on theAudit Vault Server isset toSQLNET.ALLOWED_LOGON_VERSION_SERVER = 11
O121-C2-002100
The DBMS must automaticallydisable accounts after a period of35 days of account inactivity.
CAT II Yes No No No None
O121-C2-003000
The DBMS must enforceDiscretionary Access Control(DAC) policy allowing users tospecify and control sharing bynamed individuals, groups ofindividuals, or by both, limitingpropagation of access rights andincluding or excluding access tothe granularity of a single user.
CAT II No No No Yes None
O121-C2-003400
DBMS processes or servicesmust run under custom anddedicated OS accounts.
CAT II No No No Yes None
O121-C2-003600
A single database connectionconfiguration file must not beused to configure all databaseclients.
CAT II No No No Yes None
O121-C2-004900
The DBMS must verify accountlockouts and persist until reset byan administrator.
CAT II Addressed in AuditVault andDatabaseFirewall12.2.0.1.0STIGscript.
No No No None
O121-C2-006700
A DBMS utilizing DiscretionaryAccess Control (DAC) mustenforce a policy that includes orexcludes access to thegranularity of a single user.
CAT II No No No Yes None
Appendix HCurrent Implementation of Database STIG Rules
H-10

Table H-2 (Cont.) Current Implementation of Database STIG Rules
STIG ID Title Severity Addressed byScript
AddressedbyDocumentation
Actionrequired
Implemented
Notes
O121-C2-006900
The DBMS must allowdesignated organizationalpersonnel to select specificevents that can be audited by thedatabase.
CAT II No No No Yes None
O121-C2-011500
Default demonstration, sampledatabases, database objects,and applications must beremoved.
CAT II No No No Yes None
O121-C2-011600
Unused database components,DBMS software, and databaseobjects must be removed.
CAT II No No No Yes None
O121-C2-011700
Unused database componentsthat are integrated in the DBMSand cannot be uninstalled mustbe disabled.
CAT II No No No Yes None
O121-C2-013800
The DBMS must supportorganizational requirements todisable user accounts after adefined time period of inactivityset by the organization.
CAT II Yes No No No None
O121-C2-014600
The DBMS must supportorganizational requirements toenforce password encryption forstorage.
CAT II No No No Yes None
O121-C2-015100
DBMS passwords must not bestored in compiled, encoded, orencrypted batch jobs orcompiled, encoded, or encryptedapplication source code.
CAT II No No No Yes None.
O121-C2-015200
The DBMS must enforcepassword maximum lifetimerestrictions.
CAT II Yes No No No None
Note:
The use of the DB link has already been documented in Audit Vault and DatabaseFirewall 12.2.0.1.0 STIG documentation.
Appendix HCurrent Implementation of Database STIG Rules
H-11

H.5 Additional STIG Rule NotesLearn about additional advice regarding STIG rules.
Related Topics
• Current Implementation of Database STIG RulesLearn about the current implementation of database STIG rules on Oracle AuditVault and Database Firewall.
H.5.1 DG0008-ORACLE11 STIG RuleLearn about STIG rule DG0008-ORACLE11.
Object owner accounts in Audit Vault Server:
• APEX– APEX_180200 (Oracle AVDF 20.1 to 20.3)– APEX_200100 (Oracle AVDF 20.4 to 20.5)– APEX_210100 (Oracle AVDF 20.6 and later)
• MANAGEMENT• AVRULEOWNER• SECURELOG• AVREPORTUSER• AVSYSObject owner accounts in Database Firewall:
• MANAGEMENT• SECURELOG
H.5.2 DG0075-ORACLE11 and DO0250-ORACLE11 STIG RulesLearn about STIG rules DG0075-ORACLE11 and DO0250-ORACLE11.
Database links used on Oracle Audit Vault Server:
AVRPTUSR_LINK.DBFWDB: (DESCRIPTION=(ADDRESS=(PROTOCOL=TCP)(HOST=127.0.0.1)(PORT=1521)) (CONNECT_DATA=(SERVICE_NAME=dbfwdb)))
The database link is created during installation of Oracle Audit Vault Server and isused by the REDO collector.
H.5.3 DG0116-ORACLE11 STIG RuleLearn about STIG rule DG0116-ORACLE11.
Table H-3 lists accounts and role assignments in Audit Vault Server.
Appendix HAdditional STIG Rule Notes
H-12

Table H-3 Accounts and Role Assignments in Audit Vault Server
Account Role Assignment
AV_ADMIN AQ_ADMINISTRATOR_ROLESELECT_CATALOG_ROLEXDBADMIN
AV_AUDITOR SELECT_CATALOG_ROLEAV_MONITOR SELECT_CATALOG_ROLEAV_SOURCE AQ_USER_ROLEHS_ADMIN_ROLE HS_ADMIN_EXECUTE_ROLE
HS_ADMIN_SELECT_ROLEOEM_MONITOR SELECT_CATALOG_ROLE
Table H-4 lists accounts and role assignments in Database Firewall.
Table H-4 Accounts and Role Assignments in Database Firewall
Account Role Assignment
HS_ADMIN_ROLE HS_ADMIN_EXECUTE_ROLEHS_ADMIN_SELECT_ROLE
OEM_MONITOR SELECT_CATALOG_ROLE
H.6 Current Implementation of Operating System STIG RulesLearn about the current implementation of operating system STIG rules.
This topic contains information on the current implementation of Operating System STIGRules on Oracle Audit Vault and Database Firewall.
Note:
The Operating System STIG Rule set reference is as follows:
Table H-5 Operating System STIG Rule Set Reference
Reference Detail
Document Oracle Linux 7 Security Technical Implementation Guide
Version 1.1
Release 7
Release Date 03/February/2020
Document Link Oracle Linux Security Technical Implementation Guide
Appendix HCurrent Implementation of Operating System STIG Rules
H-13

Table H-6 User Action – Definition and Guidelines
User action Description of the guideline
None The guideline is implemented by default and no user action isrequired.
Enable strict mode The guideline can be implemented by switching the appliance tostrict mode.
See Also:
Enabling and Disabling STIG Ruleson Oracle Audit Vault and DatabaseFirewall
Site policy The guideline can be implemented depending on local policy andit requires administrator action. See the Notes column foradditional information on implementation.
Administrative task The guideline implementation is administrator configuration actionafter installation or upgrade. It can also be a regularly used anddefined administrative procedure.
The table below contains the current implementation of Operating System STIG Ruleson Oracle Audit Vault and Database Firewall.
Table H-7 Current Implementation of Operating System STIG Rules
STIG ID Severity User action Title Notes
OL07-00-010290 CAT I None The Oracle Linux operating systemmust not have accounts configuredwith blank or null passwords.
Implemented by default
OL07-00-010300 CAT I None The Oracle Linux operating systemmust be configured so that the SSHdaemon does not allowauthentication using an emptypassword.
Implemented by default
OL07-00-010440 CAT I None The Oracle Linux operating systemmust not allow an unattended orautomatic logon to the system via agraphical user interface.
Implemented by default
OL07-00-010450 CAT I None The Oracle Linux operating systemmust not allow an unrestricted logonto the system.
Implemented by default
OL07-00-010480 CAT I None Oracle Linux operating systems priorto version 7.2 with a Basic Input/Output System (BIOS) must requireauthentication upon booting intosingle-user and maintenancemodes.
Implemented by default
Appendix HCurrent Implementation of Operating System STIG Rules
H-14

Table H-7 (Cont.) Current Implementation of Operating System STIG Rules
STIG ID Severity User action Title Notes
OL07-00-010482 CAT I None Oracle Linux operating systemsversion 7.2 or newer with a BasicInput/Output System (BIOS) mustrequire authentication upon bootinginto single-user and maintenancemodes.
Implemented by default
OL07-00-010490 CAT I None Oracle Linux operating systems priorto version 7.2 using UnifiedExtensible Firmware Interface(UEFI) must require authenticationupon booting into single-user andmaintenance modes.
Implemented by default
OL07-00-010491 CAT I None Oracle Linux operating systemsversion 7.2 or newer using UnifiedExtensible Firmware Interface(UEFI) must require authenticationupon booting into single-user andmaintenance modes.
Implemented by default
OL07-00-020000 CAT I None The Oracle Linux operating systemmust not have the rsh-serverpackage installed.
Implemented by default
OL07-00-020010 CAT I None The Oracle Linux operating systemmust not have the ypserv packageinstalled.
Implemented by default
OL07-00-020050 CAT I None The Oracle Linux operating systemmust prevent the installation ofsoftware, patches, service packs,device drivers, or operating systemcomponents from a repositorywithout verification they have beendigitally signed using a certificatethat is issued by a CertificateAuthority (CA) that is recognizedand approved by the organization.
Implemented by default
OL07-00-020250 CAT I None The Oracle Linux operating systemmust be a vendor supportedrelease.
Implemented by default
OL07-00-020310 CAT I None The Oracle Linux operating systemmust be configured so that the rootaccount must be the only accounthaving unrestricted access to thesystem.
Implemented by default
OL07-00-021710 CAT I None The Oracle Linux operating systemmust not have the telnet-serverpackage installed.
Implemented by default
Appendix HCurrent Implementation of Operating System STIG Rules
H-15

Table H-7 (Cont.) Current Implementation of Operating System STIG Rules
STIG ID Severity User action Title Notes
OL07-00-030000 CAT I None The Oracle Linux operating systemmust be configured so that auditingis configured to produce recordscontaining information to establishwhat type of events occurred, wherethe events occurred, the source ofthe events, and the outcome of theevents. These audit records mustalso identify individual identities ofgroup account users.
Implemented by default
OL07-00-040390 CAT I None The Oracle Linux operating systemmust be configured so that the SSHdaemon is configured to only usethe SSHv2 protocol.
Implemented by default
OL07-00-040540 CAT I None The Oracle Linux operating systemmust not contain .shosts files.
Implemented by default
OL07-00-040550 CAT I None The Oracle Linux operating systemmust not contain shosts.equiv files.
Implemented by default
OL07-00-040690 CAT I None The Oracle Linux operating systemmust not have a File TransferProtocol (FTP) server packageinstalled unless needed.
Implemented by default
OL07-00-040700 CAT I None The Oracle Linux operating systemmust not have the Trivial FileTransfer Protocol (TFTP) serverpackage installed if not required foroperational support.
Implemented by default
OL07-00-040710 CAT I None The Oracle Linux operating systemmust be configured so that remote Xconnections for interactive users areencrypted.
AVDF does not serve Xconnections.
OL07-00-040800 CAT I None SNMP community strings on theOracle Linux operating system mustbe changed from the default.
Implemented by default
OL07-00-010030 CAT II None The Oracle Linux operating systemmust display the StandardMandatory DoD Notice and ConsentBanner before granting local orremote access to the system via agraphical user logon.
AVDF does not install agraphical user login
OL07-00-010040 CAT II None The Oracle Linux operating systemmust display the approved StandardMandatory DoD Notice and ConsentBanner before granting local orremote access to the system via agraphical user logon.
AVDF does not install agraphical user login
OL07-00-010060 CAT II None The Oracle Linux operating systemmust enable a user session lockuntil that user re-establishes accessusing established identification andauthentication procedures.
Implemented by default
Appendix HCurrent Implementation of Operating System STIG Rules
H-16
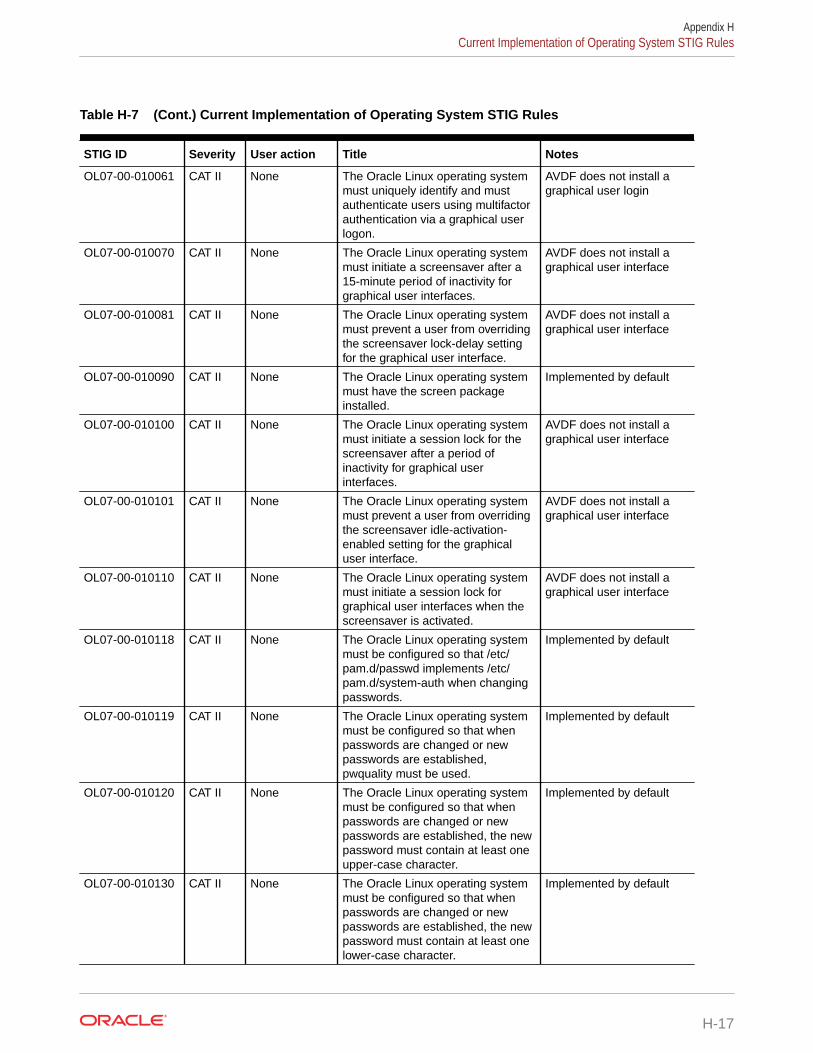
Table H-7 (Cont.) Current Implementation of Operating System STIG Rules
STIG ID Severity User action Title Notes
OL07-00-010061 CAT II None The Oracle Linux operating systemmust uniquely identify and mustauthenticate users using multifactorauthentication via a graphical userlogon.
AVDF does not install agraphical user login
OL07-00-010070 CAT II None The Oracle Linux operating systemmust initiate a screensaver after a15-minute period of inactivity forgraphical user interfaces.
AVDF does not install agraphical user interface
OL07-00-010081 CAT II None The Oracle Linux operating systemmust prevent a user from overridingthe screensaver lock-delay settingfor the graphical user interface.
AVDF does not install agraphical user interface
OL07-00-010090 CAT II None The Oracle Linux operating systemmust have the screen packageinstalled.
Implemented by default
OL07-00-010100 CAT II None The Oracle Linux operating systemmust initiate a session lock for thescreensaver after a period ofinactivity for graphical userinterfaces.
AVDF does not install agraphical user interface
OL07-00-010101 CAT II None The Oracle Linux operating systemmust prevent a user from overridingthe screensaver idle-activation-enabled setting for the graphicaluser interface.
AVDF does not install agraphical user interface
OL07-00-010110 CAT II None The Oracle Linux operating systemmust initiate a session lock forgraphical user interfaces when thescreensaver is activated.
AVDF does not install agraphical user interface
OL07-00-010118 CAT II None The Oracle Linux operating systemmust be configured so that /etc/pam.d/passwd implements /etc/pam.d/system-auth when changingpasswords.
Implemented by default
OL07-00-010119 CAT II None The Oracle Linux operating systemmust be configured so that whenpasswords are changed or newpasswords are established,pwquality must be used.
Implemented by default
OL07-00-010120 CAT II None The Oracle Linux operating systemmust be configured so that whenpasswords are changed or newpasswords are established, the newpassword must contain at least oneupper-case character.
Implemented by default
OL07-00-010130 CAT II None The Oracle Linux operating systemmust be configured so that whenpasswords are changed or newpasswords are established, the newpassword must contain at least onelower-case character.
Implemented by default
Appendix HCurrent Implementation of Operating System STIG Rules
H-17

Table H-7 (Cont.) Current Implementation of Operating System STIG Rules
STIG ID Severity User action Title Notes
OL07-00-010140 CAT II None The Oracle Linux operating systemmust be configured so that whenpasswords are changed or newpasswords are assigned, the newpassword must contain at least onenumeric character.
Implemented by default
OL07-00-010150 CAT II None The Oracle Linux operating systemmust be configured so that whenpasswords are changed or newpasswords are established, the newpassword must contain at least onespecial character.
Implemented by default
OL07-00-010160 CAT II None The Oracle Linux operating systemmust be configured so that whenpasswords are changed a minimumof eight of the total number ofcharacters must be changed.
Implemented by default
OL07-00-010170 CAT II None The Oracle Linux operating systemmust be configured so that whenpasswords are changed a minimumof four character classes must bechanged.
Implemented by default
OL07-00-010180 CAT II None The Oracle Linux operating systemmust be configured so that whenpasswords are changed the numberof repeating consecutive charactersmust not be more than threecharacters.
Implemented by default
OL07-00-010190 CAT II None The Oracle Linux operating systemmust be configured so that whenpasswords are changed the numberof repeating characters of the samecharacter class must not be morethan four characters.
Implemented by default
OL07-00-010200 CAT II None The Oracle Linux operating systemmust be configured so that the PAMsystem service is configured to storeonly encrypted representations ofpasswords.
Implemented by default
OL07-00-010210 CAT II None The Oracle Linux operating systemmust be configured to use theshadow file to store only encryptedrepresentations of passwords.
Implemented by default
OL07-00-010220 CAT II None The Oracle Linux operating systemmust be configured so that user andgroup account administration utilitiesare configured to store onlyencrypted representations ofpasswords.
Implemented by default
Appendix HCurrent Implementation of Operating System STIG Rules
H-18

Table H-7 (Cont.) Current Implementation of Operating System STIG Rules
STIG ID Severity User action Title Notes
OL07-00-010230 CAT II None The Oracle Linux operating systemmust be configured so thatpasswords for new users arerestricted to a 24 hours/1 dayminimum lifetime.
Implemented by default
OL07-00-010240 CAT II None The Oracle Linux operating systemmust be configured so thatpasswords are restricted to a 24hours/1 day minimum lifetime.
Implemented by default
OL07-00-010250 CAT II Enable strictmode
The Oracle Linux operating systemmust be configured so thatpasswords for new users arerestricted to a 60-day maximumlifetime.
Implemented in strict mode
OL07-00-010260 CAT II None The Oracle Linux operating systemmust be configured so that existingpasswords are restricted to a 60-daymaximum lifetime.
Implemented by default
OL07-00-010270 CAT II None The Oracle Linux operating systemmust be configured so thatpasswords are prohibited from reusefor a minimum of five generations.
Implemented by default
OL07-00-010280 CAT II None The Oracle Linux operating systemmust be configured so thatpasswords are a minimum of 15characters in length.
Implemented by default
OL07-00-010310 CAT II None The Oracle Linux operating systemmust disable account identifiers(individuals, groups, roles, anddevices) if the password expires.
Implemented by default
OL07-00-010430 CAT II None The Oracle Linux operating systemmust be configured so that the delaybetween logon prompts following afailed console logon attempt is atleast four seconds.
Implemented by default
OL07-00-010460 CAT II None The Oracle Linux operating systemmust not allow users to overrideSSH environment variables.
Implemented by default
OL07-00-010470 CAT II None The Oracle Linux operating systemmust not allow a non-certificatetrusted host SSH logon to thesystem.
Implemented by default
OL07-00-010481 CAT II None The Oracle Linux operating systemmust require authentication uponbooting into single-user andmaintenance modes.
Implemented by default
OL07-00-020100 CAT II None The Oracle Linux operating systemmust be configured to disable USBmass storage.
Implemented by default
Appendix HCurrent Implementation of Operating System STIG Rules
H-19

Table H-7 (Cont.) Current Implementation of Operating System STIG Rules
STIG ID Severity User action Title Notes
OL07-00-020101 CAT II None The Oracle Linux operating systemmust be configured so that theDatagram Congestion ControlProtocol (DCCP) kernel module isdisabled unless required.
Implemented by default
OL07-00-020110 CAT II None The Oracle Linux operating systemmust disable the file systemautomounter unless required.
Implemented by default
OL07-00-020240 CAT II None The Oracle Linux operating systemmust define default permissions forall authenticated users in such away that the user can only read andmodify their own files.
Implemented by default
OL07-00-020610 CAT II None The Oracle Linux operating systemmust be configured so that all localinteractive user accounts, uponcreation, are assigned a homedirectory.
Implemented by default
OL07-00-021020 CAT II None The Oracle Linux operating systemmust prevent files with the setuidand setgid bit set from beingexecuted on file systems that arebeing imported via Network FileSystem (NFS).
Implemented by default
OL07-00-021021 CAT II None The Oracle Linux operating systemmust prevent binary files from beingexecuted on file systems that arebeing imported via Network FileSystem (NFS).
Implemented by default
OL07-00-021030 CAT II None The Oracle Linux operating systemmust be configured so that all world-writable directories are group-ownedby root, sys, bin, or an applicationgroup.
Implemented by default
OL07-00-021110 CAT II None The Oracle Linux operating systemmust be configured so that thecron.allow file, if it exists, is ownedby root.
Implemented by default
OL07-00-021120 CAT II None The Oracle Linux operating systemmust be configured so that thecron.allow file, if it exists, is group-owned by root.
Implemented by default
OL07-00-030210 CAT II None The Oracle Linux operating systemmust take appropriate action whenthe audisp-remote buffer is full.
Implemented by default
OL07-00-030211 CAT II None The Oracle Linux operating systemmust label all off-loaded audit logsbefore sending them to the centrallog server.
Implemented by default
Appendix HCurrent Implementation of Operating System STIG Rules
H-20
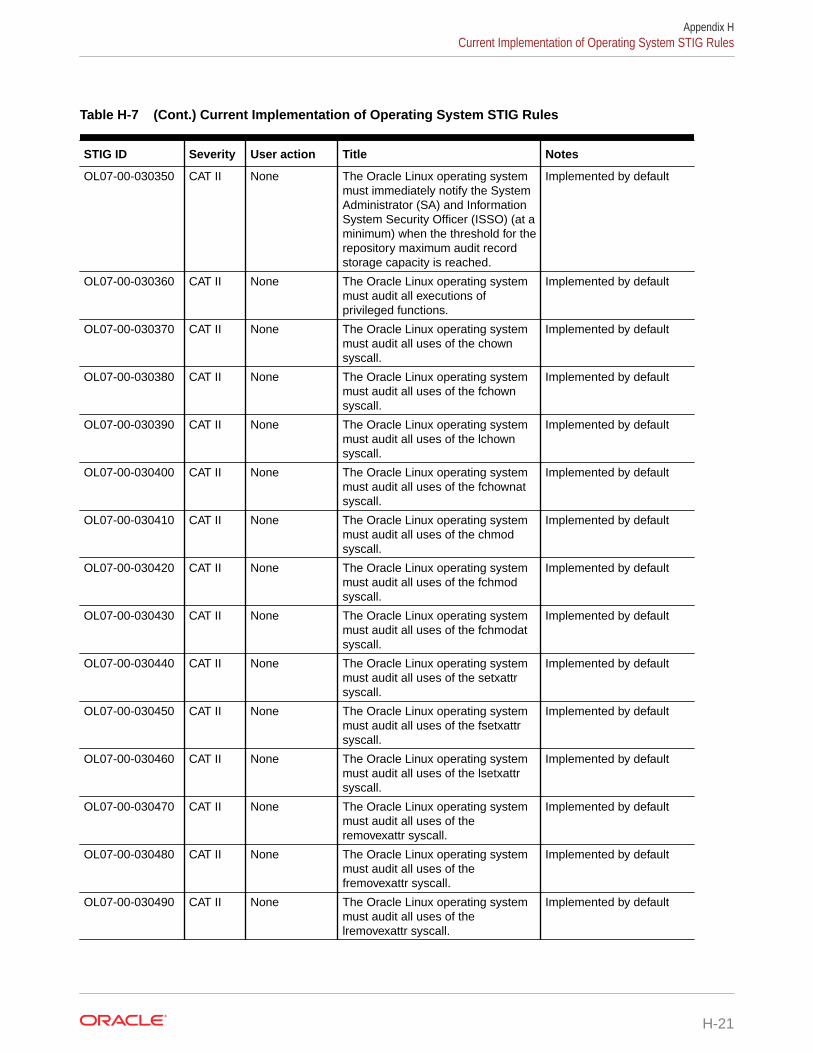
Table H-7 (Cont.) Current Implementation of Operating System STIG Rules
STIG ID Severity User action Title Notes
OL07-00-030350 CAT II None The Oracle Linux operating systemmust immediately notify the SystemAdministrator (SA) and InformationSystem Security Officer (ISSO) (at aminimum) when the threshold for therepository maximum audit recordstorage capacity is reached.
Implemented by default
OL07-00-030360 CAT II None The Oracle Linux operating systemmust audit all executions ofprivileged functions.
Implemented by default
OL07-00-030370 CAT II None The Oracle Linux operating systemmust audit all uses of the chownsyscall.
Implemented by default
OL07-00-030380 CAT II None The Oracle Linux operating systemmust audit all uses of the fchownsyscall.
Implemented by default
OL07-00-030390 CAT II None The Oracle Linux operating systemmust audit all uses of the lchownsyscall.
Implemented by default
OL07-00-030400 CAT II None The Oracle Linux operating systemmust audit all uses of the fchownatsyscall.
Implemented by default
OL07-00-030410 CAT II None The Oracle Linux operating systemmust audit all uses of the chmodsyscall.
Implemented by default
OL07-00-030420 CAT II None The Oracle Linux operating systemmust audit all uses of the fchmodsyscall.
Implemented by default
OL07-00-030430 CAT II None The Oracle Linux operating systemmust audit all uses of the fchmodatsyscall.
Implemented by default
OL07-00-030440 CAT II None The Oracle Linux operating systemmust audit all uses of the setxattrsyscall.
Implemented by default
OL07-00-030450 CAT II None The Oracle Linux operating systemmust audit all uses of the fsetxattrsyscall.
Implemented by default
OL07-00-030460 CAT II None The Oracle Linux operating systemmust audit all uses of the lsetxattrsyscall.
Implemented by default
OL07-00-030470 CAT II None The Oracle Linux operating systemmust audit all uses of theremovexattr syscall.
Implemented by default
OL07-00-030480 CAT II None The Oracle Linux operating systemmust audit all uses of thefremovexattr syscall.
Implemented by default
OL07-00-030490 CAT II None The Oracle Linux operating systemmust audit all uses of thelremovexattr syscall.
Implemented by default
Appendix HCurrent Implementation of Operating System STIG Rules
H-21
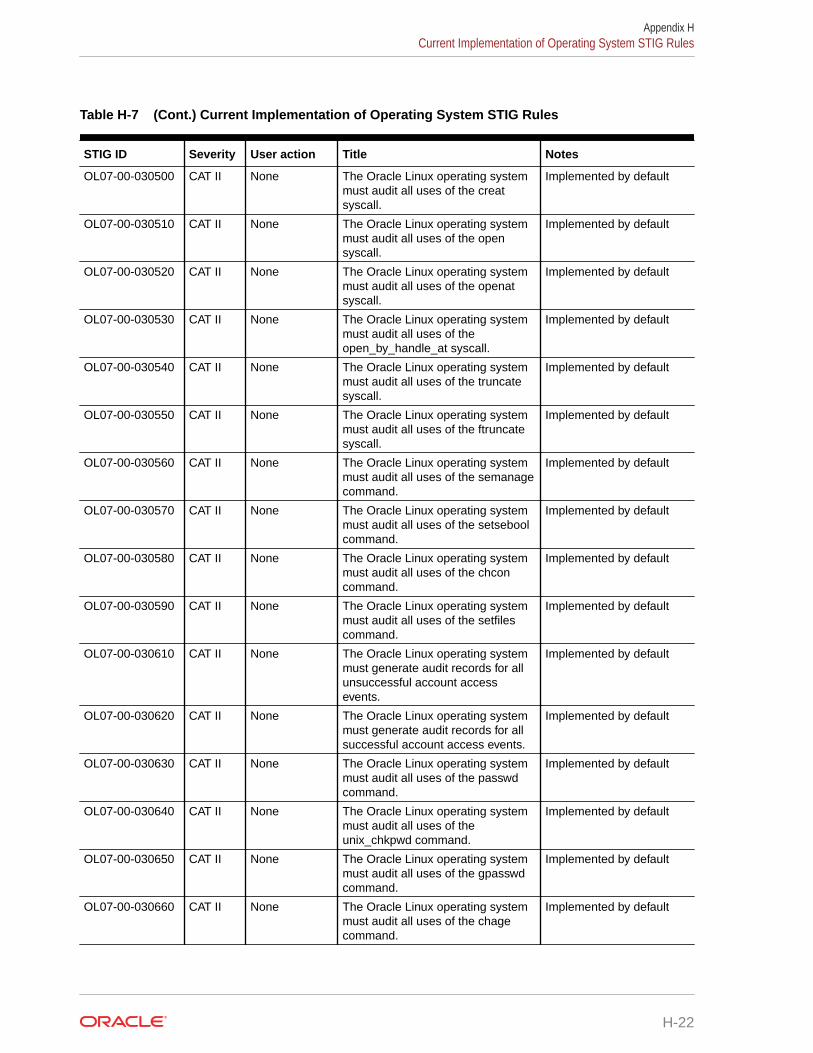
Table H-7 (Cont.) Current Implementation of Operating System STIG Rules
STIG ID Severity User action Title Notes
OL07-00-030500 CAT II None The Oracle Linux operating systemmust audit all uses of the creatsyscall.
Implemented by default
OL07-00-030510 CAT II None The Oracle Linux operating systemmust audit all uses of the opensyscall.
Implemented by default
OL07-00-030520 CAT II None The Oracle Linux operating systemmust audit all uses of the openatsyscall.
Implemented by default
OL07-00-030530 CAT II None The Oracle Linux operating systemmust audit all uses of theopen_by_handle_at syscall.
Implemented by default
OL07-00-030540 CAT II None The Oracle Linux operating systemmust audit all uses of the truncatesyscall.
Implemented by default
OL07-00-030550 CAT II None The Oracle Linux operating systemmust audit all uses of the ftruncatesyscall.
Implemented by default
OL07-00-030560 CAT II None The Oracle Linux operating systemmust audit all uses of the semanagecommand.
Implemented by default
OL07-00-030570 CAT II None The Oracle Linux operating systemmust audit all uses of the setseboolcommand.
Implemented by default
OL07-00-030580 CAT II None The Oracle Linux operating systemmust audit all uses of the chconcommand.
Implemented by default
OL07-00-030590 CAT II None The Oracle Linux operating systemmust audit all uses of the setfilescommand.
Implemented by default
OL07-00-030610 CAT II None The Oracle Linux operating systemmust generate audit records for allunsuccessful account accessevents.
Implemented by default
OL07-00-030620 CAT II None The Oracle Linux operating systemmust generate audit records for allsuccessful account access events.
Implemented by default
OL07-00-030630 CAT II None The Oracle Linux operating systemmust audit all uses of the passwdcommand.
Implemented by default
OL07-00-030640 CAT II None The Oracle Linux operating systemmust audit all uses of theunix_chkpwd command.
Implemented by default
OL07-00-030650 CAT II None The Oracle Linux operating systemmust audit all uses of the gpasswdcommand.
Implemented by default
OL07-00-030660 CAT II None The Oracle Linux operating systemmust audit all uses of the chagecommand.
Implemented by default
Appendix HCurrent Implementation of Operating System STIG Rules
H-22

Table H-7 (Cont.) Current Implementation of Operating System STIG Rules
STIG ID Severity User action Title Notes
OL07-00-030670 CAT II None The Oracle Linux operating systemmust audit all uses of the userhelpercommand.
Implemented by default
OL07-00-030680 CAT II None The Oracle Linux operating systemmust audit all uses of the sucommand.
Implemented by default
OL07-00-030690 CAT II None The Oracle Linux operating systemmust audit all uses of the sudocommand.
Implemented by default
OL07-00-030700 CAT II None The Oracle Linux operating systemmust audit all uses of the sudoersfile and all files in the /etc/sudoers.d/directory.
Implemented by default
OL07-00-030710 CAT II None The Oracle Linux operating systemmust audit all uses of the newgrpcommand.
Implemented by default
OL07-00-030720 CAT II None The Oracle Linux operating systemmust audit all uses of the chshcommand.
Implemented by default
OL07-00-030740 CAT II None The Oracle Linux operating systemmust audit all uses of the mountcommand and syscall.
Implemented by default
OL07-00-030750 CAT II None The Oracle Linux operating systemmust audit all uses of the umountcommand.
Implemented by default
OL07-00-030760 CAT II None The Oracle Linux operating systemmust audit all uses of the postdropcommand.
Implemented by default
OL07-00-030770 CAT II None The Oracle Linux operating systemmust audit all uses of the postqueuecommand.
Implemented by default
OL07-00-030780 CAT II None The Oracle Linux operating systemmust audit all uses of the ssh-keysign command.
Implemented by default
OL07-00-030800 CAT II None The Oracle Linux operating systemmust audit all uses of the crontabcommand.
Implemented by default
OL07-00-030810 CAT II None The Oracle Linux operating systemmust audit all uses of thepam_timestamp_check command.
Implemented by default
OL07-00-030819 CAT II None The Oracle Linux operating systemmust audit all uses of thecreate_module syscall.
Implemented by default
OL07-00-030820 CAT II None The Oracle Linux operating systemmust audit all uses of theinit_module syscall.
Implemented by default
OL07-00-030821 CAT II None The Oracle Linux operating systemmust audit all uses of thefinit_module syscall.
Implemented by default
Appendix HCurrent Implementation of Operating System STIG Rules
H-23
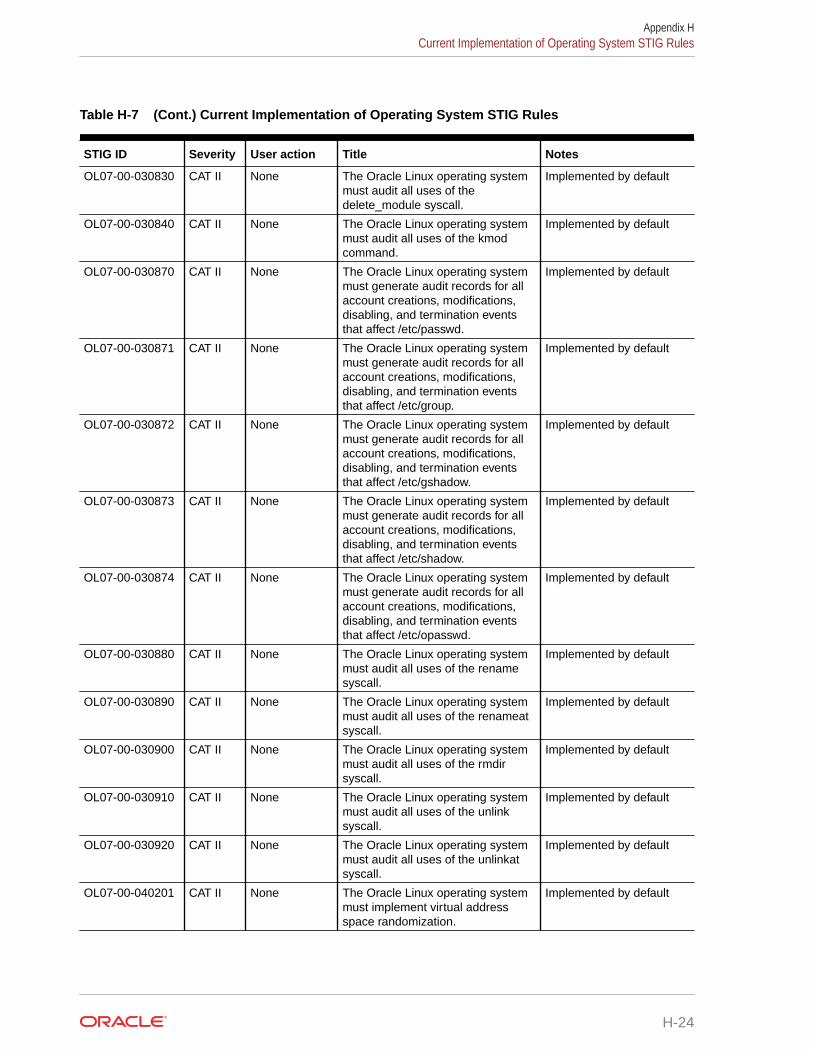
Table H-7 (Cont.) Current Implementation of Operating System STIG Rules
STIG ID Severity User action Title Notes
OL07-00-030830 CAT II None The Oracle Linux operating systemmust audit all uses of thedelete_module syscall.
Implemented by default
OL07-00-030840 CAT II None The Oracle Linux operating systemmust audit all uses of the kmodcommand.
Implemented by default
OL07-00-030870 CAT II None The Oracle Linux operating systemmust generate audit records for allaccount creations, modifications,disabling, and termination eventsthat affect /etc/passwd.
Implemented by default
OL07-00-030871 CAT II None The Oracle Linux operating systemmust generate audit records for allaccount creations, modifications,disabling, and termination eventsthat affect /etc/group.
Implemented by default
OL07-00-030872 CAT II None The Oracle Linux operating systemmust generate audit records for allaccount creations, modifications,disabling, and termination eventsthat affect /etc/gshadow.
Implemented by default
OL07-00-030873 CAT II None The Oracle Linux operating systemmust generate audit records for allaccount creations, modifications,disabling, and termination eventsthat affect /etc/shadow.
Implemented by default
OL07-00-030874 CAT II None The Oracle Linux operating systemmust generate audit records for allaccount creations, modifications,disabling, and termination eventsthat affect /etc/opasswd.
Implemented by default
OL07-00-030880 CAT II None The Oracle Linux operating systemmust audit all uses of the renamesyscall.
Implemented by default
OL07-00-030890 CAT II None The Oracle Linux operating systemmust audit all uses of the renameatsyscall.
Implemented by default
OL07-00-030900 CAT II None The Oracle Linux operating systemmust audit all uses of the rmdirsyscall.
Implemented by default
OL07-00-030910 CAT II None The Oracle Linux operating systemmust audit all uses of the unlinksyscall.
Implemented by default
OL07-00-030920 CAT II None The Oracle Linux operating systemmust audit all uses of the unlinkatsyscall.
Implemented by default
OL07-00-040201 CAT II None The Oracle Linux operating systemmust implement virtual addressspace randomization.
Implemented by default
Appendix HCurrent Implementation of Operating System STIG Rules
H-24
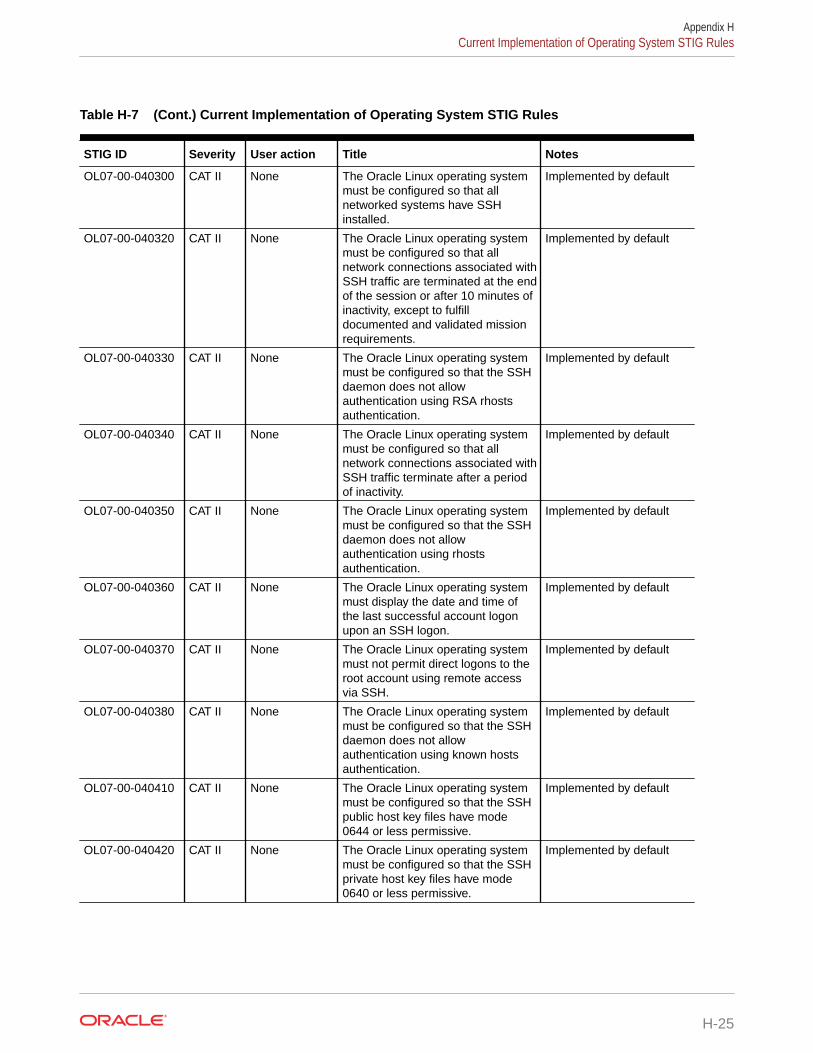
Table H-7 (Cont.) Current Implementation of Operating System STIG Rules
STIG ID Severity User action Title Notes
OL07-00-040300 CAT II None The Oracle Linux operating systemmust be configured so that allnetworked systems have SSHinstalled.
Implemented by default
OL07-00-040320 CAT II None The Oracle Linux operating systemmust be configured so that allnetwork connections associated withSSH traffic are terminated at the endof the session or after 10 minutes ofinactivity, except to fulfilldocumented and validated missionrequirements.
Implemented by default
OL07-00-040330 CAT II None The Oracle Linux operating systemmust be configured so that the SSHdaemon does not allowauthentication using RSA rhostsauthentication.
Implemented by default
OL07-00-040340 CAT II None The Oracle Linux operating systemmust be configured so that allnetwork connections associated withSSH traffic terminate after a periodof inactivity.
Implemented by default
OL07-00-040350 CAT II None The Oracle Linux operating systemmust be configured so that the SSHdaemon does not allowauthentication using rhostsauthentication.
Implemented by default
OL07-00-040360 CAT II None The Oracle Linux operating systemmust display the date and time ofthe last successful account logonupon an SSH logon.
Implemented by default
OL07-00-040370 CAT II None The Oracle Linux operating systemmust not permit direct logons to theroot account using remote accessvia SSH.
Implemented by default
OL07-00-040380 CAT II None The Oracle Linux operating systemmust be configured so that the SSHdaemon does not allowauthentication using known hostsauthentication.
Implemented by default
OL07-00-040410 CAT II None The Oracle Linux operating systemmust be configured so that the SSHpublic host key files have mode0644 or less permissive.
Implemented by default
OL07-00-040420 CAT II None The Oracle Linux operating systemmust be configured so that the SSHprivate host key files have mode0640 or less permissive.
Implemented by default
Appendix HCurrent Implementation of Operating System STIG Rules
H-25

Table H-7 (Cont.) Current Implementation of Operating System STIG Rules
STIG ID Severity User action Title Notes
OL07-00-040430 CAT II None The Oracle Linux operating systemmust be configured so that the SSHdaemon does not permit GenericSecurity Service ApplicationProgram Interface (GSSAPI)authentication unless needed.
Implemented by default
OL07-00-040440 CAT II None The Oracle Linux operating systemmust be configured so that the SSHdaemon does not permit Kerberosauthentication unless needed.
Implemented by default
OL07-00-040450 CAT II None The Oracle Linux operating systemmust be configured so that the SSHdaemon performs strict modechecking of home directoryconfiguration files.
Implemented by default
OL07-00-040460 CAT II None The Oracle Linux operating systemmust be configured so that the SSHdaemon uses privilege separation.
Implemented by default
OL07-00-040470 CAT II None The Oracle Linux operating systemmust be configured so that the SSHdaemon does not allow compressionor only allows compression aftersuccessful authentication.
Implemented by default
OL07-00-040610 CAT II None The Oracle Linux operating systemmust not forward Internet Protocolversion 4 (IPv4) source-routedpackets.
Implemented by default
OL07-00-040620 CAT II None The Oracle Linux operating systemmust not forward Internet Protocolversion 4 (IPv4) source-routedpackets by default.
Implemented by default
OL07-00-040630 CAT II None The Oracle Linux operating systemmust not respond to InternetProtocol version 4 (IPv4) InternetControl Message Protocol (ICMP)echoes sent to a broadcast address.
Implemented by default
OL07-00-040640 CAT II None The Oracle Linux operating systemmust prevent Internet Protocolversion 4 (IPv4) Internet ControlMessage Protocol (ICMP) redirectmessages from being accepted.
Implemented by default
OL07-00-040641 CAT II None The Oracle Linux operating systemmust ignore Internet Protocolversion 4 (IPv4) Internet ControlMessage Protocol (ICMP) redirectmessages.
Implemented by default
OL07-00-040650 CAT II None The Oracle Linux operating systemmust not allow interfaces to performInternet Protocol version 4 (IPv4)Internet Control Message Protocol(ICMP) redirects by default.
Implemented by default
Appendix HCurrent Implementation of Operating System STIG Rules
H-26

Table H-7 (Cont.) Current Implementation of Operating System STIG Rules
STIG ID Severity User action Title Notes
OL07-00-040660 CAT II None The Oracle Linux operating systemmust not send Internet Protocolversion 4 (IPv4) Internet ControlMessage Protocol (ICMP) redirects.
Implemented by default
OL07-00-040730 CAT II None The Oracle Linux operating systemmust not have an X Windows displaymanager installed unless approved.
Implemented by default
OL07-00-040740 CAT II None The Oracle Linux operating systemmust not be performing packetforwarding unless the system is arouter.
Implemented by default
OL07-00-040830 CAT II None The Oracle Linux operating systemmust not forward IPv6 source-routedpackets.
Implemented by default
OL07-00-020300 CAT III None The Oracle Linux operating systemmust be configured so that all GroupIdentifiers (GIDs) referenced inthe /etc/passwd file are defined inthe /etc/group file.
Implemented by default
OL07-00-021310 CAT III None The Oracle Linux operating systemmust be configured so that aseparate file system is used for userhome directories (such as /home oran equivalent).
Implemented by default
OL07-00-021320 CAT III None The Oracle Linux operating systemmust use a separate file system for /var.
AVDF uses separate filesystems for directoriesunder /var.
OL07-00-021340 CAT III None The Oracle Linux operating systemmust use a separate file systemfor /tmp (or equivalent).
Implemented by default
OL07-00-040000 CAT III None The Oracle Linux operating systemmust limit the number of concurrentsessions to 10 for all accountsand/or account types.
Implemented by default
OL07-00-040600 CAT III Administrativetask
At least two name servers must beconfigured for Oracle Linuxoperating systems using DNSresolution.
Use the WUI to assignDNS servers.
Appendix HCurrent Implementation of Operating System STIG Rules
H-27
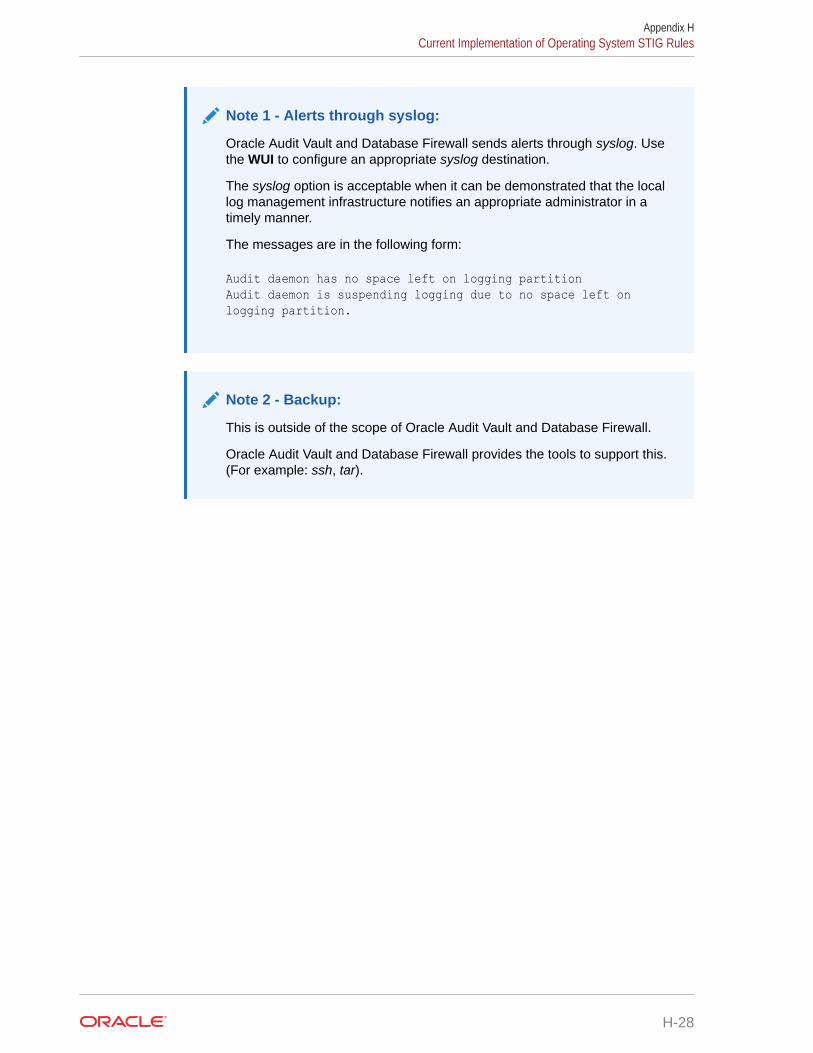
Note 1 - Alerts through syslog:
Oracle Audit Vault and Database Firewall sends alerts through syslog. Usethe WUI to configure an appropriate syslog destination.
The syslog option is acceptable when it can be demonstrated that the locallog management infrastructure notifies an appropriate administrator in atimely manner.
The messages are in the following form:
Audit daemon has no space left on logging partitionAudit daemon is suspending logging due to no space left on logging partition.
Note 2 - Backup:
This is outside of the scope of Oracle Audit Vault and Database Firewall.
Oracle Audit Vault and Database Firewall provides the tools to support this.(For example: ssh, tar).
Appendix HCurrent Implementation of Operating System STIG Rules
H-28
IEnabling FIPS 140-2 in Oracle AVDF
Learn about enabling FIPS 140-2 in Oracle AVDF.
I.1 About FIPS and Oracle AVDFLearn about FIPS and Oracle AVDF.
FIPS (Federal Information Processing Standards) is a set of standards that describedocument processing, encryption algorithms, and other information technology standards foruse within non-military government agencies, by government contractors, and vendors whowork with these agencies.
FIPS publications are issued by the National Institute of Standards and Technology (NIST).The publication entitled Security Requirements for Cryptographic Modules (FIPS 140-2)specifies the security requirements over several key areas that will be satisfied by acryptographic module utilized within a security system protecting sensitive but unclassifiedinformation.
FIPS 140-2 can be enabled for the following Oracle AVDF components only:
• Audit Vault Server: Enabling FIPS in Audit Vault Server turns on FIPS mode in theembedded Oracle Linux as per Enabling FIPS Mode on Oracle Linux and OracleDatabase as per Oracle Database FIPS 140-2 settings.
• Database Firewall: Enabling FIPS 140-2 in Database Firewall turns on FIPS mode in theembedded Oracle Linux as per Enabling FIPS Mode on Oracle Linux.
I.2 Enabling FIPS 140-2 in Audit Vault ServerLearn how to enable FIPS 140-2 in Audit Vault Server.
1. Log in to Audit Vault Server console as super administrator.
2. Click Settings tab. The Security tab in the left navigation menu is selected by default.
3. Click FIPS sub tab in the main page.
4. Turn on the toggle switch to enable FIPS 140-2. The toggle switch turns green when it isturned on.
5. Click Save button. A message pops that the Audit Vault Server will reboot and promptsyou to continue or cancel.
6. Click OK button to continue to enable FIPS 140-2 for Audit Vault Server. Else, clickCancel.
7. The Audit Vault Server is restarted and is unavailable for some time. Do not attempt toaccess the Audit Vault Server console during this period. Close the browser and open anew tab or window to log in to the Audit Vault Server console.
I-1

Note:
• To disable FIPS 140-2 mode for Audit Vault Server, turn off thetoggle switch in the FIPS sub tab.
• In case of high availability configuration, enabling FIPS 140-2 modefor the primary Audit Vault Server, also enables FIPS 140-2 mode forthe standby Audit Vault Server. Similarly, if FIPS mode is disabled forthe primary Audit Vault Server, it is disabled for the standby AuditVault Server also.
I.3 Enabling FIPS 140-2 in Database FirewallLearn how to enable FIPS 140-2 in Database Firewall.
1. Log in to Audit Vault Server console as super administrator.
2. Click Database Firewalls tab. The Database Firewalls tab in the left navigationmenu is selected by default.
3. Click the name of the specific Database Firewall instance for which you want toenable FIPS 140-2.
4. Click FIPS under the Configuration section. A dialog is displayed.
5. In the dialog, turn on the toggle switch to enable FIPS 140-2. The toggle switchturns green when it is turned on.
6. Click Save. A message pops that Database Firewall will reboot and prompts youto continue or cancel.
7. Click OK to continue to enable FIPS 140-2 for the Database Firewall instance.Else, click Cancel.
The Database Firewall instance is restarted and is unavailable for some time.
8. Wait for a while, and navigate back to the Database Firewalls tab in the leftnavigation menu.
9. Check the status of FIPS 140-2 mode under the column FIPS Mode against thespecific Database Firewall instance.
I.4 Enabling FIPS 140-2 for Database Firewall Instances inHigh Availability
Learn how to enable FIPS 140-2 for Database Firewall instances in high availabilityconfiguration.
Prerequisites
• At least two instances of Database Firewall must be configured for high availability.
• The FIPS 140-2 status of both the Database Firewall instances must either be Offor On. FIPS 140-2 mode can be disabled or enabled on both the Database Firewallinstances. In case, these two instances have different FIPS mode, then an errormessage is displayed on the screen.
Appendix IEnabling FIPS 140-2 in Database Firewall
I-2

1. Log in to Audit Vault Server console as super administrator.
2. Click Database Firewalls tab. The Database Firewalls tab in the left navigation menu isselected by default.
3. Click High Availability tab in the left navigation menu. All the Database Firewallinstances that are configured in high availability are listed in the main page.
4. The names of paired Database Firewall instances are listed under the Primary andSecondary columns on the main page. Select the specific pair of Database Firewallinstances for which you want to enable FIPS.
5. Click FIPS in the top right corner of the page. A dialog is displayed.
6. Turn on the toggle switch to enable FIPS 140-2. The toggle switch turns green when it isturned on.
7. Click Save button. A message pops that the Database Firewall instances will reboot andprompts you to continue or cancel.
8. Click OK to continue to enable FIPS 140-2 for the Database Firewall instances. Else,click Cancel.
The Database Firewall instances are restarted and are unavailable for some time.
9. Wait for a while and check the status of FIPS 140-2 mode under the column FIPS Modeagainst the paired Database Firewall instances.
See Also:
High Availability for Database Firewall
I.5 Verify the Status After Enabling FIPS 140-2 for DatabaseFirewall Instances in High Availability
Learn how to verify or check the status after enabling or disabling FIPS 140-2 for theDatabase Firewall instances configured in high availability.
1. Log in to Audit Vault Server console as super administrator.
2. Click Settings tab.
3. Click System tab in the left navigation menu.
4. Click Jobs under the Monitoring section. The Jobs dialog is displayed.
5. The recent jobs are listed on the top. Else, rearrange to locate the job that is specific toenabling or disabling the FIPS 140-2 mode for the Database Firewall instancesconfigured in high availability.
6. Verify the status is Completed. Else, click the Job Details icon to the extreme left of thespecific job.
7. The Job Status Details dialog is displayed. It contains detailed information on the list ofevents pertaining to the job triggered.
Appendix IVerify the Status After Enabling FIPS 140-2 for Database Firewall Instances in High Availability
I-3
I.6 Enabling FIPS 140-2 for Database Firewall Instances inHigh Availability Deployed in Proxy Mode
Learn how to enable FIPS 140-2 for Database Firewall instances in high availabilitydeployed in proxy mode.
Prerequisite
At least two instances of Database Firewall must be configured for high availability inproxy mode.
Steps to be followed for enabling or disabling FIPS 140-2 for all Database Firewallinstances that are part of high availability and deployed in Monitoring / Blocking(Proxy) mode:
1. All the Database Firewall instances that are part of high availability must have thesame FIPS 140-2 mode. They should either be enabled for FIPS 140-2 or disabled(On or Off).
2. To enable or disable FIPS 140-2 for every Database Firewall instance follow theprocedure in section Enabling FIPS 140-2 in Database Firewall.
3. After following the previous step, ensure all the Database Firewall instances thatare part of high availability should have the same FIPS 140-2 mode (either On orOff).
Note:
Inconsistent behavior is expected if Database Firewall instances are indifferent FIPS 140-2 modes (some of them having FIPS 140-2 enabledand some of them disabled).
See Also:
High Availability for Database Firewall in Proxy Mode
Appendix IEnabling FIPS 140-2 for Database Firewall Instances in High Availability Deployed in Proxy Mode
I-4

JTroubleshooting Oracle Audit Vault andDatabase Firewall
Oracle Audit Vault and Database Firewall provides troubleshooting advice for a range ofscenarios.
J.1 Audit Vault Agent or Host Monitor is not Upgraded to theNew Release
Learn how to upgrade the Audit Vault Agent or Host Monitor Agent manually.
Problem
After upgrading to Oracle AVDF 20.1 or later, some of the Audit Vault Agents or Host MonitorAgents are not upgraded.
Symptom - 1
Audit Vault Agent is in STOPPED state after Audit Vault Server upgrade.
Symptom - 2
Host Monitor Agent is in NEEDS UPGRADE or UPDATE FAILED state after Audit Vault Serverupgrade.
Solution - 1
The symptom indicates that the Audit Vault Agent has failed to auto upgrade during the AuditVault Server upgrade. Execute the following steps as the user who installed Agent previously:
1. Check for any Agent processes on the host machine. Ensure there are no Agent relatedprocesses currently running.
2. Remove the existing agent.jar file and the Agent folder from the host machine.
3. Download the new agent.jar file from the upgraded Audit Vault Server.
4. Execute the following command:
java -jar agent.jar [-d <AgentHome>]
5. Verify the Agent is in RUNNING state.
Solution - 2
The symptom indicates that the Host Monitor Agent has failed to auto upgrade during theAudit Vault Server upgrade. Execute the following steps as root user:
1. Check for any Host Monitor related processes on the host machine. Ensure there are nohostmonitor, hmdeployer, or hostmonmanager processes currently running.
J-1

2. Navigate to the directory outside of hm where the Host Monitor is installed.
3. Execute the following command to uninstall the Host Monitor:
./hm/hostmonsetup uninstall
4. Download the new Host Monitor installable bundle from the Audit Vault Serverconsole, for the specific platform on which it will be reinstalled.
5. Extract the Host Monitor bundle inside the hm directory.
6. Execute the following command to reinstall the Host Monitor in a root ownedlocation:
./hostmonsetup install
J.2 Partial or No Traffic Seen for an Oracle DatabaseMonitored by Oracle Database Firewall
Review the troubleshooting advice for when you see limited or no traffic for an OracleDatabase that is monitored by Oracle Database Firewall.
Problem
I see no traffic, or only partial traffic, captured in reports for an Oracle Databasemonitored by the Database Firewall.
Solutions
Go through the following checks to find the trouble:
1. In the Audit Vault Server, check that the report filters are set correctly, including thetime slot.
2. Check that the system time on the Database Firewall is synchronized with the timeon the Audit Vault Server and the target system.
3. Check that the target's network traffic is visible to the Database Firewall using theLive Capture utility on the firewall.
4. Check that the Oracle Database service name or SID is used correctly. If youspecified an Oracle Database service name in the monitoring point settings for thistarget, you will only see traffic for that service name. To see all traffic, remove theservice name from the monitoring point settings.
If you have entered a service name in the monitoring point, and see no traffic,check to see that the service name is entered correctly in the monitoring pointsettings.
For monitoring points set to use monitoring only mode, the Database Firewall maybe monitoring traffic for existing client connections to the database. Since theseconnections were in place before you deployed the Database Firewall, it will not beable to detect the service name you specify in the monitoring point. In this case,restart the client connections to the database.
5. Check that the correct Database Firewall policy is deployed.
Appendix JPartial or No Traffic Seen for an Oracle Database Monitored by Oracle Database Firewall
J-2

See Also:
• Oracle Audit Vault and Database Firewall Auditor's Guide for information onediting and deploying firewall policies.
• Configuring Database Firewall Monitoring Points
• Viewing Network Traffic in a Database Firewall
J.3 Agent Activation Request Returns 'host is not registered'Error
Read the troubleshooting advice if you receive a 'host is not registered' error.
Problem
I used the following two commands to register the Oracle Audit Vault Agent's host computer(where the agent is deployed), and to request Audit Vault Agent activation:
From the Audit Vault Server:
avcli> register host 'host_name'From the host computer:
agentctl activateBut the agentctl activate command returns: Agent host is not registered
Solution
Your agent host may be multi homed. In this case, the agent hostname to IP addressresolution may resolve to the NIC/IP that is not used by the agent while connecting to the AVserver. To resolve this issue, try to register the agent host using the with ip option and thentry activating the agent again.
From the Audit Vault Server, use the following command:
avcli> register host 'host_name' with ip 'host_ip_address'
If you still have issues, try finding the IP address used in the database session when youconnect to the Audit Vault server from the agent host, using these commands:
Start SQL*Plus connection as sqlplus /nolog without the username or password.
In SQL*Plus execute the command: connect <user>. Enter the password when prompted.
sqlplus username/password@"(DESCRIPTION=(ADDRESS=(PROTOCOL=TCP)(HOST=Audit_Vault_Server_IP)(PORT=1521))(CONNECT_DATA= (SERVICE_NAME=dbfwdb)))"
sqlplus> select SYS_CONTEXT('USERENV','IP_ADDRESS') from dual;
Appendix JAgent Activation Request Returns 'host is not registered' Error
J-3

Use the IP address from the above query to register your host.
J.4 Unable to Deploy Agent on the Secondary Audit VaultServer
Learn the resolution if you are unable to deploy an agent on a secondary Oracle AuditVault server.
Problem
When I try to deploy the Audit Vault Agent on the secondary Audit Vault Server in ahigh availability pair, I get an error that the host is not registered.
Cause
After you pair two Audit Vault Servers for high availability, you do all configuration onthe primary server in the pair only, including Audit Vault Agent deployment.
J.5 Failure While Building a Host Monitor or CollectingOracle Database Trails
Learn what to do when you experience a failure while building host monitors orcollecting Oracle Database trails.
Problem
This problem may manifest with various symptoms:
• When I try to build a host monitor, the operation fails or the operation cannot locatethe correct binaries.
• When I try to collect audit data from an Oracle Database target, the operation fails.
• The Audit Vault Agent cannot connect to the Audit Vault Server.
• Audit trail does not start.
Solution
1. Unset all environment variables except the following:
• PATH• TERM• PS1• LANG• LC_*
• JAVA_HOMEThen run the java -jar agent.jar command again on the host machine.
Appendix JUnable to Deploy Agent on the Secondary Audit Vault Server
J-4

See Also:
Deploying the Audit Vault Agent
2. If you deployed the Audit Vault Agent in a Linux environment, then ensure that the hostmachine name appears in the /etc/hosts file.
J.6 'java -jar agent.jar' Failed on Windows MachineReview the resolution procedures when the java -jar agent.jar command fails onWindows machines.
Problem
The command java -jar agent.jar failed on my Windows target machine, and I noticed inthe log files that the Audit Vault Agent services installation/un-installation failed.
Solution
1. Follow the instructions for unregistering the agent in Registering and Unregistering theAudit Vault Agent as a Windows Service.
If Method 1 fails, then try Method 2.
2. Run the java -jar agent.jar command again.
J.7 Unable to Install the Agent or Generate the agent.jar FileDetermine the steps to perform if you are unable to install the agent or generate theagent.jar file.
Problem
Unable to install the Audit Vault Agent. Attempts to regenerate the agent.jar file are alsounsuccessful.
Solution
Follow these steps to regenerate the agent.jar file:
1. Log in to the Audit Vault Server through SSH as user oracle.
2. Go to the directory /var/lib/oracle/dbfw/av/conf/ location.
3. Delete the bootstrap.prop file.
4. Execute the following command:
/var/lib/oracle/dbfw/bin/avca configure_bootstrap5. Check the avca.log file that is available at /var/lib/oracle/dbfw/av/log/ to
check if the above command was executed successfully.
6. Switch the user (su) to avsys.
7. Run the following query:
select agent_gen_ts from file_repos where file_name='agent.jar';
Appendix J'java -jar agent.jar' Failed on Windows Machine
J-5
8. The above query displays the current time in case the agent.jar file isgenerated successfully.
J.8 Unable to Un-install the Oracle Audit Vault AgentWindows Service
Review the troubleshooting advice if you are unable to un-install the Oracle Audit VaultAgent Windows Service.
Follow the instructions for unregistering the Agent inRegistering and Unregistering theAudit Vault Agent as a Windows Service.
If Method 1 fails, then try Method 2.
J.9 Access Denied Error While Installing Agent as aWindows Service
Learn how to resolve access denied errors when installing Oracle Audit Vault agent asa Windows service.
Problem
I got an error during installation of Oracle Audit Vault Agent on Windows, and I noticedthe following error in the AGENT_HOME\av\log\av.agent.prunsvr log file:
[2013-05-02 11:55:53] [info] Commons Daemon procrun (1.0.6.0 32-bit) started[2013-05-02 11:55:53] [error] Unable to open the Service Manager[2013-05-02 11:55:53] [error] Access is denied.[2013-05-02 11:55:53] [error] Commons Daemon procrun failed with exit value:7 (Failed to )[2013-05-02 11:55:53] [error] Access is denied.
Solution
The above message means that the logged in user does not have privileges to installthe Audit Vault Agent as a Windows Service. If you get the above message, trylaunching the command shell with the Run As Administrator option, and thenexecute java -jar agent.jar in that command shell.
J.10 Unable to Start the Agent Through the Services Appleton the Control Panel
Review how to resolve being unable to start the agent through the services applet onthe control panel.
Problem
I did the following:
1. Installed the Audit Vault Agent using the java -jar agent.jar command.
2. Activated the Audit Vault Agent.
Appendix JUnable to Un-install the Oracle Audit Vault Agent Windows Service
J-6
3. Started the Audit Vault Agent using the agentctl start -k key command.
The agent started up and is in RUNNING state.
4. Stopped the Audit Vault Agent.
5. Tried to start the Audit Vault Agent using the Services Applet on the Windows ControlPanel.
The Audit Vault Agent errored out immediately.
Solution
This means that the Audit Vault Agent is configured to use a Windows account that does nothave privileges to connect to the Audit Vault Server.
Take the following steps:
1. Go to Control Panel, then to Services Applet.
2. Select the Oracle Audit Vault Agent service.
3. Right click and select the Properties menu.
4. Click the Log on tab.
5. Select This account: and then enter a valid account name and password.
6. Save and exit.
7. Start the Audit Vault Agent through the Services Applet.
J.11 Error When Starting the AgentResolved errors that occur when starting the agent.
Problem
After I installed the Audit Vault Agent, I set the username and password in the OracleAVAgentWindows Service Properties Log On tab. However, when I try to start the OracleAVAgentservice, I see the following error in the Agent_Home\av\log\av.agent.prunsvr.date.log file:
[info] Commons Daemon procrun (1.0.6.0 32-bit) started[info] Running 'OracleAVAgent' Service...[info] Starting service...[error] Failed creating java [error] ServiceStart returned 1[info] Run service finished.[info] Commons Daemon procrun finished
Solution
This means that the OracleAVAgent service is not able to launch the Java process. Try thefollowing:
1. Uninstall all JDKs and/or JREs in the system.
2. Reinstall JDK SE or JRE and then start the OracleAVAgent service.
3. If this doesn't help, you can install 32 bit JDK SE or JRE and then start theOracleAVAgent service.
Appendix JError When Starting the Agent
J-7

J.12 Error When Running Host Monitor SetupReview the resolutions for errors that occur when running host monitor setup.
Problem
I am setting up a Host Monitor. When I run the command bin/hostmonsetup install,the following error is displayed:
Failed to generate executables for Host monitor
Solution
This means the host computer does not have the required libraries for the HostMonitor. Install the required libraries mentioned in Host Monitor Requirements.
Even after installing the required libraries, if the Host Monitor installation fails withabove error message, then examine the makelogerror file which is available in theHost Monitor installation directory. The following errors, may appear in the file:
/bin/ld: cannot find -laio/bin/ld: cannot find -lssl/bin/ld: cannot find -lcrypto/bin/ld: cannot find -lnslTo resolve the issue on Linux (64 bit) systems, create a symbolic link (or symlink) in /lib64/ location. For error /bin/ld: cannot find -lssl as an example, follow thesesteps:
1. Search for libssl in /lib64/ location, which is the actual SSL library and not asymbolic link.
2. Create a symbolic link in /lib64/ location with the name libssl.so.1 pointingto the actual SSL library.
3. Create another symbolic link in /lib64/ location with the name libssl.sopointing to libssl.so.1.
4. Repeat these steps for all such errors in the makelogerror file.
J.13 Alerts on Oracle Database Targets Are Not Triggeredfor Extended Periods of Time
Learn what to do when alerts on targets are not triggered for a long time.
Problem
I configured an Oracle Database target to audit to XML files, configured an audit trail inOracle AVDF of type DIRECTORY, and then configured an alert to trigger on certainevents. My alert did not get triggered for a long time.
Appendix JError When Running Host Monitor Setup
J-8

Solution
This issue can occur if the Oracle Database target is not flushing the audit records to the fileimmediately. Contact Oracle Support in order to access support note 1358183.1 Audit FilesAre Not Immediately Flushed To Disk.
J.14 Error When Creating an Audit PolicyResolve errors that can occur when you create an audit policy.
Problem
I received this error message when I tried to create a new audit policy setting for OracleDatabase:
-ORA-01400: cannot insert NULL into("AVSYS"."AUDIT_SETTING_ARCHIVE_MAP"."ARCHIVE_ID")
Cause
The Oracle Database must have at least one audit policy setting before you can create andprovision new audit settings using Oracle Audit Vault and Database Firewall. OracleDatabase comes with a predefined set of audit policy settings. You must not manually removethese settings. If the audit settings have been removed, then you can manually create at leastone audit setting in the Oracle Database. Then try again to create new audit settings usingOracle Audit Vault and Database Firewall.
See Also:
Oracle Database Security Guide for detailed information on Oracle Databaseauditing.
J.15 Connection Problems When Using Oracle DatabaseFirewall Monitoring and Blocking
Resolve the connection problems that might occur when using Oracle Database Firewallmonitoring and blocking.
Problem
In monitoring and blocking mode, my client application cannot connect to the target database.
Solution 1
1. Log in as root on the Database Firewall server.
2. Run this command using the target database IP address or host name:
ping -I secured_target_ip_address_or_hostname
Appendix JError When Creating an Audit Policy
J-9

If you do not receive a response, then ensure that the DNS is configured onOracle Database Firewall.
If a response is received, check:
• The firewall policy to ensure that it is not blocking the connection attempt.
• The client connection settings to ensure that the client is attempting to connectto the correct target database.
See Also:
• Configuring Database Firewall and Its Traffic Sources on Your Network
• Configuring Network Services for Oracle Database Firewall
Solution 2
If your client application computer is on a different subnet than the target database,then see document number 1566766.1 on My Oracle Support https://support.oracle.com/CSP/main/article?cmd=show&type=NOT&id=1566766.1.
J.16 Audit Trail Does Not StartLearn the resolution to use when the audit trail does not start.
Problem
An audit trail does not start. For example, in the Audit Vault Server console, in theAudit Trails page, the Collection Status column indicates that the trail is Stopped orUnreachable.
Solution
When a trail does not start, you can show the associated error in two ways:
• In the Audit Vault Server console:
1. Click the Targets tab, and then from the Monitoring menu, click Audit Trails.
2. Click the Actions button, and then click Select Columns.
3. From the left-hand box, double-click Error Message so that it moves into theDisplay in Report box on the right.
4. Click Apply.
The Error Message column is displayed on the Audit Trails page and contains theerror message for the stopped trail.
• On the Audit Vault Agent host computer:
1. Go to the logs directory:
cd %agenthome%/av/logs2. Run the following:
grep -i 'error|warning|fail' *
Appendix JAudit Trail Does Not Start
J-10

The error messages should indicate the cause of the problem.
If the cause is still unclear, or the grep command returns no results, raise an SR with OracleSupport and include Audit Vault Agent log files.
See also document number 1566766.1 on My Oracle Support https://support.oracle.com/CSP/main/article?cmd=show&type=NOT&id=1566766.1.
J.17 Cannot See Data for TargetsLearn what to do when you cannot see the data for a target.
Problem
Data for my Target does not appear on reports.
Solution
If you cannot see the data you expect to see in the Audit Vault Server, you can troubleshootby trying one or more of the following:
• Confirm that Audit Vault Agent hosts are up and that the Audit Vault Agents are running.
• Confirm that audit trails are running and that the audit trail settings match the auditconfiguration of the Target database
For example, the audit trail configuration in Oracle Audit Vault and Database Firewallshould have the correct trail type and location.
See Also:
Configuring and Managing Audit Trail Collection
• Check the audit policy on the target to ensure you are auditing the activity that you areexpecting to see in the reports.
• Check the firewall policy to ensure you are logging the activity you are expecting to see inreports.
• Clear any time filters on reports, and then check time settings on the target and on theAVS. If the time is incorrect, the time recorded against audit events will not be accurate.As a result, the audit events may not be displayed in the time window you expect.
• Check the /var/log/messages file on Audit Vault Server and on the Database Firewall forerrors.
• Check that the Database Firewall monitoring point is created and running.
• Check that the Database Firewall monitoring point traffic source is correct.
• If the Database Firewall is in monitoring only mode, use the Database Firewall LiveCapture utility to verify that traffic is being seen on the relevant traffic source. Ifnecessary, use the File Capture utility to capture traffic to a file and verify (usingWireshark or a similar product) that the traffic being captured is consistent with thesettings in the Target Addresses section of your Target configuration.
Appendix JCannot See Data for Targets
J-11
See Also:
Viewing Network Traffic in a Database Firewall
• Check that you have used the correct Oracle Database service name whenconfiguring the Target Address in your Target configuration.
Also, have you included all available Oracle Service names in the TargetAddresses section of the Target configuration? Unless you intend to define adifferent firewall policy for each service name, Oracle recommends you omitservice name and use only IP address and TCP ports in Target Addresses.
• On the Database Firewall, check the /var/log/httpd/ssl_access_log file toconfirm that the Audit Vault Server is collecting logs.
• On the Audit Vault Server, check the /var/dbfw/tmp/processing* directories andmake sure kernel*.dat files are arriving in the directory, and then being deletedonce the Audit Vault Server has processed them.
• On the Audit Vault Server, check that the mwecsvc process is running. Forexample, run the command:
ps -ef | grep mwecsvcIf the process is not running, use this command to restart it:
service controller start
J.18 Problems Pairing Oracle Database Firewall and OracleAudit Vault Server
Review the procedure to follow when you have problems pairing Oracle DatabaseFirewall with Oracle Audit Vault Server.
Problem
I encounter errors when I try to associate a Database Firewall with the Audit VaultServer.
Solution
Check the following:
• Ensure that you have entered the correct Audit Vault Server IP address in theDatabase Firewall Certificate page.
Log in to the Audit Vault Server console, and click the Settings tab. Then click theCertificate tab on the main page.
• Ensure that both the Database Firewall server and the Audit Vault Server areconfigured to use NTP and that each machine is synced to the NTP time server.
Appendix JProblems Pairing Oracle Database Firewall and Oracle Audit Vault Server
J-12
See Also:
• Specifying the Server Date, Time, and Keyboard Settings
• Setting the Date and Time in Database Firewall
J.19 User Names Do Not Appear on Database Firewall ReportsLearn what to do when names do not appear on Database Firewall reports.
Problem
When I generate a Database Firewall report, I do not see user names.
Solution
Check the following possibilities:
• If this is occurring for a Microsoft SQL Server database target, check to make sure thatretrieve session information is turned on.
• This problem may be caused by bad network traffic arriving at the Database Firewall.Check for duplicate or missing network packets. You can use the Database Firewall'sLive Capture utility to capture network traffic to a file and analyze it.
Note:
Sometimes unknown_username is displayed in the User field of Database Firewallreports for SQL server. This can be resolved by enabling Retrieve sessioninformation from target DB option under the Advanced tab for the DatabaseFirewall monitoring point. The report may also display unknown_osusername in theOS User field of Database Firewall reports for SQL server. This information isavailable to Database Firewall only if the client uses Windows authentication or atrusted connection.
See Also:
• Configuring Advanced Settings for Database Firewall
• Viewing Network Traffic in a Database Firewall
J.20 Alerts Are Not GeneratedReview the resolution to use when alerts that you created are not generated.
Problem
Alerts I have created are not being generated.
Appendix JUser Names Do Not Appear on Database Firewall Reports
J-13

Solution
Try the following:
• Examine the alert condition to make sure it is written correctly:
Log in to the Audit Vault Server console as an auditor, click the Policy tab, clickAlerts, and then click the name of the alert in question.
See Also:
– Oracle Audit Vault and Database Firewall Auditor's Guide for help inwriting alert conditions.
– Using Audit Vault Server Console for more information about loggingin to the Audit Vault Server console.
• Restart job framework on the Audit Vault Server. See document 1592181.1 on MyOracle Support https://support.oracle.com/CSP/main/article?cmd=show&type=NOT&id=1592181.1.
J.21 Problems Retrieving or Provisioning Audit Settings onOracle Target
Learn what to do when you encounter problems while retrieving or provisioning Oracletarget audit settings.
Problem
I have a problem either retrieving audit settings form an Oracle Database target, orprovisioning audit settings to an Oracle Database target.
Solution
If you have problems retrieving audit settings, try the following:
• Check the job status of the retrieval job for errors:
Log in to the Audit Vault Server console as an auditor, click Settings, and thenclick Jobs in the System menu.
• Ensure you have entered the correct connect string in the Oracle Database'starget configuration:
Log in to the Audit Vault Server as an administrator, click the Targets tab, and thenclick the name of this Oracle target. Check the Target Location field for theconnect string.
See Also:
Target Locations (Connect Strings)
Appendix JProblems Retrieving or Provisioning Audit Settings on Oracle Target
J-14

If you have problems provisioning audit settings, and the Oracle Database target hasDatabase Vault enabled, confirm that the Oracle Audit Vault and Database Firewall user youcreated on this database has the AUDIT SYSTEM and AUDIT ANY privileges.
J.22 Operation Failed Message Appears When Attempting toEnable Oracle Audit Vault and Database Firewall Policies
Learn how to resolve operation failures when you try to enable Oracle Audit Vault andDatabase Firewall policies.
Problem
I configured Oracle Audit Vault and Database Firewall for a backup and restore operation.After I completed the procedure, I could not enable an Oracle Audit Vault and DatabaseFirewall policy. The error message Operation failed. Please contact Oracle Supportappeared.
Solution
During the backup and restore process, Oracle Audit Vault and Database Firewall mustperform a restart of the Oracle Audit Vault Server database. The internal tool JavaFramework may need to be restarted. To remedy this problem:
1. Log in to Oracle Audit Vault Server.
2. At the command line, run the following command to check the status of the JavaFramework:
/usr/local/dbfw/bin/javafwk status3. If the output says Java framework process is stopped, then restart it as follows:
/usr/local/dbfw/bin/javafwk start
J.23 Out of Memory Error Message During RestoreLearn the resolution when you receive an out of memory error message during a restore.
Problem
Encounter out of memory error while performing restore task.
Solution
Prior to initiating the restore task, ensure that the RAM size and Disk size in the new systemis equal or bigger than the original system. This ensures that the out of memory error is notencountered while performing the restore task.
Appendix JOperation Failed Message Appears When Attempting to Enable Oracle Audit Vault and Database Firewall Policies
J-15
J.24 JAVA.IO.IOEXCEPTION ErrorLearn how to resolve a JAVA.IO.IOEXCEPTION error.
Problem
SSL peer shuts down incorrectly with the following error:
JAVA.IO.IOEXCEPTION: IO ERROR:SSL PEER SHUT DOWN INCORRECTLY
Solution
1. Access the target through SSH.
2. Change to the following location using the command:
cd $ORACLE_HOME/network/admin3. Edit the sqlnet.ora file. Add parameter sqlnet.recv_timeout=100000 in the file.
4. Restart the target listener.
5. Once the target listener is started, start the agent, and the audit trail.
J.25 Failed to Start ASM Instance ErrorLearn what to do when you receive a Failed to start ASM instance error.
Problem
The avdf-upgrade --confirm command stops and results in an error. The commandmay fail for many reasons. The error mainly occurs due to failure in starting orstopping of a service.
The following is an example of Failed to start ASM instance error:
{{{ [support@avs00161e637973 ~]$ su - root Password: [root@avs00161e637973 ~]# /usr/bin/avdf-upgrade --confirm Please wait while validating SHA256 checksum for /var/dbfw/upgrade/avdf-upgrade-12.2.0.3.0.iso Checksum validation successfull for /var/dbfw/upgrade/avdf-upgrade-12.2.0.3.0.iso Mounting /var/dbfw/upgrade/avdf-upgrade-12.2.0.3.0.iso on /images Successfuly mounted /var/dbfw/upgrade/avdf-upgrade-12.2.0.3.0.iso on /images Starting Oracle High Availability Service 2016-08-05 15:32:09.097: CLSD: Failed to generate a fullname. Additional diagnostics: ftype: 2 (:CLSD00167:) CRS-4639: Could not contact Oracle High Availability Services CRS-4000: Command Start failed, or completed with errors. Starting ASM instance Error: Failed to start ASM Instance
Appendix JJAVA.IO.IOEXCEPTION Error
J-16
Unmounted /var/dbfw/upgrade/avdf-upgrade-12.2.0.3.0.iso on /images Failed to start ASM Instance }}}
Solution
Rerun the command avdf-upgrade --confirmExecuting this command again will get past the Failed to start ASM instance error.
J.26 Internal Capacity Exceeded Messages Seen in the /var/log/messages file
Learn how to resolve Internal capacity exceeded messages that appear inthe /var/log/messages file.
Problem
Not all the expected traffic is being captured or logged by the Database Firewall, and errormessages are present in the /var/log/messages file containing the text Internalcapacity exceeded.
Solution - 1
Increase the processing resources available for the target on which the issue is observedthrough the setting of the MAXIMUM_ENFORCEMENT_POINT_THREADS collectionattribute.
See Also:
Registering Targets
Solution - 2
The size of the buffer used for inter-process communication on the Database Firewall can beincreased to improve throughput, though at the cost of more memory being allocated by therelevant processes. Please note that this setting is in units of Megabytes, and has a defaultvalue of 16. To change the configuration for this value execute the following procedure:
1. Log in to the Audit Vault Server console as the root user.
2. Edit the file /usr/local/dbfw/etc/dbfw.conf. Look for an entry with the keyIPC_PRIMARY_BUF_SIZE_MB. If it exists, this is the line to change. If it does not exist,add a new line beginning with IPC_PRIMARY_BUF_SIZE_MB.
3. Change the IPC_PRIMARY_BUF_SIZE_MB line to reflect the required buffer size. Forexample, if you wished to change the buffer size to 24 megabytes, the configuration lineshould be IPC_PRIMARY_BUF_SIZE_MB="24". Save the changes.
4. From the command line restart the Database Firewall processes so that the new settingis used with the command line /etc/init.d/dbfw restart.
Appendix JInternal Capacity Exceeded Messages Seen in the /var/log/messages file
J-17

There is also a second setting available to alter the maximum size that the inter-process communication buffer can grow to. It's units are in megabytes, and has adefault value of 64 megabytes. To change the configuration for this value execute thefollowing procedure:
1. Log in to the Audit Vault Server console as the root user.
2. Edit the file /var/dbfw/va/N/etc/appliance.conf, where N is the numberof the Database Firewall monitoring points in question. Look for an entry with thekey IPC_BUF_SIZ_MB. If it exists, this is the line to change. If it does not exist,add a new line beginning with IPC_BUF_SIZ_MB.
3. Change the IPC_BUF_SIZ_MB to reflect the desired maximum buffer size. Forexample, if you wished to change the buffer size to 80 megabytes, theconfiguration line should be IPC_BUF_SIZ_MB="80". Save the changes.
4. From the command line restart the Database Firewall processes so that the newsetting is used with the command line /etc/init.d/dbfw restart.
If the problem persists and after altering the above settings the Internal capacityexceeded error is still encountered, then further investigation by support is required.
Perform the following:
1. Log in to the Audit Vault Server console as the root user.
2. Edit the file /usr/local/dbfw/etc/logging.conf3. Find the line log4j.logger.com.oracle.dbfw.Metrics=ERROR4. Comment out this line by placing a # character at the beginning of the line
log4j.logger.com.oracle.dbfw.Metrics=ERROR. Save the changes.
5. From the command line restart the Database Firewall processes so that the newsetting is used with the command line /etc/init.d/dbfw restart
6. Leave the Database Firewall running for several hours under load even while theInternal capacity exceeded error is still encountered.
7. After this period, get the diagnostics output from the Database Firewall as detailedin MOS note How to Collect Diagnostic Logs From Audit Vault Server (Doc ID2144813.1). Provide the diagnostics output to support for further analysis.
J.27 First Archive Or Retrieve Job After UpgradeLearn what to do if after an upgrade, the first archive or rervireve job submissiondisplays the status of Starting.
Problem
After upgrade the first archive or retrieve job submission may display the status asStarting.
Solution
Submit the job again. This is a known issue and subsequent submission of jobsucceeds.
Appendix JFirst Archive Or Retrieve Job After Upgrade
J-18

J.28 Audit Vault Agent Installation Fails After HA Pairing OrSeparation
Learn what to do after the Oracle Audit Vault installation fails after an HA pairing orseparation.
Problem
Installation of Audit Vault agent fails after performing pairing or separation (un-pairing) ofOracle Audit Vault server.
The following command generates agent debug logs during agent installations.
java -jar agent.jar -v
Symptoms
The following errors may be found during agent installation in the agent log file:
PKIX path validation failedsignature check failed
Solution
After the pairing or separating of Oracle Audit Vault servers, you must download the AuditVault agent from the GUI and install the agent again after removing the existing Audit VaultAgent.
See Also:
Post High Availability Pairing Steps
If the Audit Vault agent fails to install after pairing or separating of Audit Vault server, theninstall the Audit Vault agent using -v option.
To resolve the above errors, follow the steps mentioned below:
1. Log in to the Audit Vault server as user root.
2. Run the following script to generate a new agent.jar file.
/usr/local/dbfw/bin/priv/update_connect_string_ip.sh3. Download the new agent.jar file from the GUI.
4. Install the newly downloaded agent.jar file.
Appendix JAudit Vault Agent Installation Fails After HA Pairing Or Separation
J-19
J.29 Error in Restoring FilesLearn what to do when you encounter errors while restoring files.
Problem
An attempt to restore the data files results in a failure. The restore job completessuccessfully, however the data files are not restored. There is no information in therestore job log file.
Solution
Check for the following to troubleshoot the issue:
• The restore policy must follow the guidelines listed under the section ConfiguringArchive Locations and Retention Policies.
• Check the tablespace that needs to be archived and the corresponding tablespacethat needs to be purged as per the policy defined.
• Restoring data into empty tablespaces is not possible. Check accordingly.
• In case the tablespace enters the delete period, it is deleted automatically fromOracle Audit Vault Server.
• Every tablespace is uniquely identified by the month it moves offline and themonth during which it is purged. They are created automatically based on thepolicies that you create.
• When the retention policy is changed, the new policy is applied to the incomingdata immediately. It does not affect existing tablespaces that adhere to the oldpolicy.
• You can archive the tablespace when it enters the offline period.
• After restoring the tablespace, it is online. Once it is released, it goes offline. Thetablespace must be rearchived once released.
J.30 DB2 Collector Fails Due to Source Version NULLErrors
If the DB2 collector fails due to source version NULL errors, then follow these steps.
Problem
The following error or trace is displayed in the collector log file.
Caused by: java.lang.ClassNotFoundException:sun.io.MalformedInputExceptionat java.net.URLClassLoader.findClass(Unknown Source)at java.lang.ClassLoader.loadClass(Unknown Source)
Appendix JError in Restoring Files
J-20
Solution
Check the Java version on the host system This failure is due to Java SE version 8. Attemptto use Java SE 7.
Note:
This issue may be encountered in releases prior to 12.2.0.11.0.
J.31 DB2 Collector Fails Due to Database Connection orPermission Issues
If the DB2 collector fails due to database connection or persmission issues, then follow thesesteps.
Problem
The following error or trace is displayed in the collector log file.
Caused by: oracle.ucp.UniversalConnectionPoolException: Cannot get Connectionfrom Datasource: java.sql.SQLSyntaxErrorException: [Audit Vault][DB2 JDBCDriver][DB2]<User> DOES NOT HAVE PRIVILEGE TO PERFORM OPERATION EXECUTE ON THISOBJECT NULLID.DDJC360B
Solution
Run the following command for successful execution of DB2 collector:
grant execute on package NULLID.DDJC360B to <User> (user while registering the target)
J.32 ORA-12660 Error While Registering TargetLearn how to resolve the ORA-12660 error.
Problem
Audit Vault agent fails with ORA-12660 error.
Solution
The server encryption is set to REQUIRED in on-premises by default. Set the server encryptionto ACCEPTED or REQUESTED or REJECTED.
Note:
REJECTED is not a recommended option. The following table describes these optionsin detail.
Appendix JDB2 Collector Fails Due to Database Connection or Permission Issues
J-21

Table J-1 Server Encryption Types
Option Description
ACCEPTED The server does not enable both encrypted and non-encryptedconnections. This is the default value in case the parameter is notset.
REJECTED The server does not enable encrypted traffic.
REQUESTED The server requests encrypted traffic if it is possible, but acceptsnon-encrypted traffic if encryption is not possible.
REQUIRED The server accepts only encrypted traffic.
J.33 Audit Trail Performance Issues Occur After Audit VaultServer Upgrade
Learn what to do when audit trail performance issues occur after upgrading OracleAudit Vault Server.
Problem
You might experience audit trail performance issues after upgrading Oracle Audit VaultServer.
Solution
The audit_trail_id_idx index that is created resolves the performance issuesencountered. However, you must retain sufficient disk space if there is large amount ofevent data for the period prior to upgrading Oracle Audit Vault Server. The amount ofdisk space required is about 5% of the total event log data size.
J.34 Failures Due to Dropping UsersLearn how to resolve failures that occur when dropping users.
Problem
Failed to drop the user with an error message and the user was not listed in the AuditVault Server GUI.
Solution
Contact Oracle Support for the best workaround and to drop the user manually usingSQL*Plus.
Appendix JAudit Trail Performance Issues Occur After Audit Vault Server Upgrade
J-22

J.35 Failure of Agent Automatic UpgradesLearn what to do when agent automatic upgrades fail.
Problem
The automatic upgrade of the Agent fails with the following error. This is because the Agent isunable to connect to the Audit Vault Database.
Message: Exception occurred while updating Agent.Cause: Unable to connect to AV Server.Note: Agent will try to re-connect automatically in 10 seconds.
Solution
The Agent attempts to connect to the Audit Vault Database and auto upgrade after 10seconds. Check the Oracle Audit Vault Database connection or contact Oracle Support.
J.36 Some Services May Not Start After BackupLearn what to do when services fail to start after a backup.
Problem
The system may not be stable after a cold backup operation failed to complete.
Solution
Oracle recommends that you reboot the system if there is a failure while performing a coldbackup operation.
J.37 Data Overflow Issues in the Oracle Audit Vault UILearn how to resolve data overflow issues in the Oracle Audit Vault UI.
Problem
The Recently Raised Alerts Report region appears on your dashboard and displays the listof alerts with data overflowing in the Audit Vault GUI. This may occur when you launch theGUI using Internet Explorer and the Microsoft Windows Server operating system.
Solution
To fix this issue and to display the data properly on the Audit Vault GUI, you should makeminor changes to the Internet Explorer browser settings. Press F12 and click the Emulationtab.
Change the Document mode and Browser profile fields from the default settings. Forexample, change the Document mode value to 10 from the drop down menu and change theBrowser profile field to Desktop.
Appendix JFailure of Agent Automatic Upgrades
J-23

J.38 Oracle Audit Vault Agent is Unreachable and theTransaction Log Audit Trail is Frozen in Starting Status
Learn what to do when the Oracle Audit Vault Agent is unreachable and thetransaction log audit trail is frozen in Starting status.
Problem
The status of Oracle Audit Vault Agent is unreachable from the AV GUI. The status ofthe Transaction Log audit trail persistently remains in the Starting status.
This may be due to a user application that is blocking the creation of streams byORAAUDIT user.
Symptom
The Transaction Log audit trail does not start. The following information may befound in the thread dump that is taken using jstack tool:
oracle.av.platform.agent.collfwk.impl.redo.RedoCollector.sourceSetup(RedoCollector.java:634)
Solution
Terminate the user application that is blocking the creation of streams. Restart theTransaction Log audit trail.
J.39 Scheduled PDF or XLS Reports Result in a Hung StateTo resolve a hung state that occurs for scheduled PDF or XLS reports, follow theserecommendations.
Problem
Scheduled PDF or XLS reports remain incomplete for an extended period of time orramin in q RUNNING state.
Solution
You can schedule reports to be sent to other users in PDF or XLS formats. Avoidtriggering or scheduling concurrent long-running reports at the same time. ProducingPDF and XLS reports occupies a lot of system resources because there is a significantamount of data involved. Scheduled concurrent long-running reports can remain in ahung state indefinitely. The reports must be scheduled with staggered intervals inbetween. For example, run the reports at intervals of 5, 10, or 20 minutes.
Appendix JOracle Audit Vault Agent is Unreachable and the Transaction Log Audit Trail is Frozen in Starting Status
J-24
J.40 Pending Reports Remain in Scheduled StatusTo resolve pending reports that remain in scheduled status, follow these steps.
Problem
Many reports are stuck in scheduled or pending status. These reports may never becompleted and may be stopped.
Solution
This may be due to an issue with the Java Framework process in the background. Use thesesteps to check and resolve this issue:
1. Log in to the CLI as support user.
2. Switch to root user using the command:
su root3. Run the following command to check the status of the Java Framework:
systemctl status javafwk4. Stop the Java Framework even if it is running. Run the following command:
systemctl stop javafwk5. Run the following command to start the Java Framework:
systemctl start javafwk6. Run the following command to restart the Java Framework:
systemctl restart javafwkUse the following procedure to check the status of the reports from the operating system logsafter running one of the procedures mentioned above and restarting the Java Framework:
1. Log in to AVCLI as admin user.
2. Run the following command to enable diagnostics for the reports:
ALTER SYSTEM SET loglevel=ReportLog:DEBUG|JfwkLog:DEBUG;3. The diagnostics can also be enabled using the Oracle Audit Vault Server console by
following these steps:
a. Log in to the console as admin user.
b. Click Settings tab.
c. Click on Diagnostics on the left navigation menu.
d. Select Debug against Report Generation.
e. Click Save.
4. Run a PDF report. For example, Activity Overview.
a. Log in to the Oracle Audit Vault Server console as auditor.
b. Click Reports tab.
c. Click Activity Reports under Built-in Reports.
Appendix JPending Reports Remain in Scheduled Status
J-25

d. In the Activity Reports tab on the screen, you can schedule a report and viewthe generated report.
5. After a while, check on the /var/lib/oracle/dbfw/av/log file. For example,av.report* file. It contains the PDF/XLS report generation debug logs.
J.41 Audit Vault Log Displays a Message to Install WinPcapand OpenSSL
To resolve the Audit Vault log message to install WinPcap and OpenSSL, follow thesesteps.
Problem
The Host Monitor can collect audit data from Windows 2016 servers. A messagedisplays alerting you to install WinPcap and OpenSSL.
Solution
A set of DLL files may be causing issues. Run the following procedure to resolve thisproblem:
1. Search for the following files in the system:
• ssleay32.dll• libeay32.dll• wpcap.dll• packet.dll
2. Append the file names with the .bk format notation.
3. Go to Control Panel then to Uninstall Programs and uninstall OpenSSL andWinPcap.
4. Reinstall WinPcap and OpenSSL 1.0.2.q (64-bit). The DLL files are restored toWindows system folder.
5. Check the Control Panel to verify that these two programs are installed.
6. Go to C:\Windows\System32 or C:\Windows\SysWOW64 folders and searchfor the above four DLL files. At least one file for each DLL must be present withoutthe .bk extension.
7. Go to the OpenSSL installation location and search for libssl-1_1-x64.dll andlibcrypto-1_1-x64.dll files. One for each type is available.
8. Upon confirmation, add the C:\Windows\System32 or C:\Windows\SysWOW64to the path variable.
9. Restart the trail.
10. If the network audit does not start, then check the collfwk logs present at<AgentHome>\av\log location. If the following message is available in thecollfwk log, then check the Host Monitor logs present at <AgentHome>\hm\loglocation.
<AgentHome> refers to the Audit Vault Agent installation directory.
Appendix JAudit Vault Log Displays a Message to Install WinPcap and OpenSSL
J-26
Note:
Continue with the remaining steps if your installation is 12.2.0.10.0 or before.The steps are not required for release 12.2.0.11.0 and later.
11. If the following message is available in the Host Monitor log, then execute the remainingprocedure:
Invalid AVS Credentials provided
12. Open the av/conf/bootstrap.prop file.
13. Copy the following line:
CONNECT_STRING_PARAM_POSTFIX=9999
14. Paste this line in the hm/bootstrap.prop file.
15. Restart the trail.
16. In case the network audit trail starts without any errors, then the collection status on theAudit Vault Server console confirms the same.
17. Navigate to AVAUDIT then to Target then Firewall Policies and, finally, Log All.
18. Connect to the target database instance using SQL Developer, or any other tool.
19. Generate the traffic for collecting data.
20. It must be recorded in the reports of the event_log table.
J.42 Host Monitor Agent Fails to StartLearn what to do when the Host Monitor Agent fails to start.
Problem
The Host Monitor network trail does not start after installation. The collection framework(collfwk) log file contains one of the following errors:
• java.io.IOException: Cannot run program "<AgentHome>/hm/hostmonmanager" (in directory "<AgentHome>/hm"): error=13, The file access permissions do not allow the specified action.
• HMCommandExecutor : startTrail : binary is not found here: <AgentHome>/hm/hostmonmanager
Solution
This issue may arise due to insufficient privileges while starting Host Monitor. Ensure theAudit Vault Agent user belongs to the group that owns hm (Host Monitor installation) directory.Also ensure that the group that owns Host Monitor installation (hm) directory has read andexecute permission on the hm directory and execute permission on hostmonmanagerbinary.
Appendix JHost Monitor Agent Fails to Start
J-27
Note:
• AgentHome is the Audit Vault Agent installation directory.
• hm is the Host Monitor installation directory.
J.43 Error OAV-47409 While Managing Archive LocationsLearn what to do when you receive the OAV-47409 error while managing archivelocations.
Problem
The following error message displays in the Auto Archive Message column underManage NFS Locations tab:
OAV-47409: Absolute path does not exist on remote filesystemORA-06510: PL/SQL: unhandled user-defined exception
The configured path of the archive location is either missing or outside of the remotefilesystem.
Solution
The value under Auto Archive Order column is set to 0 [zero]. The system has setthis value as the archive location is problematic. You must ensure that the NFSlocation issue is resolved to a valid directory on the remote filesystem. Upon resolvingthis issue, set the value under Auto Archive Order column to 1 or higher. This setsthe appropriate priority for the auto archive order.
J.44 Audit Trail Stopped After Relocating Windows EventLog Files
Use this procedure when the audit trail stops after you relocate the Windows event logfiles.
Problem
Windows event log relocation causes audit trail to be stopped.
Solution
Follow this procedure to resolve this problem:
1. Stop the audit trail.
2. Drop the audit trail.
3. Restart the audit trail. The new trail recognizes the new location for event logs.
Appendix JError OAV-47409 While Managing Archive Locations
J-28

J.45 Missing or Incomplete Client Information in OracleDatabase Firewall Logs
Learn how to resolve missing or incomplete client information in Oracle Database Firewalllogs.
Problem
Empty client information in the Oracle Database Firewall logs after upgrading Oracle AuditVault and Database Firewall. The logs that are generated are missing some of the clientinformation such as the user name.
Note:
This issue occurs only when you are in DAM mode deployment of Oracle DatabaseFirewall. You will not experience this issue in the Proxy mode deployment.
Cause
Oracle Database Firewall records information that is related to the TCP sessions duringinspection and it saves this data to disk. This recorded information includes client user namesand other metadata about the connection. When Oracle Database Firewall processes arerestarted after a configuration change or an upgrade, Oracle Database Firewall continues togenerate logs accurately by re-reading this cached information.
The format of the cache file has changed in the recent releases. Oracle Database Firewallmay not be able to read the file in the old format. Therefore, existing client connections to thedatabase that were established before performing the upgrade may not retain certaininformation such as client user names. This can lead to logs missing information such as theclient username.
Solution
Restart the database clients.
J.46 Network Audit Trail Does Not Start on Unix PlatformsLearn the resolution when the network audit trail failst to start on Unix platforms.
Problem
Network audit trail does not start on Unix platforms.
Symptoms
• The Oracle Audit Vault Server console displays the following error:
Unable to start Host Monitor process• The collection framework log displays the following error:
<Host Monitor home>/hostmonmanager binary is not found here
Appendix JMissing or Incomplete Client Information in Oracle Database Firewall Logs
J-29

Solution
1. Connect to the host machine on which the Audit Vault Agent and Host Monitor areinstalled.
2. In the Agent Home location there is an hm symlink pointing to Host Monitorinstallation location.
3. Run the following command from the Agent Home as the user who installedOracle Audit Vault Agent:ls -lrt hm
4. Check if it is possible to list the contents of Host Monitor install directory.
5. Check the permission of all directories in the hierarchy of the path under whichHost Monitor is installed.
Note:
The entire directory hierarchy must be owned by the root user. All of thedirectories in this hierarchy must have read and execute permission forother users or groups, but not write permission.
6. Grant the necessary permissions as stated above.
7. Restart the network audit trail.
J.47 Issues with Retrieving Session Information ThroughClients Connecting to Microsoft SQL Server
Learn what to do when you have issues retrieving session information through clientsthat connect through Microsoft SQL Server.
Problem
Database Firewall is unable to retrieve session information through some clients (forexample, MS SQL Server Management Studio) as the information is encrypted. Youcan retrieve session information for non Oracle databases to obtain the name of thedatabase user, operating system, and client program that originated a SQL statement.
Symptom
Audit Reports show unknown user names and unknown program names where thetarget is Microsoft SQL Server.
Solution
Ensure the following steps are accurate while registering Microsoft SQL Server as atarget.
1. In the User Name field, enter the user name of the system administrator.
2. In the Password field, enter the password of the system administrator.
3. In the Host Name / IP Address field, enter the IP address of the SQL Server.
Appendix JIssues with Retrieving Session Information Through Clients Connecting to Microsoft SQL Server
J-30

4. In the Port field, enter the port of the SQL server listening port.
5. In the Service Name field, enter a valid database service name on SQL Server. In casethe database service name is not correct, then SQL server DDI requests fail on the SQLServer with invalid request error.
See Also:
• Registering Targets
• Setting Permissions to Retrieve Session Information in Microsoft SQL Server
J.48 Performance Issues Due to High Memory UsageLearn how to address performance issues in Oracle AVDF with very large deployments.
Problem
Audit Vault Server in large deployments may have performance issues due to increasedmemory usage.
Solution
• Ensure the Audit Vault Server is sized as per the sizing guidelines documented in AuditVault and Database Firewall Best Practices and Sizing Calculator for AVDF 12.2 andAVDF 20.1 (Doc ID 2092683.1).
• Audit Vault Server has Transparent Huge Pages set by default which should work in mostcases. However, in some cases it has to be disabled by setting transparent_hugepagesto never. This helps in improving the performance. For detailed the steps, refer to OracleLinux 7 - How to disable Transparent HugePages for RHCK kernel? (Doc ID 2066217.1).
• If you still face performance issues after applying the above mentioned solution, contactOracle Support.
J.49 httpd Crash Issue on Database FirewallLearn how to fix httpd crash issue in Database Firewall.
Problem
The httpd process in Database Firewall may crash under some circumstances.
Symptom
The status of the Database Firewall instance appears Down in the Audit Vault Server console.The Database Firewall logs are not transferred to the Audit Vault Server.
The following is observed in the log files of the impacted Database Firewall instance. Thehttpd.service file in /etc is symlinked to the file in /usr path.
# ls -l /etc/systemd/system/multi-user.target.wants/httpd.servicelrwxrwxrwx. 1 root root 37 Nov 27 09:26 /etc/systemd/system/multi-user.target.wants/httpd.service -> /usr/lib/systemd/system/httpd.service
Appendix JPerformance Issues Due to High Memory Usage
J-31
# ls -lL /etc/systemd/system/multi-user.target.wants/httpd.service-rw-r--r--. 1 root root 752 Nov 10 20:33 /etc/systemd/system/multi-user.target.wants/httpd.service#
Solution
Follow these steps to change the configuration of the system and restart the httpdprocess:
1. Log in to the Database Firewall instance as root user.
2. Check and confirm that the above mentioned symptom exists.
3. Copy the base file from /usr to /etc by running the following command:
# install -m 0644 -o root -g root /usr/lib/systemd/system/httpd.service /etc/systemd/system/httpd.service
4. Edit the file in /etc and find the below mentioned Service block:
# vi /etc/systemd/system/httpd.service...[Service]Type=notifyEnvironmentFile=/etc/sysconfig/httpdExecStart=/usr/sbin/httpd $OPTIONS -DFOREGROUND...
5. Modify the file and add the following code to include the restart failure directive.The file looks like the folllowing:
...[Service]Restart=on-failureType=notifyEnvironmentFile=/etc/sysconfig/httpdExecStart=/usr/sbin/httpd $OPTIONS -DFOREGROUND...
6. Save the file.
7. Disable and re-enable the service to fully apply the following changes:
# systemctl disable httpdRemoved symlink /etc/systemd/system/multi-user.target.wants/httpd.service.# systemctl enable httpdCreated symlink from /etc/systemd/system/multi-user.target.wants/httpd.service to /etc/systemd/system/httpd.service.#
Appendix Jhttpd Crash Issue on Database Firewall
J-32

8. Verify the following changes:
# sha256sum -c - <<EOFeac607c17f2c122619b3e1459eafdfef6bde003d24964891aa506735df4f55c2 /etc/systemd/system/multi-user.target.wants/httpd.serviceEOF/etc/systemd/system/multi-user.target.wants/httpd.service: OK#
9. Reload the systemd configuration and restart httpd by running the following commands:
# systemctl daemon-reload
# systemctl restart httpd
10. Verifying the service is enabled by running the following command:
# systemctl list-unit-files | grep http
11. Observe the following output:
httpd.service enabled#
12. If the daemon subsequently fails, the systemd will restart it, and write the followingexample audit trail to the system log:
Nov 27 08:38:09 example systemd: httpd.service: main process exited,code=killed, status=11/SEGVNov 27 08:39:40 example systemd: httpd.service stop-sigterm timed out.Killing.Nov 27 08:39:40 example systemd: Unit httpd.service entered failed state.Nov 27 08:39:40 example systemd: httpd.service failed.Nov 27 08:39:40 example systemd: httpd.service holdoff time over, schedulingrestart.Nov 27 08:39:40 example systemd: Stopped The Apache HTTP Server.Nov 27 08:39:40 example systemd: Starting The Apache HTTP Server...Nov 27 08:39:40 example systemd: Started The Apache HTTP Server.
J.50 Issue with Retrieval of Return Row CountLearn how to fix the issue related to retrieval of return row count.
Problem
Database Firewall captures the number of rows returned by a SELECT query and display themin reports under the column Row Count.
If the database takes a while to generate response result set, then return row count may notbe extracted due to timeout configuration.
Appendix JIssue with Retrieval of Return Row Count
J-33
Workaround
Follow these steps to adjust the timeout interval:
1. Connect to the Database Firewall appliance as support user.
2. Switch to root user.
3. Change to /var/dbfw/va directory.
4. Identify the Database Firewall monitoring point by searching for the target nameconfigured in the Audit Vault Server. Run the following command:
grep -lr <TARGET NAME> *
5. The output contains the name and path of the configuration file. For example:1/etc/appliance.conf. In this example, 1 is the monitoring point number.
6. Change the directory to the identified monitoring point and open configuration fileof the appliance.
7. Search for the following entry in the file:
MAX_LOG_FILE_TIMERANGE8. Modify the MAX_LOG_FILE_TIMERANGE line to reflect the required time range in
seconds. For example, if you wish to change the time range to 5 minutes, then theconfiguration line should be MAX_LOG_FILE_TIMERANGE=="300".
9. Save the changes.
10. Run the following command to restart the Database Firewall processes so that thenew setting takes effect:
/usr/local/dbfw/bin/dbfwctl restart <monitoring point number>
In this case the monitoring point number was 1.
Hence, the command should be:
/usr/local/dbfw/bin/dbfwctl restart 1
Note:
Increasing the timeout configuration delays the availability of captured SQLstatements in the reports and any alerts configured for the same. Use yourdiscretion while configuring the above value close to the actual querycompletion time.
Appendix JIssue with Retrieval of Return Row Count
J-34
J.51 Unable to Log in to the Oracle AVDF Appliance throughSSH
Learn how to fix log in issue to Oracle AVDF appliance.
Problem
The user is unable to log in to the Oracle AVDF appliance through SSH. This may bebecause of using old SSH clients to log in to the Oracle AVDF appliance.
Workaround
Log in to ARU (Automated Release Updates). Apply the patch number 32287150 that solvesthe problem.
Note:
This patch must be applied on Oracle AVDF 20.3 and later only.
J.52 Error When Changing IP Address of Management InterfaceLearn how to resolve the error encountered when changing the IP address of theManagement Interface.
Problem
The Management Interface IP address is the IP address of the Database Firewall which wasused to register the Database Firewall in the Audit Vault Server console.
In Oracle AVDF 20.1, the following error may be encountered while attempting to change theIP address of the Management Interface:
Operation failed OAV-46981: Unable to connect to Database Firewall with IP<ipaddress>
Solution
This error may come up because the IP Address of the Database Firewall is changedsuccessfully. However, there may be a delay in the response from Database Firewall. It maytake a few seconds for the network update on the Database Firewall and for the system tosettle.
Click Save and Close buttons to exit the dialog. Do not click on the cross (X) mark in the topright corner of the dialog.
Appendix JUnable to Log in to the Oracle AVDF Appliance through SSH
J-35

J.53 Unable to Configure Microsoft SQL Server XEL AuditTrail After Upgrade
Problem
The following error is observed while configuring Microsoft SQL Server XEL audit trailon Audit Vault Server after upgrading to Oracle AVDF 20.3:
[oracle][SQLServer JDBC Driver][SQLServer]VIEW SERVER STATE permission wasdenied on object 'server', database 'master'
Solution
Follow these steps to resolve this issue in Oracle AVDF 20.3:
1. Create a new user on Microsoft SQL Server target database.
2. Grant the necessary privileges. See Oracle AVDF Administrators Guide forcomplete information.
3. Modify the registered target with the newly created user credentials.
4. Configure the Microsoft SQL Server XEL audit trail.
This issue is resolved in Oracle AVDF 20.4. Follow these steps after upgrading toOracle AVDF 20.4 (or later):
1. Revoke audit data collection privileges by running themssql_drop_db_permissions.sql script as follows:
sqlcmd -S server_name -U sa -i mssql_drop_db_permissions.sql -v username="username" mode="AUDIT_COLL" all_databases="NA" database="NA"
2. Run the mssql_user_setup.sql script as follows:
sqlcmd -S server_name -U sa -i mssql_user_setup.sql -v username="username" mode="AUDIT_COLL" all_databases="NA" database="NA"
3. Configure the Microsoft SQL Server XEL audit trail.
J.54 Transaction Log Audit Trail Stops Due to an Error WhileParsing XML File Containing Emoji
Problem
Transaction Log audit trail stops while parsing a file that contains emoji. The followingerror is observed in the Agent logs:
javax.xml.stream.XMLStreamException: ParseError at [row,col]
Appendix JUnable to Configure Microsoft SQL Server XEL Audit Trail After Upgrade
J-36

Solution
Follow these steps to resolve this error:
1. Run the following command to stop the Audit Vault Agent:
AGENT_HOME/bin/agentctl stop
.
2. Delete the sjsxp.jar file present in the AGENT_HOME/av/jlib directory.
3. Run the following command to start the Audit Vault Agent:
AGENT_HOME/bin/agentctl start
.
J.55 Unable to Find the FIPS Status for Database FirewallInstance
Learn how to fix the error when the FIPS status for a Database Firewall instance is notdisplayed in the Audit Vault Server console.
Problem
The FIPS status for the Database Firewall instance could not be determined from the AuditVault Server console.
Solution
Perform the following checks to determine the root cause of the problem:
• The Database Firewall version is 20.4 or later.
• Check the network connectivity between the Audit Vault Server and the two DatabaseFirewall instances.
• Ensure the Audit Vault Server's certificate is correctly copied or installed on the DatabaseFirewall instance.
• Check if the Audit Vault Server can connect to the Database Firewall by confirming thatthe status of the Database Firewall instance is online.
If none of the above points are helpful in identifying the cause of the problem, then contactOracle Support.
Appendix JUnable to Find the FIPS Status for Database Firewall Instance
J-37

J.56 Unable to Modify the Database Firewall FIPS ModeThrough Audit Vault Server Console
Learn how to fix the error when the FIPS mode cannot be modified through the AuditVault Server console.
Problem
This could be caused due to a communication issue between the Audit Vault Serverand the Database Firewall instances.
Solution
Perform the following checks to determine the root cause of the problem:
• The Database Firewall version is 20.4 or later.
• Check the network connectivity between the Audit Vault Server and the twoDatabase Firewall instances.
• Ensure the Audit Vault Server's certificate is correctly copied or installed on theDatabase Firewall instance.
• Check if the Audit Vault Server can connect to the Database Firewall by confirmingthat the status of the Database Firewall instance is online.
If none of the above points are helpful in identifying the cause of the problem, thencontact Oracle Support.
J.57 The FIPS Status on Both the Database FirewallInstances is Different
Learn how to fix the error when the FIPS mode is different on both the DatabaseFirewall instances.
Problem
The FIPS mode is different on both the Database Firewall instances. This could becaused when FIPS mode is manually changed on one of the Database Firewallinstances. It can also be caused when such an attempt to manually change the FIPSmode failed.
Solution
All the Database Firewall instances that are part of high availability must have thesame FIPS 140-2 mode. The FIPS 140-2 status of the Database Firewall instancesmust either be Off or On.
FIPS 140-2 mode can be disabled or enabled on both the Database Firewallinstances. In case, these two instances have different FIPS mode, then an errormessage is displayed on the screen.
Verify the high availability status of the Database Firewall instances, and change theFIPS mode again.
Appendix JUnable to Modify the Database Firewall FIPS Mode Through Audit Vault Server Console
J-38

J.58 After Restarting Secondary Audit Vault Server, the PrimaryInstance Fails to Switchover
Learn how to fix a switchover issue on the primary Audit Vault Server, after the secondaryinstance is restarted.
Problem
After restarting the secondary Audit Vault Server, the switchover status of the primary AuditVault Server shows NOT ALLOWED state.
This status of the primary Audit Vault Server is not recoverable and the following errormessages appear and are repeated every 50 seconds on the secondary Audit Vault Server:
<Date> <avs-instance-name> observerctl: com.oracle.avs.observerctl DEBUG - DGMGRL:[W000 <date and timestamp>] The primary database has requested a transition to the UNSYNC/LAGGING state with the standby database DBFWDB_HA2.<Date> <avs-instance-name> observerctl: com.oracle.avs.observerctl DEBUG - DGMGRL:[W000 <date and timestamp>] Permission granted to the primary database to transition to LAGGING state with the standby database DBFWDB_HA2.<Date> <avs-instance-name> observerctl: com.oracle.avs.observerctl DEBUG - DGMGRL:[W000 <date and timestamp>] Reconnect interval expired, create new connection to primary database.<Date> <avs-instance-name> observerctl: com.oracle.avs.observerctl DEBUG - DGMGRL:[W000 <date and timestamp>] The primary database has been in LAGGING state for 7138 seconds.
Solution
In case the primary Audit Vault Server's switchover status goes into NOT ALLOWED status afterrestarting the secondary instance, then follow the steps mentioned in MOS Note (Doc ID1258074.1) to restart the standby Audit Vault Server.
J.59 Incorrect Syntax Near Connectivity Entry in Audit LogsLearn how to fix incorrect syntax error entry in audit logs.
Problem
When attempting to add an audit trail for Microsoft SQL Server, the Audit Vault Agentattempts to acquire a target connection using JDBC driver. After the connection isestablished, a test query is sent to validate the connection by the JDBC driver.
This test query may generate the following error:
Incorrect syntax near ‘Connectivity’This error is visible in the database audit records.
Appendix JAfter Restarting Secondary Audit Vault Server, the Primary Instance Fails to Switchover
J-39
Solution
Starting Oracle AVDF release 20.6, to avoid unnecessary logging of records or eventsdue test queries in the target database, define the collection attribute as follows:
av.collector.validateConnectionOnBorrow = false
See Also:
Microsoft SQL Server Plug-in for Oracle Audit Vault and Database Firewall
J.60 Certificate Regenerate Failure ErrorLearn how to fix a certificate regenerate failure error.
Problem
In case the certificate regenerate operation fails, then one of the possible reasons canbe the incorrect date and time of the appliance (Audit Vault Server or DatabaseFirewall).
Solution
Specify the correct time, and then run the following command to regenerate thecertificate:
/usr/local/bin/gensslcert create-certs
To retrieve the details about certificate expiry date, run the following command:
openssl x509 -enddate -startdate -noout -in {certificate path}
For example:
openssl x509 -enddate -startdate -noout -in /usr/local/dbfw/etc/cert.crtnotAfter=Oct 17 17:44:53 2022 GMTnotBefore=Sep 14 17:44:53 2021 GMT
Note:
The audit trails go to UNREACHABLE state for about 45 minutes after thecertificates are rotated and all the relevant services are restarted. The trailscontinue to work normally after that. This behavior is observed in OracleAVDF release 20.6 only.
Appendix JCertificate Regenerate Failure Error
J-40
J.61 User Entitlement or Audit Policy Job Stuck in RunningState
Learn how to manage the user entitlement or audit policy job stuck in RUNNING state.
Problem
The user entitlement job or audit policy job is stuck in RUNNING state for a long time. This jobis stuck and has to be manually stopped.
Workaround
This issue may be due to an issue with the Java Framework process in the background.Follow these steps and submit the job again:
1. Log in to the Audit Vault Server as support user through SSH.
2. Switch to root user by running the following command:
su root
3. Restart the Java Framework by running the following command:
systemctl restart javafwk
J.62 Audit Trails are Toggling Between COLLECTING andUNREACHABLE Status
Learn how to fix the incorrect audit trail status issue.
Problem
The Audit Trails tab in the Audit Vault Server console displays the status of all the audittrails. Some audit trails are continuously toggling between the status COLLECTING andUNREACHABLE.
The trails go to UNREACHABLE state if they take more than 120 seconds (2 heartbeat intervals)to update the trail status. This can happen if either the target or Audit Vault Server istemporarily loaded, causing the trails to take more time to update the trail status.
Solution
Consider increasing the heartbeat interval to 120 seconds. Currently, the default value is 60seconds. Run the following command as avsys user:
exec avsys.adm.add_config_param('SYS.HEARTBEAT_INTERVAL', 120);
Appendix JUser Entitlement or Audit Policy Job Stuck in Running State
J-41
Note:
This scenario is applicable for Oracle AVDF releases 20.5 and earlier, wherethe default value is 60 seconds. Starting with Oracle AVDF 20.6, the defaultvalue is 120 seconds.
J.63 Displaying Job Status Takes Lot of Time in the AuditVault Server Console
Learn how to resolve the Jobs dialog issue.
Problem
The Jobs dialog in the System tab takes lot of time to load and to display the jobs andtheir current status.
Solution
Delete unwanted or old data from the Status column. This resolves the issue and theJobs dialog displays the required information.
For example: Delete unwanted or old data from the avsys.job_status table that ismore than 30 days old using the following SQL query:
Delete from job_statuswhere status = 'Completed'and status_time < sysdate - 30;
J.64 Microsoft SQL Server Database Audit Trails are inStopped State After Upgrading Java
Learn how to fix issue when audit trails belonging to Microsoft SQL Server databasego to stopped state after upgrading Java version u291 or greater.
Problem
Audit trails that belong to Microsoft SQL Server database are not collecting audit data.This issue is observed after upgrading the Java version to u291 or greater and whenMicrosoft SQL Server target’s connect string is one of the following:
• jdbc:av:sqlserver://<MSSQL Host name>:<Portnumber>;encryptionMethod=SSL; validateServerCertificate=false;
• jdbc:av:sqlserver://<MSSQL Host name>:<Portnumber>;encryptionMethod=SSL;validateServerCertificate=true;trustStore=<key store jks path>;trustStorePassword=<keystorepassword>;extendedOptions=enableCipherSuites=SSL_RSA_WITH_RC4_128_MD5,SSL_RSA_WITH_RC4_128_SHA
Appendix JDisplaying Job Status Takes Lot of Time in the Audit Vault Server Console
J-42

Solution
Modify the connect string for Microsoft SQL Server database (in Audit Vault Server console orAVCLI) to one of the following:
• jdbc:av:sqlserver://<MSSQL Host name>:<Portnumber>;encryptionMethod=SSL;validateServerCertificate=false;CryptoProtocolVersion=TLSv1.2;
• jdbc:av:sqlserver://<MSSQL Host name>:<Portnumber>;encryptionMethod=SSL;validateServerCertificate=true;CryptoProtocolVersion=TLSv1.2;trustStore=<key store jks path>;trustStorePassword=<keystorepassword>;extendedOptions=enableCipherSuites=SSL_RSA_WITH_RC4_128_MD5,SSL_RSA_WITH_RC4_128_SHA
J.65 Unable to Delete Database FirewallLearn how to fix an issue observed when attempting to delete Database Firewall.
Problem
An error OAV-47704 is observed when attempting to delete Database Firewall. This issue isobserved in the following scenario:
• Oracle AVDF releases 20.1 to 20.5
• Audit Vault Server is upgraded to Oracle AVDF 20, but Database Firewall is not upgradedto Oracle AVDF 20
• Error observed in the Audit Vault Server console or in AVCLI
Solution
This issue is fixed in Oracle AVDF release 20.6. In case the installed version is Oracle AVDFreleases 20.5 and earlier, then follow these steps:
1. Log in to the Audit Vault Server through SSH.
2. Switch user to root:
su root
3. Switch user to dvaccountmgr:
su dvaccountmgr
4. Start SQL*Plus connection without the username or password:
sqlplus /nolog
5. Unlock avsys user and assign a password by running the command:
alter user avsys identified by <pwd> profile default account unlock;
Appendix JUnable to Delete Database Firewall
J-43
6. Run the command:
exit
7. Start SQL*Plus connection without the username or password:
sqlplus /nolog
8. In SQL*Plus run the command:
connect avsys
9. Enter the password when prompted. Alternatively, run the command:
connect <avsys/password>
10. Run the following SQL query:
select id from avsys.firewall where name= '<firewall_name> ' and deleted_at is null;
11. Make a note of the Database Firewall ID.
12. Run the command:
update avsys.firewall set software_version=’<avs_version>’ where id=<firewall_id>;
For example: update avsys.firewall set software_version=’20.5.0.0.0’where id=<firewall_id>;
13. Run the command:
commit;
14. Repeat the process for any other Database Firewall instance that needs to bedeleted.
15. Run the command:
exit
16. Attempt to delete the Database Firewall instance from the Audit Vault Serverconsole or through AVCLI.
J.66 Issue in Language Setting of the Audit Vault AgentLearn how to fix the language setting in Audit Vault Agent.
Problem
Unable to change or set the language in Audit Vault Agent. Audit Vault Agent supportslanguages other than English.
Appendix JIssue in Language Setting of the Audit Vault Agent
J-44

Audit Vault Agent uses the language specified in the locale settings of the host machine(Agent machine), provided the language is supported. In case the specific language isalready set on the system, then there is no need to change the settings for the Agent to usethe specific language.
Solution
The locale settings for the Windows platform can be changed through the Control Panel onthe Windows host machine.
To change the locale settings on Linux/Unix/AIX/Solaris platform, set the LC_ALL and LANGenvironment variables.
For example:
export LC_ALL=fr_FR.iso88591
export LANG=fr_FR.iso88591
Appendix JIssue in Language Setting of the Audit Vault Agent
J-45

KMultiple Network Interface Cards
The Audit Vault Server (AVS) supports network separation through addition and initializationof additional network interfaces.
K.1 About Multiple Network Interface CardsOracle Audit Vault and Database Firewall enables additional network interfaces to allow someservices to be accessible on networks other than the default management interface.
Oracle Audit Vault and Database Firewall supports multiple network interface cards. TheAudit Vault Server console can only be used to modify secondary NICs of the DatabaseFirewall. The config-nic command must be used to modify the secondary NICs for the AuditVault Server only.
Note:
Oracle AVDF appliances support only 1 NIC (Network Interface Card) with an IPaddress per subnet. This can be a secondary NIC or a NIC used for monitoringtraffic. If higher throughput or redundancy is an issue, then see Bonding of NetworkInterface Cards.
Perform the following steps in the Audit Vault Server console to view and manage thenetwork interface cards for Database Firewall.
1. Log in to the Audit Vault Server console as administrator.
2. Click the Database Firewalls tab.
3. Select a specific Database Firewall instance.
4. In the main page, under the Configuration section, click Network Settings link.
5. In the Network Settings dialog, click on a specific network interface card.
6. Select the specific network interface that needs to be modified. The Network InterfaceSettings dialog is displayed. It can be used to view and manage the secondary networkinterface cards.
Note:
The Database Firewall diagnostics package can be installed. After the installation,the commands executed for the Audit Vault Server can be executed on theDatabase Firewall.
The secondary network interfaces can be enabled and modified for the Audit Vault Server.Log in to the Audit Vault Server as support user and then switch user to root, to execute thesecommands.
K-1
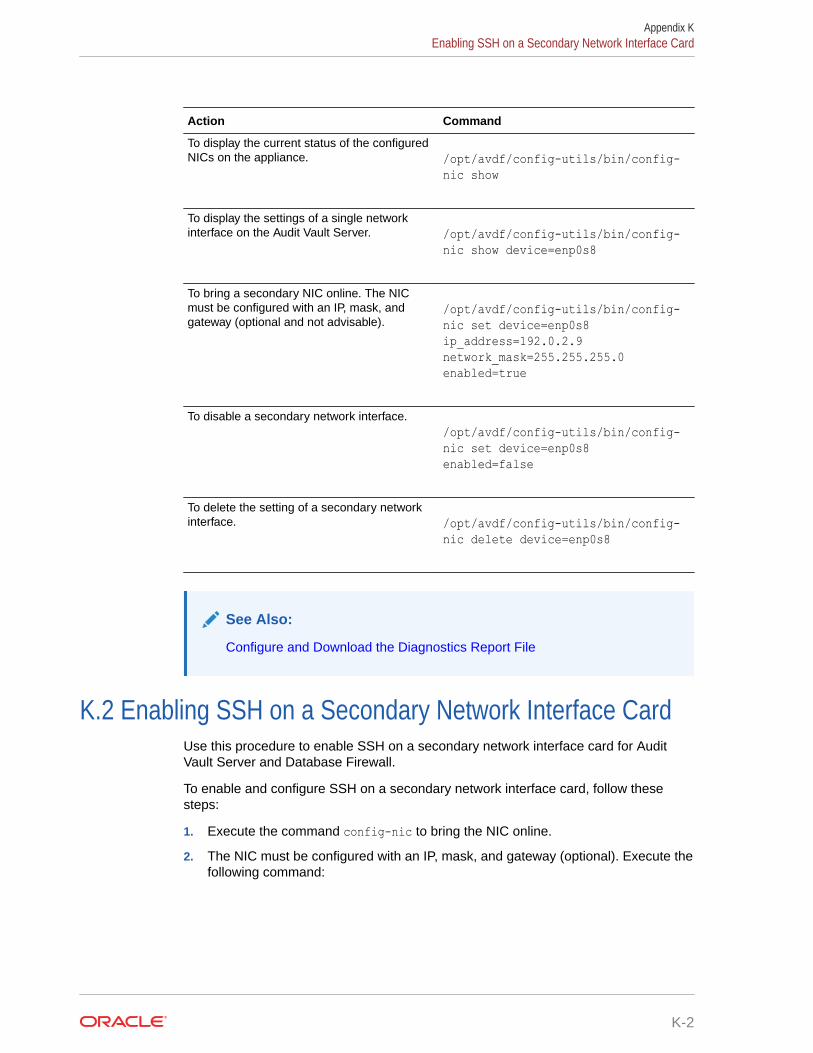
Action Command
To display the current status of the configuredNICs on the appliance. /opt/avdf/config-utils/bin/config-
nic show
To display the settings of a single networkinterface on the Audit Vault Server. /opt/avdf/config-utils/bin/config-
nic show device=enp0s8
To bring a secondary NIC online. The NICmust be configured with an IP, mask, andgateway (optional and not advisable).
/opt/avdf/config-utils/bin/config-nic set device=enp0s8 ip_address=192.0.2.9 network_mask=255.255.255.0 enabled=true
To disable a secondary network interface./opt/avdf/config-utils/bin/config-nic set device=enp0s8 enabled=false
To delete the setting of a secondary networkinterface. /opt/avdf/config-utils/bin/config-
nic delete device=enp0s8
See Also:
Configure and Download the Diagnostics Report File
K.2 Enabling SSH on a Secondary Network Interface CardUse this procedure to enable SSH on a secondary network interface card for AuditVault Server and Database Firewall.
To enable and configure SSH on a secondary network interface card, follow thesesteps:
1. Execute the command config-nic to bring the NIC online.
2. The NIC must be configured with an IP, mask, and gateway (optional). Execute thefollowing command:
Appendix KEnabling SSH on a Secondary Network Interface Card
K-2

3. The dbfw.conf file contains the settings of the secondary network interface card. Toenable SSH, modify the settings as follows:
NET_SERVICE_MAP="{"enp0s8":{"ip4":{"address":"192.0.2.9/24","gateway":"","enabled":true},"ssh":{"port":"22","access_list":["192.0.2.1"]}}}"
4. The access_list field can be used with the following attributes:
• "all": The IP tables allow any IP address to connect through SSH.
• "disabled": The IP tables reject all incoming connections for SSH on this NIC.
• An array of IP addresses separated by comma and a space. These IP addresses arepermitted to access the SSH port on the NIC. For example:["192.0.2.11","192.0.2.12"]
5. Ensure a valid port number on the appliance is mentioned in the Port field.
K.3 Enabling Agent Connectivity on a Secondary NIC for AuditVault Server
Use this procedure to enable Agent connectivity on a secondary network interface card forAudit Vault Server.
After a secondary NIC is online, you can enable it for communication between the Agent andthe database. This topic describes how to enable the Agent connectivity on secondarynetwork interface cards.
To enable agent connectivity on secondary network interfaces card for Audit Vault Server:
1. Execute the command config-nic to bring a NIC online.
2. The dbfw.conf file contains the settings of the secondary network interface card. Toenable access to the Agent, modify the settings as follows:
NET_SERVICE_MAP="{"enp0s8":{"ip4":{"address":"192.0.2.9/24","gateway":"","enabled":true},"agent":{"port":"1521","tls_port":"1522","access_list":["192.0.2.1"]}}}"
3. The access_list field can be used with the following attributes:
• "all": The IP tables allow any IP address for connection to the Agent.
• "disabled": The IP tables reject all incoming connections for the Agent on this NIC.
• An array of IP addresses separated by comma and a space. These IP addresses arepermitted to access the Agent port on the NIC. For example,["192.0.2.11","192.0.2.12"]
4. Ensure a valid port number on the appliance is mentioned in the Port field.
5. Run the following command to apply the Agent or network configuration:
/usr/local/dbfw/bin/priv/configure-networking
Appendix KEnabling Agent Connectivity on a Secondary NIC for Audit Vault Server
K-3
See Also:
Deploying the Audit Vault Agent
K.4 Enabling the Agent for High Availability Connection on aSecondary NIC for Audit Vault Server
Use this procedure to enable the Audit Vault Agent for high availability connection on asecondary network interface card for Audit Vault Server.
Prerequisite: This procedure must be performed prior to pairing the appliances (AuditVault Server or Database Firewall) for high availability.
If the Audit Vault Agent is being run on a high availability pair of appliances, thesecondary NIC must be enabled on the standby appliance (Audit Vault Server orDatabase Firewall). High availability involves a pair of Audit Vault Server instances or apair of Database Firewall instances. Additional entries must also be made to thedbfw.conf file of both appliances.
To enable Audit Vault Agent connectivity on secondary network interfaces card forAudit Vault Server in a high availability environment:
1. Enable the Audit Vault Agent for high availability connection. Open the dbfw.conffile and scroll to the bottom where you will see automatically generated entriessimilar to the following:
SECONDARY_NIC_1_DEVICE = enp0s8 SECONDARY_NIC_1_ADDRESS = enp0s8:ip4:address:192.168.90.9 SECONDARY_NIC_1_AGENT_PORT = enp0s8:agent:port:1521 SECONDARY_NIC_1_AGENT_PORT_TLS = enp0s8:agent:port:1522
2. Depending on the number of secondary NICs configured for Agent connectivity,there may be more than one block of SECONDARY_NIC_[N]_ values. Select theblock with the correct IP address and add the following field:
SECONDARY_NIC_1_ADDRESS_HA=”<IP address>”
On the primary instance, this value will be the IP address of the NIC on thestandby instance. And on the standby instance it is the IP address of the NIC onthe primary instance.
3. Apply the Audit Vault Agent high availability configuration. Run the followingcommand to apply the configuration, on both appliances:
/usr/local/dbfw/bin/priv/configure-networking
Appendix KEnabling the Agent for High Availability Connection on a Secondary NIC for Audit Vault Server
K-4
K.5 Bonding of Network Interface CardsThis section contains information on bonding of Database Firewall Network Interface cards.Oracle Audit Vault and Database Firewall 20.1.0.0.0 and later supports bonding of NetworkInterface cards for Database Firewall only. This bonding functionality is used by the DatabaseFirewall monitoring points. Bonding increases bandwidth and supports redundancy of thenetwork connections on the appliance.
Execute the following command to check for bonding between network interface cards:
/opt/avdf/config-utils/bin/config-bond
The command output displays information about the composite device.
Execute the following command to bond multiple network interface cards:
/opt/avdf/config-utils/bin/config-bond add device=bond0 slaves=enp0s18,enp0s19 ip4addr=192.0.2.10 ip4mask=255.255.255.0 ip4gateway=192.0.2.1 state=true
Upon establishing the bonding, the following confirmation message is displayed:
config-bond add ...
Execute the following command to delete a bonded device:
/opt/avdf/config-utils/bin/config-bond delete device=bond0
The following confirmation message is displayed:
config-bond delete ...
Execute the following command to remove the existing bonding between network interfaces:
/opt/avdf/config-utils/bin/config-bond delete device=bond0
The following is the output:
Notice: Settings deleted.:device: bond0:slaves:- enp0s9- enp0s8:description::ip_address: 192.0.2.20:network_mask: 255.255.255.0:gateway: '':enabled: true
Appendix KBonding of Network Interface Cards
K-5

Note:
• Execute the following command to seek help for the bonding of networkinterfaces:
/opt/avdf/config-utils/bin/config-bond help
• It is not possible to create bonding of two network interface cards usingthe interfaces on which the monitoring point already exists. In this casedisable the existing monitoring point, create bonding between thenetwork interface cards, and then use the newly created bond name toconfigure the monitoring point.
K.6 Configuring Routing on Secondary Network InterfaceCards
Learn how to configure routing on secondary network interface cards in Oracle AVDF.The following table contains the necessary information to view and set routing for thesecondary network interface cards on Audit Vault Server and Database Firewall. Log into the terminal as root user to run the commands listed in the table.
Task Command Output
To view the existing routingconfiguration on the networkinterface card.
/opt/avdf/config-utils/bin/config-route
device: enp0s3gateway: " "routes: []
To set the gateway.
Note: A gateway must beassigned to only one device.However, it is possible toassign a gateway to multipledevices. It introduces systeminstability. In most cases thegateway must be assigned toonly the default managementinterface device that isconfigured during installation.
/opt/avdf/config-utils/bin/config-route set device=enp0s3 gateway=<gateway address>
Notice: Success.Settings saved.
Appendix KConfiguring Routing on Secondary Network Interface Cards
K-6

Task Command Output
To set a custom static route./opt/avdf/config-utils/bin/config-route set device=enp0s3 routes='<IP address of the network interface card followed by the gateway address separated by space>'
For example:
/opt/avdf/config-utils/bin/config-route set device=enp0s3 routes='192.0.2.1 192.0.2.4'
Notice: Success.Settings saved.
To set multiple route at thesame time.
Note: Although the routes areassigned to a single device,the routing table applies to alldevices.
/opt/avdf/config-utils/bin/config-route set device=enp0s3 routes='<IP address of the network interface card and gateway address separated by comma and space>'
For example:
/opt/avdf/config-utils/bin/config-route set device=enp0s3 routes='192.0.2.1 192.0.2.4, 192.0.2.11 192.0.2.5, 192.0.2.21 192.0.2.6,'
- :device: enp0s3:gateway: " ":routes:- 192.0.2.1 192.0.2.4- 192.0.2.11 192.0.2.5- 192.0.2.21 192.0.2.6
Appendix KConfiguring Routing on Secondary Network Interface Cards
K-7

Task Command Output
To add a single static route./opt/avdf/config-utils/bin/config-route add device=enp0s3 routes='<IP address of the network interface card followed by the gateway address separated by space>'
For example:
/opt/avdf/config-utils/bin/config-route add device=enp0s3 routes='192.0.2.1 192.0.2.4'
Notice: Success.Settings saved.---:device: enp0s3:gateway: " ":routes:- 192.0.2.1 192.0.2.4- 192.0.2.11 192.0.2.5- 192.0.2.21 192.0.2.6- 192.0.2.22 192.0.2.16
To delete a single static route./opt/avdf/config-utils/bin/config-route delete device=enp0s3 routes='<IP address of the network interface card followed by the gateway address separated by space>'
For example:
/opt/avdf/config-utils/bin/config-route delete device=enp0s3 routes=192.0.2.1 192.0.2.4
Notice: Settingsdeleted.---:device: enp0s3:gateway: '':routes:- 192.0.2.1 192.0.2.4
To delete all static routes./opt/avdf/config-utils/bin/config-route set device=enp0s3 routes=""
Notice: Success.Settings saved.
Appendix KConfiguring Routing on Secondary Network Interface Cards
K-8

LConfiguring Quick JSON Target Type toCollect Audit Data from MongoDB
Learn how to collect MongoDB audit data using Oracle AVDF’s Quick JSON target type.
MongoDB audit data is available in multiple formats like BSON, JSON, or Syslog. Oracle AVDFsupports audit data collection from Enterprise Edition in JSON format only.
To register MongoDB as a target, select the target type as Quick JSON. Later provide therequired collection attributes for the fields in the MongoDB audit trail, as mentioned in thetable below. Quick JSON uses this mapping to read the MongoDB audit file and map it to thefields in the Audit Vault Server.
Additionally, when adding audit trail for the MongoDB target, provide the location of MongoDBaudit files. Ensure the Audit Vault Agent user can access MongoDB JSON audit file. Ifrequired grant read permissions to the file.
Use Quick JSON target type for reading from JSON audit files without any conversion ofdata. For situations where the JSON data needs to be converted before it is stored in theAudit Vault Server, use the JSON custom collector.
Table L-1 Collection attributes and values required for audit collection fromMongoDB audit file
Audit Vault Collection Attribute MongoDB JSON File Value
av.collector.qck.starttag atypeav.collector.qck.eventtime $.ts.$dateav.collector.qck.username $.users[0].userav.collector.qck.os.username $.users[0].userav.collector.qck.eventname $.atypeav.collector.qck.commandclass $.atypeav.collector.qck.client.ip $.remote.ipav.collector.qck.targetobject $.atypeav.collector.qck.targettype $.atypeav.collector.qck.eventstatus $.resultav.collector.qck.errorid $.resultav.collector.qck.errormessage $.resultav.collector.qck.target.entity $.param.nsav.collector.qck.target.user $.param.userav.collector.qck.target.role $.param.role
L-1

Note:
Delete the attribute av.collector.timezoneoffset during QuickJSON targetcreation in Oracle AVDF 20.4 and later. This attribute is not required forcollecting audit data from MongoDB.
See Also:
• Quick JSON Target Type for Oracle Audit Vault and Database Firewall
• Registering Targets
Appendix L
L-2

MAudit Vault Agent Auto Start Configuration
Learn how to configure Audit Vault Agent to restart automatically when the host machine isrestarted.
Audit Vault Agent is installed on a host machine. The Audit Vault Agent is not restartedautomatically when the host machine is restarted. The Audit Vault Agent can be configured torestart automatically, whenever the host machine is restarted. The configuration is differentfor the type of operating system installed on the host machine. This appendix contains therequired information.
Note:
• This functionality involves configuring a service to restart the Agent and isavailable in Oracle AVDF releases 20.3 to 20.6.
• Starting with Oracle AVDF release 20.7, a new Agent auto start functionality isintroduced. This functionality constantly monitors the Agent and also restartsthe Agent if it stops unexpectedly. See Configuring Agent Auto RestartFunctionality for complete information.
M.1 Configuring Agent Auto Start on Host Machine With OL7and OL8
Learn to configure Audit Vault Agent auto start functionality on a host machine with OL7 andOL8.
1. Install the Audit Vault Agent and activate using the activation key.
2. Run the following command to manually start the Audit Vault Agent as agent user:
<AgentHome>/bin/agentctl start
3. Create a file /etc/systemd/system/multi-user.target.wants/agentctl.service as root user. Use the sample script provided below. In this samplescript replace the <AgentUser> and <AgentHome> with relevant Agent user name andAgent home directory.
[Unit] Description=AgentController Service After=network.target After=syslog.target
M-1
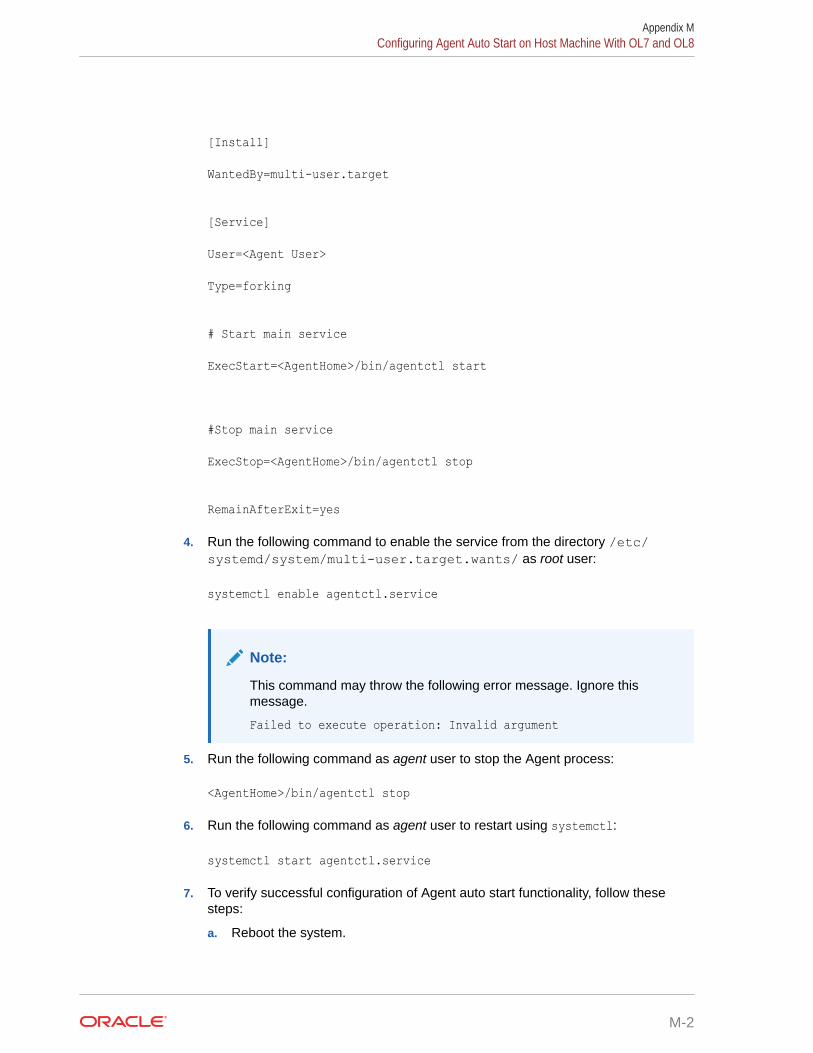
[Install] WantedBy=multi-user.target [Service] User=<Agent User> Type=forking # Start main service ExecStart=<AgentHome>/bin/agentctl start #Stop main service ExecStop=<AgentHome>/bin/agentctl stop RemainAfterExit=yes
4. Run the following command to enable the service from the directory /etc/systemd/system/multi-user.target.wants/ as root user:
systemctl enable agentctl.service
Note:
This command may throw the following error message. Ignore thismessage.
Failed to execute operation: Invalid argument
5. Run the following command as agent user to stop the Agent process:
<AgentHome>/bin/agentctl stop
6. Run the following command as agent user to restart using systemctl:
systemctl start agentctl.service
7. To verify successful configuration of Agent auto start functionality, follow thesesteps:
a. Reboot the system.
Appendix MConfiguring Agent Auto Start on Host Machine With OL7 and OL8
M-2

b. After the system is up, check the status by running the following command:
systemctl status agentctl.service
c. Verify the status is STARTED.
Note:
Ensure the Agent is started or stopped only using the systemctl command.Using the agentctl command leads to inconsistencies and must beavoided.
M.2 Configuring Agent Auto Start on Host Machine With OL6Learn to configure Audit Vault Agent auto start functionality on a host machine with OL6.
1. Install the Audit Vault Agent and activate using the activation key.
2. Create the script as root user in the location /etc/init.d/agentAVDF. Use thesample script provided below. In this sample script set the USER and AGENT_HOME withappropriate Agent user and Agent home path.
3. In the script update the chkconfig parameter with start priority and stop priority. Theparameters <start priority> and <stop priority> decide the order in which file isexecuted, in comparison with the rest of files that exist in the location ./etc/init.dduring machine start and shutdown respectively. Smaller priority numbers are executedfirst. For example, # chkconfig: 2345 99 95
# chkconfig: 2345 <start priority> <stop priority>
PROGRAM="agentAVDF"
USER=<AgentUser>
AGENT_HOME=<AgentHomeDirectory>
start() {
su - ${USER} -c "/bin/bash -c '${AGENT_HOME}/bin/agentctl start'"
}
stop() {
su - ${USER} -c "/bin/bash -c '${AGENT_HOME}/bin/agentctl stop'"
}
case "$1" in
Appendix MConfiguring Agent Auto Start on Host Machine With OL6
M-3
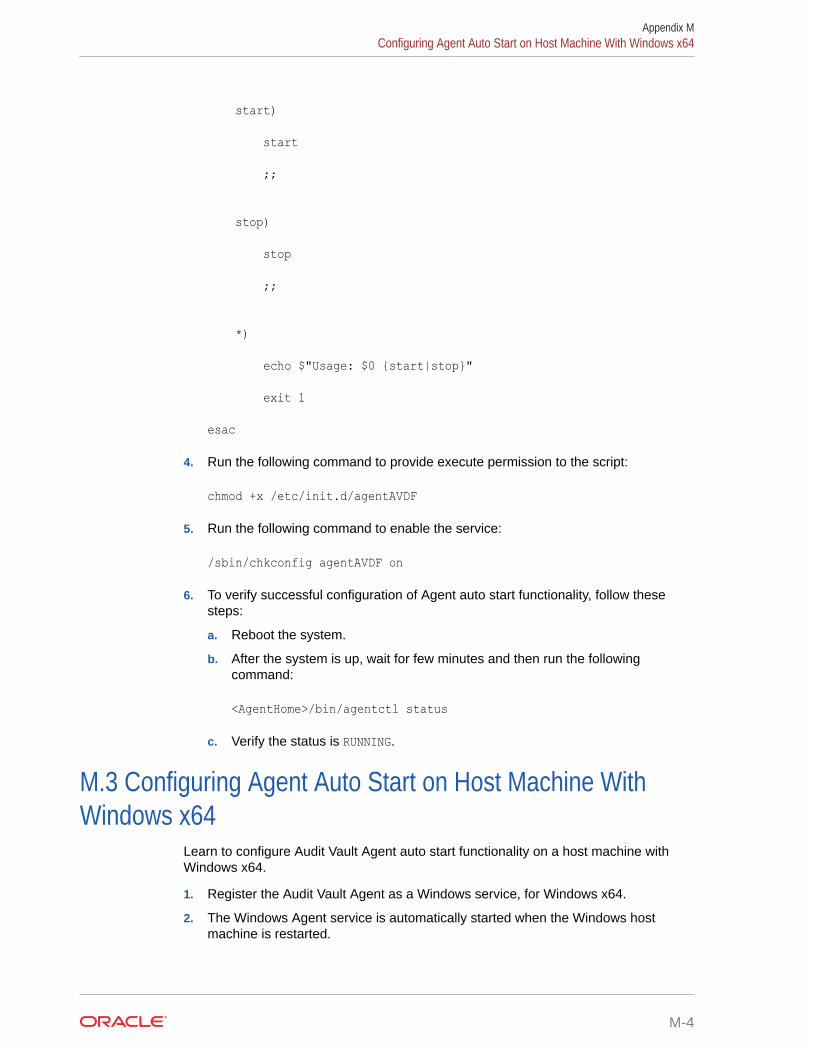
start)
start
;;
stop)
stop
;;
*)
echo $"Usage: $0 {start|stop}"
exit 1
esac
4. Run the following command to provide execute permission to the script:
chmod +x /etc/init.d/agentAVDF
5. Run the following command to enable the service:
/sbin/chkconfig agentAVDF on
6. To verify successful configuration of Agent auto start functionality, follow thesesteps:
a. Reboot the system.
b. After the system is up, wait for few minutes and then run the followingcommand:
<AgentHome>/bin/agentctl status
c. Verify the status is RUNNING.
M.3 Configuring Agent Auto Start on Host Machine WithWindows x64
Learn to configure Audit Vault Agent auto start functionality on a host machine withWindows x64.
1. Register the Audit Vault Agent as a Windows service, for Windows x64.
2. The Windows Agent service is automatically started when the Windows hostmachine is restarted.
Appendix MConfiguring Agent Auto Start on Host Machine With Windows x64
M-4

M.4 Configuring Agent Auto Start on Host Machine With Solaris[SPARC/x64]
Learn to configure Audit Vault Agent auto start functionality on a host machine with Solaris[SPARC/x64].
1. Install the Audit Vault Agent and activate using the activation key.
2. Create the file /lib/svc/method/agentAVDF as root user. Use the sample scriptprovided below. In this sample script set the AGENT_USER and AGENT_HOME with appropriateAgent user and Agent home path.
#!/bin/sh
################################################### name: agentAVDF# purpose: script that will start or stop the AVDF agent daemon.##################################################
case "$1" instart )su - <AGENT_USER> -c "/bin/bash -c '<AGENT_HOME>/bin/agentctl start'";;stop )su - <AGENT_USER> -c "/bin/bash -c '<AGENT_HOME>/bin/agentctl stop'";;* )echo "Usage: <AGENT_HOME>/bin/agentctl (start | stop)"exit 1esac
3. Run the following command to provide execute permission to the script:
chmod +x /lib/svc/method/agentAVDF
4. Create a manifest file /tmp/agentAVDF.xml as root user, using the below samplemanifest file.
<?xml version="1.0" ?><!DOCTYPE service_bundleSYSTEM '/usr/share/lib/xml/dtd/service_bundle.dtd.1'><service_bundle name="startstopAgent" type="manifest"><service name="startstopAgent" version="1" type="service"><dependency name="multi_user_dependency" grouping="require_all"restart_on="none" type="service"><service_fmri value="svc:/milestone/multi-user"/></dependency><exec_method name="start" type="method" timeout_seconds="300"exec="/lib/svc/method/agentAVDF start"/><exec_method name="stop" type="method" timeout_seconds="300"
Appendix MConfiguring Agent Auto Start on Host Machine With Solaris [SPARC/x64]
M-5

exec="/lib/svc/method/agentAVDF stop"/><!--The exec attribute below can be changed to a command that SMFshould execute when the service is refreshed. Use svcbundle -srefresh-method to set the attribute.--><exec_method name="refresh" type="method" timeout_seconds="60"exec=":true"/><!--A duration property group is not needed.--><instance name="default" enabled="true"/><template><common_name><loctext xml:lang="start/stop AVDF agent">startstopAgent</loctext></common_name><description><loctext xml:lang="The service can start and stop AVDF Agent by agentctl">The startstopAgent service.</loctext></description></template></service></service_bundle>
5. Run the following command as root user, to validate the manifest file:
/usr/sbin/svccfg validate /tmp/agentAVDF.xml
6. Run the following command as root user, to copy the manifest file to thelocation /lib/svc/manifest/site/:
cp /tmp/agentAVDF.xml /lib/svc/manifest/site/
7. Run the following command as root user, to import the manifest file and start theservice:
/usr/sbin/svcadm restart manifest-import
8. Run the following command as root user, to check the status of the service. Thestatus of the service must be maintenance or online. If the status is offline, thenrun the below command again after few minutes:
svcs | grep startstopAgent
9. To verify successful configuration of Agent auto start functionality, follow thesesteps:
a. Reboot the system.
Appendix MConfiguring Agent Auto Start on Host Machine With Solaris [SPARC/x64]
M-6
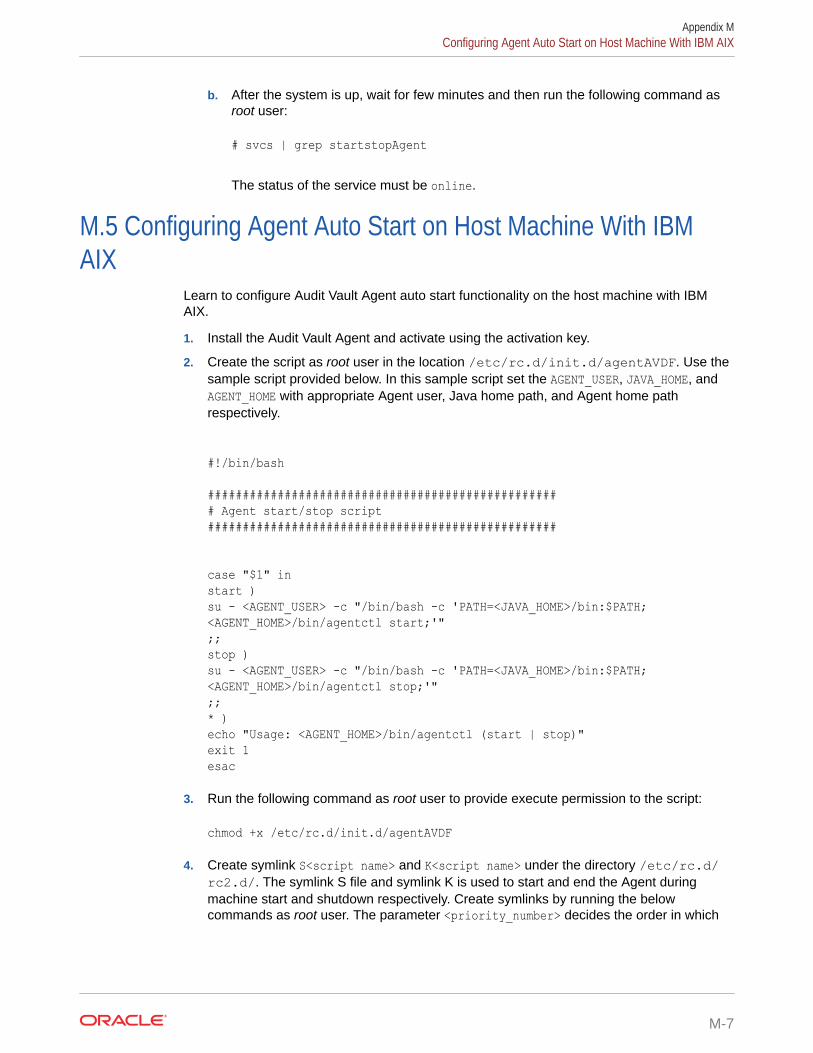
b. After the system is up, wait for few minutes and then run the following command asroot user:
# svcs | grep startstopAgent
The status of the service must be online.
M.5 Configuring Agent Auto Start on Host Machine With IBMAIX
Learn to configure Audit Vault Agent auto start functionality on the host machine with IBMAIX.
1. Install the Audit Vault Agent and activate using the activation key.
2. Create the script as root user in the location /etc/rc.d/init.d/agentAVDF. Use thesample script provided below. In this sample script set the AGENT_USER, JAVA_HOME, andAGENT_HOME with appropriate Agent user, Java home path, and Agent home pathrespectively.
#!/bin/bash ################################################### Agent start/stop script################################################## case "$1" instart )su - <AGENT_USER> -c "/bin/bash -c 'PATH=<JAVA_HOME>/bin:$PATH; <AGENT_HOME>/bin/agentctl start;'";;stop )su - <AGENT_USER> -c "/bin/bash -c 'PATH=<JAVA_HOME>/bin:$PATH; <AGENT_HOME>/bin/agentctl stop;'";;* )echo "Usage: <AGENT_HOME>/bin/agentctl (start | stop)"exit 1esac
3. Run the following command as root user to provide execute permission to the script:
chmod +x /etc/rc.d/init.d/agentAVDF
4. Create symlink S<script name> and K<script name> under the directory /etc/rc.d/rc2.d/. The symlink S file and symlink K is used to start and end the Agent duringmachine start and shutdown respectively. Create symlinks by running the belowcommands as root user. The parameter <priority_number> decides the order in which
Appendix MConfiguring Agent Auto Start on Host Machine With IBM AIX
M-7

the file runs in comparison with the rest of the files that exist in thedirectory ./etc/rc.d/rc2.d. Smaller priority numbers are run first.
ln -s /etc/rc.d/init.d/agentAVDF /etc/rc.d/rc2.d/S<priority_number>agentAVDF
ln -s /etc/rc.d/init.d/agentAVDF /etc/rc.d/rc2.d/K<priority_number>agentAVDF
For example:
ln -s /etc/rc.d/init.d/agentAVDF /etc/rc.d/rc2.d/S99999agentAVDF
ln -s /etc/rc.d/init.d/agentAVDF /etc/rc.d/rc2.d/K99999agentAVDF
5. To verify successful configuration of Agent auto start functionality, follow thesesteps:
a. Reboot the Agent machine.
b. After the machine is up, wait for few minutes, and then run the followingcommand as agent user:
<AgentHome>/bin/agentctl status
c. Ensure the status is RUNNING.
Appendix MConfiguring Agent Auto Start on Host Machine With IBM AIX
M-8

NAdding User Content To System ConfigurationFiles
Use this procedure to add user specified content to AVDF template files. AVDF allowsspecific content to persist on the appliance through various procedures such as upgrade andregular system configuration. This is handled by the user interface of the appliance.
Every template configuration file on the appliance allows to add user defined content. Anadditional file is available that contains such content. Within this file an additional output datafile must be added. Any user defined content is added to the end of the final output file.
Note:
Not all template files are written regularly. In some cases files are only updated onupgrade, while some are updated frequently like networking configuration.
To create and include a file for a template generated content follow this procedure:
1. Create a root-owned directory where all the files can be stored.
Note:
The directory must be owned by root user and must have write access.
The following commands can be executed to create the directory named include:
mkdir /usr/local/dbfw/templates/includechown root:root /usr/local/dbfw/templates/includechmod 755 /usr/local/dbfw/templates/include
2. Create a new directory to have data automatically inserted into the output of a templatefile. The name of this new directory can be prefixed with after-.
3. The list of files that have user data appended are stored at /usr/local/dbfw/templates
4. To add further host names to /etc/hosts, add the file named after-template-hosts tothe directory /usr/local/dbfw/templates/include.
N-1

Note:
The file after-template-hosts must be read-only and owned by root. Itmay be world readable also.
5. Execute the following commands to set the required permission after creating theafter-template-hosts file:
touch /usr/local/dbfw/templates/include/after-template-hostschmod 444 /usr/local/dbfw/templates/include/after-template-hostschown root:root /usr/local/dbfw/templates/include/after-template-hosts
6. Modify the file to include new user data. This is used when the template file andthe data is appended to the generated file. The newly appended data is found inthe end of the generated file.
7. In most cases it is necessary to restart or re-initialize the affected componentbefore the changes are completely applied. Refer to the Oracle Linuxdocumentation for more information about the components and files modified.
Appendix N
N-2

OMonitoring Audit Vault Server
Learn how to monitor Audit Vault Server.
Monitoring enables investigation of suspicious activity, accountability for actions, and addressauditing requirements for compliance. Monitoring involves configuring auditing (in bothembedded repository and operating system) and collecting the generated records into ashadow Audit Vault Server for analysis and reporting.
Audit Vault Server automatically configures auditing for both the operating system and theembedded repository.
O.1 About Auditing Operating SystemLearn all about auditing of the operating system.
Audit Vault Sever enables default Oracle Linux audit configuration. The configuration settingsare available in /etc/audit/auditd.conf file and the audit logs are recordedin /var/log/audit directory.
O.2 About Auditing Audit Vault Server RepositoryLearn all about auditing of Audit Vault Server repository.
Prior to Oracle AVDF release 20.7, Audit Vault Server enables the default mixed modeauditing with the following settings:
audit_file_dest = /var/lib/oracle/admin/dbfwdb/adumpaudit_sys_operations = TRUEaudit_trail = DB
Note:
The above default configuration prior to release 20.7 audits SYS operations anddoes not audit application level schemas AVSYS and MANAGEMENT.
Starting with Oracle AVDF release 20.7, pure unified auditing is automatically enabled withadditional policies to audit application schemas AVSYS and MANAGEMENT.
With pure unified auditing enabled, the Audit Vault Server centralizes all auditing to unifiedaudit trail. For example, Database Vault audit records go to unified audit trail. The UnifedAudit Policies are configured by default. This includes fresh installation and upgrade of AuditVault Server to release 20.7.
O-1
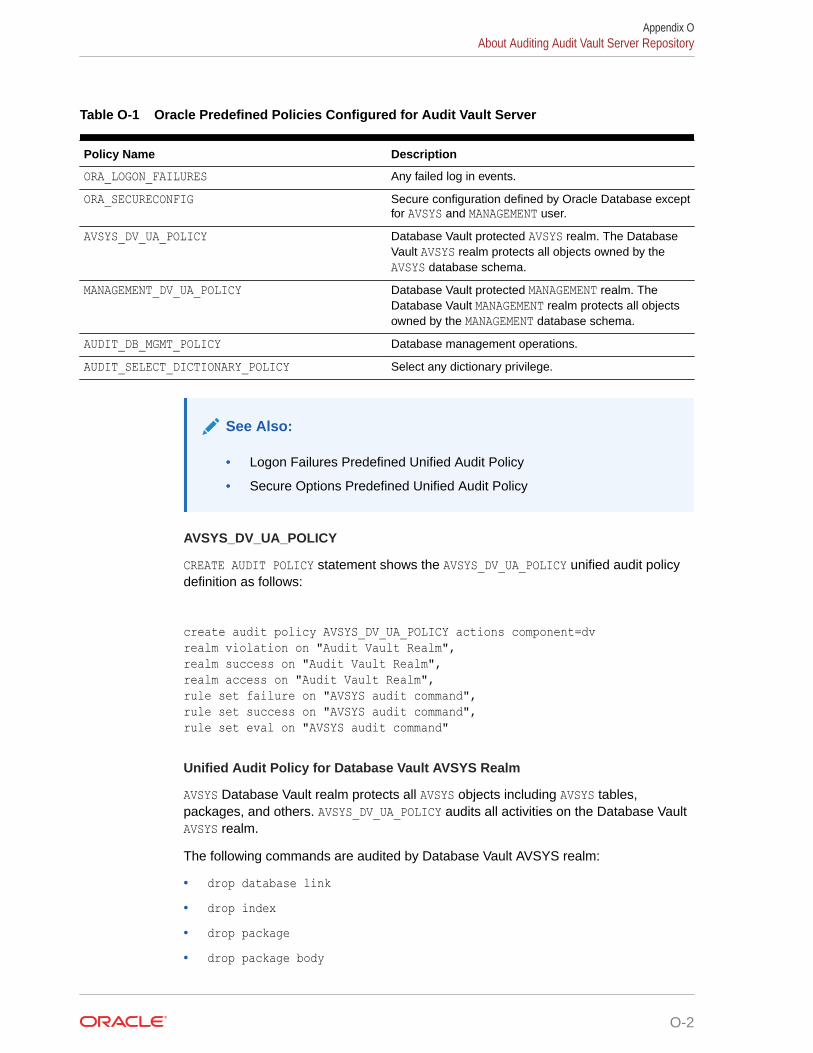
Table O-1 Oracle Predefined Policies Configured for Audit Vault Server
Policy Name Description
ORA_LOGON_FAILURES Any failed log in events.
ORA_SECURECONFIG Secure configuration defined by Oracle Database exceptfor AVSYS and MANAGEMENT user.
AVSYS_DV_UA_POLICY Database Vault protected AVSYS realm. The DatabaseVault AVSYS realm protects all objects owned by theAVSYS database schema.
MANAGEMENT_DV_UA_POLICY Database Vault protected MANAGEMENT realm. TheDatabase Vault MANAGEMENT realm protects all objectsowned by the MANAGEMENT database schema.
AUDIT_DB_MGMT_POLICY Database management operations.
AUDIT_SELECT_DICTIONARY_POLICY Select any dictionary privilege.
See Also:
• Logon Failures Predefined Unified Audit Policy
• Secure Options Predefined Unified Audit Policy
AVSYS_DV_UA_POLICY
CREATE AUDIT POLICY statement shows the AVSYS_DV_UA_POLICY unified audit policydefinition as follows:
create audit policy AVSYS_DV_UA_POLICY actions component=dvrealm violation on "Audit Vault Realm",realm success on "Audit Vault Realm",realm access on "Audit Vault Realm",rule set failure on "AVSYS audit command",rule set success on "AVSYS audit command",rule set eval on "AVSYS audit command"
Unified Audit Policy for Database Vault AVSYS Realm
AVSYS Database Vault realm protects all AVSYS objects including AVSYS tables,packages, and others. AVSYS_DV_UA_POLICY audits all activities on the Database VaultAVSYS realm.
The following commands are audited by Database Vault AVSYS realm:
• drop database link• drop index• drop package• drop package body
Appendix OAbout Auditing Audit Vault Server Repository
O-2

• drop procedure• drop sequence• drop synonym• drop table• drop type• drop type body• drop view• delete• revoke• truncate table
MANAGEMENT_DV_UA_POLICY
CREATE AUDIT POLICY statement shows the MANAGEMENT_DV_UA_POLICY unified audit policydefinition as follows:
create audit policy MANAGEMENT_DV_UA_POLICY actions component=dvrealm violation on "Audit Vault Account Manager Realm",realm success on "Audit Vault Account Manager Realm",realm access on "Audit Vault Account Manager Realm",rule set failure on "MANAGEMENT audit command",rule set success on "MANAGEMENT audit command",rule set eval on "MANAGEMENT audit command"
Unified Audit Policy for Database Vault MANAGEMENT Realm
Management Database Vault realm protects all the MANAGEMENT object, includes MANAGEMENTtables, packages, etc. MANAGEMENT_DV_UA_POLICY audits all activities on the Database VaultMANAGEMENT realm.
The following commands are audited by Database Vault MANAGEMENT realm:
• drop database link• drop index• drop package• drop package body• drop procedure• drop sequence• drop synonym• drop table• drop type• drop type body• drop view
Appendix OAbout Auditing Audit Vault Server Repository
O-3
• delete• revoke• truncate table
AUDIT_DB_MGMT_POLICY
CREATE AUDIT POLICY statement shows the AUDIT_DB_MGMT_POLICY unified audit policydefinition and audits all users:
create audit policy audit_db_mgmt_policyprivilegesALTER PUBLIC DATABASE LINK,AUDIT ANY, AUDIT SYSTEM,CREATE ANY TRIGGER, CREATE PUBLIC DATABASE LINK,DROP ANY DIRECTORY, DROP PUBLIC DATABASE LINKactionsALTER FUNCTION, ALTER PACKAGE, ALTER PROCEDURE, ALTER TRIGGER,CREATE PACKAGE, CREATE PACKAGE BODY, CREATE PROCEDURE,CREATE SPFILE, CREATE TRIGGER,DROP FUNCTION, DROP PACKAGE, DROP PROCEDURE,DROP TRIGGER;
AUDIT_SELECT_DICTIONARY_POLICY
CREATE AUDIT POLICY statement shows the AUDIT_SELECT_DICTIONARY_POLICY unifiedaudit policy definition and audits all users except AVSYS and MANAGEMENT:
create audit policy audit_select_dictionary_policyprivilegesSELECT ANY DICTIONARY;
O.3 Collecting Audit Records to Shadow Audit Vault ServerLearn how to collect audit records to the shadow Audit Vault Server.
You can configure a shadow Audit Vault Server to monitor the audit trails of the mainAudit Vault Server. For example, if someone logs in to the main Audit Vault Server anddrops an AVSYS package, the activity is audited, and the trail is collected in the shadowAudit Vault Server for reporting and analysis. The audit records are found in the activityreports that an auditor can access in the Audit Vault Server console. For example, AllActivity report.
When you configure a shadow Audit Vault Server, you should configure collection fromboth unified and OS audit trails.
Configuring these trails involves the following steps:
1. Deploying Audit Vault Agent on the main Audit Vault Server
2. Adding a trail on the shadow Audit Vault Server to collect data from unified audittrail in the main Audit Vault Server
Appendix OCollecting Audit Records to Shadow Audit Vault Server
O-4

3. Adding a trail on the shadow Audit Vault Server to collect data from operating systemaudit trail in the main Audit Vault Server
O.4 Deploying the Audit Vault Agent on the Main Audit VaultServer
Learn how to deploy Audit Vault Agent on the main Audit Vault Server.
A shadow Audit Vault Server can be configured to monitor the audit trail of the main AuditVault Server. To accomplish this an Audit Vault Agent must be deployed on the main AuditVault Server.
Follow these steps:
1. Log in to the shadow Audit Vault Server as an administrator.
2. Register the main Audit Vault Server in the Agents tab.
3. Log in to the main Audit Vault Server as root user.
4. Run the following commands to create a /var/lib/oracle/avs_agent directory inthe main Audit Vault Server:
cd /var/lib/oracle
mkdir avs_agent
chown avsagent:osaudit avs_agent
5. Run the sudo -u avsagent /bin/bash command to create a bash shell for the avsagentOS user.
Note:
There is no log in the shell defined for the avsagent OS user. To run thecommand as avsagent user, log in as root user. It can either be done by runningthe command sudo -u avsagent /bin/bash and use the created bash shell torun the command as avsagent user, or by running the command sudu -uavsagent <command>.
6. Log in to the shadow Audit Vault Server console as an administrator.
7. Click the Agents tab, and then click Downloads.
8. Download the agent.jar file to /var/lib/oracle/avs_agent directory and copy itto the main Audit Vault Server as avsagent OS user.
9. Add a line export PATH=/var/lib/oracle/avs_agent/bin:$PATH in the /home/avsagent/.bashrc. This ensures the future bash shell created by sudo -uavsagent /bin/bash has the PATH to access the agentctl.
10. Deploy the Audit Vault Agent in the main Audit Vault Server as avsagent OS user in theshell created earlier.
Appendix ODeploying the Audit Vault Agent on the Main Audit Vault Server
O-5
Make sure /var/lib/oracle/avs_agent/bin is in the PATH. Or run exportPATH=/var/lib/oracle/avs_agent/bin:$PATH.
11. Running the following command:
java -jar /var/lib/oracle/avs_agent/agent.jar
12. Running the following command to start the Agent as avsagent OS user:
agentctl start -k
13. Enter the activation key when prompted. The activation key is available in theAgents tab of the shadow Audit Vault Server. Ensure to enter the completeactivation key including the name of the Agent.
O.5 Adding a Trail to Collect Data From Unified Audit Trailon the Main Audit Vault Server
Learn how to add a trail to collect data from unified audit trail on the main Audit VaultServer as an Oracle Database target.
This involves two steps on a high level:
1. Registering the main Audit Vault Server as an Oracle Database target.
2. Configuring the trail to collect data from the unified audit trail on the main AuditVault Server.
O.5.1 Registering the Main Audit Vault Server as an Oracle DatabaseTarget
Learn how to register the main Audit Vault Server as an Oracle Database target.
1. Log in to the main Audit Vault Server as dvaccountmgr.
2. Update the password of AVSAUDIT user and unlock the account.
3. Start SQL*Plus connection as sqlplus /nolog without the username or password.
4. In SQL*Plus run the following command:
connect <sysdba>
Alternatively, run the command:
connect <sysdba/password>
5. Enter the password when prompted.
6. Run the following command:
@oracle_user_setup.sql AVSAUDIT setup
Appendix OAdding a Trail to Collect Data From Unified Audit Trail on the Main Audit Vault Server
O-6
The oracle_user_setup.sql is located at /var/lib/oracle/avs_agent/av/plugins/com.oracle.av.plugin.oracle/config.
7. Log in as dvowner.
8. Start SQL*Plus and run the following command:
GRANT DV_MONITOR TO "AVSAUDIT"
9. Log in to the shadow Audit Vault Server as administrator.
10. Create an archive location and define the archiving policy for the main Audit Vault Servertarget. It is recommended to create an archiving policy for 6 months online and 0 monthsarchived.
11. Register the main Audit Vault Server as an Oracle Database target. During the targetregistration, select 6 months online, 0 months as the retention policy. Use AVSAUDIT inthe Database User Name field. Enter AVSAUDIT password in the Password field.
O.5.2 Configuring Trail to Collect Data from Unified Audit Trail on the MainAudit Vault Server
Learn how to add an audit trail to collect data from the unified audit trail on the main AuditVault Server as an Oracle Database target.
1. Log in to the shadow Audit Vault Server as administrator.
2. Add an audit trail for the main Audit Vault Server Oracle Database target.
3. Click Targets tab.
4. Identify and click the main Audit Vault Server Oracle Database target.
5. In the Audit Data Collection section, click Add.
6. Select the table for Audit Trail Type field.
7. Select UNIFIED_AUDIT_TRAIL in the Trail Location field.
8. Select the Audit Vault Agent deployed in the Agent Host field.
9. In the Agent Plugin field, select com.oracle.av.plugin.oracle.
10. Click Save.
11. The audit trail is started automatically.
O.6 Adding a Trail to Collect Data from OS Audit Trail on theMain Audit Vault Server
Learn how to add a trail to collect data from OS audit trail on the main Audit Vault Server as aLinux target.
This involves two steps on a high level:
1. Registering the main Audit Vault Server as a Linux target.
2. Configuring trail to collect data from OS audit trail on the main Audit Vault Server.
Appendix OAdding a Trail to Collect Data from OS Audit Trail on the Main Audit Vault Server
O-7

O.6.1 Registering the Main Audit Vault Server as a Linux TargetLearn how to register the main Audit Vault Server as a Linux target.
1. Log in to the shadow Audit Vault Server as an administrator.
2. Click Targets tab, and then click Register.
3. Select Linux in the Type field.
4. Select 6 months online and 0 months as the Retention Policy.
5. Enter the Host Name of the main Audit Vault Server if DNS is configured.
6. Enter the IP address of the main Audit Vault Server.
7. Click Save.
O.6.2 Configuring a Trail to Collect Data from OS Audit Trail on theMain Audit Vault Server
Learn how to add an audit trail for unified auditing for the main Audit Vault Server as aLinux target.
1. Log in to the shadow Audit Vault Server as administrator.
2. Add an audit trail for the main Audit Vault Server as Linux target.
3. Click Targets tab.
4. Identify and click the main Audit Vault Server Linux target.
5. In the Audit Data Collection section, click Add.
6. Select DIRECTORY in the Audit Trail Type field.
7. In the Trail Location field, enter /var/log/audit/audit*.log.
8. Select the Audit Vault Agent deployed in Agent Host field. This is the Agent thatwas earlier deployed in the main Audit Vault Server.
9. In the Agent Plugin field, select com.oracle.av.plugin.linuxos.
10. Click Save.
11. The audit trail is started automatically.
Appendix OAdding a Trail to Collect Data from OS Audit Trail on the Main Audit Vault Server
O-8

Best Practice:
• It is recommended to configure a shadow Audit Vault Server to collectunified audit data and OS audit data from the main Audit Vault Server.
• The shadow Audit Vault Server must be highly restricted to capturing auditdata from only the main Audit Vault Server.
• It is recommended not to provision or modify the audit policies through theshadow Audit Vault Server for the main Audit Vault Server without carefulconsideration. Increased auditing of the main Audit Vault Server impactsthe performance.
O.7 Storage Requirement for Main Audit Vault ServerLearn about the storage requirement for the main Audit Vault Server when auditing isenabled.
For every 1 million audit records and network events collected, the Audit Vault Servergenerates 3 GB of audit records as part of self auditing. The administrator must complete thesizing exercise to account for this space usage as per the deployment.
For a fresh installation of Audit Vault Server, refer to Audit Vault Sizing Guide. For an upgradeof Audit Vault Server from an older version, follow these guidelines:
1. Collect the data on the number of records (in million) generated by the Audit Vault Serverfor a duration of 8 days. Take this as X. For example, if 2 million records are generatedper day, then X is 2 * 8 = 16.
2. Now calculate the space required (Y) for Audit Vault Server self auditing. This includesSYSTEMDATA and EVENTDATA. For every million records the space required is 3 GB.
Y = X multiplied by 3 GBThe administrator needs to allocate Y GB of space in SYSTEMDATA and EVENTDATA disk groups.For example, if the system is processing 2 million audit records per day, then it requires 48GB storage space in both SYSTEMDATA and EVENTDATA for auditing Audit Vault Server. (2million records * 8 days * 3 GB = 48 GB).
X = 2 * 8 = 16Y = 16 * 3 GB = 48 GB
For auditing of Audit Vault Server to process about 2 million audit records per day, theadministrator must allocate 48 GB space in SYSTEMDATA and EVENTDATA.
Appendix OStorage Requirement for Main Audit Vault Server
O-9

O.8 About Purging Unified Audit Trail on the Main AuditVault Server
Learn how to configure a purge job for unified audit data pertaining to the main AuditVault Server.
Unified audit trail data that is older than 7 days is purged by default. This is done aspart of the AVS_MAINTENANCE_JOB that is scheduled to run daily by default. Theschedule can be changed using the Audit Vault Server console.
See Also:
Scheduling Maintenance Jobs
After configuring the unified audit trail collection in the shadow Audit Vault Server, it isrecommended to configure a unified audit trail purge job in the main Audit Vault Server.
Follow these steps to configure unified audit trail purge job:
1. Log in to the Audit Vault Server as root OS user.
2. Run the command to switch to oracle user:
su - oracle
3. Start SQL*Plus connection as sqlplus /nolog without the username or password.
4. In SQL*Plus run the following command:
connect <sysdba>
Enter the password when prompted. Alternatively, run the command:
connect <sysdba/password>
5. Run the following SQL script to create a purge job with the job nameAVS_UNIFIED_AUDIT_CLEANUP for Unified Audit Trail:
begin dbms_audit_mgmt.create_purge_job( audit_trail_type => dbms_audit_mgmt.audit_trail_unified, audit_trail_purge_interval => 1, audit_trail_purge_name => 'AVS_UNIFIED_AUDIT_CLEANUP', use_last_arch_timestamp => true, container => dbms_audit_mgmt.container_current); end;
This job runs once every hour to clean up the unified audit trail based on thearchived timestamp updated by the shadow Audit Vault Server trail collection.
Appendix OAbout Purging Unified Audit Trail on the Main Audit Vault Server
O-10

Best Practice:
It is recommended to configure unified audit trail purge job when configuringtrails on the shadow Audit Vault Server, to collect data from the main Audit VaultServer.
Note:
When you configure unified audit trail purge job, the cleanup performed as partof AVS_MAINTENANCE_JOB is automatically removed and the following message isdisplayed in the Job Status page:
Audit Trail cleanup for Audit Vault Server is enabled, so not purging audit data by Maintenance
Note:
To check the status of AVS_UNIFIED_AUDIT_CLEANUP, run the following SQLstatement:
select * from dba_scheduler_job_run_details where job_name='AVS_UNIFIED_AUDIT_CLEANUP';
Refer to Audit Trail Management Data Dictionary Views for more information.
Appendix OAbout Purging Unified Audit Trail on the Main Audit Vault Server
O-11
Index
Symbols-HELP command, A-72-VERSION command, A-74
Aabout
high availability, 9-1access
remote, security guidelines for, 3-1revoking for targets, 14-3
access rightsabout managing, 14-1administrator account types, 14-1controlling by user, 14-7planning, 2-8targets. controlling by target or group, 14-7
accountsadministrative accounts, 14-1setting up on targets
about, C-23IBM DB2, C-32Microsoft SQL Server, C-29Oracle Database, C-24Sybase ASE, C-26Sybase SQL Anywhere, C-27
ACTIVATE HOST command, A-1activate, Audit Vault Agent with key, 6-13add audit trail
Audit Vault Server as Linux target, O-8Audit Vault Server as Oracle Database
target, O-7add target to a group, A-25add target to a target group, A-26Adding
User Content To System Configuration Files,N-1
additional informationaudit collection from Oracle Active Data
Guard, C-32audit collection from Oracle Data Guard,
C-35administrative features, 2-3
administratorsaccess rights, 14-1administrators
roles, 2-5Audit Vault and Database Firewall
administrator roles, 2-5tasks, 2-5user account types, 14-1
advice on implementationSecurity Technical Implementation Guides
(STIG), H-1agent host AVCLI commands
about, A-1agent host commands, A-1agentctl command
start/stop, 6-18to register Audit Vault Agent as Windows
service, 6-16alerts
configuring email service for, 4-16forwarding to syslog, 4-13from Database Firewall, 5-2Host Monitor, 5-8out-of-band mode, 5-7
ALTER DATABASE FIREWALL MONITORcommand, A-12
ALTER DISKGROUP command, A-57ALTER FIREWALL command, A-7ALTER HOST command, A-2ALTER REMOTE FILESYSTEM command, A-62ALTER SAN SERVER command, A-57ALTER SECURED TARGET command, A-19ALTER SMTP SERVER command, A-43ALTER SMTP SERVER DISABLE command,
A-44ALTER SMTP SERVER ENABLE command,
A-45ALTER SYSTEM SET command, A-66ALTER SYSTEM SMTP SERVER SECURE
MODE OFF command, A-45ALTER SYSTEM SMTP SERVER SECURE
MODE ON command, A-46ALTER TARGET GROUP command, A-26ALTER USER command, A-50APPLY RETENTION POLICY command, A-74
Index-1

archivingdisk space
additional for SMB and scp archive datatransfer, 4-21
expired audit recordsarchive files required, 7-18
filesystemadditional space for SMB and scp
archive data transfer, 4-21NFS filesystem, 4-21policies
creating, 4-23described, 4-18
port for Windows File Sharing transfermethod, 4-21
purging data files after retrieving, 15-10retrieving from archives, 15-10security guidelines, 3-1SMB
See Windows File Sharingtransfer method, 4-21
scp, 4-18SMB, 4-18, 4-21
archiving and retrievinghigh availability, 9-9
audit collectionbest practices, 7-18
audit datadate range in memory, 15-31storing in memory on Audit Vault Server,
15-31audit trail cleanup
IBM DB2, C-39audit trail collection
AVCLI commands used for, A-30audit trail collection AVCLI commands
about, A-30audit trails
Autostart parameters, avcli, A-66Autostart, about, 7-14cleanup
IBM DB2 audit files, 7-21Microsoft SQL Server audit trail, C-38
configurationsREDO logs, recommended settings, D-1
configuring collection, 7-12deleting, 7-19downtime history, 7-15dropping a trail, A-30finding list of, A-32IBM DB2
prerequisite for starting, 7-21MySQL
trail location, 7-20, A-33, A-39, C-45XML transformation, 7-20
audit trails (continued)planning, 2-8planning configurations, 2-8platform support, C-20prerequisites for configuring collection, 7-12prerequisites for converting MySQL formats,
7-19restart, automatic, 7-14starting and stopping, 7-14starting collection, A-33status
Collecting, 7-15Idle, 7-15Recovering, 7-15Stopped, 7-15Unreachable, 7-15
status, checking, 7-15stopping collection, A-39types, C-20
location for DIRECTORY type, 7-12,C-45
audit trails Windows Event Log and operatingsystem logs (audit logs)
audit trailsIBM DB2
about, C-20DIRECTORY audit trail
about, C-20EVENT LOG audit trail, C-20NETWORK audit trail, C-20SYSLOG audit trail, C-20syslog files, C-20TABLE, C-20TRANSACTION LOG
audit trail, about, C-20Windows Event Log, and DIRECTORY audit
trail, C-20XML files, and DIRECTORY audit trail, C-20
audit vault agentauto restart, 6-14requirements validation, 6-6
Audit Vault Agentactivating, 6-13Audit Vault Server communication, 9-6deactivating, 6-21debug, logging, 6-20, 15-1deploying and activating, 6-5log files location, 6-20logging levels, setting, 6-20OS user account for deployment, 6-12planning deployments, 2-7plug-ins
about, 6-22, C-1deploy and activate procedure, 6-23removing, 6-25
Index
Index-2

Audit Vault Agent (continued)removing, 6-21requirements, Java SE, 6-12start in console mode, 6-18starting, 6-18starting, initial, 6-13stop in console mode, 6-18stopping, 6-18, 6-21timestamps for Oracle Database trail purge
process, C-36Windows service, autostarting, 6-19Windows service, registering, 6-15Windows service, unregistering, 6-17
audit vault agent machinejava best practices, 6-6
audit vault agent requirements, 6-5Audit Vault and Database Firewall
administrative features, 2-3administrator tasks, 2-5auditing features, 2-4configuration workflow, 2-9documentation, AVDF, downloading latest,
2-1documentation, downloading latest, 2-1
Audit Vault Serveradd audit trail for Linux target, O-8add audit trail for Oracle Database target,
O-7administrative tasks
archiving log disk space, monitoring,15-33
changing user passwords, 14-8flash recovery area, 15-35SYSAUX tablespace usage, 15-33
Audit Vault Agent communication, 9-6Audit Vault Server
reboot upon changing host name, 4-7backup/restore, 15-18certificate
location, 15-4supplying to Database Firewall, 5-9
certificate warning, UI, 4-2changing keyboard layout, 15-5configuration
about, 4-1initial tasks, 4-3network settings, 4-7
configuringSSH access, 4-10
deploying Agent, O-5detailed diagnostics, 15-3diagnostic checks, 15-2encryption
changing keystore password, 15-13rotating key, 15-13
Audit Vault Server (continued)failover, 9-7high availability, 9-1, 9-10
failover, 9-7status, 9-5unpair, 9-8
host name, changing, reboot required, 4-7in-memory usage, 15-32IP address
changing, reboot required, 4-7supplying to Database Firewall, 5-9
jobs monitoring, 15-35log files location, A-66logging in to UI, 2-10network configuration, 4-7pairing, 9-1planning configuration, 2-6public key, 15-4reboot
upon changing host name, 4-7rebooting, powering off, 15-5register as a database target, O-6register as a Linux target, O-8registering Database Firewall in, 4-27removing Database Firewall from, 15-45removing targets from, 7-8restore, 15-26SNMP access, 4-10status, checking, 15-1syslog destinations, configuring, 4-13testing system operation, 4-28UI, tabs described, 2-11user accounts, creating in, 14-3
Audit Vault Server audit datapurge, O-10
Audit Vault Server high availabilitybackup and restore, 9-10
Audit Vault Serversunpair, 9-8
auditing features, 2-4authentication
using for host monitor-Database Firewallcommunication, 8-14
auto restartaudit vault agent, 6-14
automatic archivingenabling archive job, 15-9
Autostartaudit trail, about, 7-14avcli parameters, A-66
AVCLIlogging in with stored credentials, 15-40storing or overwriting credentials, 15-39
AVCLI commands-HELP, A-72
Index
Index-3

AVCLI commands (continued)-VERSION, A-74ACTIVATE HOST, A-1ALTER DATABASE FIREWALL MONITOR,
A-12ALTER DISKGROUP, A-57ALTER FIREWALL, A-7ALTER HOST, A-2ALTER REMOTE FILESYSTEM, A-62ALTER SAN SERVER, A-57ALTER SECURED TARGET, A-19ALTER SMTP SERVER, A-43ALTER SMTP SERVER DISABLE, A-44ALTER SMTP SERVER ENABLE, A-45ALTER SYSTEM SET, A-66ALTER SYSTEM SMTP SERVER SECURE
MODE OFF, A-45ALTER SYSTEM SMTP SERVER SECURE
MODE ON, A-46ALTER TARGET GROUP, A-26ALTER USER, A-50APPLY RETENTION POLICY, A-74CONNECT, A-71CREATE DATABASE FIREWALL MONITOR,
A-15CREATE RESILIENT PAIR, A-8CREATE RETENTION POLICY, A-75CREATE TARGET GROUP, A-27DEACTIVATE HOST, A-4DELETE ALERT, A-77DELETE RETENTION POLICY, A-75DEPLOY PLUGIN, A-69DISABLE ALERT, A-78DISABLE UNIFIED AUDIT POLICY, A-79DOWNLOAD LOG FILE, A-68DROP DATABASE FIREWALL MONITOR,
A-16DROP FIREWALL, A-9DROP HOST, A-4DROP REMOTE FILESYSTEM, A-63DROP RESILIENT PAIR, A-9DROP SAN SERVER, A-58DROP SECURED TARGET, A-20DROP SMTP SERVER, A-47DROP TARGET GROUP, A-28DROP TRAIL FOR SECURED TARGET,
A-30ENABLE ALERT, A-78ENABLE UNIFIED AUDIT POLICY, A-80GRANT ACCESS, A-51GRANT ADMIN, A-52GRANT AUDITOR, A-52GRANT SUPERADMIN, A-53GRANT SUPERAUDITOR, A-53LIST ADMIN, A-90
AVCLI commands (continued)LIST ADMINS, A-91LIST ALERT POLICIES, A-79LIST ATTRIBUTE FOR SECURED TARGET,
A-21LIST ATTRIBUTE OF SMTP SERVER, A-47LIST AUDITOR, A-91LIST AUDITORS, A-92LIST DATABASE FIREWALL MONITOR,
A-17LIST DISK, A-59LIST DISKGROUP, A-59LIST EXPORT, A-63LIST FIREWALL, A-10LIST HOST, A-6LIST METRICS, A-21LIST PLUGIN FOR SECURED TARGET
TYPE, A-69LIST REMOTE FILESYSTEM, A-64LIST RETENTION POLICY, A-76LIST SAN SERVER, A-60LIST SECURED TARGET, A-22LIST SECURED TARGET TYPE, A-22LIST TARGET FOR SAN SERVER, A-60LIST TARGET GROUPS, A-29LIST TARGETS OF TARGET GROUP, A-29LIST TRAIL FOR SECURED TARGET, A-32LIST UNIFIED AUDIT POLICIES, A-83POWEROFF FIREWALL, A-10QUIT, A-73REBOOT FIREWALL, A-10REGISTER FIREWALL, A-11REGISTER HOST, A-6REGISTER SAN SERVER, A-61REGISTER SMTP SERVER, A-48REGISTER TARGET, A-22REVOKE ACCESS, A-54REVOKE ADMIN, A-54REVOKE AUDITOR, A-55REVOKE SUPERADMIN, A-55REVOKE SUPERAUDITOR, A-56SHOW CERTIFICATE, A-68SHOW ISCSI INITIATOR DETAILS FOR
SERVER, A-61SHOW RETENTION POLICY, A-76SHOW STATUS FOR FIREWALL, A-12SHOW STATUS OF REMOTE
FILESYSTEM, A-65start audit trail, A-38START COLLECTION FOR SECURED
TARGET, A-33START DATABASE FIREWALL MONITOR,
A-17STOP COLLECTION FOR SECURED
TARGET, A-39
Index
Index-4

AVCLI commands (continued)STOP DATABASE FIREWALL MONITOR,
A-18SWAP RESILIENT PAIR, A-11TEST SMTP SERVER, A-49UNDEPLOY PLUGIN, A-70UPLOAD OR DELETE WALLET FILE, A-25
AVCLI commandsALTER DATAENCRYPTIONALTER DATAENCRYPTION commandencryptionAVCLI commandse ALTER DATAENCRYPTION, A-50
AVCLI commandsCLEAR LOGCLEAR LOGcommanddiagnostic logs clearing withAVCLI, A-71
AVCLI utilityabout, 15-37downloading, 15-38finding version of, 15-42help information, 15-42invoking, with stored credentials, 15-40Java_Home environment variable, 15-38,
15-39log files location, 15-42logging in to, 15-39logging levels, setting, 15-42running scripts, 15-41
BBackup/Restore, 15-18
about restoring Audit Vault Server, 15-26backup up Audit Vault Server, 15-24confguring the backup utility, 15-20configuring backup utility for restore, 15-28high availability configuration, 15-18prerequisites to restore, 15-27repository encryption, 15-18required space, 15-20restoring Audit Vault Server, 15-28validating the backup, 15-25
best practicesaudit collection, 7-18
blockingdatabase connections
and Database Firewall, 3-3IPv6 traffic, 3-3mode in monitoring point, 7-28security
database access handling, 3-3break
Database Firewall instances, 9-13
CCDB, registering target, 7-2certificate
Audit Vault Server, 15-4Database Firewall, 7-45supplying to Database Firewall, 5-9
certificate warningAudit Vault Server, changing UI certificate,
4-2certificates, 3-12change
Database Firewall host name, 5-18time zone, 4-7
change host namestandby Audit Vault Server, 4-9
change IP addressDatabase Firewall, 5-16
COLLECTING trail status, 7-15collection attributes
about, C-41Active Directory, not required, C-41collection attributes
Sybase ASE, not required, C-41Windows, not required, C-41
IBM DB2, C-44Linux, not required, C-41MySQL, C-44Oracle ACFS, C-45Oracle Database, C-42Solaris, not required, C-41SQL Server, not required, C-41targets
collection attributesSybase ASE, not required,
C-41Windows, not required, C-41
collection plug-in AVCLI commandsabout, A-68
collection plug-insAVCLI commands used for, A-68deploying with AVCLI command, A-69finding list of, A-69undeploying, A-70
command line utilitydownloading AVCLI, 15-38
configurationaudit trails, 7-12Database Firewall
about, 5-1high availability
Database Firewall, 9-11monitoring points, 7-28targets
about, 7-1
Index
Index-5

configuration (continued)targets (continued)registering, 7-1
understanding workflow, 2-9configure
custom port, 4-14Database Firewall pair, 9-12primary Audit Vault Server, 9-4standby Audit Vault Server, 9-3
configure mutual authenticationinbound TLS communication, 7-43outbound TLS communication, 7-43
configure snmpv3 users, 5-13configuring
remote syslog over TLS, 15-6Configuring Agent auto start
IBM AIX host machine, M-7OL6 host machine, M-3OL7 and OL8 host machine, M-1Solaris [SPARC/x64] host machine, M-5Windows x64 host machine, M-4
configuring high availability for Database Firewallin proxy mode
through client configuration, 9-15through DNS, 9-17
CONNECT command, A-71connect strings (for Target Location field), C-40connections, maintaining for database clients,
7-31console
reset view, 2-12console certificate
Audit Vault Server, 4-2create audit trail, A-38CREATE DATABASE FIREWALL MONITOR
command, A-15CREATE RESILIENT PAIR command, A-8CREATE RETENTION POLICY command, A-75CREATE TARGET GROUP command, A-27creating target groups, 7-8Custom Collector Development, 3-5
DData Encryption
starting, 15-14data files, purging after retrieve, 15-10data retention policies
about, 4-18creating, 4-23
data security, 3-1database clients
connecting through proxy Database Firewall,5-20
database firewallAVCLI commands used for, A-7
Database Firewalladding Database Firewall to Audit Vault
Server, 4-27certificate signed by external CA, 7-45change IP address, 5-16configuration, 5-1
Audit Vault Server certificate and IPaddress, 5-9
network services, 5-12network settings, 5-11proxy, 5-20traffic sources, 5-19
Database FirewallSNMP access, 5-12SSH access, 5-12
diagnostics, 5-20DNS servers
configuring for Database Firewall, 5-12high availability, 9-11high availability, configuring, 9-11logging in to UI, 2-11network placement, 5-18network services configuration, 5-12network settings, changing
network mask, Database Firewallnetwork settings, 5-11subnet
Database Firewall networksettings, networkmask, 5-11
network traffic, capturing to file, 15-44overview, 5-2planning configuration, 2-7ports
for external network access, F-4for firewall services, F-2required to be open, F-1
proxyconfiguration, 5-20database client connections, 5-20
public key, 7-37removing from Audit Vault Server, 15-45restart, power off, 15-44SNMP access
configuring for Database Firewall, 5-12SSH access
configuring for Database Firewall, 5-12status
viewing, 5-20system services
configuring for Database Firewall, 5-12traffic sources, configuring, 5-19ways to connect to, 5-2
Index
Index-6
database firewall AVCLI commandsabout, A-7
database firewall commands, A-7Database Firewall high availability
with monitoring points, 9-14Database Firewall in high availability
proxy mode, 9-15DATABASE FIREWALL MONITOR
AVCLI commands used for, A-12DATABASE FIREWALL MONITOR AVCLI
commandsabout, A-12
DATABASE FIREWALL MONITOR commands,A-12
Database Firewall monitoring pointsdeleting, 7-33port number used, 7-34starting and stopping, 7-33
Database Firewall pairconfigure, 9-12
Database Firewallsviewing network traffic, 15-43
database response monitoringabout, 7-49enabling, 7-50monitoring point setting, 7-31
databases supported, 2-3date and time
settingin Audit Vault Server, 4-3in Database Firewall, 5-15
timestamps in reports, 4-3DB2
See IBM DB2DEACTIVATE HOST command, A-4debugging
Audit Vault Agent, 6-20, 15-1AVCLI debug log level, setting, 15-42Java framework (Jfwklog) LOGLEVEL, A-66Syslog, generating debug messages, 4-13
DELETE ALERT command, A-77DELETE RETENTION POLICY command, A-75delete target from a group, A-25delete target from a target group, A-28deleting hosts, 6-25DEPLOY PLUGIN command, A-69deploying Agent
main Audit Vault Server, O-5developers, downloading SDK, 15-43diagnostics
about, 15-1Audit Vault Server detailed diagnostics, 15-3Audit Vault Server diagnostic checks, 15-2clearning logs, 15-4Database Firewall, 5-20
diagnostics (continued)levels, 15-1system components, 15-1
directory masktrail location for DIRECTORY trail type, 7-12,
C-45DISABLE ALERT command, A-78disable mutual authentication
inbound TLS communication, 7-48outbound TLS communication, 7-48
DISABLE UNIFIED AUDIT POLICY command,A-79
disk groupsabout repository, 16-5
disk spaceadditional for SMB and scp archive data
transfer, 4-18monitoring archive log space, 15-33
dispatcher service, security considerations, 3-4DOWNLOAD LOG FILE command, A-68DROP DATABASE FIREWALL MONITOR
command, A-16DROP FIREWALL command, A-9DROP HOST command, A-4DROP REMOTE FILESYSTEM command, A-63DROP RESILIENT PAIR command, A-9DROP SAN SERVER command, A-58DROP SECURED TARGET command, A-20DROP SMTP SERVER command, A-47DROP TARGET GROUP command, A-28DROP TRAIL FOR SECURED TARGET
command, A-30
Eemail notifications
about configuring service, 4-16altering SMTP configuration, A-43configuring (in UI), 4-17disabling SMTP configuration, A-44enabling SMTP configuration, A-45finding SMTP configuration, A-47registering for, A-43registering SMTP service, A-48removing configuration for secure server,
A-45timestamp shown in, 4-3unregistering SMTP service, A-47
enableFIPS 140-2, I-1
ENABLE ALERT command, A-78enable FIPS 140-2
Audit Vault Server, I-1Database Firewall, I-2Database Firewall in high availability, I-2
Index
Index-7
enable TLS encrypted traffic monitoringOracle Database, 7-42
ENABLE UNIFIED AUDIT POLICY command,A-80
Enabling SSHSecondary Network Interface for Audit Vault
Server, K-2encrypted traffic monitoring for Oracle Database
disabling, 7-40encryption
network encryption, handling, 3-3Oracle Databases, configuration for handling,
7-35providing public key to encrypted Oracle
Database, 7-37security guidelines, 3-3show status, AVCLI command, A-56
Enterprise Manager, Audit Vault and DatabaseFirewall Plug-in for, 2-14
Event Repository Encryptionwallet, 15-14
exiting AVCLI, A-73expired audit records, archiving, 7-18external
network dependencies, 3-2
Ffailover
Audit Vault Server, 9-7disabling/enabling, 9-8
filesystemadditional space for SMB and scp archive
data transfer, 4-18FIPS
Oracle AVDF, I-1FIPS 140-2, I-1flash recovery area, monitoring in Audit Vault
Server, 15-35
Ggeneral usage
AVCLI commands used for, A-70general usage AVCLI commands
about, A-70general user
AVCLI commands used for, A-84general user AVCLI commands
about, A-84GRANT ACCESS command, A-51GRANT ADMIN command, A-52GRANT AUDITOR command, A-52GRANT SUPERADMIN command, A-53GRANT SUPERAUDITOR command, A-53
granting access privileges, A-51granting ADMIN privileges, A-52granting AUDITOR privileges, A-52granting super admin privileges, A-53granting super auditor privileges, A-53groups, 7-8, 7-9
access rightscontrolling by group, 14-7controlling by user, 14-7
Hhelp information about AVCLI, A-72high availability
backup and restore impact on, 15-18backup encryption, 15-18check status, 9-5Database Firewall, 9-11Database Firewall with monitoring points,
9-14for Audit Vault Server, 9-1for Database Firewall, 9-11of Audit Vault Servers, 9-1, 9-10Oracle AVDF on OCI, 12-9resilient pairs, 9-1SAN repository, 16-5
host monitorabout, 8-1deploying on Windows, 8-4monitoring point for, 8-8
Host Monitorabout, 5-8
host monitor agentrequirements validation, 8-3
host monitor requirements, 8-2host monitors, 8-1
authentication, using, 8-14checking status of, 8-13deploying on Unix, 8-7installing, 8-1uninstalling (Unix hosts only), 8-13updating, Linux only, 8-14
host namechange, 5-18
hostsAVCLI commands used for, A-1changing names, 6-4deleting from Audit Vault Server, 6-25registering
procedure, 6-2registering, about, 6-1
Index
Index-8

IIBM DB2, C-10
audit trail cleanup, C-39audit trail location, C-10collection attributes, C-44converting binary audit files to ASCII format,
7-21starting audit trail, prerequisite ASCII
conversion, 7-12user account script, C-32
IDLE trail status, 7-15In-Memory usage
monitoring, 15-32installation, security guidelines, 3-1installing
PostgreSQL, E-1IP addresses
and spoofing detection in monitoring andblocking mode, 7-28
Audit Vault Serverchanging, reboot required, 4-7
subnet restrictions for proxy interface, 5-20IPv6
traffic blocked, 3-3
Jjava best practices
audit vault agent machine, 6-6Java framework, logging levels, debugging, A-66Java SE, Audit Vault Agent requires, 6-12jobs, monitoring, 15-35
Kkey, for activating agent, 6-13keyboards
changing layout, 15-5settings, 4-3
keystore password, changing, 15-13
Llink properties
network settingin Audit Vault Server, 4-7in Database Firewall, 5-11
Linuxaudit trail location, C-15, C-17user/group access required for audit trail,
C-15, C-17LIST ADMIN command, A-90LIST ADMINS command, A-91LIST ALERT POLICIES command, A-79
LIST ATTRIBUTE FOR SECURED TARGETcommand, A-21
LIST ATTRIBUTE OF SMTP SERVER command,A-47
LIST AUDITOR command, A-91LIST AUDITORS command, A-92LIST DATABASE FIREWALL MONITOR
command, A-17LIST DISK command, A-59LIST DISKGROUP command, A-59LIST EXPORT command, A-63LIST FIREWALL command, A-10LIST HOST command, A-6LIST METRICS command, A-21LIST PLUGIN FOR SECURED TARGET TYPE
command, A-69LIST REMOTE FILESYSTEM command, A-64LIST RETENTION POLICY command, A-76LIST SAN SERVER command, A-60LIST SECURED TARGET command, A-22LIST SECURED TARGET TYPE command, A-22LIST TARGET FOR SAN SERVER command,
A-60LIST TARGET GROUPS command, A-29LIST TARGETS OF TARGET GROUP command,
A-29LIST TRAIL FOR SECURED TARGET
command, A-32LIST UNIFIED AUDIT POLICIES command, A-83locked user accounts
unlocking, 14-4log files
Audit Vault Agent, location, 6-20AVCLI, location, 15-42clearing, 15-4Java framework, location, A-66system, location, A-66
log into Audit Vault Server, 2-10
logging into Database Firewall, 2-11
logging levelsAudit Vault Agent, setting, 6-20clearing, 15-4Java framework, A-66setting, changing for all components, 15-2specifying for AVCLI utility, 15-42
MMAC addresses, spoofing detection and
monitoring and blocking mode, 7-28Maintain Existing Connections monitoring point
setting, 7-31
Index
Index-9

Maintenance JobScheduling, 15-36
manual archivingstarting an archive job, 15-10
messagesAudit Vault, G-1Database Firewall, G-40
metrics of targets, A-21Microsoft Active Directory, C-1
audit trail location, C-19Microsoft Active Directory integration
about, 14-11configure OpenLDAP server, 14-12creating new users, 14-12log in as OpenLDAP or Microsoft Active
Directory user, 14-14Microsoft SQL Server, C-8
audit trail location, C-8registering, C-38trace files, preventing from being deleted by
accident, C-38user account script, C-29
Microsoft Windows, 7-11audit trail location, C-18file sharing
archiving transfer, recommended port,4-21
host monitor, deploying on, 8-4services, registering AV Agent as, 6-16target user, administrative permissions, 7-11
modifying target groups, 7-9monitor native network encrypted traffic
monitoring point setting, 7-31monitoring
Audit Vault Server detailed diagnostics, 15-3Audit Vault Server diagnostic checks, 15-2Database Firewall diagnostics, 5-20
monitoring and blocking modeand spoofing detection rules, 7-28connections, switching from monitoring only
mode, 7-31monitoring point monitoring mode, 7-28traffic disruption on time synchronization,
5-15monitoring mode
and SQL blocking, 7-28monitoring point monitoring mode, 7-28monitoring point setting, 7-28with SQL blocking firewall policy, 7-28
monitoring pointsconfiguring, 7-28database response setting, 7-31definition, 7-27deleting, 7-33Maintain Existing Connections setting, 7-31
monitoring points (continued)modifying, 7-31monitor native network encrypted traffic, 7-31monitoring and blocking mode and IP
spoofing, 7-28starting and stopping, 7-33status, 7-28status values, defined, 7-33status, viewing, 7-33
Months Archived field, 4-23Months Online field, 4-23Multiple
Network Interface Cards, K-1Multiple Network Interface Cards, K-1MySQL
ACFSSee Oracle ACFS
Active DirectorySee Microsoft Active Directory
adding audit trail, prerequisite XMLconversion, 7-12
collection attributes, C-44Microsoft Active Directory
supported versions, C-1Microsoft Windows
supported versions, C-1Oracle ACFS
supported versions, C-1Solaris
supported versions, C-1supported versions, C-1trail location, 7-20, A-33, A-39, C-45XML transformation utility, 7-20
Nnative network encrypted traffic
monitoring for Oracle Database, 7-35native network encrypted traffic through
Database Firewallenabling, 7-39
Native Network EncryptionOracle database, 7-38
Network Encryptionproviding public key to encrypted Oracle
Database, 7-37network services
configuring for Database Firewall, 5-12network traffic, capturing to file in Database
Firewall, 15-44NFS filesystem
archiving transfer method, 4-21AVCLI commands
REGISTER REMOTE FILESYSTEM,A-64
Index
Index-10
NFS filesystem (continued)REGISTER REMOTE FILESYSTEM
command, A-64registering with the Audit Vault Server, A-64
non-SQL protocol accessAudit Vault and Database Firewall
IPv6 not supported, 3-3Database Firewall
non-TCP-based connections, 3-3IPv6
connections not supported, 3-3non-TCP-based connections, and Database
Firewall, 3-3
OOCI VM shapes
Oracle AVDF, 12-2opening port
Oracle Database Cloud Service, 13-3OpenLDAP integration
about, 14-11operating systems supported, 2-3Oracle ACFS, C-1
audit trail location, C-20collection attributes, C-45
Oracle AVDF, 3-12audit trails, 12-11Cloud Marketplace image, 12-3connect to instance, 12-6create, 12-3deploy Audit Vault Agent, 12-10deploy Database Firewall on OCI, 12-11differences in on-premises and OCI
deployment, 12-8high availability, 12-9OCI, 12-1OCI VM shapes, 12-2Oracle Cloud Infrastructure
about, 12-1benefits, 12-1
ports used, 12-9post instance creation steps, 12-5provisioning on OCI, 12-2scale up instance, 12-7terminate instance, 12-15
Oracle AVDF on OCIarchive and retrieve, 12-14backup and restore, 12-13monitor Autonomous Database services,
12-12monitor DB Systems, 12-13start or stop instance, 12-14
Oracle databaseenabling auditing, 7-10
Oracle database (continued)Native Network Encryption, 7-38
Oracle Databaseaudit trail location, C-4collection attributes, C-42In-Memory
about, 15-31PDB/CDB and targets, 7-2REDO logs, audit data collection reference,
D-1user account script, C-24using Network Encryption, configuration for
handling, 7-35Oracle Database - 11.1
entitlement auditing, C-1IBM DB2
supported versions, C-1native network encrypted traffic monitoring,
C-1stored procedure auditing, C-1supported versions, C-1Sybase ASE
supported versions, C-1Sybase SQL Anywhere
supported versions, C-1Oracle Database In-Memory
allocating memory, 15-31disabling, 15-32enabling, 15-31
Oracle GoldenGateextract cleanup, C-38
Oracle RACtarget location, registering, 7-2
Oracle shared server, security considerations,3-4
Ppassword expiry
administrator, 14-10passwords
changing other administrator's password,14-9
changing your own password, 14-9expiry dates, 14-3requirements, 14-8
PDB, registering target, 7-2platform, 3-12platform certificates, 3-12platforms supported, 2-1
for audit trail types, C-20latest matrix, 6-12
plug-insabout, 6-22, C-1deploy and activate procedure, 6-23
Index
Index-11
plug-ins (continued)enabling auditing, 6-23removing, 6-25SDK for developing, 15-43
policiesarchiving, 4-18
portsarchiving
defining archiving locations, 4-21transfer method
scp, 4-21finding Database Firewall monitoring point,
7-34for Audit Vault Server external network
access, F-3for Audit Vault Server services, F-1for Database Firewall external network
access, F-4for internal TCP communication, F-5recommended for archiving using Windows
file sharing transfer, 4-21required for Database Firewall deployment,
F-1scp
See Secure CopySecure Copy
archive datafile transfer, 4-21PostgreSQL
install, E-1power off
Audit Vault Server, 15-5Database Firewall, 15-44
POWEROFF FIREWALL command, A-10prerequisites
Audit Vault Server high availability, 9-3primary and standby Database Firewall
swap, 9-13proxy
and database client connections, 5-20configuring Database Firewall as, 5-20IP address, subnet restrictions, 5-20
proxy modeDatabase Firewall high availability, 9-15
public keyAudit Vault Server, 15-4Database Firewall, 7-37providing to encrypted Oracle Database,
7-37purge job
Audit Vault Server audit data, O-10purging audit trails
IBM DB2 audit files, 7-21source database in Audit Vault environment,
C-36
QQUIT command, A-73quitting AVCLI, A-73quotation marks
invalid in user names, 7-11, 14-2
RREBOOT FIREWALL command, A-10recommends that you follow these se
guidelines, general security, 3-2security
general recommendations, 3-2recommendations, 3-2
recommends you follow thesehybrid cloud
deployment, 13-1pre-requisites, 13-1
hybrid cloud, deployment, 13-1RECOVERING trail status, 7-15REDO logs
audit data collection reference, D-1register database target
main Audit Vault Server, O-6REGISTER FIREWALL command, A-11REGISTER HOST command, A-6register Linux target
main Audit Vault Server, O-8REGISTER SAN SERVER command, A-61REGISTER SMTP SERVER command, A-48REGISTER TARGET command, A-22registeringh
hostsprocedure, 6-2
remote access, security guidelines, 3-1remote file system AVCLI commands
about, A-62remote file systems
AVCLI commands used for, A-62remote monitors
See host monitorsremote syslog
TLS, configuring, 15-6reports
host monitoring, 8-1timestamp shown in PDF/XLS, 4-3
repositoryabout disk groups, 16-5adding SAN disks, 16-6dropping SAN disks, 16-6dropping SAN servers, 16-3high availability environment, 16-5registering SAN servers, 16-3Repository Page described, 16-5
Index
Index-12

requirementsaudit vault agent, 6-5Audit Vault Agent, Java SE, 6-12host monitor, 8-2
reset console viewActions button, 2-12console
filtering and sorting lists, 2-12filtering, lists in Audit Vault Server console,
2-12formatting, lists in Audit Vault Server console,
2-12lists, finding objects in Audit Vault Server
console, 2-12sorting lists in Audit Vault Server console,
2-12resilient pairs
about, 9-1restart
Audit Vault Server, 15-5Database Firewall, 15-44
restore, Audit Vault Server, 15-26retrieve session information
for Microsoft SQL Server database, 7-40Sybase SQL Anywhere database, 7-41
retrieving, from archives, 15-10REVOKE ACCESS command, A-54REVOKE ADMIN command, A-54REVOKE AUDITOR command, A-55REVOKE SUPERADMIN command, A-55REVOKE SUPERAUDITOR command, A-56revoking
access privileges, 14-3, A-54ADMIN privileges, A-54AUDITOR privileges, A-55super admin privileges, A-55super auditor privileges, A-56
Ssample Oracle GoldenGate Integrated Extract
parameter files, D-12SAN disks
adding to repository, 16-6dropping from repository, 16-6
SAN serversdropping, 16-3logging in to targets, 16-4logging out of targets, 16-4registering, 16-3
SAN storageAVCLI commands used for, A-57iSCSI initiator name, configuring, 16-1
SAN storage AVCLI commandsabout, A-57
SchedulingMaintenance Job, 15-36
Scheduling Maintenance Job, 15-36scp
See Secure Copyscripts
account privileges on targetsabout, C-23IBM DB2, C-32Microsoft SQL Server, C-29Oracle Database, C-24Sybase ASE, C-26Sybase SQL Anywhere, C-27
running AVCLI scripts, 15-41SDK, downloading for plug-in development,
15-43Secondary Network Interface
Enable SSH, K-2Secondary Network Interface Card
enable Agent connectivity, K-3enable Agent for high availability connection,
K-4Secondary Network Interface Card for Audit Vault
Server, K-3, K-4Secure Copy, 4-18, 4-21
archive datafile transfer, 4-18Secure Sockets Layer (SSL)
SMTP configuration, A-46security
and installing, 3-1Audit Vault and Database Firewall account
guidelines, 14-2Custom Collector Development, 3-5encryption, 3-3guidelines, 3-1multiple databases on shared listener, 3-4Oracle shared server configuration, 3-4
security managementAVCLI commands used for, A-50
security management AVCLI commandsabout, A-50
Security Technical Implementation Guides(STIG)-based advice on implementation,H-1
Security Technical Implementation Guides(STIG)user account rules, 14-2
self signed certificatesDatabase Firewall, 7-42
server managementAVCLI commands used for, A-65
server management AVCLI commandsabout, A-65
Service Name field, 7-2, A-19session information
non Oracle database, 7-40
Index
Index-13
settings, keyboard, 4-3shared listener, security considerations
client program namesecurity considerations, 3-4
client-side security, 3-4OS username, security considerations, 3-4security
client-side context information, 3-4SHOW CERTIFICATE command, A-68SHOW ISCSI INITIATOR DETAILS FOR
SERVER command, A-61SHOW RETENTION POLICY command, A-76SHOW STATUS FOR FIREWALL command,
A-12SHOW STATUS OF REMOTE FILESYSTEM
command, A-65SID, 7-2SID field, 7-2, A-19SMB
archivingexpired audit records
how treated, 4-18SMTP
configuring connection (UI), 4-16enabling (AVCLI), A-45
SMTP connection AVCLI commandsabout, A-43
SMTP connectionsAVCLI commands used for, A-43
SNMP accessAudit Vault Server
configuringservices, 4-10Web access, 4-10
configuring for Audit Vault Server, 4-10DNS servers
configuring for Audit Vault Server, 4-10network services
configuring for Audit Vault Server, 4-10standby Audit Vault Server, 4-11system services
configuring for Audit Vault Server, 4-10Web access
configuring for Audit Vault Server, 4-10Solaris
audit trail location, C-15audit trail location format, C-15, C-45audit trail location format (avcli), A-33
SPA, configuring, 7-34spoofing detection
MAC and IP address, and monitoring andblocking mode, 7-28
SQL AnywhereSee Sybase SQL Anywhere
SQL Server
See Microsoft SQL ServerSQL, types not captured by Database Firewall,
3-3SQL*Net
and Sybase ASE, required on Agent host,6-12
SSH accessconfiguring for Audit Vault Server, 4-10configuring for standby Audit Vault Server,
4-11SSL connections
configuring targets for, 7-51standby Audit Vault Server
change host name, 4-9configuring
SSH access, 4-11SNMP access, 4-11
start audit trail command, A-38START COLLECTION FOR SECURED TARGET
command, A-33Start data encryption
process, 15-14START DATABASE FIREWALL MONITOR
command, A-17status
audit trails, checking, 7-15Audit Vault Server
checking, 15-1Database Firewall, viewing for, 5-20host monitor, checking, 8-13jobs in Audit Vault Server, 15-35
STOP COLLECTION FOR SECURED TARGETcommand, A-39
STOP DATABASE FIREWALL MONITORcommand, A-18
STOPPED trail status, 7-15storage requirement
main Audit Vault Server, O-9stored procedure auditing
configuring, 7-34stored procedure auditing (SPA)
configuring, 7-34subnet
Database Firewall network settings, defaultgateway, 5-11
for proxy IP address, 5-20ports
proxy, 5-20proxy
port numbers, 5-20system settings, default gateway, 4-7system settings, network mask, 4-7
sudo access configuration, 14-5super administrators
access rights, 14-1
Index
Index-14

super administrators (continued)defined, 2-5
supported operating systems, 2-3supported platforms, 2-1
for audit trail types, C-20latest matrix, 6-12
supported targets, 2-3Suspended, monitoring point status, 7-33swap
primary and standby Database Firewall, 9-13SWAP RESILIENT PAIR command, A-11swap roles
primary and standby Audit Vault Servers, 9-7Sybase ASE
audit trail location, C-11SQL*Net on Agent host, requirement, 6-12user account script, C-26
Sybase SQL Anywhere, C-12audit trail location, C-12user account script, C-27
synchronizing timetraffic disruption in monitoring and blocking
mode, 5-15SYSAUX tablespace
monitoring in Audit Vault Server, 15-33syslog
Audit Vault and Database Firewall alertforwarding, format, 4-13
debug messages, generating, 4-13forward to destinations, configuring, 4-13IP addresses for forwarding, 4-13
system configurationunderstanding workflow, 2-9workflow
with Audit Vault Agent, 2-9with Database Firewall, 2-9
TTABLE audit trail, C-20tabs, UI, described, 2-11target, A-19target AVCLI commands
about, A-19target group, A-25target group AVCLI commands
ADD TARGET, A-26DELETE TARGET, A-28
Target Location field, 7-2, C-40targets
about configuring, 7-1access rights
controlling by target or group, 14-7controlling by user, 14-7
altering, A-19
targets (continued)attributes
listing with AVCLI, A-21AVCLI commands used for, A-19collection attributes
about, C-41Active Directory, not required, C-41IBM DB2, C-44Linux, not required, C-41MySQL, C-44Oracle ACFS, C-45Oracle Database, C-42Solaris, not required, C-41SQL Server, not required, C-41
configuring TCPS/SSL connections, 7-51defined, 2-3dropping, A-20finding attributes, A-21finding metrics, A-21groups, creating, 7-8groups, modifying, 7-9hosts, registering, 6-1Microsoft Windows, administrative
permissions, 7-11name change, and reports, 7-7nondatabase sources, about, 2-3PDB/CDB, 7-2planning audit trail configuration, 2-8registering, 7-1, A-22removing from Audit Vault Server
about, 7-8service name, 7-2SID, 7-2SPA (stored procedure auditing)
configuring, 7-34supported types, 2-3upload or delete, A-25
TCPS/SSL connectionsconfiguring targets for, 7-51
TEST SMTP SERVER command, A-49testing, Audit Vault Server operation, 4-28time synchronization, traffic disruption in
monitoring and blocking mode, 5-15time zone
change, 4-7Time Zone Offset field, 4-3timestamps, and Audit Vault Server date and
time, 4-3trace files, Microsoft SQL Server, preventing
deletion, C-38traffic disruptions, and time synchronization in
monitoring and blocking mode, 5-15traffic sources
changing in monitoring point, 7-31Database Firewall, configuring in, 5-19
Index
Index-15

Trail Location fielddirectory mask for DIRECTORY trail type,
7-12, C-45trail locations
supported per target, C-45TRANSACTION LOG
recommended settings reference, D-1transfer method, archiving, 4-21Transport Layer Security (TLS)
SMTP configuration, A-46troubleshooting
Agent activation error using avcli, J-3Agent cannot connect to Audit Vault Server,
J-4Audit Vault Agent
access denied while installing asWindows service, J-6
error on startup, J-7java -jar agent.jar failed, J-5unable to start through services applet,
J-6unable to uninstall Windows service, J-6
avcli agent activation error, J-3cannot collect Oracle Database trail, J-4Database Firewall, partial traffic only, J-2host monitor fails, J-4Host Monitor, setup error, J-8Oracle Database alerts not triggered, J-8
UUI
Audit Vault Server, tabs described, 2-11UI certificates
Audit Vault Server, changing, 4-2UNDEPLOY PLUGIN command, A-70Unix
deploying host monitor on, 8-7unlock user account, 14-4, A-50unpair
Audit Vault Servers, 9-8Database Firewall instances in high
availability, 9-13UNREACHABLE trail status, 7-15Unreachable, monitoring point status, 7-33update
Audit Vault Agents, 9-5Update Certificate button
certificatefetching from upgraded firewall, 15-45Validation Failed, 15-45
Update Certificate button (continued)Database Firewall
certificate validation failed, 15-45updating
host monitors, Linux only, 8-14upload or delete wallet file command, A-25user accounts
about managing, 14-1Audit Vault Agent deployment, OS user, 6-12changing type, 14-3creating, 14-3deleting, 14-5planning, 2-8status and password expiry, 14-3sudo access, configuring, 14-5unlock, 14-4unlock (AVCLI), A-50
User Content To System Configuration Filesadd, N-1
userslogging in to the Audit Vault Server console,
2-10user names with quotes invalid, 7-11, 14-2
Vvalidate requirements
audit vault agent, 6-6host monitor agent, 8-3
verify FIPS 140-2 statusDatabase Firewall in high availability, I-3, I-4
version number of AVCLI, finding, A-74
Wwallet
event repository encryption, backing up,15-14
WindowsSee Microsoft Windows
Windows File Sharing, 4-21archive datafile transfer, 4-18, 4-21
Windows serviceAudit Vault Agent, registering as, 6-15Audit Vault Agent, unregistering as, 6-17
with monitoring pointsDatabase Firewall high availability, 9-14
Index
Index-16