Micro Focus Fortify WebInspect User Guide - SAP Help Portal
461
Micro Focus Fortify WebInspect Software Version: 21.1.0 Windows® operating systems User Guide Document Release Date: July 2021 Software Release Date: July 2021
-
Upload
khangminh22 -
Category
Documents
-
view
3 -
download
0
Transcript of Micro Focus Fortify WebInspect User Guide - SAP Help Portal

Micro FocusFortify WebInspectSoftware Version: 21.1.0Windows® operating systems
User Guide
Document Release Date: July 2021 Software Release Date: July 2021
Legal NoticesMicro Focus The Lawn22-30 Old Bath RoadNewbury, Berkshire RG14 1QNUK
https://www.microfocus.com
WarrantyThe only warranties for products and services of Micro Focus and its affiliates and licensors (“Micro Focus”) are set forth in the express warranty statements accompanying such products and services. Nothing herein should be construed as constituting an additional warranty. Micro Focus shall not be liable for technical or editorial errors or omissions contained herein. The information contained herein is subject to change without notice.
Restricted Rights LegendConfidential computer software. Except as specifically indicated otherwise, a valid license from Micro Focus is required for possession, use or copying. Consistent with FAR 12.211 and 12.212, Commercial Computer Software, Computer Software Documentation, and Technical Data for Commercial Items are licensed to the U.S. Government under vendor's standard commercial license.
Copyright Notice© Copyright 2004-2021 Micro Focus or one of its affiliates
Trademark NoticesAll trademarks, service marks, product names, and logos included in this document are the property of their respective owners.
Documentation UpdatesThe title page of this document contains the following identifying information:
l Software Version number
l Document Release Date, which changes each time the document is updated
l Software Release Date, which indicates the release date of this version of the software
This document was produced on May 18, 2021. To check for recent updates or to verify that you are using the most recent edition of a document, go to:
https://www.microfocus.com/support/documentation
About this PDF Version of Online HelpThis document is a PDF version of the online help. This PDF file is provided so you can easily print multiple topics from the help information or read the online help in PDF format. Because this content was originally created to be viewed as online help in a web browser, some topics may not be formatted properly. Some interactive topics may not be present in this PDF version. Those topics can be successfully printed from within the online help.
User Guide
Micro Focus Fortify WebInspect (21.1.0) Page 2 of 461

Contents
Preface 24
Contacting Micro Focus Fortify Customer Support 24
For More Information 24
About the Documentation Set 24
Change Log 25
Chapter 1: Introduction 33
Understanding the Findings 33
Fortify WebInspect Overview 33
About Fortify WebInspect Enterprise 35
Fortify WebInspect Enterprise Components 37
Component Descriptions 37
FIPS Compliance 38
About FIPS Compliance in Fortify WebInspect Products 38
Selecting FIPS-compliant Mode 39
Related Documents 39
All Products 39
Micro Focus Fortify WebInspect 40
Micro Focus Fortify WebInspect Enterprise 42
Chapter 2: Getting Started 43
Preparing Your System for Audit 43
Sensitive Data 43
Firewalls, Anti-virus Software, and Intrusion Detection Systems 43
Effects to Consider 44
Helpful Hints 44
Quick Start 45
Update SecureBase 45
Prepare Your System for Audit 46
Start a Scan 46
User Guide
Micro Focus Fortify WebInspect (21.1.0) Page 3 of 461

Chapter 3: WebInspect User Interface 47
The Activity Panel 47
Closing the Activity Panel 48
The Button Bar 48
Panes Associated with a Scan 49
Start Page 50
Home 51
Manage Scans 51
Manage Schedule 51
Menu Bar 51
File Menu 52
Edit Menu 53
View Menu 53
Tools Menu 54
Scan Menu 54
Enterprise Server Menu 54
Reports Menu 55
Help Menu 56
WebInspect Help 56
Search 56
Support > Request an Enhancement 56
Support > Contact Technical Support 56
Support > Get Open TC Browsers info 56
Support > Copy Application Snapshot to Clipboard 57
Tutorials 57
About WebInspect 57
Toolbars 57
Buttons Available on the Scan Toolbar 57
Buttons Available on the Standard Toolbar 59
Buttons Available on the "Manage Scans" Toolbar 59
Navigation Pane 60
Site View 62
Excluded Hosts 62
Allowed Hosts Criteria 63
User Guide
Micro Focus Fortify WebInspect (21.1.0) Page 4 of 461
Sequence View 64
SPA Coverage 65
Search View 66
Step Mode View 67
Navigation Pane Icons 67
Navigation Pane Shortcut Menu 68
Information Pane 71
Scan Info Panel 72
Dashboard 72
Traffic Monitor 73
Attachments 73
False Positives 74
Dashboard 75
Progress Bars 76
Progress Bar Descriptions 76
Progress Bar Colors 77
Activity Meters 77
Activity Meter Descriptions 78
Vulnerabilities Graphics 78
Statistics Panel - Scan 78
Statistics Panel - Crawl 80
Statistics Panel - Audit 80
Statistics Panel - Network 80
Attachments - Scan Info 81
False Positives 82
Importing False Positives 82
Inactive / Active False Positives Lists 82
Loading False Positives 82
Working with False Positives 82
Session Info Panel 83
Options Available 83
Vulnerability 86
Web Browser 86
HTTP Request 86
Highlighted Text in the Request 86
HTTP Response 86
Highlighted Text in the Response 87
Stack Traces 87
Details 87
User Guide
Micro Focus Fortify WebInspect (21.1.0) Page 5 of 461

Steps 87
Links 87
Comments: Session Info 88
Text 88
Hiddens: Session Info 88
Forms: Session Info 88
E-Mail 88
Scripts - Session Info 89
Attachments - Session Info 89
Viewing an Attachment 89
Adding a Session Attachment 89
Editing an Attachment 90
Attack Info 90
Web Service Request 90
Web Service Response 91
XML Request 91
XML Response 91
Host Info Panel 91
Options Available 92
P3P Info 93
P3P User Agents 93
AJAX 93
How AJAX Works 94
Certificates 95
Comments - Host Info 95
Cookies 95
E-Mails - Host Info 96
Forms - Host Info 96
Hiddens - Host Info 96
Scripts - Host Info 97
Broken Links 97
Offsite Links 97
Parameters 98
Summary Pane 98
Findings Tab 99
Available Columns 100
Vulnerability Severity 101
Working with Findings 101
Not Found Tab 103
User Guide
Micro Focus Fortify WebInspect (21.1.0) Page 6 of 461

Scan Log Tab 103
Server Information Tab 104
Micro Focus Fortify Monitor 104
Chapter 4: Working with Scans 105
Guided Scan Overview 105
Predefined Templates 105
Mobile Templates 105
Running a Guided Scan 106
Predefined Template (Standard, Quick, or Thorough) 106
Mobile Scan Template 106
Native Scan Template 106
Using the Predefined Template 107
Launching a Guided Scan 107
Understanding the Rendering Engine 107
About the Site Stage 108
Verifying Your Web Site 108
Choosing a Scan Type 110
About the Login Stage 111
Network Authentication Step 111
Configuring Network Authentication 111
Application Authentication Step 113
Masked Values Supported 114
Using a Login Macro without Privilege Escalation 114
Using Login Macros for Privilege Escalation 114
Using a Login Macro when Connected to Fortify WebInspect Enterprise 115
Automatically Creating a Login Macro 115
About the Workflows Stage 116
To Add Burp Proxy results 117
About the Active Learning Stage 117
Using the Profiler 117
About the Settings Stage 119
Importing Micro Focus Unified Functional Testing (UFT) Files in a Guided Scan 121
Using the Mobile Scan Template 122
Launching a Mobile Scan 123
Creating a Custom User Agent Header 123
About the Site Stage 124
User Guide
Micro Focus Fortify WebInspect (21.1.0) Page 7 of 461

Verifying Your Web Site 124
Choosing a Scan Type 126
About the Login Stage 127
Network Authentication Step 127
Configuring Network Authentication 127
Application Authentication Step 129
Masked Values Supported 130
Using a Login Macro without Privilege Escalation 130
Using Login Macros for Privilege Escalation 130
Using a Login Macro when Connected to Fortify WebInspect Enterprise 131
Automatically Creating a Login Macro 131
About the Workflows Stage 132
Adding Burp Proxy Results 133
Adding Burp Proxy Results 133
About the Active Learning Stage 133
Using the Profiler 133
About the Settings Stage 135
Importing Micro Focus Unified Functional Testing (UFT) Files in a Guided Scan 137
Using the Native Scan Template 139
Setting Up Your Mobile Device 139
Guided Scan Stages 139
Supported Devices 139
Supported Development Emulators 140
Launching a Native Scan 140
About the Native Mobile Stage 140
Choose Device/Emulator Type Step 141
Selecting a Profile 141
Setting the Mobile Device Proxy Address 141
Adding a Trusted Certificate 142
Choose Scan Type Step 143
About the Login Stage 143
Network Authentication Step 144
Configuring Network Authentication 144
Configuring a Client Certificate 146
Application Authentication Step 147
Masked Values Supported 147
Using a Login Macro without Privilege Escalation 147
Using Login Macros for Privilege Escalation 148
Using a Login Macro when Connected to Fortify WebInspect Enterprise 148
User Guide
Micro Focus Fortify WebInspect (21.1.0) Page 8 of 461
Testing the Macro 149
About the Application Stage 149
Run Application Step 149
Finalizing Allowed Hosts and RESTful Endpoints 149
About the Settings Stage 150
Final Review Step 150
Validate Settings and Start Scan 150
Post Scan Steps 152
Running an API or Web Service Scan 153
API Scans 153
Web Service Scans 153
Getting Started with the API Scan Wizard 153
What's Next? 154
Configuring an API Scan 154
What's Next? 155
Configuring a Web Service Scan 155
Using a WSDL File 155
Using an Existing WSD File 156
What's Next? 156
Configuring Proxy Settings for API and Web Service Scans 156
What's Next? 157
Configuring Authentication for API and Web Service Scans 157
Configuring Network Authentication 157
Viewing and Adjusting Postman Configuration Settings 159
What's Next? 159
Configuring Scan Details for API and Web Service Scans 160
Selecting a Policy for API Scans 160
Launching the Web Service Test Designer 160
Configuring Additional Settings for API and Web Service Scans 160
What's Next? 161
Congratulations 161
Running a Basic Scan (Web Site Scan) 162
Basic Scan Options 162
Authentication and Connectivity 165
Coverage and Thoroughness 169
Detailed Scan Configuration 170
Profiler 170
Settings 171
User Guide
Micro Focus Fortify WebInspect (21.1.0) Page 9 of 461

Auto Fill Web Forms 171
Add Allowed Hosts 171
Reuse Identified False Positives 172
Sample Macro 172
Traffic Analysis 172
Message 172
Congratulations 172
Upload to Fortify WebInspect Enterprise Scan Template 172
Save Settings 173
Generate Reports 173
Using the Site List Editor 173
Configuring the Proxy Profile 174
Configure proxy using a PAC file 174
Explicitly configure proxy 174
Specifying Allowed Hosts 176
Specifying Allowed Hosts 177
Editing Allowed Hosts 177
Multi-user Login Scans 177
Before You Begin 178
Known Limitations 178
Process Overview 178
Configuring a Multi-user Login Scan 179
Adding Credentials 179
Editing Credentials 180
Deleting Credentials 180
Interactive Scans 180
Configuring an Interactive Scan 181
Restrict to Folder Limitations 182
JavaScript Include Files 182
Login Macros 182
Workflow Macros 182
Running an Enterprise Scan 182
Edit the 'Hosts to Scan' List 185
Export a List 185
Start the Scan 185
Running a Manual Scan 186
About Privilege Escalation Scans 187
User Guide
Micro Focus Fortify WebInspect (21.1.0) Page 10 of 461

Two Modes of Privilege Escalation Scans 188
What to Expect During the Scan 188
Regex Patterns Used to Identify Restricted Pages 188
Effect of Crawler Limiting Settings on Privilege Escalation Scans 189
Effect of Parameters with Random Numbers on Privilege Escalation Scans 189
About Single-page Application Scans 190
Technology Preview 190
The Challenge of Single-page Applications 190
Enabling SPA Support 191
Scan Status 191
Updates to Information in the Scan Manager 192
Opening a Saved Scan 192
Comparing Scans 193
Selecting Scans to Compare Scans 193
Reviewing the Scan Dashboard 194
Scan Descriptions 194
The Venn Diagram 195
Vulnerabilities Bar Chart 195
Effect of Scheme, Host, and Port Differences on Scan Comparison 195
Compare Modes 196
Session Filtering 196
Using the Session Info Panel 196
Using the Summary Pane to Review Vulnerability Details 197
Grouping and Sorting Vulnerabilities 197
Filtering Vulnerabilities 197
Working with Vulnerabilities 198
Manage Scans 198
Schedule a Scan 199
Configuring Time Interval for Scheduled Scan 200
Managing Scheduled Scans 201
Selecting a Report 202
Configuring Report Settings 203
Stopping a Scheduled Scan 205
Scheduled Scan Status 205
Exporting a Scan 205
Exporting Scan Details 207
User Guide
Micro Focus Fortify WebInspect (21.1.0) Page 11 of 461

Export Scan to Software Security Center 209
Exporting Protection Rules to Web Application Firewall (WAF) 209
Importing a Scan 210
Importing False Positives 210
Importing Legacy Web Service Scans 211
Changing Import/Export Settings 211
Downloading a Scan from Enterprise Server 212
Log Files Not Downloaded 212
Uploading a Scan to Enterprise Server 212
Running a Scan in Enterprise Server 213
Transferring Settings to/from Enterprise Server 213
Creating a Fortify WebInspect Enterprise Scan Template 214
Creating a Fortify WebInspect Settings File 214
Publishing a Scan (Fortify WebInspect Enterprise Connected) 215
Integrating Vulnerabilities into Fortify Software Security Center 216
First scan 217
Second scan 218
Third scan 218
Fourth Scan 218
Synchronize with Fortify Software Security Center 218
Chapter 5: Using WebInspect Features 220
Retesting and Rescanning 220
Retesting Vulnerabilities 220
Understanding the Retest Status 221
Recommendation for Failed and Not Supported Vulnerabilities 221
Retesting All Vulnerabilities 222
Retesting All Vulnerabilities with a Specific Severity 222
Retesting Selected Vulnerabilities 222
Retesting Grouped Categories 223
Retesting a Retest Scan 223
Retest Scan Log 223
Comparison Views 223
Keeping or Deleting a Retest Scan 224
Rescanning a Site 224
User Guide
Micro Focus Fortify WebInspect (21.1.0) Page 12 of 461
Reusing Scans 225
Reuse Options 225
Difference between Remediation Scans and Retest Vulnerability 225
Guidelines for Reusing Scans 226
Reusing a Scan 226
Incremental Scanning 226
Merging Baseline and Incremental Scans 226
Incremental Scan with Continuous or Deferred Audit 227
Using Macros 228
Selecting a Workflow Macro 229
Using a Web Macro Recorder 229
Web Macro Recorder with Macro Engine 6.0 229
Session-based Web Macro Recorder 230
Traffic Monitor (Traffic Viewer) 230
Traffic Session Data in Traffic Viewer 230
Viewing Traffic in the Traffic Viewer 230
Server Profiler 231
Using the Server Profiler 231
Inspecting the Results 232
Basic Scan 232
Working with One or More Vulnerabilities 233
Working with a Group 234
Understanding the Severity 234
Working in the Navigation Pane 235
Web Services Scan 235
Search View 236
Using Filters and Groups in the Summary Pane 237
Using Filters 237
No Filters 237
Filtered by Method:Get 238
Specifying Multiple Filters 238
Filter Criteria 238
Using Groups 239
Auditing Web Services 240
Options Available from the Session Info Panel 240
Adding/Viewing Vulnerability Screenshot 242
User Guide
Micro Focus Fortify WebInspect (21.1.0) Page 13 of 461
Viewing Screenshots for a Selected Session 242
Viewing Screenshots for All Sessions 243
Editing Vulnerabilities 243
Editing a Vulnerable Session 244
Vulnerability Rollup 245
What Happens to Rolled Up Vulnerabilities 245
Rollup Guidelines 245
Rolling Up Vulnerabilities 246
Undoing Rollup 246
Mark As False Positive 247
Mark As Vulnerability 247
Flag Session for Follow-Up 247
Viewing Flags for a Selected Session 248
Viewing Flags for All Sessions 248
Scan Note 248
Session Note 249
Viewing Notes for a Selected Session 249
Viewing Notes for All Sessions 249
Vulnerability Note 249
Viewing Notes for a Selected Session 250
Viewing Notes for All Sessions 250
Recovering Deleted Items 250
Sending Vulnerabilities to Micro Focus ALM 251
Additional Information Sent 251
Disabling Data Execution Prevention 252
Generating a Report 252
Saving a Report 253
Advanced Report Options 253
Report Viewer 254
Adding a Note 255
Standard Reports 255
Manage Reports 257
Compliance Templates 257
Managing Settings 267
User Guide
Micro Focus Fortify WebInspect (21.1.0) Page 14 of 461
Creating a Settings File 268
Editing a Settings File 268
Deleting a Settings File 268
Importing a Settings File 268
Exporting a Settings File 268
Scanning with a Saved Settings File 269
SmartUpdate 269
Performing a SmartUpdate (Internet Connected) 269
Downloading Checks without Updating Fortify WebInspect 270
Performing a SmartUpdate (Offline) 270
WebSphere Portal FAQ 271
Command-line Execution 273
Launching the CLI 273
CLI Limitations in Fortify WebInspect on Docker 273
Using WI.exe 274
Options 274
Examples 289
Selenium Login Macro Example 289
Response State Rule Example 289
Merging Scans 290
Hyphens in Command Line Arguments 290
Exit Codes 290
Using WIScanStopper.exe 290
Using MacroGenServer.exe 291
Options 291
Regular Expressions 293
Regex Extensions 294
Regular Expression Tags 294
Regular Expression Operators 295
Examples 295
Fortify WebInspect REST API 296
What is the Fortify WebInspect REST API? 296
Configuring the Fortify WebInspect REST API 296
Accessing the Fortify WebInspect REST API Swagger UI 298
Using the Swagger UI 299
Getting Field-level Details 300
Automating Fortify WebInspect 301
User Guide
Micro Focus Fortify WebInspect (21.1.0) Page 15 of 461

Fortify WebInspect Updates and the API 301
Scanning with a Postman Collection 301
What is Postman? 301
Benefits of a Postman Collection 302
Options for Postman Scans 302
Postman Prerequisites 302
Using Client Certificates with Postman 302
Tips for Preparing a Postman Collection 303
Ensure Valid Responses 303
Order of Requests 303
Handling Authentication 303
Using Static Authentication 303
Using Dynamic Authentication 304
Using a Postman Login Macro 304
Postman Auto-configuration 304
Sample Postman Scripts 305
Manually Configuring Postman Login for Dynamic Tokens 305
What are Dynamic Tokens? 305
Before You Begin 305
Process Overview 305
Identifying and Isolating the Login Request 306
Creating a Logout Condition with Regular Expressions 306
Creating a Response State Rule for a Bearer Token 306
Creating a Response State Rule for an API Key 307
Postman API Scan Using WI.exe or WebInspect REST API 308
Process 308
Troubleshooting the Postman Scan 309
Integrating with Selenium WebDriver 309
Known Limitations 310
Process Overview 310
Adding the Proxy to Selenium Scripts 311
Advantages 311
Disadvantages 312
Sample Code 312
Using the CLI 316
Using the Fortify WebInspect geckodriver.exe 316
Advantages 316
Disadvantages 316
User Guide
Micro Focus Fortify WebInspect (21.1.0) Page 16 of 461

Installing the Selenium WebDriver Environment 317
Testing from the Command Line 317
Creating a Selenium Command 317
Uploading Files to Fortify WebInspect 320
Using the CLI 320
Using the API 320
Using the Selenium Command 320
Running a Scan Using WI.exe 321
Creating a Macro Using the API 322
About the Burp API Extension 322
Benefits of Using the Burp API Extension 323
Supported Versions 323
Using the Burp API Extension 323
Loading the Burp Extension 324
Connecting to Fortify WebInspect 325
Refreshing the List of Scans 327
Working with a Scan in Burp 327
Sending Items from Burp to Fortify WebInspect 330
About the WebInspect SDK 331
Audit Extensions / Custom Agents 331
SDK Functionality 332
Installation Recommendation 332
Installing the WebInspect SDK 332
Verifying the Installation 333
After Installation 333
Add Page or Directory 333
Add Variation 334
Fortify Monitor: Configure Enterprise Server Sensor 335
After Configuring as a Sensor 335
Blackout Period 336
Creating an Exclusion 336
Example 1 337
Example 2 337
Example 3 337
Example 4 337
Internet Protocol Version 6 338
User Guide
Micro Focus Fortify WebInspect (21.1.0) Page 17 of 461
Chapter 6: Default Scan Settings 339
Scan Settings: Method 339
Scan Mode 339
Crawl and Audit Mode 340
Crawl and Audit Details 340
Navigation 341
SSL/TLS Protocols 342
Scan Settings: General 342
Scan Details 343
Crawl Details 344
Scan Settings: JavaScript 348
JavaScript Settings 348
Scan Settings: Requestor 349
Requestor Performance 349
Requestor Settings 350
Stop Scan if Loss of Connectivity Detected 351
Scan Settings: Session Exclusions 352
Excluded or Rejected File Extensions 352
Excluded MIME Types 353
Other Exclusion/Rejection Criteria 353
Editing Criteria 353
Adding Criteria 353
Scan Settings: Allowed Hosts 355
Using the Allowed Host Setting 355
Adding Allowed Domains 356
Editing or Removing Domains 356
Scan Settings: HTTP Parsing 356
Options 356
CSRF 360
About CSRF 360
Using CRSF Tokens 361
Enabling CSRF Awareness in Fortify WebInspect 361
Scan Settings: Custom Parameters 361
URL Rewriting 361
RESTful Services 362
Enable automatic seeding of rules that were not used during scan 363
User Guide
Micro Focus Fortify WebInspect (21.1.0) Page 18 of 461

Double Encode URL Parameters 363
Path Matrix Parameters 364
Definition of Path Segment 364
Special Elements for Rules 364
Asterisk Placeholder 366
Benefit of Using Placeholders 366
Multiple Rules Matching a URL 366
Scan Settings: Filters 367
Options 367
Adding Rules for Finding and Replacing Keywords 367
Scan Settings: Cookies/Headers 368
Standard Header Parameters 368
Append Custom Headers 369
Adding a Custom Header 369
Append Custom Cookies 369
Adding a Custom Cookie 369
Scan Settings: Proxy 370
Options 370
Scan Settings: Authentication 373
Scan Requires Network Authentication 373
Authentication Method 373
Authentication Credentials 375
Client Certificates 375
Editing the Proxy Config File for WebInspect Tools 376
Enable Macro Validation 377
Use a login macro for forms authentication 377
Login Macro Parameters 377
Use a startup macro 377
Multi-user Login 378
Scan Settings: File Not Found 379
Options 379
Scan Settings: Policy 380
Creating a Policy 380
Editing a Policy 380
Importing a Policy 381
Deleting a Policy 381
Scan Settings: User Agent 381
User Guide
Micro Focus Fortify WebInspect (21.1.0) Page 19 of 461

Profile and User-Agent String 381
Navigator Interface Settings 382
Chapter 7: Crawl Settings 384
Crawl Settings: Link Parsing 384
Adding a Specialized Link Identifier 384
Crawl Settings: Link Sources 384
What is Link Parsing? 384
Pattern-based Parsing 385
DOM-based Parsing 385
Form Actions, Script Includes, and Stylesheets 389
Miscellaneous Options 390
Limitations of Link Source Settings 391
Crawl Settings: Session Exclusions 391
Excluded or Rejected File Extensions 391
Adding a File Extension to Exclude/Reject 392
Excluded MIME Types 392
Adding a MIME Type to Exclude 392
Other Exclusion/Rejection Criteria 392
Editing the Default Criteria 392
Adding Exclusion/Rejection Criteria 393
Chapter 8: Audit Settings 395
Audit Settings: Session Exclusions 395
Excluded or Rejected File Extensions 395
Adding a File Extension to Exclude/Reject 395
Excluded MIME Types 395
Adding a MIME Type to Exclude 396
Other Exclusion/Rejection Criteria 396
Editing the Default Criteria 396
Adding Exclusion/Rejection Criteria 396
Audit Settings: Attack Exclusions 398
Excluded Parameters 398
Adding Parameters to Exclude 398
Excluded Cookies 399
Excluding Certain Cookies 399
Excluded Headers 399
User Guide
Micro Focus Fortify WebInspect (21.1.0) Page 20 of 461

Excluding Certain Headers 400
Audit Inputs Editor 400
Audit Settings: Attack Expressions 400
Additional Regular Expression Languages 401
Audit Settings: Vulnerability Filtering 401
Adding a Vulnerability Filter 401
Suppressing Off-site Vulnerabilities 402
Audit Settings: Smart Scan 402
Enable Smart Scan 402
Use regular expressions on HTTP responses 402
Use server analyzer fingerprinting and request sampling 402
Custom server/application type definitions 402
Chapter 9: Application Settings 404
Application Settings: General 404
General 404
WebInspect Agent 407
Application Settings: Database 407
Connection Settings for Scan/Report Storage 407
SQL Server Database Privileges 408
Configuring SQL Server Standard Edition 408
Connection Settings for Scan Viewing 408
Creating Scan Data for Site Explorer 409
Application Settings: Directories 409
Changing Where Fortify WebInspect Files Are Saved 409
Application Settings: License 409
License Details 409
Direct Connection to Micro Focus 410
Connection to APLS 410
Connection to LIM 411
Application Settings: Server Profiler 411
Modules 411
Application Settings: Step Mode 413
Application Settings: Logging 414
Application Settings: Proxy 414
Not Using a Proxy Server 414
User Guide
Micro Focus Fortify WebInspect (21.1.0) Page 21 of 461

Using a Proxy Server 415
Configuring a Proxy 415
Application Settings: Reports 417
Options 417
Headers and Footers 418
Application Settings: Telemetry 419
About Telemetry 419
Enabling Telemetry 419
Uploading Scans via Telemetry 419
Setting the Upload Interval 419
Setting the On-disk Cache Size 420
Identifying Categories of Information to Send 420
Application Settings: Run as a Sensor 420
Sensor 420
Application Settings: Override SQL Database Settings 421
Override Database Settings 422
Configure SQL Database 422
Application Settings: Smart Update 422
Options 422
Application Settings: Support Channel 423
Opening the Support Channel 423
Application Settings: Micro Focus ALM 423
ALM License Usage 423
Before You Begin 424
Creating a Profile 424
Chapter 10: Reference Lists 425
Fortify WebInspect Policies 425
Best Practices 425
By Type 426
Custom 428
Hazardous 428
Deprecated Checks and Policies 428
Scan Log Messages 429
HTTP Status Codes 450
User Guide
Micro Focus Fortify WebInspect (21.1.0) Page 22 of 461

Chapter 11: Troubleshooting and Support 454
Troubleshooting WebInspect 454
Connectivity Issues 454
Scan Initialization Failures 455
Scan Configuration Issues 455
Troubleshooting Alerts 456
Technology Preview 456
Disabling Alerts 456
Alerts Troubleshooting Table 456
Testing Login Macros 457
Validation Tests Performed 457
Troubleshooting Tips 458
Contact Customer Support 459
Contacting Micro Focus Fortify Customer Support 459
For More Information 459
Suggest Enhancement 459
Purchases and Renewals 460
New Purchases 460
Renew Your Product License 460
Uninstalling Fortify WebInspect 460
Options for Removing 460
About WebInspect 460
Send Documentation Feedback 461
User Guide
Micro Focus Fortify WebInspect (21.1.0) Page 23 of 461

Preface
Contacting Micro Focus Fortify Customer SupportVisit the Support website to:
l Manage licenses and entitlements
l Create and manage technical assistance requests
l Browse documentation and knowledge articles
l Download software
l Explore the Community
https://www.microfocus.com/support
For More InformationFor more information about Fortify software products: https://www.microfocus.com/solutions/application-security
About the Documentation SetThe Fortify Software documentation set contains installation, user, and deployment guides for all Fortify Software products and components. In addition, you will find technical notes and release notes that describe new features, known issues, and last-minute updates. You can access the latest versions of these documents from the following Micro Focus Product Documentation website:
https://www.microfocus.com/support/documentation
User GuidePreface
Micro Focus Fortify WebInspect (21.1.0) Page 24 of 461
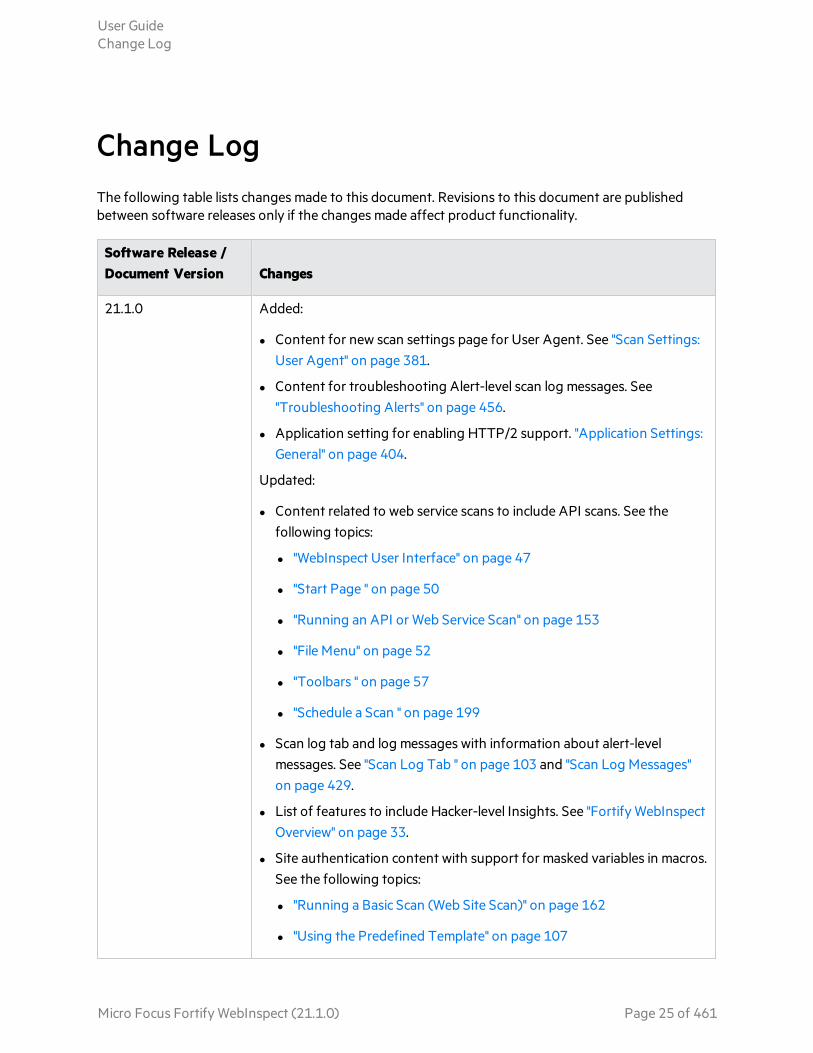
Change LogThe following table lists changes made to this document. Revisions to this document are published between software releases only if the changes made affect product functionality.
Software Release /Document Version Changes
21.1.0 Added:
l Content for new scan settings page for User Agent. See "Scan Settings: User Agent" on page 381.
l Content for troubleshooting Alert-level scan log messages. See "Troubleshooting Alerts" on page 456.
l Application setting for enabling HTTP/2 support. "Application Settings: General" on page 404.
Updated:
l Content related to web service scans to include API scans. See the following topics:
l "WebInspect User Interface" on page 47
l "Start Page " on page 50
l "Running an API or Web Service Scan" on page 153
l "File Menu" on page 52
l "Toolbars " on page 57
l "Schedule a Scan " on page 199
l Scan log tab and log messages with information about alert-level messages. See "Scan Log Tab " on page 103 and "Scan Log Messages" on page 429.
l List of features to include Hacker-level Insights. See "Fortify WebInspect Overview" on page 33.
l Site authentication content with support for masked variables in macros. See the following topics:
l "Running a Basic Scan (Web Site Scan)" on page 162
l "Using the Predefined Template" on page 107
User GuideChange Log
Micro Focus Fortify WebInspect (21.1.0) Page 25 of 461

Software Release /Document Version Changes
l "Using the Mobile Scan Template" on page 122
l "Using the Native Scan Template" on page 139
l "Scan Settings: Authentication" on page 373
l List of policies with description of the NIST-SP80053R5 policy. See "Using WI.exe" on page 274 and "Fortify WebInspect Policies" on page 425.
l WI.exe content with Postman environment file option and exit codes. See "Using WI.exe" on page 274.
l Postman content with process for using client certificates. See "Scanning with a Postman Collection" on page 301.
l Helpful hints related to preparing your system for audit with information about CAPTCHA. See "Preparing Your System for Audit" on page 43.
l Swagger UI content with information on getting field-level details about endpoints. See "Fortify WebInspect REST API" on page 296.
Removed:
l References to Selenium IDE macros.
l API scan options and settings from Basic Scan Wizard.
l Scanning Web Services at zero.webappsecurity.com topic.
l Using the WISwag.exe Tool topic.
l Reuse Crawl and Reuse Crawl Remediation options from WI.exe content.
20.2.0 Updated:
l Description of redundant page detection setting with new options. See "Scan Settings: General" on page 342.
l Description of SPA support setting with new options. See the following topics:
l "Scan Settings: JavaScript" on page 348
l "Using the Predefined Template" on page 107
l "Using the Mobile Scan Template" on page 122
l Postman prerequisite information to clarify where the Newman path variable must be installed. See "Postman Prerequisites" on page 302.
User GuideChange Log
Micro Focus Fortify WebInspect (21.1.0) Page 26 of 461
Software Release /Document Version Changes
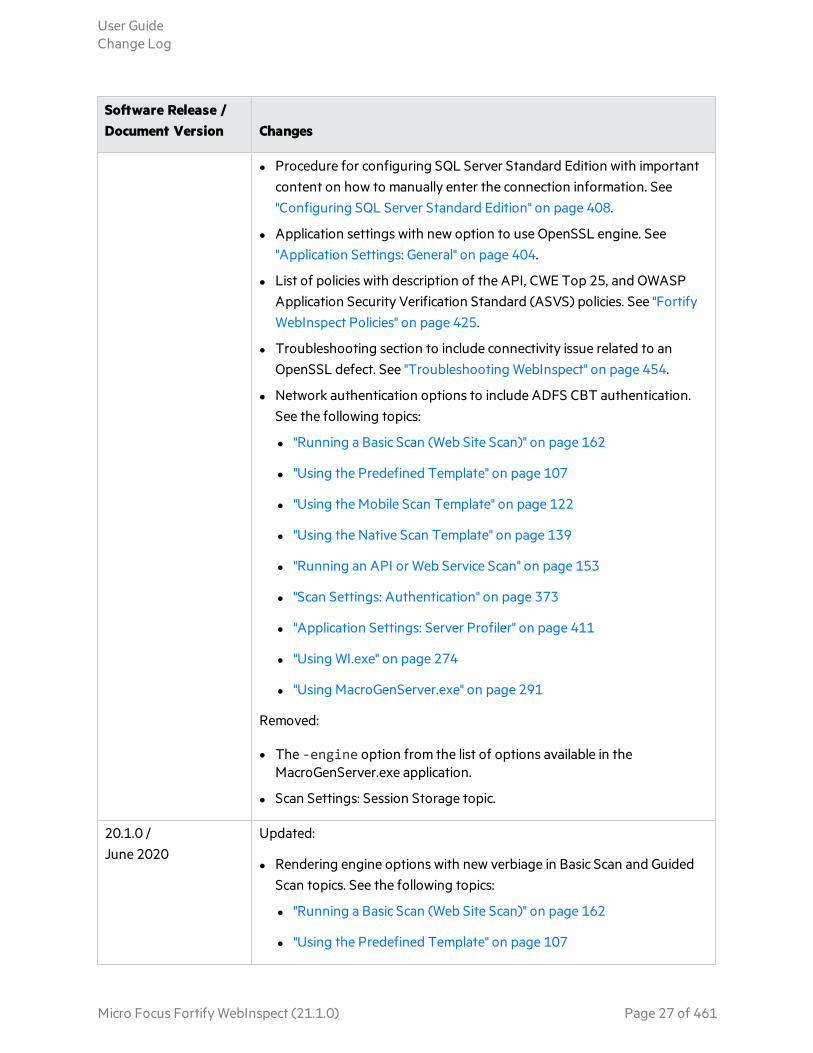
l Procedure for configuring SQL Server Standard Edition with important content on how to manually enter the connection information. See "Configuring SQL Server Standard Edition" on page 408.
l Application settings with new option to use OpenSSL engine. See "Application Settings: General" on page 404.
l List of policies with description of the API, CWE Top 25, and OWASP Application Security Verification Standard (ASVS) policies. See "Fortify WebInspect Policies" on page 425.
l Troubleshooting section to include connectivity issue related to an OpenSSL defect. See "Troubleshooting WebInspect" on page 454.
l Network authentication options to include ADFS CBT authentication. See the following topics:
l "Running a Basic Scan (Web Site Scan)" on page 162
l "Using the Predefined Template" on page 107
l "Using the Mobile Scan Template" on page 122
l "Using the Native Scan Template" on page 139
l "Running an API or Web Service Scan" on page 153
l "Scan Settings: Authentication" on page 373
l "Application Settings: Server Profiler" on page 411
l "Using WI.exe" on page 274
l "Using MacroGenServer.exe" on page 291
Removed:
l The -engine option from the list of options available in the MacroGenServer.exe application.
l Scan Settings: Session Storage topic.
20.1.0 / June 2020
Updated:
l Rendering engine options with new verbiage in Basic Scan and Guided Scan topics. See the following topics:
l "Running a Basic Scan (Web Site Scan)" on page 162
l "Using the Predefined Template" on page 107
User GuideChange Log
Micro Focus Fortify WebInspect (21.1.0) Page 27 of 461

Software Release /Document Version Changes
l "Using the Mobile Scan Template" on page 122
l Manual configuration of Postman login to include description of dynamic tokens and to correct issues with sample code. See "Manually Configuring Postman Login for Dynamic Tokens" on page 305.
Removed:
l Statement regarding allowing exceptions within firewalls, anti-virus software, and intrusion detection systems while preparing your system for audit.
20.1.0 Added:
l CLI option for exporting Site Tree of a scan to JSON and CSV format. See "Using WI.exe" on page 274.
l CLI option for using a Selenium login macro in a scan. See "Using WI.exe" on page 274.
Updated:
l Troubleshooting section to include known issue with C++ redistributable (previously documented in Release Notes). See "Troubleshooting WebInspect" on page 454.
l Retest and rescan topics to describe the updated retest feature and how to use it. See the following topics:
l "Retesting and Rescanning" on page 220
l "Retesting Vulnerabilities" on page 220
l "Scan Menu " on page 54
l Topics mentioning the Summary Pane and retesting vulnerabilities to document single Findings tab and updated retest functionality. See the following topics:
l "WebInspect User Interface" on page 47
l "Summary Pane" on page 98
l "Findings Tab" on page 99
l "Not Found Tab" on page 103
l "Scan Log Tab " on page 103
User GuideChange Log
Micro Focus Fortify WebInspect (21.1.0) Page 28 of 461

Software Release /Document Version Changes
l "Server Information Tab" on page 104
l "Using Filters and Groups in the Summary Pane" on page 237
l "Vulnerability Rollup" on page 245
l "Navigation Pane" on page 60
l "Inspecting the Results" on page 232
l "Comparing Scans" on page 193
l "Retesting and Rescanning" on page 220
l "Recovering Deleted Items" on page 250
l "Session Note" on page 249
l "Flag Session for Follow-Up" on page 247
l "Session Info Panel " on page 83
l "Integrating Vulnerabilities into Fortify Software Security Center " on page 216
l "Scan Info Panel " on page 72
l "Auditing Web Services " on page 240
l "Attachments - Scan Info" on page 81
l "Attachments - Session Info " on page 89
l "Adding/Viewing Vulnerability Screenshot" on page 242
l "Vulnerability Note" on page 249
l "Editing Vulnerabilities" on page 243
l "Application Settings: General" on page 404
l "False Positives" on page 82
l "Using the Burp API Extension" on page 323
l Topics related to Postman collections with new CLI options for conducting Postman scans and improvements to Postman scanning. See the following topics:
l "Scanning with a Postman Collection" on page 301
User GuideChange Log
Micro Focus Fortify WebInspect (21.1.0) Page 29 of 461

Software Release /Document Version Changes
l "Tips for Preparing a Postman Collection" on page 303
l "Manually Configuring Postman Login for Dynamic Tokens" on page 305
l Conducting a Scan Using a Postman Collection
l "Using WI.exe" on page 274
l Instructions for using Basic Scan and Guided Scan with various minor changes related to browser and Web Macro Recorder technology. See the following topics:
l "Running a Basic Scan (Web Site Scan)" on page 162
l "Using the Predefined Template" on page 107
l "Using the Mobile Scan Template" on page 122
l "Using the Native Scan Template" on page 139
l Description of Navigation pane to include SPA Coverage view. See "Navigation Pane" on page 60.
l Description of Web Macro Recorder tools. See "Using a Web Macro Recorder" on page 229.
l List of policies with description of the PCI Software Security Framework 1.0 policy. See "Fortify WebInspect Policies" on page 425.
Removed:
l Appendix for using the License and Infrastructure Manager. This information is now available in the Micro Focus Fortify License and Infrastructure Manager Installation and Usage Guide.
l Settings for choosing the default Web Macro Recorder from Application Settings: General.
l Information related to the Skip button from the Toolbars, Scan Menu, and Scan Log Messages topics.
l Reuse Crawl and Reuse Crawl Remediation features from Scan Menu and Reusing Scans topics.
19.2.0 Added:
l A topic describing how to use the MacroGenServer.exe application. See "Using MacroGenServer.exe" on page 291.
User GuideChange Log
Micro Focus Fortify WebInspect (21.1.0) Page 30 of 461

Software Release /Document Version Changes
l A topic describing how to use a Postman collection to conduct a scan. See "Scanning with a Postman Collection" on page 301.
l A process and several procedures for integrating Fortify WebInspect with Selenium WebDriver. See "Integrating with Selenium WebDriver" on page 309.
l Content to describe the new setting to enable and create response state rules. See "Scan Settings: HTTP Parsing" on page 356.
Updated:
l Command-line execution topic to describe the Fortify WebInspect applications that you can use by way of the command-line interface (CLI). See "Command-line Execution" on page 273.
l WI.exe topic with parameters for starting a Selenium workflow scan. See "Using WI.exe" on page 274.
l WI.exe topic with parameters for scan vulnerability retesting. See "Using WI.exe" on page 274.
l CLI and Basic Scan topics with information about performing an automated scan using a macro created from a REST API definition. See the following topics:
l "Using WI.exe" on page 274.
l "Running a Basic Scan (Web Site Scan)" on page 162
l Topics related to conducting scans with important information about concurrent scans for installations using SQL Express. See the following topics:
l "Running a Basic Scan (Web Site Scan)" on page 162
l "Using the Predefined Template" on page 107
l "Using the Mobile Scan Template" on page 122
l "Using the Native Scan Template" on page 139
l "Running an API or Web Service Scan" on page 153
l "Fortify WebInspect REST API" on page 296
l Scan Settings: Content Analyzers was renamed Scan Settings: JavaScript. See "Scan Settings: JavaScript" on page 348.
User GuideChange Log
Micro Focus Fortify WebInspect (21.1.0) Page 31 of 461

Software Release /Document Version Changes
l Fortify WebInspect REST API configuration procedure with information about using a client certificate for authentication. See "Fortify WebInspect REST API" on page 296.
Removed:
l Known limitations of the Web Macro Recorder with Macro Engine 5.x from General Application Settings.
l The following scan settings:
l Test each engine type per session (engine driven) and Test each session per engine type (session driven) options from the Sequentially Crawl and Audit Mode settings in Scan Settings: Method.
l Breadth-first and Depth-first crawler options from Scan Settings: General. The default setting is Breadth-first.
l Flash, VBScript, and Silverlight options from Scan Settings: Content Analyzers (renamed Scan Settings: JavaScript).
l Reject script include file requests to offsite hosts, Create script event sessions, Enable classic script engine, and Enable Advanced JS Framework Support options from Scan Settings: Content Analyzers (renamed Scan Settings: JavaScript).
l If you need to change any of these scan settings, contact Fortify Customer Support.
User GuideChange Log
Micro Focus Fortify WebInspect (21.1.0) Page 32 of 461

Chapter 1: Introduction Micro Focus Fortify WebInspect™ 21.1.0 is an automated Web application, API, and Web services vulnerability scanning tool. Fortify WebInspect delivers the latest evolution in scan technology—a Web application security product that adapts to any enterprise environment. As you initiate a scan, Fortify WebInspect assigns agents that dynamically catalog all areas of a Web application. These agents report their findings to a main security engine that analyzes the results. Fortify WebInspect then launches "Threat Agents" to evaluate the gathered information and apply attack algorithms to determine the existence and relative severity of potential vulnerabilities. With this smart approach, Fortify WebInspect continuously applies appropriate scan resources that adapt to your specific application environment.
Understanding the FindingsYou should consider Fortify WebInspect findings to be potential vulnerabilities rather than actual vulnerabilities. Every application is unique, and all functionality runs within a particular context that is understood best by the development team. No technology can fully determine whether a suspect behavior can be considered a vulnerability without direct developer confirmation.
See Also
"Fortify WebInspect Overview" below
Fortify WebInspect OverviewThe following is a brief overview of what you can do with Fortify WebInspect, and how it can benefit your organization.
Crawling and Auditing – Fortify WebInspect uses two basic modes to uncover your security weaknesses.
l A crawl is the process by which Fortify WebInspect identifies the structure of the target website. In essence, a crawl runs until it can access no more links on the URL.
l An audit is the actual vulnerability scan. A crawl and an audit, when combined into one function, is termed a scan.
Reporting – Use Fortify WebInspect reports to gain valuable, organized application information. You can customize report details, decide what level of information to include in each report, and gear the report for a specific audience. You can also save any customized report as a template, which you can then use to generate a report using the same reporting criteria, but with updated information. You can save reports in either PDF, HTML, Excel, Raw, RTF, or text format, and you can include graphic summaries of vulnerability data.
Micro Focus Fortify WebInspect (21.1.0) Page 33 of 461

Manual Hacking Control – With Fortify WebInspect, you can see what's really happening on your site, and simulate a true attack environment. Fortify WebInspect functionality enables you to view the code for any page that contains vulnerabilities, and make changes to server requests and resubmit them instantly.
Summary and Fixes – The information pane displays all summary and fix information for the vulnerability selected in either the navigation pane or the summary pane. For more information, see "Navigation Pane" on page 60 and "Summary Pane" on page 98.
It also cites reference material and provides links to patches, instructions for prevention of future problems, and vulnerability solutions. Because new attacks and exploits are formulated daily, Fortify frequently updates the summary and fix information database. Use Smart Update on the Fortify WebInspect toolbar to update your database with the latest vulnerability solution information, or check for updates automatically on startup. For more information, see "SmartUpdate" on page 269 and "Application Settings: Smart Update" on page 422
Scanning Policies – You can edit and customize scanning policies to suit the needs of your organization, reducing the amount of time it takes for Fortify WebInspect to complete a scan. For more information on how to configure Fortify WebInspect policies, see the Policy Manager help or the Micro Focus Fortify WebInspect Tools Guide.
Sortable and Customizable Views – When conducting or viewing a scan, the left navigation pane in the Fortify WebInspect window includes the Site, Sequence, Search, and Step Mode buttons, which determine the contents (or "view") presented in the navigation pane.
l Site view presents the hierarchical file structure of the scanned site, as determined by Fortify WebInspect. It also displays, for each resource, the HTTP status code returned by the server and the number of vulnerabilities detected.
l Sequence view displays server resources in the order Fortify WebInspect encountered them during an automated scan or a manual crawl (Step Mode).
l Search view enables you to locate sessions that match the criteria you specify. For more information, see "Search View" on page 236.
l Step Mode is used to navigate manually through the site, beginning with a session you select from either the site view or the sequence view. For more information, see "Running a Manual Scan " on page 186.
Enterprise-Wide Usage Capabilities – Integrated scan provides a comprehensive overview of your Web presence from an overall enterprise perspective, enabling you to conduct application scans of all Web-enabled applications on the network.
Web Services Scan Capabilities – Provides a comprehensive scan of your Web services vulnerabilities. Enables you to assess applications that contain Web services/SOAP objects.
Export Wizard – Fortify WebInspect's robust and configurable XML export tool enables users to export (in a standardized XML format) any and all information found during the scan. This includes comments, hidden fields, JavaScript, cookies, web forms, URLs, requests, and sessions. Users can specify the type of information to be exported.
Web Service Test Designer – Allows you to create a Web Service Test Design file (filename.wsd) that contains the values for Fortify WebInspect to submit when conducting a Web service scan.
User GuideChapter 1: Introduction
Micro Focus Fortify WebInspect (21.1.0) Page 34 of 461

API Scans – Fortify WebInspect supports scanning REST API applications as follows:
l Configure an API Scan in the user interface by way of the API Scan Wizard. For more information, see "Running an API or Web Service Scan" on page 153.
l Scan a REST API definition using the WebInspect REST API. For more information, see "Fortify WebInspect REST API" on page 296.
l Use a Postman collection of API requests to start a scan. For more information, see "Scanning with a Postman Collection" on page 301.
Integration Capabilities – You can integrate Fortify WebInspect with some of the most widely used application security development and testing tools, including the following:
l Burp (For more information, see "About the Burp API Extension" on page 322.)
l Postman (For more information, see "Scanning with a Postman Collection" on page 301.)
l Selenium WebDriver (For more information, see "Integrating with Selenium WebDriver" on page 309.)
Enhanced Third-Party Commercial Application Threat Agents – Fortify WebInspect enables users to perform security scans for any web application, including the industry-leading application platforms. Some standard commercial application threat agents with Fortify WebInspect include:
l Adobe ColdFusion
l Adobe JRun
l Apache Tomcat
l IBM Domino
l IBM WebSphere
l Microsoft.NET
l Oracle Application Server
l Oracle WebLogic
Hacker-level Insights – Fortify WebInspect flags libraries that are detected in the application during the scan. This information provides developers and security professionals with context relating to the overall security posture of their application. While these findings do not necessarily represent a security vulnerability, it is important to note that attackers commonly perform reconnaissance of their target in an attempt to identify known weaknesses or patterns.
See Also
"Contact Customer Support" on page 459
About Fortify WebInspect Enterprise Micro Focus Fortify WebInspect Enterprise employs a distributed network of Fortify WebInspect sensors controlled by a system manager with a centralized database. Optionally, you can integrate Fortify WebInspect Enterprise with Fortify Software Security Center to provide Fortify Software Security Center with information detected through dynamic scans of Web sites and Web services.
User GuideChapter 1: Introduction
Micro Focus Fortify WebInspect (21.1.0) Page 35 of 461

This innovative architecture enables you to:
l Conduct a large number of automated security scans using any number of Fortify WebInspect sensors to scan web applications and SOAP services.
l Manage large or small Fortify WebInspect deployments across your organization to control product updates, scan policies, scan permissions, tools usage, and scan results all centrally from the Fortify WebInspect Enterprise console.
l Track, manage, and detect your new and existing web applications and monitor all activity associated with them.
l Optionally upload scan data to Fortify Software Security Center.
l Independently schedule scans and blackout periods, manually launch scans, and update repository information using Fortify WebInspect or the Fortify WebInspect Enterprise console. For more information, see "Blackout Period " on page 336.
l Limit exposure to enterprise-sensitive components and data by using centrally defined roles for users.
l Obtain an accurate snapshot of the organization's risk and policy compliance through a centralized database of scan results, reporting, and trend analysis.
l Facilitate integration with third-party products and deployment of customized web-based front ends using the Web Services application programming interface (API).
User GuideChapter 1: Introduction
Micro Focus Fortify WebInspect (21.1.0) Page 36 of 461
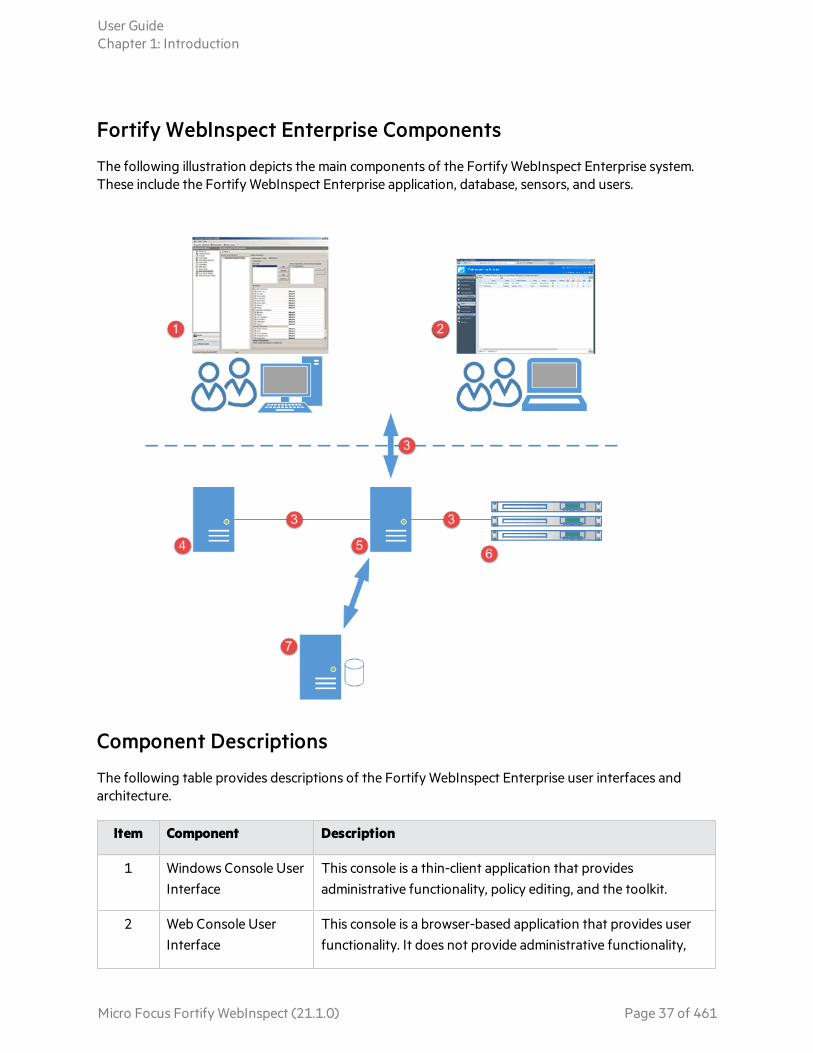
Fortify WebInspect Enterprise Components
The following illustration depicts the main components of the Fortify WebInspect Enterprise system. These include the Fortify WebInspect Enterprise application, database, sensors, and users.
Component Descriptions
The following table provides descriptions of the Fortify WebInspect Enterprise user interfaces and architecture.
Item Component Description
1 Windows Console User Interface
This console is a thin-client application that provides administrative functionality, policy editing, and the toolkit.
2 Web Console User Interface
This console is a browser-based application that provides user functionality. It does not provide administrative functionality,
User GuideChapter 1: Introduction
Micro Focus Fortify WebInspect (21.1.0) Page 37 of 461

Item Component Description
policy editing, or the toolkit.
3 HTTP or HTTPS The Fortify WebInspect Enterprise components use these communication protocols.
4 Fortify Software Security Center (optional)
Integration with Fortify Software Security Center provides a way to publish scans to a central repository of all static and dynamic scans. It provides somewhat centralized accounts, although permissions are still managed separately, the ability to submit scan requests, and more extensive reporting than a standalone installation.
5 Fortify WebInspect Enterprise Manager
This is a Microsoft Windows server with an IIS application platform. It is a Web service whose main functions are user authentication and authorization, data repository, and remote scan scheduling.
6 Sensors These WebInspect sensors are installed on Microsoft Windows or Windows Server operating systems. Sensors have no GUI and execute remote scans that are configured at the Web Console. You use the Web Console to control all scan configurations, results, reports, and updates .
7 Microsoft SQL Server This Microsoft Windows server has a SQL database that stores all users, permissions, and administrative settings. The database also stores all scan data and reporting.
FIPS ComplianceYou can run Fortify WebInspect and Fortify WebInspect Enterprise in either normal mode or FIPs-compliant mode.
About FIPS Compliance in Fortify WebInspect Products
In FIPs-compliant mode, Fortify WebInspect programs meet the encryption standards required to be compliant with Federal Information Processing Standard (FIPS). When running in FIPS-compliant mode, data is encrypted using the AES algorithm established by the National Institute of Standards and Technology (NIST). This includes the transmission of data to and from Fortify WebInspect as well as saved scan data.
User GuideChapter 1: Introduction
Micro Focus Fortify WebInspect (21.1.0) Page 38 of 461

Because FIPS-compliance uses different cryptography modules from those used by the default Fortify WebInspect product, a FIPS-compliant installation cannot access scan data generated on a non-FIPS compliant installation. If you previously used a non-FIPS compliant installation of Fortify WebInspect and now want to run Fortify WebInspect in a FIPS-compliant environment, the scan data you generated in the non FIPS-compliant installation will not be available to you unless you use the Micro Focus FIPS Migration Tool to decrypt the data and then re-encrypt it using the AES algorithm. When running multiple instances of Fortify WebInspect in your environment, these instances must all be either FIPS-compliant or non FIPS-compliant if you intend to share data among them.
Fortify WebInspect, Fortify WebInspect Enterprise, and the Fortify WebInspect Agent all have FIPS-compliant modes.
Selecting FIPS-compliant Mode
Installing Fortify WebInspect in a FIPS-compliant environment triggers the option to run Fortify WebInspect in normal mode or FIPS-compliant mode. You cannot switch from one mode to another, so make sure that you do not have dependencies that require you to maintain backward compatibility with non FIPS-compliant data before choosing this option. When running in FIPS-compliant mode, you will not notice any changes in the day-to-day operation of Fortify WebInspect.
Related DocumentsThis topic describes documents that provide information about Micro Focus Fortify software products.
Note: You can find the Micro Focus Fortify Product Documentation at https://www.microfocus.com/support/documentation. All guides are available in both PDF and HTML formats. Product help is available within the Fortify WebInspect products.
All Products
The following documents provide general information for all products. Unless otherwise noted, these documents are available on the Micro Focus Product Documentation website.
Document / File Name Description
About Micro Focus Fortify Product Software Documentation
About_Fortify_Docs_<version>.pdf
This paper provides information about how to access Micro Focus Fortify product documentation.
Note: This document is included only with the product download.
Micro Focus Fortify Software System Requirements
This document provides the details about the environments and products supported for this version of
User GuideChapter 1: Introduction
Micro Focus Fortify WebInspect (21.1.0) Page 39 of 461

Document / File Name Description
Fortify_Sys_Reqs_<version>.pdf Fortify Software.
Micro Focus Fortify Software Release Notes
FortifySW_RN_<version>.pdf
This document provides an overview of the changes made to Fortify Software for this release and important information not included elsewhere in the product documentation.
What’s New in Micro Focus Fortify Software <version>
Fortify_Whats_New_<version>.pdf
This document describes the new features in Fortify Software products.
Micro Focus Fortify WebInspect
The following documents provide information about Fortify WebInspect. Unless otherwise noted, these documents are available on the Micro Focus Product Documentation website at https://www.microfocus.com/documentation/fortify-webinspect.
Document / File Name Description
Micro Focus Fortify WebInspect Installation Guide
WI_Install_<version>.pdf
This document provides an overview of Fortify WebInspect and instructions for installing Fortify WebInspect and activating the product license.
Micro Focus Fortify WebInspect User Guide
WI_Guide_<version>.pdf
This document describes how to configure and use Fortify WebInspect to scan and analyze Web applications and Web services.
Note: This document is a PDF version of the Fortify WebInspect help. This PDF file is provided so you can easily print multiple topics from the help information or read the help in PDF format. Because this content was originally created to be viewed as help in a web browser, some topics may not be formatted properly. Additionally, some interactive topics and linked content may not be present in this PDF version.
Micro Focus Fortify WebInspect on Docker User Guide
WI_Docker_Guide_<version>.pdf
This document describes how to download, configure, and use Fortify WebInspect that is available as a container image on the Docker platform. This full version of the
User GuideChapter 1: Introduction
Micro Focus Fortify WebInspect (21.1.0) Page 40 of 461

Document / File Name Description
product is intended to be used in automated processes as a headless sensor configured by way of the command line interface (CLI) or the application programming interface (API). It can also be run as a Fortify ScanCentral DAST sensor and used in conjunction with Fortify Software Security Center.
Micro Focus Fortify WebInspect Tools Guide
WI_Tools_Guide_<version>.pdf
This document describes how to use the Fortify WebInspect diagnostic and penetration testing tools and configuration utilities packaged with Fortify WebInspect and Fortify WebInspect Enterprise.
Micro Focus Fortify License and Infrastructure Manager Installation and Usage Guide
LIM_Guide_<version>.pdf
This document describes how to install, configure, and use the Fortify WebInspect License and Infrastructure Manager (LIM), which is available for installation on a local Windows server and as a container image on the Docker platform.
Micro Focus Fortify WebInspect Agent Installation Guide
WI_Agent_Install_<version>.pdf
This document describes how to install the Fortify WebInspect Agent for applications running under a supported Java Runtime Environment (JRE) on a supported application server or service and applications running under a supported .NET Framework on a supported version of IIS.
Micro Focus Fortify WebInspect Agent Rulepack Kit Guide
WI_Agent_Rulepack_Guide_<version>.pdf
This document describes the detection capabilities of Fortify WebInspect Agent Rulepack Kit. Fortify WebInspect Agent Rulepack Kit runs atop the Fortify WebInspect Agent, allowing it to monitor your code for software security vulnerabilities as it runs. Fortify WebInspect Agent Rulepack Kit provides the runtime technology to help connect your dynamic results to your static ones.
User GuideChapter 1: Introduction
Micro Focus Fortify WebInspect (21.1.0) Page 41 of 461

Micro Focus Fortify WebInspect Enterprise
The following documents provide information about Fortify WebInspect Enterprise. Unless otherwise noted, these documents are available on the Micro Focus Product Documentation website at https://www.microfocus.com/documentation/fortify-webinspect-enterprise.
Document / File Name Description
Micro Focus Fortify WebInspect Enterprise Installation and Implementation Guide
WIE_Install_<version>.pdf
This document provides an overview of Fortify WebInspect Enterprise and instructions for installing Fortify WebInspect Enterprise, integrating it with Fortify Software Security Center and Fortify WebInspect, and troubleshooting the installation. It also describes how to configure the components of the Fortify WebInspect Enterprise system, which include the Fortify WebInspect Enterprise application, database, sensors, and users.
Micro Focus Fortify WebInspect Enterprise User Guide
WIE_Guide_<version>.pdf
This document describes how to use Fortify WebInspect Enterprise to manage a distributed network of Fortify WebInspect sensors to scan and analyze Web applications and Web services.
Note: This document is a PDF version of the Fortify WebInspect Enterprise help. This PDF file is provided so you can easily print multiple topics from the help information or read the help in PDF format. Because this content was originally created to be viewed as help in a web browser, some topics may not be formatted properly. Additionally, some interactive topics and linked content may not be present in this PDF version.
Micro Focus Fortify WebInspect Tools Guide
WI_Tools_Guide_<version>.pdf
This document describes how to use the Fortify WebInspect diagnostic and penetration testing tools and configuration utilities packaged with Fortify WebInspect and Fortify WebInspect Enterprise.
User GuideChapter 1: Introduction
Micro Focus Fortify WebInspect (21.1.0) Page 42 of 461

Chapter 2: Getting StartedThis chapter describes how to prepare your system for audit, update SecureBase, and start a scan so that you begin using Fortify WebInspect right away.
Preparing Your System for AuditFortify WebInspect is an aggressive web application analyzer that rigorously inspects your entire website for real and potential security vulnerabilities. This procedure is intrusive to varying degrees. Depending on which Fortify WebInspect policy you apply and the options you select, it can affect server and application throughput and efficiency. When using the most aggressive policies, Fortify recommends that you perform this analysis in a controlled environment while monitoring your servers.
Sensitive Data
Fortify WebInspect captures and displays all application data sent between the application and server. It might even discover sensitive data in your application that you are not aware of. Fortify recommends that you follow one of these best practices regarding sensitive data:
l Do not use potentially sensitive data, such as real user names and passwords, while testing with Fortify WebInspect.
l Do not allow Fortify WebInspect scans, related artifacts, and data stores to be accessed by anyone unauthorized to access potentially sensitive data.
Network authentication credentials are not displayed in WebInspect and are encrypted when stored in settings.
Firewalls, Anti-virus Software, and Intrusion Detection Systems
WebInspect sends attacks to servers, and then analyzes and stores the results. Web application firewalls (WAF), anti-virus software, firewalls, and intrusion detection/prevention systems (IDS/IPS) are in place to prevent these activities. Therefore, these tools can be problematic when conducting a scan for vulnerabilities.
First, these tools can interfere with WebInspect’s scanning of a server. An attack that WebInspect sends to the server can be intercepted, resulting in a failed request to the server. If the server is vulnerable to that attack, then a false negative is possible.
Second, results or attacks that are in the WebInspect product, cached on disk locally, or in the database can be identified and quarantined by these tools. When working files used by WebInspect or data in the database are quarantined, WebInspect can produce inconsistent results. Such quarantined files and data can also cause unexpected behavior.
Micro Focus Fortify WebInspect (21.1.0) Page 43 of 461
These types of issues are environmentally specific, though McAfee IPS is known to cause both types of problems, and any WAF will cause the first problem. Fortify has seen other issues related to these tools as well.
If such issues arise while conducting a scan, Fortify recommends that you disable WAF, anti-virus software, firewall, and IDS/IPS tools for the duration of the scan. Doing so is the only way to be sure you are getting reliable scan results.
Effects to Consider
During an audit of any type, Fortify WebInspect submits a large number of HTTP requests, many of which have "invalid" parameters. On slower systems, the volume of requests may degrade or deny access to the system by other users. Additionally, if you are using an intrusion detection system, it will identify numerous illegal access attempts.
To conduct a thorough scan, Fortify WebInspect attempts to identify every page, form, file, and folder in your application. If you select the option to submit forms during a crawl of your site, Fortify WebInspect will complete and submit all forms it encounters. Although this enables Fortify WebInspect to navigate seamlessly through your application, it may also produce the following consequences:
l If, when a user normally submits a form, the application creates and sends e-mails or bulletin board postings (to a product support or sales group, for example), Fortify WebInspect will also generate these messages as part of its probe.
l If normal form submission causes records to be added to a database, then the forms that Fortify WebInspect submits will create spurious records.
During the audit phase of a scan, Fortify WebInspect resubmits forms many times, manipulating every possible parameter to reveal problems in the applications. This greatly increases the number of messages and database records created.
Helpful Hints
l For systems that write records to a back-end server (database, LDAP, and so on) based on forms submitted by clients, some Fortify WebInspect users, before auditing their production system, backup their database, and then reinstall it after the audit is complete. If this is not feasible, you can query your servers after the audit to search for and delete records that contain one or more of the form values submitted by Fortify WebInspect. You can determine these values by opening the Web Form Editor.
l If your system generates e-mail messages in response to user-submitted forms, consider disabling your mail server. Alternatively, you could redirect all e-mails to a queue and then, following the audit, manually review and delete those e-mails that were generated in response to forms submitted by Fortify WebInspect.
l Fortify WebInspect can be configured to send up to 75 concurrent HTTP requests before it waits for an HTTP response to the first request. The default thread count setting is 5 for a crawl and 10 for an audit (if using separate requestors). In some environments, you may need to specify a lower number to avoid application or server failure. For more information, see "Scan Settings: Requestor" on page 349.
User GuideChapter 2: Getting Started
Micro Focus Fortify WebInspect (21.1.0) Page 44 of 461

l If, for any reason, you do not want Fortify WebInspect to crawl and attack certain directories, you must specify those directories using the Excluded URLs feature of Fortify WebInspect settings (see "Scan Settings: Session Exclusions" on page 352). You can also exclude specific file types and MIME types.
l By default, Fortify WebInspect is configured to ignore many binary files (images, documents, and so on) that are commonly found in web applications. These documents cannot be crawled or attacked, so there is no value in auditing them. Bypassing these documents greatly increases the audit speed. If proprietary documents are in use, determine the file extensions of the documents and exclude them within Fortify WebInspect's default settings. If, during a crawl, Fortify WebInspect becomes extremely slow or stops, it may be because it attempted to download a binary document.
l For form submission, Fortify WebInspect submits data extracted from a prepackaged file. If you require specific values (such as user names and passwords), you must create a file with Fortify’s Web Form Editor and identify that file to Fortify WebInspect.
l Unless you are conducting an interactive scan, turn off your CAPTCHA software. CAPTCHA is designed to prevent automation on Web applications and can interfere with an automated scan of your Web application.
l Fortify WebInspect tests for certain vulnerabilities by attempting to upload files to your server. If your server allows this, Fortify WebInspect will record this susceptibility in its scan report and attempt to delete the file. Sometimes, however, the server prevents file deletion. For this reason, search for and delete files with names that start with "CreatedByHP" as a routine part of your post-scan maintenance.
See Also
"Fortify WebInspect Overview" on page 33
"Quick Start " below
Quick Start This topic provides information to help you get started with Fortify WebInspect. It includes links to more detailed information.
Update SecureBase
To ensure that you have up-to-date information about the Fortify WebInspect catalog of vulnerabilities, use the following procedure to update your vulnerabilities database.
1. Start Fortify WebInspect.
Note: If Fortify WebInspect is installed as an interactive component of the Fortify WebInspect Enterprise, and if the enterprise server is currently using this Fortify WebInspect module to conduct a scan, then you cannot start Fortify WebInspect. The following message will be displayed: "Unable to start WebInspect. Permission denied."
2. On the Start Page, click Start Smart Update.
User GuideChapter 2: Getting Started
Micro Focus Fortify WebInspect (21.1.0) Page 45 of 461

The Smart Update window opens and lists available updates.
3. Click Update.
Note: Update the product each time you use it. You can select an application setting that runs Smart Update each time you start the program. For more information, see "Application Settings: Smart Update" on page 422.
For more information, including instructions for updating WebInspect that is offline, see "SmartUpdate" on page 269.
Prepare Your System for Audit
Before performing an audit, be aware of the potential impact on your website, and what you can do to prepare for a successful audit. For more information, see "Preparing Your System for Audit" on page 43.
Start a Scan
After you update your database, you are ready to determine your web application’s security vulnerabilities.
On the Fortify WebInspect Start Page, click one of the following selections:
l Start a Guided Scan (see "Guided Scan Overview " on page 105)
l Start a Basic Scan (see "Running a Basic Scan (Web Site Scan)" on page 162)
l Start an API Scan (see "Running an API or Web Service Scan" on page 153)
l Start an Enterprise Scan (see "Running an Enterprise Scan " on page 182)
See Also
"Preparing Your System for Audit" on page 43
"WebInspect User Interface" on page 47
User GuideChapter 2: Getting Started
Micro Focus Fortify WebInspect (21.1.0) Page 46 of 461

Chapter 3: WebInspect User InterfaceWhen you first start Fortify WebInspect, the application displays the Start Page as illustrated below.
Start Page Image
Note: When Fortify WebInspect is connected to Enterprise Server, there is a button labeled "WebInspect Enterprise WebConsole" to the right of the SmartUpdate button. This button launches the Web Console.
The Activity PanelThe left pane (the Activity Panel) displays hyperlinks to the following major functions:
l Start a Guided Scan (see "Guided Scan Overview " on page 105)
l Start a Basic Scan (see "Running a Basic Scan (Web Site Scan)" on page 162)
l Start an API Scan (see "Running an API or Web Service Scan" on page 153)
l Start an Enterprise Scan (see "Running an Enterprise Scan " on page 182)
l Generate a Report (see "Generating a Report" on page 252)
l Start SmartUpdate (see "SmartUpdate" on page 269)
Micro Focus Fortify WebInspect (21.1.0) Page 47 of 461
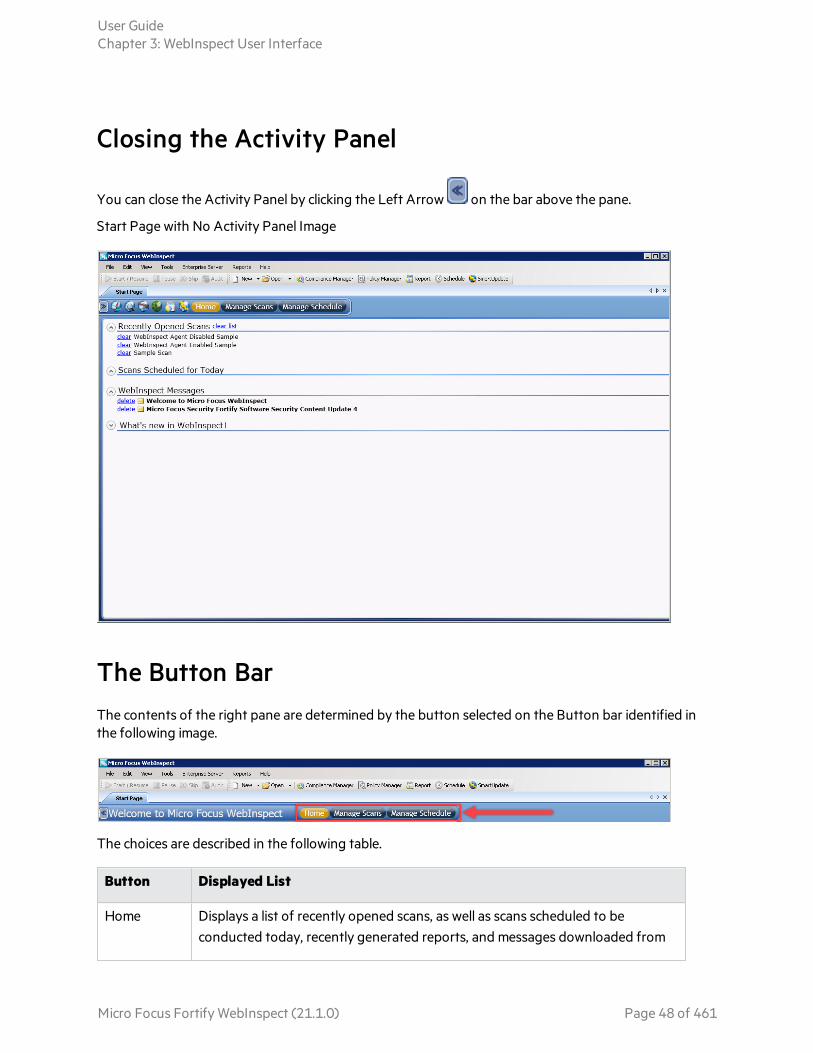
Closing the Activity Panel
You can close the Activity Panel by clicking the Left Arrow on the bar above the pane.
Start Page with No Activity Panel Image
The Button BarThe contents of the right pane are determined by the button selected on the Button bar identified in the following image.
The choices are described in the following table.
Button Displayed List
Home Displays a list of recently opened scans, as well as scans scheduled to be conducted today, recently generated reports, and messages downloaded from
User GuideChapter 3: WebInspect User Interface
Micro Focus Fortify WebInspect (21.1.0) Page 48 of 461
Button Displayed List
the Micro Focus server.
If you hover the pointer over a scan name, Fortify WebInspect displays summary information about the scan. If you click the scan name, Fortify WebInspect opens the scan on a separate tab.
Manage Scans
Displays a list of previously conducted scans, which you can open, rename, or delete. Click Connections to choose a database: either Local (scans stored in a SQL Server Express Edition database on your machine) or Remote (scans stored in a SQL Server Standard Edition database configured on your machine or elsewhere on the network), or both. For more information, see "Manage Scans " on page 198.
Manage Schedule
Displays a list of scans that are scheduled to be performed. You can add a scan to the schedule, edit or delete a scheduled scan, or start the scan manually. For more information, see "Managing Scheduled Scans " on page 201.
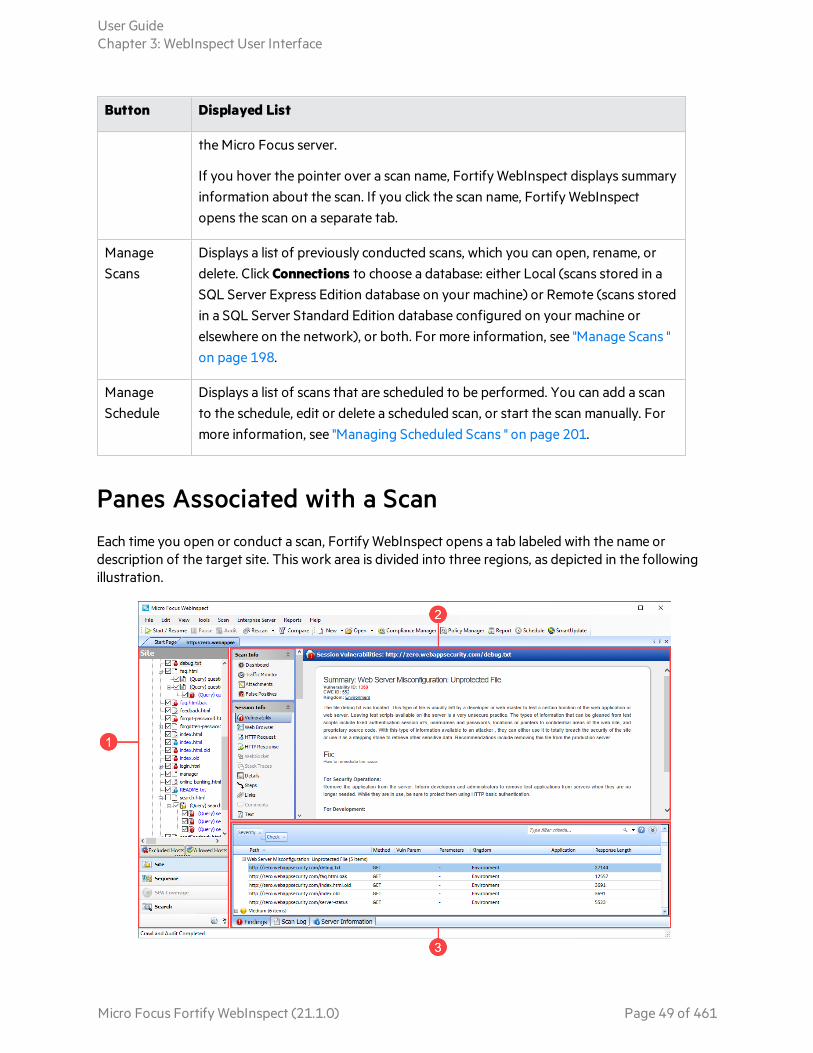
Panes Associated with a ScanEach time you open or conduct a scan, Fortify WebInspect opens a tab labeled with the name or description of the target site. This work area is divided into three regions, as depicted in the following illustration.
User GuideChapter 3: WebInspect User Interface
Micro Focus Fortify WebInspect (21.1.0) Page 49 of 461

Item Description
1 Navigation Pane
2 Information Pane
3 Summary Pane
If you have a large number of scans open at the same time, and there is no room to display all tabs, you can scroll the tabs by clicking the arrows on the extreme right end of the tab bar. Click the X to close the selected tab.
See Also
"Menu Bar " on the next page
"Toolbars " on page 57
"Start Page " below
"Navigation Pane" on page 60
"Summary Pane" on page 98
"Information Pane" on page 71
Start Page The left-hand pane of the Start Page contains a list of activities related to the vulnerability scan of your Web site, API, or Web service:
l Start a Guided Scan (see "Guided Scan Overview " on page 105)
l Start a Basic Scan (see "Running a Basic Scan (Web Site Scan)" on page 162)
l Start an API Scan (see "Running an API or Web Service Scan" on page 153)
l Start an Enterprise Scan (see "Running an Enterprise Scan " on page 182)
l Generate a Report (see "Generating a Report" on page 252)
l Start SmartUpdate (see "SmartUpdate" on page 269)
The contents of the right-hand pane are controlled by the buttons on the Button bar.
User GuideChapter 3: WebInspect User Interface
Micro Focus Fortify WebInspect (21.1.0) Page 50 of 461

Home
When Home is selected (the default), Fortify WebInspect displays a list of:
l Recently opened scans. If you hover the pointer over a scan name, Fortify WebInspect displays summary information about the scan. If you click the scan name, Fortify WebInspect opens the scan on a separate tab.
l Scans scheduled to be conducted today
l Recently generated reports
l Messages downloaded from the Micro Focus server
Manage Scans
When Manage Scans is selected, Fortify WebInspect displays a list of previously conducted scans, which you can open, rename, or delete. Click Connections to choose a database: either Local (scans stored in the SQL Server Express Edition database on your machine) or Remote (scans stored in the SQL Server database, if configured), or both. For more information, see "Manage Scans " on page 198.
Manage Schedule
When Manage Schedule is selected, Fortify WebInspect displays a list of scheduled scans. You can add a scan to the schedule, edit or delete a scheduled scan, or start the scan manually. For more information, see "Managing Scheduled Scans " on page 201.
See Also
"WebInspect User Interface" on page 47
Menu Bar Menu options are:
l "File Menu" on the next page
l "Edit Menu " on page 53
l "View Menu " on page 53
l "Tools Menu " on page 54
l "Scan Menu " on page 54
l "Enterprise Server Menu" on page 54
l "Reports Menu " on page 55
l "Help Menu" on page 56
User GuideChapter 3: WebInspect User Interface
Micro Focus Fortify WebInspect (21.1.0) Page 51 of 461

File MenuThe File menu commands are described in the following table.
Command Description
New Allows you to select Guided Scan, Basic Scan, API Scan, or Enterprise Scan, and then launches the associated Scan Wizard, which steps you through the process of starting a scan.
Open Allows you to open either a scan or a generated report.
Schedule Opens the Manage Scheduled Scans window, which allows you to add, edit, or delete a scheduled scan.
Import Scan Allows you to import a scan file.
Export This command is available only when a tab containing a scan is selected. You may:
l Export a scan
l Export scan details
l Export a scan to Software Security Center
l Export protection rules to a web application firewall (WAF)
Close Tab When multiple tabs are open, closes the selected tab.
Tip: You can right-click any open tab and use the context-menu options as follows:
l Close - Close the tab that you clicked
l Close All But This - Close all tabs except the tab that you clicked
l Close All - Close all tabs
Likewise, you can use a middle-click or CTRL+F4 to close a single tab.
If you are closing the tab for a retest scan, you may be prompted about keeping the scan. For more information, see "Retesting Vulnerabilities" on page 220.
Exit Closes the Fortify WebInspect program.
User GuideChapter 3: WebInspect User Interface
Micro Focus Fortify WebInspect (21.1.0) Page 52 of 461

Edit Menu The Edit menu commands are described in the following table.
Command Description
Default Scan Settings
Displays the Default Settings window, allowing you to select or modify options used for scanning.
Current Scan Settings
Displays a settings window that allows you to select or modify options for the current scan. This command is available only when a tab containing a scan is selected.
Manage Settings Opens a window that allows you to add, edit, or delete settings files.
Application Settings
Displays the Application Settings window, allowing you to select or modify options controlling the operation of the Fortify WebInspect application. For more information, see the "Application Settings" on page 404.
Copy URL Copies the selected URL to the Windows clipboard. This command is available only when a tab containing a scan is selected.
Copy Scan Log Copies the log (for the scan on the selected tab) to the Windows clipboard. This command is available only when a tab containing a scan is selected.
View Menu The View menu commands are described in the following table.
Command Description
Word Wrap Inserts soft returns at the right-side margins of the display area when viewing HTTP requests and responses. This command is available only when a tab containing a scan is selected.
Toolbars Allows you to select which toolbars should be displayed. For more information, see "Toolbars " on page 57.
User GuideChapter 3: WebInspect User Interface
Micro Focus Fortify WebInspect (21.1.0) Page 53 of 461

Tools Menu The Tools menu contains commands to launch the tool applications.
Scan Menu The Scan menu appears on the menu bar only when a tab containing a scan has focus. Scan menu commands are described in the following table.
Command Description
Start/Resume Starts or resumes a scan after you paused the process.
Pause Halts a crawl or audit. Click Resume to continue the scan.
Audit Assesses the crawled site for vulnerabilities. Use the command after completing a crawl or exiting Step Mode.
Rescan Launches the Scan Wizard prepopulated with settings last used for the selected scan.
The Rescan drop-down menu allows you to:
l Scan Again (see "Rescanning a Site" on page 224)
l Retest Vulnerabilities (see "Retesting Vulnerabilities" on page 220)
l Reuse Incremental (see "Incremental Scanning" on page 226)
l Reuse Remediation (see "Reusing Scans" on page 225)
Compare Compares the vulnerabilities revealed by two different scans of the same target. See "Comparing Scans" on page 193.
Enterprise Server MenuThe Enterprise Server menu contains the following commands:
Command Description
Connect to WebInspect Enterprise or
Establishes or breaks a connection to the Fortify WebInspect Enterprise server.
User GuideChapter 3: WebInspect User Interface
Micro Focus Fortify WebInspect (21.1.0) Page 54 of 461

Command Description
Disconnect
Download Scan Allows you to select a scan for copying from the server to your hard drive.
Publish Scan Displays a dialog box that allows you to review vulnerabilities and transmit them to an enterprise server which, in turn, transmits them to a Micro Focus Fortify Software Security Center server. For more information, see "Publishing a Scan (Fortify WebInspect Enterprise Connected) " on page 215.
Note: This option is available only if Fortify WebInspect Enterprise is integrated with Fortify Software Security Center.
Upload Scan Allows you to select a scan for transferring data to the server. This is used most often when the application setting "auto upload scans" is not selected.
Transfer Settings Allows you to select a Fortify WebInspect settings file and transfer it to the server, which will create a Scan Template based on those settings. Also allows you to select a Scan Template and transfer it to Fortify WebInspect, which will create a settings file based on the template. For more information, see "Transferring Settings to/from Enterprise Server" on page 213.
WebConsole Launches the Fortify WebInspect Enterprise Web Console application.
About Enterprise Server
Displays information about Fortify WebInspect Enterprise.
Note: A Fortify WebInspect installation with a standalone license may connect to an enterprise server at any time, as long as the user is a member of a role in Fortify WebInspect Enterprise.
Reports Menu The Reports menu commands are described in the following table.
Command Description
Generate Report Launches the Report Generator.
Manage Reports Displays a list of standard and custom report types. You can rename, delete, or export custom-designed reports, and you may import a report definition file.
User GuideChapter 3: WebInspect User Interface
Micro Focus Fortify WebInspect (21.1.0) Page 55 of 461

Help MenuThe Help menu provides the commands described in this topic.
WebInspect Help
This command opens the Help file.
Search
This command opens the Help file, displaying the search options in the left pane.
Support > Request an Enhancement
If the support channel is enabled (see "Application Settings: Support Channel" on page 423), this command opens a window allowing you to submit enhancement requests to Micro Focus.
Support > Contact Technical Support
This command displays instructions for contacting Fortify Customer Support.
Support > Get Open TC Browsers info
Use this menu command when working with Fortify Customer Support to troubleshoot issues with scans, such as when a scan is not completing. This command collates snapshots and logs of the TruClient browsers during a scan. The browsers are hidden during the scan and the processes cannot be seen in memory dumps, so these snapshots provide a browser view of what Fortify WebInspect encountered during the scan.
To use this command:
1. Select the Help > Support > Get Open TC Browsers info.
The Get Browsers Information window appears.
2. Click the browse button (…) and select a location to save the collated files.
3. Select Upload to Telemetry to automatically upload the collated files to Micro Focus upon completion.
4. Click Collate.
A folder is created with the name of the scan GUID, and the collated snapshots and logs are placed inside the folder.
User GuideChapter 3: WebInspect User Interface
Micro Focus Fortify WebInspect (21.1.0) Page 56 of 461

Support > Copy Application Snapshot to Clipboard
Use this menu command when working with Fortify Customer Support to diagnose problems with Fortify WebInspect. This option creates a memory dump of Fortify WebInspect so that a dump analysis can be performed using a Windows debugger tool.
To use this command:
1. Select the Help > Support > Copy Application Snapshot to Clipboard.
The Collect WebInspect State Information window appears.
2. After receiving the complete message, open Notepad and press CTRL+V to paste the contents into the file.
Tutorials
This command allows you to download tutorials and other Fortify WebInspect documentation.
About WebInspect
This command displays information about the Fortify WebInspect application, including license information, allowed hosts, and attributes.
Toolbars The Fortify WebInspect window contains two toolbars: Scan and Standard. You can display or hide either toolbar by selecting Toolbars from the View menu.
Buttons Available on the Scan Toolbar
Button Function
You can pause a scan and then resume scanning. Also, a completed scan may contain sessions that were not sent (because of timeouts or other errors); if you click Start, Fortify WebInspect will attempt to resend those sessions.
Interrupts an ongoing scan. You can continue scanning by clicking the Start/Resume button.
If you conduct a crawl-only scan or a Step Mode scan, you can afterwards click this button to conduct an audit. For more information, see "Running a Manual Scan " on page 186.
User GuideChapter 3: WebInspect User Interface
Micro Focus Fortify WebInspect (21.1.0) Page 57 of 461

Button Function
This button appears only if you select a tab containing a scan. The Rescan drop-down menu allows you to:
l Scan Again (see "Rescanning a Site" on page 224)
l Retest Vulnerabilities (see "Retesting Vulnerabilities" on page 220)
l Reuse Incremental (see "Incremental Scanning" on page 226)
l Reuse Remediation (see "Reusing Scans" on page 225)
For more information, see "Retesting and Rescanning" on page 220.
This button appears only if you select a tab containing a scan. It allows you to compare the vulnerabilities revealed by two different scans of the same target. For more information, see "Comparing Scans" on page 193.
This button appears only if Fortify WebInspect is connected to Fortify WebInspect Enterprise and a scan is open on the tab that has focus. It allows you to send the scan settings to Fortify WebInspect Enterprise, which creates a scan request and places it in the scan queue for the next available sensor. For detailed information, see "Running a Scan in Enterprise Server" on page 213.
This button appears only after connecting to Fortify WebInspect Enterprise. It allows you to specify a Fortify Software Security Center application and version. Fortify WebInspect then downloads a list of vulnerabilities from Fortify Software Security Center, compares the downloaded vulnerabilities to the vulnerabilities in the current scan, and assigns an appropriate status (New, Existing, Reintroduced, or Not Found) to the vulnerabilities in the current scan. For detailed information, see "Integrating Vulnerabilities into Fortify Software Security Center " on page 216.
Note: This option is available only if Fortify WebInspect Enterprise is integrated with Fortify Software Security Center.
This button appears only after connecting to Fortify WebInspect Enterprise and is enabled after you have synchronized Fortify WebInspect with Fortify Software Security Center. It uploads application version data through Fortify WebInspect Enterprise to Fortify Software Security Center.
User GuideChapter 3: WebInspect User Interface
Micro Focus Fortify WebInspect (21.1.0) Page 58 of 461

Button Function
Note: This option is available only if Fortify WebInspect Enterprise is integrated with Fortify Software Security Center.
Buttons Available on the Standard Toolbar
Button Function
Allows you to select Guided Scan, Basic Scan, API Scan, or Enterprise Scan, and then launches the associated Scan Wizard, which steps you through the process of starting a scan.
Allows you to open a scan or a report.
Starts the Compliance Manager.
Starts the Policy Manager.
Starts the Report Generator.
Allows you to schedule a scan to occur on a specific time and date. For more information, see "Schedule a Scan " on page 199.
Contacts the central Micro Focus database to determine if updates are available for your system and, if updates exist, allows you to install them. For more information, see "SmartUpdate" on page 269.
Launches the Fortify WebInspect Enterprise Web Console application. This button appears only if you are connected to Fortify WebInspect Enterprise.
Buttons Available on the "Manage Scans" Toolbar
Button Function
To open scans, select one or more scans and click Open (or simply double-click an entry in the list). Fortify WebInspect loads the scan data and displays each scan on a separate tab.
User GuideChapter 3: WebInspect User Interface
Micro Focus Fortify WebInspect (21.1.0) Page 59 of 461
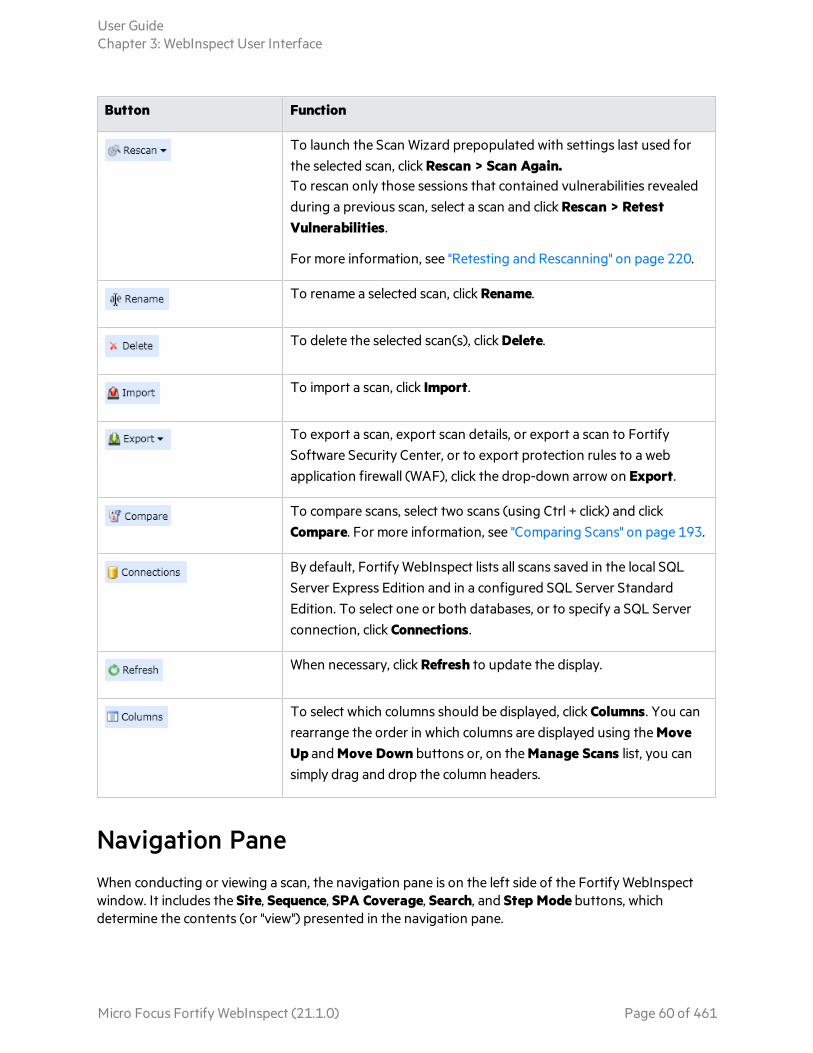
Button Function
To launch the Scan Wizard prepopulated with settings last used for the selected scan, click Rescan > Scan Again.To rescan only those sessions that contained vulnerabilities revealed during a previous scan, select a scan and click Rescan > Retest Vulnerabilities.
For more information, see "Retesting and Rescanning" on page 220.
To rename a selected scan, click Rename.
To delete the selected scan(s), click Delete.
To import a scan, click Import.
To export a scan, export scan details, or export a scan to Fortify Software Security Center, or to export protection rules to a web application firewall (WAF), click the drop-down arrow on Export.
To compare scans, select two scans (using Ctrl + click) and click Compare. For more information, see "Comparing Scans" on page 193.
By default, Fortify WebInspect lists all scans saved in the local SQL Server Express Edition and in a configured SQL Server Standard Edition. To select one or both databases, or to specify a SQL Server connection, click Connections.
When necessary, click Refresh to update the display.
To select which columns should be displayed, click Columns. You can rearrange the order in which columns are displayed using the Move Up and Move Down buttons or, on the Manage Scans list, you can simply drag and drop the column headers.
Navigation PaneWhen conducting or viewing a scan, the navigation pane is on the left side of the Fortify WebInspect window. It includes the Site, Sequence, SPA Coverage, Search, and Step Mode buttons, which determine the contents (or "view") presented in the navigation pane.
User GuideChapter 3: WebInspect User Interface
Micro Focus Fortify WebInspect (21.1.0) Page 60 of 461

Item Description
1 Navigation Pane
2 Buttons for changing the view
If all buttons are not displayed, click the drop-down arrow at the bottom of the button list and select Show More Buttons.
User GuideChapter 3: WebInspect User Interface
Micro Focus Fortify WebInspect (21.1.0) Page 61 of 461

Site View
Fortify WebInspect displays in the navigation pane only the hierarchical structure of the Web site or Web service, plus those sessions in which a vulnerability was discovered. During the crawl of the site, Fortify WebInspect selects the check box next to each session (by default) to indicate that the session will also be audited. When conducting a sequential crawl and audit (where the site is completely crawled and then audited), you can exclude a session from the audit by clearing its associated check box before the audit begins.
Site view also contains two pop-up tabs: Excluded Hosts and Allowed Hosts Criteria.
Excluded Hosts
If you click the Excluded Hosts tab (or hover your pointer over it), the tab displays a list of all disallowed hosts. These are hosts that may be referenced anywhere within the target site, but cannot be scanned because they are not specified in the Allowed Hosts setting (Default/Current Scan Settings > Scan Settings > Allowed Hosts).
Using the Excluded Hosts tab, you can select an excluded host and click either Add to scan or Add allowed host criteria.
User GuideChapter 3: WebInspect User Interface
Micro Focus Fortify WebInspect (21.1.0) Page 62 of 461

Item Description
1 Add to scan – Adding a host to the scan creates a node in the site tree representing the host root directory. Fortify WebInspect will scan that session.
2 Add to Allowed Host Criteria – Adding a host to the allowed host criteria adds the URL to the list of allowed hosts in the Current Scan Settings. Fortify WebInspect will include in the scan any subsequent links to that host. However, if you add a host to the allowed host criteria after Fortify WebInspect has already scanned the only resource containing a link to that host, the added host will not be scanned.
Allowed Hosts Criteria
If you click the Allowed Hosts Criteria tab (or hover your pointer over it), the tab displays the URLs (or regular expressions) specified in the Fortify WebInspect scan settings (under Allowed Hosts). If you click either Delete or Add allowed host criteria, Fortify WebInspect opens the Current Settings dialog box, where you can add, edit, or delete allowed host criteria (a literal URL or a regular expression representing a URL).
User GuideChapter 3: WebInspect User Interface
Micro Focus Fortify WebInspect (21.1.0) Page 63 of 461

Item Description
1 Add Allowed Host Criteria – If you add an entry, Fortify WebInspect will include in the scan any subsequent links it encounters to hosts that match the criteria. However, if you specify a host after Fortify WebInspect has already scanned the only resource containing a link to that host, the added host will not be scanned.
2 Delete – If you delete an entry from the allowed host list, the scan will still include any resources that Fortify WebInspect already encountered.
To save these settings for a future scan, select Save settings as (at the bottom of the left pane of the Settings window).
You must pause the scan before you can modify the excluded hosts or allowed hosts criteria. Furthermore, the scanning of added or deleted hosts may not occur as expected, depending on the point at which you paused the scan. For example, if you add an allowed host after Fortify WebInspect has already scanned the only resource containing a link to the added host, the added host will not be scanned.
Sequence View
The Sequence view displays server resources in the order they were encountered by Fortify WebInspect during a scan.
User GuideChapter 3: WebInspect User Interface
Micro Focus Fortify WebInspect (21.1.0) Page 64 of 461

Note: In both Site view and Sequence view, blue text denotes a directory or file that was "guessed" by Fortify WebInspect, rather than a resource that was discovered through a link. For example, Fortify WebInspect always submits the request "GET /backup/ HTTP/1.1" in an attempt to discover if the target Web site contains a directory named "backup."
SPA Coverage
The SPA Coverage view is available only if SPA support is enabled for a scan. This view displays the elements in the page that the crawler interacted with during the crawl.
The SPA Coverage view lists the URLs where the elements were discovered, along with the following additional information:
l Display Name – The visible text, symbol, link, HTML tag name, or other UI information related to the element discovered.
l Selector – The XPath location of the element in the page. This is used to find and perform operations on the element.
For more information, see "About Single-page Application Scans" on page 190.
User GuideChapter 3: WebInspect User Interface
Micro Focus Fortify WebInspect (21.1.0) Page 65 of 461

Search View
The Search view allows you to search across all sessions for various HTTP message components. For example, if you select Request Method from the drop-down list and specify POST as the search string, Fortify WebInspect lists every session whose HTTP request uses the POST method.
To use the Search view:
1. In the navigation pane, click Search (at the bottom of the pane).
If all buttons are not displayed, click the Configure Buttons drop-down at the bottom of the button list and select Show More Buttons.
2. From the top-most list, select an area to search.
3. In the combo box, type or select the string you want to locate.
4. If the string represents a regular expression, select the Regular Expression check box. For more information, see "Regular Expressions" on page 293.
5. To find an entire string in the HTTP message that exactly matches the search string, select the Match Whole String check box. The exact match is not case-sensitive.
Note: This option is not available for certain search targets.
6. Click Search.
User GuideChapter 3: WebInspect User Interface
Micro Focus Fortify WebInspect (21.1.0) Page 66 of 461

Step Mode View
Use Step Mode to navigate manually through the site, beginning with a session you select from either the site view or the sequence view.
Follow the steps below to step through the site:
1. In the site or sequence view, select a session.
2. Click the Step Mode button.
If the button is not visible, click the Configure Buttons drop-down and select Show More Buttons.
3. When Step Mode appears in the navigation pane, select either Audit as you browse or Manual Audit from the Audit Mode list. Manual Audit is recommended.
4. Click Record . 5. Click Browse.
The selected browser opens and displays the response associated with the selected session. Continue browsing to as many pages as you like.
6. When done, return to Fortify WebInspect and click Finish.
The new sessions are added to the navigation pane.
7. If you selected Manual Audit in step 3, click . Fortify WebInspect will audit all unaudited sessions, including those you added (or replaced) through Step Mode.
Navigation Pane Icons
Use the following table to identify resources displayed in the navigation pane.
Icon Description
Server/host: Represents the top level of your site's tree structure.
Blue folder: A folder discovered by "guessing" and not by crawling.
Yellow folder: A folder whose contents are available over your Web site.
Icons Used in the Navigation Pane
User GuideChapter 3: WebInspect User Interface
Micro Focus Fortify WebInspect (21.1.0) Page 67 of 461
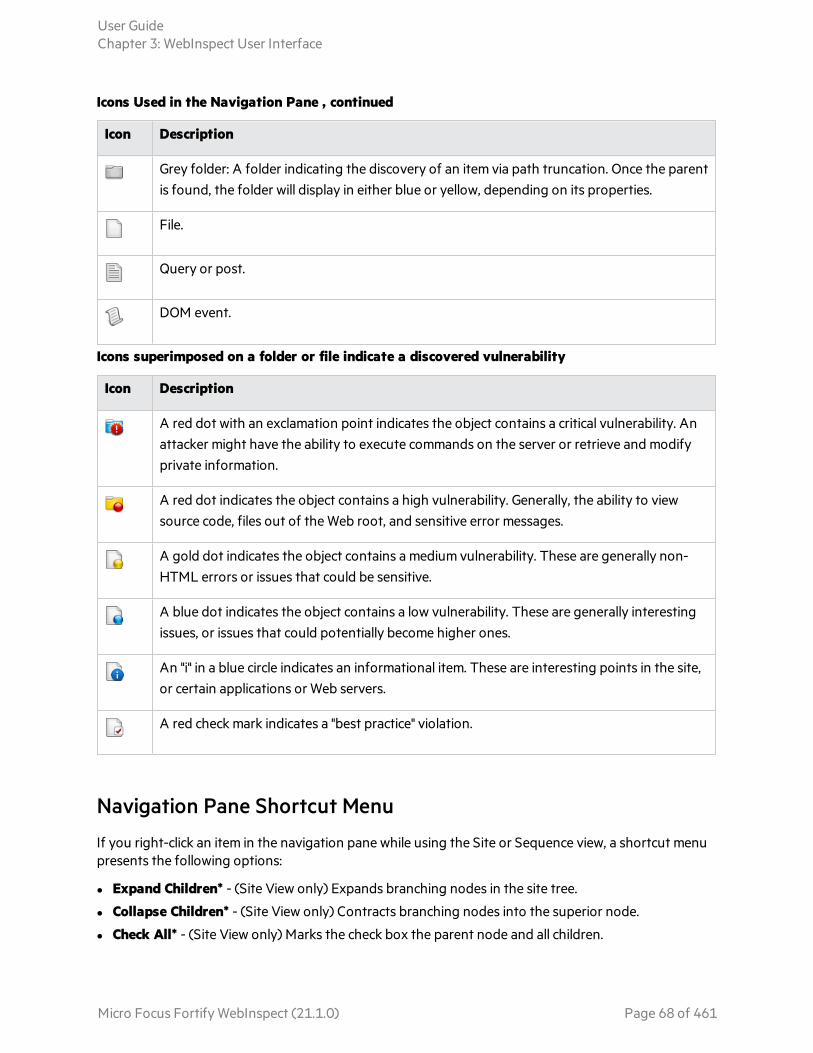
Icon Description
Grey folder: A folder indicating the discovery of an item via path truncation. Once the parent is found, the folder will display in either blue or yellow, depending on its properties.
File.
Query or post.
DOM event.
Icons Used in the Navigation Pane , continued
Icon Description
A red dot with an exclamation point indicates the object contains a critical vulnerability. An attacker might have the ability to execute commands on the server or retrieve and modify private information.
A red dot indicates the object contains a high vulnerability. Generally, the ability to view source code, files out of the Web root, and sensitive error messages.
A gold dot indicates the object contains a medium vulnerability. These are generally non-HTML errors or issues that could be sensitive.
A blue dot indicates the object contains a low vulnerability. These are generally interesting issues, or issues that could potentially become higher ones.
An "i" in a blue circle indicates an informational item. These are interesting points in the site, or certain applications or Web servers.
A red check mark indicates a "best practice" violation.
Icons superimposed on a folder or file indicate a discovered vulnerability
Navigation Pane Shortcut Menu
If you right-click an item in the navigation pane while using the Site or Sequence view, a shortcut menu presents the following options:
l Expand Children* - (Site View only) Expands branching nodes in the site tree.
l Collapse Children* - (Site View only) Contracts branching nodes into the superior node.
l Check All* - (Site View only) Marks the check box the parent node and all children.
User GuideChapter 3: WebInspect User Interface
Micro Focus Fortify WebInspect (21.1.0) Page 68 of 461

l Uncheck All* - (Site View only) Removes the check mark from the parent node and all children.
l Generate Session Report* - (Site View only) Creates a report showing summary information, the attack request and attack response, links to and from the URL, comments, forms, e-mail addresses, and check descriptions for the selected session.
l Export Site Tree* - (Site View only) Saves the site tree in XML format to a location you specify.
l Copy URL - Copies the URL to the Windows clipboard.
l View in Browser - Renders the HTTP response in a browser.
l Links - (Site View only) Lists all resources at the target site that contain links to the selected resource. The links may be rendered by HTML tags, scripts, or HTML forms. It also lists (under Linked To) all resources that are referenced by links within the HTTP response for the selected session. If you double-click a listed link, Fortify WebInspect shifts focus in the navigation pane to the referenced session. Alternatively, you can browse to the linked resource by viewing the session in the Web browser (click Web Browser).
l Add - Allows you to add locations discovered by means other than a Fortify WebInspect scan (manual inspection, other tools, etc) for information purposes. You can then add any discovered vulnerabilities to those locations so that a more complete picture of the site is archived for analysis.
l Page - A distinct URL (resource).
l Directory - A folder containing a collection of pages.
Choosing either Page or Directory invokes a dialog box that allows you to name the directory or page and edit the HTTP request and response.
l Variation - A subnode of a location that lists particular attributes for that location. For example, the login.asp location might have the variation: “(Query) Username=12345&Password=12345&Action=Login”. Variations are like any other location in that they can have vulnerabilities attached to them, as well as subnodes.
Choosing Variation invokes the Add Variation dialog box, allowing you to edit the variation attributes, specify Post or Query, and edit the HTTP request and response.
l Vulnerability - A specific security threat.
Choosing Vulnerability invokes the Edit Vulnerabilities dialog box, allowing you to edit the variation attributes, specify Post or Query, and edit the HTTP request and response. For more information, see "Editing Vulnerabilities" on page 243.
l Edit Vulnerabilities - Allows you to edit a location that was added manually or edit a vulnerability. For more information, see "Editing Vulnerabilities" on page 243.
l Remove Location - Removes the selected session from the navigation pane (both Site and Sequence views) and also removes any associated vulnerabilities.
Note: You can recover removed locations (sessions) and their associated vulnerabilities. See "Recovering Deleted Items" on page 250 for details.
l Mark as False Positive - Flags the vulnerability as a false positive and allows you to add a note.
l Send to - Allows you convert the selected vulnerability to a defect and assign it to Micro Focus Application Lifecycle Management (ALM), using the profile specified in the Fortify WebInspect application settings.
User GuideChapter 3: WebInspect User Interface
Micro Focus Fortify WebInspect (21.1.0) Page 69 of 461
l Remove Server - Deletes the server from the navigation pane and does not include the server in any remaining scan activity. This command appears only when you right-click a server.
l Crawl - Recrawls the selected URL.
l Attachments - Allows you to create a note associated with the selected session, flag the session for follow-up, add a vulnerability note, or add a vulnerability snapshot.
l Tools - Presents a submenu of available tools.
l Filter by Current Session - Restricts the display of items in the Summary pane to those having the SummaryDataID of the selected session.
* Command appears on shortcut menu only when the Navigation pane is using the Site view.
See Also
"WebInspect User Interface" on page 47
"Search View" on page 236
"Inspecting the Results" on page 232
User GuideChapter 3: WebInspect User Interface
Micro Focus Fortify WebInspect (21.1.0) Page 70 of 461
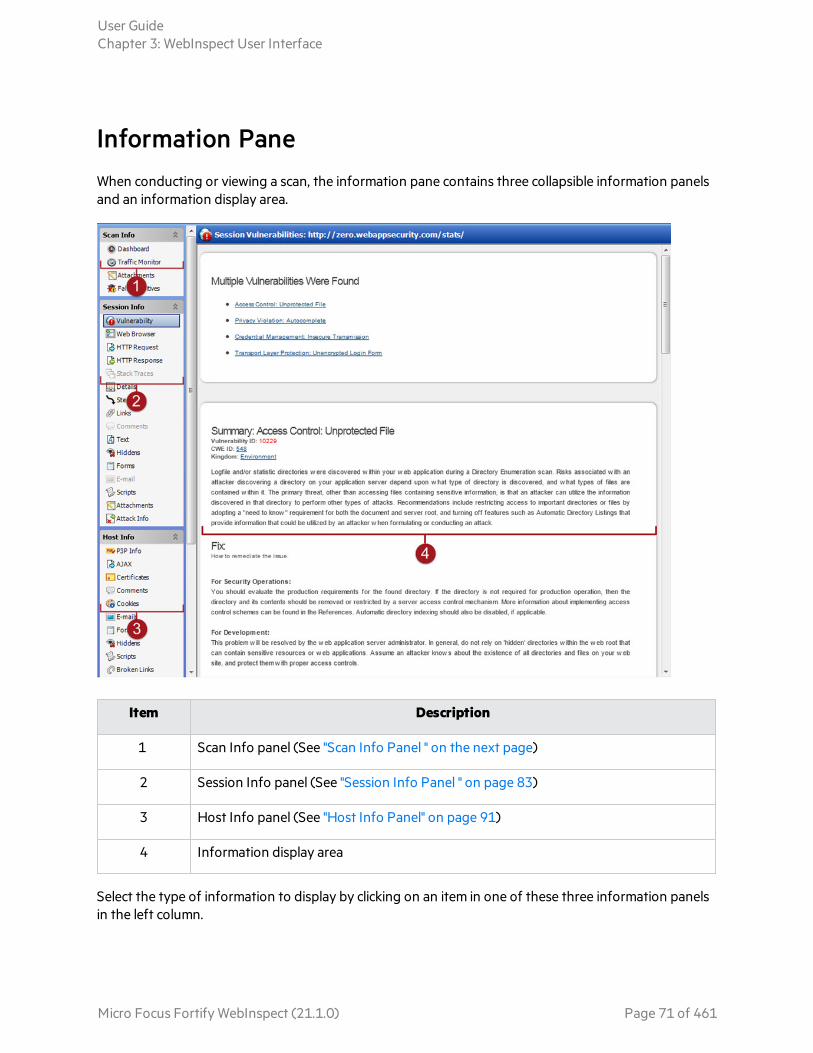
Information PaneWhen conducting or viewing a scan, the information pane contains three collapsible information panels and an information display area.
Item Description
1 Scan Info panel (See "Scan Info Panel " on the next page)
2 Session Info panel (See "Session Info Panel " on page 83)
3 Host Info panel (See "Host Info Panel" on page 91)
4 Information display area
Select the type of information to display by clicking on an item in one of these three information panels in the left column.
User GuideChapter 3: WebInspect User Interface
Micro Focus Fortify WebInspect (21.1.0) Page 71 of 461

Tip: If you follow a link when viewing the vulnerability information, click the highlighted session in the navigation pane to return.
See Also
"Summary Pane" on page 98
"WebInspect User Interface" on page 47
"Navigation Pane" on page 60
"Scan Info Panel " below
"Session Info Panel " on page 83
"Host Info Panel" on page 91
Scan Info Panel
The Scan Info panel has the following choices:
l Dashboard
l Traffic Monitor
l Attachments
l False Positives
Dashboard
The Dashboard selection displays a real-time summary of the scan results and a graphic representation of the scan progress. This section is displayed only if you select this option from the Default or Current settings. For additional information, see "Dashboard" on page 75.
User GuideChapter 3: WebInspect User Interface
Micro Focus Fortify WebInspect (21.1.0) Page 72 of 461

Dashboard Image
Traffic Monitor
Fortify WebInspect normally displays in the navigation pane only the hierarchical structure of the Web site or Web service, plus those sessions in which a vulnerability was discovered. The Traffic Monitor or Traffic Viewer allows you to display and review every HTTP request sent by Fortify WebInspect and the associated HTTP response received from the web server.
The Traffic Monitor or Traffic Viewer is available only if Traffic Monitor Logging was enabled prior to conducting the scan.
For more information, see "Traffic Monitor (Traffic Viewer)" on page 230.
Attachments
The Attachments selection displays a list of all session notes, vulnerability notes, flags for follow-up, and vulnerability screenshots that have been added to the scan. Each attachment is associated with a specific session. This form also lists scan notes (that is, notes that apply to the entire scan rather than to a specific session).
You can create a scan note, or you can edit or delete an existing attachment.
To create a scan note, click the Add menu (in the information display area).
To edit an attachment, select the attachment and click Edit.
To create attachments in other areas of the Fortify WebInspect user interface, you can do one of the following:
l Right-click a session in the navigation pane and select Attachments from the shortcut menu.
l Right-click a URL on the Findings tab of the summary pane and select Attachments from the shortcut menu.
User GuideChapter 3: WebInspect User Interface
Micro Focus Fortify WebInspect (21.1.0) Page 73 of 461
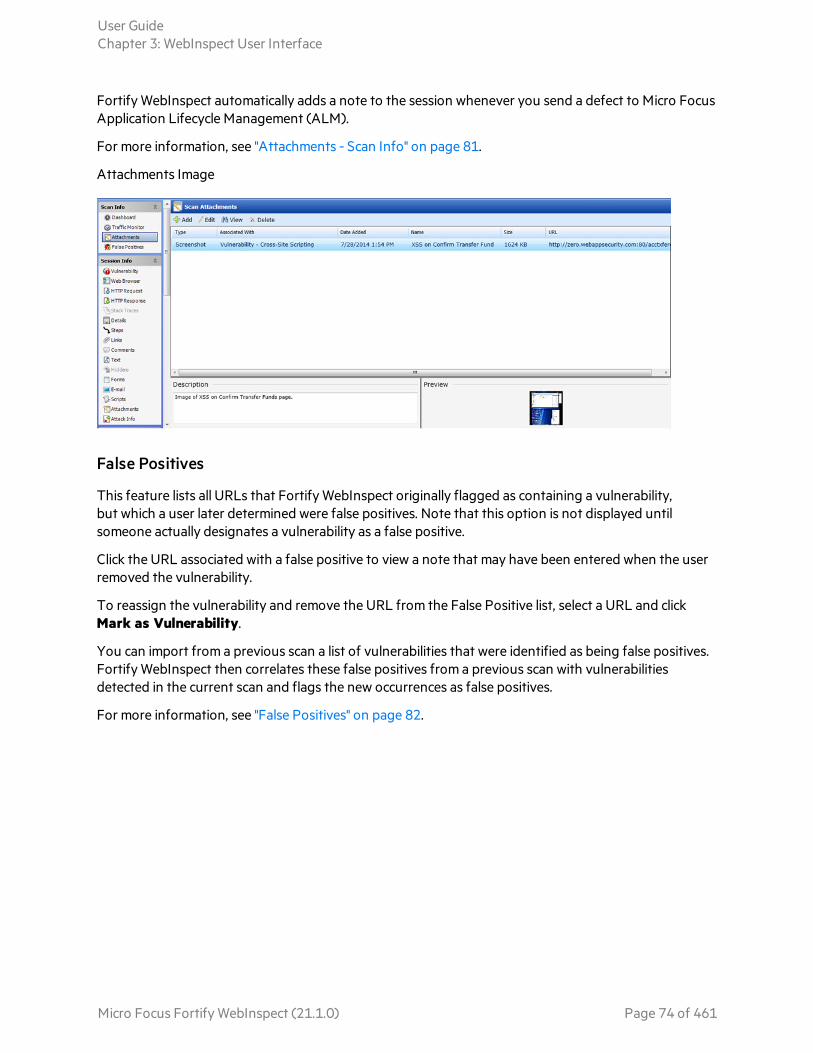
Fortify WebInspect automatically adds a note to the session whenever you send a defect to Micro Focus Application Lifecycle Management (ALM).
For more information, see "Attachments - Scan Info" on page 81.
Attachments Image
False Positives
This feature lists all URLs that Fortify WebInspect originally flagged as containing a vulnerability, but which a user later determined were false positives. Note that this option is not displayed until someone actually designates a vulnerability as a false positive.
Click the URL associated with a false positive to view a note that may have been entered when the user removed the vulnerability.
To reassign the vulnerability and remove the URL from the False Positive list, select a URL and click Mark as Vulnerability.
You can import from a previous scan a list of vulnerabilities that were identified as being false positives. Fortify WebInspect then correlates these false positives from a previous scan with vulnerabilities detected in the current scan and flags the new occurrences as false positives.
For more information, see "False Positives" on page 82.
User GuideChapter 3: WebInspect User Interface
Micro Focus Fortify WebInspect (21.1.0) Page 74 of 461

False Positives Image
See Also
"Session Info Panel " on page 83
"Host Info Panel" on page 91
"WebInspect User Interface" on page 47
"Dashboard" below
"Traffic Monitor (Traffic Viewer)" on page 230
"Attachments - Scan Info" on page 81
Dashboard
The Dashboard selection displays a real-time summary of the scan results and a graphic representation of the scan progress.
User GuideChapter 3: WebInspect User Interface
Micro Focus Fortify WebInspect (21.1.0) Page 75 of 461

Dashboard Image
The following image displays the Scan Dashboard with a scan in progress.
Progress Bars
Each bar represents the progress being made through that scanning phase.
Progress Bar Descriptions
The following table describes the progress bars.
Progress Bar Description
Crawled Number of sessions crawled / total number of sessions to crawl.
Audited Number of sessions audited / total number of sessions to audit.
The total number includes all checks except those pertaining to server type, which are handled by smart audit.
User GuideChapter 3: WebInspect User Interface
Micro Focus Fortify WebInspect (21.1.0) Page 76 of 461

Progress Bar Description
Smart Audited Number of sessions audited using smart audit / total number of sessions for smart audit.
For smart audit, Fortify WebInspect detects the type of server on which the Web application is hosted. Fortify WebInspect runs checks that are specific to the server type and avoids checks that are not valid for the server type.
Verified Number of persistent XSS vulnerable sessions verified / total number of persistent XSS vulnerable sessions to verify.
When persistent XSS auditing is enabled, Fortify WebInspect sends a second request to all vulnerable sessions and examines all responses for probes that Fortify WebInspect previously made. When probes are located, Fortify WebInspect will record links between those pages internally.
Reflection Audited
Number of persistent XSS vulnerable linked sessions audited / total number of persistent XSS vulnerable linked sessions to audit.
When persistent XSS auditing is enabled, this represents the work required for auditing the linked sessions found in the verification step for persistent XSS.
Progress Bar Colors
1. Dark green indicates sessions that have been processed.
2. Light green indicates excluded, aborted, or rejected sessions (sessions that were considered for processing, but were skipped due to settings or other reasons).
3. Light gray indicates the unprocessed sessions.
Activity Meters
Fortify WebInspect polls information about the activity occurring in the scan and displays the data in activity meters. The data presents a real-time snapshot of the scan activity. This information can help you to determine whether the scan is stalled or actively running.
User GuideChapter 3: WebInspect User Interface
Micro Focus Fortify WebInspect (21.1.0) Page 77 of 461

Activity Meter Descriptions
The following table describes the activity meters.
Meter Description
Network The amount of data being sent and received by Fortify WebInspect.
The chart shows this data as B, KB, or MB sent/received over the last one second.
Analysis The amount of work being done per second by Fortify WebInspect in processing all threads.
Vulnerabilities Graphics
The following table describes the Vulnerabilities bar graph and grid.
Graphic Description
Vulnerability Graph
Total number of issues identified for the scan per severity level.
Attack Stats Grid
Number of attacks made and issues found, categorized by attack type and audit engine.
Statistics Panel - Scan
The following table describes the Scan section of the statistics panel.
Item Description
Type Type of scan: Site, Service, or Site Retest.
Scan Status Status: Running, Paused, or Complete.
Agent Refers to the Fortify WebInspect Agent and states either Detected or Not
User GuideChapter 3: WebInspect User Interface
Micro Focus Fortify WebInspect (21.1.0) Page 78 of 461

Item Description
Detected. For certain checks (such as SQL injection, command execution, and cross-site scripting), Fortify WebInspect Agent intercepts Fortify WebInspect HTTP requests and conducts runtime analysis on the target module. If this analysis confirms that a vulnerability exists, Fortify WebInspect Agent appends the stack trace to the HTTP response. Developers can analyze this stack trace to investigate areas that require remediation.
Client The rendering engine specified for the scan. Options are:
l IE (Internet Explorer)
l FF (Firefox)
l iPhone
l iPad
l Android
l Windows Phone
l Windows RT
Duration Length of time scan has been running (can be incorrect if the scan terminates abnormally).
Policy Name of the policy used for the scan.
Deleted Items The number of sessions and vulnerabilities removed by the user from the scan.
To remove a session, right-click a session in the Navigation pane and select Remove Location from the shortcut menu. For more information, see "Navigation Pane" on page 60.
To remove a vulnerability, right-click a vulnerability in the Summary pane and select Ignore Vulnerability from the shortcut menu. For more information, see "Summary Pane" on page 98.
To restore sessions or vulnerabilities that have been deleted:
1. On the Scan Dashboard, click the number associated with deleted items.
The Recover Deleted Items window appears.
2. Select either Vulnerabilities or Sessions from the drop-down menu.
3. Select one or more items.
4. Click Recover.
User GuideChapter 3: WebInspect User Interface
Micro Focus Fortify WebInspect (21.1.0) Page 79 of 461

Statistics Panel - Crawl
The following table describes the Crawl section of the statistics panel.
Item Description
Hosts Number of hosts included in the scan.
Sessions Total number of sessions (excluding AJAX requests, script and script frame includes, and WSDL includes).
Statistics Panel - Audit
The following table describes the Audit section of the statistics panel.
Item Description
Attacks Sent Total number of attacks sent.
Issues Total number of issues found (all vulnerabilities, as well as best practices).
Statistics Panel - Network
The following table describes the Network section of the statistics panel.
Item Description
Total Requests Total number of requests made.
Failed Requests Total number of failed requests.
Script Includes Total number of script includes.
Macro Requests Total number of requests made as part of macro execution.
404 Probes Number of file not found probes made to determine file not found status.
404 Check Redirects
Number of times a 404 probe resulted in a redirect.
Verify Requests Requests made for detection of stored parameters.
Logouts Number of times logout was detected and login macro executed.
Macro Playbacks
Number of times macros have been executed.
User GuideChapter 3: WebInspect User Interface
Micro Focus Fortify WebInspect (21.1.0) Page 80 of 461

Item Description
AJAX Requests Total number of AJAX requests made.
Script Events Total number of script events processed.
Kilobytes Sent Total number of kilobytes sent.
Kilobytes Received
Total number of kilobytes received.
See Also
"Scan Info Panel " on page 72
"Session Info Panel " on page 83
"Host Info Panel" on page 91
Attachments - Scan Info
The Attachments selection displays a list of all session notes, vulnerability notes, flags for follow-up, and vulnerability screenshots that have been added to the scan. Each attachment is associated with a specific session. This form also lists scan notes (that is, notes that apply to the entire scan rather than to a specific session).
You can create a scan note, or you can edit or delete an existing attachment.
To view an attachment, select the attachment and click View (or simply double-click the attachment).
To create a scan note, click the Add menu (in the information display area). For more information, see "Information Pane" on page 71.
To edit an attachment, select the attachment and click Edit. Note that screenshots cannot be edited.
These functions are also available by right-clicking an attachment and selecting an option from the shortcut menu. You may also select Go to session, which opens the Session Info - Attachments pane and highlights in the navigation pane the session associated with that attachment.
To create attachments in other areas of the Fortify WebInspect user interface, do one of the following:
l Right-click a session in the navigation pane and select Attachments from the shortcut menu. For more information, see "Navigation Pane" on page 60.
l Right-click a URL on the Findings tab of the summary pane and select Attachments from the shortcut menu. For more information, see "Findings Tab" on page 99.
Fortify WebInspect automatically adds a note to the session whenever you send a defect to Micro Focus Application Lifecycle Management (ALM).
See Also
"Scan Info Panel " on page 72
User GuideChapter 3: WebInspect User Interface
Micro Focus Fortify WebInspect (21.1.0) Page 81 of 461

False Positives
This feature lists all URLs that Fortify WebInspect originally flagged as containing a vulnerability and which a user later determined were false positives.
Importing False Positives
You can also import from a previous scan a list of vulnerabilities that were analyzed as being false positive. Fortify WebInspect then correlates these false positives from a previous scan with vulnerabilities detected in the current scan and flags the new occurrences as false positives.
To illustrate, suppose a cross-site scripting vulnerability was detected in Scan No. 1 at URL http://www.mysite.com/foo/bar and, after further analysis, someone flagged it as a false positive. If you import false positives from Scan No. 1 into Scan No. 2 of www.mysite.com, and if that second scan detects a cross-site scripting vulnerability at the same URL (http://www.mysite.com/foo/bar), then Fortify WebInspect automatically changes that vulnerability to a false positive.
Inactive / Active False Positives Lists
Imported false positives are loaded first into a list labeled "Inactive False Positives." If a false positive in that list is matched with a vulnerability in the current scan, the item is moved from the Inactive False Positives list to the Active False Positives list. Unmatched items remain in the Inactive False Positives list.
Loading False Positives
False positives from other scans can be manually loaded into the current scan at any time. Alternatively, you may instruct the Scan Wizard, while initiating a scan, that false positives are to be loaded from a specific file; in this case, Fortify WebInspect correlates the false positives as they are encountered during the scan. You can also see (on the scan dashboard) the false positives matched while the scan is running.
Working with False Positives
1. Select False Positives from the Scan Info panel.
2. If necessary, click the plus sign next to a vulnerability description to display the associated URLs and state.
3. Click a URL to view a comment (at the bottom of the Information pane) that may have been entered when the user removed the vulnerability.
4. To import false positives from other scans, click Import False Positives.
5. To change a false positive back to a vulnerability, select an item from the Active False Positive list and click Mark as Vulnerability.
6. To remove an item from the Inactive False Positive list, select the item and click Remove From Inactive.
7. To edit a comment associated with a false positive, select the item and click Edit Comment.
For information on how to designate a vulnerability as a false positive, see "Navigation Pane Shortcut Menu" on page 68 or "Findings Tab" on page 99.
User GuideChapter 3: WebInspect User Interface
Micro Focus Fortify WebInspect (21.1.0) Page 82 of 461

For more information on the Fortify WebInspect window, see "WebInspect User Interface" on page 47.
Session Info Panel
Fortify WebInspect lists each session created during a scan in the navigation pane using either the Site view or Sequence view. Select a session and then click one of the options in the Session Info panel to display related information about that session.
In the following example scan, Fortify WebInspect sent the HTTP request GET /stats/stats.html HTTP/1.1.
To see the vulnerability:
1. Select Stats.html in the navigation pane.
2. In the Session Info panel, click Vulnerability.
Options Available
The following table lists the options available in the Session Info panel. Some options appear only for specific scans (Basic Scan or Web Service Scan). Also, options are enabled only if they are relevant to the selected session; for example, the Forms selection is not available if the session does not contain a form.
Option Description
Vulnerability Displays the vulnerability information for the session selected in the navigation pane.
Web Browser1 Displays the server's response as rendered by a Web browser for the session selected in the navigation pane.
HTTP Request Displays the raw HTTP request sent by Fortify WebInspect to the server hosting the site you are scanning.
HTTP Response Displays the server's raw HTTP response to Fortify WebInspect's request.
User GuideChapter 3: WebInspect User Interface
Micro Focus Fortify WebInspect (21.1.0) Page 83 of 461

Option Description
If the response contains one or more attack signatures (indicating that a vulnerability has been discovered) you can tab from one attack signature to the next by clicking these buttons:
If you select a Flash (.swf) file, Fortify WebInspect displays HTML instead of binary data. This allows Fortify WebInspect to display links in a readable format.
Stack Traces This feature is designed to support Fortify WebInspect Agent when it is installed and running on the target server.
For certain checks (such as SQL injection, command execution, and cross-site scripting), Fortify WebInspect Agent intercepts Fortify WebInspect HTTP requests and conducts runtime analysis on the target module. If this analysis confirms that a vulnerability exists, Fortify WebInspect Agent appends the stack trace to the HTTP response. Developers can analyze this stack trace to investigate areas that requires remediation.
Details1 Lists request and response details, such as the size of the response and the request method. Note that the Response section contains two entries for content type: returned and detected. The Returned Content Type indicates the media type specified in the Content-Type entity-header field of the HTTP response. Detected Content Type indicates the actual content-type as determined by Fortify WebInspect.
Steps1 Displays the route taken by Fortify WebInspect to arrive at the session selected in the navigation pane or the URL selected in the summary pane. Beginning with the parent session (at the top of the list), the sequence reveals the subsequent URLs visited and provides details about the scan methodology.
Links1 This option lists (under Linked From) all resources at the target site that contain links to the selected resource. The links may be rendered by HTML tags, scripts, or HTML forms. It also lists (under Linked To) all resources that are referenced by links within the HTTP response for the selected session.
Comments1 Displays all comments (in HTML) embedded in the HTTP response.
Text1 Displays all text contained in the HTTP response for the session selected in the navigation pane.
Hiddens1 Displays the name attribute of each input element whose control type is
User GuideChapter 3: WebInspect User Interface
Micro Focus Fortify WebInspect (21.1.0) Page 84 of 461

Option Description
"hidden."
Forms1 Displays the HTML interpreted by the browser to render forms.
E-mail1 Displays all e-mail addresses included in the response.
Scripts1 Displays all client-side scripts embedded in the server's response.
Attachments Displays all notes, flags, and screenshots associated with the selected object.
To create an attachment, you can either:
l Right-click a session (Basic or Guided Scan) or an operation or vulnerability (Web service scan) in the navigation pane and select Attachments from the shortcut menu, or
l Right-click a URL on the Findings tab of the summary pane and select Attachments from the shortcut menu, or
l Select a session (Basic Scan) or an operation or vulnerability (Web service scan) in the navigation pane, then select Attachments from the Session Info panel and click the Add menu (in the information pane).
Fortify WebInspect automatically adds a note to the session information whenever you send a defect to Micro Focus Application Lifecycle Management (ALM).
Attack Info1 Displays the attack sequence number, URL, name of the audit engine used, and the result of the vulnerability test. Attack information is usually associated with the session in which the attack was created and not with the session in which it was detected. If attack information does not appear for a selected vulnerable session, select the parent session and then click Attack Info.
XML Request2 Displays the SOAP envelope embedded in the request (available when selecting an operation during a Web Service Scan).
XML Response2 Displays the SOAP envelope embedded in the response (available when selecting an operation during a Web Service Scan).
Web Service Request2
Displays the web service schema and values embedded in the request (available when selecting an operation during a Web Service Scan).
Web Service Response2
Displays the web service schema and values embedded in the response (available when selecting an operation during a Web Service Scan).
1 Basic or Guided Scan only
User GuideChapter 3: WebInspect User Interface
Micro Focus Fortify WebInspect (21.1.0) Page 85 of 461

2 Web Service Scan only
Most options provide a Search feature at the top of the information pane, allowing you to locate the text you specify. To conduct a search using regular expressions, select the Regex button before clicking Find.
Tip: If you follow a link when viewing the vulnerability information, click the highlighted session in the navigation pane to return.
See Also
"WebInspect User Interface" on page 47
"Host Info Panel" on page 91
"Navigation Pane" on page 60
"Scan Info Panel " on page 72
"Summary Pane" on page 98
"Regular Expressions" on page 293
Vulnerability
This option displays the vulnerability information for the session selected in the navigation pane or for the vulnerability selected in the summary pane. It typically includes a description of the vulnerability, vulnerability ID, Common Weakness Enumeration (CWE) ID, Kingdom, implications (how this vulnerability may affect you), and instructions on how to fix the vulnerability.
Web Browser
This option displays the server's response as rendered by a Web browser for the session selected in the Navigation pane.
HTTP Request
This option displays the raw HTTP request (for the session selected in the navigation pane) sent by Fortify WebInspect to the server hosting the site you are scanning.
Highlighted Text in the Request
In the HTTP request, Fortify WebInspect highlights text as follows:
l Yellow highlighting indicates the GET, POST, or PUT status line and cookie headers.
l Red highlighting indicates the attack payload and a vulnerability, if detected.
HTTP Response
This option displays the server's raw HTTP response to Fortify WebInspect's request, for the session selected in the navigation pane.
User GuideChapter 3: WebInspect User Interface
Micro Focus Fortify WebInspect (21.1.0) Page 86 of 461

If the response contains one or more attack signatures (indicating that a vulnerability has been discovered) you can tab from one attack signature to the next by clicking these buttons:
If you select a Flash (.swf) file, Fortify WebInspect displays HTML instead of binary data. This allows Fortify WebInspect to display links in a readable format.
Highlighted Text in the Response
In the HTTP response, Fortify WebInspect uses red highlighting to indicate a detected vulnerability.
Stack Traces
This feature is designed to support Fortify WebInspect Agent when it is installed and running on the target server.
For certain checks (such as SQL injection, command execution, and cross-site scripting), Fortify WebInspect Agent intercepts Fortify WebInspect HTTP requests and conducts runtime analysis on the target module. If this analysis confirms that a vulnerability exists, Fortify WebInspect Agent appends the stack trace to the HTTP response. Developers can analyze this stack trace to investigate areas that require remediation.
Details
This option lists request and response details, such as the size of the response and the request method, for the session selected in the navigation pane.
Note that the Response section contains two entries for content type: returned and detected. Returned Content Type indicates the media type specified in the Content-Type entity-header field of the HTTP response. Detected Content Type indicates the actual content-type as determined by Fortify WebInspect.
Steps
This option displays the route taken by Fortify WebInspect to arrive at the session selected in the navigation pane or the URL selected in the summary pane. Beginning with the parent session (at the top of the list), the sequence reveals the subsequent URLs visited and provides details about the scan methodology.
Links
This option lists (under Linked From) all resources at the target site that contain links to the selected resource. The links may be rendered by HTML tags, scripts, or HTML forms.
It also lists (under Linked To) all resources that are referenced by links within the HTTP response for the selected session.
If you double-click a listed link, Fortify WebInspect shifts focus in the navigation pane to the referenced session. Alternatively, you can browse to the linked resource by viewing the session in the Web browser (click Web Browser). For more information, see "Navigation Pane" on page 60.
User GuideChapter 3: WebInspect User Interface
Micro Focus Fortify WebInspect (21.1.0) Page 87 of 461
Comments: Session Info
This option displays all comments embedded in the HTTP response for the session selected in the navigation pane.
Developers sometimes leave critical information in comments that can be used to breach the security of a site. For example, something as seemingly innocuous as a comment referencing the required order of fields in a table could potentially give an attacker a key piece of information needed to compromise the security of your site.
Use the Search feature at the top of the information pane to locate the text you specify. To conduct a search using regular expressions, select the Regex button before clicking Find.
You can copy comments to your clipboard by highlighting the text and selecting Copy from the shortcut menu.
Text
This option displays all text contained in the HTTP response for the session selected in the navigation pane. For more information, see "Navigation Pane" on page 60.
Hiddens: Session Info
Fortify WebInspect analyzes all forms and then lists all controls of the type "hidden" (i.e., controls that are not rendered but whose values are submitted with a form). Developers often include parameters in hidden controls that can be edited and resubmitted by an attacker.
Use the Search feature at the top of the information pane to locate the text you specify. To conduct a search using regular expressions, select the Regex button before clicking Find.
You can copy the HTML text to your clipboard by highlighting the text and selecting Copy from the shortcut menu.
Forms: Session Info
Fortify WebInspect lists all HTML forms discovered for the session selected in the navigation pane.
Use the Search feature at the top of the information pane to locate the text you specify. To conduct a search using regular expressions, select the Regex button before clicking Find.
You can copy forms to your clipboard by highlighting the text and selecting Copy from the shortcut menu.
For more information on the Fortify WebInspect window, see "WebInspect User Interface" on page 47.
Fortify WebInspect lists all email addresses contained in the session selected from the navigation pane.
Use the Search feature at the top of the information pane to locate the text you specify. To conduct a search using regular expressions, select the Regex button before clicking Find.
User GuideChapter 3: WebInspect User Interface
Micro Focus Fortify WebInspect (21.1.0) Page 88 of 461

You can copy email addresses to your clipboard by highlighting the text and selecting Copy from the shortcut menu.
Scripts - Session Info
Fortify WebInspect lists all scripts discovered in a session.
Use the Search feature at the top of the information pane to locate the text you specify. To conduct a search using regular expressions, select the Regex button before clicking Find. For more information, see "Regular Expressions" on page 293.
You can copy the script to your clipboard by highlighting the text and selecting Copy from the shortcut menu.
For more information on the Fortify WebInspect window, see "WebInspect User Interface" on page 47.
Attachments - Session Info
You can associate the following attachments with a session:
l Session Note
l Flag Session for Follow Up
l Vulnerability Note
l Vulnerability Screenshot
Note: You can also associate a note with a scan and view all attachments that have been added to the scan by selecting Attachments in the Scan Info panel.
The Attachments selection displays a list of all notes, flags, and screenshots that have been associated with the selected session.
Viewing an Attachment
To view an attachment:
l Select the attachment and click View (or simply double-click the attachment).
Adding a Session Attachment
To add a session attachment:
1. Do one of the following to select a session:
l On the Findings tab in the Summary pane, right-click a vulnerable URL. For more information, see "Findings Tab" on page 99.
l On the Navigation pane, right-click a session or URL. For more information, see "Navigation Pane" on page 60
2. On the shortcut menu, click Attachments and select an attachment type.
Note: An alternative method is to select a session in the Navigation pane, click Attachments in the Session Info panel, and then select a command from the Add menu (in the information
User GuideChapter 3: WebInspect User Interface
Micro Focus Fortify WebInspect (21.1.0) Page 89 of 461

display area). For more information, see "Information Pane" on page 71.
3. Enter a comment related to the type of attachment you selected.
4. Select the check box next to one or more vulnerabilities.
5. If you selected Vulnerability Screenshot:
a. Enter a name for the screenshot in the Name box. Maximum length is 40 characters.
b. Click the Browse button to locate the graphic file or, if you captured the image in memory, click Copy from Clipboard.
6. Click OK.
Editing an Attachment
To edit an attachment:
1. Do one of the following:
l To view all attachments that have been added to the scan, click Attachments in the Scan Info panel.
l To view only those attachments that have been added to a specific session, click Attachments in the Session Info panel and then click a session in the Navigation pane. You can also select a URL in the Summary pane.
2. Select an attachment and click Edit.
3. Modify the comments as required.
Note: Screenshot attachments cannot be edited.
4. Click OK.
Tip: Add, Edit, View, and Delete functions are also available by right-clicking an attachment in the information display area and selecting an option from the shortcut menu.
Attack Info
For the session selected in the navigation pane, this option displays the attack sequence number, URL, name of the audit engine used, and the result of the vulnerability test.
Attack information is usually associated with the session in which the attack was created and not with the session in which it was detected. If attack information does not appear for a selected vulnerable session, select the parent session and then click Attack Info.
Web Service Request
This option displays the web service schema and values embedded in the request (available when selecting an operation during a Web Service Scan). It is available only during a Web Service scan.
User GuideChapter 3: WebInspect User Interface
Micro Focus Fortify WebInspect (21.1.0) Page 90 of 461
Web Service Response
This option displays the web service schema and values embedded in the response (available when selecting an operation during a Web Service Scan). It is available only during a Web Service scan.
XML Request
This option displays the associated XML schema embedded in the selected request (available when selecting the WSDL object during a Web Service scan).
XML Response
This option displays the associated XML schema embedded in the response for the session selected in the navigation pane (available when selecting the WSDL object during a Web Service scan).
Host Info Panel
When you click any item listed in this collapsible panel, Fortify WebInspect displays all instances of that item type that were discovered during a crawl or audit of the site (or host).
If you double-click an item, Fortify WebInspect highlights in the navigation pane the session that contains that item. You can copy items (such as e-mail addresses) to your clipboard by highlighting the text and selecting Copy from the shortcut menu.
In most cases, you can use the Search feature at the top of the information pane to locate the text you specify. To conduct a search using regular expressions, select the Regex button before clicking Find.
Note: The Host Info panel is not displayed when conducting a Web Service scan.
In the following illustration, selecting Cookies displays a list of all sessions in which cookies were detected. If you select an item from the list, Fortify WebInspect displays the cookies associated with the selected session.
User GuideChapter 3: WebInspect User Interface
Micro Focus Fortify WebInspect (21.1.0) Page 91 of 461

Host Info Panel Image
Options Available
The Host Info options are described in the following table.
Option Description
P3P Info Displays Platform for Privacy Preferences Project (P3P) information. For more information, see "P3P Info" on the next page.
AJAX Displays a list of all pages containing an AJAX engine, as well as the AJAX requests. For more information, see "AJAX" on the next page.
Certificates Displays a list of all certificates associated with the site. For more information, see "Certificates" on page 95.
Comments Displays a list of all URLs containing comments. For more information, see "Comments - Host Info" on page 95.
Cookies Displays a list of all URLs containing cookies. For more information, see "Cookies" on page 95.
E-Mails Displays a list of all URLs containing e-mail addresses in the response. For more information, see "E-Mails - Host Info" on page 96.
Forms Displays a list of all URLs containing forms. For more information, see "Forms - Host Info" on page 96.
User GuideChapter 3: WebInspect User Interface
Micro Focus Fortify WebInspect (21.1.0) Page 92 of 461

Option Description
Hiddens Displays a list of all URLs containing input elements whose control type is "hidden." For more information, see "Hiddens - Host Info" on page 96.
Scripts Displays a list of all URLs containing client-side scripts embedded in the server's response. For more information, see "Scripts - Host Info" on page 97.
Broken Links Displays a list of all URLs containing hyperlinks to missing targets. For more information, see "Broken Links" on page 97.
Offsite Links Displays a list of all URLs containing hyperlinks to other sites. For more information, see "Offsite Links" on page 97.
Parameters Displays a list of all URLs containing embedded parameters. For more information, see "Parameters" on page 98.
P3P Info
This option displays Platform for Privacy Preferences Project (P3P) information.
The World Wide Web Consortium's P3P enables Web sites to express their privacy practices in a standard format that can be retrieved automatically and interpreted easily by user agents. P3P user agents allow users to be informed of site practices (in both machine- and human-readable formats) and to automate decision-making based on these practices when appropriate. Thus users need not read the privacy policies at every site they visit.
A P3P-compliant Web site declares in a policy the kind of information it collects and how that information will be used. A P3P-enabled Web browser can decide what to do by comparing this policy with the user's stored preferences. For example, a user may set browser preferences so that information about their browsing habits should not be collected. When the user subsequently visits a Web site whose policy states that a cookie is used for this purpose, the browser automatically rejects the cookie.
P3P User Agents
Microsoft Internet Explorer 6 can display P3P privacy policies and compare the P3P policy with your own settings to decide whether or not to allow cookies from a particular site.
The Privacy Bird (originally developed by AT&T), which you can find at http://www.privacybird.com/, is a fully featured P3P user agent that automatically searches for privacy policies at every Web site the user visits. It then compares the policy with the user's stored privacy preferences and notifies the user of any discrepancies.
See Also
"Host Info Panel" on page 91
AJAX
AJAX is an acronym for Asynchronous JavaScript and XMLHttpRequest.
User GuideChapter 3: WebInspect User Interface
Micro Focus Fortify WebInspect (21.1.0) Page 93 of 461

If you select this option, Fortify WebInspect displays all pages containing an AJAX engine, as well as the AJAX requests.
There are two types of AJAX line items in this view:
l AJAX Page (as illustrated above)
l Request
If you click an item in the list, Fortify WebInspect displays "This page uses AJAX in script" (for a Page type) or it lists the query and/or POST data parameters (for a Request type).
How AJAX Works
AJAX is not a technology per se, but a combination of existing technologies, including HTML or XHTML, Cascading Style Sheets, JavaScript, the Document Object Model, XML, XSLT, and the XMLHttpRequest object. When these technologies are combined in the AJAX model, Web applications are able to make quick, incremental updates to the user interface without reloading the entire browser page.
Instead of loading a Web page at the start of the session, the browser loads an AJAX engine that is responsible for both rendering the user interface and communicating with the server. Every user action that normally would generate an HTTP request takes the form of a JavaScript call to the AJAX engine instead. Any response to a user action that does not require communication with the server (such as simple data validation, editing data in memory, and even some navigation) is handled by the engine. If the engine needs to communicate with the server — submitting data for processing, loading additional interface code, or retrieving new data — the engine makes those requests asynchronously, usually using XML, without stalling a user's interaction with the application.
User GuideChapter 3: WebInspect User Interface
Micro Focus Fortify WebInspect (21.1.0) Page 94 of 461

Certificates
A certificate states that a specific Web site is secure and genuine. It ensures that no other Web site can assume the identity of the original secure site. A security certificate associates an identity with a public key. Only the owner of the certificate knows the corresponding private key, which allows the owner to make a "digital signature" or decrypt information encrypted with the corresponding public key.
Comments - Host Info
Developers sometimes leave critical information in comments that can be used to breach the security of a site. For example, something as seemingly innocuous as a comment referencing the required order of fields in a table could potentially give an attacker a key piece of information needed to compromise the security of your site.
To view discovered comments:
1. Select Comments from the Host Info panel to list all URLs that contain comments.
2. Click a URL to view the comments it contains.
3. Double-click an entry to locate in the navigation pane the session that contains the comment. Focus switches to the Comments choice in the Session Info panel.
Use the Search feature at the top of the information pane to locate the text you specify. To conduct a search using regular expressions, select the Regex button before clicking Find.
You can copy comments to your clipboard by highlighting the text and selecting Copy from the shortcut menu.
If you double-click a URL, Fortify WebInspect highlights in the navigation pane the session that contains the URL.
Cookies
A cookie contains information (such as user preferences or configuration information) stored by a server on a client for future use. Cookies appear in two basic forms: as individual files or as records within one contiguous file. Often, there are multiple sets, the result of multiple browsers being installed in differing locations. In many cases, "forgotten" cookies contain revealing information that you would prefer others not see.
To view discovered cookies:
1. Select Cookies from the Host Info panel to list all URLs in which cookies were found during a crawl or audit.
2. Click a URL to view the cookies it contains.
3. Double-click an entry to locate in the navigation pane the session that contains the cookie. Focus switches to the HTTP Response choice in the Session Info panel.
Use the Search feature at the top of the information pane to locate the text you specify. To conduct a search using regular expressions, select the Regex button before clicking Find.
You can copy cookie code to your clipboard by highlighting the text and selecting Copy from the shortcut menu.
User GuideChapter 3: WebInspect User Interface
Micro Focus Fortify WebInspect (21.1.0) Page 95 of 461

If you double-click a URL, Fortify WebInspect highlights in the navigation pane the session that contains the URL.
E-Mails - Host Info
Fortify WebInspect lists all email addresses discovered during a scan. To view the email addresses:
1. Select E-mail from the Host Info panel to list all URLs that contain email addresses.
2. Click a URL to view the email addresses it contains.
3. Double-click an entry to locate in the navigation pane the session that contains the email address. Focus switches to the E-mail choice in the Session Info panel.
Use the Search feature at the top of the information pane to locate the text you specify. To conduct a search using regular expressions, select the Regex button before clicking Find.
You can copy email addresses to your clipboard by highlighting the text and selecting Copy from the shortcut menu.
If you double-click a URL, Fortify WebInspect highlights in the navigation pane the session that contains the URL.
Forms - Host Info
Fortify WebInspect lists all HTML forms discovered during a scan.
1. Select Forms from the Host Info panel to list all URLs that contain forms.
2. Click a URL to view the source HTML of the form it contains.
3. Double-click an entry to locate in the navigation pane the session that contains the form. Focus switches to the Forms choice in the Session Info panel.
Use the Search feature at the top of the information pane to locate the text you specify. To conduct a search using regular expressions, select the Regex button before clicking Find.
You can copy forms to your clipboard by highlighting the text and selecting Copy from the shortcut menu.
If you double-click a URL, Fortify WebInspect highlights in the navigation pane the session that contains the URL.
Hiddens - Host Info
Fortify WebInspect analyzes all forms and then lists all controls of the type "hidden" (i.e., controls that are not rendered but whose values are submitted with a form). Developers often include parameters in hidden controls that can be edited and resubmitted by an attacker.
1. Select Hiddens from the Host Info panel to list all URLs that contain hidden controls.
2. Click a URL to view the name and value attributes of the "hidden" controls contained in that URL.
3. Double-click an entry to locate in the navigation pane the session that contains the hidden control. Focus switches to the Hiddens choice in the Session Info panel.
Use the Search feature at the top of the information pane to locate the text you specify. To conduct a search using regular expressions, select the Regex button before clicking Find.
User GuideChapter 3: WebInspect User Interface
Micro Focus Fortify WebInspect (21.1.0) Page 96 of 461

You can copy the HTML text to your clipboard by highlighting the text and selecting Copy from the shortcut menu.
If you double-click a URL, Fortify WebInspect highlights in the navigation pane the session that contains the URL.
Scripts - Host Info
Fortify WebInspect lists all scripts discovered during a scan. To view the discovered scripts:
1. Select Scripts from the Host Info panel to list all URLs that contain scripts.
2. Click a URL to view the script it contains.
3. Double-click an entry to locate in the navigation pane the session that contains the script.
Use the Search feature at the top of the information pane to locate the text you specify. To conduct a search using regular expressions, select the Regex button before clicking Find.
You can copy a script to your clipboard by highlighting the text and selecting Copy from the shortcut menu.
If you double-click a URL, Fortify WebInspect highlights in the navigation pane the session that contains the URL.
For more information on the Fortify WebInspect window, see "WebInspect User Interface" on page 47.
See Also
"Host Info Panel" on page 91
"Navigation Pane" on page 60
"Regular Expressions" on page 293
Broken Links
Fortify WebInspect finds and documents all non-working hyperlinks on the site. To locate broken links:
1. Select Broken Links from the Host Info panel to list all URLs that contain non-working hyperlinks.
2. Double-click an entry to locate in the navigation pane the session that contains a broken link. Focus switches to the HTTP Response choice in the Session Info panel.
Use the Search feature at the top of the information pane to locate the text you specify. To conduct a search using regular expressions, select the Regex button before clicking Find.
You can copy the HTML text to your clipboard by highlighting the text and selecting Copy from the shortcut menu.
If you double-click a URL, Fortify WebInspect highlights in the navigation pane the session that contains the URL.
Offsite Links
Fortify WebInspect finds and documents all hyperlinks to other sites.
User GuideChapter 3: WebInspect User Interface
Micro Focus Fortify WebInspect (21.1.0) Page 97 of 461

To examine hyperlinks to other sites:
1. Select Offsite Links from the Host Info panel to list all URLs that contain hyperlinks to other sites.
2. Double-click an entry to locate in the navigation pane the session that contains the offsite link. Focus switches to the HTTP Response choice in the Session Info panel.
Use the Search feature at the top of the information pane to locate the text you specify. To conduct a search using regular expressions, select the Regex button before clicking Find.
You can copy the HTML text to your clipboard by highlighting the text and selecting Copy from the shortcut menu.
If you double-click a URL, Fortify WebInspect highlights in the navigation pane the session that contains the URL.
For more information on the Fortify WebInspect window, see "WebInspect User Interface" on page 47.
Parameters
A parameter can be either of the following:
l A query string submitted as part of the URL in the HTTP request (or contained in another header).
l Data submitted using the Post method.
To list all URLs that contain parameters:
1. Select Parameters from the Host Info panel.
2. Click a URL to view the parameters it contains.
3. Double-click an entry to locate in the navigation pane the session that contains the parameter. For more information, see "Navigation Pane" on page 60.
Use the Search feature at the top of the information pane to search the selected URL for the text you specify. To conduct a search using regular expressions, select the Regex button before clicking Find. For more information, see "Regular Expressions" on page 293.
You can copy text to your clipboard by highlighting the text and selecting Copy from the shortcut menu.
If you double-click a URL, Fortify WebInspect highlights in the navigation pane the Session that contains the URL.
For more information on the Fortify WebInspect window, see "WebInspect User Interface" on page 47.
See Also
"Host Info Panel" on page 91
Summary PaneWhen conducting or viewing a scan, use the horizontal summary pane at the bottom of the window to view a centralized display of vulnerable resources, quickly access vulnerability information, and view Fortify WebInspect logging information.
User GuideChapter 3: WebInspect User Interface
Micro Focus Fortify WebInspect (21.1.0) Page 98 of 461
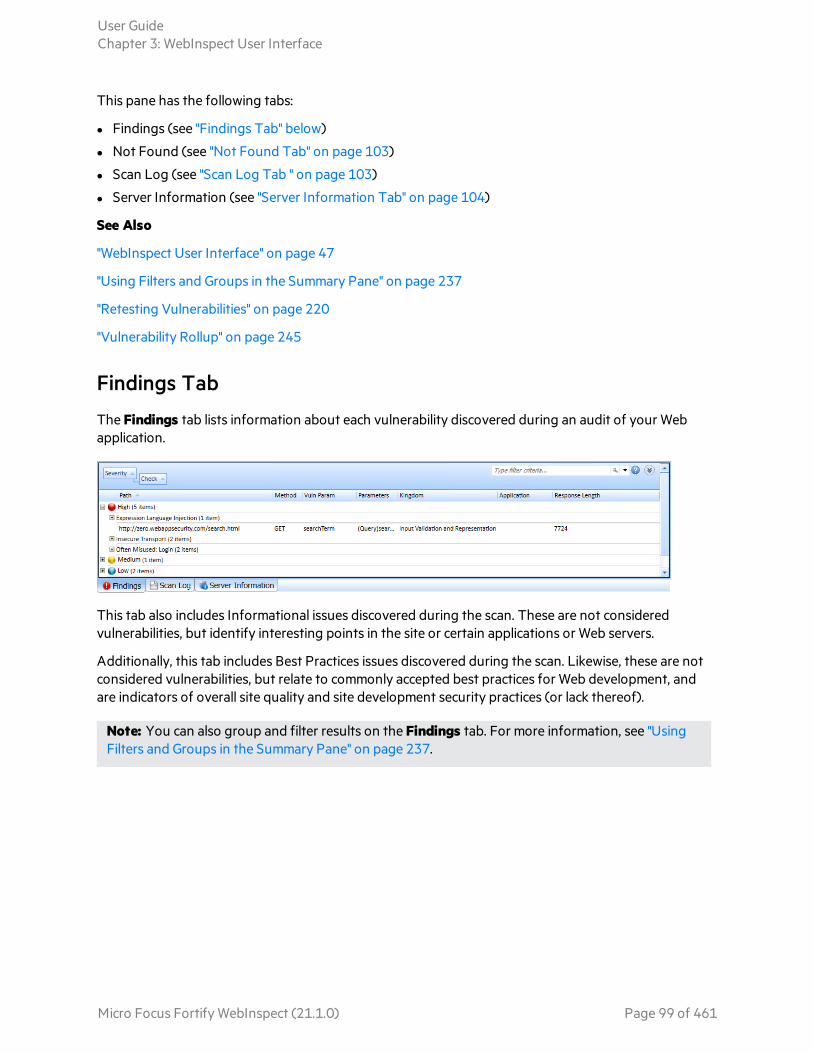
This pane has the following tabs:
l Findings (see "Findings Tab" below)
l Not Found (see "Not Found Tab" on page 103)
l Scan Log (see "Scan Log Tab " on page 103)
l Server Information (see "Server Information Tab" on page 104)
See Also
"WebInspect User Interface" on page 47
"Using Filters and Groups in the Summary Pane" on page 237
"Retesting Vulnerabilities" on page 220
"Vulnerability Rollup" on page 245
Findings Tab
The Findings tab lists information about each vulnerability discovered during an audit of your Web application.
This tab also includes Informational issues discovered during the scan. These are not considered vulnerabilities, but identify interesting points in the site or certain applications or Web servers.
Additionally, this tab includes Best Practices issues discovered during the scan. Likewise, these are not considered vulnerabilities, but relate to commonly accepted best practices for Web development, and are indicators of overall site quality and site development security practices (or lack thereof).
Note: You can also group and filter results on the Findings tab. For more information, see "Using Filters and Groups in the Summary Pane" on page 237.
User GuideChapter 3: WebInspect User Interface
Micro Focus Fortify WebInspect (21.1.0) Page 99 of 461

Available Columns
Several columns of data are available for viewing. To select the information you want to display, right-click the column header bar and choose Columns from the shortcut menu.
The available columns are:
l Severity: A relative assessment of the vulnerability, ranging from low to critical. See below for associated icons.
l Check: A Fortify WebInspect probe for a specific vulnerability, such as cross-site scripting, unencrypted log-in form, etc.
l Check ID: The identification number of a Fortify WebInspect probe that checks for the existence of a specific vulnerability. For example, Check ID 742 tests for database server error messages.
l Path: The hierarchical path to the resource.
l Method: The HTTP method used for the attack.
l Stack: Stack trace information obtained from Fortify WebInspect Agent . Column is available only when Fortify WebInspect Agent is enabled during scan.
l Vuln Param: The name of the vulnerable parameter.
l Parameters: Names of parameters and values assigned to them.
l Manual: Displays a check mark if the vulnerability was manually created.
l Duplicates: Vulnerabilities detected by Fortify WebInspect Agent that are traceable to the same source. Column is available only when Fortify WebInspect Agent is enabled during scan.
l Location: Path plus parameters.
User GuideChapter 3: WebInspect User Interface
Micro Focus Fortify WebInspect (21.1.0) Page 100 of 461
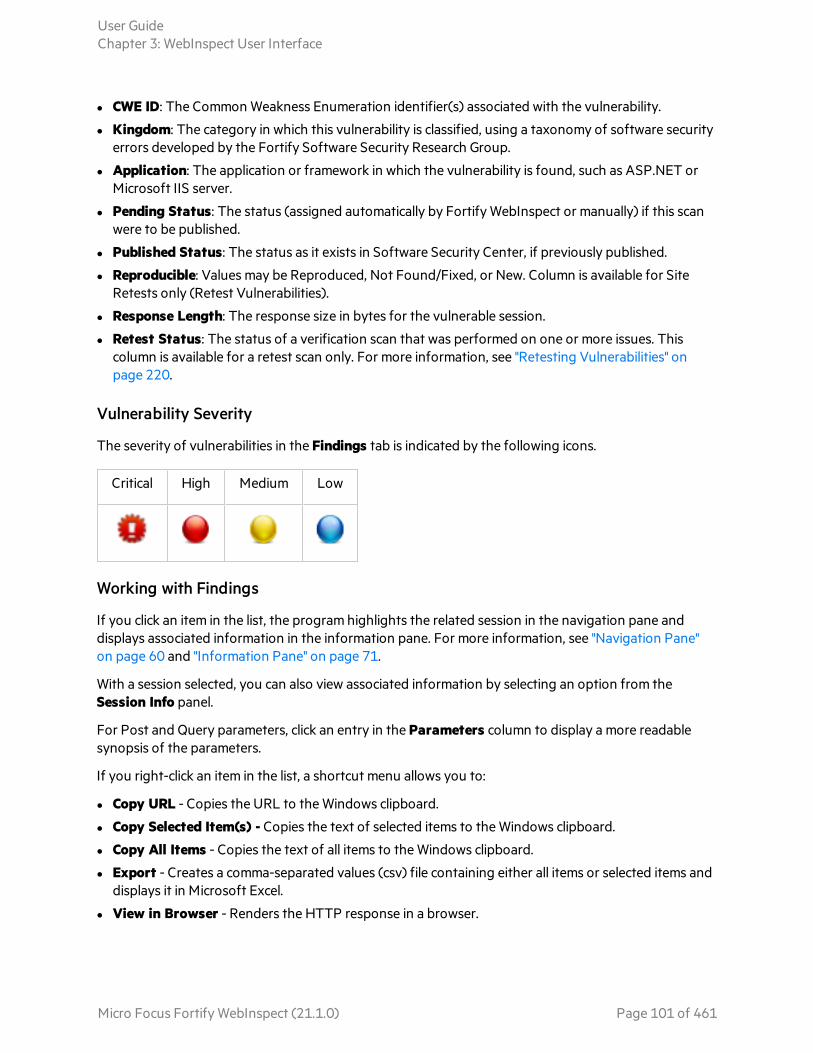
l CWE ID: The Common Weakness Enumeration identifier(s) associated with the vulnerability.
l Kingdom: The category in which this vulnerability is classified, using a taxonomy of software security errors developed by the Fortify Software Security Research Group.
l Application: The application or framework in which the vulnerability is found, such as ASP.NET or Microsoft IIS server.
l Pending Status: The status (assigned automatically by Fortify WebInspect or manually) if this scan were to be published.
l Published Status: The status as it exists in Software Security Center, if previously published.
l Reproducible: Values may be Reproduced, Not Found/Fixed, or New. Column is available for Site Retests only (Retest Vulnerabilities).
l Response Length: The response size in bytes for the vulnerable session.
l Retest Status: The status of a verification scan that was performed on one or more issues. This column is available for a retest scan only. For more information, see "Retesting Vulnerabilities" on page 220.
Vulnerability Severity
The severity of vulnerabilities in the Findings tab is indicated by the following icons.
Critical High Medium Low
Working with Findings
If you click an item in the list, the program highlights the related session in the navigation pane and displays associated information in the information pane. For more information, see "Navigation Pane" on page 60 and "Information Pane" on page 71.
With a session selected, you can also view associated information by selecting an option from the Session Info panel.
For Post and Query parameters, click an entry in the Parameters column to display a more readable synopsis of the parameters.
If you right-click an item in the list, a shortcut menu allows you to:
l Copy URL - Copies the URL to the Windows clipboard.
l Copy Selected Item(s) - Copies the text of selected items to the Windows clipboard.
l Copy All Items - Copies the text of all items to the Windows clipboard.
l Export - Creates a comma-separated values (csv) file containing either all items or selected items and displays it in Microsoft Excel.
l View in Browser - Renders the HTTP response in a browser.
User GuideChapter 3: WebInspect User Interface
Micro Focus Fortify WebInspect (21.1.0) Page 101 of 461

l Filter by Current Value - Restricts the display of vulnerabilities to those that satisfy the criteria you select. For example, if you right-click on "Post" in the Method column and then select Filter by Current Value, the list displays only those vulnerabilities that were discovered by sending an HTTP request that used the Post method.
Note: The filter criterion is displayed in the combo box in the upper right corner of the summary pane. Alternatively, you can manually enter or select a filtering criterion using this combo box. For additional details and syntax rules, see "Using Filters and Groups in the Summary Pane" on page 237.
l Change SSC Status - Change the status of a vulnerability/issue before publishing to Fortify Software Security Center.
Note: This option is available only when connected to Fortify WebInspect Enterprise that is integrated with Fortify Software Security Center.
l Change Severity - Allows you to change the severity level.
l Edit Vulnerability - Displays the Edit Vulnerabilities dialog box, allowing you to modify various vulnerability characteristics. For more information, see "Editing Vulnerabilities" on page 243.
l Rollup Vulnerabilities - Available if multiple vulnerabilities are selected; allows you to roll up the selected vulnerabilities into a single instance that is prefixed with the tag “[Rollup]” in Fortify WebInspect, Fortify WebInspect Enterprise, and reports. For more information, see "Vulnerability Rollup" on page 245.
Note: If you have selected a rolled up vulnerability, this menu option is Undo Rollup Vulnerabilities.
l Retest - Performs a retest of one or more selected vulnerabilities, all vulnerabilities, or vulnerabilities of a specific severity. For more information, see "Retesting Vulnerabilities" on page 220.
l Mark as - Flags the vulnerability as either a false positive (and allows you to add a note) or as ignored. In both cases, the vulnerability is removed from the list. You can view a list of all false positives by selecting False Positives in the Scan Info panel. You can view a list of false positives and ignored vulnerabilities by selecting Dashboard in the Scan Info panel, and then clicking the hyperlinked number of deleted items in the statistics column.
Note: You can recover "false positive" and "ignored" vulnerabilities. See "Recovering Deleted Items" on page 250 for details.
l Send to - Converts the vulnerability to a defect and adds it to the Micro Focus Application Lifecycle Management (ALM) database.
l Remove Location - Removes the selected session from the navigation pane (both Site and Sequence views) and also removes any associated vulnerabilities.
Note: You can recover removed locations (sessions) and their associated vulnerabilities. See "Recovering Deleted Items" on page 250 for details.
l Crawl - Recrawls the selected URL.
l Tools - Presents a submenu of available tools.
User GuideChapter 3: WebInspect User Interface
Micro Focus Fortify WebInspect (21.1.0) Page 102 of 461

l Attachments - Allows you to create a note associated with the selected session, flag the session for follow-up, add a vulnerability note, or add a vulnerability screenshot.
If you right-click a group heading, a shortcut menu allows you to:
l Collapse/Expand All Groups l Collapse/Expand Group l Copy Selected Item(s) l Copy All Items l Change Severity l Mark as l Send to l Remove Location
Not Found Tab
This tab appears only after connecting to Fortify WebInspect Enterprise and after synchronizing a scan with Software Security Center. It lists vulnerabilities that were detected by a previous scan in a specific application version, but were not detected by the current scan. These vulnerabilities are not included in counts on the dashboard and are not represented in the site or sequence view of the navigation pane.
The shortcut menu options, grouping, and filtering capabilities are a subset of those described for the Findings tab.
Scan Log Tab
Use the Scan Log tab to view information about your Fortify WebInspect scan activity. For instance, the time at which certain audit methodologies are applied against your Web application are listed here. Additionally, alert-level messages that may provide insight into potential issues that could affect the scan appear in the Scan Log.
You can select the logging level (Debug, Info, Warn, Error, or Fatal) using the Logging option on the Application Settings window. For more information, see "Application Settings: Logging" on page 414.
You can filter the type of messages displayed using the Errors, Warnings, and Messages buttons at the top of the pane.
Tip: Alert-level messages are included in the Warnings filter.
User GuideChapter 3: WebInspect User Interface
Micro Focus Fortify WebInspect (21.1.0) Page 103 of 461
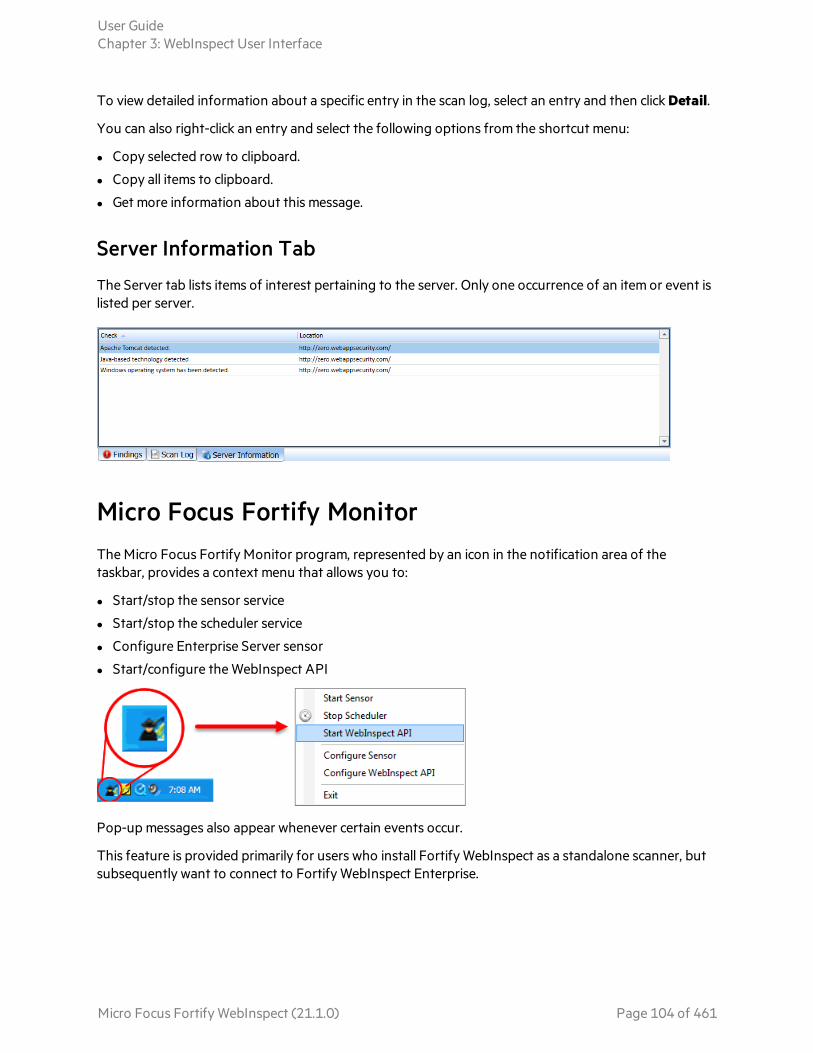
To view detailed information about a specific entry in the scan log, select an entry and then click Detail.
You can also right-click an entry and select the following options from the shortcut menu:
l Copy selected row to clipboard.
l Copy all items to clipboard.
l Get more information about this message.
Server Information Tab
The Server tab lists items of interest pertaining to the server. Only one occurrence of an item or event is listed per server.
Micro Focus Fortify Monitor The Micro Focus Fortify Monitor program, represented by an icon in the notification area of the taskbar, provides a context menu that allows you to:
l Start/stop the sensor service
l Start/stop the scheduler service
l Configure Enterprise Server sensor
l Start/configure the WebInspect API
Pop-up messages also appear whenever certain events occur.
This feature is provided primarily for users who install Fortify WebInspect as a standalone scanner, but subsequently want to connect to Fortify WebInspect Enterprise.
User GuideChapter 3: WebInspect User Interface
Micro Focus Fortify WebInspect (21.1.0) Page 104 of 461

Chapter 4: Working with ScansThis chapter describes the various types of scans that Fortify WebInspect can perform, as well as instructions on how to run those scans. It includes procedures for scheduling scans, and importing, exporting, and managing scans that have completed.
Guided Scan Overview Guided Scan directs you through the best steps for configuring a scan tailored to your application.
The Guided Scan progress display in the left pane allows you to easily see your progress as you specify settings for your scan. The right pane displays the scan options on each wizard page.
The Guided Scan Wizard allows you to:
l Verify connectivity to your application
l Test the entire application or only workflows
l Record your login procedure
l Review suggested configuration changes
Guided Scans are template based; you can select to use either a Predefined Template or a Mobile Template.
Predefined Templates
There are three predefined templates options to choose from:
l Standard Scan: use this option to when you are interested in coverage. Larger sites could take days when using this template.
l Quick Scan: use this option when focusing on breadth and performance rather than digging deep. Especially good for very large sites.
l Thorough Scan: use to perform an exhaustive crawl on your site. It is recommended that you split your site into parts and only scan smaller chunks of your site with these settings. Not recommended for large sites.
Mobile Templates
There are two mobile template options to choose from:
l Mobile Scan: use this option to scan a mobile site from the machine where your instance of Fortify WebInspect or Fortify WebInspect Enterprise is installed. Fortify WebInspect or Fortify WebInspect Enterprise will fetch the mobile version of the site rather than the full site when this option is chosen.
Micro Focus Fortify WebInspect (21.1.0) Page 105 of 461

l Native Scan: use this option to manually crawl a native mobile application and capture the Web traffic as a workflow macro. Generate the traffic on an Android, Windows, or iOS device or software emulator (Android and iOS only) running a mobile application.
After selecting a Guided Scan template, the stages and steps are displayed in the left pane, allowing you to easily navigate among them and specify the settings for your scan.
See Also
"Using the Predefined Template" on the next page
"Using the Mobile Scan Template" on page 122
"Using the Native Scan Template" on page 139
Running a Guided ScanThe Guided Scan progress display in the left pane allows you to easily see your progress as you specify settings for your scan. The right pane displays the scan options on each wizard page.
The first page of the Guided Scan presents you with the option to select the type of scan to run. There are three main types to choose from.
Predefined Template (Standard, Quick, or Thorough)
There are three Predefined templates options to choose from:
l Standard Scan: Default scan settings are designed to focus more on coverage than performance. Larger sites could take days to crawl with these settings.
l Quick Scan: A scan that focuses on breadth and performance rather than digging deep. Especially good for very large sites.
l Thorough Scan: Thorough scan settings are designed to perform an exhaustive crawl of your site. It is recommended that your split your site up into parts and only scan smaller chunks of your site with these settings. Not recommended for large sites.
For more information, see "Using the Predefined Template" on the next page.
Mobile Scan Template
This template emulates a mobile device while scanning a Web application.
For more information, see "Using the Mobile Scan Template" on page 122.
Native Scan Template
This template manually crawls a native mobile application and captures Web traffic as a workflow macro.
For more information, see "Using the Native Scan Template" on page 139.
User GuideChapter 4: Working with Scans
Micro Focus Fortify WebInspect (21.1.0) Page 106 of 461
See Also
"Guided Scan Overview " on page 105
"Fortify WebInspect Policies" on page 425
Using the Predefined TemplateThe Guided Scan wizard will step you through the necessary stages and steps required to scan your Web site. If you need to return to a previous step or stage, click the back navigation button, or click the step in the Guided Scan tree to be taken directly there.
Important! Due to limitations with SQL Express, running multiple scans using a SQL Express database may cause unsatisfactory results. For this reason, Fortify recommends not conducting concurrent (or parallel) scans for installations using SQL Express.
Launching a Guided Scan
To launch a Guided Scan:
l For Fortify WebInspect users, click the Start a Guided Scan option in the left pane, or select File > New > Guided Scan from the menu bar.
l For Fortify WebInspect Enterprise users, click Guided Scan under Actions on the Web Console.
The Guided Scan wizard launches and presents a list of Guided Scan templates. There are three Predefined templates options to choose from:
l Standard Scan: use this option to when you are interested in coverage. Larger sites could take days when using this template.
l Quick Scan: use this option when focusing on breadth and performance rather than digging deep. Especially good for very large sites.
l Thorough Scan: use to perform an exhaustive crawl on your site. It is recommended that you split your site into parts and only scan smaller chunks of your site with these settings. Not recommended for large sites.
Choose one of the Predefined Templates.
Understanding the Rendering Engine
The Rendering Engine you select determines which Web Macro Recorder is opened when recording a new macro or editing an existing macro while configuring a Guided Scan. The Rendering Engine options are:
l Session-based – Selecting this option designates the Session-based Web Macro Recorder, which uses Internet Explorer browser technology.
l Macro Engine 6.0 (recommended) – Selecting this option designates the Web Macro Recorder with Macro Engine 6.0, which uses TruClient and Firefox technology.
User GuideChapter 4: Working with Scans
Micro Focus Fortify WebInspect (21.1.0) Page 107 of 461

About the Site Stage
During the Site stage, you will:
l Verify the Web site you want to scan
l Choose a scan type
Verifying Your Web Site
To verify your Web site:
1. In the Start URL box, type or select the complete URL or IP address of the site to scan.
If you enter a URL, it must be precise. For example, if you enter MYCOMPANY.COM, Fortify WebInspect or Fortify WebInspect Enterprise will not scan WWW.MYCOMPANY.COM or any other variation (unless you specify alternatives in the Allowed Hosts setting).
An invalid URL or IP address results in an error. If you want to scan from a certain point in your hierarchical tree, append a starting point for the scan, such as http://www.myserver.com/myapplication/.
Scans by IP address do not pursue links that use fully qualified URLs (as opposed to relative paths).
Note: Fortify WebInspect supports Internet Protocol version 6 (IPv6) addresses in web site and web service scans. When you specify the Start URL, you must enclose the IPv6 address in brackets. For example:
l http://[::1]
Fortify WebInspect scans "localhost."
l http://[fe80::20c:29ff:fe32:bae1]/subfolder/
Fortify WebInspect scans the host at the specified address starting in the "subfolder" directory.
l http://[fe80::20c:29ff:fe32:bae1]:8080/subfolder/
Fortify WebInspect scans a server running on port 8080 starting in "subfolder."
Fortify WebInspect and Fortify WebInspect Enterprise support both Internet Protocol version 4 (IPV4) and Internet Protocol version 6 (IPV6). IPV6 addresses must be enclosed in brackets.
2. (Optional) To limit the scope of the scan to an area, select the Restrict to Folder check box, and then select one of the following options from the list:
Directoryonly (self). Fortify WebInspect and Fortify WebInspect Enterprise will crawl and/or audit only the URL you specify. For example, if you select this option and specify a URL of www.mycompany/one/two/, Fortify WebInspect or Fortify WebInspect Enterprise will assess only the "two" directory.
Directory and subdirectories. Fortify WebInspect or Fortify WebInspect Enterprise will begin crawling and/or auditing at the URL you specify, but will not access any directory that is higher in the directory tree.
User GuideChapter 4: Working with Scans
Micro Focus Fortify WebInspect (21.1.0) Page 108 of 461
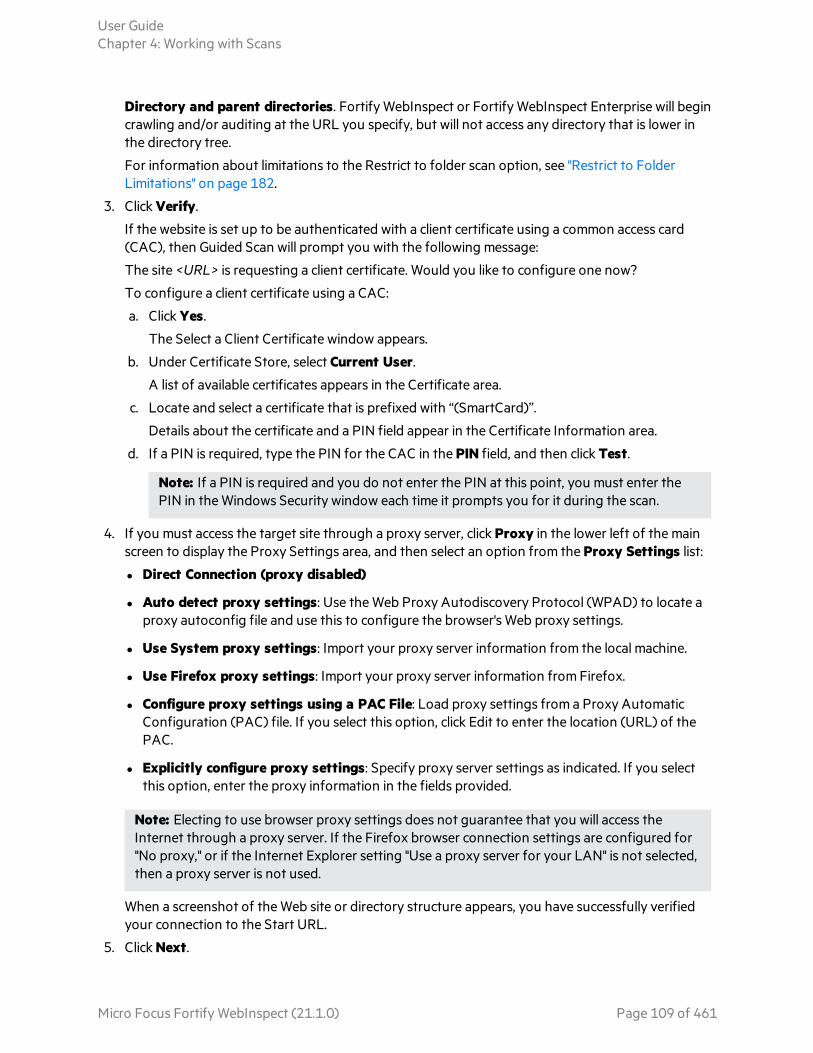
Directory and parent directories. Fortify WebInspect or Fortify WebInspect Enterprise will begin crawling and/or auditing at the URL you specify, but will not access any directory that is lower in the directory tree.
For information about limitations to the Restrict to folder scan option, see "Restrict to Folder Limitations" on page 182.
3. Click Verify.
If the website is set up to be authenticated with a client certificate using a common access card (CAC), then Guided Scan will prompt you with the following message:
The site <URL> is requesting a client certificate. Would you like to configure one now?
To configure a client certificate using a CAC:
a. Click Yes.
The Select a Client Certificate window appears.
b. Under Certificate Store, select Current User.
A list of available certificates appears in the Certificate area.
c. Locate and select a certificate that is prefixed with “(SmartCard)”.
Details about the certificate and a PIN field appear in the Certificate Information area.
d. If a PIN is required, type the PIN for the CAC in the PIN field, and then click Test.
Note: If a PIN is required and you do not enter the PIN at this point, you must enter the PIN in the Windows Security window each time it prompts you for it during the scan.
4. If you must access the target site through a proxy server, click Proxy in the lower left of the main screen to display the Proxy Settings area, and then select an option from the Proxy Settings list:
l Direct Connection (proxy disabled)
l Auto detect proxy settings: Use the Web Proxy Autodiscovery Protocol (WPAD) to locate a proxy autoconfig file and use this to configure the browser's Web proxy settings.
l Use System proxy settings: Import your proxy server information from the local machine.
l Use Firefox proxy settings: Import your proxy server information from Firefox.
l Configure proxy settings using a PAC File: Load proxy settings from a Proxy Automatic Configuration (PAC) file. If you select this option, click Edit to enter the location (URL) of the PAC.
l Explicitly configure proxy settings: Specify proxy server settings as indicated. If you select this option, enter the proxy information in the fields provided.
Note: Electing to use browser proxy settings does not guarantee that you will access the Internet through a proxy server. If the Firefox browser connection settings are configured for "No proxy," or if the Internet Explorer setting "Use a proxy server for your LAN" is not selected, then a proxy server is not used.
When a screenshot of the Web site or directory structure appears, you have successfully verified your connection to the Start URL.
5. Click Next.
User GuideChapter 4: Working with Scans
Micro Focus Fortify WebInspect (21.1.0) Page 109 of 461

The Choose Scan Type window appears.
Choosing a Scan Type
1. Type in a name for your scan in the Scan Name box.
2. Select one of the following scan types:
l Standard: Fortify WebInspect or Fortify WebInspect Enterprise perform an automated analysis, starting from the target URL. This is the normal way to start a scan.
l Workflows: If you select this option, an additional Workflows stage is added to the Guided scan.
3. In the Scan Method area, select one of the following scan methods:
l Crawl Only. This option completely maps a site's hierarchical data structure. After a crawl has been completed, you can click Audit to assess an application’s vulnerabilities.
l Crawl and Audit. Fortify WebInspect or Fortify WebInspect Enterprise map the site’s hierarchical data structure and audits each resource (page). Depending on the default settings you select, the audit can be conducted as each resource is discovered or after the entire site is crawled. For information regarding simultaneous vs. sequential crawl and audit, see "Scan Settings: Method " on page 339.
l Audit Only. Fortify WebInspect or Fortify WebInspect Enterprise apply the methodologies of the selected policy to determine vulnerability risks, but does not crawl the Web site. No links on the site are followed or assessed.
4. In the Policy area, select a policy from the Policy list. For information about managing policies, see the Policy Manager chapter in the Micro Focus Fortify WebInspect Tools Guide.
5. In the Crawl Coverage area, select the level of coverage you want using the Crawl Coverage slider. For more information on crawl coverage levels, see "Coverage and Thoroughness" on page 169.
6. In the Single-Page Applications area, select an option for crawling and auditing single-page applications (SPAs). When enabled, the DOM script engine finds JavaScript includes, frame and iframe includes, CSS file includes, and AJAX calls during the crawl, and then audits all traffic generated by those events. Options for Single-Page Applications are:
l Automatic - If Fortify WebInspect detects a SPA framework, it automatically switches to SPA-support mode.
l Enabled - Indicates that SPA frameworks are used in the target application.
Caution! SPA support should be enabled for single-page applications only. Enabling SPA support to scan a non-SPA website will result in a slow scan.
l Disabled - Indicates that SPA frameworks are not used in the target application.
For more information, see "About Single-page Application Scans" on page 190.
7. Click the Next button.
The Login stage appears with Network Authentication highlighted in the left pane.
User GuideChapter 4: Working with Scans
Micro Focus Fortify WebInspect (21.1.0) Page 110 of 461

About the Login Stage
If the application you intend to scan requires login credentials, you can use the login stage to either select a pre-existing login macro or record one for use with the scan.
If your application does not require login credentials, you can skip this section of the Guided Scan wizard by clicking through the options without assigning values, or clicking Application in the Guided Scan tree to skip to the next stage.
In this stage you can:
l Configure network authorization
l Configure application authorization
l Create or assign a login macro
Network Authentication Step
If your application requires either network or application level authentication, you can assign it here.
Configuring Network Authentication
If your network requires user authentication, you can configure it here. If your network does not require user authentication, click the Next navigation button or the next appropriate step in the Guided Scan tree to continue on.
To configure network authentication:
1. Click the Network Authentication checkbox.
2. Select a Method from the drop-down list of authentication methods. The authentication methods are:
ADFS CBT
Active Directory Federation Services Channel Binding Token authentication helps protect against man-in-the-middle (MITM) attacks in which an attacker intercepts a client's credentials and forwards them to a server. Protection against such attacks is made possible when a Channel Binding Token (CBT) is required or allowed by the server when establishing communications with clients. In some servers, such as IIS, ADFS CBT is called "Extended Protection for Authentication."
It is similar to NTLM authentication, but ADFS CBT authentication builds a CBT token based on the hash of the HTTPS site server certificate. This authentication type is usually used for HTTPS sites. For an HTTP site, it works similar to NTLM but the token is empty.
Note: Most servers require the domain name to be entered along with the user name in the Username field, such as DOMAIN/username or [email protected]. Consider this possibility if you have difficulty connecting to your server with the credentials you provide.
Automatic
Allow Fortify WebInspect to determine the correct authentication type.
User GuideChapter 4: Working with Scans
Micro Focus Fortify WebInspect (21.1.0) Page 111 of 461

Automatic detection slows the scanning process. If you know and specify one of the other authentication methods, scanning performance is noticeably improved.
Basic
A widely used, industry-standard method for collecting user name and password information.
a. The Web browser displays a window for a user to enter a previously assigned user name and password, also known as credentials.
b. The Web browser then attempts to establish a connection to a server using the user's credentials.
c. If a user's credentials are rejected, the browser displays an authentication window to re-enter the user's credentials. Internet Explorer allows the user three connection attempts before failing the connection and reporting an error to the user.
d. If the Web server verifies that the user name and password correspond to a valid user account, a connection is established.
The advantage of Basic authentication is that it is part of the HTTP specification and is supported by most browsers. The disadvantage is that Web browsers using Basic authentication transmit passwords in an unencrypted form. By monitoring communications on your network, an attacker can easily intercept and decode these passwords using publicly available tools. Therefore, Basic authentication is not recommended unless you are confident that the connection between the user and your Web server is secure.
Digest
The Windows Server operating system implements the Digest Authentication protocol as a security support provider (SSP), a dynamic-link library (DLL) that is supplied with the operating system. Using digest authentication, your password is never sent across the network in the clear, but is always transmitted as an MD5 digest of the user's password. In this way, the password cannot be determined by sniffing network traffic.
Kerberos
Kerberos uses the Needham-Schroeder protocol as its basis. It uses a trusted third party, termed a Key Distribution Center (KDC), which consists of two logically separate parts: an Authentication Server (AS) and a Ticket Granting Server (TGS). The client authenticates itself to AS, then demonstrates to the TGS that it is authorized to receive a ticket for a service (and receives it). The client then demonstrates to a Service Server that it has been approved to receive the service.
Negotiate
The Negotiate authentication protocol begins with the option to negotiate for an authentication protocol. When the client requests access to a service, the server replies with a list of authentication protocols that it can support and an authentication challenge based on the protocol that is its first choice.
For example, the server might list Kerberos and NTLM, and send a Kerberos challenge. The client examines the contents of the reply and checks to determine whether it supports any of the specified protocols. If the client supports the preferred protocol, authentication proceeds. If the client does not support the preferred protocol, but does support one of the other protocols listed
User GuideChapter 4: Working with Scans
Micro Focus Fortify WebInspect (21.1.0) Page 112 of 461

by the server, the client lets the server know which authentication protocol it supports, and the authentication proceeds. If the client does not support any of the listed protocols, the authentication exchange fails.
NT LAN Manager (NTLM)
NTLM is an authentication process that is used by all members of the Windows NT family of products. Like its predecessor LanMan, NTLM uses a challenge/response process to prove the client’s identity without requiring that either a password or a hashed password be sent across the network.
Use NTLM authentication for servers running IIS. If NTLM authentication is enabled, and Fortify WebInspect has to pass through a proxy server to submit its requests to the Web server, Fortify WebInspect may not be able to crawl or audit that Web site.
Caution! After configuring Fortify WebInspect for NTLM authentication and scanning the NTLM-protected sites, you might want to disable the NTLM authentication settings to prevent any potential problem.
3. To use a client certificate for network authentication, select Client Certificate.
4. In the Certificate Store area, select one of the following, and then select either the My or Root radio button:
l Local Machine. Fortify WebInspect uses a certificate on the local machine based on your selection in the Certificate Store area.
l Current User. Fortify WebInspect uses a certificate for the current user based on your selection in the Certificate Store area.
5. To view certificate details in the Certificate Information area, select a certificate.
6. Click the Next button.
The Application Authentication page appears.
Application Authentication Step
If your site requires authentication, you can use this step to create, select, or edit a login macro to automate the login process and increase the coverage of your site. A login macro is a recording of the activity that is required to access and log in to your application, typically by entering a user name and password and clicking a button such as Log In or Log On.
If Enable macro validation is selected in Scan Settings: Authentication for scans that use a login macro, Fortify WebInspect tests the login macro at the start of the scan to ensure that the log in is successful. If the macro is invalid and fails to log in to the application, the scan stops and an error message is written in the scan log file. For more information and troubleshooting tips, see "Testing Login Macros" on page 457.
The following options are available for login macros:
l "Using a Login Macro without Privilege Escalation " on the next page
l "Using Login Macros for Privilege Escalation" on the next page
l "Using a Login Macro when Connected to Fortify WebInspect Enterprise" on page 115
User GuideChapter 4: Working with Scans
Micro Focus Fortify WebInspect (21.1.0) Page 113 of 461

Masked Values Supported
If the macro uses parameters for which values are masked in the Web Macro Recorder, then these values are also masked when configuring a Guided Scan in Fortify WebInspect.
Using a Login Macro without Privilege Escalation
To use a login macro:
1. Select the Use a login macro for this site check box.
2. Do one of the following:
l To use a pre-recorded login macro, click the ellipsis button (...) to browse for a saved macro.
l To edit an existing login macro shown in the Login Macro field, click Edit.
l To record a new macro, click Create.
For details about recording a new login macro or using an existing login macro, see the Web Macro Recorder chapters in the Micro Focus Fortify WebInspect Tools Guide.
3. Click the Next button.
If you selected a Standard scan, the Optimization Tasks page appears. If you selected a Workflows scan, the Manage Workflows page appears.
Using Login Macros for Privilege Escalation
If you selected the Privilege Escalation policy or another policy that includes enabled Privilege Escalation checks, at least one login macro for a high-privilege user account is required. For more information, see "About Privilege Escalation Scans" on page 187.
To use login macros:
1. Select the High-Privilege User Account Login Macro check box. This login macro is for the higher-privilege user account, such as a Site Administrator or Moderator account.
2. Do one of the following:
l To use a pre-recorded login macro, click the ellipsis button (...) to browse for a saved macro.
l To edit an existing login macro shown in the Login Macro field, click Edit.
l To record a new macro, click Create.
For details about recording a new login macro or using an existing login macro, see the Web Macro Recorder chapters in the Micro Focus Fortify WebInspect Tools Guide.
After recording or selecting the first macro and clicking the next arrow, a "Configure Low Privilege Login Macro" prompt appears.
3. Do one of the following:
l To perform the scan in authenticated mode, click Yes. For more information, see "About Privilege Escalation Scans" on page 187.
User GuideChapter 4: Working with Scans
Micro Focus Fortify WebInspect (21.1.0) Page 114 of 461

Guided Scan returns to the Select Login Macro window for you to create or select a low-privilege login macro. Continue to Step 4.
l To perform the scan in unauthenticated mode, click No. For more information, see "About Privilege Escalation Scans" on page 187.
The Application Authentication Step is complete. If you selected a Standard scan, the Optimization Tasks page appears. If you selected a Workflows scan, the Manage Workflows page appears.
4. Select the Low-Privilege User Account Login Macro check box. This login macro is for the lower-privilege user account, such as a viewer or consumer of the site content.
5. Do one of the following:
l To use a pre-recorded login macro, click the ellipsis button (...) to browse for a saved macro.
l To edit an existing login macro shown in the Login Macro field, click Edit.
l To record a new macro, click Create.
For details about recording a new login macro or using an existing login macro, see the Web Macro Recorder chapters in the Micro Focus Fortify WebInspect Tools Guide.
6. After recording or selecting the second macro, click the Next button.
If you selected a Standard scan, the Optimization Tasks page appears. If you selected a Workflows scan, the Manage Workflows page appears.
Using a Login Macro when Connected to Fortify WebInspect Enterprise
For a Fortify WebInspect that is connected to Fortify WebInspect Enterprise, you can download and use a login macro from the Fortify WebInspect Enterprise macro repository.
To download a macro:
1. Select the Use a login macro for this site check box.
2. Click Download.
The Download a Macro from Fortify WebInspect Enterprise window appears.
3. Select the Application and Version from the drop-down lists.
4. Select a repository macro from the Macro drop-down list.
5. Click OK.
Note: Selecting a repository macro automatically syncs the Application and Version on the Final Review page under Automatically Upload Scan to WIE.
Automatically Creating a Login Macro
You can enter a username and password and have Fortify WebInspect create a login macro automatically.
Note: You cannot automatically create login macros for privilege-escalation and multi-user login scans or for any scan using the Session-based rendering engine.
User GuideChapter 4: Working with Scans
Micro Focus Fortify WebInspect (21.1.0) Page 115 of 461

To automatically create a login macro:
1. Select Auto-gen Login Macro.
2. Type a username in the Username field.
3. Type a password in the Password field.
Optionally, click Test to locate the login form, generate the macro, and run macro validation tests before advancing to the next stage in the Guided Scan wizard. If you need to cancel the validation test prior to completion, click Cancel.
Important! To use an automatically-generated macro in the Workflows stage or the Enhanced Coverage task of Guided Scan, you must click Test to generate a macro.
If the macro is invalid and fails to log in to the application, an error message appears. For more information and troubleshooting tips, see "Testing Login Macros" on page 457.
About the Workflows Stage
The Workflows stage only appears if you selected Workflows as the Scan Type in the Site stage. If you chose Standard, the Workflows stage will not appear. You can create a Workflow macro to ensure Fortify WebInspect audits the pages you specify in the macro. Fortify WebInspect audits only those URLs included in the macro and does not follow any hyperlinks encountered during the audit. A logout signature is not required. This type of macro is used most often to focus on a particular subsection of the application.
Important! If you use a login macro in conjunction with a workflow macro or startup macro or both, all macros must be of the same type: all .webmacro files or all Burp Proxy captures. You cannot use different types of macros in the same scan.
To complete the Workflows settings, click any of the following in the Workflows table:
l Record. Opens the Web Macro Recorder, allowing you to create a macro.
l Edit. Opens the Web Macro Recorder and loads the selected macro.
l Delete. Removes the selected macro (but does not delete it from your disk).
l Import. Opens a standard file-selection window, allowing you to select a previously recorded .webmacro file or Burp Proxy captures.
Note: If you have installed Micro Focus Unified Functional Testing (UFT) on your computer, then Fortify WebInspect detects this automatically and displays an option to import a UFT .usr file.
See "Importing Micro Focus Unified Functional Testing (UFT) Files in a Guided Scan " on page 121.
l Export. Opens a standard file-selection window, allowing you to save a recorded macro.
After you specify and play a workflow macro, it appears in the Workflows table and its Allowed Hosts are added to the Guided Scan > Workflows > Workflows > Manager Workflow page. You can enable or disable access to particular hosts. For more information, see "Scan Settings: Allowed Hosts" on page 355.
User GuideChapter 4: Working with Scans
Micro Focus Fortify WebInspect (21.1.0) Page 116 of 461

To Add Burp Proxy results
If you have run Burp Proxy security tests, the traffic collected during those tests can be imported into a Workflow macro, reducing the time it would otherwise take to rescan the same areas.
To add Burp Proxy results to a workflow macro:
1. If you are not on the Workflows screen, click on the Manage Workflows step in the Guided Scan tree.
2. Click the Import button.
The Import Macro file selector appears.
3. Change the file type box filter from Web Macro (*.webmacro) to Burp Proxy (*.*).
4. Navigate to your Burp Proxy files and select the desired file.
5. Click Open.
About the Active Learning Stage
During the Active Learning stage:
l The WebInspect Profiler is run to see if any settings need to be modified.
l Set scan optimization option if necessary.
Using the Profiler
The WebInspect Profiler conducts a preliminary examination of the target Web site to determine if certain settings should be modified. If changes appear to be required, the Profiler returns a list of suggestions, which you may accept or reject.
For example, the Profiler may detect that authorization is required to enter the site, but you have not specified a valid user name and password. Rather than proceed with a scan that would return significantly diminished results, you could follow the Profiler’s suggestion to configure the required information before continuing.
Similarly, your settings may specify that Fortify WebInspect should not conduct "file-not-found" detection. This process is useful for Web sites that do not return a status "404 Not Found" when a client requests a resource that does not exist (they may instead return a status "200 OK," but the response contains a message that the file cannot be found). If the Profiler determines that such a scheme has been implemented in the target site, it would suggest that you modify the Fortify WebInspect setting to accommodate this feature.
To launch the Profiler:
1. Click Profile.
The Profiler runs. For more information, see "Server Profiler" on page 231.
Results appear in the Optimize scan for box in the Settings section.
User GuideChapter 4: Working with Scans
Micro Focus Fortify WebInspect (21.1.0) Page 117 of 461

2. Accept or reject the suggestions that appear in the Optimize scan for drop-down box. To reject the suggestion, select None or an alternate from the drop-down menu.
3. If necessary, provide any requested information.
4. Click the Next button.
Several options may be presented even if you do not run the Profiler, as described in the following sections.
Autofill Web Forms
Select Auto-fill Web forms during crawl if you want Fortify WebInspect to submit values for input controls on forms it encounters while scanning the target site. Fortify WebInspect will extract the values from a prepackaged default file or from a file that you create using the Web Form Editor. See the Web Form Editor chapter in the Micro Focus Fortify WebInspect Tools Guide. You may:
1. Click the ellipsis button (...) to locate and load a file.
2. Click Edit to edit the selected file (or the default values) using the Web Form Editor.
3. Click Create to open the Web Form Editor and create a file.
Add Allowed Hosts
Use the Allowed Host settings to add domains to be crawled and audited. If your Web presence uses multiple domains, add those domains here. For more information, see "Scan Settings: Allowed Hosts" on page 355.
To add allowed domains:
1. Click Add.
2. In the Specify Allowed Host window, enter a URL (or a regular expression representing a URL) and click OK.
Reuse Identified False Positives
Select scans containing vulnerabilities that were changed to false positives. If those false positives match vulnerabilities detected in this scan, the vulnerabilities will be changed to false positives. For more information, see "False Positives" on page 82.
To reuse identified false positives:
1. Select Import False Positives.
2. Click Select Scans.
3. Select one or more scans containing false positives from the same site you are now scanning.
4. Click OK.
Apply Sample Macro
Fortify WebInspect’s example banking application, zero.webappsecurity.com, uses a Web form login. If you scan this site, select Apply sample macro to run the prepackaged macro containing the login script.
Traffic Analysis
Select Launch and Direct Traffic through Web Proxy to use the Web Proxy tool to examine the HTTP requests issued by Fortify WebInspect and the responses returned by the target server.
User GuideChapter 4: Working with Scans
Micro Focus Fortify WebInspect (21.1.0) Page 118 of 461

While scanning a Web site, Fortify WebInspect displays in the navigation pane only those sessions that reveal the hierarchical structure of the Web site, plus those sessions in which a vulnerability was discovered. However, if you select Enable Traffic Monitor, Fortify WebInspect adds the Traffic Monitor button to the Scan Info panel, allowing you to display and review each HTTP request sent by Fortify WebInspect and the associated HTTP response received from the server.
Message
If the Profiler does not recommend changes, the Guided Scan wizard displays the message "No settings changes are recommended. Your current scan settings are optimal for this site."
Click Next.
The Final Review page appears with Configure Detailed Options highlighted in the left pane.
About the Settings Stage
To configure detailed options, specify any of the following settings.
Reuse Identified False Positives
Select the False Positives box to reuse false positives that Fortify WebInspect has already identified.
Traffic Analysis
1. To use the Web Proxy tool, select Launch and Direct Traffic through Web Proxy to use the Web Proxy tool to examine the HTTP requests issued by Fortify WebInspect and the responses returned by the target server.
Web Proxy is a stand-alone, self-contained proxy server that you can configure and run on your desktop. Web Proxy allows you to monitor traffic from a scanner, a Web browser, or any other tool that submits HTTP requests and receives responses from a server. Web Proxy is a tool for a debugging and penetration scan; you can view every request and server response while browsing a site.
2. Select the Traffic Monitor box to display and review each HTTP request sent by Fortify WebInspect and the associated HTTP response received from the server.
While scanning a Web site, Fortify WebInspect displays only those sessions that reveal the hierarchical structure of the Web site, plus those sessions in which a vulnerability was discovered. However, if you select Enable Traffic Monitor, Fortify WebInspect allows you to display and review each HTTP request sent by Fortify WebInspect and the associated HTTP response received from the server.
3. Click Next.
The Validate Settings and Start Scan page appears with Configure Detailed Options highlighted in the left pane.
Validate Settings and Start Scan
Options on this page allow you to save the current scan settings and, if WebInspect is integrated with WebInspect Enterprise, to interact with WebInspect Enterprise.
1. To save your scan settings as an XML file, select Click here to save settings. Use the standard Save as window to name and save the file.
User GuideChapter 4: Working with Scans
Micro Focus Fortify WebInspect (21.1.0) Page 119 of 461

2. If WebInspect is integrated with WebInspect Enterprise, a Templates section appears in the toolbar. Continue according to the following table.
If you want to… Then…
Save the current scan settings as a template in the WebInspect Enterprise database
Note: When editing an existing template, the Save is actually an update. You can save any edits to settings and change the Template Name. However, you cannot change the Application, Version, or Global Template settings.
a. Do one of the following:
o Click Save in the Templates section of the toolbar.
o Select Click here to save template.
The Save Template window appears.
b. Select an application from the Application drop-down list.
c. Select an application version from the Version drop-down list.
d. Type a name in the Template field.
Load scan settings from a template a. Click Load in the Templates section of the toolbar.
A confirmation message appears advising that your current scan settings will be lost.
b. Click Yes.
The Load Template window appears.
c. Select an application from the Application drop-down list.
d. Select an application version from the Version drop-down list.
e. Select the template from the Template drop-down list.
f. Click Load.
Guided Scan returns to the Site Stage for you to verify the Web site and step through the settings from the template.
3. If WebInspect is integrated with WebInspect Enterprise, the WebInspect Enterprise section appears on this page. You can interact with WebInspect Enterprise as follows:
a. Select an application from the Application drop-down list.
b. Select an application version from the Version drop-down list.
c. Continue according to the following table.
User GuideChapter 4: Working with Scans
Micro Focus Fortify WebInspect (21.1.0) Page 120 of 461

To run the scan… Then…
With a sensor in WebInspect Enterprise
i. Select Run in WebInspect Enterprise.
ii. Select a sensor from the Sensor drop-down list.
iii. Select a Priority for the scan.
In WebInspect i. Select Run in WebInspect.
ii. If you want to automatically upload the scan results to the specified application and version in WebInspect Enterprise, select Auto Upload to WebInspect Enterprise.
Note: If the scan does not complete successfully, it will not be uploaded to WebInspect Enterprise.
4. In the Scan Now area, review your scan settings, and then click Start Scan to begin the scan.
Importing Micro Focus Unified Functional Testing (UFT) Files in a Guided Scan
If you have the Micro Focus Unified Functional Testing application installed, Fortify WebInspect detects it and allows you to import a UTF file (.usr) into your workflow scan to enhance the thoroughness and attack surface of your scan. For more information, see Unified Functional Testing on the Micro Focus Web site.
To import a UTF (.usr) file into a Fortify WebInspect Guided Scan:
1. Launch a Guided Scan, and then select Workflow Scan as the Scan Type. Additional text appears under the Workflows scan option: Micro Focus Unified Functional Testing has been detected. You can import scripts to improve the thoroughness of your security test.
2. Click the Next button.
3. In the Authentication section, Application Authentication is automatically selected. Complete the fields as indicated.
4. On the Manage Workflows screen, click Import. The Import Scripts dialog box appears. On the Import Scripts dialog box, you may:
l Type the filename.
l Browse to your file by clicking to locate your file with a .usr extension. Select Micro Focus Unified Functional Testing from the drop-down file type, and then navigate to the file.
l Click Edit to launch the Micro Focus Unified Functional Testing application.
5. (Optional) On the Import Scripts dialog box, you may select either of the following options:
l Show Micro Focus Unified Functional Testing UI during import
l Open script result after import
User GuideChapter 4: Working with Scans
Micro Focus Fortify WebInspect (21.1.0) Page 121 of 461

6. Select the file to import, and then click Import. After your file is successfully imported, the file appears in the Workflows table.
7. Select one of the following from the Workflows table:
l Record - launches the Web Macro Recorder. For more information, see the Web Macro Recorder chapters in the Micro Focus Fortify WebInspect Tools Guide.
l Edit - allows you to modify the file using the Web Macro Recorder. See the Web Macro Recorder chapters in the Micro Focus Fortify WebInspect Tools Guide.
l Delete - deletes the script from the Workflows table.
l Import - import another file.
l Export - saves a file in .webmacro format with the name and location you specify.
8. Click the Next button.
When the first .usr script file is added to the list, its name (or default name) appears in the Workflows table and an Allowed Hosts table is added to the pane.
Adding another .usr script file can add more allowed hosts. Any host that is enabled is available to all the listed workflow .usr script files, not just the workflow.usr file for which it was added. The Guided Scan will play all the listed workflow files and make requests to all the listed allowed hosts, whether or not their check boxes are selected. If a check box for an allowed host is selected, Fortify WebInspect will crawl or audit the responses from that host. If a check box is not selected, Fortify WebInspect will not crawl or audit the responses from that host. In addition, if a particular workflow .usr script uses parameters, a Macro Parameters table is displayed when that workflow macro is selected in the list. Edit the values of the parameters as needed.
9. After you have completed changes or additions to the Workflows table, proceed in the Guided Scan wizard to complete your settings and run the scan. For more information about recording a new login macro or using an existing login macro, see the Web Macro Recorder chapters in the Micro Focus Fortify WebInspect Tools Guide.
See Also
"Guided Scan Overview " on page 105
Using the Mobile Scan TemplateUsing the Mobile Scan template to create a mobile Web site scan allows you to scan the mobile version of a Web site using the desktop version of your browser from within Fortify WebInspect or Fortify WebInspect Enterprise.
A Mobile Scan is nearly identical to a Web site scan and mirrors the settings options you will find when using one of the Predefined templates to do a Standard, Thorough, or Quick scan. The only difference is that you need to select a user agent header to allow your browser to emulate a mobile browser.
Fortify WebInspect and Fortify WebInspect Enterprise come with four mobile user agent options to choose from, but you can create a custom option and create a user agent for another version of Android, Windows Phone, or other mobile device. For information creating a user agent header, see "Creating a Custom User Agent Header " on the next page.
User GuideChapter 4: Working with Scans
Micro Focus Fortify WebInspect (21.1.0) Page 122 of 461

Important! Due to limitations with SQL Express, running multiple scans using a SQL Express database may cause unsatisfactory results. For this reason, Fortify recommends not conducting concurrent (or parallel) scans for installations using SQL Express.
Launching a Mobile Scan
To launch a Mobile Scan:
1. Start a Guided Scan:
a. For Fortify WebInspect, click Start a Guided Scan on the Fortify WebInspect Start page.
b. For Fortify WebInspect Enterprise, click Guided Scan under Actions on the Web Console.
2. Select Mobile Scan from the Mobile Templates section.
3. Click the Mobile Client icon in the tool bar.
4. Select the Rendering Engine you want to use. The rendering engine you select determines which Web Macro Recorder is opened when recording a new macro or editing an existing macro while configuring a Guided Scan. The rendering engine options are:
l Session-based – Selecting this option designates the Session-based Web Macro Recorder, which uses Internet Explorer browser technology.
l Macro Engine 6.0 (recommended) – Selecting this option designates the Web Macro Recorder with Macro Engine 6.0, which uses TruClient and Firefox technology.
5. Select the User Agent that represents the agent string you want your rendering engine to present to the site. If you created your own user string, it will appear as Custom. If the user agent is not listed, you can create a custom user agent. See Creating a Custom User Agent Header.
The Guided Scan wizard displays the first step in the Native Mobile Stage: Verify Web Site.
Creating a Custom User Agent Header
Fortify WebInspect and Fortify WebInspect Enterprise include user agents for Android, Windows, and iOS devices. If you are using one of these options, you do not need to create a custom user agent header. If you want your Web browser to identify itself as a different mobile device or a specific OS version, create a custom user agent header.
To create a custom user agent:
1. Click the Advanced icon in the Guided Scan tool bar.
2. The Scan Settings window appears.
3. In the Scan Settings column, select Cookies/Headers.
4. In the Append Custom Headers section of the settings area, double-click the User-Agent string.
The Specify Custom Header box appears.
5. Type in User-Agent: followed by the user agent header string for the desired device.
6. Click OK.
The new custom user agent will now be available to select as your Mobile Client.
User GuideChapter 4: Working with Scans
Micro Focus Fortify WebInspect (21.1.0) Page 123 of 461

About the Site Stage
During the Site stage, you will:
l Verify the Web site you want to scan
l Choose a scan type
Verifying Your Web Site
To verify your Web site:
1. In the Start URL box, type or select the complete URL or IP address of the site to scan.
If you enter a URL, it must be precise. For example, if you enter MYCOMPANY.COM, Fortify WebInspect or Fortify WebInspect Enterprise will not scan WWW.MYCOMPANY.COM or any other variation (unless you specify alternatives in the Allowed Hosts setting).
An invalid URL or IP address results in an error. If you want to scan from a certain point in your hierarchical tree, append a starting point for the scan, such as http://www.myserver.com/myapplication/.
Scans by IP address do not pursue links that use fully qualified URLs (as opposed to relative paths).
Fortify WebInspect and Fortify WebInspect Enterprise support both Internet Protocol version 4 (IPV4) and Internet Protocol version 6 (IPV6). IPV6 addresses must be enclosed in brackets.
Note: Fortify WebInspect supports Internet Protocol version 6 (IPv6) addresses in web site and web service scans. When you specify the Start URL, you must enclose the IPv6 address in brackets. For example:
l http://[::1]
Fortify WebInspect scans "localhost."
l http://[fe80::20c:29ff:fe32:bae1]/subfolder/
Fortify WebInspect scans the host at the specified address starting in the "subfolder" directory.
l http://[fe80::20c:29ff:fe32:bae1]:8080/subfolder/
Fortify WebInspect scans a server running on port 8080 starting in "subfolder."
2. (Optional) To limit the scope of the scan to an area, select the Restrict to Folder check box, and then select one of the following options from the list:
l Directory only (self). Fortify WebInspect and Fortify WebInspect Enterprise will crawl and/or audit only the URL you specify. For example, if you select this option and specify a URL of www.mycompany/one/two/, Fortify WebInspect or Fortify WebInspect Enterprise will assess only the "two" directory.
l Directory and subdirectories. Fortify WebInspect or Fortify WebInspect Enterprise will begin crawling and/or auditing at the URL you specify, but will not access any directory that is higher
User GuideChapter 4: Working with Scans
Micro Focus Fortify WebInspect (21.1.0) Page 124 of 461
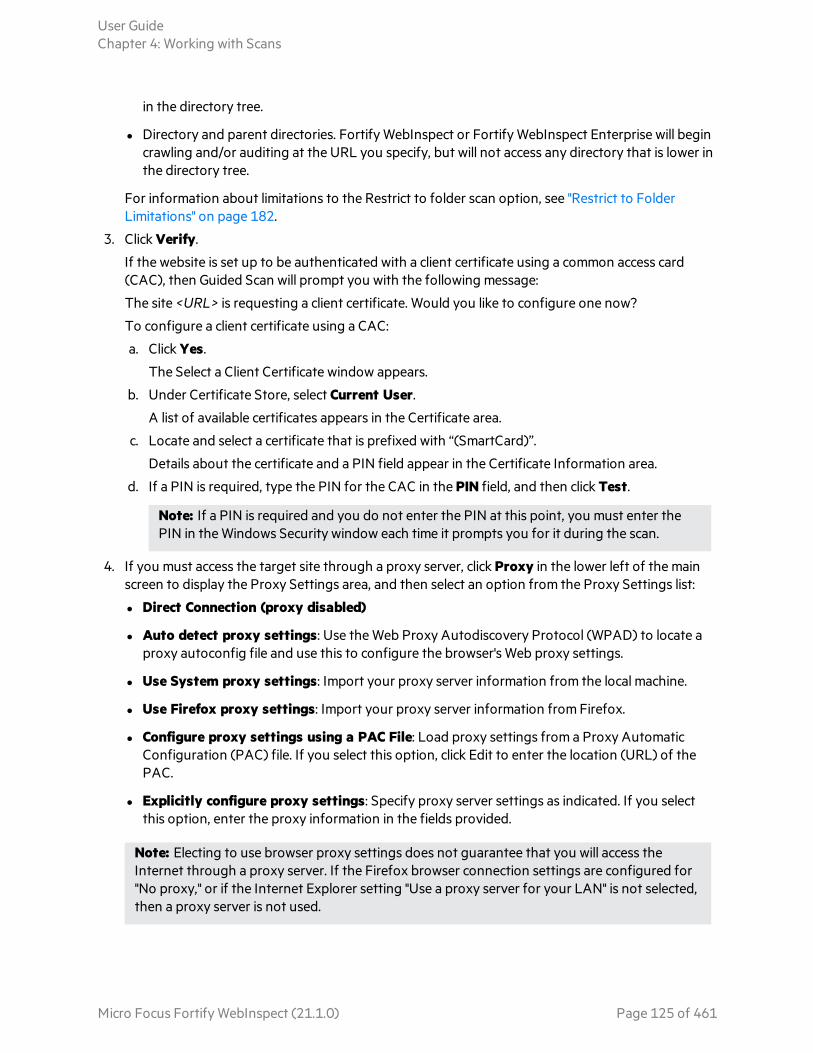
in the directory tree.
l Directory and parent directories. Fortify WebInspect or Fortify WebInspect Enterprise will begin crawling and/or auditing at the URL you specify, but will not access any directory that is lower in the directory tree.
For information about limitations to the Restrict to folder scan option, see "Restrict to Folder Limitations" on page 182.
3. Click Verify.
If the website is set up to be authenticated with a client certificate using a common access card (CAC), then Guided Scan will prompt you with the following message:
The site <URL> is requesting a client certificate. Would you like to configure one now?
To configure a client certificate using a CAC:
a. Click Yes.
The Select a Client Certificate window appears.
b. Under Certificate Store, select Current User.
A list of available certificates appears in the Certificate area.
c. Locate and select a certificate that is prefixed with “(SmartCard)”.
Details about the certificate and a PIN field appear in the Certificate Information area.
d. If a PIN is required, type the PIN for the CAC in the PIN field, and then click Test.
Note: If a PIN is required and you do not enter the PIN at this point, you must enter the PIN in the Windows Security window each time it prompts you for it during the scan.
4. If you must access the target site through a proxy server, click Proxy in the lower left of the main screen to display the Proxy Settings area, and then select an option from the Proxy Settings list:
l Direct Connection (proxy disabled)
l Auto detect proxy settings: Use the Web Proxy Autodiscovery Protocol (WPAD) to locate a proxy autoconfig file and use this to configure the browser's Web proxy settings.
l Use System proxy settings: Import your proxy server information from the local machine.
l Use Firefox proxy settings: Import your proxy server information from Firefox.
l Configure proxy settings using a PAC File: Load proxy settings from a Proxy Automatic Configuration (PAC) file. If you select this option, click Edit to enter the location (URL) of the PAC.
l Explicitly configure proxy settings: Specify proxy server settings as indicated. If you select this option, enter the proxy information in the fields provided.
Note: Electing to use browser proxy settings does not guarantee that you will access the Internet through a proxy server. If the Firefox browser connection settings are configured for "No proxy," or if the Internet Explorer setting "Use a proxy server for your LAN" is not selected, then a proxy server is not used.
User GuideChapter 4: Working with Scans
Micro Focus Fortify WebInspect (21.1.0) Page 125 of 461
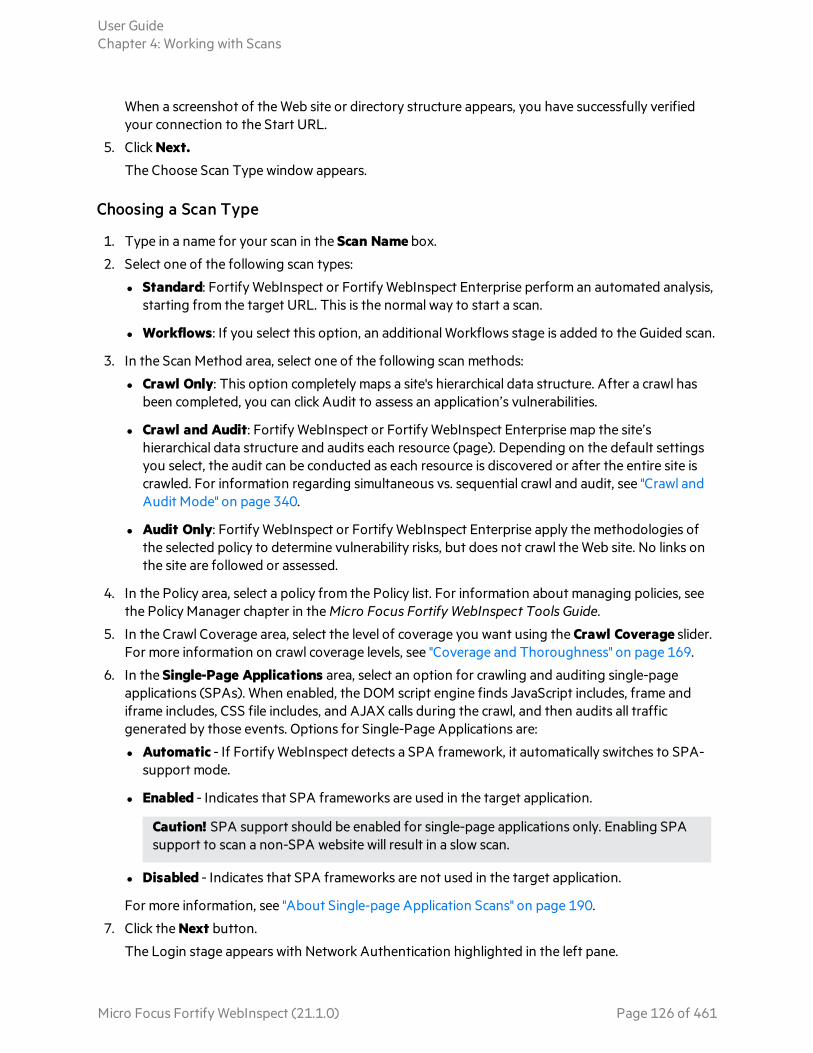
When a screenshot of the Web site or directory structure appears, you have successfully verified your connection to the Start URL.
5. Click Next.The Choose Scan Type window appears.
Choosing a Scan Type
1. Type in a name for your scan in the Scan Name box.
2. Select one of the following scan types:
l Standard: Fortify WebInspect or Fortify WebInspect Enterprise perform an automated analysis, starting from the target URL. This is the normal way to start a scan.
l Workflows: If you select this option, an additional Workflows stage is added to the Guided scan.
3. In the Scan Method area, select one of the following scan methods:
l Crawl Only: This option completely maps a site's hierarchical data structure. After a crawl has been completed, you can click Audit to assess an application’s vulnerabilities.
l Crawl and Audit: Fortify WebInspect or Fortify WebInspect Enterprise map the site’s hierarchical data structure and audits each resource (page). Depending on the default settings you select, the audit can be conducted as each resource is discovered or after the entire site is crawled. For information regarding simultaneous vs. sequential crawl and audit, see "Crawl and Audit Mode" on page 340.
l Audit Only: Fortify WebInspect or Fortify WebInspect Enterprise apply the methodologies of the selected policy to determine vulnerability risks, but does not crawl the Web site. No links on the site are followed or assessed.
4. In the Policy area, select a policy from the Policy list. For information about managing policies, see the Policy Manager chapter in the Micro Focus Fortify WebInspect Tools Guide.
5. In the Crawl Coverage area, select the level of coverage you want using the Crawl Coverage slider. For more information on crawl coverage levels, see "Coverage and Thoroughness" on page 169.
6. In the Single-Page Applications area, select an option for crawling and auditing single-page applications (SPAs). When enabled, the DOM script engine finds JavaScript includes, frame and iframe includes, CSS file includes, and AJAX calls during the crawl, and then audits all traffic generated by those events. Options for Single-Page Applications are:
l Automatic - If Fortify WebInspect detects a SPA framework, it automatically switches to SPA-support mode.
l Enabled - Indicates that SPA frameworks are used in the target application.
Caution! SPA support should be enabled for single-page applications only. Enabling SPA support to scan a non-SPA website will result in a slow scan.
l Disabled - Indicates that SPA frameworks are not used in the target application.
For more information, see "About Single-page Application Scans" on page 190.
7. Click the Next button.
The Login stage appears with Network Authentication highlighted in the left pane.
User GuideChapter 4: Working with Scans
Micro Focus Fortify WebInspect (21.1.0) Page 126 of 461
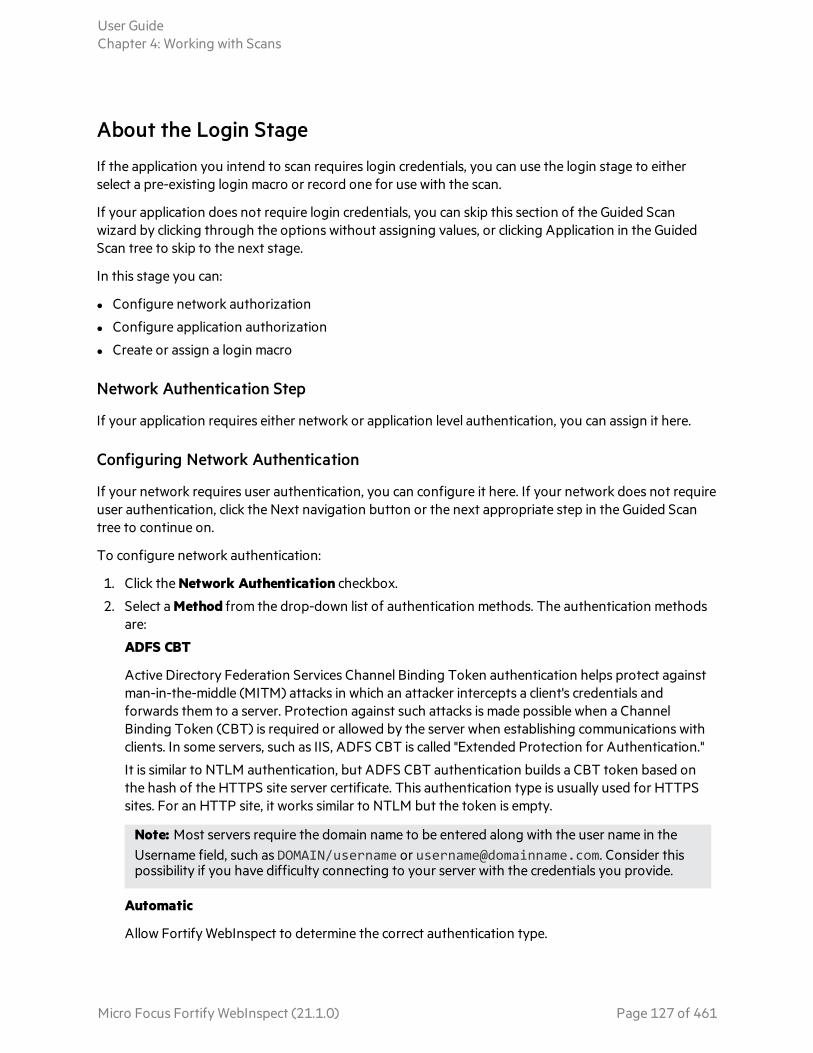
About the Login Stage
If the application you intend to scan requires login credentials, you can use the login stage to either select a pre-existing login macro or record one for use with the scan.
If your application does not require login credentials, you can skip this section of the Guided Scan wizard by clicking through the options without assigning values, or clicking Application in the Guided Scan tree to skip to the next stage.
In this stage you can:
l Configure network authorization
l Configure application authorization
l Create or assign a login macro
Network Authentication Step
If your application requires either network or application level authentication, you can assign it here.
Configuring Network Authentication
If your network requires user authentication, you can configure it here. If your network does not require user authentication, click the Next navigation button or the next appropriate step in the Guided Scan tree to continue on.
To configure network authentication:
1. Click the Network Authentication checkbox.
2. Select a Method from the drop-down list of authentication methods. The authentication methods are:
ADFS CBT
Active Directory Federation Services Channel Binding Token authentication helps protect against man-in-the-middle (MITM) attacks in which an attacker intercepts a client's credentials and forwards them to a server. Protection against such attacks is made possible when a Channel Binding Token (CBT) is required or allowed by the server when establishing communications with clients. In some servers, such as IIS, ADFS CBT is called "Extended Protection for Authentication."
It is similar to NTLM authentication, but ADFS CBT authentication builds a CBT token based on the hash of the HTTPS site server certificate. This authentication type is usually used for HTTPS sites. For an HTTP site, it works similar to NTLM but the token is empty.
Note: Most servers require the domain name to be entered along with the user name in the Username field, such as DOMAIN/username or [email protected]. Consider this possibility if you have difficulty connecting to your server with the credentials you provide.
Automatic
Allow Fortify WebInspect to determine the correct authentication type.
User GuideChapter 4: Working with Scans
Micro Focus Fortify WebInspect (21.1.0) Page 127 of 461

Automatic detection slows the scanning process. If you know and specify one of the other authentication methods, scanning performance is noticeably improved.
Basic
A widely used, industry-standard method for collecting user name and password information.
a. The Web browser displays a window for a user to enter a previously assigned user name and password, also known as credentials.
b. The Web browser then attempts to establish a connection to a server using the user's credentials.
c. If a user's credentials are rejected, the browser displays an authentication window to re-enter the user's credentials. Internet Explorer allows the user three connection attempts before failing the connection and reporting an error to the user.
d. If the Web server verifies that the user name and password correspond to a valid user account, a connection is established.
The advantage of Basic authentication is that it is part of the HTTP specification and is supported by most browsers. The disadvantage is that Web browsers using Basic authentication transmit passwords in an unencrypted form. By monitoring communications on your network, an attacker can easily intercept and decode these passwords using publicly available tools. Therefore, Basic authentication is not recommended unless you are confident that the connection between the user and your Web server is secure.
Digest
The Windows Server operating system implements the Digest Authentication protocol as a security support provider (SSP), a dynamic-link library (DLL) that is supplied with the operating system. Using digest authentication, your password is never sent across the network in the clear, but is always transmitted as an MD5 digest of the user's password. In this way, the password cannot be determined by sniffing network traffic.
Kerberos
Kerberos uses the Needham-Schroeder protocol as its basis. It uses a trusted third party, termed a Key Distribution Center (KDC), which consists of two logically separate parts: an Authentication Server (AS) and a Ticket Granting Server (TGS). The client authenticates itself to AS, then demonstrates to the TGS that it is authorized to receive a ticket for a service (and receives it). The client then demonstrates to a Service Server that it has been approved to receive the service.
Negotiate
The Negotiate authentication protocol begins with the option to negotiate for an authentication protocol. When the client requests access to a service, the server replies with a list of authentication protocols that it can support and an authentication challenge based on the protocol that is its first choice.
For example, the server might list Kerberos and NTLM, and send a Kerberos challenge. The client examines the contents of the reply and checks to determine whether it supports any of the specified protocols. If the client supports the preferred protocol, authentication proceeds. If the client does not support the preferred protocol, but does support one of the other protocols listed
User GuideChapter 4: Working with Scans
Micro Focus Fortify WebInspect (21.1.0) Page 128 of 461

by the server, the client lets the server know which authentication protocol it supports, and the authentication proceeds. If the client does not support any of the listed protocols, the authentication exchange fails.
NT LAN Manager (NTLM)
NTLM is an authentication process that is used by all members of the Windows NT family of products. Like its predecessor LanMan, NTLM uses a challenge/response process to prove the client’s identity without requiring that either a password or a hashed password be sent across the network.
Use NTLM authentication for servers running IIS. If NTLM authentication is enabled, and Fortify WebInspect has to pass through a proxy server to submit its requests to the Web server, Fortify WebInspect may not be able to crawl or audit that Web site.
Caution! After configuring Fortify WebInspect for NTLM authentication and scanning the NTLM-protected sites, you might want to disable the NTLM authentication settings to prevent any potential problem.
3. To use a client certificate for network authentication, select Client Certificate.
Note: You can add a client certificate to a Windows phone, but the only way to subsequently remove it is to restore the phone to its default settings.
4. In the Certificate Store area, select one of the following, and then select either the My or Root radio button:
l Local Machine. Fortify WebInspect uses a certificate on the local machine based on your selection in the Certificate Store area.
l Current User. Fortify WebInspect uses a certificate for the current user based on your selection in the Certificate Store area.
5. To view certificate details in the Certificate Information area, select a certificate.
6. Click the Next button.
The Application Authentication page appears.
Application Authentication Step
If your site requires authentication, you can use this step to create, select, or edit a login macro to automate the login process and increase the coverage of your site. A login macro is a recording of the activity that is required to access and log in to your application, typically by entering a user name and password and clicking a button such as Log In or Log On.
If Enable macro validation is selected in Scan Settings: Authentication for scans that use a login macro, Fortify WebInspect tests the login macro at the start of the scan to ensure that the log in is successful. If the macro is invalid and fails to log in to the application, the scan stops and an error message is written in the scan log file. For more information and troubleshooting tips, see "Testing Login Macros" on page 457.
User GuideChapter 4: Working with Scans
Micro Focus Fortify WebInspect (21.1.0) Page 129 of 461

The following options are available for login macros:
l "Using a Login Macro without Privilege Escalation " below
l "Using Login Macros for Privilege Escalation" below
l "Using a Login Macro when Connected to Fortify WebInspect Enterprise" on the next page
Masked Values Supported
If the macro uses parameters for which values are masked in the Web Macro Recorder, then these values are also masked when configuring a Guided Scan in Fortify WebInspect.
Using a Login Macro without Privilege Escalation
To use a login macro:
1. Select the Use a login macro for this site check box.
2. Do one of the following:
l To use a pre-recorded login macro, click the ellipsis button (...) to browse for a saved macro.
l To edit an existing login macro shown in the Login Macro field, click Edit.
l To record a new macro, click Create.
For details about recording a new login macro or using an existing login macro, see the Web Macro Recorder chapters in the Micro Focus Fortify WebInspect Tools Guide.
3. Click the Next button.
If you selected a Standard scan, the Optimization Tasks page appears. If you selected a Workflows scan, the Manage Workflows page appears.
Using Login Macros for Privilege Escalation
If you selected the Privilege Escalation policy or another policy that includes enabled Privilege Escalation checks, at least one login macro for a high-privilege user account is required. For more information, see "About Privilege Escalation Scans" on page 187.
To use login macros:
1. Select the High-Privilege User Account Login Macro check box. This login macro is for the higher-privilege user account, such as a Site Administrator or Moderator account.
2. Do one of the following:
l To use a pre-recorded login macro, click the ellipsis button (...) to browse for a saved macro.
l To edit an existing login macro shown in the Login Macro field, click Edit.
l To record a new macro, click Create.
For details about recording a new login macro or using an existing login macro, see the Web Macro Recorder chapters in the Micro Focus Fortify WebInspect Tools Guide.
After recording or selecting the first macro and clicking the next arrow, a "Configure Low Privilege Login Macro" prompt appears.
User GuideChapter 4: Working with Scans
Micro Focus Fortify WebInspect (21.1.0) Page 130 of 461
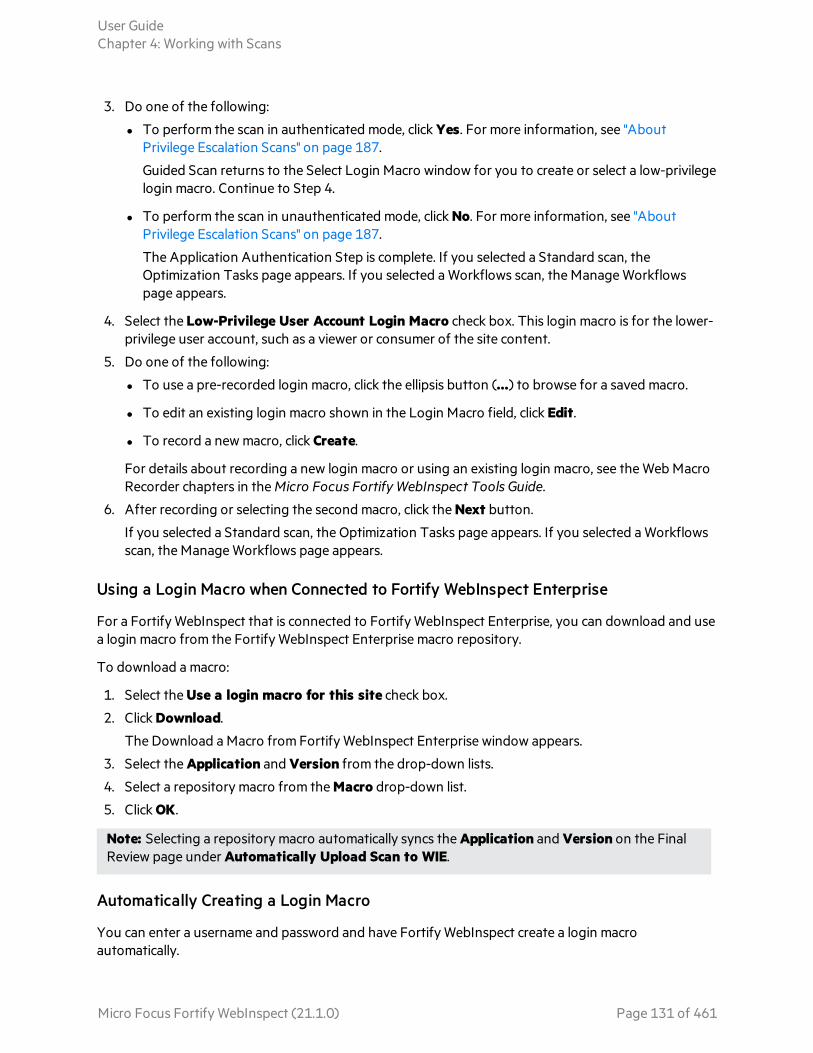
3. Do one of the following:
l To perform the scan in authenticated mode, click Yes. For more information, see "About Privilege Escalation Scans" on page 187.
Guided Scan returns to the Select Login Macro window for you to create or select a low-privilege login macro. Continue to Step 4.
l To perform the scan in unauthenticated mode, click No. For more information, see "About Privilege Escalation Scans" on page 187.
The Application Authentication Step is complete. If you selected a Standard scan, the Optimization Tasks page appears. If you selected a Workflows scan, the Manage Workflows page appears.
4. Select the Low-Privilege User Account Login Macro check box. This login macro is for the lower-privilege user account, such as a viewer or consumer of the site content.
5. Do one of the following:
l To use a pre-recorded login macro, click the ellipsis button (...) to browse for a saved macro.
l To edit an existing login macro shown in the Login Macro field, click Edit.
l To record a new macro, click Create.
For details about recording a new login macro or using an existing login macro, see the Web Macro Recorder chapters in the Micro Focus Fortify WebInspect Tools Guide.
6. After recording or selecting the second macro, click the Next button.
If you selected a Standard scan, the Optimization Tasks page appears. If you selected a Workflows scan, the Manage Workflows page appears.
Using a Login Macro when Connected to Fortify WebInspect Enterprise
For a Fortify WebInspect that is connected to Fortify WebInspect Enterprise, you can download and use a login macro from the Fortify WebInspect Enterprise macro repository.
To download a macro:
1. Select the Use a login macro for this site check box.
2. Click Download.
The Download a Macro from Fortify WebInspect Enterprise window appears.
3. Select the Application and Version from the drop-down lists.
4. Select a repository macro from the Macro drop-down list.
5. Click OK.
Note: Selecting a repository macro automatically syncs the Application and Version on the Final Review page under Automatically Upload Scan to WIE.
Automatically Creating a Login Macro
You can enter a username and password and have Fortify WebInspect create a login macro automatically.
User GuideChapter 4: Working with Scans
Micro Focus Fortify WebInspect (21.1.0) Page 131 of 461

Note: You cannot automatically create login macros for privilege-escalation and multi-user login scans or for any scan using the Session-based rendering engine.
To automatically create a login macro:
1. Select Auto-gen Login Macro.
2. Type a username in the Username field.
3. Type a password in the Password field.
Optionally, click Test to locate the login form, generate the macro, and run macro validation tests before advancing to the next stage in the Guided Scan wizard. If you need to cancel the validation test prior to completion, click Cancel.
Important! To use an automatically-generated macro in the Workflows stage or the Enhanced Coverage task of Guided Scan, you must click Test to generate a macro.
If the macro is invalid and fails to log in to the application, an error message appears. For more information and troubleshooting tips, see "Testing Login Macros" on page 457.
About the Workflows Stage
The Workflows stage only appears if you selected Workflows as the Scan Type in the Site stage. If you chose Standard, the Workflows stage will not appear.
You can create a Workflow macro to ensure Fortify WebInspect audits the pages you specify in the macro. Fortify WebInspect audits only those URLs included in the macro and does not follow any hyperlinks encountered during the audit.
You can create multiple Workflows macros; one for each use case on your site. A logout signature is not required. This type of macro is used most often to focus on a particular subsection of the application. If you select multiple macros, they will all be included in the same scan. In addition to allowing you to select multiple macros, you can also import Burp proxy captures and add them to your scan.
Important! If you use a login macro in conjunction with a workflow macro or startup macro or both, all macros must be of the same type: all .webmacro files or all Burp Proxy captures. You cannot use different types of macros in the same scan.
To complete the Workflows settings, click any of the following in the Workflows table:
l Record. Opens the Web Macro Recorder, allowing you to create a macro.
l Edit. Opens the Web Macro Recorder and loads the selected macro.
l Delete. Removes the selected macro (but does not delete it from your disk).
l Import. Opens a standard file-selection window, allowing you to select a previously recorded .webmacro file or Burp Proxy captures.
Note: If you have installed Micro Focus Unified Functional Testing (UFT) on your computer, then Fortify WebInspect detects this automatically and displays an option to import a UFT .usr file.
User GuideChapter 4: Working with Scans
Micro Focus Fortify WebInspect (21.1.0) Page 132 of 461

For more information, see "Importing Micro Focus Unified Functional Testing (UFT) Files in a Guided Scan" on page 137.
l Export a recorded macro. After a macro is selected or recorded, you may optionally specify allowed hosts. Opens a standard file-selection window, allowing you to save a recorded macro.
After you specify and play a workflow macro, it appears in the Workflows table and its Allowed Hosts are added to the Guided Scan > Workflows > Workflows > Manager Workflow page. You can enable or disable access to particular hosts. For more information, see "Scan Settings: Allowed Hosts" on page 355.
Adding Burp Proxy Results
If you have run Burp Proxy security tests, the traffic collected during those tests can be imported into a Workflows macro, reducing the time it would otherwise take to rescan the same areas.
Adding Burp Proxy Results
To add Burp Proxy results to a workflow macro:
1. If you are not on the Workflows screen, click on the Manage Workflows step in the Guided Scan tree.
2. Click the Import button.
The Import Macro file selector appears.
3. Change the file type box filter from Web Macro (*.webmacro) to Burp Proxy (*.*). 4. Navigate to your Burp Proxy files and select the desired file.
5. Click Open.
About the Active Learning Stage
During the Active Learning stage:
l The WebInspect Profiler is run to see if any settings need to be modified.
l Set scan optimization option if necessary.
Using the Profiler
The WebInspect Profiler conducts a preliminary examination of the target Web site to determine if certain settings should be modified. If changes appear to be required, the Profiler returns a list of suggestions, which you may accept or reject.
For example, the Profiler may detect that authorization is required to enter the site, but you have not specified a valid user name and password. Rather than proceed with a scan that would return significantly diminished results, you could follow the Profiler’s suggestion to configure the required information before continuing.
Similarly, your settings may specify that Fortify WebInspect should not conduct "file-not-found" detection. This process is useful for Web sites that do not return a status "404 Not Found" when a client
User GuideChapter 4: Working with Scans
Micro Focus Fortify WebInspect (21.1.0) Page 133 of 461

requests a resource that does not exist (they may instead return a status "200 OK," but the response contains a message that the file cannot be found). If the Profiler determines that such a scheme has been implemented in the target site, it would suggest that you modify the Fortify WebInspect setting to accommodate this feature.
To launch the Profiler:
1. Click Profile.
The Profiler runs. For more information, see "Server Profiler" on page 231.
Results appear in the Optimize scan for box in the Settings section .
2. If necessary, provide any requested information.
3. Click the Next button.
Several options may be presented even if you do not run the Profiler, as described in the following sections.
Autofill Web Forms
Select Auto-fill Web forms during crawl if you want Fortify WebInspect to submit values for input controls on forms it encounters while scanning the target site. Fortify WebInspect will extract the values from a prepackaged default file or from a file that you create using the Web Form Editor. See the Web Form Editor chapter in the Micro Focus Fortify WebInspect Tools Guide. You may:
1. Click the browser button to locate and load a file.
2. Click Edit to edit the selected file (or the default values) using the Web Form Editor.
3. Click Create to open the Web Form Editor and create a file.
Add Allowed Hosts
Use the Allowed Host settings to add domains to be crawled and audited. If your Web presence uses multiple domains, add those domains here. For more information, see "Scan Settings: Allowed Hosts" on page 355.
To add allowed domains:
1. Click Add.
2. In the Specify Allowed Host window, enter a URL (or a regular expression representing a URL) and click OK.
Reuse Identified False Positives
Select scans containing vulnerabilities that were changed to false positives. If those false positives match vulnerabilities detected in this scan, the vulnerabilities will be changed to false positives. For more information, see "False Positives" on page 82.
To reuse identified false positives:
1. Select Import False Positives.
2. Click Select Scans.
3. Select one or more scans containing false positives from the same site you are now scanning.
4. Click OK.
User GuideChapter 4: Working with Scans
Micro Focus Fortify WebInspect (21.1.0) Page 134 of 461

Apply Sample Macro
Fortify WebInspect’s example banking application, zero.webappsecurity.com, uses a Web form login. If you scan this site, select Apply sample macro to run the prepackaged macro containing the login script.
Traffic Analysis
Select Launch and Direct Traffic through Web Proxy to use the Web Proxy tool to examine the HTTP requests issued by Fortify WebInspect and the responses returned by the target server.
While scanning a Web site, Fortify WebInspect displays in the navigation pane only those sessions that reveal the hierarchical structure of the Web site, plus those sessions in which a vulnerability was discovered. However, if you select Enable Traffic Monitor, Fortify WebInspect adds the Traffic Monitor button to the Scan Info panel, allowing you to display and review each HTTP request sent by Fortify WebInspect and the associated HTTP response received from the server.
Message
If the Profiler does not recommend changes, the Guided Scan wizard displays the message "No settings changes are recommended. Your current scan settings are optimal for this site."
Click Next.
The Final Review page appears with Configure Detailed Options highlighted in the left pane.
About the Settings Stage
To configure detailed options, specify any of the following settings.
Reuse Identified False Positives
Select the False Positives box to reuse false positives that Fortify WebInspect has already identified.
Traffic Analysis
1. To use the Web Proxy tool, select Launch and Direct Traffic through Web Proxy to use the Web Proxy tool to examine the HTTP requests issued by Fortify WebInspect and the responses returned by the target server.
Web Proxy is a stand-alone, self-contained proxy server that you can configure and run on your desktop. Web Proxy allows you to monitor traffic from a scanner, a Web browser, or any other tool that submits HTTP requests and receives responses from a server. Web Proxy is a tool for a debugging and penetration scan; you can view every request and server response while browsing a site.
2. Select the Traffic Monitor box to display and review each HTTP request sent by Fortify WebInspect and the associated HTTP response received from the server.
While scanning a Web site, Fortify WebInspect displays only those sessions that reveal the hierarchical structure of the Web site, plus those sessions in which a vulnerability was discovered. However, if you select Enable Traffic Monitor, Fortify WebInspect allows you to display and review each HTTP request sent by Fortify WebInspect and the associated HTTP response received from the server.
3. Click Next.
User GuideChapter 4: Working with Scans
Micro Focus Fortify WebInspect (21.1.0) Page 135 of 461

The Validate Settings and Start Scan page appears with Configure Detailed Options highlighted in the left pane.
Validate Settings and Start Scan
Options on this page allow you to save the current scan settings and, if WebInspect is integrated with WebInspect Enterprise, to interact with WebInspect Enterprise.
1. To save your scan settings as an XML file, select Click here to save settings. Use the standard Save as window to name and save the file.
2. If WebInspect is integrated with WebInspect Enterprise, a Templates section appears in the toolbar. Continue according to the following table.
If you want to… Then…
Save the current scan settings as a template in the WebInspect Enterprise database
Note: When editing an existing template, the Save is actually an update. You can save any edits to settings and change the Template Name. However, you cannot change the Application, Version, or Global Template settings.
a. Do one of the following:
o Click Save in the Templates section of the toolbar.
o Select Click here to save template.
The Save Template window appears.
b. Select an application from the Application drop-down list.
c. Select an application version from the Version drop-down list.
d. Type a name in the Template field.
Load scan settings from a template a. Click Load in the Templates section of the toolbar.
A confirmation message appears advising that your current scan settings will be lost.
b. Click Yes.
The Load Template window appears.
c. Select an application from the Application drop-down list.
d. Select an application version from the Version drop-down list.
e. Select the template from the Template drop-down list.
f. Click Load.
Guided Scan returns to the Site Stage for you to verify the Web site and step through the
User GuideChapter 4: Working with Scans
Micro Focus Fortify WebInspect (21.1.0) Page 136 of 461

If you want to… Then…
settings from the template.
3. If WebInspect is integrated with WebInspect Enterprise, the WebInspect Enterprise section appears on this page. You can interact with WebInspect Enterprise as follows:
a. Select an application from the Application drop-down list.
b. Select an application version from the Version drop-down list.
c. Continue according to the following table.
To run the scan… Then…
With a sensor in WebInspect Enterprise
i. Select Run in WebInspect Enterprise.
ii. Select a sensor from the Sensor drop-down list.
iii. Select a Priority for the scan.
In WebInspect i. Select Run in WebInspect.
ii. If you want to automatically upload the scan results to the specified application and version in WebInspect Enterprise, select Auto Upload to WebInspect Enterprise.
Note: If the scan does not complete successfully, it will not be uploaded to WebInspect Enterprise.
4. In the Scan Now area, review your scan settings, and then click Start Scan to begin the scan.
Importing Micro Focus Unified Functional Testing (UFT) Files in a Guided Scan
If you have the Micro Focus Unified Functional Testing application installed, Fortify WebInspect detects it and allows you to import a UTF file (.usr) into your workflow scan to enhance the thoroughness and attack surface of your scan. For more information, see Unified Functional Testing on the Micro Focus Web site.
To import a UTF (.usr) file into a Fortify WebInspect Guided Scan:
1. Launch a Guided Scan, and then select Workflows Scan as the Scan Type. Additional text appears under the Workflows scan option: Micro Focus Unified Functional Testing has been detected. You can import scripts to improve the thoroughness of your security test.
2. Click the Next button.
3. In the Authentication section, Application Authentication is automatically selected. Complete the fields as indicated.
User GuideChapter 4: Working with Scans
Micro Focus Fortify WebInspect (21.1.0) Page 137 of 461

4. On the Manage Workflows screen, click Import. The Import Scripts dialog box appears. On the Import Scripts dialog box, you may:
l Type the filename.
l Browse to your file by clicking to locate your file with a .usr extension. Select Micro Focus Unified Functional Testing from the drop-down file type, and then navigate to the file.
l Click Edit to launch the Micro Focus Unified Functional Testing application.
5. (Optional) On the Import Scripts dialog box, you may select either of the following options:
l Show Micro Focus Unified Functional Testing UI during import
l Open script result after import
6. Select the file to import, and then click Import. After your file is successfully imported, the file appears in the Workflows table.
7. Select one of the following from the Workflows table:
l Record - launches the Web Macro Recorder. For more information, see the Web Macro Recorder chapters in the Micro Focus Fortify WebInspect Tools Guide.
l Edit - allows you to modify the file using the Web Macro Recorder. See the Web Macro Recorder chapters in the Micro Focus Fortify WebInspect Tools Guide.
l Delete - deletes the script from the Workflows table.
l Import - imports another file.
l Export - saves a file in .webmacro format with the name and location you specify
8. Click the Next button.
When the first .usr script file is added to the list, its name (or default name) appears in the Workflows table and an Allowed Hosts table is added to the pane.
Adding another .usr script file can add more allowed hosts. Any host that is enabled is available to all the listed workflow .usr script files, not just the workflow.usr file for which it was added. The Guided Scan will play all the listed workflow files and make requests to all the listed allowed hosts, whether or not their check boxes are selected. If a check box for an allowed host is selected, Fortify WebInspect will crawl or audit the responses from that host. If a check box is not selected, Fortify WebInspect will not crawl or audit the responses from that host. In addition, if a particular workflows .usr script uses parameters, a Macro Parameters table is displayed when that workflow macro is selected in the list. Edit the values of the parameters as needed.
9. After you have completed changes or additions to the Workflows table, proceed in the Guided Scan wizard to complete your settings and run the scan. For more information about recording a new login macro or using an existing login macro, see the Web Macro Recorder chapters in the Micro Focus Fortify WebInspect Tools Guide.
See Also
"Guided Scan Overview " on page 105
User GuideChapter 4: Working with Scans
Micro Focus Fortify WebInspect (21.1.0) Page 138 of 461

Using the Native Scan TemplateFortify WebInspect and Fortify WebInspect Enterprise allow you to scan the back-end traffic generated by your Android or iOS app or service. Traffic can be generated by running your application on an Android, Windows, or iOS device, or by running the software through an Android or iOS emulator.
The Guided Scan wizard will step you through the necessary stages and steps required to scan your application back-end traffic. If you need to return to a previous step or stage, click the back navigation button, or click the step in the Guided Scan tree to be taken directly there.
Important! Due to limitations with SQL Express, running multiple scans using a SQL Express database may cause unsatisfactory results. For this reason, Fortify recommends not conducting concurrent (or parallel) scans for installations using SQL Express.
Setting Up Your Mobile Device
Running a native scan requires that you configure the mobile device to work with a secure proxy. In order to do that, you will need to:
l Set up a Mobile Device/Emulator Proxy (see "Setting the Mobile Device Proxy Address" on page 141)
l Install a Trusted Certificate (see "Adding a Trusted Certificate" on page 142)
Guided Scan Stages
A Guided Scan using a mobile template consists of four or five stages, each of which has one or more steps. The stages are:
Native Mobile: where you choose a device or emulator, configure device/emulator proxy, and select the type of scan you want to run.
Login: where you define the type of authentication if back-end of your mobile application requires it.
Application: where you run your app, record Web traffic, and identify the hosts and RESTful endpoints to include in your scan.
Settings: where you review and validate your choices and run the scan.
Supported Devices
Fortify WebInspect and Fortify WebInspect Enterprise support scanning the back-end traffic on Android, Windows, and iOS devices.
Android Device Support
Any Android device, such as an Android-based phone or tablet.
User GuideChapter 4: Working with Scans
Micro Focus Fortify WebInspect (21.1.0) Page 139 of 461

Windows Device Support
Any Windows device, such as a Windows phone or Surface tablet.
iOS Device Support
Any iOS device, such as a iPhone or iPad, running the latest version of iOS.
Supported Development Emulators
In addition to support for Android and iOS devices, you can run your application through your Android or iOS emulator in your development environment. When scanning traffic generated via your device emulator, you must ensure that the development machine is on the same network as Fortify WebInspect or Fortify WebInspect Enterprise and that you have set up a proxy between Fortify WebInspect or Fortify WebInspect Enterprise and your development machine.
Launching a Native Scan
In order to launch a Native Scan, you will need to make sure your device or emulator is on the same network as Fortify WebInspect. In addition, you need to have authorization and access to the ports on the machine where you are running Fortify WebInspect in order to successfully create a proxy connection.
To launch a Native Scan:
1. Open Fortify WebInspect or Fortify WebInspect Enterprise.
2. Start a Guided Scan:
l For Fortify WebInspect, click Start a Guided Scan on the Fortify WebInspect Start page.
l For Fortify WebInspect Enterprise, click Guided Scan under Actions on the Web Console.
3. Select Native Scan from the Mobile Templates section.
The Guided Scan wizard displays the first step in the Native Mobile stage: Choose Device/Emulator.
About the Native Mobile Stage
The first stage in the process is the Native Mobile stage. In this stage you will:
l Set up the device or emulator to use a proxy connection.
l Log the device or emulator on to the same network as your instance of Fortify WebInspect or Fortify WebInspect Enterprise.
l Install a client certificate on your device or emulator.
l Name the scan for future reference.
l Select a scan method.
l Select a scan policy.
l Select the crawl coverage amount.
User GuideChapter 4: Working with Scans
Micro Focus Fortify WebInspect (21.1.0) Page 140 of 461

Choose Device/Emulator Type Step
After launching the Guided Scan, you are provided with the options described in the following table.
Option Description
Profile The type of device or emulator you want to scan. Select a type from the drop-down menu. For more information, see "Selecting a Profile" below.
Mobile Device/Emulator Proxy
The IP address and port number for the proxy that Fortify WebInspect or Fortify WebInspect Enterprise creates for listening to the traffic between your device or emulator and the Web service or application being tested. Unless the IP address and/or port are reserved for other activities, use the default settings. For more information, see "Setting the Mobile Device Proxy Address" below.
Trusted Certificate
The port and URL to acquire a client certificate for your device or emulator. To download and install the certificate on your device or emulator, see "Adding a Trusted Certificate" on the next page.
Selecting a Profile
To set the device profile, select one of the following from the Profile drop-down textbox:
l iOS Device - An iPad or iPhone running the latest version of iOS.
l iOS Simulator - The iOS emulator that is part of the iOS SDK.
l Android Device - A phone or tablet running the Android operating system.
l Android Emulator - The Android emulator that is part of the Android SDK.
l Windows Device - A Windows phone or Surface tablet.
Setting the Mobile Device Proxy Address
The Mobile Device/Emulator Proxy section lists the Host IP address and the Port number that will be used to establish a proxy connection between your device or emulator and Fortify WebInspect or Fortify WebInspect Enterprise. Use the suggested settings unless the IP address or port number are unavailable on your system.
Note: If you are unable to connect to the server or access the Internet after setting your proxy, you may need to open up or change the port on your firewall specified in the Native Mobile stage. If it still does not work, you may need to select a different IP address. The IP address presented in the Fortify WebInspect/WebInspect Enterprise interface allows you to click the address and select an alternate from a drop-down list.
User GuideChapter 4: Working with Scans
Micro Focus Fortify WebInspect (21.1.0) Page 141 of 461

To set up a proxy on an iOS device:
1. Run the Settings application.
2. Select Wi-Fi. 3. Select the Wi-Fi network you are using to connect to Fortify WebInspect or Fortify WebInspect
Enterprise.
4. Scroll down to the HTTP Proxy section and select Manual.The screen displays the network configuration options for the network your device is connected to.
5. Scroll down further and type in the Server IP address and the Port number provided by Fortify WebInspect or Fortify WebInspect Enterprise. If you don't have this information, see "Choose Device/Emulator Type Step" on the previous page.
6. In Fortify WebInspect or Fortify WebInspect Enterprise, click the Verify button in the Trusted Certificate section to verify the connection is working properly.
The Verify activity progress bar appears.
7. Launch the default browser on your device and visit any site to verify that Fortify WebInspect or Fortify WebInspect Enterprise is able to see the back-end traffic.
If everything is configured properly, after a few moments, the Verify activity progress bar will state that the traffic has been successfully verified.
8. Click OK to dismiss the verification progress bar and then click Next to select a scan type.
To set up a proxy on an Android or Windows device, consult your operator’s instructions.
Adding a Trusted Certificate
If your site requires a secure connection, each time you run a scan, Fortify WebInspect or Fortify WebInspect Enterprise generates a unique client certificate for your device or emulator. You will need to install the certificate into the device’s (or emulator’s) certificate repository.
Note: You can add a client certificate to a Windows phone, but the only way to subsequently remove it is to restore the phone to its default settings.
There are three ways to add a certificate:
l Scan the QR code from the Trusted Certificate section of Guided Scan (requires QR reader software).
l Type the address into the built-in browser on your device or device emulator.
l Copy the certificate to your system clipboard for applying later (used when scanning with a device emulator).
Choose the option that best suits your needs.
Note: After completing the scan, you should remove the certificate from the repository on your device. See "Post Scan Steps " on page 152.
To Add a Certificate to an iOS device or emulator:
1. After scanning the QR code or typing the provided URL into your browser, the Install Profile page appears.
User GuideChapter 4: Working with Scans
Micro Focus Fortify WebInspect (21.1.0) Page 142 of 461
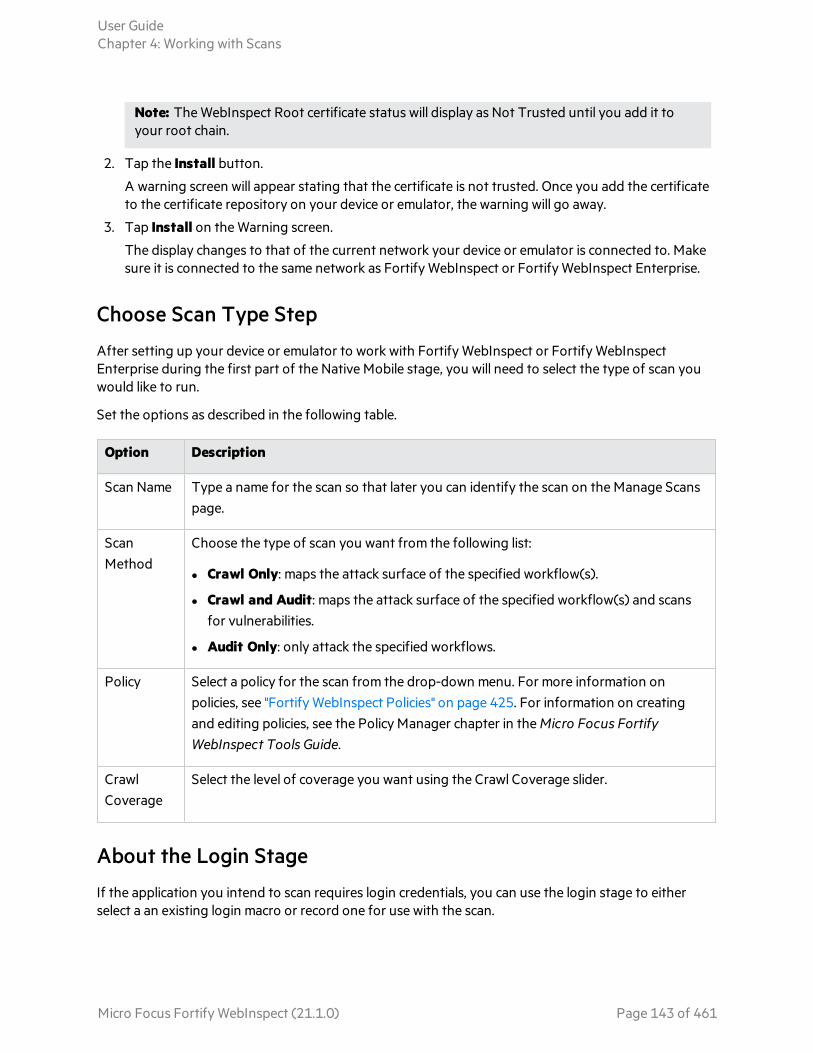
Note: The WebInspect Root certificate status will display as Not Trusted until you add it to your root chain.
2. Tap the Install button.
A warning screen will appear stating that the certificate is not trusted. Once you add the certificate to the certificate repository on your device or emulator, the warning will go away.
3. Tap Install on the Warning screen.
The display changes to that of the current network your device or emulator is connected to. Make sure it is connected to the same network as Fortify WebInspect or Fortify WebInspect Enterprise.
Choose Scan Type Step
After setting up your device or emulator to work with Fortify WebInspect or Fortify WebInspect Enterprise during the first part of the Native Mobile stage, you will need to select the type of scan you would like to run.
Set the options as described in the following table.
Option Description
Scan Name Type a name for the scan so that later you can identify the scan on the Manage Scans page.
Scan Method
Choose the type of scan you want from the following list:
l Crawl Only: maps the attack surface of the specified workflow(s).
l Crawl and Audit: maps the attack surface of the specified workflow(s) and scans for vulnerabilities.
l Audit Only: only attack the specified workflows.
Policy Select a policy for the scan from the drop-down menu. For more information on policies, see "Fortify WebInspect Policies" on page 425. For information on creating and editing policies, see the Policy Manager chapter in the Micro Focus Fortify WebInspect Tools Guide.
Crawl Coverage
Select the level of coverage you want using the Crawl Coverage slider.
About the Login Stage
If the application you intend to scan requires login credentials, you can use the login stage to either select a an existing login macro or record one for use with the scan.
User GuideChapter 4: Working with Scans
Micro Focus Fortify WebInspect (21.1.0) Page 143 of 461

If your application does not require login credentials, you can skip this section of the Guided Scan wizard by clicking through the options without assigning values, or clicking the next step in the Guided Scan tree to skip to the next stage.
In this stage you can:
l Configure network authorization
l Configure application authorization
l Create or assign a login macro
Network Authentication Step
If your application requires either network or application level authentication, you can assign it here.
Configuring Network Authentication
If your network requires user authentication, you can configure it here. If your network does not require user authentication, click the Next navigation button or the next appropriate step in the Guided Scan tree to continue on.
To configure network authentication:
1. Click the Network Authentication checkbox.
2. Select a Method from the drop-down list of authentication methods. The authentication methods are:
ADFS CBT
Active Directory Federation Services Channel Binding Token authentication helps protect against man-in-the-middle (MITM) attacks in which an attacker intercepts a client's credentials and forwards them to a server. Protection against such attacks is made possible when a Channel Binding Token (CBT) is required or allowed by the server when establishing communications with clients. In some servers, such as IIS, ADFS CBT is called "Extended Protection for Authentication."
It is similar to NTLM authentication, but ADFS CBT authentication builds a CBT token based on the hash of the HTTPS site server certificate. This authentication type is usually used for HTTPS sites. For an HTTP site, it works similar to NTLM but the token is empty.
Note: Most servers require the domain name to be entered along with the user name in the Username field, such as DOMAIN/username or [email protected]. Consider this possibility if you have difficulty connecting to your server with the credentials you provide.
Automatic
Allow Fortify WebInspect to determine the correct authentication type.
Automatic detection slows the scanning process. If you know and specify one of the other authentication methods, scanning performance is noticeably improved.
Basic
A widely used, industry-standard method for collecting user name and password information.
User GuideChapter 4: Working with Scans
Micro Focus Fortify WebInspect (21.1.0) Page 144 of 461

a. The Web browser displays a window for a user to enter a previously assigned user name and password, also known as credentials.
b. The Web browser then attempts to establish a connection to a server using the user's credentials.
c. If a user's credentials are rejected, the browser displays an authentication window to re-enter the user's credentials. Internet Explorer allows the user three connection attempts before failing the connection and reporting an error to the user.
d. If the Web server verifies that the user name and password correspond to a valid user account, a connection is established.
The advantage of Basic authentication is that it is part of the HTTP specification and is supported by most browsers. The disadvantage is that Web browsers using Basic authentication transmit passwords in an unencrypted form. By monitoring communications on your network, an attacker can easily intercept and decode these passwords using publicly available tools. Therefore, Basic authentication is not recommended unless you are confident that the connection between the user and your Web server is secure.
Digest
The Windows Server operating system implements the Digest Authentication protocol as a security support provider (SSP), a dynamic-link library (DLL) that is supplied with the operating system. Using digest authentication, your password is never sent across the network in the clear, but is always transmitted as an MD5 digest of the user's password. In this way, the password cannot be determined by sniffing network traffic.
Kerberos
Kerberos uses the Needham-Schroeder protocol as its basis. It uses a trusted third party, termed a Key Distribution Center (KDC), which consists of two logically separate parts: an Authentication Server (AS) and a Ticket Granting Server (TGS). The client authenticates itself to AS, then demonstrates to the TGS that it is authorized to receive a ticket for a service (and receives it). The client then demonstrates to a Service Server that it has been approved to receive the service.
Negotiate
The Negotiate authentication protocol begins with the option to negotiate for an authentication protocol. When the client requests access to a service, the server replies with a list of authentication protocols that it can support and an authentication challenge based on the protocol that is its first choice.
For example, the server might list Kerberos and NTLM, and send a Kerberos challenge. The client examines the contents of the reply and checks to determine whether it supports any of the specified protocols. If the client supports the preferred protocol, authentication proceeds. If the client does not support the preferred protocol, but does support one of the other protocols listed by the server, the client lets the server know which authentication protocol it supports, and the authentication proceeds. If the client does not support any of the listed protocols, the authentication exchange fails.
User GuideChapter 4: Working with Scans
Micro Focus Fortify WebInspect (21.1.0) Page 145 of 461
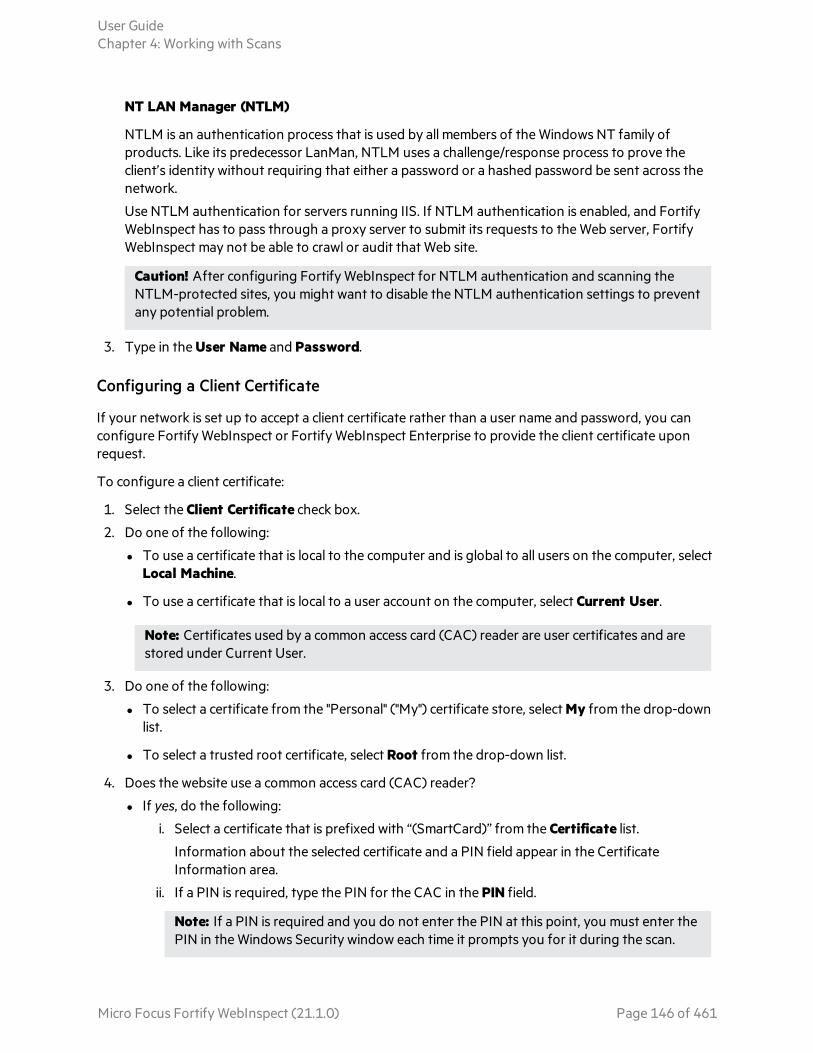
NT LAN Manager (NTLM)
NTLM is an authentication process that is used by all members of the Windows NT family of products. Like its predecessor LanMan, NTLM uses a challenge/response process to prove the client’s identity without requiring that either a password or a hashed password be sent across the network.
Use NTLM authentication for servers running IIS. If NTLM authentication is enabled, and Fortify WebInspect has to pass through a proxy server to submit its requests to the Web server, Fortify WebInspect may not be able to crawl or audit that Web site.
Caution! After configuring Fortify WebInspect for NTLM authentication and scanning the NTLM-protected sites, you might want to disable the NTLM authentication settings to prevent any potential problem.
3. Type in the User Name and Password.
Configuring a Client Certificate
If your network is set up to accept a client certificate rather than a user name and password, you can configure Fortify WebInspect or Fortify WebInspect Enterprise to provide the client certificate upon request.
To configure a client certificate:
1. Select the Client Certificate check box.
2. Do one of the following:
l To use a certificate that is local to the computer and is global to all users on the computer, select Local Machine.
l To use a certificate that is local to a user account on the computer, select Current User.
Note: Certificates used by a common access card (CAC) reader are user certificates and are stored under Current User.
3. Do one of the following:
l To select a certificate from the "Personal" ("My") certificate store, select My from the drop-down list.
l To select a trusted root certificate, select Root from the drop-down list.
4. Does the website use a common access card (CAC) reader?
l If yes, do the following:
i. Select a certificate that is prefixed with “(SmartCard)” from the Certificate list.
Information about the selected certificate and a PIN field appear in the Certificate Information area.
ii. If a PIN is required, type the PIN for the CAC in the PIN field.
Note: If a PIN is required and you do not enter the PIN at this point, you must enter the PIN in the Windows Security window each time it prompts you for it during the scan.
User GuideChapter 4: Working with Scans
Micro Focus Fortify WebInspect (21.1.0) Page 146 of 461

iii. Click Test.
If you entered the correct PIN, a Success message appears.
l If no, select a certificate from the Certificate list.
Information about the selected certificate appears below the Certificate list.
Application Authentication Step
If your site requires authentication, you can use this step to create, select, or edit a login macro to automate the login process and increase the coverage of your site. A login macro is a recording of the activity that is required to access and log in to your application, typically by entering a user name and password and clicking a button such as Log In or Log On.
If Enable macro validation is selected in Scan Settings: Authentication for scans that use a login macro, Fortify WebInspect tests the login macro at the start of the scan to ensure that the log in is successful. If the macro is invalid and fails to log in to the application, the scan stops and an error message is written in the scan log file. For more information and troubleshooting tips, see "Testing Login Macros" on page 457.
The following options are available for login macros:
l "Using a Login Macro without Privilege Escalation" below
l "Using Login Macros for Privilege Escalation" on the next page
l "Using a Login Macro when Connected to Fortify WebInspect Enterprise" on the next page
l "Testing the Macro" on page 149
Masked Values Supported
If the macro uses parameters for which values are masked in the Web Macro Recorder, then these values are also masked when configuring a Guided Scan in Fortify WebInspect.
Using a Login Macro without Privilege Escalation
To use a login macro:
1. Select the Use a login macro for this site check box.
2. Do one of the following:
l To use a pre-recorded login macro, click the ellipsis button (...) to browse for a saved macro.
l To edit an existing login macro shown in the Login Macro field, click Edit.
l To record a new macro, click Create.
For details about recording a new login macro or using an existing login macro, see the Web Macro Recorder chapters in the Micro Focus Fortify WebInspect Tools Guide.
3. Click the Next button.
The Application Authentication Step is complete. Proceed to the Application Stage to run your application.
User GuideChapter 4: Working with Scans
Micro Focus Fortify WebInspect (21.1.0) Page 147 of 461

Using Login Macros for Privilege Escalation
If you selected the Privilege Escalation policy or another policy that includes enabled Privilege Escalation checks, at least one login macro for a high-privilege user account is required. For more information, see "About Privilege Escalation Scans" on page 187. To use login macros:
1. Select the High-Privilege User Account Login Macro check box. This login macro is for the higher-privilege user account, such as a Site Administrator or Moderator account.
2. Do one of the following:
l To use a pre-recorded login macro, click the ellipsis button (...) to browse for a saved macro.
l To edit an existing login macro shown in the Login Macro field, click Edit.
l To record a new macro, click Create.
For details about recording a new login macro or using an existing login macro, see the Web Macro Recorder chapters in the Micro Focus Fortify WebInspect Tools Guide.
After recording or selecting the first macro and clicking the next arrow, a "Configure Low Privilege Login Macro" prompt appears.
3. Do one of the following:
l To perform the scan in authenticated mode, click Yes. For more information, see "About Privilege Escalation Scans" on page 187.
Guided Scan returns to the Select Login Macro window for you to create or select a low-privilege login macro. Continue to Step 4.
l To perform the scan in unauthenticated mode, click No. For more information, see "About Privilege Escalation Scans" on page 187.
The Application Authentication Step is complete. Proceed to the Application Stage.
4. Select the Low-Privilege User Account Login Macro check box. This login macro is for the lower-privilege user account, such as a viewer or consumer of the site content.
5. Do one of the following:
l To use a pre-recorded login macro, click the ellipsis button (...) to browse for a saved macro.
l To edit an existing login macro shown in the Login Macro field, click Edit.
l To record a new macro, click Create.
For details about recording a new login macro or using an existing login macro, see the Web Macro Recorder chapters in the Micro Focus Fortify WebInspect Tools Guide.
6. After recording or selecting the second macro, click the Next button.
The Application Authentication Step is complete. Proceed to the Application Stage to run your application.
Using a Login Macro when Connected to Fortify WebInspect Enterprise
For a Fortify WebInspect that is connected to Fortify WebInspect Enterprise, you can download and use a login macro from the Fortify WebInspect Enterprise macro repository.
User GuideChapter 4: Working with Scans
Micro Focus Fortify WebInspect (21.1.0) Page 148 of 461

1. Select the Use a login macro for this site check box.
2. Click Download.
The Download a Macro from Fortify WebInspect Enterprise window appears.
3. Select the Application and Version from the drop-down lists.
4. Select a repository macro from the Macro drop-down list.
5. Click OK.
Note: Selecting a repository macro automatically syncs the Application and Version on the Final Review page under Automatically Upload Scan to WIE.
Testing the Macro
Optionally, click Test to locate the login form and run macro validation tests before advancing to the next stage in the Guided Scan wizard. If you need to cancel the validation test prior to completion, click Cancel.
If the macro is invalid and fails to log in to the application, an error message appears. For more information and troubleshooting tips, see "Testing Login Macros" on page 457.
About the Application Stage
The Application Stage is where you run your application. During the application stage:
l Run the mobile application to generate and collect Web traffic.
l Identify the hosts and RESTful endpoints you want to include.
Run Application Step
To run the application and generate and collect Web traffic:
1. Click the Record button.
2. Exercise the application, navigating through the interface as your customers will.
3. When you have generated enough traffic, click the Stop button.
4. Click Play to verify your workflow.
Finalizing Allowed Hosts and RESTful Endpoints
After running the application and collecting Web traffic, a list will be generated of the Allowed Hosts and potential RESTful Endpoints.
To select the hosts to include in your audit, click the check boxes in the Enabled column of the Allowed Hosts table.
The list of RESTful endpoints is generated by listing every possible combination that could be a RESTful endpoint. Select the actual RESTful endpoints from the list by selecting their Enabled check boxes. To reduce the list to a more likely subset, click the Detect button. Heuristics are applied, filtering out some of the less likely results. Select the Enabled check boxes from the resultant list.
User GuideChapter 4: Working with Scans
Micro Focus Fortify WebInspect (21.1.0) Page 149 of 461

If Fortify WebInspect or Fortify WebInspect Enterprise didn’t find all of the RESTful endpoints, you can add them manually.
To set up a new RESTful endpoint rule:
1. Click the New Rule button.
A new rule input box appears in the RESTful Endpoints table.
2. Following the sample format in the input box, type in a RESTful Endpoint.
To Import a List of RESTful Endpoints:
1. Click the Import button.
A file selector appears.
2. Select a Web Application Description Language (.wadl) file.
3. Click OK.
About the Settings Stage
During the final stage, you can set a number of options that affect how the collected traffic is audited. The available options vary, based on the selections you have made.
Final Review Step
Configure Detailed Options
The Configure Detailed Options step allows you to set detailed options. These options will change from scan to scan, as they are dependent on the choices made in the Guided Scan wizard. Some of the options include:
Reuse Identified False Positives. Select a previous scan to identify vulnerabilities that have already been identified as false positives.
Traffic Analysis. You can use a self-contained proxy server on your desktop. With it you can monitor traffic from a scanner, a browser, or any other tool that submits HTTP requests and received responses from a server. You can also enable the Traffic Monitor and display the hierarchical structure of the Web site or Web service in a Fortify WebInspect navigation pane. It allows you to display and review every HTTP request sent by Fortify WebInspect and the associated HTTP response received from the server.
Scan Mode. A crawl-only feature. Allows you to set Discovery (Path Truncation) Path truncation allows you to make requests for known directories without file names. This can cause directory listings to be displayed. You can also select the Passive Analysis (Keyword Search) option to examine every response from the Web server for (error messages, directory listings, credit card numbers, etc. ) not properly protected by the Web site.
Validate Settings and Start Scan
Options on this page allow you to save the current scan settings and, if WebInspect is integrated with WebInspect Enterprise, to interact with WebInspect Enterprise.
User GuideChapter 4: Working with Scans
Micro Focus Fortify WebInspect (21.1.0) Page 150 of 461

1. To save your scan settings as an XML file, select Click here to save settings. Use the standard Save as window to name and save the file.
2. If WebInspect is integrated with WebInspect Enterprise, a Templates section appears in the toolbar. Continue according to the following table.
If you want to… Then…
Save the current scan settings as a template in the WebInspect Enterprise database
Note: When editing an existing template, the Save is actually an update. You can save any edits to settings and change the Template Name. However, you cannot change the Application, Version, or Global Template settings.
a. Do one of the following:
o Click Save in the Templates section of the toolbar.
o Select Click here to save template.
The Save Template window appears.
b. Select an application from the Application drop-down list.
c. Select an application version from the Version drop-down list.
d. Type a name in the Template field.
Load scan settings from a template a. Click Load in the Templates section of the toolbar.
A confirmation message appears advising that your current scan settings will be lost.
b. Click Yes.
The Load Template window appears.
c. Select an application from the Application drop-down list.
d. Select an application version from the Version drop-down list.
e. Select the template from the Template drop-down list.
f. Click Load.
Guided Scan returns to the Site Stage for you to verify the Web site and step through the settings from the template.
3. If WebInspect is integrated with WebInspect Enterprise, the WebInspect Enterprise section appears on this page. You can interact with WebInspect Enterprise as follows:
a. Select an application from the Application drop-down list.
b. Select an application version from the Version drop-down list.
User GuideChapter 4: Working with Scans
Micro Focus Fortify WebInspect (21.1.0) Page 151 of 461

c. Continue according to the following table.
To run the scan… Then…
With a sensor in WebInspect Enterprise
i. Select Run in WebInspect Enterprise.
ii. Select a sensor from the Sensor drop-down list.
iii. Select a Priority for the scan.
In WebInspect i. Select Run in WebInspect.
ii. If you want to automatically upload the scan results to the specified application and version in WebInspect Enterprise, select Auto Upload to WebInspect Enterprise.
Note: If the scan does not complete successfully, it will not be uploaded to WebInspect Enterprise.
4. In the Scan Now area, review your scan settings, and then click Start Scan to begin the scan.
Post Scan Steps
After you have completed your scan and run Fortify WebInspect or Fortify WebInspect Enterprise, you will need to reset your Android, Windows, or iOS device or emulator to its former state. The following steps show how to reset your iOS device to the way it was before you began. Steps for other devices and emulators are similar, but depend on the version of the OS you are running.
To remove the Fortify Certificate on an iOS device:
Run the Settings application.
1. Select General from the Settings column.
2. Scroll down to the bottom of the list and select Profile WebInspect Root.
3. Tap the Remove button.
To Remove the Proxy Settings on an iOS device:
1. Run the Settings application.
2. Select Wi-Fi from the Settings column.
3. Tap the Network name.
Delete the Server IP address and the Port number.
See Also
"Guided Scan Overview " on page 105
User GuideChapter 4: Working with Scans
Micro Focus Fortify WebInspect (21.1.0) Page 152 of 461

Running an API or Web Service ScanUse the API Scan Wizard to configure settings for an API scan or a Web service scan.
Important! Due to limitations with SQL Express, running multiple scans using a SQL Express database may cause unsatisfactory results. For this reason, Fortify recommends not conducting concurrent (or parallel) scans for installations using SQL Express.
API Scans
For API scans, Fortify WebInspect creates a macro from a REST API definition, and then performs an automated analysis.
Important! If you are configuring a Postman API scan, be sure that the prerequisite software is installed before proceeding. For more information about this and other aspects of using Postman collection files, including configuring dynamic authentication using dynamic tokens, see "Scanning with a Postman Collection" on page 301.
Web Service Scans
For a Web service scan, Fortify WebInspect crawls the WSDL site and submits a value for each parameter in each operation it discovers. These values are extracted from a file that you must create using the Web Service Test Designer. Fortify WebInspect then audits the site by attacking each parameter in an attempt to detect vulnerabilities such as SQL injection.
See "Auditing Web Services " on page 240 for more information on how a Web services vulnerability scan differs from other types of scan actions.
Getting Started with the API Scan Wizard
To begin configuring settings for an API scan or a Web service scan:
1. On the Fortify WebInspect Start Page, click Start an API Scan.
Step 1 of the API Scan Wizard opens.
2. Enter a name for the scan in the Scan Name box.
Tip: On any window presented by the API Scan Wizard, you can click Settings (at the bottom of the window) to modify the default settings or to load a settings file that you previously saved. Any changes that you make will apply to this scan only and will not be retained in the default settings file. To make and retain changes to default settings, click the Fortify WebInspect Edit menu, and then select Default Scan Settings.
User GuideChapter 4: Working with Scans
Micro Focus Fortify WebInspect (21.1.0) Page 153 of 461

What's Next?
Do one of the following:
l To configure an API scan, proceed with "Configuring an API Scan" below.
l To configure a Web services scan, proceed with "Configuring a Web Service Scan" on the next page.
Configuring an API Scan
You can configure settings for an API scan in Step 1 of the API Scan Wizard.
To configure settings for an API scan:
1. Select API Scan.
Important! If HTTP Authorization credentials, such as basic access authentication or a bearer token, are needed to access the API definition, then before starting the scan, you must add the information as a Custom Header in Scan Settings: Cookies/Headers as described in "Adding a Custom Header" on page 369.
Header Examples:
Authorization: Basic YWxhZGRpbjpvcGVuc2VzYW1lAuthorization:\sBearer\s(?<Token>[^\r\n]*)\r\n
2. In the API Type list, select the API type to be scanned. The options are Open API (also known as Swagger), Postman, and OData.
3. Continue according to the following table.
For this API type... Do this...
Open API or OData
In the API Definition URL box, provide the URL to the Open API or OData definition file, as shown in the following example:
http://172.16.81.36/v1
Tip: Alternatively, you can paste in the full path to a definition file that is saved on your local machine.
Note: Fortify WebInspect supports the following definitions and protocols for these API types:
l OpenAPI Specification versions 2.0 and 3.0 (formerly known as Swagger Specification). For more information, visit the Swagger website at http://swagger.io/.
l Open Data (OData) protocol (versions 2, 3, and 4). For more
User GuideChapter 4: Working with Scans
Micro Focus Fortify WebInspect (21.1.0) Page 154 of 461
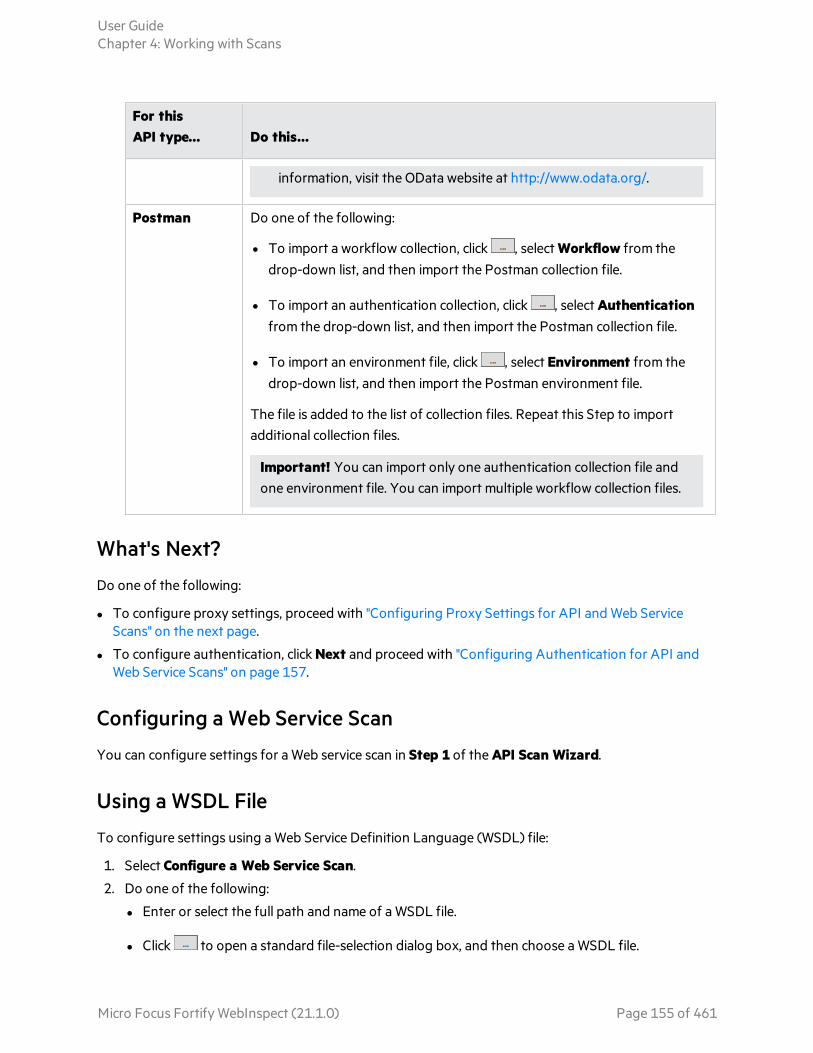
For this API type... Do this...
information, visit the OData website at http://www.odata.org/.
Postman Do one of the following:
l To import a workflow collection, click , select Workflow from the drop-down list, and then import the Postman collection file.
l To import an authentication collection, click , select Authentication from the drop-down list, and then import the Postman collection file.
l To import an environment file, click , select Environment from the drop-down list, and then import the Postman environment file.
The file is added to the list of collection files. Repeat this Step to import additional collection files.
Important! You can import only one authentication collection file and one environment file. You can import multiple workflow collection files.
What's Next?
Do one of the following:
l To configure proxy settings, proceed with "Configuring Proxy Settings for API and Web Service Scans" on the next page.
l To configure authentication, click Next and proceed with "Configuring Authentication for API and Web Service Scans" on page 157.
Configuring a Web Service Scan
You can configure settings for a Web service scan in Step 1 of the API Scan Wizard.
Using a WSDL File
To configure settings using a Web Service Definition Language (WSDL) file:
1. Select Configure a Web Service Scan.
2. Do one of the following:
l Enter or select the full path and name of a WSDL file.
l Click to open a standard file-selection dialog box, and then choose a WSDL file.
User GuideChapter 4: Working with Scans
Micro Focus Fortify WebInspect (21.1.0) Page 155 of 461

Note: You import the WSDL file at this point and later launch the Web Service Test Designer to configure a file containing values for each operation in the service.
Using an Existing WSD File
To configure settings using an existing Web Service Test Design (WSD) file:
1. Select Scan with Existing Design File.
2. Click to open a standard file-selection dialog box and choose a WSD file that you previously created using the Web Service Test Designer.
Note: The selected file contains values for each operation in the service.
What's Next?
Do one of the following:
l To configure proxy settings, proceed with "Configuring Proxy Settings for API and Web Service Scans" below.
l To configure authentication, click Next and proceed with "Configuring Authentication for API and Web Service Scans" on the next page.
Configuring Proxy Settings for API and Web Service Scans
If you need to access the target site through a proxy server, you can configure proxy settings in Step 1 of the API Scan Wizard.
To configure proxy settings:
l Select Network Proxy and then choose an option from the Proxy Profile list:
l Auto Detect: Use the Web Proxy Autodiscovery Protocol (WPAD) to locate a proxy autoconfig file and use this to configure the browser's Web proxy settings.
l Use System Proxy: Import your proxy server information from the local machine.
l Use PAC File: Load proxy settings from a Proxy Automatic Configuration (PAC) file. If you select this option, click Edit to enter the location (URL) of the PAC.
l Use Explicit Proxy Settings: Specify proxy server settings. If you select this option, click Edit to enter proxy information.
l Use Mozilla Firefox: Import your proxy server information from Firefox.
Note: Electing to use browser proxy settings does not guarantee that you will access the Internet through a proxy server. If the Firefox browser connection settings are configured for "No proxy," or if the Internet Explorer setting "Use a proxy server for your LAN" is not selected, then a proxy server will not be used.
User GuideChapter 4: Working with Scans
Micro Focus Fortify WebInspect (21.1.0) Page 156 of 461

What's Next?
To configure authentication, click Next and proceed with "Configuring Authentication for API and Web Service Scans" below.
Configuring Authentication for API and Web Service Scans
You can configure network authentication in Step 2 of the API Scan Wizard. If you are conducting a Postman API scan, the scan wizard validates the collection file(s) that you selected in Step 1 and displays the Postman configuration settings in this page. You can review the settings and make adjustments as needed.
Configuring Network Authentication
To configure network authentication for the Web server:
1. Select Network Authentication, and then select an authentication method and enter your network credentials. The authentication methods are:
ADFS CBT
Active Directory Federation Services Channel Binding Token authentication helps protect against man-in-the-middle (MITM) attacks in which an attacker intercepts a client's credentials and forwards them to a server. Protection against such attacks is made possible when a Channel Binding Token (CBT) is required or allowed by the server when establishing communications with clients. In some servers, such as IIS, ADFS CBT is called "Extended Protection for Authentication."
It is similar to NTLM authentication, but ADFS CBT authentication builds a CBT token based on the hash of the HTTPS site server certificate. This authentication type is usually used for HTTPS sites. For an HTTP site, it works similar to NTLM but the token is empty.
Note: Most servers require the domain name to be entered along with the user name in the Username field, such as DOMAIN/username or [email protected]. Consider this possibility if you have difficulty connecting to your server with the credentials you provide.
Automatic
Allow Fortify WebInspect to determine the correct authentication type.
Automatic detection slows the scanning process. If you know and specify one of the other authentication methods, scanning performance is noticeably improved.
Basic
A widely used, industry-standard method for collecting user name and password information.
a. The Web browser displays a window for a user to enter a previously assigned user name and password, also known as credentials.
b. The Web browser then attempts to establish a connection to a server using the user's credentials.
User GuideChapter 4: Working with Scans
Micro Focus Fortify WebInspect (21.1.0) Page 157 of 461

c. If a user's credentials are rejected, the browser displays an authentication window to re-enter the user's credentials. Internet Explorer allows the user three connection attempts before failing the connection and reporting an error to the user.
d. If the Web server verifies that the user name and password correspond to a valid user account, a connection is established.
The advantage of Basic authentication is that it is part of the HTTP specification and is supported by most browsers. The disadvantage is that Web browsers using Basic authentication transmit passwords in an unencrypted form. By monitoring communications on your network, an attacker can easily intercept and decode these passwords using publicly available tools. Therefore, Basic authentication is not recommended unless you are confident that the connection between the user and your Web server is secure.
Digest
The Windows Server operating system implements the Digest Authentication protocol as a security support provider (SSP), a dynamic-link library (DLL) that is supplied with the operating system. Using digest authentication, your password is never sent across the network in the clear, but is always transmitted as an MD5 digest of the user's password. In this way, the password cannot be determined by sniffing network traffic.
Kerberos
Kerberos uses the Needham-Schroeder protocol as its basis. It uses a trusted third party, termed a Key Distribution Center (KDC), which consists of two logically separate parts: an Authentication Server (AS) and a Ticket Granting Server (TGS). The client authenticates itself to AS, then demonstrates to the TGS that it is authorized to receive a ticket for a service (and receives it). The client then demonstrates to a Service Server that it has been approved to receive the service.
Negotiate
The Negotiate authentication protocol begins with the option to negotiate for an authentication protocol. When the client requests access to a service, the server replies with a list of authentication protocols that it can support and an authentication challenge based on the protocol that is its first choice.
For example, the server might list Kerberos and NTLM, and send a Kerberos challenge. The client examines the contents of the reply and checks to determine whether it supports any of the specified protocols. If the client supports the preferred protocol, authentication proceeds. If the client does not support the preferred protocol, but does support one of the other protocols listed by the server, the client lets the server know which authentication protocol it supports, and the authentication proceeds. If the client does not support any of the listed protocols, the authentication exchange fails.
NT LAN Manager (NTLM)
NTLM is an authentication process that is used by all members of the Windows NT family of products. Like its predecessor LanMan, NTLM uses a challenge/response process to prove the client’s identity without requiring that either a password or a hashed password be sent across the network.
User GuideChapter 4: Working with Scans
Micro Focus Fortify WebInspect (21.1.0) Page 158 of 461

Use NTLM authentication for servers running IIS. If NTLM authentication is enabled, and Fortify WebInspect has to pass through a proxy server to submit its requests to the Web server, Fortify WebInspect may not be able to crawl or audit that Web site.
Caution! After configuring Fortify WebInspect for NTLM authentication and scanning the NTLM-protected sites, you might want to disable the NTLM authentication settings to prevent any potential problem.
Viewing and Adjusting Postman Configuration Settings
Note: Postman Configuration settings are available only when conducting a Postman API scan.
Upon successful validation of the Postman collection file(s), a list of sessions contained in the collection file(s) appears in the Postman Configuration area. If authentication sessions are identified, they are preselected as Auth sessions. All other sessions are preselected as Audit sessions. Additionally, the type of authentication detected is listed as the Token Strategy with the options of None, Static, or Dynamic.
Note: Auth sessions will be used for authentication for the scan. Audit sessions will be audited in the scan.
Optionally, to adjust the settings:
1. Select the Auth or Audit check box for a session to change its type as needed.
2. Make changes to the Postman authentication settings as follows:
l For Static authentication, enter a token in the Custom Header Token box.
l For Dynamic authentication, do the following:
o Select the Regex (Custom) option to the right of the Response Token box, and then enter a custom regular expression in the Response Token Name box.
o Select the Regex (Custom) option to the right of the Request Token Name box, and then enter a custom regular expression in the Request Token Name box.
o Clear the Use Auto Detect option to the right of the Logout Condition box, and then enter a new logout condition string in the Logout Condition box.
For more information about dynamic authentication for Postman, see "Manually Configuring Postman Login for Dynamic Tokens" on page 305.
Important! If you make changes to the Postman authentication settings, they will not be validated unless you return to Step 1 of the API Scan Wizard, and then click Next again.
What's Next?
To configure scan details, click Next and proceed with "Configuring Scan Details for API and Web Service Scans" on the next page.
User GuideChapter 4: Working with Scans
Micro Focus Fortify WebInspect (21.1.0) Page 159 of 461

Configuring Scan Details for API and Web Service Scans
The default policy for API and Web service scans is the API policy. You can select a different policy as well as select other options for the scan in Step 3 of the API Scan Wizard.
Selecting a Policy for API Scans
By default, the API policy is selected for API scans. However, you can select a different policy if needed.
To select a different policy:
1. In the Audit Depth (Policy) area, select a policy from the drop-down list.
2. Proceed to "Configuring Additional Settings for API and Web Service Scans" below.
Launching the Web Service Test Designer
If you are creating a design test file, a message prompts you to launch the Web Service Test Designer. The API Scan Wizard will not advance until you use the designer to create a WSD file.
To launch the Web Service Test Designer:
1. Click Design.
The Web Service Test Designer opens, with the imported WSDL in view.
2. Edit the file as needed.
For more information, see the Web Service Test Designer Help or the Micro Focus Fortify WebInspect Tools Guide.
3. In the Web Service Test Designer, save the WSD file.
4. Proceed to "Configuring Additional Settings for API and Web Service Scans" below.
Configuring Additional Settings for API and Web Service Scans
Optionally, you may select or configure additional settings in the Settings section as described in the following table.
If you want to... Then...
Use the stand-alone proxy server Select Launch and Direct Traffic through Web Proxy.
Note: This option is not available if you are scheduling a scan.
Capture and display every HTTP request sent by Fortify
Select Enable Traffic Monitor.
User GuideChapter 4: Working with Scans
Micro Focus Fortify WebInspect (21.1.0) Page 160 of 461

If you want to... Then...
WebInspect during the scan
Reuse false positives that have already been identified
1. Select Import False Positives.
2. Click the select scans link to select one or more scans from which to import false positives.
Add allowed hosts 1. In the Add Allowed Hosts section, click Add.
2. On the Specify Allowed Host dialog box, enter a URL (or a regular expression representing a URL).
Note: When specifying the URL, do not include the protocol designator (such as http:// or https://).
3. If you entered a regular expression for the allowed host, select Use Regular Expression.
Tip: For assistance creating a regular expression,
click (to the right of the Allowed Host box).
4. Click OK.
The URL is added to the Allowed Hosts list.
What's Next?
To save the settings, run the scan, or schedule the scan, click Next and proceed with "Congratulations" below.
Congratulations
1. If you anticipate running this scan again, you can save the settings in an XML file. Click the Save hyperlink to name and save the file.
When starting a scan through the Web Service Scan Wizard, you can click Settings (at the bottom of the window) to load this settings file.
2. If you are scheduling a scan, you can also elect to generate a report when the scan completes. Select the Generate Report check box, and then click the Select reports hyperlink.
3. Click Scan (or click Schedule, if you are scheduling a scan).
User GuideChapter 4: Working with Scans
Micro Focus Fortify WebInspect (21.1.0) Page 161 of 461
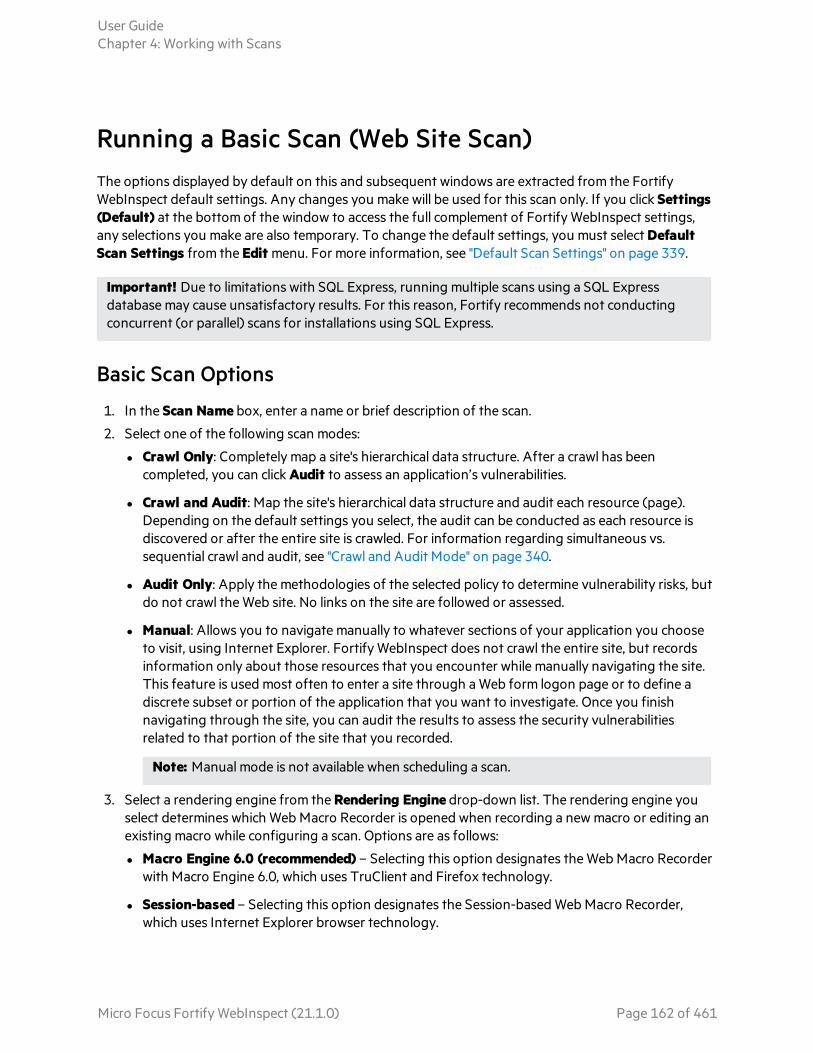
Running a Basic Scan (Web Site Scan)The options displayed by default on this and subsequent windows are extracted from the Fortify WebInspect default settings. Any changes you make will be used for this scan only. If you click Settings (Default) at the bottom of the window to access the full complement of Fortify WebInspect settings, any selections you make are also temporary. To change the default settings, you must select Default Scan Settings from the Edit menu. For more information, see "Default Scan Settings" on page 339.
Important! Due to limitations with SQL Express, running multiple scans using a SQL Express database may cause unsatisfactory results. For this reason, Fortify recommends not conducting concurrent (or parallel) scans for installations using SQL Express.
Basic Scan Options
1. In the Scan Name box, enter a name or brief description of the scan.
2. Select one of the following scan modes:
l Crawl Only: Completely map a site's hierarchical data structure. After a crawl has been completed, you can click Audit to assess an application’s vulnerabilities.
l Crawl and Audit: Map the site's hierarchical data structure and audit each resource (page). Depending on the default settings you select, the audit can be conducted as each resource is discovered or after the entire site is crawled. For information regarding simultaneous vs. sequential crawl and audit, see "Crawl and Audit Mode" on page 340.
l Audit Only: Apply the methodologies of the selected policy to determine vulnerability risks, but do not crawl the Web site. No links on the site are followed or assessed.
l Manual: Allows you to navigate manually to whatever sections of your application you choose to visit, using Internet Explorer. Fortify WebInspect does not crawl the entire site, but records information only about those resources that you encounter while manually navigating the site. This feature is used most often to enter a site through a Web form logon page or to define a discrete subset or portion of the application that you want to investigate. Once you finish navigating through the site, you can audit the results to assess the security vulnerabilities related to that portion of the site that you recorded.
Note: Manual mode is not available when scheduling a scan.
3. Select a rendering engine from the Rendering Engine drop-down list. The rendering engine you select determines which Web Macro Recorder is opened when recording a new macro or editing an existing macro while configuring a scan. Options are as follows:
l Macro Engine 6.0 (recommended) – Selecting this option designates the Web Macro Recorder with Macro Engine 6.0, which uses TruClient and Firefox technology.
l Session-based – Selecting this option designates the Session-based Web Macro Recorder, which uses Internet Explorer browser technology.
User GuideChapter 4: Working with Scans
Micro Focus Fortify WebInspect (21.1.0) Page 162 of 461
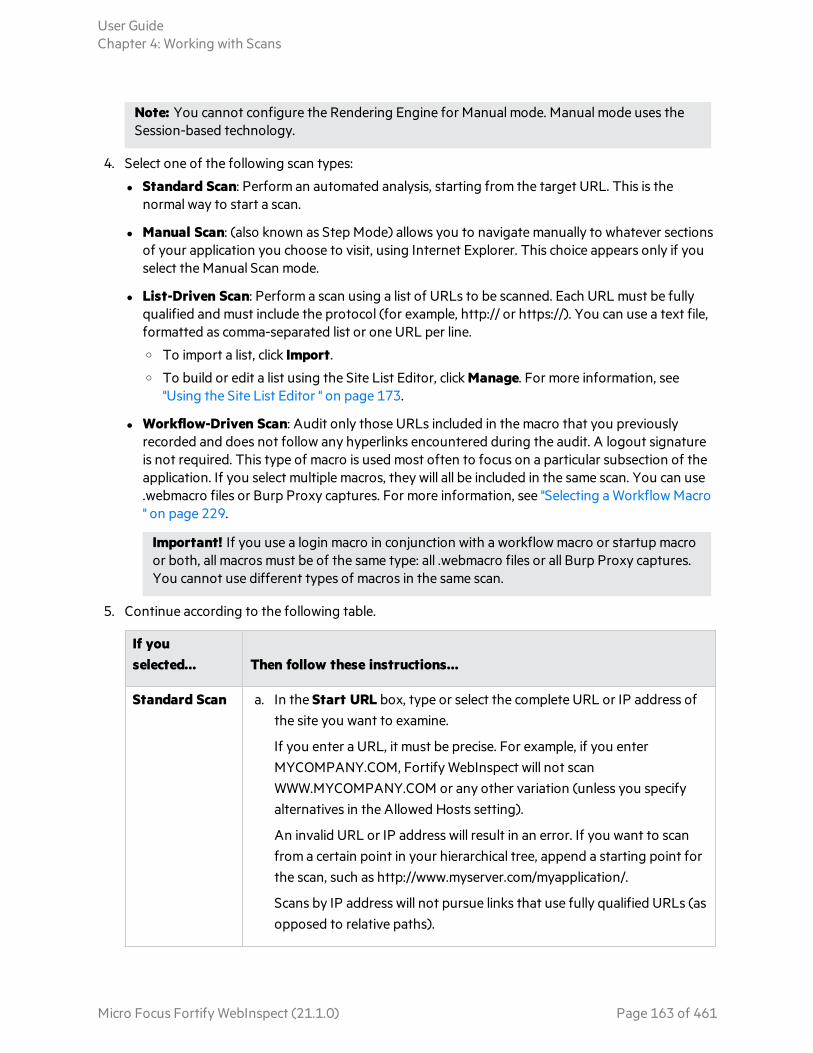
Note: You cannot configure the Rendering Engine for Manual mode. Manual mode uses the Session-based technology.
4. Select one of the following scan types:
l Standard Scan: Perform an automated analysis, starting from the target URL. This is the normal way to start a scan.
l Manual Scan: (also known as Step Mode) allows you to navigate manually to whatever sections of your application you choose to visit, using Internet Explorer. This choice appears only if you select the Manual Scan mode.
l List-Driven Scan: Perform a scan using a list of URLs to be scanned. Each URL must be fully qualified and must include the protocol (for example, http:// or https://). You can use a text file, formatted as comma-separated list or one URL per line.
o To import a list, click Import.
o To build or edit a list using the Site List Editor, click Manage. For more information, see "Using the Site List Editor " on page 173.
l Workflow-Driven Scan: Audit only those URLs included in the macro that you previously recorded and does not follow any hyperlinks encountered during the audit. A logout signature is not required. This type of macro is used most often to focus on a particular subsection of the application. If you select multiple macros, they will all be included in the same scan. You can use .webmacro files or Burp Proxy captures. For more information, see "Selecting a Workflow Macro " on page 229.
Important! If you use a login macro in conjunction with a workflow macro or startup macro or both, all macros must be of the same type: all .webmacro files or all Burp Proxy captures. You cannot use different types of macros in the same scan.
5. Continue according to the following table.
If you selected... Then follow these instructions...
Standard Scan a. In the Start URL box, type or select the complete URL or IP address of the site you want to examine.
If you enter a URL, it must be precise. For example, if you enter MYCOMPANY.COM, Fortify WebInspect will not scan WWW.MYCOMPANY.COM or any other variation (unless you specify alternatives in the Allowed Hosts setting).
An invalid URL or IP address will result in an error. If you want to scan from a certain point in your hierarchical tree, append a starting point for the scan, such as http://www.myserver.com/myapplication/.
Scans by IP address will not pursue links that use fully qualified URLs (as opposed to relative paths).
User GuideChapter 4: Working with Scans
Micro Focus Fortify WebInspect (21.1.0) Page 163 of 461
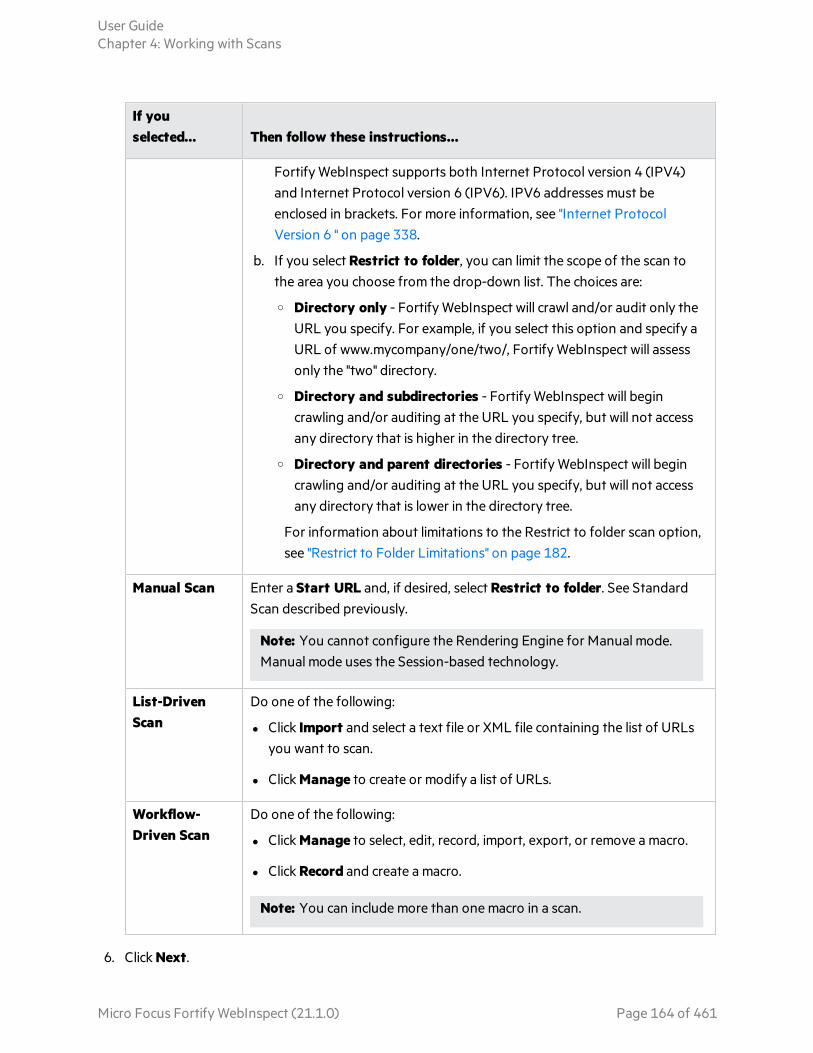
If you selected... Then follow these instructions...
Fortify WebInspect supports both Internet Protocol version 4 (IPV4) and Internet Protocol version 6 (IPV6). IPV6 addresses must be enclosed in brackets. For more information, see "Internet Protocol Version 6 " on page 338.
b. If you select Restrict to folder, you can limit the scope of the scan to the area you choose from the drop-down list. The choices are:
o Directory only - Fortify WebInspect will crawl and/or audit only the URL you specify. For example, if you select this option and specify a URL of www.mycompany/one/two/, Fortify WebInspect will assess only the "two" directory.
o Directory and subdirectories - Fortify WebInspect will begin crawling and/or auditing at the URL you specify, but will not access any directory that is higher in the directory tree.
o Directory and parent directories - Fortify WebInspect will begin crawling and/or auditing at the URL you specify, but will not access any directory that is lower in the directory tree.
For information about limitations to the Restrict to folder scan option, see "Restrict to Folder Limitations" on page 182.
Manual Scan Enter a Start URL and, if desired, select Restrict to folder. See Standard Scan described previously.
Note: You cannot configure the Rendering Engine for Manual mode. Manual mode uses the Session-based technology.
List-Driven Scan
Do one of the following:
l Click Import and select a text file or XML file containing the list of URLs you want to scan.
l Click Manage to create or modify a list of URLs.
Workflow-Driven Scan
Do one of the following:
l Click Manage to select, edit, record, import, export, or remove a macro.
l Click Record and create a macro.
Note: You can include more than one macro in a scan.
6. Click Next.
User GuideChapter 4: Working with Scans
Micro Focus Fortify WebInspect (21.1.0) Page 164 of 461

Authentication and Connectivity
1. If you need to access the target site through a proxy server, select Network Proxy and then choose an option from the Proxy Profile list:
l Auto Detect: Use the Web Proxy Autodiscovery Protocol (WPAD) to locate a proxy autoconfig file and use this to configure the browser's Web proxy settings.
l Use System Proxy: Import your proxy server information from the local machine.
l Use PAC File: Load proxy settings from a Proxy Automatic Configuration (PAC) file. If you select this option, click Edit to enter the location (URL) of the PAC. For more information, see "Configuring the Proxy Profile " on page 174.
l Use Explicit Proxy Settings: Specify proxy server settings. If you select this option, click Edit to enter proxy information. For more information, see "Configuring the Proxy Profile " on page 174.
l Use Mozilla Firefox: Import your proxy server information from Firefox.
Note: Electing to use browser proxy settings does not guarantee that you will access the Internet through a proxy server. If the Firefox browser connection settings are configured for "No proxy," or if the Internet Explorer setting "Use a proxy server for your LAN" is not selected, then a proxy server will not be used.
2. Select Network Authentication if server authentication is required. Then select an authentication method and enter your network credentials. The authentication methods are:
ADFS CBT
Active Directory Federation Services Channel Binding Token authentication helps protect against man-in-the-middle (MITM) attacks in which an attacker intercepts a client's credentials and forwards them to a server. Protection against such attacks is made possible when a Channel Binding Token (CBT) is required or allowed by the server when establishing communications with clients. In some servers, such as IIS, ADFS CBT is called "Extended Protection for Authentication."
It is similar to NTLM authentication, but ADFS CBT authentication builds a CBT token based on the hash of the HTTPS site server certificate. This authentication type is usually used for HTTPS sites. For an HTTP site, it works similar to NTLM but the token is empty.
Note: Most servers require the domain name to be entered along with the user name in the Username field, such as DOMAIN/username or [email protected]. Consider this possibility if you have difficulty connecting to your server with the credentials you provide.
Automatic
Allow Fortify WebInspect to determine the correct authentication type.
Automatic detection slows the scanning process. If you know and specify one of the other authentication methods, scanning performance is noticeably improved.
User GuideChapter 4: Working with Scans
Micro Focus Fortify WebInspect (21.1.0) Page 165 of 461

Basic
A widely used, industry-standard method for collecting user name and password information.
a. The Web browser displays a window for a user to enter a previously assigned user name and password, also known as credentials.
b. The Web browser then attempts to establish a connection to a server using the user's credentials.
c. If a user's credentials are rejected, the browser displays an authentication window to re-enter the user's credentials. Internet Explorer allows the user three connection attempts before failing the connection and reporting an error to the user.
d. If the Web server verifies that the user name and password correspond to a valid user account, a connection is established.
The advantage of Basic authentication is that it is part of the HTTP specification and is supported by most browsers. The disadvantage is that Web browsers using Basic authentication transmit passwords in an unencrypted form. By monitoring communications on your network, an attacker can easily intercept and decode these passwords using publicly available tools. Therefore, Basic authentication is not recommended unless you are confident that the connection between the user and your Web server is secure.
Digest
The Windows Server operating system implements the Digest Authentication protocol as a security support provider (SSP), a dynamic-link library (DLL) that is supplied with the operating system. Using digest authentication, your password is never sent across the network in the clear, but is always transmitted as an MD5 digest of the user's password. In this way, the password cannot be determined by sniffing network traffic.
Kerberos
Kerberos uses the Needham-Schroeder protocol as its basis. It uses a trusted third party, termed a Key Distribution Center (KDC), which consists of two logically separate parts: an Authentication Server (AS) and a Ticket Granting Server (TGS). The client authenticates itself to AS, then demonstrates to the TGS that it is authorized to receive a ticket for a service (and receives it). The client then demonstrates to a Service Server that it has been approved to receive the service.
Negotiate
The Negotiate authentication protocol begins with the option to negotiate for an authentication protocol. When the client requests access to a service, the server replies with a list of authentication protocols that it can support and an authentication challenge based on the protocol that is its first choice.
For example, the server might list Kerberos and NTLM, and send a Kerberos challenge. The client examines the contents of the reply and checks to determine whether it supports any of the specified protocols. If the client supports the preferred protocol, authentication proceeds. If the client does not support the preferred protocol, but does support one of the other protocols listed by the server, the client lets the server know which authentication protocol it supports, and the authentication proceeds. If the client does not support any of the listed protocols, the authentication exchange fails.
User GuideChapter 4: Working with Scans
Micro Focus Fortify WebInspect (21.1.0) Page 166 of 461
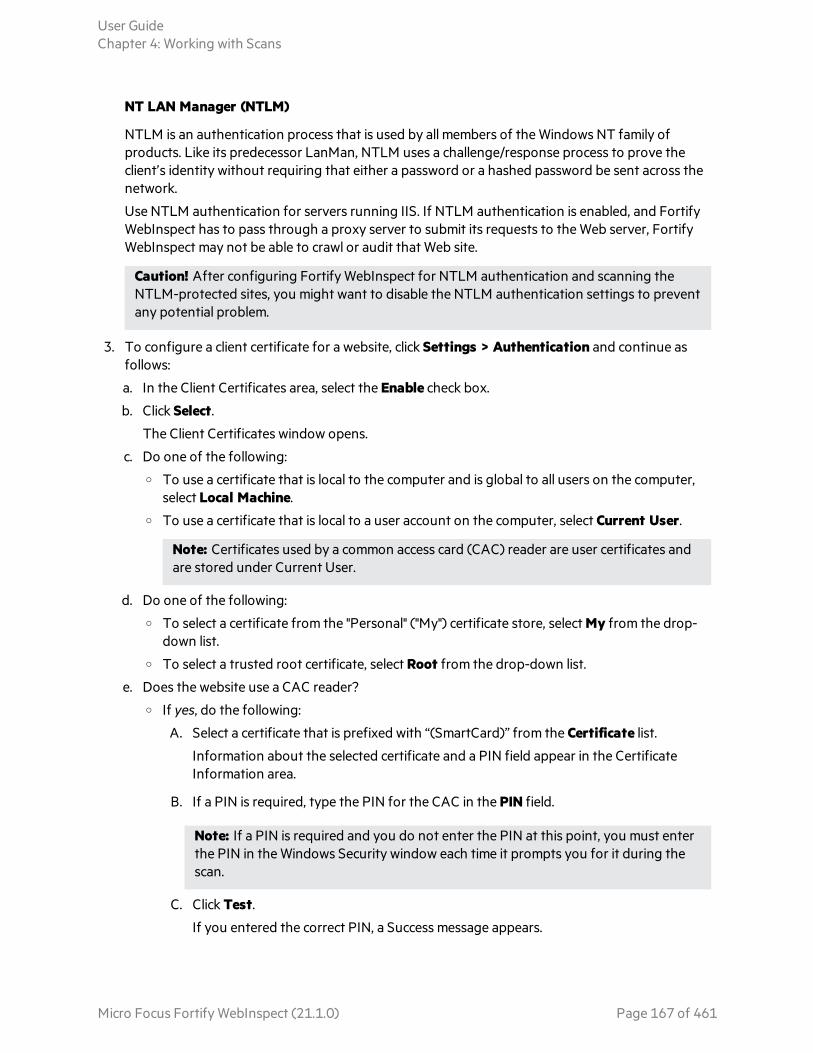
NT LAN Manager (NTLM)
NTLM is an authentication process that is used by all members of the Windows NT family of products. Like its predecessor LanMan, NTLM uses a challenge/response process to prove the client’s identity without requiring that either a password or a hashed password be sent across the network.
Use NTLM authentication for servers running IIS. If NTLM authentication is enabled, and Fortify WebInspect has to pass through a proxy server to submit its requests to the Web server, Fortify WebInspect may not be able to crawl or audit that Web site.
Caution! After configuring Fortify WebInspect for NTLM authentication and scanning the NTLM-protected sites, you might want to disable the NTLM authentication settings to prevent any potential problem.
3. To configure a client certificate for a website, click Settings > Authentication and continue as follows:
a. In the Client Certificates area, select the Enable check box.
b. Click Select.
The Client Certificates window opens.
c. Do one of the following:
o To use a certificate that is local to the computer and is global to all users on the computer, select Local Machine.
o To use a certificate that is local to a user account on the computer, select Current User.
Note: Certificates used by a common access card (CAC) reader are user certificates and are stored under Current User.
d. Do one of the following:
o To select a certificate from the "Personal" ("My") certificate store, select My from the drop-down list.
o To select a trusted root certificate, select Root from the drop-down list.
e. Does the website use a CAC reader?
o If yes, do the following:
A. Select a certificate that is prefixed with “(SmartCard)” from the Certificate list.
Information about the selected certificate and a PIN field appear in the Certificate Information area.
B. If a PIN is required, type the PIN for the CAC in the PIN field.
Note: If a PIN is required and you do not enter the PIN at this point, you must enter the PIN in the Windows Security window each time it prompts you for it during the scan.
C. Click Test.
If you entered the correct PIN, a Success message appears.
User GuideChapter 4: Working with Scans
Micro Focus Fortify WebInspect (21.1.0) Page 167 of 461
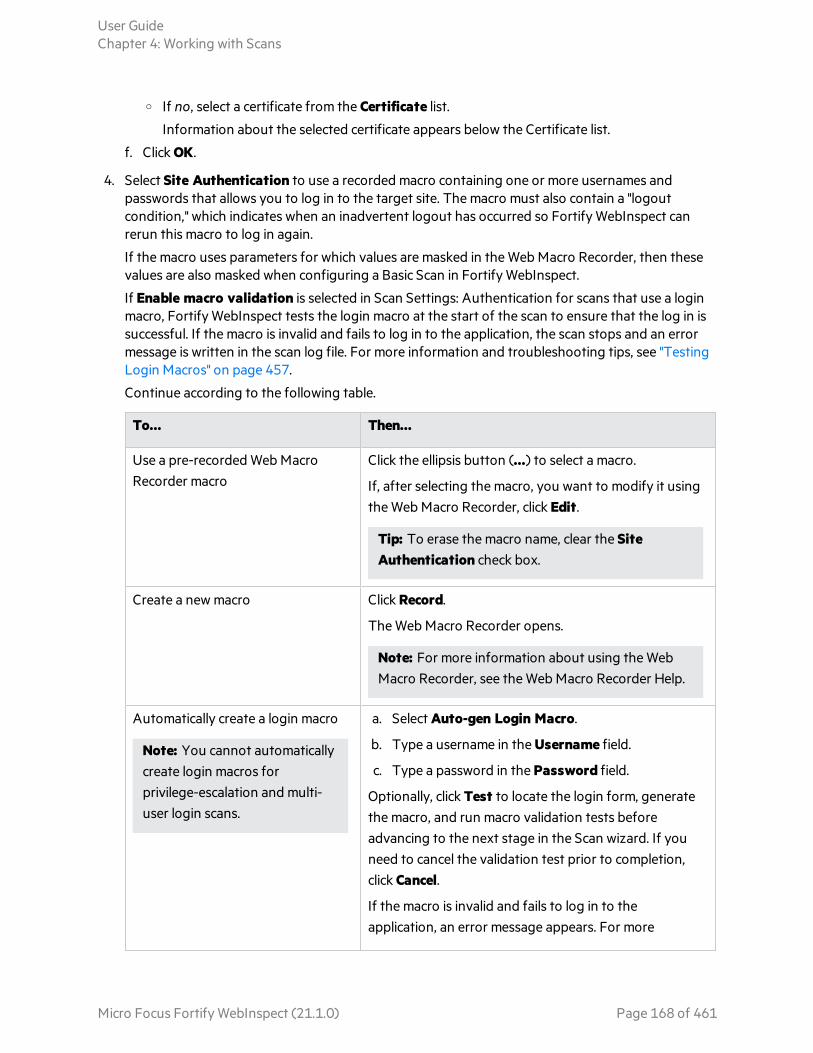
o If no, select a certificate from the Certificate list.
Information about the selected certificate appears below the Certificate list.
f. Click OK.
4. Select Site Authentication to use a recorded macro containing one or more usernames and passwords that allows you to log in to the target site. The macro must also contain a "logout condition," which indicates when an inadvertent logout has occurred so Fortify WebInspect can rerun this macro to log in again.
If the macro uses parameters for which values are masked in the Web Macro Recorder, then these values are also masked when configuring a Basic Scan in Fortify WebInspect.
If Enable macro validation is selected in Scan Settings: Authentication for scans that use a login macro, Fortify WebInspect tests the login macro at the start of the scan to ensure that the log in is successful. If the macro is invalid and fails to log in to the application, the scan stops and an error message is written in the scan log file. For more information and troubleshooting tips, see "Testing Login Macros" on page 457.
Continue according to the following table.
To... Then...
Use a pre-recorded Web Macro Recorder macro
Click the ellipsis button (...) to select a macro.
If, after selecting the macro, you want to modify it using the Web Macro Recorder, click Edit.
Tip: To erase the macro name, clear the Site Authentication check box.
Create a new macro Click Record.
The Web Macro Recorder opens.
Note: For more information about using the Web Macro Recorder, see the Web Macro Recorder Help.
Automatically create a login macro
Note: You cannot automatically create login macros for privilege-escalation and multi-user login scans.
a. Select Auto-gen Login Macro.
b. Type a username in the Username field.
c. Type a password in the Password field.
Optionally, click Test to locate the login form, generate the macro, and run macro validation tests before advancing to the next stage in the Scan wizard. If you need to cancel the validation test prior to completion, click Cancel.
If the macro is invalid and fails to log in to the application, an error message appears. For more
User GuideChapter 4: Working with Scans
Micro Focus Fortify WebInspect (21.1.0) Page 168 of 461
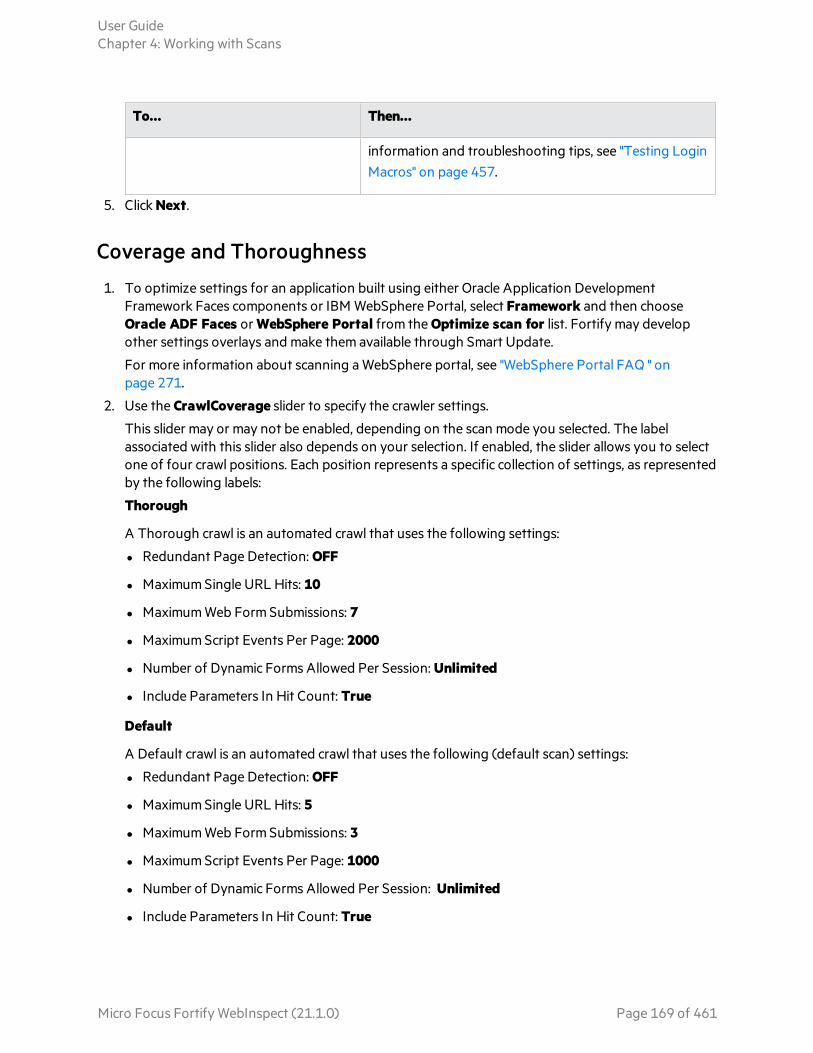
To... Then...
information and troubleshooting tips, see "Testing Login Macros" on page 457.
5. Click Next.
Coverage and Thoroughness
1. To optimize settings for an application built using either Oracle Application Development Framework Faces components or IBM WebSphere Portal, select Framework and then choose Oracle ADF Faces or WebSphere Portal from the Optimize scan for list. Fortify may develop other settings overlays and make them available through Smart Update.
For more information about scanning a WebSphere portal, see "WebSphere Portal FAQ " on page 271.
2. Use the CrawlCoverage slider to specify the crawler settings.
This slider may or may not be enabled, depending on the scan mode you selected. The label associated with this slider also depends on your selection. If enabled, the slider allows you to select one of four crawl positions. Each position represents a specific collection of settings, as represented by the following labels:
Thorough
A Thorough crawl is an automated crawl that uses the following settings:
l Redundant Page Detection: OFF
l Maximum Single URL Hits: 10
l Maximum Web Form Submissions: 7
l Maximum Script Events Per Page: 2000
l Number of Dynamic Forms Allowed Per Session: Unlimited
l Include Parameters In Hit Count: True
Default
A Default crawl is an automated crawl that uses the following (default scan) settings:
l Redundant Page Detection: OFF
l Maximum Single URL Hits: 5
l Maximum Web Form Submissions: 3
l Maximum Script Events Per Page: 1000
l Number of Dynamic Forms Allowed Per Session: Unlimited
l Include Parameters In Hit Count: True
User GuideChapter 4: Working with Scans
Micro Focus Fortify WebInspect (21.1.0) Page 169 of 461

Moderate
A Normal crawl is an automated crawl that uses the following settings:
l Redundant Page Detection: OFF
l Maximum Single URL Hits: 5
l Maximum Web Form Submissions: 2
l Maximum Script Events Per Page: 300
l Number of Dynamic Forms Allowed Per Session: 1
l Include Parameters In Hit Count: False
Quick
A Quick crawl uses the following settings
l Redundant Page Detection: ON
l Maximum Single URL Hits: 3
l Maximum Web Form Submissions: 1
l Maximum Script Events Per Page: 100
l Number of Dynamic Forms Allowed Per Session: 0
l Include Parameters In Hit Count: False
If you click Settings (to open the Advanced Settings dialog box) and change a setting that conflicts with any setting established by one of the four slider positions, the slider creates a fifth position labeled Customized Coverage Settings.
3. Select a policy from the Audit Depth (Policy) list.
This list may or may not be enabled, depending on the scan mode you selected in Step 1 of the Scan Wizard. For descriptions of policies, see "Fortify WebInspect Policies" on page 425.
4. Click Next.
Detailed Scan Configuration
Profiler
Fortify WebInspect conducts a preliminary examination of the target Web site to determine if certain settings should be modified. If changes appear to be required, the Profiler returns a list of suggestions, which you may accept or reject.
For example, the Server Profiler may detect that authorization is required to enter the site, but you have not specified a valid user name and password. Rather than proceed with a scan that would return significantly diminished results, you could follow the Server Profiler's suggestion to configure the required information before continuing.
User GuideChapter 4: Working with Scans
Micro Focus Fortify WebInspect (21.1.0) Page 170 of 461

Similarly, your settings may specify that Fortify WebInspect should not conduct "file-not-found" detection. This process is useful for Web sites that do not return a status "404 Not Found" when a client requests a resource that does not exist (they may instead return a status "200 OK," but the response contains a message that the file cannot be found). If the Profiler determines that such a scheme has been implemented in the target site, it would suggest that you modify the Fortify WebInspect setting to accommodate this feature.
To launch the Profiler each time you access this page, select Run Profiler Automatically.
To launch the Profiler manually, click Profile. For more information, see "Server Profiler" on page 231.
Results appear in the Settings section.
Settings
1. Accept or reject the suggestions. To reject, clear the associated check box.
2. If necessary, provide the requested information.
3. Click Next.
Several options may be presented even if you do not run the Profiler. They include:
l Auto fill Web forms
l Add allowed hosts
l Reuse identified false positives
l Apply sample macro
l Traffic analysis
Auto Fill Web Forms
Select Auto-fill Web forms during crawl if you want Fortify WebInspect to submit values for input controls on forms it encounters while scanning the target site. Fortify WebInspect will extract the values from a prepackaged default file or from a file that you create using the Web Form Editor. You may:
l Click the ellipsis button to locate and load a file.
l Click Edit to edit the selected file (or the default values) using the Web Form Editor.
l Click Create to open the Web Form Editor and create a file.
Add Allowed Hosts
Use the Allowed Host settings to add domains to be crawled and audited. If your Web presence uses multiple domains, add those domains here. For more information, see "Scan Settings: Allowed Hosts" on page 355.
To add allowed domains:
1. Click Add.
2. On the Specify Allowed Host window, enter a URL (or a regular expression representing a URL) and click OK.
User GuideChapter 4: Working with Scans
Micro Focus Fortify WebInspect (21.1.0) Page 171 of 461

For more information about adding or editing Allowed Hosts, see "Specifying Allowed Hosts " on page 176.
Reuse Identified False Positives
Select scans containing vulnerabilities that were changed to false positives. If those false positives match vulnerabilities detected in this scan, the vulnerabilities will be changed to false positives. For more information, see "False Positives" on page 82.
To reuse identified false positives:
1. Select Import False Positives.
2. Click SelectScans.
3. Select one or more scans containing false positives from the same site you are now scanning.
4. Click OK.
Note: You cannot import false positives when scheduling a scan or conducting an Enterprise scan.
Sample Macro
Fortify WebInspect’s example banking application, zero.webappsecurity.com, uses a Web form login. If you scan this site, select Apply sample macro to run the sample macro containing the login script.
Traffic Analysis
Select Launch and Direct Traffic through Web Proxy to use the Web Proxy tool to examine the HTTP requests issued by Fortify WebInspect and the responses returned by the target server.
While scanning a Web site, Fortify WebInspect displays in the navigation pane only those sessions that reveal the hierarchical structure of the Web site, plus those sessions in which a vulnerability was discovered. However, if you select Enable Traffic Monitor, Fortify WebInspect adds the Traffic Monitor button to the Scan Info panel, allowing you to display and review each HTTP request sent by Fortify WebInspect and the associated HTTP response received from the server.
Message
If the profiler does not recommend changes, the Scan Wizard displays the message, "No settings changes are recommended. Your current scan settings are optimal for this site."
Congratulations
The contents of this window vary, depending your choices and configuration.
Upload to Fortify WebInspect Enterprise Scan Template
When connected to an enterprise server (Fortify WebInspect Enterprise), you can send the settings for this scan to Fortify WebInspect Enterprise, which will create a scan template. However, you must be assigned to a role that allows you to create scan templates.
User GuideChapter 4: Working with Scans
Micro Focus Fortify WebInspect (21.1.0) Page 172 of 461

Save Settings
You can save the settings you configured for this scan, which would allow you to reuse the settings for a future scan.
Generate Reports
If you are scheduling a scan, you can instruct Fortify WebInspect to generate a report when the scan completes.
1. Select Generate Reports.
2. Click the Select reports hyperlink.
3. (Optional) Select a report from the Favorites list.
A "favorite" is simply a named collection of one or more reports and their associated parameters. To create a favorite once you have selected reports and parameters, click the Favorites list and select Add to favorites.
4. Select one or more reports.
5. Provide information for any parameters that may be requested. Required parameters are outlined in red.
6. Click Next.
7. If you select Automatically Generate Filename, the name of the report file will be formatted as <reportname> <date/time>.<extension>. For example, if creating a compliance report in pdf format and the report is generated at 6:30 on April 5, the file name would be "Compliance Report 04_05_2009 06_30.pdf." This is useful for recurring scans.
Reports are written to the directory specified for generated reports in the Application settings.
8. If you did not select Automatically Generate Filename, enter a name for the file in the Filename box.
9. Select the report format from the Export Format list.
10. If you selected multiple reports, you can combine then all into one report by selecting Aggregate reports into one report.
11. Select a template that defines the headers and footers used for the report and, if necessary, provide the requested parameters.
12. Click Finished.
13. Click Schedule.
Using the Site List Editor
When performing a List-Driven Scan using the Basic Scan Wizard, you can build or edit the list of URLs using the Site List Editor.
To access the Site List Editor:
l Click Manage under the List-Driven Scan option in the Basic Scan Wizard.
User GuideChapter 4: Working with Scans
Micro Focus Fortify WebInspect (21.1.0) Page 173 of 461

To add individual URLs manually:
1. Click Add.
2. Enter a URL that you want to include in the scan. If you do not specify the protocol, the editor will add "http://" to the beginning of the URL.
3. Repeat as necessary.
To add URLs specified in a text file or XML file:
1. Click Import.
2. Using the standard file-selection window, locate the file and click Open.
3. Repeat as necessary.
Note: The editor does not check for duplicates. If you import two lists and both lists contain the same URL, that URL will be listed twice.
Also, each URL must include the protocol (for example, http:// or https://). Unlike manual entry, the editor will not automatically add a protocol to the beginning of an imported URL.
To edit an entry:
l Click a URL.
To delete an entry:
l Select a URL and click Delete.
See Also
"Running a Basic Scan (Web Site Scan)" on page 162
Configuring the Proxy Profile
When performing a Basic Scan and using proxy settings from a Proxy Automatic Configuration (PAC) file or specifying Explicit Proxy Settings, you can configure the proxy options in the Proxy Profile window.
To access the Proxy Profile window:
l Click Edit under Network Proxy in the Basic Scan Wizard.
Configure proxy using a PAC file
Load proxy settings from a Proxy Automatic Configuration (PAC) file. Specify the file location in the URL box.
Explicitly configure proxy
Configure a proxy by entering the requested information.
1. In the Server box, type the URL or IP address of your proxy server, followed (in the Port box) by the port number (for example, 8080).
User GuideChapter 4: Working with Scans
Micro Focus Fortify WebInspect (21.1.0) Page 174 of 461

2. From the Type list, select a protocol for handling TCP traffic through a proxy server: SOCKS4, SOCKS5, or standard.
3. If authentication is required, select a type from the Authentication list:
Automatic
Allow Fortify WebInspect to determine the correct authentication type.
Automatic detection slows the scanning process. If you know and specify one of the other authentication methods, scanning performance is noticeably improved.
Basic
A widely used, industry-standard method for collecting user name and password information.
a. The Web browser displays a window for a user to enter a previously assigned user name and password, also known as credentials.
b. The Web browser then attempts to establish a connection to a server using the user's credentials.
c. If a user's credentials are rejected, the browser displays an authentication window to re-enter the user's credentials. Internet Explorer allows the user three connection attempts before failing the connection and reporting an error to the user.
d. If the Web server verifies that the user name and password correspond to a valid user account, a connection is established.
The advantage of Basic authentication is that it is part of the HTTP specification and is supported by most browsers. The disadvantage is that Web browsers using Basic authentication transmit passwords in an unencrypted form. By monitoring communications on your network, an attacker can easily intercept and decode these passwords using publicly available tools. Therefore, Basic authentication is not recommended unless you are confident that the connection between the user and your Web server is secure.
Digest
The Windows Server operating system implements the Digest Authentication protocol as a security support provider (SSP), a dynamic-link library (DLL) that is supplied with the operating system. Using digest authentication, your password is never sent across the network in the clear, but is always transmitted as an MD5 digest of the user's password. In this way, the password cannot be determined by sniffing network traffic.
Kerberos
Kerberos uses the Needham-Schroeder protocol as its basis. It uses a trusted third party, termed a Key Distribution Center (KDC), which consists of two logically separate parts: an Authentication Server (AS) and a Ticket Granting Server (TGS). The client authenticates itself to AS, then demonstrates to the TGS that it is authorized to receive a ticket for a service (and receives it). The client then demonstrates to a Service Server that it has been approved to receive the service.
Negotiate
The Negotiate authentication protocol begins with the option to negotiate for an authentication protocol. When the client requests access to a service, the server replies with a list of authentication
User GuideChapter 4: Working with Scans
Micro Focus Fortify WebInspect (21.1.0) Page 175 of 461

protocols that it can support and an authentication challenge based on the protocol that is its first choice.
For example, the server might list Kerberos and NTLM, and send a Kerberos challenge. The client examines the contents of the reply and checks to determine whether it supports any of the specified protocols. If the client supports the preferred protocol, authentication proceeds. If the client does not support the preferred protocol, but does support one of the other protocols listed by the server, the client lets the server know which authentication protocol it supports, and the authentication proceeds. If the client does not support any of the listed protocols, the authentication exchange fails.
NT LAN Manager (NTLM)
NTLM is an authentication process that is used by all members of the Windows NT family of products. Like its predecessor LanMan, NTLM uses a challenge/response process to prove the client’s identity without requiring that either a password or a hashed password be sent across the network.
Use NTLM authentication for servers running IIS. If NTLM authentication is enabled, and Fortify WebInspect has to pass through a proxy server to submit its requests to the Web server, Fortify WebInspect may not be able to crawl or audit that Web site.
Caution! After configuring Fortify WebInspect for NTLM authentication and scanning the NTLM-protected sites, you might want to disable the NTLM authentication settings to prevent any potential problem.
4. If your proxy server requires authentication, enter the qualifying user name and password.
5. If you do not need to use a proxy server to access certain IP addresses (such as internal testing sites), enter the addresses or URLs in the Bypass Proxy For box. Use commas to separate entries.
See Also
"Running a Basic Scan (Web Site Scan)" on page 162
Specifying Allowed Hosts
Specify an Allowed Host to add domains to be crawled. If your Web presence uses multiple domains, add those domains here. For example, if you were scanning "WIexample.com," you would need to add "WIexample2.com" and "WIexample3.com" here if those domains were part of your Web presence and you wanted to include them in the crawl or audit.
You can also use this feature to scan any domain whose name contains the text you specify. For example, suppose you specify www.myco.com as the scan target and you enter "myco" as an allowed host. As Fortify WebInspect scans the target site, if it encounters a link to any URL containing "myco," it will pursue that link and scan that site's server, repeating the process until all linked sites are scanned. For this hypothetical example, Fortify WebInspect would scan the following domains:
l www.myco.com:80
l contact.myco.com:80
l www1.myco.com
l ethics.myco.com:80
User GuideChapter 4: Working with Scans
Micro Focus Fortify WebInspect (21.1.0) Page 176 of 461

l contact.myco.com:443
l wow.myco.com:80
l mycocorp.com:80
l www.interconnection.myco.com:80
Note that if you specify a port number, then the allowed host must be an exact match.
Specifying Allowed Hosts
To specify (add) allowed hosts:
1. On the Detailed Scan Configuration page of the Basic Scan Wizard, click Add.
2. On the Specify Allowed Host dialog box, enter a URL (or a regular expression representing a URL).
Note: When specifying the URL, do not include the protocol designator (such as http:// or https://).
3. If you entered a regular expression for the allowed host, select Use Regular Expression.
For assistance creating a regular expression, click (to the right of the Allowed Host box). 4. Click OK.
Editing Allowed Hosts
To edit allowed hosts:
1. On the Detailed Scan Configuration page of the Basic Scan Wizard, select a host and then click Edit.
2. On the Edit Allowed Host dialog box, edit the URL (or the regular expression representing the URL).
Note: When editing the URL, do not include the protocol designator (such as http:// or https://).
3. Click OK.
See Also
"Running a Basic Scan (Web Site Scan)" on page 162
Multi-user Login ScansApplications that allow only a single active login session per user prevent multi-threaded scanning. With multiple logins, the threads invalidate each other's state, resulting in slow scan times.
A solution to this problem is to convert the recorded credentials in a login macro to parameters and use multiple login accounts with the same application privileges. You can use the Multi-user Login option in the Scan Settings: Authentication window to parameterize the username and password in a login
User GuideChapter 4: Working with Scans
Micro Focus Fortify WebInspect (21.1.0) Page 177 of 461

macro, and define multiple username and password pairs to use in a scan. This approach allows the scan to run across multiple threads. Each thread has a different login session, resulting in faster scan times.
Before You Begin
You must use a parameterized login macro to configure a multi-user login scan. For more information, see the Parameters Editor topic in the Web Macro Recorder chapters of the Micro Focus Fortify WebInspect Tools Guide.
Known Limitations
The following known limitations apply to the multi-user login feature:
l When using this feature, Fortify WebInspect does not detect several login-related Securebase checks.
l This feature currently supports only shared requestor threads. Using default scan settings with separate crawl and audit threads is not supported. For more information, see "Scan Settings: Requestor" on page 349.
l The scan does not distribute the work equally among the multiple users logged in. For example, one configured user might use up to 75% of the scan activities while all other users are allocated to the remaining 25% of scan activities.
Process Overview
To configure a multi-user login scan, use the process described in the following table.
Stage Description
1. Set the shared requestor to the desired number of users. For more information, see "Scan Settings: Requestor" on page 349.
Important! The number of shared requestor threads should not be more than the number of configured users. Requestor threads without valid users will cause the scan to run longer. Remember to count the original username and password in the parameterized macro as the first user when you configure multiple users.
2. Ensure that you have a login macro with parameterized username and password. For more information, see the Parameters Editor topic in the Web Macro Recorder chapters of the Micro Focus Fortify WebInspect Tools Guide.
3. In the Basic Scan wizard or Guided Scan wizard, enable the multi-user checkbox as described in "Configuring a Multi-user Login Scan" on the next page.
4. Add credentials for multiple users as described in "Adding Credentials" on the next page.
5. Continue through the scan wizard as normal and conduct the scan.
User GuideChapter 4: Working with Scans
Micro Focus Fortify WebInspect (21.1.0) Page 178 of 461

Configuring a Multi-user Login Scan
To configure a multi-user login scan:
1. Do one of the following:
l From the Basic Scan wizard, click Edit > Current Scan Settings. Then, select Scan Settings > Authentication.
l From the Guided Scan wizard, click Advanced in the ribbon, and then select Scan Settings > Authentication.
2. Select the Use a login macro for forms authentication checkbox.
Important! You must select this checkbox to enable the multi-user login option.
3. Do one of the following:
l To record a new macro, click Record and record a login macro as usual.
Note: The Record button is not available for Guided Scan, because Guided Scan includes a separate stage for recording a login macro. After recording the macro, you must parameterize the credentials.
l To use an existing macro, click ... and select a saved macro that already has parameterized credentials.
4. Select the Multi-user Login checkbox.
Note: If you clear the Multi-user Login checkbox prior to running the scan, the additional credentials will not be used during the scan. Fortify WebInspect will use only the original credentials recorded in the login macro.
5. Continue as follows:
l To add a user’s credentials, go to "Adding Credentials" below.
l To edit a user’s credentials, go to "Editing Credentials" on the next page.
l To delete a user’s credentials, go to "Deleting Credentials" on the next page.
6. After configuring the user's credentials, continue through the scan wizard as normal and conduct the scan.
Adding Credentials
To add credentials:
1. Under Multi-user Login, click Add.
The Multi-user Credential Input dialog box appears.
2. In the Username field, type a username
3. In the Password field, type the corresponding password.
User GuideChapter 4: Working with Scans
Micro Focus Fortify WebInspect (21.1.0) Page 179 of 461

4. Click OK.
5. Repeat Steps 1-4 for each user login to add.
Important! The number of shared requestor threads should not be more than the number of configured users. Requestor threads without valid users will cause the scan to run longer. Remember to count the original username and password in the parameterized macro as the first user when you configure multiple users. For more information, see "Scan Settings: Requestor" on page 349.
Editing Credentials
To edit credentials:
1. Under Multi-user Login, select a Username/Password pair and click Edit.
The Multi-user Credential Input dialog box appears.
2. Edit the credentials as needed.
3. Click OK.
Deleting Credentials
To delete credentials:
1. Under Multi-user Login, select a Username/Password pair to be removed.
2. Click Delete.
Interactive ScansWeb applications using two-factor authentication or similar anti-scanning technology require an interactive scan configuration in WebInspect. In an interactive scan, you are presented with a browser window asking for user input for authentication. You can configure an automated interactive scan that will pause only when an input field is encountered. This pause affects only the Requestor thread that encounters the input field. The remaining threads are unaffected.
This configuration works for CAPTCHA, RSA ID token fields, virtual PIN pads, virtual keyboards, and common access card (CAC) readers where the PIN or input is dynamic and changes.
Tip: For websites that use a CAC reader with a static PIN, you can configure the scan to use CAC certificates. See one of the following topics:
l "Scan Settings: Authentication" on page 373
l "Running a Basic Scan (Web Site Scan)" on page 162
l "Using the Native Scan Template" on page 139
l "Using the Mobile Scan Template" on page 122
l "Using the Predefined Template" on page 107
User GuideChapter 4: Working with Scans
Micro Focus Fortify WebInspect (21.1.0) Page 180 of 461

Configuring an Interactive Scan
The following table describes the process for configuring an interactive scan.
Stage Description
1. Prepare the Web forms input file as follows:
1. Record or enter the field name into the Web Form Editor tool.
2. Right-click the form name and select Mark As Interactive.
3. Save the Web Forms input file.
For more information, see the Web Form Editor chapter in the Micro Focus Fortify WebInspect Tools Guide.
2. Are you using a client-side certificate that requires a dynamic PIN?
l If yes, launch Internet Explorer and ensure that the client-side certificate is listed or manually import it.
This action temporarily loads the certificate into the Windows certificate store.
Note: Plugging in the hardware token and entering the requested PIN may do this automatically.
l If no, skip to Stage 3.
3. Configure the scan method for interactive scan mode as follows:
1. Open the Scan Settings: Method window.
2. In the Auto fill web forms field, specify the Web Forms input file you created in Stage 1.
3. Select the Prompt for web form values during scan (interactive mode) check box.
4. Select the Only prompt for tagged inputs check box.
Note: If this final check box is not selected, you will be prompted for all inputs encountered on the site.
4. Are you using a client-side certificate that requires a dynamic PIN?
l If yes, configure authentication to use the client-side certificate:
a. Open the Scan Settings: Authentication window.
b. In the Client Certificates area, select the Enable check box and browse to select
User GuideChapter 4: Working with Scans
Micro Focus Fortify WebInspect (21.1.0) Page 181 of 461

Stage Description
the user's certificate.
Fortify WebInspect uses this certificate until it times out and fails to enter the requested PIN, or until the hardware token is removed and Windows drops the certificate from the store.
l If no, skip to Stage 5.
5. Save the scan settings and use them in a Fortify WebInspect scan.
Important! You must watch for the pop-ups to enter the form value as needed.
Restrict to Folder LimitationsThis topic describes limitations to the Restrict to folder scan option when JavaScript include files are encountered or when a login or workflow macro is used.
JavaScript Include Files
During a scan, the crawler and JavaScript engine might access external JavaScript include files. These files are not actively audited, so no attacks are sent over HTTP. However, passive inspection can reveal issues with JavaScript include files, and these files will be listed in the site tree.
Login Macros
If you use a login macro, then sessions requested in the macro will be listed in the site tree. The sessions will be passively audited, meaning that no attacks will be sent, but vulnerabilities such as weak encryption, unencrypted login forms, and so on might be revealed.
Workflow Macros
If you use a workflow macro in a Crawl and Audit scan or a Crawl Only scan, then the scan might violate the Restrict to folder option. The assumption is that you wish to visit the URLs included in the workflow macro.
Running an Enterprise Scan An enterprise scan provides a comprehensive overview of your Web presence from an enterprise network perspective. Fortify WebInspect will automatically discover all available ports for a range of IP addresses. You can then select which servers to assess for vulnerabilities from all servers that are discovered.
User GuideChapter 4: Working with Scans
Micro Focus Fortify WebInspect (21.1.0) Page 182 of 461

To start an Enterprise Scan:
1. Do one of the following to launch the Enterprise Scan Wizard:
l On the Fortify WebInspect Start Page, click Start an Enterprise scan.
l Click File > New > Enterprise Scan.
l Click the drop-down arrow on the New icon (on the toolbar) and select Enterprise Scan.
l On the Fortify WebInspect Start Page, click Manage Scheduled Scans, click Add, and then select Enterprise Scan.
2. On Step 1 of the Enterprise Scan Wizard, specify when you want to conduct the scan. The choices are:
l Immediately: The scan will run immediately after finishing the Scheduled Scan Wizard.
l Run Once Date / Time: Modify the date and time when the scan should begin. You can click the drop-down arrow to reveal a calendar for selecting the date.
l Recurrence Schedule: Use the slider to select a frequency (Daily, Weekly, or Monthly). Then specify the time when the scan should begin and (for Weekly or Monthly) provide other schedule information.
3. Click Next.
4. On Step 2 of the Enterprise Scan Wizard, in the Enterprise Scan Name box, enter a unique name for this enterprise scan.
5. At this point, you can perform one or more of the following functions:
l Instruct Fortify WebInspect to discover all available servers within a range of IP addresses and ports that you specify.
User GuideChapter 4: Working with Scans
Micro Focus Fortify WebInspect (21.1.0) Page 183 of 461

To discover Web servers:
i. Click Discover.
The Search for Web Servers window appears.
ii. In the IPV4/IPV6 Addresses (or ranges) box, type one or more IP addresses or a range of IP addresses.
l Use a semicolon to separate multiple addresses. Example: 172.16.10.3;172.16.10.44;188.23.102.5
l Use a dash or hyphen to separate the starting and ending IP addresses in a range. Example: 10.2.1.70-10.2.1.90.
Note: IPV6 addresses must be enclosed in brackets. See "Internet Protocol Version 6 " on page 338.
iii. In the Ports (or ranges) box, type the ports you want to scan.
l Use a semicolon to separate multiple ports. Example: 80;8080;443
l Use a dash or hyphen to separate the starting and ending ports in a range. Example: 80-8080.
iv. (Optional) Click Settings to modify the number of sockets and timeout parameters used for the discovery process.
v. Click Start to initiate the discovery process.
Results display in the Discovered End Points area.
l Click an entry in the IP Address column to view that site in a browser.
l Click an entry in the Identification column to open the Session Properties window, where you can view the raw request and response.
User GuideChapter 4: Working with Scans
Micro Focus Fortify WebInspect (21.1.0) Page 184 of 461

vi. To remove a server from the list, clear the associated check box in the Selection column.
vii. Click OK.
The IP addresses appear in the "Hosts to Scan" list.
l Enter individual URLs or IP addresses of hosts to scan.
To manually enter a list of URLs or IP addresses you want to scan.
i. Click Add.
The Scan Wizard opens.
ii. Provide the information described in "Running a Basic Scan (Web Site Scan)" on page 162.
iii. Repeat for additional servers.
l Import a list of servers that you want to scan (using a list that you previously created).
If you previously used the Enterprise Scan feature or the Web Discovery tool to detect servers and then exported your findings to a text file, you can load those results by clicking Import and then selecting the saved file.
Edit the 'Hosts to Scan' List
After building a list of servers using one or more of the above methods, you can modify the list .
To modify the settings for a specific scan:
1. Select a server.
2. Click Edit.
The Scan Wizard opens.
3. Change the settings.
4. Click Finish (on the Edit Basic Scan window).
To delete a server from the list:
1. Select a server.
2. Click Delete.
Export a List
To save the "Hosts to Scan" list:
1. Click Export.
2. Using a standard file-selection window, specify the file name and location.
Start the Scan
To begin the enterprise scan, click Schedule. Each server's scan results will automatically be saved upon completion in your default Scans folder. The name of the server, along with a date and time stamp, will
User GuideChapter 4: Working with Scans
Micro Focus Fortify WebInspect (21.1.0) Page 185 of 461
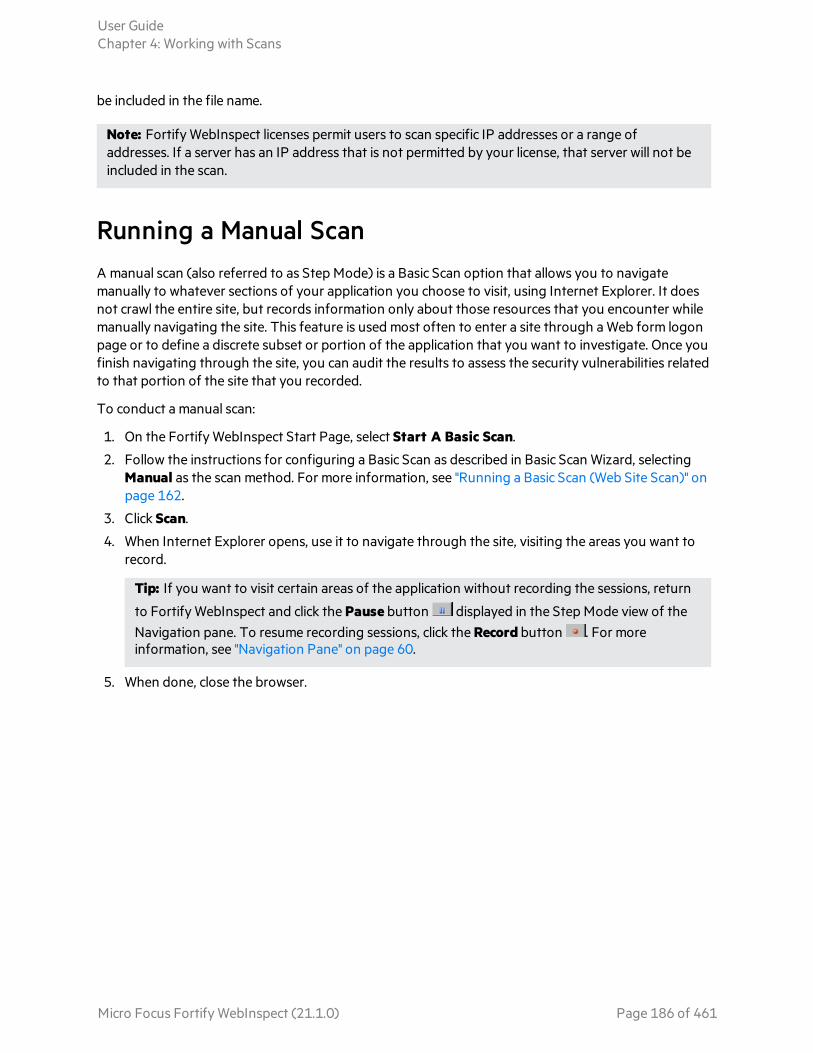
be included in the file name.
Note: Fortify WebInspect licenses permit users to scan specific IP addresses or a range of addresses. If a server has an IP address that is not permitted by your license, that server will not be included in the scan.
Running a Manual Scan A manual scan (also referred to as Step Mode) is a Basic Scan option that allows you to navigate manually to whatever sections of your application you choose to visit, using Internet Explorer. It does not crawl the entire site, but records information only about those resources that you encounter while manually navigating the site. This feature is used most often to enter a site through a Web form logon page or to define a discrete subset or portion of the application that you want to investigate. Once you finish navigating through the site, you can audit the results to assess the security vulnerabilities related to that portion of the site that you recorded.
To conduct a manual scan:
1. On the Fortify WebInspect Start Page, select Start A Basic Scan.
2. Follow the instructions for configuring a Basic Scan as described in Basic Scan Wizard, selecting Manual as the scan method. For more information, see "Running a Basic Scan (Web Site Scan)" on page 162.
3. Click Scan.
4. When Internet Explorer opens, use it to navigate through the site, visiting the areas you want to record.
Tip: If you want to visit certain areas of the application without recording the sessions, return
to Fortify WebInspect and click the Pause button displayed in the Step Mode view of the Navigation pane. To resume recording sessions, click the Record button . For more information, see "Navigation Pane" on page 60.
5. When done, close the browser.
User GuideChapter 4: Working with Scans
Micro Focus Fortify WebInspect (21.1.0) Page 186 of 461

Fortify WebInspect displays the Step Mode view in the Navigation pane.
6. Do one of the following:
l To resume browsing the application, select a session and click Browse.
l To import the sessions into the scan, click Finish. You can exclude an individual session from the import by clearing its associated check box.
7. To audit the recorded sessions, click (on the toolbar).
About Privilege Escalation ScansPrivilege escalation vulnerabilities result from programming errors or design flaws that grant an attacker elevated access to an application and its data. Fortify WebInspect can detect privilege escalation vulnerabilities by conducting either a low-privilege or unauthenticated crawl followed by a high-privilege crawl and audit in the same scan. Fortify WebInspect includes a Privilege Escalation policy as well as privilege escalation checks that can be enabled in other policies, including custom policies. In
User GuideChapter 4: Working with Scans
Micro Focus Fortify WebInspect (21.1.0) Page 187 of 461

Guided Scan, Fortify WebInspect automatically detects when you have selected a policy with privilege escalation checks enabled, and prompts you for the required login macro(s).
Two Modes of Privilege Escalation Scans
Fortify WebInspect can perform privilege escalation scans in two modes, determined by the number of login macros you use:
l Authenticated Mode – This mode uses two login macros: one for low-privilege access and one for high-privilege access. In this mode, a low-privilege crawl is followed by a high-privilege crawl and audit. You can perform this type of scan using Guided Scan. For more information, see "Running a Guided Scan" on page 106.
Note: When using the Enhance Coverage of Your Web Site feature in Guided Scan in conjunction with the Privilege Escalation policy, the explored locations are collected while authenticated with the high-privilege login macro.
l Unauthenticated Mode – This mode uses only a high-privilege login macro. In this mode, the low-privilege crawl is actually an unauthenticated crawl. Any privilege escalation detected during this scan is moving from unauthenticated to high privilege. You can perform this type of scan using Guided Scan (and providing only a high-privilege login macro) or the Basic Scan wizard. For more information, see "Running a Basic Scan (Web Site Scan)" on page 162.
What to Expect During the Scan
When conducting a scan with privilege escalation checks enabled, Fortify WebInspect first performs a low-privilege crawl of the site. During this crawl, the Site view is not populated with the hierarchical structure of the Web site. Nor are vulnerabilities populated in the Summary pane. However, you can confirm that the scan is actively working by clicking the Scan Log tab in the Summary pane. You will see messages in the log indicating the "Scan Start" time and the "LowPrivilegeCrawlStart" time. When the low-privilege crawl of the site is complete, the high-privilege crawl and audit phase of the scan occurs. During this phase, the Site view will be populated and any vulnerabilities found will appear in the Summary pane. For more information, see "Summary Pane" on page 98.
Regex Patterns Used to Identify Restricted Pages
If your site includes restricted pages that are blocked using text such as “Forbidden,” “Restricted,” or “Access Denied,” the Privilege Escalation check includes a regex pattern that determines that these pages are forbidden for the current user. Therefore, these pages are not identified as being vulnerable for privilege escalation. However, if your site uses other privilege restriction text that does not match the built-in regex pattern, you must modify the regex to include your own text patterns. Otherwise, the Privilege Escalation check may generate false positives for those pages.
Modifying Regex for Privilege Restriction Patterns
1. Click Edit > Default Scan Settings.
The Default Settings window appears.
User GuideChapter 4: Working with Scans
Micro Focus Fortify WebInspect (21.1.0) Page 188 of 461

2. Select Attack Exclusions in the Audit Settings group.
3. Click Audit Inputs Editor….
The Audit Inputs Editor appears
4. Select Check Inputs.
5. Select check 11388 Privilege Escalation.
The Privilege Restriction Patterns appear in the right pane. By default, the pattern is as follows:
‘forbidden|restricted|access\sdenied|(?:operation\snot\s(?:allowed|permitted|authorized))|(?:you\s(?:do\snot|don’t)\shave\s(?:access|permission|authorization))|(?:you\s(?:are\snot|aren’t)\s(?:allowed|permitted|authorized))’
6. Using regex syntax, add any new forbidden action words that are used in your site.
7. Click OK to save the revised Check Inputs.
8. Click OK to close the Default Settings window.
Effect of Crawler Limiting Settings on Privilege Escalation Scans
Fortify WebInspect audits each parameter value during a scan. Therefore, a Privilege Escalation scan is sensitive to settings that limit the crawler, such as:
l Limit maximum single URL hits to
l Include parameters in hit count
l Limit maximum Web form submission to
l Perform redundant page detection
For example, if you set “Limit maximum single URL hits to” 1 and the site contains links such as:
index.php?id=2 index.php?id=1 index.php?id=3
then during the high-privilege scan, Fortify WebInspect finds “index.php?id=1” and during the low-privilege scan, it finds “index.php?id=3”. In this scenario, Fortify WebInspect will mark “index.php?id=1” with a Privilege Escalation vulnerability. This vulnerability will be a false positive.
For more information, see "Scan Settings: General" on page 342.
Effect of Parameters with Random Numbers on Privilege Escalation Scans
If the site contains parameters with random numbers, you can add the parameter to the list of HTTP Parameters Used For State to exclude such sessions from audit and reduce the number of false positives.
User GuideChapter 4: Working with Scans
Micro Focus Fortify WebInspect (21.1.0) Page 189 of 461

For example, for the following parameter:
index.php?_=1440601463586 index.php?_=1440601465662 index.php?_=1440601466365
you would add the parameter to the list of HTTP Parameters Used For State as shown below:
For more information, see "Scan Settings: HTTP Parsing" on page 356.
See Also
"Running a Basic Scan (Web Site Scan)" on page 162
"Using the Predefined Template" on page 107
"Using the Mobile Scan Template" on page 122
"Using the Native Scan Template" on page 139
About Single-page Application ScansThis topic describes single-page application (SPA) support for crawling and auditing the Document Object Model (DOM) of an application.
Important! This version of SPA support is provided as a technology preview.
Technology Preview
Technology preview features are currently unsupported, may not be functionally complete, and are not suitable for deployment in production. However, these features are provided as a courtesy and the primary objective is for the feature to gain wider exposure with the goal of full support in the future.
The Challenge of Single-page Applications
Developers use JavaScript frameworks such as Angular, Ext JS, and Ember.js to build SPAs. These frameworks make it easier for developers to build applications, but more difficult for security testers to
User GuideChapter 4: Working with Scans
Micro Focus Fortify WebInspect (21.1.0) Page 190 of 461

scan those applications for security vulnerabilities.
Traditional sites use simple back-end server rendering, which involves constructing the complete HTML web page on the server side. SPAs and other “Web 2.0” sites use front-end DOM rendering, or a mix of front-end and back-end DOM rendering. With SPAs, if the user selects a menu item, the entire page can be erased and recreated with new content. However, the event of selecting the menu item does not generate a request for a new page from the server. The content update occurs without reloading the page from the server.
With traditional vulnerability testing, the event that triggered the new content might destroy other events that were previously collected on the SPA for audit. Through its SPA support, WebInspect offers a solution to the challenge of vulnerability testing on SPAs.
Enabling SPA Support
When you enable SPA support, the DOM script engine finds JavaScript includes, frame and iframe includes, CSS file includes, and AJAX calls during the crawl, and then audits all traffic generated by those events.
You can enable SPA support in the scan settings or in Guided Scan.
Caution! SPA support should be enabled for single-page applications only. Enabling SPA support to scan a non-SPA website will result in a slow scan.
See also
"Scan Settings: JavaScript" on page 348
"Using the Predefined Template" on page 107
"Using the Mobile Scan Template" on page 122
"Using the Native Scan Template" on page 139
Scan Status Unless otherwise specified, the scan status is read directly from the database. Scan statuses are described in the following table.
Status Description
Running A scheduled scan or a scan initiated through the command-line interface (CLI) is currently running on the local machine.
Locked Another instance of Fortify WebInspect has initiated the scan, which is running and its heartbeat has not expired.
Note: Applies to remote SQL Server (full version) only.
User GuideChapter 4: Working with Scans
Micro Focus Fortify WebInspect (21.1.0) Page 191 of 461
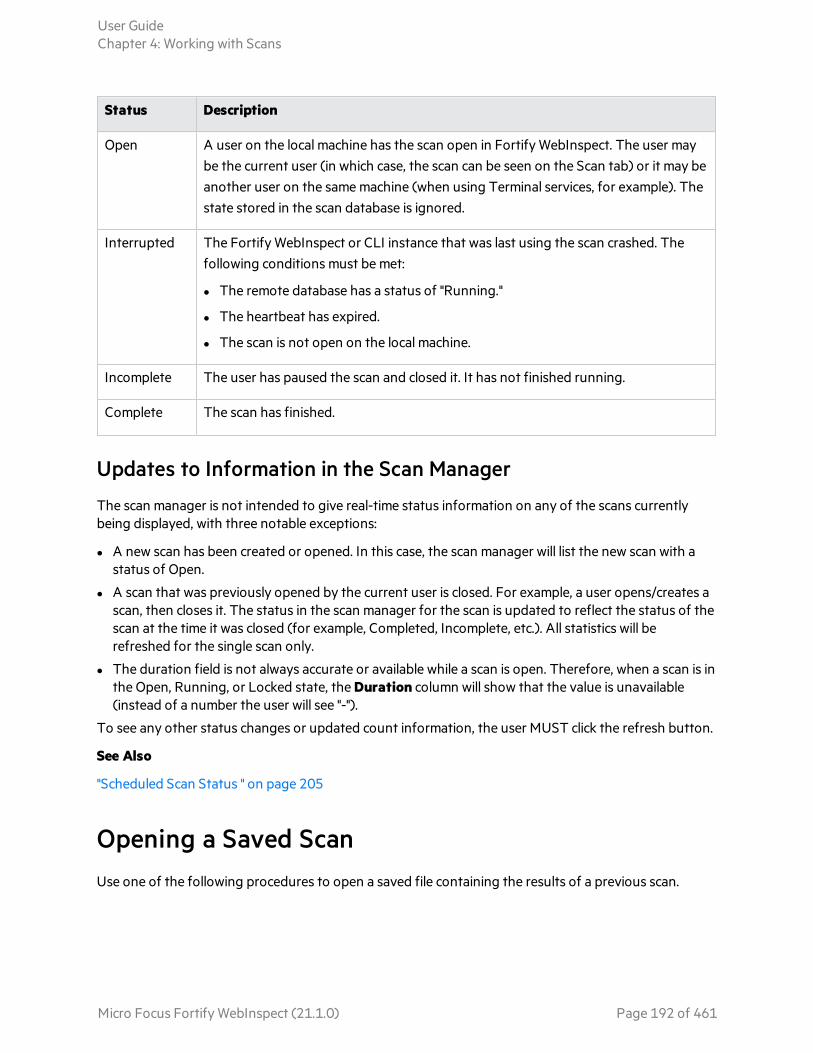
Status Description
Open A user on the local machine has the scan open in Fortify WebInspect. The user may be the current user (in which case, the scan can be seen on the Scan tab) or it may be another user on the same machine (when using Terminal services, for example). The state stored in the scan database is ignored.
Interrupted The Fortify WebInspect or CLI instance that was last using the scan crashed. The following conditions must be met:
l The remote database has a status of "Running."
l The heartbeat has expired.
l The scan is not open on the local machine.
Incomplete The user has paused the scan and closed it. It has not finished running.
Complete The scan has finished.
Updates to Information in the Scan Manager
The scan manager is not intended to give real-time status information on any of the scans currently being displayed, with three notable exceptions:
l A new scan has been created or opened. In this case, the scan manager will list the new scan with a status of Open.
l A scan that was previously opened by the current user is closed. For example, a user opens/creates a scan, then closes it. The status in the scan manager for the scan is updated to reflect the status of the scan at the time it was closed (for example, Completed, Incomplete, etc.). All statistics will be refreshed for the single scan only.
l The duration field is not always accurate or available while a scan is open. Therefore, when a scan is in the Open, Running, or Locked state, the Duration column will show that the value is unavailable (instead of a number the user will see "-").
To see any other status changes or updated count information, the user MUST click the refresh button.
See Also
"Scheduled Scan Status " on page 205
Opening a Saved Scan Use one of the following procedures to open a saved file containing the results of a previous scan.
User GuideChapter 4: Working with Scans
Micro Focus Fortify WebInspect (21.1.0) Page 192 of 461

Using the Menu or Tool bar:
l Click File > Open > Scan.
l Click the drop-down arrow on the Open button and select Scan.
From the Start Page tab:
l Click Start a Basic Scan.
l On the Home pane, click an entry in the Recently Opened Scans list.
l On the Manage Scans pane, select a scan and click Open (or double-click the scan name).
Fortify WebInspect loads the scan data and displays it on a separate tab.
Comparing ScansYou can compare the vulnerabilities revealed by two different scans of the same target and use this information to:
l Verify fixes: Compare vulnerabilities detected in the initial scan with those in a subsequent scan of the same site after the vulnerabilities were supposedly fixed.
l Check on scan health: Change scan settings and verify that those changes expand the attack surface.
l Find new vulnerabilities: Determine if new vulnerabilities have been introduced in an updated version of the site.
l Investigate Issues: Pursue anomalies such as false positives or missed vulnerabilities.
l Compare authorization access: Conduct scans using two different user accounts to discover vulnerabilities that are unique or common to both accounts.
Note: Data from both scans must be stored in the same database type (SQL Server Express Edition or SQL Server Standard/Enterprise Edition).
Selecting Scans to Compare Scans
To compare two scans, do one of the following:
l From the Manage Scans page, select two scans and click Compare.
l From a tab containing an open scan (which will be Scan A in the comparison):
a. Click Compare.
b. Select a scan from the list on the Scan Comparison window. This scan will be Scan B in the comparison.
c. Click Compare.
Note: If the open scan is a "site retest" (resulting from Rescan > Retest Vulnerabilities), Fortify WebInspect automatically selects the parent scan for comparison. For example, if you created a scan named "zero," and then verified vulnerabilities for that scan, the resulting scan would be named (by default) "site retest - zero." With the retest scan open, if you select Compare, Fortify WebInspect will compare "site retest - zero" with the parent scan "zero."
User GuideChapter 4: Working with Scans
Micro Focus Fortify WebInspect (21.1.0) Page 193 of 461

A warning message appears if the selected scans have different start URLs or used different scan policies, or if the scans are of a different type (such as a Basic Scan vs. a Web service scan). You can choose to continue, or you can terminate the function.
You cannot conduct a comparison if either of the scans is currently running.
Scan Compare Image
Reviewing the Scan Dashboard
The Scan Dashboard displays the scan comparison results.
Scan Descriptions
The Scan A and Scan B boxes provide the following information of the scans:
l Scan A or Scan B: Name of the scan.
l Date: Date and time the original scan was conducted.
l Policy: Policy used for the scan; see "Fortify WebInspect Policies" on page 425 for more information.
l Findings: Total number of issues identified on the Findings tab, as well as false positives detected.
User GuideChapter 4: Working with Scans
Micro Focus Fortify WebInspect (21.1.0) Page 194 of 461

l Unique/Total: Number of unique sessions created for this scan (that is, the number of sessions that appear in this scan and not the other scan), compared to the total number of sessions for this scan.
l Coverage: Percentage of sessions that are common to both scans.
The Venn Diagram
The Venn diagram depicts the session coverage of Scan A (represented by a yellow circle) and the session coverage of Scan B (represented by a blue circle). The intersection of the two sets is represented by the green overlap. (In prior releases, the Venn diagram represented the overlap of vulnerabilities.)
The Venn diagram is scaled to reflect the actual relationship between the sets.
Several examples of session coverage overlap are illustrated below.
No Intersection
50% Intersection
A Encompasses B
Most of A Intersects B
Complete Intersection
Vulnerabilities Bar Chart
In separate groupings for each vulnerability severity and for False Positives, the bottom of the Scan Dashboard displays a set of bar charts that show the number of vulnerabilities found in Scan A, in Scan B, and in their intersection (Intersect). The same color coding is used as in the Venn diagram. These bar charts do not change based on the selected Compare Mode.
Effect of Scheme, Host, and Port Differences on Scan Comparison
Fortify WebInspect does not ignore the scheme, host, and port when comparing scans from two duplicate sites that are hosted on different servers.
For example, the following site pairs would not be correlated in a scan comparison because of differences in scheme, host, or port:
l Scheme l Site A - http://zero.webappsecurity.com/
l Site B - https://zero.webappsecurity.com/
l Host l Site A - http://dev.foo.com/index.html?par1=123&par2=123
l Site B - http://qa.foo.com/index.html?par1=123&par2=123
User GuideChapter 4: Working with Scans
Micro Focus Fortify WebInspect (21.1.0) Page 195 of 461

l Port l Site A - http://zero.webappsecurity.com:80/
l Site B - http://zero.webappsecurity.com:8080/
Compare Modes
You can select one of the following options in the Compare Mode section to the left of the Scan Dashboard to display different data in the Sequence area in the left pane (the data in the Scan Dashboard is not affected):
l Mutual Exclusion: Lists sessions that appear in Scan A or Scan B, but not in both scans
l Only In A: Lists sessions that appear only in Scan A
l Only in B: Lists sessions that appear only in Scan B
l Union (the default): Lists sessions that appear in Scan A, Scan B, or both Scans A & B
Session Filtering
The Sequence pane lists each session that matches the selected Compare Mode. An icon to the left of the URL indicates the severity of the vulnerability, if any, for that session. The severity icons are:
Critical High Medium Low
At the top of the Sequence pane, you can specify a filter and click Filter to limit the set of displayed sessions in the following ways:
l You can enter the URL with only its starting characters, as a "starts with" match. Your entry must begin with the protocol (http:// or https://).
l You can search for an exact match by specifying the URL in quotes. Your entry must begin with the quotes and protocol ("http:// or "https://)
l You can use an asterisk (*) as a wildcard character at the beginning or end of the string you enter.
l You can use asterisks (*) at both the beginning and end of the string you enter, which requires matches to contain the string between the asterisks.
l You can enter a question mark (?) followed by a full query parameter string to find matches to that query parameter.
Using the Session Info Panel
When you select a session in the Sequence pane, the Session Info panel opens below the Compare Mode options. With a session selected, you can select an option in the Session Info panel to display more details about that session to the right of the Session Info panel. If the session contains data for
User GuideChapter 4: Working with Scans
Micro Focus Fortify WebInspect (21.1.0) Page 196 of 461

both scans, the data for some functions such as Web Browser, HTTP Request, and Steps are shown in a split view with Scan A on the left side and Scan B on the right side.
Note: The Steps option displays the path taken by Fortify WebInspect to arrive at the session selected in the Sequence pane or the URL selected in the Summary pane. Beginning with the parent session (at the top of the list), the sequence reveals the subsequent URLs visited and provides details about the scan methodology. In a scan comparison, if any of the steps for the session are different between the scans, the In Both column is added to the Steps table (as the first column). A value of Yes in the column for a particular step indicates that the step is the same for that session for both scans A and B. A value of No in the column for a particular step indicates that the step is different for that session between scans A and B.
Using the Summary Pane to Review Vulnerability Details
When comparing scans, the horizontal Summary pane at the bottom of the window provides a centralized table of vulnerable resources and allows you to quickly access vulnerability information. You can drag the horizontal divider above the table to show or hide more of the Summary pane.
The set of entries (rows) displayed in the Findings tab depends on the option selected for Compare Mode, as reflected in the Link column in the table.
Grouping and Sorting Vulnerabilities
For information on grouping and sorting vulnerabilities, see "Summary Pane" on page 98 and "Using Filters and Groups in the Summary Pane" on page 237.
Filtering Vulnerabilities
You can click the filter icon ( ) at the right of any column heading to open a filter that allows you to choose a variety of conditions regarding that column that must be met in order for a vulnerability (row) to remain listed in the table after filtering. The available conditions include the full set of current values in the column, and you can also specify logical expressions regarding the content of that column.
For example, in the filter for the Vuln Parameter column, suppose you:
1. Leave the top set of check boxes as is.
2. Below the Show rows with value that text, select Contains from the drop-down menu.
3. Type Id in the text box below the drop-down menu.
4. Click Filter.
Then the table will show only rows that contain the text "Id" in the Vuln Parameter column. This would include rows for which the value of Vuln Parameter is accountId or payeeId or any other entry that includes "Id."
You can specify filters for multiple columns, one column at a time, and they will all be applied.
If a filter for a column has been specified, its icon becomes a darker blue than the icons for unused filters.
To quickly clear a filter, click Clear Filter while the filter is open to be specified.
User GuideChapter 4: Working with Scans
Micro Focus Fortify WebInspect (21.1.0) Page 197 of 461

Working with Vulnerabilities
Right-clicking an item in the Summary pane displays a shortcut menu containing the following commands:
l Copy URL: Copies the URL to the Windows clipboard.
l Copy Selected Item(s): Copies the text of selected items to the Windows clipboard.
l Copy All Items: Copies the text of all items to the Windows clipboard.
l Export: Creates a comma-separated values (csv) file containing either all items or selected items and displays it in Microsoft Excel.
l View in Browser: Renders the HTTP response in a browser.
Note: For Post and Query parameters, click an entry in the Parameters column to display a more readable synopsis of the parameters.
See also
"Summary Pane" on page 98
"Using Filters and Groups in the Summary Pane" on page 237
Manage Scans To manage scans:
1. On the Start Page, click Manage Scans.
A list of scans appears in the right-hand pane of the Start Page.
By default, Fortify WebInspect lists all scans saved in the SQL Server Express Edition on your machine and in SQL Server Standard Edition (if configured). The current state of the scan is indicated in the Status column. For more information, see "Scan Status " on page 191.
2. (Optional) To group scans into categories based on the column headings, drag the heading and drop it on the grouping area.
3. Use the toolbar buttons to perform the functions listed below.
l To open scans, select one or more scans and click Open (or simply double-click an entry in the list). Fortify WebInspect loads the scan data and displays each scan on a separate tab.
l To launch the Scan Wizard prepopulated with settings last used for the selected scan, click Rescan > Scan Again.
l To reuse a scan, click Rescan and select the reuse option you want from the drop-down menu. For more information, see "Reusing Scans" on page 225.
l To rescan only those sessions that contained vulnerabilities revealed during a previous scan, select a scan and click Rescan > Retest Vulnerabilities.
User GuideChapter 4: Working with Scans
Micro Focus Fortify WebInspect (21.1.0) Page 198 of 461
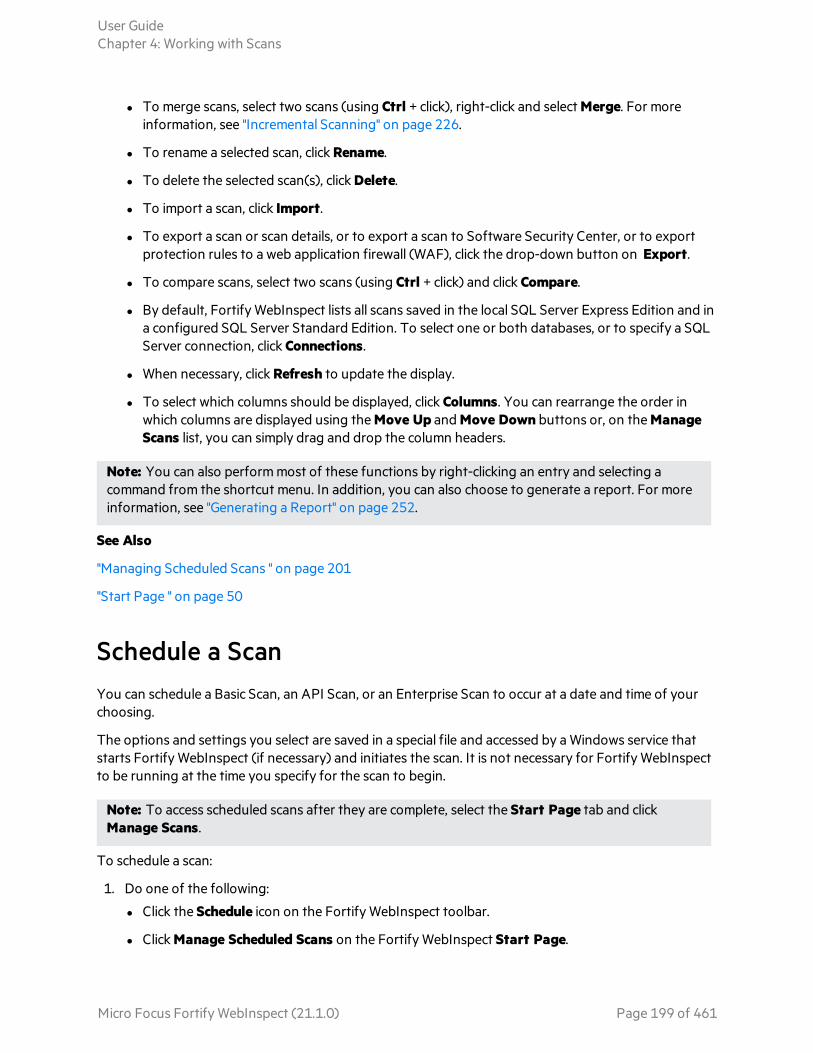
l To merge scans, select two scans (using Ctrl + click), right-click and select Merge. For more information, see "Incremental Scanning" on page 226.
l To rename a selected scan, click Rename.
l To delete the selected scan(s), click Delete.
l To import a scan, click Import.
l To export a scan or scan details, or to export a scan to Software Security Center, or to export protection rules to a web application firewall (WAF), click the drop-down button on Export.
l To compare scans, select two scans (using Ctrl + click) and click Compare.
l By default, Fortify WebInspect lists all scans saved in the local SQL Server Express Edition and in a configured SQL Server Standard Edition. To select one or both databases, or to specify a SQL Server connection, click Connections.
l When necessary, click Refresh to update the display.
l To select which columns should be displayed, click Columns. You can rearrange the order in which columns are displayed using the Move Up and Move Down buttons or, on the Manage Scans list, you can simply drag and drop the column headers.
Note: You can also perform most of these functions by right-clicking an entry and selecting a command from the shortcut menu. In addition, you can also choose to generate a report. For more information, see "Generating a Report" on page 252.
See Also
"Managing Scheduled Scans " on page 201
"Start Page " on page 50
Schedule a Scan You can schedule a Basic Scan, an API Scan, or an Enterprise Scan to occur at a date and time of your choosing.
The options and settings you select are saved in a special file and accessed by a Windows service that starts Fortify WebInspect (if necessary) and initiates the scan. It is not necessary for Fortify WebInspect to be running at the time you specify for the scan to begin.
Note: To access scheduled scans after they are complete, select the Start Page tab and click Manage Scans.
To schedule a scan:
1. Do one of the following:
l Click the Schedule icon on the Fortify WebInspect toolbar.
l Click Manage Scheduled Scans on the Fortify WebInspect Start Page.
User GuideChapter 4: Working with Scans
Micro Focus Fortify WebInspect (21.1.0) Page 199 of 461

2. When the Manage Scheduled Scans window appears, click Add.
3. In the Type of Scan group, choose one of the following:
l Web Site Scan
l API Scan
l Enterprise Scan
4. To conduct the scan one time only, select Run Once and then edit the Start Date and Time. If you click the drop-down arrow, you can use a calendar to select the date.
5. To scan a site periodically:
a. Select Recurring (or Recurrence Schedule), then specify the start time and choose a frequency: Daily, Weekly, or Monthly.
b. If you select Weekly or Monthly, provide the additional requested information.
6. Click Next.
See Also
"Running a Basic Scan (Web Site Scan)" on page 162
"Running an API or Web Service Scan" on page 153
"Running an Enterprise Scan " on page 182
"Configuring Time Interval for Scheduled Scan " below
Configuring Time Interval for Scheduled Scan To configure when to run a scan or to set up recurring scans:
1. In the Type of Scan group, choose one of the following:
l Basic Scan
l API Scan
l Enterprise Scan
2. To conduct a scan now, select Immediately.
3. To conduct a one-time-only scan at a later date or time:
a. Select Run Once.
b. Modify the date and time when the scan should begin.
Tip: Click the drop-down arrow to reveal a calendar for selecting the date.
4. To scan a site periodically:
a. Select Recurring.
b. Specify the time when the scan should start.
c. Choose a frequency: Daily, Weekly, or Monthly.
5. Click Next.
User GuideChapter 4: Working with Scans
Micro Focus Fortify WebInspect (21.1.0) Page 200 of 461

See Also
"Running a Basic Scan (Web Site Scan)" on page 162
"Running an API or Web Service Scan" on page 153
"Running an Enterprise Scan " on page 182
Managing Scheduled Scans You can instruct Fortify WebInspect to conduct a scan at a time and date you specify. The options and settings you select are saved in a special file and accessed by a Windows service that starts Fortify WebInspect (if necessary) and initiates the scan. It is not necessary for Fortify WebInspect to be running at the time you designate the scan to begin.
Note: Scheduled scans, when complete, do not appear in the Recent Scans list that displays on the Fortify WebInspect Start page. To access scheduled scans after they are complete, select the Start page and click Manage Scans.
On the Start Page, click Manage Schedule.
A list of scans you previously scheduled appears in the right-hand pane of the Start Page.
The current state of the scan is indicated in the Status column. For more information, see "Scheduled Scan Status " on page 205.
You can perform the following tasks:
Delete a Scan
l To delete a scan from the list, select a scan and click Delete.
Edit Scan Settings
l To edit settings for a scheduled scan, select a scan and click Edit.
Run a Scan Immediately
l To run a scan immediately, without waiting for the scheduled time, select a scan and click Start (or right-click a scan and select Start Scan from the shortcut menu). As with all scheduled scans, the scan runs in the background and does not appear on a tab.
Stop a Scheduled Scan
l To stop a scheduled scan, select a scan that is running and click Stop (or right-click a running scan and select Stop Scan from the shortcut menu).
Schedule a Scan
User GuideChapter 4: Working with Scans
Micro Focus Fortify WebInspect (21.1.0) Page 201 of 461

To schedule a scan:
1. Click Add.
2. In the Type of Scan group, choose one of the following:
l Basic Scan
l Web Service Scan
l Enterprise Scan
3. Specify when you want to conduct the scan. The choices are:
l Immediately
l Run Once: Modify the date and time when the scan should begin. You can click the drop-down arrow to reveal a calendar for selecting the date.
l Recurrence Schedule: Use the slider to select a frequency (Daily, Weekly, or Monthly). Then specify the time when the scan should begin and (for Weekly or Monthly) provide other schedule information.
4. Click Next.
5. Enter the settings for the type of scan you selected.
6. For Web Site and Web Service Scans only, you can elect to run a report at the conclusion of the scan:
a. Select Generate Reports and click the Select Reports hyperlink.
b. Continue with Selecting a Report (below).
7. To schedule the scan without generating a report, click Schedule.
Selecting a Report
If you opted to include a report with the scheduled scan, the Scheduled Scan Report Wizard appears:
Scheduled Scan Report Wizard (Step 1 of 2) Image
User GuideChapter 4: Working with Scans
Micro Focus Fortify WebInspect (21.1.0) Page 202 of 461

1. (Optional) Select a report from the Favorites list.
A "favorite" is simply a named collection of one or more reports and their associated parameters. To create a favorite once you have selected reports and parameters, click the Favorites list and select Add to favorites.
2. Select one or more reports.
3. Provide information for any parameters that may be requested. Required parameters are outlined in red.
4. Click Next.
The Configure Report Settings window appears.
Configuring Report Settings
Scheduled Scan Report Wizard (Step 2 of 2) Image
User GuideChapter 4: Working with Scans
Micro Focus Fortify WebInspect (21.1.0) Page 203 of 461

1. If you select Automatically Generate Filename, the name of the report file will be formatted as <reportname> <date/time>.<extension>. For example, if creating a compliance report in pdf format and the report is generated at 6:30 on April 5, the file name would be "Compliance Report 04_05_2009 06_30.pdf." This is useful for recurring scans. Reports are written to the directory specified for generated reports in the Application settings.
2. If you did not select Automatically Generate Filename, enter a name for the file in the Filename box.
3. Select the report format from the Export Format list.
4. If you selected multiple reports, you can combine then all into one report by selecting Aggregate reports into one report.
5. Select a template that defines the headers and footers used for the report and, if necessary, provide the requested parameters.
6. Click Finished.
7. Click Schedule.
See Also
"Start Page " on page 50
"Manage Scans " on page 198
"Scheduled Scan Status " on the next page
User GuideChapter 4: Working with Scans
Micro Focus Fortify WebInspect (21.1.0) Page 204 of 461

Stopping a Scheduled Scan To halt a scheduled scan while it is running, select the scan from the Manage Schedule list and click
(or right-click the scan and select Stop Scan from the shortcut menu).
To restart a stopped scan, select the scan from the Manage Schedule list and click (or right-click the scan and select Start Scan from the shortcut menu).
Scheduled Scan Status The status of each scheduled scan appears in the Last Run Status column on the Manage Schedule pane. The possible statuses are defined in the following table.
Status Definition
Failure Fortify WebInspect was unable to perform the scan.
Success The scan was conducted without error.
Not Yet Run The scan is queued to run at the scheduled time, which has not yet occurred.
Skipped The scheduled scan was not run because the service was down for some period of time.
Stopping The user clicked the Stop button, but the scan has not yet stopped.
Stopped The scan has been stopped by the user.
Running The scheduled scan is in progress.
Running with Error
The scan could not stop; see log for further details.
Exporting a Scan Use the Export Scan function to save information collected during a Fortify WebInspect crawl or audit.
Note: When exporting to Fortify Software Security Center, after exporting to the .fpr format, you must manually upload the .fpr file to Fortify Software Security Center. Fortify does not support uploading both Fortify WebInspect FPR artifacts and Fortify WebInspect Enterprise FPR artifacts to the same application version in Fortify Software Security Center.
User GuideChapter 4: Working with Scans
Micro Focus Fortify WebInspect (21.1.0) Page 205 of 461

Follow the steps below to export a scan.
1. Do one of the following:
l Open a scan (or click a tab containing an open scan), click File > Export and select either Scan or Scan to Software Security Center.
l On the Manage Scans pane of the Start page, select a scan, click the drop-down arrow on the Export button and select either Export Scan or Export Scan to Software Security Center.
The Export a Scan window (or the Export Scan to Software Security Center window) appears.
2. The Scrub Data group contains, by default, three non-editable regular expression functions that will substitute X's for each digit in a string formatted as a Social Security number, credit card number, or IP address. To include a search-and-replace function, select its associated check box. This feature prevents any sensitive data from being included in the export.
3. To create a Scrub Data function:
a. Click Add.
b. On the Add Scrub Entry window, select either Regex or Literal from the Type list.
c. In the Match box, enter the string (or a regular expression representing a string) that you want to locate. If using a regular expression, you can click the ellipsis button to open the Regular Expression Editor, with which you can create and test your regular expression.
d. In the Replace box, enter the string that will replace the target specified by the Match string.
e. Click OK.
4. If you are exporting to Software Security Center, go to Step 7.
5. If you want to include an attachment:
a. In the Attachments group, click Add.
b. Using the standard file-selection window, navigate to the directory that contains the file you want to attach.
c. Select a file and click Open.
6. To include the scan's log files, select Export Logs.
User GuideChapter 4: Working with Scans
Micro Focus Fortify WebInspect (21.1.0) Page 206 of 461

7. Click Export.
8. Using the standard file-selection window, select a location and click Save.
See Also
"Importing a Scan " on page 210
"Exporting Scan Details " below
Exporting Scan Details Use this function to save information collected during a Fortify WebInspect crawl or audit.
1. Open a scan, or click a tab containing a scan.
2. Click File > Export > Scan Details.
The Export Scan Details window appears.
User GuideChapter 4: Working with Scans
Micro Focus Fortify WebInspect (21.1.0) Page 207 of 461

3. From the Details list, select the type of information you want to export. The options are as follows:
l Comments
l Emails
l Full (all details)
l Hidden Fields
l Offsite Links
l Parameters
l Requests
l Script
l Sessions
l Set Cookies
l URLs
l Vulnerabilities
l Web Crawl Dump
l Site Tree Dump
l Web Forms
Note: Not all choices are available for a Web Service scan.
4. Choose a format (either Text or XML) from the Export Format list.
5. The Scrub Data group contains, by default, three non-editable regular expression functions that will substitute X's for each digit in a string formatted as a Social Security number, credit card number, or an IP address. To include this search-and-replace function for a data type, select its associated check box. This feature prevents any sensitive data from being included in the export.
6. To create a Scrub Data function:
a. Click Add.
b. On the Add Scrub Entry window, select either Regex or Literal from the Type list.
c. In the Match box, enter the string (or a regular expression representing a string) that you want to locate. If using a regular expression, you can click the ellipsis button to open the Regular Expression Editor, with which you can create and test your regular expression.
d. In the Replace box, enter the string that will replace the target specified by the Match string.
e. Click OK.
7. Click Export.
8. Using a standard file-selection window, specify a name and location for the exported file and click Save.
See Also
"Exporting a Scan " on page 205
User GuideChapter 4: Working with Scans
Micro Focus Fortify WebInspect (21.1.0) Page 208 of 461

Export Scan to Software Security Center This feature allows you to export the results of a Fortify WebInspect scan in a format (.fpr format) that can be consumed by Fortify Software Security Center.
Note: After exporting to the .fpr format, you must manually upload the .fpr file to Fortify Software Security Center. Fortify does not support uploading both Fortify WebInspect FPR artifacts and Fortify WebInspect Enterprise FPR artifacts to the same application version in Fortify Software Security Center.
1. Do one of the following:
l Open a scan (or click a tab containing an open scan) and click File > Export > Scan to Software Security Center.
l On the Manage Scans pane of the Start page, select a scan, click the drop-down arrow on the Export button and select Export Scan to Software Security Center.
The Export Scan to Software Security Center window appears.
2. The Scrub Data group contains, by default, three non-editable regular expression functions that will substitute X's for each digit in a string formatted as a Social Security number, credit card number, or IP address. To include a search-and-replace function, select its associated check box. This feature prevents any sensitive data from being included in the export.
3. To create a Scrub Data function:
a. Click Add.
b. On the Add Scrub Entry window, select either Regex or Literal from the Type list.
c. In the Match box, enter the string (or a regular expression representing a string) that you want to locate. If using a regular expression, you can click the ellipsis button to open the Regular Expression Editor, with which you can create and test your regular expression.
d. In the Replace box, enter the string that will replace the target specified by the Match string.
e. Click OK.
4. Click Export.
5. Using the standard file-selection window, select a location and click Save.
Exporting Protection Rules to Web Application Firewall (WAF)To generate and save a full export (.xml) file based on vulnerabilities detected by Fortify WebInspect during a scan of your web application:
1. Open the scan of interest (or click a tab containing an open scan) and click File > Export > Protection Rules to Web Application Firewall.
User GuideChapter 4: Working with Scans
Micro Focus Fortify WebInspect (21.1.0) Page 209 of 461

2. Specify the scrub data types in the same way as for the File > Export > Scan option. The Scrub Data group contains, by default, three non-editable regular expression functions that will substitute an X for each digit in a string formatted as a Social Security Number, credit card number, or IP address. To include this search-and-replace function for a data type, select its associated check box. This feature prevents any sensitive data from being included in the export.
3. Click Export. 4. Specify the path and filename to which you want to save the exported data and click Save.
A full export (.xml) file is saved as you specified.
Importing a Scan To import a scan:
1. Click File > Import Scan.
2. Using a standard file-selection window, select an option from the Files Of Type list:
l Scan files (*.scan) - scan files designed for or created by Fortify WebInspect versions beginning with 7.0.
l SPA files (*.spa) - scan files created by versions of Fortify WebInspect prior to version 7.0.
3. Choose a file and click Open.
If attachments were exported with the scan, those attachments will be imported and saved in a subdirectory of the imported scan. The default location is C:\Users\<username>\AppData\HP\HP WebInspect\ScanData\Imports\<DirectoryName>\<filename>, where DirectoryName is the ID number of the exported/imported scan.
See Also
"Exporting a Scan " on page 205
Importing False Positives You can import from a previous scan a list of vulnerabilities that were analyzed as being false positive. Fortify WebInspect then correlates these false positives from a previous scan with vulnerabilities detected in the current scan and flags the new occurrences as false positives.
Select a scan containing false positives from the same site you are now scanning.
Note: You cannot import false positives when scheduling a scan or conducting an Enterprise scan.
To import false positives:
1. In the scan currently being conducted, select False Positives in the Scan Info panel.
The Scan False Positives window appears.
2. Click Import False Positives.
The Select a Scan to Import False Positives window appears.
User GuideChapter 4: Working with Scans
Micro Focus Fortify WebInspect (21.1.0) Page 210 of 461
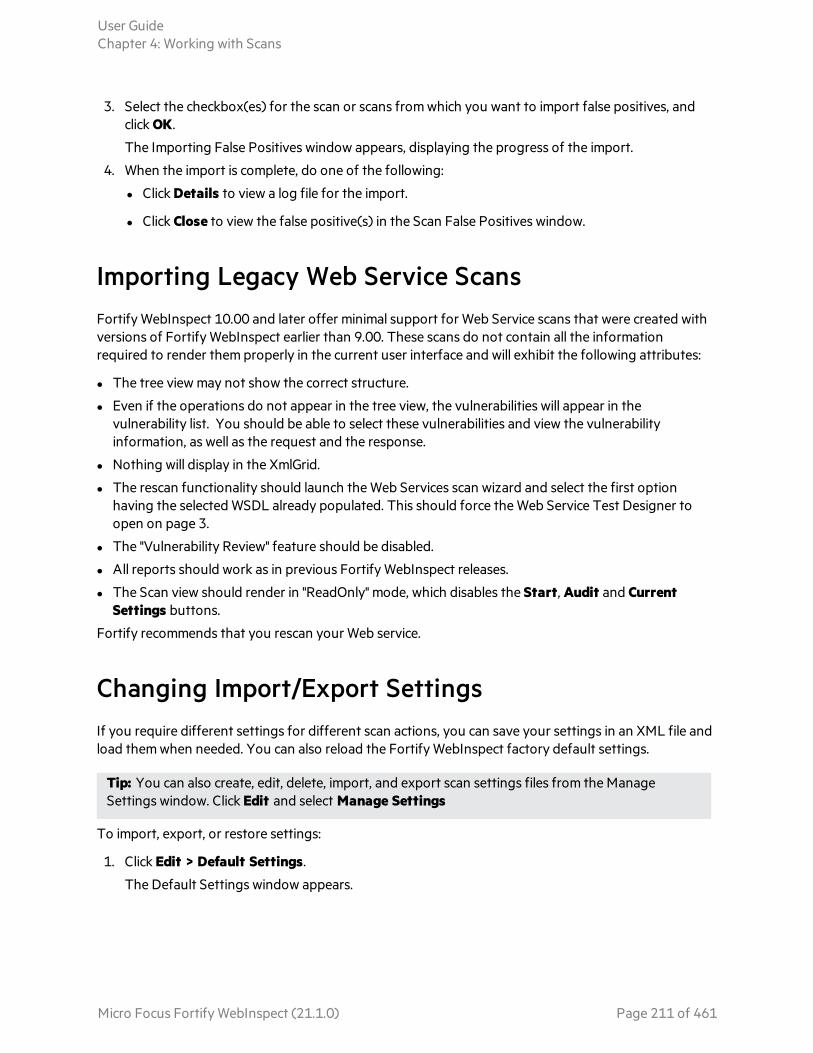
3. Select the checkbox(es) for the scan or scans from which you want to import false positives, and click OK.
The Importing False Positives window appears, displaying the progress of the import.
4. When the import is complete, do one of the following:
l Click Details to view a log file for the import.
l Click Close to view the false positive(s) in the Scan False Positives window.
Importing Legacy Web Service Scans Fortify WebInspect 10.00 and later offer minimal support for Web Service scans that were created with versions of Fortify WebInspect earlier than 9.00. These scans do not contain all the information required to render them properly in the current user interface and will exhibit the following attributes:
l The tree view may not show the correct structure.
l Even if the operations do not appear in the tree view, the vulnerabilities will appear in the vulnerability list. You should be able to select these vulnerabilities and view the vulnerability information, as well as the request and the response.
l Nothing will display in the XmlGrid.
l The rescan functionality should launch the Web Services scan wizard and select the first option having the selected WSDL already populated. This should force the Web Service Test Designer to open on page 3.
l The "Vulnerability Review" feature should be disabled.
l All reports should work as in previous Fortify WebInspect releases.
l The Scan view should render in "ReadOnly" mode, which disables the Start, Audit and Current Settings buttons.
Fortify recommends that you rescan your Web service.
Changing Import/Export Settings If you require different settings for different scan actions, you can save your settings in an XML file and load them when needed. You can also reload the Fortify WebInspect factory default settings.
Tip: You can also create, edit, delete, import, and export scan settings files from the Manage Settings window. Click Edit and select Manage Settings
To import, export, or restore settings:
1. Click Edit > Default Settings.
The Default Settings window appears.
User GuideChapter 4: Working with Scans
Micro Focus Fortify WebInspect (21.1.0) Page 211 of 461
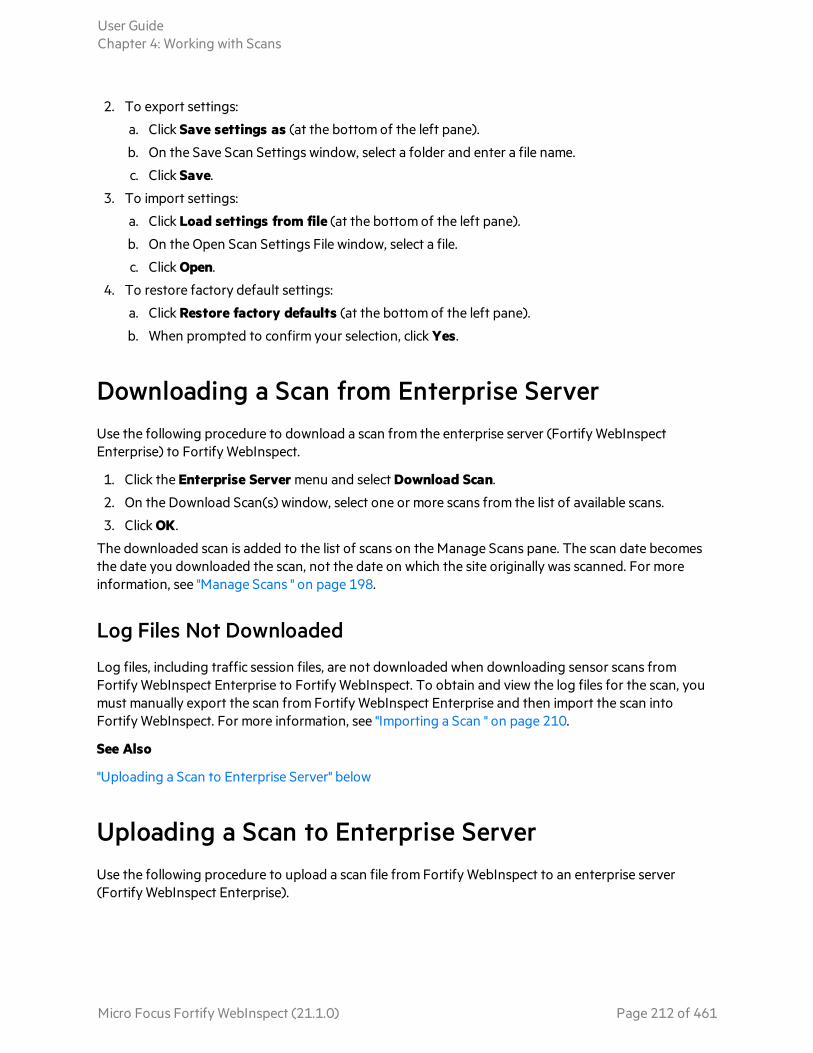
2. To export settings:
a. Click Save settings as (at the bottom of the left pane).
b. On the Save Scan Settings window, select a folder and enter a file name.
c. Click Save.
3. To import settings:
a. Click Load settings from file (at the bottom of the left pane).
b. On the Open Scan Settings File window, select a file.
c. Click Open.
4. To restore factory default settings:
a. Click Restore factory defaults (at the bottom of the left pane).
b. When prompted to confirm your selection, click Yes.
Downloading a Scan from Enterprise ServerUse the following procedure to download a scan from the enterprise server (Fortify WebInspect Enterprise) to Fortify WebInspect.
1. Click the Enterprise Server menu and select Download Scan.
2. On the Download Scan(s) window, select one or more scans from the list of available scans.
3. Click OK.
The downloaded scan is added to the list of scans on the Manage Scans pane. The scan date becomes the date you downloaded the scan, not the date on which the site originally was scanned. For more information, see "Manage Scans " on page 198.
Log Files Not Downloaded
Log files, including traffic session files, are not downloaded when downloading sensor scans from Fortify WebInspect Enterprise to Fortify WebInspect. To obtain and view the log files for the scan, you must manually export the scan from Fortify WebInspect Enterprise and then import the scan into Fortify WebInspect. For more information, see "Importing a Scan " on page 210.
See Also
"Uploading a Scan to Enterprise Server" below
Uploading a Scan to Enterprise ServerUse the following procedure to upload a scan file from Fortify WebInspect to an enterprise server (Fortify WebInspect Enterprise).
User GuideChapter 4: Working with Scans
Micro Focus Fortify WebInspect (21.1.0) Page 212 of 461

1. Click the Fortify WebInspect Enterprise Server menu and select Upload Scan.
2. On the Upload Scan(s) window, select one or more Fortify WebInspect scans from the Scan Name column.
Note: To access scans in a different database, click Connections and, in the Database application settings, change options under Connection Settings for Scan Viewing.
3. For each scan, select an Application and Version from the appropriate drop-down lists.
The program attempts to select the correct application and version based on the "Scan URL" in the scan file, but you may select an alternative.
4. Click Upload.
See Also
"Downloading a Scan from Enterprise Server" on the previous page
Running a Scan in Enterprise ServerThis feature is designed for users who prefer to configure a scan in Fortify WebInspect rather than Fortify WebInspect Enterprise. You can modify the settings and run the scan in Fortify WebInspect, repeating the process until you achieve what you believe to be the optimal settings. You can then send the open scan's settings to Fortify WebInspect Enterprise, which creates a scan request and places it in the scan queue for the next available sensor.
To run a scan in WebInspect Enterprise:
1. Open a scan.
2. If you are not connected to an enterprise server, click the Enterprise Server menu and select Connect to WebInspect Enterprise.
3. Click the Scan menu and select Run in WebInspect Enterprise (or simply click the appropriate button on the toolbar).
4. On the Run Scan in WebInspect Enterprise dialog box, enter a name for the scan.
5. Select an Application and a Version.
6. Click OK.
If you pass all permission checks, the scan is created and the priority assigned to the scan is the highest priority allowed by your role (up to 3, which is the default).
Transferring Settings to/from Enterprise ServerUse this feature to:
l Create a Fortify WebInspect Enterprise scan template based on a Fortify WebInspect settings file and upload it from Fortify WebInspect to an enterprise server (Fortify WebInspect Enterprise).
l Create a Fortify WebInspect settings file based on an enterprise server scan template and download it to Fortify WebInspect.
User GuideChapter 4: Working with Scans
Micro Focus Fortify WebInspect (21.1.0) Page 213 of 461

Fortify WebInspect settings files and Fortify WebInspect Enterprise scan templates do not have the same format; not all settings in one format are replicated in the other. Note the warnings that follow descriptions of the conversion procedure.
Creating a Fortify WebInspect Enterprise Scan Template
To create a Fortify WebInspect Enterprise scan template:
1. Click the Fortify WebInspect Enterprise Server menu and select Transfer Settings.
2. On the Transfer Settings window, select a Fortify WebInspect settings file from the Local Settings File list.
3. (Optional) Click View to review the settings as they appear in a Fortify WebInspect settings file. To continue, click Close.
Note: This is a read-only file. Any changes you make will not be persisted.
4. Select the Application and Version to which the template will be transferred in Fortify WebInspect Enterprise.
5. If necessary, click Refresh to ensure the lists include the latest settings files and scan templates.
6. Enter the name of the scan template that will be created. You cannot duplicate the name of an existing template.
7. Click Upload.
All template settings that are not extracted from Fortify WebInspect will use the Fortify WebInspect Enterprise template default settings.
l The scan template will not specify the policy used by the Fortify WebInspect settings file. Instead, it will contain the "Use Any" option.
l Any client certificate information that may be included in the Fortify WebInspect settings file is transferred to the scan template, but the certificates are not transmitted.
l All Fortify WebInspect settings are preserved in the scan template, even if they are not used by Fortify WebInspect Enterprise. Therefore, if you subsequently create a Fortify WebInspect settings file based on the scan template you created from the original settings file, the Fortify WebInspect settings will be retained.
Creating a Fortify WebInspect Settings File
To create a Fortify WebInspect settings file:
1. Click the Fortify WebInspect Enterprise Server menu and select Transfer Settings.
2. Select the Application and Version from which the template will be transferred in Fortify WebInspect Enterprise.
3. On the Transfer Settings window, select a scan template from the list.
4. (Optional) Click View to review the settings as they would appear in a Fortify WebInspect settings file. To continue, click Close.
Note: This is a read-only file. Any changes you make will not be persisted.
User GuideChapter 4: Working with Scans
Micro Focus Fortify WebInspect (21.1.0) Page 214 of 461

5. If necessary, click Refresh to ensure the lists include the latest settings files and scan templates.
6. Click Download.
7. Using a standard file-selection window, name the settings file, select a location in which to save it, and click Save.
The Fortify WebInspect settings file will not specify the policy used by the scan template. Instead, it will specify the Standard policy.
Publishing a Scan (Fortify WebInspect Enterprise Connected)
Note: This topic applies only if Fortify WebInspect Enterprise is integrated with Fortify Software Security Center.
Use the following procedure to transmit scan data from Fortify WebInspect to a Fortify Software Security Center server, via Fortify WebInspect Enterprise.
Note: For information about managing the Fortify Software Security Center status of vulnerabilities when conducting multiple scans of the same Web site or application, see "Integrating Vulnerabilities into Fortify Software Security Center " on the next page.
1. Configure Fortify WebInspect Enterprise and Fortify Software Security Center.
2. Run a scan in Fortify WebInspect (or use an imported or downloaded scan).
3. Click the Enterprise Server menu and select Connect to WebInspect Enterprise. You will be prompted to submit credentials.
4. If a scan is open on a tab that has focus, and you want to publish only that scan:
a. Click . b. Select an application and version, then click OK.
c. Examine the results. Columns will appear in the Summary pane specifying "Published Status" and "Pending Status." The Published Status is the status of the vulnerability the last time this scan was published to Fortify WebInspect Enterprise. The Pending Status is what the status of the vulnerability will be after this scan is published. Depending on the Pending Status, you can modify it to specify whether the vulnerability has been resolved or is still existing (see Step 7 below). In addition, a new tab named "Not Found" appears; this tab contains vulnerabilities that were detected in previous scans but not in the current scan. You can add screenshots and comments to vulnerabilities or mark vulnerabilities as false positive or ignored. You can also review and retest vulnerabilities, modifying the scan results until you are ready to publish.
d. Click . Go to Step 7. 5. To select from a list of scans:
a. Click the Enterprise Server menu and select Publish Scan.
b. On the Publish Scan(s) to Software Security Center dialog box, select one or more scans.
c. Select an application and version.
User GuideChapter 4: Working with Scans
Micro Focus Fortify WebInspect (21.1.0) Page 215 of 461

d. Click Next. Fortify WebInspect automatically synchronizes with Fortify Software Security Center.
6. Fortify WebInspect lists the number of vulnerabilities to be published, categorized by status and severity.
To determine the status, Fortify WebInspect compares previously submitted vulnerabilities (obtained by synchronizing with Fortify Software Security Center) with those reported in the current scan. If this is the first scan submitted to an application version, all vulnerabilities will be "New."
If a vulnerability was previously reported, but is not in the current scan, it is marked as "Not Found." You must determine if it was not found because it has been fixed or because the scan was configured differently (for example, you may have used a different scan policy, or you scanned a different portion of the site, or you terminated the scan prematurely). When examining the results (step 4c), you can change the "pending status" of individual vulnerabilities detected by all but the first scan (by right-clicking a vulnerability in the Summary pane). However, when publishing, you must specify how Fortify WebInspect should handle any remaining "Not Found" vulnerabilities.
To retain these "Not Found" vulnerabilities in Fortify Software Security Center (indicating that they still exist), select Retain: Assume all vulnerabilities still marked "Not Found" in the scan are still present.To remove them (implying that they have been fixed), select Resolve: Assume all vulnerabilities still marked "Not Found" in the scan are fixed.
7. If this scan was conducted in response to a scan request initiated at Fortify Software Security Center, select Associate scan with an "In Progress" scan request for the current application version.
8. Click Publish.
Integrating Vulnerabilities into Fortify Software Security Center
Note: This topic applies only if Fortify WebInspect Enterprise is integrated with Fortify Software Security Center.
Fortify Software Security Center is a suite of tightly integrated solutions for identifying, prioritizing, and fixing security vulnerabilities in software. It uses Fortify Static Code Analyzer to conduct static analysis and Fortify WebInspect to conduct dynamic application security testing. Fortify WebInspect Enterprise provides a central location for managing multiple Fortify WebInspect scanners and correlating scan results that can be published directly to individual application versions within Fortify Software Security Center.
User GuideChapter 4: Working with Scans
Micro Focus Fortify WebInspect (21.1.0) Page 216 of 461

Fortify WebInspect Enterprise maintains a history of all vulnerabilities for a particular Fortify Software Security Center application version. After Fortify WebInspect conducts a scan, it synchronizes with Fortify WebInspect Enterprise to obtain that history, compares vulnerabilities in the scan with those in the history, and then assigns a status to each vulnerability. The statuses are described in the following table.
Fortify Software Security Center Status Description
New A previously unreported issue.
Existing A vulnerability in the scan that is already in the history.
Not Found A vulnerability in the history that is not found in the scan. This can occur because (a) the vulnerability has been remediated and no longer exists, or (b) because the latest scan used different settings, or scanned a different portion of the site, or for some other reason did not discover the vulnerability.
Resolved A vulnerability that has been fixed.
Reintroduced A vulnerability that appears in a current scan but was previously reported as "Resolved."
Still an Issue A vulnerability that was "Not Found" in the current scan does, in fact, exist.
To change the Fortify Software Security Center status for an individual vulnerability, right-click a vulnerability on the Findings tab and select Modify Pending Status. This option appears only after connecting to Fortify WebInspect Enterprise and is enabled only after you have synchronized Fortify WebInspect with Software Security Center.
The following example demonstrates a hypothetical series of scans for integrating vulnerabilities into Fortify Software Security Center.
First scan
1. Scan the target site with Fortify WebInspect. In this example, assume that only one vulnerability (Vuln A) is discovered.
2. Examine the results. You can add screenshots and comments to vulnerabilities or mark vulnerabilities as false positive or ignored. You can also review, retest, and delete vulnerabilities.
3. Synchronize the scan with an application version in Fortify Software Security Center, then publish the scan.
User GuideChapter 4: Working with Scans
Micro Focus Fortify WebInspect (21.1.0) Page 217 of 461

Second scan
1. The second scan again reveals Vuln A, but also discovers four more vulnerabilities (Vulns B, C, D, and E).
2. Synchronize the scan with the application version in Fortify Software Security Center.
3. Now examine the results. If you added audit data (such as comments and screenshots) to Vuln A when publishing the first scan, the data will be imported into the new scan.
4. Publish the scan to Fortify Software Security Center. Vuln A will be marked "Existing," Vulns B-E will be marked "New," and five items will exist in the Fortify Software Security Center system.
Third scan
1. The third scan discovers Vulns B, C, and D, but not Vuln A or Vuln E.
2. Synchronize the scan with the application version in Fortify Software Security Center.
3. After retesting Vuln A, you determine that it does, in fact, exist. You change its pending status to "Still an Issue."
4. After retesting Vuln E, you determine that it does not exist. You change its pending status to "Resolved."
5. Publish the scan to Fortify Software Security Center. Vulns B, C, and D will be marked "Existing." Five items will exist in the Fortify Software Security Center system.
Fourth Scan
1. The fourth scan does not find Vuln A or Vuln B. The scan does find Vulns C, D, E, and F.
2. Synchronize the scan with the application version in Fortify Software Security Center.
3. Vuln E was previously declared to be resolved and so its status is set to “Reintroduced.”
4. You examine the vulnerabilities that were not found (A and B, in this example). If you determine that the vulnerability still exists, update the pending status to “Still an Issue.” If a retest verifies that the vulnerability does not exist, update the pending status to “Resolved.”
5. Publish the scan to Fortify Software Security Center. Vulns C and D remain marked "Existing."
Synchronize with Fortify Software Security Center
Note: This topic applies only if Fortify WebInspect Enterprise is integrated with Fortify Software Security Center.
Use this dialog box to specify an application and version and synchronize with Fortify Software Security Center. Fortify WebInspect then downloads a list of vulnerabilities from Fortify Software Security Center, compares the downloaded vulnerabilities to the vulnerabilities in the current scan, and assigns an appropriate status (New, Existing, Reintroduced, or Not Found) to the vulnerabilities in the current
User GuideChapter 4: Working with Scans
Micro Focus Fortify WebInspect (21.1.0) Page 218 of 461
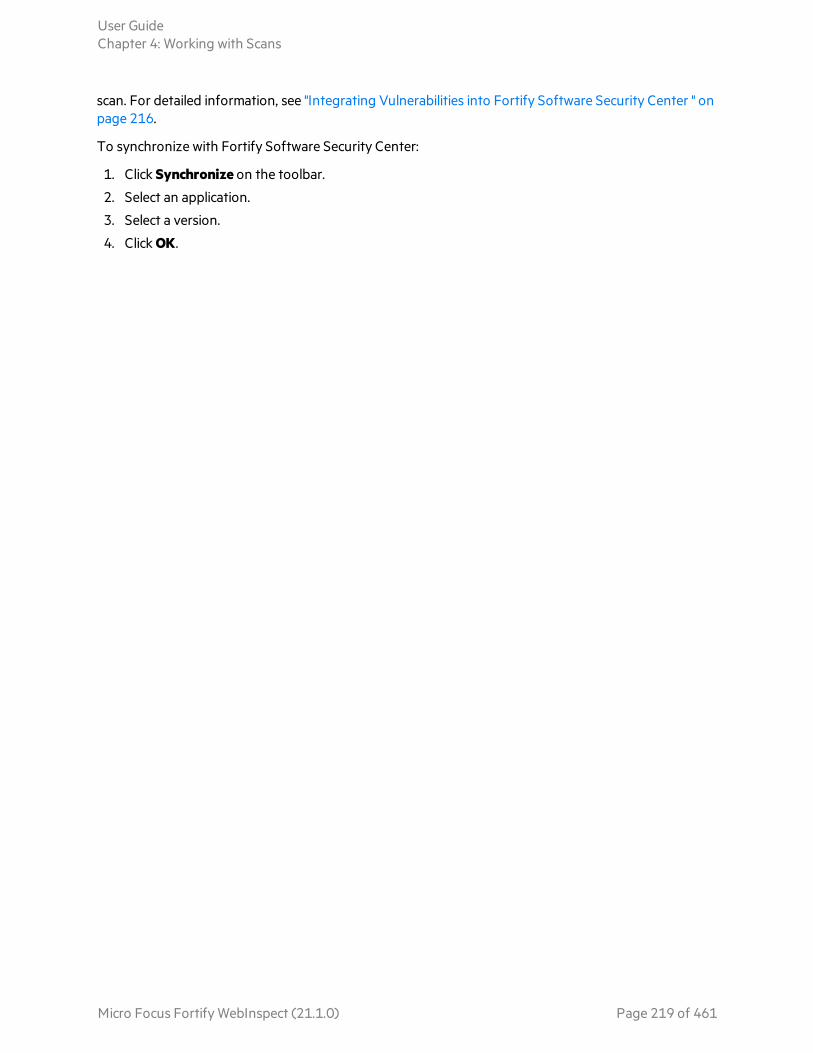
scan. For detailed information, see "Integrating Vulnerabilities into Fortify Software Security Center " on page 216.
To synchronize with Fortify Software Security Center:
1. Click Synchronize on the toolbar.
2. Select an application.
3. Select a version.
4. Click OK.
User GuideChapter 4: Working with Scans
Micro Focus Fortify WebInspect (21.1.0) Page 219 of 461

Chapter 5: Using WebInspect FeaturesThis chapter describes certain tools available in Fortify WebInspect, such as the Server Profiler and Web Macro Recorder tools. It also describes how to inspect the scan results and work with vulnerabilities discovered during the scan. It describes using the WebInspect API, Regular Expressions, and the Fortify WebInspect policies. This chapter also includes information about Compliance Templates and the reporting capabilities of Fortify WebInspect.
For more information about all tools available in Fortify WebInspect, see the Micro Focus Fortify WebInspect Tools Guide.
Retesting and RescanningFortify WebInspect offers several methods for retesting and rescanning discovered vulnerabilities. You may:
l Retest an individual vulnerability, all vulnerabilities, or all vulnerabilities with a specific severity. For more information, see "Retesting Vulnerabilities" below.
l Rescan the entire site. For more information, see "Rescanning a Site" on page 224.
l Reuse data from a previous scan to assist a new scan. For more information, see "Reusing Scans" on page 225 and "Incremental Scanning" on page 226.
Retesting Vulnerabilities
After you conduct a scan and report discovered vulnerabilities, developers may correct their code and update the site. Afterward, you can open the original scan and conduct a retest scan to verify the fix for:
l A selected vulnerability
l All vulnerabilities
l All vulnerabilities with a specific severity
Fortify WebInspect starts a new scan to determine whether the issue or issues have been fixed. The retest scan prefixes "retest:" to the original scan name so that you can easily discern the retest scan from the original scan.
During the retest scan, the vulnerabilities that are queued for retesting are listed on the Findings tab in the Summary pane, along with a Retest Status column that indicates the results of the retest.
Important! Fortify does not recommend retesting vulnerabilities in scans created using earlier versions of Fortify WebInspect. While retesting scans from earlier versions may work in many instances, it is not always reliable because individual checks may not flag the same vulnerability during a retest. Failure of a check to flag the same vulnerability while retesting a scan from an earlier version of Fortify WebInspect may not mean the vulnerability has been remediated.
Micro Focus Fortify WebInspect (21.1.0) Page 220 of 461

Understanding the Retest Status
The following table describes the values that may appear in the Retest Status column.
Status Description
Processing The vulnerability is currently being retested. This is a temporary status that will be replaced with a final status when the retest is complete.
Detected The vulnerability was reproduced in the retest scan.
Not Detected, Possible Correlation Failure
A vulnerability with the same check ID was detected during the retest scan, but the correlation did not match the finding that was being retested.
Note: Correlation refers to how Fortify WebInspect uniquely identifies a vulnerability using the same parameter or location.
Not Detected The vulnerability does not exist in the parameter or location being tested.
Not Supported The vulnerability was not retested. Retesting is not supported for the specific vulnerability. For more information, see "Recommendation for Failed and Not Supported Vulnerabilities" below.
Failed Retesting failed for the specific vulnerability. You may also see the following failed statuses that provide a reason for failure:
l Failed, Trigger Session Not Found
l Failed, Trigger Session Response Missing
l Failed, Trigger Session Status Code Different
For more information, see "Recommendation for Failed and Not Supported Vulnerabilities" below.
Dependency Failed
Retesting failed to complete because a dependency that existed in the original scan could not be duplicated in the verification scan.
Recommendation for Failed and Not Supported Vulnerabilities
For vulnerabilities with a Retest Status of "Failed" or "Not Supported," Fortify recommends that you conduct a reuse remediation scan or a new scan. For more information about reuse remediation scans, see "Reusing Scans" on page 225.
User GuideChapter 5: Using WebInspect Features
Micro Focus Fortify WebInspect (21.1.0) Page 221 of 461
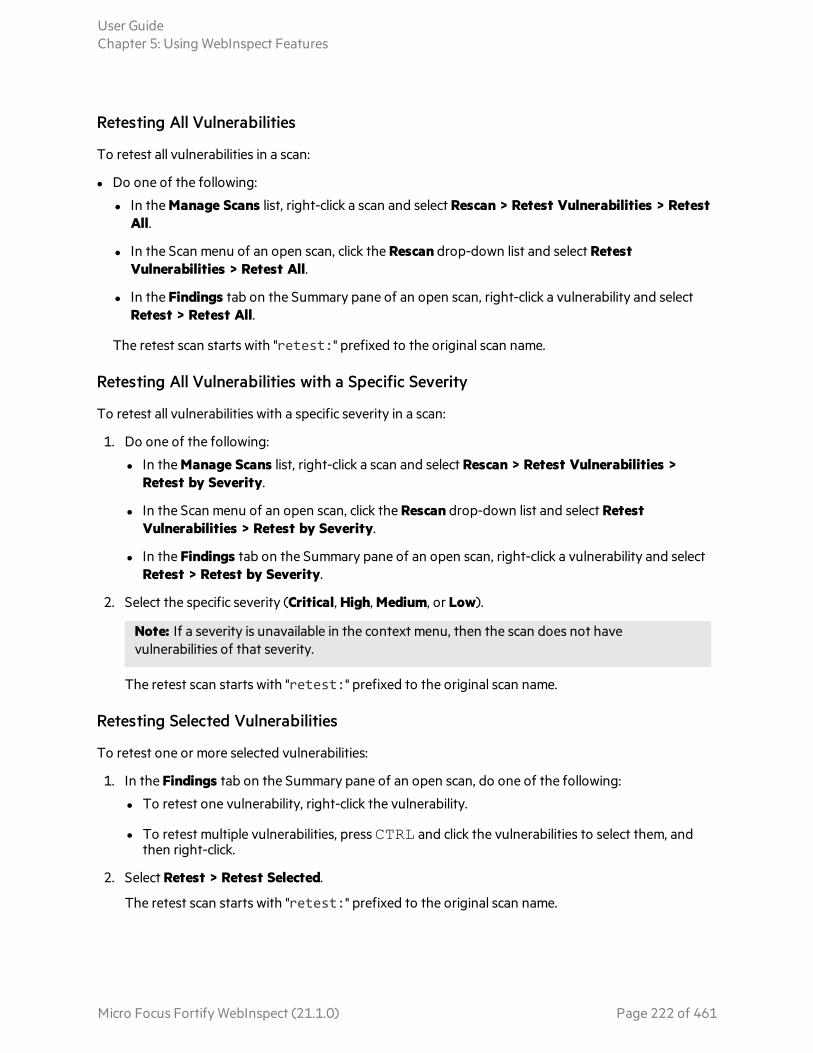
Retesting All Vulnerabilities
To retest all vulnerabilities in a scan:
l Do one of the following:
l In the Manage Scans list, right-click a scan and select Rescan > Retest Vulnerabilities > Retest All.
l In the Scan menu of an open scan, click the Rescan drop-down list and select Retest Vulnerabilities > Retest All.
l In the Findings tab on the Summary pane of an open scan, right-click a vulnerability and select Retest > Retest All.
The retest scan starts with "retest:" prefixed to the original scan name.
Retesting All Vulnerabilities with a Specific Severity
To retest all vulnerabilities with a specific severity in a scan:
1. Do one of the following:
l In the Manage Scans list, right-click a scan and select Rescan > Retest Vulnerabilities > Retest by Severity.
l In the Scan menu of an open scan, click the Rescan drop-down list and select Retest Vulnerabilities > Retest by Severity.
l In the Findings tab on the Summary pane of an open scan, right-click a vulnerability and select Retest > Retest by Severity.
2. Select the specific severity (Critical, High, Medium, or Low).
Note: If a severity is unavailable in the context menu, then the scan does not have vulnerabilities of that severity.
The retest scan starts with "retest:" prefixed to the original scan name.
Retesting Selected Vulnerabilities
To retest one or more selected vulnerabilities:
1. In the Findings tab on the Summary pane of an open scan, do one of the following:
l To retest one vulnerability, right-click the vulnerability.
l To retest multiple vulnerabilities, press CTRL and click the vulnerabilities to select them, and then right-click.
2. Select Retest > Retest Selected.
The retest scan starts with "retest:" prefixed to the original scan name.
User GuideChapter 5: Using WebInspect Features
Micro Focus Fortify WebInspect (21.1.0) Page 222 of 461

Retesting Grouped Categories
If you have findings grouped into categories, you can select a group and retest all items in that category.
To retest a group:
1. Select the group to retest.
All findings in the group are selected. In the following image, for example, findings are grouped by Kingdom, then Severity, and then Check. The API Abuse group is selected, so all findings in that category are selected.
2. Right-click, and then select Retest > Retest Selected.
Tip: You can right-click the group to select all findings in the category and display the context menu in a single action.
For more information about groups, see "Using Filters and Groups in the Summary Pane" on page 237.
Retesting a Retest Scan
You can retest the findings in a retest scan in the same way you retest an original scan. However, you can only retest findings with a Retest Status of Detected. Findings with other Retest Statuses will not be retested.
Retest Scan Log
If you retest a large number of findings in a scan, you can view a snapshot of the results in the Scan Log tab for the retest scan.
Comparison Views
When you select a vulnerability in a retest scan, you can view certain data from both scans in a dual-pane view. Select HTTP Request, HTTP Response, or Steps to display a dual pane view comparing the retest scan to the original scan. If the original scan is not available, only the data for the retest scan is displayed.
User GuideChapter 5: Using WebInspect Features
Micro Focus Fortify WebInspect (21.1.0) Page 223 of 461

To search for data in the HTTP Request and HTTP Response views:
1. Type the search term in the Search for field.
2. Optionally, to use regular expressions in the search criteria, select the RegEx option.
3. Click Find.
If the data is found, it is highlighted in both Retest Scan and Original Scan.
For more information, see "HTTP Request " on page 86, "HTTP Response " on page 86, and "Steps " on page 87.
Keeping or Deleting a Retest Scan
When you close an open scan, Fortify WebInspect detects whether it is a retest scan. If the following conditions are met, you will be prompted about keeping the scan:
l It is a retest scan.
l The parent scan exists in the scan database.
l You have not been previously prompted for the scan.
When these conditions are met, a prompt asks Do you want to keep the scan "retest:<ScanName>"? If you close multiple tabs for retest scans meeting these conditions, a prompt appears for each retest scan.
Do one of the following:
l To keep the retest scan, click Yes.
The scan is saved and added to the Recently Opened Scans list. Additionally, the scan’s settings are flagged to prevent the prompt from being shown again. This flag will be preserved even if the scan is exported and imported into another scan database.
l To delete the retest scan, click No.
The Deleting Scans window appears. When the scan is deleted, click Done.
Rescanning a Site
The Rescan feature allows you to transition easily from an open or selected scan into the scan wizard with the original scan settings preloaded. You may wish to conduct an identical scan of an updated site
User GuideChapter 5: Using WebInspect Features
Micro Focus Fortify WebInspect (21.1.0) Page 224 of 461
(using the same settings that were used for the original scan) to determine if previously discovered vulnerabilities have been fixed and if new ones have been introduced. Alternatively, you might want to tweak some of the settings to improve the crawl or audit.
There are also two options for reusing a scan: Reuse Incremental and Reuse Remediation. For more information, see "Reusing Scans" below.
The rescan functionality is available in two areas: the Rescan button on the scan toolbar and the Rescan button (and shortcut menu) for a selected scan on the Manage Scans pane.
1. Do one of the following:
l Open a scan, click Rescan and select Scan Again.
l On the Fortify WebInspect Start page, click Manage Scans; then select a scan and click Rescan.
2. Using the Scan Wizard, you may optionally modify the settings that were used for the original scan.
Note: The scan name is set by default to <original_scan_name>-1. If you conduct a rescan of a rescan, the integer appended to the default name will be incremented by one.
3. On the last step of the Scan Wizard, click Scan.
Reusing Scans
Reusing a scan uses data from a previous scan to assist a new scan. Two scans are involved when conducting a reuse scan:
l The reuse scan is the new scan being conducted.
l The source or baseline scan is the scan from which data is used to reduce the work and time needed to complete a reuse scan.
Reuse Options
Four options for scan reuse are available:
l Reuse Incremental — find new attack surface. This scan performs a normal crawl and compares each session to the baseline scan. Only new sessions that did not exist in the baseline scan are audited. For more information, see "Incremental Scanning" on the next page.
l Reuse Remediation — look for vulnerabilities that were found in the baseline scan. This scan creates a policy that includes only those checks that flagged in the baseline scan, and audits the site again using this custom policy. Therefore, this scan looks at only the checks that flagged in the baseline scan.
Difference between Remediation Scans and Retest Vulnerability
Remediation scans apply a reduced policy that is derived directly from the flagged vulnerabilities in the baseline scan to all sessions in the remediation scan, rather than to just the sessions that were vulnerable in the baseline scan.
For example, a baseline scan found cross-site scripting (XSS) on session A but not session B. Subsequently, XSS was fixed on session A, but created on session B. Using the Retest Vulnerabilities
User GuideChapter 5: Using WebInspect Features
Micro Focus Fortify WebInspect (21.1.0) Page 225 of 461

option will not find the vulnerability on session B, but a remediation scan will find it. Therefore, a remediation scan will evaluate all of the known attack surface area for previously found vulnerabilities.
Guidelines for Reusing Scans
Follow these guidelines when reusing scans:
l The baseline scan must be available on the machine where the reuse scan is executed.
l The baseline scan does not need to be in the same database as the reuse scan.
Reusing a Scan
To reuse a scan:
1. Do one of the following:
l From an open scan, click Rescan and select the reuse option you want from the drop-down menu.
l On the Manage Scans page, right-click a scan, click Rescan, and then select the reuse option you want from the menu.
l On the Manage Scans page, select a scan, click Rescan and select the reuse option you want from the drop-down menu.
For information about the rescan options, see "Reuse Options" on the previous page.
2. Using the Scan Wizard, you may optionally modify the settings that were used for the original scan.
Tip: For incremental scans, it might be beneficial to change settings to discover new attack surface. However, changing settings is not recommended for remediation scans.
Note: By default, the type of reuse scan you selected is prepended to the baseline scan name and a -1 is appended to the end.
3. On the last step of the Scan Wizard, click Scan.
See Also
"Incremental Scanning" below
Incremental Scanning
Incremental scanning provides a way for you to find and audit the areas of your web application that change over time, while keeping all findings in a single scan. This involves performing incremental scans and merging these scans back into the baseline scan. For more information about incremental scans and baseline scans, see "Reusing Scans" on the previous page.
Merging Baseline and Incremental Scans
You can merge the baseline scan and the incremental scan into a single scan. Then you can use the attack surface of the combined scans for future incremental scans.
User GuideChapter 5: Using WebInspect Features
Micro Focus Fortify WebInspect (21.1.0) Page 226 of 461

After conducting an incremental scan, if you select the incremental scan and the baseline scan and then right click, you will see a Merge option.
Important! You must click the baseline scan from which the incremental scan was derived to see the Merge option enabled.
When you click Merge, the incremental scan is merged into the baseline scan. The baseline scan now contains the union of the 2 scans. After merging, the resulting scan becomes the new baseline scan. You can continuously perform incremental-merge-incremental-merge indefinitely to create a process for continuous or deferred auditing. For more information, see "Incremental Scan with Continuous or Deferred Audit" below.
To merge scans:
1. In the Manage Scans page, select the baseline scan and the incremental scan.
2. Right-click and select Merge.
Log entries, including the baseline and incremental scan IDs, are written to the scan log when scans are merged.
Incremental Scan with Continuous or Deferred Audit
Incremental scanning provides the ability to perform continuous audit or deferred audit.
Incremental with Continuous Audit
With incremental scanning, you can put in place a process for continuous audit. This process would be as follows:
1. Create a baseline scan.
2. When an incremental scan is needed:
a. Create an incremental audit scan from the baseline scan. During this scan, new surface is audited.
b. Merge the incremental scan with the baseline scan. The merged scan becomes the new baseline scan. For more information, see "Merging Baseline and Incremental Scans" on the previous page.
c. Delete the incremental scan.
d. Return to Step 2.
Incremental with Deferred Audit
With incremental scanning, you can put in place a process for deferred audit. This process would be as follows:
1. Create a baseline scan.
2. When a new incremental scan is needed:
a. Create an incremental crawl-only scan from the baseline scan.
b. Merge the incremental scan with the baseline scan. The merged scan becomes the new baseline scan. For more information, see "Merging Baseline and Incremental Scans" on the previous page.
User GuideChapter 5: Using WebInspect Features
Micro Focus Fortify WebInspect (21.1.0) Page 227 of 461

c. Delete the incremental scan.
d. If new attack surface is found, resume the baseline audit and audit the new surface.
e. Return to Step 2.
See Also
"Reusing Scans" on page 225
Using MacrosA macro is a recording of the events that occur when you access and log in to a website. You can subsequently instruct Fortify WebInspect to begin a scan using this recording. You can use either the Session-based Web Macro Recorder tool or the Web Macro Recorder with Macro Engine 6.0 tool to record login macros, or you can create them in the Basic Scan or Guided Scan wizards. Macros that are created in a Basic Scan or a Guided Scan can be used in either type of scan.
There are two types of macros:
l A login macro is a recording of the events that occur when you access and log in to a Web site using a Web Macro Recorder tool. You can subsequently instruct Fortify WebInspect to begin a scan using this recording.
If Enable macro validation is selected in Scan Settings: Authentication for scans that use a login macro, Fortify WebInspect tests the login macro at the start of the scan to ensure that the log in is successful. If the macro is invalid and fails to log in to the application, the scan stops and an error message is written in the scan log file. For more information and troubleshooting tips, see "Testing Login Macros" on page 457.
l A workflow macro is a recording of HTTP events that occur as you navigate through a Web site using a Web Macro Recorder tool. Fortify WebInspect audits only those URLs included in the macro that you previously recorded and does not follow any hyperlinks encountered during the audit.
Any activity you record in a macro will override the scan settings. For example, if you specify a URL in the Excluded URL setting, and then you actually navigate to that URL when creating a macro, Fortify WebInspect will ignore the exclusion when it crawls and audits the site.
Note: When you play a macro, Fortify WebInspect will not send any cookie headers that may have been incorporated in the recorded macro. Macros that were recorded in a Basic Scan or a Guided Scan can be used in either type of scan.
See Also
"Scan Settings: Authentication" on page 373
"Running a Guided Scan" on page 106
"Running a Basic Scan (Web Site Scan)" on page 162
"Selecting a Workflow Macro " on the next page
"Using a Web Macro Recorder" on the next page
User GuideChapter 5: Using WebInspect Features
Micro Focus Fortify WebInspect (21.1.0) Page 228 of 461

Selecting a Workflow Macro When conducting a Workflow-driven Scan, you can select or create one or more macros that will be used to navigate your Web site.
l Record - opens the Web Macro Recorder, allowing you to create a macro
l Edit - opens the Web Macro Recorder and loads the selected macro
l Remove - removes the selected macro (but does not delete it from your disk)
l Import - opens a standard file-selection window, allowing you to select a previously recorded .webmacro file or Burp Proxy captures.
Important! If you use a login macro in conjunction with a workflow macro or startup macro or both, all macros must be of the same type: all .webmacro files or all Burp Proxy captures. You cannot use different types of macros in the same scan.
l Export - opens a standard file-selection window, allowing you to save a recorded macro
Once a macro is selected or recorded, you may optionally specify allowed hosts.
See Also
"Using Macros" on the previous page
Using a Web Macro RecorderFortify WebInspect includes two versions of Web Macro Recorder tools:
l Web Macro Recorder with Macro Engine 6.0
l Session-based Web Macro Recorder
The Web Macro Recorder tools can be launched in several ways—while configuring a Guided Scan or a Basic Scan, or outside of either scan in what is known as “stand-alone” mode. For more information, see the Web Macro Recorder help or the Web Macro Recorder chapters in the Micro Focus Fortify WebInspect Tools Guide.
Web Macro Recorder with Macro Engine 6.0
Fortify WebInspect includes two Web Macro Recorder with Macro Engine 6.0 tools: one for login macros and one for workflow macros. In this document, these two tools are referred to generally as "Web Macro Recorder" except for specific login-related and workflow-related content.
The Web Macro Recorder with Macro Engine 6.0 tool was designed with TruClient technology. It uses event-based functionality and Firefox browser technology to record and play macros.
User GuideChapter 5: Using WebInspect Features
Micro Focus Fortify WebInspect (21.1.0) Page 229 of 461

Session-based Web Macro Recorder
Fortify WebInspect includes Session-based Web Macro Recorder tools: one for login macros and one for workflow macros. In this document, these two tools are referred to generally as "Session-based Web Macro Recorder" except for specific login-related and workflow-related content.
The Session-based Web Macro Recorder uses Internet Explorer browser technology (also referred to here as IE technology) to record and play macros.
See Also
"Using Macros" on page 228
Traffic Monitor (Traffic Viewer)Fortify WebInspect normally displays in the navigation pane only the hierarchical structure of the Web site or Web service, plus those sessions in which a vulnerability was discovered. The Traffic Monitor or Traffic Viewer allows you to display and review every HTTP request sent by Fortify WebInspect and the associated HTTP response received from the web server.
The Traffic Monitor or Traffic Viewer is not available if Traffic Monitor Logging was not enabled prior to conducting the scan. You can enable the feature in the default settings (click Edit > Default Settings > Settings > General) or when you start a scan through the Scan Wizard (by selecting Enable Traffic Monitor on the Detailed Scan Configuration window under Settings).
Traffic Session Data in Traffic Viewer
The original Traffic Monitor has been converted into a standalone Traffic Viewer tool that incorporates functionality from both the original Traffic Monitor and the WebProxy tool. Traffic session files for the standalone Traffic Viewer use a different format than the Traffic Monitor. For more information about the standalone Traffic Viewer tool, refer to the Traffic Viewer tool online help or the Micro Focus Fortify WebInspect Tools Guide.
Viewing Traffic in the Traffic Viewer
To view the traffic session data in the Traffic Viewer:
l In the Scan Info panel for an open scan, click Traffic Monitor.
The Traffic Viewer tool opens with the traffic session data in view.
See Also
"Scan Info Panel " on page 72
User GuideChapter 5: Using WebInspect Features
Micro Focus Fortify WebInspect (21.1.0) Page 230 of 461

Server ProfilerUse the Server Profiler to conduct a preliminary examination of a Web site to determine if certain Fortify WebInspect settings should be modified. If changes appear to be required, the Profiler returns a list of suggestions, which you may accept or reject.
For example, the Server Profiler may detect that authorization is required to enter the site, but you have not specified a valid user name and password. Rather than proceed with a scan that would return significantly diminished results, you could follow the Server Profiler's prompt to configure the required information before continuing.
Similarly, your settings may specify that Fortify WebInspect should not conduct "file-not-found" detection. This process is useful for Web sites that do not return a status "404 Not Found" when a client requests a resource that does not exist (they may instead return a status "200 OK," but the response contains a message that the file cannot be found). If the Profiler determines that such a scheme has been implemented in the target site, it would suggest that you modify the Fortify WebInspect setting to accommodate this feature.
The Server Profiler can be selected during a Guided Scan, or enabled in the Application settings. For specific information, see "Application Settings: Server Profiler" on page 411.
Using the Server Profiler
You can use either of two methods to invoke the Server Profiler:
Launch Server Profiler as a Tool
Follow these steps to launch the Server Profiler:
1. Click the Fortify WebInspect Tools menu and select ServerProfiler.
2. In the URL box, enter or select a URL or IP address.
3. (Optional) If necessary, modify the Sample Size. Large Web sites may require more than the default number of sessions to sufficiently analyze the requirements.
4. Click Analyze.
The Profiler returns a list of suggestions (or a statement that no modifications are necessary).
5. To reject a suggestion, clear its associated check box.
6. For suggestions that require user input, provide the requested information.
7. (Optional) To save the modified settings to a file:
a. Click Save Settings.
b. Using a standard file-selection window, save the settings to a file in your Settings directory.
User GuideChapter 5: Using WebInspect Features
Micro Focus Fortify WebInspect (21.1.0) Page 231 of 461

Invoke Server Profiler when Starting a Scan
Follow these steps to launch the profiler when beginning a scan:
1. Start a scan using one of the following methods:
l On the Fortify WebInspect Start Page, click Start a Basic Scan.
l Click File > New > Basic Scan.
l Click the drop-down arrow on the New icon (on the toolbar) and select Basic Scan.
l On the Fortify WebInspect Start Page, click Manage Scheduled Scans, click Add, and then select Basic Scan.
2. On step 4 of the Scan Wizard (Detailed Scan Configuration), click Profile (unless Run Profiler Automatically is selected).
The Profiler returns a list of suggestions (or a statement that no modifications are necessary).
3. To reject a suggestion, clear its associated check box.
4. For suggestions that require user input, provide the requested information.
5. Click Next.
Inspecting the ResultsThis topic describes inspecting the results for a Basic Scan and a Web Services Scan.
Basic Scan
As soon as you start a Basic Scan, Fortify WebInspect begins scanning your Web application and displays in the navigation pane an icon depicting each session (using either the Site or Sequence view). It also reports possible vulnerabilities on the Findings tab in the summary pane. For more information, see "Navigation Pane" on page 60 and "Findings Tab" on page 99.
If you click a URL listed in the summary pane, the program highlights the related session in the navigation pane and displays its associated information in the information pane. For more information, see "Information Pane" on page 71.
Sometimes the attack that detected a vulnerable session is not listed under attack information. That is, if you select a vulnerable session in the navigation pane and then click Attack Info in the Session Info panel, the attack information does not appear in the information pane. This is because attack information is usually associated with the session in which the attack was created and not with the session in which it was detected. When this occurs, select the parent session and then click Attack Info. For more information, see "Session Info Panel " on page 83.
User GuideChapter 5: Using WebInspect Features
Micro Focus Fortify WebInspect (21.1.0) Page 232 of 461

Working with One or More Vulnerabilities
If you right-click one or more vulnerabilities in the summary pane, a shortcut menu allows you to:
l Copy URL - Copies the URL to the Windows clipboard.
l Copy Selected Item(s) - Copies the text of selected items to the Windows clipboard.
l Copy All Items - Copies the text of all items to the Windows clipboard.
l Export - Copies the item to a CSV file.
l View in Browser - Available if one vulnerability is selected; renders the HTTP response in a browser. l Filter by Current Value - Available if one vulnerability is selected; restricts the display of
vulnerabilities to those that satisfy the criteria you select. For example, if you right-click on "Post" in the Method column and then select Filter by Current Value, the list displays only those vulnerabilities that were discovered by sending an HTTP request that used the Post method.
Note: The filter criterion is displayed in the combo box in the upper right corner of the summary pane. Alternatively, you can manually enter or select a filtering criterion using this combo box. For additional details and syntax rules, see "Using Filters and Groups in the Summary Pane" on page 237.
l Change Severity - Allows you to change the severity level.
l Edit Vulnerability - Available if one vulnerability is selected; displays the Edit Vulnerabilities dialog, allowing you to modify various vulnerability characteristics. For more information, see "Editing Vulnerabilities" on page 243.
l Rollup Vulnerabilities - Available if multiple vulnerabilities are selected; allows you to roll up the selected vulnerabilities into a single instance that is prefixed with the tag “[Rollup]” in Fortify WebInspect, Fortify WebInspect Enterprise, and reports. For more information, see "Vulnerability Rollup" on page 245.
Note: If you have selected a rolled up vulnerability, this menu option is Undo Rollup Vulnerabilities.
l Retest - Performs a retest of one or more selected findings, all findings, or findings of a specific severity. For more information, see "Retesting Vulnerabilities" on page 220.
l Mark as - Flags the vulnerability as either a false positive (and allows you to add a note) or as ignored. In both cases, the vulnerability is removed from the list. You can view a list of all false positives by selecting False Positives in the Scan Info panel. You can view a list of false positives and ignored vulnerabilities by selecting Dashboard in the Scan Info panel, and then clicking the hyperlinked number of deleted items in the statistics column.
Note: You can recover "false positive" and "ignored" vulnerabilities. See "Recovering Deleted Items" on page 250 for details.
l Send to - Converts the vulnerability to a defect and adds it to the Micro Focus Application Lifecycle Management (ALM) database.
l Remove Location - Removes the selected session from the navigation pane (both Site and Sequence views) and also removes any associated vulnerabilities.
User GuideChapter 5: Using WebInspect Features
Micro Focus Fortify WebInspect (21.1.0) Page 233 of 461

Note: You can recover removed locations (sessions) and their associated vulnerabilities. See "Recovering Deleted Items" on page 250 for details.
l Crawl - Available if one vulnerability is selected; re-crawls the selected URL.
l Tools - Available if one vulnerability is selected; presents a submenu of available tools.
l Attachments - Available if one vulnerability is selected; allows you to create a note associated with the selected session, flag the session for follow-up, add a vulnerability note, or add a vulnerability screenshot.
Working with a Group
If you right-click a group, a shortcut menu allows you to:
l Collapse/Expand All Groups
l Collapse/Expand Group
l Copy URL
l Copy Selected Item(s)
l Copy All Items
l Export
l Change Severity
l Rollup Vulnerabilities
l Mark as
l Send to
l Remove Location
Understanding the Severity
The relative severity of a vulnerability listed in the summary pane is identified by its associated icon, as described in the following table.
Icon Description
Critical A vulnerability wherein an attacker might have the ability to execute commands on the server or retrieve and modify private information.
High Generally, the ability to view source code, files out of the Web root, and sensitive error messages.
Medium Indicates non-HTML errors or issues that could be sensitive.
Low Interesting issues, or issues that could potentially become higher ones.
Information An interesting point in the site, or detection of certain applications or Web servers.
User GuideChapter 5: Using WebInspect Features
Micro Focus Fortify WebInspect (21.1.0) Page 234 of 461
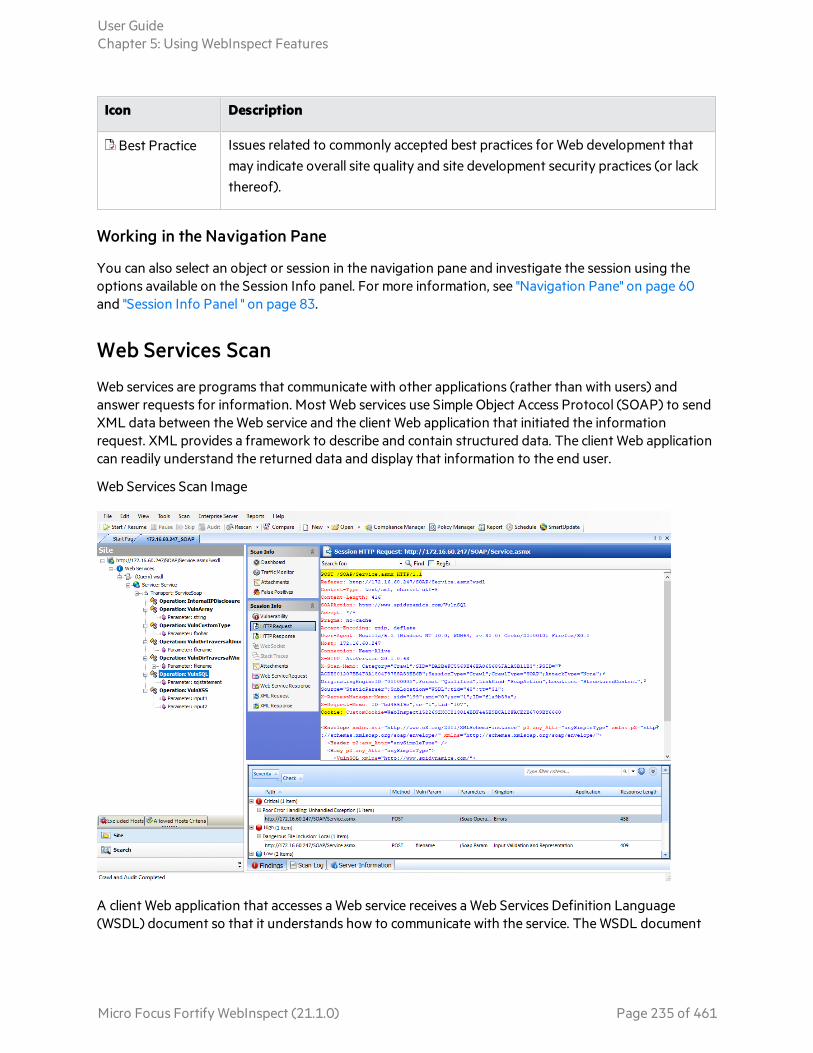
Icon Description
Best Practice Issues related to commonly accepted best practices for Web development that may indicate overall site quality and site development security practices (or lack thereof).
Working in the Navigation Pane
You can also select an object or session in the navigation pane and investigate the session using the options available on the Session Info panel. For more information, see "Navigation Pane" on page 60 and "Session Info Panel " on page 83.
Web Services Scan
Web services are programs that communicate with other applications (rather than with users) and answer requests for information. Most Web services use Simple Object Access Protocol (SOAP) to send XML data between the Web service and the client Web application that initiated the information request. XML provides a framework to describe and contain structured data. The client Web application can readily understand the returned data and display that information to the end user.
Web Services Scan Image
A client Web application that accesses a Web service receives a Web Services Definition Language (WSDL) document so that it understands how to communicate with the service. The WSDL document
User GuideChapter 5: Using WebInspect Features
Micro Focus Fortify WebInspect (21.1.0) Page 235 of 461

describes the procedures included in the Web service, the parameters those procedures expect, and the type of return information the client Web application will receive.
After selecting a session object in the navigation pane or on the Findings tab of the summary pane, you can select options from the Session Info panel. For more information, see "Navigation Pane" on page 60, "Findings Tab" on page 99, and "Session Info Panel " on page 83.
See Also
"Retesting and Rescanning" on page 220
"Auditing Web Services " on page 240
"Editing Vulnerabilities" on page 243
"WebInspect User Interface" on page 47
"Recovering Deleted Items" on page 250
Search ViewThe Search view allows you to search across all sessions for various HTTP message components. For example, if you select Response Raw from the drop-down and specify set-cookie as the search string, Fortify WebInspect lists every session whose raw HTTP response includes the "set-cookie" command.
To use the Search view:
1. In the navigation pane, click Search (at the bottom of the pane). For more information, see "Navigation Pane" on page 60.
If all buttons are not displayed, click the Configure Buttons drop-down at the bottom of the button list and select Show More Buttons.
2. From the top-most list, select an area to search.
3. In the combo box, type or select the string you want to locate.
User GuideChapter 5: Using WebInspect Features
Micro Focus Fortify WebInspect (21.1.0) Page 236 of 461

4. If the string represents a regular expression, select the Regular Expression check box. For more information, see "Regular Expressions" on page 293.
5. To find an entire string in the HTTP message that exactly matches the search string, select the Match Whole String check box. The exact match is not case-sensitive.
This option is not available for certain search targets.
6. Click Search.
See Also
"WebInspect User Interface" on page 47
Using Filters and Groups in the Summary PaneThis topics describes how to use filters and groups in the Summary Pane.
Using Filters
You can display a subset of items that match the criteria you specify using either of two methods:
l Enter filter criteria using the combo box in the top right corner of the pane.
Note: Click the filter criteria box and press CTRL + Space to view a pop-up list of all available filter criteria, and then enter a value for that criterion.
l Right-click a value in any column and select Filter by Current Value from the shortcut menu.
This filtering capability is available on all Summary pane tabs except Scan Log.
No Filters
The following example shows unfiltered items on the Findings tab.
Summary Pane with No Filters Image
User GuideChapter 5: Using WebInspect Features
Micro Focus Fortify WebInspect (21.1.0) Page 237 of 461
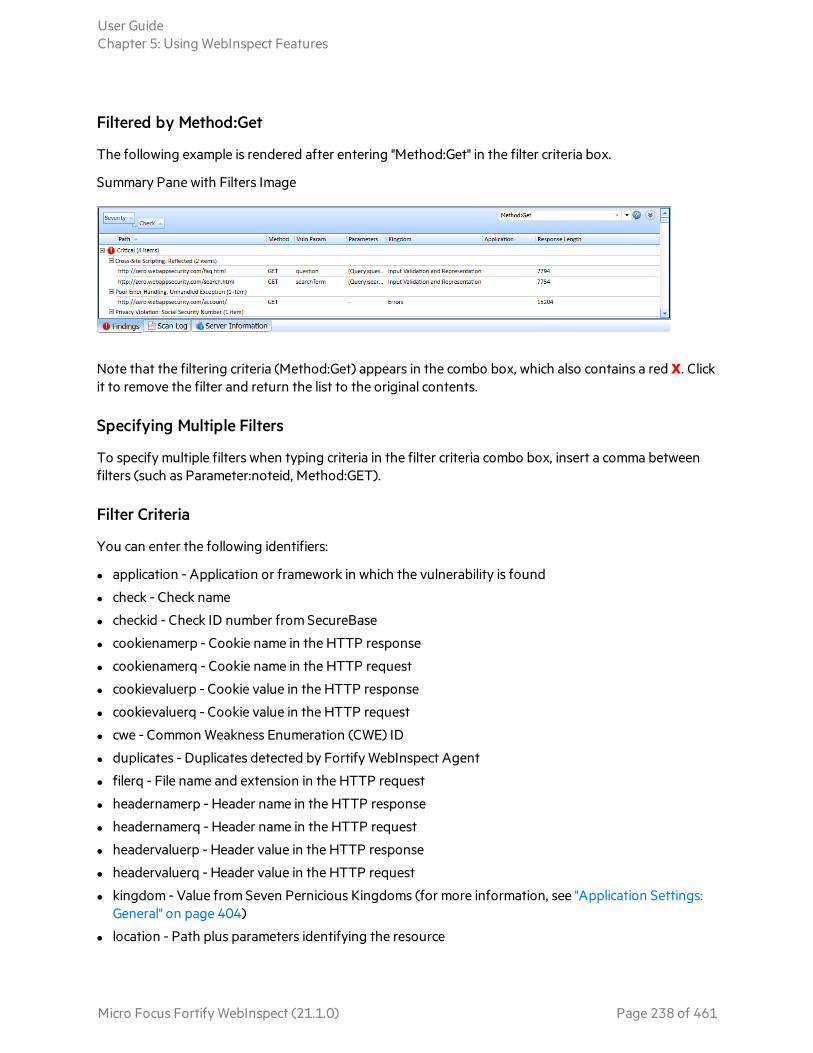
Filtered by Method:Get
The following example is rendered after entering "Method:Get" in the filter criteria box.
Summary Pane with Filters Image
Note that the filtering criteria (Method:Get) appears in the combo box, which also contains a red X. Click it to remove the filter and return the list to the original contents.
Specifying Multiple Filters
To specify multiple filters when typing criteria in the filter criteria combo box, insert a comma between filters (such as Parameter:noteid, Method:GET).
Filter Criteria
You can enter the following identifiers:
l application - Application or framework in which the vulnerability is found
l check - Check name
l checkid - Check ID number from SecureBase
l cookienamerp - Cookie name in the HTTP response
l cookienamerq - Cookie name in the HTTP request
l cookievaluerp - Cookie value in the HTTP response
l cookievaluerq - Cookie value in the HTTP request
l cwe - Common Weakness Enumeration (CWE) ID
l duplicates - Duplicates detected by Fortify WebInspect Agent
l filerq - File name and extension in the HTTP request
l headernamerp - Header name in the HTTP response
l headernamerq - Header name in the HTTP request
l headervaluerp - Header value in the HTTP response
l headervaluerq - Header value in the HTTP request
l kingdom - Value from Seven Pernicious Kingdoms (for more information, see "Application Settings: General" on page 404)
l location - Path plus parameters identifying the resource
User GuideChapter 5: Using WebInspect Features
Micro Focus Fortify WebInspect (21.1.0) Page 238 of 461

l manual - A location added manually (syntax is manual:True or manual:False)
l method - HTTP method (GET, POST)
l methodrq - Method specified in HTTP request
l parameters - Parameters specified in the HTTP request
l path - Path identifying the resource (without parameters)
l pendstatus - Status if the scan were to be published to Fortify Software Security Center
l rawrp - Raw HTTP response
l rawrq - Raw HTTP request
l responselength - Response size in bytes for the vulnerable session
l reteststatus - Retest Status values (for a list of values, see "Retesting Vulnerabilities" on page 220)
l sessiondataid - Session data identifier (right-click on a session in the Navigation pane and select Filter by Current Session)
l severity - Severity assigned to a vulnerability (critical, high, medium, low)
l stack - Stack tracereturned by Fortify WebInspect Agent (syntax is stack:True or stack:False)
l statuscode - HTTP status code
l typerq - Type of request: query, post, or SOAP
l vparam - The vulnerability parameter
Using Groups
You can group items into categories based on the column headings. To do so, simply drag the heading and drop it on the grouping area at the top of the pane.
The findings in the following illustration are grouped by severity and then by check name.
Summary Pane Using Groups Image
If you right-click a column header, Fortify WebInspect displays the following shortcut menu items related to grouping and filtering:
l Group by Field - Groups vulnerabilities according to the field you selected.
l Group by Box - Shows the "Group By" area in which you can arrange grouping by column headers.
l Columns - Allows you to select which columns are displayed.
l Save as Default View - Saves the current grouping paradigm as the default for all scans.
User GuideChapter 5: Using WebInspect Features
Micro Focus Fortify WebInspect (21.1.0) Page 239 of 461

l Reset Default View - Restores the grouping paradigm to the default view that you created.
l Reset Factory Settings - Restores the grouping paradigm to the original view (Severity > Check).
Auditing Web Services Web services are programs that communicate with other applications (rather than with users) and answer requests for information. Most Web services use Simple Object Access Protocol (SOAP) to send XML data between the Web service and the client Web application that initiated the information request. Unlike HTML, which only describes how Web pages are displayed, XML provides a framework to describe and contain structured data. The client Web application can readily understand the returned data and display that information to the end user.
A client Web application that accesses a Web service receives a Web Services Description Language (WSDL) document so that it understands how to communicate with the service. The WSDL document describes what programmed procedures the Web service includes, what parameters those procedures expect, and the type of return information the client Web application will receive.
Web Services Scan Image
Options Available from the Session Info Panel
The following table describes the options that are available from the Session Info panel.
Option Definition
Vulnerability Displays the vulnerability information for the session selected in the navigation pane. For more information, see "Navigation Pane" on page 60.
User GuideChapter 5: Using WebInspect Features
Micro Focus Fortify WebInspect (21.1.0) Page 240 of 461

Option Definition
HTTP Request Displays the raw HTTP request sent by Fortify WebInspect to the server hosting the site you are scanning.
HTTP Response Displays the server's raw HTTP response to Fortify WebInspect's request.
Note: If you select a Flash (.swf) file, Fortify WebInspect displays HTML instead of binary data. This allows Fortify WebInspect to display links in a readable format.
Stack Traces This feature is designed to support Fortify WebInspect Agent when it is installed and running on the target server. For certain checks (such as SQL injection, command execution, and cross-site scripting), Fortify WebInspect Agent intercepts Fortify WebInspect HTTP requests and conducts runtime analysis on the target module. If this analysis confirms that a vulnerability exists, Fortify WebInspect Agent appends the stack trace to the HTTP response. Developers can analyze this stack trace to investigate areas that requires remediation.
Attachments Displays all notes, flags, and screenshots associated with the selected session.
To create an attachment, do one of the following:
l Right-click an operation or vulnerability in the navigation pane and select Attachments from the shortcut menu.
l Right-click a URL on the Findings tab of the summary pane and select Attachments from the shortcut menu. For more information, see "Summary Pane" on page 98.
l Select an operation or vulnerability in the navigation pane, then select Attachments from the Session Info panel and click the Add menu (in the information pane).
Fortify WebInspect automatically adds a note to the session information whenever you send a defect to Micro Focus Application Lifecycle Management (ALM).
Web Service Request
Displays an exploded view of the SOAP envelope, header, and body elements for the request.
Web Service Response
Displays an exploded view of the SOAP envelope, header, and body elements for the response.
XML Request Displays the associated XML schema embedded in the request (available when selecting the WSDL object during a Web Service scan).
User GuideChapter 5: Using WebInspect Features
Micro Focus Fortify WebInspect (21.1.0) Page 241 of 461

Option Definition
XML Response Displays the associated XML schema embedded in the response (available when selecting the WSDL object during a Web Service scan).
For more information on how to conduct a Web services vulnerability scan, see "Running an API or Web Service Scan" on page 153.
Adding/Viewing Vulnerability ScreenshotTo add a vulnerability screenshot:
1. Do one of the following to select a vulnerability:
l On the Findings tab in the Summary pane, right-click a vulnerable URL. For more information, see "Findings Tab" on page 99.
l On the Navigation pane, right-click a vulnerable session or URL. For more information, see "Navigation Pane" on page 60.
2. On the shortcut menu, click Attachments > Add Vulnerability Screenshot.
Note: An alternative method is to select a vulnerability, click Attachments in the Session Info panel, and then select a command from the Add menu (in the information display area). For more information, see "Information Pane" on page 71.
3. If you selected a session with multiple vulnerabilities, select the check box next to one or more vulnerabilities.
4. Enter a name (40 characters max.) for the screenshot in the Name box.
5. Select an image file, using one of the following methods:
l Click the browse button and choose a file with the standard file-selection window.
l Click Copy from Clipboard to save the contents of the Windows clipboard.
Note: You can specify only one image file even if you have selected multiple vulnerabilities.
6. (Optional) Enter a note related to the vulnerability screenshot you selected.
7. Click OK.
Viewing Screenshots for a Selected Session
You can view notes, flags, and screenshots for a selected session by clicking Attachments on the Session Info panel.
User GuideChapter 5: Using WebInspect Features
Micro Focus Fortify WebInspect (21.1.0) Page 242 of 461

Viewing Screenshots for All Sessions
You can view notes, flags, and screenshots for all sessions by clicking Attachments on the Scan Info panel.
See Also
"Vulnerability Note" on page 249
"Flag Session for Follow-Up" on page 247
"Scan Note" on page 248
Editing VulnerabilitiesAfter Fortify WebInspect assesses your application’s vulnerabilities, you may want to edit and save the results for a variety of reasons, including:
l Security - If an HTTP request or response contains passwords, account numbers, or other sensitive data, you may want to delete or modify this information before making the scan results available to other persons in your organization.
l Correction - Fortify WebInspect occasionally reports a “false positive.” This occurs when Fortify WebInspect detects indications of a possible vulnerability, but further investigation by a developer determines that the problem does not actually exist. You can delete the vulnerability from the session or delete the entire session. Alternatively, you can designate it as a false positive (right-click the session in either the Site or Sequence view and select Mark As False Positive).
l Severity Modification - If you disagree with Fortify WebInspect’s ranking of a vulnerability, you can assign a different level, using the following scale:
Range Severity
0 - 9 Normal
10 Information
11 - 25 Low
26 - 50 Medium
51 - 75 High
76 - 100 Critical
l Record Keeping - You can modify any of the report fields associated with an individual vulnerability (Summary, Execution, Recommendation, Implementation, Fixes, and References). For example, you could add a paragraph to the Fixes section describing how you actually fixed the problem.
User GuideChapter 5: Using WebInspect Features
Micro Focus Fortify WebInspect (21.1.0) Page 243 of 461

l Enhancement - If you discover a new vulnerability, you could define it and add it to a session as a custom vulnerability.
Editing a Vulnerable Session
To edit a vulnerable session:
1. Do one of the following to select a session:
l On the Findings tab in the Summary pane, right-click a vulnerable URL , or
l On the navigation pane, right-click a session or URL.
2. Select Edit Vulnerability from the shortcut menu.
The Edit Vulnerabilities window opens.
3. If the session includes multiple vulnerabilities, then select a vulnerability.
4. To add an existing vulnerability to the session (that is, one that exists in the database), click Add Existing.
a. On the Add Existing Vulnerability window, enter part of a vulnerability name, or a complete vulnerability ID number or type.
Note: The * and % characters can be used interchangeably as wildcards. However, a wildcard is allowed only at the beginning, at the end, or at the beginning and end of a string. If placed within a string (such as "mic*soft,"), these characters will not function as wildcards.
b. Click Search.
User GuideChapter 5: Using WebInspect Features
Micro Focus Fortify WebInspect (21.1.0) Page 244 of 461

c. Select one or more of the vulnerabilities returned by the search.
d. Click OK.
5. To add a custom vulnerability, click Add Custom.
You can then edit the vulnerability as described in Step 7.
6. To delete the vulnerability from the selected session, click Delete.
7. To modify the vulnerability, select different options from the Vulnerability Detail section. You can also change the descriptions that appear on the Summary, Implication, Execution, Fix, and Reference Info tabs.
8. Click OK to save the changes.
Vulnerability RollupSome sites contain a vulnerability class that is endemic throughout the site. For example, a cross-site scripting vulnerability may exist in every POST and GET method for every parameter on an entire site due to lack of input validation. This means that numerous cross-site scripting vulnerabilities will be listed on the Findings tab in the summary pane. To prevent overwhelming your development team, you can roll up such vulnerabilities into a single instance that is prefixed with the tag “[Rollup]” in Fortify WebInspect, Fortify WebInspect Enterprise, and reports.
What Happens to Rolled Up Vulnerabilities
When you select multiple vulnerabilities and use the rollup feature, all vulnerabilities except the first selected vulnerability are marked as ignored. The first selected vulnerability remains visible and represents the rollup. Although the rest of the selected vulnerabilities are marked as ignored, they do not appear as ignored vulnerabilities in the Recover Deleted Items window.
Caution! Rolling up vulnerabilities indicates that they share the same root cause, and that fixing the root cause will fix all rolled up vulnerabilities. Future scans will automatically ignore rolled up vulnerabilities if found. If any of the rolled up vulnerabilities do not share the same root cause, they will still be ignored.
Rollup Guidelines
The following guidelines apply to vulnerability rollup:
l Scans that include vulnerability rollups can be rescanned and bulk retested.
l Only the visible vulnerability is retested during bulk retest. The rest of the vulnerabilities are ignored and will not show up as rolled up on the retest.
l Rollup is local to a scan and is not propagated between scans.
l Rollup works only when you select multiple vulnerabilities that have not been rolled up. Inadvertently selecting a currently rolled up vulnerability will prevent the Rollup Vulnerability option from appearing in the shortcut menu.
l You can only undo a rollup if you single select a vulnerability that is currently rolled up.
User GuideChapter 5: Using WebInspect Features
Micro Focus Fortify WebInspect (21.1.0) Page 245 of 461

Rolling Up Vulnerabilities
To rollup vulnerabilities:
1. On the Findings tab in the summary pane, select several vulnerabilities to rollup.
2. Right click and select Rollup Vulnerabilities from the shortcut menu.
The following warning appears:
Rolling up these vulnerabilities indicates that they share the same root cause, and that fixing the root cause will fix all rolled up vulnerabilities. Future scans will automatically ignore rolled up vulnerabilities if found. If any of these vulnerabilities do not share the same root cause, they will still be ignored. Do you wish to continue?
3. Do one of the following:
l Click OK to rollup the vulnerabilities.
l Click Cancel to leave the vulnerabilities as they are.
If you click OK, the selected vulnerabilities are rolled into a single instance and the check name is prefixed with the tag “[Rollup]”, as shown below. Additionally, a note is added to the Attachments on the Session Info panel detailing the URLs that were rolled up and affected by the same vulnerability. For more information, see "Viewing Notes for a Selected Session" on page 250.
Undoing Rollup
The rollup feature is reversible. To undo a rollup:
1. On the Findings tab in the summary pane, right-click any vulnerability that has been rolled up.
2. Select Undo Rollup Vulnerabilities.
The rollup is reversed, and the vulnerabilities appear on the Findings tab. Additionally, the note detailing the rolled up vulnerabilities is removed from the Attachments on the Session Info panel.
Note: If you undo a rollup in a scan that has been published to Fortify Software Security Center, the note that was added to the Attachments on the Session Info panel detailing the roll up will be removed temporarily from Fortify WebInspect, but will reappear after synchronization with Fortify Software Security Center.
User GuideChapter 5: Using WebInspect Features
Micro Focus Fortify WebInspect (21.1.0) Page 246 of 461

See Also
"Findings Tab" on page 99
Mark As False PositiveIf you think that Fortify WebInspect has erroneously determined that a session contains a vulnerability, you can remove the vulnerability from the session.
To mark as false positive:
1. Select the check box associated with one or more URLs.
2. (Optional) Enter a comment.
3. (Optional) To notify Fortify Customer Support personnel that you have found what you believe to be a false positive, select Send to Micro Focus Support.
If you select this option, you may also select Preview Data Upload, which allows you to view the contents of the data being sent to Fortify Customer Support. At that time, you can copy the data to the Windows clipboard, cancel the upload, or allow it to proceed (by clicking OK).
4. Click OK.
Tip: To view a list of all sessions that have been marked as false positives, select False Positives from the Scan Info panel. Note that this option is not displayed until you actually declare a vulnerability as a false positive.
Mark As VulnerabilityIf you think that someone has erroneously reclassified a detected vulnerability as a false positive, you can restore the vulnerability to its original session.
1. Select the check box associated with one or more URLs.
2. (Optional) Enter a comment.
3. Click OK.
Flag Session for Follow-UpTo flag a session for follow-up:
1. Do one of the following to select a session:
l On the Findings tab in the Summary pane, right-click a vulnerable URL.
l On the Navigation pane, right-click a session or URL.
2. On the shortcut menu, click Attachments > Flag Session for Follow Up.
User GuideChapter 5: Using WebInspect Features
Micro Focus Fortify WebInspect (21.1.0) Page 247 of 461

Note: You can also flag a session for follow-up by selecting a vulnerability or session, clicking Attachments in the Session Info panel, and then click the Add menu (in the information display area).
3. Enter a note related to the session you selected.
4. Click OK.
Viewing Flags for a Selected Session
You can view notes, flags, and screenshots for a selected session by clicking Attachments on the Session Info panel.
Viewing Flags for All Sessions
You can view notes, flags, and screenshots for all sessions by clicking Attachments on the Scan Info panel.
Scan NoteTo add a scan note:
1. Click Attachments on the Scan Info panel.
2. Click Add and select Scan Note.
3. On the Add Scan Note dialog box, enter a note related to the scan.
4. Click OK.
To delete a scan note (or any attachment):
1. Select the attachment.
2. Click Delete.
See Also
"Adding/Viewing Vulnerability Screenshot" on page 242
"Vulnerability Note" on the next page
"Flag Session for Follow-Up" on the previous page
User GuideChapter 5: Using WebInspect Features
Micro Focus Fortify WebInspect (21.1.0) Page 248 of 461

Session NoteTo add a session note:
1. Do one of the following to select a session:
l On the Findings tab in the Summary pane, right-click a vulnerable URL.
l On the Navigation pane, right-click a session or URL.
2. On the shortcut menu, click Attachments > Add Session Note.
Note: You can also add a session note by selecting a vulnerability or session, clicking Attachments in the Session Info panel, and then clicking the Add menu (in the information display area).
3. Enter a note related to the session you selected.
4. Click OK.
Viewing Notes for a Selected Session
You can view notes, flags, and screenshots for a selected session by clicking Attachments on the Session Info panel.
Viewing Notes for All Sessions
You can view notes, flags, and screenshots for all sessions by clicking Attachments on the Scan Info panel.
See Also
"Findings Tab" on page 99
"Information Pane" on page 71
"Navigation Pane" on page 60
Vulnerability NoteTo add a vulnerability note:
1. Do one of the following to select a vulnerability:
l On the Findings tab in the Summary pane, right-click a vulnerable URL. For more information, see "Findings Tab" on page 99.
l On the Navigation pane, right-click a vulnerable session or URL. For more information, see "Navigation Pane" on page 60.
User GuideChapter 5: Using WebInspect Features
Micro Focus Fortify WebInspect (21.1.0) Page 249 of 461

2. On the shortcut menu, click Attachments > Add Vulnerability Note.
Note: An alternative method is to select a vulnerability, click Attachments in the Session Info panel, and then click the Add menu (in the information display area). For more information, see "Information Pane" on page 71.
3. If you selected a session with multiple vulnerabilities, select the check box next to one or more vulnerabilities.
4. Enter a note related to the vulnerability (or vulnerabilities) you selected.
5. Click OK.
Viewing Notes for a Selected Session
You can view notes, flags, and screenshots for a selected session by clicking Attachments on the Session Info panel. If the selected session includes rolled up vulnerabilities, a note in the Description area details the URLs that were rolled up and affected by the same vulnerability. For more information, see "Vulnerability Rollup" on page 245.
Viewing Notes for All Sessions
You can view notes, flags, and screenshots for all sessions by clicking Attachments on the Scan Info panel.
Recovering Deleted ItemsWhen you remove a session or "ignore" a vulnerability, Fortify WebInspect deletes the item from the Navigation pane (in both the Site and Sequence views) and from the Findings tab in the Summary pane. It also omits those items from any reports you may generate.
The number of deleted items is displayed on the Dashboard (under the Scan category). To recover removed sessions and ignored vulnerabilities:
1. Click the highlighted number that appears next to the Deleted Items header.
The Recover Deleted Items window displays a list of deleted items.
2. Click the drop-down list to toggle between ignored vulnerabilities and removed sessions.
3. Select the check box next to one or more items you want to recover.
4. To view detailed information about the items, select Show details when selected.
5. Click Recover and then click Yes when prompted to verify your selection.
Recovered vulnerabilities reappear in the Navigation pane in both the Site and Sequence views (along with their parent sessions) and also reappear in the Findings tab in the Summary pane. Recovered sessions also reappear in the Navigation pane along with any child sessions and their vulnerabilities.
See Also
"Session Info Panel " on page 83
User GuideChapter 5: Using WebInspect Features
Micro Focus Fortify WebInspect (21.1.0) Page 250 of 461

Sending Vulnerabilities to Micro Focus ALM You can convert one or more vulnerabilities to defects and add them to the Micro Focus Application Lifecycle Management (ALM) database.
To send a vulnerability to your defect tracking system:
1. Right-click a vulnerability in either the Navigation pane or the Summary pane. For more information, see "Navigation Pane" on page 60 and "Summary Pane" on page 98.
2. Select Send to and choose Micro Focus ALM.
3. On the Send to dialog box, choose a profile from the Profile list.
If you need to create or edit a profile, click Manage to access the Fortify WebInspect Application Settings. For more information, see "Application Settings: Micro Focus ALM" on page 423.
Note: If the selected profile maps a Fortify WebInspect vulnerability to "Do not publish" (based on its severity level), the vulnerability will not be exported.
4. To force the creation of a defect even if it has been previously reported, select Allow duplicate defect assignment.
Fortify WebInspect recognizes duplicates only within the same scan. If you scan a site and send a specific vulnerability to ALM, you can prevent Fortify WebInspect from sending that same vulnerability if it is encountered again during that scan. However, if you conduct a subsequent scan of that site and Fortify WebInspect again encounters that same vulnerability, Fortify WebInspect is not programmatically aware that the vulnerability was sent to ALM during the previous scan.
5. To close this dialog box after sending the defect(s), select Close when finished.
6. If you have selected multiple vulnerabilities, you can exclude a vulnerability by removing the check mark next to the ID number.
7. Click Send.
Additional Information Sent
Fortify WebInspect will also add a note to the session information indicating that the defect was sent to Micro Focus ALM, as illustrated by the following example:
Defect #30 was created in Micro Focus ALM.Check ID: 182CheckName: Dan-o Log Information DisclosureProfile: ThackServer URL: http://qbakervm2003/qcbinProject: test3Priority: 3-HighSeverity: 1-Low
Note: If you receive the error message, "Error authenticating with Micro Focus ALM," see "Disabling Data Execution Prevention " on the next page.
User GuideChapter 5: Using WebInspect Features
Micro Focus Fortify WebInspect (21.1.0) Page 251 of 461
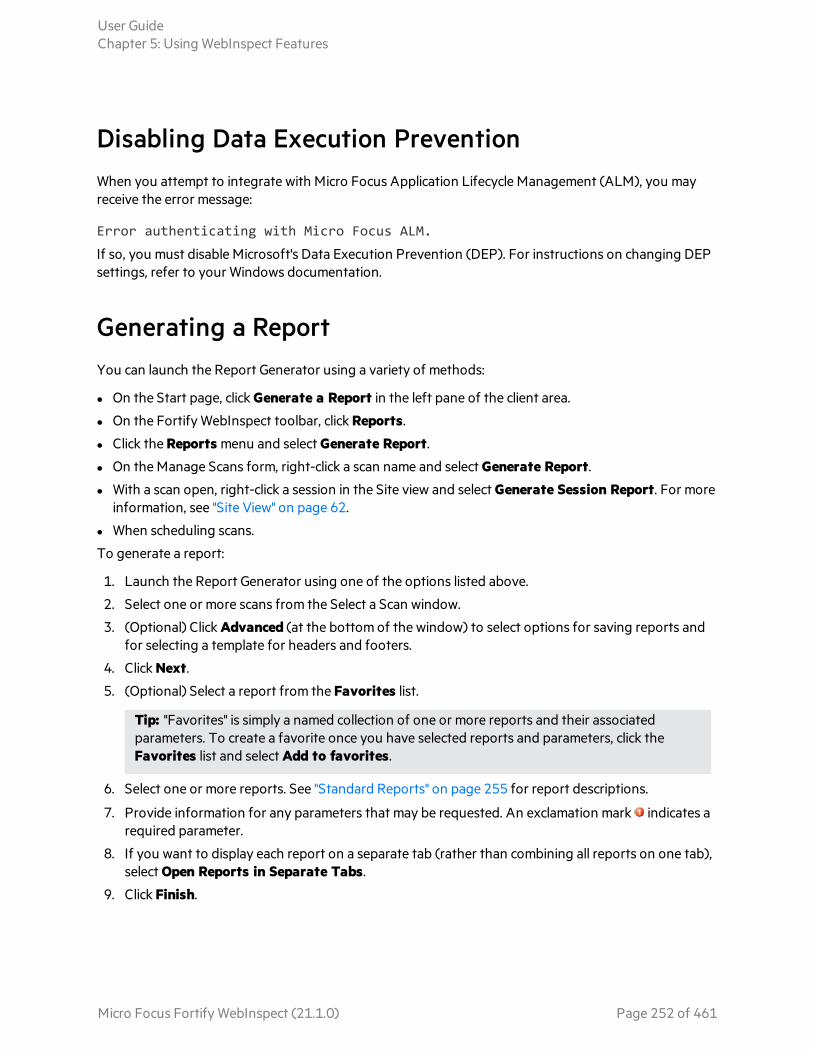
Disabling Data Execution Prevention When you attempt to integrate with Micro Focus Application Lifecycle Management (ALM), you may receive the error message:
Error authenticating with Micro Focus ALM.
If so, you must disable Microsoft's Data Execution Prevention (DEP). For instructions on changing DEP settings, refer to your Windows documentation.
Generating a ReportYou can launch the Report Generator using a variety of methods:
l On the Start page, click Generate a Report in the left pane of the client area.
l On the Fortify WebInspect toolbar, click Reports.
l Click the Reports menu and select Generate Report.
l On the Manage Scans form, right-click a scan name and select Generate Report.
l With a scan open, right-click a session in the Site view and select Generate Session Report. For more information, see "Site View" on page 62.
l When scheduling scans.
To generate a report:
1. Launch the Report Generator using one of the options listed above.
2. Select one or more scans from the Select a Scan window.
3. (Optional) Click Advanced (at the bottom of the window) to select options for saving reports and for selecting a template for headers and footers.
4. Click Next.
5. (Optional) Select a report from the Favorites list.
Tip: "Favorites" is simply a named collection of one or more reports and their associated parameters. To create a favorite once you have selected reports and parameters, click the Favorites list and select Add to favorites.
6. Select one or more reports. See "Standard Reports" on page 255 for report descriptions.
7. Provide information for any parameters that may be requested. An exclamation mark indicates a required parameter.
8. If you want to display each report on a separate tab (rather than combining all reports on one tab), select Open Reports in Separate Tabs.
9. Click Finish.
User GuideChapter 5: Using WebInspect Features
Micro Focus Fortify WebInspect (21.1.0) Page 252 of 461

Saving a Report
After Fortify WebInspect generates and displays the report, you can save it by clicking Save As on the Report Viewer toolbar.
Reports can be saved in the following formats:
l Adobe Portable Data Format (.pdf)
l Hypertext Markup Language (.html)
l Native Fortify WebInspect internal format (.raw)
l Rich Text Format (.rtf)
l Text (.txt)
l Microsoft Excel (.xls)
See Also
"Standard Reports" on page 255
"Advanced Report Options" below
"Compliance Templates " on page 257
"Application Settings: Reports" on page 417
Advanced Report OptionsThe following table describes the advanced report options:
Option Description
Save reports to disk Select this option to output a report to a file.
Automatically generate file name
If you select this option when saving the report to disk, the name of the report file will be formatted as <reportname> <date/time>.<extension>.
For example, if creating a compliance report in pdf format and the report is generated at 6:30 on April 5, the file name would be "Compliance Report 04_05_2009 06_30.pdf." This is useful for recurring scans.
l If you select more than one report type, then <reportname> will be "Combined Reports."
l Reports are written to the directory specified for generated reports in the Application settings.
If you do not select Automatically generate filename, replace the default name "auto-gen-filename" with a file name.
User GuideChapter 5: Using WebInspect Features
Micro Focus Fortify WebInspect (21.1.0) Page 253 of 461

Option Description
Export Format Select a report format.
Header/Footer Report
Select a format for the report's header and footer, and then enter or select the components.
Report Viewer Use the toolbar to navigate through the report, print or save the report, and to add notes.
Item Description
1 Show / Hide Table of Contents
2 Print Report
3 Copy
4 Search
5 Single Page View
6 Multi-Page View
7 Continuous Scroll
8 Zoom Out
9 Zoom In
10 Magnification
11 Previous Page
12 Next Page
13 Current Page Number / Total Number of Pages
User GuideChapter 5: Using WebInspect Features
Micro Focus Fortify WebInspect (21.1.0) Page 254 of 461

Item Description
14 Page Backward
15 Page Forward
16 Annotation (see "Adding a Note" below)
17 Save Report
Note: The Backward and Forward buttons function in the same manner as the Back and Forward buttons on a browser. They navigate forward or backward one step in the history list.
Adding a Note
To add a note:
1. Click the Annotation icon.
2. Select a format.
3. Drag it to the report.
4. Right-click the note and select Properties.
5. Select the Text property and enter the contents of the note.
Standard ReportsThe following table describes the standard reports that are available.
Report Description
Aggregate This report is designed for multiple scans. You can select which severity categories to report, report sections (server content and vulnerability detail), and session information (responses and requests). Stack traces can also be reported, when available.
Alert View This report lists all vulnerabilities sorted by severity, with a hyperlink to each HTTP request that elicited the vulnerability. It also includes an appendix that describes each vulnerability in detail.
Attack Status For each attack agent (check) employed during the scan, this report lists the vulnerability ID number, check name, vulnerability severity, whether or not the check was enabled for the scan, whether or not the check passed or failed (i.e., did or did not detect the vulnerability), and (if it failed) the number of URLs where the vulnerability was detected. You can select to
User GuideChapter 5: Using WebInspect Features
Micro Focus Fortify WebInspect (21.1.0) Page 255 of 461

Report Description
report vulnerabilities of a certain severity as well as the pass/fail status.
Compliance This report provides a qualitative analysis by grading how well your application complies with certain government-mandated regulations or corporate-defined guidelines.
Crawled URLs For each URL encountered during the crawl, this report lists any cookies sent and the raw HTTP request and response.
Developer Reference Totals and detailed description of each form, JavaScript, e-mail, comment, hidden control, and cookie discovered on the Web site. You can select one or more of these reference types.
Duplicates This report contains information about vulnerabilities detected by Fortify WebInspect Agent that were traceable to the same source. It begins with a bar chart comparing the total number of uncorrelated vulnerabilities to the number of unique vulnerabilities.
Executive Summary This report lists basic statistics, plus charts and graphs that reflect your application's level of vulnerability.
False Positives This report displays information about URLs that Fortify WebInspect originally classified as vulnerabilities, but were subsequently determined by a user to be false positives.
QA Summary This report lists the URLs of all pages containing broken links, server errors, external links, and timeouts. You can select one or more of these categories.
Scan Difference This report compares two scans and reports the differences, such as vulnerabilities, pages, and file-not-found responses that occur in one Web site but not the other.
Scan Log Sequential list of the activities conducted by Fortify WebInspect during the scan (as the information appears on the Scan Log tab of the summary pane).
Trend This report allows you to monitor your development team's progress toward resolving vulnerabilities. For example, you save the results of your initial scan and your team begins fixing the problems. Then once a week, you rescan the site and archive the results. To quantify your progress, you run a trend report that analyzes the results of all scans conducted to date.
User GuideChapter 5: Using WebInspect Features
Micro Focus Fortify WebInspect (21.1.0) Page 256 of 461

Report Description
The report includes a graph showing the number of vulnerabilities, by severity, plotted on a timeline defined by the date on which each scan was conducted. Important: To obtain reliable results, make sure you conduct each scan using the same policy.
Vulnerability (Legacy) This is a detailed report of each vulnerability, with recommendations concerning remediation.
Vulnerability This report also presents detailed information about discovered vulnerabilities, sorted by severity.
Manage Reports Use Manage Reports to rename, add, delete, or import report definition files.
Note that standard reports cannot be renamed, deleted, or exported.
Compliance Templates The available compliance templates are described below. Additional templates may be downloaded through SmartUpdate as they become available.
Note: This list might not match the templates that you see in your product. SmartUpdate might have added templates since this document was produced.
Template Description
21CFR11 Part 11 of Title 21 of the United States Code of Federal Regulation (commonly abbreviated as “21 CFR 11”) includes requirements for electronic records and electronic signatures. To assist medical companies in compliance, the US Food and Drug Administration (FDA) has published guidance for the proper use of electronic records and electronic signatures for records that are required to be kept and maintained by FDA regulations. The guidance outlines "criteria under which the agency considers electronic records, electronic signatures, and handwritten signatures executed to electronic records to be trustworthy, reliable, and generally equivalent to paper records and handwritten signatures executed on paper."
User GuideChapter 5: Using WebInspect Features
Micro Focus Fortify WebInspect (21.1.0) Page 257 of 461

Template Description
Due to the law and FDA guidance, medical companies and organizations dealing with highly sensitive medical information are being required to ensure that electronic records and electronic signatures are trustworthy, reliable, and generally an equivalent substitute for paper records and handwritten signatures. As interaction between equipment, operators, and computers becomes commonplace, it is important to establish a secure means to communicate and store information.
Basel II Basel II is a round of deliberations by central bankers from around the world, under the auspices of the Basel Committee on Banking Supervision (BCBS) in Basel, Switzerland, aimed at producing uniformity in the way banks and banking regulators approach risk management across national borders. The BCBS is the international rule-making body for banking compliance. In 2004, central bank governors and the heads of bank supervisory authorities in the Group of Ten (G10) countries endorsed the publication of “International Convergence of Capital Measurement and Capital Standards: a Revised Framework,” the new capital adequacy framework commonly known as Basel II.
Basel II essentially requires banks to increase their capital reserves or demonstrate that they can systematically and effectively control their credit and operational risk. The framework defines operational risk as “the risk of loss resulting from inadequate or failed internal processes, people and systems or from external events,” and highlights hacking and information theft through inadequate systems security as loss events. While banks around the world are experts at managing risk by virtue of operating in global financial markets, they are relatively new at understanding and controlling the risks inherent with operating online banking systems and keeping customer data secure.
Banks that practice effective information and systems security are able to demonstrate to regulators that they should qualify for lower capital reserves through reduced operational risk. The Basel II framework insists that banks demonstrate that an effective system of policies and processes are in place to protect information and that compliance to these policies and processes is ensured, but is not prescriptive in how banks should implement security policies and processes. The international standard ISO/ICE 17799 Code of Practice for Information Security Management provides guidelines for implementing and maintaining information security and is commonly used as a model for managing and reporting operational risk related to information
User GuideChapter 5: Using WebInspect Features
Micro Focus Fortify WebInspect (21.1.0) Page 258 of 461

Template Description
security in the context of Basel II.
CA OPPA The California Online Privacy Protection Act (OPPA) was established in 2003 to require all businesses and owners of commercial web sites in the state of California to conspicuously post and comply with a privacy policy that clearly states the policies on the collection, use, and sharing of personal information. The policy identifies the categories of personally identifiable information collected about site visitors and the categories of third parties with whom the operator may share the information.
Any business, organization, or individual that operates a Web site that collects private personal information for a person residing in the state of California is bound by the provisions of the law, so the California OPPA has a much greater impact nationally than is typical for state legislation.
CASB 1386 California Senate Bill 1386 has established the most specific and restrictive privacy breach reporting requirements of any state in the United States. The law was enacted to force businesses, organizations, and individuals holding private personal information for legitimate business purposes to inform consumers immediately when their personal information has been compromised. The law also gives consumers the right to sue businesses in civil court for damages incurred through the compromise of information. Any business, organization, or individual that holds private personal information for a person residing in the state of California is bound by the provisions of the law.
COPPA The Children’s Online Privacy Protection Act (COPPA) was enacted in 2000 to protect the online collection of personal information about children under the age of 13. COPPA’s goal was to protect children’s privacy and safety online in recognition of the easy access that children often have to the Web. The law requires that Web site operators post a privacy policy on the site and outlines requirements for Web site operators to seek parental consent to collect children’s personal information in certain circumstances.
The law applies not only to Web sites that are clearly directed toward children but to any Web site that contains general audience content where the Web site operators have actual knowledge that they are collecting personal information from children. An operator must post a link to a notice of its information practices on the home page of its Web site or online service and at each area where it collects personal information from children. An operator of a general audience site with a separate children's area must post a link to its
User GuideChapter 5: Using WebInspect Features
Micro Focus Fortify WebInspect (21.1.0) Page 259 of 461

Template Description
notice on the home page of the children's area.
CWE Top 25 <version>
The Common Weakness Enumeration (CWE) Top 25 Most Dangerous Software Errors (CWE Top 25) is a list of weaknesses created by MITRE that demonstrates the most widespread and critical weaknesses that can lead to serious vulnerabilities in software. MITRE outlines its methodology as follows:
"To create the list, the CWE Team used a data-driven approach that leverages published Common Vulnerabilities and Exposures (CVE) data and related CWE mappings found within the National Institute of Standards and Technology (NIST) National Vulnerability Database (NVD), as well as the Common Vulnerability Scoring System (CVSS) scores associated with each of the CVEs. A scoring formula was then applied to determine the level of prevalence and danger each weakness presents. This data-driven approach can be used as a repeatable, scripted process to generate a CWE Top 25 list on a regular basis with minimal effort."
DCID This directive establishes the security policy and procedures for storing, processing, and communicating classified intelligence information in information systems. For purposes of this directive, intelligence information refers to sensitive compartmented information and special access programs for intelligence under the purview of the Director of Central Intelligence.
DoD Application Security Checklist Version 2
DISA Field Security Operations (FSO) conducts Application SRRs to provide a minimum level of assurance to DISA, Joint Commands, and other Department of Defense (DoD) organizations that their applications are reasonably secure against attacks that would threaten their mission. The complexity of most mission critical applications precludes a comprehensive security review of all possible security functions and vulnerabilities in the time frame allotted for an Application SRR. Nonetheless, the SRR helps organizations address the most common application vulnerabilities and identify information assurance (IA) issues that pose an unacceptable risk to operations.
Ideally, IA controls are integrated throughout all phases of the development life cycle. Integrating the Application Review process into the development life cycle will help to ensure the security, quality, and resilience of an application. Since the Application SRR is usually performed close to or after the applications release, many of the Application SRR findings must be fixed through patches or modifications to the application infrastructure. Some vulnerabilities may require significant application changes to correct. The earlier the Application Review process is integrated into the development life
User GuideChapter 5: Using WebInspect Features
Micro Focus Fortify WebInspect (21.1.0) Page 260 of 461

Template Description
cycle, the less disruptive the remediation process will be.
DoD Application Security and Development STIG <version>
This compliance template reports all applicable web application components of the Application Security and Development Security Technical Implementation Guide (STIG) Version 3, Release 2. The STIG provides security guidance for use throughout the application development lifecycle. Defense Information Systems Agency (DISA) encourages sites to use these guidelines as early as possible in the application development process.
DoD Control Correlation Identifier (CCI)
The Defense Information Systems Agency (DISA) Field Security Operations (FSO) created the CCI specification and is currently responsible for the maintenance of the CCI specification and CCI List.
The Control Correlation Identifier (CCI) provides a standard identifier and description for each of the singular, actionable statements that comprise an Information Assurance (IA) control or IA best practice.
CCI bridges the gap between high-level policy expressions and low-level technical implementations. CCI allows a security requirement that is expressed in a high-level policy framework to be decomposed and explicitly associated with the low-level security setting(s) that must be assessed to determine compliance with the objectives of that specific security control. This ability to trace security requirements from their origin (such as regulations, IA frameworks, and so forth) to their low-level implementation allows organizations to readily demonstrate compliance to multiple IA compliance frameworks. CCI also provides a means to objectively rollup and compare related compliance assessment results across disparate technologies.
This report maps the Micro Focus Fortify 7PK Taxonomy to DISA CCI.
EU Data Protection
The European Commission's Directive on Data Protection protects the fundamental rights of European Union citizens to privacy with respect to the processing of personal data. The primary focus of the directive is on the acceptable use and protection of personal data. Like all other European Union privacy legislation, this directive also requires that personal data be collected, stored, changed or disseminated only with a citizen's express consent and with full disclosure as to the use of the data. The directive also prohibits the transfer of personal data from European organizations to non-European Union nations and organizations that do not adequately protect the safety and privacy of personal data. The United States has developed a Safe Harbor framework for U.S. organizations that are required to comply with this
User GuideChapter 5: Using WebInspect Features
Micro Focus Fortify WebInspect (21.1.0) Page 261 of 461

Template Description
directive.
EU Directive on Privacy and Electronic Communications
European Union Directive on Privacy and Electronic Communications is part of a broader "telecoms package" of legislation that governs the electronic communications sector in the European Union. The directive reinforces a basic European Union principle that all member states must ensure the confidentiality of communications made over public communications networks and the personal and private data inherent in those communications. The directive governs the physical communication networks as well as the personal data that is carried on it.
FISMA The United States Congress passed the E-Government Act of 2002 in recognition of the importance of information security to the economic and national security interests of the United States. Title III of the act, entitled the Federal Information Security Management Act (FISMA), tasked the National Institute of Standards and Technology with developing standards and guidelines to be used by all U.S. federal government agencies in implementing adequate information security as part of their information systems, underpinned by three security objectives for information systems: confidentiality, integrity and availability. FISMA requires the head of each federal agency to provide information security protections commensurate with the risk and magnitude of the harm that may result from unauthorized access, use, disclosure, disruption, modification or destruction of its information and information systems. The protection should apply not only within the agency, but also within contractor or other organizations working on behalf of the agency.
General Data Protection Regulation (GDPR)
The EU General Data Protection Regulation (GDPR) replaces the Data Protection Directive 95/46/EC and was designed to harmonize data privacy laws across Europe, to protect and empower all EU citizens' data privacy, and to reshape the way organizations across the region approach data privacy. In effect as of May 25, 2018, GDPR provides a framework for organizations on how to handle personal data.
According to GDPR regulation, personal data "means any information relating to an identified or identifiable natural person ('data subject'); an identifiable natural person is one who can be identified, directly or indirectly, in particular by reference to an identifier such as a name, an identification number, location data, an online identifier, or to one or more factors specific to the physical, physiological, genetic, mental, economic, cultural, or social identity of that
User GuideChapter 5: Using WebInspect Features
Micro Focus Fortify WebInspect (21.1.0) Page 262 of 461

Template Description
natural person."
GDPR articles that pertain to application security and require businesses to protect personal data during design and development of its product and services are:
l Article 25, Data protection by design and by default - which requires implementation of "appropriate technical and organizational measures for ensuring that, by default, only personal data which are necessary for each specific purpose of the processing are processed."
l Article 32, Security of processing - which requires businesses to protect its systems and applications from "from accidental or unlawful destruction, loss, alteration, unauthorized disclosure of, or access to personal data."
This report may be used by organizations as a framework to help identify and protect personal data as it relates to application security.
GLBA The Gramm-Leach-Bliley Act (GLBA) mandates that financial institutions must protect consumers' personal financial information. The main provision affecting Web application security in the financial industry is the GLBA Safeguards Rule.
HIPAA The Health Insurance Portability and Accountability Act (HIPAA) mandates the privacy and security of personal health information from the various threats and vulnerabilities associated with information management.
ISO17799 This is the most commonly accepted international standard for information security management. Use this policy as a baseline in crafting a compliance policy to meet the needs of your organization and its security policy.
ISO27001 <version>
ISO/IEC 27001 is an information security management system standard published in October 2005 by the International Organization for Standardization and the International Electrotechnical Commission. The basic objective is to help establish and maintain an effective information management system using a continual improvement approach. ISO 27001 specifies the requirements for the security management system itself. It is the standard, as opposed to ISO 17799, against which certification is offered. Additionally, ISO 27001 is "harmonized" with other management standards, such as ISO 9001 and ISO 14001.
JPIPA Japan enacted the Personal Information Protection Act (JPIPA) in 2003 to protect individuals' rights and personal information while preserving the
User GuideChapter 5: Using WebInspect Features
Micro Focus Fortify WebInspect (21.1.0) Page 263 of 461

Template Description
usefulness of information technology and personal information for legitimate purposes. The law establishes responsibilities for businesses that handle personal information for citizens of Japan and outlines potential fines and punishments for organizations that do not comply. The act requires businesses to communicate their purpose in collecting and using personal information. They must also take reasonable steps to protect personal information from disclosure, unauthorized use or destruction.
NERC The North American Electric Reliability Council (NERC) was established in 1968 with the mission of ensuring that the electric system of the United States is reliable, adequate and secure. After President Bill Clinton issued Presidential Decision Directive 63 in 1998 to define infrastructure industries critical to the United States' national economy and public well-being, the U.S. Department of Energy designated the NERC to act as the coordinating agency for the electricity industry, which was named one of the eight critical infrastructure industries.
NIST 800-53 <version>
The United States Congress passed the E-Government Act of 2002 in recognition of the importance of information security to the economic and national interests of the United States. Title III of the act, entitled the Federal Information Security Management Act (FISMA), tasked the National Institute of Standards and Technology with developing standards and guidelines to be used by all U.S. federal government agencies in implementing adequate information security as part of their information systems, underpinned by three security objectives for information systems: confidentiality, integrity, and availability.
OMB This policy addresses major application security sections that were defined in December 2004 by the Office of Management and Budget for federal agency public Web sites. These are information resources funded in whole or in part by the federal government and operated by an agency, contractor, or other organization on behalf of the agency. They present government information or provide services to the public or a specific non-federal user group and support the proper performance of an agency function.
OWASP ASVS The Open Web Application Security Project (OWASP) Application Security Verification Standard (ASVS) is a list of application security requirements or tests that can be used by architects, developers, testers, security professionals, tool vendors, and consumers to define, build, test, and verify secure applications
User GuideChapter 5: Using WebInspect Features
Micro Focus Fortify WebInspect (21.1.0) Page 264 of 461

Template Description
Note: Some mapping to the CWE category in the OWASP ASVS document does not match the intent of the category or matched in a limited scope. Review the reported CWE mappings in reports generated with this template.
OWASP Top Ten <year>
Many government agencies suggest testing for the OWASP Top Ten Web application vulnerabilities as a best practice in ensuring the security of your Web application.
Note: OWASP compliance templates other than "Top Ten" may also be available.
PCI Data Security <version>
The Payment Card Industry (PCI) Data Security Policy requires that all PCI Data Security members, merchants, and service providers that store, process or transmit cardholder data verify all purchased and custom Web applications, including internal and external applications.
Note: PCI compliance templates other than "Data Security" may also be available.
PIPEDA Canada's Personal Information Protection and Electronic Documents Act (PIPEDA) is a new law that protects personal information in the hands of private sector organizations and provides guidelines for the collection, use and disclosure of that information in the course of commercial activity. The Act, based on ten privacy principles developed by the Canadian Standards Association, is overseen by the Privacy Commissioner of Canada and the Federal Court. As of January 1, 2004, all Canadian businesses are required to comply with the privacy principles set out by PIPEDA. The Act covers both traditional, paper-based and on-line business.
Safe Harbor The European Commission's Directive on Data Protection prohibits the transfer of personal data from European organizations to non-European Union nations and organizations that do not adequately protect the safety and privacy of personal data. Upon passage of this comprehensive European legislation, all businesses and organizations in the United States that share data with European Union organizations were obligated to comply with the regulations, which could have disrupted many types of trans-Atlantic business transactions. Due to the differences in approaches taken by the United States and European Union nations in protecting personal data privacy, the U.S. Department of Commerce, in consultation with the European Commission,
User GuideChapter 5: Using WebInspect Features
Micro Focus Fortify WebInspect (21.1.0) Page 265 of 461
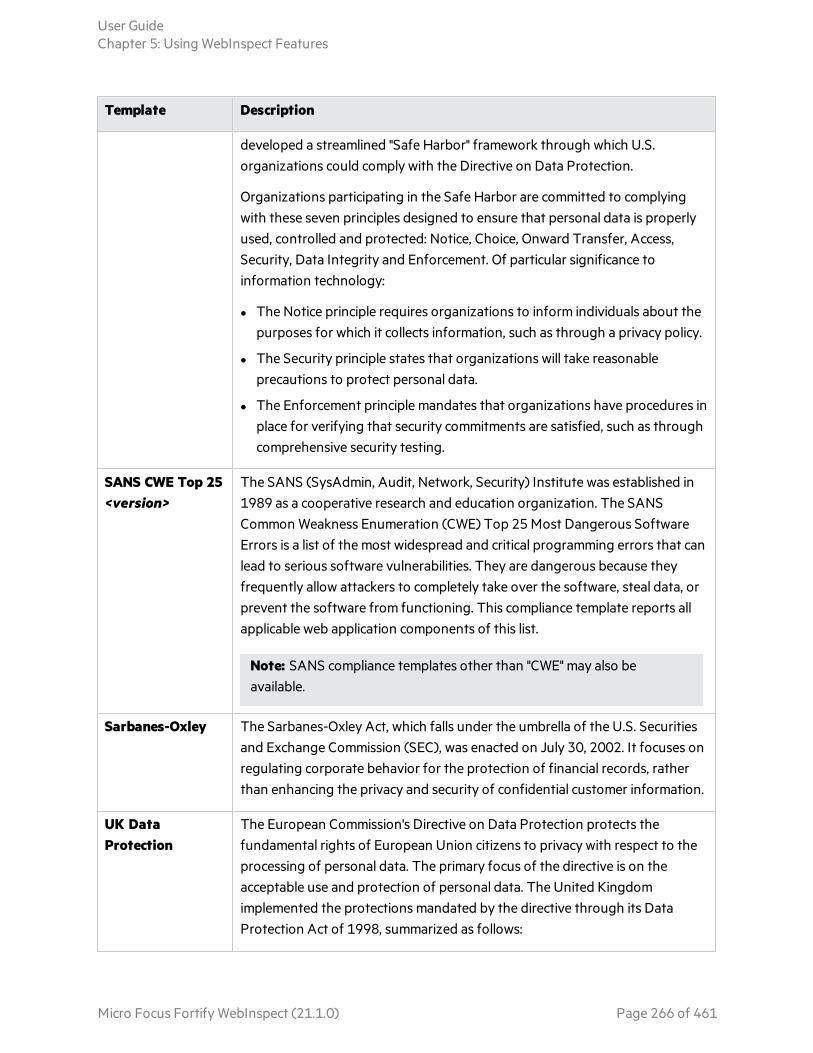
Template Description
developed a streamlined "Safe Harbor" framework through which U.S. organizations could comply with the Directive on Data Protection.
Organizations participating in the Safe Harbor are committed to complying with these seven principles designed to ensure that personal data is properly used, controlled and protected: Notice, Choice, Onward Transfer, Access, Security, Data Integrity and Enforcement. Of particular significance to information technology:
l The Notice principle requires organizations to inform individuals about the purposes for which it collects information, such as through a privacy policy.
l The Security principle states that organizations will take reasonable precautions to protect personal data.
l The Enforcement principle mandates that organizations have procedures in place for verifying that security commitments are satisfied, such as through comprehensive security testing.
SANS CWE Top 25 <version>
The SANS (SysAdmin, Audit, Network, Security) Institute was established in 1989 as a cooperative research and education organization. The SANS Common Weakness Enumeration (CWE) Top 25 Most Dangerous Software Errors is a list of the most widespread and critical programming errors that can lead to serious software vulnerabilities. They are dangerous because they frequently allow attackers to completely take over the software, steal data, or prevent the software from functioning. This compliance template reports all applicable web application components of this list.
Note: SANS compliance templates other than "CWE" may also be available.
Sarbanes-Oxley The Sarbanes-Oxley Act, which falls under the umbrella of the U.S. Securities and Exchange Commission (SEC), was enacted on July 30, 2002. It focuses on regulating corporate behavior for the protection of financial records, rather than enhancing the privacy and security of confidential customer information.
UK Data Protection
The European Commission's Directive on Data Protection protects the fundamental rights of European Union citizens to privacy with respect to the processing of personal data. The primary focus of the directive is on the acceptable use and protection of personal data. The United Kingdom implemented the protections mandated by the directive through its Data Protection Act of 1998, summarized as follows:
User GuideChapter 5: Using WebInspect Features
Micro Focus Fortify WebInspect (21.1.0) Page 266 of 461
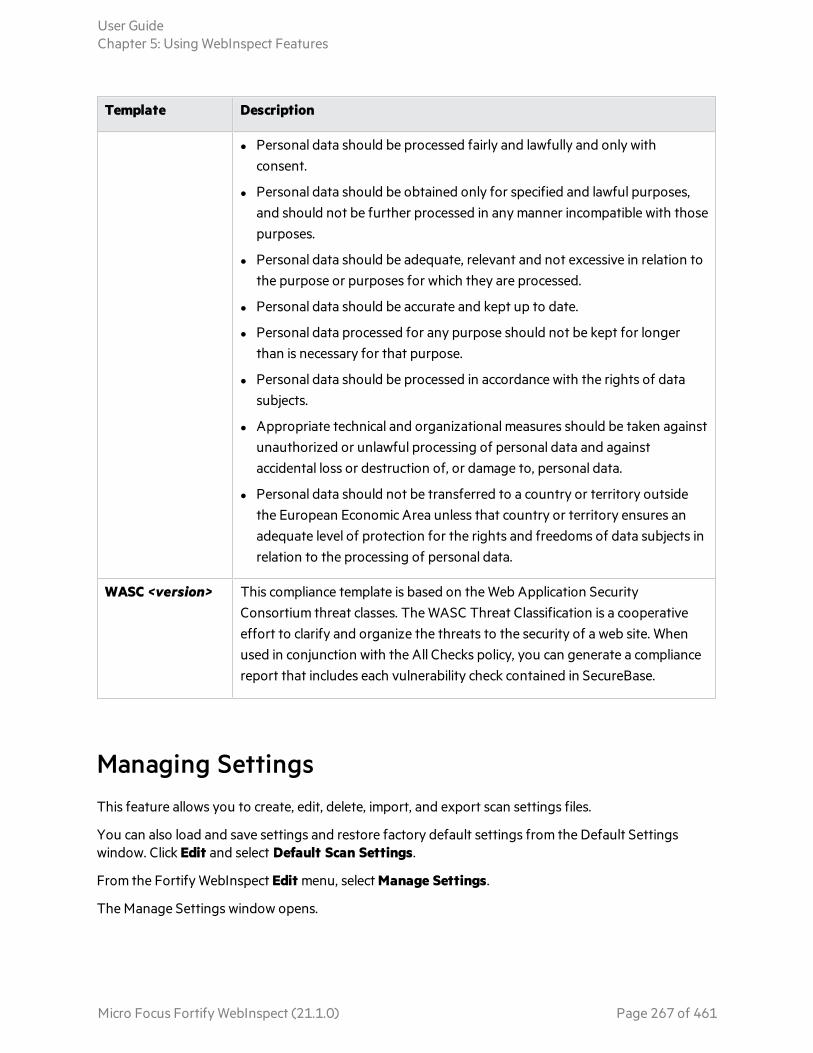
Template Description
l Personal data should be processed fairly and lawfully and only with consent.
l Personal data should be obtained only for specified and lawful purposes, and should not be further processed in any manner incompatible with those purposes.
l Personal data should be adequate, relevant and not excessive in relation to the purpose or purposes for which they are processed.
l Personal data should be accurate and kept up to date.
l Personal data processed for any purpose should not be kept for longer than is necessary for that purpose.
l Personal data should be processed in accordance with the rights of data subjects.
l Appropriate technical and organizational measures should be taken against unauthorized or unlawful processing of personal data and against accidental loss or destruction of, or damage to, personal data.
l Personal data should not be transferred to a country or territory outside the European Economic Area unless that country or territory ensures an adequate level of protection for the rights and freedoms of data subjects in relation to the processing of personal data.
WASC <version> This compliance template is based on the Web Application Security Consortium threat classes. The WASC Threat Classification is a cooperative effort to clarify and organize the threats to the security of a web site. When used in conjunction with the All Checks policy, you can generate a compliance report that includes each vulnerability check contained in SecureBase.
Managing SettingsThis feature allows you to create, edit, delete, import, and export scan settings files.
You can also load and save settings and restore factory default settings from the Default Settings window. Click Edit and select Default Scan Settings.
From the Fortify WebInspect Edit menu, select Manage Settings.
The Manage Settings window opens.
User GuideChapter 5: Using WebInspect Features
Micro Focus Fortify WebInspect (21.1.0) Page 267 of 461
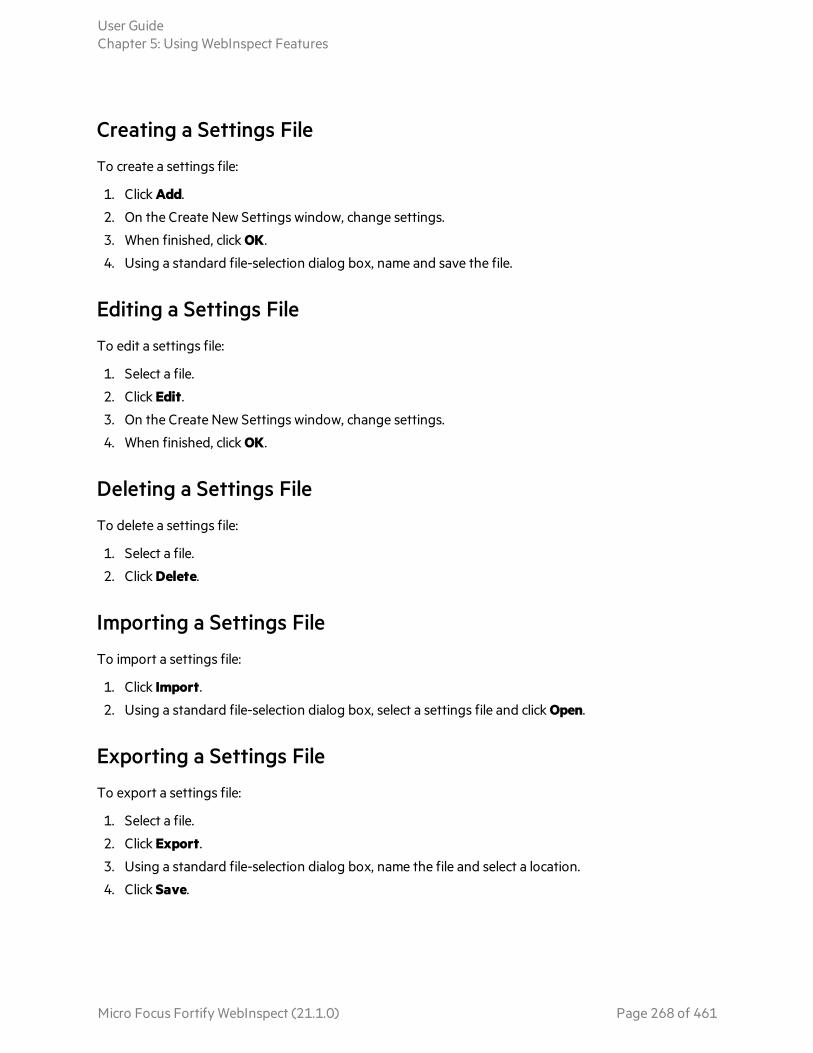
Creating a Settings File
To create a settings file:
1. Click Add.
2. On the Create New Settings window, change settings.
3. When finished, click OK.
4. Using a standard file-selection dialog box, name and save the file.
Editing a Settings File
To edit a settings file:
1. Select a file.
2. Click Edit.
3. On the Create New Settings window, change settings.
4. When finished, click OK.
Deleting a Settings File
To delete a settings file:
1. Select a file.
2. Click Delete.
Importing a Settings File
To import a settings file:
1. Click Import.
2. Using a standard file-selection dialog box, select a settings file and click Open.
Exporting a Settings File
To export a settings file:
1. Select a file.
2. Click Export.
3. Using a standard file-selection dialog box, name the file and select a location.
4. Click Save.
User GuideChapter 5: Using WebInspect Features
Micro Focus Fortify WebInspect (21.1.0) Page 268 of 461

Scanning with a Saved Settings File
To scan with a saved settings file:
1. From the Fortify WebInspect Edit menu, select Default Settings.
2. At the bottom of the Default Settings window, in the left column, click Load settings from file.
3. Using a standard file-selection dialog box, select the settings file you want to use and click Open.
The file you select is now your default settings file.
SmartUpdateFor installations connected to the Internet, the SmartUpdate feature contacts the Micro Focus data center to check for new or updated adaptive agents, vulnerability checks, and policy information. SmartUpdate will also ensure that you are using the latest version of Fortify WebInspect, and will prompt you if a newer version of the product is available for download.
You can configure Fortify WebInspect settings to conduct a SmartUpdate each time you start the application (select Application Settings from the Edit menu and choose Smart Update).
You can also run SmartUpdate on demand through the Fortify WebInspect user interface by selecting Start SmartUpdate from the Fortify WebInspect Start Page, by selecting SmartUpdate from the Tools menu, or by clicking the SmartUpdate button on the standard toolbar. For more information, see "Tools Menu " on page 54 and "Toolbars " on page 57.
For installations lacking an Internet connection, see "Performing a SmartUpdate (Offline)" on the next page.
Caution! For enterprise installations, if SmartUpdate changes or replaces certain files used by Fortify WebInspect, the sensor service might stop and the sensor will display a status of "off line." You must launch the Fortify WebInspect application and restart the service. To do so:
1. Click Edit > Application Settings.
2. Select Run as a Sensor.
3. Click the Start button in the Sensor Status area.
Performing a SmartUpdate (Internet Connected)
To perform a SmartUpdate when WebInspect is connected to the Internet:
1. Do one of the following:
l From the toolbar, click SmartUpdate.
l Select SmartUpdate from the Tools menu.
l Select Start SmartUpdate from the Fortify WebInspect Start Page.
User GuideChapter 5: Using WebInspect Features
Micro Focus Fortify WebInspect (21.1.0) Page 269 of 461
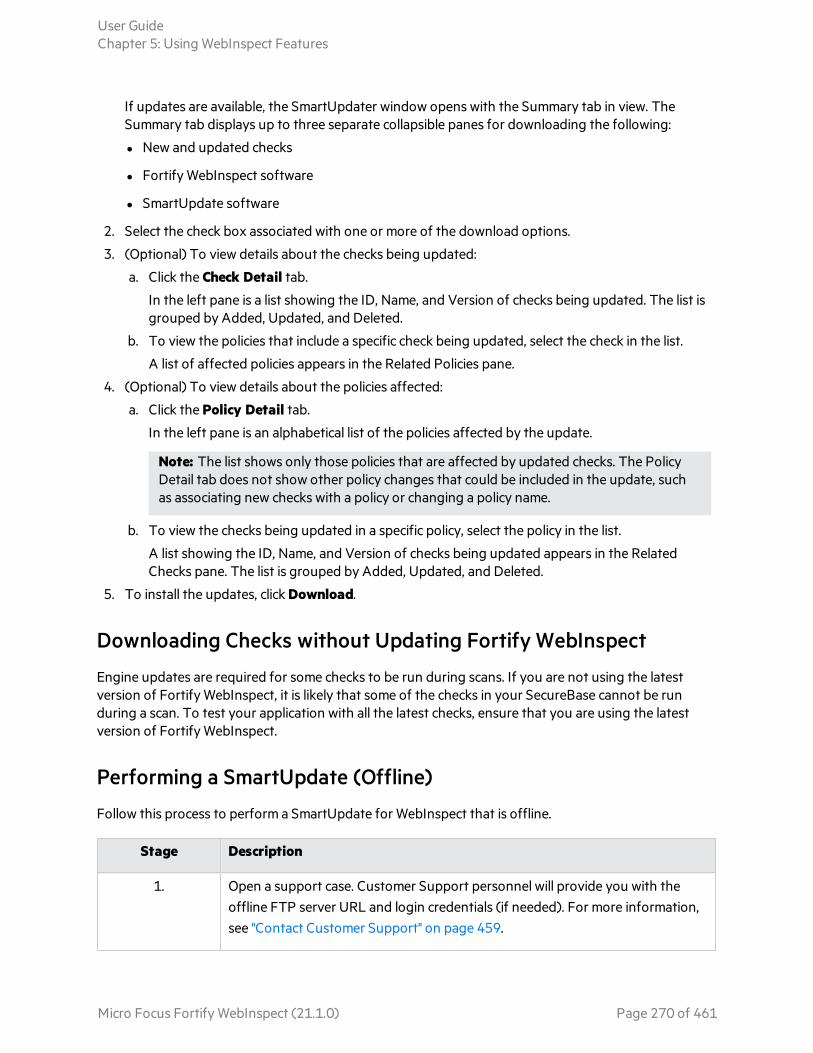
If updates are available, the SmartUpdater window opens with the Summary tab in view. The Summary tab displays up to three separate collapsible panes for downloading the following:
l New and updated checks
l Fortify WebInspect software
l SmartUpdate software
2. Select the check box associated with one or more of the download options.
3. (Optional) To view details about the checks being updated:
a. Click the Check Detail tab.
In the left pane is a list showing the ID, Name, and Version of checks being updated. The list is grouped by Added, Updated, and Deleted.
b. To view the policies that include a specific check being updated, select the check in the list.
A list of affected policies appears in the Related Policies pane.
4. (Optional) To view details about the policies affected:
a. Click the Policy Detail tab.
In the left pane is an alphabetical list of the policies affected by the update.
Note: The list shows only those policies that are affected by updated checks. The Policy Detail tab does not show other policy changes that could be included in the update, such as associating new checks with a policy or changing a policy name.
b. To view the checks being updated in a specific policy, select the policy in the list.
A list showing the ID, Name, and Version of checks being updated appears in the Related Checks pane. The list is grouped by Added, Updated, and Deleted.
5. To install the updates, click Download.
Downloading Checks without Updating Fortify WebInspect
Engine updates are required for some checks to be run during scans. If you are not using the latest version of Fortify WebInspect, it is likely that some of the checks in your SecureBase cannot be run during a scan. To test your application with all the latest checks, ensure that you are using the latest version of Fortify WebInspect.
Performing a SmartUpdate (Offline)
Follow this process to perform a SmartUpdate for WebInspect that is offline.
Stage Description
1. Open a support case. Customer Support personnel will provide you with the offline FTP server URL and login credentials (if needed). For more information, see "Contact Customer Support" on page 459.
User GuideChapter 5: Using WebInspect Features
Micro Focus Fortify WebInspect (21.1.0) Page 270 of 461

Stage Description
2. On a machine that can access the Internet, access the offline FTP server.
3. Download the Fortify WebInspect static SmartUpdate ZIP file.
4. On the machine where Fortify WebInspect is installed, extract all files from the ZIP file.
5. Close Fortify WebInspect.
6. Copy the extracted SecureBase.sdf and version.txt files to the directory where your SecureBase data resides.
l If your system is not FIPS enabled, then the default location is C:\ProgramData\HP\HP WebInspect\SecureBase.
l If your system is FIPS enabled, then the location is C:\ProgramData\HP\HP WebInspect\FIPS\SecureBase.
Note: By default, these folders are hidden in Windows. Be sure to change folder options to show hidden files.
WebSphere Portal FAQ How do you know if an application is running on WebSphere Portal?
WebSphere Portal applications typically have very long URLs that begin with /wps/portal or /wps/myportal followed by encoded sections. For example:
http://myhost.com/wps/portal/internet/customers/home/!ut/p/b1/fY7BcoIwFAC_xS94T4QCx6Rpk6qlo20x5tIJShEIJoID0q-vnfFq97Yze1hQIEEddV8W-lzaozZ_rh6-HjkRfrhERBZ4-EKESBmde5ggzEEVxmbXNGW7-sIsKdgTW3c_B3xmpzBfnacLv6QuIfxVHKJGhmNfzToue8nWdKg4fx8jtaT9MJpB2zQPgqLp9GrADyey0tvvL1F9Snftm_y0cbuw8Xbmvg2NN6412wlsQP27GAa3AO9AEBJhmxxcnWHlk8kverBIBQ!!/dl4/d5/L2dBISEvZ0FBIS9nQSEh/
Which versions of WebSphere Portal are supported?
Versions 6.1 and later are supported.
Why does Fortify WebInspect require special settings to scan a WebSphere Portal application?
The encoded sections of the URL include what is called "navigation state," which contains information about how to display elements in the current page (similar to VIEWSTATE in .Net) plus the navigation history. It is this navigation history that is troublesome for automated crawlers. As the crawler visits each link, the navigation state is being updated. This causes links on a page that the crawler may have
User GuideChapter 5: Using WebInspect Features
Micro Focus Fortify WebInspect (21.1.0) Page 271 of 461
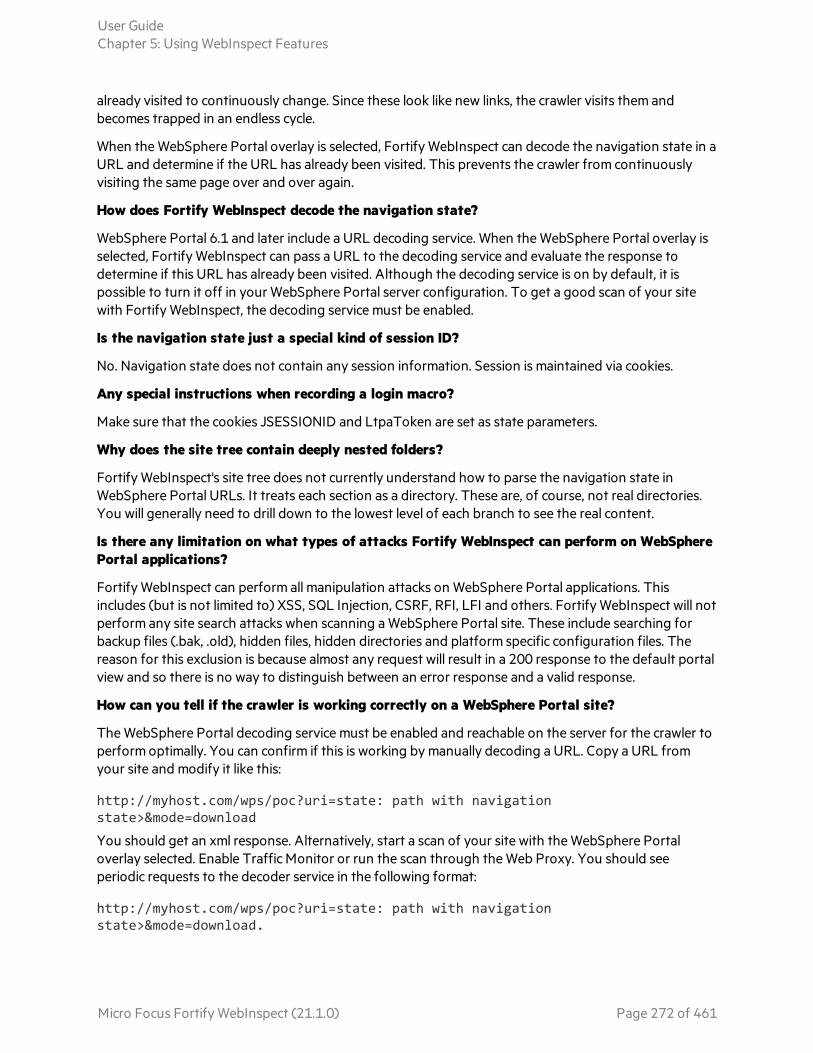
already visited to continuously change. Since these look like new links, the crawler visits them and becomes trapped in an endless cycle.
When the WebSphere Portal overlay is selected, Fortify WebInspect can decode the navigation state in a URL and determine if the URL has already been visited. This prevents the crawler from continuously visiting the same page over and over again.
How does Fortify WebInspect decode the navigation state?
WebSphere Portal 6.1 and later include a URL decoding service. When the WebSphere Portal overlay is selected, Fortify WebInspect can pass a URL to the decoding service and evaluate the response to determine if this URL has already been visited. Although the decoding service is on by default, it is possible to turn it off in your WebSphere Portal server configuration. To get a good scan of your site with Fortify WebInspect, the decoding service must be enabled.
Is the navigation state just a special kind of session ID?
No. Navigation state does not contain any session information. Session is maintained via cookies.
Any special instructions when recording a login macro?
Make sure that the cookies JSESSIONID and LtpaToken are set as state parameters.
Why does the site tree contain deeply nested folders?
Fortify WebInspect's site tree does not currently understand how to parse the navigation state in WebSphere Portal URLs. It treats each section as a directory. These are, of course, not real directories. You will generally need to drill down to the lowest level of each branch to see the real content.
Is there any limitation on what types of attacks Fortify WebInspect can perform on WebSphere Portal applications?
Fortify WebInspect can perform all manipulation attacks on WebSphere Portal applications. This includes (but is not limited to) XSS, SQL Injection, CSRF, RFI, LFI and others. Fortify WebInspect will not perform any site search attacks when scanning a WebSphere Portal site. These include searching for backup files (.bak, .old), hidden files, hidden directories and platform specific configuration files. The reason for this exclusion is because almost any request will result in a 200 response to the default portal view and so there is no way to distinguish between an error response and a valid response.
How can you tell if the crawler is working correctly on a WebSphere Portal site?
The WebSphere Portal decoding service must be enabled and reachable on the server for the crawler to perform optimally. You can confirm if this is working by manually decoding a URL. Copy a URL from your site and modify it like this:
http://myhost.com/wps/poc?uri=state: path with navigation state>&mode=download
You should get an xml response. Alternatively, start a scan of your site with the WebSphere Portal overlay selected. Enable Traffic Monitor or run the scan through the Web Proxy. You should see periodic requests to the decoder service in the following format:
http://myhost.com/wps/poc?uri=state: path with navigation state>&mode=download.
User GuideChapter 5: Using WebInspect Features
Micro Focus Fortify WebInspect (21.1.0) Page 272 of 461

Another thing to consider is that the path of the decoding service can be changed on the server. If this is the case, you will need to modify your scan settings manually. Contact Fortify Customer Support for assistance.
It is also possible to modify the navigation state marker. By default this is !ut/p. If this is changed from the default on the server, you will need to modify your scan settings manually. Contact Fortify Customer Support for assistance.
For more information, see "Contact Customer Support" on page 459.
Command-line ExecutionFortify WebInspect includes the following applications that you can use by way of the command-line interface (CLI):
l WI.exe – Allows you to configure and conduct a scan using an existing macro, export scan files and reports, merge scans, reuse scans, and test the login macro of an existing scan. For more information, see "Using WI.exe" on the next page.
l WIScanStopper.exe – Allows you to stop a scan that is currently running. For more information, see "Using WIScanStopper.exe" on page 290.
l MacroGenServer.exe – Allows you to create a login macro. For more information, see "Using MacroGenServer.exe" on page 291.
These applications are installed in the same directory as Fortify WebInspect. By default, the installation directory is:
C:\Program Files\Fortify\Fortify WebInspect
Launching the CLI
To launch the CLI:
l Right-click the Windows Command Prompt (cmd.exe) application, and select Run as administrator.
The Administrator: Command Prompt window appears.
Important! At the command prompt, use the cd command to change the current working directory to the directory where the applications are installed.
CLI Limitations in Fortify WebInspect on Docker
Some parameters and features accessible from the command-line interface are not supported in Fortify WebInspect on Docker. Items that are not supported are indicated as such.
User GuideChapter 5: Using WebInspect Features
Micro Focus Fortify WebInspect (21.1.0) Page 273 of 461

Using WI.exe
You can initiate several Fortify WebInspect functions by way of a command-line interface (CLI) using the program WI.exe. Use the following syntax when typing a command:
wi.exe -u url [-api type] [-s file] [-ws file] [-Framework name] [-CrawlCoverage name] [-ps policyID | -pc path] [-ab|ac|an|ad|aa|ak|at creds] [-macro path] [-o|c] [-n name] [-e[abcdefghijklmnopst] file] [-x|xd|xa|xn] [-b filepath] [-db] [-d filepath -m filename] [-i[erxd] scanid | -ic scanid scanname | -im option scanid scanlist] [-r report_name -y report_type -w report_favorite -f report_export_file -g[phacxe] [-t compliance_template_file] [-v] [-?]
To run multiple scans from the command line, create and execute a batch file, using a format similar to the following:
c:cd \program files\Fortify\Fortify WebInspectwi.exe -u http://172.16.60.19 -ps 4wi.exe -u http://www.mywebsite.comwi.exe -u http://172.16.60.17wi.exe -u http://172.16.60.16
Options
The options are defined in the following table. Items in italics require a value.
Category Options Definition
General -? Displays the usage help.
-u {url} Specifies the start URL or IP address.
Caution! When using the -u parameter with -s (a settings file), be sure to specify an -x, -xa, -xd, or -xn parameter to restrict a scan to folders, if desired. Failure to do so may result in an unrestricted audit under certain conditions.
If the URL contains an ampersand (&), you must enclose the URL
User GuideChapter 5: Using WebInspect Features
Micro Focus Fortify WebInspect (21.1.0) Page 274 of 461
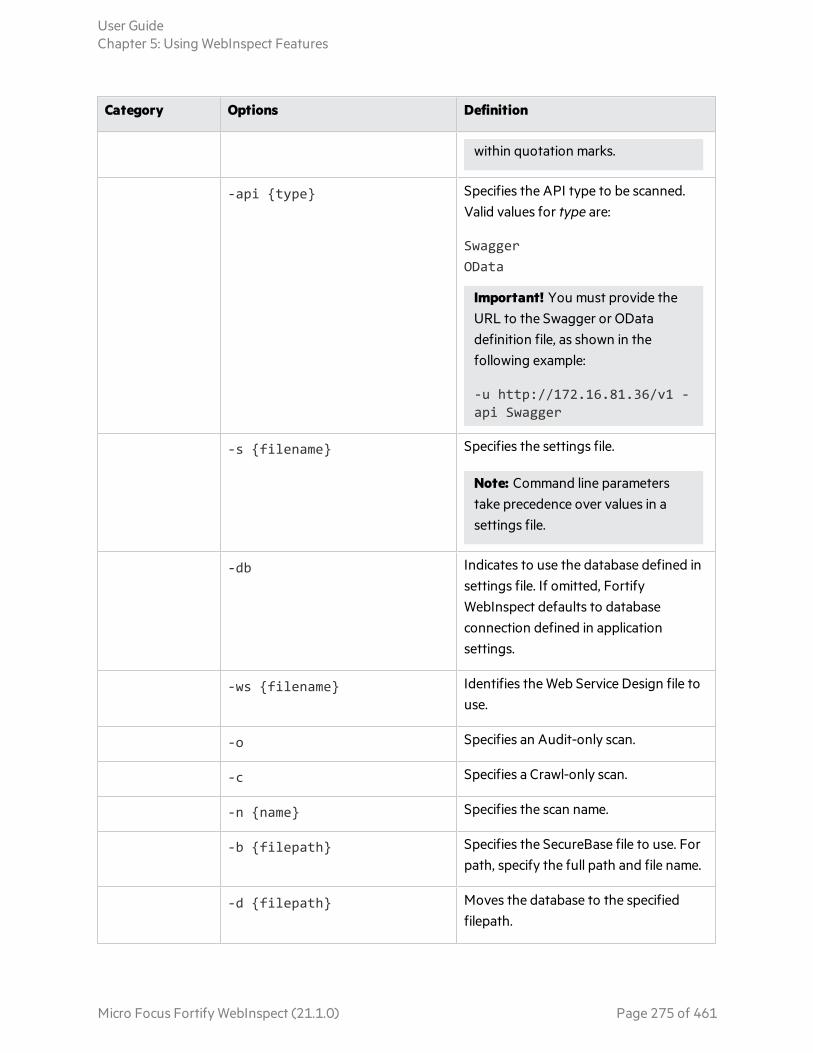
Category Options Definition
within quotation marks.
-api {type} Specifies the API type to be scanned. Valid values for type are:
SwaggerOData
Important! You must provide the URL to the Swagger or OData definition file, as shown in the following example:
-u http://172.16.81.36/v1 -api Swagger
-s {filename} Specifies the settings file.
Note: Command line parameters take precedence over values in a settings file.
-db Indicates to use the database defined in settings file. If omitted, Fortify WebInspect defaults to database connection defined in application settings.
-ws {filename} Identifies the Web Service Design file to use.
-o Specifies an Audit-only scan.
-c Specifies a Crawl-only scan.
-n {name} Specifies the scan name.
-b {filepath} Specifies the SecureBase file to use. For path, specify the full path and file name.
-d {filepath} Moves the database to the specified filepath.
User GuideChapter 5: Using WebInspect Features
Micro Focus Fortify WebInspect (21.1.0) Page 275 of 461

Category Options Definition
-m {filename} Moves the database to specified filename.
-v Creates verbose output.
-l Disables telemetry data collection (for this scan only).
-ie {scanid} Starts configured scan with the specified scan ID (GUID).
-ir {scanid} Resumes scan with the specified scan ID (GUID).
-ix {scanid} Uses existing scan with the specified scan ID (GUID), but does not continue the scan.
-id {scanid} Deletes scan with the specified scan ID (GUID).
-ii {scanid} {file path}
Imports scan.
Note: This parameter is not supported in Fortify WebInspect on Docker.
Restrict to Root Folder
-x Restricts scan to directory only (self).
-xa Restricts scan to directory and parents (ancestors).
-xd Restricts scan to directory and subdirectories (descendants).
-xn Ignores “restrict to folder” rules in referenced settings file.
Restrict to folder parameters
(x|xa|xb|xn) can be in their own category (as report or output).
User GuideChapter 5: Using WebInspect Features
Micro Focus Fortify WebInspect (21.1.0) Page 276 of 461

Category Options Definition
Framework -framework {framework_name}
Specifies name of framework; currently only Oracle ADF Faces (Oracle) and IBM WebSphere Portal (WebSpherePortal) are supported. Optimizes scanning of application built with either of these technologies.
Crawl Coverage -CrawlCoverage {Coveragename}
Specifies the type of scan coverage. Values for Coveragename are:
Thorough = Exhaustive crawl of entire site
Default = Focus more on coverage than performance
Moderate = Balance of coverage and speed
Quick = Focus on breadth and performance
Audit Policy -ps {policy id} Identifies the non-custom policy to use. Values for policy id are as follows:
Best Practices
1 = Standard1012 = OWASP Top 10 Application Security Risks 2013
1024 = SANS Top 25 20111025 = OWASP Top 10 20171027 = General Data Protection Regulation (GDPR)
1034 = DISA-STIGV4R91036 = DISA-STIGV4R101037 = CWE Top 251041 = OWASP Application Security Verification Standard (ASVS)
1043 = DISA-STIGV4R111044 = API1045 = DISA-STIGV5R11046 = NIST-SP80053R51047 = CWE Top 25 2020
User GuideChapter 5: Using WebInspect Features
Micro Focus Fortify WebInspect (21.1.0) Page 277 of 461
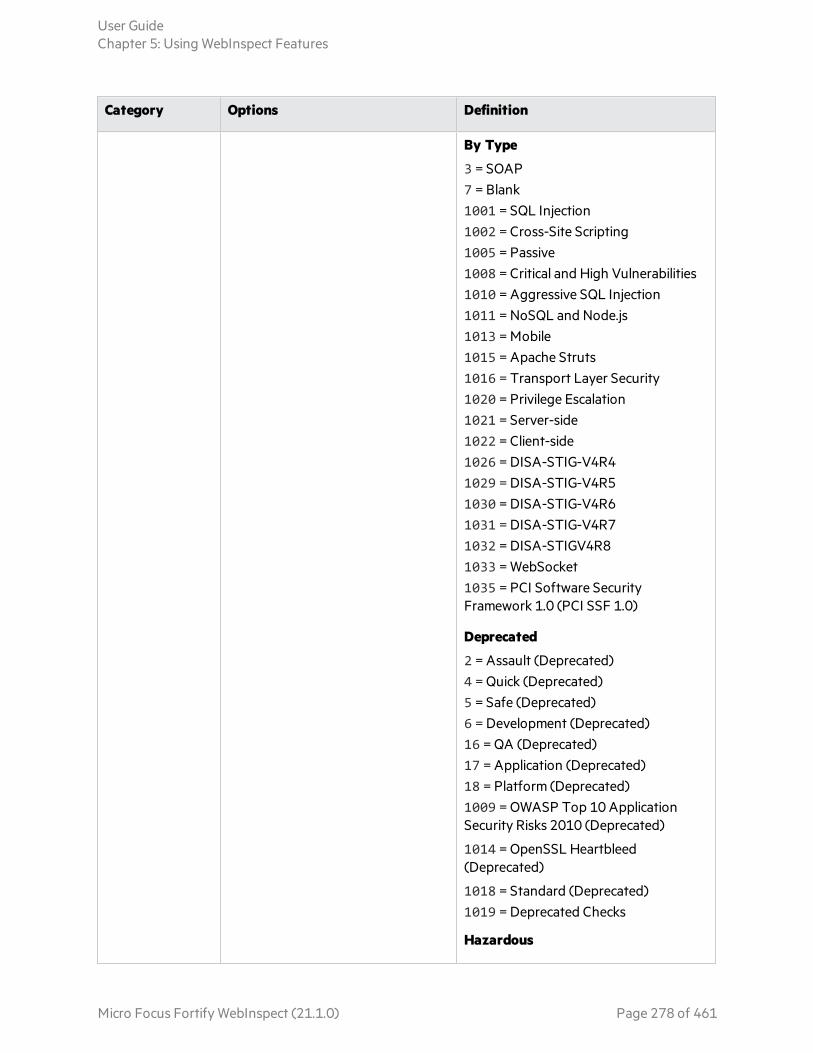
Category Options Definition
By Type
3 = SOAP 7 = Blank1001 = SQL Injection1002 = Cross-Site Scripting1005 = Passive1008 = Critical and High Vulnerabilities1010 = Aggressive SQL Injection1011 = NoSQL and Node.js1013 = Mobile1015 = Apache Struts1016 = Transport Layer Security1020 = Privilege Escalation1021 = Server-side1022 = Client-side1026 = DISA-STIG-V4R41029 = DISA-STIG-V4R51030 = DISA-STIG-V4R61031 = DISA-STIG-V4R71032 = DISA-STIGV4R81033 = WebSocket1035 = PCI Software Security Framework 1.0 (PCI SSF 1.0)
Deprecated
2 = Assault (Deprecated)4 = Quick (Deprecated)5 = Safe (Deprecated)6 = Development (Deprecated)16 = QA (Deprecated)17 = Application (Deprecated)18 = Platform (Deprecated)1009 = OWASP Top 10 Application Security Risks 2010 (Deprecated)
1014 = OpenSSL Heartbleed (Deprecated)
1018 = Standard (Deprecated)1019 = Deprecated Checks
Hazardous
User GuideChapter 5: Using WebInspect Features
Micro Focus Fortify WebInspect (21.1.0) Page 278 of 461

Category Options Definition
1004 = All Checks
-pc {policy path} Specifies a custom policy to use. For path, specify the full path and file name, such as: C:\MyPolicies\MyCustomPolicy.policy
Authentication -ab "userid:pwd" Specifies Basic mode (user name and password).
-ac "userid:pwd" Specifies ADFS CBT mode (user name and password).
-an "userid:pwd" Specifies NTLM mode (user name and password).
-ad "userid:pwd" Specifies Digest mode (user name and password).
-aa "userid:pwd" Specifies Automatic mode (user name and password).
-ak "userid:pwd" Specifies Kerberos mode (user name and password).
-am {macro path} Deprecated; use the -macro option.
-at "{type} {token}" Specifies the authentication mode (type and token) for API scans, such as:
-at "Basic YWxh0GRpbjpvcGVuc2VzYW1l"
Authentication modes for type are as follows:
BasicBearerDigestHOBAMutualNegotiateOAuthSCRAM-SHA-1
User GuideChapter 5: Using WebInspect Features
Micro Focus Fortify WebInspect (21.1.0) Page 279 of 461

Category Options Definition
SCRAM-SHA-256vapid
Note: The type and token must be enclosed in double quotation marks as shown previously.
Macro -macro {macro path} Specifies macro name and directory path for web macro authentication.
-macro {url} {username} {password}
Creates auto-generated macro for authentication.
Login Macro Parameters
-ls "userid:pwd" Replaces the SmartCredentials UserName and Password with the supplied values.
-lt "name0:value0;name1:value1;...nameN:valueN"
Replaces existing TruClient login parameters that match the specified names.
Output -ea {filepath} Exports scan in legacy full XML format.
-eb {filepath} Exports scan details (Full) in legacy XML format.
-ec {filepath} Exports scan details (Comments) in legacy XML format.
-ed {filepath} Exports scan details (Hidden Fields) in legacy XML format.
-ee {filepath} Exports scan details (Script) in legacy XML format.
-ef {filepath} Exports scan details (Set Cookies) in legacy XML format.
-eg {filepath} Exports scan details (Web Forms) in legacy XML format.
-eh {filepath} Exports scan details (URLs) in legacy XML format.
User GuideChapter 5: Using WebInspect Features
Micro Focus Fortify WebInspect (21.1.0) Page 280 of 461

Category Options Definition
-ei {filepath} Exports scan details (Requests) in legacy XML format.
-ej {filepath} Exports scan details (Sessions) in legacy XML format.
-ek {filepath} Exports scan details (E-mails) in legacy XML format.
-el {filepath} Exports scan details (Parameters) in legacy XML format.
-em {folderpath} Exports scan details (Web Dump) in legacy XML format.
-en {filepath} Exports scan details (Offsite Links) in legacy XML format.
-eo {filepath} Exports scan details (Vulnerabilities) in legacy XML format.
-ep {filepath} Exports scan in FPR format to specified file.
-eq {format} {filepath} Exports scan details from the Site Tree. The details include:
l Date and time (in milliseconds) the request was sent
l Host
l Path
l Method
l Status code
l Elapsed time (in milliseconds) between the request and the response
For single-page application (SPA) scans:
l The CSV format includes SPADisplayName and SPASelector columns.
User GuideChapter 5: Using WebInspect Features
Micro Focus Fortify WebInspect (21.1.0) Page 281 of 461

Category Options Definition
l The JSON format includes SPA Events which contain SPADisplayName and SPASelector data.
For more information, see "SPA Coverage" on page 65.
Values for format are:
jsoncsv
If a value being exported includes double quotation marks, escape characters (double quotation marks) will be added to the CSV output. For example, the selector "Sign in" includes double quotation marks, so it will appear as follows in the CSV file:
"//a[normalize-space(string(.))=""Sign in""]"
Tip: Use this option in conjunction
with the -ie, -ir, -ix, or any of the start scan options to identify the scan for which you want to retrieve data. For example:
-ix {scan GUID} -eq {format} {filepath}
-es {filepath} Exports scan in .scan format to specified file.
-et {filepath} Exports scan with logs in .scan format to specified file.
-eu {filepath} Exports scan settings to specified file after applying all other overrides.
Note: This parameter does not run
User GuideChapter 5: Using WebInspect Features
Micro Focus Fortify WebInspect (21.1.0) Page 282 of 461

Category Options Definition
the scan. It exports the settings and exits.
Reports - r {report_name}
For multiple reports, separate report names with a semicolon. All reports will be contained in a single file.
Identifies the name of the report to run. Valid values for report_name are:
AggregateAlert ViewAttack StatusComplianceCrawled URLsDeveloper ReferenceDuplicatesExecutive SummaryFalse PositiveQA SummaryScan DifferenceScan LogTrendVulnerabilityVulnerability (Legacy)
Note: Report names containing a space must be enclosed in quotation marks.
-w {favorite_name} Identifies the name of the report favorite to run.
-ag Aggregates reports in report favorite.
-y {report_type} Specifies the type of report: Standard or Custom.
-f {export_file} Specifies the file path and file name where the report will be saved.
-gp Exports as Portable Document Format (PDF) file.
-gh Exports as HTML file.
-ga Exports as raw report file.
User GuideChapter 5: Using WebInspect Features
Micro Focus Fortify WebInspect (21.1.0) Page 283 of 461
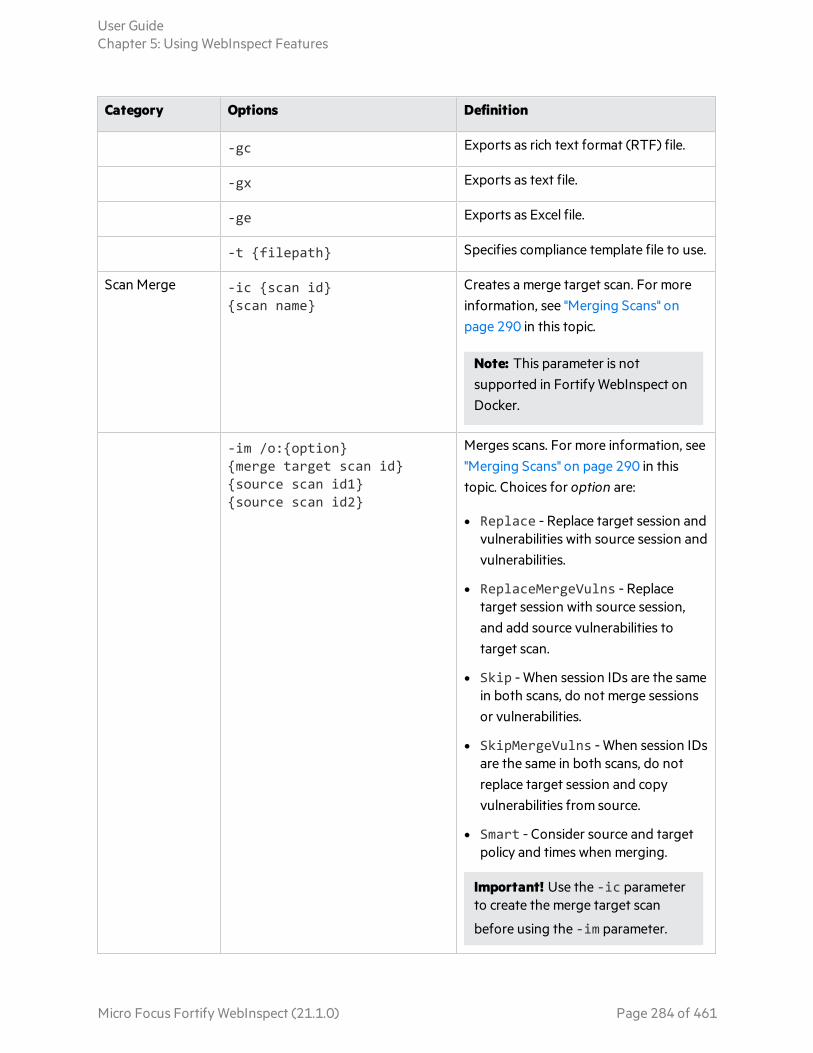
Category Options Definition
-gc Exports as rich text format (RTF) file.
-gx Exports as text file.
-ge Exports as Excel file.
-t {filepath} Specifies compliance template file to use.
Scan Merge -ic {scan id} {scan name}
Creates a merge target scan. For more information, see "Merging Scans" on page 290 in this topic.
Note: This parameter is not supported in Fortify WebInspect on Docker.
-im /o:{option} {merge target scan id} {source scan id1} {source scan id2}
Merges scans. For more information, see "Merging Scans" on page 290 in this topic. Choices for option are:
l Replace - Replace target session and vulnerabilities with source session and vulnerabilities.
l ReplaceMergeVulns - Replace target session with source session, and add source vulnerabilities to target scan.
l Skip - When session IDs are the same in both scans, do not merge sessions or vulnerabilities.
l SkipMergeVulns - When session IDs are the same in both scans, do not replace target session and copy vulnerabilities from source.
l Smart - Consider source and target policy and times when merging.
Important! Use the -ic parameter to create the merge target scan
before using the -im parameter.
User GuideChapter 5: Using WebInspect Features
Micro Focus Fortify WebInspect (21.1.0) Page 284 of 461

Category Options Definition
Note: This parameter is not supported in Fortify WebInspect on Docker.
Scan Reuse -iz /o:{option} {source scan id} {settings filename}
Creates reuse scan settings. Choices for option are:
l Incremental - Use same settings as source scan, with a modified policy that disables checks that flagged in source scan and that should only flag once. This mode audits only new crawl surface. A new crawl is performed, but only new sessions are audited.
l Remediation - Use same settings as source scan, with a modified policy that disables checks that did not flag in source scan.
The settings filename is the name of the modified settings file being created.
Note: This parameter is not supported in Fortify WebInspect on Docker.
Scan Findings Retest
-iv <guid> {[<severity> | <vuln ID prefix>] ...} /s <file path>
Creates a settings file that you can use to start a scan to retest findings. You can retest findings by severity or unique sessionCheckFoundID or both. If you do not provide a severity or sessionCheckFoundID, then all findings in the base scan are retested. Parameter components are as follows:
l <guid> is the base scan ID. This is required.
l <severity> is the vulnerability severity or severities to retest. All vulnerabilities from the base scan that
User GuideChapter 5: Using WebInspect Features
Micro Focus Fortify WebInspect (21.1.0) Page 285 of 461

Category Options Definition
were flagged with the listed severity or severities will be retested. Options
for severity are: Critical, High, Medium, Low.
l <vuln ID prefix> is the unique sessionCheckFoundID, which can be retrieved by way of the SessionCheckFounds API endpoint. For more information, see the Fortify WebInspect REST API Swagger UI.
Tip: You can specify a prefix of the sessionCheckFoundID. For
example, 012f would match sessionCheckFoundID
012fa34124.
l /s <file path> is the directory path and file name for the vulnerability retest settings file that will be created. This parameter is required, and modifies the settings from the original scan to specify a retest. The new settings file that is created identifies the vulnerability or vulnerabilities being retested.
You can provide a list consisting of severities and sessionCheckFoundIDs in any order. The following example shows a valid list:
Critical 3156 High 1234
Note: This feature is a technology preview. Technology preview features are currently unsupported, may not be functionally complete, and are not suitable for deployment in production. However, these
User GuideChapter 5: Using WebInspect Features
Micro Focus Fortify WebInspect (21.1.0) Page 286 of 461

Category Options Definition
features are provided as a courtesy and the primary objective is for the feature to gain wider exposure with the goal of full support in the future.
Test Login Macro -it {scan id} Tests login macro of existing scan.
Selenium Macro -selenium_workflow {ArrayOfSeleniumCommand object}
Creates a Selenium workflow scan.
For the complete process and procedures involved in using this command, see "Integrating with Selenium WebDriver" on page 309.
-selenium_no_validation
Disables validation of Selenium commands before running the scan.
Important! When using this parameter, you must specify one or more allowed hosts.
For more information, see "Integrating with Selenium WebDriver" on page 309.
-slm {SeleniumCommand object} or
@"PathtoFilewithobject"
Specifies a Selenium login macro for the scan. This option uses the ArrayOfSeleniumCommand object with one element or the
SeleniumCommand object.
Use @"PathtoFilewithobject" to specify the path to a file that includes
the SeleniumCommand object or ArrayOfSeleniumCommand object.
See "Selenium Login Macro Example" on page 289.
Important! A LogoutCondition element is required.
Postman Scans -pwc {filename} Starts a scan with a Postman Collection
User GuideChapter 5: Using WebInspect Features
Micro Focus Fortify WebInspect (21.1.0) Page 287 of 461

Category Options Definition
file. This option can accept several collection files separated by commas, such as:
-pwc pcOne,pcTwo,pcThree
For more information, see "Scanning with a Postman Collection" on page 301.
-pdac Disables Postman auto-configuration so that auto-configuration or analysis of the Postman collection is not performed before the scan.
-plc {Collection path} Specifies the path to the Postman login collection.
-pls "logoutsignature" Identifies the logout condition. This parameter accepts Regex Extensions.
Important! You must replace the
space character with \s.
-pec {filename} Specifies the Postman environment file to be used in the scan.
State Management
-rs {<ArrayOfResponseStateElement>} or "@{file path}"
Supplies a response state rule. This parameter accepts an
ArrayOfResponseStateElement element or a response state rule stored in a file. It is used for Bearer token and API Key.
Important! To use a response state rule stored in a file, you must specify
the file path with the @ symbol.
For examples, see "Response State Rule Example" on the next page.
Other Settings -ah {url} [,{url},...] Lists the Allowed Hosts. The URL is the schema, host, and port number.
User GuideChapter 5: Using WebInspect Features
Micro Focus Fortify WebInspect (21.1.0) Page 288 of 461

Examples
The following examples illustrate command line execution as if executed from the WebInspect home directory:
wi.exe -u www.anywebsite.com -ps 1 -ab MyUsername:Mypassword
wi.exe -u https://zero.webappsecurity.com -s c:\program files\webinspect\scans\scripted\ -r "Executive Summary";Vulnerability -y Standard -f c:\program files\webinspect\scans\scripted\zero051105.xml -gx
If you do not specify a policy, Fortify WebInspect will crawl (but not audit) the Web site.
If you specify an invalid policy number, Fortify WebInspect will not conduct the scan.
Selenium Login Macro Example
The following is an example of the Selenium login macro option:
-slm "<SeleniumCommand><Command>"wi command\"</Command> <AllowedHosts><string>http://hostname/</string> </AllowedHosts><LogoutCondition>Access\sDenied</LogoutCondition> </SeleniumCommand>"
Response State Rule Example
The following is an example of a response state rule:
-rs "<ArrayOfResponseStateElement><ResponseStateElement><name> AutoDetect</name><ReplaceRegexes><string>Authorization:\sBearer\s (?<AutoDetect>[^\r\n]*)\r\n</string></ReplaceRegexes> <SearchRegexes><string>""en"":""(?<AutoDetect> [-a-zA-Z0-9._~+/]+?=*)""}$</string></SearchRegexes> </ResponseStateElement></ArrayOfResponseStateElement>"
Tip: You can create response state rules in Scan Settings: HTTP Parsing in the Fortify WebInspect user interface. You can then open the scan settings XML file, locate the ResponseStateElement, and copy and paste it into the -rs parameter. For more information about response state rules, see "Scan Settings: HTTP Parsing" on page 356.
The following code shows an example starting a Postman scan using a response state rule that is stored in a file:
wi -pwc c:\BearerWorkflow.json -pdac -plc c:\BearerLogin.json -rs @c:\BearerResponseStateRule.txt -pls
User GuideChapter 5: Using WebInspect Features
Micro Focus Fortify WebInspect (21.1.0) Page 289 of 461

Merging Scans
Note: This feature is not supported in Fortify WebInspect on Docker.
You cannot merge into an existing scan. You must first create a merge target using the "ic" parameter.
The scans to be merged are sorted by scan date and are merged in that order. Order is important because information is lost when session IDs are the same in the two scans. When this occurs, by default the earlier session and vulnerability are overwritten with the later session and vulnerability. To prevent this when merging, you can choose another option for handling identical session IDs.
Note: Merging may work best with two scans that have few or no identical session IDs.
For all merge scan options, only sessions with an audit status of “Complete” in the source scan are merged. Session Exclusions (excluded from audit) are not merged. See "Audit Settings: Attack Exclusions" on page 398 for more information.
Hyphens in Command Line Arguments
You can use hyphens in command line arguments (output files, etc.) only if the argument is enclosed in double quotes, as illustrated by the "export path" argument in the following command:
wi.exe -u http://zero.webappsecurity.com -ea "c:\temp\command-line-test-export.xml"
Note: The process, as it appears in the Task Manager, is WI.exe. Scan data will be cached temporarily in the Working directory and then moved to the Scans directory.
Exit Codes
The WI.exe application returns one of the exit codes described in the following table.
Code Description
0 The command completed without errors.
-1 or -3 An error occurred.
Using WIScanStopper.exe
The WIScanStopper.exe application allows you to stop a scan that is currently running.
Note: This feature is not supported in Fortify WebInspect on Docker.
To stop a scan that is running, type the following on the command line:
WIScanStopper {scanid}
User GuideChapter 5: Using WebInspect Features
Micro Focus Fortify WebInspect (21.1.0) Page 290 of 461

The WIScanStopper.exe application stops the scan with the specified scan ID (GUID). The application returns one of the exit codes described in the following table.
Code Description
0 The scan successfully stopped.
1 The given argument is not a GUID. Try the command again with a valid scan ID (GUID).
2 The scan with the given GUID was not found to be running on the machine. Verify the scan ID (GUID) and try the command again.
3 A timeout occurred while waiting for the scan to stop.
There is a 60 second timeout. When the stop command is sent, the process waits for the scan to stop. If 60 seconds elapses before the scan status changes, then the timeout occurs and the process returns this code.
4 Some other exception has occurred.
Tip: You can restart a scan that is stopped using the WI.exe application with the -ir {scanid} parameter. For more information, see "Options" on page 274.
Using MacroGenServer.exe
The MacroGenServer.exe application allows you to create a login macro from the command-line interface (CLI) by providing the start URL, username, and password. The following text provides sample syntax for using the application on the CLI:
macrogenserver.exe -u http://zero.webappsecurity.com/login.html -mu username -mp password
Options
The available options are defined in the following table.
Parameter Definition
-u Specifies the start URL. This parameter is required.
-mu Specifies the login form username. This parameter is required.
Important! If the username contains special characters, you must wrap the string in double quotation marks. If the username contains the double quotation mark character, you must use the escape character to pass the
User GuideChapter 5: Using WebInspect Features
Micro Focus Fortify WebInspect (21.1.0) Page 291 of 461

Parameter Definition
quotation mark as part of the username. Refer to the documentation for the specific command-line interface you are using to determine the escape character.
-mp Specifies the login form password. This parameter is required.
Important! If the password contains special characters, you must wrap the string in double quotation marks. If the password contains the double quotation mark character, you must use the escape character to pass the quotation mark as part of the password. Refer to the documentation for the specific command-line interface you are using to determine the escape character.
-m Specifies the file path where you want to save the login macro.
-ps Identifies the IP address or host name of the proxy server.
Examples:
macrogenserver.exe -u http://zero.webappsecurity.com -mu username -mp password -ps 127.0.0.1 -pp 8080
macrogenserver.exe -u http://zero.webappsecurity.com -mu username -mp password -ps myproxyhostname -pp 8080
-pp Identifies the proxy server port.
-at Specifies the network authentication type. Options are:
l Basic
l Digest
l Ntlm
l ADFS_CBT
-au Specifies the username for network authentication.
-ap Specifies the password for network authentication.
-h Displays the MacroGenServer application help.
User GuideChapter 5: Using WebInspect Features
Micro Focus Fortify WebInspect (21.1.0) Page 292 of 461

Regular ExpressionsSpecial metacharacters and sequences are used in writing patterns for regular expressions. The following table describes some of these characters and includes short examples showing how the characters are used. Another recommended resource is the Regular Expression Library at http://regexlib.com/Default.aspx.
To verify the syntax of regular expressions you create, use the Regular Expression Editor (if it is installed on your system).
Character Description
\ Marks the next character as special. /n/ matches the character " n ". The sequence /\n/ matches a line feed or newline character.
^ Matches the beginning of input or line.
Also used with character classes as a negation character. For example, to exclude everything in the content directory except /content/en and /content/ca, use: /content/[^(en|ca)].*/.* . Also see \S \D \W.
$ Matches the end of input or line.
* Matches the preceding character zero or more times. /zo*/ matches either " z " or "zoo."
+ Matches the preceding character one or more times. /zo+/ matches "zoo" but not "z."
? Matches the preceding character zero or one time. /a?ve?/ matches the "ve" in "never."
. Matches any single character except a newline character.
[xyz] A character set. Matches any one of the enclosed characters. /[abc]/ matches the "a" in "plain."
\b Matches a word boundary, such as a space. /ea*r\b/ matches the "er" in "never early."
\B Matches a nonword boundary. /ea*r\B/ matches the "ear" in "never early."
\d Matches a digit character. Equivalent to [0-9].
\D Matches a nondigit character. Equivalent to [^0-9].
\f Matches a form-feed character.
User GuideChapter 5: Using WebInspect Features
Micro Focus Fortify WebInspect (21.1.0) Page 293 of 461

Character Description
\n Matches a line feed character.
\r Matches a carriage return character.
\s Matches any white space including space, tab, form-feed, and so on. Equivalent to [ \f\n\r\t\v]
\S Matches any nonwhite space character. Equivalent to [^ \f\n\r\t\v]
\w Matches any word character including underscore. Equivalent to [A-Za-z0-9_].
\W Matches any nonword character. Equivalent to [^A-Za-z0-9_].
Fortify WebInspect developers have also created and implemented extensions to the normal regular expression syntax. For more information, see "Regex Extensions" below.
Regex ExtensionsFortify engineers have developed and implemented extensions to the normal regular expression (regex) syntax. When building a regular expression, you can use the tags and operators described below.
Regular Expression Tags
l [STATUSCODE]
l [BODY]
l [ALL]
l [URI]
l [HEADERS]
l [COOKIES]
l [STATUSLINE]
l [STATUSDESCRIPTION]
l [SETCOOKIES]
l [METHOD]
l [REQUESTLINE]
l [VERSION]
l [POSTDATA]
l [TEXT]
User GuideChapter 5: Using WebInspect Features
Micro Focus Fortify WebInspect (21.1.0) Page 294 of 461

Regular Expression Operators
l AND
l OR
l NOT
l [ ]
l ( )
Examples
l To detect a response in which (a) the status line contains a status code of "200" and (b) the phrase "logged out" appears anywhere in the message body, use the following regular expression:
[STATUSCODE]200 AND [BODY]logged\sout
l To detect a response indicating that the requested resource resides temporarily under a different URI (redirection) and having a reference to the path "/Login.asp" anywhere in the response, use the following:
[STATUSCODE]302 AND [ALL]Login.asp
l To detect a response containing either (a) a status code of "200" and the phrase "logged out" or "session expired" anywhere in the body, or (b) a status code of "302" and a reference to the path "/Login.asp" anywhere in the response, use the following regular expression:
( [STATUSCODE]200 AND [BODY]logged\sout OR [BODY]session\sexpired ) OR ( [STATUSCODE]302 AND [ALL]Login.asp )
Note: You must include a space (ASCII 32) before and after an "open" or "close" parenthesis; otherwise, the parenthesis will be erroneously considered as part of the regular expression.
l To detect a redirection response where "login.aspx" appears anywhere in the redirection Location header, use the following regular expression:
[STATUSCODE]302 AND [HEADERS]Location:\slogin.aspx
l To detect a response containing a specific string (such as "Please Authenticate") in the Reason-Phrase portion of the status line, use the following regular expression:
[STATUSDESCRIPTION]Please\sAuthenticate
See Also
"Regular Expressions" on page 293
User GuideChapter 5: Using WebInspect Features
Micro Focus Fortify WebInspect (21.1.0) Page 295 of 461

Fortify WebInspect REST APIThis topic provides information about the Fortify WebInspect REST API.
What is the Fortify WebInspect REST API?
The Fortify WebInspect REST API provides a RESTful interface between your systems and Fortify WebInspect for remotely controlling the proxy and scanner. It runs as a lightweight Windows service (named WebInspect API) that is installed automatically when you install Fortify WebInspect. You configure, start, and stop the service using the Fortify Monitor tool. You can use the Fortify WebInspect REST API to add security audit capabilities to your existing automation scripts.
The Fortify WebInspect REST API is fully described and documented using the industry-standard Swagger RESTful API Documentation Specification version 2.0 (now known as OpenAPI Specification). The Swagger documentation provides detailed schema, parameter information, and sample code to simplify consumption of the REST API. It also provides functionality for testing the endpoints before using them in production.
Important! Due to limitations with SQL Express, running multiple scans using a SQL Express database may cause unsatisfactory results. For this reason, Fortify recommends not conducting concurrent (or parallel) scans for installations using SQL Express.
Configuring the Fortify WebInspect REST API
Before you can use the Fortify WebInspect REST API, you must configure it.
1. From the Windows Start menu, click All Programs > Fortify > Fortify WebInspect > Micro Focus Fortify Monitor.
The Micro Focus Fortify Monitor icon appears in the system tray.
2. Right-click the Micro Focus Fortify Monitor icon, and select Configure WebInspect API.The Configure WebInspect API dialog box appears.
3. Configure the API Server settings as described in the following table.
Setting Value
Host Both Fortify WebInspect and the Fortify WebInspect REST API must reside on the same machine. The default setting, +, is a wild card that tells the Fortify WebInspect REST API to intercept all request on the port identified in the Port field. If you have another service running on the same port and want to define a specific hostname just for the API service, this value can be changed.
User GuideChapter 5: Using WebInspect Features
Micro Focus Fortify WebInspect (21.1.0) Page 296 of 461

Setting Value
Port Use the provided value or change it using the up/down arrows to an available port number.
Authentication Choose None, Windows, Basic, or Client Certificate from the Authentication drop-down list.
If you choose Basic for authentication, you must provide user name(s) and password(s). To do this:
a. Click the Edit passwords button and select a text editor.
The wircserver.keys file opens in the text editor. The file includes sample user name and password entries:
username1:password1username2:password2
b. Replace the samples with user credentials for access to your server. If additional credentials are needed, add a user name and password, separated by a colon, for each user to be authenticated. There should be only one user name and password per line.
c. Save the file.
If you choose Client Certificate for authentication, you must first generate a client certificate based on your root SSL certificate issued by a trusted certificate authority (CA), and then install it on the client machine.
Tip: You can use a tool, such as the MakeCert utility in the Windows Software Development Kit (SDK), to create your client certificate.
Use HTTPS Select this check box to access the server over an HTTPS connection.
To run the server over HTTPS, you must create a server certificate and bind it to the API service. To quickly create a self-signed certificate to test the API over HTTPS, run the following script in an Administrator PowerShell console:
$rootcertID = (New-SelfSignedCertificate -DnsName "DO NOT TRUST - WIRC Test Root CA","localhost", "$($env:computername)" -CertStoreLocation "cert:\LocalMachine\My").Thumbprint $rootcert = (Get-Item -Path "cert:\LocalMachine\My\$($rootcertID)")
$trustedRootStore = (Get-Item -Path "cert:\LocalMachine\Root")
User GuideChapter 5: Using WebInspect Features
Micro Focus Fortify WebInspect (21.1.0) Page 297 of 461

Setting Value
$trustedRootStore.open("ReadWrite")$trustedRootStore.add($rootcert)$trustedRootStore.close()
netsh http add sslcert ipport=0.0.0.0:8443 certhash=$($rootcertID) appid="{160e1003-0b46-47c2-a2bc-01ea1e49b9dc}"The preceding script creates a certificate for the local host and the computer name, puts the certificate in the Personal Store and Trusted Root, and binds the certificate to port 8443. If you use a different port, specify the port you use in the script.
Important! Use the self-signed certificate created by the preceding script for testing only. The certificate works only on your local machine and does not provide the security of a certificate from a certificate authority. For production, use a certificate that is generated by a certificate authority.
Log Level Choose the level of log information you want to collect.
Tip: You can view the API log files using the Windows Event Viewer. The log files are located under Applications and Services Logs > WebInspect API.
4. Do one of the following:
l To start the Fortify WebInspect REST API service and test the API configuration, click Test API. The service starts, and a browser opens and navigates to the Fortify WebInspect REST API Swagger UI page. For more information about this page, see "Accessing the Fortify WebInspect REST API Swagger UI" below.
l To start the Fortify WebInspect REST API service without testing the API configuration, click Start.
Accessing the Fortify WebInspect REST API Swagger UI
Complete documentation—including detailed schema, parameter information, sample code, and functionality for testing endpoints—is included in the Fortify WebInspect REST API Swagger UI.
User GuideChapter 5: Using WebInspect Features
Micro Focus Fortify WebInspect (21.1.0) Page 298 of 461

To access this information:
1. After configuring and starting the Fortify WebInspect REST API service, open a browser.
2. Type http://<hostname>:<port>/webinspect/api in the address field and press Enter.
Example: If you used the default settings when configuring the Fortify WebInspect REST API, you would type http://localhost:8083/webinspect/api.
The WebInspect REST API Swagger UI page appears.
Using the Swagger UI
To use the Swagger UI:
1. On the Swagger UI page, click an endpoint category.
2. Click the endpoint method to use.
User GuideChapter 5: Using WebInspect Features
Micro Focus Fortify WebInspect (21.1.0) Page 299 of 461

Detailed schema, parameter information, sample code, and functionality for testing the endpoint appear.
Getting Field-level Details
Some API endpoints have numerous fields that you can configure. These fields are documented in detail in the Swagger UI.
To view the field-level details:
l In the Parameters section of the endpoint, click Model under the Data Type heading.
User GuideChapter 5: Using WebInspect Features
Micro Focus Fortify WebInspect (21.1.0) Page 300 of 461
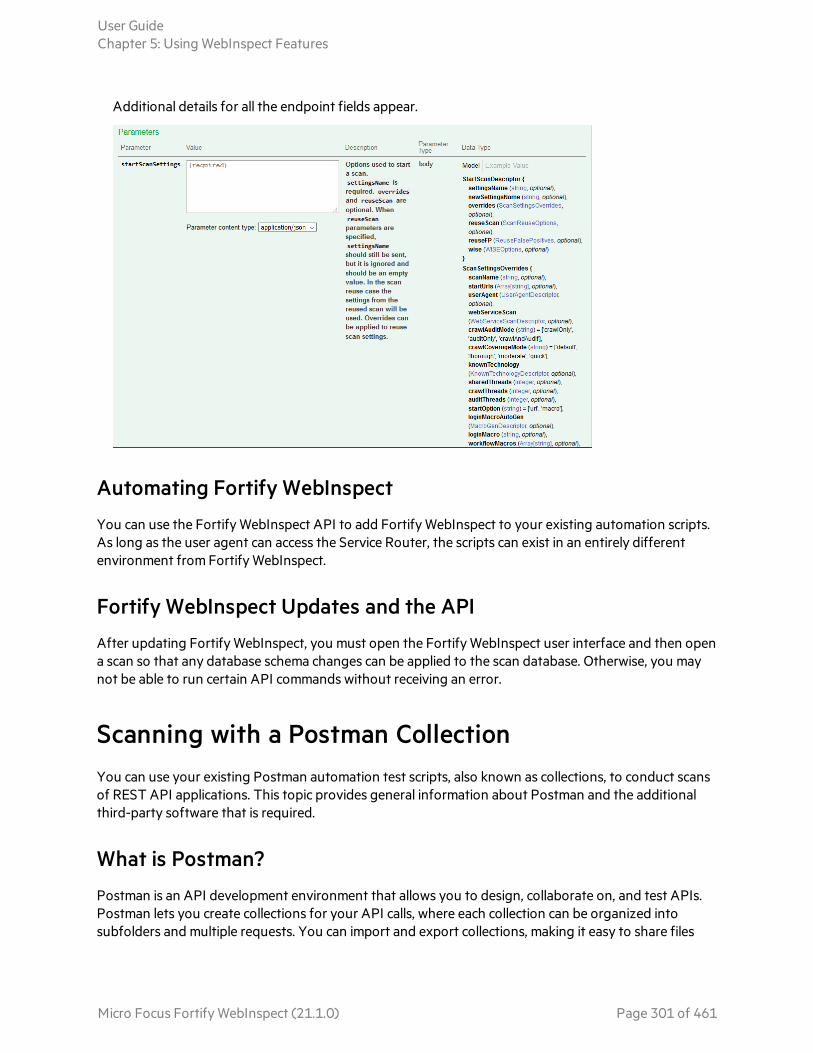
Additional details for all the endpoint fields appear.
Automating Fortify WebInspect
You can use the Fortify WebInspect API to add Fortify WebInspect to your existing automation scripts. As long as the user agent can access the Service Router, the scripts can exist in an entirely different environment from Fortify WebInspect.
Fortify WebInspect Updates and the API
After updating Fortify WebInspect, you must open the Fortify WebInspect user interface and then open a scan so that any database schema changes can be applied to the scan database. Otherwise, you may not be able to run certain API commands without receiving an error.
Scanning with a Postman CollectionYou can use your existing Postman automation test scripts, also known as collections, to conduct scans of REST API applications. This topic provides general information about Postman and the additional third-party software that is required.
What is Postman?
Postman is an API development environment that allows you to design, collaborate on, and test APIs. Postman lets you create collections for your API calls, where each collection can be organized into subfolders and multiple requests. You can import and export collections, making it easy to share files
User GuideChapter 5: Using WebInspect Features
Micro Focus Fortify WebInspect (21.1.0) Page 301 of 461
across your development and testing environment. Through the use of a Collection Runner such as Newman, tests can be run in multiple iterations, saving time on repetitive tests.
Benefits of a Postman Collection
A REST API application does not expose all the endpoints in a format that a human with a browser or an automated tool can consume. It is often simply a collection of endpoints that accepts various posts, puts, and gets with a specific set of request data. To successfully audit these endpoints, Fortify WebInspect needs to understand key details about the API. A well-defined Postman collection can expose these endpoints so that Fortify WebInspect can audit the API application.
Options for Postman Scans
You can conduct a Postman scan using one of following options:
l API Scan Wizard (See "Running an API or Web Service Scan" on page 153)
l WI.exe or the Fortify WebInspect REST API (See "Postman API Scan Using WI.exe or WebInspect REST API" on page 308)
Postman Prerequisites
A Postman collection version 2.0 or 2.1 is required for conducting scans in Fortify WebInspect. Additionally, you must install Newman command-line collection runner, Node.js, and Node Package Manager (NPM). For specific version information and additional instructions, see the Micro Focus Fortify Software System Requirements.
Using Client Certificates with Postman
To use a client certificate as authentication for a Postman scan, the certificate file format must be supported by Windows. If the client certificate is not Windows-compatible, you can convert the certificate to a Windows-compatible format and then use the converted file for your Postman scan.
The following table describes the process for converting and using a client certificate with Postman.
Stage Description
1. Use a tool such as OpenSSL to convert the certificate to a Windows format.
2. Install the converted certificate in the Windows certificate store on the machine where Fortify WebInspect is installed.
3. Add the certificate to the Scan Settings: Authentication. For more information, see "Scan Settings: Authentication" on page 373.
User GuideChapter 5: Using WebInspect Features
Micro Focus Fortify WebInspect (21.1.0) Page 302 of 461

Tips for Preparing a Postman Collection
This topic provides tips for creating a good Postman collection.
Ensure Valid Responses
In order to get valid responses, the collection must be complete and executable. Requests must include:
l A valid request URL
l The correct HTTP method (POST, GET, PUT, PATCH, or DELETE)
l Valid parameter data that allows proper exercising of the API
For example, if you have a “name” parameter, then you must provide actual sample data such as "King Lear" or "Hamlet," rather than the default data type “string.”
Order of Requests
Remember that the order of operations or requests is important. For example, you must create (or POST) sample data to a parameter before you can do a GET or a DELETE operation on the data.
Tip: To avoid URL errors while running the collection in Fortify WebInspect, after bundling the API requests in the correct order in your collection, save each request individually by clicking the request and then clicking Save.
Handling Authentication
If your API requires authentication, you must configure it in the Postman collection. Follow these guidelines when configuring authentication:
l The user credentials must be current and not expired.
l If you use an environment to specify authentication information, select the type of authentication environment in the Postman collection.
l It is possible that not all requests in the collection require authentication or not all requests require the same type of authentication. If this is the case in your collection, be sure to specify the appropriate authentication type for each request in the collection.
Important! If session state is lost while using various authentication types in a scan, it will not be restored correctly. For proper restoration of session state, use a login macro or Postman login collection with a single type of authentication.
Using Static Authentication
When using static authentication, you must hard-code user credentials as a name/value pair in the Postman collection. When Fortify WebInspect parses the collection file, it determines the type of authentication being used and retrieves the key name and value from the collection. These values are then added to the scan settings.
User GuideChapter 5: Using WebInspect Features
Micro Focus Fortify WebInspect (21.1.0) Page 303 of 461

Fortify WebInspect supports the following types of static authentication:
l API Key
l Basic
l Bearer Token
l Digest
l NTLM
l Oauth 1.0
l Oauth 2.0
Using Dynamic Authentication
When using dynamic authentication, you must store the Bearer token or API key authentication variables in either a Postman environment file or a collection file. For example, a Bearer Token may use a variable such as {{bearerToken}}.
You must use regular expressions in a response state rule to dynamically supply the Bearer token or API key during the scan. The response state rule provides search and replace options that enable the token or key to be retrieved from a response and then used in future sessions. For more information, see "Scan Settings: HTTP Parsing" on page 356.
Using a Postman Login Macro
You can provide a login macro and a workflow macro in the form of Postman collection files in the Fortify WebInspect REST API or Wi.exe. For example, you can specify a login macro file such as LoginBearer.json. When using a login macro, however, you must also specify a logout condition, such as the regular expression The\stoken\sis\snot\svalid.
Postman Auto-configuration
Auto-configuration for static authentication is supported when the authentication values are known, such as when the username and password are hard-coded in the authentication section of the collection. If auto-configuration is not disabled, Fortify WebInspect checks the authentication portion of the collection file for valid values that are then applied to the scan settings.
Auto-configuration for dynamic authentication attempts to automatically provide a login macro and response state rule. It is useful when the Bearer token or API key is stored in a variable. If successful, a message indicates that authentication for Postman collection was detected. If a Bearer token was detected but a stable configuration was not created, a message indicates that autoconfiguration failed and provides the reason.
Important! Auto-configuration for dynamic authentication works only for simple cases using Bearer token authentication.
If auto-configuration fails, you must manually configure authentication. For more information, see "Manually Configuring Postman Login for Dynamic Tokens" on the next page.
User GuideChapter 5: Using WebInspect Features
Micro Focus Fortify WebInspect (21.1.0) Page 304 of 461

Sample Postman Scripts
Sample code for leveraging the Postman API can be found at https://github.com/fortify/WebInspectAutomation.
A sample Postman collection is available for download on the Fortify repository on GitHub at https://github.com/fortify/WebInspectAutomation/tree/master/PostmanSamples.
Manually Configuring Postman Login for Dynamic Tokens
This topic describes how to configure dynamic authentication manually if auto-configuration fails for a Postman scan. Dynamic authentication uses dynamic tokens.
What are Dynamic Tokens?
Dynamic tokens are authentication tokens that are generated by software and are unique for each instance of authentication. Tokens can be created for a short period of time, and each instance is renewed individually.
Before You Begin
You must know the following to configure manual login:
l The type of authentication used in your application (such as Bearer, API key, OAuth1.0, OAuth 2.0, Cookie)
l How to create regular expression search arguments
Process Overview
The process to manually configure login is described in the following table.
Stage Description
1. Identify and isolate the login request or requests in a separate Postman collection. For more information, see "Identifying and Isolating the Login Request" on the next page.
2. Create a logout condition regular expression. For more information, see "Creating a Logout Condition with Regular Expressions" on the next page
3. Create a response state rule. For more information, see:
l "Creating a Response State Rule for a Bearer Token" on the next page
l "Creating a Response State Rule for an API Key" on page 307
Note: A response state rule is not needed for cookie session management.
User GuideChapter 5: Using WebInspect Features
Micro Focus Fortify WebInspect (21.1.0) Page 305 of 461
Identifying and Isolating the Login Request
To identify and isolate the login request:
1. Examine the Postman collection contents to identify the login request.
Tip: Typically, the login request is the first request in the Postman collection that obtains an authentication token. However, authentication could involve several requests.
2. Copy this request or multiple requests.
3. Paste the request(s) in a separate file.
4. Save the file as a Postman collection.
Creating a Logout Condition with Regular Expressions
To create a logout condition:
1. Find several requests that require authentication.
2. Do one of the following:
l For a bearer token, replace the auth token with an incorrect value and send it to the application.
l For an API key, send an incorrect APIKey value to the application.
3. Use the reply from these requests to create a regular expression that matches these responses and does not match a valid session.
For example, if you see the word “unauthorized” in most cases, then it is the best word to use in the regular expression, such as:
[STATUSCODE]200 AND [BODY]unauthorized
If an incorrect APIKey value gets a reply of “{"status": "Access Deny"}”, then the best regular expression would be:
[BODY]Access\sDeny
Creating a Response State Rule for a Bearer Token
To create a response state rule for a bearer token, you must create two regular expressions.
The first regular expression searches all responses for an authentication token update. Typically, this token will be in response to the login request that was identified in Stage 1 of the process.
For example, in the following response, we see a reference to "token."
"{"success":true,"message":"Authentication successful!","token":"eyJhbGciOiJIUzI1NiIs InR5cCI6IkpXVCJ9.eyJ1c2VybmFtZSI6ImFkbWluI iwiaWF0IjoxNTg1NzQzNzkzLCJleHAiOjE1ODU3NDc
User GuideChapter 5: Using WebInspect Features
Micro Focus Fortify WebInspect (21.1.0) Page 306 of 461

zOTN9.i8uXa20JQt00tlOjd1twRD76jTnsG-0xiU97 QWy6jkg"}"
For this response, we can create the following regular expression:
"token":"(?<Token>[-a-zA-Z0-9._~+/]+?=*)"}$
In this regular expression, the (?<Token>[-a-zA-Z0-9._~+/]+?=*) identifies the value of the token.
Note: XML uses character escaping. When you use regular expressions that include < and > symbols in XML format, the < symbol escapes with < and the > symbol escapes with >.
The second regular expression indicates where to store this token. For a bearer token, it will be in the “Authorization: Bearer ….” header.
The following is an example for a bearer token:
"Authorization:\sBearer\s(?<Token>[^\r\n]*)\r\n"
In this second regular expression, the (?<Token>[^\r\n]*) identifies the value that should be replaced with the value from the first regular expression.
Creating a Response State Rule for an API Key
To create a response state rule for an API key, you must create two regular expressions.
The first regular expression searches all responses for an authentication token update. Typically, this token will be in response to the login request that was identified in Stage 1 of the process.
For example, assume that you have a header API key type of auth. A request sends the username and password to the path “/Login” and returns a response similar to the following:
"{"success":true,"APIToken": "tp8989ieupgrjynsfbnfgh9ysdopfghsprohjo"}"
All protected requests send an “APIKey: ….” header to authorize access.
For this response, we can create the following regular expression:
"APIToken":"(?<APIToken>[a-zA-Z0-9]+?)"}$
Note: XML uses character escaping. When you use regular expressions that include < and > symbols in XML format, the < symbol escapes with < and the > symbol escapes with >.
The second regular expression indicates where to store this token. For an APIKey, it could be a custom header name and value or a custom query parameter name and value.
APIKey:\s(?<APIToken>[^\r\n]*)\r\n
User GuideChapter 5: Using WebInspect Features
Micro Focus Fortify WebInspect (21.1.0) Page 307 of 461

Postman API Scan Using WI.exe or WebInspect REST API
This topic describes the process for conducting a scan using a Postman collection in the Fortify WebInspect REST API or Wi.exe. To conduct a scan using the API Scan Wizard, see "Running an API or Web Service Scan" on page 153.
Important! The Fortify WebInspect REST API Postman endpoints do not support using SQL Express to conduct parallel scans.
Process
The following table describes the process for conducting a scan using a Postman collection.
Stage Description
1. Do the following in Postman:
1. Create a Postman collection file, following the guidelines mentioned previously in this topic.
2. Save each API call in Postman individually.
3. Click Runner to open the Newman command-line Collection Runner.
2. Do the following in Newman command-line Collection Runner:
1. With the collection open in the Collection Runner, ensure that the API calls are in the correct order for execution.
2. Click Run <Collection Name>.
3. Inspect the responses from each call to ensure the requests were successful.
3. Do one of the following in Fortify WebInspect:
l To use the Fortify WebInspect REST API:
a. Configure and start the Fortify WebInspect API. See "Configuring the Fortify WebInspect REST API" on page 296.
b. Access the Postman API endpoint in the Swagger UI. See "Accessing the Fortify WebInspect REST API Swagger UI" on page 298.
c. Configure the endpoint according to the instructions in the Swagger UI.
d. Execute the endpoint sample scripts from the Swagger UI or your API tool of choice.
Important! Include a scan settings file with the appropriate settings that provide access to the site in your Postman collection. For example, include the
User GuideChapter 5: Using WebInspect Features
Micro Focus Fortify WebInspect (21.1.0) Page 308 of 461
Stage Description
correct allowed hosts, proxy settings, and so on. If you do not specify a settings file, then the default scan settings from Fortify WebInspect are applied to the scan.
l To use Wi.exe:
a. Launch the CLI as described in "Command-line Execution" on page 273.
b. Construct your command using the Postman Scans options described in "Using WI.exe" on page 274.
4. The endpoint or CLI command returns the scan ID (GUID) and the results of the Postman collection.
Troubleshooting the Postman Scan
Use the following troubleshooting tips if you encounter issues while running a scan with a Postman collection:
1. Check the proxy configuration in the scan settings to ensure that Postman can run through the proxy and access the site for testing. One option is to try running Newman manually with the proxy configuration.
2. Check the results of the request:
a. View the total requests sent to ensure that they match the requests in the Postman file.
b. Ensure that there are no failed requests.
Integrating with Selenium WebDriver
Note: This feature is a technology preview. Technology preview features are currently unsupported, may not be functionally complete, and are not suitable for deployment in production. However, these features are provided as a courtesy and the primary objective is for the feature to gain wider exposure with the goal of full support in the future.
You can integrate Fortify WebInspect with Selenium Webdriver, also known as Selenium 2.0, to do the following:
l Conduct a scan using the WI.exe command-line tool l Create a workflow macro using the Fortify WebInspect REST API
User GuideChapter 5: Using WebInspect Features
Micro Focus Fortify WebInspect (21.1.0) Page 309 of 461
Known Limitations
The following are known limitations for integrating Fortify WebInspect with Selenium Webdriver:
l Fortify WebInspect supports Selenium WebDriver only.
l Fortify WebInspect does not support Selenium WebDriver with remote server configuration, such as the RemoteWebDriver class.
l A Selenium WebDriver macro can be used as a workflow macro only. It cannot be a login or startup macro.
l You can initiate a scan using a Selenium WebDriver macro from the command line interface (CLI) or the API only. While you cannot initiate a scan from the user interface, you can rescan and import/export a Selenium WebDriver macro.
l Support for Fortify WebInspect Enterprise is limited. You can use a macro file that was created from the CLI or API, but only if you have completed setup of the Selenium WebDriver environment on the sensor machine.
Process Overview
The process for integrating Fortify WebInspect with Selenium WebDriver is described in the following table.
Stage Description
1. Fortify WebInspect must be able to capture traffic from a web browser using the Fortify WebInspect proxy. Do one of the following to enable proxy capture:
l Add the proxy to your Selenium scripts directly in the code or using a placeholder in the command line interface as described in "Adding the Proxy to Selenium Scripts" on the next page.
l Use the Fortify WebInspect geckodriver.exe for capturing traffic when using Firefox as described in "Using the Fortify WebInspect geckodriver.exe" on page 316.
2. Install the Selenium WebDriver environment on the machine running Fortify WebInspect as described in "Installing the Selenium WebDriver Environment" on page 317.
3. Ensure that you can start up the Selenium Webdriver scripts from the command line and define your Allowed Hosts as described in "Testing from the Command Line" on page 317.
4. Optionally, upload all scripts and their dependencies to the Selenium API or manually copy them to the machine running Fortify WebInspect as described in "Uploading Files to Fortify WebInspect" on page 320.
5. Use the command from Stage 3 to run a scan using WI.exe or create a macro using the
User GuideChapter 5: Using WebInspect Features
Micro Focus Fortify WebInspect (21.1.0) Page 310 of 461

Stage Description
WebInspect REST API as described in "Using the Selenium Command" on page 320.
6. Fix any errors that occur.
When conducting a scan with WI.exe or creating a macro in the API, the macro is validated. Errors and warnings are returned for each Selenium command. This feature is enabled by default. To disable it:
l In WI.exe, use the argument -selenium_no_validation parameter. For more information, see "Using WI.exe" on page 274.
l In the API, set the VerifyMacro parameter to false. For more information, see the Fortify WebInspect REST API Swagger UI.
To troubleshoot issues, view the Scan logs for errors and the StateRequestor logs for warnings.
Tip: Generally, logs are written to the following directory paths:
l If an API scan runs as the SYSTEM USER, which is the default user, then logs are written to:
C:\ProgramData\HP\HP WebInspect\Schedule\logs\<scan_guid>\ScanLog
C:\ProgramData\HP\HP WebInspect\Schedule\logs\<scan_guid>\StateRequestor
l All CLI and UI scans, and if an API scan runs as the current user, then logs are written to:
C:\Users\<user.name>\AppData\Local\HP\HP WebInspect\Logs\<scan_guid>\ScanLog
C:\Users\<user.name>\AppData\Local\HP\HP WebInspect\Logs\<scan_guid>\StateRequestor
Adding the Proxy to Selenium Scripts
To use this method of capturing traffic from the web browser, you must add Fortify code that applies the proxy to your Selenium initialization directly in your code or, if applicable, passed as an argument in the command line interface (CLI).
Advantages
This approach provides flexibility, as it can run from any browser that Selenium supports. Additionally, this approach should provide some upgrade protection. The Fortify code resides in your scripts, so you should be able to continue using it in future versions of Selenium with only minor code changes.
User GuideChapter 5: Using WebInspect Features
Micro Focus Fortify WebInspect (21.1.0) Page 311 of 461

Disadvantages
This approach involves a one-time manual task of adding Fortify code to your scripts for initializing the browser correctly.
Sample Code
You must get the value from the environmental variable named Fortify_WI_Proxy, and then store it as an HTTP and HTTPS proxy for the web browser and trust certificate. How you do this depends on your programming language. The following sections provide sample code for several languages.
Note: These code samples are based on Selenium WebDriver version 3.14. Code for your specific version might be different.
C#
In your C# code, you must find where the browser driver is initialized and add browser options to it. The following is an example for the Chrome browser.
ChromeOptions chromeOptions = new ChromeOptions(); string proxy = Environment.GetEnvironmentVariable("Fortify_WI_Proxy"); if (!String.IsNullOrEmpty(proxy)) { chromeOptions.AcceptInsecureCertificates = true; chromeOptions.Proxy = new Proxy(); chromeOptions.Proxy.HttpProxy = proxy; chromeOptions.Proxy.SslProxy = proxy; } …. new ChromeDriver(chromeOptions) // options should go into this class
The following is an example for the Firefox browser.
FirefoxOptions config = new FirefoxOptions(); string proxy = Environment.GetEnvironmentVariable("Fortify_WI_Proxy"); if (!String.IsNullOrEmpty(proxy)) { config.AcceptInsecureCertificates = true; config.Proxy = new Proxy(); config.Proxy.HttpProxy = proxy;
User GuideChapter 5: Using WebInspect Features
Micro Focus Fortify WebInspect (21.1.0) Page 312 of 461

config.Proxy.SslProxy = proxy; } … new FirefoxDriver(config))
Java
In your Java code, you must find where the browser driver is initialized and add browser options to it. The following is an example for the Chrome browser.
ChromeOptions options = new ChromeOptions(); String wi_proxy = System.getenv("Fortify_WI_Proxy"); if (wi_proxy != null) { Proxy proxy = new Proxy(); proxy.setHttpProxy(wi_proxy); proxy.setSslProxy(wi_proxy); options.setProxy(proxy); options.setAcceptInsecureCerts(true); } ChromeDriver driver=new ChromeDriver(options);
The following is an example for the Firefox browser.
FirefoxOptions options = new FirefoxOptions(); String wi_proxy = System.getenv("Fortify_WI_Proxy"); if (wi_proxy != null) { Proxy proxy = new Proxy(); proxy.setHttpProxy(wi_proxy); proxy.setSslProxy(wi_proxy); options.setProxy(proxy); options.setAcceptInsecureCerts(true); } FirefoxDriver driver=new FirefoxDriver(options);
JavaScript
In your JavaScript code, you must find where the browser driver is initialized and add browser options to it. The following is an example for the Chrome browser.
const selProxy = require('selenium-webdriver/proxy'); …… (async function example() { let env = process.env.Fortify_WI_Proxy;
User GuideChapter 5: Using WebInspect Features
Micro Focus Fortify WebInspect (21.1.0) Page 313 of 461

if (env) { let caps = { acceptInsecureCerts: true }; //allow to accept all certificates let proxy = { http: env, https: env }; // apply env variable as proxy driver = await new Builder().withCapabilities(caps).setProxy (selProxy.manual(proxy)).forBrowser('chrome').build(); // set proxy and acceptInsecureCerts }else driver = await new Builder().forBrowser('chrome').build();
The following is an example for the Firefox browser.
const selProxy = require('selenium-webdriver/proxy'); …… let env = process.env.Fortify_WI_Proxy; if (env) { let caps = { acceptInsecureCerts: true }; //allow to accept all certificates let proxy = { http: env, https: env }; // apply env variable as proxy driver = await new Builder().withCapabilities(caps).setProxy (selProxy.manual(proxy)).forBrowser('firefox').build(); // set proxy and acceptInsecureCerts }else driver = await new Builder().forBrowser('firefox').build();
Python
In your Python code, you must find where the browser driver is initialized and add browser options to it. The following is an example for the Chrome browser.
capabilities1 = DesiredCapabilities.CHROME.copy() Fortify = os.environ.get('Fortify_WI_Proxy') if Fortify is not None: prox = Proxy() prox.proxy_type = ProxyType.MANUAL prox.http_proxy = Fortify prox.ssl_proxy = Fortify prox.add_to_capabilities(capabilities1) cls.driver = webdriver.Chrome(executable_path='C:/chromedriver.exe', desired_capabilities=capabilities1)
User GuideChapter 5: Using WebInspect Features
Micro Focus Fortify WebInspect (21.1.0) Page 314 of 461

The following is an example for the Firefox browser.
import os from selenium.webdriver import DesiredCapabilities from selenium.webdriver.common.proxy import Proxy, ProxyType …… capabilities1 = DesiredCapabilities.FIREFOX.copy() Fortify = os.environ.get('Fortify_WI_Proxy') if Fortify is not None: capabilities1['acceptInsecureCerts'] = True prox = Proxy() prox.proxy_type = ProxyType.MANUAL prox.http_proxy = Fortify prox.ssl_proxy = Fortify prox.add_to_capabilities(capabilities1) cls.driver = webdriver.Firefox(executable_path='C:/geckodriver.exe', capabilities=capabilities1)
Ruby
In your Ruby code, you must find where the browser driver is initialized and add browser options to it. The following is an example for the Chrome browser.
http_proxy = ENV['Fortify_WI_Proxy'] if http_proxy proxy = Selenium::WebDriver::Proxy.new(http: http_proxy, ssl: http_proxy) capabilities = Selenium::WebDriver::Remote::Capabilities.chrome (accept_insecure_certs: true) capabilities.proxy = proxy; else capabilities = Selenium::WebDriver::Remote::Capabilities.chrome() end driver = Selenium::WebDriver.for :chrome, desired_capabilities: capabilities
The following is an example for the Firefox browser.
http_proxy = ENV['Fortify_WI_Proxy'] if http_proxy proxy = Selenium::WebDriver::Proxy.new(http: http_proxy,
User GuideChapter 5: Using WebInspect Features
Micro Focus Fortify WebInspect (21.1.0) Page 315 of 461

ssl: http_proxy) capabilities = Selenium::WebDriver::Remote::Capabilities.firefox (accept_insecure_certs: true) capabilities.proxy = proxy; else capabilities = Selenium::WebDriver::Remote::Capabilities.firefox() end driver = Selenium::WebDriver.for :firefox, desired_capabilities: capabilities
Using the CLI
If your scripts accept an argument that configures the proxy, then you can use this method to add the Fortify WebInspect proxy to your scripts. For example, if you have an argument named -proxy "<host:port>", then you can use the placeholder {Fortify_WI_Proxy} in the command at run time as shown here:
-proxy "{Fortify_WI_Proxy}"
If you must specify the host and port separately, then you can use a placeholder for each as shown here:
-proxy "{Fortify_WI_Proxy_Host}:{Fortify_WI_Proxy_Port}"
These arguments will replace the placeholder in your scripts with the Fortify WebInspect proxy at run time.
Using the Fortify WebInspect geckodriver.exe
GeckoDriver is a proxy that helps W3C WebDriver-compatible clients communicate with Gecko-based browsers. The geckodriver.exe application provides this proxy for Firefox browsers. To use this method of capturing traffic from the web browser, you must replace your existing geckodriver.exe with the Fortify WebInspect geckodriver.exe, which you can find in the <InstallationDirectory>\Extensions folder.
Note: The default installation directory is C:\Program Files\Fortify\Fortify WebInspect\Extensions.
Advantages
This approach requires less work for you.
Disadvantages
You will not be able to use the latest version of geckodriver.exe, and you must use only Firefox scripts.
User GuideChapter 5: Using WebInspect Features
Micro Focus Fortify WebInspect (21.1.0) Page 316 of 461

Installing the Selenium WebDriver Environment
On the machine where Fortify WebInspect is installed, you must install all the software and tools that you need to run Selenium scripts. This includes, but is not limited to, such items as:
l A browser
l A test runner
l All prerequisite software to support running Selenium scripts
For example, for .NET NUnit framework, you must install .NET and nunit3-console.exe as the executable that runs the Selenium scripts.
Important! The list of required software and tools varies depending on your programming language.
Testing from the Command Line
To ensure that you are able to start up and run Selenium Webdriver scripts from the command line, you must create and use a command that will execute your Selenium script. The command that you use varies depending on the programming language and testing framework that you are using to conduct Selenium tests.
For example, to run NUnit in .NET, you can run a command similar to the following:
D:\tmp\selenium_wd\bin\net35\nunit3-console.exe "D:\tmp\selenium_wd\selenium_c_sharp-master\Selenium\bin\Debug\Selenium.dll"
In this example, the nunit3-console.exe is the unit test runner, and Selenium.dll is the DLL that contains the unit tests. For more examples, see "Creating a Selenium Command" below.
Tip: You can use the POST /configuration/selenium/folder and GET /configuration/selenium/file/{foldername} API endpoints to show the full path to the files you deployed. You can use this information to update the command in the CLI. For more information, see "Uploading Files to Fortify WebInspect" on page 320.
Creating a Selenium Command
The Selenium command is used on the command line to execute unit tests. In most cases, the command can be found during a run of unit tests on the build server or while debugging. This command varies based on the unit test framework that you are using. Each framework has its own runner and command-line arguments. The following sections provide tips and sample commands for several frameworks in various languages.
.NET MSTest
The MSTest framework uses a tool called Vstest.console.exe with the following syntax:
<Path_to_Vstest_Executable>\Vstest.console.exe <Path_to_Unit_Test_dlls>\<TestFileNames> <Options>
User GuideChapter 5: Using WebInspect Features
Micro Focus Fortify WebInspect (21.1.0) Page 317 of 461

In most cases, you must call this executable with a list of DLLs, which are the test file names that you want to run. The following sample code runs two test files:
"C:\Program Files (x86)\Microsoft Visual Studio 14.0\Common7\IDE\ CommonExtensions\Microsoft\TestWindow\vstest.console.exe" "C:\Projects\Tests\bin\TestHomepage_unittest.dll" "C:\Projects\Tests\bin\AddCart_unittest.dll"
.NET NUnit
The NUnit framework uses a tool called nunit3-console.exe (version 3.x) with the following syntax:
NUNIT3-CONSOLE <InputFiles> <Options>
You must call this executable with a list of DLLs, which are the test file names that you want to run. The following sample code runs two test files:
C:\nunit\net35\nunit3-console.exe "C:\Projects\Tests\bin\TestHomepage_unittest.dll" "C:\Projects\Tests\bin\AddCart_unittest.dll"
xUnit.net
The xUnit.net framework provides two command-line runners: xunit.console.exe and xunit.console.x86.exe. You use the following syntax:
xunit.console <assemblyFile> [configFile] [assemblyFile [configFile]...] [options] [reporter] [resultFormat filename [...]]
xUnit.net accepts .json and .xml file extensions as configuration files (configFile).
You must call the appropriate executable with a list of DLLs, which are the test file names that you want to run. The following sample code runs two test files:
C:\xunit\xunit.console.exe "C:\Projects\Tests\bin\TestHomepage_unittest.dll" "C:\Projects\Tests\bin\AddCart_unittest.dll"
Java TestNG
The TestNG framework requires testng.jar libraries with a classpath (-cp) option and the java.exe application. In the -cp option, you must list all the library classes that you need to run your project. You use the following syntax:
java -cp "<Path_to_testngjar>/testng.jar:<Path_to_Test_Classes>" org.testng.TestNG <Path_to_Test_xml>
The following sample code runs an XML test file:
C:\Program Files\Java\jdk-12.0.1\bin\java.exe -cp ".\libs\: C:\Program Files\jbdevstudio4\studio\plugins\*"
User GuideChapter 5: Using WebInspect Features
Micro Focus Fortify WebInspect (21.1.0) Page 318 of 461

org.testng.TestNG testng.xml
Java JUnit
The JUnit framework has several versions and each version has its own command to execute tests. In the -cp option, you must list all the library classes that you need to run your project.
JUnit version 5.x uses the following syntax:
java -jar junit-platform-console-standalone-<version>.jar --class-path <Path_to_Compiled_Test_Classes> --scan-class-path
JUnit version 4.x uses the following syntax:
java -cp .\libs\:<Path_to_Junitjar>\junit.jar org.junit.runner.JUnitCore [test class name]
JUnit version 3.x uses the following syntax:
java -cp .\libs\:<Path_to_Junitjar>\junit.jar junit.textui.TestRunner [test class name]
The following sample code runs a test class:
C:\Program Files\Java\jdk-12.0.1\bin\java -cp C\java\libs\:C:\junit\junit.jar org.junit.runner.JUnitCore C:\project\test.class
Python unittest and PyUnit
Python provides built-in unit test modules (-m): Python unittest and PyUnit, depending on the version of Python you are using. These frameworks use the following syntax:
python -m unittest [options] [tests]
In this syntax, the [tests] can be a list of any number of test modules, classes, and test methods. The following command displays the unittest help in Python:
python -m unittest -h
The following sample code runs a test file named tests.py in the unittest module:
C:\Python\Python37-32\python.exe -m unittest C:\SampleProjects\POMProjectDemo\Tests\tests.py
Ruby RSpec
The RSpec framework provides unit testing libraries for Ruby code. This framework uses the following syntax:
<Path_to_RSpec>\rspec.bat [options] [files or directories]
User GuideChapter 5: Using WebInspect Features
Micro Focus Fortify WebInspect (21.1.0) Page 319 of 461

The following sample code runs a test library:
C:\Ruby26-x64\bin\rspec.bat -I C:\Ruby26-x64\Project\lib\ C:\Ruby26-x64\Project\spec\calculator_spec.rb
JavaScript Jest
Jest a JavaScript library for creating and running tests on JavaScript code. This framework uses the following syntax:
<Path_to_Jest>\jest.js [--config=<pathToConfigFile>] [TestPathPattern]
The following sample code runs a test library:
C:\Users\admin\AppData\Roaming\npm\jest.cmd" --config=C:\Users\admin\AppData\Roaming\npm\jest.config.js C:/Users/admin/AppData/Roaming/npm/sum.test.js
Uploading Files to Fortify WebInspect
To run a scan in the command-line interface (CLI) or create a macro using the API, you must upload all scripts and their dependencies to the machine where Fortify WebInspect is installed.
Using the CLI
To run a scan from the CLI, you must manually copy the files to the machine where Fortify WebInspect is installed.
Using the API
The Fortify WebInspect REST API provides the following endpoints for deploying these files:
l POST /configuration/selenium/folder – Upload and unzip ZIP file(s)
l GET /configuration/selenium/folder – Get a list of ZIP files that are already uploaded
l GET /configuration/selenium/file/{foldername} – Get a list of files that are contained in the ZIP file
l DELETE /configuration/selenium/folder/{foldername} – Delete the ZIP fileFor details about using these endpoints, see the specific endpoint methods in the Swagger UI. For more information, see "Accessing the Fortify WebInspect REST API Swagger UI" on page 298.
Using the Selenium Command
After creating and testing the Selenium command, you can use it to run a scan using WI.exe or create a macro using the API.
User GuideChapter 5: Using WebInspect Features
Micro Focus Fortify WebInspect (21.1.0) Page 320 of 461

Important! When you conduct a scan using a Selenium command, a log directory is created in one of the following locations:
C:\Users\<UserName>\AppData\Local\Temp\
C:\Windows\Temp (when the Fortify WebInspect REST API is running under the system user)
If you end the geckodriver.exe or chromedriver.exe process while the scan is running, these temporary files will not be removed. You must manually remove these files.
Running a Scan Using WI.exe
For the command-line interface (CLI), WI.exe includes a -selenium_workflow parameter that accepts an XML object called ArrayOfSeleniumCommand as a file or a string.
Important! If you run a command as a string rather than a file, and the command contains the double-quotation mark character ("), then the character must be escaped with the backslash character (\) when you save it in the <Command> tag. For example, if the command includes spaces in the path, and you use double-quotation marks to pass the path in the Command, then the quotation marks must be escaped as shown here:
<Command>\"C:\Program Files\nunit\nunit3-console.ex\" C:\Projects\Tests\bin\TestHomepage_unittest.dll \"C:\Projects\Tests Main\bin\AddCart_unittest.dll\"</Command>
You place the Selenium command you created previously in the Command tag in the following syntax. For more information, see "Creating a Selenium Command" on page 317.
<ArrayOfSeleniumCommand> <SeleniumCommand> <Command>"Commands"</Command> <AllowedHosts> <string>http://hostname/</string> </AllowedHosts> <WorkingDirectory>C:\pathtoprojectfolder\</WorkingDirectory> </SeleniumCommand> <SeleniumCommand> ... </SeleniumCommand> ... </ArrayOfSeleniumCommand>
To pass the command as a file, use the following syntax:
-selenium_workflow "@PathToFile"
User GuideChapter 5: Using WebInspect Features
Micro Focus Fortify WebInspect (21.1.0) Page 321 of 461

The following sample code pass a file named wd_firefox.txt as the command:
-selenium_workflow "@D:\tmp\selenium_wd\wd_firefox.txt"
For more information, see "Using WI.exe" on page 274.
Creating a Macro Using the API
To create a macro using the API, use the following endpoint:
POST /configuration/selenium/macro
The following sample code adds a macro using cURL:
curl -X POST --header "Content-Type: application/json" -d "{\"VerifyMacro\":true,\"name\": \"test\",\"command\": \"D:\\tmp\\selenium_wd\\bin\\net35\\nunit3-console.exe \\\"D:\\tmp\\selenium_wd\\selenium_c_sharp-master\\Selenium\\ bin\\Debug\\Selenium.dll\\\"\",\"allowedHosts\": [\"http://zero.webappsecurity.com\"]}" http://localhost:8083/webinspect/configuration/selenium/macro
The following sample code starts a scan using cURL:
curl.exe -X POST --header "Content-Type: application/json" --header "Accept: application/json" -d "{\"settingsName\": \"Default\", \"overrides\": { \"startOption\": \"macro\", \"workflowMacros\": [\"test \"],\"AllowedHosts\":[\"\\*\"] , \"crawlAuditMode\": \"auditOnly\" } }" http://localhost:8083/webinspect/scanner/scans
Complete usage information and sample code are included in the Swagger UI, and objects are similar to those described in "Running a Scan Using WI.exe" on the previous page. For more information, see "Using the Swagger UI" on page 299.
The WorkingDirectory and AllowedHosts arguments are optional. In some cases, AllowedHosts can be determined automatically. However, Fortify recommends that you set AllowedHosts for each macro.
In some cases, you must set the Working Directory path, which is the "current working directory," for the WorkingDirectory argument.
About the Burp API ExtensionThe Burp Suite is a toolkit for performing security testing of web applications. Fortify WebInspect includes a Burp extension that allows Burp Suite users to connect Fortify WebInspect to Burp via the Fortify WebInspect API.
User GuideChapter 5: Using WebInspect Features
Micro Focus Fortify WebInspect (21.1.0) Page 322 of 461

Benefits of Using the Burp API Extension
Connecting Fortify WebInspect to Burp provides the following benefits:
l Create Burp issues with vulnerabilities from a Fortify WebInspect scan
l Request vulnerabilities detected in a currently running or completed scan
l Request vulnerabilities based on a specified criteria, such as Severity
Note: Fortify WebInspect check IDs and names do not map to Burp issue IDs and names.
l Select sessions in Burp and send to Fortify WebInspect
Note: Sessions could be selected for the following reasons:
l Locations that need to be added to Fortify WebInspect’s crawl in a running scan
l New vulnerabilities that need to be added to a running scan
l New vulnerabilities that need to be added to a completed scan
l Get Scan Information from Fortify WebInspect
l Get status of a specific scan
l Get a list of scans available in the currently connected Fortify WebInspect database
l Get a list of scans based on scan status (Running/Complete)
Supported Versions
The Fortify WebInspect Burp API extension is compatible with the new Burp Extension API.
See Also
"Fortify WebInspect REST API" on page 296
"Using the Burp API Extension" below
Using the Burp API ExtensionThis topic describes how to set up and use the Fortify WebInspect Burp extension.
User GuideChapter 5: Using WebInspect Features
Micro Focus Fortify WebInspect (21.1.0) Page 323 of 461

Loading the Burp Extension
Perform the following steps in Burp to load the Fortify WebInspect Burp extension:
1. On the Extender tab, select Extensions and click Add.
The Load Burp Extension window appears.
2. In the Extension file (.jar) field, click Select file and navigate to the WebInspectBurpExtension.jar file.
Tip: The WebInspectBurpExtension.jar file can be found in the Extensions directory in the Fortify WebInspect installation location. The default location is one of the following:
C:\Program Files\Fortify\Fortify WebInspect\Extensions
C:\Program Files (x86)\Fortify\Fortify WebInspect\Extensions
3. Ensure that the Show in UI option is selected under the Standard Output and Standard Error sections.
4. Click Next.
User GuideChapter 5: Using WebInspect Features
Micro Focus Fortify WebInspect (21.1.0) Page 324 of 461

WebInspect Connector appears in the list of Burp Extensions and a tab labeled "WebInspect" is added to the Burp user interface. If you do not see the WebInspect tab, then the Burp extension did not load correctly. In this case, look in the Output and Errors tabs for information that may help you to troubleshoot the issue.
Connecting to Fortify WebInspect
Perform the following steps in Burp to connect to Fortify WebInspect:
1. Ensure that the WebInspect API service is running. For more information, see "Micro Focus Fortify Monitor " on page 104.
2. On the WebInspect > Configure tab, do the following:
a. If the API requires HTTPS authentication, select the HTTPS check box.
b. Type the Host name and Port number for the Fortify WebInspect API service.
c. If the API is configured to require authentication, type the Username and Password.
d. Click Options to configure proxy settings for the API HTTP requests.
User GuideChapter 5: Using WebInspect Features
Micro Focus Fortify WebInspect (21.1.0) Page 325 of 461

A proxy settings window appears.
e. Select the Use Proxy checkbox, and type the Proxy Host name and the Proxy Port number.
f. Click Save.
3. Click Connect.
User GuideChapter 5: Using WebInspect Features
Micro Focus Fortify WebInspect (21.1.0) Page 326 of 461

A list of Fortify WebInspect scans should appear in the WebInspect tab.
Refreshing the List of Scans
To update the list of Fortify WebInspect scans, click Refresh Scans.
Working with a Scan in Burp
Perform the following steps in Burp to work with a Fortify WebInspect scan:
1. Do one of the following to open a scan:
l Double-click on a scan in the list.
l Select a scan in the list and click Open Scan.
User GuideChapter 5: Using WebInspect Features
Micro Focus Fortify WebInspect (21.1.0) Page 327 of 461

The scan opens in a new tab under the WebInspect tab, with Crawl sessions and Vulnerable sessions listed. The list of sessions is automatically sorted by Type with Vulnerabilities first followed by Crawl sessions.
2. To re-sort on a sorted column in reverse order, click the column heading. To sort the list using different sort criteria, click the heading of the column you want to sort by. The following table describes some sort scenarios:
If you... Then Sort By...
Have multiple hosts in the scan and want to group sessions by hosts
Host
Want to see all sessions that used a specific method
Method and scroll to the specific method you want
Want to see all sessions affecting a specific page in your Web site
URL and scroll to the specific page you want
Want to select all sessions with Critical and High severities and send them to a Burp tool
Severity and scroll to the sessions with Critical and High severities
Want to select all sessions with the same check name
Name and scroll to the specific check name you want
User GuideChapter 5: Using WebInspect Features
Micro Focus Fortify WebInspect (21.1.0) Page 328 of 461

3. To update the list of sessions—such as when Burp is connected to a scan that is still running—click Refresh Sessions.
4. To view the request for a session, click the session in the list.
The session request information appears at the bottom of the window. Click the request to see the response.
5. To send one or more sessions to a Burp tool for further analysis, select the session(s), right-click and select the appropriate "Send To" option.
Note: Current options are Send To Spider, Send To Intruder, and Send To Repeater. For more information about Burp tools, see the Burp Suite documentation.
6. To create an issue for a Vulnerable session and add it to the Scanner tab in Burp, right-click on the session and select Create Issue.
The issue is populated with report data from Fortify WebInspect and the issue name is tagged with [WebInspect] to indicate that the issue was added from an external resource.
Note: The Create Issue option is only available in the Burp Professional Edition and is not available for Crawl sessions.
7. To continue a stopped scan, click Resume Scan.
8. To close the Fortify WebInspect scan, click Close Tab.
User GuideChapter 5: Using WebInspect Features
Micro Focus Fortify WebInspect (21.1.0) Page 329 of 461

Sending Items from Burp to Fortify WebInspect
Perform the following steps in Burp to send requests/responses and issues to Fortify WebInspect to be crawled:
1. Ensure that the desired Fortify WebInspect scan is open in the WebInspect tab.
Tip: The Send To WebInspect option will not be available in the context menu if a Fortify WebInspect scan is not open in Burp.
2. Click the Scanner tab and then the Results tab.
3. To send a request/response to Fortify WebInspect to be crawled, right click the request and select Send To WebInspect > [scan name].
Fortify WebInspect creates a session for the request that is ready to be crawled. You can return to the scan in the WebInspect tab and click Resume Scan to crawl the session.
Note: Scan settings for the open scan apply to the session being sent. This may affect what Fortify WebInspect does with the session. For instance, if the open scan is for Host A and you send a session from Host B, but Host B is not in the Allowed Hosts list for the open scan, the session will be excluded and will not be crawled.
4. To send an issue to Fortify WebInspect as a manual finding, right click the issue and select Send To WebInspect > [scan name].
User GuideChapter 5: Using WebInspect Features
Micro Focus Fortify WebInspect (21.1.0) Page 330 of 461

The issue is populated with report data from Burp and the issue name is tagged with [Burp] to indicate that the issue was added from an external resource.
See Also
"About the Burp API Extension" on page 322
"Fortify WebInspect REST API" on page 296
"Micro Focus Fortify Monitor " on page 104
About the WebInspect SDKThe WebInspect Software Development Kit (SDK) is a Visual Studio extension that enables software developers to create an audit extension to test for a specific vulnerability in a session response.
Caution! Fortify recommends that the WebInspect SDK be used only by qualified software developers who have expertise in developing code using Visual Studio.
Audit Extensions / Custom Agents
The WebInspect SDK provides the developer with entry points into the Fortify WebInspect code. When Fortify WebInspect creates a request/response pair, the developer can examine the response and create
User GuideChapter 5: Using WebInspect Features
Micro Focus Fortify WebInspect (21.1.0) Page 331 of 461

an audit extension that will flag a vulnerability. After the extension has been created, the developer sends it to the local copy of SecureBase, the Fortify WebInspect database of adaptive agents and vulnerability checks, where it is stored as a custom agent. The custom agent is assigned a Globally Unique Identifier (GUID) and becomes available for use in policies in the Policy Manager for a Fortify WebInspect product.
Note: Custom agents will not be overwritten by SecureBase updates.
When inspecting the scan results, you can perform the same actions—such as Copy URL and Review Vulnerability—on a vulnerability discovered by a custom agent as you can a vulnerability discovered by a standard check. For more information, see "Inspecting the Results" on page 232.
SDK Functionality
The SDK provides developers with the functionality to:
l Inspect sessions generated by the Fortify WebInspect crawler and auditor
l Inject values into parameters (parameter and sub-parameter fuzzing)
l Queue a URL for crawling (for the Fortify WebInspect crawler to crawl)
l Flag a vulnerability
l Send a raw HTTP request through the Fortify WebInspect requestor
l Request and response parsing via ParseLib
l Log events and errors
Installation Recommendation
The WebInspect SDK does not need to be installed on the same machine as a Fortify WebInspect product. In most cases, it will be installed on the software developer’s development machine. However, if you are developing new extensions that will require debugging, Fortify recommends that you install Fortify WebInspect on the development machine where you will be creating the extension. Doing so will allow you to test your extension locally. For existing extensions that do not require debugging, you do not need to install Fortify WebInspect locally.
Refer to the Micro Focus Fortify Software System Requirements document for minimum requirements for installing and using the WebInspect SDK.
Installing the WebInspect SDK
To use the WebInspect SDK, the developer must install a Visual Studio extension file named WebInspectSDK.vsix.
During installation of Fortify WebInspect, a copy of the WebInspectSDK.vsix file is installed in the Extensions directory in the Fortify WebInspect installation location. The default location is one of the following:
l C:\Program Files\Fortify\Fortify WebInspect\Extensions
l C:\Program Files (x86)\Fortify\Fortify WebInspect\Extensions
User GuideChapter 5: Using WebInspect Features
Micro Focus Fortify WebInspect (21.1.0) Page 332 of 461

To install the local copy where Fortify WebInspect is installed on the developer's machine:
1. Navigate to the Extensions folder and double click the WebInspectSDK.vsix file.
The VSIX Installer is launched.
2. When prompted, select the Visual Studio product(s) to which you want to install the extension and click Install.The WebInspect Audit Extension project template is created in Visual Studio. Continue with "Verifying the Installation" below.
To install the local copy where Fortify WebInspect is NOT installed on the developer's machine:
1. Navigate to the Extensions folder and copy the WebInspectSDK.vsix file to portable media, such as a USB drive.
2. Insert the drive into the development box that has Visual Studio 2013 installed, as well as the related required software and hardware.
3. Navigate to the USB drive and double click the WebInspectSDK.vsix file.
The VSIX Installer is launched.
4. When prompted, select the Visual Studio product(s) to which you want to install the extension and click Install.The WebInspect Audit Extension project template is created in Visual Studio. Continue with "Verifying the Installation" below.
Verifying the Installation
To verify that the extension was successfully installed:
1. In Visual Studio, select Tools > Extensions and Updates.
2. Scroll down the list of extensions.
If you see WebInspect SDK in the list, the extension was installed successfully.
After Installation
After installing and configuring the WebInspect SDK, the developer can create a new WebInspect Audit Extension project in Visual Studio. In this project, the developer will create an audit extension, debug and test the extension, and publish the extension to SecureBase as a custom agent. For information about using the WebInspect Audit Extension project template, refer to the WebInspect SDK documentation in Visual Studio.
After the developer has sent the custom agent to SecureBase, the agent can be selected in policies in the Policy Manager. See the Policy Manager documentation for more information.
Add Page or Directory If you use manual inspection or other security analysis tools to detect resources that Fortify WebInspect did not discover, you can add these locations manually and assign a vulnerability to them. Incorporating
User GuideChapter 5: Using WebInspect Features
Micro Focus Fortify WebInspect (21.1.0) Page 333 of 461
the data into a Fortify WebInspect scan allows you to report and track vulnerabilities using Fortify WebInspect features.
Note: When creating additions to the data hierarchy, you must manually add resources in a logical sequence. For example, to create a subdirectory and page, you must create the subdirectory before creating the page.
1. Replace the default name of the page or directory with the name of the resource to be added.
2. If necessary, edit the HTTP request and response. Do not change the request path.
3. You can send a request to the resource and record the response in the session data. This will also verify the existence of the resource that was not discovered by Fortify WebInspect:
a. Click HTTP Editor to open the HTTP Editor.
b. If necessary, modify the request.
c. Click . d. Close the HTTP Editor.
e. When prompted to use the modified request and response, select Yes.
4. (Optional) To delete all request and response modifications, click Reset.
5. When finished, click OK.
Add Variation If you use manual inspection or other security analysis tools to detect resources that Fortify WebInspect did not discover, you can add these locations manually and assign a vulnerability to them. Incorporating the data into a Fortify WebInspect scan allows you to report and track vulnerabilities using Fortify WebInspect features.
A variation is a subnode of a location that lists particular attributes for that location. For example, the login.asp location might have the variation:
(Post) uid=12345&Password=foo&Submit=Login
Variations, like any other location, can have vulnerabilities attached to them, as well as subnodes.
1. In the Name box, replace the default "attribute=value" with the actual parameters to be sent (for example, uid=9999&Password=kungfoo&Submit=Login.
2. Select either Post or Query.
3. If necessary, edit the HTTP request and response. Do not change the request path.
4. You can send a request to the resource and record the response in the session data. This will also verify the existence of the resource that was not discovered by Fortify WebInspect:
a. Click HTTP Editor to open the HTTP Editor.
b. If necessary, modify the request.
c. Click .
User GuideChapter 5: Using WebInspect Features
Micro Focus Fortify WebInspect (21.1.0) Page 334 of 461

d. Close the HTTP Editor.
e. When prompted to use the modified request and response, select Yes.
5. (Optional) To delete all request and response modifications, click Reset.
6. When finished, click OK.
Fortify Monitor: Configure Enterprise Server Sensor This configuration information is used for integrating Fortify WebInspect into Fortify WebInspect Enterprise as a sensor. After providing the information and starting the sensor service, you should conduct scans using the Fortify WebInspect Enterprise Web console, not the Fortify WebInspect graphical user interface.
The sensor configuration items are described in the following table.
Item Description
Manager URL Enter the URL or IP address of the Enterprise Server Manager.
Sensor Authentication
Enter a user name (formatted as domain\username) and password, then click Test to verify the entry.
Enable Proxy If Fortify WebInspect must go through a proxy server to reach the Enterprise Server manager, select Enable Proxy and then provide the IP address and port number of the server. If authentication is required, enter a valid user name and password.
Override Database Settings
Fortify WebInspect normally stores scan data in the device you specify in the Application Settings for Fortify WebInspect Database. However, if Fortify WebInspect is connected to Fortify WebInspect Enterprise as a sensor, you can select this option and then click Configure to specify an alternative device.
Service Account You can log on to the sensor service using either the LocalSystem account or an account you specify.
Sensor Status This area displays the current status of the Sensor Service and provides buttons allowing you to start or stop the service.
After Configuring as a Sensor
After configuring Fortify WebInspect as a sensor, click Start.
User GuideChapter 5: Using WebInspect Features
Micro Focus Fortify WebInspect (21.1.0) Page 335 of 461

Blackout Period When Fortify WebInspect is connected to Fortify WebInspect Enterprise, a user may attempt to conduct a scan during a blackout period, which is a block of time during which scans are not permitted by the enterprise manager. When this occurs, the following error message appears:
"Cannot start Scanner because the start URL is under the following blackout period(s)..."
You must wait until the blackout period ends before conducting the scan.
Similarly, if a scan is running when a blackout period begins, the enterprise manager will suspend the scan, place it in the pending job queue, and finish the scan when the blackout period ends. In cases where a blackout is defined for multiple IP addresses, the enterprise manager will suspend the scan only if the scan begins at one of the specified IP addresses. If the scan begins at a non-excluded IP address, but subsequently pursues a link to a host whose IP address is specified in the blackout setting, the scan will not be suspended.
Creating an Exclusion To add exclusion/rejection criteria:
1. Click Add (on the right side of the Other Exclusion/Rejection Criteria list).
The Create Exclusion window opens.
2. Select an item from the Target list.
3. If you selected Query Parameter, Post Parameter, or Response Header as the target, enter the Target Name.
4. From the Match Type list, select the method to be used for matching text in the target:
l Matches Regex - Matches the regular expression you specify in the Match String box.
l Matches Regex Extension - Matches a syntax available from Fortify's regular expression extensions you specify in the Match String box. For more information, see "Regex Extensions" on page 294.
l Matches - Matches the text string you specify in the Match String box.
l Contains - Contains the text string you specify in the Match String box.
5. In the Match String box, enter the string or regular expression for which the target will be searched. Alternatively, if you selected a regular expression option in the Match Type, you can click the drop-down arrow and select Create Regex to launch the Regular Expression Editor.
6. Click . 7. (Optional) Repeat steps 2-6 to add more conditions. Multiple matches are ANDed.
8. If you are working in Current Settings, you can click Test to process the exclusions on the current scan. Any sessions from that scan that would have been filtered by the criteria will appear in the
User GuideChapter 5: Using WebInspect Features
Micro Focus Fortify WebInspect (21.1.0) Page 336 of 461

test screen, allowing you to modify your settings if required.
9. Click OK.
10. When the exclusion appears in the Other Exclusion/Rejection Criteria list, select either Reject, Exclude, or both.
Note: You cannot reject Response, Response Header, and Status Code Target types during a scan. You can only exclude these Target types.
Example 1
To ensure that you ignore and never send requests to any resource at Microsoft.com, enter the following exclusion and select Reject.
Target Target Name Match Type Match String
URL N/A contains Microsoft.com
Example 2
Enter "logout" as the match string. If that string is found in any portion of the URL, the URL will be excluded or rejected (depending on which option you select). Using the "logout" example, Fortify WebInspect would exclude or reject URLs such as logout.asp or applogout.jsp.
Target Target Name Match Type Match String
URL N/A contains logout
Example 3
The following example rejects or excludes a session containing a query where the query parameter "username" equals "John."
Target Target Name Match Type Match String
Query parameter username matches John
Example 4
The following example excludes or rejects the following directories:
http://www.test.com/W3SVC55/
User GuideChapter 5: Using WebInspect Features
Micro Focus Fortify WebInspect (21.1.0) Page 337 of 461

http://www.test.com/W3SVC5/
http://www.test.com/W3SVC550/
Target Target Name Match Type Match String
URL N/A matches regex /W3SVC[0-9]*/
Internet Protocol Version 6 Fortify WebInspect (beginning with version 8.1) supports Internet Protocol version 6 (IPv6) addresses in web site and web service scans. When you specify the Start URL, you must enclose the IPv6 address in brackets. For example:
l http://[::1]
Fortify WebInspect scans "localhost."
l http://[fe80::20c:29ff:fe32:bae1]??/subfolder/??
Fortify WebInspect scans the host at the specified address starting in the "subfolder" directory.
l http://[fe80::20c:29ff:fe32:bae1]??:8080/subfolder/??
Fortify WebInspect scans a server running on port 8080 starting in "subfolder."
User GuideChapter 5: Using WebInspect Features
Micro Focus Fortify WebInspect (21.1.0) Page 338 of 461

Chapter 6: Default Scan SettingsThis chapter describes the Default Scan Settings. Use Default Settings to establish scanning parameters for your scan actions. Fortify WebInspect uses these options unless you specify alternatives while initiating a scan (using the options available through the Scan Wizard or by accessing Current Settings).
See Also
"Crawl Settings" on page 384
"Audit Settings" on page 395
Scan Settings: Method To access this feature, click the Edit menu and select Default Scan Settings or Current Scan Settings. Then, in the Scan Settings category, select Method.
Scan Mode
The Scan Mode options are described in the following table.
Option Description
Crawl Only This option completely maps a site's tree structure. After a crawl has been completed, you can click Audit to assess an application’s vulnerabilities.
Crawl and Audit As Fortify WebInspect maps the site's hierarchical data structure, it audits each resource (page) as it is discovered (rather than crawling the entire site and then conducting an audit). This option is most useful for extremely large sites where the content may possibly change before the crawl can be completed. This is described in the Default Settings Crawl and Audit Mode option called Simultaneously. For more information, see "Crawl and Audit Mode" on the next page.
Audit Only Fortify WebInspect applies the methodologies of the selected policy to determine vulnerability risks, but does not crawl the Web site. No links on the site are followed or assessed.
Manual
(Not available for Guided Scan)
Manual mode allows you to navigate manually to whatever sections of your application you choose to visit. It does not crawl the entire site, but records information only about those resources that you encounter while manually
Micro Focus Fortify WebInspect (21.1.0) Page 339 of 461
Option Description
navigating the site. This feature is used most often to enter a site through a Web form logon page or to define a discrete subset or portion of the application that you want to investigate. After you finish navigating through the site, you can audit the results to assess the security vulnerabilities related to that portion of the site that you recorded.
Crawl and Audit Mode
The Crawl and Audit Mode options are described in the following table.
Option Description
Simultaneously As Fortify WebInspect maps the site's hierarchical data structure, it audits each resource (page) as it is discovered (rather than crawling the entire site and then conducting an audit). This option is most useful for extremely large sites where the content may possibly change before the crawl can be completed.
Sequentially In this mode, Fortify WebInspect crawls the entire site, mapping the site's hierarchical data structure, and then conducts a sequential audit, beginning at the site's root.
Crawl and Audit Details
The Crawl and Audit Details options are described in the following table.
Option Description
Include search probes (send search attacks)
If you select this option, Fortify WebInspect will send requests for files and directories that might or might not exist on the server, even if those files are not found by crawling the site.
This option is selected by default only when the Scan Mode is set to Crawl & Audit. The option is cleared(unchecked) by default when the Scan Mode is set to Crawl Only or Audit Only.
Crawl links on File Not Found responses
If you select this option, Fortify WebInspect will look for and crawl links on responses that are marked as “file not found.”
This option is selected by default when the Scan Mode is set to Crawl Only or Crawl & Audit. The option is not available when the Scan Mode is set to
User GuideChapter 6: Default Scan Settings
Micro Focus Fortify WebInspect (21.1.0) Page 340 of 461

Option Description
Audit Only.
Navigation
The Navigation options are described in the following table.
Option Description
Auto-fill Web forms during crawl
If you select this option, Fortify WebInspect submits values for input controls found on all forms. The values are extracted from a file you create using the Web form editor. Use the browse button to specify the file containing the values you want to use. Alternatively, you can select the
Edit button (to modify the currently selected file) or the Create
button (to create a Web form file).
Caution! Do not rely on this feature for authentication. If the crawler and the auditor are configured to share state, and if Fortify WebInspect never inadvertently logs out of the site, then using values extracted by the Web Form Editor for a login form may work. However, if the audit or the crawl triggers a logout after the initial login, then Fortify WebInspect will not be able to log in again and the auditing will be unauthenticated. To prevent Fortify WebInspect from terminating prematurely if it inadvertently logs out of your application, go to Scan Settings - Authentication and select Use a login macro for forms authentication.
Prompt for Web form values
If you select this option, Fortify WebInspect pauses the scan when it encounters an HTTP or JavaScript form and displays a window that allows you to enter values for input controls within the form. However, if you also select Only prompt for tagged inputs, Fortify WebInspect will not pause for user input unless a specific input control has been designated Mark as Interactive Input (using the Web Form Editor). This pausing for input is termed "interactive mode" and you can cancel it at any time during the scan.
For more information about configuring an interactive scan, see "Interactive Scans" on page 180.
Use Web Service Design
This option applies only to Web Service scans.
When performing a Web service scan, Fortify WebInspect crawls the WSDL
User GuideChapter 6: Default Scan Settings
Micro Focus Fortify WebInspect (21.1.0) Page 341 of 461

Option Description
site and submits a value for each parameter in each operation. These values are contained in a file that you create using the Web Service Test Designer tool. Fortify WebInspect then audits the site by attacking each parameter in an attempt to detect vulnerabilities such as SQL injection.
Use the browse button to specify the file containing the values you want to
use. Alternatively, you can select the Edit button (to modify the
currently selected file) or the Create button (to create a SOAP values file).
SSL/TLS Protocols
Secure Sockets Layer (SSL) and Transport Layer Security (TLS) protocols provide secure HTTP (HTTPS) connections for Internet transactions between Web browsers and Web servers. SSL/TLS protocols enable server authentication, client authentication, data encryption, and data integrity for Web applications.
Note: If Use OpenSSL Engine is selected in Application Settings, the SSL/TLS Protocols options are disabled. You cannot select individual protocols. For more information, see "Application Settings: General" on page 404.
Select the SSL/TLS protocol(s) used by your Web server. The following options are available:
l Use SSL 2.0
l Use SSL 3.0
l Use TLS 1.0
l Use TLS 1.1
l Use TLS 1.2
If you do not configure the SSL/TLS protocol to match your Web server, Fortify WebInspect will still connect to the site, though there may be a performance impact.
For example, if the setting in Fortify WebInspect is configured to Use SSL 3.0 only, but the Web server is configured to accept TLS 1.2 connections only, Fortify WebInspect will first try to connect with SSL 3.0, but will fail. Fortify WebInspect will then implement each protocol until it discovers that TLS 1.2 is supported. The connection will then succeed, although more time will have been spent in the effort. The correct setting (Use TLS 1.2) in Fortify WebInspect would have succeeded on the first try.
Scan Settings: GeneralTo access this feature, click the Edit menu and select Default Scan Settings or Current Scan Settings. Then, in the Scan Settings category, select General.
User GuideChapter 6: Default Scan Settings
Micro Focus Fortify WebInspect (21.1.0) Page 342 of 461

Scan Details
The Scan Details options are described in the following table.
Option Description
Enable Path Truncation
Path truncation attacks are requests for known directories without file names. This may cause directory listings to be displayed. Fortify WebInspect truncates paths, looking for directory listings or unusual errors within each truncation.
Example: If a link consists of http://www.site.com/folder1/folder2/file.asp, then truncating the path to look for http://www.site.com/folder1/folder2/ and http://www.site.com/folder1/ may cause the server to reveal directory contents or may cause unhandled exceptions.
Case-sensitive request and response handling
Select this option if the server at the target site is case-sensitive to URLs.
Recalculate correlation data
This option is used only for comparing scans. The setting should be changed only upon the advice of Fortify Customer Support personnel.
Compress response data
If you select this option, Fortify WebInspect saves disk space by storing each HTTP response in a compressed format in the database.
Enable Traffic Monitor Logging
During a Basic Scan, Fortify WebInspect displays in the navigation pane only those sessions that reveal the hierarchical structure of the Web site plus those sessions in which a vulnerability was discovered. However, if you select the Traffic Monitor option, Fortify WebInspect adds the Traffic Monitor button to the Scan Info panel, allowing you to display and review every single HTTP request sent by Fortify WebInspect and the associated HTTP response received from the server.
Encrypt Traffic Monitor File
All sessions are normally recorded in the traffic monitor file as clear text. If you are concerned about storing sensitive information such as passwords on your computer, you can elect to encrypt the file.
Encrypted files cannot be compressed. Selecting this option will significantly increase the size of exported scans containing log files.
Note: The Traffic Viewer tool does not support the encryption of traffic files. The Encrypt Traffic Monitor File option is reserved for
User GuideChapter 6: Default Scan Settings
Micro Focus Fortify WebInspect (21.1.0) Page 343 of 461

Option Description
use under special circumstances with legacy traffic files only.
Maximum crawl-audit recursion depth
When an attack reveals a vulnerability, Fortify WebInspect crawls that session and follows any link that may be revealed. If that crawl and audit reveals a link to yet another resource, the depth level is incremented and the discovered resource is crawled and audited. This process can be repeated until no other links are found. However, to avoid the possibility of entering an endless loop, you may limit the number of recursions. The default value is 2. The maximum recursion level is 1,000.
Crawl Details
By default, Fortify WebInspect uses breadth-first crawling, which begins at the root node and explores all the neighboring nodes (one level down). Then for each of those nearest nodes, it explores their unexplored neighbor nodes, and so on, until all resources are identified. The following illustration depicts the order in which linked pages are accessed using a breadth-first crawl. Node 1 has links to nodes 2, 3, and 4. Node 2 has links to nodes 5 and 6.
You cannot change this crawling method in the user interface. However, the configurable Crawl Details options are described in the following table.
Option Description
Enable keyword search audit
A keyword search, as its name implies, uses an attack engine that examines server responses and searches for certain text strings that typically indicate a vulnerability. Normally, this engine is not used during a crawl-only scan, but you can enable it by selecting this option.
Perform redundant page detection
Highly dynamic sites could create an infinite number of resources (pages) that are virtually identical. If allowed to pursue each resource, Fortify WebInspect would never be able to finish the scan. This option compares
User GuideChapter 6: Default Scan Settings
Micro Focus Fortify WebInspect (21.1.0) Page 344 of 461

Option Description
page structure to determine the level of similarity, allowing Fortify WebInspect to identify and exclude processing of redundant resources.
Important! Redundant page detection works in the crawl portion of the scan. If the audit introduces a session that would be redundant, the session will not be excluded from the scan.
You can configure the following settings for redundant page detection:
l Page Similarity Threshold – indicates how similar two pages must be to be considered redundant. Enter a percentage from 0 to 100, where 100 is an exact match. The default setting is 95 percent.
l Tag attributes to include - identifies the tag attributes to include in the page structure. Typically, tag attributes and their values are dropped when determining structure. Identifying tag attributes in this field in a comma-separated list adds those attributes and their values in the page
structure. By default, "id,class" tag attributes are included.
Tip: Certain sites may be primarily composed of one type of tag,
such as <div>. Including these attributes creates a more rigid page match. Excluding these attributes creates a less strict match.
Limit maximum single URL hits to
Sometimes, the configuration of a site will cause a crawl to loop endlessly through the same URL. Use this field to limit the number of times a single URL will be crawled. The default value is 5.
Include parameters in hit count
If you select Limit maximum single URL hits to (above), a counter is incremented each time the same URL is encountered. However, if you also select Include parameters in hit count, then when parameters are appended to the URL specified in the HTTP request, the crawler will crawl that resource up to the single URL limit. Any differing set of parameters is treated as unique and has a separate count.
For example, if this option is selected, then "page.aspx?a=1" and "page.apsx?b=1" will both be counted as unique resources (meaning that the crawler has found two pages).
If this option is not selected, then "page1.aspx?a=1" and "page.aspx?b=1" will be treated as the same resource (meaning that the crawler has found the same page twice).
Note: This setting applies to both GET and POST parameters.
User GuideChapter 6: Default Scan Settings
Micro Focus Fortify WebInspect (21.1.0) Page 345 of 461

Option Description
Limit maximum directory hit count to
This setting defines the maximum number of sub-directories and pages to be traversed within each directory during the crawl. This setting reduces the scope of the crawl and might be useful in reducing scan times for some sites, such as those consisting of a content management system (CMS). The default setting is 200.
Minimum folder depth If you select Limit maximum directory hit count to (above), this setting defines the folder depth at which the maximum directory hit count will begin to apply. The default setting is 1.
Limit maximum link traversal sequence to
This option restricts the number of hyperlinks that can be sequentially accessed as Fortify WebInspect crawls the site. For example, if five resources are linked as follows
l Page A contains a hyperlink to Page B
l Page B contains a hyperlink to Page C
l Page C contains a hyperlink to Page D
l Page D contains a hyperlink to Page E
and if this option is set to "3," then Page E will not be crawled. The default value is 15.
Limit maximum crawl folder depth to
This option limits the number of directories that may be included in a single request. The default value is 15.
For example, if the URL is
http://www.mysite.com/Dir1/Dir2/Dir3/Dir4/Dir5/Dir6/Dir7
and this option is set to "4," then the contents of directories 5, 6, and 7 will not be crawled.
Limit maximum crawl count to
This feature restricts the number of HTTP requests sent by the crawler and should be used only if you experience problems completing a scan of a large site.
Note: The limit set here does not directly correlate to the Crawled progress bar that is displayed during a scan. The maximum crawl count set here applies to links found by the Crawler during a crawl of the application. The Crawled progress bar includes all sessions (requests and responses) that are parsed for links during a crawl and audit, not just the links found by the Crawler during a crawl.
User GuideChapter 6: Default Scan Settings
Micro Focus Fortify WebInspect (21.1.0) Page 346 of 461

Option Description
Limit maximum Web form submission to
Normally, when Fortify WebInspect encounters a form that contains controls having multiple options (such as a list box), it extracts the first option value from the list and submits the form; it then extracts the second option value and resubmits the form, repeating this process until all option values in the list have been submitted. This ensures that all possible links will be followed.
There are occasions, however, when submitting the complete list of values would be counterproductive. For example, if a list box named "State" contains one value for each of the 50 states in the United States, there is probably no need to submit 50 instances of the form.
Use this setting to limit the total number of submissions that Fortify WebInspect will perform. The default value is 3.
Suppress Repeated Path Segments
Many sites have text that resembles relative paths that become unusable URLs after Fortify WebInspect parses them and appends them to the URL being crawled. These occurrences can result in a runaway scan if paths are
continuously appended, such as /foo/bar/foo/bar/. This setting helps reduce such occurrences and is enabled by default.
With the setting enabled, the options are:
1 – Detect a single sub-folder repeated anywhere in the URL and reject the
URL if there is a match. For example, /foo/baz/bar/foo/ will match because “/foo/” is repeated. The repeat does not have to occur adjacently.
2 – Detect two (or more) pairs of adjacent sub-folders and reject the URL if
there is a match. For example, /foo/bar/baz/foo/bar/ will match because “/foo/bar/” is repeated.
3 – Detect two (or more) sets of three adjacent sub-folders and reject the URL if there is a match.
4 – Detect two (or more) sets of four adjacent sub-folders and reject the URL if there is a match.
5 – Detect two (or more) sets of five adjacent sub-folders and reject the URL if there is a match.
If the setting is disabled, repeating sub-folders are not detected and no URLs are rejected due to matches.
User GuideChapter 6: Default Scan Settings
Micro Focus Fortify WebInspect (21.1.0) Page 347 of 461
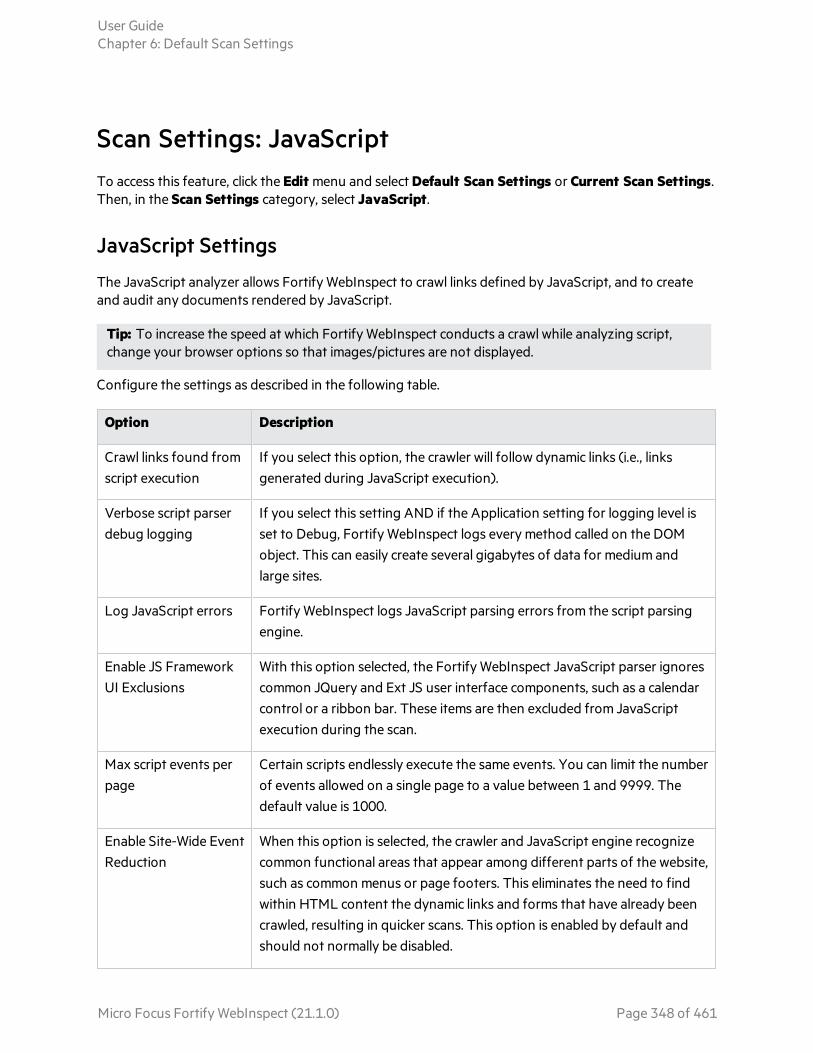
Scan Settings: JavaScriptTo access this feature, click the Edit menu and select Default Scan Settings or Current Scan Settings. Then, in the Scan Settings category, select JavaScript.
JavaScript Settings
The JavaScript analyzer allows Fortify WebInspect to crawl links defined by JavaScript, and to create and audit any documents rendered by JavaScript.
Tip: To increase the speed at which Fortify WebInspect conducts a crawl while analyzing script, change your browser options so that images/pictures are not displayed.
Configure the settings as described in the following table.
Option Description
Crawl links found from script execution
If you select this option, the crawler will follow dynamic links (i.e., links generated during JavaScript execution).
Verbose script parser debug logging
If you select this setting AND if the Application setting for logging level is set to Debug, Fortify WebInspect logs every method called on the DOM object. This can easily create several gigabytes of data for medium and large sites.
Log JavaScript errors Fortify WebInspect logs JavaScript parsing errors from the script parsing engine.
Enable JS Framework UI Exclusions
With this option selected, the Fortify WebInspect JavaScript parser ignores common JQuery and Ext JS user interface components, such as a calendar control or a ribbon bar. These items are then excluded from JavaScript execution during the scan.
Max script events per page
Certain scripts endlessly execute the same events. You can limit the number of events allowed on a single page to a value between 1 and 9999. The default value is 1000.
Enable Site-Wide Event Reduction
When this option is selected, the crawler and JavaScript engine recognize common functional areas that appear among different parts of the website, such as common menus or page footers. This eliminates the need to find within HTML content the dynamic links and forms that have already been crawled, resulting in quicker scans. This option is enabled by default and should not normally be disabled.
User GuideChapter 6: Default Scan Settings
Micro Focus Fortify WebInspect (21.1.0) Page 348 of 461

Option Description
SPA Support SPA support applies to single-page applications. When enabled, the DOM script engine finds JavaScript includes, frame and iframe includes, CSS file includes, and AJAX calls during the crawl, and then audits all traffic generated by those events.
Options for SPA support are:
l Automatic - If Fortify WebInspect detects a SPA framework, it automatically switches to SPA-support mode.
l Enabled - Indicates that SPA frameworks are used in the target application.
Caution! SPA support should be enabled for single-page applications only. Enabling SPA support to scan a non-SPA website will result in a slow scan.
l Disabled - Indicates that SPA frameworks are not used in the target application.
For more information, see "About Single-page Application Scans" on page 190.
Scan Settings: RequestorA requestor is the software module that handles HTTP requests and responses.
To access this feature, click the Edit menu and select Default Scan Settings or Current Scan Settings. Then, in the Scan Settings category, select Requestor.
Requestor Performance
The Requestor Performance options are described in the following table.
Option Description
Use a shared requestor
If you select this option, the crawler and the auditor use a common requestor when scanning a site, and each thread uses the same state, which is also shared by both modules. This replicates the technique used by previous versions of Fortify WebInspect and is suitable for use when maintaining state is not a significant consideration. You also specify the maximum number of threads (up to 75).
User GuideChapter 6: Default Scan Settings
Micro Focus Fortify WebInspect (21.1.0) Page 349 of 461

Option Description
Use separate requestors
If you select this option, the crawler and auditor use separate requestors. Also, the auditor's requestor associates a state with each thread, rather than having all threads use the same state. This method results in significantly faster scans.
When performing crawl and audit, you can specify the maximum number of threads that can be created for each requestor. The Crawl requestor thread count can be configured to send up to 25 concurrent HTTP requests before waiting for an HTTP response to the first request; the default setting is 5.
The Audit requestor thread count can be set to a maximum of 50; the default setting is 10. Increasing the thread counts may increase the speed of a scan, but might also exhaust your system resources as well as those of the server you are scanning.
Note: Depending on the capacity of the application being scanned, increasing thread counts may increase request failures due to increased load on the server, causing some responses to exceed the Request timeout setting. Request failures may reduce scan coverage because the responses that failed may have exposed additional attack surface or revealed vulnerabilities. If you notice increased request failures, you might reduce them by either increasing the Request timeout or reducing the Crawl requestor thread count and Audit requestor thread count.
Also, depending on the nature of the application being scanned, increased crawl thread counts may reduce consistency between subsequent scans of the same site due to differences in crawl request ordering. By reducing the default Crawl requestor thread count setting to 1, consistency may be increased.
Requestor Settings
The Requestor Settings options are described in the following table.
Option Description
Limit maximum response size to
Select this option to limit the size of accepted server responses, and then specify the maximum size (in kilobytes). The default is 1000 kilobytes.
User GuideChapter 6: Default Scan Settings
Micro Focus Fortify WebInspect (21.1.0) Page 350 of 461
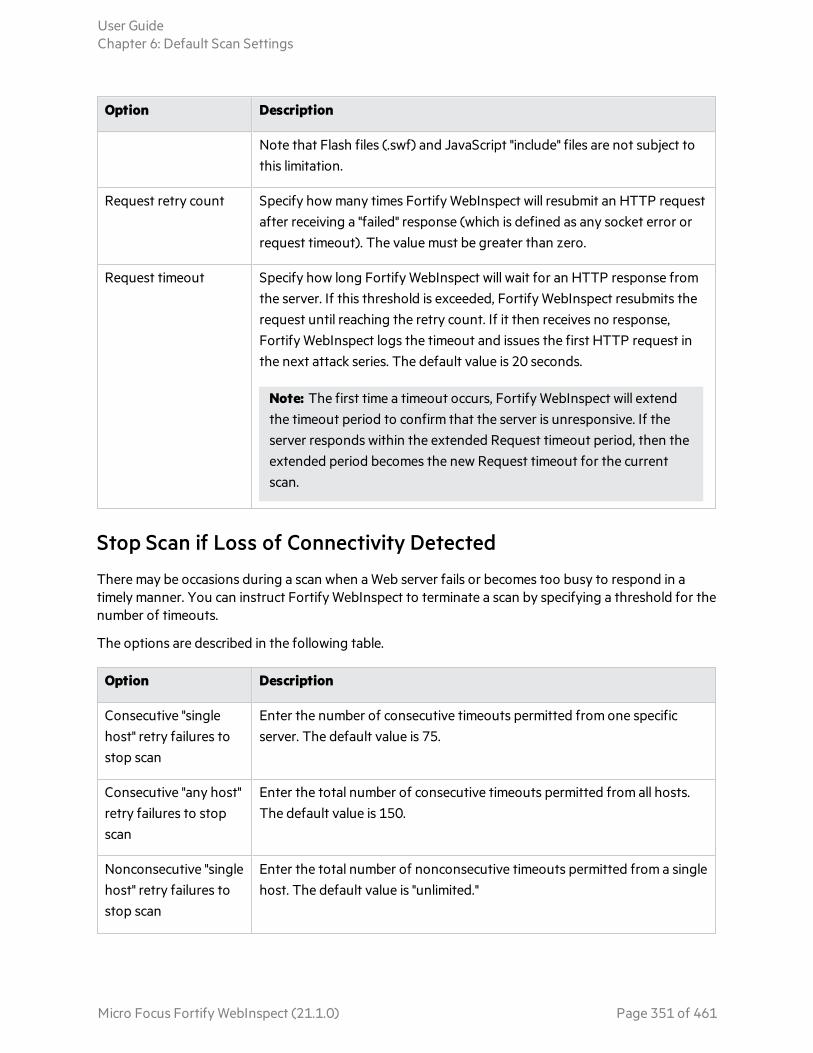
Option Description
Note that Flash files (.swf) and JavaScript "include" files are not subject to this limitation.
Request retry count Specify how many times Fortify WebInspect will resubmit an HTTP request after receiving a "failed" response (which is defined as any socket error or request timeout). The value must be greater than zero.
Request timeout Specify how long Fortify WebInspect will wait for an HTTP response from the server. If this threshold is exceeded, Fortify WebInspect resubmits the request until reaching the retry count. If it then receives no response, Fortify WebInspect logs the timeout and issues the first HTTP request in the next attack series. The default value is 20 seconds.
Note: The first time a timeout occurs, Fortify WebInspect will extend the timeout period to confirm that the server is unresponsive. If the server responds within the extended Request timeout period, then the extended period becomes the new Request timeout for the current scan.
Stop Scan if Loss of Connectivity Detected
There may be occasions during a scan when a Web server fails or becomes too busy to respond in a timely manner. You can instruct Fortify WebInspect to terminate a scan by specifying a threshold for the number of timeouts.
The options are described in the following table.
Option Description
Consecutive "single host" retry failures to stop scan
Enter the number of consecutive timeouts permitted from one specific server. The default value is 75.
Consecutive "any host" retry failures to stop scan
Enter the total number of consecutive timeouts permitted from all hosts. The default value is 150.
Nonconsecutive "single host" retry failures to stop scan
Enter the total number of nonconsecutive timeouts permitted from a single host. The default value is "unlimited."
User GuideChapter 6: Default Scan Settings
Micro Focus Fortify WebInspect (21.1.0) Page 351 of 461

Option Description
Nonconsecutive "any host" retry failures to stop scan
Enter the total number of nonconsecutive timeouts permitted from all hosts. The default value is 350.
If first request fails, stop scan
Selecting this option will force Fortify WebInspect to terminate the scan if the target server does not respond to Fortify WebInspect's first request.
Response codes to stop scan if received
Enter the HTTP status codes that, if received, will force Fortify WebInspect to terminate the scan. Use a comma to separate entries; use a hyphen to specify an inclusive range of codes.
Scan Settings: Session ExclusionsTo access this feature, click the Edit menu and select Default Scan Settings or Current Scan Settings. Then, in the Scan Settings category, select Session Exclusions.
These settings apply to both the crawl and audit phases of a Fortify WebInspect vulnerability scan. To specify exclusions for only the crawl or only the audit, use the Crawl Settings: Session Exclusions or the Audit Settings: Session Exclusions.
Excluded or Rejected File Extensions
You can identify a file type and then specify whether you want to exclude or reject it.
l Reject - Fortify WebInspect will not request files of the type you specify.
l Exclude - Fortify WebInspect will request the files, but will not attack them (during an audit) and will not examine them for links to other resources.
By default, most image, drawing, media, audio, video, and compressed file types are rejected.
To add a file extension to reject or exclude:
1. Click Add.
The Exclusion Extension window opens.
2. In the File Extension box, enter a file extension.
3. Select either Reject, Exclude, or both.
4. Click OK.
User GuideChapter 6: Default Scan Settings
Micro Focus Fortify WebInspect (21.1.0) Page 352 of 461

Excluded MIME Types
Fortify WebInspect will not process files associated with the MIME type you specify. By default, image, audio, and video types are excluded.
To add a MIME Type to exclude:
1. Click Add.
The Provide a Mime-type to Exclude window opens.
2. In the Exclude Mime-type box, enter a MIME type.
3. Click OK.
Other Exclusion/Rejection Criteria
You can identify various components of an HTTP message and then specify whether you want to exclude or reject a session that contains that component.
l Reject - Fortify WebInspect will not send any HTTP requests to the host or URL you specify. For example, you should usually reject any URL that deals with logging off the site, since you don't want to log out of the application before the scan is completed.
l Exclude - During a crawl, Fortify WebInspect will not examine the specified URL or host for links to other resources. During the audit portion of the scan, Fortify WebInspect will not attack the specified host or URL. If you want to access the URL or host without processing the HTTP response, select the Exclude option, but do not select Reject. For example, to check for broken links on URLs that you don't want to process, select only the Exclude option.
Editing Criteria
To edit the default criteria:
1. Select a criterion and click Edit (on the right side of the Other Exclusion/Rejection Criteria list).
The Reject or Exclude a Host or URL window opens.
2. Select either Host or URL.
3. In the Host/URL box, enter a URL or fully qualified host name, or a regular expression designed to match the targeted URL or host.
4. Select either Reject, Exclude, or both.
5. Click OK.
Adding Criteria
To add exclusion/rejection criteria:
1. Click Add (on the right side of the Other Exclusion/Rejection Criteria list).
The Create Exclusion window opens.
2. Select an item from the Target list.
User GuideChapter 6: Default Scan Settings
Micro Focus Fortify WebInspect (21.1.0) Page 353 of 461

3. If you selected Query Parameter or Post Parameter as the target, enter the Target Name.
4. From the Match Type list, select the method to be used for matching text in the target:
l Matches Regex - Matches the regular expression you specify in the Match String box.
l Matches Regex Extension - Matches a syntax available from Fortify's regular expression extensions you specify in the Match String box.
l Matches - Matches the text string you specify in the Match String box.
l Contains - Contains the text string you specify in the Match String box.
5. In the Match String box, enter the string or regular expression for which the target will be searched. Alternatively, if you selected a regular expression option in the Match Type, you can click the drop-down arrow and select Create Regex to launch the Regular Expression Editor.
6. Click (or press Enter). 7. (Optional) Repeat steps 2-6 to add more conditions. Multiple matches are ANDed.
8. If you are working in Current Settings, you can click Test to process the exclusions on the current scan. Any sessions from that scan that would have been filtered by the criteria will appear in the test screen, allowing you to modify your settings if required.
9. Click OK.
10. When the exclusion appears in the Other Exclusion/Rejection Criteria list, select either Reject, Exclude, or both.
Note: You cannot reject Response, Response Header, and Status Code Target types during a scan. You can only exclude these Target types.
Example 1
To ensure that you ignore and never send requests to any resource at Microsoft.com, enter the following exclusion and select Reject.
Target Target Name Match Type Match String
URL N/A contains Microsoft.com
Example 2
Enter "logout" as the match string. If that string is found in any portion of the URL, the URL will be excluded or rejected (depending on which option you select). Using the "logout" example, Fortify WebInspect would exclude or reject URLs such as logout.asp or applogout.jsp.
Target Target Name Match Type Match String
URL N/A contains logout
User GuideChapter 6: Default Scan Settings
Micro Focus Fortify WebInspect (21.1.0) Page 354 of 461
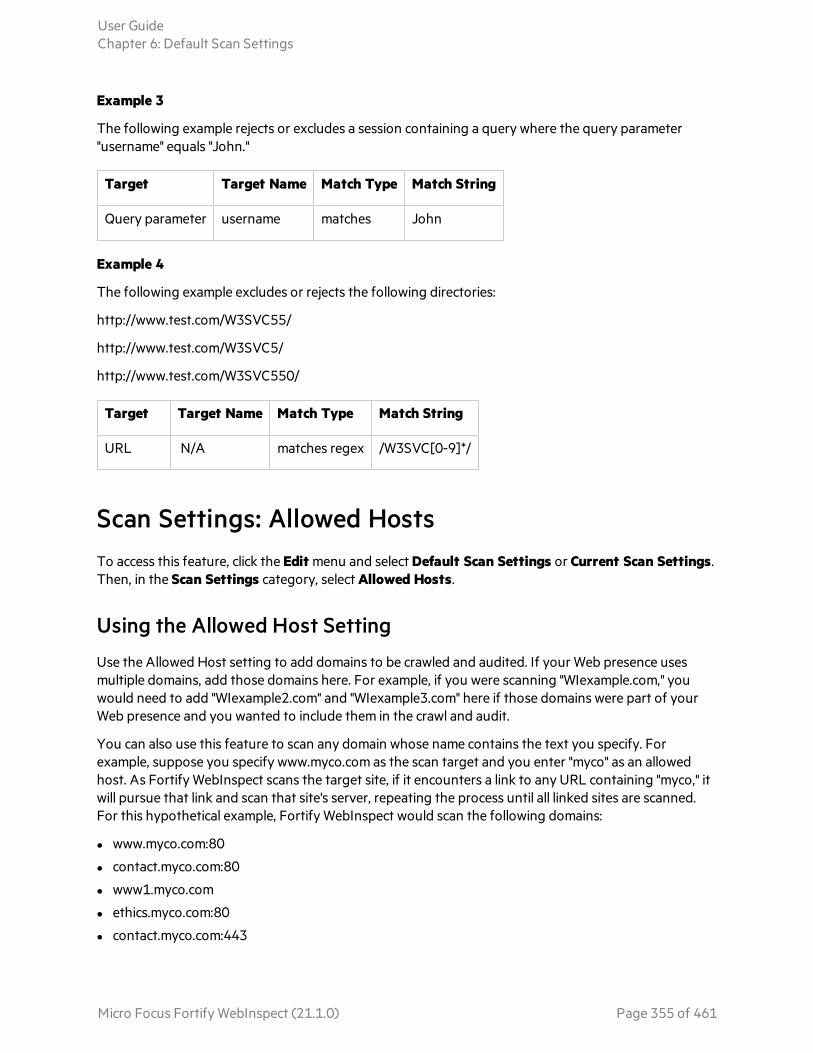
Example 3
The following example rejects or excludes a session containing a query where the query parameter "username" equals "John."
Target Target Name Match Type Match String
Query parameter username matches John
Example 4
The following example excludes or rejects the following directories:
http://www.test.com/W3SVC55/
http://www.test.com/W3SVC5/
http://www.test.com/W3SVC550/
Target Target Name Match Type Match String
URL N/A matches regex /W3SVC[0-9]*/
Scan Settings: Allowed HostsTo access this feature, click the Edit menu and select Default Scan Settings or Current Scan Settings. Then, in the Scan Settings category, select Allowed Hosts.
Using the Allowed Host Setting
Use the Allowed Host setting to add domains to be crawled and audited. If your Web presence uses multiple domains, add those domains here. For example, if you were scanning "WIexample.com," you would need to add "WIexample2.com" and "WIexample3.com" here if those domains were part of your Web presence and you wanted to include them in the crawl and audit.
You can also use this feature to scan any domain whose name contains the text you specify. For example, suppose you specify www.myco.com as the scan target and you enter "myco" as an allowed host. As Fortify WebInspect scans the target site, if it encounters a link to any URL containing "myco," it will pursue that link and scan that site's server, repeating the process until all linked sites are scanned. For this hypothetical example, Fortify WebInspect would scan the following domains:
l www.myco.com:80
l contact.myco.com:80
l www1.myco.com
l ethics.myco.com:80
l contact.myco.com:443
User GuideChapter 6: Default Scan Settings
Micro Focus Fortify WebInspect (21.1.0) Page 355 of 461

l wow.myco.com:80
l mycocorp.com:80
l www.interconnection.myco.com:80
Adding Allowed Domains
To add allowed domains:
1. Click Add.
2. On the Specify Allowed Host window, enter a URL (or a regular expression representing a URL) and click OK.
Note: When specifying the URL, do not include the protocol designator (such as http:// or https://).
Editing or Removing Domains
To edit or remove an allowed domain:
1. Select a domain from the Allowed Hosts list.
2. Click Edit or Remove.
Scan Settings: HTTP ParsingTo access this feature, click the Edit menu and select Default Scan Settings or Current Scan Settings. Then, in the Scan Settings category, select HTTP Parsing.
Options
The HTTP Parsing options are described in the following table.
Option Description
HTTP Parameters Used for State
If your application uses URL rewriting or post data techniques to maintain state within a Web site, you must identify which parameters are used. For example, a PHP4 script can create a constant of the session ID named SID, which is available inside a session. By appending this to the end of a URL, the session ID becomes available to the next page. The actual URL might look something like the following:
.../page7.php?PHPSESSID=4725a759778d1be9bdb668a236f01e01
Because session IDs change with each connection, an HTTP
User GuideChapter 6: Default Scan Settings
Micro Focus Fortify WebInspect (21.1.0) Page 356 of 461

Option Description
request containing this URL would create an error when you tried to replay it. However, if you identify the parameter (PHPSESSID in this example), then Fortify WebInspect will replace its assigned value with the new session ID obtained from the server each time the connection is made.
Similarly, some state management techniques use post data to pass information. For example, the HTTP message content may include userid=slbhkelvbkl73dhj. In this case, "userid" is the parameter you would identify.
Note: You need to identify parameters only when the application uses URL rewriting or posted data to manage state. It is not necessary when using cookies.
Fortify WebInspect can identify potential parameters if they occur as posted data or if they exist within the query string of a URL. However, if your application embeds session data in the URL as extended path information, you must provide a regular expression to identify it. In the following example, "1234567" is the session information:
http://www.onlinestore.com/bikes/(1234567)/index.html
The regular expression for identifying the parameter would be: /\([\w\d]+\)/
Enable CSRF The Enable CSRF option should only be selected if the site you are scanning includes Cross-Site Request Forgery (CSRF) tokens as it adds overhead to the process. For more information, see "CSRF" on page 360.
Determine State from URL Path
If your application determines state from certain components in the URL path, select this check box and add one or more regular expressions that identify those components. Two default regular expressions identify two ASP.NET cookieless session IDs. The third regular expression matches jsessionid cookie.
Enable Response State Rules
If your application maintains client state with bearer tokens, select this option and create a rule that will identify the bearer token from the response and add it to the next request automatically.
To add a rule:
1. After selecting the Enable Response State Rules check box, click Add.
User GuideChapter 6: Default Scan Settings
Micro Focus Fortify WebInspect (21.1.0) Page 357 of 461

Option Description
The Rule Search and Replace window appears.
2. In the Rule Name field, type a unique name for the rule. An example is
Bearer.
3. Click Add next to the Search in Response field.
The Search in Response dialog box appears.
4. Construct a regular expression to use as criteria for searching in the response. An example is:
"Authentication" value="(?<Bearer>[A-Za-z0-9]*)"
Tip: Click the arrow to the right of the field for regular expression tips or to launch the Regular Expressions Editor.
5. Click OK.
The regular expression is validated. You must correct any errors that are found before continuing.
6. Click Add next to the Replace in Request field.
The Replace in Request dialog box appears.
7. Construct a regular expression to use as criteria for adding the token to the request. An example is:
"Authorization: Bearer (?<Bearer>[A-Za-z0-9]*)"
8. Click OK.
The regular expression is validated. You must correct any errors that are found before continuing.
9. Click OK to close the Rule Search and Replace window.
Important! To avoid regular expressions that could drain your system resources and affect scan performance, do not use the following text strings when constructing your regular expressions:
l Any character with infinite numbers ".*" or ".+"
l Positive lookahead "(?=…)"
l Negative lookahead "(?!...)"
l Positive lookbehind "(?<=…)"
l Negative lookbehind "(?<!...)"
HTTP Parameters Used for Navigation
Some sites contain only one directly accessible resource, and then rely on query strings to deliver the requested information, as in the following
User GuideChapter 6: Default Scan Settings
Micro Focus Fortify WebInspect (21.1.0) Page 358 of 461
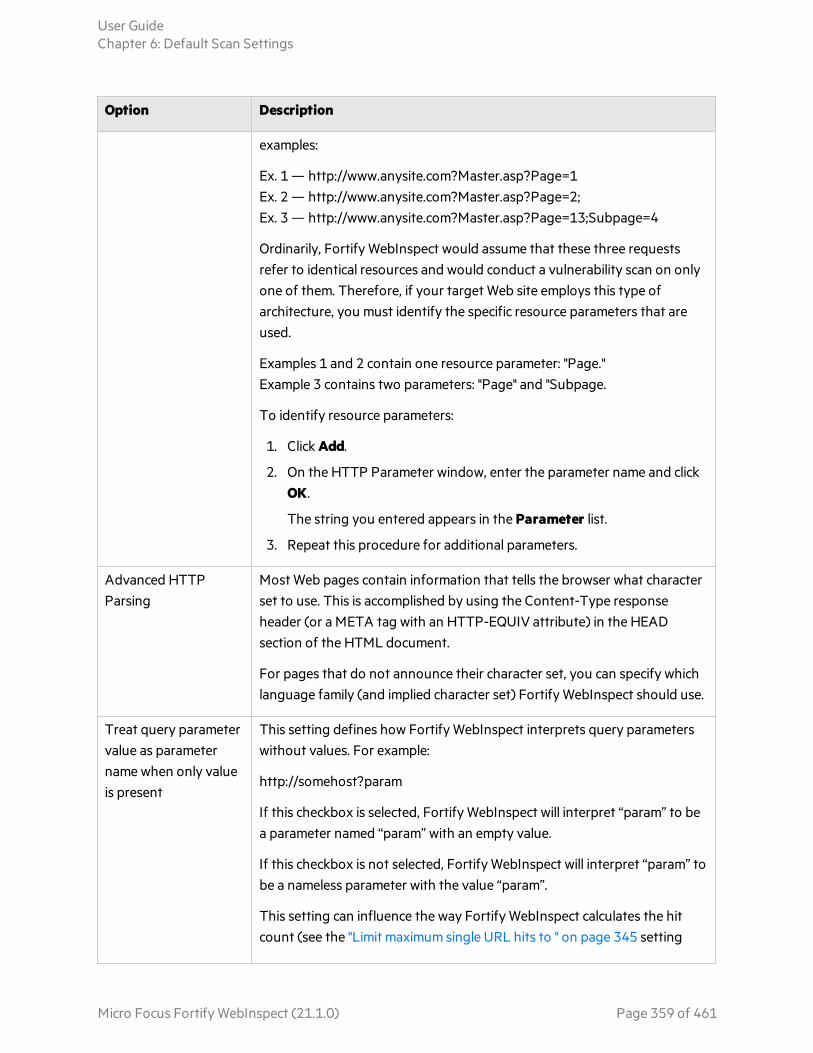
Option Description
examples:
Ex. 1 — http://www.anysite.com?Master.asp?Page=1Ex. 2 — http://www.anysite.com?Master.asp?Page=2;Ex. 3 — http://www.anysite.com?Master.asp?Page=13;Subpage=4
Ordinarily, Fortify WebInspect would assume that these three requests refer to identical resources and would conduct a vulnerability scan on only one of them. Therefore, if your target Web site employs this type of architecture, you must identify the specific resource parameters that are used.
Examples 1 and 2 contain one resource parameter: "Page."Example 3 contains two parameters: "Page" and "Subpage.
To identify resource parameters:
1. Click Add.
2. On the HTTP Parameter window, enter the parameter name and click OK.
The string you entered appears in the Parameter list.
3. Repeat this procedure for additional parameters.
Advanced HTTP Parsing
Most Web pages contain information that tells the browser what character set to use. This is accomplished by using the Content-Type response header (or a META tag with an HTTP-EQUIV attribute) in the HEAD section of the HTML document.
For pages that do not announce their character set, you can specify which language family (and implied character set) Fortify WebInspect should use.
Treat query parameter value as parameter name when only value is present
This setting defines how Fortify WebInspect interprets query parameters without values. For example:
http://somehost?param
If this checkbox is selected, Fortify WebInspect will interpret “param” to be a parameter named “param” with an empty value.
If this checkbox is not selected, Fortify WebInspect will interpret “param” to be a nameless parameter with the value “param”.
This setting can influence the way Fortify WebInspect calculates the hit count (see the "Limit maximum single URL hits to " on page 345 setting
User GuideChapter 6: Default Scan Settings
Micro Focus Fortify WebInspect (21.1.0) Page 359 of 461

Option Description
under Scan Settings: General). This setting is useful for scenarios in which a URL contains an anti-caching parameter. These often take the form of a numeric counter or timestamp. For example, the following parameters are numeric counters:
l http://somehost?1234567
l http://somehost?1234568
In such cases, the value is changing for each request. If the value is treated as the parameter name, and the “Include parameters in hit count” setting is selected, the crawl count may inflate artificially, thus increasing the scan time. In these cases, clearing the “Treat query parameter value as parameter name when only value is present” checkbox will prevent these counters from contributing to the hit count and produce a more reasonable scan time.
CSRFThe Enable CSRF option should only be selected if the site you are scanning includes Cross-Site Request Forgery (CSRF) tokens as it adds overhead to the process.
About CSRF
Cross-Site Request Forgery (CSRF) is a malicious exploit of a website where unauthorized commands are transmitted from a user’s browser that the website trusts. CSRF exploits piggyback on the trust that a site has in a user’s browser; using the fact that the user has already been authenticated by the site and the chain of trust is still open.
Example:
A user visits a bank, is authenticated, and a cookie is placed on the user’s machine. After the user completes the banking transaction, he or she switches to another browser tab and continues a conversation on an enthusiast Web site devoted to the user’s hobby. On the site, someone has posted a message that includes an HTML image element. The HTML image element includes a request to the user’s bank to extract all of the cash from the account and deposit it into another account. Because the user has a cookie on his or her device that has not expired yet, the transaction is honored and all of the money in the account is withdrawn.
CSRF exploits often involve sites that rely on trust in a user’s identity, often maintained through the use of a cookie. The user’s browser is then tricked into sending HTTP requests to the target site in hopes that a trust between the user’s browser and the target site still exists.
User GuideChapter 6: Default Scan Settings
Micro Focus Fortify WebInspect (21.1.0) Page 360 of 461

Using CRSF Tokens
To stop Cross-site request forgeries from occurring, common practice is to set up the server to generate requests that include a randomly generated parameter with a common name such as "CSRFToken". The token may be generated once per session or a new one generated for each request. If you have used CSRF tokens in your code and enabled CSRF in Fortify WebInspect, we will take this into consideration when crawling your site. Each time Fortify WebInspect launches an attack, it will request the form again to acquire a new CSRF token. This adds significantly to the time it take for Fortify WebInspect to complete a scan, so do not enable CSRF if you are not using CSRF tokens on your site.
Enabling CSRF Awareness in Fortify WebInspect
If your site uses CSRF tokens, you can enable CSRF awareness in Fortify WebInspect as follows:
1. Select Default Scan Settings from the Edit menu.
The Scan Settings window appears.
2. From the Scan Settings column, select HTTP Parsing.
3. Select the Enable CSRF box.
Scan Settings: Custom ParametersTo access this feature, click the Edit menu and select Default Scan Settings or Current Scan Settings. Then, in the Scan Settings category, select Custom Parameters.
Custom Parameters are used to accommodate sites that use URL rewriting techniques and/or Representation State Transfer (REST) web services technologies. You can write rules for these custom parameters, or you can import rules from a common configuration file written in Web Application Description Language (WADL).
URL Rewriting
Many dynamic sites use URL rewriting because static URLs are easier for users to remember and are easier for search engines to index the site. For example, an HTTP request such as
http://www.pets.com/ShowProduct/7
is sent to the server's rewrite module, which converts the URL to the following:
http://www.pets.com/ShowProduct.php?product_id=7
In this example, the URL causes the server to execute the PHP script "ShowProduct" and display the information for product number 7.
User GuideChapter 6: Default Scan Settings
Micro Focus Fortify WebInspect (21.1.0) Page 361 of 461

When Fortify WebInspect scans a page, it must be able to determine which elements are variables so that its attack agents can thoroughly check for vulnerabilities. To enable this, you must define rules that identify these elements. You can do so using a proprietary Fortify WebInspect syntax.
Examples:
HTML: <a href="someDetails/user1/">User 1 details</a>Rule: /someDetails/{username}/
HTML: <a href="TwoParameters/Details/user1/Value2">User 1 details</a>Rule: /TwoParameters/Details/{username}/{parameter2}
HTML: <a href="/Value2/PreFixParameter/Details/user1">User 1 details</a>Rule: /{parameter2}/PreFixParameter/Details/{username}
RESTful Services
A RESTful web service (also called a RESTful web API) is a simple Web service implemented using HTTP and the principles of REST. It has gained widespread acceptance across the Web as a simpler alternative to web services based on SOAP and Web Services Description Language (WSDL).
The following request adds a name to a file using an HTTP query string:
GET /adduser?name=Robert HTTP/1.1
This same function could be achieved by using the following method with a Web service. Note that the parameter names and values have been moved from the request URI and now appear as XML tags in the request body.
POST /users HTTP/1.1 Host: myserver Content-Type: application/xml <?xml version="1.0"?> <user> <name>Robert</name> </user>
In the case of both URL rewriting and RESTful web services, you must create rules that instruct Fortify WebInspect how to create the appropriate requests.
Creating a Rule
To create a rule:
1. Click New Rule.
2. In the Expression column, enter a rule. See "Path Matrix Parameters" on page 364 for guidelines and examples.
The Enabled check box is selected by default. Fortify WebInspect examines the rule and, if it is valid, removes the red X.
User GuideChapter 6: Default Scan Settings
Micro Focus Fortify WebInspect (21.1.0) Page 362 of 461
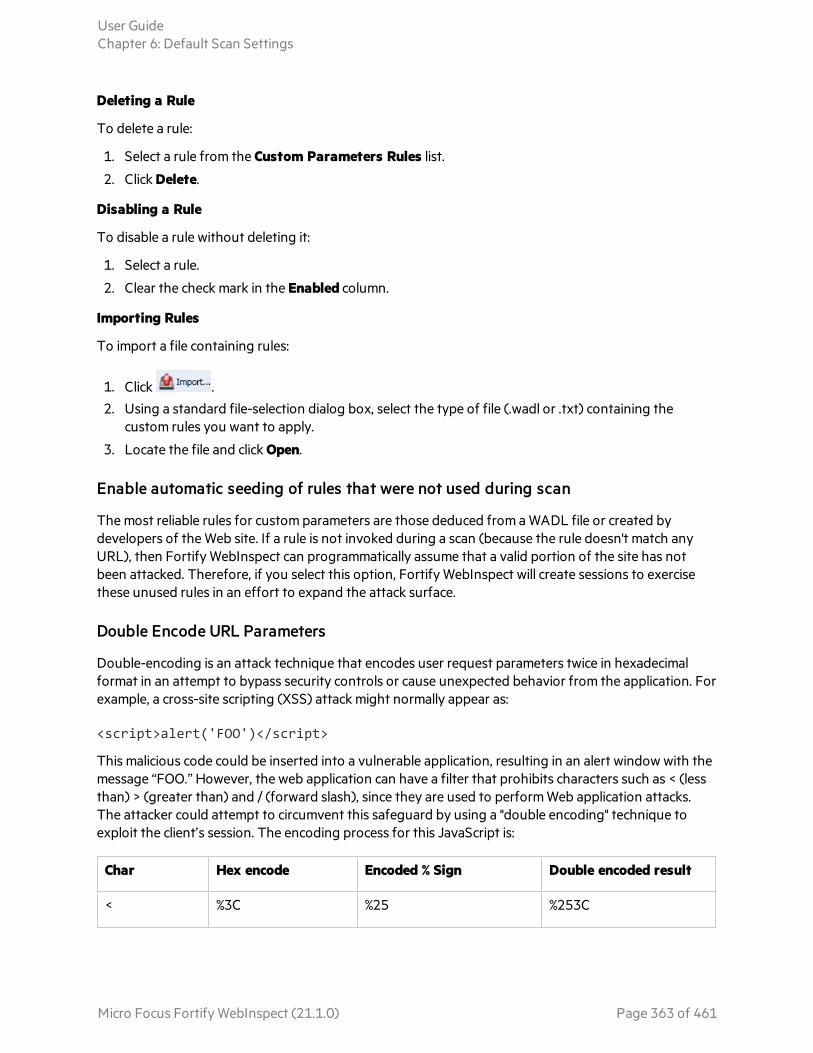
Deleting a Rule
To delete a rule:
1. Select a rule from the Custom Parameters Rules list.
2. Click Delete.
Disabling a Rule
To disable a rule without deleting it:
1. Select a rule.
2. Clear the check mark in the Enabled column.
Importing Rules
To import a file containing rules:
1. Click . 2. Using a standard file-selection dialog box, select the type of file (.wadl or .txt) containing the
custom rules you want to apply.
3. Locate the file and click Open.
Enable automatic seeding of rules that were not used during scan
The most reliable rules for custom parameters are those deduced from a WADL file or created by developers of the Web site. If a rule is not invoked during a scan (because the rule doesn't match any URL), then Fortify WebInspect can programmatically assume that a valid portion of the site has not been attacked. Therefore, if you select this option, Fortify WebInspect will create sessions to exercise these unused rules in an effort to expand the attack surface.
Double Encode URL Parameters
Double-encoding is an attack technique that encodes user request parameters twice in hexadecimal format in an attempt to bypass security controls or cause unexpected behavior from the application. For example, a cross-site scripting (XSS) attack might normally appear as:
<script>alert('FOO')</script>
This malicious code could be inserted into a vulnerable application, resulting in an alert window with the message “FOO.” However, the web application can have a filter that prohibits characters such as < (less than) > (greater than) and / (forward slash), since they are used to perform Web application attacks. The attacker could attempt to circumvent this safeguard by using a "double encoding" technique to exploit the client’s session. The encoding process for this JavaScript is:
Char Hex encode Encoded % Sign Double encoded result
< %3C %25 %253C
User GuideChapter 6: Default Scan Settings
Micro Focus Fortify WebInspect (21.1.0) Page 363 of 461

/ %2F %25 %252F
> %3E %25 %253E
Finally, the malicious code, double-encoded, is:
%253Cscript%253Ealert('XSS')%253C%252Fscript%253E
If you select this option, Fortify WebInspect will create double-encoded URL parameters (instead of single-encoded parameters) and submit them as part of the attack sequence. This is recommended when the Web server uses, for example, Apache mod-rewrite plus PHP or Java URL Rewrite Filter 3.2.0.
Path Matrix ParametersThere are three ways rules can be created in the system. Rules may be:
l Entered manually
l Generated from a WADL file specified by the user or received through Fortify WebInspect Agent
l Imported from a flat file containing a list of rules
When entering rules manually, you specify the path segments of a URL that should be treated as parameters.
The rules use special characters to designate parts of the actual URL that contain parameters. If a URL matches a rule, Fortify WebInspect parses the parameters and attacks them. Notable components of a rule are:
l Path (gp/c/{book_name}/)
l Query (anything that follows "?")
l Fragment (anything that follows "#")
Definition of Path Segment
A path segment starts with ‘/’ characters and is terminated either by another ‘/’ character or by end of line. To illustrate, path "/a" has one segment whereas path "/a/" has two segments (the first containing the string “a” and the second being empty. Note that paths "/a" and "/a/" are not equal. When attempting to determine if a URL matches a rule, empty segments are considered.
Special Elements for Rules
A rule may contain the special elements described in the following table.
Element Description
* Asterisk. May appear in production defined below; presence in non-path productions means that this part of the URL will not participate in matching (or, in other words, will
User GuideChapter 6: Default Scan Settings
Micro Focus Fortify WebInspect (21.1.0) Page 364 of 461
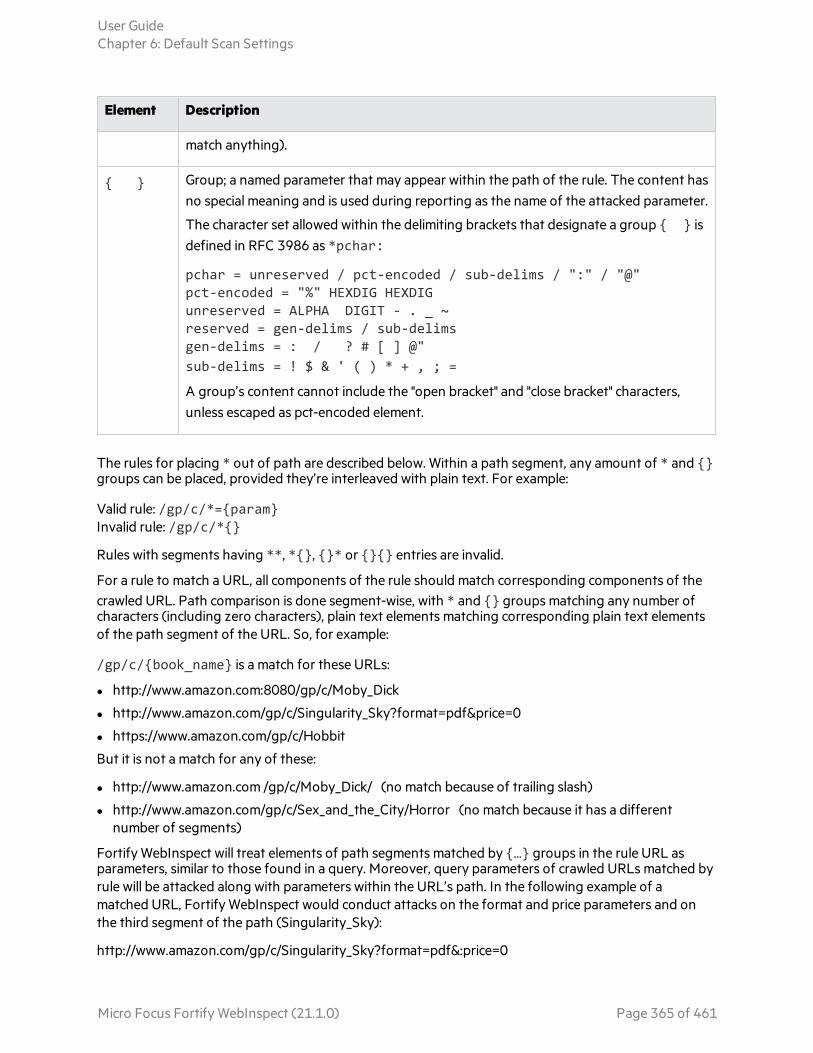
Element Description
match anything).
{ } Group; a named parameter that may appear within the path of the rule. The content has no special meaning and is used during reporting as the name of the attacked parameter.
The character set allowed within the delimiting brackets that designate a group { } is defined in RFC 3986 as *pchar:
pchar = unreserved / pct-encoded / sub-delims / ":" / "@"pct-encoded = "%" HEXDIG HEXDIGunreserved = ALPHA DIGIT - . _ ~reserved = gen-delims / sub-delimsgen-delims = : / ? # [ ] @"sub-delims = ! $ & ' ( ) * + , ; =
A group’s content cannot include the "open bracket" and "close bracket" characters, unless escaped as pct-encoded element.
The rules for placing * out of path are described below. Within a path segment, any amount of * and {} groups can be placed, provided they’re interleaved with plain text. For example:
Valid rule: /gp/c/*={param}Invalid rule: /gp/c/*{}
Rules with segments having **, *{}, {}* or {}{} entries are invalid.
For a rule to match a URL, all components of the rule should match corresponding components of the crawled URL. Path comparison is done segment-wise, with * and {} groups matching any number of characters (including zero characters), plain text elements matching corresponding plain text elements of the path segment of the URL. So, for example:
/gp/c/{book_name} is a match for these URLs:
l http://www.amazon.com:8080/gp/c/Moby_Dick
l http://www.amazon.com/gp/c/Singularity_Sky?format=pdf&price=0
l https://www.amazon.com/gp/c/Hobbit
But it is not a match for any of these:
l http://www.amazon.com /gp/c/Moby_Dick/ (no match because of trailing slash)
l http://www.amazon.com/gp/c/Sex_and_the_City/Horror (no match because it has a different number of segments)
Fortify WebInspect will treat elements of path segments matched by {…} groups in the rule URL as parameters, similar to those found in a query. Moreover, query parameters of crawled URLs matched by rule will be attacked along with parameters within the URL’s path. In the following example of a matched URL, Fortify WebInspect would conduct attacks on the format and price parameters and on the third segment of the path (Singularity_Sky):
http://www.amazon.com/gp/c/Singularity_Sky?format=pdf&:price=0
User GuideChapter 6: Default Scan Settings
Micro Focus Fortify WebInspect (21.1.0) Page 365 of 461

Asterisk Placeholder
The “*” placeholder may appear in the following productions and subproductions of the URL:
l Path – cannot be matched as a whole, since * in path matches a single segment or less.
l Path segments – as in /gp/*/{param}, which will match URLs with schema HTTP, hostname www.amazon.com, path containing three segments (first is exactly “gp”, second is any segment, and the third segment will be treated as parameter and won’t participate in matching).
l Part of path segment – as in /gp/ref=*, which will match URLs with path containing two segments (first is exactly “gp”, second containing any string with prefix “ref=”).
l Query – as in /gp/c/{param}?*, which matches any URL with path of three segments (first segment is “gp”, second segment is “c” and third segment being a parameter, so it won’t participate in matching); this URL also MUST contain a query string of arbitrary structure. Note the difference between rules /gp/c/{param} and /gp/c/{param}?*. The first rule will match URL http://www.amazon.com/gp/c/Three_Little_Blind_Mice, while the second will not.
l Key-value pair of query – as in /gp/c/{param}?format=* which will match URL only if query string has exactly one key-value pair, with key name being “format.”
l Key-value pair of query – as in /gp/c/{param}?*=pdf which will match URL only if query string has exactly one key-value pair, with value being “pdf.”
l Fragment – as in case /gp/c/{param}#* which matches any URL with fragment part being present
Benefit of Using Placeholders
The main benefit of using placeholders is that it enables you to create rules that combine matrix parameters and URL path-based parameters within single rule. For relevant URL
http://www.amazon.com/gp/color;foreground=green;background=black/something?format=dvi
the following rule will allow attacks on all parameters
gp/*/{param}
with the matrix parameter segment being ignored by * placeholder within second segment of the path, but recognized by Fortify WebInspect and attacked properly.
Multiple Rules Matching a URL
In the case of multiple rules matching a given URL, there are two options:
l Stop iterating over the rules once a match is found and so use only the first rule.
l Iterate over all of the rules and collect all custom parameters that match.
For instance, for the following URL
http://mySite.com/store/books/Areopagitica/32/1
the following rules both match
User GuideChapter 6: Default Scan Settings
Micro Focus Fortify WebInspect (21.1.0) Page 366 of 461

l */books/{booktitle}/32/{paragraph} l store/*/Areopagitica/{page}/{paragraph}Fortify WebInspect will try to collect parameters from both rules to ensure the greatest attack coverage, so all three segments (“Areopagitica”, “32” and “1” in the example above) will be attacked.
Scan Settings: FiltersTo access this feature, click the Edit menu and select Default Scan Settings or Current Scan Settings. Then, in the Scan Settings category, select Filters.
Use the Filters settings to add search-and-replace rules for HTTP requests and responses. This feature is used most often to avoid the disclosure of sensitive data such as credit card numbers, employee names, or social security numbers. It is a means of disguising information that you do not want to be viewed by persons who use Fortify WebInspect or those who have access to the raw data or generated reports.
Options
The Filter options are described in the following table.
Option Description
Filter HTTP Request Content
Use this area to specify search-and-replace rules for HTTP requests.
Filter HTTP Response Content
Use this area to specify search-and-replace rules for HTTP responses.
Adding Rules for Finding and Replacing Keywords
Follow the steps below to add a regular expression rule for finding or replacing keywords in requests or responses:
1. In either the Request Content or the Response Content group, click Add.
The Add Request/Response Data Filter Criteria window opens.
2. In the Search for text box, type (or paste) the string you want to locate (or enter a regular expression that describes the string).
Click to insert regular expression notations or to launch the Regular Expression Editor (which facilitates the creation and testing of an expression).
User GuideChapter 6: Default Scan Settings
Micro Focus Fortify WebInspect (21.1.0) Page 367 of 461
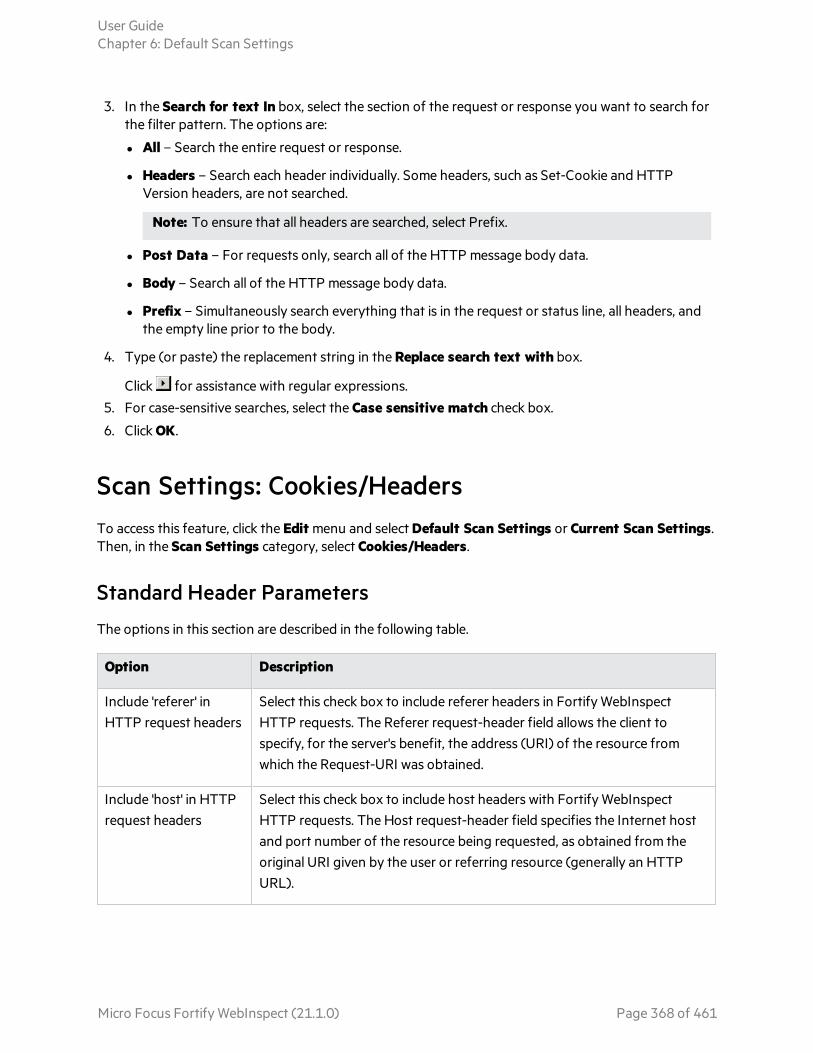
3. In the Search for text In box, select the section of the request or response you want to search for the filter pattern. The options are:
l All – Search the entire request or response.
l Headers – Search each header individually. Some headers, such as Set-Cookie and HTTP Version headers, are not searched.
Note: To ensure that all headers are searched, select Prefix.
l Post Data – For requests only, search all of the HTTP message body data.
l Body – Search all of the HTTP message body data.
l Prefix – Simultaneously search everything that is in the request or status line, all headers, and the empty line prior to the body.
4. Type (or paste) the replacement string in the Replace search text with box.
Click for assistance with regular expressions. 5. For case-sensitive searches, select the Case sensitive match check box.
6. Click OK.
Scan Settings: Cookies/Headers To access this feature, click the Edit menu and select Default Scan Settings or Current Scan Settings. Then, in the Scan Settings category, select Cookies/Headers.
Standard Header Parameters
The options in this section are described in the following table.
Option Description
Include 'referer' in HTTP request headers
Select this check box to include referer headers in Fortify WebInspect HTTP requests. The Referer request-header field allows the client to specify, for the server's benefit, the address (URI) of the resource from which the Request-URI was obtained.
Include 'host' in HTTP request headers
Select this check box to include host headers with Fortify WebInspect HTTP requests. The Host request-header field specifies the Internet host and port number of the resource being requested, as obtained from the original URI given by the user or referring resource (generally an HTTP URL).
User GuideChapter 6: Default Scan Settings
Micro Focus Fortify WebInspect (21.1.0) Page 368 of 461

Append Custom Headers
Use this section to add, edit, or delete headers that will be included with each audit Fortify WebInspect performs. For example, you could add a header such as "Alert: You are being attacked by Consultant ABC" that would be included with every request sent to your company's server when Fortify WebInspect is auditing that site. You can add multiple custom headers.
The default custom headers are described in the following table.
Header Description
Accept: */* Any encoding or file type is acceptable to the crawler.
Pragma: no-cache This forces a fresh response; cached or proxied data is not acceptable.
Adding a Custom Header
To add a custom header:
1. Click Add.
The Specify Custom Header window opens.
2. In the Custom Header box, enter the header using the format <name>: <value>.
3. Click OK.
Append Custom Cookies
Use this section to specify data that will be sent with the Cookie header in HTTP requests sent by Fortify WebInspect to the server when conducting a vulnerability scan.
The default custom cookie used to flag the scan traffic is:
CustomCookie=WebInspect;path=/
Adding a Custom Cookie
To add a custom cookie:
1. Click Add.
The Specify Custom Cookie window opens.
2. In the Custom Cookie box, enter the cookie using the format <name>=<value>.
For example, if you enter
CustomCookie=ScanEngine
then each HTTP-Request will contain the following header:
User GuideChapter 6: Default Scan Settings
Micro Focus Fortify WebInspect (21.1.0) Page 369 of 461

Cookie: CustomCookie=ScanEngine
3. Click OK.
Scan Settings: Proxy To access this feature, click the Edit menu and select Default Scan Settings or Current Scan Settings. Then, in the Scan Settings category, select Proxy.
Options
The Proxy options are described in the following table.
Option Description
Direct Connection (proxy disabled)
Select this option if you are not using a proxy server.
Auto detect proxy settings
Use the Web Proxy Autodiscovery (WPAD) protocol to locate a proxy autoconfig file and configure the browser's Web proxy settings.
Use System proxy settings
Import your proxy server information from the local machine.
Use Firefox proxy settings
Import your proxy server information from Firefox.
Note: Electing to use Firefox proxy settings does not guarantee that you will access the Internet through a proxy server. If the Firefox browser connection settings are configured for "No proxy," then a proxy will not be used.
Configure proxy using a PAC file URL
Load proxy settings from a Proxy Automatic Configuration (PAC) file in the location you specify in the URL box.
Explicitly configure proxy
Configure a proxy by entering the requested information:
1. In the Server box, type the URL or IP address of your proxy server, followed (in the Port box) by the port number (for example, 8080).
2. Select a protocol Type for handling TCP traffic through a proxy server: SOCKS4, SOCKS5, or standard.
3. If authentication is required, select a type from the Authentication list:
Automatic
User GuideChapter 6: Default Scan Settings
Micro Focus Fortify WebInspect (21.1.0) Page 370 of 461
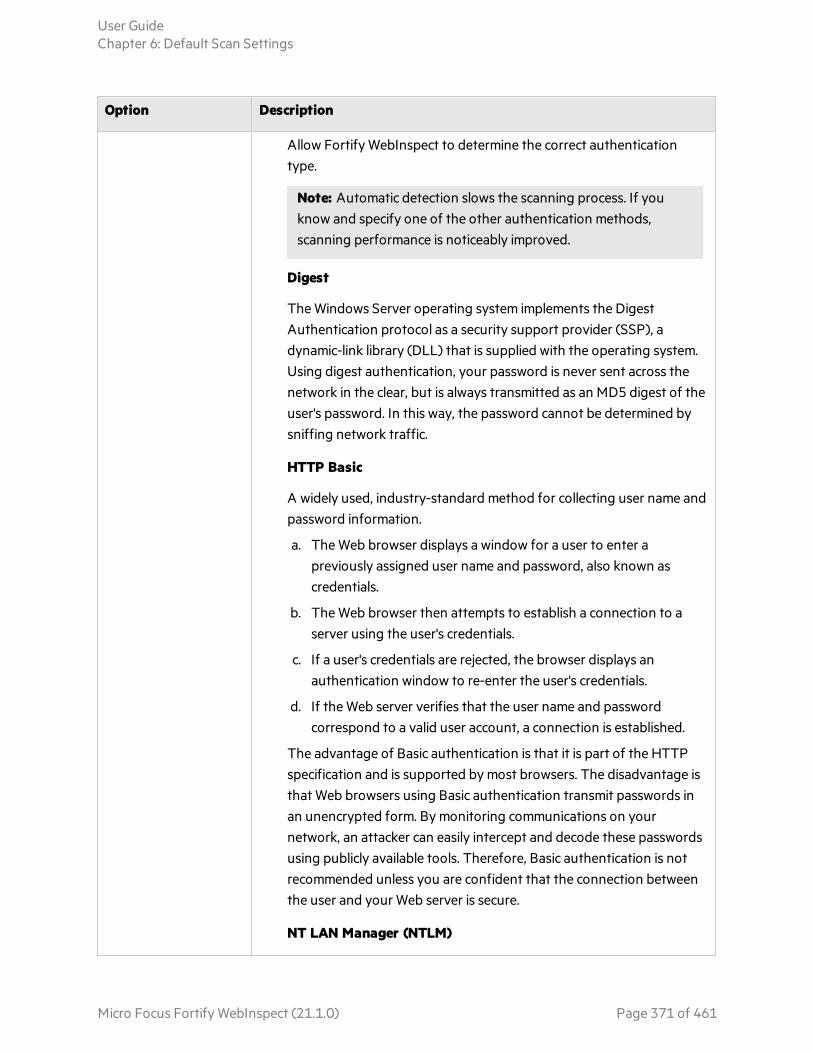
Option Description
Allow Fortify WebInspect to determine the correct authentication type.
Note: Automatic detection slows the scanning process. If you know and specify one of the other authentication methods, scanning performance is noticeably improved.
Digest
The Windows Server operating system implements the Digest Authentication protocol as a security support provider (SSP), a dynamic-link library (DLL) that is supplied with the operating system. Using digest authentication, your password is never sent across the network in the clear, but is always transmitted as an MD5 digest of the user's password. In this way, the password cannot be determined by sniffing network traffic.
HTTP Basic
A widely used, industry-standard method for collecting user name and password information.
a. The Web browser displays a window for a user to enter a previously assigned user name and password, also known as credentials.
b. The Web browser then attempts to establish a connection to a server using the user's credentials.
c. If a user's credentials are rejected, the browser displays an authentication window to re-enter the user's credentials.
d. If the Web server verifies that the user name and password correspond to a valid user account, a connection is established.
The advantage of Basic authentication is that it is part of the HTTP specification and is supported by most browsers. The disadvantage is that Web browsers using Basic authentication transmit passwords in an unencrypted form. By monitoring communications on your network, an attacker can easily intercept and decode these passwords using publicly available tools. Therefore, Basic authentication is not recommended unless you are confident that the connection between the user and your Web server is secure.
NT LAN Manager (NTLM)
User GuideChapter 6: Default Scan Settings
Micro Focus Fortify WebInspect (21.1.0) Page 371 of 461

Option Description
NTLM (NT LanMan) is an authentication process that is used by all members of the Windows NT family of products. Like its predecessor LanMan, NTLM uses a challenge/response process to prove the client’s identity without requiring that either a password or a hashed password be sent across the network.
Use NTLM authentication for servers running IIS. If NTLM authentication is enabled, and Fortify WebInspect has to pass through a proxy server to submit its requests to the Web server, Fortify WebInspect may not be able to crawl or audit that Web site. Use caution when configuring Fortify WebInspect for scans of sites protected by NTLM. After scanning, you may want to disable the NTLM authentication settings to prevent any potential problem.
Kerberos
Kerberos uses the Needham-Schroeder protocol as its basis. It uses a trusted third party, termed a Key Distribution Center (KDC), which consists of two logically separate parts: an Authentication Server (AS) and a Ticket Granting Server (TGS). The client authenticates itself to AS, then demonstrates to the TGS that it is authorized to receive a ticket for a service (and receives it). The client then demonstrates to a Service Server that it has been approved to receive the service.
Negotiate
The Negotiate authentication protocol begins with the option to negotiate for an authentication protocol. When the client requests access to a service, the server replies with a list of authentication protocols that it can support and an authentication challenge based on the protocol that is its first choice.
For example, the server might list Kerberos and NTLM, and send a Kerberos challenge. The client examines the contents of the reply and checks to determine whether it supports any of the specified protocols. If the client supports the preferred protocol, authentication proceeds. If the client does not support the preferred protocol, but does support one of the other protocols listed by the server, the client lets the server know which authentication protocol it supports, and the authentication proceeds. If the client does not support any of the listed protocols, the authentication exchange fails.
4. If your proxy server requires authentication, enter the qualifying user
User GuideChapter 6: Default Scan Settings
Micro Focus Fortify WebInspect (21.1.0) Page 372 of 461
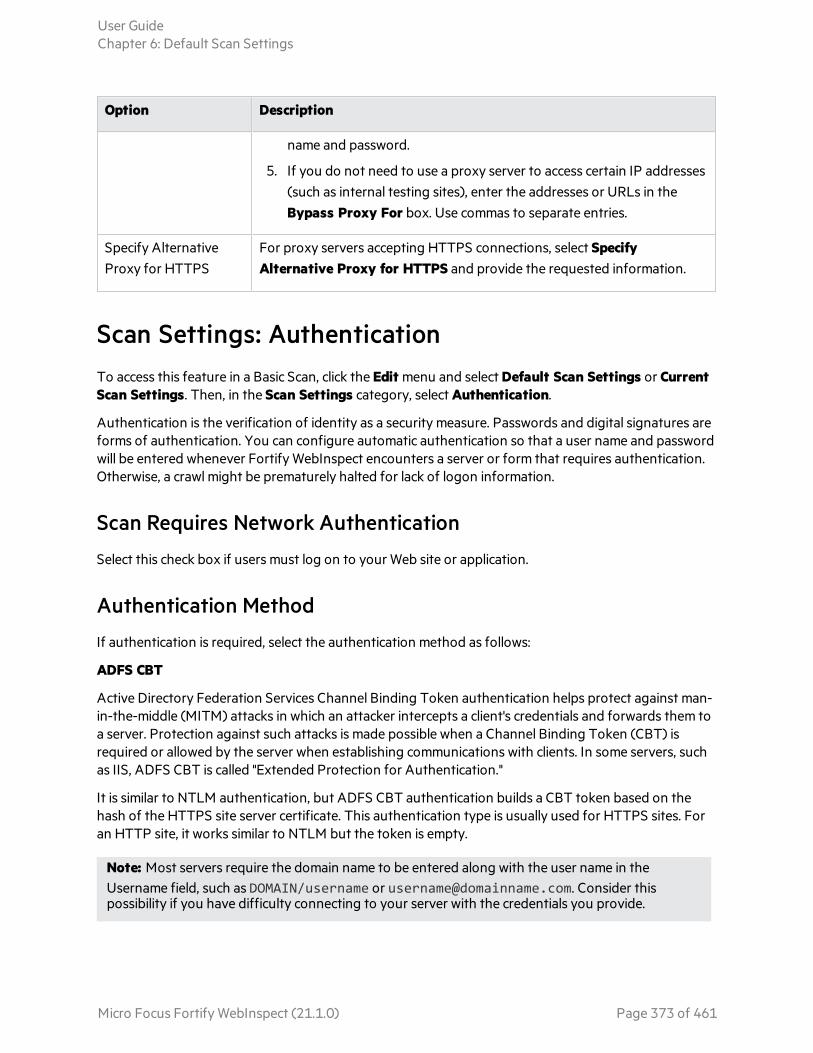
Option Description
name and password.
5. If you do not need to use a proxy server to access certain IP addresses (such as internal testing sites), enter the addresses or URLs in the Bypass Proxy For box. Use commas to separate entries.
Specify Alternative Proxy for HTTPS
For proxy servers accepting HTTPS connections, select Specify Alternative Proxy for HTTPS and provide the requested information.
Scan Settings: AuthenticationTo access this feature in a Basic Scan, click the Edit menu and select Default Scan Settings or Current Scan Settings. Then, in the Scan Settings category, select Authentication.
Authentication is the verification of identity as a security measure. Passwords and digital signatures are forms of authentication. You can configure automatic authentication so that a user name and password will be entered whenever Fortify WebInspect encounters a server or form that requires authentication. Otherwise, a crawl might be prematurely halted for lack of logon information.
Scan Requires Network Authentication
Select this check box if users must log on to your Web site or application.
Authentication Method
If authentication is required, select the authentication method as follows:
ADFS CBT
Active Directory Federation Services Channel Binding Token authentication helps protect against man-in-the-middle (MITM) attacks in which an attacker intercepts a client's credentials and forwards them to a server. Protection against such attacks is made possible when a Channel Binding Token (CBT) is required or allowed by the server when establishing communications with clients. In some servers, such as IIS, ADFS CBT is called "Extended Protection for Authentication."
It is similar to NTLM authentication, but ADFS CBT authentication builds a CBT token based on the hash of the HTTPS site server certificate. This authentication type is usually used for HTTPS sites. For an HTTP site, it works similar to NTLM but the token is empty.
Note: Most servers require the domain name to be entered along with the user name in the Username field, such as DOMAIN/username or [email protected]. Consider this possibility if you have difficulty connecting to your server with the credentials you provide.
User GuideChapter 6: Default Scan Settings
Micro Focus Fortify WebInspect (21.1.0) Page 373 of 461
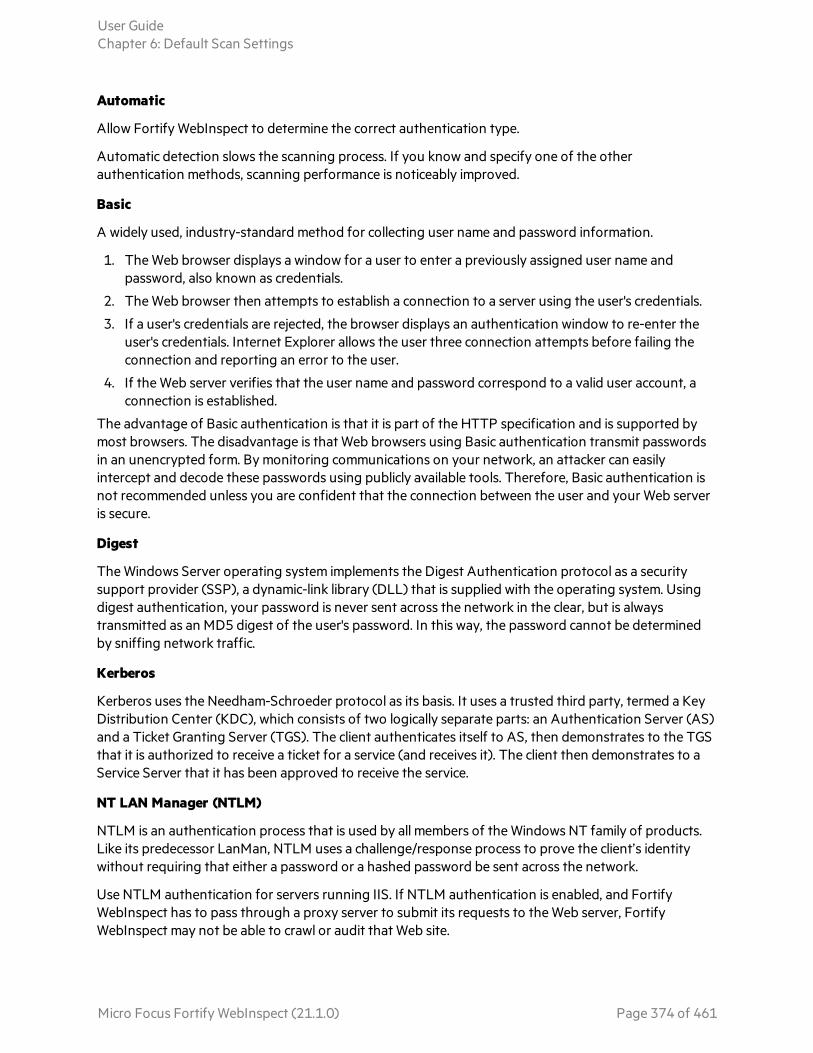
Automatic
Allow Fortify WebInspect to determine the correct authentication type.
Automatic detection slows the scanning process. If you know and specify one of the other authentication methods, scanning performance is noticeably improved.
Basic
A widely used, industry-standard method for collecting user name and password information.
1. The Web browser displays a window for a user to enter a previously assigned user name and password, also known as credentials.
2. The Web browser then attempts to establish a connection to a server using the user's credentials.
3. If a user's credentials are rejected, the browser displays an authentication window to re-enter the user's credentials. Internet Explorer allows the user three connection attempts before failing the connection and reporting an error to the user.
4. If the Web server verifies that the user name and password correspond to a valid user account, a connection is established.
The advantage of Basic authentication is that it is part of the HTTP specification and is supported by most browsers. The disadvantage is that Web browsers using Basic authentication transmit passwords in an unencrypted form. By monitoring communications on your network, an attacker can easily intercept and decode these passwords using publicly available tools. Therefore, Basic authentication is not recommended unless you are confident that the connection between the user and your Web server is secure.
Digest
The Windows Server operating system implements the Digest Authentication protocol as a security support provider (SSP), a dynamic-link library (DLL) that is supplied with the operating system. Using digest authentication, your password is never sent across the network in the clear, but is always transmitted as an MD5 digest of the user's password. In this way, the password cannot be determined by sniffing network traffic.
Kerberos
Kerberos uses the Needham-Schroeder protocol as its basis. It uses a trusted third party, termed a Key Distribution Center (KDC), which consists of two logically separate parts: an Authentication Server (AS) and a Ticket Granting Server (TGS). The client authenticates itself to AS, then demonstrates to the TGS that it is authorized to receive a ticket for a service (and receives it). The client then demonstrates to a Service Server that it has been approved to receive the service.
NT LAN Manager (NTLM)
NTLM is an authentication process that is used by all members of the Windows NT family of products. Like its predecessor LanMan, NTLM uses a challenge/response process to prove the client’s identity without requiring that either a password or a hashed password be sent across the network.
Use NTLM authentication for servers running IIS. If NTLM authentication is enabled, and Fortify WebInspect has to pass through a proxy server to submit its requests to the Web server, Fortify WebInspect may not be able to crawl or audit that Web site.
User GuideChapter 6: Default Scan Settings
Micro Focus Fortify WebInspect (21.1.0) Page 374 of 461
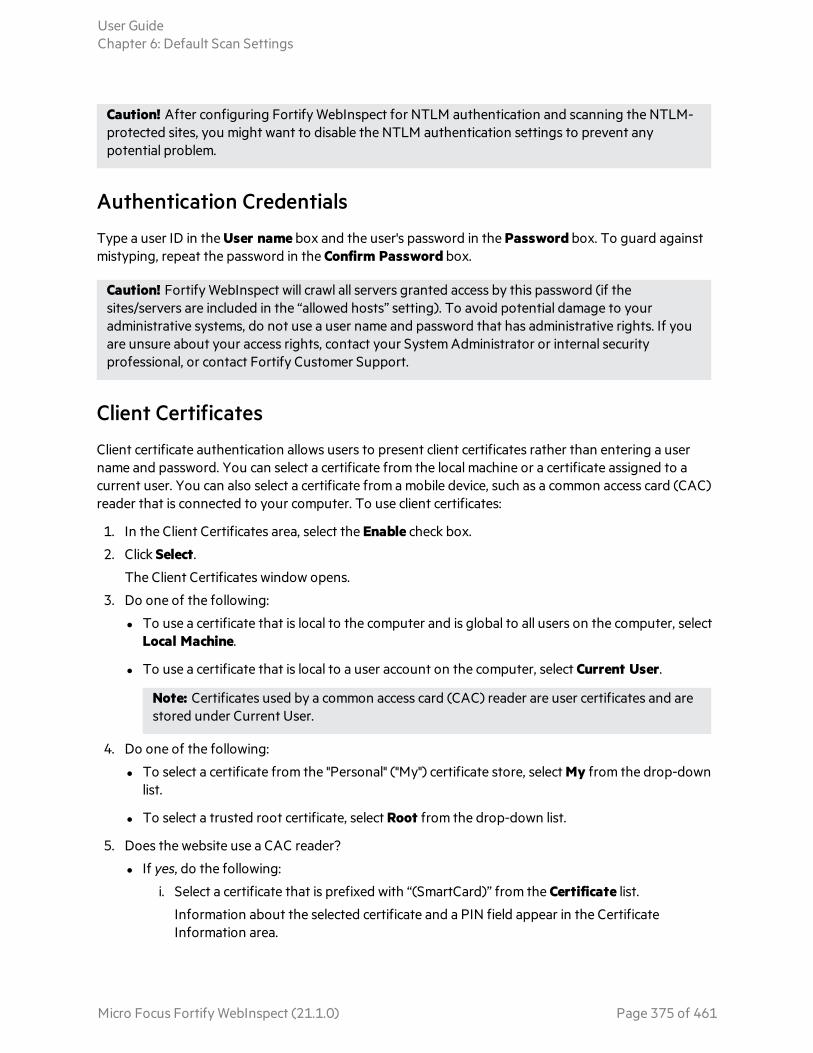
Caution! After configuring Fortify WebInspect for NTLM authentication and scanning the NTLM-protected sites, you might want to disable the NTLM authentication settings to prevent any potential problem.
Authentication Credentials
Type a user ID in the User name box and the user's password in the Password box. To guard against mistyping, repeat the password in the Confirm Password box.
Caution! Fortify WebInspect will crawl all servers granted access by this password (if the sites/servers are included in the “allowed hosts” setting). To avoid potential damage to your administrative systems, do not use a user name and password that has administrative rights. If you are unsure about your access rights, contact your System Administrator or internal security professional, or contact Fortify Customer Support.
Client Certificates
Client certificate authentication allows users to present client certificates rather than entering a user name and password. You can select a certificate from the local machine or a certificate assigned to a current user. You can also select a certificate from a mobile device, such as a common access card (CAC) reader that is connected to your computer. To use client certificates:
1. In the Client Certificates area, select the Enable check box.
2. Click Select.
The Client Certificates window opens.
3. Do one of the following:
l To use a certificate that is local to the computer and is global to all users on the computer, select Local Machine.
l To use a certificate that is local to a user account on the computer, select Current User.
Note: Certificates used by a common access card (CAC) reader are user certificates and are stored under Current User.
4. Do one of the following:
l To select a certificate from the "Personal" ("My") certificate store, select My from the drop-down list.
l To select a trusted root certificate, select Root from the drop-down list.
5. Does the website use a CAC reader?
l If yes, do the following:
i. Select a certificate that is prefixed with “(SmartCard)” from the Certificate list.
Information about the selected certificate and a PIN field appear in the Certificate Information area.
User GuideChapter 6: Default Scan Settings
Micro Focus Fortify WebInspect (21.1.0) Page 375 of 461

ii. If a PIN is required, type the PIN for the CAC in the PIN field.
Note: If a PIN is required and you do not enter the PIN at this point, you must enter the PIN in the Windows Security window each time it prompts you for it during the scan.
iii. Click Test.
If you entered the correct PIN, a Success message appears.
l If no, select a certificate from the Certificate list.
Information about the selected certificate appears below the Certificate list.
6. Click OK.
Editing the Proxy Config File for WebInspect Tools
When using tools that incorporate a proxy (specifically Web Macro Recorder, Web Proxy, and Web Form Editor), you may encounter servers that do not ask for a client certificate even though a certificate is required. To accommodate this situation, you must perform the following tasks to edit the SPI.Net.Proxy.Config file.
Task 1: Find your certificate's serial number
1. Open Microsoft Internet Explorer.
2. From the Tools menu, click Internet Options.
3. On the Internet Options window, select the Content tab and click Certificates.
4. On the Certificates window, select a certificate and click View.
5. On the Certificate window, click the Details tab.
6. Click the Serial Number field and copy the serial number that appears in the lower pane (highlight the number and press Ctrl + C).
7. Close all windows.
Task 2: Create an entry in the SPI.Net.Proxy.Config file
1. Open the SPI.Net.Proxy.Config file for editing. The default location is C:\Program Files\Fortify\Fortify WebInspect.
2. In the ClientCertificateOverrides section, add the following entry:
<ClientCertificateOverride HostRegex="RegularExpression" CertificateSerialNumber="Number" />where:
RegularExpression is a regular expression matching the host URL (example: .*austin\.microfocus\.com).Number is the serial number obtained in Task 1.
3. Save the edited file.
User GuideChapter 6: Default Scan Settings
Micro Focus Fortify WebInspect (21.1.0) Page 376 of 461

Enable Macro Validation
Most dynamic application scans require user authentication to expose the complete surface of the application. Failure of the login macro to log in to the application results in a poor quality scan. If the login macro quality is measured before the scan, then low quality scans can be avoided.
Select Enable macro validation to enable Fortify WebInspect to test for inconsistencies in macro behavior at the start of the scan. For more information about the specific tests performed, see "Testing Login Macros" on page 457.
Use a login macro for forms authentication
This type of macro is used primarily for Web form authentication. It incorporates logic that will prevent Fortify WebInspect from terminating prematurely if it inadvertently logs out of your application. When recording this type of macro, be sure to specify the application's log-out signature. Click the ellipsis button to locate the macro. Click Record to record a macro.
Note: The Record button is not available for Guided Scan, because Guided Scan includes a separate stage for recording a login macro.
Login Macro Parameters
This section appears only if you have selected Use a login macro for forms authentication and the macro you have chosen or created contains fields that are designated username and password parameters.
If you start a scan using a macro that includes parameters for user name and password, then when you scan the page containing the input elements associated with these entries, Fortify WebInspect substitutes the user name and password specified here. This allows you to create the macro using your own user name and password, yet when other persons run the scan using this macro, they can substitute their own user name and password.
If the macro uses parameters for which values are masked in the Web Macro Recorder, then these values are also masked when configuring a Basic Scan or Guided Scan in Fortify WebInspect.
For information about creating parameters using the Web Macro Recorder, see the Web Macro Recorder chapters in the Micro Focus Fortify WebInspect Tools Guide.
Use a startup macro
This type of macro is used most often to focus on a particular subsection of the application. It specifies URLs that Fortify WebInspect will use to navigate to that area. It may also include login information, but does not contain logic that will prevent Fortify WebInspect from logging out of your application. Fortify WebInspect visits all URLs in the macro, collecting hyperlinks and mapping the data hierarchy. It then calls the Start URL and begins a normal crawl (and, optionally, audit). Click the ellipsis button to locate the macro. Click Record to record a macro.
User GuideChapter 6: Default Scan Settings
Micro Focus Fortify WebInspect (21.1.0) Page 377 of 461

Multi-user Login
You can use the Multi-user Login option to parameterize the username and password in a login macro, and then define multiple username and password pairs to use in a scan. This approach allows the scan to run across multiple threads. Each thread has a different login session, resulting in faster scan times.
Important! To use Multi-user Login, you must first select Use a login macro for forms authentication and record a new macro or select an existing macro to use. See "Use a login macro for forms authentication" on the previous page.
To use multiple user logins to conduct the scan:
1. Select the Multi-user Login checkbox.
Note: If you clear the Multi-user Login checkbox prior to running the scan, the additional credentials will not be used during the scan. Fortify WebInspect will use only the original credentials recorded in the login macro.
2. Continue according to the following table:
To... Then...
Add a user’s credentials
a. Under Multi-user Login, click Add.
The Multi-user Credential Input dialog box appears.
b. In the Username field, type a username
c. In the Password field, type the corresponding password.
d. Click OK.
e. Repeat Steps a-d for each user login to add.
Important! The number of shared requestor threads should not be more than the number of configured users. Requestor threads without valid users will cause the scan to run longer. Remember to count the original username and password in the parameterized macro as the first user when you configure multiple users. For more information, see "Scan Settings: Requestor" on page 349.
Edit a user’s credentials
a. Under Multi-user Login, select a Username/Password pair and click Edit.
The Multi-user Credential Input dialog box appears.
b. Edit the credentials as needed.
c. Click OK.
Delete a user’s a. Under Multi-user Login, select a Username/Password pair to be
User GuideChapter 6: Default Scan Settings
Micro Focus Fortify WebInspect (21.1.0) Page 378 of 461
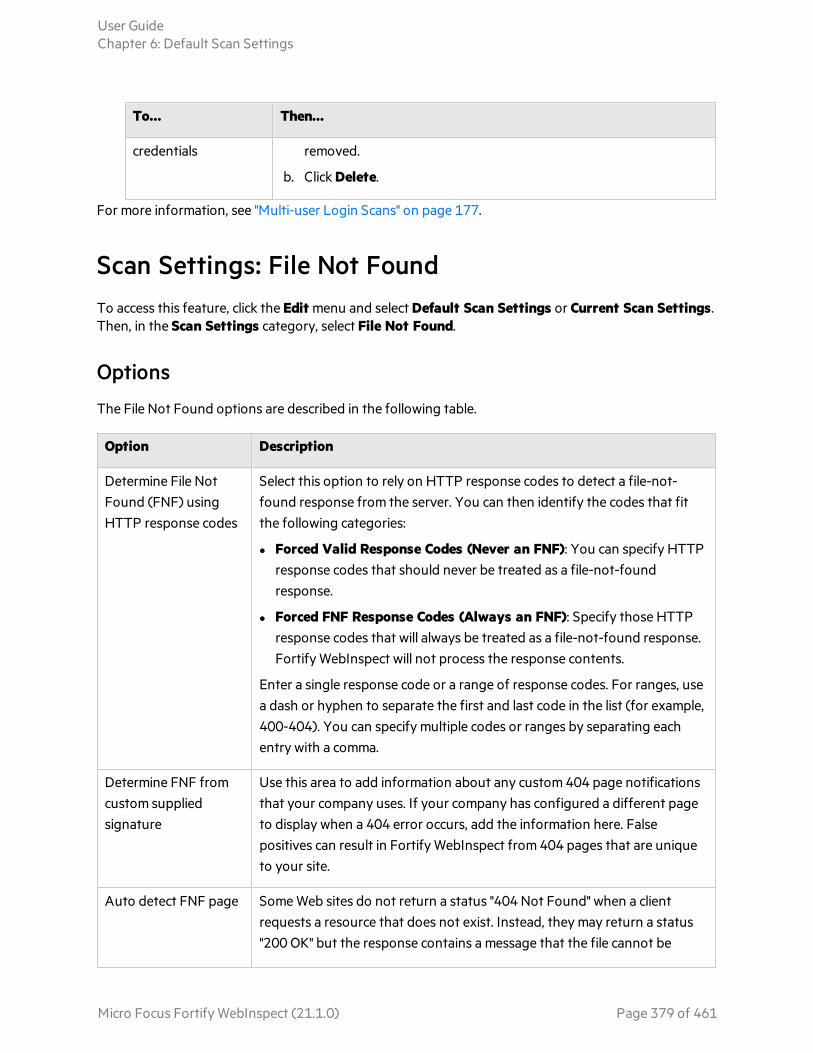
To... Then...
credentials removed.
b. Click Delete.
For more information, see "Multi-user Login Scans" on page 177.
Scan Settings: File Not Found To access this feature, click the Edit menu and select Default Scan Settings or Current Scan Settings. Then, in the Scan Settings category, select File Not Found.
Options
The File Not Found options are described in the following table.
Option Description
Determine File Not Found (FNF) using HTTP response codes
Select this option to rely on HTTP response codes to detect a file-not-found response from the server. You can then identify the codes that fit the following categories:
l Forced Valid Response Codes (Never an FNF): You can specify HTTP response codes that should never be treated as a file-not-found response.
l Forced FNF Response Codes (Always an FNF): Specify those HTTP response codes that will always be treated as a file-not-found response. Fortify WebInspect will not process the response contents.
Enter a single response code or a range of response codes. For ranges, use a dash or hyphen to separate the first and last code in the list (for example, 400-404). You can specify multiple codes or ranges by separating each entry with a comma.
Determine FNF from custom supplied signature
Use this area to add information about any custom 404 page notifications that your company uses. If your company has configured a different page to display when a 404 error occurs, add the information here. False positives can result in Fortify WebInspect from 404 pages that are unique to your site.
Auto detect FNF page Some Web sites do not return a status "404 Not Found" when a client requests a resource that does not exist. Instead, they may return a status "200 OK" but the response contains a message that the file cannot be
User GuideChapter 6: Default Scan Settings
Micro Focus Fortify WebInspect (21.1.0) Page 379 of 461

Option Description
found, or they might redirect to a home page or login page. Select this check box if you want Fortify WebInspect to detect these "custom" file-not-found pages.
Fortify WebInspect attempts to detect custom file-not-found pages by sending requests for resources that cannot possibly exist on the server. It then compares each response and measures the amount of text that differs between the responses. For example, most messages of this type have the same content (such as "Sorry, the page you requested was not found"), with the possible exception being the name of the requested resource. If you select the Auto detect FNF page check box, you can specify what percentage of the response content must be the same in the Match FNF page with field. The default is 90 percent.
Scan Settings: Policy To access this feature, click the Edit menu and select Default Scan Settings or Current Scan Settings. Then, in the Scan Settings category, select Policy.
You can change to a different policy when starting a scan through the Scan Wizard, but the policy you select here will be used if you do not select an alternate.
You can also create, import, or delete policies.
Creating a Policy
To create a policy:
1. Click Create.
The Policy Manager tool opens.
2. Select New from the File menu (or click the New Policy icon).
3. Select the policy on which you will model a new one.
4. Refer to the Policy Manager on-line Help for additional instructions.
Editing a Policy
To edit a policy:
1. Select a custom policy.
Only custom policies may be edited.
2. Click Edit.
User GuideChapter 6: Default Scan Settings
Micro Focus Fortify WebInspect (21.1.0) Page 380 of 461

The Policy Manager tool opens.
3. Refer to the on-line Help for additional instructions.
Importing a Policy
To import a policy:
1. Click Import.
2. On the Import Custom Policy window, click the ellipses button .
3. Using the Files of type list on the standard file-selection window, choose a policy type:
l Policy Files (*.policy): Policy files designed and created for versions of Fortify WebInspect beginning with version 7.0.
l Old Policy Files (*.apc): Policy files designed and created for versions of Fortify WebInspect prior to version 7.0.
l All Files (*.*): Files of any type, including non-policy files.
4. Click OK.
A copy of the policy is created in the Policies folder (the default location is C:\ProgramData\HP\HP WebInspect\Policies\). The policy and all of its enabled checks are imported into SecureBase using the specified policy name. Custom agents are not imported.
Deleting a Policy
To delete a policy:
1. Select a custom policy.
Only custom policies may be deleted.
2. Click Delete.
Scan Settings: User AgentTo access this feature, click the Edit menu and select Default Scan Settings or Current Scan Settings. Then, in the Scan Settings category, select User Agent.
You can configure user agent settings that will synchronize in both Fortify WebInspect and the Web Macro Recorder with Macro Engine 6.0.
Profile and User-Agent String
You can select a predefined Profile that specifies the user agent string for the browser. The following table describes the available profiles.
User GuideChapter 6: Default Scan Settings
Micro Focus Fortify WebInspect (21.1.0) Page 381 of 461

Profile User-Agent String
Default Mozilla/5.0 (Windows NT 10.0; Win64; x64; rv:71.0) Gecko/20100101 Firefox/71.0
Internet Explorer 6
Mozilla/4.0 (compatible; MSIE 6.0; Windows NT 5.1; .NET CLR 1.1.4322)
Internet Explorer 7
Mozilla/4.0 (compatible; MSIE 7.0; Windows NT 5.1)
Internet Explorer 8
Mozilla/4.0 (compatible; MSIE 8.0; Windows NT 5.1; Trident/4.0; GTB5; .NET CLR 1.1.4322; .NET CLR 2.0.50727; .NET CLR 3.0.04506.648; .NET CLR 3.5.21022; InfoPath.2; .NET CLR 3.0.4506.2152; .NET CLR 3.5.30729)
Googlebot 2.1 Mozilla/5.0 (compatible; Googlebot/2.1; +http://www.google.com/bot.html)
Bingbot Mozilla/5.0 (compatible; bingbot/2.0; +http://www.bing.com/bingbot.htm)
Yahoo! Slurp Mozilla/5.0 (compatible; Yahoo! Slurp; http://help.yahoo.com/help/us/ysearch/slurp)
iPhone, iOS 14.3 Mozilla/5.0 (iPhone; CPU iPhone OS 14_3 like Mac OS X) AppleWebKit/605.1.15 (KHTML, like Gecko) Version/14.0.2 Mobile/15E148 Safari/604.1
Custom User-specified.
Important! Fortify recommends that the Custom profile be used by advanced users only.
Navigator Interface Settings
The Navigator Interface settings provide information that legacy web applications use to facilitate browser detection. You can customize these settings if you require browser-specific behavior. The settings are:
l appName - All browsers return "Netscape" as the value of this property.
l appVersion - The browser returns either "4.0" or a string representing version information about the browser.
l platform - The browser returns an empty string or a string representing the platform on which the browser is running.
User GuideChapter 6: Default Scan Settings
Micro Focus Fortify WebInspect (21.1.0) Page 382 of 461

Examples:
MacIntel, Win32, Win64, iPhone
User GuideChapter 6: Default Scan Settings
Micro Focus Fortify WebInspect (21.1.0) Page 383 of 461

Chapter 7: Crawl SettingsThis chapter describes the Crawl Settings that are used by the Fortify WebInspect crawler. The Fortify WebInspect crawler is a software program designed to follow hyperlinks throughout a Web site, retrieving and indexing pages to document the hierarchical structure of the site. The parameters that control the manner in which Fortify WebInspect crawls a site are available from the Crawl Settings list.
Crawl Settings: Link ParsingTo access this feature, click the Edit menu and select Default Scan Settings or Current Scan Settings. Then, in the Crawl Settings category, select Link Parsing.
Fortify WebInspect follows all hyperlinks defined by HTML (using the <a href> tag) and those defined by scripts (JavaScript and VBScript). However, you may encounter other communications protocols that use a different syntax for specifying links. To accommodate this possibility, you can use the Custom Links feature and regular expressions to identify links that you want Fortify WebInspect to follow. These are called special link identifiers.
Adding a Specialized Link Identifier
To add a specialized link identifier:
1. Click Add.
The Specialized Link Entry window opens.
2. In the Specialized Link Pattern box, enter a regular expression designed to identify the link.
3. (Optional) Enter a description of the link in the Comment box.
4. Click OK.
Crawl Settings: Link SourcesTo access this feature, click the Edit menu and select Default Scan Settings or Current Scan Settings. Then, in the Crawl Settings category, select Link Sources.
What is Link Parsing?
The Fortify WebInspect crawler sends a request to a start URL and recursively parses links (URLs) from the response content. These links are added to a work queue and the crawler iterates through the queue until it is empty. The techniques used to extract the link information from the HTTP responses are collectively referred to as ‘link parsing.’ There are two choices for how the crawler performs link parsing: Pattern-based and DOM-based.
Micro Focus Fortify WebInspect (21.1.0) Page 384 of 461

Pattern-based Parsing
Pattern-based link parsing uses a combination of text searching and pattern matching to find URLs. These URLs include the ordinary content that is rendered by a browser, such as <A> elements, as well as invisible text that may reveal additional site structure.
This option matches the default behavior of Fortify WebInspect 10.40 and earlier versions. This is a more aggressive approach to crawling the website and can increase the amount of time it takes to conduct a scan. The aggressive behavior can cause the crawler to create many extra links which are not representative of actual site content. For these situations, DOM-based parsing should expose the site’s URL content with fewer false positives.
Note: All of the DOM-based Parsing techniques for finding links are used when Pattern-based Parsing is selected. Pattern-based Parsing, however, is not capable of computing the metadata for the link source. DOM-based Parsing is capable of computing this information and thus provides more intelligent parsing. DOM-based Parsing also provides more control over which parsing techniques are used.
DOM-based Parsing
The Document Object Model (DOM) is a programming concept that provides a logical structure for defining and building HTML and XML documents, navigating their structure, and editing their elements and content.
A graphical representation of an HTML page rendered as DOM would resemble an upside-down tree: starting with the HTML node, then branching out in a tree structure to include the tags, sub-tags, and content. This structure is called a DOM tree.
Using DOM-based parsing, Fortify WebInspect parses HTML pages into a DOM tree and uses the detailed parsed structure to identify the sources of hyperlinks with higher fidelity and greater confidence. DOM-based parsing can reduce false positives and may also reduce the degree of ‘aggressive link discovery.’
On some sites, the crawler iteratively requests bad links and the resulting responses echo those links back in the response content, sometimes adding extra text that compounds the problem. These repeated cycles of ‘bad links in and bad links out’ can cause scans to run for a long time or, in rare cases, forever. DOM-based parsing and careful selection of link sources provide a mechanism for limiting this runaway scan behavior. Web applications vary in structure and content, and some experimentation may be required to get optimal link source configurations.
User GuideChapter 7: Crawl Settings
Micro Focus Fortify WebInspect (21.1.0) Page 385 of 461

To refine DOM-based Parsing, select the techniques you want to use for finding links. Clearing techniques that may not be a concern for your site may decrease the amount of time it takes to complete the scan. For a more thorough scan, however, select all techniques or use Pattern-based Parsing. The DOM-based Parsing techniques are described in the following table. For more information, see "Limitations of Link Source Settings" on page 391.
Technique Description
Include Comment Links (Aggressive)
Programmers may leave notes to themselves that include links inside HTML comments that are not visible on the site, but may be discovered by an attacker. Use this option to find links inside HTML comments. Fortify WebInspect will find more links, but these may not always be valid URLs, causing the crawler to try to access content that does not exist. Also, the same link can be on every page and those links can be relative, which can exponentially increase the URL count and lengthen the scan time.
Include Conditional Comment Links
A conditional comment link occurs when the HTML on the page is conditionally included or excluded depending on the user agent (browser type and version) making the request.
Regular comment example:
<!—hidden.txt -->
Conditional comment example:
<!--[if lt IE9]> <script src="//www.somesite.com/static/v/all/js/html5sh.js"></script> <link rel="stylesheet" type"text/css" href='//www.somesite.com/static/v/fn-hp/css/IE8.css'> <![endif]-->
Fortify WebInspect emulates browser behaviors in evaluating HTML code and processes the DOM differently depending on the user agent. A link found in a comment by one user agent is a normal HTML link for other user agents.
Use this option to find conditional links that are inside HTML commands, such as those commented out based on browser version. These conditional statements may also contain script includes that need to be executed when script parsing is enabled. Crawling these links will be more thorough, but can increase the scan time. Additionally, such comments may be out of date and pointless to crawl.
Include Plain Text Links
Plain text in a .txt file or a paragraph inside HTML code can be formatted as a URL,
such as http://www.something.com/mypage.html. However, because this is only text and not a true link, the browser would not render it as a link, and the text would not be functionally part of the page. For example, the content may be part of a page that describes how to code in HTML using fake syntax that is not meant to be
User GuideChapter 7: Crawl Settings
Micro Focus Fortify WebInspect (21.1.0) Page 386 of 461

Technique Description
clicked by users. Use this option for Fortify WebInspect to parse these text links and queue them for a crawl.
Also, using smart pattern matches, Fortify WebInspect can identify common file extensions, such as .css, .js, .bmp, .png, .jpg, .html, etc., and add these files to the crawl queue. Auditing these files that are referenced in plain text can produce false positives.
Include Links in Static Script blocks
Use this option for Fortify WebInspect to examine inside the opening and closing script tags for text that looks like links. Valid links may be found inside these script blocks, but developers may also leave comments that include text resembling links inside the opening and closing script tags. For example:
<script type="text/javascript">// go to http://www.foo.com/blah.html for helpvar url = "http:www.foo.com/xyz/" + path + "?help"</script>
Additionally, JavaScript code inside these tags can be handled by the JavaScript execution engine during the scan. However, searching for static links in a line of code that sets a variable, such as the “var url” in the example above, can create problems when those partial paths are added to the queue for crawling. If the variable includes a relative link with a common extension, such as “foo.html”, the crawler will append the extension to the end of every page that includes the line of code. This can produces unusable URLs and may create false positives.
Parse URLs Embedded in URLs
Use this option for Fortify WebInspect to parse any text that is inside an href attribute and add it to the crawl queue. The following is an example of a URL embedded in a URL:
<a href="http://www.foo.com/xyz/bar.html?url=http%3A%2F%2Fwww.zzzz.com%2Fblah" />
On some sites, however, file not found pages return the URL in a form action tag and append the URL to the original URL as follows:
<form action="http://www.foo.com/xyz/bar.html?url=http%3A%2F%2Fwww.zzzz.com%2Fblah?http://www.foo.com/xyz/bar.html?url=http%3A%2F%2Fwww.zzzz.com%2Fblah" />
Fortify WebInspect will then request the form action, and receive another file not found response, again with the URL appended in a form action, as shown below:
User GuideChapter 7: Crawl Settings
Micro Focus Fortify WebInspect (21.1.0) Page 387 of 461

Technique Description
<form action="http://www.foo.com/xyz/bar.html?url=http%3A%2F%2Fwww.zzzz.com%2Fblah?http://www.foo.com/xyz/bar.html?url=http%3A%2F%2Fwww.zzzz.com%2Fblah?http://www.foo.com/xyz/bar.html?url=http%3A%2F%2Fwww.zzzz.com%2Fblah?http://www.foo.com/xyz/bar.html?url=http%3A%2F%2Fwww.zzzz.com%2Fblah" />
On such a site, these URLs will continue to produce file not found responses that add more URLs to the crawl queue, creating an infinite crawl loop. To avoid adding this type of URL to the crawl queue, do not use this option.
Allow Un-rooted URLs (for the above items)
This option modifies the behavior of the previous five options. Some URLs do not include the specific scheme, such as http, and are not fully qualified domain names.
These URLs, which may resemble xyz.html, are considered unanchored or “un-rooted.” The assumption is that the un-rooted URL is relative to the request.
For example, the non-fully qualified URL <a href='foo.html' /> does not include a scheme. This URL uses the scheme of the context URL. If an HTTPS page requested to get the content, then HTTPS would be prepended to the URL.
Use this option to treat un-rooted URLs as links when parsing. If this option is selected, the scan will be more thorough and more aggressive, but may take considerably longer to complete.
URL Samples and Parsing Results
The following samples describe various URLs and how they are parsed during a crawl.
A Normal URL
The URL in the following request includes a forward (or anchor) slash.
Request from http://www.foo.com/x/y/z/ For <a href='/bar.html' /> Results in a link to http://www.foo.com/bar.html.
Simple Un-rooted URL
The URL in the following request is un-rooted because it does not include a forward slash.
Request from http://www.foo.com/ For <a href='bar.html' />
User GuideChapter 7: Crawl Settings
Micro Focus Fortify WebInspect (21.1.0) Page 388 of 461

Technique Description
Results in a link to http://www.foo.com/bar.html.
Long Un-rooted URL
The following request shows a long, un-rooted URL.
Request from http://www.foo.com/x/y/z/ For <a href='bar.html' /> Results in a link to http://www.foo.com/x/y/z/bar.html.
Comments in Code
You may include comments, such as <!-- baz_ads.js -->, in your code before a script include. The following request shows how this comment is interpreted during an aggressive crawl.
Request from http://www.foo.com/x/y/z/ For <!-- baz_ads.js --> Results in a link to http://www.foo.com/x/y/z/baz_ads.js
If you include this comment on your master page, then during an aggressive scan, the comment will be discovered on many, if not all, page responses in the site. This configuration can cause runaway scans.
The comment <!-- baz_ads.js --> on the master page results in multiple links:
http://www.foo.com/baz_ads.js http://www.foo.com/x/baz_ads.js http://www.foo.com/x/y/baz_ads.js http://www.foo.com/x/y/z/baz_ads.js And so on for all pages in the site.
Form Actions, Script Includes, and Stylesheets
Some link types—such as form actions, script includes, and stylesheets—are special and are treated differently than other links. On some sites, it may not be necessary to crawl and parse these links. However, if you want an aggressive scan that attempts to crawl and parse everything, the following options will help accomplish this goal. For more information, see "Limitations of Link Source Settings" on page 391.
Note: You can also allow un-rooted URLs for each of these options. See “Allow Un-rooted URLs” in this topic.
User GuideChapter 7: Crawl Settings
Micro Focus Fortify WebInspect (21.1.0) Page 389 of 461

Option Description
Crawl Form Action Links
When Fortify WebInspect encounters HTML forms during the crawl, it creates variations on the inputs that a user can make and submits the forms as requests to solicit more site content. For example, for forms with a POST method, Fortify WebInspect can use a GET instead and possibly reveal information. In addition to this type of crawling, use this option for Fortify WebInspect to treat form targets as normal links.
Crawl Script Include Links
A script include imports JavaScript from a .js file and processes it on the current page. Use this option for Fortify WebInspect to crawl the .js file as a link.
Crawl Stylesheet Links
A stylesheet link imports the style definitions from a .css file and renders them on the current page. Use this option for Fortify WebInspect to crawl the .css file as a link.
Miscellaneous Options
The following additional options may help improve link parsing for your site. For more information, see "Limitations of Link Source Settings" on the next page.
Option Description
Crawl Links on FNF Pages
If you select this option, Fortify WebInspect will look for and crawl links on responses that are marked as “file not found.”
This option is selected by default when the Scan Mode is set to Crawl Only or Crawl & Audit. The option is not available when the Scan Mode is set to Audit Only.
Suppress URLs with Repeated Path Segments
Many sites have text that resembles relative paths that become unusable URLs after Fortify WebInspect parses them and appends them to the URL being crawled. These occurrences can result in a runaway scan if paths are
continuously appended, such as /foo/bar/foo/bar/. This setting helps reduce such occurrences and is enabled by default.
With the setting enabled, the options are:
1 – Detect a single sub-folder repeated anywhere in the URL and reject the
URL if there is a match. For example, /foo/baz/bar/foo/ will match because “/foo/” is repeated. The repeat does not have to occur adjacently.
2 – Detect two (or more) pairs of adjacent sub-folders and reject the URL if
User GuideChapter 7: Crawl Settings
Micro Focus Fortify WebInspect (21.1.0) Page 390 of 461

Option Description
there is a match. For example, /foo/bar/baz/foo/bar/ will match because “/foo/bar/” is repeated.
3 – Detect two (or more) sets of three adjacent sub-folders and reject the URL if there is a match.
4 – Detect two (or more) sets of four adjacent sub-folders and reject the URL if there is a match.
5 – Detect two (or more) sets of five adjacent sub-folders and reject the URL if there is a match.
If the setting is disabled, repeating sub-folders are not detected and no URLs are rejected due to matches.
Limitations of Link Source Settings
Clearing a link source check box prevents the crawler from processing that specific kind of link when it is found using static parsing. However, these links can be found in many other ways. For example, clearing the Crawl Stylesheet Links option does not control path truncation nor suppress .css file requests made by the script engine. Clearing this setting only prevents static link parsing of the .css response from the server. Similarly, clearing the Crawl Script Include Links option does not suppress .js, AJAX, frameIncludes, or any other file request made by the script engine. Therefore, clearing a link source check box is not a universal filter for that type of link source.
The goal for clearing a check box is to prevent potentially large volumes of bad links from cluttering the crawl and resulting in extremely long scan times.
Crawl Settings: Session ExclusionsAll items specified in the Scan Settings - Session Exclusions are automatically replicated in the Session Exclusions for both the Crawl Settings and the Audit Settings. These items are listed in gray (not black) text. If you do not want these objects to be excluded from the crawl, you must remove them from the Scan Settings - Session Exclusions panel.
This panel (Crawl Settings - Session Exclusions) allows you to specify additional objects to be excluded from the crawl.
Excluded or Rejected File Extensions
If you select Reject, files having the specified extension will not be requested.
If you select Exclude, files having the specified extension will be requested, but will not be audited.
User GuideChapter 7: Crawl Settings
Micro Focus Fortify WebInspect (21.1.0) Page 391 of 461

Adding a File Extension to Exclude/Reject
To add a file extension:
1. Click Add.
The Exclusion Extension window opens.
2. In the File Extension box, enter a file extension.
3. Select either Reject, Exclude, or both.
4. Click OK.
Excluded MIME Types
Files associated with the MIME types you specify will not be audited.
Adding a MIME Type to Exclude
To add a MIME Type:
1. Click Add.
The Provide a Mime-type to Exclude window opens.
2. In the Exclude Mime-type box, enter a MIME type.
3. Click OK.
Other Exclusion/Rejection Criteria
You can identify various components of an HTTP message and then specify whether you want to exclude or reject a session that contains that component.
l Reject - Fortify WebInspect will not send any HTTP requests to the host or URL you specify. For example, you should usually reject any URL that deals with logging off the site, since you don't want to log out of the application before the scan is completed.
l Exclude - During a crawl, Fortify WebInspect will not examine the specified URL or host for links to other resources. During the audit portion of the scan, Fortify WebInspect will not attack the specified host or URL. If you want to access the URL or host without processing the HTTP response, select the Exclude option, but do not select Reject. For example, to check for broken links on URLs that you don't want to process, select only the Exclude option.
Editing the Default Criteria
To edit the default criteria:
1. Select a criterion and click Edit (on the right side of the Other Exclusion/Rejection Criteria list).
The Reject or Exclude a Host or URL window opens.
2. Select either Host or URL.
User GuideChapter 7: Crawl Settings
Micro Focus Fortify WebInspect (21.1.0) Page 392 of 461

3. In the Host/URL box, enter a URL or fully qualified host name, or a regular expression designed to match the targeted URL or host.
4. Select either Reject, Exclude, or both.
5. Click OK.
Adding Exclusion/Rejection Criteria
To add exclusion/rejection criteria:
1. Click Add (on the right side of the Other Exclusion/Rejection Criteria list).
The Create Exclusion window opens.
2. Select an item from the Target list.
3. If you selected Query Parameter or Post Parameter as the target, enter the Target Name.
4. From the Match Type list, select the method to be used for matching text in the target:
l Matches Regex - Matches the regular expression you specify in the Match String box.
l Matches Regex Extension - Matches a syntax available from Fortify's regular expression extensions you specify in the Match String box.
l Matches - Matches the text string you specify in the Match String box.
l Contains - Contains the text string you specify in the Match String box.
5. In the Match String box, enter the string or regular expression for which the target will be searched. Alternatively, if you selected a regular expression option in the Match Type, you can click the drop-down arrow and select Create Regex to launch the Regular Expression Editor.
6. Click (or press Enter). 7. (Optional) Repeat steps 2-6 to add more conditions. Multiple matches are ANDed.
8. If you are working in Current Settings, you can click Test to process the exclusions on the current scan. Any sessions from that scan that would have been filtered by the criteria will appear in the test screen, allowing you to modify your settings if required.
9. Click OK.
10. When the exclusion appears in the Other Exclusion/Rejection Criteria list, select either Reject, Exclude, or both.
Note: You cannot reject Response, Response Header, and Status Code Target types during a scan. You can only exclude these Target types.
Example 1
To ensure that you ignore and never send requests to any resource at Microsoft.com, enter the following exclusion and select Reject.
Target Target Name Match Type Match String
URL N/A contains Microsoft.com
User GuideChapter 7: Crawl Settings
Micro Focus Fortify WebInspect (21.1.0) Page 393 of 461

Example 2
Enter "logout" as the match string. If that string is found in any portion of the URL, the URL will be excluded or rejected (depending on which option you select). Using the "logout" example, Fortify WebInspect would exclude or reject URLs such as logout.asp or applogout.jsp.
Target Target Name Match Type Match String
URL N/A contains logout
Example 3
The following example rejects or excludes a session containing a query where the query parameter "username" equals "John."
Target Target Name Match Type Match String
Query parameter username matches John
Example 4
The following example excludes or rejects the following directories:
http://www.test.com/W3SVC55/
http://www.test.com/W3SVC5/
http://www.test.com/W3SVC550/
Target Target Name Match Type Match String
URL N/A matches regex /W3SVC[0-9]*/
User GuideChapter 7: Crawl Settings
Micro Focus Fortify WebInspect (21.1.0) Page 394 of 461

Chapter 8: Audit SettingsThis chapter describes the Audit Settings used by Fortify WebInspect during an audit scan. An audit is the probe or attack conducted by Fortify WebInspect which is designed to detect vulnerabilities. The parameters that control the manner in which Fortify WebInspect conducts that probe are available from the Audit Settings list.
Audit Settings: Session ExclusionsTo access this feature, click the Edit menu and select Default Scan Settings or Current Scan Settings. Then, in the Audit Settings category, select Session Exclusions.
All items specified in the Scan Settings - Session Exclusions are automatically replicated in the Session Exclusions for both the Crawl Settings and the Audit Settings. These items are listed in gray (not black) text. If you do not want these objects to be excluded from the audit, you must remove them from the Scan Settings - Session Exclusions panel.
This panel (Audit Settings - Session Exclusions) allows you to specify additional objects to be excluded from the audit.
Excluded or Rejected File Extensions
If you select Reject, Fortify WebInspect will not request files having the specified extension.
If you select Exclude, Fortify WebInspect will request files having the specified extension, but will not audit them.
Adding a File Extension to Exclude/Reject
To add a file extension:
1. Click Add.
The Exclusion Extension window opens.
2. In the File Extension box, enter a file extension.
3. Select either Reject, Exclude, or both.
4. Click OK.
Excluded MIME Types
Fortify WebInspect will not audit files associated with the MIME types you specify.
Micro Focus Fortify WebInspect (21.1.0) Page 395 of 461

Adding a MIME Type to Exclude
To add a MIME type:
1. Click Add.
The Provide a Mime-type to Exclude window opens.
2. In the Exclude Mime-type box, enter a MIME type.
3. Click OK.
Other Exclusion/Rejection Criteria
You can identify various components of an HTTP message and then specify whether you want to exclude or reject a session that contains that component.
l Reject - Fortify WebInspect will not send any HTTP requests to the host or URL you specify. For example, you should usually reject any URL that deals with logging off the site, since you don't want to log out of the application before the scan is completed.
l Exclude - During a crawl, Fortify WebInspect will not examine the specified URL or host for links to other resources. During the audit portion of the scan, Fortify WebInspect will not attack the specified host or URL. If you want to access the URL or host without processing the HTTP response, select the Exclude option, but do not select Reject. For example, to check for broken links on URLs that you don't want to process, select only the Exclude option.
Editing the Default Criteria
To edit the default criteria:
1. Select a criterion and click Edit (on the right side of the Other Exclusion/Rejection Criteria list).
The Reject or Exclude a Host or URL window opens.
2. Select either Host or URL.
3. In the Host/URL box, enter a URL or fully qualified host name, or a regular expression designed to match the targeted URL or host.
4. Select either Reject, Exclude, or both.
5. Click OK.
Adding Exclusion/Rejection Criteria
To add exclusion/rejection criteria:
1. Click Add (on the right side of the Other Exclusion/Rejection Criteria list).
The Create Exclusion window opens.
2. Select an item from the Target list.
3. If you selected Query Parameter or Post Parameter as the target, enter the Target Name.
User GuideChapter 8: Audit Settings
Micro Focus Fortify WebInspect (21.1.0) Page 396 of 461
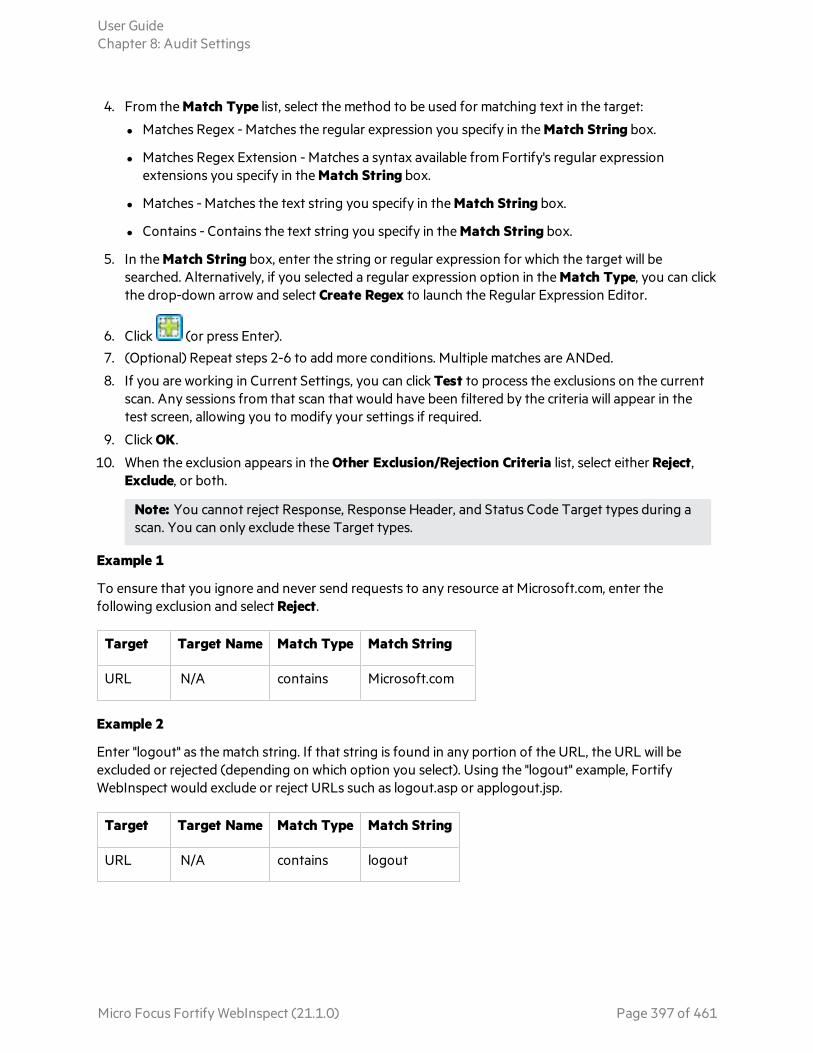
4. From the Match Type list, select the method to be used for matching text in the target:
l Matches Regex - Matches the regular expression you specify in the Match String box.
l Matches Regex Extension - Matches a syntax available from Fortify's regular expression extensions you specify in the Match String box.
l Matches - Matches the text string you specify in the Match String box.
l Contains - Contains the text string you specify in the Match String box.
5. In the Match String box, enter the string or regular expression for which the target will be searched. Alternatively, if you selected a regular expression option in the Match Type, you can click the drop-down arrow and select Create Regex to launch the Regular Expression Editor.
6. Click (or press Enter). 7. (Optional) Repeat steps 2-6 to add more conditions. Multiple matches are ANDed.
8. If you are working in Current Settings, you can click Test to process the exclusions on the current scan. Any sessions from that scan that would have been filtered by the criteria will appear in the test screen, allowing you to modify your settings if required.
9. Click OK.
10. When the exclusion appears in the Other Exclusion/Rejection Criteria list, select either Reject, Exclude, or both.
Note: You cannot reject Response, Response Header, and Status Code Target types during a scan. You can only exclude these Target types.
Example 1
To ensure that you ignore and never send requests to any resource at Microsoft.com, enter the following exclusion and select Reject.
Target Target Name Match Type Match String
URL N/A contains Microsoft.com
Example 2
Enter "logout" as the match string. If that string is found in any portion of the URL, the URL will be excluded or rejected (depending on which option you select). Using the "logout" example, Fortify WebInspect would exclude or reject URLs such as logout.asp or applogout.jsp.
Target Target Name Match Type Match String
URL N/A contains logout
User GuideChapter 8: Audit Settings
Micro Focus Fortify WebInspect (21.1.0) Page 397 of 461

Example 3
The following example rejects or excludes a session containing a query where the query parameter "username" equals "John."
Target Target Name Match Type Match String
Query parameter username matches John
Example 4
The following example excludes or rejects the following directories:
http://www.test.com/W3SVC55/
http://www.test.com/W3SVC5/
http://www.test.com/W3SVC550/
Target Target Name Match Type Match String
URL N/A matches regex /W3SVC[0-9]*/
Audit Settings: Attack ExclusionsTo access this feature, click the Edit menu and select Default Scan Settings or Current Scan Settings. Then, in the Audit Settings category, select Attack Exclusions.
Excluded Parameters
Use this feature to prevent Fortify WebInspect from using certain parameters in the HTTP request to attack the Web site. This feature is used most often to avoid corrupting query and POSTDATA parameters.
Adding Parameters to Exclude
To prevent certain parameters from being modified:
1. In the Excluded Parameters group, click Add.
The Specify HTTP Exclusions window opens.
2. In the HTTP Parameter box, enter the name of the parameter you want to exclude.
Click to insert regular expression notations. 3. Choose the area in which the parameter may be found: HTTP query data or HTTP POST data. You
can select both areas, if necessary.
4. Click OK.
User GuideChapter 8: Audit Settings
Micro Focus Fortify WebInspect (21.1.0) Page 398 of 461

Excluded Cookies
Use this feature to prevent Fortify WebInspect from using certain cookies in the HTTP request to attack the Web site. This feature is used to avoid corrupting cookie values.
This setting requires you to enter the name of a cookie.
In the following example HTTP response, the name of the cookie is "FirstCookie."
Set-Cookie: FirstCookie=Chocolate+Chip; path=/
Excluding Certain Cookies
To exclude certain cookies:
1. In the Excluded Headers group, click Add.
The Regular Expression Editor appears.
Note: You can specify a cookie using either a text string or a regular expression.
2. To enter a text string:
a. In the Expression box, type a cookie name.
b. Click OK.
3. To enter a regular expression:
a. In the Expression box, type or paste a regular expression that you believe will match the text for which you are searching.
Click to insert regular expression notations. b. In the Comparison Text box, type or paste the text that is known to contain the string you
want to find (as specified in the Expression box).
c. To find only those occurrences matching the case of the expression, select the Match Case check box.
d. If you want to replace the string identified by the regular expression, select the Replace check box and then type or select a string from the Replace box.
e. Click Test to search the comparison text for strings that match the regular expression. Matches will be highlighted in red.
f. Did your regular expression identify the string?
o If yes, click OK.
o If no, verify that the Comparison Text contains the string you want to identify or modify the regular expression.
Excluded Headers
Use this feature to prevent Fortify WebInspect from using certain headers in the HTTP request to attack the Web site. This feature is used to avoid corrupting header values.
User GuideChapter 8: Audit Settings
Micro Focus Fortify WebInspect (21.1.0) Page 399 of 461
Excluding Certain Headers
To prevent certain headers from being modified, create a regular expression using the procedure described below.
1. In the Excluded Headers group, click Add.
The Regular Expression Editor appears.
Note: You can specify a header using either a text string or a regular expression.
2. To enter a text string:
a. In the Expression box, type a header name.
b. Click OK.
3. To enter a regular expression:
a. In the Expression box, type or paste a regular expression that you believe will match the text for which you are searching.
Click to insert regular expression notations. b. In the Comparison Text box, type or paste the text that is known to contain the string you
want to find (as specified in the Expression box).
c. To find only those occurrences matching the case of the expression, select the Match Case check box.
d. If you want to replace the string identified by the regular expression, select the Replace check box and then type or select a string from the Replace box.
e. Click Test to search the comparison text for strings that match the regular expression. Matches will be highlighted in red.
f. Did your regular expression identify the string?
o If yes, click OK.
o If no, verify that the Comparison Text contains the string you want to identify or modify the regular expression.
Audit Inputs Editor
Using the Audit Inputs Editor, you can create or modify parameters for audit engines and checks that require inputs.
l To launch the tool, click Audit Inputs Editor.
l To load inputs that you previously created using the editor, click Import Audit Inputs.
Audit Settings: Attack ExpressionsTo access this feature, click the Edit menu and select Default Scan Settings or Current Scan Settings. Then, in the Audit Settings category, select Attack Expressions.
User GuideChapter 8: Audit Settings
Micro Focus Fortify WebInspect (21.1.0) Page 400 of 461
Additional Regular Expression Languages
You may select one of the following language code-country code combinations (as used by the CultureInfo class in the .NET Framework Class Library):
l zh-cn: Chinese - China
l zh-tw: Chinese - Taiwan
l ja-jp: Japanese - Japan
l ko-kr: Korean - Korea
l pt-br: Portuguese - Brazil
l es-es: Spanish - Spain
The CultureInfo class holds culture-specific information, such as the associated language, sublanguage, country/region, calendar, and cultural conventions. This class also provides access to culture-specific instances of DateTimeFormatInfo, NumberFormatInfo, CompareInfo, and TextInfo. These objects contain the information required for culture-specific operations, such as casing, formatting dates and numbers, and comparing strings.
Audit Settings: Vulnerability FilteringTo access this feature, click the Edit menu and select Default Settings or Current Settings. Then, in the Audit Settings category, select Vulnerability Filtering.
By applying certain filters, you can limit the display of certain vulnerabilities reported during a scan. The options are:
l Standard Vulnerability Definition - This filter sorts parameter names for determining equivalency between similar requests. For example, if a SQL injection vulnerability is found in parameter "a" in both http://x.y?a=x;b=y and http://x.y?b=y;a=x, it would be considered equivalent.
l Parameter Vulnerability Roll-Up - This filter consolidates multiple parameter manipulation and parameter injection vulnerabilities discovered during a single session into one vulnerability.
l 403 Blocker - This filter revokes vulnerabilities when the status code of the vulnerable session is 403 (Forbidden).
l Response Inspection DOM Event Parent-Child - This filter disregards a keyword search vulnerability found in JavaScript if the same vulnerability has already been detected in the parent session.
Adding a Vulnerability Filter
To add a filter to your default settings:
1. Click the Edit menu and select Default Scan Settings.
2. In the Audit Settings panel in the left column, select Vulnerability Filtering.
All available filters are listed in either the Disabled Filters list or the Enabled Filters list.
User GuideChapter 8: Audit Settings
Micro Focus Fortify WebInspect (21.1.0) Page 401 of 461
3. To enable a filter, select a filter in the Disabled Filters list and click Add.
The filter is removed from the Disabled Filters list and added to the Enabled Filters list.
4. To disable a filter, select a filter in the Enabled Filters list and click Remove.
The filter is removed from the Enabled Filters list and added to the Disabled Filters list.
You can also modify the settings for a specific scan by clicking the Settings button at the bottom of the Scan Wizard or the Web Service Scan Wizard.
Suppressing Off-site Vulnerabilities
If your Web application includes links to hosts that are not in your Allowed Hosts list, Fortify WebInspect may identify passive vulnerabilities on those hosts. To suppress all vulnerabilities against sessions for off-site hosts that are not in your Allowed Hosts list, select the Suppress Offsite Vulnerabilities check box.
For more information about Allowed Hosts, see "Scan Settings: Allowed Hosts" on page 355.
Audit Settings: Smart ScanTo access this feature, click the Edit menu and select Default Scan Settings or Current Scan Settings. Then, in the Audit Settings category, select Smart Scan.
Enable Smart Scan
Smart Scan is an "intelligent" feature that discovers the type of server that is hosting the Web site and checks for known vulnerabilities against that specific server type. For example, if you are scanning a site hosted on an IIS server, Fortify WebInspect will probe only for those vulnerabilities to which IIS is susceptible. It would not check for vulnerabilities that affect other servers, such as Apache or iPlanet.
If you select this option, you can choose one or more of the identification methods described below.
Use regular expressions on HTTP responses
This method, employed by previous releases of Fortify WebInspect, searches the server response for strings that match predefined regular expressions designed to identify specific servers.
Use server analyzer fingerprinting and request sampling
This advanced method sends a series of HTTP requests and then analyzes the responses to determine the server/application type.
Custom server/application type definitions
If you know the server type for a target domain, you can select it using the Custom server/application type definitions section. This identification method overrides any other selected method for the server you specify.
User GuideChapter 8: Audit Settings
Micro Focus Fortify WebInspect (21.1.0) Page 402 of 461
To specify a custom definition:
1. Click Add.
The Server/Application Type Entry window opens.
2. In the Host box, enter the domain name or host, or the server's IP address.
3. (Optional) Click Identify.
Fortify WebInspect contacts the server and uses the server analyzer fingerprinting method to determine the server type. If successful, it selects the corresponding check box in the Server/Application Type list.
Note: Alternatively, if you select the Use Regular Expressions option, enter a regular
expression designed to identify a server. Click to insert regular expression notations or to launch the Regular Expression Editor (which facilitates the creation and testing of an expression).
4. Select one or more entries from the Server/Application Type list.
5. Click OK.
User GuideChapter 8: Audit Settings
Micro Focus Fortify WebInspect (21.1.0) Page 403 of 461

Chapter 9: Application SettingsThis chapter describes the settings that define where Fortify WebInspect stores scan data and log files, as well as settings for licensing, telemetry, and SmartUpdates. These settings also configure Fortify WebInspect to interact with other applications, such as Micro Focus Application Lifecycle Management (ALM).
Application Settings: GeneralTo access this feature, click Edit > Application Settings and then select General.
General
The General options are described in the following table.
Option Description
Enable Active Content in Browser Views
Select this option to allow execution of JavaScript and other dynamic content in all browser windows within Fortify WebInspect.
For example, one Fortify WebInspect attack tests for cross-site scripting by attempting to embed a script in a dynamically generated Web page. That script instructs the server to display an alert containing the number "76712." If active content is enabled and if the attack is successful (i.e., cross-site scripting is possible), then selecting the vulnerable session and clicking on Web Browser in the Session Info panel will execute the script and display the following:
Note: If you initiate or open a scan while this option is disabled, and you then enable this option, the browser will not execute the active content until you close and then reopen the scan.
Micro Focus Fortify WebInspect (21.1.0) Page 404 of 461

Option Description
Enable Diagnostic File Creation
If the Fortify WebInspect application should ever fail, this option forces Fortify WebInspect to create a file containing data that was stored in main memory at the time of failure. You can then provide the file to Fortify support personnel.
If you select this option, you may also specify how many diagnostic files should be retained. When the number of files exceeds this limit, the oldest file will be deleted.
Reset "Don't Show Me Again" messages
By default, Fortify WebInspect displays various prompts and dialog boxes to remind you of certain consequences that may occur as a result of an action you take. These dialog boxes contain a check box labeled "Don't show me again." If you select that option, Fortify WebInspect discontinues displaying those messages. You can force Fortify WebInspect to resume displaying those messages if you click Reset "Don't Show Me Again" messages.
Use Seven Pernicious Kingdom (7PK) Taxonomy
This option allows you to select The Seven Pernicious Kingdoms taxonomy for ordering and organizing the reported vulnerabilities.
Seven Pernicious Kingdoms (7PK) is a taxonomy of software security errors developed by the Fortify Software Security Research Group together with Dr. Gary McGraw. Each vulnerability category is accompanied by a detailed description of the issue with references to original sources and code excerpts, where applicable, to better illustrate the problem.
The organization of the classification scheme is described with the help of terminology borrowed from biology: vulnerability categories are referred to as phyla, while collections of vulnerability categories that share the same theme are referred to as kingdoms. Vulnerability phyla are classified into pernicious kingdoms presented in the order of importance to software security.
The seven kingdoms are:
1. Input Validation and Representation
2. API Abuse
3. Security Features
4. Time and State
5. Errors
6. Code Quality
User GuideChapter 9: Application Settings
Micro Focus Fortify WebInspect (21.1.0) Page 405 of 461

Option Description
7. Encapsulation
* Environment
The first seven kingdoms are associated with security defects in source code, while the last one describes security issues outside the actual code.
The primary goal of defining this taxonomy is to organize sets of security rules that can be used to help software developers understand the kinds of errors that have an impact on security. By better understanding how systems fail, developers will better analyze the systems they create, more readily identify and address security problems when they see them, and generally avoid repeating the same mistakes in the future. For more information, see https://vulncat.fortify.com/.
You might want to use the Seven Pernicious Kingdoms taxonomy if you are integrating Fortify WebInspect with other Micro Focus Fortify products as it provides for a unified taxonomy.
Use OpenSSL Engine By default, Fortify WebInspect uses this option. The OpenSSL engine provides support for websites that require use of the TLS 1.3 security protocol. OpenSSL is backwards compatible with previous versions of the TLS protocol.
If this option is enabled, the SSL/TLS Protocols options are disabled in Scan Settings: Method. You cannot select individual protocols for a scan.
Note: This feature is a technology preview. Technology preview features are currently unsupported, may not be functionally complete, and are not suitable for deployment in production. However, these features are provided as a courtesy and the primary objective is for the feature to gain wider exposure with the goal of full support in the future.
Enable HTTP/2 Support
Use this option if your website supports the HTTP/2 protocol only and you experience issues using the HTTP/1 protocol.
Note: This feature is a technology preview. Technology preview features are currently unsupported, may not be functionally complete, and are not suitable for deployment in production. However, these features are provided as a courtesy and the primary objective is for the feature to gain wider exposure with the goal of full support in the future.
User GuideChapter 9: Application Settings
Micro Focus Fortify WebInspect (21.1.0) Page 406 of 461

WebInspect Agent
The Fortify WebInspect Agent options are described in the following table.
Option Description
Use WebInspect Agent information when encountered on target site
If this option is selected and Fortify WebInspect detects that Fortify WebInspect Agent is installed on a target server, it will incorporate Fortify WebInspect Agent information to improve overall scan efficiency.
A notation on the Fortify WebInspect dashboard indicates whether or not Fortify WebInspect Agent has been detected.
Automatically group by duplicate vulnerabilities in vulnerability window
If this option is selected and Fortify WebInspect Agent information is used (above setting), then vulnerabilities listed on the Findings tab in the Summary pane will be grouped by check and then by equivalent vulnerabilities.
Allow WebInspect Agent to suggest attack strategy
If this option is selected and Fortify WebInspect information is used (see Use WebInspect Agent Information When Encountered on Target Site above), the agent operates in an active mode and can suggest attack strategies to Fortify WebInspect to improve accuracy and performance. This feature requires version 4.1 or above of the Fortify WebInspect Agent and you must be using the Seven Pernicious Kingdoms taxonomy.
Application Settings: DatabaseTo access this feature, click Edit > Application Settings and then select Database.
Connection Settings for Scan/Report Storage
Select the device that will store Fortify WebInspect scan and report data. The choices are:
l Use SQL Server Express (for SQL Server Express Edition). Data for each scan will be stored in a separate database.
l Use SQL Server (for SQL Server Standard Edition). Data for multiple scans will be stored in a single database. You can configure multiple database settings and assign a "profile name" to each collection of settings, allowing you to switch easily from one configuration to another.
User GuideChapter 9: Application Settings
Micro Focus Fortify WebInspect (21.1.0) Page 407 of 461
SQL Server Database Privileges
The account specified for the database connection must also be a database owner (DBO) for the named database. However, the account does not require sysadmin (SA) privileges for the database server. If the database administrator (DBA) did not generate the database for the specified user, then the account must also have the permission to create a database and to manipulate the security permissions. The DBA can rescind these permissions after Fortify WebInspect sets up the database, but the account must remain a DBO for that database.
Configuring SQL Server Standard Edition
To configure a profile for SQL Server Standard Edition:
1. Click Configure (to the right of the drop-down list).
The Manage Database Settings dialog box appears.
2. Click Add.
The Add Database dialog box appears.
3. Enter a name for this database profile.
4. Select a server from the Server Name list.
Important! If SQL Server Browser is not enabled, the database server may not appear in the list. In this case, you must manually enter the connection information. The connection string is formatted as follows:
SERVER\INSTANCE,PORTNote that the port definition is added with a comma instead of a colon or semicolon.
5. In the Log on to the server group, specify the type of authentication used for the selected server:
l Use Windows Authentication - Log on by submitting the user's Windows account name and password.
l Use SQL Server Authentication - Use SQL Server authentication, which relies on the internal user list maintained by the SQL Server computer. Enter the user name and password.
6. Enter or select a specific database, or click New to create a database.
7. Click OK to close the Add Database dialog box.
8. Click OK to close the Manage Database Settings dialog box.
Connection Settings for Scan Viewing
When displaying a list of scans (using either the Manage Scans view or the Report Generator wizard), Fortify WebInspect can access scan data stored in SQL Server Standard Edition and/or SQL Server Express Edition. You can select either or both options.
l Show Scans Stored in SQL Server Express: Select this option if you want to access scan data stored in a local SQL Server Express Edition.
User GuideChapter 9: Application Settings
Micro Focus Fortify WebInspect (21.1.0) Page 408 of 461

l Show Scans Stored in SQL Server Standard: Select this option if you want to access data in SQL Server Standard Edition. See "Configuring SQL Server Standard Edition" on the previous page for instructions.
Creating Scan Data for Site Explorer
During a scan, Fortify WebInspect creates a SQL Express database (.mdf) file or adds the scan to an existing SQL Server database (.mdf) file. However, Site Explorer uses a variation of the traffic session file (.tsf) format. You can configure Fortify WebInspect to create a .tsf file during a scan.
Note: The .tsf file created for Site Explorer does not include vulnerabilities and other details that are available in the standard scan files.
To have Fortify WebInspect create a traffic file that can be displayed in Site Explorer, select the Create Scan Data for Site Explorer check box.
When enabled, Fortify WebInspect creates a file in the format <ScanID>.tsf in the scandata folder in the user's Fortify WebInspect directory, such as:
c:\users\<username>\appdata\local\hp\hp webinspect\scandata
If you select this check box while a scan is running, it will have no effect on the current scan. Only scans started after this check box is selected will generate a .tsf file for Site Explorer.
Application Settings: DirectoriesTo access this feature, click Edit > Application Settings and then select Directories.
Changing Where Fortify WebInspect Files Are Saved
You can change the locations in which Fortify WebInspect files are saved. To change locations:
1. Click the ellipsis button next to a category of information.
2. Use the Browse For Folder dialog box to select or create a directory.
3. Click OK.
Application Settings: LicenseTo access this feature, click Edit > Application Settings and then select License.
License Details
This section provides pertinent information about the Fortify WebInspect license. If you want to change certain provisions of the license, click Configure Licensing, which will invoke the License Wizard.
User GuideChapter 9: Application Settings
Micro Focus Fortify WebInspect (21.1.0) Page 409 of 461

The contents of the lower section of the window depend on the type of license management currently employed:
l Connected directly to the Micro Focus license server. See "Direct Connection to Micro Focus" below.
l Connected to a local AutoPass License Server (APLS). See "Connection to APLS" below.
l Connected to a local License and Infrastructure Manager (LIM). See "Connection to LIM" on the next page.
Direct Connection to Micro Focus
Options are described in the following table.
Option Description
Update If you upgrade from a trial version or if you otherwise modify the conditions of your license, click Update. The application will contact the license server and update the information stored locally on your machine.
Note: This option is not available for installations using an AutoPass license.
Deactivate Fortify WebInspect licenses are assigned to specific computers. If you would like to transfer this license to a different computer:
1. Copy the activation token.
Take care not to lose or misplace this number. Write it or print it, and keep it in a safe place.
2. Click Deactivate.
The application will contact the license server and release your license, allowing you to install Fortify WebInspect on another computer.
3. At the new computer, access the Fortify WebInspect application settings for licensing and enter the activation token.
Connection to APLS
While using a concurrent (floating) license managed by your APLS, Fortify WebInspect must be connected to your APLS at all times. If the Status shows "Disconnected," click Reconnect to reestablish a connection of your APLS.
User GuideChapter 9: Application Settings
Micro Focus Fortify WebInspect (21.1.0) Page 410 of 461

Connection to LIM
Select the manner in which you want the License and Infrastructure Manager to handle the Fortify WebInspect license assigned to this computer. Options are described in the following table.
Option Description
Connected License The computer can run the Fortify software only when the computer is able to contact the LIM. Each time you start the software, the LIM allocates a seat from the license pool to this installation. When you close the software, the seat is released from the computer and allocated back to the pool, allowing another user to consume the license.
Detached License The computer can run the Fortify software anywhere, even when disconnected from your corporate intranet (on which the LIM is normally located), but only until the expiration date you specify. This allows you to take your laptop to a remote site and run the software. When you reconnect to the corporate intranet, you can access the Application License settings and reconfigure from Detached to Connected.
Application Settings: Server ProfilerTo access this feature, click Edit > Application Settings and then select Server Profiler.
Before starting a scan, Fortify WebInspect can invoke the Server Profiler to conduct a preliminary examination of the target Web site to determine if certain scan settings should be modified. If changes appear to be required, the Server Profiler returns a list of suggestions, which you may accept or reject.
To enable this preliminary examination, click Profile (or select Run Profiler Automatically) on Step 4.
By default, 10 specific modules are enabled. To exclude a module, clear its associated check box.
Modules
The Server Profiler modules are described in the following table.
Module Description
Check for case-sensitive servers
This module determines if the host server is case-sensitive when discriminating among URLs. For example, some servers (such as IIS) do not differentiate between www.mycompany.com/samplepage.htm and www.mycompany.com/SamplePage.htm. If the profiler determines that the
User GuideChapter 9: Application Settings
Micro Focus Fortify WebInspect (21.1.0) Page 411 of 461

Module Description
server is not case-sensitive, you can disable Fortify WebInspect’s case-sensitive feature, which would improve the speed and accuracy of the crawl.
Check ‘Maximum Folder Depth’ setting
The maximum folder depth setting is intended primarily for sites that programmatically append subfolders to URLs. Without such a limit, Fortify WebInspect would endlessly crawl these dynamic folders. This module determines if the site contains valid URLs that extend beyond that limit and, if so, allows you to increase the setting.
Verify client authentication protocol
This module determines which authentication (sign-in) protocol, if any, is required. Fortify WebInspect supports ADFS CBT, Automatic, Digest, HTTP Basic, Kerberos, and NTLM.
Check for additional hosts
This module searches the target site for references to additional host servers and allows you to include them as allowed hosts.
Reveal navigation parameters
This module determines if the target site uses query parameters in URLs to specify the content of the page and, if so, displays a list of parameters and values that were encountered during the analysis. You can select one or more parameters for Fortify WebInspect to use during the scan.
Check for non-standard ‘file not found’ responses
This module determines if a site returns a response code other than 404 when the client requests a non-existent resource. Recognizing this will prevent Fortify WebInspect from auditing non-essential responses.
Check for session state embedded in URLs
Instead of using cookies, some servers embed session state in URLs. Fortify WebInspect detects this practice by analyzing the URL with regular expressions. This module attempts to determine if changes to the regular expressions are required.
Analyze thread count This module determines if the thread count should be lowered. Relatively high thread counts, while enabling a faster scan, can sometimes exhaust server resources.
Check for invalid audit exclusions
Fortify WebInspect settings prevent pages with certain file extensions from being audited (see "Audit Settings: Session Exclusions" on page 395). The specified extensions are for pages that ordinarily do not have query parameters in the URL of the request. If the settings are incorrect, the audit will not be as thorough. The profiler can detect when pages having audit-excluded extensions actually contain query parameters and will recommend
User GuideChapter 9: Application Settings
Micro Focus Fortify WebInspect (21.1.0) Page 412 of 461
Module Description
removing those exclusions.
Verify maximum response size
A Fortify WebInspect scan setting specifies the maximum response size allowed; the default is 1,000 kilobytes. This module attempts to detect responses larger than the maximum and, if found, recommends that you increase the limit.
Optimize settings for specific applications
This module determines if you are scanning a well-known test site (such as WebGoat, Hacme Bank, etc.) and determines if Fortify WebInspect has a prepopulated settings file (a template) designed specifically for that site. These templates are configured to optimize the crawl, audit, and performance of your scans.
Add/Remove Trailing Slash
This module determines if the target site requires or prohibits a trailing slash on the start URL.
Check for cross-site request forgery
Cross-site request forgery, also known as a one-click attack or session riding, is often abbreviated as CSRF. CSRF is a type of website exploit where unauthorized commands are transmitted from a user that the website trusts. Unlike cross-site scripting , which exploits the trust a user has for a particular site, CSRF exploits the trust that a site has in a user's browser. For more on CSRF, see "CSRF" on page 360.
Check for WebSphere servers
WebSphere servers require additional settings changes; enables the Profiler to detect these changes are required.
Application Settings: Step ModeTo access this feature, click Edit > Application Settings and then select Step Mode.
Options for Step Mode are described in the following table.
Option Description
Default Audit Mode Select one of the following choices:
l Audit as you browse: While you are navigating a target Web site, Fortify WebInspect concurrently audits the pages you visit.
l Manual Audit: This option allows you to pause the Step Mode scan and return to Fortify WebInspect, where you can select a specific session and audit it.
User GuideChapter 9: Application Settings
Micro Focus Fortify WebInspect (21.1.0) Page 413 of 461

Option Description
Proxy Listener Select the following options:
l Local IP Address: Step Mode requires a proxy. Specify the IP address that the proxy should use.
l Port: Specify the port that the proxy should use, or select Automatically Assign Port.
Application Settings: LoggingTo access this feature, click Edit > Application Settings and then select Logging.
The Logging options are described in the following table.
Option Description
Clear Logs Click this button to clear all logs.
Minimum Logging Level
Specify how Fortify WebInspect should log different functions and events that occur within the application. The choices are (from most verbose to least verbose) Debug, Info, Warn, Error, and Fatal.
Threshold for Log Purging
If you do not select Never Purge, Fortify WebInspect deletes all logs when either the total amount of disk space used by all logs exceeds the size you specify or the number of logs exceeds the number you specify. Alternatively, you can elect to Never Purge log files.
Rolling Log File Maximum Size
Specify the maximum size (in kilobytes) that any log file may attain. When a file reaches this limit, Fortify WebInspect simply stops writing to it.
Application Settings: ProxyTo access this feature, click Edit > Application Settings and then select Proxy Settings.
Fortify WebInspect Web services are used for update and support communications. Configure how these services are accessed in the Proxy Settings.
Not Using a Proxy Server
If you are not using a proxy server to access these services, select Direct Connection (proxy disabled).
User GuideChapter 9: Application Settings
Micro Focus Fortify WebInspect (21.1.0) Page 414 of 461

Using a Proxy Server
If you are required to use a proxy server to access these services, select an option as described in the following table.
Option Description
Auto detect proxy settings
Use the Web Proxy Autodiscovery (WPAD) protocol to locate a proxy autoconfig file and configure the browser's Web proxy settings.
Use System Proxy settings
Import your proxy server information from the local machine.
Note: Electing to use system proxy settings does not guarantee that you will access the Internet through a proxy server. If the Internet Explorer setting "Use a proxy server for your LAN" is not selected, then a proxy will not be used.
Use Firefox proxy settings
Import your proxy server information from Firefox.
Note: Electing to use Firefox proxy settings does not guarantee that you will access the Internet through a proxy server. If the Firefox browser connection settings are configured for "No proxy," then a proxy will not be used.
Configure a proxy using a PAC file
Load proxy settings from a Proxy Automatic Configuration (PAC) file in the location you specify in the URL box.
Explicitly configure proxy
Configure a proxy by entering the requested information. See "Configuring a Proxy" below in this topic.
Configuring a Proxy
To configure a proxy:
1. In the Server box, type the URL or IP address of your proxy server, followed (in the Port box) by the port number (for example, 8080).
2. From the Type list, select a protocol for handling TCP traffic through a proxy server: SOCKS4, SOCKS5, or standard.
Important! Smart Update is not available if you use a SOCKS4 or SOCKS5 proxy server configuration. Smart Update is available only when using a standard proxy server.
User GuideChapter 9: Application Settings
Micro Focus Fortify WebInspect (21.1.0) Page 415 of 461

3. If authentication is required, select a type from the Authentication list:
Automatic
Allow Fortify WebInspect to determine the correct authentication type.
Note: Automatic detection slows the scanning process. If you know and specify one of the other authentication methods, scanning performance is noticeably improved.
Digest
The Windows Server operating system implements the Digest Authentication protocol as a security support provider (SSP), a dynamic-link library (DLL) that is supplied with the operating system. Using digest authentication, your password is never sent across the network in the clear, but is always transmitted as an MD5 digest of the user's password. In this way, the password cannot be determined by sniffing network traffic.
HTTP Basic
A widely used, industry-standard method for collecting user name and password information.
a. The Web browser displays a dialog box for a user to enter a previously assigned user name and password, also known as credentials.
b. The Web browser then attempts to establish a connection to a server using the user's credentials.
c. If a user's credentials are rejected, the browser displays an authentication dialog box to re-enter the user's credentials. Internet Explorer allows the user three connection attempts before failing the connection and reporting an error to the user.
d. If the Web server verifies that the user name and password correspond to a valid user account, a connection is established.
The advantage of Basic authentication is that it is part of the HTTP specification and is supported by most browsers. The disadvantage is that Web browsers using Basic authentication transmit passwords in an unencrypted form. By monitoring communications on your network, an attacker can easily intercept and decode these passwords using publicly available tools. Therefore, Basic authentication is not recommended unless you are confident that the connection between the user and your Web server is secure.
NT LAN Manager (NTLM)
NTLM (NT LanMan) is an authentication process that is used by all members of the Windows NT family of products. Like its predecessor LanMan, NTLM uses a challenge/response process to prove the client’s identity without requiring that either a password or a hashed password be sent across the network.
Use NTLM authentication for servers running IIS. If NTLM authentication is enabled, and Fortify WebInspect has to pass through a proxy server to submit its requests to the Web server, Fortify WebInspect may not be able to crawl or audit that Web site. Use caution when configuring Fortify WebInspect for scans of sites protected by NTLM. After scanning, you may want to disable the NTLM authentication settings to prevent any potential problem.
User GuideChapter 9: Application Settings
Micro Focus Fortify WebInspect (21.1.0) Page 416 of 461

Kerberos
Kerberos uses the Needham-Schroeder protocol as its basis. It uses a trusted third party, termed a Key Distribution Center (KDC), which consists of two logically separate parts: an Authentication Server (AS) and a Ticket Granting Server (TGS). The client authenticates itself to AS, then demonstrates to the TGS that it is authorized to receive a ticket for a service (and receives it). The client then demonstrates to a Service Server that it has been approved to receive the service.
Negotiate
The Negotiate authentication protocol begins with the option to negotiate for an authentication protocol. When the client requests access to a service, the server replies with a list of authentication protocols that it can support and an authentication challenge based on the protocol that is its first choice.
For example, the server might list Kerberos and NTLM, and send a Kerberos challenge. The client examines the contents of the reply and checks to determine whether it supports any of the specified protocols. If the client supports the preferred protocol, authentication proceeds. If the client does not support the preferred protocol, but does support one of the other protocols listed by the server, the client lets the server know which authentication protocol it supports, and the authentication proceeds. If the client does not support any of the listed protocols, the authentication exchange fails.
4. If your proxy server requires authentication, enter the qualifying user name and password.
Application Settings: ReportsTo access this feature, click Edit > Application Settings and then select Reports.
Options
The Reports options are described in the following table.
Option Description
Always prompt to save favorites
A "favorite" is simply a named collection of one or more reports and their associated parameters. When using the Report Generator, you can select reports and parameters, and then select Favorites > Add to favorites to create the combination. If you select this option, then Fortify WebInspect will prompt you to save the favorite whenever you modify it by adding or removing a report.
Smart truncate vulnerability text
Generated reports can contain very lengthy HTTP request and response messages. To save space and help focus on the pertinent data related to a vulnerability, you can exclude message content that precedes and follows the data that identifies or confirms the vulnerability (identified by red
User GuideChapter 9: Application Settings
Micro Focus Fortify WebInspect (21.1.0) Page 417 of 461

Option Description
highlighting).
The following example illustrates the report of a cross-site scripting vulnerability using "smart" truncation and a padding size of 20 characters. The complete header is always reported. The remaining message text is deleted, except for the vulnerability and the 20 characters preceding it and the 20 characters following it. The retained text is then bracketed by the notation "...TRUNCATED..." to indicate that truncation has occurred. Note that the length of the original message was 2,377 characters (Content-Length: 2377).
To use smart truncation in reports, select Smart truncate vulnerability text and then specify the number of characters to retain preceding and following the data that identifies or confirms the vulnerability. A maximum of 10 vulnerabilities can be reported in a single request or response.
Note: This feature functions as described only if the report controls containing the RequestText and ResponseText data fields have the TruncateVulnerability property set to True and the MaxLength property set to zero. If TruncateVulnerability is set to True and the MaxLength property is nonzero, then the application setting for padding size is overridden by the MaxLength value.
Headers and Footers
Select a template containing the headers and footers to be used by default on all reports. Also, if necessary, enter the requested parameters.
The Fortify WebInspect Master Report uses three images to create a report.
l The cover page image appears in the center of the cover page, with the top of the image approximately 3.5 inches from the top.
l The header logo image appears on the left side of the header on every page.
User GuideChapter 9: Application Settings
Micro Focus Fortify WebInspect (21.1.0) Page 418 of 461

Application Settings: TelemetryTo access this feature, click Edit > Application Settings and then select Telemetry.
About Telemetry
Telemetry provides an automated process for collecting and sending Fortify WebInspect usage information to Fortify. Fortify software developers use this information to help improve the product.
Note: The information collected contains no personally identifiable data.
Use the Application Settings: Telemetry page to configure the type of information you want sent to Fortify, as well as other Telemetry settings.
Enabling Telemetry
Select the Telemetry check box to allow Fortify WebInspect to collect and send usage information to Fortify.
Uploading Scans via Telemetry
You can choose to upload a scan file as part of the data transmitted via telemetry. To be prompted to upload a scan file when the scan is paused or completed, select Prompt for scan upload when a scan stops.
The prompt enables you to upload the scan with log files or upload the scan log files only.
Setting the Upload Interval
The Upload interval (in minutes) box defines how often the collected information is sent to Fortify. The range of values is 5-45 minutes. The default setting is 10 minutes. To change the interval:
l To increase the interval and send information to Fortify less often, click the up arrow in the Upload interval (in minutes) box until the desired setting appears.
l To decrease the interval and send information to Fortify more often, click the down arrow in the Upload interval (in minutes) box until the desired setting appears.
l To set a specific time interval, type the number in the Upload interval (in minutes) box.
User GuideChapter 9: Application Settings
Micro Focus Fortify WebInspect (21.1.0) Page 419 of 461

Setting the On-disk Cache Size
The Maximum on-disk cache size (in MB) box specifies how much disk cache can be allocated to the information collected for Telemetry. The range of values is 250-1024 MB. The default setting is 500 MB. To change the interval:
l To increase or decrease the allocated disk cache, click the up or down arrow in the Maximum on-disk cache size (in MB) box until the desired setting appears.
l To set a specific cache size, type the number in the Maximum on-disk cache size (in MB) box.
Identifying Categories of Information to Send
The Categorized Telemetry Opt-in options specify the types of information to collect and send. All options are selected by default and will be included in the data sent to Fortify. The options include such categories as the various Fortify WebInspect features, tools, and the user interface.
To opt-out of a category:
l Clear the category check box.
Application Settings: Run as a SensorTo access this feature, click Edit > Application Settings and then select Run as a Sensor.
Sensor
This configuration information is used for integrating Fortify WebInspect into Fortify WebInspect Enterprise as a sensor. After providing the information and starting the sensor service, you should conduct scans using the Fortify WebInspect Enterprise console, not the Fortify WebInspect graphical user interface.
The following table describes the options.
Option Description
Manager URL Enter the URL or IP address of the Fortify WebInspect Enterprise Manager.
Sensor Authentication Enter a user name (formatted as domain\username) and password, then click Test to verify the entry.
Enable Proxy If Fortify WebInspect must go through a proxy server to reach the Fortify WebInspect Enterprise manager, select Enable Proxy and then provide the IP address and port number of the server. If authentication is required,
User GuideChapter 9: Application Settings
Micro Focus Fortify WebInspect (21.1.0) Page 420 of 461

Option Description
enter a valid user name and password.
Override Database Settings
Fortify WebInspect normally stores scan data in the device you specify in the Application Settings for database connectivity. For more information, see "Application Settings: Database" on page 407. However, if Fortify WebInspect is connected to Fortify WebInspect Enterprise as a sensor, you can select this option and then click Configure to specify an alternative device.
Service Account Select one of the following options to specify the account under which the service should run:
l Local system account: The LocalSystem account is a predefined local account used by the service control manager. The service has complete unrestricted access to local resources.
l This account: Identify the account and provide the password.
Sensor Status This area displays the current status of the Sensor Service and provides buttons allowing you to start or stop the service.
After configuring Fortify WebInspect as a sensor, click Start.
Note: Normally, when Fortify WebInspect is configured as a sensor, launching Fortify WebInspect as a standalone application halts the Sensor Service. When you subsequently close Fortify WebInspect, the service restarts, placing Fortify WebInspect once again under the control of the Fortify WebInspect Enterprise manager. However, if you conduct a Smart Update while Fortify WebInspect is running as a standalone application, the service will not restart automatically. You must click the Start button (or right-click the Fortify icon in the notification area of the taskbar and select Start Sensor).
Application Settings: Override SQL Database SettingsTo access this feature, click Edit > Application Settings > Run as a Sensor > Configure.
User GuideChapter 9: Application Settings
Micro Focus Fortify WebInspect (21.1.0) Page 421 of 461
Override Database Settings
Fortify WebInspect normally stores scan data in the device you specify in the Application Settings for database connectivity. For more information, see "Application Settings: Database" on page 407. However, if Fortify WebInspect is connected to Fortify WebInspect Enterprise as a sensor, you can select this option and then click Configure to specify an alternative device.
Configure SQL Database
To configure SQL Database settings for Fortify WebInspect as a sensor:
1. On the Application Settings window, select Override Database Settings, and then click Configure.
The Configure SQL Settings dialog box appears.
2. Select one of the following options:
l Use SQL Server Express
l Use SQL Server
3. If you selected Use SQL Server Express, click OK to complete the task and return to the Application Settings window.
4. If you selected Use SQL Server, then type the Server Name or select a Server Name from the list.
5. To update the server name, click Refresh.
6. In the Log on to the server area, select one of the following authentication options:
l Use Windows Authentication
l Use SQL Server Authentication
7. Type the User name and Password to log on to the server. In the Connect to a Database area, Select or enter a database name from the list, or click New to browse to a database.
8. Click OK.
Application Settings: Smart UpdateTo access this feature, click Edit > Application Settings and then select Smart Update.
Options
The Smart Update Options are described in the following table.
Option Description
Service Enter the URL for the Smart Update service. The default is:
User GuideChapter 9: Application Settings
Micro Focus Fortify WebInspect (21.1.0) Page 422 of 461
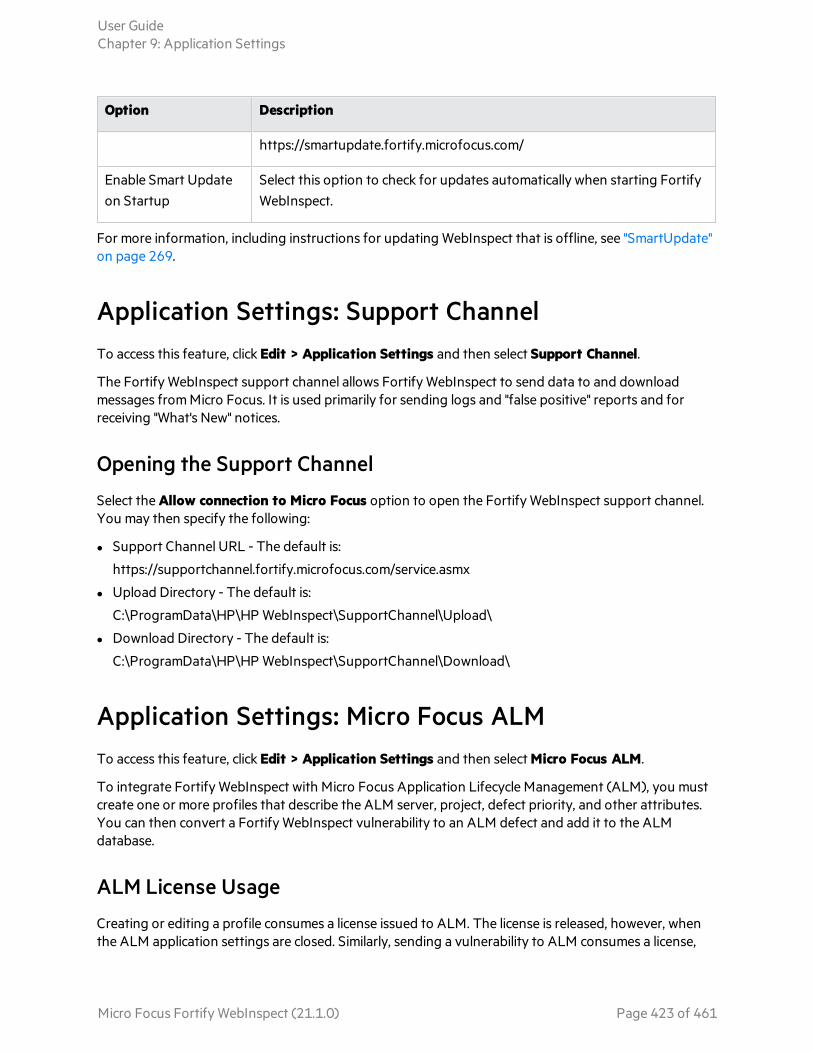
Option Description
https://smartupdate.fortify.microfocus.com/
Enable Smart Update on Startup
Select this option to check for updates automatically when starting Fortify WebInspect.
For more information, including instructions for updating WebInspect that is offline, see "SmartUpdate" on page 269.
Application Settings: Support ChannelTo access this feature, click Edit > Application Settings and then select Support Channel.
The Fortify WebInspect support channel allows Fortify WebInspect to send data to and download messages from Micro Focus. It is used primarily for sending logs and "false positive" reports and for receiving "What's New" notices.
Opening the Support Channel
Select the Allow connection to Micro Focus option to open the Fortify WebInspect support channel. You may then specify the following:
l Support Channel URL - The default is:
https://supportchannel.fortify.microfocus.com/service.asmx
l Upload Directory - The default is:
C:\ProgramData\HP\HP WebInspect\SupportChannel\Upload\
l Download Directory - The default is:
C:\ProgramData\HP\HP WebInspect\SupportChannel\Download\
Application Settings: Micro Focus ALMTo access this feature, click Edit > Application Settings and then select Micro Focus ALM.
To integrate Fortify WebInspect with Micro Focus Application Lifecycle Management (ALM), you must create one or more profiles that describe the ALM server, project, defect priority, and other attributes. You can then convert a Fortify WebInspect vulnerability to an ALM defect and add it to the ALM database.
ALM License Usage
Creating or editing a profile consumes a license issued to ALM. The license is released, however, when the ALM application settings are closed. Similarly, sending a vulnerability to ALM consumes a license,
User GuideChapter 9: Application Settings
Micro Focus Fortify WebInspect (21.1.0) Page 423 of 461

but it is released after the vulnerability is sent.
Before You Begin
Make sure that the ALM Client Registration Add-in is installed on the same machine as Fortify WebInspect before creating a profile. Refer to your ALM documentation for more details.
Creating a Profile
To create a profile:
1. Click Add, and then enter a profile name in the Add Profile dialog box.
2. Enter or select the URL of an ALM server. If you haven't previously visited an ALM site, the list is empty. To enter a URL, use the format http://<qc-server>/qcbin/. Do not append "start_a.htm" (or other file name) to the URL.
3. Enter the user name and password that will allow you to access the server, and then click Authenticate.
If the authentication credentials are accepted, the server populates the Domain and Project lists.
4. Click Connect, and then select a subject in the Defect Reporting group.
5. From the Defect priority list, select a priority that will be assigned to all Fortify WebInspect vulnerabilities reported to ALM using this profile.
6. Use the Assign defects to list to select the person to whom the defect will be assigned, and then select an entry from the Project found in list.
7. Use the remaining lists to map the Fortify WebInspect vulnerability rating to an ALM defect rating. If you select Do Not Publish, the vulnerability will not be exported. You must select at least one of the file mappings.
8. To export notes and screenshots associated with a Fortify WebInspect vulnerability, select Upload vulnerability attachments to defect.
9. In the Required/Optional Fields group, double-click an entry and enter or select the requested information. If you try to save your work without supplying a required field, Fortify WebInspect prompts you to enter it.
User GuideChapter 9: Application Settings
Micro Focus Fortify WebInspect (21.1.0) Page 424 of 461

Chapter 10: Reference ListsThis chapter provides lists of Fortify WebInspect Policies, Scan Log Messages, and HTTP Status Codes.
Fortify WebInspect PoliciesA policy is a collection of vulnerability checks and attack methodologies that Fortify WebInspect deploys against a Web application. Each policy is kept current through SmartUpdate functionality, ensuring that scans are accurate and capable of detecting the most recently discovered threats.
Fortify WebInspect contains the following packaged policies that you can use to determine the vulnerability of your Web application.
Note: This list might not match the policies that you see in your product. SmartUpdate might have added or deprecated policies since this document was produced.
Best Practices
The Best Practices group contains policies designed to test applications for the most pervasive and problematic web application security vulnerabilities.
l API: This policy contains checks that target various issues relevant to an API security assessment. This includes various injection attacks, transport layer security, and privacy violation, but does not include checks to detect client-side issues and attack surface discovery such as directory enumeration or backup file search checks. All vulnerabilities detected by this policy may be directly targeted by an attacker. This policy is not intended for scanning applications that consume Web APIs.
l CWE Top 25 <version>: The Common Weakness Enumeration (CWE) Top 25 Most Dangerous Software Errors (CWE Top 25) is a list created by MITRE. The list demonstrates the most widespread and critical software weaknesses that can lead to vulnerabilities in software.
l DISA STIG <version>: The Defense Information Systems Agency (DISA) Security Technical Implementation Guide (STIG) provides security guidance for use throughout the application development lifecycle. This policy contains a selection of checks to help the application meet the secure coding requirements of the DISA STIG <version>. Multiple versions of the DISA STIG policy may be available in the Best Practices group.
l General Data Protection Regulation (GDPR): The EU General Data Protection Regulation (GDPR) replaces the Data Protection Directive 95/46/EC and provides a framework for organizations on how to handle personal data. The GDPR articles that pertain to application security and require businesses to protect personal data during design and development of their products and services are as follows:
l Article 25, data protection by design and by default, which requires businesses to implement appropriate technical and organizational measures for ensuring that, by default, only personal data that is necessary for each specific purpose of the processing is processed.
Micro Focus Fortify WebInspect (21.1.0) Page 425 of 461

l Article 32, security of processing, which requires businesses to protect their systems and applications from accidental or unlawful destruction, loss, alteration, unauthorized disclosure of or access to personal data.
This policy contains a selection of checks to help identify and protect personal data specifically related to application security for the GDPR.
l NIST-SP80053R5: NIST Special Publication 800-53 Revision 5 - (NIST SP 800-53 Rev.5) provides a list of security and privacy controls designed to protect federal organizations and information systems from security threats. This policy contains a selection of checks that must be audited to meet the guidelines and standards of NIST SP 800-53 Rev.5.
l OWASP Application Security Verification Standard (ASVS): The Application Security Verification Standard (ASVS) is a list of application security requirements or tests that can be used by architects, developers, testers, security professionals, tool vendors, and consumers to define, build, test, and verify secure applications.
This policy uses OWASP ASVS suggested CWE mapping for each category of Securebase checks to include. Because CWE is a hierarchical taxonomy, this policy also includes checks that map to additional CWEs that are implied from OWASP ASVS suggested CWE using a "ParentOf" relationship.
l OWASP Top 10 <year>: This policy provides a minimum standard for web application security. The OWASP Top 10 represents a broad consensus about the most critical web application security flaws. Adopting the OWASP Top 10 is perhaps the most effective first step towards changing the software development culture within your organization into one that produces secure code. Multiple releases of the OWASP Top Ten policy may be available. For more information, consult the OWASP Top Ten Project.
l SANS Top 25 <year>: The SANS Top 25 Most Dangerous Software Errors provides an enumeration of the most widespread and critical errors, categorized by Common Weakness Enumeration (CWE) identifiers, that lead to serious vulnerabilities in software. These software errors are often easy to find and exploit. The inherent danger in these errors is that they can allow an attacker to take over the software completely, steal data, or prevent the software from working altogether.
l Standard: A standard scan includes an automated crawl of the server and performs checks for known and unknown vulnerabilities such as SQL Injection and Cross-Site Scripting as well as poor error handling and weak SSL configuration at the web server, web application server, and web application layers.
By Type
The By Type group contains policies designed with a specific application layer, type of vulnerability, or generic function as its focus. For instance, the Application policy contains all checks designed to test an application, as opposed to the operating system.
l Aggressive SQL Injection: This policy performs a comprehensive security assessment of your web application for SQL Injection vulnerabilities. SQL Injection is an attack technique that takes advantage of non-validated input vulnerabilities to pass arbitrary SQL queries and/or commands through the web application for execution by a backend database. This policy performs a more accurate and decisive job, but has a longer scan time.
l Apache Struts: This policy detects supported known advisories against the Apache Struts framework.
User GuideChapter 10: Reference Lists
Micro Focus Fortify WebInspect (21.1.0) Page 426 of 461

l Blank: This policy is a template that you can use to build your own policy. It includes an automated crawl of the server and no vulnerability checks. Edit this policy to create custom policies that only scan for specific vulnerabilities.
l Client-side: This policy intends to detect all issues that require an attacker to perform phishing in order to deliver an attack. These issues are typically manifested on the client, thus enforcing the phishing requirement. This includes Reflected Cross-site Scripting and various HTML5 checks. This policy may be used in conjunction with the Server-side policy to provide coverage across both the client and the server.
l Criticals and Highs: Use the Criticals and Highs policy to quickly scan your web applications for the most urgent and pressing vulnerabilities while not endangering production servers. This policy checks for SQL Injection, Cross-Site Scripting, and other critical and high severity vulnerabilities. It does not contain checks that may write data to databases or create denial-of-service conditions, and is safe to run against production servers.
l Cross-Site Scripting: This policy performs a security scan of your web application for cross-site scripting (XSS) vulnerabilities. XSS is an attack technique that forces a website to echo attacker-supplied executable code, such as HTML code or client-side script, which then loads in a user's browser. Such an attack can be used to bypass access controls or conduct phishing expeditions.
l DISA STIG <version>: The Defense Information Systems Agency (DISA) Security Technical Implementation Guide (STIG) provides security guidance for use throughout the application development lifecycle. This policy contains a selection of checks to help the application meet the secure coding requirements of the DISA STIG <version>. Multiple versions of the DISA STIG policy may be available in the By Type group.
l Mobile: A mobile scan detects security flaws based on the communication observed between a mobile application and the supporting backend services.
l NoSQL and Node.js: This policy includes an automated crawl of the server and performs checks for known and unknown vulnerabilities targeting databases based on NoSQL, such as MongoDB, and server side infrastructures based on JavaScript, such as Node.js.
l Passive Scan: The Passive Scan policy scans an application for vulnerabilities detectable without active exploitation, making it safe to run against production servers. Vulnerabilities detected by this policy include issues of path disclosure, error messages, and others of a similar nature.
l PCI Software Security Framework 1.0 (PCI SSF 1.0): The PCI SSF 1.0 provides a baseline of requirements and guidance for building secure payment systems and software that handle payment transactions. This policy contains a selection of checks that must be audited to meet the secure coding requirements of PCI SSF 1.0.
l Privilege Escalation: The Privilege Escalation policy scans your web application for programming errors or design flaws that allow an attacker to gain elevated access to data and applications. The policy uses checks that compare responses of identical requests with different privilege levels.
l Server-side: This policy contains checks that target various issues on the server-side of an application. This includes various injection attacks, transport layer security, and privacy violation, but does not include attack surface discovery such as directory enumeration or backup file search. All vulnerabilities detected by this policy may be directly targeted by an attacker. This policy may be used in conjunction with the Client-side policy to provide coverage across both the client and the server.
l SQL Injection: The SQL Injection policy performs a security scan of your web application for SQL injection vulnerabilities. SQL injection is an attack technique that takes advantage of non-validated input vulnerabilities to pass arbitrary SQL queries and/or commands through the web application for
User GuideChapter 10: Reference Lists
Micro Focus Fortify WebInspect (21.1.0) Page 427 of 461

execution by a backend database.
l Transport Layer Security: This policy performs a security assessment of your web application for insecure SSL/TLS configurations and critical transport layer security vulnerabilities, such as Heartbleed, Poodle, and SSL Renegotiation attacks.
l WebSocket: This policy detects vulnerabilities related to WebSocket implementation in your application.
Custom
The Custom group contains all user-created policies and any custom policies modified by a user.
Hazardous
The Hazardous group contains a policy with potentially dangerous checks, such as a denial-of-service attack, that could cause production servers to fail. Use this policy against non-production servers and systems only.
l All Checks: An All Checks scan includes an automated crawl of the server and performs all active checks from SecureBase, the database. This scan includes all checks that are listed in the compliance reports that are available in Fortify web application and web services vulnerability scan products. This includes checks for known and unknown vulnerabilities at the web server, web application server, and web application layers.
Caution! An All Checks scan includes checks that may write data to databases, submit forms, and create denial-of-service conditions. Fortify strongly recommends using the All Checks policy only in test environments.
Deprecated Checks and Policies
The following policies and checks are deprecated and are no longer maintained.
l Application (Deprecated): The Application policy performs a security scan of your web application by submitting known and unknown web application attacks, and only submits specific attacks that assess the application layer. When performing scans of enterprise level web applications, use the Application Only policy in conjunction with the Platform Only policy to optimize your scan in terms of speed and memory usage.
l Assault (Deprecated): An assault scan includes an automated crawl of the server and performs checks for known and unknown vulnerabilities at the web server, web application server, and web application layers. An assault scan includes checks that can create denial-of-service conditions. It is strongly recommended that assault scans only be used in test environments.
l Deprecated Checks: As technologies go end of life and fade out of the technical landscape it is necessary to prune the policy from time to time to remove checks that are no longer technically necessary. Deprecated checks policy includes checks that are either deemed end of life based on current technological landscape or have been re-implemented using smart and efficient audit algorithms that leverage latest enhancements of core WebInspect framework.
User GuideChapter 10: Reference Lists
Micro Focus Fortify WebInspect (21.1.0) Page 428 of 461

l Dev (Deprecated): A Developer scan includes an automated crawl of the server and performs checks for known and unknown vulnerabilities at the web application layer only. The policy does not execute checks that are likely to create denial-of-service conditions, so it is safe to run on production systems.
l OpenSSL Heartbleed (Deprecated): This policy performs a security assessment of your web application for the critical TLS Heartbeat read overrun vulnerability. This vulnerability could potentially disclose critical server and web application data residing in the server memory at the time a malicious user sends a malformed Heartbeat request to the server hosting the site.
l OWASP Top 10 Application Security Risks - 2010 (Deprecated): This policy provides a minimum standard for web application security. The OWASP Top 10 represents a broad consensus about what the most critical web application security flaws are. Adopting the OWASP Top 10 is perhaps the most effective first step towards changing the software development culture within your organization into one that produces secure code. This policy includes elements specific to the 2010 Top Ten list. For more information, consult the OWASP Top Ten Project.
l Platform (Deprecated): The Platform policy performs a security scan of your web application platform by submitting attacks specifically against the web server and known web applications. When performing scans of enterprise-level web applications, use the Platform Only policy in conjunction with the Application Only policy to optimize your scan in terms of speed and memory usage.
l QA (Deprecated): The QA policy is designed to help QA professionals make project release decisions in terms of web application security. It performs checks for both known and unknown web application vulnerabilities. However, it does not submit potentially hazardous checks, making it safe to run on production systems.
l Quick (Deprecated): A Quick scan includes an automated crawl of the server and performs checks for known vulnerabilities in major packages and unknown vulnerabilities at the web server, web application server and web application layers. A quick scan does not run checks that are likely to create denial-of-service conditions, so it is safe to run on production systems.
l Safe (Deprecated): A Safe scan includes an automated crawl of the server and performs checks for most known vulnerabilities in major packages and some unknown vulnerabilities at the web server, web application server and web application layers. A safe scan does not run any checks that could potentially trigger a denial-of-service condition, even on sensitive systems.
l Standard (Deprecated): Standard (Deprecated) policy is copy of the original standard policy before it was revamped in R1 2015 release. A standard scan includes an automated crawl of the server and performs checks for known and unknown vulnerabilities at the web server, web application server and web application layers. A standard scan does not run checks that are likely to create denial-of-service conditions, so it is safe to run on production systems.
Scan Log MessagesThis topic describes the messages that appear in the scan log. Messages are arranged alphabetically.
Note: For information about Alert-level messages in the scan log, see "Troubleshooting Alerts" on page 456.
User GuideChapter 10: Reference Lists
Micro Focus Fortify WebInspect (21.1.0) Page 429 of 461

Audit Engine Initialization Error
Full Message
Audit Engine initialization error, engine:%engine%, error:%error%"
Description
An unrecoverable error occurred while attempting to initialize an audit engine. Contact Fortify Customer Support.
Argument Descriptions
Engine: The engine that was attempting to initialize.
Error: The actual error that occurred.
Possible Fixes
Not Applicable
External Links
Not Applicable
Auditor Error
Full Message
Error: Auditor error, session: <session ID> engine:<engine>, error:<error>
Description
An error occurred during an audit.
Argument Descriptions
Session: The session being audited when the error occurred.
Engine: The engine being run when the error occurred.
Error: The actual error that occurred.
Possible Fixes
Not Applicable
External Links
Not Applicable
Check Error
Full Message
Error: Check error, session:8BE3AFEC5051507168B66AEC59C8915B, Check:10346, engine: SPI.Scanners.Web.Audit.Engines.RequestModify
User GuideChapter 10: Reference Lists
Micro Focus Fortify WebInspect (21.1.0) Page 430 of 461

Description
An error occurred while processing a check.
Argument Descriptions
Session: Session where the check error occurred.
Check: The check that encountered the problem.
Engine: The engine being run when the error occurred.
Error: The error.
Possible Fixes
Install the latest version of SmartUpdate.
External Links
Not Applicable
Completed Post-Scan Analysis Module
Full Message
Completed Post-Scan Analysis Module: %module%
Description
One of the post-scan analysis modules has ended.
Argument Descriptions
module: the name of the post-scan analysis module.
Possible Fixes
Not Applicable
External Links
Not Applicable
Concurrent Crawl and Audit Start
Full Message
Info:Concurrent Crawl and Audit Start
Description
This message indicates that Concurrent Crawl and Audit has started.
Argument Descriptions
Not applicable
User GuideChapter 10: Reference Lists
Micro Focus Fortify WebInspect (21.1.0) Page 431 of 461

Possible Fixes
Not Applicable
External Links
Not Applicable
Concurrent Crawl and Audit Stop
Full Message
Info:Concurrent Crawl and Audit Stop
Description
This message indicates that Concurrent Crawl and Audit has stopped.
Argument Descriptions
Not applicable
Possible Fixes
Not Applicable
External Links
Not Applicable
Concurrent Crawl Start
Full Message
Info:Concurrent Crawl Start:
Description
This message indicates that Concurrent Crawl has started.
Argument Descriptions
Not applicable
Possible Fixes
Not Applicable
External Links
Not Applicable
Concurrent Crawl Stop
Full Message
Info:Concurrent Crawl Stop
User GuideChapter 10: Reference Lists
Micro Focus Fortify WebInspect (21.1.0) Page 432 of 461

Description
This message indicates that Concurrent Crawl has stopped.
Argument Descriptions
Not applicable
Possible Fixes
Not Applicable
External Links
Not Applicable
Connectivity Issue, Reason
Full Message
Connectivity issue, Reason: FirstRequestFailed, HTTP Status:404,
Description This message indicates a network connectivity issue. Fortify WebInspect was unable to communication with the remote host.
Argument Descriptions
Reason: FirstRequestFailed - a requested has failed. HTTP Status: 404 - The status returned for the failed request.
Possible Fixes
l Power cycle your network hardware
If the issue persists, unplug your modem and router, wait a few seconds, then plug them back in. Sometimes, these devices simply need to be refreshed. This could be due to a network outage or improperly configured network settings.
l Use Microsoft's network diagnostic tools
Open Network Diagnostics by right-clicking the network icon in the notification area, and then clicking Diagnose and repair.
l Check wiring
Make sure that all wires are connected properly.
l Check host's power
If you're trying to connect to another computer, make sure that computer is powered on.
l Check connection settings
If the problem began after you installed new software, check your connection settings to see if they have been changed. Open Network Connections by clicking the Start button , clicking Control Panel, clicking Network and Internet, clicking Network and Sharing Center, and then clicking Manage network connections. Right-click the connection, and then click Properties. If you are prompted for an administrator password or confirmation, type the password or provide
User GuideChapter 10: Reference Lists
Micro Focus Fortify WebInspect (21.1.0) Page 433 of 461
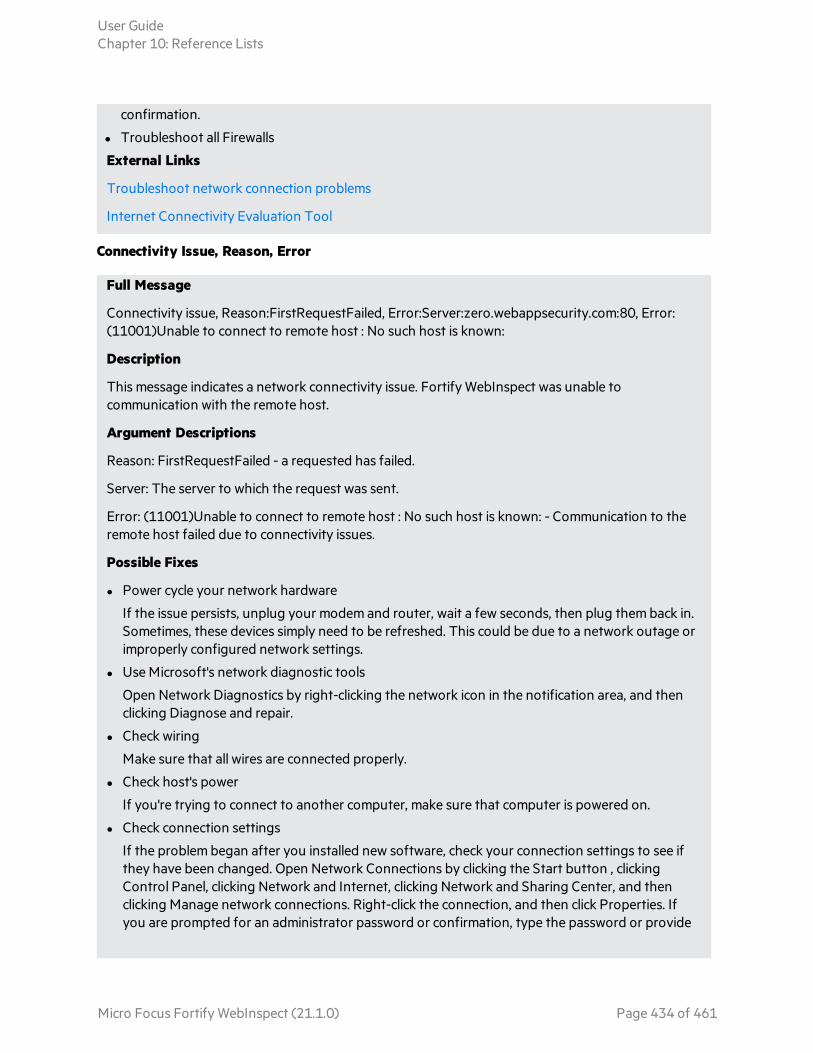
confirmation.
l Troubleshoot all Firewalls
External Links
Troubleshoot network connection problems
Internet Connectivity Evaluation Tool
Connectivity Issue, Reason, Error
Full Message
Connectivity issue, Reason:FirstRequestFailed, Error:Server:zero.webappsecurity.com:80, Error:(11001)Unable to connect to remote host : No such host is known:
Description
This message indicates a network connectivity issue. Fortify WebInspect was unable to communication with the remote host.
Argument Descriptions
Reason: FirstRequestFailed - a requested has failed.
Server: The server to which the request was sent.
Error: (11001)Unable to connect to remote host : No such host is known: - Communication to the remote host failed due to connectivity issues.
Possible Fixes
l Power cycle your network hardware
If the issue persists, unplug your modem and router, wait a few seconds, then plug them back in. Sometimes, these devices simply need to be refreshed. This could be due to a network outage or improperly configured network settings.
l Use Microsoft's network diagnostic tools
Open Network Diagnostics by right-clicking the network icon in the notification area, and then clicking Diagnose and repair.
l Check wiring
Make sure that all wires are connected properly.
l Check host's power
If you're trying to connect to another computer, make sure that computer is powered on.
l Check connection settings
If the problem began after you installed new software, check your connection settings to see if they have been changed. Open Network Connections by clicking the Start button , clicking Control Panel, clicking Network and Internet, clicking Network and Sharing Center, and then clicking Manage network connections. Right-click the connection, and then click Properties. If you are prompted for an administrator password or confirmation, type the password or provide
User GuideChapter 10: Reference Lists
Micro Focus Fortify WebInspect (21.1.0) Page 434 of 461

confirmation.
l Troubleshoot all firewalls
External Links
Troubleshoot network connection problems
Internet Connectivity Evaluation Tool
Crawler Error
Full Message
Error: Crawler error, session: <session ID> error:<error>
Description
The crawler failed to process the session. Not user-correctable. Contact Fortify Customer Support.
Argument Descriptions
Session: The session in which the error occurred.
Error: The actual error.
Possible Fixes
Not Applicable
External Links
Not Applicable
Database Connectivity Issue
Full Message
Error: SPI.Scanners.Web.Framework.Session in updateExisting,retries failed, giving up calling iDbConnetivityHandler.OnConnectivityIssueDetected
Description
This message indicates that the database stopped responding.
Argument Descriptions
Error Text: Contains a description of the error that triggered the message
Possible Fixes
Make sure the database server is running and responding.
External Links
Not Applicable
User GuideChapter 10: Reference Lists
Micro Focus Fortify WebInspect (21.1.0) Page 435 of 461

Engine Driven Audit Start
Full Message
Info:Engine Driven Audit Start
Description
This message indicates Engine Driven Audit has started.
Argument Descriptions
Not applicable
Possible Fixes
Not Applicable
External Links
Not Applicable
Engine Driven Audit Stop
Full Message
Info:Engine Driven Audit Stop
Description
This message indicates Engine Driven Audit has stopped.
Argument Descriptions
Not Applicable
Possible Fixes
Not Applicable
External Links
Not Applicable
Engine Driven Engine Start
Full Message
Info:Engine Driven Engine Start, Engine: LFI Agent
Description
This message indicates the engine indicated has started execution.
Argument Descriptions
Engine: The Engine that is starting.
Possible Fixes
User GuideChapter 10: Reference Lists
Micro Focus Fortify WebInspect (21.1.0) Page 436 of 461

Not Applicable
External Links
Not Applicable
Engine Driven Engine Stop
Full Message
Info:Engine Driven Engine Stop, Engine: LFI Agent Sessions Processed:406
Description
Engine driven audit completed for the specified engine.
Argument Descriptions
Engine: The Engine that has been stopped.
Sessions processed: Number of sessions processed by the engine.
Possible Fixes
Not Applicable
External Links
Not Applicable
License Issue
Full Message
Error: License issue: License Deactivated
Description
A problem has occurred with the license.
Argument Descriptions
Issue: The issue that occurred.
Possible Fixes
Make sure Fortify WebInspect is properly licensed.
External Links
Not Applicable
Log Message Occurred
Full Message :
<Level>: <ScanID> , <Logger>: <Exception>
User GuideChapter 10: Reference Lists
Micro Focus Fortify WebInspect (21.1.0) Page 437 of 461

Description:
Generic message for exceptions
Argument Descriptions
ScanID: Scan ID.
Logger: Name of logger.
Exception: The exception thrown.
Possible Fixes
Not Applicable
External Links
Not Applicable
Memory Limit Reached
Full Message
Warn: Memory limit reached: level:1,limit:1073610752, actual:1076625408.
Error: Memory limit reached: level:0,limit:1073610752, actual:1076625408.
Description
The memory limits of the WI process have been reached.
Argument Descriptions
Level: The severity of the problem.
Limit: The memory limit of the process.
Actual: The actual memory allocated to the process.
Possible Fixes
Close other scans that are not running.
Run only one scan at a time in a given Fortify WebInspect instance.
External Links
Not Applicable
Missing Session for Vulnerability
Full Message
Info: Missing Session for Vulnerability
Description
User GuideChapter 10: Reference Lists
Micro Focus Fortify WebInspect (21.1.0) Page 438 of 461

Cannot find session that is associated with a vulnerability.
Argument Descriptions
Not Applicable
Possible Fixes
Not Applicable
External Links
Not Applicable
New Blind SQL Check Not Enabled
Full Message
New Blind SQL check (checkid newcheckid%) is not enabled. A policy with both check %newcheckid% and check %oldcheckid% enabled is recommended.
Description
The newer check for blind SQL injection is not included in the scan policy.
Argument Descriptions
newcheckid: The identifier of the newer SQL injection check (10962)
oldcheckid: The identifier of the older SQL injection check (5659)
Possible Fixes
Add the newer check (10962) to the scan policy.
External Links
Not Applicable
Persistent Cross-Site Scripting Audit Start
Full Message
Info:Persistent Cross-Site Scripting Audit Start
Description
Persistent Cross-Site Scripting Audit has started.
Argument Descriptions
Not Applicable
Possible Fixes
Not Applicable
External Links
User GuideChapter 10: Reference Lists
Micro Focus Fortify WebInspect (21.1.0) Page 439 of 461

Not Applicable
Persistent Cross-Site Scripting Audit Stop
Full Message
Info:Persistent Cross-Site Scripting Audit Stop
Description
Persistent Cross-Site Scripting Audit has stopped.
Argument Descriptions
Not Applicable
Possible Fixes
Not Applicable
External Links
Not Applicable
Post-Scan Analysis Started
Full Message
Post-Scan Analysis started.
Description
Post-scan analysis has begun. Additional messages will be displayed for each module used (authentication, macro, file not found, etc.).
Argument Descriptions
Not Applicable
Possible Fixes
Not Applicable
External Links
Not Applicable
Post-Scan Analysis Completed
Full Message
Post-Scan Analysis completed.
Description
Post-scan analysis has ended. Additional messages will be displayed for each module used (authentication, macro, file not found, etc.).
User GuideChapter 10: Reference Lists
Micro Focus Fortify WebInspect (21.1.0) Page 440 of 461

Argument Descriptions
Not Applicable
Possible Fixes
Not Applicable
External Links
Not Applicable
Reflect Audit Start
Full Message
Info:Reflect Audit Start
Description
Reflection phase started.
Argument Descriptions
Not Applicable
Possible Fixes
Not Applicable
External Links
Not Applicable
Reflect Audit Stop
Full Message
Info:Reflect Audit Stop
Description
Reflection phase completed.
Argument Descriptions
Not Applicable
Possible Fixes
Not Applicable
External Links
Not Applicable
User GuideChapter 10: Reference Lists
Micro Focus Fortify WebInspect (21.1.0) Page 441 of 461

Scan Complete
Full Message
Info:Scan Complete, ScanID:<id-number>
Description
This message indicates that the scan has completed successfully.
Argument Descriptions
ScanID: Unique identifier of a scan
Possible Fixes
Not Applicable
External Links
Not Applicable
Scan Failed
Full Message
Info:Scan Failed, ScanID::<id-number>
Description
This message indicates that the scan has failed.
Argument Descriptions
ScanID: Unique identifier of a scan
Possible Fixes
Depends upon the reason the scan failed, which is specified in a different message.
External Links
Not Applicable
Scan Start
Full Message
Info:Scan Start, ScanID:<id-number> Version:X.X.X.X, Location:C:\Program Files\Fortify\Fortify WebInspect\WebInspect.exe
Description
This message indicates the start of a scan.
Argument Descriptions
ScanID: Unique identifier of a scan.
User GuideChapter 10: Reference Lists
Micro Focus Fortify WebInspect (21.1.0) Page 442 of 461

Version: Version of Fortify WebInspect running the scan.
Location: The physical location of the Fortify WebInspect executable.
Possible Fixes
Not Applicable
External Links
Not Applicable
Scan Start Error
Full Message
Scan start error: %error%
Description
An unrecoverable error occurred while starting the scan. Contact Fortify Customer Support.
Argument Descriptions
error: description of the problem.
Possible Fixes
Not Applicable
External Links
Not Applicable
Scan Stop
Full Message
Info:Scan Stop, ScanID:<id-number>
Description
This message indicates that the scan has been stopped.
Argument Descriptions
ScanID: Unique identifier of a scan.
Possible Fixes
Not Applicable
External Links
Not Applicable
User GuideChapter 10: Reference Lists
Micro Focus Fortify WebInspect (21.1.0) Page 443 of 461

Scanner Retry Start
Full Message
Info:Scanner Retry Start
Description
Retry phase started.
Argument Descriptions
Not Applicable
Possible Fixes
Not Applicable
External Links
Not Applicable
Scanner Retry Stop
Full Message
Info:Scanner Retry Stop
Description
Retry phase stopped.
Argument Descriptions
Not Applicable
Possible Fixes
Not Applicable
External Links
Not Applicable
Sequential Audit Start
Full Message
Info:Sequential Audit Start
Description
This message indicates that the Sequential Audit has started.
Argument Descriptions
Not applicable
Possible Fixes
User GuideChapter 10: Reference Lists
Micro Focus Fortify WebInspect (21.1.0) Page 444 of 461

Not Applicable
External Links
Not Applicable
Sequential Audit Stop
Full Message
Info:Sequential Audit Stop
Description
This message indicates that the Sequential Audit has stopped.
Argument Descriptions
Not applicable
Possible Fixes
Not Applicable
External Links
Not Applicable
Sequential Crawl Start
Full Message
Info:Sequential Crawl Start
Description
This message indicates that Sequential Crawl has started.
Argument Descriptions
Not applicable
Possible Fixes
Not Applicable
External Links
Not Applicable
Sequential Crawl Stop
Full Message
Info:Sequential Crawl Stop
Description
User GuideChapter 10: Reference Lists
Micro Focus Fortify WebInspect (21.1.0) Page 445 of 461

This message indicates that the Sequential Crawl has stopped.
Argument Descriptions
Not applicable
Possible Fixes
Not Applicable
External Links
Not Applicable
Settings Override
Full Message
Settings Override, Setting:<setting, Original Value:<original>, New Value:<newValue>, Reason:<reason>
Description
A setting was changed by the product. This may indicate a setting upgrade issue.
Argument Descriptions
Setting: The setting that is being overridden.
Original Value: The original value of the setting.
New Value: The value to which the setting is being changed.
Reason: The reason for the override.
Possible Fixes
Restore factory defaults and reapply custom settings.
External Links
Not Applicable
SPA Frameworks Detected
Full Message
The crawl identified the following Single Page Application frameworks: %frameworks%. SPA support enabled.
Description
The crawler detected one or more Single Page Application (SPA) frameworks and enabled SPA support for the scan.
Argument Descriptions
User GuideChapter 10: Reference Lists
Micro Focus Fortify WebInspect (21.1.0) Page 446 of 461

frameworks: A list of the detected frameworks.
Possible Fixes
Not Applicable
External Links
Not Applicable
Start URL Error
Full Message
Start Url Error:%url%, error:%error%
Description
An unrecoverable error occurred processing the start URL. Check url syntax; if correct, contact Fortify Customer Support.
Argument Descriptions
url: The URL that caused the error.
error: Description of the error.
Possible Fixes
Not Applicable
External Links
Not Applicable
Start URL Rejected
Full Message
Start Url Rejected:%url%, reason:%reasons%, session:%session%
Description
The URL was rejected due to request rejection settings; settings should be modified or a different start URL used.
Argument Descriptions
url: the start URL
reason: Reason for the rejection.
session: The session during which the error occurred.
Possible Fixes
Not Applicable
User GuideChapter 10: Reference Lists
Micro Focus Fortify WebInspect (21.1.0) Page 447 of 461

External Links
Not Applicable
Starting Post-Scan Analysis Module
Full Message
Starting Post-Scan Analysis Module: %module%
Description
One of the post-scan analysis modules has begun.
Argument Descriptions
module: the name of the post-scan analysis module.
Possible Fixes
Not Applicable
External Links
Not Applicable
Stop Requested
Full Message
Info:Stop Requested, reason=Pause button pushed
Description
Scan is entering suspended state.
Argument Descriptions
Reason: Reason for the stop.
Possible Fixes
Not Applicable
External Links
Not Applicable
Verify Audit Start
Full Message
Info:Verify Audit Start
Description
Verify phase started.
User GuideChapter 10: Reference Lists
Micro Focus Fortify WebInspect (21.1.0) Page 448 of 461

Argument Descriptions
Not Applicable
Possible Fixes
Not Applicable
External Links
Not Applicable
Verify Audit Stop
Full Message
Info:Verify Audit Stop
Description
Verify phase completed.
Argument Descriptions
Not Applicable
Possible Fixes
Not Applicable
External Links
Not Applicable
Web Macro Error
Full Message
Error: Web Macro Error, Name: Login webmacro Error: RequestAborted
Description
An error occurred during playback of a web macro.
Argument Descriptions
Name: Name of the macro being played when the error occurred.
Error: The error that occurred.
Possible Fixes
Depends on the error encountered. For RequestAborted error, the server did not respond during macro playback. If this occurs frequently, the value of Request timeout should be increased. See Connectivity issue for other potential solutions.
External Links
User GuideChapter 10: Reference Lists
Micro Focus Fortify WebInspect (21.1.0) Page 449 of 461

Not Applicable
Web Macro Status
Full Message
Error: Web Macro Status, Name: login.webmacro Expected:302, Actual:200, Url:<URL>
Description
Fortify WebInspect received a response during macro playback that did not match the response obtained during the recording of the macro.
Argument Descriptions
Name: Name of the web macro.
Expected: The status code expected to be returned.
Actual: The status code that was actually returned.
URL: The target URL of the request.
Possible Fixes
This could indicate that Fortify WebInspect is attempting to log in when it is already logged in or that Fortify WebInspect is failing to log in. Check to see if Fortify WebInspect is successfully logged in during a scan. If not, record the login macro again.
External Links
Not Applicable
HTTP Status CodesThe following list of status codes was extracted from the Hypertext Transfer Protocol version 1.1 standard (RFC 2616). You can find more information at http://www.w3.org/Protocols/.
Code Definition
100 Continue
101 Switching Protocols
200 OK Request has succeeded
201 Created Request fulfilled and new resource being created
202 Accepted Request accepted for processing, but processing not completed.
User GuideChapter 10: Reference Lists
Micro Focus Fortify WebInspect (21.1.0) Page 450 of 461

Code Definition
203 Non-Authoritative Information
The returned metainformation in the entity-header is not the definitive set as available from the origin server, but is gathered from a local or a third-party copy.
204 No Content The server has fulfilled the request but does not need to return an entity-body, and might want to return updated metainformation.
205 Reset Content The server has fulfilled the request and the user agent should reset the document view which caused the request to be sent.
206 Partial Content The server has fulfilled the partial GET request for the resource.
300 Multiple Choices The requested resource corresponds to any one of a set of representations, each with its own specific location, and agent-driven negotiation information (section 12) is being provided so that the user (or user agent) can select a preferred representation and redirect its request to that location.
301 Moved Permanently
The requested resource has been assigned a new permanent URI and any future references to this resource should use one of the returned URIs.
302 Found The requested resource resides temporarily under a different URI.
303 See Other The response to the request can be found under a different URI and should be retrieved using a GET method on that resource.
304 Not Modified If the client has performed a conditional GET request and access is allowed, but the document has not been modified, the server should respond with this status code.
305 Use Proxy The requested resource MUST be accessed through the proxy given by the Location field.
306 Unused Unused.
307 Temporary Redirect
The requested resource resides temporarily under a different URI.
400 Bad Request The request could not be understood by the server due to malformed syntax.
401 Unauthorized The request requires user authentication. The response MUST include a WWW-Authenticate header field (section 14.47) containing a challenge
User GuideChapter 10: Reference Lists
Micro Focus Fortify WebInspect (21.1.0) Page 451 of 461
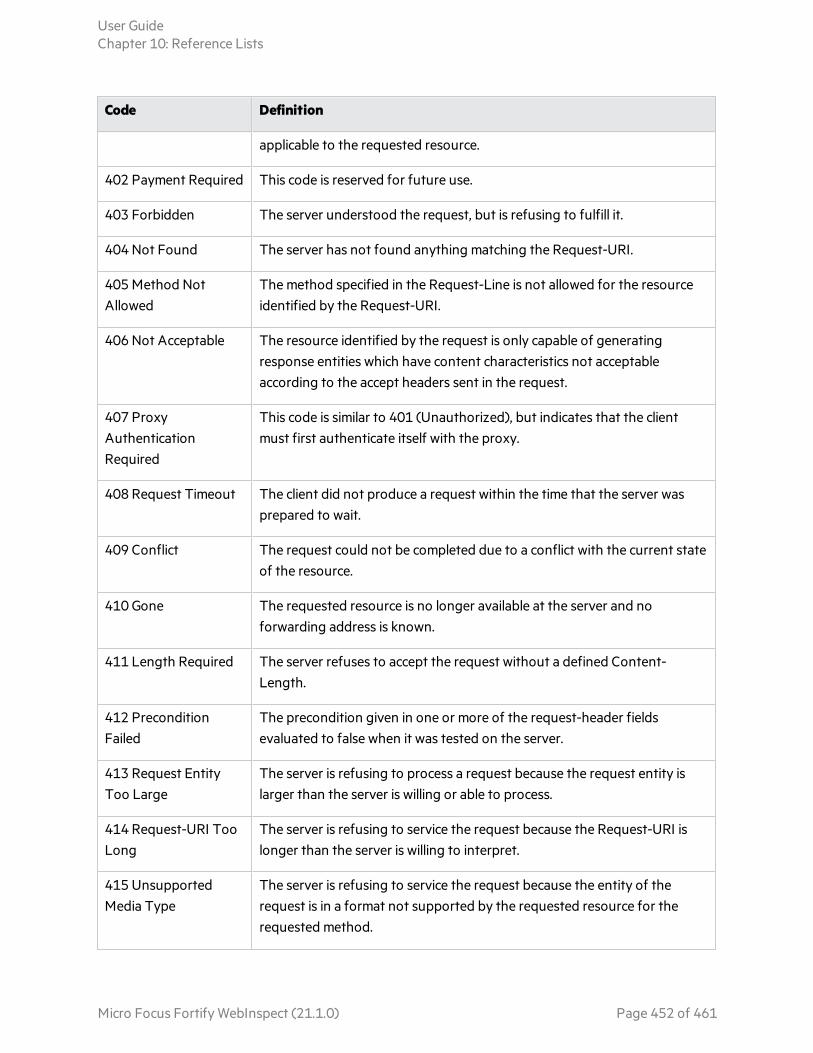
Code Definition
applicable to the requested resource.
402 Payment Required This code is reserved for future use.
403 Forbidden The server understood the request, but is refusing to fulfill it.
404 Not Found The server has not found anything matching the Request-URI.
405 Method Not Allowed
The method specified in the Request-Line is not allowed for the resource identified by the Request-URI.
406 Not Acceptable The resource identified by the request is only capable of generating response entities which have content characteristics not acceptable according to the accept headers sent in the request.
407 Proxy Authentication Required
This code is similar to 401 (Unauthorized), but indicates that the client must first authenticate itself with the proxy.
408 Request Timeout The client did not produce a request within the time that the server was prepared to wait.
409 Conflict The request could not be completed due to a conflict with the current state of the resource.
410 Gone The requested resource is no longer available at the server and no forwarding address is known.
411 Length Required The server refuses to accept the request without a defined Content-Length.
412 Precondition Failed
The precondition given in one or more of the request-header fields evaluated to false when it was tested on the server.
413 Request Entity Too Large
The server is refusing to process a request because the request entity is larger than the server is willing or able to process.
414 Request-URI Too Long
The server is refusing to service the request because the Request-URI is longer than the server is willing to interpret.
415 Unsupported Media Type
The server is refusing to service the request because the entity of the request is in a format not supported by the requested resource for the requested method.
User GuideChapter 10: Reference Lists
Micro Focus Fortify WebInspect (21.1.0) Page 452 of 461

Code Definition
416 Requested Range Not Satisfiable
A server should return a response with this status code if a request included a Range request-header field (section 14.35), and none of the range-specifier values in this field overlap the current extent of the selected resource, and the request did not include an If-Range request-header field.
417 Expectation Failed The expectation given in an Expect request-header field (see section 14.20) could not be met by this server, or, if the server is a proxy, the server has unambiguous evidence that the request could not be met by the next-hop server.
500 Internal Server Error
The server encountered an unexpected condition which prevented it from fulfilling the request.
501 Not Implemented The server does not support the functionality required to fulfill the request. This is the appropriate response when the server does not recognize the request method and is not capable of supporting it for any resource.
502 Bad Gateway The server, while acting as a gateway or proxy, received an invalid response from the upstream server it accessed in attempting to fulfill the request.
503 Service Unavailable
The server is currently unable to handle the request due to a temporary overloading or maintenance of the server.
504 Gateway Timeout The server, while acting as a gateway or proxy, did not receive a timely response from the upstream server specified by the URI (e.g., HTTP, FTP, LDAP) or some other auxiliary server (e.g., DNS) it needed to access in attempting to complete the request.
505 HTTP Version Not Supported
The server does not support, or refuses to support, the HTTP protocol version that was used in the request message.
User GuideChapter 10: Reference Lists
Micro Focus Fortify WebInspect (21.1.0) Page 453 of 461

Chapter 11: Troubleshooting and SupportThis chapter provides troubleshooting tables and contact information for Fortify Support and for suggesting an enhancement.
Troubleshooting WebInspectThe following paragraphs provide troubleshooting information for Fortify WebInspect and WebInspect Tools.
Connectivity Issues
The following table describes issues with connectivity.
Symptom or Error Message Possible Cause Possible Solution
When using a macro recorder or the Guided Scan Wizard while testing a site that uses HTTPS rather than HTTP, there is no connectivity to the site.
The user running Fortify WebInspect does not have required access to the Windows MachineKeys folder.
Modify the permissions of C:\ProgramData\Microsoft\Crypto\RSA\MachineKeys.
On the folder properties Security tab, use the Advanced button and configure permissions to allow full control for the user for This folder, subfolders and files.
The Use OpenSSL Engine application setting is selected and you see an error that contains the following text in the Guided Scan browser, in the Profiler results, or in the scan logs:
"Make this client Certificate key exportable in Certificate storage."
An OpenSSL defect has caused a connectivity issue with the target web application.
Ensure that the certificate or certificates that you use to connect to the target web application are marked as exportable. For more information, refer to your Windows documentation.
Micro Focus Fortify WebInspect (21.1.0) Page 454 of 461

Scan Initialization Failures
The following table describes issues with scan initialization.
Symptom or Error Message Possible Cause Possible Solution
Scan initialization fails when using SQL Express as the scan database.
The SQL Express service is not running.
Verify that the service is running. The service name is “SQL Server (SQLEXPRESS)" or similar.
The SQL Express cache may have become corrupted.
To clear the cache:
1. Stop all SQL related services and processes.
2. Delete the SQL Express cache folder.
A typical location is as follows or similar:
C:\Users\<username>\AppData\Local\Microsoft\Microsoft SQL Server Data\SQLEXPRESS
3. Restart the machine.
Scan initialization fails with errors related to loading SPI.Parsers.Script.
Windows may have failed to apply the Microsoft Visual C++ redistributable package for Visual Studio 2015, 2017, or 2019.
Manually install the C++ redistributable package before continuing.
Scan Configuration Issues
The following table describes issues that may occur while configuring a scan.
Symptom or Error Message Possible Cause Possible Solution
In Guided Scan, a truclientbrowser.exe system error occurs related to a missing .dll file.
Windows may have failed to apply the Microsoft Visual C++ redistributable package for Visual Studio 2015, 2017, or 2019.
Manually install the C++ redistributable package before continuing.
User GuideChapter 11: Troubleshooting and Support
Micro Focus Fortify WebInspect (21.1.0) Page 455 of 461

Troubleshooting AlertsAlerts do not always indicate that there is a scan quality issue. Some alerts may be false positive. However, alerts may provide insight into issues that could adversely affect the scan.
Important! The alerts feature is provided as a technology preview.
Technology Preview
Technology preview features are currently unsupported, may not be functionally complete, and are not suitable for deployment in production. However, these features are provided as a courtesy and the primary objective is for the feature to gain wider exposure with the goal of full support in the future.
Disabling Alerts
The alerts feature includes sample intervals and active intervals. Sample interval alerts may occur as often as once per minute in your scan log. Although these alerts may not indicate a functional issue with the scan, if the number of alerts received becomes problematic, contact Fortify Customer Support for assistance in disabling individual alerts or the alerts feature. For more information, see Preface.
Alerts Troubleshooting Table
Important! Any solutions involving changes to scan settings must be made for a future scan. You cannot change the scan settings for the current scan.
The following table describes possible causes and solutions for alerts.
Alert Possible Cause Possible Solution
Excessive logins detected The login macro has been played an excessive number of times for the number of requests made. The login credentials may be incorrect or the logout signature may be invalid.
Do one of the following:
l Perform troubleshooting procedures on the macro.
l Record a new login macro.
For more information, see the Micro Focus Fortify WebInspect Tools Guide.
Redundant content detected Redundant content has been detected.
You might be able to improve performance by enabling redundant page detection. For
User GuideChapter 11: Troubleshooting and Support
Micro Focus Fortify WebInspect (21.1.0) Page 456 of 461

Alert Possible Cause Possible Solution
more information, see "Scan Settings: General" on page 342.
Excessive response time Responses coming from the Web server are taking longer than average or longer than expected. A longer response time may result in a slower scan.
Check your network connectivity or the performance of the application under test (AUT).
WAF detected A Web application firewall (WAF) signature has been detected.
Disable the WAF that is protecting the AUT.
Testing Login MacrosFortify WebInspect performs tests on the login macro in the following instances:
l When an auto-generated macro, newly-recorded macro, or pre-existing macro is tested during scan configuration
l At the start of the scan with any login macro if Enable macro validation is selected in Scan Settings: Authentication
Validation Tests Performed
The following table describes the tests that Fortify WebInspect performs.
Test Result of Failure
Determine if the validation step is missing. The scan continues, but a warning is written to the scan log.
Verify that the auto-generated macro logs into the application.
The scan stops and an error is written to the scan log.
Verify that the replay of the macro logs into the application.
The scan stops and an error is written to the scan log.
If a scan stops after failing a test, it may be possible to examine the specific error message in the scan log to determine and resolve the issue. Use the error message and the troubleshooting tips in this topic to help resolve the issue.
User GuideChapter 11: Troubleshooting and Support
Micro Focus Fortify WebInspect (21.1.0) Page 457 of 461

Troubleshooting Tips
In all cases of macro failure, it is possible that an invalid macro was recorded. However, a previously good macro that fails is almost always due to site changes or credentials.
The following table provides possible causes and solutions for each error message.
Note: This table does not include all possible causes and solutions for each error message. Additional troubleshooting may be necessary.
Error Message Possible Cause Possible Solution
Automatic login generation failed
The login macro could not be created because the user credentials provided are not valid.
Try the Auto-gen Login Macro option again using credentials that are known to be valid.
Execution Failed An HTML element, such as a verification element, username, or password, was not located.
Record a new macro in the Web Macro Recorder to identify the login input elements.
The username has been deactivated (removed from the database) and/or the password has changed.
Record a new macro in the Web Macro Recorder using credentials that are known to be valid.
Logged in verification step not found
The login macro does not contain a verification step.
Edit the macro in the Web Macro Recorder to add a verification step to indicate a successful login.
Verification step did not fail after invalid login
The verification step succeeded after an invalid login attempt. A valid verification step should only succeed upon successful login. This indicates that an incorrect login verification object was selected.
Edit the macro in the Web Macro Recorder to select another object for the verification step.
For specific information about using the Web Macro Recorder, see the Micro Focus Fortify WebInspect Tools Guide.
User GuideChapter 11: Troubleshooting and Support
Micro Focus Fortify WebInspect (21.1.0) Page 458 of 461
Contact Customer SupportWhen contacting Fortify Customer Support, provide the following product information:
Version: 21.1.0Date: July 2021
Contacting Micro Focus Fortify Customer Support
Visit the Support website to:
l Manage licenses and entitlements
l Create and manage technical assistance requests
l Browse documentation and knowledge articles
l Download software
l Explore the Community
https://www.microfocus.com/support
For More Information
For more information about Fortify software products: https://www.microfocus.com/solutions/application-security
Suggest EnhancementWe value the opinions of our users and would greatly appreciate any suggestions you may have for improving the quality and usefulness of our products.
To suggest an enhancement:
1. Click Help > Support > Request an Enhancement.
2. Select Suggestion or Enhancement from the Type list.
3. Do one of the following:
l Select a category that most closely matches your area of interest.
l Select General if no category appears suitable.
4. In the Synopsis box, enter a brief topic summary.
5. In the Description area, tell us how we can improve Fortify WebInspect.
6. Click Submit.
User GuideChapter 11: Troubleshooting and Support
Micro Focus Fortify WebInspect (21.1.0) Page 459 of 461
Purchases and RenewalsThis topic describes how to purchase Micro Focus Fortify products and renew product licenses.
New Purchases
Visit Contact Micro Focus to obtain the telephone number of Micro Focus Fortify sales representatives who can assist you, or to send an e-mail inquiring about Fortify products.
Renew Your Product License
You can request your updated license online at the Micro Focus Software Licensing and Downloads Portal.
Uninstalling Fortify WebInspectWhen uninstalling, you can choose to repair Fortify WebInspect or remove it from your computer.
Options for Removing
If you select Remove, you may choose one or both of the following options:
l Remove product completely - Deletes the Fortify WebInspect application and all related files, including scan data stored on a local (non-shared) SQL server, settings files, and logs.
l Deactivate license - Releases your Fortify WebInspect license, which allows you to install Fortify WebInspect on a different computer. Application data and files are not deleted.
About WebInspectUse the About WebInspect window to view the application version number and display information about the Fortify WebInspect license.
User GuideChapter 11: Troubleshooting and Support
Micro Focus Fortify WebInspect (21.1.0) Page 460 of 461

Send Documentation FeedbackIf you have comments about this document, you can contact the documentation team by email.
Note: If you are experiencing a technical issue with our product, do not email the documentation team. Instead, contact Micro Focus Fortify Customer Support at https://www.microfocus.com/support so they can assist you.
If an email client is configured on this computer, click the link above to contact the documentation team and an email window opens with the following information in the subject line:
Feedback on User Guide (Fortify WebInspect 21.1.0)
Just add your feedback to the email and click send.
If no email client is available, copy the information above to a new message in a web mail client, and send your feedback to [email protected].
We appreciate your feedback!
Micro Focus Fortify WebInspect (21.1.0) Page 461 of 461