Mi Smart Fan - Batna24.com
9
Mi Smart Fan Installing of a stand of the fan Insert the stand pole to the special socket on the device base. Open the main block of the fan Turn the front protective mesh anti- clockwise to remove it. Installing the rear fan protective mesh While installing the rear protective mesh to fan motor module, two red triangles must match. Installing the front fan protective mesh While installing the front protective mesh, turn it clockwise until two marks on lower side match. Mi Smart Fan Before using the device, read the instructions carefully
-
Upload
khangminh22 -
Category
Documents
-
view
3 -
download
0
Transcript of Mi Smart Fan - Batna24.com
Mi Smart Fan
Installing of a stand of the fan
Insert the stand pole to the special socket on the device base.
Open the main block of the fan
Turn the front protective mesh anti-clockwise to remove it.
Installing the rear fan protective mesh
While installing the rear protective mesh to fan motor module, two red triangles must match.
Installing the front fan protective mesh
While installing the front protective mesh, turn it clockwise until two marks on lower side match.
Mi Smart FanBefore using the device, read the
instructions carefully
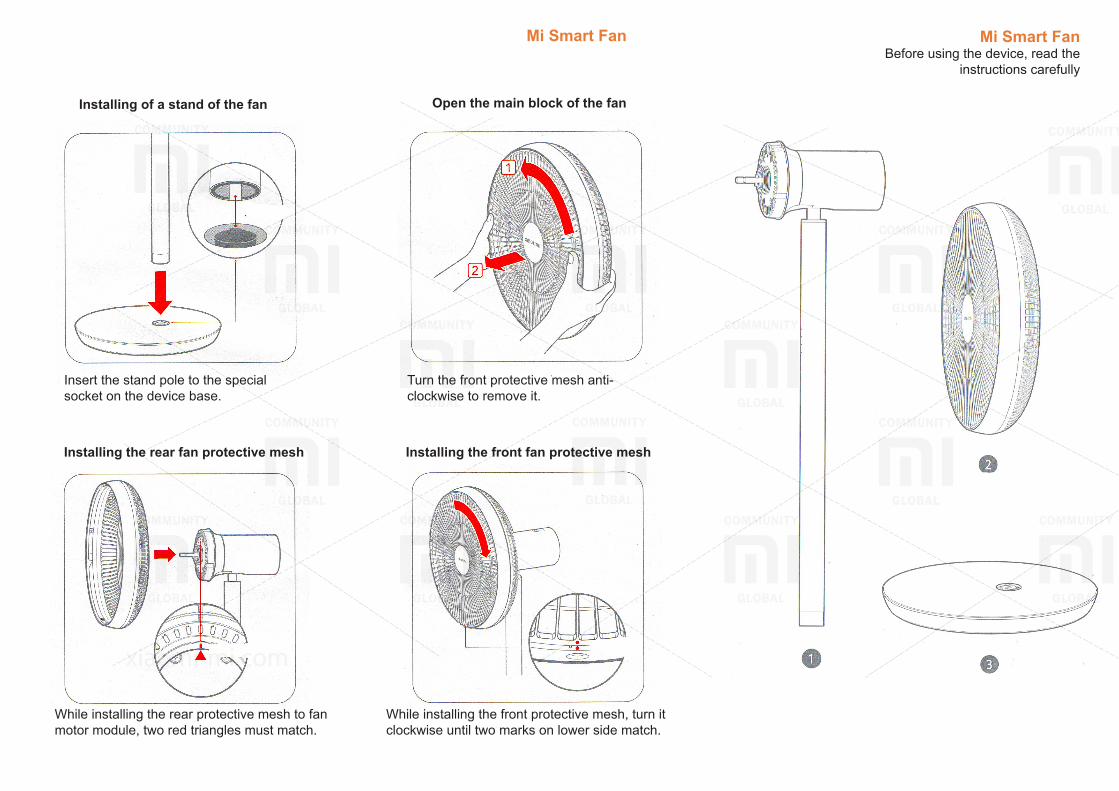
Accessories1. Motoer module with stand;2. Main fan block;3. Base of fan;4. Paddle fixing screw;5. Rear protective mesh fixing screw;6. Hex wrench;7. Basis screw; 8. Main block screws (+1 more);9. Power cable;10. Battery.
Overview
Mode indicators
Stand
Base
Fan tilt adjustment button
Wi-Fi indicator
Power cable slot
Mode indicators
Power button / wind adjustment button
Battery compartment
Battery compartment
panelStand screw
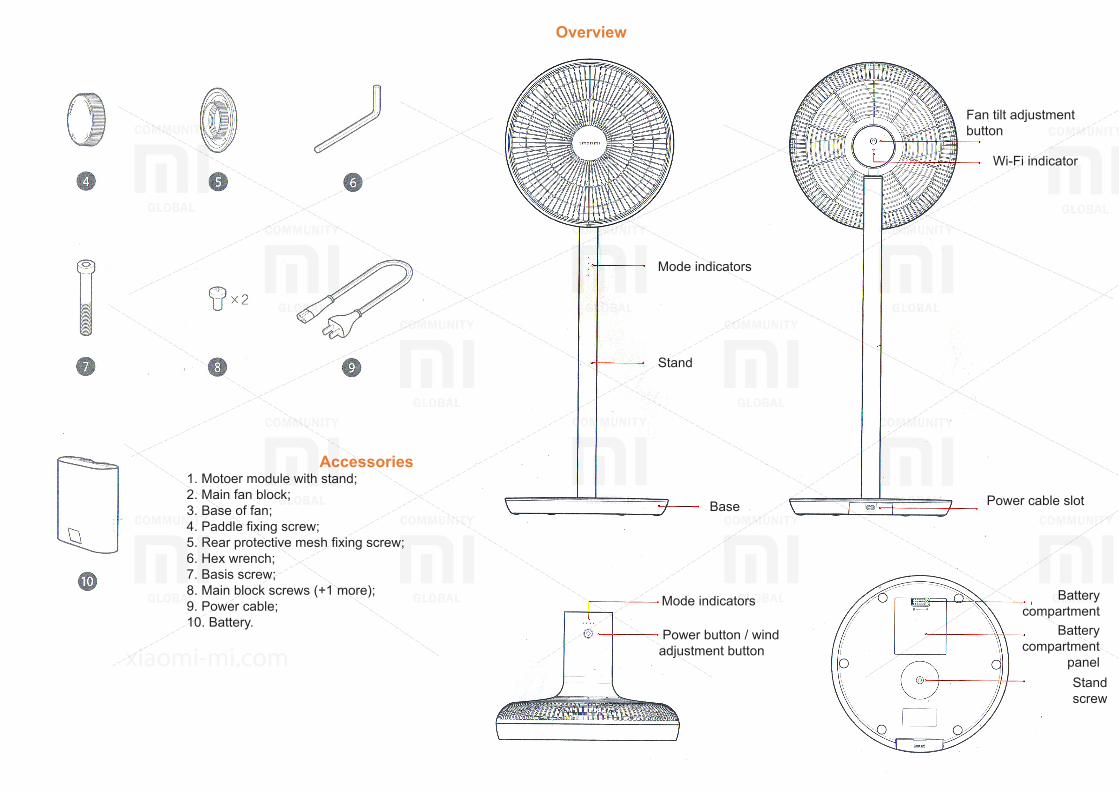
Installation of stand
Insert the fan stand into the special rack slot
Insert (7) screw of stand into slot
Using (6) hex wrench, screw (7) up to the limit
Open the main fan block
Unpack the main fan unit. Turn the front protective mesh anti-clockwise to remove it and remove a paddle.
fan main block
front protective mesh propeller rear protective mesh

Installation of the rear protective mesh
Install the rear protective mesh when two red triangle on it and motor block match, then scroll clockwise. Set (5) screw of the rear protective mesh and tighten it to the limit.
Installing the propeller
Install the propeller on motor shaft. Then set securing screw (4) on shaft and scroll counterclockwise to the limit.
Installation of the front protective mesh
To install the front protective mesh, turn it clockwise until two marks on lower fringe match.
Fixinf the main fan block
Insert (8) screw into the slot of the main unit and, using a cruciform head screwdriver, tighten it to the limit.

Installing the battery
Before performing these steps, we strongly recommend to switch off the fan and disconnect it from the power supply.
1. Scroll slider to the right to open a cover of a battery compartment.2. Remove a cover of a battery compartment.3. Insert the battery in a special battery compartment.4. Close a cover panel of a battery. Make sure that you securely closea panel of a battery compartment.
Connecting a power cable / battery charging
Plug a power cord into a special connector in fan base, and connect it to power supply. The corresponding beep indicates successful connection of the device to a power supply;
After inserting the battery into a battery compartment, connect the fan to a power supply to start charging it.
UsingOn/Off/Wind speed ajusting
On/Off
Click on the button, the fan turns on; fan remembers settings after last use of the device. After first use, disconnect it from the power supply and turn on to mode 1.
Switching wind speed
Adjust wind speed by pressing the wind button. Each time you press the button you switch the power supply to 1st, 2nd, 3rd, 4th mode, accordingly also switch status indicators of the device.
Turning off
Press and hold the button for 2 seconds untill fan is turned off
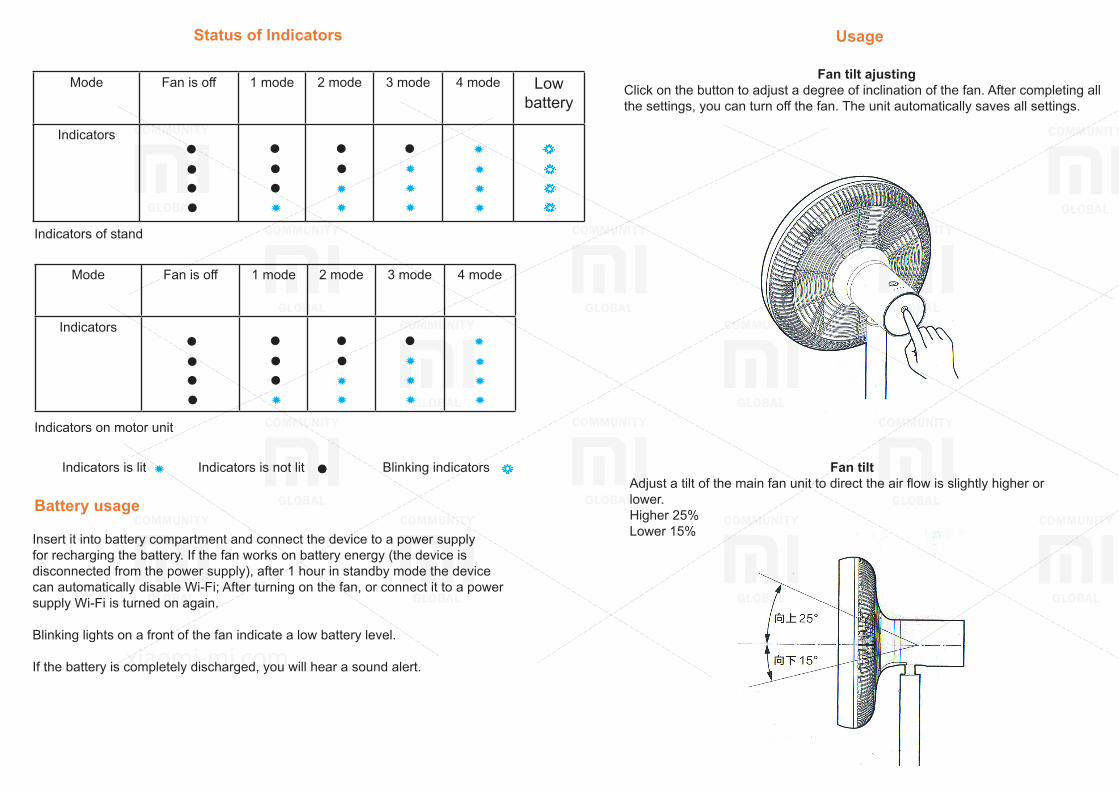
Status of Indicators
Mode Fan is off 1 mode 2 mode 3 mode 4 mode Low battery
Indicators
Mode Fan is off 1 mode 2 mode 3 mode 4 mode
Indicators
Indicators of stand
Indicators on motor unit
Indicators is lit Indicators is not lit Blinking indicators
Battery usage
Insert it into battery compartment and connect the device to a power supply for recharging the battery. If the fan works on battery energy (the device is disconnected from the power supply), after 1 hour in standby mode the device can automatically disable Wi-Fi; After turning on the fan, or connect it to a power supply Wi-Fi is turned on again.
Blinking lights on a front of the fan indicate a low battery level.
If the battery is completely discharged, you will hear a sound alert.
Usage
Fan tilt ajustingClick on the button to adjust a degree of inclination of the fan. After completing all the settings, you can turn off the fan. The unit automatically saves all settings.
Fan tiltAdjust a tilt of the main fan unit to direct the air flow is slightly higher or lower.Higher 25%Lower 15%
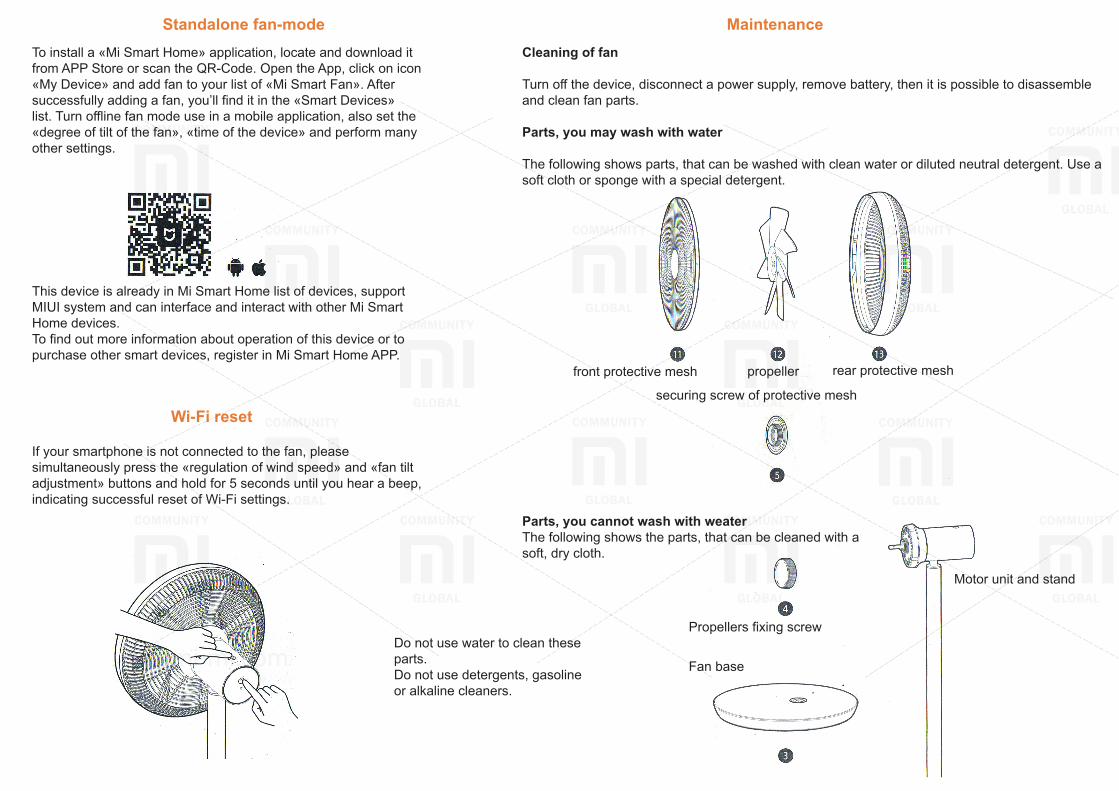
Standalone fan-modeTo install a «Mi Smart Home» application, locate and download it from APP Store or scan the QR-Code. Open the App, click on icon «My Device» and add fan to your list of «Mi Smart Fan». After successfully adding a fan, you’ll find it in the «Smart Devices» list. Turn offline fan mode use in a mobile application, also set the «degree of tilt of the fan», «time of the device» and perform many other settings.
This device is already in Mi Smart Home list of devices, support MIUI system and can interface and interact with other Mi Smart Home devices.To find out more information about operation of this device or to purchase other smart devices, register in Mi Smart Home APP.
Wi-Fi reset
If your smartphone is not connected to the fan, please simultaneously press the «regulation of wind speed» and «fan tilt adjustment» buttons and hold for 5 seconds until you hear a beep, indicating successful reset of Wi-Fi settings.
MaintenanceCleaning of fan
Turn off the device, disconnect a power supply, remove battery, then it is possible to disassemble and clean fan parts.
Parts, you may wash with water
The following shows parts, that can be washed with clean water or diluted neutral detergent. Use a soft cloth or sponge with a special detergent.
front protective mesh propeller rear protective mesh
securing screw of protective mesh
Parts, you cannot wash with weaterThe following shows the parts, that can be cleaned with a soft, dry cloth.
Propellers fixing screw
Fan base
Motor unit and stand
Do not use water to clean these parts.Do not use detergents, gasoline or alkaline cleaners.
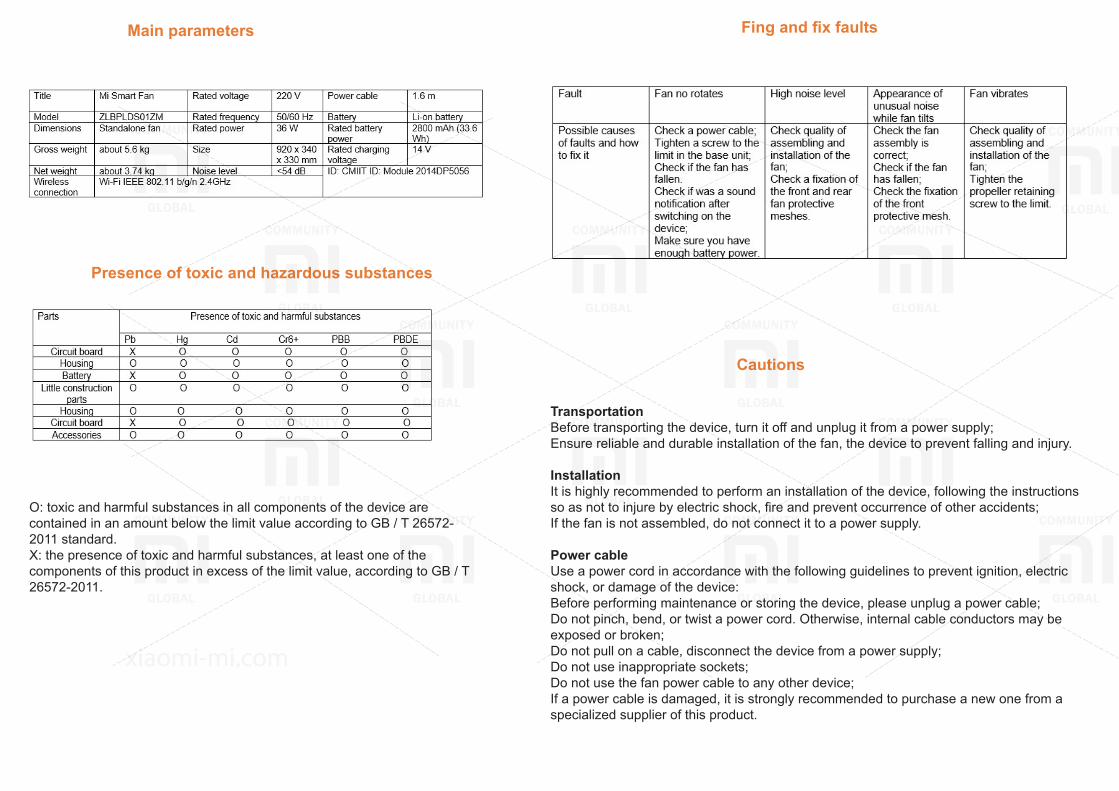
Main parameters
Presence of toxic and hazardous substances
O: toxic and harmful substances in all components of the device are contained in an amount below the limit value according to GB / T 26572-2011 standard.X: the presence of toxic and harmful substances, at least one of the components of this product in excess of the limit value, according to GB / T 26572-2011.
Fing and fix faults
Cautions
TransportationBefore transporting the device, turn it off and unplug it from a power supply;Ensure reliable and durable installation of the fan, the device to prevent falling and injury.
InstallationIt is highly recommended to perform an installation of the device, following the instructions so as not to injure by electric shock, fire and prevent occurrence of other accidents;If the fan is not assembled, do not connect it to a power supply.
Power cableUse a power cord in accordance with the following guidelines to prevent ignition, electric shock, or damage of the device:Before performing maintenance or storing the device, please unplug a power cable;Do not pinch, bend, or twist a power cord. Otherwise, internal cable conductors may be exposed or broken;Do not pull on a cable, disconnect the device from a power supply;Do not use inappropriate sockets;Do not use the fan power cable to any other device;If a power cable is damaged, it is strongly recommended to purchase a new one from a specialized supplier of this product.

CautionsBatteryIf for a long time you not use the device, remove a battery and charge it once every 6 months;Store battery in a cool dry place, avoid contact with it to direct sunlight or leave it in places with a temperature in excess of 60C (140F);Do not store battery with metal objects to prevent the occurrence of a short circuit or damage;Do not disassemble, crush, puncture, stepping or remodel a battery;Do not place battery in a microwave oven, on other subjects, which are sources of heat. Do not throw a battery into water, into the fire;If a battery has increased significantly, do not use it.
UsageIt is prohibited to shove your fingers and other outer objects into fan protective mesh.Do not allow a hair or tissue is very close to the fan, to avoid injury to people and damage to the device;If there unusual sounds, smell, increase the device temperature, and other strange symptoms, immediately turn off the fan;Do not lean on the fan.
Limitations of fan usage
The following are circumstances in which it is not recommended to use the device, because inflammation, injury, etc. can occur:The surface is very uneven and unsteady;Next to the fan have unstable things;Do not use the device in a bathroom and other rooms with high temperatures, high humidity;Any damage to a power cord or plug is very unreliable.
Do not perform the actions listed below. This can lead to personal injury, fire, damage to the device, etc .:Do not trust the children and adults, who do not know the features of this technique to control the fan;Do not disassemble the unit by yourself (unless performing maintenance). If necessary, contact and consult with a specialist of Zhimi company;Do not turn on the fan, if it is not installed front and / or rear protective meshes.
Warranty
Mi Smart Fan Quality Assurance: 12 months from the date of signing the warranty card.
• In case of unjustified return of the goods within 7 days after purchase, the item is returned to the supplier company dedicated to the Xiaomi official. In the event of damage to the product or its packaging, the lack of some details of return is not possible. In case of return of the goods within 7 days after purchase, a buyer shall bear a cost of its transportation. Within 7 days after the company receives the goods, a buyer return the money.
• In case of problems with the quality of goods, it can be replaced within 15 days after the signing of a guarantee. After 15 days of warranty buyer meyt have a repair of goods.
• The warranty on this unit 12 months. For the major component (brushless DC motor, PCBA, stepper motor, switching power supply) and warranty maintenance for 3 years. The signed sales receipt and warranty are the documents, confirming the fact of purchase, so you need to store them properly.
Warranty terms
- The warranty period is ended;- Repair of the device by unauthorized companies fall, neglect, abuse, water influence, an accident, improper use of the components, if torn or soiled label and labeling of devices;- Damage caused by improper use, maintenance and storage;- The lack of packaging, component parts, «gifts» to the product, instructions, the lack of sales receipt;- Damage caused by force majeure.
XIAOMI-MI.COM