Mercury GL Migrator Guide - Support
144
Mercury IT Governance Center™ Mercury GL Migrator™ Guide Version: 6.0
-
Upload
khangminh22 -
Category
Documents
-
view
0 -
download
0
Transcript of Mercury GL Migrator Guide - Support

Mercury IT Governance Center™Mercury GL Migrator™ Guide
Version: 6.0

This manual, and the accompanying software and other documentation, is protected by U.S. and international copyright laws, and may be used only in accordance with the accompanying license agreement. Features of the software, and of other products and services of Mercury Interactive Corporation, may be covered by one or more of the following patents: United States: 5,511,185; 5,657,438; 5,701,139; 5,870,559; 5,958,008; 5,974,572; 6,137,782; 6,138,157; 6,144,962; 6,205,122; 6,237,006; 6,341,310; 6,360,332, 6,449,739; 6,470,383; 6,477,483; 6,549,944; 6,560,564; 6,564,342; 6,587,969; 6,631,408; 6,631,411; 6,633,912; 6,694,288; 6,738,813; 6,738,933; 6,754,701; 6,792,460 and 6,810,494. Australia: 763468 and 762554. Other patents pending. All rights reserved.
Mercury, Mercury Interactive, the Mercury logo, the Mercury Interactive logo, LoadRunner, WinRunner, SiteScope and TestDirector are trademarks of Mercury Interactive Corporation and may be registered in certain jurisdictions. The absence of a trademark from this list does not constitute a waiver of Mercury's intellectual property rights concerning that trademark.
All other company, brand and product names may be trademarks or registered trademarks of their respective holders. Mercury disclaims any responsibility for specifying which marks are owned by which companies or which organizations.
Mercury379 North Whisman RoadMountain View, CA 94043Tel: (650) 603-5200Toll Free: (800) TEST-911Customer Support: (877) TEST-HLPFax: (650) 603-5300
© 1997–2005 Mercury Interactive Corporation. All rights reserved.
If you have any comments or suggestions regarding this document, please send email to [email protected].
Publication Number: ITG60GLMigrator0805A

Table of Contents
List of Figures ....................................................................................................................................... vii
List of Tables .......................................................................................................................................... ix
Chapter 1: Introduction.......................................................................................................................11
About This Document.............................................................................................................................................. 12
Who Should Read This Document ................................................................................................................... 13
Prerequisite Documents ........................................................................................................................................ 13
Related Documents.................................................................................................................................................. 13
Overview of Mercury GL Migrator .................................................................................................................... 14
Chapter 2: Installing GL Migrator....................................................................................................15
Overview of the Installation Process............................................................................................................... 16
Object Migrator Considerations ........................................................................................................................ 17
System Requirements............................................................................................................................................. 18File System Requirements ............................................................................................................................. 18Tablespace Requirements.............................................................................................................................. 18Platform Requirements .................................................................................................................................... 19Instance Requirements .................................................................................................................................... 19Distributed Database Option - Recommended .................................................................................. 19Application Naming Requirements ............................................................................................................ 20Version Control Considerations .................................................................................................................. 20
Product Components .............................................................................................................................................. 21Migrators and Other Programs Included with GL Migrator .......................................................... 21SQL and Shell Scripts....................................................................................................................................... 21
Pre-Installation Setup .............................................................................................................................................. 21
iii

Table of Contents
Installing GL Migrator on Windows.................................................................................................................. 26
Installing GL Migrator on UNIX........................................................................................................................... 31
Configuring Your System to Work with GL Migrator.............................................................................. 35Optional Setup Procedures ........................................................................................................................... 44
Setting Up a Separate Responsibility for Migrations ............................................................... 44Setting Up an Unrestricted Migrator................................................................................................. 48Using GL Migrator Without the Distributed Database Option ............................................ 56
Chapter 3: Upgrading GL Migrator .................................................................................................57
New Features............................................................................................................................................................... 58Overview .................................................................................................................................................................. 58Supportability ........................................................................................................................................................ 58
GL Migrator Support of Oracle E-Business Suite ...................................................................... 59Integration with Mercury IT Governance Center and Oracle Apps Extension............ 59Integration with Object Migrator ......................................................................................................... 59
Special Considerations for Release 6.0 .................................................................................................. 60Upgrade Impacts for Release 6.0 ............................................................................................................... 60
Upgrade Requirements .......................................................................................................................................... 60
Before You Begin the Upgrade.......................................................................................................................... 61GL Migrator Upgrade Directories ............................................................................................................... 62GL Migrator Upgrade Script .......................................................................................................................... 63
Upgrading GL Migrator on Windows............................................................................................................... 64
Upgrading GL Migrator on UNIX ...................................................................................................................... 68
Chapter 4: Using GL Migrator ..........................................................................................................73
User Configuration.................................................................................................................................................... 74
Entity Values ................................................................................................................................................................ 74
Entity Types .................................................................................................................................................................. 75
Migration Capabilities.............................................................................................................................................. 76
Version Control........................................................................................................................................................... 76
Comparison Reports................................................................................................................................................ 77Comparison Functionality Within Each Migrator................................................................................ 77GL Migration Comparison Report .............................................................................................................. 77
Migration Audit Reports ......................................................................................................................................... 77
Common GL Migrator Parameters ................................................................................................................... 78
Chapter 5: Maintaining GL Migrator ..............................................................................................85
Overview of Maintenance Tasks........................................................................................................................ 86
Purging Temporary Tables.................................................................................................................................... 87
iv Mercury GL Migrator™ Guide

Table of Contents
Running Audit Reports............................................................................................................................................ 89
Recompiling Descriptive Flexfields .................................................................................................................. 90
Setting Up GL Migrator Security ....................................................................................................................... 90
Validating and Rebuilding Views ....................................................................................................................... 91
Running Without the Distributed Database Option ................................................................................ 92
Using Version Control ............................................................................................................................................. 93
Adding a Database Instance................................................................................................................................ 93
Using Views .................................................................................................................................................................. 94Drawbacks to Using Views............................................................................................................................. 95Switching Between Non-Validated Mode and Validated Mode.................................................. 96Controlling Database Access Through Links ....................................................................................... 97Local Chart of Accounts (COA) and Set of Books (SOB) Names............................................. 97
Chapter 6: Using Version Control ...................................................................................................99
Overview of Version Control..............................................................................................................................100
Overview of Entity Archive..................................................................................................................................100
Saving to the Entity Archive...............................................................................................................................102
Restoring Entities from the Entity Archive .................................................................................................102
GL Archive Version Detail Report...................................................................................................................103
Purge Entity Archive Versions Program.......................................................................................................104
Comparing Entities .................................................................................................................................................105Comparison Methodology ............................................................................................................................105Comparison Procedure and Sample Report ......................................................................................106
Chapter 7: Migrating General Ledger Entities ........................................................................ 109
Migrate Budget Organizations Migrator ......................................................................................................110
Migrate Consolidations Migrator .....................................................................................................................112
Migrate Cross Validation Rules Migrator ....................................................................................................114
Migrate JE Sources Migrator.............................................................................................................................116
Migrate Journal Categories Migrator ............................................................................................................117
Migrate Mass Allocations Migrator.................................................................................................................118
Migrate Summary Templates Migrator.........................................................................................................120
Appendix A: Exception Messages ............................................................................................... 123
Index ...................................................................................................................................................... 141
v

Table of Contents
vi Mercury GL Migrator™ Guide

List of Figures
Figure 2-1 Sample system configuration .......................................................................................................... 17
Figure 4-1 Submit Requests form......................................................................................................................... 74
Figure 4-2 Parameters for Migrate Budget Organizations program ................................................... 75
Figure 6-1 Sample version labels and revision numbers ........................................................................101
Figure 6-2 Sample Mass Allocation/Budget Comparison Report ......................................................108
vii

List of Figures
viii Mercury GL Migrator™ Guide

List of Tables
Table 2-1 GL Migrator file system space requirements .......................................................................... 18
Table 2-2 GL Migrator tablespace requirements ........................................................................................ 18
Table 2-3 CLGM_INSTALL_NT script parameters....................................................................................... 27
Table 2-4 CLGM_INSTALL script parameters............................................................................................... 32
Table 2-5 Migrators in GL Migrator .................................................................................................................... 39
Table 2-6 System administration and maintenance programs in GL Migrator ........................... 40
Table 3-1 GL Migrator file system space requirements .......................................................................... 60
Table 3-2 Information required by the upgrade script ............................................................................. 63
Table 5-1 Purge GL Migrator Interface Tables program parameters ............................................... 87
Table 5-2 GL Migrator Audit Report parameters ........................................................................................ 89
Table 5-3 Maintain GL Migrator Views program parameter.................................................................. 91
Table 5-4 Values for CLM_DATABASES .......................................................................................................... 94
Table 5-5 Values for CLM_DB_LINKS ............................................................................................................... 94
Table 6-1 GL Archive Version Detail Report parameters .....................................................................103
Table 6-2 Purge Entity Archive Versions program parameters .........................................................104
Table 7-1 Migrate Budget Organizations migrator parameters.........................................................110
Table 7-2 Migrate Consolidations migrator parameters........................................................................112
Table 7-3 Migrate Cross Validation Rules migrator parameters .......................................................114
Table 7-4 Migrate JE Sources migrator parameters ...............................................................................116
Table 7-5 Migrate Journal Categories migrator parameters...............................................................117
Table 7-6 Migrate Mass Allocations migrator parameters ...................................................................118
Table 7-7 Migrate Summary Templates migrator parameters ...........................................................120
ix

List of Tables
x Mercury GL Migrator™ Guide

Chapter
1Introduction
In This Chapter:
About This DocumentWho Should Read This DocumentPrerequisite DocumentsRelated DocumentsOverview of Mercury GL Migrator
11

Chapter 1: Introduction
About This DocumentThis document provides information about installing, upgrading, and using Mercury GL Migrator release 6.0, which manages Oracle E-Business Suite™ Release 10, 11, and 11i General Ledger setup entities across multiple database instances.
This document is organized as follows:
Chapter 1, Introduction, on page 11, this chapter, provides information about this document and an overview of GL Migrator.
Chapter 2, Installing GL Migrator, on page 15 describes in detail the requirements and procedure to install GL Migrator on Windows or UNIX. It also describes initial configuration of Oracle E-Business Suite to work with GL Migrator.
Chapter 3, Upgrading GL Migrator, on page 57 describes in detail the requirements and procedure to upgrade GL Migrator on Windows or UNIX from an earlier release. It also describes GL Migrator’s supportability with Oracle E-Business Suite, Mercury IT Governance Center™, Mercury Extension for Oracle E-Business Suite™, and Mercury Object Migrator™.
Chapter 4, Using GL Migrator, on page 73 describes the capabilities of GL Migrator at a high level and describes the parameters that are common to many of the GL migrators.
Chapter 5, Maintaining GL Migrator, on page 85 describes the maintenance tasks associated with GL Migrator and the programs to perform them.
Chapter 6, Using Version Control, on page 99 describes GL Migrator’s version control, archiving, and entity comparison capabilities.
Chapter 7, Migrating General Ledger Entities, on page 109 describes how to run the individual GL migrators.
Appendix A: Exception Messages on page 123 lists and describes exception messages, their causes, and recovery actions.
For More Information
For more information about Mercury GL Migrator, see Overview of Mercury GL Migrator on page 14.
12 Mercury GL Migrator™ Guide

Chapter 1: Introduction
Who Should Read This DocumentThis book is for the following users of Mercury IT Governance Center:
Application administrators
Application developers or configurators
System or instance administrators
Database administrators
End users
For More Information
For information about audience types, see the Guide to Documentation.
Prerequisite DocumentsPrerequisite documents include:
Getting Started
Key Concepts
System Administration Guide and Reference
Security Model Guide and Reference
Related DocumentsRelated documents include:
Commands, Tokens, and Validations Guide and Reference
Mercury Change Management User’s Guide
Mercury Change Management: Configuring a Deployment System
Who Should Read This Document 13

Chapter 1: Introduction
For More Information
For information about the Mercury IT Governance Center product documentation, see the Guide to Documentation.
Overview of Mercury GL MigratorMercury GL Migrator manages migrations of Oracle Applications General Ledger setup entities across multiple database instances. GL Migrator consists of a series of concurrent programs that run through the standard Oracle Submit Requests form. There is one GL Migrator program for each corresponding Oracle General Ledger entity type (for example, Budget Orgs, Consolidations, and Mass Allocations). Users launch a program and specify information regarding the entities to migrate, where the data is coming from, and where it is going. Some parameters are specific to the individual entity type.
Users can query the results of each GL Migrator execution from the standard Oracle View Requests form. Each execution produces an output report that lists the parameters passed to the program, the entities queried for migration, and results of the migration.
In addition to migrating Oracle General Ledger data from one instance to another, GL Migrator can be used to put entities into a version control product and to compare different versions of the same entity.
Mercury GL Migrator release 6.0 supports Oracle E-Business Suite Releases 10, 11, and 11i (11.5.1 through 11.5.10 and Financial Suite Family Pack F and the FND.H Minipack).
If Kintana GL*Migrator release 2.0 is installed, you can upgrade to Mercury GL Migrator release 6.0. For a description of features that are new for release 6.0 and upgrade impacts, see New Features on page 58.
14 Mercury GL Migrator™ Guide

Chapter
2Installing GL Migrator
In This Chapter:
Overview of the Installation ProcessObject Migrator ConsiderationsSystem Requirements
File System RequirementsTablespace RequirementsPlatform RequirementsInstance RequirementsDistributed Database Option - RecommendedApplication Naming RequirementsVersion Control Considerations
Product ComponentsMigrators and Other Programs Included with GL MigratorSQL and Shell Scripts
Pre-Installation SetupInstalling GL Migrator on WindowsInstalling GL Migrator on UNIXConfiguring Your System to Work with GL Migrator
Optional Setup Procedures
15

Chapter 2: Installing GL Migrator
Overview of the Installation ProcessThis chapter describes installation and initial configuration activities that are to be performed by administrators, who are not necessarily the end users of GL Migrator.
(The upgrade procedure from Kintana GL*Migrator release 2.0 is described in Chapter 3, Upgrading GL Migrator, on page 57.)
The Mercury GL Migrator release 6.0 installation procedure copies various entities into the Oracle Applications E-Business Suite database. For a list and description of those entities, see Product Components on page 21.
Installation consists of the following major steps:
Verifying that system requirements are met
Performing pre-installation setup, including deciding where GL Migrator will be installed and creating directory structures for it
Downloading and installing the software
Configuring your system to work with GL Migrator
Figure 2-1 shows an example system configuration at a company that has four database instances named STAGE, PILOT, DVLP, and PROD. (Information in the “Define Values” boxes reflects completion of the detailed installation procedures.)
Assume that a database administrator named Carl will decide which instance will include GL Migrator. Although he could choose any of the instances, he wants to pick the one that is refreshed least often. DVLP and PILOT are refreshed often. PROD might seem to be a good candidate, but the operations staff wants Carl not to install any external tools in the PROD database. STAGE is a small staging database that has only the Application Object Library and General Ledger modules installed, and it is never refreshed. So Carl chooses STAGE as the instance on which GL Migrator will be installed.
16 Mercury GL Migrator™ Guide

Chapter 2: Installing GL Migrator
Figure 2-1. Sample system configuration
Object Migrator ConsiderationsIf you have also purchased Mercury Object Migrator, you must install Mercury Object Migrator before installing Mercury GL Migrator. GL Migrator and Object Migrator must be installed in the same Oracle account.
Object Migrator release 6.0 is compatible with Kintana GL*Migrator release 2.0, but Mercury recommends that you upgrade both GL Migrator and Object Migrator to release 6.0. For complete compatibility information, see Integration with Object Migrator on page 59.
Object Migrator Considerations 17

Chapter 2: Installing GL Migrator
System RequirementsFor basic system requirements and support information, see the System Requirements and Compatibility Matrix, available at the IT Governance Download Center.
The following sections contain additional requirements for installing and using GL Migrator.
File System RequirementsGL Migrator requires a minimum amount of disk space to be successfully installed. Table 2-1 lists the space requirements for the GL Migrator file system.
Tablespace RequirementsGL Migrator requires a minimum amount of tablespace in order to function properly. Table 2-2 lists the tablespace requirements for GL Migrator.
* Requirements directly relate to the number of entities placed under version control (see Version Control Considerations on page 20 for details). In addition, sizing can depend on your database version and configuration.
Table 2-1. GL Migrator file system space requirements
Object Required Space
Install Bundle 30–35 MB (temporary)
Install Scripts (shell and SQL scripts) 3 MB
Programs (.rdf files) 15 MB total
Table 2-2. GL Migrator tablespace requirements
Entity Required Space Recommended Space
Interface Tables 10 MB 25MB
Indexes on Interface Tables 15 MB 10 MB
Archive Tables and Indexes 15 MB* 30 MB*
18 Mercury GL Migrator™ Guide

Chapter 2: Installing GL Migrator
Platform RequirementsSince GL Migrator works within Oracle E-Business Suite and uses standard Oracle tools, it can run on any platform running Oracle E-Business Suite.
Installation of GL Migrator is driven by SQL and shell scripts. The location in which GL Migrator is being installed must support Bourne shell executions. The MKS Toolkit fulfills this requirement on Windows environments.
Instance RequirementsGL Migrator runs as concurrent programs using Oracle Application’s Concurrent Manager. The user accesses the Oracle Submit Requests form (also known as the Standard Request Submission form) to launch migration programs. The instance on which GL Migrator is installed must be able to run a concurrent program.
GL Migrator requires installation of the Applications Object Library (AOL) and General Ledger modules. GL Migrator does not need any other application (such as INV or HR) to be installed, although having these applications installed will not cause any compatibility problems.
Also, see Special Considerations for Release 6.0 on page 60.
Distributed Database Option - RecommendedGL Migrator uses database links to access all databases. The Distributed Database Option is required to insert, delete, or update data on a remote database. Mercury strongly recommends that this option be active on all the databases being used as sources and destinations. For information about how to install GL Migrator with the Distributed Database Option turned off, see Using GL Migrator Without the Distributed Database Option on page 56.
Since GL Migrator resides as a custom application within the Oracle E-Business Suite instance, it should be installed in an instance that will not be refreshed. Normally, this will be either a production instance or an instance dedicated to hosting GL Migrator.
If using GL Migrator in conjunction with Mercury Change Management™, the Distributed Database Option is required.
System Requirements 19

Chapter 2: Installing GL Migrator
The instance where GL Migrator resides must be configured such that Oracle Applications instances that will be the source or destination of a migration can be accessed using database links (that is, configurations such as tnsnames, listener, or global names).
Application Naming RequirementsThere must be no existing applications with the short name CLGM on the instance in which GL Migrator is being installed. If a CLGM application does exist, contact Mercury Customer Support for assistance (support.mercury.com).
Version Control ConsiderationsGL Migrator uses archive tables to store version information for GL entities. These tables reside on the instance where GL Migrator is installed. If GL Migrator is installed on multiple instances and someone uses the version control functionality on all the installations, multiple entity repositories result. To prevent confusion, Mercury recommends that the version control functionality be used on only one installation.
Sizing Requirements for Entity Archive Tables
When saving an entity to the entity archive, GL Migrator takes the entire definition of the entity and stores it in special archive tables. The growth of these archive tables directly corresponds to the number of entities and the number of versions put into these tables. For some entities, entity complexity and size can also be factors.
If you plan periodically to store versions of entire groups of entities rather than storing only the entities that change, then more tablespace will be required than the recommended 30 megabytes. Mercury recommends starting with a 30-megabyte allocation and then adding tablespace as needed.
Since GL Migrator uses database tables to store entity information, install it on a database instance that will not be periodically refreshed.If the database must be refreshed for some reason, export the data in the GL Migrator tables (all migrator table names begin with CLGM) before the refresh and import the data once the refresh is completed.
20 Mercury GL Migrator™ Guide

Chapter 2: Installing GL Migrator
Product ComponentsThis section describes the programs and SQL and shell scripts that are included with GL Migrator.
Migrators and Other Programs Included with GL MigratorOne migrator file is included for each of the individual GL migrators. GL Migrator also includes system administration and maintenance programs. These migrators and other programs have .rdf extensions and are executable as concurrent programs launched from the Submit Requests form (also known as the Run Requests form).
Table 2-5 on page 39 and Table 2-6 on page 40, which are used during configuration after installation, list the migrators and the system administration and maintenance programs included with GL Migrator.
SQL and Shell ScriptsSQL and shell scripts are used to perform automatic setup of the internal entities (for example, applications, tables, indexes, sequences, concurrent programs, flexfields, and value sets) necessary for each of the GL Migrator modules to execute.
SQL script files have .sql extensions.
Pre-Installation SetupBefore beginning the GL Migrator installation, review the following sections, then complete the following pre-installation procedures:
Overview on page 58
Supportability on page 58
Special Considerations for Release 6.0 on page 60
Upgrade Impacts for Release 6.0 on page 60
Product Components 21

Chapter 2: Installing GL Migrator
To prepare to install GL Migrator:
1. Decide where GL Migrator will be installed and create the required directory structure.
GL Migrator can be installed in its own <PROD>_TOP directory (for example, CLGM_TOP), or it can share a <PROD>_TOP directory with an existing application (for example, FND_TOP). Mercury recommends a separate <PROD>_TOP directory.
In this document, CLGM_TOP is used to represent the location where GL Migrator is installed; you must define the specific directory to be used for GL Migrator consistently throughout this step.
a. If GL Migrator will use its own <PROD>_TOP, create the directory structure according to applications standards.
For example, Carl creates the appropriate CLGM_TOP directory for GL Migrator:
On UNIX:
mkdir /u1/stageappl/CLGM
On Windows:
mkdir d:\stageappl\CLGM
b. Subdirectories are needed for the installation files and the Oracle Reports files. This file structure should be created on every tier in the instance. The directories should be owned by the user who owns the other TOP directories (usually applmgr).
In addition to the installation and Oracle Reports subdirectories, if this instance is set up to place log and output files for concurrent processing under individual applications rather than in a central location, create log and out subdirectories under CLGM_TOP.
The subdirectory name for Oracle Reports files varies by release.Release 10 - CLGM_TOP/srwRelease 11 - CLGM_TOP/reportsRelease 11i - CLGM_TOP/reports/US
22 Mercury GL Migrator™ Guide

Chapter 2: Installing GL Migrator
For example, Carl creates the following installation, reports, log, and out subdirectories:
On UNIX:
mkdir /u1/stageappl/CLGM/installmkdir /u1/stageappl/CLGM/reports/USmkdir /u1/stageappl/CLGM/$APPLLOGmkdir /u1/stageappl/CLGM/$APPLOUT
On Windows:
mkdir d:\stageappl\CLGM\installmkdir d:\stageappl\CLGM\reports\USmkdir d:\stageappl\CLGM\%APPLLOG%mkdir d:\stageappl\CLGM\%APPLOUT%
c. Add the CLGM_TOP environment variable to the instance context. Often, this is the customization section of the appropriate file where environment variables are set.
For Release 11i, this file is usually the $APPL_TOP/admin/adovars.env file for the instance (adovars.cmd on Windows).
Your instance might have additional requirements or different procedures. On Windows, the value must also be populated to the registry.
For example, Carl would set
On UNIX:
CLGM_TOP="//u1/stageappl/CLGM"export CLGM_TOP
On Windows:
set CLGM_TOP=d:\stageappl\CLGM\
d. Ensure that the environment has been updated.
On UNIX:
Source the file and then restart the Oracle E-Business Suite applications processes.
On Windows:
If the installation is done as a custom application on Windows, update the Windows registry with CLGM_TOP.
Pre-Installation Setup 23

Chapter 2: Installing GL Migrator
2. Decide which tablespaces GL Migrator will use for tables and indexes.
Mercury recommends that GL Migrator use its own tablespaces, especially if GL Migrator will reside in a production Oracle E-Business Suite instance.
a. If you want new tablespaces, create them. See the sizing requirements for the tablespaces in Tablespace Requirements on page 18.
b. Consider creating additional rollback segments to support GL Migrator migration transactions, especially if GL Migrator does not reside in a dedicated instance. Adding at least one new rollback segment for each of the new tablespaces is recommended. These rollback segments should reside in a separate tablespace reserved for rollback segments. They should be generated with the OPTIMAL size constraint to make sure that the rollback segments automatically deallocate space as it becomes free.
3. Create a custom SQL account in which to install GL Migrator.
An existing SQL account can be used, but this is not recommended unless the account was originally created for Object Migrator. This account needs privileges to create tables, indexes, sequences, database links, and stored procedures. It should also have access to the V$DATABASE view.
Default tablespaces should be defined for the user.
For example, Carl chooses to call his schema CLM with a password of CLM. He has also set up new tablespaces of CLGM_DATA and CLGM_NDX to hold the tables and indexes for CLGM.
create user CLM identified by CLMdefault tablespace CLGM_DATAquota unlimited on CLGM_DATAquota unlimited on CLGM_NDX;grant connect, resource, unlimited tablespace to CLM;
If you have already performed this step for Object Migrator, skip this step, since both GL Migrator and Object Migrator use the same SQL account.
24 Mercury GL Migrator™ Guide

Chapter 2: Installing GL Migrator
4. Register the SQL account created for GL Migrator with the Oracle E-Business Suite, as follows:
a. Log onto the Oracle E-Business Suite for this database instance.
b. Through the system administrator responsibility, navigate to the Register form (Security:ORACLE:Register).
c. Add an entry for the new SQL account.
For example, Carl chose to call his schema CLM, so he registers that schema in the STAGE instance.
If you have already performed this step for Object Migrator, skip this step, since both GL Migrator and Object Migrator use the same SQL account.
For some Oracle E-Business Suite releases, this will automatically submit the Make Foundation Grants and Synonyms program for an Oracle user. Wait for the program to finish before continuing. If the program does not get submitted, continue with the installation.
Pre-Installation Setup 25

Chapter 2: Installing GL Migrator
Installing GL Migrator on WindowsTo install GL Migrator in a Windows environment, do the following:
1. Decide where GL Migrator will be installed and create the requisite directory (folder) structure. For more information, see Pre-Installation Setup on page 21.
For example, Carl has signed onto his database server, hostname Cobra, as applmgr, the user who owns the Oracle Applications files.
2. Download the GL Migrator bundle from the Mercury IT Governance Download Center at itg.merc-int.com/support/download/login.jsp.
The executables are compressed into one zip file for Windows named CLGM_60.zip. Place this file into the folder where the GL Migrator installation is to be staged.
For example, in Carl’s case, the folder is d:\stageappl\CLGM\install.
3. Extract the GL Migrator bundle using an unzip utility.
This creates an installation folder, CLGM_6_0, with install and srw subfolders.
The install folder contains all the installation scripts necessary to install GL Migrator.
The srw folder contains all of the GL Migrator executables.
4. Navigate to the install folder created by the unzip process, CLGM_6_0\install.
Under the install folder are two folders, one for Release 10 (r10) and another for Release 11 (r11). When installing GL Migrator on a Release 10 instance, navigate to the r10 folder. When using a Release 11 or 11i instance, navigate to the r11 folder.
a. Start a command shell and set the Oracle E-Business Suite context, if required.
b. Navigate to the install folder.
26 Mercury GL Migrator™ Guide

Chapter 2: Installing GL Migrator
For example, Carl is installing GL Migrator on a Release 11i instance:
cmd d:\stageappl\envshell.cmdcd d:\stageappl\CLGM\install\CLGM_6_0\install\r11
5. Make sure the custom SQL account discussed in Pre-Installation Setup on page 21 has been created and registered.
6. Run the CLGM_INSTALL_NT script:
a. Start a bash shell.
In environments where MKS Toolkit is in use (not required), MKS must be in the user’s path.
b. Run the CLGM_INSTALL_NT script.
For example:
sh CLGM_INSTALL_NT
CLGM_INSTALL_NT is an interactive program that prompts for the information in Table 2-3. The interactive program verifies the information you enter and proceeds only if it is valid. For example, the installation program tries to connect to the database using the user name and password you enter.
To stop the installation process, enter a period (.) at any of the prompts.
Table 2-3. CLGM_INSTALL_NT script parameters
Parameter Description
SQL Account registration Confirm (Y/N) whether the GL Migrator SQL account has been registered in the Oracle E-Business Suite.
sql executable The executable to use to make a command-line SQL*Plus connection. This could be plus80 or sqlplus, depending on the toolset in use.
Username of GL Migrator sql account
The user name for the GL Migrator SQL account that was created and registered in Oracle E-Business Suite.
Password for GL Migrator sql account The password for this SQL account.
Installing GL Migrator on Windows 27

Chapter 2: Installing GL Migrator
For example:
bashsh CLGM_INSTALL_NT
Indicate whether the GL Migrator user is registered (enter Y if you are installing GL Migrator in the same account as Object Migrator): Y (Carl registered the SQL account according to the steps in Pre-Installation Setup on page 21.)
Command name used for invoking SQL*Plus: plus80
Username of GL Migrator sql account: CLGM
Password for CLGM sql account: CLGM (twice)
Connect String for GL Migrator Database: STAGE (if Carl had been using SQL*Net 1.x, he would have entered t:cobra:STAGE as the connect string)
Tablespace for GL Migrator tables: CLGM_DATA
Tablespace for GL Migrator indexes: CLGM_NDX
Username of APPS user: APPS
Password for APPS user: APPS (twice)
Connect string for GL Migrator database
Specifies the database on which GL Migrator is being installed. When using SQL*Net 1.x, enter the entire two-task database connect string. (For example, T:dev_machine:MIGRATE)When using SQL*Net 2.0 or higher, enter the database identifier (usually the ORACLE_SID).
Tablespace for GL Migrator tables
All GL Migrator tables will go into the specified tablespace.Note: The SQL account must have permissions to write to this tablespace.
Tablespace for GL Migrator indexes
All GL Migrator indexes will go into the specified tablespace.Note: The SQL account must have permissions to write to this tablespace.
Username of APPS user The user name for the Oracle E-Business Suite APPS account.
Password for APPS user The password for this SQL account.
Table 2-3. CLGM_INSTALL_NT script parameters [continued]
Parameter Description
28 Mercury GL Migrator™ Guide

Chapter 2: Installing GL Migrator
Carl had already created the CLGM_DATA and CLGM_NDX tablespaces before he began the installation process. You can use an existing tablespace.
7. The script sends log messages as standard output to the screen and saves the output to a log file named clgm_log.out in the current directory.
The command file CLGM_INSTALL_NT runs all the GL Migrator install scripts. These scripts perform the following actions:
Create Mercury GL Migrator Application (application code = CLGM)
Add the new application to all data groups that contain the FND application (using the OracleID in which GL Migrator was installed)
Create database objects used by GL Migrator
Create value sets and register concurrent programs used to run migrators and system maintenance and administration programs
Create a limited number of grants and synonyms to the APPS account to facilitate request submission
8. Move the .rdf files from the srw folder of the extracted GL Migrator bundle (for example, CLGM_TOP\install\CLGM_6_0\srw) to their permanent location under CLGM_TOP.
This location varies by release:
CLGM_TOP\srw for Release 10
CLGM_TOP\reports for Release 11
CLGM_TOP\reports\us for Release 11i
For example, Carl is using the CLGM_TOP folder structure to store the GL Migrator programs and files, so he is copying from CLGM_TOP\install\CLGM_6_0\srw to CLGM_TOP\reports\US.
All object names created by the install scripts begin with CLGM. If an application with the name of CLGM already exists, contact Mercury Customer Support for assistance (support.mercury.com).
Installing GL Migrator on Windows 29

Chapter 2: Installing GL Migrator
If Carl were using a Release 11 instance instead of a Release 11i instance, he would copy the files to CLGM_TOP\reports. For Release 10.7, he would copy the files to CLGM_TOP\srw\10.7.
9. Point GL Migrator to the correct basepath.
The installation program defaults to point the CLGM application to the FND_TOP area. Update this value to reference the <PROD>_TOP where GL Migrator is installed.
To change the CLGM application to point to an existing directory structure, navigate to the Register Application form. Query the application named Mercury GL Migrator. Change the Basepath field to point to the <PROD>_TOP environment variable for the CLGM application, namely CLGM_TOP, as shown in the following figure.
At this point, GL Migrator must be configured before it can be used to migrate data. For these instructions, see Configuring Your System to Work with GL Migrator on page 35.
The installation files are not needed for continued use of GL Migrator, but Mercury recommends that they be saved.
30 Mercury GL Migrator™ Guide

Chapter 2: Installing GL Migrator
Installing GL Migrator on UNIXTo install GL Migrator in a UNIX environment, do the following:
1. Decide where GL Migrator will be installed and create the requisite directory structure. For more information, see Pre-Installation Setup on page 21.
For example, Carl has signed onto his database server, hostname Cobra, as applmgr, the user who owns the Oracle Applications files.
2. Download the GL Migrator bundle from the Mercury IT Governance Download Center at itg.merc-int.com/support/download/login.jsp.
The executables are compressed into a tar file for UNIX named CLGM_60_tar.Z. Place this file into the directory where GL Migrator installation is to be staged.
For example, in Carl’s case, the directory is /u1/stageappl/CLGM/install.
3. Extract the files from the GL Migrator bundle.
For example, the files are uncompressed and unarchived.
uncompress CLGM_60_tar.Ztar -xvf CLGM_60_tar
4. Navigate to the install subdirectory created by the untar process, CLGM_6_0/install.
Under the install directory are two subdirectories, one for Oracle Release 10 (r10) and another for Release 11 (r11). When installing GL Migrator on a Release 10 instance, navigate to the r10 directory. When using a Release 11 or 11i instance, navigate to the r11 directory.
For example, Carl is installing GL Migrator on a Release 11i instance.
cd CLGM_6_0/install/r11
5. Make sure the custom SQL account discussed in Pre-Installation Setup on page 21 has been created and registered.
6. Set the environment context to the Oracle E-Business Suite instance, if not already set.
Installing GL Migrator on UNIX 31

Chapter 2: Installing GL Migrator
7. Run the CLGM_INSTALL script.
The installation script spawns a Bourne shell and runs under it.
CLGM_INSTALL is an interactive program that prompts for the parameters listed in Table 2-4 before installing GL Migrator. The interactive program verifies the information you enter and proceeds only if it is valid. For example, the installation program tries to connect to the database using the user name and password you enter.
For example:
CLGM_INSTALL
Indicate whether the GL Migrator user is registered (enter Y if you are installing GL Migrator in the same account as Object Migrator): Y (Carl registered the SQL account according to the steps in Pre-Installation Setup on page 21).
Table 2-4. CLGM_INSTALL script parameters
Parameter Description
SQL Account registration Confirm (Y/N) whether the GL Migrator SQL account has been registered in the Oracle E-Business Suite.
Username of GL Migrator sql account
The user name for the GL Migrator SQL account that was created and registered in Oracle E-Business Suite.
Password for GL Migrator sql account The password for this SQL account.
Connect string for GL Migrator database
Specifies the database on which GL Migrator is being installed. When using SQL*Net 1.x, enter the entire two-task database connect string. (For example, T:dev_machine:MIGRATE.)When using SQL*Net 2.0 or higher, enter the database identifier (usually the ORACLE_SID).
Tablespace for GL Migrator tables
All GL Migrator tables will go into the specified tablespace. Note: The SQL account must have permissions to write to this tablespace.
Tablespace for GL Migrator indexes
All GL Migrator indexes will go into the specified tablespace.Note: The SQL account must have permissions to write to this tablespace.
Username of APPS user The user name for the Oracle E-Business Suite APPS account.
Password for APPS user The password for this SQL account.
32 Mercury GL Migrator™ Guide

Chapter 2: Installing GL Migrator
Username of GL Migrator sql account: CLGM
Password for CLGM sql account: CLGM (twice)
Connect String for GL Migrator Database: STAGE (if Carl had been using SQL*Net 1.x, he would have entered t:cobra:STAGE as the connect string)
Tablespace for GL Migrator tables: CLGM_DATA
Tablespace for GL Migrator indexes: CLGM_NDX
Username of APPS user: APPS
Password for APPS user: APPS (twice)
Carl had already created the CLGM_DATA and CLGM_NDX tablespaces before he began the installation process. You can use an existing tablespace.
8. The script sends log messages as standard output to the screen and saves the output to a log file named clgm_log.out in the current directory.
The command file CLGM_INSTALL runs all the GL Migrator install scripts. These scripts perform the following actions:
Create Mercury GL Migrator Application (application code = CLGM)
Add the new application to all data groups that contain the FND application (using the OracleID in which GL Migrator was installed)
Create database objects used by GL Migrator
Create value sets and register the concurrent programs used to run migrators and system maintenance and administration programs
Create a limited number of grants and synonyms to the APPS account to facilitate request submission
All object names created by the install scripts begin with CLGM. If an application with the name of CLGM already exists, contact Mercury Customer Support for assistance (support.mercury.com).
Installing GL Migrator on UNIX 33

Chapter 2: Installing GL Migrator
9. Move the .rdf files from the srw subdirectory of the extracted GL Migrator bundle (for example, CLGM_TOP/install/CLGM_6_0/srw) to their permanent location under CLGM_TOP.
This location varies by release:
CLGM_TOP/srw for Release 10
CLGM_TOP/reports for Release 11
CLGM_TOP/reports/us for Release 11i
For example, Carl is using the CLGM_TOP directory structure to store the GL Migrator programs and files.
cp $CLGM_TOP/install/CLGM_6_0/srw/*.rdf $CLGM_TOP/reports/US/
If Carl were using a Release 11 instance instead of a Release 11i instance, he would copy the files to CLGM_TOP/reports. For Release 10.7, he would copy the files to CLGM_TOP/srw/10.7.
10. Point GL Migrator to the correct basepath.
The installation program defaults to point the CLGM application to the FND_TOP area. Update this value to reference the <PROD>_TOP where GL Migrator is installed.
To change the CLGM application to point to an existing directory structure, navigate to the Register Application form. Query the application named Mercury GL Migrator. Change the Basepath field to point to the <PROD>_TOP environment variable for the CLGM application, namely CLGM_TOP.
The installation files are not needed for continued use of GL Migrator, but Mercury recommends that they be saved.
34 Mercury GL Migrator™ Guide

Chapter 2: Installing GL Migrator
At this point, GL Migrator must be configured before it can be used to migrate data. For more information, see Configuring Your System to Work with GL Migrator on page 35.
Configuring Your System to Work with GL MigratorAfter installing GL Migrator, you must configure Oracle E-Business Suite to work with GL Migrator. Configuration consists of the following major steps, which are then discussed in detail:
Create database links for each source and destination database.
Register these database links with GL Migrator.
Define security to access GL Migrator programs, including users, responsibilities, request groups, and so forth.
Run the Maintain GL Migrator Views program.
Run a test migration (or a simulation) to validate the installation.
The example given is a simplified case that assumes the system administrator will be able to access all GL Migrator functions. See Setting Up GL Migrator Security on page 90 for more information about security options.
Configuring Your System to Work with GL Migrator 35

Chapter 2: Installing GL Migrator
To configure your system:
1. Create database links to all valid source and destination databases. Note that the database configurations (for example, tnsnames.ora) must support connection using the database link.
Perform this step in the instance containing GL Migrator using the SQL account under which GL Migrator was installed. Create a database link to the APPS account of each remote database that will be a source or destination of migrations.
For example, Carl signs onto the STAGE database as CLGM and creates a link to each database he will use.
Create a database link called STAGE_LINK from STAGE to STAGE:
Create a database link called DVLP_LINK from STAGE to DVLP:
Create a database link called PILOT_LINK from STAGE to PILOT:
Create a database link called PROD_LINK from STAGE to PROD:
Test each link after creating it by executing the following in sql*plus:
Prior to this step, you must have configured the database to see other databases.
SQL> create database link STAGE_LINK2 connect to APPS identified by APPS <Password for APPS account in STAGE>3 using 'STAGE' ; <Connect string for the STAGE database>
SQL> create database link DVLP_LINK2 connect to APPS identified by APPS <Password for APPS account in DVLP>3 using 'DVLP' ; <Connect string for the DVLP database>
SQL> create database link PILOT_LINK2 connect to APPS identified by APPS <Password for APPS account in PILOT>3 using 'PILOT' ; <Connect string for the PILOT database>
SQL> create database link PROD_LINK2 connect to APPS identified by APPS <Password for APPS account in PROD>3 using 'PROD' ; <Connect string for the PROD database>
SQL> select count(*) from fnd_user@<db_link_name> where rownum = 1;
36 Mercury GL Migrator™ Guide

Chapter 2: Installing GL Migrator
2. Add a value to the CLM_DATABASES value set for each valid source or destination database.
This includes a value for the database in which Object Migrator is installed. Disable the Value 1 if this value is not already disabled.
a. Select the System Administrator responsibility. Go to the Define Value Set Values form (Application:Validation:Values).
b. Enter CLM_DATABASES in the Name field of the Find section.
c. Click Find.
d. Query all the records in the Values zone.
This should bring up three records:
One representing the Object Migrator account (this value is initially set to Disabled)
One representing the object archive (for version control)
One representing the Open Interface (this value is initially set as Disabled)
This value set represents all the database instances between which entities will be migrated.
If you have already installed Object Migrator and entered values for the CLM_DATABASES and CLM_DB_LINKS value sets, skip to step 4 on page 39.
The values must be pure numeric values (integers) with no leading zeroes.
Configuring Your System to Work with GL Migrator 37

Chapter 2: Installing GL Migrator
e. Add additional records in this region, one per database instance, as shown in the following figure.
This includes a value for the current database. The Value field must be a pure numeric value (integer). The Description value should identify the instance to users.
3. For each database link, add a value to the CLM_DB_LINKS value set. For the descriptions, use the exact database link names.
This value set represents all the database links that have been created.
a. Enter CLM_DB_LINKS in the Name field of the Find section.
b. Click Find.
c. Query all the records in the Values zone.
This should bring up three records.
d. Add all the database links created in the prior steps as shown in the following figure.
Be sure you use the same numbers in the Value column that were used for the corresponding databases in the CLM_DATABASES value set. The values must be pure numeric values (integers).
38 Mercury GL Migrator™ Guide

Chapter 2: Installing GL Migrator
4. Add the concurrent programs defined for each of the migrators and the system administration and maintenance programs to the appropriate request security group(s). Add programs one by one or attach the entire CLGM application to the Request Security Group.
Table 2-5 lists the migrators that can be included. Table 2-6 lists the administration and maintenance programs that can be included. Check off each program as it is included.
Table 2-5. Migrators in GL Migrator
Migrator File Migrator Name Included?
CLGMRB01.rdf Migrate Budget Organizations
CLGMRC01.rdf Migrate Consolidations
CLGMRCV1.rdf Migrate Cross Validation Rules
CLGMRJC1.rdf Migrate Journal Categories
CLGMRJS1.rdf Migrate JE Sources
CLGMRMA1.rdf Migrate Mass Allocations
CLGMRST1.rdf Migrate Summary Templates
Configuring Your System to Work with GL Migrator 39

Chapter 2: Installing GL Migrator
For optional setups, see Optional Setup Procedures on page 44.
For example, Carl is adding the GL Migrator concurrent programs to the System Administrator Reports request group. This allows the system administrator to run all the GL Migrator programs.
Carl navigates to the Define Request Security Group form (Security:Responsibility:Request).
He queries a request group called System Administrator Reports.
He goes to the Requests zone.
He inserts a record by using the Add Row button from the toolbar.
He selects Application in the Type field.
He selects Mercury GL Migrator as the application.
Table 2-6. System administration and maintenance programs in GL Migrator
Program File Program Name Included?
CLGMRAD1.rdf GL Migrator Audit Report
CLGMRMC1.rdf GL Migration Comparison Report
CLGMRVR1.rdf GL Archive Version Detail Report
CLGMRPG1.rdf Purge GL Migrator Interface Tables
CLGMRPV1.rdf Purge Entity Archive Versions
CLGMDVW1.rdf Maintain GL Migrator Views
40 Mercury GL Migrator™ Guide

Chapter 2: Installing GL Migrator
Alternatively, Carl could have added individual programs rather than the GL Migrator application.
5. Run the Maintain GL Migrator Views program with Report Only set to 2 (No).
This program defines the views used by some GL Migrator parameters when submitting GL Migrator migrations.
This program should be scheduled to run periodically (Mercury recommends once a day) to keep the GL Migrator views current with the number and statuses of your databases. For details regarding the support of these views, see Using Views on page 94.
Make sure to view the report output of this program. The output lists all the databases enabled for use with GL Migrator and any errors encountered while trying to connect to these databases.
If you have more than four databases that you will be migrating to or from, increase the value for the open_links database parameter (Mercury recommends a value of 20) and restart the database before executing this step. For more information, see Controlling Database Access Through Links on page 97.
Configuring Your System to Work with GL Migrator 41

Chapter 2: Installing GL Migrator
For example, since Carl has only four enabled databases, he does not need to change the open_links database parameter. Therefore, he can now run this concurrent program with Report Only set to 2 (No). He runs this concurrent program with reschedule options to run one day after completion. For information regarding the support of these views, see Using Views on page 94.
6. To validate your installation, launch one of the GL Migrator programs. Set the Run Type parameter to Migration or, if you do not want to perform an actual migration, set it to Simulation.
For example, Carl is validating his installation as recommended.
Carl launches GL Migrator programs.
He logs onto the Oracle E-Business Suite in the STAGE database and selects the System Administrator responsibility.
He navigates to the Submit Requests form (Other:Requests:Run).
He selects Request for the Type field.
He enters Migrate% in the Name field.
This brings up all the GL Migrator programs.
In our example, Carl selects Migrate Budget Organizations.
This opens up the Parameters window.
42 Mercury GL Migrator™ Guide

Chapter 2: Installing GL Migrator
Carl selects source and destination databases and fills in other information as shown in the following figure.
In the example in the following figure, GL Migrator will migrate a budget organization called Federal Budget from the DVLP database to the PROD database. Submit the migration and monitor the concurrent program. At the end of the run, GL Migrator produces a report with the results of the migration.
Configuring Your System to Work with GL Migrator 43

Chapter 2: Installing GL Migrator
Optional Setup ProceduresFollowing are some of the different ways of setting up GL Migrator. These procedures are optional, depending on your needs and preferences.
Setting Up a Separate Responsibility for MigrationsYou can set up a separate responsibility just to perform the migrations and then assign this responsibility to specific users. The steps are described in the following sections.
Create a Custom Menu
Create a custom menu as follows:
1. Sign onto the instance of Oracle Applications on which GL Migrator is installed. In our example, it is STAGE.
2. Select the System Administrator responsibility.
3. Navigate to the Define Menu form (Application:Menu).
4. Create a new menu called CLGM_MIGRATE as shown in the following figure.
Add the Run Reports and View All Concurrent Requests forms to the menu. This allows users to submit GL Migrator requests and view the results.
.
44 Mercury GL Migrator™ Guide

Chapter 2: Installing GL Migrator
5. Create another new menu called CLGM_MAIN as shown in the following figure.
Add the CLGM_MIGRATE menu as a menu entry. This becomes the main navigation menu for the new responsibility.
Create a Custom Request Group
Create a custom request group as follows:
1. Navigate to the Define Request Groups form (Security:Responsibility:Request).
2. Create a new request group called CLGM_TOOLS as shown in the following figure.
Add GL Migrator programs to the request group. Add either individual programs if the group should include limited functionality, or the GL Migrator application if all programs will be allowed.
Configuring Your System to Work with GL Migrator 45

Chapter 2: Installing GL Migrator
Create a Custom Responsibility
Create a custom responsibility as follows:
1. Navigate to the Define Responsibility form (Security:Responsibility:Define).
2. Define a new responsibility called Mercury GL Migrator as shown in the following figure.
Add the menu and the request group defined in Create a Custom Menu on page 44 and Create a Custom Request Group on page 45. (Alternatively, it is possible to include a standard menu and define explicit menu exclusions.)
46 Mercury GL Migrator™ Guide

Chapter 2: Installing GL Migrator
Configure Access to GL Migrator Programs
Configure access to GL Migrator programs as follows:
1. Navigate to the Define Concurrent Programs form (Concurrent:Program:Define).
2. Modify default values as desired.
3. If there are GL Migrator programs that are not in use, disable them to prevent them from appearing in select lists.
4. If different groups of users should have different access to a program, copy the program and modify it appropriately.
See Setting Up an Unrestricted Migrator on page 48 for a sample of these types of changes.
Assign the Custom Responsibility to Users
Assign the new custom responsibility to users as follows:
1. Navigate to the Define Application User form (Security:User:Define).
2. Assign the new Mercury GL Migrator custom responsibility defined in Create a Custom Responsibility on page 46 to the users who will perform the migrations, as shown in the following figure.
Configuring Your System to Work with GL Migrator 47

Chapter 2: Installing GL Migrator
Setting Up an Unrestricted MigratorSetting up an Unrestricted Migrator allows users to migrate entities among all the non-critical database instances while restricting their ability to migrate entities into critical database instances such as a production database instance.
To accomplish this, create a new set of concurrent programs by copying the existing GL Migrator programs and changing the value sets behind the parameters for each of the programs. The steps are described in the following sections.
Create a New Value Set
Create a new value set as follows:
1. Create a new value set called CLM_DATABASES_UNRES by copying the existing value set called CLM_DATABASES.
2. Remove the databases that are considered to be critical from the CLM_DATABASES_UNRES value set.
After this step, the value set should look like the ones shown in the following figure. In this example, assume that PILOT and PROD are critical databases and STAGE and DVLP are not. Also, we are not allowing access to the entity archive (that is, the Unrestricted Migrator will not have version control capability).
The values in this new value set must match the values in the original value set for each database entered.
48 Mercury GL Migrator™ Guide

Chapter 2: Installing GL Migrator
Create New Concurrent Programs
In this section we copy all the existing GL Migrator concurrent programs to create identical concurrent programs for the Unrestricted Migrator. GL Migrator consists of many concurrent programs. In this section we explain setting up one of the concurrent programs as an “Unrestricted” program. You can follow the same steps for all the other programs to complete the task.
Find all the concurrent programs that belong to GL Migrator as follows:
1. Navigate to the Define Concurrent Programs form (Concurrent:Program:Define).
2. Query Mercury GL Migrator in the Application field.
3. Use the <Down Arrow> key to review all the concurrent programs that belong to GL Migrator.
This example uses the Migrate Consolidations program (short name CLGMRCO1) to set up a Migrate Consolidations - Unrestricted program (short name CLGMRCO1_UNRES), as shown in the following figure.
Configuring Your System to Work with GL Migrator 49

Chapter 2: Installing GL Migrator
4. If your Oracle E-Business Suite release supports the Copy to button, use it to create a copy of CLGMRC01 named CLGMRC01_UNRES.
If your Oracle E-Business Suite release does not support Copy To functionality, copy CLGMRC01 to CLGMRC01_UNRES using the Concurrent Programs Migrator as follows:
a. Navigate to the Submit Requests form (Other:Requests:Run).
b. Launch the Concurrent Programs Migrator as shown in the following figure.
50 Mercury GL Migrator™ Guide

Chapter 2: Installing GL Migrator
5. If you have GL Migrator installed, launch Migrate Concurrent Programs and complete the parameters as shown in the example in the following figure to copy CLGMRCO1 to a new program called CLGMRCO1_UNRES.
If you do not have GL Migrator installed, you can use the Oracle Applications Copy Concurrent Program form to create a copy of CLGMRCO1 and then update the description of the new concurrent program CLGMRCO1_UNRES.
Configuring Your System to Work with GL Migrator 51

Chapter 2: Installing GL Migrator
Assign the New Value Set
Assign the new value set to the new concurrent programs as follows:
1. Navigate to the Define Concurrent Programs form (Concurent:Program:Define).
2. Query for the new concurrent program CLGMRCO1_UNRES.
3. Click Parameters.
4. Change the value set associated with the Destination Database parameter from CLM_DATABASES to CLM_DATABASES_UNRES, as shown in the following figure.
Create a Custom Menu
Create a custom menu as follows:
1. Sign onto the instance of Oracle Applications on which GL Migrator is installed. In our example, it is STAGE.
2. Select the System Administrator responsibility.
3. Navigate to the Define Menu form (Application:Menu).
52 Mercury GL Migrator™ Guide

Chapter 2: Installing GL Migrator
4. Create a new menu called CLGM_MIGRATE as shown in the following figure.
Add the Run Reports and View All Concurrent Requests forms to the menu. This allows users to submit GL Migrator requests and view the results.
5. Create another new menu called CLGM_MAIN as shown in the following figure.
Add the CLGM_MIGRATE menu as a menu entry. This becomes the main navigation menu for the new responsibility.
Configuring Your System to Work with GL Migrator 53

Chapter 2: Installing GL Migrator
Create a Custom Request Group
To create a custom request group for the unrestricted migrator:
1. Navigate to the Define Request Groups form (Security:Responsibility:Request).
2. Create a new request group called CLGM_TOOLS_UNRESTRICTED, as shown in the following figure.
Associate all the unrestricted migrator concurrent programs we had defined to this request group.
Create a Custom Responsibility
Create a custom responsibility as follows:
1. Navigate to the Define Responsibility form (Security:Responsibility:Define).
2. Create a new responsibility called Mercury GL Migrator - Unrestricted as shown in the following figure.
Associate the new request group CLGM_TOOLS_UNRESTRICTED to this responsibility as shown in the following figure.
54 Mercury GL Migrator™ Guide

Chapter 2: Installing GL Migrator
Assign the Custom Responsibility to Users
Assign the new custom responsibility to users as follows:
1. Navigate to the Define Application User form (Security:User:Define).
2. Assign the new Mercury GL Migrator - Unrestricted responsibility to the users who will perform the migrations, as shown in the following figure.
These users can now migrate entities between all the non-critical database instances, whereas the users who have the Mercury GL Migrator responsibility can migrate entities among all the database instances including the ones identified as critical.
Configuring Your System to Work with GL Migrator 55

Chapter 2: Installing GL Migrator
Using GL Migrator Without the Distributed Database OptionIt is possible, though not recommended, to use GL Migrator without the Distributed Database Option.
When running GL Migrator with a destination database other than the current instance, GL Migrator will attempt to insert, delete, and update data using database links. This is not allowed by Oracle without the Distributed Database Option.
To work around this restriction, you must install GL Migrator on each of the instances that can potentially be a destination database. Then, whenever an entity is to be moved to a given database, log onto that destination database and run GL Migrator there, setting the destination database to be the current database. The source database can be a remote database because GL Migrator queries data from only the source database (that is, no inserts, updates, or deletes) and Oracle allows queries across database links even without the Distributed Database Option.
Since the Distributed Database Option is required to execute database link inserts, updates, or deletes even on the same database, do one of the following when installing GL Migrator on an instance:
Install GL Migrator into the APPS account, enable value 1 in CLM_DATABASES (when selecting this value, GL Migrator will not use any database link), and use Current Database for its description.
Install GL Migrator in a custom account, and instead of creating a link to the APPS account, grant all the appropriate objects from APPS to the custom account. Contact Mercury Customer Support (support.mercury.com) for a sample script to execute these grants. Then, enable value 1 in CLM_DATABASES and rename it to Current Database.
When GL Migrator is used in conjunction with Mercury Change Management, the Distributed Database Option is required.
The privileges of the APPS account might need to be extended to allow creating tables and indexes.
56 Mercury GL Migrator™ Guide

Chapter
3Upgrading GL Migrator
In This Chapter:
New FeaturesOverviewSupportabilitySpecial Considerations for Release 6.0Upgrade Impacts for Release 6.0
Upgrade RequirementsBefore You Begin the Upgrade
GL Migrator Upgrade DirectoriesGL Migrator Upgrade Script
Upgrading GL Migrator on WindowsUpgrading GL Migrator on UNIX
57

Chapter 3: Upgrading GL Migrator
New Features
OverviewThis chapter describes upgrade activities that are to be performed by administrators, who are not necessarily the end users of GL Migrator.
Kintana GL*Migrator release 2.0 must be installed to upgrade to Mercury GL Migrator release 6.0.
Mercury GL Migrator release 6.0 includes the following new features, most of which provide support for Oracle Applications Release 11.5.10:
The Migrate Consolidations migrator now supports the Autopost flag.
The Migrate Cross Validation Rules migrator now supports Security Group functionality.
The Migrate Journal Categories migrator now supports the Consolidation flag.
The Migrate Mass Allocations migrator now supports the Conversion Method Code flag and the Security flag.
The product architecture extends support for the Oracle Applications instances, which use custom schema names for Application Object Library (FND) tables.
The product name has been changed from Kintana GL*Migrator to Mercury GL Migrator.
SupportabilityThis section describes the Oracle and Mercury product releases supported by GL Migrator release 6.0.
See also Upgrade Requirements on page 60 and the System Requirements and Compatibility Matrix.
58 Mercury GL Migrator™ Guide

Chapter 3: Upgrading GL Migrator
GL Migrator Support of Oracle E-Business SuiteMercury GL Migrator release 6.0 supports Oracle E-Business Suite Releases 10, 11, and 11i (11.5.1 through 11.5.10 and Financial Suite Family Pack F and the FND.H Minipack). The prior release, Kintana GL*Migrator release 2.0, supports Oracle releases through 11.5.1.
As Oracle E-Business Suite evolves with new and modified functionality, changes are reviewed for incorporation into GL Migrator. More detailed information regarding point release and patch level support, as well as known issues, is available from the Mercury IT Governance Download Center at itg.merc-net.com/support/download/login.jsp.
Integration with Mercury IT Governance Center and Oracle Apps ExtensionMercury recommends using GL Migrator release 6.0 for integration with Mercury IT Governance Center release 6.0 (and Mercury Extension for Oracle E-Business Suite release 6.0).
GL Migrator release 6.0 can integrate with Mercury IT Governance Center release 5.0 or later. However, the release of Mercury IT Governance Center must support the release of Oracle E-Business Suite that is installed on the instance with GL Migrator.
If GL Migrator release 6.0 is installed with Oracle E-Business Suite Release 11.5.10, it (GL Migrator) can integrate with only release 6.0 of Mercury IT Governance Center and the Extension. For more information, see the System Requirements and Compatibility Matrix.
Mercury IT Governance Center and the Extension should be at their most recent patch levels.
Integration with Object MigratorMercury recommends that Mercury Object Migrator release 6.0 be used for integration with Mercury GL Migrator release 6.0.
If Object Migrator is installed with Oracle E-Business Suite Release 10, 11, or 11.5.1, it can integrate with GL Migrator release 6.0.
If Object Migrator is installed with Oracle E-Business Suite Release 11.5.2 or later, GL Migrator release 6.0 is required for integration.
For more information, see the System Requirements and Compatibility Matrix.
New Features 59

Chapter 3: Upgrading GL Migrator
Special Considerations for Release 6.0Pay special attention to the following:
Do not customize any forms related to the Mercury GL Migrator application, including Concurrent Programs Definitions and Submit Concurrent Request Parameters. Customization of these forms is not supported.
Do not convert Mercury GL Migrator custom schema (CLM) using the Oracle Applications Tablespace Model (OATM) that is available with Oracle Applications Release 11.5.10. If you want to migrate to OATM, use the available OATM migration utility and exclude the Mercury GL Migrator schema.
Upgrade Impacts for Release 6.0To support Oracle Applications Release 11.5.10, the upgrade script automatically adds new columns for the following migrators:
Migrate Consolidations migrator
Migrate Cross Validation Rules migrator
Migrate Journal Categories migrator
Migrate Mass Allocations migrator
Upgrade RequirementsThis section describes what is required before upgrading to GL Migrator release 6.0.
Table 3-1 lists the file system space requirements.
Table 3-1. GL Migrator file system space requirements
Object Required Space
Install Bundle 30–35 MB (temporary)
Install Scripts (shell and SQL scripts) 3 MB
Programs (.rdf files) 15 MB total
60 Mercury GL Migrator™ Guide

Chapter 3: Upgrading GL Migrator
Other requirements are as follows:
If the application short name in Oracle E-Business Suite applications for GL Migrator is not CLGM, contact Mercury Customer Support for assistance (support.mercury.com).
Release 6.0 of GL Migrator backs up the data for archived users during the upgrade process. Make sure there is adequate database space before beginning the upgrade.
Only upgrades from Kintana GL*Migrator release 2.0 are supported.
If you are running a version of GL Migrator earlier than Kintana GL*Migrator release 2.0, you must upgrade to Kintana GL*Migrator release 2.0 before upgrading to Mercury GL Migrator release 6.0. Instructions for upgrading to Kintana GL*Migrator release 2.0 are available from the Mercury IT Governance Download Center at itg.merc-net.com/support/download/login.jsp.
To run the upgrade, your system environment must support a bash- or Bourne-style shell.
Before You Begin the UpgradeThis section lists information to consider or obtain before upgrading to GL Migrator release 6.0.
Before upgrading the current version of GL Migrator, back up the current version of the GL Migrator files (such as .rdf files) and the database where GL Migrator is installed.
Before initiating an upgrade to GL Migrator release 6.0, read the entire section regarding the upgrade process.
For upgrades on Windows, see Upgrading GL Migrator on Windows on page 64.For upgrades on UNIX, see Upgrading GL Migrator on UNIX on page 68.
If you already have an existing, non-Mercury application with a short name of CLGM, contact Mercury Customer Support for assistance (support.mercury.com).
Before You Begin the Upgrade 61

Chapter 3: Upgrading GL Migrator
GL Migrator Upgrade DirectoriesThe main directories associated with upgrading GL Migrator to release 6.0 include:
The current GL Migrator directory
The current GL Migrator directory is the directory where the current version of GL Migrator resides. GL Migrator might be installed in its own <PROD>_TOP directory (such as CLGM_TOP), or GL Migrator might share a <PROD>_TOP directory with an existing application.
In this document, CLGM_TOP is used to represent the location where GL Migrator is installed.
The staging GL Migrator directory
The staging GL Migrator directory is where the GL Migrator release 6.0 bundle is downloaded from the Mercury IT Governance Download Center. The staging GL Migrator directory should be a different directory than the current GL Migrator directory, usually a subdirectory under CLGM_TOP.
In this document, CLGM_TOP/clgm_upg is used to represent the staging GL Migrator directory.
The upgrade GL Migrator directory
The upgrade GL Migrator directory is where most of the GL Migrator upgrade scripts and libraries reside. The upgrade GL Migrator directory is created by the unzip process for Windows and the untar process for UNIX.
In this document, CLGM_TOP/clgm_upg/upg represents the upgrade GL Migrator directory. In addition to the upgrade scripts and libraries, the CLGM_TOP/clgm_upg/upg directory has the following subdirectories:
The srw subdirectory contains all of the GL Migrator executables for GL Migrator release 6.0.
The r10 and r11 subdirectories contain release-specific scripts used by the upgrade.
Create the CLGM_TOP/clgm_upg directory before downloading the GL Migrator release 6.0 upgrade bundle.
62 Mercury GL Migrator™ Guide

Chapter 3: Upgrading GL Migrator
GL Migrator Upgrade ScriptThis section details information concerning the GL Migrator upgrade script.
For Windows, the upgrade script is CLGM_UPG_60_NT
For UNIX, the upgrade script is CLGM_UPG_60
The upgrade scripts are in the CLGM_TOP/clgm_upg/upg directory created by the unzip process for Windows or the untar process for UNIX.
The upgrade scripts are interactive programs that prompt for the parameters detailed in Table 3-2. Regardless of what shell is running, the installation script spawns a Bourne shell and runs under it. The interactive program verifies the information you enter and proceeds only if it is valid. For example, the upgrade program tries to connect to the database using the user name and password you enter.
To stop the upgrade process, enter a period (.) at any of the prompts.
The upgrade script sends log messages as standard output to the screen and saves the output to a log file named clgm_log.out in the current directory.
Table 3-2. Information required by the upgrade script
Information Description
sql executableThe executable to use to make a command-line SQL*Plus connection. This could be plus80 or sqlplus, depending on the toolset in use.
Username of GL Migrator sql account The user name for the GL Migrator SQL account that was created and registered in Oracle E-Business Suite.
Password for GL Migrator sql account The password for this SQL account.
Connect string for GL Migrator database
Specifies the database on which GL Migrator is being installed.
When using SQL*Net 1.x, enter the entire two-task database connect string. (For example, T:dev_machine:MIGRATE)When using SQL*Net 2.0 or higher, enter the database identifier (usually the ORACLE_SID).
Tablespace for GL Migrator tablesAll GL Migrator tables will go into the specified tablespace.Note: The SQL account must have permissions to write to this tablespace.
Before You Begin the Upgrade 63

Chapter 3: Upgrading GL Migrator
Upgrading GL Migrator on WindowsThis section details how to upgrade to GL Migrator release 6.0 on Windows.
Before starting the upgrade, review the following sections:
Upgrade Requirements on page 60
Before You Begin the Upgrade on page 61
This entire section
To upgrade GL Migrator release 6.0 on Windows:
1. Download the GL Migrator release 6.0 upgrade bundle. It is a zip file.
a. Log onto the Mercury IT Governance Download Center at itg.merc-net.com/support/download/login.jsp.
b. Download the GL Migrator release 6.0 upgrade bundle to the staging GL Migrator directory, CLGM_TOP/clgm_upg (for more information, see GL Migrator Upgrade Directories on page 62). The name of the GL Migrator release 6.0 upgrade bundle (file) is CLGM_UPG60.zip.
2. Sign onto the server where GL Migrator is currently installed as the owner of the Oracle file system, typically applmgr. Set the Oracle E-Business Suite applications context, if required.
Tablespace for GL Migrator indexesAll GL Migrator indexes will go into the specified tablespace.Note: The SQL account must have permissions to write to this tablespace.
Username of APPS user The user name for the Oracle E-Business Suite APPS account.
Password for APPS user The password for this SQL account.
Table 3-2. Information required by the upgrade script [continued]
Information Description
Before upgrading, back up the current version of the GL Migrator files (such as .rdf files) and the database where GL Migrator is installed.
64 Mercury GL Migrator™ Guide

Chapter 3: Upgrading GL Migrator
3. From the staging GL Migrator directory, use the unzip utility to extract the GL Migrator release 6.0 upgrade bundle files in the CLGM_TOP/clgm_upg directory. This process creates the CLGM_TOP/clgm_upg/upg subdirectory containing the upgrade files.
4. Determine the current GL Migrator release version.
a. In the command shell, navigate to the CLGM_TOP/clgm_upg/upg subdirectory.
b. Connect to the database containing the current installation of GL Migrator as the Oracle user owning GL Migrator (for example, CLGM).
c. Run the CLGM_REL_INFO.sql script in the CLGM_TOP/clgm_upg/upg directory. This script outputs the current GL Migrator release.
For example:
% SQL > @CLGM_REL_INFO.sql
5. Run the upgrade script.
From the CLGM_TOP/clgm_upg/upg subdirectory, run the upgrade script CLGM_UPG_60_NT. For information about the CLGM_UPG_60_NT upgrade script, see GL Migrator Upgrade Script on page 63. The upgrade script prompts for the information in Table 3-2 on page 63. Following is an example of the CLGM_UPG_60_NT upgrade script. For this example:
CLGM is the GL Migrator SQL account name and password.
STAGE is the database connect string.
CLGM_DATA is the tablespace for GL Migrator tables.
If the currently installed version of GL Migrator is earlier than Kintana GL*Migrator release 2.0, stop. Do not proceed. Upgrade to release 2.0 prior to upgrading to release 6.0. Obtain the GL Migrator release 2.0 upgrade from the Mercury IT Governance Download Center at itg.merc-net.com/support/download/login.jsp.
If the application short name for GL Migrator in Oracle E-Business Suite applications is not CLGM, contact Mercury Customer Support for assistance (support.mercury.com). Do not proceed with the upgrade.
Upgrading GL Migrator on Windows 65

Chapter 3: Upgrading GL Migrator
CLGM_INDEX is the tablespace for GL Migrator indexes.
APPS is the APPS account SQL user name and password.
a. Start a command shell and set the applications context, if required.
b. Navigate to the CLGM_TOP/clgm_upg/upg directory.
c. If the environment supports bash, start a bash shell. In environments where MKS Toolkit is in use, this is not required, but MKS must be in the user’s path.
d. Run the CLGM_UPG_60_NT script.
For example:
The upgrade runs, sends log messages as standard output to the screen, and saves the output to a log file in the current directory. The log file name is clgm_upg_60.out.
6. Review the upgrade output log file for errors. If unexpected errors are found, contact Mercury Customer Support (support.mercury.com) for information about how to proceed.
7. Install the GL Migrator executables required for GL Migrator release 6.0.
a. Navigate to the CLGM_TOP/clgm_upg/upg/srw subdirectory. The srw subdirectory contains all of the current versions of GL Migrator programs.
> sh CLGM_UPG_60_NTEnter the command name(sqlplus/plus80/plus33) used for invoking SQL*Plus (. to exit): sqlplusEnter username of GL Migrator sql account (. to exit): CLGMEnter the password for CLGM sql account (. to exit): CLGM <<does not print>>Please reenter for verification: CLGM <<does not print>>Please enter the connect string (ex. PROD, DEV, etc.) for the GL Migrator database. : STAGEVerifying Username and Password, Please wait.... successfulEnter the tablespace for the GL Migrator tables (. to exit): CLGM_DATAVerifying tablespace, Please wait....successfulEnter the tablespace for the GL Migrator indexes (. to exit): CLGM_INDEXVerifying tablespace, Please wait....successfulEnter username of APPS user - usually APPS (. to exit): APPSEnter the password for APPS user (. to exit): APPS <<does not print>>Please reenter for verification: APPS <<does not print>>Verifying Username and Password, Please wait.... successful
66 Mercury GL Migrator™ Guide

Chapter 3: Upgrading GL Migrator
b. Copy all the files under the srw subdirectory (the files all have the .rdf file extension) to the area where the current GL Migrator executables are stored. These new files replace all existing GL Migrator .rdf files. Typically, these files are stored in the following directory:
CLGM_TOP/srw for Release 10.7 instances
CLGM_TOP/reports for Release 11 instances
CLGM_TOP/reports/US for Release 11i instances
8. Verify the Database Settings.
Select the setting of the open_links database parameter (select a value from v$parameter where the name is open_links). If this value is smaller than the maximum number of databases that you will be migrating to and from (the default value is 4), increase this setting to a number larger than the maximum number of databases (Mercury recommends 20). You can change this parameter through the init.ora file (add the line open_links = 20). If you do change this parameter, you will need to shut down and restart the database before continuing.
9. Re-create the GL Migrator Views.
In Oracle E-Business Suite applications, run the Maintain GL Migrator Views program with Report Only set to 2 (No) to refresh the view definition. Schedule this program to run periodically (Mercury recommends once a day) to keep the GL Migrator views current with the number and status of databases. For information regarding the support of these views, see Using Views on page 94.
The upgrade process sets GL Migrator in Validated mode for the specific GL parameter. If you are using GL Migrator in Non-Validated mode, you will need to rerun CLGMMBS9.sql (under the GL Migrator install directory). See Switching Between Non-Validated Mode and Validated Mode on page 96 for details regarding Validated Mode and Non-Validated Mode.
Be sure to review the report output of this program. The output lists all the databases enabled for use with GL Migrator, and any errors encountered while trying to connect to these databases.
Upgrading GL Migrator on Windows 67

Chapter 3: Upgrading GL Migrator
10. Oracle recommends periodically recompiling all the descriptive flexfields. To recompile the descriptive flexfields:
a. Sign onto the server where GL Migrator is currently installed as the owner of the Oracle E-Business Suite applications file system, typically applmgr.
b. Run the fdfcmp command using the syntax appropriate for the installed Oracle E-Business Suite applications release.
For example:
$FND_TOP/bin/fdfcmp apps/<apps passwd> 0 Y
11. Review the following sections for additional information about, changes made by, and features of GL Migrator release 6.0.
Overview on page 58
Supportability on page 58
Special Considerations for Release 6.0 on page 60
Upgrade Impacts for Release 6.0 on page 60
GL Migrator release 6.0 is now ready to use. Contact Mercury Customer Support (support.mercury.com) if any questions or issues arise.
Upgrading GL Migrator on UNIX This section details how to upgrade to GL Migrator release 6.0 on UNIX.
Before starting the upgrade, review the following sections:
Upgrade Requirements on page 60
Before You Begin the Upgrade on page 61
This entire section
Before upgrading, back up the current version of the GL Migrator files (such as .rdf files) and the database where GL Migrator is installed.
68 Mercury GL Migrator™ Guide

Chapter 3: Upgrading GL Migrator
To upgrade GL Migrator release 6.0 on UNIX:
1. Download the GL Migrator release 6.0 upgrade bundle. It is a compressed tar file.
a. Log onto the Mercury IT Governance Download Center at:
itg.merc-net.com/support/download/login.jsp.
b. Download the GL Migrator release 6.0 upgrade bundle to the staging GL Migrator directory, CLGM_TOP/clgm_upg (for more information, see GL Migrator Upgrade Directories on page 62). The name of the GL Migrator release 6.0 upgrade bundle (file) is CLGM_UPG60_tar.Z.
2. Sign onto the server where GL Migrator is currently installed as the owner of the Oracle file system, typically applmgr. Set the Oracle E-Business Suite applications context.
3. From the staging GL Migrator directory, uncompress and untar the GL Migrator release 6.0 upgrade bundle files in the CLGM_TOP/clgm_upg directory. This process creates the CLGM_TOP/clgm_upg/upg subdirectory containing the upgrade files.
For example:
% cd $CLGM_TOP/clgm_upg% uncompress CLGM_UPG60_tar.Z% tar -xvf CLGM_UPG60_tar
4. Determine the current GL Migrator release version.
a. Navigate to the CLGM_TOP/clgm_upg/upg subdirectory created by the untar process.
b. Connect to the database containing the current installation of GL Migrator as the Oracle user owning GL Migrator (for example, CLGM).
c. Run the CLGM_REL_INFO.sql script in the CLGM_TOP/clgm_upg/upg directory. This script outputs the current GL Migrator release.
For example:
SQL > @CLGM_REL_INFO.sql
Upgrading GL Migrator on UNIX 69

Chapter 3: Upgrading GL Migrator
5. Run the upgrade script.
From the CLGM_TOP/clgm_upg/upg subdirectory, run the upgrade script CLGM_UPG_60. For information about the CLGM_UPG_60 upgrade script, see GL Migrator Upgrade Script on page 63. The upgrade script prompts for information in Table 3-2 on page 63. Following is an example of the CLGM_UPG_60 upgrade script. For this example:
CLGM is the GL Migrator SQL account name and password.
STAGE is the database connect string.
CLGM_DATA is the tablespace for GL Migrator tables.
CLGM_INDEX is the tablespace for GL Migrator indexes.
APPS is the APPS account SQL user name and password.
For example:
If the currently installed version of GL Migrator is earlier than Kintana GL*Migrator release 2.0, stop. Do not proceed. Upgrade to release 2.0 prior to upgrading to release 6.0. Obtain the GL Migrator release 2.0 upgrade from the Mercury IT Governance Download Center at itg.merc-net.com/support/download/login.jsp.
If the application short name for GL Migrator in Oracle E-Business Suite applications is not CLGM, contact Mercury Customer Support for assistance (support.mercury.com). Do not proceed with the upgrade.
% CLGM_UPG_60Enter the command name(sqlplus/plus80/plus33) used for invoking SQL*Plus (. to exit): sqlplusEnter username of GL Migrator sql account (. to exit): CLGMEnter the password for CLGM sql account (. to exit): CLGM <<does not print>>Please reenter for verification: CLGM <<does not print>>Please enter the connect string (ex. PROD, DEV, etc.) for the GL Migrator database. : STAGEVerifying Username and Password, Please wait.... successfulEnter the tablespace for the GL Migrator tables (. to exit): CLGM_DATAVerifying tablespace, Please wait....successfulEnter the tablespace for the GL Migrator indexes (. to exit): CLGM_INDEXVerifying tablespace, Please wait....successfulEnter username of APPS user - usually APPS (. to exit): APPSEnter the password for APPS user (. to exit): APPS <<does not print>>Please reenter for verification: APPS <<does not print>>Verifying Username and Password, Please wait.... successful
70 Mercury GL Migrator™ Guide

Chapter 3: Upgrading GL Migrator
The upgrade runs, sends log messages as standard output to the screen, and saves the output to a log file in the current directory. The log file name is clgm_upg_60.out.
6. Review the upgrade output log file for errors. If unexpected errors are found, contact Mercury Customer Support (support.mercury.com) for information about how to proceed.
7. Install the GL Migrator executables required for GL Migrator release 6.0.
a. Navigate to the CLGM_TOP/clgm_upg/upg/srw subdirectory created by the untar process. The srw subdirectory contains all of the current versions of GL Migrator programs.
b. Copy all the files under the srw subdirectory (the files all have the .rdf file extension) to the area where the current GL Migrator executables are stored. These new files replace all existing GL Migrator .rdf files. Typically, these files are stored in the following directory:
CLGM_TOP/srw for Release 10.7 instances
CLGM_TOP/reports for Release 11 instances
CLGM_TOP/reports/US for Release 11i instances
For example:
% cp $CLGM_TOP/clgm_upg/upg/srw/*.rdf $CLGM_TOP/reports/US/
8. Verify the Database Settings.
Select the setting of the open_links database parameter (select a value from v$parameter where the name is open_links). If this value is smaller than the maximum number of databases that you will be migrating to and from (the default value is 4), increase this setting to a number larger than the maximum number of databases (Mercury recommends 20). You can change this parameter through the init.ora file (add the line open_links = 20). If you do change this parameter, you will need to shut down and restart the database before continuing.
9. Re-create the GL Migrator Views.
In Oracle E-Business Suite applications, run the Maintain GL Migrator Views program with Report Only set to 2 (No) to refresh the view definition. Schedule this program to run periodically (Mercury recommends once a day) to keep the GL Migrator views current with the number and status of
Upgrading GL Migrator on UNIX 71

Chapter 3: Upgrading GL Migrator
databases. See Using Views on page 94 for details regarding the support of these views.
The upgrade process sets GL Migrator in Validated mode for the specific GL parameter. If you are using GL Migrator in Non-Validated mode, you will need to rerun CLGMMBS9.sql (under the GL Migrator install directory). See Switching Between Non-Validated Mode and Validated Mode on page 96 for details regarding Validated Mode and Non-Validated Mode.
10. Oracle recommends periodically recompiling all the descriptive flexfields. To recompile the descriptive flexfields:
a. Sign onto the server where GL Migrator is currently installed as the owner of the Oracle E-Business Suite applications file system, typically applmgr.
b. Run the fdfcmp command using the syntax appropriate for the installed Oracle E-Business Suite applications release.
For example,
$FND_TOP/bin/fdfcmp apps/<apps passwd> 0 Y
11. Review the following sections for additional information about, changes made by, and features of GL Migrator release 6.0.
Overview on page 58
Supportability on page 58
Special Considerations for Release 6.0 on page 60
Upgrade Impacts for Release 6.0 on page 60
GL Migrator release 6.0 is now ready to use. Contact Mercury Customer Support (support.mercury.com) if any questions or issues arise.
Be sure to review the report output of this program. The output lists all the databases enabled for use with GL Migrator, and any errors encountered while trying to connect to these databases.
72 Mercury GL Migrator™ Guide

Chapter
4Using GL Migrator
In This Chapter:
User ConfigurationEntity ValuesEntity TypesMigration CapabilitiesVersion ControlComparison Reports
Comparison Functionality Within Each MigratorGL Migration Comparison Report
Migration Audit ReportsCommon GL Migrator Parameters
73

Chapter 4: Using GL Migrator
User ConfigurationFor an introduction to GL Migrator, see Overview of Mercury GL Migrator on page 14.
To run GL Migrator, your administrator must provide you with an Oracle Application User ID and Password and assign that User ID the appropriate responsibilities with access to the Submit Requests form that runs GL Migrator.
Entity ValuesYou can obtain a list of values for an entity name based on the values you have entered for Source Database and Source Set of Books. This is accomplished using views that look at all the databases you have set up for use by GL Migrator. If any of these databases are down, the list of values fails. In that case, the Mercury GL Migrator administrator must run the Maintain GL Migrator Views program to re-create the views, omitting the problem database. There is a slight performance impact the first time you use an entity view in a session, but then there should not be any significant delays.
For example, Figure 4-1 and Figure 4-2 show the Migrate Budget Organizations program in the Submit Requests form and some of the parameters.
Figure 4-1. Submit Requests form
74 Mercury GL Migrator™ Guide

Chapter 4: Using GL Migrator
Figure 4-2. Parameters for Migrate Budget Organizations program
Entity TypesGL Migrator supports the following entity types (each entity type is considered a separate module):
Budget Organizations
Consolidations
Cross Validation Rules
Journal Categories
JE Sources
Mass Allocations
Summary Templates
Entity Types 75

Chapter 4: Using GL Migrator
Migration CapabilitiesFor each entity type, you can migrate a single entity, a range of entities, or entities matching a string with wild cards. You can rename an entity as you migrate it into your destination instance. You can also migrate between sets of books, as long as the chart of account structures are the same. GL Migrator supports both the creation of new entities and updates to existing entities in the destination instance. Existing referential integrity is retained when creating or updating existing entities just as if performed using the application forms. When migrating across releases of Oracle Applications, new data is added or removed to make the migrating data compatible with the destination database.
Version ControlAs you migrate data across databases, you can save that data to special archive tables. This allows you to store each new version of a given entity. GL Migrator allows you to use this archived data as your source information, so you can revert to previous entity versions. GL Migrator reports examine the archived data and give you complete version histories of a specific entity or a group of entities.
For more information, see Chapter 6, Using Version Control, on page 99.
76 Mercury GL Migrator™ Guide

Chapter 4: Using GL Migrator
Comparison ReportsWithout actually migrating a new version of a specific GL setup entity from one instance to another, you can generate a comparison report that shows all of that entity’s differences across the instances, using the user-recognizable parameter names and values. Note that long parameters and translated data for instances running under multi-language support (MLS) are not compared in the comparison reports.
Comparison Functionality Within Each MigratorYou can use the migrators described in Chapter 7, Migrating General Ledger Entities, on page 109 to compare entity versions between two environments.
GL Migration Comparison ReportRunning the GL Migration Comparison Report allows you to compare entities for which there is a migrator (see Chapter 7, Migrating General Ledger Entities, on page 109) across up to five environments.
Migration Audit ReportsGL Migrator provides an audit report with every batch of entities being migrated. This report provides an audit trail of all successfully migrated entities as well as a detailed exception listing for entities that failed migration. The report lists all key information about each entity.
Comparison Reports 77

Chapter 4: Using GL Migrator
Common GL Migrator ParametersMost of the migrators provided in GL Migrator use the common parameters described in this section.
Source Database (required)
Select the database where the entities to be migrated currently exist. If you want to use an archived version of the entities as the source data for the migration, select Entity Archive as the Source Database, select Yes for the Recover From Archive parameter, and specify the appropriate version label in the From Version Label parameter. See Chapter 6, Using Version Control, on page 99 for more information about version control. If the desired source database is not available for selection, contact the system administrator to have the database name added to the appropriate value set.
Dest Database (required)
Select the database to which the entities are to be migrated. This can be the same as or different from the source database. If you want to migrate the entities into the entity archive rather than to another Oracle Applications instance, then select Entity Archive for the Dest Database parameter, select Yes for the Save To Archive parameter, and specify a version label in the Version Label parameter. See Chapter 6, Using Version Control, on page 99 for more information about version control. If the desired destination database is not available for selection, contact the system administrator to have the database name added to the appropriate value set.
78 Mercury GL Migrator™ Guide

Chapter 4: Using GL Migrator
Run Type (required)
Select one of the following options:
Migration
Migrate an entity from a specified source to a specified destination.
Simulation
Do not import the data after it is extracted from the source and validated. Only report what would be the successes and exceptions in the same format as the standard report.
Comparison
Compare a specific entity or a range of entities from two instances (see Comparing Entities on page 105 for more details on entity comparison). Do not migrate any data.
From Set of Books Name (required if present)
For entity types that are owned by a specific Sets of Books, select the Set of Books that currently owns the entities being migrated (ownership in the source database).
New Set of Books Name (required)
For entity types that are owned by a specific Sets of Books, select the Set of Books that is intended to own the entities after migration (ownership in the destination database).
Common GL Migrator Parameters 79

Chapter 4: Using GL Migrator
Selection Type (required)
Select one of the following options:
Specific Entity
One entity will be selected for migration at this time. Enter the specific entity name.
Range of Entities
A range of entities will be selected for migration at this time. Specify the range to use.
Wild Card Match
Multiple entities will be migrated with entity names matching a specified string. The % character is used as a wild card in this string. Specify this character string to match against.
Specific <Entity Type> Name
Enter the current name (as named in the source database) of the entity you want to migrate. The specific name parameters to use are explained in Chapter 7, Migrating General Ledger Entities, on page 109 for each entity type. If you entered Specific Entity in the Selection Type parameter, you must specify a value for this parameter, otherwise the program will present an error. If you entered Range of Entities in the Selection Type parameter, do not specify a value for this parameter.
New <Entity Type> Name
Enter the new name of the specific entity as you want it to appear in the destination database after the migration. This parameter defaults to the value from the source database but you can change it to correct the entity name or to duplicate the same entity to multiple new entities. Specify a value in this parameter only if you selected Specific Entity in the Selection Type parameter.
80 Mercury GL Migrator™ Guide

Chapter 4: Using GL Migrator
New User <Entity Type> Name/Title
Some entity types have restrictions on user names or titles. They sometimes require that these names or titles be unique within a given Set of Books. Because of this, GL Migrator programs for these entity types allow you to change the user name or title of the entity during the migration process. This is especially useful when duplicating an entity. This parameter is used only if you set the Selection Type parameter to Specific Entity. If left blank, GL Migrator uses the title from the source database.
<Entity Type> From
Enter the starting name for the range of entities you want to migrate. GL Migrator does an alphabetic search using this parameter so the value does not have to be an exact entity name. For example, to migrate all entities for a given application, you would migrate from A to zzz. Specify a value for this parameter only if you specified Range of Entities for the Selection Type parameter.
To
Enter the ending name for the range of entities you want to migrate. GL Migrator does an alphabetic search using this parameter so the value does not have to be an exact entity name. For example, to migrate all entities for a given application, you would migrate from A to zzz. Specify a value for this parameter only if you specified Range of Entities for the Selection Type parameter.
If you have entities that do not begin with letters, use from ! to ~ to obtain all entities.
If you have entities that do not begin with letters, use from ! to ~ to obtain all entities.
Common GL Migrator Parameters 81

Chapter 4: Using GL Migrator
<Entity Type> Like
Enter the character string to match against. Use % as the multi-character wild card character and/or _ (underscore) as the single character wild card character. GL Migrator limits the entities to be migrated to entity names that match this character string. Note that this wild card match is case sensitive. Specify a value for this parameter only if you specified Wild Card Match for the Selection Type parameter.
Save To Archive (required)
Select one of the following options:
Yes
Put the entities being migrated under version control and store them in the entity archive. You can save to the archive when doing a regular migration to an Oracle Applications instance or you can specify Entity Archive for the Dest Database parameter. Do not set this parameter to Yes if the Run Type parameter is set to Simulation or Comparison.
No
Do not store the entities being migrated into the entity archive.
Version Label
Enter the Version Label name to store the entities into. GL Migrator will store the entities with the version label you specify. If you specify a new version label, GL Migrator will create this label for you. If you specify an existing version label, GL Migrator will add the entities to the existing label. A version label is required if the Save To Archive parameter is set to Yes.
This parameter is also used when comparing two versions of the same entity. When the Run Type parameter is set to Comparison and the Dest Database parameter is Entity Archive, specify No for the Save To Archive parameter and enter one of the version labels you want to compare in the Version Label parameter. See Chapter 6, Using Version Control, on page 99 for more information about version control and entity comparison.
82 Mercury GL Migrator™ Guide

Chapter 4: Using GL Migrator
Version Desc
Enter the description to attach to the entity version(s) as they are stored in the entity archive. This value will also be the description for the version label if this is a new version label. If this parameter is left blank and the version label already exists, GL Migrator uses the description of the version label as the description of the entity versions. This parameter should be specified only if the Save To Archive parameter is set to Yes.
Recover From Archive (required)
Select one of the following options:
Yes
The entity archive is to be the source database for the migration.
No
The entity archive is not to be the source database for the migration.
From Version Label
Enter the version label name from which to recover the entities. You can get a list of values for this parameter. If you are trying to recover a specific entity, you can select from all the valid version labels for that entity. If you are recovering a range of entities, you can pick from all version labels that have at least one entity of the entity type (Budget Org, Consolidation, etc.) you are trying to recover.
This parameter is also used when comparing two versions of the same entity. When the Run Type parameter is set to Comparison and the Source Database is Object Archive, specify Yes for the Save To Archive parameter and enter one of the version labels you want to compare in the From Version Label parameter. See Chapter 6, Using Version Control, on page 99 for more information about version control and entity comparison.
Common GL Migrator Parameters 83

Chapter 4: Using GL Migrator
Overwrite if Exists (required)
Select one of the following options:
Yes
If the entities being migrated already exist in the destination database and the destination application, overwrite the current entity definitions with the new definitions. If you are migrating one specific entity, use the value in the New <Entity Type> Name parameter as the entity name to check against.
No
If the entities being migrated already exist in the destination database and the destination application, they should fail migration and the program should log the appropriate error message.
Partials Allowed (required if present)
Select one of the following options:
Yes
If an entity passes validation but any of the components fail validation, log the failing components as failed in the error report, but continue the migration for the components that pass validation.
No
If an entity passes validation but any of the components fail validation, do not migrate the entity or any of its components. In the error report:
Log the failing components as having failed.
Log the entity as having failed due to a component failure.
Log the non-failing components as having failed due to an entity failure.
84 Mercury GL Migrator™ Guide

Chapter
5Maintaining GL Migrator
In This Chapter:
Overview of Maintenance TasksPurging Temporary TablesRunning Audit ReportsRecompiling Descriptive FlexfieldsSetting Up GL Migrator SecurityValidating and Rebuilding ViewsRunning Without the Distributed Database OptionUsing Version ControlAdding a Database InstanceUsing Views
Drawbacks to Using ViewsSwitching Between Non-Validated Mode and Validated ModeControlling Database Access Through LinksLocal Chart of Accounts (COA) and Set of Books (SOB) Names
85

Chapter 5: Maintaining GL Migrator
Overview of Maintenance TasksSome maintenance tasks discussed in this section must be done on a frequent basis; others can be done less often.
The following tasks must be done on a frequent basis:
Updating database links
Maintain database links whenever passwords change. To do that, drop the appropriate database link and re-create it using the new password.
Updating value sets
Maintain the CLM_DATABASES and CLM_DB_LINKS value sets whenever databases and database links are added, modified, or deleted.
The maintenance tasks discussed in the following sections must be done on a periodic basis. They include:
Purging temporary tables
Running audit reports
Recompiling Descriptive Flexfields
Validating and rebuilding views
Running without the Distributed Database Option
Using version control
Adding a database instance
Using views
86 Mercury GL Migrator™ Guide
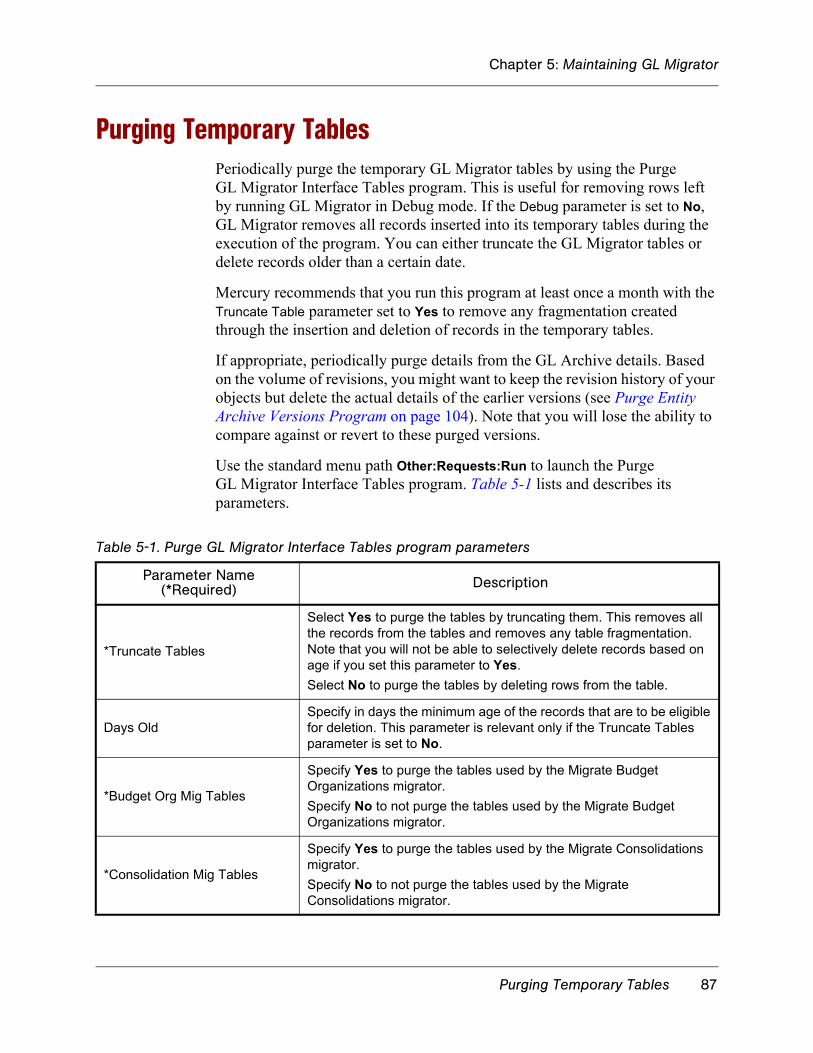
Chapter 5: Maintaining GL Migrator
Purging Temporary TablesPeriodically purge the temporary GL Migrator tables by using the Purge GL Migrator Interface Tables program. This is useful for removing rows left by running GL Migrator in Debug mode. If the Debug parameter is set to No, GL Migrator removes all records inserted into its temporary tables during the execution of the program. You can either truncate the GL Migrator tables or delete records older than a certain date.
Mercury recommends that you run this program at least once a month with the Truncate Table parameter set to Yes to remove any fragmentation created through the insertion and deletion of records in the temporary tables.
If appropriate, periodically purge details from the GL Archive details. Based on the volume of revisions, you might want to keep the revision history of your objects but delete the actual details of the earlier versions (see Purge Entity Archive Versions Program on page 104). Note that you will lose the ability to compare against or revert to these purged versions.
Use the standard menu path Other:Requests:Run to launch the Purge GL Migrator Interface Tables program. Table 5-1 lists and describes its parameters.
Table 5-1. Purge GL Migrator Interface Tables program parameters
Parameter Name (*Required) Description
*Truncate Tables
Select Yes to purge the tables by truncating them. This removes all the records from the tables and removes any table fragmentation. Note that you will not be able to selectively delete records based on age if you set this parameter to Yes.Select No to purge the tables by deleting rows from the table.
Days OldSpecify in days the minimum age of the records that are to be eligible for deletion. This parameter is relevant only if the Truncate Tables parameter is set to No.
*Budget Org Mig Tables
Specify Yes to purge the tables used by the Migrate Budget Organizations migrator.Specify No to not purge the tables used by the Migrate Budget Organizations migrator.
*Consolidation Mig Tables
Specify Yes to purge the tables used by the Migrate Consolidations migrator.Specify No to not purge the tables used by the Migrate Consolidations migrator.
Purging Temporary Tables 87

Chapter 5: Maintaining GL Migrator
*Cross Val Rule Mig Tables
Specify Yes to purge the tables used by the Migrate Cross Validation Rules migrator.Specify No to not purge the tables used by the Migrate Cross Validation Rules migrator.
*Summary Template Mig Tables
Specify Yes to purge the tables used by the Migrate Summary Templates migrator.Specify No to not purge the tables used by the Migrate Summary Templates migrator.
*Mass Allocation Mig Tables
Specify Yes to purge the tables used by the Migrate Mass Allocations migrator.Specify No to not purge the tables used by the Migrate Mass Allocations migrator.
*Journal Category Mig Tables
Specify Yes to purge the tables used by the Migrate Journal Categories migrator.
Specify No to not purge the tables used by the Migrate Journal Categories migrator.
*Journal Source Mig Tables
Specify Yes to purge the tables used by the Migrate JE Sources migrator.Specify No to not purge the tables used by the Migrate JE Sources migrator.
Table 5-1. Purge GL Migrator Interface Tables program parameters [continued]
Parameter Name (*Required) Description
88 Mercury GL Migrator™ Guide

Chapter 5: Maintaining GL Migrator
Running Audit ReportsRun the GL Migrator Audit Report to audit usage of GL Migrator. You can run the audit report within a date range for a specific entity type or for all entity types.
Use the standard menu path Other:Requests:Run to launch the GL Migrator Audit Report. Table 5-2 lists and describes its parameters.
Table 5-2. GL Migrator Audit Report parameters
Parameter Name (*Required) Description
*Order By
Select Run Date to order the audit report by the run date of the migrator program.Select Entity Type to order the audit report by the entity type that was migrated. Within a specific entity type, order the report by the program run date.
*Run Date From Enter the starting run date of the migrators you want to include in the audit report.
*To Enter the ending run date of the migrators you want to include in the audit report.
Specific Entity Type Limit the audit report to this specific GL Migrator entity type.
Specific Entity Limit the audit report to this specific GL Migrator entity name (this refers to the destination entity name).
Destination Database Limit the audit report to migrations to this specific destination database.
*Ignore Report Only
Specify Yes to exclude executions of GL Migrator that were run in Report Only mode.Specify No to include executions of GL Migrator that were run in Report Only mode.
Running Audit Reports 89

Chapter 5: Maintaining GL Migrator
Recompiling Descriptive FlexfieldsAs recommended by Oracle, periodically recompile all of your descriptive flexfields. To do this, at the filesystem level, run the command:
For Oracle Applications Release 10.5 or lower:
$FND_TOP/bin/fdfcmp applsys/<applsys password> 0 Y
For Oracle Applications Release 10.6 or higher:
$FND_TOP/bin/fdfcmp apps/<apps password> 0 Y
Setting Up GL Migrator SecurityMercury GL Migrator uses standard Oracle E-Business Suite security functionality to control access to GL Migrator programs. See Configuring Your System to Work with GL Migrator on page 35 for some default security setup information. Beyond this default security setup, you might want to consider additional internal security considerations for GL Migrator. Your security tasks might include the following:
Request groups. Set up a request group for each grouping of programs if there are different groups of users who should access different sets of programs.
Responsibilities. For each grouping of programs, set up a custom responsibility for the user group that will access the group of programs.
Users. The Oracle E-Business Suite instance where GL Migrator is installed needs to have a logon defined for each user who will submit GL Migrator requests (this is optional if integrating with Mercury Change Management). Create the user and assign the appropriate responsibility that includes GL Migrator programs.
System administrators might have access to all programs, whereas business analysts and developers would have access only to migrator and archive programs.
90 Mercury GL Migrator™ Guide

Chapter 5: Maintaining GL Migrator
Validating and Rebuilding ViewsThis section explains how to run the Maintain GL Migrator Views program. This program validates and rebuilds the GL Migrator views based on the current values in the CLM_DB_LINKS and CLM_DATABASES value sets as well as the current status of your remote databases. The program also reports the current definition of these views. See Using Views on page 94 for more details on the GL Migrator views.
The program also queries all the enabled database links and populates a local table of all the chart of accounts and set of books names that it sees. This information is stored in local custom tables for better performance when getting a list of values for the chart of accounts or set of books.
This program should be scheduled to run periodically and must be run after any change to the CLM_DB_LINKS or CLM_DATABASES value sets.
Make sure to review the report output of this program. The output lists all the databases enabled for use with GL Migrator and any errors encountered while trying to connect to these databases.
Use the standard menu path Other:Requests:Run to launch the Maintain GL Migrator Views program. Table 5-3 lists and describes its key parameter.
Table 5-3. Maintain GL Migrator Views program parameter
Parameter Name (*Required) Description
*Report Only
Specify Yes if you want to just see a report on the current definition of the GL Migrator views without modifying them.Specify No if you want this program to re-create the GL Migrator views based on the current enabled values in the CLM_DATABASES and CLM_DB_LINKS value sets and the current statuses of your remote databases, checking each view against each database and rebuilding each view, omitting the problem databases.
Validating and Rebuilding Views 91

Chapter 5: Maintaining GL Migrator
Running Without the Distributed Database OptionWhile Mercury strongly recommends that you run the Distributed Database Option, you can still use GL Migrator without it. However, if you use GL Migrator in conjunction with Mercury Change Management, the Distributed Database Option is required.
When running GL Migrator with a destination database other than the current instance, GL Migrator attempts to insert, delete, and update data using database links. This is not allowed by Oracle without the Distributed Database Option.
To work around this restriction, you must install GL Migrator on each of the instances that can ever be a destination database. Then, whenever you want to move entities to a given database, you must log onto that destination database and run GL Migrator there, setting the Dest Database parameter to be the current database. The Source Database parameter can be a remote database because GL Migrator only queries data from the source database (no inserts, updates, or deletes) and Oracle allows queries across database links even without the Distributed Database Option.
Since you must run the Distributed Database Option to execute database link inserts, updates, or deletes even on the same database, when installing GL Migrator on an instance, you must do one of the following:
Install GL Migrator into the APPS account, and enable value 1 in CLM_DATABASES (when selecting this value, GL Migrator will not use any database link) and give it a description of Current Database. You might have to extend the privileges of the APPS account to allow creating tables and indexes.
Install GL Migrator in a custom account and instead of creating a link to the APPS account, grant all the appropriate entities from APPS to the custom account. Contact Mercury Customer Support (support.mercury.com) for a sample script to execute these grants. Then, enable value 1 in CLM_DATABASES and rename it to Current Database.
92 Mercury GL Migrator™ Guide

Chapter 5: Maintaining GL Migrator
Using Version ControlFor information about using the Version Control functionality of GL Migrator, see Chapter 6, Using Version Control, on page 99.
Adding a Database InstanceTo add a new database instance for use by GL Migrator (as a source for object data and/or a destination for object data), perform the following steps:
1. On the GL Migrator instance, add a database link from the GL Migrator sql account to the new database instance. If using Oracle Applications Release 10.6 or later, link to the APPS account on the destination database. See step 1 on page 36 for examples.
2. Add a value to the CLM_DATABASES value set for the new database instance. See step 2 on page 37.
3. Add a value to the CLM_DB_LINKS value set for the new <db_link>. Use the exact <db_link_name> for the description. See step 3 on page 38.
4. Run the Maintain GL Migrator Views concurrent program. This re-creates all the entity views used by GL Migrator to include this new database. It also performs a validation check for all your enabled database names and links. See Validating and Rebuilding Views on page 91 for details.
Use the same number in the Value field that the database is assigned in the CLM_DATABASES value set.
Using Version Control 93

Chapter 5: Maintaining GL Migrator
Using ViewsGL Migrator allows you to get a list of values when selecting a specific entity to migrate. This list of values is taken from the source database you are migrating from and is based on custom views created and maintained by the Maintain GL Migrator Views program.
The custom views (one per entity type) are a series of unions that select from each database you currently have defined in the CLM_DATABASES value set. To get to the remote databases, the views include the database links defined in the CLM_DB_LINKS value set. GL Migrator is not copying the remote entity name data to any temp table; it is querying from the remote database in real time.
For example, assume CLM_DATABASES has the enabled values shown in Table 5-4 and CLM_DB_LINKS has the enabled values shown in Table 5-5.
Table 5-4. Values for CLM_DATABASES
Value Meaning
2 DEV
3 QA
4 PROD
900 Entity Archive
Table 5-5. Values for CLM_DB_LINKS
Value Meaning
2 DEV_LINK
3 QA_LINK
4 PROD_LINK
900 Entity Archive
94 Mercury GL Migrator™ Guide

Chapter 5: Maintaining GL Migrator
Then the view for the user migrator would be:
SELECT 2 db_value,
name entity_name
FROM gl_budget_entities@DEV_LINK
UNION
SELECT 3 db_value,
name entity_name
FROM gl_budget_entities@QA_LINK
UNION
SELECT 4 db_value,
name entity_name
FROM gl_budget_entities@PROD_LINK
<select clause to query entity archive tables against the local database>
When getting a list of values from this view, the migrator concurrent programs look at the source database you have selected and return only the values from that database. Additionally, where appropriate, the list of values is limited by the source application.
Drawbacks to Using ViewsWhile having the ability to select the entity name as it exists on the source database is an important feature, there are drawbacks to the use of these views.
While the list of values based on these views only queries the database you have selected, it does validate each database link when it first parses the query. If it takes a long time to access one or more of your remote databases using a database link, there will be a slight delay when you first execute the list of values. This should occur only the first time you use the list of values in your application session. Subsequent uses of the list of values should have better performance.
Using Views 95

Chapter 5: Maintaining GL Migrator
Because of the way the database handles unions, if one database link in the union is invalid (the link has the wrong username or password, the remote database is down, or there is a problem with SQL*Net), the entire view is invalid. This results in an error while trying to submit the GL Migrator program.
To alleviate the second drawback, you must periodically run the Maintain GL Migrator Views program.
When run with the Report Only parameter set to No, this program looks at all your databases, as defined in CLM_DATABASES and CLM_DB_LINKS, and checks each view against each database. It then rebuilds each view omitting the problem databases. The report output of this program reports on any problems that occurred. If run with Report Only set to Yes, the program simply reports on the current definition of the views.
To keep the GL Migrator views current with your current database statuses, you should schedule the Maintain GL Migrator Views program to run periodically. The greater your database instability (in terms of changes in passwords, database status, and SQL*Net status), the more often this program should be run. A good rule of thumb is to run the program once a day. You must run the program after making any modifications to CLM_DATABASES or CLM_DB_LINKS.
Switching Between Non-Validated Mode and Validated ModeIf you are having significant problems with the GL Migrator views, you can switch to the non-validated entity name mode. To do this, execute the script CLGMMBS9.sql (located with the rest of the GL Migrator install scripts) against the GL Migrator SQL account. When prompted for the inst_value_sets parameter, enter Y. After running this script, the entity name parameters will have no validation or list of values.
sqlplus <GLM acct>/<GLM password>
SQL> @CLGMMBS9.sql
Enter value for inst_value_sets: Y
SQL> exit;
96 Mercury GL Migrator™ Guide

Chapter 5: Maintaining GL Migrator
To revert to validated parameters with lists of values, run the script CLGMMBS8.sql against the GL Migrator SQL account.When prompted for the inst_value_sets parameter, enter Y.
sqlplus <GLM acct>/<GLM password>
SQL> @CLGMMBS8.sql
Enter value for inst_value_sets: Y
SQL> exit;
Controlling Database Access Through LinksThe database parameter open_links controls how many different databases can be accessed through database links in a given session (but it does not control how many times a specific link can be used in that session). The default value is 4. If you have (or ever plan to have) more than four databases defined in CLM_DATABASES (that is, the databases you will be migrating from and to), you must increase the value for this parameter (Mercury recommends 20) in your GL Migrator instance, then shut down and restart the database. You can make the change by modifying your init.ora file by adding (or modifying) the line open_links = 20.
Local Chart of Accounts (COA) and Set of Books (SOB) NamesIn addition to building the entity views, the Maintain GL Migrator Views program also queries all the remote databases and populates a local table (CLGM_ENTITY_LOOKUPS) with the chart of accounts and set of books that it finds. This is done for performance reasons so that queries on the list of values for a chart of accounts or set of books will run faster.
If you add a set of books or chart of accounts to any of your source databases, you must run the Maintain GL Migrator Views program to bring the new values into the local table.
Using Views 97

Chapter 5: Maintaining GL Migrator
98 Mercury GL Migrator™ Guide

Chapter
6Using Version Control
In This Chapter:
Overview of Version ControlOverview of Entity ArchiveSaving to the Entity ArchiveRestoring Entities from the Entity ArchiveGL Archive Version Detail ReportPurge Entity Archive Versions ProgramComparing Entities
Comparison MethodologyComparison Procedure and Sample Report
99

Chapter 6: Using Version Control
Overview of Version ControlGL Migrator uses a set of database tables called the entity archive as a repository for version control information regarding GL setup entities. These tables reside in the same instance on which GL Migrator is installed, allowing you to have one central location for all your GL setup entity versions.
If you were to install GL Migrator on multiple databases and use its Version Control functionality on all the installations, you would have multiple repositories with potentially confusing duplicate entity versions. To avoid this, Mercury recommends that you use the Version Control functionality at only one point in your migration workflow, that is, on only one GL Migrator installation. Avoid scenarios such as saving entities to the entity archive when migrating from a Development instance to a QA instance and then saving them again when migrating from the QA instance to a Production instance.
Since GL Migrator uses database tables to store entity information, you should install GL Migrator on a database instance that will not be periodically refreshed. If you need to refresh the database, you must export the data in the GL Migrator tables (they all begin with CLGM) before the refresh and import the data once the refresh is completed.
Overview of Entity ArchiveThe entity archive consists of a set of database tables that are similar in structure to the standard Oracle General Ledger setup entity tables, with additional columns for version control information (for example, revision number and label name).
When you save an entity to the entity archive, GL Migrator copies the entire definition of the entity to the entity archive database tables. GL Migrator gives the new entity a new version revision number. This revision number is calculated internally and is equivalent to the maximum existing revision number for the entity, plus one.
In addition, GL Migrator gives the entity a version label. This label is entered by the user during the execution of GL Migrator programs. The ability to specify a version label allows you to group multiple entities by label name. You can then report on the entities with that version label, or you can use the version label number to retrieve multiple entities from the entity archive.
100 Mercury GL Migrator™ Guide

Chapter 6: Using Version Control
If the entity being saved to the archive is linked to a Chart of Account, that Chart of Account definition is also stored in the entity archive. The Chart of Account is linked to the same version label as the entity being archived. There is only one instance of a given Chart of Account in one version label.
The growth of these archive tables directly corresponds to the number of entities and the number of versions put into these tables. If you plan to periodically store versions of entire groups of entities rather than storing only the entities that change, then more tablespace will be required than the recommended 30 megabytes. Mercury recommends starting with a 30 megabyte allocation and then adding tablespace as needed.
You can periodically remove details of earlier versions with the Purge Entity Archive Versions program. You can use this program to keep the revision history of your entities but delete the actual details of the earlier versions (see Purge Entity Archive Versions Program on page 104). Note that you will lose the ability to compare against or revert to these purged versions.
A sample of version labels and revision numbers might look similar to the example shown in Figure 6-1.
Figure 6-1. Sample version labels and revision numbers
GL Migrator Executions
Run # Entity Type Entity Version Label----- ----------- ------ -------------1 Budget Organization Engineering Department Label_12 Budget Organization Engineering Department Label_23 Cross Validation Rules Region_10 Label_14 Budget Organization San Jose Plant Label_25 Budget Organization Engineering Department Label_3
Status of Entity Archive after Mercury GL Migrator executions-------------------------------------------------------------Version Label Entity Type Entity Rev------------- ----------- ------ ---Label_1 Budget Organization Engineering Department 1Label_1 Cross Validation Rule Region_10 1Label_2 Budget Organization Engineering Department 2Label_2 Budget Organization San Jose Plant 1Label_3 Budget Organization Engineering Department 3
Overview of Entity Archive 101

Chapter 6: Using Version Control
Saving to the Entity ArchiveThis section describes migrating a General Ledger setup entity or a group of entities to the entity archive, thereby putting the entities under version control.
To achieve this, while running GL Migrator programs, you must set the Dest Database parameter to Object Archive, set the Save to Archive parameter to Yes, and enter values for the Version Label and Version Desc parameters. GL Migrator stores the entities with the version label you specify. If you specify a new version label, GL Migrator creates this label for you. If you specify an existing version label, GL Migrator adds the entities to the existing label. (If you leave the description blank for an existing label, GL Migrator uses the description from the existing version label.)
If saving to an existing version label, GL Migrator prohibits you from saving an entity that already exists in that version label. You must either specify a new version label or first purge the entity from the existing version label (see Purge Entity Archive Versions Program on page 104).
You can also save entities to the entity archive while executing a regular migration. Set the Dest Database parameter to the appropriate Oracle Applications instance, set the Save to Archive parameter to Yes, and specify the appropriate Version Label and Version Desc parameters. GL Migrator migrates the entity to both the destination database and the entity archive during the same execution.
Restoring Entities from the Entity ArchiveOnce you store entity versions in the entity archive, you can use GL Migrator to restore these versions into your “live” Oracle Applications instances. You can use the entity archive as a source for your entity definition rather than getting entity information from an Oracle Applications instance.
To recover an entities from the entity archive, set the Source Database parameter to Object Archive, set the Recover From Archive parameter to Yes, and in the From Version Label parameter, enter the version label from which you want to retrieve the entities. You can select this parameter. If you are trying to recover a specific entity, you can select from all the version labels than contain that entity. If you are recovering a range of entities, you can pick from all version labels that have at least one entity of the entity type (Budget Org, Consolidation, etc.) you are trying to recover.
102 Mercury GL Migrator™ Guide

Chapter 6: Using Version Control
GL Archive Version Detail ReportThe GL Archive Version Detail Report audits the contents of the GL entity archive and displays the revision history of the GL Migrator Setup entities.
Use the standard menu path Other:Requests:Run to launch the GL Archive Version Detail Report. Table 6-1 lists and describes its parameters.
Table 6-1. GL Archive Version Detail Report parameters
Parameter Name (*Required) Description
*Order By
Order by one of the following: Creation DateVersion LabelObject Name
Version Label Limit the report to a specific version label in the GL entity archive.
Entity Type Limit the report to a specific entity type (for example, Budget Org or Consolidation).
Entity Name From Limit the report to entities that start with this name or an alphabetically later name.
Entity Name ToLimit the report to entities that start with this name or an alphabetically earlier name. For a single entity, enter the only entity name to be included.
Creation Date From Limit the report to entity versions saved into the GL entity archive on or after this date.
Creation Date To Limit the report to entity versions saved into the GL entity archive before or on this date.
Specific User Limit the report to the versions created by this user.
GL Archive Version Detail Report 103

Chapter 6: Using Version Control
Purge Entity Archive Versions ProgramThe Purge Entity Archive Versions program purges versions of entities from GL Archive. You can remove old versions of entities that are no longer needed or that were incorrectly archived.
Use the standard menu path Other:Requests:Run to launch the Purge Entity Archive Versions program. Table 6-2 lists and describes its parameters.
Table 6-2. Purge Entity Archive Versions program parameters
Parameter Name (*Required) Description
*Report Only
Specify Yes to list the purge candidates but not execute the purge process.Specify No to list the purge candidates and execute the purge process.
Version Label Enter a version label to limit the purge to archives with that label.
Entity Type Limit the purge to a specific entity type (for example, Budget Org or Consolidation).
Entity Name From Limit the purge to entities that start with this name or an alphabetically later name.
Entity Name ToLimit the purge to entities that start with this name or an alphabetically earlier name. For a single entity, enter the only entity name to be included.
Creation Date From Limit the purge to entity versions saved into the GL entity archive on or after this date.
Creation Date To Limit the purge to entity versions saved into the GL entity archive before or on this date.
*Version Details Only
Specify Yes to purge the details of the entity but not the version. Then you can report on the revision history of the entity, but you will never be able to use this entity version as a source for migrations or as a version to run comparisons against.Specify No to purge all information about the entity version(s).
104 Mercury GL Migrator™ Guide

Chapter 6: Using Version Control
Comparing EntitiesThis section discuses the entity comparison functionality in GL Migrator.
Comparison MethodologyThe entity comparison functionality is available for all of the migrators (see Chapter 7, Migrating General Ledger Entities, on page 109). It is activated in GL Migrator by setting the Run Type parameter to Comparison. GL Migrator compares entities or entity details by pulling information from the source and destination databases into custom temporary tables, where it compares the attributes of the entities and lists the differences in the output report.
The “difference” status for each identified entity or entity detail is one of the following:
Only in Source DB
The entity or entity detail exists only in the source database. There is nothing in the destination database with the entity name or entity detail name. For example, if an exclusion for a cross validation was added in the source database, the comparison report would indicate that the parameter exists only in the Source DB.
Only in Dest DB
The entity or entity detail exists only in the destination database.
Differences Exist
Entities or entity details with this status either have different attributes (for example, the entity descriptions could be different) or have different details.
If an entity or entity detail has a status of Only in Source DB or Only in Dest DB, GL Migrator does not report any additional information about it. For example, if GL Migrator compares a range of cross validation rules between one database and another and finds that a rule exists on the source database and not the destination database, it does not report on the specific exclusions and inclusions of the rule.
Comparing Entities 105

Chapter 6: Using Version Control
Comparison Procedure and Sample ReportThe following procedures describe how to:
Compare entities from two Oracle Applications instances
Compare an entity from an Oracle Applications instance with another entity from the entity archive
Compare two versions of one or more entities in the entity archive
To compare entities from two Oracle Applications instances:
1. Launch the desired migrator (see Chapter 7, Migrating General Ledger Entities, on page 109).
2. With the Run Type parameter set to Comparison, specify one Oracle Applications instance as the source database and the other instance as the destination database.
3. (For a single entity) Enter the name of the entity to compare.
GL Migrator ignores the value in the New <Entity Type> Name parameter and instead uses the value in the Specific <Entity Type> Name parameter when retrieving entity information from both source and destination databases.
4. (For a range of entities) Use the <Entity Type> From and To parameters to specify a range. Specifying a range allows you to see which entities do not exist on one database versus another, as well as the differences for the entities that exist on both databases.
If you are comparing data between Oracle Applications Releases 10, 11, and 11i, you might encounter differences due to changes in the GL data model between these releases.
106 Mercury GL Migrator™ Guide

Chapter 6: Using Version Control
To compare entities from an Oracle Applications instance and the entity archive:
1. Launch the desired migrator (see Chapter 7, Migrating General Ledger Entities, on page 109).
2. With the Run Type parameter set to Comparison, specify Object Archive for the Source Database parameter and specify the Oracle Applications instance for the Dest Database parameter.
3. For the Recover From Archive parameter, specify Yes.
4. Enter the appropriate Version Label parameter.
5. (For a single entity) Enter the name of the entity to compare.
GL Migrator ignores the value in the New <Entity Type> Name parameter and instead uses the value in the Specific <Entity Type> Name parameter when retrieving entity information from both source and destination databases.
6. (For a range of entities) Use the <Entity Type> From and To parameters to specify a range. Specifying a range allows you to see which entities do not exist on one database versus another, as well as the differences for the entities that exist on both databases.
To compare two versions of one or more entities:
1. Launch the desired migrator (see Chapter 7, Migrating General Ledger Entities, on page 109).
2. With the Run Type parameter set to Comparison, specify Object Archive for both the Source Database and Dest Database parameters.
3. For the Save To Archive parameter, specify No.
4. For the Recover From Archive parameter, specify Yes.
5. Enter the appropriate Version Label parameter.
6. (For a single entity) Enter the name of the entity to compare.
GL Migrator ignores the value in the New <Entity Type> Name parameter and instead uses the value in the Specific <Entity Type> Name parameter when retrieving entity information from both source and destination databases.
Comparing Entities 107

Chapter 6: Using Version Control
7. (For a range of entities) Use the <Entity Type> From and To parameters to specify a range. Specifying a range allows you to see which entities do not exist on one database versus another, as well as the differences for the entities that exist on both databases.
A sample comparison report might look similar to the example shown in Figure 6-2, where a mass allocation called Allocation One is compared between two Oracle Applications instances.
Figure 6-2. Sample Mass Allocation/Budget Comparison Report
The report shows the following differences:
The status of the mass allocation is Valid in the source database, and Error in the destination database.
Mass allocation formula 2 is present only in the destination database.
For the Mass Alloc Formula for SOB3 formula, the JE Category Name and the Description were changed.
In the Formula Lines, Line 1 has different currencies in the source and destination databases.
Mass Allocation/Budget Comparison Report** Mass Alloc/Budget Batches **
Set ofAction Books Mass Alloc/Budget Name Description----------------- --------- ---------------------------- ------------------------------Differences Exist SOB3 Allocation One Mass Allocation Test
Column Name Value From Source DB Value From Dest DB------------------------- ---------------------------------------- --------------------Status Valid Error
** Mass Alloc/Budget Formulas **Action Formula Name Description----------------- ------------------------------ ------------------------------Only in Dest DB Mass allocation formula 2 Mass allocation formula 2Differences Exist Mass Alloc Formula for SOB3 Mass Alloc Formula for SOB3
Column Name Value From Source DB Value From Dest DB--------------------- ------------------------------------ -------------------------JE Category Name Accrual DiscountsDescription Mass Allocation Formula for SOB3 Mass Allocation Formula oneStatus Valid Error
** Mass Alloc/Budget Formula Lines **Action Line Number Line Type----------------- ------------ ------------------------------Differences Exist 1 Total
Column Name Value From Source DB Value From Dest DB------------------------- --------------------------------- ------------------Currency CAD USD
108 Mercury GL Migrator™ Guide

Chapter
7Migrating General Ledger Entities
In This Chapter:
Migrate Budget Organizations MigratorMigrate Consolidations MigratorMigrate Cross Validation Rules MigratorMigrate JE Sources MigratorMigrate Journal Categories MigratorMigrate Mass Allocations MigratorMigrate Summary Templates Migrator
109

Chapter 7: Migrating General Ledger Entities
Migrate Budget Organizations MigratorThe Migrate Budget Organizations migrator prompts the user for parameters enabling migration of user selected Budget Organization(s) from a source database and set of books to a destination database and set of books. The migration is accompanied by a report displaying all migrated entities along with the status or error codes associated with each record in migration.
The Assign Budget Account Ranges concurrent program is submitted at the destination database for each successfully migrated Budget Organization. The Concurrent Request ID(s) of the submitted requests are listed in the Concurrent Request log file of the migration. Users are advised to review the requests at the destination database and take any necessary actions.
Use the standard menu path Other:Requests:Run to launch the Migrate Budget Organizations migrator. Table 7-1 lists and describes its parameters.
Table 7-1. Migrate Budget Organizations migrator parameters
Parameter Name (*Required) Description
*Source Database See Common GL Migrator Parameters on page 78.
*Dest Database See Common GL Migrator Parameters on page 78.
*Run Type See Common GL Migrator Parameters on page 78.
*Selection Type See Common GL Migrator Parameters on page 78.
*From Set of Books Name See Common GL Migrator Parameters on page 78.
*New Set of Books Name See Common GL Migrator Parameters on page 78.
Specific Budget Org Name
See Common GL Migrator Parameters on page 78.Enter the current Short Name (as named in source database) of the budget organization that you want to migrate. You can query this value from the Define Budget Organizations form.
New Budget Org Name
Enter the new budget org name of the budget organization as you want it to appear in the destination database after the migration. This gives you the ability to change the name of a budget org. If left blank, GL Migrator uses the name from the source database.
New User Budget Org Name
Enter the new user budget org name of the budget organization as you want it to appear in the destination database after the migration. This gives you the ability to change the user name for a budget org. If left blank, GL Migrator uses the user name from the source database.
Budget Org From See Common GL Migrator Parameters on page 78.
110 Mercury GL Migrator™ Guide

Chapter 7: Migrating General Ledger Entities
To See Common GL Migrator Parameters on page 78.
Budget Org Like See Common GL Migrator Parameters on page 78.
*Save To Archive See Common GL Migrator Parameters on page 78.
Version Label See Common GL Migrator Parameters on page 78.
Version Desc See Common GL Migrator Parameters on page 78.
*Recover from Archive See Common GL Migrator Parameters on page 78.
From Version Label See Common GL Migrator Parameters on page 78.
*Overwrite if Exists See Common GL Migrator Parameters on page 78.
Table 7-1. Migrate Budget Organizations migrator parameters [continued]
Parameter Name (*Required) Description
Migrate Budget Organizations Migrator 111

Chapter 7: Migrating General Ledger Entities
Migrate Consolidations MigratorThe Migrate Consolidations migrator prompts the user for parameters enabling migration of user-selected Consolidation Mapping(s) from a source database to a destination database. The migration is accompanied by a report displaying all migrated entities along with the status or error codes associated with each record in migration.
Use the standard menu path Other:Requests:Run to launch the Migrate Consolidations migrator. Table 7-2 lists and describes its parameters.
Table 7-2. Migrate Consolidations migrator parameters
Parameter Name (*Required) Description
*Source Database See Common GL Migrator Parameters on page 78.
*Dest Database See Common GL Migrator Parameters on page 78.
*Run Type See Common GL Migrator Parameters on page 78.
*Selection Type See Common GL Migrator Parameters on page 78.
Parent Set of Books Name
If you want to consolidate to a different Parent Set of Books at the destination database, then enter the Set of Books Name here. This parameter is not required and if you leave it blank, the Parent Set of Books at the destination database will be same as it is in the source database.
Specific Consolidation Name
See Common GL Migrator Parameters on page 78.Enter the current Name (as named in source database) of the Consolidation you want to migrate. You can query this value from the Define Consolidations form.
New Consolidation Name See Common GL Migrator Parameters on page 78.
New DescriptionIf you want to change the description of the consolidation, enter the new description here. If left blank, the migrator uses the description as it exists in the source database.
Consolidation From See Common GL Migrator Parameters on page 78.
To See Common GL Migrator Parameters on page 78.
Consolidation Like See Common GL Migrator Parameters on page 78.
*Save To Archive See Common GL Migrator Parameters on page 78.
Version Label See Common GL Migrator Parameters on page 78.
Version Desc See Common GL Migrator Parameters on page 78.
*Recover From Archive See Common GL Migrator Parameters on page 78.
112 Mercury GL Migrator™ Guide

Chapter 7: Migrating General Ledger Entities
From Version Label See Common GL Migrator Parameters on page 78.
*Overwrite if Exists See Common GL Migrator Parameters on page 78.
Table 7-2. Migrate Consolidations migrator parameters [continued]
Parameter Name (*Required) Description
Migrate Consolidations Migrator 113

Chapter 7: Migrating General Ledger Entities
Migrate Cross Validation Rules MigratorThe Migrate Cross Validation Rules migrator prompts the user for parameters enabling migration of user selected Cross Validation Rule(s) from a source database and application to a destination database and application. The migration is accompanied by a report displaying all migrated entities along with the status or error codes associated with each record in migration.
Use the standard menu path Other:Requests:Run to launch the Migrate Cross Validation Rules migrator. Table 7-3 lists and describes its parameters.
Table 7-3. Migrate Cross Validation Rules migrator parameters
Parameter Name (*Required) Description
*Source Database See Common GL Migrator Parameters on page 78.
*Dest Database See Common GL Migrator Parameters on page 78.
*Run Type See Common GL Migrator Parameters on page 78.
*Selection Type See Common GL Migrator Parameters on page 78.
*Application Select the application the cross validation is tied to.
*Source Flexfield Structure Select the Flexfield Structure tied to the Cross Validation Rule at the source database.
*Destination Flexfield Structure Select the Flexfield Structure at the destination database to which you want to migrate the Cross Validation Rule(s).
Specific Cross Validation Rule Name
See Common GL Migrator Parameters on page 78.Enter the current Name (as named in the source database) of the Cross Validation Rule that you want to migrate. You can query this value from the Define Cross Validation Rules form.
New Cross Validation Rule Name See Common GL Migrator Parameters on page 78.
New DescriptionIf you want to change the description of the cross validation rule, enter the new description here. If left blank, the migrator uses the description as it exists in the source database.
Cross Validation Rule From See Common GL Migrator Parameters on page 78.
To See Common GL Migrator Parameters on page 78.
Cross Validation Rule Like See Common GL Migrator Parameters on page 78.
*Save to Archive See Common GL Migrator Parameters on page 78.
Version Label See Common GL Migrator Parameters on page 78.
Version Desc See Common GL Migrator Parameters on page 78.
114 Mercury GL Migrator™ Guide

Chapter 7: Migrating General Ledger Entities
*Recover from Archive See Common GL Migrator Parameters on page 78.
From Version Label See Common GL Migrator Parameters on page 78.
*Overwrite if Exists See Common GL Migrator Parameters on page 78.
Table 7-3. Migrate Cross Validation Rules migrator parameters [continued]
Parameter Name (*Required) Description
Migrate Cross Validation Rules Migrator 115

Chapter 7: Migrating General Ledger Entities
Migrate JE Sources MigratorThe Migrate JE Sources migrator prompts the user for parameters enabling migration of the user selected JE Source from a source database to a destination database. The migration is accompanied by a report displaying all migrated entities along with the status or error codes associated with each record in migration.
Use the standard menu path Other:Requests:Run to launch the Migrate JE Sources migrator. Table 7-4 lists and describes its parameters.
Table 7-4. Migrate JE Sources migrator parameters
Parameter Name (*Required) Description
*Source Database See Common GL Migrator Parameters on page 78.
*Dest Database See Common GL Migrator Parameters on page 78.
*Run Type See Common GL Migrator Parameters on page 78.
*Selection Type See Common GL Migrator Parameters on page 78.
Specific JE Source Name
See Common GL Migrator Parameters on page 78.Enter the current Name (as named in source database) of the JE source you want to migrate. You can query this value from the Define JE Sources form.
New JE Source Name See Common GL Migrator Parameters on page 78.
JE Source From See Common GL Migrator Parameters on page 78.
To See Common GL Migrator Parameters on page 78.
JE Source Like See Common GL Migrator Parameters on page 78.
*Save To Archive See Common GL Migrator Parameters on page 78.
Version Label See Common GL Migrator Parameters on page 78.
Version Desc See Common GL Migrator Parameters on page 78.
*Recover from Archive See Common GL Migrator Parameters on page 78.
From Version Label See Common GL Migrator Parameters on page 78.
*Overwrite if Exists See Common GL Migrator Parameters on page 78.
116 Mercury GL Migrator™ Guide

Chapter 7: Migrating General Ledger Entities
Migrate Journal Categories MigratorThe Migrate Journal Categories migrator prompts the user for parameters enabling migration of the user selected Journal Category from a source database to a destination database. The migration is accompanied by a report displaying all migrated entities along with the status or error codes associated with each record in migration.
Use the standard menu path Other:Requests:Run to launch the Migrate Journal Categories migrator. Table 7-5 lists and describes its parameters.
Table 7-5. Migrate Journal Categories migrator parameters
Parameter Name (*Required) Description
*Source Database See Common GL Migrator Parameters on page 78.
*Dest Database See Common GL Migrator Parameters on page 78.
*Run Type See Common GL Migrator Parameters on page 78.
*Selection Type See Common GL Migrator Parameters on page 78.
Specific Journal Category Name
See Common GL Migrator Parameters on page 78.Enter the current Name (as named in source database) of the journal category you want to migrate. You can query this value from the Define Journal Categories form.
New Journal Category Name See Common GL Migrator Parameters on page 78.
New Description
See Common GL Migrator Parameters on page 78.If you want to change the description of the journal category, enter the new description here. If left blank, the migrator uses the description as it exists in the source database.
Journal Category From See Common GL Migrator Parameters on page 78.
To See Common GL Migrator Parameters on page 78.
Journal Category Like See Common GL Migrator Parameters on page 78.
*Save To Archive See Common GL Migrator Parameters on page 78.
Version Label See Common GL Migrator Parameters on page 78.
Version Desc See Common GL Migrator Parameters on page 78.
*Recover from Archive See Common GL Migrator Parameters on page 78.
From Version Label See Common GL Migrator Parameters on page 78.
*Overwrite if Exists See Common GL Migrator Parameters on page 78.
Migrate Journal Categories Migrator 117

Chapter 7: Migrating General Ledger Entities
Migrate Mass Allocations MigratorThe Migrate Mass Allocations migrator prompts the user for parameters enabling migration of a user-selected mass allocation or budget from a source database to a destination database. The migration is accompanied by a report displaying all migrated entities along with the status or error codes associated with each record in migration.
The Validate Mass Allocations concurrent program is submitted at the destination database after successful migration of mass allocations or budgets. The Concurrent Request ID(s) of the submitted request are listed in the Concurrent Request log file of the migration. Users are advised to review the requests at the destination database and take any necessary actions.
The migrated mass allocations or budgets at the destination database will have a status of Non-Validated. The status will be updated as appropriate by the Validate Mass Allocations concurrent program.
Use the standard menu path Other:Requests:Run to launch the Migrate Mass Allocations migrator. Table 7-6 lists and describes its parameters.
Table 7-6. Migrate Mass Allocations migrator parameters
Parameter Name (*Required) Description
*Source Database See Common GL Migrator Parameters on page 78.
*Dest Database See Common GL Migrator Parameters on page 78.
*Run Type See Common GL Migrator Parameters on page 78.
*Selection Type See Common GL Migrator Parameters on page 78.
*Set of Books Select the set of books tied to the mass allocation or budget.
*Balance Type Select the balance type of the mass allocation or budget.
Specific Mass Allocation/Budget Name
See Common GL Migrator Parameters on page 78.Enter the current Mass Allocation/Budget Name (as named in source database) of the mass allocation/budget that you want to migrate. You can query this value from the Define Mass Allocation form or the Define Budget form.
New Mass Allocation/Budget Name See Common GL Migrator Parameters on page 78.
New Description
If you want to change the description of the mass allocation or budget, enter the new description here. If left blank, the migrator uses the description as it exists in the source database.
118 Mercury GL Migrator™ Guide

Chapter 7: Migrating General Ledger Entities
Mass Allocation/Budget From See Common GL Migrator Parameters on page 78.
To See Common GL Migrator Parameters on page 78.
Mass Allocation/Budget Like See Common GL Migrator Parameters on page 78.
*Save to Archive See Common GL Migrator Parameters on page 78.
Version Label See Common GL Migrator Parameters on page 78.
Version Desc See Common GL Migrator Parameters on page 78.
*Recover from Archive See Common GL Migrator Parameters on page 78.
From Version Label See Common GL Migrator Parameters on page 78.
*Overwrite if Exists See Common GL Migrator Parameters on page 78.
*Partials Allowed See Common GL Migrator Parameters on page 78.
Table 7-6. Migrate Mass Allocations migrator parameters [continued]
Parameter Name (*Required) Description
Migrate Mass Allocations Migrator 119

Chapter 7: Migrating General Ledger Entities
Migrate Summary Templates MigratorThe Migrate Summary Templates migrator prompts the user for parameters enabling migration of user selected Summary Template(s) from a source database to a destination database. The migration is accompanied by a report displaying all migrated entities along with the status or error codes associated with each record in migration.
The Add/Delete Summary Accounts concurrent program is submitted at the destination database for each successfully migrated Summary Template. The Concurrent Request ID(s) of the submitted requests are listed in the Concurrent Request log file of the migration. Users are advised to review the requests at the destination database and take any necessary actions.
Use the standard menu path Other:Requests:Run to launch the Migrate Summary Templates migrator. Table 7-7 lists and describes its parameters.
Table 7-7. Migrate Summary Templates migrator parameters
Parameter Name (*Required) Description
*Source Database See Common GL Migrator Parameters on page 78.
*Dest Database See Common GL Migrator Parameters on page 78.
*Run Type See Common GL Migrator Parameters on page 78.
*Selection Type See Common GL Migrator Parameters on page 78.
*From Set of Books Name See Common GL Migrator Parameters on page 78.
*New Set of Books Name See Common GL Migrator Parameters on page 78.
Specific Summary Template Name
See Common GL Migrator Parameters on page 78.Enter the current Name (as named in source database) of the summary template which you want to migrate. You can query this value from the Define Summary Templates form.
New Summary Template Name See Common GL Migrator Parameters on page 78.
New Description See Common GL Migrator Parameters on page 78.
Summary Template From See Common GL Migrator Parameters on page 78.
To See Common GL Migrator Parameters on page 78.
Summary Template Like See Common GL Migrator Parameters on page 78.
*Save to Archive See Common GL Migrator Parameters on page 78.
Version Label See Common GL Migrator Parameters on page 78.
120 Mercury GL Migrator™ Guide

Chapter 7: Migrating General Ledger Entities
Version Desc See Common GL Migrator Parameters on page 78.
*Recover From Archive See Common GL Migrator Parameters on page 78.
From Version Label See Common GL Migrator Parameters on page 78.
Table 7-7. Migrate Summary Templates migrator parameters [continued]
Parameter Name (*Required) Description
Migrate Summary Templates Migrator 121

Chapter 7: Migrating General Ledger Entities
122 Mercury GL Migrator™ Guide

Appendix
AException Messages
This appendix lists and describes the GL Migrator exception messages.
Mercury GL Migrator exception messages fall into the following categories:
Internal Error Messages. Require action, are generally caused by some system problem, and should be passed directly to the system administrator for follow-up with Mercury.
Error Messages. Require action, are generally caused by some form of invalid data, and can often be resolved by the user.
Warning Messages. Do not require action but often provide useful information or a reminder to the user.
The following list includes the GL Migrator exception messages in numerical order, with their causes and recovery actions to take.
123

Appendix A: Exception Messages
Message: CLGM-1001 Freeze Flexfield Definition not enabled for COA name at the Source.
Cause Flexfield definition is frozen for the chart of accounts referenced by the entity at the source database.
Action Disable the Freeze flag in the flexfield definition for the chart of accounts at source database.
Message: CLGM-1002 Freeze Flexfield Definition not enabled for COA name at the Destination.
Cause Flexfield definition is frozen for the chart of accounts referenced by the entity at the destination database.
Action Disable the Freeze flag in the flexfield definition for the chart of accounts at destination database.
Message: CLGM-1003 Mismatch in Application Columns (SEGMENT) in Segment No value for the COA name.
Cause Application column values in flexfield segments do not match for the chart of accounts.
Action Ensure that the chart of accounts flexfield segments have common application columns values.
Message: CLGM-1004 Mismatch in Data Type of the Value Set for Segment name - chart of accounts name(src), chart of accounts name(dest).
Cause The datatypes associated with the value set for the flexfield segments (source and destination) do not match.
Action Define datatypes that match.
Message: CLGM-1005 COA name Does not Exist at the Destination.
Cause The specified chart of accounts does not exist in the destination database.
Action Create the chart of accounts in the destination database.
Message: CLGM-1006 Mismatch in Segment Size for Segment name, chart of accounts name(src) is size and chart of accounts name(dest) is size.
Cause The segment sizes associated with the flexfield (source and destination) do not match.
Action Define segment sizes that match.
124 Mercury GL Migrator™ Guide

Appendix A: Exception Messages
Message: CLGM-1007 Mismatch in Value Set for Segment No. number, Value Set name is used by chart of accounts name(src) and name is used by chart of accounts name(dest).
Cause The chart of account value sets associated with the flexfield segments (source and destination) do not match.
Action Define value sets that match.
Message: CLGM-1008 Value Set name used by COA chart of accounts name in Segment name should be of type Independent at Source.
Cause Value set associated with the flexfield segment for the specified chart of accounts in the source is not of the type Independent.
Action Modify the value set in the definition to type Independent at source.
Message: CLGM-1009 Value Set name used by COA chart of accounts name in Segment name should be of type Independent at Destination.
Cause Value set associated with the flexfield segment for the specified chart of accounts in the destination is not of the type Independent.
Action Modify the value set in the definition to type Independent at destination.
Message: CLGM-1010 Segment name is flag for chart of accounts name(src) and flag for chart of accounts name(dest).
Cause The status of the specified segment in the flexfield definition, defined for the chart of accounts in the source database does not match the status in the destination database.
Action Enable or disable the specified segment in the flexfield definition for the specified chart of accounts.
Message: CLGM-1011 Mismatch in Required Flag for Segment name - chart of accounts name has it flag and chart of accounts name(dest) has it flag.
Cause The required flag for the specified segment in the flexfield definition, defined for the chart of accounts in the source database does not match the flag in the destination database.
Action Enable or disable the required flag for the specified segment in the flexfield definition for the specified chart of accounts.
125

Appendix A: Exception Messages
Message: CLGM-1012 Mismatch in Security Flag for Segment name - chart of accounts name(src) has it flag and chart of accounts name(dest) has it flag.
Cause The security flag for the specified segment in the flexfield definition, defined for the chart of accounts in the source database does not match the flag in the destination database.
Action Enable or disable the security flag for the specified segment in the flexfield definition for the specified chart of accounts.
Message: CLGM-1013 Mismatch in Qualifier for Segment Num - chart of accounts name (src) is flag and chart of accounts name(dest) is flag.
Cause The qualifier for the specified segment in the flexfield definition defined for the chart of accounts in the source database does not match the flag in the destination database.
Action Enable or disable the security flag for the specified segment in the flexfield definition for the specified chart of accounts.
Message: CLGM-1014 Mismatch in Number of Segments - chart of accounts name(src) has value segments and chart of accounts name(dest) has value segments.
Cause The number of segments for the flexfield definition associated with the chart of accounts in the source database does not match the number of segments in the destination database.
Action Migrate the entity between charts of accounts that have an equal number of segments in their flexfield definitions.
Message: CLGM-1015 Application Column mismatch in Segment name, value is used by chart of accounts name(src) and value is used by chart of accounts name(dest).
Cause Application column values in the flexfield segments to not match the values for the chart of accounts.
Action Be sure the chart of accounts flexfield segments have common application column values.
Message: CLGM-1016 Cross Segment validation flag not enabled for COA name at the Destination.
Cause The cross segment validation flag is disabled for the specified chart of accounts at the destination.
Action Enable the cross segment validation flag for the specified chart of accounts at the destination.
126 Mercury GL Migrator™ Guide

Appendix A: Exception Messages
Message: CLGM-3001 Account combination does not exist in the destination.
Cause The specified account or code combination in the source database does not exist in the destination database.
Action Create the code combination at the destination database.
Message: CLGM-9000 You have not specified all the required parameters.
Cause One or more required input parameters are missing.
Action Specify all the required parameters.
Message: CLGM-9001 Database link to source not found in lookup table.
Cause The database link defined for the source database does not exist in the lookup table.
Action Define the database link in the lookup table in the source database.
Message: CLGM-9002 Both Source and Destination DBs cannot be Entity Archive.
Cause Both the source and destination databases defined in the input parameters are labeled as Entity Archive.
Action Modify one of the parameters to not be Entity Archive.
Message: CLGM-9003 Both Source and Destination DBs cannot be Open Interface.
Cause Both the source and destination databases defined in the input parameters are labeled as Open Interface.
Action Modify one of the parameters to not be Open Interface.
Message: CLGM-9004 Destination DB and Copy to Archive values are inconsistent.
Cause The Copy to Archive value is inconsistent based on the type of migration and the destination database.
Action Change the value for Copy to Archive so it is consistent with the type of migration and the destination database. See Common GL Migrator Parameters on page 78.
127

Appendix A: Exception Messages
Message: CLGM-9005 Source DB and Recover From Archive values are inconsistent.
Cause The Recover from Archive value is inconsistent based on the source or destination database.
Action Change the value for Recover from Archive so it is consistent with the source or destination database. See Common GL Migrator Parameters on page 78.
Message: CLGM-9006 New Version Label must be entered.
Cause You have not entered the New Version label input parameter while saving to archive.
Action Enter the New Version label input parameter.
Message: CLGM-9007 Old Version Label must be entered.
Cause You have not entered the Old Version label input parameter while recovering from archive.
Action Enter the Old Version label input parameter.
Message: CLGM-9008 Report Only cannot be Yes if the Destination DB is Open Interface.
Cause Report Only input parameter is set to Yes while migrating to the open interface.
Action Set the Report Only input parameter to No.
Message: CLGM-9009 Compare Only cannot be Yes if Copying to Entity Archive.
Cause The Run Type parameter is set to Comparison while copying to the entity archive.
Action Set the Run Type parameter to Migration or Simulation.
Message: CLGM-9010 Compare Only cannot be Yes if Destination DB is Open Interface.
Cause Run Type parameter is set to Comparison while migrating to the open interface.
Action Set the Run Type parameter to Migration or Simulation.
128 Mercury GL Migrator™ Guide

Appendix A: Exception Messages
Message: CLGM-9011 Report Only cannot be Yes if Copying to Entity Archive.
Cause Report Only input parameter is set to Yes while migrating to the entity archive.
Action Report Only input parameter must be set to No while migrating to the entity archive.
Message: CLGM-9012 Version Labels are identical.
Cause Version labels are the same for a comparison of the same entities in the entity archive.
Action Make the version labels different.
Message: CLGM-9013 New Application App Name does not exist on the destination database.
Cause The specified new application does not exist in the destination database.
Action Create the new application in the destination database.
Message: CLGM-9014 Database link to destination not found in lookup table.
Cause Database link defined for the destination database does not exist in the lookup table.
Action Define the database link for the source database in the lookup.
Message: CLGM-9015 No entities were successfully migrated. See report for details.
Cause The specified entities were not migrated successfully to the destination database.
Action See the report for details.
Message: CLGM-9016 Internal Error: Error getting entity.entity_id. Contact Mercury Support.
Cause An internal error has occurred.
Action Contact Mercury Customer Support.
Message: CLGM-9017 Flexfield Structures from the Source and Destination databases do not match.
Cause The flexfield structure associated with the entity in the source database does not match the structure in the destination database.
Action Look at the report to find the differences.
129

Appendix A: Exception Messages
Message: CLGM-9018 Unable to submit conc.program - name using link name.
Cause The program is unable to submit.
Action Verify the concurrent program’s existence and submission at the destination and the database links to the destination.
Message: CLGM-9019 “open_links” database parameter is less than number of enabled database values. See System Administration Guide and Reference.
Cause The open links database parameter is limited.
Action Increase the number defined for the open_links parameter. See Controlling Database Access Through Links on page 97.
Message: CLGM-9020 Value Set name does not exist.
Cause The specified value does not exist.
Action Verify the existence of the value set and contact Mercury Customer Support.
Message: CLGM-9021 Maximum size for the New Entity Name is Number, entered value has Number characters.
Cause The specified value exceeds the maximum allowed.
Action Change the value to a number within the allowed limit.
Message: CLGM-10000 Journal Sources name already exists in the New Version Label label.
Cause The entity being saved to the entity archive already exists in the specified version label.
Action Either save the entity to another version label or use the Purge Entity Archive Versions program to remove the entity from the version label.
Message: CLGM-10001 Journal Sources exists in the dest. database & overwrite is not allowed.
Cause The specified journal sources already exists in the destination database.
Action Run the migration of journal sources with the overwrite option set to Yes.
Message: CLGM-10002 Journal Sources Title already exists in the destination database.
Cause The specified new user JE source name already exists in the destination database.
Action Try migrating the journal sources with a different new user JE source name.
130 Mercury GL Migrator™ Guide

Appendix A: Exception Messages
Message: CLGM-11001 Journal Category name already exists in the New Version Label Label Name.
Cause The entity being saved to the entity archive already exists in the specified version label.
Action Either save the entity to another version label or use the Purge Entity Archive Versions program to remove the entity from the version label.
Message: CLGM-11002 Journal Category name exists in the dest. database & overwrite is not allowed.
Cause The specified journal category already exists in the destination database.
Action Run the migration of journal categories with the overwrite option set to Yes.
Message: CLGM-12000 Mass Allocation/Budget - name exists in the destination database & overwrite is not allowed.
Cause The specified mass allocation/budget already exists in the destination database.
Action Run the mass allocation/budget with the overwrite option set to Yes.
Message: CLGM-12001 Chart of accounts - name does not exist in the destination database.
Cause The specified chart of accounts already exists in the destination database.
Action Create the specified chart of accounts in the destination database.
Message: CLGM-12002 JE Category - name does not exist in the destination database.
Cause The specified JE category referenced by the entity in migration must exist in the destination database prior to migration.
Action Create the specified JE category in the destination database.
Message: CLGM-12003 Currency code - currency does not exist in the destination database.
Cause The specified currency code referenced by the entity in migration must exist in the destination database prior to migration.
Action Create the specified currency code in the destination database.
Message: CLGM-12004 Budget - name does not exist in the destination database.
Cause The specified budget referenced by the entity in migration must exist in the destination database prior to migration.
Action Create the specified budget in the destination database.
131

Appendix A: Exception Messages
Message: CLGM-12005 Encumbrance Type - name does not exist in the destination database.
Cause The specified encumbrance type referenced by the entity in migration must exist in the destination database prior to migration.
Action Create the specified encumbrance type in the destination database.
Message: CLGM-12006 Mass Allocation/Budget - name already exists in the New Version Label label.
Cause The entity being saved to the entity archive already exists in the specified version label.
Action Either save the entity to another version label or use the Purge Entity Archive Versions program to remove the entity from the version label.
Message: CLGM-12007 Set of Books does not exist in the Destination.
Cause The specified set of books does not exist in the destination database.
Action Either migrate to another set of books or create a new set of books.
Message: CLGM-12008 Chart of Accounts does not exist in the Destination.
Cause The specified chart of accounts does not exist in the destination database.
Action Either migrate to another chart of accounts or create a new set of books.
Message: CLGM-12009 Segment Value value associated with the Chart of Accounts does not exist in the destination database.
Cause The specified segment value referenced in the code combination or account of the entity in migration must exist in the destination database prior to migration.
Action Create the segment value or the account at the destination.
Message: CLGM-12010 Chart of Accounts does not exist in the Source.
Cause The specified chart of accounts does not exist in the source database.
Action Verify the associated chart of accounts for the specified set of books in the source database.
132 Mercury GL Migrator™ Guide

Appendix A: Exception Messages
Message: CLGM-13001 Cross Validation Rule - name exists in the destination database & overwrite is not allowed.
Cause The specified cross validation already exists in the destination database.
Action Run the migration of cross validation with the overwrite option set to Yes.
Message: CLGM-13002 Cross Validation Rule - name already exists in the New Version Label label.
Cause The entity being saved to the entity archive already exists in the specified version label.
Action Either save the entity to another version label or use the Purge Entity Archive Versions program to remove the entity from the version label.
Message: CLGM-15000 Budget Organization Exists at the Destination and Override parameter is set to No.
Cause The specified budget organization already exists in the destination database.
Action Run the migration of budget organization with the overwrite option set to Yes.
Message: CLGM-15001 Budget Funding does not exist at the destination.
Cause The specified budget funding referenced by the entity in migration must exist in the destination database prior to migration.
Action Create the specified budget funding in the destination database.
Message: CLGM-15002 Budget Ranges Overlap with an existing Budget at the Destination.
Cause Budget ranges defined for the budget organization in the source database overlap with an existing budget at the destination database.
Action Be sure that the budget ranges to not overlap with an existing budget at the destination.
Message: CLGM-15003 Error in the Chart of Accounts name.
Cause The chart of accounts associated with set of books at the source database does not match that of the destination database.
Action Verify the details of the chart of accounts in the report.
133

Appendix A: Exception Messages
Message: CLGM-15004 Set of Books uses a different COA at the Destination.
Cause The chart of accounts associated with the set of books at the source database does not match that of the destination database.
Action Either migrate to the set of books that matches the chart of account details or associate the appropriate chart of accounts to the set of books.
Message: CLGM-15005 Set of Books does not exist at the destination.
Cause The specified set of books does not exist in the destination database.
Action Either migrate to another set of books or create a new set of books.
Message: CLGM-15006 Budget Org name already exists in the Archive with label Version label.
Cause The entity being saved to the entity archive already exists in the specified version label.
Action Either save the entity to another version label or use the Purge Entity Archive Versions program to remove the entity from the version label.
Message: CLGM-18001 For name Consolidation name SOB does not exist at the Destination.
Cause The specified set of books for the consolidation migration does not exist in the destination database.
Action Migrate to another set of books or create a new set of books.
Message: CLGM-18002 For name Consolidation Subsidiary SOB in source is name and name at destination.
Cause The specified subsidiary set of books in the source database is different from that of the destination database for the specified consolidation.
Action The consolidation at the destination must be associated with the same subsidiary set of books.
Message: CLGM-18003 From SOB name uses name calendar at the source and name at the destination.
Cause Calendar details Accounting Calendar / Period Types / Future Period for the set of books in the source database does not match the destination database.
Action Migrate to a valid set of books in the destination database that matches the calendar details.
134 Mercury GL Migrator™ Guide

Appendix A: Exception Messages
Message: CLGM-18004 From SOB name uses code1 currency at source and code2 at destination.
Cause The specified currency code associated with the set of books referenced by the entity in migration must exist in the destination database prior to migration.
Action Create the currency code for the specified set of books in the destination database.
Message: CLGM-18005 From SOB name uses name COA at source and name COA at destination.
Cause The chart of accounts associated with the set of books at the source database does not match that of the destination database.
Action Either migrate to a set of books that match the chart of account details or associate the appropriate chart of accounts to the set of books.
Message: CLGM-18006 Error in COA name.
Cause The chart of accounts associated with the set of books at the source database does not match that of the destination database.
Action Verify the details of the chart of accounts in the report.
Message: CLGM-18007 For name Consolidation name to SOB is not there at the destination.
Cause The specified set of books does not exist in the destination database.
Action Migrate to another set of books or create a new set of books.
Message: CLGM-18008 For name Consolidation Parent SOB is name at the source and name at the destination.
Cause The specified parent set of books in the source database is different than that of the destination for the specified consolidation.
Action Associate both consolidations with the same parent set of books.
Message: CLGM-18009 From SOB name uses name Calendar at source and name at destination.
Cause Calendar details Accounting Calendar / Period Types / Future Period for the set of books in the source database does not match the destination database.
Action Migrate to a valid set of books in the destination database that matches the calendar details.
135

Appendix A: Exception Messages
Message: CLGM-18010 To SOB name uses name calendar at source and name at destination.
Cause Calendar details Accounting Calendar / Period Types / Future Period for the set of books in the source database does not match the destination database.
Action Migrate to a valid set of books in the destination database that matches the calendar details.
Message: CLGM-18011 To SOB name uses code currency at source and code at destination.
Cause The specified currency code associated with the set of books referenced by the entity in migration must exist in the destination database prior to migration.
Action Create the currency code for the specified set of books in the destination database.
Message: CLGM-18012 To SOB name uses name COA at source and name at destination.
Cause The chart of accounts associated with the set of books at the source database does not match that of the destination database.
Action Either migrate to the set of books that matches the chart of account details or associate the appropriate chart of accounts to the set of books.
Message: CLGM-18013 Error in COA name.
Cause The chart of accounts associated with the set of books at the source database does not match that of the destination database.
Action Verify the details of the chart of accounts in the report.
Message: CLGM-18014 For name consolidation account Account Does Not exist at the destination.
Cause Parent account referenced in the account rules for the specified consolidation does not exist in the destination database.
Action Create the specified account at the destination.
Message: CLGM-18015 value Parent Flex Value Does Not Exist in name Value Set at the Destination.
Cause The specified parent flex value referenced by the entity in migration must exist in the value set at the destination database prior to migration.
Action Include the parent flex value in the associated value set at the destination database.
136 Mercury GL Migrator™ Guide

Appendix A: Exception Messages
Message: CLGM-18016 value Parent Rollup Value Does Not Exist in name Value Set At the Destination.
Cause The specified parent rollup value referenced by the entity in migration must exist in the value set at the destination database prior to migration.
Action Include the parent rollup value in the associated value set at the destination database.
Message: CLGM-18017 The Consolidation in the Archive was from a later version of Oracle Applications.
Cause The specified consolidation in the archive is of a higher version of Oracle Applications than the destination database.
Action Migration of a consolidation can be done only to an equivalent or lower version of Oracle Applications.
Message: CLGM-18018 Migration of Consolidation to a lower version of Oracle Apps is not supported.
Cause Migration of a consolidation from a higher version of Oracle Applications to a lower version is not supported.
Action A migration of consolidation can be done only to an equivalent or lower version of Oracle Applications.
Message: CLGM-18019 Consolidation exists in the Archive for the same Version label.
Cause The entity being saved to the entity archive already exists in the specified version label.
Action Either save the entity to another version label or use the Purge Entity Archive Versions program to remove the entity from the version label.
Message: CLGM-18020 Consolidation exists at the destination and Override flag is set to No.
Cause The specified consolidation already exists in the destination database.
Action Run the migration of consolidation with the overwrite option set to Yes.
Message: CLGM-18021 Parent SOB and Subsidiary SOB cannot be the same.
Cause The parent set of books and the subsidiary set of books for the entity in migration are identical.
Action Migrate the consolidations by having different sets of books for the parent and the subsidiary.
137

Appendix A: Exception Messages
Message: CLGM-19000 Summary Template - name exists in the destination database & overwrite is not allowed.
Cause The specified summary template name already exists in the destination database.
Action Run the migration of summary templates with another name that does not exist in the destination database.
Message: CLGM-19001 Chart of Account - name does not exist in the destination database.
Cause The specified chart of accounts does not exist in the destination database.
Action Create the specified chart of accounts in the destination database.
Message: CLGM-19002 Budget - name does not exist in the destination database.
Cause The specified budget referenced by the entity in migration must exist in the destination database prior to migration.
Action Create budgets in the destination database.
Message: CLGM-19003 Start Actuals Period - name does not exist in the destination database.
Cause The specified start actuals period referenced by the entity in migration must exist in the destination database prior to migration.
Action Create start actual periods in the destination database.
Message: CLGM-19004 Summary Template - name already exists in the New Version Label label.
Cause The entity being saved to the entity archive already exists in the specified version label.
Action Either save the entity to another version label or use the Purge Entity Archive Versions program to remove the entity from the version label.
Message: CLGM-19005 Set of Books does not exist in the Destination.
Cause The specified set of books does not exist in the destination database.
Action Either migrate to another set of books or create a new set of books.
138 Mercury GL Migrator™ Guide

Appendix A: Exception Messages
Message: CLGM-19006 Currency Code currency in the source does not match with the destination set of books.
Cause The specified currency code associated with the set of books referenced by the entity in migration must exist in the destination database prior to migration.
Action Create the currency code for the specified set of books in the destination database.
Message: CLGM-19007 Calendar details Accounting calendar/Period types/Future Period in the source does not match with the destination Set of Books.
Cause Calendar details Accounting Calendar / Period Types / Future Period for the set of books in the source database does not match the destination database.
Action Migrate to a valid set of books at the destination matching the calendar details.
Message: CLGM-19008 Chart of Accounts name in the source does not match with that of the destination Set of Books.
Cause The chart of accounts associated with the set of books at the source database does not match that of the destination database.
Action Either migrate to a set of books that matches the chart of account details or associate an appropriate chart of accounts to the set of books.
Message: CLGM-19009 Template Combination - account already exists in the destination database for this set of books.
Cause The specified code combination or the account referenced by the entity being migrated already exists in the destination database.
Action You can migrate only if the code combination or the account is unique and does not exist in the destination database.
Message: CLGM-19010 Segment Value account associated with the Template Chart of Accounts does not exist in the destination database.
Cause The specified segment value referenced in the code combination or account of the entity in migration must exist in the destination database prior to migration.
Action Create the segment value or the account at the destination.
139

Appendix A: Exception Messages
140 Mercury GL Migrator™ Guide

Index
Aarchive table size 20audience types 13audit reports
adding program file 40introduction 77running 89
Autopost flag supported 58
Bbudget organizations
adding program file to migrate 39migrating 110
Cchart of accounts 97common parameters among migrators 78comparison reports
adding program file 40introduction 77running 105
compatibilitiesSee supportability
concurrent programs included with GL Migrator 21, 39
configuring after installation 35configuring users 74Consolidation flag supported 58consolidations
adding program file to migrate 39changes for release 6.0 58, 60migrating 112
Conversion Method Code flag supported 58cross validation rules
adding program file to migrate 39changes for release 6.0 58, 60migrating 114
Ddatabase access through links 97database instance, adding 93descriptive flexfields, recompiling 90Distributed Database Option 19documents
prerequisite 13related 13
Eentities
types 75values 74
141

Index
entity archiveadding program file to purge versions 40overview 100restoring entities from 102saving entities to 102table size 20
error messages 123exception messages 123
Ffile system requirements for installation 18flexfields, recompiling 90
GGeneral Ledger entity type 14GL Archive Version Detail Report
adding program file 40running 103
GL Migration Comparison Reportadding program file 40running 77
GL Migratoradministration and maintenance programs included 39migrators included 21, 39overview 14
GL Migrator Audit Reportadding program file 40running 89
GL Migrator release 6.0installation requirements 18overview of new features 58upgrade impacts 60upgrade requirements 60
Iimpacts of upgrading 60installing GL Migrator
configuration after installation 35on UNIX 31
on Windows 26overview 16pre-installation setup 21requirements 18
instance requirements for installation 19interface tables
adding program file to purge 40purging 87
internal error messages 123
JJE sources
adding program file to migrate 39migrating 116
journal categoriesadding program file to migrate 39changes for release 6.0 58, 60migrating 117
KKintana GL*Migrator 58
Llinks for database access 97
MMaintain GL Migrator Views program
adding program file 40querying chart of accounts or set of books 97running 91
maintenance tasks 86mass allocations
adding program file to migrate 39changes for release 6.0 58, 60migrating 118
Mercury GL MigratorSee GL Migrator
Mercury GL Migrator release 6.0See GL Migrator release 6.0
142 Mercury GL Migrator™ Guide

Index
Mercury Object MigratorSee Object Migrator
Migrate Budget Organizations migratoradding program file 39running 110
Migrate Consolidations migratoradding program file 39changes for release 6.0 58, 60running 112
Migrate Cross Validation Rules migratoradding program file 39changes for release 6.0 58, 60running 114
Migrate JE Sources migratoradding program file 39running 116
Migrate Journal Categories migratoradding program file 39changes for release 6.0 58, 60running 117
Migrate Mass Allocations migratoradding program file 39changes for release 6.0 58, 60running 118
Migrate Summary Templates migratoradding program file 39running 120
migration capabilities 76migrators
included with GL Migrator 21, 39Migrate Budget Organizations 39, 110Migrate Consolidations 39, 112Migrate Cross Validation Rules 39, 114Migrate JE Sources 39, 116Migrate Journal Categories 39, 117Migrate Mass Allocations 39, 118Migrate Summary Templates 39, 120
NNon-Validated mode, switching to and from 96
OObject Migrator
installation sequence 17supportability with GL Migrator 17, 59
open_links parameter for database access 97Oracle
concurrent programs included with GL Migrator 39General Ledger entity type 14Submit Requests form 14View Requests form 14
overview of GL Migrator 14overview of GL Migrator release 6.0 features 58
Pparameters common among migrators 78platform requirements for installation 19preparing for an upgrade 61preparing for installation 21prerequisite documents 13programs
included with GL Migrator 21, 39Maintain GL Migrator Views 40, 91, 97Purge Entity Archive Versions 40, 104Purge GL Migrator Interface Tables 40, 87
Purge Entity Archive Versions programadding program file 40running 104
Purge GL Migrator Interface Tables programadding program file 40running 87
Rrebuilding views 91recompiling descriptive flexfields 90related documents 13release 6.0
See GL Migrator release 6.0reports
143

Index
comparison 105GL Archive Version Detail Report 40, 103GL Migration Comparison Report 40, 77GL Migrator Audit Report 40, 89
requirements for installationfile system 18instance 19platform 19system 18tablespace 18
requirements for upgrading 60responsibility for migrations, setting up 44Run Requests form 21
SSecurity flag supported 58Security Group functionality supported 58security, setting up 90set of books 97setup for installation 21shell scripts 21size of entity archive tables 20SQL scripts 21Submit Requests form 14, 19, 21summary templates
adding program file to migrate 39migrating 120
supportabilityMercury Extension for Oracle E-Business Suite 59Mercury IT Governance Center 59Mercury Object Migrator 59Oracle E-Business Suite 59
system requirements for installation 18
Ttablespace requirements for installation 18temporary tables, purging 87
Uunrestricted migrator, setting up 48upgrading GL Migrator
from a previous product release 58, 61impacts 60on UNIX 68on Windows 64requirements 60
user configuration 74
VValidated mode, switching to and from 96validating views 91version control
considerations for installation 20entity archive table size 20introduction 76overview 100
version detail reportadding program file 40running 103
View Requests form 14views
adding program file to maintain 40drawbacks 95maintaining 91using 94
Wwarning messages 123
144 Mercury GL Migrator™ Guide