Maximum Availability Architecture - Oracle
62
Transitioning E-Business Suite to the Maximum Availability Architecture with Minimal Downtime: E-Business Suite 11i.10.2 and Database 10gR2 An Oracle White Paper May 2007 Maximum Availability Architecture Oracle Best Practices For High Availability
-
Upload
khangminh22 -
Category
Documents
-
view
1 -
download
0
Transcript of Maximum Availability Architecture - Oracle
Transitioning E-Business Suite to the Maximum Availability Architecture with Minimal Downtime: E-Business Suite 11i.10.2 and Database 10gR2
An Oracle White Paper May 2007
Maximum Availability Architecture Oracle Best Practices For High Availability

Maximum Availability Architecture
Transitioning E-Business Suite to the Maximum Availability Architecture with Minimal Downtime
Executive Summary ....................................................................................................... 3 Introduction.................................................................................................................... 4 Prerequisites.................................................................................................................. 12 Phase 1 - Move the Primary Database to a Single Node RAC with ASM.......... 14
Task 1.1 - Implement Cluster Prerequisites........................................................ 14 Task 1.2 - Establish Oracle Clusterware on the New Database Node........... 15 Task 1.3 - Establish ASM on the New Database Node.................................... 15 Task 1.4 - Prepare Existing Database for RAC.................................................. 16 Task 1.5 - Prepare Existing Database for Data Guard ..................................... 17 Task 1.6 - Clone Existing Database Software and Prepare New Instance .... 19 Task 1.7 - Establish Local Standby Database..................................................... 21 Task 1.8 - Clone Application Software and Configure for Switchover.......... 23 Task 1.9 - Switchover and Enable Flashback ..................................................... 25
Phase 2 - Add the Original Node as a Secondary RAC Instance into the RAC Cluster............................................................................................................................ 28
Task 2.1 - Implement Cluster Prerequisites........................................................ 28 Task 2.2 - Establish Oracle Clusterware and ASM............................................ 28 Task 2.3 - Clone Database Software and Prepare New Instance .................... 28 Task 2.4 - Configure Application Tiers for RAC............................................... 32 Task 2.5 - Update Clusterware Configuration.................................................... 33
Phase 3 - Establish Disaster Recovery Site Utilizing Oracle Data Guard .......... 35 Task 3.1 - Implement Cluster Prerequisites........................................................ 35 Task 3.2 - Establish Oracle Clusterware.............................................................. 36 Task 3.3 - Establish ASM ...................................................................................... 36 Task 3.4 - Prepare Existing Database for Data Guard ..................................... 37 Task 3.5 - Clone Database Software and Prepare New Instances .................. 39 Task 3.6 - Establish Standby Database................................................................ 42 Task 3.7 - Clone Application Software and Configure on the DR Site.......... 44 Task 3.8 - Update Clusterware Configuration.................................................... 46
Phase 4 - Ongoing Switchover and Failover Testing ............................................. 47 Task 4.1 - Switchover Procedure.......................................................................... 47 Task 4.2 - Switch Back Procedure........................................................................ 49 Task 4.3 - Failover Procedure ............................................................................... 49 Task 4.4 - DR Testing Procedure using Flashback Database .......................... 52 Task 4.5 - Automating Switchover and Failover Procedures........................... 53
Appendix A –E-Business Suite Switchover/Failover Script................................. 56 References ..................................................................................................................... 60
Transitioning E-Business Suite to the Maximum Availability Architecture with Minimal Downtime Page 2
Maximum Availability Architecture
Transitioning E-Business Suite to the Maximum Availability Architecture with Minimal Downtime
EXECUTIVE SUMMARY Oracle Maximum Availability Architecture (MAA) is Oracle's best practice blueprint based on proven Oracle high-availability technologies and recommendations. The goal of MAA is to remove the complexity in designing the optimal high-availability architecture.
Published as part of the MAA series of white papers, this paper focuses on transitioning an E-Business Suite application to an MAA configuration while keeping application downtime to a minimum. The most current version of this document is located at Oracle Maximum Availability Architecture (MAA).
The starting point for our process is Oracle E-Business Suite 11.5.10.2 on a single instance (non-RAC) Oracle 10gR2 database. Our final configuration is Oracle E-Business Suite 11.5.10.2 running on a two node 10gR2 RAC cluster with Flashback, ASM, Oracle Clusterware, and a disaster recovery site leveraging Oracle Data Guard
During our tests we were able to limit E-Business Suite application downtime to 5 minutes for the transition to MAA. We also formulated an approach for the switchover and failover to the disaster site that limited E-Business Suite application downtime to 5 minutes.
Transitioning E-Business Suite to the Maximum Availability Architecture with Minimal Downtime Page 3
Maximum Availability Architecture
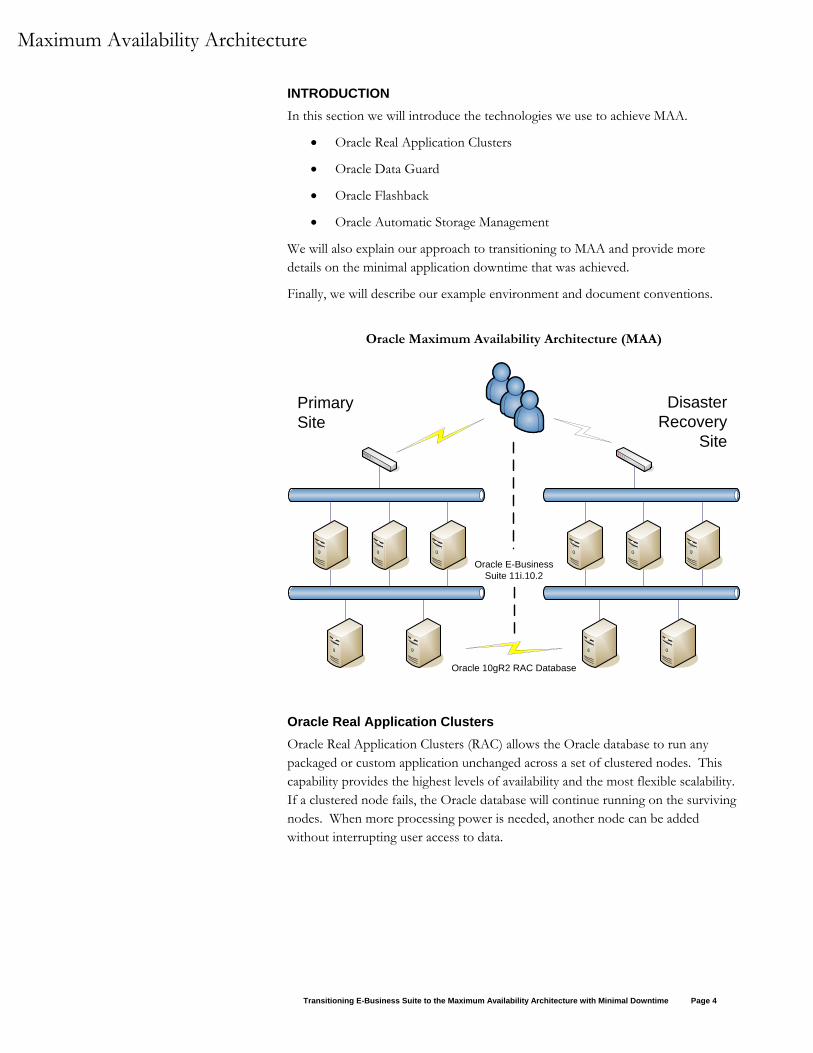
INTRODUCTION In this section we will introduce the technologies we use to achieve MAA.
• Oracle Real Application Clusters
• Oracle Data Guard
• Oracle Flashback
• Oracle Automatic Storage Management
We will also explain our approach to transitioning to MAA and provide more details on the minimal application downtime that was achieved.
Finally, we will describe our example environment and document conventions.
Oracle Maximum Availability Architecture (MAA)
Oracle 10gR2 RAC Database
PrimarySite
DisasterRecovery
Site
Oracle E-BusinessSuite 11i.10.2
Oracle Real Application Clusters Oracle Real Application Clusters (RAC) allows the Oracle database to run any packaged or custom application unchanged across a set of clustered nodes. This capability provides the highest levels of availability and the most flexible scalability. If a clustered node fails, the Oracle database will continue running on the surviving nodes. When more processing power is needed, another node can be added without interrupting user access to data.
Transitioning E-Business Suite to the Maximum Availability Architecture with Minimal Downtime Page 4
Maximum Availability Architecture
Oracle Data Guard Oracle Data Guard provides a comprehensive set of services that create, maintain, manage, and monitor one or more standby databases to enable production Oracle databases to survive failures, disasters, errors, and data corruption. Data Guard maintains these standby databases as transactionally consistent copies of the production database. If the production database becomes unavailable due to a planned or an unplanned outage, Data Guard can switch any standby database to the production role, thus greatly reducing the application downtime caused by the outage. Data Guard can be used with traditional backup, restore, and clustering solutions to provide a high level of data protection and data availability.
Oracle Flashback Database Flashback Database quickly rewinds an Oracle database to a previous time, to correct any problems caused by logical data corruptions or user errors. Flashback Database is like a 'rewind button' for your database. It provides database point in time recovery without requiring a backup of the database to first be restored. When you eliminate the time it takes to restore a database backup from tape, database point in time recovery is fast.
In this paper we document how Flashback can be used to return the production database to standby mode after failover without the need for a lengthy database restore, thus accelerating the return to normal production operation after a disaster.
Oracle Automatic Storage Management Automatic Storage Management (ASM) provides a vertically integrated file system and volume manager directly in the Oracle kernel, resulting in:
• Significantly less work to provision database storage
• Higher levels of availability
• Elimination of the expense, installation, and maintenance of specialized storage products
• Unique capabilities for database applications
For optimal performance, ASM spreads files across all available storage. To protect against data loss, ASM extends the concept of SAME (stripe and mirror everything) and adds more flexibility in that it can mirror at the database file level rather than the entire disk level1.
Oracle Clusterware High availability configurations have redundant hardware and software that maintain operations by avoiding single points of failure. To accomplish this, the Oracle Clusterware is installed as part of the RAC installation process. Oracle Clusterware is a portable solution that is integrated and designed specifically for the
1 It can be said that ASM is the implementation and automation of SAME.
Transitioning E-Business Suite to the Maximum Availability Architecture with Minimal Downtime Page 5
Maximum Availability Architecture
Oracle database2. In a RAC environment, Oracle Clusterware monitors all Oracle resources (such as instances and listeners). If a failure occurs, Oracle Clusterware will automatically attempt to restart the failed resource. During outages, Oracle Clusterware relocates the processing performed by the inoperative resource to a backup resource. For example, if a node in the cluster fails, Oracle Clusterware will relocate services being used by the application and notify client processes to reconnect to a surviving node.
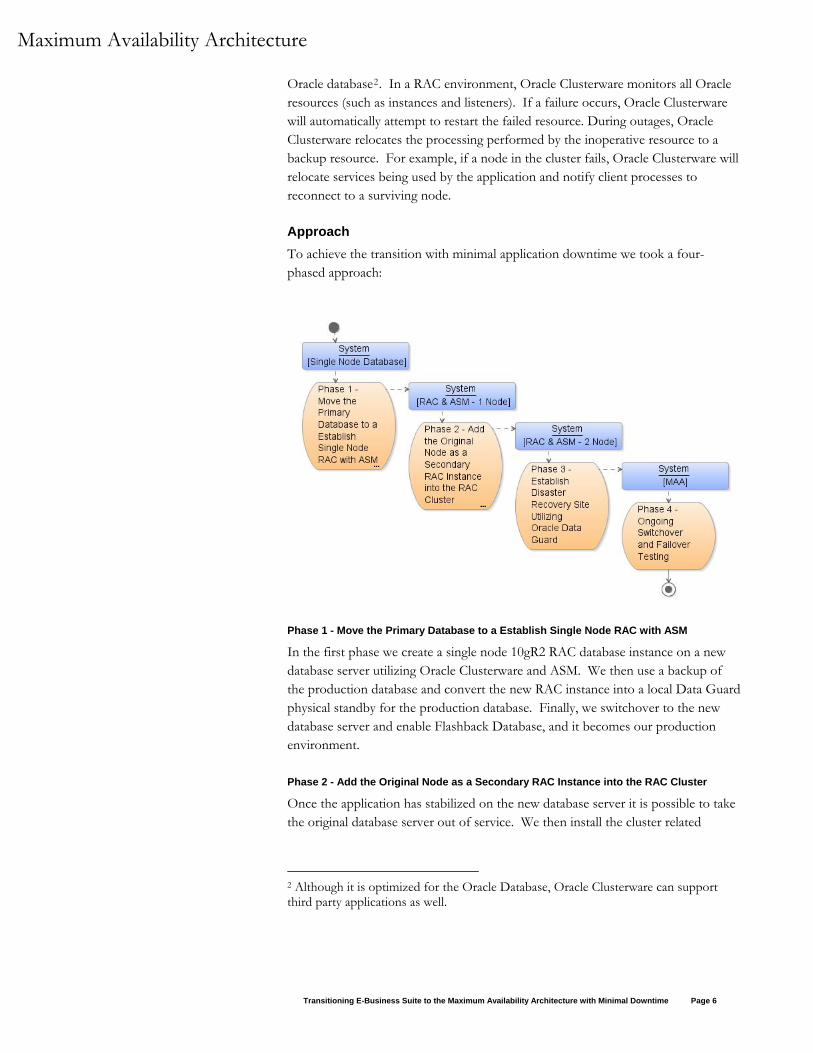
Approach To achieve the transition with minimal application downtime we took a four-phased approach:
Phase 1 - Move the Primary Database to a Establish Single Node RAC with ASM
In the first phase we create a single node 10gR2 RAC database instance on a new database server utilizing Oracle Clusterware and ASM. We then use a backup of the production database and convert the new RAC instance into a local Data Guard physical standby for the production database. Finally, we switchover to the new database server and enable Flashback Database, and it becomes our production environment.
Phase 2 - Add the Original Node as a Secondary RAC Instance into the RAC Cluster
Once the application has stabilized on the new database server it is possible to take the original database server out of service. We then install the cluster related
2 Although it is optimized for the Oracle Database, Oracle Clusterware can support third party applications as well.
Transitioning E-Business Suite to the Maximum Availability Architecture with Minimal Downtime Page 6
Maximum Availability Architecture
hardware and establish Oracle Clusterware, ASM and RAC on the old production server and add it to the cluster, creating a two node RAC cluster.
Phase 3 - Establish Disaster Recovery Site Utilizing Oracle Data Guard
To complete the MAA it is also necessary to establish a disaster recovery site. To do this we establish a two node 10gR2 RAC database cluster on servers at the DR site utilizing Oracle Clusterware and ASM. We instantiate the Data Guard physical standby using backups taken from the production database. We also clone the E-Business Suite application tier software from the primary site to the disaster site. The standby system will apply changes received from the primary site so that it stays up to date and will be ready to take over in the event of an emergency.
Phase 4 - Ongoing Switchover and Failover Testing
The Disaster Recovery site can be used via switchover to provide application services while the production platform or site is undergoing planned maintenance or via failover if the production site is rendered unusable by a severe unplanned outage. In this phase we test the switchover and failover procedures. We recommend that switchover and failover procedures are tested regularly to validate the MAA configuration.
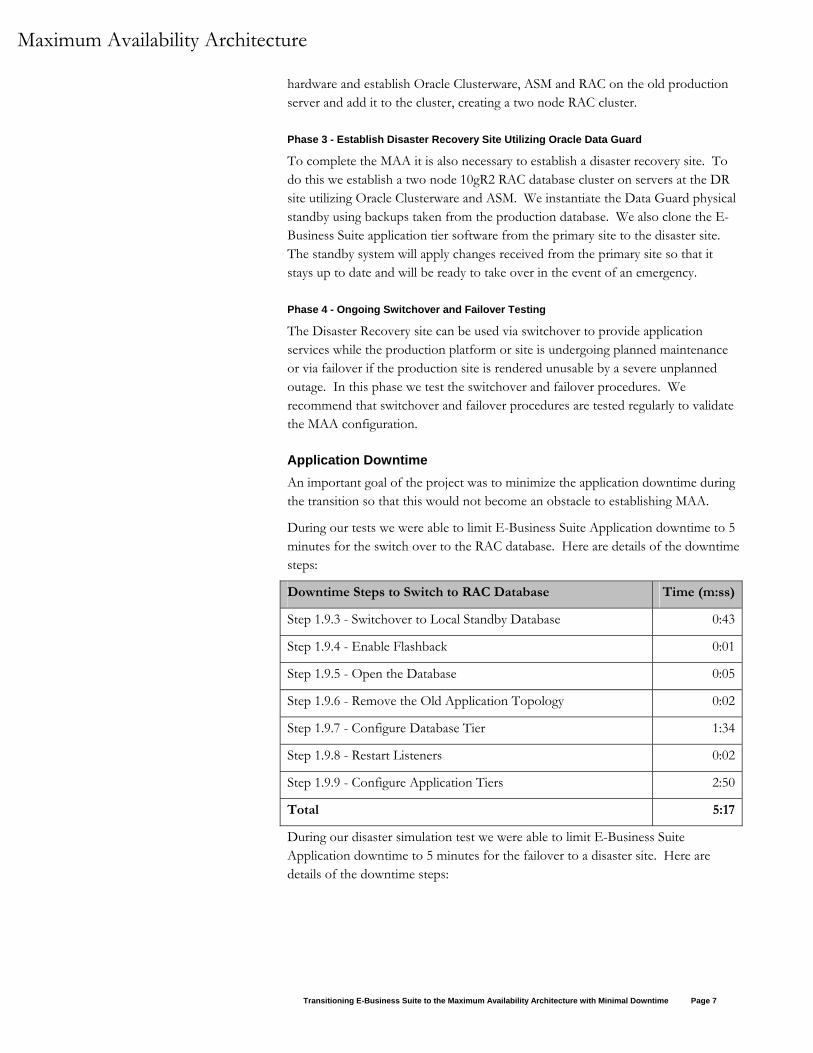
Application Downtime An important goal of the project was to minimize the application downtime during the transition so that this would not become an obstacle to establishing MAA.
During our tests we were able to limit E-Business Suite Application downtime to 5 minutes for the switch over to the RAC database. Here are details of the downtime steps:
Downtime Steps to Switch to RAC Database Time (m:ss)
Step 1.9.3 - Switchover to Local Standby Database 0:43
Step 1.9.4 - Enable Flashback 0:01
Step 1.9.5 - Open the Database 0:05
Step 1.9.6 - Remove the Old Application Topology 0:02
Step 1.9.7 - Configure Database Tier 1:34
Step 1.9.8 - Restart Listeners 0:02
Step 1.9.9 - Configure Application Tiers 2:50
Total 5:17
During our disaster simulation test we were able to limit E-Business Suite Application downtime to 5 minutes for the failover to a disaster site. Here are details of the downtime steps:
Transitioning E-Business Suite to the Maximum Availability Architecture with Minimal Downtime Page 7

Maximum Availability Architecture
Downtime Steps to Failover to Disaster Recovery Site Time (m:ss)
Step 4.3.1 - Failover to DR Database 0:09
Step 4.3.2 - Enable Flashback 0:01
Step 4.3.3 - Open the DR Database 0:12
Step 4.3.5 - Remove the Old Application Topology 0:02
Step 4.3.6 - Configure DR Database Tier 1:34
Step 4.3.7 - Restart Listeners 0:02
Step 4.3.8 - Configure Application Tiers 2:50
Total 4:50
Note, the time to shutdown and startup the application services was not included in our downtime estimates as this can vary considerably in each environment. In our test environment the application shutdown and startup took approximately 3 minutes.
Example Environment The example used in this document is based on a UNIX system. It starts with a database named VIS located on node ha1db. This database is transitioned to a two node RAC cluster running on nodes ha1db01 and ha1db02 and then a disaster recovery site is established on ha2db01 and ha2db02. ha1db is renamed to ha1db02 during this process. Details of the node names and configurations used for each phase of the transition are summarized in the following table:
Primary Site
Single Node Database
Single Node RAC and ASM
Two Node RAC and ASM
Disaster Site
Network Domain
ha.us.oracle.com ha.us.oracle.com ha.us.oracle.com ha.us.oracle.com
Application Tier Nodes
ha1mt01 ha1mt02 ha1mt03
ha1mt01 ha1mt02 ha1mt03
ha1mt01 ha1mt02 ha1mt03
ha2mt01
APPL_TOP
/u01/appltop /u01/appltopRAC /u01/appltopRAC /u01/appltopRAC
Database Tier Nodes
ha1db ha1db01 ha1db01 ha1db02 (renamed
from ha1db)
ha2db01 ha2db02
ORACLE_HOME
/u01/app/oracle/visdb/10.2.0
/u01/app/oracle/ visdbRAC/10.2.0
/u01/app/oracle/ visdbRAC/10.2.0
/u01/app/oracle/ visdbRAC/10.2.0
Instance Names
VIS VIS1 VIS1 and VIS2 VIS1 and VIS2
Transitioning E-Business Suite to the Maximum Availability Architecture with Minimal Downtime Page 8
Maximum Availability Architecture
Primary Site
Single Node Database
Single Node RAC and ASM
Disaster Site
Two Node RAC and ASM
Unique DB Name
VIS VIS_ha1 VIS_ha1 VIS_ha2
DB File Location
/oradb/oradata/ visdata
+DATA/VIS_ha1/ datafile
+DATA/VIS_ha1/ datafile
+DATA/VIS_ha2/ datafile
Log File Location
/oradb/oradata/ visdata
+DATA/VIS_ha1/ onlinelog
+DATA/VIS_ha1/ onlinelog
+DATA/VIS_ha2/ onlinelog
Database Instance Configuration When configuring a database in an Oracle E-Business Suite environment it is essential to make changes in the “ifile” (the parameter “include file”) so that the AutoConfig utility does not overwrite them. The “ifile” is located at:
$ORACLE_HOME/dbs/<CONTEXT_NAME>_ifile.ora
The Oracle Database Reference is an excellent reference for all database parameters.
It will be necessary to configure the original instance and the RAC instances during the transition to RAC, and the primary and standby instances when we establish the DR site. In this document we show the configurations we used for our test environment as examples. We recommend that you prepare similar configuration files and scripts for your environment ahead of time and have them available to use at the appropriate steps.
We have described some of the parameters in more detail below:
parallel_execution_message_size
It is recommended that this parameter be set as follows for optimal redo processing on the standby database.
parallel_execution_message_size=8192
db_recovery_file_dest
This parameter represents the location of Oracle’s Flash Recovery Area. The Flash Recovery Area holds all of Oracle’s recovery related files, and more importantly automates the management of those files based on user specified settings. This automation significantly simplifies the administration and configuration of recovery-related files such as backup sets, image copies, archive log files, flashback log files, etc. The Flash Recovery Area can be located on a filesystem or in an ASM diskgroup.
Transitioning E-Business Suite to the Maximum Availability Architecture with Minimal Downtime Page 9
Maximum Availability Architecture
db_recovery_file_dest_size
This parameter represents the amount of space the Flash Recovery Area is allowed to use. The recommended size depends on the application but for the Oracle recommended backup strategy, the Flash Recovery Area is generally 2.5 times larger than the database.
db_file_name_convert and log_file_name_convert
These parameters ensure that database and log file names are matched up properly when the names are not the same in a primary controlfile and a standby controlfile3.. Note they cannot be set dynamically, so their settings have to be considered carefully to avoid unnecessary downtime.
fal_server and fal_client
These parameters automate the detection and fetching of log sequence gaps between the primary and the standby. For example, gaps can occur if managed recovery is turned off on the standby during a time when many logs are archived on the primary.
For the temporary local standby system set up to convert the production system to RAC and ASM, we used EZConnect syntax in these parameters. This simplified our TNS settings for the interim configuration.
For permanent communications between the production and DR site, we defined and referenced services for these parameters.
db_unique_name
This is a name that differentiates databases running in a Data Guard standby configuration.
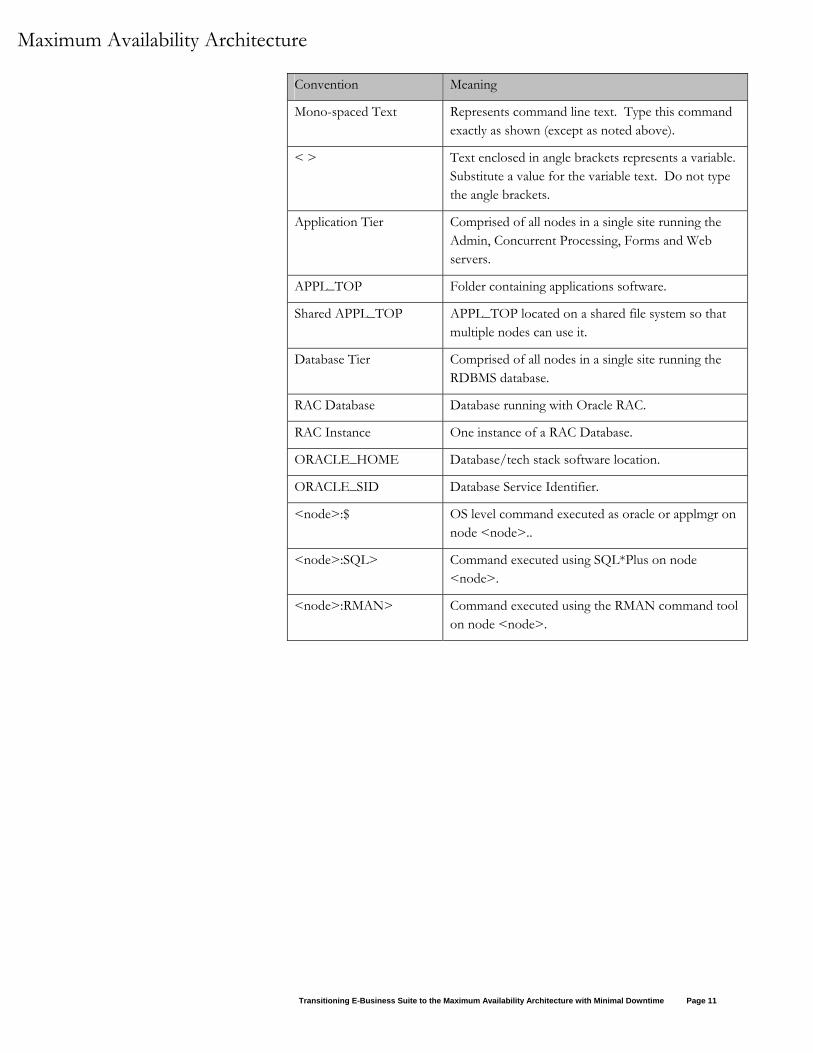
Conventions Convention Meaning
Production or primary system
Initial Applications system
applmgr User that owns the applications file system (APPL_TOP and application tier technology stack)
oracle User that owns the database (ORACLE_HOME and database files).
CONTEXT_NAME The CONTEXT_NAME variable refers to the name of the Applications Context file, typically in the format <SID>_<HOSTNAME>.
3 This is generally the case when using ASM since ASM uses the db_unqiue_name as part of datafile path
Transitioning E-Business Suite to the Maximum Availability Architecture with Minimal Downtime Page 10
Maximum Availability Architecture
Convention Meaning
Mono-spaced Text Represents command line text. Type this command exactly as shown (except as noted above).
< > Text enclosed in angle brackets represents a variable. Substitute a value for the variable text. Do not type the angle brackets.
Application Tier Comprised of all nodes in a single site running the Admin, Concurrent Processing, Forms and Web servers.
APPL_TOP Folder containing applications software.
Shared APPL_TOP APPL_TOP located on a shared file system so that multiple nodes can use it.
Database Tier Comprised of all nodes in a single site running the RDBMS database.
RAC Database Database running with Oracle RAC.
RAC Instance One instance of a RAC Database.
ORACLE_HOME Database/tech stack software location.
ORACLE_SID Database Service Identifier.
<node>:$ OS level command executed as oracle or applmgr on node <node>..
<node>:SQL> Command executed using SQL*Plus on node <node>.
<node>:RMAN> Command executed using the RMAN command tool on node <node>.
Transitioning E-Business Suite to the Maximum Availability Architecture with Minimal Downtime Page 11
Maximum Availability Architecture
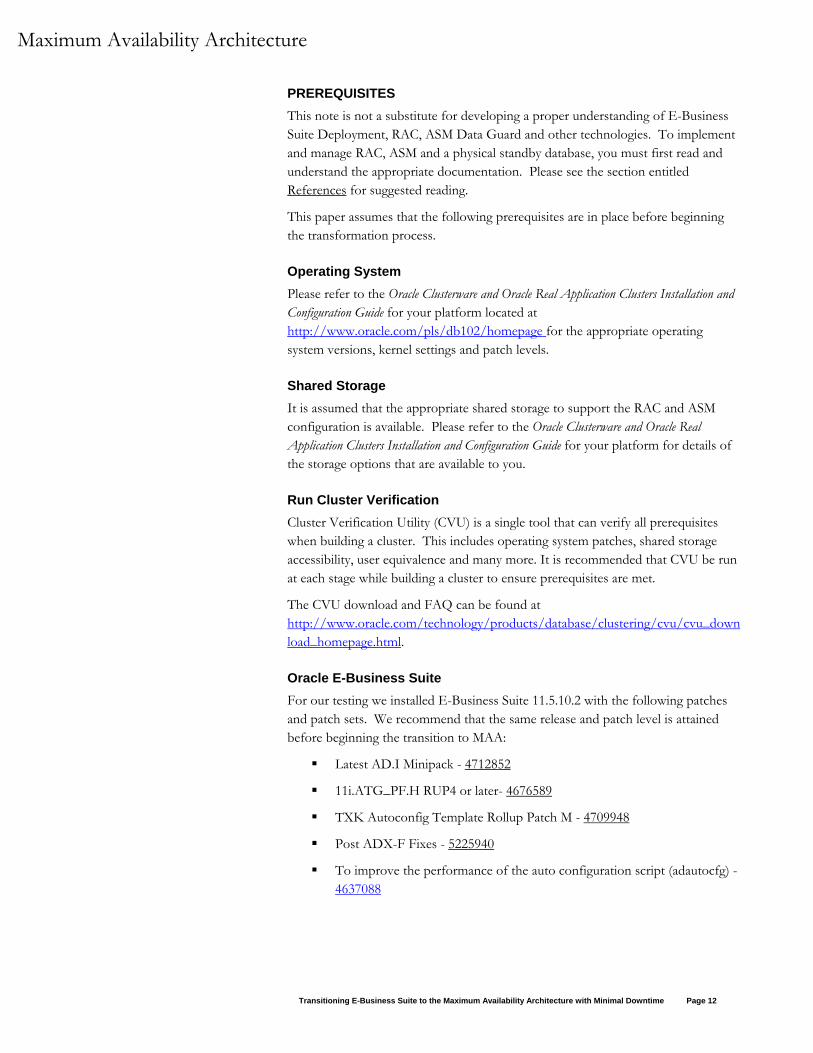
PREREQUISITES This note is not a substitute for developing a proper understanding of E-Business Suite Deployment, RAC, ASM Data Guard and other technologies. To implement and manage RAC, ASM and a physical standby database, you must first read and understand the appropriate documentation. Please see the section entitled References for suggested reading.
This paper assumes that the following prerequisites are in place before beginning the transformation process.
Operating System Please refer to the Oracle Clusterware and Oracle Real Application Clusters Installation and Configuration Guide for your platform located at http://www.oracle.com/pls/db102/homepage for the appropriate operating system versions, kernel settings and patch levels.
Shared Storage It is assumed that the appropriate shared storage to support the RAC and ASM configuration is available. Please refer to the Oracle Clusterware and Oracle Real Application Clusters Installation and Configuration Guide for your platform for details of the storage options that are available to you.
Run Cluster Verification Cluster Verification Utility (CVU) is a single tool that can verify all prerequisites when building a cluster. This includes operating system patches, shared storage accessibility, user equivalence and many more. It is recommended that CVU be run at each stage while building a cluster to ensure prerequisites are met.
The CVU download and FAQ can be found at http://www.oracle.com/technology/products/database/clustering/cvu/cvu_download_homepage.html.
Oracle E-Business Suite For our testing we installed E-Business Suite 11.5.10.2 with the following patches and patch sets. We recommend that the same release and patch level is attained before beginning the transition to MAA:
Latest AD.I Minipack - 4712852
11i.ATG_PF.H RUP4 or later- 4676589
TXK Autoconfig Template Rollup Patch M - 4709948
Post ADX-F Fixes - 5225940
To improve the performance of the auto configuration script (adautocfg) - 4637088
Transitioning E-Business Suite to the Maximum Availability Architecture with Minimal Downtime Page 12
Maximum Availability Architecture
5456078 – CloneContext: Skip DB port check if VALIDATE=NO on application tier
2873456 – Enable EditContext on the database tier
For a list of other required database patches, refer to Interoperability Notes - Oracle Applications 11i with Oracle Database 10g Release 2.
We assume that the application is configured with multiple application tier nodes fronted by a hardware load balancer.
Oracle Database Our initial production database was a single instance Oracle DB 10.2.0.2. No addition patches are required.
It is assumed that the database is in archive log mode. If this is not the case then this should be scheduled and performed before the transition is started. Note that this will require some database downtime.
It is strongly recommended that the database be configured with mirrored online redo logs and control files.
It is assumed that sufficient network bandwidth to support Oracle Data Guard is available between the primary and disaster recovery site.
Transitioning E-Business Suite to the Maximum Availability Architecture with Minimal Downtime Page 13
Maximum Availability Architecture
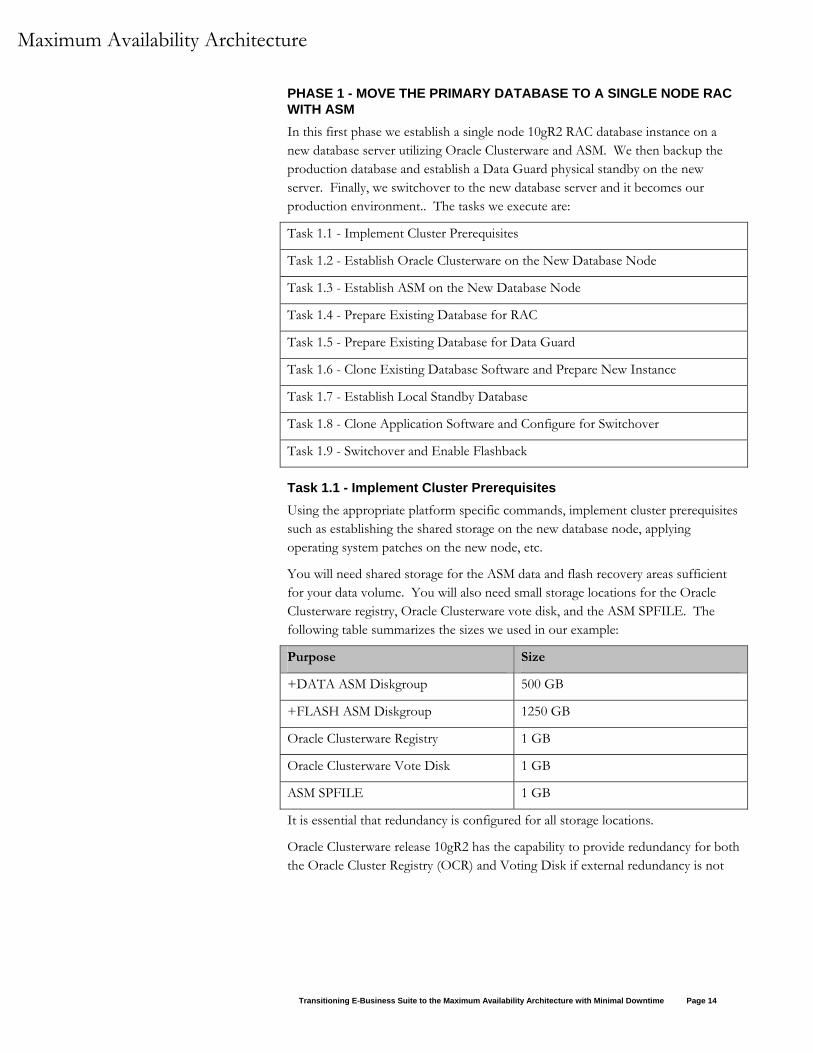
PHASE 1 - MOVE THE PRIMARY DATABASE TO A SINGLE NODE RAC WITH ASM In this first phase we establish a single node 10gR2 RAC database instance on a new database server utilizing Oracle Clusterware and ASM. We then backup the production database and establish a Data Guard physical standby on the new server. Finally, we switchover to the new database server and it becomes our production environment.. The tasks we execute are:
Task 1.1 - Implement Cluster Prerequisites
Task 1.2 - Establish Oracle Clusterware on the New Database Node
Task 1.3 - Establish ASM on the New Database Node
Task 1.4 - Prepare Existing Database for RAC
Task 1.5 - Prepare Existing Database for Data Guard
Task 1.6 - Clone Existing Database Software and Prepare New Instance
Task 1.7 - Establish Local Standby Database
Task 1.8 - Clone Application Software and Configure for Switchover
Task 1.9 - Switchover and Enable Flashback
Task 1.1 - Implement Cluster Prerequisites Using the appropriate platform specific commands, implement cluster prerequisites such as establishing the shared storage on the new database node, applying operating system patches on the new node, etc.
You will need shared storage for the ASM data and flash recovery areas sufficient for your data volume. You will also need small storage locations for the Oracle Clusterware registry, Oracle Clusterware vote disk, and the ASM SPFILE. The following table summarizes the sizes we used in our example:
Purpose Size
+DATA ASM Diskgroup 500 GB
+FLASH ASM Diskgroup 1250 GB
Oracle Clusterware Registry 1 GB
Oracle Clusterware Vote Disk 1 GB
ASM SPFILE 1 GB
It is essential that redundancy is configured for all storage locations.
Oracle Clusterware release 10gR2 has the capability to provide redundancy for both the Oracle Cluster Registry (OCR) and Voting Disk if external redundancy is not
Transitioning E-Business Suite to the Maximum Availability Architecture with Minimal Downtime Page 14
Maximum Availability Architecture
being used. The installer offers a default mirroring configuration of two OCR devices and three Voting Disk devices.
ASM has the capability to provide diskgroup redundancy if external redundancy is not being used. Both NORMAL (two-way) and HIGH (three-way) redundancy options exist. If a high-end storage subsystem is being used that already offers redundancy, then redundancy should be deferred to that high-end storage subsystem and ASM redundancy should not be used. This is done by configuring diskgroups with the EXTERNAL redundancy attribute
Task 1.2 - Establish Oracle Clusterware on the New Database Node Oracle Clusterware provides critical cluster management features including node membership and resource management. The following sections explain how to install Oracle Clusterware.
Step 1.2.1 - Install Oracle Clusterware 10gR2
Follow the instructions in the Oracle Clusterware and Oracle Real Application Clusters Installation and Configuration Guide for your platform (see http://www.oracle.com/pls/db102/homepage) to install Oracle Clusterware on the new database server. This should be installed in an Oracle home that is separate from the Oracle Application Database and ASM homes.
Step 1.2.2 - Apply Patchset 10.2.0.2 or Later
The latest database patch set for your platform can be located on OracleMetaLink and should be applied.
Task 1.3 - Establish ASM on the New Database Node Oracle Automatic Storage Management provides volume management and file system capabilities for database files. It automatically stripes data across all disks in a disk group and optionally provides redundancy for cases when customers choose not to have it implemented in the backend storage subsystem. ASM also includes the ability to add and remove storage with no downtime as data is automatically moved from the disks being removed to the remaining disks. The following sections explain how to install and configure ASM.
The best practice is to have two disk groups, one for database files and one for flash recovery area files. Mirrored copies of your redo logs and control files should be stored in both the flash recovery and the database file disk groups. Detailed ASM administration concepts and commands can be found in the 10gR2 Oracle Database Administrator's Guide.
Step 1.3.1 - Install 10gR2 Database for ASM
Follow the instructions in the Oracle Clusterware and Oracle Real Application Clusters Installation and Configuration Guide for your platform to create a clustered ASM installation on the new database node. This should be installed in an Oracle home
Transitioning E-Business Suite to the Maximum Availability Architecture with Minimal Downtime Page 15
Maximum Availability Architecture
that is separate from the Oracle Application Database and Oracle Clusterware homes. Choose the “software only” installation because we want to apply the patch before creating the instance.
Step 1.3.2 - Apply Patchset 10.2.0.2 or Later
The latest database patch set for your platform can be located on OracleMetaLink and should be applied.
Step 1.3.3 - Create ASM Instance and Disk Groups
Use the DBCA utility to create an ASM instance and configure the disk groups. You will need to create data and flash recovery disk groups. This is also documented in the guide.
Step 1.3.4 - Remove the Listener Created by DBCA.
While configuring ASM, DBCA creates a listener and registers it to CRS. If it uses the same port or name as E-Business Suite then it needs to be removed with netca.
Task 1.4 - Prepare Existing Database for RAC
Step 1.4.1 - Create Additional Redo Threads
Each RAC instance requires its own redo thread. A single instance database has only one thread of redo, so additional threads must be added and enabled. Here is an example of how this can be done:
ha1db:SQL> alter database add logfile thread 2 group 4 ('/oradb/oradata/visdata/log2_1.dbf') size 50M, group 5 ('/oradb/oradata/visdata/log2_2.dbf') size 50M, group 6 ('/oradb/oradata/visdata/log2_3.dbf') size 50M; alter database enable public thread 2;
Step 1.4.2 - Create Additional Undo Tablespaces
Each RAC instance requires its own undo tablespace. A single instance database has only one undo tablespace, so additional tablespaces must be added. Here is an example of how this can be done:
ha1db:SQL> create undo tablespace "APPS_UNDOTS2" datafile '/oradb/oradata/visdata/undots201.dbf' size 1048576000, '/oradb/oradata/visdata/undots202.dbf' size 1048576000, '/oradb/oradata/visdata/undots203.dbf' size 1048576000, '/oradb/oradata/visdata/undots204.dbf' size 1048576000 blocksize 8192 extent management local autoallocate;
Step 1.4.3 - Execute CATCLUST.SQL
The Oracle provided catclust.sql script must be executed to prepare a database for RAC operation:
ha1db:SQL> @$ORACLE_HOME/rdbms/admin/catclust.sql
Transitioning E-Business Suite to the Maximum Availability Architecture with Minimal Downtime Page 16
Maximum Availability Architecture
Task 1.5 - Prepare Existing Database for Data Guard
Step 1.5.1 - Create Password Files
Oracle Data Guard in database release 10g requires the use of a password file for communications between the primary and standby databases. The method required to implement this feature varies by platform. See OracleMetaLink note 185703.1 for more information, and to get pointers for the commands needed for your platform. An example UNIX invocation:
ha1db:$ cd $ORACLE_HOME/dbs
ha1db:$ orapwd file=orapw<SID> password=<SYS’s password>
Repeat this procedure for the current SID (VIS) and the new SIDs (VIS1 and VIS2) that will be used for the RAC environment so that they will be copied over and used as we clone the Oracle homes.
For the password file to function correctly the following parameter setting must be configured in the database instance.
remote_login_passwordfile=EXCLUSIVE
This is the default setting in Database 10gR2 and is not overridden by the standard Applications database configuration files, so is not listed in our database configuration parameters elsewhere in this document.
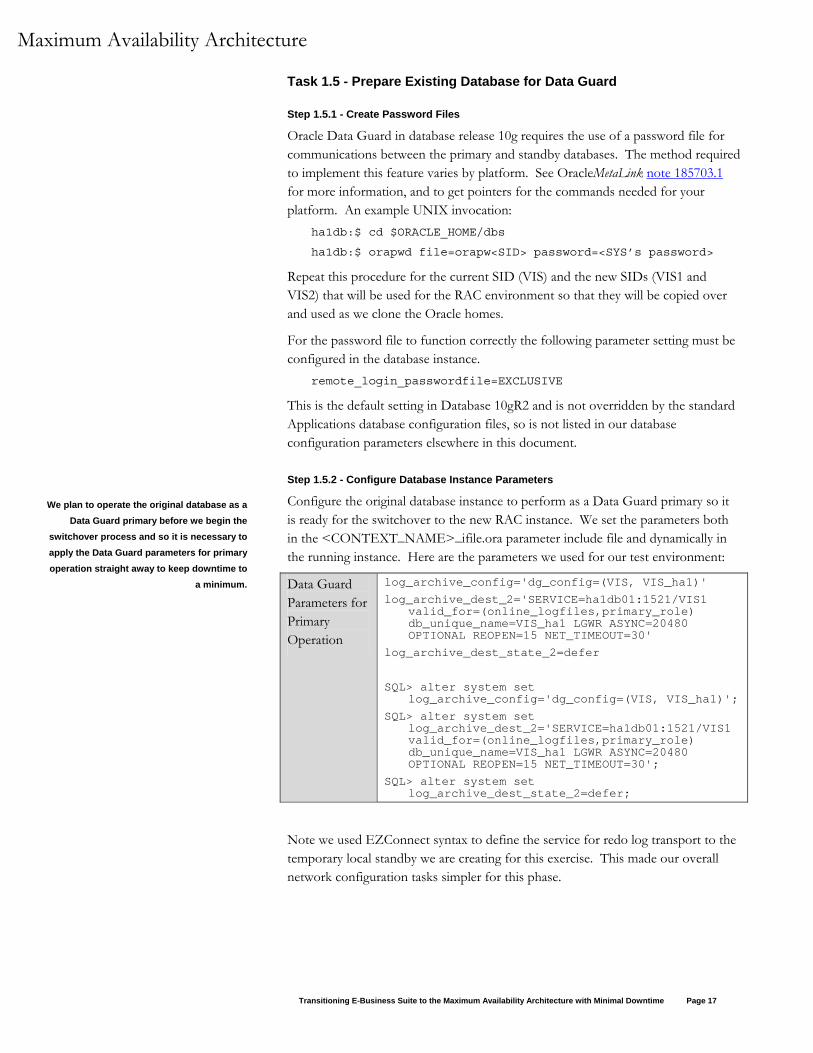
Step 1.5.2 - Configure Database Instance Parameters
We plan to operate the original database as a Data Guard primary before we begin the
switchover process and so it is necessary to apply the Data Guard parameters for primary operation straight away to keep downtime to
a minimum.
Configure the original database instance to perform as a Data Guard primary so it is ready for the switchover to the new RAC instance. We set the parameters both in the <CONTEXT_NAME>_ifile.ora parameter include file and dynamically in the running instance. Here are the parameters we used for our test environment:
Data Guard Parameters for Primary Operation
log_archive_config='dg_config=(VIS, VIS_ha1)' log_archive_dest_2='SERVICE=ha1db01:1521/VIS1
valid_for=(online_logfiles,primary_role) db_unique_name=VIS_ha1 LGWR ASYNC=20480 OPTIONAL REOPEN=15 NET_TIMEOUT=30'
log_archive_dest_state_2=defer SQL> alter system set
log_archive_config='dg_config=(VIS, VIS_ha1)'; SQL> alter system set
log_archive_dest_2='SERVICE=ha1db01:1521/VIS1 valid_for=(online_logfiles,primary_role) db_unique_name=VIS_ha1 LGWR ASYNC=20480 OPTIONAL REOPEN=15 NET_TIMEOUT=30';
SQL> alter system set log_archive_dest_state_2=defer;
Note we used EZConnect syntax to define the service for redo log transport to the temporary local standby we are creating for this exercise. This made our overall network configuration tasks simpler for this phase.
Transitioning E-Business Suite to the Maximum Availability Architecture with Minimal Downtime Page 17

Maximum Availability Architecture
Step 1.5.3 - Enable Forced Logging
E-Business Suite sometimes uses the NOLOGGING feature, which would cause certain changes to not be populated to the standby database, and this would invalidate the standby database. To avoid this we must turn on "force logging" on the database by issuing the following command from SQL*Plus connected as sysdba:
ha1db:SQL> alter database force logging;
See OracleMetaLink note 216211.1 for more information.
Step 1.5.4 - Create Standby Redo Logs
Create standby redo logs on the primary database to support the standby role. The standby redo logs should be the same size or larger than the primary database online redo logs. The recommended number of standby redo logs is one more than the number of online redo logs for each thread. Because this example has two online redo logs for each thread, three standby redo logs are required for each thread. Here is a formula that can be followed:
(maximum # of logfiles +1) * maximum # of threads
To create standby redo log groups, as the ORACLE user on the production database server, connect to SQL*Plus as sysdba and issue a command like this for each standby redo log group you will create:
ha1db:SQL> alter database add standby logfile thread N < group N > ( ‘<fully qualified logfile member name>’, ‘<fully qualified logfile member name>’) size NNN;
You can see the members created by querying V$LOGFILE view: ha1db:select * from v$logfile;
ha1db:select * from v$standby_log;
See the “Configure a Standby Redo Log” section in Oracle Data Guard Concepts and Administration Guide for more information.
Step 1.5.5 - Grant Access to Database Nodes
SQL*NET Access Security blocks requests coming to the database at the TNS listener level, from servers that are not specifically authorized. If the SQL*Net Access security is enabled in the existing system (enabled by default from 11i10), it is essential that all the database nodes in the current, RAC and disaster sites are given access for correct database operation. Pay particular attention to nodes that have multiple network interfaces and make sure the appropriate node aliases are included. See Managed SQL*Net Access from Hosts in document 281758.1 OracleMetaLink for instructions on how to achieve this from OAM.
Note: The standard node alias of each application tier node is automatically given access. If different network interfaces are used on the application tiers then their network aliases must be granted access manually.
Transitioning E-Business Suite to the Maximum Availability Architecture with Minimal Downtime Page 18
Maximum Availability Architecture
Note: It is not necessary to include the network interface used exclusively for cluster interconnect communications in your RAC configuration.
Task 1.6 - Clone Existing Database Software and Prepare New Instance
Step 1.6.1 - Prepare the Database Oracle Home for Cloning
As the ORACLE user on the production database server, run the following commands:
ha1db:$ cd $ORACLE_HOME/appsutil/scripts/<CONTEXT_NAME> ha1db:$ perl adpreclone.pl dbTier
Supply the APPS password when requested.
Step 1.6.2 - Backup, Ship and Restore the Database Oracle Home
Using the appropriate operating system utilities, create a backup of the database Oracle home, ship the backups to the new database server, and then restore the Oracle home to the new RAC database node.
Note that this document assumes that the new node is not the same as the current production database node. Using the existing node would result in conflicting database listener configurations during the switchover. See the section entitled Add the Original Node as a Secondary RAC Instance into the RAC Cluster for details on how to add the original database node to the cluster after the switchover.
You must use a different ORACLE_HOME location for the RAC instances to prevent a conflict when you reintroduce the original node to the configuration.
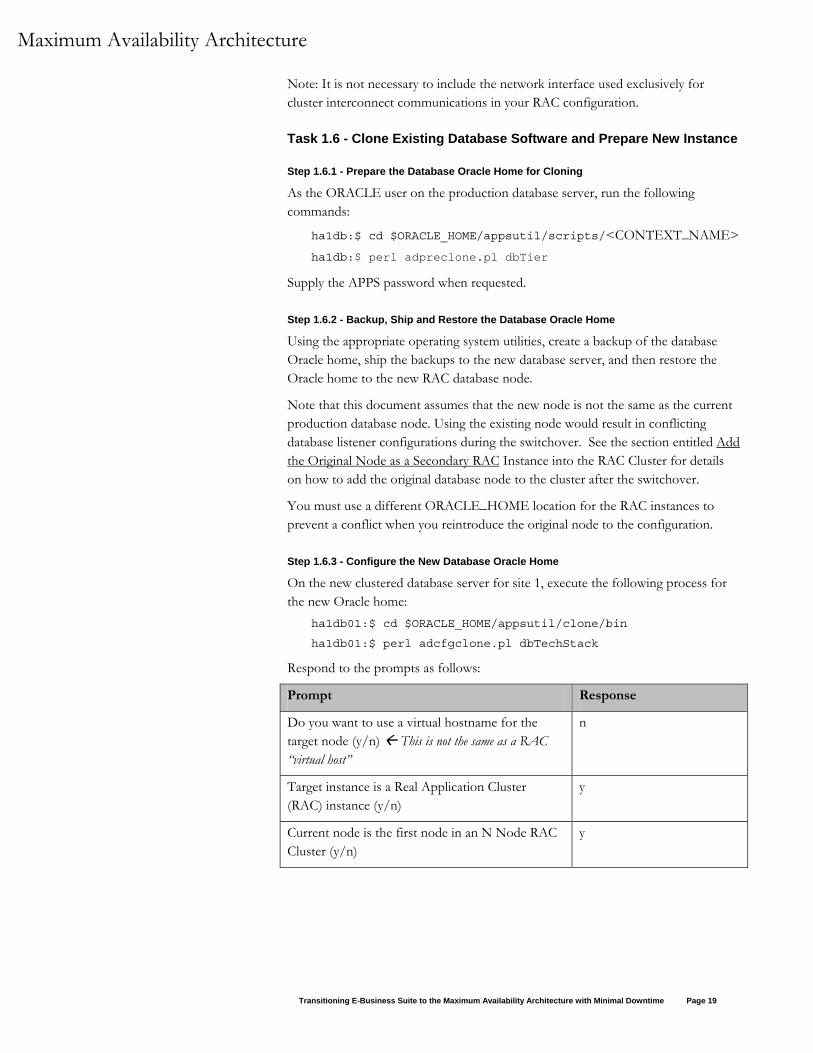
Step 1.6.3 - Configure the New Database Oracle Home
On the new clustered database server for site 1, execute the following process for the new Oracle home:
ha1db01:$ cd $ORACLE_HOME/appsutil/clone/bin
ha1db01:$ perl adcfgclone.pl dbTechStack
Respond to the prompts as follows:
Prompt Response
Do you want to use a virtual hostname for the target node (y/n) This is not the same as a RAC “virtual host”
n
Target instance is a Real Application Cluster (RAC) instance (y/n)
y
Current node is the first node in an N Node RAC Cluster (y/n)
y
Transitioning E-Business Suite to the Maximum Availability Architecture with Minimal Downtime Page 19
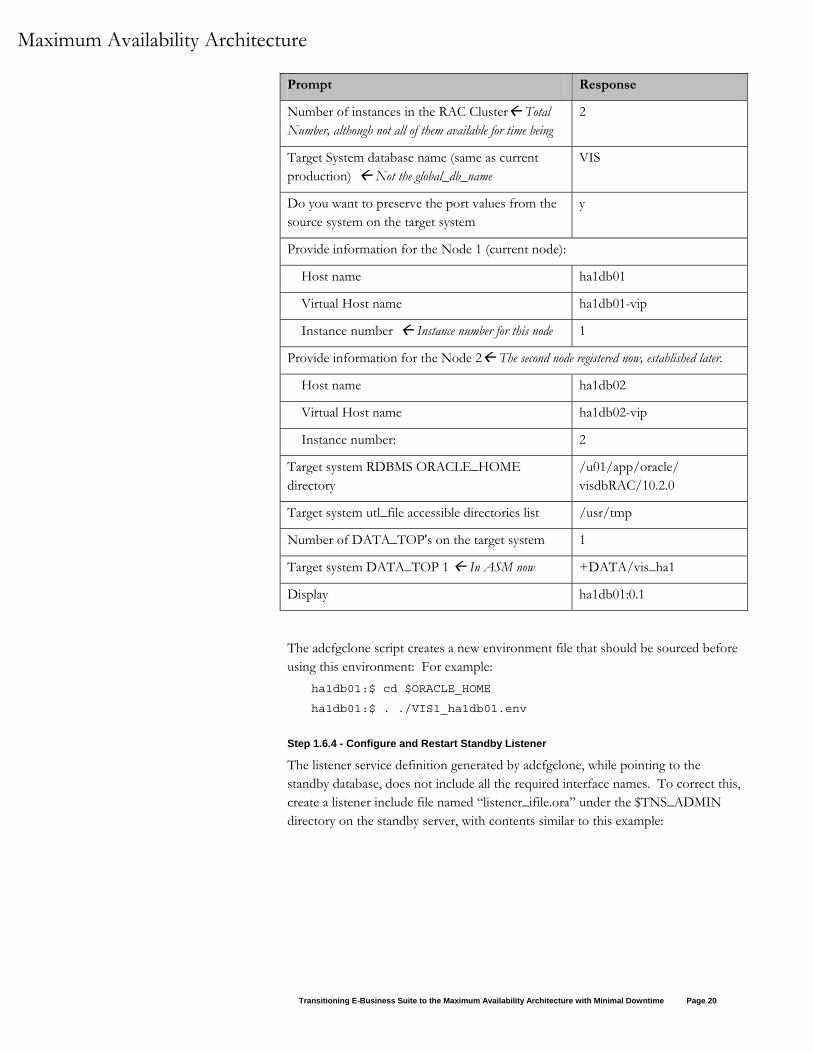
Maximum Availability Architecture
Prompt Response
Number of instances in the RAC Cluster Total Number, although not all of them available for time being
2
Target System database name (same as current production) Not the global_db_name
VIS
Do you want to preserve the port values from the source system on the target system
y
Provide information for the Node 1 (current node):
Host name ha1db01
Virtual Host name ha1db01-vip
Instance number Instance number for this node 1
Provide information for the Node 2 The second node registered now, established later.
Host name ha1db02
Virtual Host name ha1db02-vip
Instance number: 2
Target system RDBMS ORACLE_HOME directory
/u01/app/oracle/ visdbRAC/10.2.0
Target system utl_file accessible directories list /usr/tmp
Number of DATA_TOP's on the target system 1
Target system DATA_TOP 1 In ASM now +DATA/vis_ha1
Display ha1db01:0.1
The adcfgclone script creates a new environment file that should be sourced before using this environment: For example:
ha1db01:$ cd $ORACLE_HOME
ha1db01:$ . ./VIS1_ha1db01.env
Step 1.6.4 - Configure and Restart Standby Listener
The listener service definition generated by adcfgclone, while pointing to the standby database, does not include all the required interface names. To correct this, create a listener include file named “listener_ifile.ora” under the $TNS_ADMIN directory on the standby server, with contents similar to this example:
Transitioning E-Business Suite to the Maximum Availability Architecture with Minimal Downtime Page 20
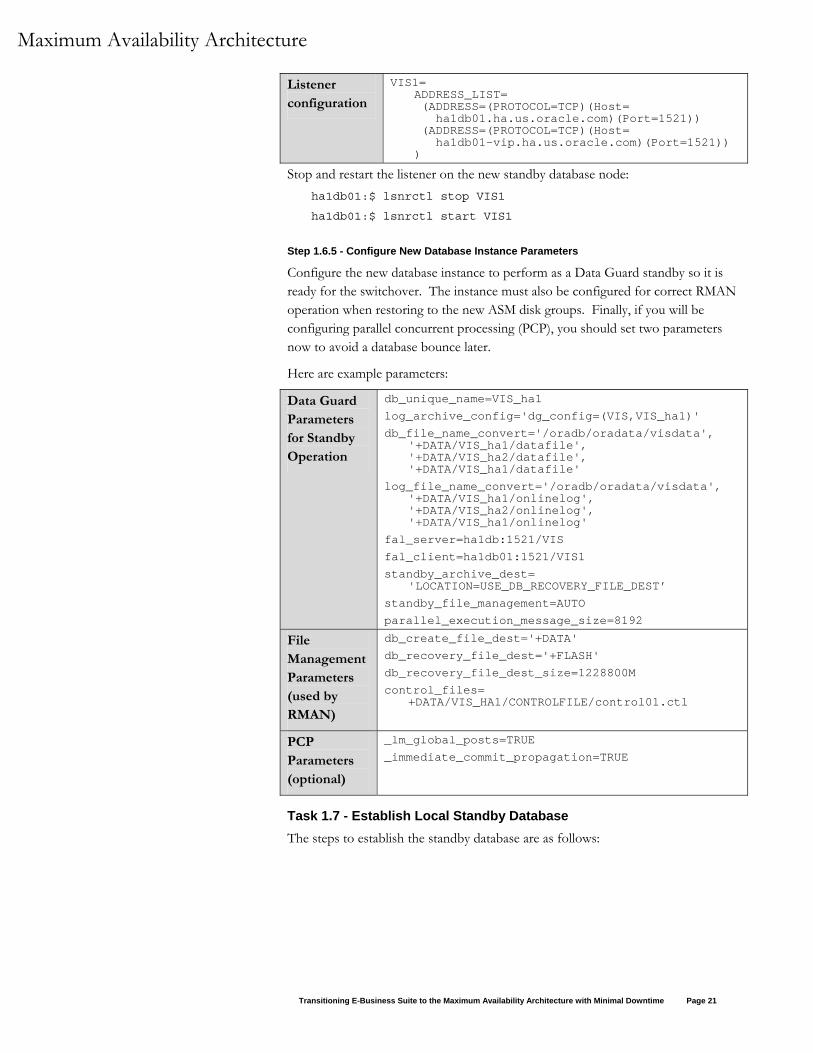
Maximum Availability Architecture
Listener configuration
VIS1= ADDRESS_LIST= (ADDRESS=(PROTOCOL=TCP)(Host= ha1db01.ha.us.oracle.com)(Port=1521)) (ADDRESS=(PROTOCOL=TCP)(Host= ha1db01-vip.ha.us.oracle.com)(Port=1521)) )
Stop and restart the listener on the new standby database node: ha1db01:$ lsnrctl stop VIS1
ha1db01:$ lsnrctl start VIS1
Step 1.6.5 - Configure New Database Instance Parameters
Configure the new database instance to perform as a Data Guard standby so it is ready for the switchover. The instance must also be configured for correct RMAN operation when restoring to the new ASM disk groups. Finally, if you will be configuring parallel concurrent processing (PCP), you should set two parameters now to avoid a database bounce later.
Here are example parameters:
Data Guard Parameters for Standby Operation
db_unique_name=VIS_ha1 log_archive_config='dg_config=(VIS,VIS_ha1)' db_file_name_convert='/oradb/oradata/visdata',
'+DATA/VIS_ha1/datafile', '+DATA/VIS_ha2/datafile', '+DATA/VIS_ha1/datafile'
log_file_name_convert='/oradb/oradata/visdata', '+DATA/VIS_ha1/onlinelog', '+DATA/VIS_ha2/onlinelog', '+DATA/VIS_ha1/onlinelog'
fal_server=ha1db:1521/VIS fal_client=ha1db01:1521/VIS1 standby_archive_dest=
'LOCATION=USE_DB_RECOVERY_FILE_DEST’ standby_file_management=AUTO parallel_execution_message_size=8192
File Management Parameters (used by RMAN)
db_create_file_dest='+DATA' db_recovery_file_dest='+FLASH' db_recovery_file_dest_size=1228800M control_files=
+DATA/VIS_HA1/CONTROLFILE/control01.ctl
PCP Parameters (optional)
_lm_global_posts=TRUE _immediate_commit_propagation=TRUE
Task 1.7 - Establish Local Standby Database The steps to establish the standby database are as follows:
Transitioning E-Business Suite to the Maximum Availability Architecture with Minimal Downtime Page 21
Maximum Availability Architecture
Step 1.7.1 - Backup the Production Database using RMAN
RMAN should be used to backup the current production database so that it is ready to be restored to the new standby. You must backup the database and the archived redo logs, and then the control file. Here is an example of how this can be achieved:
ha1db:$ rman target /
ha1db:RMAN> backup device type disk format '/NAS/oracle/rman_backups/%U' database plus archivelog;
ha1db:RMAN> backup device type disk format '/NAS/oracle/rman_backups/%U' current controlfile for standby;
Step 1.7.2 - Ship Backup to the new Database Server
Using the appropriate system tools, ship the backup to the new database server. Note that the backup should be placed in the same location on the target system (/NAS/oracle/rman_backups in the above example) so that the RMAN restore will function correctly.
Step 1.7.3 - Start one RAC instance
On the new clustered server for Site 1, start the RAC instance with the NOMOUNT option:
ha1db01:SQL> startup nomount
Step 1.7.4 - Restore the Database Backup to the Standby Using RMAN
The database must be restored with the “for standby” option, for example: ha1db01:$ rman target sys/manager@ha1db:1521/VIS
auxiliary /
ha1db01:RMAN> duplicate target database for standby;
Step 1.7.5 - Start Managed Recovery
Pay close attention to which instance the following commands are executed.
On the standby database, check to make sure the database is in standby mode by executing this query from SQL*Plus connected as sysdba:
ha1db01:SQL> select DATABASE_ROLE from v$database; DATABASE_ROLE ---------------- PHYSICAL STANDBY
On the primary database enable the previously deferred remote destination by executing this command from SQL*Plus connected as sysdba:
ha1db:SQL> alter system set log_archive_dest_state_2=enable;
Also, update the database configuration in the <context_name>_ifile.ora database parameter file on the primary database server:
log_archive_dest_state_2=enable
Transitioning E-Business Suite to the Maximum Availability Architecture with Minimal Downtime Page 22
Maximum Availability Architecture
Place the standby database in managed recovery by executing this command: ha1db01:SQL> recover managed standby database disconnect;
Step 1.7.6 - Verify Correct Standby Operation
Validate that the standby is correctly applying redo from the primary.
On the primary database, archive the current log using the following statement: ha1db:SQL> alter system archive log current;
On the standby database, query the gv$archived_log view to verify that the logs are received and applied:
ha1db01: SQL> select sequence#, applied, to_char(first_time, ‘mm/dd/yy hh24:mi:ss’) first, to_char(next_time, ‘mm/dd/yy hh24:mi:ss’) next, to_char(completion_time, ‘mm/dd/yy hh24:mi:ss’) completion from gv$archived_log order by first_time;
Task 1.8 - Clone Application Software and Configure for Switchover We will reuse the existing production application tiers to access the single node RAC, Flashback, and ASM-enabled database just built. To avoid any risk to production operations and get as much configuration work done as possible ahead of time, we cloned the application tier software to a new location on the application tiers.
Step 1.8.1 - Prepare the Application Tier for Cloning
For each type of application tier install at your site (e.g., Concurrent Processing, Administration, Web, Forms), log on as the APPLMGR user and prepare the application tier for cloning. If you share a single common APPL_TOP or have only full installs, you need only do this on one application tier. For example:
ha1mt01:$ cd <COMMON_TOP>/admin/scripts/<CONTEXT_NAME>
ha1mt01:$ perl adpreclone.pl appsTier
Step 1.8.2 - Copy the Application Tier File System
Using the appropriate tool, make a copy of the application tier files to a new directory location on the existing application tiers. We will use this new copy of the software to run the application after the switchover.
Step 1.8.3 - Configure New Application Tier File System
Configure the new application tier file system with the adclonectx.pl script using original context file, or copy of it, as the source context file. This script must be run on each application tier node. In the example for node ha1mt01 below, our new mount point is /u01/appltopRAC and we are pointing to the original context file at /u01/appltop:
ha1mt01:$ cd /u01/appltopRAC/viscomn/clone/bin
ha1mt01:$ perl adclonectx.pl contextfile= /u01/appltop/visappl/admin/<CONTEXT_NAME>.xml
Transitioning E-Business Suite to the Maximum Availability Architecture with Minimal Downtime Page 23
Maximum Availability Architecture
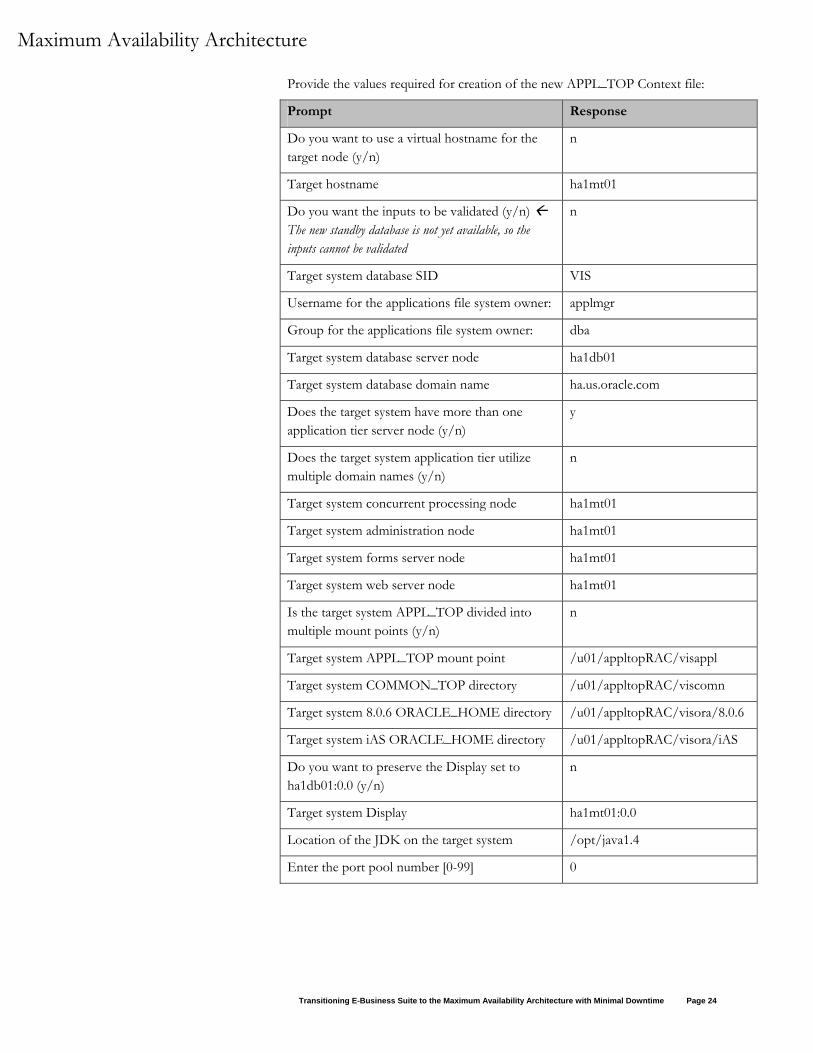
Provide the values required for creation of the new APPL_TOP Context file:
Prompt Response
Do you want to use a virtual hostname for the target node (y/n)
n
Target hostname ha1mt01
Do you want the inputs to be validated (y/n) The new standby database is not yet available, so the inputs cannot be validated
n
Target system database SID VIS
Username for the applications file system owner: applmgr
Group for the applications file system owner: dba
Target system database server node ha1db01
Target system database domain name ha.us.oracle.com
Does the target system have more than one application tier server node (y/n)
y
Does the target system application tier utilize multiple domain names (y/n)
n
Target system concurrent processing node ha1mt01
Target system administration node ha1mt01
Target system forms server node ha1mt01
Target system web server node ha1mt01
Is the target system APPL_TOP divided into multiple mount points (y/n)
n
Target system APPL_TOP mount point /u01/appltopRAC/visappl
Target system COMMON_TOP directory /u01/appltopRAC/viscomn
Target system 8.0.6 ORACLE_HOME directory /u01/appltopRAC/visora/8.0.6
Target system iAS ORACLE_HOME directory /u01/appltopRAC/visora/iAS
Do you want to preserve the Display set to ha1db01:0.0 (y/n)
n
Target system Display ha1mt01:0.0
Location of the JDK on the target system /opt/java1.4
Enter the port pool number [0-99] 0
Transitioning E-Business Suite to the Maximum Availability Architecture with Minimal Downtime Page 24
Maximum Availability Architecture
Prompt Response
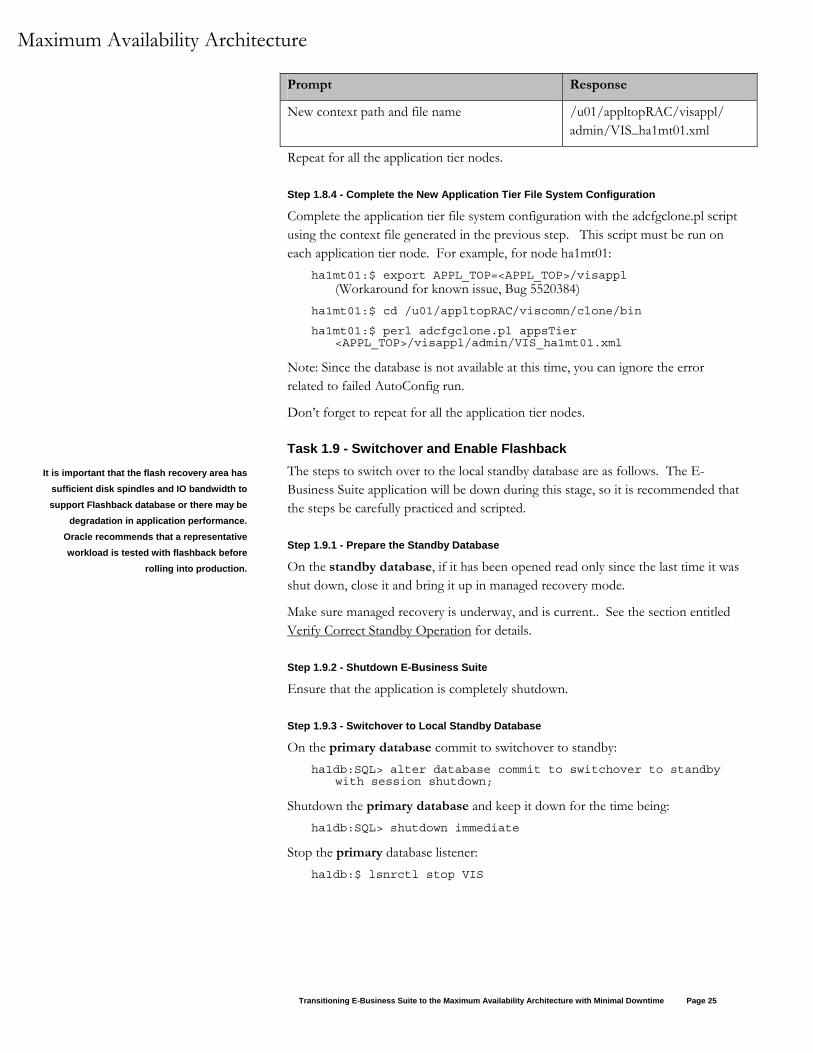
New context path and file name /u01/appltopRAC/visappl/ admin/VIS_ha1mt01.xml
Repeat for all the application tier nodes.
Step 1.8.4 - Complete the New Application Tier File System Configuration
Complete the application tier file system configuration with the adcfgclone.pl script using the context file generated in the previous step. This script must be run on each application tier node. For example, for node ha1mt01:
ha1mt01:$ export APPL_TOP=<APPL_TOP>/visappl (Workaround for known issue, Bug 5520384)
ha1mt01:$ cd /u01/appltopRAC/viscomn/clone/bin
ha1mt01:$ perl adcfgclone.pl appsTier <APPL_TOP>/visappl/admin/VIS_ha1mt01.xml
Note: Since the database is not available at this time, you can ignore the error related to failed AutoConfig run.
Don’t forget to repeat for all the application tier nodes.
Task 1.9 - Switchover and Enable Flashback It is important that the flash recovery area has
sufficient disk spindles and IO bandwidth to support Flashback database or there may be
degradation in application performance. Oracle recommends that a representative workload is tested with flashback before
rolling into production.
The steps to switch over to the local standby database are as follows. The E-Business Suite application will be down during this stage, so it is recommended that the steps be carefully practiced and scripted.
Step 1.9.1 - Prepare the Standby Database
On the standby database, if it has been opened read only since the last time it was shut down, close it and bring it up in managed recovery mode.
Make sure managed recovery is underway, and is current.. See the section entitled Verify Correct Standby Operation for details.
Step 1.9.2 - Shutdown E-Business Suite
Ensure that the application is completely shutdown.
Step 1.9.3 - Switchover to Local Standby Database
On the primary database commit to switchover to standby: ha1db:SQL> alter database commit to switchover to standby
with session shutdown;
Shutdown the primary database and keep it down for the time being: ha1db:SQL> shutdown immediate
Stop the primary database listener: ha1db:$ lsnrctl stop VIS
Transitioning E-Business Suite to the Maximum Availability Architecture with Minimal Downtime Page 25
Maximum Availability Architecture
On the standby database, verify that it is ready to be converted to the new primary:
ha1db01:SQL> select switchover_status from v$database; SWITCHOVER_STATUS ----------------- TO PRIMARY
On the standby database, execute the following command to convert it to be the new primary:
ha1db01:SQL> alter database commit to switchover to primary;
Step 1.9.4 - Enable Flashback
Enable the flashback feature on the new production database: ha1db01:SQL> alter database flashback on;
If you like to check the flashback status, run the following query: ha1db01:SQL> select flashback_on from v$database;
FLASHBACK_ON ------------ NO
Step 1.9.5 - Open the Database ha1db01:SQL> alter database open; Beginning with Oracle Database 10g Release 2,
you can open the new primary database from the mount state if the standby database has not
been opened read-only since the last time the database was started. If the database has been
opened read-only, it will need to be restarted.
Step 1.9.6 - Remove the Old Application Topology
Connect to the new production database using SQL*Plus as user APPS and execute the following commands, substituting the appropriate db name:
ha1db01:SQL> exec FND_NET_SERVICES.remove_system('VIS');
ha1db01:SQL> commit;
Step 1.9.7 - Configure Database Tier
Run the following command on the new database server to complete the configuration of the new Oracle home for use by E-Business Suite:
ha1db01:$ cd $ORACLE_HOME/appsutil/scripts/<CONTEXT_NAME>
ha1db01:$ ./adautocfg.sh
Step 1.9.8 - Restart Listeners
At this time, AutoConfig starts the listener using the non-RAC naming convention (<SID>) as the listener name) when the database is not available. We need to start the correct listener on the new production database node, using the RAC naming convention (LISTENER_<hostname>):
ha1db01:$ lsnrctl stop VIS1
ha1db01:$ lsnrctl start LISTENER_ha1db01
Transitioning E-Business Suite to the Maximum Availability Architecture with Minimal Downtime Page 26

Maximum Availability Architecture
Step 1.9.9 - Configure Application Tiers
Run AutoConfig using the new APPL_TOP on all the application tier nodes. Note, these can be run in parallel. For example, for node ha1mt01:
ha1mt01:$ cd $COMMON_TOP/admin/scripts/<CONTEXT_NAME>
ha1mt01:$ ./adautocfg.sh
Don’t forget to repeat for all application tier nodes.
Step 1.9.10 - Startup E-Business Suite
Startup E-Business Suite on all application tier hosts. Online users can gain access at this time.
Transitioning E-Business Suite to the Maximum Availability Architecture with Minimal Downtime Page 27
Maximum Availability Architecture
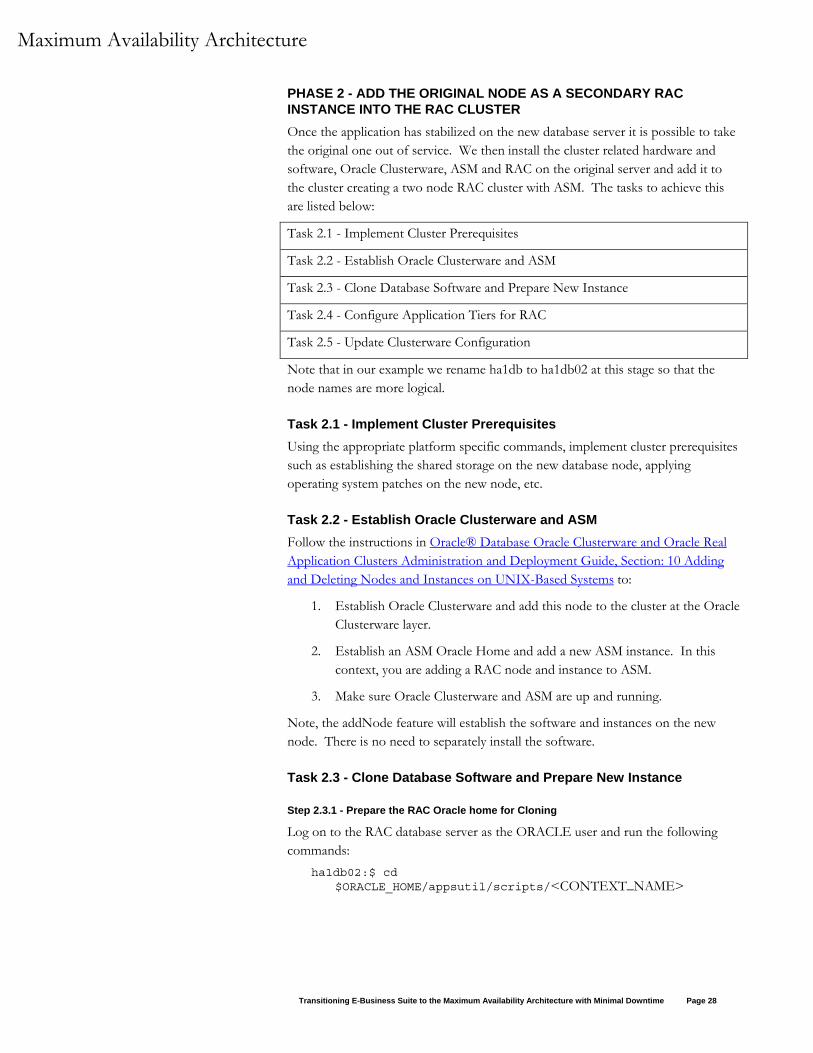
PHASE 2 - ADD THE ORIGINAL NODE AS A SECONDARY RAC INSTANCE INTO THE RAC CLUSTER Once the application has stabilized on the new database server it is possible to take the original one out of service. We then install the cluster related hardware and software, Oracle Clusterware, ASM and RAC on the original server and add it to the cluster creating a two node RAC cluster with ASM. The tasks to achieve this are listed below:
Task 2.1 - Implement Cluster Prerequisites
Task 2.2 - Establish Oracle Clusterware and ASM
Task 2.3 - Clone Database Software and Prepare New Instance
Task 2.4 - Configure Application Tiers for RAC
Task 2.5 - Update Clusterware Configuration
Note that in our example we rename ha1db to ha1db02 at this stage so that the node names are more logical.
Task 2.1 - Implement Cluster Prerequisites Using the appropriate platform specific commands, implement cluster prerequisites such as establishing the shared storage on the new database node, applying operating system patches on the new node, etc.
Task 2.2 - Establish Oracle Clusterware and ASM Follow the instructions in Oracle® Database Oracle Clusterware and Oracle Real Application Clusters Administration and Deployment Guide, Section: 10 Adding and Deleting Nodes and Instances on UNIX-Based Systems to:
1. Establish Oracle Clusterware and add this node to the cluster at the Oracle Clusterware layer.
2. Establish an ASM Oracle Home and add a new ASM instance. In this context, you are adding a RAC node and instance to ASM.
3. Make sure Oracle Clusterware and ASM are up and running.
Note, the addNode feature will establish the software and instances on the new node. There is no need to separately install the software.
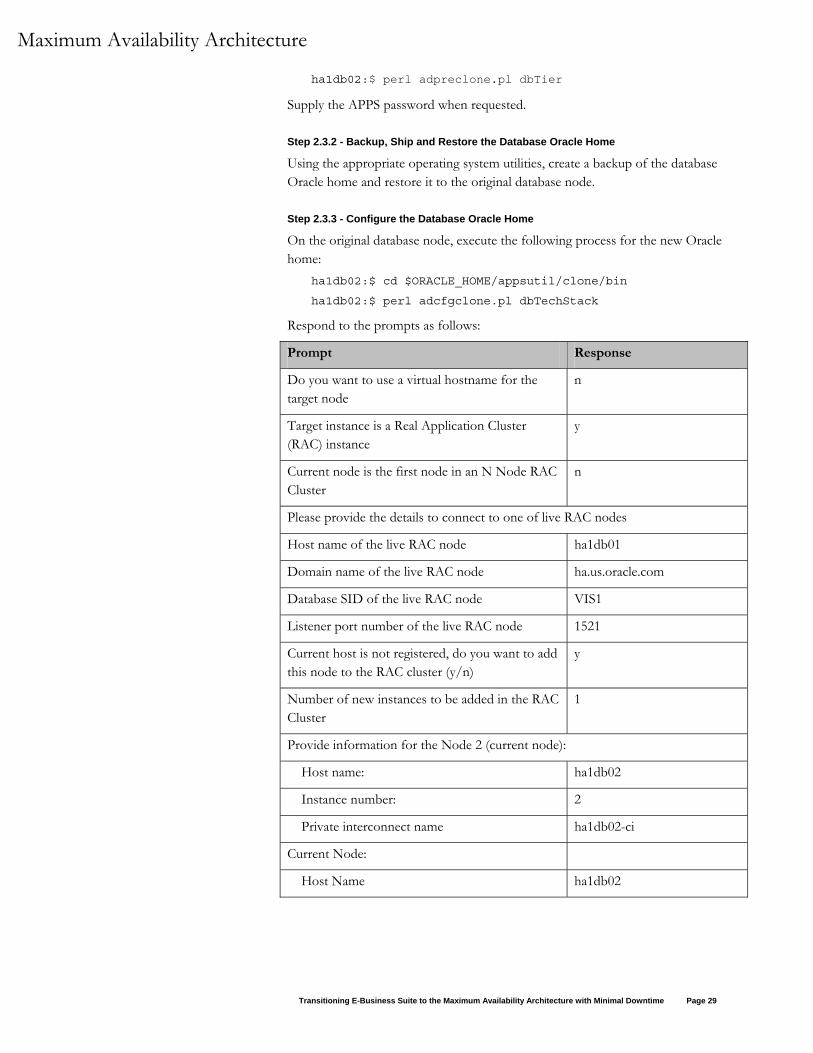
Task 2.3 - Clone Database Software and Prepare New Instance
Step 2.3.1 - Prepare the RAC Oracle home for Cloning
Log on to the RAC database server as the ORACLE user and run the following commands:
ha1db02:$ cd $ORACLE_HOME/appsutil/scripts/<CONTEXT_NAME>
Transitioning E-Business Suite to the Maximum Availability Architecture with Minimal Downtime Page 28
Maximum Availability Architecture
ha1db02:$ perl adpreclone.pl dbTier
Supply the APPS password when requested.
Step 2.3.2 - Backup, Ship and Restore the Database Oracle Home
Using the appropriate operating system utilities, create a backup of the database Oracle home and restore it to the original database node.
Step 2.3.3 - Configure the Database Oracle Home
On the original database node, execute the following process for the new Oracle home:
ha1db02:$ cd $ORACLE_HOME/appsutil/clone/bin
ha1db02:$ perl adcfgclone.pl dbTechStack
Respond to the prompts as follows:
Prompt Response
Do you want to use a virtual hostname for the target node
n
Target instance is a Real Application Cluster (RAC) instance
y
Current node is the first node in an N Node RAC Cluster
n
Please provide the details to connect to one of live RAC nodes
Host name of the live RAC node ha1db01
Domain name of the live RAC node ha.us.oracle.com
Database SID of the live RAC node VIS1
Listener port number of the live RAC node 1521
Current host is not registered, do you want to add this node to the RAC cluster (y/n)
y
Number of new instances to be added in the RAC Cluster
1
Provide information for the Node 2 (current node):
Host name: ha1db02
Instance number: 2
Private interconnect name ha1db02-ci
Current Node:
Host Name ha1db02
Transitioning E-Business Suite to the Maximum Availability Architecture with Minimal Downtime Page 29
Maximum Availability Architecture
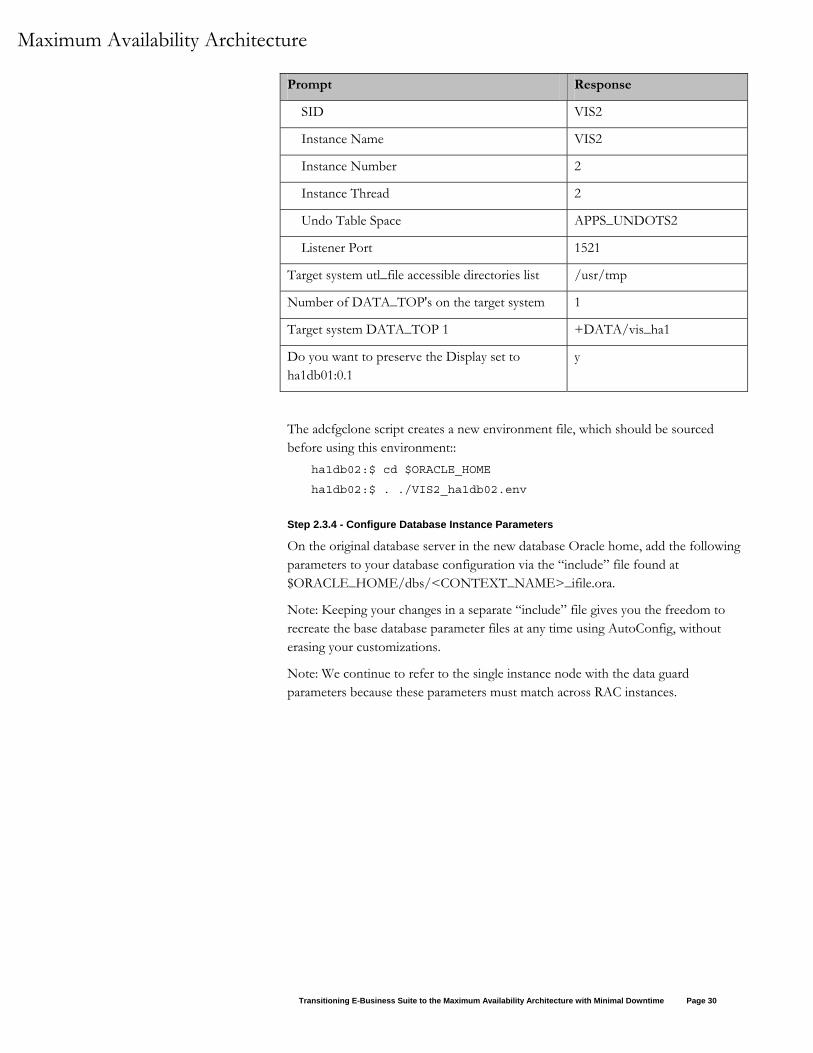
Prompt Response
SID VIS2
Instance Name VIS2
Instance Number 2
Instance Thread 2
Undo Table Space APPS_UNDOTS2
Listener Port 1521
Target system utl_file accessible directories list /usr/tmp
Number of DATA_TOP's on the target system 1
Target system DATA_TOP 1 +DATA/vis_ha1
Do you want to preserve the Display set to ha1db01:0.1
y
The adcfgclone script creates a new environment file, which should be sourced before using this environment::
ha1db02:$ cd $ORACLE_HOME
ha1db02:$ . ./VIS2_ha1db02.env
Step 2.3.4 - Configure Database Instance Parameters
On the original database server in the new database Oracle home, add the following parameters to your database configuration via the “include” file found at $ORACLE_HOME/dbs/<CONTEXT_NAME>_ifile.ora.
Note: Keeping your changes in a separate “include” file gives you the freedom to recreate the base database parameter files at any time using AutoConfig, without erasing your customizations.
Note: We continue to refer to the single instance node with the data guard parameters because these parameters must match across RAC instances.
Transitioning E-Business Suite to the Maximum Availability Architecture with Minimal Downtime Page 30
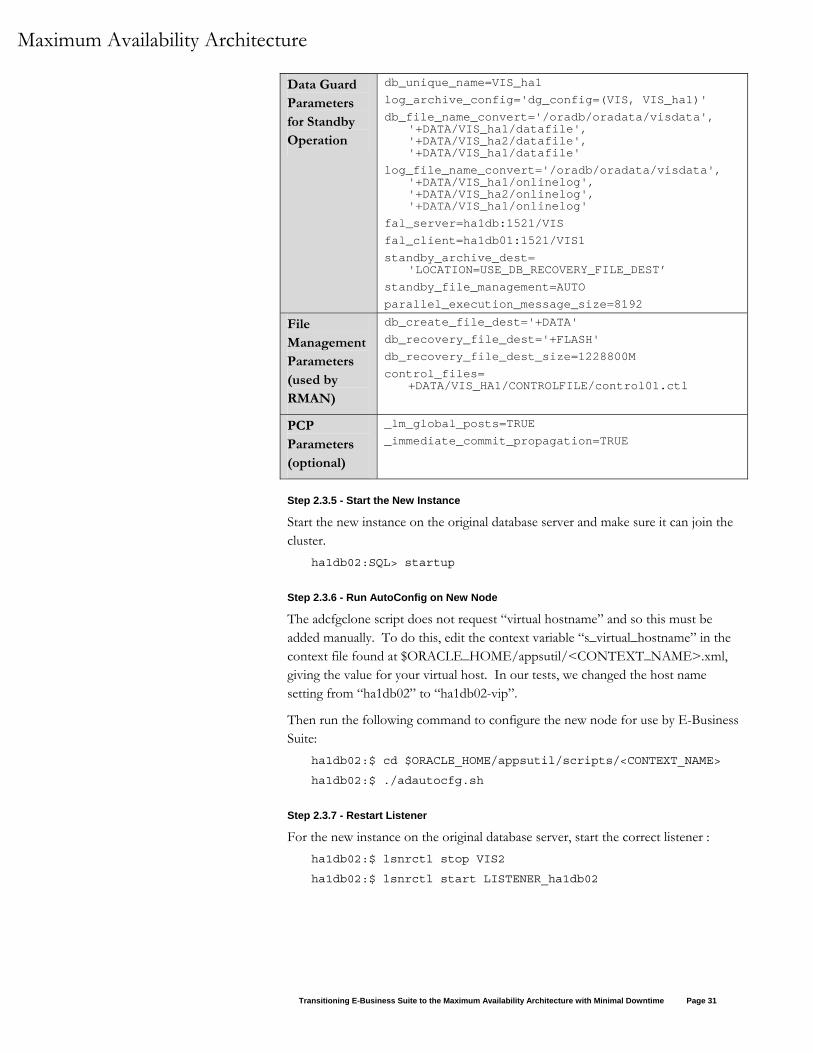
Maximum Availability Architecture
Data Guard Parameters for Standby Operation
db_unique_name=VIS_ha1 log_archive_config='dg_config=(VIS, VIS_ha1)' db_file_name_convert='/oradb/oradata/visdata',
'+DATA/VIS_ha1/datafile', '+DATA/VIS_ha2/datafile', '+DATA/VIS_ha1/datafile'
log_file_name_convert='/oradb/oradata/visdata', '+DATA/VIS_ha1/onlinelog', '+DATA/VIS_ha2/onlinelog', '+DATA/VIS_ha1/onlinelog'
fal_server=ha1db:1521/VIS fal_client=ha1db01:1521/VIS1 standby_archive_dest=
'LOCATION=USE_DB_RECOVERY_FILE_DEST’ standby_file_management=AUTO parallel_execution_message_size=8192
File Management Parameters (used by RMAN)
db_create_file_dest='+DATA' db_recovery_file_dest='+FLASH' db_recovery_file_dest_size=1228800M control_files=
+DATA/VIS_HA1/CONTROLFILE/control01.ctl
PCP Parameters (optional)
_lm_global_posts=TRUE _immediate_commit_propagation=TRUE
Step 2.3.5 - Start the New Instance
Start the new instance on the original database server and make sure it can join the cluster.
ha1db02:SQL> startup
Step 2.3.6 - Run AutoConfig on New Node
The adcfgclone script does not request “virtual hostname” and so this must be added manually. To do this, edit the context variable “s_virtual_hostname” in the context file found at $ORACLE_HOME/appsutil/<CONTEXT_NAME>.xml, giving the value for your virtual host. In our tests, we changed the host name setting from “ha1db02” to “ha1db02-vip”.
Then run the following command to configure the new node for use by E-Business Suite:
ha1db02:$ cd $ORACLE_HOME/appsutil/scripts/<CONTEXT_NAME>
ha1db02:$ ./adautocfg.sh
Step 2.3.7 - Restart Listener
For the new instance on the original database server, start the correct listener : ha1db02:$ lsnrctl stop VIS2
ha1db02:$ lsnrctl start LISTENER_ha1db02
Transitioning E-Business Suite to the Maximum Availability Architecture with Minimal Downtime Page 31
Maximum Availability Architecture
Step 2.3.8 - Run AutoConfig on the Live Database Nodes
Run the following command on the first database node to generate a TNS configuration that includes the RAC instance just added. This can be done while the system is up:
ha1db01:$ cd $ORACLE_HOME/appsutil/scripts/<CONTEXT_NAME>
ha1db01:$ ./adautocfg.sh
Task 2.4 - Configure Application Tiers for RAC At this point, the original database server is now running the second RAC instance, but the application tiers are still only accessing the first RAC instance on the new database server. To complete the picture, AutoConfig must be run once more on the application tiers, and the Application processes on the application tiers bounced. To reduce the effect of this outage, you might control the bounce of the application tiers by “starving” them one by one via your hardware load balancer and bouncing each one in turn when idle.
Step 2.4.1 - Modify Context Variables for Load Balancing
The adcfgclone script does not set variables to use the load balanced services. To adjust these parameters manually, run the Context Editor through Oracle Applications Manager to set the value of "Tools OH TWO_TASK" (s_tools_two_task), "iAS OH TWO_TASK" (s_weboh_twotask), and “Apps JDBC Connect Alias” (s_apps_jdbc_connect_alias). Repeat the steps for all the application tiers.
To load balance the forms based applications database connections, set the value of "Tools OH TWO_TASK" to point to the <database_name>_806_balance alias generated in the tnsnames.ora file.
To load balance the self-service applications database connections, set the value of iAS OH TWO_TASK" and “Apps JDBC Connect Alias” to point to the <database_name>_balance alias generated in the tnsnames.ora file.
If you are load balancing for Concurrent Processing, set the value of “Concurrent Manager TWO_TASK” (s_cp_twotask) to point to the <database_name>_806_balance alias generated in the tnsnames.ora file.
If there is more than one Concurrent Processing Node and you would like to take advantage of PCP refer to “Configure Parallel Concurrent Processing” section of the Note 362135.1.
Step 2.4.2 - Run AutoConfig
Run AutoConfig on all the application tier nodes, for example to run on node ha1mt01:
ha1mt01:$ cd $COMMON_TOP/admin/scripts/<CONTEXT_NAME>
ha1mt01:$ ./adautocfg.sh
Transitioning E-Business Suite to the Maximum Availability Architecture with Minimal Downtime Page 32
Maximum Availability Architecture
Step 2.4.3 - Restart E-Business Suite
Source the new environment file and restart the E-Business Suite processes on all the application tier nodes.
Step 2.4.4 - Configure Parallel Concurrent Processing (PCP)
If there is more than one Concurrent Processing Node and you would like to take advantage of PCP, refer to the “Configure Parallel Concurrent Processing” section of MetaLink Note 362135.1, to complete PCP configuration.
Task 2.5 - Update Clusterware Configuration If you want to use srvctl to control the resources you need to add the new resources to CRS.
Step 2.5.1 - Add Database to the Clusterware Configuration
Add the database to CRS using the following command: ha1db01:srvctl add database -d VIS -o $ORACLE_HOME
Step 2.5.2 - Add Instances to the Clusterware Configuration
Add instances to CRS using the following commands: ha1db01:srvctl add instance -d VIS -i VIS1 -n ha1db01
ha1db01:srvctl add instance -d VIS -i VIS2 -n ha1db02
ha1db01:srvctl setenv instance -d VIS -i VIS1 -t TNS_ADMIN=$ORACLE_HOME/network/admin/VIS1_ha1db01
ha1db01:srvctl setenv instance -d VIS -i VIS2 -t TNS_ADMIN=$ORACLE_HOME/network/admin/VIS2_ha1db02
ha1db01:srvctl modify instance -d VIS -i VIS1 -s +ASM1
ha1db01:srvctl modify instance -d VIS -i VIS2 -s +ASM2
Step 2.5.3 - Add Listeners to the Clusterware Configuration
Use NETCA to add listeners to CRS by following the steps listed below:
• Edit $ORACLE_HOME/bin/racgwrap, and add commands similar to this:
TNS_ADMIN=$ORACLE_HOME/network/admin/<CONTEXT_NAME>
export TNS_ADMIN
• Make sure the listener is running so the AutoConfig generated listener definition is used at all times.
• Run netca and choose “Cluster Configuration”. Choose only local node.
• Add (or reconfigure) the listener named "LISTENER" listening on the database port, ignore the errors “Listener is already running” or “Port already in use”.
• Run AutoConfig to overwrite the listener.ora file generated by netca.
Transitioning E-Business Suite to the Maximum Availability Architecture with Minimal Downtime Page 33

Maximum Availability Architecture
Repeat these steps on all nodes, since each has different $TNS_ADMIN settings.
Step 2.5.4 - Verify CRS Setup
Verify the resources were added correctly using following command: ha1db01:$ $CRS_HOME/bin/crs_stat
Transitioning E-Business Suite to the Maximum Availability Architecture with Minimal Downtime Page 34
Maximum Availability Architecture
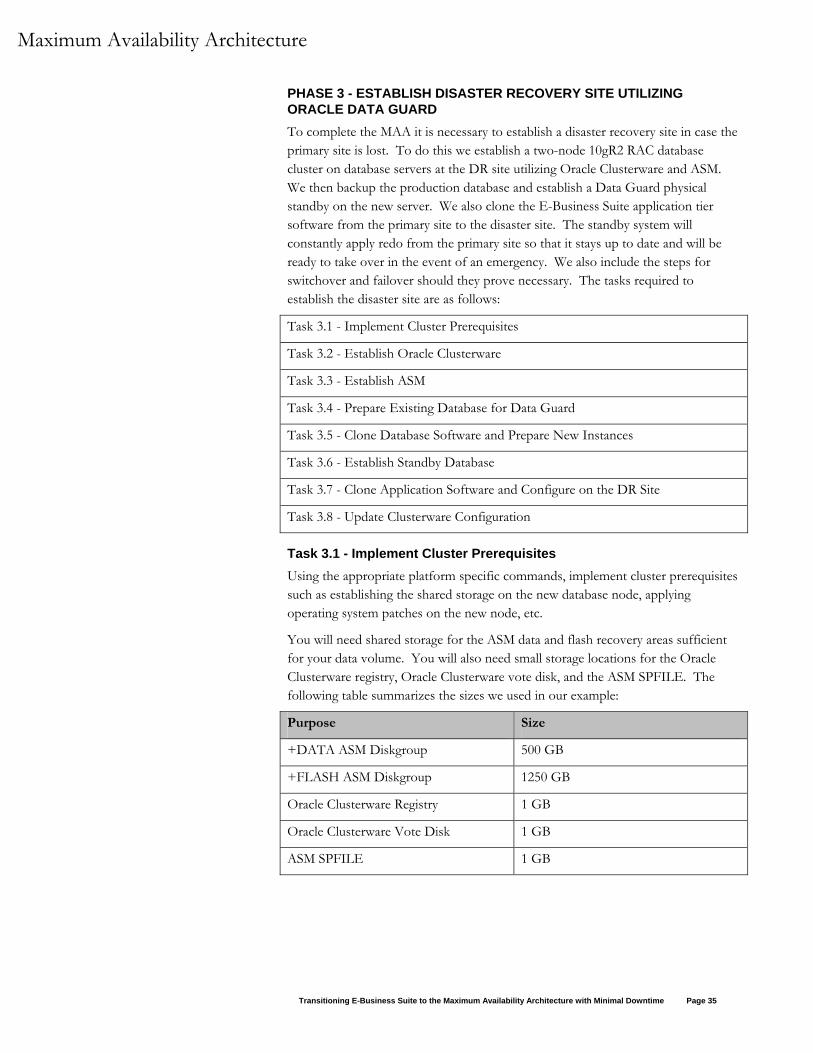
PHASE 3 - ESTABLISH DISASTER RECOVERY SITE UTILIZING ORACLE DATA GUARD To complete the MAA it is necessary to establish a disaster recovery site in case the primary site is lost. To do this we establish a two-node 10gR2 RAC database cluster on database servers at the DR site utilizing Oracle Clusterware and ASM. We then backup the production database and establish a Data Guard physical standby on the new server. We also clone the E-Business Suite application tier software from the primary site to the disaster site. The standby system will constantly apply redo from the primary site so that it stays up to date and will be ready to take over in the event of an emergency. We also include the steps for switchover and failover should they prove necessary. The tasks required to establish the disaster site are as follows:
Task 3.1 - Implement Cluster Prerequisites
Task 3.2 - Establish Oracle Clusterware
Task 3.3 - Establish ASM
Task 3.4 - Prepare Existing Database for Data Guard
Task 3.5 - Clone Database Software and Prepare New Instances
Task 3.6 - Establish Standby Database
Task 3.7 - Clone Application Software and Configure on the DR Site
Task 3.8 - Update Clusterware Configuration
Task 3.1 - Implement Cluster Prerequisites Using the appropriate platform specific commands, implement cluster prerequisites such as establishing the shared storage on the new database node, applying operating system patches on the new node, etc.
You will need shared storage for the ASM data and flash recovery areas sufficient for your data volume. You will also need small storage locations for the Oracle Clusterware registry, Oracle Clusterware vote disk, and the ASM SPFILE. The following table summarizes the sizes we used in our example:
Purpose Size
+DATA ASM Diskgroup 500 GB
+FLASH ASM Diskgroup 1250 GB
Oracle Clusterware Registry 1 GB
Oracle Clusterware Vote Disk 1 GB
ASM SPFILE 1 GB
Transitioning E-Business Suite to the Maximum Availability Architecture with Minimal Downtime Page 35
Maximum Availability Architecture
Task 3.2 - Establish Oracle Clusterware The following sections explain how to install Oracle Clusterware.
Step 3.2.1 - Install Oracle Clusterware 10gR2
Follow the instructions in the Oracle Clusterware and Oracle Real Application Clusters Installation and Configuration Guide for your platform (see http://www.oracle.com/pls/db102/homepage) to install Oracle Clusterware on all database servers at the disaster site. This should be installed in an Oracle home that is separate from the Oracle Application Database and ASM homes.
Step 3.2.2 - Apply Patchset 10.2.0.2 or Later
The latest database patch set for your platform can be located on OracleMetaLink and should be applied.
Task 3.3 - Establish ASM In this task we establish an ASM installation and create the disk groups. In our example we created one disk group “DATA” for data and one disk group “FLASH” for flash recovery.
Step 3.3.1 - Install 10gR2 Database for ASM
Follow the instructions in the Oracle Clusterware and Oracle Real Application Clusters Installation and Configuration Guide for your platform (see http://www.oracle.com/pls/db102/homepage) to create a clustered ASM installation on the database servers at the disaster site. This should be installed in an Oracle home that is separate from the Oracle Application Database and Oracle Clusterware homes. Choose the “software only” installation because we want to apply the patch before creating the instance.
Step 3.3.2 - Apply Patchset 10.2.0.2 or Later
The latest database patch set for your platform can be located on OracleMetaLink and should be applied.
Step 3.3.3 - Create ASM Instance and Disk Groups
Use the DBCA utility to create an ASM instance and configure the disk groups. You will need to create data and flash recovery disk groups.
Step 3.3.4 - Remove the Listener Created by DBCA.
While configuring ASM, DBCA creates listeners that conflict with those that will be created by the E-Business Suite, and registers them to CRS. From either DR site node, deregister the ASM listeners from CRS using netca.
Transitioning E-Business Suite to the Maximum Availability Architecture with Minimal Downtime Page 36
Maximum Availability Architecture
Task 3.4 - Prepare Existing Database for Data Guard
Step 3.4.1 - Create Password Files
Make sure that a password file is available for each of the DR database instances. See the earlier section Create Password Files for details.
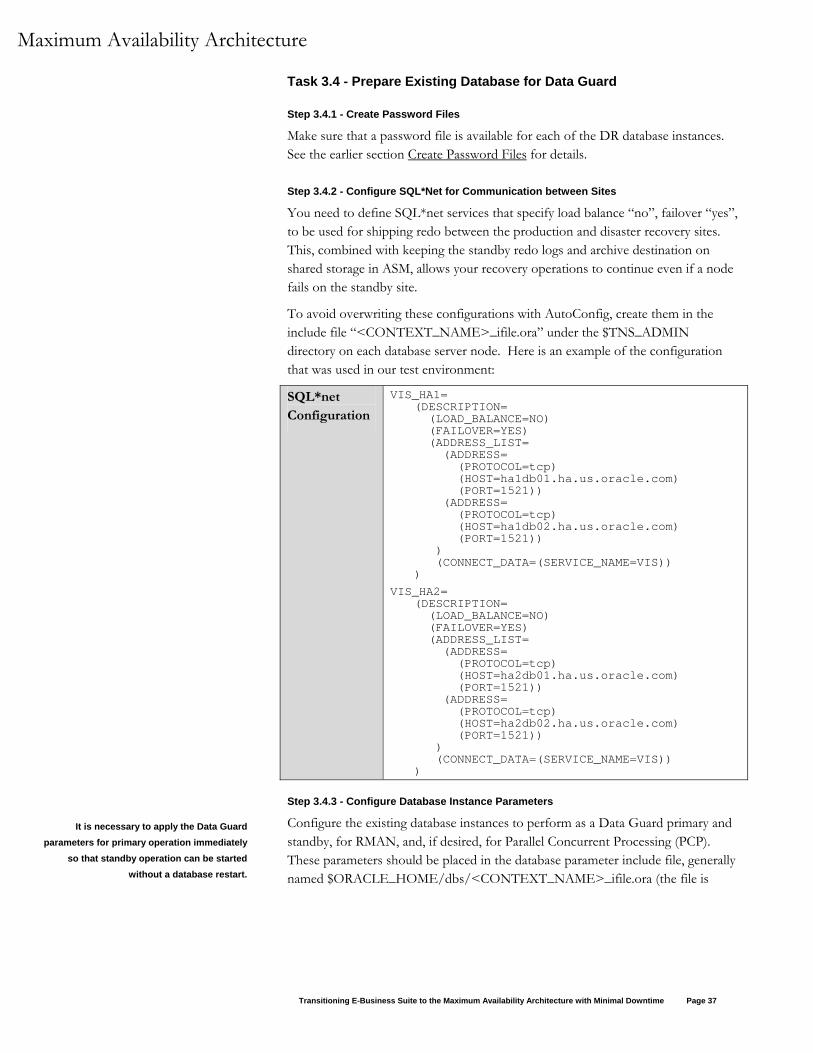
Step 3.4.2 - Configure SQL*Net for Communication between Sites
You need to define SQL*net services that specify load balance “no”, failover “yes”, to be used for shipping redo between the production and disaster recovery sites. This, combined with keeping the standby redo logs and archive destination on shared storage in ASM, allows your recovery operations to continue even if a node fails on the standby site.
To avoid overwriting these configurations with AutoConfig, create them in the include file “<CONTEXT_NAME>_ifile.ora” under the $TNS_ADMIN directory on each database server node. Here is an example of the configuration that was used in our test environment:
SQL*net Configuration
VIS_HA1= (DESCRIPTION= (LOAD_BALANCE=NO) (FAILOVER=YES) (ADDRESS_LIST= (ADDRESS= (PROTOCOL=tcp) (HOST=ha1db01.ha.us.oracle.com) (PORT=1521)) (ADDRESS= (PROTOCOL=tcp) (HOST=ha1db02.ha.us.oracle.com) (PORT=1521)) ) (CONNECT_DATA=(SERVICE_NAME=VIS)) )
VIS_HA2= (DESCRIPTION= (LOAD_BALANCE=NO) (FAILOVER=YES) (ADDRESS_LIST= (ADDRESS= (PROTOCOL=tcp) (HOST=ha2db01.ha.us.oracle.com) (PORT=1521)) (ADDRESS= (PROTOCOL=tcp) (HOST=ha2db02.ha.us.oracle.com) (PORT=1521)) ) (CONNECT_DATA=(SERVICE_NAME=VIS)) )
Step 3.4.3 - Configure Database Instance Parameters
It is necessary to apply the Data Guard parameters for primary operation immediately
so that standby operation can be started without a database restart.
Configure the existing database instances to perform as a Data Guard primary and standby, for RMAN, and, if desired, for Parallel Concurrent Processing (PCP). These parameters should be placed in the database parameter include file, generally named $ORACLE_HOME/dbs/<CONTEXT_NAME>_ifile.ora (the file is
Transitioning E-Business Suite to the Maximum Availability Architecture with Minimal Downtime Page 37
Maximum Availability Architecture
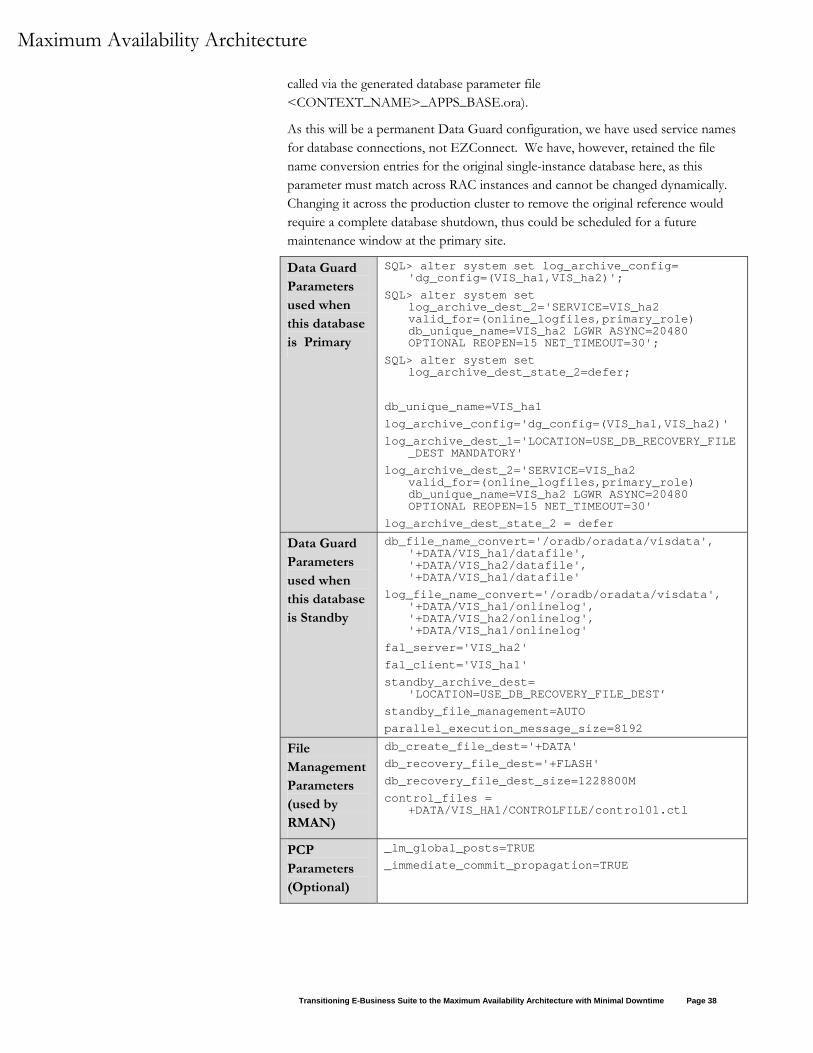
called via the generated database parameter file <CONTEXT_NAME>_APPS_BASE.ora).
As this will be a permanent Data Guard configuration, we have used service names for database connections, not EZConnect. We have, however, retained the file name conversion entries for the original single-instance database here, as this parameter must match across RAC instances and cannot be changed dynamically. Changing it across the production cluster to remove the original reference would require a complete database shutdown, thus could be scheduled for a future maintenance window at the primary site.
Data Guard Parameters used when this database is Primary
SQL> alter system set log_archive_config= 'dg_config=(VIS_ha1,VIS_ha2)';
SQL> alter system set log_archive_dest_2='SERVICE=VIS_ha2 valid_for=(online_logfiles,primary_role) db_unique_name=VIS_ha2 LGWR ASYNC=20480 OPTIONAL REOPEN=15 NET_TIMEOUT=30';
SQL> alter system set log_archive_dest_state_2=defer;
db_unique_name=VIS_ha1 log_archive_config='dg_config=(VIS_ha1,VIS_ha2)' log_archive_dest_1='LOCATION=USE_DB_RECOVERY_FILE
_DEST MANDATORY' log_archive_dest_2='SERVICE=VIS_ha2
valid_for=(online_logfiles,primary_role) db_unique_name=VIS_ha2 LGWR ASYNC=20480 OPTIONAL REOPEN=15 NET_TIMEOUT=30'
log_archive_dest_state_2 = defer
Data Guard Parameters used when this database is Standby
db_file_name_convert='/oradb/oradata/visdata', '+DATA/VIS_ha1/datafile', '+DATA/VIS_ha2/datafile', '+DATA/VIS_ha1/datafile'
log_file_name_convert='/oradb/oradata/visdata', '+DATA/VIS_ha1/onlinelog', '+DATA/VIS_ha2/onlinelog', '+DATA/VIS_ha1/onlinelog'
fal_server='VIS_ha2' fal_client='VIS_ha1' standby_archive_dest=
'LOCATION=USE_DB_RECOVERY_FILE_DEST’ standby_file_management=AUTO parallel_execution_message_size=8192
File Management Parameters (used by RMAN)
db_create_file_dest='+DATA' db_recovery_file_dest='+FLASH' db_recovery_file_dest_size=1228800M control_files =
+DATA/VIS_HA1/CONTROLFILE/control01.ctl
PCP Parameters (Optional)
_lm_global_posts=TRUE _immediate_commit_propagation=TRUE
Transitioning E-Business Suite to the Maximum Availability Architecture with Minimal Downtime Page 38
Maximum Availability Architecture
Step 3.4.4 - Grant Access to Database Nodes
If SQL*Net Access security is enabled in the existing system (enabled by default from 11i10), you need to give the database nodes in the production and disaster sites access for standby communications. See Managed SQL*Net Access from Hosts in document 281758.1 on OracleMetaLink for instructions on how to achieve this from OAM.
Step 3.4.5 - Add Standby Redo Logs
If you haven’t already created standby redo logs, see section Create Standby Redo Logs earlier in this document for more information.
Task 3.5 - Clone Database Software and Prepare New Instances
Step 3.5.1 - Prepare the Database Oracle Home for Cloning
As the ORACLE user on one of the production database servers, run the adpreclone.pl script, for example:
ha1db01:$ cd $ORACLE_HOME/appsutil/scripts/<CONTEXT_NAME>
ha1db01:$ perl adpreclone.pl dbTier
Supply the APPS password when requested.
Step 3.5.2 - Backup, Ship and Restore the Database Oracle Home
Using the appropriate operating system utilities, create a backup of the database Oracle home, ship the backups to the new database server, then restore the Oracle home to the first RAC database node. It is best to use the same directory structures on the DR site.
Step 3.5.3 - Configure the New Database Oracle Homes
Execute the following adcfgclone.pl script for each new database Oracle home on the DR site, for example for ha2db01:
ha2db01:$ cd $ORACLE_HOME/appsutil/clone/bin
ha2db01:$ perl adcfgclone.pl dbTechStack
Respond to the prompts as follows:
Prompt Response
Do you want to use a virtual hostname for the target node (y/n)
n
Target instance is a Real Application Cluster (RAC) instance (y/n)
y
Current node is the first node in an N Node RAC Cluster (y/n) Answer “y” for the 2nd node also since DB is not up.
y
Number of instances in the RAC Cluster 2
Transitioning E-Business Suite to the Maximum Availability Architecture with Minimal Downtime Page 39
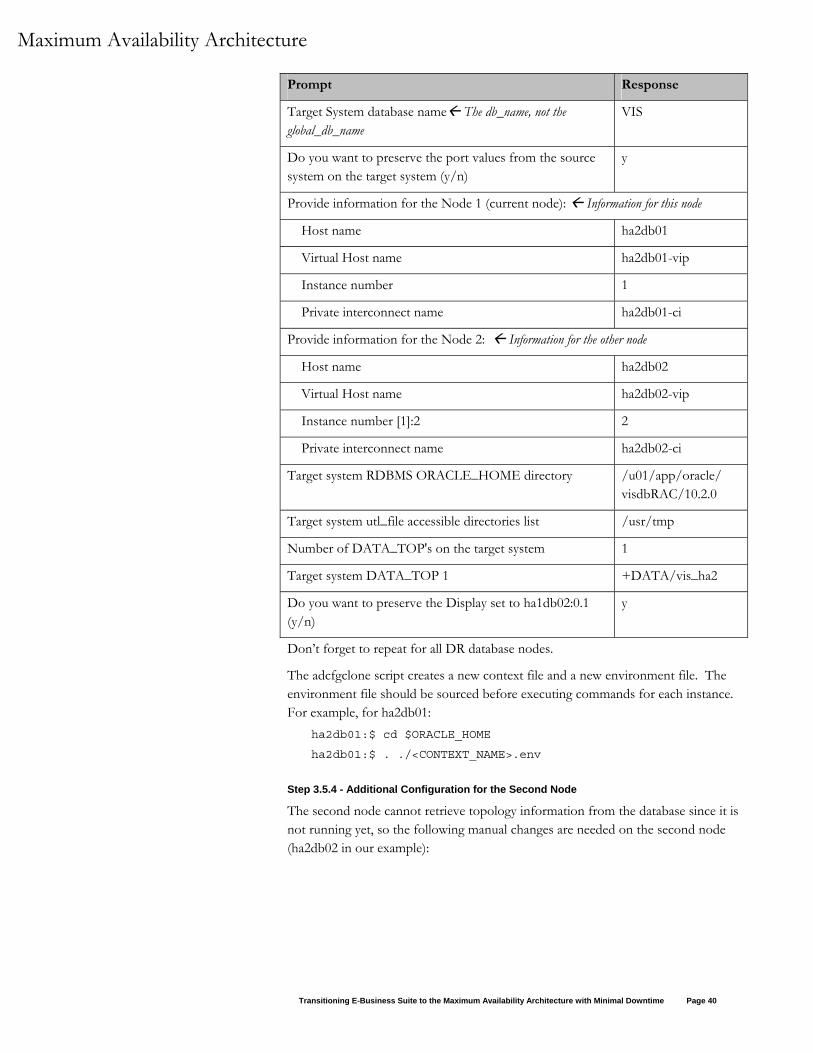
Maximum Availability Architecture
Prompt Response
Target System database name The db_name, not the global_db_name
VIS
Do you want to preserve the port values from the source system on the target system (y/n)
y
Provide information for the Node 1 (current node): Information for this node
Host name ha2db01
Virtual Host name ha2db01-vip
Instance number 1
Private interconnect name ha2db01-ci
Provide information for the Node 2: Information for the other node
Host name ha2db02
Virtual Host name ha2db02-vip
Instance number [1]:2 2
Private interconnect name ha2db02-ci
Target system RDBMS ORACLE_HOME directory /u01/app/oracle/ visdbRAC/10.2.0
Target system utl_file accessible directories list /usr/tmp
Number of DATA_TOP's on the target system 1
Target system DATA_TOP 1 +DATA/vis_ha2
Do you want to preserve the Display set to ha1db02:0.1 (y/n)
y
Don’t forget to repeat for all DR database nodes.
The adcfgclone script creates a new context file and a new environment file. The environment file should be sourced before executing commands for each instance. For example, for ha2db01:
ha2db01:$ cd $ORACLE_HOME
ha2db01:$ . ./<CONTEXT_NAME>.env
Step 3.5.4 - Additional Configuration for the Second Node
The second node cannot retrieve topology information from the database since it is not running yet, so the following manual changes are needed on the second node (ha2db02 in our example):
Transitioning E-Business Suite to the Maximum Availability Architecture with Minimal Downtime Page 40

Maximum Availability Architecture
Edit the context file (found at $ORACLE_HOME/appsutil/<CONTEXT_NAME>.xml) and modify following variables:
Variable Comment
instance_number Specifying the instance number
instance_thread Specifying the redo log thread
undotablespace Specifying the undo tablespace name
Remove the database initialization files so that AutoConfig can recreate them: ha2db02:$ cd $ORACLE_HOME/dbs
ha2db02:$ rm init<SID>.ora <SID>_APPS_BASE.ora
Run AutoConfig: ha2db02:$ cd $ORACLE_HOME/appsutil/bin
ha2db02:$ ./adconfig.sh contextfile = $ORACLE_HOME/appsutil/<CONTEXT_NAME> run=INSTE8
Step 3.5.5 - Configure SQL*Net for Communication between Sites
When adjusting parameters on the production site for DR setup, you created an include file holding TNS service definitions with failover, not load balancing, across RAC instances for each node. Copy that file to the $TNS_ADMIN directory for each instance at your DR site and name it <CONTEXT_NAME>_ifile.ora.
Step 3.5.6 - Configure and Restart Listeners
The listener service definition generated by AutoConfig, while pointing to the standby database, does not include all the required interface names. To correct this, create a listener include file named “listener_ifile.ora” under the $TNS_ADMIN directory on each standby database server, with contents similar to this example:
Listener configuration for the first node
VIS1= ADDRESS_LIST= (ADDRESS=(PROTOCOL=TCP)(Host= ha2db01.ha.us.oracle.com)(Port=1521)) (ADDRESS=(PROTOCOL=TCP)(Host= ha2db01-vip.ha.us.oracle.com)(Port=1521)) )
Listener configuration for the second node
VIS2= ADDRESS_LIST= (ADDRESS=(PROTOCOL=TCP)(Host= ha2db02.ha.us.oracle.com)(Port=1521)) (ADDRESS=(PROTOCOL=TCP)(Host= ha2db02-vip.ha.us.oracle.com)(Port=1521)) )
Stop/Start Listeners, for example: ha2db01:$ lsnrctl stop VIS1
ha2db01:$ lsnrctl start VIS1
ha2db02:$ lsnrctl stop VIS2
ha2db02:$ lsnrctl start VIS2
Transitioning E-Business Suite to the Maximum Availability Architecture with Minimal Downtime Page 41
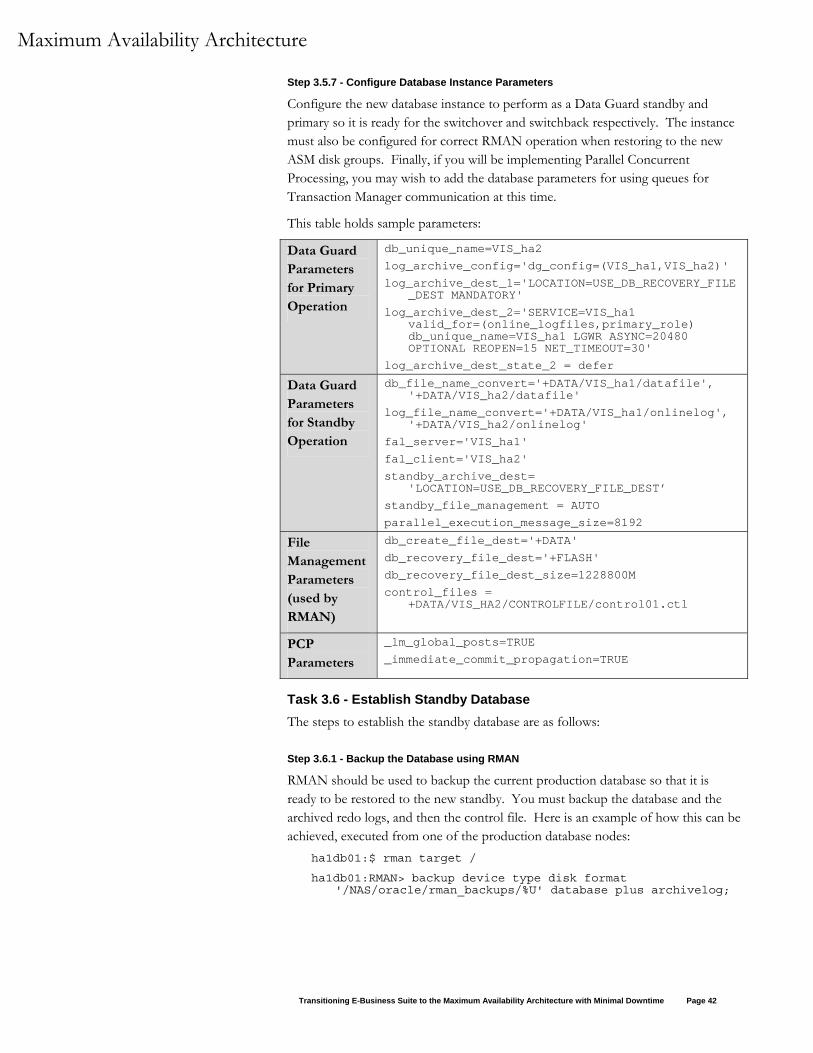
Maximum Availability Architecture
Step 3.5.7 - Configure Database Instance Parameters
Configure the new database instance to perform as a Data Guard standby and primary so it is ready for the switchover and switchback respectively. The instance must also be configured for correct RMAN operation when restoring to the new ASM disk groups. Finally, if you will be implementing Parallel Concurrent Processing, you may wish to add the database parameters for using queues for Transaction Manager communication at this time.
This table holds sample parameters:
Data Guard Parameters for Primary Operation
db_unique_name=VIS_ha2 log_archive_config='dg_config=(VIS_ha1,VIS_ha2)' log_archive_dest_1='LOCATION=USE_DB_RECOVERY_FILE
_DEST MANDATORY' log_archive_dest_2='SERVICE=VIS_ha1
valid_for=(online_logfiles,primary_role) db_unique_name=VIS_ha1 LGWR ASYNC=20480 OPTIONAL REOPEN=15 NET_TIMEOUT=30'
log_archive_dest_state_2 = defer
Data Guard Parameters for Standby Operation
db_file_name_convert='+DATA/VIS_ha1/datafile', '+DATA/VIS_ha2/datafile'
log_file_name_convert='+DATA/VIS_ha1/onlinelog', '+DATA/VIS_ha2/onlinelog'
fal_server='VIS_ha1' fal_client='VIS_ha2' standby_archive_dest=
'LOCATION=USE_DB_RECOVERY_FILE_DEST’ standby_file_management = AUTO parallel_execution_message_size=8192
File Management Parameters (used by RMAN)
db_create_file_dest='+DATA' db_recovery_file_dest='+FLASH' db_recovery_file_dest_size=1228800M control_files =
+DATA/VIS_HA2/CONTROLFILE/control01.ctl
PCP Parameters
_lm_global_posts=TRUE _immediate_commit_propagation=TRUE
Task 3.6 - Establish Standby Database The steps to establish the standby database are as follows:
Step 3.6.1 - Backup the Database using RMAN
RMAN should be used to backup the current production database so that it is ready to be restored to the new standby. You must backup the database and the archived redo logs, and then the control file. Here is an example of how this can be achieved, executed from one of the production database nodes:
ha1db01:$ rman target /
ha1db01:RMAN> backup device type disk format '/NAS/oracle/rman_backups/%U' database plus archivelog;
Transitioning E-Business Suite to the Maximum Availability Architecture with Minimal Downtime Page 42
Maximum Availability Architecture
ha1db01:RMAN> backup device type disk format '/NAS/oracle/rman_backups/%U' current controlfile for standby;
Step 3.6.2 - Ship Backup to the new Database Server
Using the appropriate system tools, ship the backup to the new database server. The backup must be restored to the same folder name on the destination as where it was created on the source.
Step 3.6.3 - Start one RAC instance
Choose one of the RAC instances at the DR site and start it with the NOMOUNT option:
ha2db01:SQL> startup nomount
Step 3.6.4 - Restore the Database Backup to the Standby Using RMAN
Restore the database using RMAN on the same server that has the instance started NOMOUNT. The database must be restored with the “for standby” option, for example:
ha2db01:$ rman target sys/manager@ha1db01:1521/VIS auxiliary /
ha2db01:RMAN> duplicate target database for standby;
Step 3.6.5 - Start Managed Recovery
Pay close attention to which instance the following commands are executed.
On the standby database, check to make sure the database is in standby mode by executing this query from SQL*Plus connected as sysdba:
ha2db01:SQL> select DATABASE_ROLE from v$database; DATABASE_ROLE ---------------- PHYSICAL STANDBY
On the primary database enable the previously deferred remote destination by executing this command from SQL*Plus connected as sysdba:
ha1db01:SQL> alter system set log_archive_dest_state_2=enable SID=’*’;
Also, update the database configuration “include” files on all nodes of the primary database:
log_archive_dest_state_2=enable
Place the standby database in managed recovery by executing this command from SQL*Plus connected as sysdba:
ha2db01:SQL> recover managed standby database using current logfile disconnect;
Step 3.6.6 - Verify Correct Standby Operation
Validate that the standby is correctly applying redo from the primary.
Transitioning E-Business Suite to the Maximum Availability Architecture with Minimal Downtime Page 43
Maximum Availability Architecture
On the primary database, archive the current log using the following SQL statement:
ha1db01:SQL> alter system archive log current;
On the standby database, query the gv$archived_log view to verify that the logs are received and applied:
ha2db01:SQL> select thread#, sequence#, applied, to_char(first_time, ‘mm/dd/yy hh24:mi:ss’) first, to_char(next_time, ‘mm/dd/yy hh24:mi:ss’) next, to_char(completion_time, ‘mm/dd/yy hh24:mi:ss’) completion from gv$archived_log order by first_time;
Task 3.7 - Clone Application Software and Configure on the DR Site
Step 3.7.1 - Prepare the Application Tier for Cloning
For each type of application tier install at your site (e.g., Concurrent Processing, Administration, Web, Forms), log on as the APPLMGR user and prepare the application tier for cloning. If you share a single common APPL_TOP or have only full installs, you need only do this on one application tier. For example:
ha1mt01:$ cd <COMMON_TOP>/admin/scripts/<CONTEXT_NAME>
ha1mt01:$ perl adpreclone.pl appsTier
Step 3.7.2 - Copy the Application Tier File System
Using appropriate tool make a copy of the Applications software and tech stack to the DR application servers. We will use this clone of the software to run the application after the switchover.
Step 3.7.3 - Configure New Application Tier File Systems
Configure the new application tier file systems with the adclonectx.pl APPL_TOP using original context file, or a copy of it, as the source context file. This script must be run on each application tier node. For example for node ha2mt01:
ha2mt01:$ cd /u01/appltopRAC/viscomn/clone/bin
ha2mt01:$ perl adclonectx.pl contextfile=/u01/appltopRAC/visappl/admin/VIS_ha1mt01.xml
Provide the values required for creation of the new APPL_TOP Context file:
Prompt Response
Do you want to use a virtual hostname for the target node (y/n)
n
Target hostname ha2mt01
Do you want the inputs to be validated (y/n) n
Target system database SID VIS
Transitioning E-Business Suite to the Maximum Availability Architecture with Minimal Downtime Page 44
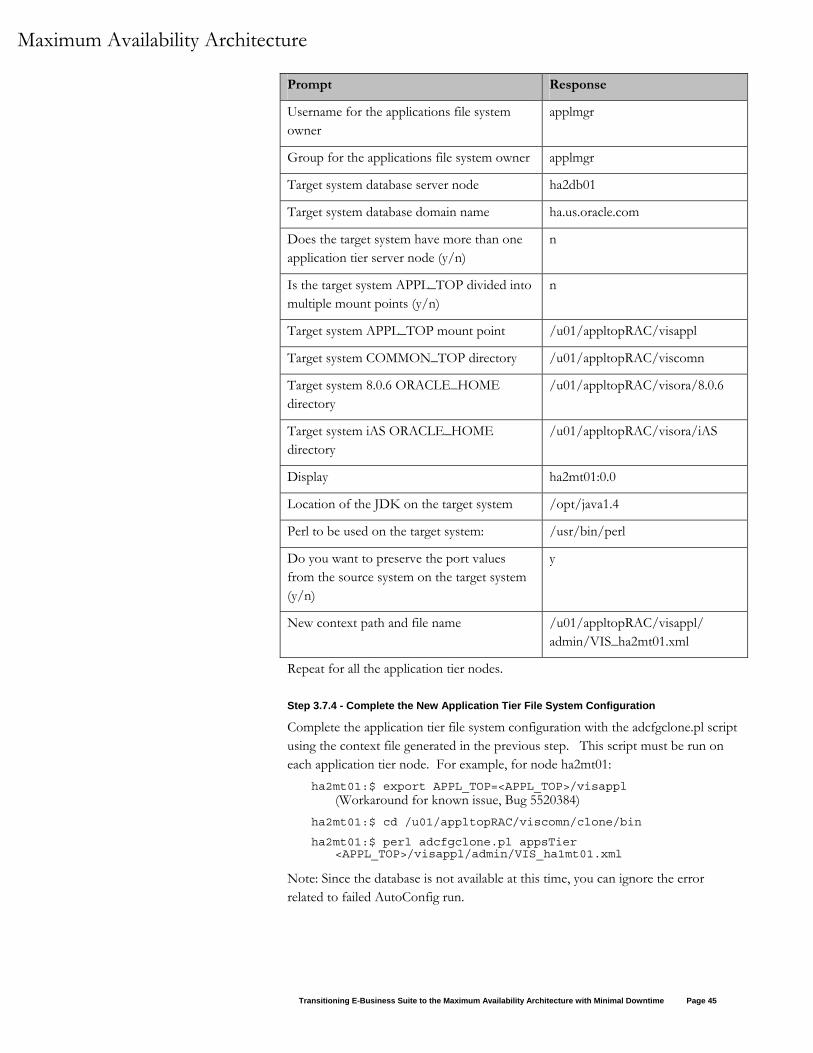
Maximum Availability Architecture
Prompt Response
Username for the applications file system owner
applmgr
Group for the applications file system owner applmgr
Target system database server node ha2db01
Target system database domain name ha.us.oracle.com
Does the target system have more than one application tier server node (y/n)
n
Is the target system APPL_TOP divided into multiple mount points (y/n)
n
Target system APPL_TOP mount point /u01/appltopRAC/visappl
Target system COMMON_TOP directory /u01/appltopRAC/viscomn
Target system 8.0.6 ORACLE_HOME directory
/u01/appltopRAC/visora/8.0.6
Target system iAS ORACLE_HOME directory
/u01/appltopRAC/visora/iAS
Display ha2mt01:0.0
Location of the JDK on the target system /opt/java1.4
Perl to be used on the target system: /usr/bin/perl
Do you want to preserve the port values from the source system on the target system (y/n)
y
New context path and file name /u01/appltopRAC/visappl/ admin/VIS_ha2mt01.xml
Repeat for all the application tier nodes.
Step 3.7.4 - Complete the New Application Tier File System Configuration
Complete the application tier file system configuration with the adcfgclone.pl script using the context file generated in the previous step. This script must be run on each application tier node. For example, for node ha2mt01:
ha2mt01:$ export APPL_TOP=<APPL_TOP>/visappl (Workaround for known issue, Bug 5520384)
ha2mt01:$ cd /u01/appltopRAC/viscomn/clone/bin
ha2mt01:$ perl adcfgclone.pl appsTier <APPL_TOP>/visappl/admin/VIS_ha1mt01.xml
Note: Since the database is not available at this time, you can ignore the error related to failed AutoConfig run.
Transitioning E-Business Suite to the Maximum Availability Architecture with Minimal Downtime Page 45
Maximum Availability Architecture
Don’t forget to repeat for all the application tier nodes.
Step 3.7.5 - Configure Application Tiers for RAC
The script adcfgclone.pl does not set variables to use the load balanced services. To adjust these parameters, edit the context file found at $ORACLE_HOME/appsutil/<CONTEXT_NAME>.xml to set the value of "Tools OH TWO_TASK" (s_tools_two_task) "iAS OH TWO_TASK" (s_weboh_twotask), and Apps JDBC Connect Alias (s_apps_jdbc_connect_alias). Repeat the steps for all the application tier nodes.
To load balance the forms based applications database connections, set the value of "Tools OH TWO_TASK" to point to the <database_name>_806_balance alias generated in the tnsnames.ora file.
To load balance the self-service applications database connections, set the value of iAS OH TWO_TASK" and "Apps JDBC Connect Alias" to point to the <database_name>_balance alias generated in the tnsnames.ora file
If you are load balancing for Concurrent Processing, set the value of “Concurrent Manager TWO_TASK” (s_cp_twotask) to point to the <database_name>_806_balance alias generated in the tnsnames.ora file.
If there is more than one Concurrent Processing Node and you would like to take advantage of PCP refer to “Configure Parallel Concurrent Processing” section of the Note 362135.1.
Task 3.8 - Update Clusterware Configuration If you want to use srvctl to control the resources you need to add the new resources to CRS. See the earlier section Update Clusterware Configuration for details of this task.
Transitioning E-Business Suite to the Maximum Availability Architecture with Minimal Downtime Page 46

Maximum Availability Architecture
PHASE 4 - ONGOING SWITCHOVER AND FAILOVER TESTING The DR site can be used via switchover to provide application services while the production platform or site is undergoing planned maintenance or via failover if the production site is rendered unusable by a severe unplanned outage. We recommend that switchover and failover procedures are tested regularly to validate your MAA configuration. In this section we document the following procedures:
Task 4.1 - Switchover Procedure
Task 4.2 - Switch Back Procedure
Task 4.3 - Failover Procedure
Task 4.4 - DR Testing Procedure using Flashback Database
Task 4.5 - Automating Switchover and Failover Procedures
Task 4.1 - Switchover Procedure The steps to switch over to the remote standby database are as follows. The E-Business Suite application will be down during this stage, so it is recommended that the steps be carefully practiced and scripted.
Step 4.1.1 - Prepare the Remote Standby Database
If the database has been opened read-only since it was last shut down, bring it down and back up.
Make sure that managed recovery is running, and is up to date.
Shut down all RAC instances but the one performing recovery on the standby site.
Check to see if flashback has been enabled with the following query: ha2db01:SQL> select flashback_on from v$database;
FLASHBACK_ON ------------ NO
Step 4.1.2 - Shutdown E-Business Suite and Extra Database Instances
Shut down the E-Business Suite completely. Ensure the application is completely shutdown.
Stop all RAC instances but one, on the production site.
Step 4.1.3 - Switchover to Remote Standby Database
On the primary database commit to switchover to standby: ha1db01:SQL> alter database commit to switchover to standby
with session shutdown;
Shutdown the primary database and keep it down for now: ha1db01:SQL> shutdown immediate
Transitioning E-Business Suite to the Maximum Availability Architecture with Minimal Downtime Page 47
Maximum Availability Architecture
Stop the primary database listener: on each node: ha1db01:$ lsnrctl stop LISTENER_<hostname>
On the standby database, verify that it is ready to be converted to the new primary:
ha2db01:SQL> select switchover_status from v$database; SWITCHOVER_STATUS ----------------- TO PRIMARY
On the standby database, execute the following command to convert it to be the new primary:
ha2db01:$ alter database commit to switchover to primary;
Step 4.1.4 - Enable Flashback on the New Primary (Optional)
If flashback has not yet been enabled on this database, enable it now with this command:
ha2db01:SQL> alter database flashback on;
Step 4.1.5 - Open the DR Database ha2db01:SQL> alter database open;
Step 4.1.6 - Start Other DR Database Instances
Other instances of the new primary database can be started as normal: ha2db02:SQL> startup
Step 4.1.7 - Remove the Old Application Topology
Connect to the new primary database using SQL*Plus as user APPS and execute the following commands:
ha2db01:SQL> exec FND_NET_SERVICES.remove_system('VIS');
ha2db01:SQL> commit;
Step 4.1.8 - Configure DR Database Tier
Run AutoConfig twice on each DR database node to configure the Oracle home for use by the E-Business Suite. For example, for ha2db01:
ha2db01:$ cd $ORACLE_HOME/appsutil/scripts/<CONTEXT_NAME>
ha2db01:$ ./adautocfg.sh
This command needs to be run once on each database node to register the node, then after all nodes are registered it must be run once again on each node to generate the correct SQL*Net configuration files.
Step 4.1.9 - Restart Listeners
Start the correct listener on each new primary database node. For example, for ha2db01:
Transitioning E-Business Suite to the Maximum Availability Architecture with Minimal Downtime Page 48
Maximum Availability Architecture
ha2db01:$ lsnrctl stop VIS1
ha2db01:$ lsnrctl start LISTENER_ha2db01
Step 4.1.10 - Configure Application Tiers
Run AutoConfig on all the new primary application tier nodes. This step can be run in parallel. For example, for ha2mt01:
ha2mt01:$ cd $COMMON_TOP/admin/scripts/<CONTEXT_NAME>
ha2mt01:$ ./adautocfg.sh
Step 4.1.11 - Start E-Business Suite
Start the E-Business Suite applications on the DR site. Online users can gain access at this time.
Step 4.1.12 - Start Original Primary as Standby
Start the database listeners on at least one database node at the original primary site: ha1db01:$ lsnrctl start LISTENER_ha1db01
On the same node, start the database in mount mode, and then start managed recovery:
ha1db01:SQL> startup mount;
ha1db01:SQL> recover managed standby database using current logfile disconnect;
On the DR database enable remote archiving by executing this command from SQL*Plus connected as sysdba:
ha2db01:SQL> alter system set log_archive_dest_state_2=enable SID=’*’;
Step 4.1.13 - Perform the Cloning Finishing Tasks
Perform the “Finishing Tasks” outlined in the OracleMetaLink note 230672.1 – Cloning Oracle Applications Release 11i with Rapid Clone:
Step 4.1.14 - Direct users to the new system.
The ex-standby system should be available to your users as your new production system. Direct your users to the new URL.
Task 4.2 - Switch Back Procedure It may be necessary to switch back to the primary after the switchover. The process to switch back to the original primary is the mirror image of the switchover. Please see the previous task for details.
Task 4.3 - Failover Procedure In this section we assume that the primary site has been lost and a disaster site is available. We document the steps to switch the production system to the remote
Transitioning E-Business Suite to the Maximum Availability Architecture with Minimal Downtime Page 49
Maximum Availability Architecture
disaster site and then enable the original primary as a Data Guard standby using the Flashback feature.
The E-Business Suite application will be down during this stage, so it is recommended that the steps are carefully practiced and scripted so that they can be executed quickly in an emergency.
Step 4.3.1 - Failover to DR Database
On the standby database, execute the following command to convert it to be the new primary:
ha2db01:SQL> recover managed standby database cancel;
ha2db01:SQL> recover managed standby database finish force;
ha2db01:SQL> alter database commit to switchover to primary;
Step 4.3.2 - Enable Flashback
If flashback has never been enabled for the DR database, you should enable it now. If you enable it and it has already been enabled, the command will simply give you a warning.
ha2db01:SQL> alter database flashback on;
To check flashback status, run the following query: ha2db01:SQL> select flashback_on from v$database;
FLASHBACK_ON ------------ YES
Step 4.3.3 - Open the DR Database ha2db01:SQL> alter database open;
Note: If the database has been opened read-only since it was last shut down, it will need to be shut down and restarted.
Step 4.3.4 - Start Other RAC Instances on the DR site
The other RAC instances can be started normally: ha2db02:SQL> startup
You may continue with the next step while the instances are starting.
Step 4.3.5 - Remove the Old Application Topology
Connect to the DR database using SQL*Plus as user apps and execute the following commands:
ha2db01:SQL> exec FND_NET_SERVICES.remove_system('VIS');
ha2db01:SQL> commit;
Transitioning E-Business Suite to the Maximum Availability Architecture with Minimal Downtime Page 50
Maximum Availability Architecture
Step 4.3.6 - Configure DR Database Tier
Run AutoConfig twice on each DR database node to configure the Oracle home for use by the E-Business Suite. For example, for ha2db01:
ha2db01:$ cd $ORACLE_HOME/appsutil/scripts/<CONTEXT_NAME>
ha2db01:$ ./adautocfg.sh
This command needs to be run once on each database node to register the node, then after all nodes are registered it must be run once again on each node to generate the correct SQL*Net configuration files.
Step 4.3.7 - Restart Listeners
Start the correct listener on each new primary database node. For example, for ha2db01:
ha2db01:$ lsnrctl stop VIS1
ha2db01:$ lsnrctl start LISTENER_ha2db01
Step 4.3.8 - Configure Application Tiers
Run AutoConfig on all the new primary application tier nodes. This step can be run in parallel. For example, for ha2mt01:
ha2mt01:$ cd $COMMON_TOP/admin/scripts/<CONTEXT_NAME>
ha2mt01:$ ./adautocfg.sh
Step 4.3.9 - Start E-Business Suite
Start the E-Business Suite applications on the DR site. Online users can gain access at this time.
Step 4.3.10 - Establish Original Primary as Standby Using Flashback (Optional)
Once access to the failed production site is restored, if you had flashback database enabled, you may be able to reinstate the original primary database as a physical standby of the new primary database.
Make sure Oracle Clusterware and ASM are restarted on the original primary system.
On the DR site, get the SCN when the database became primary: ha2db01:SQL> select to_char(standby_became_primary_scn)
from v$database;
On the original primary site, flashback and start managed recovery: ha1db01:SQL> shutdown immediate;
ha1db01:SQL> startup mount;
ha1db01:SQL> flashback database to scn <standby_became_primary_scn>;
ha1db01:SQL> alter database convert to physical standby;
ha1db01:SQL> shutdown immediate;
ha1db01:SQL> startup mount;
Transitioning E-Business Suite to the Maximum Availability Architecture with Minimal Downtime Page 51
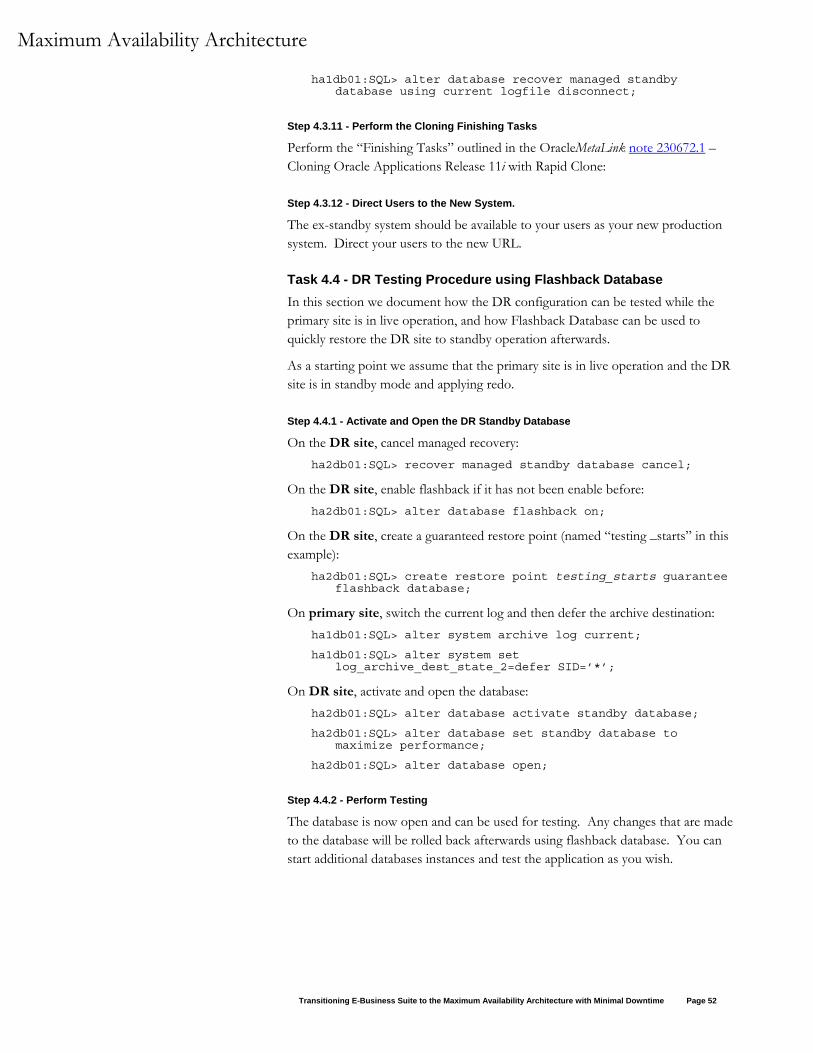
Maximum Availability Architecture
ha1db01:SQL> alter database recover managed standby database using current logfile disconnect;
Step 4.3.11 - Perform the Cloning Finishing Tasks
Perform the “Finishing Tasks” outlined in the OracleMetaLink note 230672.1 – Cloning Oracle Applications Release 11i with Rapid Clone:
Step 4.3.12 - Direct Users to the New System.
The ex-standby system should be available to your users as your new production system. Direct your users to the new URL.
Task 4.4 - DR Testing Procedure using Flashback Database In this section we document how the DR configuration can be tested while the primary site is in live operation, and how Flashback Database can be used to quickly restore the DR site to standby operation afterwards.
As a starting point we assume that the primary site is in live operation and the DR site is in standby mode and applying redo.
Step 4.4.1 - Activate and Open the DR Standby Database
On the DR site, cancel managed recovery: ha2db01:SQL> recover managed standby database cancel;
On the DR site, enable flashback if it has not been enable before: ha2db01:SQL> alter database flashback on;
On the DR site, create a guaranteed restore point (named “testing _starts” in this example):
ha2db01:SQL> create restore point testing_starts guarantee flashback database;
On primary site, switch the current log and then defer the archive destination: ha1db01:SQL> alter system archive log current;
ha1db01:SQL> alter system set log_archive_dest_state_2=defer SID=’*’;
On DR site, activate and open the database: ha2db01:SQL> alter database activate standby database;
ha2db01:SQL> alter database set standby database to maximize performance;
ha2db01:SQL> alter database open;
Step 4.4.2 - Perform Testing
The database is now open and can be used for testing. Any changes that are made to the database will be rolled back afterwards using flashback database. You can start additional databases instances and test the application as you wish.
Transitioning E-Business Suite to the Maximum Availability Architecture with Minimal Downtime Page 52
Maximum Availability Architecture
Note that the DR site will be getting behind on redo application during the testing period and so make sure that you do not get too far behind.
Step 4.4.3 - Flashback the Database and Resume Standby Operation
On the DR site, shutdown all but one database instance. In this example, only the instance on ha2db01 remains.
On the DR site, flashback and start managed recovery: ha2db01:SQL> startup mount force;
ha2db01:SQL> flashback database to restore point testing_starts;
ha2db01:SQL> drop restore point testing_starts;
ha2db01:SQL> alter database convert to physical standby;
ha2db01:SQL> startup mount force;
ha2db01:SQL> alter database recover managed standby database using current logfile disconnect;
On the primary site, enable the archive destination: ha1db01:SQL> alter system set
log_archive_dest_state_2=enable SID=’*’;
Task 4.5 - Automating Switchover and Failover Procedures In this section we provide an example of how to achieve complete automation of switchover and failover procedures by utilizing Oracle Data Guard Broker.
The Oracle Data Guard broker is a distributed management framework that automates and centralizes the creation, maintenance, and monitoring of Data Guard configurations. The broker automates and simplifies the following operations:
• Management of an entire Data Guard configuration, including all databases, redo transport services, and log apply services, through a client connection to any database in the configuration.
• Management of the protection mode for the broker configuration.
• Invoking switchover or failover with a single command to initiate and control complex role changes across all databases in the configuration.
• Configuring failover to occur automatically upon loss of the primary database, increasing availability without manual intervention. This is known as Fast-Start Failover (FSFO).
• Monitoring the status of the entire configuration, capturing diagnostic information, reporting statistics such as the log apply rate and the redo generation rate, and detecting problems quickly with centralized monitoring, testing, and performance tools.
All management operations can be performed locally or remotely through the broker's easy-to-use interfaces: the Data Guard management pages in Oracle
Transitioning E-Business Suite to the Maximum Availability Architecture with Minimal Downtime Page 53
Maximum Availability Architecture
Enterprise Manager, which is the broker's graphical user interface (GUI), and the Data Guard command-line interface called DGMGRL.
In our example we have automated the entire switchover/failover process including automatic triggering of failover. It is possible to omit certain pieces, such as automatic triggering, if they do not make sense for your implementation.
The process works like this:
1. Fast-Start Failover (FSFO) determines that a failover is necessary and initiates a failover to the standby database automatically, or the administrator instructs the broker to switchover or failover.
2. When the database switchover/failover has completed the DB_ROLE_CHANGE database event is fired.
3. The event causes a trigger to be fired which calls a script that configures and starts the E-Business Suite application..
As a starting point for our setup procedures we assume that the primary site is in live operation and the DR site is in standby mode and applying redo.
Step 4.5.1 - Develop E-Business Suite Configuration and Startup Script
Develop a script that will automate the E-Business Suite configuration and startup process. This equates to the following steps in the switchover procedure:
Step 4.1.7 - Remove the Old Application Topology
Step 4.1.8 - Configure DR Database Tier
Step 4.1.10 - Configure Application Tiers
Step 4.1.11 - Start E-Business Suite
An example script is provided for your reference in Appendix A. Modify the script to suit your environment and requirements.
Make sure ssh (or equivalent) is configured so that remote shell scripts can be executed without password prompts.
Step 4.5.2 - Automate Script Execution by Trigger
Create a database event “DB_ROLE_CHANGE” trigger, which fires after database role changes from standby to primary. For example:
CREATE OR REPLACE TRIGGER postover
AFTER DB_ROLE_CHANGE ON DATABASE
DECLARE
v_db_unique_name varchar2(30);
BEGIN
select upper(VALUE) into v_db_unique_name
from v$parameter where NAME='db_unique_name';
Transitioning E-Business Suite to the Maximum Availability Architecture with Minimal Downtime Page 54
Maximum Availability Architecture
dbms_scheduler.create_job(
job_name=>'postover',
job_type=>'executable',
job_action=>
'/NAS/oracle/FSFO/' || v_db_unique_name||'.fsfo.sh',
enabled=>TRUE
);
END;
The trigger calls a wrapper script named <DB_UNIQUE_NAME>.fsfo.sh which in turn calls the fsfo.sh script. This is done because it is not possible to directly pass arguments to a script from dbms_scheduler. A wrapper script must be created for the primary and DR databases:
In our case, we create a script named VIS_HA1.fsfo.sh as follows: #!/bin/sh
/NAS/oracle/FSFO/fsfo.sh VIS_HA1
And, we create a script named VIS_HA2.fsfo.sh as follows: #!/bin/sh
/NAS/oracle/FSFO/fsfo.sh VIS_HA2
Step 4.5.3 - Configure Fast-Start Failover
Follow the steps in Oracle Database 10g Release 2 Best Practices: Data Guard Fast-Start Failover to configure Fast-Start Failover.
As always, use include files (ifiles) for additional SQL*NET configuration so that your changes are preserved across AutoConfig executions.
Transitioning E-Business Suite to the Maximum Availability Architecture with Minimal Downtime Page 55
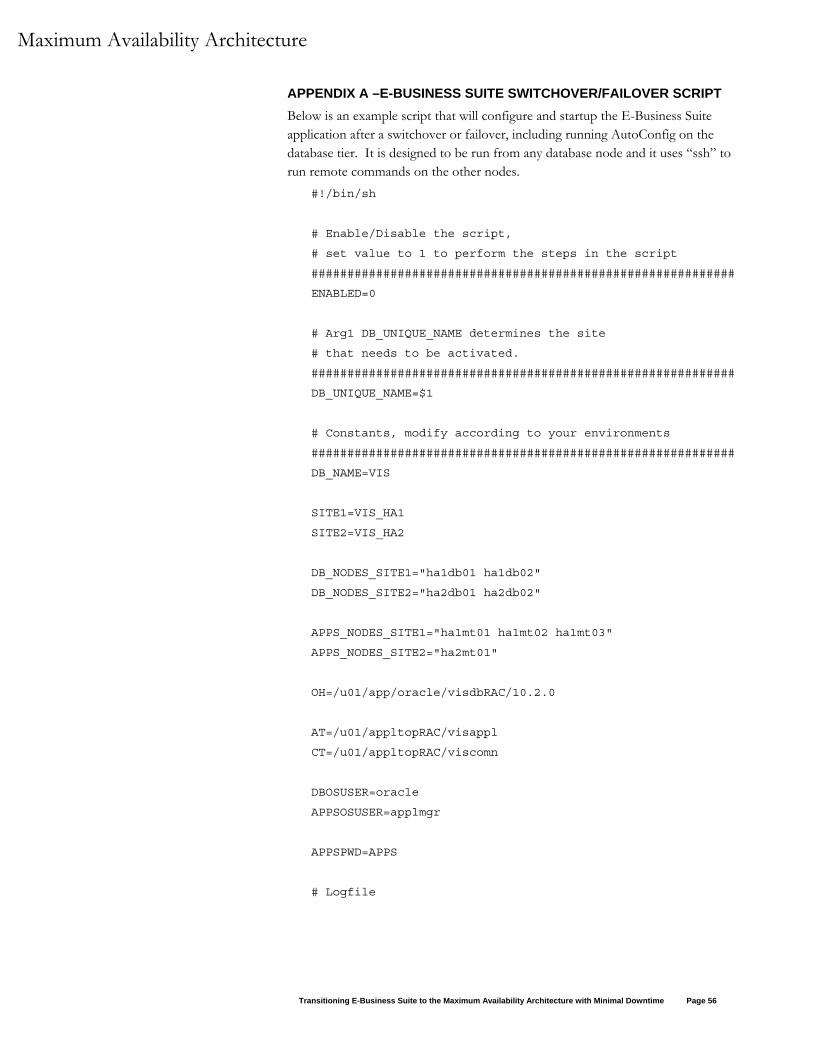
Maximum Availability Architecture
APPENDIX A –E-BUSINESS SUITE SWITCHOVER/FAILOVER SCRIPT Below is an example script that will configure and startup the E-Business Suite application after a switchover or failover, including running AutoConfig on the database tier. It is designed to be run from any database node and it uses “ssh” to run remote commands on the other nodes.
#!/bin/sh
# Enable/Disable the script,
# set value to 1 to perform the steps in the script
###########################################################
ENABLED=0
# Arg1 DB_UNIQUE_NAME determines the site
# that needs to be activated.
###########################################################
DB_UNIQUE_NAME=$1
# Constants, modify according to your environments
###########################################################
DB_NAME=VIS
SITE1=VIS_HA1
SITE2=VIS_HA2
DB_NODES_SITE1="ha1db01 ha1db02"
DB_NODES_SITE2="ha2db01 ha2db02"
APPS_NODES_SITE1="ha1mt01 ha1mt02 ha1mt03"
APPS_NODES_SITE2="ha2mt01"
OH=/u01/app/oracle/visdbRAC/10.2.0
AT=/u01/appltopRAC/visappl
CT=/u01/appltopRAC/viscomn
DBOSUSER=oracle
APPSOSUSER=applmgr
APPSPWD=APPS
# Logfile
Transitioning E-Business Suite to the Maximum Availability Architecture with Minimal Downtime Page 56
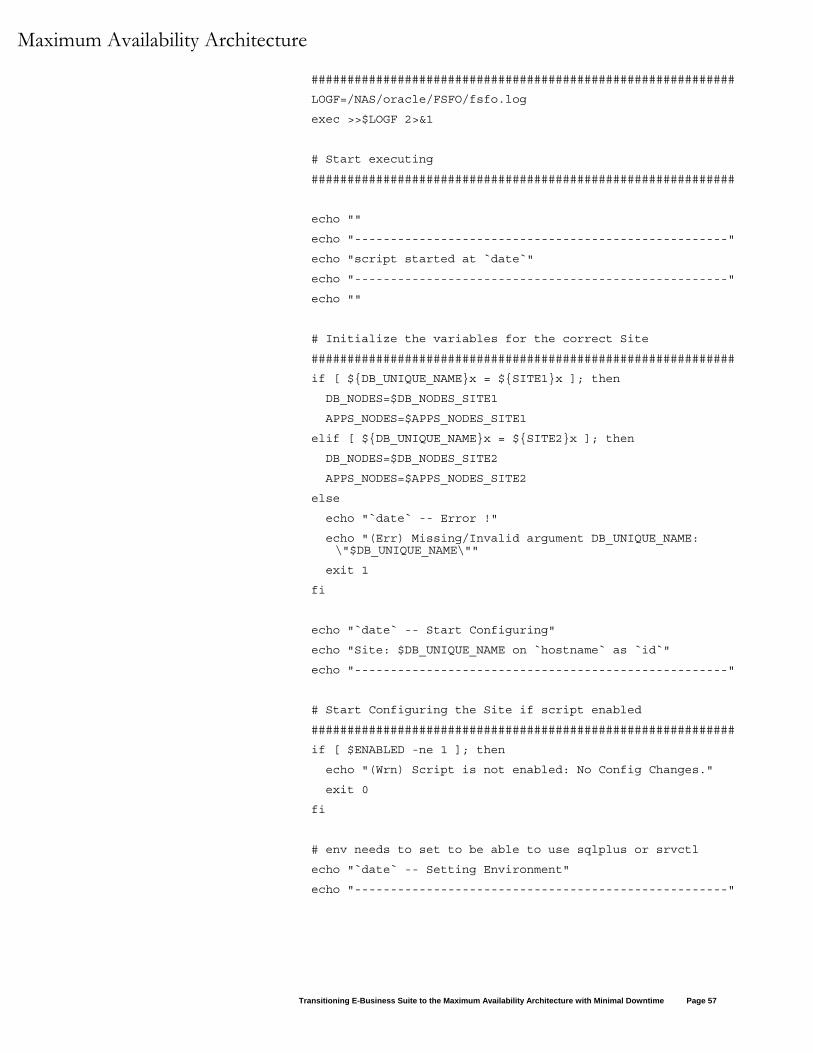
Maximum Availability Architecture
###########################################################
LOGF=/NAS/oracle/FSFO/fsfo.log
exec >>$LOGF 2>&1
# Start executing
###########################################################
echo ""
echo "----------------------------------------------------"
echo "script started at `date`"
echo "----------------------------------------------------"
echo ""
# Initialize the variables for the correct Site
###########################################################
if [ ${DB_UNIQUE_NAME}x = ${SITE1}x ]; then
DB_NODES=$DB_NODES_SITE1
APPS_NODES=$APPS_NODES_SITE1
elif [ ${DB_UNIQUE_NAME}x = ${SITE2}x ]; then
DB_NODES=$DB_NODES_SITE2
APPS_NODES=$APPS_NODES_SITE2
else
echo "`date` -- Error !"
echo "(Err) Missing/Invalid argument DB_UNIQUE_NAME: \"$DB_UNIQUE_NAME\""
exit 1
fi
echo "`date` -- Start Configuring"
echo "Site: $DB_UNIQUE_NAME on `hostname` as `id`"
echo "----------------------------------------------------"
# Start Configuring the Site if script enabled
###########################################################
if [ $ENABLED -ne 1 ]; then
echo "(Wrn) Script is not enabled: No Config Changes."
exit 0
fi
# env needs to set to be able to use sqlplus or srvctl
echo "`date` -- Setting Environment"
echo "----------------------------------------------------"
Transitioning E-Business Suite to the Maximum Availability Architecture with Minimal Downtime Page 57
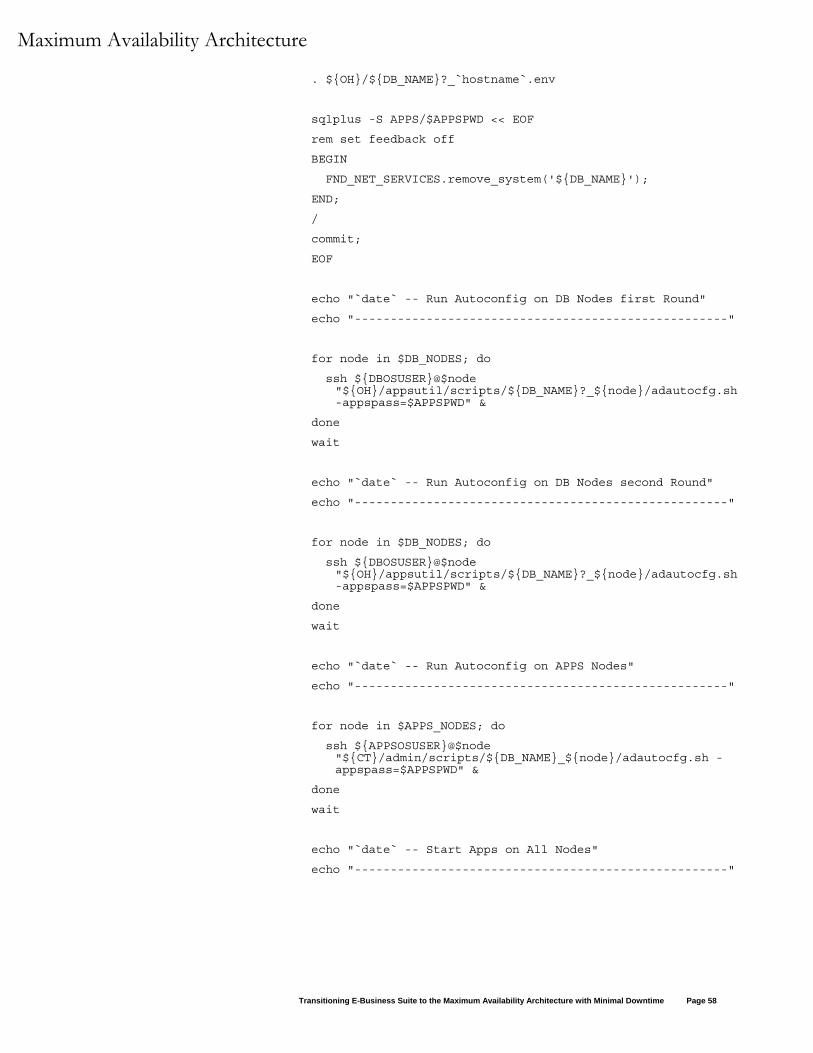
Maximum Availability Architecture
. ${OH}/${DB_NAME}?_`hostname`.env
sqlplus -S APPS/$APPSPWD << EOF
rem set feedback off
BEGIN
FND_NET_SERVICES.remove_system('${DB_NAME}');
END;
/
commit;
EOF
echo "`date` -- Run Autoconfig on DB Nodes first Round"
echo "----------------------------------------------------"
for node in $DB_NODES; do
ssh ${DBOSUSER}@$node "${OH}/appsutil/scripts/${DB_NAME}?_${node}/adautocfg.sh -appspass=$APPSPWD" &
done
wait
echo "`date` -- Run Autoconfig on DB Nodes second Round"
echo "----------------------------------------------------"
for node in $DB_NODES; do
ssh ${DBOSUSER}@$node "${OH}/appsutil/scripts/${DB_NAME}?_${node}/adautocfg.sh -appspass=$APPSPWD" &
done
wait
echo "`date` -- Run Autoconfig on APPS Nodes"
echo "----------------------------------------------------"
for node in $APPS_NODES; do
ssh ${APPSOSUSER}@$node "${CT}/admin/scripts/${DB_NAME}_${node}/adautocfg.sh -appspass=$APPSPWD" &
done
wait
echo "`date` -- Start Apps on All Nodes"
echo "----------------------------------------------------"
Transitioning E-Business Suite to the Maximum Availability Architecture with Minimal Downtime Page 58
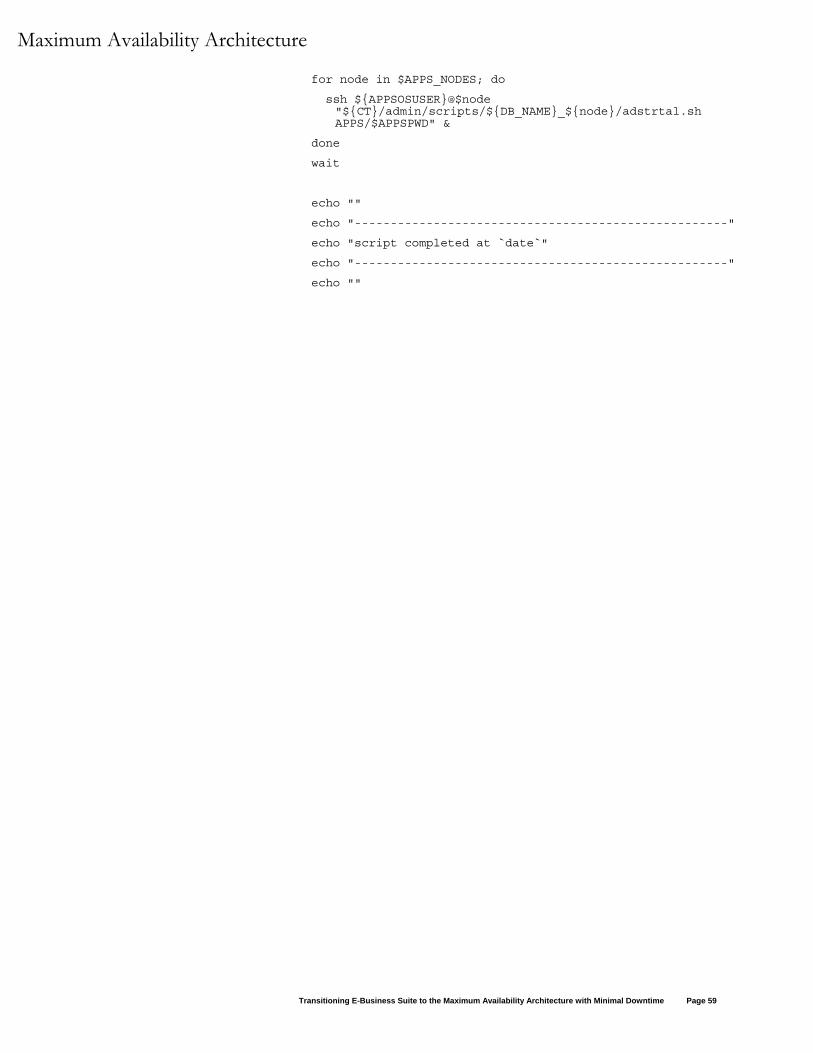
Maximum Availability Architecture
for node in $APPS_NODES; do
ssh ${APPSOSUSER}@$node "${CT}/admin/scripts/${DB_NAME}_${node}/adstrtal.sh APPS/$APPSPWD" &
done
wait
echo ""
echo "----------------------------------------------------"
echo "script completed at `date`"
echo "----------------------------------------------------"
echo ""
Transitioning E-Business Suite to the Maximum Availability Architecture with Minimal Downtime Page 59
Maximum Availability Architecture
REFERENCES Oracle Maximum Availability Architecture (MAA) on OTN: http://www.oracle.com/technology/deploy/availability/htdocs/maa.htm
Oracle Data Guard Overview http://www.oracle.com/technology/deploy/availability/htdocs/DataGuardOverview.html
Oracle® Database Reference 10g Release 2: http://download-west.oracle.com/docs/cd/B19306_01/server.102/b14237/toc.htm
Interoperability Notes - Oracle Applications 11i with Database 10g Release 2: http://metalink.oracle.com/metalink/plsql/showdoc?db=NOT&id=362203.1
Oracle® Database Administrator's Guide 10g Release 2: http://download-west.oracle.com/docs/cd/B19306_01/server.102/b14231/toc.htm
Oracle® Clusterware and Oracle Real Application Clusters Installation and Configuration Guide Guides for 10g Release 2: http://www.oracle.com/pls/db102/homepage
OracleMetaLink Note 185703.1 - How to Avoid Common Flaws and Errors Using Passwordfile http://metalink.oracle.com/metalink/plsql/ml2_documents.showDocument?p_database_id=NOT&p_id=185703.1
OracleMetaLink Note 216211.1 - Nologging In The E-Business Suite http://metalink.oracle.com/metalink/plsql/ml2_documents.showDocument?p_database_id=NOT&p_id=216211.1
Oracle® Data Guard Concepts and Administration 10g Release 2 (10.2) http://download-west.oracle.com/docs/cd/B19306_01/server.102/b14239/toc.htm
OracleMetaLink Note 281758.1 - Additional Features in Oracle Applications Manager in Oracle Applications Release 11.5.10 http://metalink.oracle.com/metalink/plsql/ml2_documents.showDocument?p_database_id=NOT&p_id=281758.1
Oracle® Database Oracle Clusterware and Oracle Real Application Clusters Administration and Deployment Guide 10g Release 2 http://download-west.oracle.com/docs/cd/B19306_01/rac.102/b14197/toc.htm
OracleMetaLink Note 362135.1- Configuring Oracle Applications Release 11i with 10g Release2 Real Application Clusters and Automatic Storage Management http://metalink.oracle.com/metalink/plsql/ml2_documents.showDocument?p_database_id=NOT&p_id=362135.1
Transitioning E-Business Suite to the Maximum Availability Architecture with Minimal Downtime Page 60
http://metalink.oracle.com/metalink/plsql/ml2_documents.showDocument?p_database_id=NOT&p_id=185703.1
http://metalink.oracle.com/metalink/plsql/ml2_documents.showDocument?p_database_id=NOT&p_id=185703.1
http://metalink.oracle.com/metalink/plsql/ml2_documents.showDocument?p_database_id=NOT&p_id=216211.1
http://metalink.oracle.com/metalink/plsql/ml2_documents.showDocument?p_database_id=NOT&p_id=216211.1
http://metalink.oracle.com/metalink/plsql/ml2_documents.showDocument?p_database_id=NOT&p_id=281758.1
http://metalink.oracle.com/metalink/plsql/ml2_documents.showDocument?p_database_id=NOT&p_id=281758.1
Transitioning E-Business Suite to the Maximum Availability Architecture with Minimal Downtime Page 61
Maximum Availability Architecture
Oracle Applications Release 11i (11.5.10) Concepts http://oraclesvca2.oracle.com/docs/cd/B16981_01/current/acrobat/11iconcepts.pdf
OracleMetaLink Note 216205.1- Database Initialization Parameters for Oracle Applications 11i http://metalink.oracle.com/metalink/plsql/ml2_documents.showDocument?p_database_id=NOT&p_id=216205.1
The CVU download and FAQ http://www.oracle.com/technology/products/database/clustering/cvu/cvu_download_homepage.html
http://metalink.oracle.com/metalink/plsql/ml2_documents.showDocument?p_database_id=NOT&p_id=216205.1
Transitioning E-Business Suite to the Maximum Availability Architecture with Minimal Downtime October 2006 Authors: Richard Exley, Michael Nowak, Lyn Pratt, Metin Yilmaz, Andrew Babb. Oracle Corporation World Headquarters 500 Oracle Parkway Redwood Shores, CA 94065 U.S.A. Worldwide Inquiries: Phone: +1.650.506.7000 Fax: +1.650.506.7200 oracle.com Copyright © 2005, Oracle. All rights reserved. This document is provided for information purposes only and the contents hereof are subject to change without notice. This document is not warranted to be error-free, nor subject to any other warranties or conditions, whether expressed orally or implied in law, including implied warranties and conditions of merchantability or fitness for a particular purpose. We specifically disclaim any liability with respect to this document and no contractual obligations are formed either directly or indirectly by this document. This document may not be reproduced or transmitted in any form or by any means, electronic or mechanical, for any purpose, without our prior written permission. Oracle, JD Edwards, and PeopleSoft are registered trademarks of Oracle Corporation and/or its affiliates. Other names may be trademarks of their respective owners.
Transitioning E-Business Suite to the Maximum Availability Architecture with Minimal Downtime Page 62