MatrixOne QuickUserManual - Music-Market
38
-
Upload
khangminh22 -
Category
Documents
-
view
0 -
download
0
Transcript of MatrixOne QuickUserManual - Music-Market

2
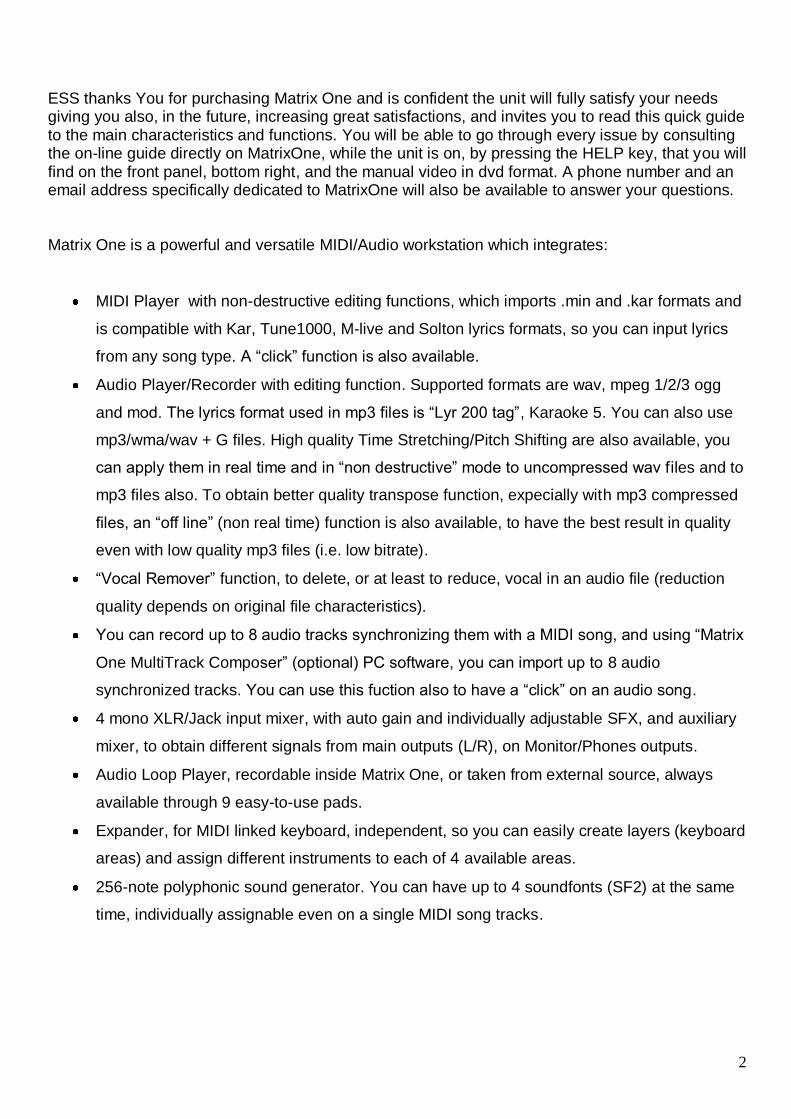
ESS thanks You for purchasing Matrix One and is confident the unit will fully satisfy your needs giving you also, in the future, increasing great satisfactions, and invites you to read this quick guide to the main characteristics and functions. You will be able to go through every issue by consulting the on-line guide directly on MatrixOne, while the unit is on, by pressing the HELP key, that you will find on the front panel, bottom right, and the manual video in dvd format. A phone number and an email address specifically dedicated to MatrixOne will also be available to answer your questions. Matrix One is a powerful and versatile MIDI/Audio workstation which integrates:
MIDI Player with non-destructive editing functions, which imports .min and .kar formats and
is compatible with Kar, Tune1000, M-live and Solton lyrics formats, so you can input lyrics
from any song type. A “click” function is also available.
Audio Player/Recorder with editing function. Supported formats are wav, mpeg 1/2/3 ogg
and mod. The lyrics format used in mp3 files is “Lyr 200 tag”, Karaoke 5. You can also use
mp3/wma/wav + G files. High quality Time Stretching/Pitch Shifting are also available, you
can apply them in real time and in “non destructive” mode to uncompressed wav files and to
mp3 files also. To obtain better quality transpose function, expecially with mp3 compressed
files, an “off line” (non real time) function is also available, to have the best result in quality
even with low quality mp3 files (i.e. low bitrate).
“Vocal Remover” function, to delete, or at least to reduce, vocal in an audio file (reduction
quality depends on original file characteristics).
You can record up to 8 audio tracks synchronizing them with a MIDI song, and using “Matrix
One MultiTrack Composer” (optional) PC software, you can import up to 8 audio
synchronized tracks. You can use this fuction also to have a “click” on an audio song.
4 mono XLR/Jack input mixer, with auto gain and individually adjustable SFX, and auxiliary
mixer, to obtain different signals from main outputs (L/R), on Monitor/Phones outputs.
Audio Loop Player, recordable inside Matrix One, or taken from external source, always
available through 9 easy-to-use pads.
Expander, for MIDI linked keyboard, independent, so you can easily create layers (keyboard
areas) and assign different instruments to each of 4 available areas.
256-note polyphonic sound generator. You can have up to 4 soundfonts (SF2) at the same
time, individually assignable even on a single MIDI song tracks.
3
Easy and user-friendly arranger with styles support in “.sty” format.
Please note also: 10.4" 640x480 colour display touch screen, with various lyrics visualization modes (2/4/12
lyrics lines, if included in the song). Please remember to adopt normal display touch screen instructions (i.e. use plastic rounded pointed objects or recommended tools for this kind of display, as an alternative to finger pressure, but never use metallic or pointed tools). Same care must be taken for the whole unit.
Presence of effects available for audio inputs (Reverb / Chorus / Compressor / Guitar amp
simulator with drive / Delay regulation), with new implementations on future SW versions. Audio playing through 24 bt 44.1 KHz codec, 32 bit internal sound processing. You can tilt the unit in 3 positions, to optimize visualization.
ROM flash card operative system. Linking inputs wide availability (4 USB 2.0 / Lan Ethernet 10/100 / LPT (to import songs
from Charlie Lab Megabeat Pro) / Serial Port / VGA video outputs and Composite Video, etc.), if you use a Mini ITX motherboard.
“Real Time” operativity for most of the functions.
You can create many completely independent archives * (only sounds and samples sets will
be in common), so you can divide the different repertoires, and they will be easily recognizable through different colour background assignment. * Every archive can contain a maximum song number between 10.000 and 60.000, depending on quantity of characters
used for song.
“IMPORT” function from audio CD (CDA grabbing).
Getting Started
First connect the supplied cable with the VDE connection, to the correspondent plug placed on MatrixOne rear panel. Connect the other end of the cable to the 220 V electric plug. Any damage depending on use of damaged cables or of a cable different from the one included in MatrixOne package, will not be accepted in warranty. Connect the audio cables, not included in the package, to balanced Cannon signal outputs or to unbalanced Jack outputs, placed on MatrixOne rear panel, to your audio P.A. inputs (amplified speakers, power amplifier, mixer line input, your home HI-FI AUX or TAPE inputs). Please remember to keep audio P.A. volume levels to zero before turning MatrixOne on or off through the button on rear panel. ESS rejects any responsibility for any damage caused if this important rule is not observed.

4
Rear panel. Audio In/Out connections
2 3 4 5 6 1 7 11 10 9 8
1) Connections for pedal switch. Using the special ESS pedal switch (optional) you can choose function assignment between SONG + or – and Play&Stop, or input patch change, or keyboard performance change. You can choose the various options in CONSOLEUTILITYGLOBAL PEDAL1/2 MODE.
2) Pre-amplified headphones outputs. If in “MAST” MON=LR” is lighted (default, red button background) the signal will be the same as “MASTER R/L”, while if “MAST” MON=LR” is not lighted (white button background) you will be able to to individually adjust the different sound sources (Song - Samples - In 1/2/3/4 - Keyboard and reverber percentage regarding Audio inputs.
3) Main outputs Left/Right, unbalanced Jack ¼”. 4) Main outputs Left/Right, balanced XLR Neutrik . 5) Independent monitor outputs L+R. Same regulation as the headphones one.
6) 4 audio inputs, mono XLR/Jack Neutrik balanced. 7) MatrixOne On/Off Button. 8) VDE power cord. 9) Cooling fan grid. To have a correct internal ventilation, please be careful not to obstruct it
with objects or other. Same care has to be taken also with air grid on the bottom of the unit.
10) 4 hardware filters 12 dB/oct. at 100 Hz, individually adjustable for each of the 4 analog audio inputs. It can be used, for example, as an “antipop” filter using sound sources as a voice.
11) RCA connector output, to be connected to any TV set or any other video unit, compatible with “Video Composite” type signal.

5
Right side panel. Connections
1 2 3 4
9 5 6 7 8
1) PS/2 mouse input, activated combining keys when MatrixOne is turned on, (see included “Emergency Keys” document)
2) Parallel port (LPT1), to import files, via cable, from “Charlie Lab Megabeat Pro” 3) 2 Ethernet RJ45 Ports (currently disabled) 4) Integrated sound card connections (currently disabled) 5) Input PS/2 keyboard Pc always active (first connect the keyboard then turn MatrixOne
on) 6) COM1 serial connector (currently disabled) 7) VGA Connector, to connect to an external video monitor, with 2 display modes:
TV/VGA (Only text, with or without chords display, if included)
TV/VGA Clone (copies what is displayed on MatrixOne display)
8) 4 USB 2.0 ports 9) MIDI Ports
6
Front Panel
12 11 1 2 3 4 5 6 7 8 9 10
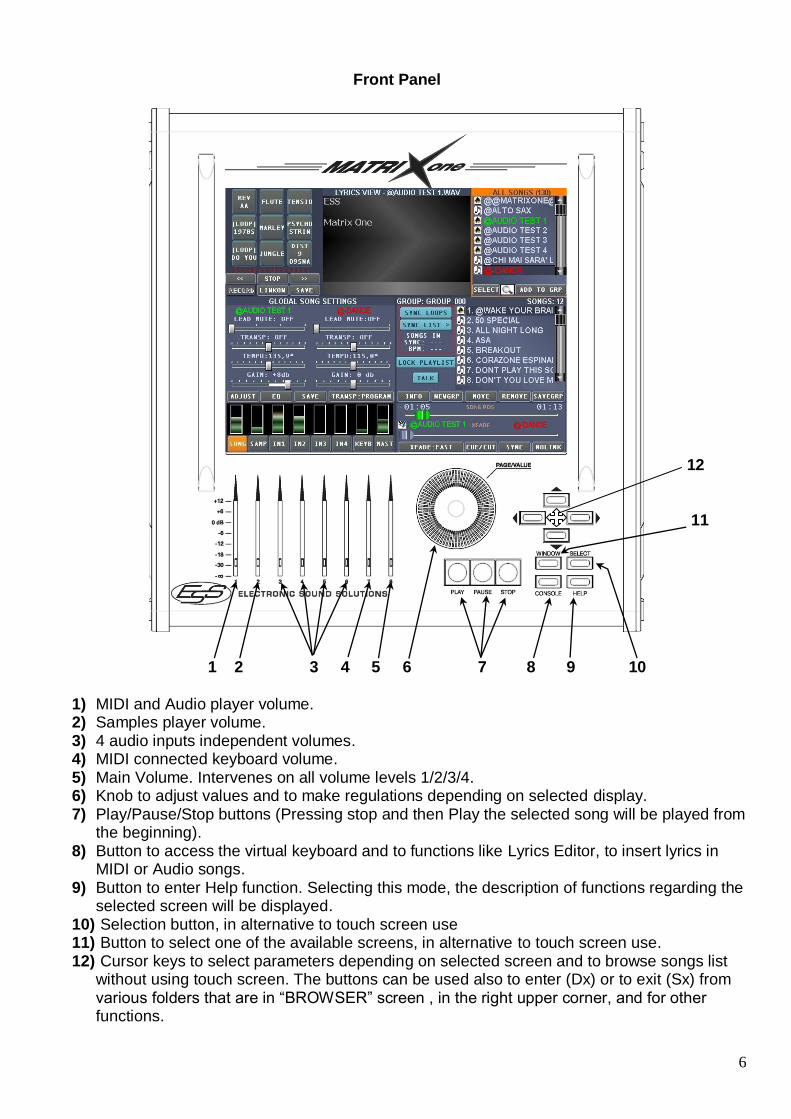
1) MIDI and Audio player volume. 2) Samples player volume. 3) 4 audio inputs independent volumes. 4) MIDI connected keyboard volume. 5) Main Volume. Intervenes on all volume levels 1/2/3/4. 6) Knob to adjust values and to make regulations depending on selected display. 7) Play/Pause/Stop buttons (Pressing stop and then Play the selected song will be played from
the beginning). 8) Button to access the virtual keyboard and to functions like Lyrics Editor, to insert lyrics in
MIDI or Audio songs. 9) Button to enter Help function. Selecting this mode, the description of functions regarding the
selected screen will be displayed. 10) Selection button, in alternative to touch screen use 11) Button to select one of the available screens, in alternative to touch screen use. 12) Cursor keys to select parameters depending on selected screen and to browse songs list
without using touch screen. The buttons can be used also to enter (Dx) or to exit (Sx) from various folders that are in “BROWSER” screen , in the right upper corner, and for other functions.
7
Main screen description & quick guide to use
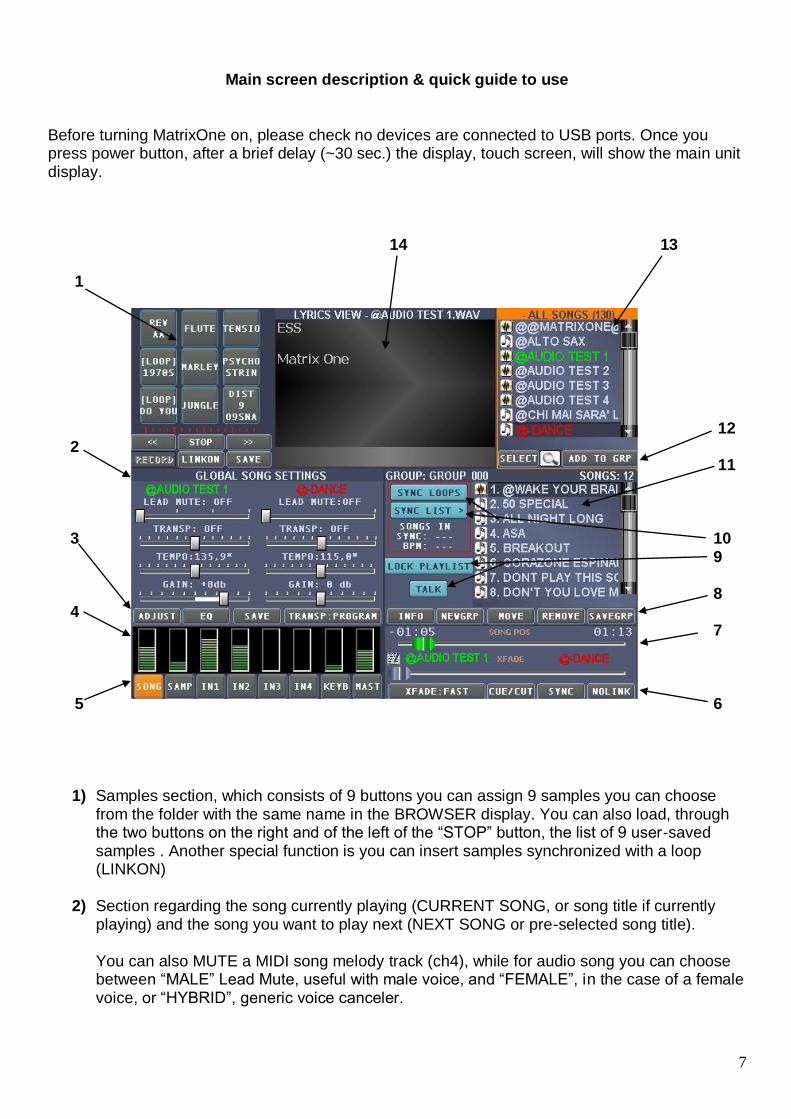
Before turning MatrixOne on, please check no devices are connected to USB ports. Once you press power button, after a brief delay (~30 sec.) the display, touch screen, will show the main unit display. 14 13 1
12 2 11 3 10 9 8 4 7 5 6
1) Samples section, which consists of 9 buttons you can assign 9 samples you can choose from the folder with the same name in the BROWSER display. You can also load, through the two buttons on the right and of the left of the “STOP” button, the list of 9 user-saved samples . Another special function is you can insert samples synchronized with a loop (LINKON)
2) Section regarding the song currently playing (CURRENT SONG, or song title if currently
playing) and the song you want to play next (NEXT SONG or pre-selected song title).
You can also MUTE a MIDI song melody track (ch4), while for audio song you can choose between “MALE” Lead Mute, useful with male voice, and “FEMALE”, in the case of a female voice, or “HYBRID”, generic voice canceler.
8
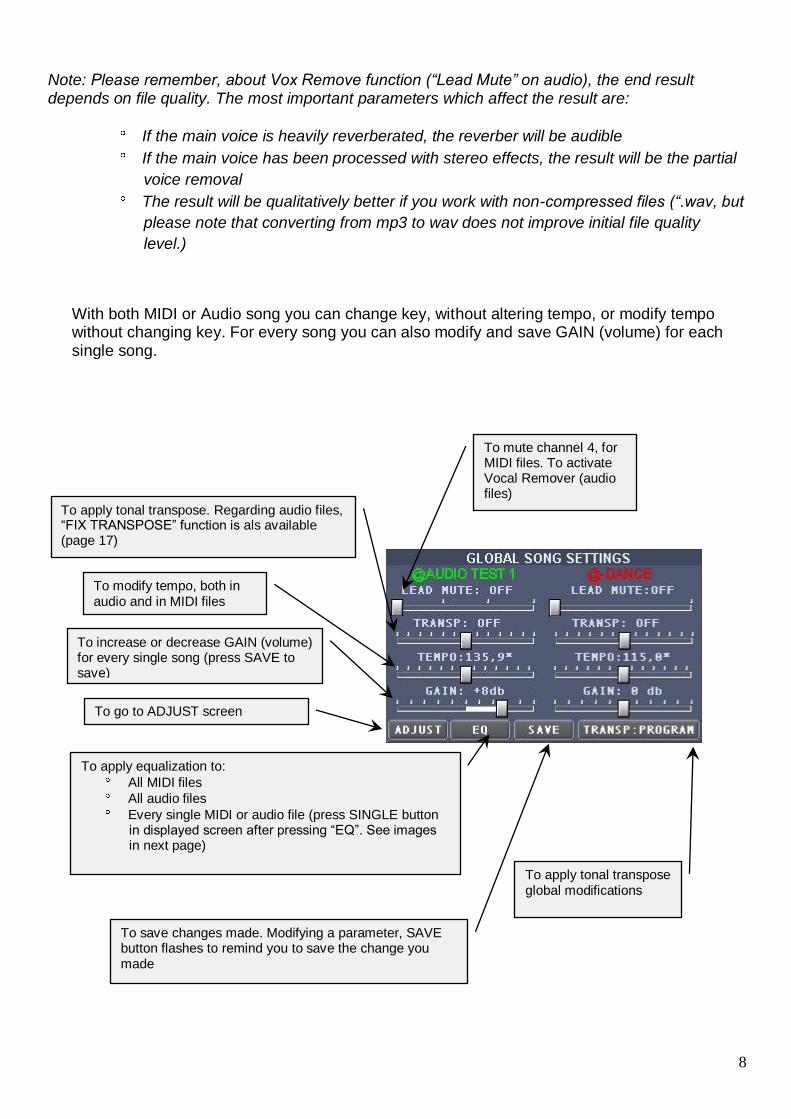
Note: Please remember, about Vox Remove function (“Lead Mute” on audio), the end result depends on file quality. The most important parameters which affect the result are:
If the main voice is heavily reverberated, the reverber will be audible
If the main voice has been processed with stereo effects, the result will be the partial
voice removal
The result will be qualitatively better if you work with non-compressed files (“.wav, but
please note that converting from mp3 to wav does not improve initial file quality
level.)
With both MIDI or Audio song you can change key, without altering tempo, or modify tempo without changing key. For every song you can also modify and save GAIN (volume) for each single song.
To mute channel 4, for MIDI files. To activate Vocal Remover (audio files)
To apply tonal transpose. Regarding audio files, “FIX TRANSPOSE” function is als available (page 17)
To modify tempo, both in audio and in MIDI files
To increase or decrease GAIN (volume) for every single song (press SAVE to save)
To go to ADJUST screen
To apply equalization to:
All MIDI files
All audio files
Every single MIDI or audio file (press SINGLE button in displayed screen after pressing “EQ”. See images in next page)
To apply tonal transpose global modifications
To save changes made. Modifying a parameter, SAVE button flashes to remind you to save the change you made
9
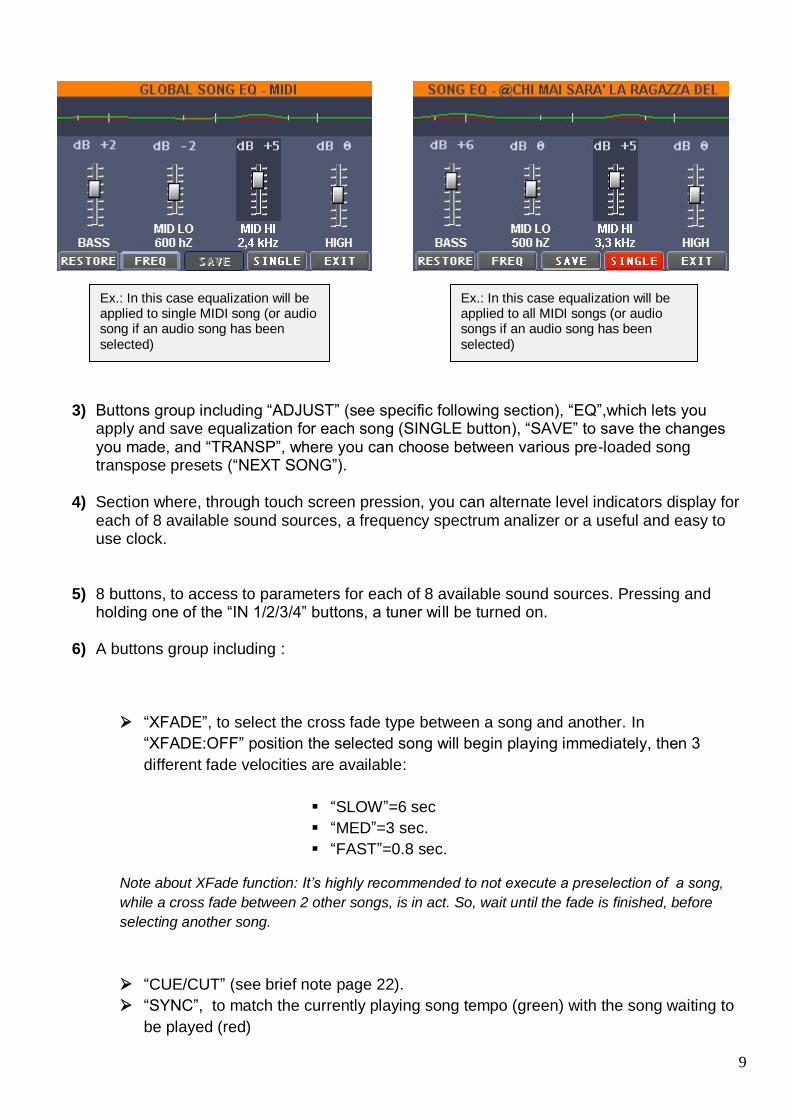
3) Buttons group including “ADJUST” (see specific following section), “EQ”,which lets you apply and save equalization for each song (SINGLE button), “SAVE” to save the changes you made, and “TRANSP”, where you can choose between various pre-loaded song transpose presets (“NEXT SONG”).
4) Section where, through touch screen pression, you can alternate level indicators display for
each of 8 available sound sources, a frequency spectrum analizer or a useful and easy to use clock.
5) 8 buttons, to access to parameters for each of 8 available sound sources. Pressing and
holding one of the “IN 1/2/3/4” buttons, a tuner will be turned on. 6) A buttons group including :
“XFADE”, to select the cross fade type between a song and another. In
“XFADE:OFF” position the selected song will begin playing immediately, then 3
different fade velocities are available:
“SLOW”=6 sec
“MED”=3 sec.
“FAST”=0.8 sec.
Note about XFade function: It’s highly recommended to not execute a preselection of a song,
while a cross fade between 2 other songs, is in act. So, wait until the fade is finished, before
selecting another song.
“CUE/CUT” (see brief note page 22).
“SYNC”, to match the currently playing song tempo (green) with the song waiting to
be played (red)
Ex.: In this case equalization will be applied to all MIDI songs (or audio songs if an audio song has been selected)
Ex.: In this case equalization will be applied to single MIDI song (or audio song if an audio song has been selected)
10
“NOLINK”, button useful for various song loop in a group:
“NOLINK“, no link, when a song is finished Matrix One will wait for next
operation
“LINK”, the group songs will be played one after another and when the last
song is played Matrix One will wait for next operation
“LOOPALL”, like in LINK, but when the last song is played, play will
automatically resume from group first song
“LOOP1”, repeats the same song (both the group or the browser one)
“RANDOM”, repeats group songs randomly
“SELNEXT”, plays a song, then selects the following one, and remains in
pause, waiting for the user to press play
7) This display is divided between two parallel virtual sliders. The upper one, “SONG POS”, lets you know the current song play position (you can drag the green slider cursor, as you like, forward and backwards during play). The lower slider, “XFADE”, lets you display the selected fade type or to activate it manually. The text symbol which appears on the right of the song title currently playing (green) or on the left of the next song (red) is very useful. In this way you will be able to know in advance if the song waiting to be played includes text data.
8) Buttons group including:
“INFO” which displays info on songs (current/next), and on any selected songs group.
Pressing this button, the VIEWTAG key is also available, to display any other info
about the selected song (Tags Mp3)
“NEW GROUP”, to create a group from scratch
“MOVE”, to modify a song position inside a group
“REMOVE”, to remove a song from a group
“SAVEGRP”, to save the displayed group
9) These two buttons can operate the following functions:
LOCK PLAYLIST, to temporarily disable the preselection, this is useful for example, during songs search, so they are not automatically preselected. When activated, the key will flash, to warn you that the function is on.
TALK, function also known as “ducking”, reduces instantly the volume of the song
currently playing and removes temporarily reverb and any other effect in IN 1/2/3/4 analog inputs. This function can be very useful in case you want to make a very loud and clear vocal announcement. When this function is on, the key will be flashing, to warn you the function is on.
11
10) Two buttons with synchro functions: “SYNC GROUP LIST” assigns a common medium
bpm to songs with compatile tempo (+/-15% differences, max 100 songs), “SYNC SAMPLE
LOOPS”, samples synchro function (currently non available).
11) Songs list included in a group.
12) “SELECT” to select a song, “ADD SONG” to insert a selected song in the underlying group
list (11). The number of songs included in a group is theoretically unlimited, anyway, to
avoid randomly mixing songs and so creating problems in songs management, it is
advisable not to create groups with more than 150 songs.
13) “ALL SONGS” list containing all the songs (MIDI/Audio) transferred on MatrixOne. Beside
ALL SONGS you can see the songs number. You can browse the list through the side bar,
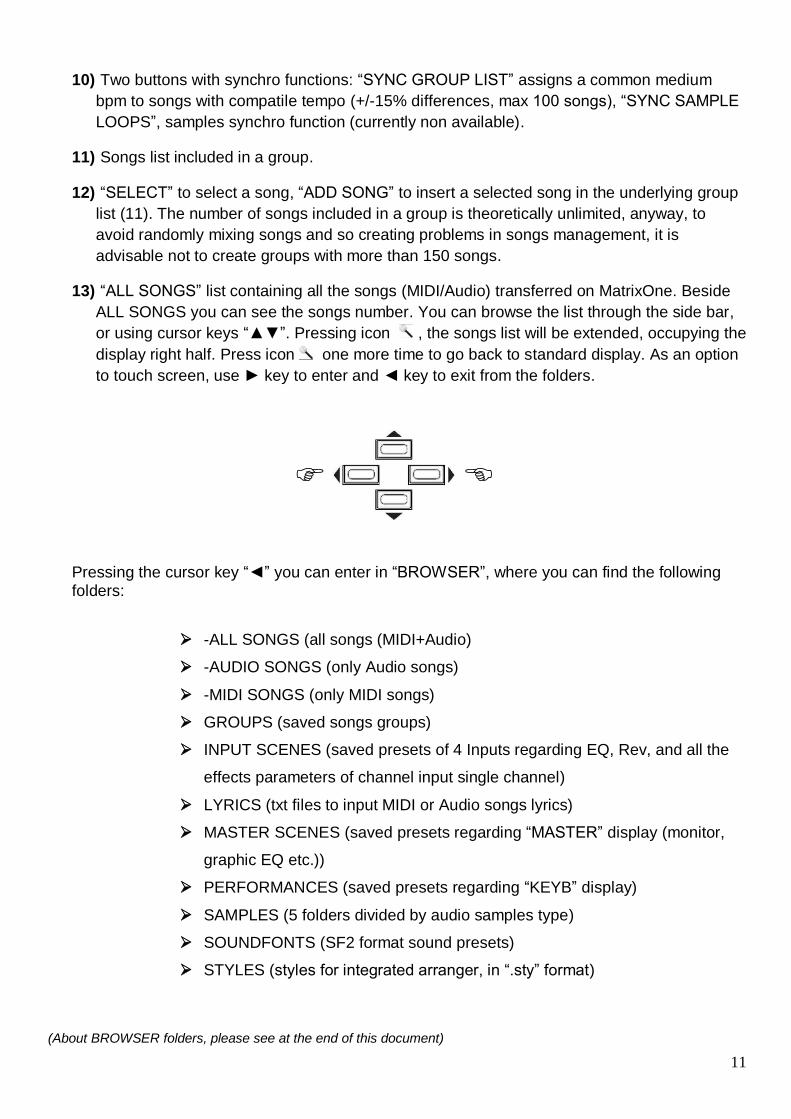
or using cursor keys “▲▼”. Pressing icon , the songs list will be extended, occupying the
display right half. Press icon one more time to go back to standard display. As an option
to touch screen, use ► key to enter and ◄ key to exit from the folders.
Pressing the cursor key “◄” you can enter in “BROWSER”, where you can find the following folders:
-ALL SONGS (all songs (MIDI+Audio)
-AUDIO SONGS (only Audio songs)
-MIDI SONGS (only MIDI songs)
GROUPS (saved songs groups)
INPUT SCENES (saved presets of 4 Inputs regarding EQ, Rev, and all the
effects parameters of channel input single channel)
LYRICS (txt files to input MIDI or Audio songs lyrics)
MASTER SCENES (saved presets regarding “MASTER” display (monitor,
graphic EQ etc.))
PERFORMANCES (saved presets regarding “KEYB” display)
SAMPLES (5 folders divided by audio samples type)
SOUNDFONTS (SF2 format sound presets)
STYLES (styles for integrated arranger, in “.sty” format)
(About BROWSER folders, please see at the end of this document)
12
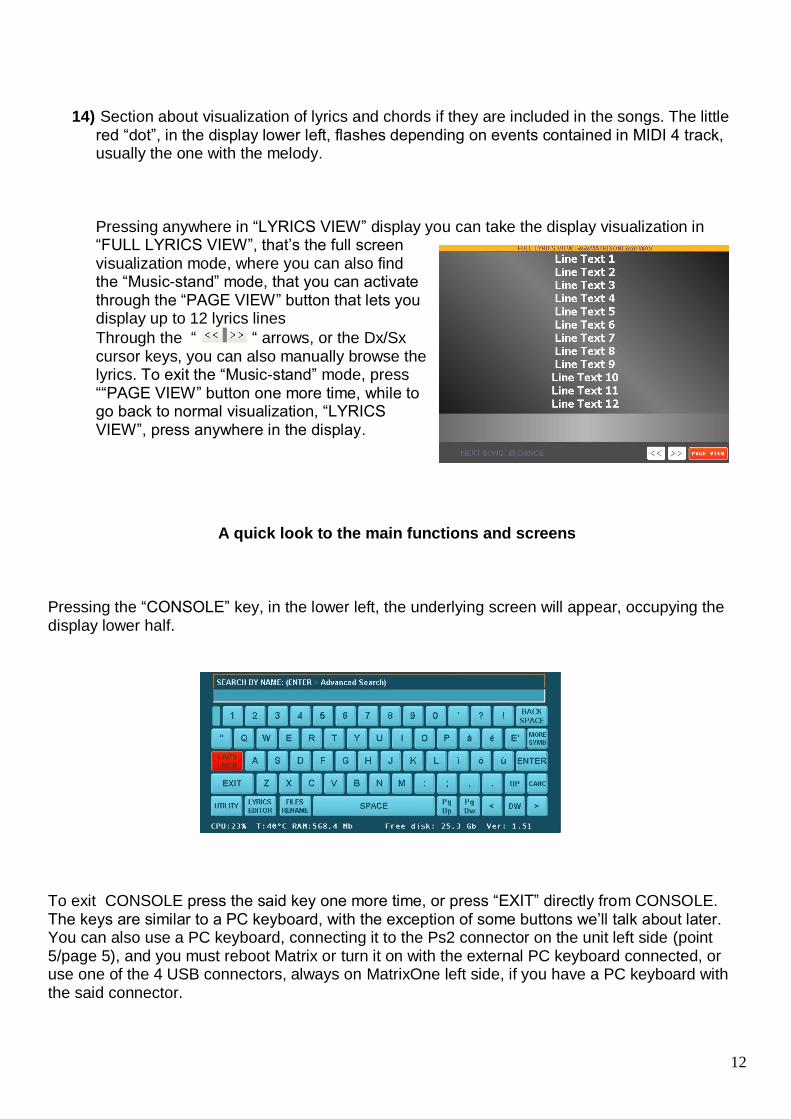
14) Section about visualization of lyrics and chords if they are included in the songs. The little red “dot”, in the display lower left, flashes depending on events contained in MIDI 4 track, usually the one with the melody. Pressing anywhere in “LYRICS VIEW” display you can take the display visualization in “FULL LYRICS VIEW”, that’s the full screen visualization mode, where you can also find the “Music-stand” mode, that you can activate through the “PAGE VIEW” button that lets you display up to 12 lyrics lines
Through the “ “ arrows, or the Dx/Sx cursor keys, you can also manually browse the lyrics. To exit the “Music-stand” mode, press ““PAGE VIEW” button one more time, while to go back to normal visualization, “LYRICS VIEW”, press anywhere in the display.
A quick look to the main functions and screens
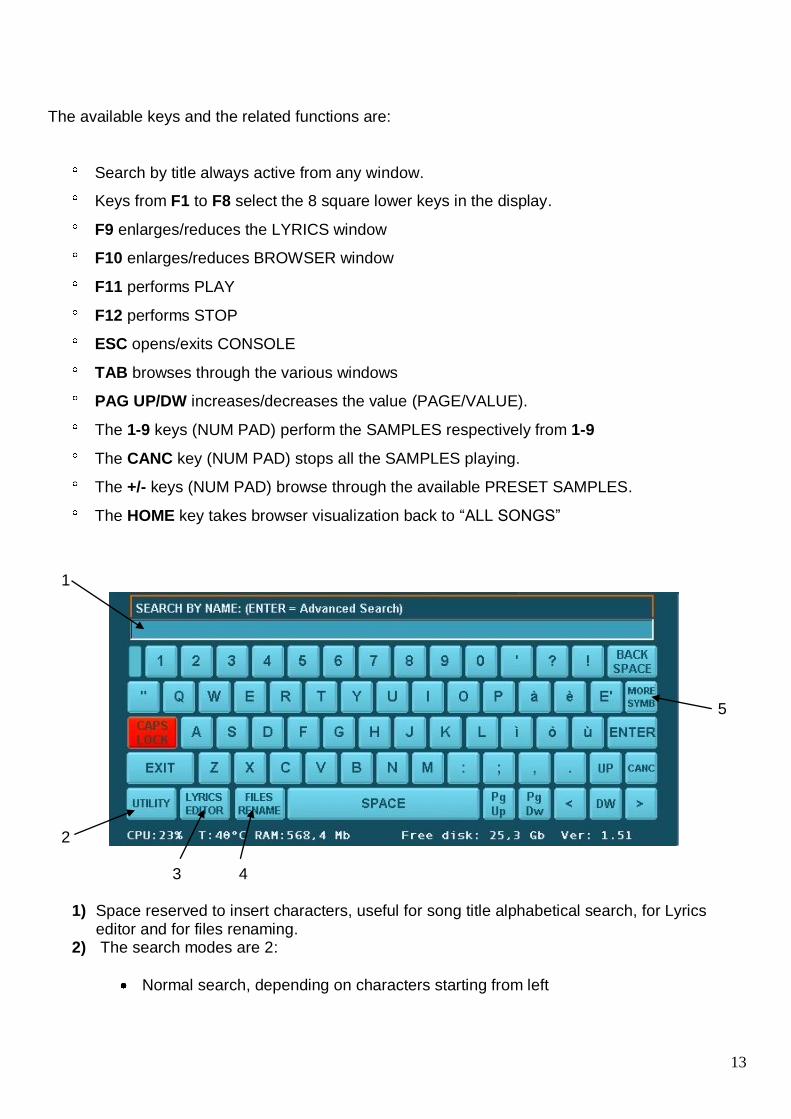
Pressing the “CONSOLE” key, in the lower left, the underlying screen will appear, occupying the display lower half. To exit CONSOLE press the said key one more time, or press “EXIT” directly from CONSOLE. The keys are similar to a PC keyboard, with the exception of some buttons we’ll talk about later. You can also use a PC keyboard, connecting it to the Ps2 connector on the unit left side (point 5/page 5), and you must reboot Matrix or turn it on with the external PC keyboard connected, or use one of the 4 USB connectors, always on MatrixOne left side, if you have a PC keyboard with the said connector.
13
The available keys and the related functions are:
Search by title always active from any window.
Keys from F1 to F8 select the 8 square lower keys in the display.
F9 enlarges/reduces the LYRICS window
F10 enlarges/reduces BROWSER window
F11 performs PLAY
F12 performs STOP
ESC opens/exits CONSOLE
TAB browses through the various windows
PAG UP/DW increases/decreases the value (PAGE/VALUE).
The 1-9 keys (NUM PAD) perform the SAMPLES respectively from 1-9
The CANC key (NUM PAD) stops all the SAMPLES playing.
The +/- keys (NUM PAD) browse through the available PRESET SAMPLES.
The HOME key takes browser visualization back to “ALL SONGS”
1
5 2 3 4
1) Space reserved to insert characters, useful for song title alphabetical search, for Lyrics editor and for files renaming.
2) The search modes are 2:
Normal search, depending on characters starting from left
14
Characters search (ex. one word) inside a song title. After inputting characters,
pressing ENTER key, Matrix One will highlight, in a temporary list, all the songs
containing the characters just written, displaying them in BROWSER screen
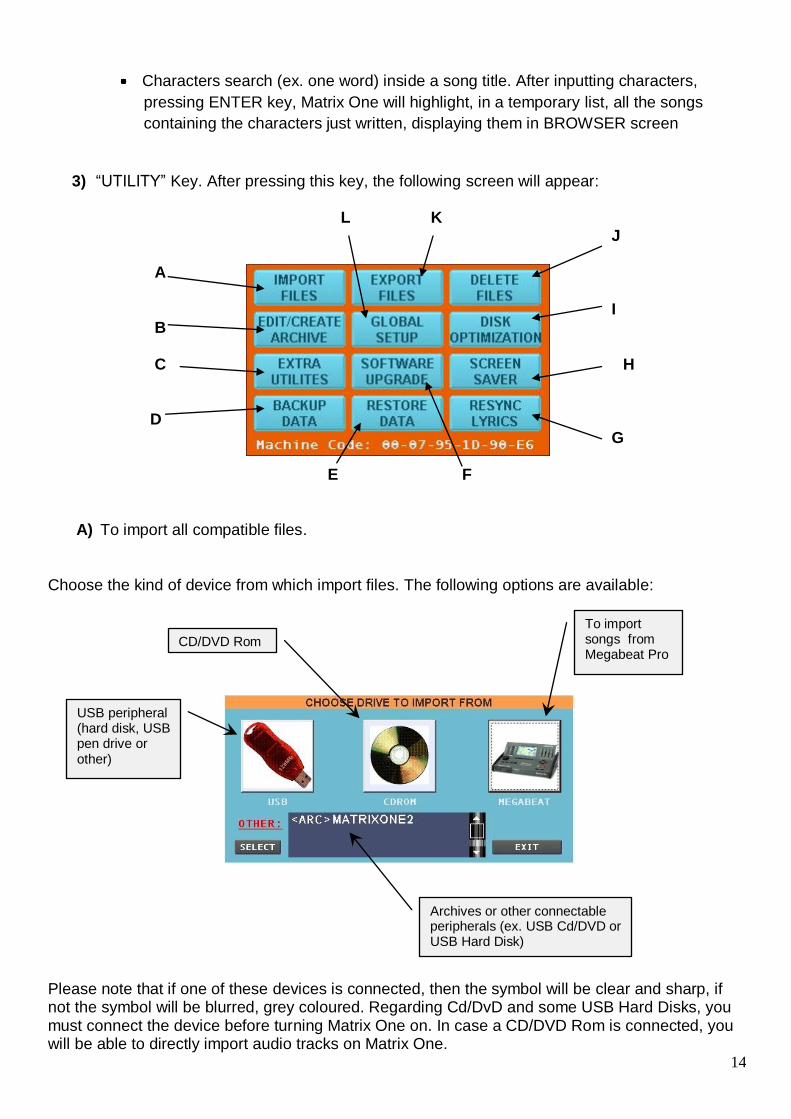
3) “UTILITY” Key. After pressing this key, the following screen will appear: L K J
A I B C H D G E F
A) To import all compatible files. Choose the kind of device from which import files. The following options are available: Please note that if one of these devices is connected, then the symbol will be clear and sharp, if not the symbol will be blurred, grey coloured. Regarding Cd/DvD and some USB Hard Disks, you must connect the device before turning Matrix One on. In case a CD/DVD Rom is connected, you will be able to directly import audio tracks on Matrix One.
USB peripheral (hard disk, USB pen drive or other)
Archives or other connectable peripherals (ex. USB Cd/DVD or USB Hard Disk)
To import songs from Megabeat Pro
CD/DVD Rom
15
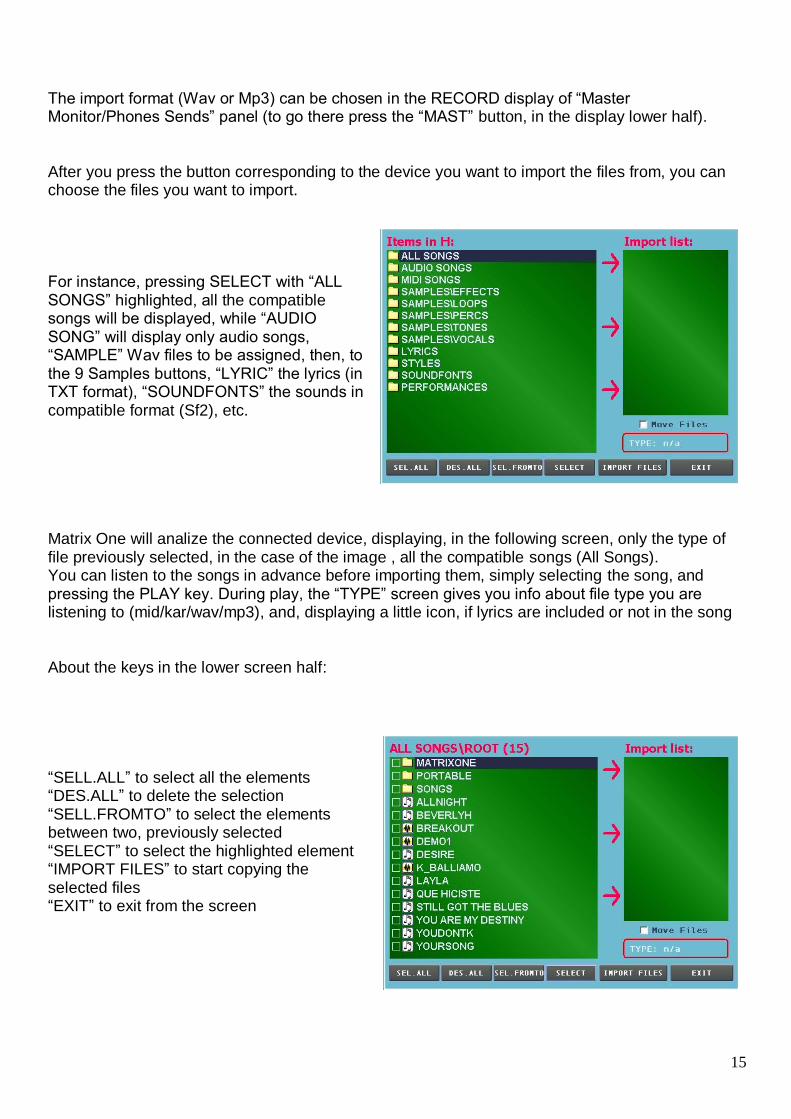
The import format (Wav or Mp3) can be chosen in the RECORD display of “Master Monitor/Phones Sends” panel (to go there press the “MAST” button, in the display lower half). After you press the button corresponding to the device you want to import the files from, you can choose the files you want to import. For instance, pressing SELECT with “ALL SONGS” highlighted, all the compatible songs will be displayed, while “AUDIO SONG” will display only audio songs, “SAMPLE” Wav files to be assigned, then, to the 9 Samples buttons, “LYRIC” the lyrics (in TXT format), “SOUNDFONTS” the sounds in compatible format (Sf2), etc. Matrix One will analize the connected device, displaying, in the following screen, only the type of file previously selected, in the case of the image , all the compatible songs (All Songs). You can listen to the songs in advance before importing them, simply selecting the song, and pressing the PLAY key. During play, the “TYPE” screen gives you info about file type you are listening to (mid/kar/wav/mp3), and, displaying a little icon, if lyrics are included or not in the song About the keys in the lower screen half: “SELL.ALL” to select all the elements “DES.ALL” to delete the selection “SELL.FROMTO” to select the elements between two, previously selected “SELECT” to select the highlighted element “IMPORT FILES” to start copying the selected files “EXIT” to exit from the screen
16
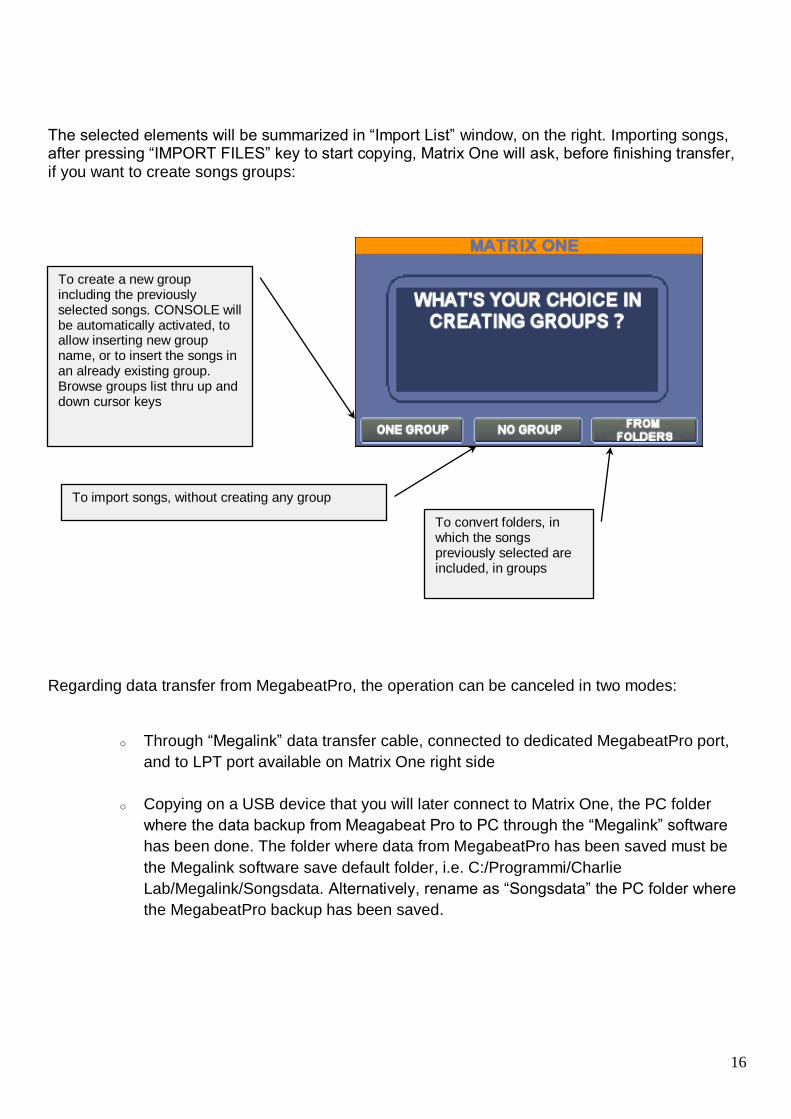
The selected elements will be summarized in “Import List” window, on the right. Importing songs, after pressing “IMPORT FILES” key to start copying, Matrix One will ask, before finishing transfer, if you want to create songs groups:
Regarding data transfer from MegabeatPro, the operation can be canceled in two modes:
o Through “Megalink” data transfer cable, connected to dedicated MegabeatPro port,
and to LPT port available on Matrix One right side
o Copying on a USB device that you will later connect to Matrix One, the PC folder
where the data backup from Meagabeat Pro to PC through the “Megalink” software
has been done. The folder where data from MegabeatPro has been saved must be
the Megalink software save default folder, i.e. C:/Programmi/Charlie
Lab/Megalink/Songsdata. Alternatively, rename as “Songsdata” the PC folder where
the MegabeatPro backup has been saved.
To create a new group including the previously selected songs. CONSOLE will be automatically activated, to allow inserting new group name, or to insert the songs in an already existing group. Browse groups list thru up and down cursor keys
To import songs, without creating any group
To convert folders, in which the songs previously selected are included, in groups
17
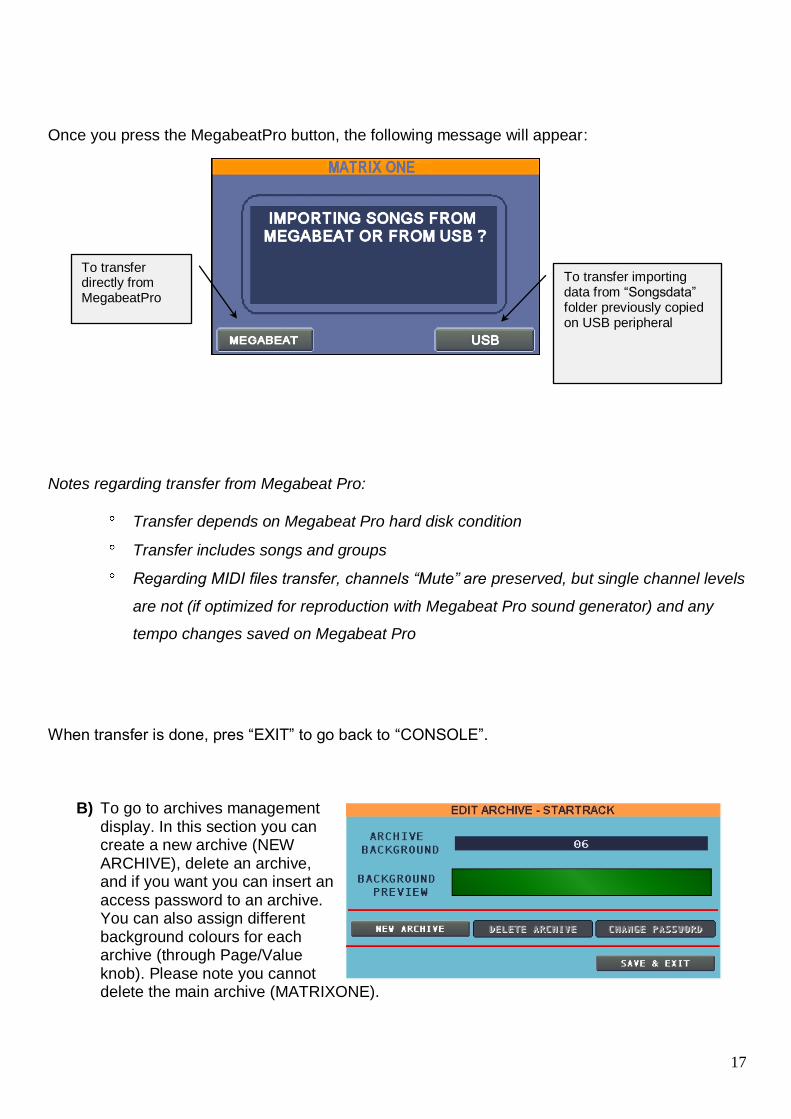
Once you press the MegabeatPro button, the following message will appear:
Notes regarding transfer from Megabeat Pro:
Transfer depends on Megabeat Pro hard disk condition
Transfer includes songs and groups
Regarding MIDI files transfer, channels “Mute” are preserved, but single channel levels
are not (if optimized for reproduction with Megabeat Pro sound generator) and any
tempo changes saved on Megabeat Pro
When transfer is done, pres “EXIT” to go back to “CONSOLE”.
B) To go to archives management display. In this section you can create a new archive (NEW ARCHIVE), delete an archive, and if you want you can insert an access password to an archive. You can also assign different background colours for each archive (through Page/Value knob). Please note you cannot delete the main archive (MATRIXONE).
To transfer directly from MegabeatPro
To transfer importing data from “Songsdata” folder previously copied on USB peripheral
18
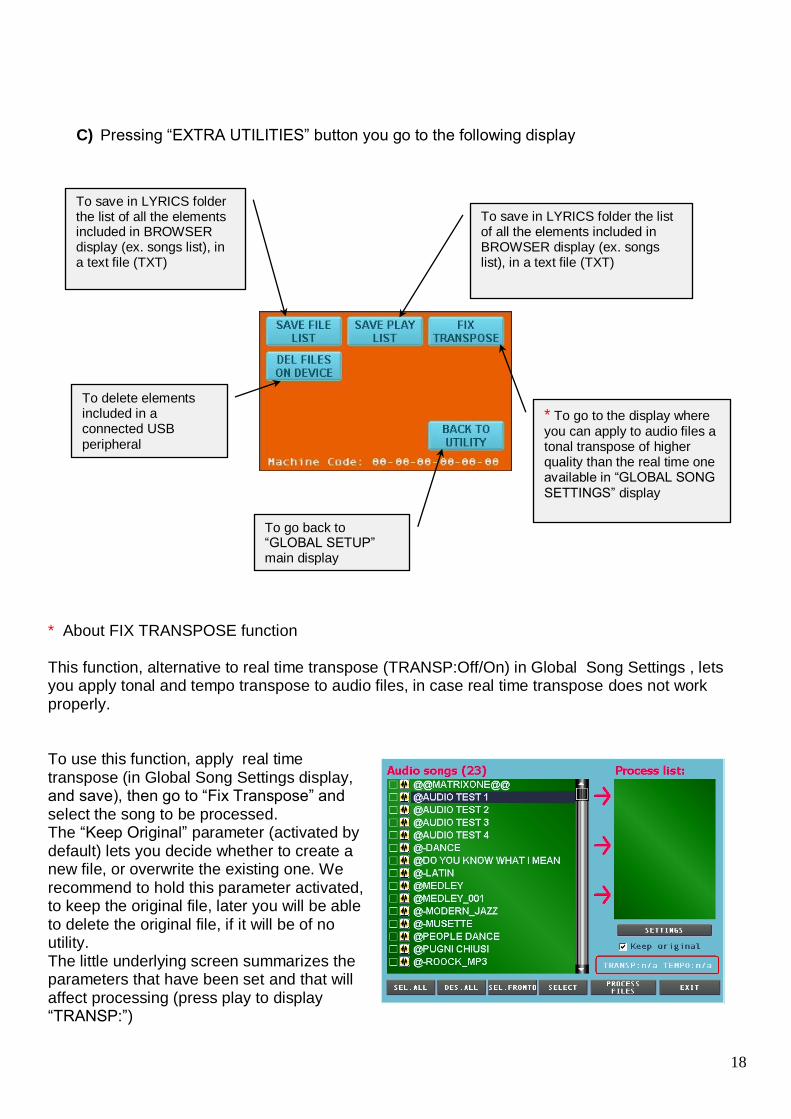
C) Pressing “EXTRA UTILITIES” button you go to the following display
* About FIX TRANSPOSE function This function, alternative to real time transpose (TRANSP:Off/On) in Global Song Settings , lets you apply tonal and tempo transpose to audio files, in case real time transpose does not work properly. To use this function, apply real time transpose (in Global Song Settings display, and save), then go to “Fix Transpose” and select the song to be processed. The “Keep Original” parameter (activated by default) lets you decide whether to create a new file, or overwrite the existing one. We recommend to hold this parameter activated, to keep the original file, later you will be able to delete the original file, if it will be of no utility. The little underlying screen summarizes the parameters that have been set and that will affect processing (press play to display “TRANSP:”)
To save in LYRICS folder the list of all the elements included in BROWSER display (ex. songs list), in a text file (TXT)
To save in LYRICS folder the list of all the elements included in BROWSER display (ex. songs list), in a text file (TXT)
To delete elements included in a connected USB peripheral
* To go to the display where you can apply to audio files a tonal transpose of higher quality than the real time one available in “GLOBAL SONG SETTINGS” display
To go back to “GLOBAL SETUP” main display
19
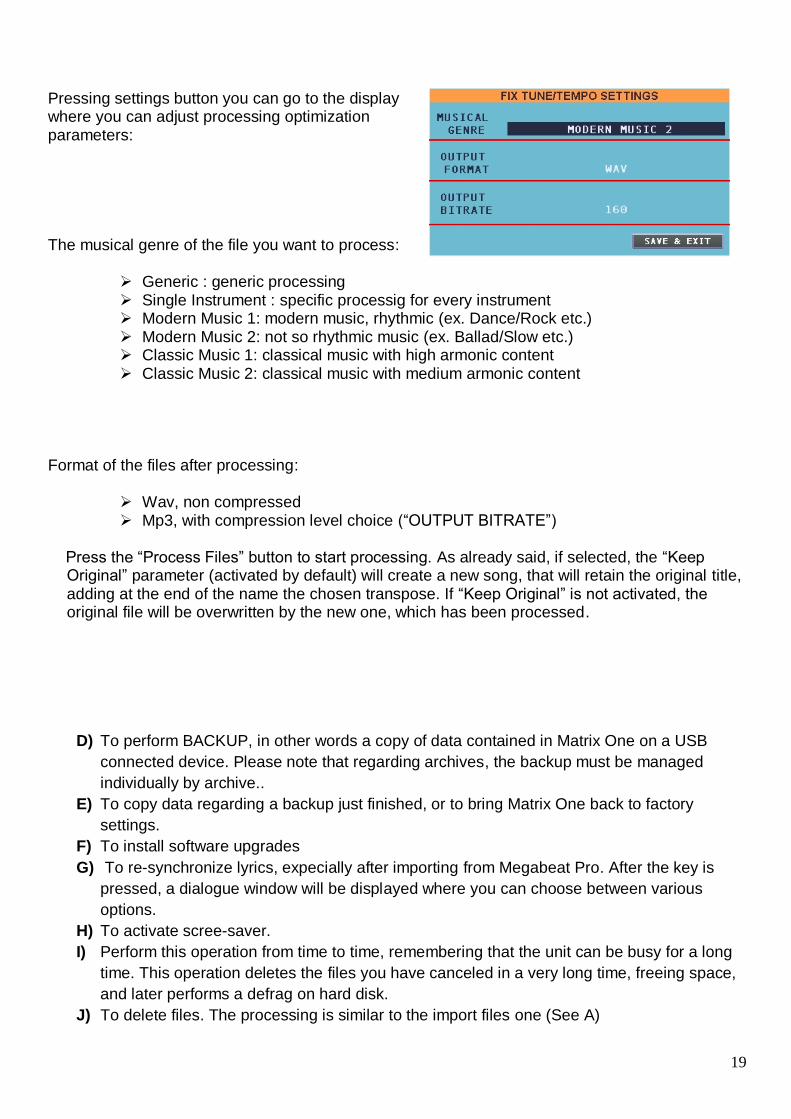
Pressing settings button you can go to the display where you can adjust processing optimization parameters: The musical genre of the file you want to process:
Generic : generic processing Single Instrument : specific processig for every instrument Modern Music 1: modern music, rhythmic (ex. Dance/Rock etc.) Modern Music 2: not so rhythmic music (ex. Ballad/Slow etc.) Classic Music 1: classical music with high armonic content Classic Music 2: classical music with medium armonic content
Format of the files after processing:
Wav, non compressed Mp3, with compression level choice (“OUTPUT BITRATE”)
Press the “Process Files” button to start processing. As already said, if selected, the “Keep
Original” parameter (activated by default) will create a new song, that will retain the original title, adding at the end of the name the chosen transpose. If “Keep Original” is not activated, the original file will be overwritten by the new one, which has been processed.
D) To perform BACKUP, in other words a copy of data contained in Matrix One on a USB
connected device. Please note that regarding archives, the backup must be managed
individually by archive..
E) To copy data regarding a backup just finished, or to bring Matrix One back to factory
settings.
F) To install software upgrades
G) To re-synchronize lyrics, expecially after importing from Megabeat Pro. After the key is
pressed, a dialogue window will be displayed where you can choose between various
options.
H) To activate scree-saver.
I) Perform this operation from time to time, remembering that the unit can be busy for a long
time. This operation deletes the files you have canceled in a very long time, freeing space,
and later performs a defrag on hard disk.
J) To delete files. The processing is similar to the import files one (See A)
20
K) To export to a write-ready device, connected to Matrix One. The processing is similar to
the import files one (See A)
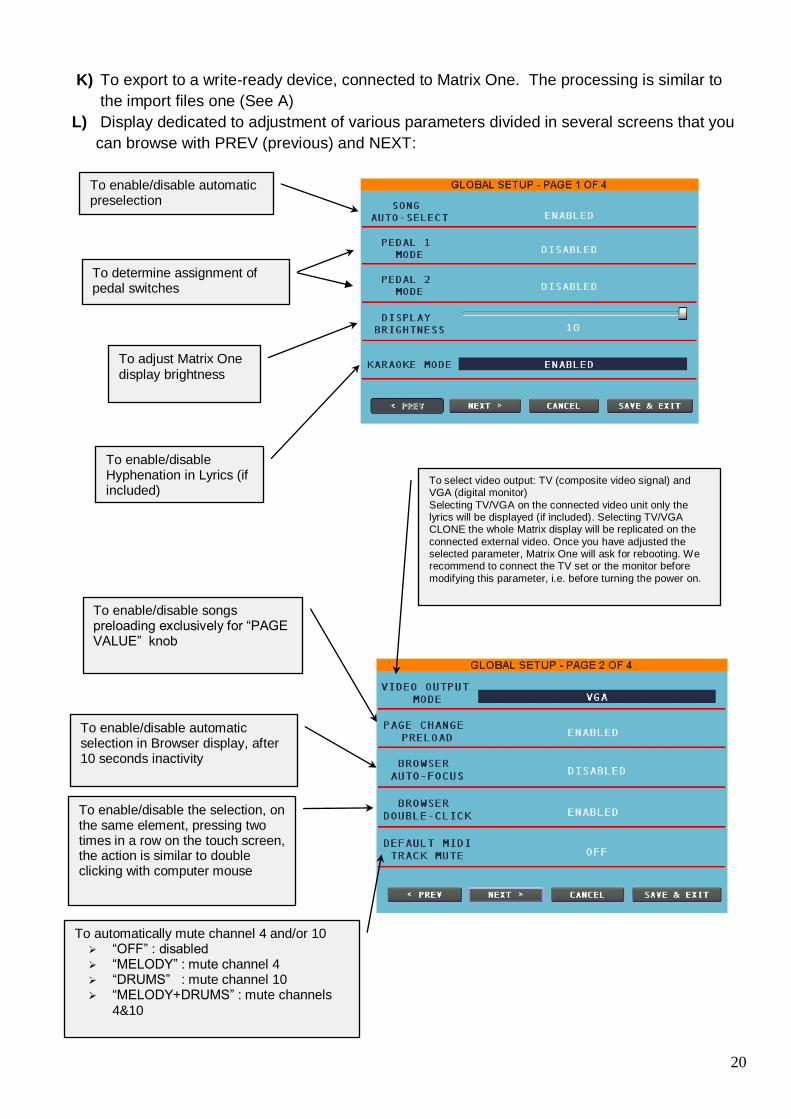
L) Display dedicated to adjustment of various parameters divided in several screens that you
can browse with PREV (previous) and NEXT:
Le/disable
To enable/disable automatic preselection
To determine assignment of pedal switches
To adjust Matrix One display brightness
To enable/disable Hyphenation in Lyrics (if included)
To select video output: TV (composite video signal) and VGA (digital monitor)
Selecting TV/VGA on the connected video unit only the lyrics will be displayed (if included). Selecting TV/VGA CLONE the whole Matrix display will be replicated on the
connected external video. Once you have adjusted the selected parameter, Matrix One will ask for rebooting. We recommend to connect the TV set or the monitor before
modifying this parameter, i.e. before turning the power on.
To enable/disable the selection, on the same element, pressing two times in a row on the touch screen, the action is similar to double clicking with computer mouse
To enable/disable songs preloading exclusively for “PAGE VALUE” knob
To enable/disable automatic selection in Browser display, after 10 seconds inactivity
To automatically mute channel 4 and/or 10 “OFF” : disabled “MELODY” : mute channel 4 “DRUMS” : mute channel 10 “MELODY+DRUMS” : mute channels
4&10
21
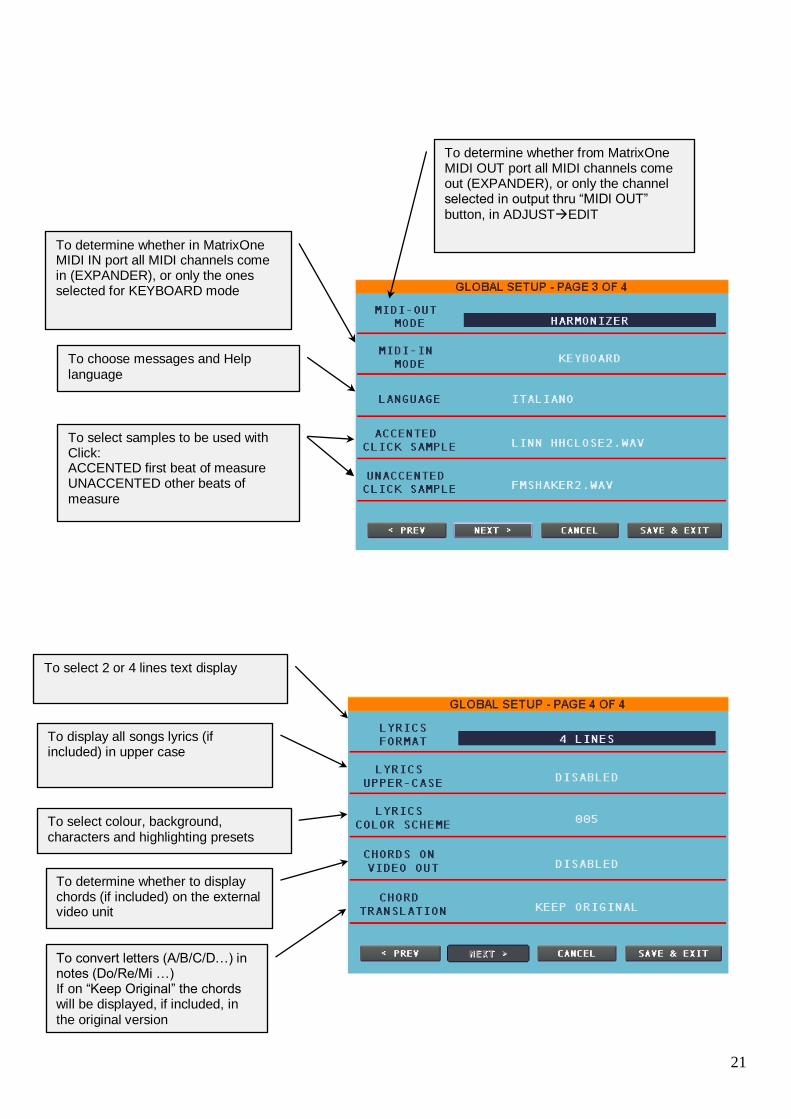
To select 2 or 4 lines text display
To display all songs lyrics (if included) in upper case
To determine whether from MatrixOne MIDI OUT port all MIDI channels come out (EXPANDER), or only the channel selected in output thru “MIDI OUT” button, in ADJUSTEDIT
To determine whether to display chords (if included) on the external video unit
To select colour, background, characters and highlighting presets
To determine whether in MatrixOne MIDI IN port all MIDI channels come in (EXPANDER), or only the ones selected for KEYBOARD mode
To choose messages and Help language
To select samples to be used with Click: ACCENTED first beat of measure UNACCENTED other beats of measure
To convert letters (A/B/C/D…) in notes (Do/Re/Mi …) If on “Keep Original” the chords will be displayed, if included, in the original version
22
To exit the display without saving changes press “CANCEL” key To exit the display saving changes press “SAVE & EXIT” key Going back to “CONSOLE”:
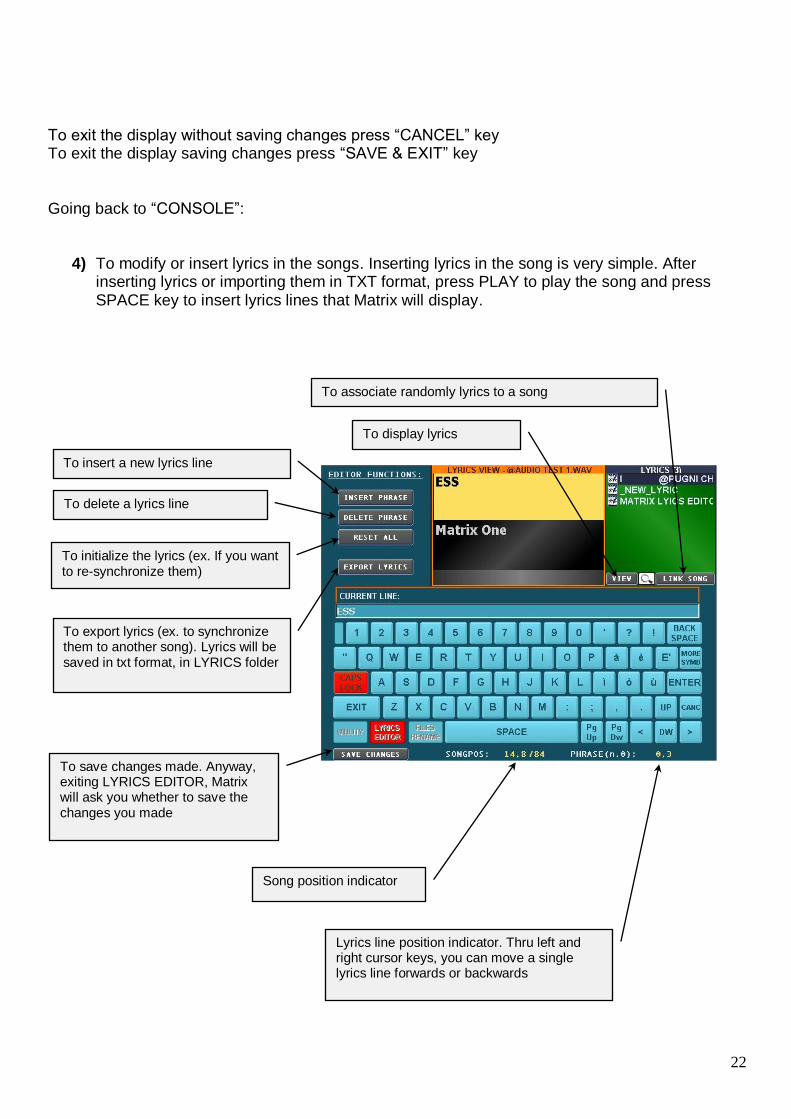
4) To modify or insert lyrics in the songs. Inserting lyrics in the song is very simple. After inserting lyrics or importing them in TXT format, press PLAY to play the song and press SPACE key to insert lyrics lines that Matrix will display.
To insert a new lyrics line
To delete a lyrics line
To initialize the lyrics (ex. If you want to re-synchronize them)
To export lyrics (ex. to synchronize them to another song). Lyrics will be saved in txt format, in LYRICS folder
To display lyrics
To associate randomly lyrics to a song
To save changes made. Anyway, exiting LYRICS EDITOR, Matrix will ask you whether to save the changes you made
Song position indicator
Lyrics line position indicator. Thru left and right cursor keys, you can move a single lyrics line forwards or backwards
23
4) To rename songs. After pressing this key, select the song to be renamed. In the CONSOLE (1)
dedicated space, the name of the song to be renamed will appear. The “Keep original” parameter will let you decide whether to modify the name of the selected song (parameter on “NO”, default) or to create a copy of the song with a new name (parameter on “YES”). Apply changes and press CONSOLE “ENTER” key. 5) To use other symbols
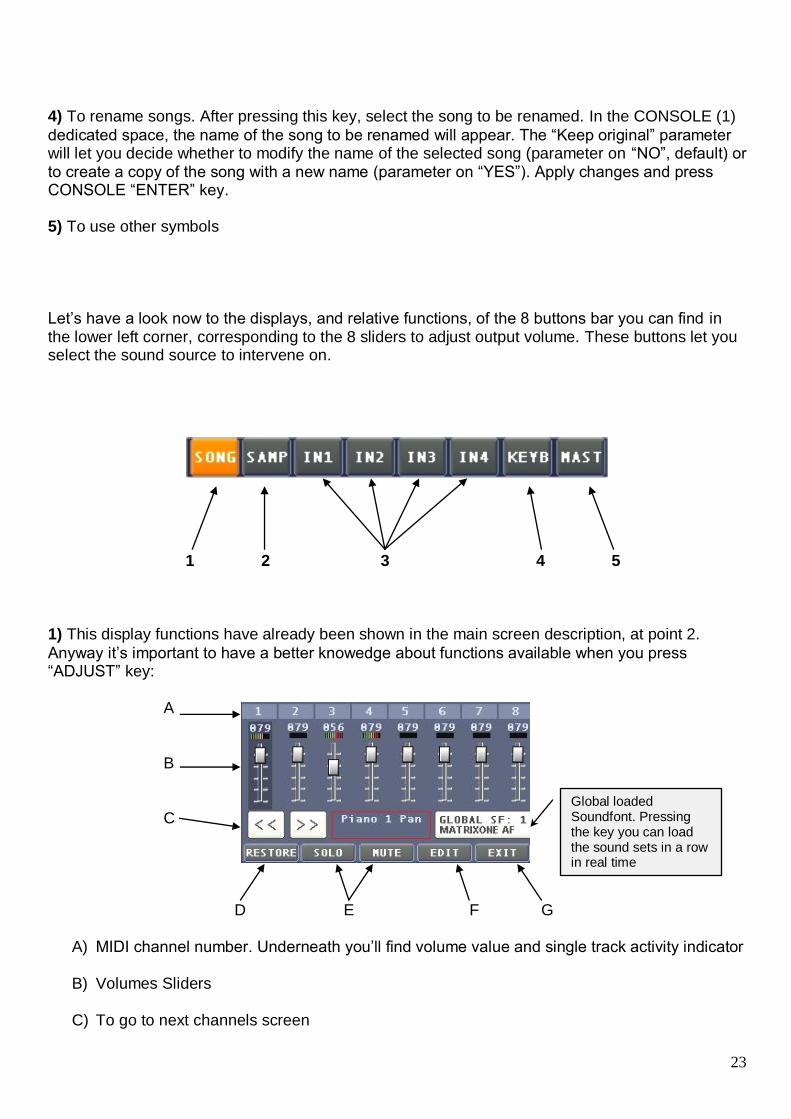
Let’s have a look now to the displays, and relative functions, of the 8 buttons bar you can find in the lower left corner, corresponding to the 8 sliders to adjust output volume. These buttons let you select the sound source to intervene on.
1 2 3 4 5 1) This display functions have already been shown in the main screen description, at point 2.
Anyway it’s important to have a better knowedge about functions available when you press “ADJUST” key: A B C D E F G
A) MIDI channel number. Underneath you’ll find volume value and single track activity indicator B) Volumes Sliders
C) To go to next channels screen
Global loaded Soundfont. Pressing the key you can load the sound sets in a row in real time successione
24
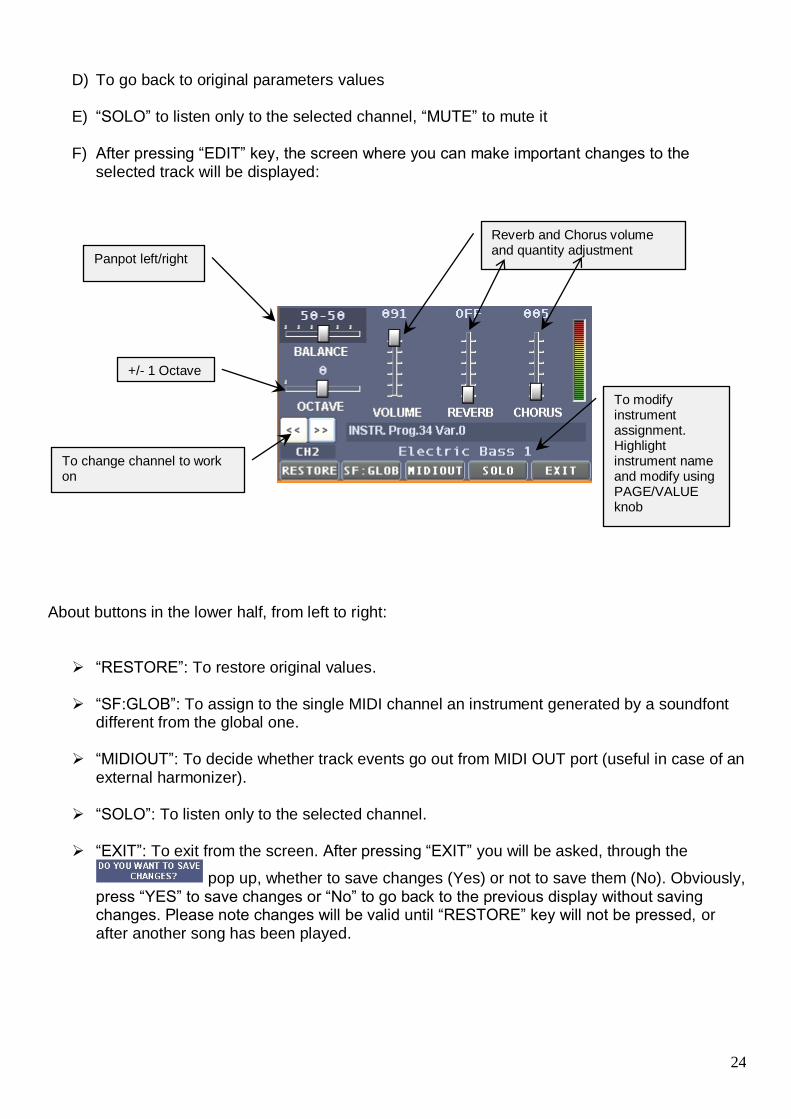
D) To go back to original parameters values
E) “SOLO” to listen only to the selected channel, “MUTE” to mute it
F) After pressing “EDIT” key, the screen where you can make important changes to the selected track will be displayed:
About buttons in the lower half, from left to right: “RESTORE”: To restore original values. “SF:GLOB”: To assign to the single MIDI channel an instrument generated by a soundfont
different from the global one. “MIDIOUT”: To decide whether track events go out from MIDI OUT port (useful in case of an
external harmonizer). “SOLO”: To listen only to the selected channel.
“EXIT”: To exit from the screen. After pressing “EXIT” you will be asked, through the
pop up, whether to save changes (Yes) or not to save them (No). Obviously, press “YES” to save changes or “No” to go back to the previous display without saving changes. Please note changes will be valid until “RESTORE” key will not be pressed, or after another song has been played.
To modify instrument assignment. Highlight instrument name and modify using PAGE/VALUE knob
Panpot left/right
+/- 1 Octave
To change channel to work on
Reverb and Chorus volume and quantity adjustment
25
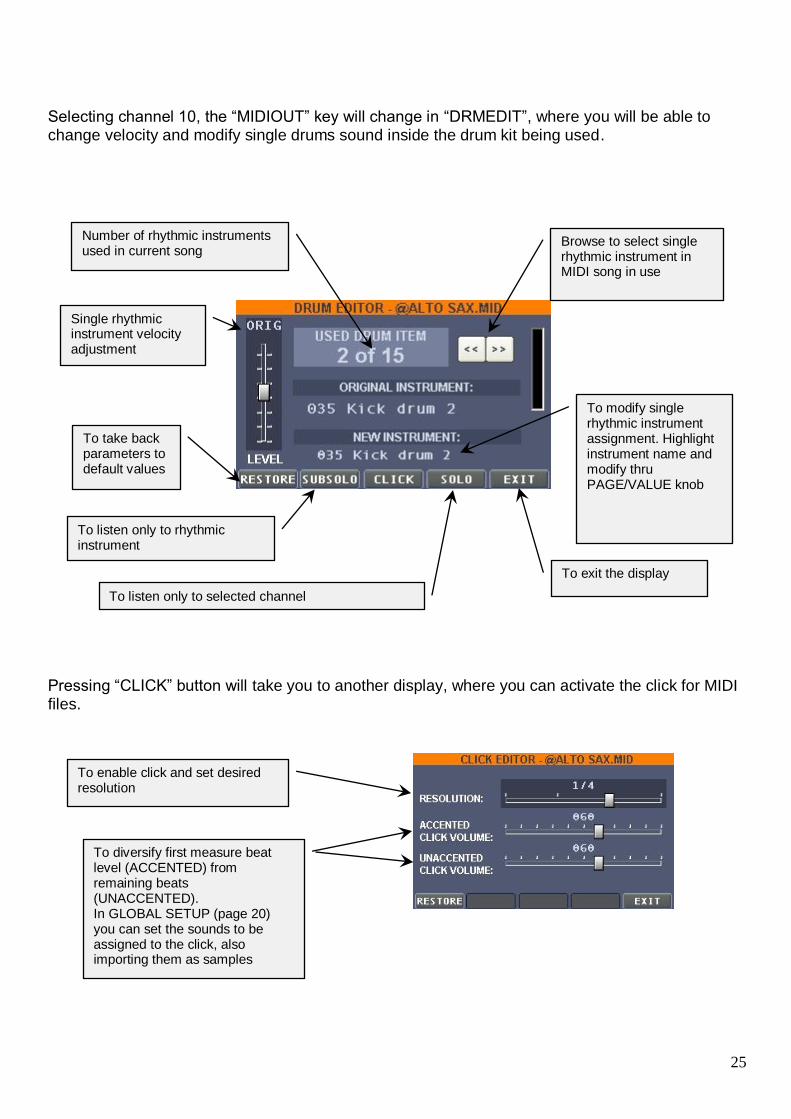
Selecting channel 10, the “MIDIOUT” key will change in “DRMEDIT”, where you will be able to change velocity and modify single drums sound inside the drum kit being used. Pressing “CLICK” button will take you to another display, where you can activate the click for MIDI files.
Single rhythmic instrument velocity adjustment
To take back parameters to default values
To modify single rhythmic instrument assignment. Highlight instrument name and modify thru PAGE/VALUE knob
Browse to select single rhythmic instrument in MIDI song in use
To exit the display
To listen only to selected channel
Number of rhythmic instruments used in current song
To listen only to rhythmic instrument
To enable click and set desired resolution
To diversify first measure beat level (ACCENTED) from remaining beats (UNACCENTED). In GLOBAL SETUP (page 20) you can set the sounds to be assigned to the click, also importing them as samples
26
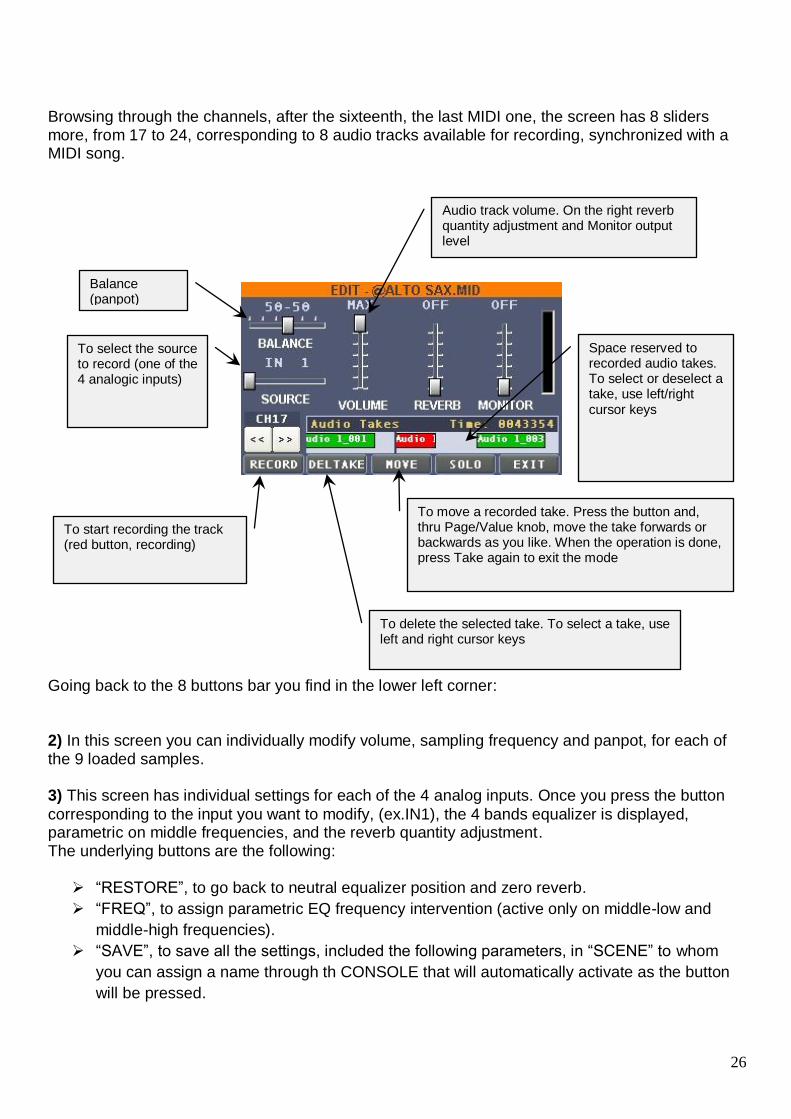
Browsing through the channels, after the sixteenth, the last MIDI one, the screen has 8 sliders more, from 17 to 24, corresponding to 8 audio tracks available for recording, synchronized with a MIDI song.
Going back to the 8 buttons bar you find in the lower left corner: 2) In this screen you can individually modify volume, sampling frequency and panpot, for each of the 9 loaded samples. 3) This screen has individual settings for each of the 4 analog inputs. Once you press the button
corresponding to the input you want to modify, (ex.IN1), the 4 bands equalizer is displayed, parametric on middle frequencies, and the reverb quantity adjustment. The underlying buttons are the following: “RESTORE”, to go back to neutral equalizer position and zero reverb.
“FREQ”, to assign parametric EQ frequency intervention (active only on middle-low and
middle-high frequencies).
“SAVE”, to save all the settings, included the following parameters, in “SCENE” to whom
you can assign a name through th CONSOLE that will automatically activate as the button
will be pressed.
To start recording the track (red button, recording)
To select the source to record (one of the 4 analogic inputs)
Balance (panpot)
Audio track volume. On the right reverb quantity adjustment and Monitor output level
To delete the selected take. To select a take, use left and right cursor keys
Space reserved to recorded audio takes. To select or deselect a take, use left/right cursor keys
To move a recorded take. Press the button and, thru Page/Value knob, move the take forwards or backwards as you like. When the operation is done, press Take again to exit the mode
27
“FX”, to access the available effects, currently: Compressor, Chorus, Combo (guitar
amplifier simulator) and Delay. Select the desired effect through the FX – and FX + buttons.
The “ACTIVE” button is also available to turn the effect on (red) or off (grey).
“EXIT” to exit the screen
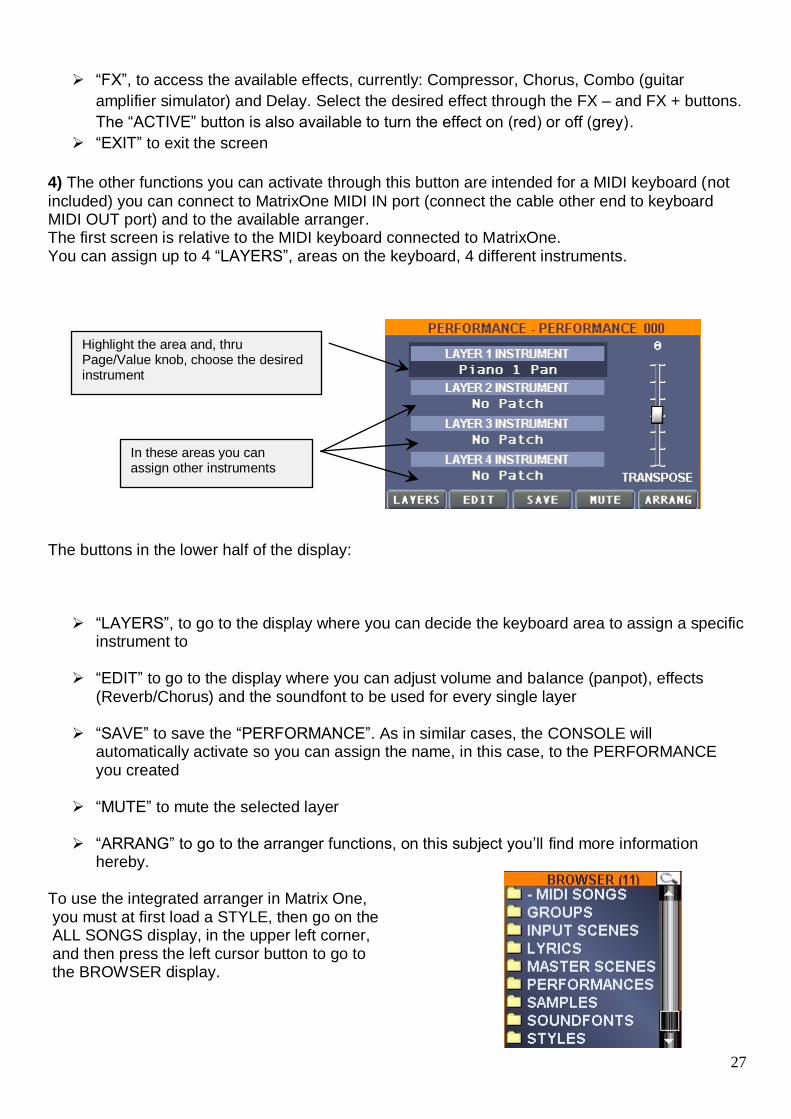
4) The other functions you can activate through this button are intended for a MIDI keyboard (not
included) you can connect to MatrixOne MIDI IN port (connect the cable other end to keyboard MIDI OUT port) and to the available arranger. The first screen is relative to the MIDI keyboard connected to MatrixOne. You can assign up to 4 “LAYERS”, areas on the keyboard, 4 different instruments.
The buttons in the lower half of the display: “LAYERS”, to go to the display where you can decide the keyboard area to assign a specific
instrument to “EDIT” to go to the display where you can adjust volume and balance (panpot), effects
(Reverb/Chorus) and the soundfont to be used for every single layer “SAVE” to save the “PERFORMANCE”. As in similar cases, the CONSOLE will
automatically activate so you can assign the name, in this case, to the PERFORMANCE you created
“MUTE” to mute the selected layer
“ARRANG” to go to the arranger functions, on this subject you’ll find more information
hereby. To use the integrated arranger in Matrix One, you must at first load a STYLE, then go on the ALL SONGS display, in the upper left corner, and then press the left cursor button to go to the BROWSER display.
Highlight the area and, thru Page/Value knob, choose the desired instrument
In these areas you can assign other instruments
28
Button to activate arranger thru a MIDI connected keyboard
To select the soundfont to use, only for arranger playing
To exit arranger panel
Layer from which the arranger gets the input (harmonic information)
Rhythmic structure display Delivers a test
chord for the arranger
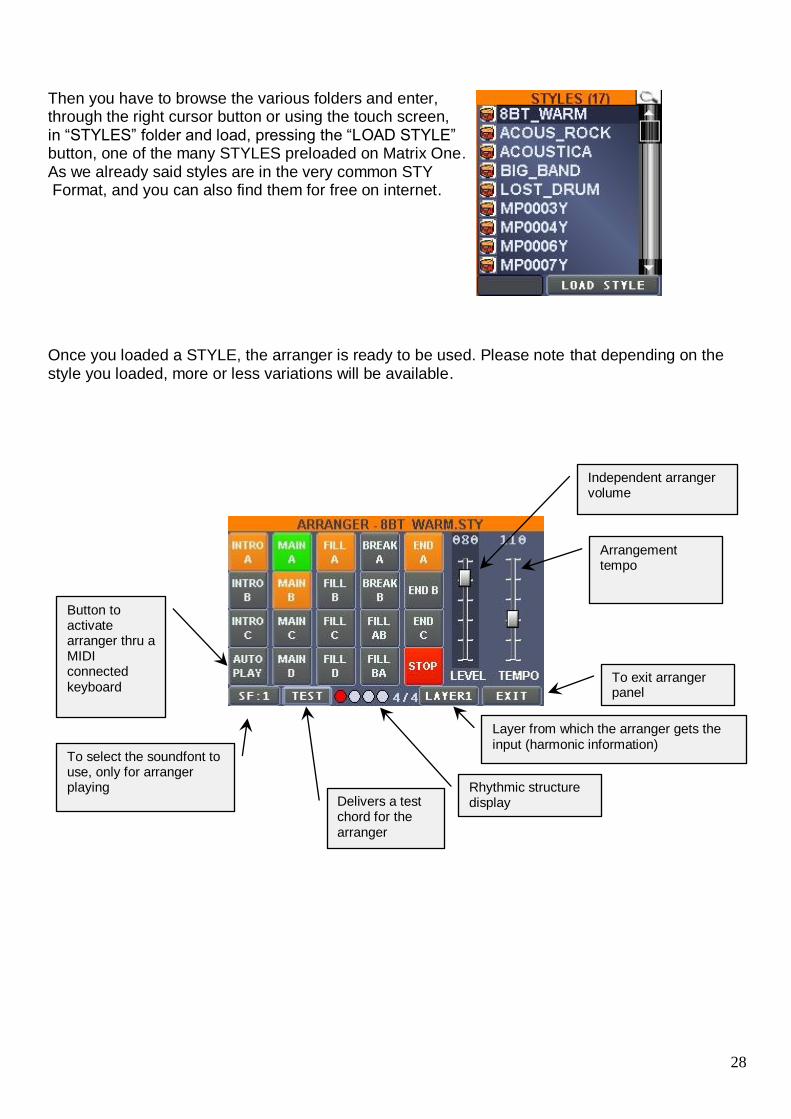
Then you have to browse the various folders and enter, through the right cursor button or using the touch screen, in “STYLES” folder and load, pressing the “LOAD STYLE” button, one of the many STYLES preloaded on Matrix One. As we already said styles are in the very common STY Format, and you can also find them for free on internet. Once you loaded a STYLE, the arranger is ready to be used. Please note that depending on the style you loaded, more or less variations will be available.
Independent arranger volume
Arrangement tempo

29
Going back to the last one of the 8 bar buttons you find on the lower left corner: 5) In this screen you can adjust monitor and headphones output sends of the 7 sound sources
available (the MIDI&AUDIO songs, the samples, the 4 analog inputs and any keyboard connected thru MIDI), and also the reverb level, so you can customize and suit to your needs the main Left/Right outputs, from monitor signals, if they are connected, and of the headphones. Other functions connected to this panel are the audio recording, the global equalization in output and the effects.. After you pressed the “MAST” key the following screen will be displayed: K A L J B I I H H C D E F G
A. Balance (panpot) individual adjustment of every sound source. B. Buttons to determine whether 1-2 inputs have to be considered as 1 stereo channel or 2
mono channels. Same as 3-4 inputs. If buttons are white channels will be considered singularly (4 mono channels), if red channels will be linked, becoming 1 stereo channel.
C. This button leads you in the specific panel to audio signal recording on Left/Right main outputs, or Monitor, so you can record, in real time, your live performances, a function always demanded on this kind of units. About this panel, please find hereby a description of the available functions:
30
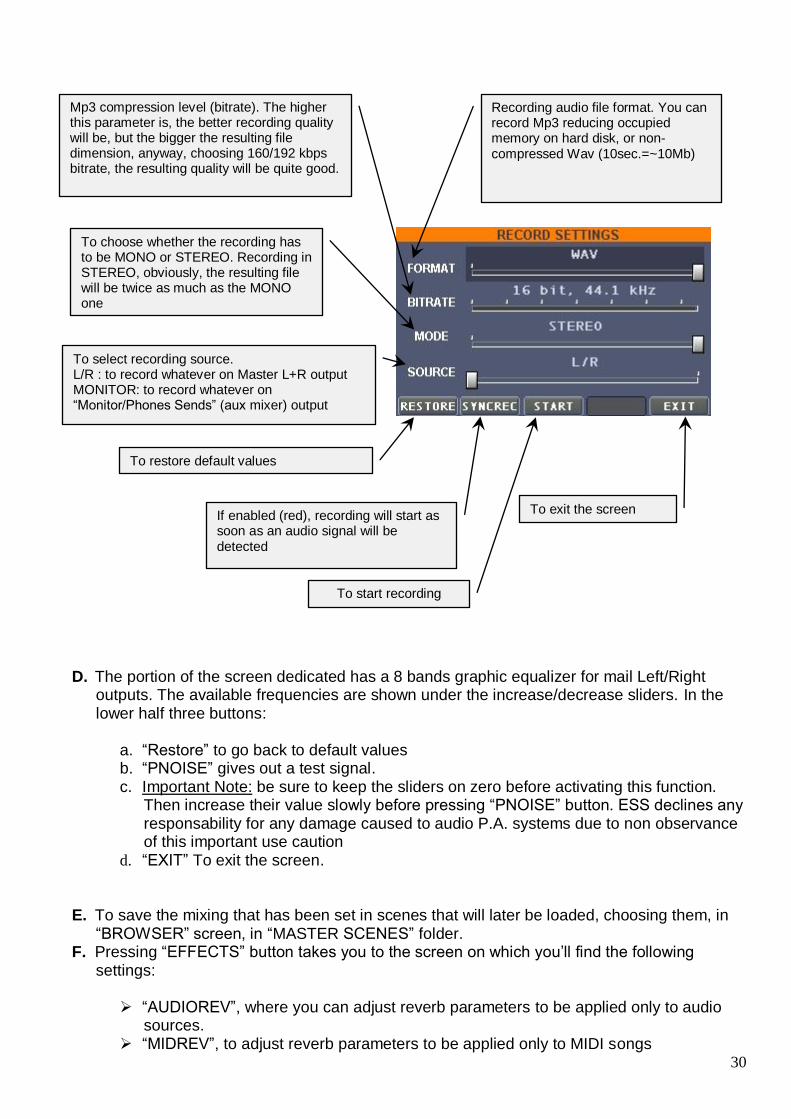
To exit the screen
D. The portion of the screen dedicated has a 8 bands graphic equalizer for mail Left/Right outputs. The available frequencies are shown under the increase/decrease sliders. In the lower half three buttons:
a. “Restore” to go back to default values b. “PNOISE” gives out a test signal. c. Important Note: be sure to keep the sliders on zero before activating this function.
Then increase their value slowly before pressing “PNOISE” button. ESS declines any responsability for any damage caused to audio P.A. systems due to non observance of this important use caution
d. “EXIT” To exit the screen.
E. To save the mixing that has been set in scenes that will later be loaded, choosing them, in “BROWSER” screen, in “MASTER SCENES” folder.
F. Pressing “EFFECTS” button takes you to the screen on which you’ll find the following settings:
“AUDIOREV”, where you can adjust reverb parameters to be applied only to audio
sources. “MIDREV”, to adjust reverb parameters to be applied only to MIDI songs
Recording audio file format. You can record Mp3 reducing occupied memory on hard disk, or non-compressed Wav (10sec.=~10Mb)
Mp3 compression level (bitrate). The higher this parameter is, the better recording quality will be, but the bigger the resulting file dimension, anyway, choosing 160/192 kbps bitrate, the resulting quality will be quite good.
To choose whether the recording has to be MONO or STEREO. Recording in STEREO, obviously, the resulting file will be twice as much as the MONO one
If enabled (red), recording will start as soon as an audio signal will be detected
To select recording source. L/R : to record whatever on Master L+R output MONITOR: to record whatever on “Monitor/Phones Sends” (aux mixer) output
To start recording
To restore default values
31
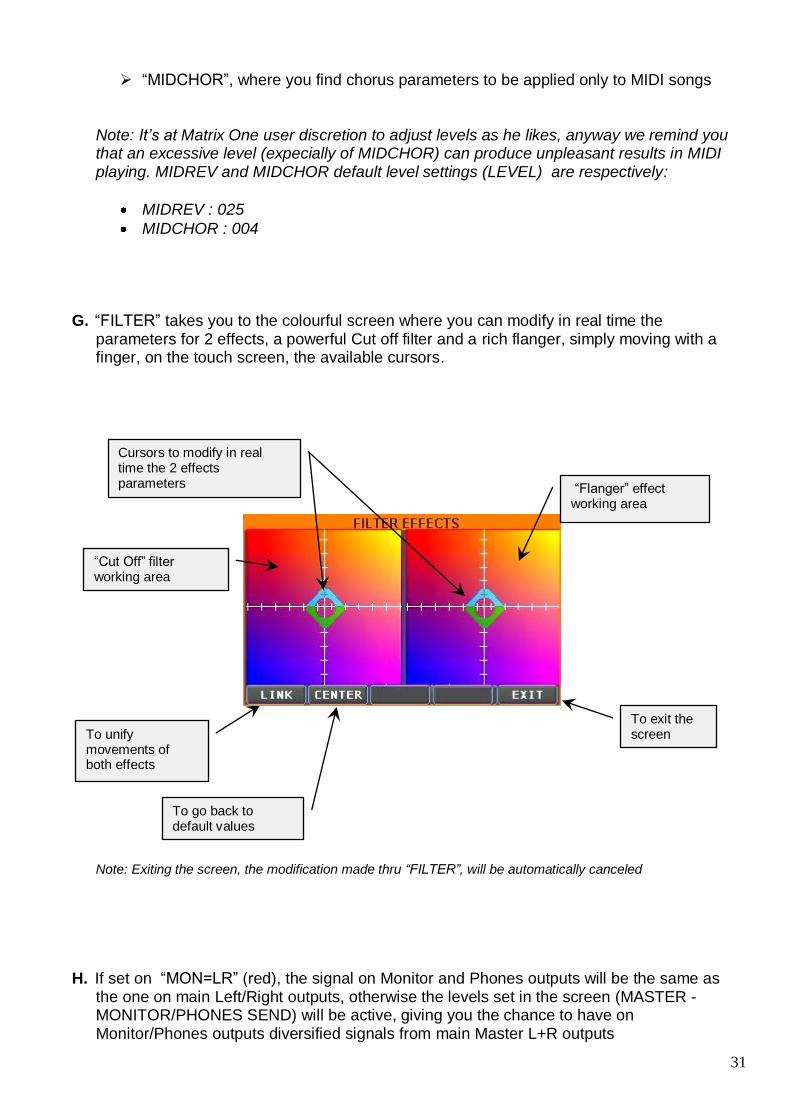
To unify movements of both effects
To go back to default values
To exit the screen
“MIDCHOR”, where you find chorus parameters to be applied only to MIDI songs
Note: It’s at Matrix One user discretion to adjust levels as he likes, anyway we remind you that an excessive level (expecially of MIDCHOR) can produce unpleasant results in MIDI playing. MIDREV and MIDCHOR default level settings (LEVEL) are respectively:
MIDREV : 025
MIDCHOR : 004
G. “FILTER” takes you to the colourful screen where you can modify in real time the
parameters for 2 effects, a powerful Cut off filter and a rich flanger, simply moving with a finger, on the touch screen, the available cursors.
Note: Exiting the screen, the modification made thru “FILTER”, will be automatically canceled
H. If set on “MON=LR” (red), the signal on Monitor and Phones outputs will be the same as the one on main Left/Right outputs, otherwise the levels set in the screen (MASTER - MONITOR/PHONES SEND) will be active, giving you the chance to have on Monitor/Phones outputs diversified signals from main Master L+R outputs
“Cut Off” filter working area
“Flanger” effect working area
Cursors to modify in real time the 2 effects parameters
32
I. Reverb level in monitor and headphones outputs J. Monitor and Phones independent volume level (if Mon=L+R the volume will be affected from
MASTER (MAST) slider level K. Levels of the seven sound sources (active if “MON=LR” is coloured grey)
A look at the browser and at the folders and functions included:
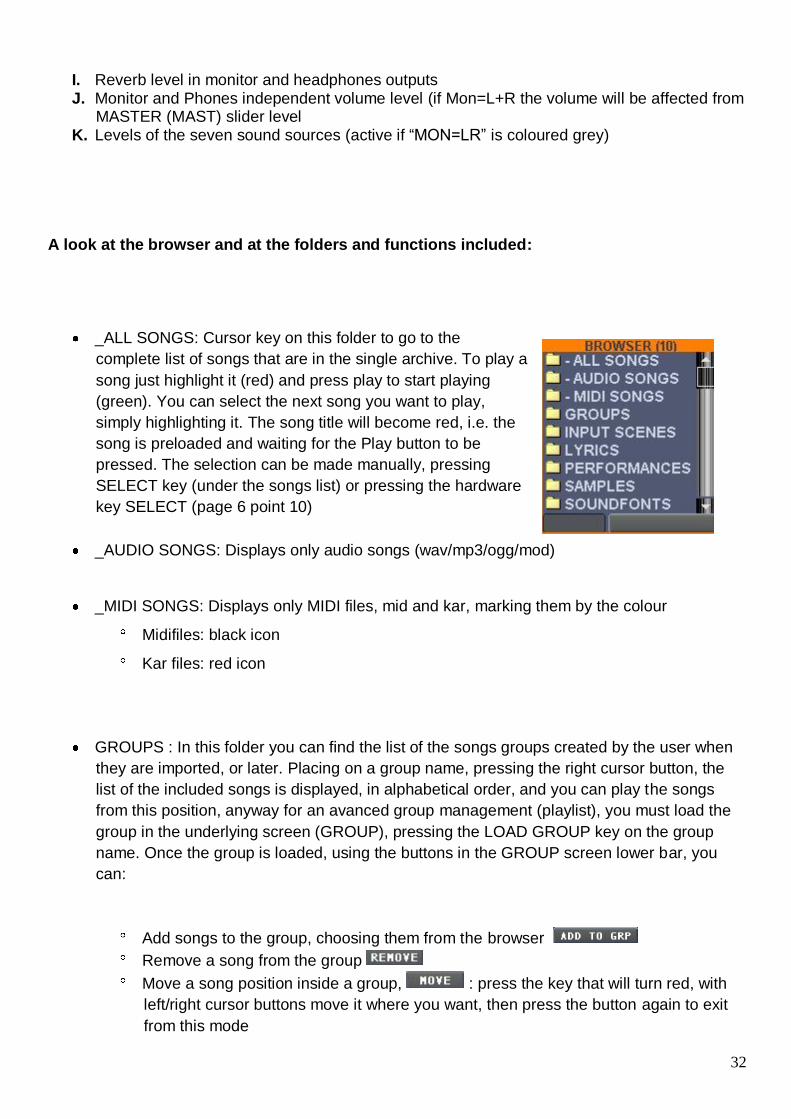
_ALL SONGS: Cursor key on this folder to go to the
complete list of songs that are in the single archive. To play a
song just highlight it (red) and press play to start playing
(green). You can select the next song you want to play,
simply highlighting it. The song title will become red, i.e. the
song is preloaded and waiting for the Play button to be
pressed. The selection can be made manually, pressing
SELECT key (under the songs list) or pressing the hardware
key SELECT (page 6 point 10)
_AUDIO SONGS: Displays only audio songs (wav/mp3/ogg/mod)
_MIDI SONGS: Displays only MIDI files, mid and kar, marking them by the colour
Midifiles: black icon
Kar files: red icon
GROUPS : In this folder you can find the list of the songs groups created by the user when
they are imported, or later. Placing on a group name, pressing the right cursor button, the
list of the included songs is displayed, in alphabetical order, and you can play the songs
from this position, anyway for an avanced group management (playlist), you must load the
group in the underlying screen (GROUP), pressing the LOAD GROUP key on the group
name. Once the group is loaded, using the buttons in the GROUP screen lower bar, you
can:
Add songs to the group, choosing them from the browser
Remove a song from the group
Move a song position inside a group, : press the key that will turn red, with
left/right cursor buttons move it where you want, then press the button again to exit
from this mode
33
Create a new group : automatically CONSOLE will ask you the name to
assign to the new group. Once you’ve inserted the name, press ENTER to confirm
Save a group : modify a group, remember to save the changes)
Save one of the linking modes between songs contained in a group (see page 8)
Note about deleting a group:
_Deleting a group, remember that if it’s loaded in the GROUP screen, Matrix will not delete
the group (download it from GROUPS before deleting it, loading another one, or pressing
NEW GROUP and further CONSOLE appears, without typing anything, close it, press
CONSOLE key one more time)
_When you delete a group, Matrix One will ask you confirmation thru the message:
Once you press YES, the unit will ask:
If later “YES” is pressed, together with the group also the songs contained in it will be
deleted by Matrix One, with no regard to the presence of these songs in other groups. If you
only want to delete the group, and keep the songs in the archive, press “NO”.
INPUT SCENES: Where you can save and load equalization and effects presets regarding
In1/2/3/4 single analogic inputs
LYRICS: Where you can save and load text files (txt)
PERFORMANCES: Where you can save and load PERFORMANCE section settings preset
(KEYB key)
SAMPLES: Where you can save and load samples divided in folders by type.
SOUNDFONTS: Where you can manage soundfonts. The available positions are 4, anyway
remember that “1” position is the main one for MIDI files playing.
SURE YOU WANT TO
DELETE?
DO YOU WANT TO DELLETE
ALSO GROUP’S SONGGS
DEFINITELY ?
34
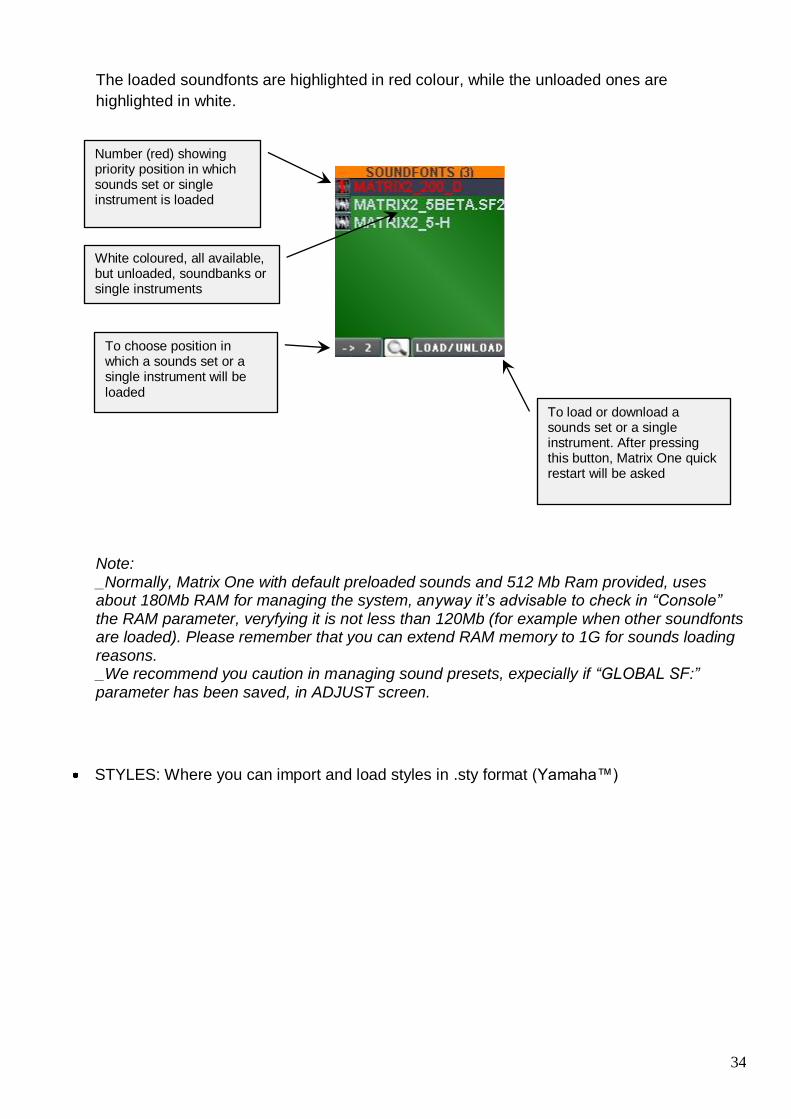
Number (red) showing priority position in which sounds set or single instrument is loaded
To choose position in which a sounds set or a single instrument will be loaded
To load or download a sounds set or a single instrument. After pressing this button, Matrix One quick restart will be asked
White coloured, all available, but unloaded, soundbanks or single instruments
The loaded soundfonts are highlighted in red colour, while the unloaded ones are
highlighted in white.
Note: _Normally, Matrix One with default preloaded sounds and 512 Mb Ram provided, uses about 180Mb RAM for managing the system, anyway it’s advisable to check in “Console” the RAM parameter, veryfying it is not less than 120Mb (for example when other soundfonts are loaded). Please remember that you can extend RAM memory to 1G for sounds loading reasons. _We recommend you caution in managing sound presets, expecially if “GLOBAL SF:” parameter has been saved, in ADJUST screen.
STYLES: Where you can import and load styles in .sty format (Yamaha™)
35
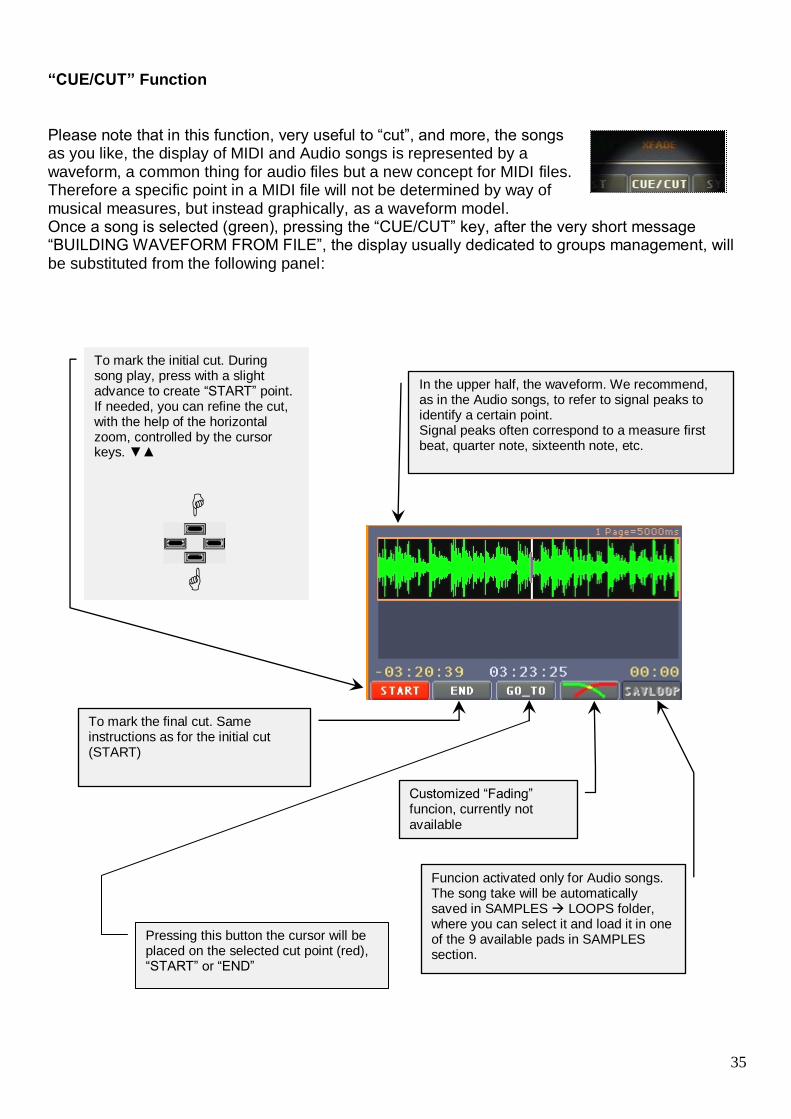
To mark the initial cut. During song play, press with a slight advance to create “START” point. If needed, you can refine the cut, with the help of the horizontal zoom, controlled by the cursor keys. ▼▲
“CUE/CUT” Function
Please note that in this function, very useful to “cut”, and more, the songs as you like, the display of MIDI and Audio songs is represented by a waveform, a common thing for audio files but a new concept for MIDI files. Therefore a specific point in a MIDI file will not be determined by way of musical measures, but instead graphically, as a waveform model. Once a song is selected (green), pressing the “CUE/CUT” key, after the very short message “BUILDING WAVEFORM FROM FILE”, the display usually dedicated to groups management, will be substituted from the following panel:
In the upper half, the waveform. We recommend, as in the Audio songs, to refer to signal peaks to identify a certain point. Signal peaks often correspond to a measure first beat, quarter note, sixteenth note, etc.
Funcion activated only for Audio songs. The song take will be automatically saved in SAMPLES LOOPS folder, where you can select it and load it in one of the 9 available pads in SAMPLES section.
To mark the final cut. Same instructions as for the initial cut (START)
Pressing this button the cursor will be placed on the selected cut point (red), “START” or “END”
Customized “Fading” funcion, currently not available
36
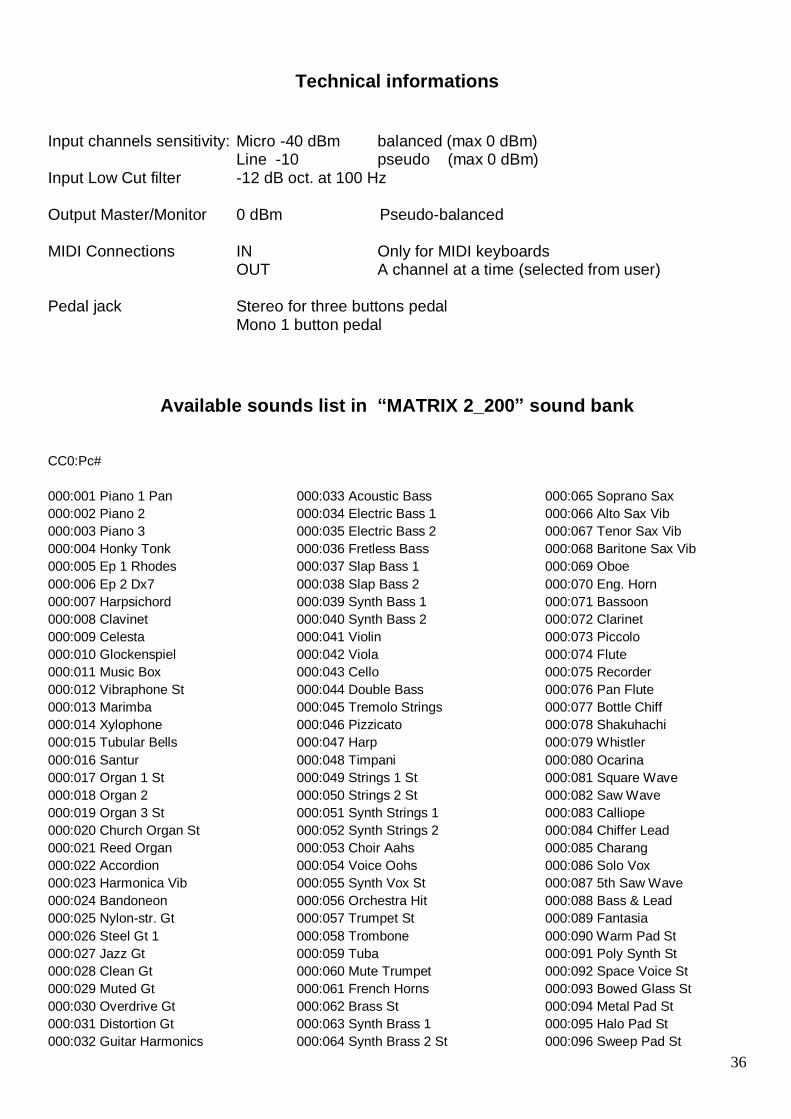
Technical informations
Input channels sensitivity: Micro -40 dBm balanced (max 0 dBm) Line -10 pseudo (max 0 dBm) Input Low Cut filter -12 dB oct. at 100 Hz Output Master/Monitor 0 dBm Pseudo-balanced MIDI Connections IN Only for MIDI keyboards OUT A channel at a time (selected from user) Pedal jack Stereo for three buttons pedal Mono 1 button pedal
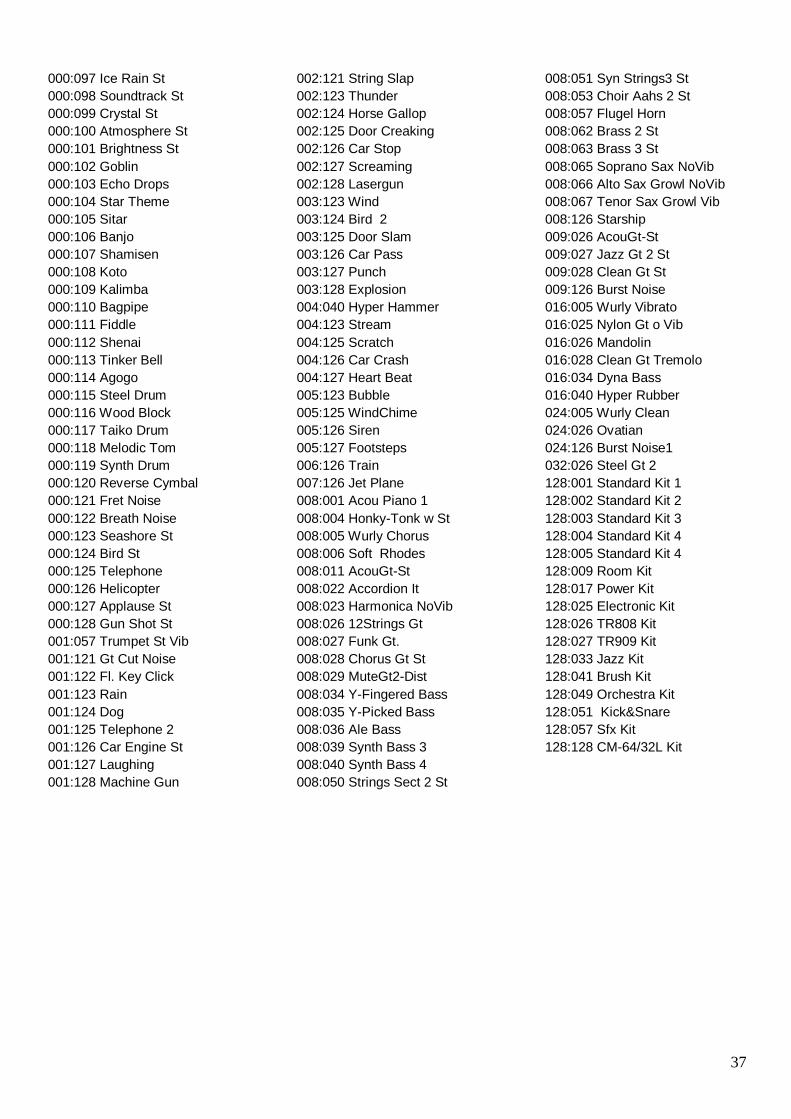
Available sounds list in “MATRIX 2_200” sound bank
CC0:Pc#
000:001 Piano 1 Pan
000:002 Piano 2
000:003 Piano 3
000:004 Honky Tonk
000:005 Ep 1 Rhodes
000:006 Ep 2 Dx7
000:007 Harpsichord
000:008 Clavinet
000:009 Celesta
000:010 Glockenspiel
000:011 Music Box
000:012 Vibraphone St
000:013 Marimba
000:014 Xylophone
000:015 Tubular Bells
000:016 Santur
000:017 Organ 1 St
000:018 Organ 2
000:019 Organ 3 St
000:020 Church Organ St
000:021 Reed Organ
000:022 Accordion
000:023 Harmonica Vib
000:024 Bandoneon
000:025 Nylon-str. Gt
000:026 Steel Gt 1
000:027 Jazz Gt
000:028 Clean Gt
000:029 Muted Gt
000:030 Overdrive Gt
000:031 Distortion Gt
000:032 Guitar Harmonics
000:033 Acoustic Bass
000:034 Electric Bass 1
000:035 Electric Bass 2
000:036 Fretless Bass
000:037 Slap Bass 1
000:038 Slap Bass 2
000:039 Synth Bass 1
000:040 Synth Bass 2
000:041 Violin
000:042 Viola
000:043 Cello
000:044 Double Bass
000:045 Tremolo Strings
000:046 Pizzicato
000:047 Harp
000:048 Timpani
000:049 Strings 1 St
000:050 Strings 2 St
000:051 Synth Strings 1
000:052 Synth Strings 2
000:053 Choir Aahs
000:054 Voice Oohs
000:055 Synth Vox St
000:056 Orchestra Hit
000:057 Trumpet St
000:058 Trombone
000:059 Tuba
000:060 Mute Trumpet
000:061 French Horns
000:062 Brass St
000:063 Synth Brass 1
000:064 Synth Brass 2 St
000:065 Soprano Sax
000:066 Alto Sax Vib
000:067 Tenor Sax Vib
000:068 Baritone Sax Vib
000:069 Oboe
000:070 Eng. Horn
000:071 Bassoon
000:072 Clarinet
000:073 Piccolo
000:074 Flute
000:075 Recorder
000:076 Pan Flute
000:077 Bottle Chiff
000:078 Shakuhachi
000:079 Whistler
000:080 Ocarina
000:081 Square Wave
000:082 Saw Wave
000:083 Calliope
000:084 Chiffer Lead
000:085 Charang
000:086 Solo Vox
000:087 5th Saw Wave
000:088 Bass & Lead
000:089 Fantasia
000:090 Warm Pad St
000:091 Poly Synth St
000:092 Space Voice St
000:093 Bowed Glass St
000:094 Metal Pad St
000:095 Halo Pad St
000:096 Sweep Pad St
37
000:097 Ice Rain St
000:098 Soundtrack St
000:099 Crystal St
000:100 Atmosphere St
000:101 Brightness St
000:102 Goblin
000:103 Echo Drops
000:104 Star Theme
000:105 Sitar
000:106 Banjo
000:107 Shamisen
000:108 Koto
000:109 Kalimba
000:110 Bagpipe
000:111 Fiddle
000:112 Shenai
000:113 Tinker Bell
000:114 Agogo
000:115 Steel Drum
000:116 Wood Block
000:117 Taiko Drum
000:118 Melodic Tom
000:119 Synth Drum
000:120 Reverse Cymbal
000:121 Fret Noise
000:122 Breath Noise
000:123 Seashore St
000:124 Bird St
000:125 Telephone
000:126 Helicopter
000:127 Applause St
000:128 Gun Shot St
001:057 Trumpet St Vib
001:121 Gt Cut Noise
001:122 Fl. Key Click
001:123 Rain
001:124 Dog
001:125 Telephone 2
001:126 Car Engine St
001:127 Laughing
001:128 Machine Gun
002:121 String Slap
002:123 Thunder
002:124 Horse Gallop
002:125 Door Creaking
002:126 Car Stop
002:127 Screaming
002:128 Lasergun
003:123 Wind
003:124 Bird 2
003:125 Door Slam
003:126 Car Pass
003:127 Punch
003:128 Explosion
004:040 Hyper Hammer
004:123 Stream
004:125 Scratch
004:126 Car Crash
004:127 Heart Beat
005:123 Bubble
005:125 WindChime
005:126 Siren
005:127 Footsteps
006:126 Train
007:126 Jet Plane
008:001 Acou Piano 1
008:004 Honky-Tonk w St
008:005 Wurly Chorus
008:006 Soft Rhodes
008:011 AcouGt-St
008:022 Accordion It
008:023 Harmonica NoVib
008:026 12Strings Gt
008:027 Funk Gt.
008:028 Chorus Gt St
008:029 MuteGt2-Dist
008:034 Y-Fingered Bass
008:035 Y-Picked Bass
008:036 Ale Bass
008:039 Synth Bass 3
008:040 Synth Bass 4
008:050 Strings Sect 2 St
008:051 Syn Strings3 St
008:053 Choir Aahs 2 St
008:057 Flugel Horn
008:062 Brass 2 St
008:063 Brass 3 St
008:065 Soprano Sax NoVib
008:066 Alto Sax Growl NoVib
008:067 Tenor Sax Growl Vib
008:126 Starship
009:026 AcouGt-St
009:027 Jazz Gt 2 St
009:028 Clean Gt St
009:126 Burst Noise
016:005 Wurly Vibrato
016:025 Nylon Gt o Vib
016:026 Mandolin
016:028 Clean Gt Tremolo
016:034 Dyna Bass
016:040 Hyper Rubber
024:005 Wurly Clean
024:026 Ovatian
024:126 Burst Noise1
032:026 Steel Gt 2
128:001 Standard Kit 1
128:002 Standard Kit 2
128:003 Standard Kit 3
128:004 Standard Kit 4
128:005 Standard Kit 4
128:009 Room Kit
128:017 Power Kit
128:025 Electronic Kit
128:026 TR808 Kit
128:027 TR909 Kit
128:033 Jazz Kit
128:041 Brush Kit
128:049 Orchestra Kit
128:051 Kick&Snare
128:057 Sfx Kit
128:128 CM-64/32L Kit
38
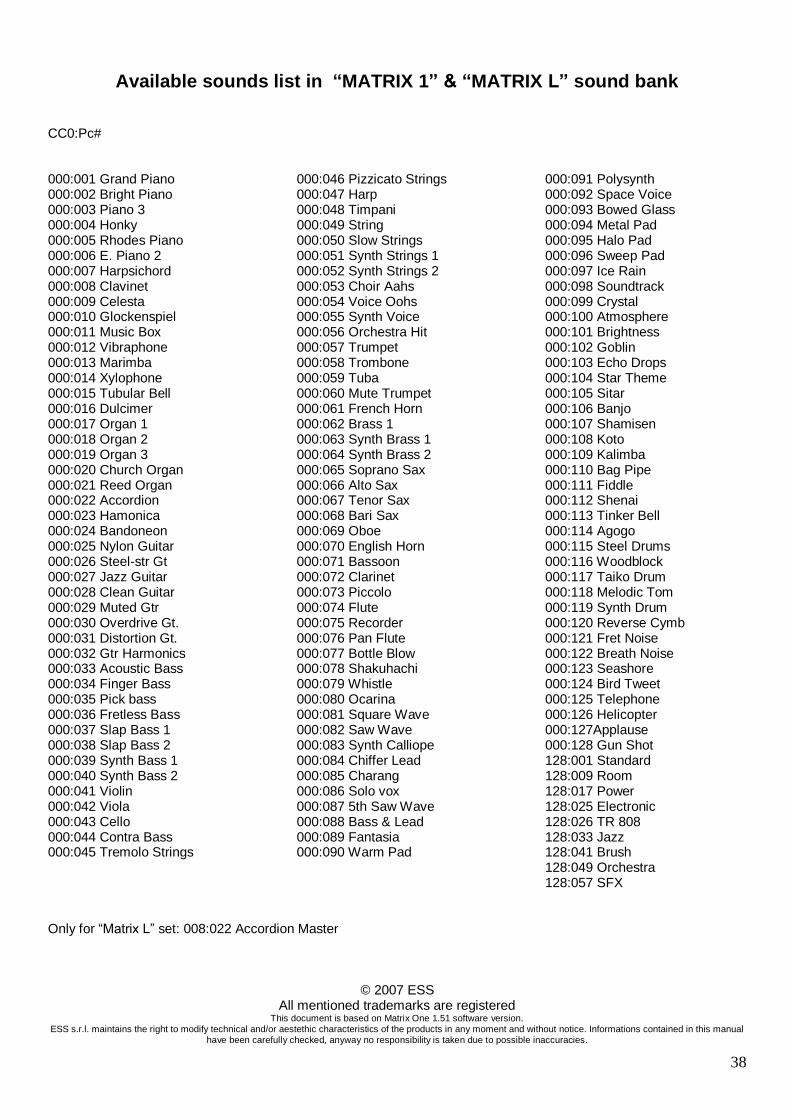
Available sounds list in “MATRIX 1” & “MATRIX L” sound bank
CC0:Pc# 000:001 Grand Piano 000:002 Bright Piano 000:003 Piano 3 000:004 Honky 000:005 Rhodes Piano 000:006 E. Piano 2 000:007 Harpsichord 000:008 Clavinet 000:009 Celesta 000:010 Glockenspiel 000:011 Music Box 000:012 Vibraphone 000:013 Marimba 000:014 Xylophone 000:015 Tubular Bell 000:016 Dulcimer 000:017 Organ 1 000:018 Organ 2 000:019 Organ 3 000:020 Church Organ 000:021 Reed Organ 000:022 Accordion 000:023 Hamonica 000:024 Bandoneon 000:025 Nylon Guitar 000:026 Steel-str Gt 000:027 Jazz Guitar 000:028 Clean Guitar 000:029 Muted Gtr 000:030 Overdrive Gt. 000:031 Distortion Gt. 000:032 Gtr Harmonics 000:033 Acoustic Bass 000:034 Finger Bass 000:035 Pick bass 000:036 Fretless Bass 000:037 Slap Bass 1 000:038 Slap Bass 2 000:039 Synth Bass 1 000:040 Synth Bass 2 000:041 Violin 000:042 Viola 000:043 Cello 000:044 Contra Bass 000:045 Tremolo Strings
000:046 Pizzicato Strings 000:047 Harp 000:048 Timpani 000:049 String 000:050 Slow Strings 000:051 Synth Strings 1 000:052 Synth Strings 2 000:053 Choir Aahs 000:054 Voice Oohs 000:055 Synth Voice 000:056 Orchestra Hit 000:057 Trumpet 000:058 Trombone 000:059 Tuba 000:060 Mute Trumpet 000:061 French Horn 000:062 Brass 1 000:063 Synth Brass 1 000:064 Synth Brass 2 000:065 Soprano Sax 000:066 Alto Sax 000:067 Tenor Sax 000:068 Bari Sax 000:069 Oboe 000:070 English Horn 000:071 Bassoon 000:072 Clarinet 000:073 Piccolo 000:074 Flute 000:075 Recorder 000:076 Pan Flute 000:077 Bottle Blow 000:078 Shakuhachi 000:079 Whistle 000:080 Ocarina 000:081 Square Wave 000:082 Saw Wave 000:083 Synth Calliope 000:084 Chiffer Lead 000:085 Charang 000:086 Solo vox 000:087 5th Saw Wave 000:088 Bass & Lead 000:089 Fantasia 000:090 Warm Pad
000:091 Polysynth 000:092 Space Voice 000:093 Bowed Glass 000:094 Metal Pad 000:095 Halo Pad 000:096 Sweep Pad 000:097 Ice Rain 000:098 Soundtrack 000:099 Crystal 000:100 Atmosphere 000:101 Brightness 000:102 Goblin 000:103 Echo Drops 000:104 Star Theme 000:105 Sitar 000:106 Banjo 000:107 Shamisen 000:108 Koto 000:109 Kalimba 000:110 Bag Pipe 000:111 Fiddle 000:112 Shenai 000:113 Tinker Bell 000:114 Agogo 000:115 Steel Drums 000:116 Woodblock 000:117 Taiko Drum 000:118 Melodic Tom 000:119 Synth Drum 000:120 Reverse Cymb 000:121 Fret Noise 000:122 Breath Noise 000:123 Seashore 000:124 Bird Tweet 000:125 Telephone 000:126 Helicopter 000:127Applause 000:128 Gun Shot 128:001 Standard 128:009 Room 128:017 Power 128:025 Electronic 128:026 TR 808 128:033 Jazz 128:041 Brush 128:049 Orchestra 128:057 SFX
Only for “Matrix L” set: 008:022 Accordion Master
© 2007 ESS All mentioned trademarks are registered
This document is based on Matrix One 1.51 software version. ESS s.r.l. maintains the right to modify technical and/or aestethic characteristics of the products in any moment and without notice. Informations contained in this manual
have been carefully checked, anyway no responsibility is taken due to possible inaccuracies.