MANUALS + WARRANTIES - Formwerks Boutique Properties
353
MANUALS + WARRANTIES
-
Upload
khangminh22 -
Category
Documents
-
view
2 -
download
0
Transcript of MANUALS + WARRANTIES - Formwerks Boutique Properties

MANUALS + WARRANTIES

Heritage on 16th & Burrard Manuals + Warranties
CONTENTS
APPLIANCES
Dryer -------- Blomberg User Manual ........................................................... 3 Blomberg Warranty ................................................................. 27 LG User Manual ..................................................................... 209 LG Warranty ............................................................................ 261
Washer ----- Blomberg User Manual ........................................................... 28 Blomberg Warranty ................................................................. 104 LG User Manual ...................................................................... 106 LG Warranty ............................................................................ 261
Range ------- Wolf User Manual .................................................................... 163 Wolf Warranty Information ................................................. ..... 190
Hood Fan - Wolf User Manual ................................................................... 178 Wolf Warranty Information ...................................................... 190 Faber User Manual ................................................................. 191 Faber Consumer Warranty & Service ...................................... 208
Appliance Warranty Service Letter-30 inch Package ................................. 266Appliance Warranty Service Letter-36 inch Package ................................. 270
Fisher Paykel Warranty Information .......................................................... 274
TECHNOLOGY
Lutron - Light Automation Set Up Guide ................................................... 302
OTHER
Paint Care Information ............................................................................... 342How to care for your window film (Units 1-6) ............................................ 344Hardwood Warranty Care & Maintenance ................................................. 345
Click to jump to the page

1 / ENDryer / User Manual
Front-Loading DryerOwner’s Guide:Installation and Operation Instructions
DV 17600 W

Please read this user manual first!Dear Customer,Thank you for prefering a Blomberg product. We hope that your product which has been manufactured with high quality and technology will give you the best results. We advise you to read through this manual and the other accompanying documentation carefully before using your product and keep it for future reference. If you transfer the product to someone else, give its manual as well. Pay attention to all details and warnings specified in the user manual and follow the instructions given therein. Use this user manual for the model indicated on the cover page.
Read the instructions.
Explanation of symbolsThroughout this user manual the following symbols are used:
C Important information or useful hints about usage.
A Warning for hazardous situations with regard to life and property.
B Warning against electric shock.
Warning against hot surfaces.
Warning against fire hazard.
Packaging materials of the product are manufactured from recyclable materials in accordance with our National Environment Regulations.
Do not dispose of the packaging wastes with the domestic waste or other wastes, discard them to the dedicated collection points designated by the local authorities.

1 Your Dryer 4
2 Important Safety Instructions 5
3 Installation Instructions 9
3.1 Electrical connection............................83.2 Grounding Instructions ......................103.3 Appropriate installation location .........113.4 Minimum Installation Clearances.......123.5 Use on top of a washer......................123.6 Adjusting the feet ...............................133.7 Ventilation duct and connection ........133.8 Destroying packaging material ..........14
4 Operating Instructions 15
4.1 First Use ............................................154.2 Garments suitable for drying .............154.3 Garments unsuitable for drying .........154.4 Preparing clothes to be dried.............164.5 Correct load capacity .........................16
5 Operating the product 17
5.1 Control Panel .....................................175.2 Symbols .............................................175.3. Preparation of drying machine..........175.4 Program selection and consumption chart.........................................................185.5 Auxiliary functions ..............................195.6 Warning indicators .............................195.7 Starting the program ..........................195.8 Child Lock ..........................................195.9 Changing the program after it isstarted......................................................205.10 Cancelling the program ...................205.11 End of program ................................20
6 Technical Specifications 21
7 User maintenance and cleaning instructions 22
7.1 Lint filter ............................................227.2 Sensor ..............................................22
8 Troubleshooting 23
9 Warranty Statement 24
TABLE OF CONTENTS

4 / EN Dryer / User Manual
OverviewFigure 1
1 Your Dryer
1
2 5
1
234
5
3
4Control Panel Loading Door
Lint Filter
Type label
Adjustable Feet
NOTE: Specifications of this appliance may change without notice to improve the quality of the product. Drawings in this manual are schematic and may not match your product exactly. Values stated on the dryer labels or in the documentation accompanying it are obtained in the laboratory in accordance with relevant standards. Depending on operational and environmental conditions of the appliance, values may vary.

5 / ENDryer / User Manual
2 Important Safety Instructions
AWARNING: To reduce the risk of fire or electric shock resulting in serious injury or death when using this appliance, follow the basic precautions including the following:
• Read all instructions before using the appliance. Failure to follow these instructions will increase the risk of fire or electric shock and will void the warranty.
A This product has been designed for home use only.
• The appliance must be operated at temperatures between +5°C and +35°C. (41°F and +95°F) • The appliance must not be installed behind a lockable door, a sliding door or a door with the hinges on the opposite side to that of the tumble dryer.• Do not install or store this appliance where it will be exposed to weather.• Do not tamper with the controls.• Do not repair or replace any part of the appliance or attempt any servicing unless specifically recommended in the user-maintenance instructions or in published user-repair instructions that you understand and have the skills to carry out.• Never wash the appliance with water.• Never touch the plug with wet hands.• Never pull from the cable to unplug the dryer.• Do not operate the appliance if the power cord or plug is damaged.• For malfunctions that cannot be solved by information in the operating manual: Turn off and unplug the appliance and call an authorized service provider.• This appliance must be grounded. In the event of malfunction or breakdown, grounding will reduce the risk of electric shock by providing a path of least resistance

6 / EN Dryer / User Manual
for electric current. This appliance is equipped with a cord having an equipment-grounding conductor and a grounded plug. The plug must be plugged into an appropriate outlet that is properly installed and grounded in accordance with all local codes and ordinances.
BWARNING: Improper connection of the equipment-grounding conductor can result in a risk of electric shock. Check with a qualified electrician or service representative or personnel if you are in doubt as to whether the appliance is properly grounded.
• Power cord plug must be within easy reach after installation.• To reduce the risk of fire or electric shock, do not use extension cords, multi-plugs or an adapter to connect the dryer to electrical mains.• Do not modify the plug provided with the appliance: if it will not fit the outlet, have a proper outlet installed by a qualified electrician.• If the power supply cord is damaged, it must be replaced by the manufacturer, its service agent or similarly qualified persons in order to avoid an electrical hazard.• The appliance must not be operated unless it is repaired! • Ventilation openings in the base must not be obstructed by carpets, etc.• Exhaust air must not be discharged into a flue used for exhausting fumes from appliances burning gas or other fuels.• Adequate ventilation must be provided to avoid the back flow of gases into the room from appliances burning other fuels, including open fires.• Do not dry articles that have been previously cleaned in, washed in, soaked in or spotted with gasoline, dry-cleaning solvents or other flammable or explosive substances as they give off vapors that could ignite or explode.• Do not use the tumble dryer if industrial chemicals have been used for cleaning what you want to dry.

7 / ENDryer / User Manual
• Do not dry unwashed items in the tumble dryer.• Items such as foam rubber (latex foam), shower caps, waterproof textiles, rubber-backed articles and clothes or pillows fitted with foam rubber pads should not be dried in the tumble dryer.• Do not use fabric softeners or products to eliminate static unless recommended by the manufacturer of the fabric softener or product.• Blomberg does not recommend the use of fabric softening dryer sheets in our Electric Dryers. The contents of these sheets can clog the units filters, causing reduced air flow and possible damage to the heating system. You may use fabric softeners in the washing machine but not the dryer• The appliance may only be used for the drying of textiles that are marked accordingly.• Undergarments that contain metal reinforcements should not be placed in a tumble dryer. Damage to the tumble dryer can result if any of the metal reinforcement come loose during drying.• Before loading check all garments for lighters, coins, metal pieces, needles, etc.• The use of fabric softener sheets is not recommended.• Do not place items exposed to cooking oils in your dryer. Items contaminated with cooking oils may contribute to a chemical reaction that could cause a load to catch fire. To reduce the risk of fire due to contaminated loads, the final part of a tumble dryer cycle occurs without heat (cool down period). Avoid stopping a tumble dryer before the end of the drying cycle unless all items are quickly removed and spread out so that the heat is dissipated.
AWARNING: Never stop the tumble dryer before the end of the drying cycle unless all items are quickly removed and spread out to dissipate heat.
• Do not reach into the appliance if the drum is moving.

8 / EN Dryer / User Manual
• Do not allow children to play on or in the appliance.Close supervision of children is necessary when the appliance is used near children.• Keep pets away from the appliance during the drying cycle.• Before the appliance is removed from service or discarded, remove the door to the drying compartment.• Close the loading door when you leave the area where the dryer is located.• This appliance is not intended for use by persons (including children) with reduced physical, sensory or mental capabilities, or lack of experience and knowledge, unless they are supervised or have been given instructions concerning the use of the appliance by a person responsible for their safety.• Clean lint filter before or after each load.• Keep area around the exhaust vent and adjacent surrounding areas free from the accumulation of lint, dust, and dirt.• The interior of the appliance and exhaust ductwork should be cleaned periodically by qualified service personnel.• Never use the dryer without the lint filter.• When your dryer is not in use or after the laundry is taken out following the completion of drying process, turn off by using the On/Off button. In cases when the On/Off button is in the On position while the dryer is plugged in, keep the door of the dryer closed.• For power saving in models with lamps, when your dryer is not in use, keep the door closed if the On/Off button is in the On position and the dryer is energized.
A
WARNING: This product can expose you to chemicals including Nickel (Metallic) which is known to the State of California to cause cancer. For more information go to www.P65Warnings.ca.govNote : Nickel is a component in all stainless steel and some other metal components.

9 / ENDryer / User Manual
WARNING: Failure to follow these instructions could result in a risk of fire
•The clothes dryer (“appliance‘) installation must be performed by a qualified installer.•Install the appliance according to the manufacturer’s instructions and local codes.•Do not install a clothes dryer with flexible plastic venting materials. If flexible metal (foil type) duct is installed, it must be of a specific type identified by the ap pliance manufacturer as suitable for use with clothes dryers. Flexible venting materials are known to collapse, be easily crushed, and trap lint. These conditions will obstruct the clothes dryer’s airflow and increase the risk of fire.SAVE THESE INSTRUCTIONS 3.1 Electrical connectionConnect the appliance to a grounded outlet protected by a fuse or circuit breaker of suitable capacity.
4-wire receptacle (14 -30R)
3-wire receptacle (10 -30R)
If yo u have 3-wire receptacle, like this , a 3-wire dryer cord must be purc hased locall y.
Dryer shipped with cord to fit thistype 4 -wire receptacle
C Neutral conecction is not used in this product
Power Cable
3-Wire Electrical Connection If your receptacle is a 3-wire receptacle as shown below, you must obtain a 3-wire dryer cord. A dryer cord can usually be found at your local hardware supply, electrical supply or home center. Cord should have closed loop or upturned end wire terminating connectors. The cord kit must be marked “For Use with Clothes Dryers”.
3- wire receptacle( 10-30R)
Typical 3- Wire Dryer Cord 240V/30 ampNEMA 10-30 Type SRDT
AIf the dryer is installed in a mobile home, recreational vehicles, new branch-circuit installations or in areas where local codes do not permit grounding through the neutral conductor, only a 4-wire power supply cord shall be used.
3 Installation Instructions

10 / EN Dryer / User Manual
To change the cord:1. Make sure that the dryer is not plugged into any power outlet.
BDO NOT plug end of dryer power cord into a live receptacle before connecting dryer power cord to dryer terminals and closing junction/splitter box as described below.
BDO NOT repair old power supply cords. Power cord must be changed only by a qualified person. There is a risk of electric shock!
2. Remove the screw from the cover of the junction box located at the top rear of the dryer.3. Remove the red, white and black wire from the terminal block.4. Remove the green ground wire from the ground terminal.5. Loosen the strain relief clamp holding the 4-wire cable.6. Thread the 4-wire cable out through the strain relief clamp.7. Thread the new 3-wire dryer cord through the strain relief clamp.8. Attach the power cord Ground conductor (the center wire) to the terminal labeled N. Connect the terminal labeled N and the Ground terminal labeled G with the supplied short cable. Tighten the terminals so that they securely hold the conductors.9. Attach the two remaining power cord outer conductors to the 2 terminals labeled L. Tighten both screws so that the power conductors are securely held in place. 10. Tighten the strain relief so that the power cord cannot be moved.11. Replace the cover on the junction box and fasten in place.
Power Cable
The dryer is now ready to be plugged into the 3-wire receptacle of the proper rating.
The receptacle should be located so that the plug and receptacle will be accessible with the dryer in its installed position.3.2 Grounding InstructionsThis appliance must be grounded. In the event of malfunction or breakdown, grounding will reduce the risk of electric shock by providing a path of least resistance for electric current. This appliance is equipped with a cord having an equipment-grounding conductor and a grounding plug. The plug must be plugged into an appropriate outlet that is properly installed and grounded in accordance with all local codes and ordinances.• Power cord plug must be within easy reach after installation.• The voltage and the allowed fuse/breaker protection are specified in the section “Technical Specifications”.• The stated voltage must match your mains voltage.• Connection via extension cords or multi-plugs should not be made.• The main fuse/breaker and switches must have a contact distance of minimum 3 mm.
B A damaged power cable must be replaced by a qualified electrician.
B WARNING – Improper connection of the equipment-grounding conductor can result in a risk of electric shock. Check with a qualified electrician or service representative or personnel if you are in doubt as to whether the appliance is properly grounded. Do not modify the plug provided with the appliance: if it will not fit the outlet, have a proper outlet installed by a qualified electrician.

11 / ENDryer / User Manual
BThe appliance must not be operated unless it is repaired! There is the risk of electric shock!
3.3 Appropriate installation location•Install your appliance in environments that have no risk of freezing and are in a stable and level position.•Do not place your appliance on a high pile rug or on similar surfaces.•Operate your appliance in a well-ventilated, dust-free environment.•Do not block the air ducts in front of and under the dryer.
B Make sure that your appliance is not placed on the power cable.
BKeep appliance at least 0.6” (1.5 cm) from the edges of other furniture.

12 / EN Dryer / User Manual
Ventilation RequirementsCloset door must have 2 openings, one located 3.2 inches (8 cm) from bottom of door having a minimum area of 16 sq. inches (103 cm2) and the other one located 3 inches (7.5 cm) from top of door having a minimum area of 46 sq. inches (294 cm2).3.5 Use on top of a washer•A stacking-kit (Part no: 297 954 0100) should be used between the washer and dryer for use on top of a washer. The stacking-kit should be installed by the Authorized Service provider.
3.4 Minimum Installation Clearances
Alcove or Built-under Closet
Sides 0.16 in. (4 mm) 0.16 in. (4 mm)
Top 1 in. (25 mm) 1 in. (25 mm)
Rear 4 in. (100 mm) 4 in. (100 mm)
Front 0.20 in. (5 mm) 0.20 in. (5 mm)
33 ¾"(856,5 mm)
23 (595 mm)
22
(583 mm)
7 16"/
15 / 16"
900 900
36.14 (918 mm)
min.
23.7 603 mm
min.
24.6(625 mm)
min.
”
”
”

13 / ENDryer / User Manual
•Place the appliance on a solid floor. If it is to be placed on top of a washer, the approximate weight together may reach 397 lbs (180 kg) when they are full. Therefore, the floor must be capable of carrying the load placed on it!3.6 Adjusting the feetIn order to ensure that your appliance operates almost silently and vibration-free, it must stand level and balanced on its feet. The all feet of the appliance can be adjusted. Balance the appliance by adjusting the feet.
CDo not use any tools to loosen the adjustable feet. Otherwise, they may be damaged.
CNever unscrew the adjustable feet from their housings.
3.7 Ventilation duct and connection Ventilation duct ensures exhaust of air from inside the appliance.The vented dryer has 1 air outlet.
A Only rigid or flexible metal duct should be used for exhausting.
• In Canada, the diameter of the duct to be used should be 4” (102 mm). In United States, the regulation for the required exhaust duct diameter must be followed. Maximum duct length is given in the table below:
Metal rigid ductNumber of Elbows Length
0 92ft (28.0m)1 82ft (25.0m)2 72ft (21.9m)3 62ft (18.9m)4 52ft (15.8m)
To connect a ventilation duct;1.Connect the air outlet metal duct to the spacer by turning it counter-clockwise.2.Make the duct passages as shown in the illustration below.
CExhaust of humid air from the dryer into the room is to be avoided. It may damage the walls and furniture in the room.

14 / EN Dryer / User Manual
CThe ventilation duct can be routed outdoors via a window or it can be connected to the air outlet in a bathroom.
CAir outlet duct must be extended directly outdoors. There must be a limited number of elbows to not hinder air flow.
CTo prevent water accumulation in the duct, make sure it is not folded on the floor.
CIn Canada only those foil-type flexible ducts, if any, specificially identified for use with the appliance by the manufacturer shallbe used. In the United States, only those foil-type flexible ducts, if any, specifically identified for use with the appliance by the manufacturer and that comply with the Outline for Clothes Dryer Transition Duct, Subject 2158A, shall be used.
AThe appliance should not be vented into a chimney, a wall, a ceiling, an attic, a crawl space or a concealed space of a building.
ADo not operate the appliance at the same time with heaters such as a coal or gas stove. Airflow may cause the chimney to flare up.
CCare must be taken not to pinch or bend the ducts.
CThe end of the hose should not be bent, it should not be stepped on and it must not be folded between the drain and the dryer.
CThe total length of flexible metal duct shall not exceed 7.8 foot(2.4 m).
CThe duct shall not be assembled with screws or other fastening means that extend inside the duct to catch lint.
AThe appliance should not be vented into a chimney, a wall, a ceiling, an attic, a crawl space or a concealed space of a building.
3.8 Destroying packaging material
APackaging material can be dangerous to children. Keep the packaging materials out of the reach of children or dispose of them accordingly.
Do not dispose of them together with normal domestic waste.Packaging materials of your appliance are manufactured from recyclable materials.

15 / ENDryer / User Manual
AWARNING: To reduce the risk of fire, electric shock, or personal injury, read the 2. IMPORTANT SAFETY INSTRUCTIONS before operating this appliance.
4 Operating Instructions
Drying Settings
At a
ny te
mpe
ratu
re
At h
igh
tem
pera
ture
At m
ediu
m
tem
pera
ture
At lo
w te
mpe
ratu
re
With
out h
eatin
g
Hang
to d
ry
Lay
to d
ry
Hang
wet
to d
ry
Lay
in s
hado
w
to d
ry
Dry-
clean
able
Iron -
IRONDry or Steam
Iron at high temperature
Iron at medium temperature Iron at low
temperature
Do n
ot ir
on
Iron
with
out
stea
m
Maximum temperature200 0C392 0F
150 0C302 0F
110 0C230 0F
LAUNDRY DRYING SYMBOLS
Drying Symbols
Suitable for dryer
No Iron Sensitive / Delicate dry
Do not dry with dryer
Do not dry Do not dry-clean
4.1 First Use•When operating your dryer for the first time check inside the drum for any foreign objects.•Partly load the drum with wet clothes and let the dryer run for approximately 15 minutes. This operation will clean the drum before loading garments.•You may smell an unpleasant odor and excessive fiber/lint may accumulate during the first drying cycle.4.2 Garments suitable for dryingAlways follow the advice on garment labels. Dry only laundry having a label stating that they are suitable for tumble-drying.
4.3 Garments unsuitable for drying•Items with metal attachments like, belt buckles and metal buttons can damage your dryer.•Do not dry items like woolens, silk garments and nylon stockings, delicate embroidered fabrics, garments with metal accessories and items like sleeping bags in the dryer.•Garments made of delicate and valuable fabrics as well as lace curtains can be permanently wrinkled. Do not dry these in your dryer!•Do not dry items made of hermetic fibers such as pillows and quilts in the dryer.•Garments made of foam or rubber may deform.•Do not dry clothes containing rubber in the dryer.•Do not dry clothes exposed to petroleum, oil, combustible or explosive agents in the dryer even if they are washed beforehand.

16 / EN Dryer / User Manual
•Overly wet laundry or laundry with dripping water must not be put into the dryer.4.4 Preparing clothes to be dried•All laundry must be spun at the highest possible spin speed the washer allows for the textile type.•Laundry may be tangled after washing. Separate laundry before placing them into your dryer. •Sort laundry according to their types and thicknesses. Dry similar types of laundry together. 4.5 Correct load capacity
CPlease consult the information in the “Program Selection” section.
AAdding laundry to the dryer over the level shown in the figure is not recommended. Drying performance will be reduced when the dryer is overloaded. Doing so may damage your dryer and your clothes.
C Place garments into the drum loosely so they won’t get tangled.
CLarge items (e.g. bed sheets, quilt covers, large tablecloths) may bunch-up. Stop the dryer 1 or 2 times during drying process to separate any bunched-up laundry.
The following weights are given as examples.
Home articles Weight (g)* Weight (lb)*
Cotton quit covers (double) 1500 3 ¼
Cotton quit covers (single) 1000 2 ¼
Bed sheets (double) 500 1 1/8
Bed sheets (single) 350 ¾
Large tablecloths 700 1 ½
Small tablecloths 250 ½
Tea napkins 100 ¼
Bath towels 700 1 ½
Hand towels 350 ¾
Garments Weight (g)* Weight (lb)*
Blouses 150 3/8
Cotton shirts 300 5/8
Shirts 200 ½
Cotton dresses 500 1 1/8
Dresses 350 ¾
Jeans 700 1 ½
Handkerchiefs (10 pieces) 100 ¼
T-Shirts 125 ¼
*Dry laundry weight before washing.Approximate weights of average home laundry type.

17 / ENDryer / User Manual
5 Operating the product
1. On/Off/Program selection button2. Start/Pause button3. End Time button
5.1 Control Panel
5.2 Symbols
5.3. Preparation of drying machine• Plug the drying machine.• Open the loading door.• Place the laundry to the drying machine
without jamming them.• Push and close the loading door.
A Ensure that no laundry is jammed to the loading door.
345 2
1
Super
Extra
Normal
Damp
Timed
Filter
Lock
Buzzer
Dry/TimeLevel
3sec
EndingIn Start / PauseBuzzer
Ready
Drying
Damp Dry
Regular Dry
End / AntiWrinkle
3sec
4. Buzzer volume button5. Drying level/Time programs selection
button
Select the desired program using the On/Off/Program selection knob, the machine will turn on.
CSelecting a program using the On/Off/Program selection button does not mean that the program started. Press the Start / Stand-by button to start the program.
Volume upFiltercleaning
Tankfull
Child-prooflock
MuteFilter drawer /Heat exchanger
cleaning
Anti-creasing
On/O� TimerDelay
Drying Cupboard Dry
Iron Dry
Express 14’
Delicates
Jeans BabyProtect Extra dry Cupboard dry plus
Sport Freshen Up
Startpausecancel
Cottons
Synthetics
Mix
Express 30’
Drying Rack/ TimeDry
Daily Exspress Shirts 30
Wool Refresh
Shirts
Lowtemperature
select
Hygiene (BabyProtect+)
Cottons Eco
End
Downwear/Duvet

18 / EN Dryer / User Manual
5.4 Program selection and consumption chart
EN
Programs Wight (Ib)
Spin speed in wash-ing
machine (rpm)Drying time (minutes) Explanation
Cottons/Nor-mal 15 Medium 121 Durable clothing can be dried with this
program at a normal temperature.
Perm Press 7 Low 55Less durable clothing can be dried with this program at a at a lower temperature compared to the cottons program. It is recommended for synthetic clothing (e.g.)
Heavy Duty 8 Medium 131 Use for heavy -duty clothes such as jeans or garmets should be extra dry.
Mixed fabric 8 Medium 85Mix program (Regular Dry) is for mixed loads with dif-ferent types of fabrics. Mixed laundry can be dried at a lower temperature.
Sanitize 11 Medium 125
It is a long-term program that you can use for the clothes (baby clothes, towels, underwear, etc. cotton) you require hygeine. Hygiene is provided with high tempera-ture. It is especially suitable for durable fabrics. Do not dry use this program for delicate fabrics. Super drying level is recommended to kill high incidence of bacteria.
Timed Dryer (High tempa-ture)
- Medium 10Timed programs can be selected to reach the desired final drying level at high temperatures.
Timed Dryer (low tempa-ture)
- Medium 10 Timed programs can be selected to reach the desired final drying level at low temperatures.
Air fluff - - 10 Only cool air circulation is performed for 10 minutes without providing hot air.
Wool 4 Low 20Use for shofting is wool items and garments made of wool blend such as sweaters, scarves,head scarves. It prepares wool garmets for drying with low air tempea-ture.
Towel 11 Medium 95 Drying towels such as kitchen towel, bath towel and hand towel.
Wrinkle Free 2 Medium 40 Dries the shirts in a more sensitive way so that they are less wrinkled and ironed easily.
Delicates 3 Low 40Very delicate laundry (silk blouses, fine underwear, etc.) can be dried at a lower temperature that are suitable for drying or for laundry that is advised to be handwashed.
Sports wear 8 Medium 85 Use for drying sport, fitness, and casual polyester blended garments.
Bedding 5 High 40 Drying cotton beddings such as bedlinen, sheets, bed cover, pillow case
Quick Dry 2 High 45 For the small loads of qualified fabrics with short drying times such as synthetic clothing

19 / ENDryer / User Manual
SuperUse for heavy-duty fabrics in to be very dry
Extra Use for extra drying
Normal
Use fora normal dryness level. It is recommended level fora energy saving.
Damp Items can be partially damp5.5 Auxiliary functionsBuzzer / timeDrying machine makes an audible warning when the program is completed. If you don’t want the machine to make an audible warn-ing, press the “Buzzer / Time” button. When you press the Buzzer/Time button, a light will illuminate and no audible warning will be made when the program ends.
C You can select this function before or after the program starts.
Dry/Time level button is used to adjust pro-gram duration while the timed programs are selected. Drying LevelDry/Time Level button is used for adjusting to desired dryness level. Program duration may change depending on the selection.
C You can activate this function only prior to start of program.
End timeYou can delay the end time of the program up to 24 hours with End time function. 1. Open the loading door and place the
laundry.2. Select the drying program.3. Press the End Time selection button and
set the delay time you wish. End Time LED will illuminate. (When pressed and hold the button, End Time proceeds non-stop).
4. Press the Start / Stand-by button. End Time countdown starts. “:” Separator in the middle of displayed delay time flashes.
CYou can add or remove laundry within end time. Displayed time is the sum of normal drying time and end time. End Time LED will turn off at the end of countdown, drying starts and drying LED will illuminate.
Changing the end timeIf you want to change the duration during the countdown:
Cancel the program by turning the On/Off/Program selection knob. Select the program you want and repeat the End Time selection process.Cancelling the end time functionIf you want to cancel the end time countdown and start the program immediately:Cancel the program by turning the On/Off/Program selection knob. Select the program you want and press the Dry/Time Level but-ton.5.6 Warning indicators
CWarning indicators may vary depending on the model of your dryer.
Filter cleaningWhen the program is completed, the warning indicator for filter cleaning turns on.5.7 Starting the programPress the Dry/Time Level button to start the program.Dry/Time Level and Drying indicators will illuminate to indicate that program started.5.8 Child LockThe drying machine has a child lock which prevents the program flow from being inter-rupted when the buttons are pressed during a program. When the child lock is activated, all buttons on the panel except the On/Off/Program selection knob are deactivated.Press the Buzzer button simultaneously for 3 buttons to activate the child lock. The child lock has to be deactivated to be able to start a new program after the current program is finished or to be able to interfere with the program. To deactivate the child lock, keep the same button pressed for 3 seconds.
CWhen the child lock is activated, the child lock warning indicator on the screen turns on.Child lock deactivates when the drying machine is turned off and on by the On/Off/Cancel knob.When the drying machine runs and the child lock is active, it beeps twice when the program selection knob is turned. If the child lock is deactivated without returning the program selection knob to its previous position, program will terminate due to the change in the program selection knob position.
Drying level

20 / EN Dryer / User Manual
5.9 Changing the program after it is startedYou can change the program you selected to dry your laundry with a different program after the drying machine starts running• For instance, select Extra Dry program
by turning the On/Off/Program selection knob to select Extra Dry instead of Iron Dry.
• Press the Dry/Time Level button to start the program.
Adding and removing clothes during stand-byIf you want to add or remove clothes to/from the drying machine after the drying program starts:• Press the Dry/Time Level button to put
the drying machine in Stand-by state. The drying operation stops.
• Open the loading door while in Stand-by state, and close the door after you remove or add laundry.
• Press the Dry/Time Level button to start the program.
CAdding laundry after the drying operation starts may cause the dried laundry inside the machine to mix with wet laundry and leave the laundry damp at the end of operation.Adding or removing laundry during drying may be repeated as many times as you wish. But this operation continuously interrupts the drying operation, and thus increases program duration and energy consumption. So, it is recommended to add laundry before the program starts.If a new program is selected by turning the program selection knob while the drying machine is in stand-by, the running program terminates.Do not touch the inner surface of the drum while adding or removing clothes during a continuing program. The drum surface is hot.
5.10 Cancelling the programIf you want to cancel the program and ter-minate the drying operation for any reason after the drying machine starts running, turn the On/Off/Cancel knob, the program will be cancelled.
AThe inside of the drying machine shall be extremely hot when you cancel the program during machine operation, so run the refresh program to allow it to cool down.
5.11 End of programWhen the program ends, the Fibre Filter Cleaning and Water Tank warning symbols on the program observation indicator turn on. Loading door may be opened and the dryer machine becomes ready for another run.Bring the On/Off/Program selection knob to On/Off position to turn the drying machine off.
CIf the laundry is not removed after the program is completed, the wrinkle prevention function activates for 2 hours to prevent the laundry inside the machine to get wrinkled. The program tumbles the laundry with 10-minute intervals to prevent them from wrinkling.

21 / ENDryer / User Manual
This appliance’s packaging material is recyclable. Help recycle it and protect the environment by dropping it off at recycling locations provided for this purpose. Your appliance also contains a large amount of recyclable material. It is marked with this label to indicate that used appliances should not be mixed with other waste. This way, the appliance recycling organised by your manufacturer will be done under the best possible conditions, in compliance with European Directive 2002/96/EC on Waste Electrical and Electronic Equipment. Contact your local government or your retailer for used appliance collection points closest to your home. We thank you for doing your part to protect the environment.
Model Vented Dryer with electronic sensor controlHeight (in) 33 1/4Witdth (in) 23 7/16Depth (in) 22 15/16Height adjustment of feet (in) 1 1/16Net weight (plastic front door usage) (lbs) 69,7Net weight (glass front door usage) (lbs) 73,4Voltage / Frequency 208-240V ~ 60 HzConnected load 2000-2400 WDry Load Capacity 7kg / 15,5 lbCapacity 3,77 cu-ft
6 Technical Specifications

22 / EN Dryer / User Manual
7.2 Sensor There are humidity sensors in your dryer that detect whether the laundry is dry or not.For sensor cleaning;1. Open loading door.2. Allow dryer to cool off if drying has been done recently.3. Wipe the metal sensors with a soft cloth dampened with vinegar and dry the sensors afterwards.
C Clean the metal sensors at regular intervals (4 times a year).
AWARNING: Never use solvents, cleaning agents or similar substances when cleaning as these might cause fire and/or an explosion!
7.1 Lint filter Lint and fibers released from the laundry in to the air during the drying cycle are collected in the “Lint Filter”.
C Fibres and lint are formed during wearing and washing.
A WARNING: Always clean the filter after each drying cycle.
To clean the Filter;1. Open loading door.2. Remove the lint filter by pulling it up and open the filter.3. Clean lint, fiber, and by hand or with a soft piece of cloth.4. Close the filter and put it back in place.
C You can clean the filter and filter area with a vacuum cleaner.
CClogging may arise on the filter surface after using your dryer for some time; if this occurs, wash the filter with water and dry it before using again.
7 User maintenance and cleaning instructions

23 / ENDryer / User Manual
8 TroubleshootingProblem Cause Explanation / Solution
Drying process takes too long.
*Lint filter may not have been cleaned.
* Clean the lint filter.* Meshes of the filter may be clogged. Wash with water.
*Ventilation grids on the front side of the machine are blocked.
*Remove the objects (if any) that block ventilation in front of the ventilation grids.
*Ventilation is not sufficient since the room where the machine is installed is very small.
*Open the door and window of the room to avoid the room temperature increase too much.
*Lime deposit has built up on the dampness sensor *Clean the dampness sensor.
*Excessive laundry is loaded. *Do not load the dryer in excess.
*Laundry is not spun sufficiently *Spin your laundry at a higher speed in your washing machine.
Dryer does not switch on or the program does not start. Dryer does not start when set.
* It may not plugged in.* The loading door may be ajar.* Program may not be set or the “Start/Pause/Cancel” button may not have been pressed.* “Childproof lock” may be activated.
* Make sure that the dryer is plugged in.* Make sure the loading door is properly closed.* Make sure the program has been set and it is not in “Pause” mode.* Deactivate the childproof lock.
Program is interrupted for no reason.
* The loading door may be ajar.* Electricity may be cut off.
* Make sure the loading door is properly closed.* Press the “Start/Pause/Cancel” button to start the program.
Laundry has shrunk, become felted or has deteriorated.
* A program not suitable for the laundry type might have been used.
* Dry only the laundry which is suitable for drying in the dryer. First check the labels on the clothes.* Select a program a suitable low temperature setting for the laundry type to dry the clothes.
“End / Anticrease” LED flashes.
* The 2-hour anti creasing program to prevent laundry from wrinkling may have been activated.
* Turn off the dryer and take the laundry out of the dryer.
“End / Anticrease” LED is on. * Program has come to an end. * Turn off the dryerand take the
laundry out of the dryer.
“Filter cleaning” LED flashes.
* Lint filter may not have been cleaned.
* Clean the lint filter.* Meshes of the filter may be clogged. Wash with water.
The “Drying” LED flashes.
* A heat sensor failure has occurred. dryer ends the program without heating.
* Turn off the dryer and remove the laundry. Call the authorized service.
NOTE: Call an authorized service if the problem persists.

24 / EN Dryer / User Manual
This product is fully tested and went through official quality assurance inspections before leaving the original manufacturing site. Warranty terms for this Blomberg household appliance is not valid if the product is altered, tampered, modifed, additional parts assembled, fixed and re-packed by an authorized distributor, servicer, a third party retailer, reseller or by any other unauthorized person(s)
9 Warranty Statement


WM72200W
Front-Loading Automatic WasherOwner’s Guide & Installation Instructions
To prevent accidents and machine damage, read these instructions before installation or use. Use the washer only as instructed in this owner’s guide and installation instructions included with your washer. Keep this guide for future reference
As an ENERGY STAR® partner,BLOMBERG has determined that thisproduct meets the ENERGY STAR®guidelines for energy efficiency.

2 / English Front-Loading Automatic Washer
Please read this guide first!Dear Customer,We hope that your product which has been manufactured in modern facilities and passed through a strict quality control procedure will give you the best results.Therefore, we advise you to read through this document carefully before using your product and keep it for future reference.
This guide will… …help you use your washer in a fast and safe way.• Please read the guide before installing and starting your washer.• Particularly follow the instructions related to safety.• Keep this guide within easy reach. You may need it in the future. • Please read all additional documents supplied with this washer.Please note that this owner’s guide & installation instructions may be applicable for several other models. Differences between models will be identified in the guide.

Owner’s Guide & Installation Instructions 3 / English
Explanation of symbolsThroughout this guide the following symbols are used:
C CAUTION
• Important information or useful hints about usage.
A WARNING
• Warning for hazardous situations with regard to life and property.
B WARNING
• Warning for electrical shockIf you have questions, call:Call Center (toll free number)1-800-459-9848 (USA)or send e-mail to:[email protected] the list of dealers/retailers, distributors and authorized service agents, visit:http://www.blombergappliances.com
Please fill in the information below for future reference.
Model no.: Serial no.:Purchase date:

4 / English Front-Loading Automatic Washer
TABLE OF CONTENTS
1 Your Washer 6Overview . . . . . . . . . . . . . . . . . . . . . . . . . . . . . . . . . . . . . . . . . . . . . . . . . . . . . . . 6Specifications . . . . . . . . . . . . . . . . . . . . . . . . . . . . . . . . . . . . . . . . . . . . . . . . . . . . 7
2 Important Safety Instructions 8
3 Installation Instructions 13The Right Location of Installation . . . . . . . . . . . . . . . . . . . . . . . . . . . . . . . . . . . . 13Installation Clearances . . . . . . . . . . . . . . . . . . . . . . . . . . . . . . . . . . . . . . . . . . . . 14Allowable Clearances for Undercounter Installation. . . . . . . . . . . . . . . . . . . . . . . 15Allowable Clearances for Closet Installation . . . . . . . . . . . . . . . . . . . . . . . . . . . . 16Stacked Installation . . . . . . . . . . . . . . . . . . . . . . . . . . . . . . . . . . . . . . . . . . . . . . 16Removing packaging reinforcement . . . . . . . . . . . . . . . . . . . . . . . . . . . . . . . . . . 16Removing shipping bolts . . . . . . . . . . . . . . . . . . . . . . . . . . . . . . . . . . . . . . . . . . 17Leveling the washer . . . . . . . . . . . . . . . . . . . . . . . . . . . . . . . . . . . . . . . . . . . . . . 18Electrical Connection . . . . . . . . . . . . . . . . . . . . . . . . . . . . . . . . . . . . . . . . . . . . . 18Power supply and circuit . . . . . . . . . . . . . . . . . . . . . . . . . . . . . . . . . . . . . . . . . . 20Water Supply Connection . . . . . . . . . . . . . . . . . . . . . . . . . . . . . . . . . . . . . . . . . . 21Drainage. . . . . . . . . . . . . . . . . . . . . . . . . . . . . . . . . . . . . . . . . . . . . . . . . . . . . . . 23Installation Checklist . . . . . . . . . . . . . . . . . . . . . . . . . . . . . . . . . . . . . . . . . . . . . . 24Transportation . . . . . . . . . . . . . . . . . . . . . . . . . . . . . . . . . . . . . . . . . . . . . . . . . . 24Disposal Information . . . . . . . . . . . . . . . . . . . . . . . . . . . . . . . . . . . . . . . . . . . . . . 25Appliance Disposal . . . . . . . . . . . . . . . . . . . . . . . . . . . . . . . . . . . . . . . . . . . . . . . 25
4 Operating Instructions 26First Use. . . . . . . . . . . . . . . . . . . . . . . . . . . . . . . . . . . . . . . . . . . . . . . . . . . . . . . 26Laundry Tips . . . . . . . . . . . . . . . . . . . . . . . . . . . . . . . . . . . . . . . . . . . . . . . . . . . 27Preparing the laundry . . . . . . . . . . . . . . . . . . . . . . . . . . . . . . . . . . . . . . . . . . . . . 28Loading the washer . . . . . . . . . . . . . . . . . . . . . . . . . . . . . . . . . . . . . . . . . . . . . . 29Detergent Use . . . . . . . . . . . . . . . . . . . . . . . . . . . . . . . . . . . . . . . . . . . . . . . . . . 30Detergent Quantity . . . . . . . . . . . . . . . . . . . . . . . . . . . . . . . . . . . . . . . . . . . . . . . 31Detergent Dispenser. . . . . . . . . . . . . . . . . . . . . . . . . . . . . . . . . . . . . . . . . . . . . . 32(II) Main Wash Detergent Compartment . . . . . . . . . . . . . . . . . . . . . . . . . . . . . . . 33Liquid Fabric Softener Compartment . . . . . . . . . . . . . . . . . . . . . . . . . . . . . . . . . 34Using liquid detergents . . . . . . . . . . . . . . . . . . . . . . . . . . . . . . . . . . . . . . . . . . . . 34(I) Liquid Chlorine Bleach Compartment . . . . . . . . . . . . . . . . . . . . . . . . . . . . . . . 35Water Consumption . . . . . . . . . . . . . . . . . . . . . . . . . . . . . . . . . . . . . . . . . . . . . . 35

Owner’s Guide & Installation Instructions 5 / English
TABLE OF CONTENTS
5 Selecting a Program and Operating Your Washer 36Control panel . . . . . . . . . . . . . . . . . . . . . . . . . . . . . . . . . . . . . . . . . . . . . . . . . . . 36Programs . . . . . . . . . . . . . . . . . . . . . . . . . . . . . . . . . . . . . . . . . . . . . . . . . . . . . 37Program selection . . . . . . . . . . . . . . . . . . . . . . . . . . . . . . . . . . . . . . . . . . . . . . . 40Program and consumption table. . . . . . . . . . . . . . . . . . . . . . . . . . . . . . . . . . . . . 41Temperature selection . . . . . . . . . . . . . . . . . . . . . . . . . . . . . . . . . . . . . . . . . . . . 44Spin speed selection . . . . . . . . . . . . . . . . . . . . . . . . . . . . . . . . . . . . . . . . . . . . . 45Auxiliary function selection . . . . . . . . . . . . . . . . . . . . . . . . . . . . . . . . . . . . . . . . . 46End Time . . . . . . . . . . . . . . . . . . . . . . . . . . . . . . . . . . . . . . . . . . . . . . . . . . . . . . 48Changing the selections after program has started . . . . . . . . . . . . . . . . . . . . . . . 49Child Lock . . . . . . . . . . . . . . . . . . . . . . . . . . . . . . . . . . . . . . . . . . . . . . . . . . . . . 50
6 Preparation 51Starting the program . . . . . . . . . . . . . . . . . . . . . . . . . . . . . . . . . . . . . . . . . . . . . 51Door locking system. . . . . . . . . . . . . . . . . . . . . . . . . . . . . . . . . . . . . . . . . . . . . . 51Adding or taking out laundry. . . . . . . . . . . . . . . . . . . . . . . . . . . . . . . . . . . . . . . . 52Cancelling the program . . . . . . . . . . . . . . . . . . . . . . . . . . . . . . . . . . . . . . . . . . . 52Re-spinning the laundry . . . . . . . . . . . . . . . . . . . . . . . . . . . . . . . . . . . . . . . . . . . 53End of program . . . . . . . . . . . . . . . . . . . . . . . . . . . . . . . . . . . . . . . . . . . . . . . . . 53Energy saving mode. . . . . . . . . . . . . . . . . . . . . . . . . . . . . . . . . . . . . . . . . . . . . . 54
7 User maintenance instructions 55Cleaning detergent dispenser . . . . . . . . . . . . . . . . . . . . . . . . . . . . . . . . . . . . . . . 55Cleaning the door seal . . . . . . . . . . . . . . . . . . . . . . . . . . . . . . . . . . . . . . . . . . . . 56Cleaning the drum . . . . . . . . . . . . . . . . . . . . . . . . . . . . . . . . . . . . . . . . . . . . . . . 56Cleaning the outer cabinet and control panel . . . . . . . . . . . . . . . . . . . . . . . . . . . 57Cleaning the water inlet strainers . . . . . . . . . . . . . . . . . . . . . . . . . . . . . . . . . . . . 57Cleaning the drain pump filter . . . . . . . . . . . . . . . . . . . . . . . . . . . . . . . . . . . . . . 58Descaling the washer . . . . . . . . . . . . . . . . . . . . . . . . . . . . . . . . . . . . . . . . . . . . . 60
8 Troubleshooting 61
9 WARRANTY STATEMENT FOR THE BLOMBERG CLOTHES WASHERS 74
10 HOW TO GET SERVICE 75

6 / English Front-Loading Automatic Washer
1 Your Washer
1
2
3
4
5
6
7
8
Overview
1- Power cable2- Top panel3- Control panel4- Drain hose5- Loading door6- Filter cap7- Adjustable feet8- Detergent drawer

Owner’s Guide & Installation Instructions 7 / English
Your Washer
Specifications
Specifications of this appliance may change without notice to improve the quality of the product. Figures in this guide are schematic and may not match your product exactly. Values stated on the washer labels or in the documentation accompanying it are obtained in laboratory in accordance with the relevant standards. Depending on operational and environmental conditions of the appliance, these values may vary.
Front Loading Automatic Washer
Models WM72200W
Height (in) / (cm) 33.1 / 84
Width (in) / (cm) 23.6 / 60
Depth (in) / (cm) 23.22 / 59
Net Weight (lbs) / (kg) 149.91 / 68
Electricity (V/Hz.) 120 / 60
Total Current (A) 10
Total Power (W) 1100
Water pressure (psi) / (bar) (15-145) / (1-10)
Drain height (ft.) / (m.) 4.9 / 1.5
Wash capacity (cu. Ft.) 1.94
Dry Load Capacity (lbs)/(kg) 15.43 / 7

8 / English Front-Loading Automatic Washer
2 Important Safety Instructions
B WARNING
• To reduce the risk of fire, electric shock or injury to persons while using your appliance follow basic safety precautions, including the following:
• Read all instructions before using the washer. • Do not wash articles that have been previously cleaned in, washed
in, soaked in, or spotted with gasoline, dry-cleaning solvents, or other flammable or explosive substances (acetone, alcohol, kerosene, some liquid household cleaners, some spot removers, turpentine, waxes and wax removers) as they give off vapors that could ignite or explode.
• Do not add gasoline, dry-cleaning solvents, or other flammable or explosive substances to the wash water. These substances give off vapors that could ignite or explode.
• Under certain conditions, hydrogen gas may be produced in a hot-water system that has not been used for 2 weeks or more. HYDROGEN GAS IS EXPLOSIVE. If the hot-water system has not been used for such a period, before using a washing machine, turn on all hot-water faucets and let the water flow from each for several minutes. This will release any accumulated hydrogen gas. As the gas is flammable, do not smoke or use an open flame this time.
• Do not allow children to play on or in the appliance. Close supervision of children is necessary when the appliance is used near children.
• Before the appliance is removed from service or discarded, remove the door and the power cord / main plug to prevent accidents.
• Do not reach into the appliance if the drum is moving. Wait until the drum has completely stopped before opening the door.
• Do not install or store this appliance where it will be exposed to the weather and direct sunlight.
• Do not tamper with controls.

Owner’s Guide & Installation Instructions 9 / English
Important Safety Instructions
• Do not repair or replace any part of the appliance or attempt any servicing unless specifically recommended in the user-maintenance instructions or in published user-repair instructions that you understand and have the skills to carry out.
• This appliance must only be used for the purpose of washing, rinsing and spinning machine-washable items using laundry additives that are suitable for use in washers . The appliance manufacturer cannot be held responsible for damage caused by improper or unintended use of the appliance.
• Only detergents, softeners and additives suitable for use in HE (High-efficiency) washers may be used. Always follow the instructions and information given by the laundry detergent manufacturers when using these products.
• Always follow the fabric care instructions of garment manufacturers.• Do not touch the door glass while washing at high temperatures.
Danger of burning! • Do not sit on top of the washer.• Do not climb onto the washer.• Destroy the shipping carton, plastic bag and other packing
materials after the washer is unpacked. Keep children away from these packing materials. Danger of suffocation from plastic sheets and cartons!
• Do not mix chlorine bleach with ammonia or acids such as vinegar and/or rust remover when washing. This mixture can produce hazardous fume which may cause death.
• Do not operate this appliance if it is damaged, malfunctioning, partially disassembled, or has missing or broken parts, including a damaged cord or plug.

10 / English Front-Loading Automatic Washer
Important Safety Instructions
• Store laundry detergents and additives in a cool, dry place out of children’s reach due to danger of chemical poisoning and skin irritation. Follow the manufacturers’ instructions when using laundry products.
• Do not machine wash fiberglass materials. Small particles can stick to fabrics washed in following cycles and may lead to skin irritation.
• Do not wash items stained with vegetable oil, cooking oil or petroleum. These items may contain some flammable oils after laundering and the fabric may smoke or catch fire by itself.
• Be sure to unplug the power cable before attempting maintenance or cleaning of your appliance to minimize the risk of electric shock. Always unplug the cable by grasping the plug, not the cord.
• Do not use wet hands when plugging/unplugging the power cable.• Check the water inlet and drain hose connections regularly for any
leakage. Hoses should be replaced every 5 years.• Do not leave the washer door open to prevent children hurt
themselves by hanging on the door or going inside the drum.• Be careful when the appliance is draining hot water. Danger of
burning!• At the end of a washing day, turn off the water faucets to prevent
any leakage that may occur due to a faulty condition of the appliance.
• Check the appliance and inlet hose connections for water leakage after each use. If there is leakage, turn off the appliance and water faucets and call service.
• Do not machine wash items having large or heavy metal parts such as buttons or buckles. These items could severely damage the appliance.
• Always be sure to empty all foreign materials from the pockets of your clothing as small items such as coins, pins etc. could severely damage the appliance.
• Do not install and operate the appliance in places exposed to temperatures below freezing. Frozen water may cause severe damage by bursting hoses and pump.
Owner’s Guide & Installation Instructions 11 / English
Important Safety Instructions
• Make sure that shipping bolts are removed before you operate the washer. If service is required as a result of not removing the bolts, it will not be covered by the warranty.
• Make sure that the wash drum is empty before you load the washer.• Do not store and use any flammable and combustible substances
such as lint, paper and chemicals near the appliance.• Always follow the manufacturer’s instructions when you are using
a descaling agent. Be sure that descaling agent contains rust-protective materials and rinse the washer a few times thoroughly after the descaling process (See, Descaling the washer).
• Install and operate the washer on a solid floor to prevent vibration or movement. It is not recommended to install and operate the washer on wooden floor or on a carpet.
• The rated voltage of your washer is 120V, so it should be directly connected to the wall power of 120V. (See, Installation Instructions for Grounding Instructions and Requirements).
• If an abnormal sound is heard during the washer operation, refer to the “Troubleshooting” of this guide.
• Call service for checking any possible damage or fault if the appliance is dropped or bumped.
• The end of drain hose should not contact the discharge water in any way as this might cause siphoning of water.
• Always leave the property after checking that the wash cycle is completed and the washer is turned off.
• Damaged or worn power cords and plugs must only be replaced by a Blomberg Service technician.
• Never use an extension cord or adapter to connect the appliance to the electrical power due to the risk of electric shock and/or fire.
• All broken and faulty components, panels and parts must only be replaced with original Blomberg spare parts by a Blomberg Service technician.
• Do not force the washer door open when it is locked. The door must be closed any time during the program cycle.

12 / English Front-Loading Automatic Washer
Important Safety Instructions
• Do not use fabric softeners or products to reduce static unless recommended by the manufacturers of the fabric softener product.
• Check the drain pump filter occasionally to remove coins, buttons and such small objects.
• Always drain off the water completely before cleaning the pump filter, before transporting the washer, when there is a danger of frost and when there is a power failure (For emergency draining, See User maintenance instructions).
• Always be sure that the washer has been properly installed by licensed personnel, water and electrical connections and grounding conform to all relevant codes and requirements.
• This manual does not cover every possible condition and situation that may occur. Use common sense and caution when installing, operating, and maintaining any appliance.
A WARNING
• This product can expose you to chemicals including Nickel (Metallic) which is known to the State of California to cause cancer.
• For more information go to www.P65Warnings.ca.gov• Note : Nickel is a component in all stainless steel and some other
metal components.SAVE THESE INSTRUCTIONS
Always follow the instructions on this user guide. If you aren’t sure how to perform them, please call Customer Service for assistance and scheduling service.

Owner’s Guide & Installation Instructions 13 / English
3 Installation InstructionsRead this first !This washer can be individually installed in free-standing and built-in installations. You can also install your washer with your dryer as a free-standing or built-in pair. Before you install your appliance, read the following instructions completely and carefully:• Save these instructions for future reference.• This appliance must be properly installed and grounded by qualified
and skilled technicians in accordance with all local codes and ordinances and the latest edition of the National Electrical Code, ANSI/NFPA 70.
• Proper installation of this appliance is the responsibility of the owner and failure due to improper installation is not covered by the warranty.
The Right Location of Installation
You can install your washer in a basement, closet or in a laundry room if the location has proper drainage, plumbing and power supply system. Always follow these instructions for installation:• Do not install or store this appliance where it will be exposed to
the weather, rain, damp places, water and direct sunlight. The ambient temperature must be higher than 60°F (15.6°C) for proper operation. Installation location must have the proper ventilation.
• Do not store and use any flammable and combustible substances such as lint, paper, curtains, gasoline, coal and liquid or vapor chemicals near the appliance.
• Install and operate the washer on a strong solid concrete floor to prevent vibration, noise or movement in case of load unbalance. The floor must have sufficient load carrying capacity and the washer must be leveled properly before the operation.

14 / English Front-Loading Automatic Washer
Installation Instructions
• It is not recommended to install and operate the washer on a wooden floor or soft floor. If you have to install your washer on a wooden or frame construction floor, the floor must be reinforced properly and the washer must be located in the corner of the room if possible.
• Never place your washer on a carpet. This prevents air circulation. The electrical components of the machine may overheat and cause damage.
• Do not stand appliance on the power cable.• Do not install and operate your washer in ambient temperatures
lower than 32˚F (0˚C). Controls may stop working properly in such condition.
• If there is danger of frost, drain all remaining water in pump and hoses since it may freeze and cause damage by bursting them (see “Cleaning the drain pump filter”).
Installation Clearances
C CAUTION
• The installation location must be large enough for the washer door to be fully opened for loading.
• The installation location must be large enough for ease of operation, maintenance and service.
• Ensure there is min 1/2” of clearance on each side of the washer to allow slight sideways movement during washing and spin drying.

Owner’s Guide & Installation Instructions 15 / English
Installation Instructions
Allowable Clearances for Undercounter Installation
The dimensions are for the recommended spacing. Counter depth should be 23.5-24.5”(60-62 cm).Custom undercounter installation – Washer only
Minimum counter width should be 50” (127 cm) for a pair of Blomberg washer & dryer.Custom undercounter installation – Washer & Dryer
50”(127 cm)

16 / English Front-Loading Automatic Washer
Installation Instructions
Allowable Clearances for Closet Installation
When installed in closet (washer only/washer dryer stacked) :Sides, Rear, Front 1/2 in. (1.27 cm), Top= 1 in. (2.54 cm)Closet door ventilation requirement: A louver having minimum 23 in2 (148 cm2) air opening located at 3 in (7.62 cm) from the bottom of closet door.
Stacked Installation
You can stack your Blomberg washer and dryer by using a special stacking kit. If necessary, consult your dealer or technical service for supplying the stack kit. In stacked closet installation, following configuration is necessary:A louver having minimum 23 in2 (148 cm2) air opening located at 3 in (7.62 cm) height from the bottom of closet door (for washer) & A louver of minimum 46 in2 (297 cm2) air opening located at 3 in (7.62 cm) distance from the top of closet door (for dryer).
Removing packaging reinforcement
Tilt the washer to remove the packaging reinforcement. Remove the packaging reinforcement by pulling the ribbon.
Owner’s Guide & Installation Instructions 17 / English
Installation Instructions
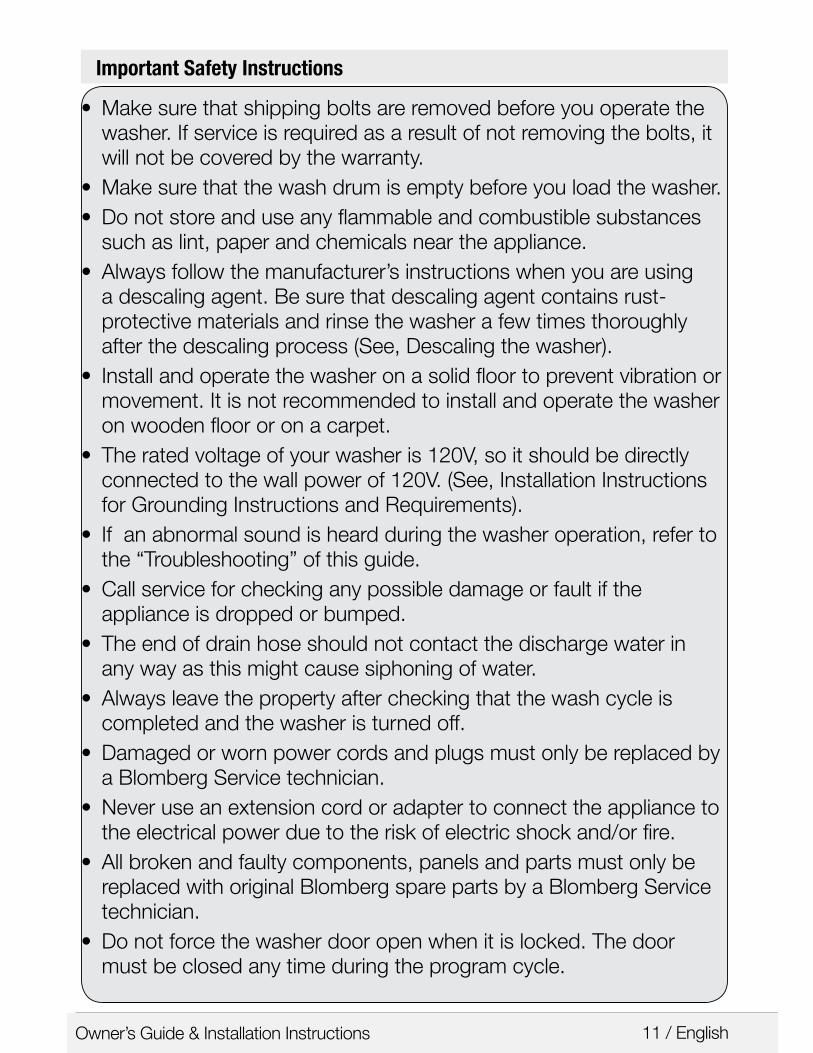
Removing shipping bolts
B WARNING
• Shipping bolts must be removed before operating the washer! Otherwise, the appliance will be damaged seriously!
1.Loosen all the bolts with a spanner wrench until they rotate freely.
2.Remove the shipping bolts by turning them gently.3.Bolt hole covers (supplied in the bag with the owner’s guide)
are fitted into the holes on the rear panel with a special lock mechanism. To fit the cover, first insert it into the hole and then rotate it counterclockwise with a screwdriver until it is locked. To unlock, apply the procedure in reverse.
C CAUTION
• Keep the shipping bolts in a safe place to reuse when the clothes washer needs to be moved again in the future.
• Never move the appliance without shipping bolts properly fixed in place!

18 / English Front-Loading Automatic Washer
Installation Instructions
Leveling the washer
B WARNING
• Do not use any tools to loosen the lock nuts. Otherwise, they can be damaged.
1.Manually (by hand) loosen the lock nuts on the feet.2.Adjust them until the washer stands level and firmly.3.Important: Tighten all lock nuts up again.
Electrical Connection
Grounding InstructionsThis appliance must be grounded. In the event of malfunction or breakdown, grounding will reduce the risk of electric shock by providing a path of least resistance for electric current. This appliance is equipped with a cord having an equipment-grounding conductor and a grounding plug. The plug must be plugged into an appropriate outlet that is properly installed and grounded in accordance with all local codes and ordinances and the latest edition of the National Electrical Code, ANSI/NFPA 70.

Owner’s Guide & Installation Instructions 19 / English
Installation Instructions
B WARNING
• Improper connection of the equipment-grounding conductor can result in a risk of electric shock. Check with a qualified electrician or serviceman if you are in doubt as to whether the appliance is properly grounded.
• Do not modify the plug provided with the appliance – if it will not fit the outlet, have a proper outlet installed by a qualified electrician.
• Be sure that the power cord is always accessible by the user after the appliance is installed.
• Never use an extension cord or adapter to connect the appliance to the electrical power due to the risk of electric shock and/or fire.
• It is the personal responsibility and obligation of the appliance owner to provide a proper and grounded outlet installed by a qualified electrician.
• Never use a damaged power cord since there is a risk of electric shock and/or fire.
• The damaged power cord must be replaced by a qualified electrician as soon as possible.
• Do not use wet hands when plugging/unplugging the power cable.
• Electrical supply voltage must conform to the voltage specifications (120V, 60Hz) located on the appliance.
• Only one appliance must be connected to a properly grounded individual branch circuit outlet.
• Be sure to unplug the power cable before attempting maintenance or cleaning of your appliance to minimize the risk of electric shock. Always unplug the cable by grasping the plug, not the cord.
• Do not use wet hands when plugging/unplugging the power cable.

20 / English Front-Loading Automatic Washer
Installation Instructions
Power supply and circuit
Connect the clothes washer to an earthed outlet protected by a fuse of suitable capacity.Important:• Wall power connection should comply with national regulations.• The wiring for the electrical outlet circuit must be sufficient to meet
the appliance requirements. Use of a Groud Fault Circuit Interrupter (GFCI) is recommended.
• The voltage and maximum total current are specified in the section “Specifications”.
• The appliance must be connected to the wall power. • Connection via extension cords or multi-plugs should not be made.
B WARNING
• A damaged power cable must be replaced by a qualified electrician.
• The appliance must not be operated unless it is repaired! There is the risk of electric shock!
10 Amp. Fuse or circuit breaker, 120 volt, 60 Hz, grounded, alternating current

Owner’s Guide & Installation Instructions 21 / English
Installation Instructions
Water Supply Connection
Your washer comes with both cold and hot water connections. Connect the blue marked cold water supply hose to the cold water inlet valve/faucet and the red marked hot water intake hose to the hot water inlet valve/faucet. Screw the connecting bolts by hand and tighten the connection properly using a plier. Over tightening may cause damage on bolted connection.
B WARNING
• Be sure that the water connection of this washer is handled by a qualified service technician or a plumber.
The washer has two bolted ½’’ water supply hoses and ¾’’ female hose connections that can be connected to ¾’’ hot and cold water faucets.
B WARNING
• Be sure that there are rubber seals located on the hose connections. These seals and adjustable bolts ensure a safe connection without leaking. After the water connection is done, turn on both water faucets slowly and completely to check any water leaks.
• Be sure that water supply hoses are not crushed and they have no kinking, bulges or cuts before the water connection.

22 / English Front-Loading Automatic Washer
Installation Instructions
The water pressure must be between 15-145 psi (1-10 bar) for the proper operation of this washer. 1 bar corresponds to more than 2.1 gallons (8 liters) per minute flow rate with a fully open faucet. Water inlet hoses and valves should withstand a water pressure of 145 psi (10 bar) at maximum. If the pressure is higher than 145 psi, a pressure-reducing valve must be installed before the water inlet. If the water pressure is lower than 15 psi (1 bar), water fill time may extend or water inlet valve may shut off completely.• Hot water supply temperature must not exceed 140˚F (60˚C). (Ideally
120˚F (48˚C))• Do not connect the washer to an unpressurized water boiler since
water pressure may not be adequate for proper operation.• Do not remove the filters located on the water supply hoses (on
faucet/hose and hose/inlet valve connections).• Always use genuine “Blomberg” water supply hoses when
connecting with this washer. Old or worn-out hoses must not be reused. It is not advised to extend inlet or drain hoses, if necessary consult your dealer or technical service about hose extensions.
• Hot and cold water faucets must always be easily accessible to the user.
• At the end of a washing day, turn off water faucets to prevent any leakage or water damage that may occur due to a faulty condition of the appliance.
• Check the appliance and inlet hose connections for water leakage after each use. If there is leakage, turn off the appliance and water faucets and call service.
• Check the water inlet and drain hose connections regularly for any leakage. Hoses should be replaced every 5 years.
• If there is no hot water supply, hot water valve must be connected to a cold water faucet nevertheless. Both water valves should be connected to water supply for proper operation of your washer.

Owner’s Guide & Installation Instructions 23 / English
Installation Instructions
Drainage
B WARNING
• Drain hose should not be bent. Be sure that there are no kinks or cuts on it.
• Drain hose outlet must not contact the drained water.
Drain hose may be connected into a sink, into the drain of a sink, to a standpipe and floor drain.• When connecting into a sink, the drain hose should be placed at the
edge of the sink and secured with the hose guide supplied by the manufacturer. Additionally, the guided hose may be tied to the water faucet with a strap for extra security.
• Drain hose may be connected into the drain of a sink . Be sure that the connection is safe and not leaking. An additional clip etc can be used for safe connection.
• Drain hose may also be connected to a minimum 1.26 in (32 mm) diameter stand pipe.
• Be sure to secure the drain hose tightly to the pipe (stand pipe, drain pipe/edge of the sink) with a strap etc.
• The hose should be placed between 16 and 39 in. (40 and 100 cm) from the floor level
• If you have floor drain system, you can place the drain hose in the hole located on the floor.

24 / English Front-Loading Automatic Washer
Installation Instructions
Installation Checklist
• Water inlet hoses and accessory bags must be removed from the wash drum.
• Transportation/shipping bolts must be removed.• Washer must be properly leveled by using the adjustable feet.• Water inlet hoses are connected to the water faucets, secured and
checked for any leaks by turning on both faucets.• Drain installation is done properly and drain hose is checked and
secured to prevent any flooding.• Washer is connected to a properly grounded live wall power outlet.• Be sure that power outlet, water faucets and drain outlet must be
always accessible to the user.
Transportation
Before you transport the washer, you should carry out the following:1.Turn off both water faucets.2.Before you disconnect the water inlet hoses, decrease the pressure
inside hoses by turning on the washer choosing any wash program. As soon as the Start/Pause/Cancel led starts blinking, turn off the appliance. You may securely disconnect inlet hoses without any water gush.
3.Disconnect the drain hose and hang it on the back plate by inserting into the holder plastic brackets.
4.Unplug the power cord and hang it on the back plate by inserting into the holder plastic brackets.
5.Remove bolt hole covers and reinstall shipping bolts to their places. You can apply the procedure in chapter “Removing shipping bolts” in reverse to accomplish this.
6.Be sure that rubber bushes are properly located in holes and bolts are screwed back tightly for secure transportation of the appliance.

Owner’s Guide & Installation Instructions 25 / English
Installation Instructions
Disposal Information
Packing Disposal
A WARNING
• Packing materials of the appliance are potentially dangerous for children. Materials such as plastic bags, films or wrappings must be kept away from children or disposed properly to prevent the danger of suffocation.
C CAUTION
• Packing materials are made of biodegradable and recyclable substances. You should consult your local authority or dealer about the environmental-friendly disposal of the packaging of your appliance.
Appliance Disposal
A WARNING
• Be sure to unplug the power cable, cut off the plug and disable the door lock before you dispose your old appliance. Otherwise there is a risk of injury for children and pets.
C CAUTION
• Old appliances contain many recyclable parts. You should consult your local environmental authority about a proper disposal. A proper disposal enables recycling therefore protects the environment.

26 / English Front-Loading Automatic Washer
4 Operating InstructionsFirst Use
A WARNING
• To reduce the risk of fire, electric shock, or injury to persons, read the IMPORTANT SAFETY INSTRUCTIONS before operating this appliance.
Before the first use,• Be sure that the washer is installed properly by a qualified installer
or service technician in accordance with all national and local codes and requirements.
• Read all instructions carefully before using the washer.• Check that shipping bolts are completely removed.• Be sure that the location of installation has proper electrical supply
voltage (120V 60Hz) and plumbing system needed for the operation of the appliance.
• Turn on both water faucets and be sure that there are no leaks on hose-faucet connection points or on hoses themselves.
• Check that the wash drum is empty.• Turn on the washer, choose “"Tub Sanitize"” cycle on the program
selector knob and start the washer as empty and without any laundry additives. When the cycle is finished, your washer is ready for subsequent uses.
Owner’s Guide & Installation Instructions 27 / English
Operating Instructions
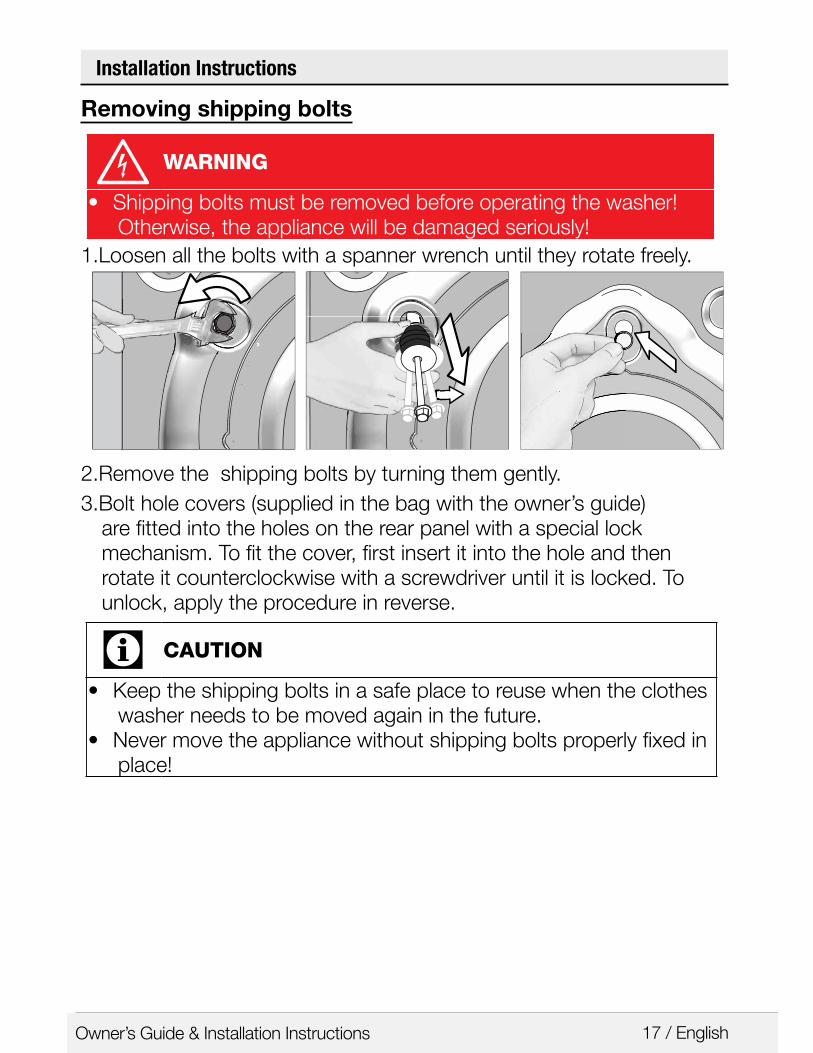
A WARNING
• Be sure that siiica gel package, which is located inside the drum, has been removed from the washer before the first use. Granules in this package do not contain poisonous or harmful materials. It is not a detergent and it is not adible. Do not swallow. Do not use for any purpose. Throw into the recycle bin together with this package before the first usage of the washing machine.
Laundry Tips
Sorting the laundry
C CAUTION
• Always follow the fabric care instructions of garment manufacturers. These instructions would give you proper guidance on suitable wash cycles, wash temperatures and bleach usage.

28 / English Front-Loading Automatic Washer
Operating Instructions
C CAUTION
• Wash the items which are care labeled as “machine-washable”. Do not machine wash items that are having symbol on fabric care label.
• Sort the laundry according to the following fabric types, color groups and wash them separately:
• White and color fast fabrics• Non-fast, colored fabrics• Permanent press items(mens shirt, dress pants, poly-cotton blends)• Delicate fabrics (silk, rayon etc.)• Woolens (only wash woolens that are labeled “machine washable”
or “hand washable”• Hand knits (They should be placed inside out in the washer)
C CAUTION
• Do not wash dark colors with light colors and whites. Color items may bleed and white and light colored items may be discolored. Avoid extended contact of damp clothes before or after washing to prevent dye transfer.
• Wash heavily and lightly soiled items separately. • Lint producers (towels, linen etc) and lint collectors (easy care,
permanent press) should be washed separately. Lint producers should be washed inside-out.
Preparing the laundry
• Items of laundry with metal parts (e.g. underwire bras, belt buckles, metal buttons) will damage the washer. Remove metal parts of place the items in a cloth bag, pillow case, or something similar.
• Remove any non-washable items and accessories from laundry before washing.
• Empty pockets, remove all foreign objects (e.g. coins, pens, paper clips). If possible: Turn pockets inside out and brush.

Owner’s Guide & Installation Instructions 29 / English
Operating Instructions
• Place small items of laundry (e.g. tights) in a cloth bag, pillow case or something similar. This can also help you to avoid searching for lost socks.
• Handle curtains special care. Remove non-stainless curtain runners and lead tape. Place runners that can’t be removed in a cloth bag, pillow case or something similar.
• Heavy stains should be pretreated with soapy water appropriately before washing (Do not rub or scratch the stained area). If in doubt, check with a pharmacist or dry-cleaner.
• Use only dyes/discoloring and anti-scaling agents suitable for machine wash. Make sure to follow the instructions on the package.
Loading the washer
Maximum load capacity depends on the fabric type of laundry, soiling amount of laundry and program cycle you wish to use.
C CAUTION
• Do not exceed the maximum load capacity of the selected program cycle. Washing results are adversely affected by an overloaded drum. Overloading may also cause wrinkling and abrasion on clothes.
Make sure power button is off before loading the washer. To load the washer,• Pull the door handle.• Place laundry items loosely in the drum.• Mix small and large items for an even load distribution. Large items
should be loaded first. Large items should not be more than half of the total wash load.
• If you put a wash bag or net which is filled with small items in the drum, put an additional wash bag to prevent load unbalance. Both wash bags should have the same amount of items to provide an even load distribution.

30 / English Front-Loading Automatic Washer
Operating Instructions
• Before washing a single or a few items such as a pillow, a teddy bear, a single or a pair of shirts, sweat shirts etc, put some additional items in the drum for better load distribution and spinning.
• Make sure that there is no clothing obstructing the door or caught between the door and rubber seal.
• Push the loading door firmly and make sure that the door has been closed properly (especially if you load the washer with full load or big items).
• In case the door is not locked, door led remains off. In that case, door should be opened and closed again firmly until the door led lights up.
• If the door is not closed completely, the machine will not start. This is a safety precaution. The front door is locked until end of the washing program and it can not be opened untill the door led on the panel is off following the end of the program.
• Unload the washed items just after the program cycle has finished. Delay of unloading may cause wrinkling and unwanted odor on laundry.
• Check to see any small metal items such as pins, coins etc left in rubber seal while unloading the washer. Any residual metal items may cause rusting on the rubber seal.
• If there is any water left in rubber seal, remove with a soft cloth.
Detergent Use
About Detergent
C CAUTION
• Your washer is designed to use only HE (high efficiency) detergents. You should always look for the following symbol on the label of detergents:
If you use a non-HE detergent with this washer, high sudsing will occur. High sudsing will decrease tumble action effectiveness, washing and rinsing performance worsen. Suds may flow out of detergent dispenser giving damage to your washer.

Owner’s Guide & Installation Instructions 31 / English
Operating Instructions
C CAUTION
• The detergents labeled as “HE compatible” may also lead to high sudsing and inefficient tumble action. Don’t use such detergents.
Always follow the instructions and information given by laundry detergent manufacturers when using these products.
A WARNING
• Store laundry detergents and additives in a cool, dry place out of children’s reach due to danger of chemical poisoning and skin irritation.
Detergent Quantity
The amount of washing detergent to use depends on the amount of laundry, the degree of soiling and water hardness.For small amounts of laundry or only slight soiling use accordingly less detergent.Too much detergent causes an excessive amount of foaming, bad washing and rinsing results and a strain on water resources.Too little washing detergent causes laundry to turn grey and calcification of the machine. Recommended amount of powder detergent is max. 1/3 cup (80 ml). Recommended amount of liquid detergent is max. 1/4 cup (60 ml).

32 / English Front-Loading Automatic Washer
Operating Instructions
Light soilingNo visible stains or soiling Normal soilingA few visible light stains or soilingHeavy soilingHighly visible stains or soiling
Detergent Dispenser
Detergent dispenser of your washer has three separate compartments for main wash detergent, fabric softener and liquid bleach. Each of these laundry additives are automatically dispensed at appropriate time during wash program.
C CAUTION
• Do not put laundry additives directly in the wash drum. Always use the detergent dispenser.
• After adding laundry additives do not close the drawer too quickly. This may cause early dispensing of the additives thus poor wash results and fabric damage.
• Do not open the drawer during wash program (except for addition of liquid main wash detergent at the beginning of main wash water intake).
Dispenser compartments are as follows:-left compartment numbered as “II” (main wash compartment) -middle compartment marked as “ ” (liquid fabric softener compartment)-right compartment numbered as “I” (liquid chlorine bleach compartment)

Owner’s Guide & Installation Instructions 33 / English
Operating Instructions
(II) Main Wash Detergent Compartment
Add HE (High efficiency) powder detergent to this compartment numbered as “II” before starting the wash program. Use the detergent manufacturer’s dosing cup and follow the instructions on the package.If you use a liquid detergent, be sure to use a HE (High efficiency) detergent and add detergent directly to main wash compartment before operating your washer. If you observe liquid detergent stains on washed items, it is recommended for subsequent wash cycles that you should add liquid detergent during first water intake.
Color-safe bleach in powder or liquid form may be added into main wash detergent compartment with main wash detergent. Be sure to use main wash detergent and color-safe bleach in same form (either powder or liquid) when adding into main wash compartment.

34 / English Front-Loading Automatic Washer
Operating Instructions
Liquid Fabric Softener Compartment
Add the recommended amount of liquid fabric softener to the middle compartment marked as “” and dilute it with warm water to the maximum fill line.
C CAUTION
• Especially concentrated fabric softeners must be diluted with warm water otherwise siphon may be clogged in time.
Do not fill the fabric softener above the maximum fill line as any excess amount will mix into the wash water and you will have to re-fill the compartment. Do not pour the softener directly onto laundry, it may cause stains.Liquid fabric softener is automatically dispensed during the final rinse of wash program.
Using liquid detergents
If the product contains a liquid detergent cup:• Make sure that you have placed the liquid detergent cup in
compartment no. “2”.• If the liquid detergent has lost its fluidity, dilute it with water before
putting in the detergent cup.
If the product does not contain a liquid detergent cup:• Do not use liquid detergent for the prewash in a program with
prewash.• Liquid detergent stains your clothes when used with Delayed Start
function. If you are going to use the Delayed Start function, do not use liquid detergent.

Owner’s Guide & Installation Instructions 35 / English
Operating Instructions
(I) Liquid Chlorine Bleach Compartment
Add liquid chlorine bleach to the right compartment numbered as “I”. Measure 1/3 cup (80 ml) of bleach and pour it into the special container located in the right compartment of the dispenser. This container ensures dispensing and dilution of bleach during the first rinse of wash cycle. There is a maximum fill line on the container. Do not exceed the maximum fill line to prevent early dispensing. Early dispensing may damage your clothes.
C CAUTION
• Be sure that bleach container is present in the right compartment of dispenser before you add liquid bleaching agent. You may remove bleach container if you would not use bleach. However do not put any other laundry additives to the empty compartment.
• Be sure to choose extra rinse option if you are using bleach in wash program. Bleach must be rinsed from laundry properly otherwise it may cause skin irritation.
Bleach is automatically dispensed and diluted during the first rinse of wash program.
A WARNING
• Don’t use bleach with delicates, hand washables or wools, it will lead to clothes damage.
• The liquid bleach cup insert must be removed if not using liquid bleach to avoid water leaking from the dispenser.
Water Consumption
Your clothes washer automatically adjusts the water consumption according to load amount. This feature ensures high wash performance results with efficient water and energy consumption.

36 / English Front-Loading Automatic Washer
5 Selecting a Program and Operating Your WasherControl panel
1 - Program selection knob (Uppermost position On / Off)2 - Duration information display3 - End Time Setting button4 - Program Follow-up indicator lights5 - Start / Pause button6 - Auxiliary function buttons7 - Spin speed adjustment button8 - Temperature adjustment button
1 2 3
4
5678

Owner’s Guide & Installation Instructions 37 / English
Selecting a Program and Operating Your Washer
Programs
• Heavy Duty Use to wash your heavily soiled, durable cotton and linen laundry. Heavy Soil option is automatically selected for a perfect cleansing. Heavy Soil option prolongs heating step.• Cottons / NormalYou can wash your durable white and colorfast items with this cycle. Washes with vigorous tumbling movements. It is recommended for your cotton or linen items (such as bed sheets, pillowcases,jeans,towels, bathrobes,garments, T-shirts,sweat-shirts , etc.). You can select wash temperature according to care label of items.• Perm PressYou can wash your easy care items on this cycle. Washes with gentler tumbling movements and in shorter washing cycles. It is recommended for your cotton,synthetic or blended items (such as shirts, pants, wrinkle-free items, etc.). You can select wash temperature according to care label of items.• Hand Wash / WoolYou can wash your machine-washable wool items on this program. It is recommended to use appropriate detergents and laundry additives for wools.

38 / English Front-Loading Automatic Washer
Selecting a Program and Operating Your Washer
• AllergenApplying a steam step at the beginning of the programme allows to soften the dirt easily.Use this programme for your laundry (baby clothes, bed sheets, bedlinen, underwear, etc. cotton items) that requires an anti-allergic and hygienic washing at high temperature with intensive and long washing cycle. The high level of hygiene is ensured thanks to the steam application before the programme, long heating duration and additional rinsing step.• Spin&Drain This program is used to discharge the water and spin dry the load with selected spin speed.Spin&Drain may be selected as one program in this model.• RinseThis cycle is used when you want to rinse separately.• Organic Wash You can use organic detergent to wash your durable white and colorfast items with this cycle. Washes with vigorous tumbling movements in a longer washing cycle to give a superior washing performance with organic detergents.• Quick WashUse to wash your lightly soiled and unstained cotton laundry quickly.• Delicates & DarkYou can wash your delicate easy-care and dark coloured items on this program. It has more sensitive tumbling movements. and does not do intermediate spinning compared to the permanent program. It must be used for cotton, synthetic or blended clothes for which sensitive washing is recommended.• Sports Wear You can use this programme to wash sports and outdoors garments that contain cotton/synthetics mix and water repellent covers such as gore-tex etc. It makes sure your garments are washed gently thanks to special rotating movements.

Owner’s Guide & Installation Instructions 39 / English
Selecting a Program and Operating Your Washer
• Mixed FabricUse to wash your cotton and synthetic clothes together without sorting them.• Cool CleanUse to wash your moderately soiled and durable cotton/synthetic laundry. An effective and energy efficient washing is provided thanks to the intense washing action.• Down Wear Use this programme to wash your coats, vest, jackets etc. containing feathers with a “machine-washable” label on them. Thanks to special spinning profiles, it is ensured that the water reaches the air gaps amongst the feathers.
• Tub SanitizeUse regularly (once in every 1-2 months) to clean the drum and provide the required hygiene. Steam is applied before the programme to soften the residues in the drum. Operate the programme while the machine is completely empty. To obtain better results, put powder lime-scale remover for washing machines into the detergent compartment no. „2“. When the programme is over, leave the loading door ajar so that the inside of the machine gets dry.
C CAUTION
• This is not a washing programme. It is a maintenance programme.
• Do not run the programme when there is something in the machine. If you try to do so, the machine detects that there is a load inside and aborts the programme.

40 / English Front-Loading Automatic Washer
Selecting a Program and Operating Your Washer
Program selection
1 Determine the program suitable for the type, quantity and soiling level of the laundry in accordance with the “Program and consumption table”.
C CAUTION
• Programmes are limited with the highest spin speed appropriate for that particular type of fabric.
• When selecting a programme, always consider the type of fabric, colour, degree of soiling and permissible water temperature. Always select the relevant lowest required temperature.
• A higher temperature means higher power consumption.2 Select the desired program with the Program Selection knob.

Owner’s Guide & Installation Instructions 41 / English
Program and consumption table
Program and consumption table
• : Selectable* : Automatically selected, not cancellable.- : See program description for maximum load.
Defa
ult D
urat
ion
Was
h Cy
cle
Heav
y So
il
Soa
k
Extra
Rin
se
AntiW
rinkl
e+
Wat
er
Inta
ke
"Wash Water Temperature
°F / °C"
"Max Spin Speed (rpm)"
Load
Cap
acity
Cottons/
Normal00:43
Extra Hot
• • - -
Hot-cold 167/75
Extra High Full
Hot Hot-cold 86/30
Warm Hot-cold 81/27
Cold Hot-cold 77/25
Tap Cold Cold 60/15
Heavy Duty 03:07
Extra Hot
* - - •
Hot-cold 167/75
Extra High Full
Hot Hot-cold 118/48
Warm Hot-cold 104/40
Cold Hot-cold 86/30
Tap Cold Cold 60/15
Organic
Wash03:05
Hot
- * - -
Hot-cold 153/67
Extra High 1/2Warm Hot-cold 111/44
Cold Hot-cold 86/30
Allergen 03:44
Extra Hot
- - * •
Hot-cold 167/75
Extra High FullHot Hot-cold 153/67
Warm Hot-cold 104/40
Cold Hot-cold 86/30

42 / English Front-Loading Automatic Washer
Program and consumption table
• : Selectable* : Automatically selected, not cancellable.- : See program description for maximum load.
Defa
ult D
urat
ion
Was
h Cy
cle
Heav
y So
il
Soa
k
Extra
Rin
se
AntiW
rinkl
e+
Wat
er
Inta
ke
"Wash Water Temperature
°F / °C"
"Max Spin Speed (rpm)"
Load
Cap
acity
Perm Press 01:29
Hot
- • • •
Hot-cold 140/60
Extra High 1/2Warm Hot-cold 110/43
Cold Hot-cold 86/30
Tap Cold Cold 60/15
Sports
Wear01:15
Warm
- - - -
Hot-cold 95/35
Extra High 1/2Cold Hot-cold 86/30
Tap Cold Cold 60/15
Mixed
Fabric01:30
Warm
- • - •
Hot-cold 110/43
Medium 1/2Cold Hot-cold 86/30
Tap Cold Cold 60/15
Delicates /
Dark01:20
Warm
- - - -
Hot-cold 104/40
Medium 1/2Cold Hot-cold 86/30
Tap Cold Cold 60/15
Hand Wash
/ Wool01:02
Warm
- - • -
Hot-cold 104/40
Extra High 1/4Cold Hot-cold 86/30
Tap Cold Cold 60/15
Down Wear 01:38
Hot
- • • -
Hot-cold 140/60
High 1/4Warm Hot-cold 104/40
Cold Hot-cold 86/30
Tap Cold Cold 60/15

Owner’s Guide & Installation Instructions 43 / English
Program and consumption table
Defa
ult D
urat
ion
Was
h Cy
cle
Heav
y So
il
Soa
k
Extra
Rin
se
AntiW
rinkl
e+
Wat
er
Inta
ke
"Wash Water Temperature
°F / °C"
"Max Spin Speed (rpm)"
Load
Cap
acity
Tub sanitize 02:48Extra Hot
90
- - - -Hot-cold 167/75 Low
-
Quick
Wash00:35
Extra Hot
- - • •
Hot-cold 167/75
Extra High Full
Hot Hot-cold 140/60
Warm Hot-cold 104/40
Cold Hot-cold 86/30
Tap Cold Cold 60/15
CoolClean 02:00Cold
- - - •Hot-cold 86/30
Extra High 1/2Tap Cold Cold 60/15
• : Selectable* : Automatically selected, not cancellable.- : See program description for maximum load.

44 / English Front-Loading Automatic Washer
Selecting a Program and Operating Your Washer
Temperature selection
Whenever a new programme is selected, the recommended temperature level for the selected programme appears on the temperature indicator.
C CAUTION
• If the programme has not reached the heating step, you can change the temperature without switching the product to Pause mode.
To decrease the temperature, press the Temperature Adjustment button. Temperature will decrease gradually.

Owner’s Guide & Installation Instructions 45 / English
Selecting a Program and Operating Your Washer
Spin speed selection
Whenever a new programme is selected, the recommended spin speed level of the selected programme is displayed on the spin speed indicator.
C CAUTION
• If the programme has not reached the spinning step, you can change the spinning speed without switching the product to Pause mode.
To decrease the spin speed, press the Spin Speed Adjustment button. Spin speed decreases gradually.
Then, depending on the model of the product, “Rinse Hold” and “No Spin” options appear on the display.

46 / English Front-Loading Automatic Washer
Selecting a Program and Operating Your Washer
Auxiliary function selection
Select the desired auxiliary functions before starting the programme. The chosen auxiliary function indicator will light up.
Furthermore, you may also select or cancel auxiliary functions that are suitable to the running programme without pressing the Start / Pause button when the machine is operating. For this, the machine must be in a step before the auxiliary function you are going to select or cancel.If the auxiliary function cannot be selected or canceled, light of the relevant auxiliary function will blink 3 times to warn the user.
C CAUTION
• If a second auxiliary function conflicting with the first one is selected before starting the machine, the function selected first will be canceled and the second auxiliary function selection will remain active.
• An auxiliary function that is not compatible with the programme cannot be selected. (See, “Programme and consumption table”)
• Auxiliary Function buttons may vary according to the model of the machine.

Owner’s Guide & Installation Instructions 47 / English
Selecting a Program and Operating Your Washer
Auxiliary functions• Heavy SoilThis function increases washing times for heavily soiled items for better wash results.• Extra RinseWhen this function is selected, you can increase the number of current rinsing steps. Thus, sensitive skins’ risk of being affected by the remaining detergent on the clothes will be decreased.• SoakThis function is used for heavily soiled items when you want to pre-treat them before washing. Laundry is soaked in a relatively high amount of warm water. You can use full load and HE “High efficiency” detergent for soaking. Use 1/3-1/2 of the recommended detergent dosage for the load amount to be soaked.
Functions/Programmes Selected by Pressing the Function Buttons for 3 Seconds• AntiWrinkle+
This function is selected when the 1rd auxiliary function is pressed and held for 3 seconds and the programme follow-up light for the relevant step turns on. When the function is selected, the drum rotates for up to 8 hours for preventing the laundry from creasing at the end of the programme. You can cancel the programme and take your laundry out at any time during the 8-hour duration. Press the function selection key or the machine on/off key to cancel the function. The programme follow-up light will remain on until the function is canceled or the step is complete. If the function is not cancelled, it will be active in the subsequent washing cycles as well.

48 / English Front-Loading Automatic Washer
Selecting a Program and Operating Your Washer
End Time
With the End Time function, the endup of the programme may be delayed up to 19 hours. After pressing the End Time button, the program’s estimated ending time is displayed.
19
1 Open the loading door, place the laundry inside and add detergent, etc.
2 Select the washing programme, temperature, spin speed and, if required, the auxiliary functions.
3 Set the end time of your choice by pressing the End Time button.4 Press Start / Pause button. The delayed start time you have set is
displayed. Delayed start countdown starts. “_” symbol next to the delayed start time moves up and down on the display.
C CAUTION
• Additional laundry may be loaded during the delayed start period.5 At the end of the countdown, duration of the selected programme will
be displayed. “_” will disappear and the selected programme will start.Adjusting the end timeIf you want to cancel the End Time function, turn the Programme Selection knob to any programme.
C CAUTION
• Additional laundry may be loaded to the product during the End Time countdown period. At the end of the countdown, the washing cycle starts and the time of the selected program appears on the display.

Owner’s Guide & Installation Instructions 49 / English
Selecting a Program and Operating Your Washer
C CAUTION
• When the End Time selection is completed, the time that appears on the screen is the total of the end time chosen with the duration of the selected program.
• Do not use liquid detergents when you activate the End Time function! There is a risk of staining the clothes.
Changing the selections after program has started
After the programme has started you can make the following changes.Switching the product to pause modePress the Start/Pause button to switch the machine to pause mode while a programme is running. The light of the step which the machine is in and Start/Pause starts flashing in the Program Follow-up indicator to show that the machine has been switched to the pause mode. Also the ready light blinks until the door is ready to be opened. When the loading door is ready to be opened, the ready light will turn off; the program step light and the Start / Pause light will continue to flash. Changing the auxiliary function, speed and temperatureDepending on the step the programme has reached, you can cancel or select the auxiliary functions. See “Auxiliary function selection”. Also you can change the temperature and make cycle adjustments. See “Temperature selection” and “ Spin speed selection”.
C CAUTION
• If no change is allowed, the relevant light will flash 3 times.

50 / English Front-Loading Automatic Washer
Selecting a Program and Operating Your Washer
Child Lock
Use the Child Lock function to prevent children from tampering with the product. You can also avoid any changes being made in a running program.
C CAUTION
• You can switch the product on and off with the On / Off button when the Child Lock is active. When you switch on the product again, the program will resume from where it has stopped.
To activate the Child Lock:Press and hold the 2nd auxiliary function button for 3 seconds. In the program selection display on the panel, the “C03-C02-C01 C On” light will turn on. When this light is on you can stop pressing on 2nd the Auxiliary Function button .
C O
To deactivate the child lock:Press and hold the Auxiliary Function button 2 for 3 seconds. In the program selection display on the panel, the “C03-C02-C01 C OF” light will turn on.
C O
C OF

Owner’s Guide & Installation Instructions 51 / English
6 Preparation1. Turn on both hot and cold water faucets fully. Check and be sure
the water connection is tight.2. Place the laundry in the drum.
3. Add laundry additives (e.g. detergent, fabric softener,bleach).
Starting the program
1. Close the door2. Press the Start / Pause button to start the program.3. The program follow-up light showing the startup of the program will
turn on.4. The door locks and the door led will light up.5. The led of the relevant step (prewash, main wash, rinse, softener
and spin) that the program has started from will light up.
C CAUTION
• Before pressing the Start / Pause button please ensure that the front door has been closed properly. Otherwise Start / Pause button should be pressed again to start the program
• If no program is started or no key is pressed within 10 minutes during the program selection process. The display and the program follower indicators will turn off.
Door locking system
There is a locking system on the loading door of the product that prevents the door from opening in cases when the water level is unsuitable.The ready light in the panel turns on when the loading door is locked.

52 / English Front-Loading Automatic Washer
Preparation
Adding or taking out laundry
This is only possible under the following conditions:• During time delay,
C CAUTION
• Washer allows adding more laundry during a future step only if the water level is low enough to open the loading door or if the temperature in the washer is low
1. Press the Start / Pause button to switch the product to pause mode. The programme follow-up light of the relevant step during which the machine was switched into the pause mode will flash.
2. Wait until the Loading Door can be opened if the water level is low enough.
3. Open the Loading Door and add or take out the laundry.4. Close the Loading Door.5. Make changes in auxiliary functions, temperature and speed
settings if necessary. 6. Press the Start / Pause button to then restart the product.
Cancelling the program
To cancel the programme, turn the Programme Selection knob to select another programme. Previous programme will be cancelled. End / Cancel light will flash continuously to notify that the programme has been canceled.

Owner’s Guide & Installation Instructions 53 / English
Preparation
Your machine will end the programme when you turn the Programme Selection knob; however, it does not drain the water inside. When you select and start a new programme.
C CAUTION
• Depending on the step where the programme was canceled in, you may have to put detergent and softener again for the programme you have selected anew.
• If you want to open the loading door after you have cancelled the program but it is not possible to open the loading door since the water level in the product is above the loading door opening, turn the Program Selection knob to the Pump+Spin program and discharge the water in the product.
Re-spinning the laundry
If you want to re-spin the clothes:1. Rearrange the previously placed clothes in the drum.2. Select the spin program.3. Adjust the spin speed.
End of program
“End” warning appears on the display when the program is completed.
If you do not press any button for 10 minutes, The display and the program follower indicators will turn off.

54 / English Front-Loading Automatic Washer
Preparation
Energy saving mode
After you switch on your machine with program selection knob, if no programme is started or no other procedure is performed at the selection step or no action is taken within approx. 10 minutes after the selected programme ends, your machine will switch to energy saving mode automatically and the display and program follower indicators will be completely turned off. If you turn the Programme Selection knob or touch any button, lights and display will switch back to previous condition. The selections which you make when exiting from the energy efficiency may change. Please check the correctness of your selections before starting the programme. If necessary, please make your settings again. This is not an error.
C CAUTION
• This is a feature of this product, and not an error.

Owner’s Guide & Installation Instructions 55 / English
7 User maintenance instructions
A WARNING
• Be sure to unplug the power cable before attempting maintenance or cleaning of your appliance to minimize the risk of electric shock.
Cleaning detergent dispenser
Remove any powder/liquid residue buildup in the dispenser drawer. To do this;
1. Press the dotted point on the siphon of the softener compartment and pull towards yourself until the it is removed from the dispenser.
C CAUTION
• If more than a normal amount of water and softener/bleach mixture starts to gather in the dispenser compartments, dispenser must be cleaned.
2. Wash the dispenser drawer, liquid chlorine bleach container and siphon of softener under running warm water in a sink etc. Wear protective gloves or use an appropriate brush or sponge to avoid touching the detergent residues in the drawer when cleaning.
3. Replace the drawer into its housing after cleaning. Check if the siphon and container are in their original locations.

56 / English Front-Loading Automatic Washer
User maintenance instructions
Cleaning the door seal
Be sure to check the rubber door seal after unloading your washer. Pull the seal back to search for any foreign objects. Residual metal objects such as pins and coins may form rust stains on rubber seal, and cause the seal to leak.Wipe the stained areas with soapy water using a damp cloth. Then wipe with a dry cloth properly. Do not use an abrasive scrubbing agent when cleaning rubber seal.
Cleaning the drum
Check the wash drum for any foreign objects after unloading your washer. Residual metal objects such as pins and coins may form rust stains on drum surface and your clothes. Do not use abrasive materials while cleaning the inner surface of the drum. Use soapy water with a damp cloth to wipe the inner surface, then dry it and leave the door open to let inside dry properly."Tub Sanitize" cycle with extra rinse option should be used for monthly cleaning of drum. To carry out this procedure select "Tub Sanitize" Program.

Owner’s Guide & Installation Instructions 57 / English
User maintenance instructions
Cleaning the outer cabinet and control panel
When necessary:• Wipe the exterior panels of your washer with soapy water or mild
detergent. Dry it with a soft cloth.• Use only a soft and damp cloth to clean the control panel.
C CAUTION
• Never use a sponge or scrubbing material. These will damage the painted and plastic parts.
Cleaning the water inlet strainers
There is a strainer at the end of each water inlet valve at the back side of the washer and also at the end of each water inlet hose where they are connected to the faucets. These strainers prevent the foreign substances and dirt in the water to enter into the washer. Strainers should be cleaned from time to time.
• Close the water faucets.• Remove the nuts of the water inlet hoses to clean the
surfaces of the strainers on the water inlet valves with an appropriate brush.
• If the strainers are very dirty, you can pull them out by means of pliers and clean them.
• Take out the strainers on the flat ends of the water inlet hoses together with the rubber seals and clean thoroughly under running water.
• Replace the rubber seals and strainers carefully and tighten the hose nuts by hand.

58 / English Front-Loading Automatic Washer
User maintenance instructions
Cleaning the drain pump filter
Filter system in your washer prevents solid items such as buttons, coins and fabric fibers clogging the pump impeller during discharging of the washing water. Thus, a good water discharge is achieved and the pump life is extended.• If your washer fails to drain the water, the pump filter may be
clogged. You may have to clean it occasionally to prevent any clogging. Water must be drained completely to clean the pump filter.
In addition, water may have to be drained off completely in the following cases:• before transporting the appliance (e.g. when moving )• when there is a danger of frostIn order to clean the dirty filter and discharge the water:1. Disconnect or unplug the washer from the power supply.
A WARNING
• There may be water at 158F (70°C) in the drum. Therefore, the filter must be cleaned only after the inside water is cooled down to avoid hazard of scalding.
2. Open the filter cover.

Owner’s Guide & Installation Instructions 59 / English
User maintenance instructions
3. Follow the below procedures in order to drain water.Product has an emergency water draining hose, in order to drain the water:a Pull the emergency draining hose out from its seatb Place a large container at the end of the hose. Drain the water
into the container by pulling out the plug at the end of the hose. When the container is full, block the inlet of the hose by replacing the plug. After the container is emptied, repeat the above procedure to drain the water in the product completely.
c When draining the water is finished, close the end by the plug again and fix the hose in place.
d Turn and remove the pump filter.
4. Clean any residues inside the filter as well as fibers, if any, around the pump impeller region.
5. Replace the filter.6. If the filter cap is composed of two pieces, close the filter cap by
pressing on the tab. If it is one piece, seat the tabs in the lower part into place first, and then press the upper part to close.

60 / English Front-Loading Automatic Washer
User maintenance instructions
Descaling the washer
Hard water can cause scale build-up inside the drum and other parts of your washer in time. Scaling may lead to some serious problems such as clogging in hoses, heater or pump failure eventually. To prevent scaling, wash drum should be cleaned frequently. Do not use abrasive materials such as metal wool while cleaning the drum. Take the manufacturer’s instructions into account if you are using a descaling agent. Descaling agents may contain materials that are hazardous for washer components. Use descaling agents compatible for use in clothes washers.When using a powder descaling agent, add 1 cup to the main wash compartment of the dispenser and run a regular hot cycle (with extra rinse) without any clothes and detergents.

Owner’s Guide & Installation Instructions 61 / English
8 Troubleshooting
Problem Reason SolutionA program cannot be started or selected.
The product may have switched to self protection mode due to a supply problem (line voltage, water pressure, etc.).
* To cancel the programme, turn the Programme Selection knob to select another programme. Previous programme will be canceled. (See "Canceling the program")
There is water inside the product.
Some water might have remained in the product due to the quality control processes in the production.
* This is not a failure; water is not harmful to the product.
Washer does not fill with water or wash after the program was selected and the “Start/Pause/Cancel” button was pressed.
Faucets may be turned off. * Open the water faucets fully.
Water inlet hose may be folded.
* Check the water inlet hose and straighten if necessary.
Water inlet strainers might be clogged.
* Clean the water inlet strainers.
Is there power at the outlet?* Call an electrician and have
the power outlet / circuit breaker / fuse checked.
Washer might be unplugged. * Plug the power cord to a live electrical outlet.
Drain hose may be folded. * Check the drain hose and straighten if necessary.
Washer may be in handwash, wools or soak cycle.
* Wait for a short time and tumbling will start.
Drain pump filter or drain itself may be clogged.
* Clean the drain pump filter (See “User maintenance instructions” ). If the house drain pipes are clogged, call a plumber for assistance.
Door may not be closed properly. * Close the loading door.
Washer does not drain water / Washer drains water slowly.
Drain hose may be folded. * Check the drain hose and straighten if necessary.
Drain pump filter or drain itself may be clogged.
* Clean the drain pump filter (See “User maintenance instructions” ). If the house drain pipes are clogged, call a plumber for assistance.

62 / English Front-Loading Automatic Washer
Troubleshooting
Problem Reason SolutionProduct vibrates or makes noise.
Product might be standing unbalanced.
* Stablize the product by adjusting the feet.
A hard substance might have entered into the pump filter.
* Clean the pump filter.
Transportation safety bolts are not removed.
* Remove the transportation safety bolts.
Laundry quantity in the product might be too little.
* Add more laundry to the product.
Excessive laundry might be loaded in the product.
* Take out some of the laundry from the product or distribute the load by hand to balance it evenly in the product.
Product might be leaning on a rigid item.
* Make sure that the product is not leaning on anything.
There is water leaking from the bottom of the washer.
Inlet hose connections may be leaking.
* Be sure the strainers and rubber seals of the water inlet hoses are solid and securely fitted.
End of the drain hose may be loosely inserted into the waste pipe or sink.
* Tightly attach the drain hose to the waste pipe or sink (See “Installation Instructions, Drainage”).
House drain may be clogged.* If the house drain pipes are
clogged, call a plumber for assistance.
Filter cap of the drain pump may not be properly fitted.
* Make sure that the pump filter cap is tightly closed.
Hose connections inside the washer may be leaking.
* Internal hose connections (e.g. dispenser hoses, drain system) should be checked by a service technician.
Product stopped shortly after the programme started.
The machine might have stopped temporarily due to low voltage.
* Product will resume running when the voltage is restored to a normal level.
Product directly discharges the water it takes in.
Draining hose might not be at an adequate height.
* Connect the water draining hose as described in the operation manual.
No water can be seen in the drum during washing.
Water is inside the invisible part of the product.
* This is not a failure.

Owner’s Guide & Installation Instructions 63 / English
Troubleshooting
Problem Reason SolutionLoading door cannot be opened.
The cover lock is activated due to the water level inside the product.
* Drain the water by running the Pump or Spin programme.
Washer might be heating up the water or it may be at the spinning cycle.
* Wait until the process is over.
Due to electrical safety mechanism, the door can only be opened a few minutes after the program has stopped.
* Wait until the process is over.
Child lock is engaged. Door lock will be deactivated a couple of minutes after the programme has come to an end.
* Wait for a couple of minutes for deactivation of the door lock.
If the door can not be opened after minimum ten minutes the program has stopped , washer should be switched off pressing on/off button.
* If the situation remains, call the qualified service technician.

64 / English Front-Loading Automatic Washer
Troubleshooting
Problem Reason SolutionWashing takes longer than specified in the manual.(*)
Water pressure is low. * Product waits until taking in an adequate amount of water to prevent poor washing quality due to the decreased amount of water. Therefore, the washing time extends.
Supply voltage might be low. * Washing time is prolonged to avoid poor washing results when the supply voltage is low.
Input temperature of the water might be low.
* Required time to heat up the water extends in cold seasons. Also, washing time can be lengthened to avoid poor washing results.
Number of rinse cycles and/or amount of rinse water might have increased.
* Product increases the amount of rinse water when good rinsing is needed and adds an extra rinsing step if necessary.
Excessive foam might have occurred and the automatic foam absorption system might have been activated due to too much detergent.
* Use the recommended amount of detergent.
There may be an imbalance of load in the drum.
* The automatic spin correction system might have been activated due to the unbalanced distribution of the laundry in the drum.

Owner’s Guide & Installation Instructions 65 / English
Troubleshooting
Problem Reason SolutionProgramme time does not countdown. (On models with display) (*)
Timer may stop during water intake.
* Timer indicator will not countdown until the product takes in an adequate amount of water. The product will wait until there is a sufficient amount of water to avoid poor washing results due to lack of water. Timer indicator will resume countdown after this.
Timer may stop during the heating step.
* Timer indicator will not countdown until the product reaches the selected temperature.
Timer may stop during spinning step.
* The automatic unbalanced load detection system might be activated due to the unbalanced distribution of laundry in the product.
Product does not switch to spinning step. (*)
There might be an unbalanced load in the product.
* The automatic unbalanced load detection system might be activated due to the unbalanced distribution of laundry in the product.
The product will not spin if water is not drained completely.
* Check the filter and the draining hose.
Excessive foam might have occurred and automatic foam absorption system might have been activated due to too much detergent.
* Use recommended amount of detergent.
“No spin” setting may be adjusted. * See “Spin Speed Selection”.
Drain pump filter or drain itself may be clogged.
* Clean the drain pump filter (See “User maintenance instructions” ). If the house drain pipes are clogged, call a plumber for assistance.

66 / English Front-Loading Automatic Washer
Troubleshooting
Problem Reason SolutionWashing performance is poor: Laundry turns Grey. (**)
Insufficient amount of detergent has been used over a long period of time.
* Use the recommended amount of detergent appropriate for water hardness and type of laundry.
Washing was made at low temperatures for a long time.
* Select the proper temperature for the type of laundry to be washed.
Insufficient amount of detergent is used with hard water.
* Using insufficient amount of detergent with hard water causes the soil to stick on the cloth and this turns the cloth grey over time. It is difficult to eliminate greying once it happens. Use the recommended amount of detergent appropriate for water hardness and the type of laundry.
Excessive amount of detergent was used.
* Use the recommended amount of detergent appropriate for water hardness and type of laundry.
Washing performance is poor: Stains persist or the laundry is not whitened. (**)
Insufficient amount of detergent is used.
* Use the recommended amount of detergent appropriate for water hardness and the type of laundry.
Excessive laundry was loaded in.
* Do not load the product to excess. Load with amounts recommended in the "Program and consumption table".
Wrong programme and temperature were selected.
* Select the proper programme and temperature for the laundry to be washed.
Wrong type of detergent is used.
* Use detergent appropriate for the product.
Excessive amount of detergent was used.
* Put the detergent in the correct compartment. Do not mix the bleaching agent and the detergent.

Owner’s Guide & Installation Instructions 67 / English
Troubleshooting
Problem Reason SolutionWashing performance is poor: Stains could not be removed. Laundry could not be whitened.
Wrong program cycle and temperature might have been selected.
* Select the proper program cycle and temperature for the laundry to be washed (See “Laundry Tips” & “Program Cycle Selection”).
Using insufficient amount of detergent.
* Use the recommended amount of HE detergent appropriate for water hardness and soil level of laundry.
Using wrong type of detergent.
* Use liquid detergent for cold wash cycle for good wash results. Use proper detergents recommended for wools, handwashable and delicate items.
Mixing different sorts of items.* Sort the laundry according to
care labels and user manual (See “Laundry Tips”).
Mixing different types of laundry additives.
* Put the detergent in the correct compartment of dispenser (See “Detergent Dispenser”).
* Do not mix detergent with bleaching agent or fabric softener.
Excessive laundry may be loaded into washer.
* Do not load the washer in excess.
Detergent residue left on the laundry.
Excessive laundry might have been loaded in.
* Do not load the washer in excess.
Wrong program cycle and temperature might have been selected.
* Select the proper program cycle and temperature for the laundry to be washed (See “Laundry Tips” & “Program Cycle Selection”).
Using powder or granular detergents in cold water washing may leave residue on wash load.
* Use a liquid detergent when washing in cold water. Use proper detergents recommended for wools, handwashable and delicate items.

68 / English Front-Loading Automatic Washer
Troubleshooting
Problem Reason SolutionWashing performance is poor: Oily stains appear on laundry.
Oily accumulations of prior wash cycles on the drum may have stuck to the laundry.
* Washer must be operated empty at “Tub Sanitize” cycle with detergent.
The detergent may have been placed into the wrong compartment; the detergent may be mixed with the softener.
* Softener should not come into contact with detergent when being added.
Washing performance is poor: Clothes smell unpleasant. (**)
Odours and bacteria layers are formed on the drum as a result of continuous washing at lower temperatures and/or in short programmes.
* Leave the detergent drawer as well as the loading door of the product ajar after each washing. Thus, a humid environment favorable for bacteria cannot develop in the machine.
Color of the clothes is faded. (**)
Excessive laundry was loaded in.
* Do not load the product to excess.
Detergent in use is damp. * Keep detergents closed in an environment free of humidity and do not expose them to excessive temperatures.
Exposure of laundry to undiluted liquid chlorine bleach.
* Do not pour undiluted liquid bleach onto laundry. Always pour it into bleach compartment of the dispenser prior to beginning of the wash cycle .
* Do not overfill the bleach compartment. Fill up to max line at the most.
A higher temperature is selected.
* Select the proper programme and temperature according to the type and soiling degree of the laundry.

Owner’s Guide & Installation Instructions 69 / English
Troubleshooting
Problem Reason SolutionRinsing performance is poor.
Intermediate spins may be skipped.
* There may be an imbalance of laundry in the machine. The laundry in the drum may be tangled up too much. Laundry should be rearranged and re-spun. No spinning is performed when the laundry is not evenly distributed in the drum to prevent any damage to the appliance and to its environment.
The amount and storage conditions of the detergent used might not be appropriate.
* Store detergents in a cool and dry place. Do not keep them under high temperatures.
Not using HE detergent * Use HE detergent.Using excessive amount of detergent
* Reduce the amount of detergent.
Drain hose may be folded. * Check the drain hose and straighten if necessary.
Drain pump filter or drain itself may be clogged.
* Clean the drain pump filter (See “User maintenance instructions” ). If the house drain pipes are clogged, call a plumber for assistance.
Laundry became stiff after washing. (**)
Insufficient amount of detergent is used.
* Using an insufficient amount of detergent for the water hardness can cause the laundry to become stiff over time. Use appropriate amount of detergent according to the water hardness.
Detergent is put in the wrong compartment.
* If detergent is put in the prewash compartment when the prewash cycle is not selected, the product can take this detergent during the rinsing or softener step. Put the detergent in the correct compartment.
Detergent might be mixed with the softener.
* Do not mix the softener with detergent. Wash and clean the dispenser with hot water.

70 / English Front-Loading Automatic Washer
Troubleshooting
Problem Reason SolutionLaundry does not smell like the softener. (**)
Detergent is put in the wrong compartment.
* If detergent is put in the prewash compartment when the prewash cycle is not selected, the product can take this detergent during the rinsing or softener step. Wash and clean the dispenser with hot water. Put the detergent in the correct compartment.
Detergent might be mixed with the softener.
* Do not mix the softener with detergent. Wash and clean the dispenser with hot water.
Softener might have been released early.
* You may have added too much softener beyond max fill line.
* The detergent dispenser might be problematic. Water may be siphoned (pulling the softener into the washer early) during the fill or rinse cycles.
* There might be problems with the water inlet valves.
Detergent residue in the detergent drawer. (**)
Detergent is put in a wet drawer.
* Dry the detergent drawer before putting in detergent.
Detergent has gotten damp. * Keep detergents closed in an environment free of humidity and do not expose them to excessive temperatures.
Water pressure is low. * Check the water pressure.The detergent in the main wash compartment got wet while taking in the prewash water. Holes of the detergent compartment are blocked.
* Check the holes and clean if they are clogged.
There is a problem with the detergent drawer valves.
* Call the Authorized Service Agent.
Detergent might be mixed with the softener.
* Do not mix the softener with detergent. Wash and clean the dispenser with hot water.
Regular drum cleaning is not performed.
* Clean the drum regularly. For this procedure, please see "Cleaning the loading door and the drum".

Owner’s Guide & Installation Instructions 71 / English
Troubleshooting
Problem Reason SolutionToo much foam forms inside the product. (**)
Not using HE detergent * Use HE detergent.Excessive amount of detergent is used.
* Use only a sufficient amount of detergent.
Detergent was stored under improper conditions.
* Store detergent in a closed and dry location. Do not store in excessively hot places.
Some meshed laundry such as tulle may cause too much foam because of their texture.
* Use smaller amounts of detergent for this type of item.
Detergent is put in the wrong compartment.
* Put the detergent in the correct compartment.
Softener is being taken early by the product.
* There may be problem in the valves or detergent dispenser. Call the Authorized Service Agent.
Foam is overflowing from the detergent drawer / Washer is completely full of suds.
Not using HE detergent / Using excessive amount of detergent
* Push “Start/Pause/Cancel” button. Mix 2 cups of water with 1-2 tablespoon of fabric softener and pour it into detergent dispenser. Push “Start/Pause/Cancel” button again. Use proper amount of HE detergent next time you operate the washer.
* Use detergent suitable for the programs and maximum loads indicated in the “Program and consumption table”. When you use additional chemicals (stain removers, bleaches, etc.), reduce the amount of detergent.
Load is still too soapy / Washer is full of suds at the end of program.
Not using HE detergent / Using excessive amount of detergent
* Do not unload the washer. Operate a quick wash cycle (e.g. Delicates, Wools) without any detergent. Add 1-2 tablespoon of fabric softener into main wash compartment of detergent dispenser during water intake. Use proper amount of HE detergent next time you operate the washer.

72 / English Front-Loading Automatic Washer
Troubleshooting
Problem Reason SolutionLaundry remains wet at the end of the programme. (*)
Excessive foam might have occurred and automatic foam absorption system might have been activated due to too much detergent.
* Use the recommended amount of detergent.
Unbalance detection due to small amount of laundry inside the drum and/or uneven load distribution.
* Add more laundry (e.g. a few additional towels) to the drum and start a “Spin” or “Spin&Drain” cycle.
Poor spinning results due to not using HE detergent / using excessive amount of detergent
* Use proper amount of HE detergent.
Washer fills with water when a process is cancelled.
There may be hot water inside washer.
* For safety reasons, water should be cycled in and out a couple times.
Time delay function does not work.
Door may not be closed properly. * Close the loading door.
The door will not lock/door led remains OFF.
Door is not properly closed/Door hinge is not aligned with lock switch.
* Check for excessive laundry avoiding the door to be closed. Push and/or shut the loading door firmly until it is properly closed.
Clothes get tangled up too much in the drum when washing.
Excessive laundry might have been loaded in.
* Do not load the washer in excess.
Washing many items of the same type or size of clothes together.
* Load the wash drum with items of different sizes.
Load is wrinkled.
Delay in unloading the washer. * Unload the washer as soon as the wash cycle ends.
Wrong program cycle might have been selected.
* Select the proper program cycle for the laundry to be washed (See “Laundry Tips” & “Program Cycle Selection”).
Excessive laundry might have been loaded in.
* Do not load the washer in excess.
Washer does work. Nothing is displayed on the screen.
The plug might not be plugged in the wall power outlet. * Check the plug.
Fuse may have blown. * Check the fuse / circuit breaker.
Power may be cut off. * Check the supply power.

Owner’s Guide & Installation Instructions 73 / English
Troubleshooting
Problem Reason Solution
(*) The product does not switch to the spinning step when the laundry is not evenly distributed in the drum to prevent any damage to the product and to its surroundings. Laundry should be rearranged and re-spun.(**) Regular drum cleaning is not performed. Clean the drum regularly. See “Cleaning the loading door and the drum”
C CAUTION
• If you cannot eliminate the problem despite following the instructions in this section, consult your dealer or the Authorized Service Agent. Never try to repair a nonfunctional product yourself.

74 / English Front-Loading Automatic Washer
9 WARRANTY STATEMENT FOR THE BLOMBERG CLOTHES WASHERS
The warranties provided by Blomberg in these statements only apply to Blomberg washers sold to the original purchaser or homeowner in the US and Canada. The warranty is not transferable. To obtain warranty service, please contact our nearest distributor as listed by state. You will need your washer model number, serial number, retailer name and address, where purchased and purchase date / installation date. This warranty gives you specific legal rights, and you may also have other rights which vary from state to state.
1 year * limited warranty from date of first installation Blomberg will repair or replace at no cost to the consumer any defective parts of the washer if used under normal household conditions (warranty is void if the product is used commercially e.g., bed + breakfast, nursing home etc.). Service must also be performed by an authorized Blomberg service agency. (Cosmetic defects must be reported within 10 business days from installation)
2 year * ++ limited warranty from date of first installation (Parts only) Blomberg will repair or replace any parts at no cost to the consumer if material defects or workmanship have caused the damage or failure of these components. Again the appliance must have been used under normal household conditions and not commercially as stated above (Labor charges are the responsibility of the consumer)
5 year * ++ limited warranty from date of first installation (parts only 2-5 years) Blomberg will repair or replace any circuit boards or washer drum (excluding any plastic attachments) at no cost to the consumer if material defects or workmanship have caused the damage or failure of these components. The washer must have been used under normal household conditions and not commercially (Labor charges are the responsibility of the consumer)
Lifetime limited warranty from date of first installation * ++ (parts only) Blomberg will repair or replace to the original owner the stainless steel drum if rust through occurs under normal household use and normal water conditions (no excessive chlorine). Blomberg may, at its option, also replace the whole washer with the same and/or equivalent model with equal or better functionality if the original model is no longer available. (Labor, removal and installation charges are the responsibility of the consumer.)
Disclaimers of warranties and exclusions: Warranty does not cover service costs by an authorized service agent to correct installation, electrical and plumbing problems or educational instruction on the use of the washer. The warranty also does not cover defects or damage caused by an act of god (such as storms, floods, fires, mudslides, etc.), damage cause by use of the washer for purposes other than those for which it was designed, misuse, abuse, accident, alteration, improper installation, maintenance, travel fees, service calls outside normal service hours, unauthorized service work or work.
This product is fully tested and went through official quality assurance inspections before leaving the original manufacturing site. Warranty terms for this Blomberg household appliance is not valid if the product is altered, tampered, modifed, additional parts assembled, fixed and re-packed by an authorized distributor, servicer, a third party retailer, reseller or by any other unauthorized person(s)”
TO THE EXTENT PERMITTED BY LAW, THIS WARRANTY IS IN LIEU OF ALL OTHER EXPRESSED AND IMPLIED WARRANTIES, INCLUDING THE IMPLIED WARRANTIES OF MERCHANTABILITY AND FITNESS FOR A PARTICULAR PURPOSE. BLOMBERG UNDERTAKES NO RESPONSIBILITY FOR THE QUALITY OF THIS PRODUCT EXCEPT AS OTHERWISE PROVIDED IN THIS WARRANTY STATEMENT. BLOMBERG ASSUMES NO RESPONSIBILITY THAT THE PRODUCT WILL BE FIT FOR ANY PARTICULAR PURPOSE FOR WHICH YOU MAY BE BUYING THIS PRODUCT, EXCEPT AS OTHERWISE PROVIDED IN THIS WARRANTY STATEMENT.
Blomberg does not assume any responsibility for incidental or consequential damages. Such damages include, but are not limited to, loss of profits, loss of savings or revenue, loss of use of the washer or any associated equipment, cost of capital, cost of any substitute equipment, facilities or services, downtime, the claims of third parties, and injury to property. Some states do not allow the exclusion or limitation of incidental or consequential damages, so the above limitations or exclusion may not apply to you. * installation date shall refer to either purchase date or 5 business days after delivery of the product to the home, whichever is later.
++Parts replaced will assume the identity of the original parts + their original warranty.
No Other Warranties. This Warranty Statement is the complete and exclusive warranty from the manufacturer. No employee of Blomberg or any other party is authorized to make any warranty in addition to those made in this Warranty Statement.

Owner’s Guide & Installation Instructions 75 / English
10 HOW TO GET SERVICE
Please contact the Distributor for your state as listed on the Distributor Contact List, or call our Toll Free Number at 1 800 459 9848 for direction to an Authorized Blomberg Service Agent.


FRA
NÇ
AIS
ENG
LISHESPA
ÑO
L
OWNER'S MANUAL
WASHING MACHINE
Read this owner's manual thoroughly before operating the appliance and keep it handy for reference at all times.
WM3700H*A
MFL68005568Rev.06_090219
www.lg.comCopyright © 2018-2019 LG Electronics Inc. All Rights Reserved.

2
TABLE OF CONTENTS3 PRODUCT FEATURES
4 SAFETY INSTRUCTIONS4 IMPORTANT SAFETY INSTRUCTIONS
8 PRODUCT OVERVIEW8 Parts8 Accessories
9 INSTALLATION9 Tools Needed9 Installation Overview10 Product Specifications11 Choosing the Proper Location12 Unpacking and Removing Shipping Bolts13 Connecting the Water Lines14 Connecting the Drain Hose15 Leveling the Washer16 Connecting to the Power Supply16 Testing the Washer
17 OPERATION17 Using the Washer18 Sorting Laundry19 Loading the Washer19 Adding Cleaning Products22 Control Panel24 Wash Cycles26 Cycle Guide28 Cycle Modifier Buttons29 Option Buttons
31 SMART FUNCTIONS31 LG SmartThinQ Application34 Smart Diagnosis™ Function
35 MAINTENANCE35 Regular Cleaning37 Cleaning the Door Seal37 Cleaning the Water Inlet Filters38 Cleaning the Drain Pump Filter39 Care in Cold Climates
40 TROUBLESHOOTING40 FAQs: Frequently Asked Questions41 Before Calling for Service
49 LIMITED WARRANTY49 FOR USA52 FOR CANADA56 Warranty Exceptions (U.S. and Canada)

3PRODUCT FEATURESEN
GLISH
PRODUCT FEATURESInverter Direct Drive Motor
The inverter motor, which is directly connected to the tub, produces little noise and vibration and offers great durability and a long lifespan.
Tub Clean
Cleaning of the drum on a regular monthly basis using Tub Clean can help keep the drum clean and fresh.
Large Capacity Stainless Steel Drum
The large capacity stainless steel drum offers extreme durability and is tilted to improve efficiency and allow easier access for large items.
Control Lock
Use this option to disable the controls during a wash cycle. This option can prevent children from changing cycles or operating the machine.
Detergent Dispenser Drawer
The four-compartment dispenser makes it easy to separate the pre-wash detergent, main laundry detergent, liquid bleach, and fabric softener into different compartments.
High Temperature Steam Cycles (On Some Models)
LG's unique, high-temperature steam cycles help to remove tough stains.
Smart Diagnosis™
Should you experience any technical difficulty with the appliance, it has the capability of transmitting data via your telephone to the Customer Information Center. The call center agent records the data transmitted from your machine and uses it to analyze the issue, providing a fast and effective diagnosis.
4 SAFETY INSTRUCTIONS
SAFETY INSTRUCTIONSREAD ALL INSTRUCTIONS BEFORE USEYour safety and the safety of others are very important.We have provided many important safety messages in this manual and on your appliance. Always read and follow all safety messages.
This is the safety alert symbol. This symbol alerts you to potential hazards that can kill or injure you and others. All safety messages will follow the safety alert symbol and either the word WARNING or CAUTION.
These words mean:
WARNINGIf you do not follow instructions, it could result in death or serious injury.
CAUTIONIf you do not follow instructions, it could result in minor or moderate injury or damage to the product.
All safety messages tell you what the potential hazard is, tell you how to reduce the chance of injury, and tell you what may happen if the instructions are not followed.
IMPORTANT SAFETY INSTRUCTIONSWARNING
To reduce the risk of explosion, fire, death, electric shock, scalding or injury to persons when using this product, follow basic precautions, including the following:
INSTALLATION •Adhere to all industry recommended safety procedures including the use of long-sleeved gloves and safety glasses. •Never attempt to operate this appliance if it is damaged, malfunctioning, partially disassembled, or has missing or broken parts, including a damaged cord or plug. •Before use, the appliance must be properly installed as described in this manual. •To reduce the risk of severe injury or death, follow all installation instructions. •Refer to the INSTALLATION INSTRUCTIONS for detailed grounding procedures. Installation instructions are packed with the appliance for the installer’s reference. If the appliance is moved to a new location, have it checked and reinstalled by qualified service personnel. •Moving or installation of the appliance requires two or more people. •Do not install the appliance in humid spaces. •Store and install the appliance where it will not be exposed to temperatures below freezing or exposed to outdoor weather conditions. •This appliance is not designed for maritime use or for mobile installations such as in RVs, trailers, or aircraft.

5SAFETY INSTRUCTIONSEN
GLISH
•Keep packing materials out of the reach of children. Packaging material can be dangerous for children. There is a risk of suffocation. •Destroy the carton, plastic bag, and other packing materials after the appliance is unpacked. Children might use them for play. Cartons covered with rugs, bedspreads, or plastic sheets can become airtight chambers. •The appliance must be installed and electrically grounded by qualified service personnel in accordance with local codes. •Do not, under any circumstances, cut or remove the third (ground) prong from the power cord. •When installing or moving the appliance, be careful not to pinch, crush, or damage the power cord. •Connect to a properly rated, protected, and sized power circuit to avoid electrical overload. •This appliance must be positioned near to an electrical power supply. •Disconnect the power cord, house fuse or circuit breaker before installing or servicing the appliance. •The power cord of this appliance is equipped with a 3-prong (grounding) plug which mates with a standard 3-prong (grounding) wall outlet to minimize the possibility of electric shock from this appliance. •Use new hoses when connecting the appliance to the water supply. Do not reuse old hoses.
OPERATION •Read all instructions before using the appliance and save these instructions. •Use this appliance only for its intended purpose. • If the product has been submerged, contact an LG Electronics customer information center for instructions before resuming use. • If you detect a strange sound, a chemical or burning smell, or smoke coming from the appliance, unplug it immediately, and contact an LG Electronics customer information center. •Under certain conditions, hydrogen gas may be produced in a hot-water system that has not been used for two weeks or more. HYDROGEN GAS IS EXPLOSIVE. If the hot-water system has not been used for such a period, before using the appliance turn on all hot water faucets and let the water flow from each for several minutes. This will release any accumulated hydrogen gas. As the gas is flammable, do not smoke or use an open flame during this time. •Do not reach into the washer if the tub or drum, agitator, or any interior parts are moving. Before loading, unloading, or adding items, press Start/Pause and allow the tub or drum to coast to a complete stop before reaching inside. •This appliance is not intended for use by persons (including children) with reduced physical, sensory or mental capabilities, or lack of experience and knowledge, unless they have been given supervision or instruction concerning the use of the appliance by a person responsible for their safety. •Do not allow children or pets to play on, in or with the appliance. Close supervision is necessary when the appliance is used near children or pets. •Keep laundry products out of children’s reach. To prevent injury to persons, observe all warnings on product labels. •Repair or immediately replace all power cords that have become frayed or otherwise damaged. Do not use a cord that shows cracks or abrasion damage along its length or at either end. •Never unplug the appliance by pulling on the power cord. Always grip the plug firmly and pull straight out from the outlet. •Do not use an extension cord or adapter with this appliance. •Do not grasp the power cord or touch the appliance controls with wet hands. •Do not modify or extend the power cord.

6 SAFETY INSTRUCTIONS
• If the electrical supply cord is damaged, it must only be replaced by the manufacturer or its service agent or a similar qualified person in order to avoid a hazard. •Do not put oily or greasy clothing, candles or flammable materials on top of the appliance. •Keep the area underneath and around your appliances free of combustible materials (lint, paper, rags, etc.), gasoline, chemicals and other flammable vapors and liquids. •Do not store or use gasoline or other flammable vapors and liquids in the vicinity of this or any other appliance. •Do not mix chlorine bleach with ammonia or acids such as vinegar. Follow package directions when using laundry products. Incorrect usage can produce poisonous gas, resulting in serious injury or death. •Never use harsh chemicals, abrasive cleaners, or solvents to clean the washer. They will damage the finish. •Do not wash articles that have been previously cleaned in, washed in, soaked in, or spotted with gasoline, dry-cleaning solvents, vegetable or cooking oil, or other flammable or explosive substances, as they give off vapors that could ignite or explode. •Do not add gasoline, dry cleaning solvents, or other flammable or explosive substances to the wash water. These substances give off vapors that could ignite or explode. • In the event of a gas leak (propane gas, LP gas, etc.) do not operate this or any other appliance. Open a window or door to ventilate the area immediately. •Do not tamper with controls. •Fix the drain hose securely in place to avoid flooding. •Do not abuse, sit on, or stand on the door of the appliance. •Do not allow water, bleach or other liquids to sit in the drum for extended periods. Doing so can corrode the drum or cause mildew or odors.
MAINTENANCE •Do not repair or replace any part of the appliance. All repairs and servicing must be performed by qualified service personnel unless specifically recommended in this owner’s manual. Use only authorized factory parts. •Disconnect this appliance from the power supply before cleaning and attempting any user maintenance. Turning the controls to the OFF position does not disconnect this appliance from the power supply. •Remove any dust or foreign matter from the power plug pins. •Do not disassemble or repair the appliance by yourself. •Remove the door before the appliance is removed from service or discarded to avoid the danger of children or small animals getting trapped inside. •Make sure the dispenser drawer or lid is closed at all times when not being filled with laundry products.
GROUNDING INSTRUCTIONS • Improper connection of the equipment-grounding conductor can result in a risk of electric shock. Check with a qualified electrician or service personnel if you are in doubt whether the appliance is properly grounded. Do not modify the plug provided with the appliance; if it will not fit the outlet, have a proper outlet installed by a qualified electrician. •The appliance must be grounded. In the event of a malfunction or breakdown, grounding will reduce the risk of electric shock by providing a path of least resistance for electric current. The appliance is equipped with a cord having an equipment-grounding conductor and a grounding plug. The plug must be plugged into an appropriate outlet that is installed and grounded in accordance with all local codes and ordinances.

7SAFETY INSTRUCTIONSEN
GLISH
CAUTIONTo reduce the risk of minor or moderate injury to persons, malfunction, or damage to the product or property when using this product, follow basic precautions, including the following:
INSTALLATION • Install the product on a firm and level floor.
OPERATION •Do not place objects on top of the appliance. •Turn off the water faucets and unplug the appliance if the appliance is to be left for an extended period of time, such as during vacations. •ALWAYS follow the fabric care instructions supplied by the garment manufacturer. •Use fabric softeners or products to eliminate static only as recommended by the manufacturer. •Do not combine laundry products for use in one load unless specified on the label. •Do not touch draining water which may be hot. • If the drain hose and the water supply hose are frozen in winter, defrost them before using the appliance. •Do not store or spill liquid detergents, cleaners, or bleaches (chlorine bleach, oxygen bleach) on the appliance. Doing so may result in corrosion, discoloration or damage to the surface of the appliance. •Clothing or articles that are waterproof or water resistant must be washed in the Waterproof cycle only. (e.g. water resistant clothing, mattress covers, outdoor clothes, plastic mats, etc.) Otherwise, it may result in personal injury or damage to the washer, clothes, walls, floor, and surrounding objects due to abnormal vibration.
SAVE THESE INSTRUCTIONS

8 PRODUCT OVERVIEW
PRODUCT OVERVIEWParts
13
12
1 Control Panel 4 Drum 7 Drain Pump Filter Cover 10 Water Inlets
2Detergent Dispenser Drawer 5 Door 8 Drain Pump Filter 11 Shipping Bolts
3 Door Seal 6 Leveling Feet 9 Drain Hose 12 Power Cord
13 Drain Hose
AccessoriesIncluded Accessories
Non-skid pads Hole caps (4) Wrench Tie strap Elbow bracket (for securing drain
hose)
Required Accessories
Hot/cold water hoses (sold separately)
Optional Accessories
Pedestal or Pedestal washer (sold separately)
Stacking Kit (sold separately)
NOTE •The images in this guide may be different from the actual components and accessories, which are subject to change by the manufacturer without prior notice for product improvement purposes. •For your safety and for extended product life, use only authorized components. The manufacturer is not responsible for product malfunction or accidents caused by the use of separately purchased unauthorized components or parts.

9INSTALLATIONEN
GLISH
INSTALLATIONTools Needed
Pliers Level
Installation OverviewPlease read the following installation instructions first after purchasing this product or transporting it to another location.
TEST!
Choosing the proper location Unpacking and removing shipping bolts
Connecting the water lines
Connecting the drain line Leveling the washer Connecting to the power supply
Testing the washer

10 INSTALLATION
Product SpecificationsThe appearance and specifications listed in this manual may vary due to constant product improvements.
Electrical requirements 120 VAC @ 60 Hz
Min. / Max. water pressure 20 – 120 psi (138–827 kPa)
Dimensions 70 cm(W) X 77 cm(D) X 99 cm(H), 139.6 cm (D with door open) 27”(W) X 30 ¼”(D) X 39”(H), 55” (D with door open)
Net weight 187.4 lb (85 kg)
Max spin speed 1300 RPM
WARNING •Moving or installation of the appliance requires two or more people. Failure to follow these instructions may result in injury. •Store and install the appliance where it will not be exposed to temperatures below freezing or exposed to outdoor weather conditions. Failure to follow this warning can cause product or part failure, serious injury, fire, electric shock, or death. •Properly ground the washer to conform with all governing codes and ordinances. Failure to follow this warning can cause serious injury, fire, electric shock, or death. •To reduce the risk of electric shock, do not install the appliance in humid spaces. Failure to follow this warning can cause serious injury, fire, electric shock, or death. •To ensure proper airflow, do not block the large opening on the bottom of the washer with carpeting or other materials. •Do not remove the ground prong. Do not use an adapter or extension cord. Plug into a grounded 3-prong outlet. Failure to follow this warning can cause serious injury, fire, electric shock, or death. •Certain internal parts are intentionally not grounded and may present a risk of electric shock only during servicing. Service personnel - Do not contact the following parts while the appliance is energized: pump, valve, motor, control board.

11INSTALLATIONEN
GLISH
Choosing the Proper LocationInstall the washer on a solid floor that is strong and rigid enough to support the weight of the washer, even when fully loaded, without flexing or bouncing. If the floor has too much flex, you may need to reinforce it to make it more rigid. If the floor is not solid, it may cause severe vibration and noise.
NOTE •Before installing the washer, make sure the floor is clean, dry and free of dust, dirt, water and oil so the washer feet cannot slide easily. Leveling feet that can move or slide on the floor can contribute to excess vibration and noise due to poor contact with the floor. • If a drip pan must be used, take extra care to follow the instructions provided with the drip pan and make sure the leveling feet are adjusted for firm and even contact with the pan. Use of drip pans and failure to properly level the machine may result in increased vibration and noise during operation. •Allow for sufficient space between the walls and the washer for installation.
Power Outlet •The power outlet must be within 60 inches (1.5 m) of either side of the washer. •The appliance and outlet must be positioned so that the plug is easily accessible. •Do not overload the outlet with more than one appliance. •The outlet must be grounded in accordance with current electrical wiring codes and regulations. •Use a time-delay fuse or circuit breaker.
NOTE • It is the personal responsibility and obligation of the product owner to have a proper outlet installed by qualified service personnel.
Flooring •To minimize noise and vibration, the washer must be installed on a solidly constructed floor. •Allowable slope under the entire washer is a maximum 1 inch (2.5 cm) difference from side to side or from front to back. • Installing on carpeting and soft tile surfaces is not recommended. •Never install the washer on a platform or weakly supported structure.
NOTE •The washer must be installed on firm flooring to minimize vibration during the spin cycle. Concrete flooring is best, but a wood floor is sufficient, provided it is built to FHA standards.
Floor Installation
(70 cm)(2.5 cm) (2.5 cm)27"1" 1"
(0.5 cm)
4"(10 cm)
(62.6 cm)
(77 cm)
55"(139.6 cm)
24 ¾13/64
30 ¼
To ensure sufficient clearance for water lines, the drain line and airflow, allow minimum clearances of at least 1 inch (2.5 cm) at the sides and 4 inches (10 cm) behind the unit. Be sure to allow for wall, door, or floor moldings that may increase the required clearances.
Stacked or Pedestal Installation
30 ¼"(77 cm)
4"(10 cm)
27"(70 cm)
1"(2.5 cm)
1"(2.5 cm)
77 ½"(196.8 cm)
(0.5 cm)13
64
NOTE •Refer to the instructions packaged with the optional pedestal kit before installing with a pedestal kit. •Do not use a drip pan with a pedestal or pedestal washer installation as it can block the drawer. Using a drip pan may result in increased vibration and noise during operation.

12 INSTALLATION
Unpacking and Removing Shipping BoltsUnpack all shipping materials from the washer for proper operation and inspect it for shipping damage.
CAUTION •Failure to remove shipping materials can cause excessive noise and vibration.
1 Lift the washer off the foam base.After removing the carton and shipping material, lift the washer off the foam base. Make sure the plastic tub support comes off with the base and is not stuck to the bottom of the washer.If you must lay the washer down to remove the base packaging materials, always protect the side of the washer and lay it carefully on its side. Do not lay the washer on its front or back.
Foam tub support
Carton base
2 Remove the bolt assemblies.Starting with the bottom two shipping bolts, use the wrench (included) to fully loosen all four shipping bolts by turning them counterclockwise. Remove the bolt assemblies by wiggling them slightly while pulling them out.
Retainer
Shipping bolt
3 Install the hole caps.Locate the four hole caps included in the accessory pack and install them in the shipping bolt holes.
Cap
NOTE •Save the bolt assemblies for future use. To prevent damage to internal components, do not transport the washer without reinstalling the shipping bolts. •Failure to remove shipping bolts and retainers may cause severe vibration and noise, which can lead to permanent damage to the washer. The cord is secured to the back of the washer with a shipping bolt to help prevent operation with shipping bolts in place.

13INSTALLATIONEN
GLISH
Connecting the Water LinesTo avoid the risk of costly water damage, purchase and install new inlet hoses when installing the washer.
1 Check the fittings and seals.Inspect the threaded fitting on each hose and make sure there is a rubber seal in place in both ends of each hose to prevent leaking.
Rubber seal Rubber seal
Water hose (to water inlet on washer)
Water hose (to tap)
2 Connect the water supply hoses.Connect the water supply hoses to the hot and cold water faucets tightly by hand and then tighten another 2/3 turn with pliers. Connect the blue hose to a cold water faucet and the red hose to a hot water faucet.
3 Flush out the inlet hoses.After connecting the inlet hoses to the water faucets, turn on the water faucets to flush out foreign substances (dirt, sand or sawdust) in the water lines. Let water drain into a bucket, and check the water temperature to make sure you've connected the hoses to the correct faucets.
4 Attach the water lines to the back of the washer.Attach the hot water line to the hot water inlet on the back of the washer. Attach the cold water line to the cold water inlet on the back of the washer. Tighten the fittings securely. Turn ON both faucets all the way and check for leaks at both ends of the hoses.
Cold water
inlet
Hot water inlet
WARNING •Do not overtighten the hoses or cross-thread the hose fittings. Overtightening or cross-threading can damage the valves or couplings, resulting in leaking and property damage. •Do not reuse old hoses. Use only new hoses when installing the washer. Old hoses could leak or burst causing flooding and property damage. Contact an LG Customer Information Center for assistance in buying hoses.
NOTE •Periodically check the hoses for cracks, leaks, and wear, and replace the hoses every five years. Do not stretch the water hoses intentionally, and make sure that they are not pinched, crushed or kinked by other objects. •Water supply pressure must be between 20 psi and 120 psi (138 – 827 kPa). If the water supply pressure is more than 120 psi, a pressure reducing valve must be installed. •To provide optimum washing performance, the hot water temperature should be set at 120 – 130 °F (48 – 54 °C) and the cold at 60 °F (15 °C). •The washer should never be installed or stored in a location subject to freezing temperatures. Damage to the water lines and internal mechanisms of the washer can result. If the washer was exposed to freezing temperatures prior to installation, allow it to stand at room temperature for several hours before use and check for leaks prior to operation. •Do not use flood-preventing hoses with auto shutoff devices. The devices can be tripped during fill and prevent the machine from filling properly.

14 INSTALLATION
Connecting the Drain HoseConnect the drain hose to either a standpipe or laundry tub.
NOTE •The drain hose should always be properly secured. Failure to properly secure the drain hose can result in flooding and property damage. •The drain must be installed in accordance with any applicable local codes and regulations. •Make sure that the drain hose is not stretched, pinched, crushed, or kinked. •Do not install the drain hose with the end lower than 29.5 inches (0.7 m) or higher than 96 inches (2.4 m) above the bottom of the washer or more than 60 inches (1.5 m) away from the washer. •Never create an airtight seal between the hose and the drain with tape or other means. If no air gap is present, water can be siphoned out of the tub resulting in poor wash/rinse performance or clothing damage.
Option 1: Standpipe
1 Clip the end of the hose into the elbow bracket.Connect the elbow bracket within 4 inches (10 cm) of the end of the drain hose. If the drain hose is extended more than 4 inches (10 cm) beyond the end of the elbow bracket, mold or microorganisms could spread to the inside of the washer.
No more than 4 inches (10 cm)
Elbow bracket
2 Insert the end of the drain hose into the standpipe.
Drain hose
Elbow bracket
3 Use a tie strap to secure the drain hose in place.
Option 2: Laundry Tub
1 Clip the end of the hose into the elbow bracket.Connect the elbow bracket within 4 inches (10 cm) of the end of the drain hose. If the drain hose is extended more than 4 inches (10 cm) beyond the end of the elbow bracket, mold or microorganisms could spread to the inside of the washer.
No more than 4 inches (10 cm)
Elbow bracket
2 Hang the end of the drain hose over the side of the laundry tub.
Drain hose
Elbow bracket
3 Use a tie strap to secure the drain hose in place.

15INSTALLATIONEN
GLISH
Leveling the WasherThe drum of your new washer spins at very high speeds. To minimize vibration, noise, and unwanted movement, the floor must be a level, solid surface.
NOTE •Adjust the leveling feet only as far as necessary to level the washer. Extending the leveling feet more than necessary can cause the washer to vibrate. •Before installing the washer, make sure that the floor is clean, dry and free of dust, dirt, water and oil so the washer feet cannot slide easily. Feet that move or slide on the floor can contribute to excessive vibration and noise due to poor contact with the floor.
1 Position the washer in its final location.Take special care not to pinch, strain, or crush the water and drain lines. If you have a carpenter's level, you can place it across the top of the washer. The slope beneath the washer should not exceed 1 inch, and all four leveling feet must rest firmly on the floor.
Level
1"
2 Adjust the lower leveling feet.Turn in one direction to raise the washer or the other direction to lower it.
Raise Lower
3 Tighten the locknuts.Turn the locknuts counter-clockwise and tighten them when the washer is level.
Lock nut
Tighten all 4 lock nuts securely
4 Recheck the washer’s levelness.Push or rock the top edges of the washer gently to make sure the washer does not rock. If the washer rocks, repeat steps 1-3.
CAUTION •Using the washer without leveling it may cause excess vibration and noise, leading to a machine malfunction. •Extend the leveling feet only to level the washer. If you extend the leveling feet unnecessarily, it may cause abnormal vibration of the washer.
Using Non-Skid PadsIf you install the washer on a slippery surface, it may move because of excessive vibration. Incorrect leveling may cause malfunction through noise and vibration. If this occurs, install the non-skid pads under the leveling feet and adjust the level.
1 Clean the floor to attach the non-skid pads.Use a dry rag to remove and clean foreign objects or moisture. If moisture remains, the non-skid pads may slip.
2 Adjust the level after placing the washer in the installation area.
3 Place the adhesive side of the non-skid pad on the floor.It is most effective to install the non-skid pads under the front leveling feet. If it is hard to place the pads under the front leveling feet, place them under the back leveling feet.
This side up
Adhesive side
Remove backing
4 Recheck the washer’s levelness.Push or rock the top edges of the washer gently to make sure that the washer does not rock. If the washer rocks, level the washer again.

16 INSTALLATION
Connecting to the Power SupplyThe washer should be plugged into a 120-VAC, 60 Hz grounded 3-prong outlet. Plug in the washer.
WARNING •Do not use a worn or damaged power cord or power plug. Replace or repair it immediately. Failure to do so may result in death, fire, electric shock, or malfunction. •Do not modify the power cord and plug provided with the appliance. Take care not to damage it when installing or moving the washer. Failure to do so may result in death, fire, electric shock, or malfunction. •Make sure that the washer is grounded. •Connect this washer to a grounded outlet conforming to the rating prior to use. Failure to do so may result in fire, electric shock, or malfunction. •Do not damage or cut off the ground prong of the power cord. Doing so may cause death, fire, electric shock, or product malfunction. • Improper connection of the equipment-grounding conductor can result in risk of electric shock. Check with a qualified electrician or service technician if you are in doubt as to whether the appliance is properly grounded. If it does not fit the outlet, have a proper outlet installed by a qualified electrician •The appliance and outlet must be positioned so that the plug is easily accessible. •Do not use adapters or extension cords. Doing so may result in serious injury, fire, electric shock, or death. •For best performance, plug the washer into its own individual outlet. This helps prevent overloading house wiring circuits which could cause a fire hazard from overheated wires. • If necessary, use a new, UL-listed 3-prong adapter or 3-wire extension cord with a 3-prong (grounding) plug rated at no less than the branch circuit. Do not use an extension cord longer than 3 feet. Failure to follow these warnings may result in serious injury, fire, electric shock, or death.
Testing the WasherCheck if the washer is properly installed and run a test cycle.
1 Load the washer with 6 pounds of laundry (approximately 6 thick bath towels).
2 Press the Power button.
3 Press the Rinse+Spin button.
4 Press the Start/Pause button.The wash cycle starts.
5 Check if water is supplied, that the machine does not rock or vibrate excessively, and that it drains well during the spin cycle.
NOTE • If water leaks during water supply, see Connecting the Water Lines to connect them properly. • If the washer rocks and vibrates excessively, see Leveling the Washer to level it again. • If the drain does not work, see Connecting the Drain Hose to install the hose properly.
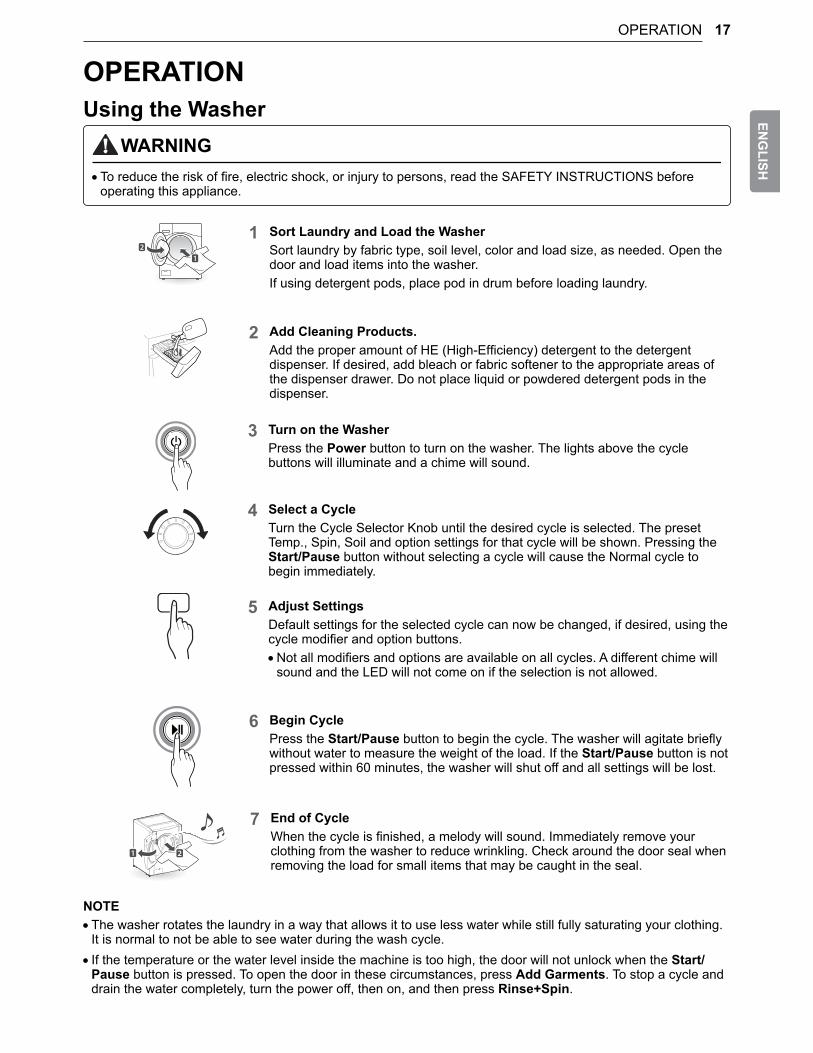
17OPERATIONEN
GLISH
OPERATIONUsing the Washer
WARNING •To reduce the risk of fire, electric shock, or injury to persons, read the SAFETY INSTRUCTIONS before operating this appliance.
1 Sort Laundry and Load the WasherSort laundry by fabric type, soil level, color and load size, as needed. Open the door and load items into the washer.If using detergent pods, place pod in drum before loading laundry.
2 Add Cleaning Products.Add the proper amount of HE (High-Efficiency) detergent to the detergent dispenser. If desired, add bleach or fabric softener to the appropriate areas of the dispenser drawer. Do not place liquid or powdered detergent pods in the dispenser.
3 Turn on the WasherPress the Power button to turn on the washer. The lights above the cycle buttons will illuminate and a chime will sound.
4 Select a CycleTurn the Cycle Selector Knob until the desired cycle is selected. The preset Temp., Spin, Soil and option settings for that cycle will be shown. Pressing the Start/Pause button without selecting a cycle will cause the Normal cycle to begin immediately.
5 Adjust SettingsDefault settings for the selected cycle can now be changed, if desired, using the cycle modifier and option buttons. •Not all modifiers and options are available on all cycles. A different chime will sound and the LED will not come on if the selection is not allowed.
6 Begin CyclePress the Start/Pause button to begin the cycle. The washer will agitate briefly without water to measure the weight of the load. If the Start/Pause button is not pressed within 60 minutes, the washer will shut off and all settings will be lost.
7 End of CycleWhen the cycle is finished, a melody will sound. Immediately remove your clothing from the washer to reduce wrinkling. Check around the door seal when removing the load for small items that may be caught in the seal.
NOTE •The washer rotates the laundry in a way that allows it to use less water while still fully saturating your clothing. It is normal to not be able to see water during the wash cycle. • If the temperature or the water level inside the machine is too high, the door will not unlock when the Start/Pause button is pressed. To open the door in these circumstances, press Add Garments. To stop a cycle and drain the water completely, turn the power off, then on, and then press Rinse+Spin.

18 OPERATION
Sorting LaundryCAUTION
•The washer can be fully loaded, but the drum should not be tightly packed with items. The door of the washer should close easily. •Use the Bedding cycle for buoyant or nonabsorbent items such as pillows or comforters. Failure to follow this caution can result in leakage. •Clothing or articles that are waterproof or water resistant must be washed in the Bedding cycle only. (e.g. water resistant clothing, mattress covers, outdoor clothes, plastic mats, etc.) Otherwise, it may result in personal injury or damage to the washer, clothes, walls, floor, and surrounding objects due to abnormal vibration. •Remove the stuffing from pillows and cushions before washing the covers. Failure to do so can cause excessive vibration, resulting in damage to the washer, clothes, nearby objects, walls, and floor.
Grouping Similar ItemsFor the best washing results, and to reduce the possibility of damage to clothing, care should be taken to sort the clothing into loads that are made up of similar items.Mixing different fabric types and/or soil levels can result in poor wash performance, color transfer, discoloration, fabric damage or linting. Fabrics should be sorted into groups as described below.
ColorsSort articles by color. Wash dark clothes together in a separate load from light colors or whites. Mixing dark clothes with light clothes can result in dye transfer or discoloration of the lighter clothes.
Soil LevelWash heavily soiled clothing together. Washing lightly soiled clothing in the same load with heavily soiled clothing could result in poor wash performance for the lightly soiled clothing.
Fabric TypeDelicate articles should not be mixed with heavy or sturdy fabric types. Washing heavy fabrics in a delicate load can result in poor wash performance for the heavy fabrics and possible damage to the delicates.
Lint TypeSome fabrics attract and bind lint to them while others give off lint in the laundry process. Avoid mixing these lint collectors and lint producers in the same load. Mixing these fabrics will result in pilling and linting on the lint collectors. (For example, lint collector—knit sweater; lint producer—terry cloth towels.)
Sort Laundry
By colors By Soil By Fabric By Lint
White Heavy Delicates Lint Producer
Lights Normal Easy Care Lint Collector
Darks Light Sturdy
Fabric Care LabelsMany articles of clothing include a fabric care label. Using the chart below, adjust the cycle and option selections to care for your clothing according to the manufacturer’s recommendations.
Category Label Directions
Washing
Hand wash
Machine wash, Normal cycle
Perm Press/Wrinkle Resistant setting (which has a cool down or cold spray before the slower spin)
Gentle/Delicate setting (slow agitation and/or reduced wash time)
Do not wash
Do not wring
Water Temperature
Hot
Warm
Cold/Cool
Bleach Symbols
Any bleach (when needed)
Only non-chlorine bleach (when needed)
Do not bleach

19OPERATIONEN
GLISH
Loading the Washer •Check and empty pockets. Paper clips, coins, matches, etc. can damage clothing and the washer. •Close zippers and hooks, and tie drawstrings to prevent snagging or tangling of clothes. •Pretreat heavily stained areas for best results. •Combine large and small items in a load. Load large items first. Large items should not be more than half of total load. •The washer can be fully loaded, but the drum should not be tightly packed with items. The door of the washer must close easily. •Do not wash single small items. Add 1-2 similar items to the load to prevent an out-of-balance load. •Wash thick, bulky items individually. Heavy blankets, comforters, bedspreads, or pet beds can get tangled or cause an unbalanced load if combined with other items. •Do not wash/spin waterproof items. Washing raincoats or sleeping bags may result in abnormal vibration or may cause the load to bounce, which could damage the drum. •Wash small, light items in a mesh bag. Items like underwear can get caught in the door seal, and a brassiere hook may damage other items or the drum. •Brush off heavy soil, dust, and hair from items before washing. Excess dirt or sand can abrade other fabrics and lead to poor wash performance. •For best performance, load clothes as shown.
1
32
4
- Load clothes loosely, and do not overfill the drum. Clothes need room to circulate in order to get clean.
- Do not press down on items while stacking them in the drum.
Adding Cleaning ProductsLoading the DispenserTo add detergent, bleach, and fabric softener to the automatic dispenser.
1 Open the detergent dispenser drawer.
2 Load the laundry products into the appropriate compartments. • If using a liquid detergent, make sure the liquid detergent cup is in place. • If using a powdered detergent, remove the liquid detergent cup and put the powder in the main wash detergent compartment. • If using detergent pods, place the pod in the drum before loading the laundry. Do not place liquid or powdered detergent pods in the dispenser.
Pre-washdetergent
compartment
Liquid detergent
cup
Liquid chlorine bleach compartment
Main wash detergent compartment
Liquid fabric softener compartment
3 Close the detergent dispenser drawer slowly before starting the cycle. •Slamming the detergent dispenser drawer may result in the detergent overflowing into another compartment or pouring into the tub earlier than programmed.
NOTE • It is normal for a small amount of water to remain in the dispenser compartments at the end of the cycle.

20 OPERATION
IMPORTANT: •Do not place or store laundry products, such as detergent, bleach, or liquid fabric softener, on top of your washer or dryer. Wipe up any spills immediately. These products can damage the machine's finish and controls.
Pre-Wash Detergent CompartmentAdd liquid or powdered detergent to this compartment when using the Pre-Wash option. Always use HE (High-Efficiency) detergent with your washer. •When using the Pre-Wash option, liquid detergent for the main wash needs to be loaded in the liquid detergent cup accessory in the main wash dispenser, to prevent it from being dispensed with the pre-wash detergent. •The amount of detergent added for the Pre-Wash option is 1/2 the amount recommended for the main wash cycle. For example, if the main wash cycle requires one measure of detergent, add 1/2 measure for the Pre-Wash option.
Main Wash Detergent CompartmentThis compartment holds laundry detergent for the main wash cycle. Either powdered or liquid detergent may be used in this compartment. The detergent is added to the load at the beginning of the cycle. Always use HE (High-Efficiency) detergent with your washer.
NOTE •Never exceed the manufacturer’s recommendations when adding detergent. Using too much detergent can result in detergent buildup in clothing and the washer. • Liquid or powdered color-safe bleach may be added to the main wash compartment with detergent of the same type. •When using liquid detergent, make sure the liquid detergent cup and insert are in place. Do not exceed the maximum fill line. •When using powdered detergent, remove the insert and liquid detergent cup from the compartment. Powdered detergent will not dispense with the liquid detergent cup and insert in place. • If you use a detergent that does not dissolve easily or a detergent with high viscosity, it will leave a residue and may clog on the dispenser.
Liquid Bleach CompartmentThis compartment holds liquid bleach, which is dispensed automatically at the proper time during the wash cycle. The dispenser is activated twice to ensure complete dispensing of the bleach. Any liquid remaining in the dispenser at the end of the cycle is water, not bleach. •Do not add powdered bleach to this compartment. The bleach compartment is designed to dispense liquid chlorine bleach only. Powdered or liquid color-safe bleach will not dispense properly. •Always follow the manufacturer's recommendations when adding bleach. Never add more than one cup and do not exceed the maximum fill line since this can cause the bleach to be dispensed immediately, resulting in damage to fabrics. Using too much bleach can damage fabrics. •Never pour undiluted liquid chlorine bleach directly onto the load or into the drum. Fabric damage can occur. •Do not use color-safe bleach or Oxi products in the same cycle with liquid chlorine bleach.
WARNING •Do NOT mix chlorine bleach with ammonia or acids such as vinegar or rust/scale remover. Mixing chemicals like these can produce a lethal gas, resulting in severe injury or death.

21OPERATIONEN
GLISH
Fabric Softener CompartmentThis compartment holds liquid fabric softener, which is automatically dispensed during the final rinse cycle. Do not exceed the manufacturer’s recommendations when adding softener. Using too much fabric softener can result in buildup in clothing and the washer. Either powdered or liquid fabric softener may be used. •Follow the manufacturer’s recommendations when adding fabric softener. Do not exceed the maximum fill line. Using too much fabric softener may stain clothes. •Dilute concentrated fabric softeners with warm water. Do not exceed the maximum fill line. •Never pour fabric softener directly onto the load or into the drum.
Detergent UseThis washer is designed for use with only HE (High-Efficiency) detergents. HE detergents produce fewer suds, dissolve more efficiently to improve washing and rinsing performance, and help to keep the interior of the washer clean. Using detergent that is not HE may cause oversudsing and unsatisfactory performance which could result in error codes, cycle failure, and machine damage.
Designed specially to use only HE (High-Efficiency) detergent
•For proper wash performance, always measure detergent using the measuring device provided by the detergent manufacturer. For an average load, use less than half of the recommended maximum. Use less detergent for soft water, light soil, or smaller loads. •Never use more than the maximum amount of detergent recommended by the manufacturer. Using too much detergent can lead to oversudsing, poor rinsing, detergent buildup in clothing, and residue buildup that can contribute to odors in the machine. •Use extra care when measuring 2X and 3X concentrated detergents because even a small amount extra can lead to problems. •Detergents designated as HE-compatible may not provide optimal results.
•Do not use more than one detergent pod in the washer. Using too much detergent may cause oversudsing and unsatisfactory performance. Reduce detergent amount or add an extra rinse if detergent residue is left on fabrics. To add an extra rinse, press the Extra Rinse button.
Liquid detergent
Maximum
Normal Load Amount
Powdered detergent
Detergent PodsPlace liquid or powdered detergent pods in the drum before loading laundry. Do not place pods in the dispenser.

22 OPERATION
Control Panel5 6
Control Panel FeaturesPower On/Off ButtonPress to turn the washer on. Press again to turn the washer off. Pressing the Power button during a cycle will cancel that cycle and any load settings will be lost. The door will unlock after a brief pause.
Cycle Selector KnobTurn this knob to select the desired cycle. Once the desired cycle has been selected, the standard presets will be shown in the display. These settings can be adjusted using the cycle modifier buttons any time before starting the cycle. • To protect your clothing, not all settings are available on all cycle selections.
Start/Pause ButtonPress this button to start the selected cycle. If the washer is running, use this button to pause the cycle without losing the current settings. • If Start/Pause is not pressed within 60 minutes of selecting a cycle, the washer automatically turns off and all cycle settings are lost.
1
2
3
Cycle Modifier ButtonsUse these buttons to adjust the water temperature, spin speed and soil level settings for the selected cycle. The current settings are shown in the display. Press the button for that option to select other settings.
Special Cycle and Option ButtonsPress these buttons to select special cycles or additional cycle options. Certain buttons also allow you to activate special functions by pressing and holding the button for three seconds.
Time and Status DisplayThe display shows the settings, estimated time remaining, options, and status messages for your washer. When the washer is turned on, the default settings in the display will illuminate.
4
5
6

23OPERATIONEN
GLISH
Time and Status Display
Cycle Status IndicatorThese LEDs illuminates when a cycle is selected to indicate which stages runs. When a cycle is running, the LED for the active stage blinks, and the LEDs for the remaining stages remain steady. Once a stage is complete, the LED turns off. If a cycle is paused, the active stage LED stops blinking.
Door Lock IndicatorThe Door Lock indicator will light up once a cycle has started. The indicator light will stay on until the cycle is paused, stopped or has finished.
Control Lock IndicatorWhen the control lock function is activated, the LED lights up. When the control lock function is set, all controls are disabled except for the Power button. Once the control lock function is disabled, the LED turns off.
Estimated Time RemainingWhen a cycle is selected, the default time for that cycle is displayed. This time will change as modifiers or options are selected. Once the Start/Pause button is pressed, the washer will measure the size of the load. The estimated time may change once the load size has been measured. If Delay Wash is set, the remaining delay time counts down until the cycle begins.
NOTE • The time shown is only an estimate. This time is based on normal operating conditions. Several external factors (load size, room temperature, incoming water temperature, etc.) can affect the actual time.
1
2
3
4

24 OPERATION
Wash CyclesWash cycles are designed for the best wash performance for each type of load. Select the cycle that best matches the load contents for maximum wash performance and fabric care. See the Sorting Laundry section for best results, follow the fabric care labels on your garments. For a guide to fabric care symbols, see the Sorting Laundry section.Press the button to select the desired cycle. When you select a wash cycle, the light for the corresponding wash cycle will turn on.
NOTE •Whenever load weights are mentioned, assume 1 lb (0.45 kg) = 1 thick bath towel (dry). •For information on using LG SmartThinQ applications to save energy, see the SMART FUNCTIONS section.
Choosing by Wash Cycle Description
Fabric Type
Normal
Use this cycle to wash all normal items, except delicate fabrics such as wool or silk.
NOTE: Pressing the Start/Pause button without selecting a cycle will cause the Normal cycle to begin immediately, using the default settings.
Bright Whites™ This cycle is for washing white items only. (less than 15 lb. (6.8 kg))
Perm.Press Use this cycle to wash wrinkle-free clothes or tablecloths, to minimize wrinkles.
Delicates This cycle is for washing lingerie or sheer and lacy clothes which can easily be damaged.
Towels Use this cycle for washing towels, shirts, jeans and mixed loads.
Load Size
Normal
If you have a mixed load that is half-size, use the Normal cycle with default settings. For full-size loads, use the Normal cycle with the soil level set to heavy, and add an extra rinse. In both cases, the machine will automatically detect the load size and adjust accordingly.
Bedding
This cycle is for washing king or queen sized comforters.
NOTE: Use the Bedding cycle with a low spin speed when washing waterproof or water-resistant items, to help protect the fabrics’ properties. If your washer does not function properly, manually redistribute the load or put one comforter in at a time.
Speed Wash
Use the Speed Wash cycle to quickly wash lightly soiled clothing and small loads. For high wash and rinse efficiency, wash small loads of 2-3 lightly soiled garments(less than 3 lb. (1.36 kg)).
NOTE:Use very little detergent in this cycle. To add an extra rinse, use the Extra Rinse button.

25OPERATIONEN
GLISH
Choosing by Wash Cycle Description
Convenience
Tub Clean Use this cycle to clean the drum of your washer. See the Maintenance section.
Speed Wash
Use the Speed Wash cycle to quickly wash lightly soiled clothing and small loads. For high wash and rinse efficiency, wash small loads of 2-3 lightly soiled garments(less than 3 lb. (1.36 kg)).
NOTE:Use very little detergent in this cycle. To add an extra rinse, use the Extra Rinse button.
Downloaded
If you download a cycle using the function, it will be placed in the Downloaded cycle position. Choose the Downloaded cycle to run the new cycle.
NOTE: The default cycle for this position is Small Load, used for normally soiled loads with just a few items. The Small Load cycle is also available for download.
Soil Level
Normal For tough stains on children's clothes, use the Normal cycle with a hot Wash Temp. setting, plus the Pre Wash option and an Extra Rinse.
Heavy Duty This cycle is for washing heavily soiled laundry using more powerful wash motions.
Sanitary This wash cycle reduces 99% of bacteria on laundry through high temperature.
Allergiene™
This cycle is a powerful, high-temperature cycle designed specifically to reduce certain allergens.
NOTE:
Selecting the Allergiene™ cycle automatically incorporates steam into the wash cycle.
The Allergiene™ cycle can significantly reduce allergens in bedding and clothing.
The Allergiene™ cycle helps reduce dust mite populations and helps reduce allergens. Due to the higher energy and temperatures used, the Allergiene™ cycle is not recommended for wool, silk, leather, or any other delicate or temperature sensitive items.

26 OPERATION
Cycle Guide
Cycle Cycle Modifiers Temp. Spin Soil Delay
WashExtra Rinse
Fresh Care
Normal
Extra Hot Extra High Heavy
Steam Hot High ▲
Cold Wash Warm Medium Normal
Pre Wash Cold Low ▲
Tap Cold No Spin Light
Heavy Duty
Extra Hot Extra High Heavy
Steam Hot High ▲
Cold Wash Warm Medium Normal
Pre Wash Cold Low ▲
Tap Cold No Spin Light
Bedding
Heavy
Steam Hot ▲
Cold Wash Warm Medium Normal
Pre Wash Cold Low ▲
Tap Cold No Spin Light
Sanitary
Extra Hot Extra High Heavy
Steam High ▲
Medium Normal
Pre Wash Low ▲
No Spin Light
Allergiene™
Extra HighSteam High
Medium
Low
No Spin
Tub Clean
Steam
= available option, = default setting

27OPERATIONEN
GLISH
Cycle Cycle Modifiers Temp. Spin Soil Delay
WashExtra Rinse
Fresh Care
Bright Whites™
Extra High Heavy
Steam Hot High ▲
Warm Medium Normal
Pre Wash Cold Low ▲
Tap Cold No Spin Light
Perm.Press
Heavy
Hot High ▲
Cold Wash Warm Medium Normal
Pre Wash Cold Low ▲
Tap Cold No Spin Light
Delicates
Heavy
▲
Cold Wash Warm Medium Normal
Pre Wash Cold Low ▲
Tap Cold No Spin Light
Towels
Extra High Heavy
Hot High ▲
Cold Wash Warm Medium Normal
Pre Wash Cold Low ▲
Tap Cold No Spin Light
Speed Wash
Extra High HeavyHot High ▲
Cold Wash Warm Medium Normal
Cold Low ▲
Tap Cold No Spin Light
Downloaded
Default: Small Load
Extra High Heavy
Hot High ▲
Cold Wash Warm Medium Normal
Pre Wash Cold Low ▲
Tap Cold No Spin Light
= available option, = default setting

28 OPERATION
Cycle Modifier ButtonsEach cycle has default settings that are selected automatically. Customize these settings using the cycle modifier buttons. Press the button for the desired modifier to toggle through the available settings. The washer automatically adjusts the water level for the type and size of wash load for best results and maximum efficiency. Due to the high-efficiency nature of this product, water levels may be much lower than expected. This is normal and cleaning/rinsing performance will not be compromised.
Temp.Temp. selects the wash and rinse temperature combination for the selected cycle. Press the Temp. button until the indicator light for the desired setting is lit. All rinses use tap cold water .Cold rinses use less energy. The actual cold rinse temperature depends on the temperature of the cold water at the faucet.Your washer features a heating element to boost the hot water temperature for Extra Hot settings. This provides improved wash performance at normal water heater settings. •Select the water temperature suitable for the type of load you are washing. Follow the garment fabric care labels for best results.
SpinHigher spin speeds extract more water from clothes, reducing drying time and saving energy. Press the Spin button until the desired speed is selected. Some fabrics, such as delicates, require a slower spin speed. To protect your clothing, not all spin speeds are available for all cycles. •The Spin button also activates the Drain+Spin cycle to drain the tub and spin clothes; for example, if you want to remove clothes before the cycle has ended. To use Drain+Spin, press the Power button, then press the Spin button repeatedly to select a spin speed. Press the Start/Pause button to begin.
SoilAdjusting the soil level setting will modify the cycle times and/or wash actions. Press the Soil button until the desired soil level is selected. •This feature needs more time for heavily soiled loads or less time for lightly soiled loads.
SignalThe washer plays a melody when the wash cycle is finished. The buttons make a sound each time a button is pressed. Use this option to adjust the volume of the melody and button tones.

29OPERATIONEN
GLISH
Option ButtonsYour washer features several additional cycle options that customize cycles to meet your individual needs. To use these options, select the desired option after selecting the desired cycle.After selecting the desired cycle and settings, press the cycle option button(s) for the option(s) you would like to add. The button will light when that option is selected. If the selected option is not allowed for the selected cycle, the chime will sound twice to alert you and the LED will not illuminate.
NOTE •To protect your garments, not every feature is available with every cycle. • If the Start/Pause button is not pressed within 60 minutes to start the cycle, the control will shut off and all settings will be lost.
SteamAdding the Steam option to a wash cycle helps provide superior cleaning performance. By using hot steam, the fabrics will get the cleaning benefits of a very hot wash.
NOTE •The Steam option cannot be used with all cycles. •Steam may not be clearly visible during the steam cycles. This is normal. Too much steam could damage clothing. •Do not use steam with delicate fabrics such as wool, silk, or easily discolored fabrics.
WARNING •Do not touch the door during steam cycles. The door surface can become very hot. Allow the door lock to release before opening the door. •Do not attempt to override the door lock mechanism or reach into the washer during a steam cycle. Steam can cause severe burns.
Fresh CareUse this function when you won't be able to unload your clothes immediately after the wash cycle ends. After the cycle ends, the drum will tumble periodically for up to 19 hours to prevent wrinkles.
1 Press and hold the Fresh Care button for 3 seconds.
2 Press the Start/Pause or Power button at any time to unload laundry.
Pre WashA 15-minute prewash for clothes that are covered in dirt or dust. This feature is suitable for heavily soiled items.
Delay WashOnce you have selected the cycle and other settings, press this button to delay the start of the wash cycle. Each press of the button increases the delay time by 1 hour, for up to 19 hours. Once the desired delay time is set, press the Start/Pause button to start the delay time.
NOTE • If the Start/Pause button is not pressed to begin the delay time, the washer will automatically shut off after 60 minutes and all cycle settings will be lost.

30 OPERATION
Add GarmentsUse this function to add garments or remove foreign objects like coins or keys after the cycle has started.
1 Press Add Garments. The cycle pauses and the door unlocks.
2 Open the door, add garments or remove foreign objects, and close the door.
3 Press the Start/Pause button to start the cycle. The cycle continues automatically.
NOTE •After checking the water level/temperature conditions for safety, the door unlocks once the wash movement has stopped. (Door Lock LED turns off.) • If the water level is too high, the door will not unlock, and the Add Garments option cannot be used. • If the temperature in the tub is higher than 113 °F (45 °C), a short warning chime sounds and Add Garments is not allowed for safety. •Add Garments is disabled during the Tub Clean cycle or while a cycle is in Spin mode for safety. •To preserve wash performance, wash time may be extended depending on when garments are added to a cycle.
WARNING •Be careful when opening the door as wet laundry may drip or fall out when the door is opened. •Do not attempt to force the door to open when locked. Doing so could result in damage to the machine, malfunction, or personal injury.
Cold WashThis option saves energy by using cooler water while increasing the wash and rinse times to maintain wash performance.
NOTE •Wash time will increase up to several minutes with the Cold Wash option. •For best wash results, only wash small loads (less than 8 lb) with the Cold Wash option.
Extra RinseThis option will add an extra rinse to the selected cycle. Use this option to help ensure the removal of detergent or bleach residue from fabrics. Liquid fabric softener, if used, is always dispensed in the final rinse. Pressing the Extra Rinse button twice will add two additional rinses to the cycle.
Rinse+SpinSelect this cycle to rinse and spin a load separately from a regular cycle. This can be helpful in preventing fresh stains from setting in fabrics. You can change the spin speed by pressing the Spin button.
1 Press the Power button to turn on the washer.
2 Press the Rinse+Spin button.
3 Press the Start/Pause button to start the cycle.
Control LockUse this option to disable the controls. This feature can prevent children from changing cycles or operating the machine. The feature does not lock the door. Once the Control Lock is set, it must be deactivated before any controls, except the Power button, can be used. Once the washer has shut off, the Power button will allow the machine to be turned on, but the controls will still be locked. When the controls are locked, will display alternately with the estimated time remaining.
Locking/Unlocking the Control PanelPress and hold the Control Lock button for 3 seconds.
NOTE •Turning off the power will not reset the Control Lock function. You must deactivate Control Lock before you can access any other functions. •When Control Lock is turned on, you cannot operate any buttons except the Power button.

31SMART FUNCTIONSEN
GLISH
SMART FUNCTIONSLG SmartThinQ ApplicationThe LG SmartThinQ application allows you to communicate with the appliance using a smartphone.
Before Using LG SmartThinQ •For appliances with the or logo
1 Use a smartphone to check the strength of the wireless router (Wi-Fi network) near the appliance. • If the distance between the appliance and the wireless router is too far, the signal strength becomes weak. It may take a long time to register or installation may fail.
2 Turn off the Mobile data or Cellular Data on your smartphone.
3 Connect your smartphone to the wireless router.
NOTE •To verify the Wi-Fi connection, check that Wi-Fi icon on the control panel is lit. •The appliance supports 2.4 GHz Wi-Fi networks only. To check your network frequency, contact your Internet service provider or refer to your wireless router manual. • LG SmartThinQ is not responsible for any network connection problems or any faults, malfunctions, or errors caused by network connection. •The surrounding wireless environment can make the wireless network service run slowly.
• If the appliance is having trouble connecting to the Wi-Fi network, it may be too far from the router. Purchase a Wi-Fi repeater (range extender) to improve the Wi-Fi signal strength. •The network connection may not work properly depending on the Internet service provider. •The Wi-Fi connection may not connect or may be interrupted because of the home network environment. • If the appliance cannot be registered due to problems with the wireless signal transmission, unplug the appliance and wait about a minute before trying again. • If the firewall on your wireless router is enabled, disable the firewall or add an exception to it. •The wireless network name (SSID) should be a combination of English letters and numbers. (Do not use special characters.) •Smartphone user interface (UI) may vary depending on the mobile operating system (OS) and the manufacturer. • If the security protocol of the router is set to WEP, network setup may fail. Change the security protocol (WPA2 is recommended), and register the product again.
Installing the LG SmartThinQ ApplicationSearch for the LG SmartThinQ application from the Google Play Store or Apple App Store on a smart phone. Follow instructions to download and install the application.

32 SMART FUNCTIONS
LG SmartThinQ Application Features •For appliances with the or logo
Washer Cycle (Remote Start, Downloaded)Set or download any preferred cycle and operate by remote control.
Tub Clean CoachThis function shows how many cycles remain before it is time to run the Tub Clean cycle.
Smart Diagnosis™This function provides useful information for diagnosing and solving issues with the appliance based on the pattern of use.
Energy MonitoringThe washer energy usage is affected by the cycles and options so you may see some changes in energy usage from one cycle to another.
Push AlertsWhen the cycle is complete or the appliance has problems, you have the option of receiving push notifications on a smart phone.
SettingsSet the product nickname and delete product.
NOTE • If you change your wireless router, Internet service provider, or password, delete the registered appliance from the LG SmartThinQ application and register it again. •This information is current at the time of publication. The application is subject to change for product improvement purposes without notice to users.
Using Washer CycleRemote StartUse a smart phone to control the appliance remotely or check to see how much time is left in the cycle.
Using Remote Start
1 Press the Power button.
2 Load the laundry.
3 Press and hold Remote Start button for 3 seconds to enable the Remote Start function.
4 Start a cycle from the LG SmartThinQ application on your smart phone.
NOTE •Once the Remote Start mode is enabled, you can start a cycle from the LG SmartThinQ smartphone application. If the cycle is not started, the machine will wait to start the cycle until it is turned off remotely from the application or the Remote Start mode is disabled. •When Remote Start is turned on, the door is automatically locked.
Disabling Remote StartWhen the Remote Start is activated, press and hold the Remote Start button for 3 seconds.
DownloadedDownload new and specialized cycles that are not included in the standard cycles on the appliance.Appliances that have been successfully registered can download a variety of specialty cycles specific to the appliance.Only one cycle can be stored on the appliance at a time.Once cycle download is completed in the appliance, the appliance keeps the downloaded cycle until a new cycle is downloaded.

33SMART FUNCTIONSEN
GLISH
Wireless LAN Module SpecificationsThe FCC ID number on the product’s rating label indicates which module is installed.(For example, LCW-004 refers to the FCC ID number BEJ-LCW004.)
Model LCW-004
Frequency Range 2412 - 2462 MHz
Output Power (Max) < 30 dBm
Model LCW-007
Frequency Range 2412 - 2462 MHz
Output Power (Max) < 30 dBm
FCC Notice (For transmitter module contained in this product)This equipment has been tested and found to comply with the limits for a Class B digital device, pursuant to Part 15 of the FCC Rules. These limits are designed to provide reasonable protection against harmful interference in a residential installation. This equipment generates, uses, and can radiate radio frequency energy and, if not installed and used in accordance with the instructions, may cause harmful interference to radio communications. However, there is no guarantee that interference will not occur in a particular installation. If this equipment does cause harmful interference to radio or television reception, which can be determined by turning the equipment off and on, the user is encouraged to try to correct the interference by one or more of the following measures: •Reorient or relocate the receiving antenna. • Increase the separation between the equipment and the receiver. •Connect the equipment to an outlet on a circuit different from that to which the receiver is connected. •Consult the dealer or an experienced radio/TV technician for help.
This device complies with part 15 of the FCC Rules. Operation is subject to the following two conditions:1) This device may not cause harmful interference and2) This device must accept any interference received, including interference that may cause undesired operation of the device.Any changes or modifications in construction of this device which are not expressly approved by the party responsible for compliance could void the user’s authority to operate the equipment.
FCC RF Radiation Exposure StatementThis equipment complies with FCC radiation exposure limits set forth for an uncontrolled environment. This transmitter must not be co-located or operating in conjunction with any other antenna or transmitter.This equipment should be installed and operated with a minimum distance of 20 cm (7.8 inches) between the antenna and your body. Users must follow the specific operating instructions for satisfying RF exposure compliance.
Industry Canada Statement (For transmitter module contained in this product)This device contains licence-exempt transmitter(s)/receiver(s) that comply with Innovation, Science and Economic Development Canada’s licence-exempt RSS(s). Operation is subject to the following two conditions:1) This device may not cause interference.2) This device must accept any interference, including interference that may cause undesired operation of the device.
IC Radiation Exposure StatementThis equipment complies with IC radiation exposure limits set forth for an uncontrolled environment.This equipment should be installed and operated with a minimum distance of 20 cm (7.8 inches) between the antenna and your body.
NOTE •THE MANUFACTURER IS NOT RESPONSIBLE FOR ANY RADIO OR TV INTERFERENCE CAUSED BY UNAUTHORIZED MODIFICATIONS TO THIS EQUIPMENT. SUCH MODIFICATIONS COULD VOID THE USER’S AUTHORITY TO OPERATE THE EQUIPMENT.
Open Source Software Notice InformationTo obtain the source code under GPL, LGPL, MPL, and other open source licenses, that is contained in this product, please visit http://opensource.lge.com. In addition to the source code, all referred license terms, warranty disclaimers and copyright notices are available for download.LG Electronics will also provide open source code to you on CD-ROM for a charge covering the cost of performing such distribution (such as the cost of media, shipping, and handling) upon email request to [email protected]. This offer is valid for a period of three years after our last shipment of this product. This offer is valid to anyone in receipt of this information.

34 SMART FUNCTIONS
Smart Diagnosis™ FunctionShould you experience any problems with the appliance, it has the capability of transmitting data via your telephone to the LG Customer Information Center. NFC or Wi-Fi equipped models can also transmit data to a smartphone using the LG SmartThinQ application.
Smart Diagnosis™ through the Customer Information Center •For appliances with the or logo
This method allows you to speak directly to our trained specialists. The specialist records the data transmitted from the appliance and uses it to analyze the issue, providing a fast and effective diagnosis.
1 Call the LG Electronics Customer Information Center at:(LG U.S.A.) 1-800-243-0000(LG Canada) 1-888-542-2623
2 When instructed to do so by the call center, place the mouthpiece of the phone close to the Smart Diagnosis™ icon. Do not press any other buttons.
3 Press and hold Temp. button for three seconds.
4 Keep the phone in place until the tone transmission has finished. •For best results, do not move the phone while the tones are being transmitted. • If the call center agent is not able to get an accurate recording of the data, you may be asked to try again.
5 Once the countdown is over and the tones have stopped, resume your conversation with the call center agent, who will then be able to assist you using the information transmitted for analysis.
NOTE •Smart Diagnosis™ cannot be activated unless the appliance can be turned on using the Power button. If the appliance cannot be turned on, troubleshooting must be done without using Smart Diagnosis™. •For best results, do not move the phone while the tones are being transmitted. • If the call center agent is not able to get an accurate recording of the data, you may be asked to try again. •The Smart Diagnosis™ function depends on the local call quality. •Bad call quality may result in poor data transmission from your phone to the call center, which could cause Smart Diagnosis™ to malfunction.
LG SmartThinQ Smart Diagnosis™ •For appliances with the or logo
Use the Smart Diagnosis feature in the LG SmartThinQ application for help diagnosing issues with the appliance without the assistance of the LG Customer Information Center.Follow the instructions in the LG SmartThinQ application to perform a Smart Diagnosis using your smartphone.
NOTE •Smart Diagnosis™ cannot be activated unless the appliance can be turned on using the Power button. If the appliance cannot be turned on, troubleshooting must be done without using Smart Diagnosis™.

35MAINTENANCEEN
GLISH
MAINTENANCEWARNING
To reduce the risk of fire, electric shock, or injury to persons, read this entire owner's manual, including the Important Safety Instructions, before operating this washer. •Unplug the washer before cleaning to avoid the risk of electric shock. Failure to follow this warning can cause serious injury, fire, electric shock, or death. •Do not use volatile substances (benzene, paint thinner, alcohol, acetone, etc.), abrasive cleaners, or detergents with strong chemical components when cleaning the washer. Doing so may cause discoloration or damage to the machine, or may cause a fire. •Certain internal parts are intentionally not grounded and may present a risk of electric shock only during servicing. Service personnel - Do not contact the following parts while the appliance is energized: pump, valve, motor, control board.
Regular CleaningCare After WashAfter the cycle is finished, wipe the door and the inside of the door seal to remove any moisture. • Leave the door open to dry the drum interior. •Wipe the body of the washer with a dry cloth to remove any moisture.
Cleaning the ExteriorProper care of your washer can extend its life.
Door:Wash with a damp cloth on the outside and inside and then dry with a soft cloth.
Exterior: • Immediately wipe off any spills. •Wipe with a damp cloth. •Do not touch the surface or the display with sharp objects.
Care and Cleaning of the Interior •Use a towel or soft cloth to wipe around the washer door opening and door glass. •Always remove items from the washer as soon as the cycle is complete. Leaving damp items in the washer can cause wrinkling, color transfer, and odor. •Run the Tub Clean cycle once a month, or more often if needed, to remove detergent buildup and other residue.
Cleaning the DrumOver time, residue may build up in the drum, leading to mildew or a musty odor. Run the Tub Clean cycle monthly to remove residue and prevent odor. Run the cycle more often under heavy use conditions or if odor is already present.
1 Remove any clothing from the drum.
2 Add cleaning agents.
Cleaner InstructionsDrum cleaner Add to main detergent
compartment of detergent dispenserLime scale remover
Liquid chlorine bleach
Add to bleach compartment of detergent dispenser
Powdered cleanerPull out liquid detergent cup before adding to main detergent compartment
Cleaning tablets Place directly into washer drum
•For other drum cleaning products, follow the cleaner manufacturer’s instructions and recommendations. •Do not exceed the maximum fill line when adding bleach or powdered cleaners. Powdered detergent may remain in the drum after cleaning.
3 Close the door and press the Power button to turn the washer on.
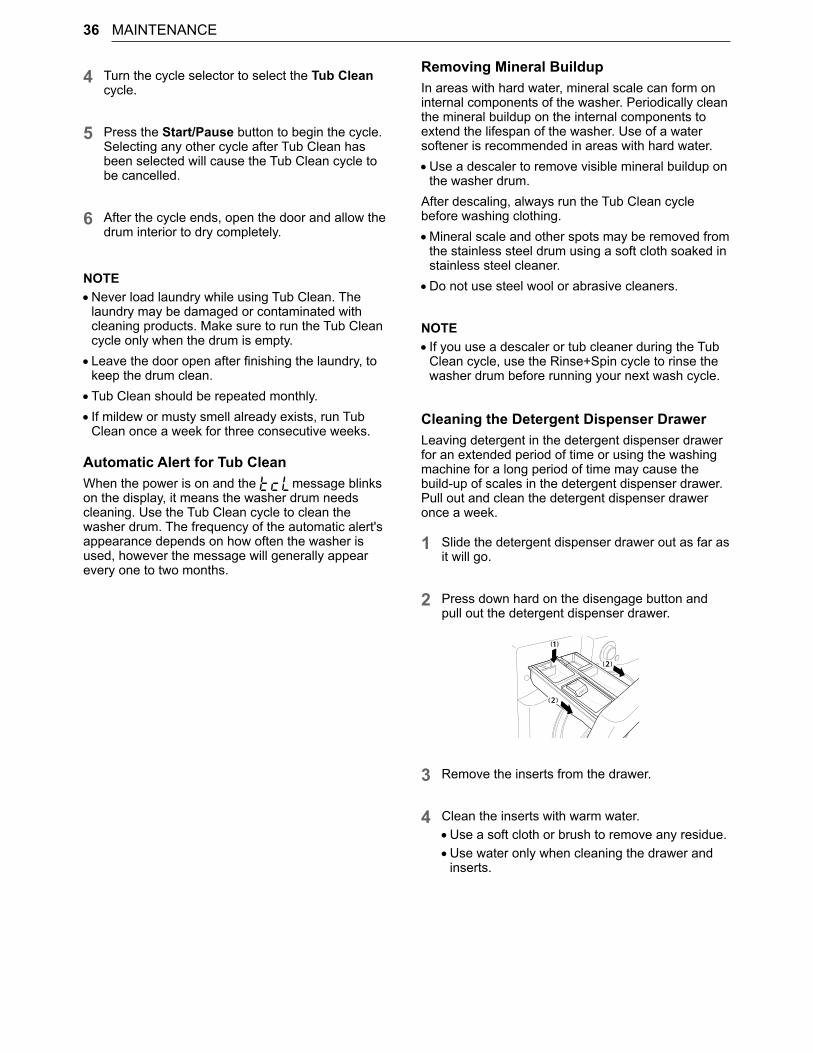
36 MAINTENANCE
4 Turn the cycle selector to select the Tub Clean cycle.
5 Press the Start/Pause button to begin the cycle. Selecting any other cycle after Tub Clean has been selected will cause the Tub Clean cycle to be cancelled.
6 After the cycle ends, open the door and allow the drum interior to dry completely.
NOTE •Never load laundry while using Tub Clean. The laundry may be damaged or contaminated with cleaning products. Make sure to run the Tub Clean cycle only when the drum is empty. • Leave the door open after finishing the laundry, to keep the drum clean. •Tub Clean should be repeated monthly. • If mildew or musty smell already exists, run Tub Clean once a week for three consecutive weeks.
Automatic Alert for Tub CleanWhen the power is on and the message blinks on the display, it means the washer drum needs cleaning. Use the Tub Clean cycle to clean the washer drum. The frequency of the automatic alert's appearance depends on how often the washer is used, however the message will generally appear every one to two months.
Removing Mineral BuildupIn areas with hard water, mineral scale can form on internal components of the washer. Periodically clean the mineral buildup on the internal components to extend the lifespan of the washer. Use of a water softener is recommended in areas with hard water. •Use a descaler to remove visible mineral buildup on the washer drum.
After descaling, always run the Tub Clean cycle before washing clothing. •Mineral scale and other spots may be removed from the stainless steel drum using a soft cloth soaked in stainless steel cleaner. •Do not use steel wool or abrasive cleaners.
NOTE • If you use a descaler or tub cleaner during the Tub Clean cycle, use the Rinse+Spin cycle to rinse the washer drum before running your next wash cycle.
Cleaning the Detergent Dispenser DrawerLeaving detergent in the detergent dispenser drawer for an extended period of time or using the washing machine for a long period of time may cause the build-up of scales in the detergent dispenser drawer. Pull out and clean the detergent dispenser drawer once a week.
1 Slide the detergent dispenser drawer out as far as it will go.
2 Press down hard on the disengage button and pull out the detergent dispenser drawer.
3 Remove the inserts from the drawer.
4 Clean the inserts with warm water. •Use a soft cloth or brush to remove any residue. •Use water only when cleaning the drawer and inserts.

37MAINTENANCEEN
GLISH
5 Wipe off any moisture with a dry towel or cloth after cleaning.
6 Replace the detergent dispenser drawer.
WARNING •Do not spray water inside the cabinet. Doing so may cause fire or electric shock.
Cleaning the Door SealClean the door seal once a month to prevent build-up of dirt.
1 Wear rubber gloves and protective goggles.
2 Dilute 3/4 cup (177 ml) of liquid chlorine bleach in 1 gallon (3.8 L) of water.
3 Wipe around the door seal.Soak a sponge or a soft cloth in this diluted solution and wipe all around the door seal.
4 Wipe dry.After cleaning, wipe up any moisture with a dry towel or cloth.
5 Leave the door open to allow the door seal to dry completely.
CAUTION •Cleaning the door seal with undiluted bleach may cause malfunction of the door seal and washer parts. You must add water to the bleach before using it.
Cleaning the Water Inlet FiltersIf the washer does not fill properly, an error message will show on the display. The inlet valve filter screens could be plugged by hard water scale, sediment in the water supply, or other debris.
CAUTION •The inlet screens protect the delicate parts of the inlet valve from being damaged by particles that could enter the valves with the water supply. Operating the washer with these filters removed could cause a valve to stick open resulting in flooding and/or property damage • If you use the washer in an area with hard water, the inlet filter may clog due to lime buildup.
1 Turn off both water faucets completely.
2 Unscrew the hot and cold water hoses from the back of the washer.
3 Carefully remove the filters from the water valves.
4 Remove foreign objects and soak the filters in white vinegar or a lime scale remover.If using a lime scale remover, follow the manufacturer’s instructions. Be careful not to damage the filters while cleaning them.
5 Rinse filters thoroughly and press them back into place.
6 Flush then reattach the water hoses.Before reattaching the hoses, flush the hoses and water lines by running several gallons of water into a bucket or drain, preferably with the faucets wide open for maximum flow.
NOTE •An message may blink on the display when the water pressure is weak or an inlet filter is clogged with dirt. Clean the inlet filter.

38 MAINTENANCE
Cleaning the Drain Pump FilterThe washer fails to drain if the drain pump filter is clogged. Periodically clean the drain filter to prevent clogging with foreign objects.
WARNING •Opening the drain filter will result in water overflowing if there is water in the washer drum. Use a bucket if the drum is not completely drained before you open the drain filter. •Using the washer without the drain filter or with an incorrectly assembled drain filter may cause leaks or malfunctioning of the washer.
1 Turn off the machine and unplug it.
2 Open the drain pump filter cover.
3 Drain any remaining water.Unclip the drain hose and remove the plug from the drain hose to drain the remaining water.
4 Remove the pump filter.Twist the pump filter counterclockwise to remove.
5 Clean the pump filter and opening.
6 Recap the plug onto the drain hose and attach the drain hose.
7 Insert the drain pump filter.
8 Close the drain pump filter cover.
NOTE •An message blinks on the display when the drain pump filter is clogged with dirt. Clean the drain pump filter.

39MAINTENANCEEN
GLISH
Care in Cold ClimatesStoring the WasherIf the washer will not be used for an extended period of time and is in an area that could be exposed to freezing temperatures, perform the following steps to protect the washer from damage.
1 Turn off the water supply.
2 Disconnect the hoses from the water supply and drain any water from the hoses.
3 Plug the power cord into a properly grounded electrical outlet.
4 Add 1 gallon of nontoxic recreational vehicle (RV) antifreeze to the empty drum and close the door. Never use automotive antifreeze.
5 Press the Power button, then select Spin.
6 Press the Start/Pause button to start the drain pump.
7 Allow the drain pump to run for one minute, then press the Power button to shut off the washer. This will expel some of the antifreeze, leaving enough to protect the washer from damage.
8 Unplug the power cord, dry the drum interior with a soft cloth, and close the door.
9 Remove the inserts from the dispenser. Drain any water in the compartments and let them dry.
10 Store the washer in an upright position.
11 To remove the antifreeze from the washer after storage, run a complete Speed Wash cycle using detergent. •Do not add laundry to this cycle.
When the Water Line is Frozen
1 Turn off the faucets connected to the water lines.
2 Pour hot water on the frozen faucets to thaw the water lines and remove them.
3 Immerse the water lines in hot water to thaw them.
4 Connect the water lines with the water inlets of the washer and with the faucets.See Connecting the Water Lines for details.
5 Turn on the faucets.
6 Press the Power button.
7 Press the Spin button.
8 Press the Start/Pause button. Verify the water fills properly.
When the Drain Line is Frozen
1 Pour hot water in the washer drum and close the lid. Wait for 1-2 hours.
2 Press the Power button after thawing.
3 Press the Spin button to select draining and spinning.
4 Press the Start/Pause button. Check to make sure the water drains.

40 TROUBLESHOOTING
TROUBLESHOOTINGFAQs: Frequently Asked Questions
Q: Why does my washer make loud banging noises while it is filling with water?
A: This is actually a problem with the plumbing in your home. When the water valve in the washer shuts off, it can cause pipes in your home to move, resulting in a loud banging noise. This effect, called water hammer, can be reduced by installing an item called a water hammer arrestor. Add-on arrestors can be purchased through your local hardware or home improvement store.
Q: Why is there so little water in my washer? How can it clean the clothes?
A: HE (High-Efficiency) washers are designed to properly wash your laundry while using a minimum amount of water and energy. Because the water volume is low, the small amount of detergent used is more concentrated in the water, resulting in excellent cleaning performance.
Q: When I press a button, why does my washer beep and then nothing happens?
A: •The Control Lock feature is turned on. To turn off Control Lock, turn the washer on, then press and hold the button that has "*Control Lock" on or under it for three seconds. •Power or Signal is off.
Q: Where should I pour powdered laundry products when doing my laundry?
A: If you are using powdered laundry detergent, load it in the main detergent dispenser after removing the liquid detergent insert. Powdered laundry agents or powdered color safe bleach should be put directly into the tub. These products can be put in the empty tub before loading or on top of the laundry after loading the machine.
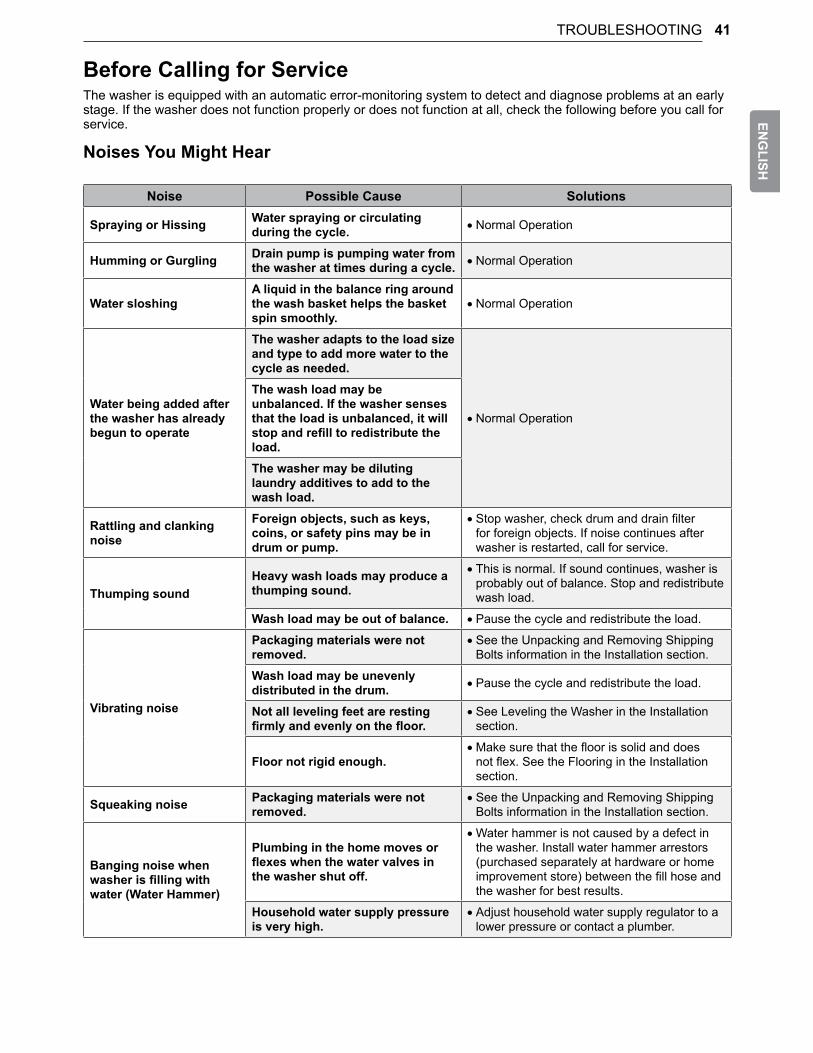
41TROUBLESHOOTINGEN
GLISH
Before Calling for ServiceThe washer is equipped with an automatic error-monitoring system to detect and diagnose problems at an early stage. If the washer does not function properly or does not function at all, check the following before you call for service.
Noises You Might Hear
Noise Possible Cause Solutions
Spraying or Hissing Water spraying or circulating during the cycle. • Normal Operation
Humming or Gurgling Drain pump is pumping water from the washer at times during a cycle. • Normal Operation
Water sloshingA liquid in the balance ring around the wash basket helps the basket spin smoothly.
• Normal Operation
Water being added after the washer has already begun to operate
The washer adapts to the load size and type to add more water to the cycle as needed.
• Normal Operation
The wash load may be unbalanced. If the washer senses that the load is unbalanced, it will stop and refill to redistribute the load.The washer may be diluting laundry additives to add to the wash load.
Rattling and clanking noise
Foreign objects, such as keys, coins, or safety pins may be in drum or pump.
• Stop washer, check drum and drain filter for foreign objects. If noise continues after washer is restarted, call for service.
Thumping soundHeavy wash loads may produce a thumping sound.
• This is normal. If sound continues, washer is probably out of balance. Stop and redistribute wash load.
Wash load may be out of balance. • Pause the cycle and redistribute the load.
Vibrating noise
Packaging materials were not removed.
• See the Unpacking and Removing Shipping Bolts information in the Installation section.
Wash load may be unevenly distributed in the drum. • Pause the cycle and redistribute the load.
Not all leveling feet are resting firmly and evenly on the floor.
• See Leveling the Washer in the Installation section.
Floor not rigid enough. • Make sure that the floor is solid and does not flex. See the Flooring in the Installation section.
Squeaking noise Packaging materials were not removed.
• See the Unpacking and Removing Shipping Bolts information in the Installation section.
Banging noise when washer is filling with water (Water Hammer)
Plumbing in the home moves or flexes when the water valves in the washer shut off.
• Water hammer is not caused by a defect in the washer. Install water hammer arrestors (purchased separately at hardware or home improvement store) between the fill hose and the washer for best results.
Household water supply pressure is very high.
• Adjust household water supply regulator to a lower pressure or contact a plumber.

42 TROUBLESHOOTING
Operation
Problem Possible Cause Solutions
Water leaking
Inlet hose connection is loose at faucet or washer.
• Check hoses for leaks, cracks and splits.
• Check and tighten hose connections.
House drain pipes are clogged.
• The washer pumps out water very rapidly. Check for water backing up out of the drain pipe during drain. If water is seen coming out of the drain, check for proper drain hose installation and check for restrictions in the drain. Contact a plumber to repair drain pipe.
Drain hose has come out of drain or is not inserted far enough.
• Tie drain hose to inlet hose or standpipe to prevent it from coming out during drain. For smaller drain pipes, insert the drain hose into the pipe as far as the drain hose flange. For larger drain pipes, insert the drain hose into the pipe 1-2 inches past the flange.
A large item such as a pillow or blanket is above the top of the drum.
• Use the Bedding cycle for large or bulky items. Use extra care and never wash more than half a load of items that float, such as pillows.
• Stop the washer and check the load. Make sure the load does not crest above the top edge of the drum.
Oversudsing of detergent.
• Oversudsing may create leaks, and may be caused by the type and amount of detergent used. High-Efficiency detergent is the only detergent recommended. The normal amount of detergent to use is 1/4 to 1/2 of the maximum amount recommended by the detergent manufacturer.
Water leaks every load Hoses not installed correctly. • See Connecting the Water Lines to reinstall hoses. Replace damaged hoses.
Washer will not drain water
Kinked drain hose. • Ensure that the drain hose is not kinked.
Drain located unproperly. • Make sure that the drain hose is no more than 5 ft. (1.5 m) away from the washer.
Excessive sudsing Too much detergent or incorrect detergent.
• HE detergents are formulated specifically for High-Efficiency washers and contain suds-reducing agents. Only use detergent with the High-Efficiency (HE) logo.
Washer will not turn on
Power cord is not properly plugged in.
• Make sure that the plug is plugged securely into a grounded, 3-prong, 120 VAC, 60 Hz outlet.
House fuse is blown, circuit breaker has tripped, or power outage has occurred.
• Reset circuit breaker or replace fuse. Do not increase fuse capacity. If the problem is a circuit overload, have it corrected by a qualified electrician.

43TROUBLESHOOTINGEN
GLISH
Problem Possible Cause Solutions
Wash cycle time is longer than usual
The washer automatically adjusts the wash time for the amount of laundry, water pressure and other operating conditions.
• This is normal. The washer adjusts cycle time automatically to provide optimal results for the selected cycle. The time remaining shown in the display is only an estimate. Actual time may vary.
Bleach does not dispense
Bleach dispenser cover is not properly installed.
• Make sure that the bleach cover is properly installed and snapped into place before the beginning of the cycle.
Bleach dispenser is dirty or clogged.
• Lift out the bleach dispenser cover and clean out the reservoir. Lint and other foreign debris that collects inside the dispenser may prevent proper dispensing of the bleach.
Premature dispensing of bleach
Bleach dispenser filled for future load.
• You cannot store bleach in the dispenser for future use. The bleach will be dispensed every load.
Incomplete or no dispensing of detergent
Detergent compartments clogged from incorrect filling.
• Make sure that detergent and additives are put into the correct dispenser compartments. For all detergent types, always make sure that the dispenser drawer is fully closed before the start of the cycle.
Too much detergent used.
• Make sure that the suggested amount of detergent is used per the manufacturer’s recommendations. You may also dilute the detergent with water to the maximum fill line on the compartment to avoid clogging. Use only HE (High-Efficiency) detergent.
• NOTE: Always use as little detergent as possible. High-Efficiency washers need very little detergent to achieve optimum results. Using too much detergent will cause poor wash and rinse performance and may contribute to odors in washer.
Insufficient water supply. • Make sure that both hot and cold water faucets are turned on all the way.
Normal residue. • It is normal for a small amount of detergent to remain in the dispenser. If this residue builds up it can interfere with normal dispensing of products. Refer to the cleaning instructions.
Washer will not operate
Control panel has powered off due to inactivity.
• This is normal. Press the Power button to turn the washer on.
Washer is unplugged. • Make sure cord is plugged securely into a working outlet.
Water supply is turned off. • Turn both hot and cold faucets fully on.
Controls are not set properly. • Make sure the cycle was set correctly, close the lid and press the Start/Pause button.

44 TROUBLESHOOTING
Problem Possible Cause Solutions
Washer will not operate
Lid is open. • The washer will not operate if the lid is open. Close the lid and make sure that nothing is caught under the lid preventing it from closing completely.
Circuit breaker/fuse is tripped/ blown.
• Check house circuit breakers/fuses. Replace fuses or reset breaker. The washer should be on a dedicated branch circuit.
Control needs to be reset. • Press the Power button, then re-select the desired cycle and press the Start/Pause button.
Start/Pause was not pressed after a cycle was set.
• Press the Power button then re-select the desired cycle and press the Start/Pause button. The washer will shut off if the Start/Pause button is not pressed within 60 minutes.
Extremely low water pressure. • Check another faucet in the house to make sure that household water pressure is adequate.
Washer is too cold.
• If the washer has been exposed to temperatures below freezing for an extended period of time, allow it to warm up before pressing the Power button.
• Otherwise, the display will not come on.
Washer not filling properly
Filter clogged. • Make sure the inlet filters on the fill valves are not clogged. Refer to the filter cleaning instructions.
Inlet hoses may be kinked. • Check that inlet hoses are not kinked or clogged.
Energy efficiency. • This is an High-Efficiency (HE) washer. As a result, the water level settings for this washer may be different than for conventional washers.
Insufficient water supply. • Make sure that both hot and cold water faucets are turned on all the way.
The washer lid is open. • The washer will not operate if the lid is open. Close the lid and make sure that nothing is caught under the lid preventing it from closing completely.
Water level is too low/ No water is visible in the drum
Energy efficiency
• This is an High-Efficiency (HE) washer. As a result, the water level settings for this washer may be different than on your previous washer. The water will not normally cover the clothes. The fill level is optimized for the wash motion to achieve the best wash performance.

45TROUBLESHOOTINGEN
GLISH
Performance
Problem Possible Cause Solutions
Wrinkling
Washer not unloaded promptly. • Always remove items from the washer as soon as the cycle is complete.
Washer overloaded. • The washer can be fully loaded, but the drum should not be tightly packed with items. The lid of the washer should close easily.
Hot and cold water inlet hoses are reversed.
• Hot water rinse can set wrinkles in garments. Check the inlet hose connections.
Staining
Bleach or softener dispensed too soon.
• Dispenser compartment is overfilled causing bleach or softener to dispense immediately. Always measure bleach to prevent overfilling - one cup maximum. Dispenser drawer closed too quickly causing softener to dispense immediately.
Bleach or softener was added directly to the wash load in the drum.
• Always use the dispensers to ensure that laundry products are properly dispensed at the right time in the cycle.
Washer was not unloaded promptly.
• Always remove items from the washer as soon as possible after the cycle is complete.
Clothes were not properly sorted. • Always wash dark colors separately from light colors and whites to prevent discoloration. Never wash heavily soiled items with lightly soiled items.
Poor stain removal
Proper options not selected. • Heavier soils and tougher stains may require extra cleaning power. Select the Heavy feature to boost the cleaning power of the selected cycle.
Previously set stains.
• Articles that have previously been washed may have stains that have been set. These stains may be difficult to remove and may require hand washing or pre-treating to aid in stain removal.
Odor
Some odor is caused by the rubber attached to the washing machine.
• This odor is normal for new rubber and will disappear after the machine has been run a few times.
If the rubber door gasket and door seal area are not cleaned regularly, odors can occur from mold or foreign substances.
• Be sure to clean the gasket and door seal regularly and check under the door seal for small items when unloading the washer.
Odors can occur if foreign substances are left in the drainage pump filter.
• Be sure to clean the drainage pump filter regularly.

46 TROUBLESHOOTING
Problem Possible Cause Solutions
Odor
Odors can occur if the drainage hose is not properly installed, causing siphoning (water flowing back inside the washing machine).
• When installing the drainage hose, be sure that it doesn’t become kinked or blocked.
Using the dry function, odors can occur from lint and other laundry matter sticking to the heater. (Dryer model only)
• This is not a malfunction.
A particular odor can occur from drying wet clothes with hot air. (Dryer model only)
• The odor will disappear after a short while.
Wi-FiProblem Possible Cause Solutions
Trouble connecting appliance and smartphone to Wi-Fi network
The password for the Wi-Fi network was entered incorrectly.
• Delete your home Wi-Fi network and begin the registration process again.
Mobile data for your smartphone is turned on.
• Turn off the Mobile data on your smartphone before registering the appliance.
The wireless network name (SSID) is set incorrectly.
• The wireless network name (SSID) should be a combination of English letters and numbers. (Do not use special characters.)
The router frequency is not 2.4 GHz.
• Only a 2.4 GHz router frequency is supported. Set the wireless router to 2.4 GHz and connect the appliance to the wireless router. To check the router frequency, check with your Internet service provider or the router manufacturer.
The distance between the appliance and the router is too far.
• If the appliance is too far from the router, the signal may be weak and the connection may not be configured correctly. Move the router closer to the appliance or purchase and install a Wi-Fi repeater.

47TROUBLESHOOTINGEN
GLISH
Error Codes
Problem Possible Cause Solutions
Washer fills with water slowly or not at all, or
Water supply faucets are not fully open.
• Make sure that the water faucets are fully open.
Water line hoses are kinked, pinched, or crushed.
• Make sure that the hoses are not kinked or pinched. Be careful when moving the washer during cleaning and maintenance.
Water inlet filters are clogged. • Clean the inlet filters. See the Maintenance section.
Water supply pressure to faucet or house is too low.
• Check another faucet in the house to make sure that household water pressure is adequate and flow is not restricted. Disconnect the inlet hose from the washer and run a few gallons of water through the hose to flush the water supply lines. If flow is too low, contact a plumber to have the water lines repaired.
Water supply connected with leaklimiting hoses.
• Hoses designed to limit leaks can trip falsely and prevent the washer from filling. The use of leaklimiting hoses is not recommended.
If the balance is not successful, this error will be displayed.
• The automatic attempt to rebalance the load was not successful. The cycle has been paused to allow the load to be manually adjusted.
The load is too small. • Small loads may need additional items to be added to allow the washer to balance the loads.
Heavy articles are mixed with lighter items.
• The load may have heavy items loaded with lighter items. Always try to wash articles of somewhat similar weight to allow the washer to evenly distribute the weight of the load for spinning.
The load is out of balance. • Manually redistribute the load if articles have become tangled, preventing the automatic distribution from working properly.
The load contains pillows or cushions.
• Wash the covers only. Remove the stuffing from the pillows or cushions before washing the covers.
The tub does not rotate or
The door is not secured. • Close and secure the door. If the message keeps appearing, unplug the power cord and call for service.

48 TROUBLESHOOTING
Problem Possible Cause Solutions
Water in the washer drains slowly or not at all and
Drain hose is kinked, pinched, or clogged
• Make sure the drain hose is free of clogs or kinks, and is not pinched behind or under the washer.
Drain discharge is more than 96 inches (2.4 m) above bottom of washer.
• The end of the drain hose should be no more than 96 inches (2.4 m) above the bottom of the washer.
Control error. • Unplug the washer and wait 60 seconds. Reconnect power and try again. If the error reappears, call for service.
Water level is too high due to a faulty water valve.
• Close the water faucets, unplug the washer, and call for service.
The water level sensor is not working correctly.
• Close the water faucets, unplug the washer, and call for service.
A motor error has occurred. • Allow the washer to stand for 30 minutes and then restart the cycle. If the LE error code persists, call for service.
If the washing machine detects too many suds, it displays this error code and adds a Suds Reducing cycle. This adds about 2 hours to the cycle time. If too many suds are detected during spinning, the washing machine stops to help prevent leaking.
• Do not add more than the manufacturer's recommended amount of detergent. To remove suds, turn the washer off and on, then run the Rinse+Spin cycle.
The water level too low or high compared to the size of the load.
• The water level sensor ir not working correctly. Unplug the power cord and call for service.
Inlet hose, drain hose or drain pump frozen.
• See the Care in Cold Climates section for instructions.
Control Lock is activated. • This is not an error code. This code indicates that the Control Lock is activated. Press and hold Control Lock for 3 seconds.
Tub Clean is activated or the washer drum needs cleaning.
• This is not an error code. This code indicates that the Tub Clean is activated or needed. Use the Tub Clean cycle to clean the washer drum.

49LIMITED WARRANTYEN
GLISH
LIMITED WARRANTYFOR USAARBITRATION NOTICE: THIS LIMITED WARRANTY CONTAINS AN ARBITRATION PROVISION THAT REQUIRES YOU AND LG TO RESOLVE DISPUTES BY BINDING ARBITRATION INSTEAD OF IN COURT, UNLESS YOU CHOOSE TO OPT OUT. IN ARBITRATION, CLASS ACTIONS AND JURY TRIALS ARE NOT PERMITTED. PLEASE SEE THE SECTION TITLED “PROCEDURE FOR RESOLVING DISPUTES” BELOW.Should your LG Washer fail due to a defect in materials or workmanship under normal home use, during the warranty period set forth below, LG will at its option repair or replace the product. This limited warranty is valid only to the original retail purchaser of the product and applies only when purchased and used within the United States, including U.S. Territories. Proof of original retail purchase is required to obtain warranty service under this limited warranty.
Warranty Period Scope of Warranty RemarkOne (1) year from date of original
retail purchaseAny internal /functional Parts and
LaborLG will provide parts and labor to repair or replace defective parts.
Three (3) years from date of original retail purchase Stainless Steel Drum Parts only. Customer will be
responsible for any labor or in-home service to replace defective parts.Ten (10) years from date of original
retail purchase DD Motor (Stator, Rotor, Hall Sensor)
•Replacement products and parts are warranted for the remaining portion of the original warranty period or ninety (90) days, whichever is greater. •Replacement products and parts may be new or remanufactured.
THIS WARRANTY IS IN LIEU OF ANY OTHER WARRANTY, EXPRESS OR IMPLIED, INCLUDING WITHOUT LIMITATION, ANY WARRANTY OF MERCHANTABILITY OR FITNESS FOR A PARTICULAR PURPOSE. TO THE EXTENT ANY IMPLIED WARRANTY IS REQUIRED BY LAW, IT IS LIMITED IN DURATION TO THE EXPRESS WARRANTY PERIOD ABOVE. NEITHER THE MANUFACTURER NOR ITS U.S. DISTRIBUTOR SHALL BE LIABLE FOR ANY INCIDENTAL, CONSEQUENTIAL, INDIRECT, SPECIAL, OR PUNITIVE DAMAGES OF ANY NATURE, INCLUDING WITHOUT LIMITATION, LOST REVENUES OR PROFITS, OR ANY OTHER DAMAGE WHETHER BASED IN CONTRACT, TORT, OR OTHERWISE.Some states do not allow the exclusion or limitation of incidental or consequential damages or limitations on how long an implied warranty lasts, so the above exclusion or limitation may not apply to you. This warranty gives you specific legal rights and you may also have other rights that vary from state to state.
THIS LIMITED WARRANTY DOES NOT COVER: •Service trips to deliver, pick up, or install or repair the product; instruction to the customer on operation of the product; repair or replacement of fuses or correction of wiring or plumbing, or correction of unauthorized repairs/installation. •Failure of the product to perform during power failures and interrupted or inadequate electrical service. •Damage caused by leaky or broken water pipes, frozen water pipes, restricted drain lines, inadequate or interrupted water supply or inadequate supply of air. •Damage resulting from operating the product in a corrosive atmosphere or contrary to the instructions outlined in the product’s owner’s manual. •Damage to the product caused by accidents, pests and vermin, lightning, wind, fire, floods, or acts of God. •Damage or failure caused by unauthorized modification or alteration, or if it is used for other than the intended purpose, or any water leakage where the unit was not properly installed.

50 LIMITED WARRANTY
•Damage or failure caused by incorrect electrical current, voltage, or plumbing codes, commercial or industrial use, or use of accessories, components, or consumable cleaning products that are not approved by LG. •Damage caused by transportation and handling, including scratches, dents, chips, and/or other damage to the finish of your product, unless such damage results from defects in materials or workmanship and is reported within one (1) week of delivery. •Damage or missing items to any display, open box, discounted, or refurbished product. •Products with original serial numbers that have been removed, altered, or cannot be readily determined. Model and serial numbers, along with original retail sales receipts, are required for warranty validation. • Increases in utility costs and additional utility expenses. •Repairs when your product is used for other than normal and usual household use (e.g. commercial use, in offices and recreational facilities) or contrary to the instructions outlined in the product’s owner’s manual. •Costs associated with removal of your product from your home for repairs. •The removal and reinstallation of the product if it is installed in an inaccessible location or is not installed in accordance with published installation instructions, including LG’s owner’s and installation manuals. •Damage resulting from misuse, abuse, improper installation, repair, or maintenance. Improper repair includes use of parts not approved or specified by LG.
The cost of repair or replacement under these excluded circumstances shall be borne by the consumer.TO OBTAIN WARRANTY SERVICE AND ADDITIONAL INFORMATIONFor additional product information, visit the LG website at http://www.lg.comFor assistance using this product or to schedule service, contact LG Electronics at 1-800-243-0000.For further assistance, write: LG Electronics, 201 James Record Road, Huntsville, Alabama 35813
PROCEDURE FOR RESOLVING DISPUTES:ALL DISPUTES BETWEEN YOU AND LG ARISING OUT OF OR RELATING IN ANY WAY TO THIS LIMITED WARRANTY OR THE PRODUCT SHALL BE RESOLVED EXCLUSIVELY THROUGH BINDING ARBITRATION, AND NOT IN A COURT OF GENERAL JURISDICTION. BINDING ARBITRATION MEANS THAT YOU AND LG ARE EACH WAIVING THE RIGHT TO A JURY TRIAL AND TO BRING OR PARTICIPATE IN A CLASS ACTION.Definitions. For the purposes of this section, references to “LG” mean LG Electronics U.S.A., Inc., its parents, subsidiaries and affiliates, and each of their officers, directors, employees, agents, beneficiaries, predecessors in interest, successors, assigns and suppliers; references to “dispute” or “claim” shall include any dispute, claim or controversy of any kind whatsoever (whether based in contract, tort, statute, regulation, ordinance, fraud, misrepresentation or any other legal or equitable theory) arising out of or relating in any way to the sale, condition or performance of the product or this Limited Warranty.Notice of Dispute. In the event you intend to commence an arbitration proceeding, you must first notify LG in writing at least 30 days in advance of initiating the arbitration by sending a letter to LG at LG Electronics, USA, Inc. Attn: Legal Department- Arbitration 1000 Sylvan Ave, Englewood Cliffs 07632. You and LG agree to engage in good faith discussions in an attempt to amicably resolve your claim. The notice must provide your name, address, and telephone number; identify the product that is the subject of the claim; and describe the nature of the claim and the relief being sought. If you and LG are unable to resolve the dispute within 30 days, either party may proceed to file a claim for arbitration.

51LIMITED WARRANTYEN
GLISH
Agreement to Binding Arbitration and Class Action Waiver. Upon failure to resolve the dispute during the 30 day period after sending written notice to LG, you and LG agree to resolve any claims between us only by binding arbitration on an individual basis, unless you opt out as provided below. Any dispute between you and LG shall not be combined or consolidated with a dispute involving any other person’s or entity’s product or claim. More specifically, without limitation of the foregoing, any dispute between you and LG shall not under any circumstances proceed as part of a class or representative action. Instead of arbitration, either party may bring an individual action in small claims court, but that small claims court action may not be brought on a class or representative basis.Arbitration Rules and Procedures. To begin arbitration of a claim, either you or LG must make a written demand for arbitration. The arbitration will be administered by the American Arbitration Association (“AAA”) and will be conducted before a single arbitrator under the AAA’s Consumer Arbitration Rules that are in effect at the time the arbitration is initiated (referred to as the “AAA Rules”) and under the procedures set forth in this section. The AAA Rules are available online at www.adr.org/consumer. Send a copy of your written demand for arbitration, as well as a copy of this provision, to the AAA in the manner described in the AAA Rules. You must also send a copy of your written demand to LG at LG Electronics, USA, Inc. Attn: Legal Department- Arbitration 1000 Sylvan Avenue Englewood Cliffs, NJ 07632. If there is a conflict between the AAA Rules and the rules set forth in this section, the rules set forth in this section will govern. This arbitration provision is governed by the Federal Arbitration Act. Judgment may be entered on the arbitrator’s award in any court of competent jurisdiction. All issues are for the arbitrator to decide, except that issues relating to the scope and enforceability of the arbitration provision and to the arbitrability of the dispute are for the court to decide. The arbitrator is bound by the terms of this provision.Governing Law. The law of the state of your residence shall govern this Limited Warranty and any disputes between us except to the extent that such law is preempted by or inconsistent with applicable federal law.Fees/Costs. You do not need to pay any fee to begin an arbitration. Upon receipt of your written demand for arbitration, LG will promptly pay all arbitration filing fees to the AAA unless you seek more than $25,000 in damages, in which case the payment of these fees will be governed by the AAA Rules. Except as otherwise provided for herein, LG will pay all AAA filing, administration and arbitrator fees for any arbitration initiated in accordance with the AAA Rules and this arbitration provision. If you prevail in the arbitration, LG will pay your attorneys’ fees and expenses as long as they are reasonable, by considering factors including, but not limited to, the purchase amount and claim amount. Notwithstanding the foregoing, if applicable law allows for an award of reasonable attorneys’ fees and expenses, an arbitrator can award them to the same extent that a court would. If the arbitrator finds either the substance of your claim or the relief sought in the demand is frivolous or brought for an improper purpose (as measured by the standards set forth in Federal Rule of Civil Procedure 11(b)), then the payment of all arbitration fees will be governed by the AAA Rules. In such a situation, you agree to reimburse LG for all monies previously disbursed by it that are otherwise your obligation to pay under the AAA Rules. Except as otherwise provided for, LG waives any rights it may have to seek attorneys’ fees and expenses from you if LG prevails in the arbitration.Hearings and Location. If your claim is for $25,000 or less, you may choose to have the arbitration conducted solely on the basis of (1) documents submitted to the arbitrator, (2) through a telephonic hearing, or (3) by an in-person hearing as established by the AAA Rules. If your claim exceeds $25,000, the right to a hearing will be determined by the AAA Rules. Any in-person arbitration hearings will be held at a location within the federal judicial district in which you reside unless we both agree to another location or we agree to a telephonic arbitration.Opt Out. You may opt out of this dispute resolution procedure. If you opt out, neither you nor LG can require the other to participate in an arbitration proceeding. To opt out, you must send notice to LG no later than 30 calendar days from the date of the first consumer purchaser’s purchase of the product by either: (i) sending an e-mail to [email protected], with the subject line: “Arbitration Opt Out” or (ii) calling 1-800-980-2973. You must include in the opt out e-mail or provide by telephone: (a) your name and address; (b) the date on which the product was purchased; (c) the product model name or model number; and (d) the serial number (the serial number can be found (i) on the product; or (ii) online by accessing https://www.lg.com/us/support/repair-service/schedule-repair-continued and clicking on “Find My Model & Serial Number”).You may only opt out of the dispute resolution procedure in the manner described above (that is, by e-mail or telephone); no other form of notice will be effective to opt out of this dispute resolution procedure. Opting out of this dispute resolution procedure will not affect the coverage of the Limited Warranty in any way, and you will continue to enjoy the full benefits of the Limited Warranty. If you keep this product and do not opt out, then you accept all terms and conditions of the arbitration provision described above.
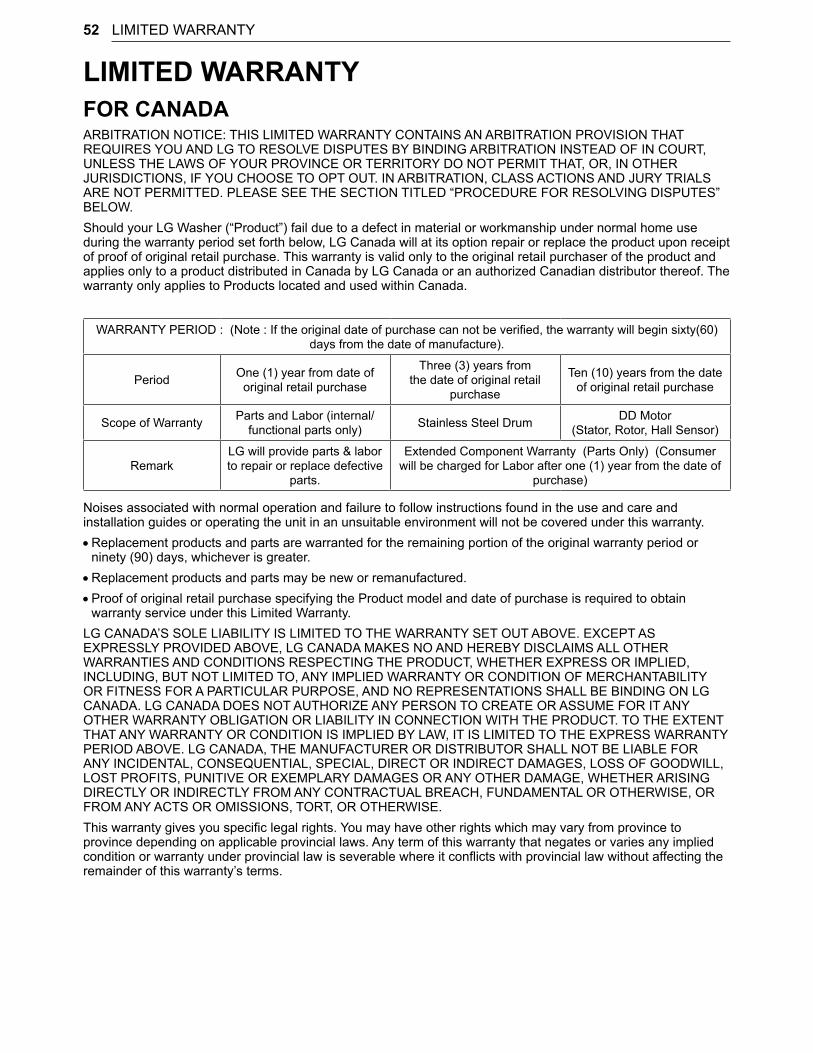
52 LIMITED WARRANTY
LIMITED WARRANTYFOR CANADAARBITRATION NOTICE: THIS LIMITED WARRANTY CONTAINS AN ARBITRATION PROVISION THAT REQUIRES YOU AND LG TO RESOLVE DISPUTES BY BINDING ARBITRATION INSTEAD OF IN COURT, UNLESS THE LAWS OF YOUR PROVINCE OR TERRITORY DO NOT PERMIT THAT, OR, IN OTHER JURISDICTIONS, IF YOU CHOOSE TO OPT OUT. IN ARBITRATION, CLASS ACTIONS AND JURY TRIALS ARE NOT PERMITTED. PLEASE SEE THE SECTION TITLED “PROCEDURE FOR RESOLVING DISPUTES” BELOW.Should your LG Washer (“Product”) fail due to a defect in material or workmanship under normal home use during the warranty period set forth below, LG Canada will at its option repair or replace the product upon receipt of proof of original retail purchase. This warranty is valid only to the original retail purchaser of the product and applies only to a product distributed in Canada by LG Canada or an authorized Canadian distributor thereof. The warranty only applies to Products located and used within Canada.
WARRANTY PERIOD : (Note : If the original date of purchase can not be verified, the warranty will begin sixty(60) days from the date of manufacture).
Period One (1) year from date of original retail purchase
Three (3) years from the date of original retail
purchase
Ten (10) years from the date of original retail purchase
Scope of Warranty Parts and Labor (internal/functional parts only) Stainless Steel Drum DD Motor
(Stator, Rotor, Hall Sensor)
RemarkLG will provide parts & labor to repair or replace defective
parts.
Extended Component Warranty (Parts Only) (Consumer will be charged for Labor after one (1) year from the date of
purchase)
Noises associated with normal operation and failure to follow instructions found in the use and care and installation guides or operating the unit in an unsuitable environment will not be covered under this warranty. •Replacement products and parts are warranted for the remaining portion of the original warranty period or ninety (90) days, whichever is greater. •Replacement products and parts may be new or remanufactured. •Proof of original retail purchase specifying the Product model and date of purchase is required to obtain warranty service under this Limited Warranty.
LG CANADA’S SOLE LIABILITY IS LIMITED TO THE WARRANTY SET OUT ABOVE. EXCEPT AS EXPRESSLY PROVIDED ABOVE, LG CANADA MAKES NO AND HEREBY DISCLAIMS ALL OTHER WARRANTIES AND CONDITIONS RESPECTING THE PRODUCT, WHETHER EXPRESS OR IMPLIED, INCLUDING, BUT NOT LIMITED TO, ANY IMPLIED WARRANTY OR CONDITION OF MERCHANTABILITY OR FITNESS FOR A PARTICULAR PURPOSE, AND NO REPRESENTATIONS SHALL BE BINDING ON LG CANADA. LG CANADA DOES NOT AUTHORIZE ANY PERSON TO CREATE OR ASSUME FOR IT ANY OTHER WARRANTY OBLIGATION OR LIABILITY IN CONNECTION WITH THE PRODUCT. TO THE EXTENT THAT ANY WARRANTY OR CONDITION IS IMPLIED BY LAW, IT IS LIMITED TO THE EXPRESS WARRANTY PERIOD ABOVE. LG CANADA, THE MANUFACTURER OR DISTRIBUTOR SHALL NOT BE LIABLE FOR ANY INCIDENTAL, CONSEQUENTIAL, SPECIAL, DIRECT OR INDIRECT DAMAGES, LOSS OF GOODWILL, LOST PROFITS, PUNITIVE OR EXEMPLARY DAMAGES OR ANY OTHER DAMAGE, WHETHER ARISING DIRECTLY OR INDIRECTLY FROM ANY CONTRACTUAL BREACH, FUNDAMENTAL OR OTHERWISE, OR FROM ANY ACTS OR OMISSIONS, TORT, OR OTHERWISE.This warranty gives you specific legal rights. You may have other rights which may vary from province to province depending on applicable provincial laws. Any term of this warranty that negates or varies any implied condition or warranty under provincial law is severable where it conflicts with provincial law without affecting the remainder of this warranty’s terms.

53LIMITED WARRANTYEN
GLISH
THIS LIMITED WARRANTY DOES NOT COVER: •Service trips to deliver, pick up, or install the product; instructing a customer on operation of the product; repair or replacement of fuses or correction of wiring or plumbing, or correction of unauthorized repairs/installation. •Failure of the product to perform during power failures and interruptions or inadequate electrical service. •Damage caused by leaky or broken water pipes, frozen water pipes, restricted drain lines, inadequate or interrupted water supply or inadequate supply of air. •Damage resulting from operating the Product in a corrosive atmosphere or contrary to the instructions outlined in the Product owner’s manual. •Damage to the Product caused by accidents, pests and vermin, lightning, wind, fire, floods, or acts of God. •Damage or product failure caused by unauthorized modification or alteration, or use for other than its intended purpose, or resulting from any water leakage due to improper installation. •Damage or Product failure caused by incorrect electrical current, voltage, or plumbing codes, commercial or industrial use, or use of accessories, components, or cleaning products that are not approved by LG Canada. •Damage caused by transportation and handling, including scratches, dents, chips, and/or other damage to the finish of your product, unless such damage results from defects in materials or workmanship and is reported within one (1) week of delivery. •Damage or missing items to any display, open box, discounted, or refurbished Product. •Products with original serial numbers that have been removed, altered, or cannot be readily determined. Model and Serial numbers, along with original retail sales receipt, are required for warranty validation. • Increases in utility costs and additional utility expenses. •Replacement of light bulbs, filters, or any consumable parts. •Repairs when your Product is used in other than normal and usual household use (including, without limitation, commercial use, in offices or recreational facilities) or contrary to the instructions outlined in the Product owner’s manual. •Costs associated with removal of the Product from your home for repairs. •The removal and reinstallation of the Product if it is installed in an inaccessible location or is not installed in accordance with published installation instructions, including the Product owner’s and installation manuals. •Accessories to the Product such as door bins, drawers, handles, shelves, etc.. Also excluded are parts besides those that were originally included with the Product. •Damage resulting from the misuse, abuse, improper installation, repair, or maintenance of the Product. Improper repair includes use of parts not approved or specified by LG Canada. •Coverage for "in Home" repairs, for products in-warranty, will be provided if the Product is within a 150 km radius from the nearest authorized service center (ASC), as determined by LG Canada. If your Product is located outside a 150 km radius from a ASC, as determined by LG Canada, it will be your responsibility to bring the Product, at your sole expense, to the ASC for in-warranty repair.
All costs and expenses associated with the above excluded circumstances, listed under the heading, This Limited Warranty Does Not Cover, shall be borne by the consumer.TO OBTAIN WARRANTY SERVICE AND ADDITIONAL INFORMATION, PLEASE CALL OR VISIT OUR WEBSITE:Call 1-888-542-2623 (7 A.M. to 12 A.M., 365 days a year) and select the appropriate option from the menu, or visit our website at http://www.lg.com

54 LIMITED WARRANTY
PROCEDURE FOR RESOLVING DISPUTES:EXCEPT WHERE PROHIBITED AT LAW, ALL DISPUTES BETWEEN YOU AND LG ARISING OUT OF OR RELATING IN ANY WAY TO THIS LIMITED WARRANTY OR THE PRODUCT SHALL BE RESOLVED EXCLUSIVELY THROUGH BINDING ARBITRATION, AND NOT IN A COURT OF GENERAL JURISDICTION. EXCEPT WHERE PROHIBITED AT LAW, YOU AND LG BOTH IRREVOCABLY AGREE TO WAIVE THE RIGHT TO A JURY TRIAL AND TO BRING OR PARTICIPATE IN A CLASS ACTION.Definitions. For the purposes of this section, references to “LG” mean LG Electronics Canada, Inc., its parents, subsidiaries and affiliates, and each of their officers, directors, employees, agents, beneficiaries, predecessors in interest, successors, assigns and suppliers; references to “dispute” or “claim” shall include any dispute, claim or controversy of any kind whatsoever (whether based in contract, tort, statute, regulation, ordinance, fraud, misrepresentation or any other legal or equitable theory) arising out of or relating in any way to the sale, condition or performance of the product or this Limited Warranty.Notice of Dispute. In the event you intend to commence an arbitration proceeding, you must first notify LG in writing at least 30 days in advance of initiating the arbitration by sending a letter to LGECI Legal Team at 20 Norelco Drive, North York, Ontario, Canada M9L 2X6 (the “Notice of Dispute”). You and LG agree to engage in good faith discussions in an attempt to amicably resolve your claim. The notice must provide your name, address, and telephone number; identify the product that is the subject of the claim; and describe the nature of the claim and the relief being sought. If you and LG are unable to resolve the dispute within 30 days of LG’s receipt of the Notice of Dispute, the dispute shall be resolved by binding arbitration in accordance with the procedure set out herein. You and LG both agree that, during the arbitration proceeding, the terms (including any amount) of any settlement offer made by either you or LG will not be disclosed to the arbitrator until the arbitrator determines the dispute.Agreement to Binding Arbitration and Class Action Waiver. Upon failure to resolve the dispute during the 30 day period after LG’s receipt of the Notice of Dispute, you and LG agree to resolve any claims between you and LG only by binding arbitration on an individual basis, unless you opt out as provided below, or you reside in a jurisdiction that prevents full application of this clause in the circumstances of the claims at issue (in which case if you are a consumer, this clause will only apply if you expressly agree to the arbitration). To the extent permitted by applicable law, any dispute between you and LG shall not be combined or consolidated with a dispute involving any other person’s or entity’s product or claim. More specifically, without limitation of the foregoing, except to the extent such a prohibition is not permitted at law, any dispute between you and LG shall not under any circumstances proceed as part of a class or representative action. Instead of arbitration, either party may bring an individual action in small claims court, but that small claims court action may not be brought on a class or representative basis except to the extent this prohibition is not permitted at law in your province or territory of jurisdiction as it relates to the claims at issue between you and LG.Arbitration Rules and Procedures. To begin arbitration of a claim, either you or LG must make a written demand for arbitration. The arbitration will be private and confidential, and conducted on a simplified and expedited basis before a single arbitrator chosen by the parties under the provincial or territorial commercial arbitration law and rules of the province or territory of your residence. You must also send a copy of your written demand to LG at LG Electronics, Canada, Inc., Attn: Legal Department- Arbitration, 20 Norelco Drive, North York, Ontario M9L 2X6. This arbitration provision is governed by your applicable provincial or territorial commercial arbitration legislation. Judgment may be entered on the arbitrator’s award in any court of competent jurisdiction. All issues are for the arbitrator to decide, except that, issues relating to the scope and enforceability of the arbitration provision and to the arbitrability of the dispute are for the court to decide. The arbitrator is bound by the terms of this provision.Governing Law. The law of the province or territory of your purchase shall govern this Limited Warranty and any disputes between you and LG except to the extent that such law is preempted by or inconsistent with applicable federal or provincial/territorial law. Should arbitration not be permitted for any claim, action, dispute or controversy between you and LG, you and LG attorn to the exclusive jurisdiction of the courts of the province or territory of your purchase for the resolution of the claim, action, dispute or controversy between you and LG.

55LIMITED WARRANTYEN
GLISH
Fees/Costs. You do not need to pay any fee to begin an arbitration. Upon receipt of your written demand for arbitration, LG will promptly pay all arbitration filing fees unless you seek more than $25,000 in damages, in which case the payment of these fees will be governed by the applicable arbitration rules. Except as otherwise provided for herein, LG will pay all filing, administration and arbitrator fees for any arbitration initiated in accordance with the applicable arbitration rules and this arbitration provision. If you prevail in the arbitration, LG will pay your attorneys’ fees and expenses as long as they are reasonable, by considering factors including, but not limited to, the purchase amount and claim amount. Notwithstanding the foregoing, if applicable law allows for an award of reasonable attorneys’ fees and expenses, an arbitrator can award them to the same extent that a court would. If the arbitrator finds either the substance of your claim or the relief sought in the demand is frivolous or brought for an improper purpose (as measured by the applicable laws), then the payment of all arbitration fees will be governed by the applicable arbitration rules. In such a situation, you agree to reimburse LG for all monies previously disbursed by it that are otherwise your obligation to pay under the applicable arbitration rules. Except as otherwise provided for, LG waives any rights it may have to seek attorneys’ fees and expenses from you if LG prevails in the arbitration.Hearings and Location. If your claim is for $25,000 or less, you may choose to have the arbitration conducted solely (1) on the basis of documents submitted to the arbitrator, (2) through a telephonic hearing, or (3) by an in-person hearing as established by the applicable arbitration rules. If your claim exceeds $25,000, the right to a hearing will be determined by the applicable arbitration rules. Any in-person arbitration hearings will be held at the nearest, most mutually-convenient arbitration location available within the province or territory in which you reside unless you and LG both agree to another location or agree to a telephonic arbitration.Severability and Waiver. If any portion of this Limited Warranty (including these arbitration procedures) is unenforceable, the remaining provisions will continue in full force and effect to the maximum extent permitted by applicable law. Should LG fail to enforce strict performance of any provision of this Limited Warranty (including these arbitration procedures), it does not mean that LG intends to waive or has waived any provision or part of this Limited Warranty.Opt Out. You may opt out of this dispute resolution procedure. If you opt out, neither you nor LG can require the other to participate in an arbitration proceeding. To opt out, you must send notice to LG no later than 30 calendar days from the date of the first consumer purchaser’s purchase of the product by either (i) sending an e-mail to [email protected], with the subject line: “Arbitration Opt Out;” or (ii) calling 1-800-980-2973. You must include in the opt out e-mail or provide by telephone: (a) your name and address; (b) the date on which the product was purchased; (c) the product model name or model number; and (d) the serial number (the serial number can be found (i) on the product; or (ii) online by accessing https://www.lg.com/ca_en/support/repair-service/schedule-repair and clicking on “Find My Model & Serial Number”).In the event that you “Opt Out”, the law of the province or territory of your residence shall govern this Limited Warranty and any disputes between you and LG except to the extent that such law is preempted by or inconsistent with applicable federal or provincial/territorial law. Should arbitration not be permitted for any claim, action, dispute or controversy between you and LG, you and LG agree to attorn to the exclusive jurisdiction of the courts of the province or territory of your residence for the resolution of the claim, action, dispute or controversy between you and LG.You may only opt out of the dispute resolution procedure in the manner described above (that is, by e-mail or telephone); no other form of notice will be effective to opt out of this dispute resolution procedure. Opting out of this dispute resolution procedure will not affect the coverage of the Limited Warranty in any way, and you will continue to enjoy the full benefits of the Limited Warranty. If you keep this product and do not opt out, then you accept all terms and conditions of the arbitration provision described above.Conflict of Terms. In the event of a conflict or inconsistency between the terms of this Limited Warranty and the End User License Agreement (“EULA”) in regards to dispute resolution, the terms of this Limited Warranty shall control and govern the rights and obligations of the parties and shall take precedence over the EULA.

56 LIMITED WARRANTY
Strange vibration or noise caused by not removing shipping bolts or tub support.
Tub support
Carton base
Shipping bolt
Remove the shipping bolts & tub support.
Leakage caused by dirt (hair, lint) on seal and door glass. Clean the seal & door glass.
Not draining caused by clogging of pump filter. Clean the pump filter.
Water is not supplied because water inlet valve filters are clogged or water inlet hoses are kinked.
Inlet filter
Clean the inlet valve filter or reinstall the water inlet hoses.
Water is not supplied because too much detergent is used.
Dispenser Clean the detergent dispenser drawer.
Laundry is hot or warm after washing because the inlet hoses are installed in reverse.
Cold water inlet
Hot water inlet
Reinstall the inlet hoses.
Water is not supplied because the water tap is not turned on.
Water tap Turn on the water tap.
Leakage caused by improper installation of drain hose or clogged drain hose. Elbow bracket
Tie strap
Reinstall the drain hose.
Warranty Exceptions (U.S. and Canada)

57LIMITED WARRANTYEN
GLISH
Leakage caused by improper installation of water inlet hose or using non-LG inlet hoses.
Reinstall the inlet hose.
Power not supplied because of loose connection of power cord or electrical outlet problem.
Reconnect the power cord or change the electrical outlet.
Service trips to deliver, pick up, install the product or for instruction on product use. The removal and reinstallation of the Product.
Level
The warranty covers manufacturing defects only. Service resulting from improper Installation is not covered.
If all screws are not installed properly, it may cause excessive vibration (Pedestal model only).
Install 4 screws at each corner (Total 16EA).

G A S R A N G E
USE AND CARE GUIDEC L E A N I N G , M A I N T E N A N C E , A N D M O R E

2 | Wolf Customer Care 800.222.7820
Contents
4 Safety Precautions
6 Gas Range Features
7 Oven Operation
9 Surface Operation
13 Care Recommendations
14 Troubleshooting
15 Wolf Warranty
GAS RANGE

wolfappliance.com | 3
Customer Care
The model and serial number are printed on the enclosed product registration card. Both numbers are also listed on the product rating plate. Refer to page 6 for rating plate location. For warranty purposes, you will also need the date of installation and name of your authorized Wolf dealer. Record this information below for future reference.
SERVICE INFORMATION
Model Number
Serial Number
Date of Installation
Certified Service Name
Certified Service Number
Authorized Dealer
Dealer Number
If your product ever needs attention, be sure to use a Wolf Factory Certified Service provider recommended by our customer care center, or select one from our list of providers available at wolfappliance.com/locator. All Factory Certi-fied Service providers are carefully selected and thoroughly trained by us.
GAS RANGE
Important Note
To ensure this product is installed and operated as safely and efficiently as possible, take note of the following types of highlighted information throughout this guide:
IMPORTANT NOTE highlights information that is especially important.
CAUTION indicates a situation where minor injury or product damage may occur if instructions are not followed.
WARNING states a hazard that may cause serious injury or death if precautions are not followed.
IMPORTANT NOTE: Throughout this guide, dimensions in parentheses are millimeters unless otherwise specified.

4 | Wolf Customer Care 800.222.7820
WARNING
A child or adult can tip this appliance and be killed.
Verify the anti-tip device has been properly installed and engaged. Ensure the anti-tip device is re-engaged when this appliance is moved. Refer to the illustrations below for how to verify correct installation.
To reduce the risk of burns, do not move this appliance while hot.
Do not operate this appliance without the anti-tip device in place and engaged. Failure to do so can result in death or serious burns to children or adults.
SAFETY PRECAUTIONS
IMPORTANT INSTRUCTIONS
WARNING
If the information in this guide is not followed exactly, a fire or explosion may result, causing property damage, personal injury or death.
Do not store or use gasoline or other flammable vapors and liquids in the vicinity of this or any other appliance.
WHAT TO DO IF YOU SMELL GAS:
• Do not try to light any appliance.
• Do not touch any electrical switch.
• Do not use any phone in your building.
• Immediately call your gas supplier from a neighbor’s phone. Follow the gas supplier’s instructions.
• If you cannot reach your gas supplier, call the fire department.
This appli ance must be properly installed and ser-viced by a qualified installer, service agency or gas supplier and grounded by a qualified technician.
GENERAL SAFETY PRECAUTIONS
• For safety when cooking, set burner controls so flame does not extend beyond the bottom of pan.
• IMPORTANT: Do not install a ventilation system that blows air downward toward this gas cooking appliance. This type of ventilation system may cause ignition and combustion problems with this gas cooking appliance resulting in personal injury or unintended operation.
ANTI-TIPDEVICE
ANTI-TIPDEVICE
ENGAGED
Anti-tip device location
Anti-tip device engaged
GENERAL SAFETY PRECAUTIONS
• Read this guide carefully before using this appli-ance to reduce risk of fire, electric shock or injury.
• Before performing service, shut off gas supply by closing the gas shut-off valve and shut off elec-tricity to this appliance.
• Keep appliance area clear and free from combus-tible material.

wolfappliance.com | 5
SAFETY PRECAUTIONS
• Do not leave children alone or unattended in the area where this appliance is in use. Never allow children to sit or stand on the appliance.
• Do not store items of interest to children above or at the back of this appliance, as they could climb on the appliance to reach items and be injured.
• Do not use water on grease fires. Smother the flame or use a dry chemical or foam-type extinguisher.
• Never leave this appliance unattended when in use. Boilovers and greasy spills may smoke or ignite.
• Do not heat unopened food containers, such as baby food jars and cans. Pressure build-up may cause the container to burst and cause injury.
• Do not store flammable materials near burners or let grease or other flammable substances accumu-late on this appliance.
WARNING
PROPOSITION 65 FOR CALIFORNIA RESIDENTS
Cancer and Reproductive Harm— www.P65Warnings.ca.gov
COMMONWEALTH OF MASSACHUSETTS
• Installations and repairs must be performed by a qualified or licensed contractor, plumber or gas fitter, qualified or licensed by the state, province or region where this appliance is being installed.
• Use only gas shut-off valves approved for use within the state, province or region where this appliance is being installed.
• A flexible gas connector, when used, must not exceed 3' (.9 m).
IMPORTANT INSTRUCTIONSGENERAL SAFETY PRECAUTIONS
• Do not use aluminum foil to line any part of this appliance.
• Never use this appliance to warm or heat the room. Doing so may result in carbon monoxide poisoning.
• Be sure the oven cool air intake (above the door) and oven exhaust vent (below the door) are unob-structed at all times.
• Wear proper apparel. Loose-fitting or hanging garments should never be worn while using this appliance.
• Use extreme caution when moving a grease kettle or disposing of hot grease.
• Always use dry pot holders when removing pans from this appliance. Wet or damp pot holders can cause steam burns. Do not use a towel or bulky cloth in place of pot holders.
• Clean only those parts listed in this guide.
• Exercise caution when opening oven door. Let hot air or steam escape before looking or reaching into oven.
• Position oven racks in desired locations when oven is cool. If a rack must be repositioned after the oven is already hot, be sure pot holder does not contact a hot heating element in the oven.
• Do not repair or replace any part of this appli-ance unless specifically recommended in literature accompanying this appliance.
• Do not obstruct the flow of air to ensure proper combustion and ventilation.
• When using this appliance, do not touch grates, burner caps, burner bases or any other parts in proximity to the flame. These components may be hot enough to cause burns.
• Do not clean oven gasket; rubbing or moving the gasket may compromise the door seal.

6 | Wolf Customer Care 800.222.7820
GAS RANGE FEATURES
Gas Range Features
FEATURES
1 Product Rating Plate
2 Oven Control Knob
3 Convection Fan and Lights
4 Convection Oven
5 Surface Burner
6 Optional Charbroiler
7 Optional Griddle
8 Optional French Top (not shown)
48" gas range shown
2
4
7
5
1
6
3
Getting Started
We know you are eager to start cooking, but before you do, please take some time to read this use & care guide. Whether you are an occasional cook or an expert chef, it will be to your benefit to familiarize yourself with the safety practices, features, operation and care recommendations of your Wolf gas range.
• Clean the range thoroughly with hot water and mild detergent. Rinse and dry with a soft cloth to remove any residual oil and grease left from the manufacturing process. Refer to care recommendations on page 13.
• Verify surface burner components are assembled correctly.
• Optional charbroiler, griddle and French top require special attention. Refer to pages 10–12.
CAUTION
Do not place cookware on oven floor or use aluminum foil or other material to line oven floor or side walls. Failure to adhere to this notice will damage the porce-lain interior and will void your warranty.
Accessories
Bake stone and dehydration kits and other accessories are avail able through an authorized Wolf dealer. For local dealer information, visit the find a showroom section of our website, wolfappliance.com.

wolfappliance.com | 7
Oven Racks
OVEN RACK GUIDES
To insert the rack guides, place the guide into the oblong holes on the oven side walls. Rotate the bottom of the rack guide inward then lower into the bottom holes on the oven floor. Refer to the illustration below.
OVEN RACKS
To insert a rack in the oven, place the rack anti-tip lock under the side rack guide rails. Slide the rack back and lift up to clear the rack stops. Continue to slide the rack back until completely inside the oven. Refer to the illustration below.
OVEN OPERATION
Oven Operation
PRIOR TO USE
To ensure all residual oil from the manufacturing process has been removed, each oven must go through the fol-lowing procedure.
1 Clean oven thoroughly with hot water and a mild deter-gent. Rinse and dry with a soft cloth.
2 Turn on ventilation. Some smoke and odor is normal.
3 Set oven to BAKE 500°F (260°C) and allow oven to heat for 30 minutes.
4 Set oven temperature to BROIL for an additional 30 minutes.
5 Turn oven off and allow it to cool with the door closed.
BOTTOMHOLE
OBLONGHOLE
ANTI-TIPLOCK
RACK STOP
Oven rack guides
Oven rack anti-tip lock

8 | Wolf Customer Care 800.222.7820
OVEN OPERATION
BROIL
The convection oven has an infrared broiler that cooks food by searing the exterior and sealing in juices. Rack position affects doneness.
To broil, place the rack in the appropriate position. Push and turn the control knob counterclockwise to BROIL. Do not preheat. Always use the two-piece broiler pan supplied with the range and broil with the oven door closed.
Oven Operation
BAKE
To set the oven temperature, press and turn the oven con-trol knob counterclockwise to the desired temperature. The oven indicator light illuminates and preheat begins. Once preheat is complete, the oven indicator light is no longer illuminated. The light will cycle on and off as more heat is required to maintain set temperature. Refer to the illustration below.
To utilize convection, press the convection fan button.
Convection cooking is preferred for tender cuts of meat and poultry, air-leavened baked foods, breads, cakes and cookies. For best results, cook foods uncovered in low-sided pans. Standard cooking is best for less tender cuts of meat that should be covered, covered one-dish recipes and pizzas.
To turn the oven light on, press the light button. Refer to the illustration below.
INDICATOR LIGHT
CONVECTION FAN
OVENLIGHT
Oven control knob

wolfappliance.com | 9
SURFACE OPERATION
Sabbath
This appliance is certified by Star-K to meet strict religious regulations in conjunction with specific instructions found on www.star-k.org.
Oven Light
WARNING
Verify power is disconnected from the electrical box before replacing the light bulb.
Allow the oven to cool completely, then unscrew the light lens and remove the light bulb by unscrewing it from the socket. Replace with a 40-watt halogen bulb. Refer to the illustration below.
Surface Burners
The dual-stacked burner design combines all burner parts in one assembly. The burner cap must be seated flatly on the burner. Refer to the illustration below.
To light a burner, push and turn the corresponding control knob counterclockwise to HI. The igniter will begin to click until the burner is lit. Once lit, continue to turn the knob counterclockwise to desired setting.
To select a simmer setting, turn the control knob to the detent at the lowest setting. Push and continue to turn counterclockwise. The flame will transition to the second tier on the burner cap. Continue to turn the knob to desired simmer setting.
During a power outage, surface burners can be lit manually. Turn the knob to HI and light using a multi-purpose lighter.
CAUTION
Never leave pans on a high setting unattended. Be careful when cooking food in fat or grease; it can become hot enough to ignite.
IGNITERBURNERCAP
SEALED BURNER
Dual-stacked burner
LIGHTLENS
Light bulb replacement

10 | Wolf Customer Care 800.222.7820
Infrared Charbroiler
The charbroiler has an infrared burner that transfers intense heat to food, searing the outside to seal in juices. Cook food directly on the charbroiler grate, do not use cookware.
For optimal performance of the charbroiler and provide even cooking, install the blank-off plate provided with the range.
Assemble charbroiler:
1 To assemble, position charbroiler frame on the range.
2 Position blank-off plate centered directly on ceramic tiles. Refer to the illustration below.
3 Install charbroiler grate. Refer to the illustration below.
CAUTION
Use care when assembling the charbroiler to avoid contact with the igniter.
CHARBROILER OPERATION
The stainless steel cover must be removed prior to operation.
1 Turn on ventilation.
2 Push and turn control knob counterclockwise to HI. Igniter will begin to click until burner is lit.
3 Allow to preheat for 10 minutes.
CHARBROILER CARE
• After cooking is complete, allow the charbroiler to remain on for 10 minutes. High heat will help burn off excess food particles.
• When cool, remove the grate and place in the sink. Cover with wet dish towels and pour hot water over it to help loosen residue. Clean with soap and a scouring pad. Rinse and dry.
• To clean the frame, remove and place in the sink. Soak in hot water and mild detergent. Wash thoroughly and scrub with a scouring pad.
• To clean the blank-off plate, remove and use a soap-filled scouring pad to remove residue. Clean with hot water and mild detergent.
IGNITER
BLANK-OFF PLATE
CHARBROILERGRATE
Blank-off plate
Charbroiler grate
SURFACE OPERATION

wolfappliance.com | 11
SURFACE OPERATION
Infrared Griddle
The griddle is thermostatically controlled to maintain a consistent temperature. To prevent food from sticking, it is necessary to “season” the griddle prior to use.
Season griddle:
1 The griddle has a protective coating that must be removed before use. Use hot water and mild detergent to remove. Rinse and dry.
2 Turn on ventilation.
3 Push and turn control knob counterclockwise to 350°F (175°C) and heat for 30 minutes. After 30 minutes, turn knob to OFF and allow to cool.
4 While surface is slightly warm, pour a small amount of peanut or vegetable oil on a paper towel and spread evenly.
5 Push and turn control knob to 350°F (175°C). Heat until griddle begins to smoke, then turn knob to OFF and allow to cool. Once cool, wipe off any excess oil.
GRIDDLE OPERATION
The stainless steel cover must be removed prior to operation.
1 Turn on ventilation.
2 Push and turn control knob counterclockwise to desired temperature. Igniter will begin to click until burner is lit. Double griddle has separate controls for each side.
3 Indicator light above the knob illuminates until griddle reaches set temperature. The light will cycle on and off as more heat is required to maintain set temperature.
GRIDDLE CARE
• Scrape grease into the grease collection tray after each use. When the surface has cooled, wipe with a paper towel to remove excess grease or oil.
• After each use, reapply a small amount of peanut or vegetable oil on a paper towel and spread evenly.
• Occasionally, remove seasoning. Pour 1/2 cup (120 ml) warm water and 1 teaspoon (5 ml) griddle cleaner onto the griddle and scrape residue into the grease collection tray, then empty. When dry, reapply a small amount of oil for seasoning.
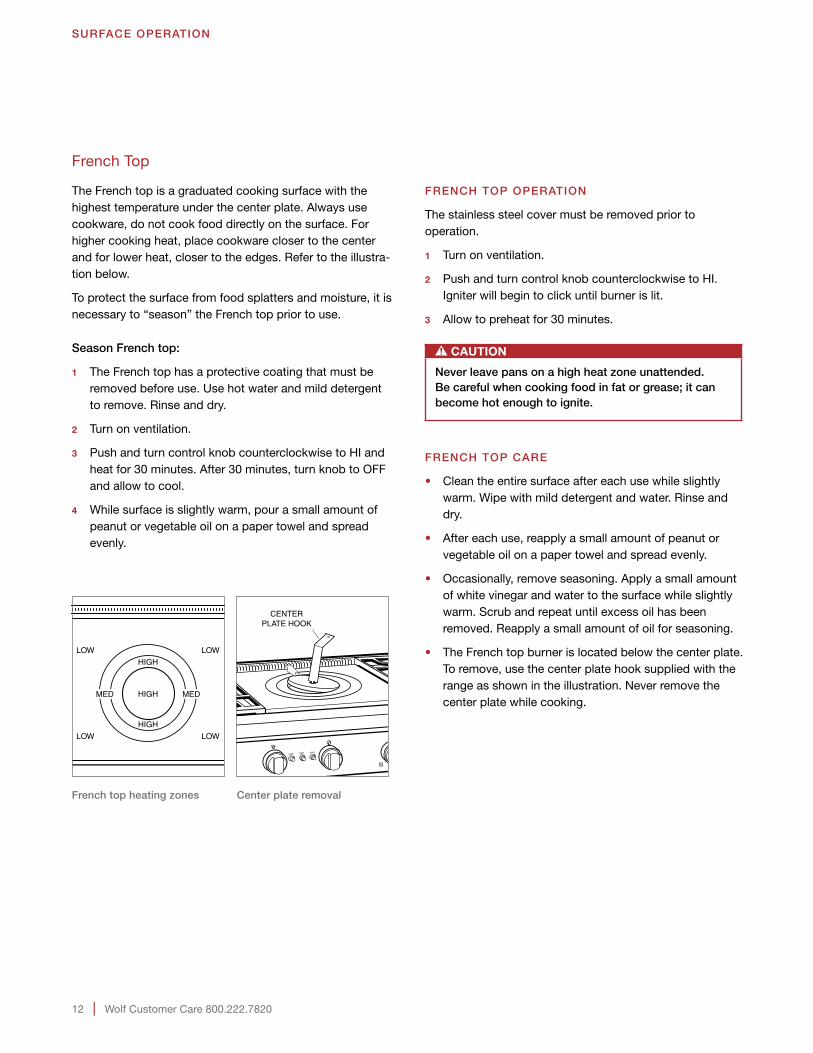
12 | Wolf Customer Care 800.222.7820
SURFACE OPERATION
French Top
The French top is a graduated cooking surface with the highest temperature under the center plate. Always use cookware, do not cook food directly on the surface. For higher cooking heat, place cookware closer to the center and for lower heat, closer to the edges. Refer to the illustra-tion below.
To protect the surface from food splatters and moisture, it is necessary to “season” the French top prior to use.
Season French top:
1 The French top has a protective coating that must be removed before use. Use hot water and mild detergent to remove. Rinse and dry.
2 Turn on ventilation.
3 Push and turn control knob counterclockwise to HI and heat for 30 minutes. After 30 minutes, turn knob to OFF and allow to cool.
4 While surface is slightly warm, pour a small amount of peanut or vegetable oil on a paper towel and spread evenly.
HIGH
HIGH
HIGH
LOW
LOW
LOW
LOW
MED MED
CENTERPLATE HOOK
French top heating zones
Center plate removal
FRENCH TOP OPERATION
The stainless steel cover must be removed prior to operation.
1 Turn on ventilation.
2 Push and turn control knob counterclockwise to HI. Igniter will begin to click until burner is lit.
3 Allow to preheat for 30 minutes.
CAUTION
Never leave pans on a high heat zone unattended. Be careful when cooking food in fat or grease; it can become hot enough to ignite.
FRENCH TOP CARE
• Clean the entire surface after each use while slightly warm. Wipe with mild detergent and water. Rinse and dry.
• After each use, reapply a small amount of peanut or vegetable oil on a paper towel and spread evenly.
• Occasionally, remove seasoning. Apply a small amount of white vinegar and water to the surface while slightly warm. Scrub and repeat until excess oil has been removed. Reapply a small amount of oil for seasoning.
• The French top burner is located below the center plate. To remove, use the center plate hook supplied with the range as shown in the illustration. Never remove the center plate while cooking.

wolfappliance.com | 13
CARE RECOMMENDATIONS
Care Recommendations
CLEANING
Stainless steel Use a nonabrasive stainless steel cleaner and apply with a soft lint-free cloth. To bring out the natural luster, lightly wipe surface with a water-dampened microfiber cloth followed by a dry polishing chamois. Always follow the grain of stainless steel.
Burner grates Oven rack guides
Remove and place on a flat surface near the sink. Clean with hot water and mild detergent or paste of baking soda and water. Do not immerse in water. Towel dry.
Burner pan Remove surface debris before cleaning to help speed up the cleaning process and decrease the chance of scratching the surface during cleaning. Using mild abrasive cleaners or spray degreasers, clean and rinse the surface and dry immediately to avoid streaking. To clean hard water stains, use white vinegar and water. Rinse and dry immediately.
Surface burners Allow to cool. Use mild detergent or spray degreaser to clean. Rinse with water and towel dry.
Charbroiler Griddle French top
Refer to pages 10–12 for care recommendations.
Control knobs Bezels
Using a damp cloth, wipe with a mild detergent or spray degreaser; rinse and dry. Do not place in dishwasher.
Oven interior Use mild abrasive cleaners, spray degreasers. Use a razor blade to gently lift baked on foods from oven cavity and window. For stubborn stains, spray with a mild abrasive cleaner or spray degreaser. Wash the entire oven cavity with soap and water to remove all cleaning chemicals.
Broiler pan To clean the upper rack, use mild detergent and a scouring pad. Rinse and dry. To clean the bottom pan, discard grease and wash with hot water and mild detergent. Rinse and dry. The stainless steel upper rack is dishwasher safe, however, do not place any porcelain-coated rack or pan in dishwasher.

14 | Wolf Customer Care 800.222.7820
TROUBLESHOOTING
Troubleshooting
OPERATION
Range does not operate.
• Verify power is on.
• Verify electrical power to range and home circuit breaker is on.
OVEN
Oven temperature issue.
• Contact Wolf customer care at 800-222-7820 for recommendations.
Oven ‘pops’ or ‘bangs’ during preheat or cool down.
• Normal with new oven cavity expansion and contraction.
• If it persists, contact Wolf customer care at 800-222-7820.
RANGE SURFACE
Erratic flame, poor ignition or no ignition.
• Verify burner caps are positioned properly.
• Clean burner and igniter properly.
• If water spilled over recently, let area dry completely. Use hair dryer, if desired.
• If burner cap secures to burner head, verify it is tightly fastened.
• Push in knob, then release. Verify knob springs back.
Charbroiler clicks continually.
• Verify knob is set fully at HI.
Oven or griddle indicator light flashes.
• Turn knob off, then back on. Flame was lost and unit entered safety lock-out mode.
SERVICE
• Maintain the quality built into your product by contacting Wolf Factory Certified Service. For the name of the nearest Wolf Factory Certified Service, check the contact & support section of our website, wolfappliance.com or call Wolf customer care at 800-222-7820.
• When contacting service, you will need the model and serial number of your product. Both numbers are listed on the product rating plate. Refer to page 6 for rating plate location.
• For warranty purposes, you will also need the date of installation and name of your authorized Wolf dealer. This information should be recorded on page 3 of this guide.
Sub-Zero, Sub-Zero & Design, Sub-Zero & Snowflake Design, Dual Refrigeration, The Living Kitchen, Great American Kitchens The Fine Art of Kitchen Design, Wolf, Wolf & Design, Wolf Gourmet, W & Design, red colored knobs, Cove, and Cove & Design are registered trademarks and service marks of Sub-Zero Group, Inc. and its subsidiaries. All other trademarks are property of their respective owners in the United States and other countries.

Wolf Appliance Residential Limited Warranty
FOR RESIDENTIAL USE
FULL TWO YEAR WARRANTY*
For two years from the date of original installation, this Wolf Appliance product warranty covers all parts and labor to repair or replace, under normal residential use, any part of the product that proves to be defective in materials or workmanship. All service provided by Wolf Appliance under the above warranty must be performed by Wolf factory certified service, unless otherwise specified by Wolf Appliance, Inc. Service will be provided during normal business hours.
LIMITED FIVE YEAR WARRANTY
For five years from the date of original installation, Wolf Appliance will repair or replace the following parts that prove to be defective in materials or workmanship: gas burners (excludes appearance), electric heating elements, blower motors (ventilation hoods), electronic control boards, magnetron tubes and induction generators. If the owner uses Wolf factory certified service, the service provider will repair or replace these parts with the owner paying for all other costs, including labor. If the owner uses non-certi-fied service, the owner must contact Wolf Appliance, Inc. (using the information below) to receive repaired or replacement parts. Wolf Appliance will not reimburse the owner for parts purchased from non-certified service or other sources.
TERMS APPLICABLE TO EACH WARRANTY
The warranty applies only to products installed for normal residential use. The warranty applies only to products installed in any one of the fifty states of the United States, the District of Columbia or the ten provinces of Canada. This warranty does not cover any parts or labor to correct any defect caused by negligence, accident or improper use, maintenance, installation, service or repair.
THE REMEDIES DESCRIBED ABOVE FOR EACH WARRANTY ARE THE ONLY ONES THAT WOLF APPLIANCE, INC. WILL PROVIDE, EITHER UNDER THIS WARRANTY OR UNDER ANY WARRANTY ARISING BY OPERATION OF LAW. WOLF APPLIANCE, INC. WILL NOT BE RESPONSIBLE FOR ANY CONSEQUENTIAL OR INCIDEN-TAL DAMAGES ARISING FROM THE BREACH OF THIS WARRANTY OR ANY OTHER WARRANTY, WHETHER EXPRESS, IMPLIED OR STATUTORY.
Some states do not allow the exclusion or limitation of incidental or consequential damages, so the above limitation or exclusion may not apply to you. This warranty gives you specific legal rights and you may also have other legal rights that vary from state to state.
To receive parts and/or service and the name of Wolf factory certified service nearest you, contact Wolf Appliance, Inc., P.O. Box 44848, Madison, WI 53744; check the contact & support section of our website, wolfappliance.com, email us at [email protected] or call 800-222-7820.
*Stainless steel (doors, panels, handles, product frames and interior surfaces) are covered by a limited 60-day parts and labor warranty for cosmetic defects.
*Replacement filters for ventilation hood recirculating kits are not covered by the product warranty.

P R O V E N T I L AT I O N H O O D
USE AND CARE GUIDEC L E A N I N G , M A I N T E N A N C E , A N D M O R E

2 | Wolf Customer Care 800.222.7820
Contents
4 Safety Precautions
6 Hood Features
7 Hood Operation
9 Care Recommendations
10 Troubleshooting
11 Wolf Warranty
PRO VENTILATION HOOD

wolfappliance.com | 3
Customer Care
The model and serial number are printed on the enclosed product registration card. Both numbers are also listed on the product rating plate. Refer to page 6 for rating plate location. For warranty purposes, you will also need the date of installation and name of your authorized Wolf dealer. Record this information below for future reference.
SERVICE INFORMATION
Model Number
Serial Number
Date of Installation
Certified Service Name
Certified Service Number
Authorized Dealer
Dealer Number
If your product ever needs attention, be sure to use a Wolf Factory Certified Service provider recommended by our customer care center, or select one from our list of providers available at wolfappliance.com/locator. All Factory Certi-fied Service providers are carefully selected and thoroughly trained by us.
Important Note
To ensure this product is installed and operated as safely and efficiently as possible, take note of the following types of highlighted information throughout this guide:
IMPORTANT NOTE highlights information that is especially important.
CAUTION indicates a situation where minor injury or product damage may occur if instructions are not followed.
WARNING states a hazard that may cause serious injury or death if precautions are not followed.
IMPORTANT NOTE: Throughout this guide, dimensions in parentheses are millimeters unless otherwise specified.
PRO VENTILATION HOOD

4 | Wolf Customer Care 800.222.7820
SAFETY PRECAUTIONS
GENERAL SAFETY PRECAUTIONS
• Sufficient air is needed for proper combustion and exhausting of gases through the flue (chimney) of fuel burning equipment to prevent back drafting.
• Follow the heating equipment manufacturer’s guideline and safety standards such as those pub-lished by the National Fire Protection Association (NFPA), the American Society for Heating, Refrig-eration and Air Conditioning Engineers (ASHRAE) and the local code authorities.
CAUTION
For general ventilating use only. Do not use to exhaust hazardous or explosive materials and vapors.
• Ducted fans must always be vented to the outdoors.
• To reduce the risk of fire, use only steel ductwork.
CAUTION
To reduce the risk of fire and properly exhaust air, be certain to duct air outside. Do not vent exhaust air into spaces within walls or ceilings or into attics, crawl spaces or garages.
IMPORTANT INSTRUCTIONSREAD AND SAVE THESE INSTRUCTIONS
• Read this use & care guide carefully before using your new ventilation hood to reduce the risk of fire, electric shock or injury to persons.
• Ensure proper installation and servicing. This appliance must be properly installed and grounded by a qualified technician.
• Warranty service must be performed by Wolf Factory Certified Service.
• Installation work and electrical wiring must be done by qualified person(s) in accordance with all appli-cable codes and standards, including fire-rated construction codes and standards.
WARNING
TO REDUCE THE RISK OF FIRE, ELECTRIC SHOCK, OR INJURY TO PERSONS, OBSERVE THE FOLLOWING:
a) Use this unit only in the manner intended by the manufacturer. If you have questions, con-tact the manufacturer.
b) Before servicing or cleaning unit, unplug the appliance or switch power off at service panel and lock the service disconnecting means to prevent power from being switched on accidentally. When the service disconnecting means cannot be locked, securely fasten a prominent warning device, such as a tag, to the service panel.

wolfappliance.com | 5
SAFETY PRECAUTIONS
IMPORTANT INSTRUCTIONSGENERAL SAFETY PRECAUTIONS
• Do not repair or replace any part of this appliance unless specifically recommended in this guide. All other service should be performed by a qualified technician.
• To avoid motor bearing damage and noisy or unbalanced impellers, keep drywall spray, con-struction dust, etc. off power unit.
• When cutting or drilling into wall or ceiling, do not damage electrical wiring or other hidden utilities.
• Please read the specification label on the ventila-tion hood for further information and requirements.
WARNING
TO REDUCE THE RISK OF A RANGE TOP GREASE FIRE:
a) Never leave surface units unattended at high settings. Boilovers cause smoking and greasy spillovers that may ignite. Heat oils slowly on low or medium settings.
b) Always turn hood ON when cooking at high heat or when flambéing food (i.e. Crepes Suzette, Cherries Jubilee, Peppercorn Beef Flambé).
c) Clean ventilating fans frequently. Grease should not be allowed to accumulate on fan or filter.
d) Use proper pan size. Always use cookware appropriate for the size of the surface element.
WARNING
TO REDUCE THE RISK OF INJURY TO PERSONS IN THE EVENT OF A RANGE TOP GREASE FIRE, OBSERVE THE FOLLOWING*:
a) SMOTHER FLAMES with a close-fitting lid, cookie sheet, or metal tray, then turn off the burner. BE CAREFUL TO PREVENT BURNS. If the flames do not go out immediately, EVAC-UATE AND CALL THE FIRE DEPARTMENT.
b) NEVER PICK UP A FLAMING PAN—You may be burned.
c) DO NOT USE WATER, including wet dishcloths or towels—a violent steam explosion will result.
d) Use an extinguisher ONLY if:
1) You know you have a Class ABC extin-guisher, and you already know how to operate it.
2) The fire is small and contained in the area where it started.
3) The fire department is being called.
4) You can fight the fire with your back to an exit.
*Based on “Kitchen Fire Safety Tips” published by NFPA.
WARNING
PROPOSITION 65 FOR CALIFORNIA RESIDENTS
Cancer and Reproductive Harm— www.P65Warnings.ca.gov

6 | Wolf Customer Care 800.222.7820
ISLAND HOOD
WALL CHIMNEY HOOD
HOOD LINER
HOOD FEATURES
Pro Ventilation Hood Features
FEATURES
1 Product Rating Plate (inside hood shell)
2 Recessed Controls
3 Filters
4 Halogen Lighting
WALL HOOD
W482418 wall hood shown
3
1
2 4
WC482418 wall chimney hood shown
31
2 4
I5434418 island hood shown
31
2 4
L462212 hood liner shown
1
3
2 4

wolfappliance.com | 7
Hood Controls
Controls for pro ventilation hoods and hood liners are recessed under the front edge of the hood. Refer to the illustration below.
LIGHTS
The control knob on the left operates the halogen lights. From the OFF position, turn the knob to the left for LOW and right for the HIGH light setting.
HEAT LAMP
For 27" deep wall hoods, the center control knob operates the heat lamps. Each lamp can be controlled independently or simultaneously. Turn the knob to the left, right or center to select desired setting.
BLOWER
The control knob on the right operates the blower with infinite control of blower speed. To turn the blower off, turn the knob counterclockwise.
HOOD OPERATION
LIGHTS
HEATLAMPS
BLOWER
Hood controls
Heat Sentry
The heat sentry feature automatically turns the blower on or increases blower speed when the exhaust temperature exceeds 200°F (95°C). It automatically adjust blower speed to the previous setting once the temperature drops below 186°F (85°C).

8 | Wolf Customer Care 800.222.7820
HOOD OPERATION
Lighting
LIGHT BULB REPLACEMENT
Pro ventilation hoods require 50W, 120V, GU10 halogen light bulbs, available through an authorized Wolf dealer. For local dealer information, visit the find a showroom section of our website, wolfappliance.com.
A suction-cup-style light bulb changer is provided with the ventilation hood. To remove a bulb, use the changer to rotate the bulb counterclockwise one-quarter turn. Refer to the illustration below.
Heat Lamps
For 27" deep wall hoods, two heat lamp receptacles require R40, 250W bulbs (not included). Bulbs are available at hard-ware stores or through an authorized Wolf dealer. For local dealer information, visit the find a showroom section of our website, wolfappliance.com.
Allow the heat lamps to cool before replacing bulbs. Unscrew the bulb to replace.
CAUTION
Use caution when replacing heat lamp bulbs. Adjacent parts of the ventilation hood may retain heat.
LIGHT BULBCHANGER
Light bulb replacement

wolfappliance.com | 9
CARE RECOMMENDATIONS
Filter Removal
The filters are dishwasher safe. Refer to care recommendations.
Remove the center filter first. To remove, press filter upward then rotate the bottom downward. Refer to the illustration below. Remove grease cups from the bottom edge of the hood (not included with low-profile wall hoods and hood liners). Gloves should be worn when handling filters.
Reinstall using the reverse procedure. Slide outer filters over slightly to reinstall the center filter.
IMPORTANT NOTE: Do not operate the ventilation hood without filters. This may damage the blower or other internal components of the hood.
Care Recommendations
CLEANING
Stainless steel
Use a nonabrasive stainless steel cleaner and apply with a soft lint-free cloth. To bring out the natural luster, lightly wipe surface with a water-dampened microfiber cloth followed by a dry polishing chamois. Always follow the grain of stainless steel.
Control knobs
Using a damp cloth, wipe with mild detergent or spray degreaser. Rinse and dry.
IMPORTANT NOTE: Do not spray cleaners directly on the control knobs.
Filters Grease cups
Filters are dishwasher safe and are designed to fit most dishwashers. Wipe filters and grease cups (if applicable) to remove excess grease before placing in the dishwasher.
FILTER
SIDE VIEW
SPRING GREASECUP
Filter removal

10 | Wolf Customer Care 800.222.7820
SERVICE
• Maintain the quality built into your product by contacting Wolf Factory Certified Service. For the name of the nearest Wolf Factory Certified Service, check the contact & support section of our website, wolfappliance.com or call Wolf customer care at 800-222-7820.
• When contacting service, you will need the model and serial number of your product. Both numbers are listed on the product rating plate, located inside the left wall of the hood shell. Refer to page 6 for rating plate location.
• For warranty purposes, you will also need the date of installation and name of your authorized Wolf dealer. This information should be recorded on page 3 of this guide.
TROUBLESHOOTING
Troubleshooting
OPERATION
Ventilation hood does not operate.
• Verify power is on.
• Verify electrical power to hood and home circuit breaker is on.
Sub-Zero, Sub-Zero & Design, Sub-Zero & Snowflake Design, Dual Refrigeration, The Living Kitchen, Great American Kitchens The Fine Art of Kitchen Design, Wolf, Wolf & Design, Wolf Gourmet, W & Design, red colored knobs, Cove, and Cove & Design are registered trademarks and service marks of Sub-Zero Group, Inc. and its subsidiaries. All other trademarks are property of their respective owners in the United States and other countries.

Wolf Appliance Residential Limited Warranty
FOR RESIDENTIAL USE
FULL TWO YEAR WARRANTY*
For two years from the date of original installation, this Wolf Appliance product warranty covers all parts and labor to repair or replace, under normal residential use, any part of the product that proves to be defective in materials or workmanship. All service provided by Wolf Appliance under the above warranty must be performed by Wolf factory certified service, unless otherwise specified by Wolf Appliance, Inc. Service will be provided during normal business hours.
LIMITED FIVE YEAR WARRANTY
For five years from the date of original installation, Wolf Appliance will repair or replace the following parts that prove to be defective in materials or workmanship: gas burners (excludes appearance), electric heating elements, blower motors (ventilation hoods), electronic control boards, magnetron tubes and induction generators. If the owner uses Wolf factory certified service, the service provider will repair or replace these parts with the owner paying for all other costs, including labor. If the owner uses non-certi-fied service, the owner must contact Wolf Appliance, Inc. (using the information below) to receive repaired or replacement parts. Wolf Appliance will not reimburse the owner for parts purchased from non-certified service or other sources.
TERMS APPLICABLE TO EACH WARRANTY
The warranty applies only to products installed for normal residential use. The warranty applies only to products installed in any one of the fifty states of the United States, the District of Columbia or the ten provinces of Canada. This warranty does not cover any parts or labor to correct any defect caused by negligence, accident or improper use, maintenance, installation, service or repair.
THE REMEDIES DESCRIBED ABOVE FOR EACH WARRANTY ARE THE ONLY ONES THAT WOLF APPLIANCE, INC. WILL PROVIDE, EITHER UNDER THIS WARRANTY OR UNDER ANY WARRANTY ARISING BY OPERATION OF LAW. WOLF APPLIANCE, INC. WILL NOT BE RESPONSIBLE FOR ANY CONSEQUENTIAL OR INCIDEN-TAL DAMAGES ARISING FROM THE BREACH OF THIS WARRANTY OR ANY OTHER WARRANTY, WHETHER EXPRESS, IMPLIED OR STATUTORY.
Some states do not allow the exclusion or limitation of incidental or consequential damages, so the above limitation or exclusion may not apply to you. This warranty gives you specific legal rights and you may also have other legal rights that vary from state to state.
To receive parts and/or service and the name of Wolf factory certified service nearest you, contact Wolf Appliance, Inc., P.O. Box 44848, Madison, WI 53744; check the contact & support section of our website, wolfappliance.com, email us at [email protected] or call 800-222-7820.
*Stainless steel (doors, panels, handles, product frames and interior surfaces) are covered by a limited 60-day parts and labor warranty for cosmetic defects.
*Replacement filters for ventilation hood recirculating kits are not covered by the product warranty.

WOLF APPLIANCE, INC. P.O. BOX 44848 MADISON, WI 53744 WOLFAPPLIANCE.COM 800.222.7820
821377 REV-C 2/2018

Wolf Appliance Residential Limited Warranty
FOR RESIDENTIAL USE
FULL TWO YEAR WARRANTY*
For two years from the date of original installation, this Wolf Appliance product warranty covers all parts and labor to repair or replace, under normal residential use, any part of the product that proves to be defective in materials or workmanship. All service provided by Wolf Appliance under the above warranty must be performed by Wolf factory certified service, unless otherwise specified by Wolf Appliance, Inc. Service will be provided during normal business hours.
LIMITED FIVE YEAR WARRANTY
For five years from the date of original installation, Wolf Appliance will repair or replace the following parts that prove to be defective in materials or workmanship: gas burners (excludes appearance), electric heating elements, blower motors (ventilation hoods), electronic control boards, magnetron tubes and induction generators. If the owner uses Wolf factory certified service, the service provider will repair or replace these parts with the owner paying for all other costs, including labor. If the owner uses non-certi-fied service, the owner must contact Wolf Appliance, Inc. (using the information below) to receive repaired or replacement parts. Wolf Appliance will not reimburse the owner for parts purchased from non-certified service or other sources.
TERMS APPLICABLE TO EACH WARRANTY
The warranty applies only to products installed for normal residential use. The warranty applies only to products installed in any one of the fifty states of the United States, the District of Columbia or the ten provinces of Canada. This warranty does not cover any parts or labor to correct any defect caused by negligence, accident or improper use, maintenance, installation, service or repair.
THE REMEDIES DESCRIBED ABOVE FOR EACH WARRANTY ARE THE ONLY ONES THAT WOLF APPLIANCE, INC. WILL PROVIDE, EITHER UNDER THIS WARRANTY OR UNDER ANY WARRANTY ARISING BY OPERATION OF LAW. WOLF APPLIANCE, INC. WILL NOT BE RESPONSIBLE FOR ANY CONSEQUENTIAL OR INCIDEN-TAL DAMAGES ARISING FROM THE BREACH OF THIS WARRANTY OR ANY OTHER WARRANTY, WHETHER EXPRESS, IMPLIED OR STATUTORY.
Some states do not allow the exclusion or limitation of incidental or consequential damages, so the above limitation or exclusion may not apply to you. This warranty gives you specific legal rights and you may also have other legal rights that vary from state to state.
To receive parts and/or service and the name of Wolf factory certified service nearest you, contact Wolf Appliance, Inc., P.O. Box 44848, Madison, WI 53744; check the contact & support section of our website, wolfappliance.com, email us at [email protected] or call 800-222-7820.
*Stainless steel (doors, panels, handles, product frames and interior surfaces) are covered by a limited 60-day parts and labor warranty for cosmetic defects.
*Replacement filters for ventilation hood recirculating kits are not covered by the product warranty.

INSD29SSV INSD35SSV
INCA SD
Installation InstructionsUse and Care Information
Instructions d'installationUtilisez et d'entretien
Instrucciones de instalaciónInformación de uso y cuidado

2
READ AND SAVE THESE INSTRUCTIONS BEFORE YOU START INSTALLING THIS RANGEHOOD
WARNING: - TO REDUCE THE RISK OF A RANGE TOP GREASE FIRE: a) Never leave surface units unattended at high settings. Boilovers cause smoking and
greasy spillovers that may ignite. Heat oils slowly on low or medium setting. b)AlwaysturnhoodONwhencookingathighheatorwhenflambeingfood(i.e.Crepes
Suzette, Cherries Jubilee, Peppercorn Beef Flambé). c) Clean ventilating fans frequently. Grease should not be allowed to accumulate on fan orfilter.
d) Use proper pan size. Always use cookware appropriate for the size of the surface element.
WARNING: - TO REDUCE THE RISK OF INJURY TO PERSONS IN THE EVENT OF A RANGE TOP GREASE FIRE, OBSERVE THE FOLLOWING*: a)SMOTHERFLAMESwithaclose-fittinglid,cookiesheet,ormetaltray,thenturnofftheburner.BECAREFULTOPREVENTBURNS.IftheflamesdonotgooutimmediatelyEVACUATEAND CALL THE FIRE DEPARTMENT.
b) NEVER PICK UP A FLAMING PAN - You may be burned. c) DO NOT USE WATER, including wet dishcloths or towels - a violent steam explosion will
result.d) Use an extinguisher ONLY if: 1. You know you have a Class ABC extinguisher, and you already know how to operate it. 2. Thefireissmallandcontainedintheareawhereitstarted.3. Thefiredepartmentisbeingcalled.4. Youcanfightthefirewithyourbacktoanexit.* Based on "Kitchen Firesafety Tips" published by NFPA
WARNING - TO REDUCE THE RISK OF FIRE OR ELECTRIC SHOCK, do not use this fan with any solid-state speed control device.
WARNING - TO REDUCE THE RISK OF FIRE, ELECTRICAL SHOCK, OR INJURY TO PERSONS, OBSERVE THE FOLLOWING: 1. Use this unit only in the manner intended by the manufacturer. If you have any
questions, contact the manufacturer.2. Before servicing or cleaning unit, switch power off at service panel and lock the
service disconnecting means to prevent power from being switched on acciden-tally. When the service disconnecting means cannot be locked, securely fasten a prominent warning device, such as a tag, to the service panel.
CAUTION: For General Ventilating Use Only. Do Not Use To Exhaust Hazardous or Explosive Materials and Vapors.
WARNING - TO REDUCE THE RISK OF FIRE, ELECTRICAL SHOCK, OR INJURY TO PERSONS, OBSERVE THE FOLLOWING: 1. InstallationWorkAndElectricalWiringMustBeDoneByQualifiedPerson(s)InAccor-
dance With All Applicable Codes And Standards, Including Fire-Rated Construction. 2. Sufficientair isneededforpropercombustionandexhaustingofgasesthrough
theflue(chimney)offuelburningequipmenttopreventbackdrafting.Followtheheating equipment manufacturer's guideline and safety standards such as those publishedby theNationalFireProtectionAssociation (NFPA),and theAmericanSocietyforHeating,RefrigerationandAirConditioningEngineers(ASHRAE),andthe local code authorities.

3
ALL WALL AND FLOOR OPENINGS WHERE THE RANGEHOOD IS INSTALLED MUST BE SEALED.
This rangehood requires at least 24" of clearance between the bottom of the rangehood and the cooking surface or countertop. This hood has been approved by UL at this distance from the cooktop. This minimum clearance may be higher depending on local building codes. For gas cooktops and combination ranges, a minimum of 30" is recommended and may be required.Overhead cabinets on both sides of this unit must be a minimum of 18" above the cooking surface or countertop. Consult the cooktop or range installation instructions given by the manufacturer before making any cutouts. MOBILE HOME INSTALLATION The installation of this rangehood must conform to the Manufactured Home Construction and Safety Standards, Title 24 CFR, Part 3280 (formerly Federal Standard for Mobile Home Construction and Safety, Title 24, HUD, Part 280). See Electrical Requirements.
• Venting system MUST terminate outside the home.• DO NOT terminate the ductwork in an attic or other enclosed space.• DO NOT use 4" laundry-type wall caps.• Flexible-type ductwork is not recommended.• DO NOT obstruct the flow of combustion and ventilation air.• Failure to follow venting requirements may result in a fire.
WARNING!
VENTING REQUIREMENTSDetermine which venting method is best for your application. Ductwork can extend either through the wall or the roof.
The length of the ductwork and the number of elbows should be kept to a minimum to provide efficient performance. The size of the ductwork should be uniform. Do not install two elbows together. Use duct tape to seal all joints in the ductwork system. Use caulking to seal exterior wall or floor opening around the cap.
Flexible ductwork is not recommended. Flexible ductwork creates back pressure and air turbulence that greatly reduces performance.
Make sure there is proper clearance within the wall or floor for exhaust duct before making cutouts. Do not cut a joist or stud unless absolutely necessary. If a joist or stud must be cut, then a supporting frame must be constructed.
WARNING - To Reduce The Risk Of Fire, Use Only Metal Ductwork.CAUTION-Toreduceriskoffireandtoproperlyexhaustair,besuretoductairoutside–Donot vent exhaust air into spaces within walls or ceilings or into attics, crawl spaces, or garages.
3. When cutting or drilling into wall or ceiling, do not damage electrical wiring and other hidden utilities.
4. Ducted fans must always be vented to the outdoors.
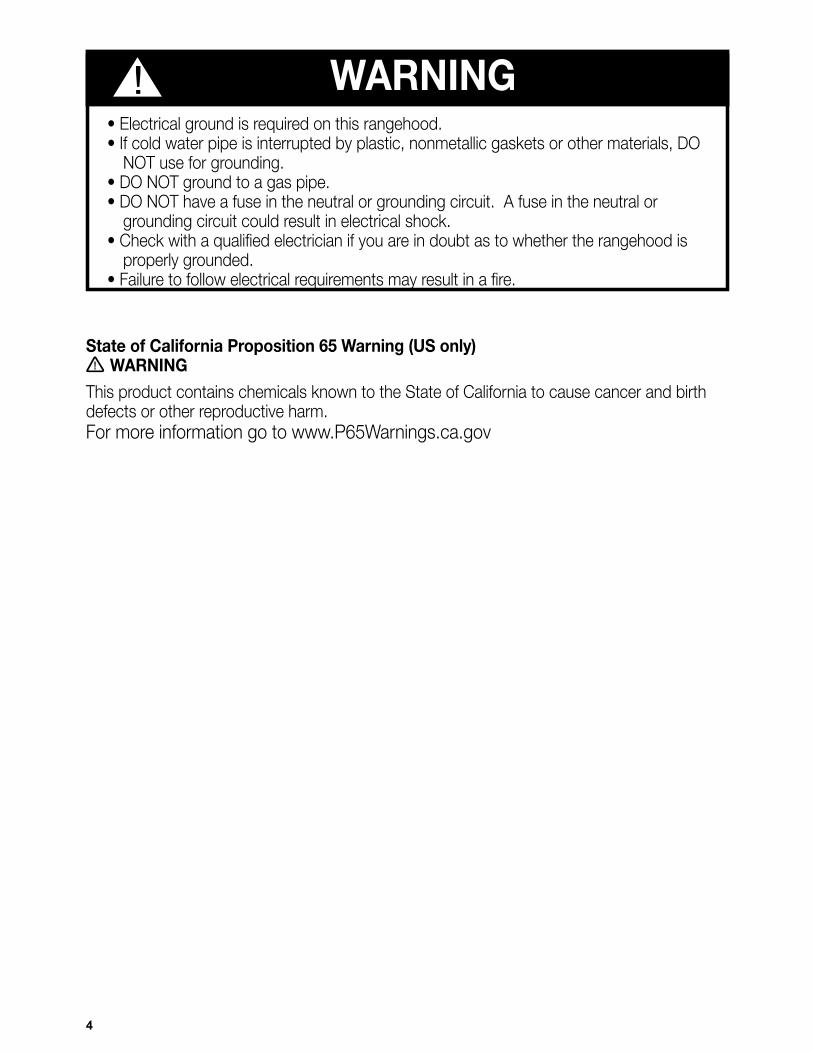
4
• Electrical ground is required on this rangehood.• If cold water pipe is interrupted by plastic, nonmetallic gaskets or other materials, DO
NOT use for grounding.• DO NOT ground to a gas pipe.• DO NOT have a fuse in the neutral or grounding circuit. A fuse in the neutral or
grounding circuit could result in electrical shock.• Check with a qualified electrician if you are in doubt as to whether the rangehood is
properly grounded. • Failure to follow electrical requirements may result in a fire.
WARNING!
StateofCaliforniaProposition65Warning(USonly) WARNING
This product contains chemicals known to the State of California to cause cancer and birth defects or other reproductive harm.For more information go to www.P65Warnings.ca.gov

5
RANGEHOOD DIMENSIONS
RANGEHOOD DIMENSIONS
INSD29SSV
INSD35SSV
DRAFT 22-NOV-2018 13:20
DRAFT 22-NOV-2018 13:29

6
Min. 24" Min. 30"

7
Available Accessories
Parts needed
- 6" Round Metal ductwork .
Direct Connect Wiring Box sku # WIREBOX
Liner 30" Stainless #LINE30ST (used only with INSD29SSV)Liner 36" Stainless #LINE36ST (used only with INSD29SSV)
Activated Charcoal Filter sku #; FILTER1 Long Lasting Activated Charcoal Filter sku# FILTER1LL
Remote Control Accessory - REMCTRL2
Created by -Denomination
-
Lang EN Sheet 1 /1Modif.by
Approved by
Approval date
Doc. status
Drawing N.NEW_DRAWING_BOX
Rev01
MAIN PARTS
ComponentsRef. Qty. Product Components1 1 Hood Body, complete with: Con- trols, Light, Filters, Blower.2 1 Power cord 6 2 Caps 7 4 Filter knobs 8 1 Recirculation Vent Grill9 2 Greasefilters10 1 Damper ø 5 7/8"Ref. Qty. Installation Components12a 4 Greasefiltersscrews5/32"x5/16"12e 2 Screws1/8"x3/8" (for Recirculation Grill mounting) Qty. Documentation 1 Instruction Manual
6
1
9c
9c
5
8
7
5
4
4
6
9d
10
9e
1
9c
9c
5
8
7
5
4
4
6
9d
10
9e
7
9
1
9c
9c
5
8
7
5
4
4
6
9d
10
9e12a

8
Choose your ducting method
Requires purchase of Activated Charcoal Accessory
Horizontal
Vertical6"
Install Damper that is included with the Hood before connecting to the ductwork.
Only for Ducted Venting Installation
Non Ducted - RecirculationDucted Venting Installation

9
1
Cut out the opening in the underside of the cabinet as shown in Figure 1.
Installation Instructions
2.a
Install Roof or Wall Cap purchased separately. Connect the 6" metal ductwork to the Roof or Wall Cap and then attach ductwork.
Ducted(infrontofVertical)
Hood 29" 35" X 27 5/8" 33 3/4" Y 13 9/16" 13 9/16"
X
Y

10
2.b
2 1/2”>
For horizontal(rear) ducting there must be a minimum of 2 1/2" of space open between the back of the Hood Insert and the wall.
For a horizontal ducting installation the motor needs to be unsecured by first removing the 12 screws as shown.
Once the screws are removed, extract the blower from the body of the Insert Hood and position it so the transition opening is facing to the rear wall (from the back remove and rotate 180 degrees to the left, and then flip it back 90 degrees as shown in the diagram).
Once the blower is in place re-install the 12 screws to fasten the motor to the Insert Hood body.
Horizontal Ducting Installation

11
4
2x
2x
Install the Insert Hood through the cabinet cutout into the cabinet opening that has a minimum height of 16 ". Allow for ducting.The range hood is secured to the cabinet cutout by two spring loaded brackets, one on each side of the range hood.It is recommend that the Insert Hood is supported with a 3/4" wood base to insure proper align-ment of the two side clipsAfter the Insert Hood is installed into the cabinet opening lock it into position by tightening the indicated screws in each of the two side clips from underneath the Insert Hood.
3For Non-Ducted Recirculation venting route the ductwork to a location above the hood where the discharge is vented back into the room.
Non-Ducted Recirculation Option
Use the included Recirculation Vent Grill to cover the opening. Secure the grill with the 2 screws provided in the Install Kit.
Required Activated Charcoal Filter Accessory - sku # - FILTER1 (purchased separately). Long Lasting Activated Charcoal Filter Accessory - sku # FILTER1LL (purchased separately).
Min. 24" Min. 30"

12
5
6 7Attach each charcoal filter to the black grid on each side of the blower. Press the charcoal filter tightly to the black grid on the blower side and rotate the filter
Before putting the filters, tighten the 2 knobs (7) with 2 screws (12a). Use two hands to insert and remove the filters.
Direct Connect Wiring Box Accessory sku # WIREBOX (purchased separately)
Created by -Denomination
-
Lang EN Sheet 1 /1Modif.by
Approved by
Approval date
Doc. status
Drawing N.NEW_DRAWING_BOX
Rev01
ELECTRICAL INSTALLATION WITH CONNECTION CABLE
ELECTRICAL INSTALLATION WITH OPTIONAL WIRING BOX
For permanent wiring, use only the Direct Con-nect Wiring Box accessory sku WIREBOX, manufactured by Faber.
Max. 33 7/16”
For Non-Ducted Recirculation Option
clockwise (towards the front of the insert hood) until it locks into place. Turn counterclockwise (towards the back of the insert hood) to remove.
12
GROUNDING INSTRUCTIONS This appliance must be grounded. In the event of an electrical short circuit, grounding reduces the risk of electric shock by providing an escape wire for the electric current. This appliance is equipped with a cord having a grounding wire with a grounding plug. The plug must be plugged into an outlet that is properly installed and grounded.WARNING - Improper grounding can result in a risk of electric shock.Consult a qualified electrician if the grounding instructions are not completely understood, or if doubt exists as to whether the appliance is properly grounded.Do not use an extension cord. If the power supply cord is too short, have a qualified electrician install an outlet near the appliance.
Required Activated Charcoal Filter Accessory - sku # - FILTER1Long Lasting Activated Charcoal Filter Accessory - sku # FILTER1LL(purchased separately)
12a
7
9
12a
7

13
Standard Liner 36 Stainless (LINE36ST)designed for 36” wide installationsCadre Standard 36 Axier Inoxydable (620000305)peut être employée les hottes encastrable sur mesure de 36"
Standard Liner 30 Stainless (LINE30ST)designed for 30” wide installationsCadre Standard 30 Axier Inoxydable (620000304)peut être employée les hottes encastrable sur mesure de 30"
Note: Standard Liners are pre-cut for installation of Inca Smart. For installations with the Inca HC SS, remove the additional perforated section.Note: Les Cadres Standard sont précoupés pour l'installation de l'Inca Smart. Pour des installations avec L'Inca HC SS, enlevez la section perforée additionnelle.
LINER DIMENSIONS / DIMENSIONS DU CADRE FIGURE 1
Pre-Planning Your Installation - Important: The recommended height to install this hood off the cooktop is a minimum of 24" and a maximum of 30” for maximum effectiveness. Also consult the cooktop manufacturer’s recommendation.Planifiez votre installation - Important : La hauteur recommandée pour installer cette hotte au-des-sus de la surface de cuisson est d’un minimum de 24” et d’un maximum de 30” pour un maximum d’efficacité. De plus, nous vous recommandons consulter le manuel de recommandations du fabricant de la surface de cuisson.
MOD. INCA BIG ESB
RIF. -
N.DIS. 352_731.1
DATA 24-Nov-10
LINER DIMENSIONS
ADDITIONAL FIXATION POINTS
Standard Liner 36 Stainless (LINE36ST)designed for 36” wide installationsCadre Standard 36 Axier Inoxydable (620000305)peut être employée les hottes encastrable sur mesure de 36"
Standard Liner 30 Stainless (LINE30ST)designed for 30” wide installationsCadre Standard 30 Axier Inoxydable (620000304)peut être employée les hottes encastrable sur mesure de 30"
Note: Standard Liners are pre-cut for installation of Inca Smart. For installations with the Inca HC SS, remove the additional perforated section.Note: Les Cadres Standard sont précoupés pour l'installation de l'Inca Smart. Pour des installations avec L'Inca HC SS, enlevez la section perforée additionnelle.
LINER DIMENSIONS / DIMENSIONS DU CADRE FIGURE 1
Pre-Planning Your Installation - Important: The recommended height to install this hood off the cooktop is a minimum of 24" and a maximum of 30” for maximum effectiveness. Also consult the cooktop manufacturer’s recommendation.Planifiez votre installation - Important : La hauteur recommandée pour installer cette hotte au-des-sus de la surface de cuisson est d’un minimum de 24” et d’un maximum de 30” pour un maximum d’efficacité. De plus, nous vous recommandons consulter le manuel de recommandations du fabricant de la surface de cuisson.
MOD. INCA BIG ESB
RIF. -
N.DIS. 352_731.1
DATA 24-Nov-10
"Note: Standard Liners need to have the center perforation removed for installation"
"Note: Possible additional fixation points of the product with 4 screws "
3/16 “
Min
.1 3
/8 “
Max
.1 3
/4 “
Insert the 2 Caps in the screws hole, as shown.
8

14
FOR INSTALLATIONS WITH LINERS
CUSTOM/WOODHOOD
STANDARD LINER
WARNING!When building a custom hood, always follow all applicable codes and standards.
1. The custom/wood hood must have a sturdy base (3/4" plywood recommended) toaccomodate the cut-out for the Inca HC SS. The base must be recessed to accomodate the height of the Liner (see LINER DIMENSIONS on Page 4). The Liner attaches to the bottom of the base using screws appropriate for the size and material of your custom/wood hood. The Inca HC SS inserts into the cut-out in the Liner and base.
2. Position the rear section of the Liner so that it abuts the back edge of your custom/wood hood. Using a pen, trace the outline of the pre-cut out. Remove the Liner and proceed to MAKE YOUR CUT-OUTS on Page 7. Install both sections of the Liner and proceed to INSTALL THE Range hood on Page 7.
INCA HC SS
The Inca HC SS can be used with custom cabinetry and hoods 30" wide and up. Choose either a custom liner or our Standard Liner designed for 30" and 36" wide installations.
Liners create a perfectly-sealed, non-combustible finish for the underside of your custom/wood hood.
The Standard Liners are made up of two sections: a larger, rear section (pre-cut out for insertion of the Inca Smart) and a front section for a total adjustable depth between 16" and 17 7/8".
!!! IMPORTANT NOTE: YOU MUST REMOVE THE ADDITIONAL PERFORATED SECTION AROUND THE PRE-CUT-OUT WHEN INSTALLING THE STANDARD LINER WITH THE INCA HC SS MODEL.
Consider the shape, size, and weight of the Inca HC SS and Liner to determine the configuration of the custom/wood hood. See Range hood AND CUT-OUT DIMENSIONS AND LINER DIMENSIONS on Page 4.
FOR INSTALLATION WITH LINERS
When building a custom hood,always follow all applicable codes and standards.
WARNING!
The Inca SD can be used withcustom cabinetry and hoods 30"wide and up. Choose either acustom liner or our Standard Linerdesigned for 30" and 36" wideinstallations.
Liners create a perfectly-sealed,non-combustible finish for theunderside of your custom/woodhood.
The Standard Liners are made up of two sections: a larger, rear section (pre-cut out for insertion of the Inca Smart) and a front section for a total adjustable depth between16" and 17 7/8".
!!! IMPORTANT NOTE: YOUMUST REMOVE THE ADDITIONALPERFORATED SECTION AROUND THE PRE-CUT-OUT WHEN INSTALLING THE STANDARD LINER WITH THE INCA SD MODEL.
Consider the shape, size, andweight of the Inca SD and Linerto determine the configurationof the custom/wood hood.
1. The custom/wood hood must have a sturdy base (3/4" plywood recommended) to accomodate the cut-out for the Inca SD. The base must be recessed to ac-comodate the height of the Liner (see LINER DIMEN-SIONS on Page 13). The Liner attaches to thebottom of the base using screws appropriate for the size and material of your custom/ wood hood. The Inca SD inserts into the cut-out in the Liner and base.
2. Position the rear section of the Liner so that it abuts the back edge of your custom/ wood hood. Using a pen, trace the outline of the pre-cut out. Remove the Liner and proceed to MAKE YOUR CUT-OUTS. Install both sections of the Liner and proceed to INSTALL THE Range hood.

15
USE AND CARE INFORMATION
T1 T2 T3 T4 L
LT1 T2 T3 T4
For Best ResultsStart the rangehood several minutes before cooking to develop proper airflow. Allow the rangehood to operate for several minutes after cooking is complete to clear all smoke and odors from the kitchen.
T1. Fan off button:turn the blower Off. The fan can be operated by pressing any of the fan setting buttons. Hold down this button for 2 seconds to activate Delay off function which will keep the fan on for 15
minutes and automatically shut off.T2. Fan settings buttons: Low speed.T3. Fan settings buttons: Medium speed.T4. Fan settings buttons: High speed / Intensive speed. Hold down the button for 2 seconds to activate the intensive speed, which is timed to run for 6
minutes. At the end of this time it will automatically return to the speed set before.Suitable to deal with maximum levels of cooking fumes.
L. Light button: On/Off switch for the lights.
NOTE: If your product has had a CFM adjustment, refer to the CFM adjustment manual for the infor-mation. Some motor speeds or functions may be reduced.

16
CleaningmetalgreasefiltersThe metal grease filters can be cleaned in hot detergent solution or washed in the dishwasher. They should be cleaned every 2 months, or more frequently if use is particularly heavy. • Remove the filter, pushing the lever towards the back
of the unit and at the same time pulling downward.• Wash the filter without bending it, leave it to dry
thoroughly before replacing (if the surface of the filter changes color over time, this will have absolutely no effect on its efficiency).
• Replace, taking care to ensure that the handle faces forward.
• Cleaning in dishwasher may dull the finish of the metal grease filter.
• No water can be present in filters before in-stalling back in hood.
Replacing Activated Charcoal FilterThe Activated Charcoal Filters are not washable and cannot be regenerated, and should be replaced approximately every 4 months of operation, or more frequently with heavy usage.• Remove the charcoal filter by rotating it clockwise (
backwards) until it unlocks from the motor housing and pull off sideways.
• To re-insert each charcoal filter, place up against the side of the blower and push it inward. Then turn the charcoal filter clockwise (forward) until it fits into place.
Caution: "When used in recirculation mode, to Reduce the Risk of Fire and Shock use only conversion kit Model FILTER 1 or FILTER1LL"
Lighting unit • Replace the lamp with a new one of the same
type, making sure that you insert the two pins properly into the housings on the lamp holder.
�
�
Gu10 self-ballasted led lamps – listed in accordance with ul 1993/nmx-j-578/1-ance/csa c22.2 No. 1993
a
b
a
b

17
Wiring Diagram
991.0530.011 H90-503D00004494_00
991.0530.011 H90-503D00004494_00
120V
60H
z

18
January 4, 2016
FABER CONSUMER WARRANTY & SERVICE
All Faber products are warranted against any defect in materials or workmanship for the original purchaser
for a period of 1 year from the date of original purchase (requires proof of purchase). This warranty covers
labor and replacement parts. Faber, at its option, may repair or replace the product or components
necessary to restore the product to good working condition. To obtain warranty service, contact the dealer
from whom you purchased the range hood, or the local Faber distributor. If you cannot identify a local Faber
distributor, contact us at (508) 358-5353 for the name of a distributor in your area.
The following is not covered by Faber's warranty: 1. Service calls to correct the installation of your range hood, to instruct you how to use your range hood, to
replace or repair house fuses or to correct house wiring or plumbing.
2. Service calls to repair or replace range hood light bulbs, fuses or filters. Those consumable parts are
excluded from warranty coverage.
3. Repairs when your range hood is used for other than normal, single-family household use.
4. Damage resulting from accident, alteration, misuse, abuse, fire, flood, acts of God, improper installation,
installation not in accordance with electrical or plumbing codes or Faber documentation, or use of products
not approved by Faber.
5. Replacement parts or repair labor costs for units operated outside the United States or Canada, including
any non-UL or C-UL approved Faber range hoods.
6. Repairs to the hood resulting from unauthorized modifications made to the range hood.
7. Expenses for travel and transportation for product service in remote locations and pickup and delivery
charges. Faber range hoods should be serviced in the home.
THIS WARRANTY DOES NOT ALLOW RECOVERY OF INCIDENTAL OR CONSEQUENTIAL DAMAGES, INCLUDING, WITHOUT
LIMITATION, DIRECT, INDIRECT, INCIDENTAL, SPECIAL OR CONSEQUENTIAL DAMAGES, PERSONAL INJURY/WRONGFUL
DEATH OR LOST PROFITS FABER WARRANTY IS LIMITED TO THE ABOVE CONDITIONS AND TO THE WARRANTY PERIOD
SPECIFIED HEREIN AND IS EXCLUSIVE. EXCEPT AS EXPRESSLY SPECIFIED IN THIS AGREEMENT, FABER DISCLAIMS ALL
EXPRESS OR IMPLIED CONDITIONS, REPRESENTATIONS, AND WARRANTIES INCLUDING, WITHOUT LIMITATION, ANY
IMPLIED WARRANTIES OF MERCHANTABILITY OR FITNESS FOR A PARTICULAR PURPOSE.
This warranty gives you specific legal rights that may vary from state to state.
Model#: ______________________________ Serial #: _____________________________

ENG
LISHFR
AN
ÇA
IS
OWNER'S MANUAL
DRYER
Read this owner's manual thoroughly before operating the appliance and keep it handy for reference at all times.
DLE3500*, DLG3501*DLE3095*, DLE3090* DLEX3700*, DLGX3701* DLEX3900*, DLGX3901*
MFL67652523Rev.04_011119
www.lg.comCopyright © 2018 - 2019 LG Electronics Inc. All Rights Reserved.

2
TABLE OF CONTENTS3 PRODUCT FEATURES
4 SAFETY INSTRUCTIONS5 IMPORTANT SAFETY INSTRUCTIONS
9 PRODUCT OVERVIEW9 Parts9 Accessories
10 INSTALLATION10 Installation Overview10 Product Specifications11 Installation Location Requirements12 Clearances14 Leveling the Dryer15 Reversing the Door16 Installing the Side Vent Kit17 Stacking the Dryer18 Venting the Dryer20 Connecting the Inlet Hose
(Steam Models)21 Connecting Gas Dryers23 Connecting Electric Dryers24 Special Electrical Requirements24 Final Installation Check25 Installation Test (Duct Check)
28 OPERATION28 Using the Dryer29 Check the Lint Filter Before Every Load29 Sorting Laundry29 Loading the Dryer30 Control Panel33 Cycle Guide37 Cycle Modifier Buttons37 Option Buttons38 Special Functions39 Steam Functions
(Steam Models)
41 SMART FUNCTIONS41 LG SmartThinQ Application44 Smart Diagnosis™ Function
45 MAINTENANCE45 Regular Cleaning
46 TROUBLESHOOTING46 FAQs: Frequently Asked Questions47 Before Calling for Service
53 WARRANTY
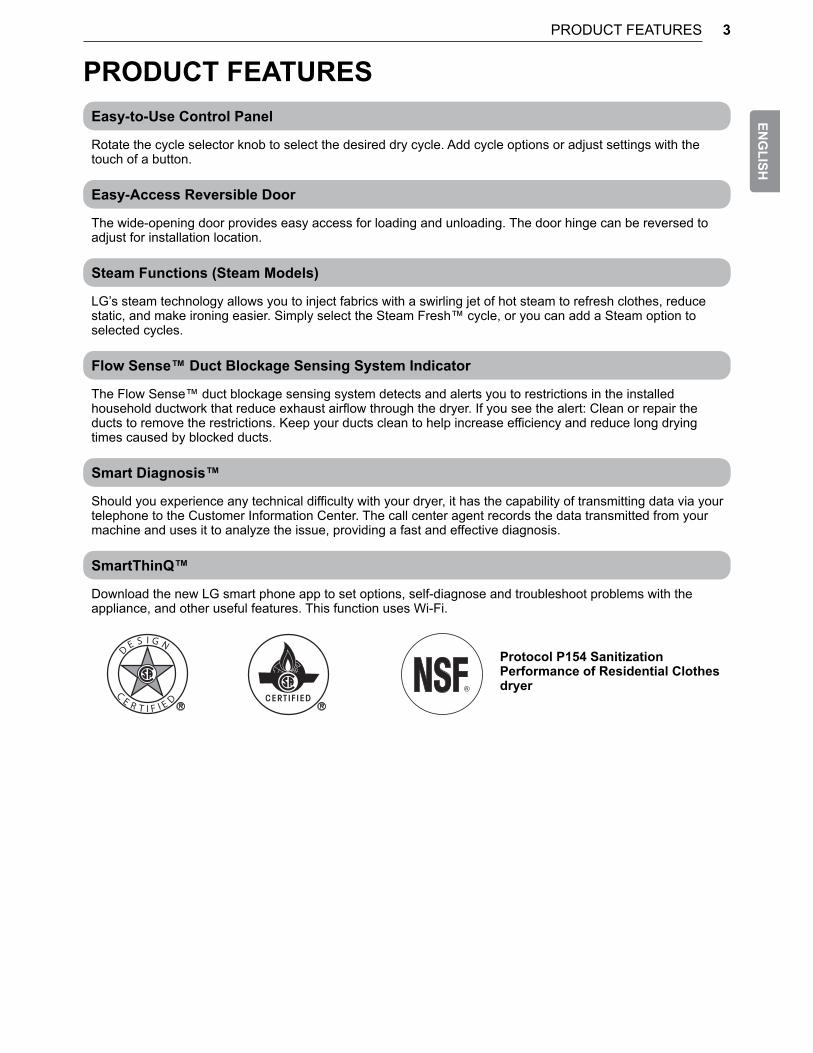
3PRODUCT FEATURESEN
GLISH
PRODUCT FEATURESEasy-to-Use Control Panel
Rotate the cycle selector knob to select the desired dry cycle. Add cycle options or adjust settings with the touch of a button.
Easy-Access Reversible Door
The wide-opening door provides easy access for loading and unloading. The door hinge can be reversed to adjust for installation location.
Steam Functions (Steam Models)
LG’s steam technology allows you to inject fabrics with a swirling jet of hot steam to refresh clothes, reduce static, and make ironing easier. Simply select the Steam Fresh™ cycle, or you can add a Steam option to selected cycles.
Flow Sense™ Duct Blockage Sensing System Indicator
The Flow Sense™ duct blockage sensing system detects and alerts you to restrictions in the installed household ductwork that reduce exhaust airflow through the dryer. If you see the alert: Clean or repair the ducts to remove the restrictions. Keep your ducts clean to help increase efficiency and reduce long drying times caused by blocked ducts.
Smart Diagnosis™
Should you experience any technical difficulty with your dryer, it has the capability of transmitting data via your telephone to the Customer Information Center. The call center agent records the data transmitted from your machine and uses it to analyze the issue, providing a fast and effective diagnosis.
SmartThinQ™
Download the new LG smart phone app to set options, self-diagnose and troubleshoot problems with the appliance, and other useful features. This function uses Wi-Fi.
CE R T I F I E D
DE S I G N Protocol P154 Sanitization
Performance of Residential Clothes dryer

4 SAFETY INSTRUCTIONS
SAFETY INSTRUCTIONSREAD ALL INSTRUCTIONS BEFORE USEYour safety and the safety of others are very important.We have provided many important safety messages in this manual and on your appliance. Always read and follow all safety messages.
This is the safety alert symbol. This symbol alerts you to potential hazards that can kill or injure you and others. All safety messages will follow the safety alert symbol and either the word WARNING or CAUTION.
These words mean:
WARNINGYou may be killed or seriously injured if you do not follow instructions.
CAUTIONYou may be slightly injured or cause damage to the product if you do not follow instructions.All safety messages will tell you what the potential hazard is, tell you how to reduce the chance of injury, and tell you what may happen if the instructions are not followed.
WARNING- Risk of FireInstall the clothes dryer according to the manufacturer’s instructions and local codes. •Clothes dryer installation must be performed by a qualified installer. •Do not install a clothes dryer with flexible plastic venting materials. If flexible metal (foil type) duct is installed, it must be of a specific type identified by the appliance manufacturer as suitable for use with clothes dryers. Flexible venting materials are known to collapse, be easily crushed, and trap lint. These conditions will obstruct clothes dryer airflow and increase the risk of fire. •To reduce the risk of severe injury or death, follow all installation instructions. •Save these instructions.
WARNINGFIRE OR EXPLOSION HAZARDFailure to follow safety warnings exactly could result in serious injury, death or property damage. •Do not store or use gasoline or other flammable vapors and liquids in the vicinity of this or any other appliance. •WHAT TO DO IF YOU SMELL GAS- Do not try to light any appliance.- Do not touch any electrical switch; do not use any phone in your building.- Clear the room, building or area of all occupants.- Immediately call your gas supplier from a neighbor’s phone. Follow the gas supplier’s instructions.- If you cannot reach your gas supplier, call the fire department. • Installation and service must be performed by a qualified installer, service agency or your gas supplier.

5SAFETY INSTRUCTIONSEN
GLISH
IMPORTANT SAFETY INSTRUCTIONSWARNING
To reduce the risk of explosion, fire, death, electric shock, scalding or injury to persons when using this product, follow basic precautions, including the following:
INSTALLATION •Before use, the appliance must be properly installed as described in this manual. •Connect to a properly rated, protected, and sized power circuit to avoid electrical overload. •To reduce the risk of severe injury or death, follow all installation instructions. •The appliance must be installed and electrically grounded by qualified service personnel in accordance with local codes. •Disconnect the power cord, house fuse or circuit breaker before installing or servicing the appliance. •When moving or installing the product in a different location, call qualified service personnel for installation and service. •Keep packing materials out of the reach of children. Packaging material can be dangerous for children. There is a risk of suffocation. •Moving or installation of the appliance requires two or more people. •This appliance is not designed for maritime use or for mobile installations such as in RVs, trailers, or aircraft. •Store and install the appliance where it will not be exposed to temperatures below freezing or exposed to outdoor weather conditions. •This appliance must be positioned near to an electrical power supply. •Do not, under any circumstances, cut or remove the third (ground) prong from the power cord. •When installing or moving the appliance, be careful not to pinch, crush, or damage the power cord. •Do not install the appliance in humid spaces. •Destroy the carton, plastic bag, and other packing materials after the appliance is unpacked. Children might use them for play. Cartons covered with rugs, bedspreads, or plastic sheets can become airtight chambers. •Adhere to all industry recommended safety procedures including the use of long sleeved gloves and safety glasses. •Never attempt to operate this appliance if it is damaged, malfunctioning, partially disassembled, or has missing or broken parts, including a damaged cord or plug. •Do not install a clothes dryer with flexible plastic venting materials. If flexible metal (foil type) duct is installed, it must be of a specific type identified by the appliance manufacturer as suitable for use with clothes dryers. Flexible venting materials are known to collapse, be easily crushed, and trap lint. These conditions will obstruct clothes dryer airflow and increase the risk of fire.

6 SAFETY INSTRUCTIONS
•Place the dryer at least 18 inches above the floor for a garage installation. •Do not use sheet metal screws or other fasteners which extend into the duct that could catch lint and reduce the efficiency of the exhaust system. Secure all joints with duct tape. •Use only rigid, semi-rigid or flexible metal 4-inch diameter duct inside the dryer cabinet or for exhausting to the outside. Use of plastic or other combustible ductwork may cause a fire. Punctured ductwork may cause a fire if it collapses or becomes otherwise restricted in use or during installation. •The exhaust duct must be 4 inches (10.2 cm) in diameter with no obstructions. The exhaust duct should be kept as short as possible. Make sure to clean any old ducts before installing your new dryer. •Rigid, semi-rigid or flexible metal ducting is recommended for use between the dryer and the wall. All non-rigid metal transition duct must be UL-listed. Use of other materials for transition duct could affect drying time. •Ductwork is not provided with the dryer, and you should obtain the necessary ductwork locally. The end cap should have hinged dampers to prevent backdraft when the dryer is not in use. •Gas dryers MUST be exhausted to the outside. •The dryer exhaust system must be exhausted to the outside of the dwelling. If the dryer is not exhausted outdoors, some fine lint and large amounts of moisture will be expelled into the laundry area. An accumulation of lint in any area of the home may create a health and fire hazard. •Do not install near another heat source such as a stove, oven or heater. •Keep area around the exhaust opening and adjacent surrounding areas free from the accumulation of lint, dust, and dirt. •The appliance must not be supplied through an external switching device, such as a timer, or connected to a circuit that is regularly switched on and off by a utility.
OPERATION •Repair or immediately replace all power cords that have become frayed or otherwise damaged. Do not use a cord that shows cracks or abrasion damage along its length or at either end. • If you detect a strange sound, a chemical or burning smell, or smoke coming from the appliance, unplug it immediately, and contact an LG Electronics customer information center. •Never unplug the appliance by pulling on the power cord. Always grip the plug firmly and pull straight out from the outlet. •Do not use an extension cord or adapter with this appliance. •Do not grasp the power cord or touch the appliance controls with wet hands. •Do not modify or extend the power cord. • If the product has been submerged, contact an LG Electronics customer information center for instructions before resuming use. •Do not store or use gasoline or other flammable vapors and liquids in the vicinity of this or any other appliance. •Keep the area underneath and around your appliances free of combustible materials (lint, paper, rags, etc.), gasoline, chemicals and other flammable vapors and liquids. •This appliance is not intended for use by persons (including children) with reduced physical, sensory or mental capabilities, or lack of experience and knowledge, unless they have been given supervision or instruction concerning the use of the appliance by a person responsible for their safety.

7SAFETY INSTRUCTIONSEN
GLISH
•Read all instructions before using the appliance and save these instructions. •Use this appliance only for its intended purpose. •Do not abuse, sit on, or stand on the door of the appliance. •Do not allow children to play on, in or with the appliance. Close supervision of children is necessary when the appliance is used near children. •Do not tamper with controls. • In the event of a gas leak (propane gas, LP gas, etc.) do not operate this or any other appliance. Open a window or door to ventilate the area immediately. •Under certain conditions, hydrogen gas may be produced in a hot-water system that has not been used for two weeks or more. HYDROGEN GAS IS EXPLOSIVE. If the hot-water system has not been used for such a period, before using the appliance turn on all hot water faucets and let the water flow from each for several minutes. This will release any accumulated hydrogen gas. As the gas is flammable, do not smoke or use an open flame during this time. •Fix the drain hose securely in place. •Do not put oily or greasy clothing, candles or flammable materials on top of the appliance. •Do not use fabric softeners or products to eliminate static unless recommended by the manufacturer of the fabric softener or product. •Do not reach into the appliance if the drum is moving. •Do not dry articles that have been previously cleaned in, washed in, soaked in, soiled with or spotted with gasoline, dry cleaning solvents, vegetable oil, cooking oil or other flammable or explosive substances, as they give off vapors that could ignite or explode. •Do not use heat to dry articles containing foam rubber or similarly textured rubber-like materials. •Do not store plastic, paper, or clothing that may burn or melt on top of the dryer during operation. •Always check the inside of the appliance for foreign objects. •Gas appliances can cause minor exposure to four potentially hazardous substances, namely benzene, carbon monoxide, formaldehyde, and soot, caused primarily by the incomplete combustion of natural gas or LP fuels. •Properly adjusted dryers will minimize incomplete combustion. Exposure to these substances can be minimized further by properly venting the dryer to the outdoors.
STEAM (Steam models) •Do not open the dryer door during STEAM CYCLE. •Do not touch the steam nozzle in the drum during or after the STEAM CYCLE.

8 SAFETY INSTRUCTIONS
MAINTENANCE •Do not repair or replace any part of the appliance. All repairs and servicing must be performed by qualified service personnel unless specifically recommended in this Owner’s Manual. Use only authorized factory parts. •Do not disassemble or repair the appliance by yourself. •Remove any dust or foreign matter from the power plug pins. •Disconnect this appliance from the power supply before cleaning and attempting any user maintenance. Turning the controls to the OFF position does not disconnect this appliance from the power supply. •Remove the door before the appliance is removed from service or discarded to avoid the danger of children or small animals getting trapped inside. •Unplug the appliance before cleaning to avoid the risk of electric shock. •Clean the lint filter before or after each load. •The interior of the appliance and exhaust duct should be cleaned periodically by qualified service personnel.
GROUNDING INSTRUCTIONS • Improper connection of the equipment-grounding conductor can result in a risk of electric shock. Check with a qualified electrician or service personnel if you are in doubt whether the appliance is properly grounded. Do not modify the plug provided with the appliance; if it will not fit the outlet, have a proper outlet installed by a qualified electrician. •The appliance must be grounded. In the event of a malfunction or breakdown, grounding will reduce the risk of electric shock by providing a path of least resistance for electric current. The appliance is equipped with a cord having an equipment-grounding conductor and a grounding plug. The plug must be plugged into an appropriate outlet that is installed and grounded in accordance with all local codes and ordinances. •This dryer must be plugged into a properly grounded outlet. Electrical shock may result if the dryer is not properly grounded. Have the wall outlet and circuit checked by a qualified electrician to make sure the outlet is properly grounded. Failure to follow these instructions may create an electric shock hazard and/or a fire hazard.
WARNINGFire HazardFailure to follow safety warnings exactly could result in serious injury, death or property damage. •Do not install a booster fan in the exhaust duct. • Install all clothes dryers in accordance with the installation instructions of the manufacturer of the dryer.
SAVE THESE INSTRUCTIONS

9PRODUCT OVERVIEWEN
GLISH
PRODUCT OVERVIEWParts
Control panel
Lint filter
Leveling feet
Reversible door
Power Cord (gas models)
Gas connection (gas models)
Exhaust Duct Outlet
Terminal Block Access Panel (electric models)
AccessoriesIncluded Accessories
NOTE• For your safety and extended product life, use only authorized components. The manufacturer is not
responsible for product malfunction or accidents caused by the use of unauthorized components or parts.• The images in this manual may be different from the actual components and accessories which are subject to
change by the manufacturer without prior notice for product improvement purposes.
Drying Rack (on some models)
Optional Accessories
Pedestal (sold separately) Stacking kit (sold separately) Side vent kit(sold separately)
Kit No. 383EEL9001B
Y connector (Steam Models)
Hoses (Steam Models)

10 INSTALLATION
INSTALLATIONInstallation OverviewPlease read the following installation instructions first after purchasing this product or transporting it to another location.
Check and choose the proper location
Level the dryer Vent the dryer
Product SpecificationsThe appearance and specifications listed in this manual may vary due to constant product improvements.
Dryer Models DLE3500* / DLG3501* / DLE3095* / DLE3090*
DLEX3700* / DLGX3701*
DLEX3900* / DLGX3901*
Description Non-steam Dryer Steam Dryer Steam Dryer
Electrical requirements Please refer to the rating label for detailed information.
Gas requirements NG: 4 - 10.5-inch (10.2 - 26.7 cm) WC LP: 8 - 13-inch (20.4 - 33.1 cm) WC
Dimensions 27” (W) X 30.2” (D) X 39” (H), 51.4” (D with door open) 68.6 cm (W) X 76.5 cm (D) X 99 cm (H), 130.5 cm (D with door open)
Net weight Gas : 123.02 lb (55.8kg) Electric : 122.36 lb (55.5kg)
Gas : 125.44 lb (56.9kg) Electric : 123.90 lb (56.2kg)
Gas : 126.77 lb (57.5kg) Electric : 125.66 lb (57kg)
Drying capacitySteam Cycle - IEC 7.4 cu.ft. (8 lb/3.6 kg)
Normal Cycle IEC 7.4 cu.ft. (22.5 lb/10.2 kg)
Electric dryerGas dryer
Connect the Electric dryerConnect the Gas dryerConnect the inlet hose (steam models)
Test runInstallation test
Model numbers can be found on the cabinet inside the door.NOTE
Plug in the power cord

11INSTALLATIONEN
GLISH
Installation Location RequirementsWARNING
• Read all installation instructions completely before installing and operating your dryer! It is important that you review this entire manual before installing and using your dryer. Detailed instructions concerning electrical connections, gas connections, and exhaust requirements are provided on the following pages.
The installation requires: •A location that allows for proper exhaust installation. A gas dryer must be exhausted to the outdoors. See Venting the Dryer. •A grounded electrical outlet located within 2 ft. (61 cm) of either side of the dryer. See Connecting Electric Dryers. •A sturdy floor to support the total dryer weight of 200 lb (90.7 kg). The combined weight of a companion appliance should also be considered. •No other fuel-burning appliance can be installed in the same closet as a dryer. •Additional clearances might be required for wall, door and floor moldings. •Companion appliance spacing should also be considered.
NOTE• The floor must be level, with a maximum slope of 1 inch (2.5 cm) under the entire dryer. Clothes may not
tumble properly, and automatic sensor cycles may not operate correctly if the dryer is not level.• For garage installation, you will need to place the dryer at least 18 inches (45.7 cm) above the floor. The
standard pedestal height is 15 inches (38 cm). You will need 18 inches (45.7 cm) from the garage floor to the bottom of the dryer.
• Do not operate your dryer at temperatures below 45 °F (7 °C). At lower temperatures, the dryer might not shut off at the end of an automatic cycle. This can result in longer drying times.
• The dryer must not be installed or stored in an area where it will be exposed to water and/or weather.• Check code requirements that limit, or do not permit, installation of the dryer in garages, closets, mobile homes
or sleeping quarters. Contact your local building inspector.
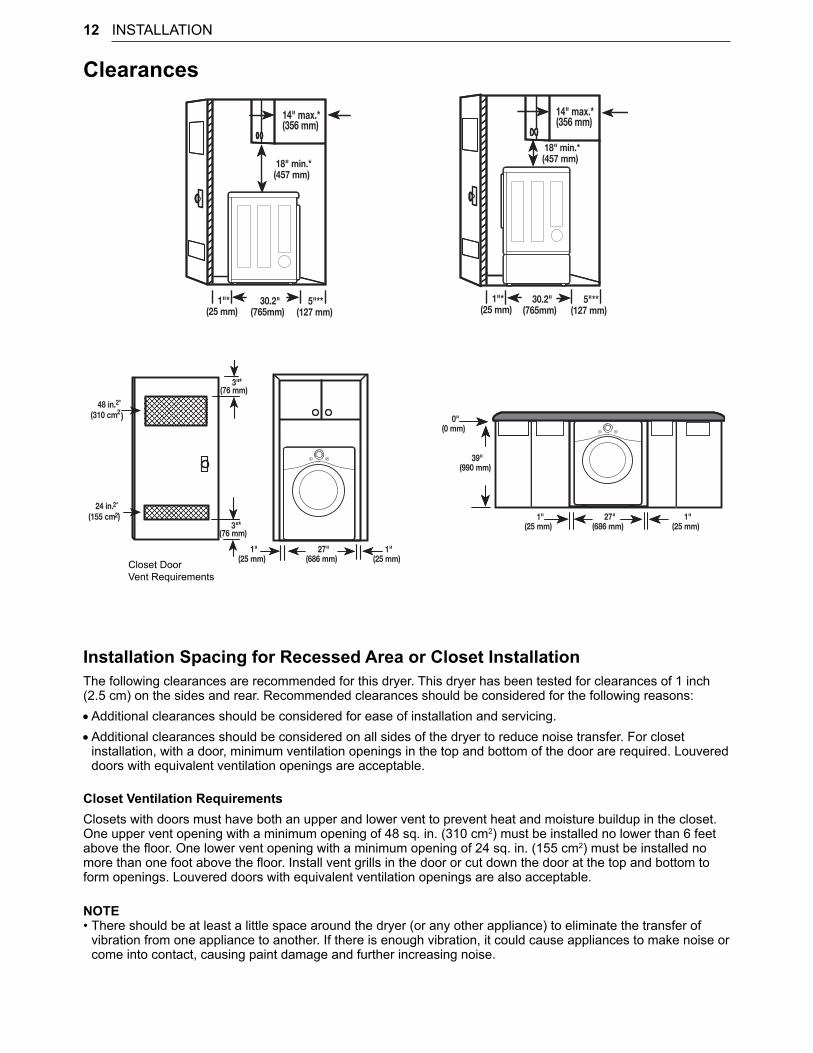
12 INSTALLATION
Clearances
1"*(25 mm)
14" max.* (356 mm)
18" min.*(457 mm)
14" max.* (356 mm)
18" min.*(457 mm)
30.2"(765mm)
5"**(127 mm)
1"*(25 mm)
30.2"(765mm)
5"**(127 mm)
24 in.2*
(155 cm2)
2*
(310 cm2)
3" *(76 mm)
48 in.
3" *(76 mm)
1"(25 mm)
1"(25 mm)
27"(686 mm)
0" (0 mm)
39"(990 mm)
1"(25 mm)
1"(25 mm)
27"(686 mm)
Closet Door Vent Requirements
Installation Spacing for Recessed Area or Closet InstallationThe following clearances are recommended for this dryer. This dryer has been tested for clearances of 1 inch (2.5 cm) on the sides and rear. Recommended clearances should be considered for the following reasons: •Additional clearances should be considered for ease of installation and servicing. •Additional clearances should be considered on all sides of the dryer to reduce noise transfer. For closet installation, with a door, minimum ventilation openings in the top and bottom of the door are required. Louvered doors with equivalent ventilation openings are acceptable.
Closet Ventilation RequirementsClosets with doors must have both an upper and lower vent to prevent heat and moisture buildup in the closet. One upper vent opening with a minimum opening of 48 sq. in. (310 cm2) must be installed no lower than 6 feet above the floor. One lower vent opening with a minimum opening of 24 sq. in. (155 cm2) must be installed no more than one foot above the floor. Install vent grills in the door or cut down the door at the top and bottom to form openings. Louvered doors with equivalent ventilation openings are also acceptable.
NOTE• There should be at least a little space around the dryer (or any other appliance) to eliminate the transfer of
vibration from one appliance to another. If there is enough vibration, it could cause appliances to make noise or come into contact, causing paint damage and further increasing noise.
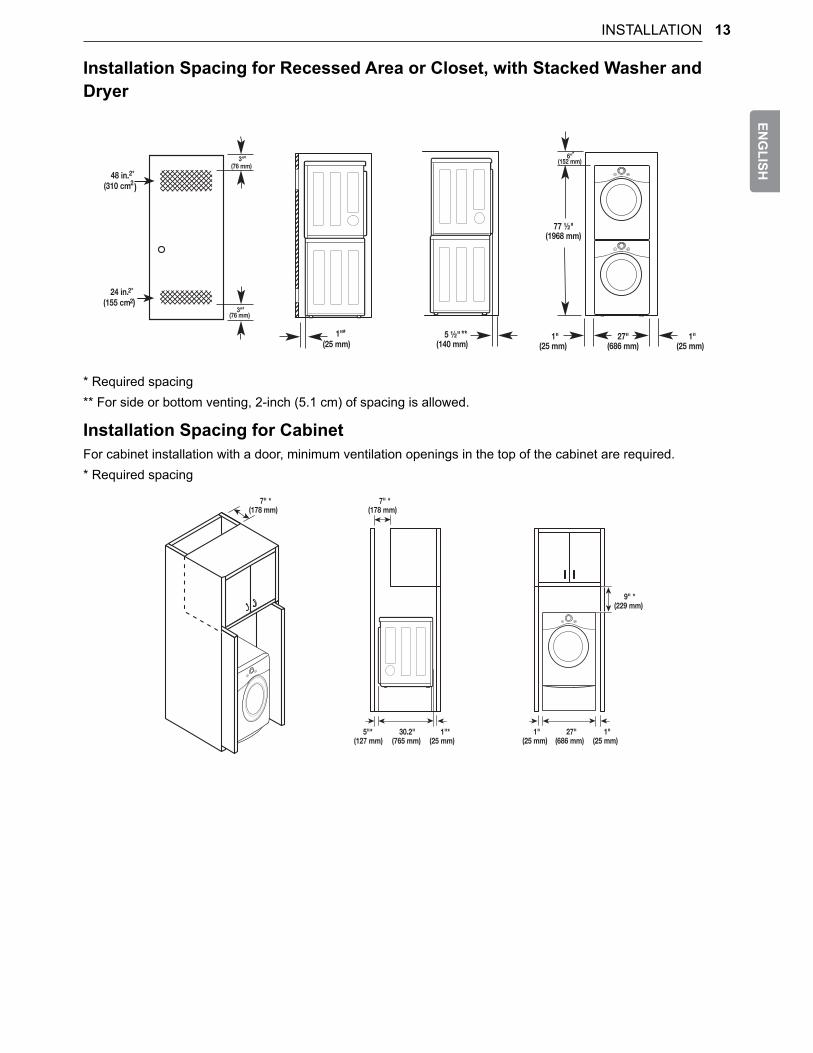
13INSTALLATIONEN
GLISH
Installation Spacing for Recessed Area or Closet, with Stacked Washer and Dryer
24 in.2*
(155 cm2)
2*
(310 cm2)48 in.
3" *(76 mm)
3" *(76 mm)
1"*(25 mm)
1"(25 mm)
1"(25 mm)
27"(686 mm)
5 ½" **(140 mm)
6" *(152 mm)
77 ½"(1968 mm)
* Required spacing** For side or bottom venting, 2-inch (5.1 cm) of spacing is allowed.
Installation Spacing for CabinetFor cabinet installation with a door, minimum ventilation openings in the top of the cabinet are required.* Required spacing
7" *(178 mm)
7" *(178 mm)
9" *
1"(25 mm)
1"(25 mm)
27"(686 mm)
5"*(127 mm)
1"*(25 mm)
30.2"(765 mm)
(229 mm)

14 INSTALLATION
Leveling the Dryer
WARNINGTo reduce the risk of serious injury or death, follow basic precautions, including the following:• Use long-sleeved gloves and safety glasses.• The appliance is heavy. Two or more people are
required when installing the dryer.
NOTE• Adjust the leveling feet only as far as necessary
to level the dryer. Extending the leveling feet more than necessary may cause the dryer to vibrate.
• To ensure that the dryer provides optimal drying performance, it must be level. To minimize vibration, noise, and unwanted movement, the floor must be a perfectly level, solid surface.
1 Position the dryer in the final location. Place a level across the top of the dryer.
Level
Leveling Feet
• All four leveling feet must rest solidly on the floor. Gently push on the top corners of the dryer to make sure that the dryer does not rock from corner to corner.
NOTE• If you are installing the dryer on the optional
pedestal, you must use the leveling feet on the pedestal to level the dryer. The dryer leveling feet should be fully retracted.
2 Use an adjustable wrench to turn the leveling feet. Unscrew the legs to raise the dryer or screw in the legs to lower it. Raise or lower with the leveling feet until the dryer is level from side to side and front to back. Make sure that all four leveling feet are in firm contact with the floor.

15INSTALLATIONEN
GLISH
Reversing the DoorTools Required •Phillips screwdriver • Large flat blade screwdriver (recommended for hinge screws if they are tight or your Phillips screwdriver is worn) •Small flat blade screwdriver (for lifting out parts)
WARNINGTo reduce the risk of damage to the dryer, property damage or personal injury, follow basic precautions, including the following:• Support the door with a stool or box that fits
under the door, or have an assistant support the weight of the door.
• Avoid dropping the door.• Unplug the dryer or turn off power at the main
circuit breaker before beginning door reversal.• Always reverse the door BEFORE stacking the
dryer on top of the washer.
Door Reversal InstructionsThe instructions here are for changing the door swing from a right to a left side hinge. If the door has been reversed, and it is necessary to change it back, use care when following these instructions. Some of the illustrations and the left/right references will be reversed, and you will need to read the instructions carefully.
WARNING• Be sure to support the weight of the door before
removing the hinge screws.
1 Open the door and remove the two decorative screws, two latch screws, and the latch on the catch side with a screwdriver. Save these for step 4.
2 While supporting the door, remove the 2 screws on the door hinge. Remove the door.
3 Turn the door upside down and line up the holes in the hinge with the holes on the opposite side of the cabinet. Reinstall the door with the screws removed in step 2.
WARNING• Be sure to support the weight of the door before
installing the hinge screws.
4 Install the two decorative screws, the latch, and two latch screws removed in step 1 on the opposite side from which they were removed.
5 Check that the door closes properly.

16 INSTALLATION
Installing the Side Vent Kit
WARNINGTo reduce the risk of serious injury, death or property damage, follow basic precautions, including the following:• Use long-sleeved gloves and safety glasses.• Use a heavy metal vent.• Do not use plastic or thin foil ducts.• Clean old ducts before installing this dryer.
Your new dryer is configured to vent to the rear. It can also vent to the bottom or side (right-side venting is not available on gas models).An adapter kit, part number 383EEL9001B, may be purchased from your LG retailer. This kit contains duct components necessary to change the dryer vent location.
1 Remove the rear exhaust duct retaining screw. Pull out the exhaust duct.
Retaining Screw
Rear Exhaust Duct
Option 1: Side Venting
2 Press the tabs on the knockout and carefully remove the knockout for the desired vent opening (right-side venting is not available on gas models). Press the adapter duct onto the blower housing and secure to the base of the dryer as shown.
Adapter Duct
BracketKnockout
3 Preassemble a 4-inch (10.2 cm) elbow to the next 4-inch (10.2 cm) duct section, and secure all joints with duct tape. Be sure that the male end of the elbow faces AWAY from the dryer. Insert the elbow/duct assembly through the side opening and press it onto the adapter duct. Secure it in place with duct tape. Be sure that the male end of the duct protrudes 1.5 inches (3.8 cm) to connect the remaining ductwork. Attach the cover plate to the back of the dryer with the included screw.
Cover Plate
Elbow1½" (38 mm)
Option 2: Bottom Venting
2 Press the adapter duct onto the blower housing and secure it to the base of the dryer as shown.
Adapter Duct
Bracket
3 Insert the 4-inch (10.2 cm) elbow through the rear opening and press it onto the adapter duct. Be sure that the male end of the elbow faces down through the hole in the bottom of the dryer. Secure it in place with duct tape. Attach the cover plate to the back of the dryer with the included screw.
Cover Plate
Elbow

17INSTALLATIONEN
GLISH
Stacking the DryerStacking Kit InstallationThis stacking kit includes: •Two (2) side rails •One (1) front rail •Four (4) screws
Tools Needed for Installation: •Phillips screwdriver
WARNINGTo reduce the risk of electrical shock, fire, explosion, property damage, serious injury or death, follow basic precautions, including the following:• The weight of the dryer and the height of
installation make this stacking procedure too risky for one person. Two or more people are required when installing the stacking kit.
• Do not use the stacking kit with a gas dryer in potentially unstable conditions such as a mobile home.
• Place the washer on a solid, stable, level floor capable of supporting the weight of both appliances.
• Do not stack the washer on top of the dryer.• If appliances are already installed, disconnect
them from all power, water, or gas lines and from draining or venting connections.
To ensure safe and secure installation, please observe the following instructions.
1 Make sure the surface of the washer is clean and dry. Remove paper backing from the tape on one of the stacking kit side brackets.
2 Fit the side bracket to the side of the washer top as shown in the below illustration. Firmly press the adhesive area of the bracket to the washer surface. Secure the side bracket to the washer with a screw on the back side of the bracket. Repeat steps 1 and 2 to attach the other side bracket.
3 Place the dryer on top of the washer, fitting the dryer feet into the side brackets as illustrated. Avoid finger injuries; do not allow fingers to be pinched between the washer and dryer.Slowly slide the dryer toward the back of the washer until the side bracket stoppers catch the dryer feet.
4 Insert the front rail between the bottom of the dryer and the top of the washer. Push the front rail toward the back of the washer until it comes in contact with the side rail stoppers.Install the two remaining screws to secure the front rail to the side rails.

18 INSTALLATION
Venting the Dryer
WARNINGTo reduce the risk of fire or explosion, electric shock, property damage, injury to persons or death when using this appliance, follow basic safety precautions, including the following:• Do not crush or collapse ductwork.• Do not allow ductwork to rest on or contact sharp
objects.• If connecting to existing ductwork, make sure it is
suitable and clean before installing the dryer.• Venting must conform to local building codes.• Gas dryers MUST exhaust to the outdoors.• Use only 4-inch (10.2 cm) rigid, semi-rigid or
flexible metal ductwork inside the dryer cabinet and for venting outside.
• To reduce the risk of fire, combustion, or accumulation of combustible gases, DO NOT exhaust dryer air into an enclosed and unventilated area, such as an attic, wall, ceiling, crawl space, chimney, gas vent, or concealed space of a building.
• To reduce the risk of fire, DO NOT exhaust the dryer with plastic or thin foil ducting.
• The exhaust duct must be 4-inch (10.2 cm) in diameter with no obstructions. The exhaust duct should be kept as short as possible. Make sure to clean any old ducts before installing your new dryer.
• Rigid, semi-rigid or flexible metal ducting is recommended for use between the dryer and the wall. All non-rigid metal transition duct must be UL-listed. Use of other materials for transition duct could affect drying time.
• DO NOT use sheet metal screws or other fasteners which extend into the duct that could catch lint and reduce the efficiency of the exhaust system. Secure all joints with duct tape.
• Do not exceed the recommended duct length limitations noted in the chart. Failure to follow these instructions may result in extended drying times, fire or death.
WARNING• Ductwork is not provided with the dryer. You
should obtain the necessary ductwork locally. The vent hood should have hinged dampers to prevent backdraft when the dryer is not in use.
• The total length of flexible metal duct must not exceed 8 ft. (2.4 m).
Ductwork
Wall Cap TypeNumber of 90°
Elbows
Maximum length of 4-inch diameter rigid
metal ductRecommended
a
a
a: 4" (10.2 cm)
0 65 ft.(19.8 m)
1 55 ft.(16.8 m)
2 47 ft.(14.3 m)
3 36 ft.(11.0 m)
4 28 ft.(8.5 m)
Use only for short run installations
b
b: 2.5" (6.35 cm)
0 55 ft.(16.8 m)
1 47 ft.(14.3 m)
2 41 ft.(12.5 m)
3 30 ft.(9.1 m)
4 22 ft.(6.7 m)
NOTE• Deduct 6 ft. (1.8 m) for each additional elbow. Do
not use more than four 90° elbows.• In Canada, only those foil-type flexible ducts, if any,
specifically identified for use with the appliance by the manufacturer should be used. In the United States, only those foil-type flexible ducts, if any, specifically identified for use with the appliance by the manufacturer and that comply with the Outline for Clothes Dryer Transition Duct, Subject 2158A, should be used.

19INSTALLATIONEN
GLISH
Routing and Connecting Ductwork
NOTEFollow the guidelines below to maximize drying performance and reduce lint buildup and condensation in the ductwork. Ductwork and fittings are NOT included and must be purchased separately.• Use 4-inch (10.2 cm) diameter rigid, semi-rigid or
flexible metal ductwork.• The exhaust duct run should be as short as
possible.• Use as few elbow joints as possible.• The male end of each section of exhaust duct must
point away from the dryer.• Use duct tape on all duct joints.• Insulate ductwork that runs through unheated areas
in order to reduce condensation and lint buildup on duct surfaces.
• Incorrect or inadequate exhaust systems are not covered by the dryer warranty. Dryer failures or service required because of such exhaust systems will not be covered by the dryer warranty.
Correct Venting
Incorrect Venting

20 INSTALLATION
Connecting the Inlet Hose (Steam Models)The dryer must be connected to the cold water tap using the new water supply hose. Do not reuse old hoses.
1 Check the rubber seal at each end of the inlet hoses. Two ru ber seals are supplied with each inlet hose. They are used for preventing water leaks. Make sure the connection to the cold water tap is tight.
2 Check the installation type.
Connect all water supply hoses tightly by hand and then tighten another 2/3 turn with pliers.WITH WASHER: When connecting the dryer to the same faucet as a washer.
a. Shut off the cold water tap and remove the washer hose.
b. Connect the short hose to the Y-connector using one of the rubber seals.
c. Connect the other end of the short hose to the cold water faucet.
NOTE• Water supply pressure must be between 20
and 120 psi (138 - 827 kPa) .• Do not strip or cross-thread when connecting
the inlet hose to the valve.• If the water supply pressure is more than 800
kPa, a pressure-reducing valve should be installed.
• Periodically check the condition of the hose and replace the hose if necessary.
• Replace inlet hoses after 5 years of use to reduce the risk of hose failure.
• Record hose installation or replacement dates on the hoses for future reference.
Hose connector
Y connector
Rubber seal
Long hose
WITH WASHER WITHOUT WASHER
Short hose
Y connector
d. Connect the long dryer hose to one side of the Y-connector and connect the washer hose to the other side.
WITHOUT WASHER: If the dryer does not share the cold water tap with a washer.a. Connect the straight end of the long hose to the
cold water faucet.
3 Connect the hose to the dryer. Connect the water supply hose to the dryer inlet valve tightly by hand and then tighten another 2/3 turn with pliers. Make sure that there are no kinks in the hoses and that they are not crushed.
4 Turn on the cold water faucet.
5 Check for leaks at the Y-connector (if used) and in all hoses.
NOTE• Before connecting the water line to the dryer,
flush several gallons of water into a drain or bucket. This will help prevent foreign particles such as sand and scale from clogging the dryer inlet valve.
• Do not overtighten. Damage to the coupling may result.
NOTE• If any leaks are found, shut off the water faucet,
remove the hose and check the condition of the rubber seal.

21INSTALLATIONEN
GLISH
Connecting Gas Dryers
WARNINGTo reduce the risk of fire or explosion, electric shock, property damage, injury to persons, or death when using this appliance, follow requirements including the following:
Electrical Requirements for Gas Models Only• Do not, under any circumstances, cut or remove
the third (ground) prong from the power cord.• For personal safety, this dryer must be properly
grounded.• This dryer must be plugged into a 120-VAC,
60-Hz. grounded outlet protected by a 15-ampere fuse or circuit breaker.
• Where a standard 2-prong wall outlet is encountered, it is your personal responsibility and obligation to have it replaced with a properly grounded 3-prong wall outlet.
ELECTRIC SHOCK HAZARDFailure to follow safety warnings could result in serious injury• This dryer is equipped with a three-prong
grounding plug for protection against shock hazard and should be plugged directly into a properly grounded three-prong receptacle. Do not cut or remove the grounding prong from this plug.
Gas Supply Requirements• As shipped from the factory, this dryer is
configured for use with natural gas (NG). It can be converted for use with propane (LP) gas. Gas pressure must not exceed 8-inch (20.4 cm) water column for NG, or 13-inch (33.1 cm) water column for LP.
• A qualified service or gas company technician must connect the dryer to the gas service.
• Isolate the dryer from the gas supply system by closing its individual manual shutoff valve during any pressure testing of the gas supply.
• DO NOT attempt any disassembly of the dryer; disassembly requires the attention and tools of an authorized and qualified service technician or company.
• Securely tighten all gas connections.• Connect the dryer to the type of gas shown on
the nameplate.
WARNINGGas Supply Requirements (continued)• Supply line requirements: Your laundry room
must have a rigid gas supply line to your dryer. In the United States, an individual manual shutoff valve MUST be installed within at least 6 ft. (1.8 m) of the dryer, in accordance with the National Fuel Gas Code ANSI Z223.1 or Canadian gas installation code CSA B149.1. A 1/8-inch NPT pipe plug must be installed.
• If using a rigid pipe, the rigid pipe should be 0.5-inch IPS. If acceptable under local codes and ordinances and when acceptable to your gas supplier, 3/8-inch approved tubing may be used where lengths are less than 20 ft. (6.1 m). Larger tubing should be used for lengths in excess of 20 ft. (6.1 m).
• To prevent contamination of the gas valve, purge the gas supply of air and sediment before connecting the gas supply to the dryer. Before tightening the connection between the gas supply and the dryer, purge remaining air until the odor of gas is detected.
• DO NOT use an open flame to inspect for gas leaks. Use a noncorrosive leak detection fluid.
• Use only a new AGA- or CSA-certified gas supply line with flexible stainless steel connectors.
• Use Teflon tape or a pipe-joint compound that is insoluble in propane (LP) gas on all pipe threads.
Connecting the Gas Supply• Installation and service must be performed by
a qualified installer, service agency, or the gas supplier.
• Use only a new stainless steel flexible connector and a new AGA-certified connector.
• A gas shutoff valve must be installed within 6 ft. (1.8 m) of the dryer.
• The dryer is configured for natural gas when shipped from the factory. Make sure that the dryer is equipped with the correct burner nozzle for the type of gas being used (natural gas or propane gas).
• If necessary, the correct nozzle (for the LP nozzle kit, order part number 383EEL3002D) should be installed by a qualified technician and the change should be noted on the dryer.
• All connections must be in accordance with local codes and regulations. Gas dryers MUST exhaust to the outdoors.

22 INSTALLATION
NOTE• In the Commonwealth of Massachusetts: This
product must be installed by a licensed plumber or gas fitter. When using ball-type gas shut off valves, they shall be T-handle-type. A flexible gas connector, when used, must not exceed 3 feet.
This dryer is configured from the factory for natural gas (NG). If the dryer is to be used with propane (LP) gas, it must be converted by a qualified service technician.
1 Make sure that the gas supply to the laundry room is turned OFF and the dryer is unplugged. Confirm that the type of gas available in your laundry room is appropriate for the dryer.
2 Remove the shipping cap from the gas fitting at the back of the dryer. Be careful not to damage the threads of the gas connector when removing the shipping cap.
3 Connect the dryer to your laundry room’s gas supply using a new flexible stainless steel connector with a 3/8-inch NPT fitting.
NOTE• DO NOT use old connectors.
4 Securely tighten all connections between the dryer and your laundry room’s gas supply.
5 Turn on your laundry room’s gas supply.
6 Check all pipe connections (both internal and external) for gas leaks with a noncorrosive leak-detection fluid.
7 Proceed to Venting the Dryer.
3/8" NPT gas Connection
AGA/CSA-Certified Stainless Steel Flexible Connector
Gas Supply Shutoff Valve
1/8" NPT Pipe Plug
High-Altitude InstallationsThe BTU rating of this dryer is AGA-certified for elevations below 10,000 feet.If your gas dryer is being installed at an elevation above 10,000 feet, it must be derated by a qualified technician or gas supplier.

23INSTALLATIONEN
GLISH
Connecting Electric Dryers
WARNINGTo reduce the risk of fire or explosion, electric shock, property damage, injury to persons, or death when using this appliance, follow requirements including the following:
Electrical Requirements for Electric Models Only• The wiring and grounding must conform to
the latest edition of the National Electrical Code, ANSI/NFPA 70 and all applicable local regulations. Please contact a qualified electrician to check your home’s wiring and fuses to ensure that your home has adequate electrical power to operate the dryer.
• This dryer must be connected to a grounded metal, permanent wiring system, or an equipment-grounding conductor must be run with the circuit conductors and connected to the equipment-grounding terminal or lead on the dryer.
• The dryer has its own terminal block that must be connected to a separate 230 VAC, 60-Hertz, single-phase circuit, fused at 30 amperes (the circuit must be fused on both sides of the line). ELECTRICAL SERVICE FOR THE DRYER SHOULD BE OF THE MAXIMUM RATE VOLTAGE LISTED ON THE NAMEPLATE. DO NOT CONNECT THE DRYER TO 110-, 115-, OR 120-VOLT CIRCUIT.
• If the branch circuit to dryer is 15 ft. (4.5 m) or less in length, use UL (Underwriters Laboratories) listed No.-10 AWG wire (copper wire only), or as required by local codes. If over 15 ft. (4.5 m), use UL-listed No.-8 AWG wire (copper wire only), or as required by local codes. Allow sufficient slack in wiring so the dryer can be moved from its normal location when necessary.
• The power cord (pigtail) connection between the wall receptacle and the dryer terminal block IS NOT supplied with the dryer. Type of pigtail and gauge of wire must conform to local codes and with instructions on the following pages.
WARNING• A 4-wire connection is required for all mobile and
manufactured home installations, as well as all new construction after January 1, 1996. A 4-wire connection must be used where local codes do not permit grounding through the neutral wire.
• Do not modify the plug and internal wire provided with the dryer.
• The dryer should be connected to a 4-hole outlet.• If the plug does not fit the outlet, a proper outlet
will need to be installed by a qualified electrician.• Connect the power cord to the terminal block.
Each colored wire should be connected to the same color screw. Wire color indicated on manual is connected to the same color screw in the block.
• Grounding through the neutral conductor is prohibited for: (1) new branch-circuit installations, (2) mobile homes, (3) recreational vehicles, and (4) areas where local codes prohibit grounding through the neutral conductor.
• This dryer is supplied with the neutral wire grounded. This white ground wire MUST BE MOVED to the neutral terminal when a 4-wire cord is to be used, or where grounding through the neutral conductor is prohibited.
NOTE• For electrical requirements for mobile or
manufactured homes, see Special Electrical Requirements.

24 INSTALLATION
Special Electrical Requirements(For Mobile or Manufactured Homes) •Any installation in a manufactured or mobile home must comply with the Manufactured Home Construction and Safety Standards Title 24 CFR, Part 3280 or Standard CAN/ CSA Z240 MH and local codes and ordinances. If you are uncertain whether your proposed installation will comply with these standards, please contact a service and installation professional for assistance. •A 4-wire connection is required for all mobile and manufactured home installations, as well as all new construction after January 1, 1996. •A gas dryer must be permanently attached to the floor. •The electrical connection for an electric dryer must be a 4-wire connection. More detailed information concerning the electrical connection is provided in the section Connecting Electric Dryers. •To reduce the risk of combustion and fire, the dryer must be vented to the outside. •DO NOT vent the dryer under a manufactured home or mobile home. •Electric dryers may be vented to the outside using the back, left, right, or bottom panel. •Gas dryers may be vented to the outside using the back, left, or bottom panel. Gas dryers may not be vented to the outside using the right side panel because of the burner housing. •The dryer exhaust duct must be affixed securely to the manufactured or mobile home structure, and the exhaust duct must be made of a material that will resist fire and combustion. It is recommended that you use a rigid, semi-rigid or flexible metal duct. •DO NOT connect the dryer exhaust duct to any other duct, vent, chimney, or other exhaust duct. •Make sure the dryer has adequate access to outside fresh air to ensure proper operation. The opening for outside fresh air must be at least 25 sq. in (163 cm²). • It is important that the clearance of the duct from any combustible construction be at least 2 inches (5 cm), and when venting the dryer to the outdoors, the dryer should be installed with a clearance of at least 1 inch (2.5 cm) at the sides and back of the dryer. •Please be aware that venting materials are not supplied with the dryer. You must obtain the venting materials necessary for proper installation.
Final Installation CheckOnce you have completed the installation of the dryer and it is in its final location, confirm proper operation with the following tests and Installation Test (Duct Check).
Testing Dryer HeatingGAS MODELSClose the dryer door and press the Power button to turn the dryer on. Press the Time Dry and Start/Pause buttons to start the test. When the dryer starts, the igniter should ignite the main burner.
NOTE• If all air is not purged from the gas line, the gas
igniter may turn off before the main burner ignites. If this happens, the igniter will reattempt gas ignition after approximately two minutes.
ELECTRIC MODELSClose the dryer door and press the Power button to turn the dryer on. Press the Time Dry and Start/Pause buttons to start the test. The exhaust air should be warm after the dryer has been operating for 3 minutes.
Checking AirflowEffective dryer operation requires proper airflow. The adequacy of the airflow can be measured by evaluating the static pressure. Static pressure in the exhaust duct can be measured with a manometer, placed on the exhaust duct approximately 2 ft. (60.9 cm) from the dryer. Static pressure in the exhaust duct should not exceed 0.6 inch (1.5 cm). The dryer should be checked while the dryer is running with no load.
Checking LevelnessOnce the dryer is in its final location, recheck the dryer to be sure it is level. Make sure it is level front to back and side to side, and that all four leveling feet are in firm contact with the floor.

25INSTALLATIONEN
GLISH
Installation Test (Duct Check)Once you have completed the installation of the dryer, use this test to make sure the condition of the exhaust system is adequate for proper operation of the dryer. This test should be performed to alert you to any serious problems in the exhaust system of your home. •Your dryer features Flow Sense™, an innovative sensing system that automatically detects blockages and restrictions in dryer ductwork. Keeping ductwork clean of lint buildup and free of restrictions allows clothes to dry faster and reduces energy use.
NOTE• The dryer should be cool before starting this test. If
the dryer was warmed up during installation, run the Air Dry cycle for a few minutes to reduce the interior temperature.
Activating the Installation Test
1 Remove the drying rack and literature, and then close the door.Do not load anything in the drum for this test, as it may affect the accuracy of the results.
2 Press and hold the Signal and Temp. buttons and then press the Power button.(On models with a glass touch control panel, press the Power button then IMMEDIATELY press and hold the Temp. and Signal buttons.)This button sequence activates the installation test. The code will display if the activation is successful.
3 Press the Start/Pause button.The dryer will start the test, which will last a few minutes. The heat will be turned on and the temperatures in the drum will be measured.
4 Check the display for results.During the test cycle, monitor the Flow Sense™ display on the control panel. If the Flow Sense™ LED has not turned on, when the cycle ends, the exhaust system is adequate. If the exhaust system is severely restricted, the Flow Sense™ LED will turn on. Other problems may also be shown with error codes. See the chart on the next page for error code details and solutions.
LED; turned on :RESTRICTED
The Flow Sense™ LED indicates that the exhaust system is severely restricted. Have the system checked immediately, as performance will be poor.
5 End of cycle.At the end of the test cycle, will display. The test cycle will end and the dryer will shut off automatically after a short delay.

26 INSTALLATION
Check the Duct ConditionIf the Flow Sense™ LED is turned on, check the exhaust system for restrictions and damage. Repair or replace the exhaust system as needed.
NOTE• When the dryer is first installed, this test should be
performed to alert you to any existing problems with the exhaust duct in your home. However, since the test performed during normal operation provides more accurate information on the condition of the exhaust duct than the installation test, the number of bars displayed during the two tests may not be the same.
• Do not interrupt the test cycle, as this could result in inaccurate results.
• Even if no bars are displayed during the test cycle, some restrictions may still be present in the exhaust system. Refer to the Venting the Dryer section of this manual for complete exhaust system and venting requirements.
• Your dryer features Flow Sense™, an innovative sensing system that automatically detects blockages and restrictions in the dryer ductwork. Keeping ductwork clean of lint buildup and free of restrictions allows clothes to dry faster and reduces energy use.
Error CodesCheck the error code before you call for service.
Error Code
Possible Causes Solutions
tE1 or tE2
Temperature sensor failure.
Turn off the dryer and call for service.
HS Humidity sensor failure.
Turn off the dryer and call for service.
PS, PF, or nP
Electric dryer power cord is not connected correctly, or house power supply is incorrect.
Check the power supply or the connection of the power cord to the terminal block. Refer to the Connecting Electric Dryers section of this manual for complete instructions.
House fuse is blown, circuit breaker has tripped, or power outage has occurred.
Reset circuit breaker or replace fuse. Do not increase the fuse capacity. If the problem is a circuit overload, have it corrected by a qualified electrician.
gAS Gas supply or service turned off. (Gas Model only.)
Confirm that house gas shutoff and the dryer gas shutoff are both fully open.

27INSTALLATIONEN
GLISH
Restricted or Blocked AirflowAvoid long runs or runs with multiple elbows or bends.
Excess or crushed transition duct
Too many elbows or exhaust too long
Check for blockages and lint buildup.
Lint buildup or blockage
Make sure the ductwork is not crushed or restricted.
Crushed or damaged exhaust

28 OPERATION
OPERATIONWARNING
• To reduce the risk of fire, electric shock, or injury to persons, read the SAFETY INSTRUCTIONS before operating this appliance.
Using the Dryer
1
2
3
4
5
6
Clean the Lint FilterIf the lint filter has not already been cleaned, lift out the filter and remove the lint from the last load. This will help ensure the fastest and most efficient drying performance. Make sure to reinstall the filter, pressing down until it clicks firmly into place.
Load the DryerLoad the dryer with the wet laundry from the washer. If the load is extra large, you may need to divide it into smaller loads for proper performance and fabric care.
Turn on the DryerPress the Power button to turn on the dryer. The cycle LEDs will illuminate and a chime will sound.
Select a CycleTurn the cycle selector knob either direction until the LED for the desired cycle is on. The preset temperature, dry level, and option settings for that cycle will be shown. Default settings for the selected cycle can now be changed if desired. Refer to the Cycle Setting and Options page for details.
NOTE• Not all options or modifiers are available on all cycles. Refer to the Cycle
Guide page for default settings and available options. A different chime will sound and the LED will not come on if the selection is not available.
Begin CyclePress the Start/Pause button to begin the cycle. The cycle can be paused at any time either by opening the door or by pressing the Start/Pause button. If the cycle is not restarted within 60 minutes of being paused, the dryer will shut off and the settings will be lost.
End of CycleWhen the cycle is finished, the chime will sound. Immediately remove your clothing from the dryer to reduce wrinkling. If Wrinkle Care is selected, the dryer will tumble briefly every few minutes to help prevent wrinkles from setting in the clothes.

29OPERATIONEN
GLISH
Check the Lint Filter Before Every LoadAlways make sure the lint filter is clean before starting a new load; a clogged lint filter will increase drying time. To clean, pull the lint filter straight up and roll any lint off the filter with your fingers. Push the lint filter firmly back into place. See Regular Cleaning for more information.Always ensure the lint filter is properly installed before running the dryer. Running the dryer with a loose or missing lint filter will damage the dryer and articles in the dryer.
Lint Filter
Sorting LaundryFabric Care LabelsMany articles of clothing include a fabric care label. Using the chart below, adjust the cycle and option selections to care for your clothing according to the manufacturer’s recommendations.
Tumble dry
Dry Gentle/delicate
Normal Do not tumble dry
Permanent Press/ wrinkle resistant
Do not dry (used with do not wash)
Heat setting
High Low
Medium No heat/air
Grouping Similar ItemsFor best results, sort clothes into loads that can be dried with the same drying cycle.Different fabrics have different care requirements, and some fabrics will dry more quickly than others.
Loading the Dryer
WARNINGTo reduce the risk of fire, explosion, electric shock, injury to persons, and death when using this appliance, follow basic precautions, including the following:• Check all pockets to make sure that they are
empty. Items such as clips, pens, coins, and keys can damage both the dryer and your clothes. Flammable objects such as lighters or matches could ignite, causing a fire.
• Never dry clothes that have been exposed to oil, gasoline, or other flammable substances. Washing clothes will not completely remove oil residues.
NOTELoading Tips• Combine large and small items in the same load.• Damp clothes will expand as they dry. Do not
overload the dryer; clothes require room to tumble and dry properly.
• Close zippers, hooks, and drawstrings to prevent these items from snagging or tangling on other clothes.

30 OPERATION
Control Panel
Non-Steam Models (DLE3500*, DLG3501*, DLE3095*, DLE3090*)
7 6
1 2 3 4
5
Steam Models (DLEX3700*, DLGX3701*)
7 6
1 2 3 4
8 5
Steam Models (DLEX3900*, DLGX3901*)
7 6
1 2 3 4
8 5
NOTE• Model numbers can be found on the cabinet inside the door.

31OPERATIONEN
GLISH
1 Power ButtonPress the button to turn the dryer ON. Press again to turn the dryer OFF.
NOTE• Pressing the Power button during a cycle will
cancel that cycle and any load settings will be lost.
2 Cycle Selector KnobTurn this knob to select the desired cycle. Once the desired cycle has been selected, the standard presets will be shown in the display. On Manual Dry cycles, these settings can be adjusted using the cycle modifier buttons anytime before starting the cycle.
3 Start/Pause ButtonPress this button to start the selected cycle. If the dryer is running, use this button to pause the cycle without losing the current settings.
NOTE• If you do not press the Start/Pause button to
resume a cycle within 60 minutes, the dryer turns off automatically and all cycle settings are lost.
4 Cycle Modifier ButtonsUse these buttons to select the desired cycle settings for the selected cycle. The current settings are shown in the display. Press the button for that option to view and select other settings.
5 More Time/Less Time ButtonsUse these buttons with the Time Dry and other Manual Dry cycles to adjust the drying time. Press the More Time button to increase the selected manual cycle time by 1 minute; press the Less Time button to decrease the cycle time by 1 minute.
6 Time and Status DisplayThe display shows the settings, estimated time remaining, options, and status messages for the dryer.
7 Cycle Option ButtonsPress each of these buttons to select additional cycle options. And press and hold any button marked with an asterisk for 3 seconds to activate a special function.
8 Steam FunctionsLG’s steam technology allows you to inject fabrics with a swirling jet of steam to refresh clothes, reduce static, and make ironing easier. Simply select the Steam Fresh™ or Steam Sanitary™ cycle or you can add a Steam option to selected cycles.

32 OPERATION
13
14
15
9
10
11
12
9 Flow Sense Duct Blockage Sensing System Indicator
The Flow Sense™ duct blockage sensing system detects and alerts you to blockages in the ductwork that reduce exhaust flow from the dryer. Maintaining a clean exhaust system improves operating efficiency and helps minimize service calls, saving you money.
10 Custom PGMIf you have a special combination of settings that you use frequently, you can save these settings as a Custom Program.
11 Control Lock IndicatorWhen Control Lock is set, the Control Lock indicator appears and all buttons are disabled except the Power button. This prevents children from changing settings while the dryer is operating.
12 WI-FI IndicatorWhen the appliance is connected to the Internet through a home Wi-Fi network, this indicator appears.
13 Clean Filter ReminderThe display will show Clean Filter when the dryer is turned on as a reminder to clean the filter. It turns off when the Start/Pause button is pressed.
14 Estimated Time RemainingThis display shows the estimated time remaining for Sensor Dry cycles or the actual time remaining for Time Dry or Manual Dry cycles.
NOTE• The cycle time on Sensor Dry cycles may fluctuate
as the dryer recalculates drying time for optimal results.
15 Cycle Completion Indicator
This portion of the display shows which stage of the drying cycle is currently underway (Dry or Cool).

33OPERATIONEN
GLISH
Cycle Guide
Sensor Dry CyclesSensor Dry cycles utilize LG’s unique dual sensor system to detect and compare the moisture level in clothes and in the air and adjust the drying time as needed to ensure superior results. The dryer automatically sets the dryness level and temperature at the recommended setting for each cycle. The estimated time remaining will be shown in the display.
NOTE• To protect your garments not every dryness level,
temperature, or option is available with every cycle. See the Cycle Guide for details.
Manual Dry CyclesUse Manual Dry cycles to select a specific amount of drying time and a drying temperature. When a Manual Dry cycle is selected, the Estimated Time Remaining display shows the actual time remaining in your cycle. You can change the actual time in the cycle by pressing the More Time or Less Time buttons.
NOTE• The Energy Saver option is turned on by default in
the Normal Cycle. Turn off the Energy Saver option for a faster Normal cycle which begins with heated drying. To turn the Energy Saver default off, press and hold the Energy Saver button. ON or OFF appears in the display.
NSF CertificationNSF International (formerly the National Sanitation Foundation), certifies that the Antibacterial cycle reduces 99.9% of bacteria on laundry, and none of the bacteria will carry over onto the next laundry load. •The default settings for the Antibacterial cycle are High temperature and Very dry level. These default settings cannot be changed. •Do NOT use this cycle with delicate items or fabrics.
Protocol P154 Sanitization Performance of Residential Clothes dryer
(DLE3500*, DLG3501*, DLE3095*, DLE3090*, DLEX3700*, DLGX3701*, DLEX3900*, DLGX3901*)

34 OPERATION
Non-Steam Models (DLE3500*, DLG3501*, DLE3095*, DLE3090*) = default setting● = allowable option* = Energy Saver on by default
Cycle Fabric Type Dry Level Temp. Wrinkle Care Damp Dry
SignalAnti
BacterialSENSOR DRY
Normal* Work clothes, corduroys, etc.
NormalMedium ● ● ●
Adj.
Heavy Duty
Jeans, heavyweight items
NormalHigh ● ● ●
Adj.
Bedding Comforters, Pillows, Shirts
NormalMedium
Adj.
Towels Denims, towels, heavy cottons
NormalMedium ● ● ●
Adj.
Small Load
Only normal & cotton/towels fabric type (Max.
3lb)
NormalHigh ●
Adj.
Perm. Press
Permanent press, synthetic items
NormalMedium ● ●
Adj.
Delicates Lingerie, sheets, blouses
NormalLow ● ●
Adj.
MANUAL DRY
Speed Dry For small loads with short drying times Off
High●
Adj.
Air DryFor items that require heat-free drying such as plastics or rubber
Off No Heat ●

35OPERATIONEN
GLISH
Steam Models (DLEX3700*, DLGX3701*) = default setting● = allowable option* = Energy Saver on by default
Cycle Fabric Type Dry Level Temp. Wrinkle Care Damp Dry
SignalReduce Static
SENSOR DRY
Normal* Work clothes, corduroys, etc.
NormalMid High ● ● ●
Adj.
Heavy Duty
Jeans, heavyweight items
NormalHigh ● ● ●
Adj.
Bedding Comforters, pillows, shirts
NormalMedium ●
Adj.
Anti Bacterial
Do not use this cycle with delicate fabrics Very High ●
Perm. Press
Permanent press, synthetic items
NormalMedium ● ● ●
Adj.
Delicates Lingerie, sheets, blouses
NormalLow ● ● ●
Adj.
Towels Denims, towels, heavy cottons
NormalMid High ● ● ●
Adj.
MANUAL DRY
Speed Dry For small loads with short drying times Off
High● ●
Adj.
Air DryFor items that require heat-free drying such as plastics or rubber
Off No Heat ●
STEAM CYCLESteam
Sanitary™Comforter, bedding, children's clothing Off High ●
Steam Fresh™
Comforter, shirts, trousers (except
especially delicate fabrics)
Off
Mid High
●Adj.

36 OPERATION
Steam Models (DLEX3900*, DLGX3901*) = default setting● = allowable option* = Energy Saver on by default
Cycle Fabric Type Dry Level Temp. Wrinkle Care Damp Dry
SignalReduce Static
SENSOR DRY
Normal* Work clothes, corduroys, etc.
NormalMid High ● ● ●
Adj.
Heavy Duty
Jeans, heavyweight items
NormalHigh ● ● ●
Adj.
Bedding Comforters, pillows, shirts
NormalMedium ●
Adj.
Small Load
Only normal & cotton/towels fabric type (Max.
3lb)
NormalHigh ●
Adj.
Anti Bacterial
Do not use this cycle with delicate fabrics Very High ●
Perm. Press
Permanent press, synthetic items
NormalMedium ● ● ●
Adj.
Delicates Lingerie, sheets, blouses
NormalLow ● ● ●
Adj.
Sportswear Sports Wear Off ● ●
Towels Denims, towels, heavy cottons
NormalMid High ● ● ●
Adj.
MANUAL DRY
Speed Dry For small loads with short drying times Off
High● ●
Adj.
Air DryFor items that require heat-free drying such as plastics or rubber
Off No Heat ●
STEAM CYCLESteam
Sanitary™Comforter, bedding, children's clothing Off High ●
Steam Fresh™
Comforter, shirts, trousers (except
especially delicate fabrics)
Off
Mid High
●Adj.

37OPERATIONEN
GLISH
Cycle Modifier ButtonsSensor Dry cycles have preset settings that are selected automatically. Manual Dry cycles have default settings, but you may also customize the settings using the cycle modifier buttons. Press the button for that option to view and select other settings.
Dry LevelUse this button to select the level of dryness for the cycle. Press the Dry Level button repeatedly to scroll through available settings. •This option is only available with Sensor Dry cycles. •The dryer will automatically adjust the cycle time. Selecting More or Very will increase the cycle time, while Less or Damp will decrease the cycle time. •Use a Less or Damp setting for items that you wish to iron.
Temp.Use this button to adjust the temperature setting. This allows precise care of fabrics and garments. Press the Temp. button repeatedly to scroll through available settings.
Time DryUse this button to manually select the drying time, from 20 to 60 minutes, in 10-minute increments. Use this for small loads or to remove wrinkles. Use the More Time/Less Time buttons to add or reduce the drying time in 1-minute increments.
SignalUse this button to adjust the volume of the end of cycle signal or turn off the signal. Press the button repeatedly until the desired volume setting is illuminated.
Option ButtonsThe dryer features several additional cycle options to customize cycles to meet individual needs. Certain option buttons also feature a special function that can be activated by pressing and holding that option button for 3 seconds.
Adding Cycle Options to a Cycle
1 Turn on the dryer and turn the Cycle selector knob to select the desired cycle.
2 Use the cycle modifier buttons to adjust the settings for that cycle.
3 Press the cycle option button(s) to add the desired options. A confirmation message is shown in the display.
4 Press the Start/Pause button to start the cycle. The dryer starts automatically.
Wrinkle CareSelecting this option will tumble the load periodically for up to 3 hours after the selected cycle, or until the door is opened. This is helpful in preventing wrinkles when you are unable to remove items from the dryer immediately.
Damp Dry SignalWhen this option is selected, the dryer signals when the load is approximately 80% dry. This allows you to remove faster-drying lightweight items or items that you would like to iron or hang while they are still slightly damp.
Energy SaverThis option helps to reduce the energy consumption of the Normal Cycle, depending on the load size. When the Energy Saver option is selected, the cycle begins with an air dry section and the drying time is increased.

38 OPERATION
Rack Dry (On Some Models)Use the Rack Dry function with items, such as wool swearters, silk items, and lingerie, that should be dried flat. Rack Dry can also be used with items that should not be tumbled dry, such as gym shoes or stuffed animals.
NOTE• NEVER tumble dry a load of clothing with the rack
installed.• When the rack is installed, the drum will rotate as
usual, but the rack will not move. Make sure all articles to be dried remain completely on the rack and cannot fall off or be pulled off by the turning drum. Be sure to remove the rack after use.
Using the Rack Dry Cycle
1 With the dryer door open, slide the rack into the dryer drum.
2 Make sure it is seated evenly on the edge of the inner door rim and resting flat on the inside of the dryer.
3 Place wet items on the rack. Allow space around the items for air to circulate.
4 Close the door and select Rack Dry.
5 Press Temp. to select a temperature option. If no temperature is selected, Rack Dry defaults to no heat.
Special FunctionsSome cycle option buttons also activate secondary functions. These special functions are marked with an asterisk (*). Press and hold the option button marked with the special function to activate it.
Control LockUse this option to prevent unwanted use of the dryer or to keep cycle settings from being changed while the dryer is operating.
Activating the Control Lock FunctionPress and hold the Wrinkle Care button for 3 seconds.The Control Lock icon will be shown in the display, and all controls will be disabled except the Power button.Deactivating the Control Lock FunctionPress and hold the Wrinkle Care button for 3 seconds.Once set, Control Lock remains active until it is manually deactivated. Control Lock must be turned off to run another cycle.
Custom PGMSave special combinations of settings that are used frequently as a custom program.Saving a Custom Program1 Turn on the dryer and select the desired settings
using the cycle selector knob and cycle modifier or option buttons.
2 Press and hold the Custom PGM button for three seconds.
NOTE• Only one custom program can be saved at a time.
Pressing and holding the Custom PGM button will overwrite any previously saved custom program.
Recalling a Custom Program
1 Turn on the dryer and press the Custom PGM button.
2 Press the Start/Pause button to start the cycle.
Default On/OffThis option allows the Energy Saver settings to be changed. To run a Normal cycle without the Energy Saver option, press and hold the Energy Saver button for three seconds. ON or OFF appears in the display.
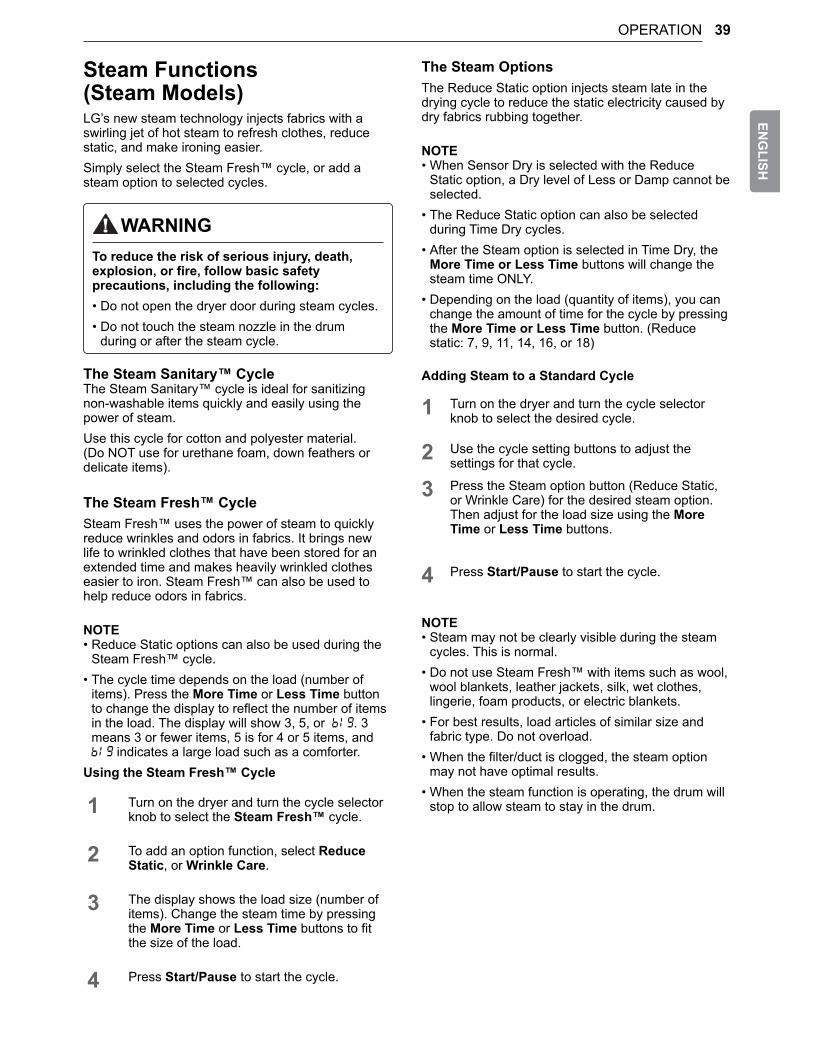
39OPERATIONEN
GLISH
The Steam OptionsThe Reduce Static option injects steam late in the drying cycle to reduce the static electricity caused by dry fabrics rubbing together.
NOTE• When Sensor Dry is selected with the Reduce
Static option, a Dry level of Less or Damp cannot be selected.
• The Reduce Static option can also be selected during Time Dry cycles.
• After the Steam option is selected in Time Dry, the More Time or Less Time buttons will change the steam time ONLY.
• Depending on the load (quantity of items), you can change the amount of time for the cycle by pressing the More Time or Less Time button. (Reduce static: 7, 9, 11, 14, 16, or 18)
Adding Steam to a Standard Cycle
1 Turn on the dryer and turn the cycle selector knob to select the desired cycle.
2 Use the cycle setting buttons to adjust the settings for that cycle.
3 Press the Steam option button (Reduce Static, or Wrinkle Care) for the desired steam option. Then adjust for the load size using the More Time or Less Time buttons.
4 Press Start/Pause to start the cycle.
NOTE• Steam may not be clearly visible during the steam
cycles. This is normal.• Do not use Steam Fresh™ with items such as wool,
wool blankets, leather jackets, silk, wet clothes, lingerie, foam products, or electric blankets.
• For best results, load articles of similar size and fabric type. Do not overload.
• When the filter/duct is clogged, the steam option may not have optimal results.
• When the steam function is operating, the drum will stop to allow steam to stay in the drum.
Steam Functions (Steam Models)LG’s new steam technology injects fabrics with a swirling jet of hot steam to refresh clothes, reduce static, and make ironing easier.Simply select the Steam Fresh™ cycle, or add a steam option to selected cycles.
WARNINGTo reduce the risk of serious injury, death, explosion, or fire, follow basic safety precautions, including the following:• Do not open the dryer door during steam cycles.• Do not touch the steam nozzle in the drum
during or after the steam cycle.
The Steam Sanitary™ CycleThe Steam Sanitary™ cycle is ideal for sanitizing non-washable items quickly and easily using the power of steam.Use this cycle for cotton and polyester material. (Do NOT use for urethane foam, down feathers or delicate items).
The Steam Fresh™ CycleSteam Fresh™ uses the power of steam to quickly reduce wrinkles and odors in fabrics. It brings new life to wrinkled clothes that have been stored for an extended time and makes heavily wrinkled clothes easier to iron. Steam Fresh™ can also be used to help reduce odors in fabrics.
NOTE• Reduce Static options can also be used during the
Steam Fresh™ cycle.• The cycle time depends on the load (number of
items). Press the More Time or Less Time button to change the display to reflect the number of items in the load. The display will show 3, 5, or . 3 means 3 or fewer items, 5 is for 4 or 5 items, and
indicates a large load such as a comforter.Using the Steam Fresh™ Cycle
1 Turn on the dryer and turn the cycle selector knob to select the Steam Fresh™ cycle.
2 To add an option function, select Reduce Static, or Wrinkle Care.
3 The display shows the load size (number of items). Change the steam time by pressing the More Time or Less Time buttons to fit the size of the load.
4 Press Start/Pause to start the cycle.

40 OPERATION
Steam Cycle Guide
Steam Default Time Temp. Dry
LevelFabric State
Fabric Type
Maximum Amount
Steam SanitaryTM
Turbo Steam 31 minutes Dry
Comforter Bedding
Single (1 each)
Children’s clothing 3 lbs.
Steam FreshTM
Turbo Steam 10 minutes ● Dry
Comforter Single (1 each)
Shirts* 5 each
Steam Option
Reduce Static
Follows Selected
Cycle● Wet
Varies by selected
cycle
8 lbs. (18 Items.)
Turbo Steam
Follows Selected
Cycle● Wet
Varies by selected
cycle
8 lbs. (18 Items.)
Time Dry Reduce Static 38 minutes ● Wet
Varies by selected
cycle
8 lbs. (18 Items.)
* Shirt: 70% cotton, 30% poly blend. Except especially delicate fabrics
= default setting● = allowable option

41SMART FUNCTIONSEN
GLISH
SMART FUNCTIONSLG SmartThinQ ApplicationThe LG SmartThinQ application allows you to communicate with the appliance using a smartphone.
Before Using LG SmartThinQ •For appliances with the or logo
1 Use a smartphone to check the strength of the wireless router (Wi-Fi network) near the appliance.• If the distance between the appliance and the
wireless router is too far, the signal strength becomes weak. It may take a long time to register or installation may fail.
2 Turn off the Mobile data or Cellular Data on your smartphone.
3 Connect your smartphone to the wireless router.
NOTE• To verify the Wi-Fi connection, check that Wi-Fi
icon on the control panel is lit.• The appliance supports 2.4 GHz Wi-Fi networks
only. To check your network frequency, contact your Internet service provider or refer to your wireless router manual.
• LG SmartThinQ is not responsible for any network connection problems or any faults, malfunctions, or errors caused by network connection.
• The surrounding wireless environment can make the wireless network service run slowly.
• If the appliance is having trouble connecting to the Wi-Fi network, it may be too far from the router. Purchase a Wi-Fi repeater (range extender) to improve the Wi-Fi signal strength.
• The network connection may not work properly depending on the Internet service provider.
• The Wi-Fi connection may not connect or may be interrupted because of the home network environment.
• If the appliance cannot be registered due to problems with the wireless signal transmission, unplug the appliance and wait about a minute before trying again.
• If the firewall on your wireless router is enabled, disable the firewall or add an exception to it.
• The wireless network name (SSID) should be a combination of English letters and numbers. (Do not use special characters.)
• Smartphone user interface (UI) may vary depending on the mobile operating system (OS) and the manufacturer.
• If the security protocol of the router is set to WEP, network setup may fail. Change the security protocol (WPA2 is recommended), and register the product again.
Installing the LG SmartThinQ ApplicationSearch for the LG SmartThinQ application from the Google Play Store or Apple App Store on a smart phone. Follow instructions to download and install the application.
NOTE• If you change your wireless router, Internet service
provider, or password, delete the registered appliance from the LG SmartThinQ application and register it again.

42 SMART FUNCTIONS
LG SmartThinQ Application Features •For appliances with the or logo
Dryer CycleDownload new and specialized cycles that are not included in the standard cycles on the appliance.Appliances that have been successfully registered can download a variety of specialty cycles specific to the appliance.Only one cycle can be stored on the appliance at a time.Once cycle download is completed in the appliance, the appliance keeps the downloaded cycle until a new cycle is downloaded.
Venting TipsProvides venting tips.
Smart Diagnosis™This function provides useful information for diagnosing and solving issues with the appliance based on the pattern of use.
Energy MonitoringThe dryer energy usage is affected by the cycles and options so you may see some changes in energy usage from one cycle to another.
Push AlertsWhen the cycle is complete or the appliance has problems, you have the option of receiving push notifications on a smart phone.
SettingsSet the product nickname and delete product.
NOTE• To verify the Wi-Fi connection, check that Wi-Fi
icon on the control panel is lit.• LG Smart ThinQ is not responsible for any network
connection problems or any faults, malfunctions, or errors caused by network connection.
• The machine supports 2.4 GHz Wi-Fi networks only.• If the appliance is having trouble connecting to the
Wi-Fi network, it may be too far from the router. Purchase a Wi-Fi repeater (range extender) to improve the Wi-Fi signal strength.
• The Wi-Fi connection may not connect or may be interrupted because of the home network environment.
• The network connection may not work properly depending on the internet service provider.
• The surrounding wireless environment can make the wireless network service run slowly.
• This information is current at the time of publication. The application is subject to change for product improvement purposes without notice to users.
Using Remote StartUse a smart phone to control the appliance remotely or check to see how much time is left in the cycle.
1 Press the Power button.
2 Load the laundry.
3 Press and hold the Remote Start button for 3 seconds to enable the Remote Start function.
4 Start a cycle from the LG Smart ThinQ application on your smart phone.
NOTE• Once the Remote Start mode is enabled, you can
start a cycle from the LG Smart ThinQ smartphone application. If the cycle is not started, the machine will wait to start the cycle until it is turned off remotely from the application or the Remote Start mode is disabled.
• If the door is opened, Remote Start is disableb\d.
Disabling Remote StartWhen the Remote Start is activated, press and hold the Remote Start button for 3 seconds.

43SMART FUNCTIONSEN
GLISH
Industry Canada Statement (For transmitter module contained in this product)This device contains licence-exempt transmitter(s)/receiver(s) that comply with Innovation, Science and Economic Development Canada’s licence-exempt RSS(s). Operation is subject to the following two conditions:(1) This device may not cause interference. (2) This device must accept any interference, including interference that may cause undesired operation of the device.
IC Radiation Exposure StatementThis equipment complies with IC radiation exposure limits set forth for an uncontrolled environment.This equipment should be installed and operated with a minimum distance of 20 cm (7.8 inches) between the antenna and your body.
NOTE• THE MANUFACTURER IS NOT RESPONSIBLE
FOR ANY RADIO OR TV INTERFERENCE CAUSED BY UNAUTHORIZED MODIFICATIONS TO THIS EQUIPMENT. SUCH MODIFICATIONS COULD VOID THE USER’S AUTHORITY TO OPERATE THE EQUIPMENT.
Open Source Software Notice InformationTo obtain the source code under GPL, LGPL, MPL, and other open source licenses, that is contained in this product, please visit http://opensource.lge.com. In addition to the source code, all referred license terms, warranty disclaimers and copyright notices are available for download.LG Electronics will also provide open source code to you on CD-ROM for a charge covering the cost of performing such distribution (such as the cost of media, shipping, and handling) upon email request to [email protected]. This offer is valid for three (3) years from the date on which you purchased the product.
Wireless LAN Module SpecificationsModel LCW-004
Frequency Range 2412 to 2462 MHz
Output Power (Max)
IEEE 802.11 b: 22.44 dBm
IEEE 802.11 g: 24.68 dBm
IEEE 802.11 n: 24.11 dBm
FCC NoticeThis equipment has been tested and found to comply with the limits for a Class B digital device, pursuant to Part 15 of the FCC Rules. These limits are designed to provide reasonable protection against harmful interference in a residential installation. This equipment generates, uses, and can radiate radio frequency energy and, if not installed and used in accordance with the instructions, may cause harmful interference to radio communications. However, there is no guarantee that interference will not occur in a particular installation. If this equipment does cause harmful interference to radio or television reception, which can be determined by turning the equipment off and on, the user is encouraged to try to correct the interference by one or more of the following measures: •Reorient or relocate the receiving antenna. • Increase the separation between the equipment and the receiver. •Connect the equipment to an outlet on a circuit different from that to which the receiver is connected. •Consult the dealer or an experienced radio/TV technician for help.
This device complies with part 15 of the FCC Rules. Operation is subject to the following two conditions:1) this device may not cause harmful interference and2) this device must accept any interference received, including interference that may cause undesired operation of the device.Any changes or modifications in construction of this device which are not expressly approved by the party responsible for compliance could void the user’s authority to operate the equipment.
FCC RF Radiation Exposure StatementThis equipment complies with FCC radiation exposure limits set forth for an uncontrolled environment. This transmitter must not be co-located or operating in conjunction with any other antenna or transmitter.This equipment should be installed and operated with a minimum distance of 20 cm (7.8 inches) between the antenna and your body. Users must follow the specific operating instructions for satisfying RF exposure compliance.

44 SMART FUNCTIONS
SmartThinQ Smart Diagnosis™ •For appliances with the or logo
Use the Smart Diagnosis feature in the SmartThinQ application for help diagnosing issues with the appliance without the assistance of the LG Customer Information Center.Follow the instructions in the SmartThinQ application to perform a Smart Diagnosis using your smartphone.
NOTE• Smart Diagnosis™ cannot be activated unless
the appliance can be turned on using the Power button. If the appliance cannot be turned on, troubleshooting must be done without using Smart Diagnosis™.
Smart Diagnosis™ FunctionShould you experience any problems with the appliance, it has the capability of transmitting data via your telephone to the LG Customer Information Center. NFC or Wi-Fi equipped models can also transmit data to a smartphone using the LG SmartThinQ application.
Smart Diagnosis™ through the Customer Information Center •For appliances with the or logo
This method allows you to speak directly to our trained specialists. The specialist records the data transmitted from the appliance and uses it to analyze the issue, providing a fast and effective diagnosis.1 Call the LG Electronics Customer Information
Center at:(LG U.S.A.) 1-800-243-0000(LG Canada) 1-888-542-2623
2 When instructed to do so by the call center, place the mouthpiece of the phone close to the Smart Diagnosis™ icon. Do not press any other buttons.
3 Press and hold the Temp. button for 3 seconds.
4 Keep the phone in place until the tone transmission has finished.
5 Once the countdown is over and the tones have stopped, resume your conversation with the call center agent, who will then be able to assist you using the information transmitted for analysis.
NOTE• Smart Diagnosis™ cannot be activated unless
the appliance can be turned on using the Power button. If the appliance cannot be turned on, troubleshooting must be done without using Smart Diagnosis™.
• For best results, do not move the phone while the tones are being transmitted.
• If the call center agent is not able to get an accurate recording of the data, you may be asked to try again.
• The Smart Diagnosis™ function depends on the local call quality.
• Bad call quality may result in poor data transmission from your phone to the call center, which could cause Smart Diagnosis™ to malfunction.

45MAINTENANCEEN
GLISH
MAINTENANCERegular Cleaning
WARNINGTo reduce the risk of fire, electric shock, injury to persons, or death when using this appliance, follow basic precautions, including the following:• Unplug the dryer before cleaning.• Never use harsh chemicals, abrasive cleaners,
or solvents to clean the washer. They will damage the finish.
Cleaning the ExteriorProper care of your dryer can extend its life. The outside of the machine can be cleaned with warm water and a mild, nonabrasive household detergent. Immediately wipe off any spills with a soft, damp cloth.
NOTE• Do not use methylated spirits, solvents, or similar
products.• Never use steel wool or abrasive cleansers; they
can damage the surface.
Cleaning the InteriorWipe around the door opening and seal with a soft, damp cloth to prevent lint and dust buildup that could damage the door seal.Clean the window with a soft cloth dampened with warm water and a mild, nonabrasive household detergent, then wipe dry.The stainless steel drum can be cleaned with a conventional stainless steel cleaner, used according to the manufacturer’s specifications. Never use steel wool or abrasive cleansers; they may scratch or damage the surface.
Cleaning Around and Under the DryerVacuum lint and dust from around the dryer and underneath it regularly. Vent ductwork should be checked for lint buildup and cleaned at least once per year. If any noticeable reduction in airflow or drying performance occurs, immediately check ductwork for obstructions and blockages.
Maintaining DuctworkVent ductwork should be checked for lint buildup once per month and cleaned at least once per year. If any noticeable reduction in airflow or drying performance occurs, immediately check ductwork for obstructions and blockages. Contact a qualified technician or service provider.
Cleaning the Lint FilterAlways clean the lint from the filter after every cycle.
Lint Filter
To clean the lint filter, open the dryer door and pull the lint filter straight up. Then:
1 For everyday cleaning, roll any lint off the filter with your fingers, or
2 Vacuum the lint filter.
3 If the lint filter has become very dirty or clogged with fabric softener, wash the lint filter in warm, soapy water and allow it to dry thoroughly before reinstalling.
NOTE• NEVER operate the dryer without the lint filter in
place.

46 TROUBLESHOOTING
TROUBLESHOOTINGFAQs: Frequently Asked QuestionsQ: When I press a button, why does my dryer beep and then nothing happens?
A: The Control Lock feature is turned on. To turn off Control Lock, turn the dryer on, then press and hold the button that has *Control Lock on or under it for 3 seconds.
Q: Why does my dryer take so long to dry clothes?
A: Proper airflow is critical to the efficient operation of clothes dryers. A lint filter which is full of lint or clogged with fabric softener sheet residue can reduce the airflow to the point that the time required to dry clothing will be greatly increased. Another factor affecting dry time is your home exhaust system. An exhaust system which is dirty and clogged with lint, or is excessively long, needs to be professionally cleaned or repaired.
Q: Why does my dryer start by itself every few minutes?
A: This is how the Wrinkle Care feature works. The dryer runs briefly every few minutes for up to 3 hours after the cycle finishes. This feature is designed to help prevent wrinkles from setting in when the dryer is not unloaded immediately after the cycle is finished.
Q: Why does my dryer show 3 minutes when I select the Steam Fresh™ cycle?
A: When the Steam Fresh™ cycle is selected, the dryer displays the recommended number of garments for the cycle, not the estimated cycle time, until the cycle is started. Use the More Time or Less Time buttons to adjust the load size setting for the number of garments you desire. For a large load or single bulky item use the (big) setting.

47TROUBLESHOOTINGEN
GLISH
Before Calling for ServiceThis dryer is equipped with an automatic error-monitoring system to detect and diagnose problems at an early stage. If the dryer does not function properly or does not function at all, check the following before you call for service.
OperationProblem Possible Cause Solutions
The Flow Sense™ indicator remains active after clearing the restriction in the venting.
After clearing the restriction, the Flow Sense™ system requires multiple, consecutive cycles to determine that the performance value has improved before the Flow Sense™ indicator is reset.
• If the Flow Sense™ indicator remains active for more than five cycles after the restriction has been cleared, call for service.
Dryer will not turn on
Power cord is not properly plugged in.
• Make sure that the plug is securely plugged into a grounded outlet matching the dryer’s rating plate.
House fuse is blown, circuit breaker has tripped, or power outage has occurred.
• Reset circuit breaker or replace fuse. Do not increase fuse capacity. If the problem is a circuit overload, have it corrected by a qualified electrician.
Dryer does not heat
House fuse is blown, circuit breaker has tripped, or power outage has occurred.
• Reset circuit breaker or replace fuse. Do not increase fuse capacity. If the problem is a circuit overload, have it corrected by a qualified electrician.
• NOTE: Due to the design of electric dryers, it is possible for a circuit problem to allow an electric dryer to run without heat.
Gas supply or service is turned off.
• Confirm that the house gas shutoff and the dryer gas shutoff valves are both fully open. Even if gas is not supplied to the dryer, it will run and no error codes will display. Verify that other gas appliances in the home are working normally.
ENERGY SAVER option selected (on some models)
• If using the Normal cycle, deselect the ENERGY SAVER option. The Energy Saver option is selected by default. This option reduces energy use by adding an air dry section to the beginning of the cycle. It is normal to feel no heat at the beginning of the cycle while in ENERGY SAVER mode.
Clothes take too long to dry
Exhaust ducts are blocked, dirty, or duct run is too long.
• Confirm that the exhaust duct is properly configured and free of debris, lint, and obstructions. Make sure that outside wall dampers can open properly and are not blocked, jammed, or damaged.
Load is not properly sorted. • Separate heavy items from lightweight items. Larger and heavier items take longer to dry. Light items in a load with heavy items can fool the sensor because the light items dry faster.
Display show error code nP
Electric dryer power cord is not connected correctly, or house power supply is incorrect.
• Check the power supply or the connection of the power cord to the terminal block.
Display show error code gAS
Gas supply or service turned off (gas models only).
• Confirm that house gas shutoff and the dryer gas shutoff are both fully open.
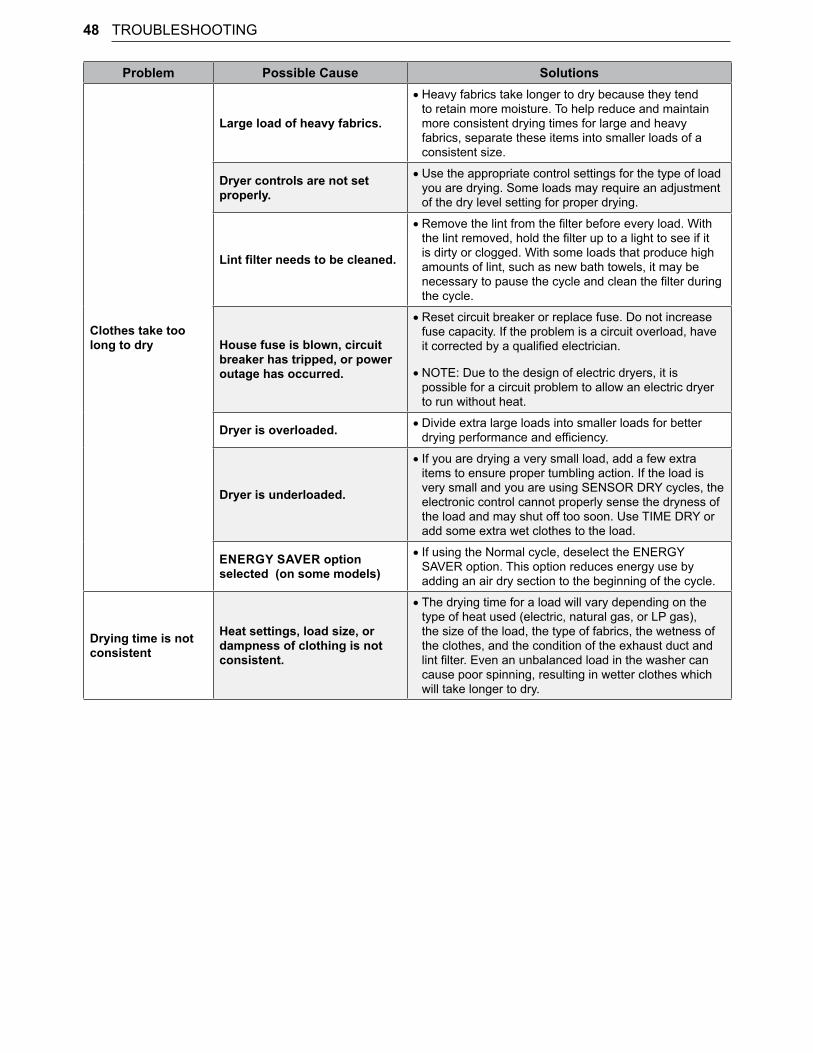
48 TROUBLESHOOTING
Problem Possible Cause Solutions
Clothes take too long to dry
Large load of heavy fabrics.
• Heavy fabrics take longer to dry because they tend to retain more moisture. To help reduce and maintain more consistent drying times for large and heavy fabrics, separate these items into smaller loads of a consistent size.
Dryer controls are not set properly.
• Use the appropriate control settings for the type of load you are drying. Some loads may require an adjustment of the dry level setting for proper drying.
Lint filter needs to be cleaned.
• Remove the lint from the filter before every load. With the lint removed, hold the filter up to a light to see if it is dirty or clogged. With some loads that produce high amounts of lint, such as new bath towels, it may be necessary to pause the cycle and clean the filter during the cycle.
House fuse is blown, circuit breaker has tripped, or power outage has occurred.
• Reset circuit breaker or replace fuse. Do not increase fuse capacity. If the problem is a circuit overload, have it corrected by a qualified electrician.
• NOTE: Due to the design of electric dryers, it is possible for a circuit problem to allow an electric dryer to run without heat.
Dryer is overloaded. • Divide extra large loads into smaller loads for better drying performance and efficiency.
Dryer is underloaded.
• If you are drying a very small load, add a few extra items to ensure proper tumbling action. If the load is very small and you are using SENSOR DRY cycles, the electronic control cannot properly sense the dryness of the load and may shut off too soon. Use TIME DRY or add some extra wet clothes to the load.
ENERGY SAVER option selected (on some models)
• If using the Normal cycle, deselect the ENERGY SAVER option. This option reduces energy use by adding an air dry section to the beginning of the cycle.
Drying time is not consistent
Heat settings, load size, or dampness of clothing is not consistent.
• The drying time for a load will vary depending on the type of heat used (electric, natural gas, or LP gas), the size of the load, the type of fabrics, the wetness of the clothes, and the condition of the exhaust duct and lint filter. Even an unbalanced load in the washer can cause poor spinning, resulting in wetter clothes which will take longer to dry.

49TROUBLESHOOTINGEN
GLISH
PerformanceProblem Possible Cause Solutions
Greasy or dirty spots on clothes
Fabric softener used incorrectly.
• Confirm and follow the instructions provided with your fabric softener.
Clean and dirty clothes are being dried together.
• Use your dryer to dry only clean items. Soil from dirty clothes can transfer to the clean clothes in the same or later loads.
Clothes were not properly cleaned or rinsed before being placed in the dryer.
• Stains on dried clothes could be stains that were not removed during the washing process. Make sure that clothes are being completely cleaned or rinsed according to the instructions for your washer and detergent. Some difficult soils may require pre-treating prior to washing.
Clothes are wrinkled
Clothes dried too long (over dried).
• Over drying a load of laundry can lead to wrinkled clothes. Try a shorter drying time or LESS DRY setting and remove items while they still retain a slight amount of moisture.
Clothes left in dryer too long after cycle ends.
• Use the WRINKLE CARE option. This feature will tumble the clothes briefly every few minutes for up to 3 hours to help prevent wrinkling.
Clothes are shrinking
Garment care instructions are not being followed.
• To avoid shrinking your clothes, always consult and follow fabric care instructions. Some fabrics will naturally shrink when washed. Other fabrics can be washed but will shrink when dried in a dryer. Use a low or no heat setting.
Lint on clothes
Lint filter not cleaned properly.
• Remove the lint from the filter before every load. With the lint removed, hold the filter up to a light to see if it is dirty or clogged. If it looks dirty, follow the cleaning instructions. With some loads that produce high amounts of lint, it may be necessary to clean the filter during the cycle.
Laundry not sorted properly. • Some fabrics are lint producers (i.e., a fuzzy white cotton towel) and should be dried separately from clothes that are lint trappers (i.e., a pair of black linen pants).
Excess static in clothes.
• Use a fabric softener to reduce static electricity. Be sure to follow the manufacturer’s instructions. Overdrying a load of laundry can cause a buildup of static electricity. Adjust settings and use a shorter drying time, or use SENSOR DRY cycles.
Dryer is overloaded. • Divide extra large loads into smaller loads for drying.
Tissue, paper, etc., left in pockets.
• Check pockets thoroughly before washing and drying clothes.

50 TROUBLESHOOTING
Problem Possible Cause Solutions
Excess static in clothes after drying
Fabric softener is not used or used incorrectly.
• Use a fabric softener or the REDUCE STATIC option, if equipped, to reduce static electricity. Be sure to follow the manufacturer’s instructions.
Clothes dried too long (overdried).
• Overdrying a load of laundry can cause a buildup of static electricity. Adjust settings and use a shorter drying time, or use MANUAL DRY cycles. Select a LESS DRY setting on SENSOR DRY cycles, if necessary.
Drying synthetics, permanent press, or synthetic blends.
• These fabrics are naturally more prone to static buildup. Try using fabric softener, or use LESS DRY and/or shorter TIME DRY time settings.
Clothes have damp spots after a Sensor Dry cycle.
Very large load or very small load.Single large item such as a blanket or comforter.
• If items are too tightly packed or too sparse the sensor may have trouble reading the dryness level of the load. Use a TIME DRY cycle for very small loads.
• Large, bulky items such as blankets or comforters can sometimes wrap themselves into a tight ball of fabric. The outside layers will dry and register on the sensors, while the inner core remains damp. When drying a single bulky item, it may help to pause the cycle once or twice and rearrange the item to unwrap and expose any damp areas.
• To dry a few remaining damp items from a very large load or a few damp spots on a large item after a sensor cycle has completed, empty the lint trap, then set a TIME DRY cycle to finish drying the item(s).
Trouble connecting appliance and smartphone to Wi-Fi network
The password for the Wi-Fi network was entered incorrectly.
• Delete your home Wi-Fi network and begin the registration process again.
Mobile data for your smartphone is turned on.
• Turn off the Mobile data on your smartphone before registering the appliance.
The wireless network name (SSID) is set incorrectly.
• The wireless network name (SSID) should be a combination of English letters and numbers. (Do not use special characters.)
The router frequency is not 2.4 GHz.
• Only a 2.4 GHz router frequency is supported. Set the wireless router to 2.4 GHz and connect the appliance to the wireless router. To check the router frequency, check with your Internet service provider or the router manufacturer.
The distance between the appliance and the router is too far.
• If the appliance is too far from the router, the signal may be weak and the connection may not be configured correctly. Move the router closer to the appliance or purchase and install a Wi-Fi repeater.

51TROUBLESHOOTINGEN
GLISH
Steam Functions (Steam Models)Problem Possible Cause Solutions
Water drips from nozzle when STEAM CYCLE starts This is normal.
• This is steam condensation. The dripping water will stop after a short time.
Garments still wrinkled after Steam Fresh™
Too many or overly different types of garments in dryer.
• Small loads of 1 to 5 items work best. Load fewer garments. Load similar types of garments.
Creases or pleats are gone from garments after Steam Fresh™
The function of this cycle is to remove wrinkles from fabric.
• Use an iron to replace creases and pleats in garments.
Garments have static after using the Reduce Static option This is normal.
• The amount of static experienced will depend on the individual moisture level in the skin.
Garments are too damp or too dry after using the Reduce Static option
Correct drying options not selected.
• Select the load weight manually before starting the Reduce Static option.
Steam does not generate, but no error code is shown Water level error. • Unplug dryer and call for service.
Water drips from door during STEAM CYCLE This is normal.
• Condensation will normally form on the inside of the dryer door during steam operation. Some condensation may drip out the bottom of the door.
Steam is not visible during STEAM CYCLE This is normal.
• Steam vapor is difficult to see when the door is closed. However, condensation will normally form on the inside of the dryer door if the steam system is operating normally.
Drum does not turn during STEAM CYCLE This is normal.
• The drum is turned off so that the steam vapor remains in the drum. The drum will normally turn for about 2 seconds once a minute.
Cannot see steam vapor at the beginning of cycle This is normal. • Steam is released at different stages
of the cycle for each option.
Odors remain in clothing after Steam Fresh™
Steam Fresh™ did not remove odor completely.
• Fabrics containing strong odors should be washed in a normal cycle.

52 TROUBLESHOOTING
Error CodesProblem Possible Cause Solutions
Error code: tE1 through tE7 Temperature sensor failure. • Turn off the dryer and call for service.
Display shows error code: PS Power cord is connected incorrectly.
• Check the connection of the power cord to the terminal block.
*Flow Sense™ indicator shows four bars during the drying cycle or the display shows "d80" after drying
* This warning light is not a dryer failure and is not covered by the dryer warranty. Contact a duct cleaning service to set up an appointment to have your exhaust system cleaned and inspected.
Exhaust system is too long or has too many turns/restrictions.
• Install a shorter or straighter duct run. See the Installation Instructions for details.
Partial blockage of the ductwork due to lint buildup or other foreign object.
• Ductwork should be checked/cleaned immediately. Dryer can be used in this condition, but drying times will be longer and energy consumption will increase.
The appliance has detected a restriction in the external dryer venting.
• If exhaust restrictions are sensed by the Flow Sense™ system, the indicator will remain on for 2 hours after the end of the cycle. Opening the door or pressing the Power button will turn off the display.
The Flow Sense™ indicator remains active after clearing the restriction in the venting.
After clearing the restriction, the Flow Sense™ system requires multiple, consecutive cycles to determine that the performance value has improved before the Flow Sense™ indicator is reset.
• If the Flow Sense™ indicator remains active for more than five cycles after the restriction has been cleared, call for service.
The display shows More Time button was pressed.
• This display indicates that the steam option has been set for a “big” item such as a comforter. Press the LESS TIME button to reduce the indicated load size.
The display shows
The duct work is about 75% - 95% blocked.(“d75”, “d80”, “d90” or “d95” error code is displayed for 2 hours only)
• Do not use the dryer until the exhaust system has been cleaned and/or repaired. Using the dryer with a severely restricted exhaust is dangerous and could result in a fire or other property damage. Check the outside dryer vent while the dryer is operating to make sure there is strong airflow. If the exhaust system is extremely long, have it repaired or rerouted.
House exhaust system blocked.
• Keep the area around the dryer clean and free of clutter. Check vent hood for damage or lint clogging. Make sure the area around the vent hood is clear.
Check filter indicator is on during the drying cycle
Lint filter not cleaned properly.
• Remove the lint from the filter before every load. With the lint removed, hold the filter up to a light to see if it is dirty or clogged. If it looks dirty, follow the cleaning instructions. With some loads that produce high amounts of lint, it may be necessary to clean the filter during the cycle.

53WARRANTYEN
GLISH
WARRANTYARBITRATION NOTICE: THIS LIMITED WARRANTY CONTAINS AN ARBITRATION PROVISION THAT REQUIRES YOU AND LG TO RESOLVE DISPUTES BY BINDING ARBITRATION INSTEAD OF IN COURT, UNLESS THE LAWS OF YOUR PROVINCE OR TERRITORY DO NOT PERMIT THAT, OR, IN OTHER JURISDICTIONS, IF YOU CHOOSE TO OPT OUT. IN ARBITRATION, CLASS ACTIONS AND JURY TRIALS ARE NOT PERMITTED. PLEASE SEE THE SECTION TITLED “PROCEDURE FOR RESOLVING DISPUTES” BELOW.WARRANTY: Should your LG Dryer (“Product”) fail due to a defect in material or workmanship under normal home use during the warranty period set forth below, LG Canada will at its option repair or replace the Product upon receipt of proof of original retail purchase. This warranty is valid only to the original retail purchaser of the product and applies only to a Product distributed in Canada by LG Canada or an authorized Canadian distributor thereof. The warranty only applies to Products located and used within Canada. Coverage for “in Home” repairs, for products in-warranty, will be provided if the Product is within a 150 km radius from the nearest authorized service center (ASC), as determined by LG Canada. If your Product is located outside a 150 km radius from a ASC, as determined by LG Canada, it will be your responsibility to bring the Product, at your sole expense, to the ASC for in-warranty repair.
WARRANTY PERIOD: (Note: If the original date of purchase can not be verified, the warranty will begin sixty(60) days from the date of manufacture).
Period One (1) year from the date of original retail purchase
Ten (10) years from the date of original retail purchase
Scope of Warranty Parts and Labor (internal/functional parts only) Dryer Drum (Parts only)
•Replacement products and parts are warranted for the remaining portion of the original warranty period or ninety (90) days, whichever is greater. •Replacement products and parts may be new or remanufactured. • LG Authorized Service Center warranties their repair work for thirty (30) days.
LG CANADA’S SOLE LIABILITY IS LIMITED TO THE WARRANTY SET OUT ABOVE. EXCEPT AS EXPRESSLY PROVIDED ABOVE, LG CANADA MAKES NO AND HEREBY DISCLAIMS ALL OTHER WARRANTIES AND CONDITIONS RESPECTING THE PRODUCT, WHETHER EXPRESS OR IMPLIED, INCLUDING, BUT NOT LIMITED TO, ANY IMPLIED WARRANTY OR CONDITION OF MERCHANTABILITY OR FITNESS FOR A PARTICULAR PURPOSE, AND NO REPRESENTATIONS SHALL BE BINDING ON LG CANADA. LG CANADA DOES NOT AUTHORIZE ANY PERSON TO CREATE OR ASSUME FOR IT ANY OTHER WARRANTY OBLIGATION OR LIABILITY IN CONNECTION WITH THE PRODUCT. TO THE EXTENT THAT ANY WARRANTY OR CONDITION IS IMPLIED BY LAW, IT IS LIMITED TO THE EXPRESS WARRANTY PERIOD ABOVE. LG CANADA, THE MANUFACTURER OR DISTRIBUTOR SHALL NOT BE LIABLE FOR ANY INCIDENTAL, CONSEQUENTIAL, SPECIAL, DIRECT OR INDIRECT DAMAGES, LOSS OF GOODWILL, LOST PROFITS, PUNITIVE OR EXEMPLARY DAMAGES OR ANY OTHER DAMAGE, WHETHER ARISING DIRECTLY OR INDIRECTLY FROM ANY CONTRACTUAL BREACH, FUNDAMENTAL OR OTHERWISE, OR FROM ANY ACTS OR OMISSIONS, TORT, OR OTHERWISE.This warranty gives you specific legal rights. You may have other rights which may vary from province to province depending on applicable provincial laws. Any term of this warranty that negates or varies any implied condition or warranty under provincial law is severable where it conflicts with provincial law without affecting the remainder of this warranty’s terms.
THIS LIMITED WARRANTY DOES NOT COVER: •Service trips to deliver, pick up, or install the product; instructing a customer on operation of the product; repair or replacement of fuses or correction of wiring or plumbing, or correction of unauthorized repairs/installation. •Failure of the product to perform during power failures and interruptions or inadequate electrical service. •Damage caused by leaky or broken water pipes, frozen water pipes, restricted drain lines, inadequate or interrupted water supply or inadequate supply of air. •Damage resulting from operating the Product in a corrosive atmosphere or contrary to the instructions outlined in the Product owner’s manual. •Damage to the Product caused by accidents, pests and vermin, lightning, wind, fire, floods, or acts of God. •Damage or product failure caused by unauthorized modification or alteration, or use for other than its intended purpose, or resulting from any water leakage due to improper installation. •Damage or Product failure caused by incorrect electrical current, voltage, or plumbing codes, commercial or industrial use, or use of accessories, components, or cleaning products that are not approved by LG Canada. •Conversion of product from natural gas or L.P. gas.

54 WARRANTY
•Damage caused by transportation and handling, including scratches, dents, chips, and/or other damage to the finish of your product, unless such damage results from defects in materials or workmanship and is reported within one (1) week of delivery. •Damage or missing items to any display, open box, discounted, or refurbished Product. •Products with original serial numbers that have been removed, altered, or cannot be readily determined. Model and Serial numbers, along with original retail sales receipt, are required for warranty validation. • Increases in utility costs and additional utility expenses. •Replacement of light bulbs, filters, or any consumable parts. •Repairs when your Product is used in other than normal and usual household use (including, without limitation, commercial use, in offices or recreational facilities) or contrary to the instructions outlined in the Product owner’s manual. •Costs associated with removal of the Product from your home for repairs. •The removal and reinstallation of the Product if it is installed in an inaccessible location or is not installed in accordance with published installation instructions, including the Product owner’s and installation manuals. •Accessories to the Product such as door bins, drawers, handles, shelves, etc.. Also excluded are parts besides those that were originally included with the Product. •Damage resulting from the misuse, abuse, improper installation, repair, or maintenance of the Product. Improper repair includes use of parts not approved or specified by LG Canada.
Filter is clogged.
Clean the lint filter.
Not heating, long dry time
Duct is clogged.
Clean the hood and duct.Not heating, long dry time
Excessive duct length and/or multiple elbows Keep exhaust ducts as
short as possible, using as few elbows and bends as possible.Not heating, long dry time
Improperly connected power cord or electrical outlet issue.
Reconnect power cord, replace house fuse or reset breaker. If outlet is issue, electrician may be required.
No Power
Not Heating
Gas valve is not turned on. (Gas Dryer)
Open the gas valve.Not heating
Door ReversalInstructions for door reversal can be found in the owner’s manual.

55WARRANTYEN
GLISH
All costs associated with the above excluded circumstances shall be borne by the consumer. For complete warranty details and customer assistance, please call or visit our website:Call 1-888-542-2623 (7 A.M. to 12 A.M., 365 days a year) and select the appropriate option from the menu, or visit our website at http://www.lg.com
Write your warranty information below
Product Registration InformationModel
Serial NumberDate of Purchase

56 WARRANTY
PROCEDURE FOR RESOLVING DISPUTES: EXCEPT WHERE PROHIBITED AT LAW, ALL DISPUTES BETWEEN YOU AND LG ARISING OUT OF OR RELATING IN ANY WAY TO THIS LIMITED WARRANTY OR THE PRODUCT SHALL BE RESOLVED EXCLUSIVELY THROUGH BINDING ARBITRATION, AND NOT IN A COURT OF GENERAL JURISDICTION. EXCEPT WHERE PROHIBITED AT LAW, YOU AND LG BOTH IRREVOCABLY AGREE TO WAIVE THE RIGHT TO A JURY TRIAL AND TO BRING OR PARTICIPATE IN A CLASS ACTION.
Definitions. For the purposes of this section, references to “LG” mean LG Electronics Canada, Inc., its parents, subsidiaries and affiliates, and each of their officers, directors, employees, agents, beneficiaries, predecessors in interest, successors, assigns and suppliers; references to “dispute” or “claim” shall include any dispute, claim or controversy of any kind whatsoever (whether based in contract, tort, statute, regulation, ordinance, fraud, misrepresentation or any other legal or equitable theory) arising out of or relating in any way to the sale, condition or performance of the product or this Limited Warranty.
Notice of Dispute. In the event you intend to commence an arbitration proceeding, you must first notify LG in writing at least 30 days in advance of initiating the arbitration by sending a letter to LGECI Legal Team at 20 Norelco Drive, North York, Ontario, Canada M9L 2X6 (the “Notice of Dispute”). You and LG agree to engage in good faith discussions in an attempt to amicably resolve your claim. The notice must provide your name, address, and telephone number; identify the product that is the subject of the claim; and describe the nature of the claim and the relief being sought. If you and LG are unable to resolve the dispute within 30 days of LG’s receipt of the Notice of Dispute, the dispute shall be resolved by binding arbitration in accordance with the procedure set out herein. You and LG both agree that, during the arbitration proceeding, the terms (including any amount) of any settlement offer made by either you or LG will not be disclosed to the arbitrator until the arbitrator determines the dispute.
Agreement to Binding Arbitration and Class Action Waiver. Upon failure to resolve the dispute during the 30 day period after LG’s receipt of the Notice of Dispute, you and LG agree to resolve any claims between you and LG only by binding arbitration on an individual basis, unless you opt out as provided below, or you reside in a jurisdiction that prevents full application of this clause in the circumstances of the claims at issue (in which case if you are a consumer, this clause will only apply if you expressly agree to the arbitration). To the extent permitted by applicable law, any dispute between you and LG shall not be combined or consolidated with a dispute involving any other person’s or entity’s product or claim. More specifically, without limitation of the foregoing, except to the extent such a prohibition is not permitted at law, any dispute between you and LG shall not under any circumstances proceed as part of a class or representative action. Instead of arbitration, either party may bring an individual action in small claims court, but that small claims court action may not be brought on a class or representative basis except to the extent this prohibition is not permitted at law in your province or territory of jurisdiction as it relates to the claims at issue between you and LG.
Arbitration Rules and Procedures. To begin arbitration of a claim, either you or LG must make a written demand for arbitration. The arbitration will be private and confidential, and conducted on a simplified and expedited basis before a single arbitrator chosen by the parties under the provincial or territorial commercial arbitration law and rules of the province or territory of your residence. You must also send a copy of your written demand to LG at LG Electronics, Canada, Inc., Attn: Legal Department- Arbitration, 20 Norelco Drive, North York, Ontario M9L 2X6. This arbitration provision is governed by your applicable provincial or territorial commercial arbitration legislation. Judgment may be entered on the arbitrator’s award in any court of competent jurisdiction. All issues are for the arbitrator to decide, except that, issues relating to the scope and enforceability of the arbitration provision and to the arbitrability of the dispute are for the court to decide. The arbitrator is bound by the terms of this provision.
Governing Law. The law of the province or territory of your purchase shall govern this Limited Warranty and any disputes between you and LG except to the extent that such law is preempted by or inconsistent with applicable federal or provincial/territorial law. Should arbitration not be permitted for any claim, action, dispute or controversy between you and LG, you and LG attorn to the exclusive jurisdiction of the courts of the province or territory of your purchase for the resolution of the claim, action, dispute or controversy between you and LG.

57WARRANTYEN
GLISH
Fees/Costs. You do not need to pay any fee to begin an arbitration. Upon receipt of your written demand for arbitration, LG will promptly pay all arbitration filing fees unless you seek more than $25,000 in damages, in which case the payment of these fees will be governed by the applicable arbitration rules. Except as otherwise provided for herein, LG will pay all filing, administration and arbitrator fees for any arbitration initiated in accordance with the applicable arbitration rules and this arbitration provision. If you prevail in the arbitration, LG will pay your attorneys’ fees and expenses as long as they are reasonable, by considering factors including, but not limited to, the purchase amount and claim amount. Notwithstanding the foregoing, if applicable law allows for an award of reasonable attorneys’ fees and expenses, an arbitrator can award them to the same extent that a court would. If the arbitrator finds either the substance of your claim or the relief sought in the demand is frivolous or brought for an improper purpose (as measured by the applicable laws), then the payment of all arbitration fees will be governed by the applicable arbitration rules. In such a situation, you agree to reimburse LG for all monies previously disbursed by it that are otherwise your obligation to pay under the applicable arbitration rules. Except as otherwise provided for, LG waives any rights it may have to seek attorneys’ fees and expenses from you if LG prevails in the arbitration.
Hearings and Location. If your claim is for $25,000 or less, you may choose to have the arbitration conducted solely (1) on the basis of documents submitted to the arbitrator, (2) through a telephonic hearing, or (3) by an in-person hearing as established by the applicable arbitration rules. If your claim exceeds $25,000, the right to a hearing will be determined by the applicable arbitration rules. Any in-person arbitration hearings will be held at the nearest, most mutually-convenient arbitration location available within the province or territory in which you reside unless you and LG both agree to another location or agree to a telephonic arbitration.
Severability and Waiver. If any portion of this Limited Warranty (including these arbitration procedures) is unenforceable, the remaining provisions will continue in full force and effect to the maximum extent permitted by applicable law. Should LG fail to enforce strict performance of any provision of this Limited Warranty (including these arbitration procedures), it does not mean that LG intends to waive or has waived any provision or part of this Limited Warranty.
Opt Out. You may opt out of this dispute resolution procedure. If you opt out, neither you nor LG can require the other to participate in an arbitration proceeding. To opt out, you must send notice to LG no later than 30 calendar days from the date of the first consumer purchaser’s purchase of the product by either (i) sending an e-mail to [email protected], with the subject line: “Arbitration Opt Out;” or (ii) calling 1-800-980-2973. You must include in the opt out e-mail or provide by telephone: (a) your name and address; (b) the date on which the product was purchased; (c) the product model name or model number; and (d) the serial number (the serial number can be found (i) on the product; or (ii) online by accessing https://www.lg.com/ca_en/support/repair-service/schedulerepair and clicking on “Find My Model & Serial Number”).
In the event that you “Opt Out”, the law of the province or territory of your residence shall govern this Limited Warranty and any disputes between you and LG except to the extent that such law is preempted by or inconsistent with applicable federal or provincial/territorial law. Should arbitration not be permitted for any claim, action, dispute or controversy between you and LG, you and LG agree to attorn to the exclusive jurisdiction of the courts of the province or territory of your residence for the resolution of the claim, action, dispute or controversy between you and LG.
You may only opt out of the dispute resolution procedure in the manner described above (that is, by e-mail or telephone); no other form of notice will be effective to opt out of this dispute resolution procedure. Opting out of this dispute resolution procedure will not affect the coverage of the Limited Warranty in any way, and you will continue to enjoy the full benefits of the Limited Warranty. If you keep this product and do not opt out, then you accept all terms and conditions of the arbitration provision described above.
Conflict of Terms. In the event of a conflict or inconsistency between the terms of this Limited Warranty and the End User License Agreement (“EULA”) in regards to dispute resolution, the terms of this Limited Warranty shall control and govern the rights and obligations of the parties and shall take precedence over the EULA.

@TrailBCStores Trailbc @TrailBCStores TrailAppliancesBC TrailAppliances.com

@TrailBCStores Trailbc @TrailBCStores TrailAppliancesBC TrailAppliances.com
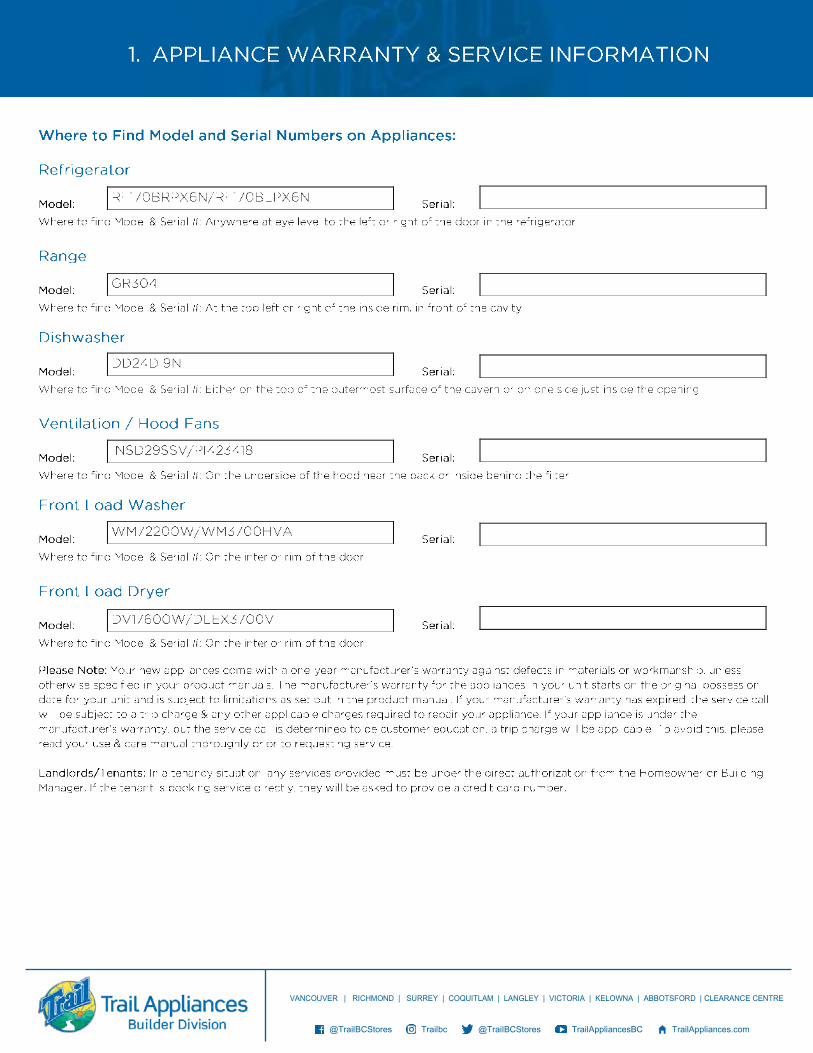
@TrailBCStores Trailbc @TrailBCStores TrailAppliancesBC TrailAppliances.com

@TrailBCStores Trailbc @TrailBCStores TrailAppliancesBC TrailAppliances.com

@TrailBCStores Trailbc @TrailBCStores TrailAppliancesBC TrailAppliances.com

@TrailBCStores Trailbc @TrailBCStores TrailAppliancesBC TrailAppliances.com

@TrailBCStores Trailbc @TrailBCStores TrailAppliancesBC TrailAppliances.com

@TrailBCStores Trailbc @TrailBCStores TrailAppliancesBC TrailAppliances.com

Register your product with us so we can provide you with the best service possible.
To register your product, visit our website:
FISHERPAYKEL.COM

2
CAFisher & Paykel Appliances Inc.695 Town Center Drive, Suite 180Costa Mesa, CA 92626-1902USAtoll free: 1.888.936.7872fax: 949.790.8911email: [email protected]: www.fisherpaykel.com
CHMerial Vertriebs AG Lerchenweg 3 4552 Derendingen tel: + 41 32 682 22 30 fax: + 41 32 682 58 86 email: [email protected] web: www.fisherpaykel.com
CN通讯地址:山东省青岛市海尔路1号海尔工业园创牌大楼北501A邮编:266100 电话:400 6407 888传真:0532 88935384电邮:[email protected]网址:www.fisherpaykel.com
CYDOMESTICA Ltd.67, Prodromou Ave, Strovolos 1095P.O.Box 21774 Nicosia tel: + 357 22 666333fax: + 357 22 664441email: [email protected]: www.fisherpaykel.com
DECoolHouse AGFriedrich-Bergius-Str. 6D-85662 Hohenbrunn tel: + 49 1805 35 55 85fax: + 49 1805 35 55 85-100email: [email protected]: www.fisherpaykel.com
AEBetter LifeBetter Life & OFIS BuildingUmm Hurair RoadKarama, Dubai, U.A.E. tel: + 971 4 3309295fax: + 971 4 3309418email: [email protected]
ATCoolHouse AGFriedrich-Bergius-Str. 6D-85662 Hohenbrunn tel: + 49 1805 35 55 85fax: + 49 1805 35 55 85-100email: [email protected]: www.fisherpaykel.com
AUFisher & Paykel Appliances LimitedPO Box 798, Cleveland, QLD 4163toll free: 1 300 650 590fax: + 61 7 3826 9298email: [email protected]: www.fisherpaykel.com
BDSogo lnternationalSobhan Mansion (3rd Floor)Suite#3, 46/1 Purana PaltanDhaka-1000, Bangladesh tel: 880 2 9554590fax: 880 2 9570078email: [email protected]
BENew RovatecVerbrandhofstraat 16B-8800 Roeselare tel: +32 51 27 23 30fax: +32 51 20 88 42email: [email protected]: www.fisherpaykel.com

3
DKFor fejl relateret til gasblus :
Witt Hvidevarer A/SGødstrup Søvej 9DK-7400 Herningtel: + 45 70252323fax: + 45 70254823
For fejl relateret til elektriske komponenter :
Nordjysk Hvidevare ServiceDK-9200 Aalborg SVtel: 9818 2254fax: 9818 2413Dækker følgende postnumre7700-7790 96907900-7990 9700-97609300-9382 9800-98819400-9493 9900-9990
Dansk Køle- og VaskeserviceDK-9270 Klaruptel: 9831 9028fax: 9831 9065Dækker følgende postnumre8900-8990 9500-95759000-9293 9600-9681
CJ Hvidevareservice ApSDK-8981 Spentruptel: 8647 7777fax: 8647 7705Dækker følgende postnumre8000-8100 8641-86438200-8270 8654-86808300-8382 87008400-8472 8732-87528500-8592 8850-8883
AP Hvidevare ServiceDK-6933 Kibæktel: 9694 6070fax: 9647 6080Dækker følgende postnumre6900-6990 8600-86327260-7280 86537323-7362 8765-87667400-7680 88007800-7884 8830-8840
Kvik HvidevareserviceDK-6000 Koldingtel: 7556 9999fax: 7556 9800Dækker følgende postnumre6000-6064 7300-73216091-6094 8721-87236560-6622 8762-87636640 8781-87837000-7184
Vestjysk ServicecenterDK-6800 Vardetel: 7526 9190fax: 7526 9706Dækker følgende postnumre6240 67006261 6800-68936510-6520 7190-72506623-6630 7600-67926650-6690
Storm’s HvidevareserviceDK-6470 Sydals tel: 7441 5005fax: 7441 5004Dækker følgende postnumre6100-6230 6400-64706270-6280 65006300-6392 6534-6541
Service-Centralen Brændekilde ApSDK-5250 Odense SVtel: 6596 1340fax: 6596 2560Dækker følgende postnumre5000-5985
Hornshøj HvidevareserviceDK-4100 Ringstedtel: 5761 0606fax: 5761 2876Dækker følgende postnumre4000 syd for city 4500-45934060 4600-46904100-4190 47004200-4295 4731-47334300-4390 47364400-4490
Scandia Serviceteknik A/SDK-2605 Brøndbytel: 4320 2700fax: 4320 2709Dækker følgende postnumre1000-1473 4000 city1501-1799 4040-40501800-1974 40702000-2990 4300 Orø3000-3670
LF Servicecenter ApSDK-4800 Nykøbing Falstertel: 5485 7066fax: 5485 7666Dækker følgende postnumre4720 4800-48954734-4735 4900-49904750-4793
BMMF Hvidevare ServiceDK-3700 Rønnetel: 5695 2663fax: 5695 2796Dækker følgende postnumre3700-3790

4
FIVM Trade OyVasarakatu 215700 Lahtitel: 00358 3 875 410fax: 00358 3 875 4150
FRF&U - Fourneaux & Ustensiles 6A rue Jean Mermoz 33185 Le Haillan tel: + 33 5 56 34 29 41 fax: + 33 5 56 34 29 60 email: [email protected]: www.fisherpaykel.com
GBFisher & Paykel Appliances LimitedMaidstone RoadKingstonMilton Keynes, BuckinghamshireMK10 0BDtoll free: 08000 886 605fax: 08000 886 606email: [email protected]: www.fisherpaykel.com
GRCarad S.A.5 Falirou Street18543 Piraeustel: + 30 210 4203625-28
HKKelvin Electric Trading Co., Ltd.Unit 1701-1703, Tower A Regent Centre63 Wo Yi Hop RoadKwai ChungN.T. Hong Kong tel: + 852 2421 1200email: [email protected]
ILCenter ServiceF & F (S.D.) Ltd.4 Hasadnaot St., Herzliyatel: 972-9-9519950 fax: 972-9-9519960email: [email protected]: www.fisherpaykel.com
F & F (S.D.) Ltd.Liran Electronics ServiceNorth Zonetel: 972-4-8666360fax: 972-4-8664896F & F (S.D.) Ltd.G.A.S. Ltd. ServiceCenter Zonetel: 972-9-7661799fax: 972-9-7670150
F & F (S.D.) Ltd.Ron Technica ServiceJerusalem Zonetel: 972-2-6541414fax: 972-2-6541444
F & F (S.D.) Ltd.Quality ServiceSouth Zonetel: 972-8-6652306
F & F (S.D.) Ltd.Kol Sherut ServiceBeer-Sheva Zonetel: 972-8-8534575fax: 972-8-8564164
F & F (S.D.) Ltd.Sheruton ServiceHasharon Zonetel: 972-9-7411511fax: 972-9-7441334
F & F (S.D.) Ltd.Tze ServiceEilat Zonetel: 972-8-6766799fax: 972-8-6370587

5
IEFisher & Paykel Appliances (Irl) Ltd. Unit D2 North Dublin Corporate Park Swords Co Dublin tel: 1800 625 174fax: 1800 635 012email: [email protected]: www.fisherpaykel.com
INFisher & Paykel Appliances Ltd Flat No 202-203, BMC House,N-1, Middle CircleConnaught Place New Delhi - 110001Indiatelefax: +91 11 42408366direct: +91 11 42408365email: [email protected]: www.fisherpaykel.com
KRJSP lnternational Co., Ltd #1106, New T Castle429-1 Gasan-dong, Geumcheon-gu,Seoul, Korea 153-773toll free: 080-300-2807tel: 02-2626-9440fax: 02-2626-9444email: [email protected]
KWYusuf A. Alghanim & Sons w.l.l. P.O. Box 223Safat, 13003Kuwaittel: + 965 188 11 11 Ext:2443fax: + 965 24846819email: [email protected]
LBSte. les Fils de Najib Safi Chakhtoura Building Harissa Main Road Haret Sakher Jounieh tel: + 961 9 933299 fax: + 961 9 832888 email: [email protected]: www.fisherpaykel.com
MTCentro CasalingaParish Priest Mifsud Stre.St Venera tel: 21250980/1/2sales: 21233566email: [email protected]: www.fisherpaykel.com
MYA.M. Marketing SDN. BHDLot 5 Jalan Majistret U1/26Hicom - Glenmasie lndustrial Park40150 Shah AlamMalaysia tel: + 60 3 78049889fax: + 60 378054348email: [email protected]
NLweb: www.fisherpaykel.com
NOApparatserviceVestvollveien 8N-2019 Skedsmokorsettel: 0047 6483 8120fax: 0047 6387 823

6
NZFisher & Paykel Appliances LimitedPO Box 58-546Botany, Auckland 2163 toll free: 0800 FP CARE or 0800 37 2273fax: (09) 273 0656email: [email protected]: www.fisherpaykel.com
PFESI - Tahiti MenagerTahiti - French Polynesiatel: (689) 87736000 email: [email protected]: www.tahitimenager.pf
PHTW & Company, lnc.1820 Paz Mendoza Guanzon StreetPaco, Metro ManilaPhilippines 1007 tel: + 63 (2) 564 1521 to 28fax: + 63 (2) 564 0429, 564 0434email: [email protected]
QA Almana & Partners W.L.L.P.O.Box 49, Al Rayyan ComplexAl Rayyan Street, DohaQatartel: + 974 4422221, 4422690fax: + 974 4439610email: [email protected]; [email protected]
SEGarantGruppen ABBangårdsgatan 6582 77 Linköpingtel: 0046 1315 4510fax: 0046 1315 4507
SG Singapore Fisher & Paykel (Singapore) PTE Ltd.150 Ubi Avenue 4Sunlight Building #02-00Singapore 408825tel: + 65 6741 0777fax: + 65 6547 0123email: [email protected]: www.fisherpaykel.com
TH Timsaeng 2000 Co Ltd2 Soi Suan Siam12, Yak12Kannayao, Khan Na YaoBangkok 10230 Thailandtel: + 66 2 9197371fax: + 66 2 9197493email: [email protected]; [email protected]
TW Kingsware Corporation 7F-5, No. 50; Lin-Sen N. RoadTaipei 104TaiwanR.O.C.tel: 886-2-2551-3830fax: 886-2-2536-8023email: [email protected]: www.fisherpaykel.com
US Fisher & Paykel Appliances Inc.695 Town Center Drive, Suite 180Costa Mesa, CA 92626-1902USAtoll free: 1.888.9.FNP.USA (1.888.936.7872)fax: 949.790.8911email: [email protected]: www.fisherpaykel.com
VN Venus Company Limited32 Than Nhan Trung Str; Ward13Dist.Tan BinhHochiminh CityVietnamtel: + 84 83 8130569fax: + 84 83 8130570email: [email protected]

8
BD HK IN KR KW MY PH QA TH VN
MANUFACTURER’S WARRANTY
You automatically receive a 1 year Manufacturer’s Warranty with the purchase of this Product covering parts and labour for servicing within the country of purchase.
Fisher & Paykel undertakes to:Repair or, at its option, replace without cost to the owner either for material or labour any part of the Product, the serial number of which appears on the Product, which is found to be defective within ONE YEAR of the date of purchase.
This product has been designed for use in a normal domestic (residential environment). This product is not designed for any commercial use. Any commercial use by the customer will affect this products manufacturer’s warranty.
This warranty DOES NOT coverA Service calls to which are not related to any defect in the Product. The cost of a service
call will be charged if the problem is not found to be a Product fault. For example: 1. Correcting the installation of the product. 2. Instructing you how to use the product. 3. Replacing house fuses or correct house wiring or plumbing. 4. Correcting fault(s) caused by the user. 5. Noise or vibration that is considered normal, e.g. drain/fan sounds, regeneration
noises or user warning beeps. 6. Correcting damage caused by pests, e.g. rats, cockroaches etc.B Defects caused by factors other than: 1. Normal domestic use or 2. Use in accordance with the Product’s User Guide.C Defects to the Product caused by accident, neglect, misuse or Act of God.D The cost of repairs carried out by non-authorised repairers or the cost of correcting
such unauthorised repairs.E Normal recommended maintenance as set out in the Product’s User Guide.F Repairs when the appliance has been dismantled, repaired or serviced by other than an
AUTHORISED CUSTOMER SERVICE CENTRE or the selling dealer.G Pick-up and delivery.H Transportation or travelling costs involved in the repair when the product is installed
outside the AUTHORISED CUSTOMER SERVICE CENTRE’S normal service area.
Service under this manufacturer’s warranty must be provided by an Authorised Service Agent (refer to the Service Contacts section at the start of this book). Such service shall be provided during normal business hours. This warranty certificate should be shown when making any claim.
NoteThis Warranty is an extra benefit and does not affect your legal rights.
Please keep this document in a safe place.

9
AE
التصنیع جھة ضمان تتلقى ضماًنا لمدة عام واحد تلقائًیا من جھة التصنیع بمجرد شراء ھذا المنتج والذي یغطي تغییر األجزاء وأعمال الخدمة
داخل دولة الشراء.
:Fisher & Paykel تتولى شركةإصالح، أو كما تقرر، استبدال دون تكلفة على المالك، إما المواد أو عمل أي جزء من المنتج، الذي یظھر رقمھ التسلسلي
على المنتج، ویظھر أنھ معیب خالل عام واحد من تاریخ الشراء.
ال یغطي ھذا الضمانال یغطي ھذا الضماناتصاالت بالخدمة لیست متعلقة بأي عیب في المنتج. سیتحمل المستھلك تكلفة الخدمة إذا لم یكن العیب في تصنیع A
المنتج. على سبیل المثال: ۱- تصحیح طریقة تركیب المنتج.
۲- تقدیم التوجیھ حول طریقة استخدام المنتج.۳- استبدال مصھرات منزلیة أو أسالك منزلیة أو كبالت سلیمة.
٤- تصحیح الخطأ (األخطاء) الناتجة عن سوء االستخدام.٥- الضوضاء أو االھتزاز الذي یعتبر عادًیا، على سبیل المثال، أصوات التصریف/المروحة، الضوضاء الناتجة عن التجدید
أو صافرات تحذیر المستخدم.٦- تصحیح التلف الناتج عن وجود الحشرات، على سبیل المثال الفئران، والصراصیر وما إلى ذلك.
العیوب الناتجة عن عوامل بخالف: B۱- االستخدام المنزلي العادي أو
۲- االستخدام بما یتفق مع دلیل المستخدم الخاص بالمنتج.
عیوب المنتج الناتجة عن الحوادث، أو اإلھمال، أو إساءة االستخدام، أو القضاء والقدر. C
تكلفة اإلصالحات التي تقوم بھا جھات إصالح غیر معتمدة أو تكلفة تصلیح مثل ھذه اإلصالحات غیر المعتمدة. D
الصیانة العادیة الموصى بھا كما ھو محدد في دلیل المستخدم الخاص بالمنتج. E
اإلصالحات في حالة فك الجھاز، أو إصالحھ، أو صیانتھ على ید جھات بخالف مركز خدمة العمالء المعتمد Fأو موزع البیع.
والتسلیم. الشحن G
تكالیف النقل أو السفر المتضمنة في اإلصالح عند تركیب المنتج خارج منطقة الخدمة العادیة لمركز خدمة العمالء المعتمد. H
یجب أن ُتقدم الخدمة بموجب ضمان جھة التصنیع ھذا بواسطة وكیل خدمة معتمد (یرجى الرجوع إلى قسم جھات اتصال الخدمة في بدایة ھذا الكتیب). یجب أن یتم تقدیم ھذه الخدمة أثناء ساعات العمل العادیة. یجب أن یتم إظھار شھادة الضمان
ھذه عند التقدم بأي مطالبة.
مالحظةمالحظةإن ھذا الضمان عبارة عن میزة إضافیة وال یؤثر على حقوقك القانونیة.
احتفظ بھذا المستند في مكان آمن. احتفظ بھذا المستند في مكان آمن.

10
CN
厂商保修
斐雪派克(Fisher & Paykel) 及中国注册经销商
我公司将按照《中华人民共和国消费者权益保护法》和国家技术监督局,工商局关于《部分商品维修更换退货责任规定》的有关规定,凭此保修证及发票为您提供以下服务:1、 整机免费保修一年。2、 主要零部件免费保修一或三年。不同产品的主要零件在以下列出: a、 冰箱:压缩机、蒸发器、冷凝器、电磁阀、主控板、箱体、门体、温控器、过滤器、毛细管、风扇电机、化霜加热丝、制冰机总成和定时器(免费保修三年)。 b、 冷柜:温控器、压机、蒸发器、继电器和热保 (免费保修三年)。 c、 洗衣机:电机、定时器、程控器和电容器(免费保修三年)。 d、 微波炉:磁控管、电机、主控板、炉门(免费保修三年)。 e、 洗碗柜:风扇电机、主控板、加热器、传感器总成和水泵电机(免费保修三年)。 f、 燃气灶:阀体(免费保修三年)。 g、 电磁灶:电脑板、控制板、副热炉盘、电磁灶模块、线圈盘组合 (免费保修一年)。 h、 电烤箱:电热管、电脑板(免费保修一年)。 i、 油烟机:电机(免费保修三年)。

11
CN
保修范围不包括:
A、 不能出示此保修证及发票; B、 发票涂改; C、 意外事故或使用不当造成损坏。 D、 未经我公司许可,自行修理造成的损坏。 E、 建议的日常维修,按本产品用户指南之规定。 F、 超过三包有效期,经修复仍可继续使用。 G、 水过滤器更换,除非滤筒内的零件或材料存在缺陷。3、 三包有效期自开具发票之日起计算,扣除维修占用和无备件待修的时间。 三包有效期内消费者凭发票及三包凭证办理修复、退货、换货。4、 产品自售出之日起7日内,发生性能故障,消费者可以选择换货、退货或修理。5、 产品自售出之日起15日内,发生性能故障,消费可以选择换货或修理。6、 “性能故障”是指产品不符合安全、卫生要求,存在危及人身、财产安全的不合理危险;或者不 具备产品应具备的使用性能;或者不符合明示的质量状况。
本产品设计用于住宅用途。 本产品不适用于任何商业用途。 客户的任何商业用途将影响本产品制造商的保修。
本产品是为家用设计的,不应商用。如果商用,则影响产品保修。
本厂商保修项下的服务必须由授权服务代理商提供(客户服务中心联系方式,参看本手册背面)。该类服务将在正常上班时间提供。当提出任何索赔时,须出示本保修凭证。
注意本保修凭证是一项额外福利,不影响您的法定权利。
请将本保修证保存在安全的地方。

12
DE
HERSTELLERGARANTIE - FISHER & PAYKEL
Mit dem Neukauf eines Weißwaren-Produkts von Fisher & Paykel erhalten Sie automatisch eine für 2 Jahre gültige Hersteller-Garantie, die Ersatzteile und Service-Aufwand einschließt.
Garntieerklärung - Fisher & PaykelFisher & Paykel erklärt sich hiermit einverstanden, innerhalb von ZWEI JAHREN nach Kauf des Produkts alle als defekt befunden und durch Seriennummer identifizierten Teile dieses Produkts kostenfrei hinsichtlich Ersatzteil- und Service-Aufwand zu ersetzen.
Dieses Produkt wurde für den privaten Gebrauch entwickelt. Dieses Produkt ist nicht für kommerzielle Zwecke bestimmt. Jegliche kommerzielle Nutzung durch den Kunden wirkt sich auf die Garantie dieses Produktherstellers aus.
Folgende Umstände sind über diese Garantie NICHT ABGEDECKT:A Serviceleistungen, die nicht in unmittelbaren Zusammenhang mit einem Produktdefekt
stehen. Dazu zählen unter anderem: 1. Die korrekte Installation des Produkts vor Ort. 2. Eine Einführung in die Funktionsweise des Produkts. 3. Reparatur von haushaltseigenen Sicherungen, Stromkabeln oder Leitungen. 4. Die Behebung von durch den Benutzer verursachten Defekten.B Defekte die nicht zurückzuführen sind auf: 1. Normale Anwendung im Haushalt oder 2. Benutzung gemäß der dem Produkt mitgelieferten Bedienungsanleitung.C Defekte aufgrund von Unfällen, Fahrlässigkeit oder höherer Gewalt.D Reparaturkosten für nicht autorisierte Reparatur-Fachhändler oder die Kosten für die
Korrektur von nicht autorisierten Reparaturmaßnahmen.E Normale Wartungsarbeiten, wie in der Bedienungsanleitung aufgeführt.F Reparaturarbeiten, nachdem das Produkt von nicht durch das Fisher & Paykel
SERVICEZENTRUM oder dem Verkaufshändler autorisierten Reparatur-Fachhändlern geöffnet, repariert oder gewartet wurde.
G Transport und Auslieferung.H Transport und Transportkosten außerhalb des normalen Servicegebiets des Fisher &
Paykel SERVICEZENTRUMS.
Die in dieser Garantie aufgeführten Servicearbeiten dürfen nur von Fisher & Paykel vorgenommen werden. Die relevanten Servicearbeiten beziehen sich auf normale Geschäftsöffnungszeiten. Bei einer Inanspruchnahme von Garantieleistungen muss dieses Garantie-Zertifikat vorgelegt werden.
HinweisDiese Garantie ist Serviceangebot seitens des Herstellers und repräsentiert keine rechtliche Grundlage.
Bitte bewahren Sie diese Bedienungsanleitung sorgfältig auf.

13
DK
GARANTI
Når du køber et nyt Fisher & Paykel hvidevareprodukt modtager du automatisk en 2-årig fabriksgaranti, der dækker dele og servicearbejde.
Fisher & Paykel påtager sig atReparere eller, efter eget valg, at udskifte uden omkostning for ejeren enten for materiale eller arbejde, enhver del af produktet, det serienummer, som er anført på produktet, som konstateres at være defekt, inden for TO ÅR efter købsdatoen.
Dette produkt er designet til privat brug. Dette produkt er ikke beregnet til kommerciel brug. Eventuel kommerciel brug af kunden vil påvirke denne produktproducents garanti.
Denne garanti dækker IKKEA Et servicekald, der ikke er relateret til nogen defekt i produktet. Omkostningen for et
servicekald vil blive faktureret, hvis problemet viser sig ikke at være en produktfejl. F.eks.:
1. Korrektion af installationen af produktet. 2. Instruktion i, hvordan produktet anvendes. 3. Udskiftning af sikringer eller korrekt kabelføring eller blikkenslagerarbejde i huset. 4. Rettelse af fejl forårsaget af brugeren.B Defekter forårsaget af andre faktorer end: 1. Normal hjemmebrug eller 2. Brug i overensstemmelse med produktets Brugsanvisning.C Defekter på produktet forårsaget af uheld, forsømmelse, misbrug eller force majeure.D Omkostning til reparationer udført af uautoriserede reparatører eller omkostning i
forbindelse med korrektion af uautoriserede reparationer.E Normal anbefalet vedligeholdelse som angivet i produktets Brugsanvisning.F Reparationer, når apparatet er blevet skilt ad, repareret eller serviceret af andre end et
Fisher & Paykel AUTORISERET KUNDESERVICECENTRE eller forhandleren.G Afhentning og levering.H Transport- eller rejseomkostninger, der indgår i reparationen, når produktet installeres
uden for et Fisher & Paykel AUTORISERET KUNDESERVICECENTERS normale serviceområde.
Service under denne forhandlergaranti skal udføres af et autoriseret servicecenter,venligst referer til dit referencekort vedr. servicekontaktpersoner. Sådan service skal ydes inden for normal arbejdstid. Dette garanticertifikat skal fremvises ved enhver reklamation.
Bemærk: Denne garanti er en ekstra fordel og har ingen indflydelse på dine lovmæssige rettigheder.
Opbevar venligst denne Brugsanvisning på et sikkert sted.

14
FI
FISHER & PAYKELIN TAKUUEHDOT
Jokaiselle Fisher & Paykelin kodinkoneelle myönnetään 2 vuoden tehdastakuu, joka kattaa korjauksen edellyttämät varaosat ja työn.
Fisher & Paykel sitoutuuvalintansa mukaan korjaamaan tai vaihtamaan veloituksetta minkä tahansa tämän tuotteen osan, jonka havaitaan olevan viallinen KAHDEN VUODEN kuluessa tuotteen ostopäivästä.
Tämä tuote on suunniteltu asumiskäyttöön. Tätä tuotetta ei ole tarkoitettu kaupalliseen käyttöön. Asiakkaan kaupallinen käyttö vaikuttaa tuotteen valmistajan takuun piiriin.
Takuu EI KATA seuraavia tapauksia:A huoltokäynnit, joiden syy ei ole tuotteessa oleva vika. Huoltokäynnin kustannukset
veloitetaan asiakkaalta, jos käynnin aiheuttaneen ongelman syy ei ole tuotteessa oleva vika. Tällaisia ovat esimerkiksi seuraavat:
1. tuotteen asennuksen korjaaminen 2. tuotteen käytön opastus 3. kiinteistön sulakkeiden vaihto, kiinteistön sähköverkon korjaaminen tai LVI-työt 4. käyttäjän aiheuttamien vikojen korjaaminenB viat, joiden syy on muu kuin jokin seuraavista: 1. tuotteen normaali käyttö tai 2. käyttöohjeen mukainen käyttöC onnettomuuden, huolimattomuuden, väärinkäytön tai odottamattomien tapahtumien
laitteelle aiheuttamat viatD valtuuttamattoman huoltohenkilöstön tekemien huolto- ja korjaustöiden kustannukset tai
tällaisten toimien aiheuttamien vikojen korjaamisen kustannuksetE käyttöohjeen mukaiset normaalit ylläpitotoimetF korjaukset, jos laitetta on huoltanut tai korjannut joku muu kuin Fisher & Paykelin
valtuuttama huoltoedustaja tai tuottee jälleenmyyjäG tuotteen kuljetuskustannuksetH tuotteen korjaamiseen liittyvät kuljetus- ja matkakustannukset, jos tuote on asennettu
Fisher & Paykelin valtuuttaman huoltoedustajan normaalin palvelualueen ulkopuolella.
Tämän takuun mukaiset korjaukset saa tehdä vain Fisher & Paykel. Palvelu on käytettävissä säännöllisen työajan puitteissa. Takuuvaatimusten yhteydessä on esitettävä tämä takuutodistus.
Huomautus: Tämä takuu on asiakkaalle myönnettävä ylimääräinen etu. Se ei vaikuta kuluttajalle lain mukaan kuuluviin oikeuksiin. Säilytä käyttöohje turvallisessa paikassa.
Älä palauta Fisher & Paykelille.

15
FR
GARANTIE FABRICANT FISHER & PAYKEL
Lorsque vous achetez un produit blanc Fisher & Paykel, vous bénéficiez automatiquement d’une garantie fabricant de 2 ans couvrant le service après-vente pièces et main d’oeuvre.
Fisher & paykel s’engage aRéparer ou, à son choix, remplacer sans frais pour le propriétaire, pièces et main d’oeuvre, toute pièce du produit dont le numéro de série qui figure sur le produit qui s’avère défectueux est dans les DEUX ANS qui suivent la date d’achat.
Ce produit a été conçu pour être utilisé dans un environnement résidentiel. Ce produit n’est pas destiné à un usage commercial. Toute utilisation commerciale par le client affectera la garantie du fabricant de ce produit.
Cette garantie NE COUVRE PASA Les demandes de service après-ventes qui ne concernent pas un défaut du produit. Le
coût d’une demande de service aprèsventes sera facturé si le problème s’avère ne pas être un défaut du produit. Par exemple:
1. Corriger l’installation du produit. 2. Vous donner les instructions d’utilisation du produit. 3. Remplacer les fusibles de l’habitation ou rectifier le câblage électrique ou la plomberie
de la maison. 4. Corriger la(les) panne(s) imputables à l’utilisateur.B Les défauts dus à des facteurs autres que: 1. L’usage domestique normal, ou 2. L’utilisation en conformité avec le Guide d’utilisation du produit.C Les défauts du produit dus à un accident, une négligence, un abus d’utilisation ou une
catastrophe naturelle.D Le coût des réparations effectuées par des réparateurs non-agréés ou le coût de
rectification de ces réparations non-agréées.E L’entretien normal recommandé tel qu’il est défini dans le Guide d’utilisation du produit.F Les réparations lorsque l’appareil a été démonté, réparé ou entretenu par quelqu’un
d’autre qu’un CENTRE D’ASSISTANCE CLIENTELE AGREE Fisher & Paykel ou le revendeur.
G L’enlèvement et la livraison.H Les frais de transport ou de déplacement impliqués dans la réparation lorsque le
produit est installé hors de la zone normale d’intervention des CENTRES D’ASSISTANCE CLIENTELE AGREES Fisher & Paykel.
Dans le cadre de la présente garantie fabricant, le service après-ventes doit être assuré par Fisher & Paykel. Ce service après-ventes sera assuré durant les heures ouvrables normales. Le présent certificat de garantie devra être présenté lors du dépôt de toute réclamation.
Remarque : Cette garantie est un avantage supplémentaire qui n’affecte pas vos droits juridiques.
Veuillez conserver le présent Guide d’utilisation en lieu sûr.

16
GB IE NZ AU SG PAC
MANUFACTURER’S WARRANTY
You automatically receive a 2 year Manufacturer’s Warranty with the purchase of this Product covering parts and labour for servicing within the country of purchase.
Fisher & Paykel undertakes to:Repair or, at its option, replace without cost to the owner either for material or labour any part of the Product, the serial number of which appears on the Product, which is found to be defective within TWO YEARS of the date of purchase.
This product has been designed for use in a normal domestic (residential environment). This product is not designed for any commercial use. Any commercial use by the customer will affect this products manufacturer’s warranty.
This warranty DOES NOT coverA Service calls to which are not related to any defect in the Product. The cost of a service
call will be charged if the problem is not found to be a Product fault. For example: 1. Correcting the installation of the product. 2. Instructing you how to use the product. 3. Replacing house fuses or correct house wiring or plumbing. 4. Correcting fault(s) caused by the user. 5. Noise or vibration that is considered normal, e.g. drain/fan sounds, regeneration noises
or user warning beeps. 6. Correcting damage caused by pests, e.g. rats, cockroaches etc.B Defects caused by factors other than: 1. Normal domestic use or 2. Use in accordance with the Product’s User Guide.C Defects to the Product caused by accident, neglect, misuse or Act of God.D The cost of repairs carried out by non-authorised repairers or the cost of correcting such
unauthorised repairs.E Normal recommended maintenance as set out in the Product’s User Guide.F Repairs when the appliance has been dismantled, repaired or serviced by other than an
AUTHORISED CUSTOMER SERVICE CENTRE or the selling dealer.G Pick-up and delivery.H Transportation or travelling costs involved in the repair when the product is installed
outside the AUTHORISED CUSTOMER SERVICE CENTRE’S normal service area.
Service under this manufacturer’s warranty must be provided by an Authorised Service Agent (refer to the Service Contacts section at the start of this book). Such service shall be provided during normal business hours. This warranty certificate should be shown when making any claim.This Warranty is an extra benefit and does not affect your legal rights.
Product sold in Australia onlyOur goods come with guarantees that cannot be excluded under the Australian Consumer Law. You are entitled to a replacement or refund for a major failure and for compensation for any other reasonably foreseeable loss or damage. You are also entitled to have the goods repaired or replaced if the goods fail to be of acceptable quality and the failure does not amount to a major failure.
Please keep this document in a safe place.

17
GR
Εγγυησηκατ ασκευαστη απο την Fisher & Paykel
Κάθε καινούργια συσκευή Fisher & Paykel, όταν την αγοράζετε, συνοδεύεται αυτόματα από διετή εγγύηση του κατασκευαστή, που καλύπτει ανταλλακτικά και σέρβις.
Η Fisher & Paykel αναλαμβανει: Να επισκευάσει ή να αντικαταστήσει, κατά την κρίση της, χωρίς δαπάνη του κατόχου για υλικά ή εργασία, οποιοδήποτε τμήμα της συσκευής, ο αριθμός σειράς της οποίας αναγράφεται στην ίδια τη συσκευή που αποδεικνύεται ελαττωματική, μέσα σε χρονικό διάστημα ΔΥΟ ΕΤΩΝ από την ημερομηνία αγοράς. Το προϊόν αυτό έχει σχεδιαστεί για χρήση σε περιβάλλον κατοικίας. Το προϊόν αυτό δεν προορίζεται για εμπορική χρήση. Οποιαδήποτε εμπορική χρήση από τον πελάτη θα επηρεάσει την εγγύηση του κατασκευαστή αυτού του προϊόντος.
Η εγγύηση αυτή ΔΕΝ καλύπτει A Κλήσεις του σέρβις που δεν αφορούν ελαττώματα της συσκευής. Σε περίπτωση που
διαπιστωθεί ότι το πρόβλημα δεν οφείλεται σε ελάττωμα της συσκευής, ο πελάτης χρεώνεται για την κλήση του σέρβις. Για παράδειγμα: 1. Διόρθωση εγκατάστασης της συσκευής. 2. Καθοδήγηση για τη χρήση της συσκευής. 3. Αντικατάσταση ασφαλειών της κατοικίας ή επισκευές στην ηλεκτρική ή υδραυλική εγκατάσταση.4. Διόρθωση βλάβης που προκάλεσε ο χρήστης.
B Προβλήματα που οφείλονται σε άλλους παράγοντες, εκτός από τους παρακάτω: 1. Φυσιολογική οικιακή χρήση ή 2. Χρήση σύμφωνα με τις Οδηγίες Χρήσης του προϊόντος.
Γ Προβλήματα στη συσκευή που προκαλούνται από ατύχημα, αμέλεια, κακή χρήση ή ανωτέρα βία.
Δ Το κόστος επισκευής που εκτελείται από αναρμόδιους τεχνικούς ή το κόστος διόρθωσης τέτοιων αναρμόδιων επισκευών.
E Την τακτική συνιστώμενη συντήρηση που περιγράφεται στις Οδηγίες Χρήσης της συσκευής.
ΣΤ Επισκευές όταν η συσκευή έχει λυθεί, επισκευαστεί ή συντηρηθεί από οποιονδήποτε άλλον εκτός από τους τεχνικούς του ΞΟΥΣΙΟΔΟΤΗΜΕΝΟΥ ΚΕΝΤΡΟΥ ΕΞΥΠΗΡΕΤΗΣΗΣ ΠΕΛΑΤΩΝ της Fisher & Paykel ή τον εξουσιοδοτημένο αντιπρόσωπο.
Ζ Παραλαβή και παράδοση.
H Κόστος μεταφοράς ή μετάβασης όταν η συσκευή είναι εγκατεστημένη εκτός της περιοχής του ΕΞΟΥΣΙΟΔΟΤΗΜΕΝΟΥ ΚΕΝΤΡΟΥ ΕΞΥΠΗΡΕΤΗΣΗΣ ΠΕΛΑΤΩΝ της Fisher & Paykel.
Το σέρβις στα πλαίσια της εγγύησης αυτής παρέχεται μόνο από τη Fisher & Paykel.Οι εργασίες σέρβις εκτελούνται κατά τις εργάσιμες ώρες.Το παρόν πιστοποιητικό εγγύησης πρέπει να επιδεικνύεται σε κάθε αξίωση του πελάτη.
Σημείωση: Η εγγύηση αυτή αποτελεί πρόσθετη παροχή και δεν επηρεάζει τα νόμιμα δικαιώματά σας.
Φυλάξτε αυτές τις Οδηγίες Χρήσης σε ασφαλές μέρος.

18
IT
GARANZIA DEL PRODUTTORE
All’acquisto di ogni Prodotto Fisher & Paykel riceverete automaticamente una Garanzia del Produttore della durata di due anni, a copertura delle parti di ricambio e delle ore di lavoro per eventuale assistenza.
Fisher & paykel si impegna a:Riparare o, dietro sua scelta, sostituire (senza addebitare all’utente alcun costo per materiali o assistenza) qualsiasi parte difettosa del Prodotto (identificato dal numero di serie che appare sul Prodotto), entro due ANNI dalla data d’acquisto.
Questo prodotto è stato progettato per essere utilizzato in un ambiente residenziale. Questo prodotto non è destinato ad uso commerciale. Qualsiasi utilizzo commerciale da parte del cliente interesserà la garanzia del produttore.
Questa garanzia NON COPRE:A Telefonate di servizio non relative ad alcun difetto del Prodotto. Il costo di una telefonata
di assistenza viene addebitato al cliente se il problema non è causato da un difetto del prodotto, ad esempio nel caso di:
1. Correzione dell’installazione del prodotto. 2. Istruzioni su come usare il prodotto. 3. Sostituzione dei fusibili o dei cavi o tubature della casa. 4. Correzione di errori causati dall’utente.B Difetti causati da fattori diversi da: 1. Normale uso domestico 2. Uso secondo il Manuale Utente del prodotto.C Difetti del Prodotto causati da incidente, negligenza, abuso o calamità.D Il costo delle riparazioni effettuate da persone non autorizzate o il costo per la
correzione di riparazioni non autorizzate.E La normale manutenzione suggerita, come indicato nel Manuale Utente del prodotto.F Riparazioni quando l’apparecchio è stato smontato, riparato o modificato da qualsiasi
persona che non sia il CENTRO ASSISTENZA CLIENTI AUTORIZZATO Fisher & Paykel o il rivenditore.
G Trasporto e consegna.H I costi di viaggio o di trasporto legati alle riparazioni quando il prodotto viene installato
al di fuori della normale area di servizio dei CENTRI ASSISTENZA CLIENTI AUTORIZZATI Fisher & Paykel.
Solo l’assistenza offerta da Fisher & Paykel rende valida questa Garanzia del Produttore.L’assistenza viene prestata nei normali orari di ufficio. In caso di reclami di qualunque tipo, mostrare al personale questo certificato di garanzia.
Nota: Questa Garanzia è un vantaggio extra, che non ha conseguenze sui vostri diritti legali.
Conservare questo Manuale Utente in un luogo sicuro.
19
NL
FISHER & PAYKEL FABRIEKSGARANTIE
Bij aankoop van een nieuw apparaat (white good) van Fisher & Paykel krijgt u automatisch 2 jaar fabrieksgarantie op onderdelen en werkuren voor serviceproblemen.
Fisher & Paykel verbindt zich ertoeIeder onderdeel van het product, waarvan het serienummer op het product is vermeld, dat defect blijkt te zijn binnen de TWEE JAAR na datum van aankoop te repareren of, naar eigen keuze, te vervangen zonder aanrekening van materiaalkosten of werkuren aan de eigenaar.
Dit product is ontworpen voor gebruik in een woonomgeving. Dit product is niet bedoeld voor commercieel gebruik. Elk commercieel gebruik door de klant zal de garantie van deze productfabrikant beïnvloeden.
Van deze garantie zijn UITGESLOTEN:A Serviceoproepen niet in verband met een defect aan het product. De kosten voor een
serviceoproep worden aangerekend als het probleem geen defect van het product blijkt te zijn. Bijvoorbeeld:
1. Een installatiefout van het product verhelpen. 2. De klant gebruiksaanwijzingen geven over het product. 3. Zekeringen van de woning vervangen of een storing verhelpen aan bedrading of
leiding van de woning. 4. Storingen verhelpen die door de gebruiker zijn veroorzaakt.B Defecten wegens andere oorzaken dan: 1. Normaal huiselijk gebruik of 2. Gebruik overeenkomstig de gebruikershandleiding van het product.C Defecten aan het product veroorzaakt door toeval, nalatigheid, verkeerd gebruik of
overmacht.D De kosten voor reparaties uitgevoerd door onbevoegd personeel of voor het corrigeren
van door onbevoegden uitgevoerde reparaties.E Normaal aanbevolen onderhoudswerk zoals aangegeven in de gebruikershandleiding
van het product.F Reparaties na demontage, reparatie of service uitgevoerd door anderen dan de
ERKENDE KLANTENDIENST van Fisher & Paykel of door de dealer.G Ophalen en afleveren.H Vervoer of reiskosten voor de reparatie wanneer het product zich buiten de normale
dienstzone van de ERKENDE KLANTENDIENST van Fisher & Paykel bevindt.
Service in het kader van de Fabrieksgarantie moet door Fisher & Paykel worden geleverd.Dergelijke service zal worden geleverd tijdens de normale openingstijden.Dit garantiecertificaat dient te worden vertoond wanneer er aanspraak op wordt gemaakt.
Opmerking: Deze garantie is een extra voordeel en verandert niets aan uw wettelijke rechten.
Bewaar deze gebruikershandleiding op een veilige plaats.

20
NO
FISHER & PAYKEL PRODUSENTGARANTI
Når du kjøper et nytt hvitevareprodukt fra Fisher & Paykel vil du automatisk få en 2 års Produsentgaranti som dekker deler og arbeid for service.
Fisher & Paykel påtar seg å:Reparere eller, etter eget valg, erstatte uten kostnad for eieren, verken til materiell eller arbeid, enhver del av Produktet, hvis serienummer er å finne på Produktet, som viser seg å være defekt innenfor TO ÅR fra innkjøpsdatoen.
Dette produktet er designet for bruk i et normalt husholdningsområde (boligmiljø). Dette produktet er ikke laget for kommersiell bruk. Eventuell kommersiell bruk av kunden vil påvirke denne produsentens garanti.
Denne garantien DEKKER IKKE:A Servicehenvendelser som ikke er relatert til noen defekt på Produktet. Kostnaden
for servicen vil bli belastet kunden dersom det ikke finnes noe problem som er en Produktfeil. For eksempel:
1. Korrigering av installasjonen av produktet. 2. Instruksjon i bruken av produktet. 3. Skifting av hussikringer eller utbedring av husinstallasjon eller rørleggerarbeid. 4. Utbedring av feil som er forårsaket av brukeren.B Defekter forårsaket av faktorer som ikke omfattes av: 1. Normalt husholdningsbruk eller 2. Bruk i samsvar med Produktets Brukerhåndbok.C Defekter på Produktet forårsaket av ulykke, vanskjøtsel, feilaktig bruk eller force majeure.D Kostnader til reparasjon utført av ikke godkjente reparatører eller kostnader til
korrigering av slike ikke godkjente reparasjoner.E Normalt anbefalt vedlikehold som beskrevet i Produktets Brukerhåndbok.F Reparasjoner når apparatet har vært demontert, reparert eller fått utført service av
andre enn et Fisher & Paykel GODKJENT KUNDESENTER eller en forhandler.G Henting og levering.H Transport- eller reisekostnader involvert i reparasjonen når produktet er installert utenfor
det normale serviceområdet for Fisher & Paykel GODKJENT KUNDESENTER.
Service under denne Produsentgarantien skal være levert av Fisher & Paykel.Slik service skal leveres innenfor normale forretningstider.Denne garantierklæringen skal fremlegges når det fremmes et garantikrav.
NB: Denne garantien er en tilleggsfordel, og den påvirker ikke dine lovfestede rettigheter.
Oppbevar denne Brukerhåndboken på et sikkert sted.

21
SE
FISHER & PAYKELTIL LVERKNINGSGARANTI
När du köper en ny vitvaruprodukt från Fisher & Paykel får du automatiskt en tillverkargaranti på två år som täcker reservdelar och arbete vid service.
Fisher & paykel åtar sig attReparera eller eventuellt byta ut en reservdel på produkten, utan kostnad för ägaren (serienumret som visas på produkten), gällande material eller arbete, som upptäcks vara defekt inom TVÅ ÅR från inköpsdatum.
Denna produkt har utformats för användning i en vanlig inhemsk (bostadsmiljö). Denna produkt är inte avsedd för kommersiell användning. Eventuell kommersiell användning av kunden kommer att påverka den här tillverkarens garanti.
Denna garanti TÄCKER INTEA Service som inte är relaterad till något dom är defekt i produkten. Kostnaden för service
debiteras om problemet inte är ett produktfel. Till exempel: 1. Rätta till installationen av produkten. 2. Instruera dig hur du använder produkten. 3. Byta ut säkringar eller rätta till kabeldragning eller rörsystem. 4. Rätta till fel som orsakats av användaren.B Defekter som orsakats av andra faktorer än: 1. Normal hushållsanvändning eller 2. användning enligt produktens användarhandbok.C Defekter i produkten som orsakas av en olyckshändelse, försummelse, felanvändning
eller en handling som man inte rår över.D Kostnaden för reparationer som utförs av en icke auktoriserade reparatör eller
kostnaden för att rätta till sådana icke auktoriserade reparationer.E Normalt rekommenderat underhåll som visas i produktens användarhandbok.F Reparationer när apparaten har nedmonterats, reparerats eller service utförs av någon
annan än ett AUKTORISERAT KUNDSERVICECENTRA eller återförsäljare av Fisher & Paykel.
G Köpa och leverera.H Transport- eller resekostnader som ingår i reparationen när produkten installeras utanför
det normala serviceområdet för det AUKTORISERADE KUNDSERVICECENTRAT Fisher & Paykel.
Service som gäller under denna tillverkargaranti måste utföras av Fisher & Paykel.Sådan service skall utföras under normal kontorstid.Detta garantibevis skall visas upp vid anspråk.
Notera: Denna garanti är en extra förmån och inverkar inte på dina lagliga rättigheter.
Vänligen förvara denna användarhandbok på ett säkert ställe.

22
TW

23
US CA
LIMITED WARRANTY
When you purchase any new Fisher & Paykel product for personal or consumer use you automatically receive a two year limited warranty covering parts and labor for servicing within the 48 mainland United States, Hawaii, Washington DC and Canada. In Alaska the limited warranty is the same except that you must pay to ship the product to the service shop or the service technician’s travel to your home. Products for use in Canada must be purchased through the Canadian distribution channel to ensure regulatory compliance.
If the product is installed in a motor vehicle, boat or similar mobile facility, you receive the same two year limited warranty, but you must bring the vehicle, boat or mobile facility containing the product to the service shop at your expense or pay the service technician’s travel to the location of the product.
Fisher & Paykel Refrigeration product only: You receive an additional three year limited warranty (for a total of five years) coveringparts and labor for sealed refrigeration system (compressor, evaporator, condenser, filterdryer, and connecting tubing) within the 48 mainland United States, Hawaii, WashingtonD.C. and Canada. In Alaska the limited warranty for the sealed refrigeration system is thesame except that you must pay to ship the product to the service shop or the servicetechnician’s travel to your home.
Fisher & Paykel undertakes to:Repair without cost to the owner either for material or labor any part of the product, the serial number of which appears on the product, which is found to be defective. In Alaska, you must pay to ship the product to the service shop or for the service technician’s travel to your home. If the product is installed in a motor vehicle, boat or similar mobile facility, you must bring it to the service shop at your expense or pay for the service technician’s travel to the location of the product. If we are unable to repair a defective part of the product after a reasonable number of attempts, at our option we may replace the part or the product, or we may provide you a full refund of the purchase price of the product (not including installation or other charges).
This warranty extends to the original purchaser and any succeeding owner of the product for products purchased for ordinary single-family home use.
All service under this limited warranty shall be provided by Fisher & Paykel or its Authorized Service Agent during normal business hours.
How long does this limited warranty last?Our liability under this limited warranty expires TWO YEARS from the date of purchase of the product by the first consumer.
Our liability under any implied warranties, including the implied warranty of merchantability (an unwritten warranty that the product is fit for ordinary use) also expires TWO YEARS (or such longer period as required by applicable law) from the date of purchase of the product by the first consumer. Some states do not allow limitations on how long an implied warranty lasts, so this limit on implied warranties may not apply to you.

24
US CA
This warranty does not cover:A Service calls that are not related to any defect in the product. The cost of a service
call will be charged if the problem is not found to be a defect of the product. For example:
1. Correct faulty installation of the product. 2. Instruct you how to use the product. 3. Replace house fuses, reset circuit breakers, correct house wiring or plumbing, or
replace light bulbs. 4. Correct fault(s) caused by the user. 5. Change the set-up of the product. 6. Unauthorized modifications of the product. 7. Noise or vibration that is considered normal, for example, drain/fan sounds,
regeneration noises or user warning beeps. 8. Correcting damage caused by pests, for example, rats, cockroaches etc.B Defects caused by factors other than: 1. Normal domestic use or 2. Use in accordance with the product’s user guide.C Defects to the product caused by accident, neglect, misuse, fire, flood or Act of God.D The cost of repairs carried out by non-authorized repairers or the cost of correcting
such unauthorized repairs.E Travel fees and associated charges incurred when the product is installed in a location
with limited or restricted access. (eg airplane flights, ferry charges, isolated geographic areas).
F Normal recommended maintenance as set forth in the product’s user guide.
If you have an installation problem contact your dealer or installer. You are responsible for providing adequate electrical, exhausting and other connection facilities.We are not responsible for consequential or incidental damages (the cost of repairing or replacing other property damaged if the product is defective or any of your expenses caused if the product is defective). Some states do not allow the exclusion or limitation of incidental or consequential damages, so the above limitation or exclusion may not apply to you.
You may be required to provide reasonable proof of the date of purchase of the product before the product will be serviced under this limited warranty.

25
US CA
Commercial useIf you are using the product in a commercial setting (any use other than a single family dwelling), we agree to repair or replace, without cost to you for parts only, any defective parts. Our liability for these repairs expires ONE YEAR from the date of original purchase.
At our option we may replace the part or the product, or we may provide you a full refund of the purchase price of the product (not including installation or other charges). All service under this limited warranty shall be provided by Fisher & Paykel or its Authorized Service Agent during normal business hours.
No other warrantiesThis limited warranty is the complete and exclusive agreement between you and Fisher & Paykel regarding any defect in the product. None of our employees (or our Authorized Service Agents) are authorized to make any addition or modification to this limited warranty.
Warrantor: Fisher & Paykel Appliances, Inc.
If you need further help concerning this limited warranty, please contact us:
Call us toll-free: 1.888.936.7872
Email us: [email protected]
Write to us: Fisher & Paykel Appliances Inc. 695 Town Center Drive, Suite 180 Costa Mesa, CA 92626-1902 USA
This limited warranty gives you specific legal rights, and you may also have other rights which vary from state to state.
26
CA
GARANTIE LIMITÉE
Lorsque vous achetez un nouvel appareil électroménager Fisher & Paykel pour une utilisation ménagère, vous recevez automatiquement une garantie limitée deux ans couvrant les pièces de rechange et la main d’oeuvre pour le service dans les 48 états du continent américain, Hawaï, Washington D.C. et au Canada. Eu égard à l’Alaska, la garantie limitée est identique sauf que vous devez prendre en charge les frais d’expédition du produit jusqu’au service clientèle ou prendre en charge les frais de déplacement du technicien de maintenance jusqu’à votre domicile. Les produits destinés à être utilisés au Canada doivent être achetés par l’intermédiaire de la chaîne de distribution canadienne pour garantir la conformité avec la réglementation en vigueur.
Si le produit est installé dans un véhicule automobile, sur un bateau ou sur une unité mobile similaire, vous bénéficiez de la même garantie limitée deux ans, mais il relève de votre responsabilité d’amener le véhicule, bateau ou l’unité mobile dans laquelle est installé le produit au service après-vente à vos frais ou de prendre en charge les frais de déplacement du technicien de maintenance jusqu’au lieu où se trouve le produit.
Produit Fisher & Paykel Réfrigération uniquement: Vous recevez une garantie limitée supplémentaire de trois ans (pour un total de cinq ans) couvrant pièces et main d’oeuvre pour le système de réfrigération scellé (compresseur, évaporateur, condenseur, filtre sèche-linge, et le tube de connexion) dans les 48 continentale des États-Unis, Hawaii, Washington D.C. et au Canada. En Alaska, la garantie limitée pour le système de réfrigération scellé est le même, sauf que vous devez payer pour expédier le produit au centre de service ou le service Le Voyage de technicien à votre domicile.
Fisher & Paykel s’engage à :Réparer sans frais encourus pour le propriétaire en termes de main d’oeuvre ou de matériau une quelconque partie du produit, dont le numéro de série se trouve sur le produit, s’avérant défectueuse. Eu égard à l’Alaska, vous devez prendre en charge les frais d’expédition du produit jusqu’au service clientèle ou prendre en charge les frais de déplacement du technicien de maintenance jusqu’à votre domicile. Si le produit est installé dans un véhicule automobile, sur un bateau ou sur une unité mobile similaire, il relève de votre responsabilité d’amener le véhicule, bateau ou l’unité mobile dans laquelle est installé le produit au service après-vente à vos frais ou de prendre en charge les frais de déplacement du technicien de maintenance jusqu’au lieu où se trouve le produit. Si nous ne pouvons pas réparer une pièce défectueuse du produit après un nombre raisonnable de tentatives, nous procéderons au remplacement de la pièce ou du produit ou nous vous proposerons de vous rembourser intégralement le prix d’achat du produit (frais d’installation et autres frais étant exclus), selon notre choix.
Cette garantie s’étend à l’acheteur original et à tout propriétaire successeur du produit pour les produits achetés pour toute utilisation ménagère par une seule famille.
Le service en vertu de cette garantie limitée devra être assuré par Fisher & Paykel ou par son agent agréé pendant les heures normales de bureau.

27
CA
Durée de cette garantie limitée?Notre responsabilité en vertu de cette garantie limitée expire DEUX ANS après la date d’achat du produit par le premier consommateur.
Notre responsabilité en vertu de toutes garanties implicites, y compris la garantie implicite de qualité marchande (une garantie implicite selon laquelle le produit est adapté à toute utilisation ordinaire) expire également DEUX ANS (ou durée supérieure comme requis par la loi en vigueur) à compter de la date d’achat du produit par le premier consommateur. Certains états n’autorisent pas les limitations sur la durée de la garantie implicite, il est donc possible que les limitations sur les garanties implicites ne vous concernent pas.
Cette garantie ne couvre pas les points suivants :A Les déplacements d’un technicien de maintenance jusqu’à votre domicile pour tout
problème non lié à un défaut dans le produit. Les frais du déplacement vous seront facturés si le problème s’avère ne pas être un défaut du produit. Par exemple :
1. Rectifier une mauvaise installation du produit. 2. Vous expliquer comment utiliser le produit. 3. Remplacer les fusibles de la maison ou procéder au réglage des disjoncteurs, refaire le câblage ou la plomberie de la maison ou remplacer les ampoules. 4. Rectifier les défaillances provoquées par l’utilisateur. 5. Rectifier le réglage du produit. 6. Modifications non autorisées du produit. 7. Bruit ou vibrations considérés comme normaux, par exemple, bruits de tuyauterie/
ventilateur, bruits de régénération ou sonneries d’avertissement destinées à l’utilisateur.
8. Réparations des dommages provoqués par des animaux nuisibles comme les rats ou les cafards, etc.
B Défauts causés par des facteurs autres que : 1. L’utilisation ménagère normale ou 2. L’utilisation en conformité avec le manuel d’utilisation du produit.C Les défaillances du produit causées par accident, la négligence, une mauvaise utilisation,
l’incendie, l’inondation ou une catastrophe naturelle.D Les frais des réparations effectuées par des réparateurs non agréés ou les frais associés
à la correction de telles réparations non autorisées.E Les frais de déplacement et frais associés encourus lorsque le produit est installé dans
un endroit disposant d’un accès limité ou restreint (p. ex. : frais d’avions, frais de ferry et zones géographiques isolées).
F La maintenance recommandée normale comme énoncée dans le manuel d’utilisation du produit.
En cas de problème avec l’installation, prenez contact avec votre revendeur ou installateur.Les raccordements électriques et d’évacuation et autres raccordements relèvent de votre responsabilité. Nous ne sommes pas responsable des dommages indirects (les frais des réparations ou les frais de remplacement d’autres propriétés endommagées si le produit est défectueux ou vos dépenses encourues si le produit est défectueux). Certains états n’autorisent pas l’exclusion ou la limitation des dommages indirects, il est donc possible que la limitation ou l’exclusion ci-dessus ne s’applique pas à votre situation.
Il est possible qu’il vous soit demandé de fournir une preuve valable de la date d’achat du produit avant que le produit puisse être accepté par le service clientèle en vertu de cette garantie limitée.

28
CA
Utilisation commercialeSi vous utilisez le produit dans un environnement commercial (toute autre utilisation quel’utilisation par une unité familiale simple), nous nous engageons à réparer ou remplacer, sans frais de pièces uniquement, les pièces défectueuses. Notre responsabilité eu égard à ces réparations expire UN AN à compter de la date d’achat originale.
Selon notre choix, nous procéderons au remplacement de la pièce ou du produit ou nous vous proposerons de vous rembourser intégralement le prix d’achat du produit (frais d’installation et autres frais étant exclus). Le service en vertu de cette garantie limitée devra être assuré par Fisher & Paykel ou par son agent agréé pendant les heures normales de bureau.
Aucune autre garantieCette garantie limitée constitue l’intégralité de l’accord exclusif passé entre l’acheteur etFisher & Paykel eu égard à toute défaillance du produit. Aucun de nos employés (ou denos agents agréés) n’est autorisé à procéder à un quelconque ajout ou à une quelconquemodification de cette garantie limitée.
Garant : Fisher & Paykel Appliances, Inc.
Si vous avez besoin d’assistance eu égard à cette garantie limitée, veuillez nous contacter:
Par téléphone (appel gratuit): 1.888.936.7872
Par courriel: [email protected]
Par courrier: Fisher & Paykel Appliances Inc. 695 Town Center Drive, Suite 180 Costa Mesa, CA 92626-1902 USA
Cette garantie limitée vous donne des droits juridiques spécifiques et il est également possible que vous bénéficiez d’autres droits pouvant varier d’un état à un autre.
590256H / 1103875-ß8 10.17
FISHERPAYKEL.COM
© Fisher & Paykel Appliances 2017. All rights reserved.The product specifications in this booklet apply to the specific products and models described at the date of issue. Under our policy of continuous product improvement, these specifications may change at any time. You should therefore check with your Dealer to ensure this booklet correctly
describes the product currently available.

manual setup guidea step-by-step guide for manually setting up a complete Lutron® RadioRAR 2 wireless control system
start here
please leave this setup guide with owner
Lutron Technical Support Hotline 800.523.9466 U.S.A./Canada/Caribbean24 hours, 7 days a week

table of contents
read through all instructions before starting
overview 3
planning and design 6
installing 8
creating the system 10
choosing room/scene buttons 12
about programming 14
programming buttons 15
programming keypad columns 22
programming Pico® wireless controls 24
programming shortcuts 27
programming Visor Control Receiver 29
optional: configuring VCRX inputs 31
optional: testing RF signal quality 32
optional: setting shade/drapery limits 34
resetting devices to factory settings 35
repeater troubleshooting 37
device troubleshooting 38
Technical Support 24/7—800.523.9466
If you have any questions, visit us on the web at www.lutron.com/radiora2. For immediate assistance, call the LutronR Technical Support Hotline at 800.523.9466 (U.S.A./Canada/Caribbean) 24 hours, 7 days a week.

www.lutron.com/radiora2 Lutron® | 3
Note: Once a system has been programmed using the RadioRAR 2 Design and Setup PC Tool, the system cannot be manually programmed. All subsequent programming must be performed using the RadioRAR 2 Design and Setup PC Tool.
overview
Programming Method
FeatureSimple Setup Manual Essentials PC Inclusive PC
(No Repeater) (Main Repeater) (Requires qualification)
IR Keypad Control
Single-Room Scenes
Multi-Room Scenes
Single-Action Buttons
Toggle Buttons
Individual Zone Control
Room Monitoring
Time Clock and Away Mode
Security Mode (Full/Flash)
Integration (RS-232/Ethernet)
Mobile Device Apps
Occupancy/Vacancy Sensors
Wallbox Power Module
RF Softswitch® Module
HVAC Monitor and Control
+100 Devices (2 Main Repeaters)
RadioRAR 2 is a wireless multi-room control system for lights and Shades/Draperies. Create the right ambiance for various activities, easily monitor and control your lights, reduce energy usage, and increase safety in and around your home. Manually programmed systems can have up to 100 devices (1 Main Repeater, 0 to 4 Auxiliary Repeaters, and 1 to 95 other devices). Additional qualification is needed for PC programming and for systems over 100 devices. Qualified Level 2 (L2) dealers/installers can upgrade their software to provide support for a 200 device system. Contact your LutronR representative to learn more about PC programming or the qualification program.

24/7 Technical Support—800.523.94664 | Lutron®
manual programming system components*
Main Repeater Supports system setup, allows integration and PC connectivity (ethernet, RS-232), and ensures error-free communication between system components.
Auxiliary Repeater Extends RF coverage to ensure error-free communication between system components.
Dimmer/Switch Replaces a standard light switch. Dimmers allows smooth transitions of light and create unique lighting environments.
seeTouch® Keypad Wall-Mount—controls lights and Shades / Draperies throughout the home.
Tabletop—convenient, portable control of lights and Shades/Draperies throughout the home.
Pico® Wireless Control Battery-powered, retrofit, portable Keypad for convenient control of lights and Shades/Draperies throughout the home.
Plug-In Module
Lamp Dimmer
overview
Dimmer
Main Repeater
Auxiliary Repeater
Switch
seeTouchR Wall-Mount Keypad
seeTouchR Tabletop Keypad
PicoR Wireless Control
* some systems do not require every component listed
120 V 50 / 60 HzRR-3PD-1
®COOPERSBURG, PA 18036 USA
I H 300 VA /200 W300 W
LUTRON LUTRON
Setup
WiredRF
Communication
Repeater Status1 3 42 M
Power Repeater LinkCO
M9 V
1
N / C
MU
X
MU
X
2 3 4
AddTest
USB
Integrate Program / Integrate
RS232 Ethernet
Main Repeater
AddTest
Setup
WiredRF
Communication
Repeater Status1 3 42 M
Auxiliary Repeater
Power Repeater LinkCO
M9 V
1
N / C
MU
X
MU
X
2 3 4
AddTest
Shade
Open
Close

www.lutron.com/radiora2 Lutron® | 5
overview
Hybrid Keypad Replaces a standard light switch for dimming control. Buttons control lights and Shades/Draperies locally and throughout the home.
Visor Control Transmitter Controls lights throughout the home from the comfort of your car.
Visor Control Receiver Receives signal from Visor Control Transmitter and transmits to the entire RadioRAR 2 system.
GRAFIK Eye® QS Wireless Unit Powers and controls up to six zones of lights and up to 3 zones of Shades/ Draperies in a room.
Wireless Shade/Drapery Allows quiet, precise control of daylight.
manual programming system components* (continued)
Visor Control Transmitter
Visor Control Receiver
* some systems do not require every component listed
GRAFIK EyeR QS Wireless Unit
SivoiaR QS Wireless Shade/Drapery
Hybrid Keypad
SivoiaR QS TriathalonR
Shade

24/7 Technical Support—800.523.94666 | Lutron®
planning and design
system planning
A properly planned RadioRA® 2 system is easy to use and provides the maximum benefits. Planning a system involves creating areas. An area is a group of lights and Shades/Draperies that are controlled together. Consider the following questions when designing your system:
• What areas do I want to control?• What load types do I want to control?• How many devices do I need in each area?• How will the Keypad buttons control the areas?
Use the following five steps to answer the above questions when designing your system.
system design
1. Identify the areas of the home to be controlled.
Example areas:• Master suite• Kitchen/Family room
2. Identify the load types to be controlled.
Example loads:• Incandescent/Halogen• CFL/LED• Magnetic Low Voltage (MLV)• Electronic Low Voltage (ELV)
3. Install devices to control as much of the lighting within the areas as possible (i.e. Dimmers, Switches, Shades/Draperies, etc.).
4. Place at least one Keypad or Wireless Control in each area.
• Outdoor/Entry• Basement
• Shade/Drapery• Fluorescent• Garage door• Other switched loads

www.lutron.com/radiora2 Lutron® | 7
planning and design
5. Choose how the Keypads will control the areas. Note: This step does not apply to Pico® Wireless Controls and
Visor Control Transmitters.
Ways to control the area Benefit
1 Individual device control - Control of a single Dimmer, Switch, or Shade/Drapery.
Provides ability to turn an individual light on/off and allows changing level of an individual control.
2 Local scene - Preset scene for all lighting and shading within a room.
Sets all room lighting and Shades/Draperies to the optimal level for a specific activity, at the touch of one button. Example Scenes: • Read • Watch TV • Relax
3 Whole home scene - Illuminates part of or most of the home for a specific activity or mood.
Set light and Shade/Drapery levels in multiple areas within the home to ensure that the entire home is in its best light, at the touch of one button. Example Scenes:• Entertain • Sleep
4 Room monitoring - Allows a user to see if lights within a specific room (or entire house) are on or off.
Know when lights are left on anywhere in the home—and easily turn them off—all from the convenience of a single location.
5 Path of light - Illuminates a convenient path of light to take the user from one location to the next.
Simplifies daily activities. Example: Nighttime path to the bathroom or kitchen.

24/7 Technical Support—800.523.94668 | Lutron®
installing
After planning and designing the layout of the system, install system components according to the installation instructions that came with each component.
installing devices
• Dimmers, Switches, and Hybrid Keypads
Note: A Dimmer, Switch, or Hybrid Keypad in a 3-way or 4-way application must use RadioRA® 2 Remote Dimmers or Remote Switches.
• seeTouch® Wall-Mount and Tabletop Keypads• Pico® Wireless Controls• Sivoia® QS Wireless Shades/Draperies• GRAFIK Eye® QS Wireless Controls• Visor Control Transmitter (VCTX) and Visor Control Receiver (VCRX)
Note: The VCTX is typically clipped to a car visor. A common installation location for the VCRX is in the garage above the garage door opener.
Dimmer/ Switch
Wall-Mount Keypad
VCRX
GRAFIK EyeR QS Wireless Control Unit
VCTXSivoiaR QS Wireless Shade/
Drapery
Tabletop Keypad
PicoR Wireless Control
Hybrid Keypad

www.lutron.com/radiora2 Lutron® | 9
installing
installing repeaters
We recommend installing Repeaters in a location that is out of sight and will not be disturbed (i.e. cabinet, closet, etc.). Repeaters do not need to be placed in the open.
• Main Repeater• Auxiliary Repeater
All devices must be located within 30 ft (9 m) of a Repeater. Multiple Repeaters may be necessary to provide adequate coverage.
When using two or more Repeaters, position each Repeater within 60 ft (18 m) of another Repeater (spheres overlap) for optimum performance.
30 ft (9 m)radius
30 ft (9 m)
radius
60 ft (18 m) maximum
60 ft (18 m) maximum
Main Repeater Auxiliary Repeater
30 ft (9 m) radius
30 ft (9 m) radius
Setup
WiredRF
Communication
Repeater Status1 3 42 M
Power Repeater LinkCO
M9 V
1
N / C
MU
X
MU
X
2 3 4
AddTest
USB
Integrate Program / Integrate
RS232 Ethernet
Main Repeater
AddTest
Setup
WiredRF
Communication
Repeater Status1 3 42 M
Auxiliary Repeater
Power Repeater LinkCO
M9 V
1
N / C
MU
X
MU
X
2 3 4
AddTest
Setup
WiredRF
Communication
Repeater Status1 3 42 M
Power Repeater LinkCO
M9 V
1
N / C
MU
X
MU
X
2 3 4
AddTest
USB
Integrate Program / Integrate
RS232 Ethernet
Main Repeater
AddTest
Setup
WiredRF
Communication
Repeater Status1 3 42 M
Auxiliary Repeater
Power Repeater LinkCO
M9 V
1
N / C
MU
X
MU
X
2 3 4
AddTest

24/7 Technical Support—800.523.946610 | Lutron®
creating the system
system setup
To set up a RadioRA® 2 system, components must be added to the Main Repeater. First, add Auxiliary Repeater(s)*; then add all other system devices.
adding Auxiliary Repeaters and devices
1. Enter Add Mode
Press and hold the Add button on the Main Repeater for 3 seconds until the green Add LED begins to rapid-flash (ten times per second) and the Repeater beeps. Wait 10 seconds.
After the green Add LED begins to normal-flash (once per second) the system is in Add Mode and is ready to add new components.
Note: The first time Add Mode is entered on a Main Repeater, it will create a new system with a unique system address.
2. Add Auxiliary Repeater(s)*
Press and hold the Add button on an Auxiliary Repeater for 3 seconds until the green Add LED begins to rapid-flash.
Note: If the system does NOT require Auxiliary Repeater(s), skip ahead to step 3.
When an Auxiliary Repeater has been added successfully, the Main Repeater will beep once and the Add LED on the Auxiliary Repeater will normal-flash. The Repeater Status LEDs corresponding to the Auxiliary Repeater that was added will also turn on.
To add another Auxiliary Repeater (4 Auxiliary Repeaters maximum), repeat step 2.
* Auxiliary Repeater(s) are required when devices extend beyond the range of the Main Repeater
If a device does not respond as described, consult the troubleshooting section.
Main Repeater
Setup
WiredRF
Communication
Repeater Status1 3 42 M
Power Repeater LinkCO
M9 V
1
N / C
MU
X
MU
X
2 3 4
AddTest
USB
Integrate Program / Integrate
RS232 Ethernet
Main Repeater

www.lutron.com/radiora2 Lutron® | 11
creating the system
3. Add devices When a device has been successfully added, the Repeater will beep.
4. Exit Add Mode
Press and hold the Add button on any Repeater for 3 seconds until the Add LED begins to rapid-flash. After the LED turns off (can take up to 60 seconds), system has exited Add Mode.
Note: To remove an individual device from the system, consult the resetting devices to factory settings section.
Press and hold any button except raise/lower or Learn (press and release the OK button on a GRAFIK Eye® QS Wireless unit) for 3 seconds until all LEDs normal-flash. Devices with outputs (i.e. Dimmer) will turn the load on/off 3 times to indicate the device has been successfully added.
Press and hold any button for 3 seconds, until the green LED rapid-flashes for 2 seconds, then normal-flashes.
Press and hold the bottom button for 6 to 8 seconds.
Pico® Wireless Control
Check LED feedback on devices:• Slow-flash (3 seconds on, 1 second off)—device not added to system.• Normal-flash (once per second)—device is added to system.• No flash—device not communicating properly with Repeater. Consult
the troubleshooting section.
SivoiaR QS Wireless Shades/Draperies
Tabletop Keypads must be plugged in during set up and programming.
TriathalonR Shades
Press and hold the Shade button for 5 seconds until the green LED rapid-flashes for 2 seconds, then normal-flashes.
Wait up to 60 seconds until the Shade LED slow flashes before adding.
LUTRONLUTRON
LUTRONLUTRON
LUTRONLUTRON
LUTRONLUTRON

24/7 Technical Support—800.523.946612 | Lutron®
Keypad button LEDs can be configured to show the status of the lights or Shades/Draperies programmed to the Keypad button. They can be configured to provide Room Status (default) or Scene Status.
Room Status * Scene Status
Button LED is on when at least one of the devices assigned to the button is on at any level.
Button LED is only on when all of the devices assigned to the button are at exactly their programmed level.
ways to control the area ways to control the area
Individual device control - Control of a single Dimmer, Switch, or Shade/Drapery.Room monitoring - Allows a user to see if lights within a specific room are on or off.
Local scene - Preset scene for all lighting and shading within a room.Whole home scene - Illuminates part of or most of the home for a specific activity or mood.Path of light - Illuminates a convenient path of light to take the user from one location to the next.
common applications common applications
Bedside Keypad: Press the “Basement” button to verify the basement lights are off and the “Hall” button to make sure the hall light is left on at night.
Wall-Mount Keypad: Press the “Entertain” button to set the light levels in common areas of the home for entertaining guests.Bedside Keypad: Press the “Pathway” button to illuminate a soft path of light from the bedroom to the bathroom at night.
choosing room/scene buttons
Best Practice: The top button on a Keypad should create the brightest lighting scene – with each button below creating progressively lower light levels. The bottom button should be very low or off.
Best Practice: Use a consistent programming method on all of the Keypads.
* Shades / Draperies do not have an “off” state. Adding them to a Room Status button will result in unpredictable behavior. Use Scene Status buttons to control Shades / Draperies.

www.lutron.com/radiora2 Lutron® | 13
choosing room/scene buttons
button configuration
1. Enter Button Configuration
2. Configure each button as Scene or Room Status
Press and release desired button to toggle configuration between Scene and Room Status.
By default, all buttons are set to Room Status, indicated by the LEDs normal-flashing.
3. Exit Button Configuration
Press and hold the top 3 buttons of rightmost column (top 2 buttons on RRD-W2RLD Keypad and VCRX Keypad column) until all LEDs turn off (3 to 6 seconds).
LED StatusNormal-flash Room (default)On solid Scene
Press and hold the top 2 buttons for 6 seconds, until all LEDs turn on (solid or flashing).
RRD-W2RLD Keypads
Press and hold the top 2 buttons in the Keypad column for 3 seconds, until all LEDs turn on (solid or flashing).
VCRXOnly the “Keypad” column can be configured on the Receiver.
Press and hold the top 3 buttons in rightmost column for 3 seconds, until all LEDs turn on (solid or flashing).
All other Keypads* (including Hybrid Keypads) Tabletop Keypads
must be plugged in during set up and programming.
*Does not apply to Pico® Wireless Controls.

24/7 Technical Support—800.523.946614 | Lutron®
about programming
After all components have been added to the RadioRA® 2 system and all Keypad buttons have been configured as Scene or Room Status, program the Keypads so that each button controls a device (i.e. Dimmer, Switch, Shade/Drapery, etc.) or a group of devices. Programming a button consists of assigning devices to buttons and setting levels of those devices.
The VCRX can be programmed so that lights, garage doors, etc. can be activated by the VCTX buttons remotely or by contact closure inputs.
Pico® Wireless Controls and "Shade" Keypad columns are programmed as a column of buttons. Consult the programming Pico® wireless controls and programming keypad columns sections.
Tabletop Keypads must be plugged in during set up and programming.
Garage1 Home Away
Shade
Open
Close

www.lutron.com/radiora2 Lutron® | 15
programming buttons
1. Enter Program Mode
Press and hold the top and bottom buttons of the rightmost column (top 2 buttons on RRD-W2RLD Keypad and VCRX Keypad column) for 3 seconds until the top button LED begins to normal-flash.
2. Select the button to program
Press and release the button to be programmed.
Note: The top button in the column will be selected by default, indicated by the top button LED normal-flashing. To program a different button, press and release the desired button.
Note: Raise/lower buttons cannot be programmed.
Note: If the All On button on a Tabletop Keypad is selected, all the LEDs on the Tabletop Keypad will scroll up. If the All Off button is selected, all the LEDs will scroll down.
Note: The VCRX Keypad and Inputs buttons can be programed but the VCRX Security Input buttons can not be programmed in manually programmed systems.

24/7 Technical Support—800.523.946616 | Lutron®
Steps 3 to 7 cover assigning devices to the selected button and setting the levels for those devices. To assign the devices, follow the step appropriate to that device:
3. Assign Dimmer/Switch and set level
i. Press and hold the main button on the Dimmer/Switch to be assigned for 3 seconds.
When the Dimmer/Switch has been successfully assigned, the load connected to the Dimmer/Switch will turn on/off 3 times and the LED(s) will normal-flash.
Note: To unassign a Dimmer/Switch, press and hold the main button on the Dimmer/Switch for 3 seconds until the load turns on/off 3 times and the LED(s) turn off.
ii. Adjust the level of the assigned Dimmer/Switch to the desired setting using the raise/lower buttons on the Dimmer, or using the main button on the Dimmer/Switch to turn the device off.
Note: A Dimmer/Switch assigned to a Room Status Keypad button cannot be set to Off.
Note: To assign additional Dimmers/Switches to the currently selected Keypad button, repeat step 3.
Note: To program another Keypad button, restart at step 2.
programming buttons
Step 3
Step 7
Steps 5-6
Step 4
Hybrid
Step 7
LUTRON
LUTRON
LUTRON

www.lutron.com/radiora2 Lutron® | 17
4. Assign Hybrid Keypad and set level
i. Press and hold the raise and lower buttons on the Hybrid Keypad to be assigned for 3 seconds.
When the Hybrid Keypad has been successfully assigned, the load connected to the Hybrid Keypad will turn on/off 3 times and the LEDs will normal-flash.
Note: When a button on a Hybrid Keypad is assigned to the local load of that Hybrid Keypad, the LED of the button being programmed will flash 2 times followed by a single flash of all the LEDs.
Note: To unassign a Hybrid Keypad, press and hold the raise and lower buttons on the Hybrid Keypad for 3 seconds until the load turns on/off 3 times and the LEDs turn off.
ii. Adjust the level of the assigned Hybrid Keypad to the desired setting using the raise/lower buttons on the Hybrid Keypad. To toggle the Hybrid Keypad on/off, press and release the raise and lower buttons at the same time.
Note: A Hybrid Keypad assigned to a Room Status Keypad button cannot be set to Off.
Note: To assign additional Hybrid Keypads to the currently selected Keypad button, repeat step 4.
Note: To program another Keypad button, restart at step 2.
programming buttons

24/7 Technical Support—800.523.946618 | Lutron®
Individual zones and single scenes can be assigned to buttons on GRAFIK Eye® QS Wireless units, but not both to the same unit. Step 5 covers assigning zones to a button, and step 6 covers assigning a scene to a button. If assigning single scenes to buttons, skip ahead to step 6.
5. Assign individual zones to a GRAFIK Eye® QS Wireless unit and set levels
i. Simultaneously press the raise and lower buttons of the zone to be assigned.
When the zone has been successfully assigned, the zone LEDs will normal-flash.
Note: To unassign a zone, simultaneously press the raise and lower buttons until only the 3 middle LEDs are lit.
ii. Adjust the level of the assigned zone to the desired setting using the raise/lower buttons of the zone. While adjusting levels, the zone LEDs display the level and do not flash. Tapping another zone resumes flashing on the previous zone. After 3 seconds of inactivity, the assigned zone LEDs resume flashing.
Note: To assign additional zones to the currently selected Keypad button repeat step 5.
Note: To program another Keypad button, restart at step 2.
Note: If individual zones were assigned to a GRAFIK Eye® QS Wireless unit, skip step 6 for this GRAFIK Eye® QS Wireless unit. Individual zones and single scenes can not be assigned to the same GRAFIK Eye® QS Wireless unit.
programming buttons

www.lutron.com/radiora2 Lutron® | 19
6. Assign single scenes to a GRAFIK Eye® QS Wireless unit and set levels
Note: Both individual zones and single scenes can not be assigned to the same GRAFIK Eye® QS Wireless unit.
i. Press the OK button to enter the Scene menu.
ii. Use the Master raise/lower buttons to select the desired scene, then press the OK button to confirm the selection.
When the scene has been successfully assigned, all zone LEDs will flash at their scene preset levels and loads will go to the assigned scene.
Note: To assign additional scenes to the GRAFIK Eye® QS Wireless unit, repeat step 6.
Note: When a zone has a preset level of OFF, the zone LEDs will not flash.
Note: To change the GRAFIK Eye® QS Wireless unit back to individual zones, use the Master raise/lower buttons to select “Zones”, then press the OK button.
Note: Scenes can only be programed locally at the GRAFIK Eye® QS Wireless unit.
Note: To unassign a scene, press the OK button then use the Master raise/lower buttons to select “Unassign”, then press the OK button to complete the unassignment.
Note: To program another Keypad button, restart at step 2.
programming buttons

24/7 Technical Support—800.523.946620 | Lutron®
7. Assign Sivoia® QS Wireless Shade/Drapery and set level
A. Roller Shade/Drapery
i. Press and hold the open button ( ) or close button ( ) on the Electronic Drive Unit (EDU) to be assigned for 3 seconds.
When the Roller Shade/Drapery has been successfully assigned, the green LED on the EDU will rapid-flash.
Note: To unassign a Roller Shade/Drapery, press and hold the open or close button for 3 seconds. The LED on the EDU will flash twice in 2 seconds, then turn off for 8 seconds.
ii. Adjust the level of the assigned Roller Shade/Drapery to the desired setting using the raise/lower buttons ( and ). To raise the Roller Shade/Drapery to the fully open position, double-tap the open button ( ). To lower the Roller Shade/Drapery to the fully closed position, double-tap the close button ( ).
programming buttons

www.lutron.com/radiora2 Lutron® | 21
B. TriathalonR Shade
i. Press and release the TriathalonR Shade button.
When the TriathalonR Shade has been successfully assigned, the Shade LED will rapid-flash.
Note: To unassign a TriathalonR Shade, press and release the Shade button. The LED on the Shade will flash twice in 2 seconds, then turn off for 8 seconds.
ii. Adjust the level of the TriathalonR Shade. Levels of TriathalonR Shades cannot be set locally. To adjust the level of a Shade, skip ahead to step 8 (exit program mode) and refer to programming shortcuts.
Note: To assign additional Shades/Draperies to the currently selected Keypad button repeat step 7.
Note: To program another Keypad button, restart at step 2.
8. Exit Program Mode
Press and hold the top and bottom buttons of the rightmost column (top 2 buttons on RRD-W2RLD Keypad and VCRX Keypad column) for 3 seconds until all LEDs rapid-flash.
programming buttons

24/7 Technical Support—800.523.946622 | Lutron®
programming keypad columns
"Shade" Keypad columns are shipped pre-configured from Lutron, and typically have engraving for Shades/Draperies (i.e. open, preset, close). GRAFIK Eye® QS Wireless unit "Shade" columns are pre-configured as RadioRA® 2 "Shade" Keypad columns. Only Shades/Draperies can be programmed to "Shade" Keypad columns.
1. Enter Program Mode
Press and hold the top and bottom buttons of a "Shade" Keypad column for 3 seconds until the Repeater beeps.
Note: A Shade/Drapery already assigned to this Keypad column will close and the green LED on the EDU will rapid-flash. An unassigned Shade/Drapery will open and the green LED on the EDU will flash twice in 2 seconds, then turn off for 8 seconds.
2. Assign a Shade/Drapery
A A Shade/Drapery can be assigned either at a Keypad column or locally at the Shade/Drapery.
A. At the Keypad column:
i. Tap the Open button to wiggle the next Shade/Drapery or tap the Close button to wiggle the previous Shade/Drapery. The wiggling Shade/Drapery is the selected Shade/Drapery.
ii. Tap the Lower button to assign the selected Shade/Drapery. The Shade/Drapery will close and the green LED on the EDU will rapid-flash.
B. At the Shade/Drapery:
Tap any button on the Shade/Drapery. The Shade/Drapery will close and the LED will rapid-flash.
Tabletop Keypads must be plugged in during set up and programming.

www.lutron.com/radiora2 Lutron® | 23
3. Set presets for Shades/Draperies
i. Tap the preset button you wish to program. Assigned devices will go to their preset level and the selected preset button LED will turn on solid.
ii. Tap the Open button to wiggle the next Shade/Drapery or tap the Close button to wiggle the previous Shade/Drapery. The wiggling Shade/Drapery is the selected Shade/Drapery.
iii. Press the raise or lower button to adjust the level of the Shade/Drapery.
iv. Press and hold the preset button for 3 seconds until the LED rapid-flashes to save the level of the Shade/Drapery.
Note: To program another preset button, repeat step 3.
Note: If any other preset button is pressed while a preset button is selected, the currently selected preset will not be saved.
Note: To cancel preset save, tap the selected preset button.
4. Exit Program Mode
Press and hold the top and bottom buttons of the selected Keypad column for 3 seconds until the Repeater beeps.
programming keypad columns

24/7 Technical Support—800.523.946624 | Lutron®
programming Pico® wireless controls
Pico® Wireless Controls are available in “Light” and “Shade” versions. The “Light” version can control lighting and the “Shade” version can control Shades/Draperies. "Shade" versions are shipped pre-configured from Lutron, and typically have engraving for Shades/Draperies.
1. Enter Program Mode
Press and hold the top and bottom buttons of a Pico® Wireless Control for 3 seconds until the Repeater beeps.
Note: A Shade/Drapery already assigned to this Pico® Wireless Control will close and the green LED on the EDU will rapid-flash. An unassigned Shade/Drapery will open and the green LED on the EDU will flash twice in 2 seconds, then turn off for 8 seconds.
2. Assign Devices
A. Dimmer/Switch ("Light" version only)
Press and hold the main button on the Dimmer/Switch to be assigned for 3 seconds. When the Dimmer/Switch has been successfully assigned, the load connected to the Dimmer/Switch will turn on/off 3 times and the LED(s) will normal-flash.
Note: To unassign a Dimmer/Switch, press and hold the main button on the Dimmer/Switch for 3 seconds until the load turns on/off 3 times and the LED(s) turn off.
Note: Once all the desired Dimmers/Switches are assigned to the Pico® Wireless Control, skip ahead to step 4.
LUTRON
Shade
Open
Close

www.lutron.com/radiora2 Lutron® | 25
B. Shade/Drapery ("Shade" version only)
A Shade/Drapery can be assigned either at a Pico® Wireless Control or locally at the Shade/Drapery.
a. At the Pico® Wireless Control:
i. Tap the Open button to wiggle the next Shade/Drapery or tap the Close button to wiggle the previous Shade/Drapery. The wiggling Shade/Drapery is the selected Shade/Drapery.
ii. Tap the Lower button to assign the selected Shade/Drapery. The Shade/Drapery will close and the green LED on the EDU will rapid-flash.
b. At the Shade/Drapery:
Tap any button on the Shade/Drapery. The Shade/Drapery will close and the green LED will rapid-flash.
programming Pico® wireless controls
Shade
Open
Close
Shade
Open
Close

24/7 Technical Support—800.523.946626 | Lutron®
programming Pico® wireless controls
3. Set presets for Shades/Draperies i. Tap the preset button you wish to program.
Assigned devices will go to their preset level.
ii. Tap the Open button to wiggle the next Shade/Drapery or tap the Close button to wiggle the previous Shade/Drapery. The wiggling Shade/Drapery is the selected Shade/Drapery.
iii. Press the raise or lower button to adjust the level of the Shade/Drapery.
iv. Press and hold the preset button for 3 seconds to save the level of the Shade/Drapery.
Note: If any other preset button is pressed while a preset button is selected, the currently selected preset will not be saved.
Note: To cancel preset save, tap the selected preset button.
4. Exit Program Mode
Press and hold the top and bottom buttons of the selected Pico® Wireless Control for 3 seconds until the Repeater beeps.
Note: To program another Pico® Wireless Control, repeat steps 1 to 4.
Shade
Open
Close
Shade
Open
Close
Shade
Open
Close
Shade
Open
Close
Shade
Open
Close

www.lutron.com/radiora2 Lutron® | 27
programming shortcuts
saving new levels on previously programmed Keypad buttons
1. Select Keypad button
Press and release the Keypad button to be programmed. Assigned devices will go to their preset level.
2. Adjust levels
Use raise, lower, or tapswitch to adjust the level of assigned devices.
Note: To raise/lower a Wireless Shade, use a "Shade" Keypad that has been assigned to that Shade.
3. Save levels
Press and hold the previously selected Keypad button for 6 to 8 seconds.
LUTRON
Shade
Open
Close
Shade
Open
Close
Shade
Open
Close

24/7 Technical Support—800.523.946628 | Lutron®
programming shortcuts
copy button programming
Any previously programmed Keypad button in a Keypad column can be copied to another Keypad button. A Keypad button can be copied to a Keypad button on the same Keypad or to a Keypad button on a different Keypad. Buttons in a "Shade" Keypad column can not be copied.
Note: Prior to copying Keypad buttons, make sure to enter and exit Program Mode at least once on each Keypad that you will be copying to. See steps 1 and 7 of programming buttons.
1. Enter Program Mode on a previously programmed Keypad
Press and hold the top and bottom buttons of the rightmost column (top 2 buttons on RRD-W2RLD Keypad and VCRX Keypad column) for 3 seconds until the top button LED begins to normal-flash.
2. Press and release the previously programmed Keypad button to be copied
3. Paste programming to a new Keypad button
Press and hold the new Keypad button for 6 seconds until the new Keypad button LED rapid-flashes for 2 seconds.
After 2 seconds, the “pasted to” Keypad button LED will normal-flash. The “pasted to” Keypad is now in Program Mode and the “copied from” Keypad has exited Program Mode.
Note: To copy additional programming, repeat steps 2 to 3.
4. Exit Program Mode
Press and hold the top and bottom buttons of last Keypad "pasted to" for 3 seconds until all LEDs rapid-flash.

www.lutron.com/radiora2 Lutron® | 29
1. Enter Learn Mode
Press and hold the Learn button on a VCRX for 3 seconds until Learn LED turns on solid.
2. Learn a VCTX button to a VCRX
i. Press and release any button on the VCRX that is to Learn a VCTX button. The selected VCRX button LED will turn on solid.
Note: Security Mode (Full/Flash) not available in manual programming.
ii. Press and hold a VCTX button for 3 seconds until the LED next to selected VCRX button begins to rapid-flash, then release the VCTX button. The Learn LED will also rapid-flash while the VCTX button is pressed.
Note: To learn additional VCTX buttons, repeat step 2.
programming Visor Control Receiver

24/7 Technical Support—800.523.946630 | Lutron®
3. Exit Learn Mode
Press and release the Learn button on the VCRX until the Learn LED turns off.
Note: When the VCRX button has learned the VCTX button, the LED next to selected VCRX button will turn off when the VCTX button is released.
Note: To verify that the VCRX button has learned the VCTX button, press and release the VCTX button again. The LED next to the VCRX button will rapid-flash if the VCTX button was learned.
remove all VCTXs from the VCRX
To remove ALL VCTXs that have been learned to the VCRX, follow these steps:
i. Triple tap and hold the Learn button. DO NOT release the button after the third tap.
ii. Keep the button pressed on the third tap until the Learn LED starts to rapid-flash (approximately 3 seconds).
iii. Release the Learn button. Immediately (within 1/2 second) triple tap it again and release. The Learn LED will rapid-flash again. When the LED stops flashing, all VCTXs have been removed from the VCRX.
programming Visor Control Receiver
3X+
hold,then
3X

www.lutron.com/radiora2 Lutron® | 31
optional: configuring VCRX inputs
The VCRX input contact closures can be configured to accept maintained or momentary contact closures.
configure VCRX inputs
1. Enter Advanced Program Mode
Press and hold both buttons of the Inputs column for 10 seconds until the Inputs LEDs begin to rapid-flash.
2. Change the input closure type
Press and release an input button to change its type.LED status Input Closure TypeNormal-flash Momentary (default)On solid Maintained
3. Exit Advanced Program Mode
Press and hold both buttons of the Inputs column for 3 seconds until the Inputs LEDs begin to rapid-flash.
VCRXActivateSwitch
ReleaseSwitch
SwitchOpen
ActivateSwitch
ReleaseSwitch
SwitchOpen
Maintained (toggle action)
Open Close Open
Open Close Open
Momentary (single action)

24/7 Technical Support—800.523.946632 | Lutron®
optional: testing RF signal quality
Test Mode provides a method for identifying if system components are communicating properly. Use Test Mode to verify that all Repeaters (in systems with multiple Repeaters) and all devices are communicating effectively. An acceptable signal ensures error-free communication.
1. Enter Test Mode
Press and hold the Test button on any Repeater for 3 seconds until the Repeater beeps.
Setup
WiredRF
Communication
Repeater Status1 3 42 M
Power Repeater LinkCO
M9 V
1
N / C
MU
X
MU
X
2 3 4
AddTest
USB
Integrate Program / Integrate
RS232 Ethernet
Main Repeater
Setup
WiredRF
Communication
Repeater Status1 3 42 M
Power Repeater LinkCO
M9 V
1
N / C
MU
X
MU
X
2 3 4
AddTest
USB
Integrate Program / Integrate
RS232 Ethernet
Main Repeater

www.lutron.com/radiora2 Lutron® | 33
If a device does not respond as described, consult the troubleshooting section.
optional: testing RF signal quality
2. Verify Repeater location.
Confirm that all Repeaters on the RF link are within 60 ft (18 m) of another Repeater. Consult the installing repeaters section on page 7.
Check the Repeater Status LEDs to verify signal quality. Every Repeater will show the status of the Main Repeater and 4 Auxiliary Repeaters.
Repeater Status LED Feedback Action
Green or flashing* green
Repeater is within acceptable signal quality.
No action required.
Red or flashing* red
Repeater is unable to hear the other Repeaters or has unacceptable signal quality.
Ensure all Repeaters are powered. Locate the Repeater with the red flashing Repeater Status LED and reposition until the LED flashes green. Do NOT unplug Repeaters. Additional Repeaters may be needed to extend the RF coverage.
Off Repeater is not addressed to the system.
See adding Auxiliary Repeaters and devices on page 10.
* Only one Repeater Status LED flashes per Repeater. The flashing LED indicates which Repeater you are looking at (M, 1, 2, 3, 4).
3. Exit Test Mode
Press and hold the Test button on any Repeater for 3 seconds until the green Test LED stops flashing, and the Repeater Status LEDs turn off.
Setup
WiredRF
Communication
Repeater Status1 3 42 M
Power Repeater LinkCO
M9 V
1
N / C
MU
X
MU
X
2 3 4
AddTest
USB
Integrate Program / Integrate
RS232 Ethernet
Main Repeater

24/7 Technical Support—800.523.946634 | Lutron®
optional: setting shade/drapery limits
The upper and lower limits of a Shade/Drapery can be adjusted from any "Shade" Keypad or Wireless Control that has been assigned to it.
1. Enter Limit Set Mode
Press and hold the Open and Raise buttons on a "Shade" Keypad or Wireless Control for 3 seconds until the Shade/Drapery LED begins to rapid-flash, then stays on. The first Shade/Drapery assigned to the "Shade" Keypad or Wireless Control will begin to wiggle.
2. Select Shade/Drapery
Tap the Open button to wiggle the next Shade/Drapery or tap the Close button to wiggle the previous Shade/Drapery. The wiggling Shade/Drapery is the selected Shade/Drapery.
3. Adjust the limit
Press the Raise or Lower button to adjust the selected Shade/Drapery to the desired upper or lower limit.
4. Save the limit
Press and hold the Open or Close button for 5 seconds to save the current level of the Shade/Drapery as the upper (Open button) or lower (Close button) limit.
Note: To save another limit repeat steps 2 to 4.
Note: Pico® Wireless Controls automatically exit Limit Set Mode after a limit is saved. To save another limit, repeat steps 1 to 4.
5. Exit Limit Set Mode
Press and hold the Open and Raise buttons for 3 seconds until the Shade/Drapery LED turns off.
Note: Step 5 does not apply to Pico® Wireless Controls.
Tabletop Keypads must be plugged in during set up and programming.
Shade
Open
Close

www.lutron.com/radiora2 Lutron® | 35
resetting devices to factory settings
Resetting a device to factory settings will remove it from the system and will clear its programming. After being reset to factory settings, the device will need to be reprogrammed as part of a RadioRA® 2 system. To reset a device to factory settings, perform the steps below.
Dimmer, Switch, Keypad, Visor Control Receiver, Pico® Wireless Control, Triathalon® Shade, or Repeater
1. Triple tap and hold any button* on the device. DO NOT release the button after the third tap.
2. Keep the button pressed on the third tap until...
A. Dimmer: the Dimmer LEDs ramp up and down rapidly and the load flashes at the same rate.
B. Pico® Wireless Control: 6 to 8 seconds.
C. All other devices: the LED(s) start to rapid-flash (approximately 3 seconds).
3. Release the button and immediately (within 1/2 second) triple tap it again. Dimmers and Switches will normal-flash their loads. All other devices will rapid-flash their LED(s) again. When the load(s)/LED(s) stop flashing, the device has been reset to factory settings.
* Except raise, lower, or learn.
3X+
hold
3X
LUTRON
Setup
WiredRF
Communication
Repeater Status1 3 42 M
Power Repeater LinkCO
M9 V
1
N / C
MU
X
MU
X
2 3 4
AddTest
USB
Integrate Program / Integrate
RS232 Ethernet
Main Repeater
Shade
Open
Close

24/7 Technical Support—800.523.946636 | Lutron®
resetting devices to factory settings
Sivoia® QS wireless EDU
1. Press and hold the close limit button ( ) on the EDU for 5 seconds. The green LED on the EDU will flash quickly for 2 seconds and then stay on.
2. Press and hold the open limit button ( ) for 5 seconds. The green LED on the EDU will flash and then stay on.
3. Press and hold the clockwise button ( ) for 5 seconds. The green LED on the EDU will flash and then stay on.
4. Press and hold the counter-clockwise button ( ) for 5 seconds. The LED will flash blue briefly and the EDU will now reset to factory settings.
Note: If the time between steps exceeds 1 minute the EDU will return to normal operation. Begin at step 1 to reset the EDU to factory settings.
GRAFIK Eye® QS Wireless control unit
1. Press and hold the master lower and scenes 1, 3, and 5 buttons on the GRAFIK EyeR QS Wireless control unit for 5 seconds until the display reads “Erase Database?”.
2. Press the OK button to confirm. The GRAFIK EyeR QS Wireless control unit will now reset to factory settings.

www.lutron.com/radiora2 Lutron® | 37
repeater troubleshooting
Symptom Possible Cause Remedy
Cre
atin
g t
he S
yste
mAfter entering Add Mode, the Add LED on a Main or Auxiliary Repeater is:
Rapid-flashing green (10 times per second)
Entering Add Mode. Repeater is listening for neighboring systems within RF range.
This is normal. Wait 10 seconds for the LED to begin normal-flashing.
Normal-flashing green (1 time per second)
Repeater is addressed with acceptable signal quality.
Move on to the next device or exit Add Mode if finished.
Rapid-flashing red for 5 seconds, then turns off
Repeater has been addressed, but with unacceptable signal quality.
Optimize system communications by following the steps in testing RF signal quality.
System has encountered a neighboring system within RF communication range that is in Add mode.
Discontinue activating RadioRA® 2 system until activation of the neighboring system is complete.
System has been programmed using the RadioRAR 2 Design and Setup PC tool, and cannot enter Add Mode manually.
System must be programmed using the RadioRAR 2 Design and Setup PC tool.
Main Repeater is out of RF range or is not powered.
Move the Main Repeater within RF range. Additional Repeaters may be needed to provide adequate coverage.
Main Repeater only: Solid red for 5 seconds, then turns off
System has been programmed using the RadioRAR 2 Design and Setup PC tool, and cannot enter Add Mode manually.
System must be programmed using the RadioRAR 2 Design and Setup PC tool.
Main Repeater only: Repeater Status LEDs (M, 1, 2, 3, 4) solid red (not flashing)
Main Repeater is in Safe Mode.
Cycle power to the Main Repeater.

24/7 Technical Support—800.523.946638 | Lutron®
device troubleshooting
Symptom Possible Cause RemedyC
reat
ing
the
Sys
tem
After attempting to add a device, the Repeaters beep 3 times.
The system is out of device addresses.
If the system has less than the maximum number of devices, use the RadioRA® 2 Design and Setup PC Tool to recover missing device addresses.
While attempting to add a Keypad, the Keypad LEDs rapid-flash for approximately 5 seconds then go out.
Keypad is out of RF range of the closest Repeater.
Move a Repeater closer to the device in question. Additional Repeaters may be needed to provide adequate coverage.
System not in Add Mode.
Place system in Add Mode.
While attempting to add a device, the LEDs do not slow flash.
Device is out of RF range of the closest Repeater.
Move a Repeater closer to the device in question. Additional Repeaters may be needed to provide adequate coverage.
Device may be part of another system.
If the device should be in this system, reset the device to factory settings. Follow the steps in resetting devices to factory settings.
TriathalonR Shades only: It may take up to 60 seconds before a TriathalonR Shade LED begins to flash.
Wait up to 60 seconds until the Shade LED slow flashes before adding.

www.lutron.com/radiora2 Lutron® | 39
Symptom Possible Cause RemedyP
rog
ram
min
g B
utto
nsAfter entering Program Mode, LEDs on a Keypad, Dimmer/Switch, or other device are not normal-flashing.
Device has not been assigned to a button.
Assign the device to a button following the instructions starting at step 2 in programming buttons.
When attempting to assign a Dimmer/Switch to a Keypad button, the load connected to the Dimmer/Switch does not turn on/off 3 times and the LED(s) do not normal-flash.
Dimmer/Switch has not been added to the system.
Add the Dimmer/Switch to the system following the steps in adding auxiliary repeaters and devices.
Pro
gra
mm
ing
VC
RX After entering Program
Mode, LEDs on a VCRX, Dimmer/Switch, or other device are not normal-flashing.
Device has not been assigned to a VCRX button.
Assign the device to a VCRX button following the instructions starting at step 2 in programming buttons.
device troubleshooting

Worldwide Technical and Sales Assistance
If you have questions concerning the installation or operation of this product, visit us on the web at www.lutron.com/radiora2 or call the Lutron Technical Support Center.
Please provide the exact model number when calling.Model number can be found on the product packaging.Example: RRD-6CL
U.S.A., Canada, and the Caribbean: 800.523.9466Mexico: +1.888.235.2910Other countries: +1.610.282.3800
Lutron, RadioRA, Sivoia, GRAFIK Eye, seeTouch, Pico, Triathalon, Softwitch, and are registered trademarks and RadioRA 2 is a trademark of Lutron Electronics Co., Inc.
Lutron Electronics Co., Inc.7200 Suter RoadCoopersburg, PA 18036
P/N 044331Rev. A
© 12/2013 Lutron Electronics Co., Inc.

Maintaining Painted Surfaces
Even though properly applied, high-quality paint will protect and beautify your home for years; paint has a number of enemies that can spoil both its appearance and its longevity. Like any aspect of home improvement, painted surfaces need periodic attention and maintenance. You should check painted surfaces twice a year so you catch problems early and thus minimize paint failures. In addition to assessing and treating dirt, chalking, mildew, and efflorescence, look for cracking or checking, blistering, peeling, serious fading, loss of gloss, and signs of rusting -- and treat these conditions immediately.
2liminating mold and mildew For all their protective qualities, all paints, especially flat paints, oil-base paints, and economy formulations, can provide a great growth medium for mold and mildew. These fungi love damp and shaded conditions, so on the exterior, check northern exposures thoroughly. On the inside, check laundry rooms, bathrooms, and basements. Wherever you find these conditions, household bleach is the solution. Protect plantings, grass, and interior floors with plastic and scrub the affected paint with a 3-to-1 water-bleach mix and a stiff scrub brush. Work the solution into the surface 1 foot beyond the affected area and let it set for 20 minutes, keeping it wet as it sits. Then rinse the area thoroughly. Dealing with dirt Most dirt on exterior paints is airborne and can be removed with a pressure washer as shown below. Dirt on interior paint is usually in the form of handprints around switches and knobs; splashes in kitchen and bathrooms; marks on hallways and corridors; or "soot" above lamps and other heat sources. Removing dirt before it accumulates not only keeps the paint looking tidy, it prohibits dirt from permanently embedding itself in the paint film. Check for dirt and assume you'll find it near cooking areas and at all places at hand height. Always begin cleaning with a mild detergent and a sponge or soft cloth and work up to harsher cleaners only when necessary. Alkaline cleaners can dull the sheen of glossy paints. Abrasive cleaners will burnish nearly any paint, and will dull the gloss of satin, semigloss, and gloss products. Rinse the surfaces thoroughly to keep residual cleaner from interfering with the adhesion of new paint. Touchy touch-ups Just when you've finished artfully touching up a damaged surface, and after the paint has dried, you take another look at your handiwork only to find that the area you've touched up looks glaringly different from the rest of the wall. Touch-ups can look lighter or darker than the original color, they can have a different sheen, and they can stick out from the surface, depending on how much paint you apply. To minimize these effects2
Apply an appropriate primer, especially if you have removed some paint from the area. Tint your touch-up paint -- this may mean taking a chip of the old paint to your supplier to match a faded color. When spraying, backroll the final coat to create a less uniform surface that will hide later touch-ups more easily. Apply the touch-up paint in a thin coat with a foam brush. Dab the brush to mimic the texture of the rolled
surface.
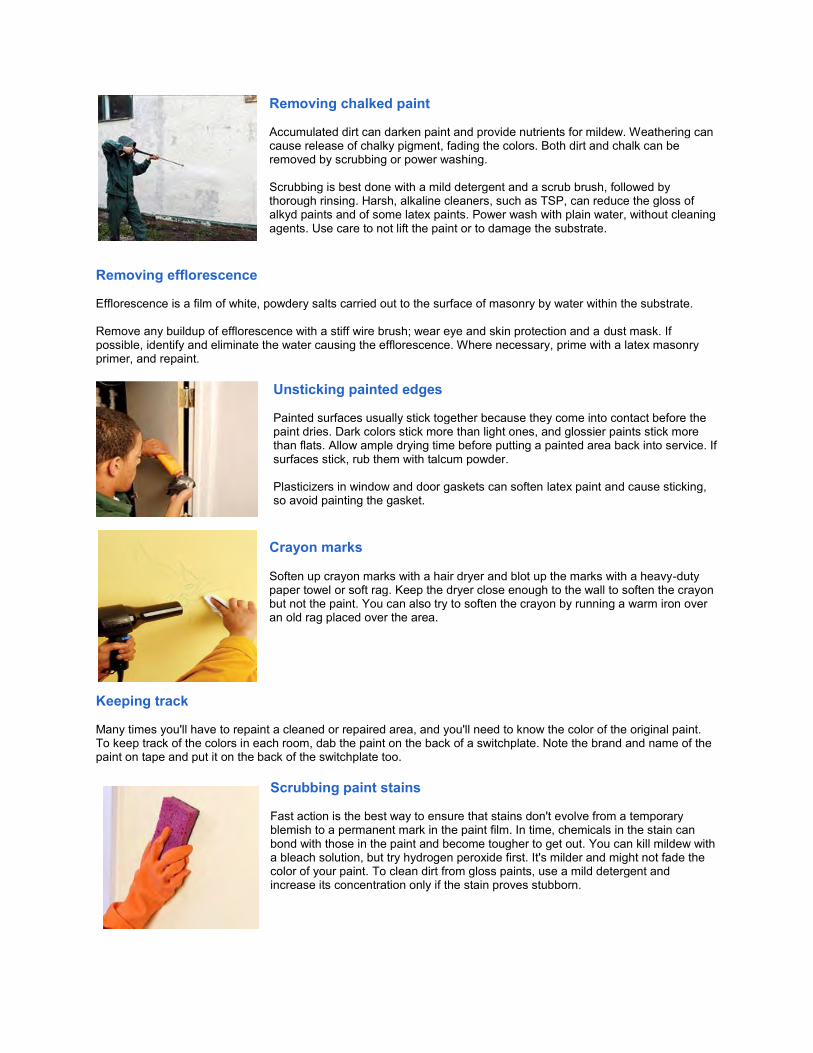
Removing chalked paint
Accumulated dirt can darken paint and provide nutrients for mildew. Weathering can cause release of chalky pigment, fading the colors. Both dirt and chalk can be removed by scrubbing or power washing. Scrubbing is best done with a mild detergent and a scrub brush, followed by thorough rinsing. Harsh, alkaline cleaners, such as TSP, can reduce the gloss of alkyd paints and of some latex paints. Power wash with plain water, without cleaning agents. Use care to not lift the paint or to damage the substrate.
Removing efflorescence
Efflorescence is a film of white, powdery salts carried out to the surface of masonry by water within the substrate. Remove any buildup of efflorescence with a stiff wire brush; wear eye and skin protection and a dust mask. If possible, identify and eliminate the water causing the efflorescence. Where necessary, prime with a latex masonry primer, and repaint.
Unsticking painted edges
Painted surfaces usually stick together because they come into contact before the paint dries. Dark colors stick more than light ones, and glossier paints stick more than flats. Allow ample drying time before putting a painted area back into service. If surfaces stick, rub them with talcum powder. Plasticizers in window and door gaskets can soften latex paint and cause sticking, so avoid painting the gasket.
Crayon marks Soften up crayon marks with a hair dryer and blot up the marks with a heavy-duty paper towel or soft rag. Keep the dryer close enough to the wall to soften the crayon but not the paint. You can also try to soften the crayon by running a warm iron over an old rag placed over the area.
Keeping track
Many times you'll have to repaint a cleaned or repaired area, and you'll need to know the color of the original paint. To keep track of the colors in each room, dab the paint on the back of a switchplate. Note the brand and name of the paint on tape and put it on the back of the switchplate too.
Scrubbing paint stains
Fast action is the best way to ensure that stains don't evolve from a temporary blemish to a permanent mark in the paint film. In time, chemicals in the stain can bond with those in the paint and become tougher to get out. You can kill mildew with a bleach solution, but try hydrogen peroxide first. It's milder and might not fade the color of your paint. To clean dirt from gloss paints, use a mild detergent and increase its concentration only if the stain proves stubborn.

How to care for your window film Film dry-out time: During the film installation, your Dealer/Installer will remove as much of the installation fluid as possible, but a small amount will still remain. This may result in small water bubbles appearing and/ or a slightly cloudy view. This is normal and should be expected. Do not pierce the water bubbles during this drying period. This damage to the window film will not be covered by the warranty. The water bubbles and cloudy view will disappear over time. Film type and climate conditions will determine the drying time you experience. Warm weather and direct sunlight will shorten the drying time, while cooler climates, cloudy conditions and thicker films may prolong it. If slow drying does occur, do not become alarmed. The film will dry-out. Do not clean the film for 30 days after installation Window film care and maintenance: To maximize the life of the window film, please follow these instructions for proper care and maintenance. Cleaning instructions:
• Always use fresh clean soft materials to wash and dry your window film surfaces. • A good cleaning solution for window film is 1/2 ounce of liquid dish soap added to 1 quart of fresh water.
(Avoid cleaners such as Windex, vinegar, lemon cleaners) • A soft cloth or a clean synthetic sponge is recommended for washing the window film followed by another
clean soft cloth or soft rubber squeegee for drying. • To avoid scratching the film, do not use bristle brushes, abrasive scrubbing sponges, or any cleaning
materials that may have been contaminated with dirt particles, as is commonly the case when washing interior and exterior windows with the same cleaning materials.
• Some brands of paper towels are coarse enough to put fine scratches in the film, even films with scratch resistant, protective hard coat finish. While these scratches may be too thin to be seen at the beginning, they can damage the polished look of the film over time.
STOP! Before you call to report a problem – please review the below
Visual Inspection of window film: no installation will be debris free when dust and air borne particles are present. Majority of all inquires we receive after install report bubbling, streaks, lines, spots, water pockets – all real things you may legitimately see BUT 99% of all the reports we receive end up working themselves our within the first 7 days cure out after install. If after 7 days you still find issues with your window film install, please contact your sales rep. directly.

HARD SURFACE WARRANTIES, CARE & MAINTENANCE
HARDWOOD
shawfloors.com

1

Shaw represents a promise of outstanding performance, unique styling and
overall value. For more than 50 years, consumers just like you have trusted Shaw
products to stand up to their busy lifestyles.
This brochure was designed to help you better understand the warranties that
come with your new hard surface product. In addition, each category supplies
care and maintenance guidelines.
CONTENTS
2
HARDWOOD
Overview 3
Care & Maintenance 3
Radiant Heat Guidelines 4
Warranty 4

SHAW HARDWOOD PRODUCTSThe true essence of the American home is captured in the time-honored choice of quality hardwood flooring. While jobsite-finished floors may be beautiful for a while, they cannot compare to the distinctive and inherently stronger wood floors made by Shaw Industries Group, Inc. (Shaw).
Shaw not only produces more durable floors, but we also offer comprehensive warranties. These products and limited warranties allow you to choose the floor that is right for you, your lifestyle, and your budget. While a quality product and warranty are extremely important, proper installation and maintenance of your new Shaw hardwood floor is also essential to ensure years of enjoyment.
ENVIRONMENTAL COMMITMENT AND RENEWABLE RESOURCESShaw takes the environment seriously and supports the best management practices for timber harvesting. Our environmental goals include: wildlife preservation, forest regeneration, limiting soil erosion, and making the most efficient use of all our raw materials.
HARDWOOD FLOOR CARE AND MAINTENANCELike any floor covering, our factory finished wood floors will show signs of wear over time, depending on the size and lifestyle of your family. By observing a few precautions and setting up a regular cleaning routine and maintenance program, you can expect years of beauty from your Shaw floor. The following are examples of the reasonable and necessary maintenance you are expected to perform. They are not intended to be an exclusive list.
1. Sweep or vacuum regularly since built-up grit can damage the surface of the wood. The vacuum head must be a brush or felt type. Be certain the wheels of the vacuum are clean and do not damage the finish. Do not use a vacuum with a beater bar head.
2. Remove spills promptly using a soft cloth and cleaning products recommended by Shaw.
3. Never wet-mop, damp-mop, or clean your floor with water or other products. This can severely damage the flooring, and damage resulting from these actions may not be covered under warranty. Do not use hardwood floor cleaning machines or steam cleaners. See warranty exclusions under Improper Maintenance.
4. Shaw recommends Shaw R2X® Hard Surfaces Flooring Cleaner applied with a terry cloth mop. Always vacuum the floors prior to using R2X. Do not allow excess cleaner to remain on the floor’s surface as this may permanently damage the wood fiber.
5. Important: Do not use oil soaps, liquid or paste wax products, or other household cleaners that contain citrus oils, lemon oil, tung oil, silicon, or ammonia since these warranties do not cover damage caused by non-recommended products. Use of these and other such products will harm the long-term performance of your floor and may also affect its re-coat ability.
6. Do not use 2-in-1 cleaners with polish that may contain acrylics or urethane polish to restore gloss — damage resulting from the use of these products may not be covered under warranty and may produce unsatisfactory results when not applied properly.
7. Keep pets’ nails trimmed and paws clean and free of dirt, gravel, grease, oil, and stains.
8. Place protective felt pads beneath furniture legs and feet to reduce scratches and dents. Replace pads as needed.
9. Use a dolly and protective sheets of plywood when moving heavy objects, furniture, or appliances.
10. Make certain furniture casters are clean and operate properly (a minimum 1"-wide vinyl surface where it comes in contact with wood is recommended). Clean wheels periodically to remove dirt and debris.
11. Remove shoes with spiked or damaged heels before walking on floor.
12. Exposure to the sun and its UV rays accelerates the oxidation and aging of wood. This can cause the wood stain and/or wood to fade and/or to change color. We recommend that you rearrange rugs and furniture periodically so the floor ages evenly. Exotic species such as Brazilian Cherry are more susceptible to color
HARDWOOD
3 BACK TO CONTENTS

change during the aging process. These warranties do not cover damage from the sun and its UV rays.
13. Use area rugs in high-traffic areas and pivot points (e.g., stair landings, room entries, etc.), especially if you have a large family or indoor pets.
14. Maintain the proper relative humidity in your home between 35% – 55%.
RADIANT HEAT GUIDELINESSelected Shaw engineered hardwood products are approved over radiant-heated subfloors provided that the floors are installed in strict accordance with the Shaw installation guidelines pertaining to radiant-heated subfloors. The products approved for use over radiant heat MUST be designated as radiant-heat approved with the radiant heat logo on the actual Shaw sample board. Products without this logo are NOT recommended for use over radiant heat and are NOT warranted for this application.
The following guidelines must be applied throughout the life of the floor in order to reduce the affects of radiant heat on engineered wood floors. Even when these guidelines are followed it is still possible that your flooring may experience some cracks (seasonal checking) on the surface, gapping between boards, or delamination of boards. The approved engineered products can only be installed over radiant-heated subfloors using the installation methods approved by Shaw. The temperature and humidity levels described below must be maintained; otherwise, any damage resulting from such failure to maintain may not be covered under warranty. After the flooring is installed, slowly raise the temperature to the preferred comfort level (over at least a 5-day time frame), beginning two days after installation or at the onset of colder weather conditions.
• The radiant heat system must be controlled and the surface temperature of the flooring must never be allowed to exceed 82°F.
• The proper humidity level (35% – 55%) must be maintained within your home at all times during the year. Use of a humidification system may be required to maintain proper humidity levels to avoid excessive drying of the wood flooring.
• Seasonal gapping should be expected.
• Surface checking can be expected if the humidity level is not properly maintained between 35 – 55% R. H. or if the floor’s surface temperature exceeds 82°.
HARDWOOD LIMITED RESIDENTIAL WARRANTIESThese warranties, which begin from the date of purchase, apply to products used in dry residential applications. Lifetime warranties apply for as long as the original purchaser owns and resides in the home where the product was installed.
Limited lifetime structural warranty
Shaw warrants all first-quality engineered hardwood floors, in their manufactured condition, to be free from defect in material and workmanship including milling, assembly, dimension, and grading. Shaw additionally warrants that these engineered hardwood floors will not delaminate when properly installed and maintained according to Shaw’s installation and maintenance procedures.
What Shaw will do
In the event that the plies should delaminate due to glue bond failure, Shaw will, at our option, either: (1) repair the defective plank(s), (2) replace the defective plank(s). This warranty is a limited lifetime warranty for all first-quality Shaw engineered products. Solid products are excluded.
Limited warranty for residential finish wear
Our factory-applied finishes make hardwood floor installations fast and easy. Every plank is ready to install right out of the carton. There is no need for sanding or staining. With our UV-cured finish you gain the assurance of superior durability and wear resistance. Shaw will warrant, under normal residential conditions and uses, and providing that Shaw’s maintenance guidelines are strictly followed, that the finish will not wear through or peel off of the hardwood flooring during the length of the warranty (i.e., 3 years, 25 years, lifetime, etc.) of the product you purchase. Consult your retail sales person or the Shaw Information Center 800-441-7429 if you have questions about the length of your warranty.
HARDWOOD
4BACK TO CONTENTS

What Shaw will do
In the event that the finish wears through or peels off of the hardwood flooring, Shaw will, at our option, either: (1) replace the affected plank(s), (2) recoat the affected area.
NOTE: This limited warranty extends only for defects that cover at least 10% of the surface area of the installed flooring. Gloss reduction, scratches, and dents in the finish are not considered surface wear and are not covered under this warranty. Please note that maple, pine, and birch floors require extra care. Maple and birch are inherently smooth wood and will show scratches and dents more readily than oak or pecan. You should consider these factors when making your flooring selection.
SPECIAL NOTE: WARRANTY LIMITATIONS (APPLIES TO ALL WARRANTIES UNDER WHICH SHAW IS OR MAY BE OBLIGATED). Shaw products are not warranted against squeaking, popping, or crackling. Some squeaking, popping, or crackling is possible when using staple-down or nail-down installation methods. In addition, Shaw floors are not warranted against staple or nail pullout from the subfloor.
Who is covered under these limited warranties
These limited warranties apply to you only if you: (1) are the original consumer purchaser of any Shaw hardwood floor, (2) have paid in full for your hardwood floor, and (3) have purchased the hardwood floor for your own personal residential use and not for resale. These warranties ARE NOT transferable or assignable and they DO NOT apply to nonresidential, rental, or commercial purchases/installations.
Warranty Process
Product determined to have any possible defect by the person doing the installation should be returned to your dealer for inspection and possible replacement PRIOR TO INSTALLATION. All questions of product quality are to be addressed prior to installation.
What you should do if any of the above listed problems occur and you need warranty service:
During the warranty period, should you have any problems with your Shaw floor, please contact the
authorized Shaw dealer who sold the product within 30 days from the date the problem occurs. NOTE that these dealers are not authorized to make any decisions regarding warranty coverage or any remedies thereunder; they are merely the means through which you should report any problems to Shaw. NOTE ALSO that Shaw must be given a reasonable opportunity to inspect the floor prior to the determination of any coverage or remedy issue, which should be no less than thirty (30) days after you report the problem.
Labor charges
If your floor was professionally installed, Shaw will pay the reasonable labor costs to perform the replacement or repair during the first five (5) years from the date of the original purchase.
Replacement option
In the event that the style installed in the home is no longer available, Shaw will authorize your dealer to replace the affected floor with another style of equal value. The above described remedy is the purchaser’s sole and exclusive remedy for claim under this limited warranty.
Shaw’s Curative Actions/Remedies
THE ABOVE TERMS AND CONDITIONS OF EACH LIMITED WARRANTY ARE THE SOLE AND EXCLUSIVE REMEDIES AVAILABLE FOR THESE WARRANTIES. IF YOU ARE FOUND TO BE ENTITLED TO COVERAGE UNDER ANY WARRANTY, EXPRESSED OR IMPLIED, IN ADDITION TO THOSE SPECIFICALLY LISTED ABOVE, AND YOU CAN PROVE THAT SHAW BREACHED SUCH WARRANTY, THEN YOUR SOLE AND EXCLUSIVE REMEDY FOR ANY PROVEN BREACH IS EITHER (AT THE OPTION OF SHAW): (1) REPAIR THE DEFECTIVE PLANK(S), (2) REPLACEMENT OF THE DEFECTIVE PLANK(S). IF THE REMEDY SHAW INITIALLY SELECTS IS FOUND TO FAIL IN ITS ESSENTIAL PURPOSE, THEN ANY FURTHER REMEDY TO WHICH YOU MAY BE ENTITLED IS SOLEY AND EXCLUSIVELY LIMITED TO ONE OF THE REMAINING REMEDIES (OF THE TWO OPTIONS, DESCRIBED ABOVE IN THE LIMITED WARRANTIES), WHICH SHALL BE CHOSEN BY SHAW.
Warranty Exclusions
Natural variations: Wood is a natural product containing natural variations in color, tone, and graining.
HARDWOOD
5 BACK TO CONTENTS

Shaw cannot warrant against natural variations in color or any other variations, such as mineral streaks, small knots, and grain variations from plank to plank. Nor can we warrant against natural variations or gloss level between samples/models and installed flooring. Any sample or model shown or used by your seller is for demonstrative purposes only, and such sample or model DOES NOT create a warranty of any kind that the goods you purchased shall conform thereto. Any warranties based on any such sample or models are specifically disclaimed.
Improper installation: The floor must be installed according to Shaw’s installation guidelines. Detailed installation instructions are included in cartons of Shaw hardwood flooring. Damage caused by improper storage, handling, or installation methods is not covered by these warranties. Improper preparation of, or deficiencies in, the subfloor/floor joist assembly, including but not limited to excessive floor deflection, uneven or irregular subfloor surface (particularly at joints) or voids in the subfloor, are not covered under these warranties. Check to be certain that the subfloor is within structural and manufacturing requirements. Defects or failures of other manufacturers’ products at the subfloor assembly, including but not limited to subfloor material, fasteners, patching compound, adhesives, and other floor coverings are not covered by these limited warranties. In no event shall Shaw be held responsible for any damage caused to your hardwood flooring by other manufacturers’ products. Other items not covered under the limited warranties include construction traffic abuse to the surface of the flooring; use of non-recommended nailers, staplers, or adhesives; end gapping due to mastic memory or improper seating of planks during installation; squeaking, popping, or crackling by any cause. (Popping sounds caused by depressions in the subfloor ARE NOT covered under these limited warranties.) Cabinets and other built-in appliances should be installed PRIOR to the installation of the hardwood flooring. They should NOT be installed on top of the hardwood flooring. Pre-finished hardwood floors should be installed at the same time as carpets and AFTER finishing the walls to prevent damage from paint, drywall dust, wallpaper adhesives, and other materials.
Improper maintenance: Floor maintenance must follow the recommendations outlined in this guide. Damage to the flooring such as dents, scratches, or dulling
of the finish is NOT covered. Wet or damp-mopping your floor with water or other substances is not covered by these limited warranties. In addition, the following are NOT covered under these limited warranties: use of hard floor cleaning machines; use of non-recommended maintenance and floor-care products, including but not limited to oil soaps, liquid, or paste wax products, other household cleaners that contain lemon, orange, or tung oils; neglect or abuse of the hardwood floor, including but not limited to not taking proper precautions to protect furniture legs and feet with protective pads to reduce scratches and dents; not using dollies and protective plywood when moving heavy objects; furniture or appliances having dirty or improperly operating casters; spiked and/or damaged heels; pet claws and scratches; falling or dropped objects which can dent or fracture the flooring and finish; and dents or scratches in the flooring caused by furniture, appliances, casters, or normal foot traffic.
Improper environment: Shaw floors are not warranted against damage caused by man-made or natural disasters, including but not limited to leaking or broken plumbing, landscape watering/irrigation, fire, flood, earthquake, insect infestation, or standing water during or after construction. Shaw also does not warrant against: (1) moisture infiltration from side walls, through the subfloor, or from any source; (2) normal wearing of the finish in high-traffic areas, pivot points, and seating areas; or (3) other extraordinary circumstances such as extreme low humidity (below 35% for an extended period of time). In extreme low humidity conditions (below 35%), planks may shrink and/or exhibit surface checking until the humidity returns to a normal level.
Seasonal Checking: Cracks or checks in the surface of planks due to low humidity, excessively high humidity, or dramatic fluctuations in humidity are inherent in all wood products and may affect your floor’s finish. Checking is not covered under these limited warranties. The use of a humidifier/dehumidifier may be necessary to maintain the proper humidity level between 35%-55%. Shaw research and experience show that some species such as hickory or pecan are more susceptible to this phenomenon than others and are not recommended in certain regions without the use of a humidification system.
HARDWOOD
6BACK TO CONTENTS

Recoating and finish alterations: Alterations to the finish or non- factory- applied finishes (finishes applied by the owner or installer), including but not limited to refinishing or recoating, are NOT part of the limited warranty for residential finish wear stated above and therefore are NOT warranted by Shaw.
Natural Sunlight: The sun and its UV rays cause the aging of wood and therefore can cause the wood stain and/or wood to fade and/or change color. This includes any showroom sample/models; therefore, fading or discoloration due to exposure to sunlight and its UV rays are not covered by these warranties. Use draperies or shades to help block out most of the sun’s harmful rays. Samples or models in the showroom may also fade, making an exact match to new flooring impossible. Custom finishing and staining of interior millwork and/or cabinets should be done from the actual floor to be installed, not a showroom sample, if a color and/or gloss match is desired.
Special series, cabin grade, and non-standard items: These products carry a one-year limited warranty for residential finish wear only, and engineered products carry a one-year limited structural warranty when installed in a residential installation only. NOTE: All warranty exclusions, disclaimers, and limitations, including the available remedies, stated throughout this booklet apply to special series, cabin grade, or non-standard items.
Warranty Disclaimers
ANY WARRANTIES ARISING OUT OF THIS SALE IN ADDITION TO THE ABOVE LIMITED WARRANTIES, INCLUDING BUT NOT LIMITED TO THE IMPLIED WARRANTIES OF MERCHANTABILITY AND FITNESS FOR A PARTICULAR PURPOSE, ARE LIMITED IN DURATION TO THE LIMITED WARRANTY FOR RESIDENTIAL FINISH WEAR DESCRIBED ABOVE. SHAW SHALL NOT BE LIABLE FOR LOSS OF USE OR ANY OTHER INCIDENTAL OR CONSEQUENTIAL COSTS, EXPENSES OR DAMAGES INCURRED BY THE PURCHASER OR BY ANY OTHER PERSON. THE REMEDIES
AS DESCRIBED IN THESE WARRANTIES ARE THE SOLE AND EXCLUSIVE REMEDIES AVAILABLE TO YOU FOR ANY BREACH BY SHAW OF THE EXPRESSED AND IMPLIED WARRANTIES ARISING FROM THIS SALE. THESE WARRANTIES EXCLUDE CONSEQUENTIAL AND INCIDENTAL DAMAGES, INCLUDING BUT NOT LIMITED TO REMOVAL OR DAMAGE TO MOLDINGS, CABINETS, BUILT-IN APPLIANCES, CARPETING, DRYWALL, WALLPAPER, PAINT, AND ALL RELOCATION COSTS ASSOCIATED WITH ANY REPAIR OR REPLACEMENT OF THE FLOORING. YOU UNDERSTAND AND AGREE THAT ALL INCIDENTAL AND CONSEQUENTIAL DAMAGES ARE SOLELY YOUR RESPONSIBILITY AND ARE EXCLUDED AS A POTENTIAL REMEDY FOR ANY BREACH BY SHAW OF THE EXPRESSED AND IMPLIED WARRANTIES ARISING FROM THIS SALE. SOME STATES DO NOT ALLOW LIMITATIONS ON THE AVAILABLE REMEDIES, OR THE LENGTH OF AN IMPLIED WARRANTY OR THE EXCLUSION OR LIMITATION OF INCIDENTAL OR CONSEQUENTIAL DAMAGES, SO THE ABOVE LIMITATIONS MAY NOT APPLY TO YOU. THESE WARRANTIES GIVE YOU SPECIFIC LEGAL RIGHTS, AND YOU MAY HAVE OTHER RIGHTS THAT VARY FROM STATE TO STATE. UNLESS A STATEMENT MADE IN THIS DOCUMENT IS SPECIFICALLY IDENTIFIED AS A WARRANTY, ANY OTHER STATEMENTS MADE HEREIN, OR BY YOUR SELLER, ARE NOT WARRANTIES AND ARE NOT A PART OF THE BASIS OF THE BARGAIN FOR THE SALE OF THE HARDWOOD FLOORS. ANY AND ALL WARRANTIES, EXCEPT THOSE LIMITED WARRANTIES PROVIDED HE REIN, ARE SPECIFICALLY DISCLAIMED AND EXCLUDED. THIS AGREEMENT SHALL BE GOVERNED BY AND CONSTRUED IN ACCORDANCE WITH THE LAWS OF THE STATE OF GEORGIA AND ANY APPLICABLE FEDERAL LAWS OF THE UNITED STATES OF AMERICA. ANY ACTION BROUGHT SEEKING THE RESOLUTION OF ANY CONTROVERSY ARISING OUT OF OR RELATING TO ANY WARRANTIES REFERENCED HEREIN SHALL BE BROUGHT IN THE COURTS OF THE STATE OF GEORGIA OR IN THE UNITED STATES DISTRICT COURT FOR THE NORTHERN DISTRICT OF GEORGIA.
HARDWOOD
7 BACK TO CONTENTS

shawfloors.comBACK TO CONTENTS
WARRANTY SERVICEThe Shaw Information Center provides information about proper installation and maintenance of your Shaw hard surface product. Much of this information is included in this booklet. If you have
other questions, please feel free to write or call us.
If you think that there is a defect in your hard surface product that is covered by one of the Shaw warranties, you must notify the Shaw
retailer who sold you the product. Your retailer will be able to file the claim with Shaw for you. If you are unable to contact your
retailer or do not receive satisfaction, write:
Shaw Industries Financial Services
P.O. Box 40 Mail Drop 026-04
Dalton, GA 30722-0040
Be sure to include a full description of the problem, photos if available, and proof of purchase showing the
price paid for the product.
How to contact the Shaw Information Center
1.800.441.7429 or shawfloors.com/customer-care/contact-us